

If you’ve mastered the embroidery hoop but feel ready for a bigger canvas, it’s time to turn your attention to the wall. Yarn wall art isn’t about making your small projects bigger; it’s about embracing a new sense of scale, texture, and presence.
Here, yarn is not just a thread but a sculptural material. You can weave, knot, tuft, and dye it to create pieces that command a room, soften a space, or tell a story with bold, tactile energy. The techniques range from meditative macrame to the satisfying speed of a tufting gun, but the goal is the same: to create something personal and impactful.
Let these ideas serve as your guide. See how a change in fiber thickness, a shift in knotting style, or the introduction of a new material can transform a simple concept into a breathtaking statement. Your walls are waiting.
1. Frame Your Geometry with Tactile Borders
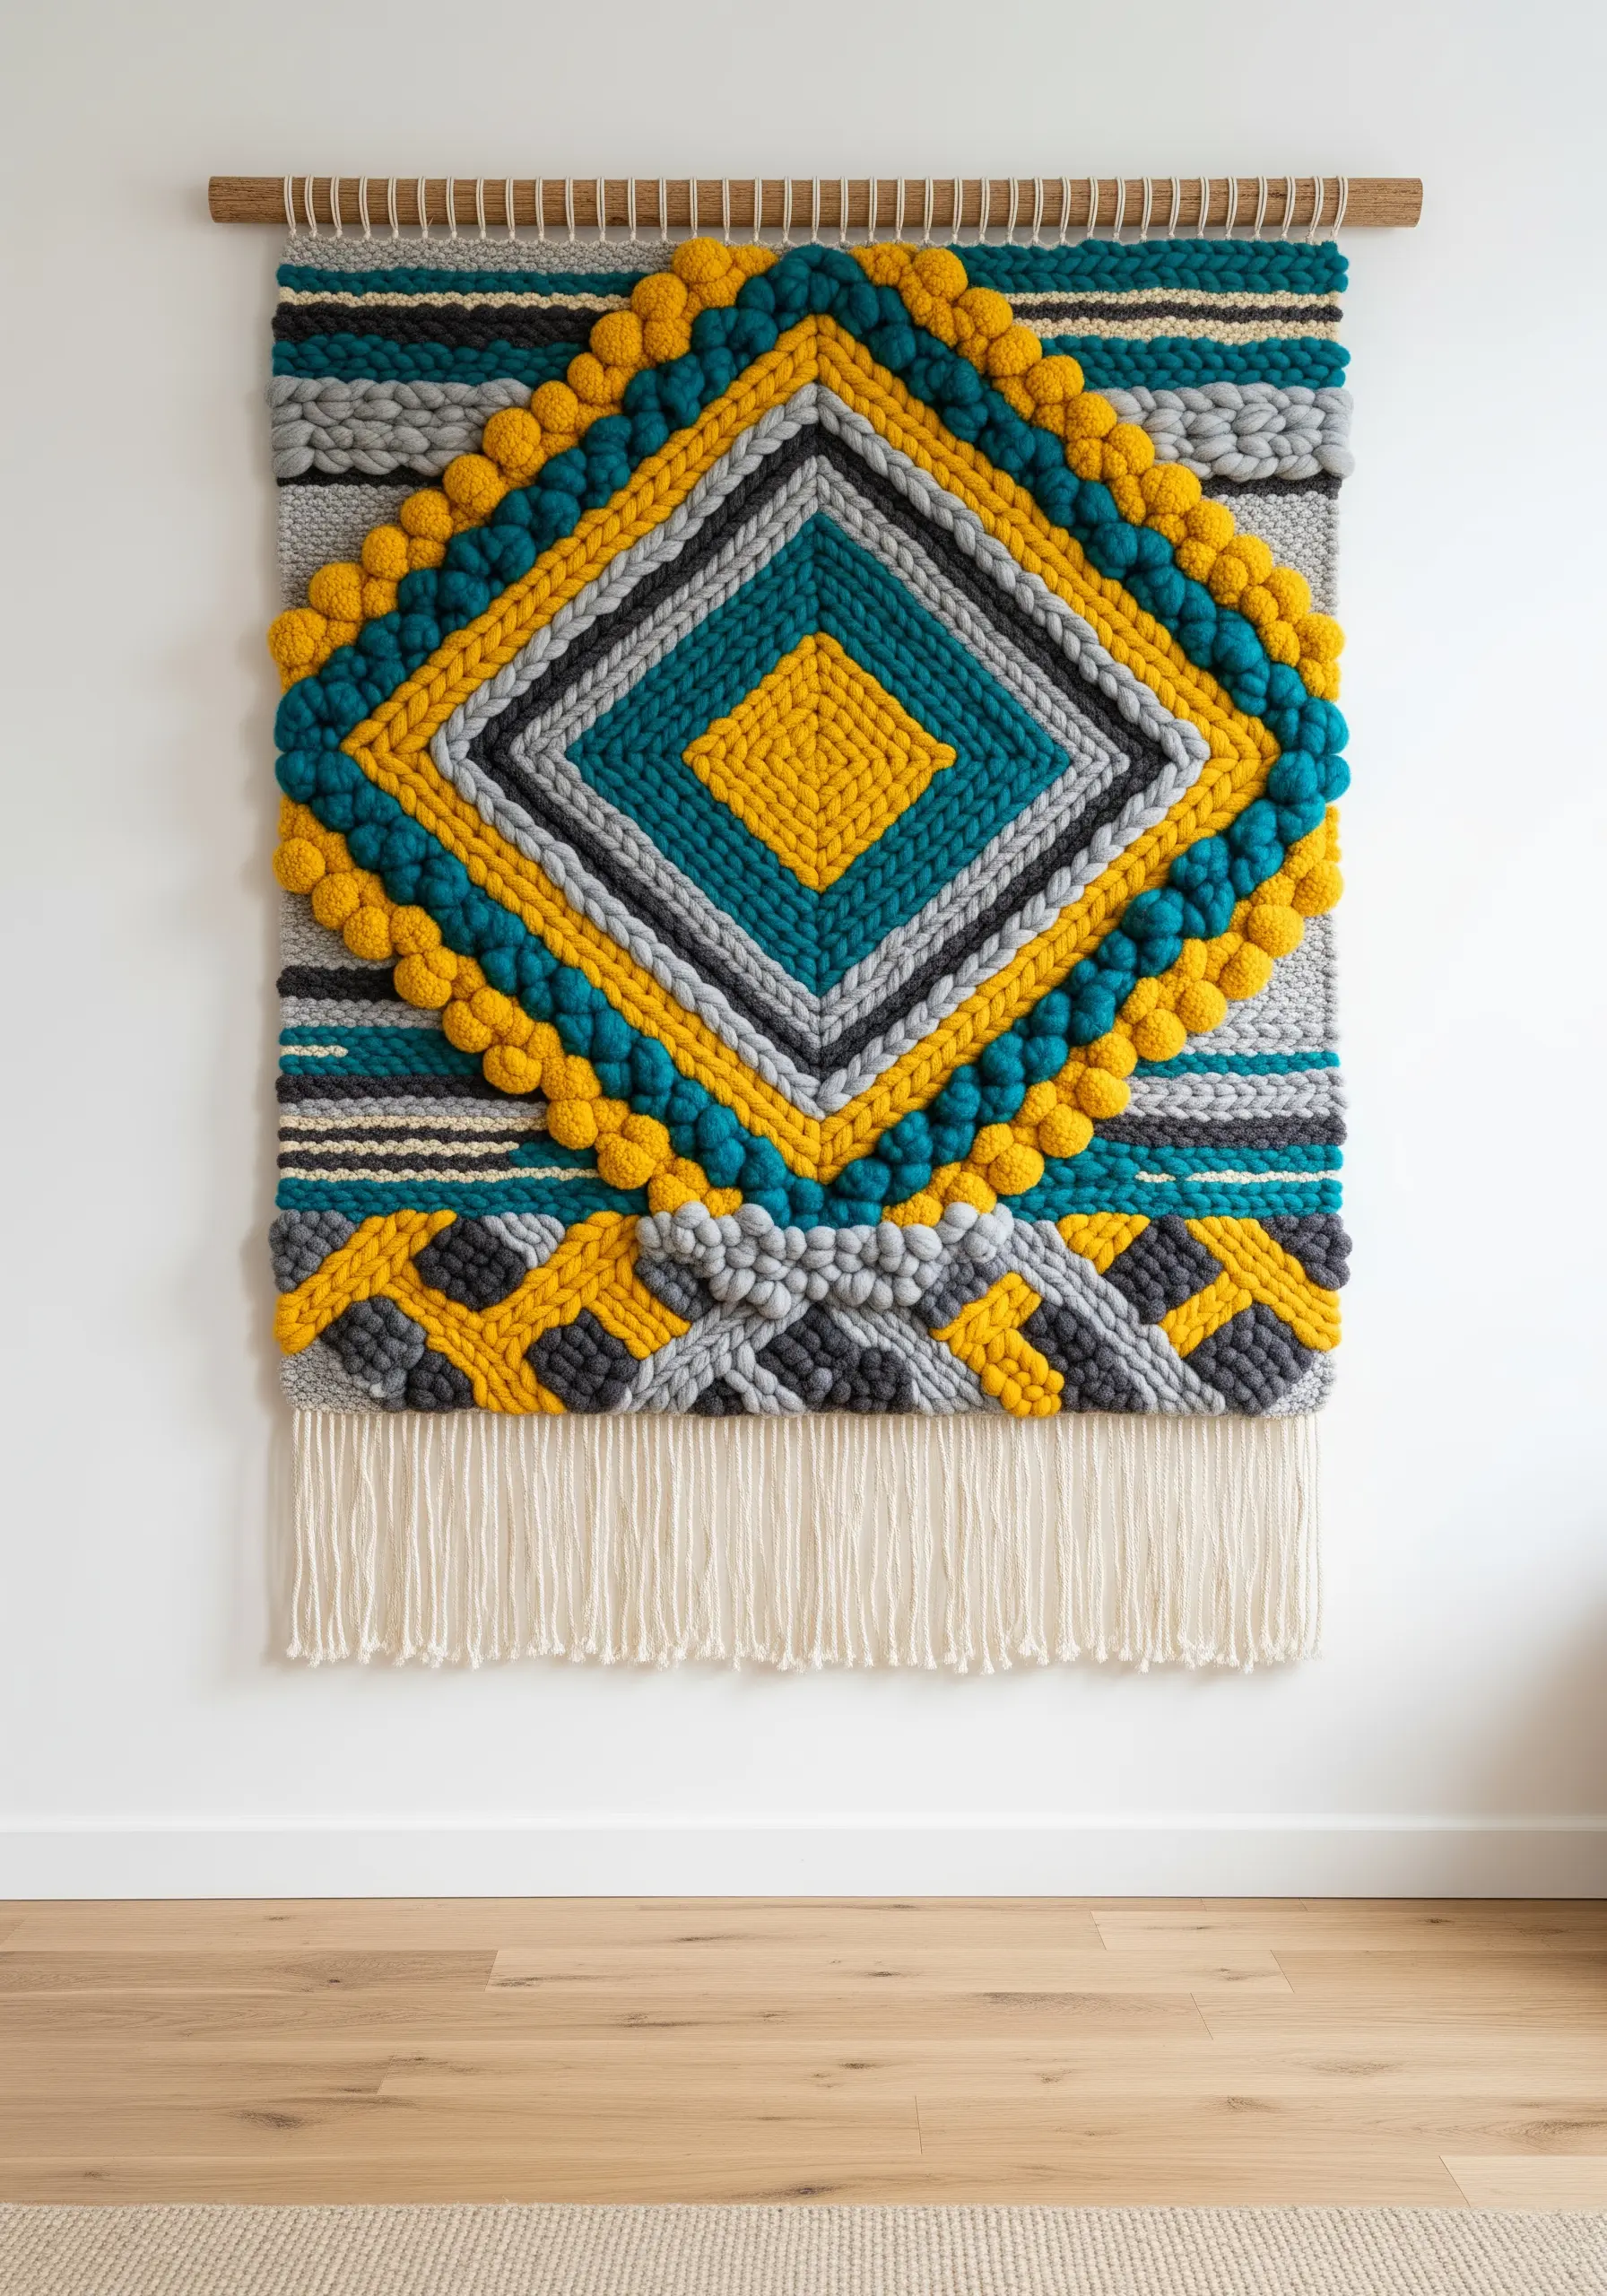
To create a design with this level of dimensional structure, combine flat tapestry weaving with high-relief techniques.
Use a chunky merino wool to create raised soumak braids or plush bobble stitches that act as a frame around your flatter, geometric shapes.
This contrast is what gives the piece its commanding presence, drawing the eye inward while providing a satisfyingly tactile border.
Limit your palette to four complementary colors—two neutrals and two accents—to maintain graphic clarity and prevent the textures from competing with the colors.
2. Master the Art of Dip-Dye Gradients

Transform a standard macrame piece into a painterly work of art by introducing a dip-dye gradient.
After knotting your design, submerge the lower portion of the fringe into a concentrated fabric dye bath (like indigo).
To achieve a seamless ombre effect, slowly lift the piece out of the dye, allowing the higher sections less time in the pigment.
The capillary action of the natural cotton fibers will create soft, blended transitions, giving the piece an organic, watercolor-like finish.
3. Construct a Modular Punch Needle Triptych
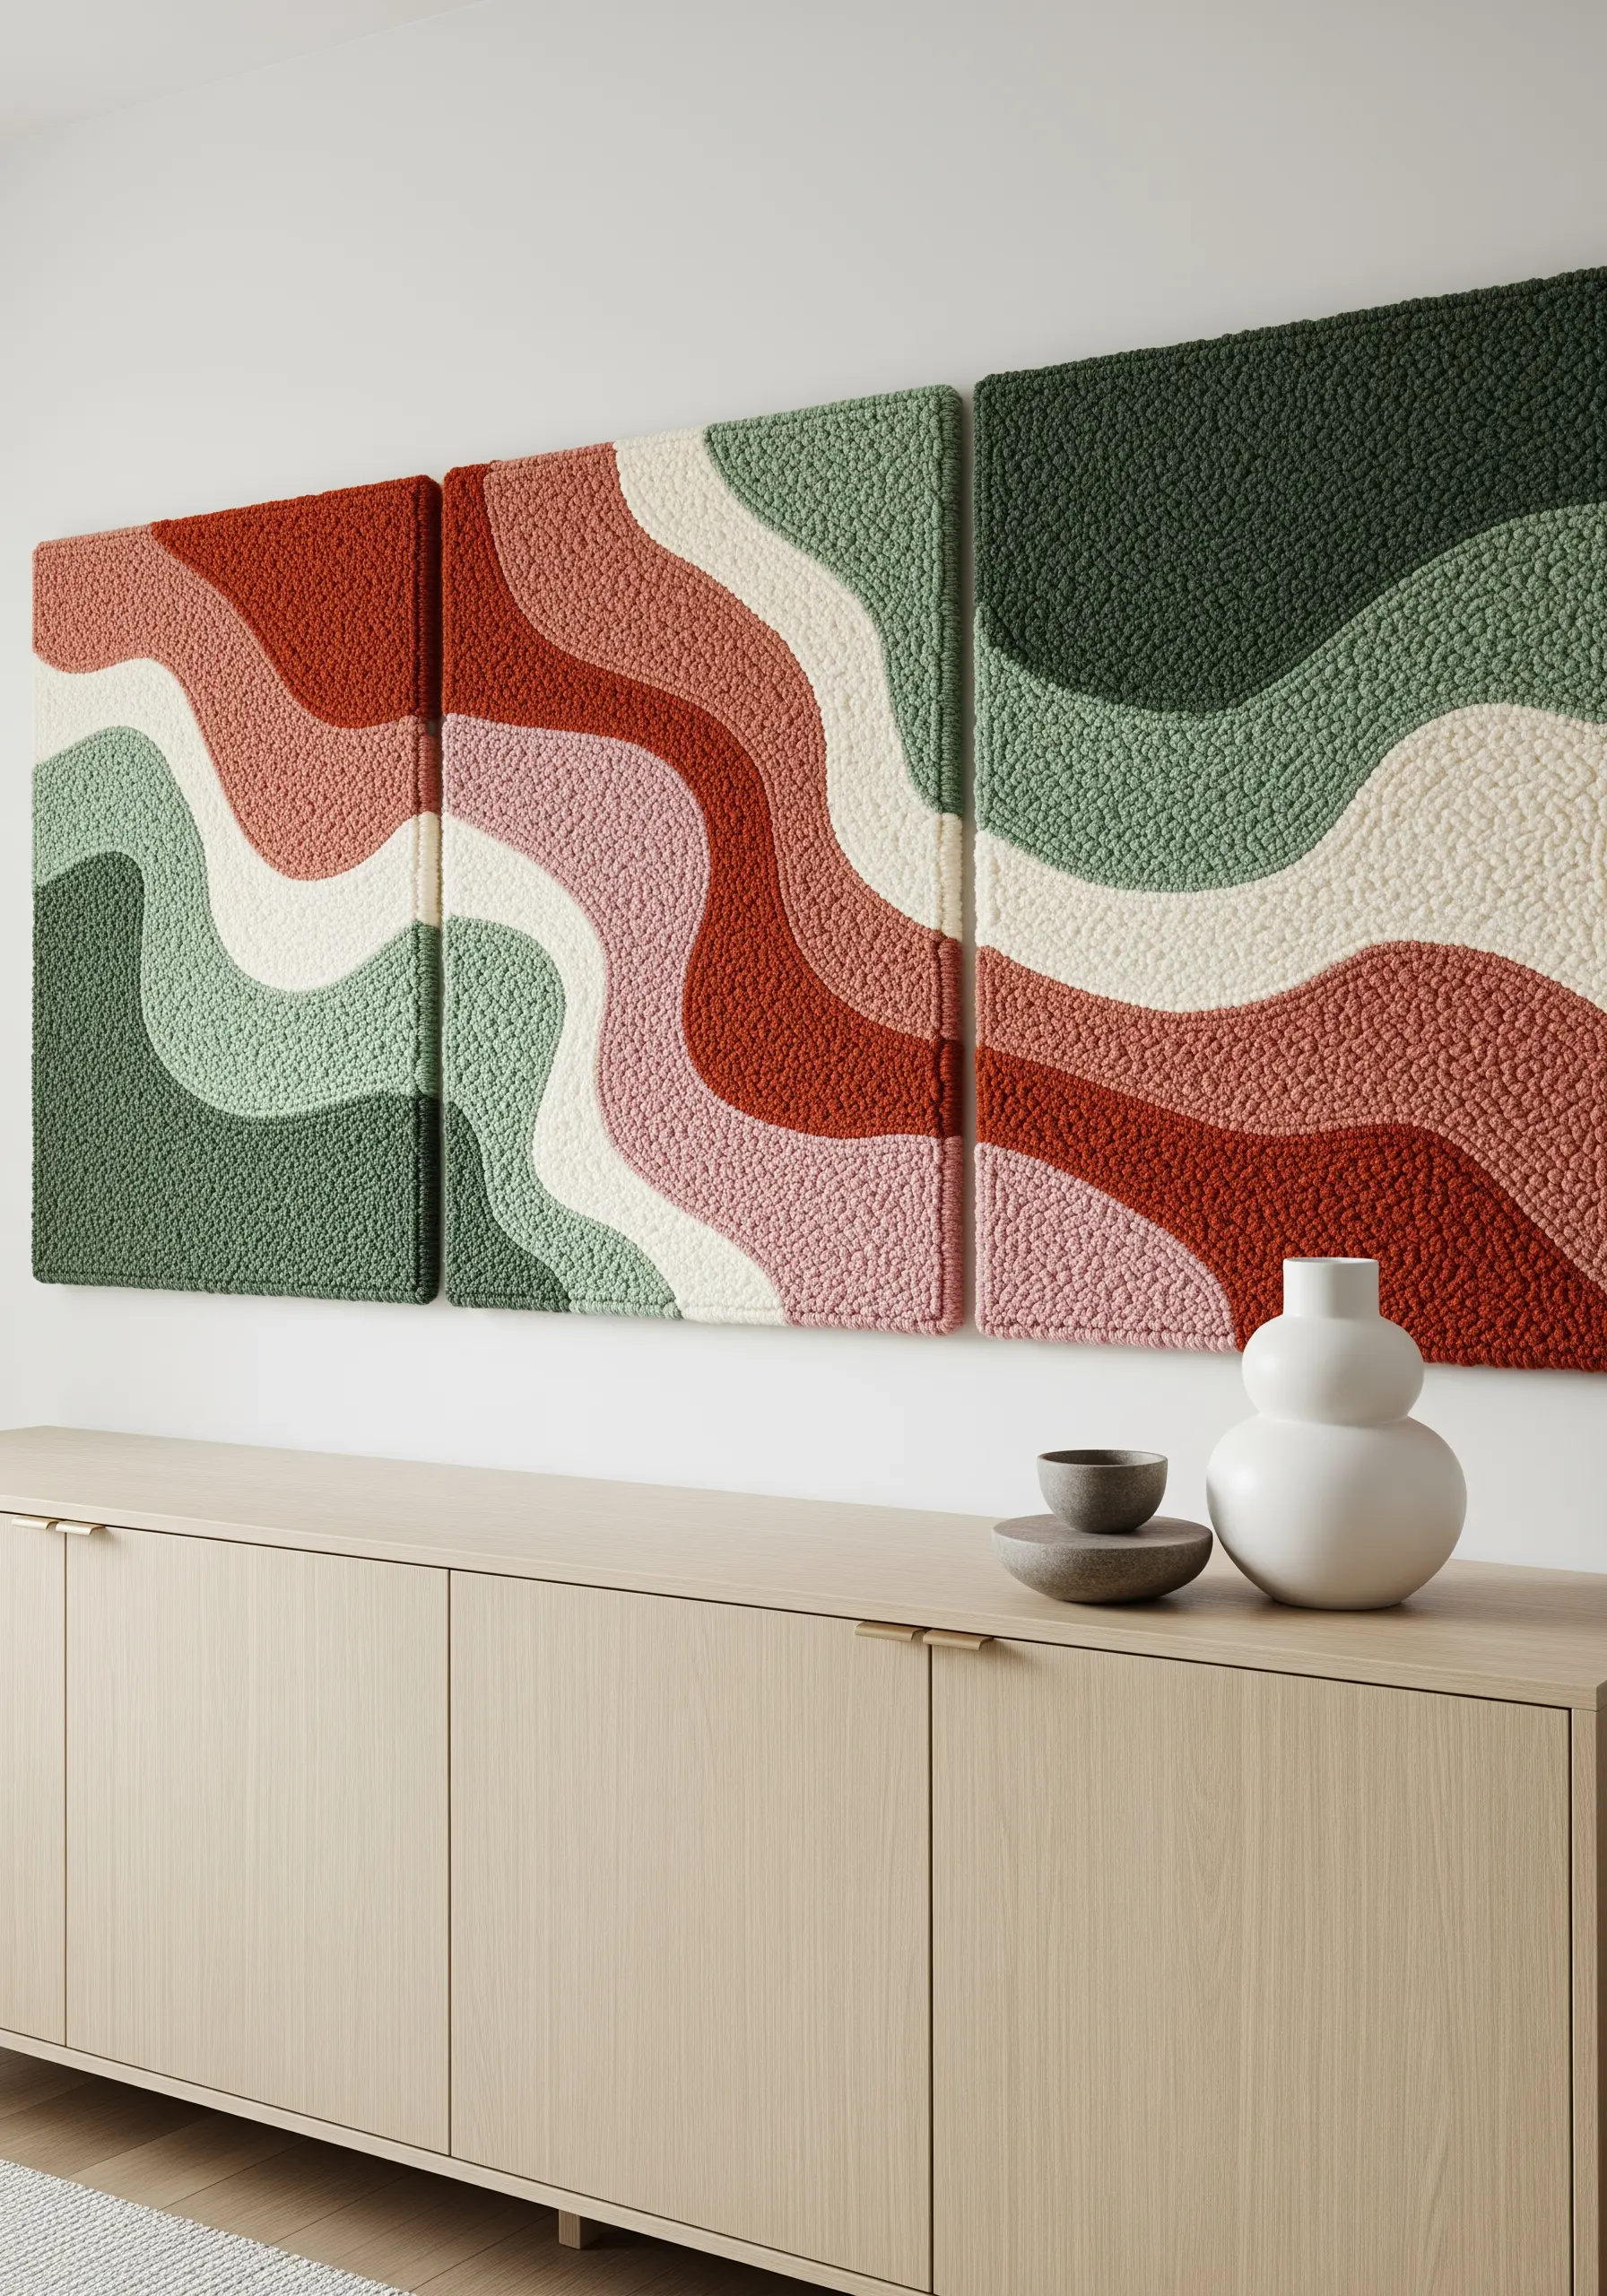
For an expansive statement piece, break your design into a triptych of three or more vertical panels.
This modular approach makes a large-scale project more manageable and allows for easier transport and installation.
Use a punch needle with a consistent loop height to create that uniform, plush texture reminiscent of bouclé fabric.
When designing your waves, ensure the lines flow seamlessly from one panel to the next to create a cohesive, uninterrupted visual current across the wall.
4. Paint with Yarn Using a Tufting Gun
Achieve a vibrant, impressionistic landscape by using a tufting gun to “paint” with yarn onto a stretched canvas.
This technique allows you to fill large areas with dense, plush texture quickly.
To create the soft, blended sky, load your tufting gun with multiple strands of similar-colored yarn at once.
This creates subtle color variations within each stitch, giving the finished piece a rich, painterly depth that solid colors alone cannot achieve.
5. Explore Optical Depth with Linear String Art

Create a mesmerizing sense of dimension using only straight lines and a simple frame.
Start by hammering small nails at precise, regular intervals around the perimeter of a wooden board.
Stretch high-tension string or thread from one nail to another in a systematic pattern, layering lines to create geometric shapes and curves.
The magic lies in the overlapping threads, which produce optical moiré patterns that shift as the viewer moves, giving the static piece a dynamic quality.
6. Curate a Tapestry of Asymmetrical Textures
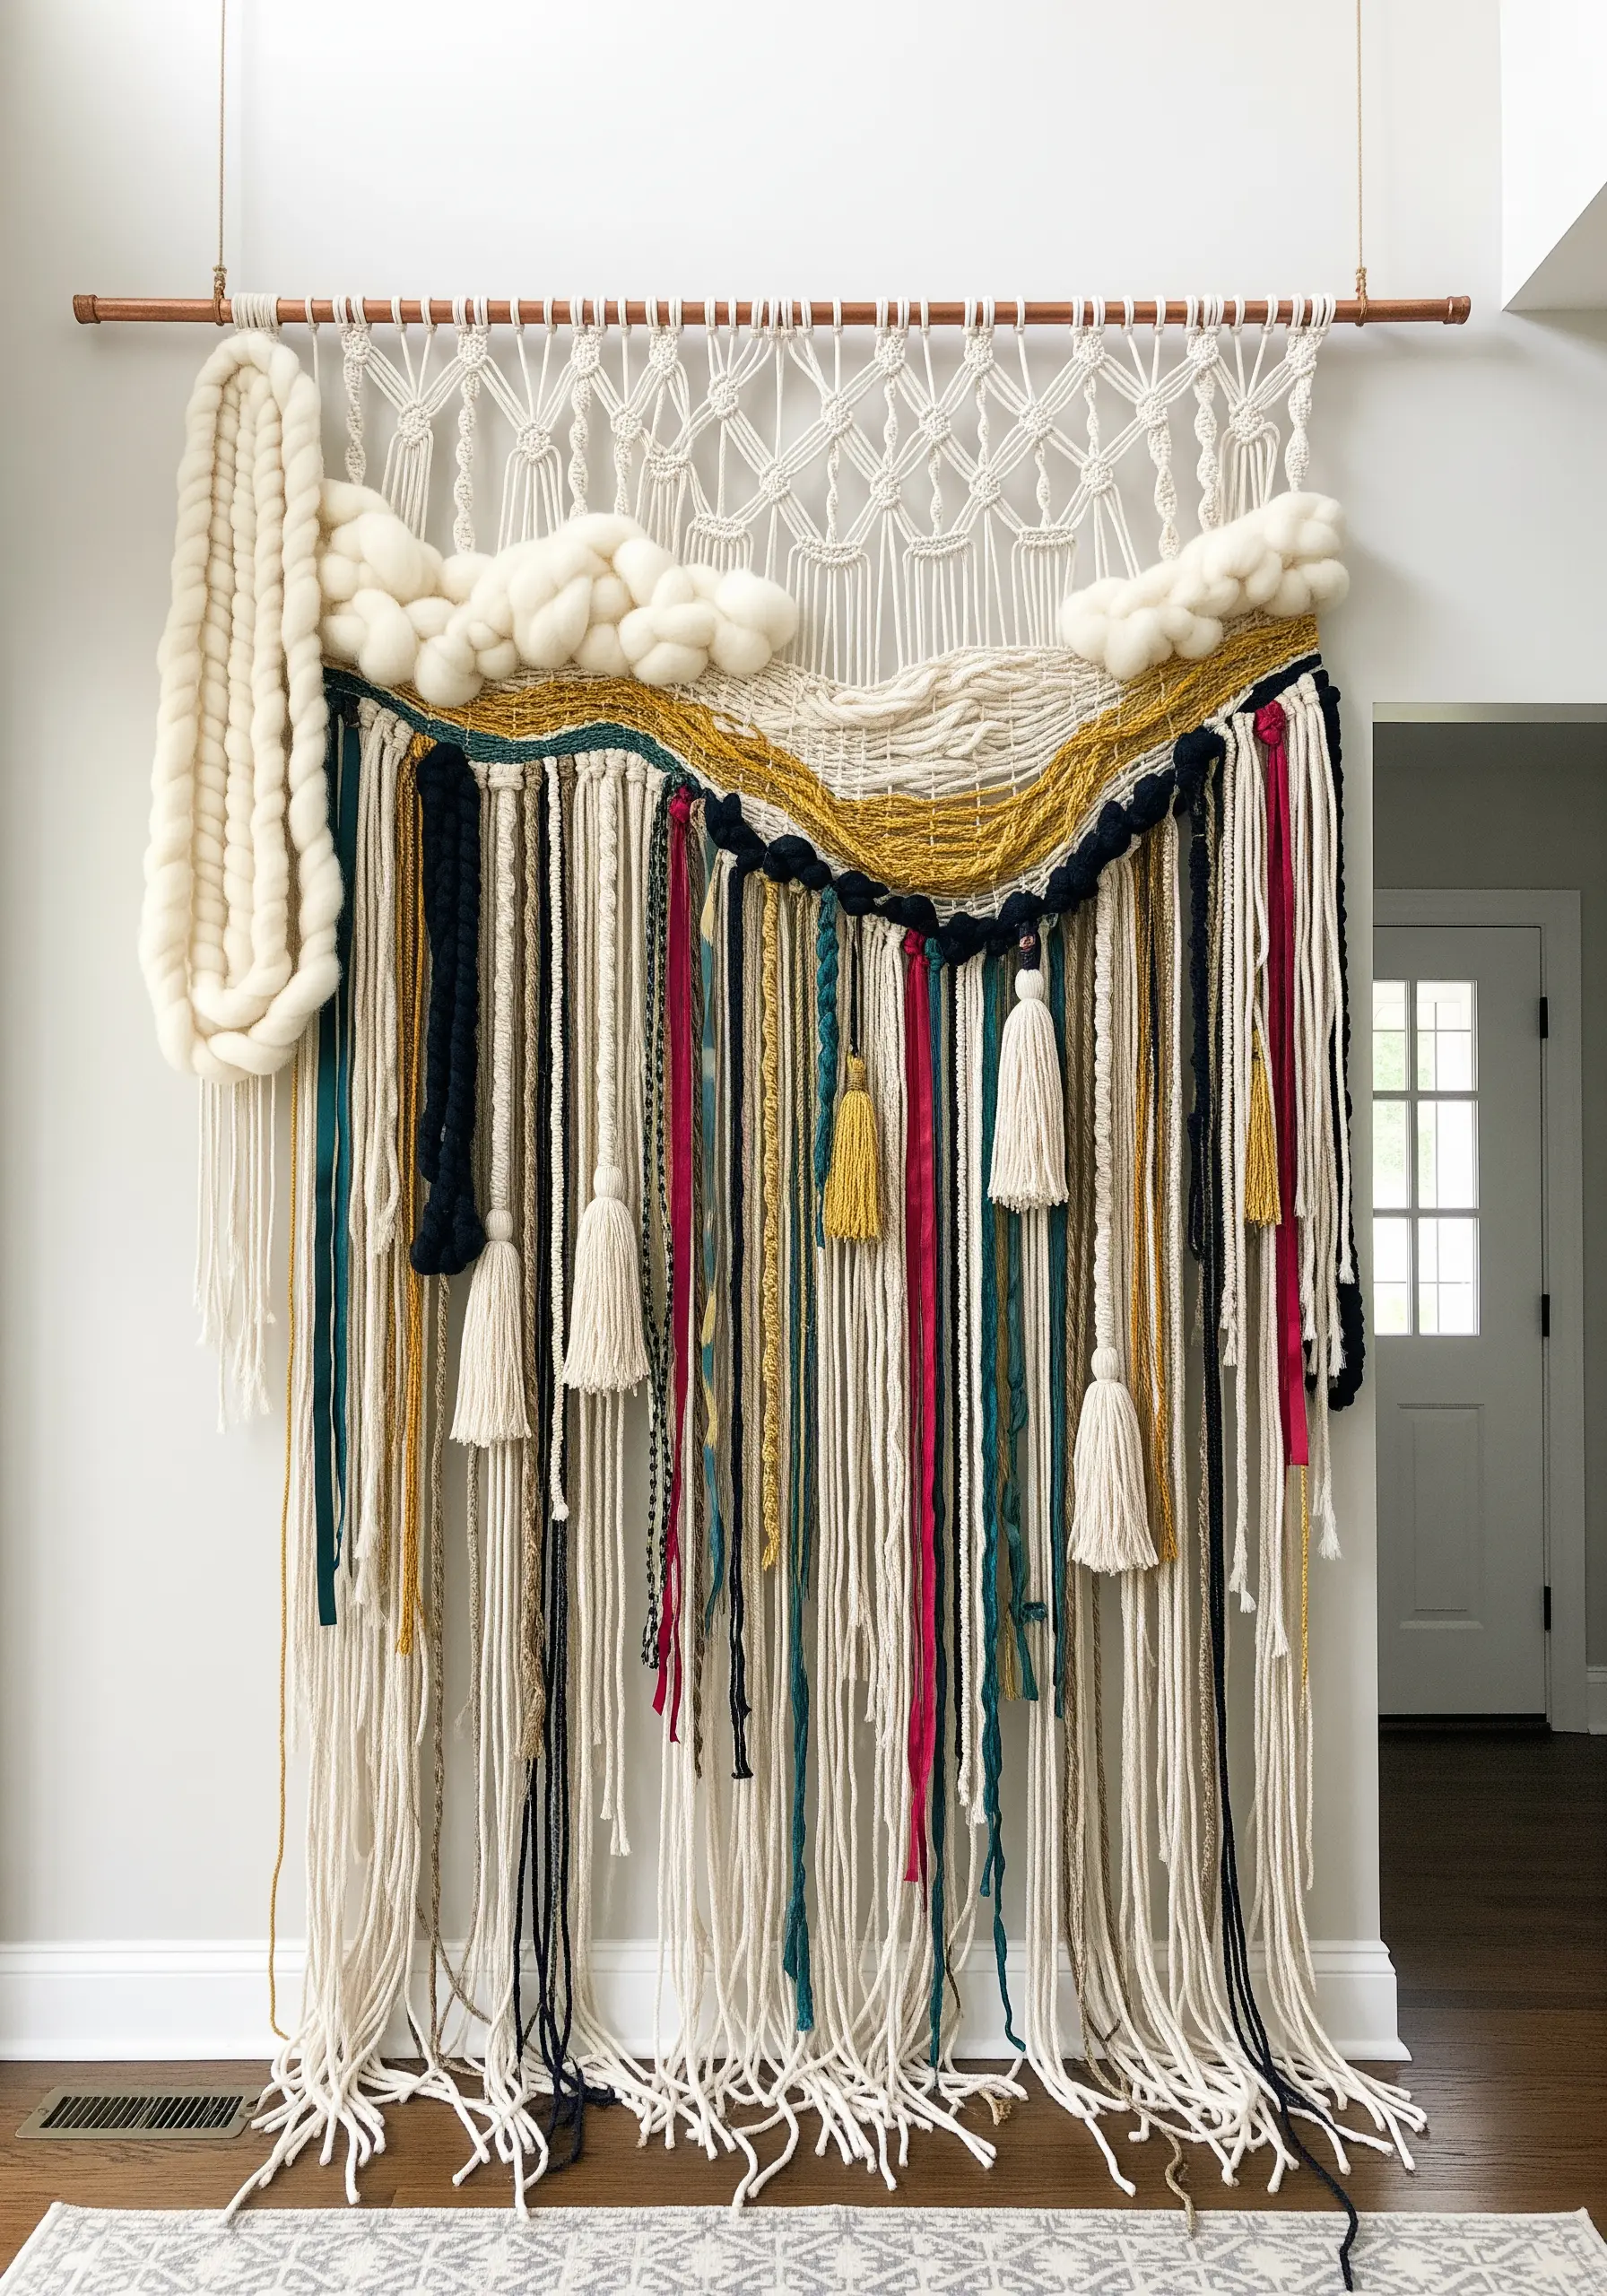
Move beyond symmetrical designs by composing a wall hanging that feels like a curated collection of different fibers.
Combine macrame knots, thick woven sections, and loose hanging tassels with unexpected materials like velvet ribbons or raw silk strips.
Anchor the composition with a dramatic, cloud-like form made from unspun merino wool roving to create a soft focal point.
This freeform approach results in DIY art pieces that add color and texture, telling a story through its varied materials.
7. Weave a Radial Sunburst on a Metal Hoop

Use a simple metal ring as a loom to create a striking radial weaving.
First, create the “spokes” of your wheel by wrapping the warp threads from one side of the hoop to the other, crossing in the center.
Then, begin weaving your weft yarn in a circular pattern from the center outwards, alternating over and under the warp threads.
Leaving the warp threads exposed around the edge adds a fringe-like detail that beautifully frames the central medallion.
8. Sculpt with Rope on a Gridded Canvas

Elevate rope from a simple craft material into a sculptural element by mounting it on a structured background.
Wrap square canvases with twine in alternating directions to create a subtle checkerboard grid.
Then, arrange thick, knotted sections of rope on top, securing them from behind to create a floating, three-dimensional composition.
The monochrome palette focuses all attention on the interplay between the tight grid of the background and the fluid, organic lines of the knots.
9. Energize a Room with Abstract Color Blocking

Create a punch-needle piece that functions like a bold, graphic painting to energize your space.
Sketch out a dynamic, abstract design with interlocking organic shapes and strong, contrasting lines.
Use a vibrant, high-contrast color palette—like hot pink, turquoise, and yellow—to make the shapes pop.
The uniform looped texture of the punch needle ensures that even the most chaotic design feels cohesive and intentional, turning yarn into a powerful graphic statement.
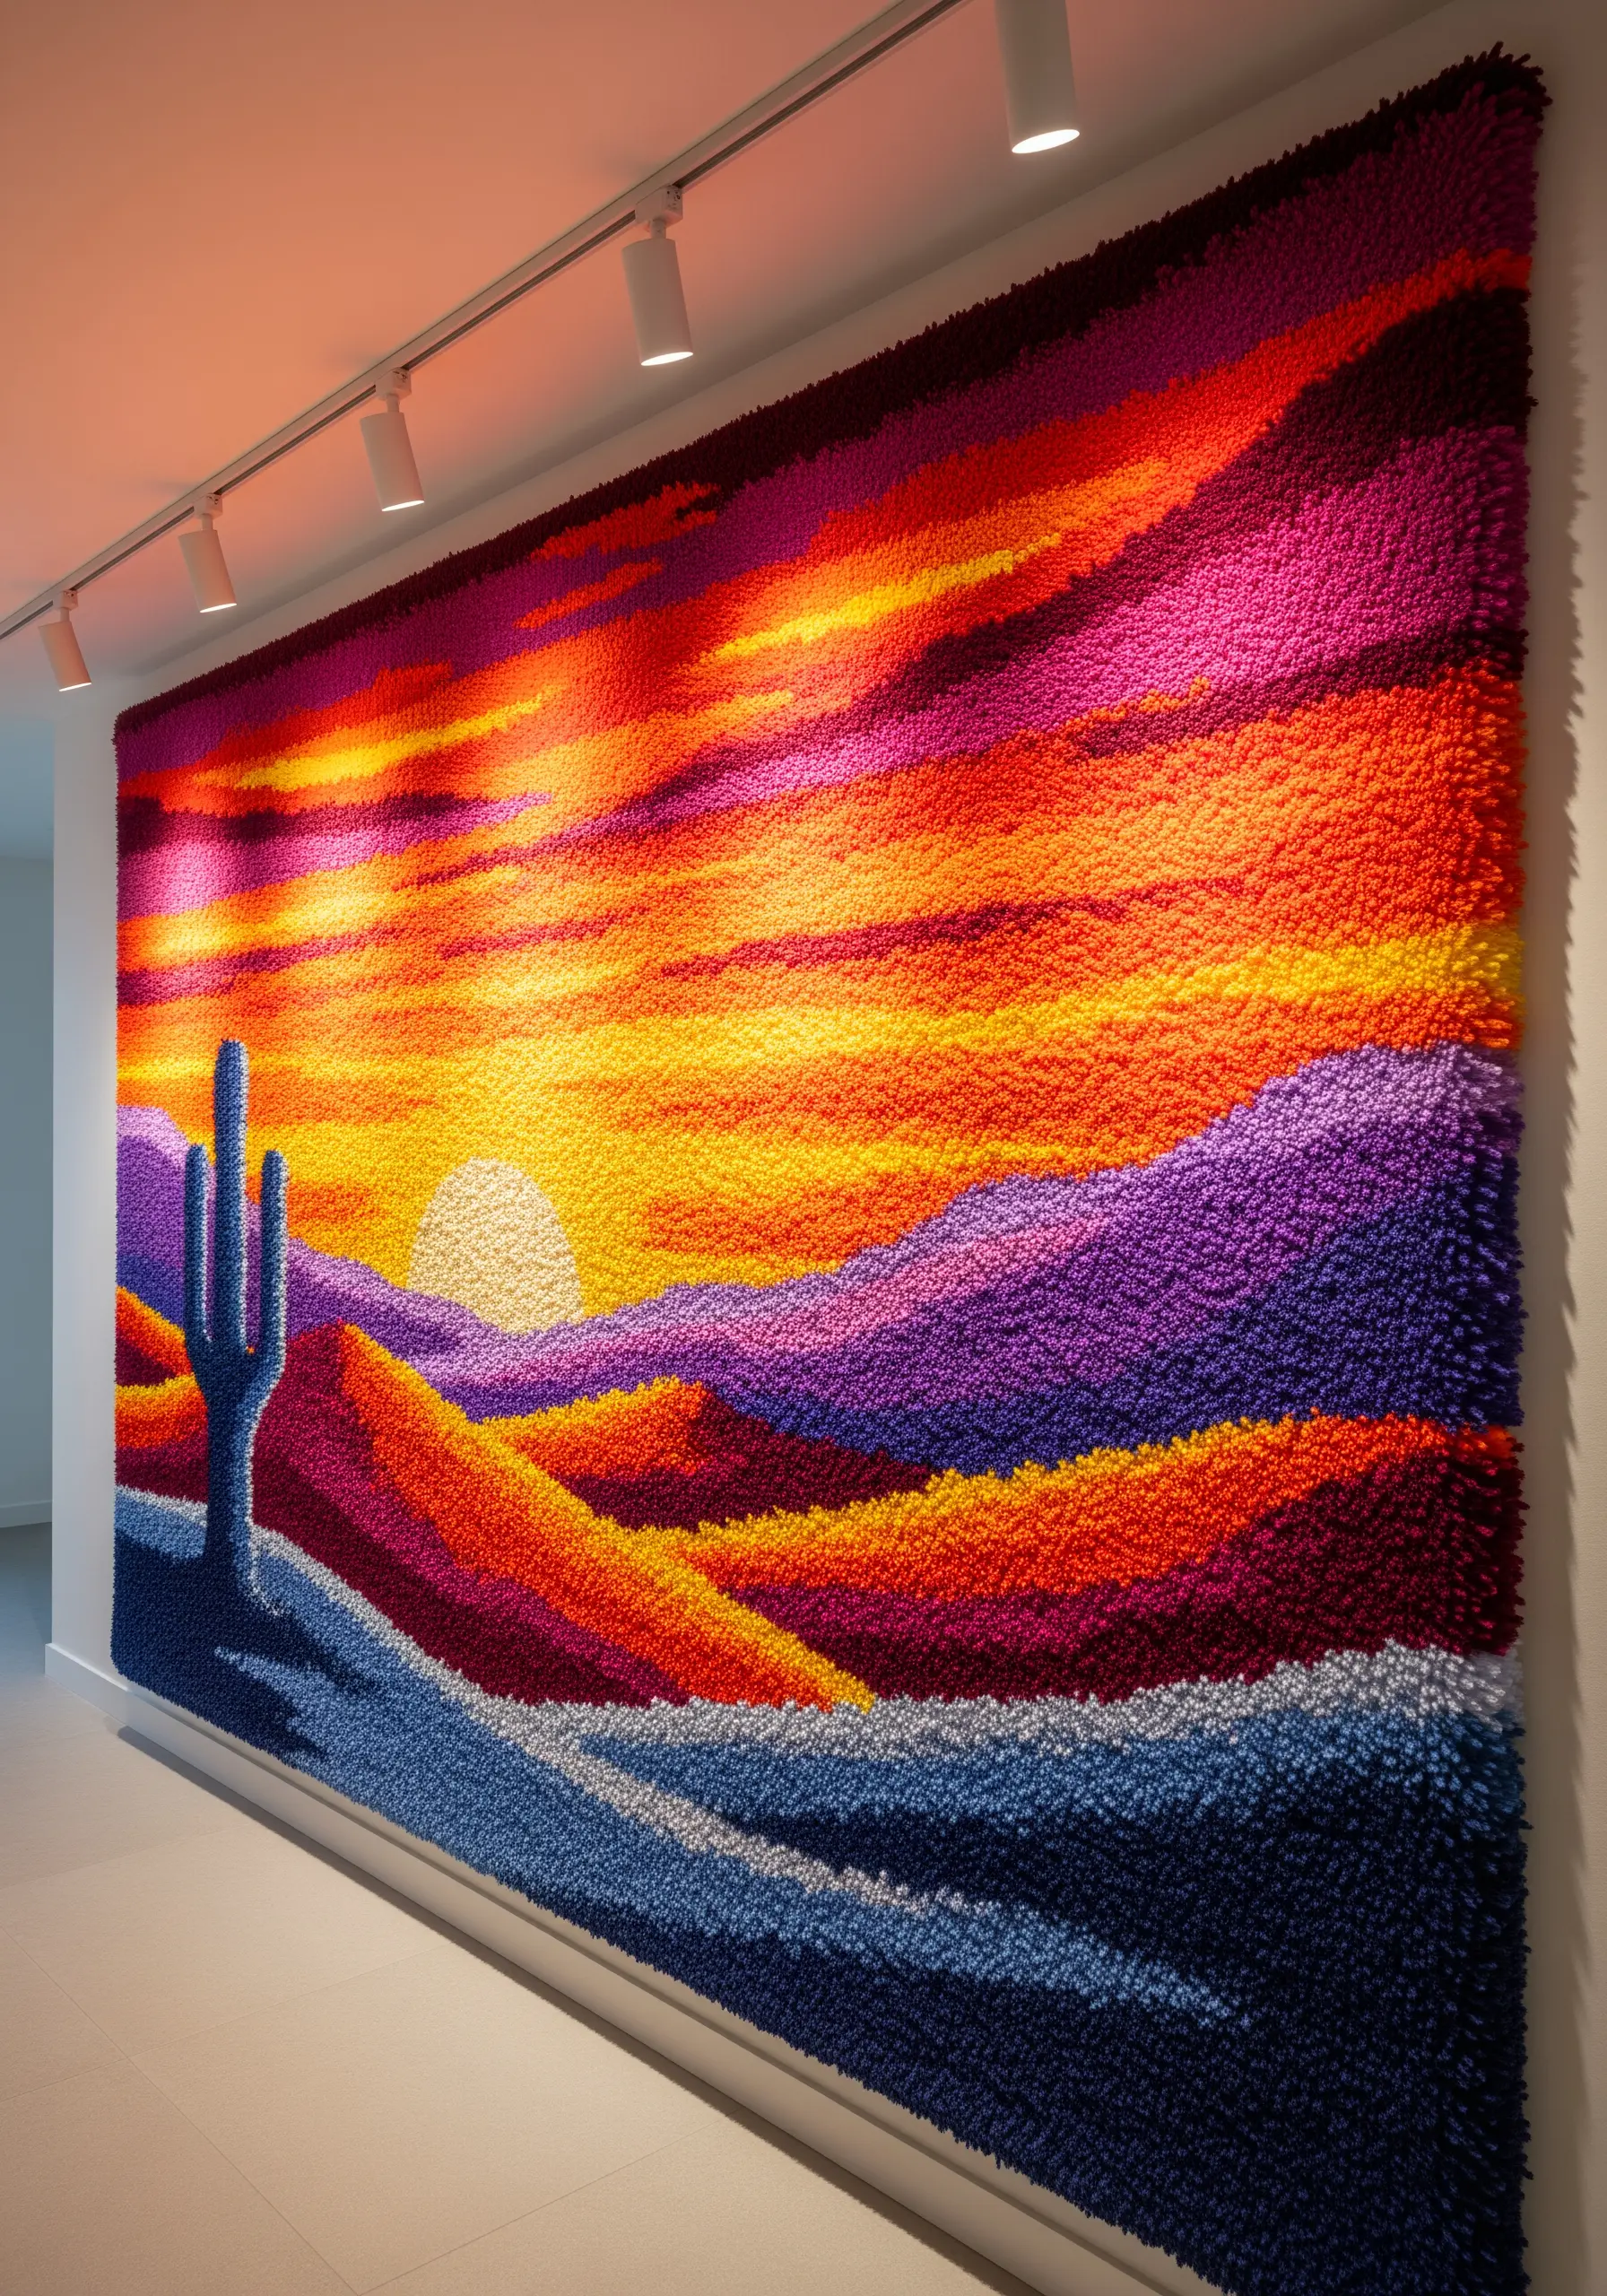
10. Capture a Stylized Landscape with Flat Weaving

Translate the graphic style of a vintage travel poster into a woven tapestry by focusing on clean lines and distinct color blocks.
Use the tapestry weaving technique, where the weft threads are packed down to completely cover the warp, creating a solid, image-based fabric.
Simplify complex shapes like clouds and rock formations into their most essential forms.
This stylized approach allows you to build a detailed scene that remains clear and impactful, even from a distance.
11. Build a Cascading Wall of Pom-Poms and Tassels
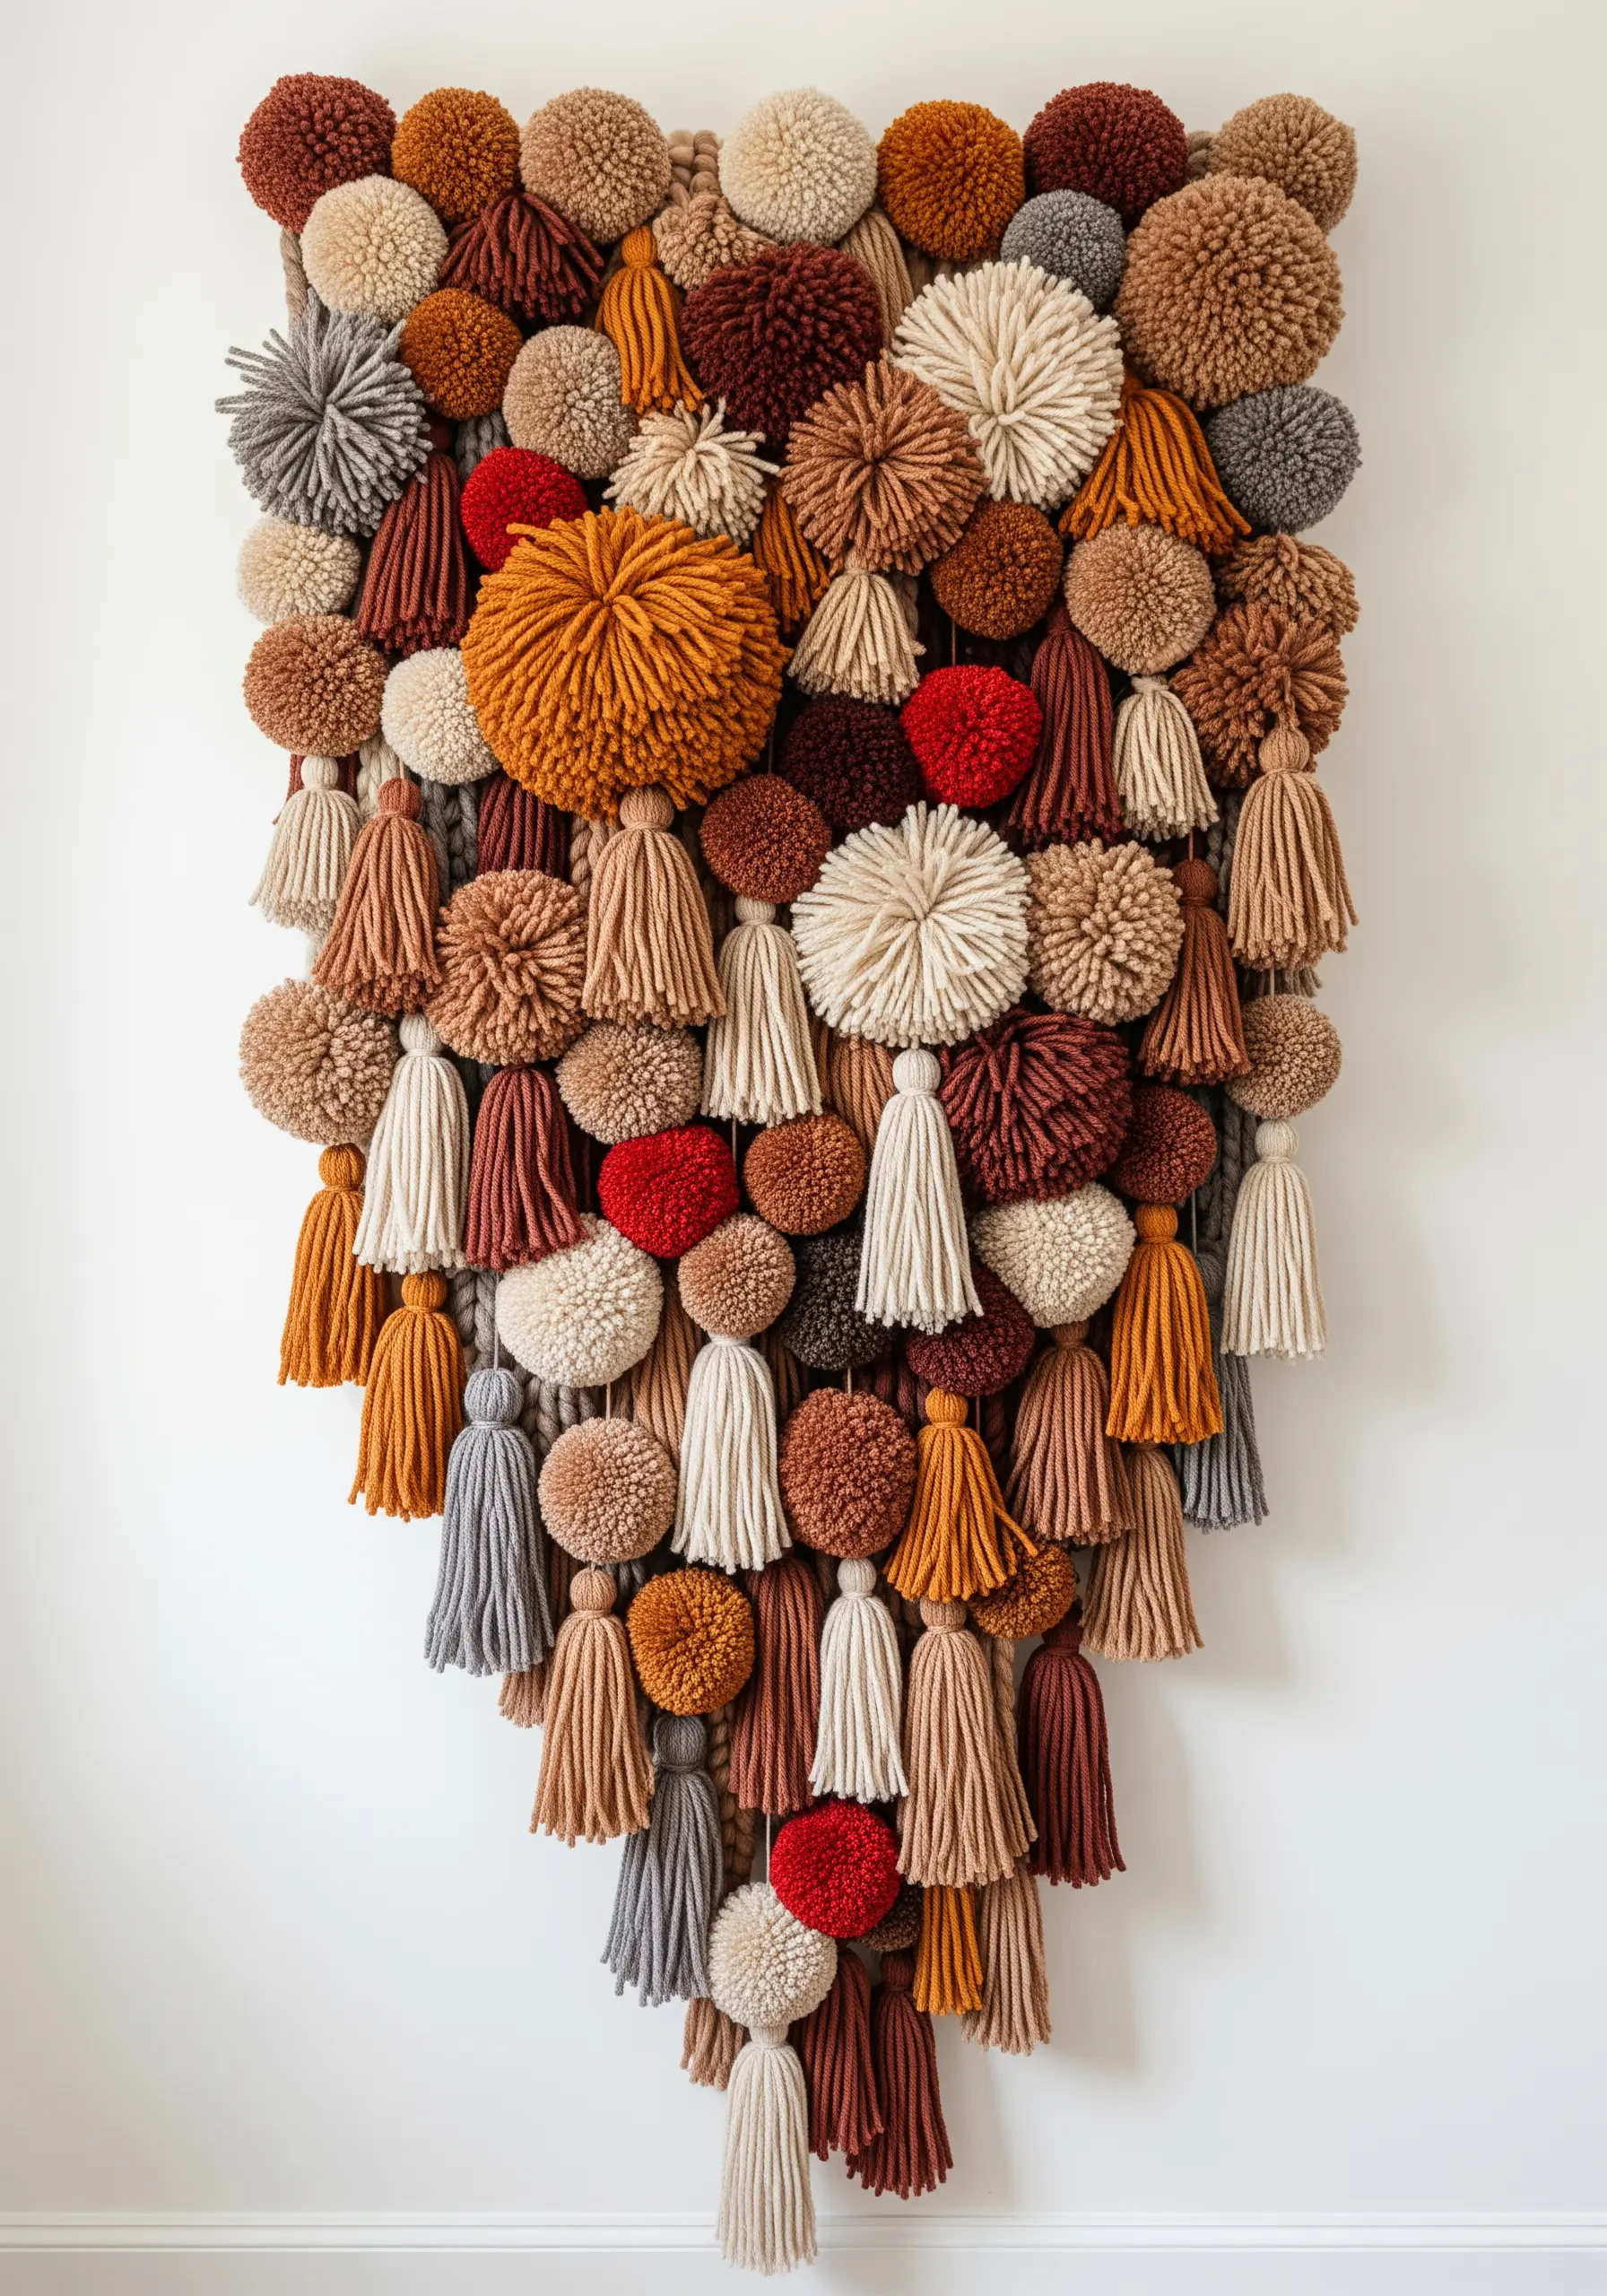
Create a stunning, high-impact wall hanging using two of the simplest fiber techniques: making pom-poms and tassels.
Vary the size, density, and color of your pom-poms, and alternate them with tassels of different lengths and thicknesses.
String them onto a sturdy backing like a wire grid or a piece of canvas, clustering them tightly at the top and letting them taper down.
This density gradient creates a beautiful cascading effect, turning simple yarn embellishments into a substantial work of art.
12. Define Space with Macrame Panel Dividers
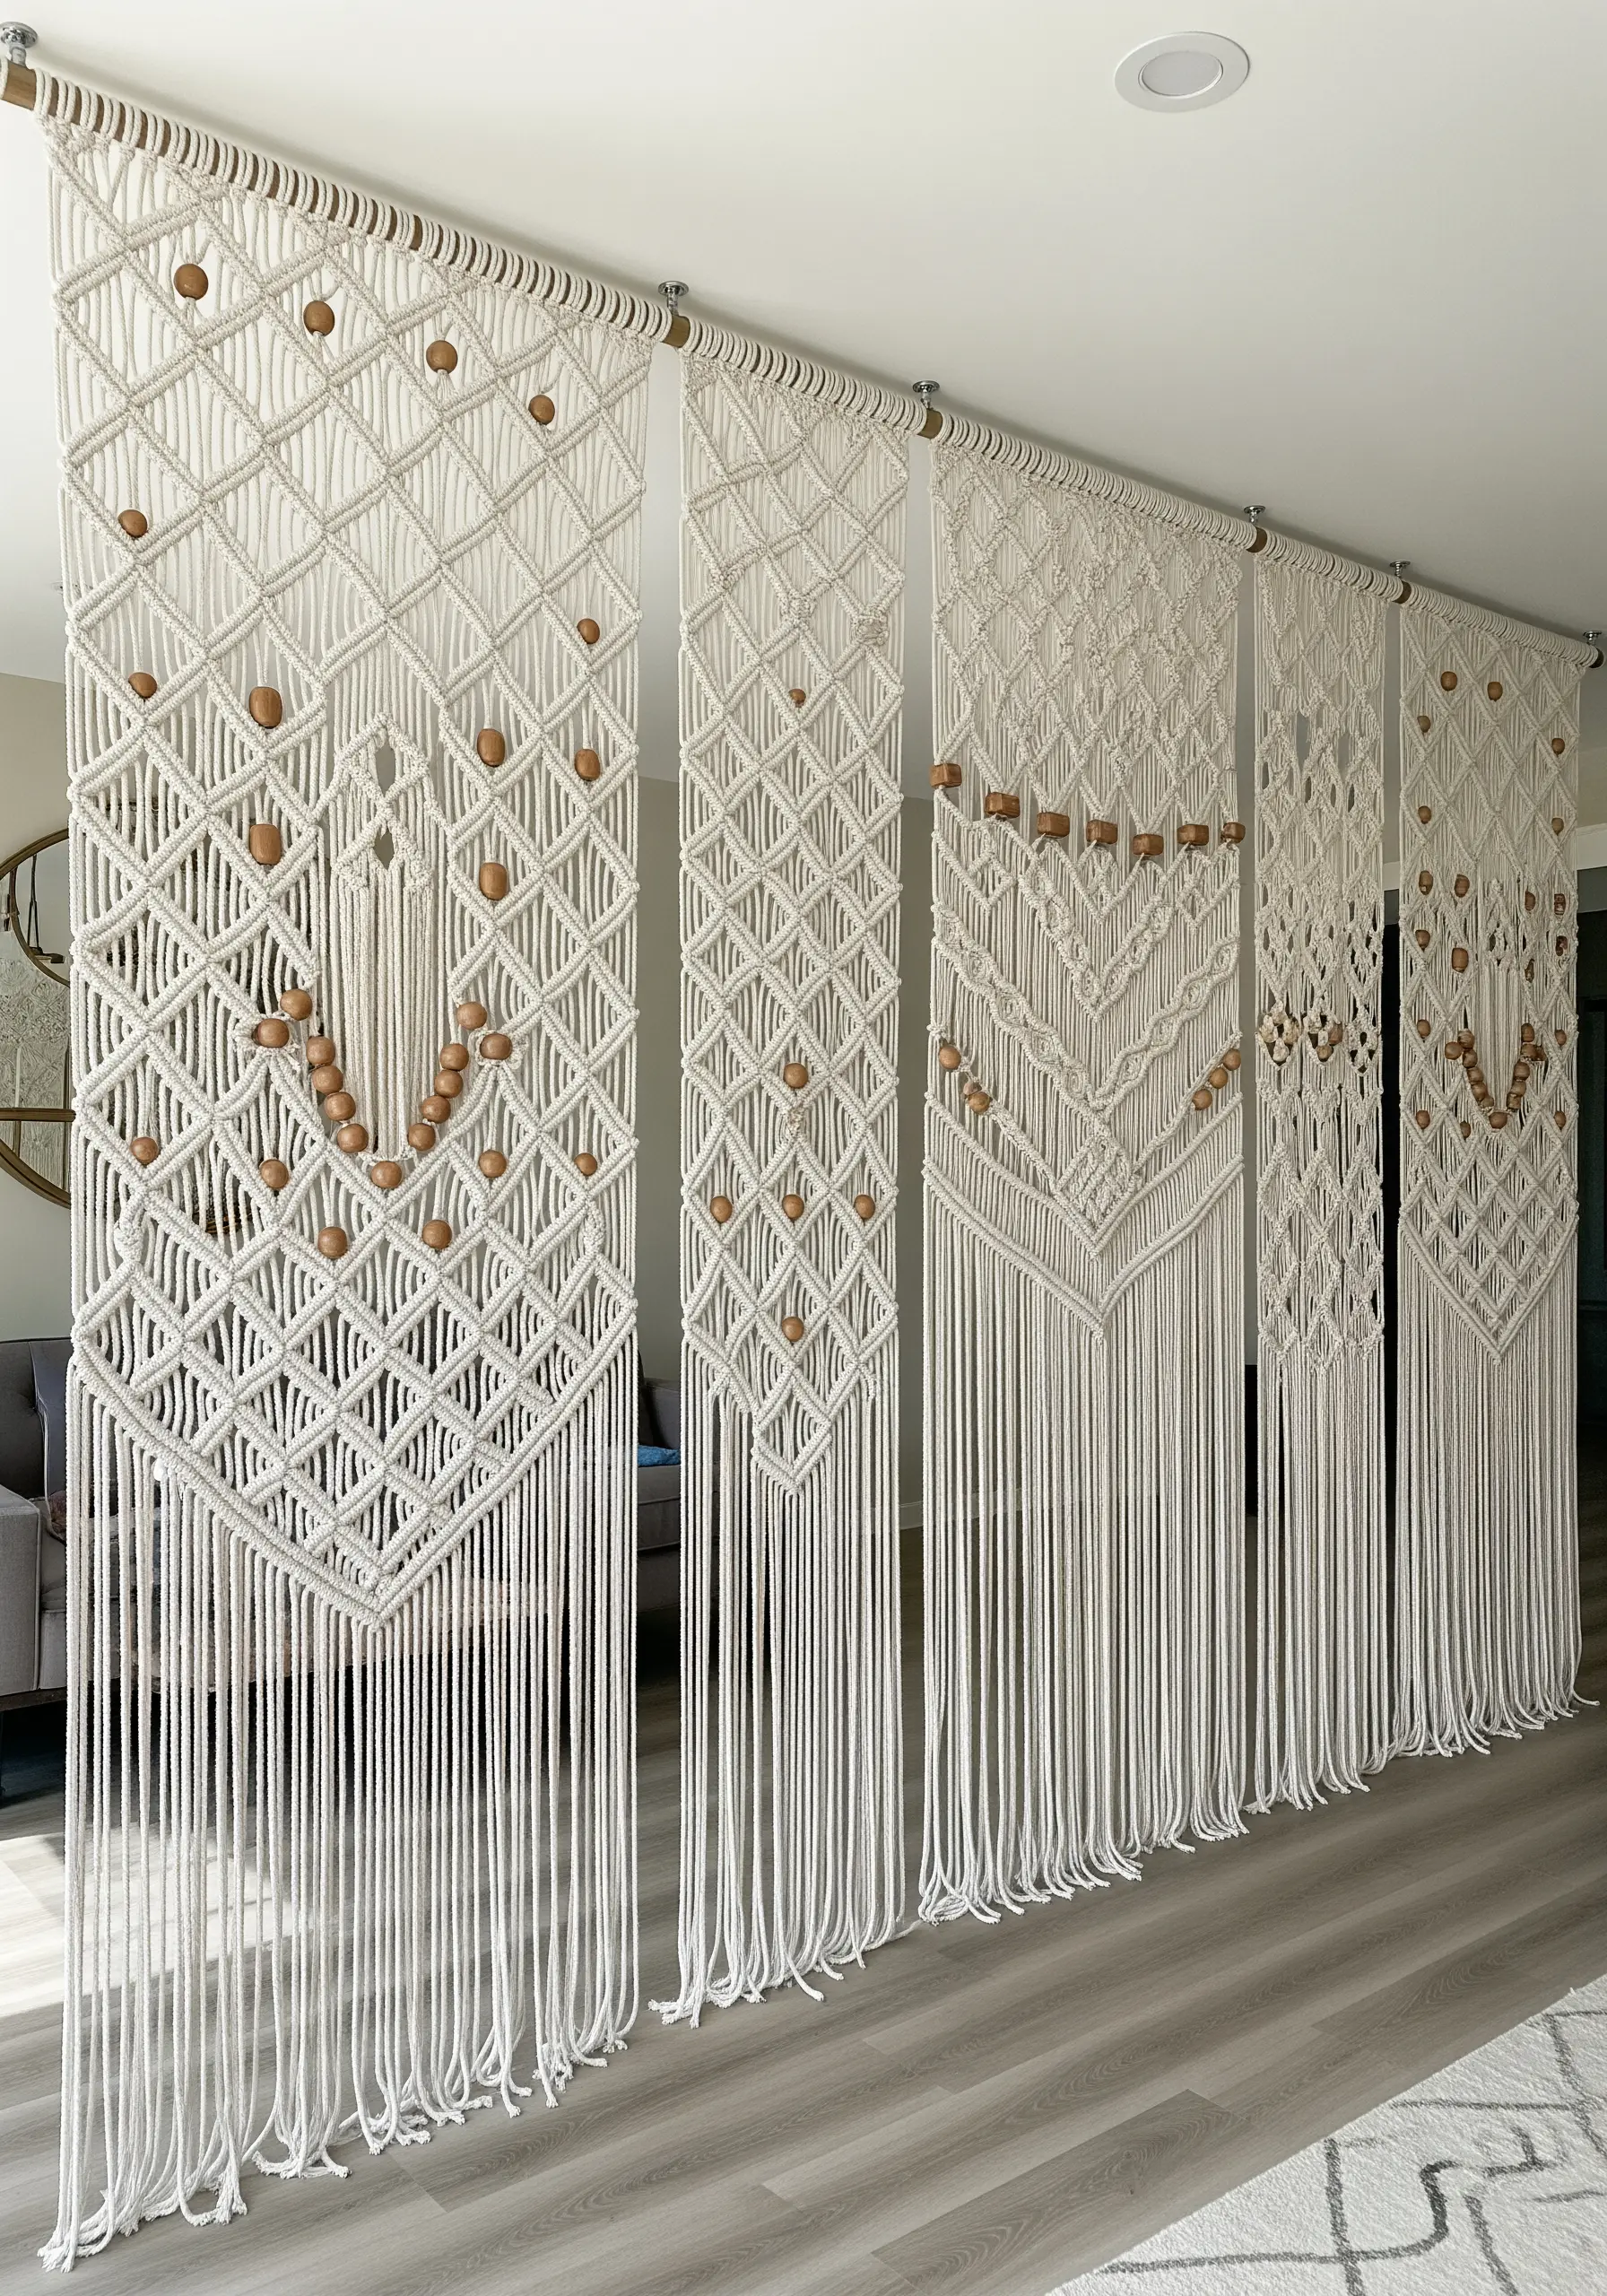
Use macrame to create elegant, semi-transparent room dividers that define a space without blocking light.
Work on four (or more) separate panels, each hanging from its own rod, to allow for flexibility and movement.
Incorporate wooden beads or other elements into your knotting pattern to add weight and a touch of warmth to the monochrome cotton.
Using an open, geometric knot pattern like repeating diamonds ensures the panels feel airy and light while still providing a clear sense of separation.
13. Evoke Art Deco Glamour with Metallic Accents
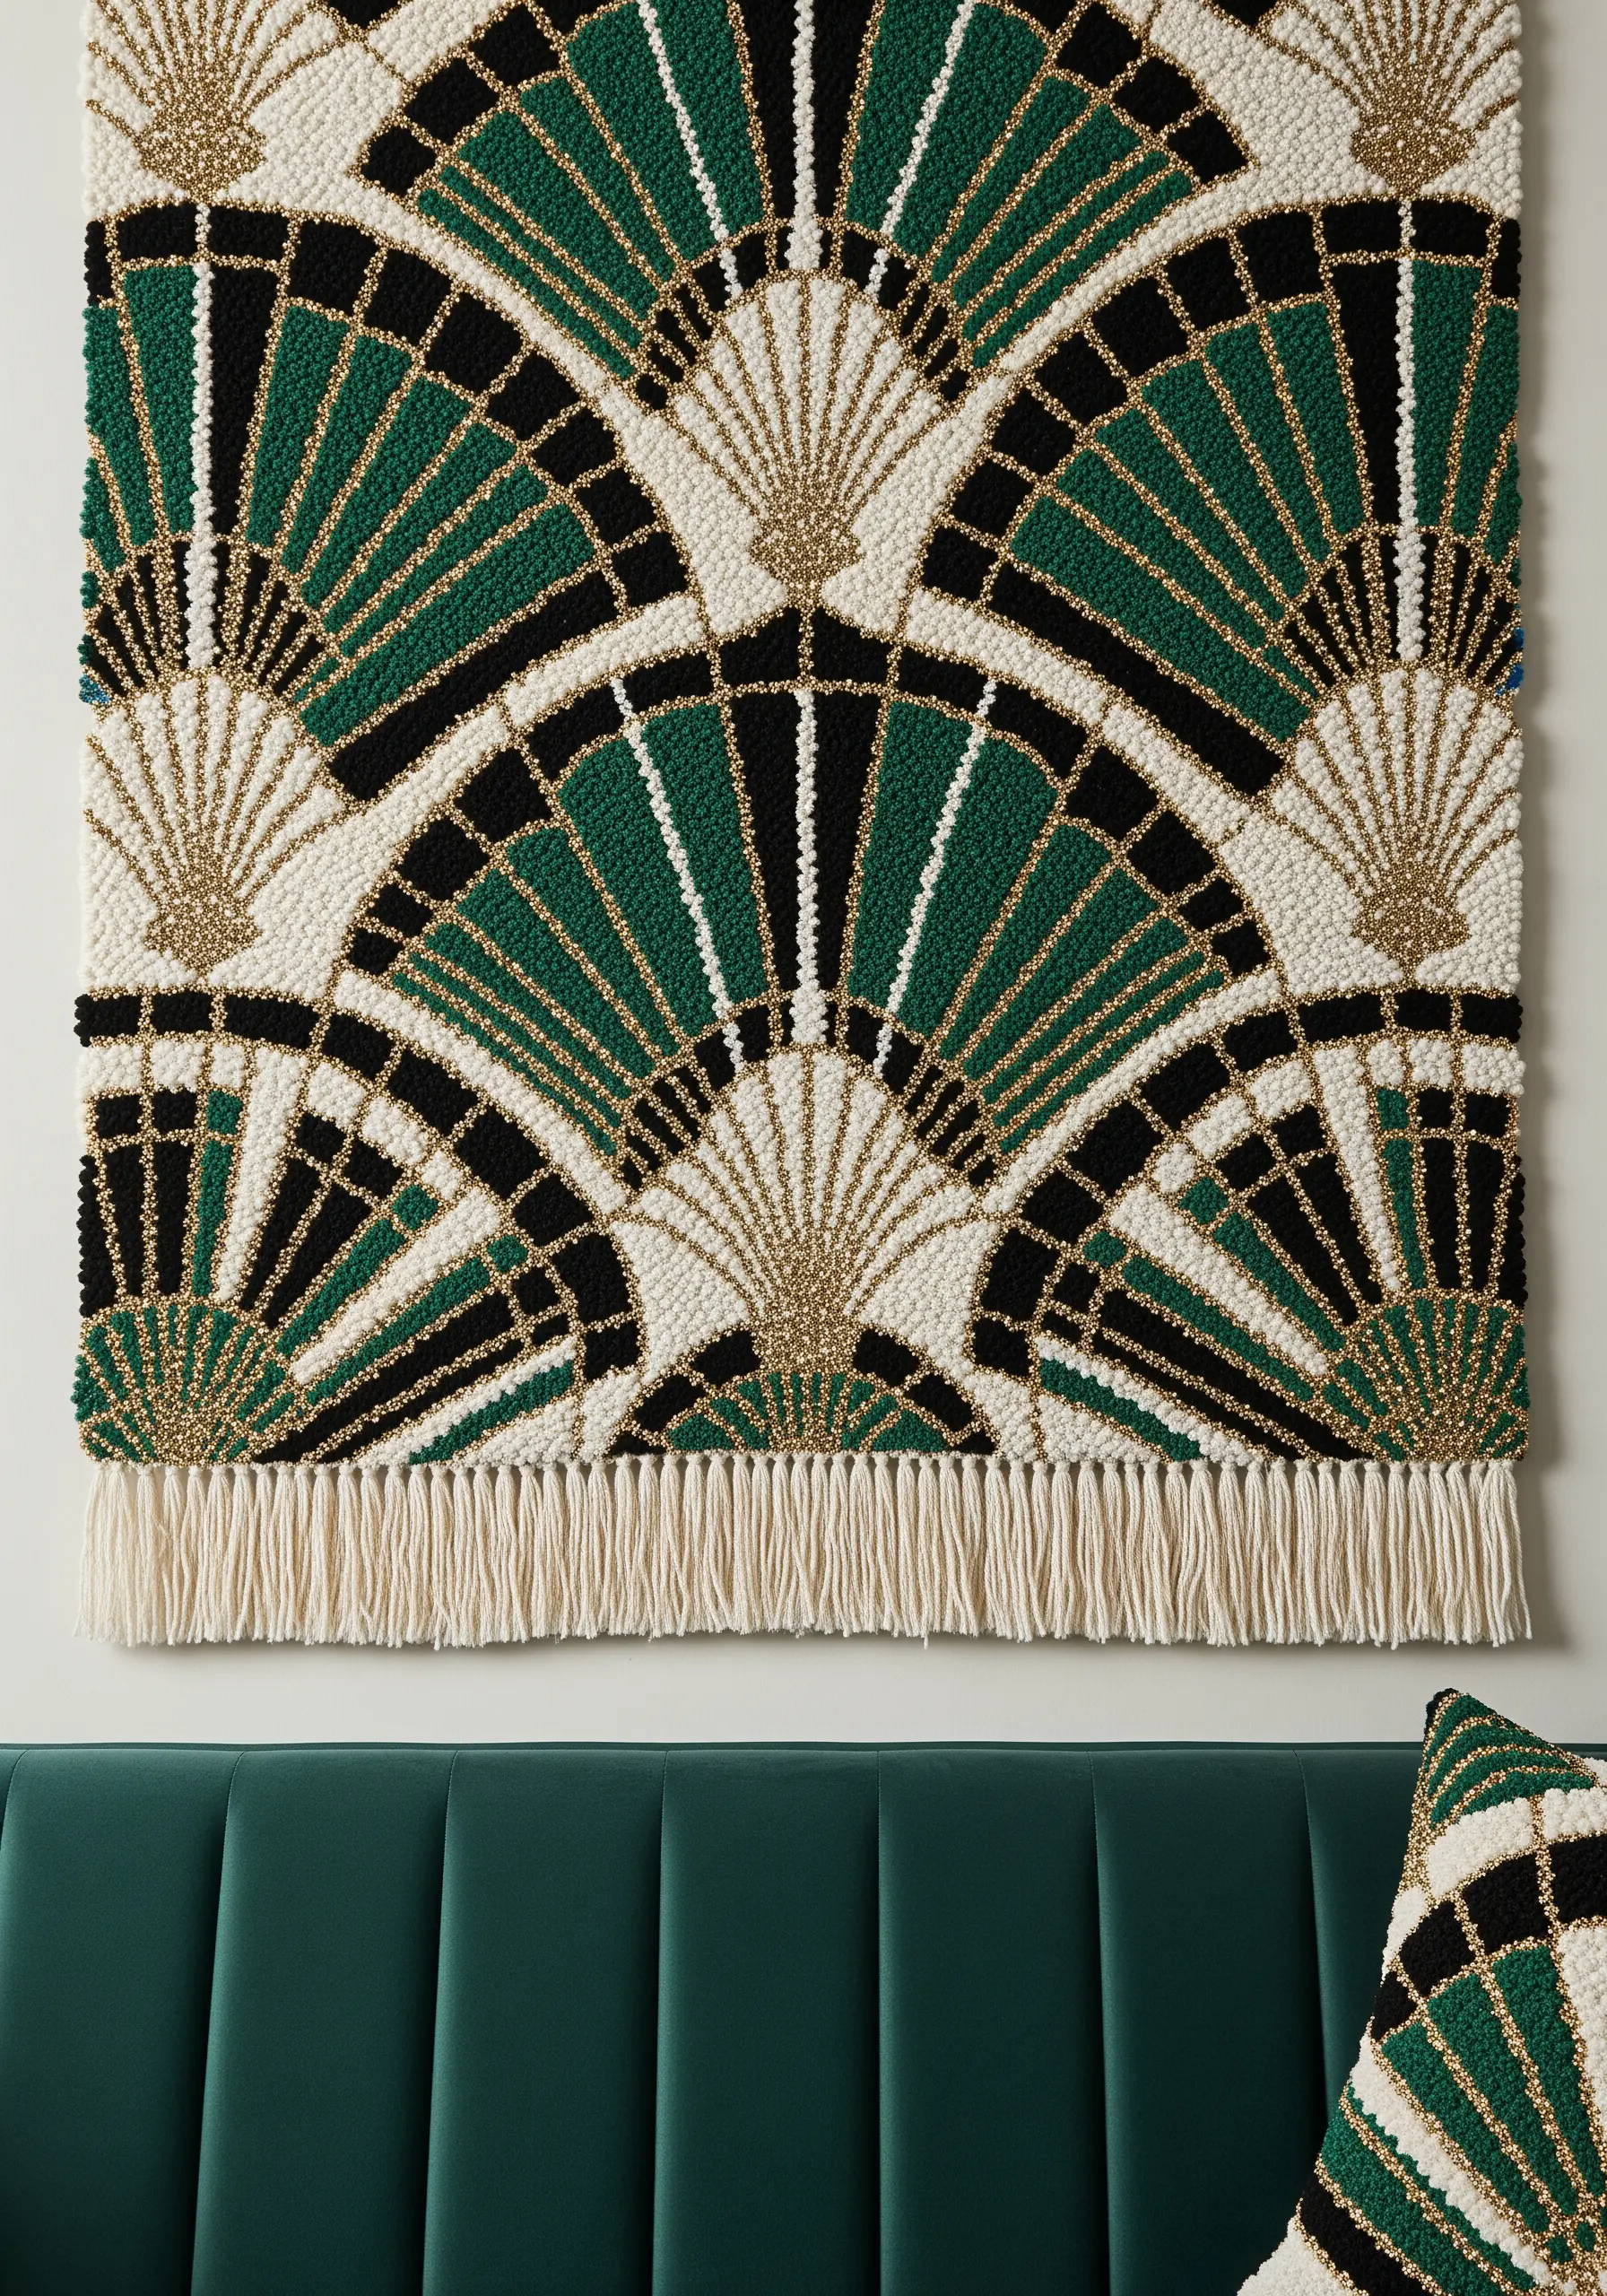
Capture the opulence of the Art Deco era by integrating metallic yarn into your punch needle or rug hooking designs.
Outline your classic fan or shell motifs with a fine, gold-flecked yarn to create sharp, light-catching borders.
This simple addition instantly elevates the piece, providing a touch of luxury and structure that contrasts beautifully with the soft, matte texture of the wool yarn.
Pair the gold with a sophisticated palette of emerald green, black, and cream for a truly timeless and elegant finish.
14. Explore a Monochrome Palette of Textures
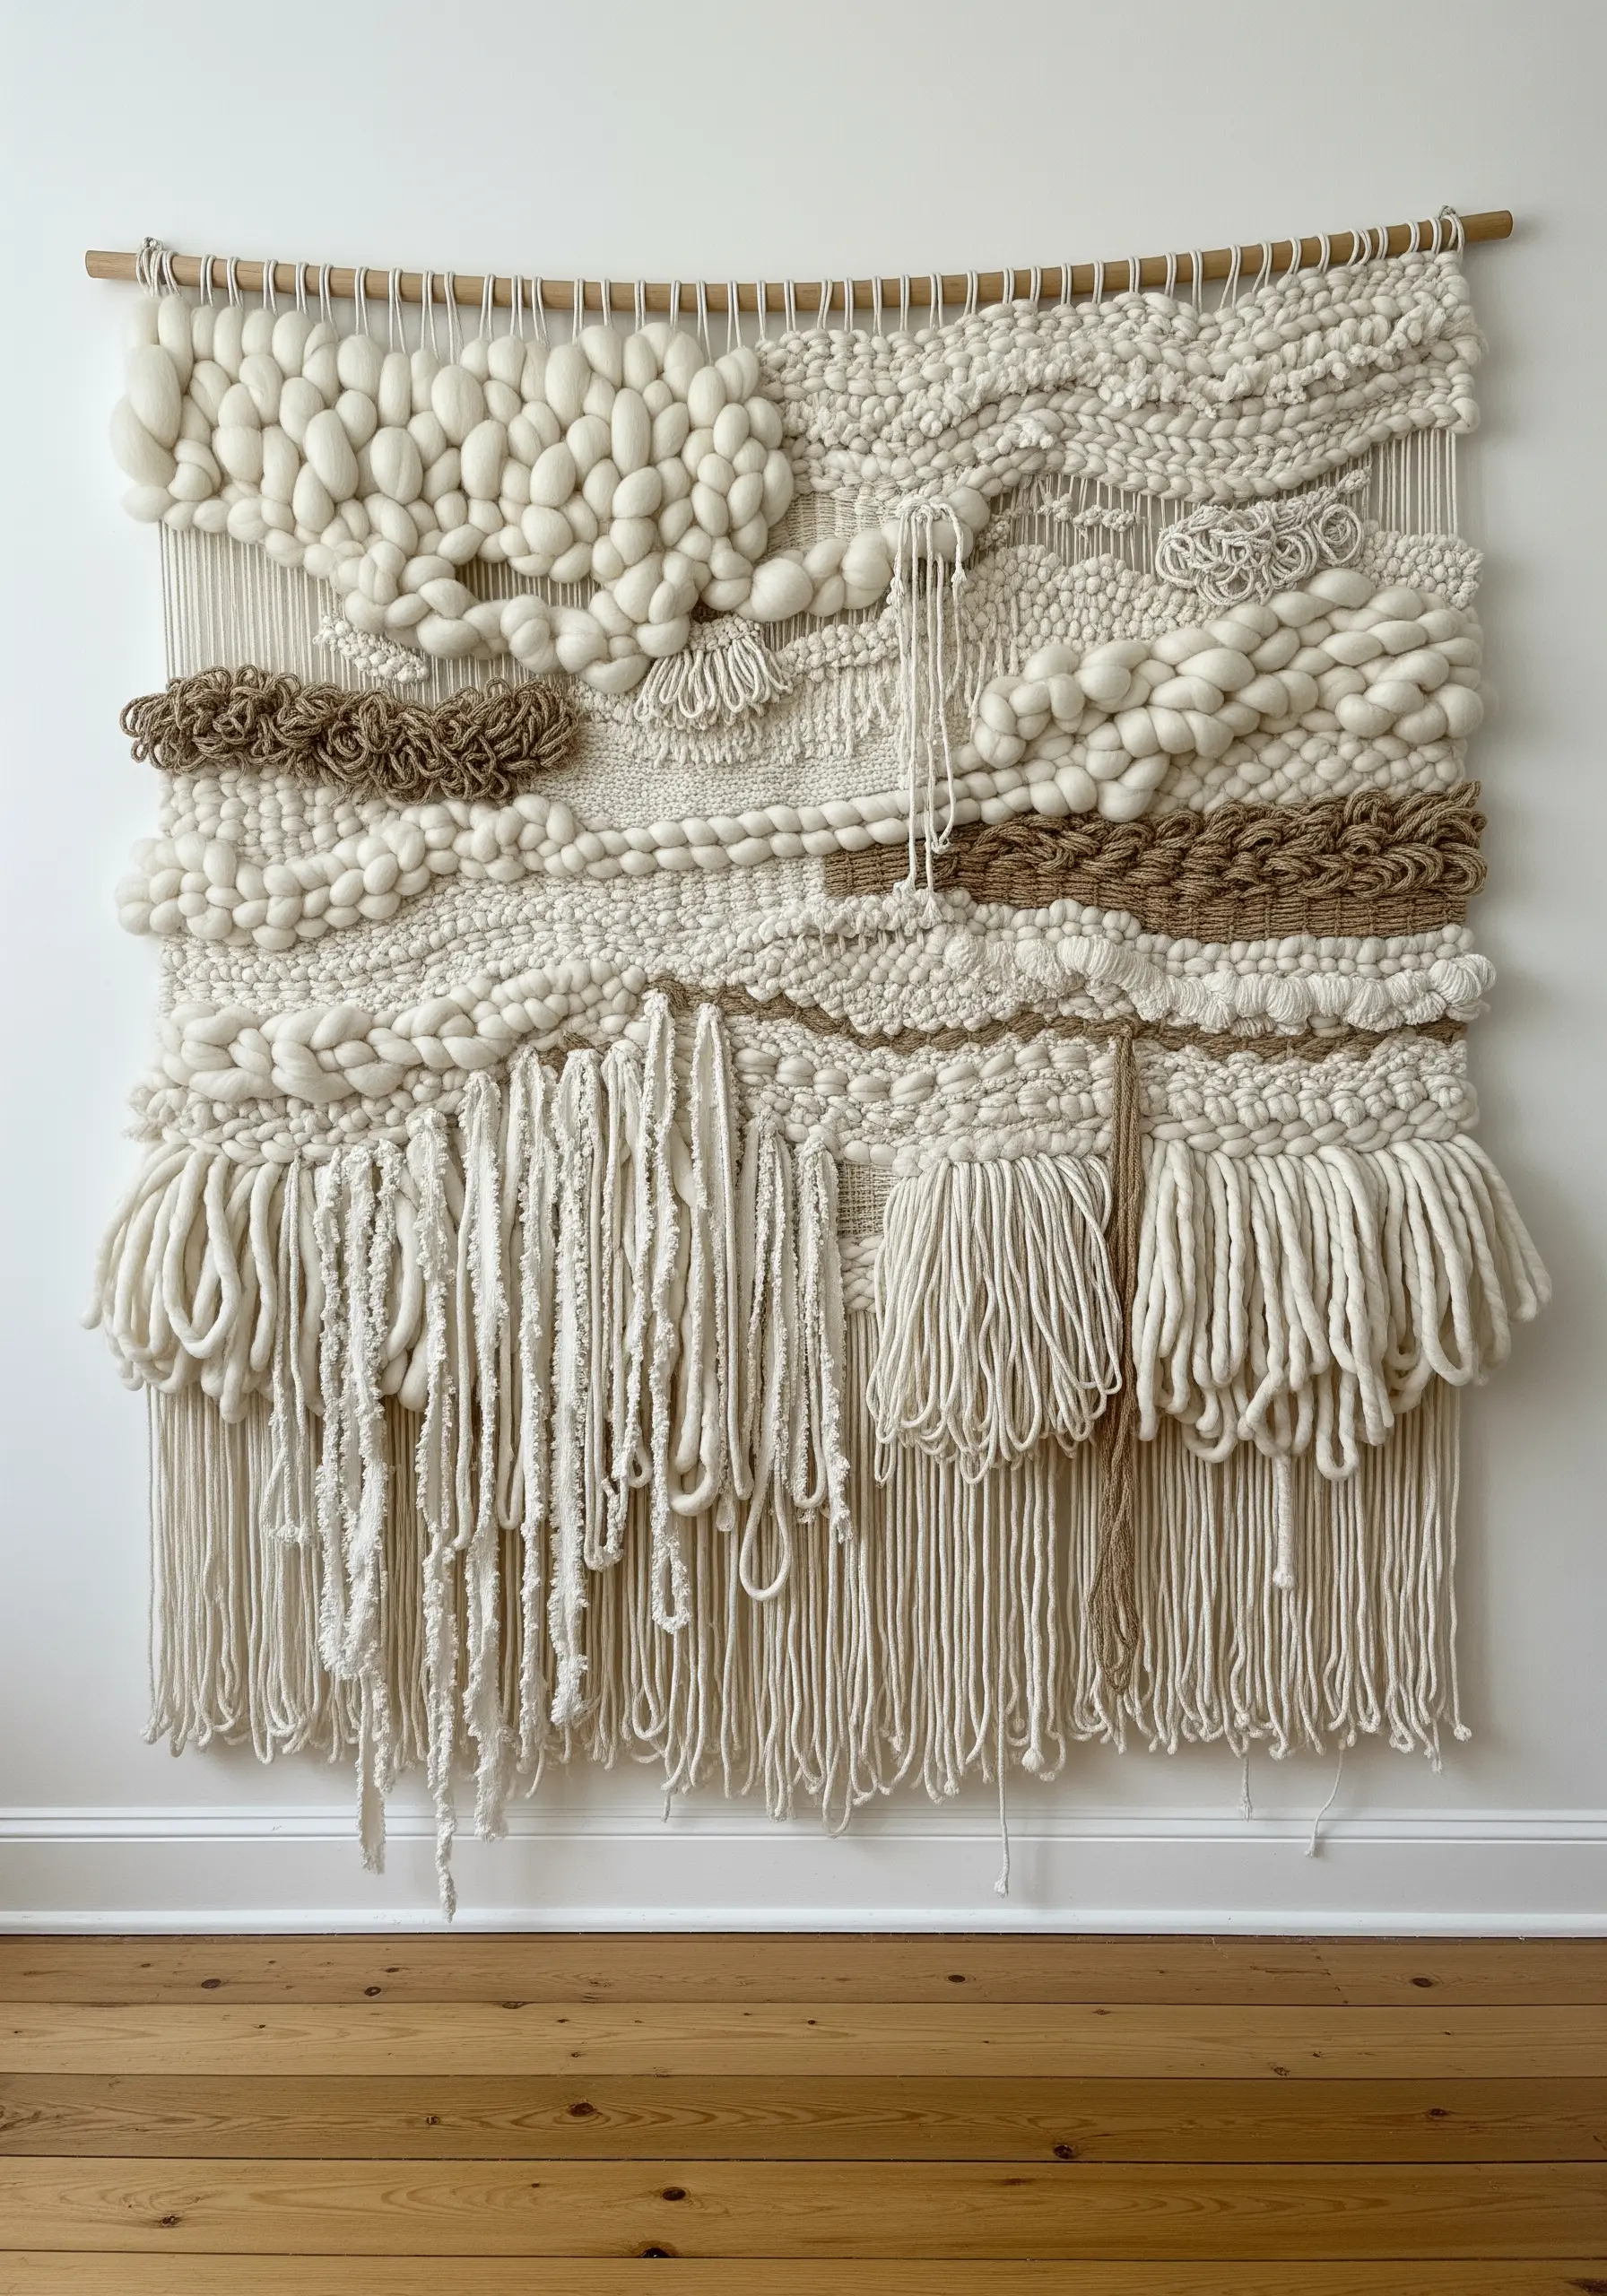
Prove that a neutral palette can be incredibly dynamic by focusing entirely on texture.
Create a woven wall hanging using only shades of cream, beige, and taupe, but vary the materials and techniques dramatically.
Incorporate chunky roving, tightly wound soumak, fluffy loop stitches, and delicate Ghiordes knots.
This creates a rich tactile landscape where the absence of color allows the unique character of each stitch and fiber to become the main focal point, resulting in neutral thread texture combinations that look boutique-level.
15. Embrace Neon and Unconventional Materials

Break free from traditional yarn by incorporating unexpected textures and vibrant, synthetic colors into your weaving.
Juxtapose neon paracord or brightly colored wool with strips of recycled fabric, ruffled ribbon, or even plastic.
Create highly sculptural forms using loop stitches (pile knots) that stand out from the flat-woven background.
This playful, maximalist approach turns a simple tapestry into a tactile explosion of color and form, perfect for a bold statement.
16. Depict Atmospheric Depth with Tonal Layers

Create the illusion of a misty mountain range using a limited color palette and subtle textural shifts.
Divide your design into layers, assigning the darkest shades to the foreground mountains and the lightest to those in the distance.
Use a French knot or a short loop pile stitch to fill each section, packing the stitches tightly for a uniform, pointillist effect.
This technique mimics atmospheric perspective, where tones lighten with distance, giving your textile art a serene and realistic depth.
17. Integrate Fiber Optics for a Luminous Effect

Take your fiber art into a new dimension by weaving with light itself.
Incorporate flexible fiber optic filaments directly into your tapestry or macrame piece alongside traditional yarn.
Connect the ends of the filaments to a small LED light source hidden behind the artwork or at its base.
When illuminated, the threads will glow from within, creating a dynamic, interactive piece that transforms completely from day to night.
18. Construct an Architectural, Open-Weave Sculpture
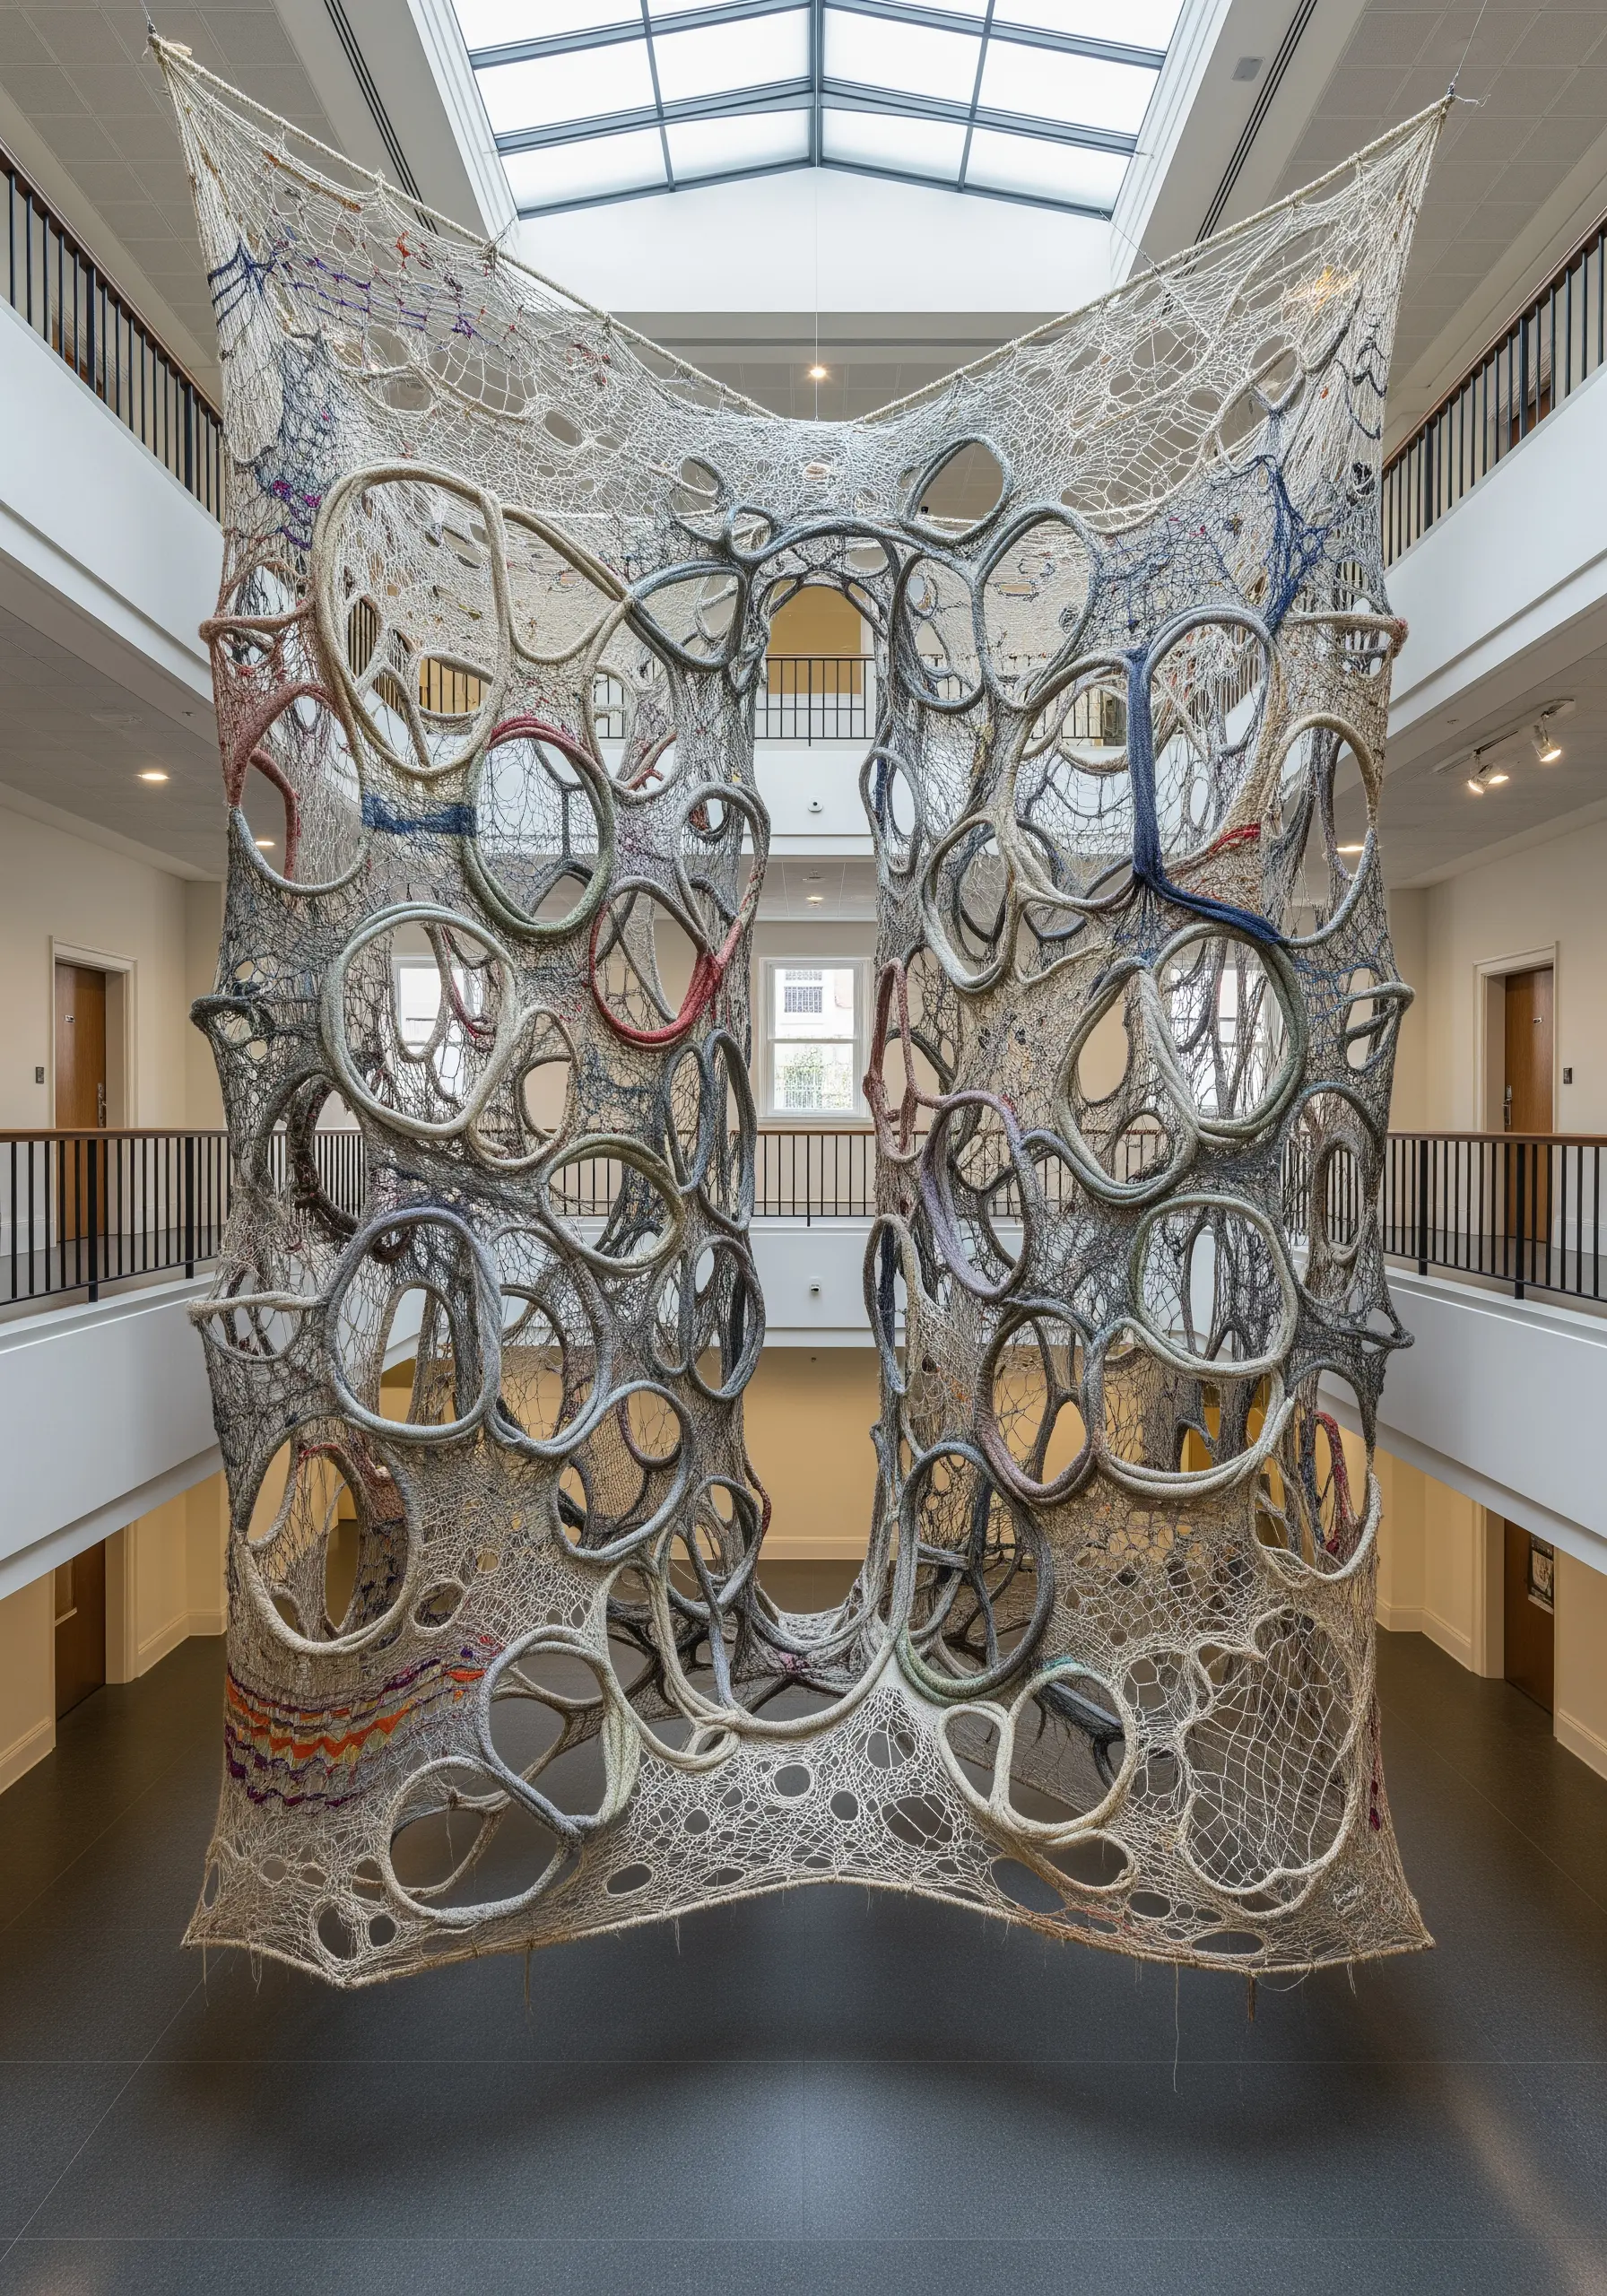
Think beyond the rectangle and use yarn to create large-scale, architectural forms that interact with the space around them.
Build a frame from metal or PVC pipes and stretch your warp threads across it in multiple directions, creating a web-like structure.
Instead of weaving a solid fabric, use techniques like crochet, knitting, or netting to build up organic, cellular shapes within the open space.
This turns the yarn from a surface decoration into a load-bearing structural element, creating mind-blowing fiber art installations that redefine textile design.
19. Weave a Pixelated Portrait
Translate a digital image into a tactile tapestry by embracing a pixelated aesthetic.
Use a gridded pattern (like a cross-stitch chart) as your guide, with each square representing a single knot or a small block of color.
The key is to use a consistent weaving or knotting technique, like the Ghiordes knot (a rug-making technique), to create uniform “pixels.”
From a distance, the individual blocks of color merge to form a detailed and surprisingly realistic portrait with a unique digital-meets-analog feel.
20. Design a Sampler of Weaving Techniques
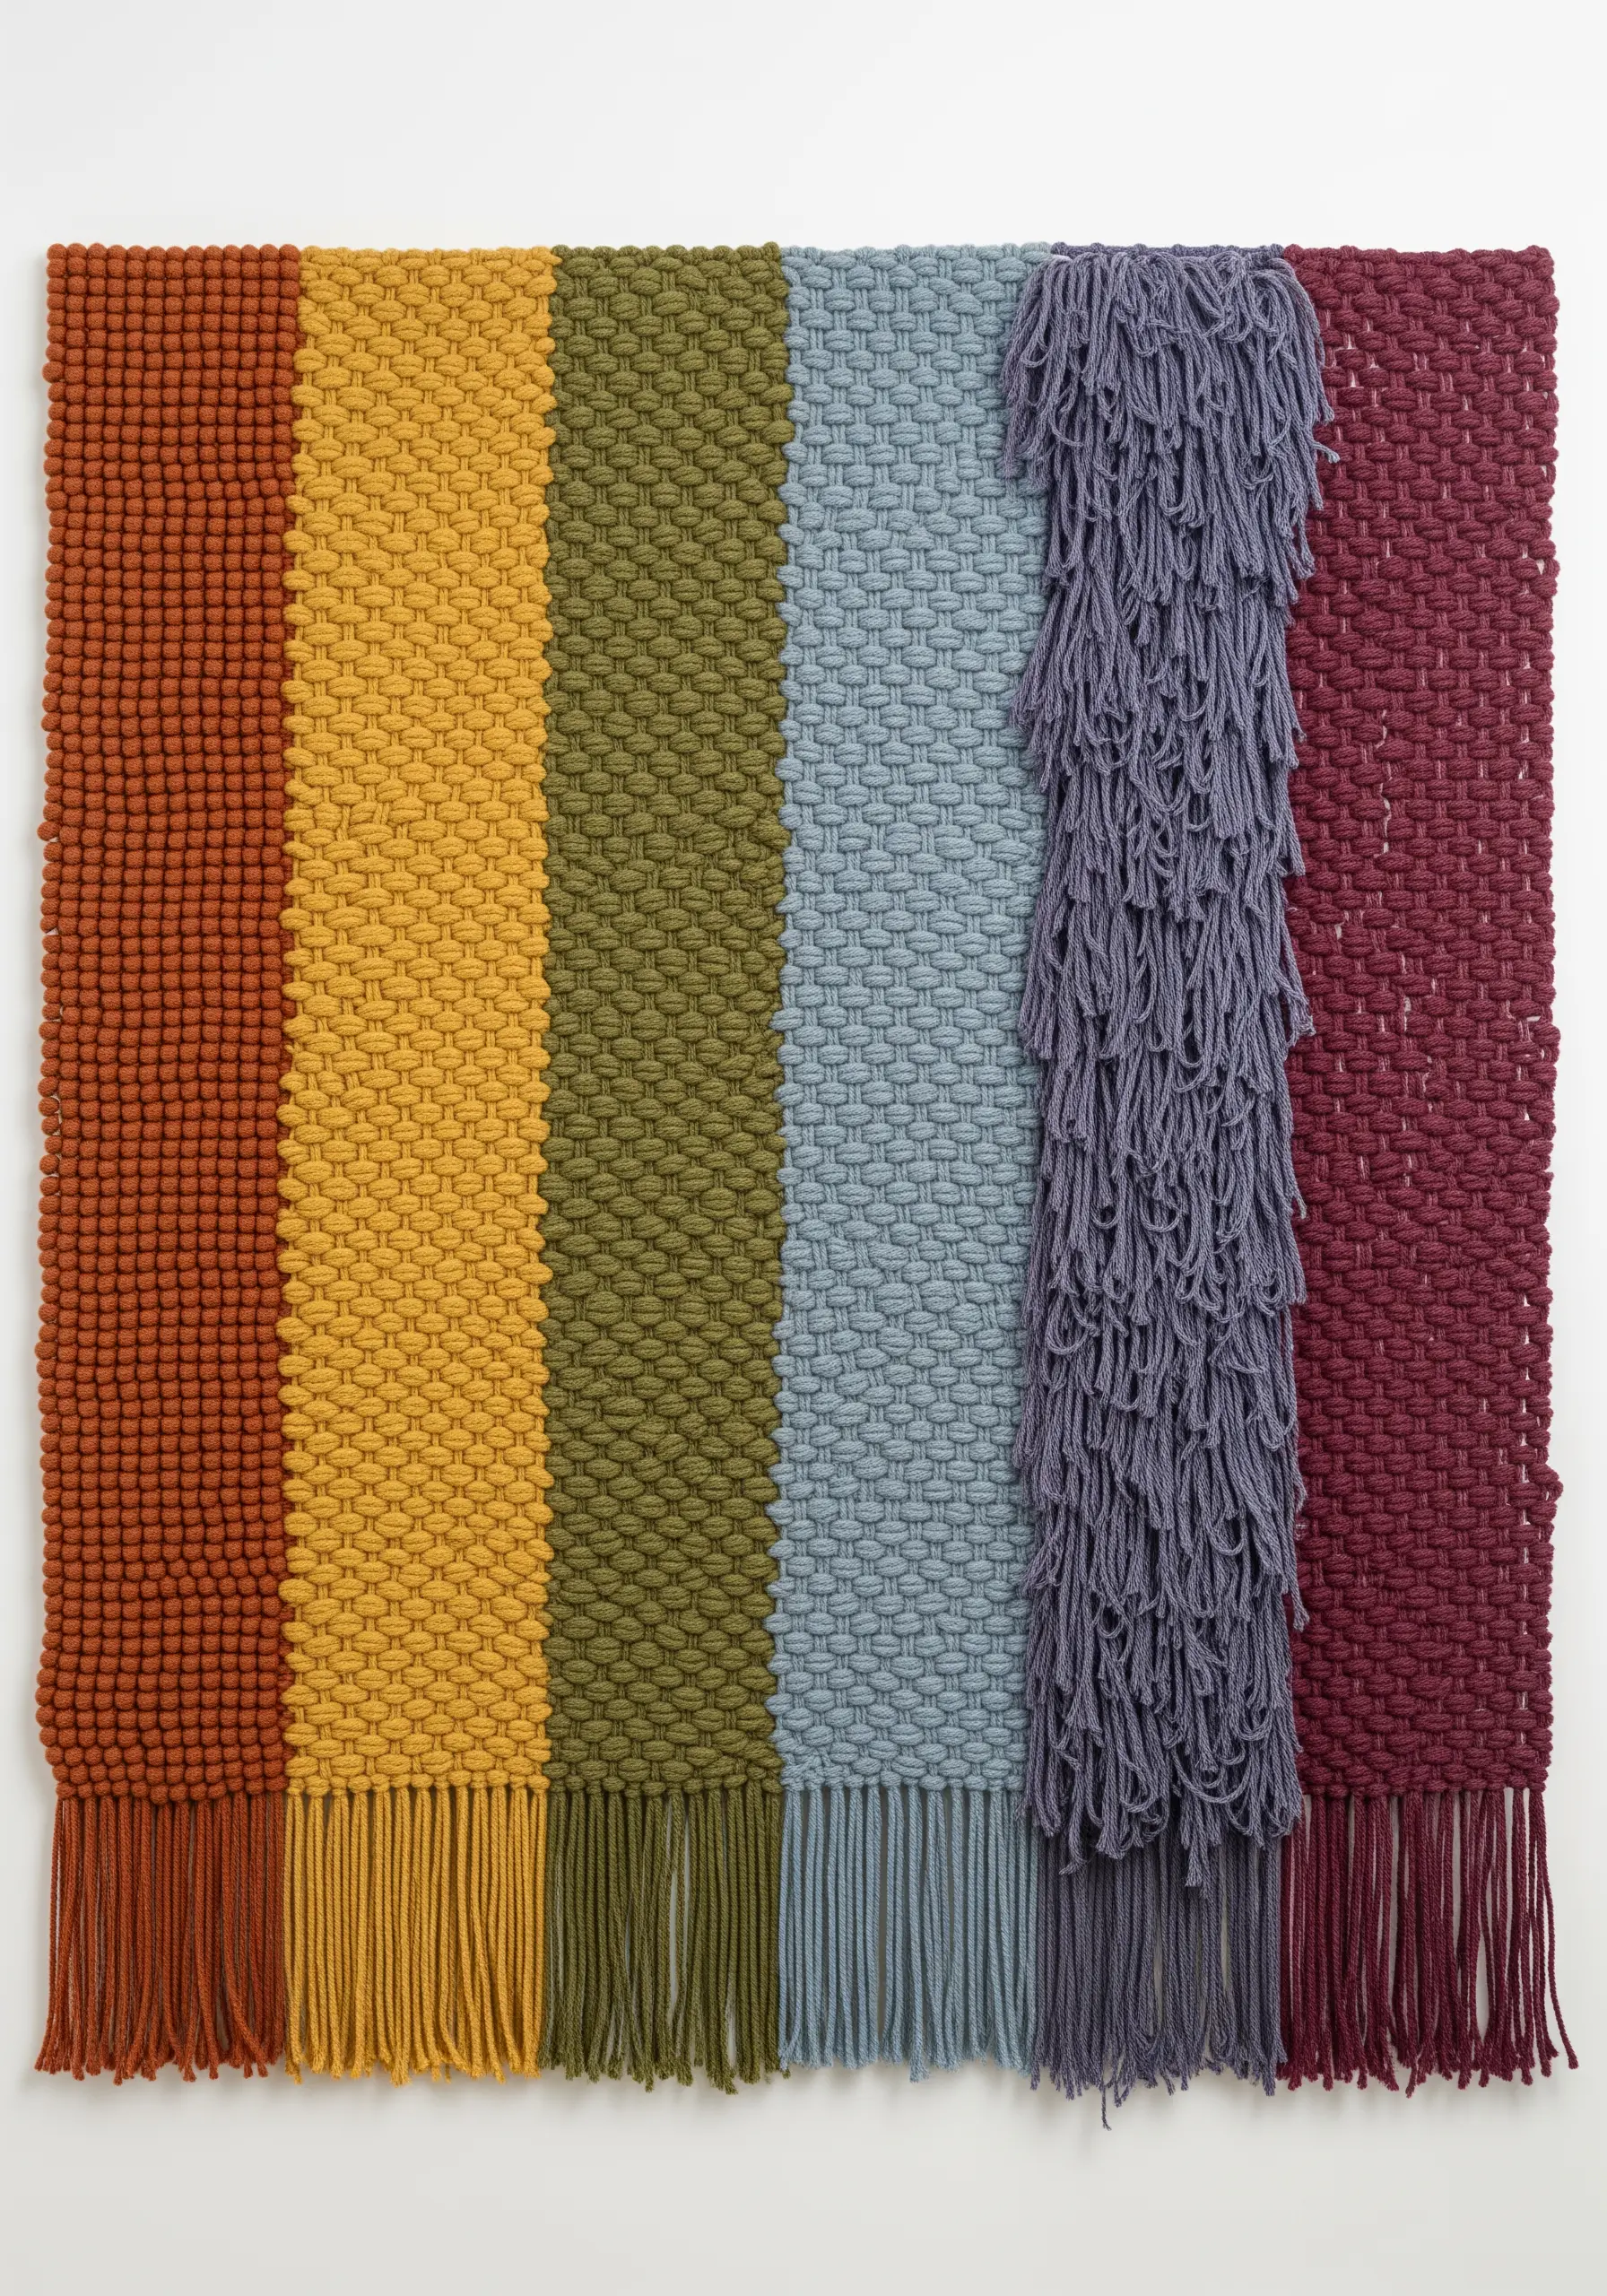
Create a wall hanging that doubles as a visual encyclopedia of textures.
Divide your warp into vertical columns and assign a different color and weaving technique to each one.
Experiment with plain weave, soumak, rya knots, and pile weaves side-by-side.
This approach not only creates a visually fascinating piece with rhythmic stripes of texture but also serves as a beautiful reference sampler for your future projects.
21. Illustrate a Celestial Scene with Mixed Media
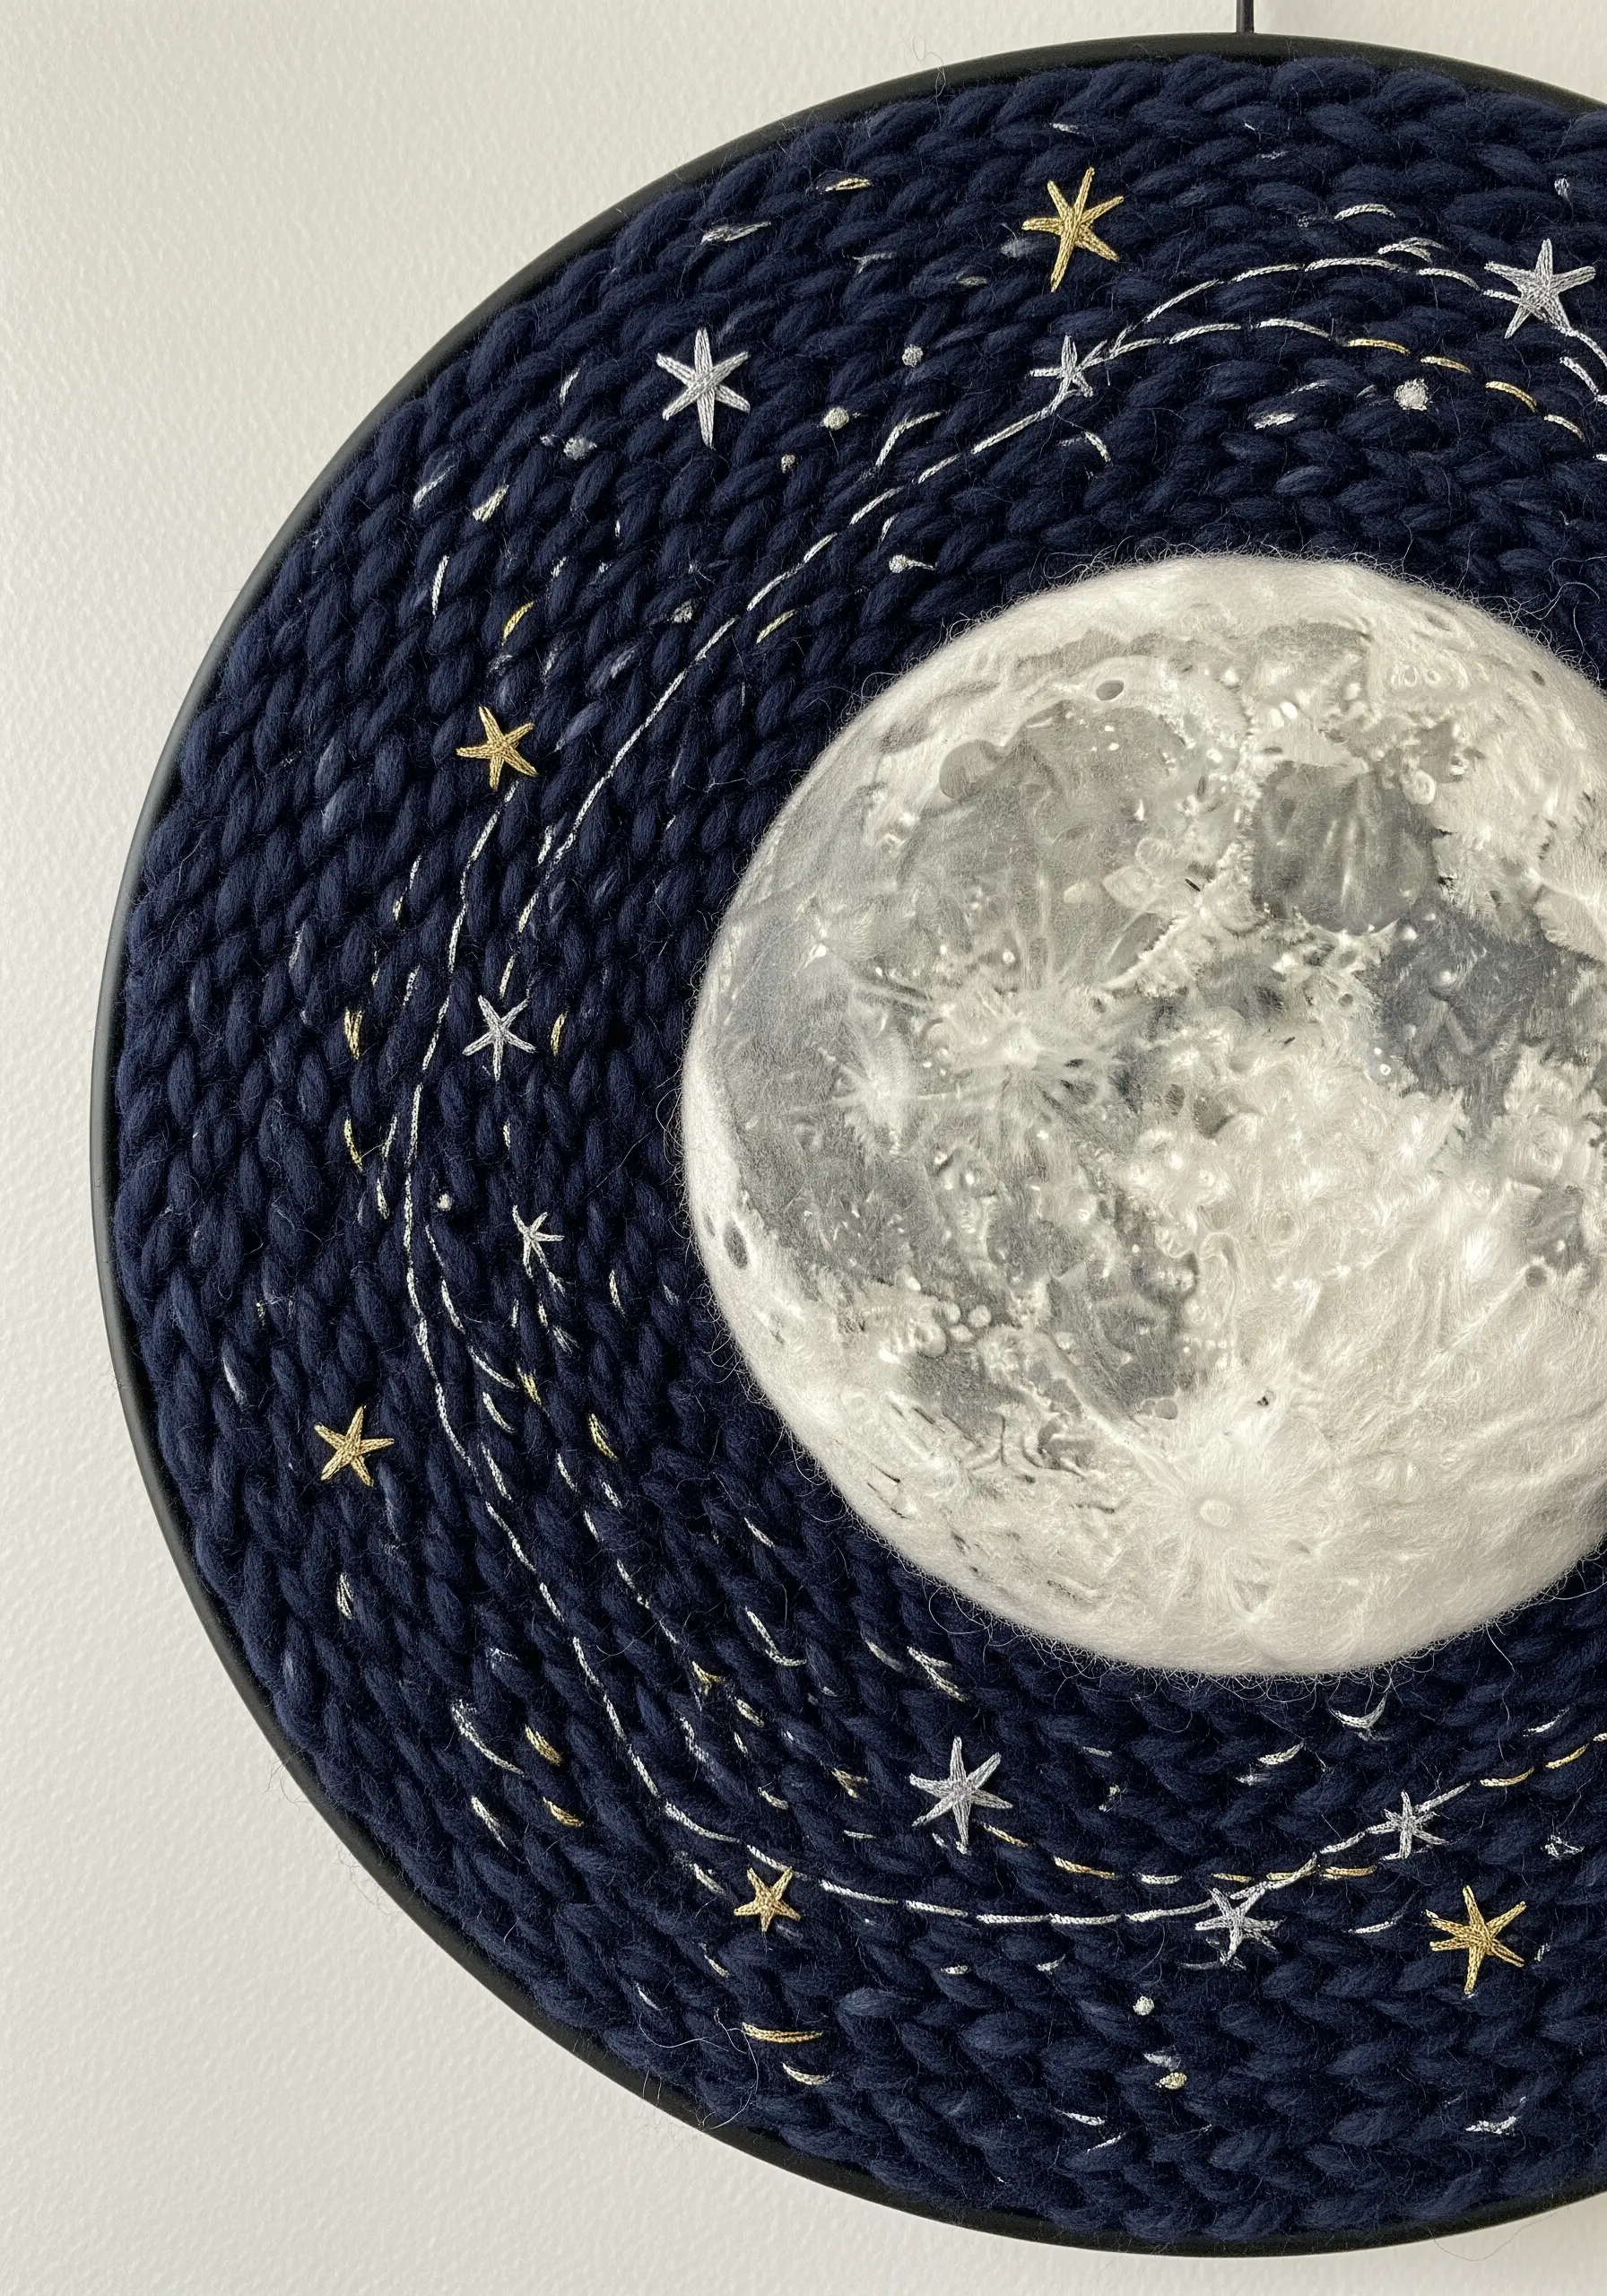
Combine traditional fiber techniques with other media to create a celestial masterpiece.
Use a tightly coiled wrapping technique with dark navy yarn to form the night sky background on a round frame.
Create the moon using needle felting, blending shades of white and grey wool roving to form realistic craters and shadows.
Finally, use metallic embroidery floss to stitch swirling star paths and sparkling starbursts, adding a delicate, shimmering touch that contrasts with the matte wool.
22. Plot a Freeform Journey on a Pegboard Canvas
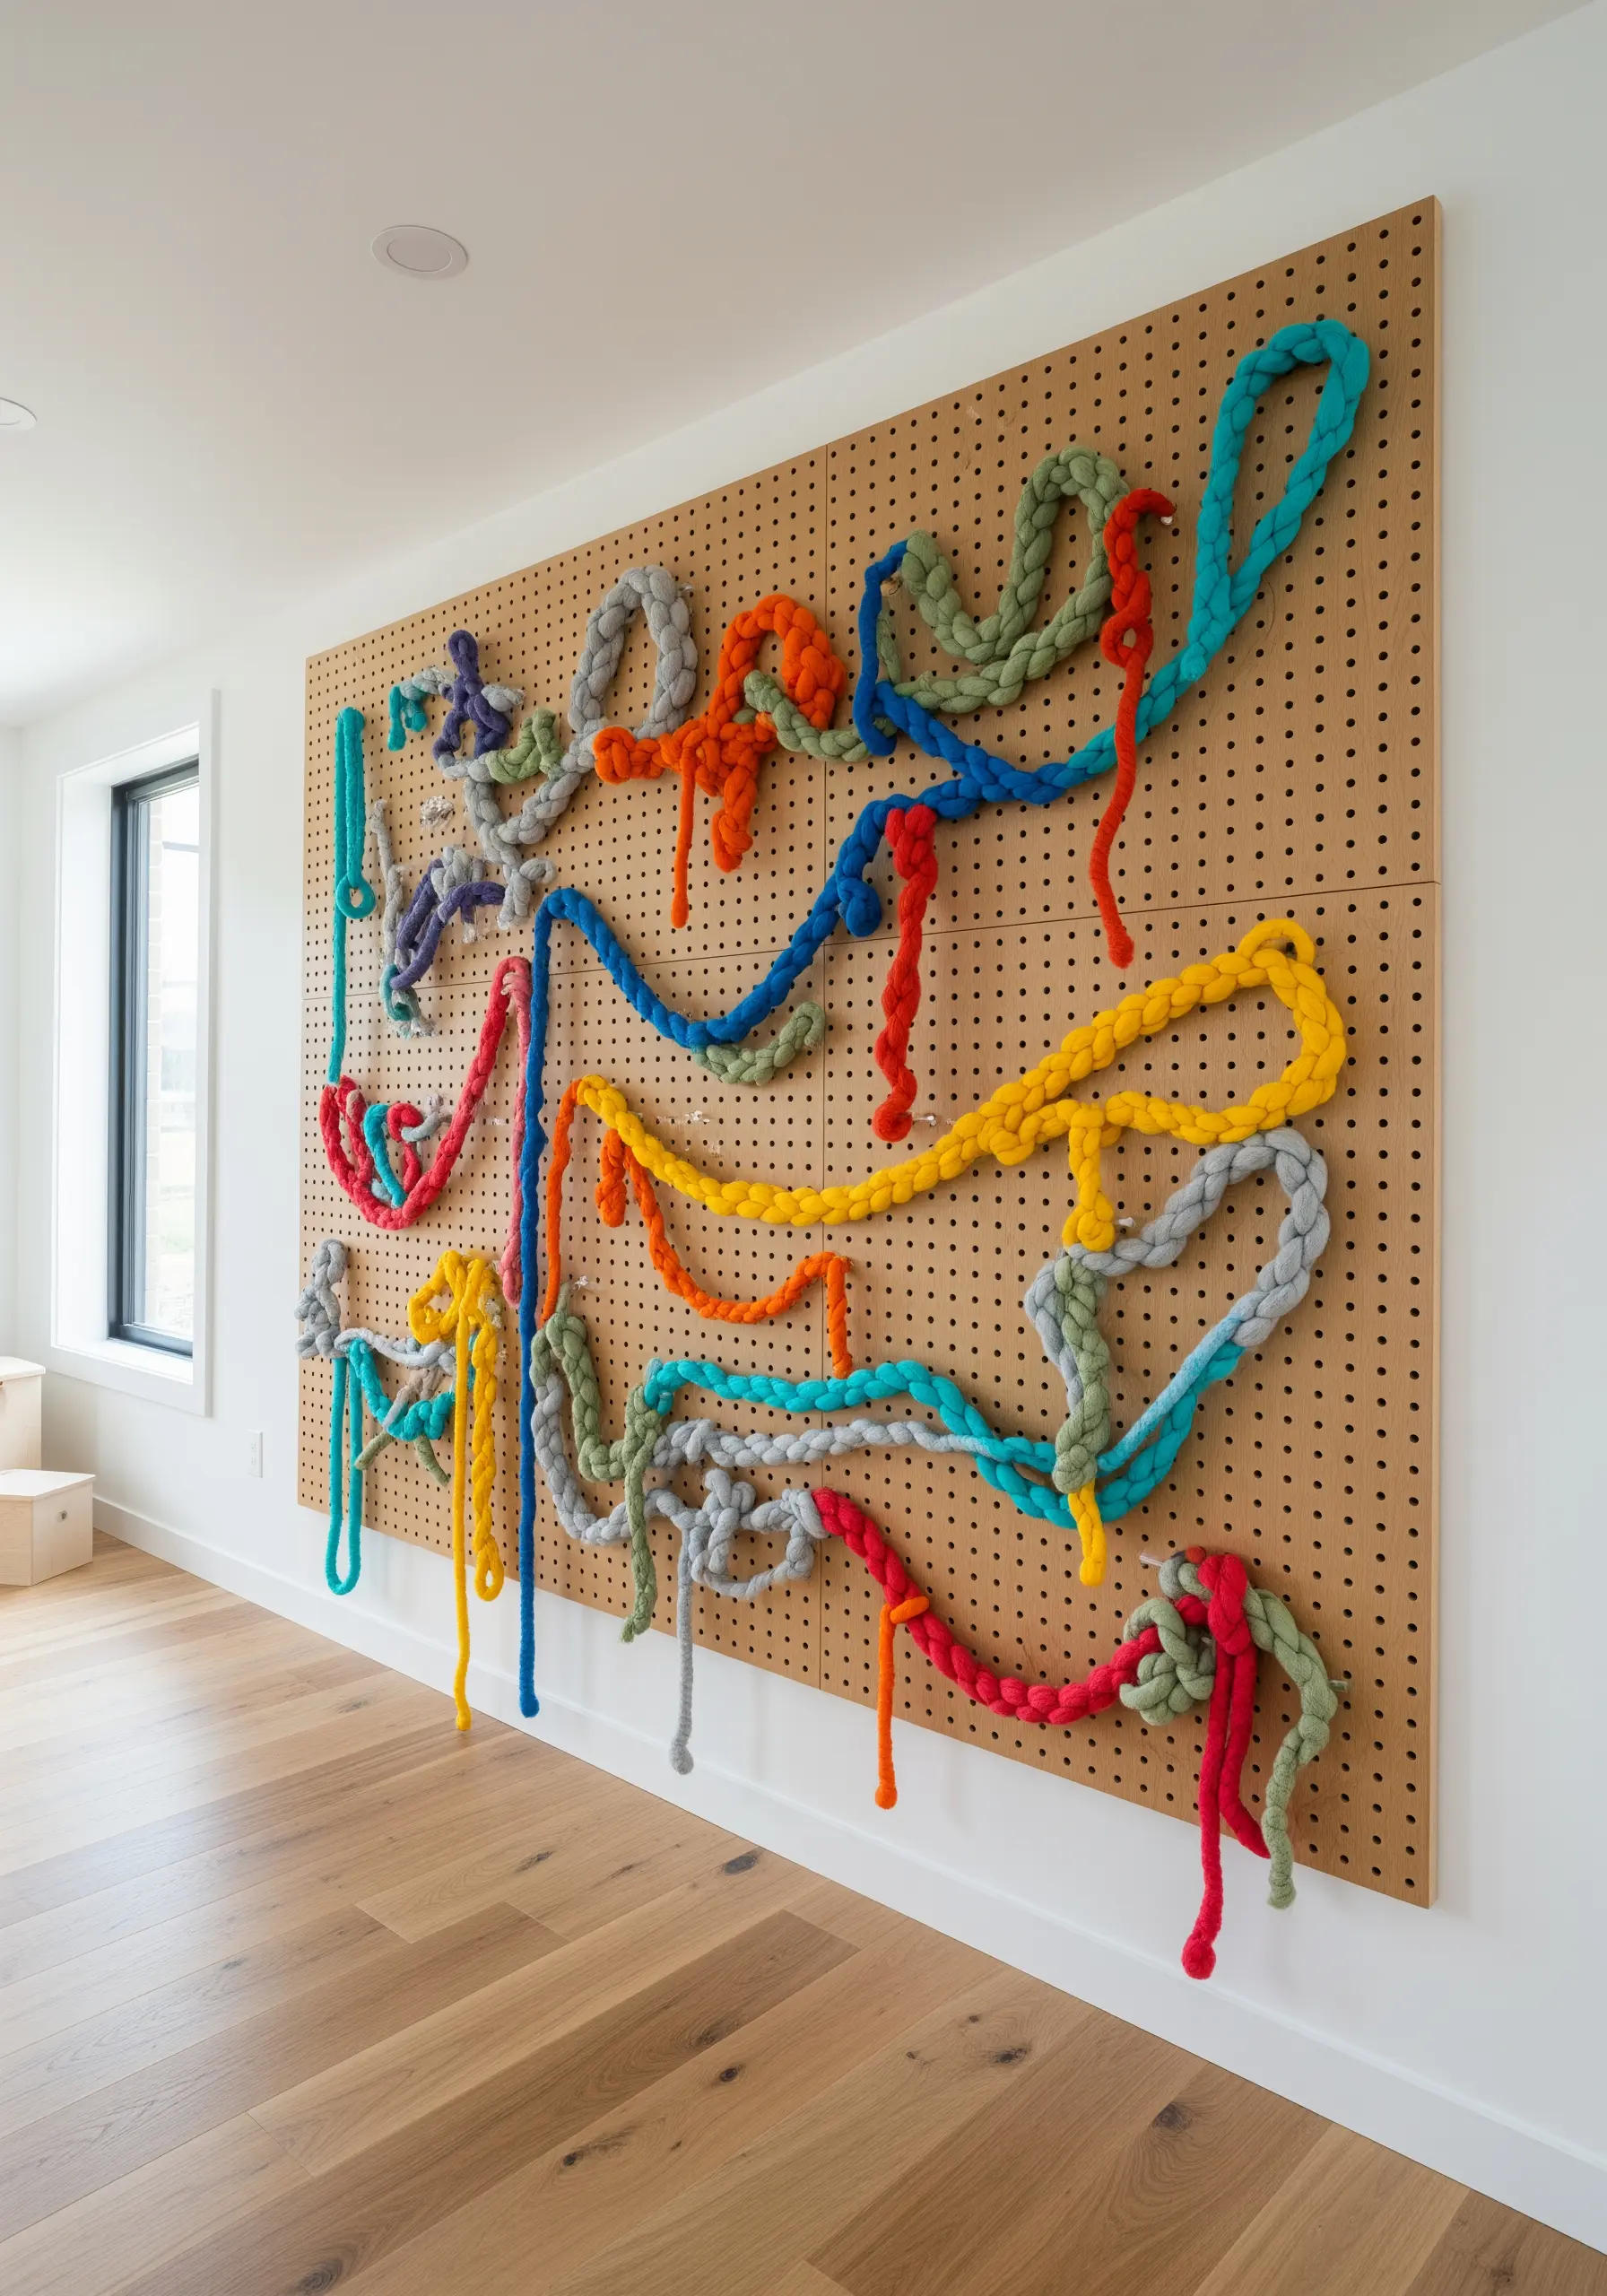
Use a common pegboard as an unconventional canvas for a playful, sculptural yarn installation.
Knit or crochet thick tubes of yarn in various colors and lengths, stuffing them lightly to give them body.
Then, simply weave, loop, and drape these yarn “snakes” through the holes in the pegboard, creating an interactive and ever-changeable abstract drawing.
This approach is perfect for a dynamic space, as you can rearrange the composition whenever you want a fresh look.
23. Juxtapose Hard Ceramic and Soft Fiber

Create a sophisticated wall hanging by exploring the contrast between hard and soft materials.
Source smooth, sculptural objects like ceramic rings or wooden beads to act as the structural elements of your piece.
Use macrame wrapping techniques (like the gathering knot) to connect the hard elements with soft cotton cord.
The clean, minimalist aesthetic relies on this material contrast—the glossy, cool ceramic against the warm, pliable texture of the knots—for its quiet impact.
24. Reveal the Process with an Unfinished Weaving

Turn the loom itself into part of the finished artwork by leaving the weaving intentionally incomplete.
Let the top half of the piece consist only of the exposed, untouched warp threads, creating an airy, delicate contrast with the dense, patterned weaving below.
This approach not only adds visual interest and negative space but also celebrates the process of creation, showing the transformation from simple threads to complex fabric.
It’s a conceptual statement that is both rustic and deeply modern.
25. Achieve Crisp Detail with Raised Satin Stitch

For intricate, folk-art-inspired designs, make your motifs pop by giving them dimension.
Before working your satin stitch, lay down a foundation of padding stitches (small straight stitches) within the shape you want to fill.
Then, work your satin stitch over this padding, completely covering it.
This simple extra step raises the surface of the stitch, creating a subtle, three-dimensional effect that catches the light and makes your colorful florals and figures look incredibly crisp and defined.
26. Make a Bold Statement with Extreme Scale
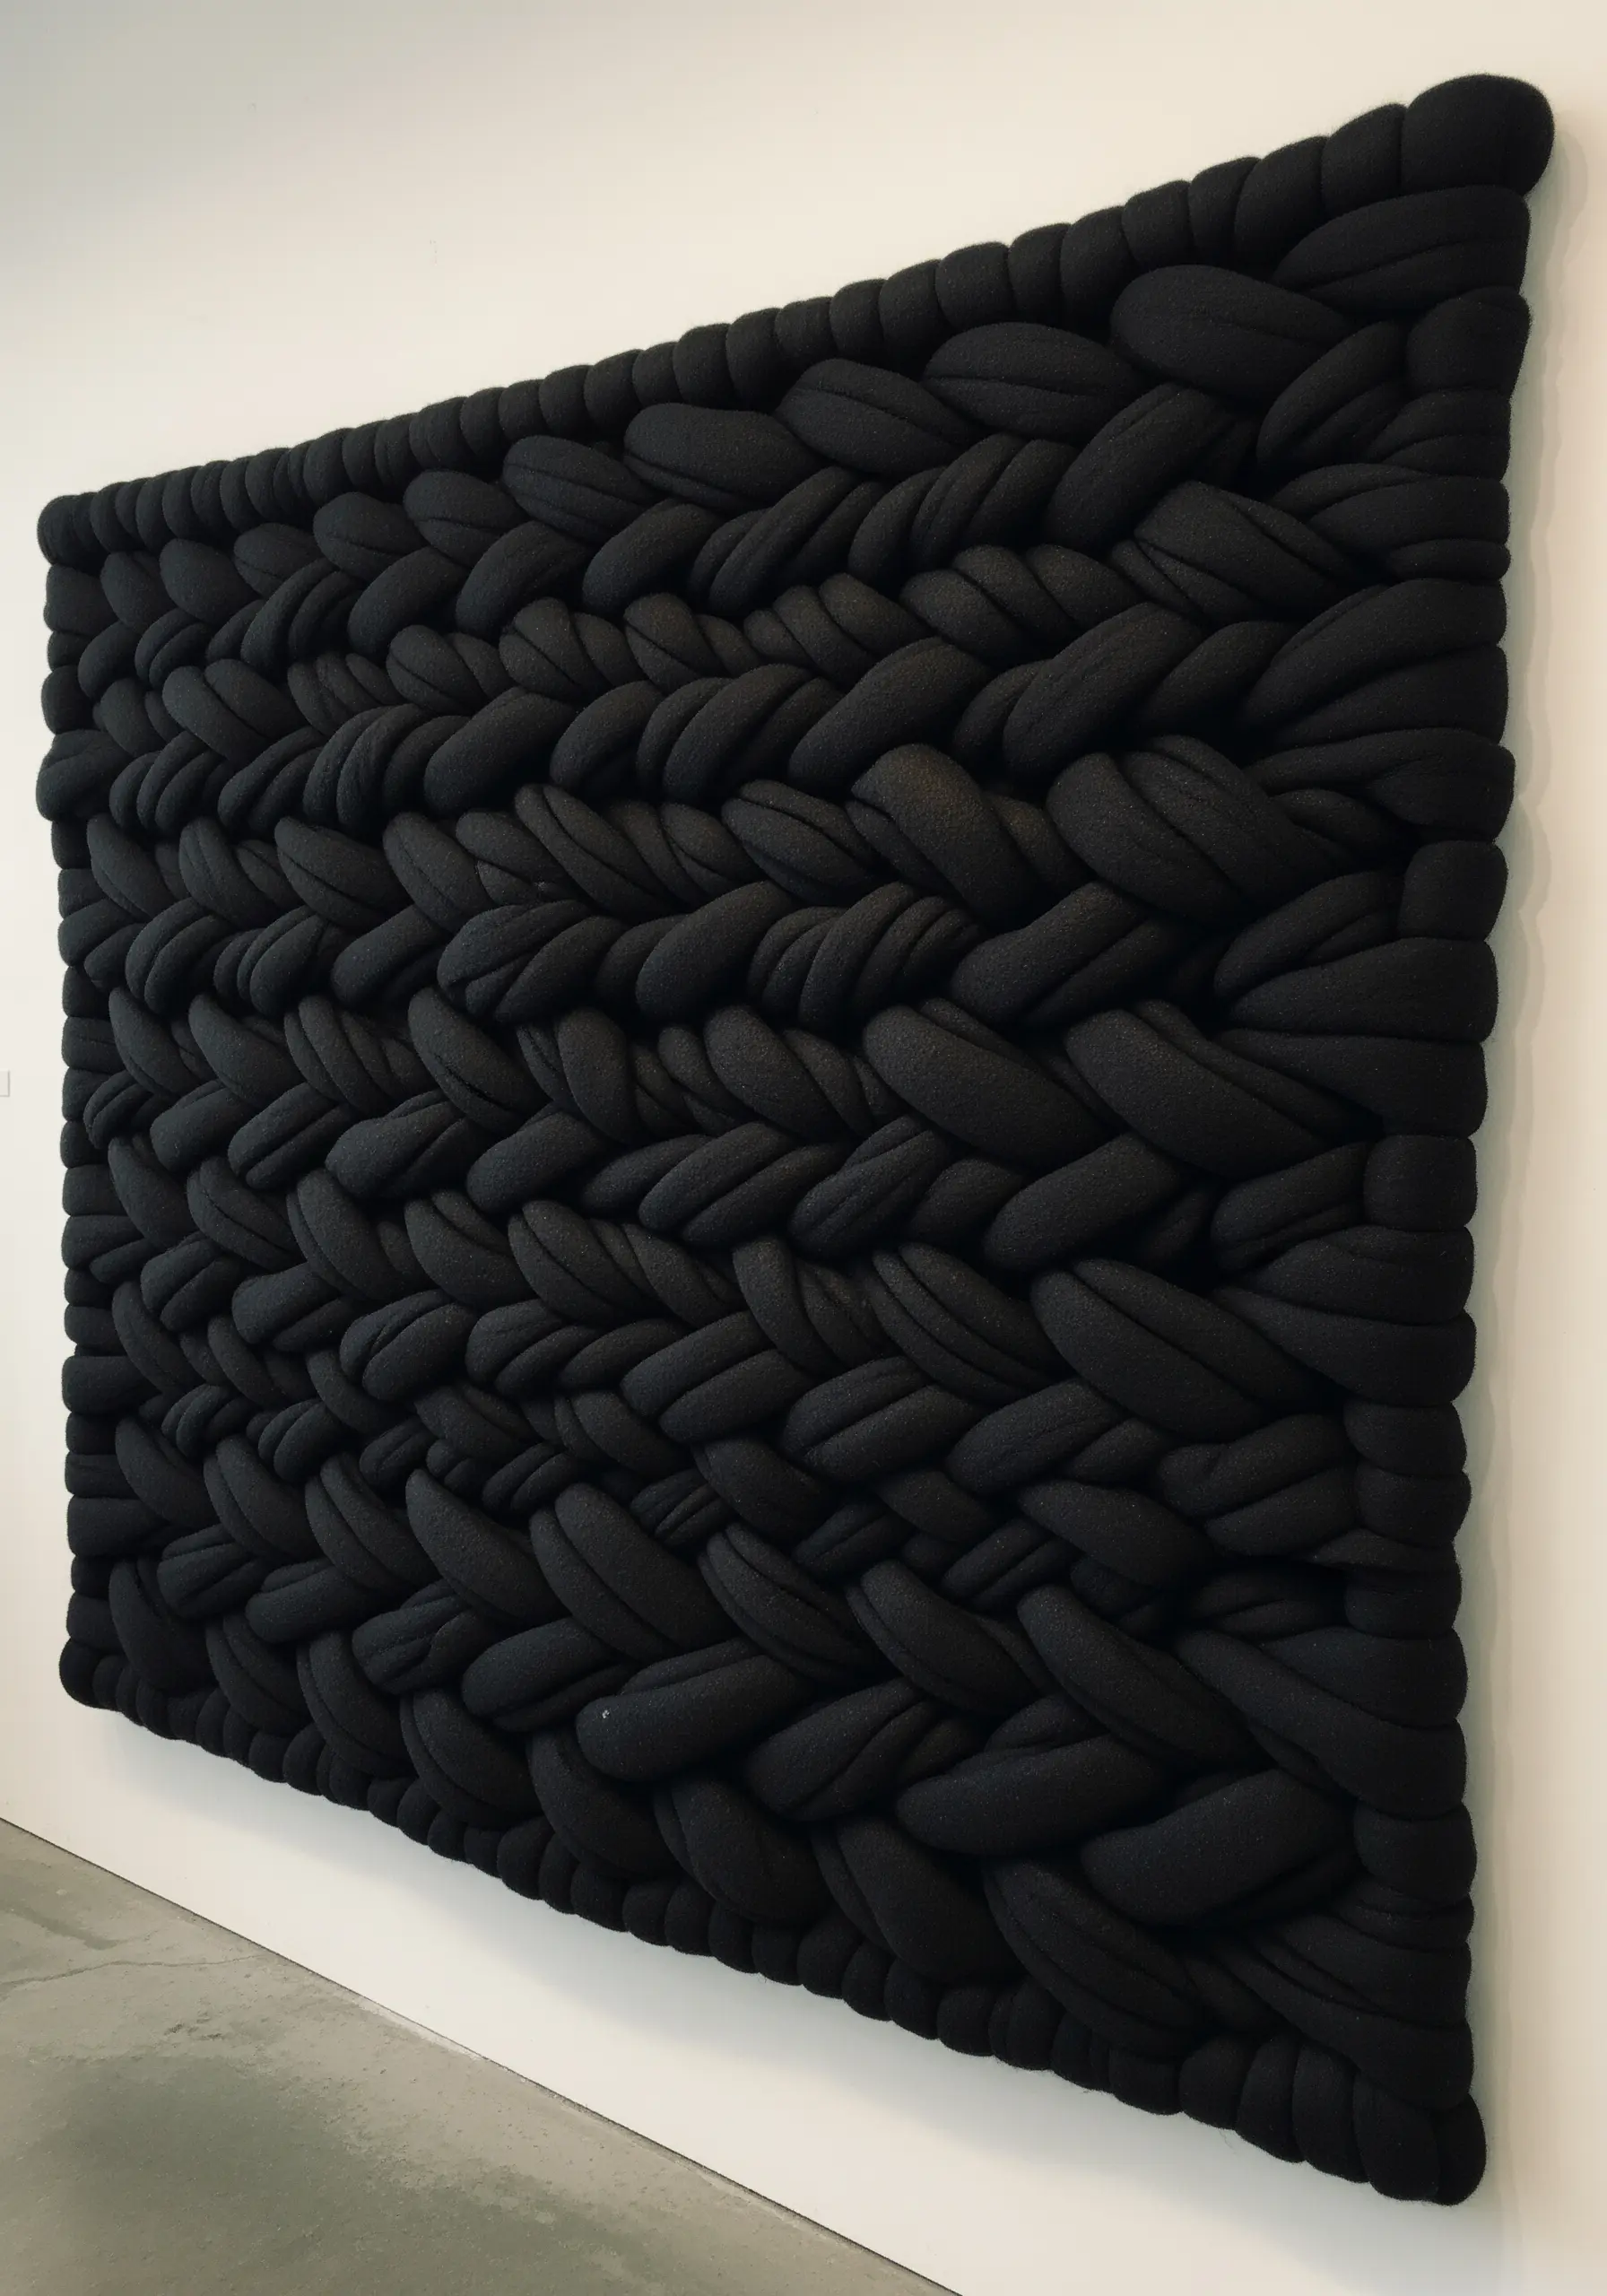
Create a powerful, minimalist statement by focusing on a single, oversized texture.
Use giant, chunky yarn—often made from tube fabric stuffed with fill—and a simple weaving or braiding technique.
The impact comes not from color or complex pattern, but from the extreme scale of the stitches themselves.
A monochrome palette, like solid black, further emphasizes the sculptural quality of the weave, forcing the viewer to appreciate the form, shadow, and sheer physicality of the piece.
27. Recreate Pop Art with Punch Needle
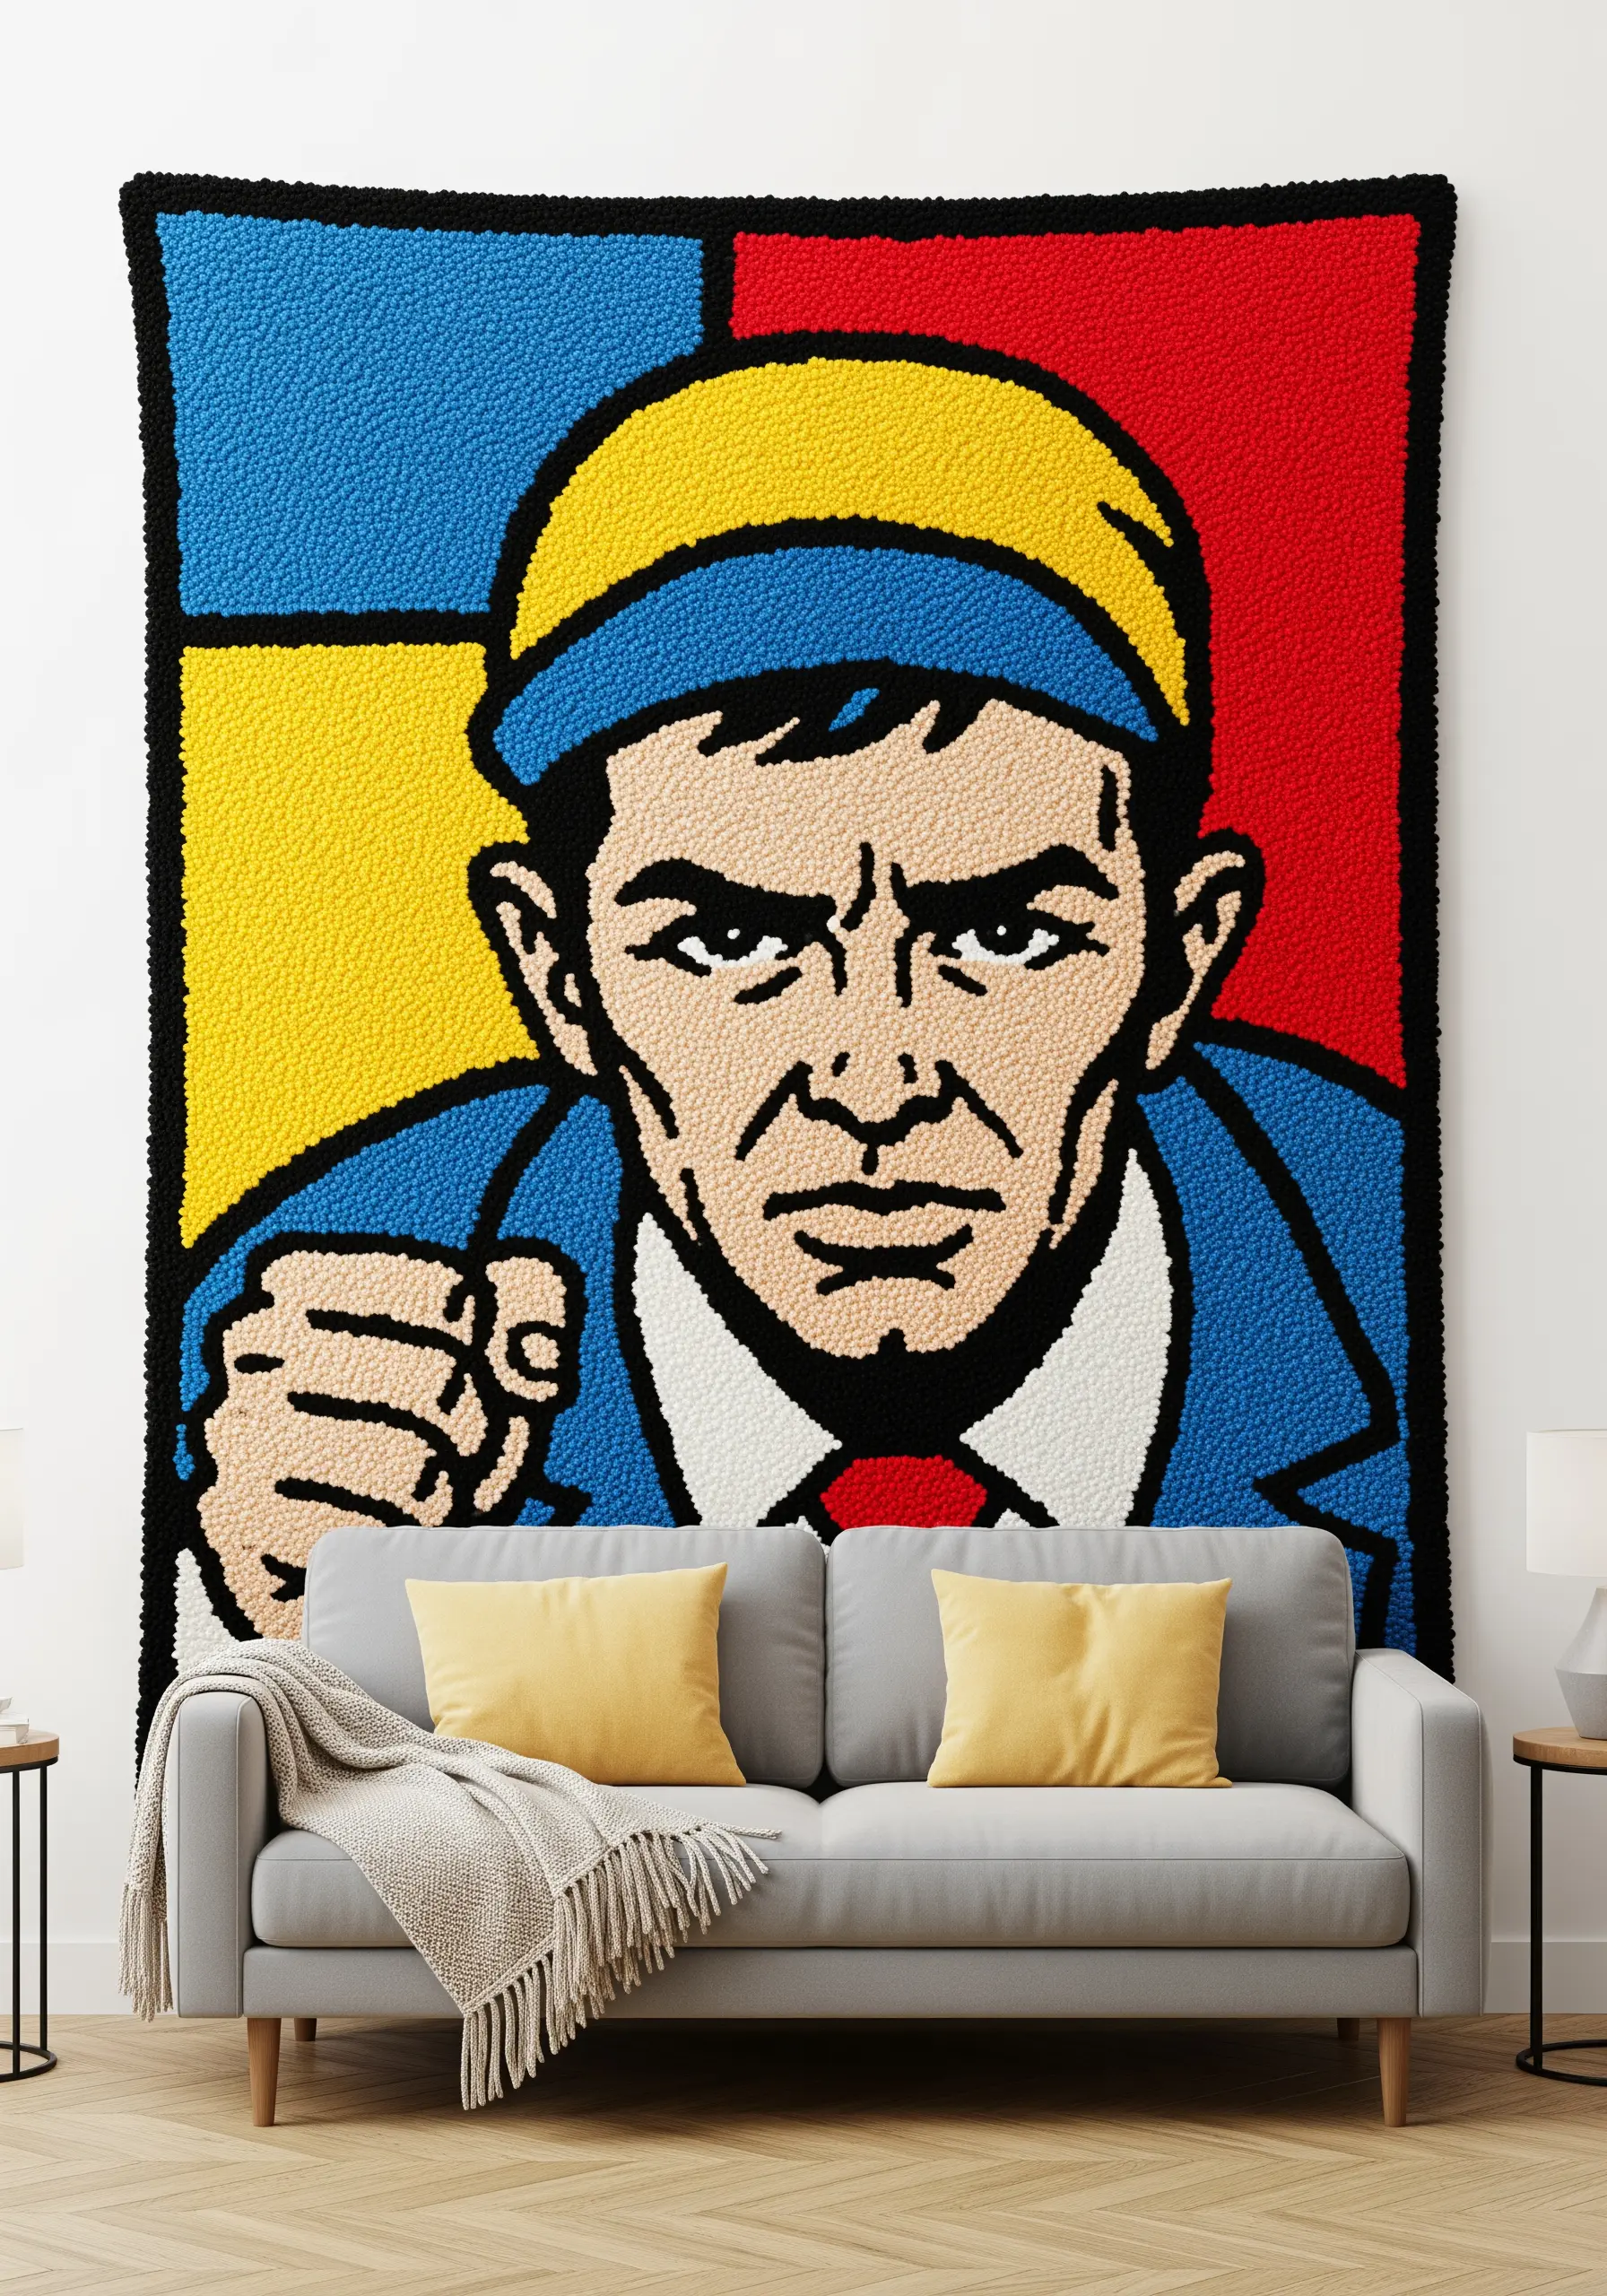
Capture the bold, graphic style of comic book art using the flat, uniform texture of punch needle.
Translate your image into a simplified pattern with strong black outlines and flat blocks of primary color, just like a classic pop art print.
The dense loops of the punch needle technique are perfect for creating the saturated, unblended colors that define this style.
This fusion of a tactile, handmade process with a mass-media aesthetic creates a compelling and fun piece of art.
28. Drape Your Walls with a Chunky Arm-Knit Gradient

Create a wall hanging that feels as cozy as a blanket by using the arm knitting technique with chunky wool roving.
To achieve a soft color transition, you’ll need to learn the Russian join, a felting technique that allows you to seamlessly connect the ends of two different colored rovings without a knot.
This lets you create a beautiful gradient effect in your knitting.
Instead of using it as a throw, mount the finished piece on a large dowel to display its soft drape and comforting texture on the wall.
29. Combine Modern Hardware with Traditional Knots

Give traditional macrame a contemporary edge by pairing it with sleek, modern hardware.
Instead of a natural driftwood branch, hang your work from a polished brass or copper rod.
The contrast between the warm, metallic sheen of the hardware and the soft, natural texture of the cotton cord creates a sophisticated and polished look.
Using a two-tone knotting pattern further enhances the graphic, modern feel of the piece.
30. Compose a Patchwork of Fiber Techniques
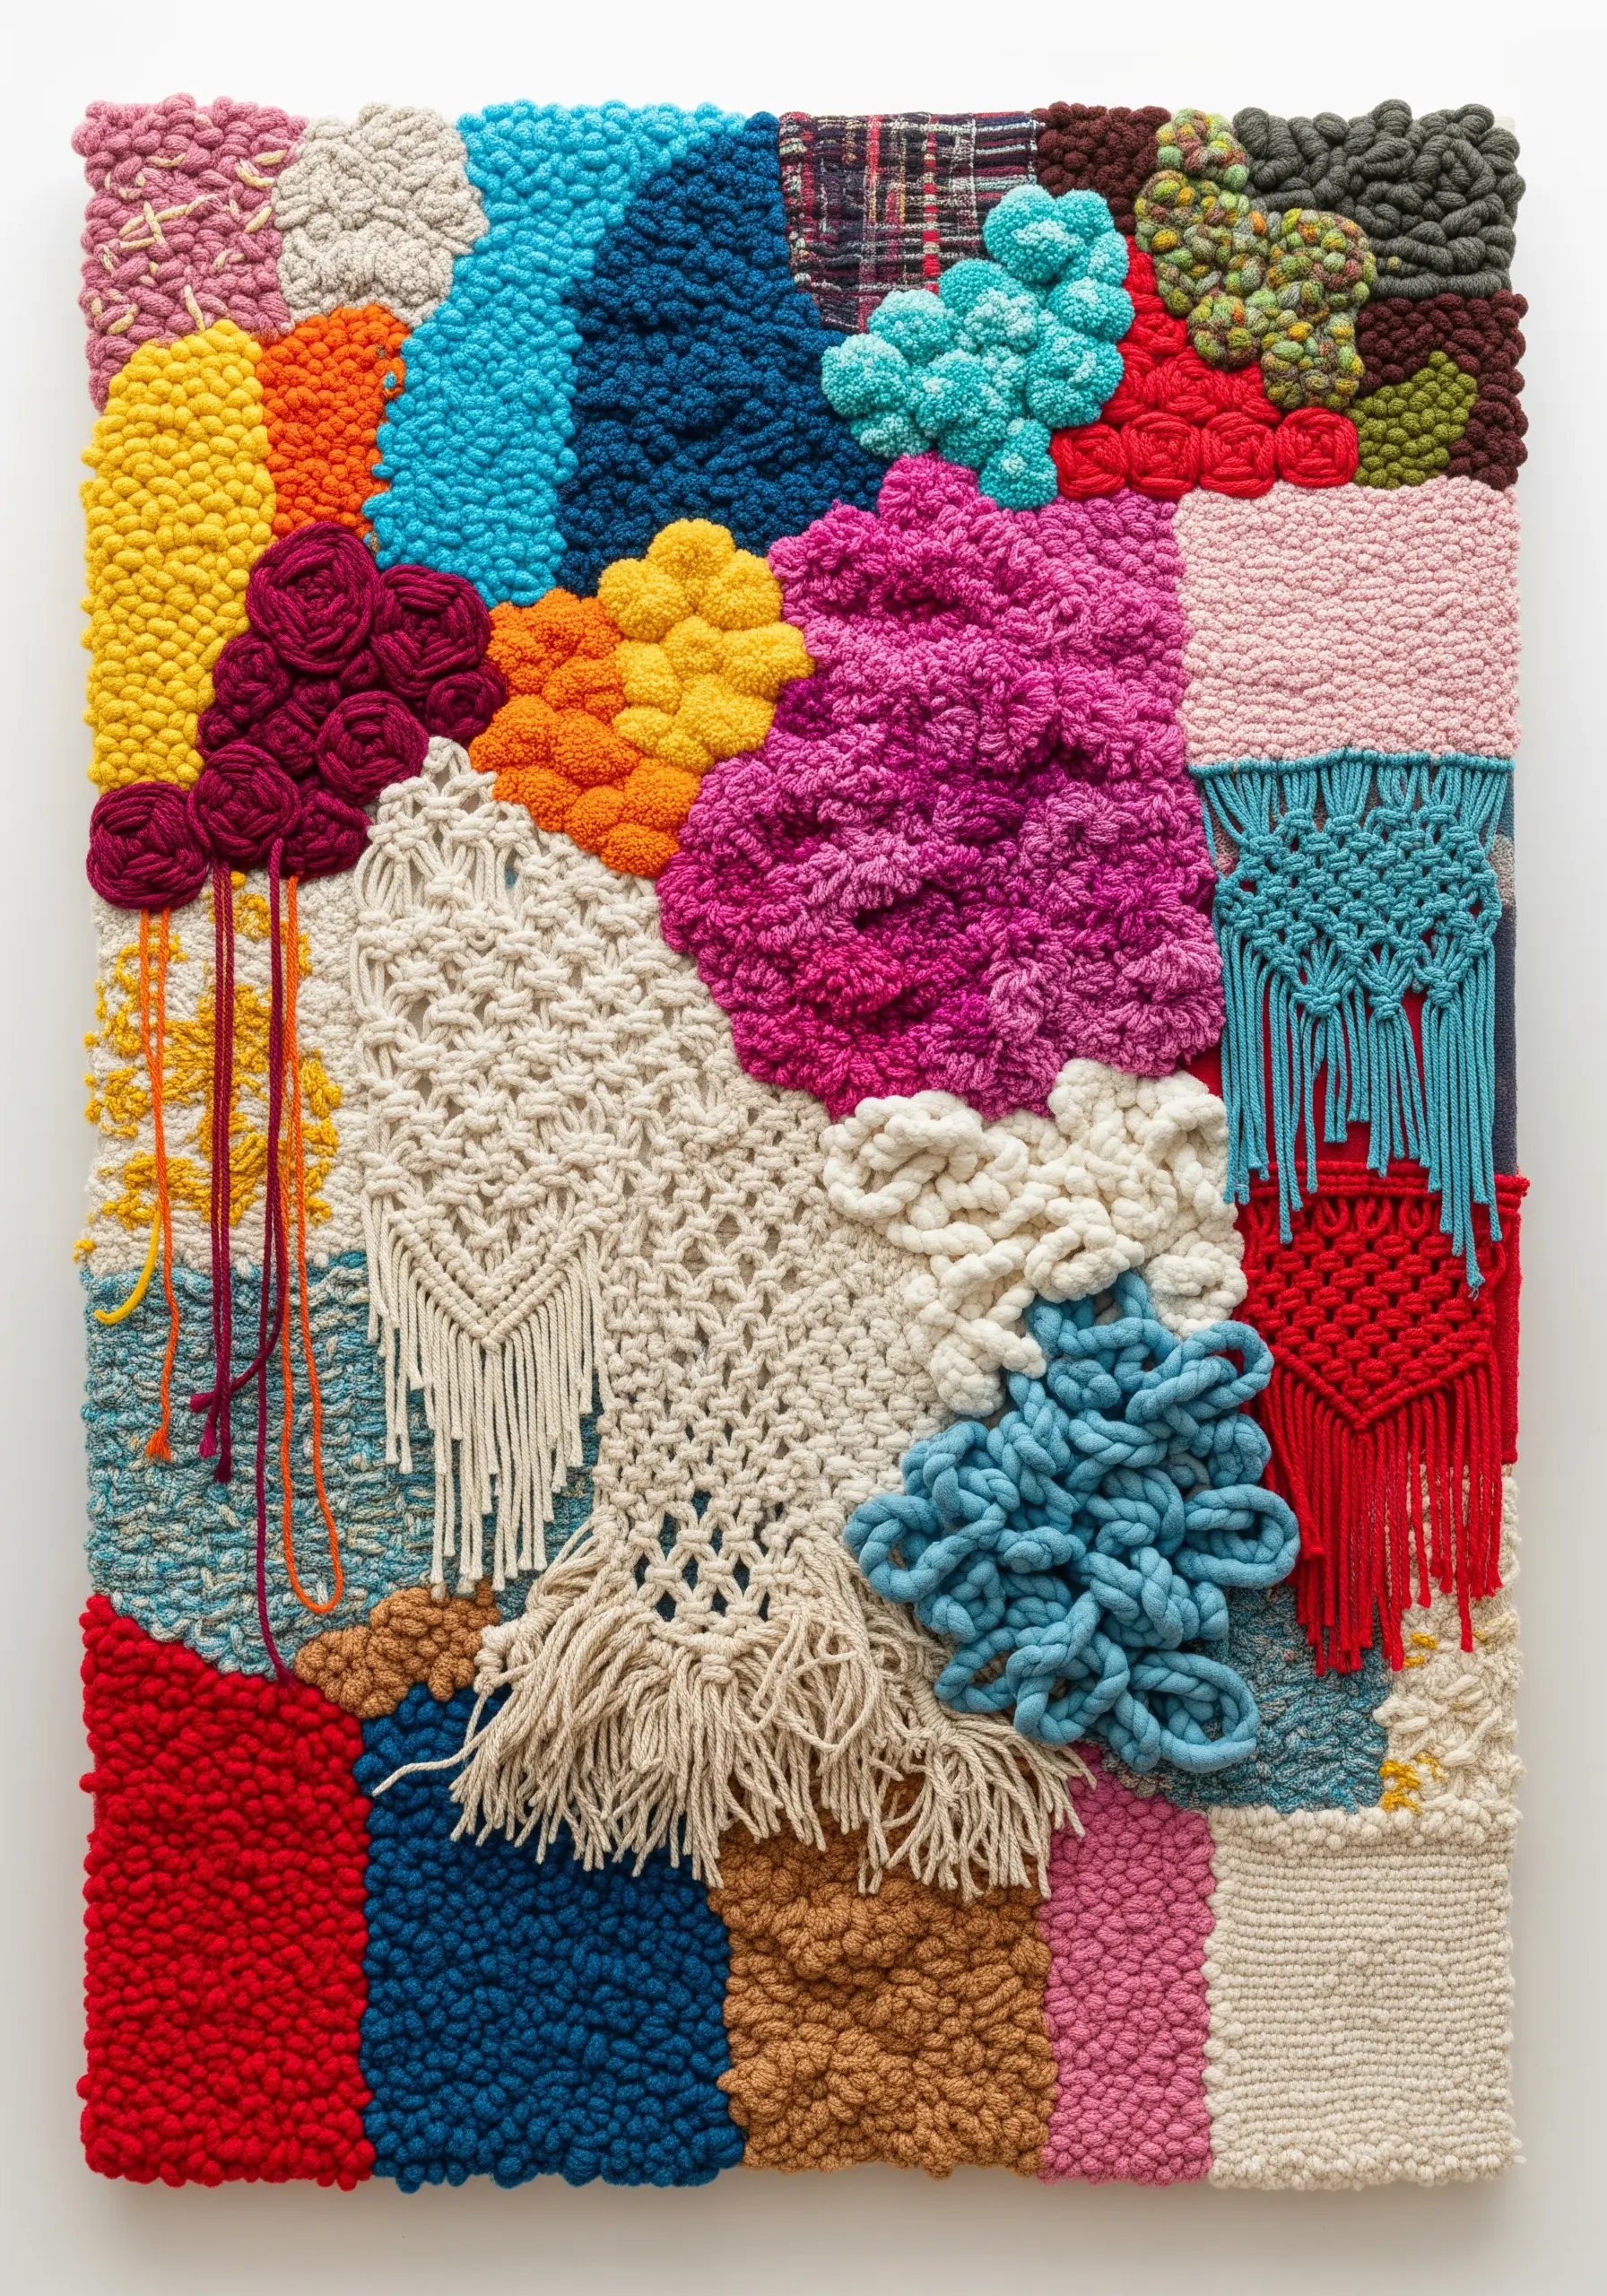
Create a sampler-style wall hanging that celebrates the diversity of fiber art in a single, cohesive piece.
Think of your canvas as a quilt, and fill each “patch” with a different technique: punch needle, macrame knots, weaving, latch hooking, and felting.
To ensure the final piece feels harmonious rather than chaotic, work within a defined color palette, allowing the textures to be the main source of variation.
This approach results in a stunning visual and tactile feast, showcasing your skills and creativity.


