

Look closely at the world of large-scale fiber art, and you’ll find it’s not about expensive tools or inaccessible techniques. It’s about a change in perspective. It’s about seeing thread not just as a line, but as a sculptural material, a splash of paint, or a structural element.
These monumental installations hold secrets you can borrow for your own work, right now, in your own hands. By thinking about texture, scale, and material in a new way, you can transform your embroidery from something flat and decorative into a piece that has weight, dimension, and a powerful artistic voice.
Let these ideas guide you. Try one. See how it changes the feel of the thread in your fingers and the look of the final piece. This is how you move from following a pattern to designing with intention, creating work that is uniquely, confidently yours.
1. Sculpt with Fiber and Air

Think beyond the flat surface by using thick wool roving or chunky yarn to create monumental shapes.
Instead of stitching *through* the fabric, couch these thick fibers onto the surface with a thinner, matching thread.
This method allows you to build dramatic, three-dimensional lines that create shadow and movement, turning a simple hoop into a dynamic sculpture.
Vary the tension of your couching stitches—tighter for sharp curves, looser for gentle arcs—to control the final form with precision.
2. Integrate Sculptural Knots and Braids

Introduce architectural weight to your work by incorporating macrame techniques directly onto your fabric.
Create braids with multiple strands of floss or use thick cord and couch it down with invisible thread, shaping it into Celtic knots or bold, graphic lines.
This adds an immediate, high-contrast texture that stands out from traditional satin or back stitches.
The key is to treat the rope or braid as a sculptural element, letting it guide the composition rather than just outlining a shape.
3. Draw with Thread Tension

Use the principles of string art to create depth and geometric dimension in your hoop art.
Instead of filling shapes, stitch points along the perimeter of your design—a circle, a square, an abstract outline—and connect them with straight stitches.
By layering these taut lines, you can create the illusion of curves and planes.
This works beautifully with neon or metallic threads on dark fabric, as the tension makes each strand catch the light and define the form.
4. Build Topographical Textures

Create landscapes you can feel by layering colors and textures to mimic topography.
Use the Turkey stitch (or rug-hooking stitch) and trim the loops at varying heights to build contoured surfaces.
Alternatively, arrange dense rows of French knots in graduating shades to create a similar effect.
This technique transforms a flat plane into a tactile map, inviting touch and adding incredible depth to abstract or landscape-inspired pieces.
5. Stitch Ethereal, Open-Work Forms

Create delicate, web-like structures by stitching onto a water-soluble stabilizer instead of fabric.
Draw your design, then use a combination of running stitches and couching to build a self-supporting network of threads.
Once you dissolve the stabilizer, you are left with a freestanding lace-like element that appears to float.
This is perfect for creating intricate leaves, wings, or abstract nets that can be framed in a shadow box or hung as ornaments.
6. Master the Art of the Gradient

Achieve a flawless, painterly blend of color by focusing on the direction and density of your long-and-short stitches.
Instead of stitching in rigid rows, angle your stitches slightly to follow the contours of the shape you’re filling.
When introducing a new shade, ensure your stitches interlock with the previous color like fine brushstrokes, eliminating any harsh lines.
Working with single strands of floss provides the ultimate control for creating pastel gradient stitch patterns that feel impossibly smooth.
7. Embrace Exaggerated Textures

Create a sense of immersive comfort by incorporating oversized materials like chunky merino wool or thick felted yarn.
You don’t need giant knitting needles; simply couch these fibers onto a heavy-duty fabric base like canvas or burlap.
This technique is perfect for creating cozy embroidery projects that have a powerful, tactile presence, turning a simple cushion cover or wall hanging into a statement piece.
8. Tell a Story Through Repetition

Amplify the impact of a simple motif by stitching it in a series.
Instead of one large, complex piece, create a collection of small, coordinated hoops that explore a theme through subtle variations—like the changing phases of the moon or the life cycle of a plant.
Arranged as a gallery wall, this approach transforms minimalist embroidery art into a compelling visual narrative.
The repetition creates rhythm and coherence, giving each small piece a greater collective meaning.
9. Stitch on a Painterly Canvas

Elevate your embroidery by starting with a hand-dyed fabric base instead of a plain one.
Use ice-dyeing or simple tie-dye techniques to create an abstract, watercolor-like background before you even thread your needle.
Then, use your stitches to accentuate the organic patterns in the dye, adding definition and texture.
This method ensures your work is completely unique and integrates the background and foreground into one cohesive piece of art.
10. Create Plush, Tactile Surfaces

Move beyond flat fills by creating dense, brush-like textures with the Turkey stitch.
Work rows of loops close together, then trim them with sharp scissors to create a velvety, uniform pile similar to a pom-pom.
By varying the color of your threads, you can create soft, blended fields of color that are incredibly satisfying to touch.
This technique is ideal for abstract color studies or adding a playful, 3D element to your designs.
11. Redefine Your Canvas with Netting

Explore the beauty of negative space by using tulle or fine netting as your embroidery base.
This transparent ground allows you to create designs that appear to float, with the wall color behind them becoming part of the artwork.
Focus your stitches along the structural lines of the net or create solid motifs that contrast with the airy background.
It’s a modern approach that emphasizes lightness and structure over dense, filled surfaces.
12. Design for Touch

Create interactive art by building up highly tactile surfaces that invite connection.
Use chunky French knots, looped bullion stitches, or shag-like Turkey work to construct areas with distinct, touchable textures.
Combine different yarn weights and materials—from soft wool to smooth cotton—to create a sensory landscape within a single piece.
This approach moves embroidery from a purely visual medium to a multi-sensory one.
13. Unify a Collage with Stitches
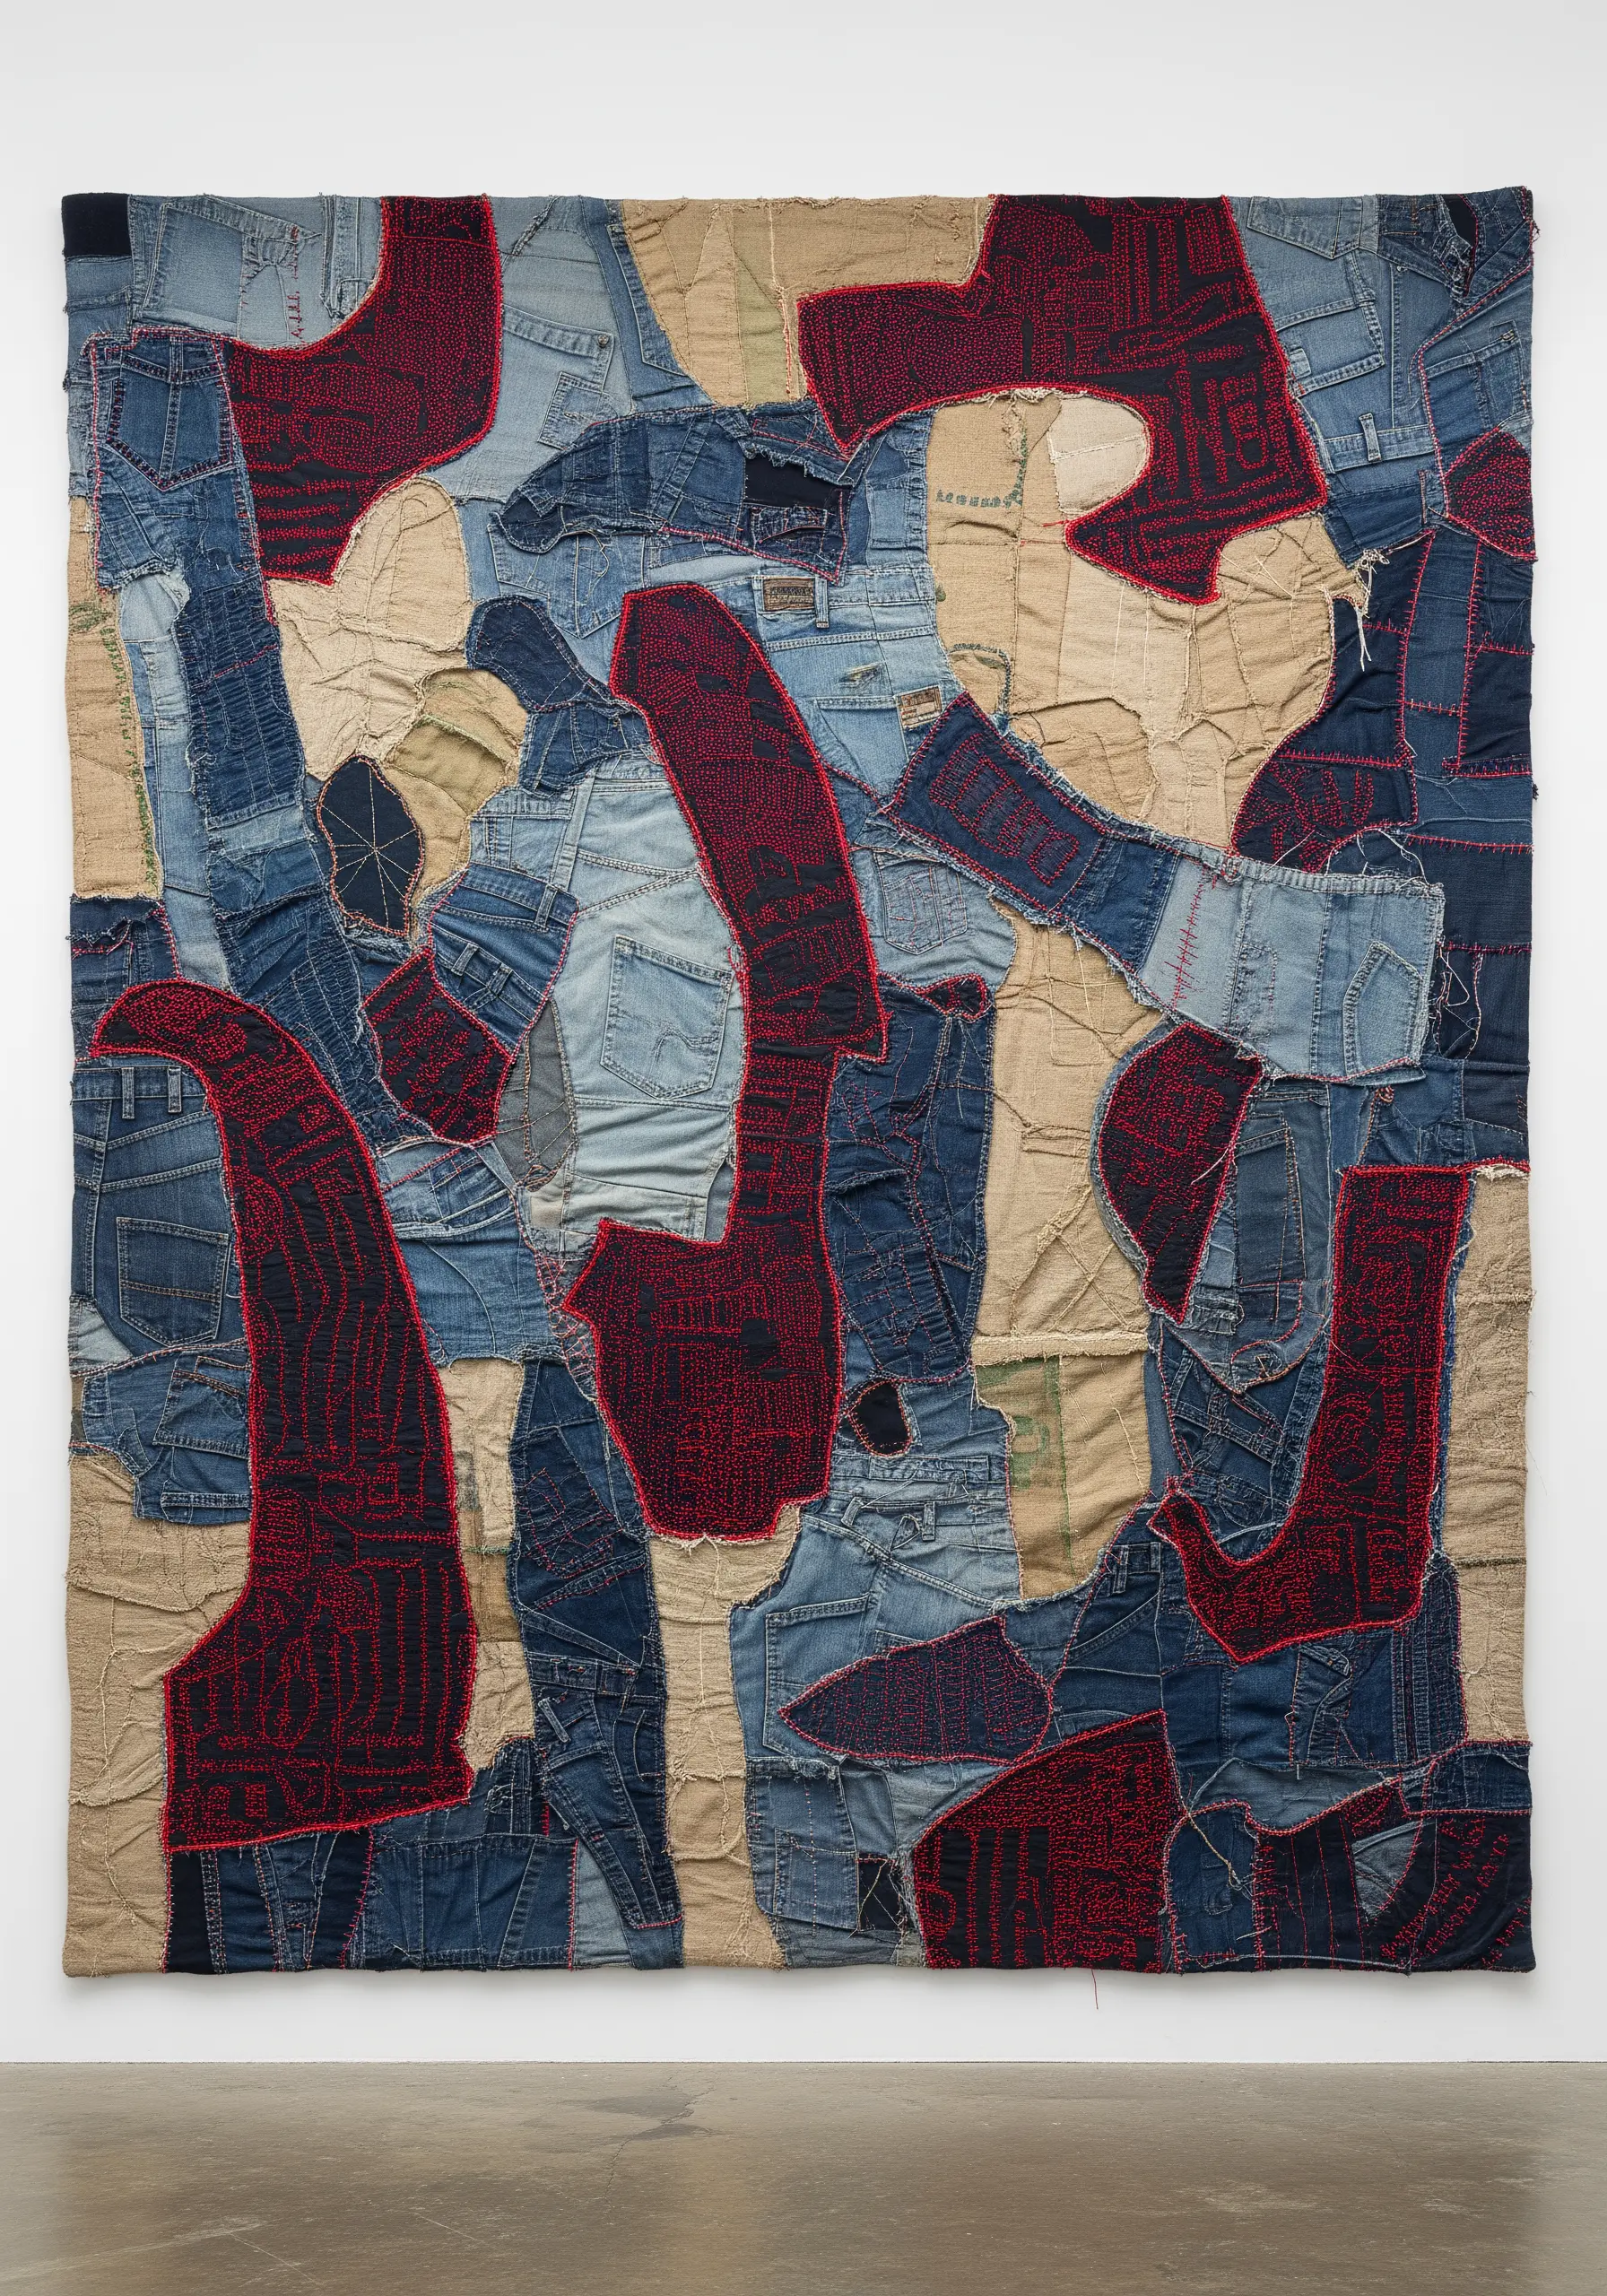
Create a rich, historical surface by starting with a base of collaged fabric scraps.
Piece together old denim, linen, and canvas to build a textured, uneven ground.
Then, use a single, continuous stitch—like a meandering running stitch or seed stitch—in a high-contrast color to connect and unify the disparate pieces.
Your stitching becomes a map that travels across the fabric collage embroidery, turning fragments into a cohesive whole.
14. Build Form with Coiled Fibers

Construct sculptural forms by using traditional basket-coiling techniques in your embroidery.
Wrap a core material, like thick cotton cord or rope, with threads of various colors and textures.
Then, couch this coiled element onto your fabric, shaping it into towers, vessels, or abstract organic shapes.
This method allows you to build solid, dimensional structures that rise dramatically from the surface.
15. Animate Your Work with Weight and Motion

Introduce a sense of delicate movement by allowing your threads to respond to their environment.
Instead of securing every thread, let some hang loose and attach a small bead or weight to the end.
When used in a series, these weighted threads create subtle, undulating lines that can shift with a gentle breeze or vibration.
It’s a beautiful way to capture the fluidity of water or the gentle sway of grass.
16. Give Knots Sculptural Volume

Elevate a simple knot from a flat motif to a 3D object using stumpwork techniques.
Create a padded base by stitching layers of felt or dense stitches onto your fabric first.
Then, cover this padded shape with satin stitch, wrapping the thread around the raised form.
This technique gives your knots a realistic sense of weight and dimension, making them pop from the surface with satisfying solidity.
17. Let Gravity Shape Your Design

Incorporate the elegant pull of gravity into your work by letting your fibers drape and fall naturally.
Instead of stitching a complete design within the hoop, allow long tails of yarn or thread to cascade down from the bottom edge.
Group different colors and textures to create a waterfall effect.
This turns your wall into part of the canvas and adds a soft, organic sense of movement to the finished piece.
18. Weave with Light and Data

Capture a futuristic aesthetic by using threads that interact with light.
Work on a black or navy fabric and use fine metallic, reflective, or glow-in-the-dark threads to stitch grids and flowing lines.
This mimics the look of fiber optics or data visualizations, creating a dynamic piece that transforms depending on the ambient light.
It’s a way to explore contemporary nature meets digital stitch designs with a surprisingly simple palette.
19. Take Your Stitches into the World

Think of embroidery not just as hoop art, but as a way to embellish your environment.
Practice your stitches by wrapping them around an everyday object—a tree branch from your garden, a lamp base, or a bicycle frame.
This technique, often called ‘yarn bombing,’ transforms mundane objects into joyful, unexpected moments of color and texture.
It’s a wonderful way to play with pattern and color on a 3D canvas without the pressure of a formal project.
20. Reveal Patterns with Stitch-Resist Dyeing
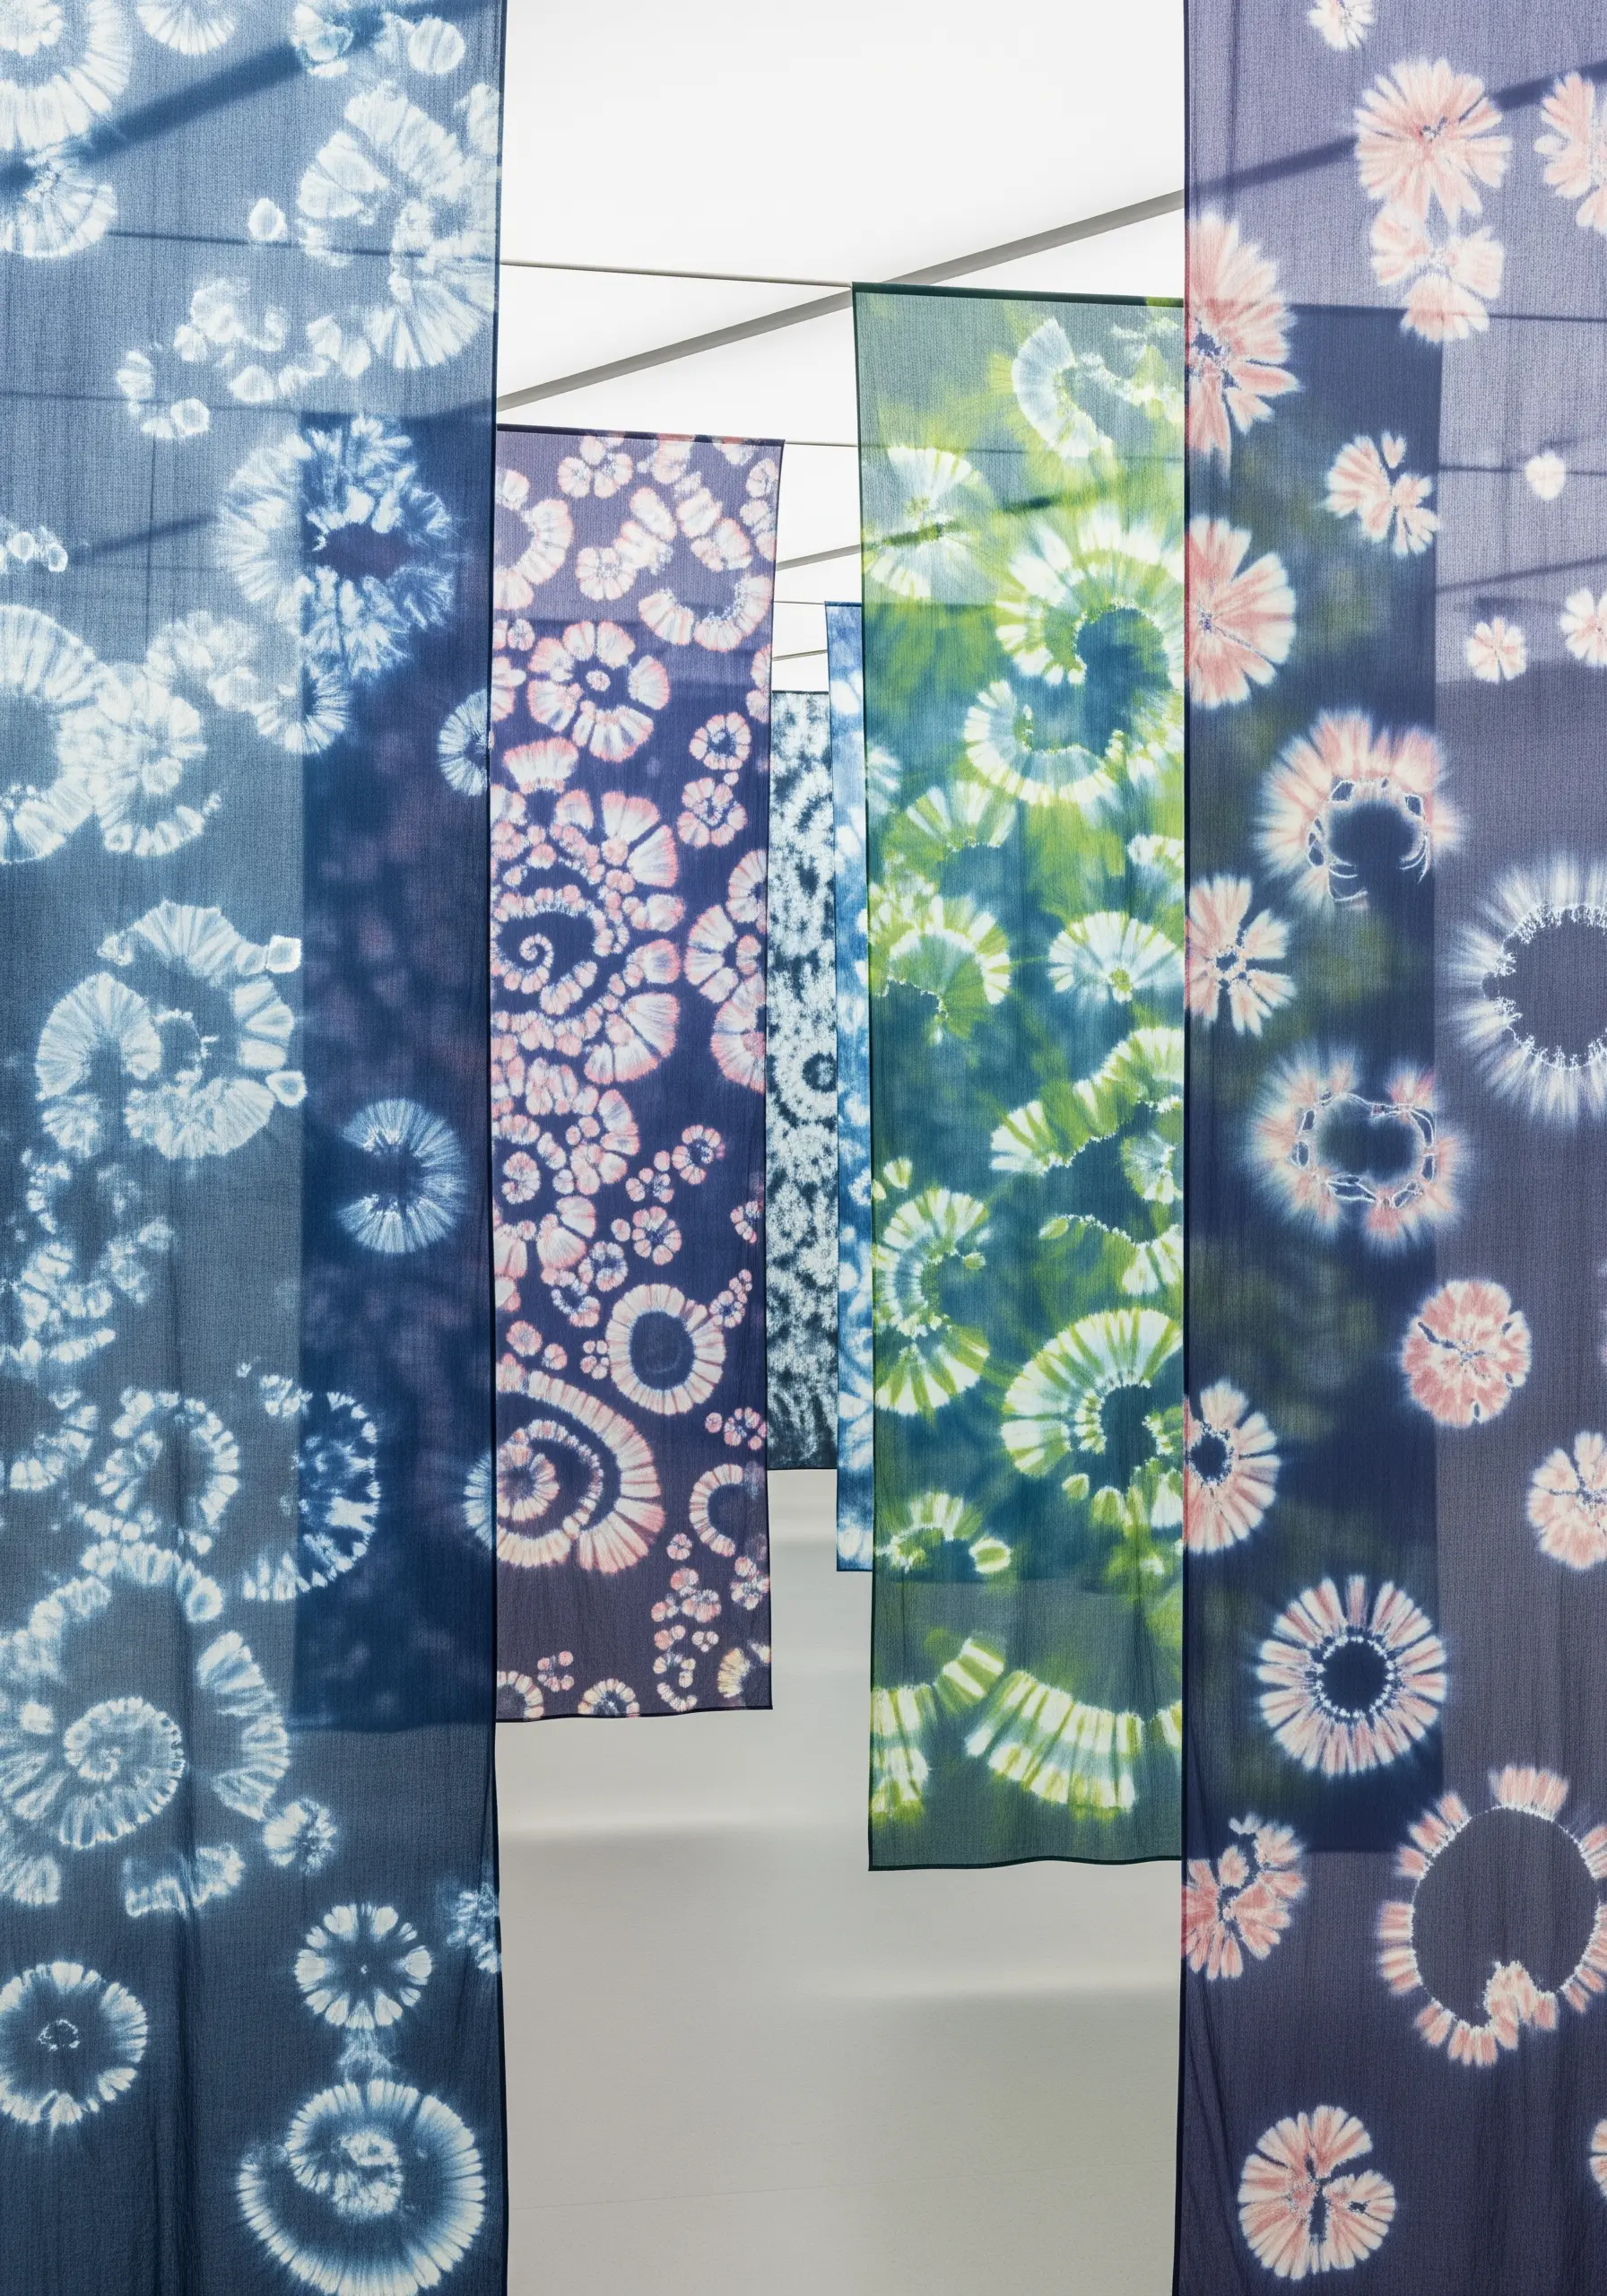
Create intricate, organic patterns by using your stitches as a mask during the dyeing process.
Before dyeing your fabric, use a strong thread to stitch patterns like circles or lines, pulling the thread tight to gather the cloth.
After dyeing and drying, carefully snip and remove the resist stitches to reveal your design.
This Shibori-inspired technique produces results that are beautifully unique and impossible to replicate exactly.
21. Construct a Thread-Based Skeleton

Build three-dimensional embroidered sculptures by starting with a simple wire armature.
Shape thin craft wire into the ‘skeleton’ of your object—an animal, a hand, or an abstract form.
Then, use thread to wrap, weave, and stitch around the wire frame, building up the form layer by layer.
This technique allows you to create stunning handmade sculptures that are both structurally sound and delicately detailed.
22. Weave a Narrative with Found Objects
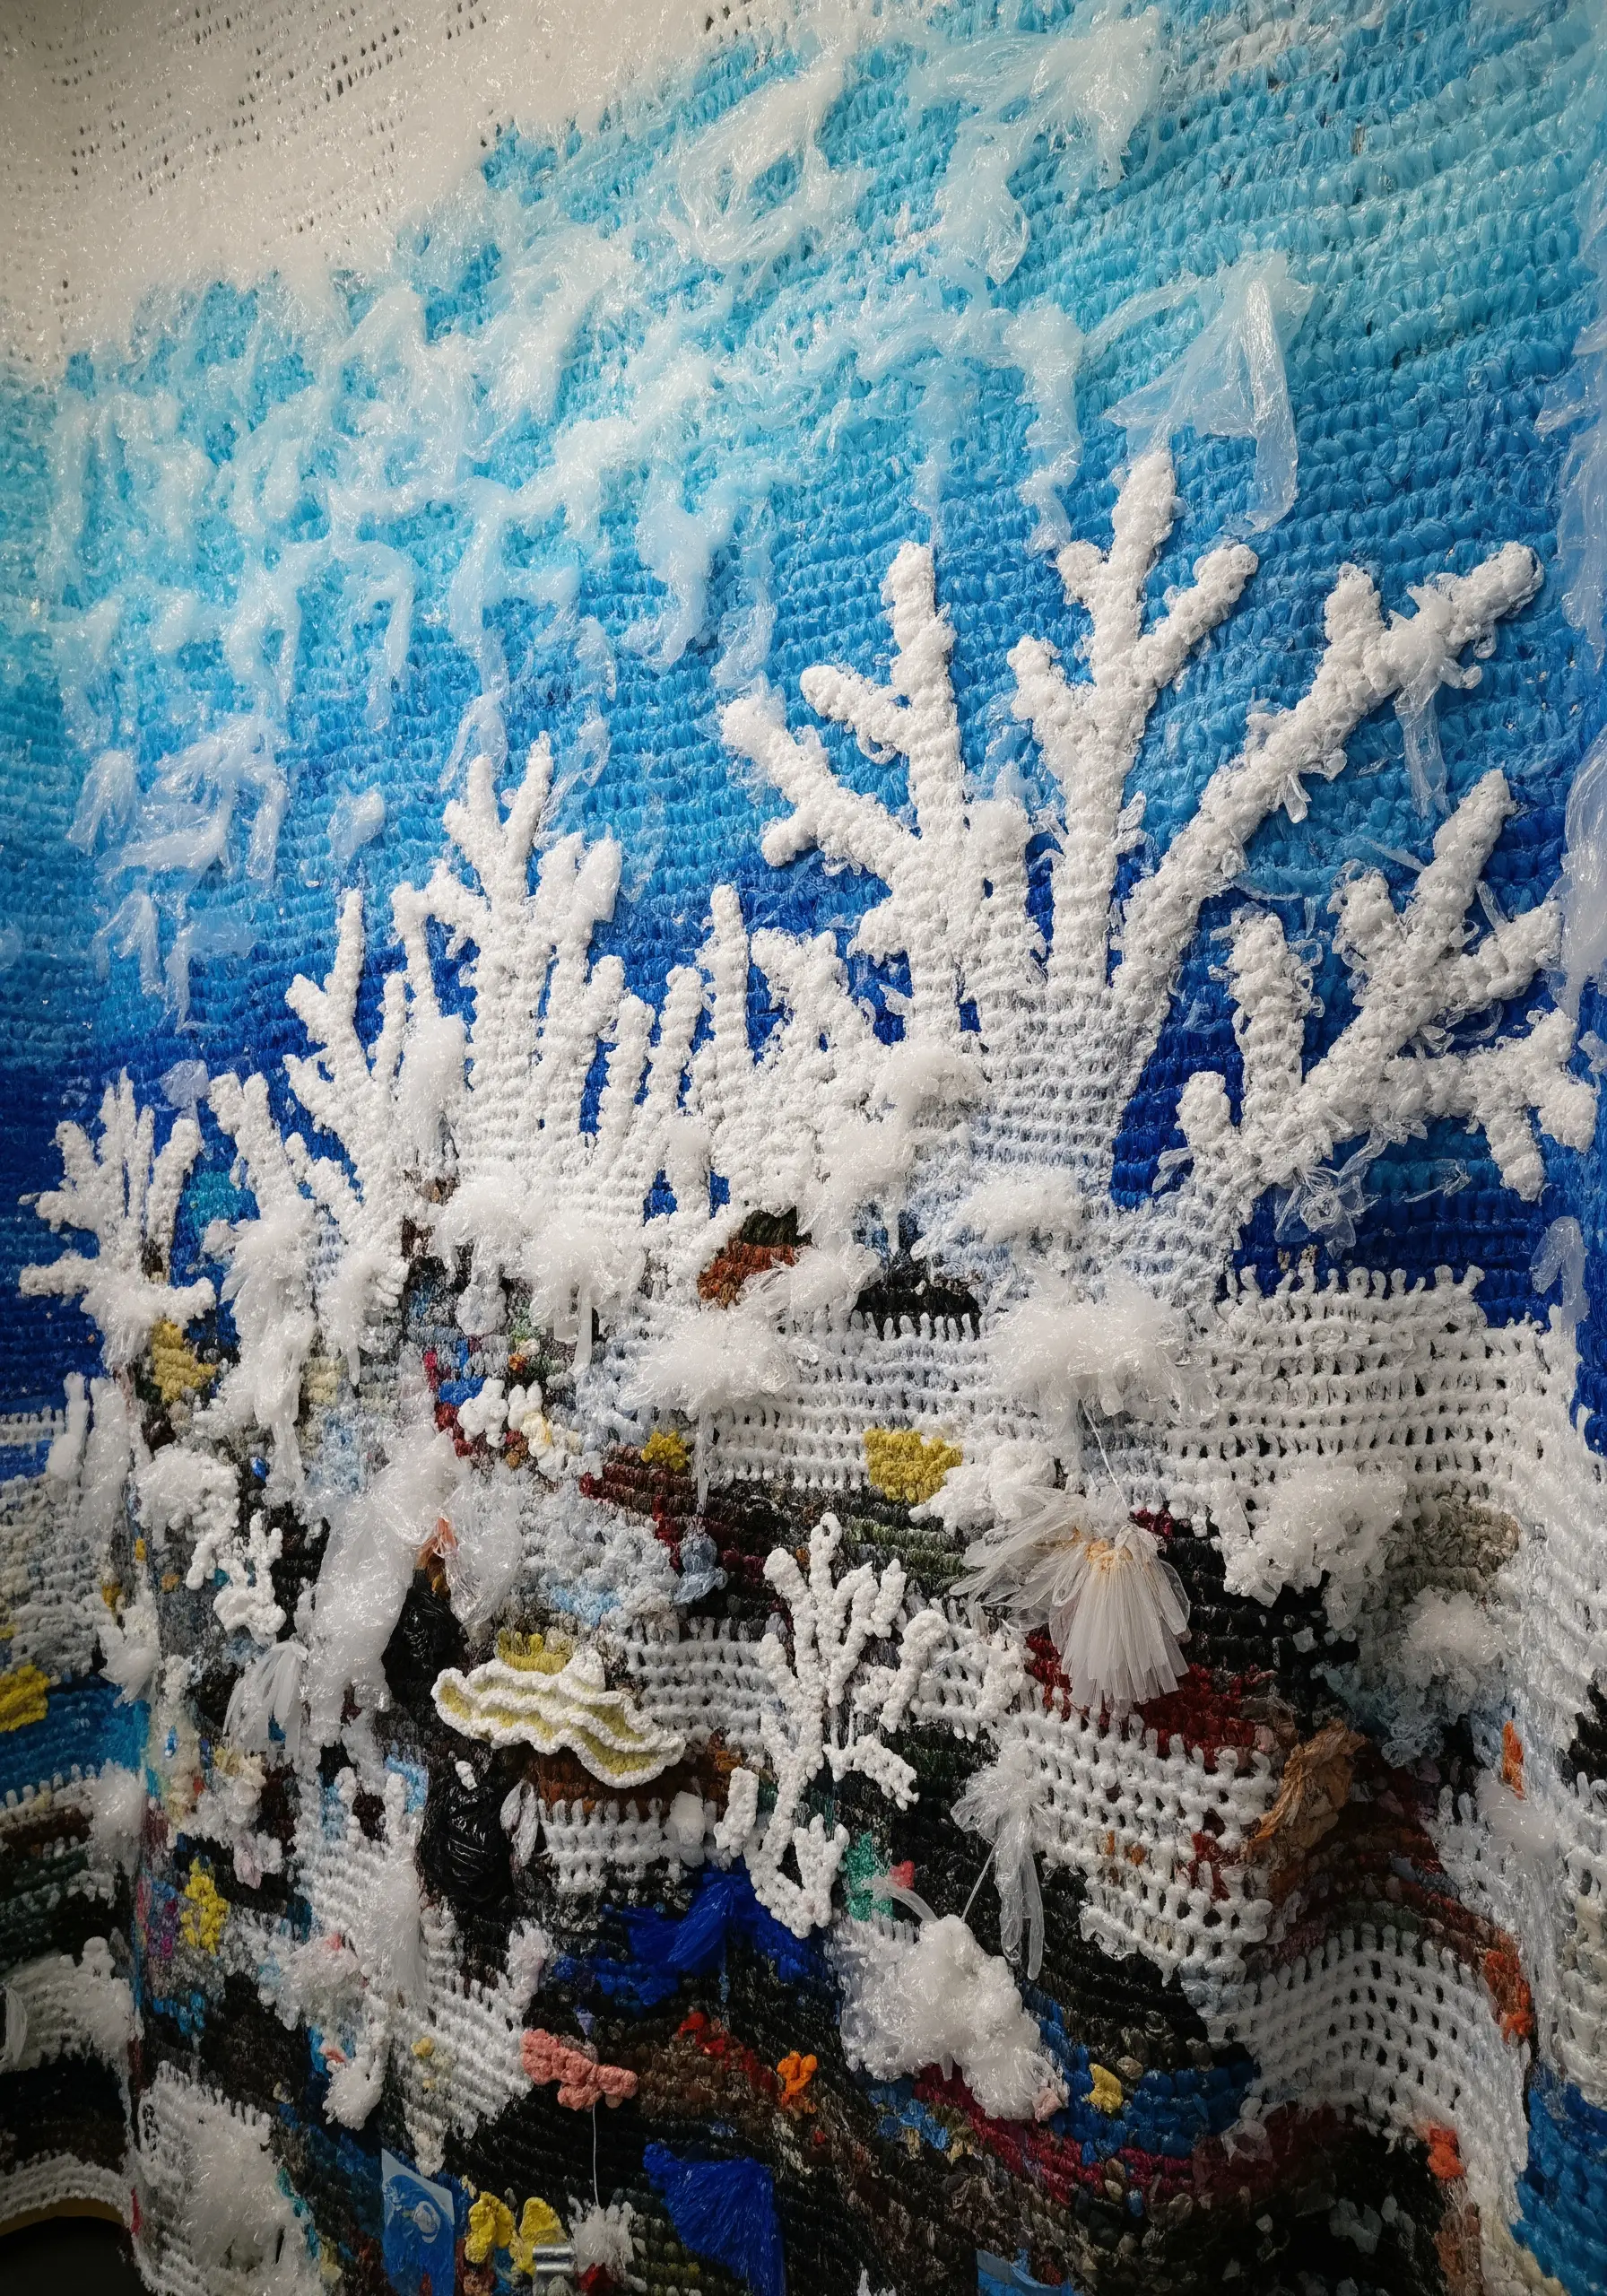
Add layers of meaning to your work by incorporating unconventional materials.
Think about the story you want to tell. To depict a polluted ocean, weave in threads of plastic bags; for a forest floor, stitch in dried leaves and twigs.
These mixed media embroidery crafts move beyond decoration and become a form of commentary, adding texture and conceptual weight that traditional thread alone cannot achieve.
23. Create Texture with Fabric ‘Yarn’

Instead of thread, use strips of fabric as your primary medium.
Cut old t-shirts, sheets, or leftover fabric into thin strips, then braid or twist them together.
Couch this ‘fabric yarn’ onto a sturdy backing in spirals or rows to create a piece with incredible texture and a rustic, handmade feel.
It’s a sustainable way to recycle textiles and achieve a bold, graphic quality in your work.
24. Create Site-Specific Thread Installations

Let your environment become your canvas by creating embroidery that interacts with its surroundings.
Stitch a delicate web in the corner of a bookshelf, a vine of leaves climbing a doorframe, or a constellation of stars across an empty ceiling space.
This approach makes the embroidery a living part of your home, transforming forgotten corners into spaces of quiet wonder and detail.
25. Define Form with Strategic Wrapping

Explore how thread can describe a three-dimensional shape through meticulous wrapping.
Start with a small sculptural base, like a smooth stone, a wooden figure, or a wire armature.
Carefully wrap the object with fine thread or twine, paying close attention to the direction of your wrap.
Changing the direction can emphasize curves and contours, transforming a simple object into a detailed textile sculpture and proving that line alone can create form.
26. Draw with Unspun Wool Roving

Create large, expressive artworks without a single stitch by ‘drawing’ with thick wool roving.
Lay the soft, unspun fibers directly onto a surface—like a floor, a large canvas, or a felt background—to outline bold shapes and fill them with color.
The fibers can be gently felted into place for permanence or left loose for a temporary installation.
This method allows for a fluid, painterly approach to fiber art that is both immediate and impactful.
27. Stitch into 3D Felted Forms

Move your embroidery off the flat plane by creating felted objects to use as your base.
Use wet felting or needle felting techniques to create sculptural shapes like pods, stones, or vessels.
Once your 3D form is complete, use embroidery to add intricate details, patterns, and contrasting textures.
This combination of soft sculpture and fine stitching results in unique, highly tactile artistic objects that beg to be held.
28. Paint a Portrait with French Knots

Embrace a pointillist approach by building an image entirely from French knots.
Create a grid on your fabric and assign a thread color to each square, similar to a pixel map or cross-stitch chart.
By placing a single French knot in each square, you can build a detailed, textured portrait or image.
The density of the knots creates a rich, tactile surface where colors blend optically from a distance, revealing their distinct texture up close.
29. Weave Your Own Textured Canvas

Create a wall hanging with incredible depth by weaving directly onto a rigid frame.
You can build a simple loom or use an empty, sturdy picture frame as your base.
Warp the frame with a strong cotton thread, then weave with a variety of materials—thick yarn, thin ribbons, strips of leather, and unspun wool.
This creates a dense, layered yarn wall art piece where texture is the undisputed star.
30. Emulate Tufting with a Punch Needle

Achieve the lush, high-pile look of a tufted rug on a smaller scale using a punch needle.
This tool allows you to quickly create dense loops of yarn on weaver’s cloth, building up vibrant fields of color and texture.
Play with loop height and density to create sculptural effects and bold, graphic designs.
It’s a fast, satisfying way to create impactful fiber art that combines the feel of embroidery with the look of modern rug making.


