
Perhaps you’ve mastered the basic stitches, completed a few kits, and now you find yourself wondering: how do I make my work feel less like a hobby and more like art? How do I develop a style that feels uniquely mine?
The answer rarely lies in learning dozens of complicated new stitches. Instead, it’s found in the quiet, intentional decisions you make before the needle ever touches the fabric. It’s in choosing a single strand of thread over three, in padding a satin stitch for dimension, or in combining two simple stitches to create unexpected texture.
These projects are more than just instructions; they are invitations to refine your eye and your hand. They are exercises in choosing the right technique for the right effect—to transform a simple line into a statement, and a plain surface into a canvas for luxurious, personal expression.
1. Render Metallic Constellations on Paper
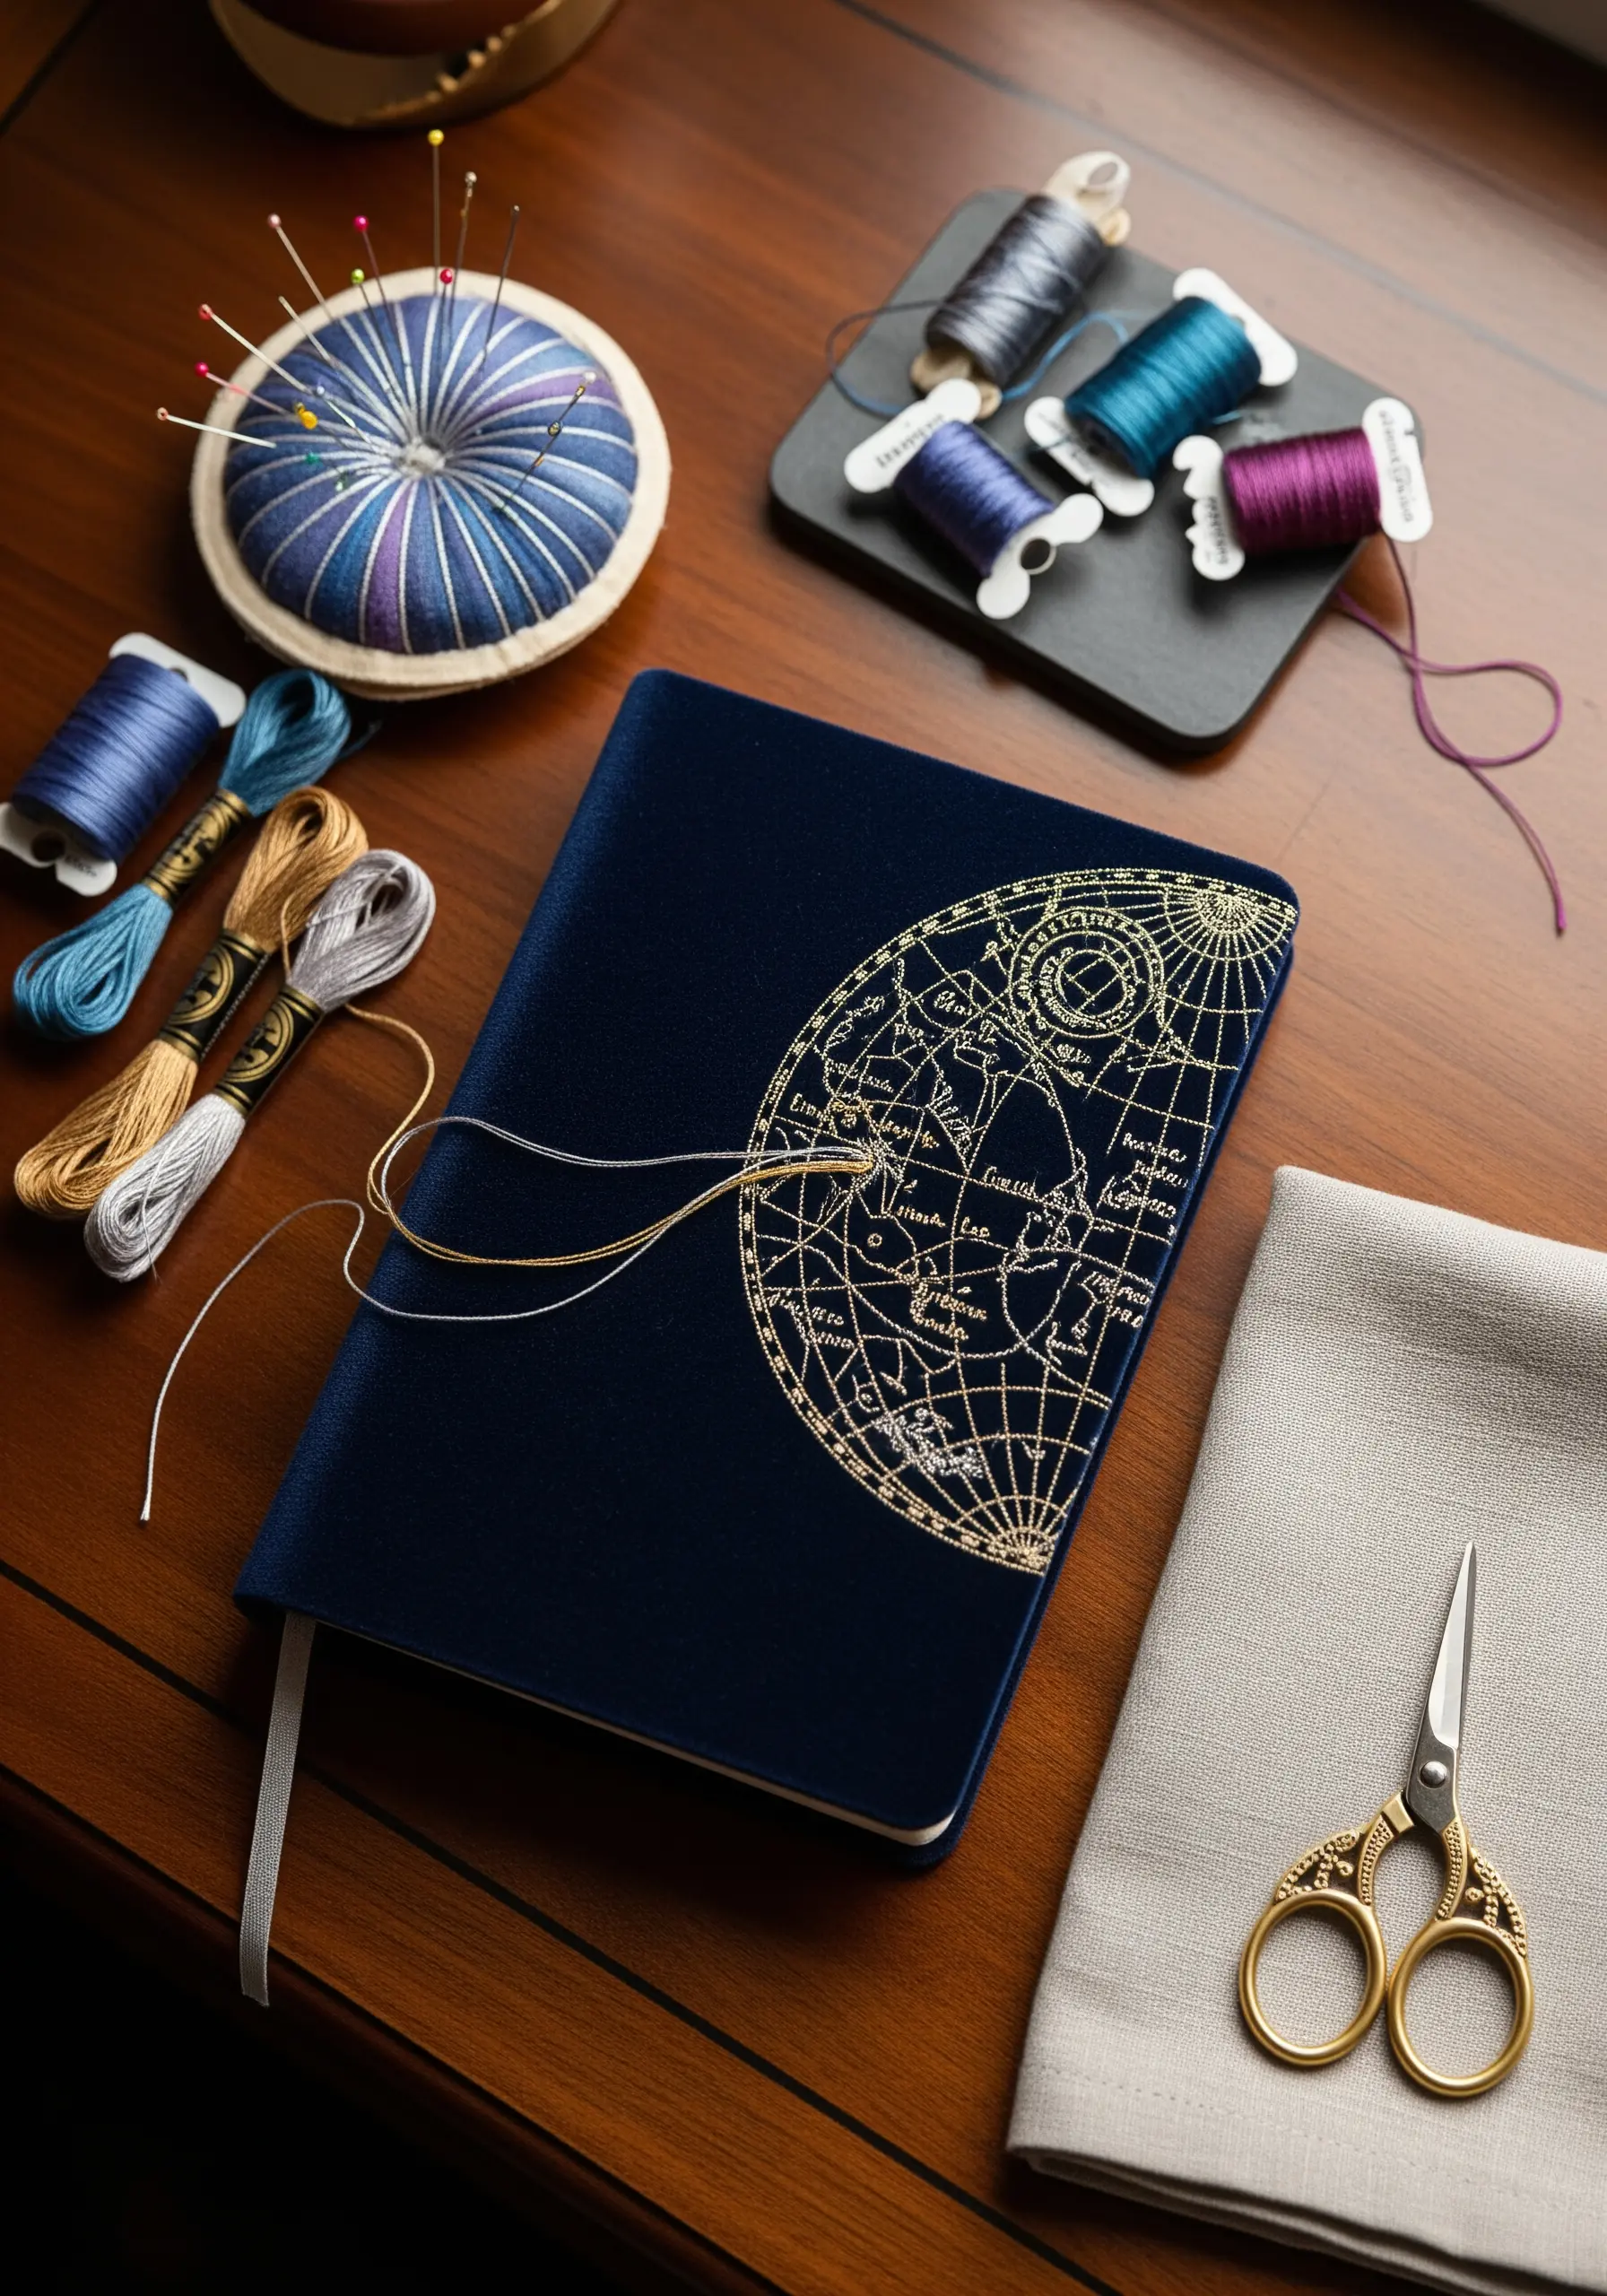
Elevate a simple journal by embroidering on paper or book cloth for an effect that resembles gilded engraving.
Use a single strand of a fine metallic thread, like a Kreinik #4 Very Fine Braid, for its smoothness and strength.
To prevent tearing, first perforate your design onto the cover using a pin vise or a spare needle held with pliers, creating evenly spaced holes for your stitches.
A simple backstitch will create a continuous, elegant line that catches the light beautifully, transforming an everyday object into a personal artifact.
2. Master Botanical Dimension with Contrasting Fills

Give your botanical designs a modern, graphic quality by focusing on texture instead of realistic color blending.
For each leaf, combine a solid satin stitch with more open, textural fills like the fishbone stitch or detached chain stitches.
This contrast between dense and sparse stitching creates depth and visual rhythm, making the design feel dynamic and alive.
Use a limited, earthy color palette to keep the focus on the interplay of forms and textures, which gives the final cushion a sophisticated, contemporary look.
3. Create Graphic Impact with Large-Scale Couching
To create large-scale embroidery tapestries that feel both graphic and handmade, use couching instead of traditional stitches.
Lay down thick yarn, cord, or even rope onto your stretched fabric and secure it with small, perpendicular stitches using a thinner, matching or contrasting thread.
This technique allows you to create bold, clean lines much faster than filling them, and it adds a sculptural, three-dimensional quality to the surface.
Working on a large frame stretched with canvas or heavy linen ensures your fabric remains taut and distortion-free.
4. Refine Your Linework for Minimalist Motifs

You can create a set of simple embroidery accents for your home by perfecting a single, clean line.
Use a whipped backstitch for your outlines; first, create a standard backstitch, then whip the thread around each stitch without piercing the fabric. This smooths the line, removing the segmented look.
Stitch with two or three strands of a high-quality cotton floss on a tightly woven fabric like cotton twill or linen canvas for a crisp finish.
The high contrast of white thread on dark gray fabric ensures these minimalist designs feel intentional and elegant, not sparse.
5. Build Vibrant Florals on Denim
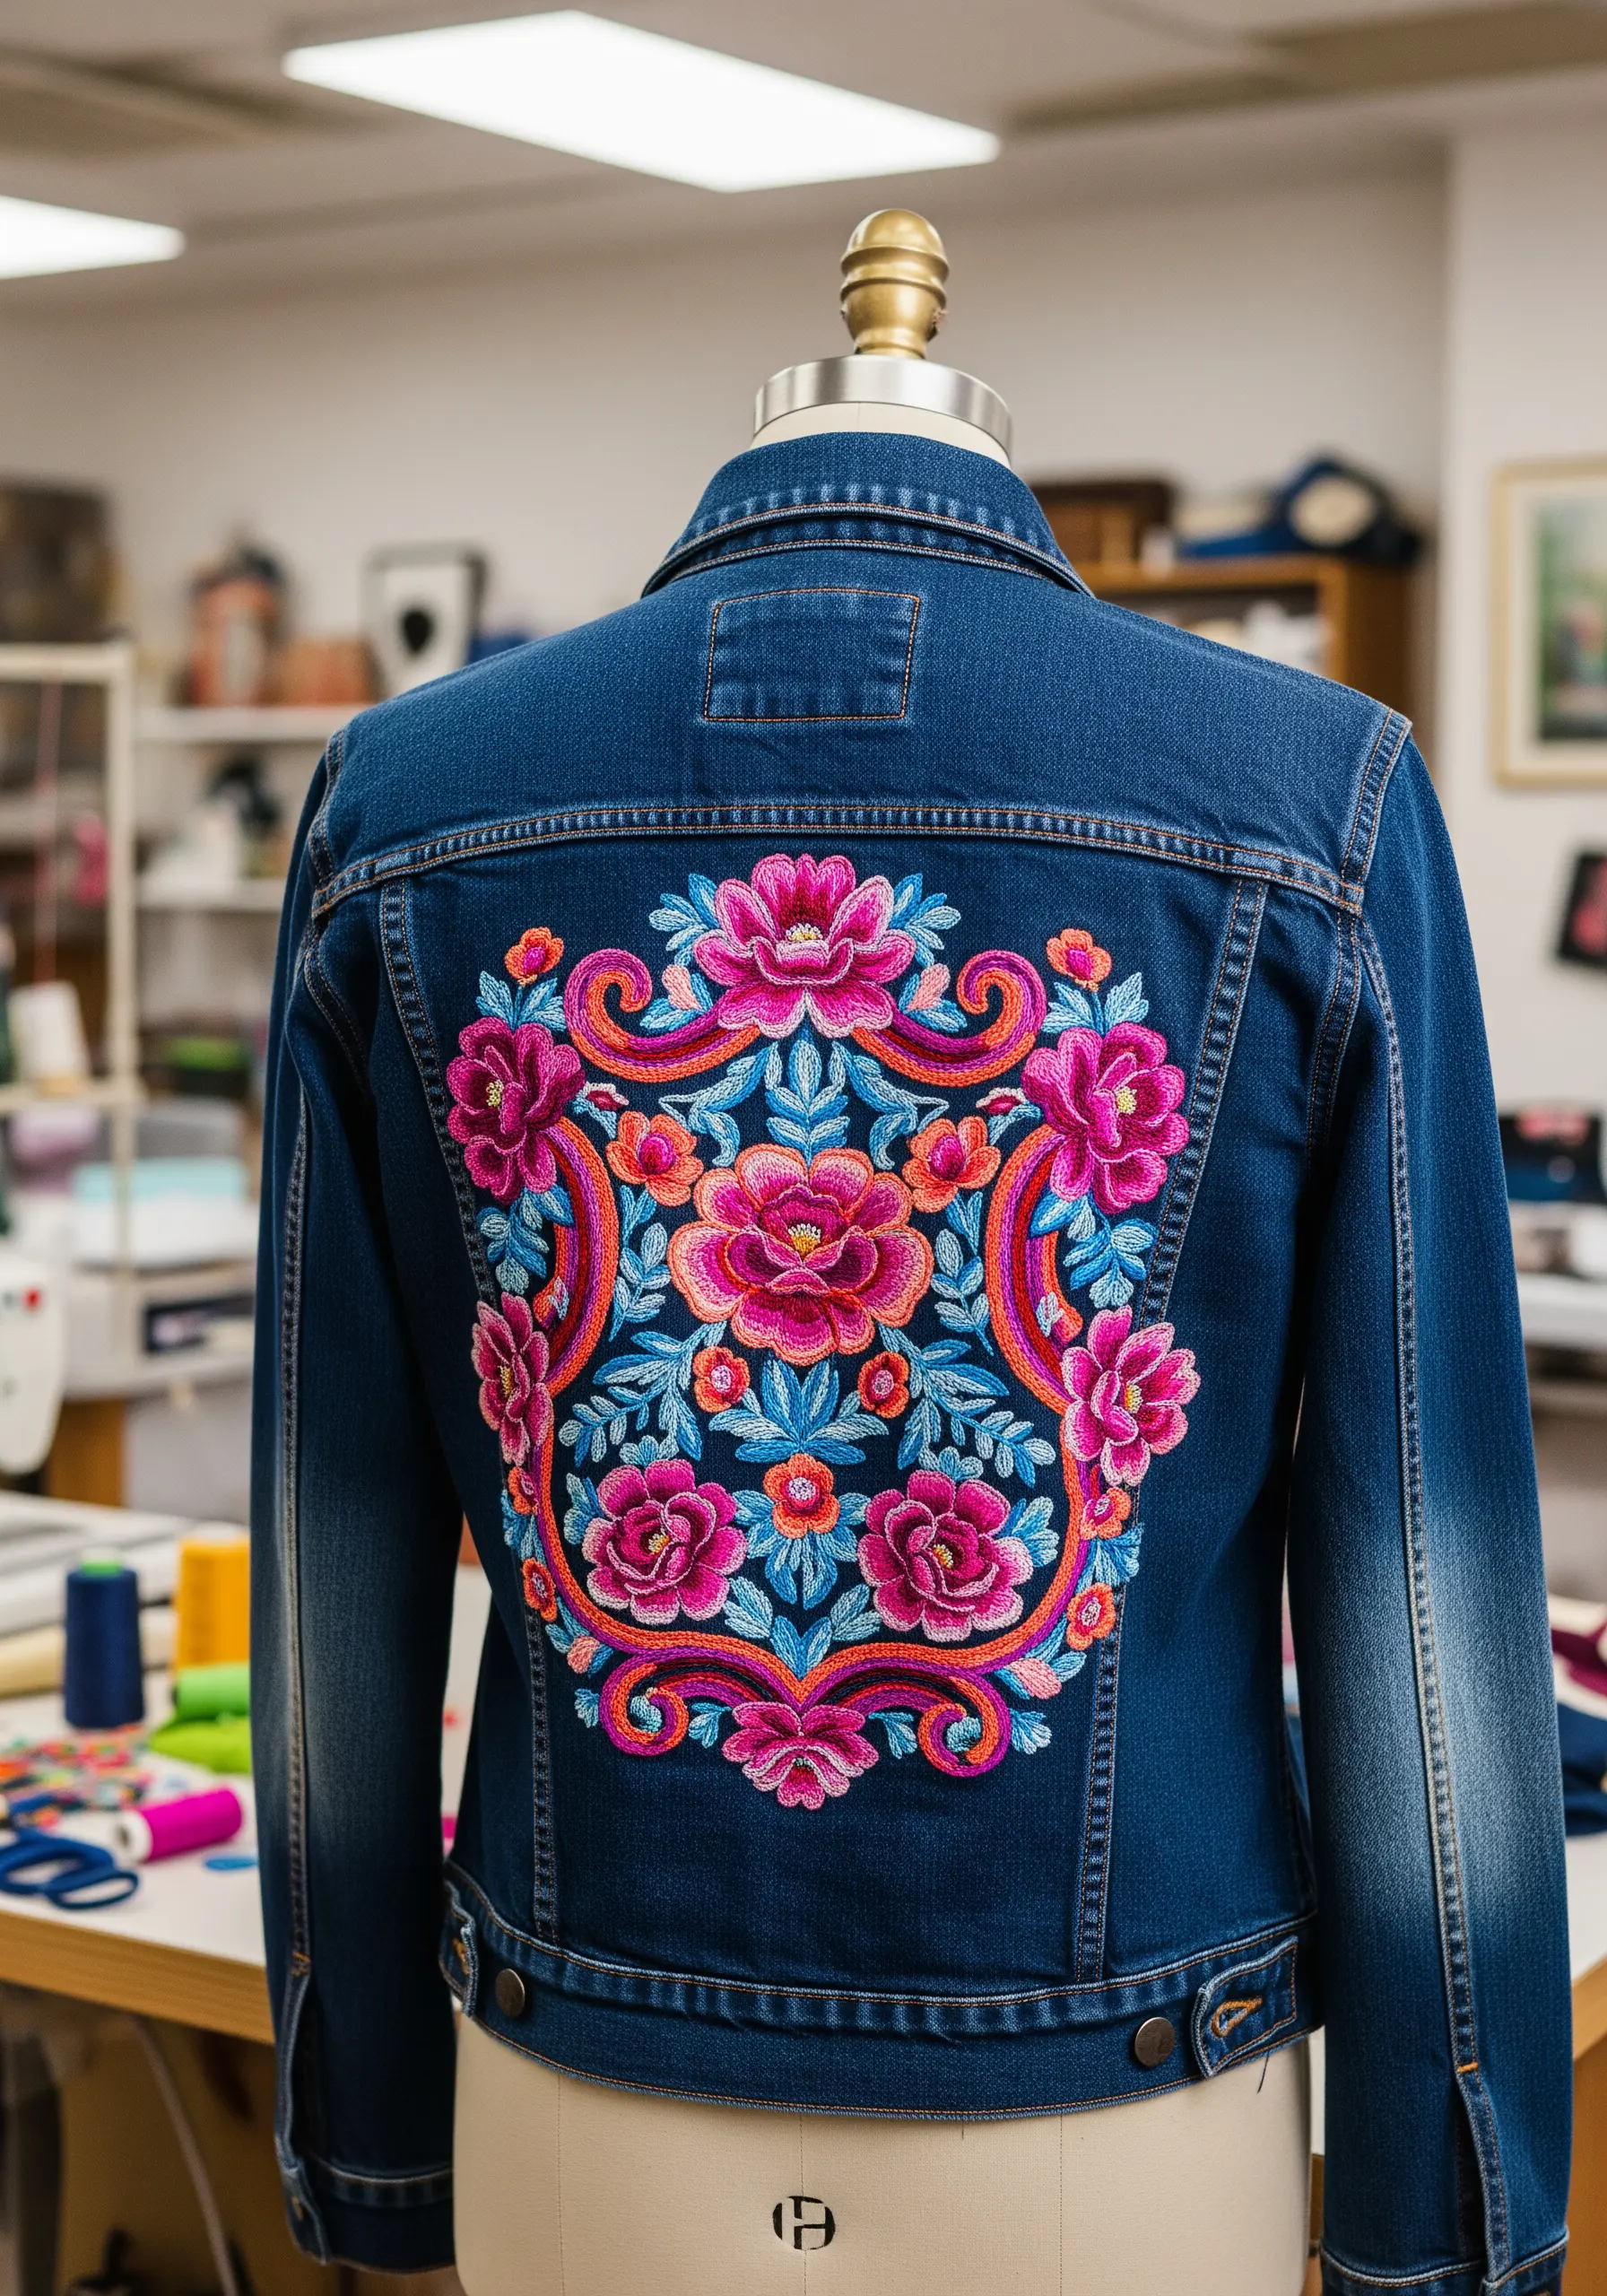
Transform a vintage-inspired denim jacket with a bold, colorful motif that feels lush and dimensional.
The key to dense, vibrant designs on heavy fabric is a medium-weight iron-on stabilizer applied to the inside of the jacket. This prevents the denim from stretching and puckering under the tension of the stitches.
Use long-and-short stitch to blend colors within the petals, creating a smooth gradient that gives the flowers a realistic, painted look.
Outline each shape with a darker shade using a stem stitch to define the edges and make the bright colors pop even more.
6. Explore Structural Stitching on Leather
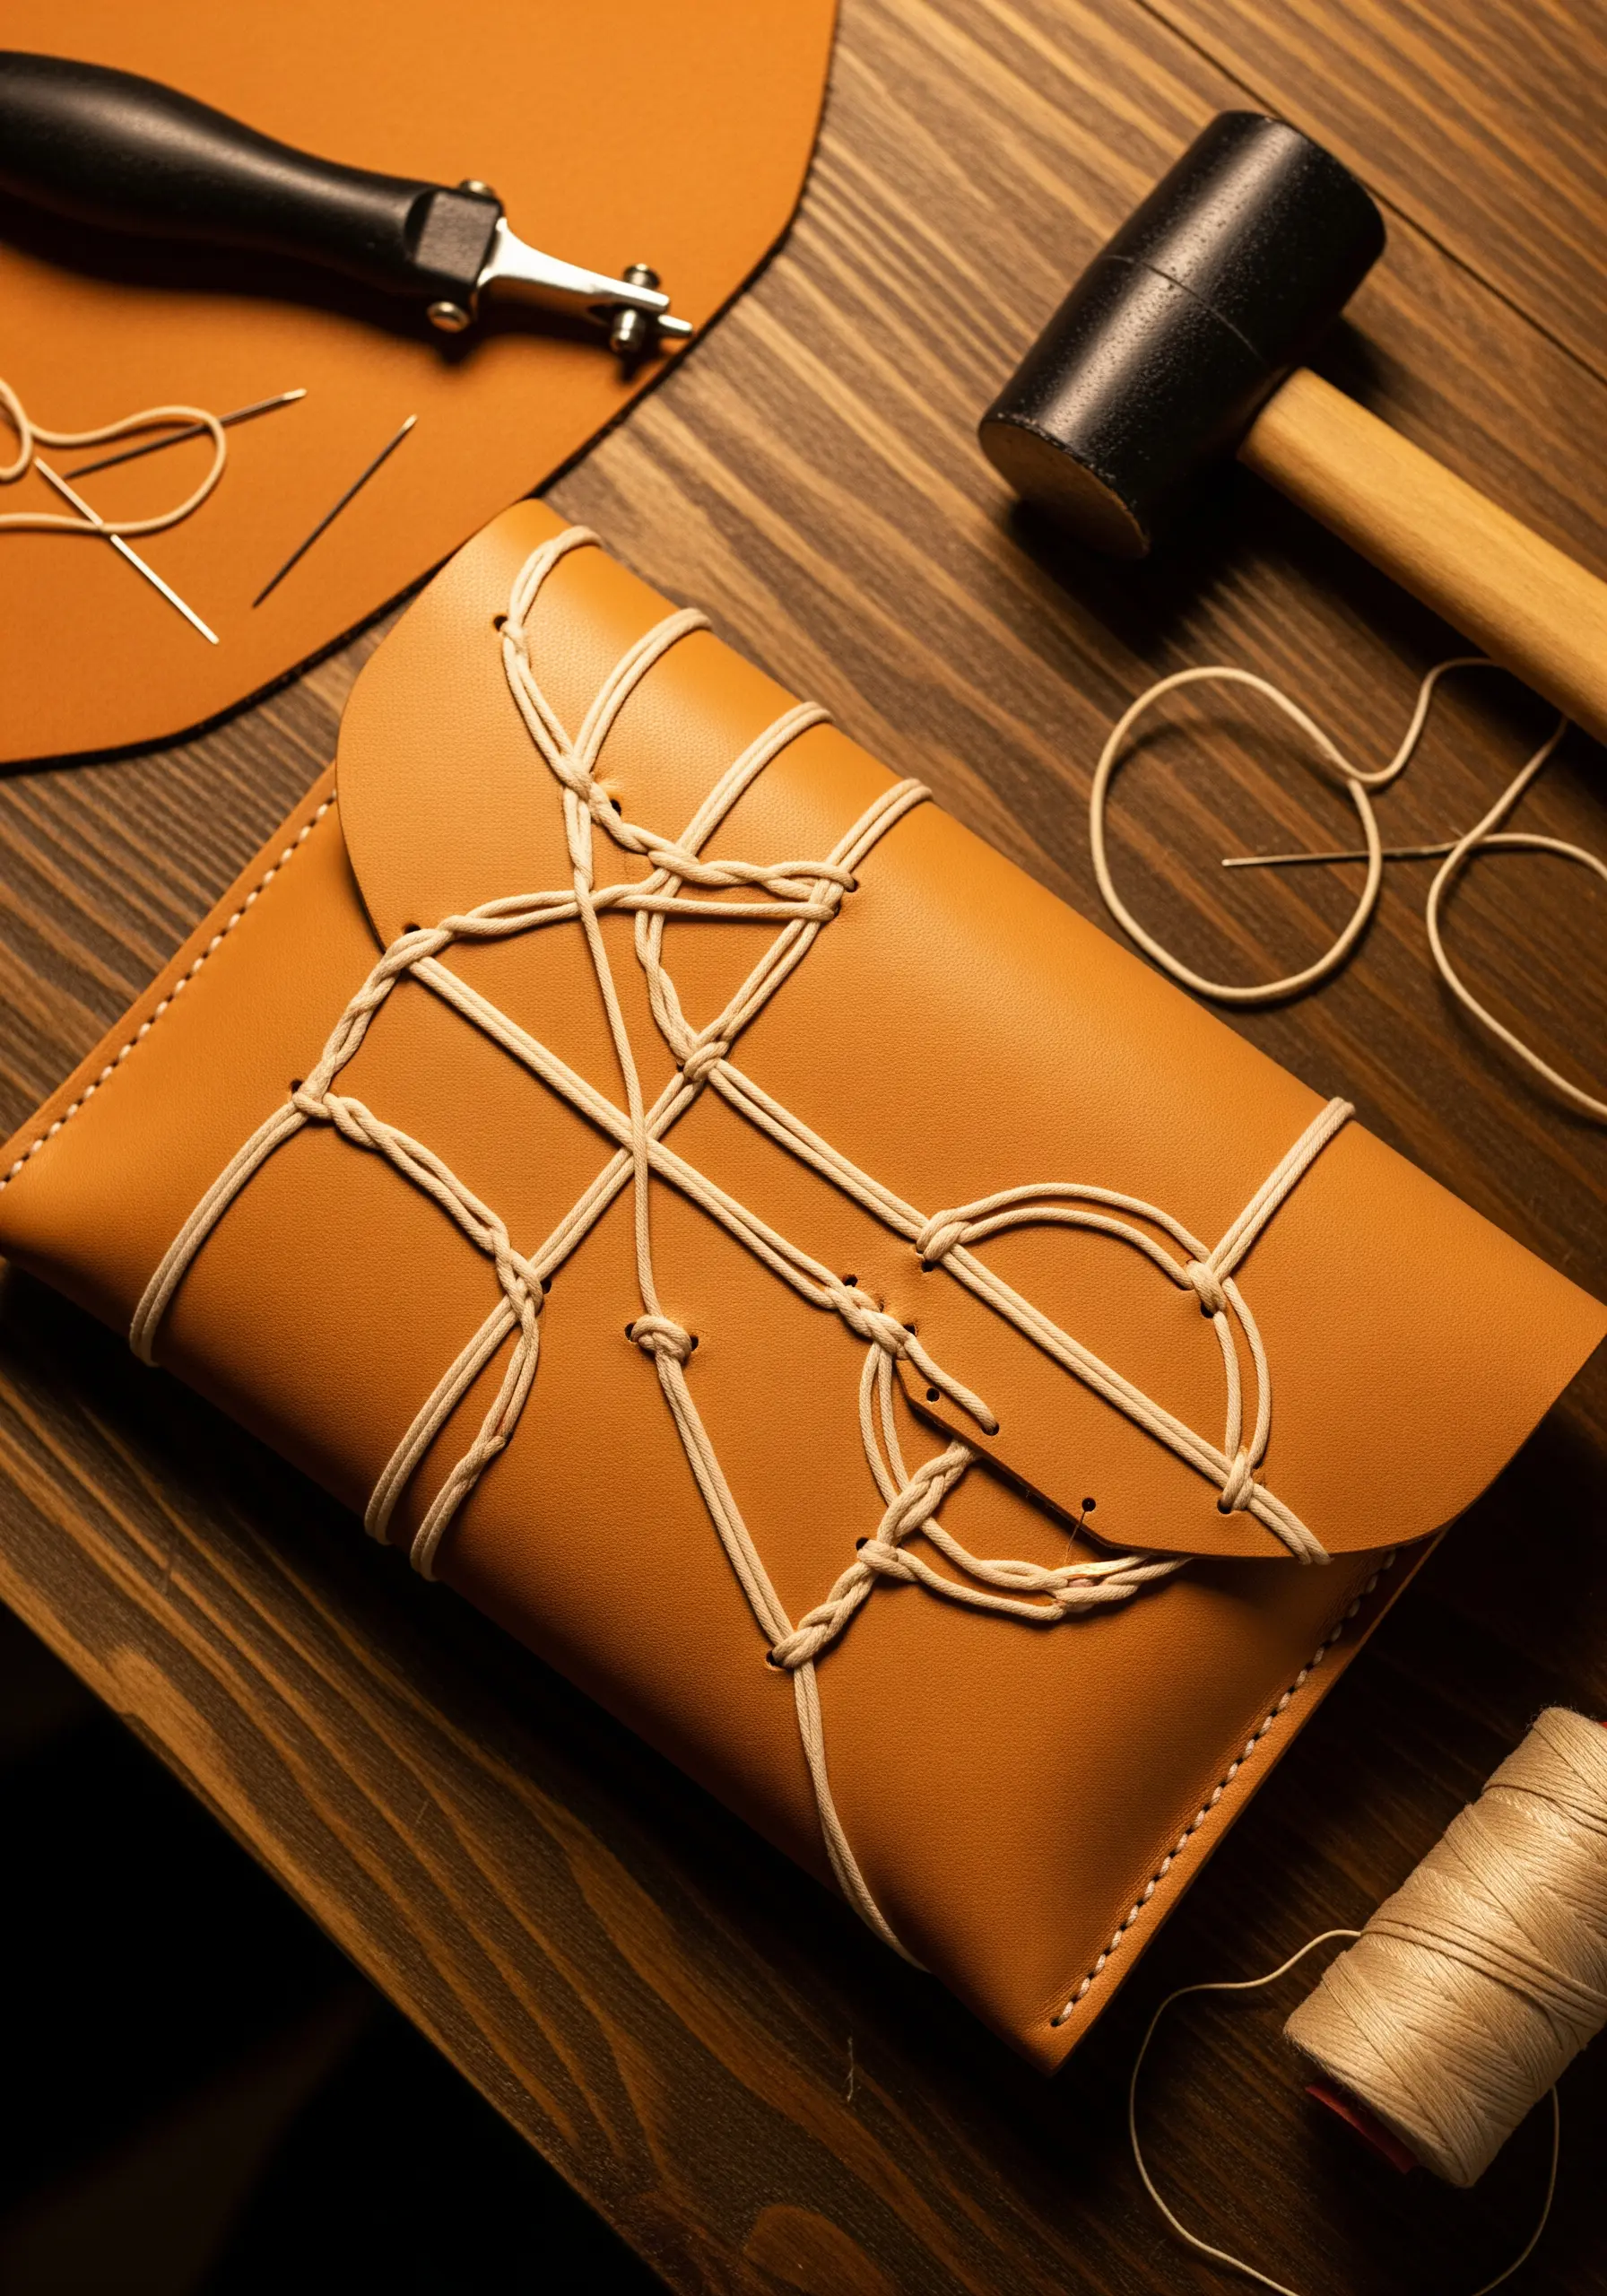
Apply your stitching skills to new materials by trying one of the most unexpected embroidery techniques, like stitching on leather.
Instead of piercing the leather directly with a needle, use a stitching awl or a diamond chisel to pre-punch your holes. This ensures clean, even stitches and prevents the material from tearing.
Use a durable, waxed thread, which glides through the holes easily and provides the strength needed for a functional item like a clutch closure.
This method transforms stitching from purely decorative to a structural element of the design, creating a piece that is both beautiful and functional.
7. Add Delicate Botanicals to a Lampshade

You can create calming bedroom art by stitching directly onto a fabric lampshade for a custom, high-end feel.
Choose a lampshade made from linen or cotton for the best results. Use only one or two strands of floss to keep the design delicate and to allow light to filter through the stitches.
A simple stem stitch for the branches and lazy daisy stitches for the blossoms are perfect for creating an elegant, trailing floral pattern.
Since you can’t use a hoop, hold the shade carefully and use short lengths of thread to avoid tangles as you work around the curved surface.
8. Compose Textured Landscapes on Bookmarks
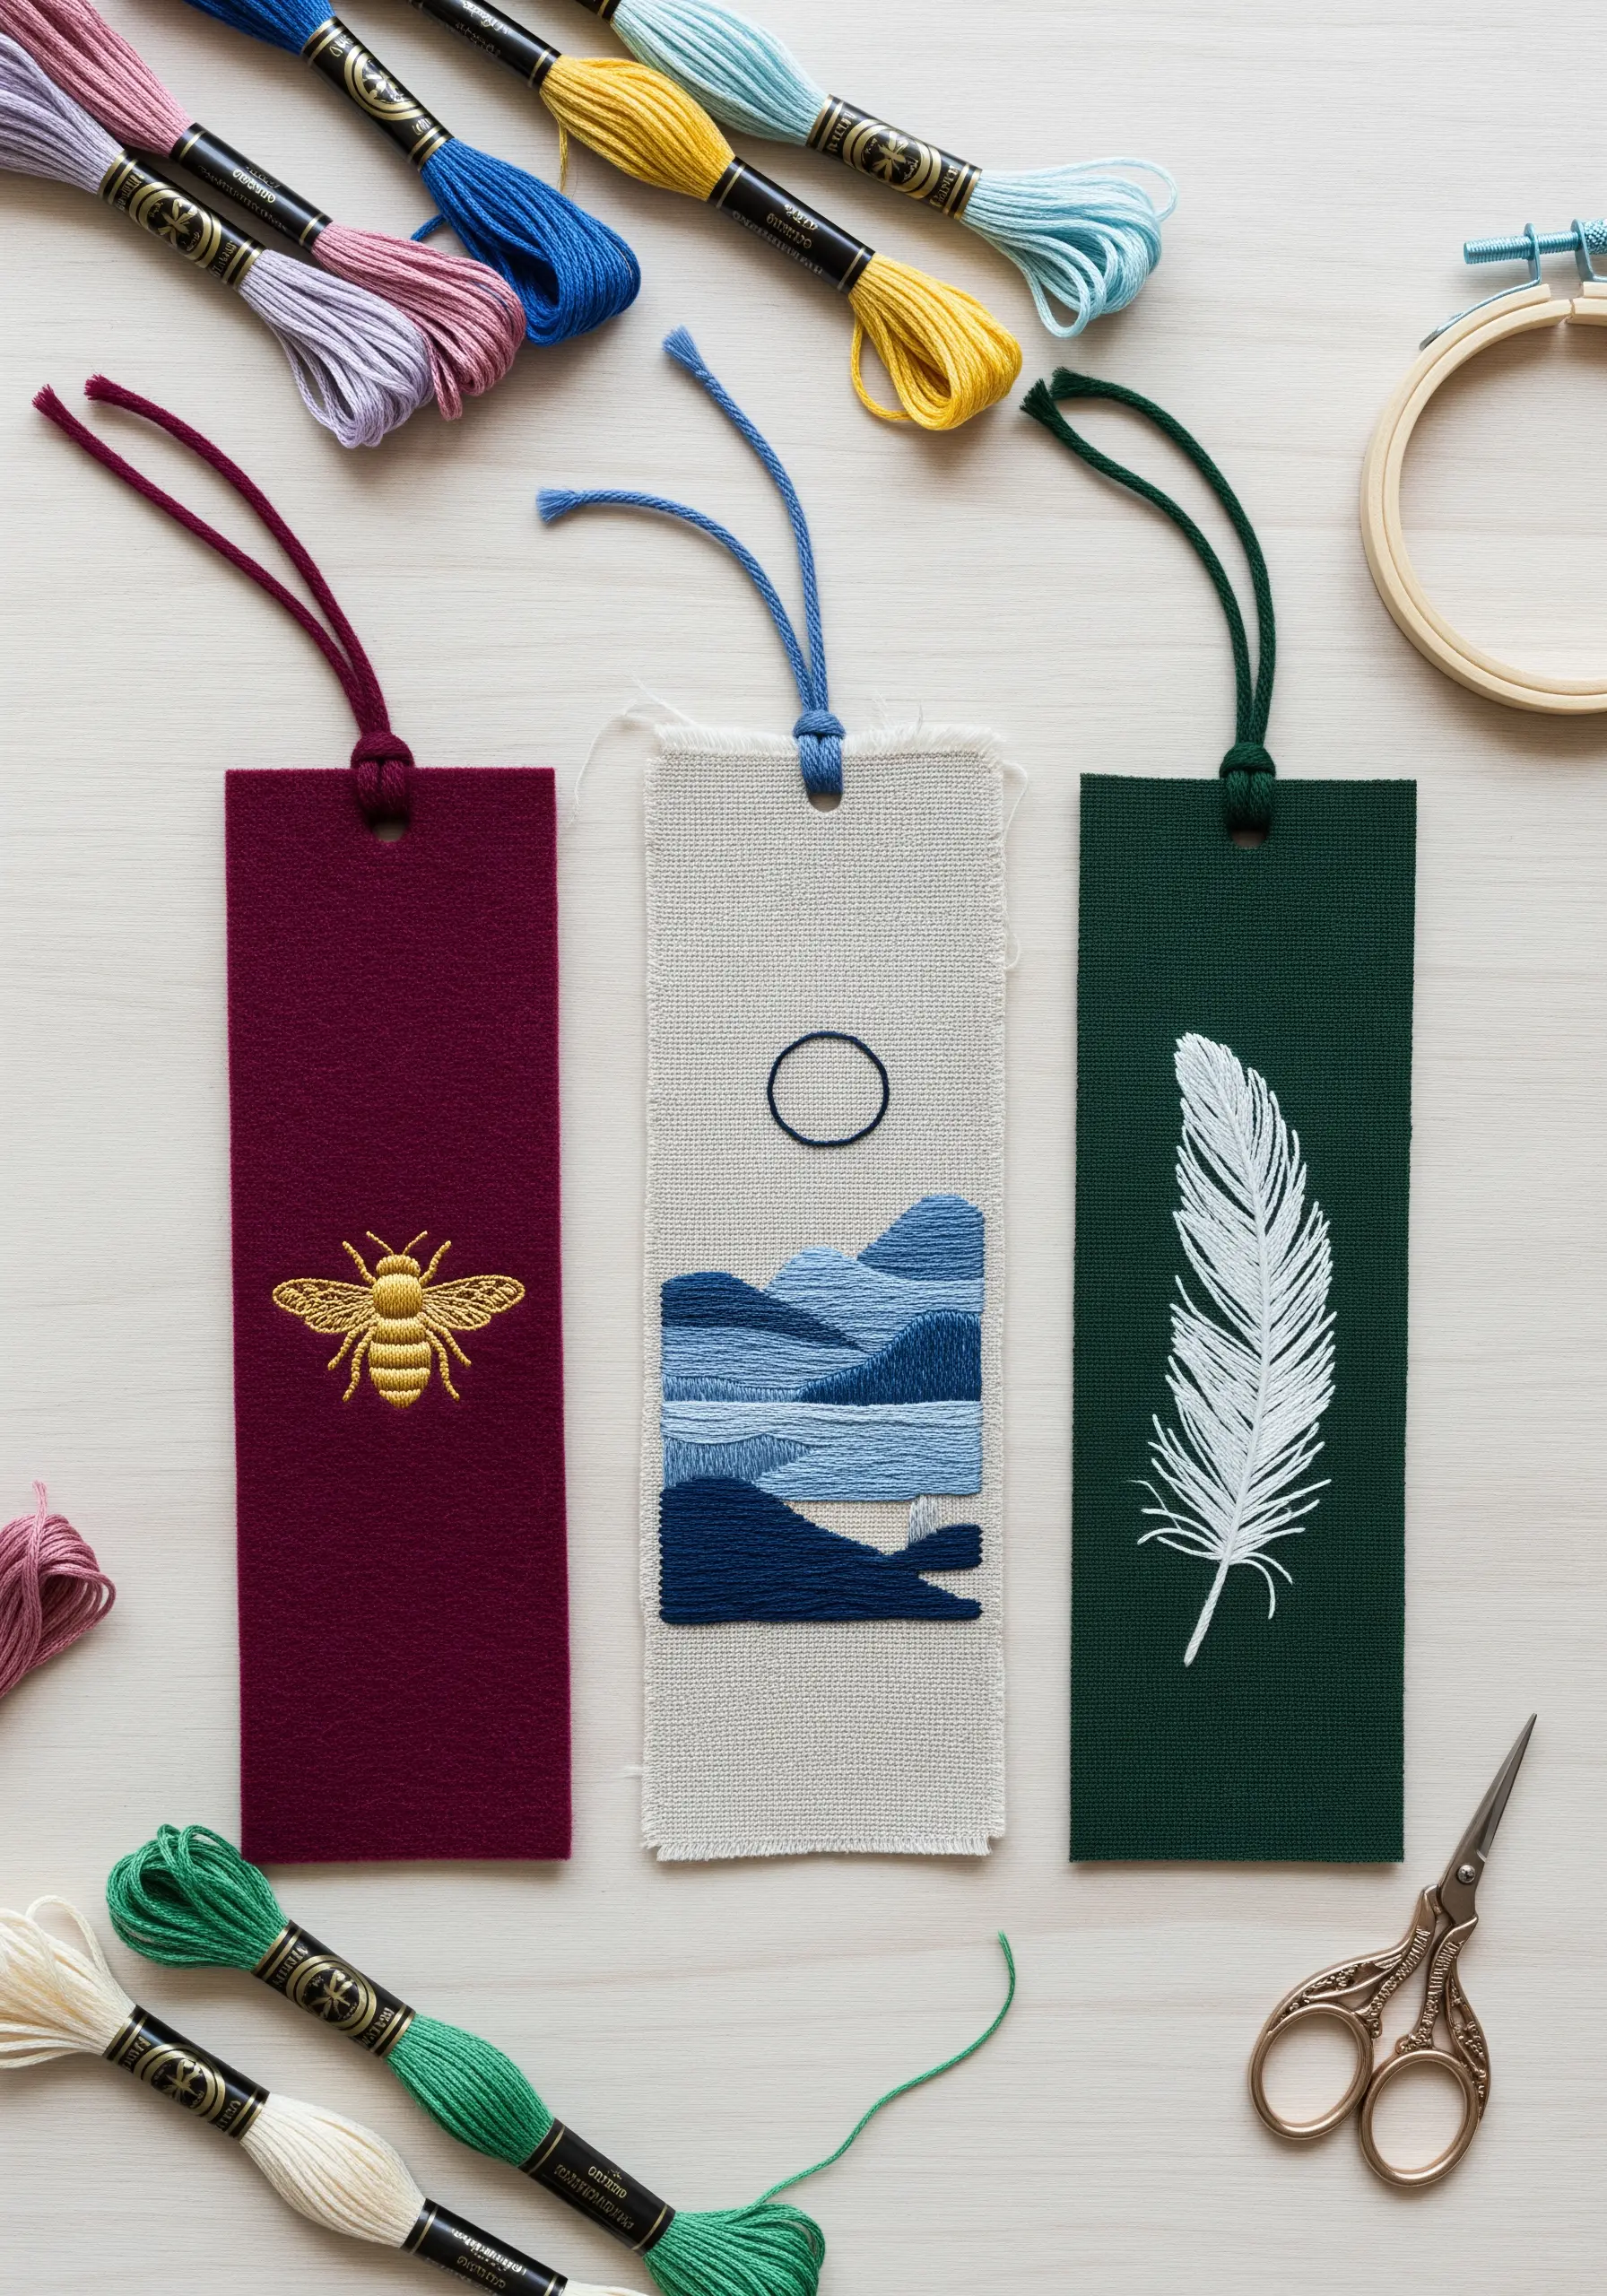
Create polished, handmade embroidery projects to give as thoughtful gifts, like these textural bookmarks.
For the landscape, use directional satin stitches to mimic rolling hills, varying the shades of blue to create atmospheric depth.
To achieve the fine detail on the feather and bee, use a single strand of thread and a sharp needle. A split stitch outline followed by a carefully placed satin stitch fill works perfectly.
Finish by backing the embroidered fabric with stiff felt or cardstock, using fusible web or a thin layer of fabric glue for a durable, professional-looking result.
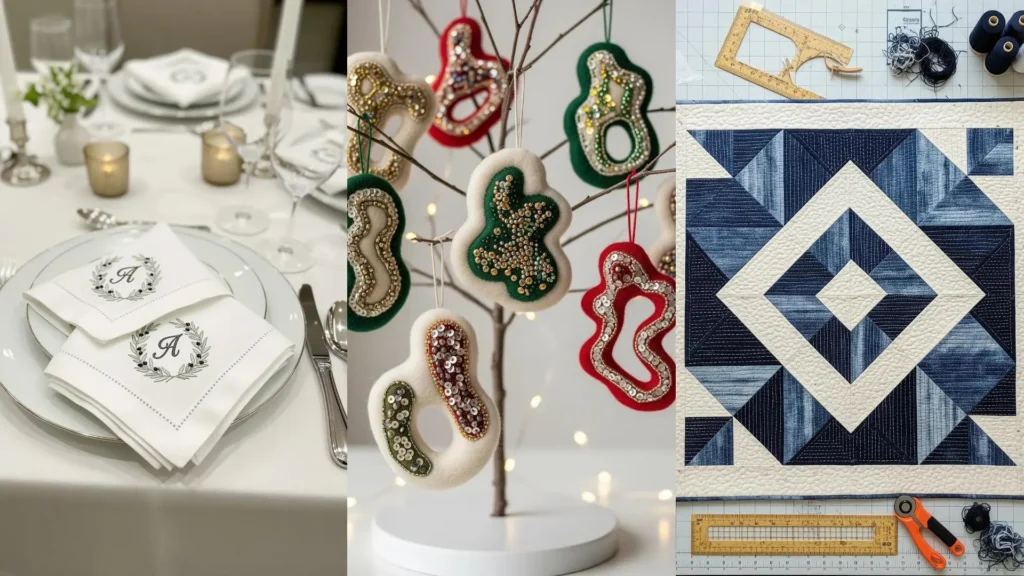
9. Achieve Classic Luxury with Padded Monograms

Elevate simple table linens with a classic, monogram embroidery that feels substantial and luxurious.
The secret to a raised, three-dimensional letter is padding. First, outline your letter with a split stitch. Then, fill the inside of the shape with a layer of small, straight seed stitches.
Finally, cover the entire padded area with a smooth layer of satin stitches worked perpendicular to the padding stitches. This technique lifts the monogram off the fabric surface, giving it a professional, tactile quality.
Frame the monogram with a delicate olive branch motif using stem stitch and French knots for a timeless finish.
10. Curate a Wall with Mixed-Media Hoops
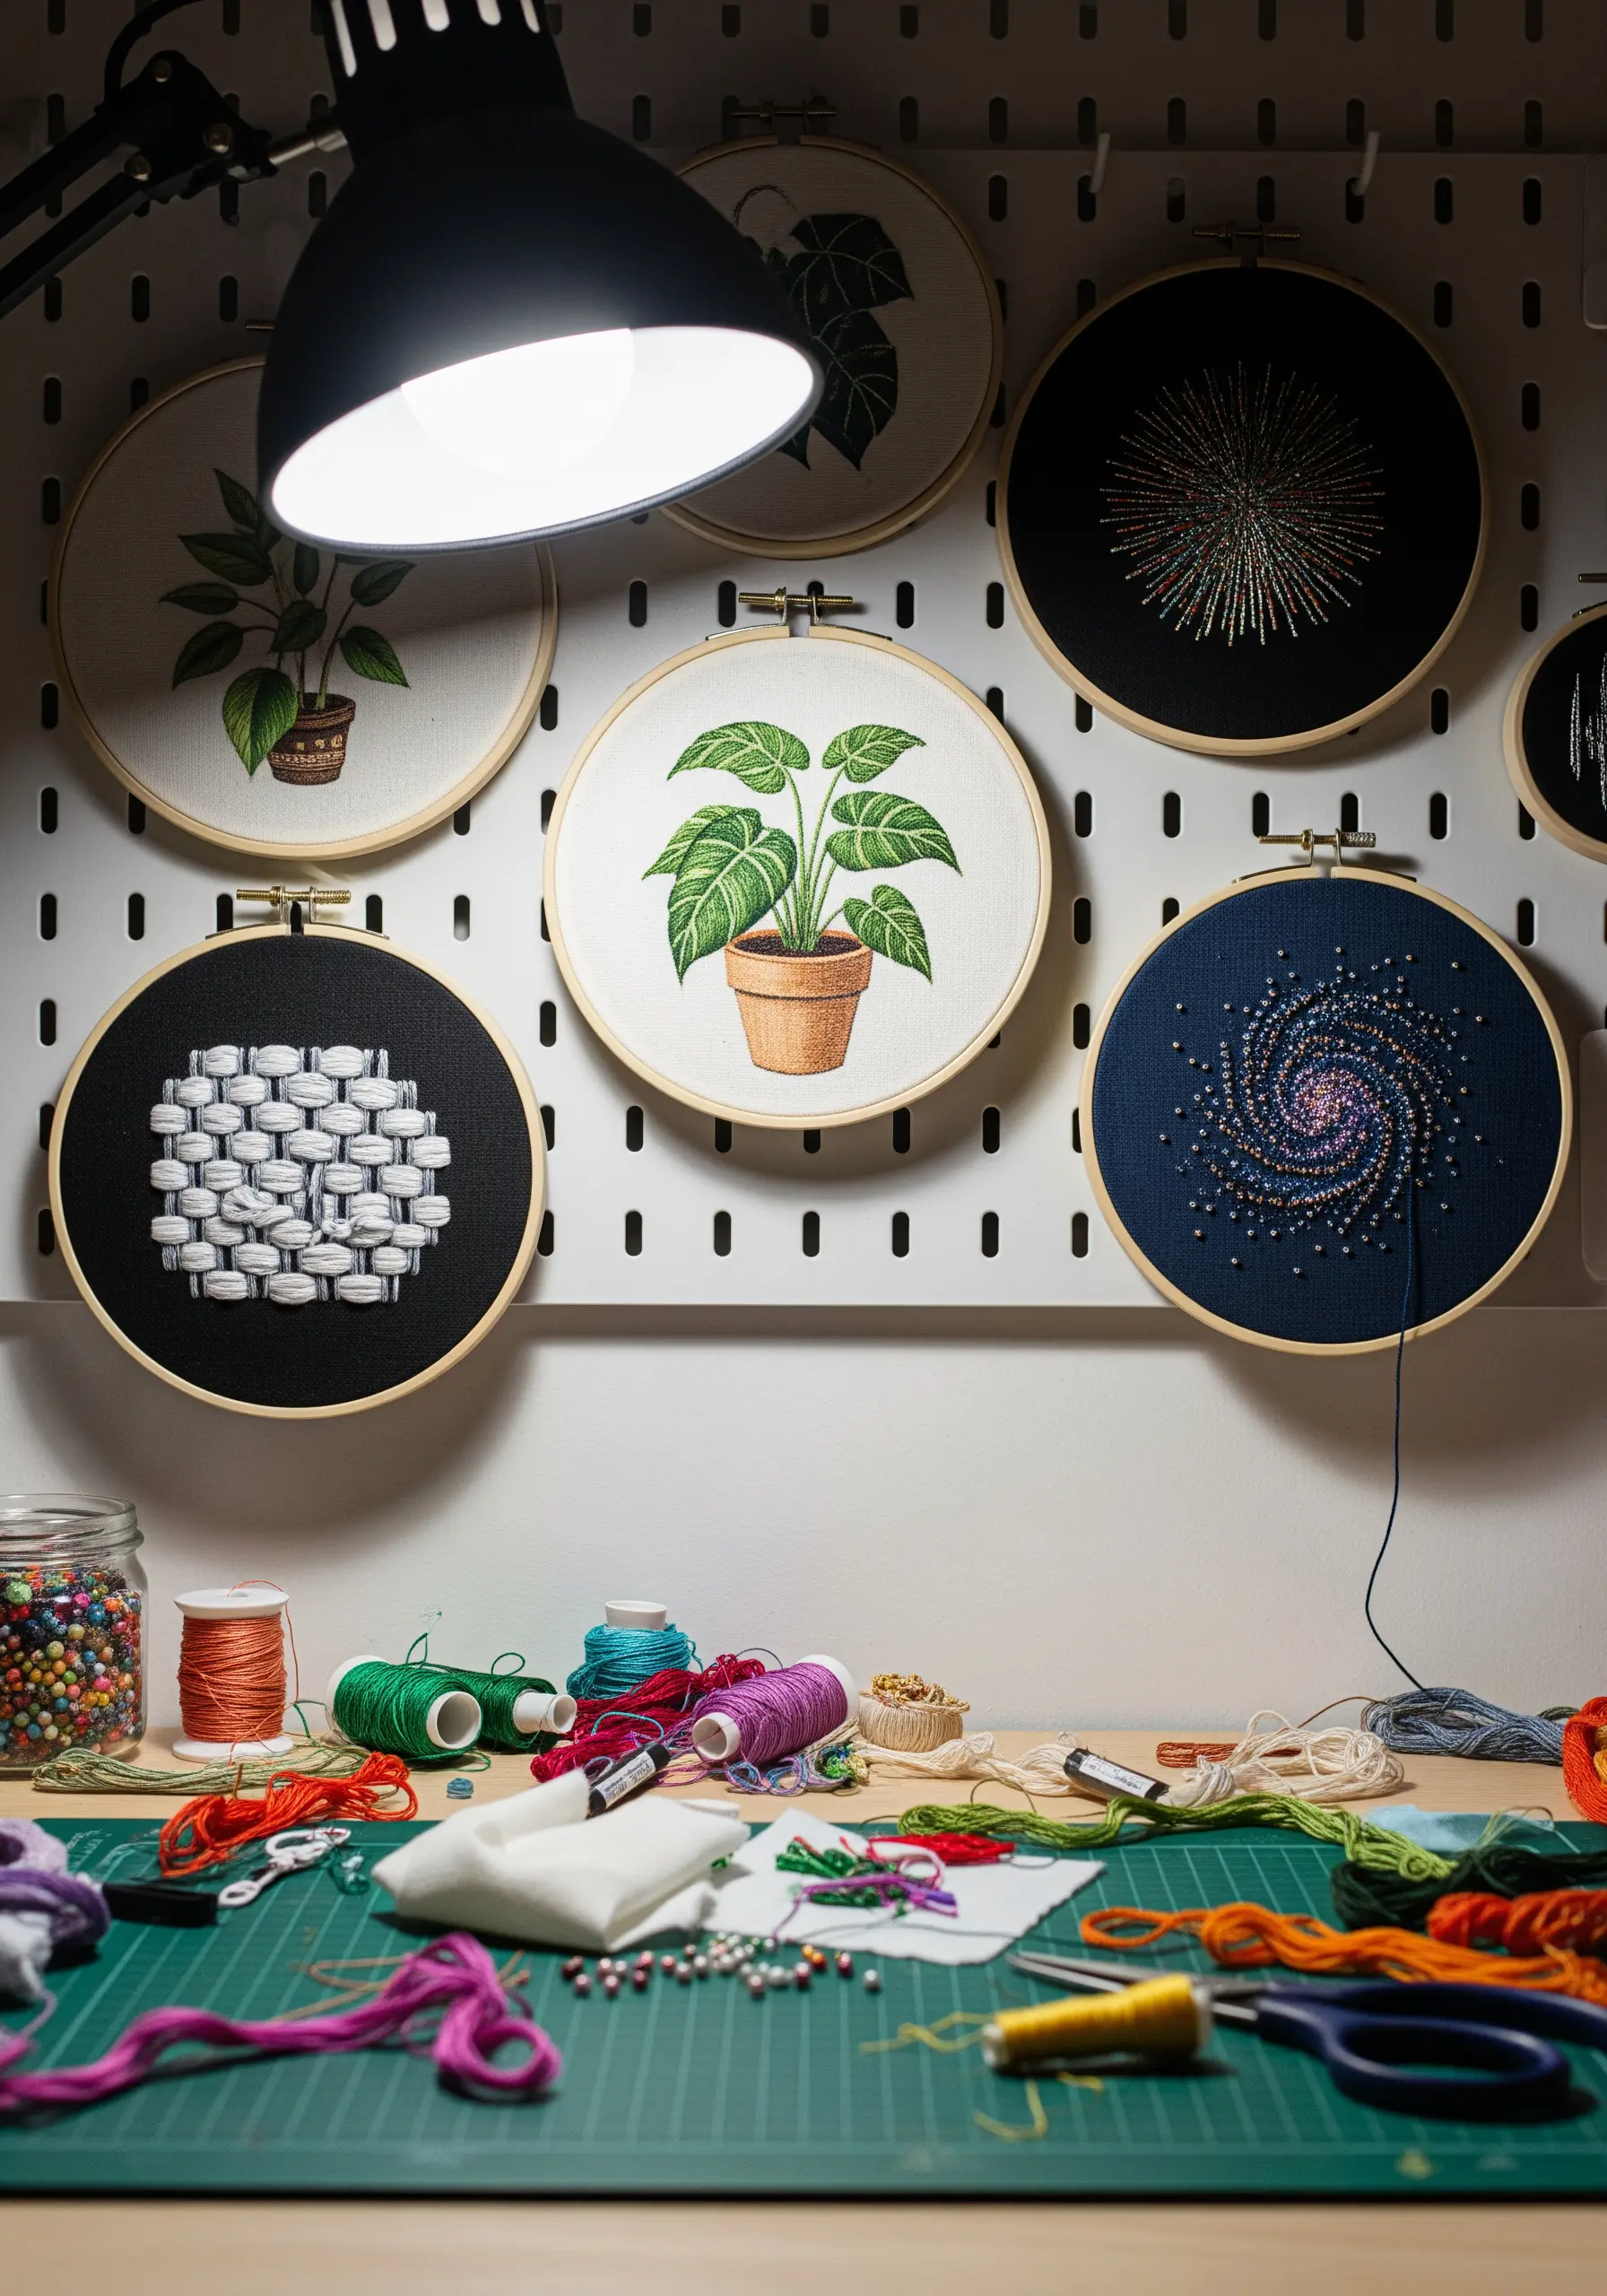
To build a stunning gallery wall of your work, experiment with a variety of techniques and materials beyond thread.
Incorporate small seed beads to add sparkle and texture. Secure them individually with a single stitch back down through the fabric for a strong hold.
Try weaving threads or yarns through a grid of straight stitches to create dimensional, woven patterns. This adds a sculptural element that contrasts beautifully with flat stitches.
Varying your background fabric colors, from light linen to dark cotton, helps each piece stand out while creating a cohesive collection.
11. Master Detail with Micro-Embroidery

Practice the art of tiny embroidery by creating a piece of jewelry that showcases incredible detail in a small space.
Work on a high-count fabric like 28-count linen or evenweave, which provides a tight grid for precise stitches. Use a magnifying lamp to reduce eye strain.
The key is to use only a single strand of six-strand floss. This allows for incredibly fine lines and subtle color blending, even in a pendant less than an inch wide.
Use split stitch for outlines and tiny straight stitches for shading to achieve a realistic, thread-painted effect on a miniature scale.
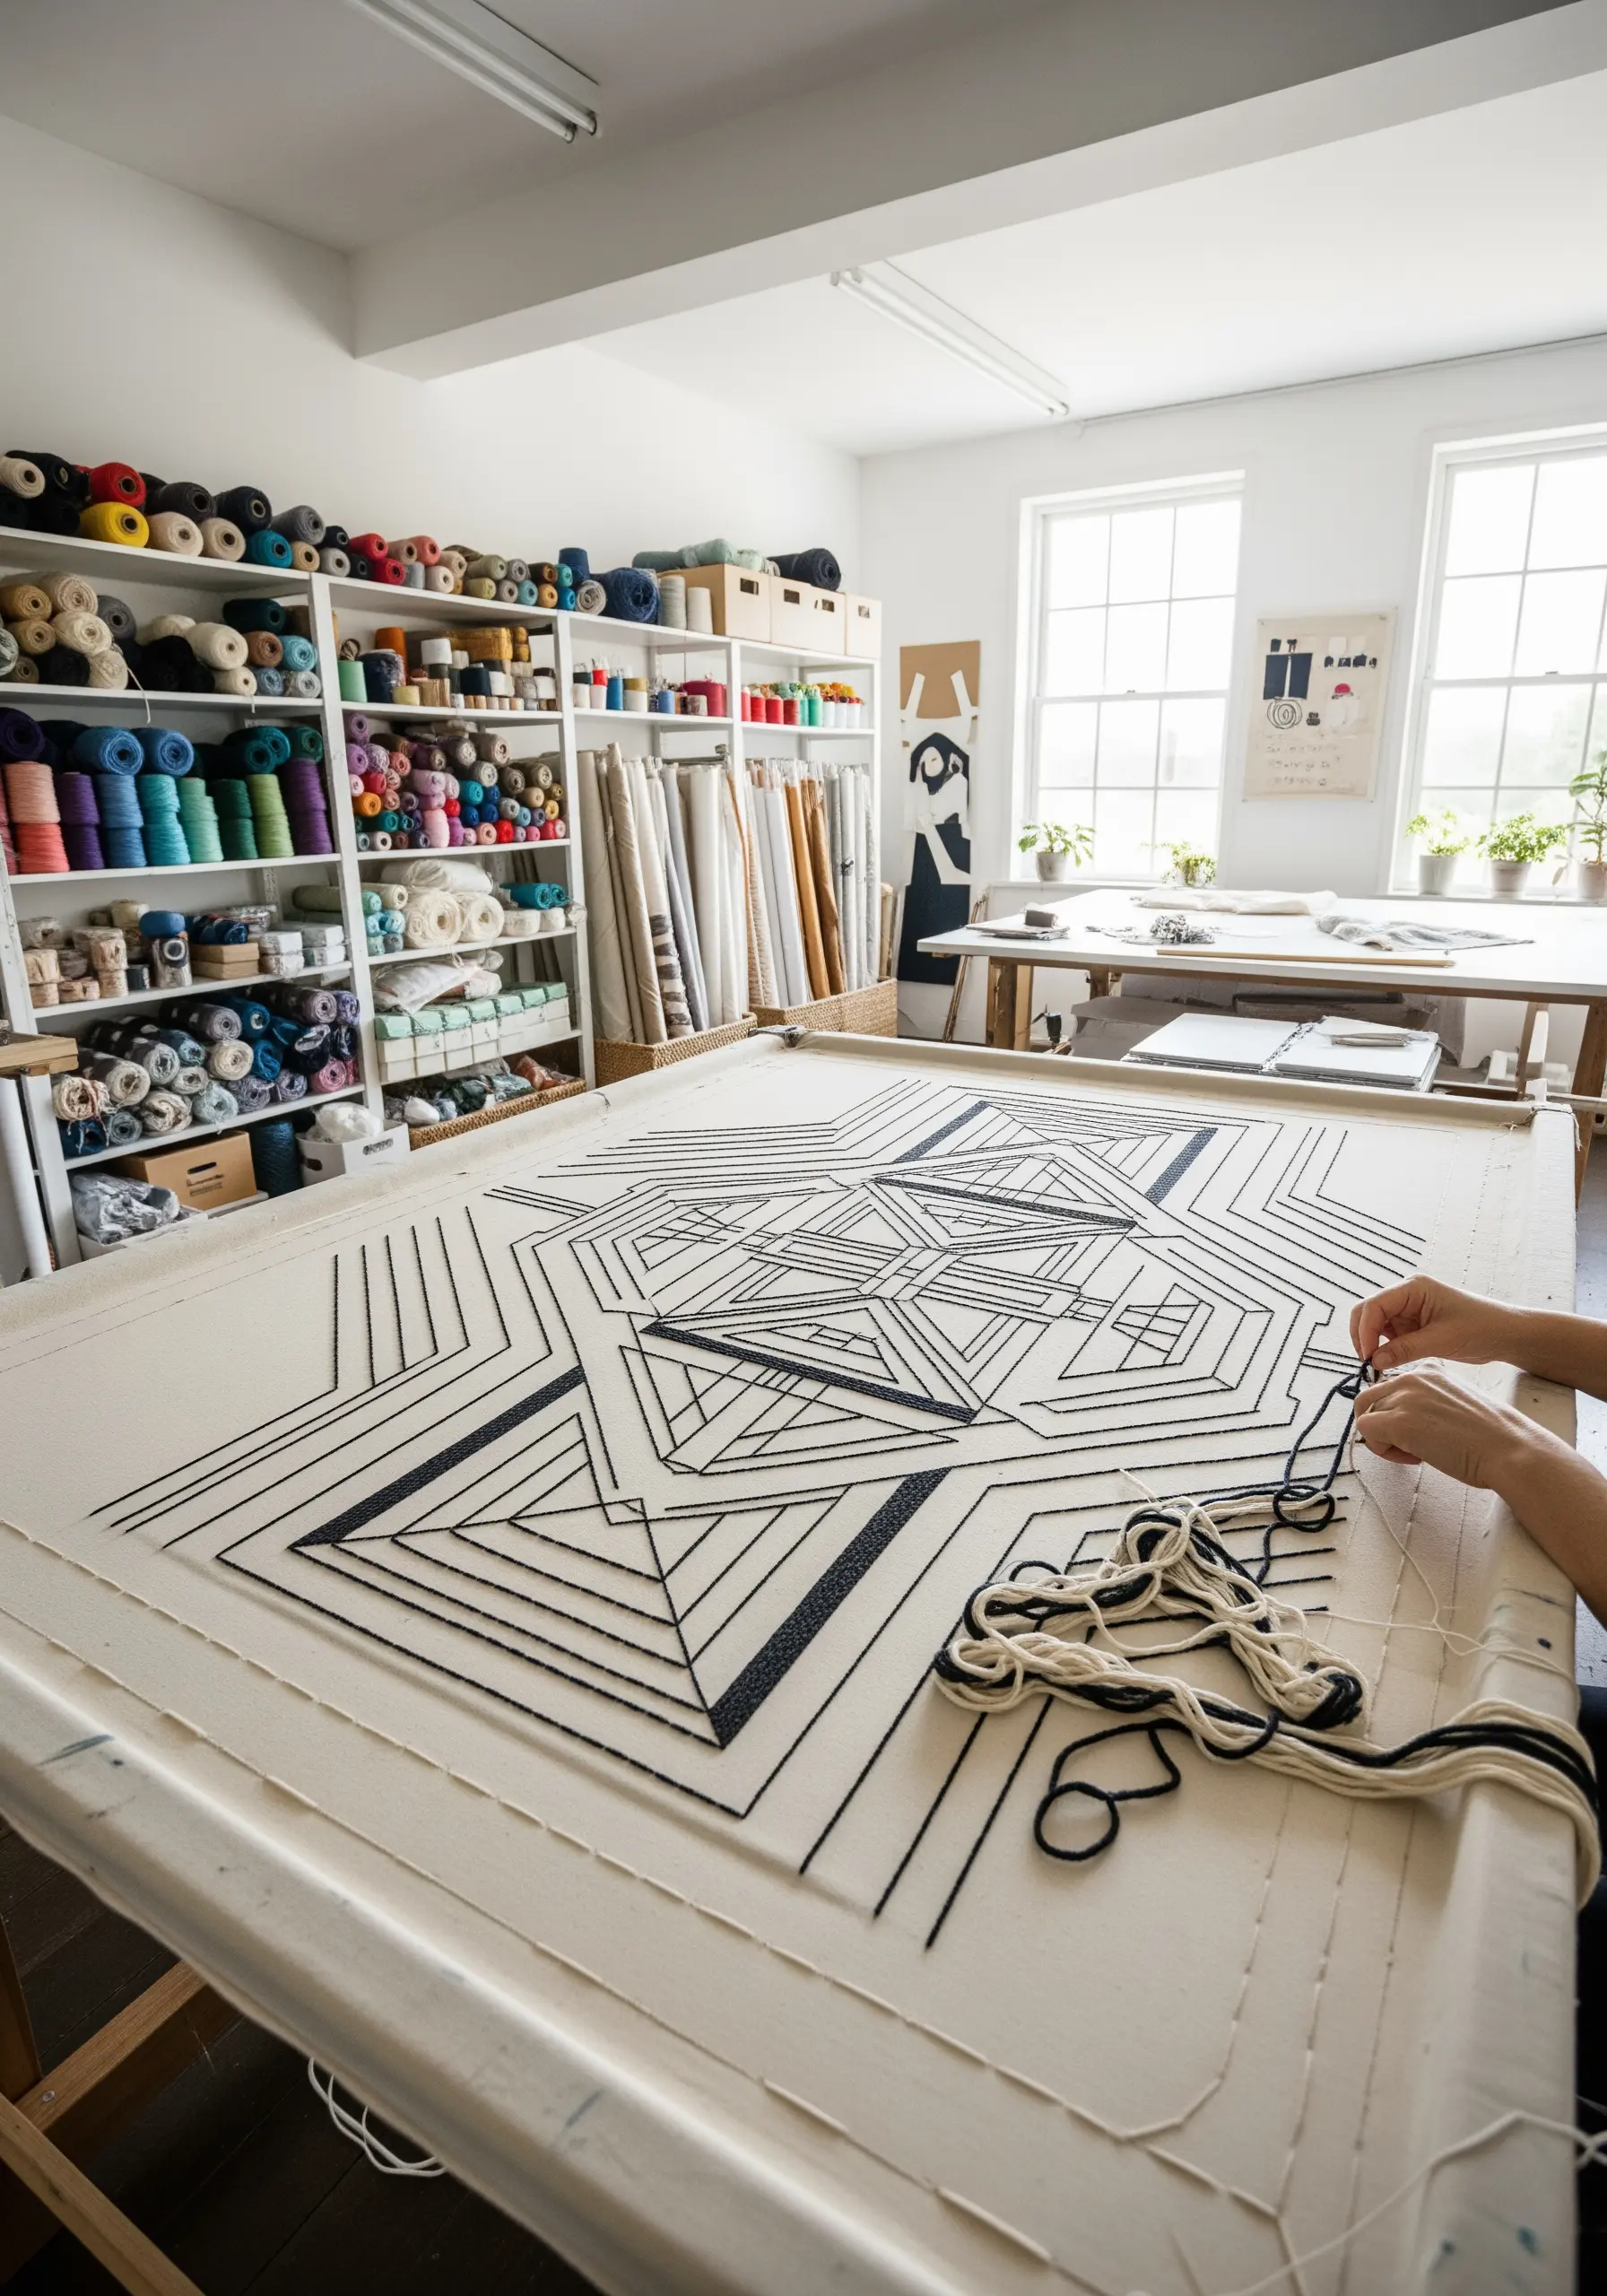
12. Create Sculptural Lines with Couching
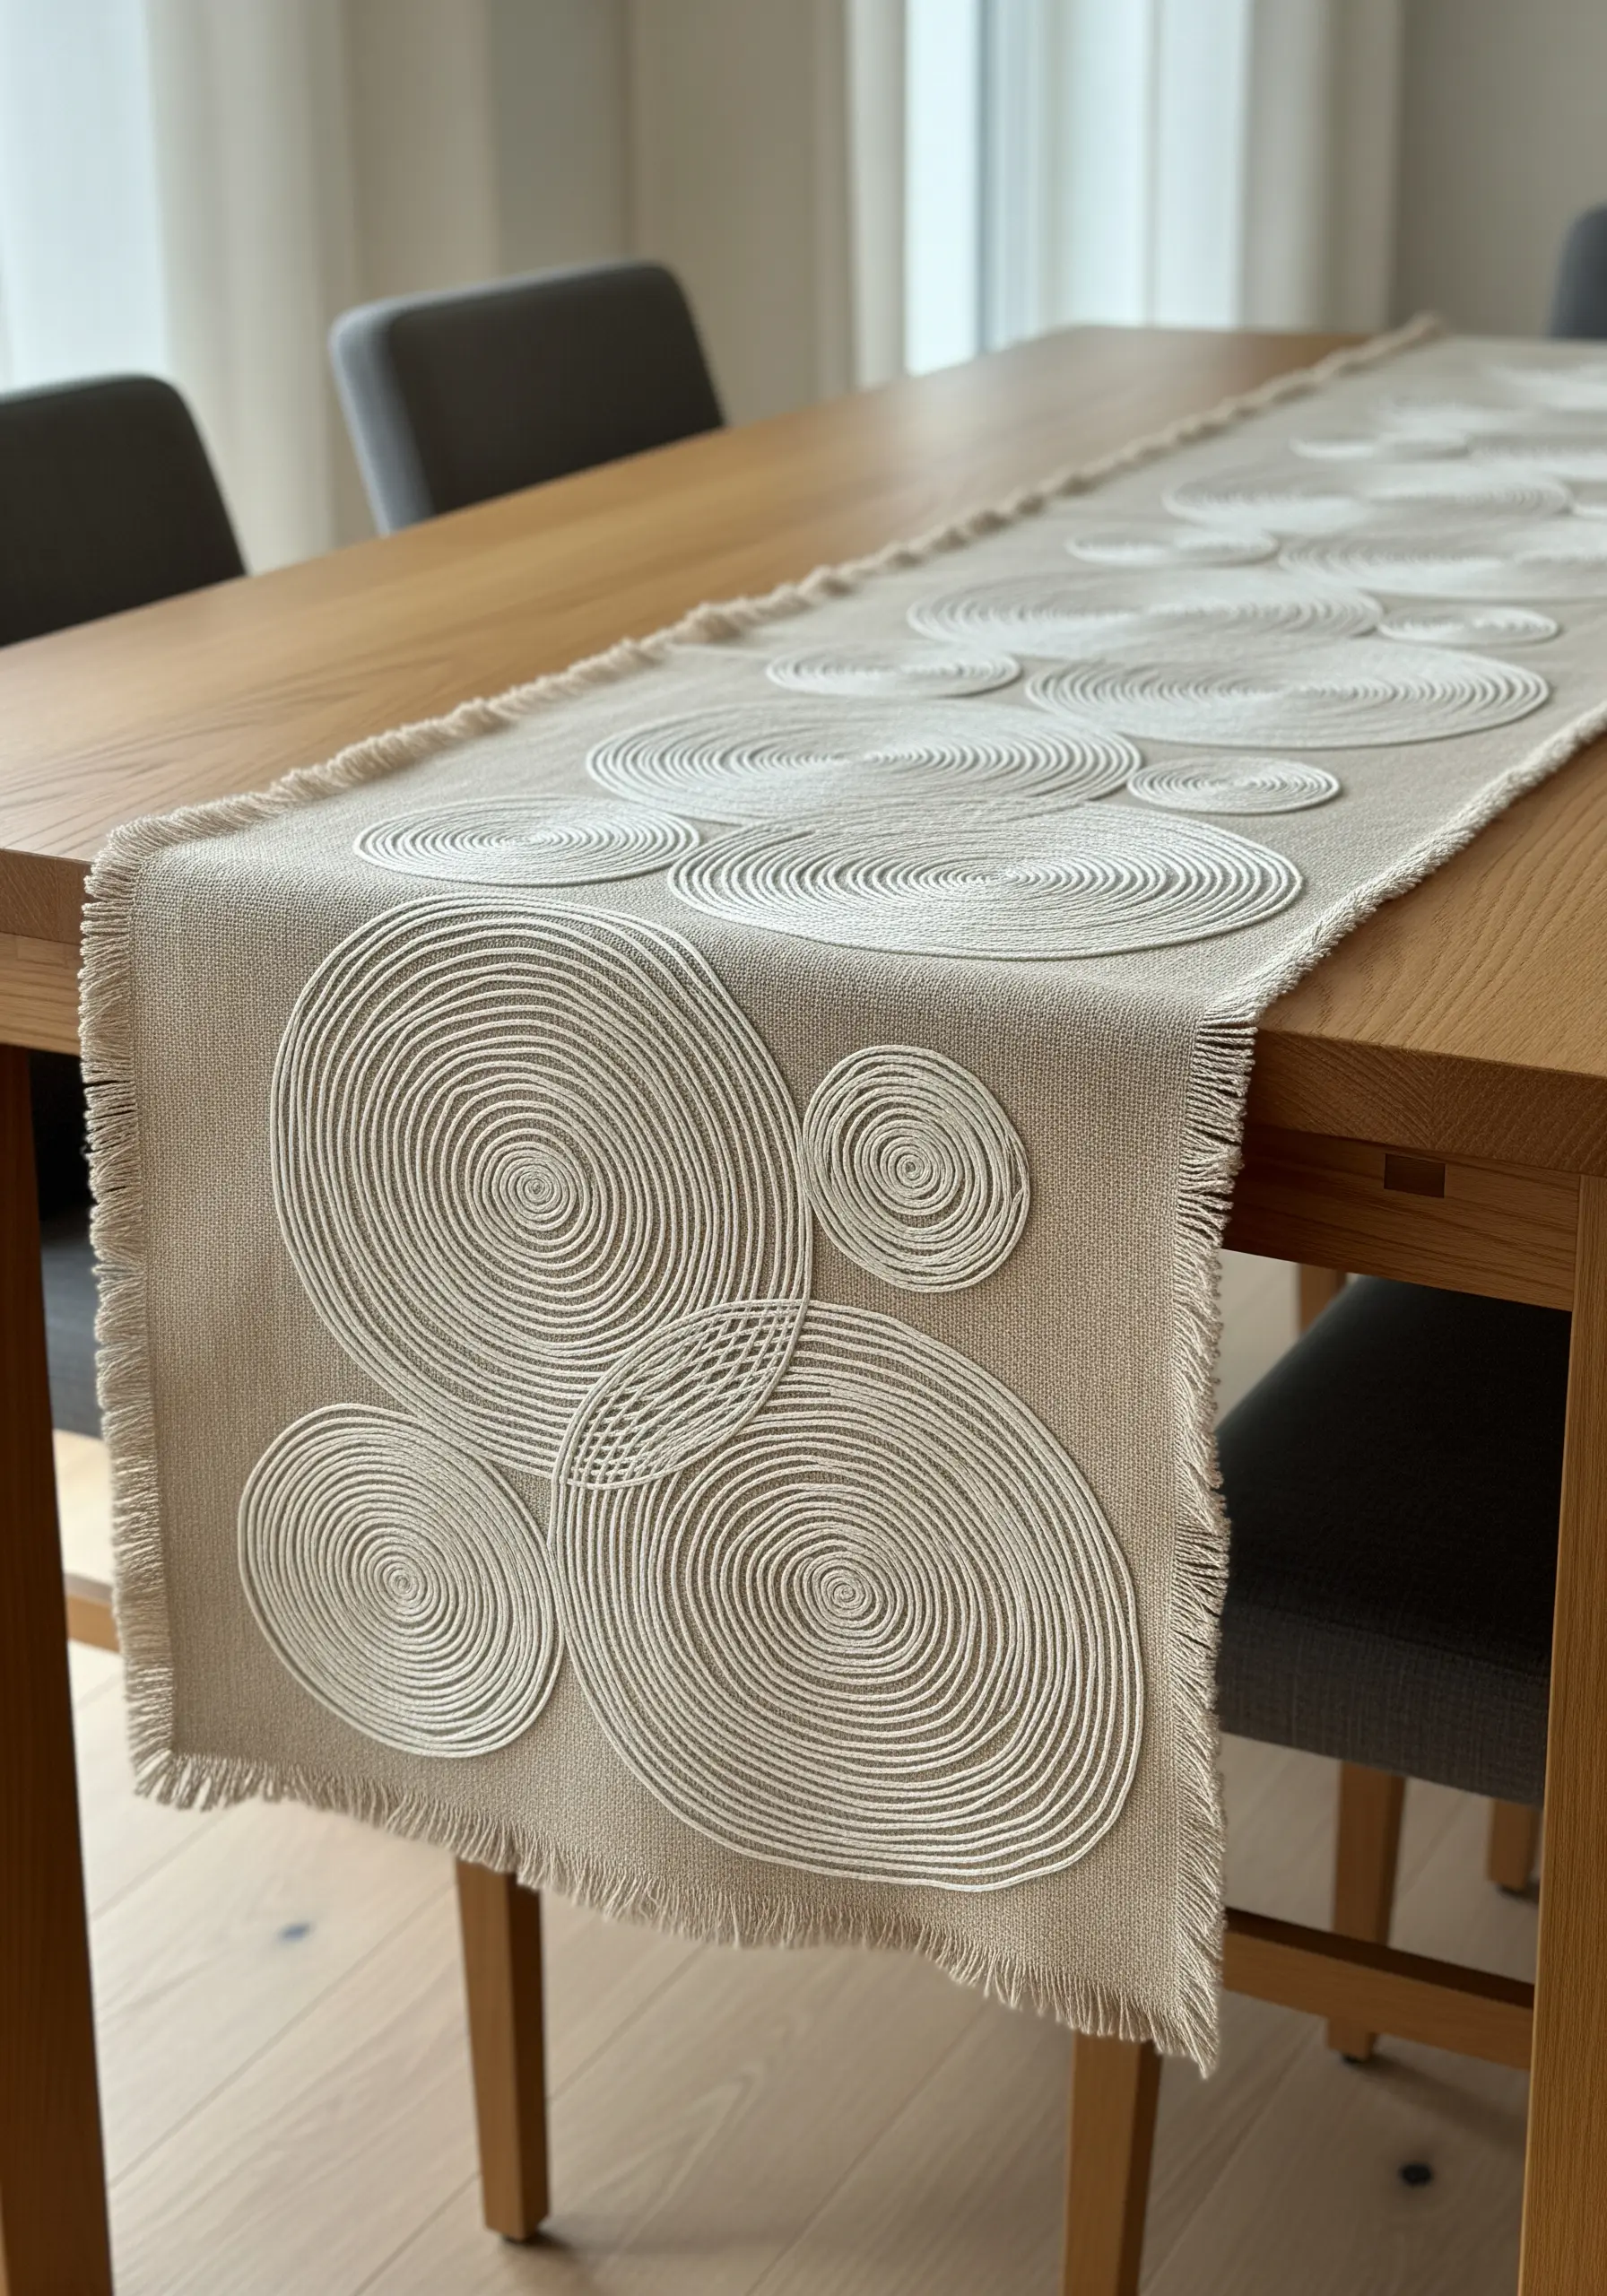
Transform a plain table runner using modern, minimalist embroidery that prioritizes texture over color.
This striking spiral effect is achieved by couching a thick, soft cotton cord onto a linen base. Lay the cord in your desired pattern and use a matching, finer thread to tack it down with small, evenly spaced stitches.
The monochrome palette of cream-on-beige creates a sophisticated, calming aesthetic where the sculptural quality of the raised lines becomes the focal point.
This technique is significantly faster than filling a large area with satin stitch and produces a wonderfully tactile, high-impact result.
13. Embellish Canvas Sneakers with Graphic Motifs

Why not turn your old clothes into art, or in this case, your plain canvas sneakers?
To transfer your design, use a stick-and-stitch stabilizer. Simply print or draw your design onto the soluble patch, adhere it to the shoe, and stitch through it. When you’re done, it dissolves in water.
Use a sturdy, sharp needle and a thimble to help push through the tough canvas. Three strands of floss will provide good coverage and durability for an item that gets a lot of wear.
Long-and-short stitches are ideal for blending the colors on the koi fish, giving it a dynamic, painted appearance.
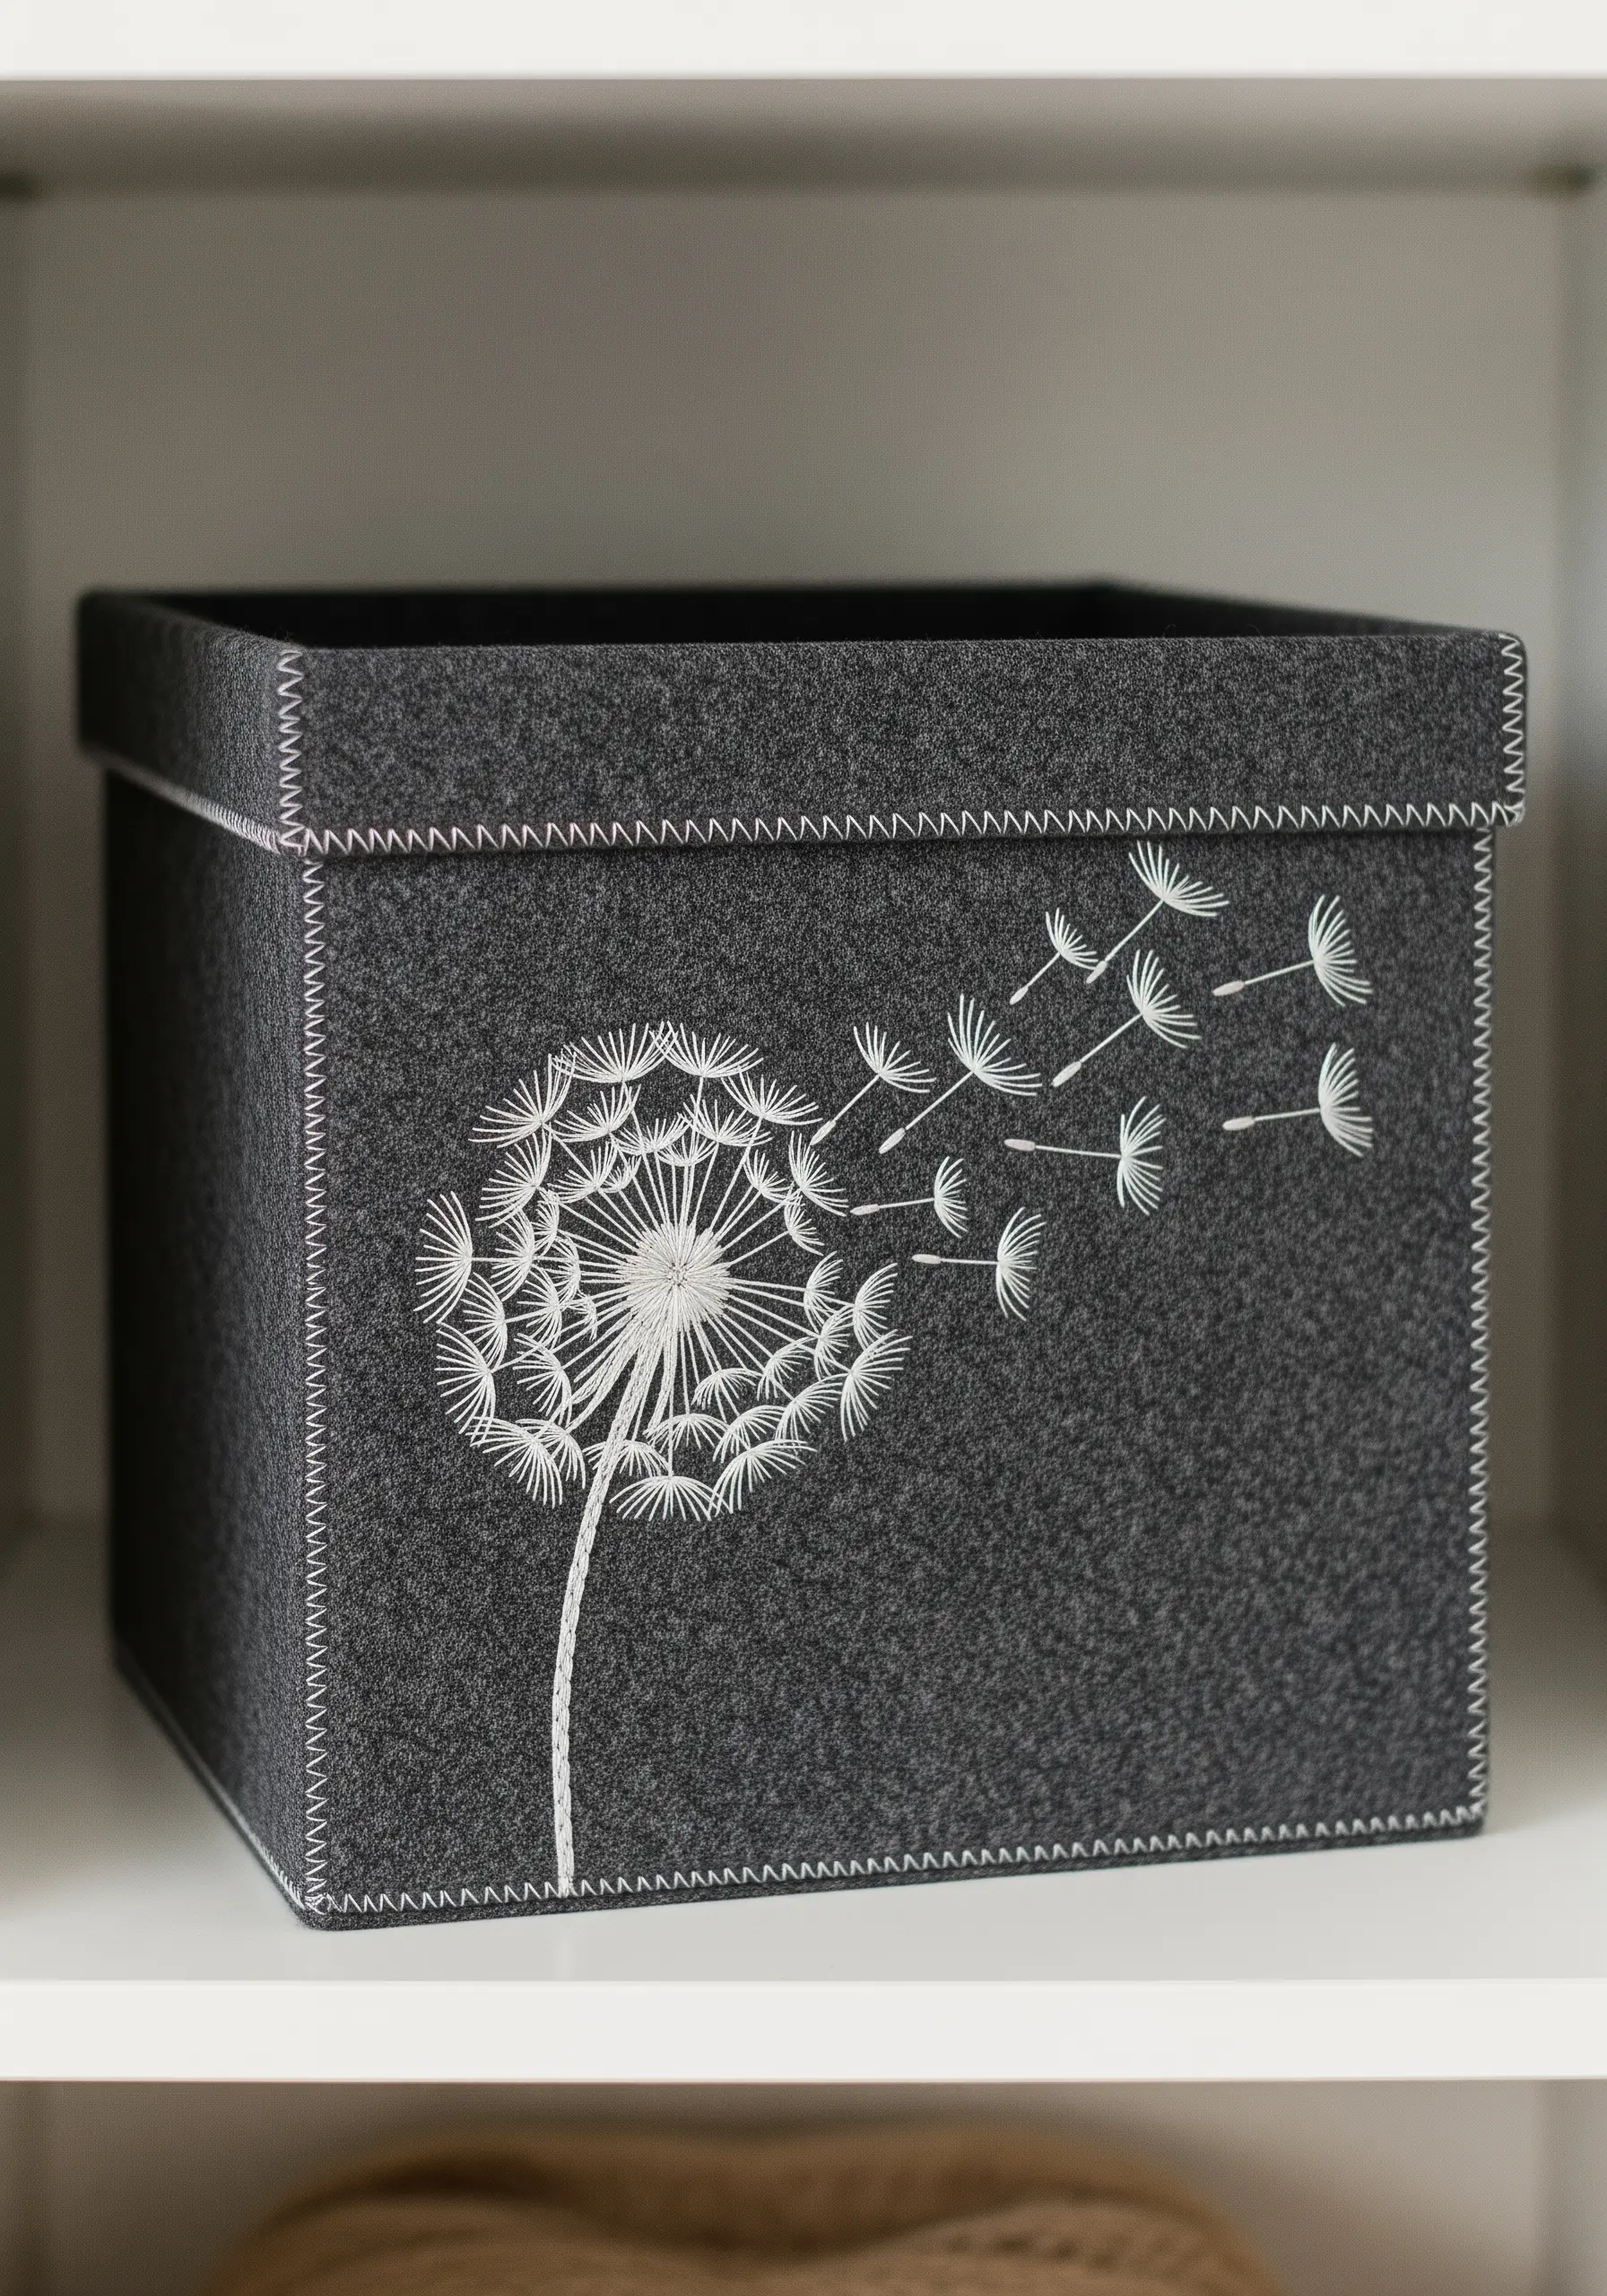
14. Add Delicate Detail to Utilitarian Felt
The beauty of working with felt is that its stable, non-woven structure requires no hemming and is incredibly easy to stitch through.
A simple running stitch in a contrasting color can turn a basic felt box into a piece of cozy, neutral decor.
For the delicate dandelion seeds, use a single strand of white floss and a combination of straight stitches and French knots to capture their airy quality.
This project shows how a few well-placed, simple stitches can transform a purely functional object into something personal and artistic.
15. Embrace Texture with Hand Quilting

Stunning embroidered wall hangings don’t always require intricate stitches; sometimes, simple repetition is key.
This piece uses hand quilting as a primary design element. The simple running stitch, known as Sashiko in Japanese tradition, adds a layer of texture and pattern over the pieced fabric.
Use a thicker thread, like a pearl cotton #8, and a long, sharp needle designed for quilting to create consistent, visible stitches.
The rhythmic lines of stitching unify the different fabric patterns, creating a cohesive and deeply textural work of art.
16. Personalize Leather with Raised Lettering
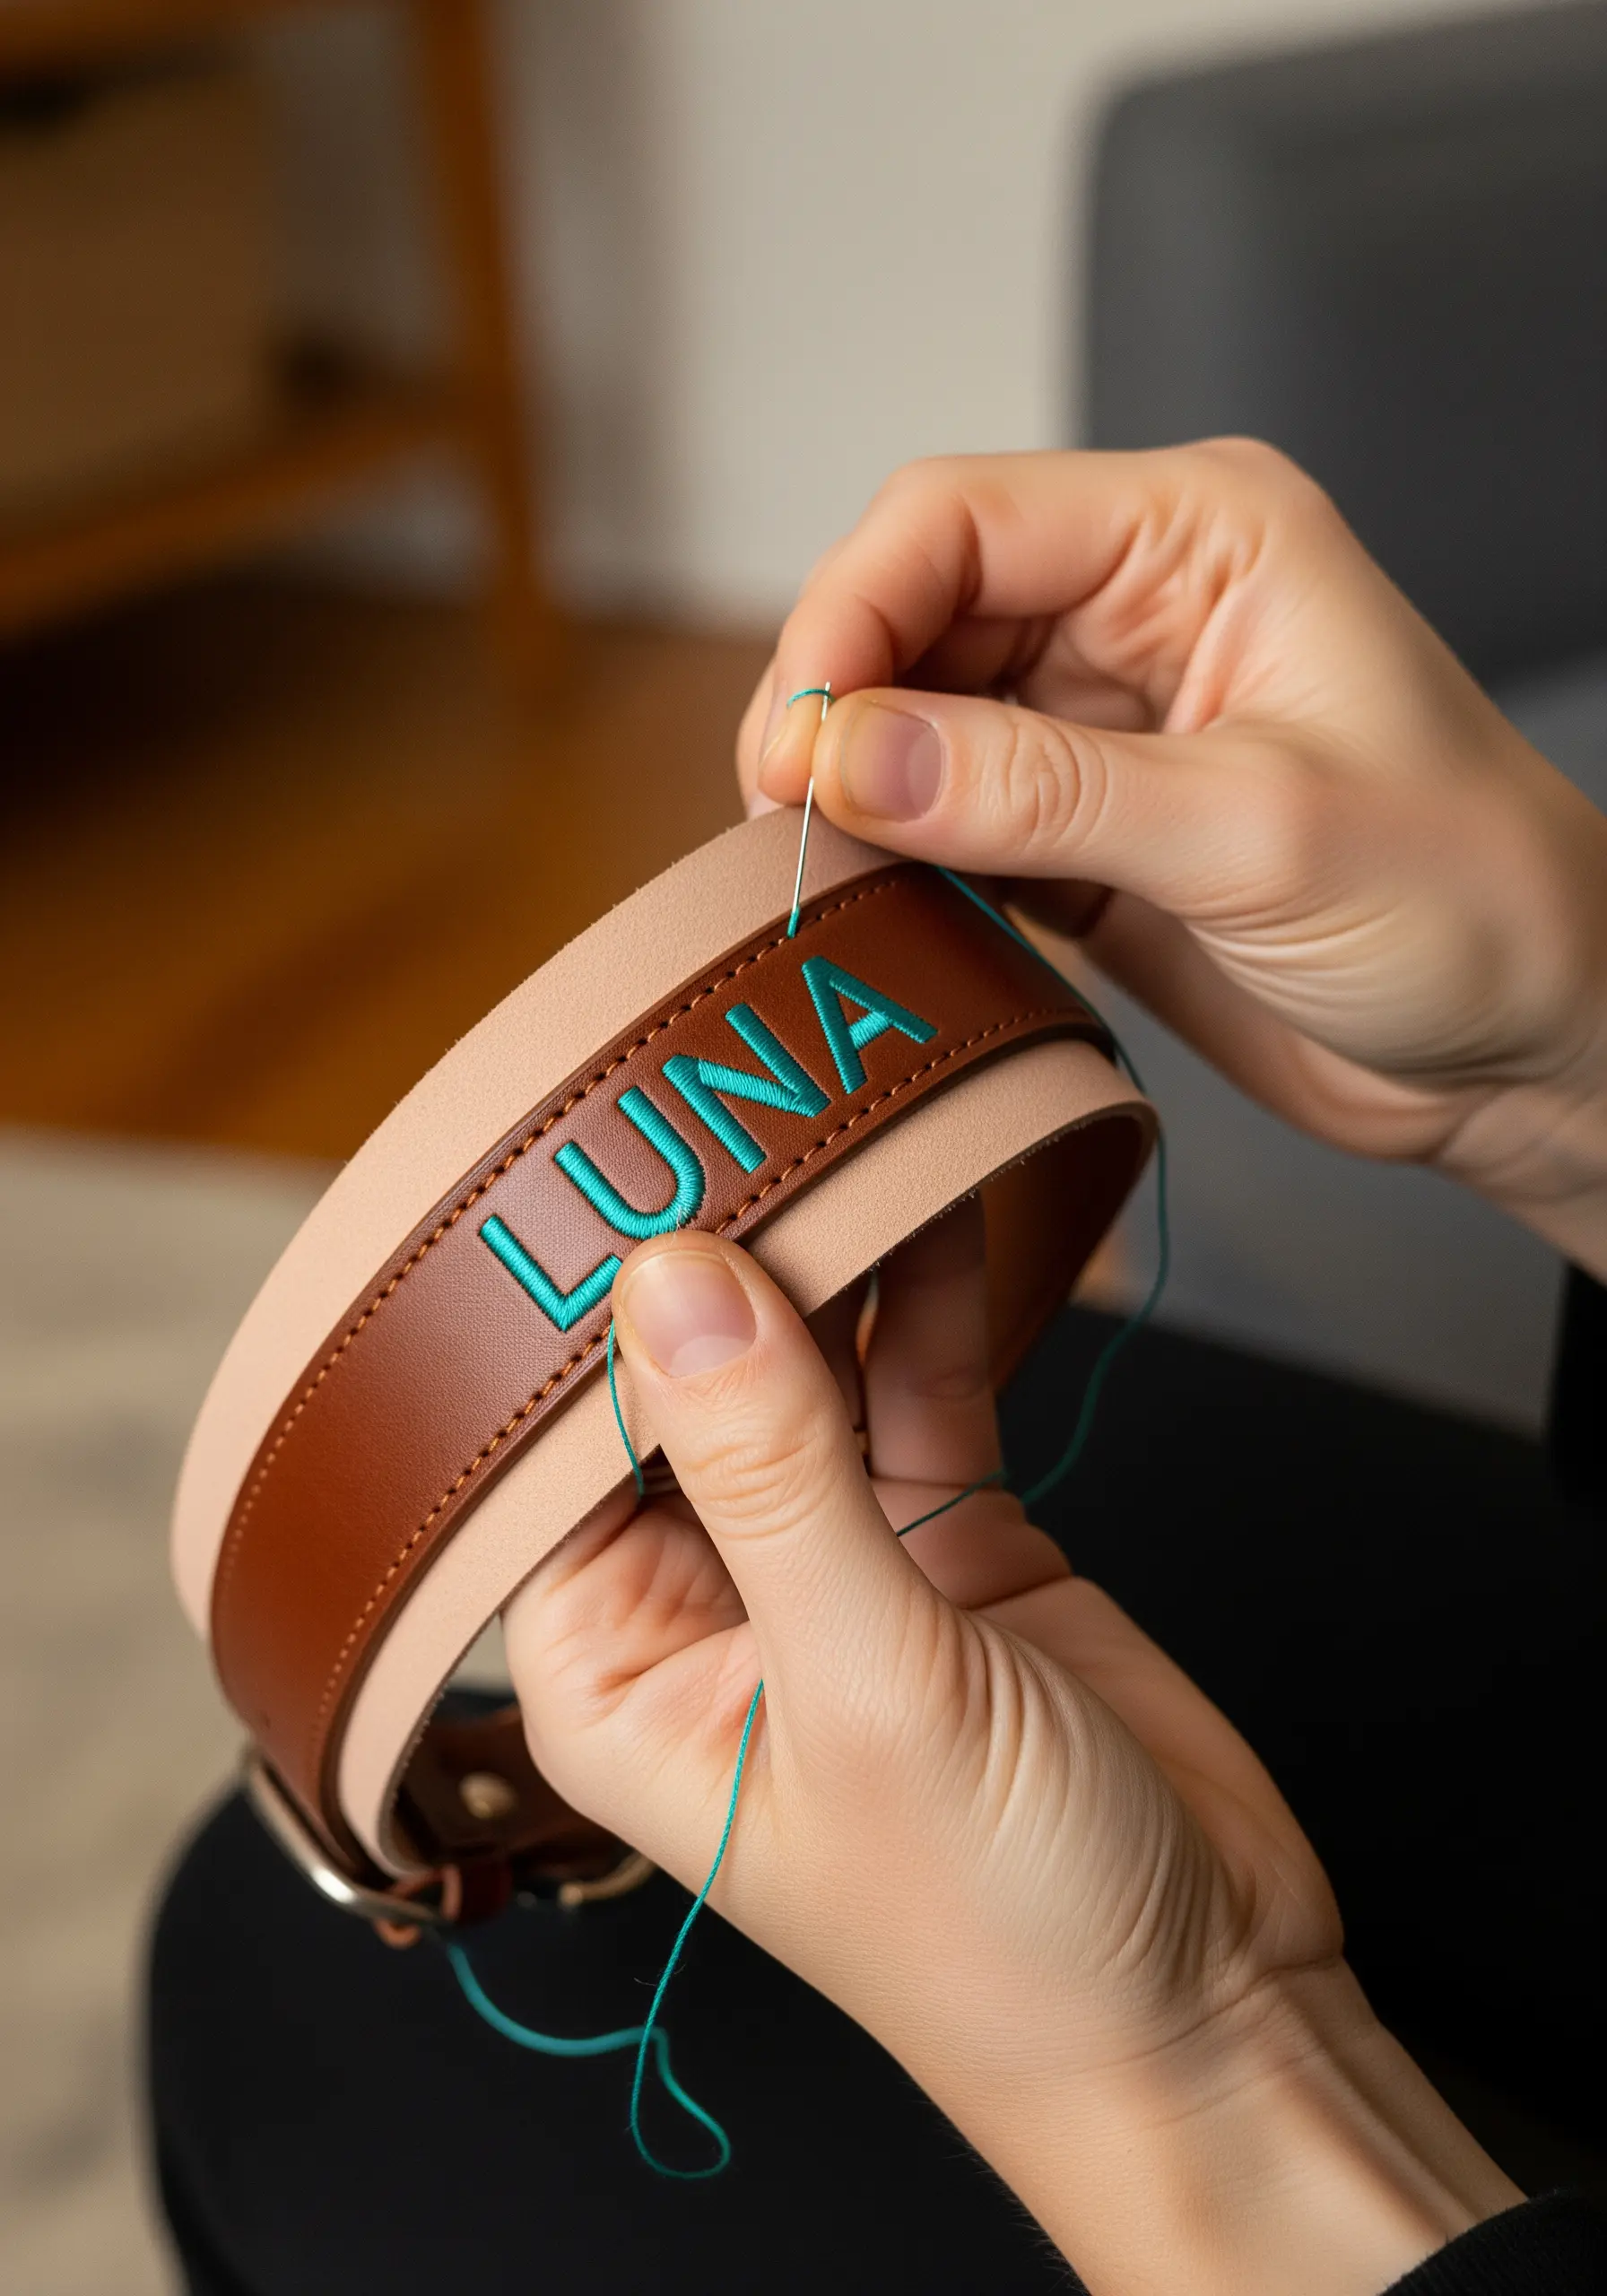
Tiny lettering embroidery is perfect for personalizing accessories for you or your furry friends.
For sharp, readable letters on a surface like this, a padded satin stitch is the best choice. It lifts the letters off the background, making them pop.
First, create an outline with a split stitch. Then, lay down a foundation of straight stitches within the outline before covering everything with dense, smooth satin stitches.
Choose a high-contrast, durable thread, like the turquoise against the brown leather, to ensure the name is both beautiful and long-lasting.
17. Stitch Botanical Sachets for Scent and Style
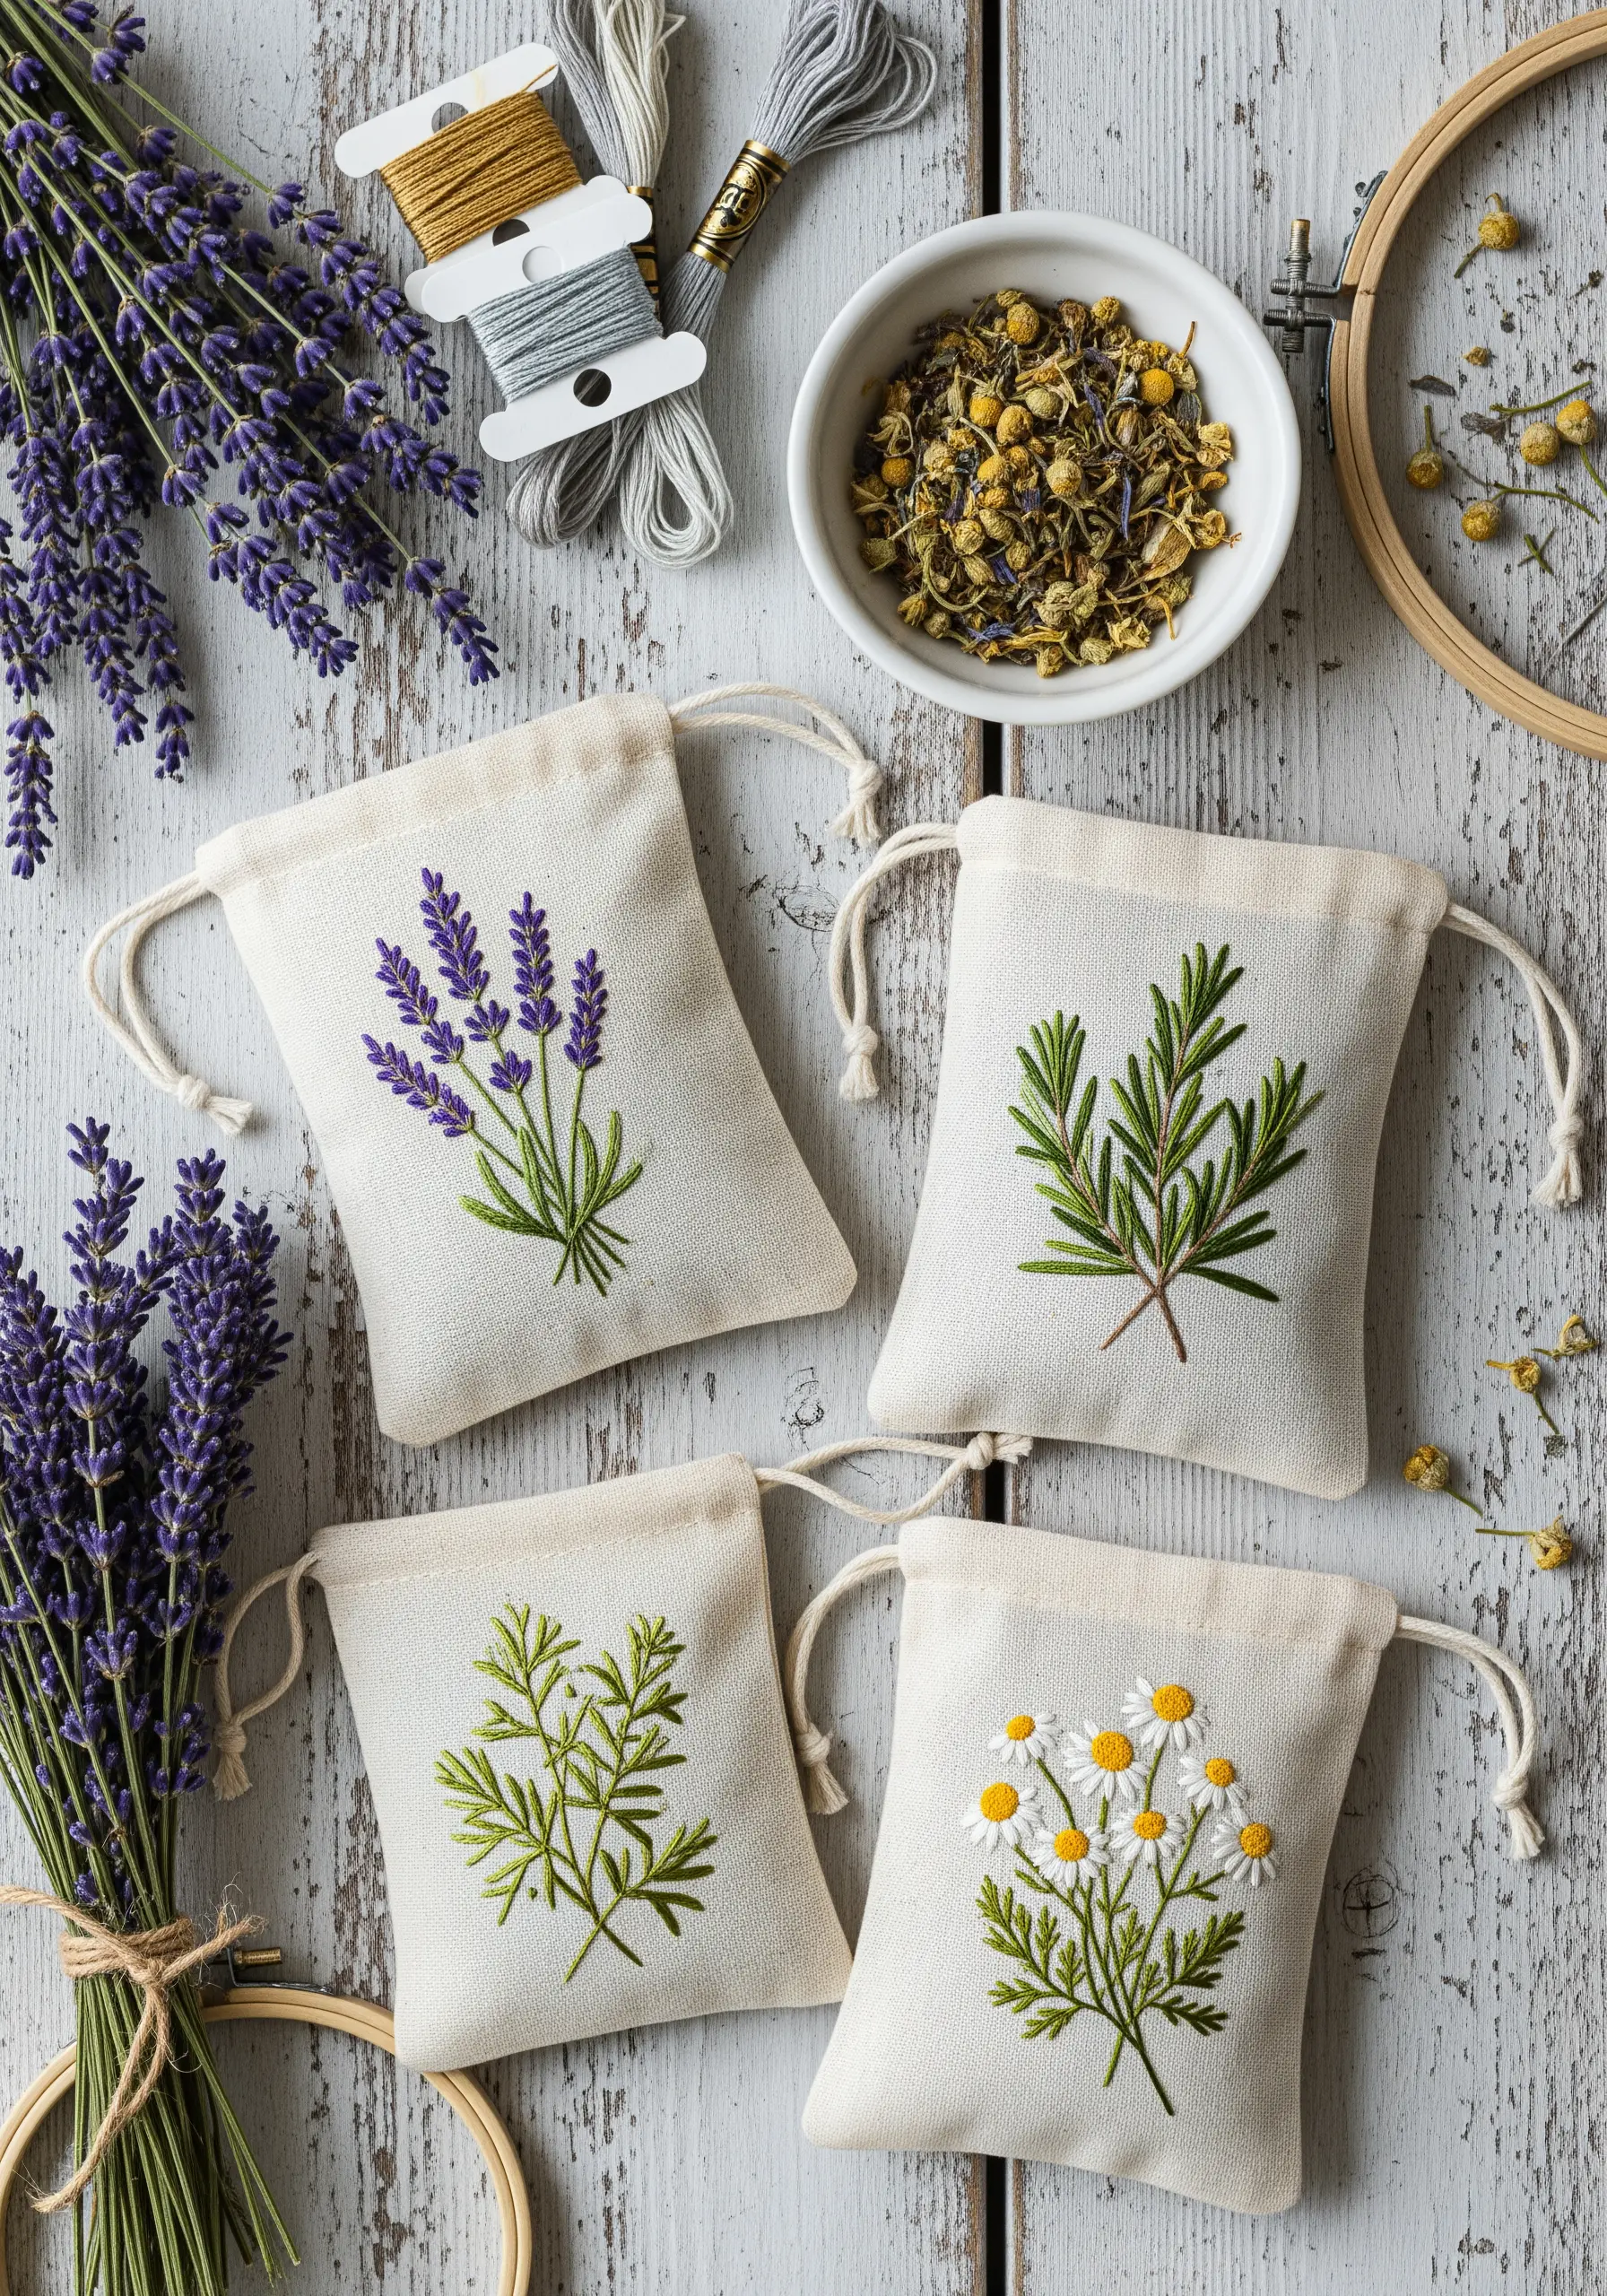
Create beautiful, reusable gift packaging like these herbal sachets, where the embroidery is as lovely as the fragrant contents.
Use simple, classic stitches to render these herbs. Fishbone stitch creates perfectly textured leaves, stem stitch is ideal for the stalks, and French knots or lazy daisy stitches make wonderful blossoms.
Stitching on small linen or cotton drawstring bags is manageable and quick, making this a perfect project for an afternoon.
These sachets show that luxurious items don’t need to be complex—just thoughtfully made with well-executed basic stitches.
18. Embellish Accessories with Golden Botanicals

Use a high-sheen or metallic thread to create botanical art on a satin headband, transforming it into a luxury accessory.
To prevent the delicate satin from puckering, apply a lightweight, fusible stabilizer to the back of the fabric before you begin stitching.
A dense satin stitch is perfect for creating the solid, appliqué-like effect of the ginkgo leaves. For the best result, outline each shape with a split stitch first to create a raised, clean edge for your satin stitches to wrap around.
The combination of shimmering gold thread on the vibrant green satin creates a rich, opulent look.
19. Tackle a Large-Scale Mandala Project
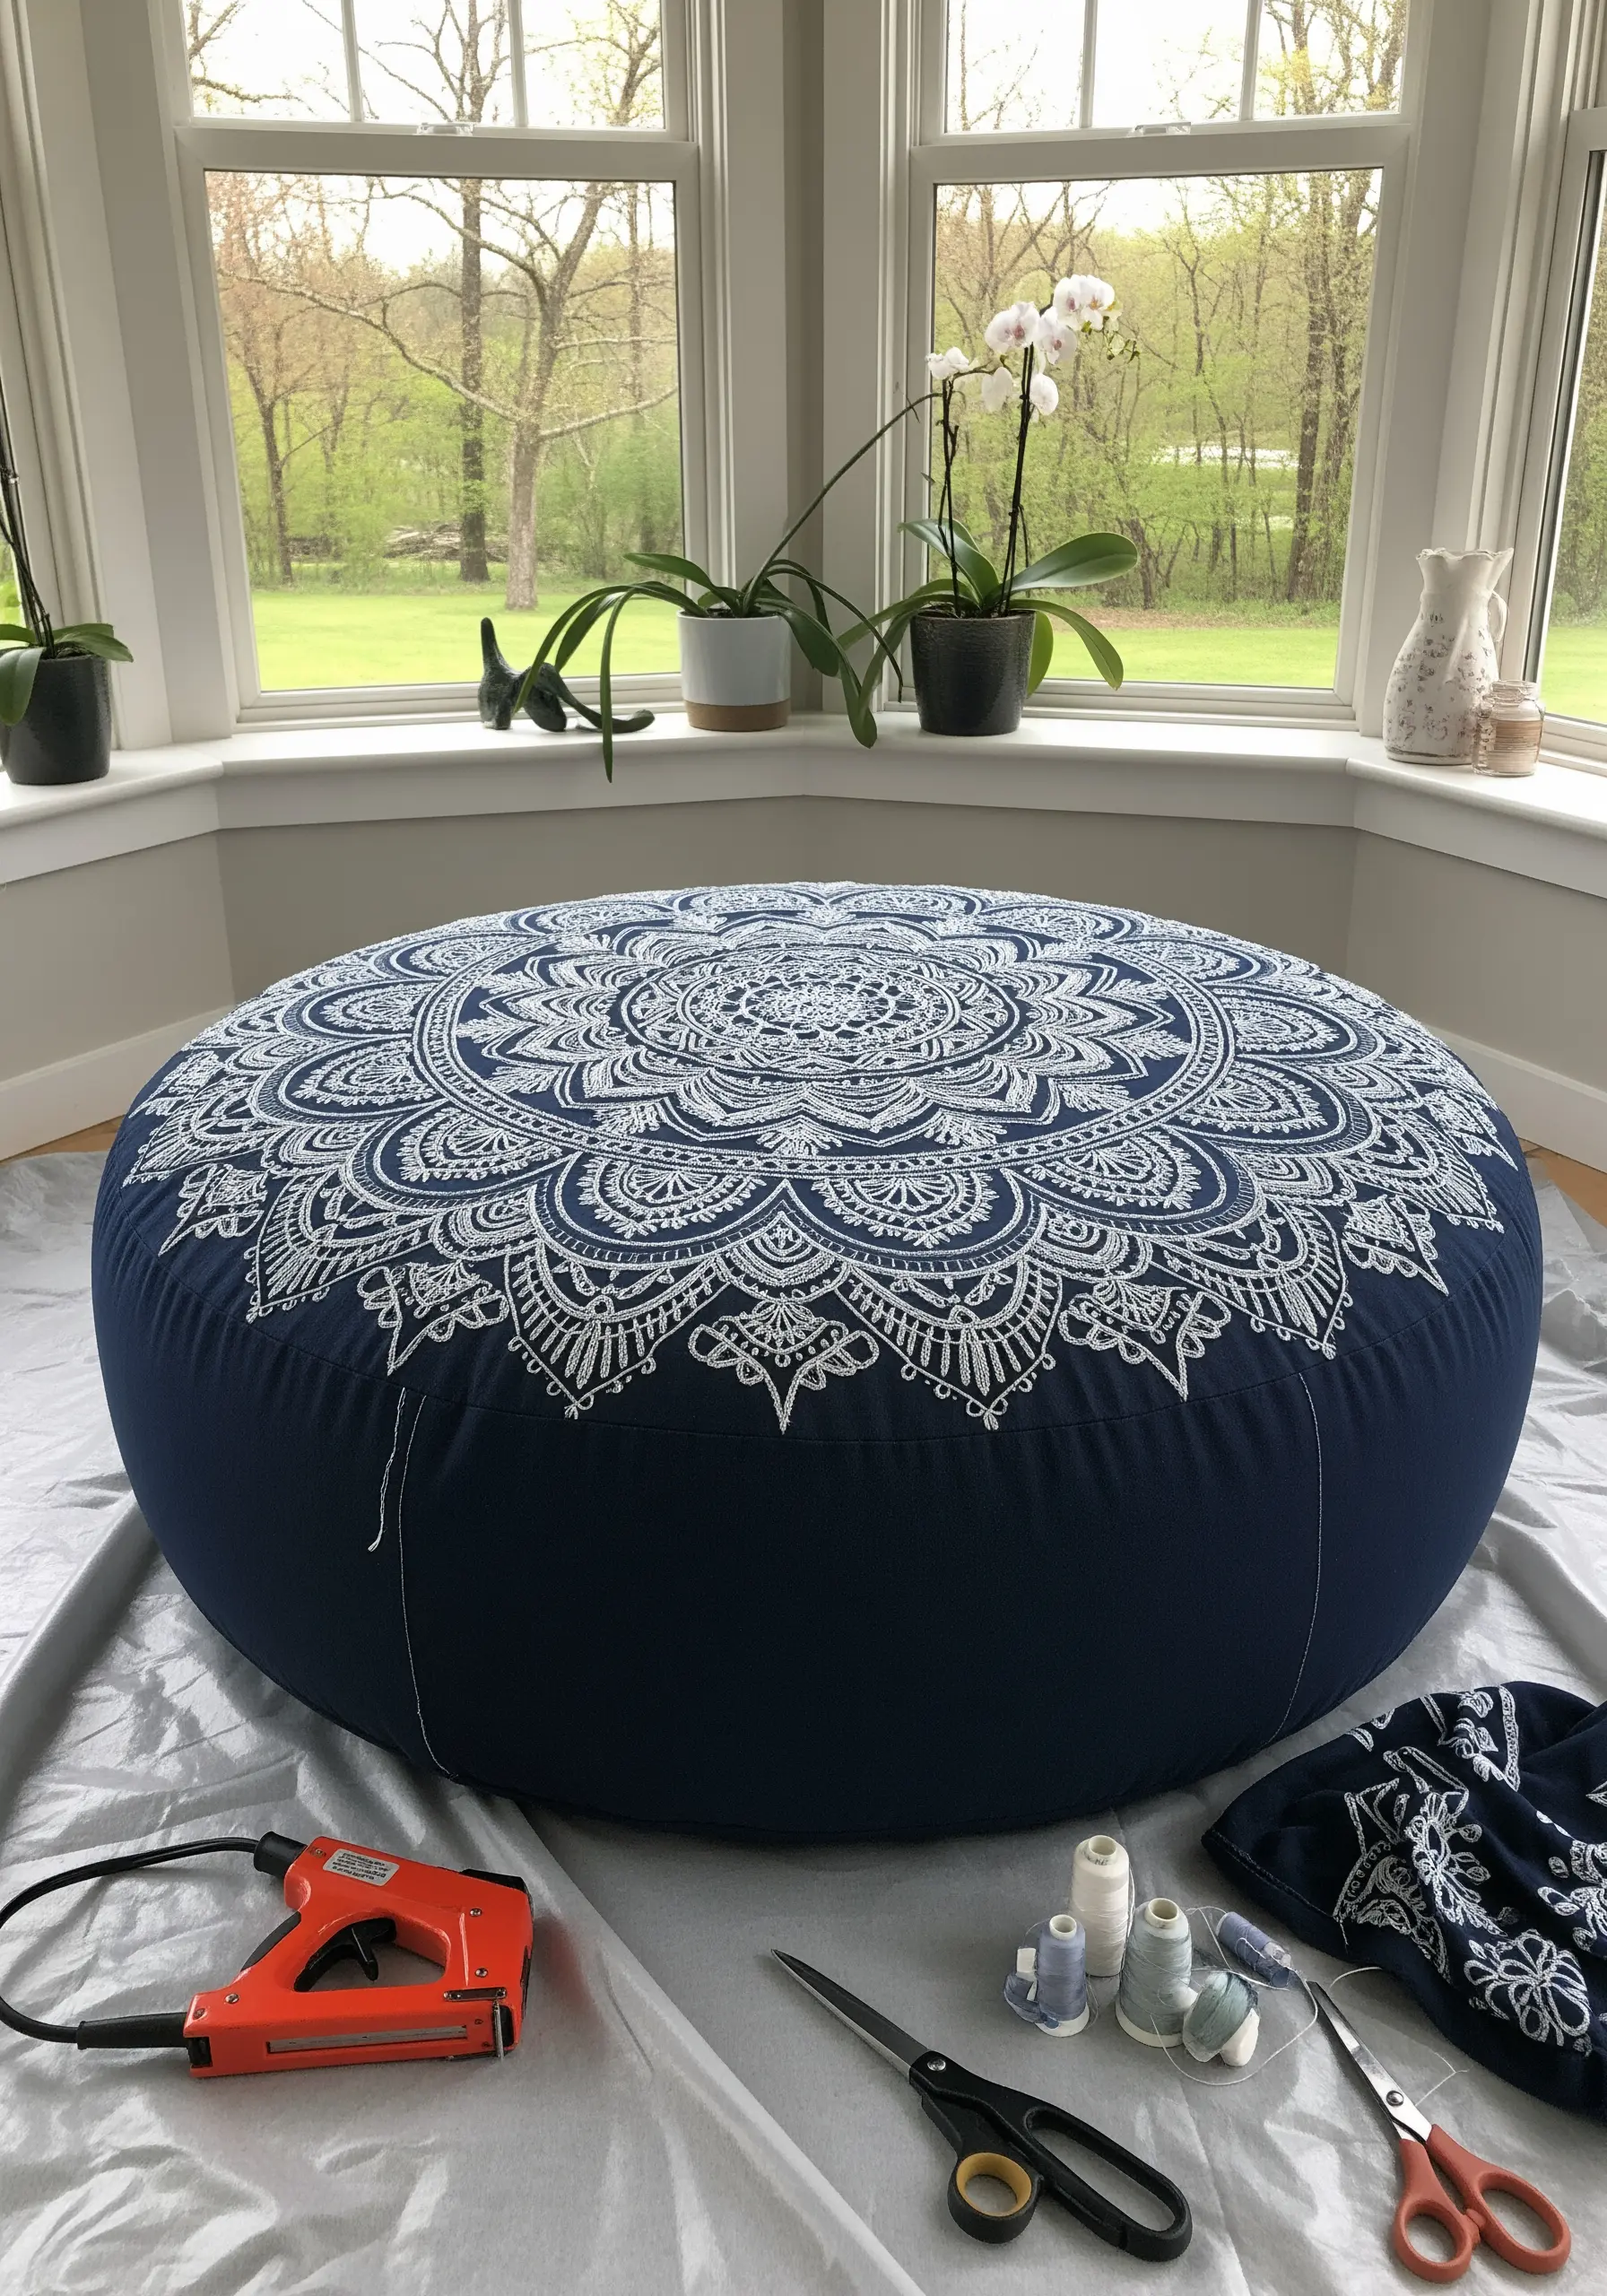
To create an embroidered mandala on a large floor cushion, focus on line stitches for a manageable and meditative process.
Instead of trying to fill every shape, use a simple backstitch or chain stitch to trace the intricate patterns. This defines the design beautifully without requiring hundreds of hours of satin stitching.
Use a white or light-colored thread on a dark fabric base to create a striking, high-contrast visual. A thicker thread, like a pearl cotton #5, will make your lines bold and substantial.
Transfer the design onto the fabric in sections using a water-soluble pen or a chalk pencil to keep the large pattern from smudging as you work.
20. Weave a Frame for Your Embroidery

Sometimes the presentation is just as important as the stitching itself, so consider creative ways to frame your embroidery.
This frame uses woven satin ribbons to create a soft, textural border. Wrap a simple wooden frame with strips of ribbon, securing them at the back with glue or staples.
To integrate a hand-stitched feel, you can add a delicate line of seed stitches or French knots along the edge of the lace trim before attaching it.
This mixed-media approach turns a simple frame into a bespoke piece that complements the soft texture of embroidery.
21. Craft 3D Ornaments with Beaded Felt

Create holiday-themed embroidery that feels modern and organic by combining felt, beads, and sequins into three-dimensional forms.
Use felt as a sturdy base for your beadwork. Stitch your design—using a mix of seed beads, bugle beads, and sequins—onto the top layer of felt first.
Once decorated, place this piece on top of a backing piece of felt, add a small amount of stuffing between the layers, and neatly join the edges with a blanket stitch.
This appliqué technique allows you to create plush, tactile ornaments with intricate detail and a clean, professional finish.


