Have you ever finished an embroidery project and felt that, while technically correct, it was missing a certain spark? That something extra that would transform it from a craft into a piece of art?
This is where the magic of mixed media comes in. It’s not about complicating your process, but about expanding your creative language. By thoughtfully combining thread with paint, paper, or even natural elements, you can add layers of texture, depth, and story that stitching alone cannot achieve.
Think of thread as just one tool in your art supply box. These projects are designed to help you see the possibilities that open up when you allow your needle to collaborate with a paintbrush, a pair of scissors, or the beauty of a pressed flower. It’s an invitation to create wall art that is not only seen, but truly felt.
1. Celestial Canvas: Stitching a Painted Galaxy

Begin by painting a galactic swirl directly onto dark cotton or linen fabric using acrylic paints thinned slightly with water.
Blend whites, blues, and purples with a sponge to create a soft, nebulous background before you even thread your needle.
Once dry, use a single strand of silver or gold metallic thread to stitch constellations with simple straight stitches, connecting beaded stars.
Add dimension by scattering tiny seed beads and white French knots across the background to represent distant star fields, creating layers of light.
2. Ethereal Botanics: Layering Stitches over Pressed Flora
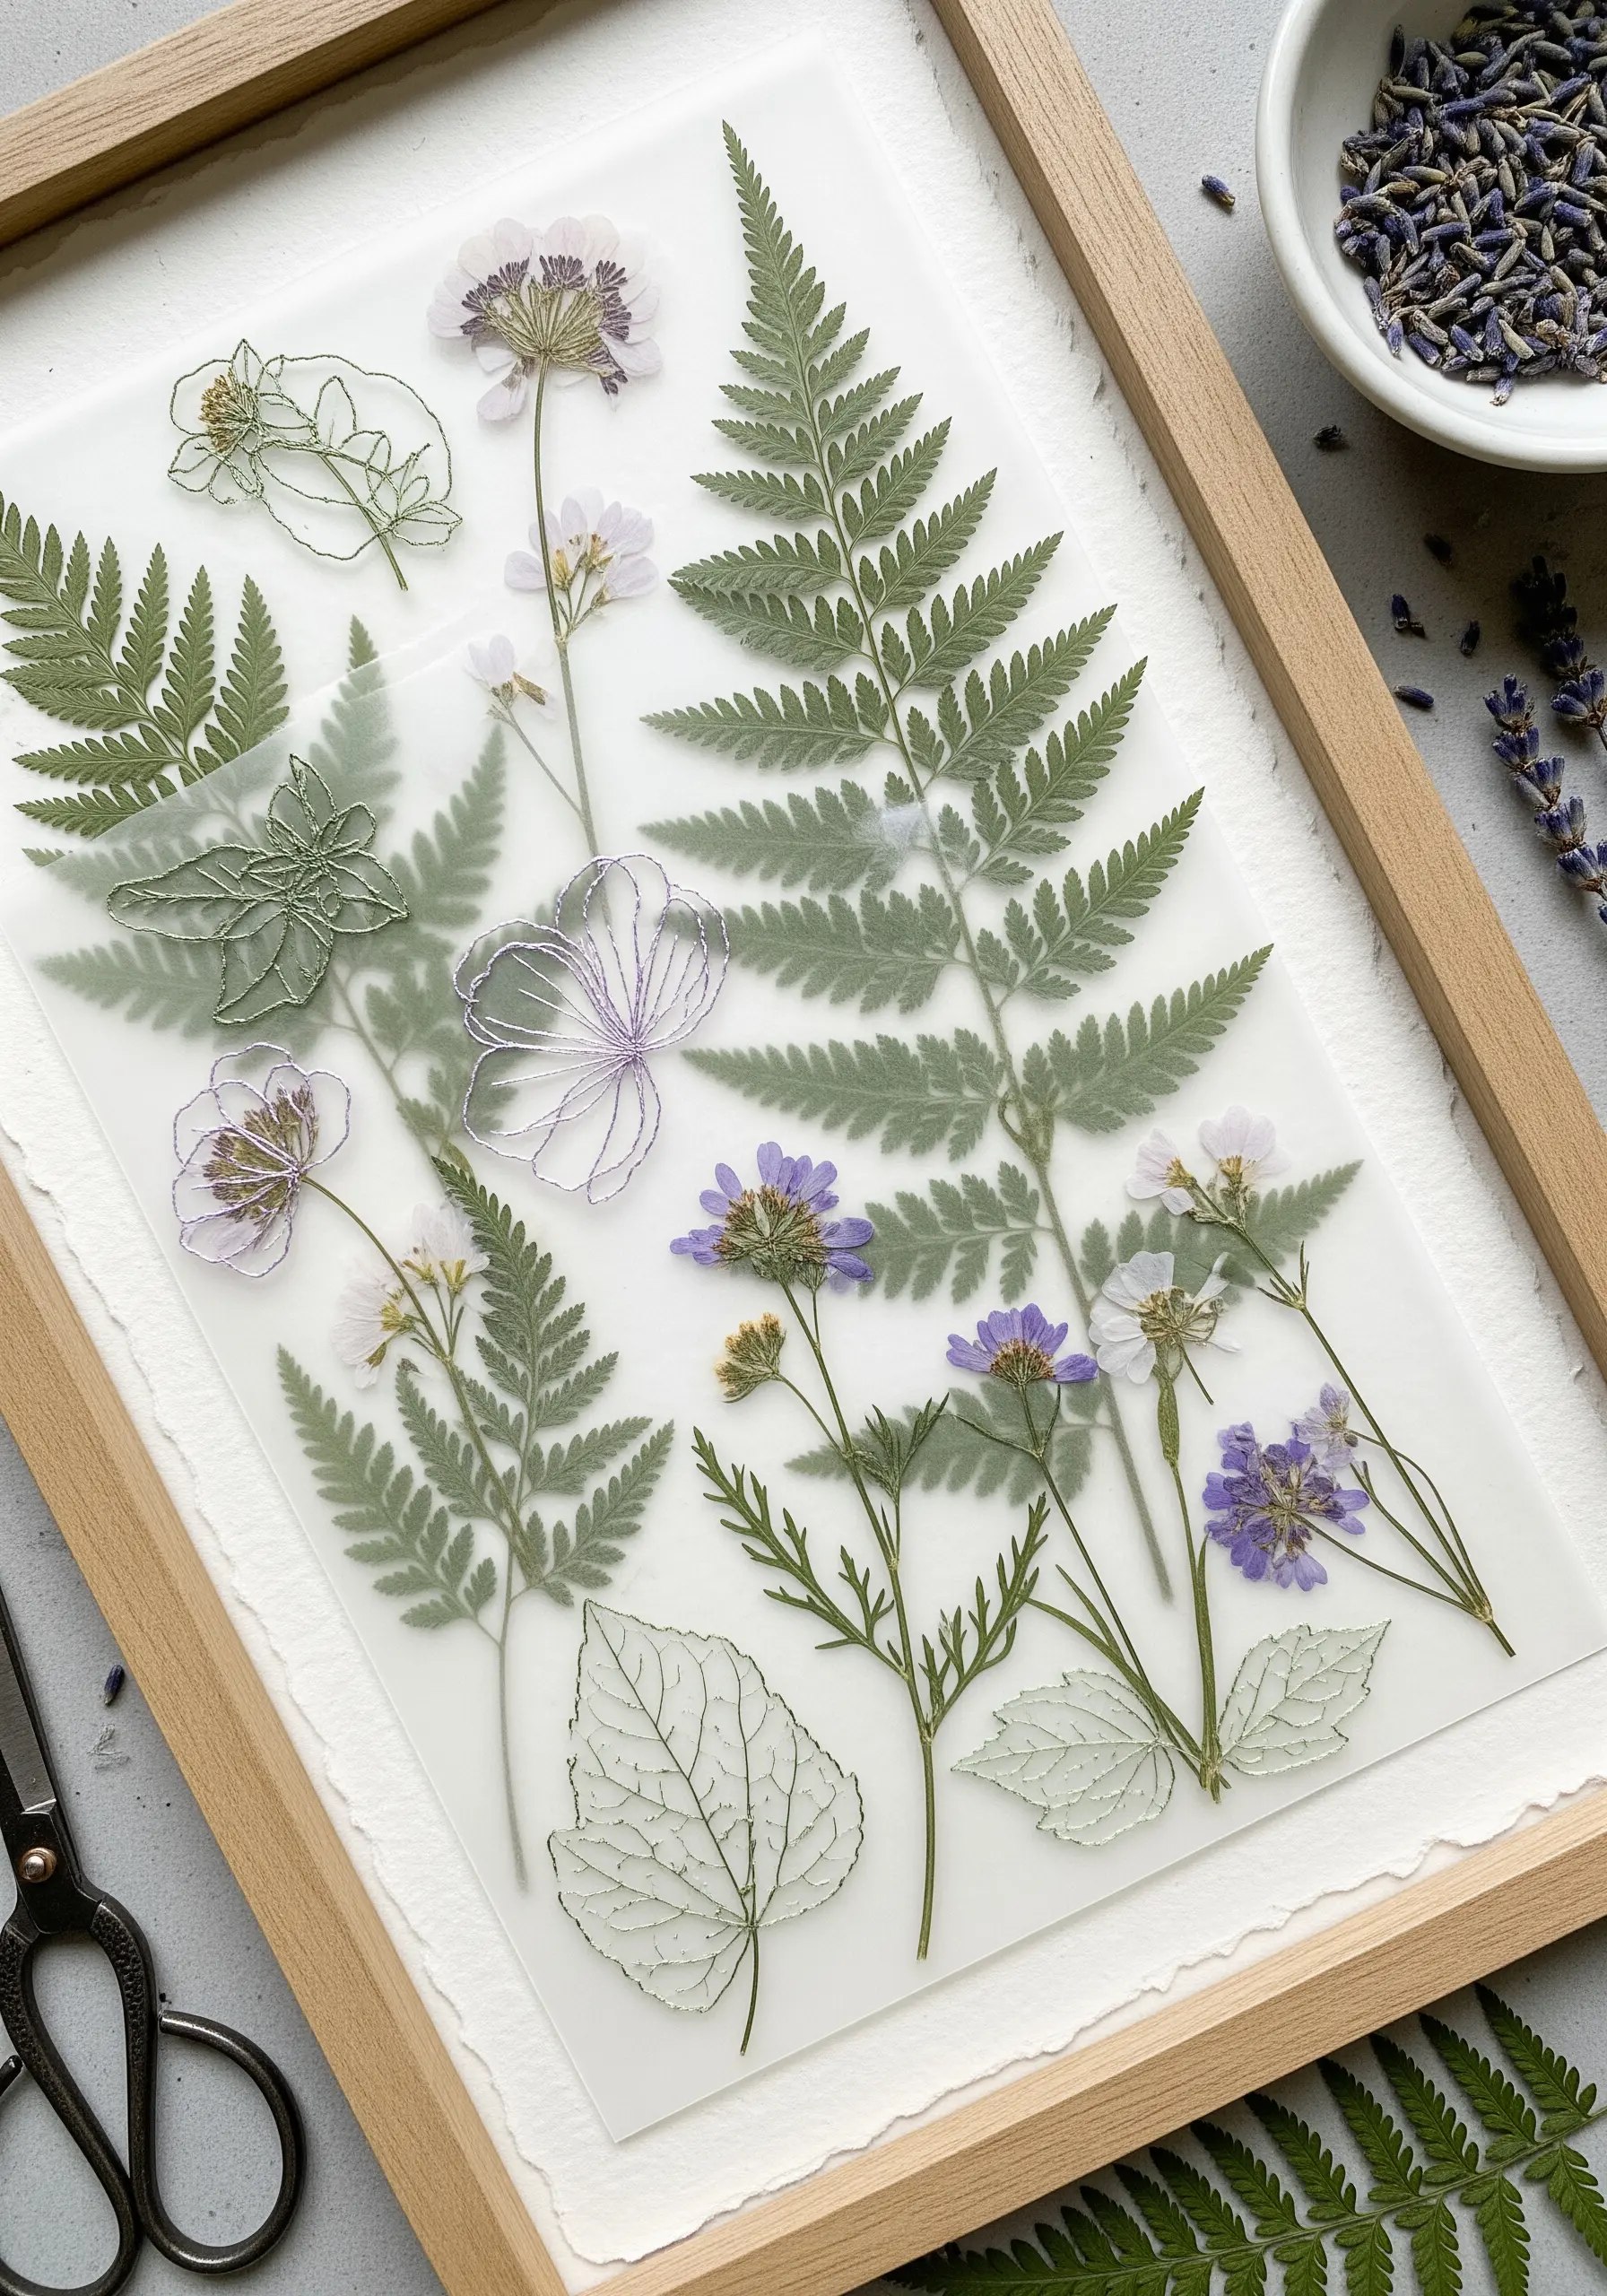
Stitch delicate floral and leaf outlines onto a sheer fabric like tulle or organza, which will act as a transparent top layer.
Use a single strand of floss in white or silver to create ethereal, ghost-like impressions of botanical forms.
Arrange your real pressed flowers and leaves on a piece of high-quality art paper, then carefully place your stitched tulle over the top.
Framing these layers together creates a beautiful interplay between the tangible, natural elements and their delicate threaded interpretations.
3. Thread as Line: Architectural Stitching on Paper Collage
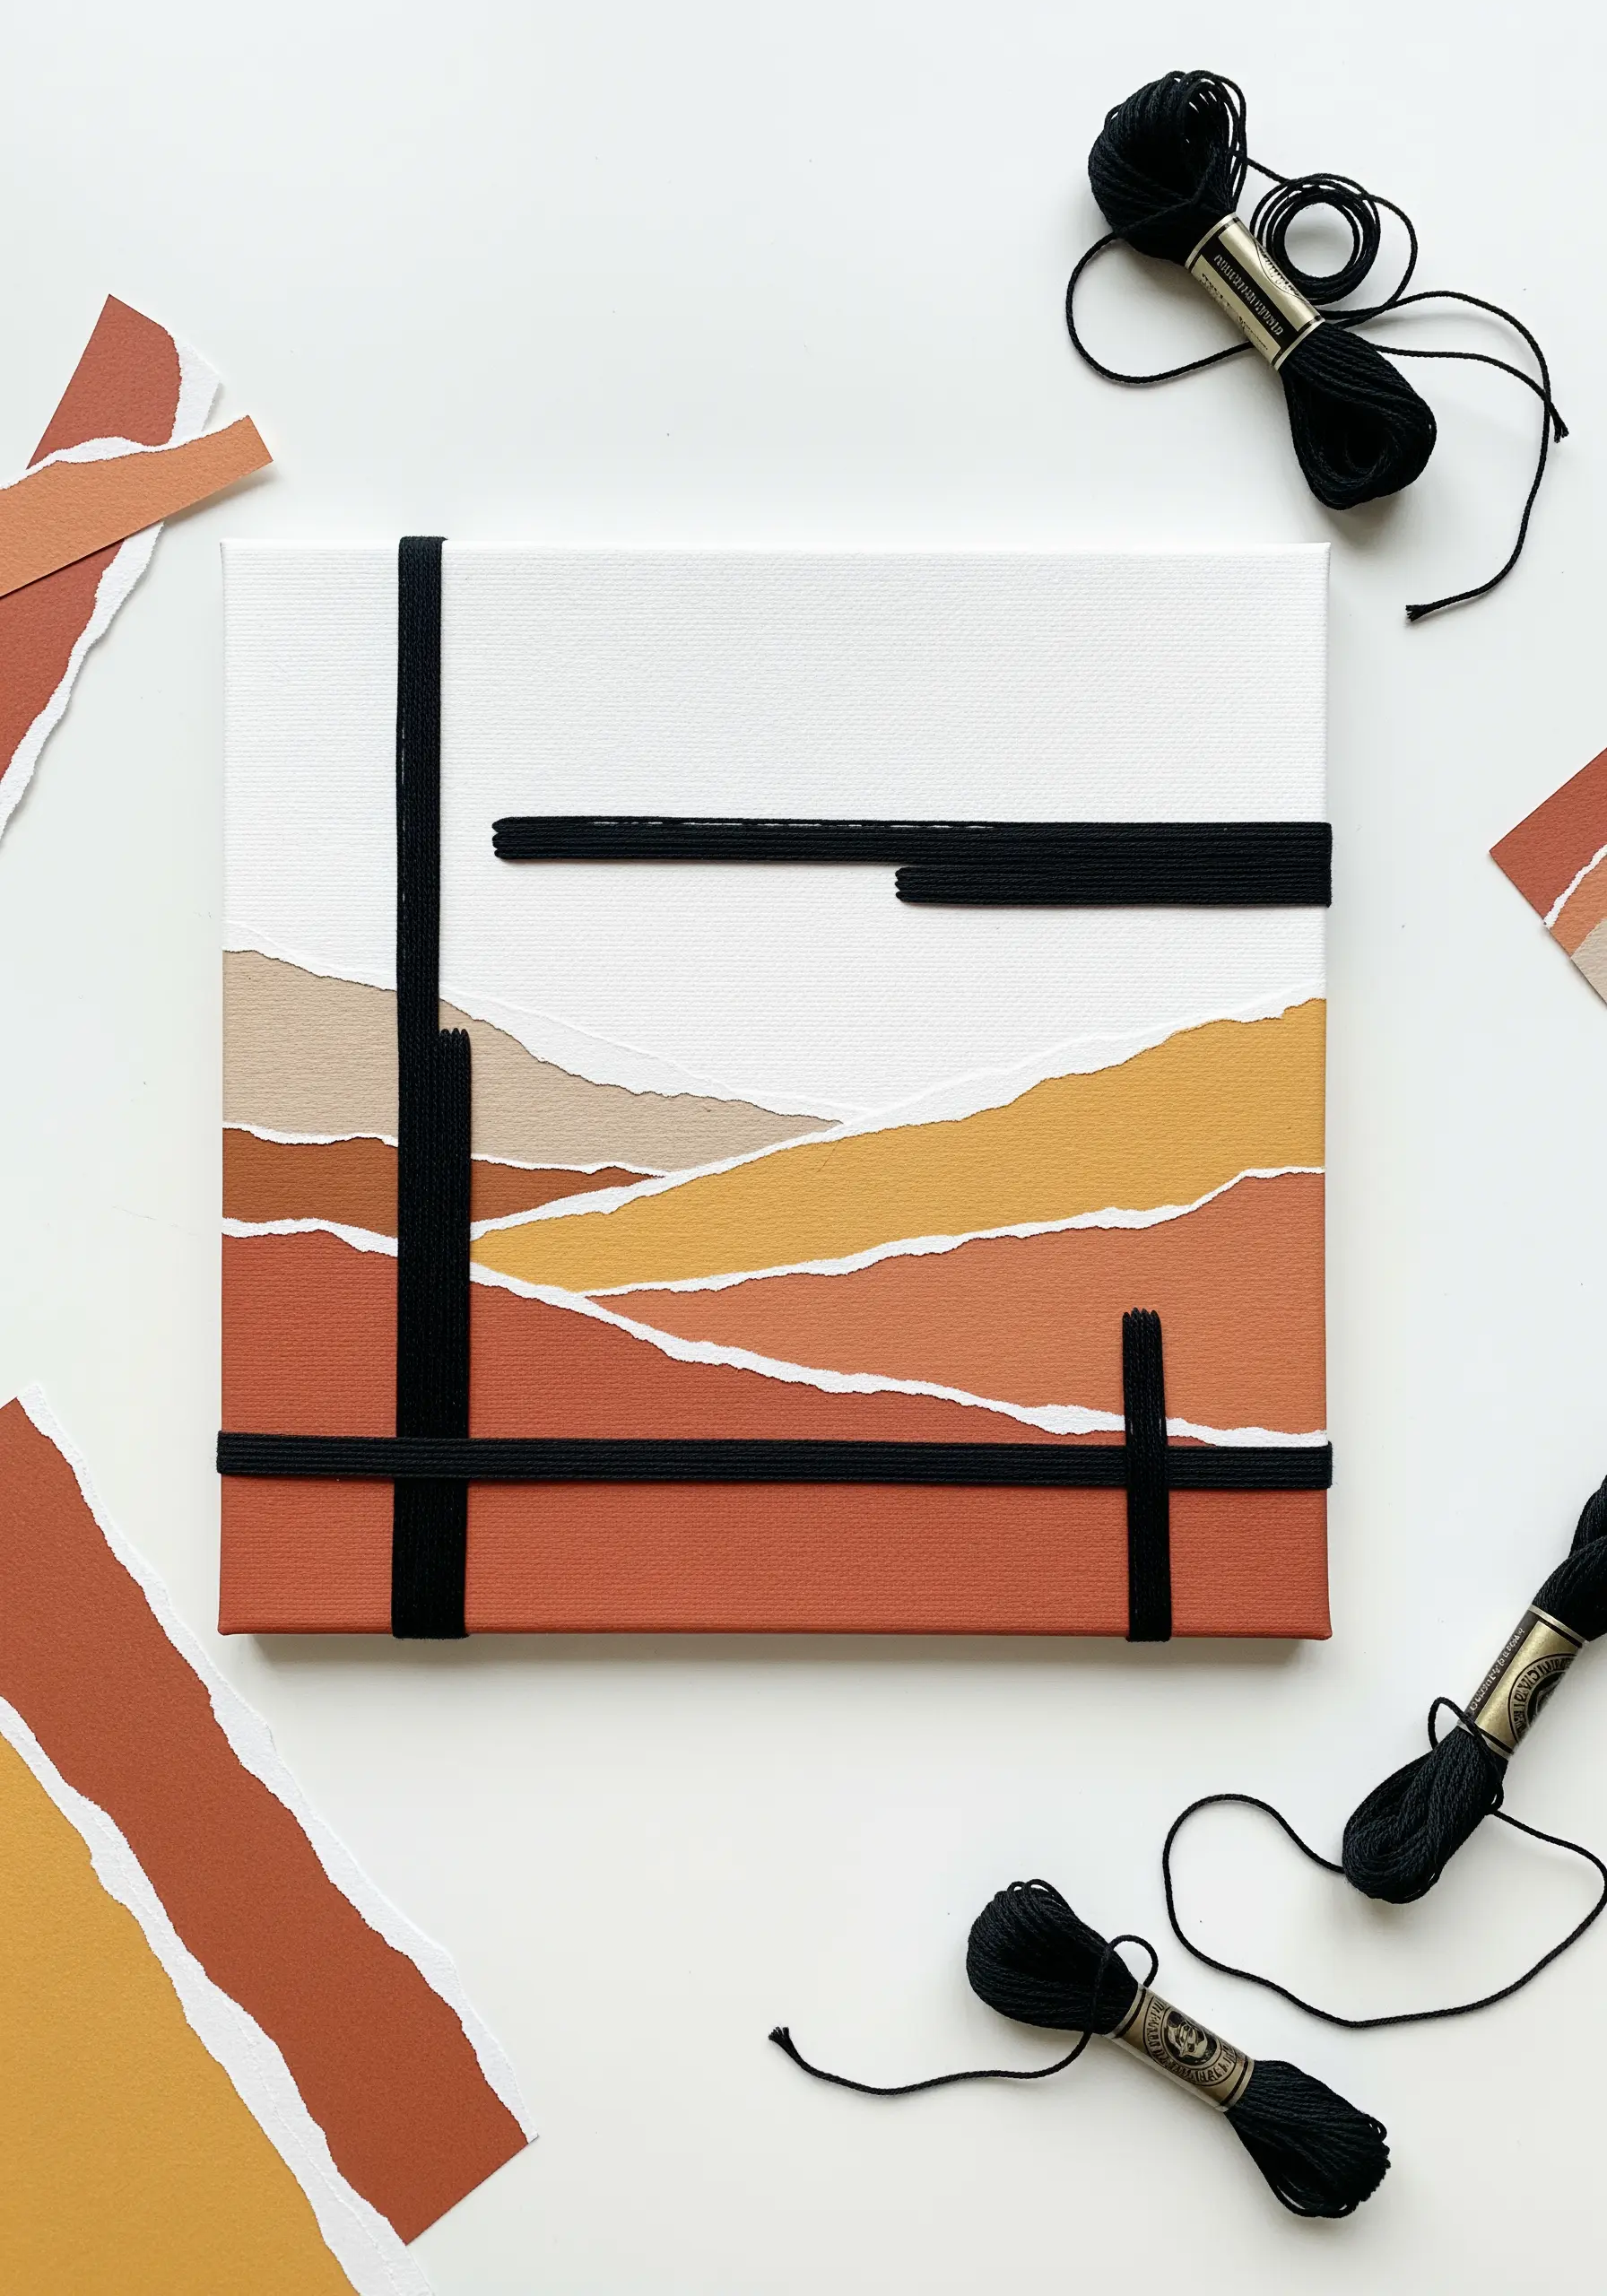
Create your foundational landscape by layering torn, earthy-toned paper onto a square canvas, securing it with matte mod podge.
Instead of using thread to fill shapes, treat it as a bold, graphic element that brings structure to the composition.
Use a thick, black pearl cotton or yarn and wrap it decisively around the canvas, creating strong vertical and horizontal lines.
This technique transforms your embroidery floss from a decorative detail into a key structural component of the artwork, adding tension and a clean, modern edge.
4. Appliqué Accents: Integrating Fabric into Thread Painting
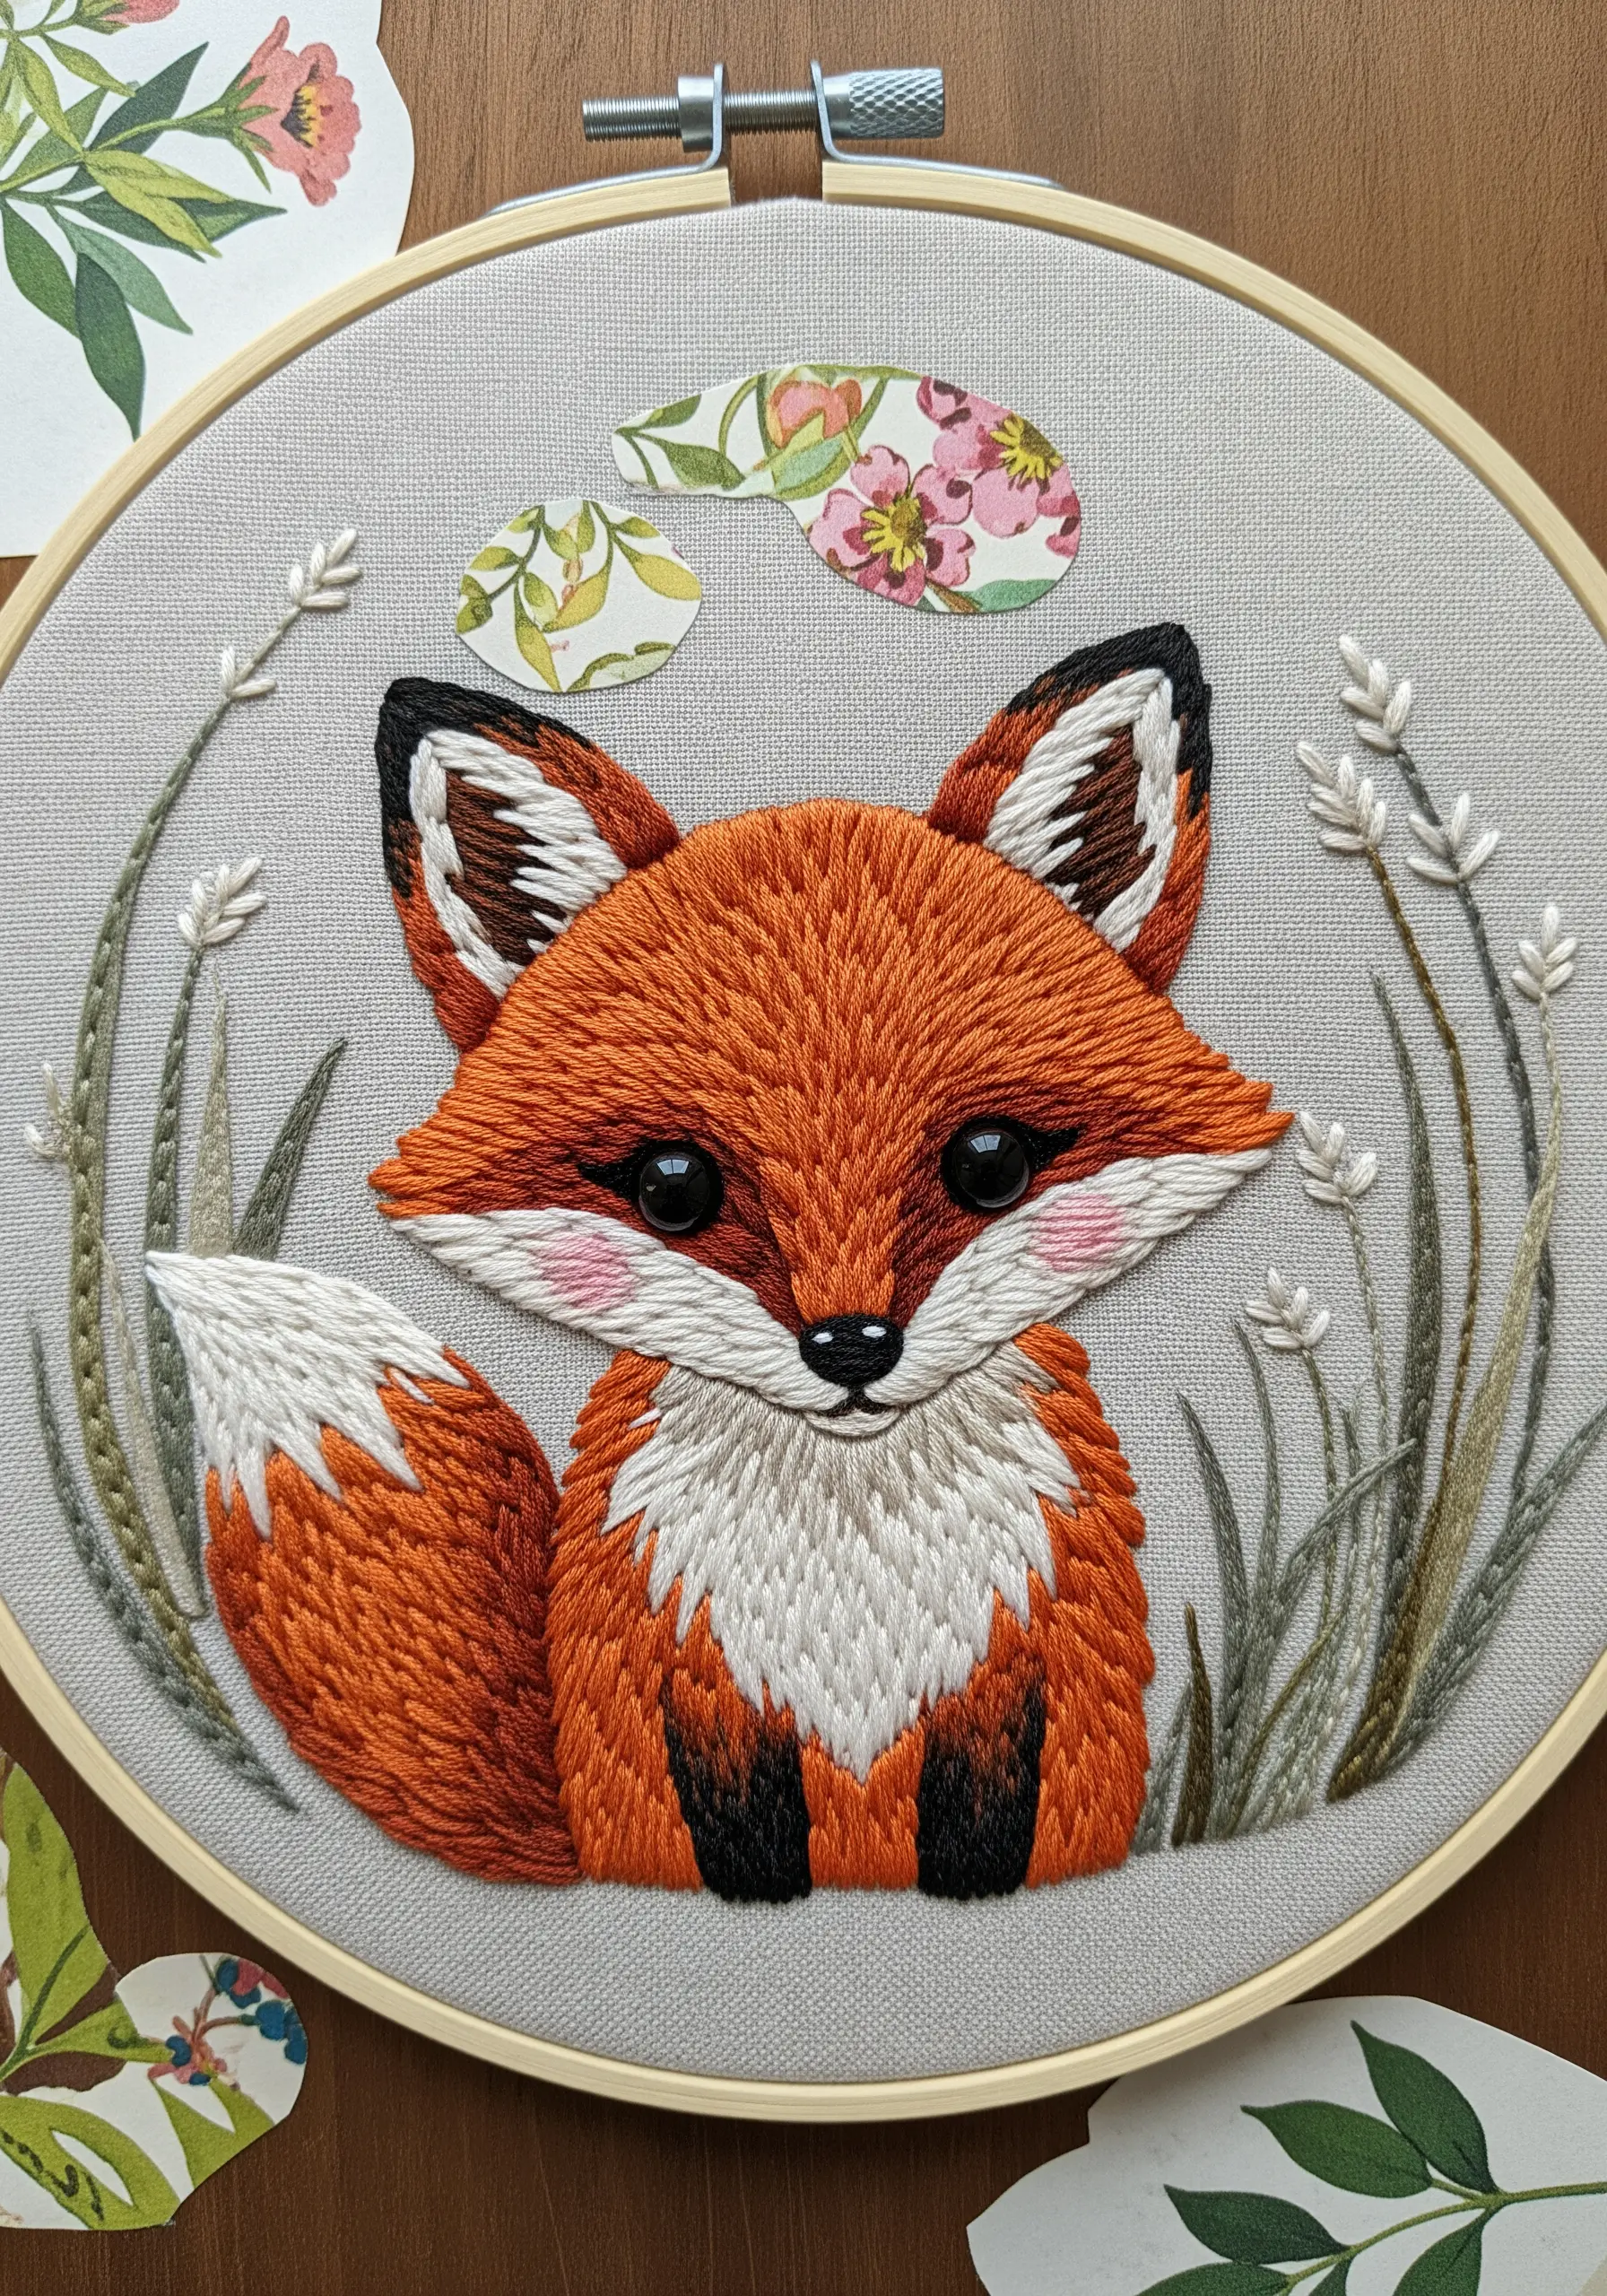
Elevate your thread-painted animals by introducing small, patterned fabric appliqué elements for unexpected detail.
Cut tiny pieces of floral or geometric fabric for areas like the inner ears or a decorative patch, and secure them with a lightweight fusible web.
Edge the fabric pieces with a precise backstitch or split stitch to seamlessly integrate them into your design.
This method of fabric collage embroidery adds a pop of pattern and texture that thread alone cannot replicate, making your work more dynamic and personal.
5. Sculptural Waves: Stitching into a Textured Paint Surface
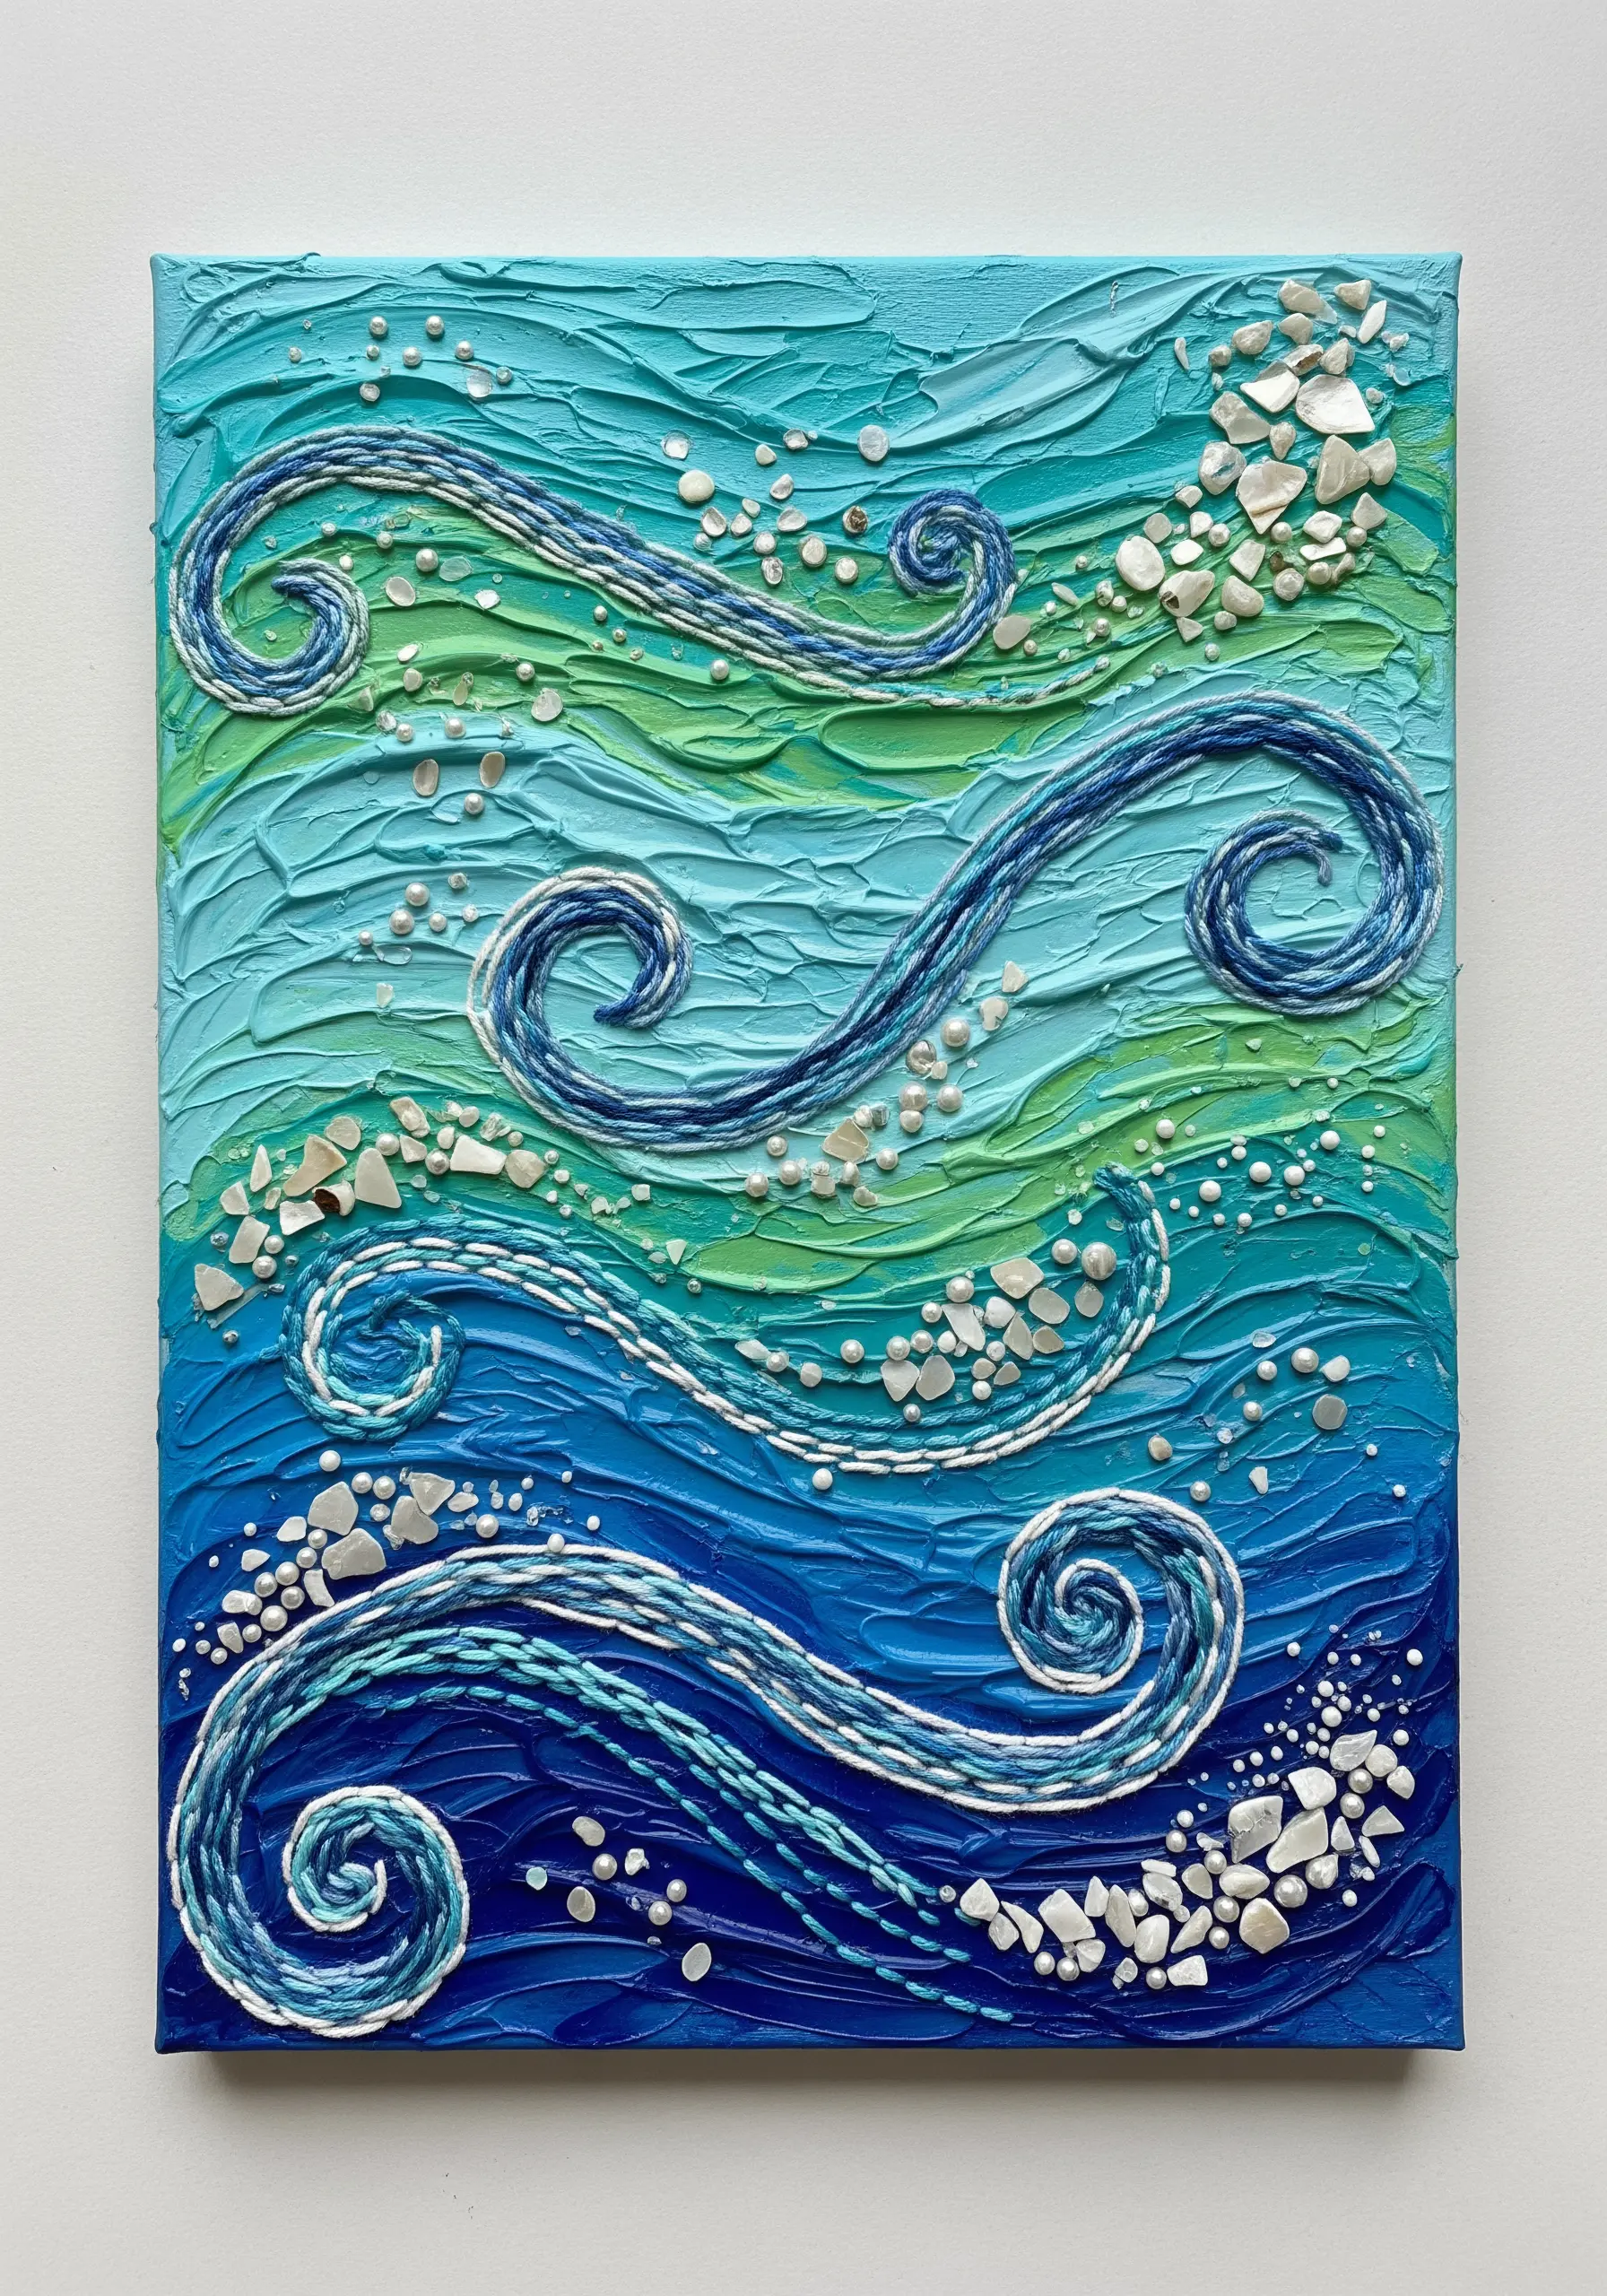
Build a dimensional foundation on your canvas using heavy body acrylic paint or a modeling paste, sculpted into waves with a palette knife.
Allow the surface to dry completely, creating a rigid, textured base that you can stitch directly into.
Use couching to lay down twisted strands of variegated blue and green yarn, following the contours of the painted waves.
Finally, scatter crushed shells or seed beads and secure them with tiny stitches to mimic sea spray and capture motion and flow in your piece.
6. Urban Layers: Papercut Collage with Selective Stitching
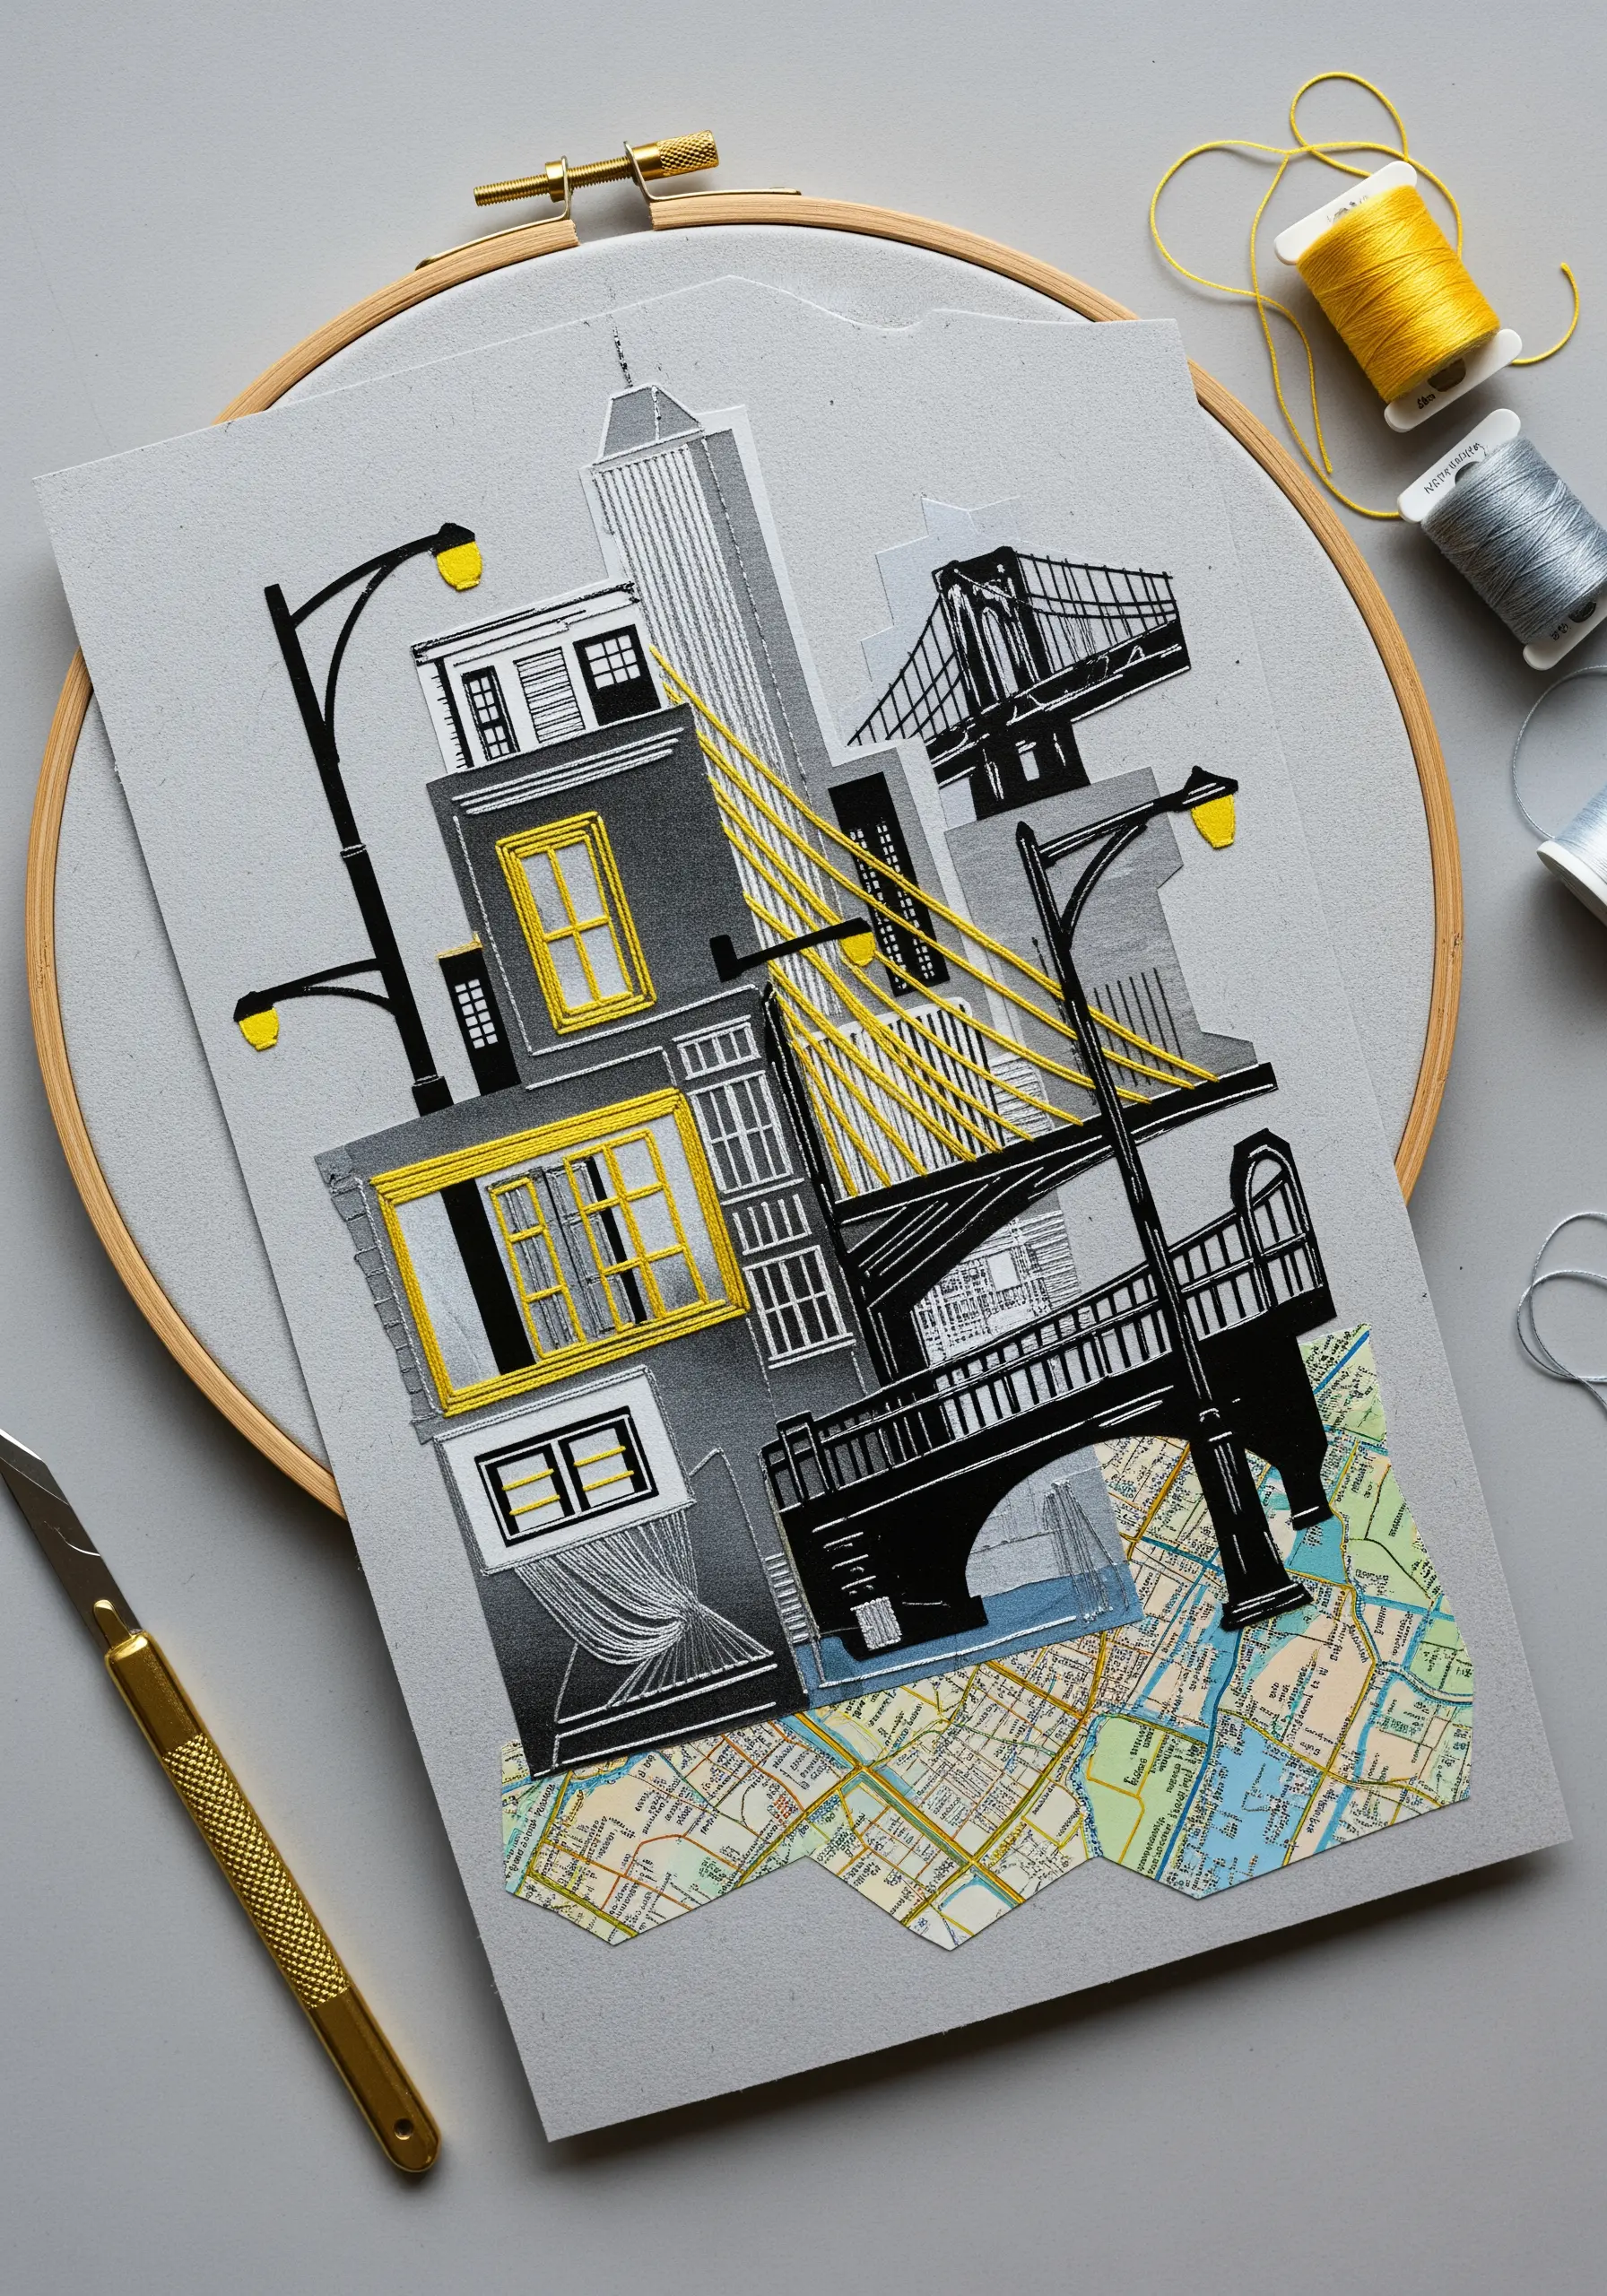
Construct a dynamic cityscape by layering different paper elements, such as maps, hand-cut silhouettes, and solid-colored cardstock.
Instead of outlining every shape, use embroidery floss to selectively draw attention to specific architectural details.
Long, straight stitches in a contrasting color like yellow are perfect for representing the cables of a bridge or a beam of light from a window.
This thoughtful approach of combining paper layers with subtle embroidery creates focus and adds a vibrant, handmade touch to the graphic collage.
7. Paper & Thread Portraiture: Creating Depth with Stitched Lines
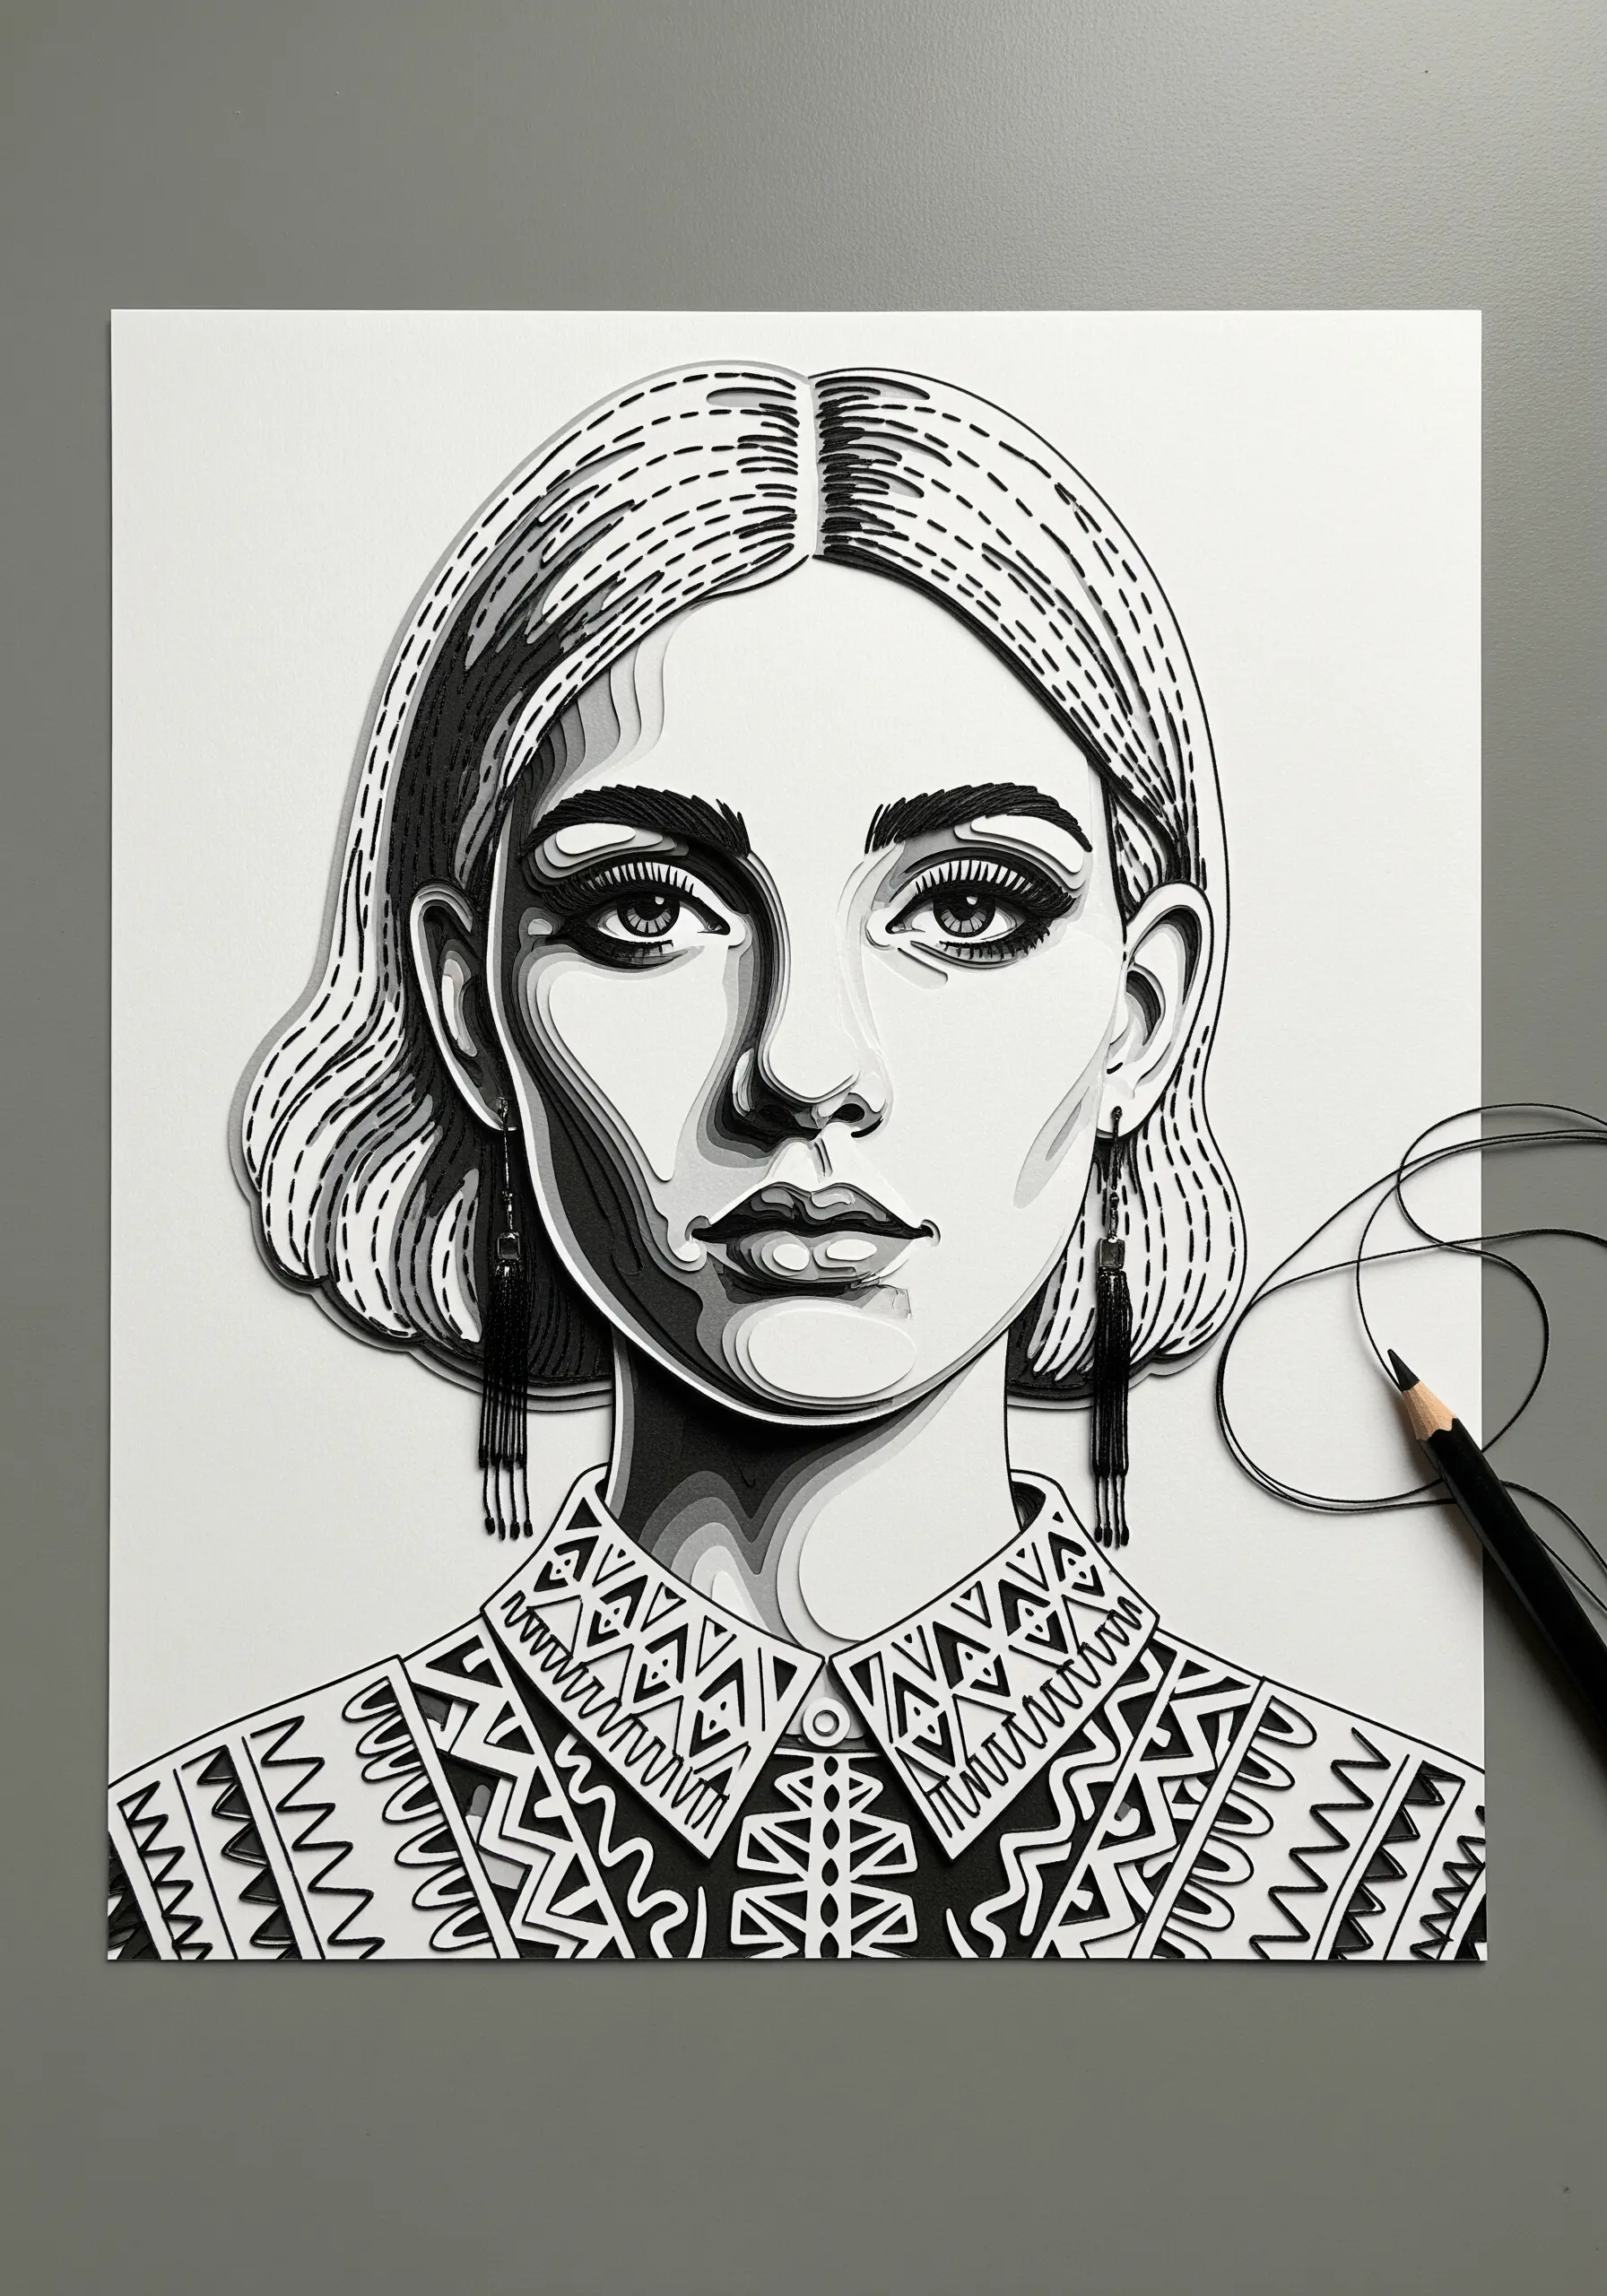
Begin with a layered papercut portrait, using shades of grey and black cardstock to build shadows and define facial features.
Introduce thread not as color, but as pure texture and line work to enhance the illustration.
Use simple backstitches or running stitches to delineate hair strands, patterns on clothing, or delicate eyelashes.
These stitched details add a tactile dimension that elevates the flat paper art designs, creating a sophisticated fusion of illustration and embroidery.
8. Watercolor Meadow: Painting a Foundation for 3D Florals
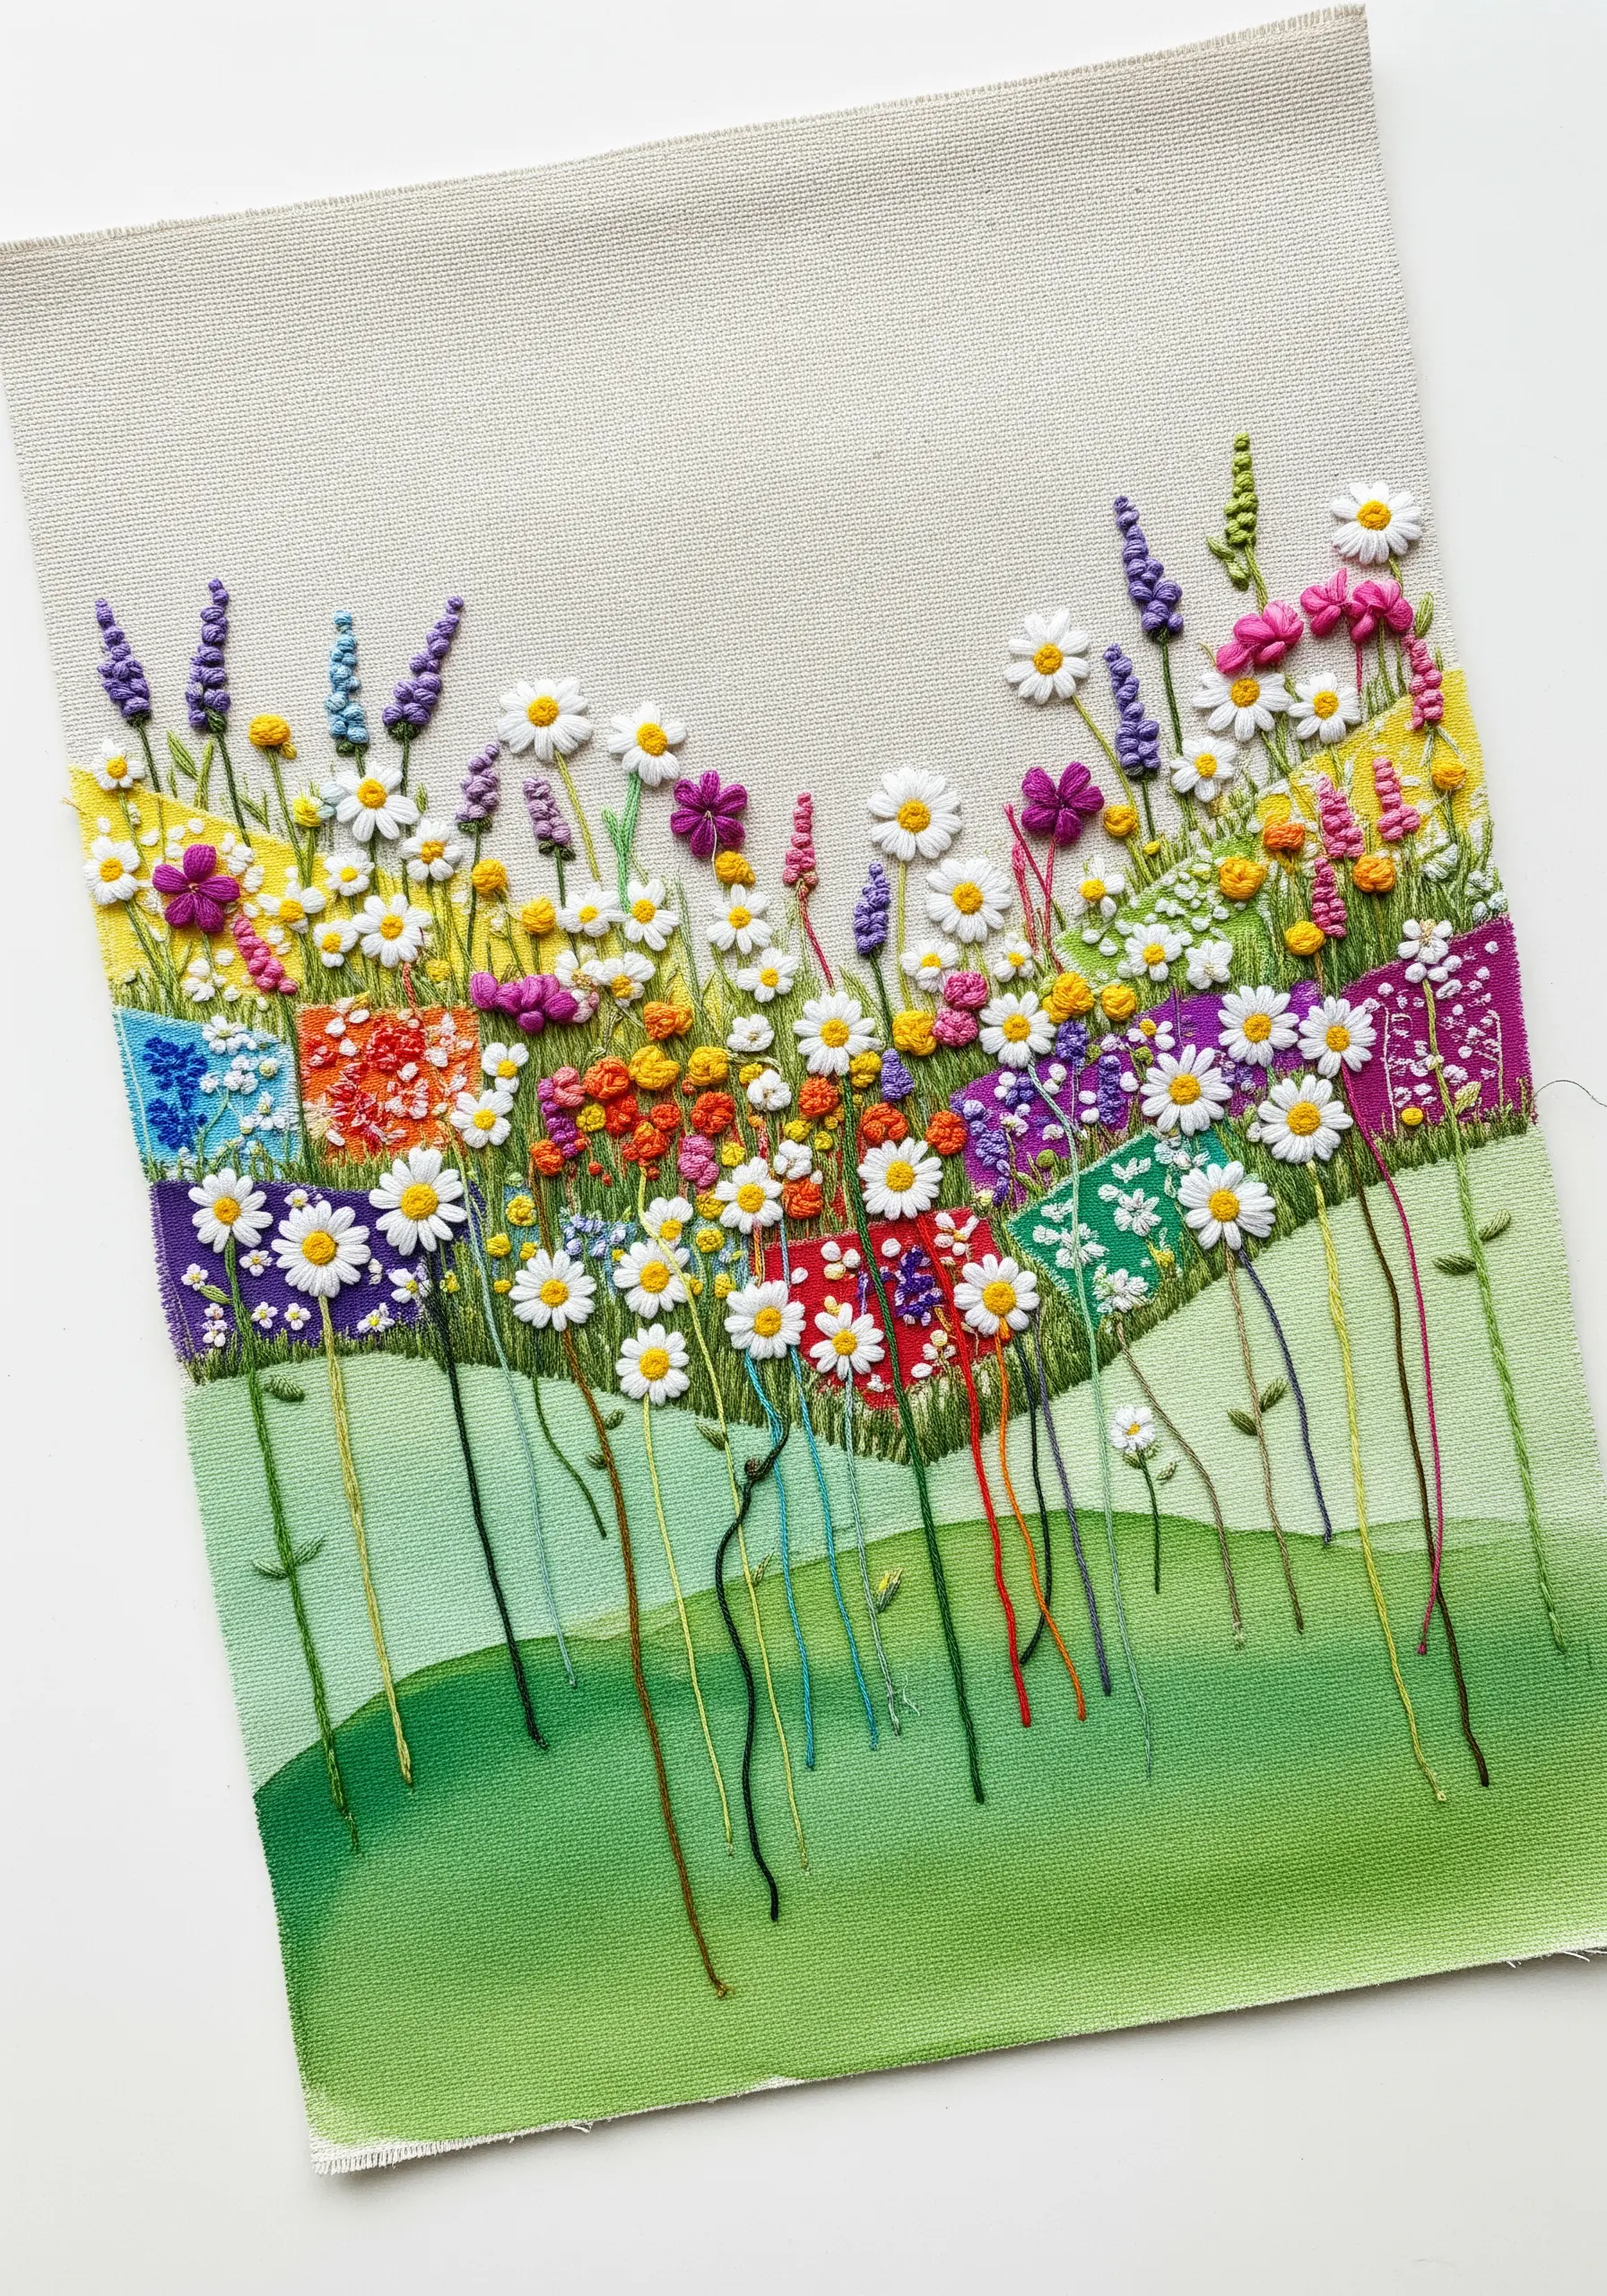
Lightly paint a soft, blended background of greens and abstract color patches onto your fabric using watercolors or diluted acrylics.
This painterly base removes the pressure of filling the entire background with stitches and provides a beautiful, soft-focus effect.
Concentrate your stitching on creating a dense foreground of highly textured flowers using bullion knots, woven wheel stitches, and French knots.
The result is a vibrant, dimensional garden that seems to grow out of a dreamy, artistic landscape, making for beautiful abstract floral embroidery hoops.
9. A Tactile Solar System: Exploring Texture with Yarn and Knots
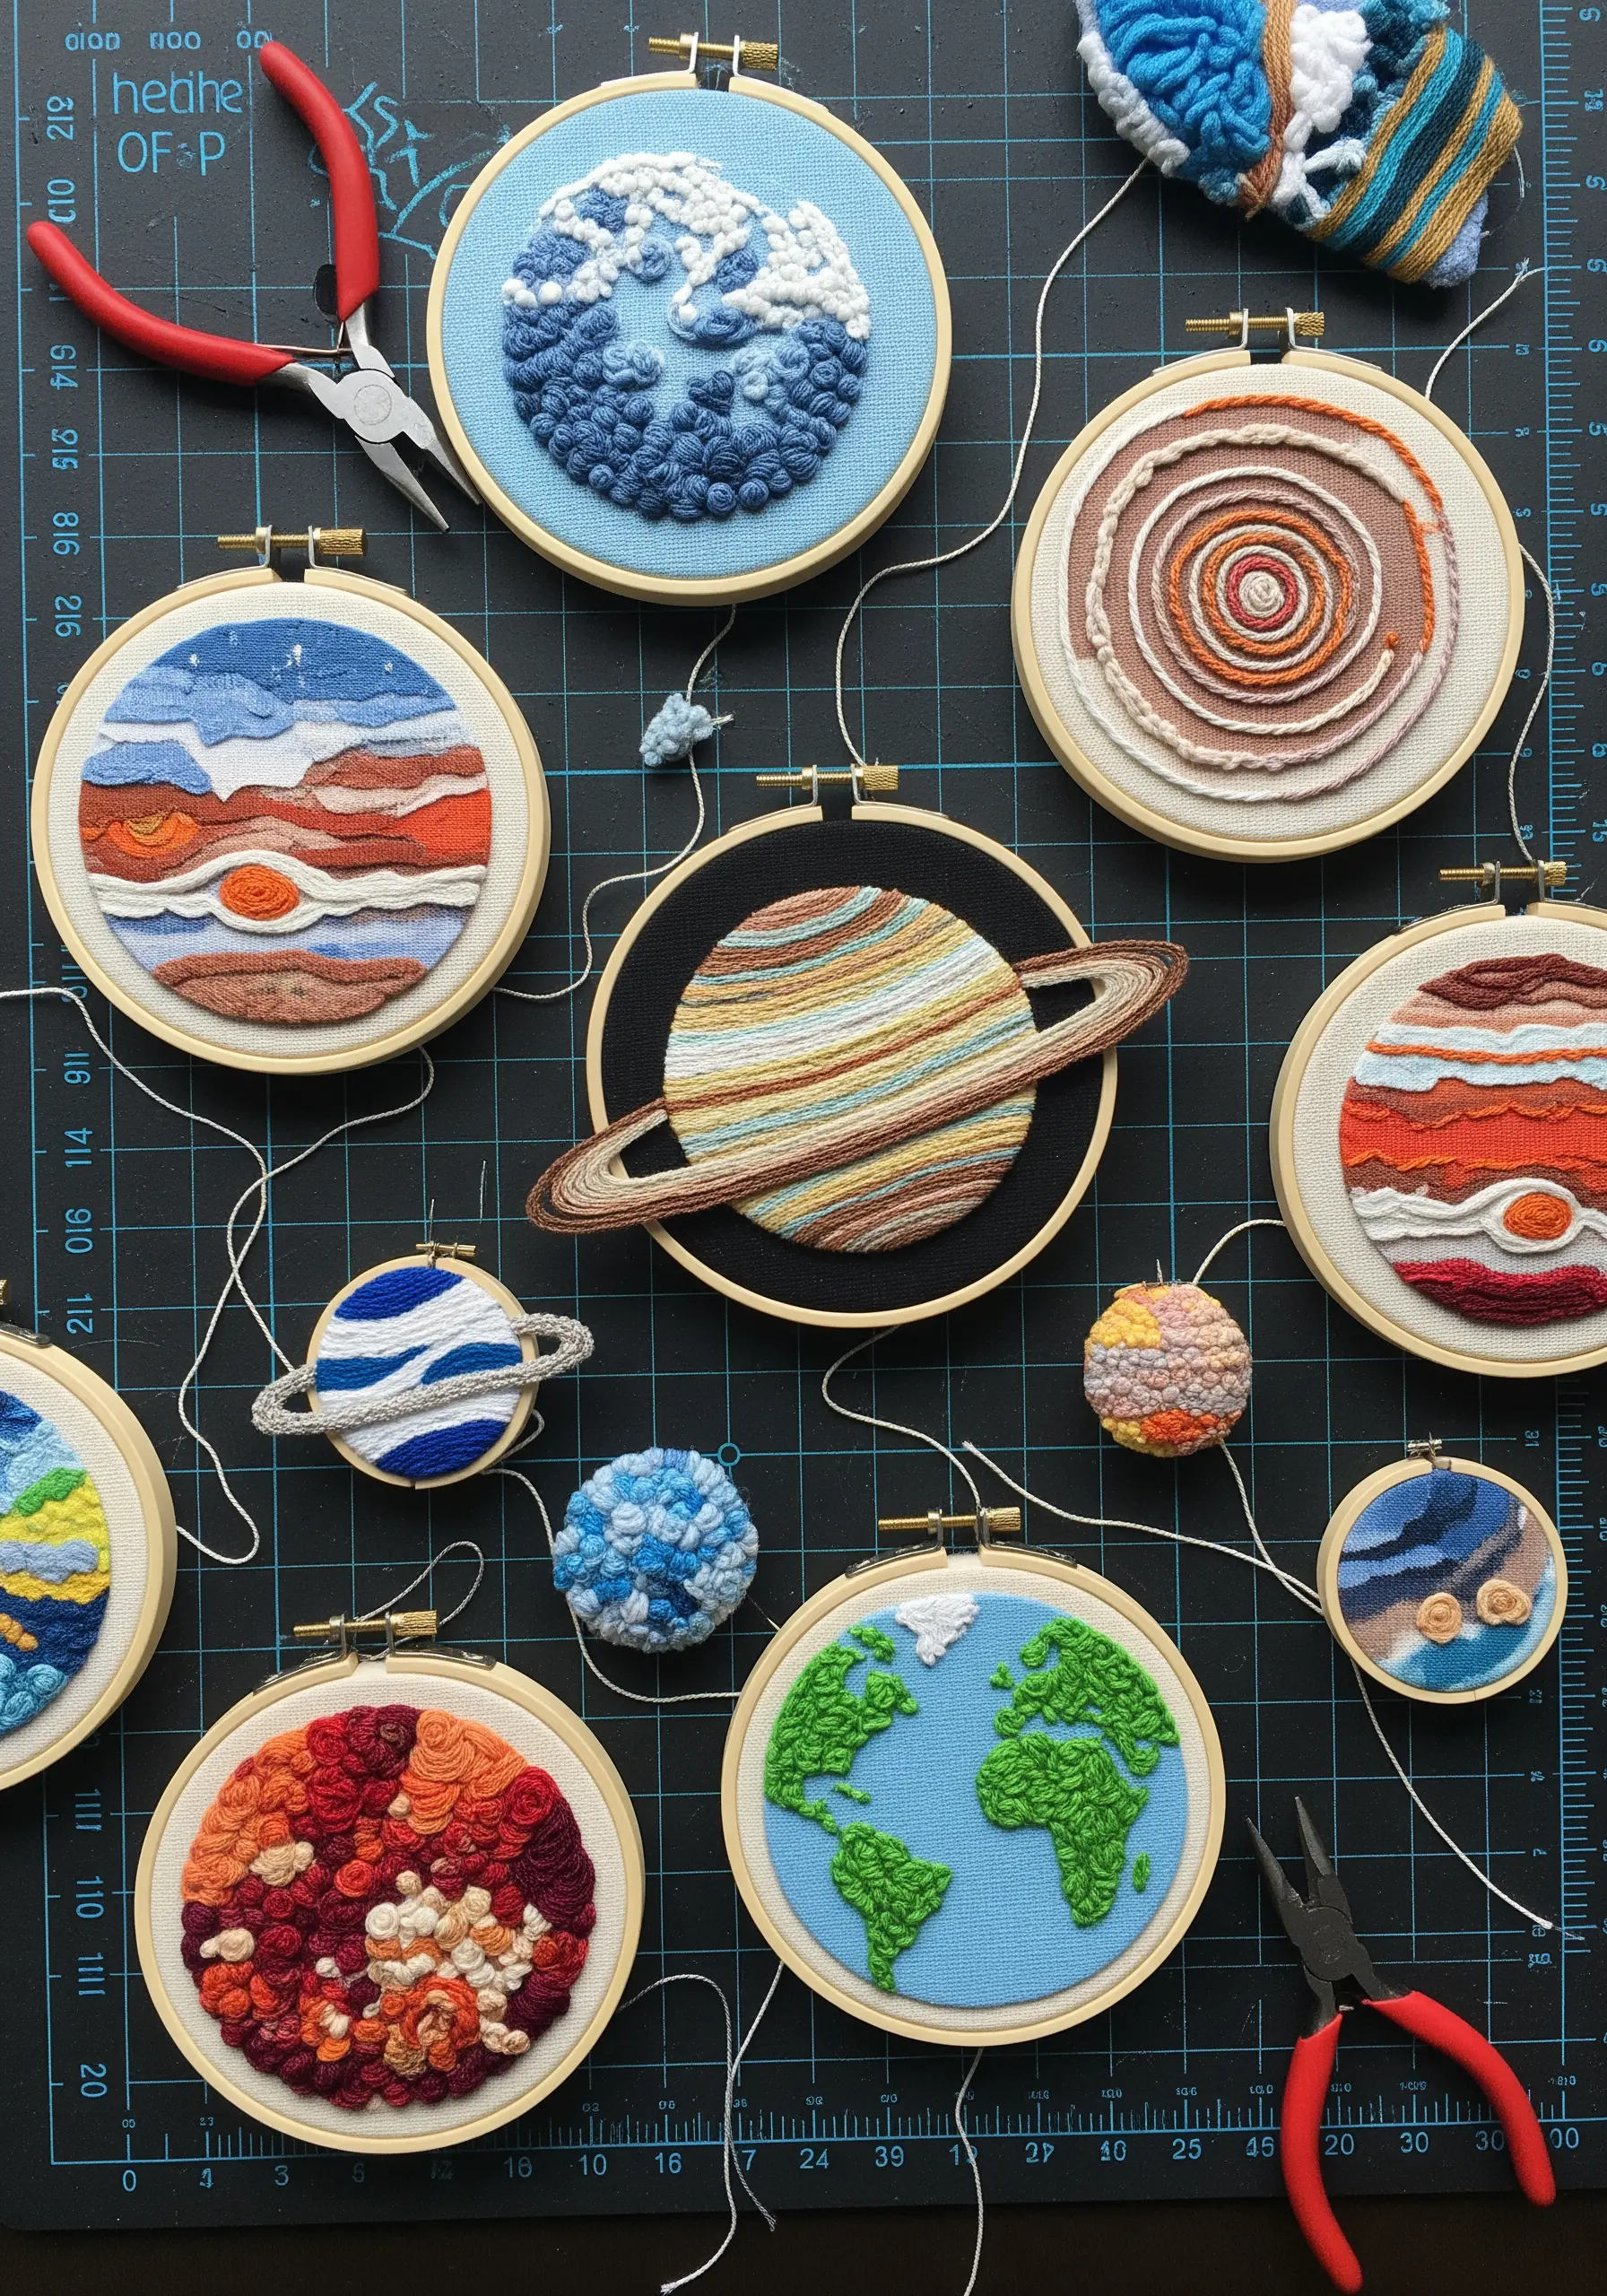
Transform a planetary theme into a sampler of stitches and fibers, giving each celestial body a unique tactile identity.
Use chunky French knots for a cratered surface, couch thick yarn in concentric circles for a gas giant, or use smooth satin stitch for icy rings.
Varying the fiber—from standard six-strand floss to wool yarn and metallic thread—enhances the individuality of each piece.
This approach is a brilliant way to experiment with and display an array of gorgeous mixed-fiber textures within a cohesive and striking collection.
10. Autumnal Impressions: Stitching on Watercolor Paper
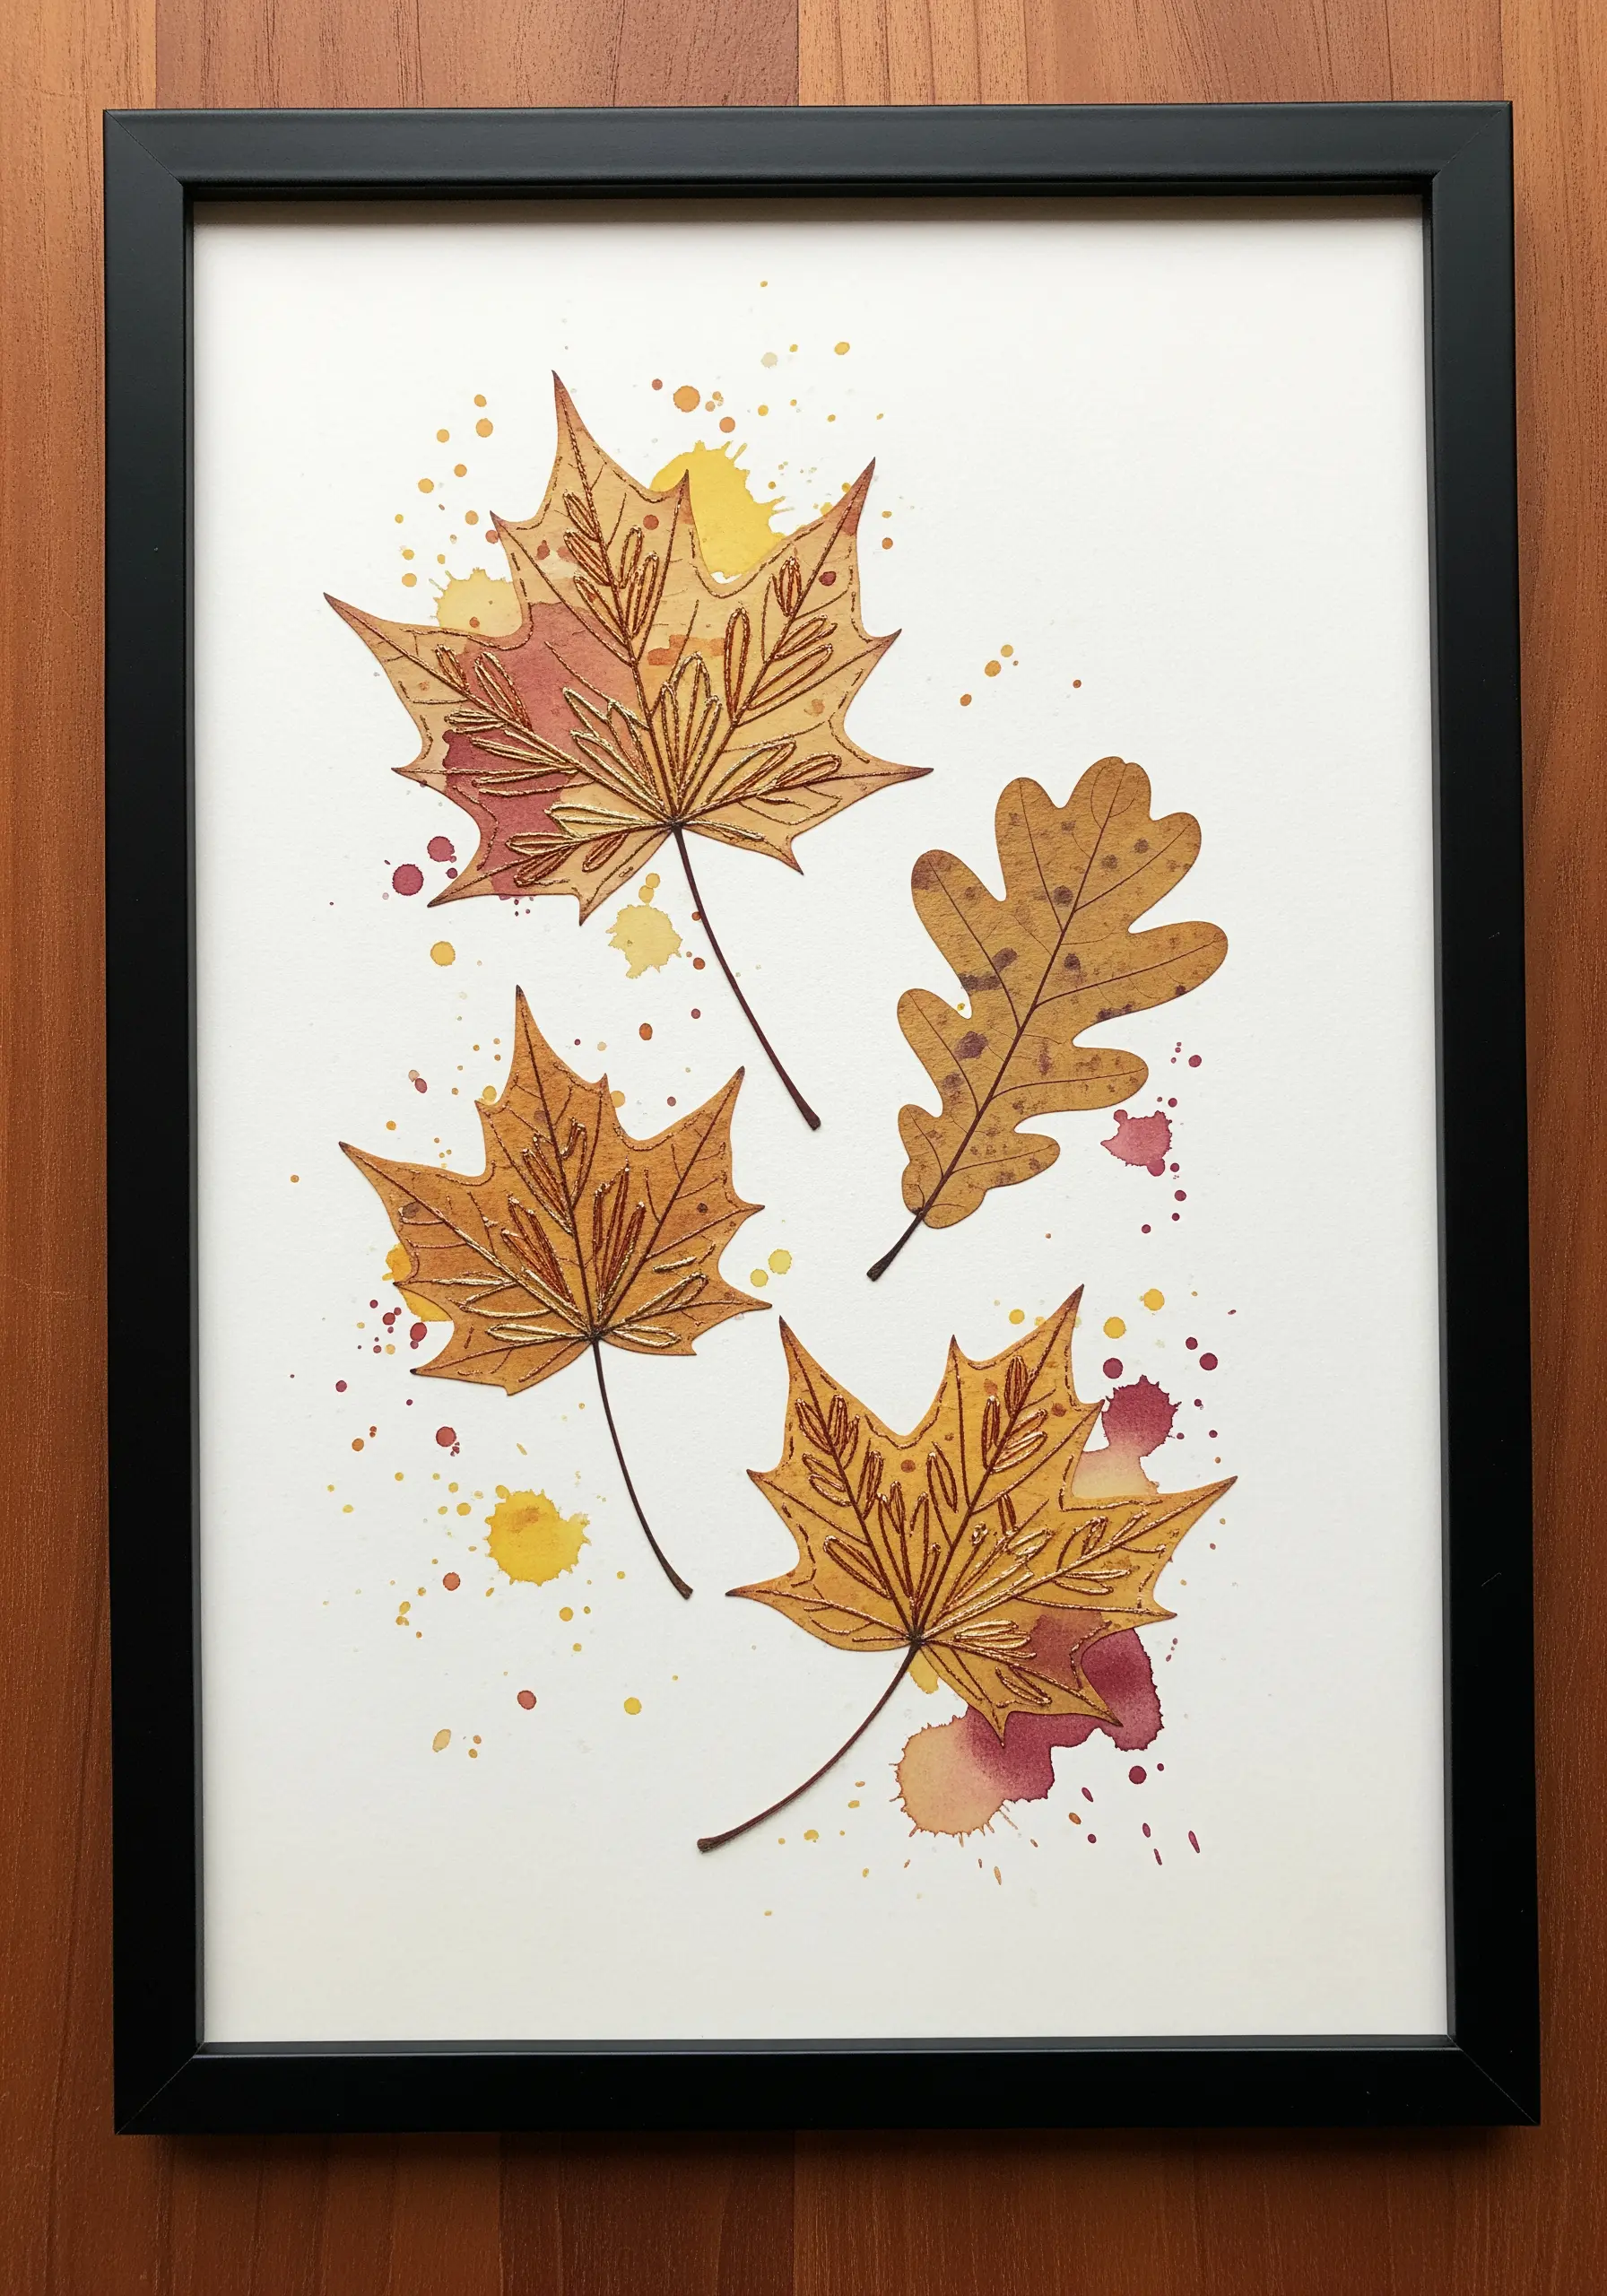
Use a heavy, high-quality watercolor paper as your stitching surface for a crisp, illustrative result.
Create a loose background with autumnal watercolor splatters and washes, letting them dry completely before you begin stitching.
Carefully pre-pierce your stitching holes along your leaf designs with a sharp needle to prevent the paper from tearing.
Use a simple backstitch for the outlines and veins; the clean embroidered lines provide a beautiful structure that contrasts with the organic, free-flowing paint, helping to turn simple stitches into stunning decor.
11. Woven Coral Garden: 3D Stitches on a Hand-Dyed Seascape
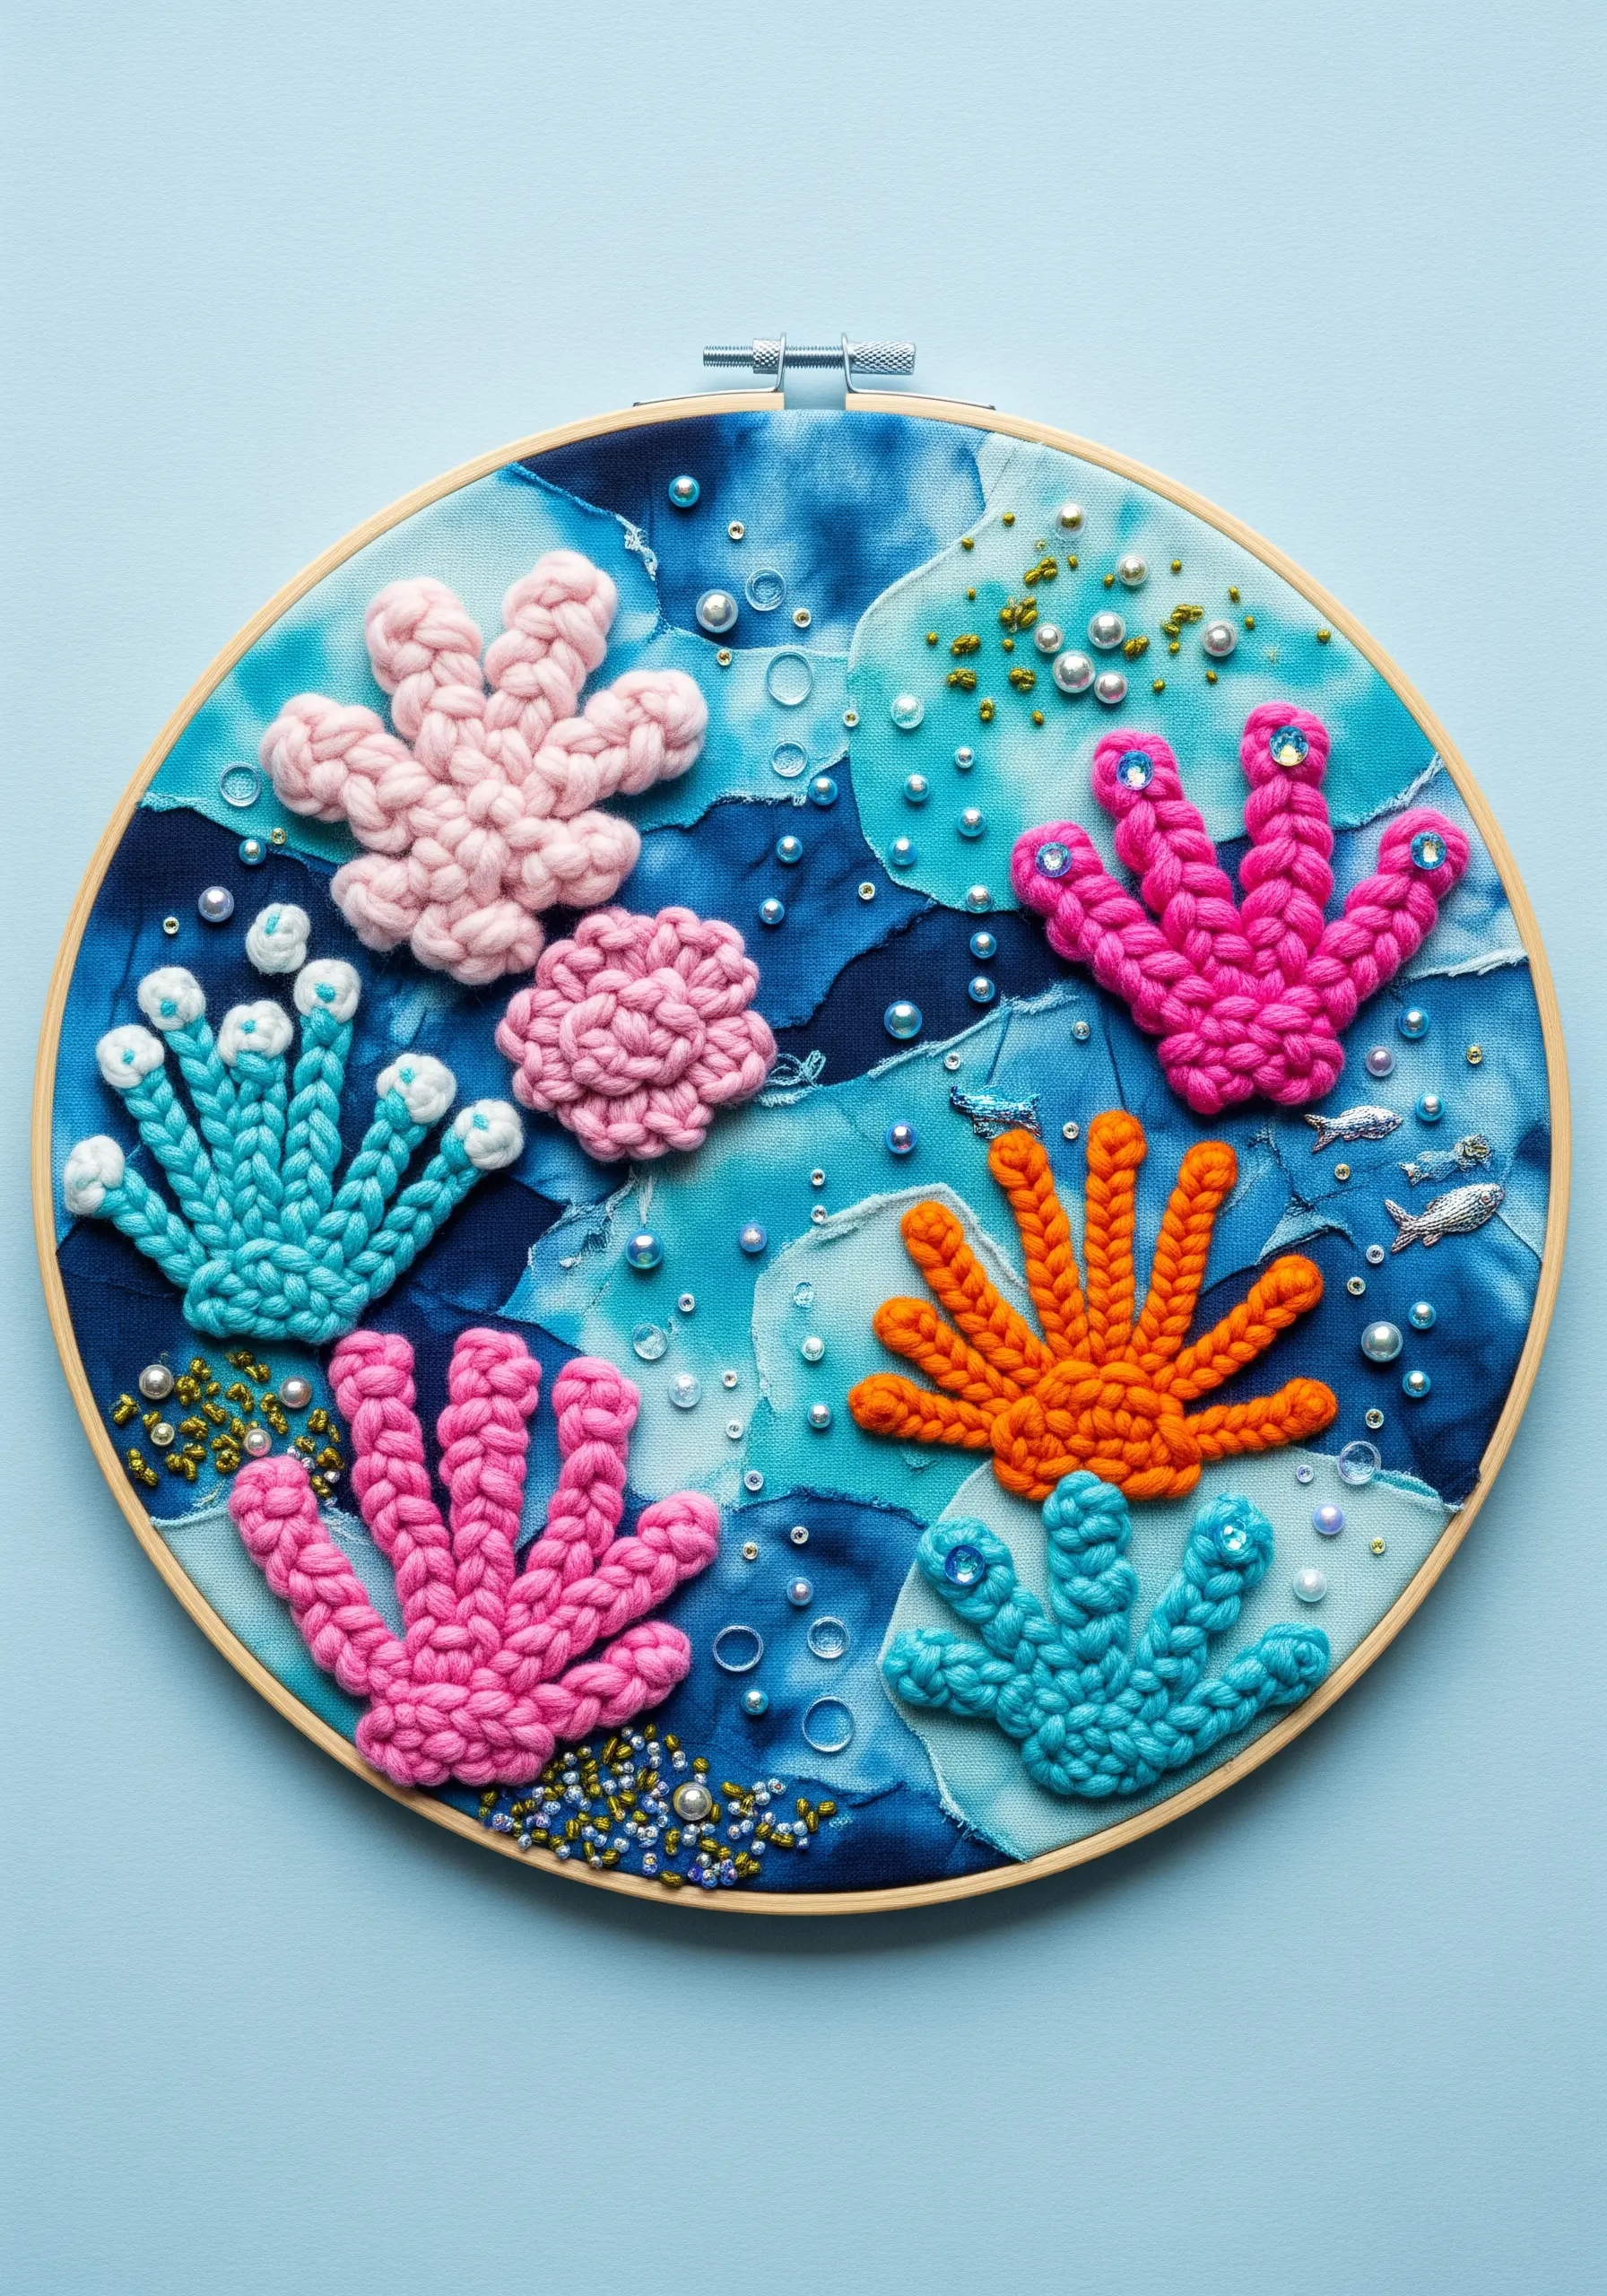
Create your underwater canvas by dyeing your fabric with varying shades of blue to achieve a mottled, light-dappled effect.
Build up coral shapes using highly dimensional stitches that rise from the surface, like woven picot and cast-on stitches.
Incorporate thick fibers like chenille thread or wool yarn to create soft, organic forms that mimic real sea life.
This is one of those DIY mixed-media embroidery projects where scattering iridescent beads adds a final touch of underwater magic, catching the light like air bubbles.
12. Sculptural Line Art: Couching Wire onto Textured Paper
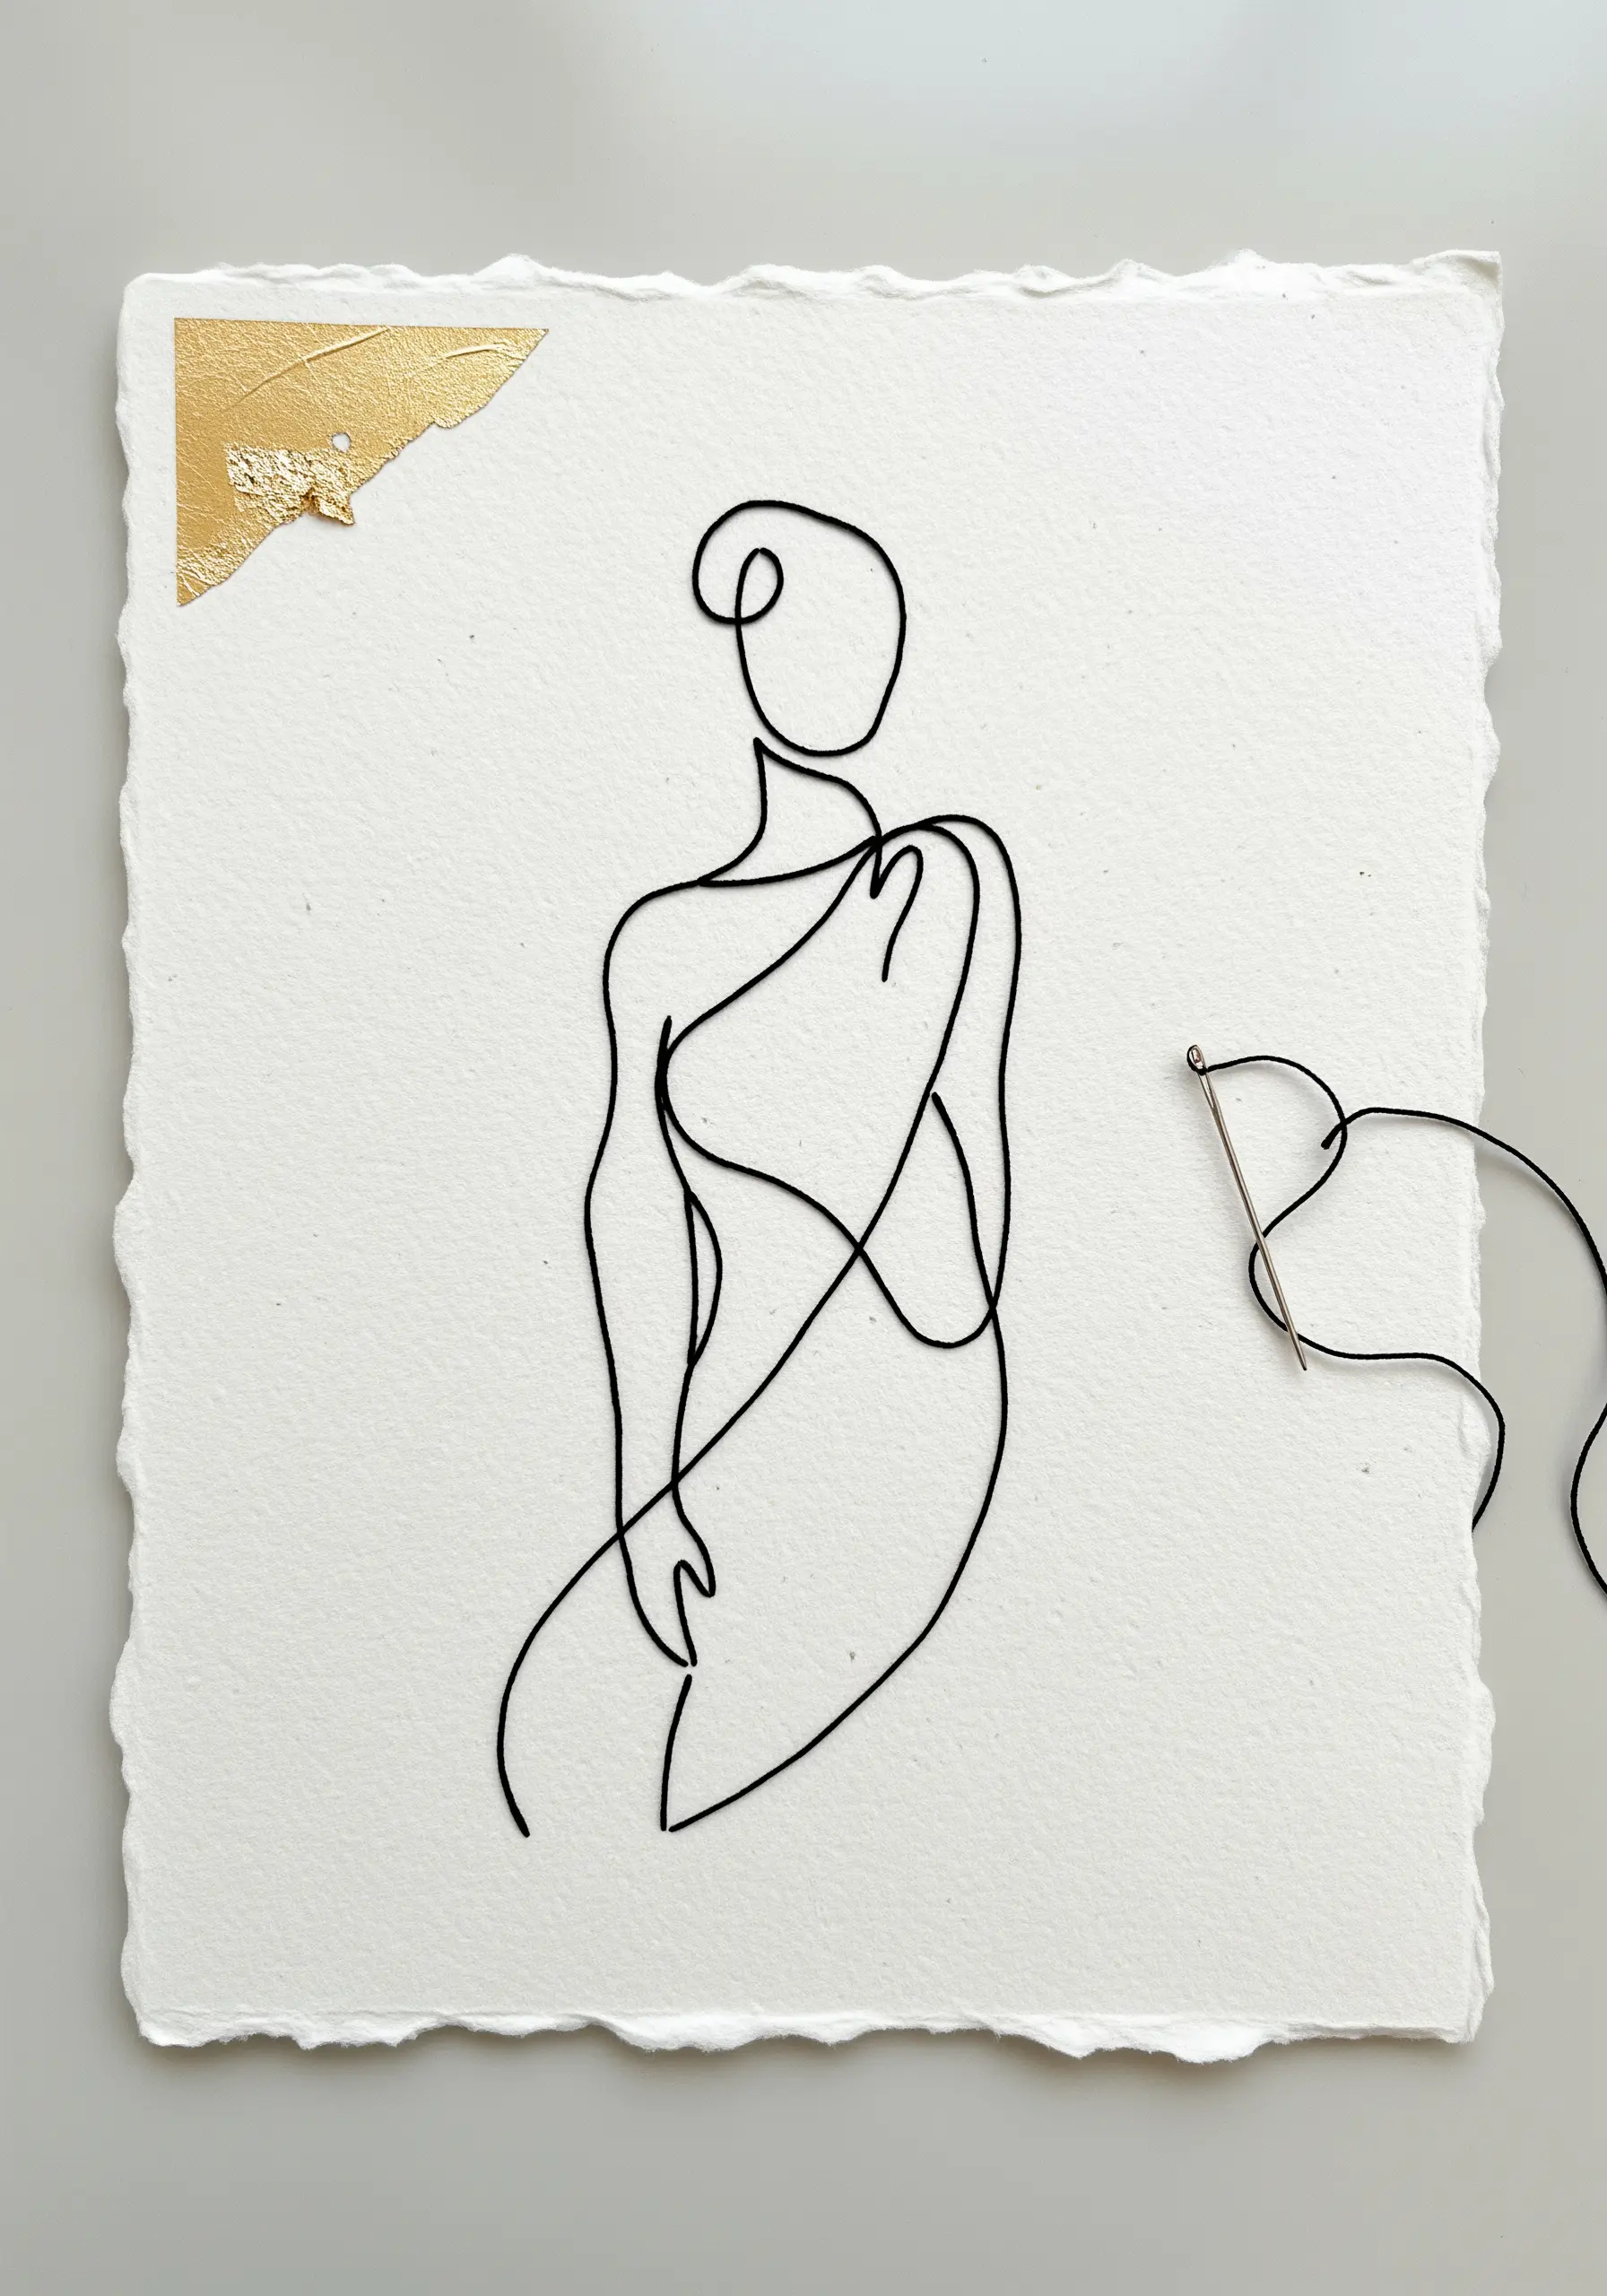
Elevate minimalist line art by trading thread for a thin, pliable wire or a stiff cord for your main subject.
Choose a high-quality, textured paper with a deckled edge, as its weight will support the embellishment without buckling.
Shape your wire into a continuous-line figure, then attach it to the paper’s surface using tiny, almost invisible couching stitches with a single strand of matching floss.
This technique creates a clean, raised silhouette with a subtle shadow, turning simple delicate line-art embroidery ideas into sculptural statements.
13. Dimensional Jungle: Layering Felt Appliqué with Stitched Details
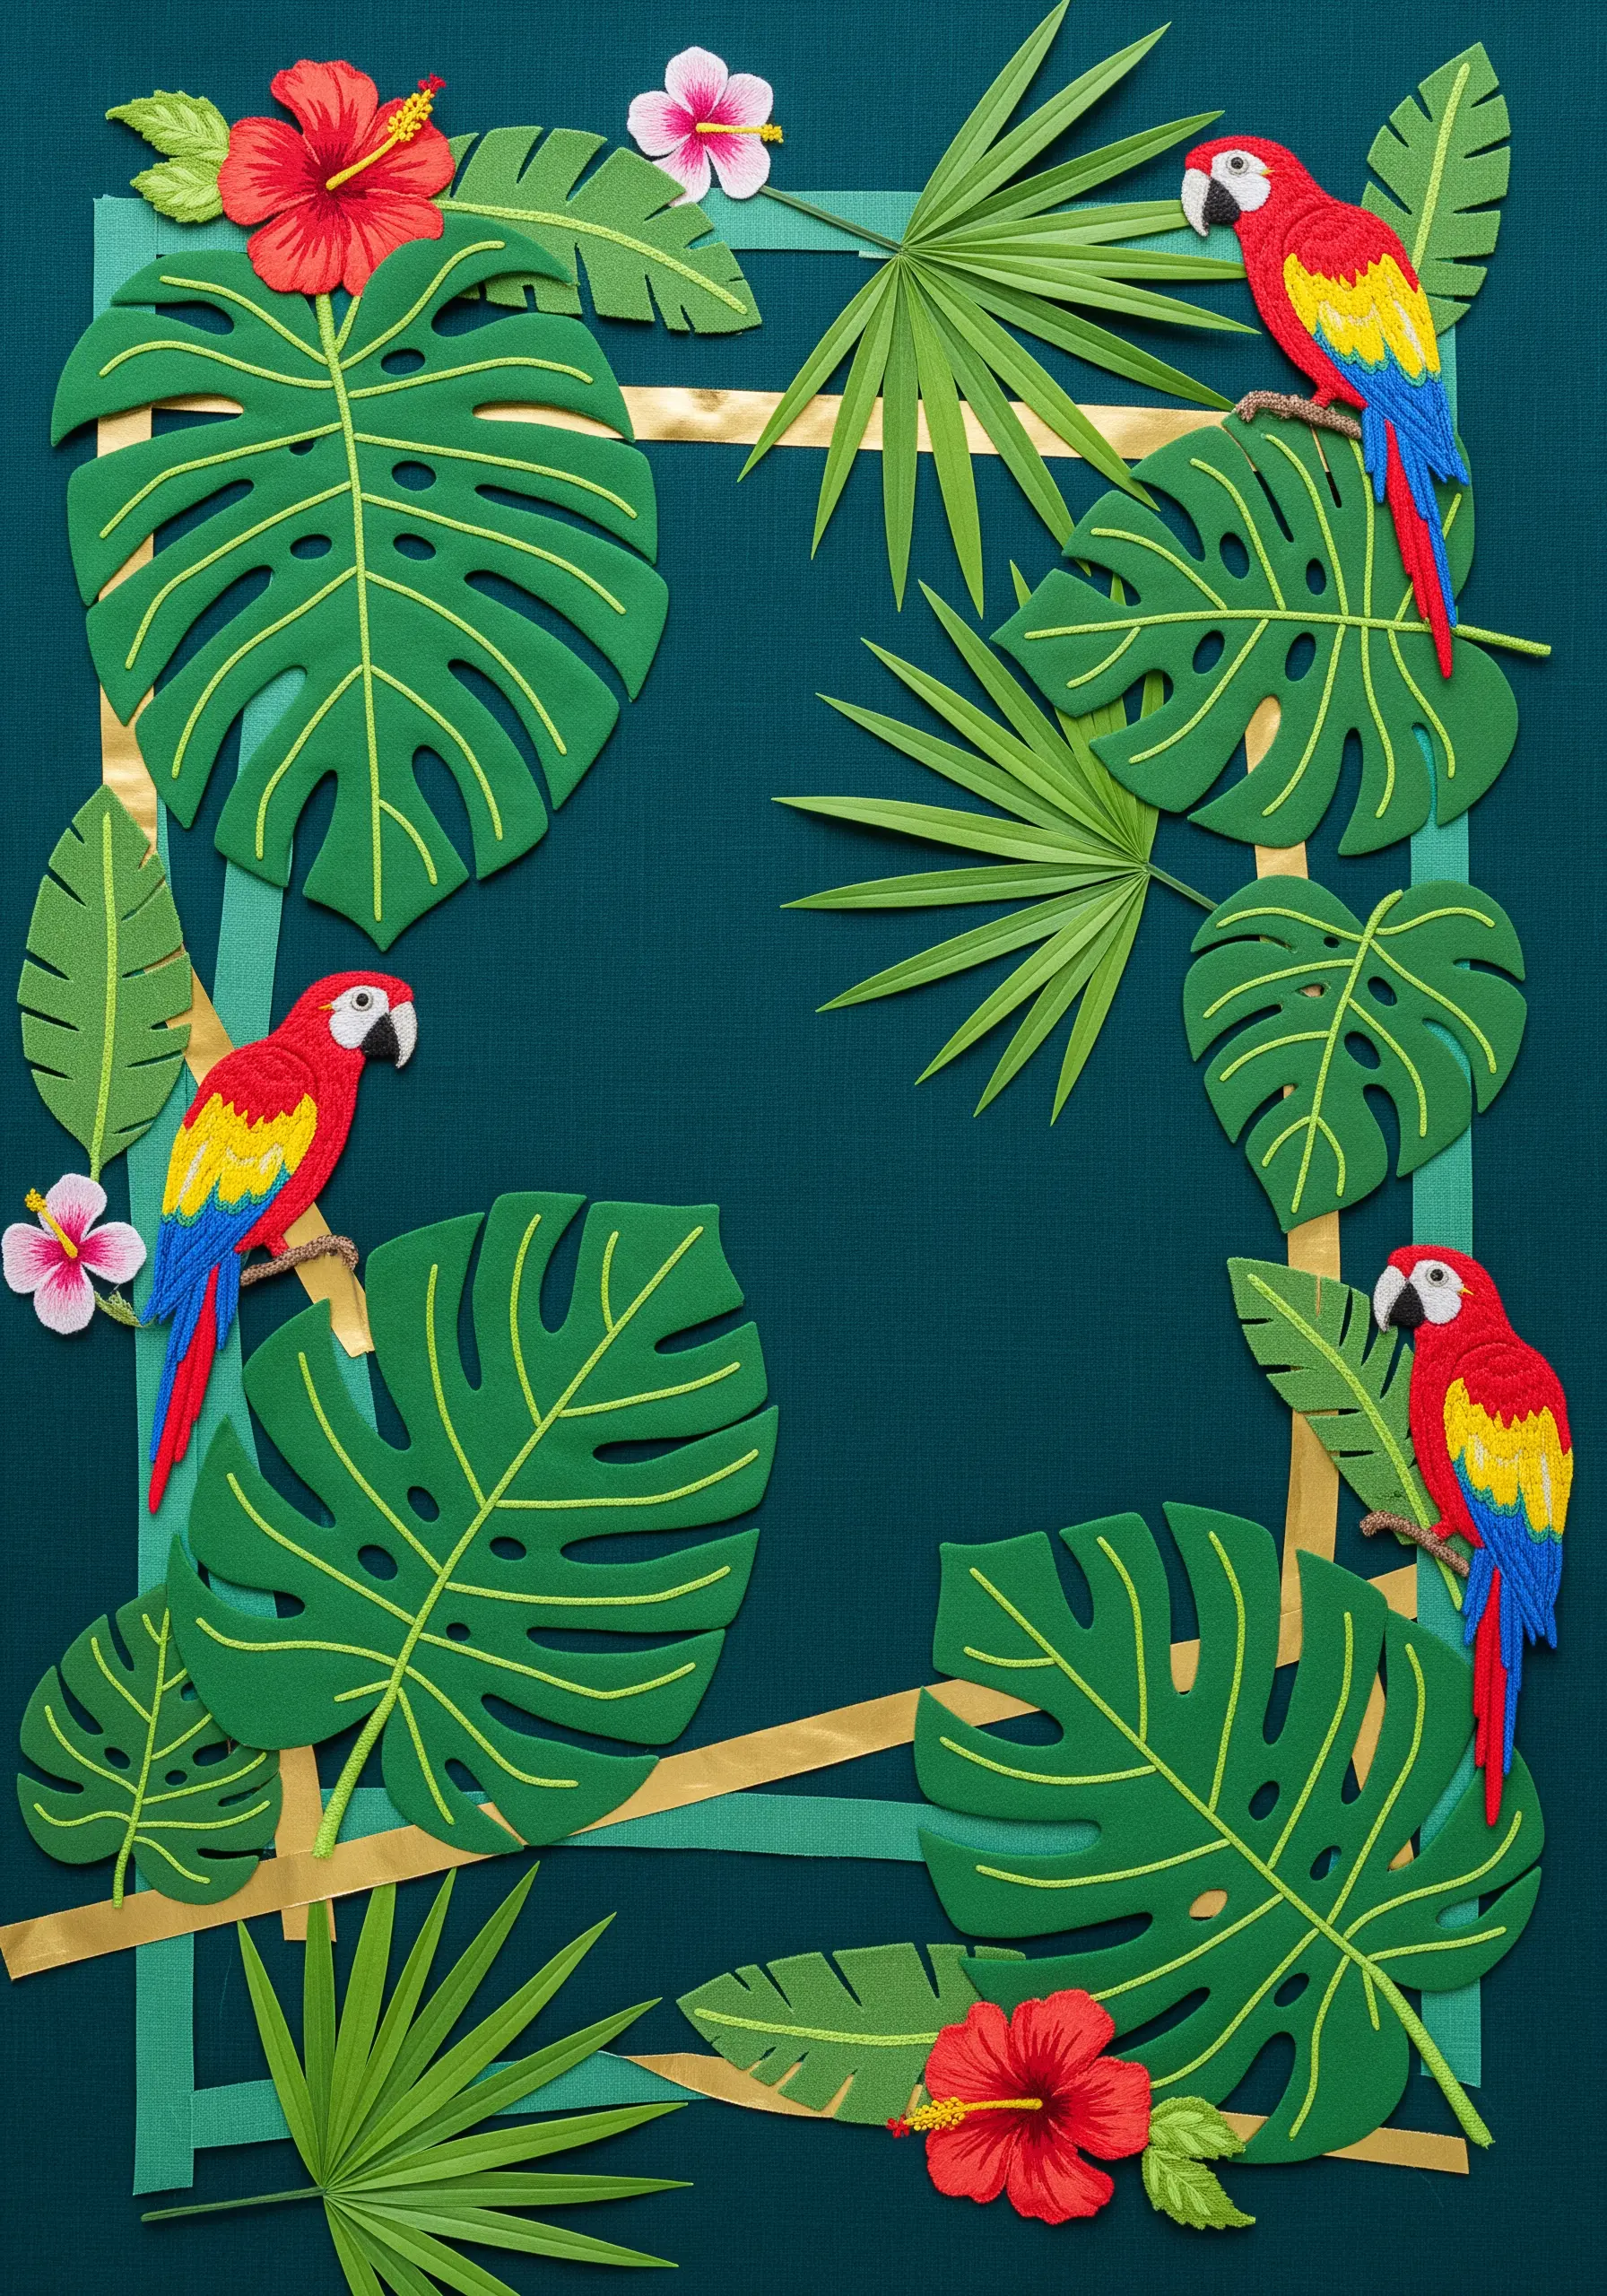
Construct a lush, multi-layered scene by using cut shapes from craft foam or stiffened felt as your base elements.
Arrange and overlap the leaves on your background fabric to create a natural sense of depth before adding any stitches.
Use embroidery floss to add the final, unifying details: satin stitch to render a parrot’s vibrant feathers, and simple backstitch to define the veins on each leaf.
This combination turns basic craft materials into sophisticated art by integrating them with classic embroidery. Tropical leaf & flower combination patterns are perfect for this technique.
14. Epistolary Art: Embroidering on Vintage-Style Paper
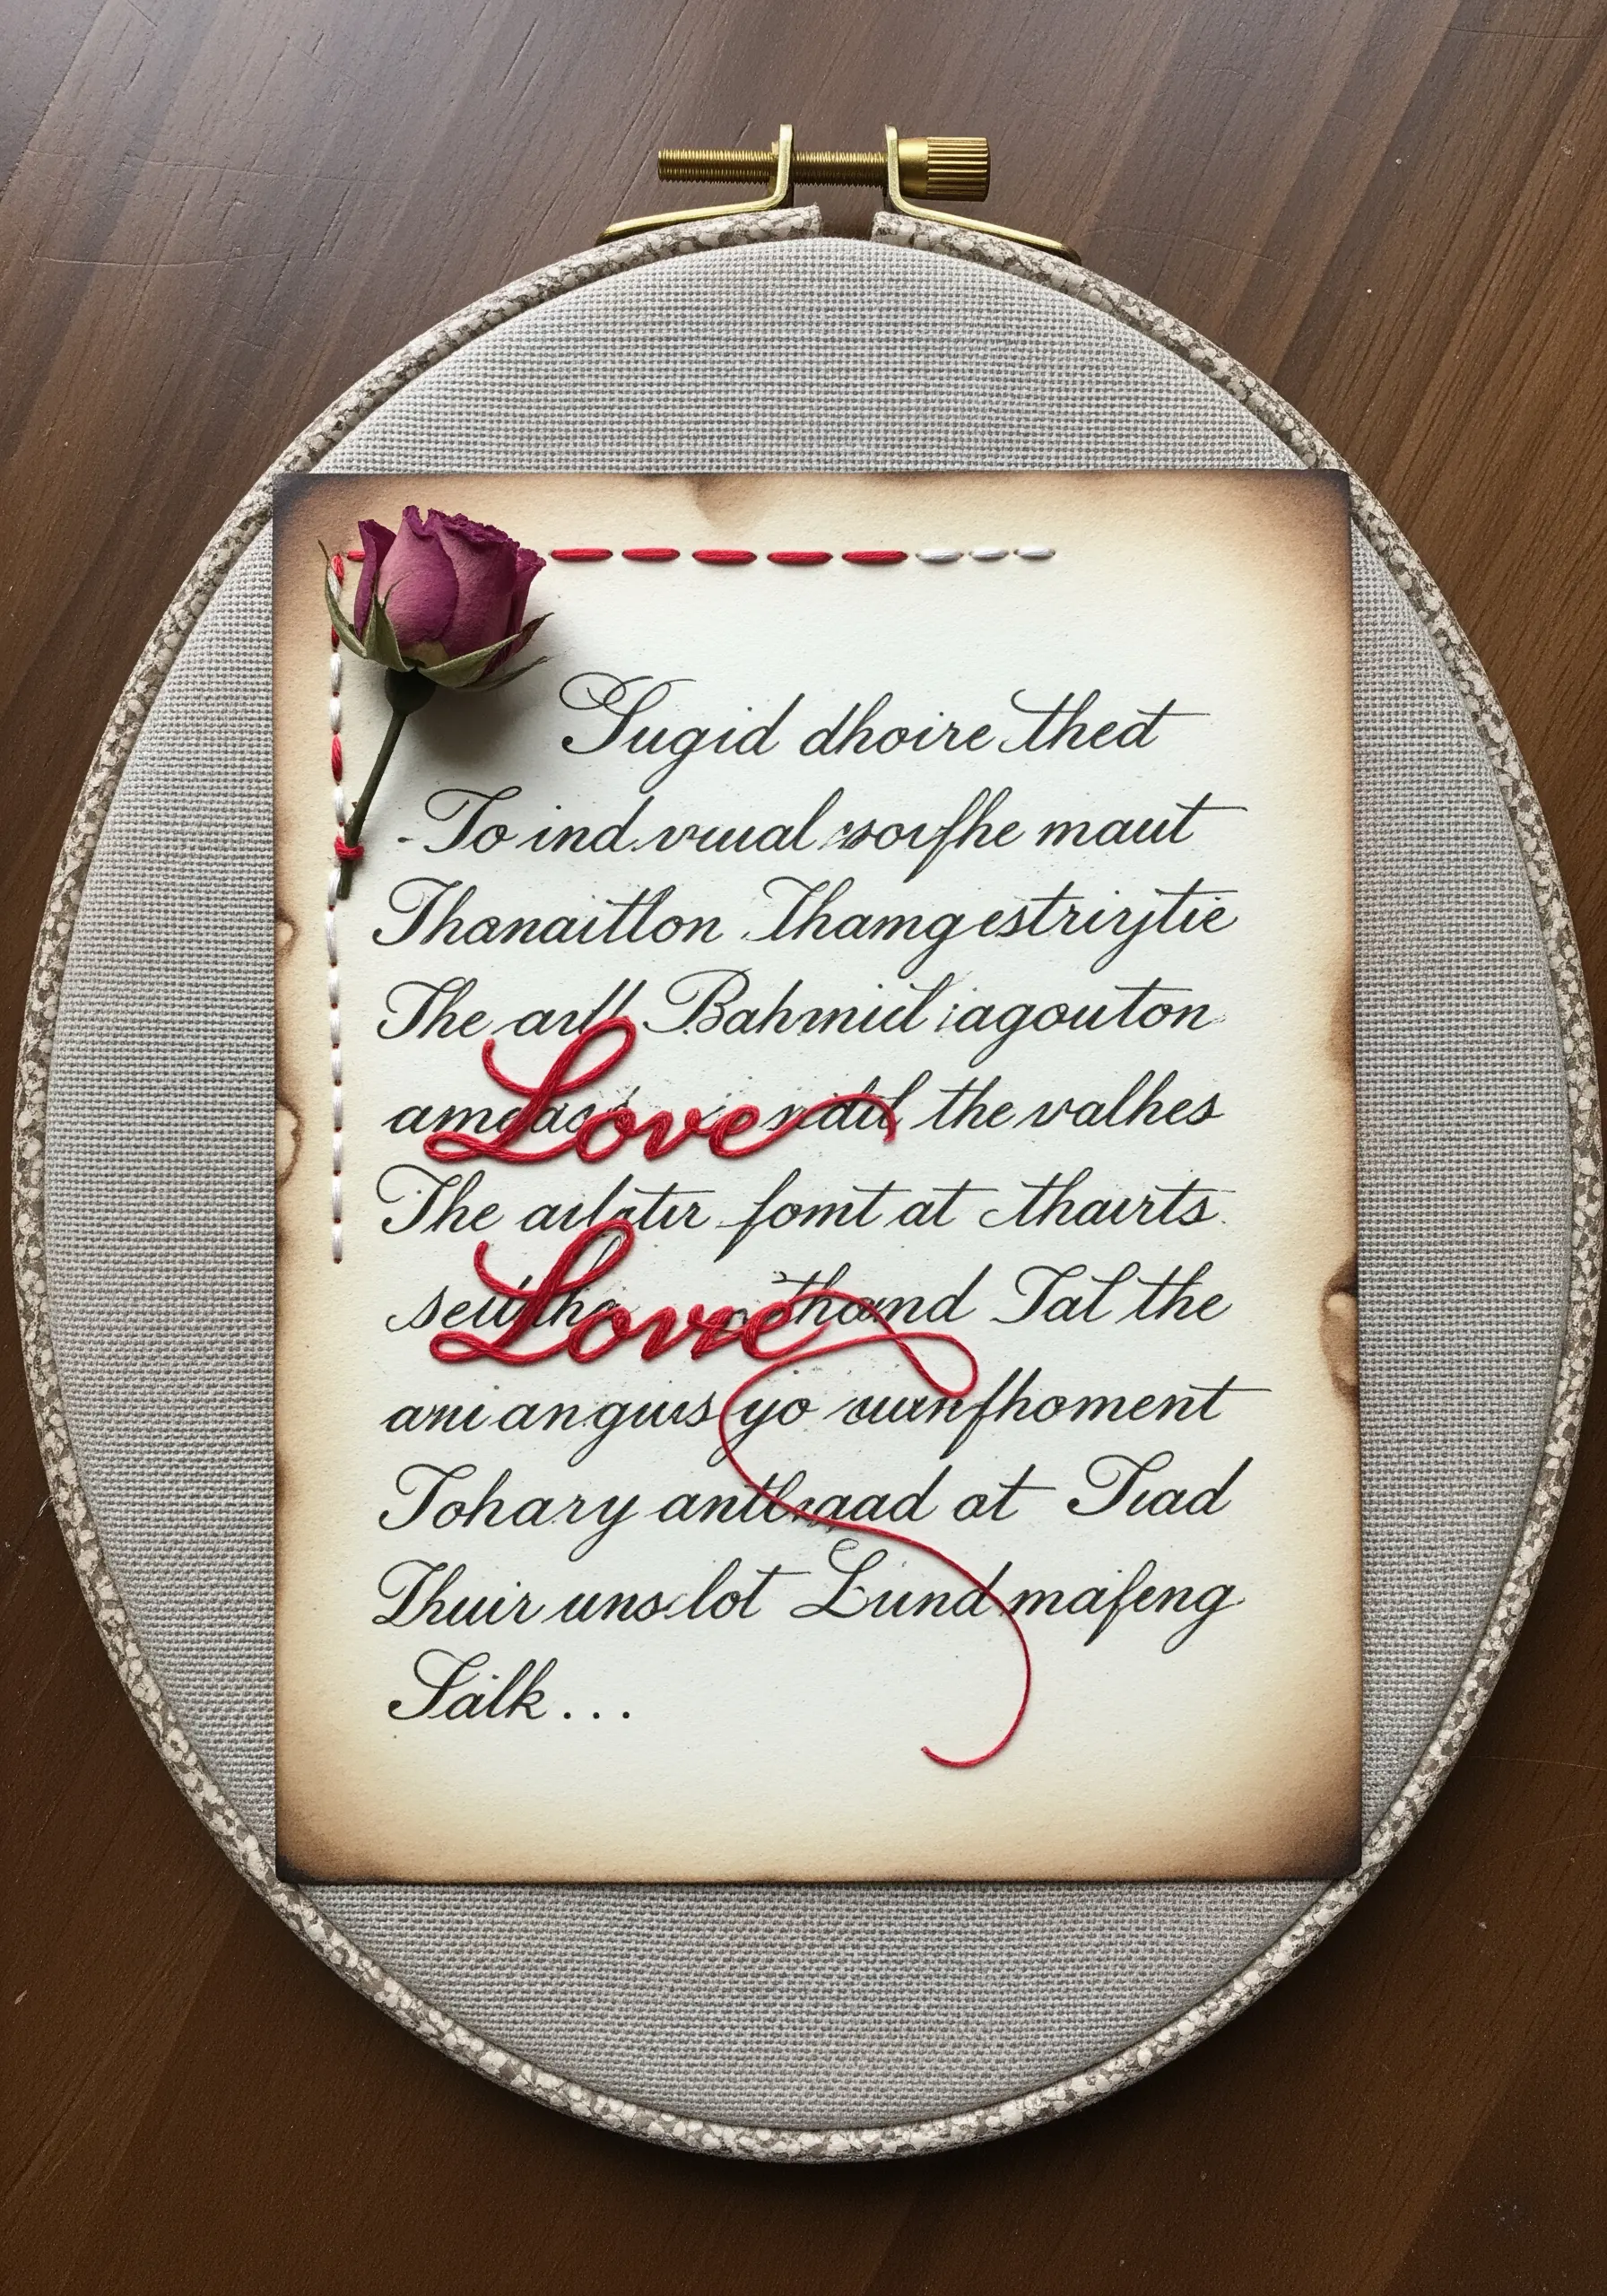
Select a heavyweight paper or cardstock and age it with coffee or tea stains for a convincing vintage look.
Carefully punch your stitching holes with a fine needle before you begin to prevent any tearing of the paper fibers.
Use a bold, contrasting thread to emphasize a single, powerful word within the text, stitching it directly over the calligraphy.
Mounting the finished piece on linen within a hoop frames it beautifully and combines the delicate paper element with a soft textile background, perfect for poetic quote embroidery hoops.
15. Fabric Landscape: Torn Textiles with Radiating Stitches
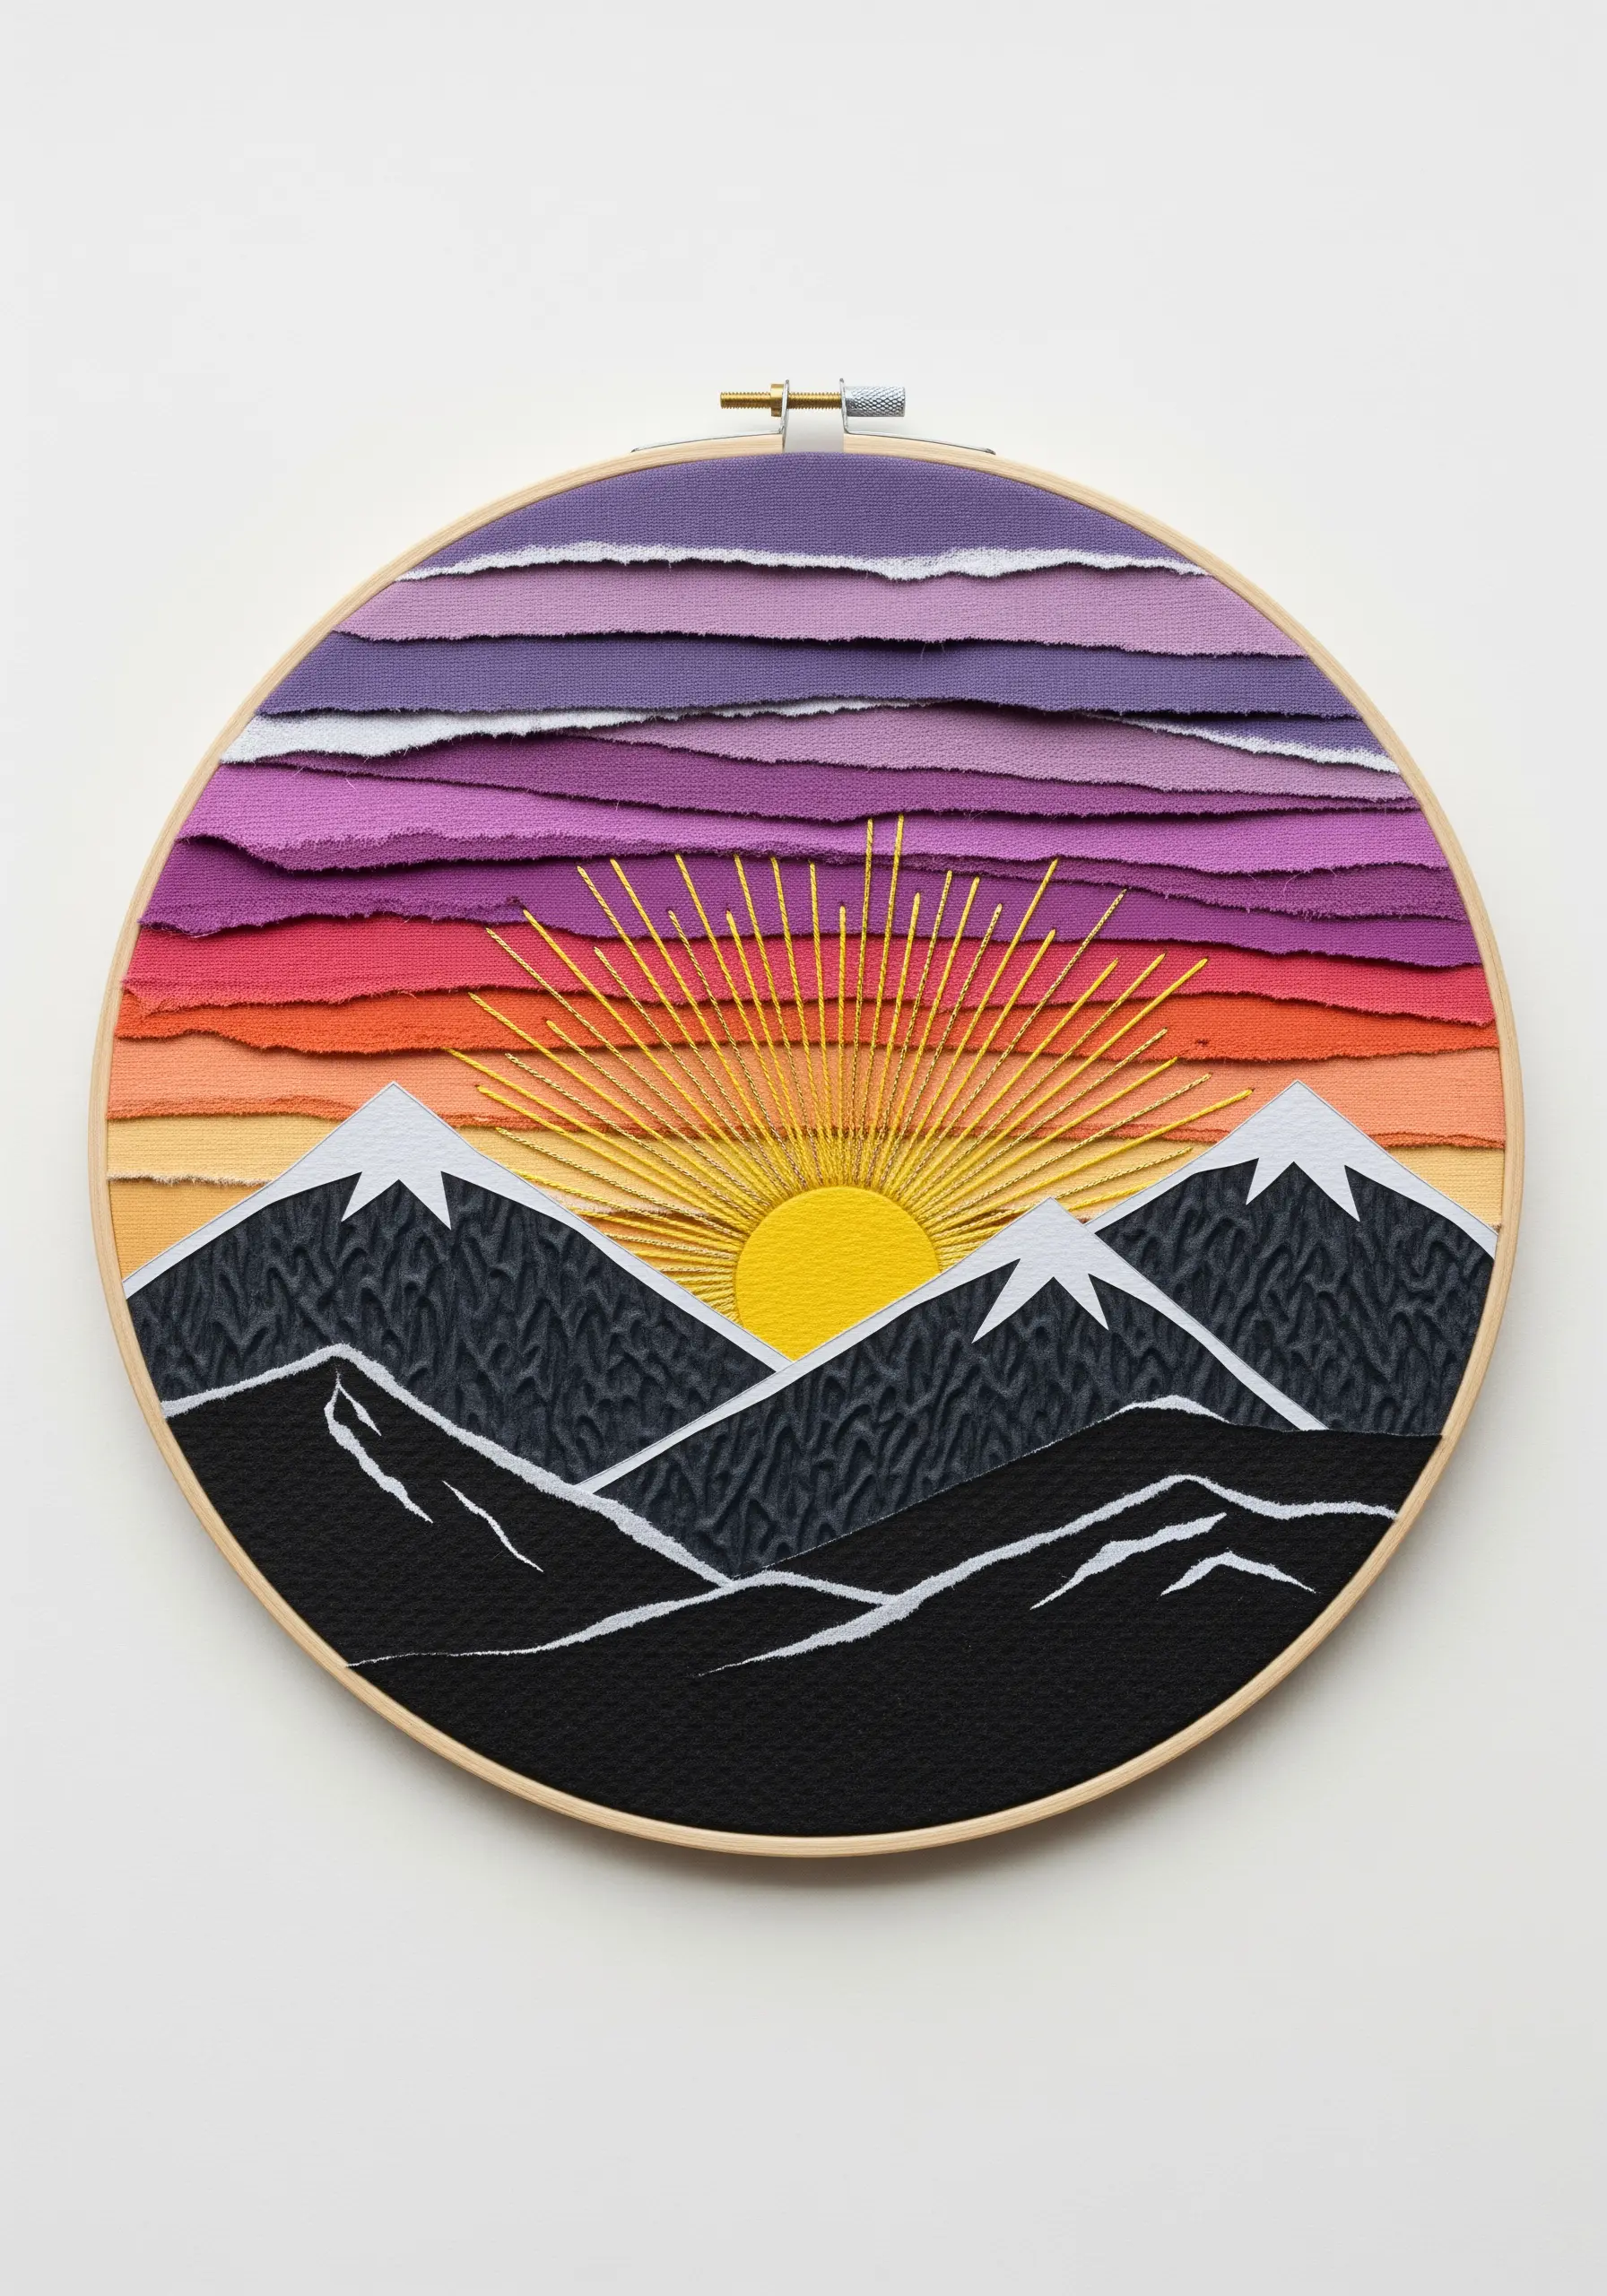
Build a dramatic sky by layering torn strips of fabric in a gradient of sunset colors directly onto your backing fabric.
The raw, frayed edges of the torn fabric provide an organic texture that mimics clouds and mountain ridges perfectly.
Once your fabric collage is in place, add definition with embroidery: long, golden straight stitches radiating from a central point to form a sunburst.
This is one of the most effective high-texture fabric collage embroidery projects because it balances soft, raw edges with sharp, clean lines.
16. Abstract Resonance: Texture Paste, Foil, and Outline Stitching
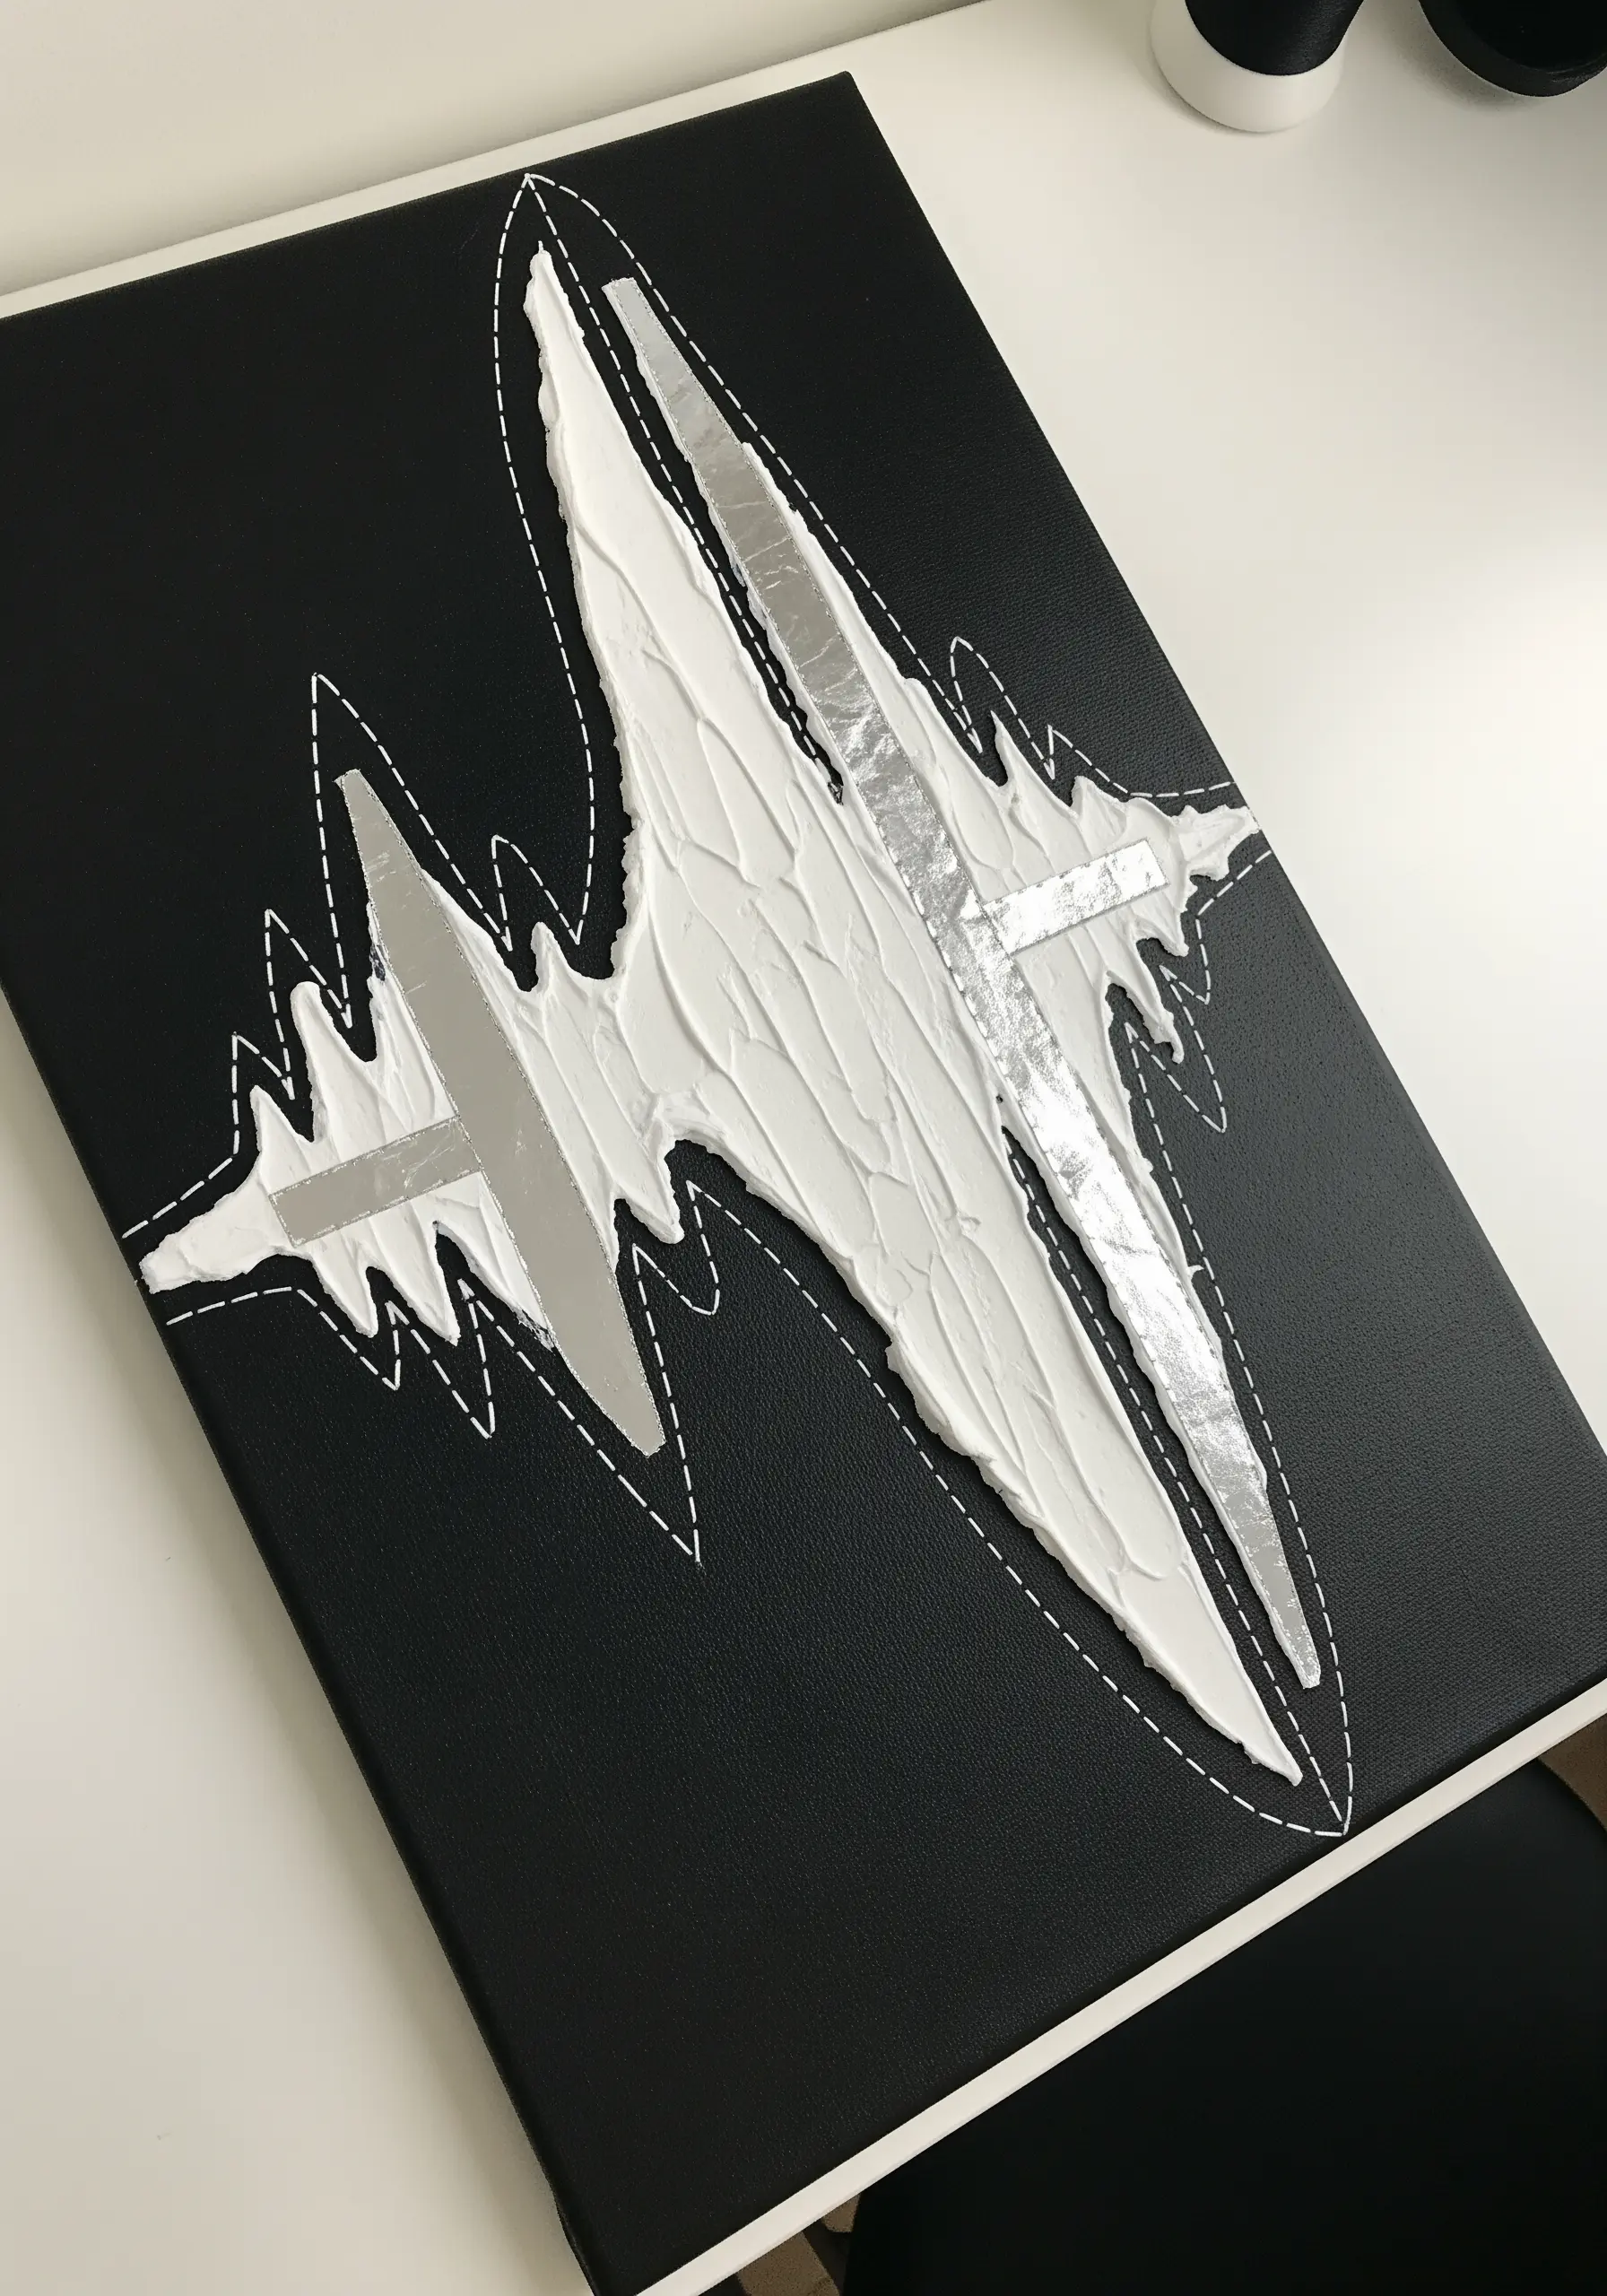
On a stark black canvas, use a palette knife to apply thick modeling paste in a dynamic, abstract shape like a sound wave.
While the paste is still wet or tacky, press sheets of silver leaf onto sections of it for a fractured, metallic effect.
After the paste has cured completely, use a simple, high-contrast running stitch in white thread to outline the entire shape.
This technique frames the raw, chaotic texture with a clean, graphic line, making it one of the most impactful abstract mixed-media embroidery ideas.
17. Whimsical Appliqué: Assembling a Scene with Fabric and Floss

This charming project relies on the playful combination of patterned fabric scraps to create a cheerful scene.
Use a lightweight fusible web to apply your cut fabric pieces to the background, ensuring clean edges and a flat surface to stitch on.
The embroidery here is for adding personality and softness: a simple backstitched smile, woven stitches for the basket’s texture, and padded satin stitch for fluffy clouds.
This method of fabric collage is perfect for creating narrative, storybook-style art with a gentle, handmade feel.
18. Meditative Mandala: Dimensional Paint with Beaded Accents
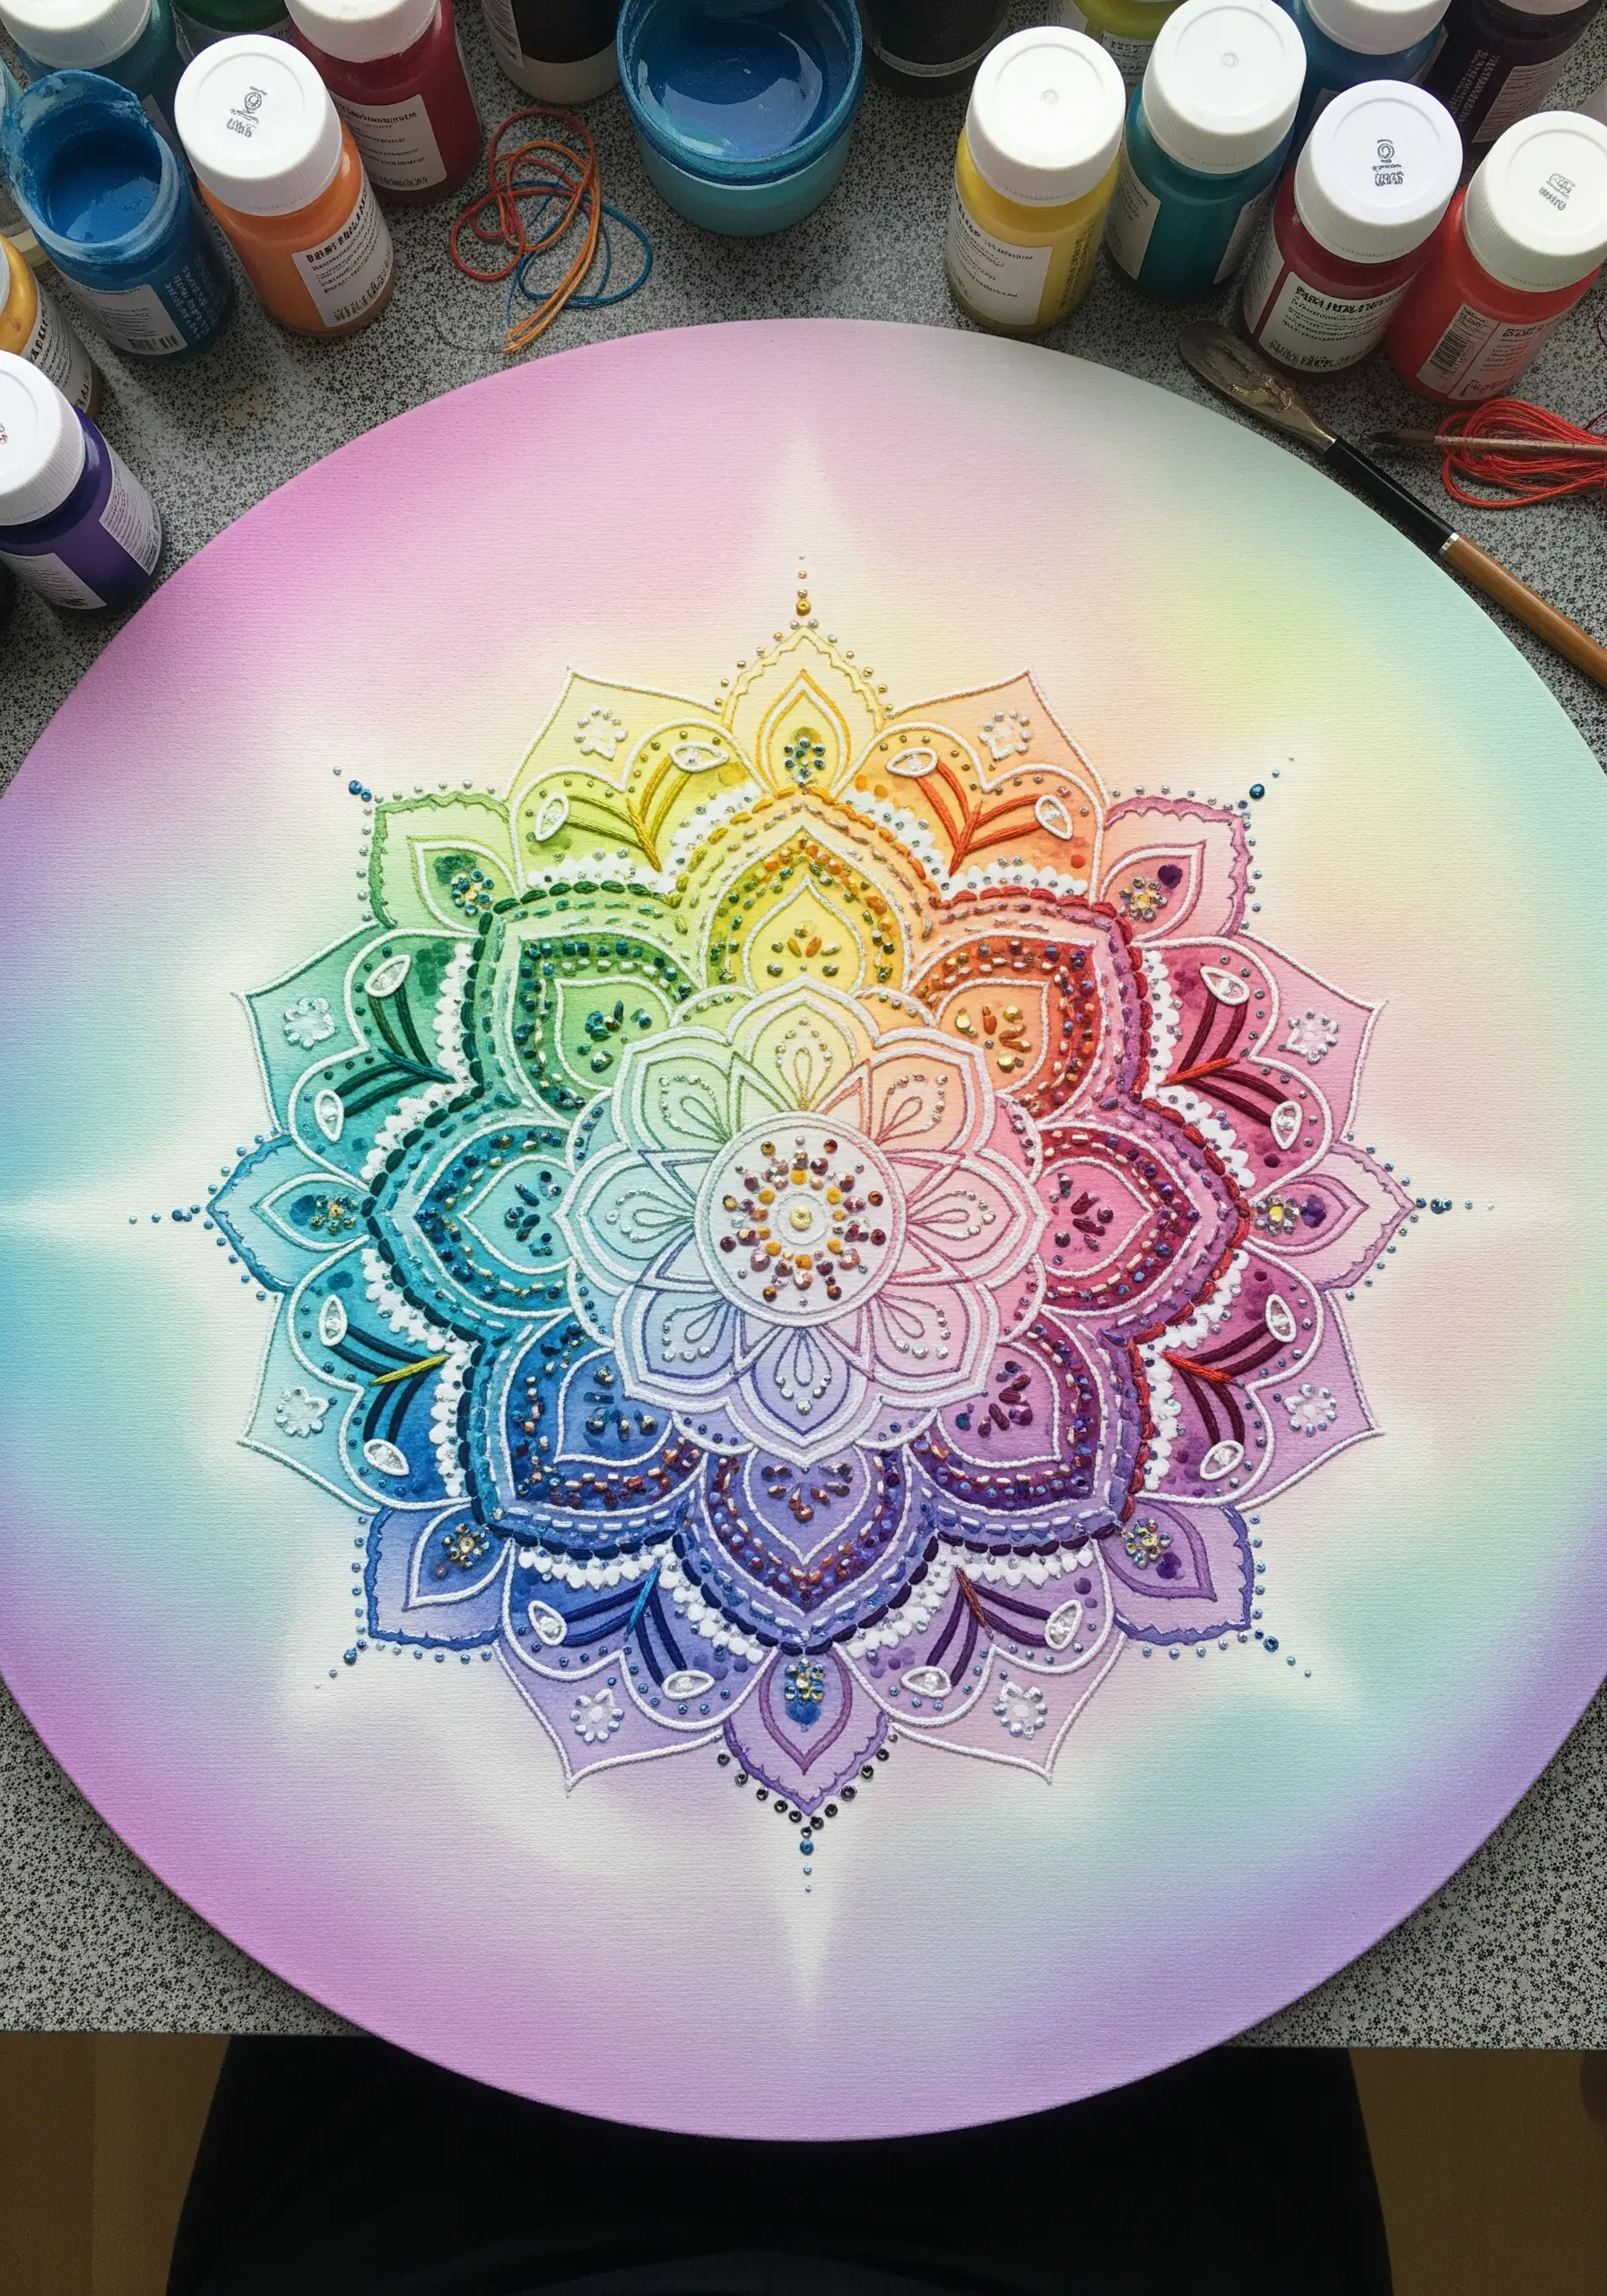
Start with a canvas painted in a soft, gradient rainbow, which provides a vibrant base for your design.
Instead of outlining with thread, use a fine-tipped bottle of dimensional fabric paint to create raised, white lines for your mandala pattern.
This technique creates immediate texture and a clear structure, simplifying the process while adding a tactile quality.
Enhance the design by filling in small sections with seed beads or French knots, turning your piece into one of those striking Embroidered mandala wall art designs that blend painting with embellishment.
19. Celestial Cartography: Highlighting Printed Fabric with Thread
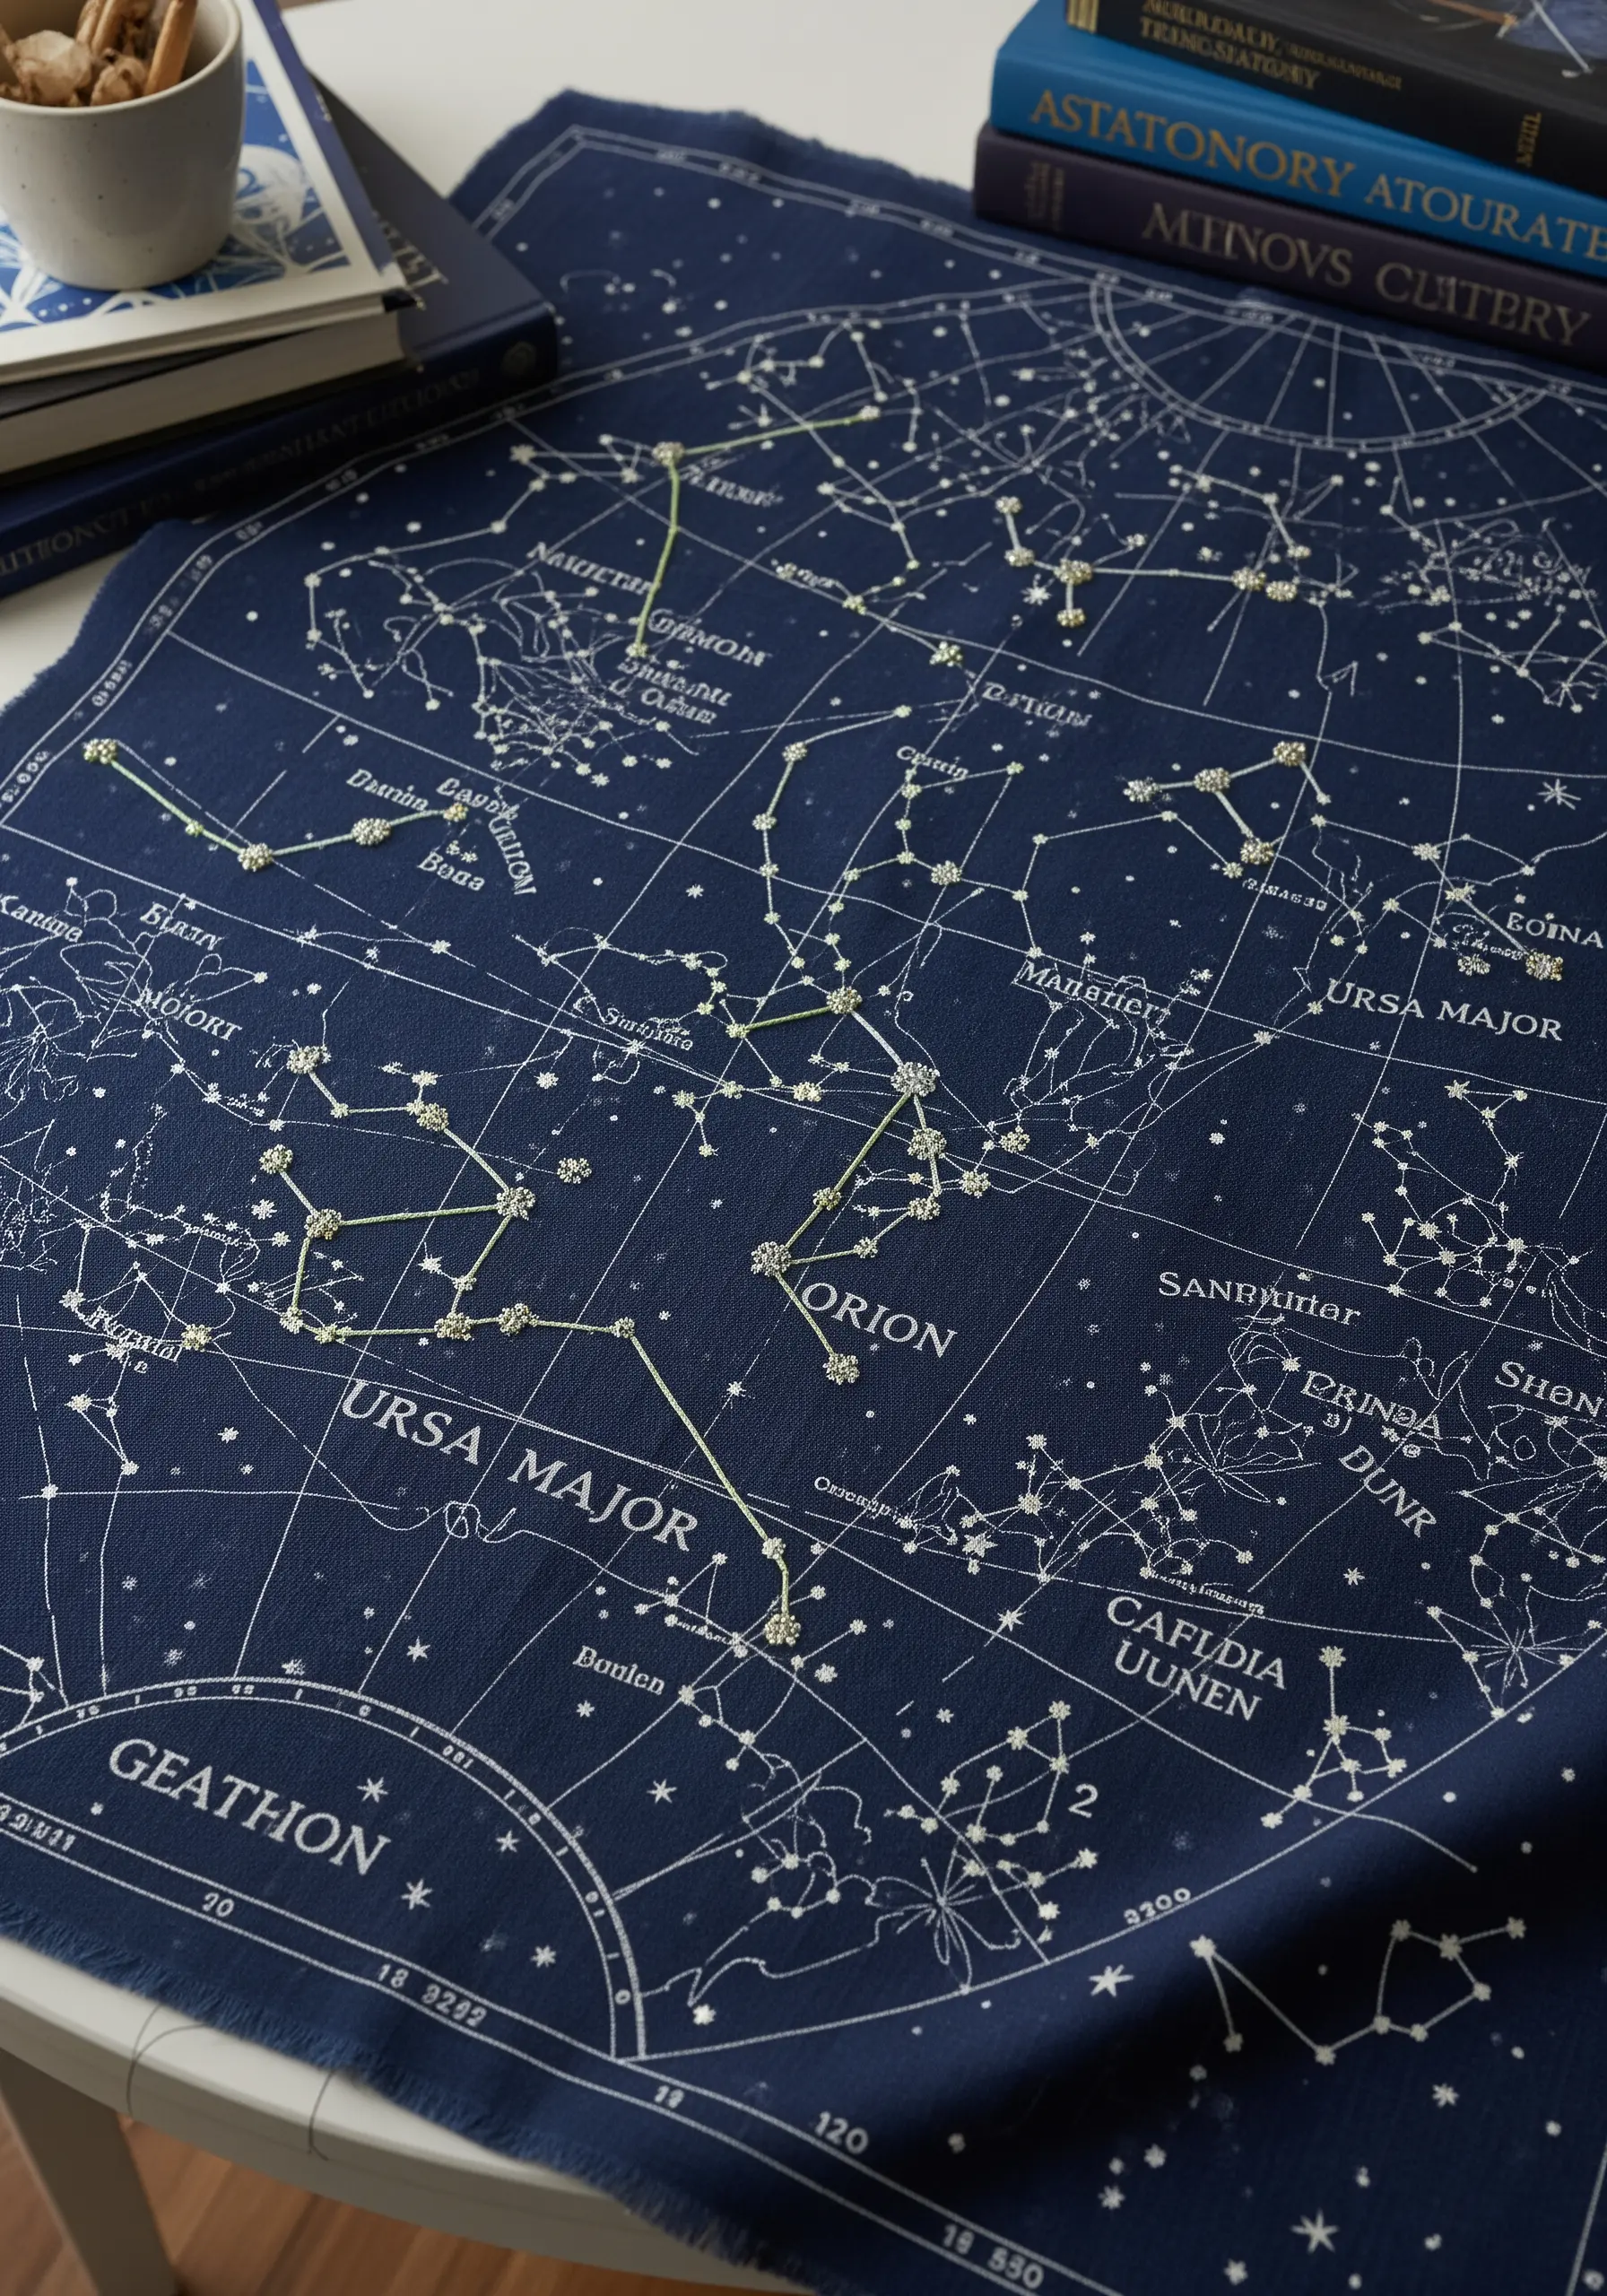
Begin with a piece of commercially printed fabric featuring a design you love, such as a vintage star map.
Selectively embellish the existing print rather than creating a design from scratch. Choose one or two constellations and trace their lines with a metallic or glow-in-the-dark thread.
Use tiny French knots, seed beads, or single straight stitches to accentuate the printed stars, giving them a subtle shimmer and texture.
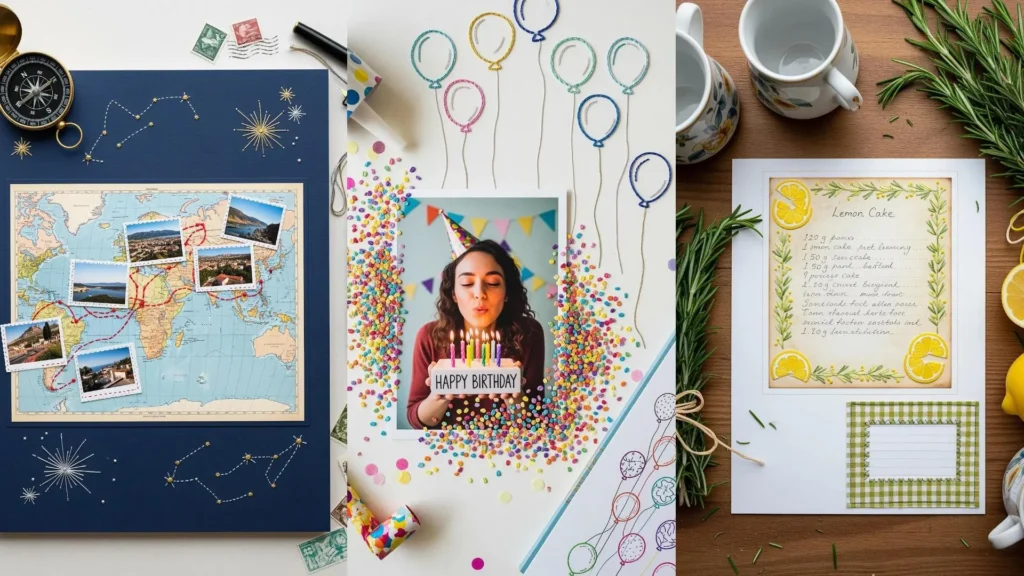
This technique elevates a simple piece of fabric into personalized art, much like how you can create string art maps for turning your memories into embroidery.
20. Forest Floor Diorama: 3D Stumpwork and Textured Knots
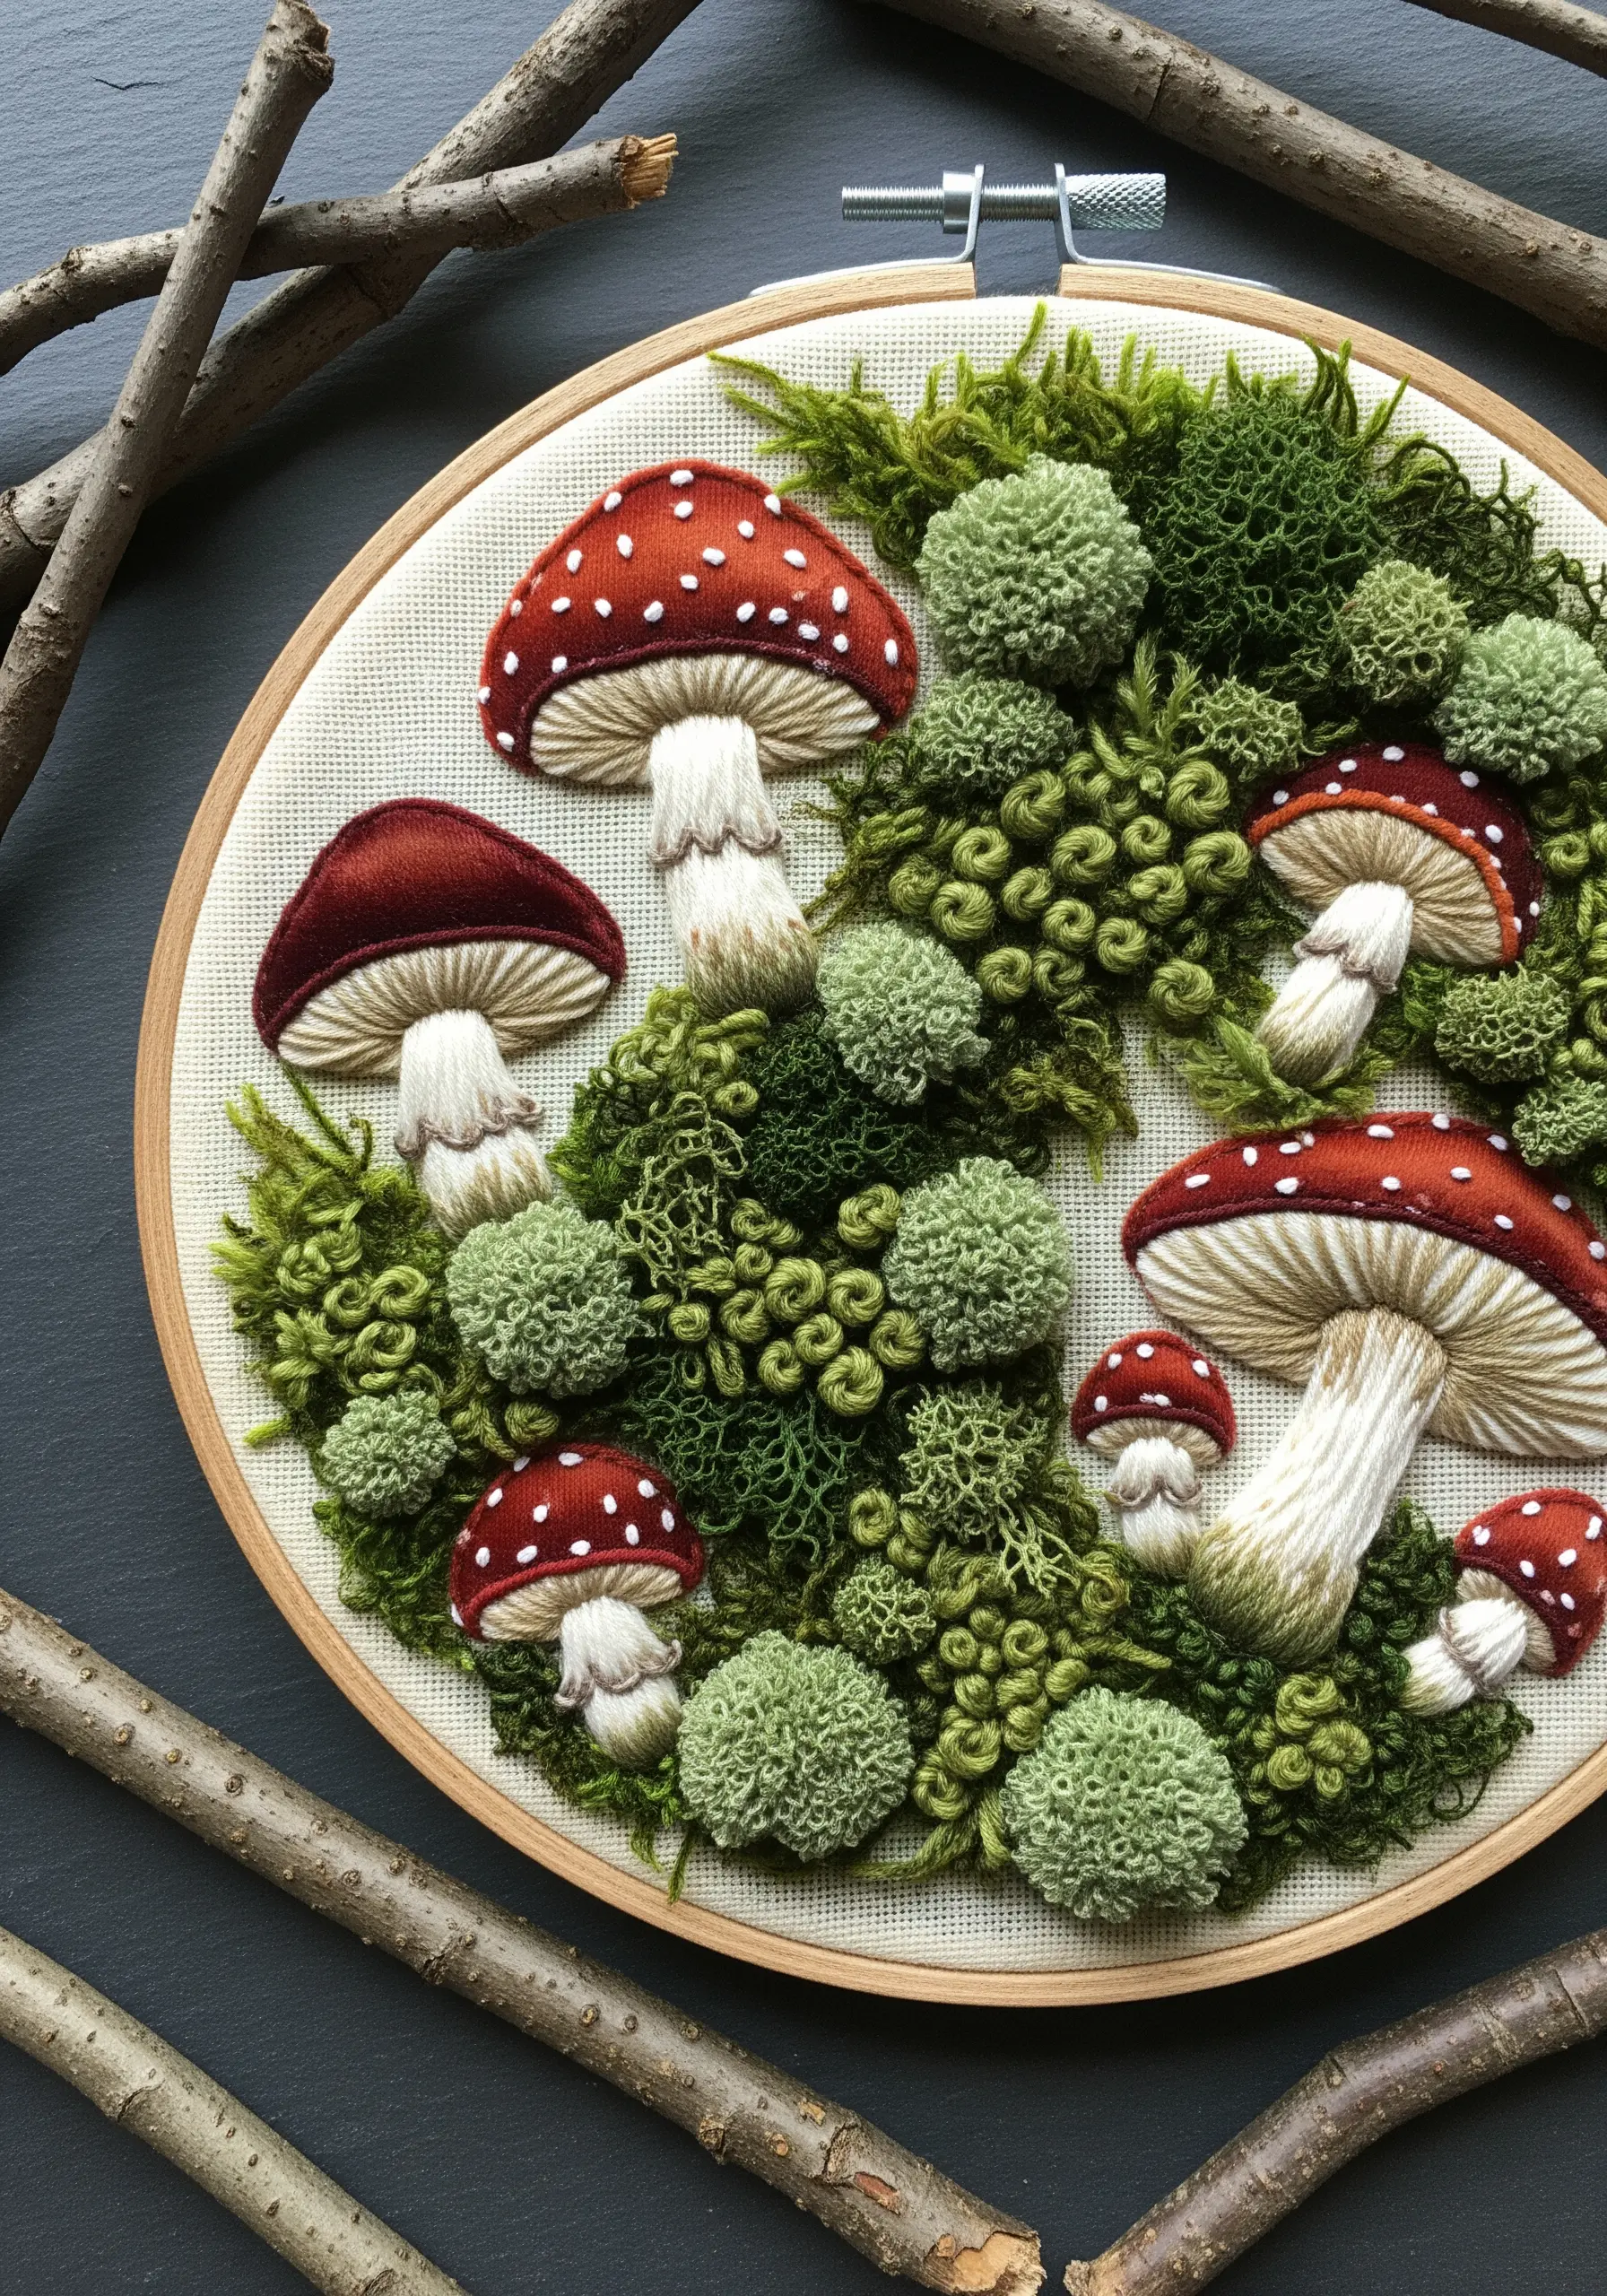
Create a truly dimensional scene by using stumpwork techniques for the larger elements, like the mushroom caps.
Stitch over a small wire frame using detached buttonhole stitches or needle weaving to create raised, self-supporting shapes.
For the mossy ground, use a dense application of French knots and turkey work (gimp stitch) in various shades of green and brown yarn to build up a rich, shaggy texture.
Combining these advanced techniques turns your hoop into a miniature, tactile sculpture, resulting in stunningly realistic mushroom forest floor embroidery projects.