
You have the yarn, the dowels, and the desire to create something beautiful for your walls. But how do you move beyond simple knots and fringes to craft something that feels truly elevated and intentional? The secret isn’t in buying more expensive materials—it’s in mastering the subtle details of texture, composition, and technique.
This collection is designed to be your guide. We’ll explore how to blend different yarn weights for dramatic effect, use negative space to create a modern feel, and introduce unexpected materials that add a layer of sophistication. Think of this as a conversation about transforming simple fibers into art that speaks to your personal style.
Prepare to see yarn not just as a craft supply, but as a medium for sculpture, painting, and storytelling. Each piece here holds a lesson in balance and beauty, ready for you to adapt and make your own.
1. Mastering Textural Contrast in Woven Art
To achieve this sculptural look, focus on varying the density and weight of your yarns within a single piece.
Combine a tightly woven tabby stitch using a thin warp thread with sections of plush, unspun wool roving for a dramatic textural shift.
The key is to create “moments” of high texture, like the braided soumak stitch, and balance them with areas of flat weave.
This contrast not only adds visual interest but also gives your work a professional, gallery-quality depth.
Limit your color palette to three or four neutral tones to let the textures become the main focal point.
2. The Art of the Dip-Dye Gradient
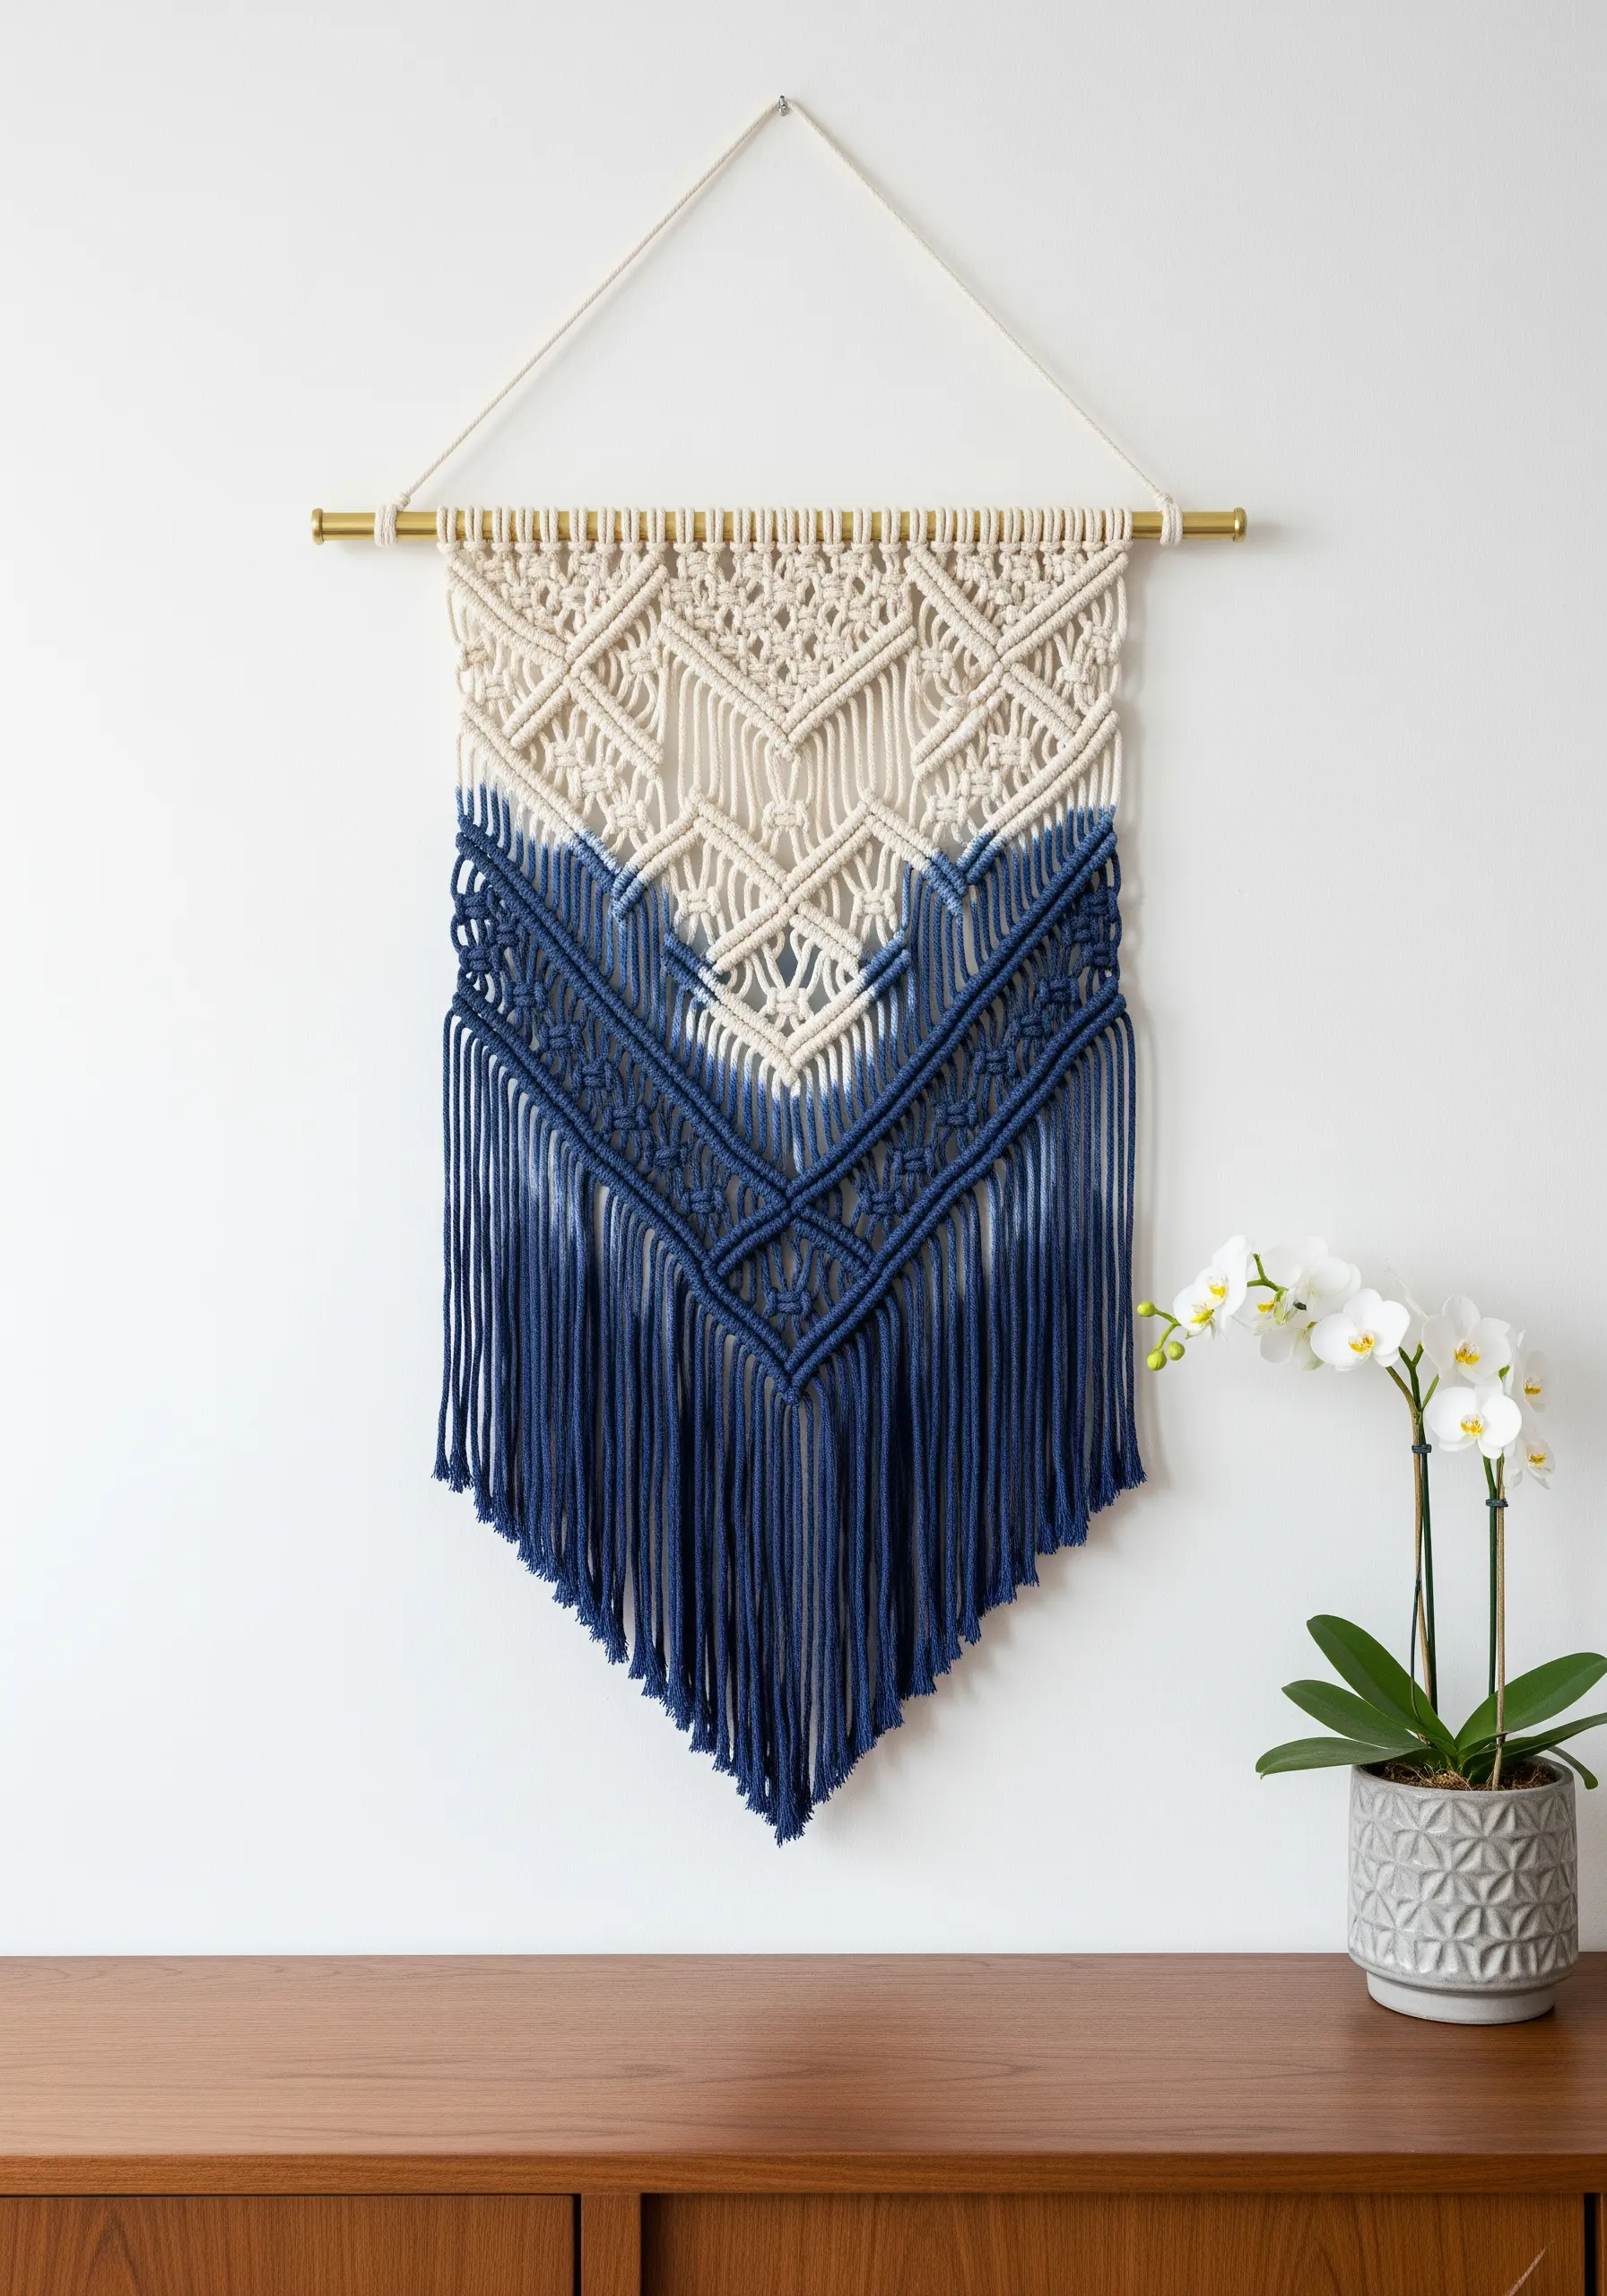
Elevate a simple macrame design by introducing a dip-dye gradient, which adds a painterly, sophisticated finish.
First, complete your knotting with natural cotton cord, as it absorbs dye beautifully.
To create the soft fade, submerge the bottom tip of your hanging into the dye bath, then slowly pull it out over several minutes, allowing less time for the upper sections.
This gradual process ensures a seamless transition from dark to light, avoiding harsh lines and creating a sense of movement.
For best results, use a fiber-reactive dye and let the piece hang freely to dry, preventing any color bleeding.
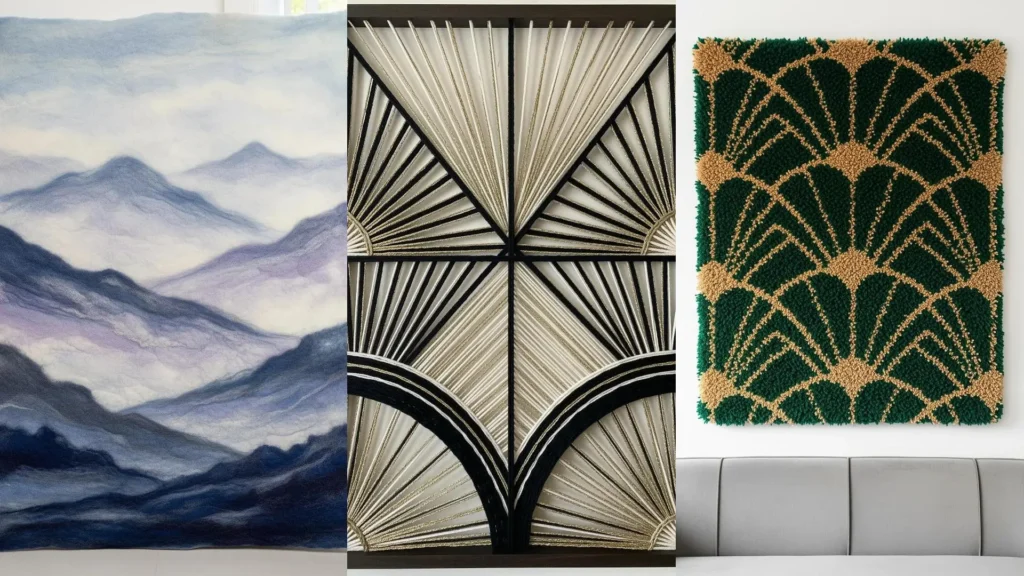
3. Creating Punch Needle Landscapes
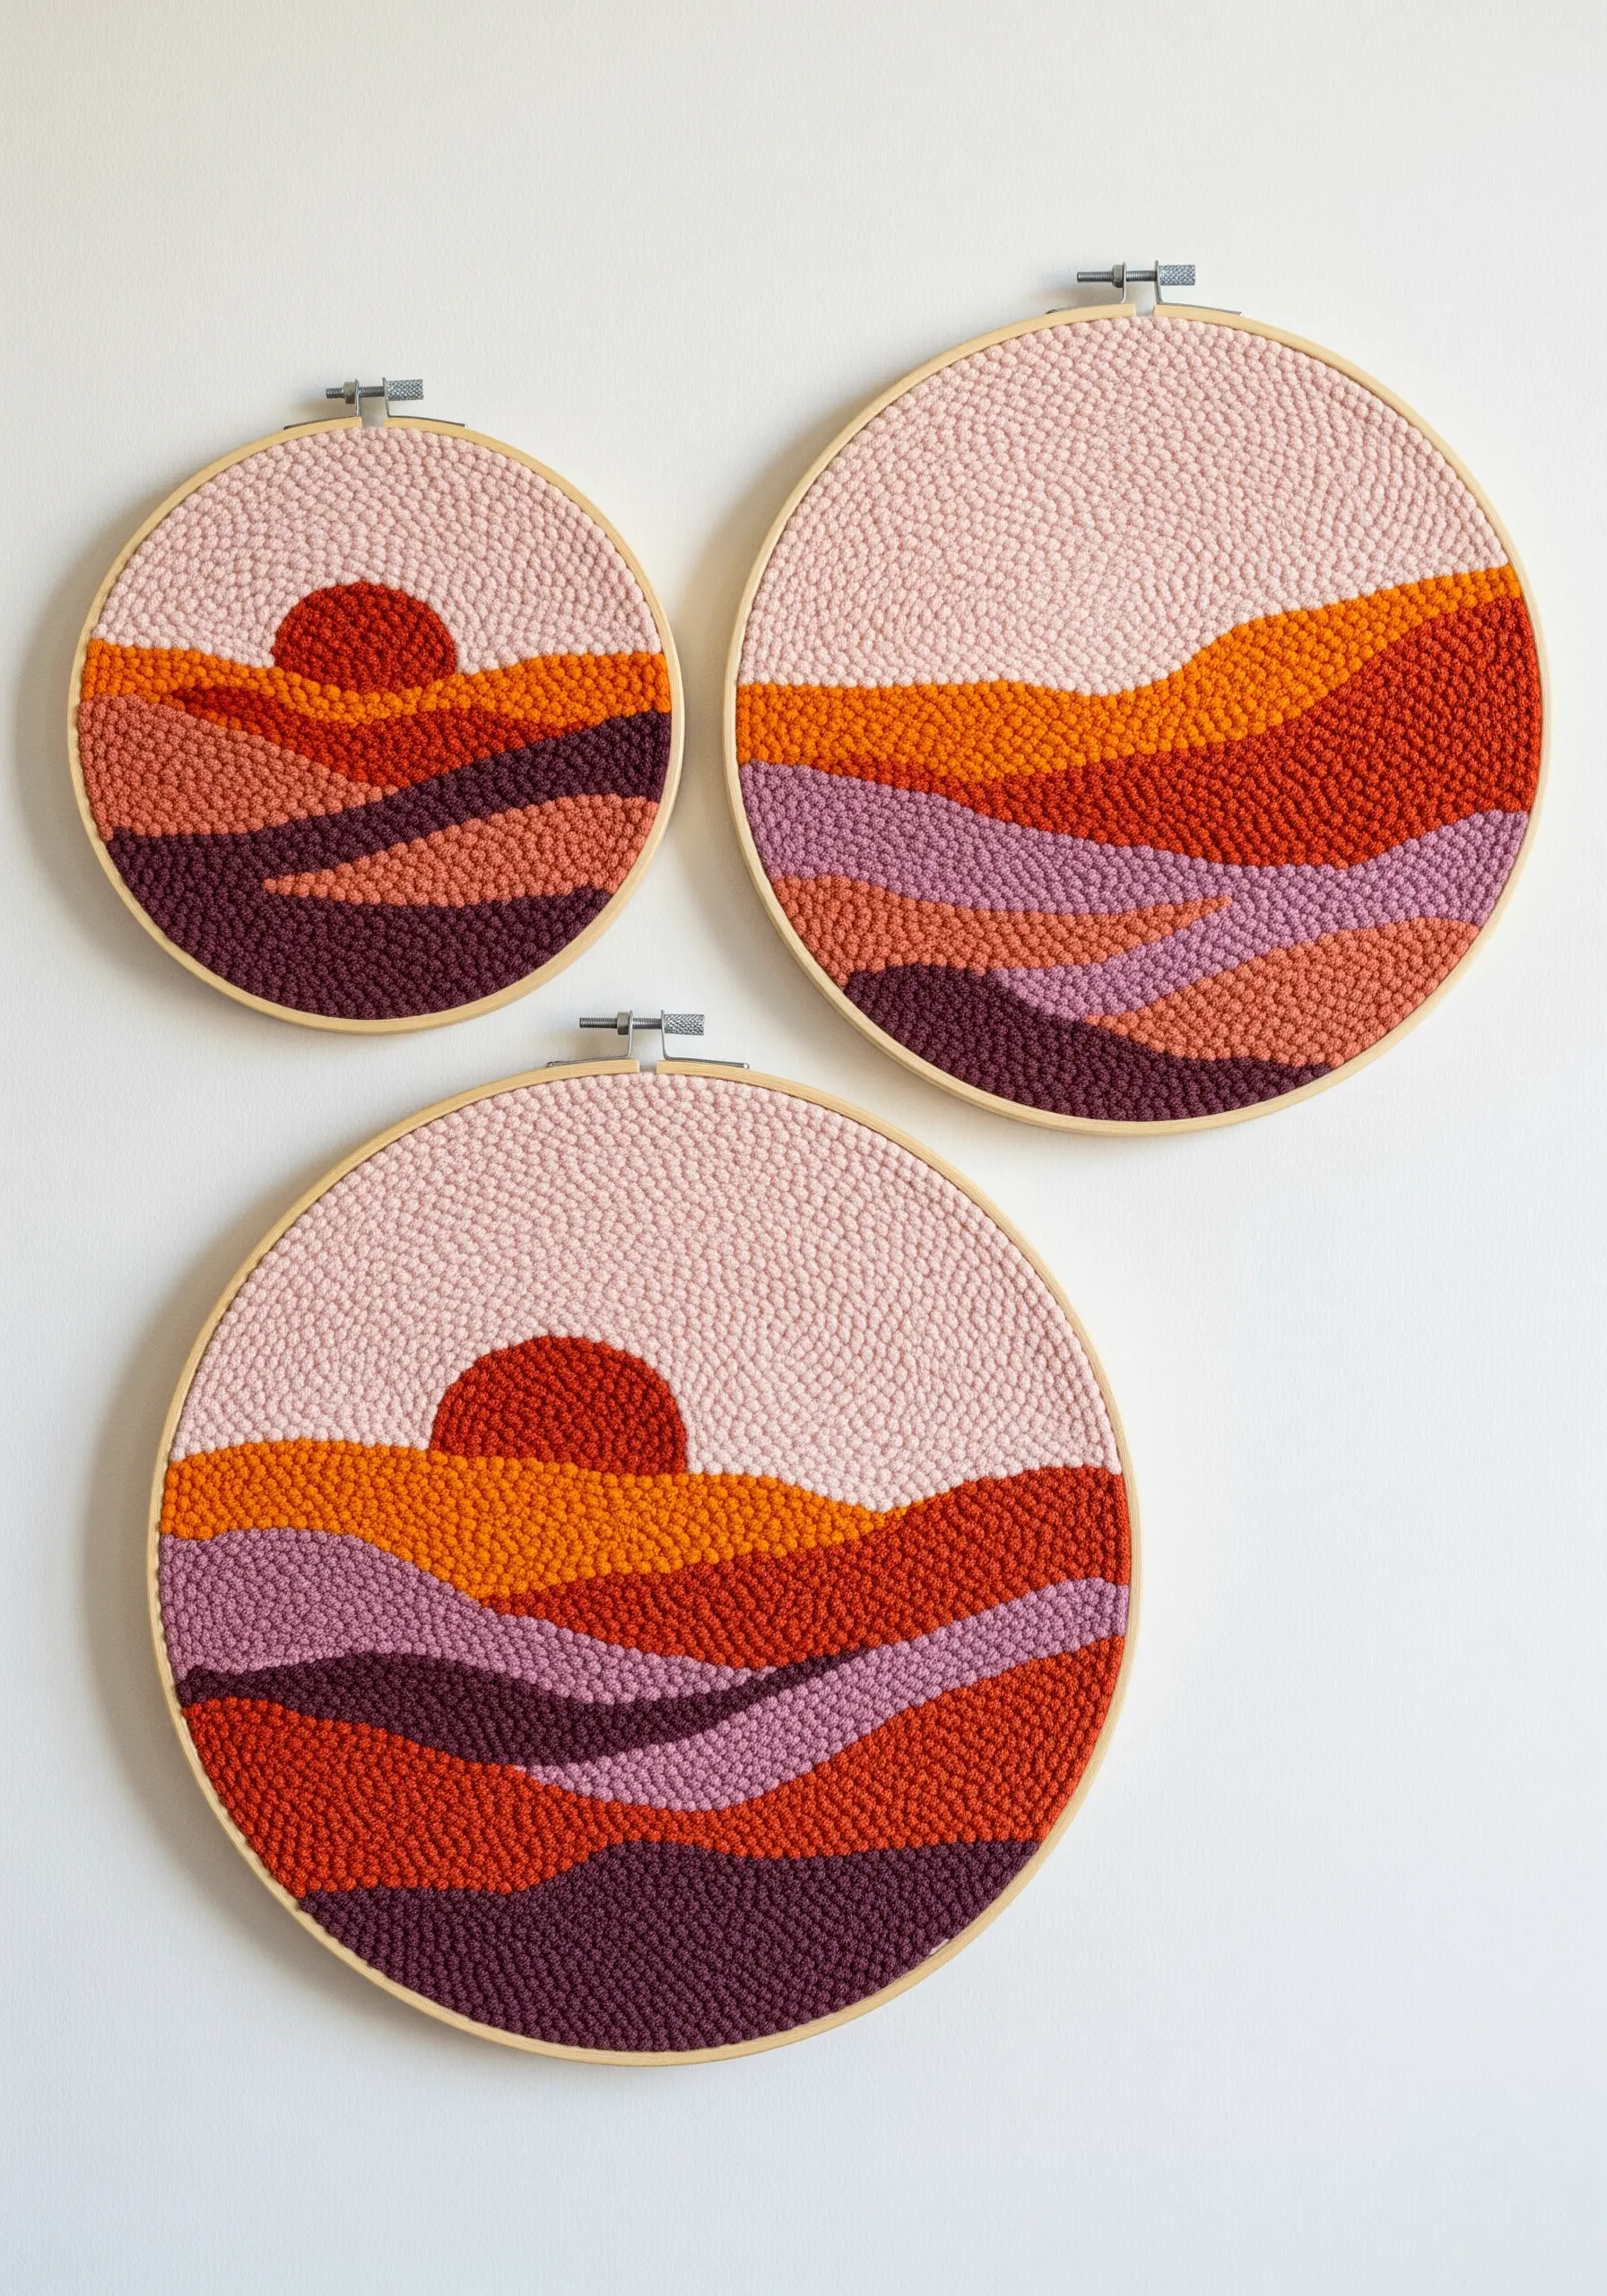
You can create incredible depth in punch needle art by focusing on two elements: color blocking and loop height.
Use a single, consistent loop height for the entire piece to achieve that uniform, plush texture that reads like a textile painting.
The illusion of rolling hills comes from carefully planned, curved color blocks.
Sketch your design onto the monk’s cloth first, then fill in each section with distinct colors, working from the background to the foreground.
This technique turns a simple craft into stunning abstract thread landscapes that feel both modern and cozy.
4. The Layered Ombré Fringe Wall Hanging
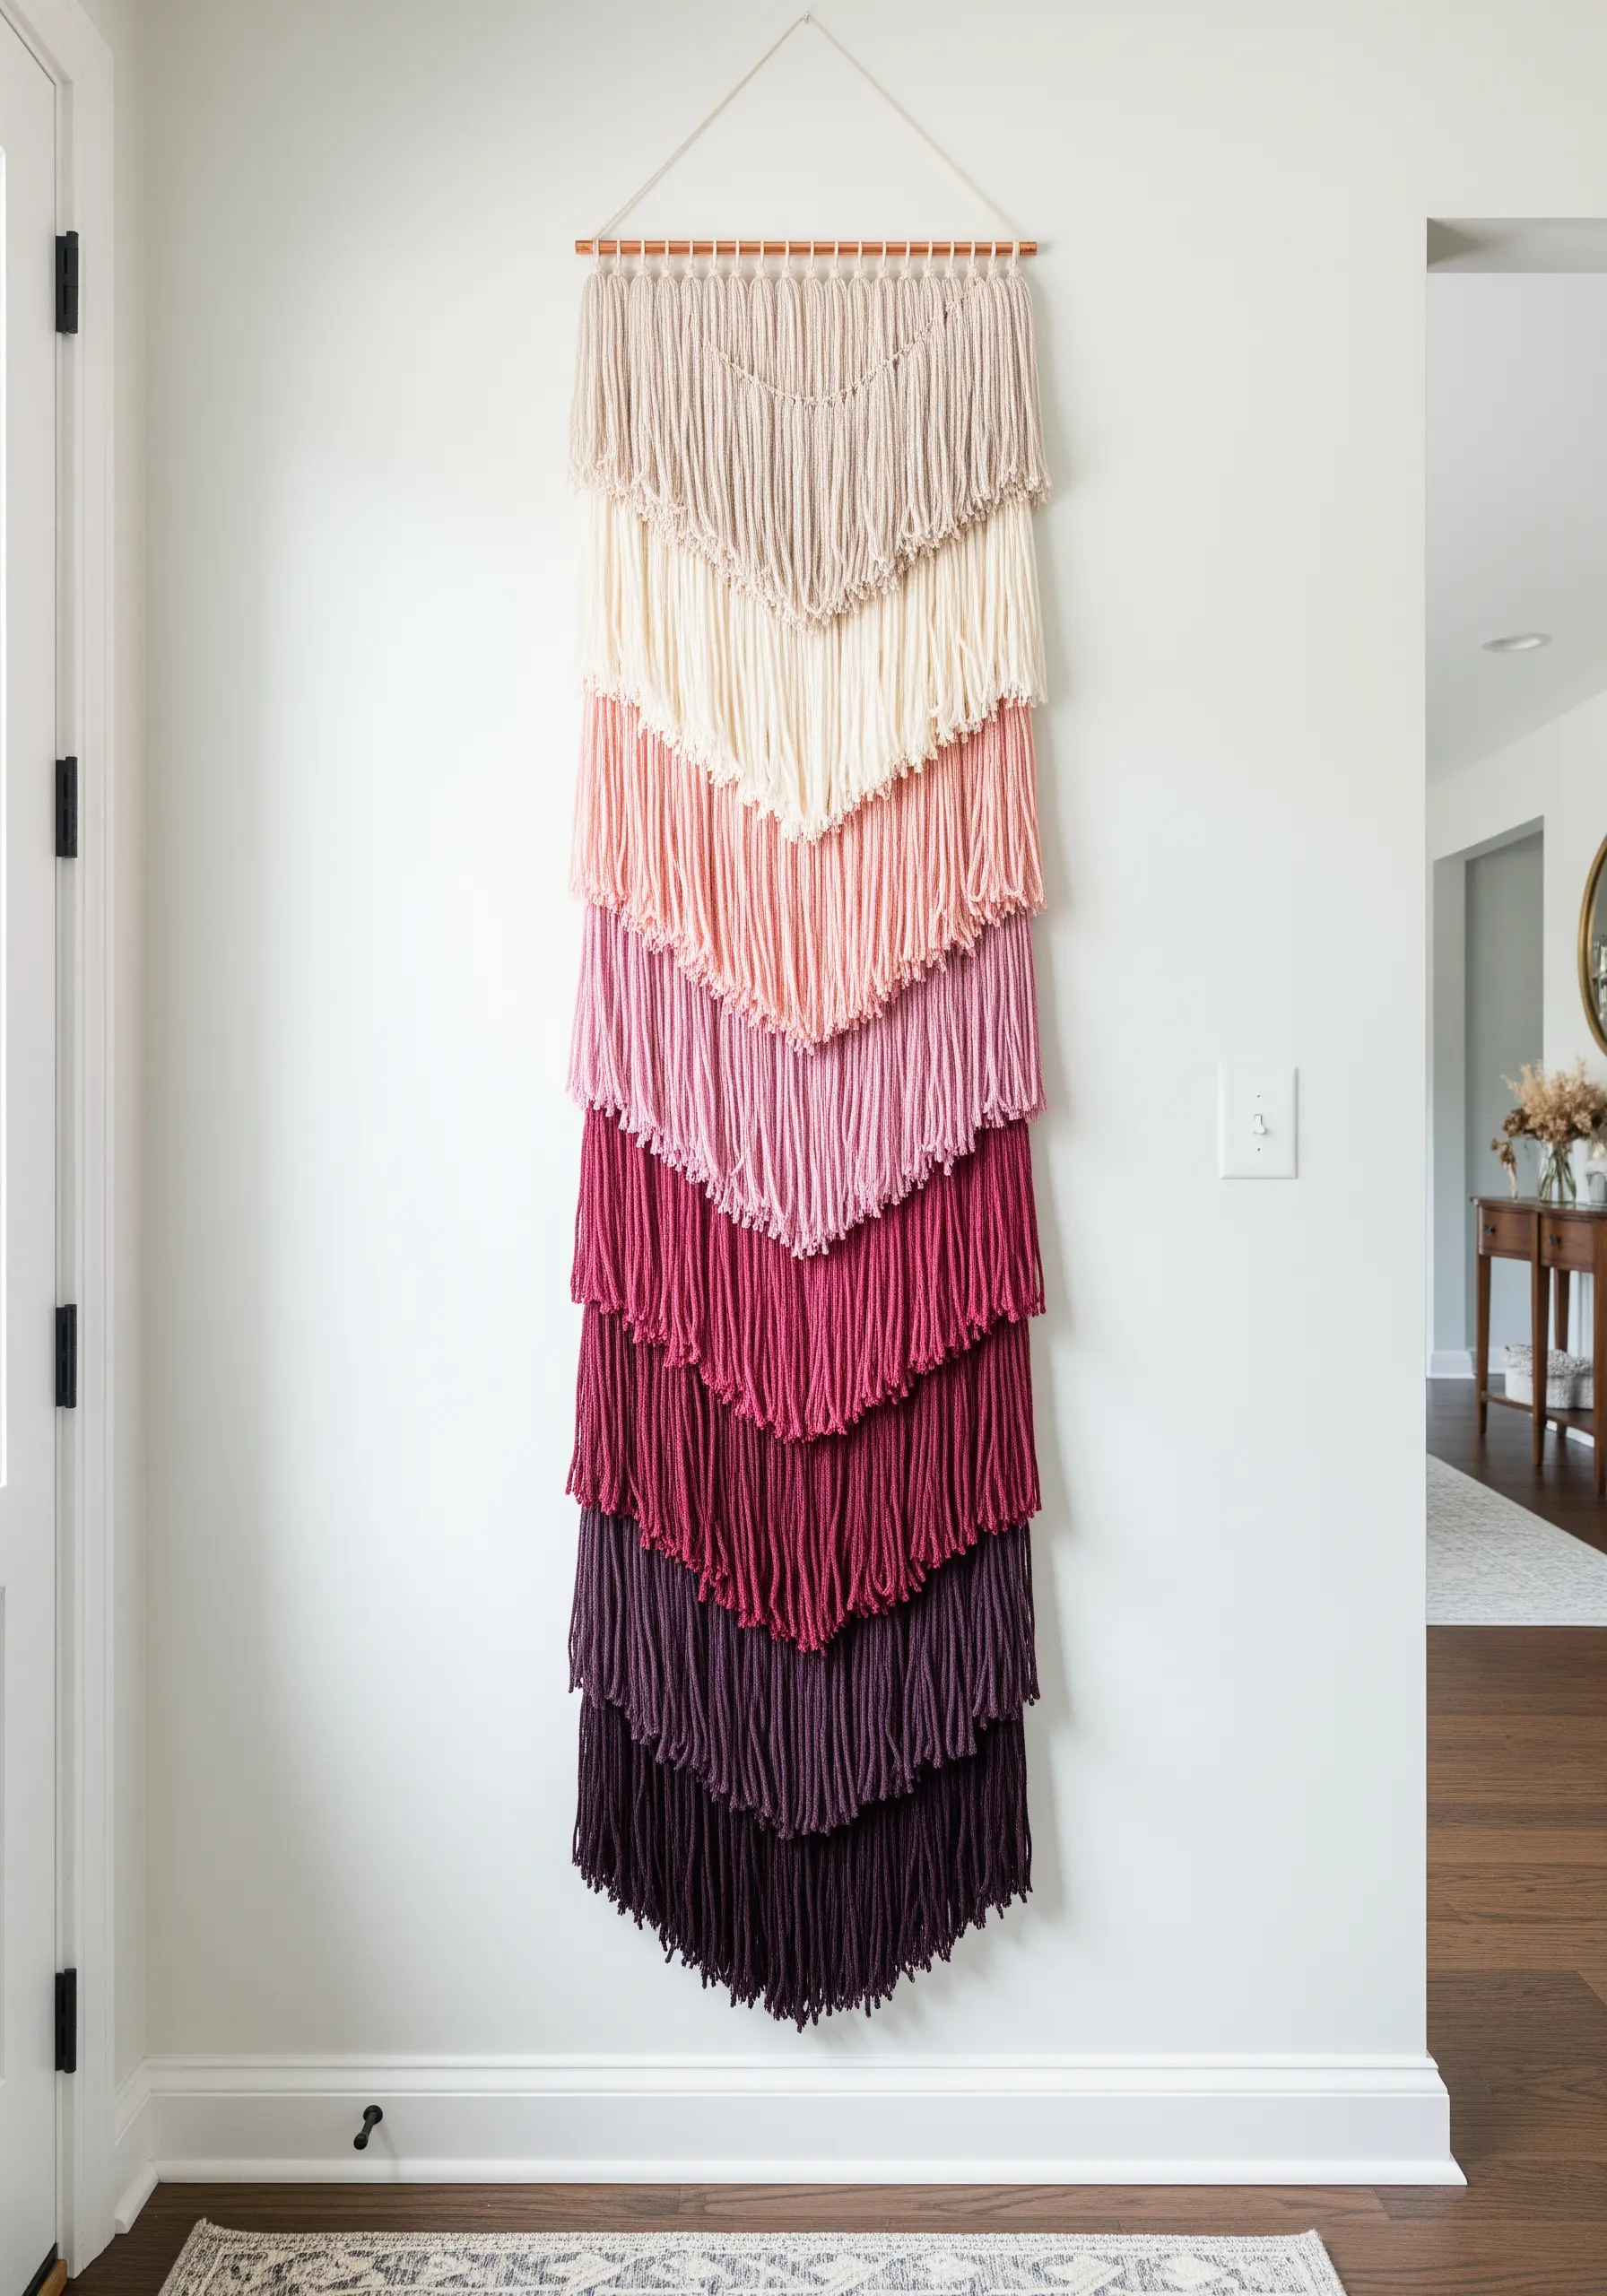
This impressive ombré effect is achieved through layering, not dyeing, making it accessible for any skill level.
Start by selecting five to seven shades of yarn in a single color family, from light to dark.
Create individual, V-shaped macrame panels for each color, making each subsequent layer slightly wider than the last.
Attach each panel to a single dowel, with the lightest color at the top and the darkest at the bottom.
The layers overlap to create a full, cascading effect, turning simple fringe into a statement piece of yarn wall art.
5. Elevating the Tassel with Mixed Materials
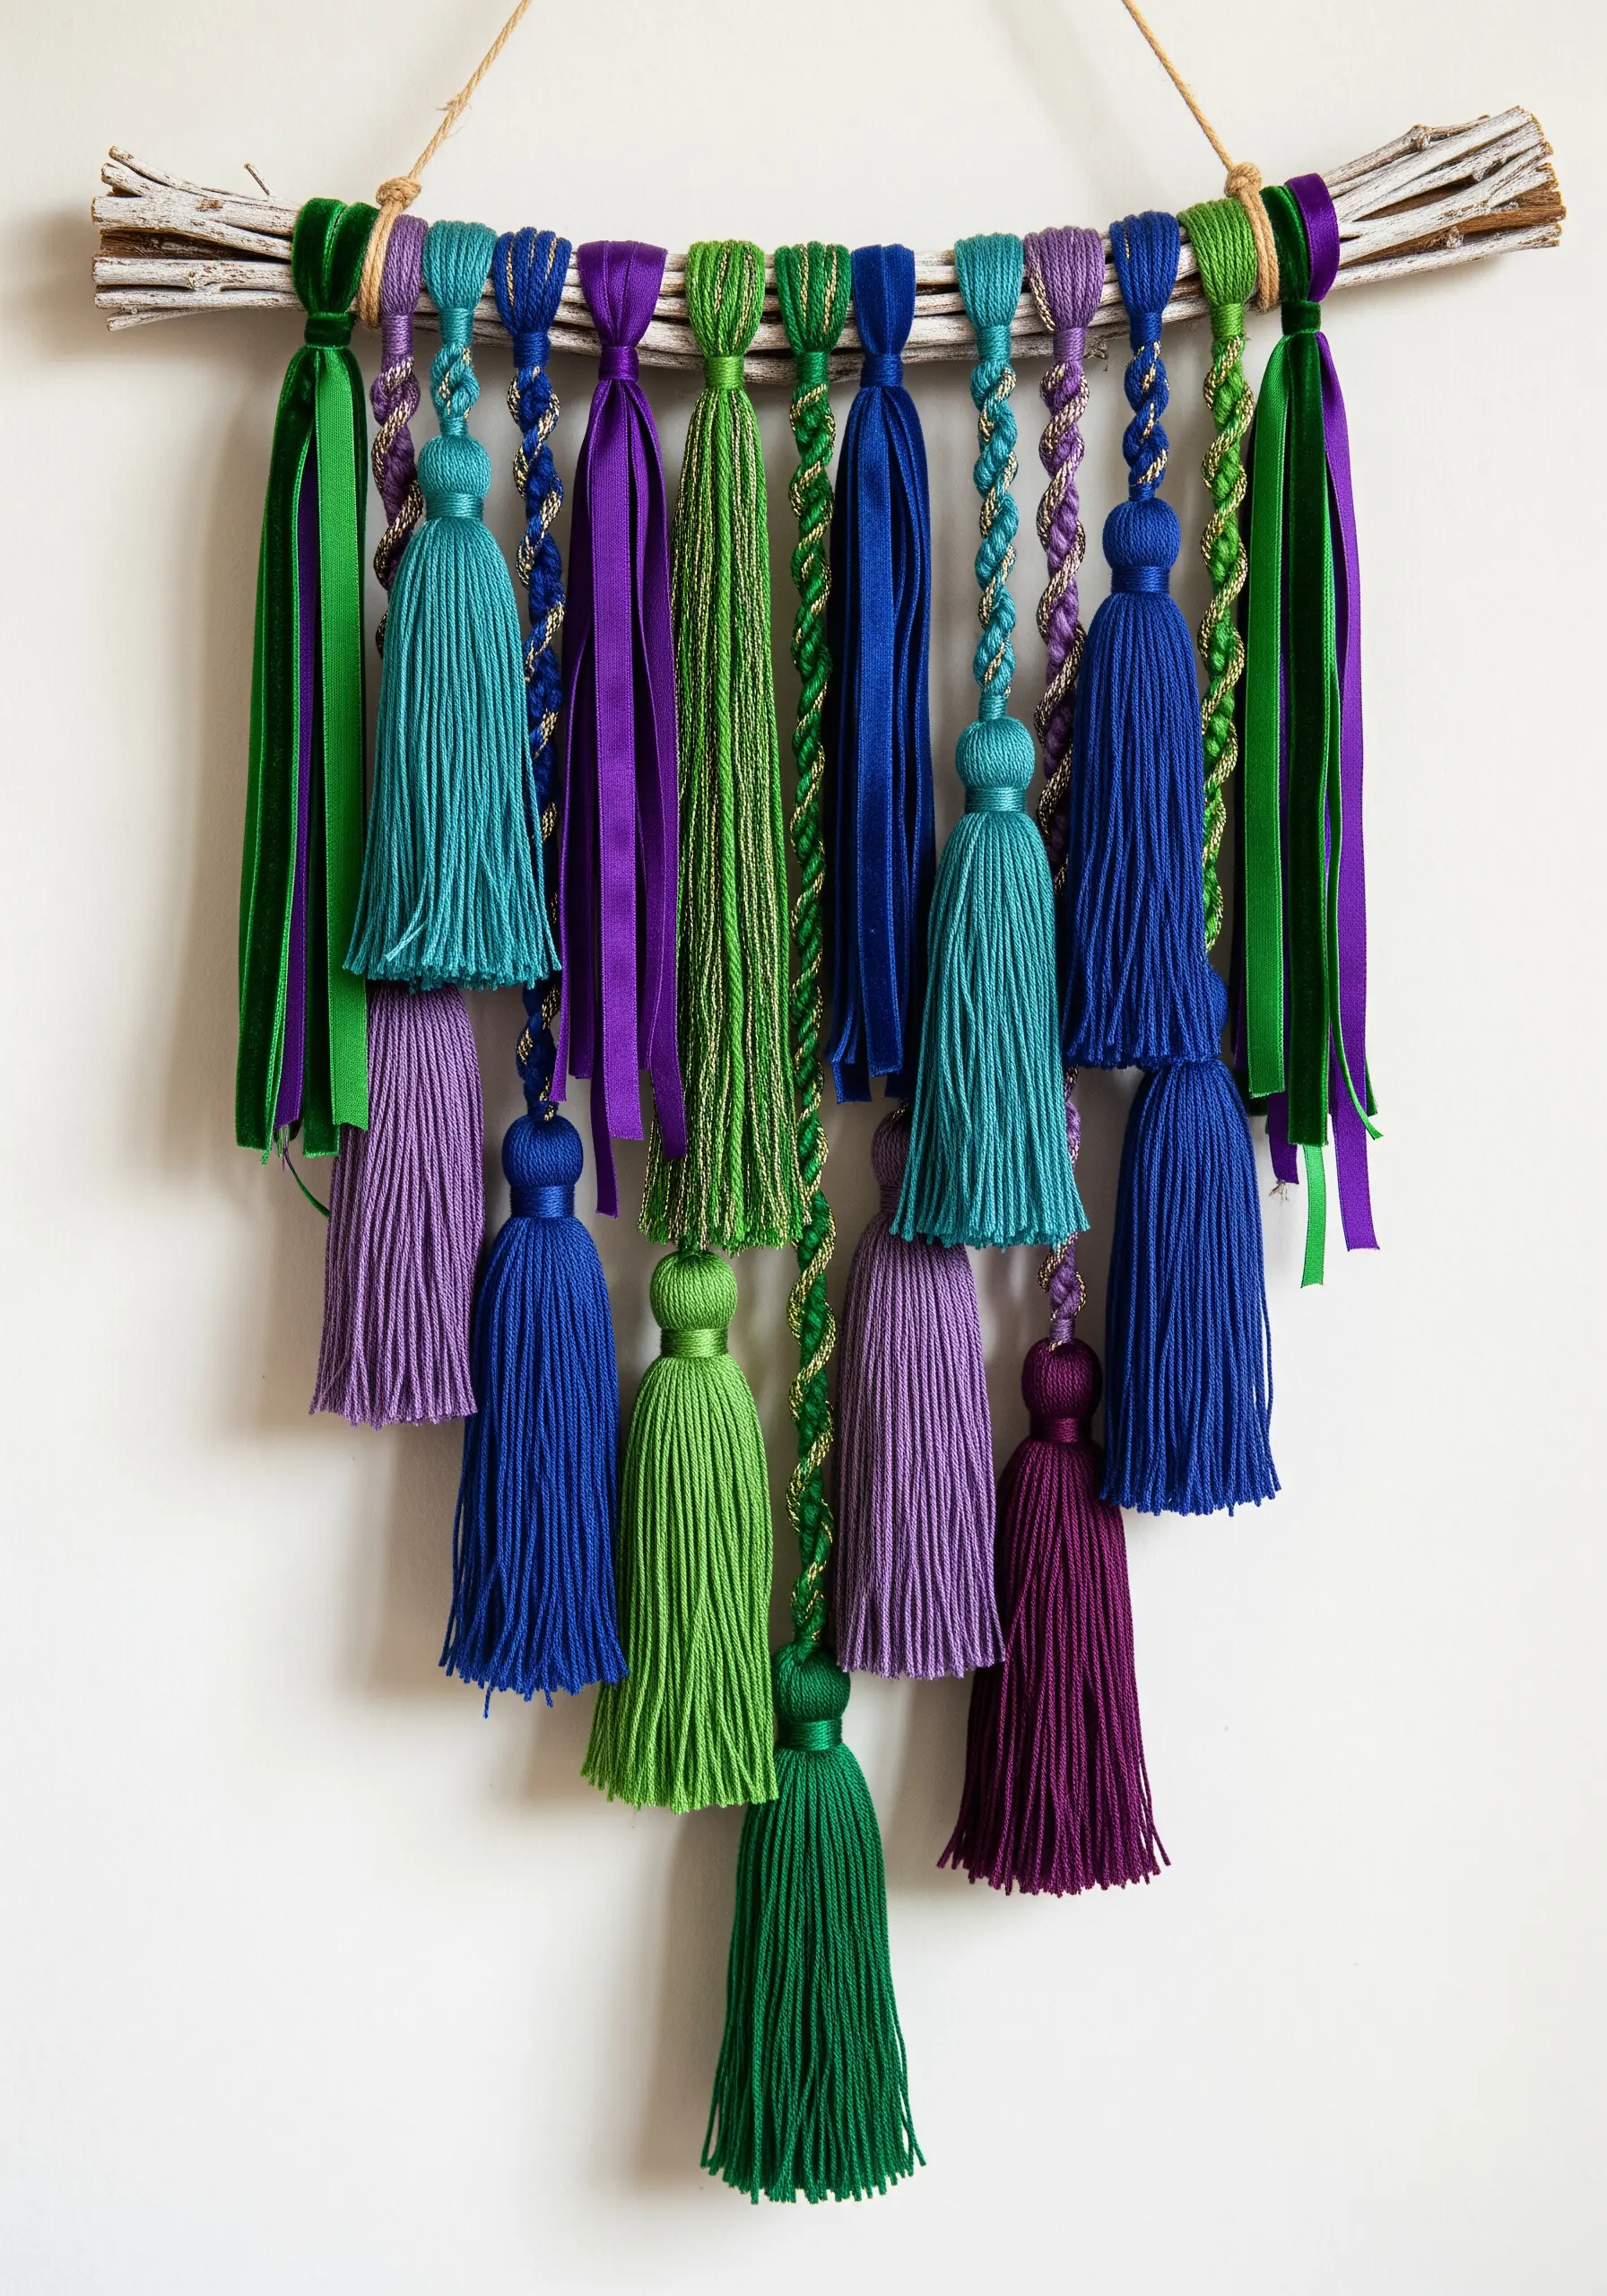
Transform simple yarn tassels from a craft project into a sophisticated wall hanging by introducing varied materials and textures.
Instead of using only yarn, create some tassels with embroidery floss for a silky sheen, or twisted cord for structure.
Integrate satin or velvet ribbons as hanging elements between the tassels. This breaks up the monotony and adds a touch of luxe.
A bold, jewel-toned color palette of greens, purples, and blues gives the piece a rich, cohesive feel.
Hanging them at different lengths from a natural branch adds an organic, balanced asymmetry.
6. Minimalist Color-Blocked Yarn Panels
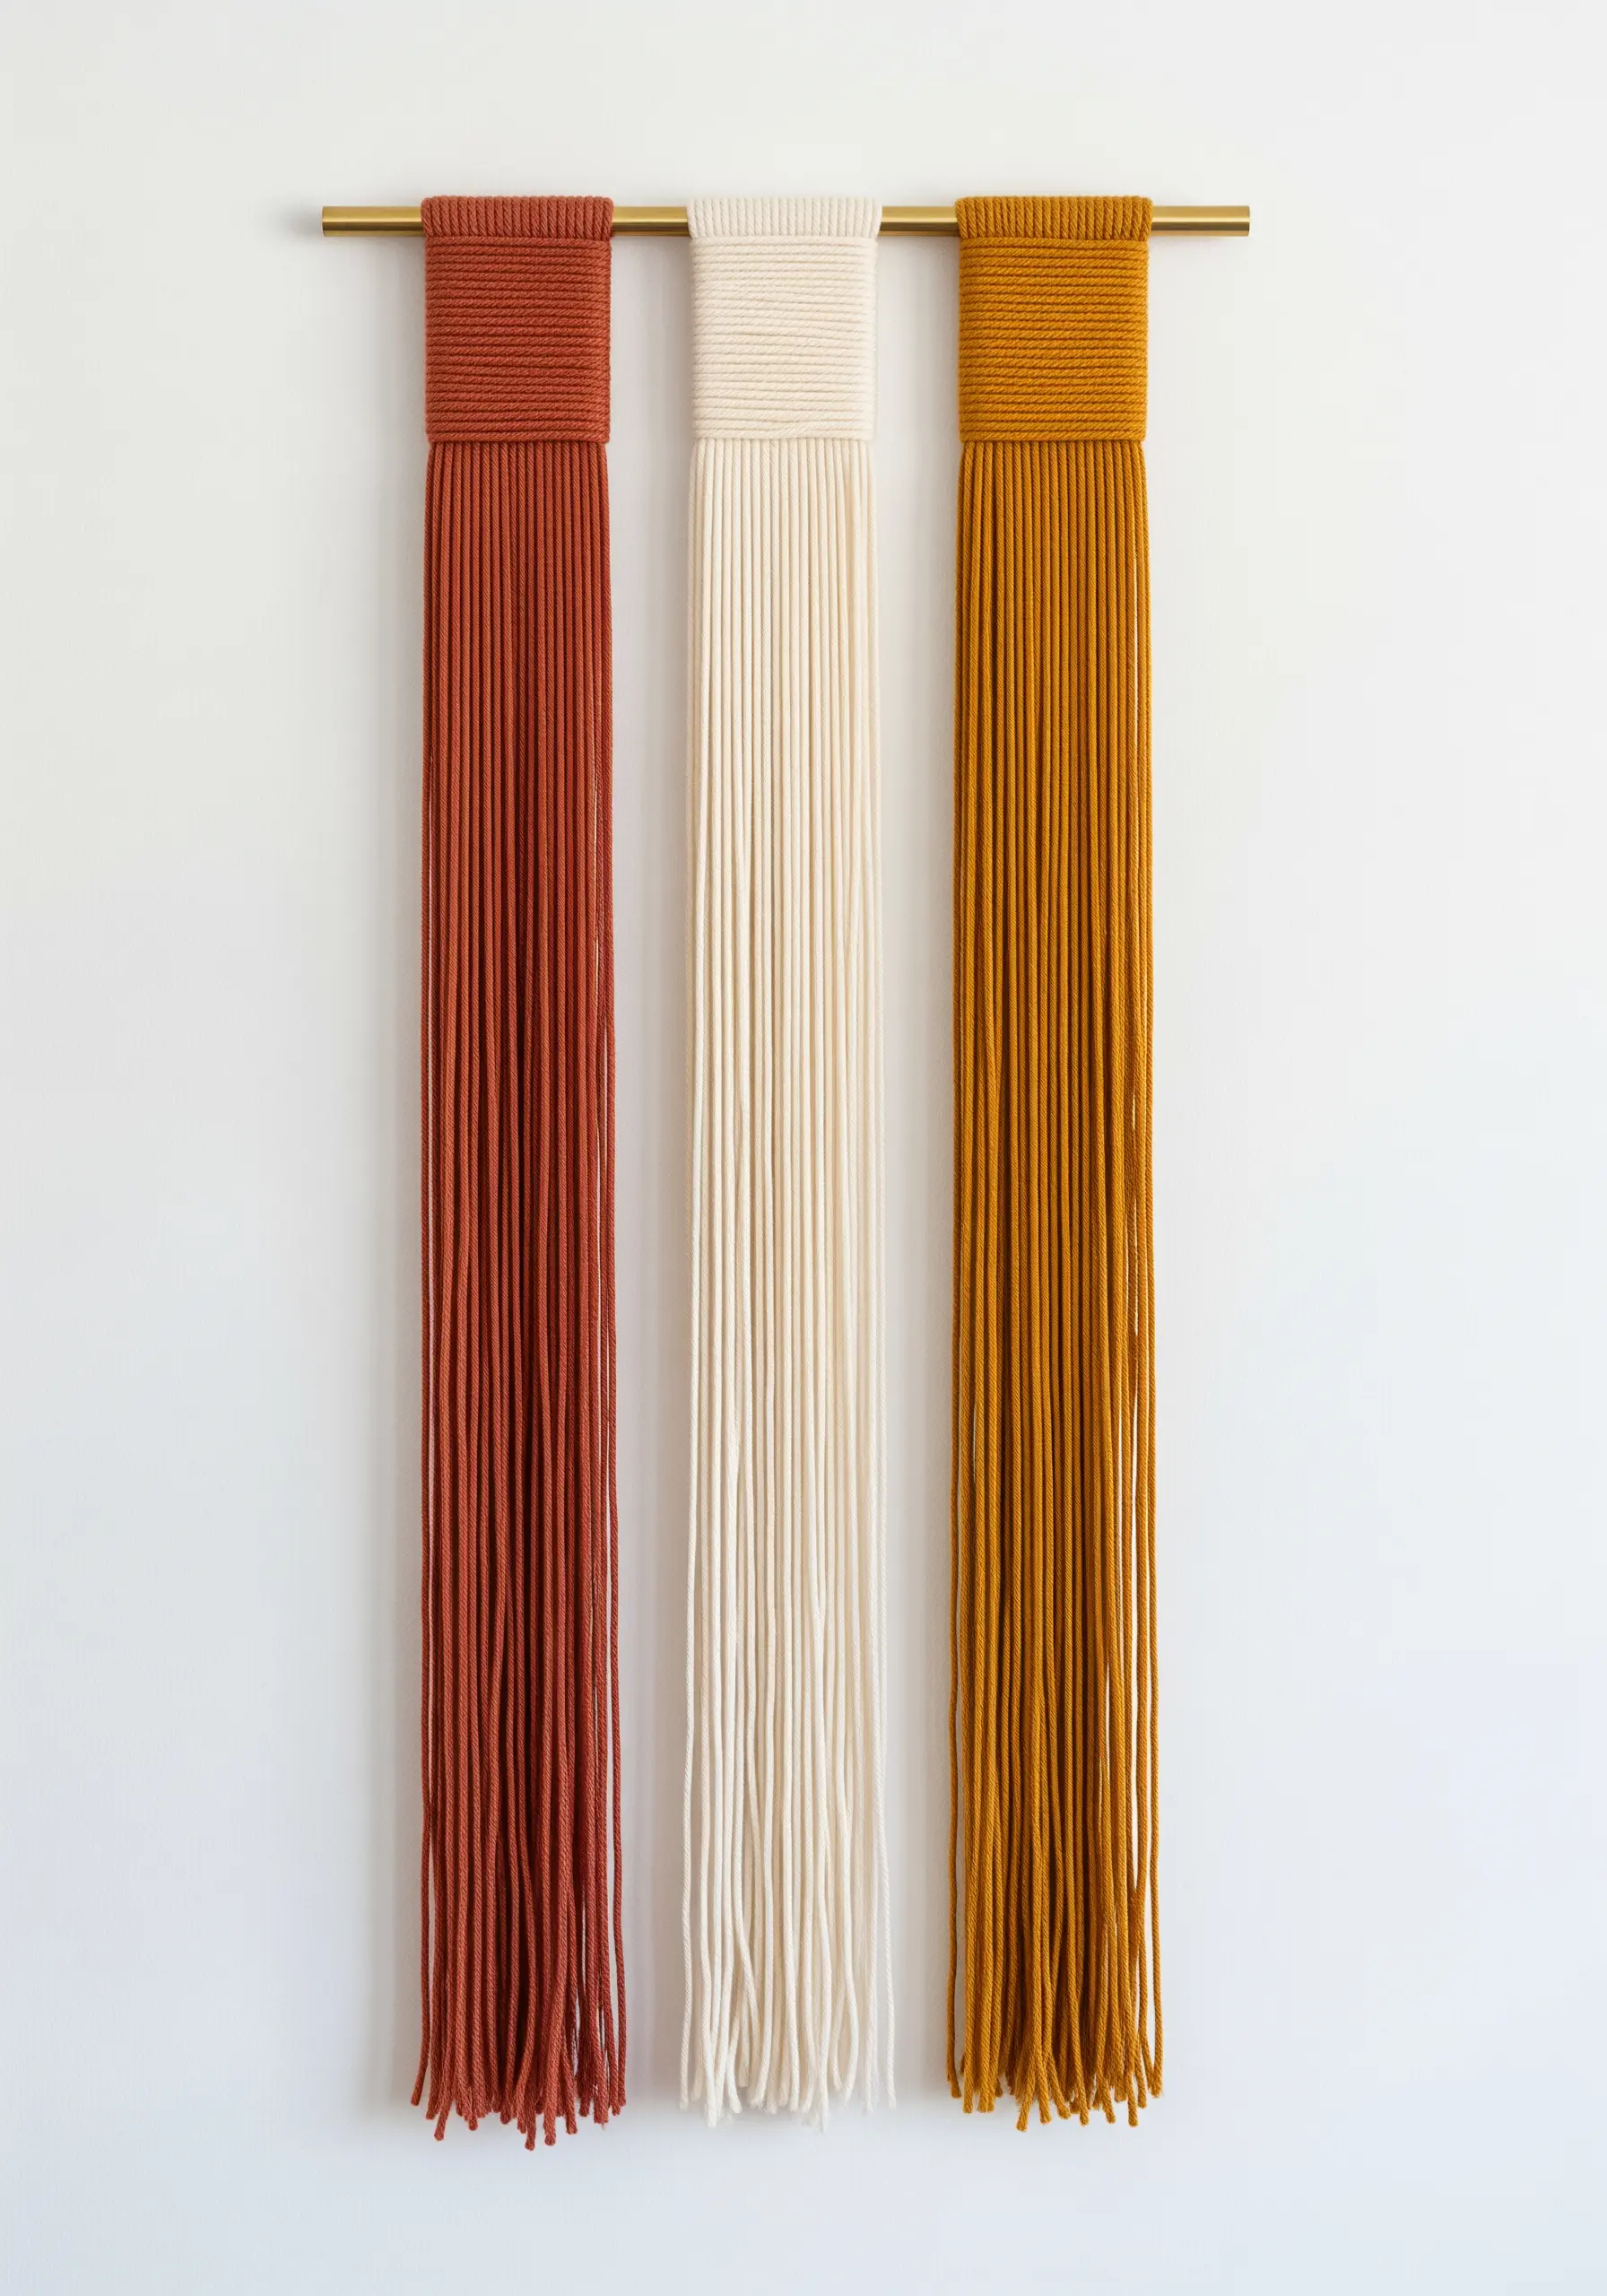
For a clean, contemporary look, focus on the simplicity of color blocking and perfect tension.
This design uses a simple wrapping technique around a thin metal bar or dowel. Secure the top of the yarn with lark’s head knots.
The key to the polished finish is ensuring every strand hangs perfectly straight and parallel.
Use a steamer or a flat iron on a low setting (with a cloth as a barrier) to release any kinks in the yarn before trimming the ends.
Hanging three panels in a tight, earthy color palette creates a rhythmic, minimalist wall piece that feels both handmade and highly designed.
7. Art Deco Punch Needle for a Statement Wall
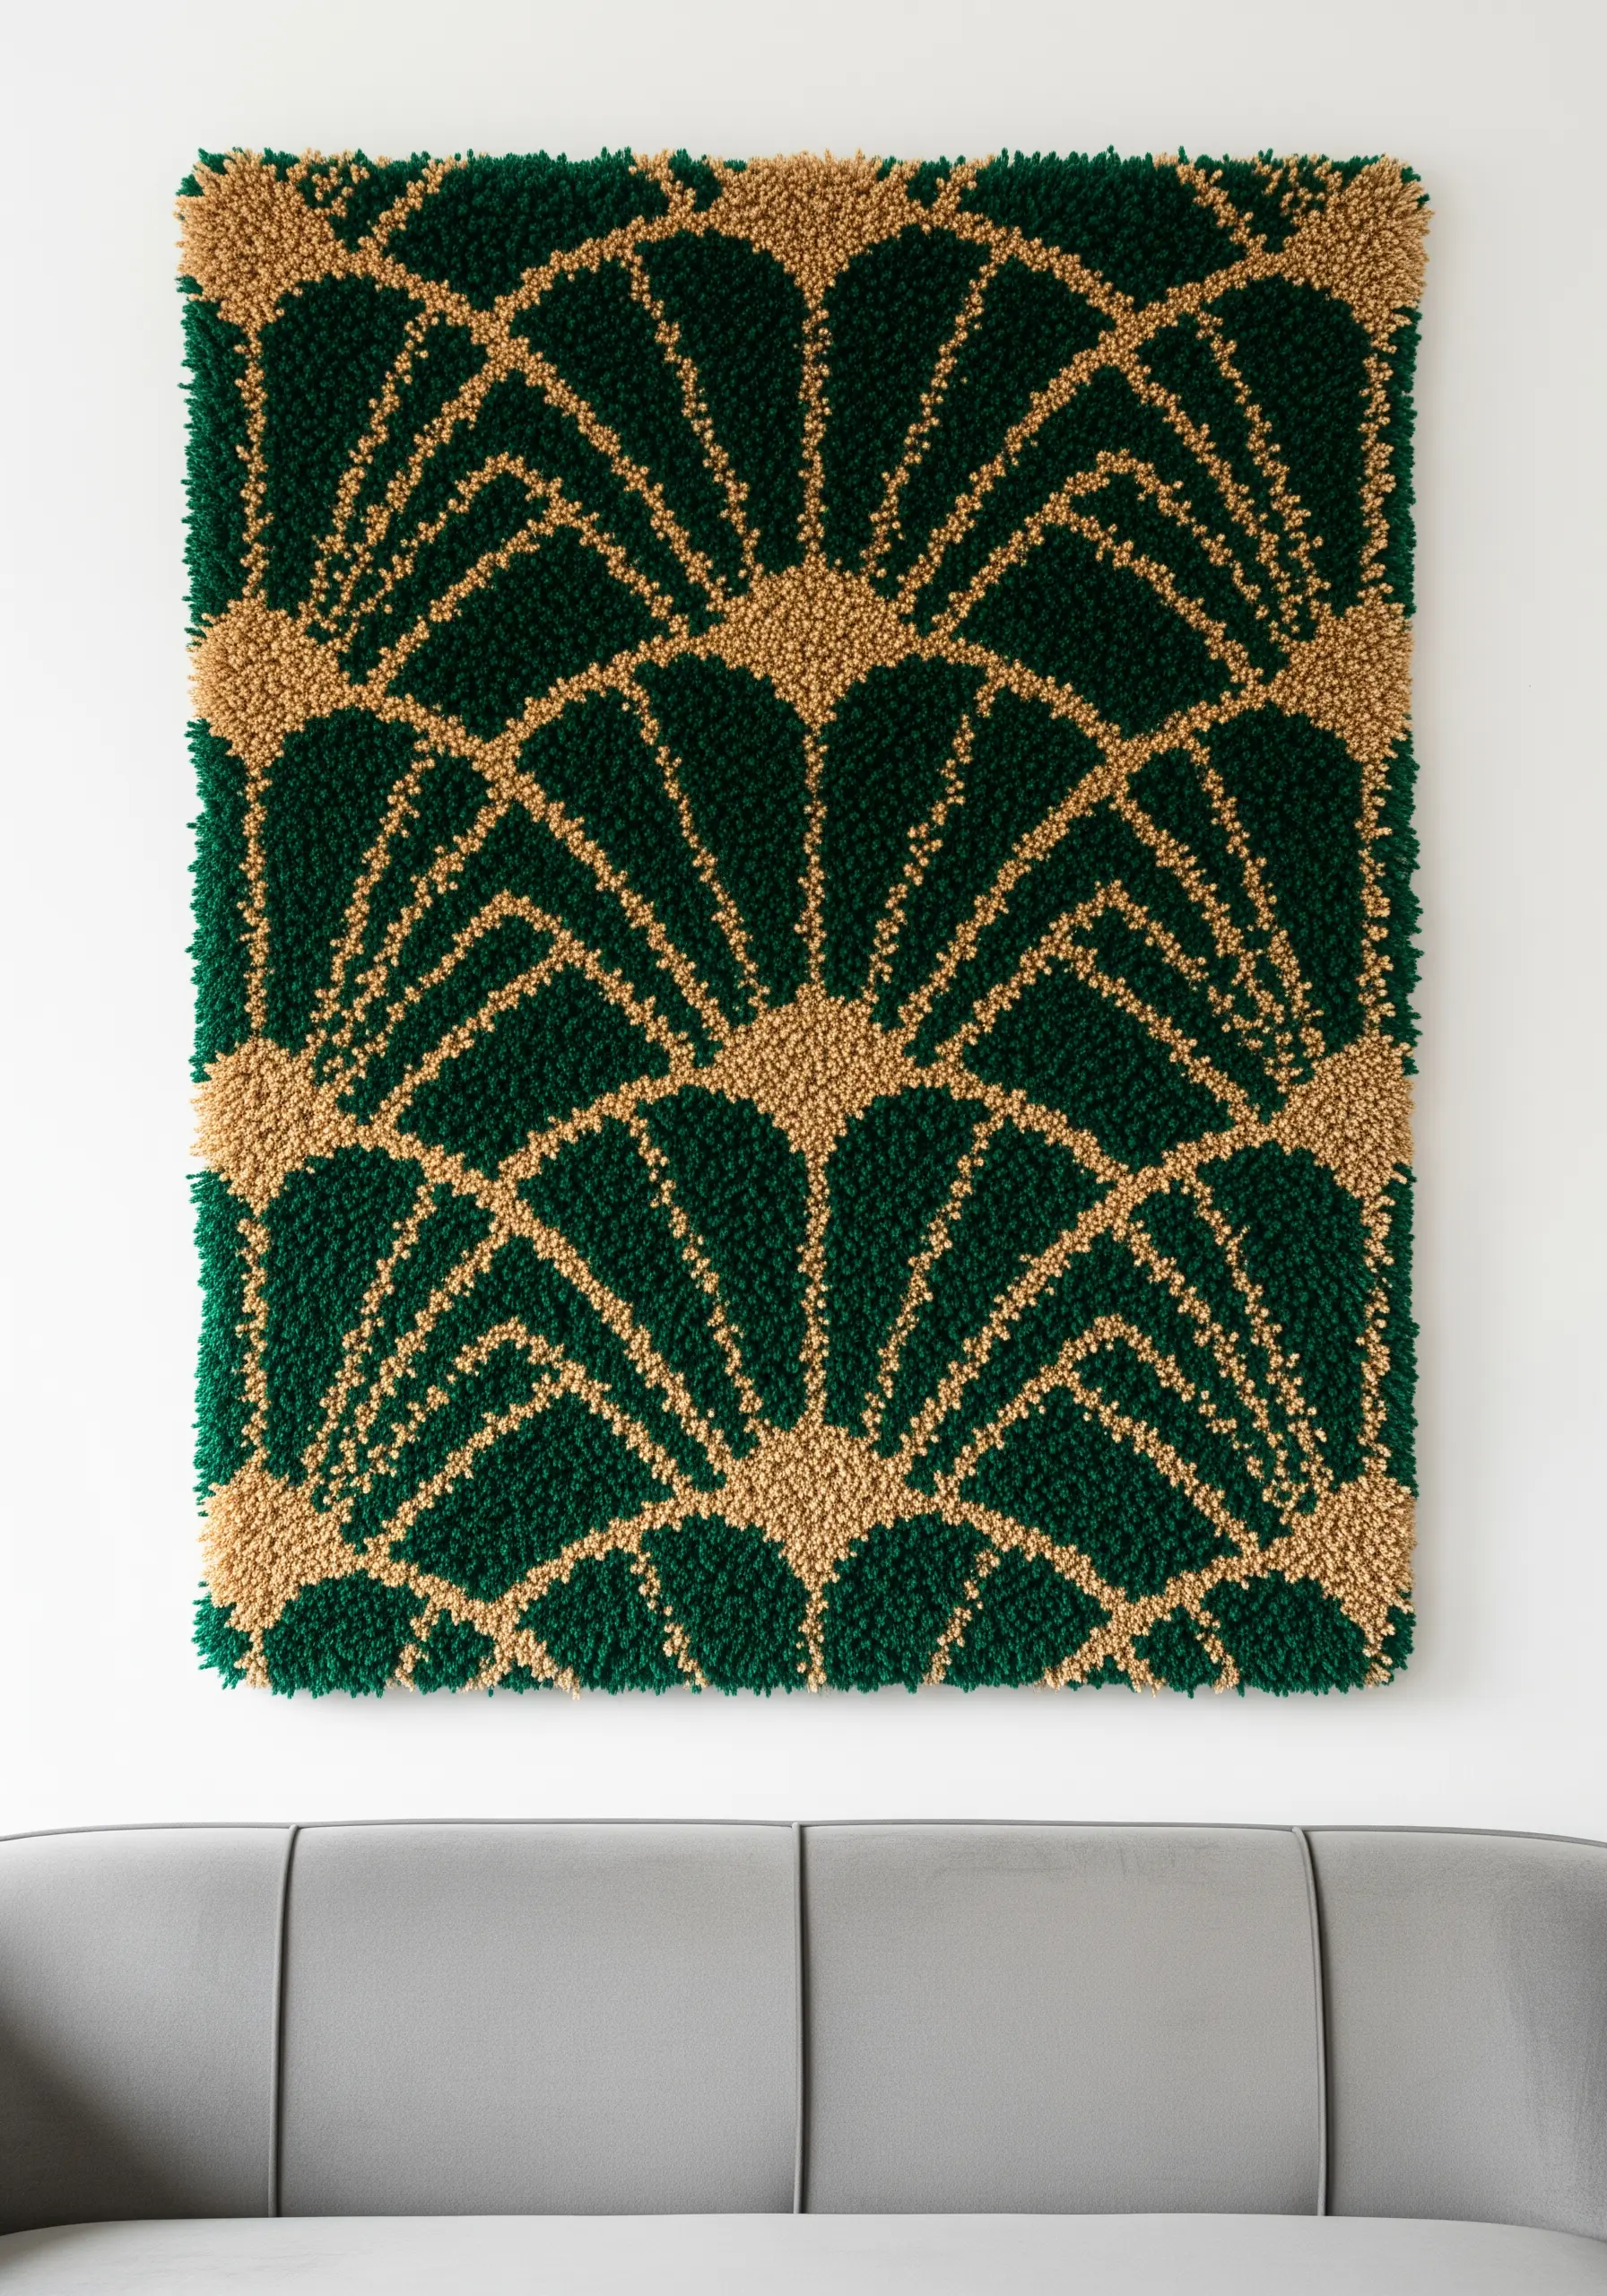
Translate a graphic pattern into a plush, tactile masterpiece using a punch needle or latch hook technique.
Choose a high-contrast color palette, like this emerald green and gold, to make the Art Deco fan pattern truly pop.
To create the sharp definition between colors, work the outline of each shape first, then fill in the interior.
This method, known as “outlining,” prevents colors from blurring and ensures your geometric lines are crisp and intentional.
The resulting piece has the visual impact of a rug but the artistry of a tapestry, making it a true focal point.
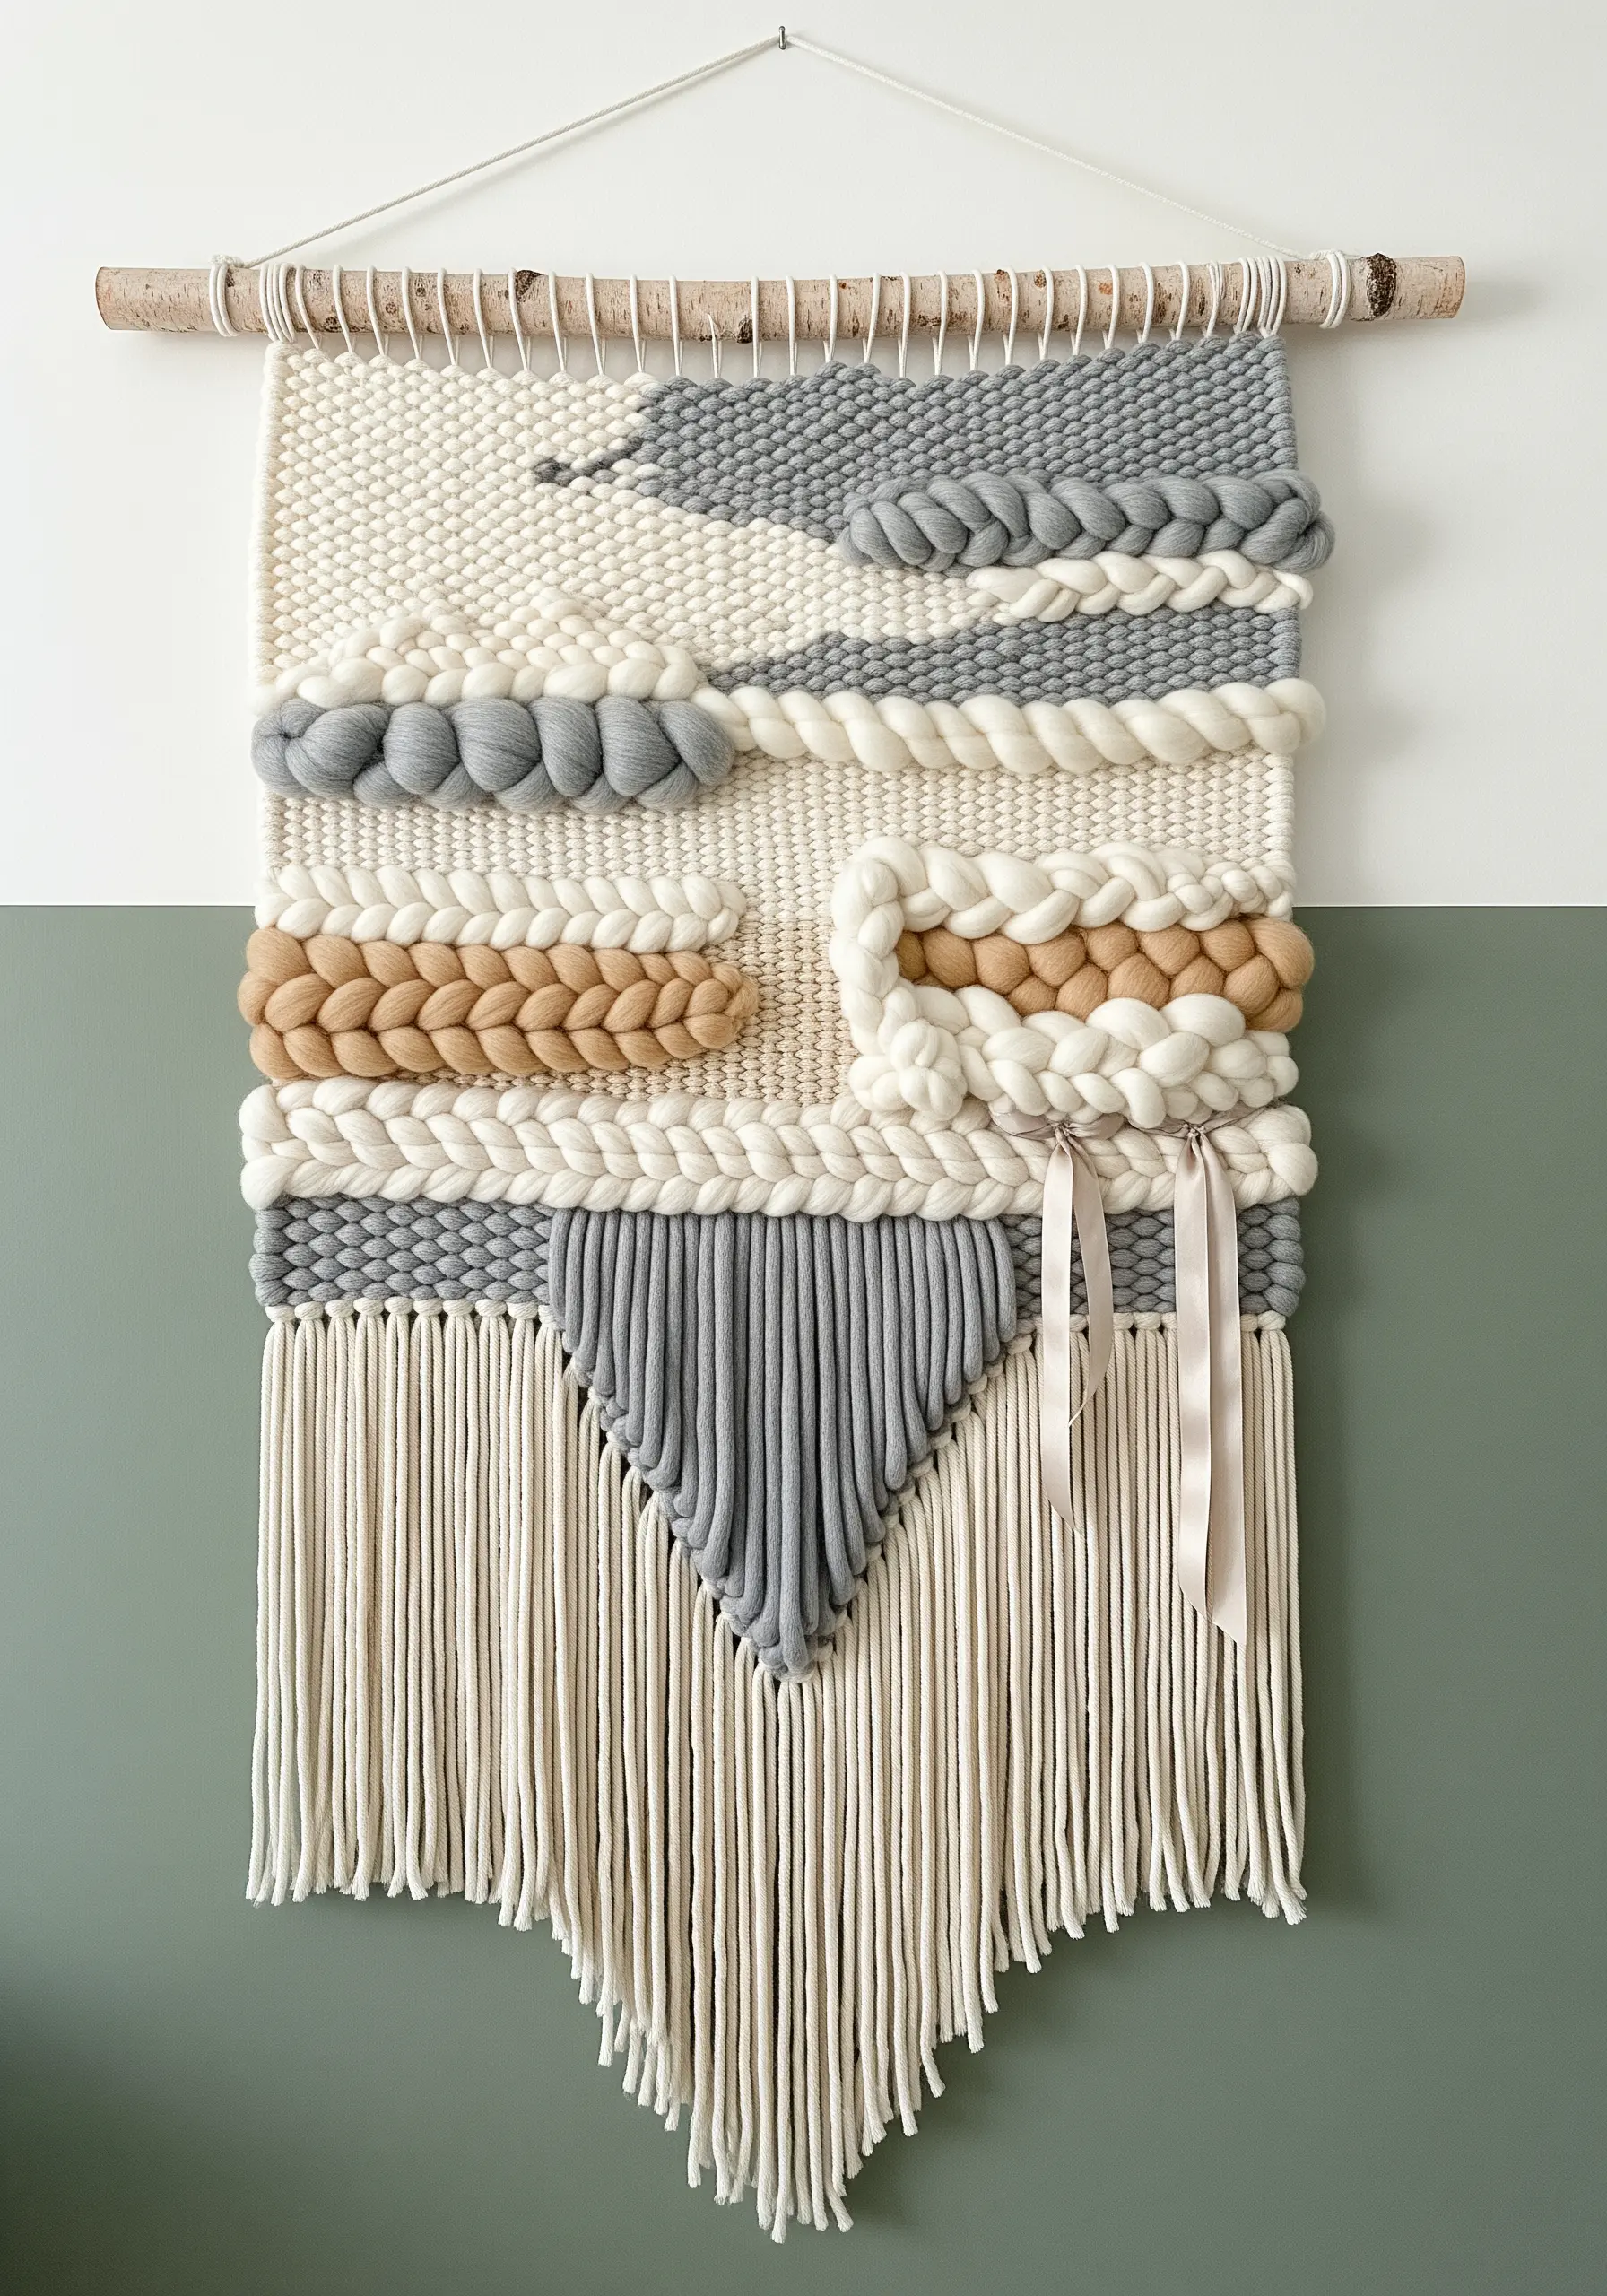
8. The Modern Weaver’s Sampler
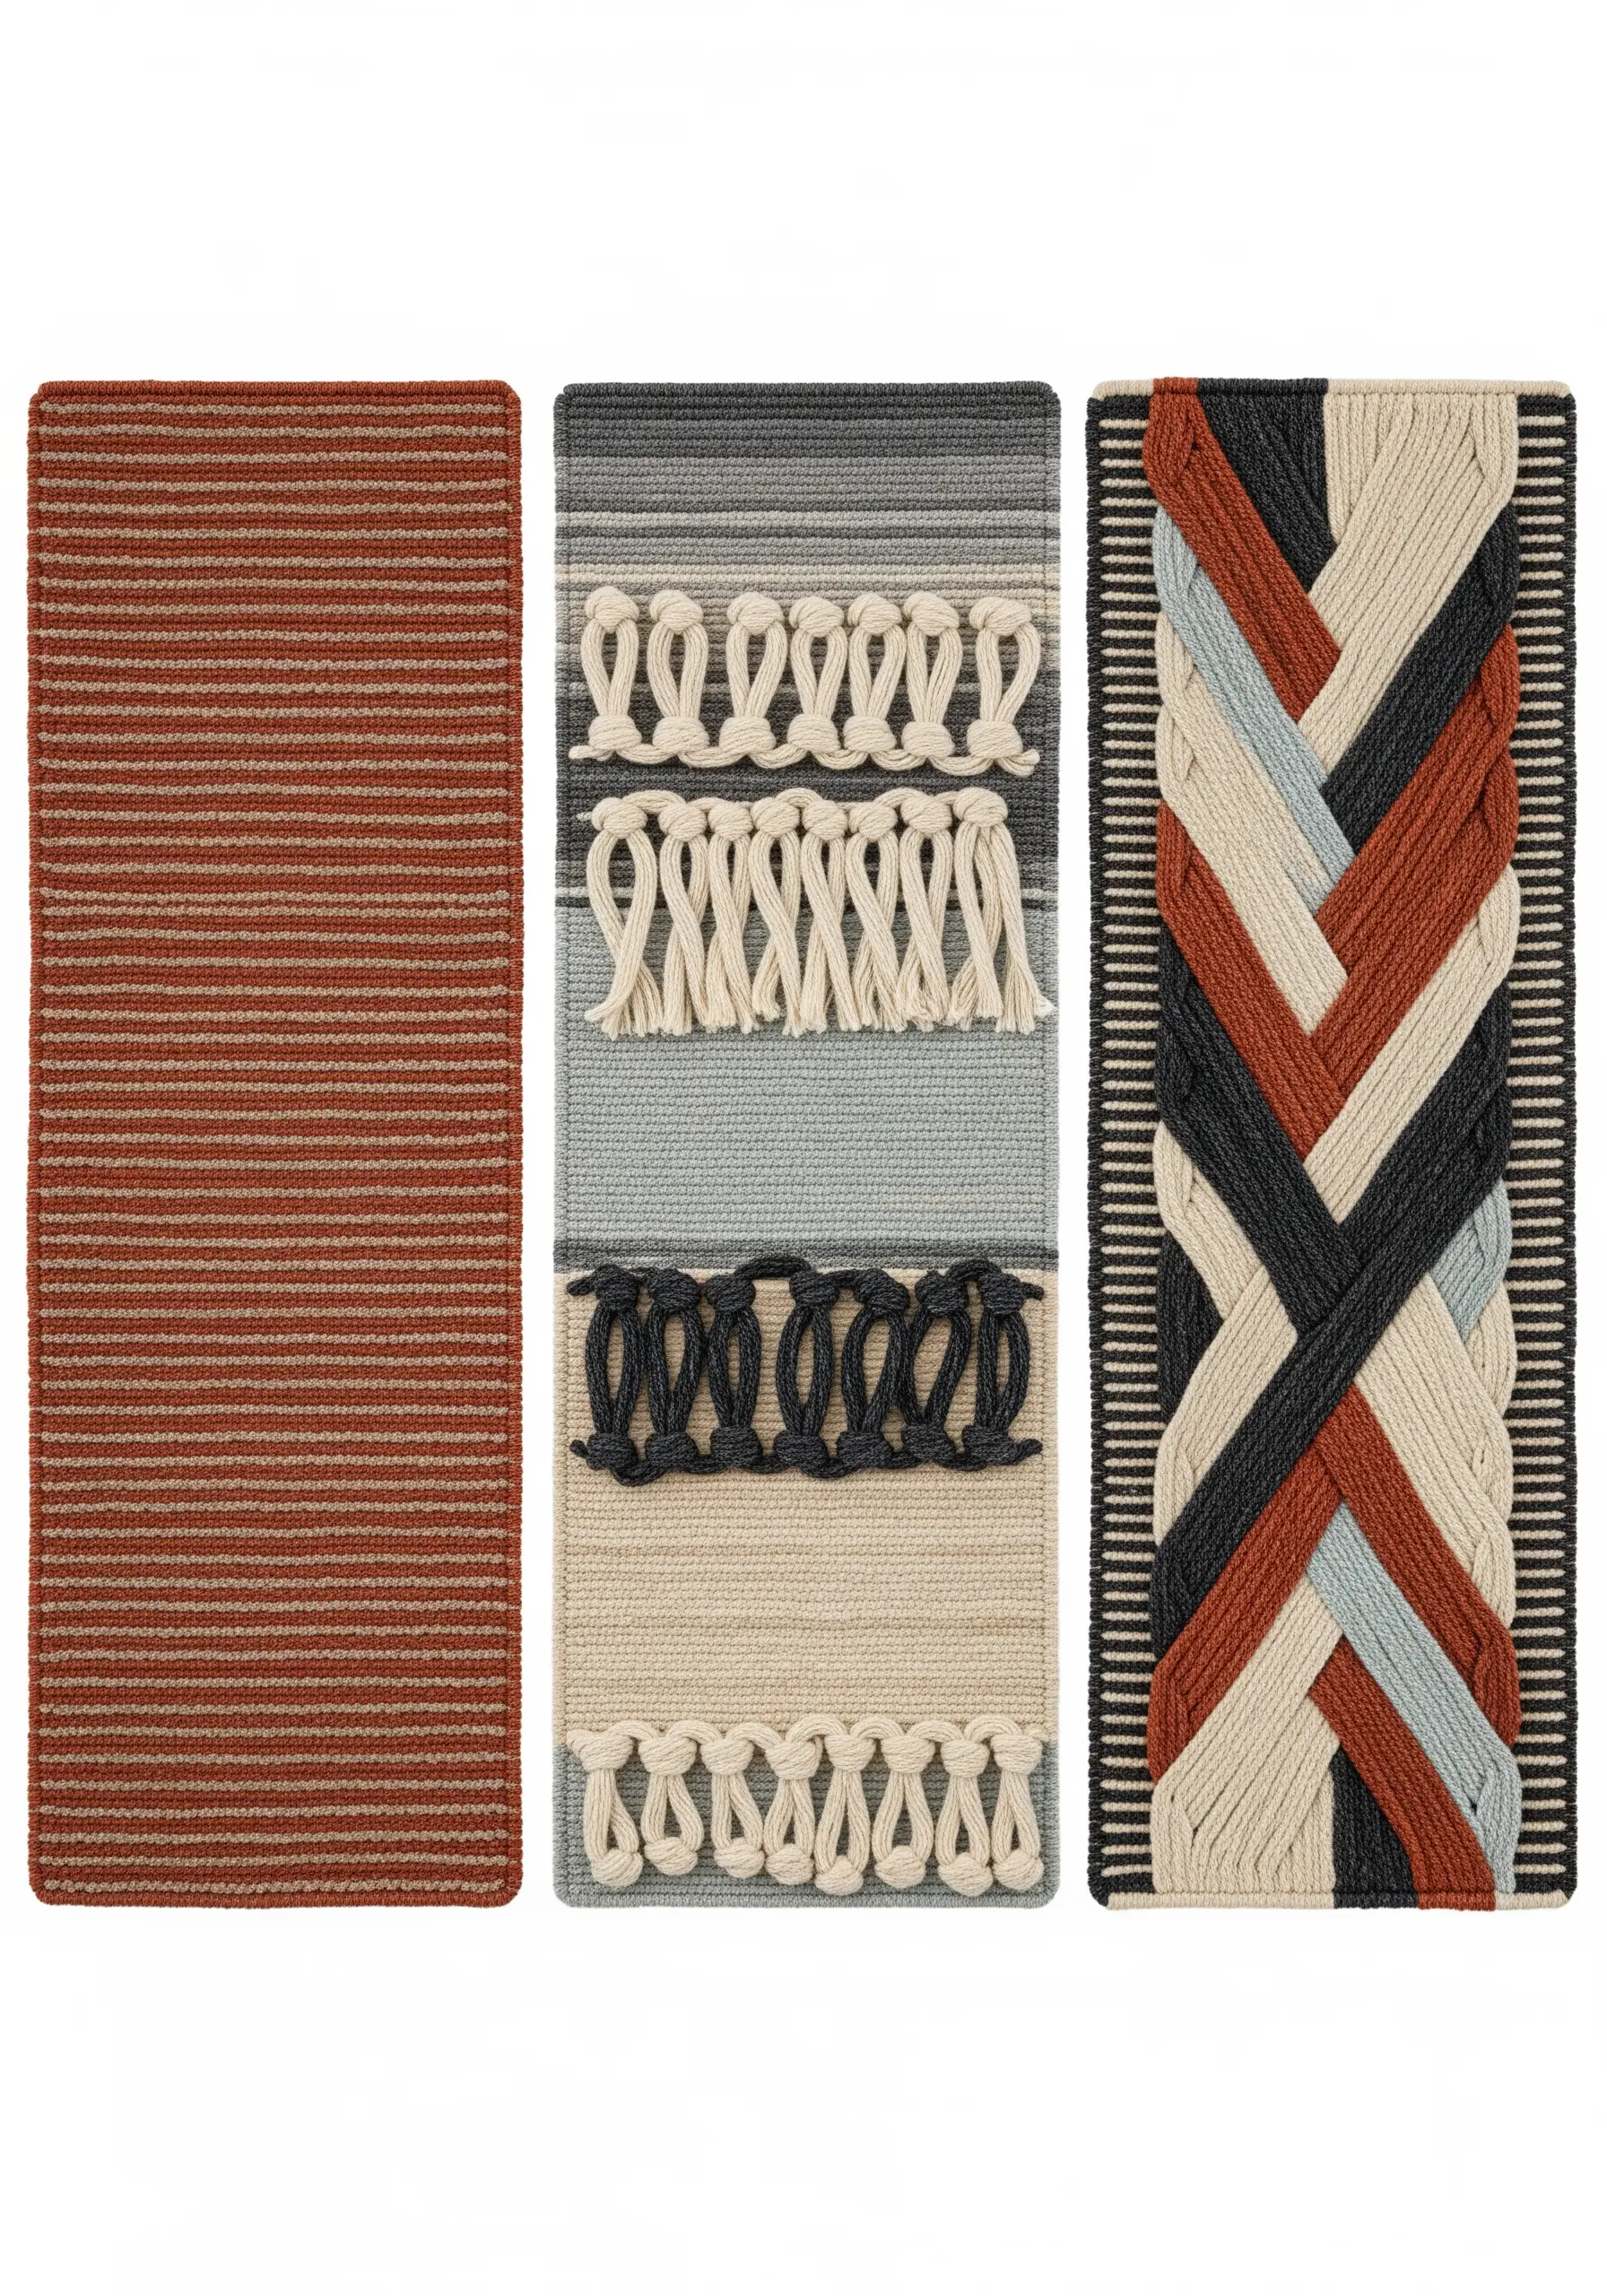
Think of these rectangular weavings as studies in texture and form, perfect for exploring new techniques on a small scale.
Instead of a single large piece, create a series of smaller panels, each focusing on a different stitch: soumak braids, rya knots, or simple tabby weave.
Varying the thickness of the yarn—from thin cotton to chunky wool—within a limited color palette creates sophisticated visual rhythm.
The most graphic design is achieved by weaving thick yarn over just a few warp threads, creating bold, crisscrossing lines.
Group them together to form a cohesive collection of handmade organic pieces that showcases your skill.
9. Combining Macrame with Extreme Roving
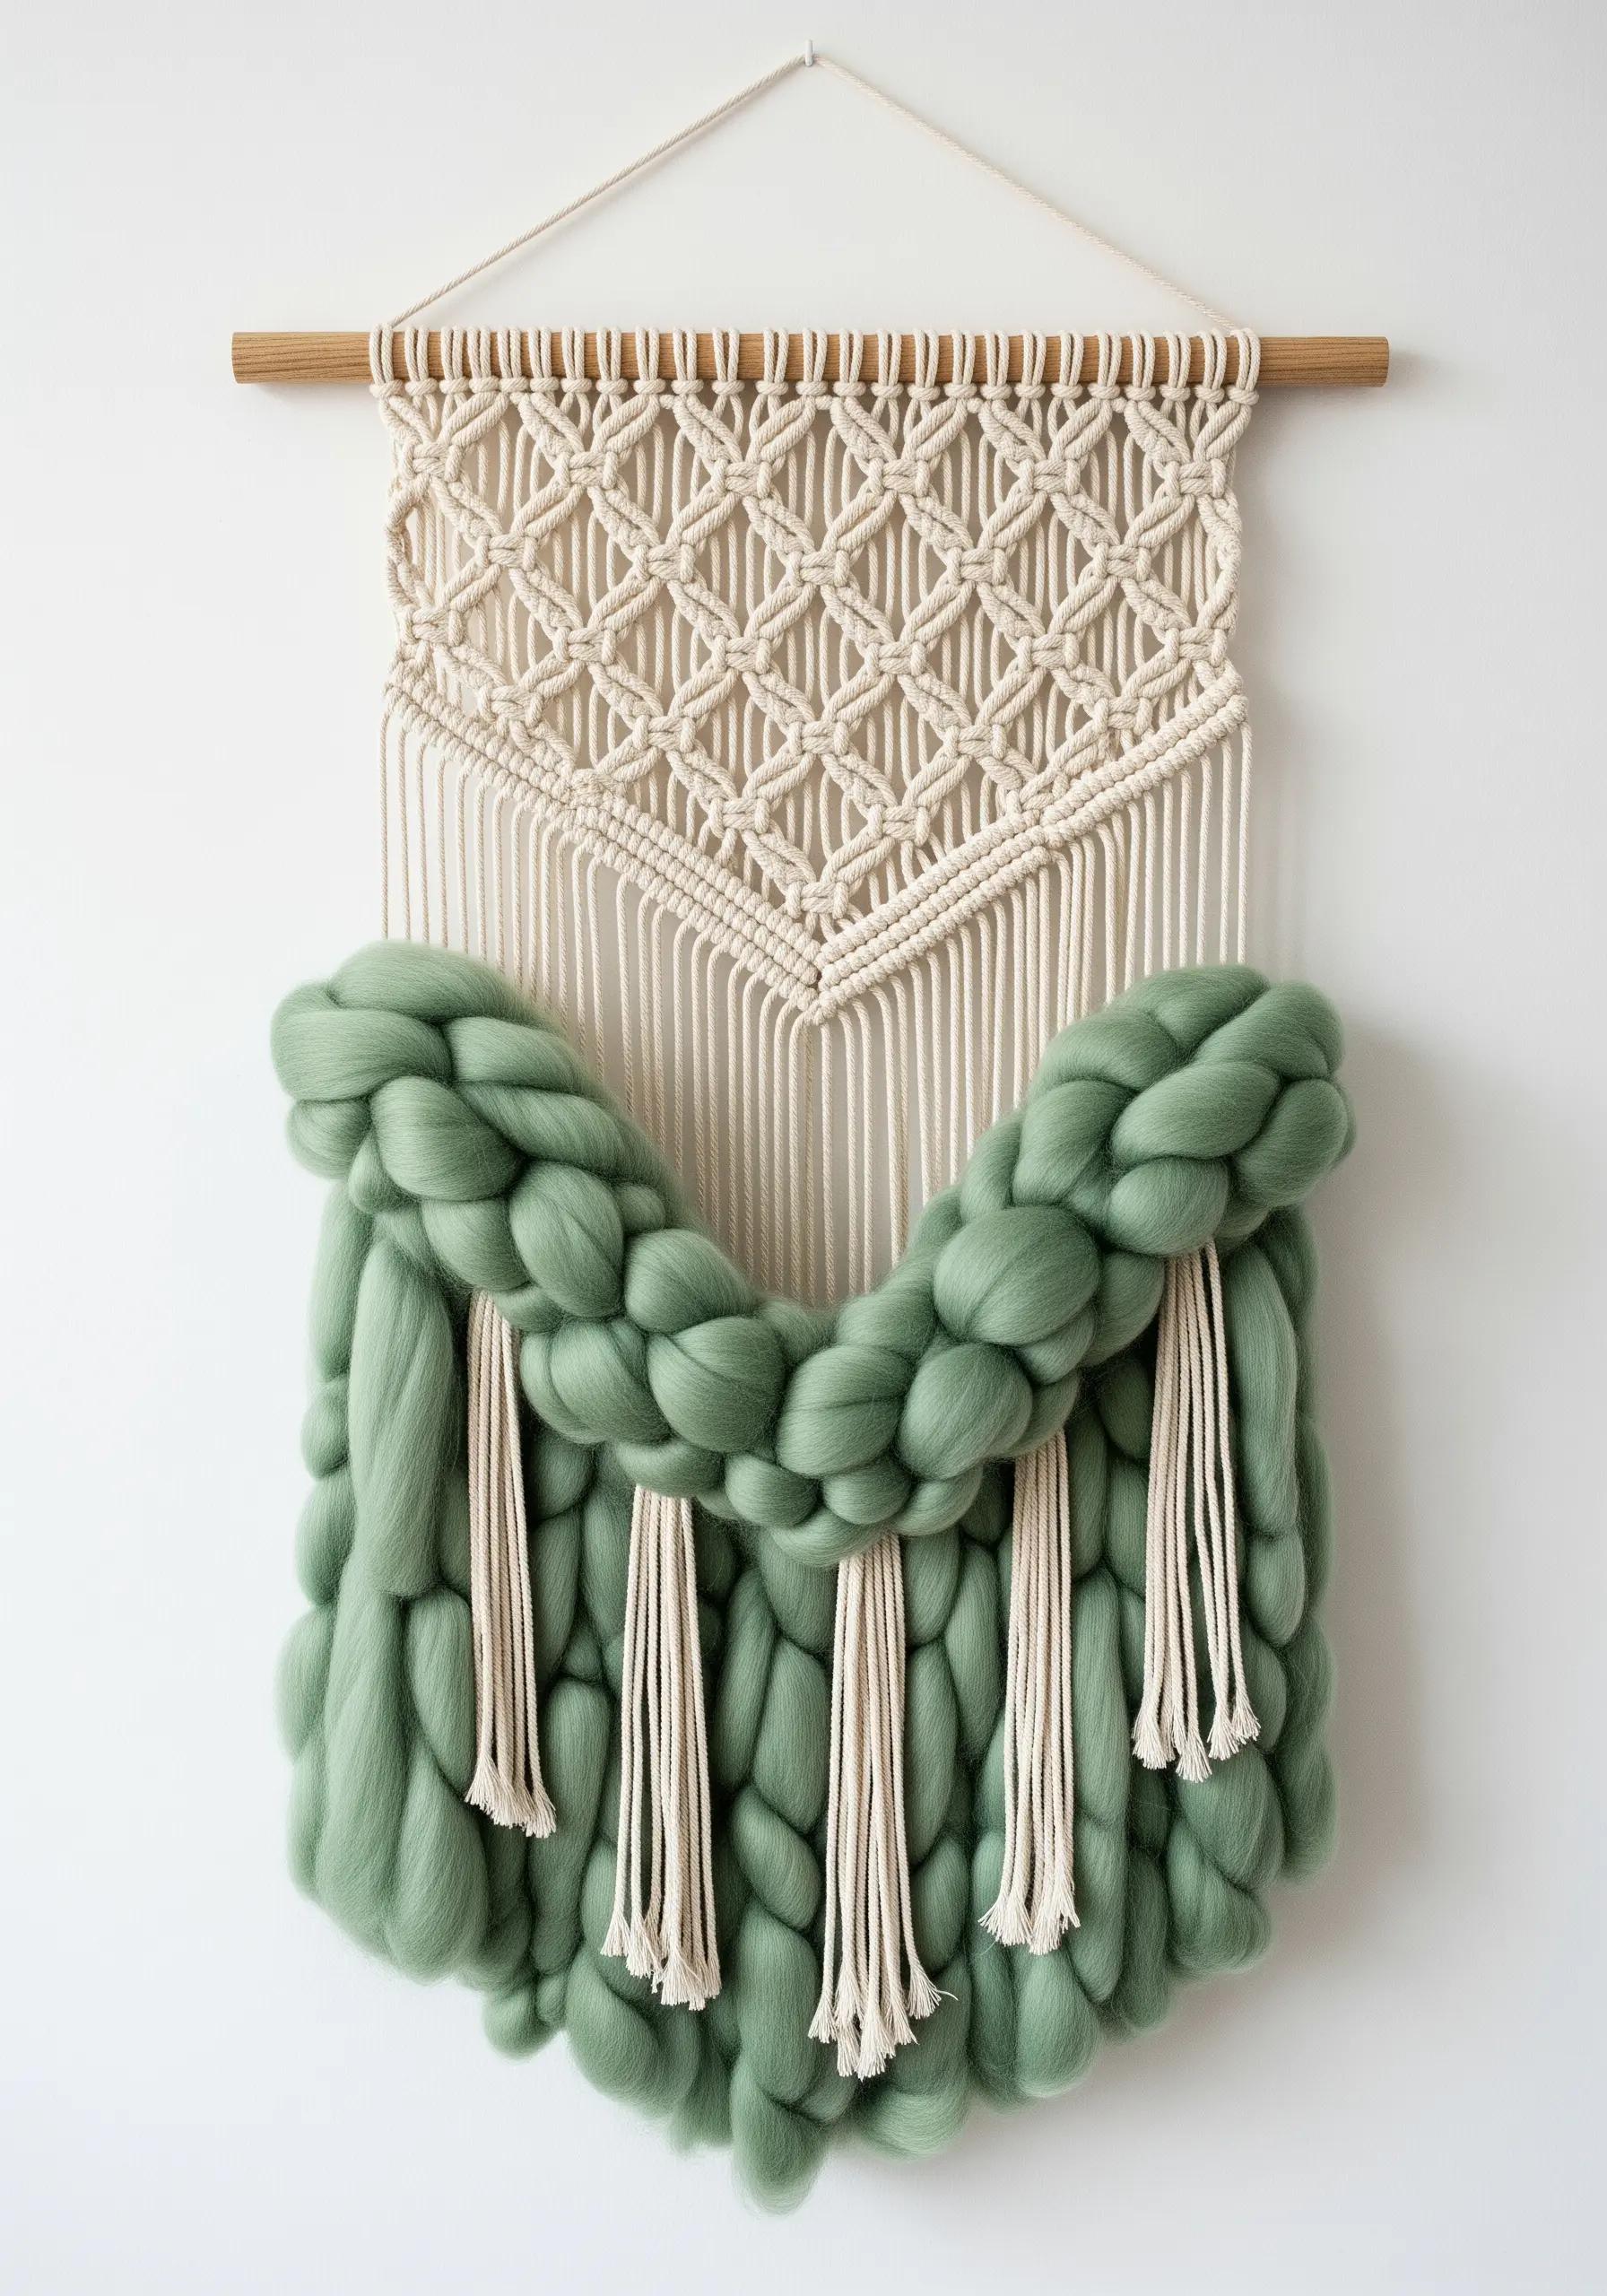
Create a stunning focal point by combining the delicate structure of macrame with the cloud-like volume of unspun wool roving.
Start with a classic macrame panel using square knots to establish a structured, geometric base.
Then, weave the chunky roving directly through the macrame cords, allowing it to drape naturally and create soft, sculptural dimension.
This contrast between the tight knots and the soft, bulky wool is what gives the piece its high-end, artistic feel.
Finish with simple tassels made from the thinner cord to visually anchor the voluminous roving section.
10. Weaving a Celestial Narrative in a Hoop

Turn a simple circular loom into a canvas for storytelling by blending weaving with embroidery and embellishment.
Create a swirling, galactic background by weaving with variegated blue, black, and white yarns.
Incorporate wisps of wool roving to mimic nebulae or clouds, gently needle-felting them into place for stability.
Finally, stitch constellation patterns over the top using a bright metallic thread, adding tiny beads or French knots for stars.
This multi-layered approach transforms a flat weaving into a dynamic, three-dimensional piece of art.
11. The “Ojo de Dios” Geometric Weave
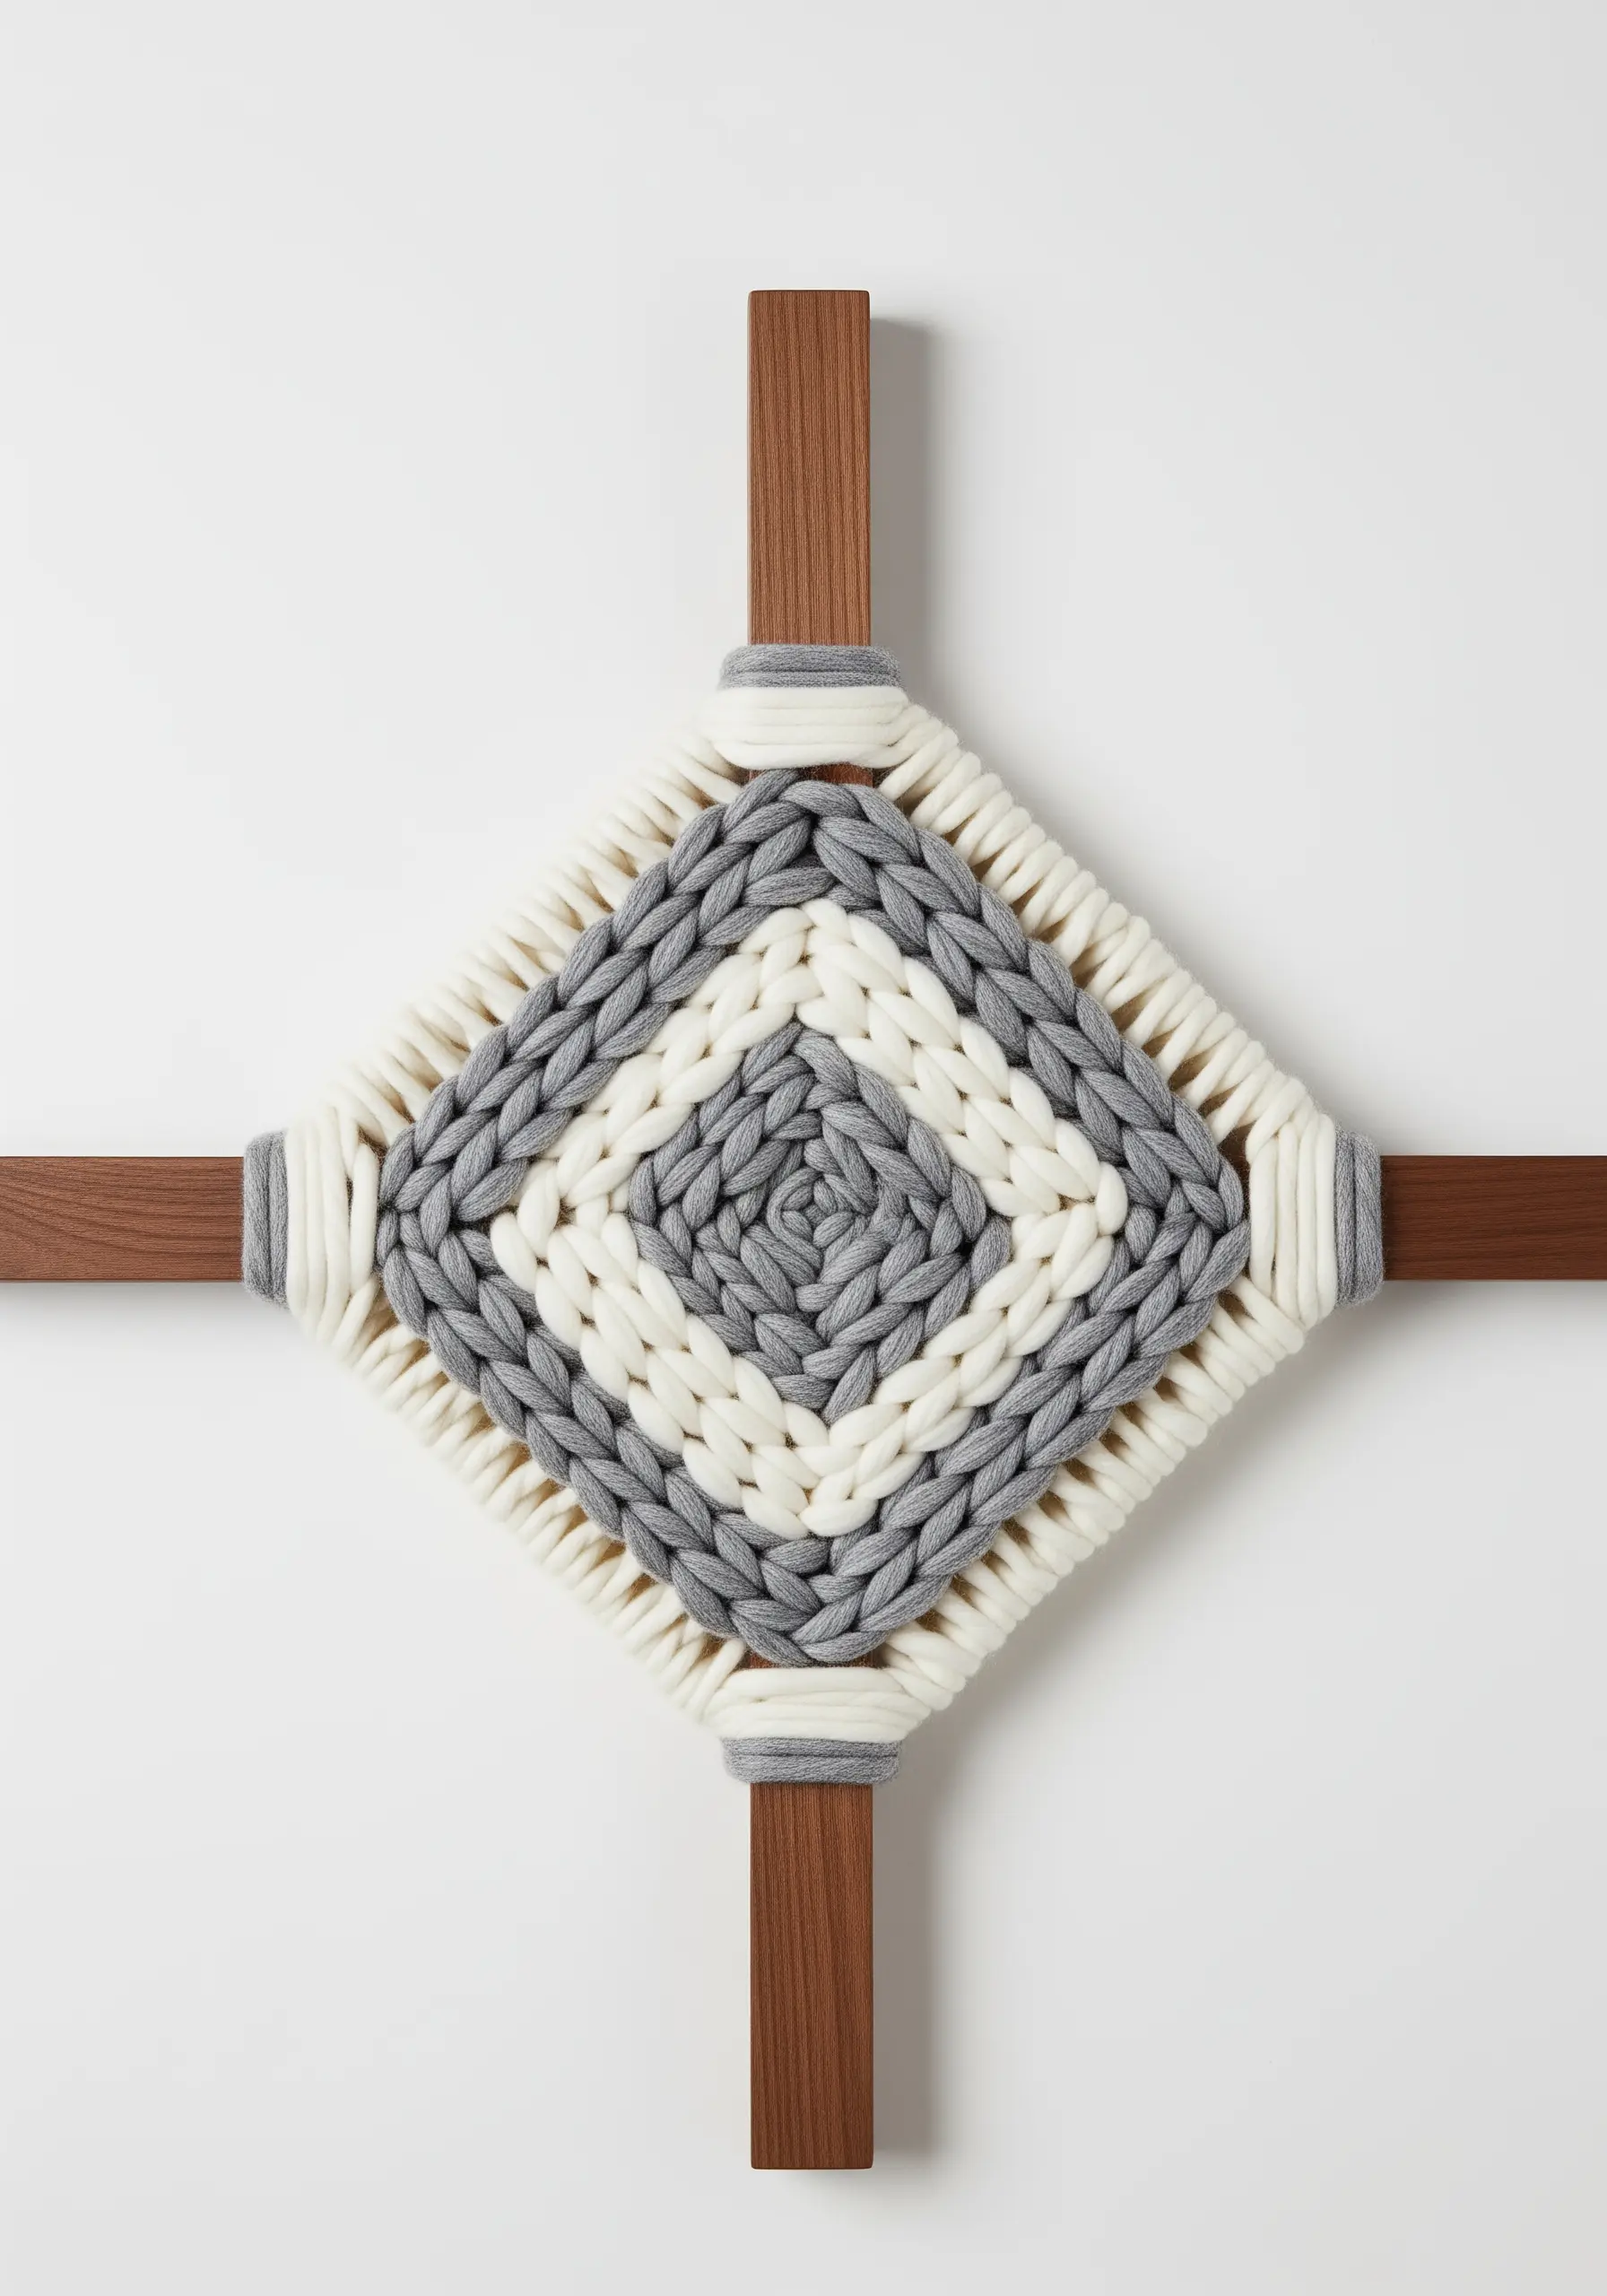
This captivating design is based on the traditional “Ojo de Dios” (God’s Eye) weaving technique, modernized with a minimalist aesthetic.
Start with two intersecting wooden dowels to form a cross-shaped frame.
Wrap your yarn around the frame, moving from one dowel to the next in a consistent pattern, always crossing in the center.
The key to the clean, braided appearance is to use a thick, plush yarn and maintain even tension with every wrap.
Alternating between two neutral colors creates a sharp, graphic diamond pattern that feels both rustic and contemporary.
12. Abstract Forms with the Couching Technique
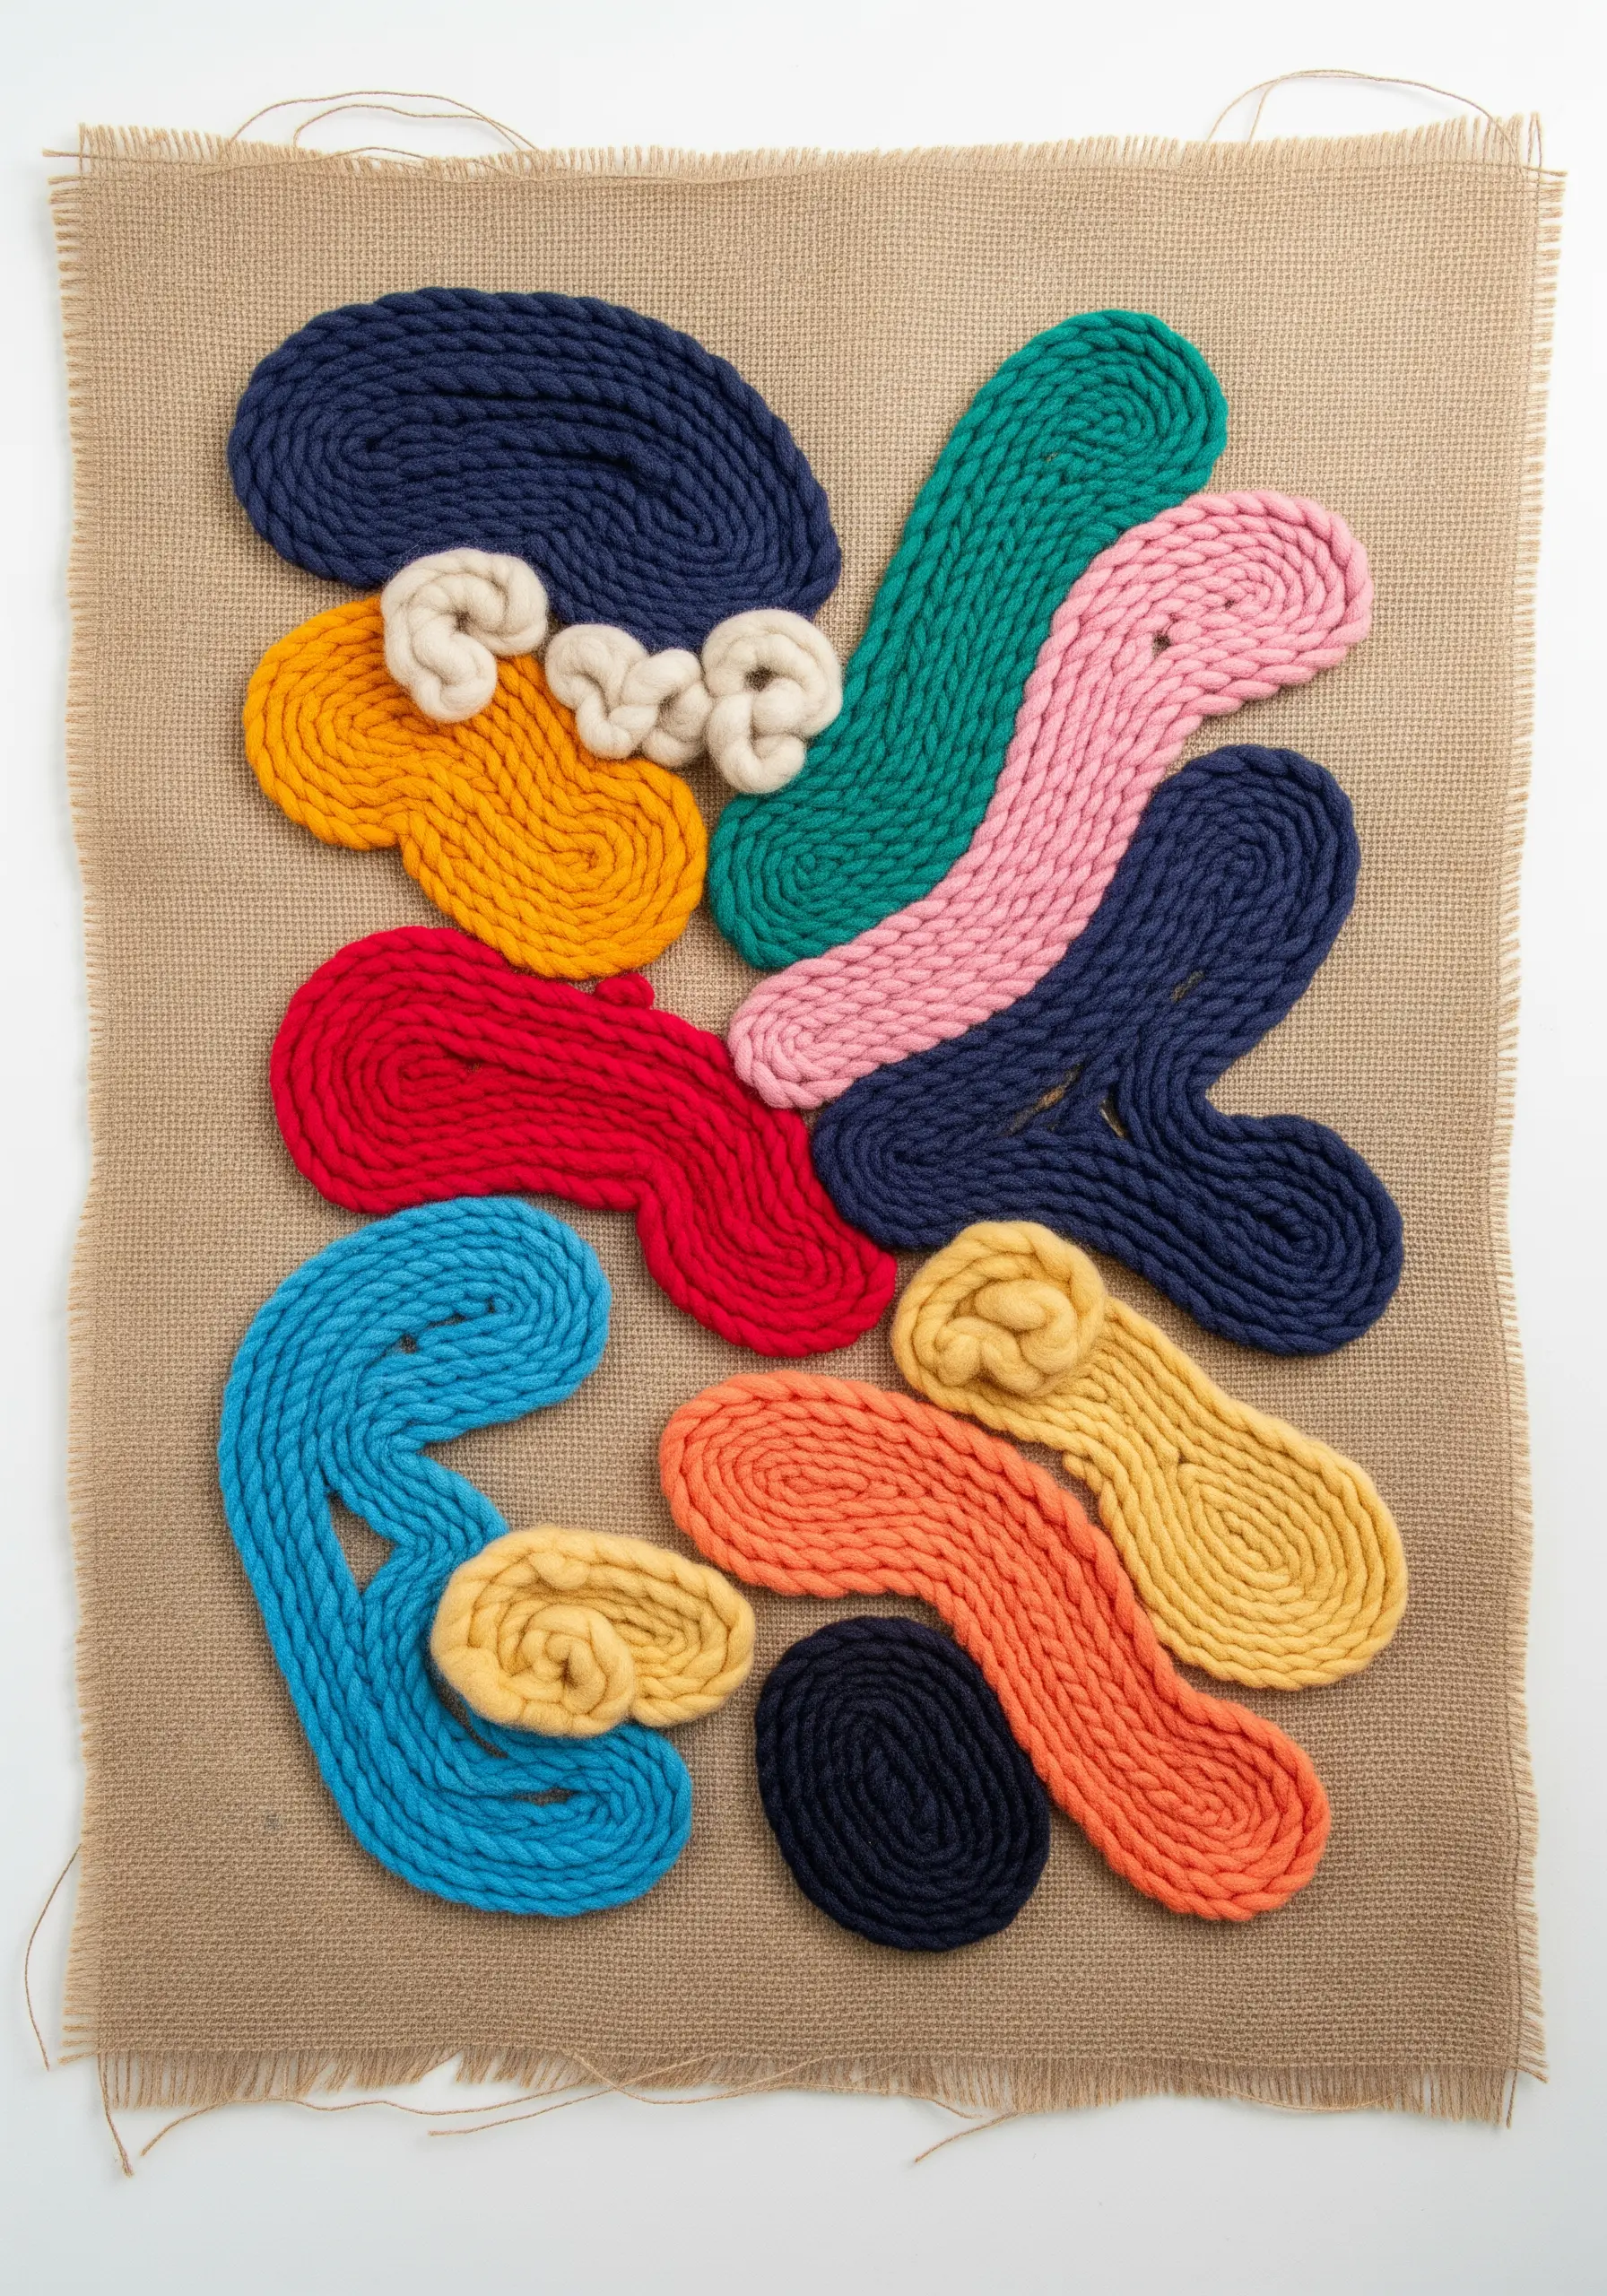
Create painterly, abstract shapes by “couching” thick yarn or cord onto a fabric base like burlap or canvas.
Couching is the process of laying a thick thread on the surface and tacking it down with a thinner, often invisible, stitch.
Arrange your colorful cords into organic, free-flowing shapes, pinning them in place before you begin stitching.
This technique allows you to work with heavy fibers that are too thick for a needle, giving you the freedom to create bold, sculptural lines.
It’s a fantastic way to experiment with color and composition, resulting in unique abstract fabric collage art.
13. The Perfectly Wrapped Macrame Rainbow
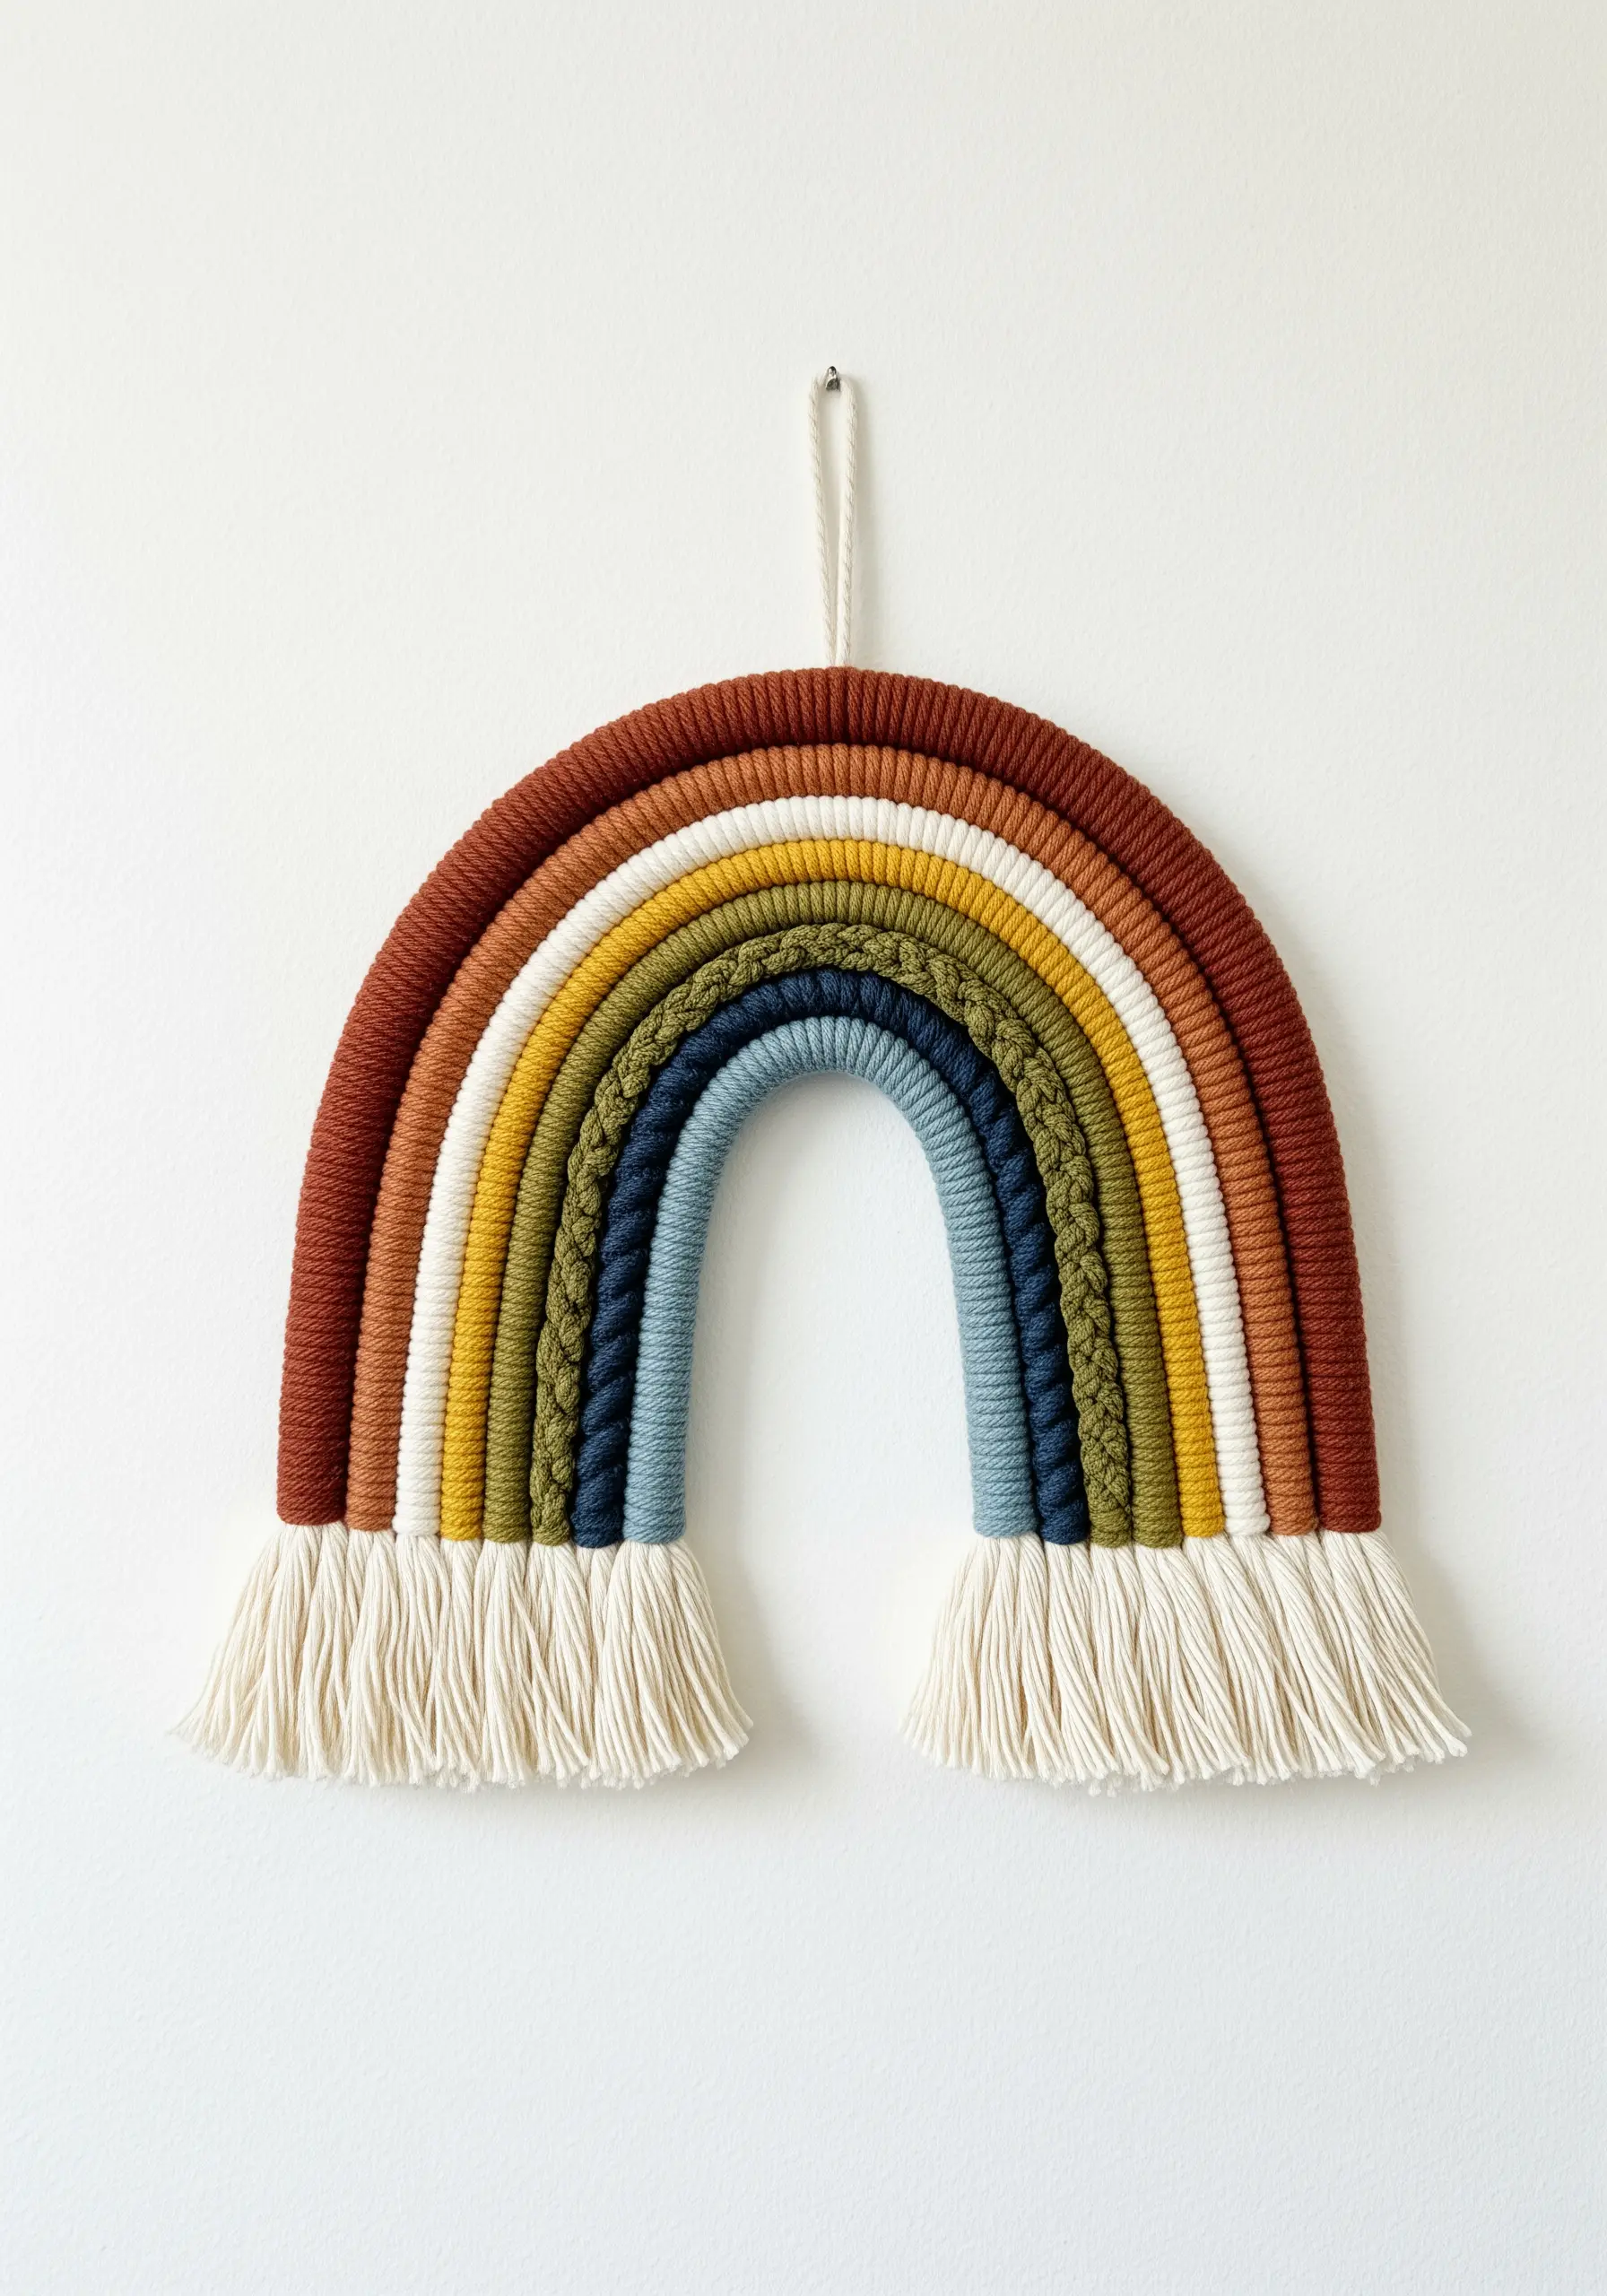
The secret to a neat and professional-looking macrame rainbow is a flawless wrapping technique.
First, form the arches using several strands of thick rope bundled together—this creates a sturdy, chunky base.
Next, take your colored yarn and wrap it tightly and evenly around each rope arch, ensuring there are no gaps.
Secure the ends of the wrapping yarn by tucking them underneath the last few wraps with a needle. A dab of glue adds extra security.
Using an earthy, muted color palette gives this classic children’s decor a sophisticated, modern twist.
14. Introducing Metallic Accents in Weaving
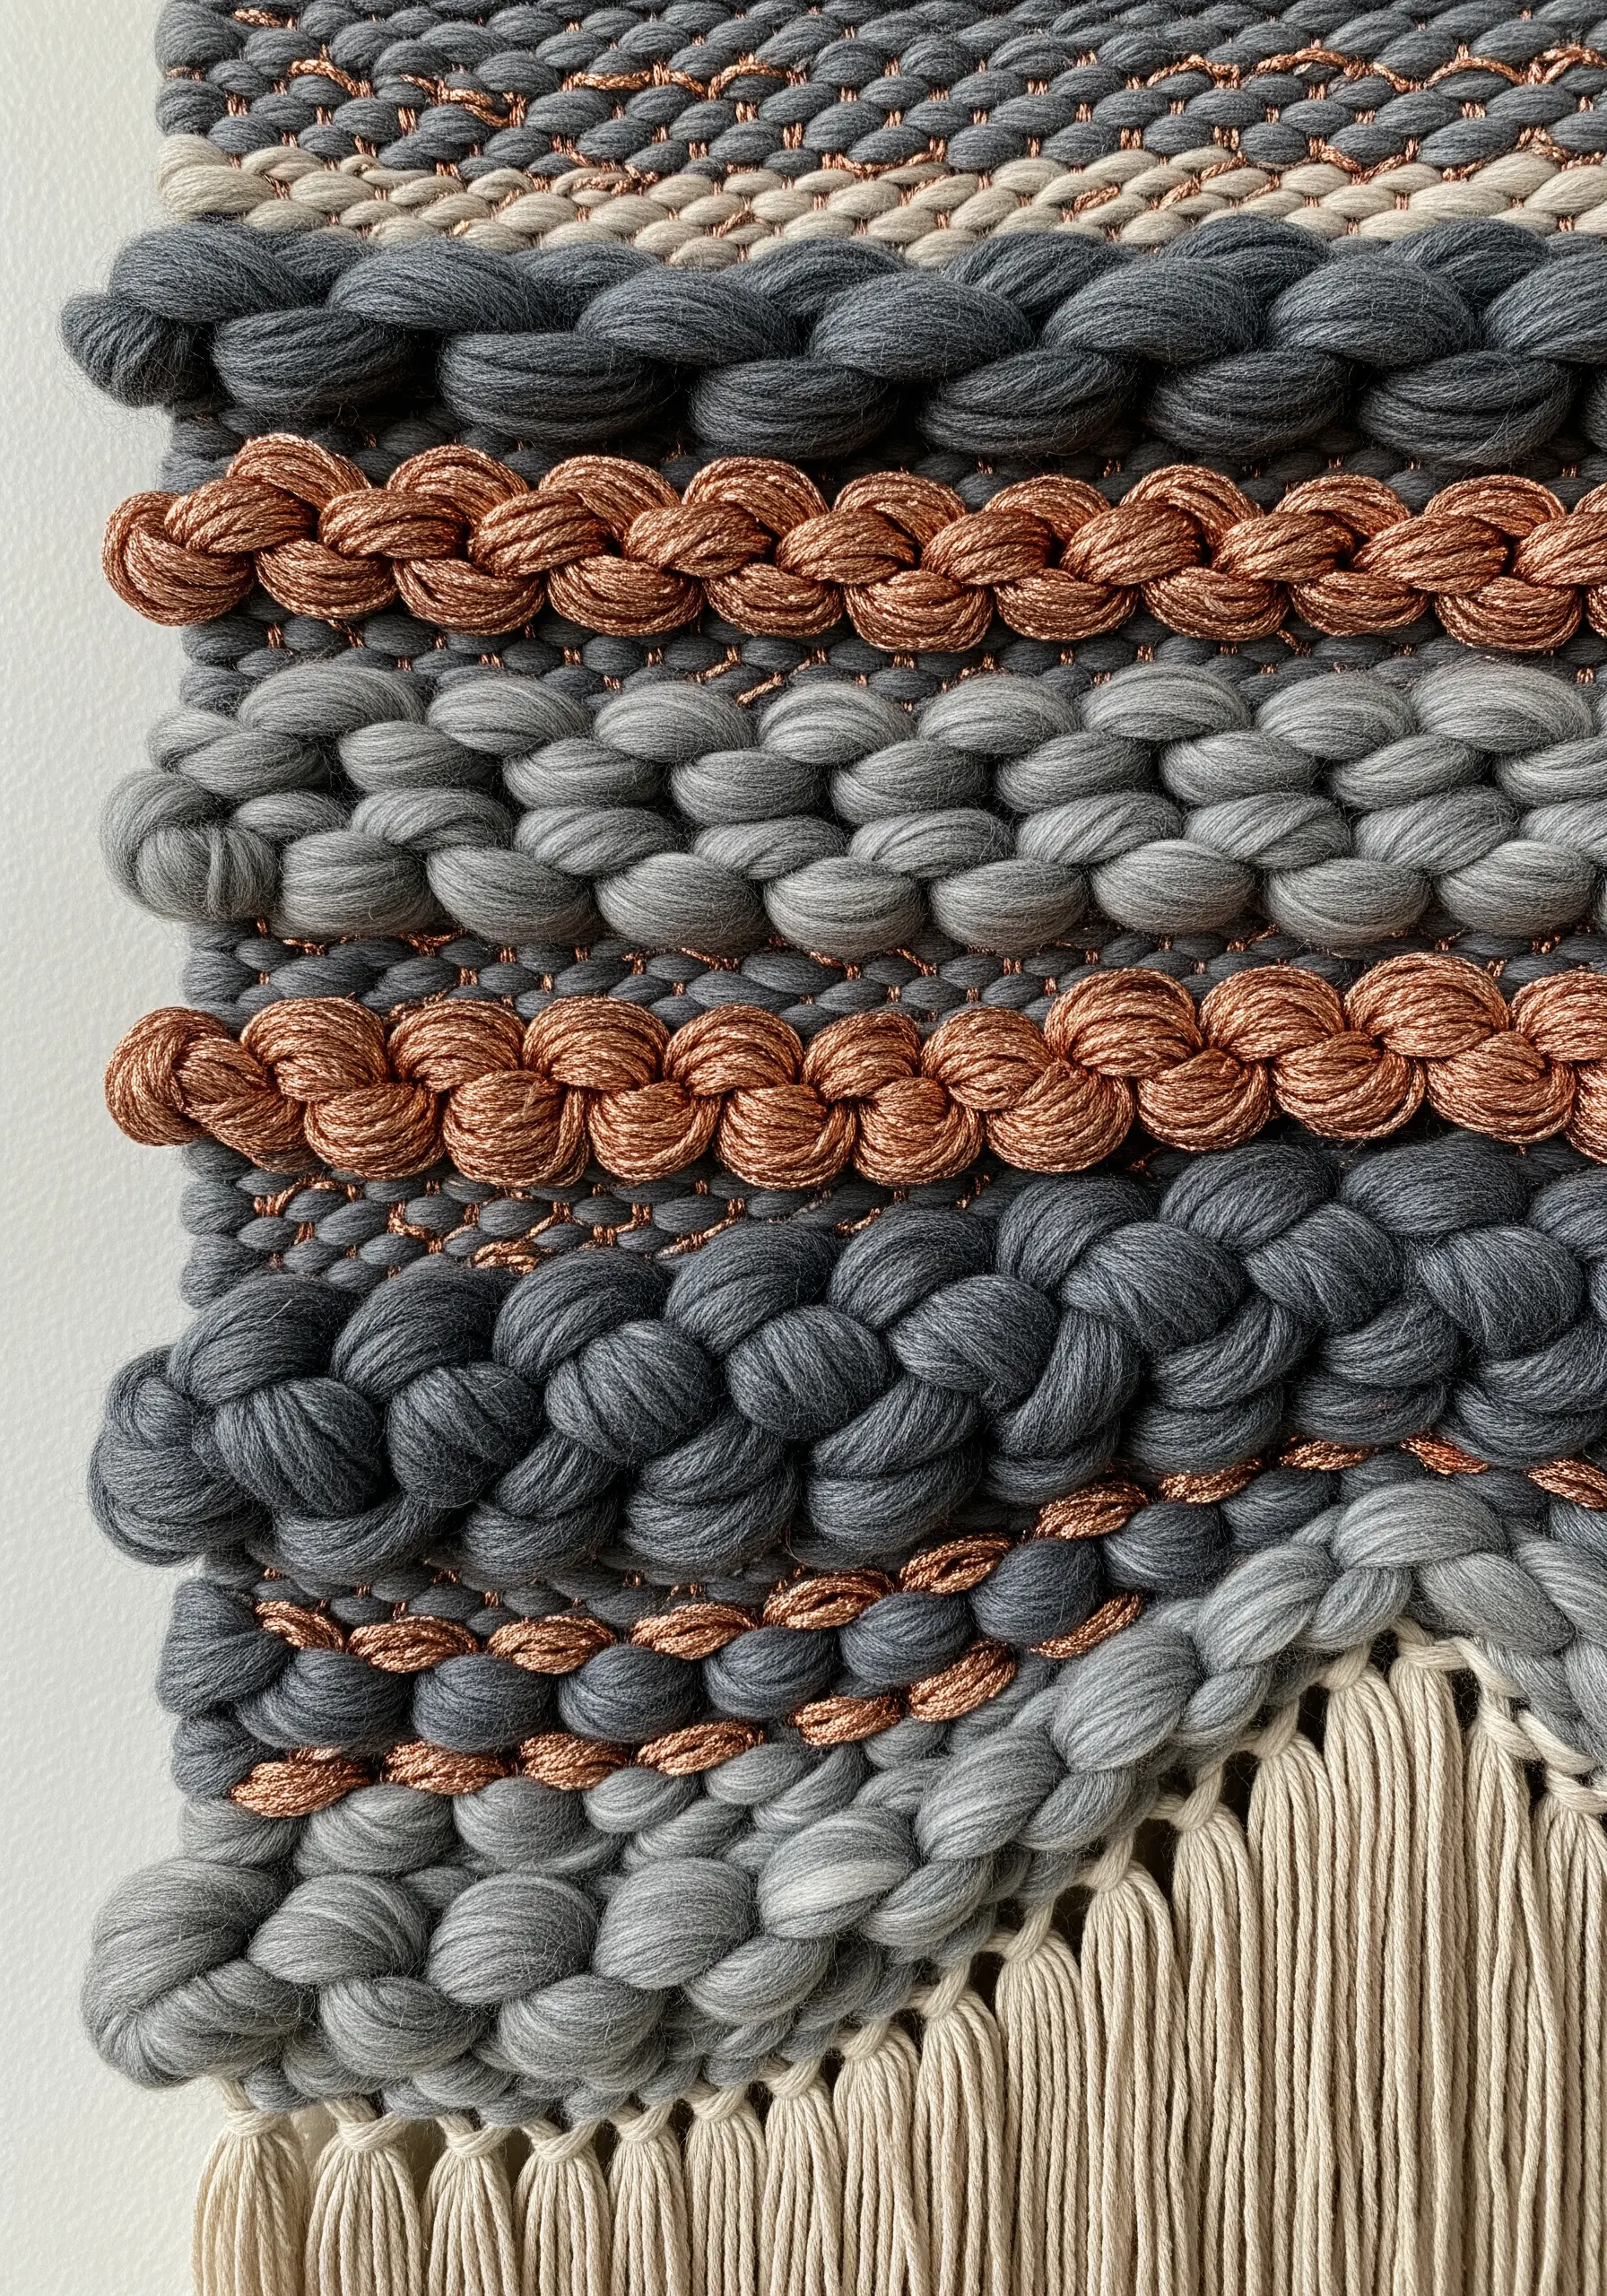
Instantly elevate a neutral-toned weaving by introducing a metallic or high-sheen accent thread.
In this piece, a copper-colored braided cord is used to create thin, horizontal soumak braids that catch the light.
Place these accent rows strategically to draw the eye and create a rhythm throughout the piece.
The contrast between the matte, soft wool and the sleek, metallic cord adds a layer of unexpected luxury.
This simple addition transforms a rustic design into a more contemporary and refined piece of fiber art.
15. The Power of Monochrome Texture
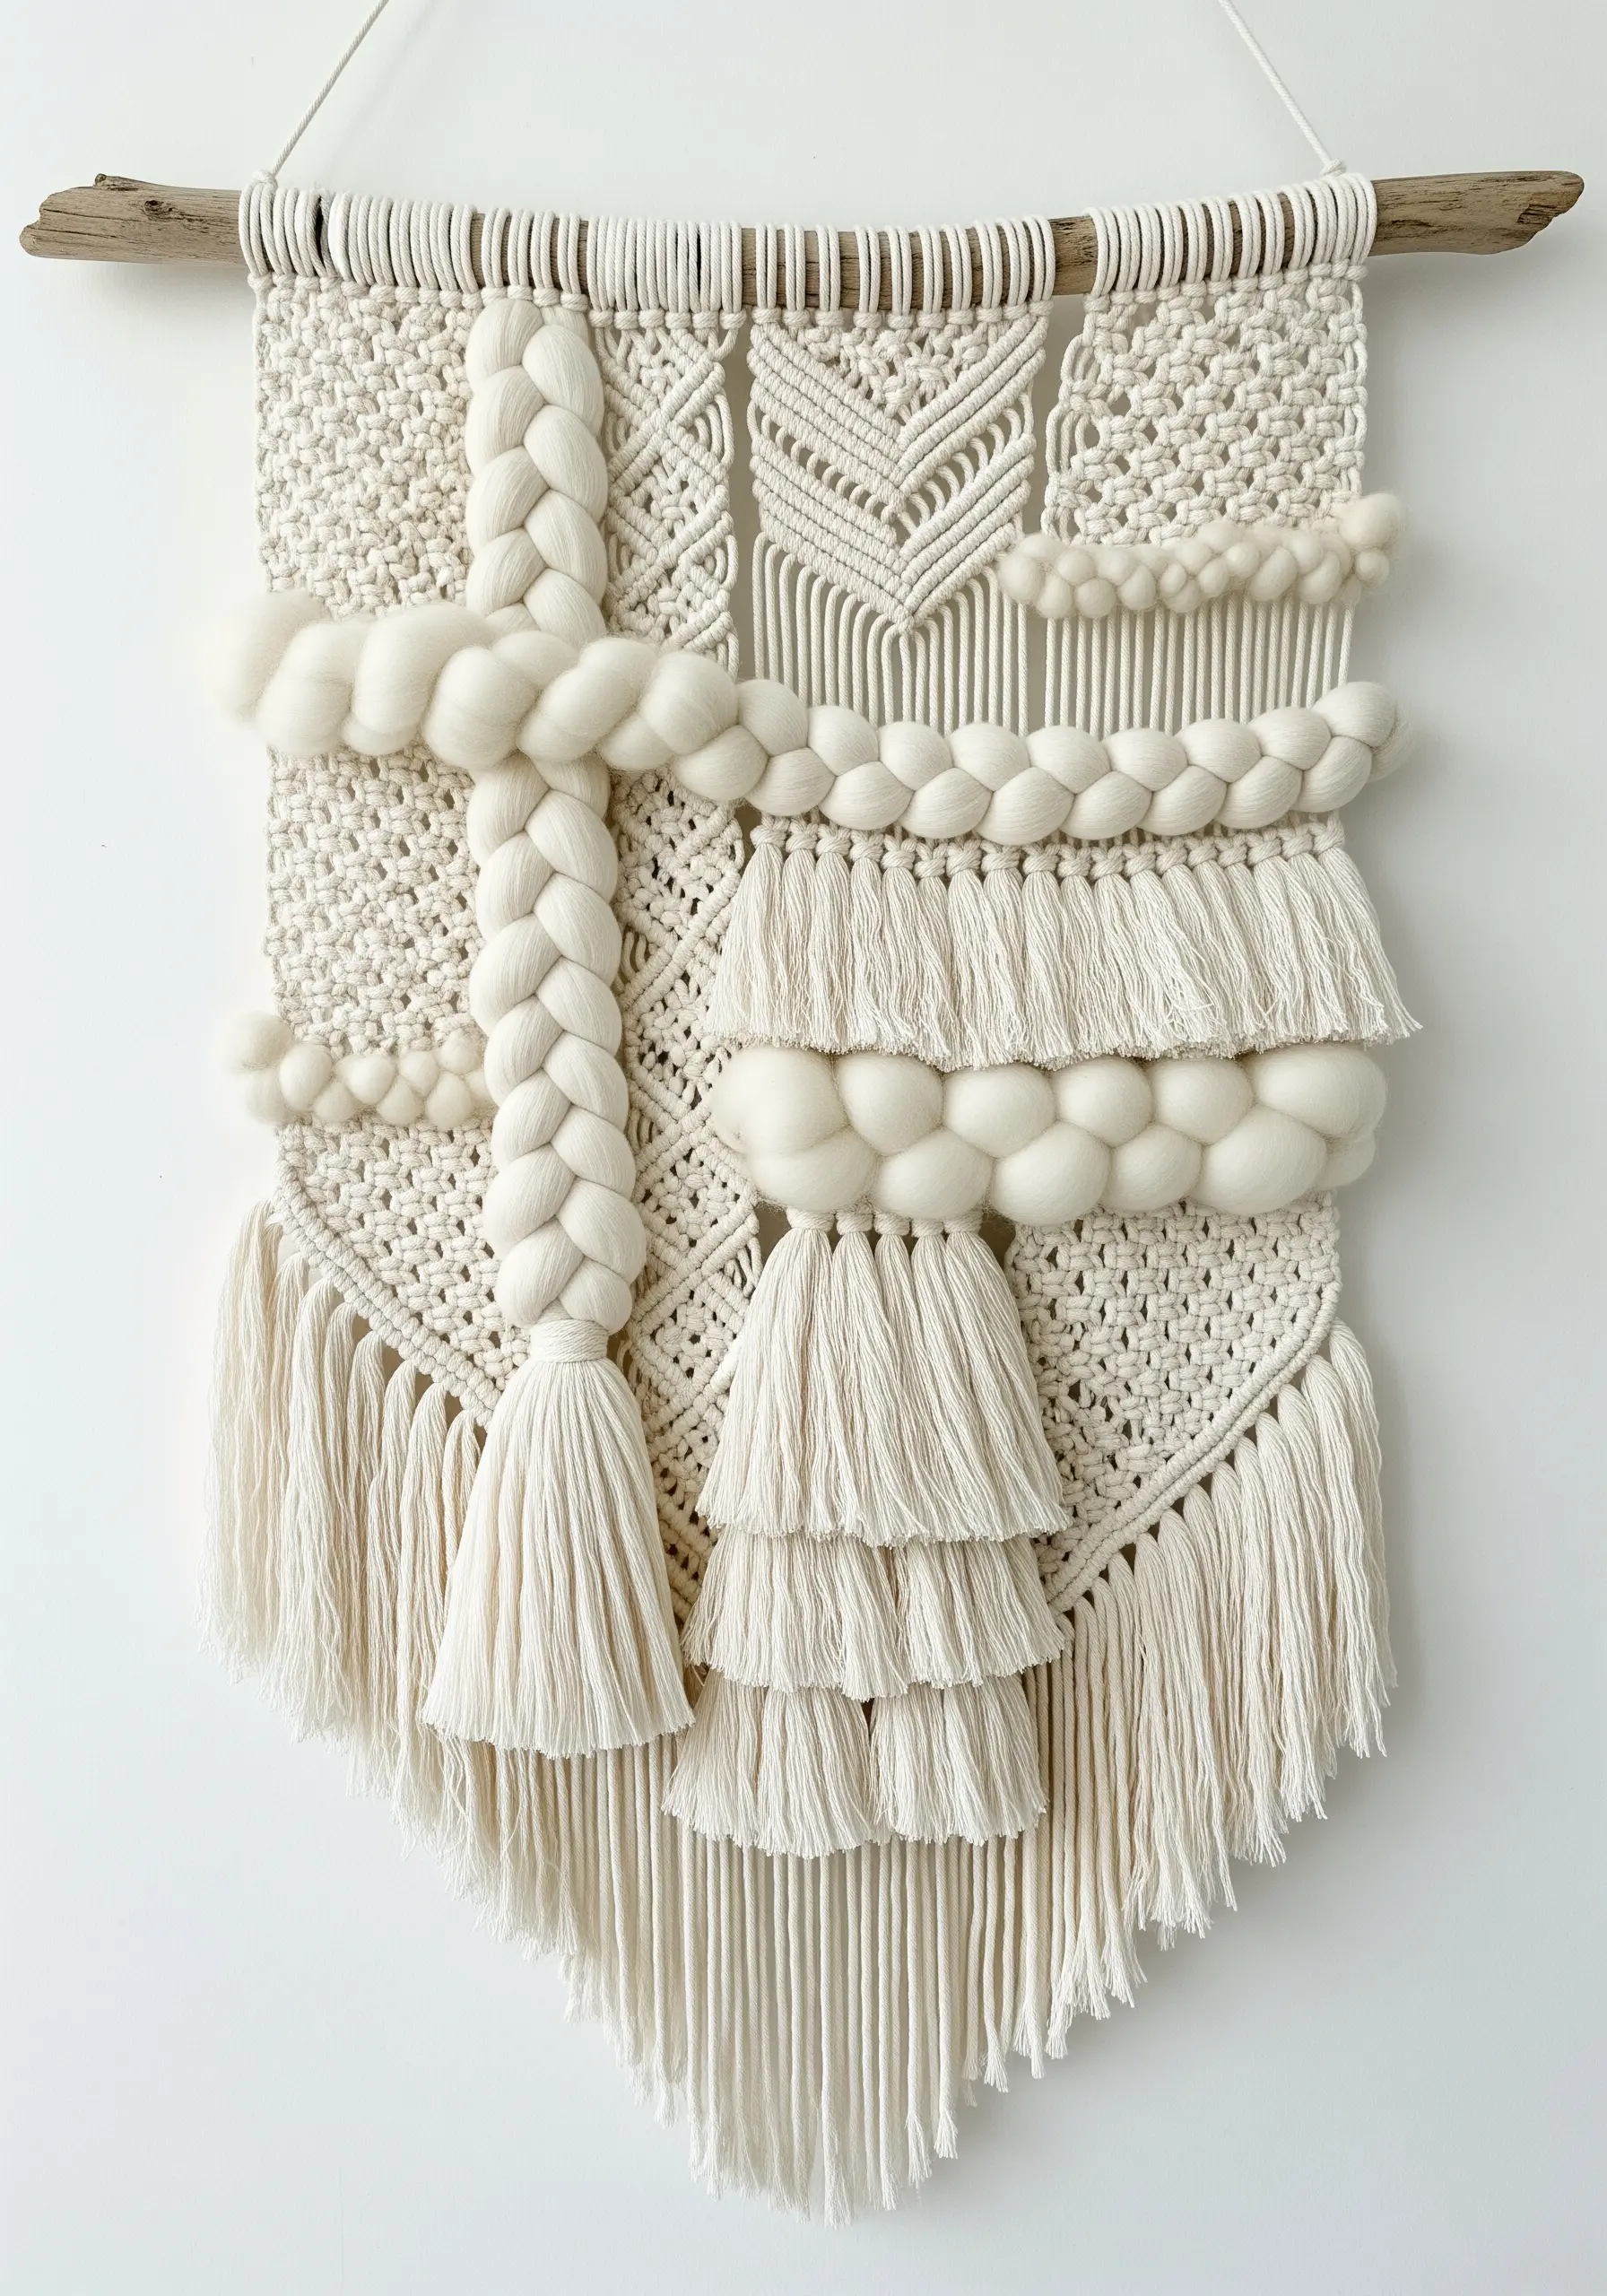
Prove that you don’t need color to create a dynamic piece by focusing entirely on texture and form.
Working with a single shade, like this natural cream, forces you to explore a variety of techniques to create interest.
Combine macrame knots, thick braids, fluffy roving, and layered tassels to build a rich, tactile landscape.
The absence of color allows the shadows and highlights created by the different textures to become the central design element.
This approach results in sophisticated, monochrome embroidery ideas that feel calming and complex at the same time.
16. Framing Macrame in a Modern Hoop
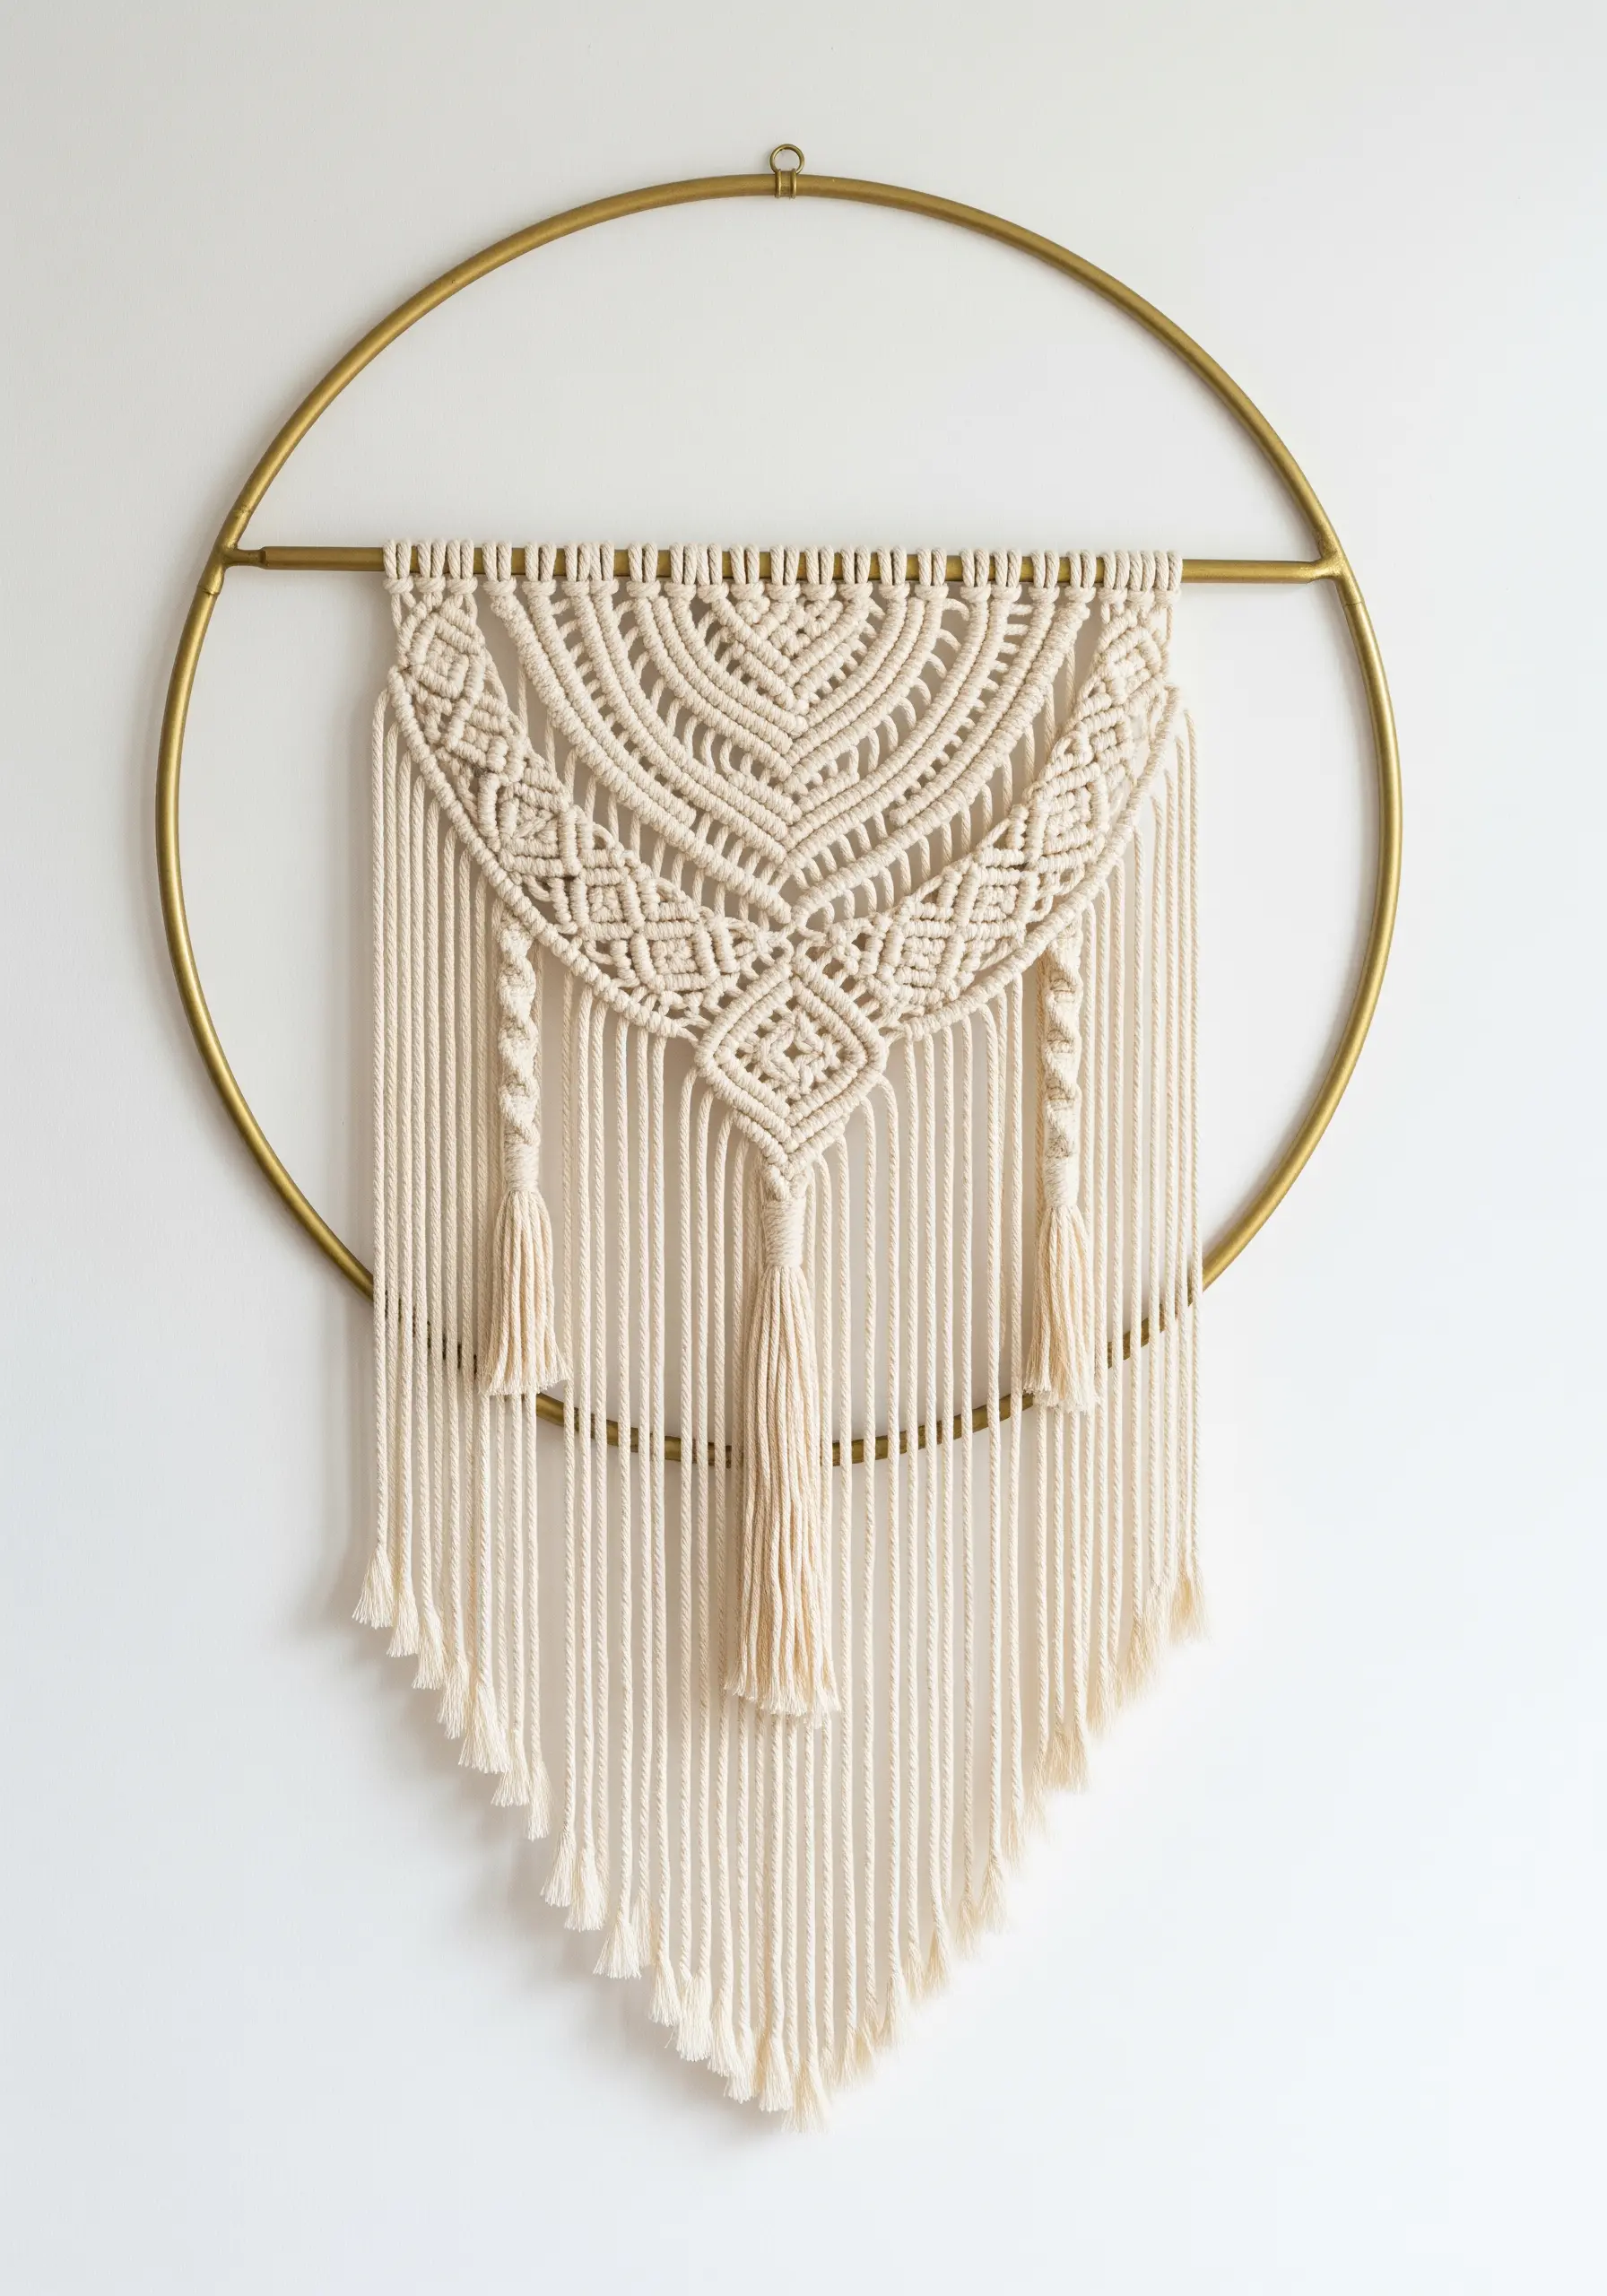
Using a metal hoop as a frame gives traditional macrame a contemporary, almost sculptural, presence.
Attach your cords to the top of the hoop and use it as the anchor for your knotwork, allowing the design to cascade downwards.
The circular frame contrasts beautifully with the geometric diamond patterns often found in macrame.
Leaving parts of the metal hoop exposed is a key design choice—this negative space adds to the modern, airy aesthetic.
It’s a perfect way to create framed embroidery wall art that feels both bohemian and chic.
17. The Graphic Pom-Pom Grid
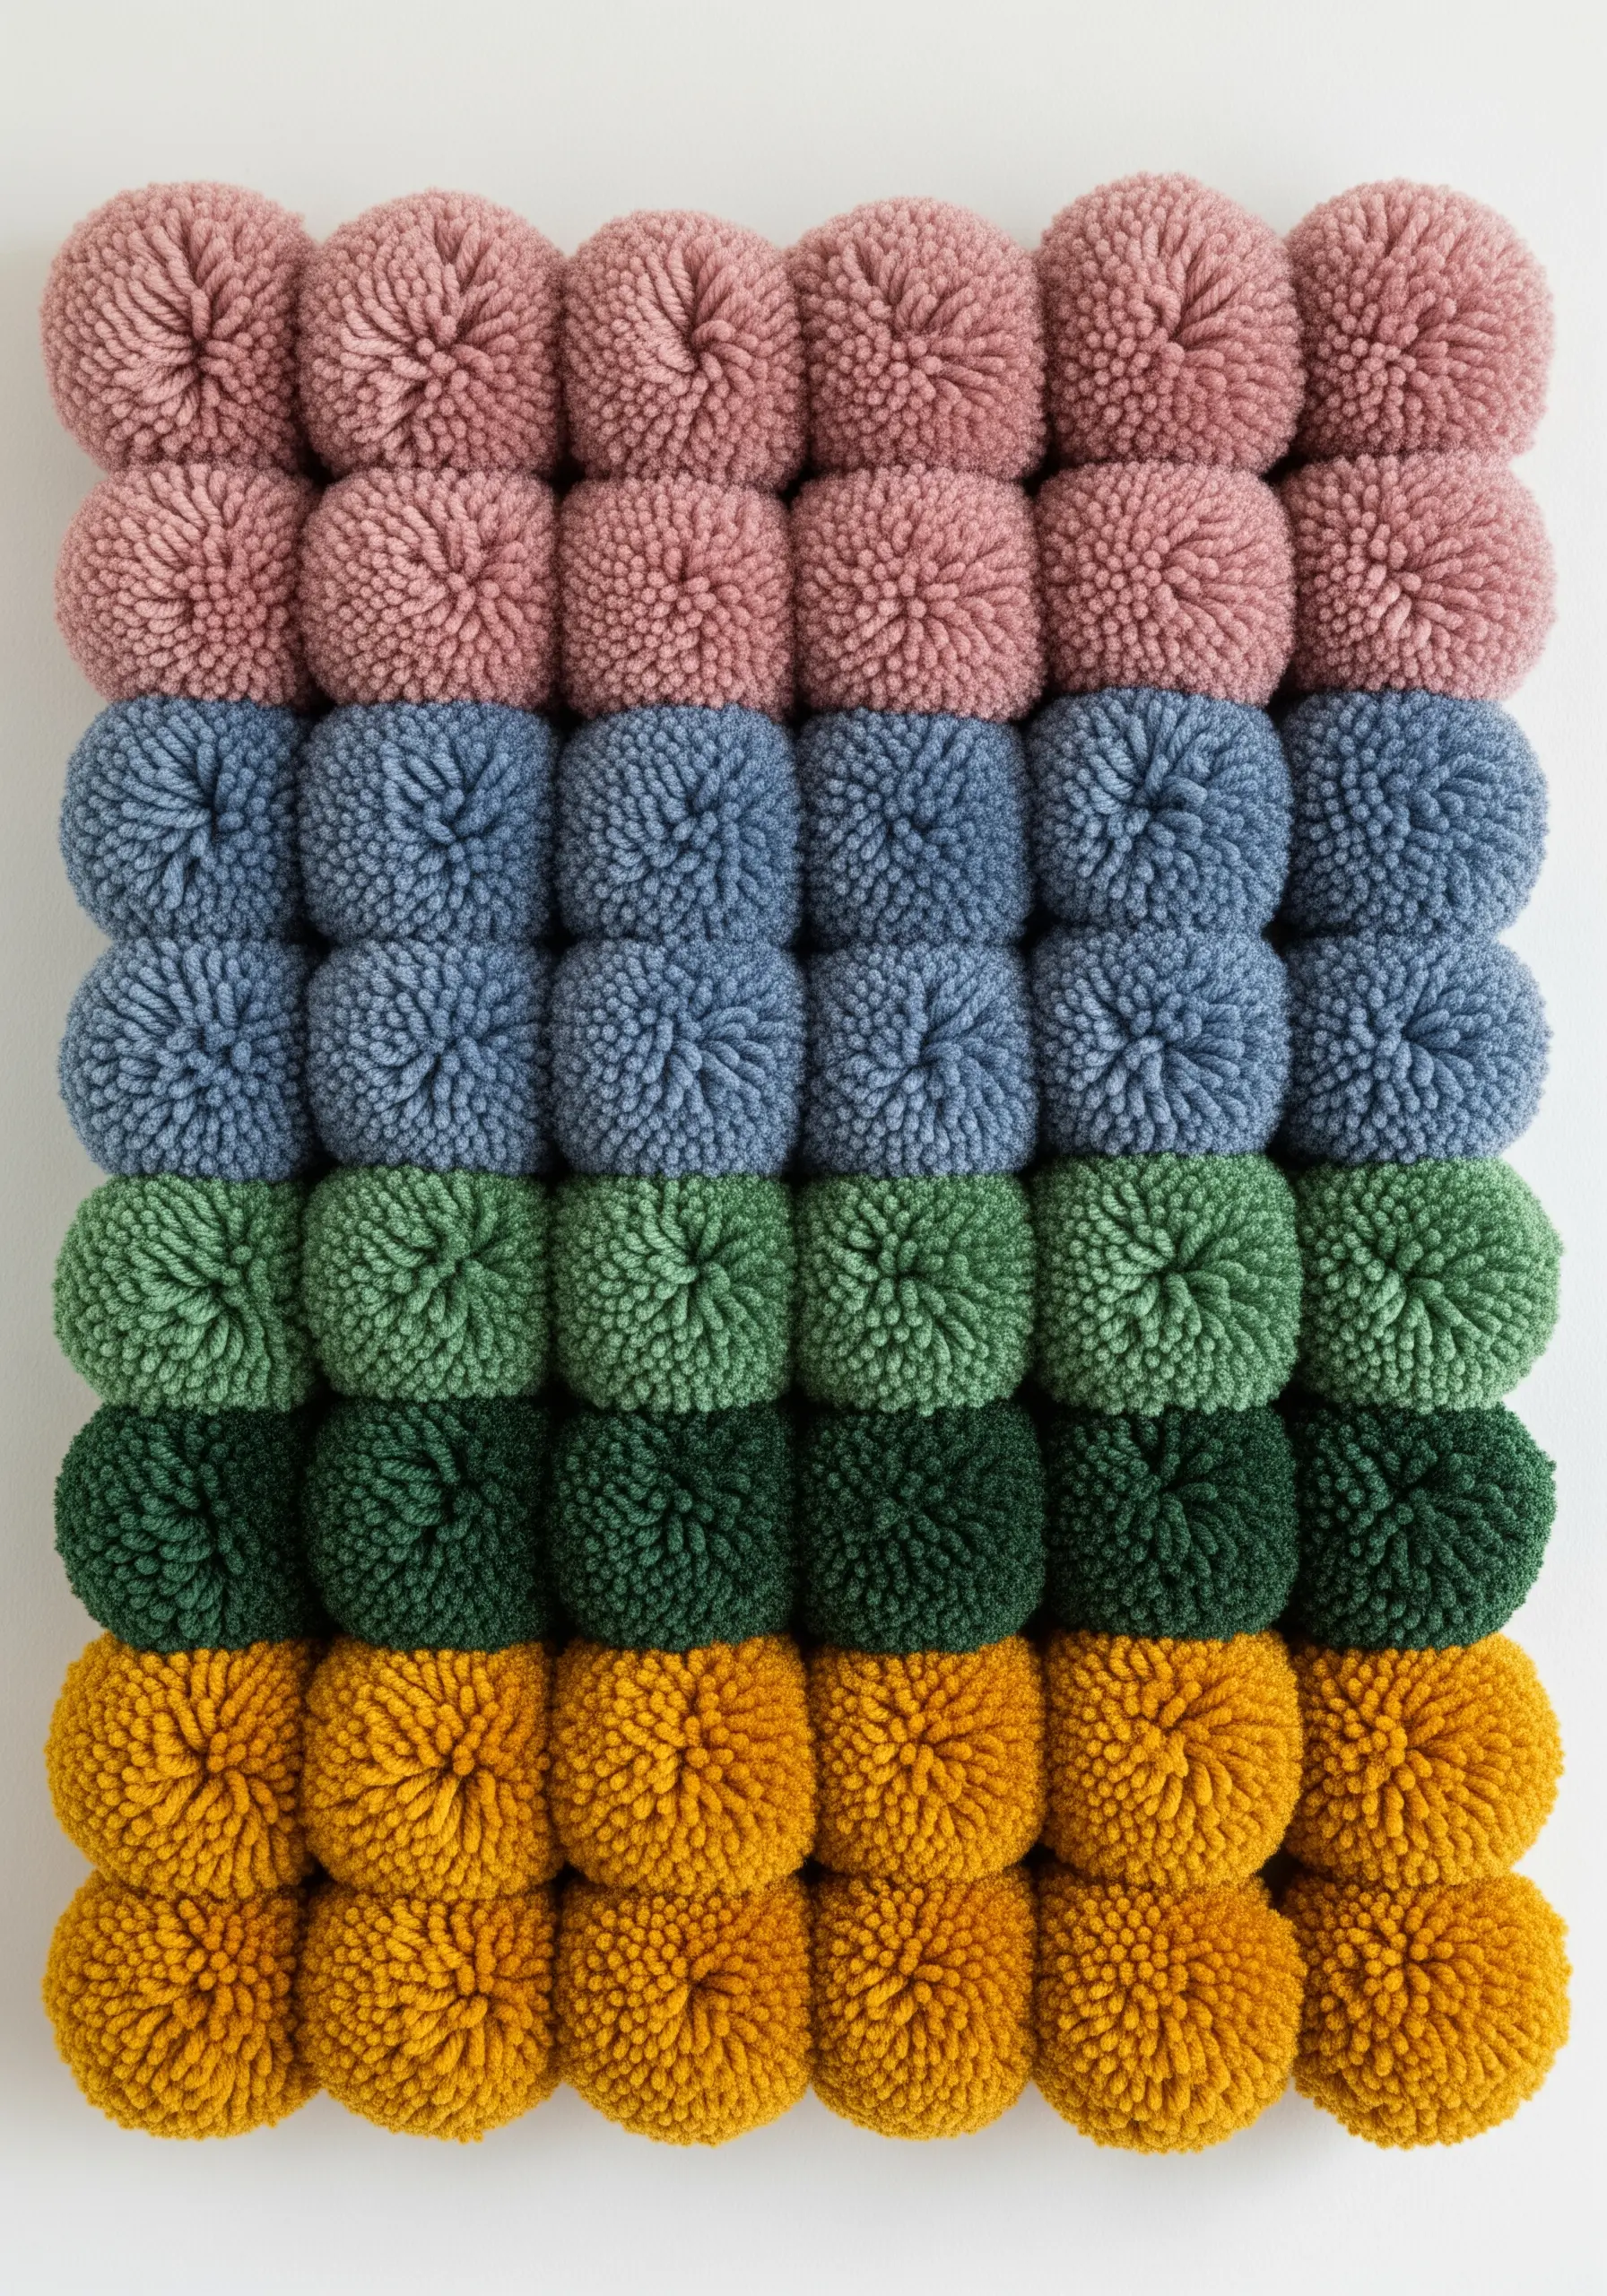
Turn playful pom-poms into a work of modern art by arranging them in a structured, geometric grid.
The key to success is consistency. Use a pom-pom maker to ensure each one is the same size and density.
Plan your color blocks on graph paper first to create a clean, pixelated gradient effect.
Attach the finished pom-poms to a sturdy canvas or mesh backing using a hot glue gun or by tying them on from behind.
This technique transforms a simple craft into a plush, textural piece with significant graphic impact.
18. Sculptural Forms with Giant Crochet
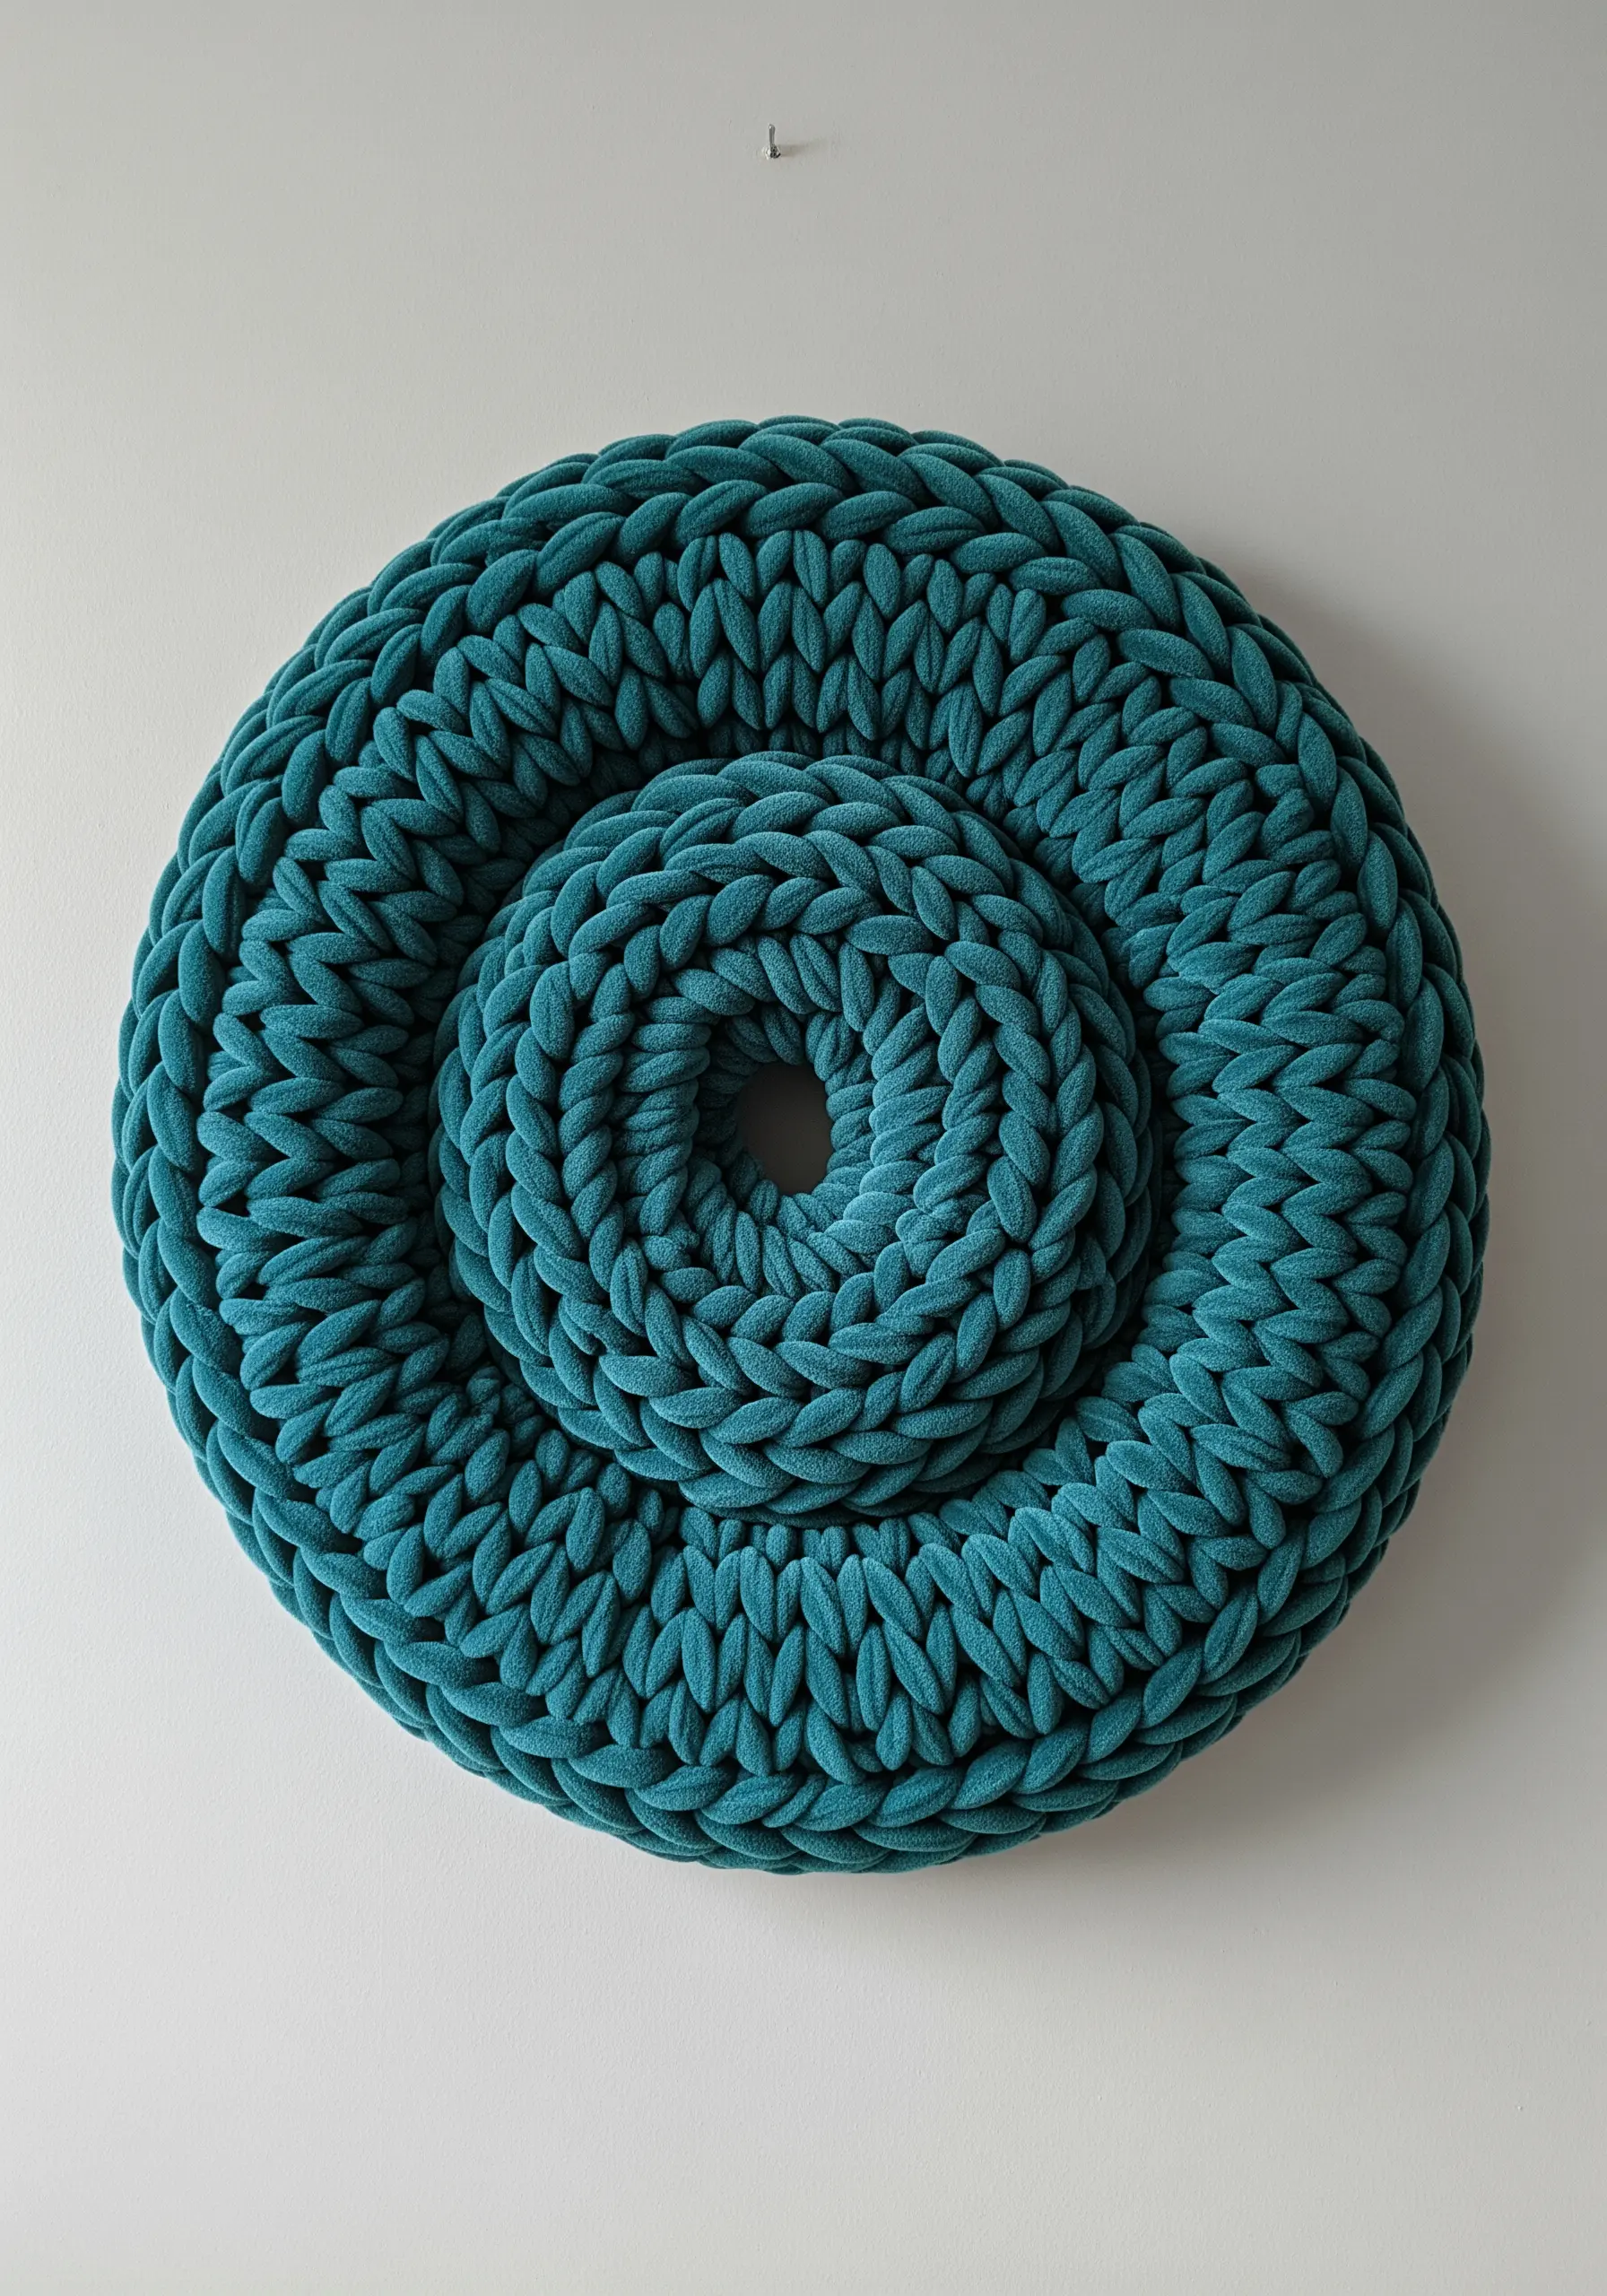
You can create bold, sculptural wall art using basic crochet stitches and super-chunky tube yarn.
Working in the round with a simple single crochet stitch, you can build concentric circles that have incredible texture and dimension.
The trick is to use a very large crochet hook—or even just your hands—to keep the stitches loose and defined.
By creating two separate circular pieces and nesting them, you add depth and a more complex form.
This method allows you to create large-scale abstract embroidery stitches quickly, resulting in a minimalist yet high-impact statement piece.
19. The Precision of Geometric String Art
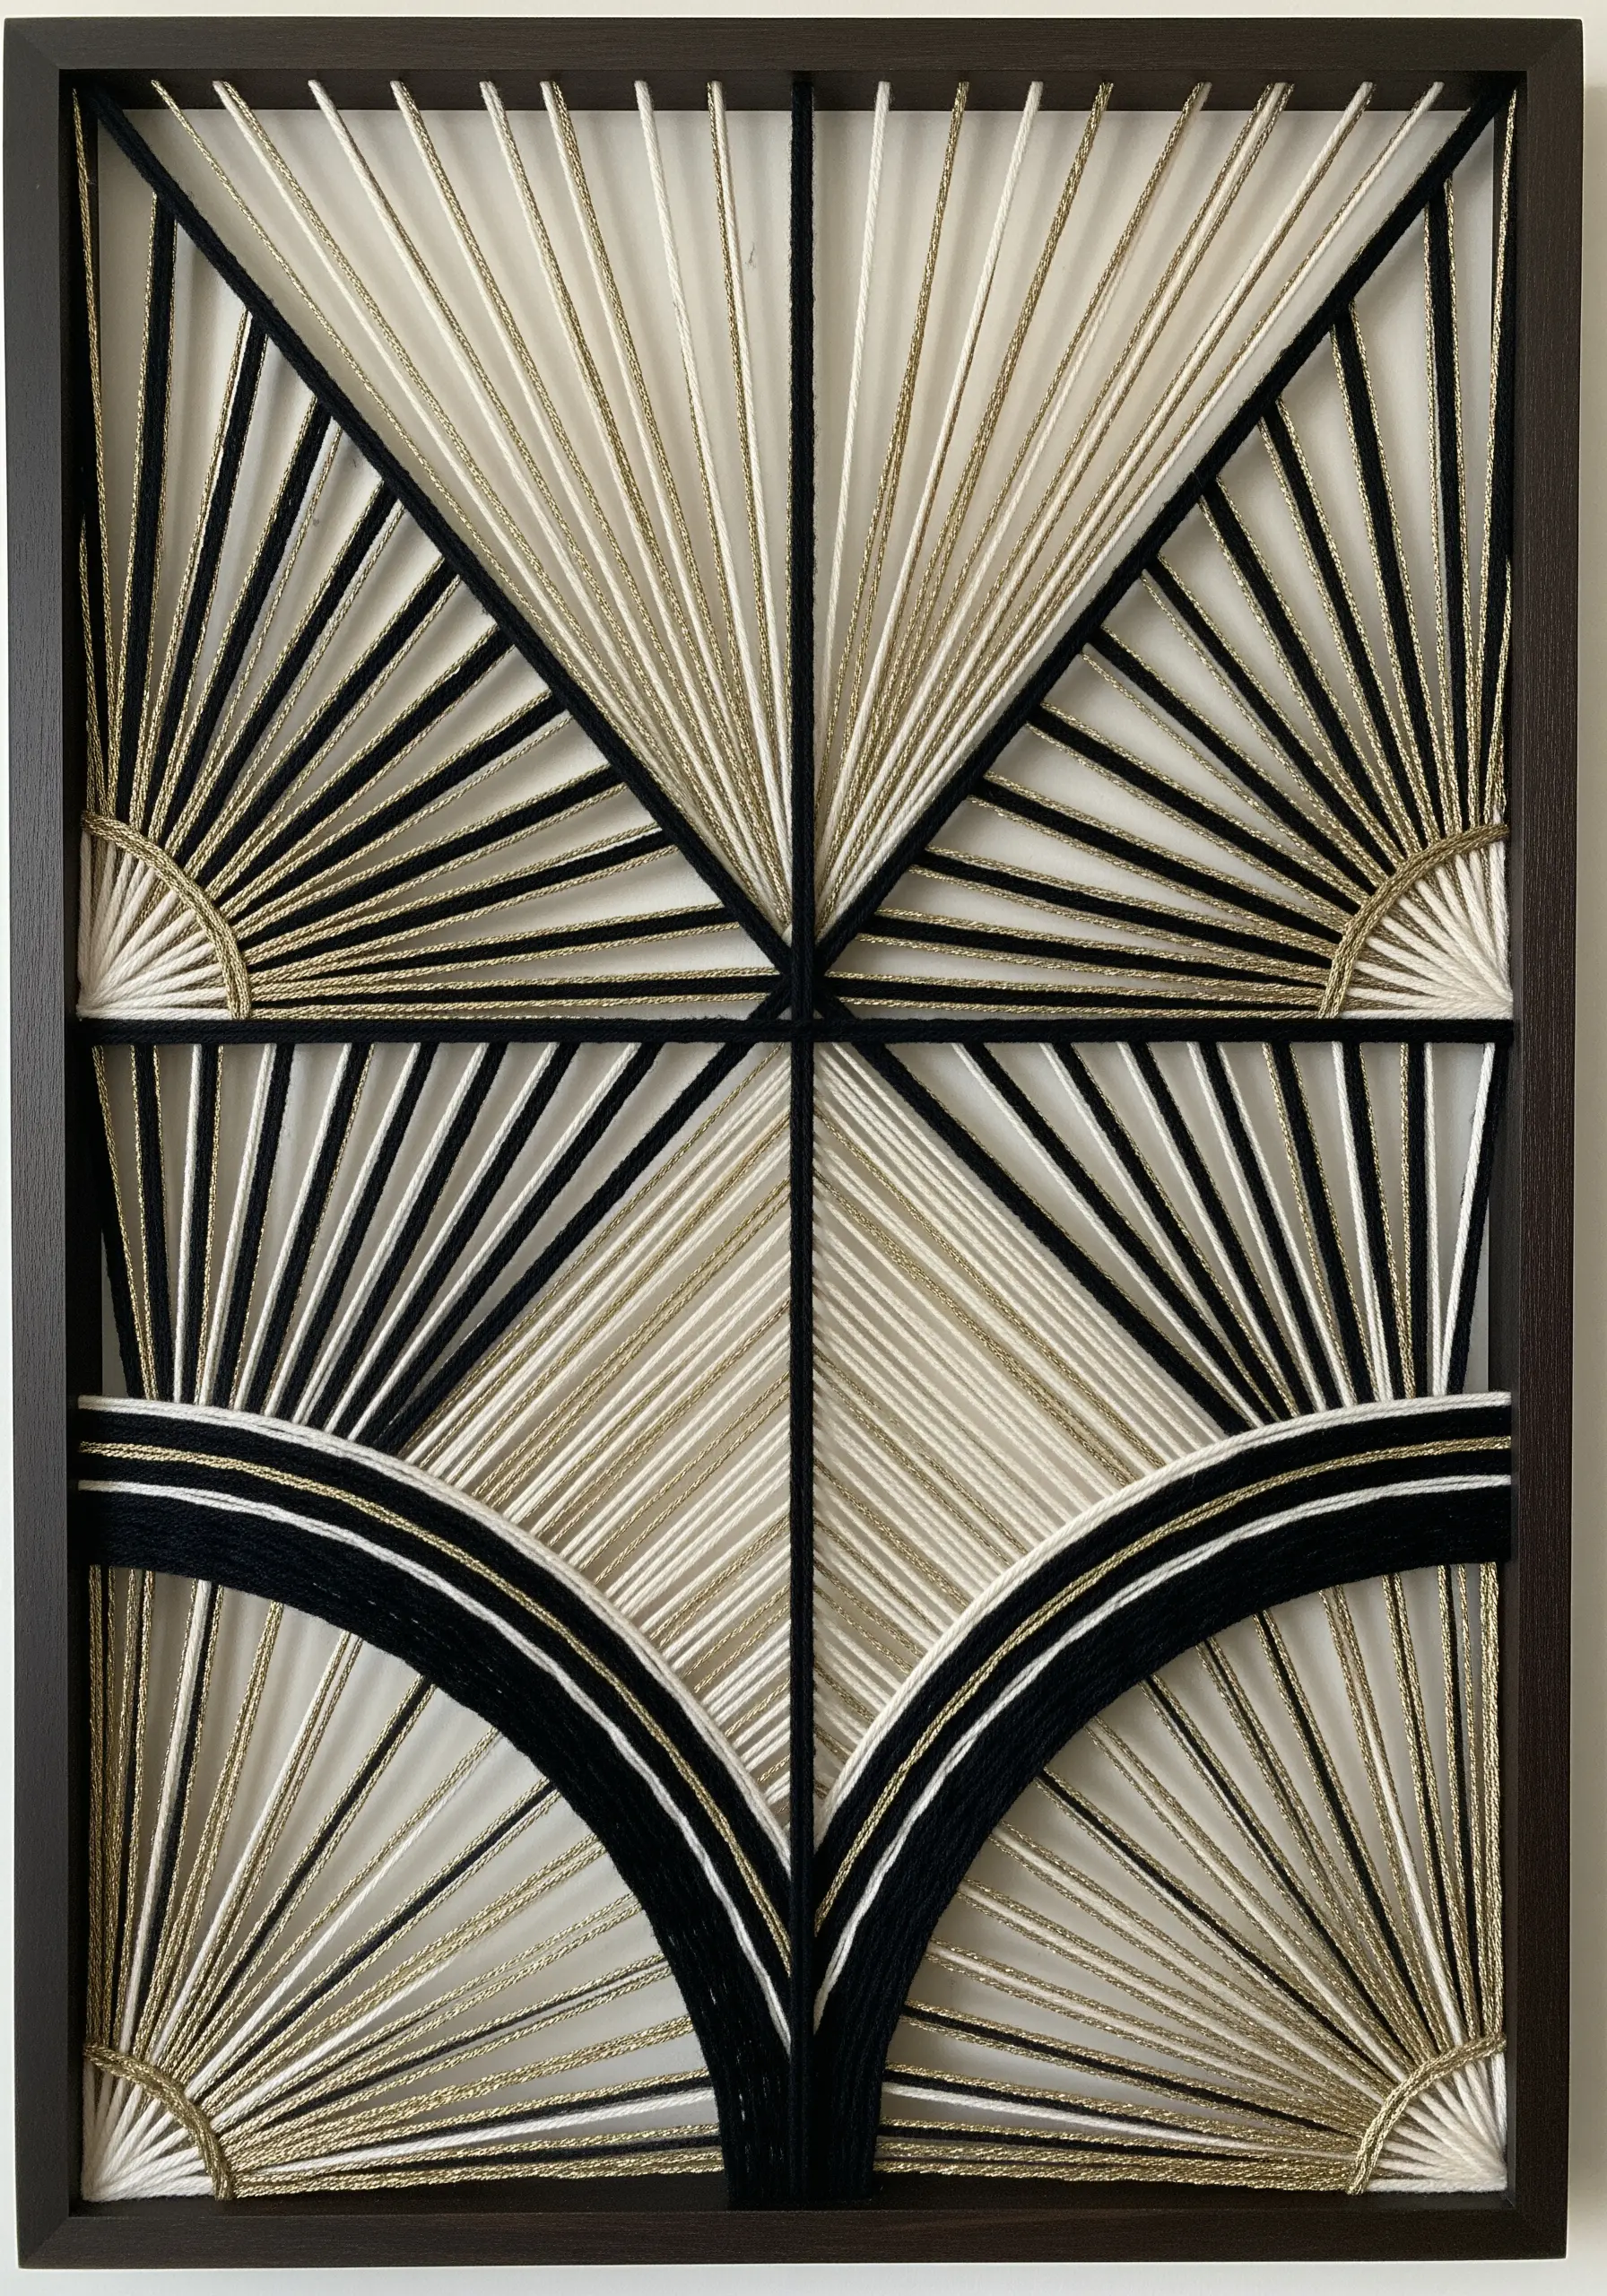
Achieve this striking Art Deco effect by focusing on the mathematical precision of string art.
Start by drawing a grid on your backing board and hammering in small nails at regular intervals along your design lines.
The magic comes from wrapping the string in straight lines between these nails. The overlapping threads create the illusion of curves.
Using high-contrast threads—like black, white, and a shimmering gold—amplifies the sharp, geometric quality of the design.
This technique is a perfect blend of mathematics and art, resulting in geometric framed embroidery patterns that feel incredibly luxe.
20. Creating Portraits with Tapestry Crochet
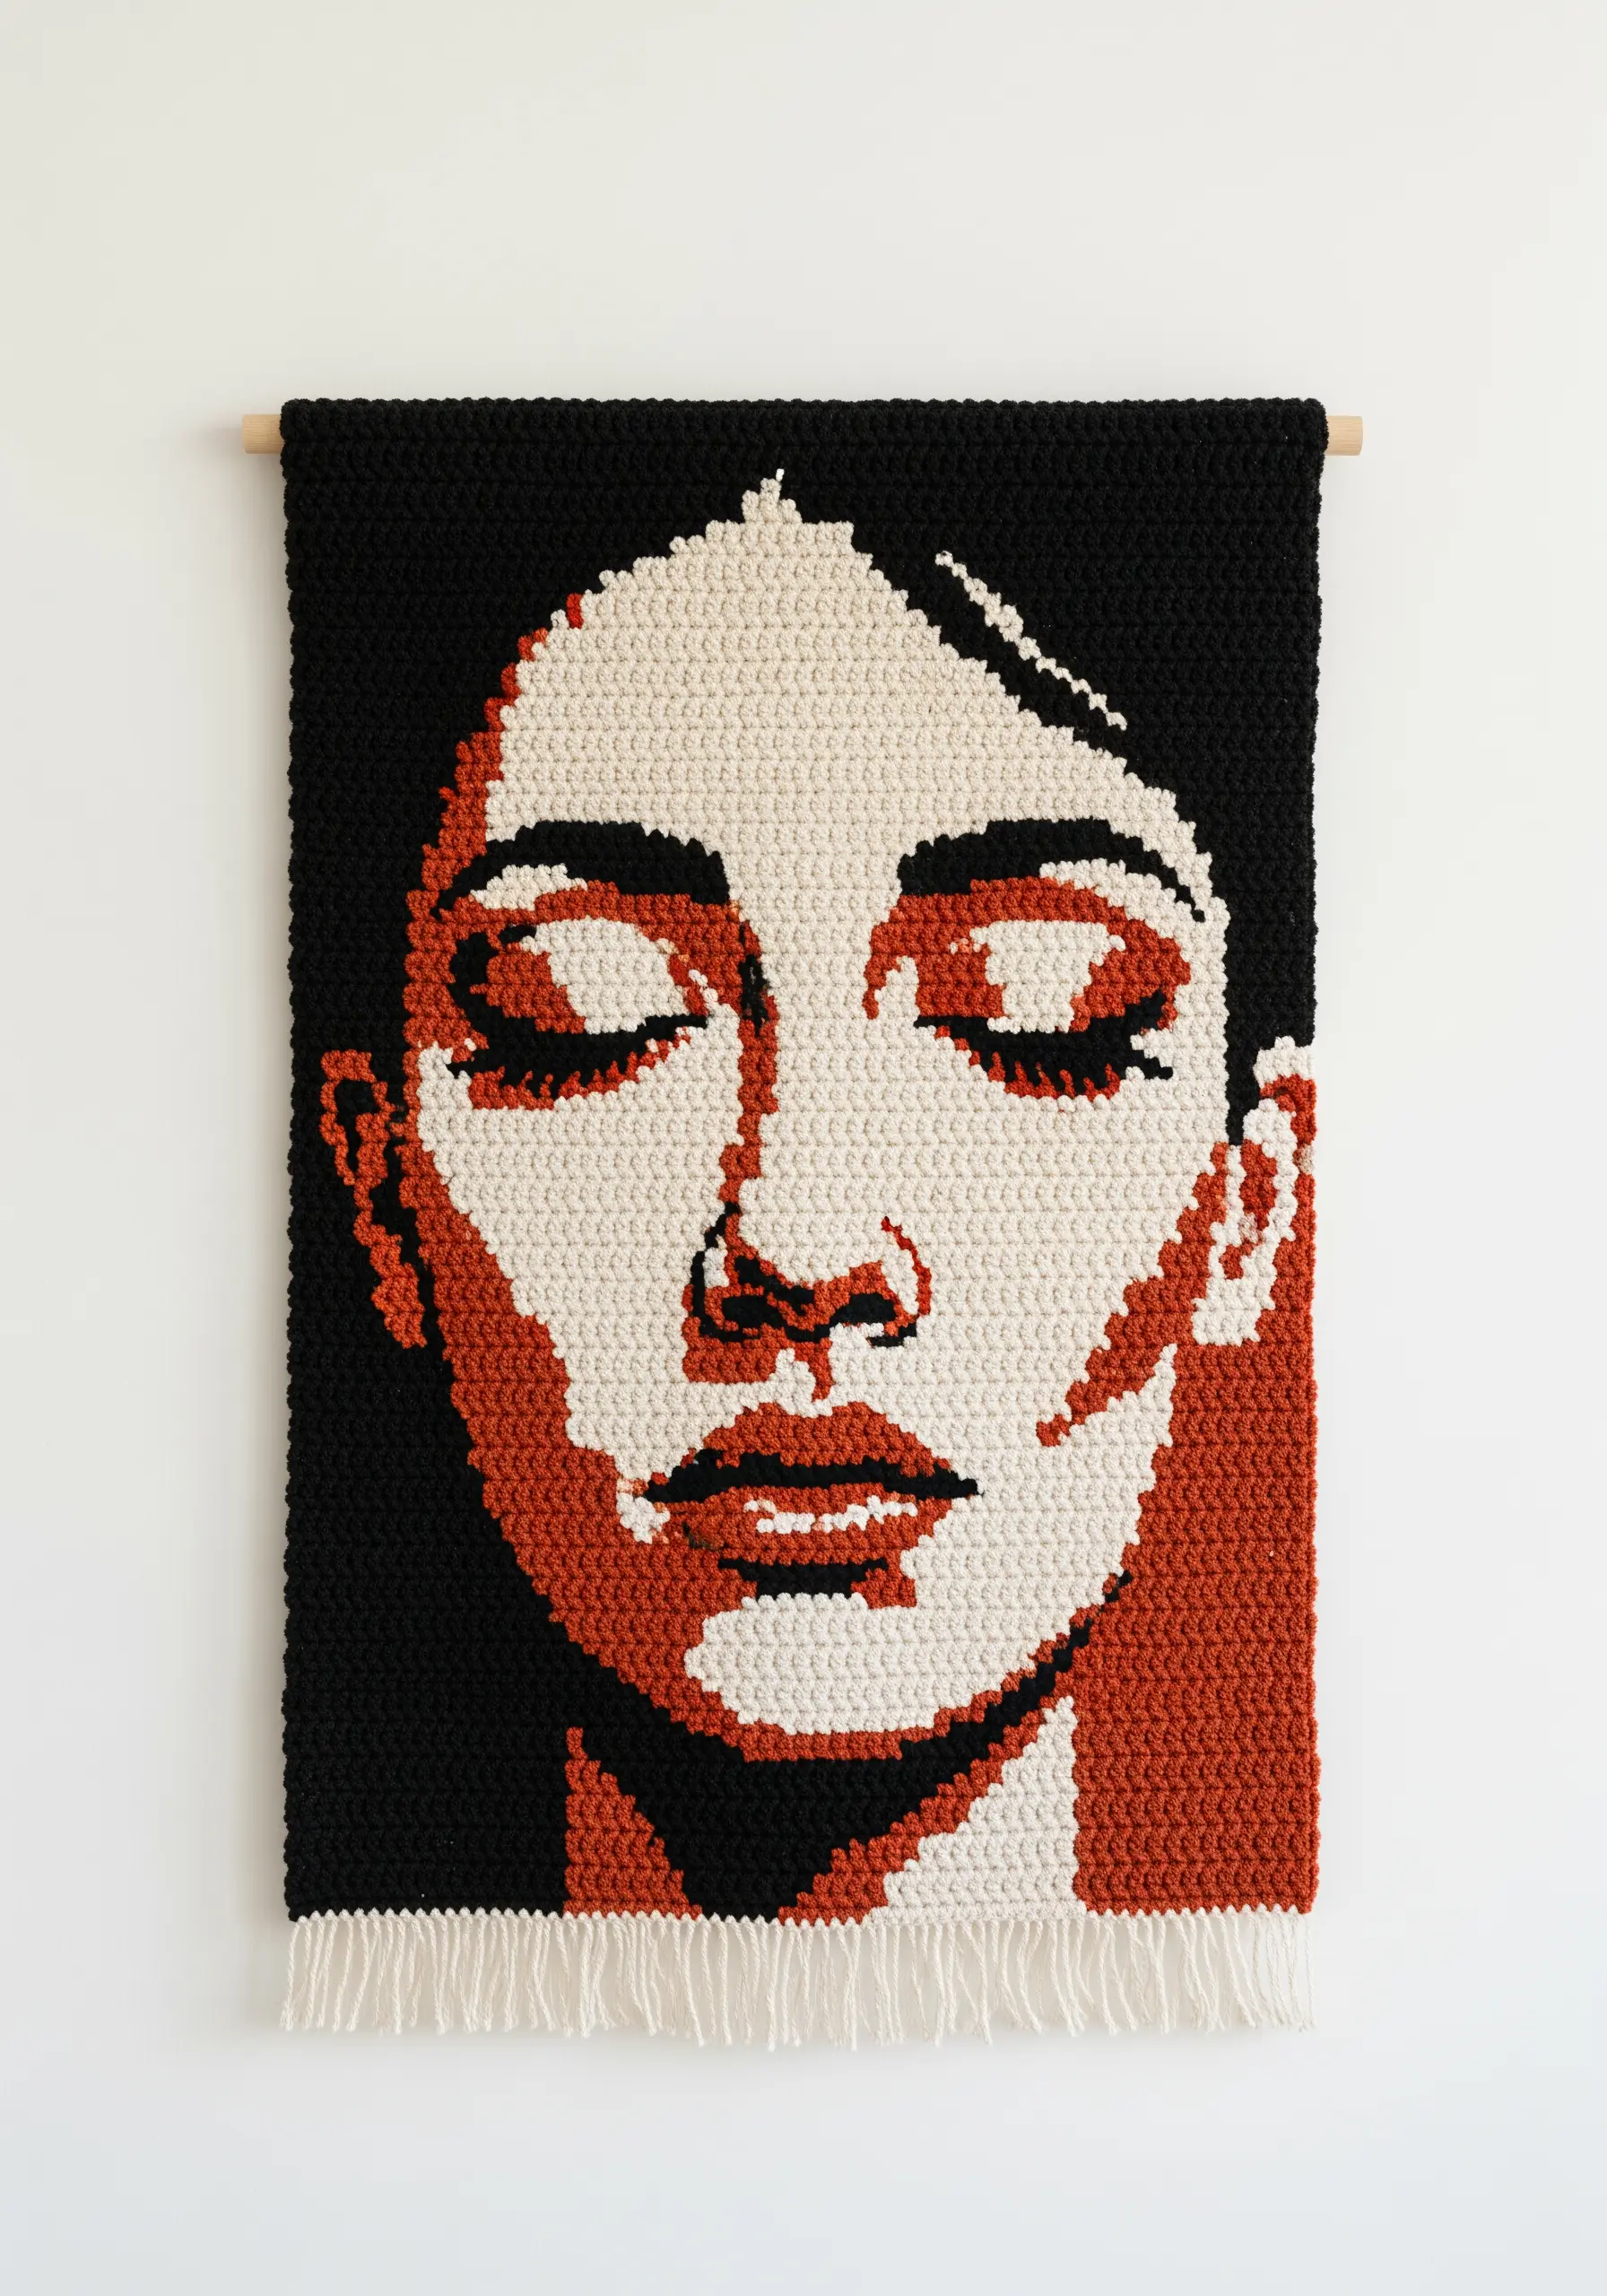
You can “paint” a portrait with yarn using the technique of tapestry crochet, where you work with multiple colors in a single row.
Translate your image into a pixelated grid—each square represents one single crochet stitch.
As you work, you’ll carry the unused colors within your stitches, switching to the active color as dictated by your chart.
Using a high-contrast, limited color palette (like black, white, and rust) simplifies the process and creates a powerful, graphic effect.
This method turns a simple stitch into a tool for creating detailed, hand-stitched portrait wall art.
21. Painting with Wool: Needle-Felted Landscapes
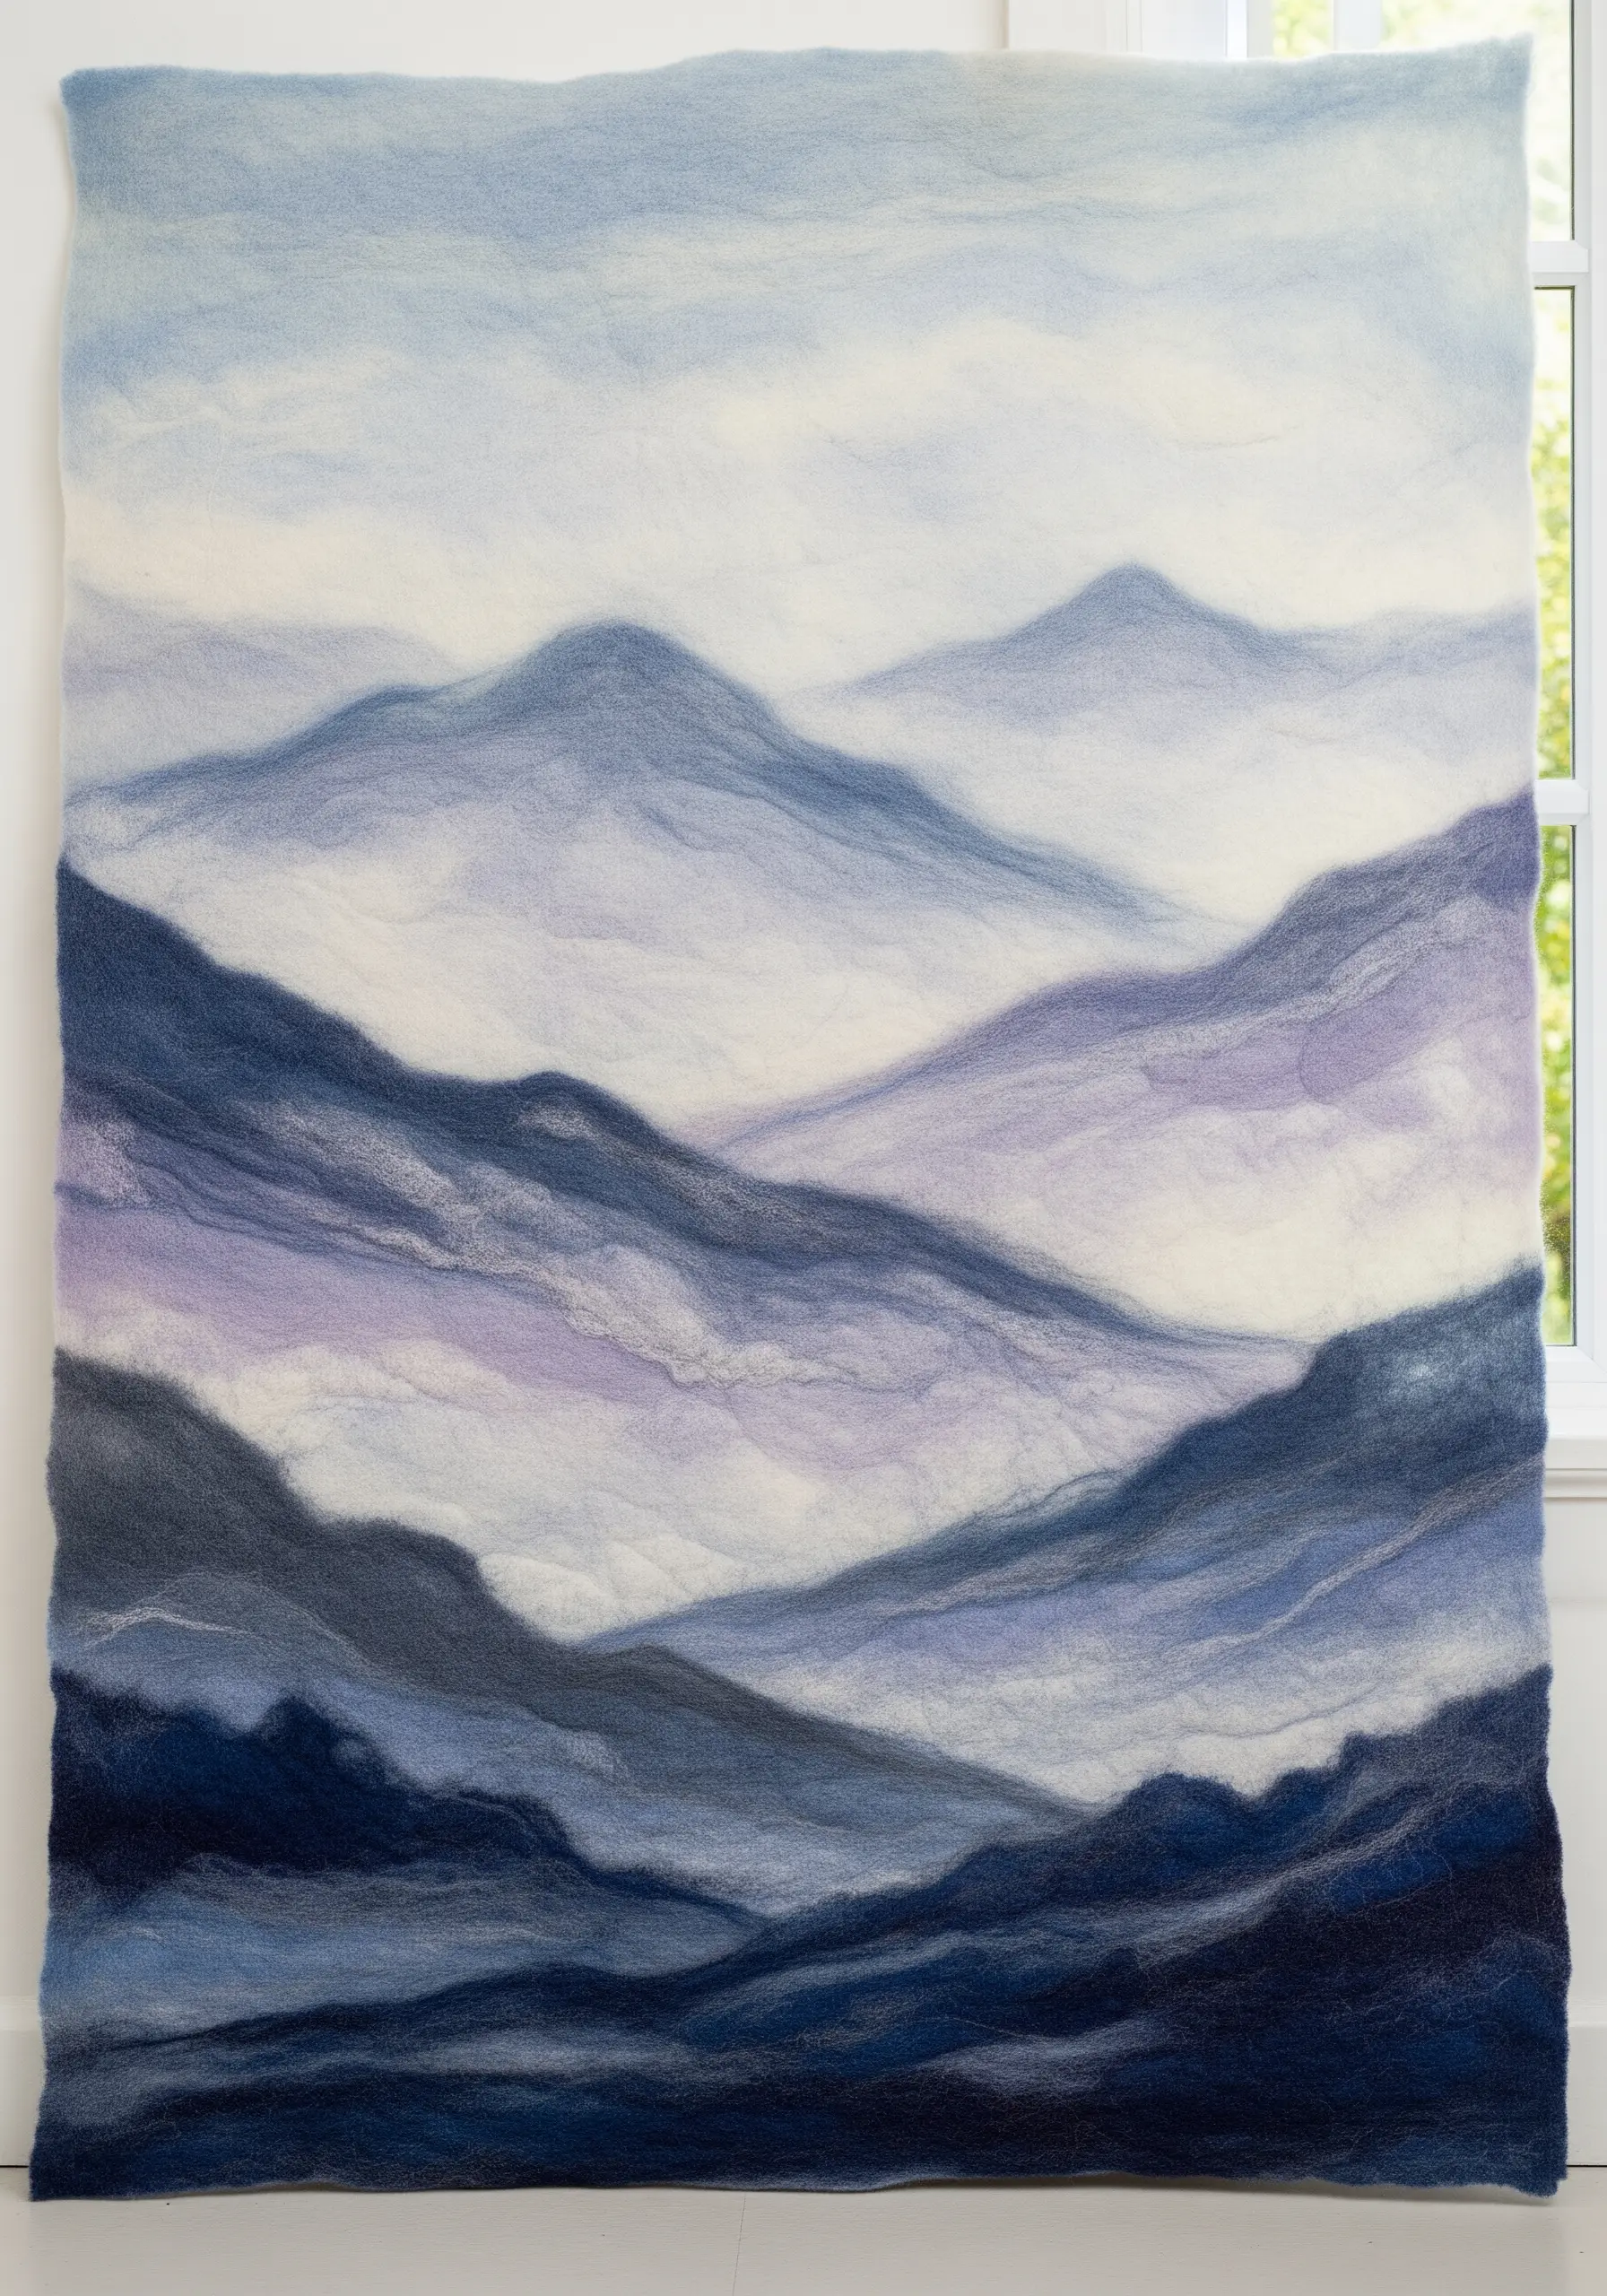
Create soft, atmospheric landscapes by using wool roving as your “paint” and a felting needle as your “brush.”
Start by laying down a base layer of wool for the sky on a piece of felt or foam backing.
Build your mountains layer by layer, starting with the lightest, most distant peaks and moving to the darker, closer ones.
Use your felting needle to gently tack the fibers in place, then blend the edges of different colors together to create soft, misty transitions.
This technique allows for a level of subtlety and color blending that is difficult to achieve with yarn, resulting in truly painterly fiber art.
22. Integrating Dried Botanicals into Macrame
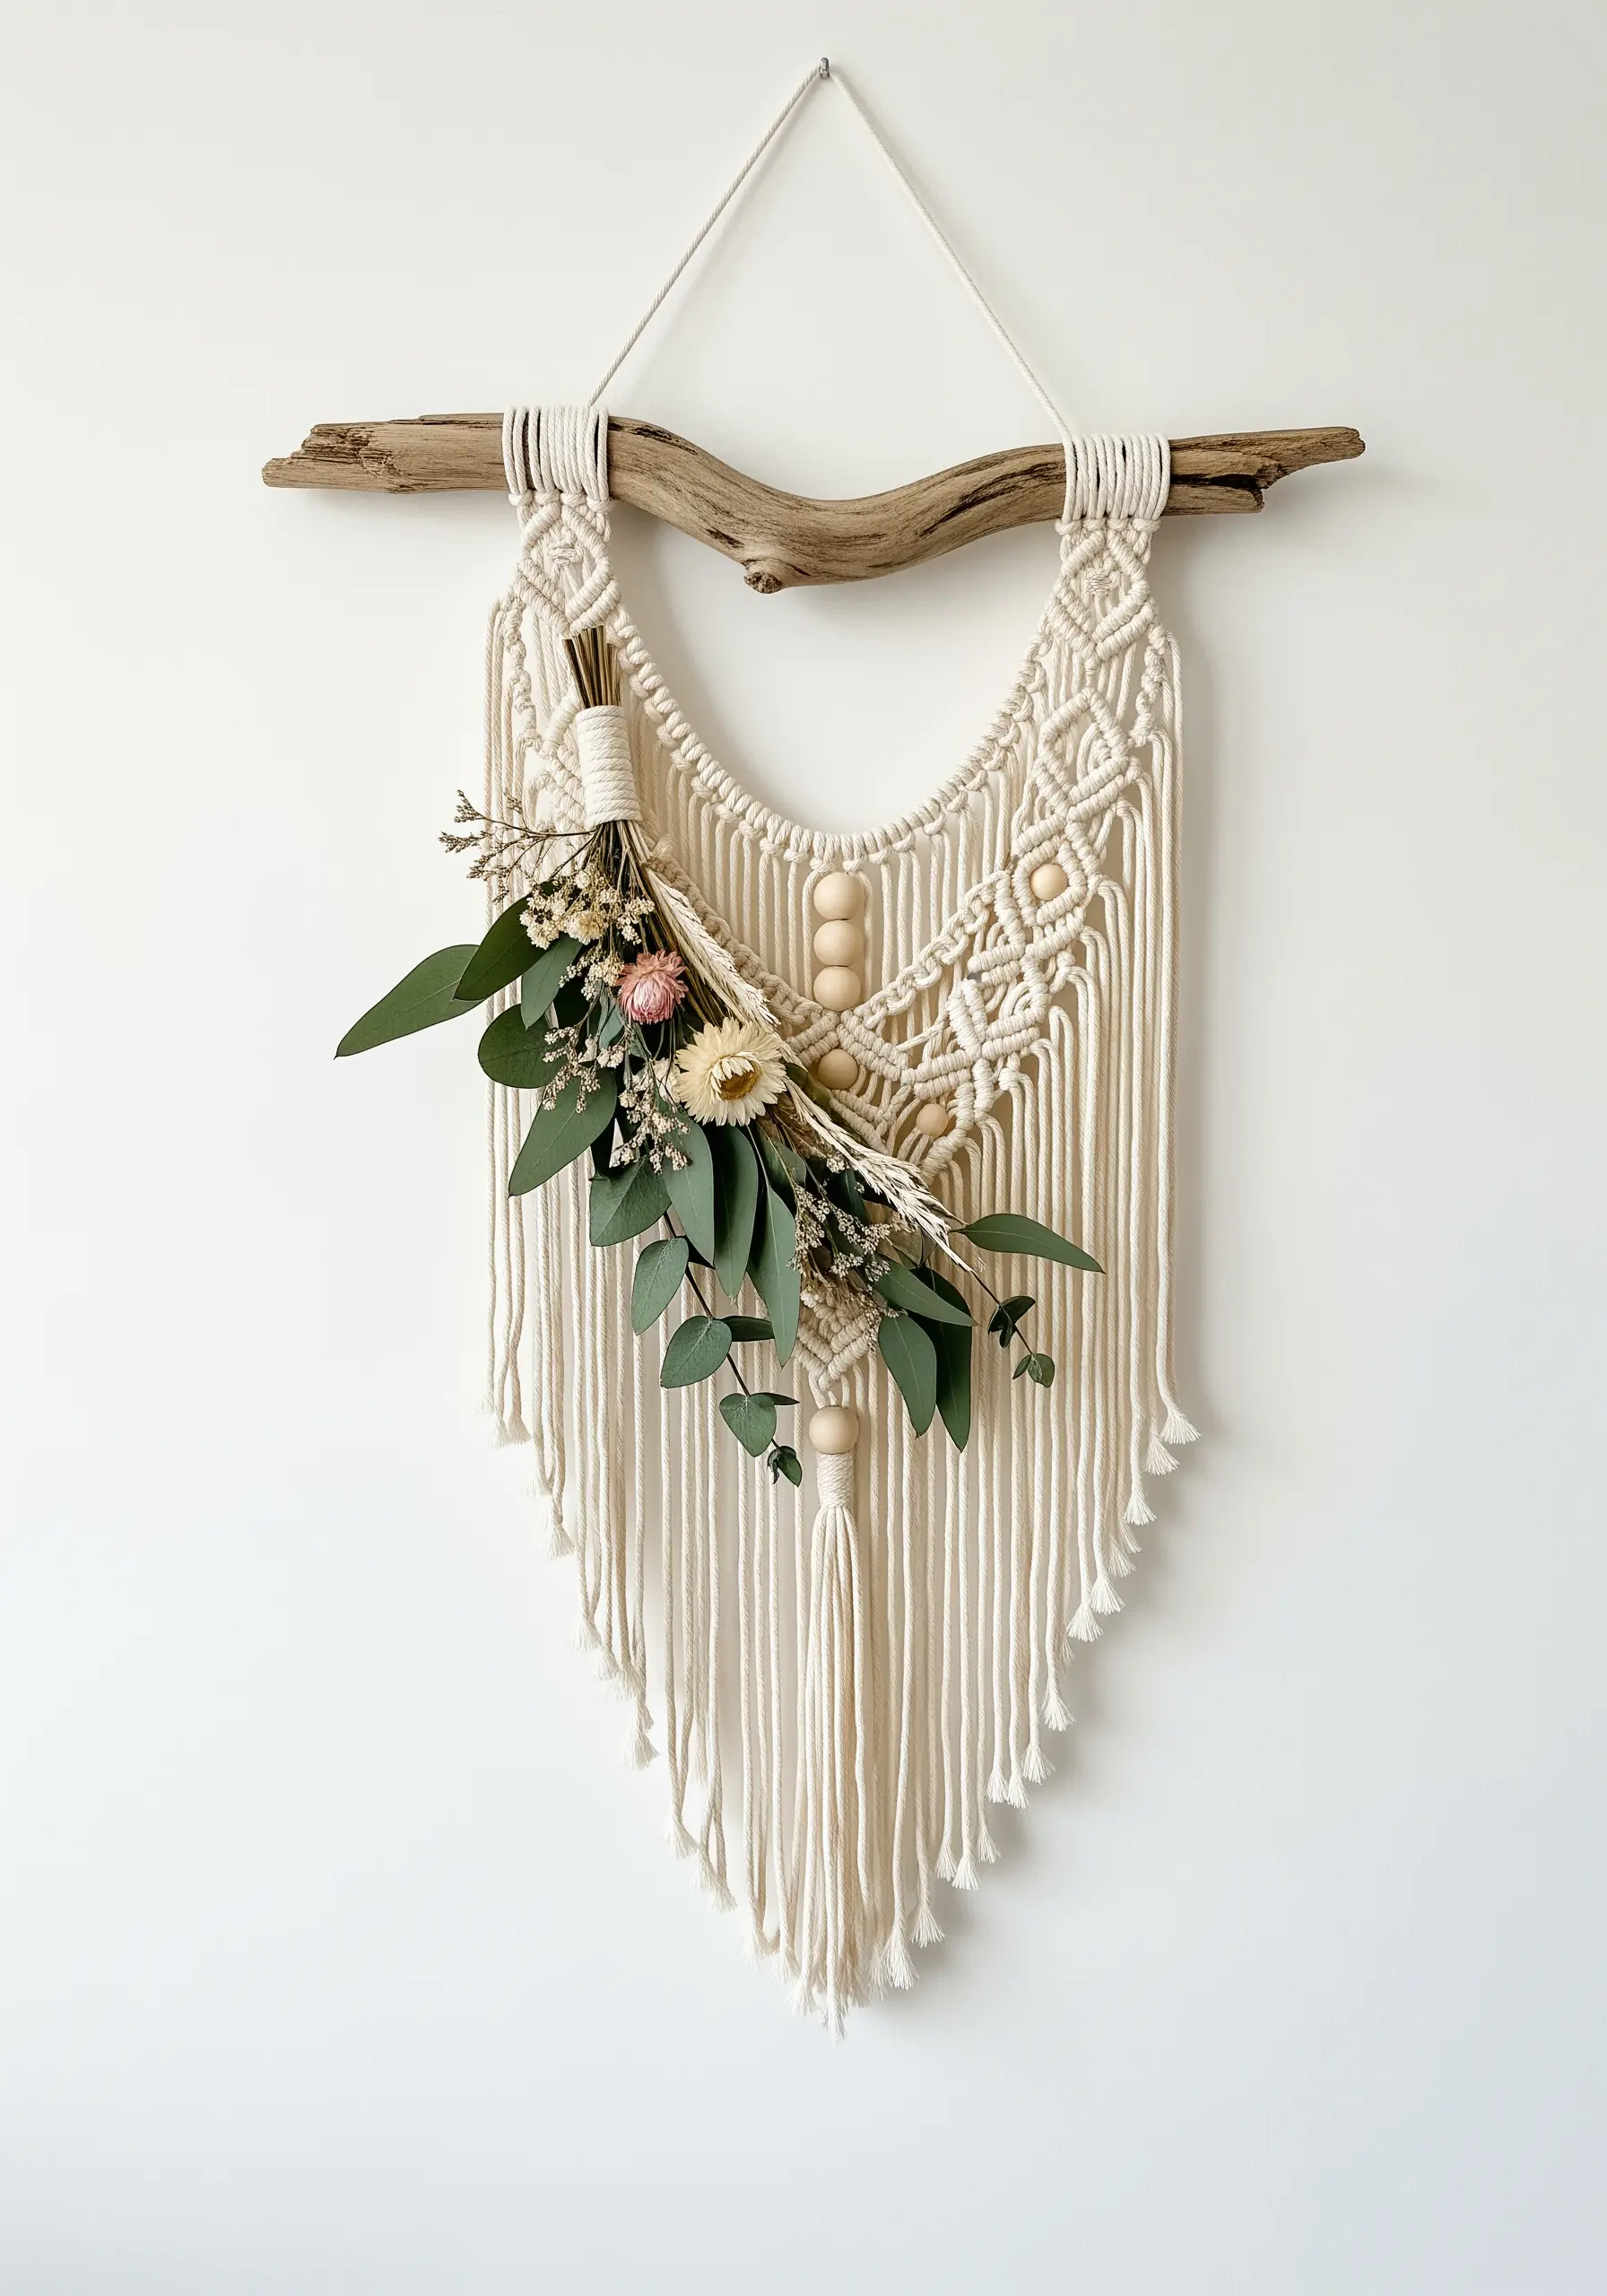
Add a soft, organic touch to your macrame by weaving in dried flowers and foliage.
Create a simple macrame base with a “pouch” or open-weave section specifically designed to hold the botanicals.
Choose sturdy dried elements like eucalyptus, pampas grass, and craspedia that won’t crumble easily.
Secure the bouquet to the macrame using a fine, neutral-colored thread or wire, tucking it in so it feels integrated rather than just attached.
This combination of natural fibers and dried flower-style elements creates a beautiful piece that celebrates nature indoors.
23. The Immersive Gradient Yarn Curtain
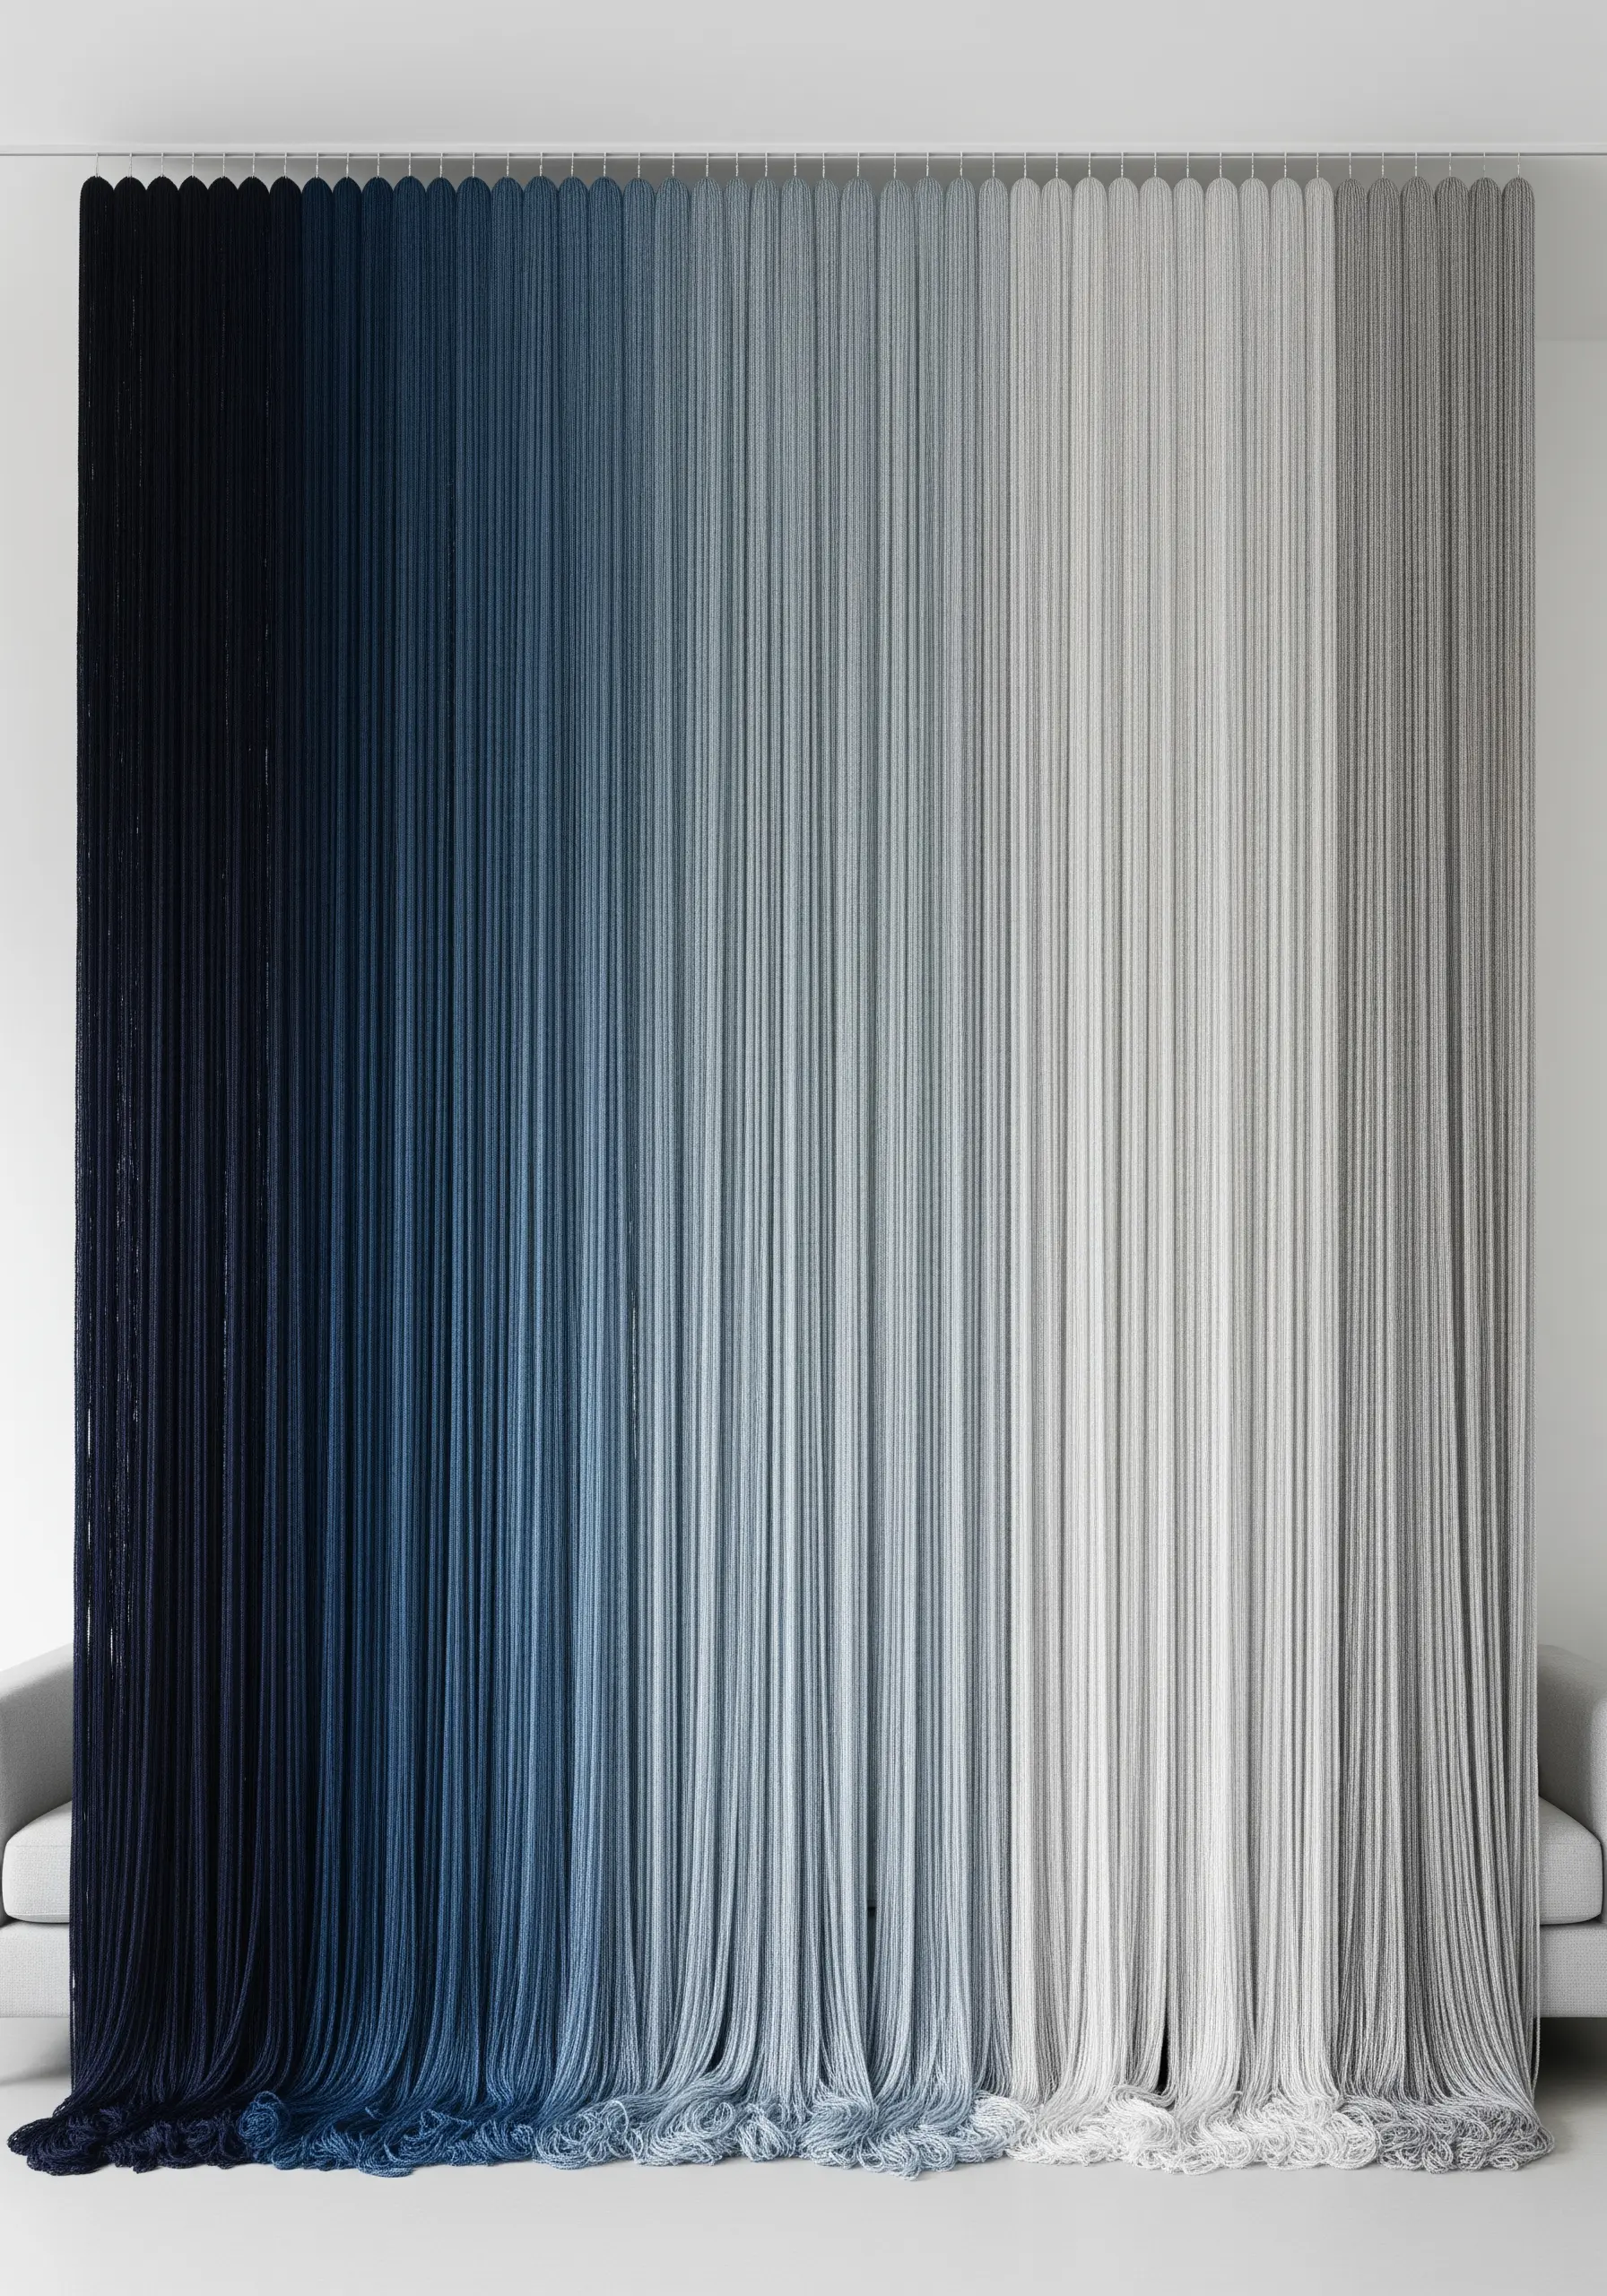
For a truly show-stopping installation, think beyond the small-scale hanging and create a floor-to-ceiling yarn curtain.
The key to this design is meticulous planning of the color gradient. Arrange your yarn skeins in your desired order before you begin.
Attach long strands of yarn to a ceiling track or a long curtain rod using simple lark’s head knots.
To create the smooth ombré, you’ll need many shades of yarn. Blend sections by alternating strands of two adjacent colors where they meet.
This large-scale project transforms an entire wall, acting as both art and an architectural feature in any room.
24. A Modern Dreamcatcher with Mixed Fibers
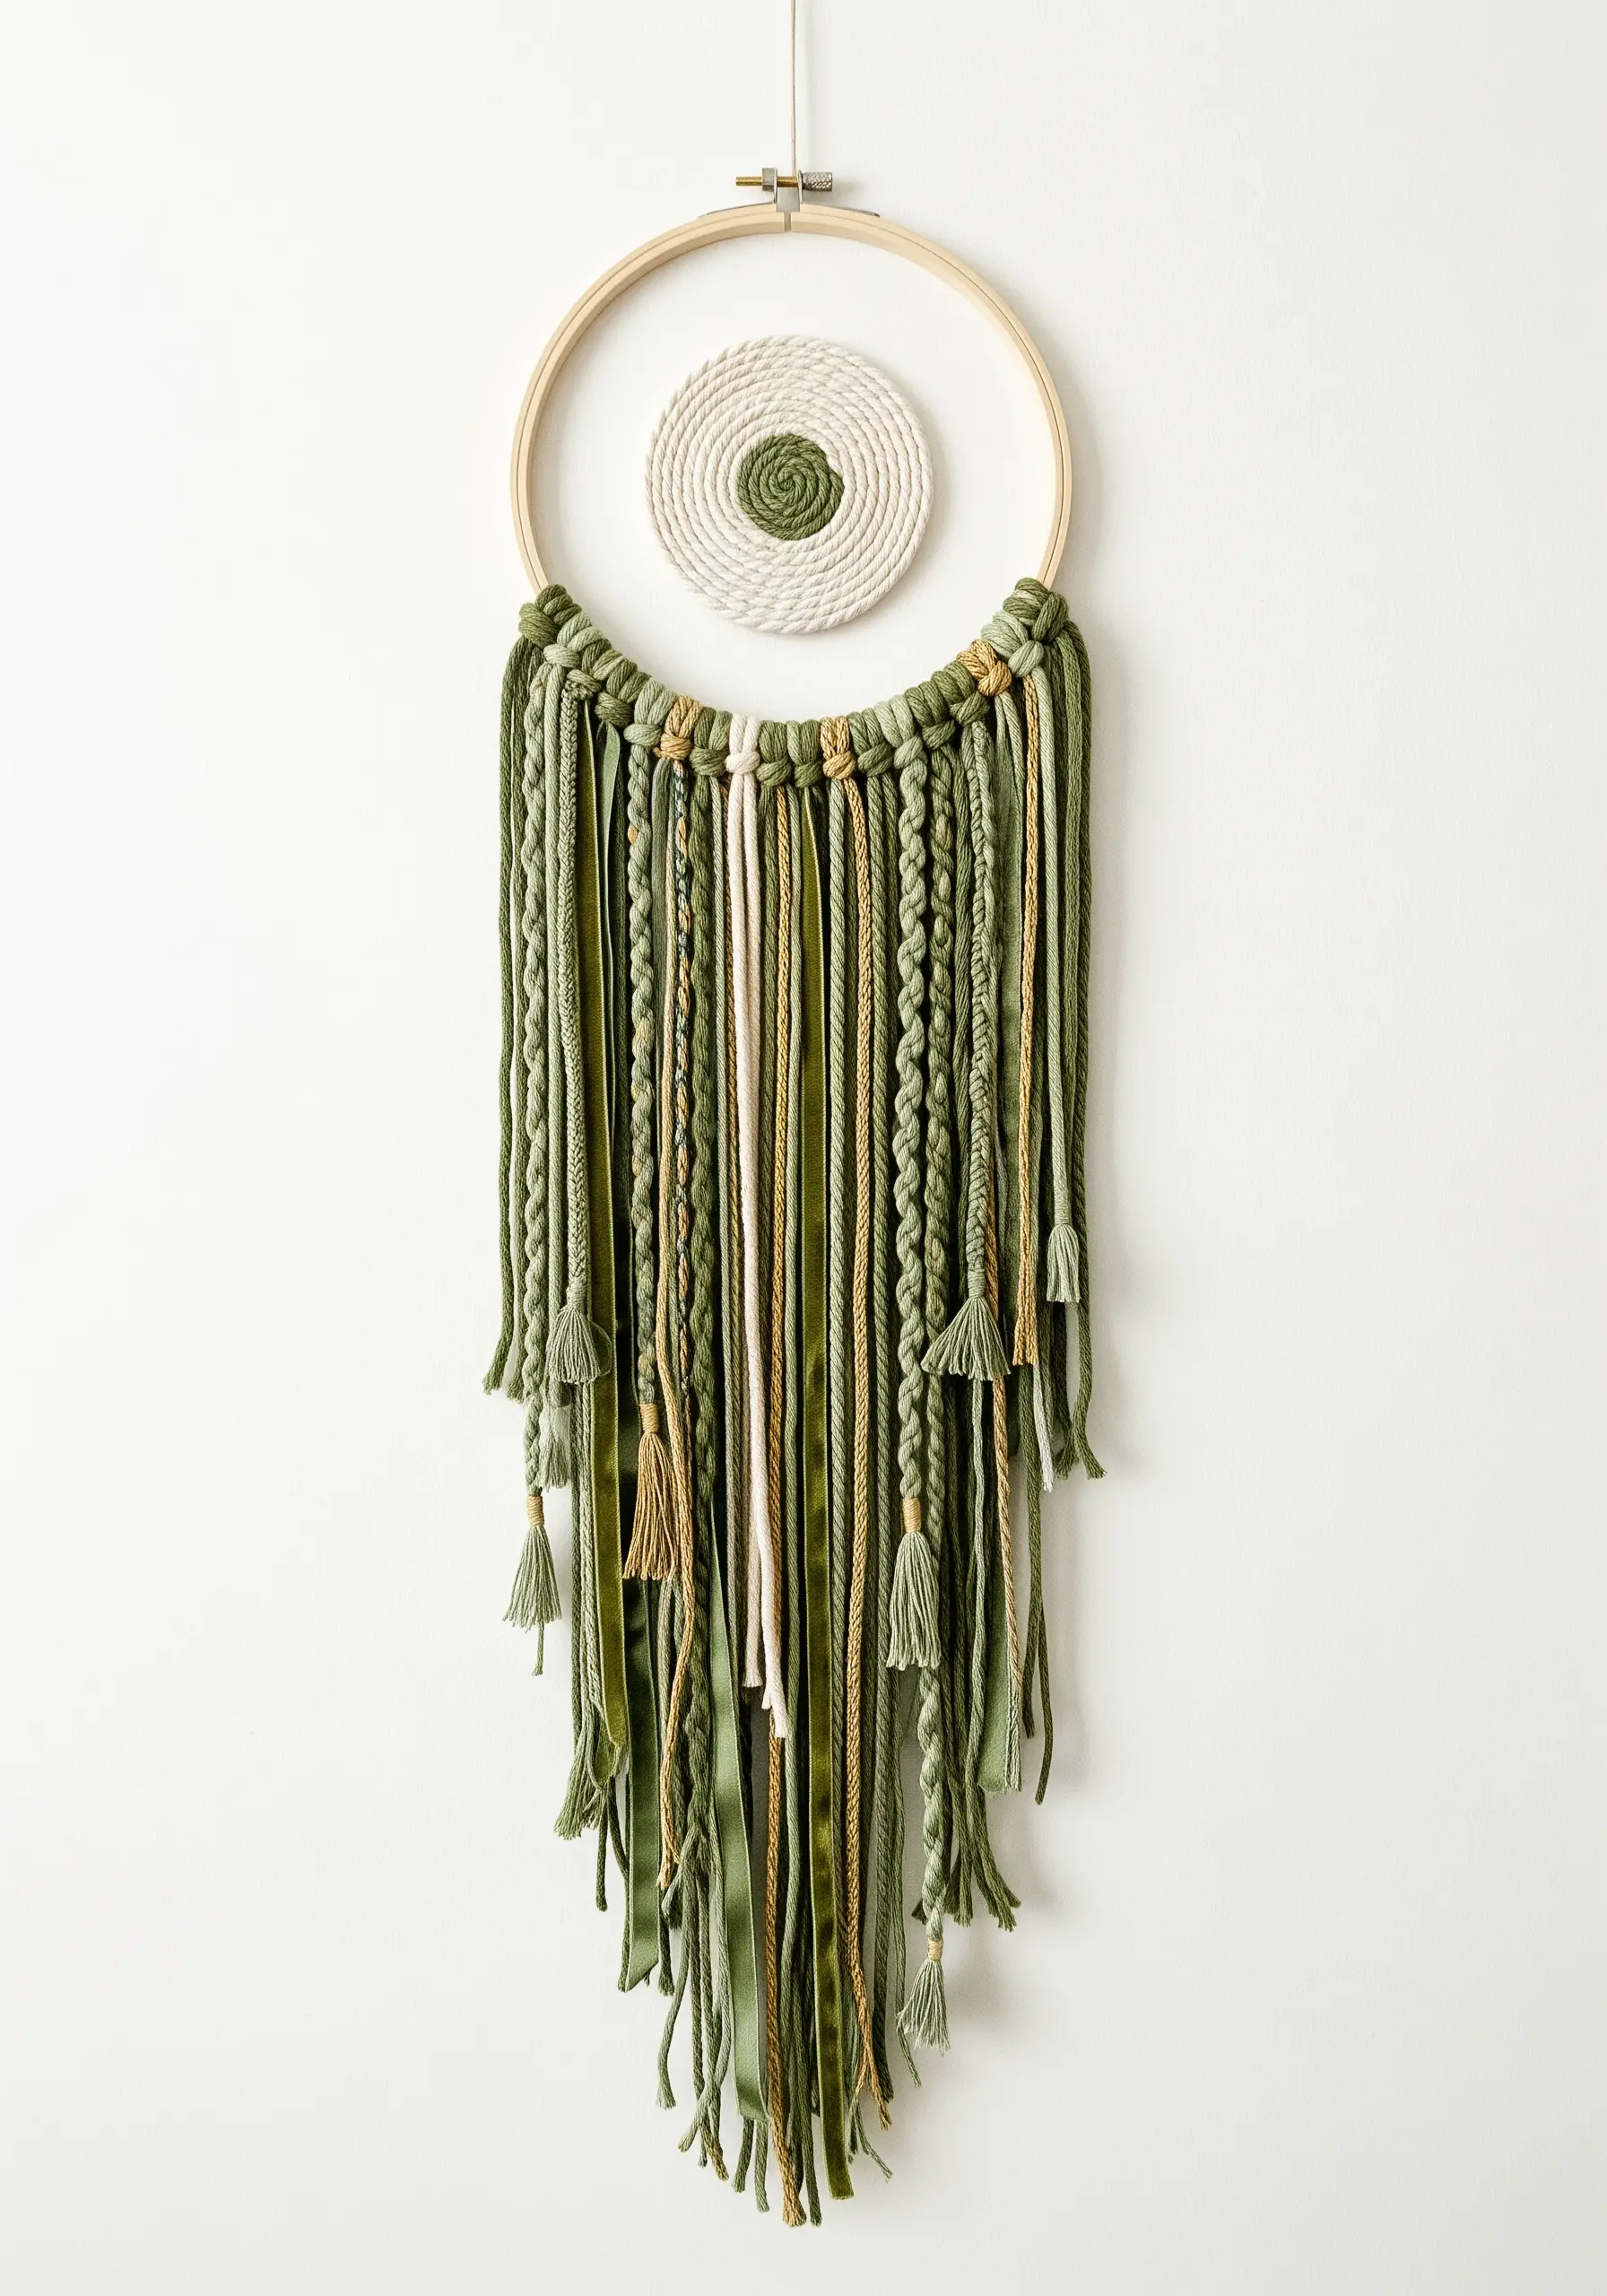
Reimagine the classic dreamcatcher with a modern, minimalist approach that focuses on texture and asymmetry.
Instead of a web, create a small, tightly woven coaster-like medallion and place it off-center within the larger hoop.
Use the bottom of the hoop as an anchor point for a cascade of different fibers: braided cords, silky ribbons, and simple yarn strands.
Keeping the color palette cohesive—like these shades of olive green and muted gold—ensures the varied textures feel harmonious.
This composition plays with negative space, turning a traditional craft into a piece of contemporary fun hoop art.


