

You have the threads, the fabric, the desire to create something beautiful. But perhaps you feel stuck, repeating the same stitches, unsure how to make your work feel truly special, truly yours. The path forward isn’t about learning dozens of complex new techniques. It’s about learning to see.
It’s about understanding that the direction of a single stitch can create the illusion of light. It’s knowing that using one less strand of floss can make a mountain recede into the mist. It’s realizing that a simple French knot, when repeated, can become a lush, mossy forest floor.
These projects are your guide to intentional stitching. They invite you to slow down, to observe the world’s textures, and to translate that beauty into thread. Here, you’ll find not just patterns, but principles—ways of thinking about color, texture, and form that will transform your embroidery from a craft into an art form, making your home a true reflection of the care and creativity you pour into it.
1. Render Mountain Light with Directional Stitches
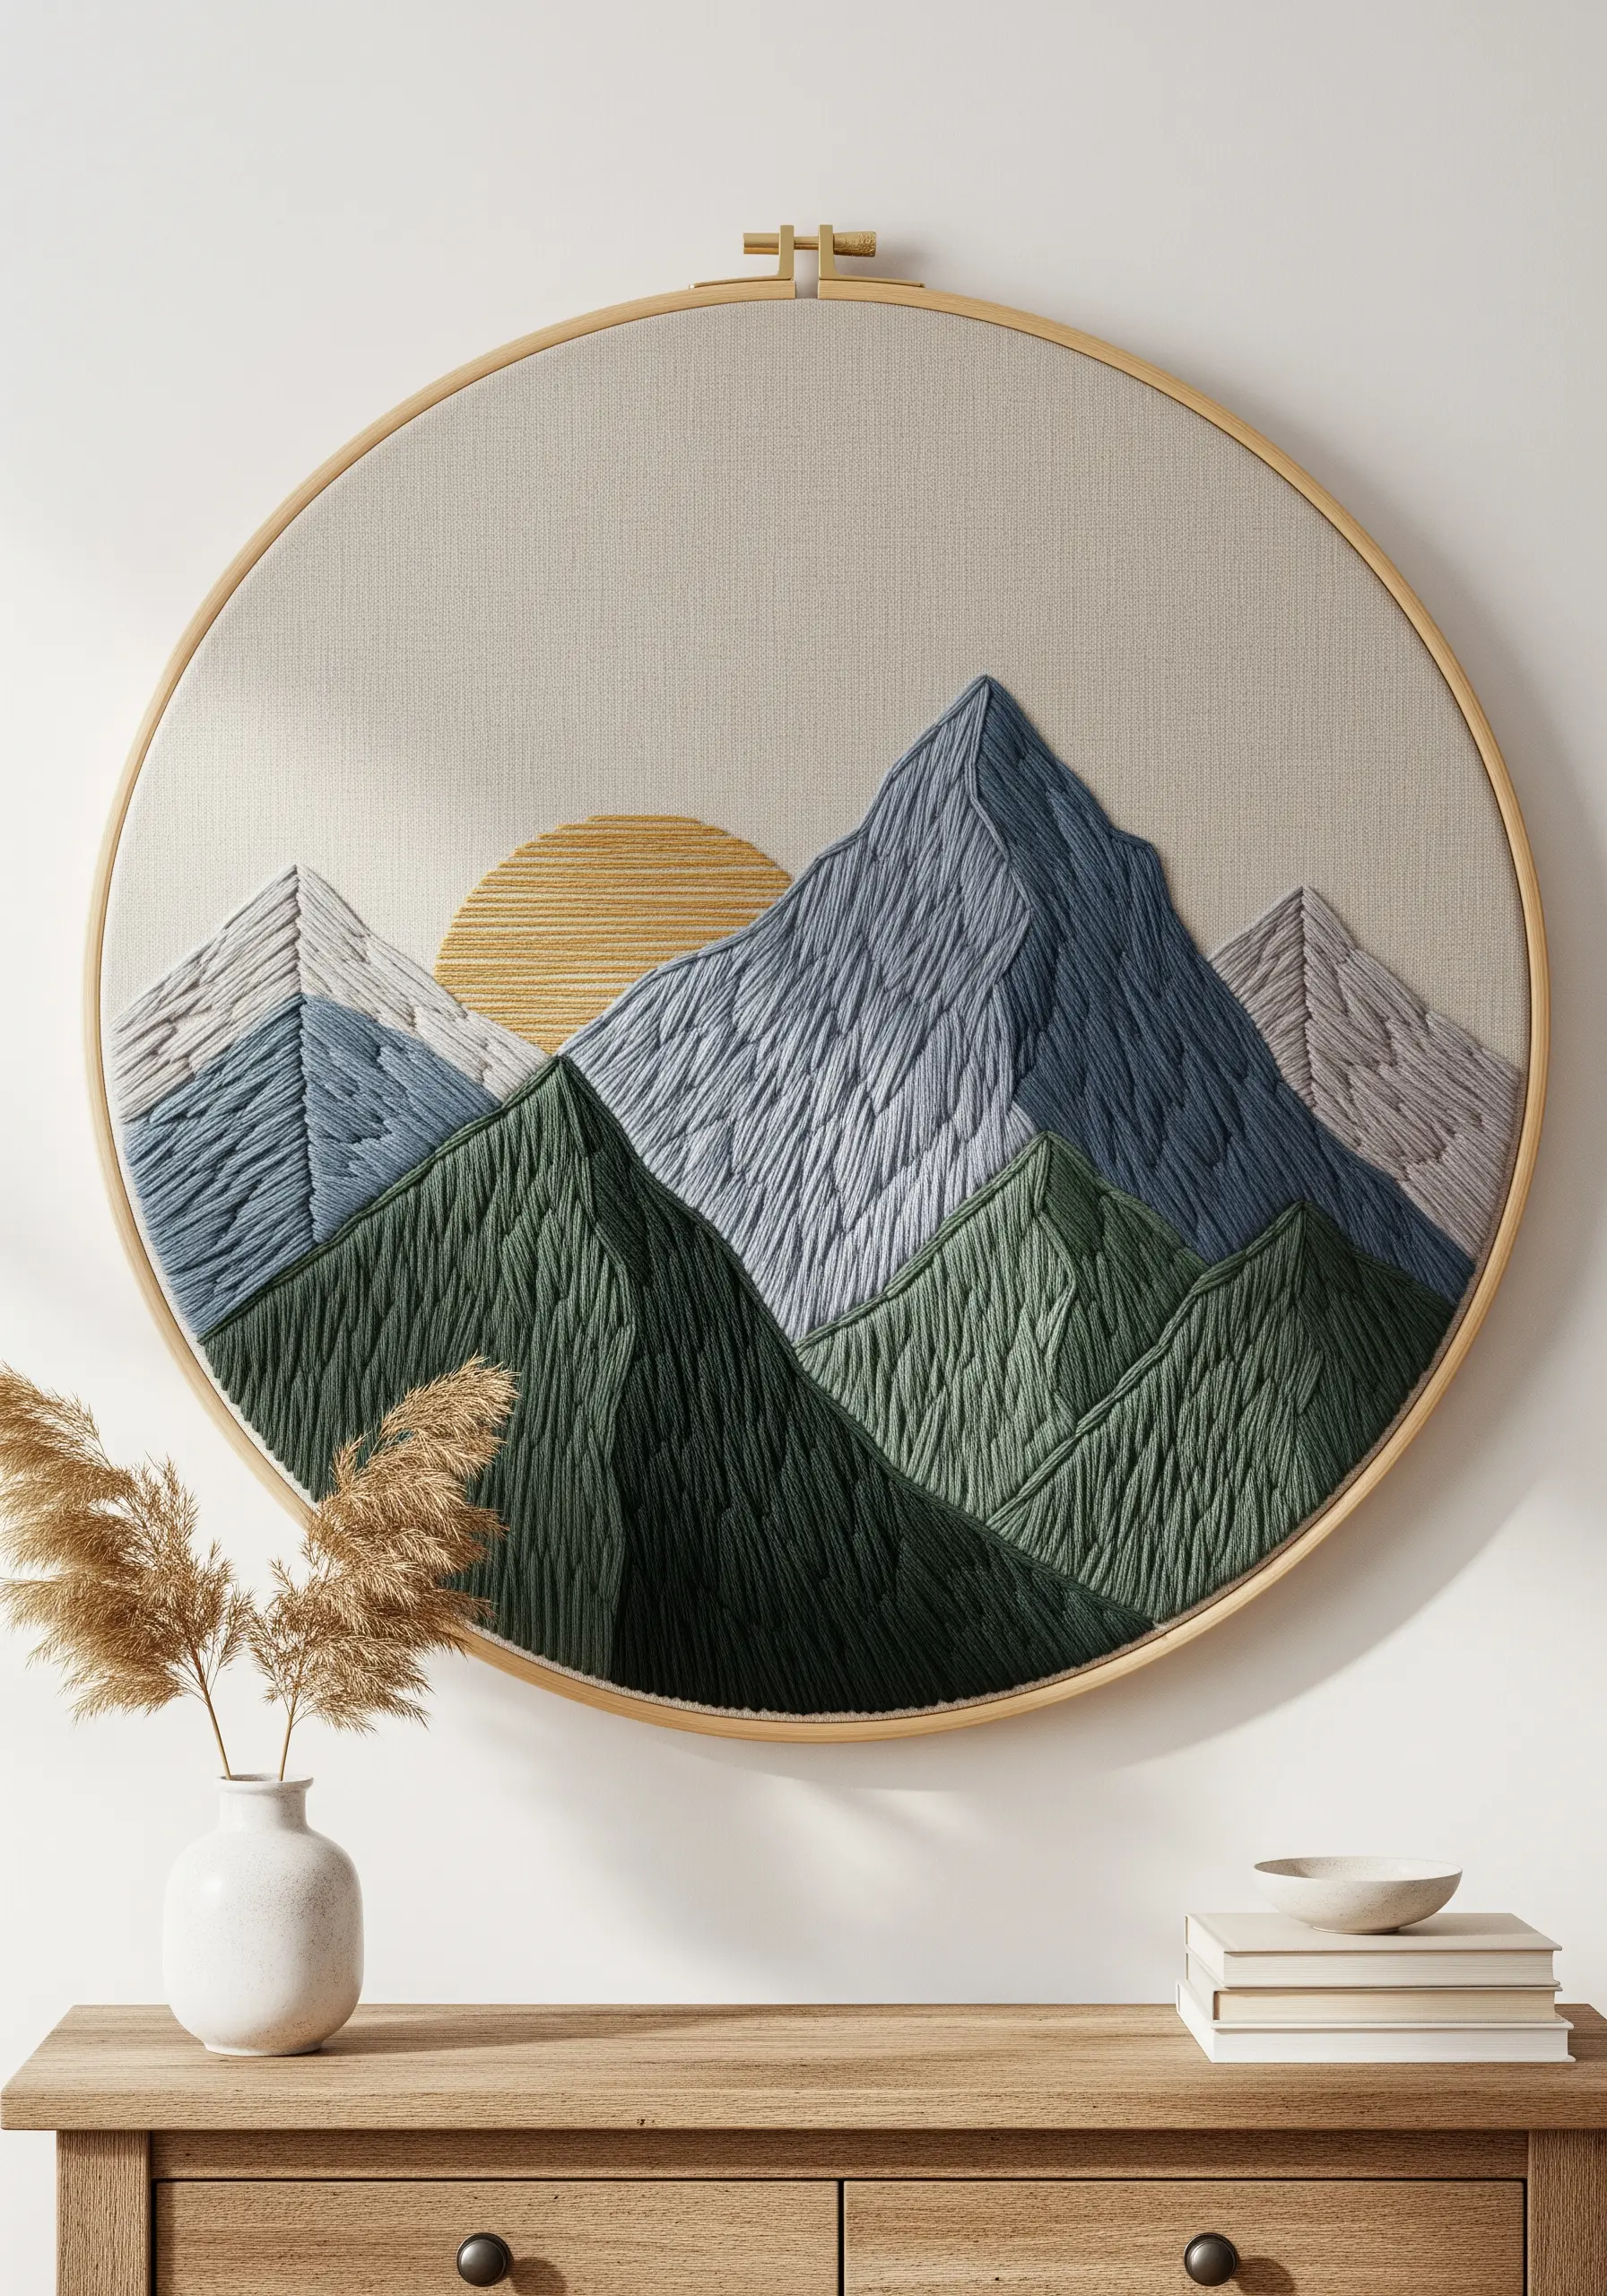
To capture the way light hits a mountain range, change the direction of your satin stitches on each plane.
Stitch the sunlit faces with vertical stitches and the shadowed faces with angled stitches—this simple shift creates an immediate sense of dimension and realism.
For peaks in the distance, use only one or two strands of floss and slightly muted colors. This technique, called atmospheric perspective, gives your landscape embroidery a feeling of deep space without adding complex details.
The sun can be stitched with a tight, circular satin stitch or a woven wheel stitch for a more textured, radiant effect.
2. Create a Lush Fern Pattern with a Limited Palette

To embroider a dense botanical pattern that feels cohesive, not chaotic, limit your palette to just three or four shades of the same color.
Use a fishbone stitch for each fern frond; this technique creates a central spine and angled leaves in one fluid motion, giving the foliage a natural, organic look.
Vary the shades of green randomly across the pillow to create depth and visual interest, preventing the pattern from looking flat or machine-made.
Stitching on a sturdy, neutral fabric like linen or cotton canvas ensures your stitches remain taut and the design holds its shape on a functional item.
3. Weave a River’s Flow with Mixed-Fiber Couching

For large-scale abstract wall art, move beyond floss and incorporate thicker fibers like wool yarn or roving.
Use the couching technique—laying the thick yarn on the fabric and securing it with small, evenly spaced stitches of a thinner thread—to create bold, flowing lines that mimic a river’s current.
For the river stones, use padded satin stitch. Place small pieces of felt on your fabric and stitch over them completely to create smooth, raised, three-dimensional shapes that truly stand out.
This combination of high-relief and flat textures makes the piece dynamic and invites touch, transforming your wall into a tactile landscape.
4. Paint with Texture Using Punch Needle
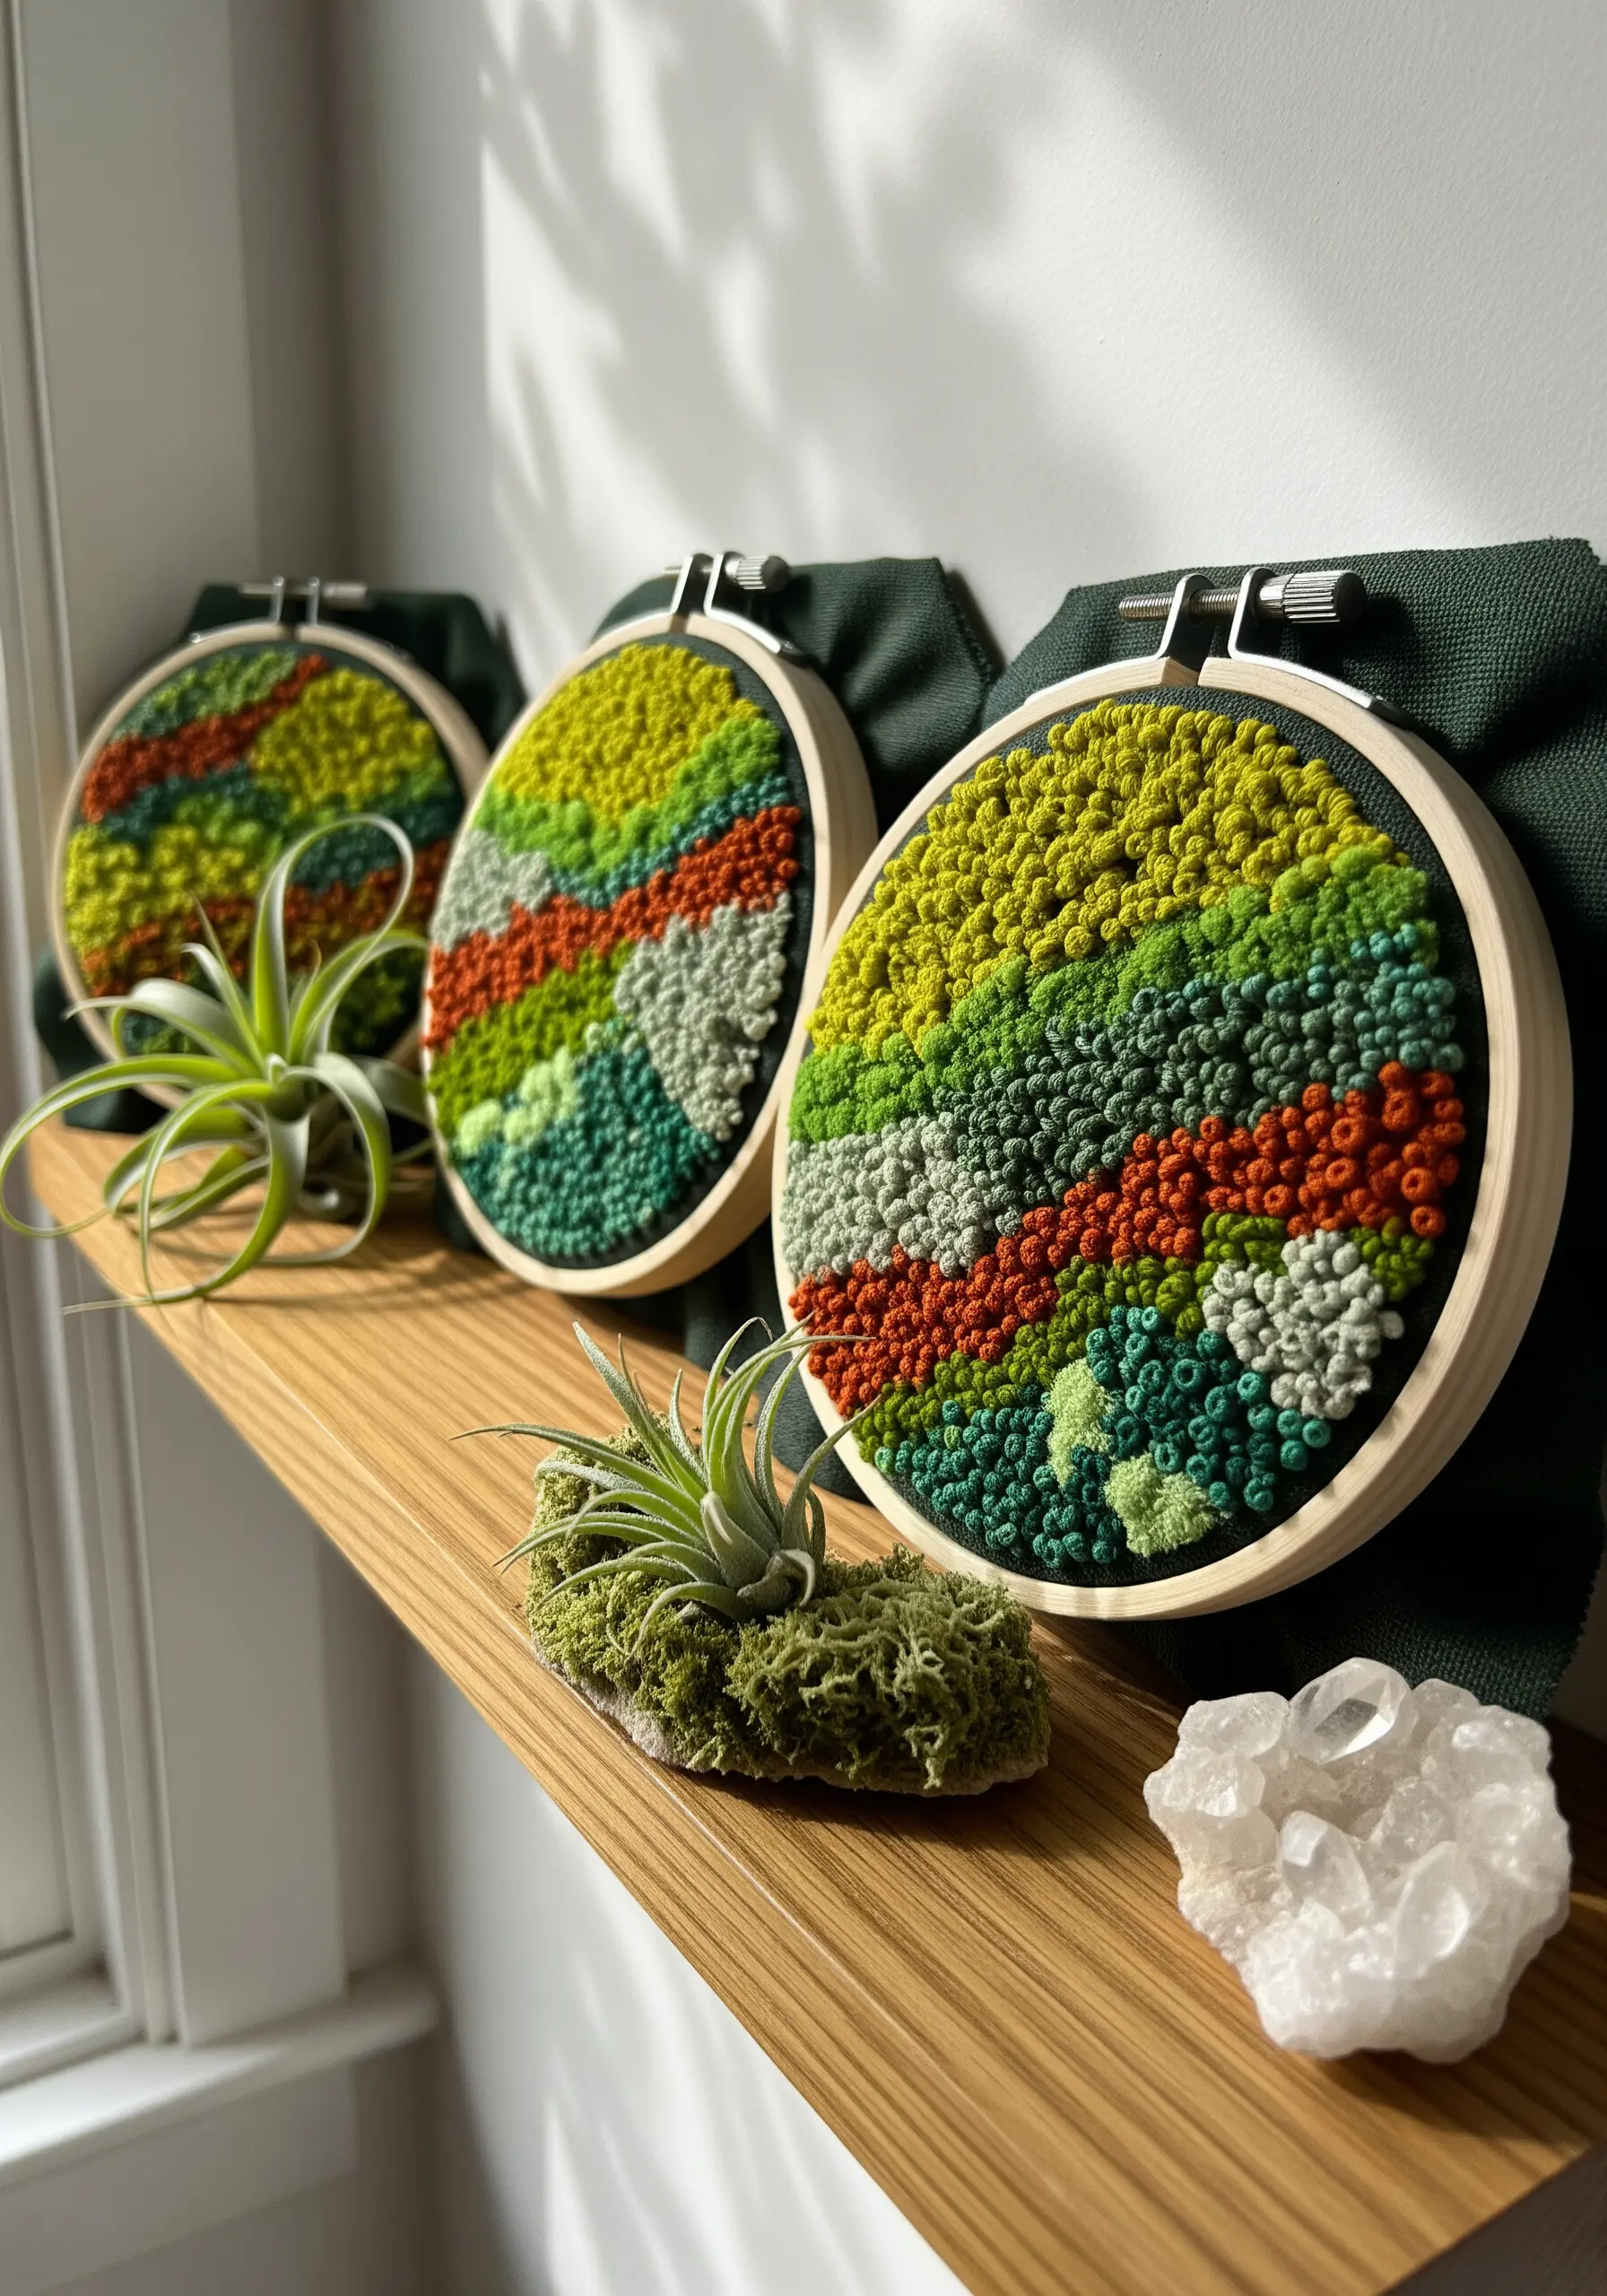
If you want to fill large areas with color and texture quickly, punch needle is an ideal technique.
Instead of individual stitches, you are creating rows of loops, which work together to form a dense, plush surface reminiscent of a rug.
Create abstract landscapes by color-blocking sections with different shades of yarn. You can vary the loop height by adjusting your needle settings, giving certain areas more prominence and depth.
Group a series of small punch needle hoops on a shelf to create a cohesive, modern art display that feels both handmade and highly intentional.
5. Go Bold with a Large-Scale Ginkgo Tapestry
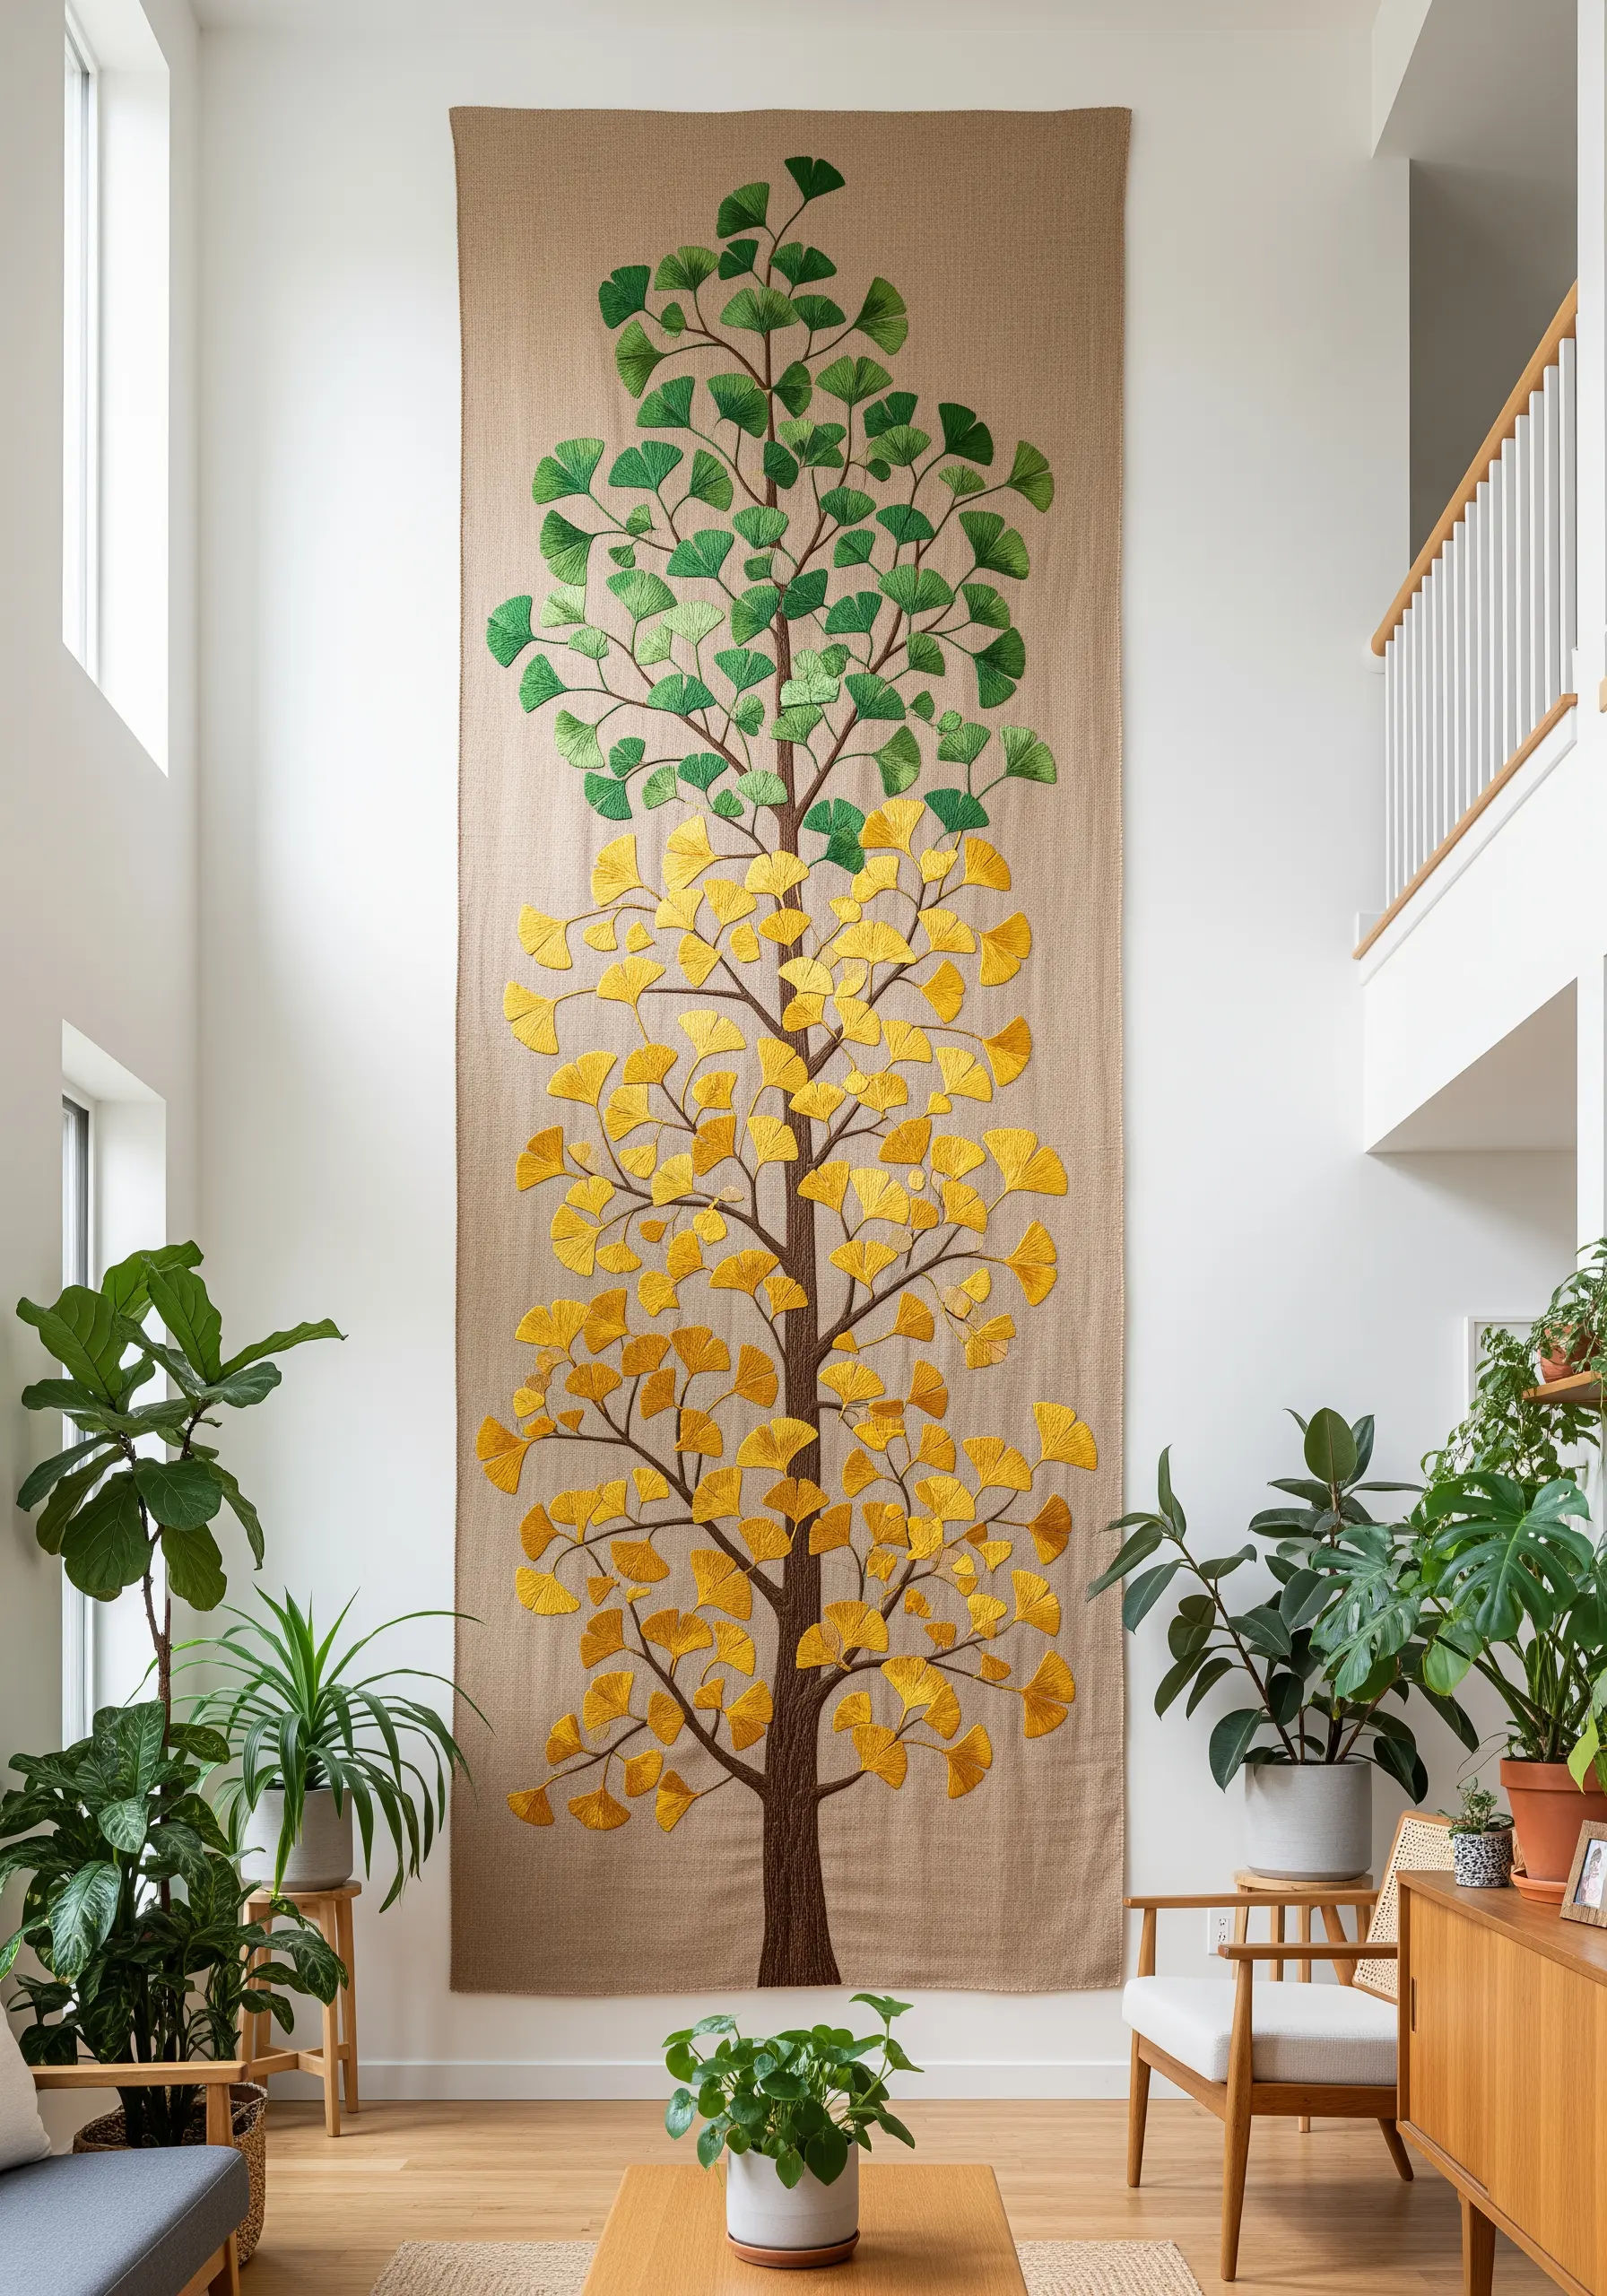
To make a statement that fills a large wall, scale up a simple motif.
Choose a durable, earthy base fabric like burlap or heavy linen that can support the weight of the thread without puckering.
Use a simple satin stitch for the ginkgo leaves, but work with a thicker pearl cotton or all six strands of embroidery floss to ensure the shapes are bold and visible from a distance.
The gradual color shift from summer green to autumn gold creates a beautiful narrative flow, turning a simple tree into a piece of seasonal art for your home.
6. Design an Elegant Botanical Table Runner
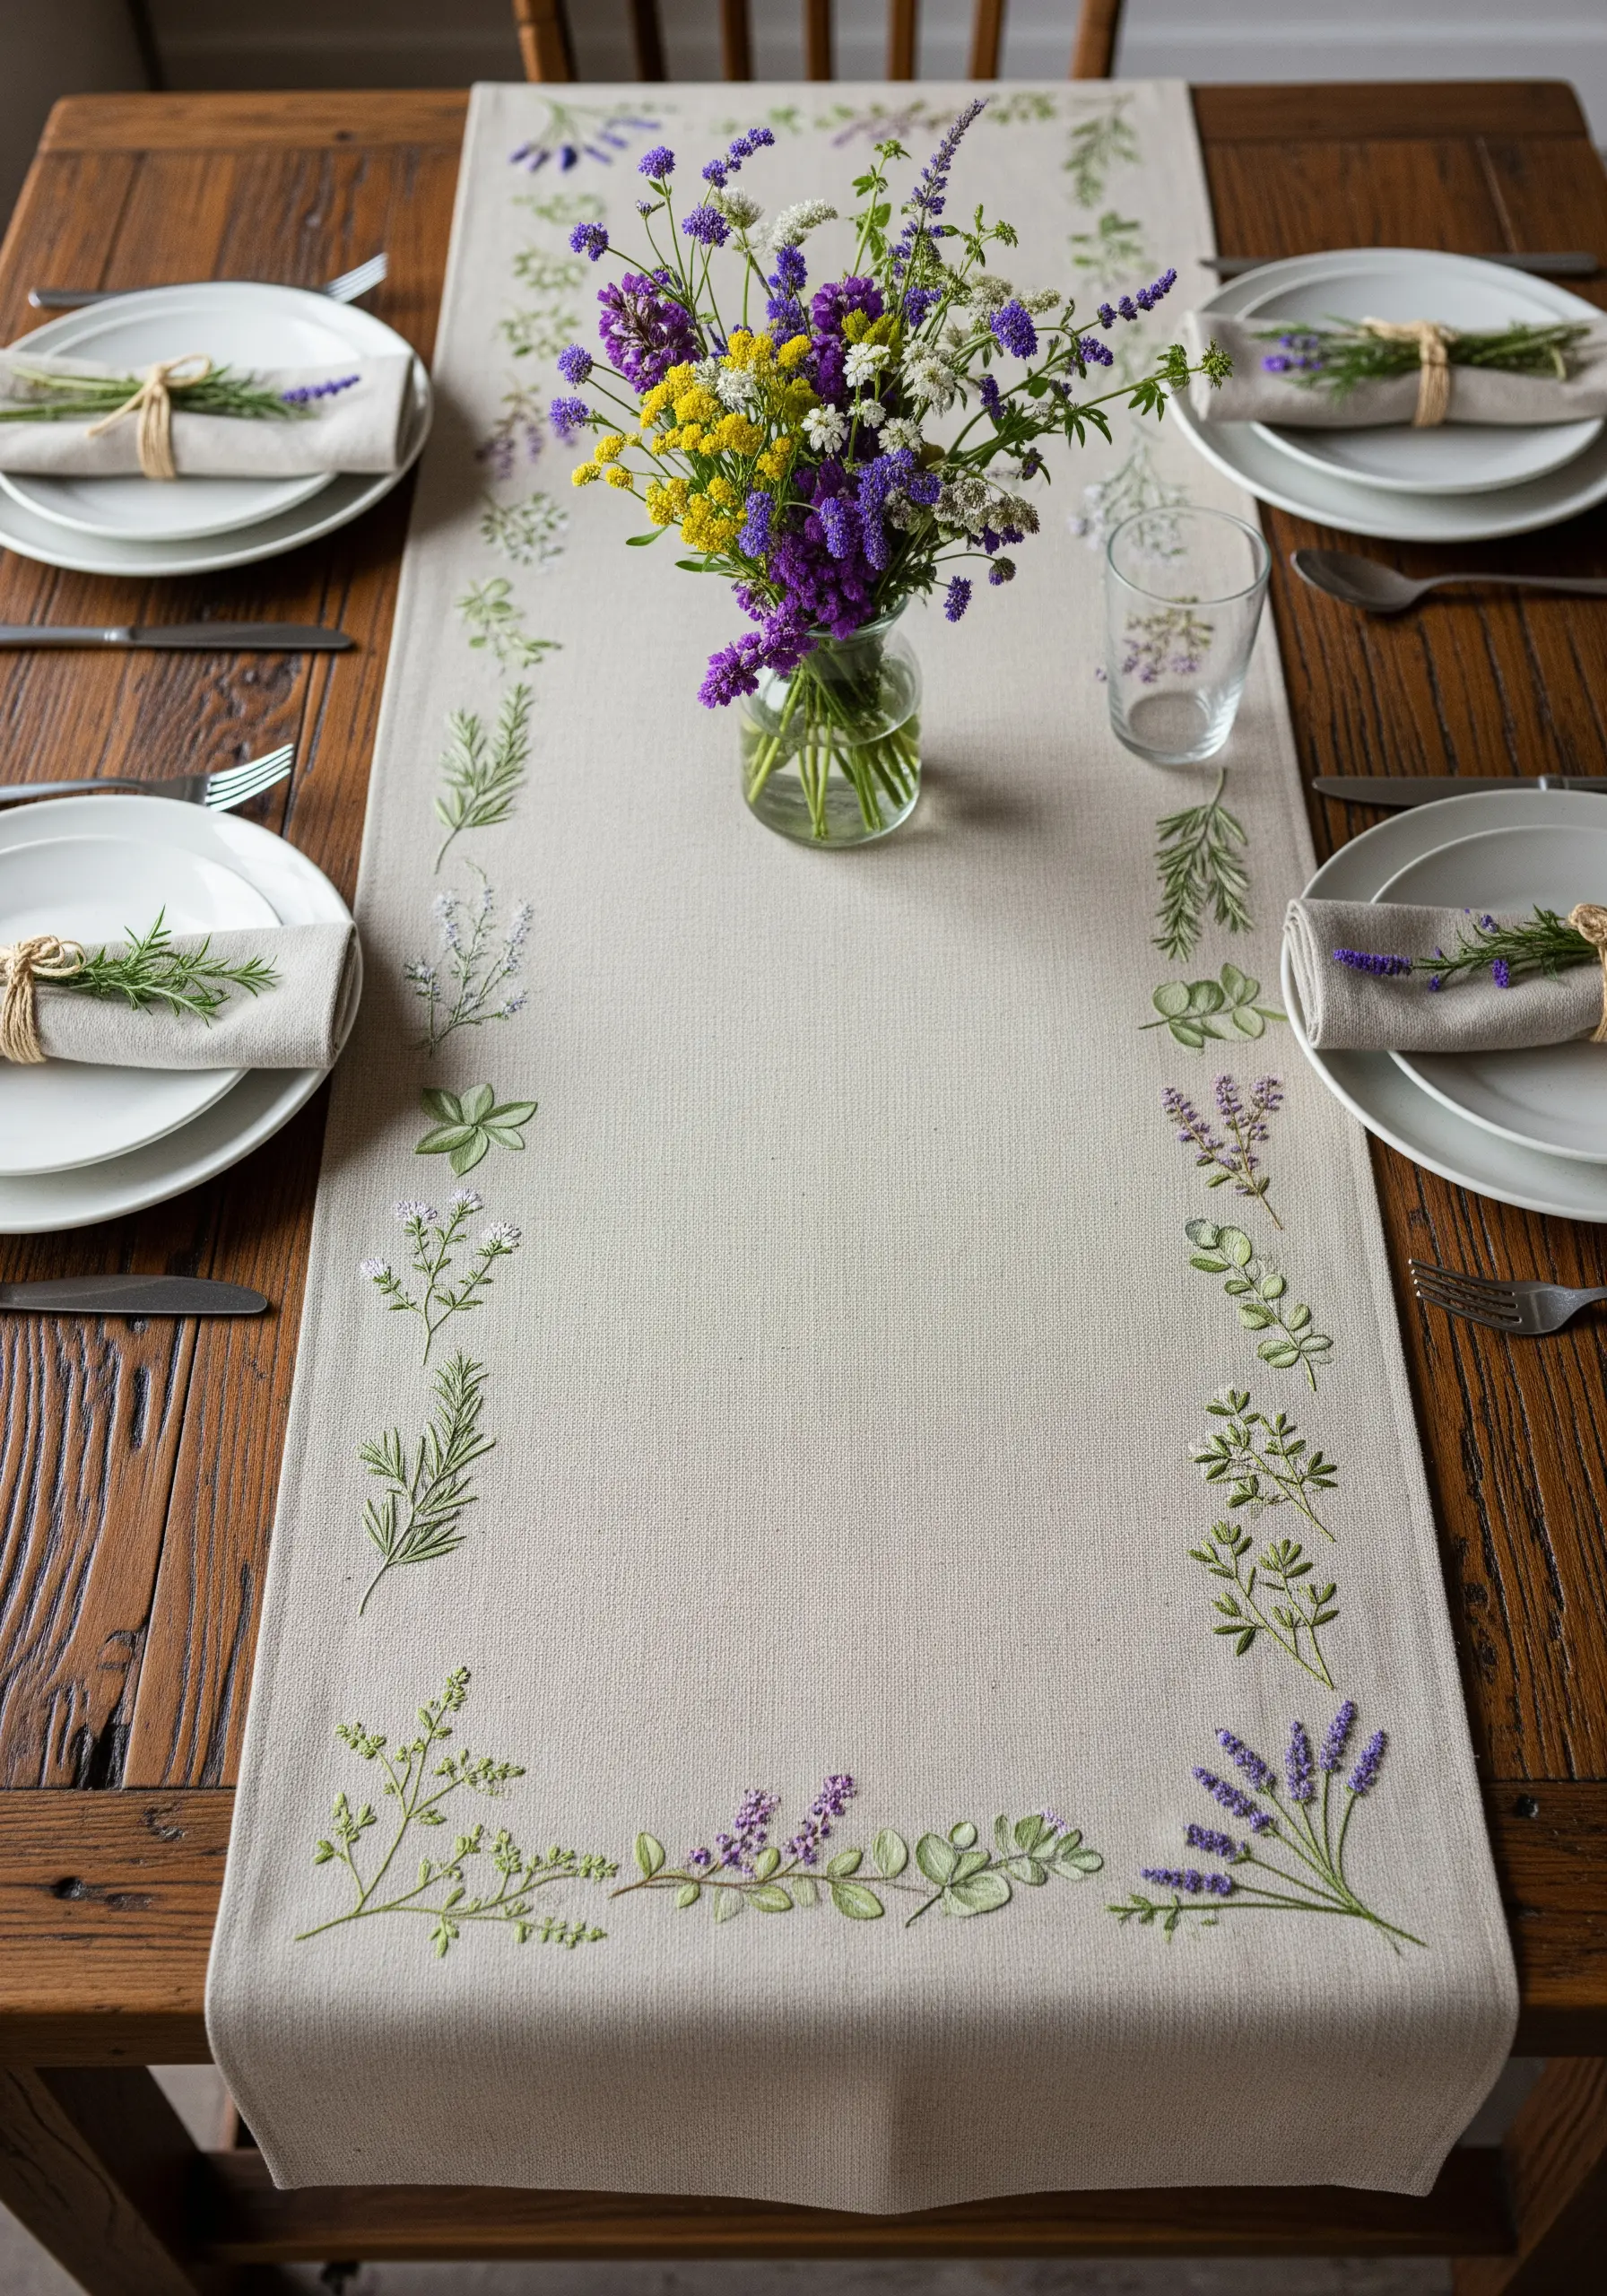
To elevate your table linens, stitch a delicate border of herbs and wildflowers.
The key to an elegant design is negative space; keep the motifs small and spaced apart to avoid a cluttered, heavy look.
Use single-strand floss for a refined finish. Stem stitch for the stalks, lazy daisy for tiny petals, and French knots for buds are all you need.
Choose just a few complementary colors—like sage green, lavender, and butter yellow—to create a harmonious design that enhances your tablescape without overwhelming it.
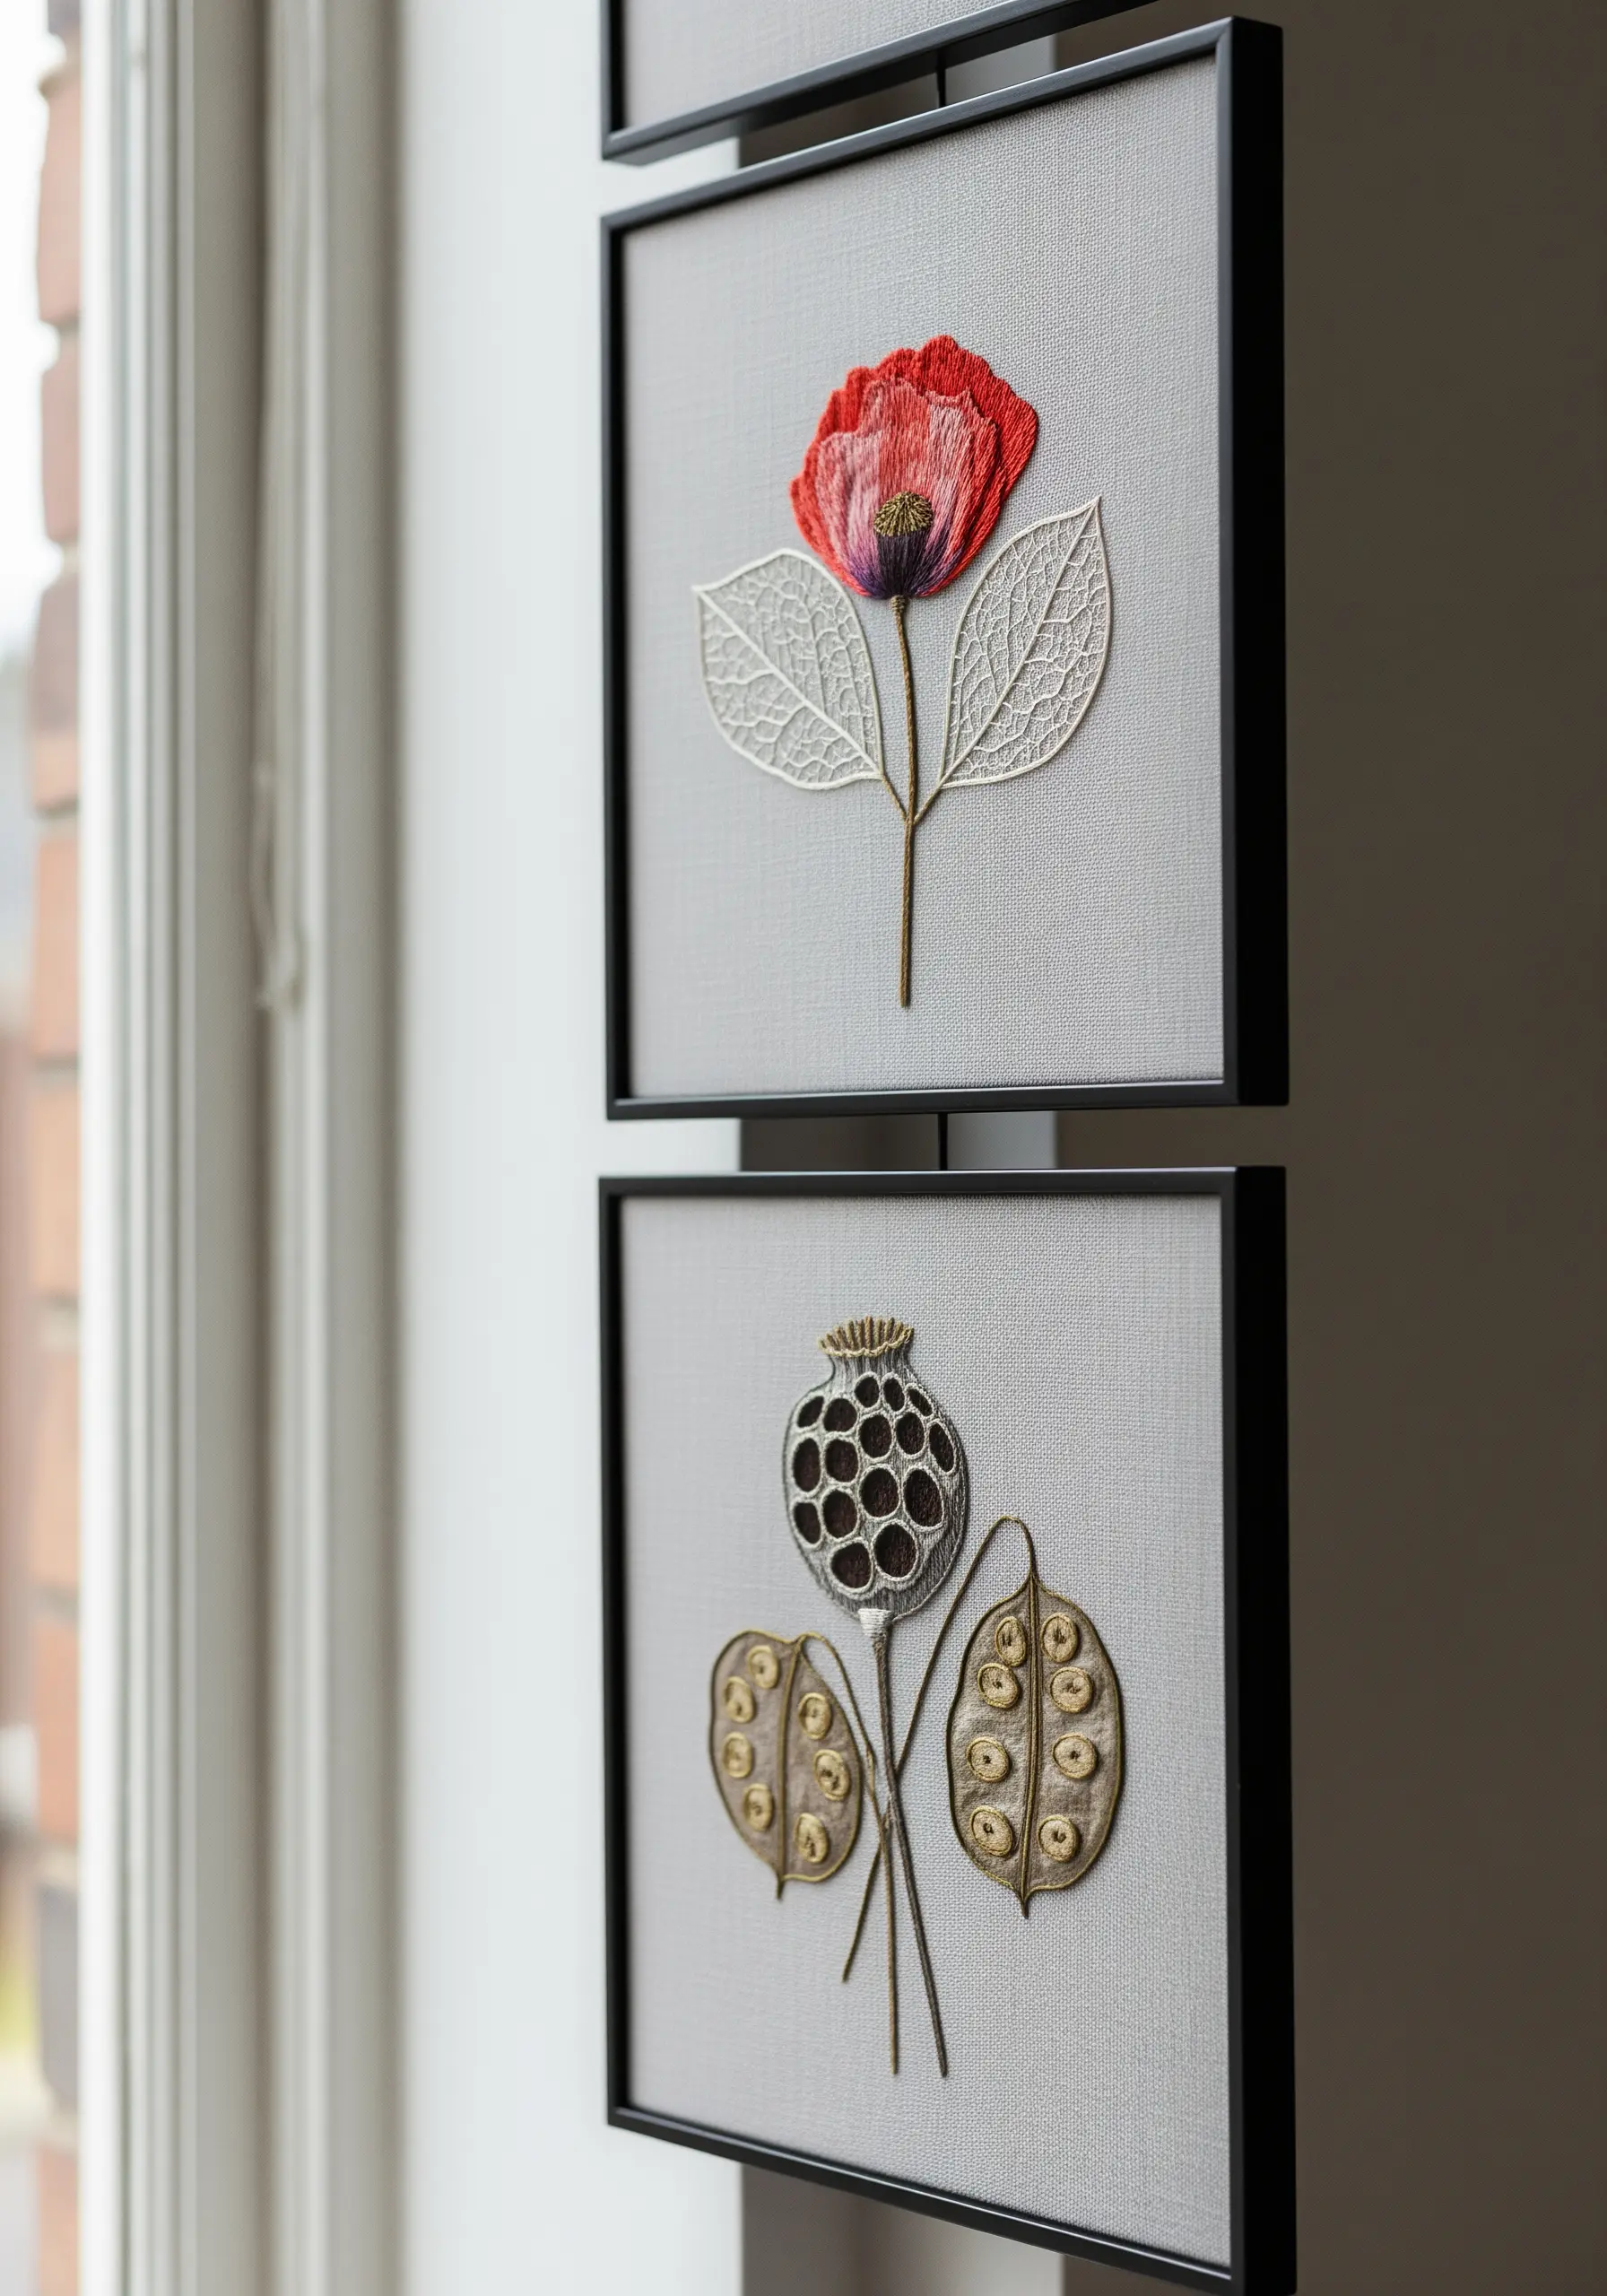
7. Add Dimension to Botanicals with Thread Painting

To make a motif like a mushroom cap look rounded and realistic, use the long-and-short stitch technique for blending colors.
Start with your darkest shade on the outer edge, then work inward with progressively lighter shades, overlapping your stitches to create a seamless gradient.
For the mossy ground, use a dense collection of French knots in several shades of green. This creates a wonderfully tactile, 3D texture that contrasts beautifully with the smooth mushroom caps.
Framing your work in an unconventional hoop, like this birch slice, connects the art to its natural inspiration.
8. Imply Movement with Directional Satin Stitch
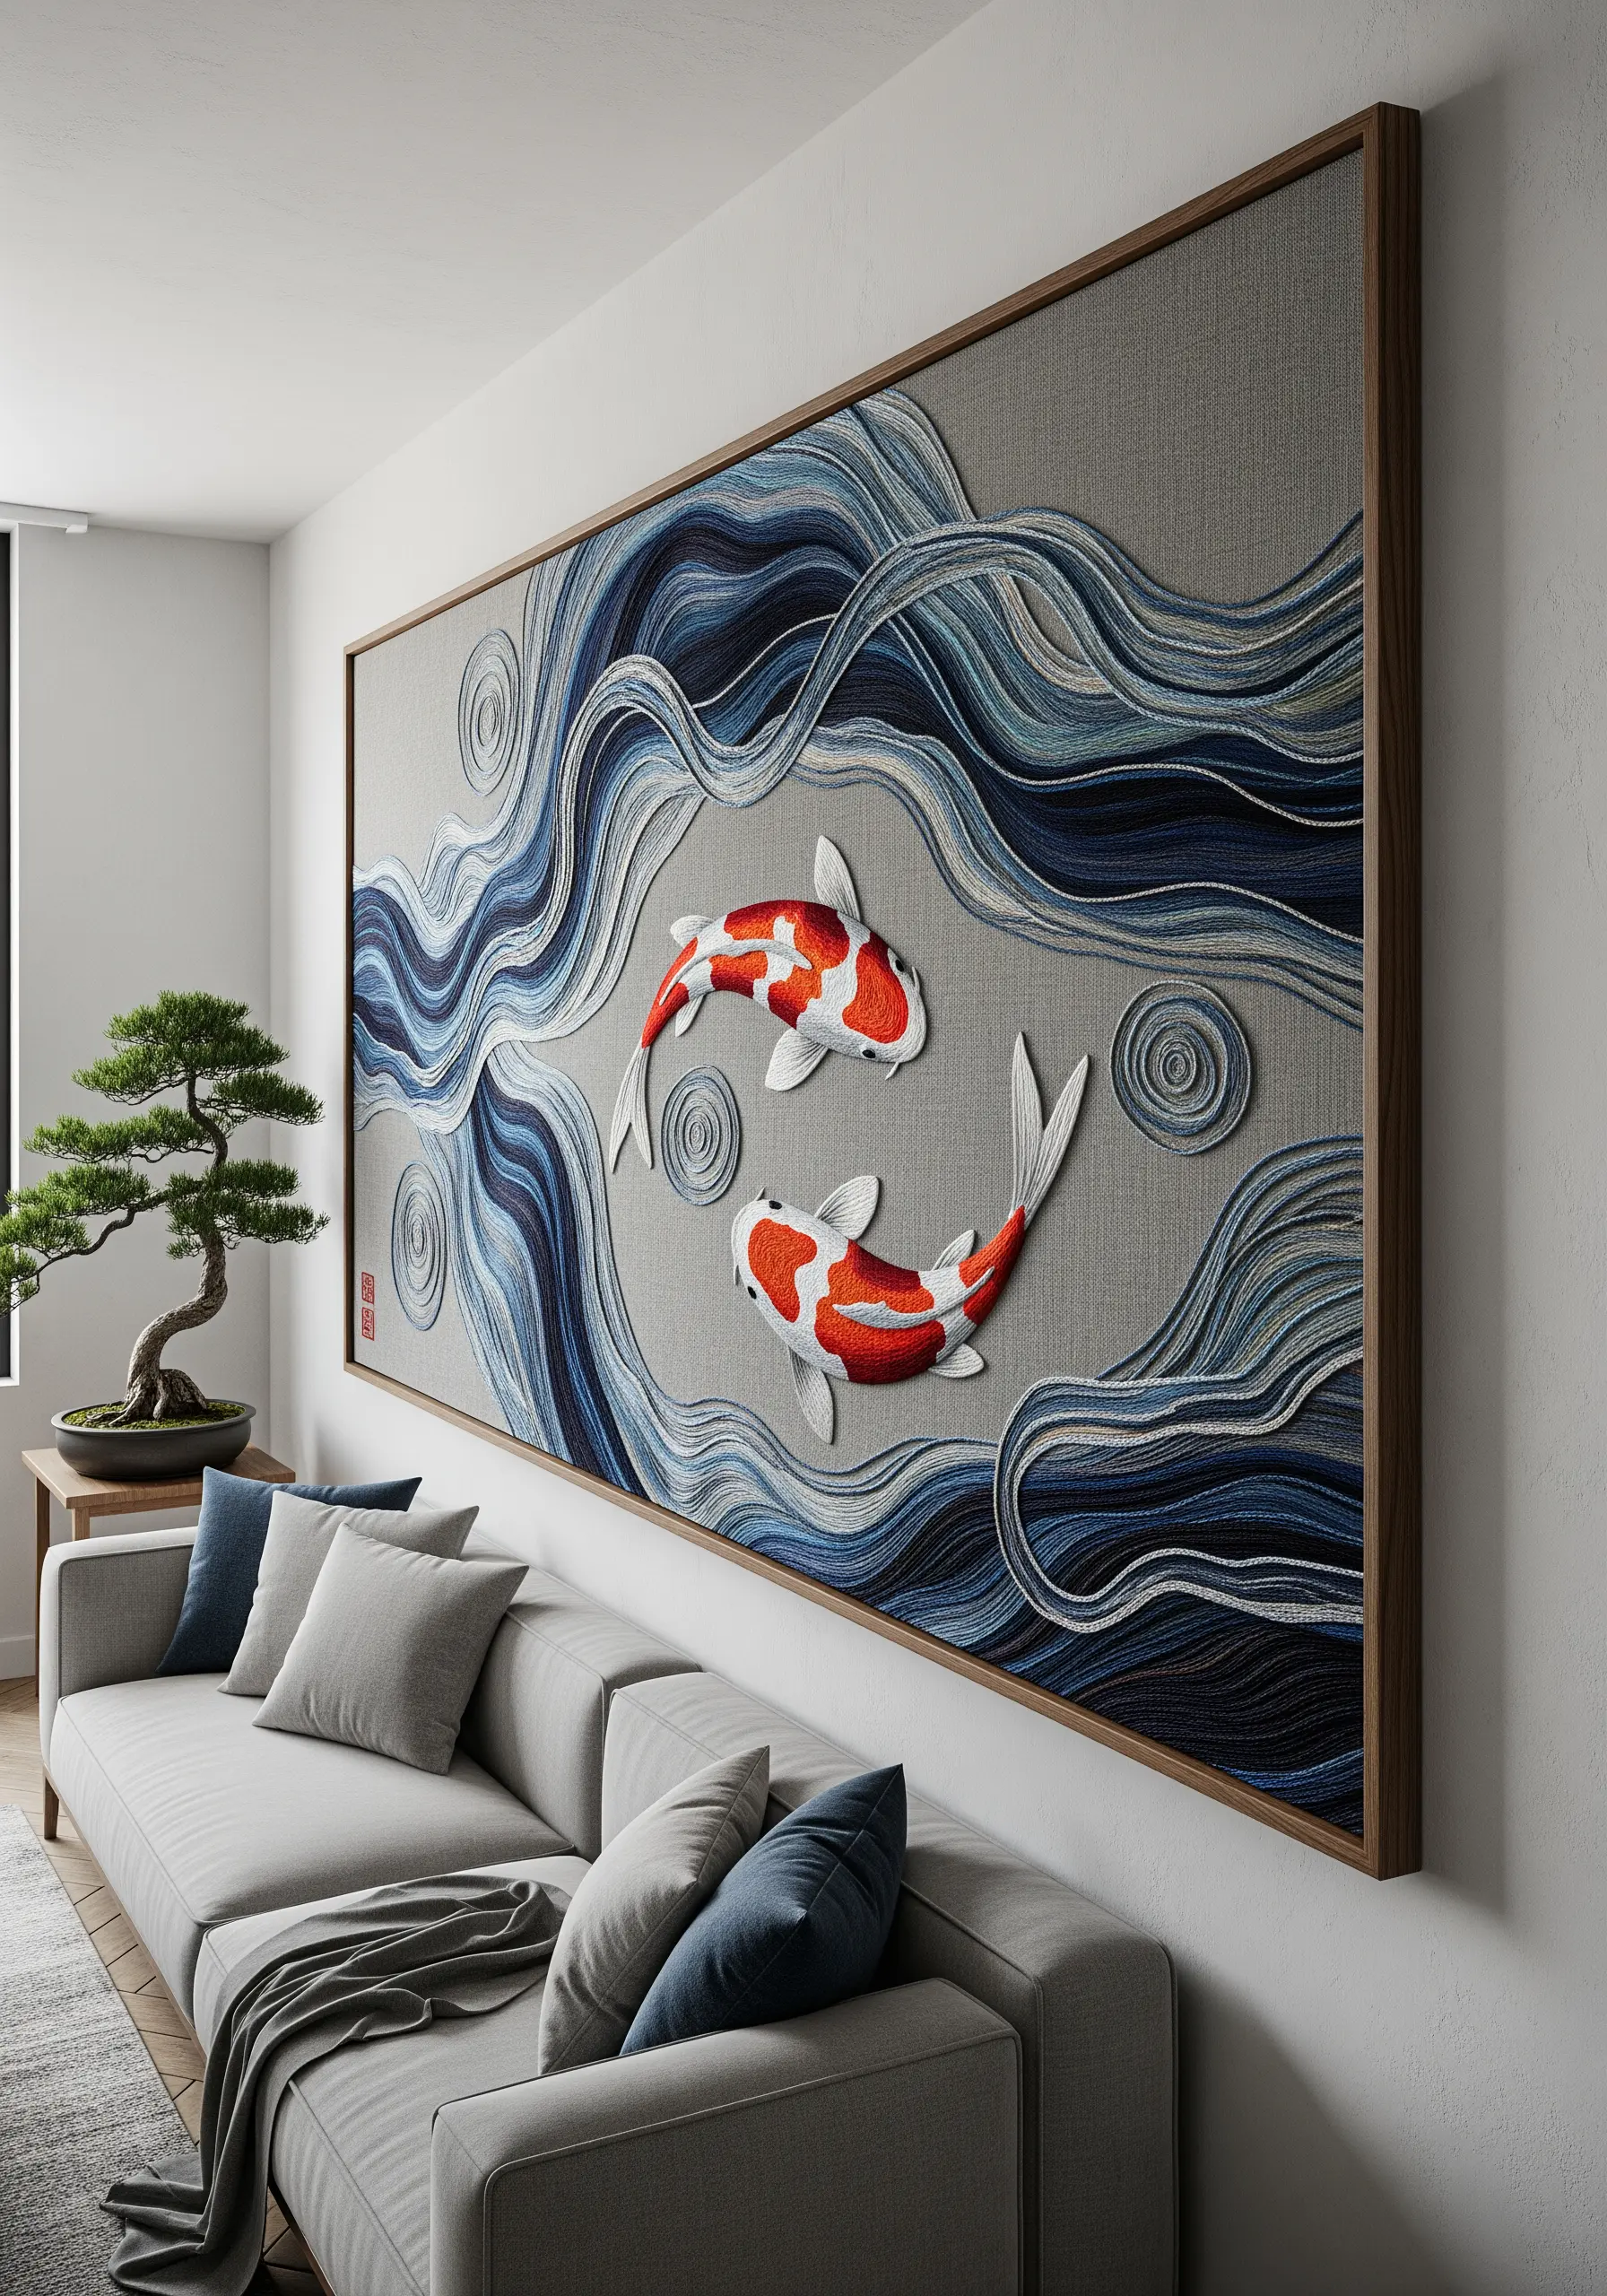
In this large-scale piece, the water isn’t just blue—it flows. You can achieve this effect by carefully planning the direction of your stitches.
Instead of filling the waves with uniform stitches, angle them to follow the curves of your design. This simple change tricks the eye into seeing movement and energy.
For the koi fish, the same principle applies: angle your satin stitches to mimic the direction of scales, creating a shimmering, lifelike surface.
A tight, limited color palette of blues, white, and a single pop of orange-red gives the composition power and focus.
9. Balance Warm and Cool Tones for Celestial Harmony

Create a design that feels both radiant and calm by pairing a warm, energetic color with a cool, stable one.
Here, the sun is stitched in vibrant golds and oranges using a simple backstitch, its rays extending outward to create energy.
The moon phases, stitched in a cool, dark grey, provide a grounding contrast. Using a split stitch for these outlines will give them a smoother, more solid appearance than a standard backstitch.
Hanging the canvas from a piece of driftwood adds a final, natural touch that completes the earthy aesthetic.
10. Play with Light and Shadow on a Lampshade
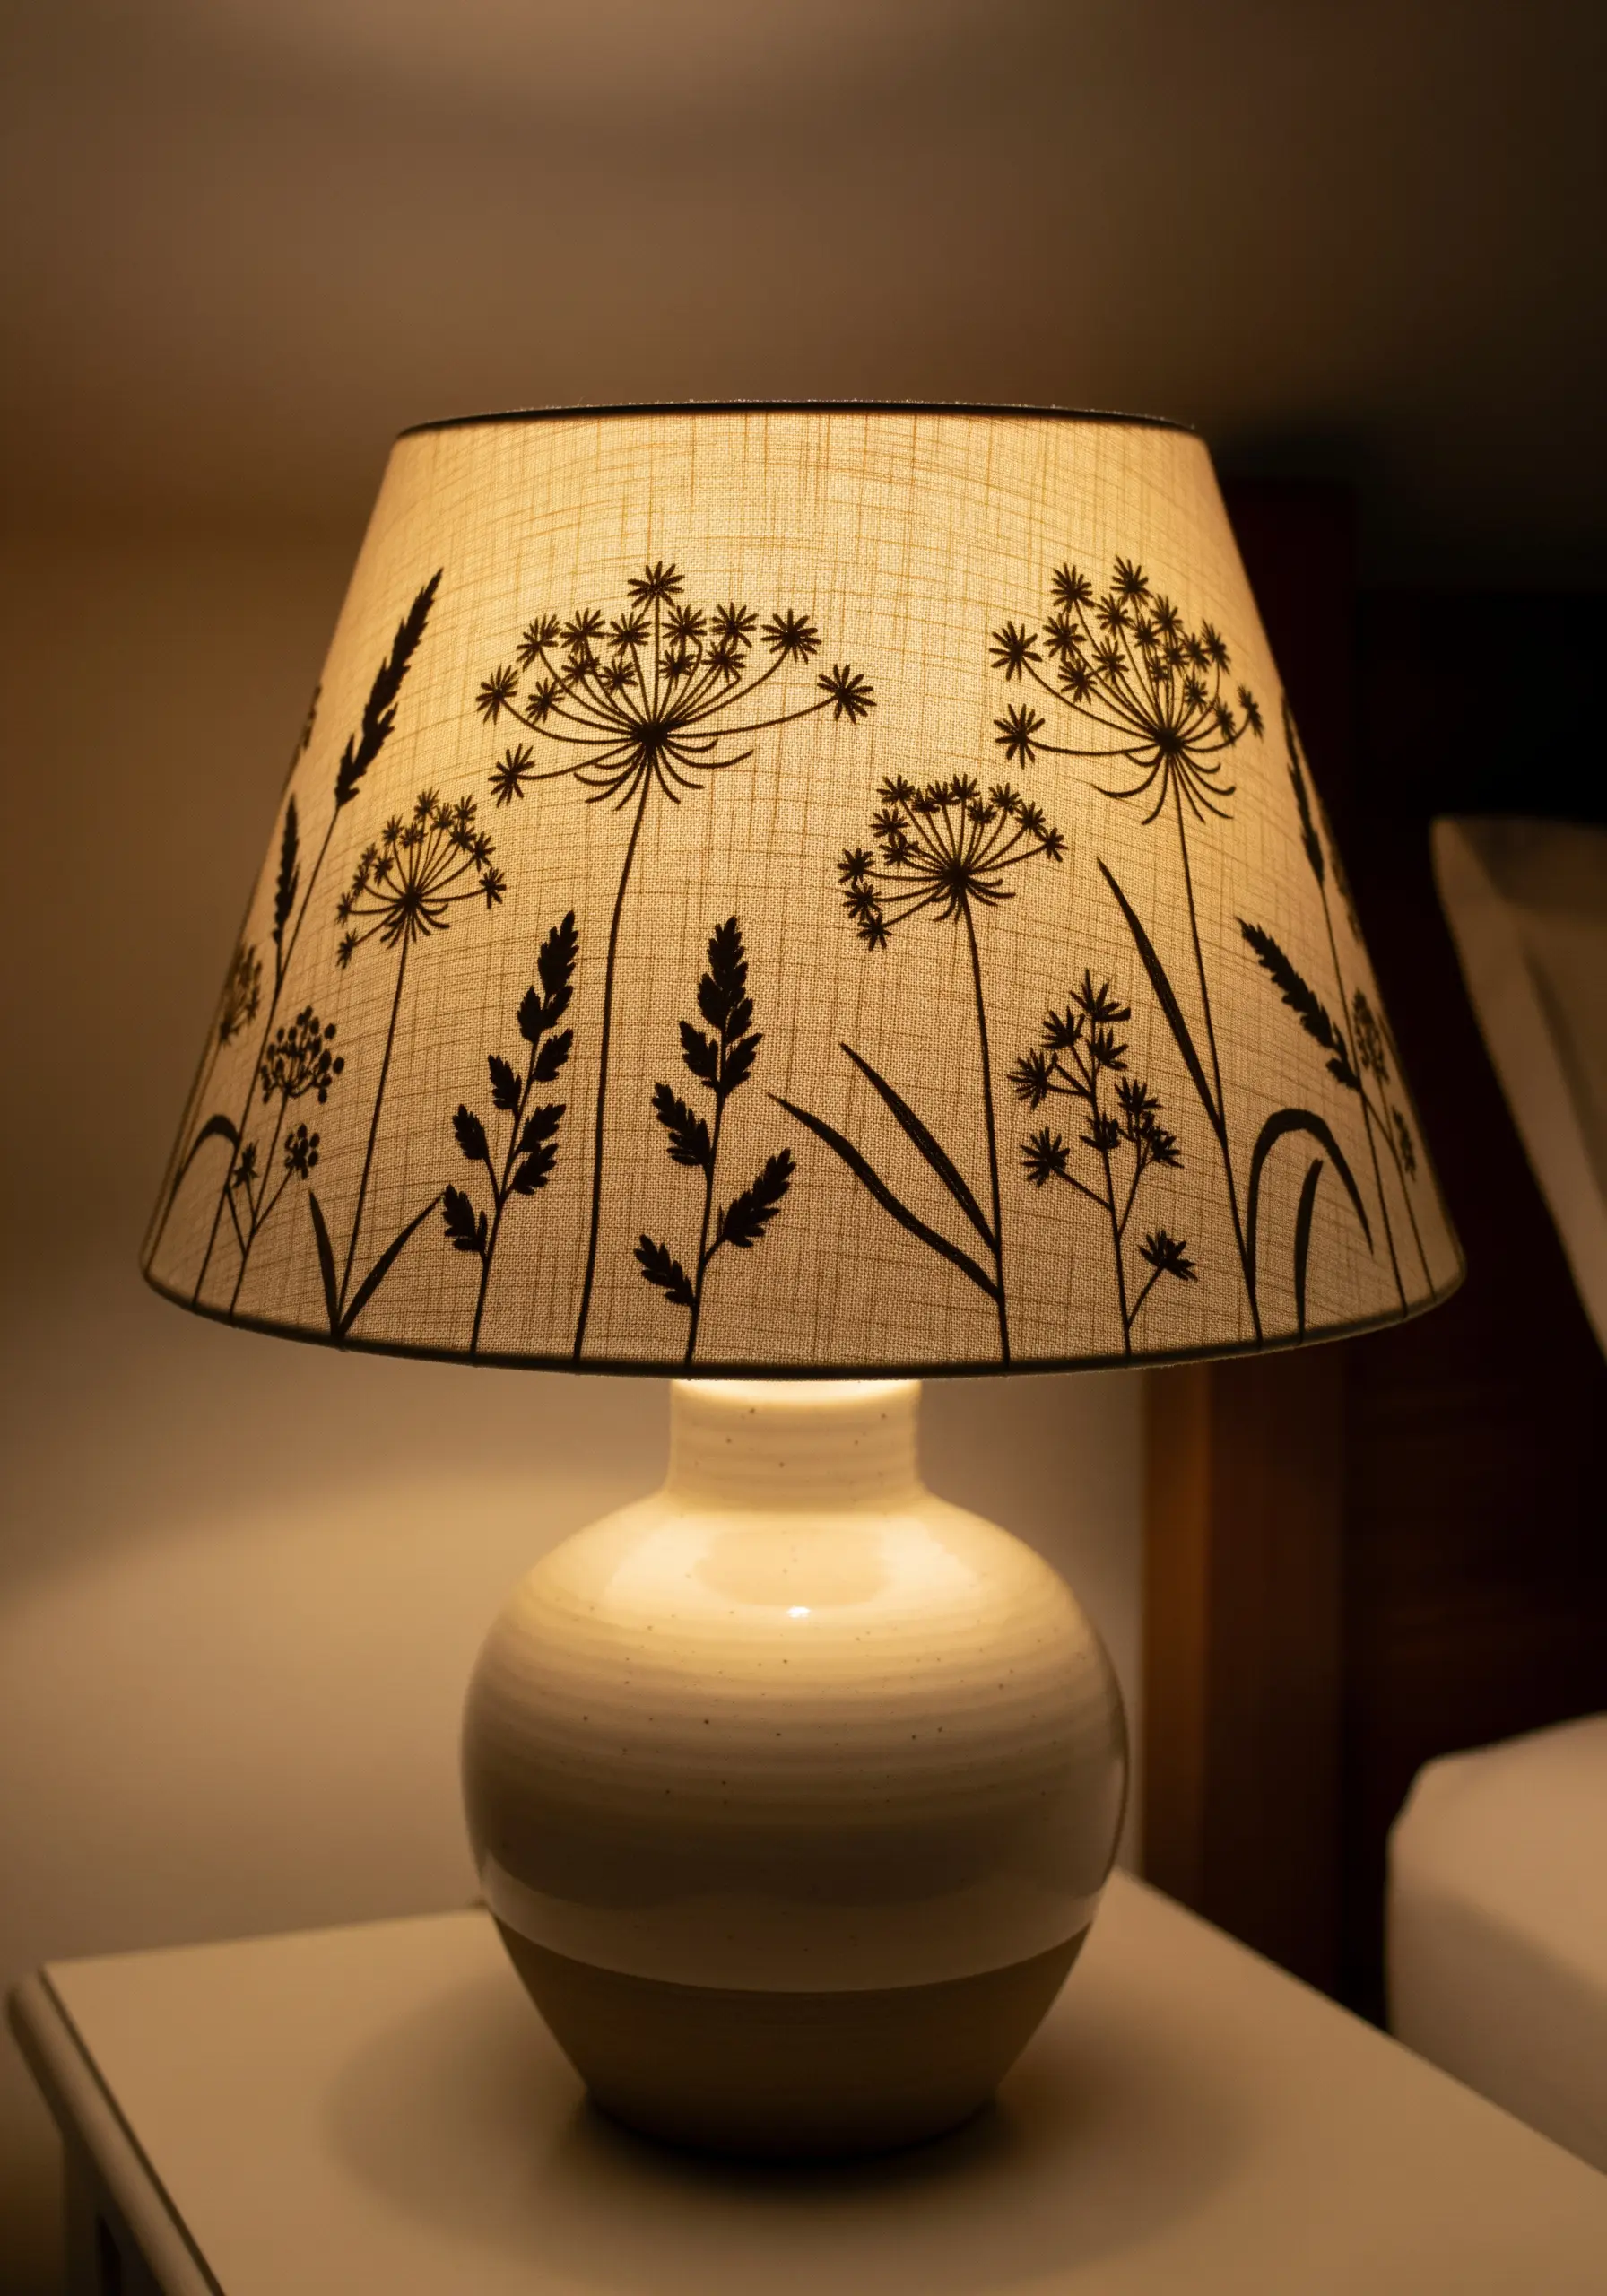
Transform a plain lampshade into a piece of art by focusing on silhouette.
Choose a dark, heat-resistant thread and stitch simple botanical outlines directly onto a light-colored linen or cotton shade. A simple backstitch or stem stitch is all you need.
When the lamp is off, you have a delicate, graphic design. When it’s on, the light shines through the fabric, turning your embroidery into a dramatic silhouette that casts beautiful shadows.
This project is about how the embroidery interacts with its function, making it a dynamic part of your home’s atmosphere.
11. Recreate Tree Bark with Textural Freeform Stitching

To capture the rugged, organic texture of tree bark, abandon uniform stitches and embrace randomness.
Use a mix of short straight stitches, seed stitches, and single-strand knots, layering them in different directions. This builds up the craggy, uneven surface of bark.
Work with a palette of at least five or six colors—browns, greys, blacks, and even off-whites—to create highlights and deep crevices.
The magic is in the layering. Don’t be afraid to stitch over previous stitches to build up the density and create a truly convincing, tactile piece of natural texture embroidery.
12. Craft Tactile Art with Embroidered Stones
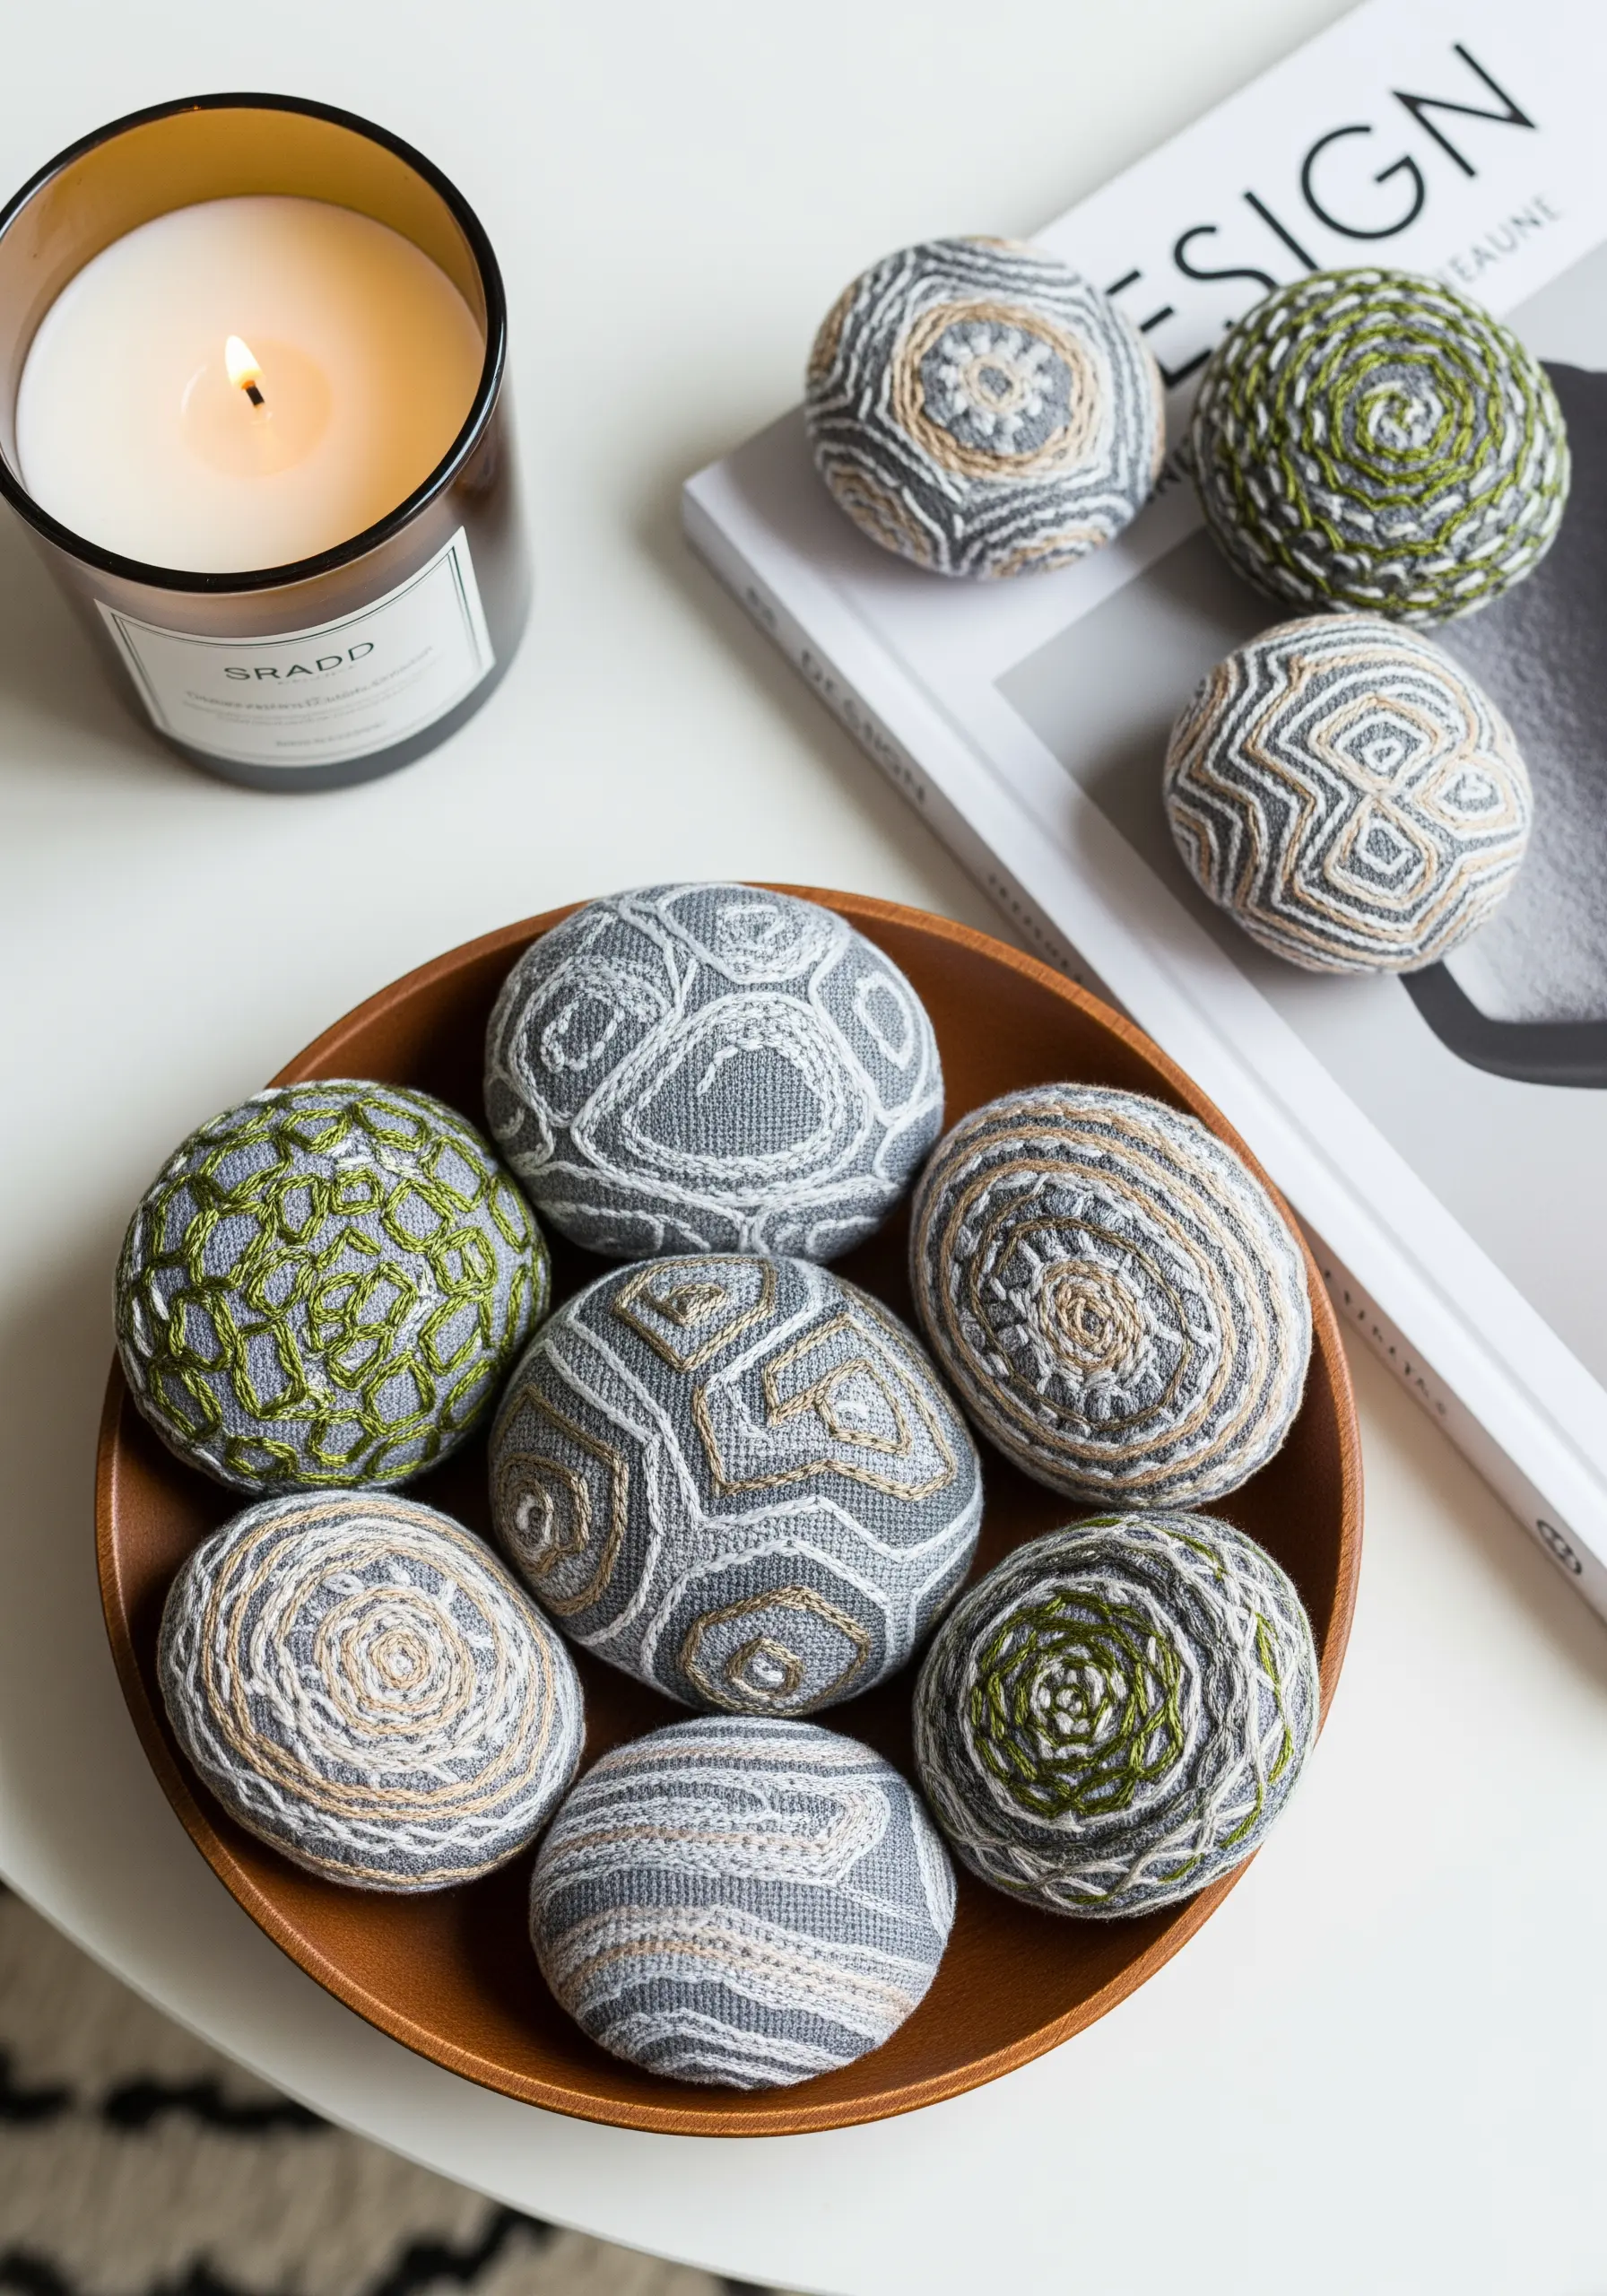
Turn simple stones into decorative objects by wrapping them in fabric and adding stitched patterns.
Choose a durable, tightly woven fabric like linen or cotton canvas that can be stretched smoothly over the stone and secured at the back with glue or a gathering stitch.
Use pearl cotton or thicker floss to embroider simple geometric patterns—spirals, grids, or radiating lines. The thread will stand out beautifully against the fabric.
Group these tactile stones in a bowl or on a shelf to create a serene, nature-inspired vignette that invites you to hold and appreciate them.
13. Add Gentle Detail to a Felt Nursery Mobile

Elevate a simple felt mobile with delicate hand-stitched details.
After cutting your felt shapes, use a contrasting thread to add character. A simple backstitch creates the crescent moon’s sleepy eye and smile, while tiny straight stitches define the clouds.
For the raindrops, stitch small teardrop shapes using a silver or grey satin stitch. The subtle sheen adds a touch of magic as the mobile turns.
This project shows that even the most minimal embroidery can bring personality and handmade charm to a simple form.
14. Tell a Story with Textured Layers
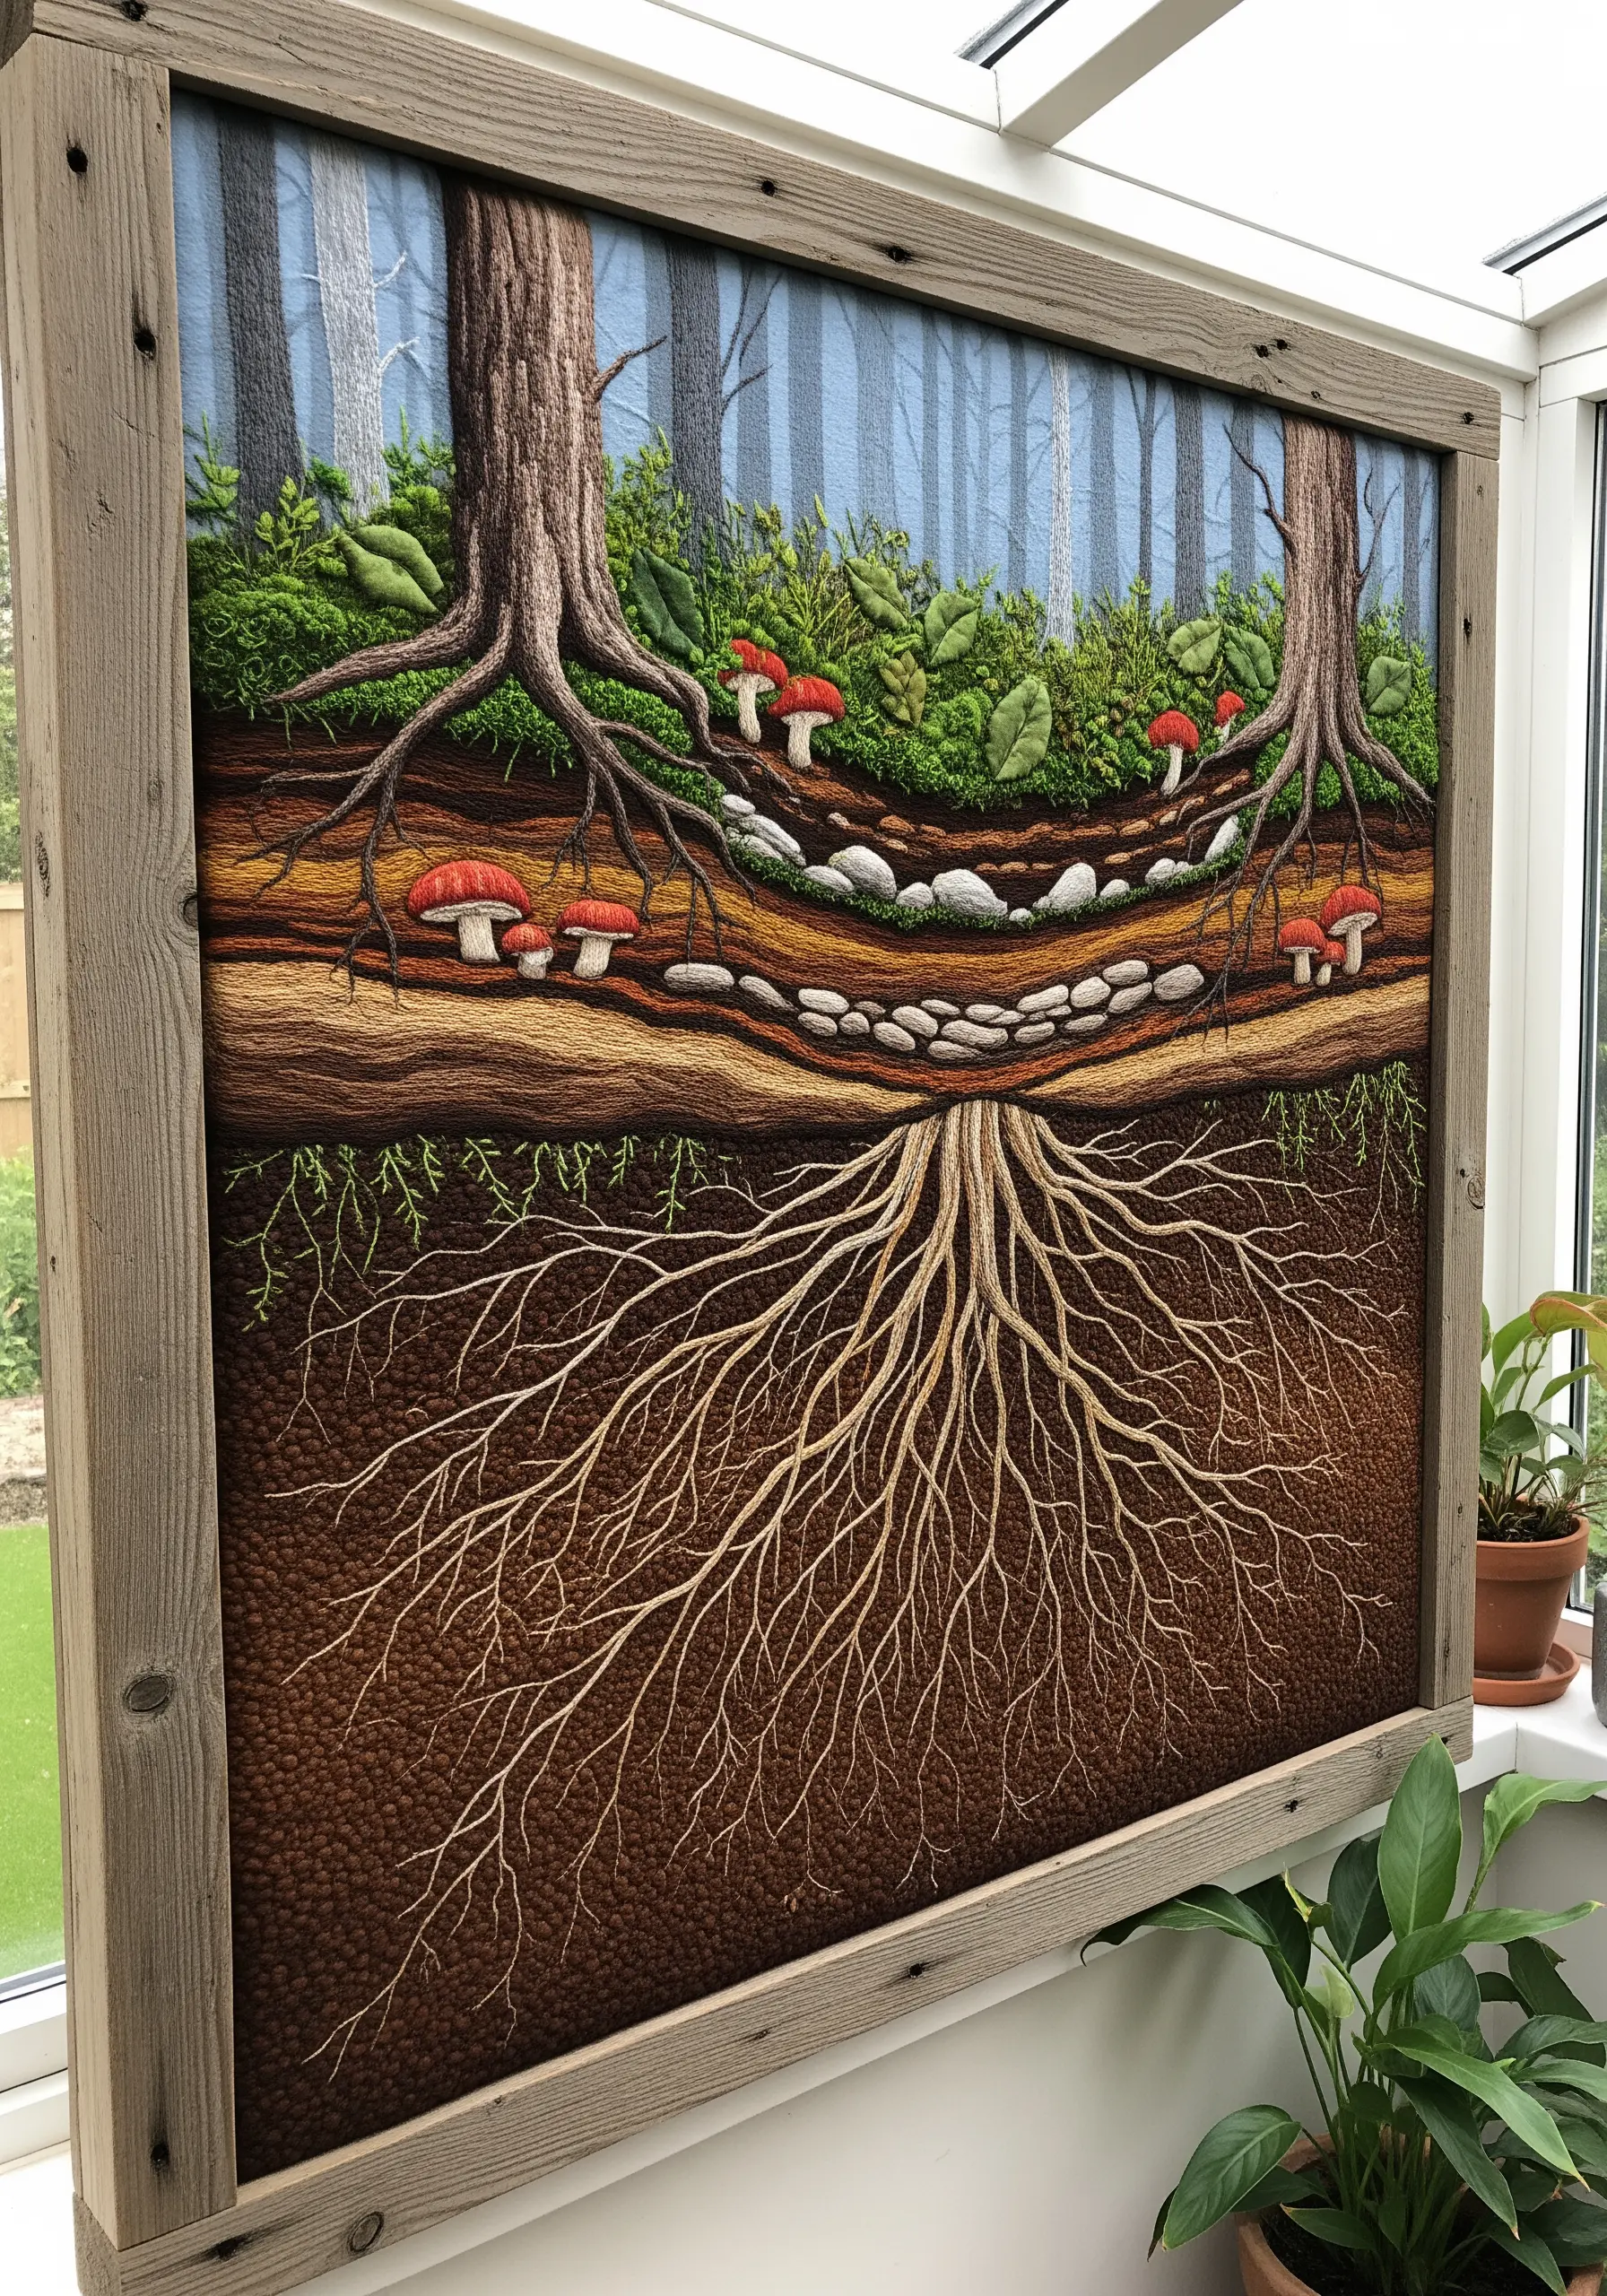
To create a complex scene like this forest cross-section, assign a different stitch or texture to each distinct layer.
Use a dense field of French knots for the forest floor, varied straight stitches for the tree bark, and long, flowing vertical stitches for the tree roots to show direction and growth.
For the soil and rock layers, try using a mix of seed stitches and small, irregular satin stitches to create a sense of earthy, compacted texture.
This methodical approach turns a potentially overwhelming design into a manageable and visually fascinating study of the world beneath our feet.
15. Combine Thread Painting with Delicate Line Work
Create visual contrast in your botanical art by pairing a richly colored element with a delicate, skeletal one.
Use long-and-short stitch to blend reds and purples for a vibrant poppy petal, giving it a soft, painted look.
For the leaves and seed pods, switch to fine line work. Use a single strand of grey or metallic thread in a simple backstitch to create an x-ray or dried-botanical effect.
This juxtaposition of full color and minimal line makes both elements more striking and adds a modern, artistic sensibility to your work.
16. Stitch a Calming Lavender Bookmark

Create a small, functional piece of art that brings a moment of calm to your reading.
For the lavender blossoms, use French knots, pulling them tighter for the buds at the top and looser for the flowers at the bottom to create a natural taper.
A simple stem stitch in green creates a clean, elegant stalk. Two small lazy daisy stitches at the base are all you need to suggest leaves.
By stitching this on a piece of fabric attached to an elastic band, you create a beautiful and practical bookmark that slips easily over your journal or book cover.
17. Embroider a Cozy Wool Throw with Eucalyptus

When stitching on a thick, plush fabric like wool, your technique needs a slight adjustment to ensure the stitches stand out.
Always use a tear-away or water-soluble stabilizer on top of the fabric. This prevents your stitches from sinking into the pile and keeps them sharp and defined.
Use all six strands of floss or a thicker pearl cotton for better coverage. A classic satin stitch or fishbone stitch works beautifully for the eucalyptus leaves, allowing you to blend blues and greens for that signature dusty look.
18. Create a Floral House Number Sign

Personalize your entryway with a house number sign that feels like a miniature garden.
First, outline your numbers with a split stitch. Then, fill the interior with a dense layer of French knots in a mossy green to create a lush, textured base.
Sprinkle in tiny lazy daisy stitches in white, yellow, and cream to represent wildflowers. This technique creates a beautiful, raised effect that is both legible and artistic.
Mounting the finished piece on a stretched canvas inside a wooden frame gives it a polished, professional finish perfect for outdoor display.
19. Capture a Beach Scene with Textural Layers

To create a convincing coastal scene, focus on replicating the distinct textures of sand, stone, and water.
Use a dense scattering of French knots in beige, grey, and white for the pebbles, varying the size and color for a natural look. For the sand, a field of tiny seed stitches creates a finer, granular texture.
Create the seafoam by layering wavy lines of white straight stitches or using turkey work for a frothy, 3D effect.
Incorporate other materials, like couched twine for driftwood, to add another layer of realism and tactile interest.
20. Stitch Graphic Moon Phases for Modern Coasters

For a bold, modern aesthetic, use high-contrast colors and clean shapes.
On a simple black cotton fabric, use a bright white thread to stitch the phases of the moon. To achieve the solid white areas, use a dense, smooth satin stitch or fill the shape with tight rows of chain stitch.
For the textured full moon, use a random scattering of French knots and seed stitches to mimic the craters and shadows.
This simple, graphic approach results in functional art that is both beautiful and educational.
21. Create Atmospheric Fog with Thread Weight
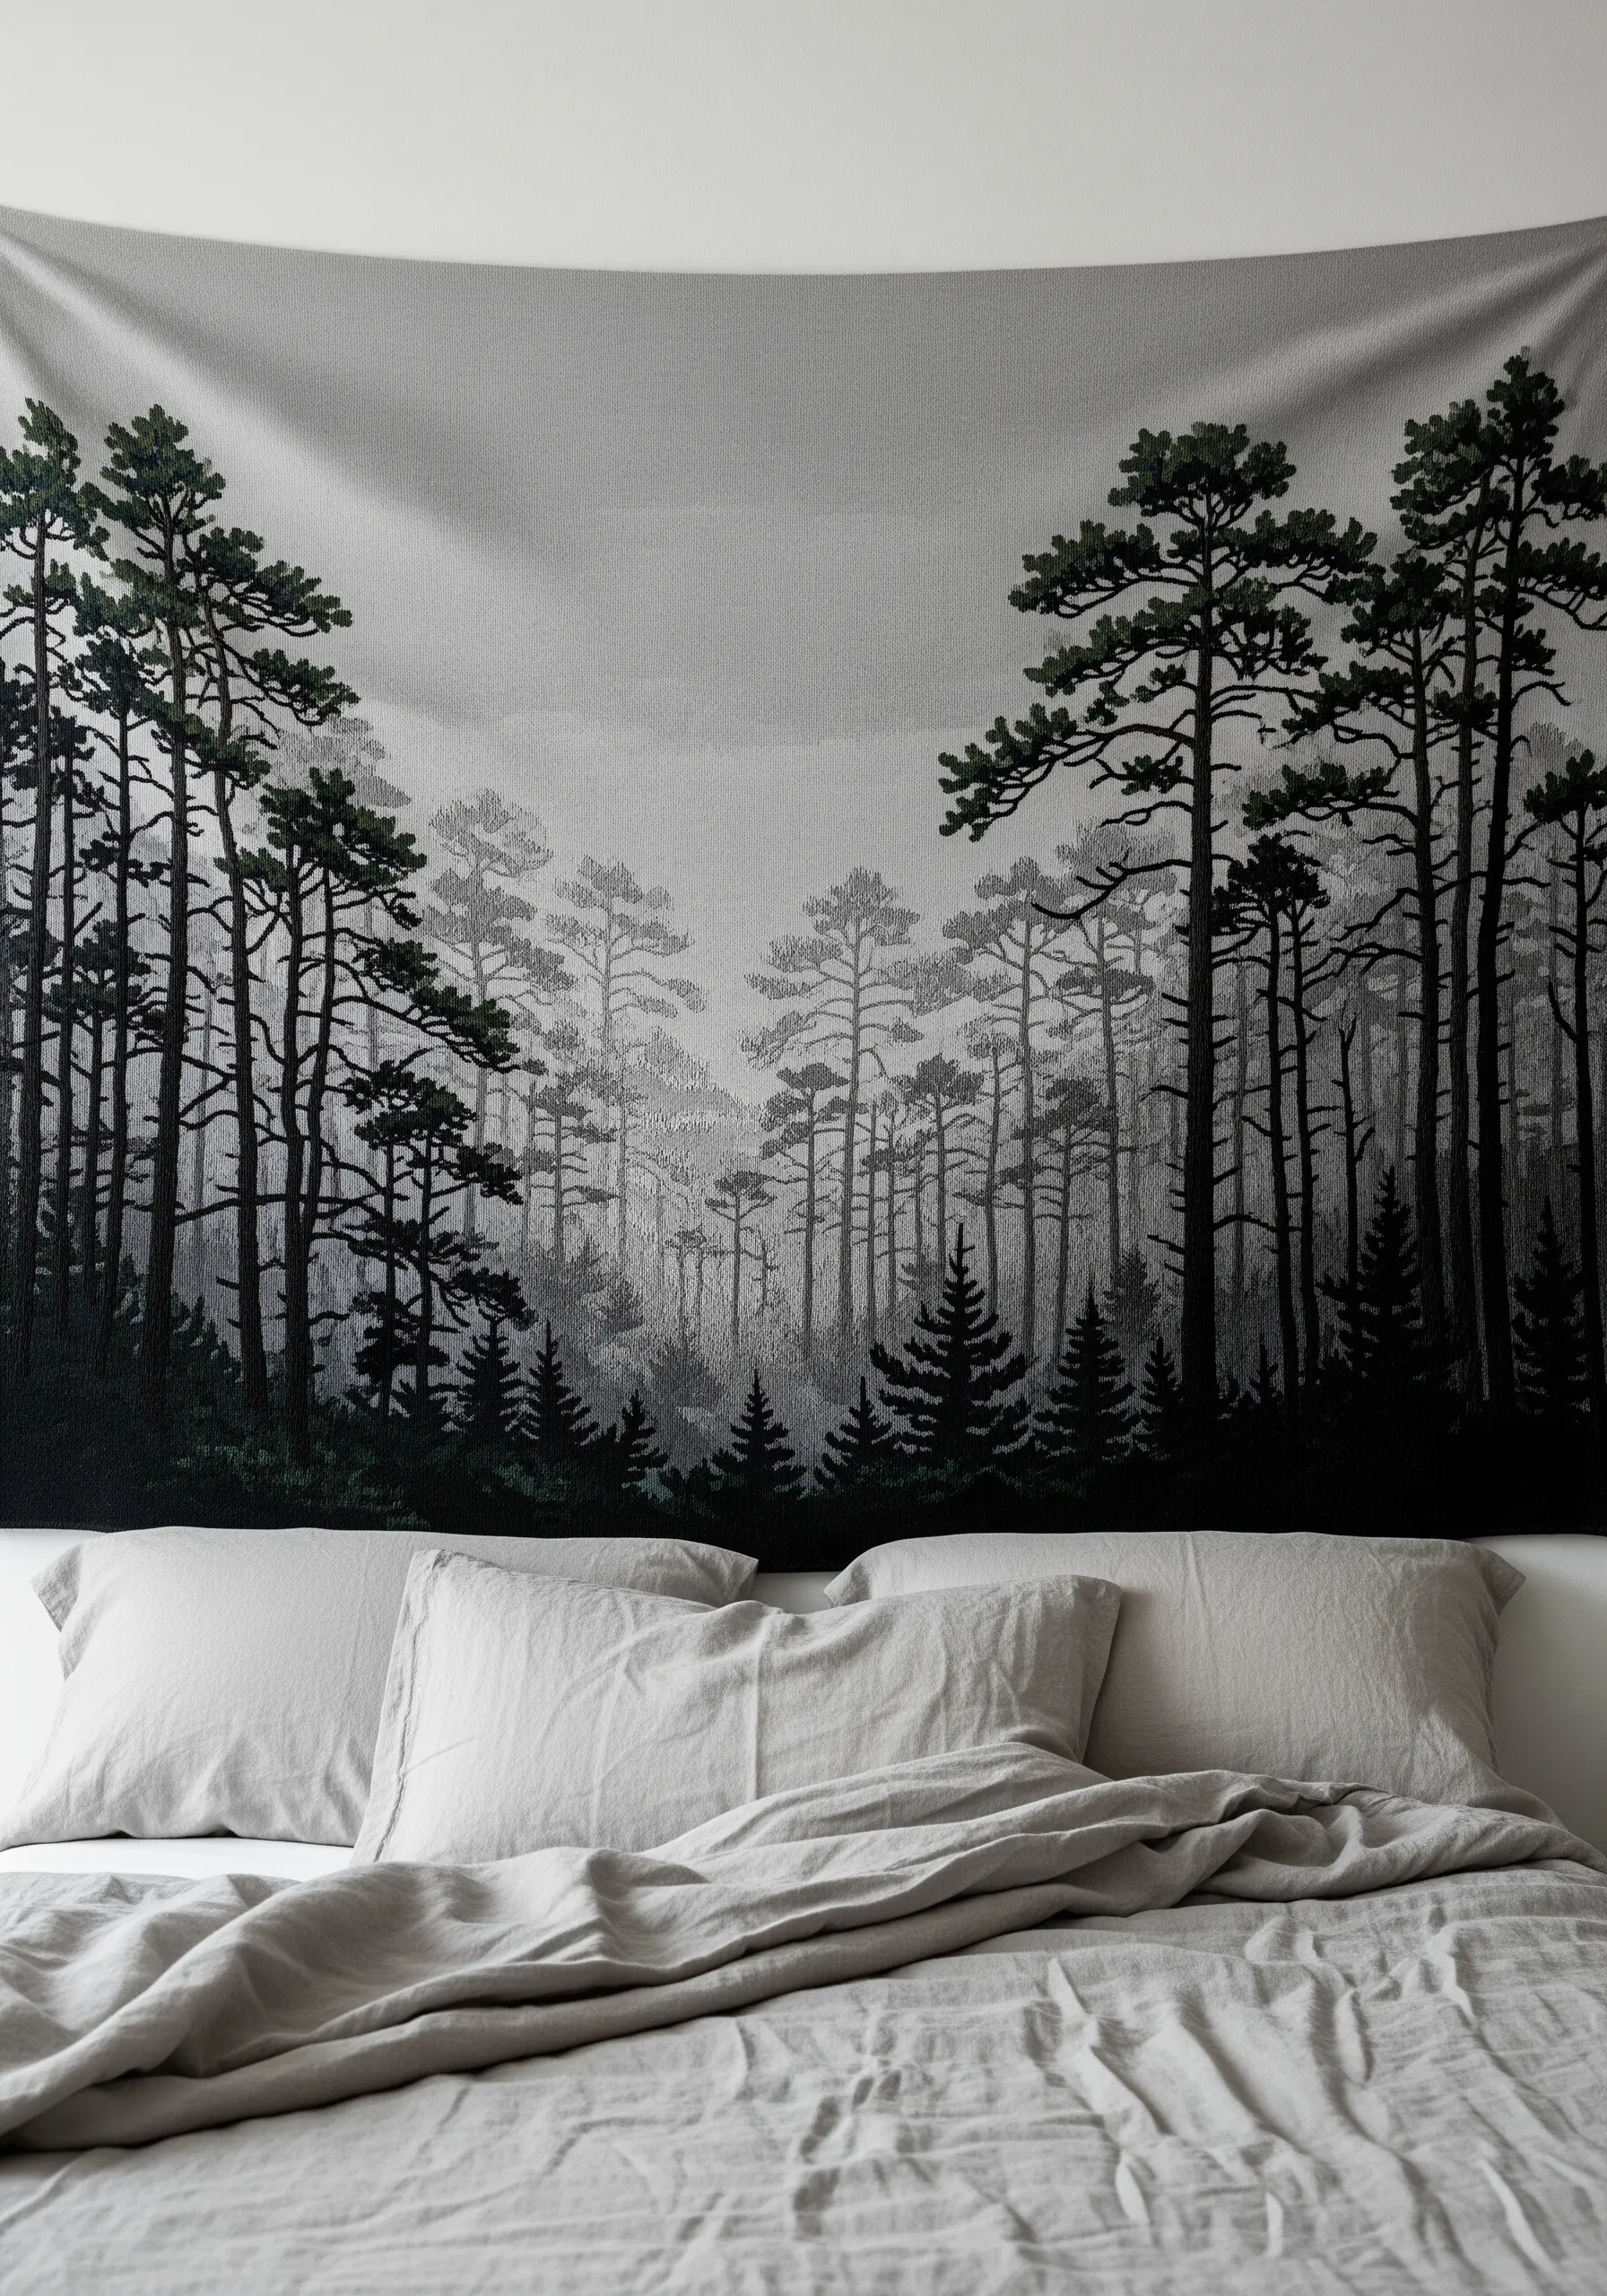
To give your forest landscape a sense of misty depth, play with the number of floss strands you use.
For the trees in the foreground, use four to six strands of floss to create bold, dark trunks and dense foliage. This brings them visually forward.
For the trees in the background, switch to just one or two strands of a lighter grey or green. The lines will be finer and less defined, perfectly mimicking the effect of fog or distance.
This technique creates a stunning atmospheric perspective, turning a flat piece of fabric into a deep, moody forest.
22. Embellish Your Home with Functional Art

Turn an everyday object like a curtain tie-back into a beautiful, handcrafted detail.
Stitch your design onto a sturdy base fabric, like linen or canvas, and add an equally sturdy backing to ensure it holds its shape and withstands daily use.
Use a classic satin stitch for the flower petals, angling your stitches to create a subtle sheen and sense of form. For the swirling vines, a whipped backstitch creates a smooth, raised line that adds an elegant, corded effect.
This small touch can tie a room together, proving that embroidery can be both beautiful and practical.
23. Map the Stars with Mixed-Media Embroidery

Combine different fibers and materials to create a celestial artwork that is rich in texture.
Create your background by wrapping a dark grey yarn tightly around a hoop or frame. This provides a perfect night-sky canvas.
Use a simple white thread and straight stitches to map out a constellation. At each intersection, add a small lazy daisy stitch or a seed bead to represent a star, giving the piece a delicate sparkle.
Frame the design with a crescent of wrapped jute or twine to add a final rustic, earthy element that contrasts beautifully with the celestial theme.
24. Add a Touch of Nature to Kitchen Linens

Embroidering on items that will be frequently washed, like a kitchen towel, requires smart material choices.
Always use a high-quality, colorfast embroidery floss that won’t bleed in the wash. Preshrinking your linen or cotton towel before stitching is also a good idea.
For the bee’s body, use alternating black and yellow satin stitches, and add delicate wings with a few simple straight stitches in a light grey or white.
This small, charming motif is a wonderful way to practice your satin stitch and bring a bit of the garden into your kitchen.
25. Stitch an Abstract Geode with Thread and Beads

To capture the organic, layered beauty of a geode, think in concentric rings of texture.
Use a variety of stitches to create different layers: smooth satin stitch, bumpy French knots, and raised chain stitch bands all work well.
Incorporate different types of thread, from matte cotton floss to shiny rayon and metallic threads, to mimic the different mineral deposits.
Fill the center with a dense cluster of seed beads or French knots to create the sparkling crystalline core. This abstract approach to a natural form results in a stunning, tactile piece of art.
26. Create Serenity with a Stitched Zen Garden
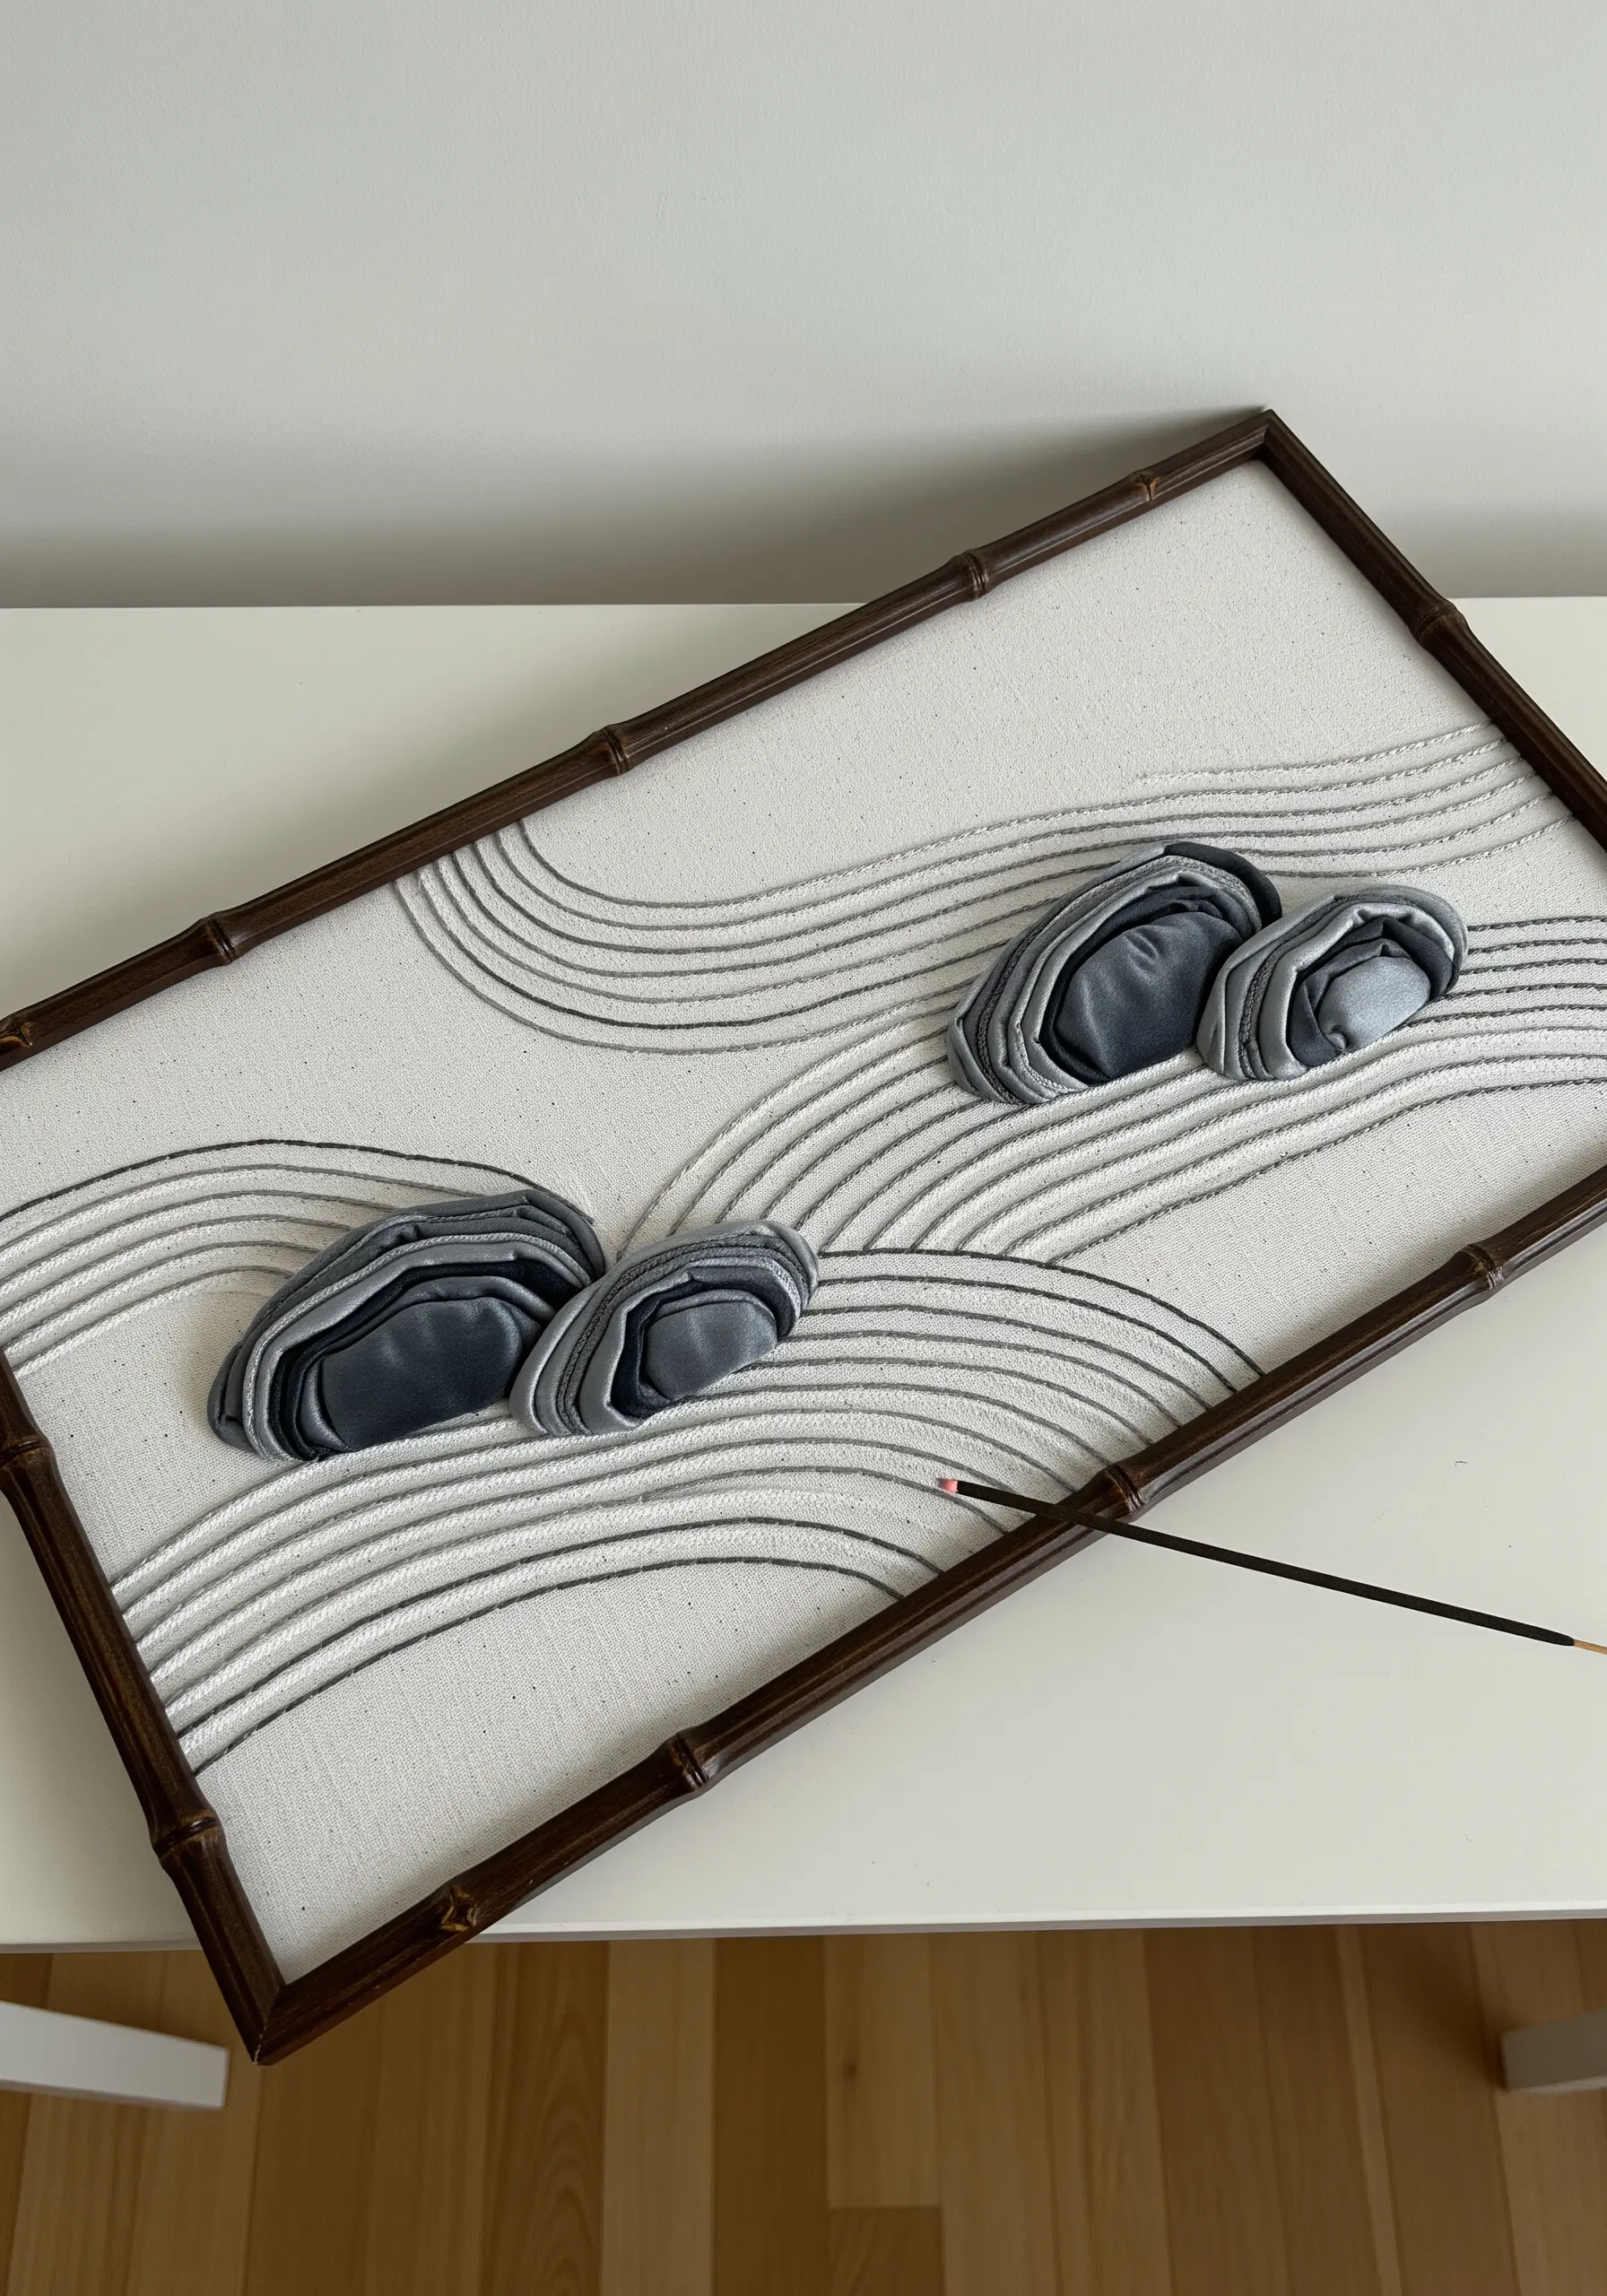
This project is an exercise in minimalism and texture, capturing the essence of a zen garden.
The raked sand is created with precise, parallel lines of grey backstitch or stem stitch. The key is maintaining consistent spacing and gentle curves.
For the garden stones, use stumpwork techniques. Create small, padded forms with felt, and then cover them with a smooth, grey satin fabric, securing them to the canvas.
Framing the piece with bamboo adds the perfect finishing touch, completing the meditative and tranquil aesthetic.
27. Add Autumnal Warmth to Textured Fabric
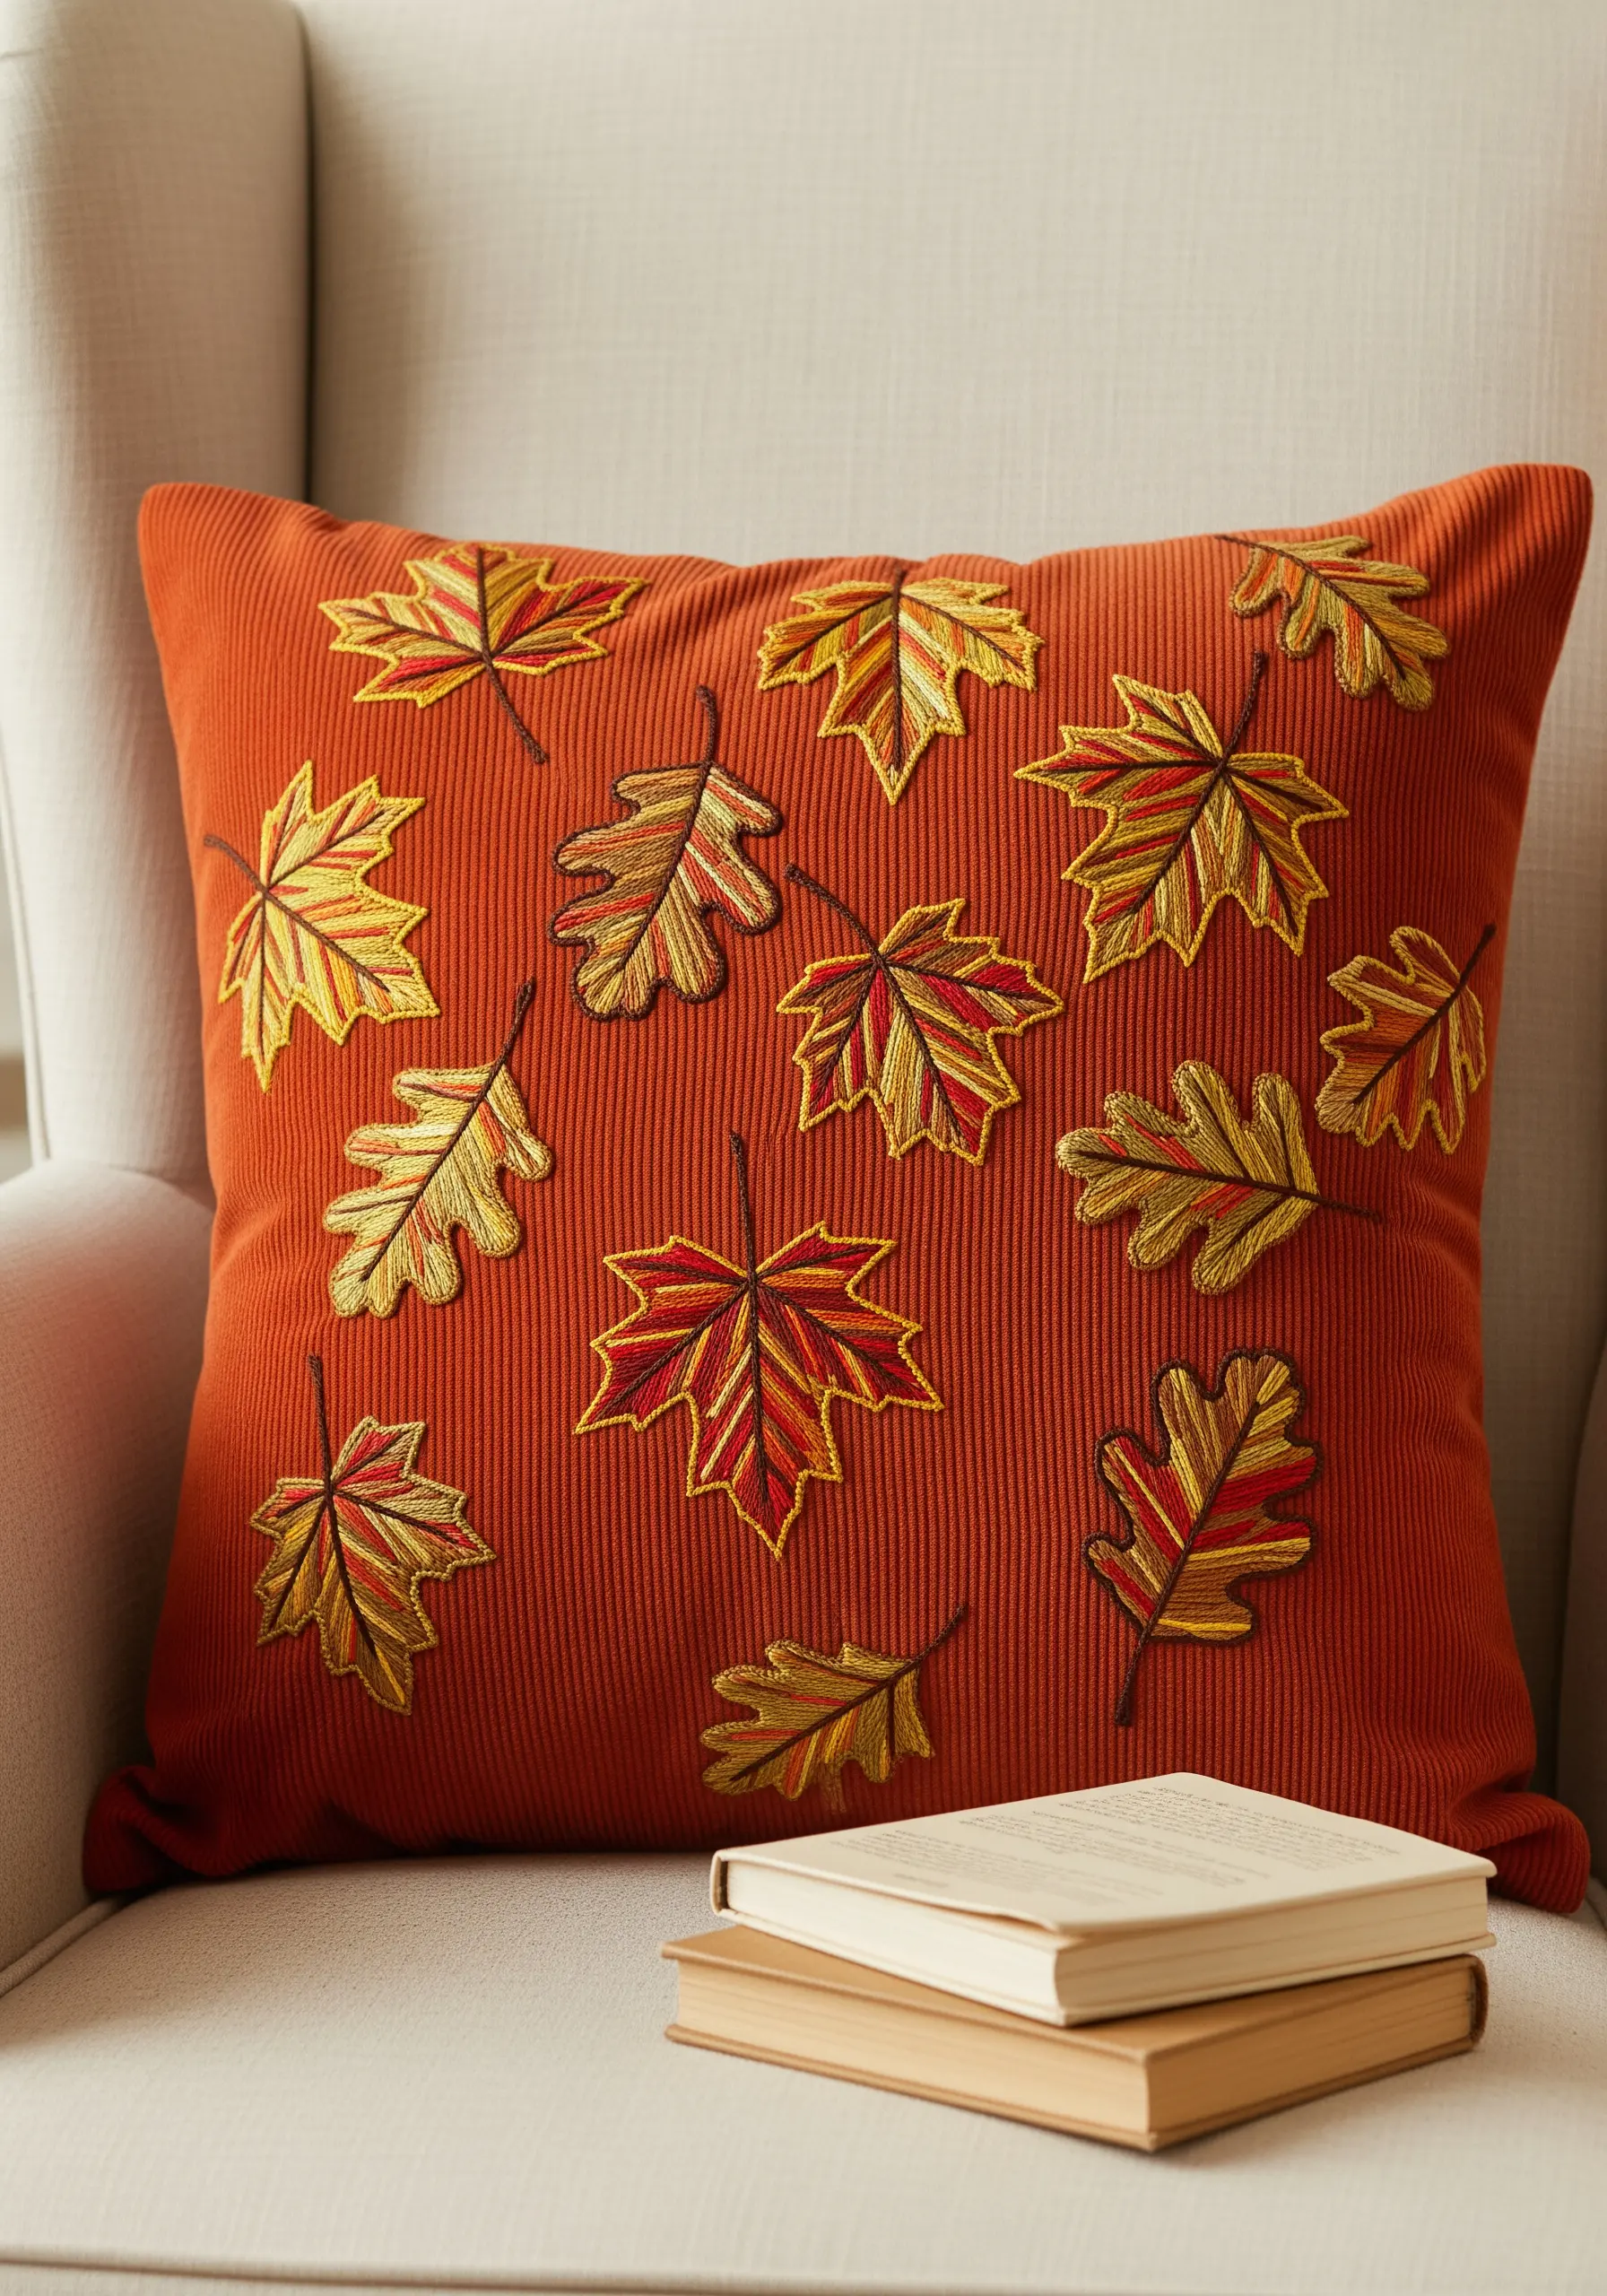
Embroidering on a textured fabric like corduroy can add instant depth and coziness to your design.
To prevent your stitches from getting lost in the fabric’s ridges, use a tear-away stabilizer on the back for support.
Outline each leaf with a dark, contrasting backstitch or split stitch to ensure the shapes are crisp and well-defined.
Fill the leaves using a long-and-short stitch, blending classic autumn colors—red, gold, and orange—to create a beautiful, variegated effect that perfectly captures the changing season.
28. Personalize Simple Sachets with Botanical Sprigs

Transform simple linen drawstring bags into thoughtful gifts with a single, delicate botanical motif.
Choose simple designs like a sprig of eucalyptus, a stem of chamomile, or a stalk of thyme. Use only two or three strands of floss to keep the look light and refined.
Stem stitch is perfect for the stalks, lazy daisy stitches create lovely leaves and petals, and a few French knots can represent buds or tiny flowers.
These small embroidery projects are quick to complete and add a priceless handmade touch to a simple item.
29. Chart a World of Texture on a Fabric Map
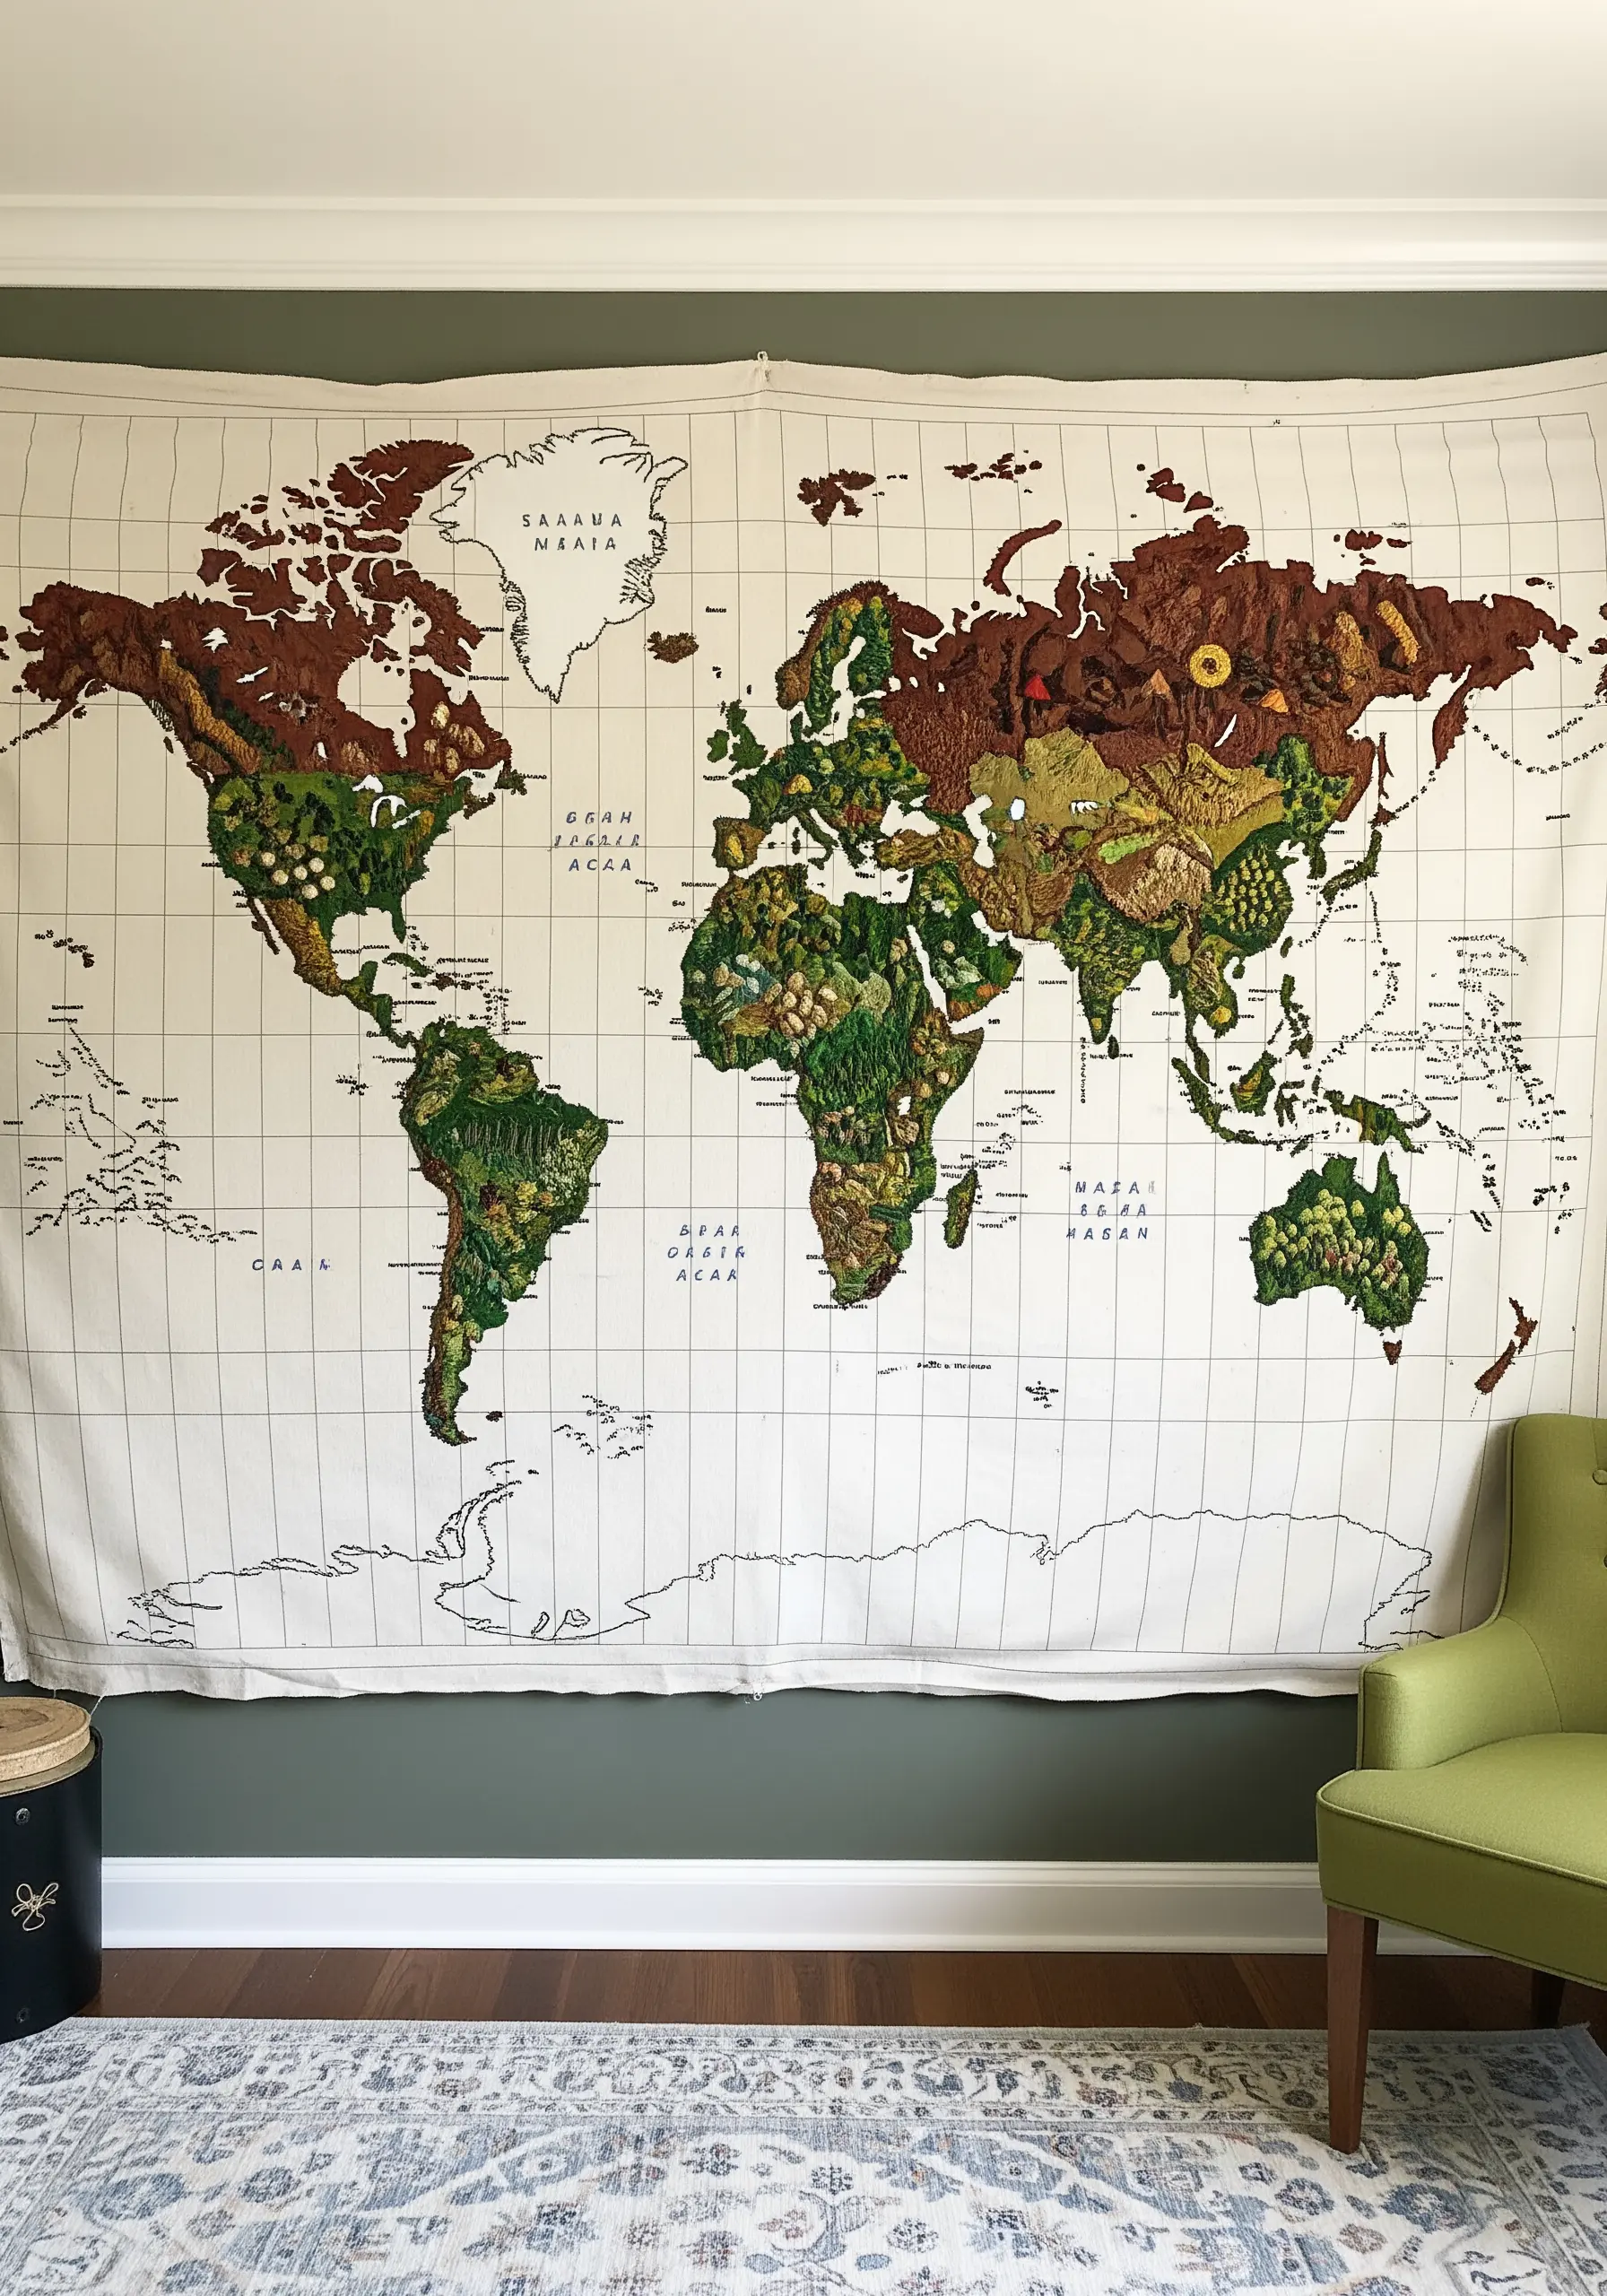
Embark on an ambitious project by transforming a printed fabric map into a tactile, embroidered masterpiece.
Assign different stitches and colors to different geographical features. Use dense green French knots for rainforests, scattered seed stitches in beige for deserts, and brown satin stitch for mountain ranges.
This approach breaks the enormous task into small, manageable sections, allowing you to build the world one texture at a time.
The result is a stunning, personal piece of wall art that is both a map and a testament to your patience and creativity.


