

Sometimes the most beautiful embroidery isn’t found in the largest, most complex projects, but in the quiet perfection of a small, focused piece of art. If you’ve ever finished a hoop and felt that something was missing—a certain polish or intention—I want you to know that the answer isn’t more stitches, but more thoughtful ones.
True artistry in embroidery comes from the small details. It’s in the way you angle your satin stitch to catch the light, the decision to use a single strand of thread for a delicate line, or the choice to create texture with a cluster of French knots instead of a flat fill. These are the adjustments that transform your work from a hobby into an heirloom.
Think of these small embroidery ideas not as patterns to be copied, but as invitations to explore technique. Each one is a study in color, texture, or form. Allow them to build your confidence and refine your eye, so that every piece you create—no matter how small—feels complete, beautiful, and entirely your own.
1. Render Lavender with Dimensional Knots
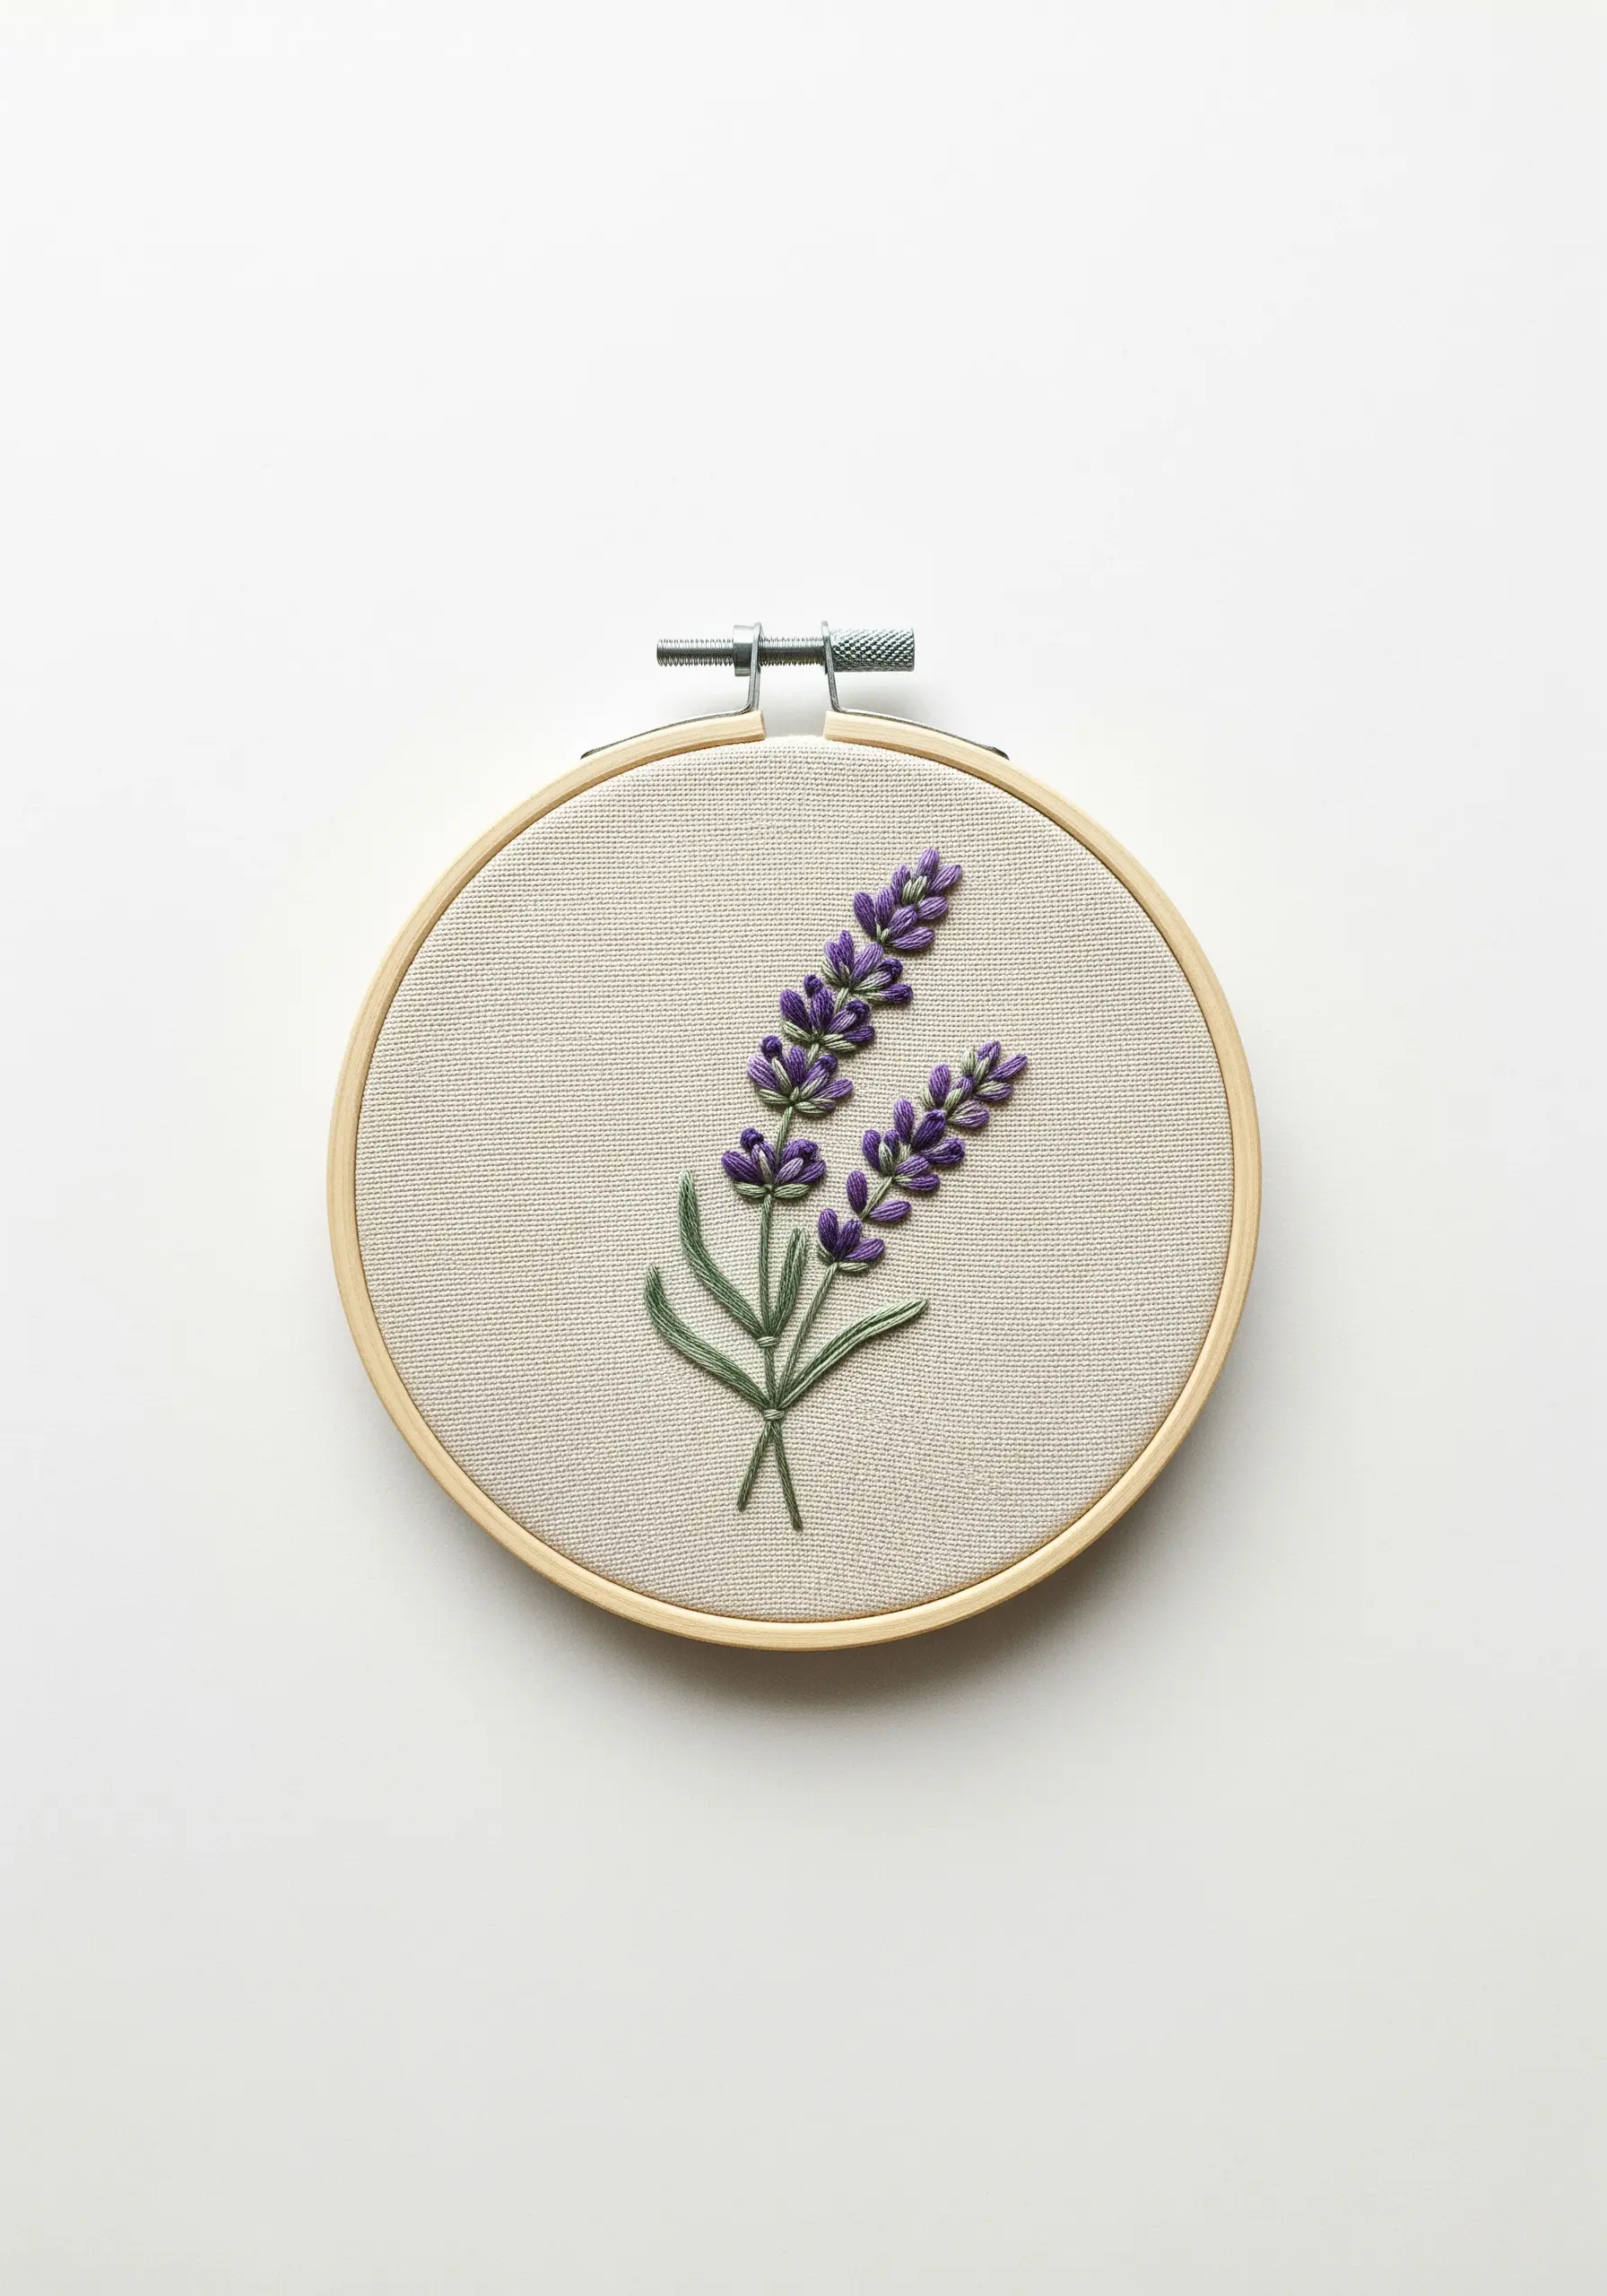
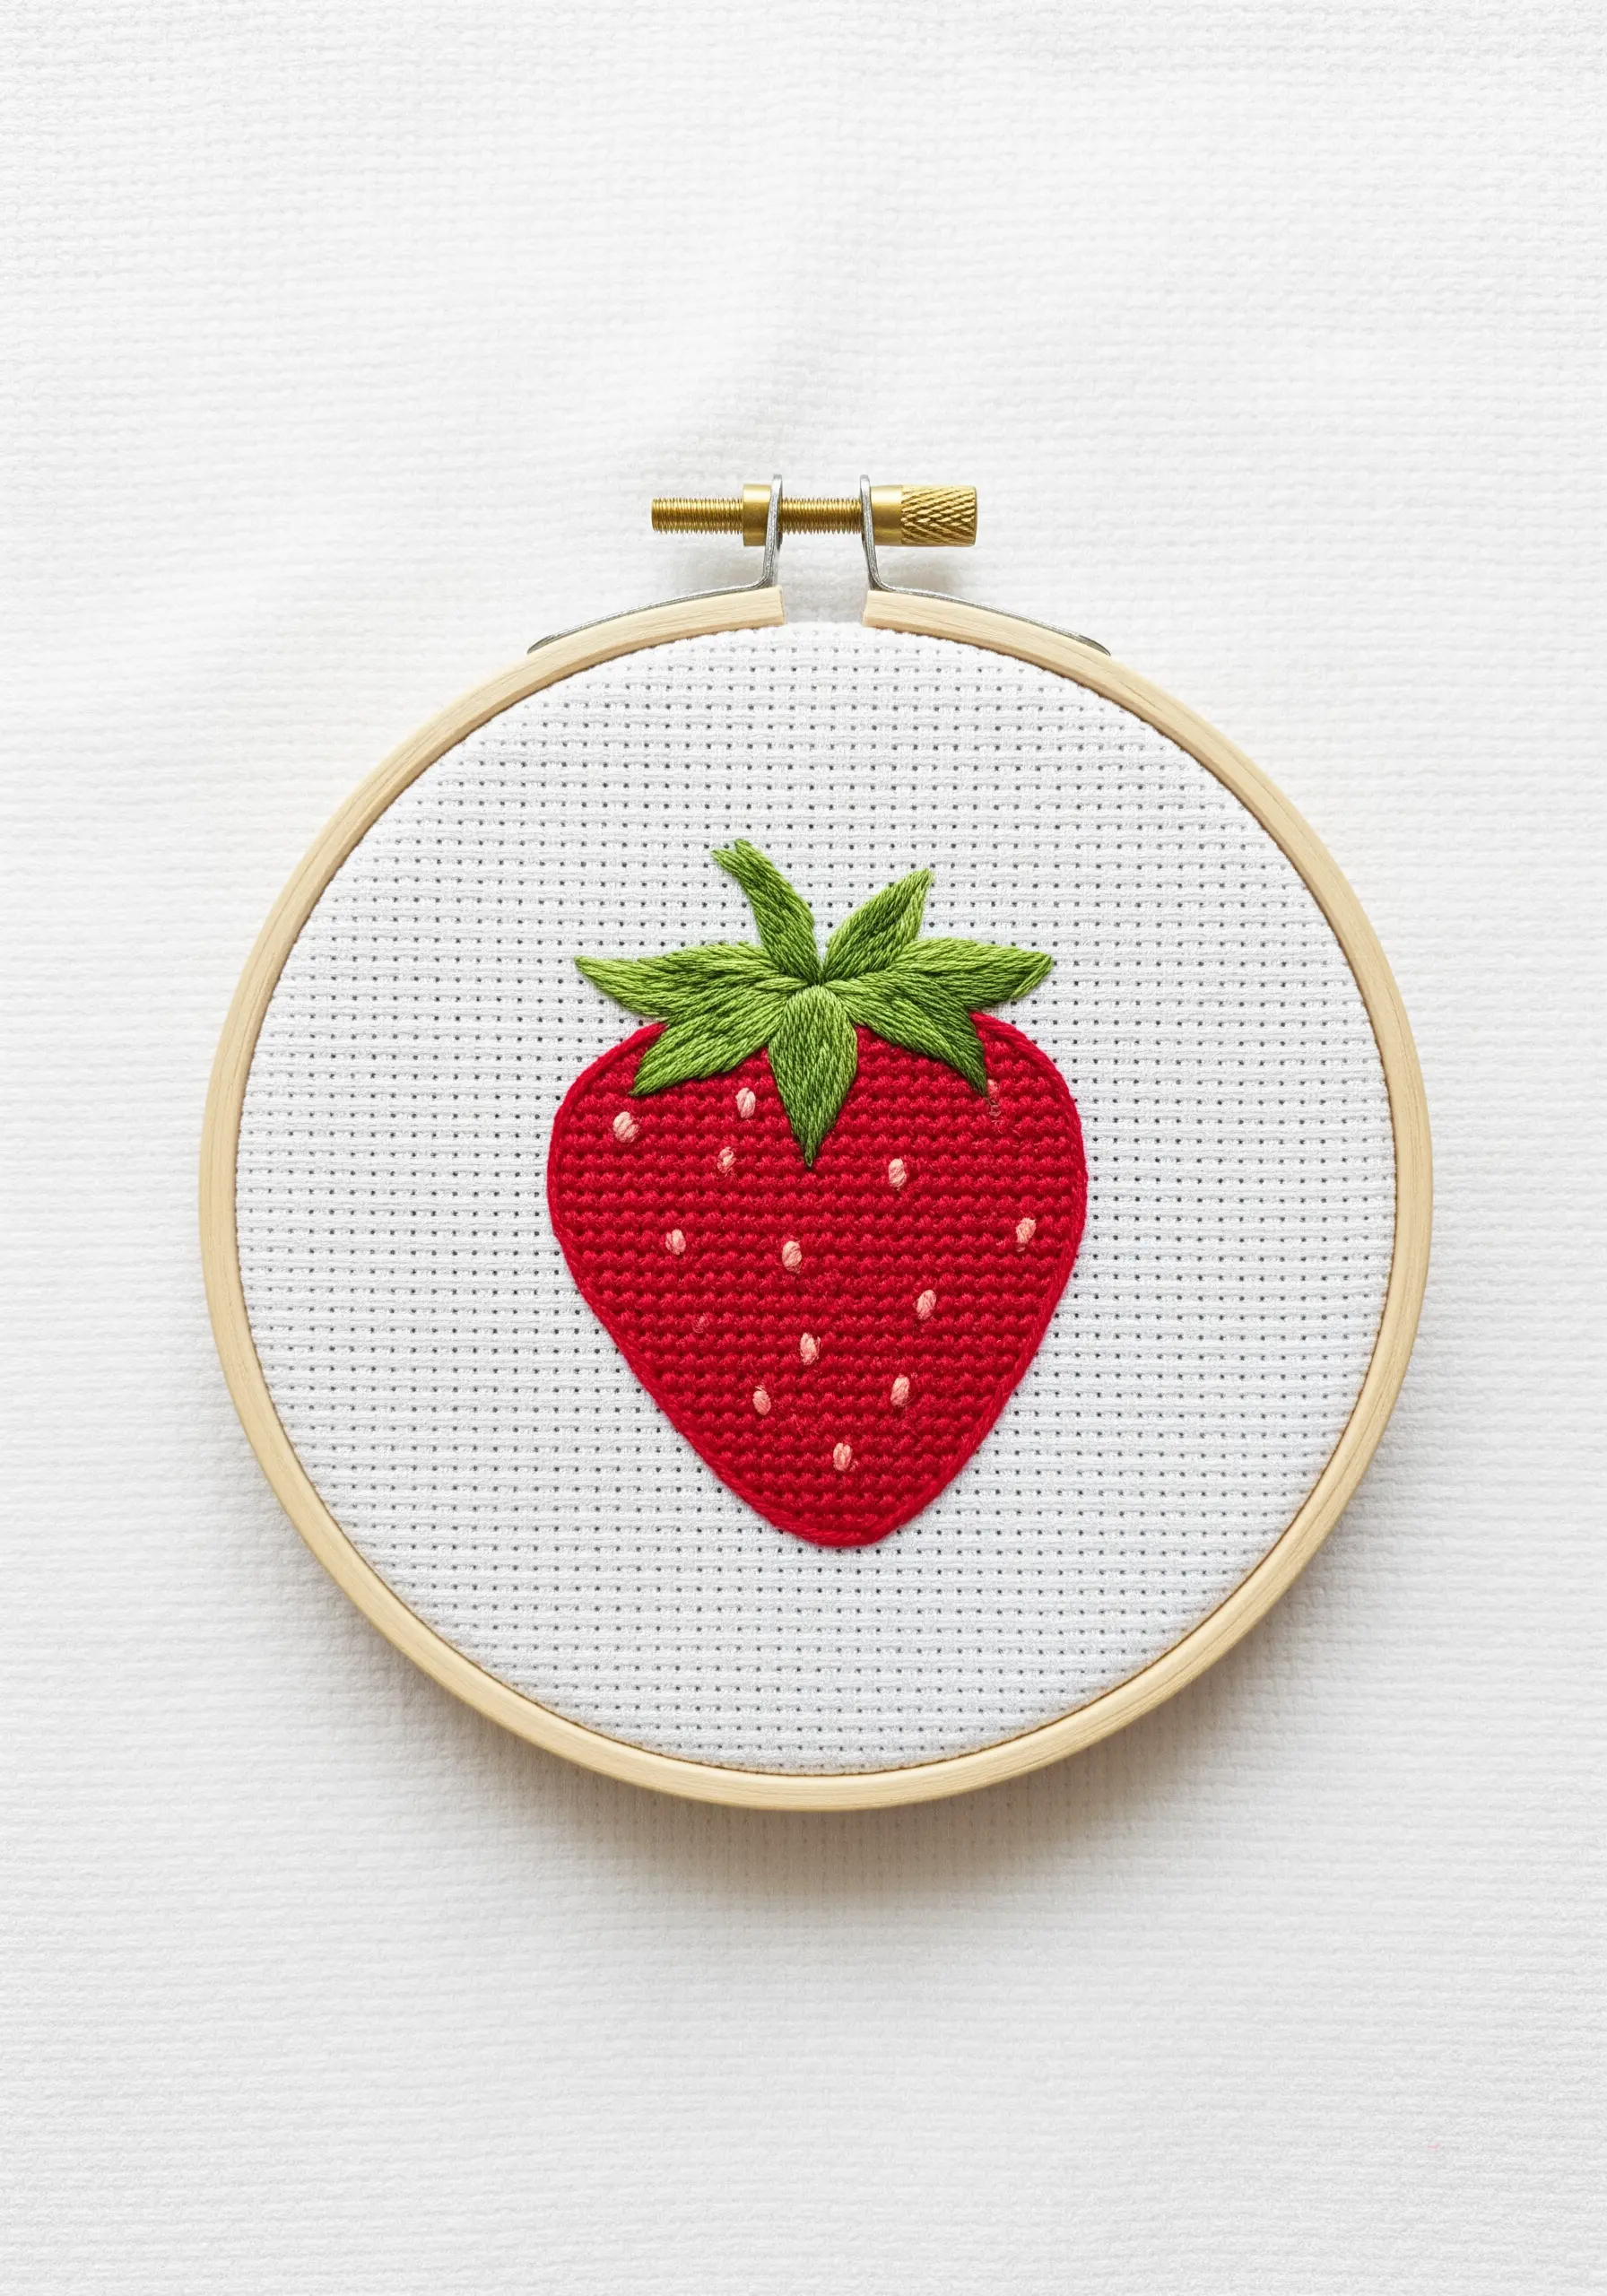
To give your lavender realistic texture, use French knots for the tiny blossoms instead of satin stitch.
Vary the number of wraps around your needle for each knot—one wrap for smaller buds at the top, two or three for fuller blooms below.
This creates a natural, tapered shape and adds depth that satin stitch can’t replicate.
For the stems, a delicate whipped backstitch provides a smooth, rounded line that complements the textured flowers, resulting in dried-flower-style embroidery that feels both rustic and refined.
2. Achieve Realism with Thread Painting
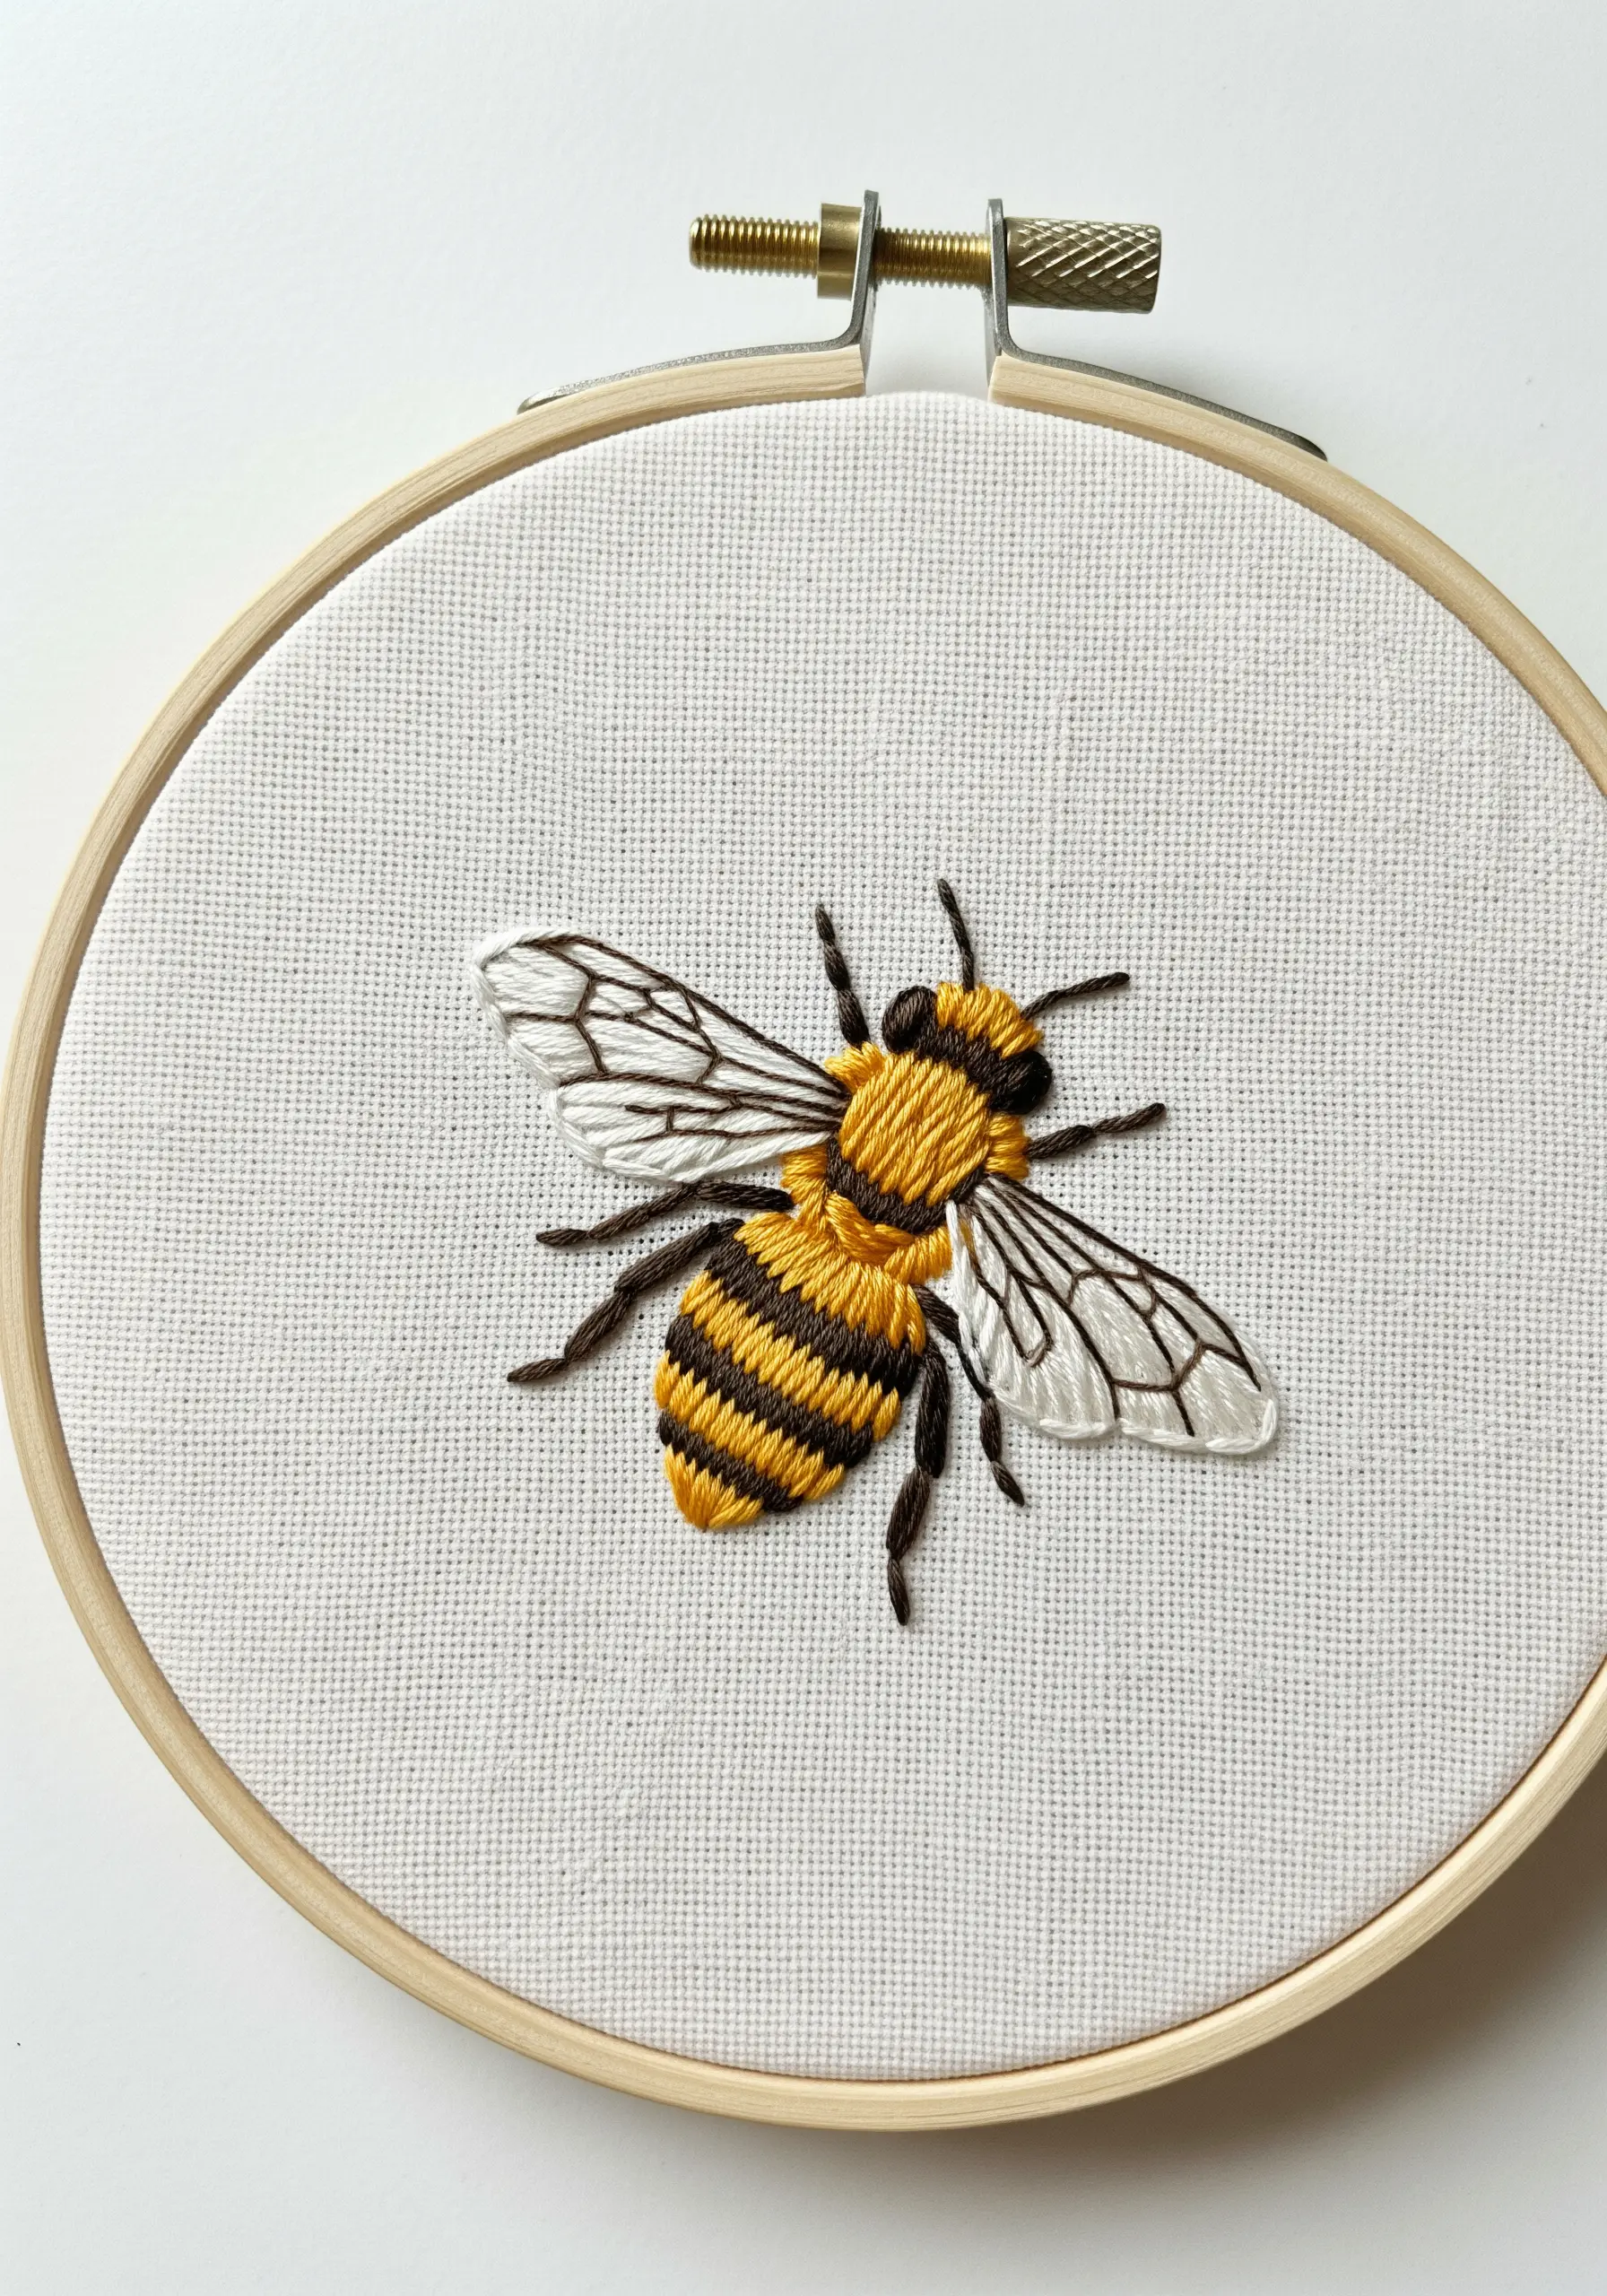
Elevate a simple bee by using long-and-short stitch to create a soft, fuzzy texture on its body.
Blend shades of gold, yellow, and brown with just two strands of floss, angling your stitches to follow the curve of the body for a three-dimensional effect.
For the delicate wings, outline them with a single strand of gray or off-white, then fill with sparse, open buttonhole stitches to mimic translucency.
This combination of textures is how you turn everyday nature into stunning art.
3. Master Geometric Fills with Satin Stitch
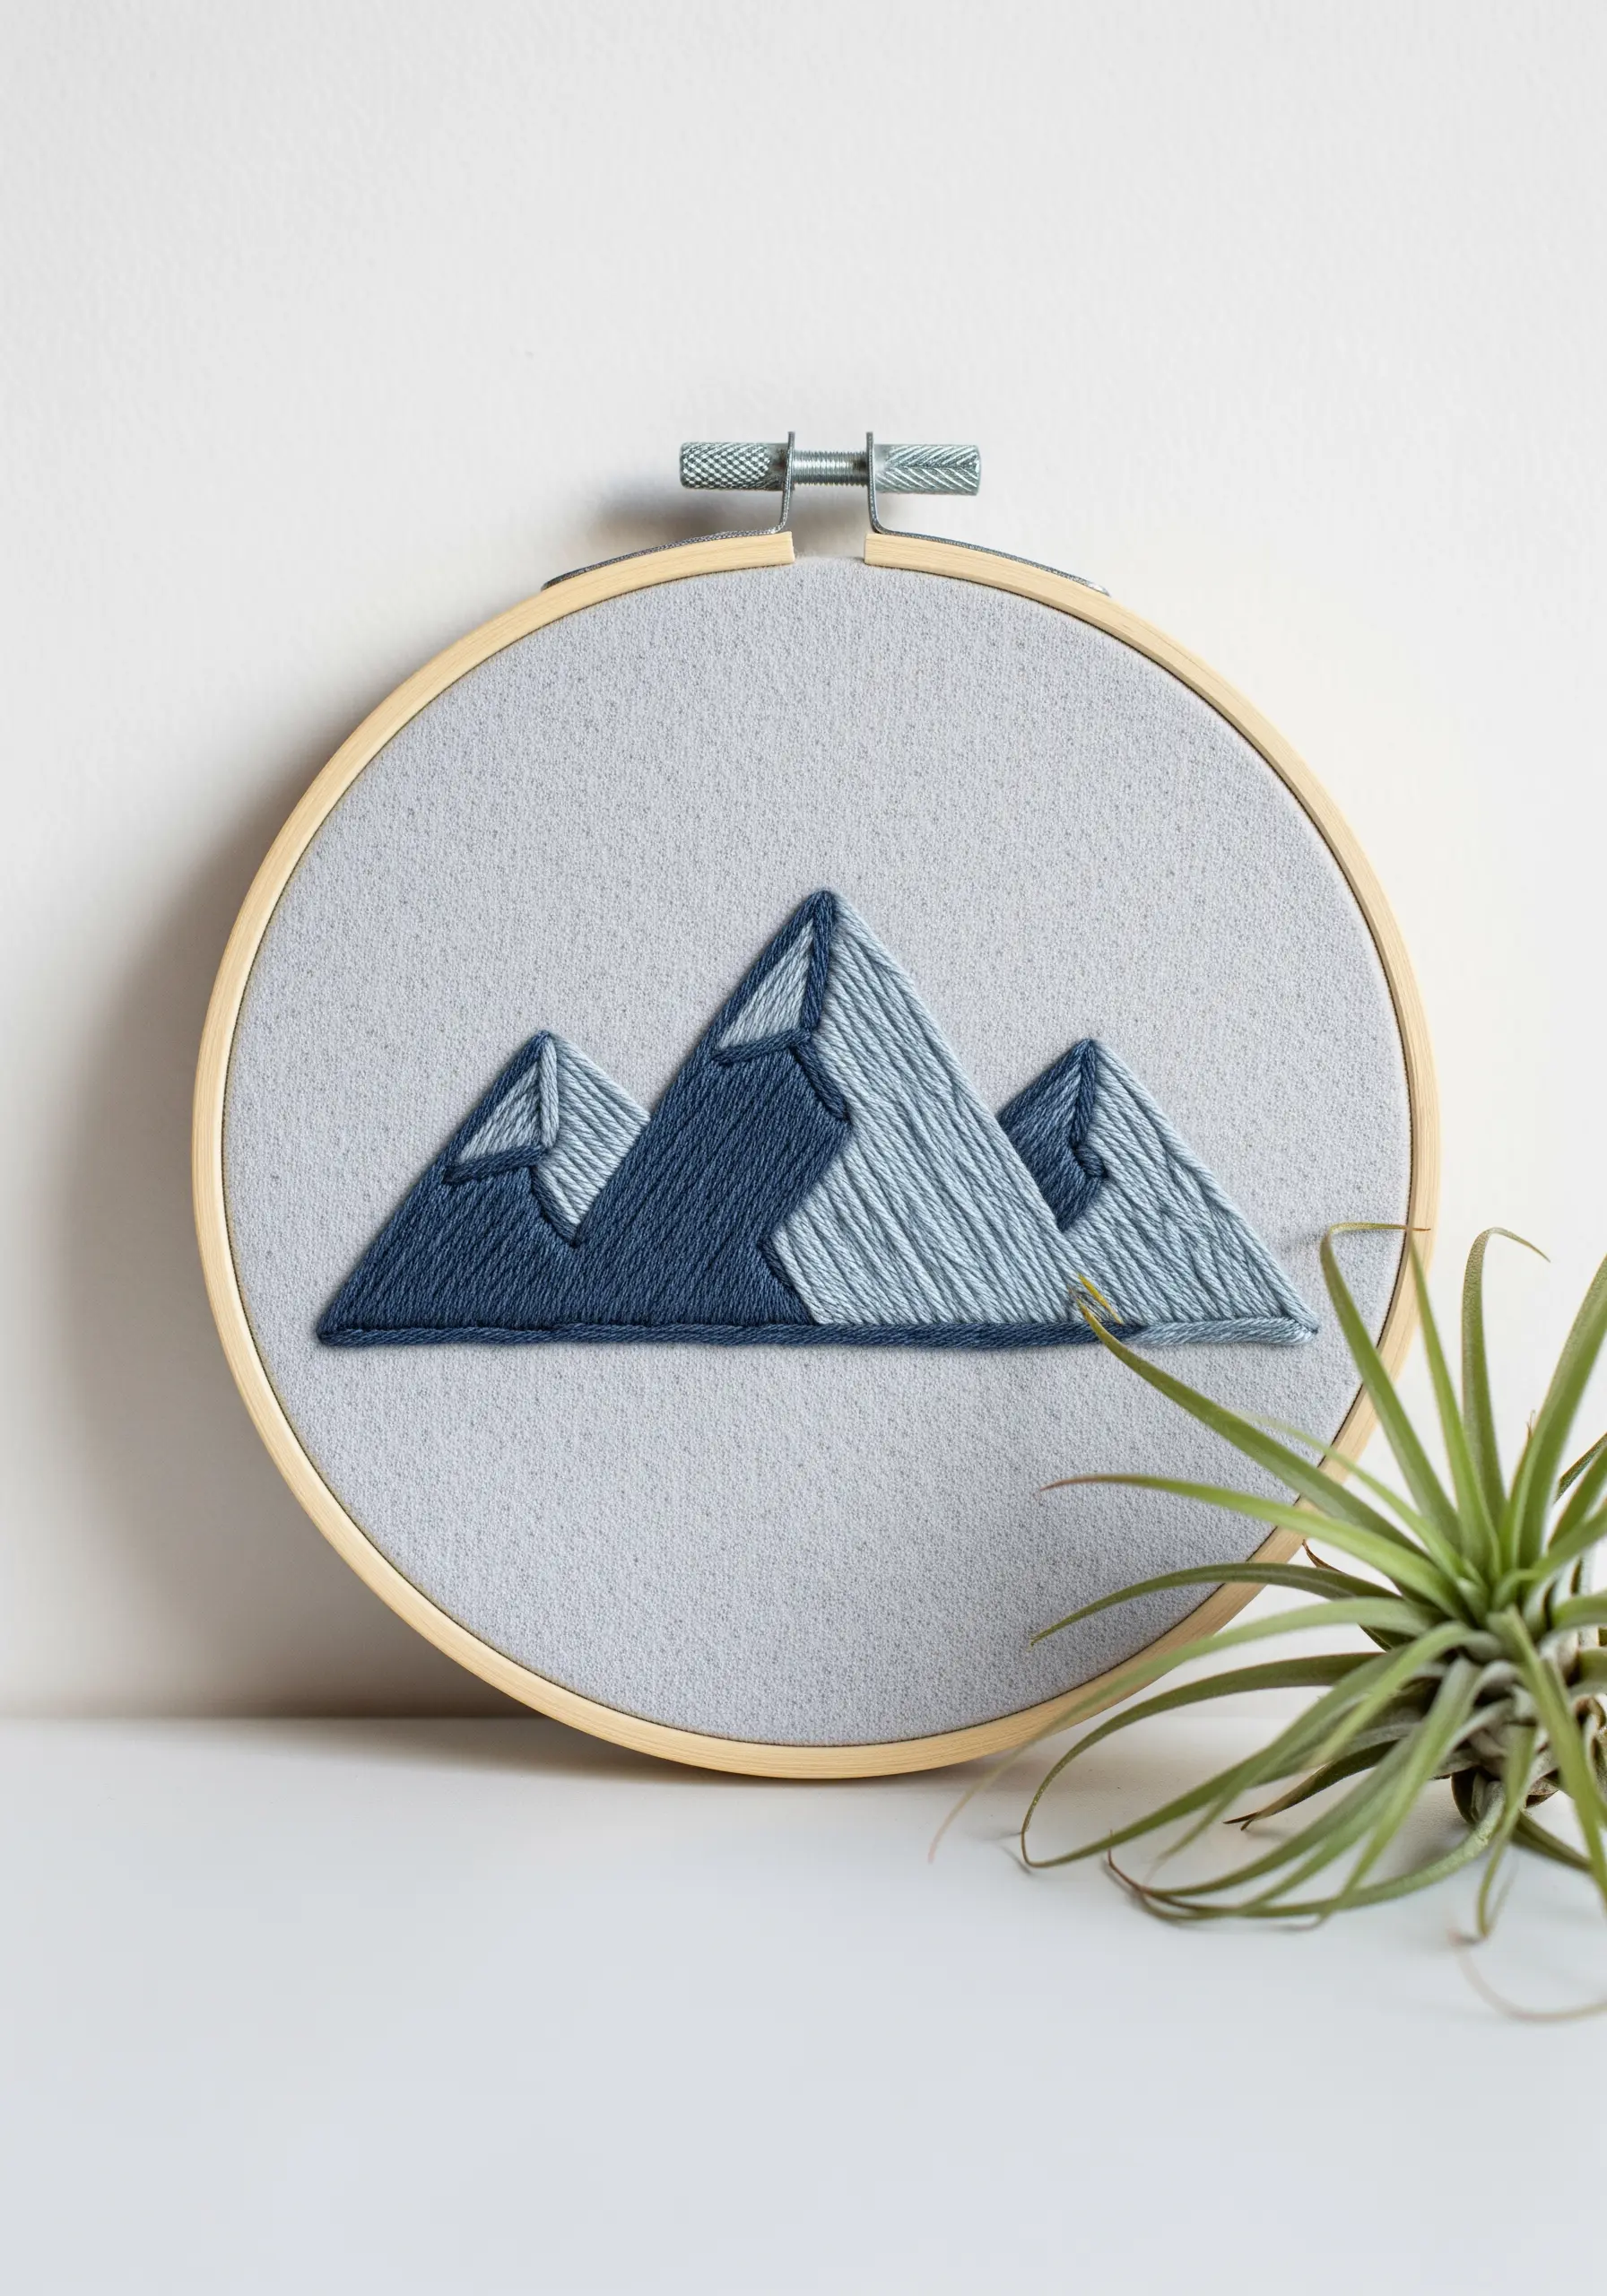
For clean, graphic mountainscapes, the direction of your satin stitch is everything.
Keep your stitches perfectly parallel within each distinct color block to create a smooth, solid surface that reflects light uniformly.
Before you begin, draw faint guide lines with a pencil to ensure your stitches don’t drift.
Using a tonal color palette—three or four shades of the same color—gives the geometric shapes a sophisticated, minimalist look perfect for modern decor and mimics the feel of mountain landscape thread painting.
4. Create Luminous Texture on Dark Fabric
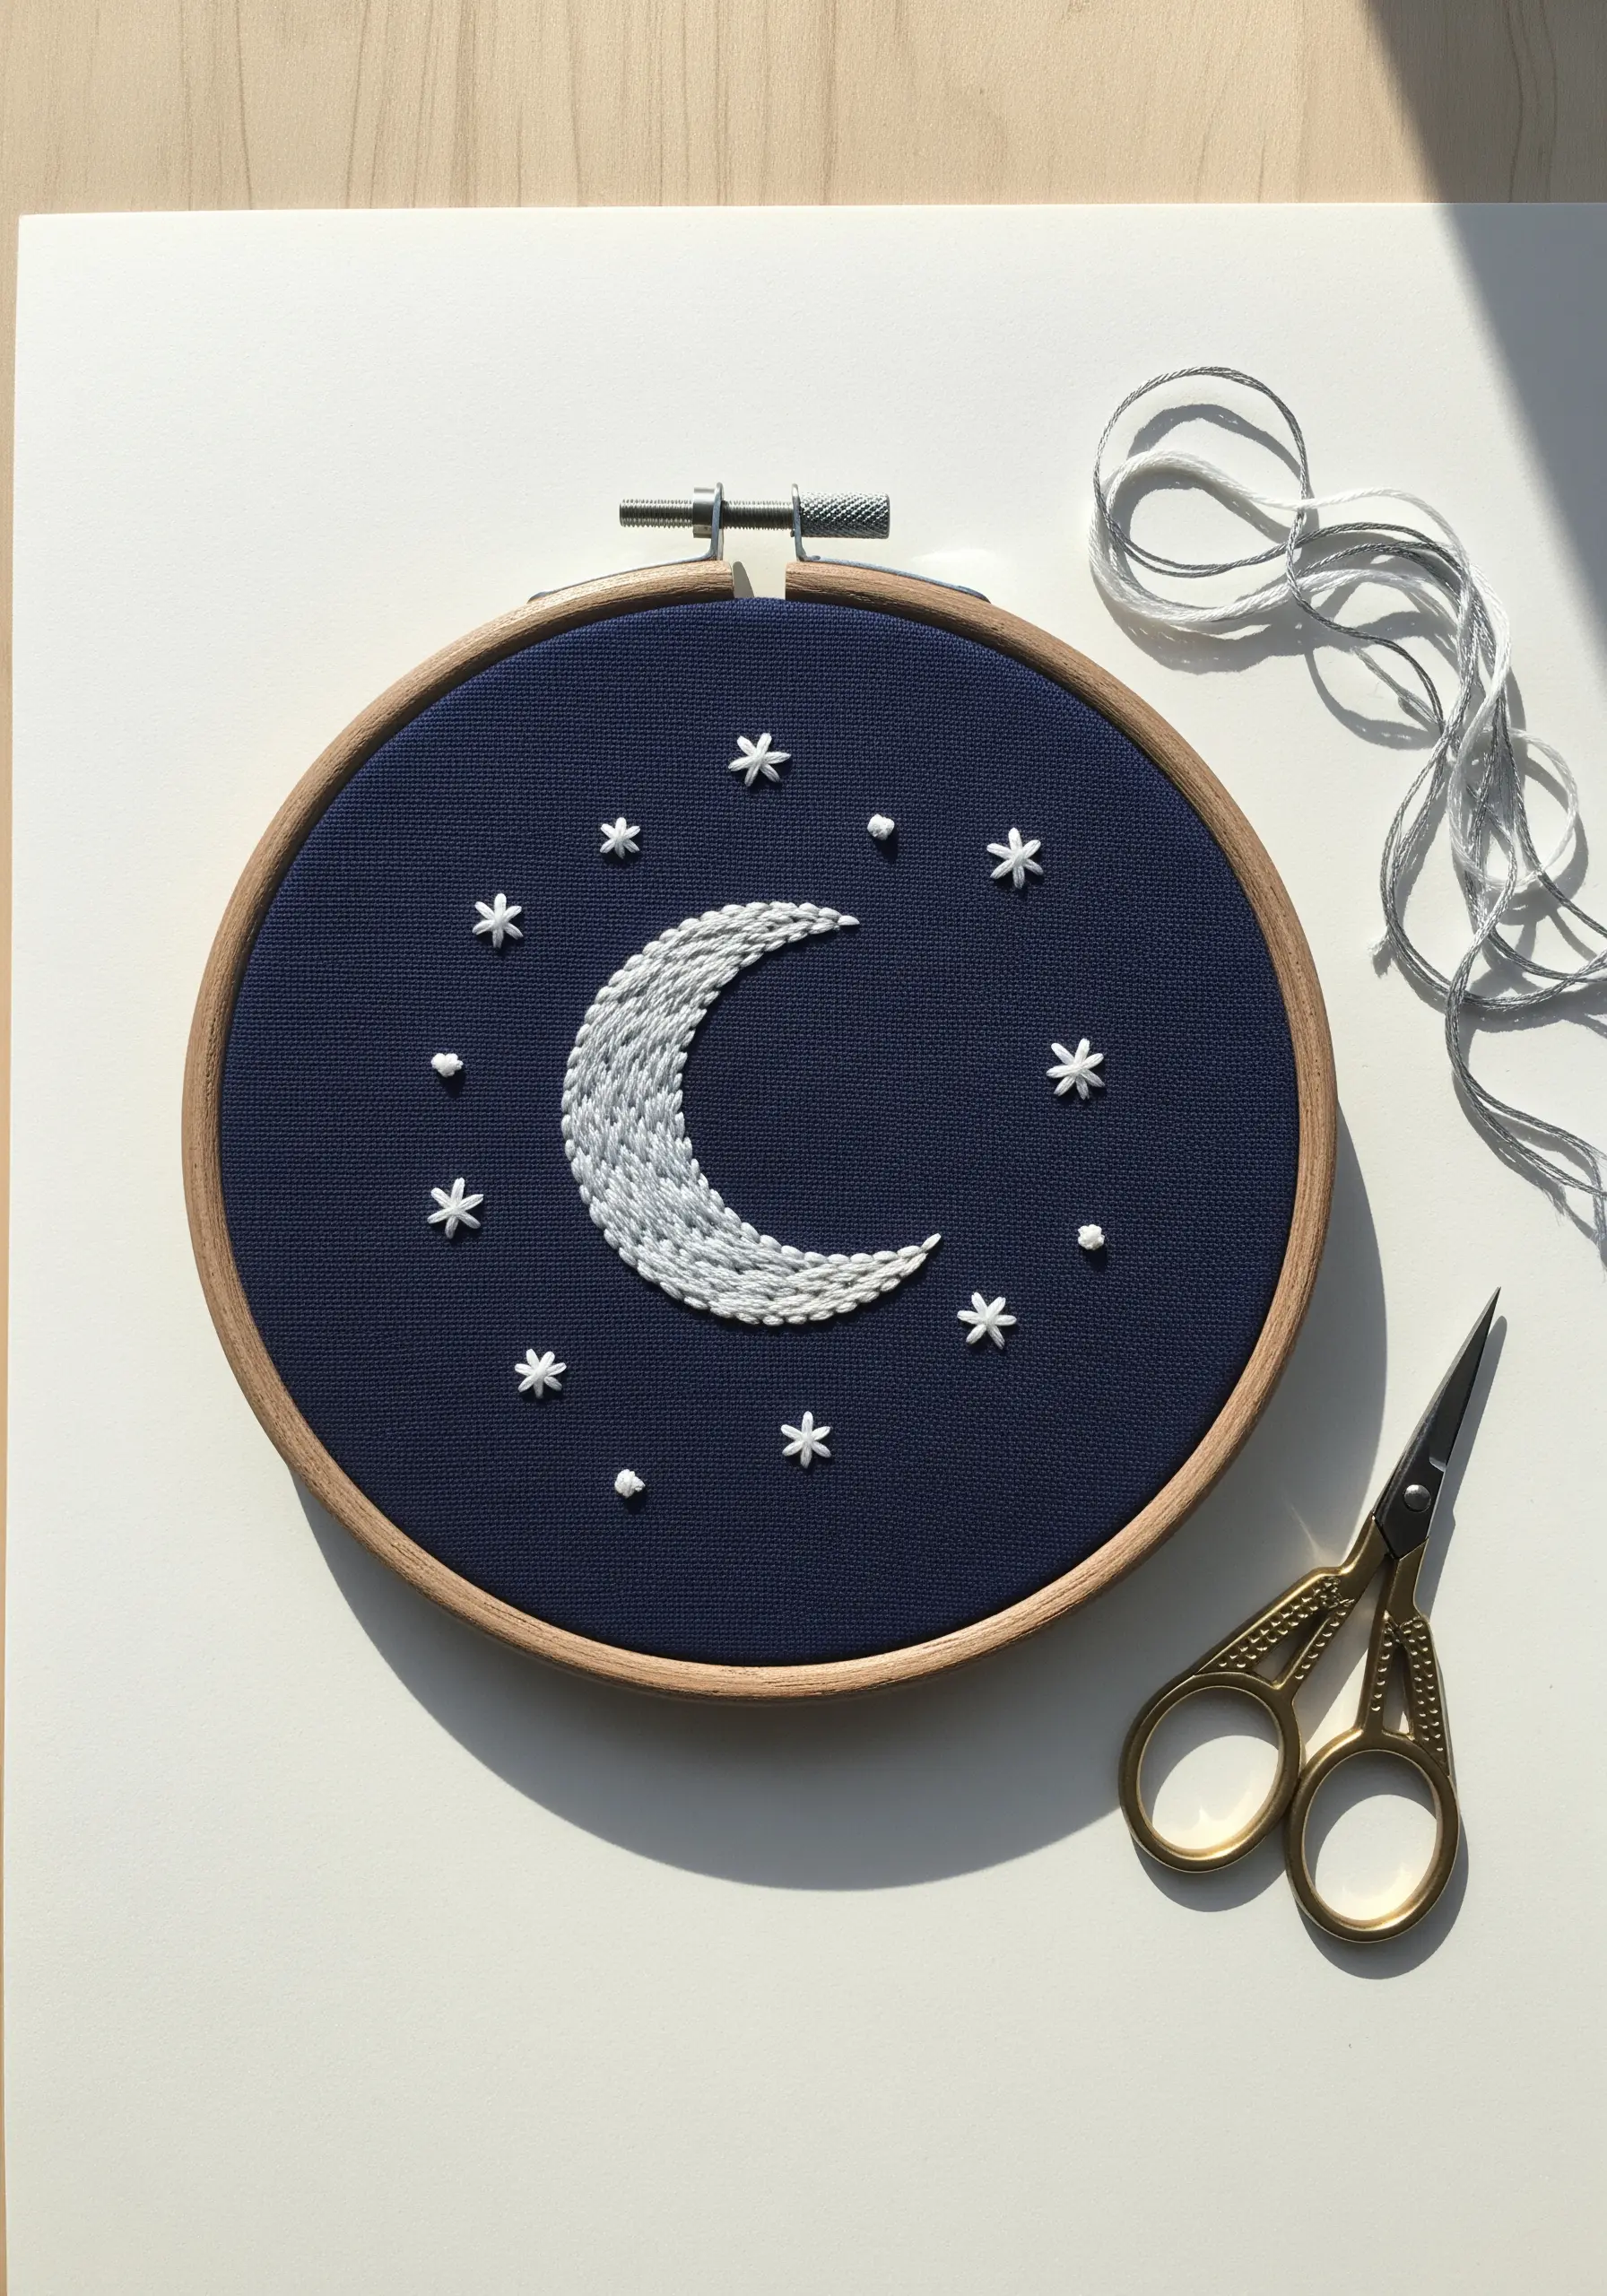
Make your celestial designs glow by choosing a high-contrast background like navy or black cotton.
Instead of a flat satin stitch for the moon, use a woven wheel stitch or layer short satin stitches in a brick pattern to create a cratered, dimensional surface.
For the stars, use a single strand of metallic silver thread to stitch simple star knots or tiny straight stitches; this adds a subtle sparkle that catches the light.
The combination of rich texture and metallic accents creates a truly magical piece.
5. Build Playful Dimension with Mixed Stitches
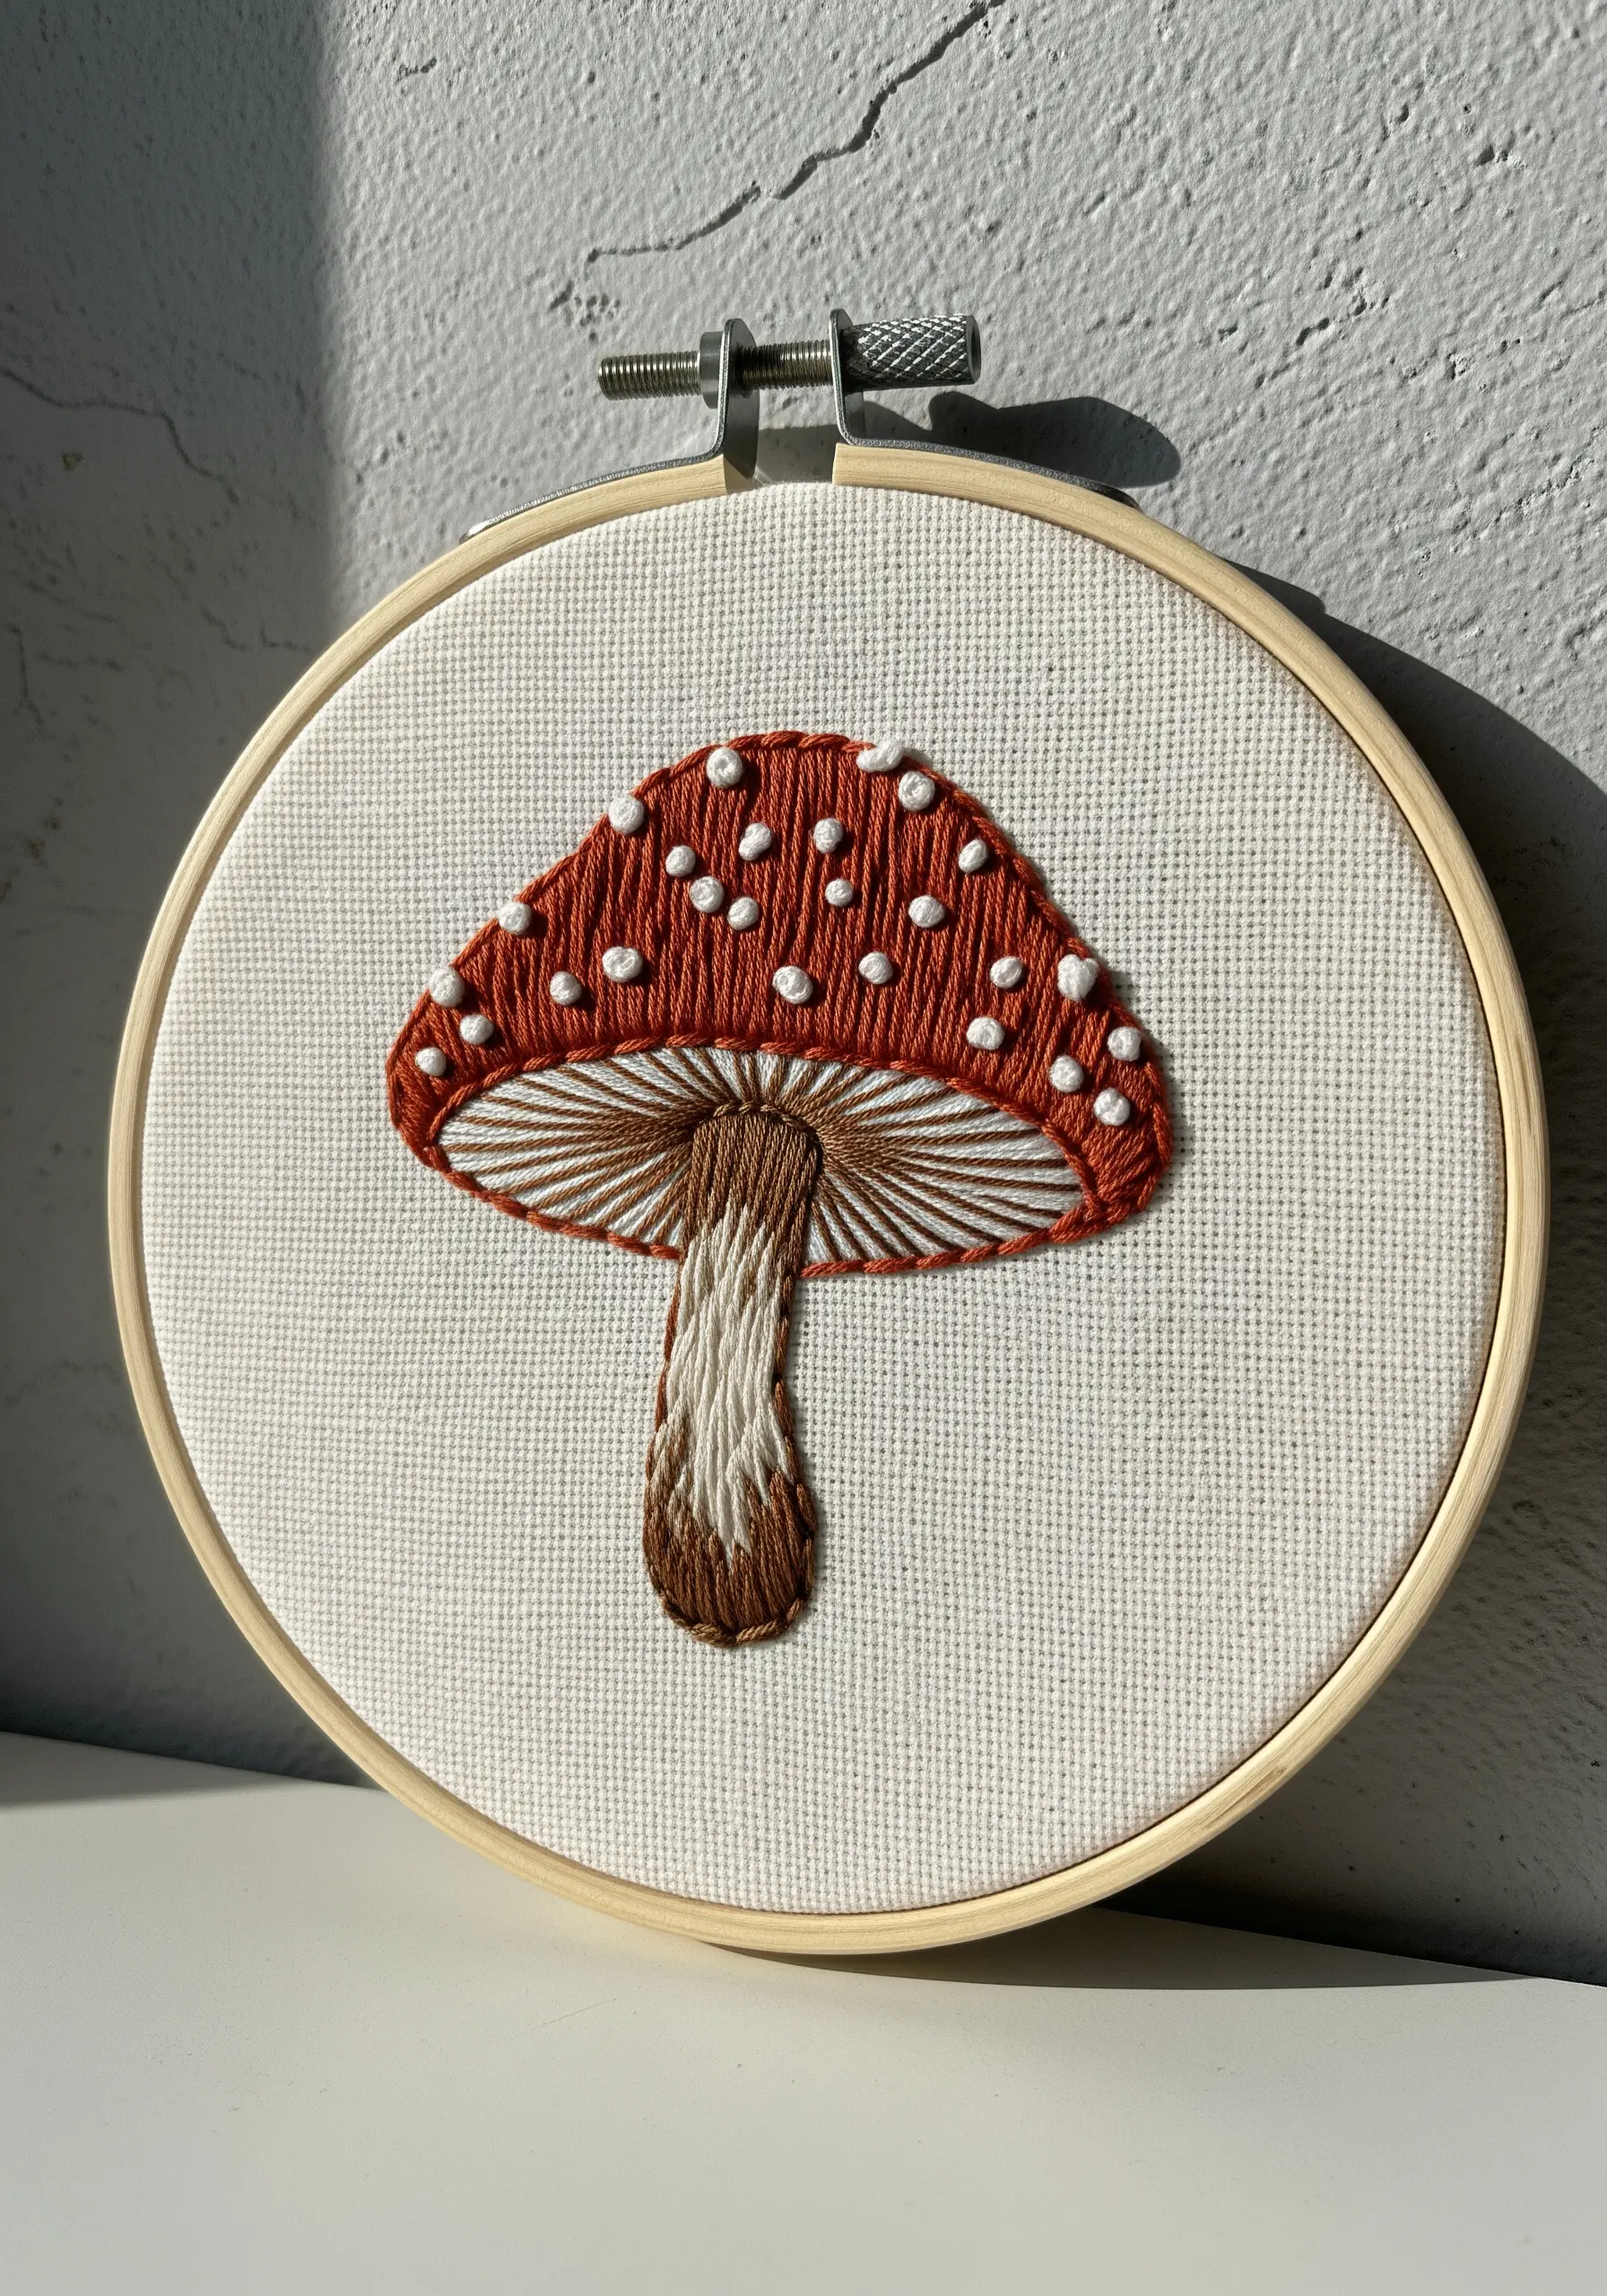
Combine different stitches to give a simple mushroom motif character and depth.
Use raised satin stitch for the cap, but instead of leaving it flat, add scattered French knots for the iconic white spots—this immediately creates a three-dimensional effect.
For the gills underneath, use long, straight stitches fanning out from the center to create the illusion of shadow.
This thoughtful mix of textures turns a simple shape into a captivating piece of forest floor botanical art.
6. Refine Your Linework with Split Stitch
For elegant, single-line designs, precision is paramount.
Instead of backstitch, which can sometimes appear disjointed, use a split stitch for a continuous, rope-like line that looks incredibly smooth and professional.
Work with two or three strands of floss to give the line just enough weight without becoming bulky.
This technique is perfect for minimalist thread art ideas where the quality of the line itself is the main focus.
7. Convey Energy with Radiating Straight Stitches
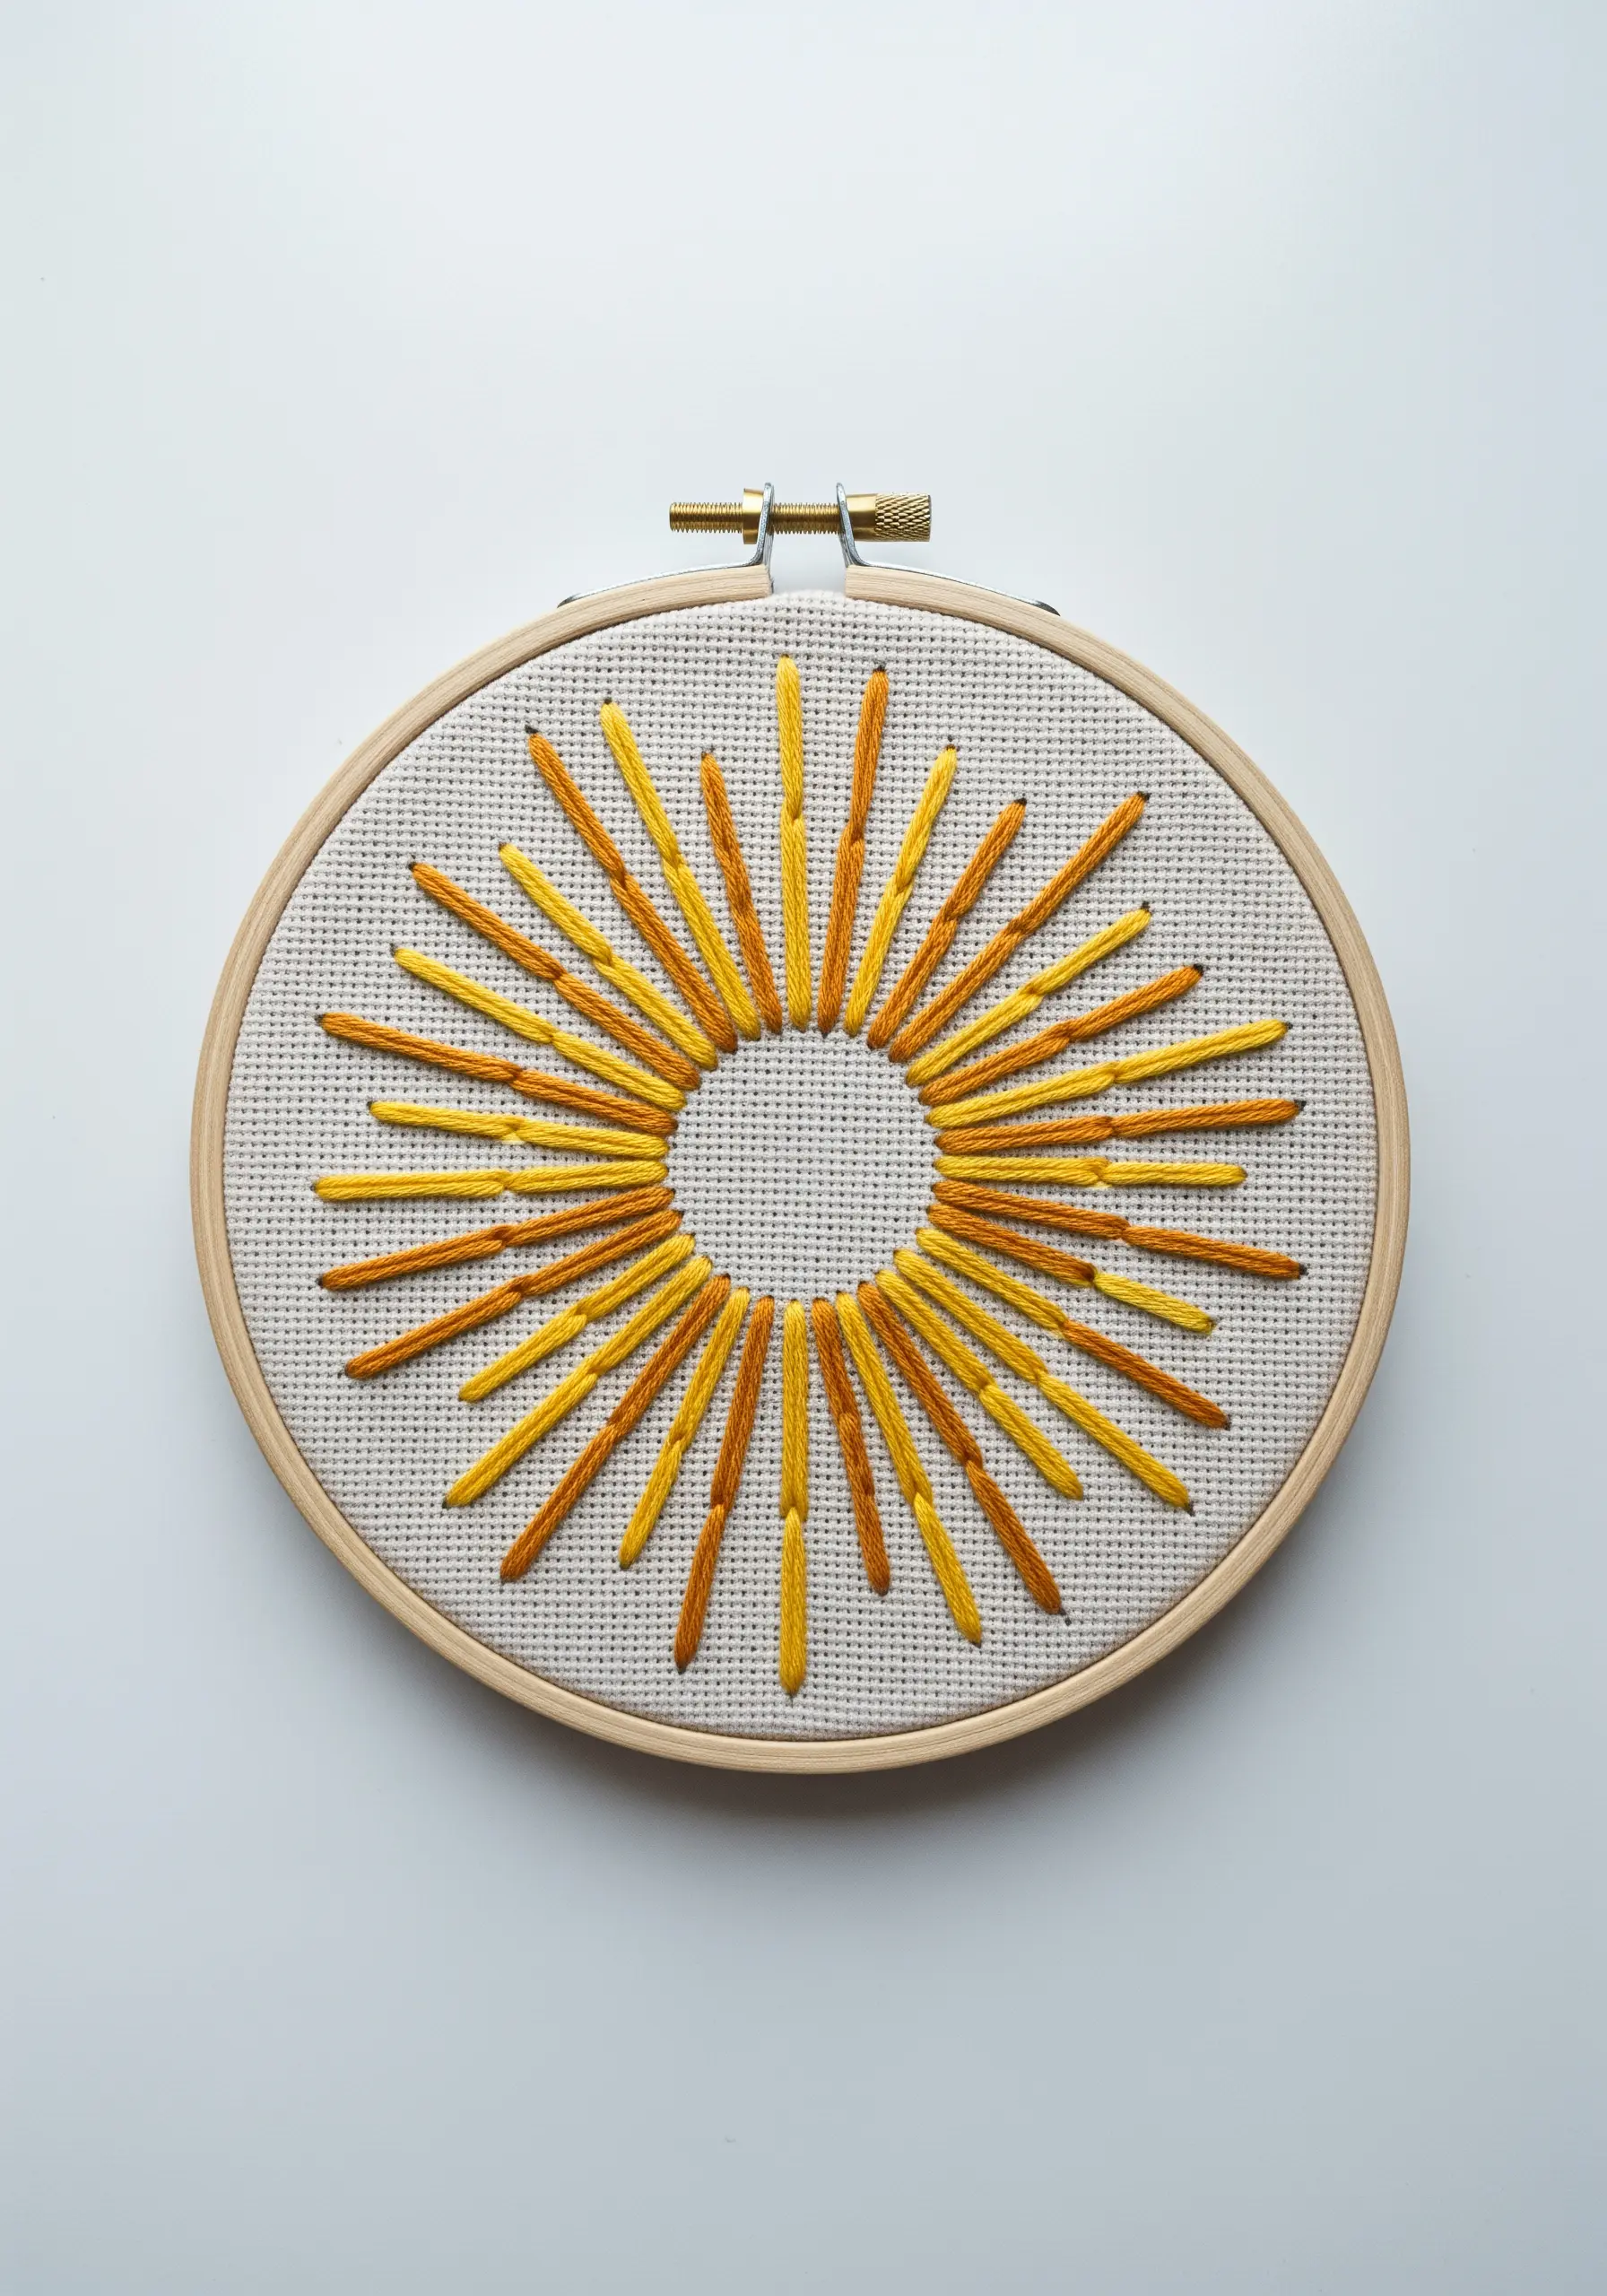
Transform simple straight stitches into a dynamic sunburst by focusing on length and color.
Create a central circle as your guide, then stitch rays of varying lengths radiating outward.
Alternate between two or three complementary colors, like gold and yellow, to add warmth and movement.
The slight irregularity in length and color is what makes the design feel energetic and alive, rather than static and perfect.
8. Capture Delicacy with Detached Stitches
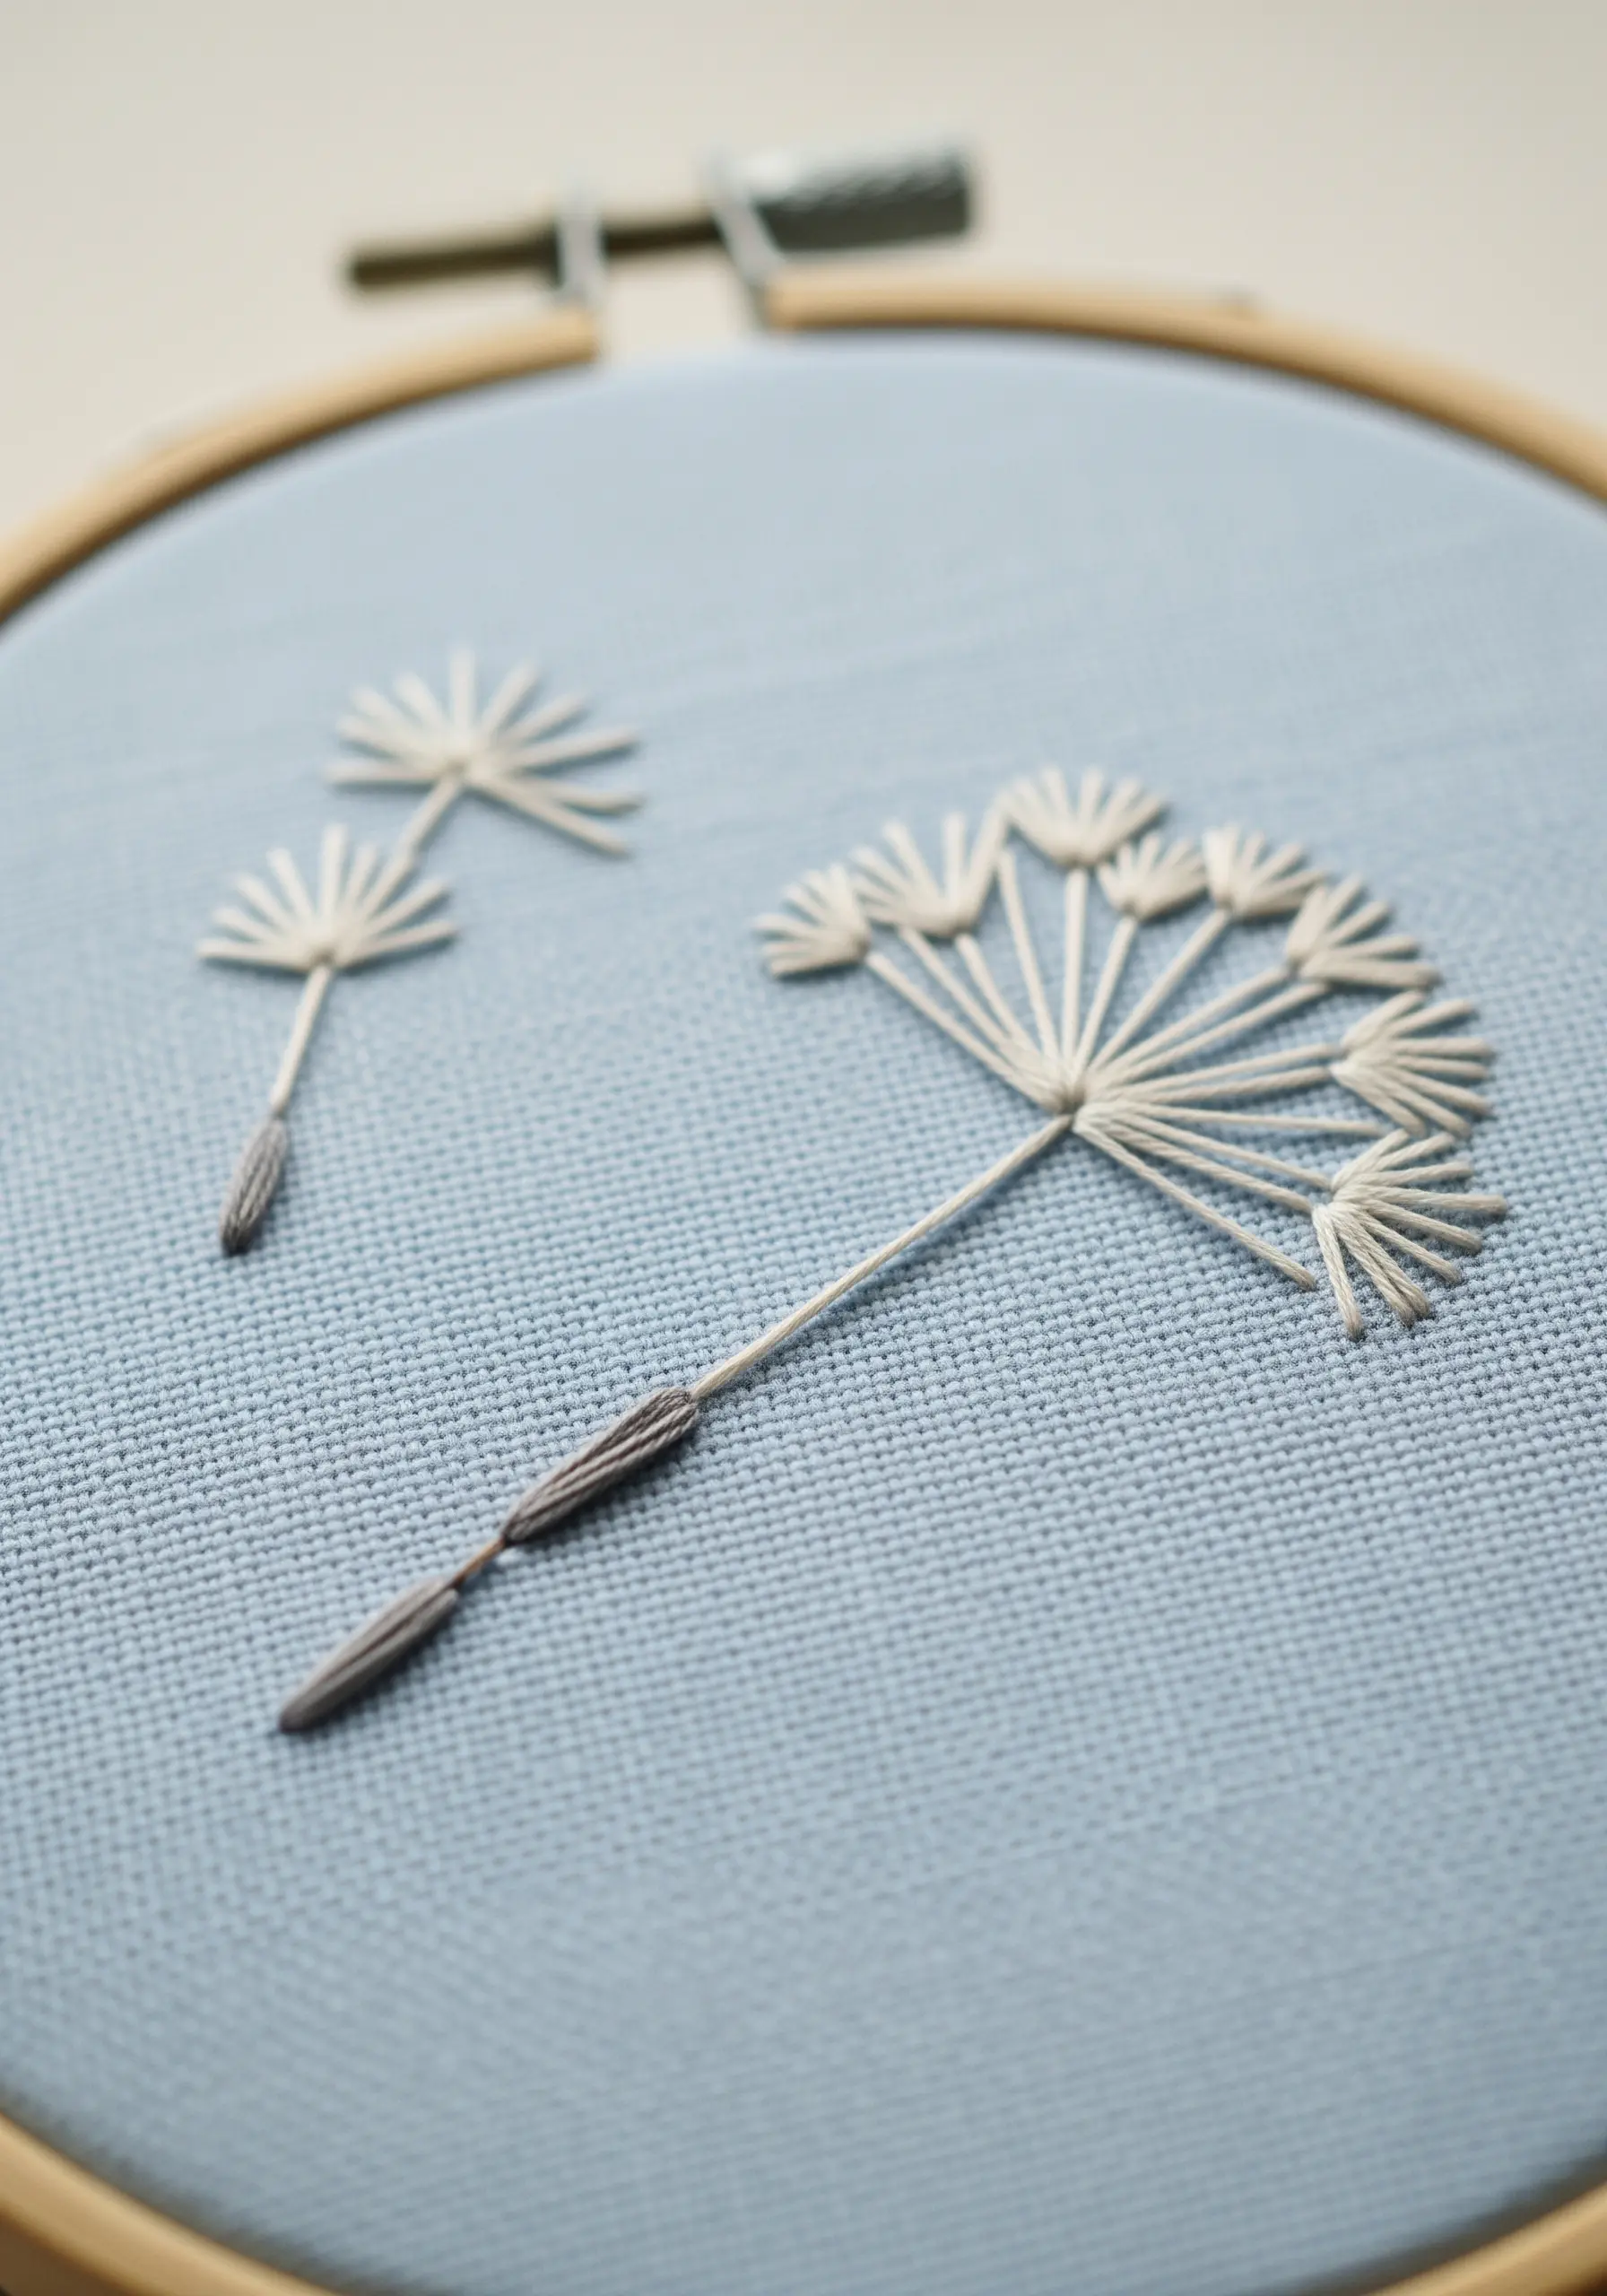
To embroider something as light and airy as a dandelion seed head, you need to embrace negative space.
Use detached straight stitches—often called seed stitches—fanning out from a central point to create the fluffy pappus.
Keep the stitches sparse and use a fine, single-strand thread to maintain a delicate feel.
For the stem, a tightly worked whipped backstitch provides a solid anchor, enhancing the visual lightness of the seeds and making for beautifully whimsical floral embroidery.
9. Perfect Your Satin Stitch with an Outline
If you struggle with getting a clean, sharp edge on your satin stitch, here is the solution: outline the shape first.
Use a split stitch to create a raised border around your entire design.
Then, when you fill the shape with satin stitch, bring your needle up just outside the outline and down just inside it on the other side.
This technique contains your fill stitches, resulting in a perfectly smooth, defined edge every time.
10. Make an Impact with Minimalist Star Knots
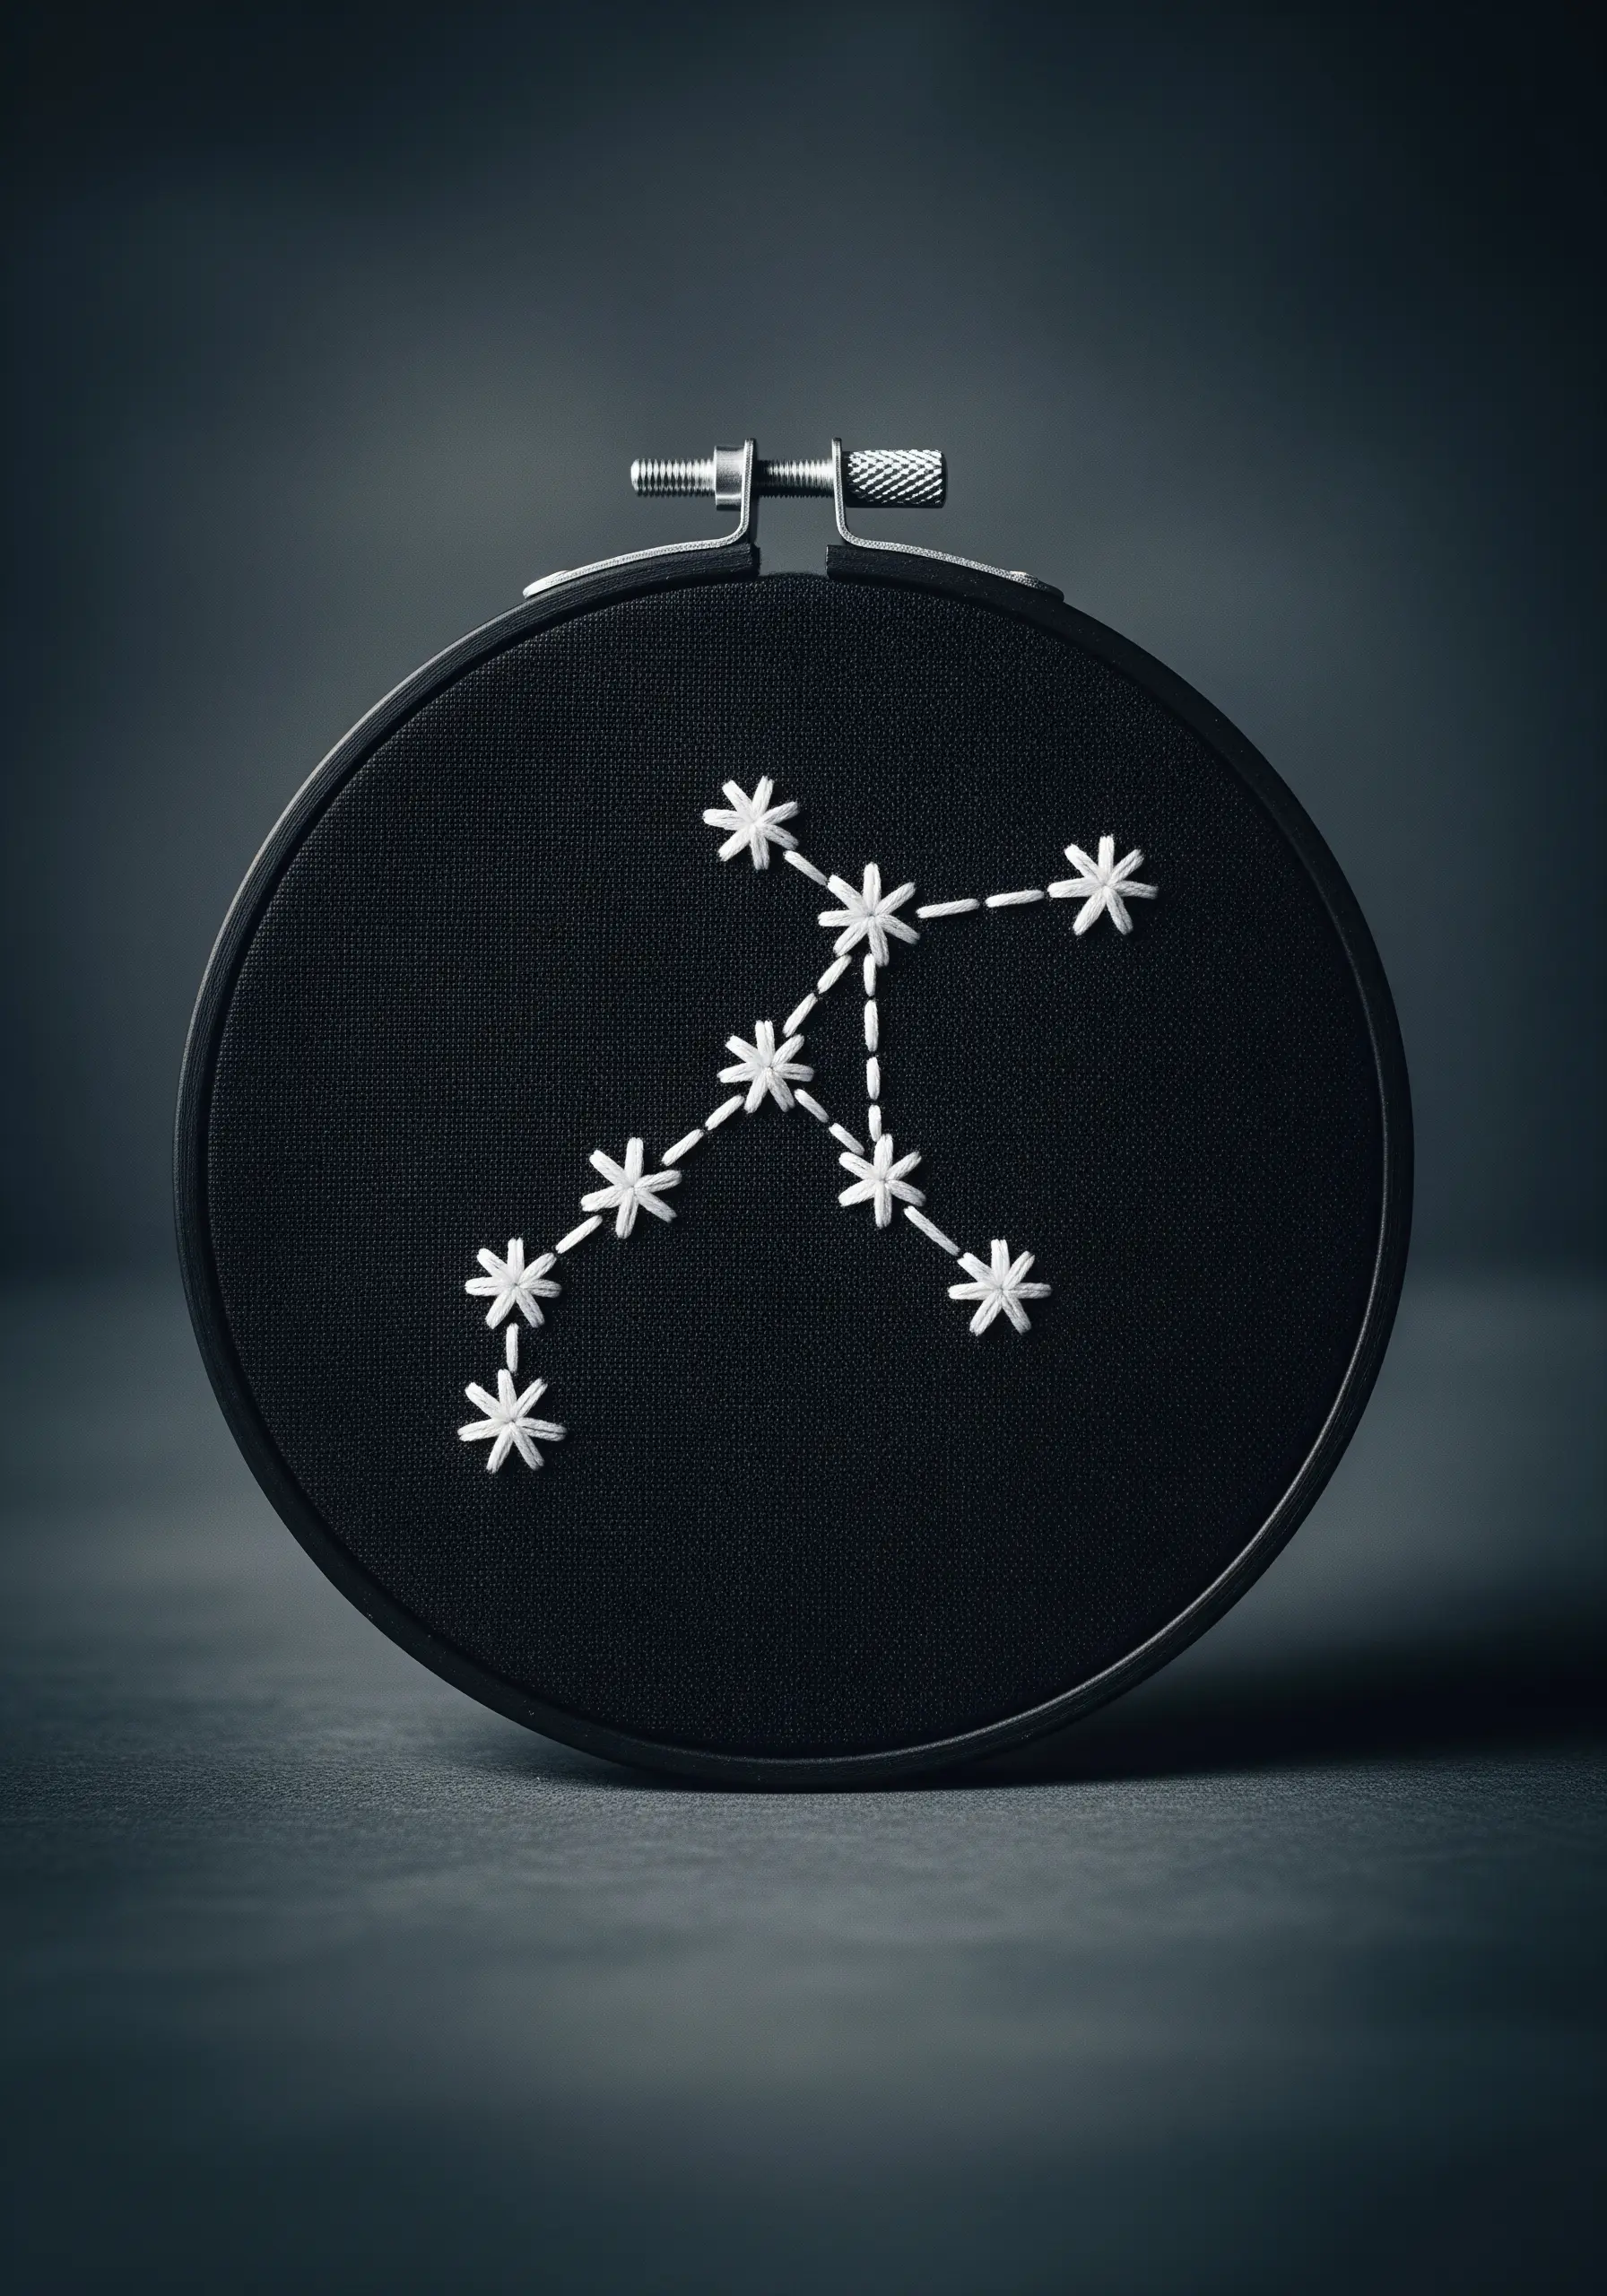
On a dark, dramatic background, you don’t need complex stitches to make a statement.
Create a constellation using simple star stitches (also known as Algerian eye stitches) for the stars, which are faster and more uniform than French knots.
Connect them with a dashed running stitch to map out the shape without adding visual clutter.
Using a bright white or silver thread on black fabric creates a high-contrast, graphic look that is both modern and timeless.
11. Elevate a Rainbow with a Muted Palette
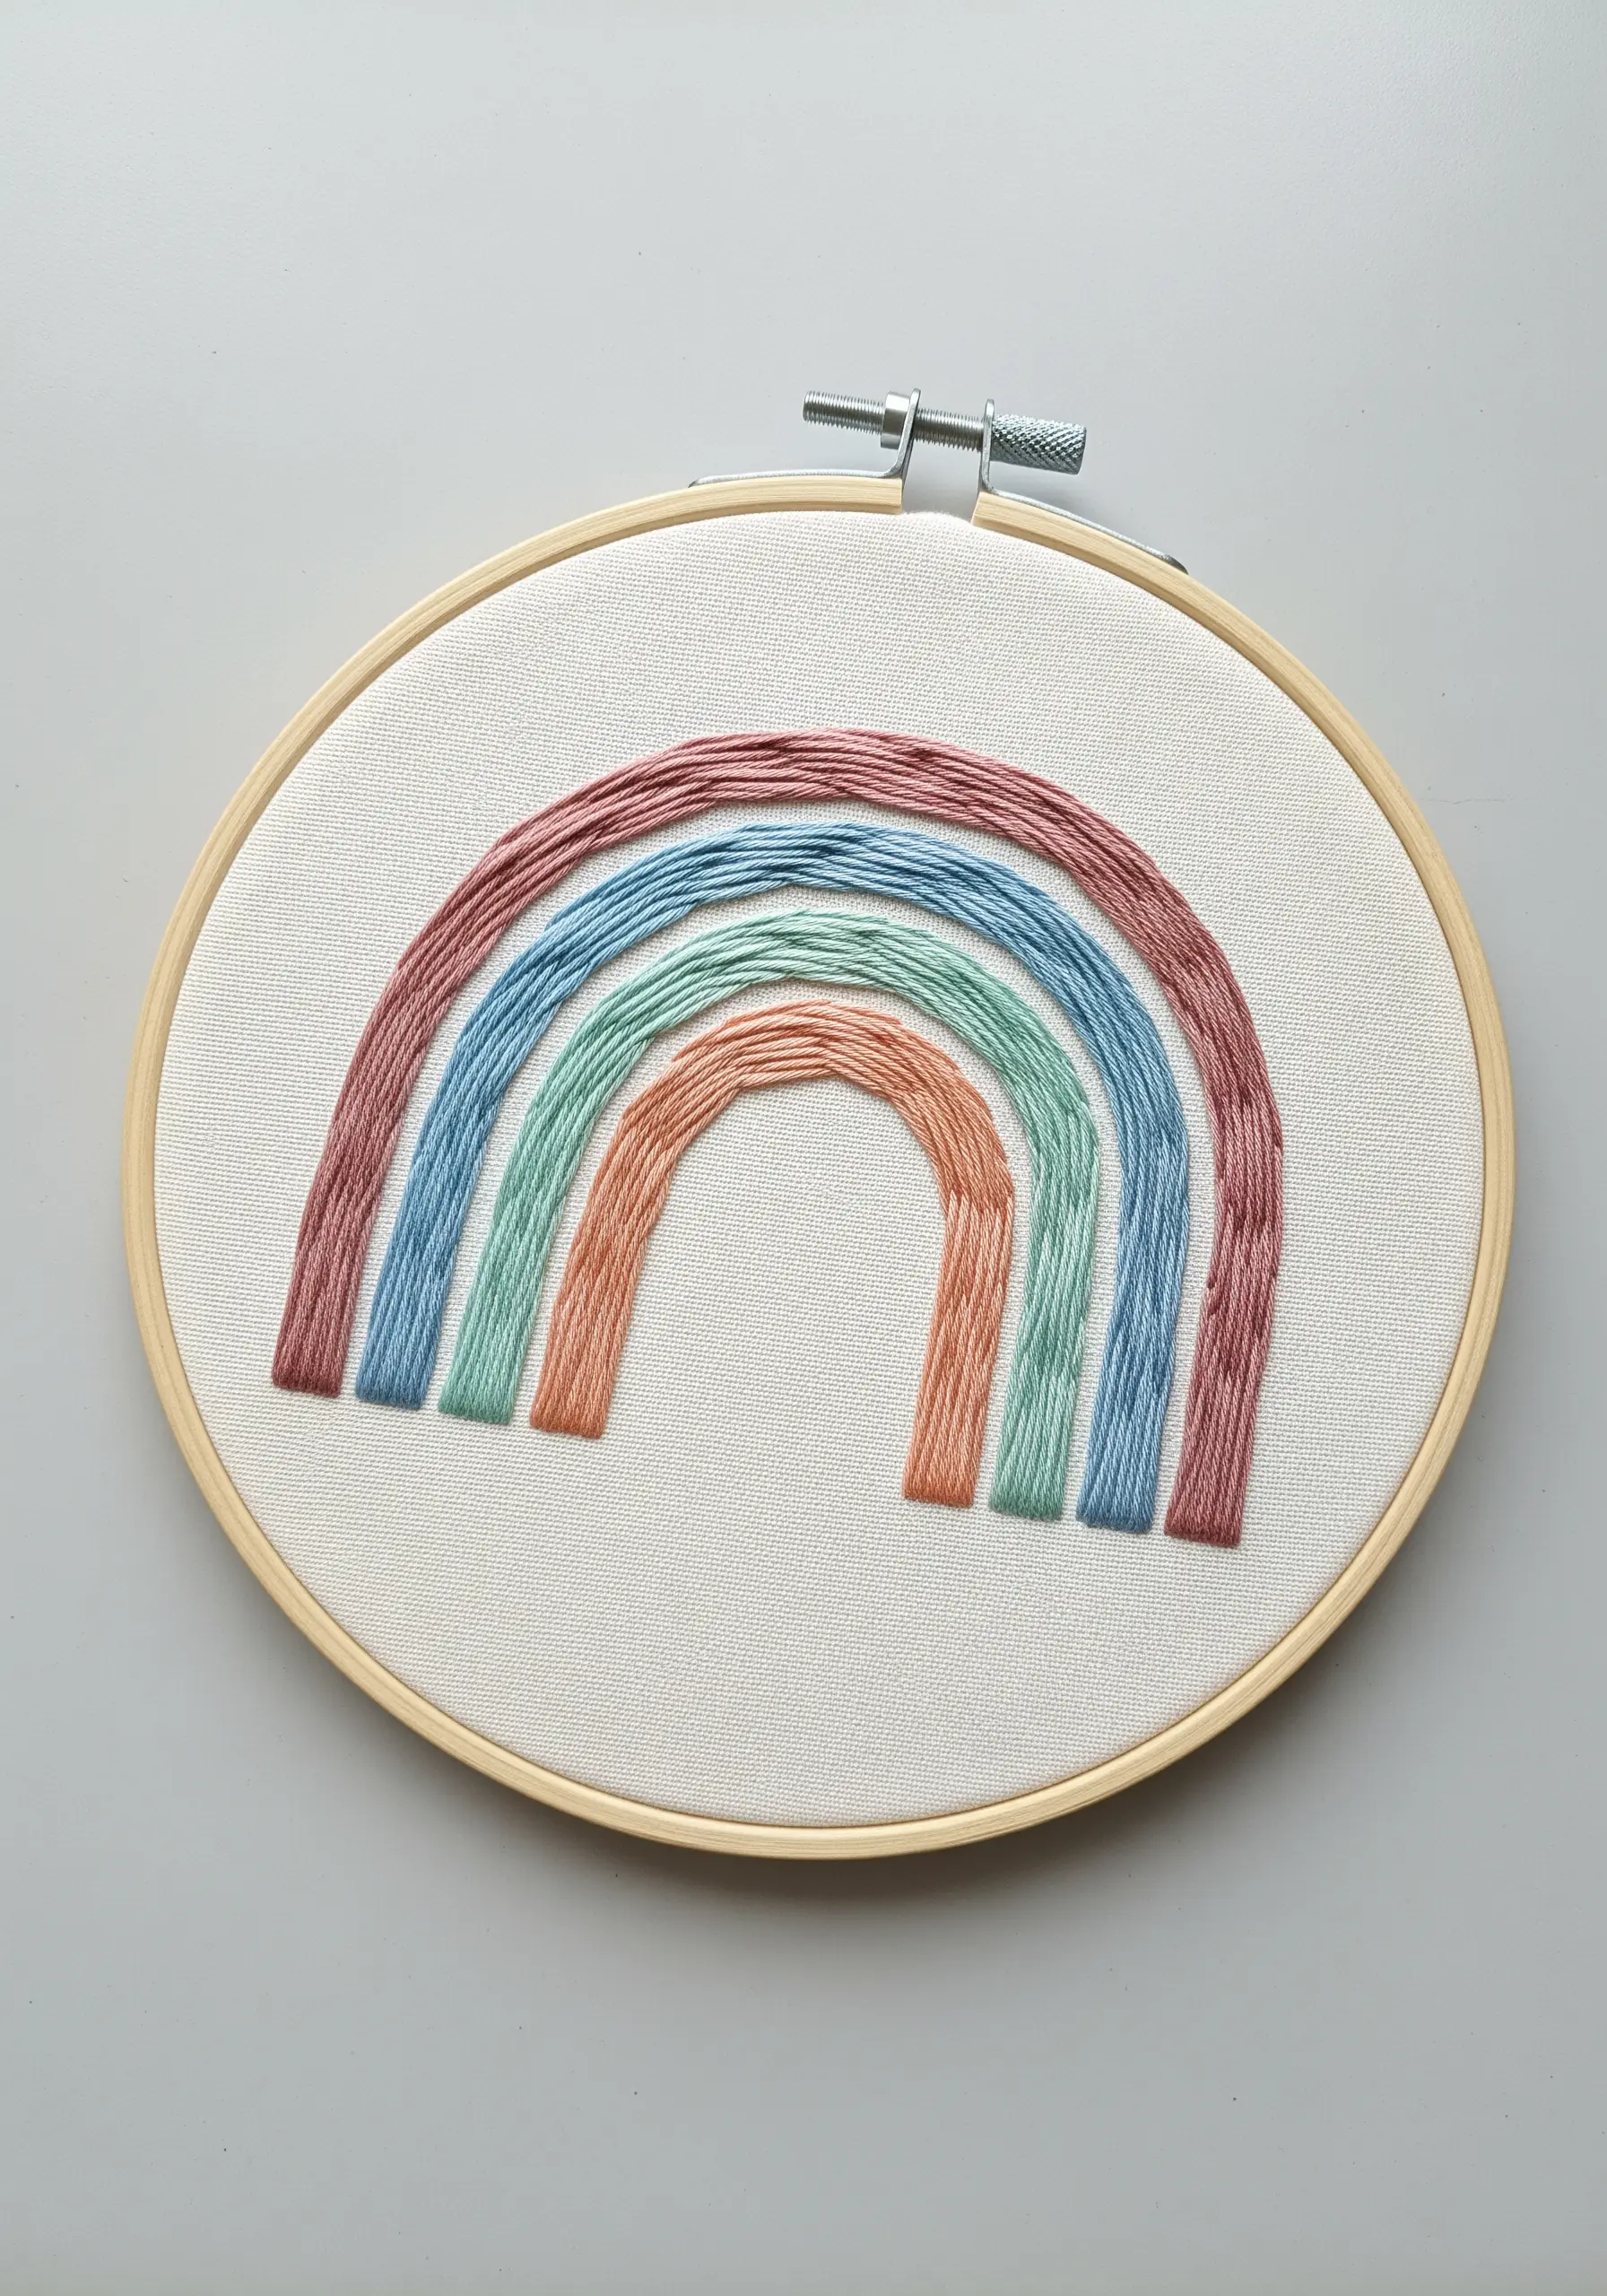
A rainbow motif can be instantly elevated from playful to chic by adjusting your color palette.
Instead of traditional primary colors, choose a range of muted, earthy, or desaturated tones.
Focus on creating beautifully smooth satin stitch bands—using four strands of floss will help you fill the space more quickly while maintaining a plush texture.
This thoughtful color choice turns a simple design into a sophisticated piece of wall art.
12. Create Definition with Contrasting Stitches
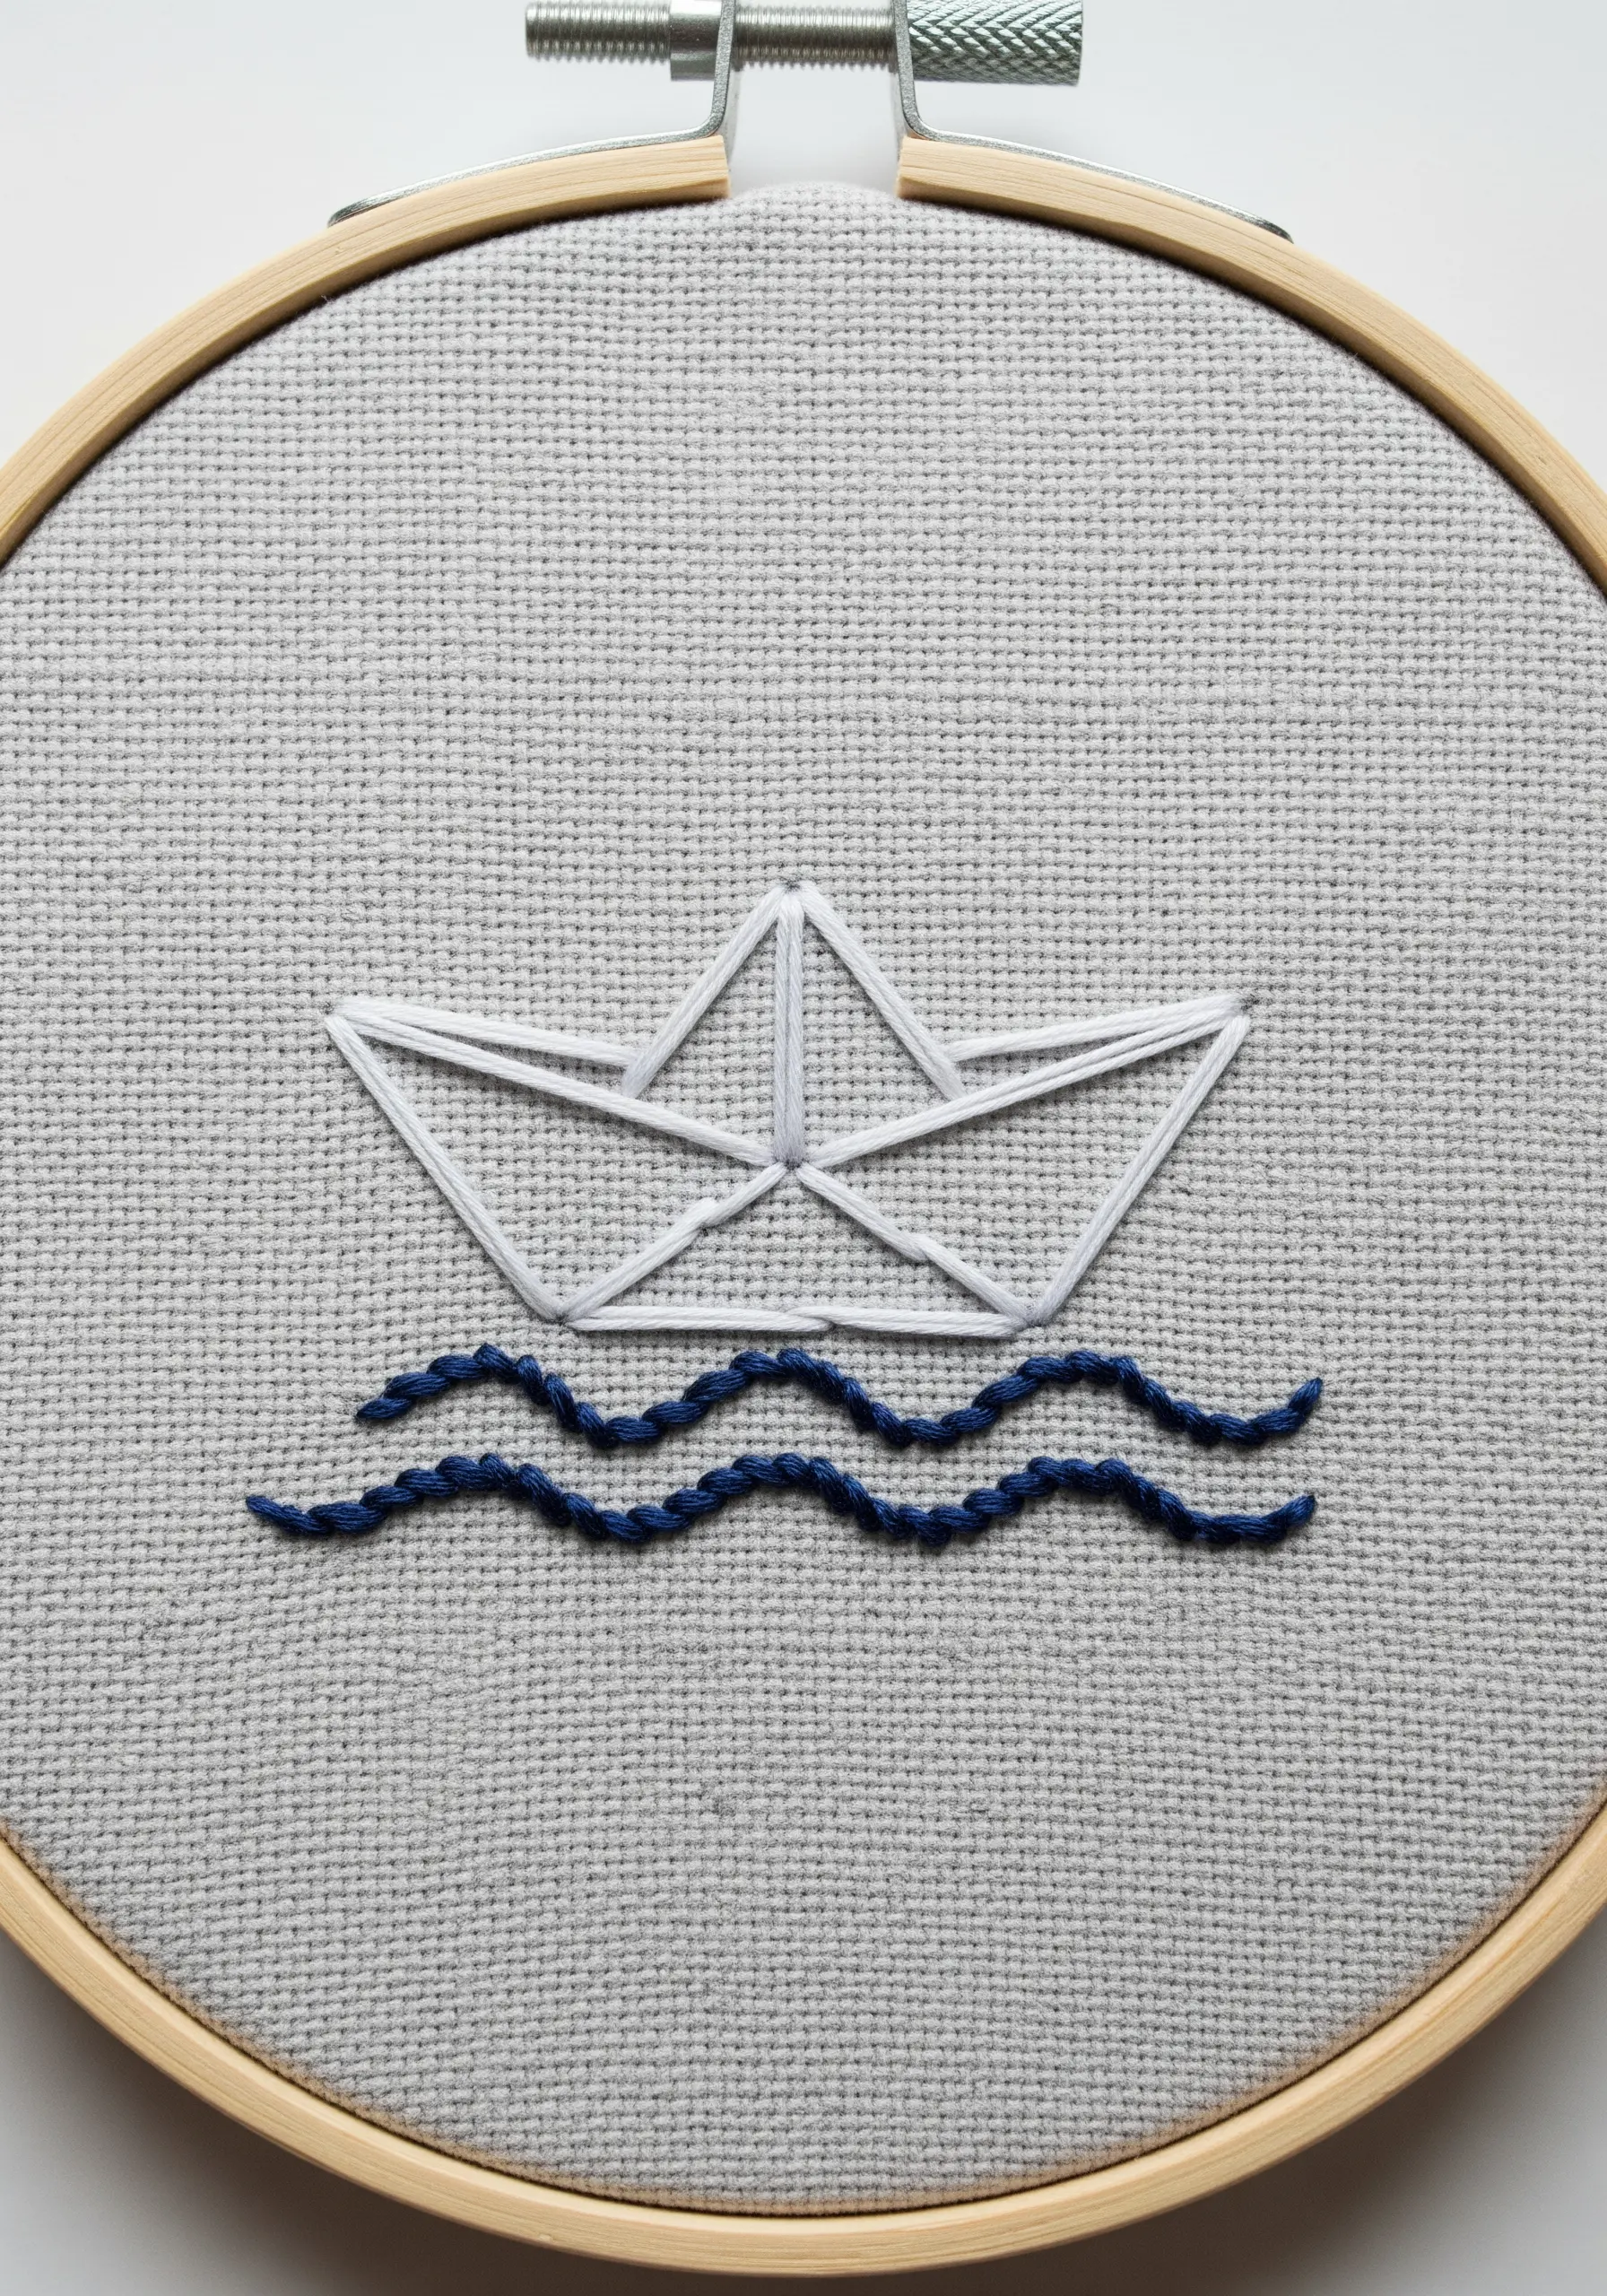
To make a simple line-art design pop, use two different but complementary stitches.
For the crisp, folded lines of the paper boat, a clean backstitch using a single strand of white floss works perfectly.
Then, for the water, switch to a thicker thread (3-4 strands) and use a stem stitch or chain stitch to create a wavy, textured line.
This contrast in stitch style and thread weight adds visual interest and clearly defines the two different elements of the design.
13. Emphasize Form with Radiating Long Stitches
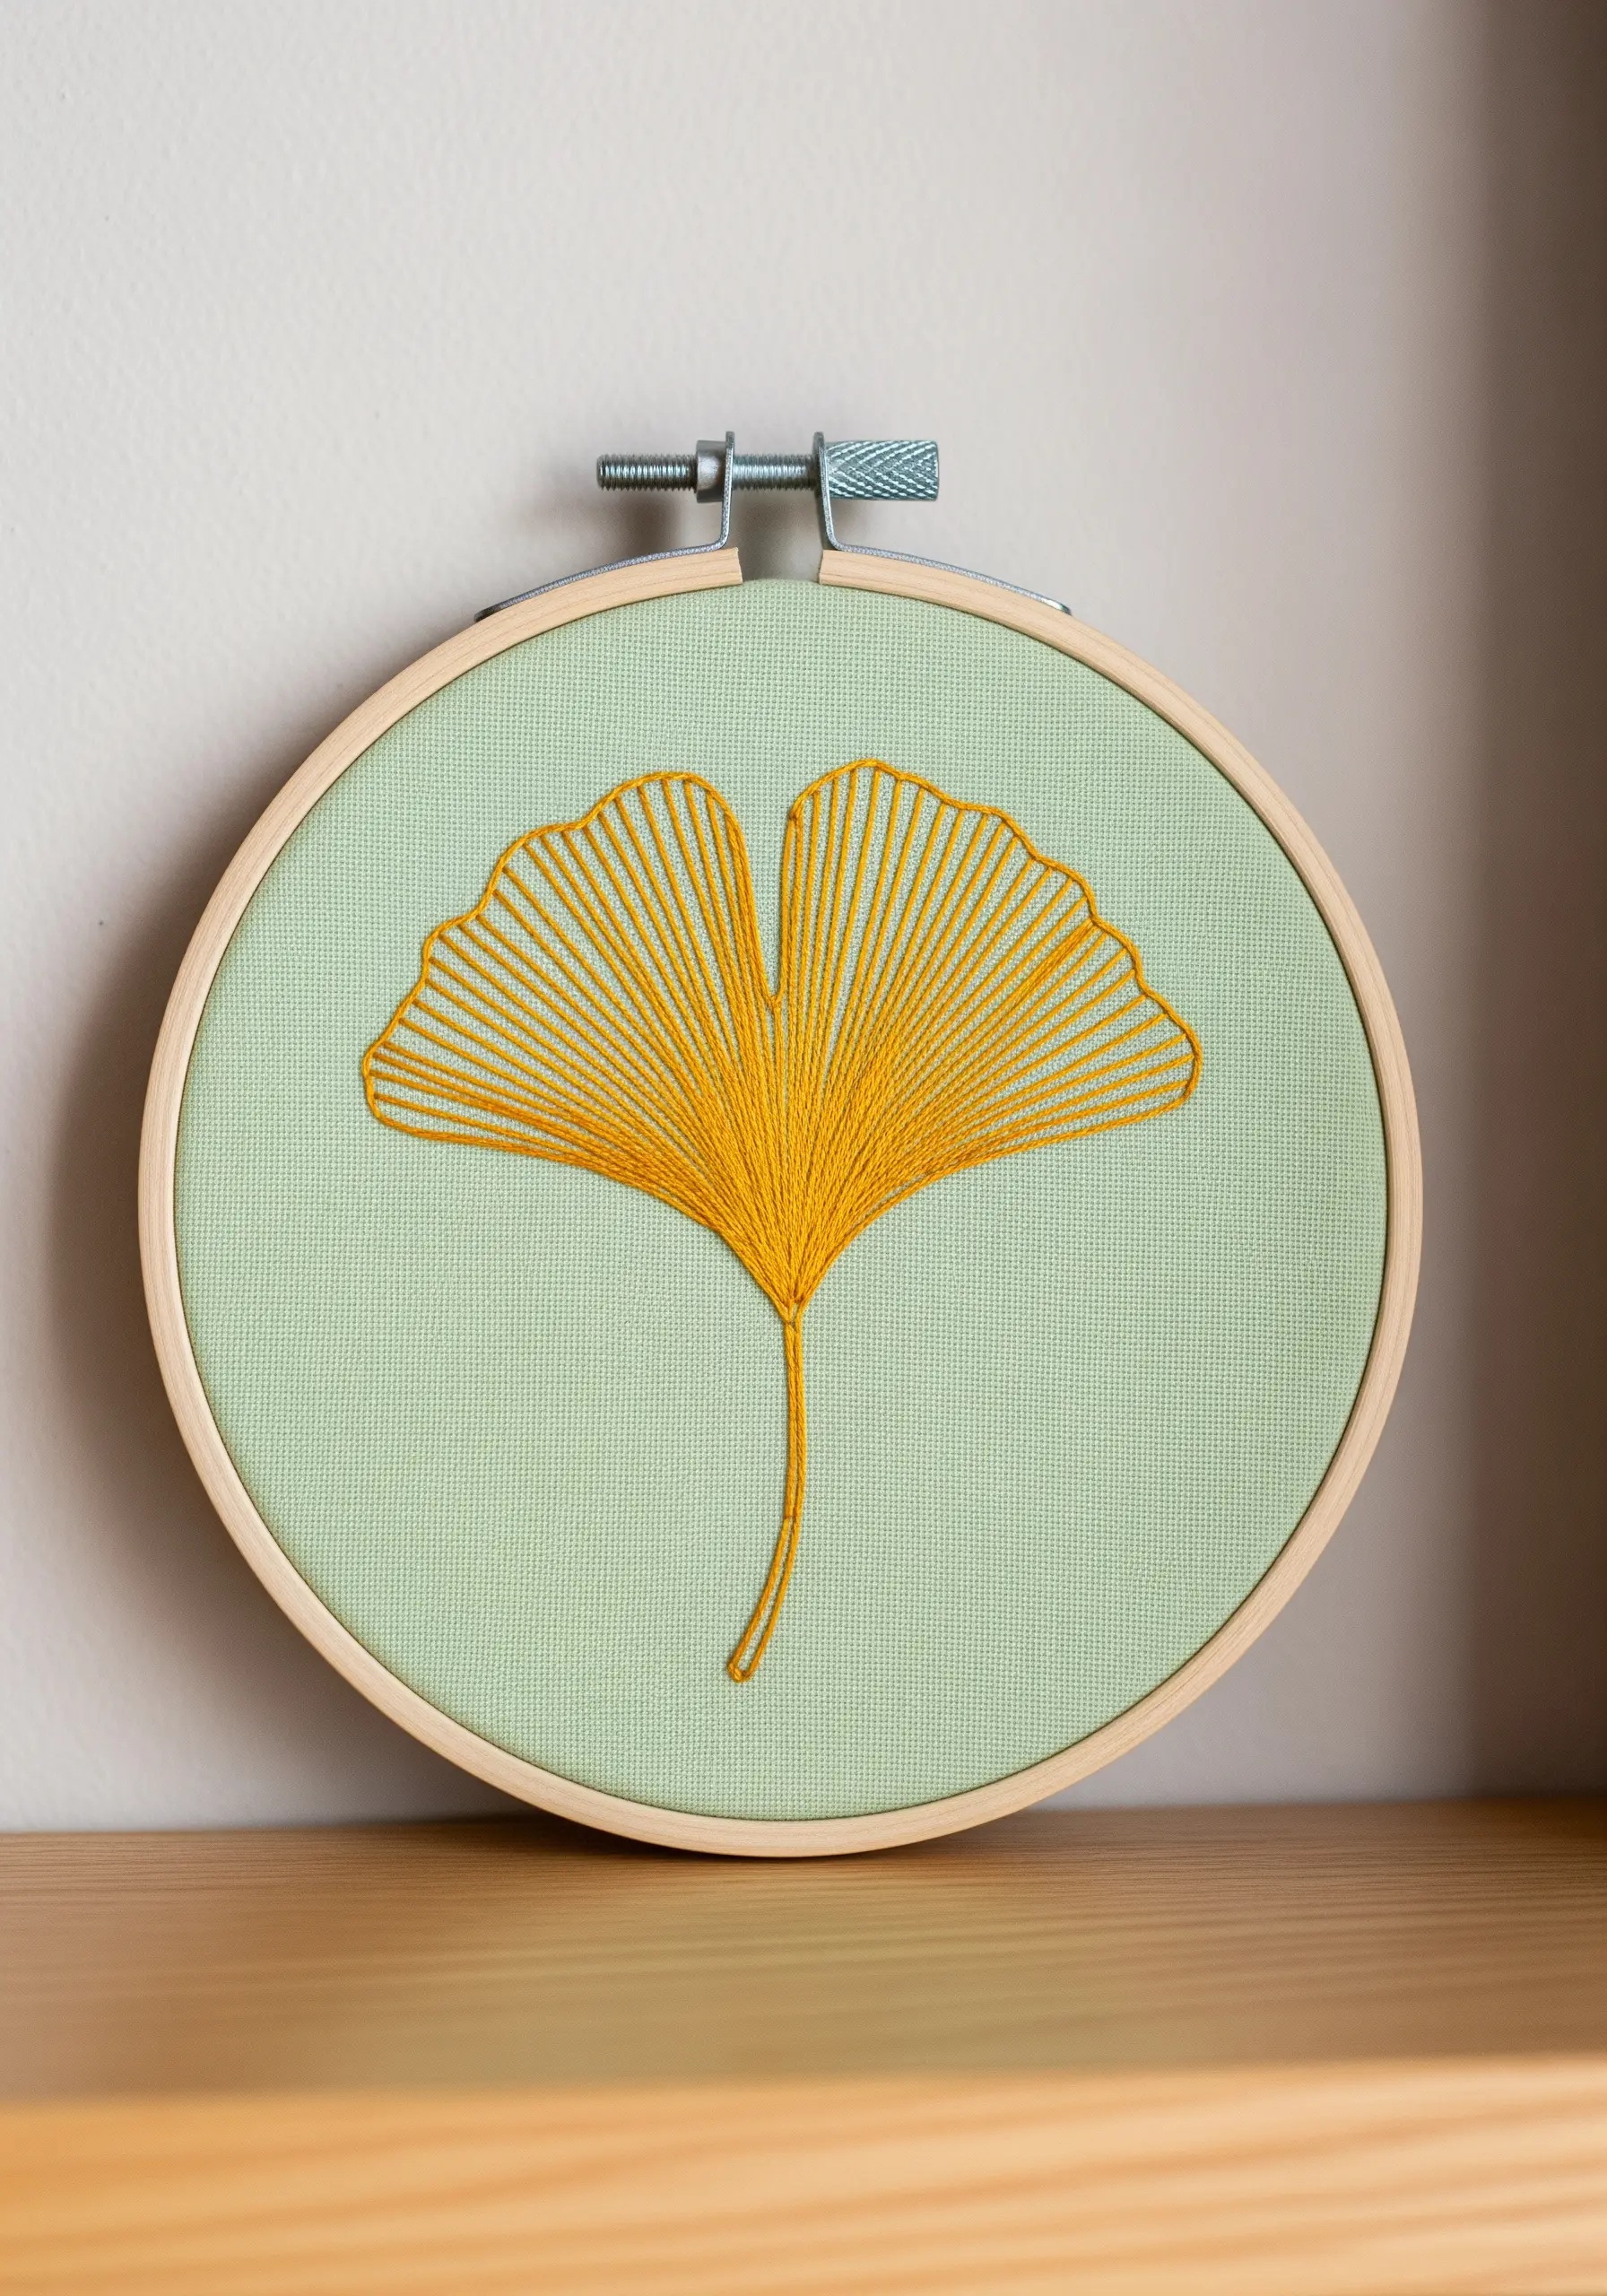
For a ginkgo leaf, the beauty lies in its elegant, fan-like shape. You can emphasize this with your stitch direction.
Instead of filling it with a standard satin stitch, use long straight stitches that all radiate from a single point at the base of the leaf stem.
This technique naturally creates the delicate veins and graceful form of the ginkgo.
Using a single, vibrant color on a neutral background keeps the focus entirely on the beautiful shape you’ve created and is one of the most delicate leaf stitch techniques.
14. Layer Lazy Daisy Stitches for Fuller Florals

The lazy daisy stitch is simple, but it can create stunningly full flowers with one small adjustment: layering.
Instead of stitching five petals in a single, flat layer, stitch a second set of petals in the gaps behind the first layer.
This instantly makes your blooms look lusher and more realistic.
Finish with a bold French knot in the center to draw the eye and complete the effect.
15. Tell a Story with Unexpected Textures

Combine simple linework with a surprising textural fill to create a conceptual piece.
Outline a lightbulb shape with a clean backstitch in a neutral color like white or gray.
Then, instead of filling the filament area with more linework, cluster a dense patch of bright yellow French knots.
This clever use of texture turns a simple object into a bright idea, making the embroidery more engaging and thought-provoking.
16. Weave a Textured Rose Garden
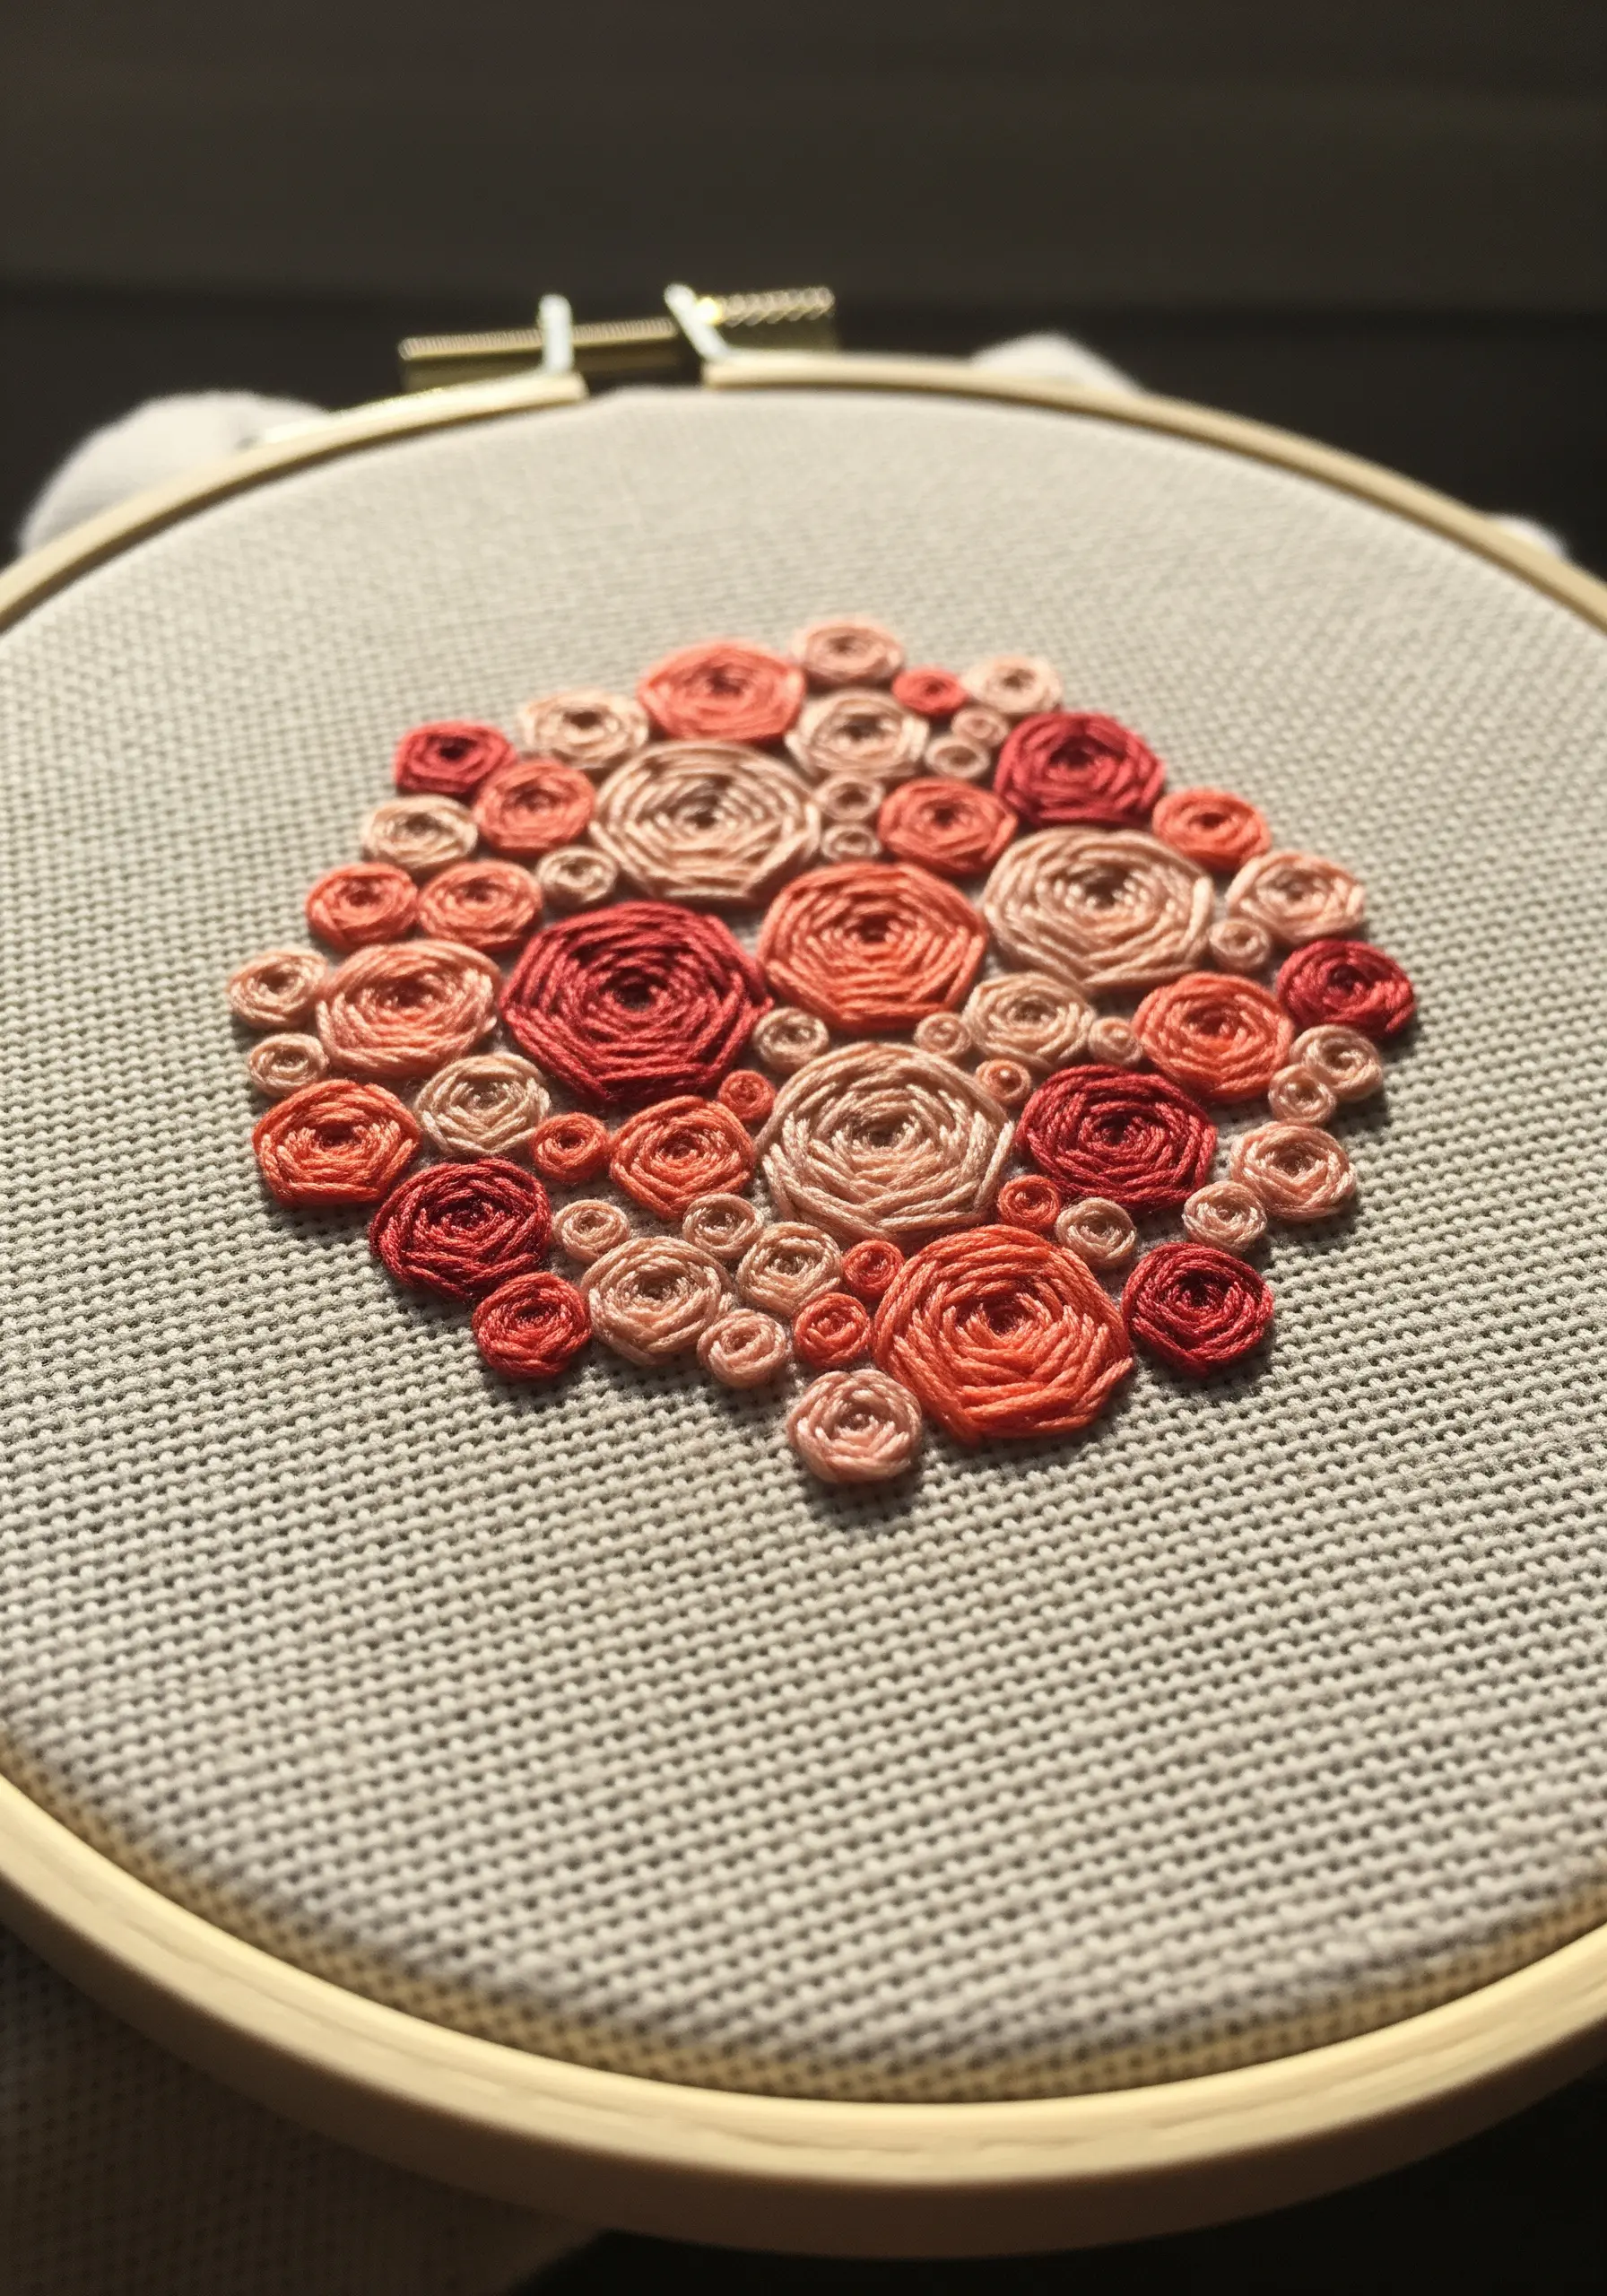
For a rich, sculptural effect, fill a shape with woven wheel roses instead of satin stitch.
Create a base of an odd number of straight stitches (like spokes on a wheel), then weave your thread over and under them until the spokes are covered.
Vary the size of your roses and pack them tightly together for a dense, bouquet-like appearance.
Using an analogous color scheme—shades of red, pink, and coral—creates one of those gorgeous floral embroidery ideas with beautiful harmony and depth.
17. Recreate Fine Detail with Single-Thread Backstitch
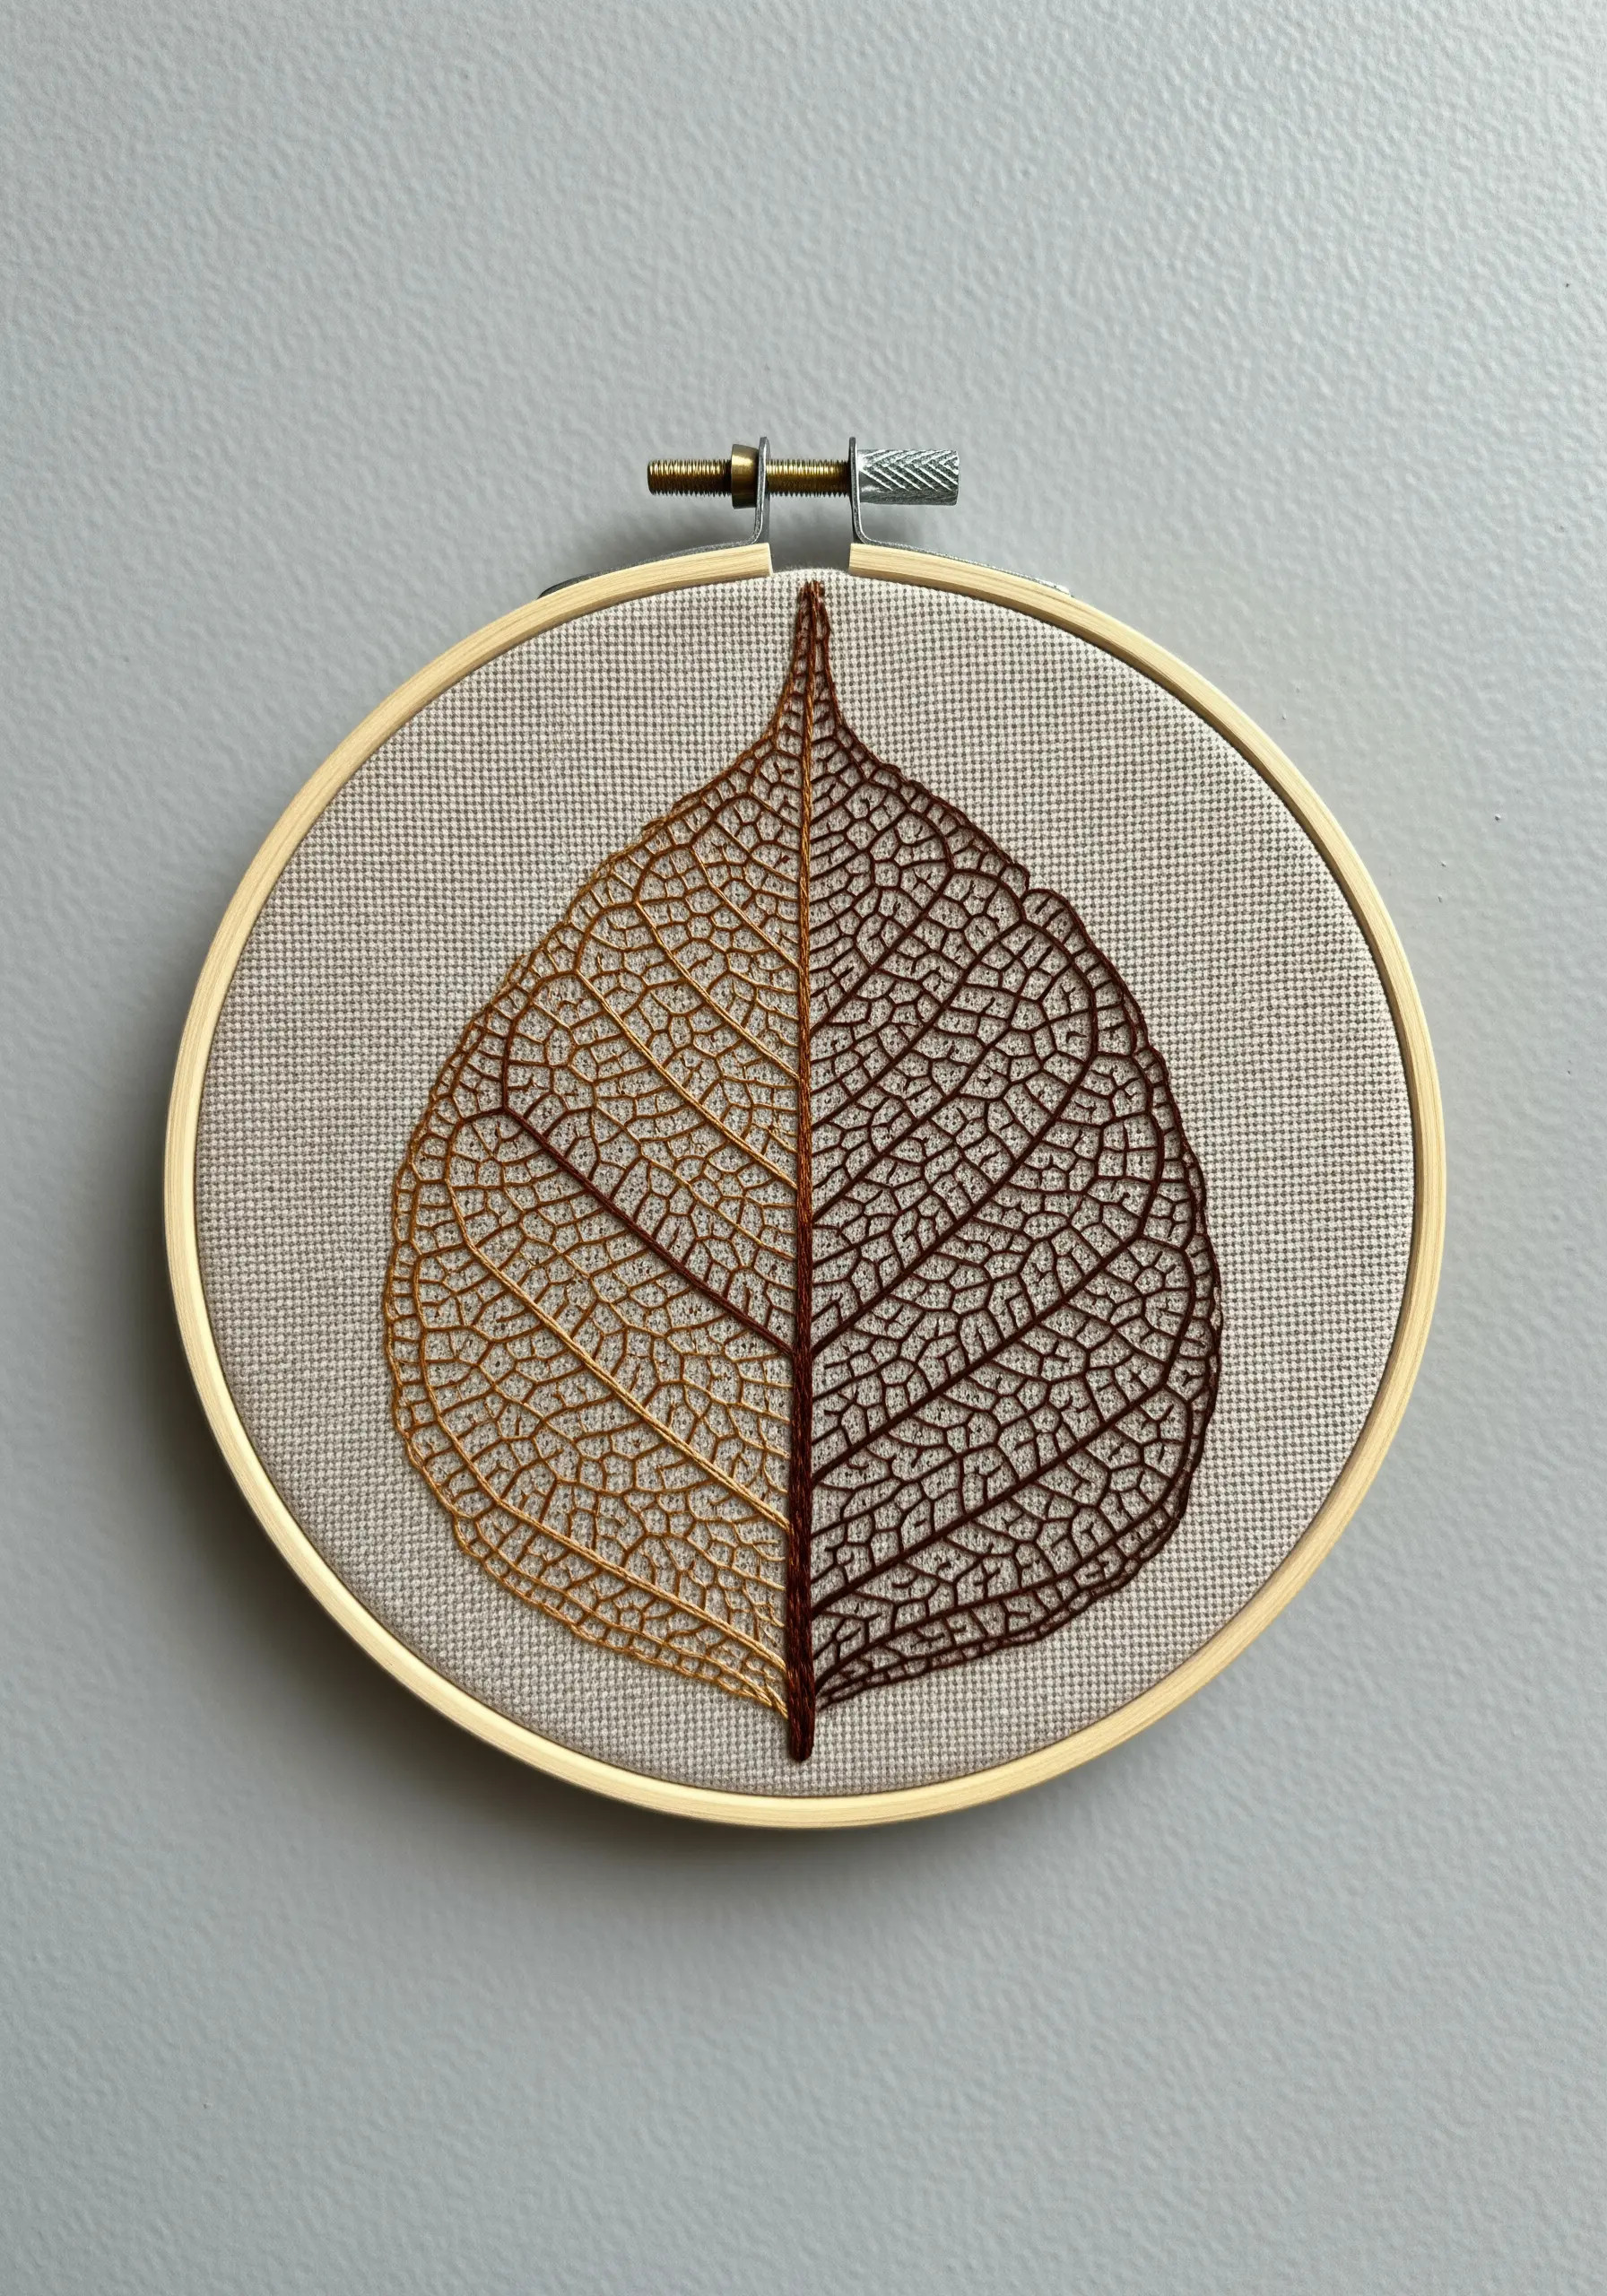
To capture the intricate beauty of a skeleton leaf, you need to think like a technical illustrator.
Use only a single strand of embroidery floss to keep your lines incredibly fine and detailed.
A simple, tiny backstitch is the perfect choice for this kind of delicate work.
Stitching the leaf in two complementary colors, like gold and brown, adds depth and artistry, highlighting the delicate leaf vein details that make the piece so captivating.
18. Define Shapes with a Bold Outline
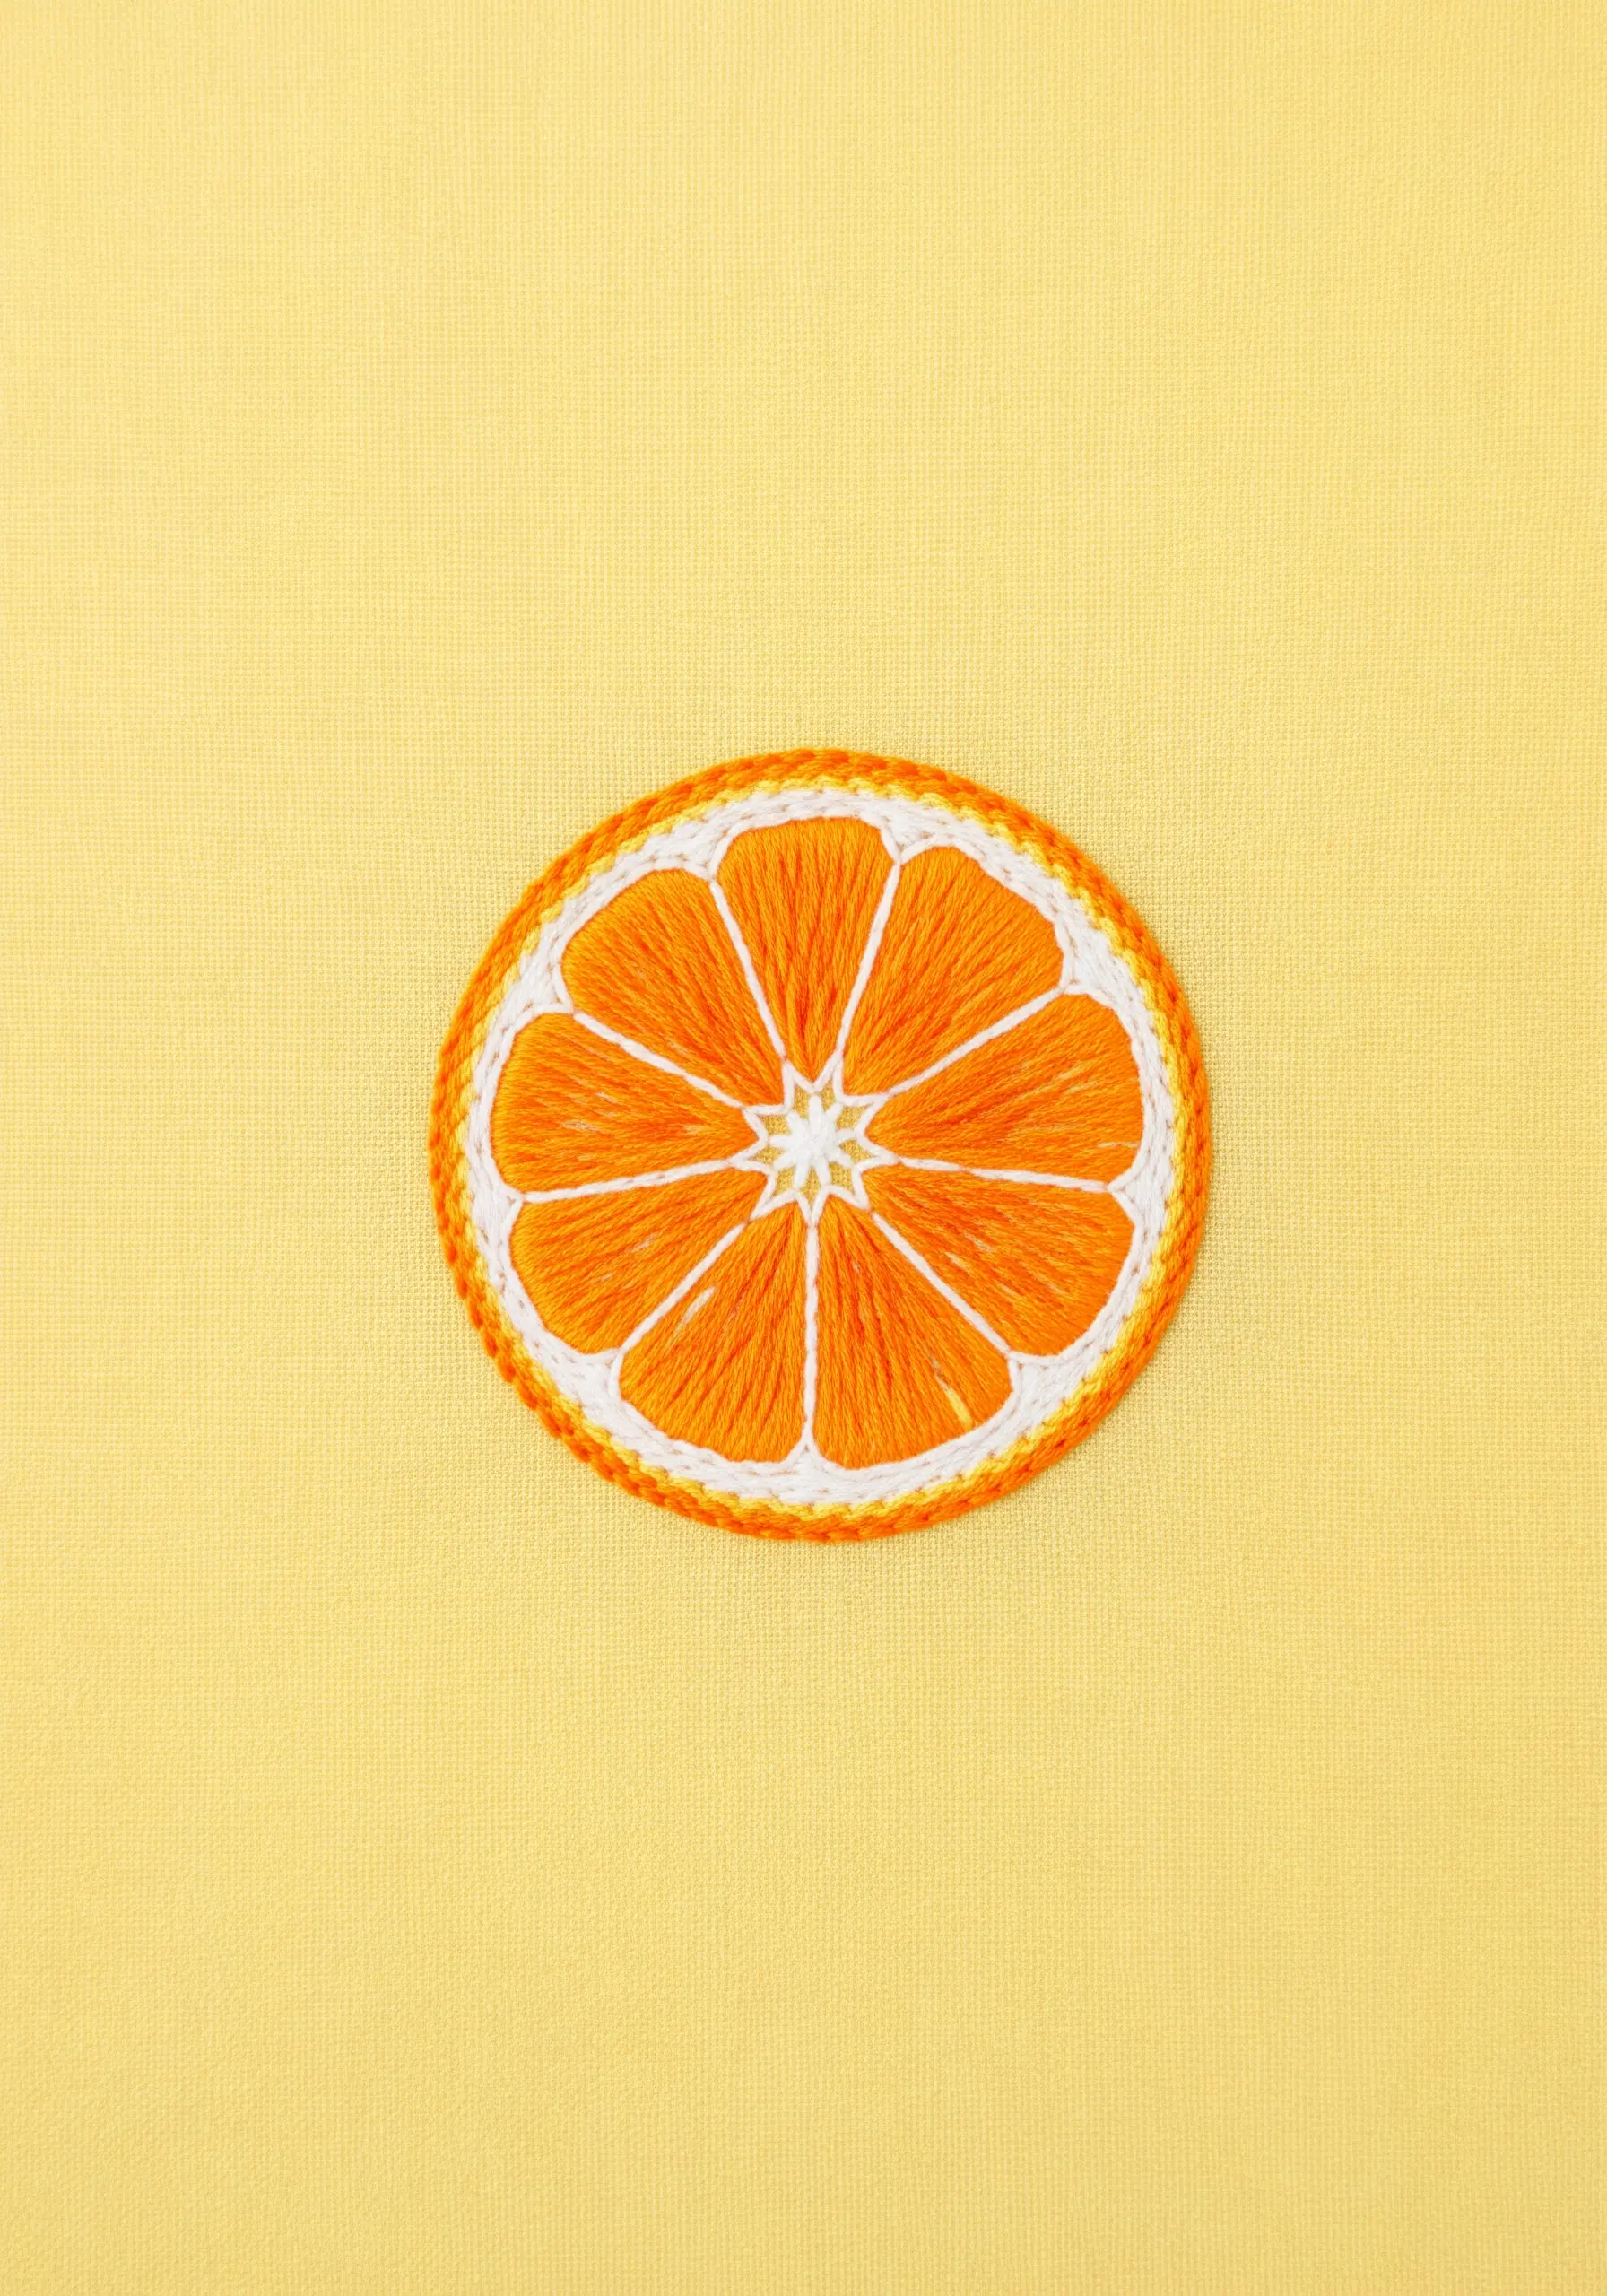
Make your satin-stitched shapes pop by framing them with a contrasting outline.
After filling the orange segments with a smooth satin stitch, go back and outline each section with a whipped backstitch or a thick chain stitch in a clean white.
This not only hides any minor imperfections in your satin stitch edges but also creates a crisp, graphic definition that makes the colors look brighter and the entire design more polished.
19. Use Stitch Direction to Create Feather Texture
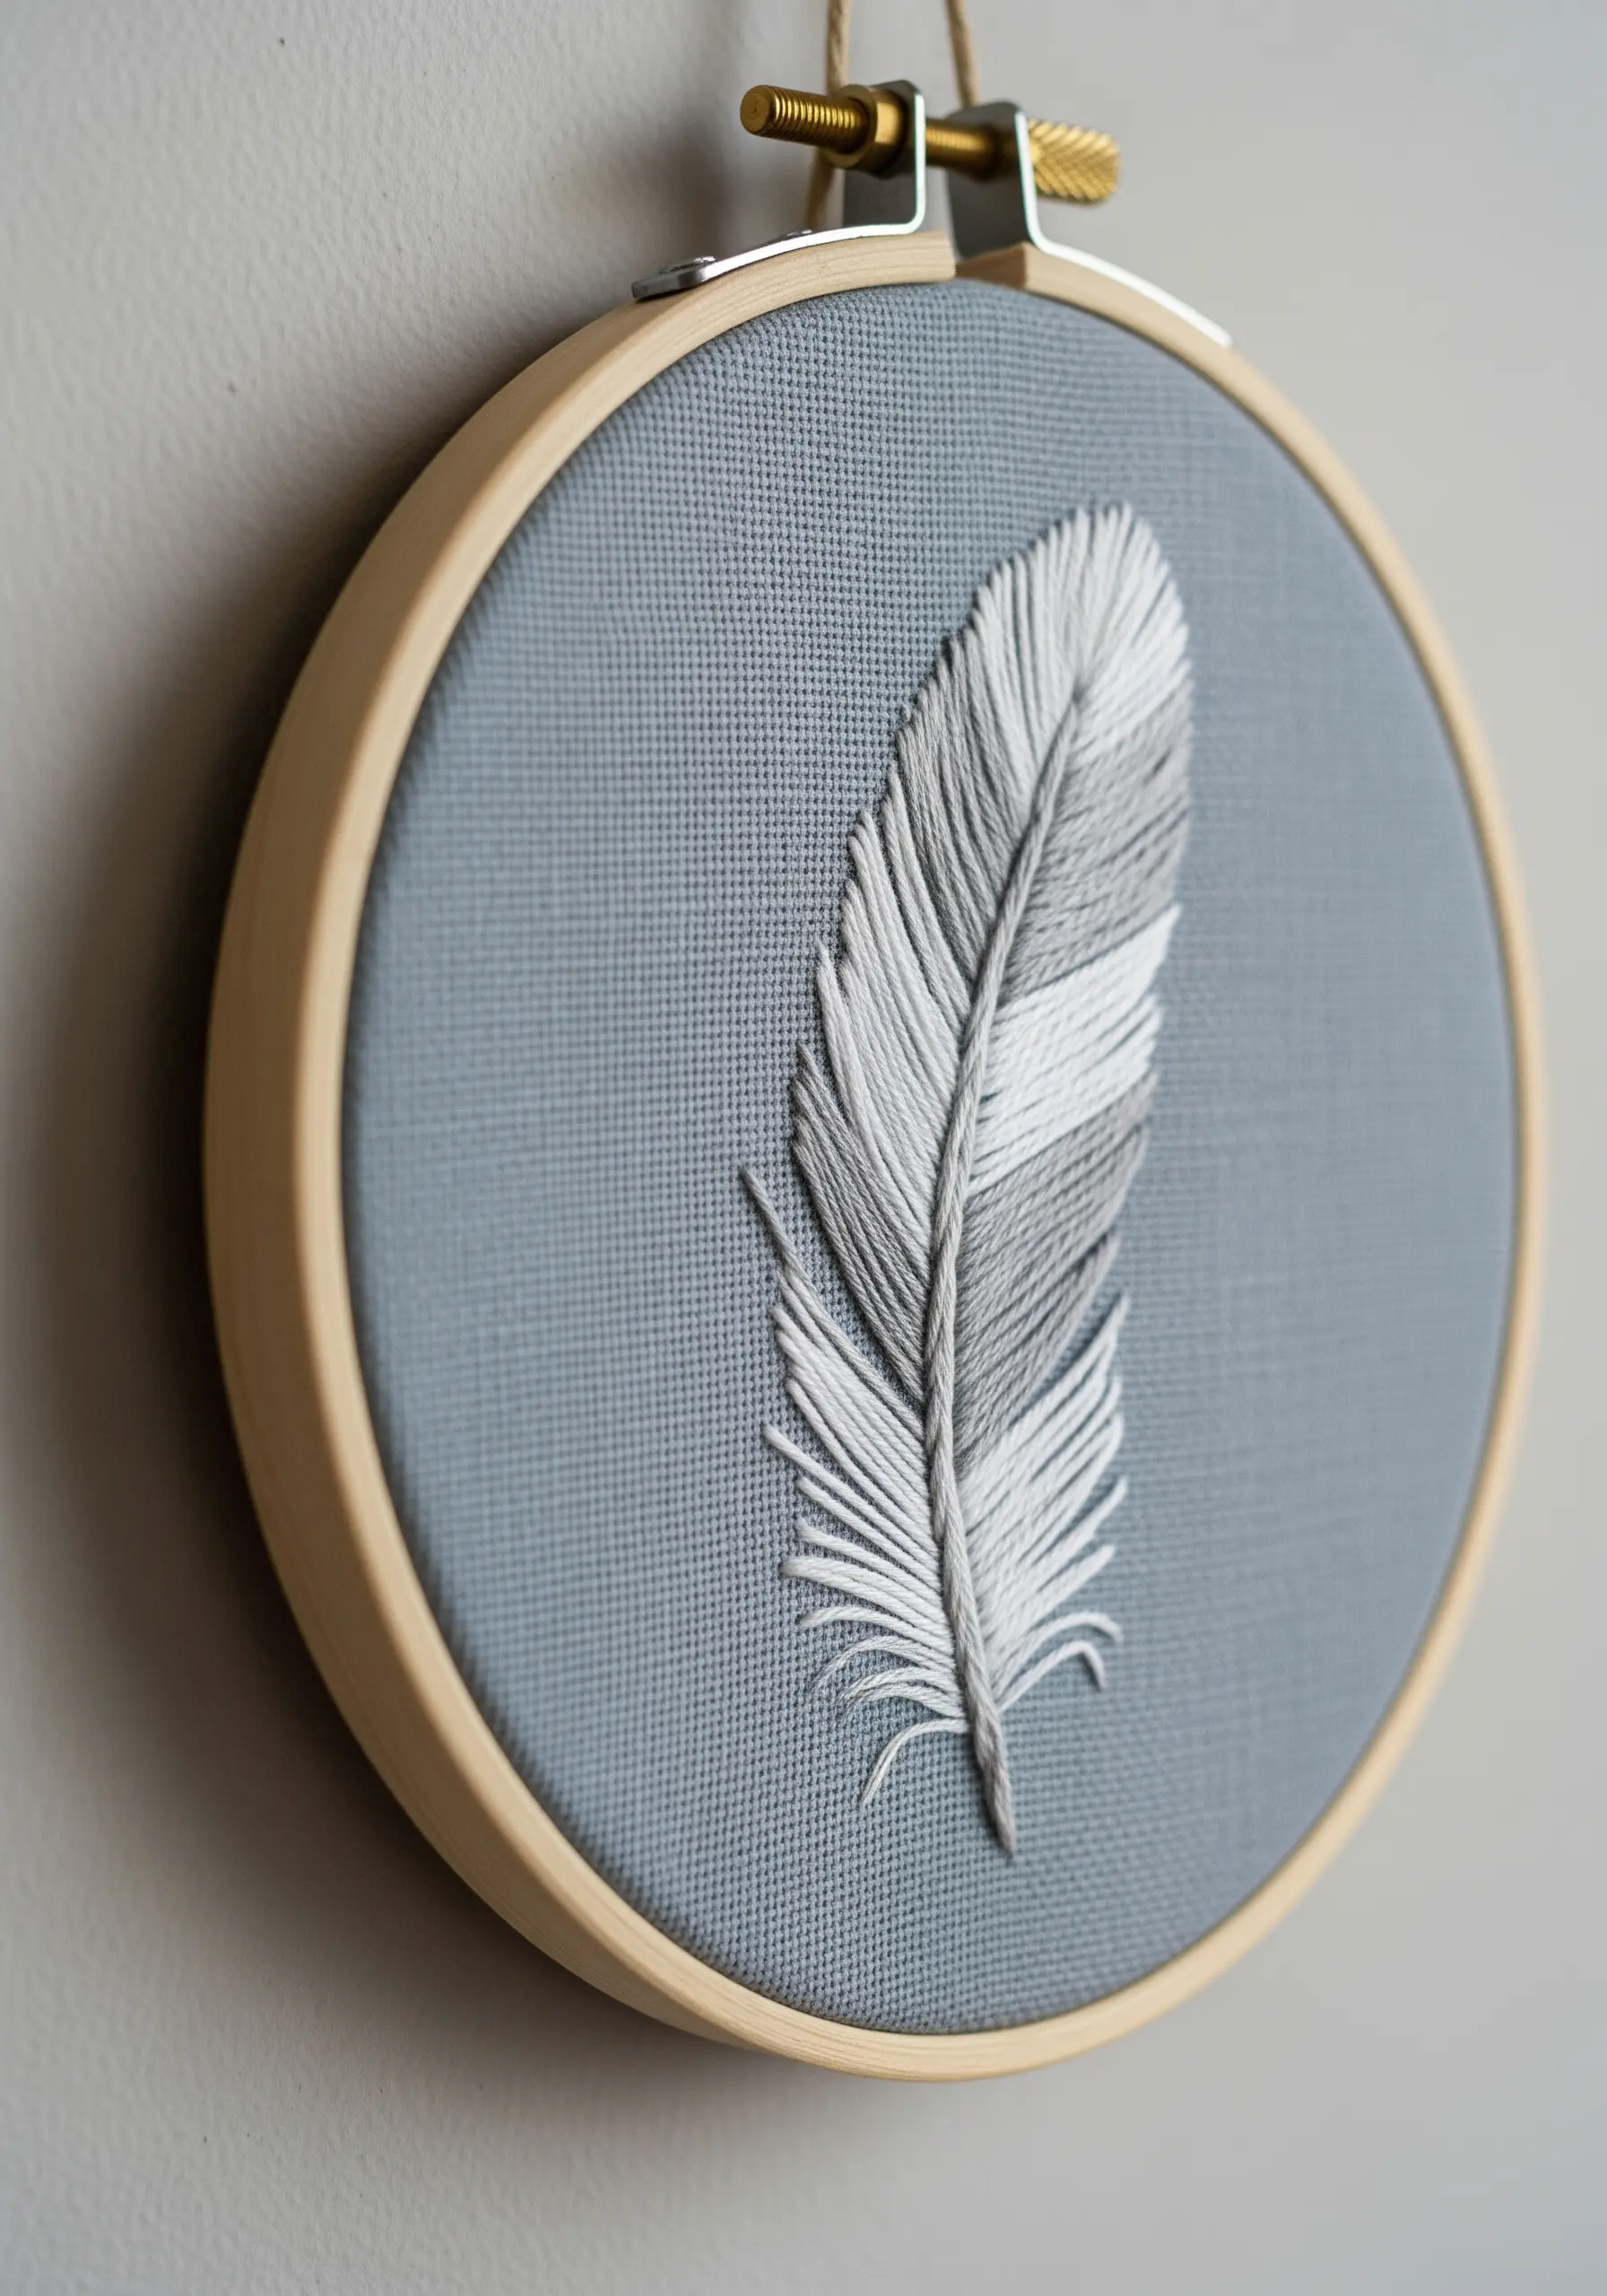
To make a feather look soft and realistic, your stitch direction is more important than the stitch itself.
Use a simple long-and-short stitch, but angle every stitch outwards and downwards from the central shaft (or rachis).
This mimics the natural growth pattern of a feather’s barbs.
Color-blocking with shades of gray and white adds a modern, graphic touch while still maintaining that soft, realistic texture.
20. Mimic Metal with Chain Stitch
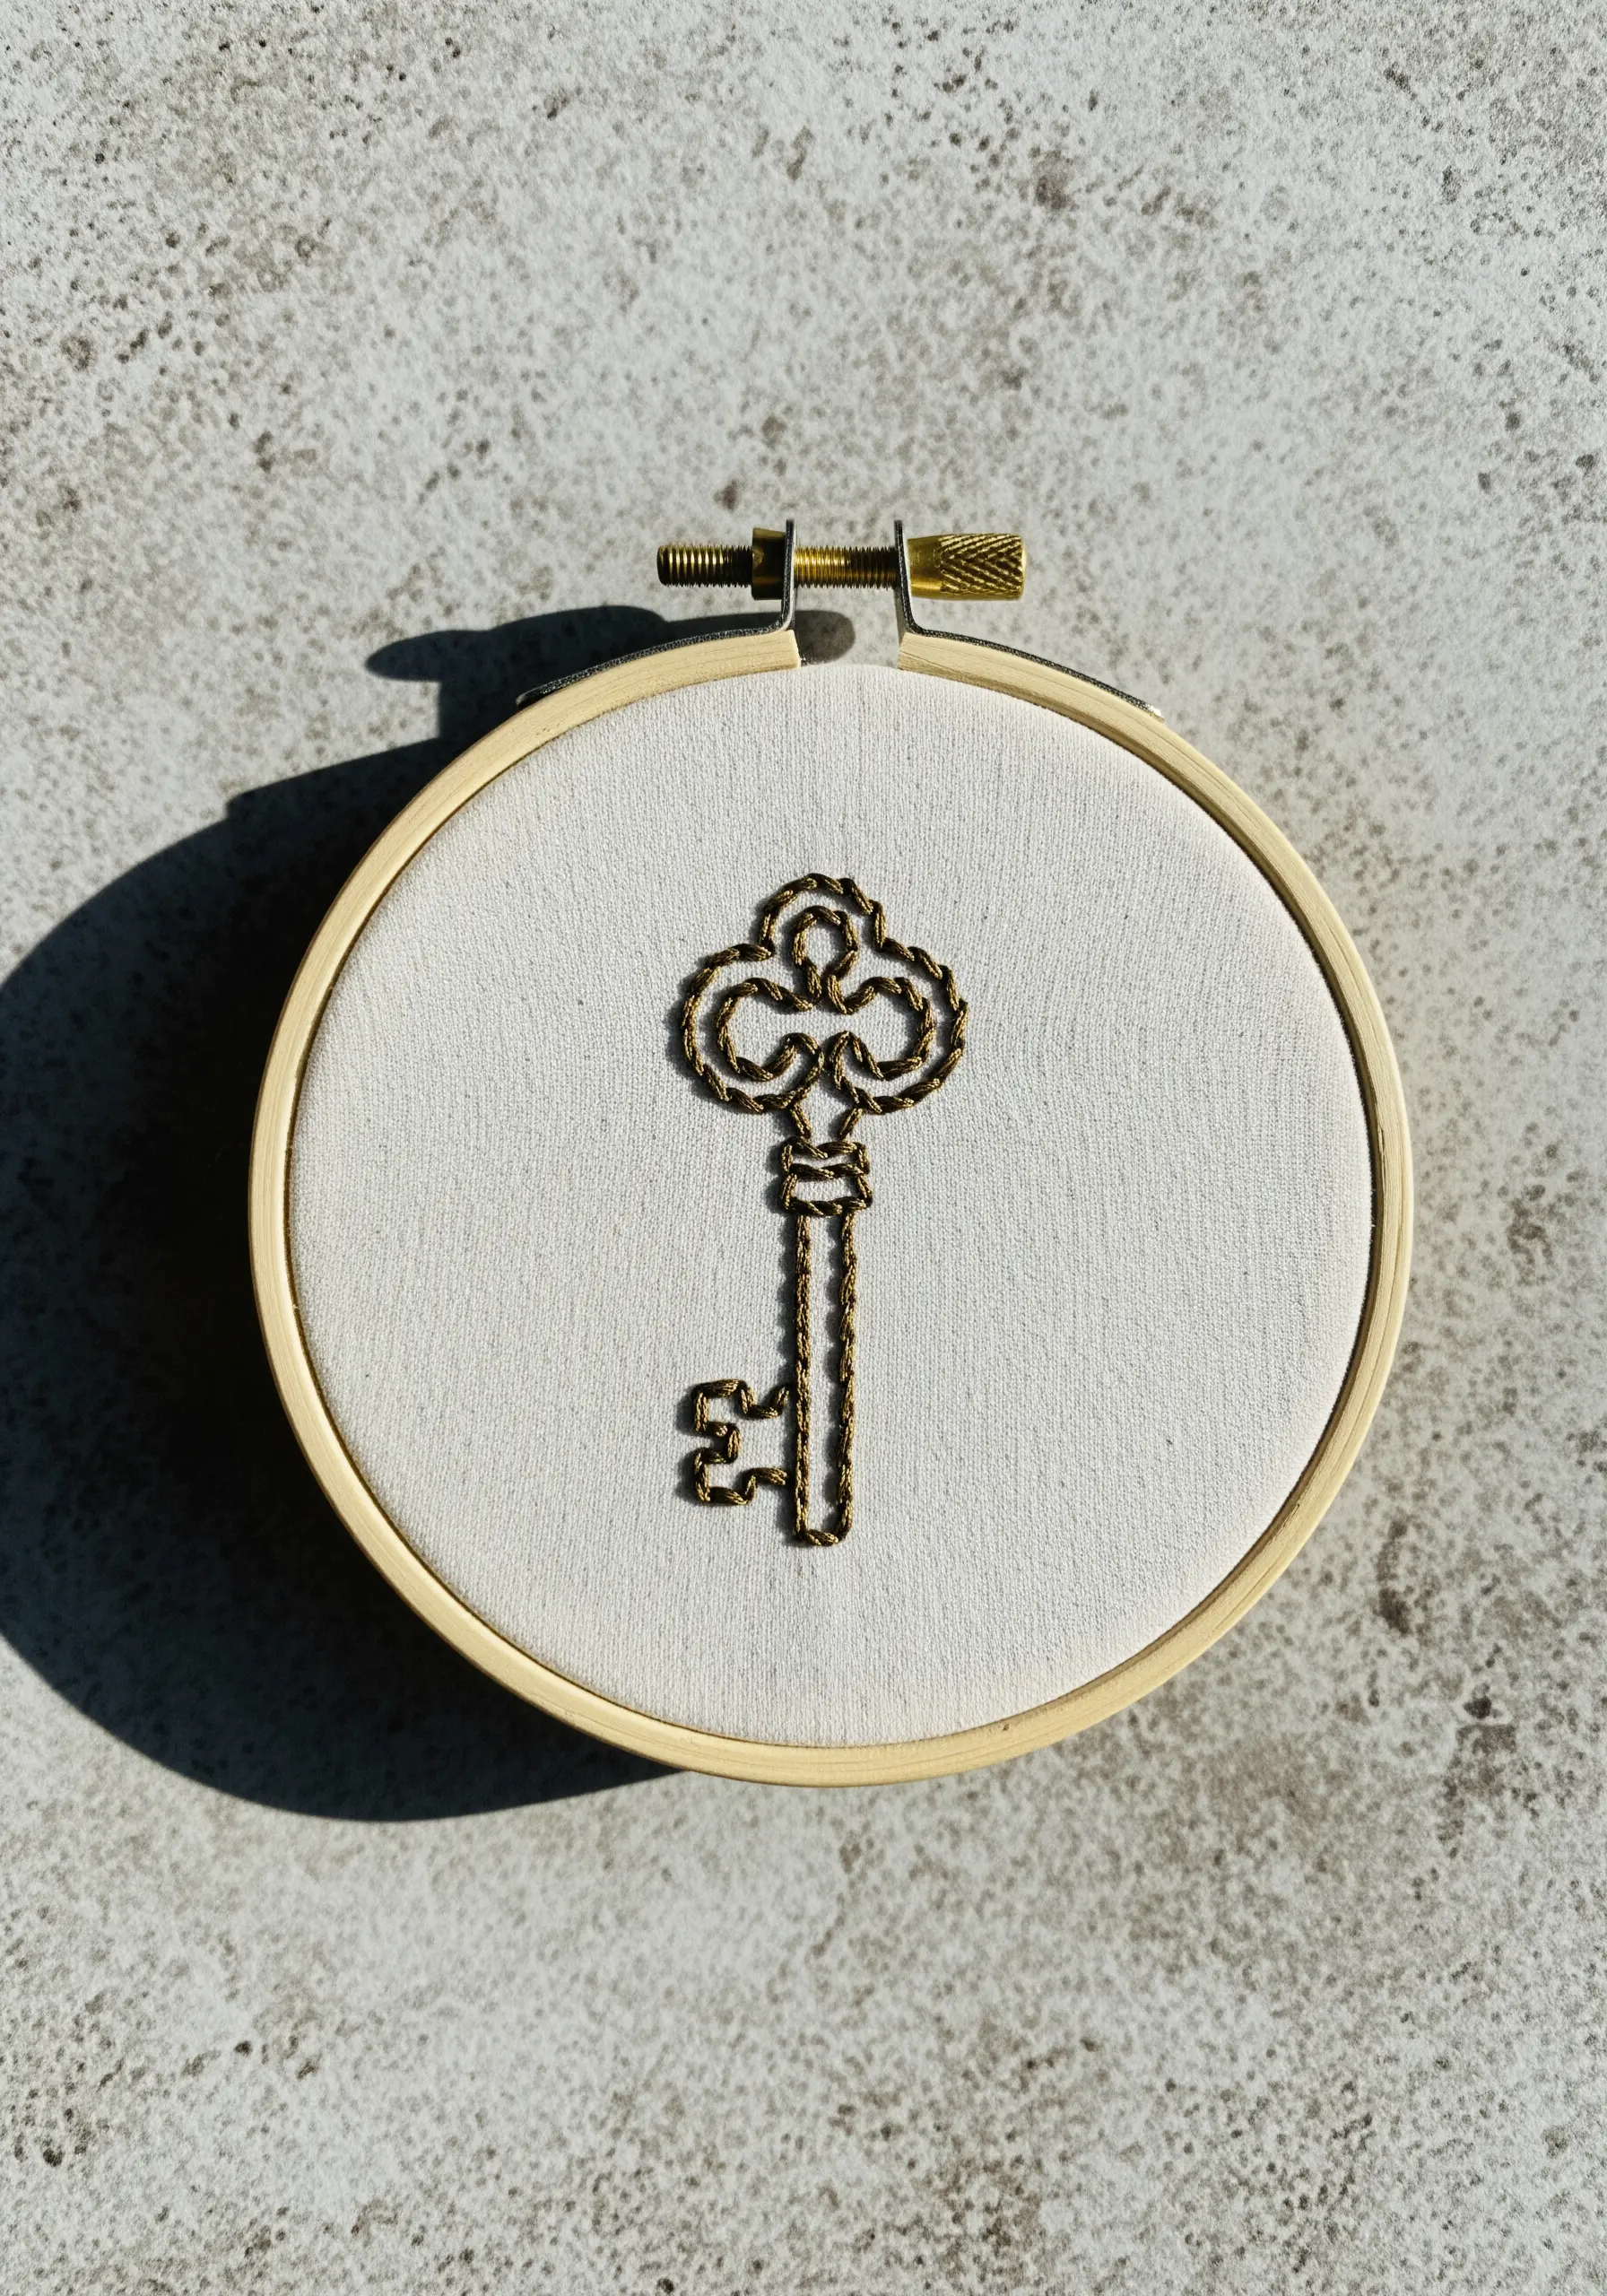
To give an object a heavy, metallic feel, choose a stitch that has inherent texture and dimension.
The chain stitch is perfect for this, as its linked structure creates a beautiful, rope-like line that looks far more substantial than a simple backstitch.
Using a metallic or antique gold thread enhances the effect, giving your embroidered key a sense of weight and history.
Work with shorter lengths of metallic floss to prevent it from snagging and tangling.
21. Sculpt Leaves with Angled Satin Stitch
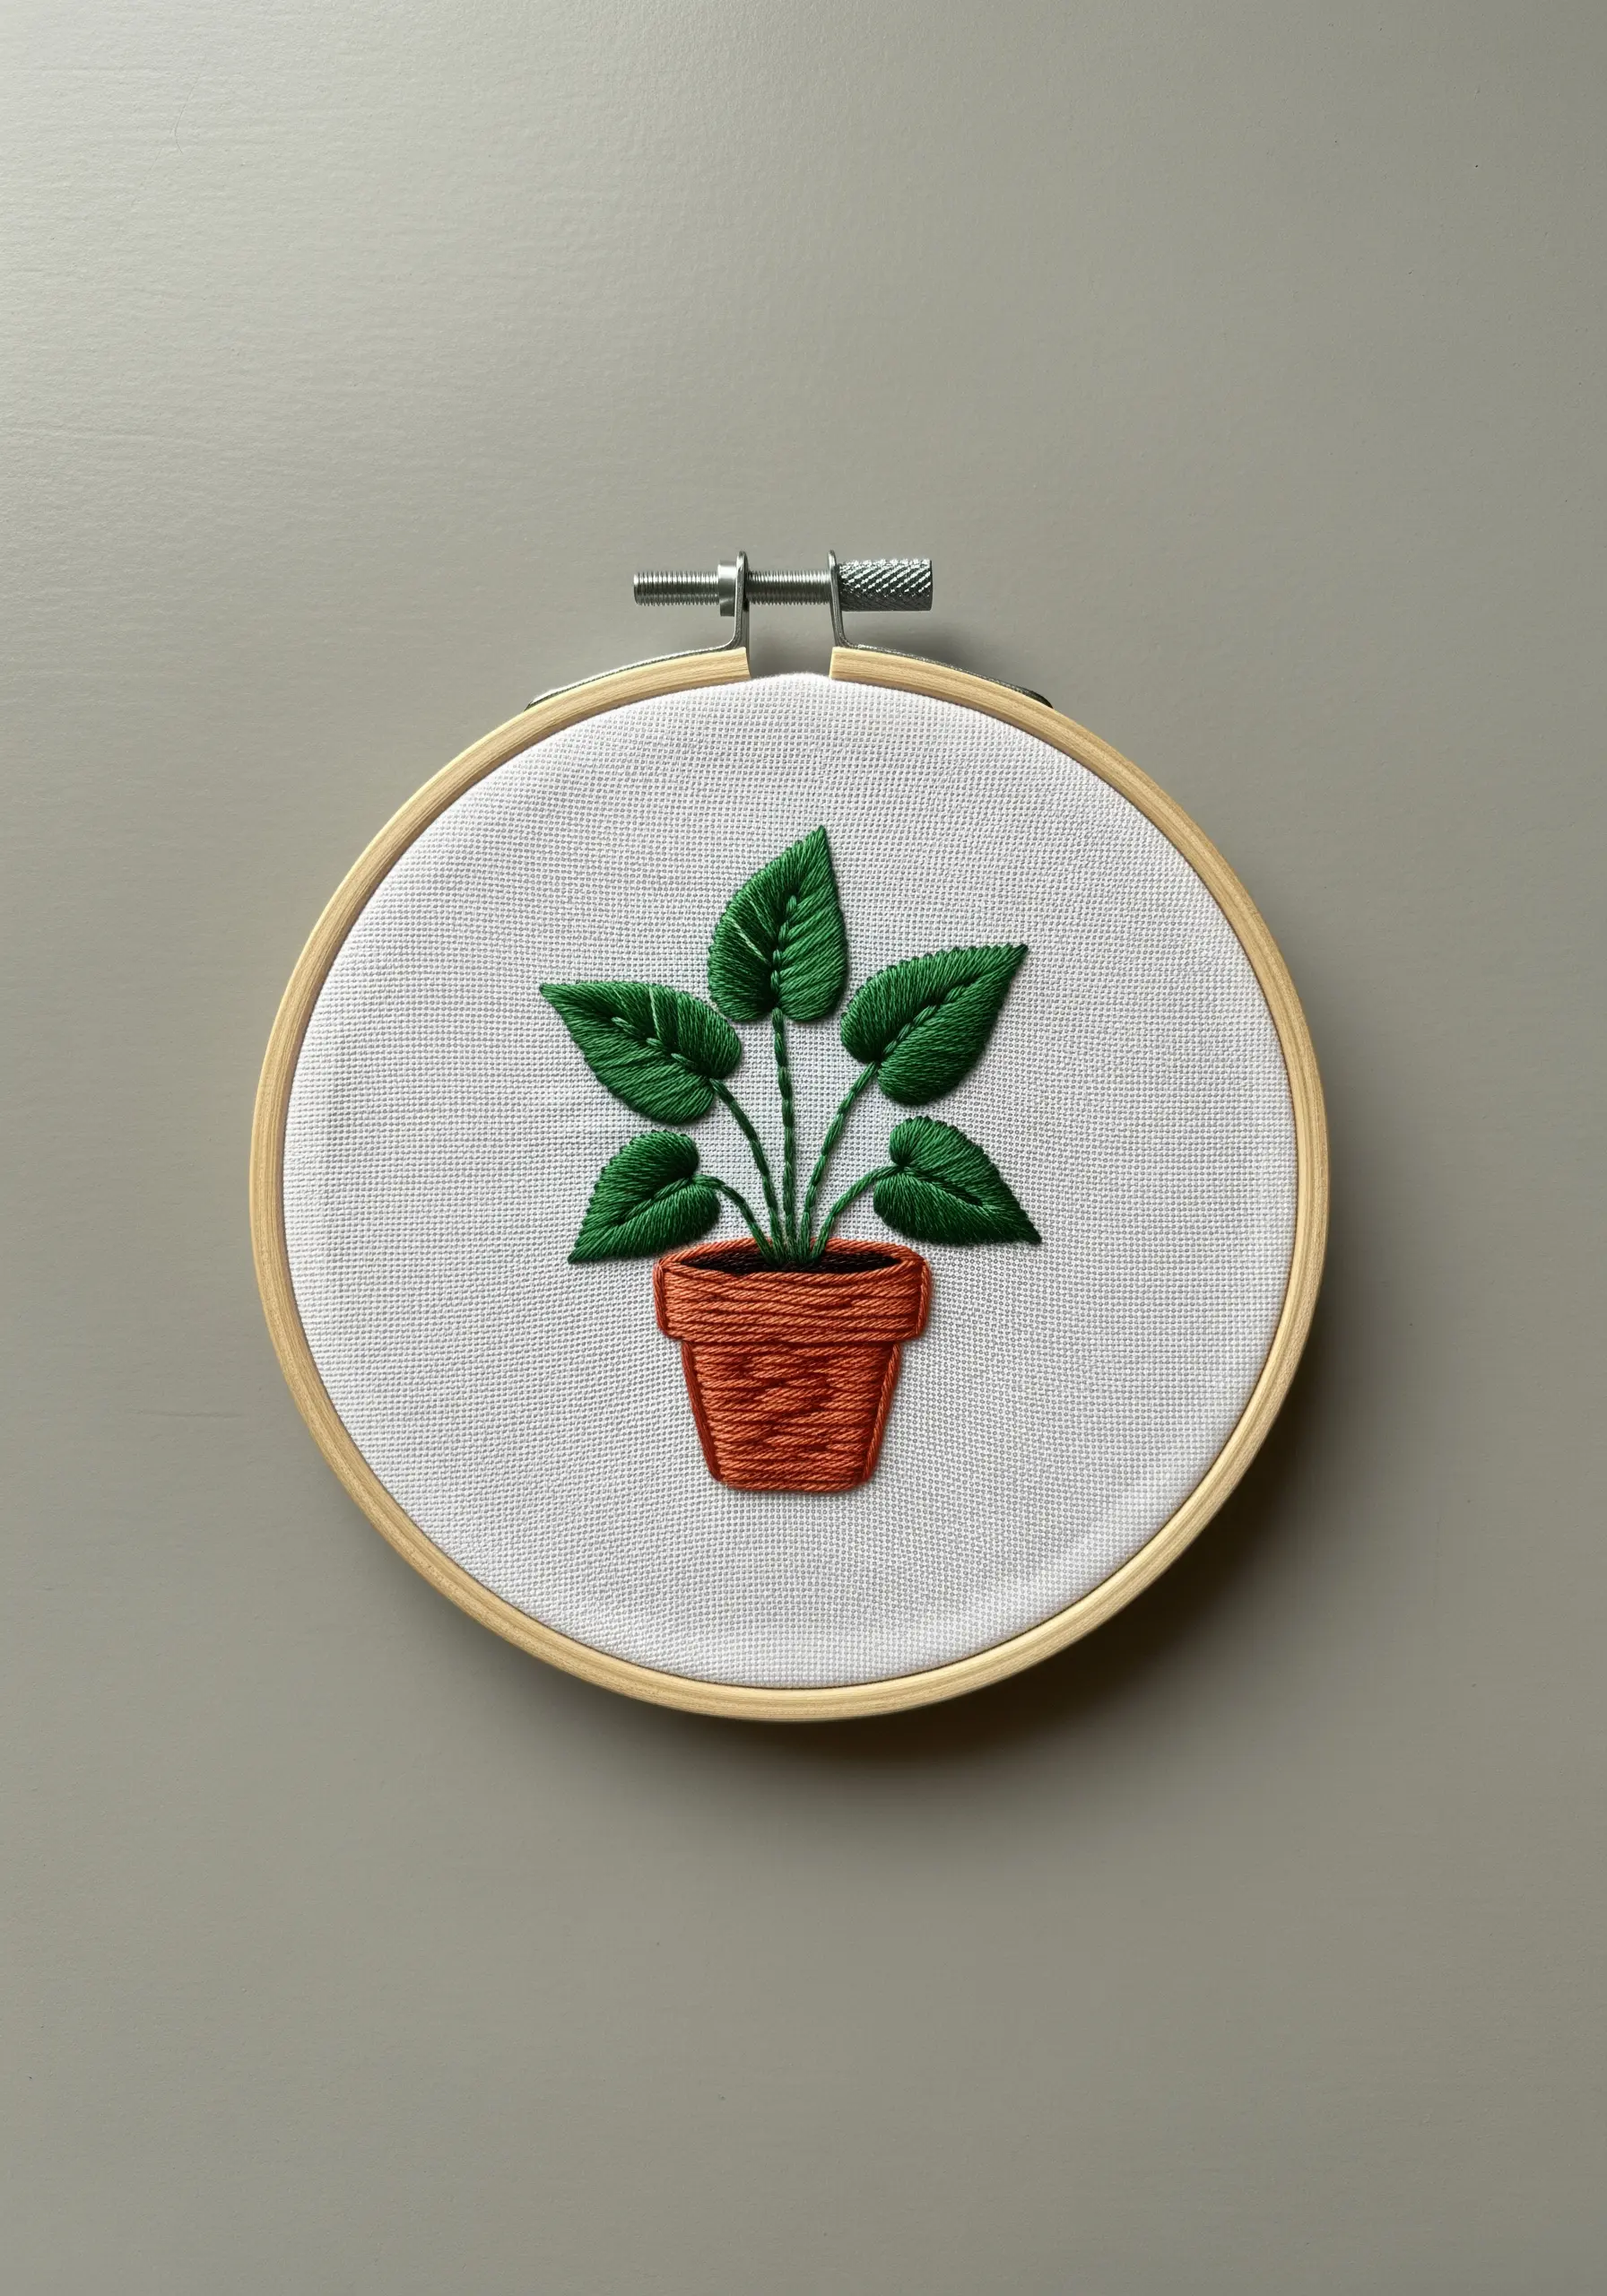
You can make simple leaf shapes look dynamic and three-dimensional without any complex shading.
The secret is to change the direction of your satin stitch for each leaf.
Fill one leaf with stitches angled to the left, the next with vertical stitches, and another angled to the right.
This variation causes the light to reflect differently off each leaf, creating highlights and shadows that suggest movement and form, and is perfect for modern botanical stitches.
22. Create Gradients in Small Spaces
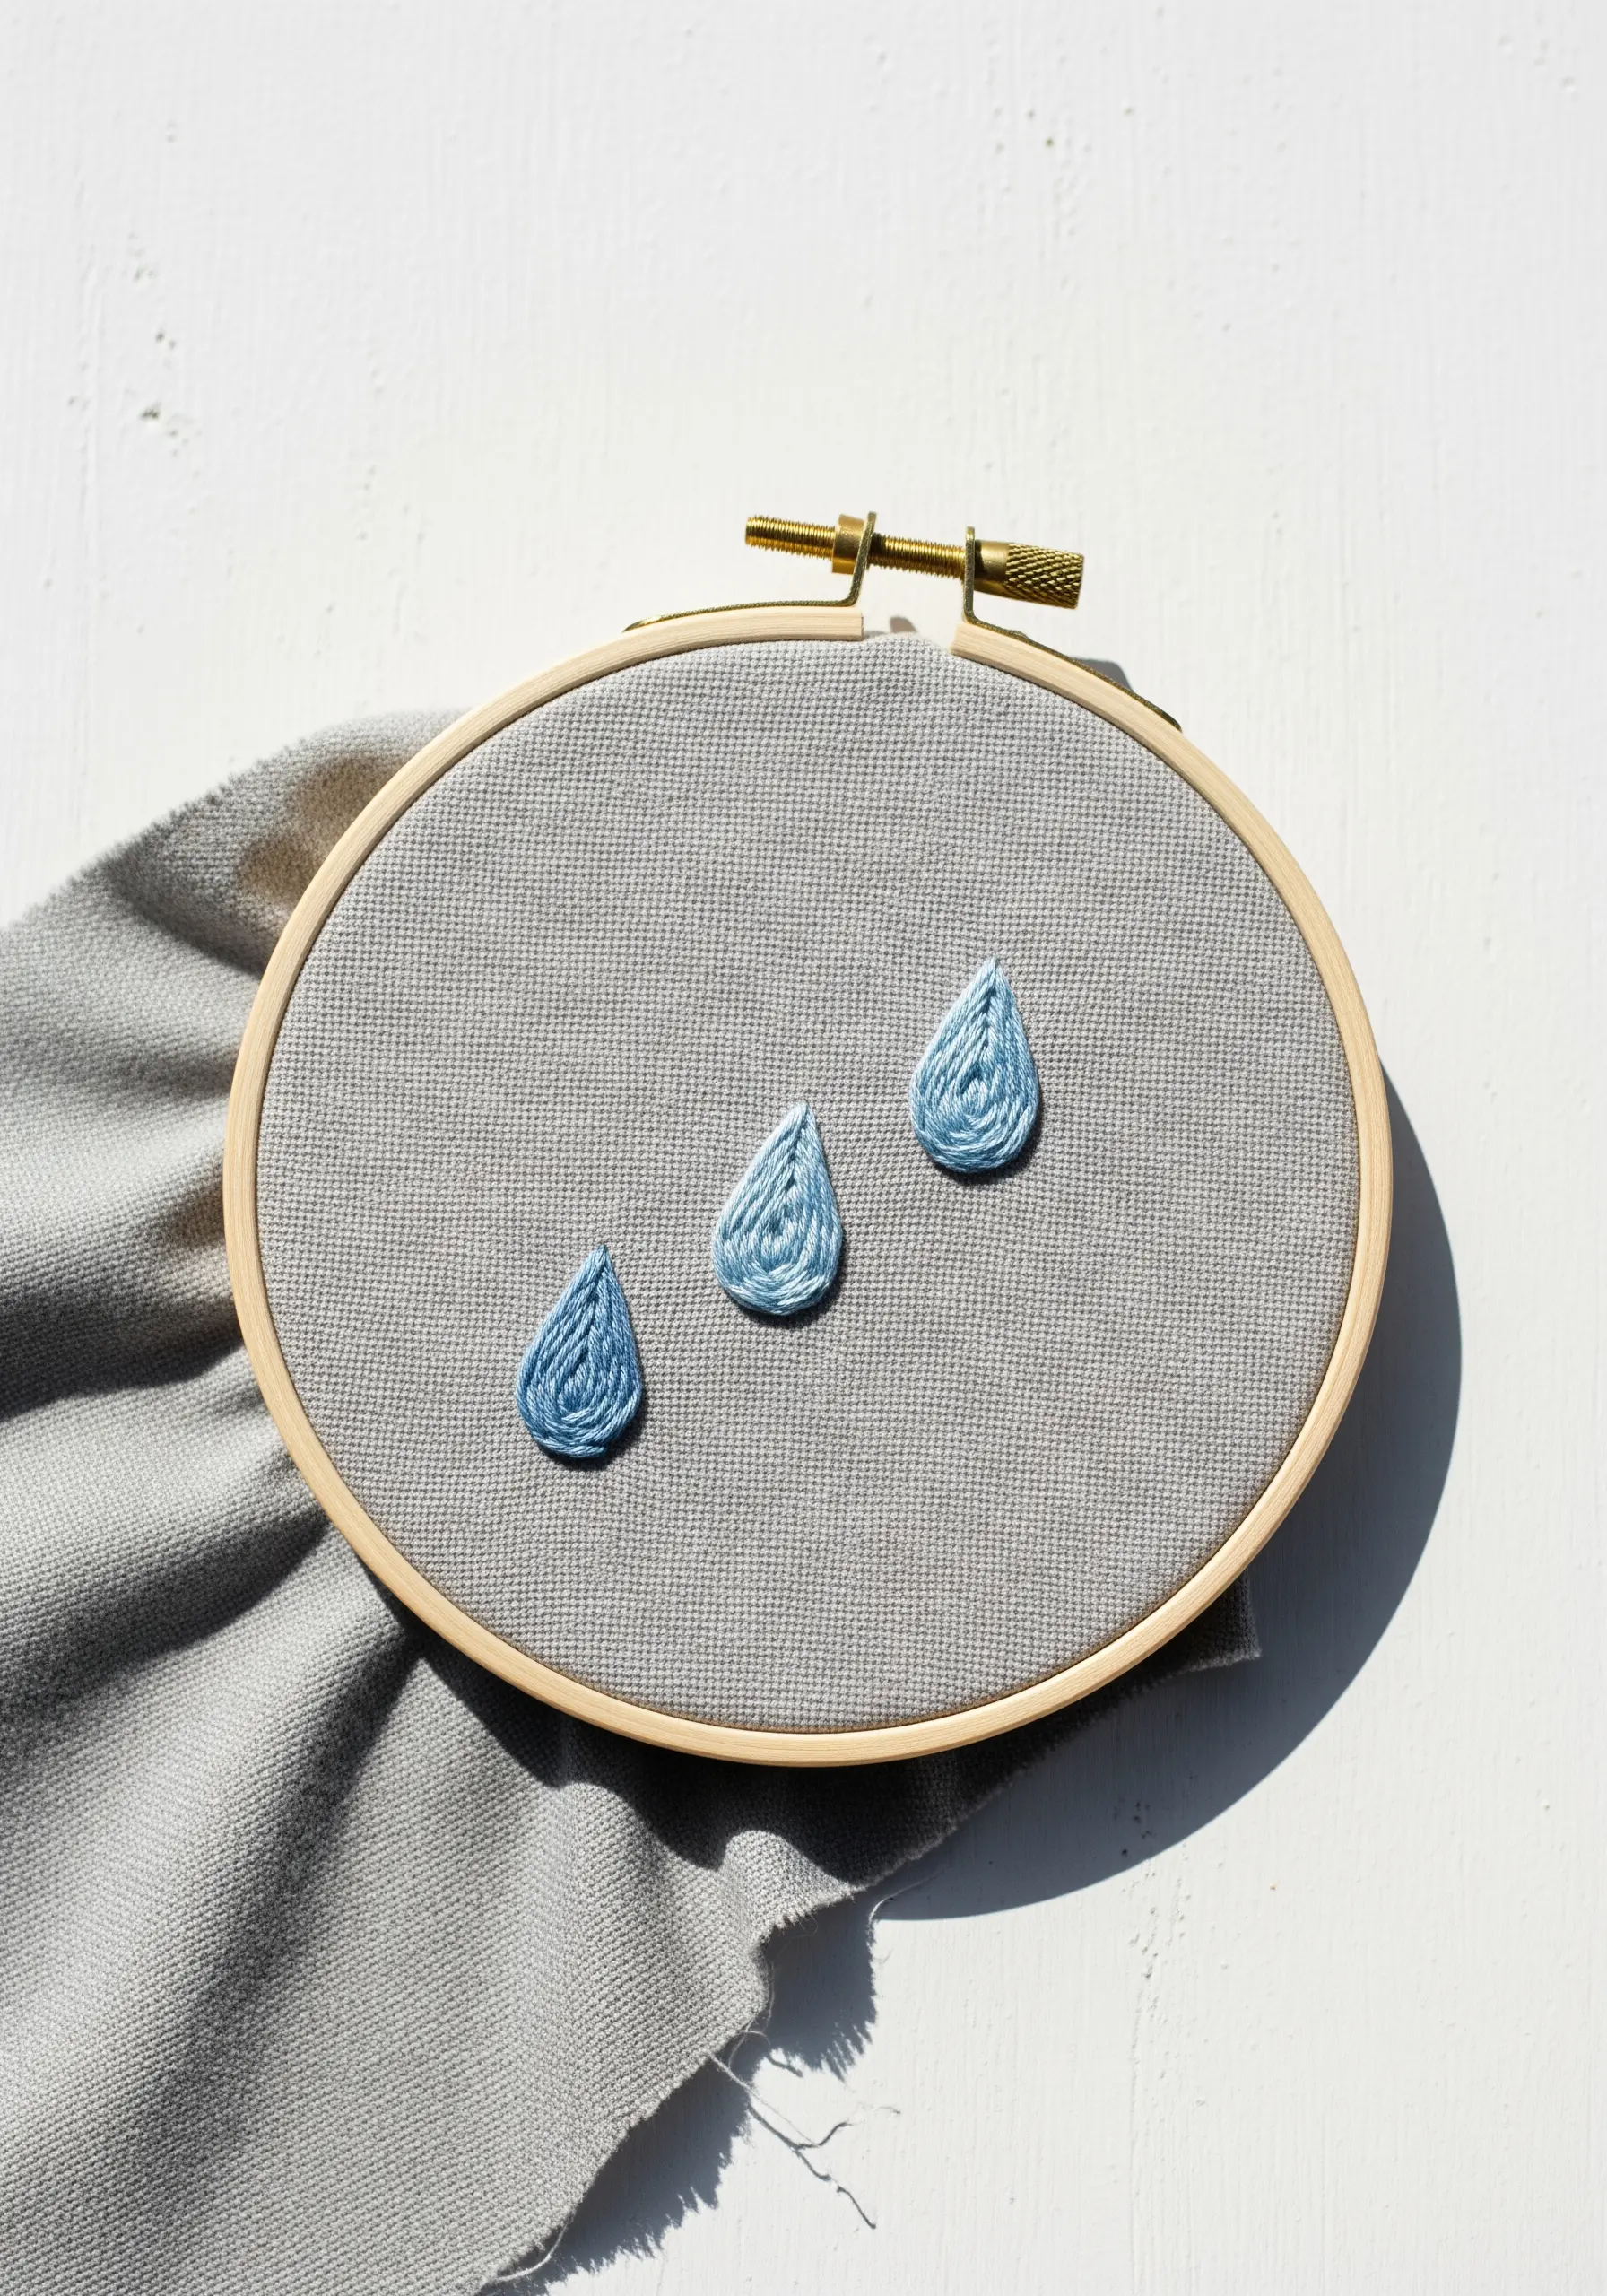
Even a tiny shape like a raindrop can be made more beautiful with subtle color blending.
Choose three similar shades of a color, from light to dark.
Fill the top portion of the teardrop shape with the lightest color using satin stitch, then fill the middle with the medium shade, and the bottom with the darkest.
Allow the stitches to interlock slightly where the colors meet to create a soft, seamless gradient that gives the simple shape a liquid-like depth.
23. Add Elegance with Braided Chain Stitch
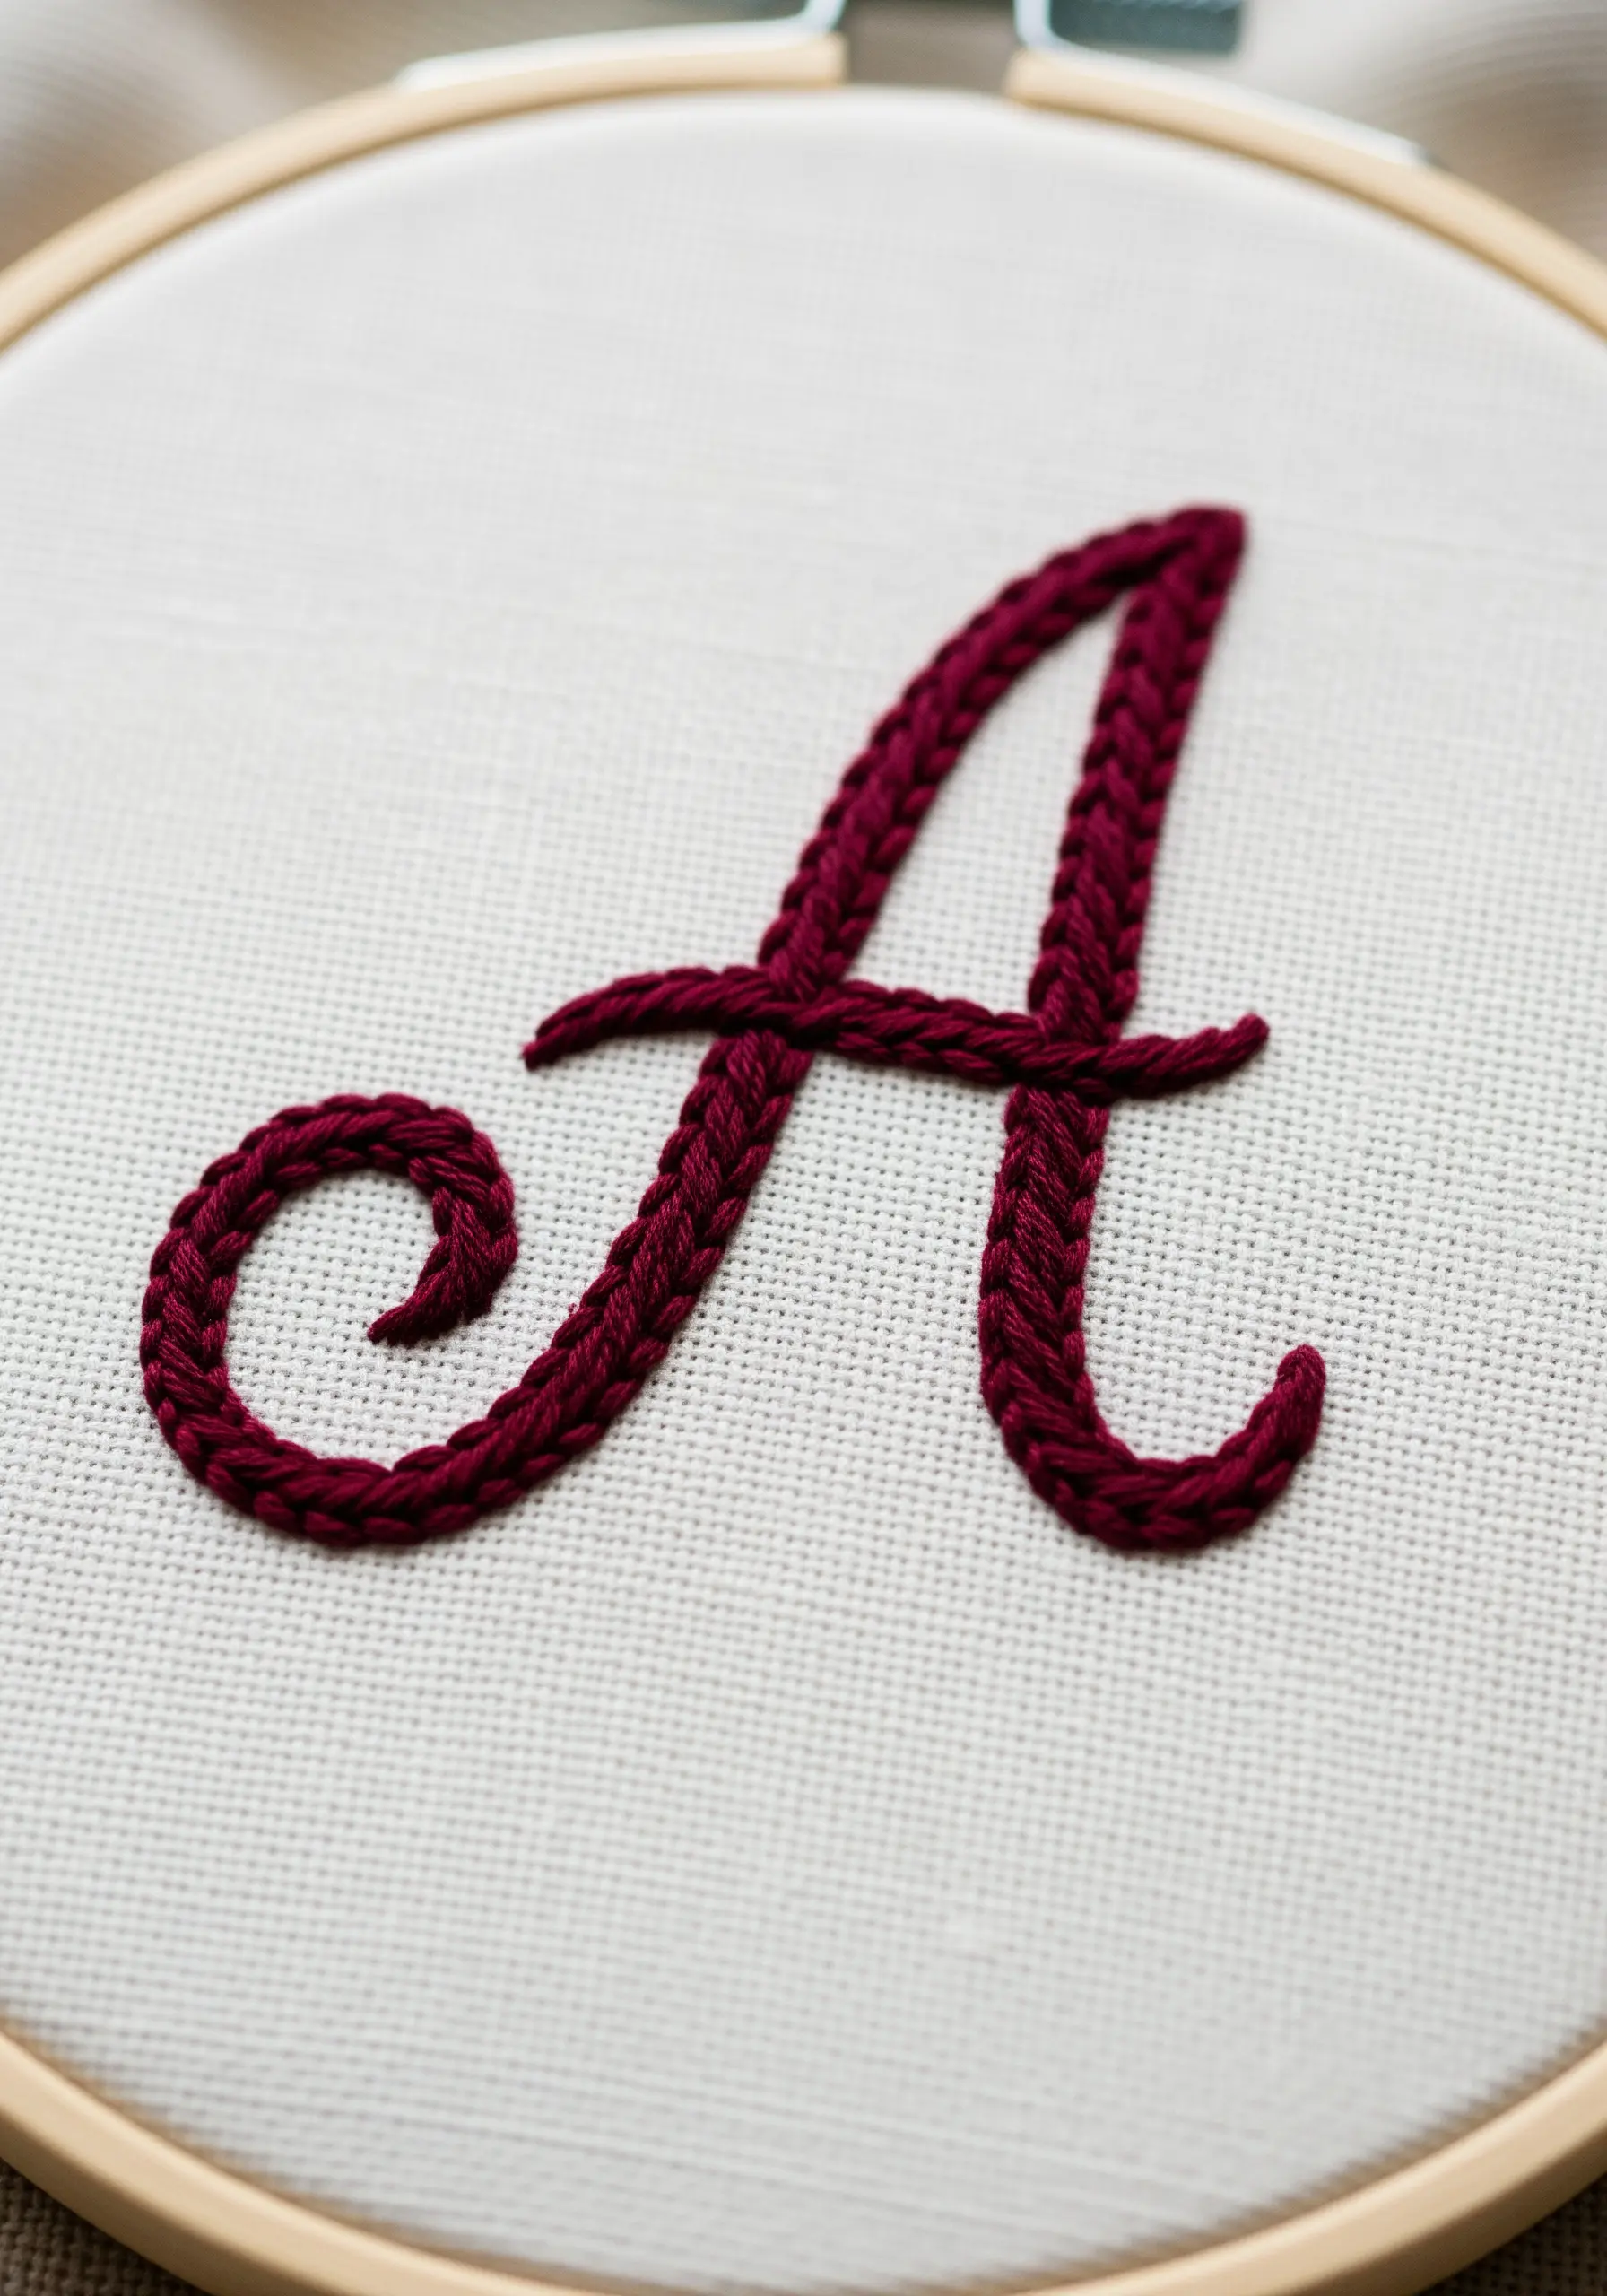
For a truly luxurious monogram, elevate your lettering with the braided chain stitch (also known as the heavy chain stitch).
This stitch creates a thick, plaited line with beautiful texture that looks far more intricate than it is to execute.
It’s the perfect choice for a single initial, turning it into a statement piece of art.
A rich, jewel-toned thread like burgundy or emerald green enhances the sophisticated feel, ideal for monogram embroidery ideas.
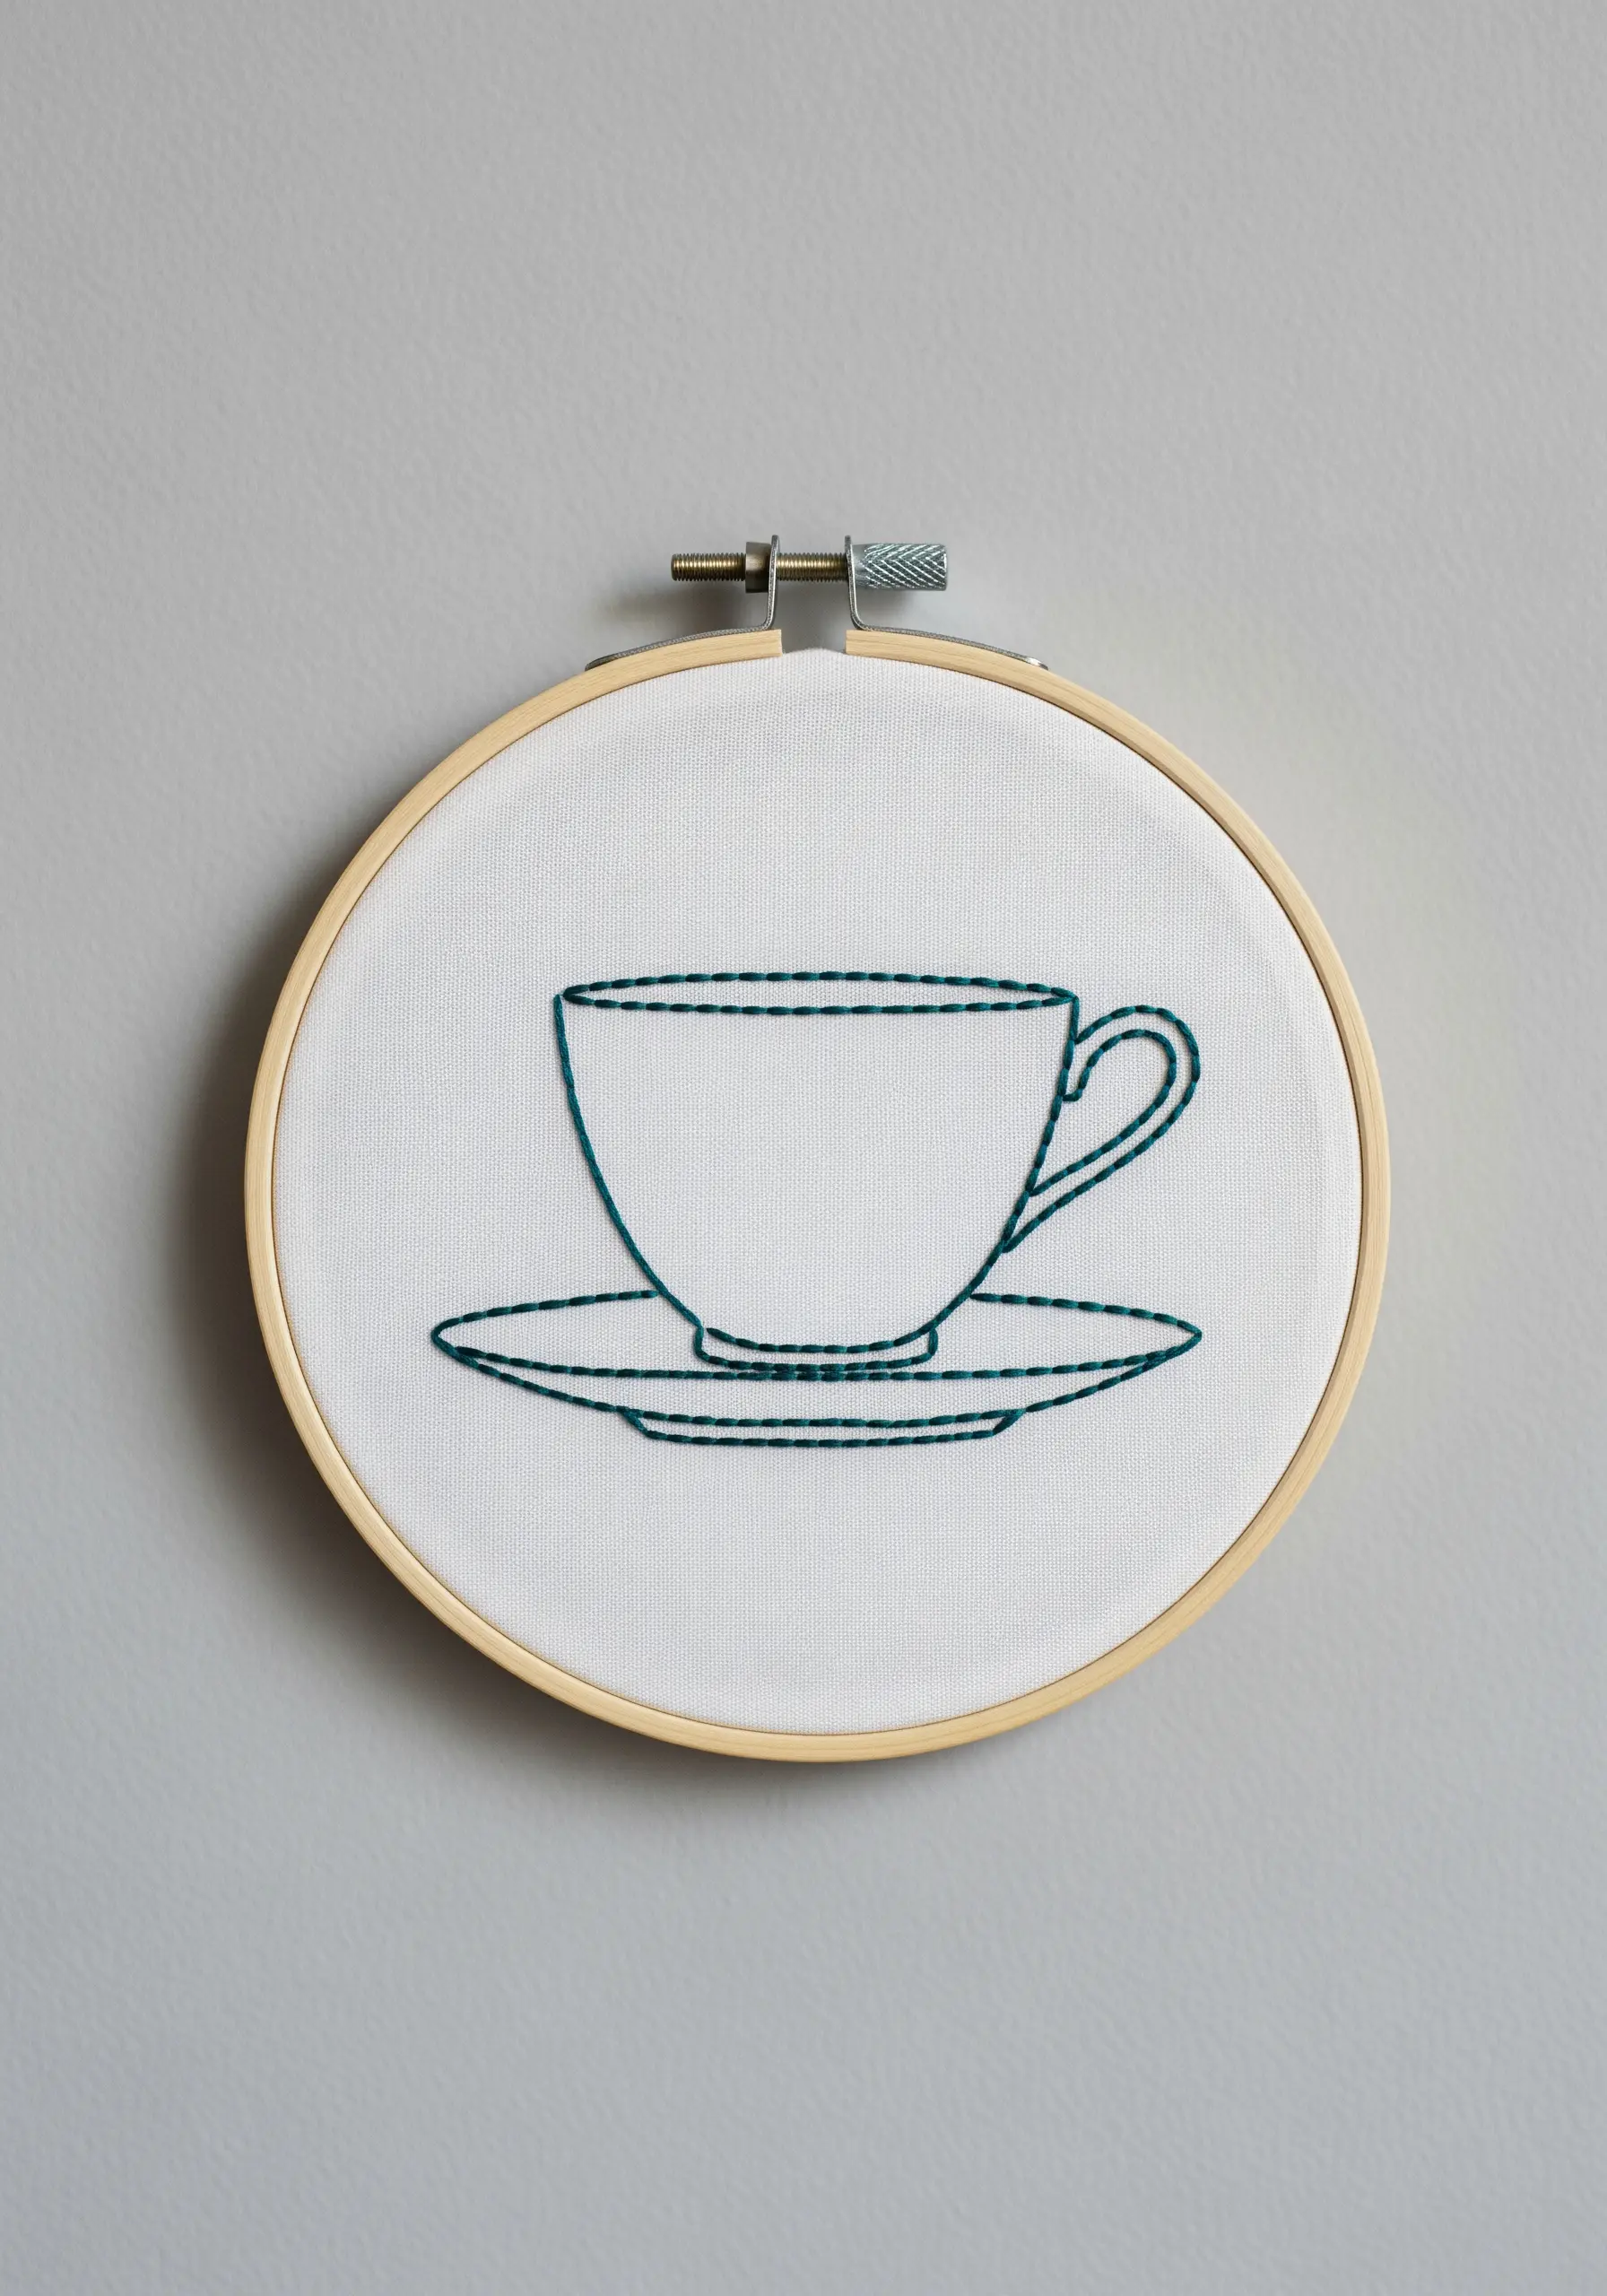
24. Capture Detail with Minimalist Linework
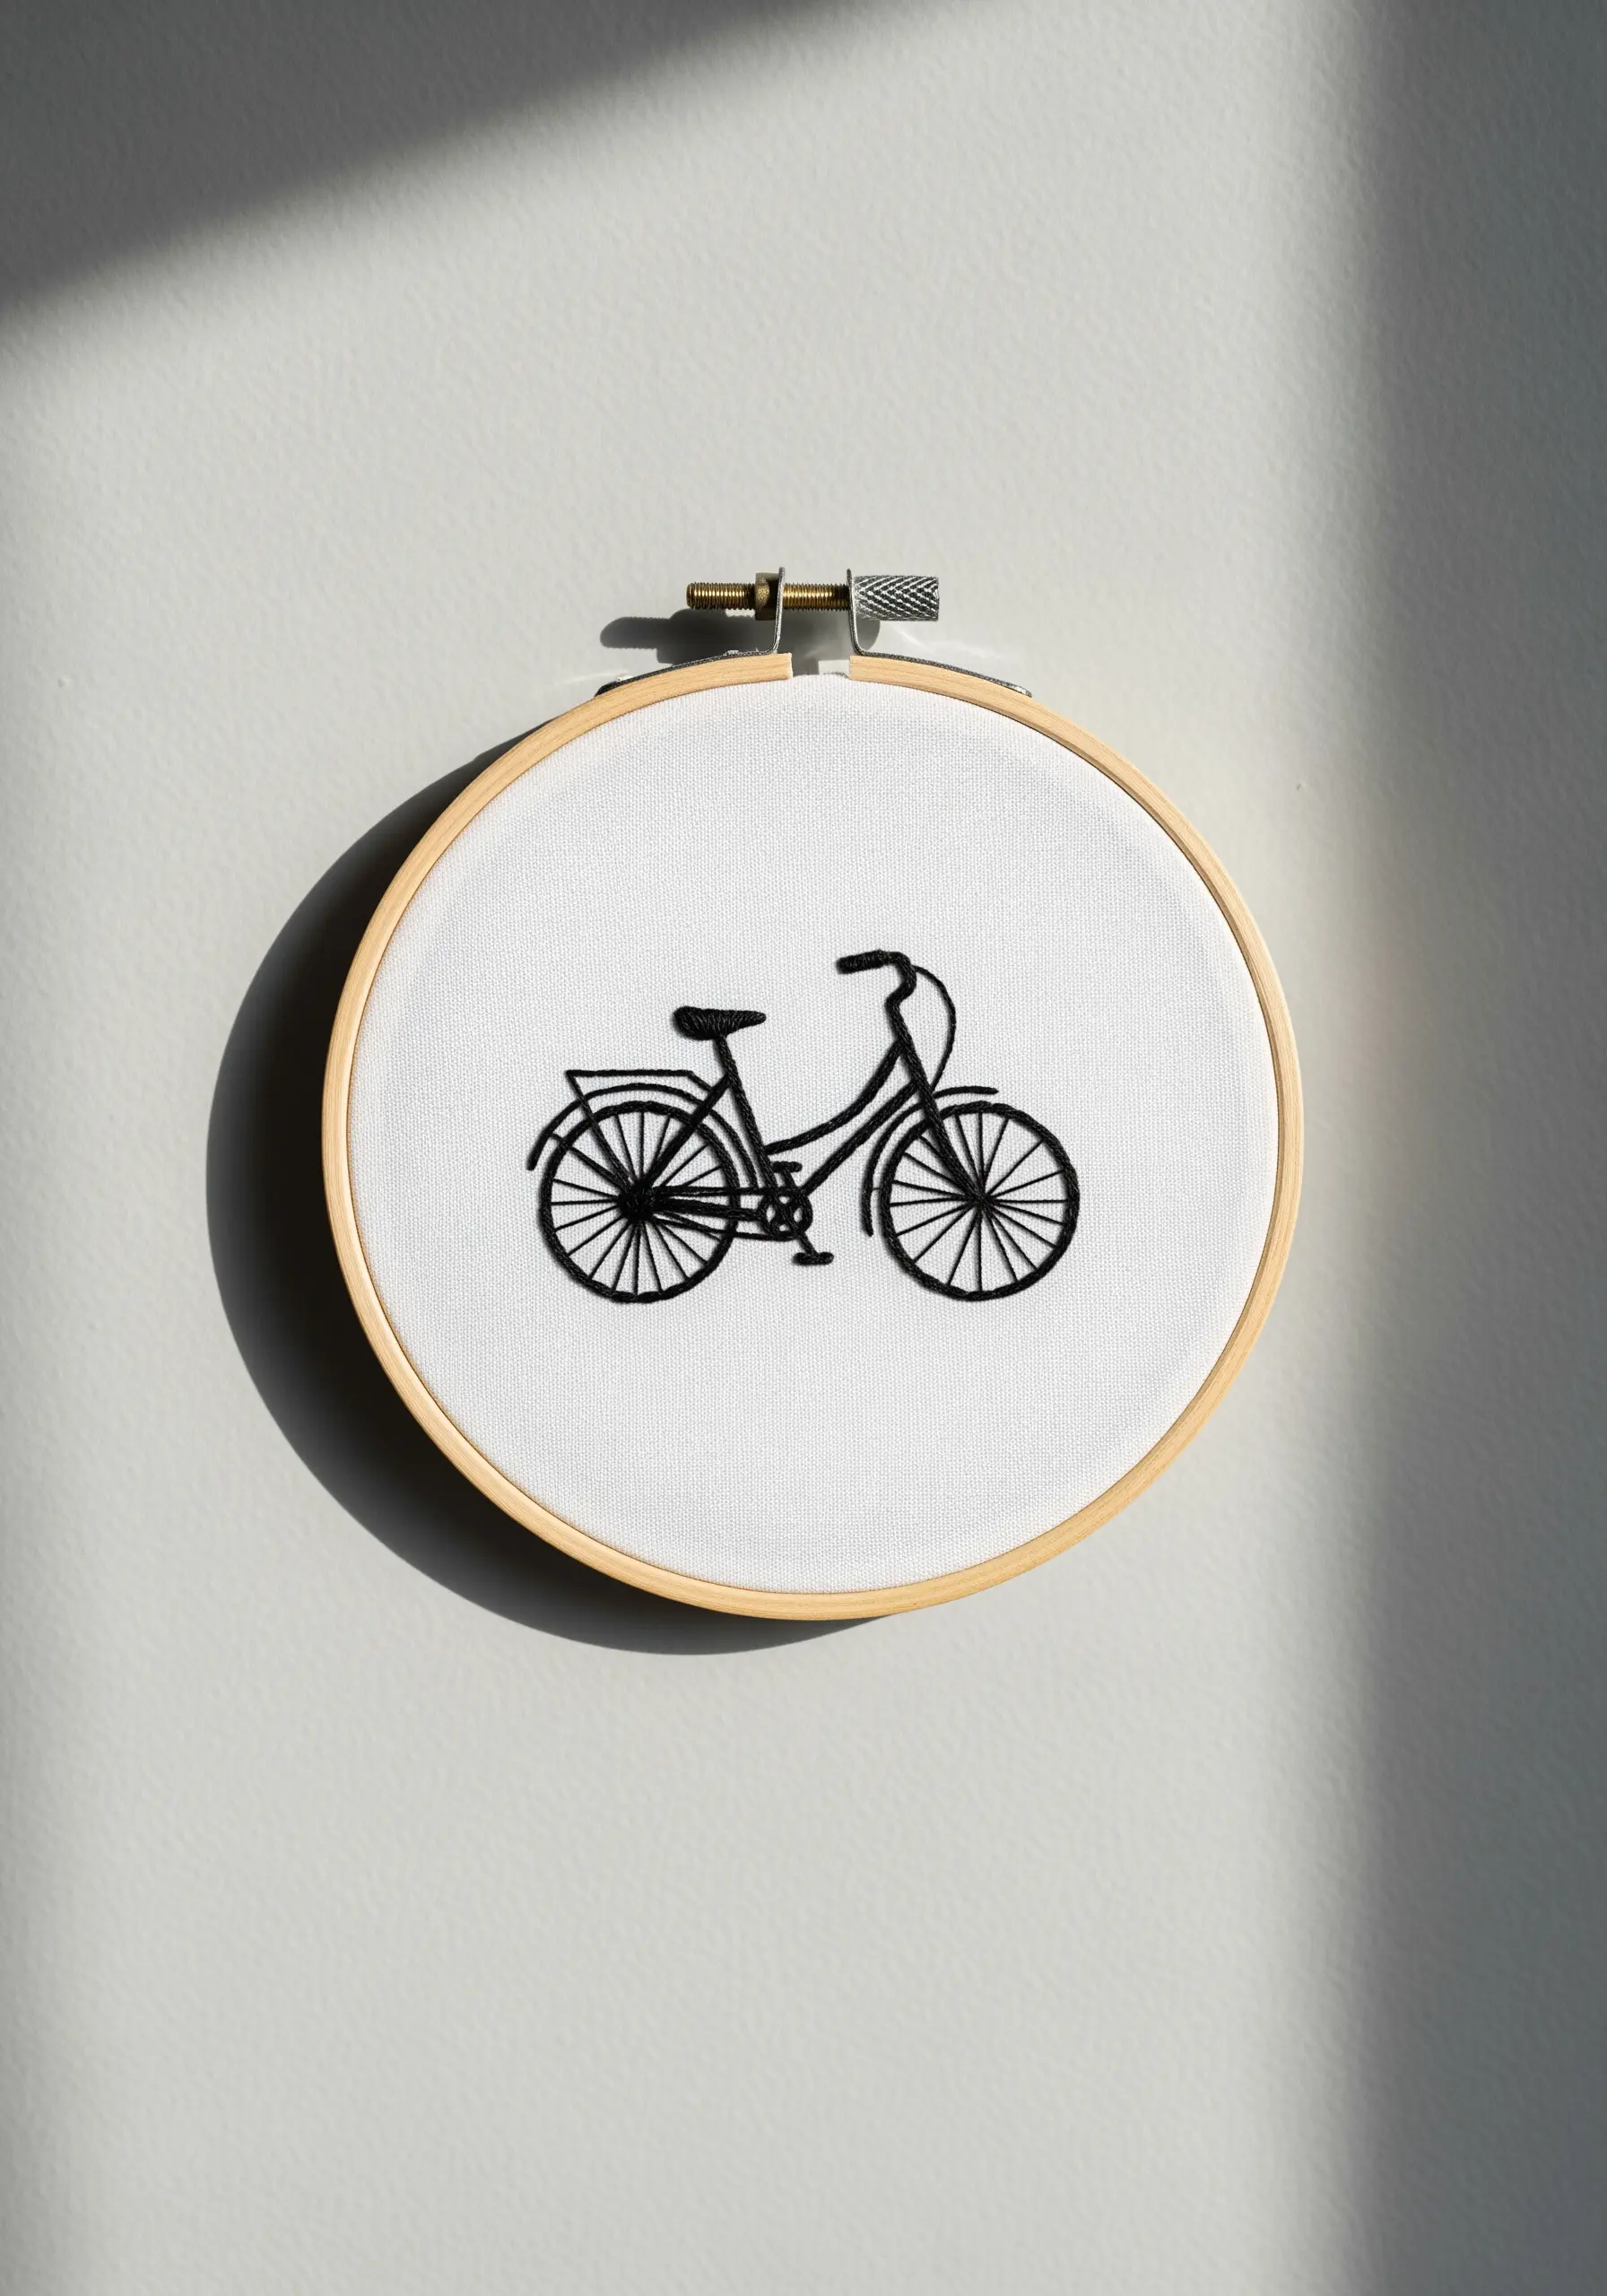
When your subject is complex, like a bicycle, simplifying it to its essential lines is the key to an elegant design.
Trace the object’s silhouette and use a single color of thread to create a clean, graphic illustration.
A precise backstitch or split stitch using only two strands of floss will allow you to capture fine details like the spokes and chain without the work looking cluttered.
This approach transforms a detailed object into a piece of graceful, minimalist line art.


