

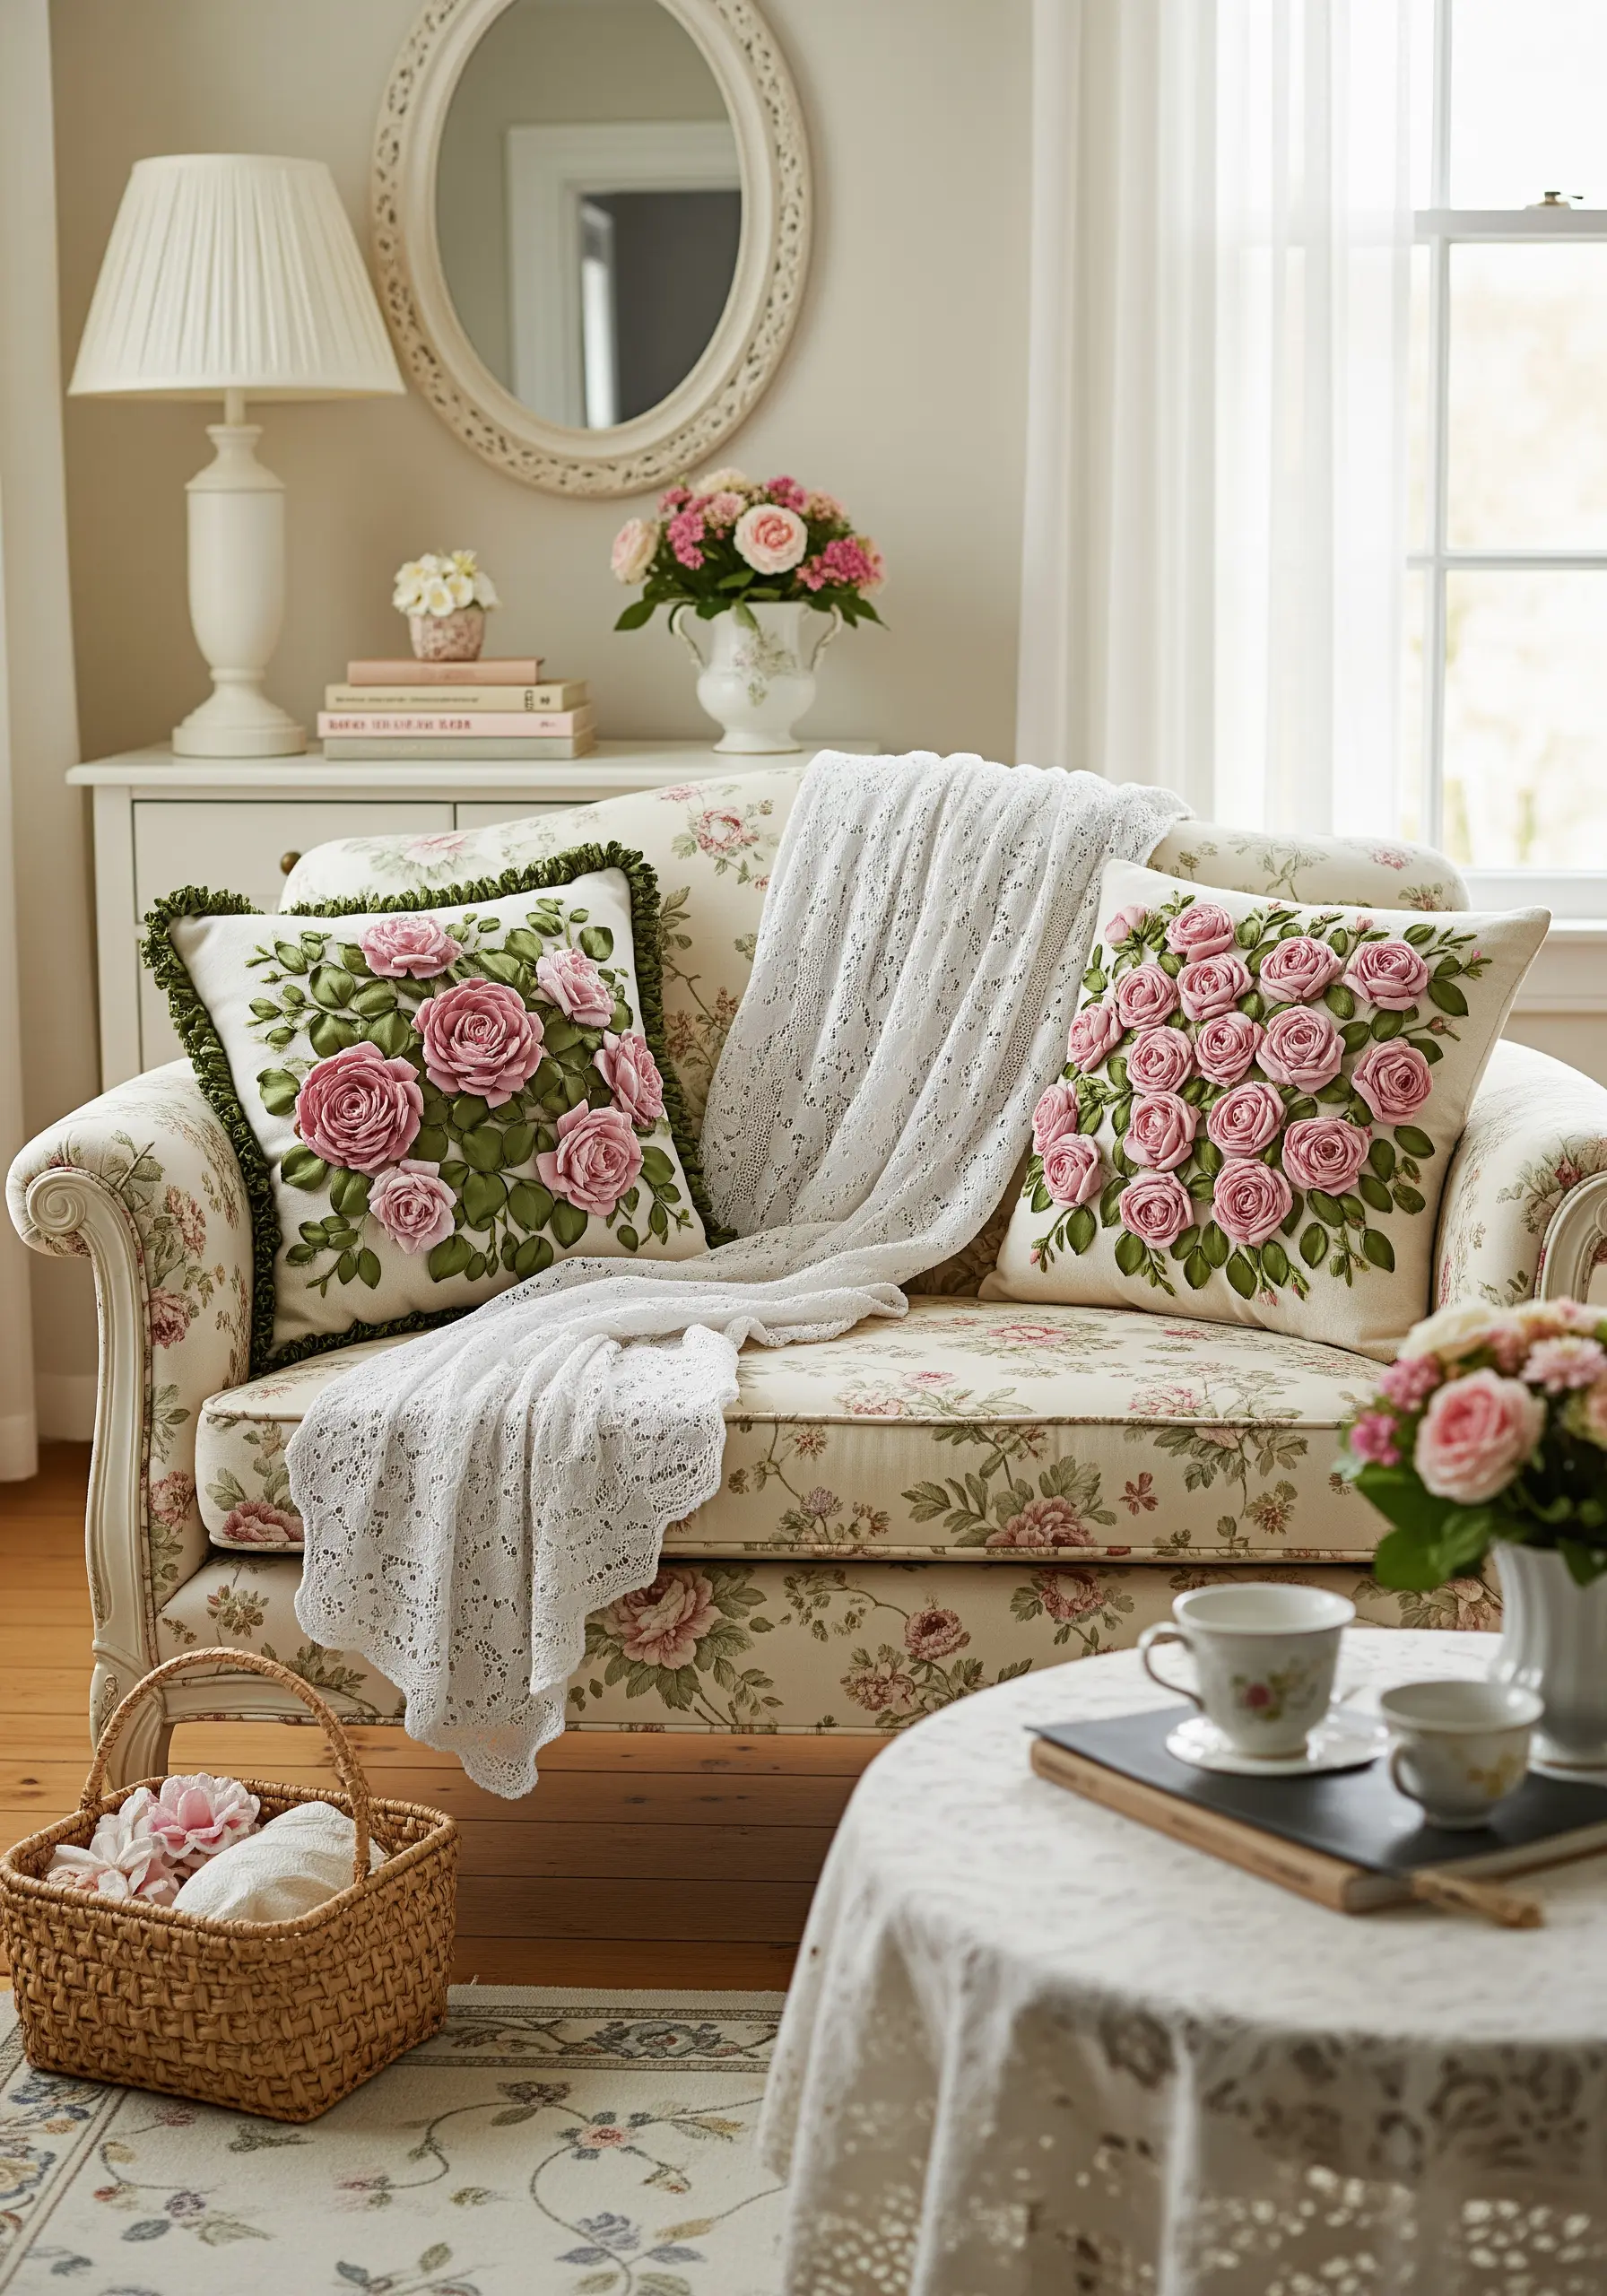
A simple cushion can do more than just offer comfort; it can be the canvas that transforms your entire living space. Before you begin your next project, I want you to reconsider the humble pillow, not as an afterthought, but as a small, powerful statement piece waiting to be brought to life.
The difference between an amateur piece and a professional one often lies in the smallest details—the weight of a thread, the direction of a stitch, the subtle shift in color that creates depth. It’s about moving beyond simply filling in a pattern and starting to think like a textile artist.
In the ideas that follow, I’ll guide you through specific techniques that create texture, drama, and elegance. These aren’t complex methods requiring new tools, but rather thoughtful adjustments to the skills you already possess. Let’s stitch with intention and turn your small sofa into a gallery of your own making.
1. Layered Botanicals for Realistic Depth
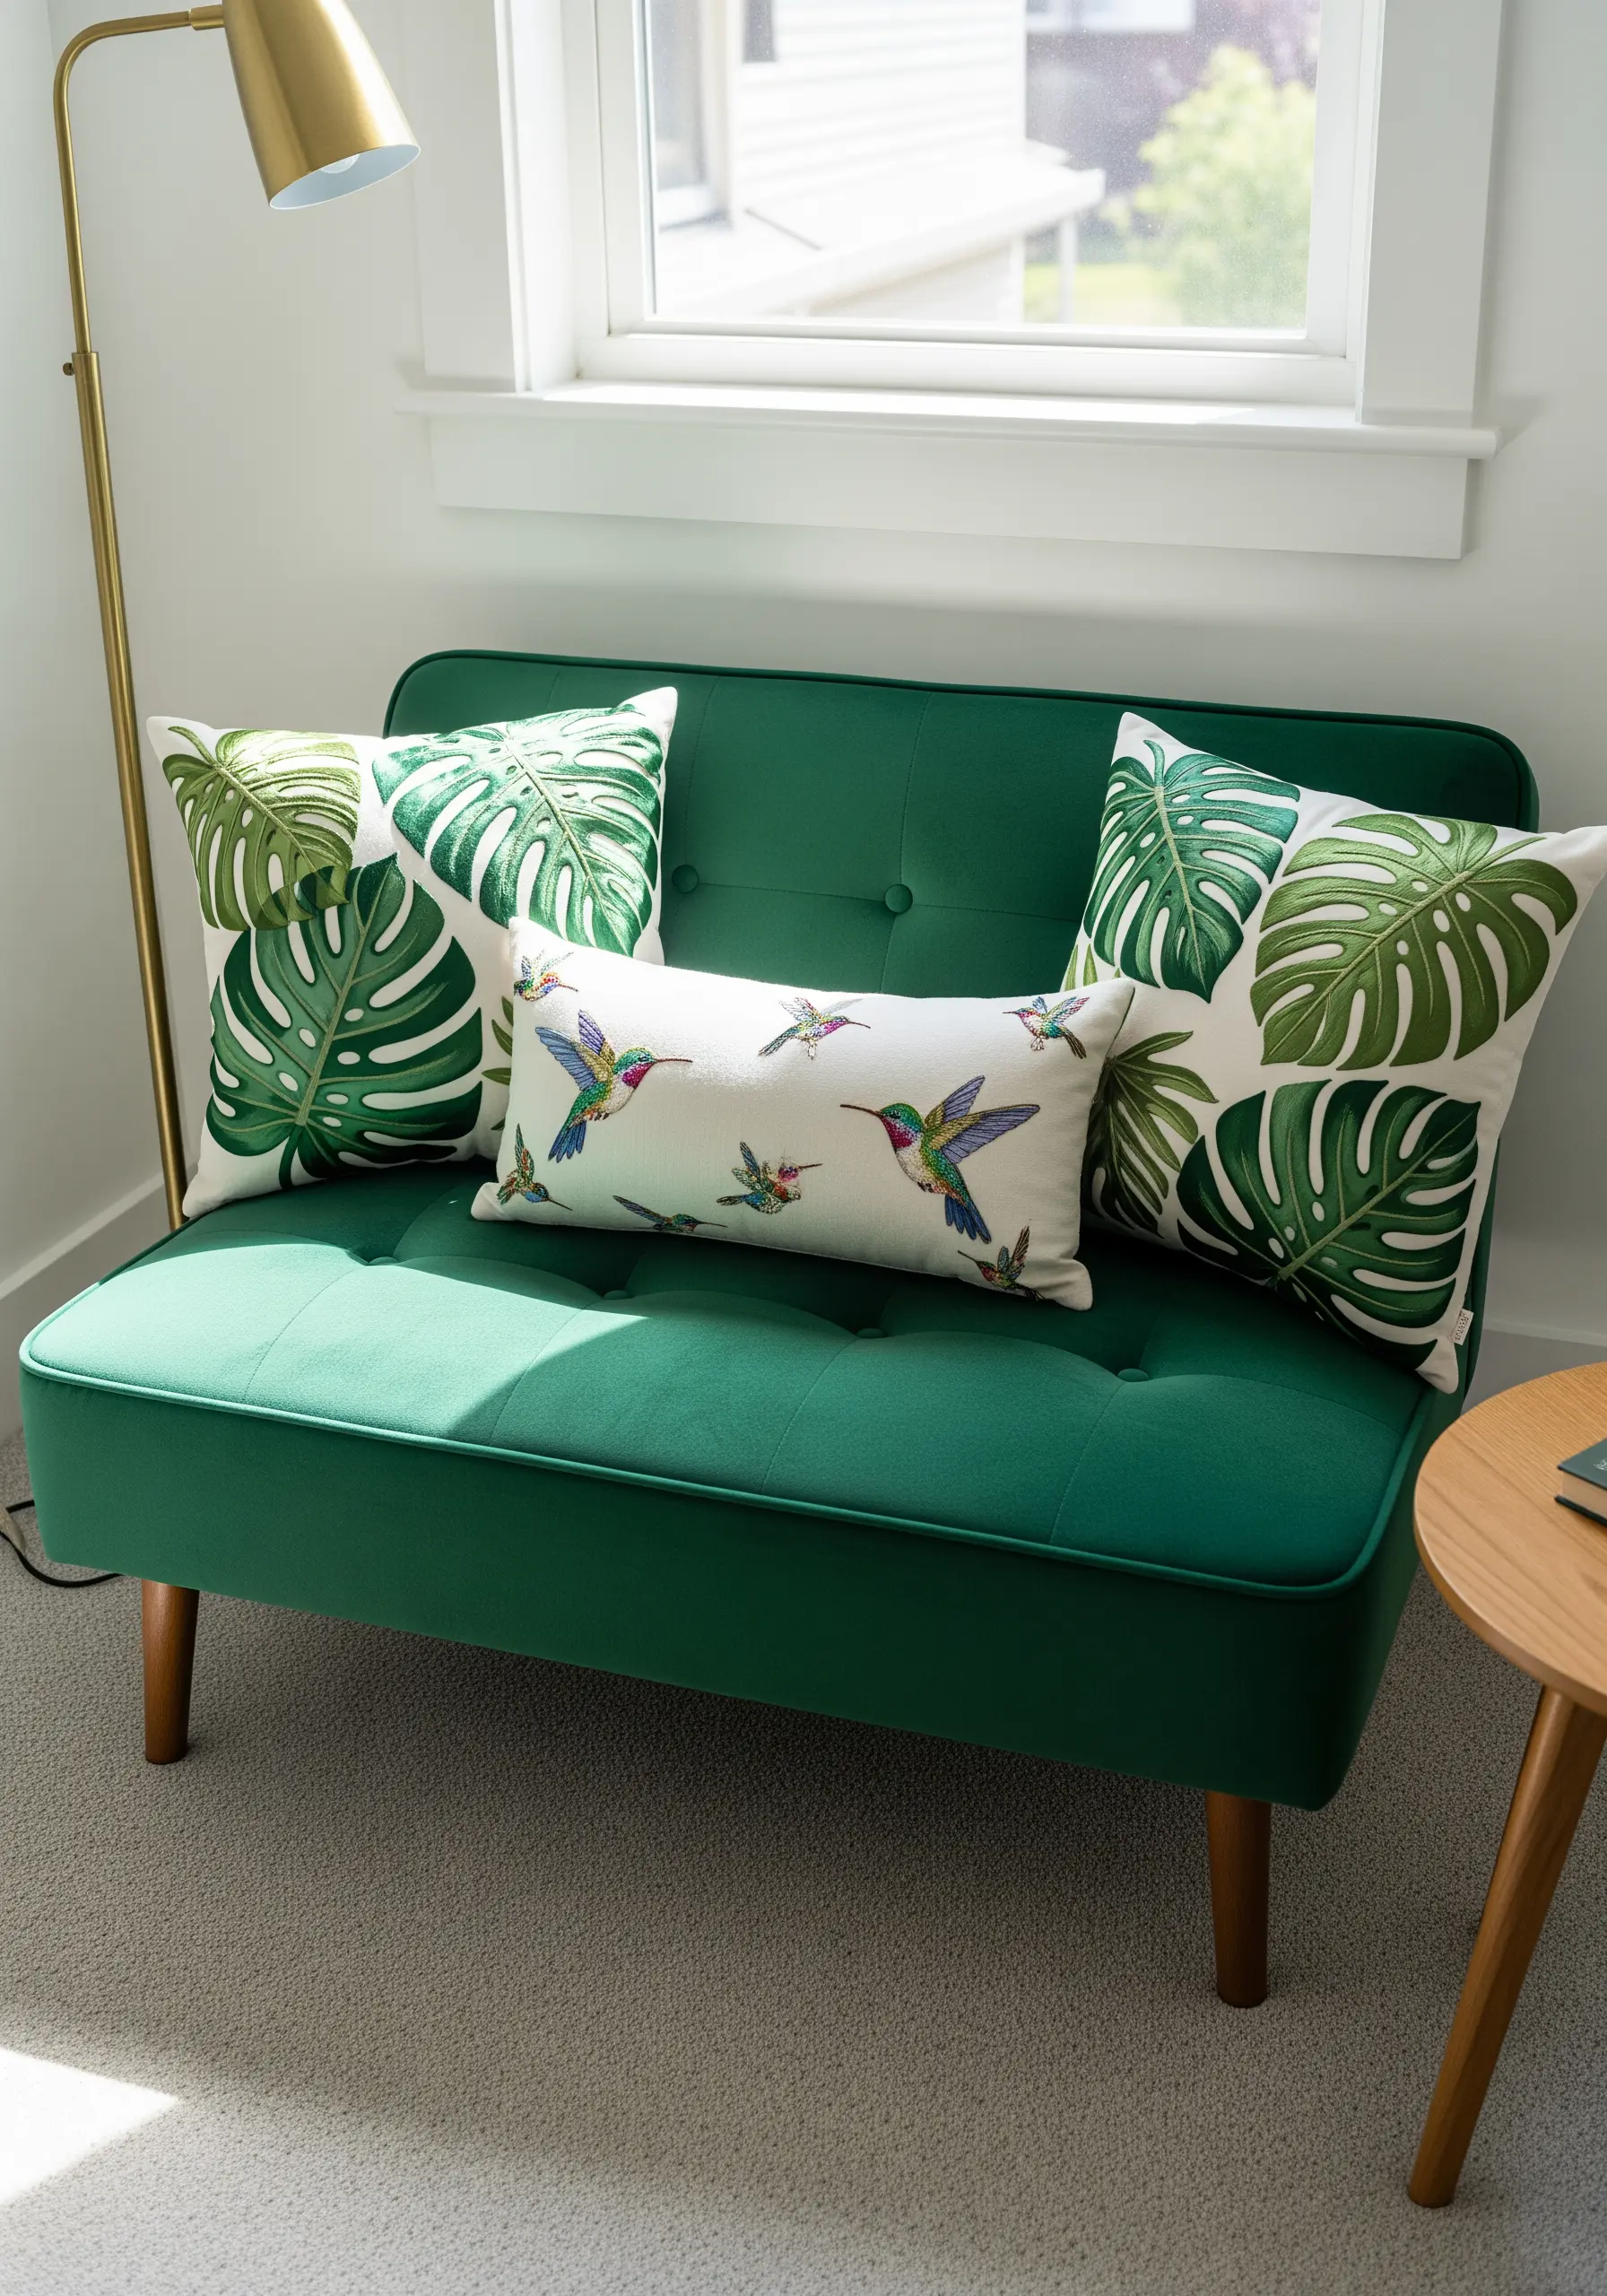
To prevent your embroidered leaves from looking flat, use a long-and-short stitch and work in sections, slightly changing the angle of your stitches to mimic the way light hits a real leaf.
For the delicate hummingbirds, switch to a single strand of six-strand floss.
This reduction in thread weight allows for hyper-detailed work on feathers and eyes, creating a sharp contrast against the bolder foliage.
This approach transforms a simple pattern into a dynamic scene, using only basic stitches with thoughtful adjustments in scale and texture.
2. High-Contrast Couching for Sculptural Framing

Create a bold, three-dimensional frame by using a couching stitch with thick black yarn or cord.
Lay the yarn on the surface of your pillow and use a thinner, matching thread to tack it down with small, evenly spaced stitches.
This technique adds immediate architectural structure and a satisfying tactile quality that simple stitching cannot achieve.
Contrast this heavy frame with fine metallic threads on an adjacent cushion to create a balanced yet striking composition of textures.
3. Punch Needle Texture for Pop Art Impact
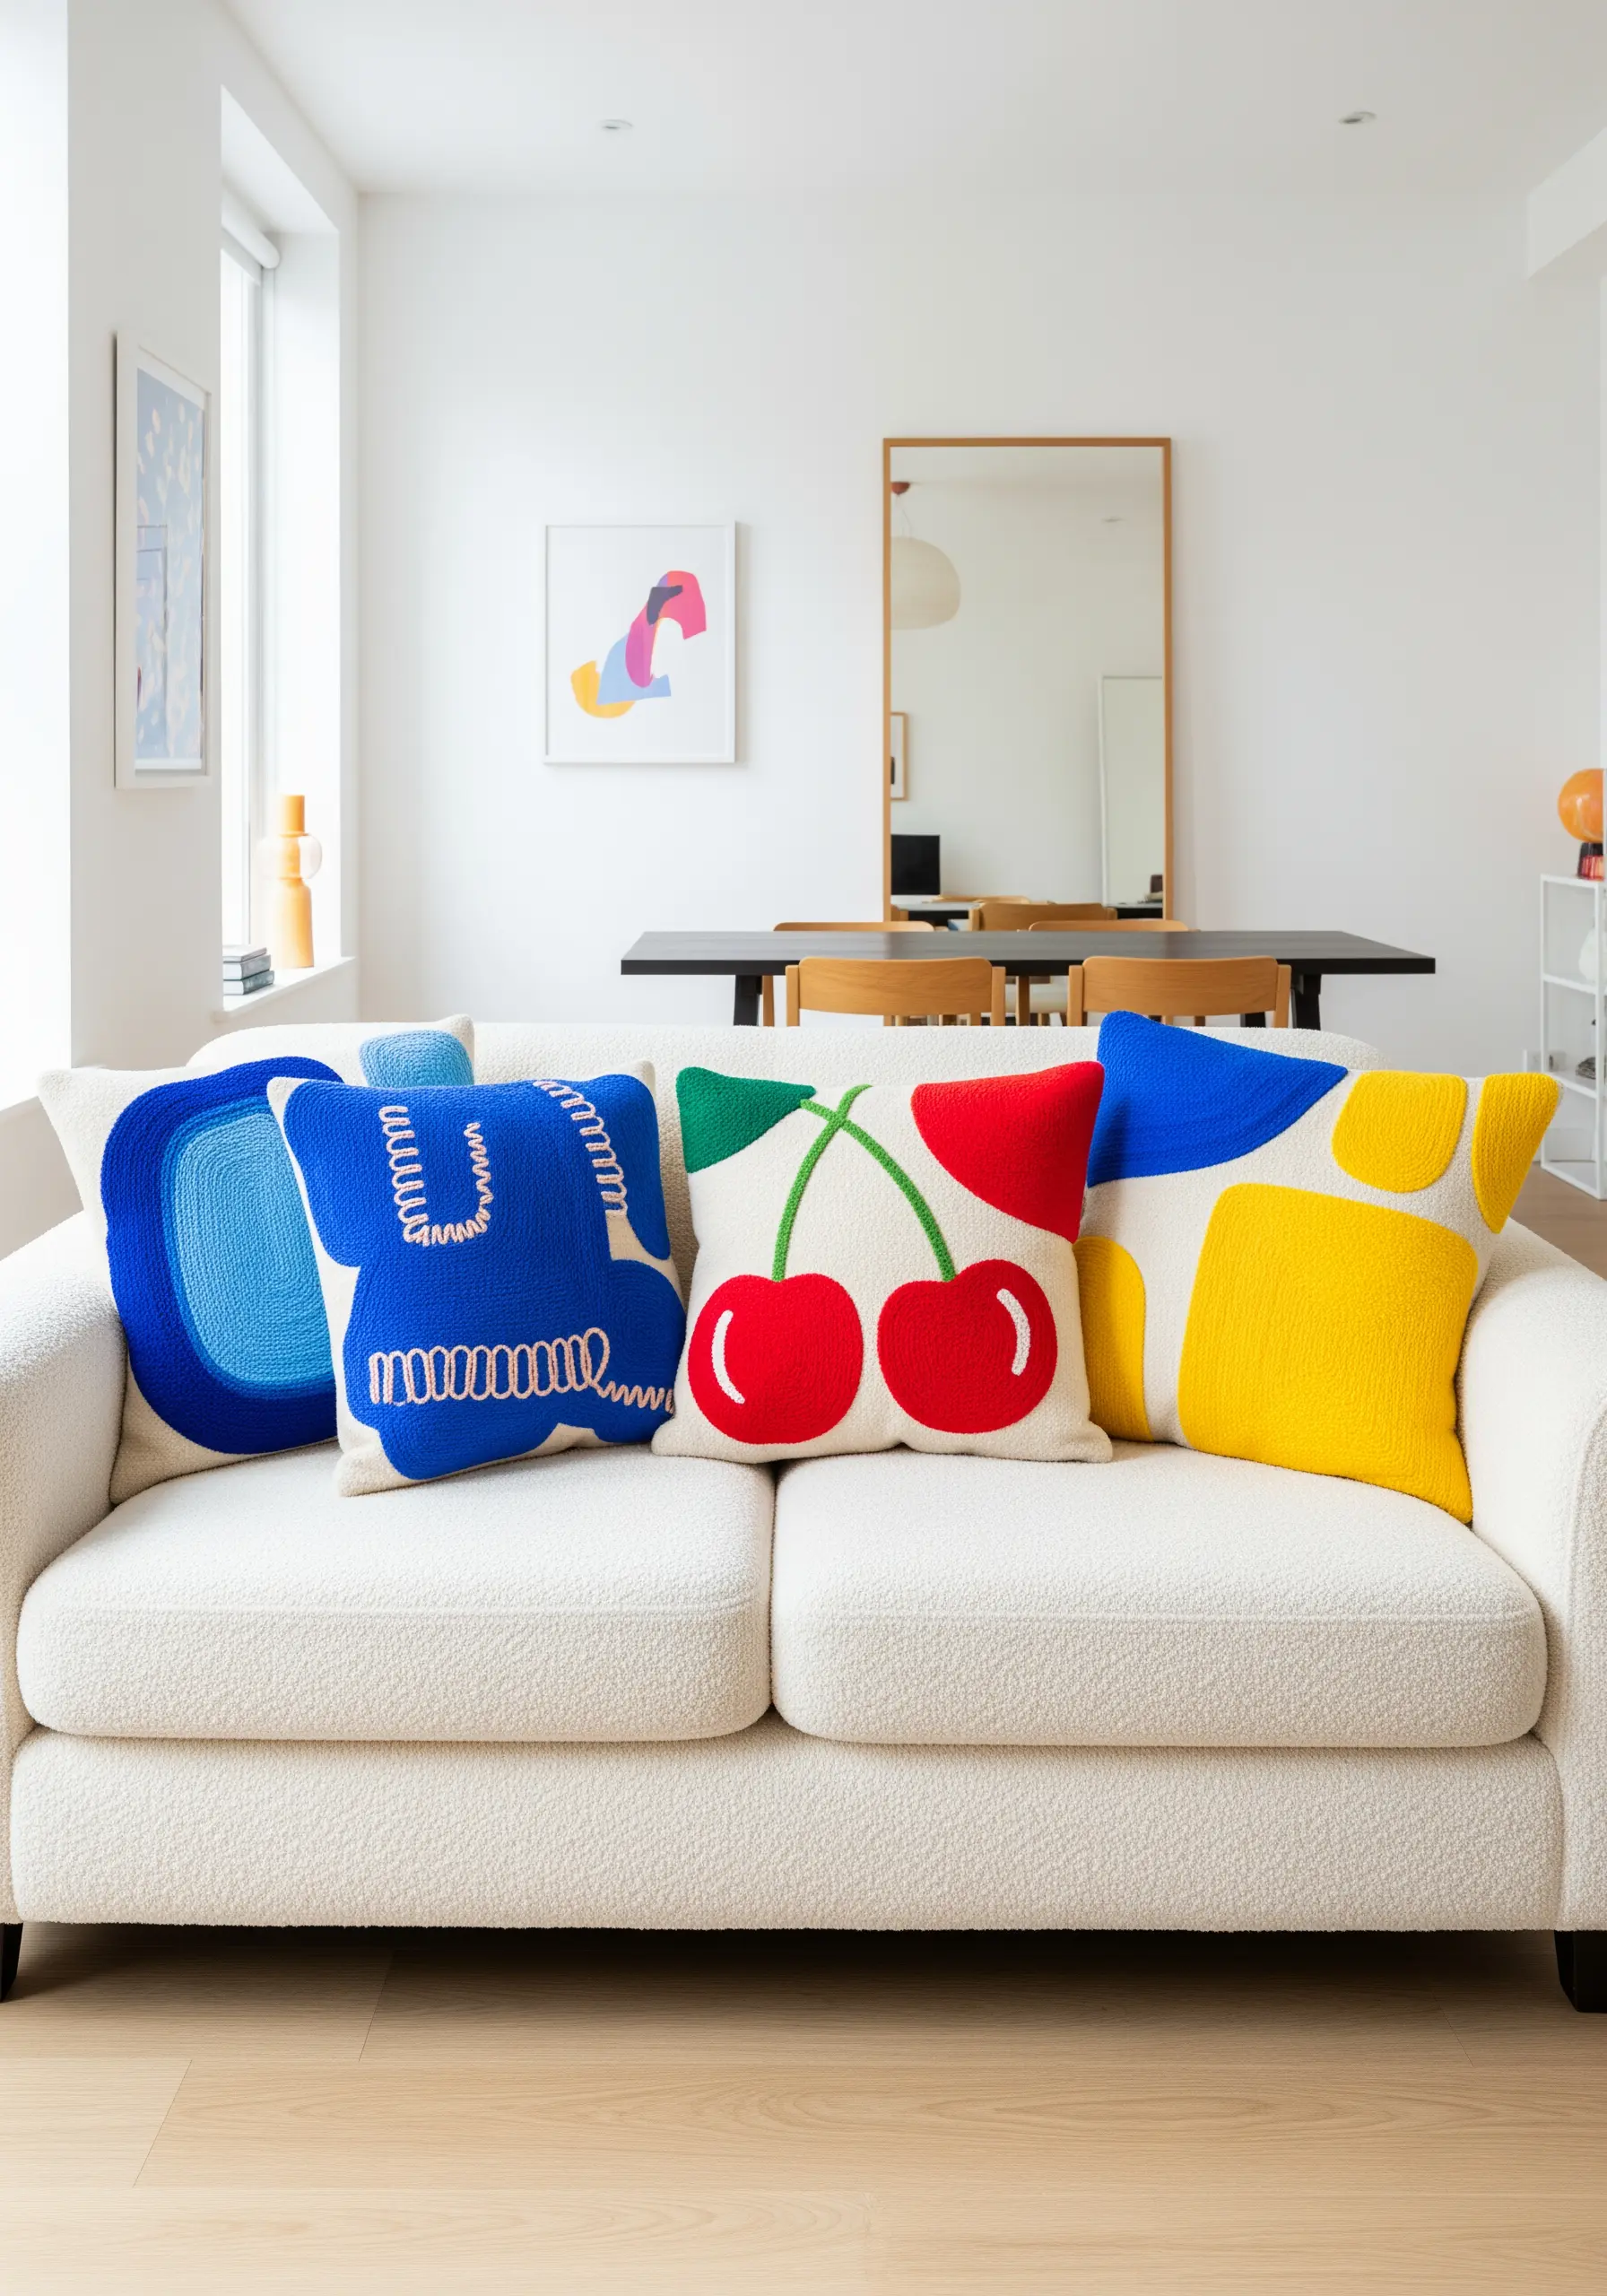
For vibrant, graphic designs like these, abandon traditional embroidery in favor of the punch needle technique.
Working from the back of the fabric, the punch needle creates dense, plush loops on the front, perfect for filling large blocks of color with a uniform, carpet-like texture.
This method is not only faster for large areas but also gives your cushions a playful, highly tactile finish that invites touch.
Choose a bold, limited color palette to maximize the design’s graphic impact.
4. Celestial Details with Metallic Thread on Velvet

Stitching on velvet requires care, as the fabric has a deep pile and can easily pucker.
Always use a stabilizer on the back to support your stitches.
For crisp constellation lines, opt for a simple backstitch or stem stitch with a high-quality metallic thread that won’t shred.
Use tiny French knots or seed stitches for stars, varying their size to create a sense of distance and sparkle against the deep, light-absorbing velvet.
5. Energetic Florals with Dense Chain Stitch Fills
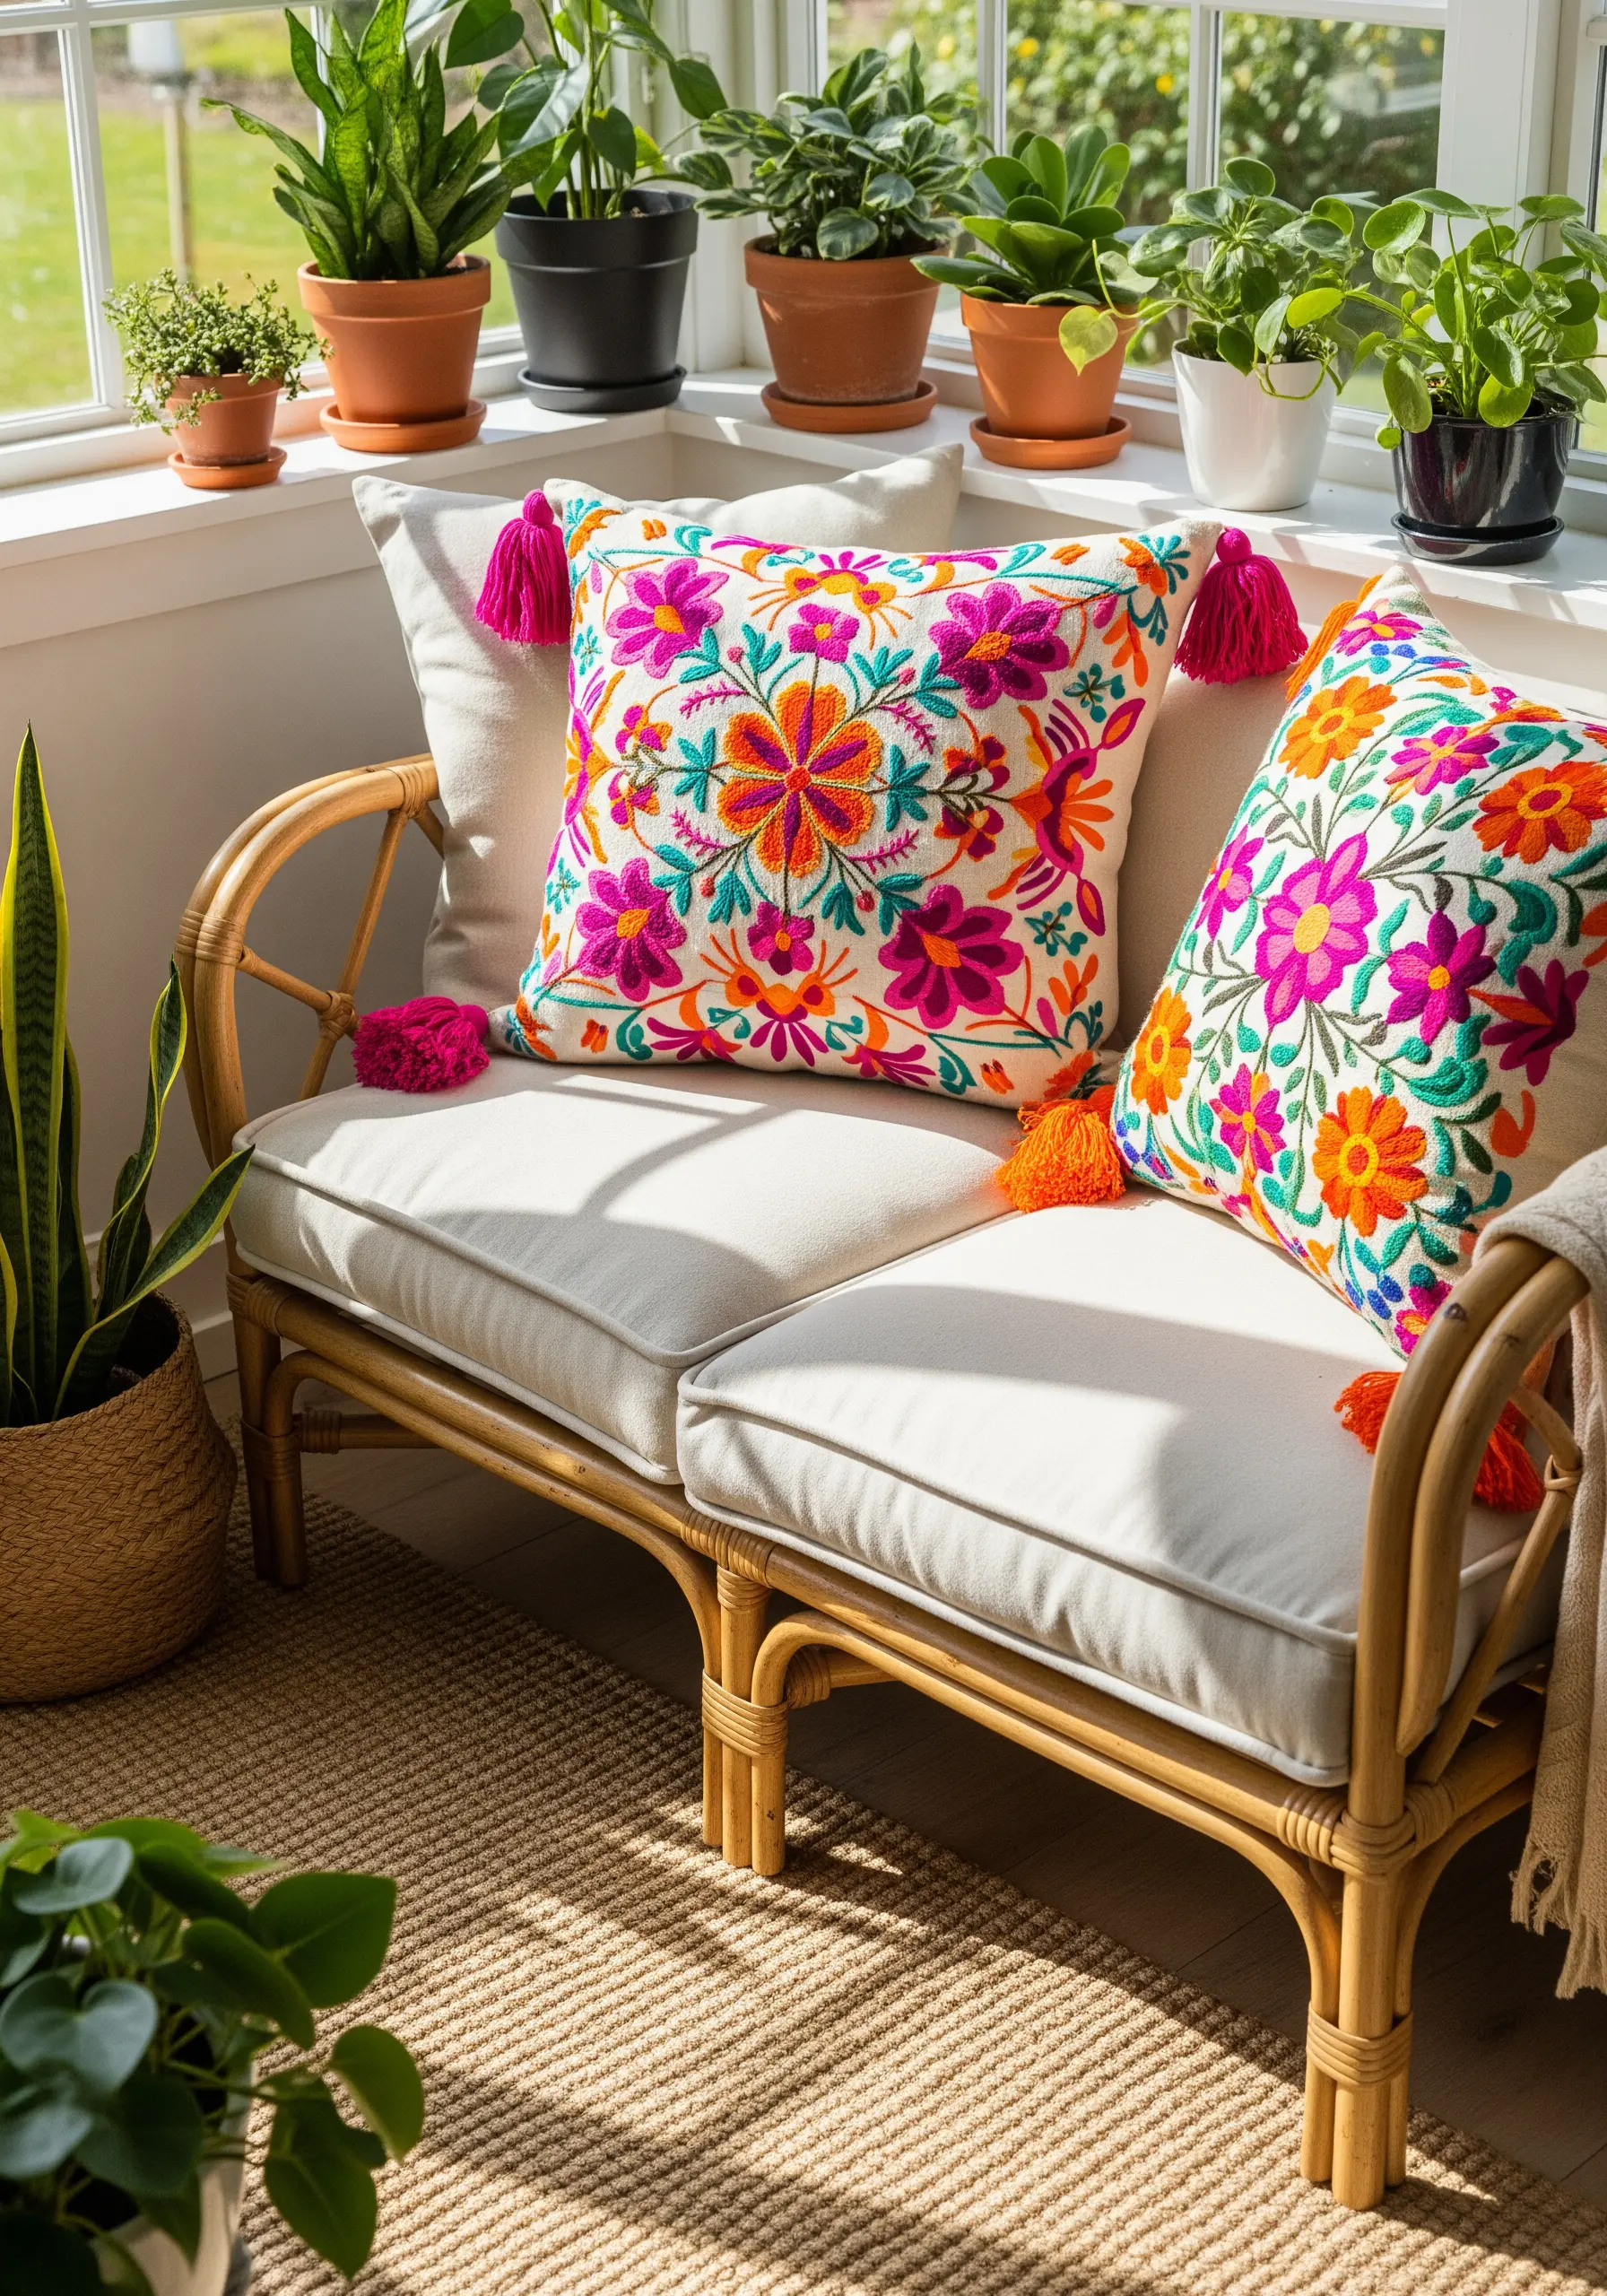
To achieve this vibrant, folk-art-inspired look, fill your floral motifs with rows of chain stitch instead of satin stitch.
Chain stitch creates a braided, textured surface that adds visual interest and dimension, making the colors appear even richer.
Work the stitches closely together to create a solid, fabric-like fill.
Finish with handmade tassels in coordinating colors to complete the boho-chic aesthetic and tie the design together.
6. Delicate Coastal Textures with French Knots

Capture the organic texture of coral by filling the shape entirely with French knots.
Vary the number of times you wrap the thread around the needle (once or twice) to create subtle variations in knot size, mimicking natural growth.
For the shells, use a whipped backstitch for the outlines to ensure a perfectly smooth, raised line that defines each shape clearly.
This pairing of textures—bumpy knots and smooth lines—creates a sophisticated coastal-themed pillow.
7. Art Deco Precision with Guided Satin Stitch
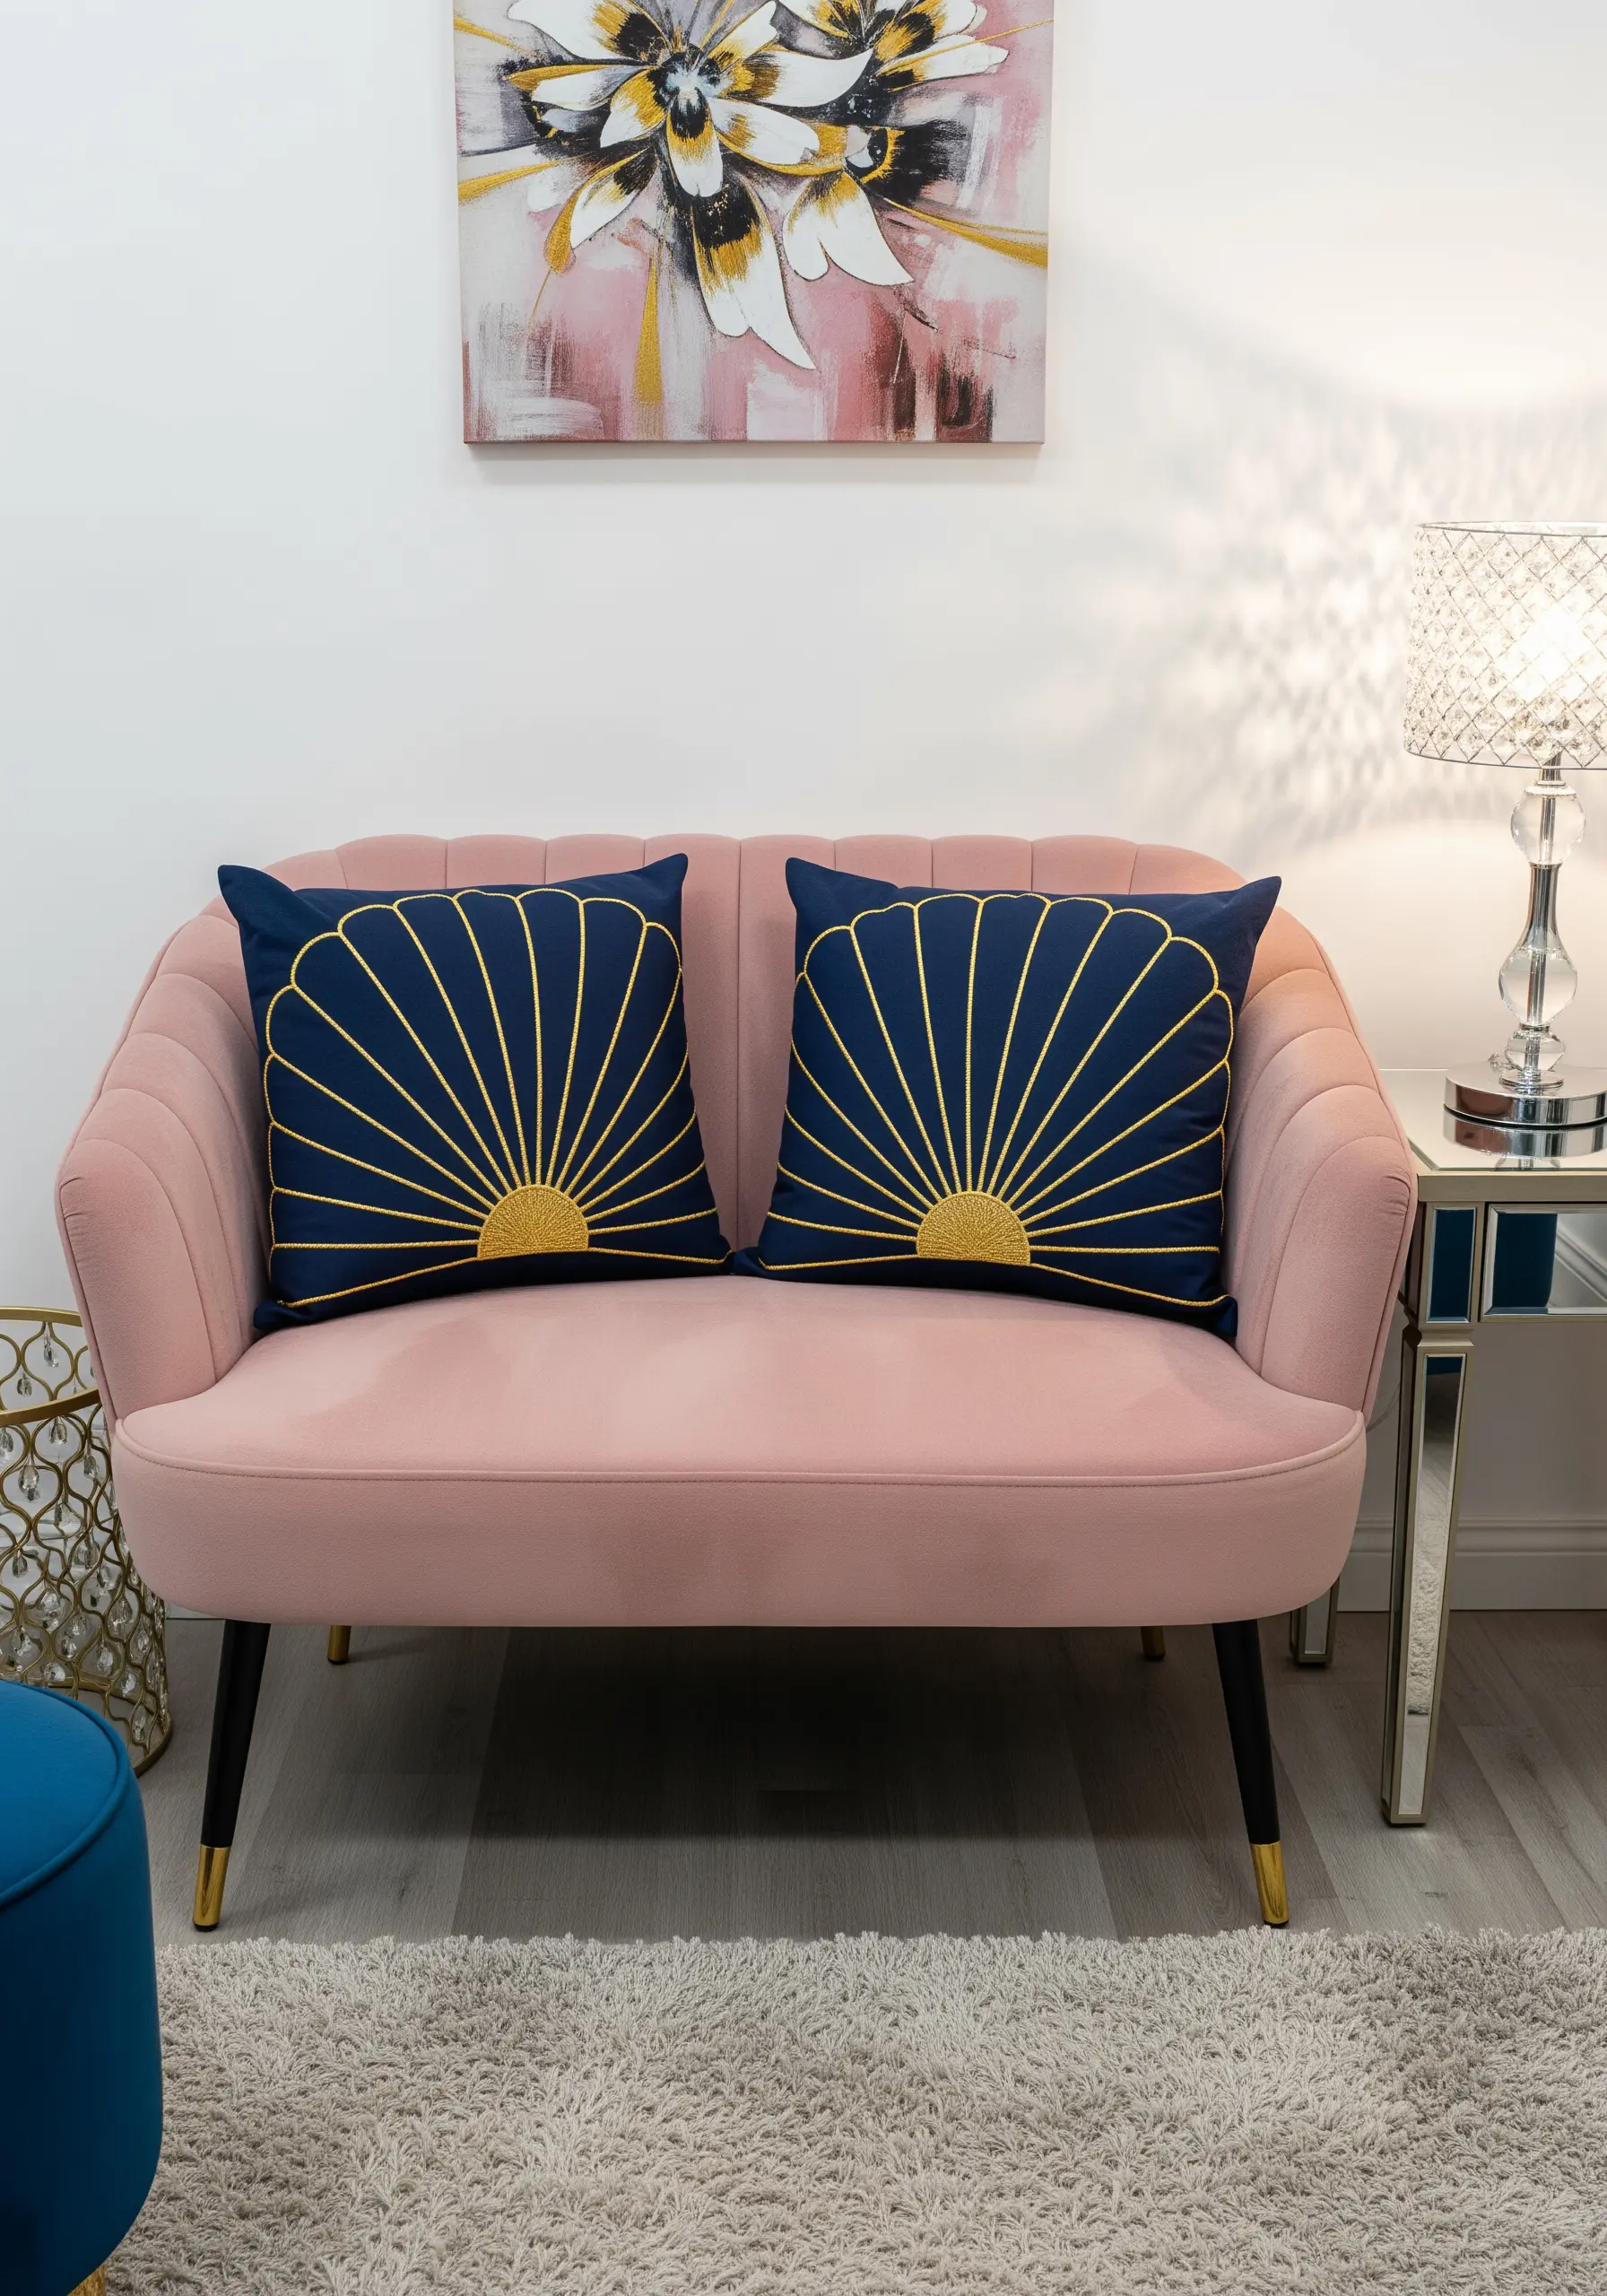
The success of an Art Deco sunburst lies in its perfect symmetry and clean lines.
Use a water-soluble stabilizer and print your design directly onto it to ensure every ray is perfectly placed.
Stitch each ray with a single, long satin stitch using a glossy rayon or metallic thread for maximum sheen.
The contrast between the shimmering thread and the matte navy fabric is what gives this design its timeless, glamorous appeal.
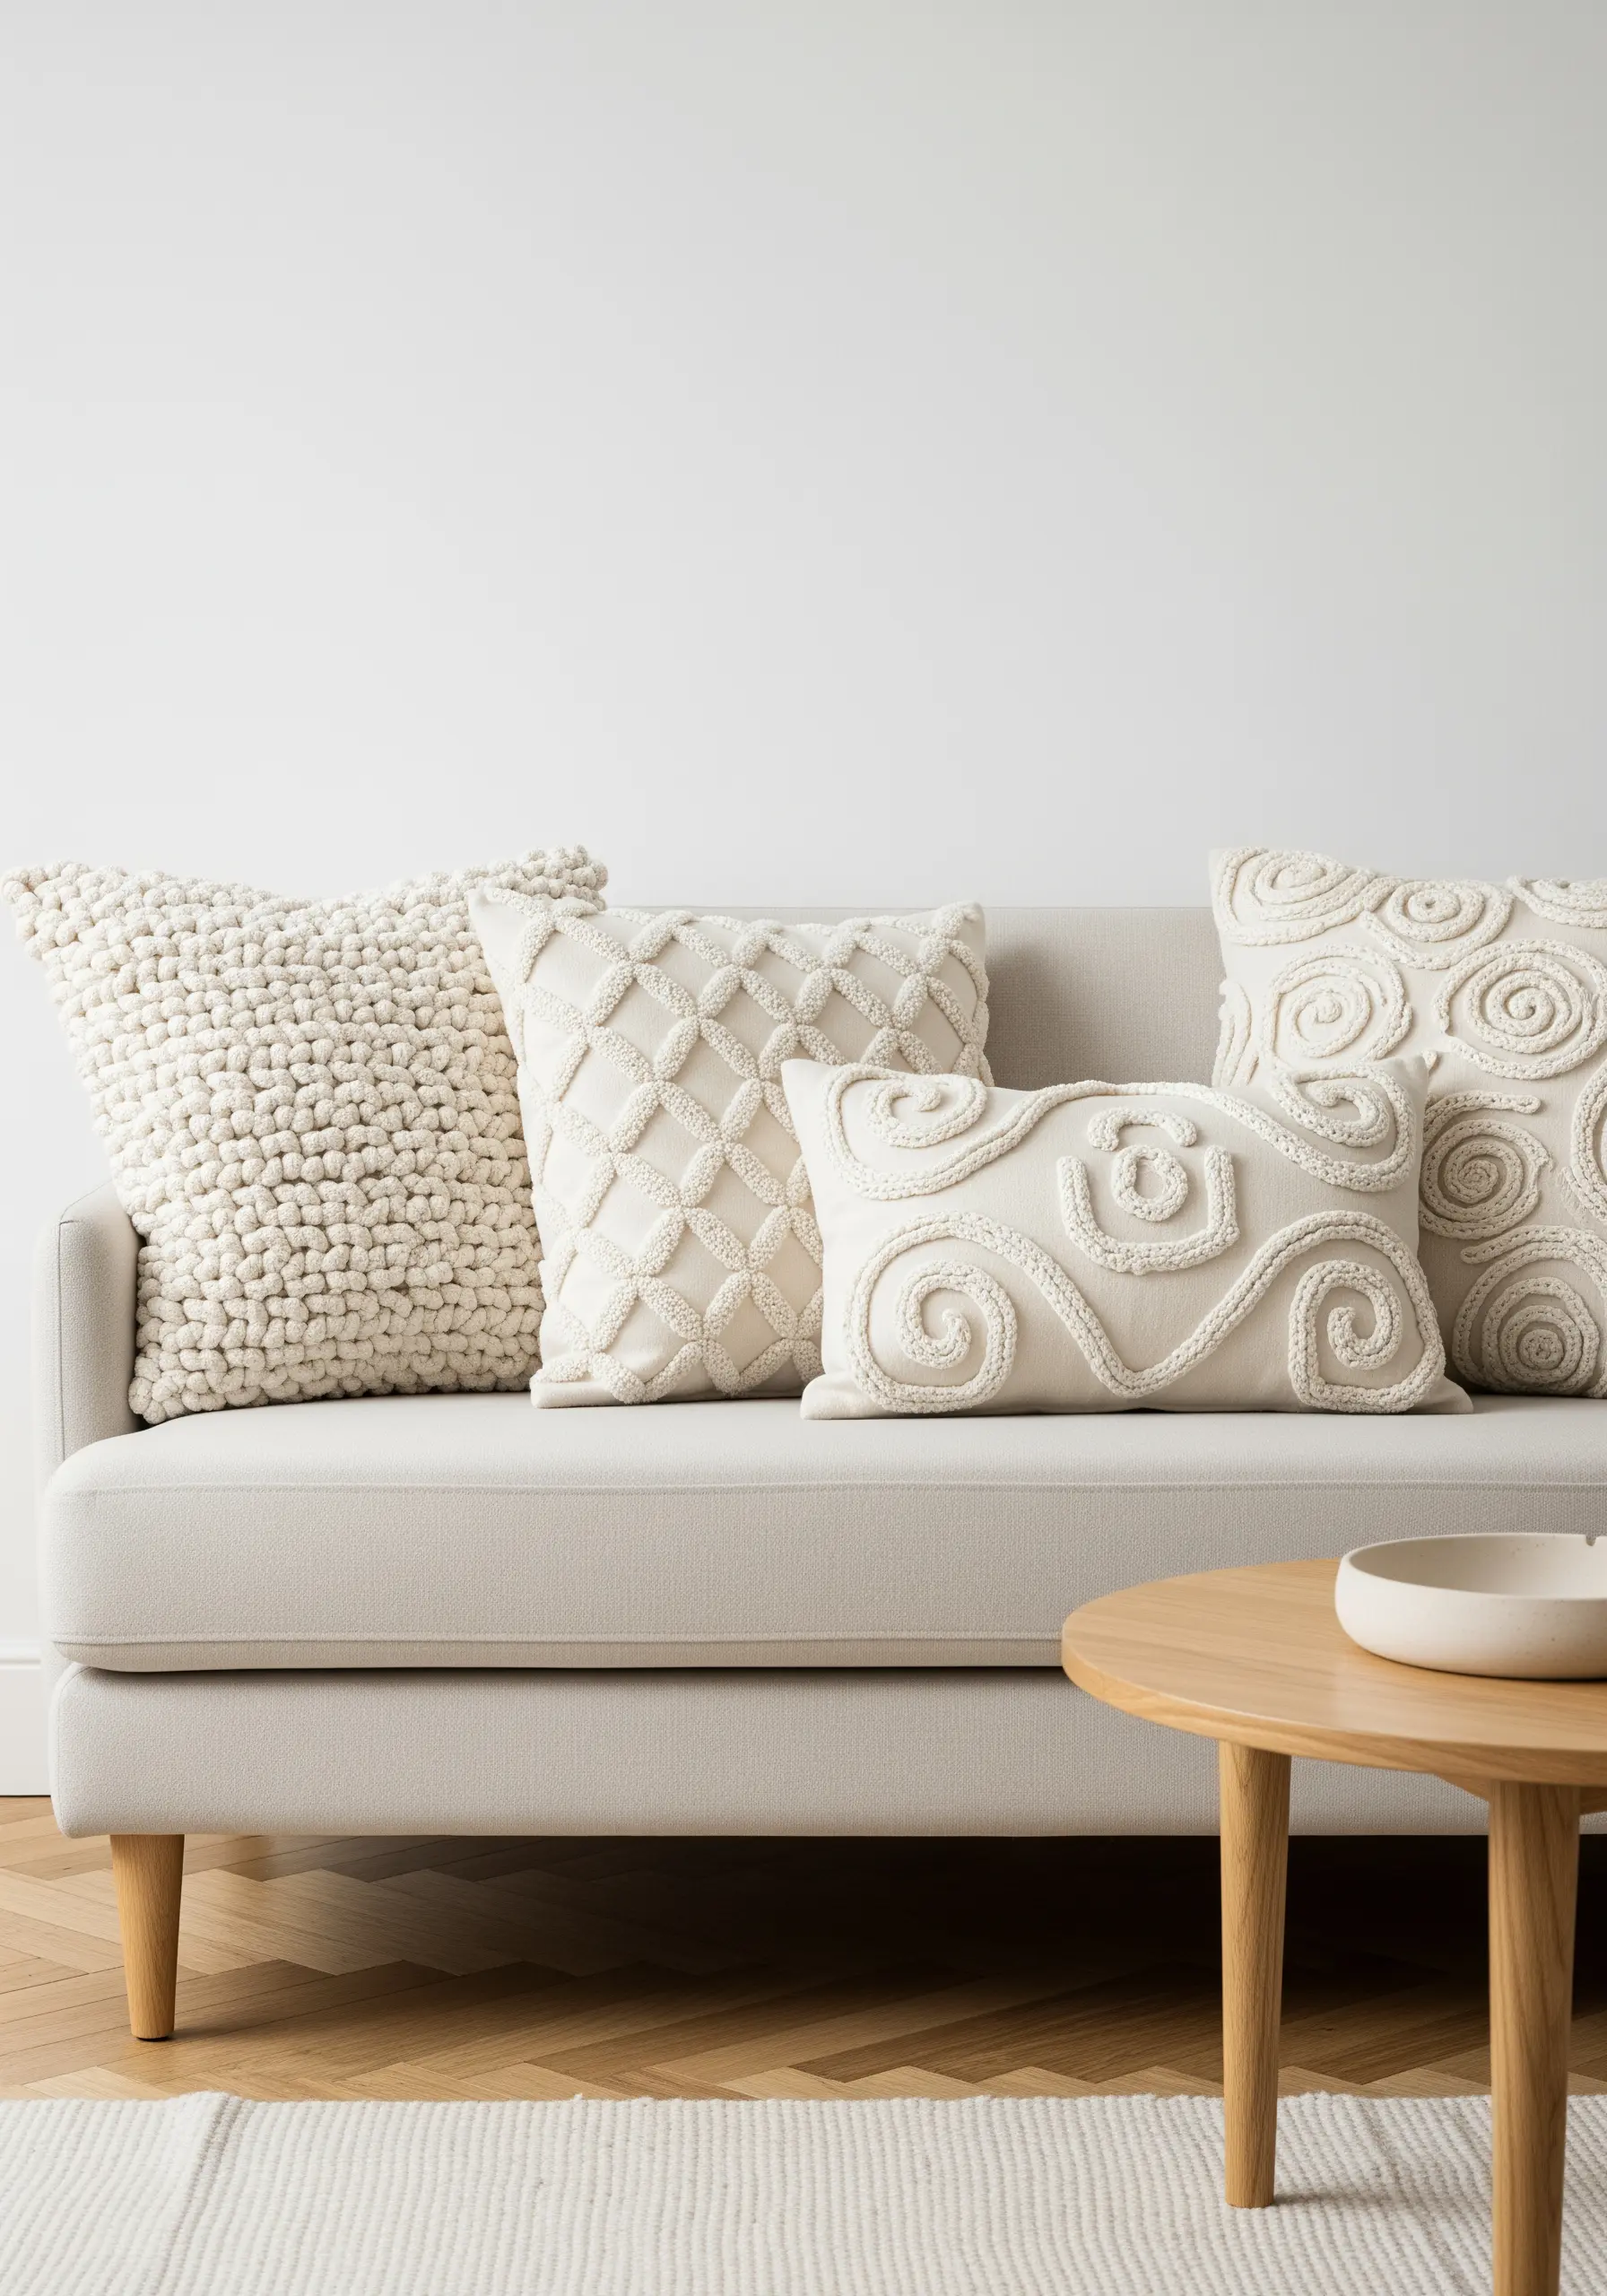
8. Sculptural Grids with Woven Yarn

Move beyond surface stitching and create a truly sculptural effect by weaving or knotting thick yarn directly onto the pillow front.
Lay down a grid of vertical and horizontal yarns, tacking them in place at intersections with a matching thin thread.
This creates a stunning, high-relief texture that is both visual and tactile.
Explore different knotting techniques from macrame to add even more complexity to your monochrome embroidery ideas.
9. Minimalist Elegance Through Negative Space
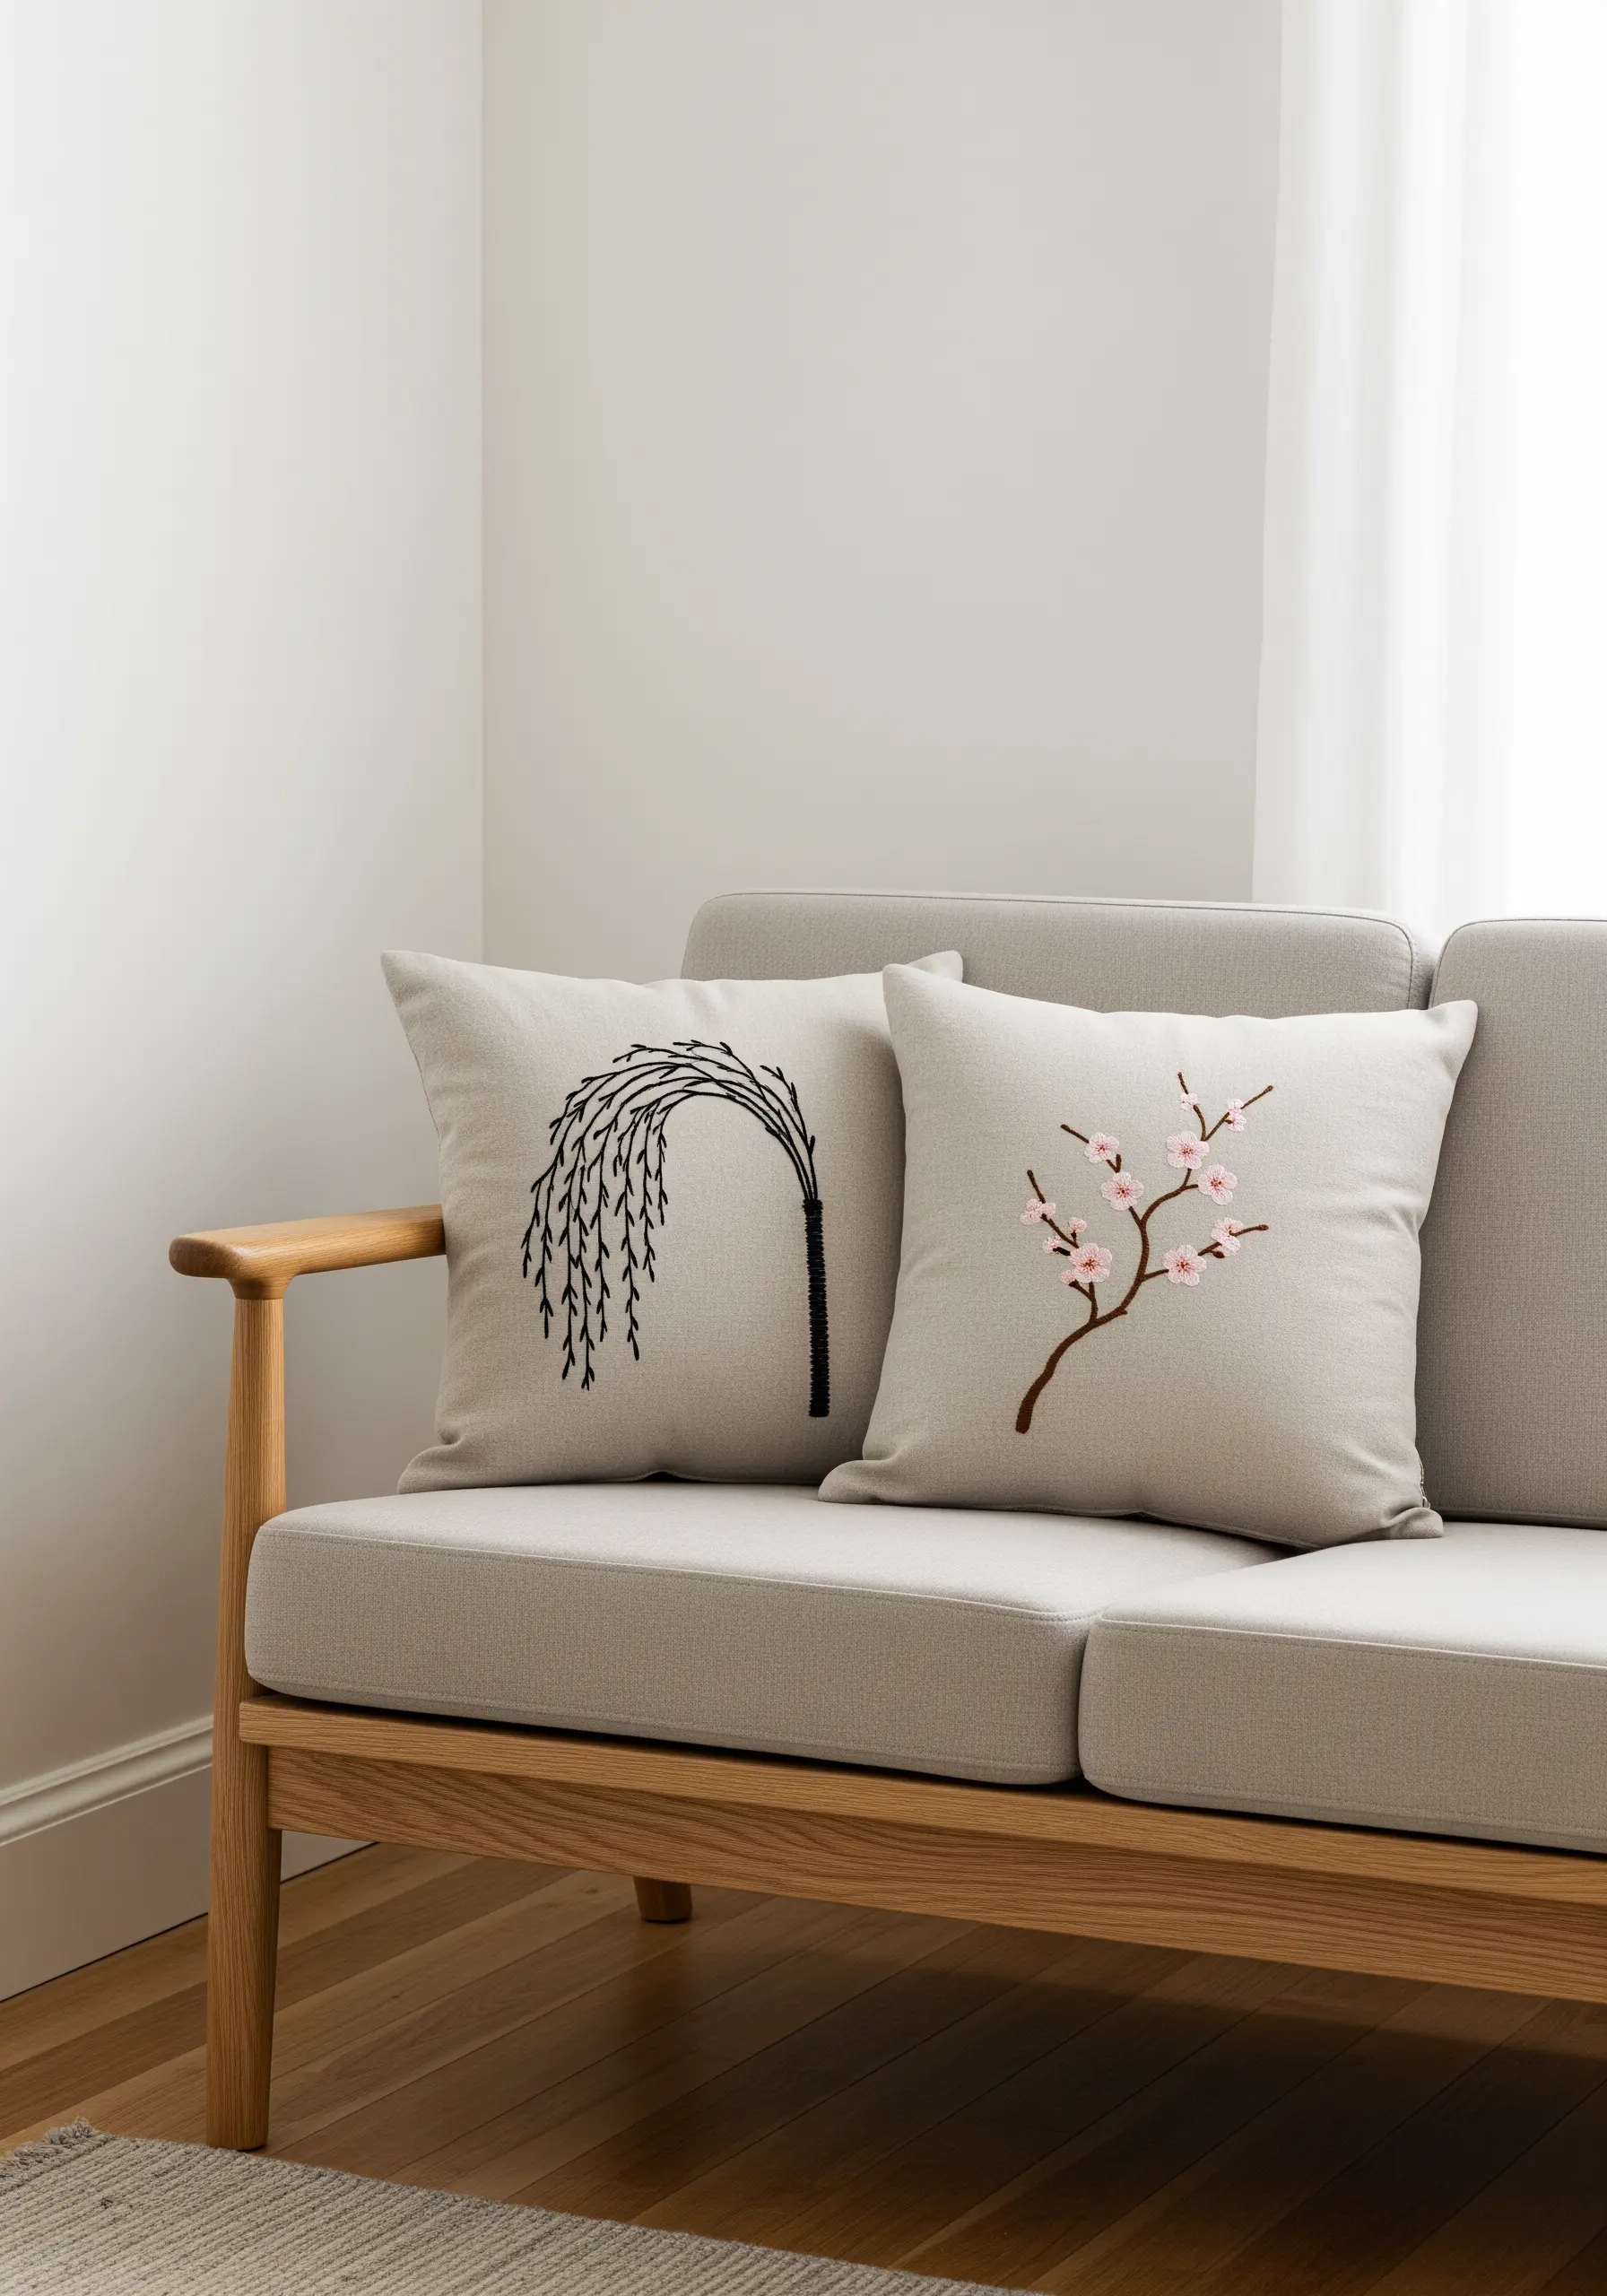
Embrace the principle of ‘less is more’ by letting the unstitched fabric play a major role in your design.
Choose a high-quality linen or cotton with a visible weave to add texture to the empty areas.
Use a simple stem stitch or split stitch in a contrasting color, like black on natural linen, to create elegant, calligraphic lines.
This minimalist approach highlights the beauty of both the thread and the textile itself.
10. Maximalist Depth with Thread Painting
To create hyper-realistic animals and botanicals, you must master the long-and-short stitch, also known as thread painting.
Use single strands of floss and blend shades of the same color to create smooth gradients, just as you would with paint.
For the tiger’s fur, ensure your stitches follow the direction of hair growth to create movement and realism.
Layering motifs, like leaves over branches, adds to the lush, maximalist effect of these stunning handmade pillow cushion embroidery patterns.
11. Polished Typography with Whipped Backstitch
If your script lettering looks disjointed, the secret is to use a whipped backstitch.
First, create a foundation of simple backstitches along your letters.
Then, without piercing the fabric, take a second thread and ‘whip’ it around each backstitch, creating a smooth, uninterrupted line.
This technique elevates simple text into elegant calligraphy, perfect for adding a personal, polished touch to farmhouse decor.
12. Textured Landscapes with Varied Fill Stitches

Give your landscape designs a tactile dimension by assigning a different fill stitch to each color block.
Use a dense satin stitch for a smooth sun, a seed stitch for the speckled ground, and long-and-short stitch for the layered hills.
This technique creates distinct textural zones that add depth and interest, transforming a simple graphic into a rich textile piece.
This is a great way to explore earth-tone embroidery projects with added character.
13. Tone-on-Tone Texture for Subtle Luxury
Create a high-end, minimalist look by focusing on texture rather than color.
Use thick, soft yarn in the same shade as your fabric to create raised patterns with French knots, bullion knots, and couching.
The play of light and shadow across the different textures is what makes the design compelling.
This tone-on-tone embroidery technique adds sophisticated detail without overwhelming a neutral decor scheme.
14. Symmetrical Mandalas with Color Planning

The key to a stunning embroidered mandala is flawless symmetry and a deliberate color story.
Start from the center and work your way outwards, completing each colored ring before moving to the next.
Alternate between flat stitches like satin stitch and textured ones like chain stitch to create visual rhythm.
Planning your color palette in advance—whether you choose a gradient or a high-contrast scheme—is essential for a harmonious and mesmerizing result.
15. Atmospheric Perspective in Thread
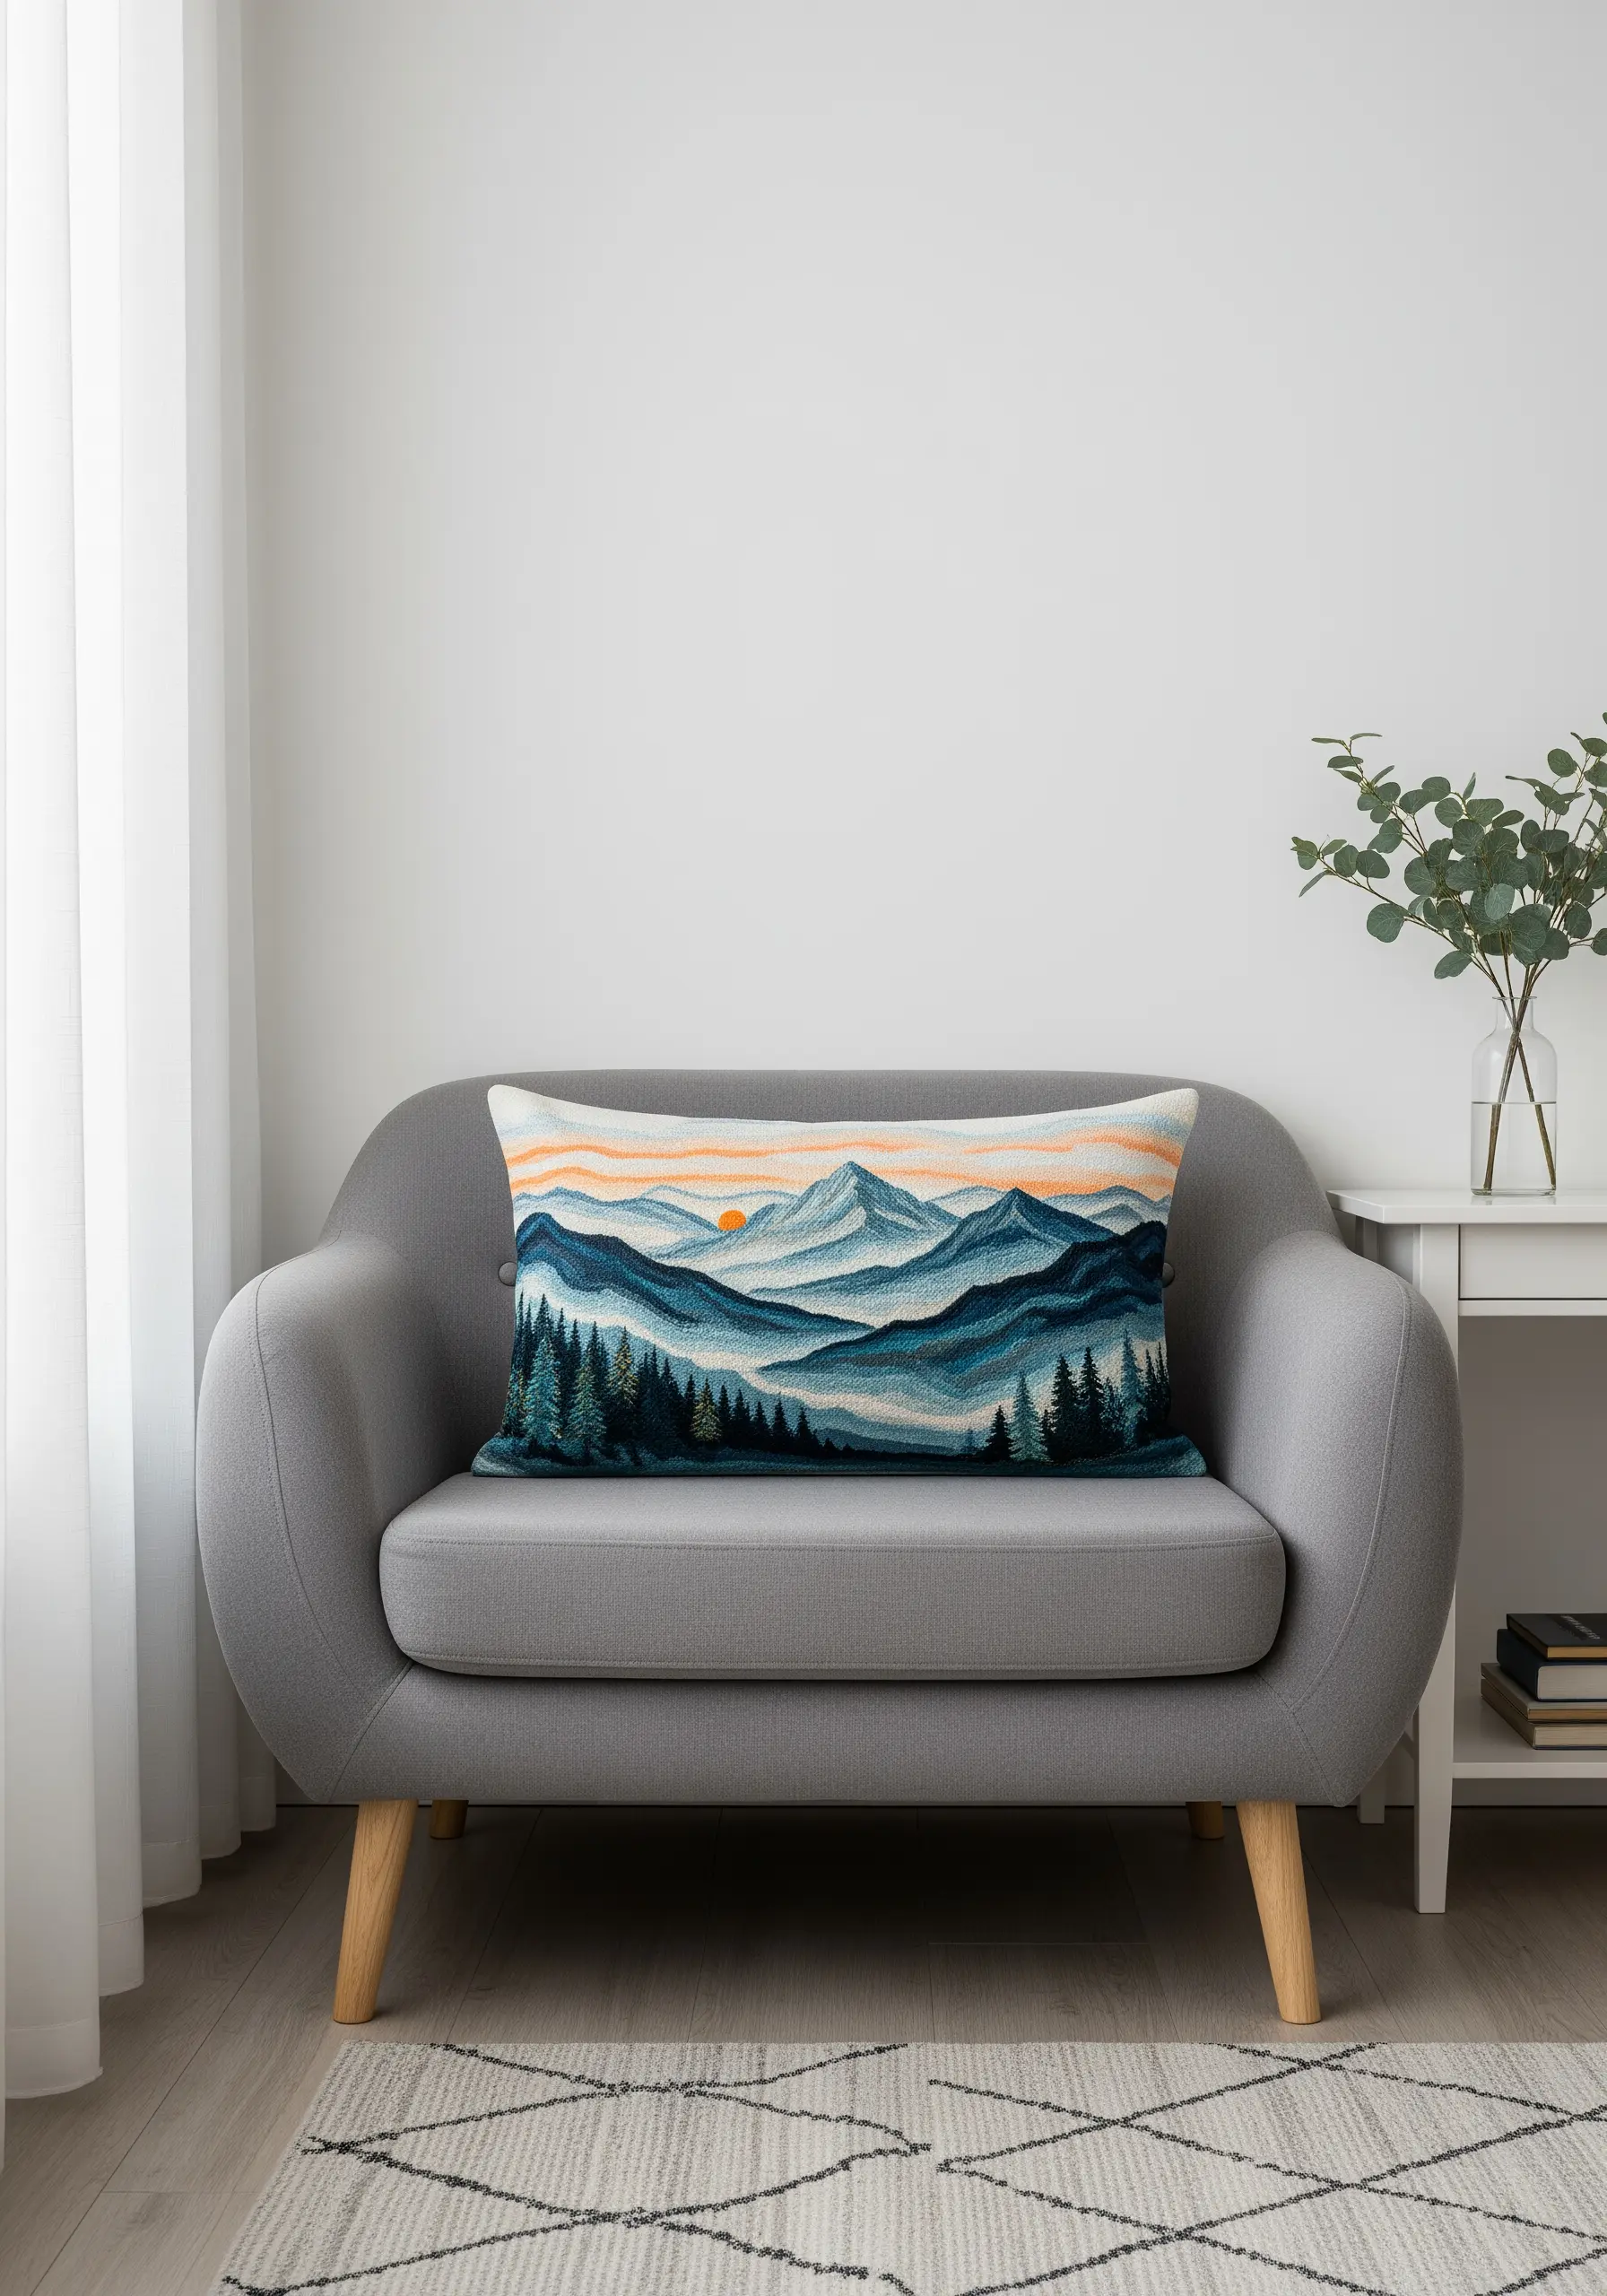
To give your embroidered landscapes a realistic sense of distance, use the principle of atmospheric perspective.
Stitch the foreground elements—like the trees—in darker, more saturated colors.
For each layer of mountains moving into the background, switch to a progressively lighter and less saturated shade of blue or grey.
This simple color shift tricks the eye into seeing depth, turning your cushion into a window to a serene mountain landscape.
16. Watercolor Florals with Blended Single Strands

To achieve a soft, painterly effect, work with a single strand of embroidery floss.
Use the long-and-short stitch and blend several closely related shades of pink and purple within each petal.
Avoid hard outlines; instead, let the colors feather into one another to create soft edges, just like in watercolor painting.
This delicate technique transforms your embroidery into a piece of fine art, perfect for gentle floral embroidery ideas.
17. Graphic Cityscapes with Consistent Backstitch

For minimalist architectural designs, precision is everything.
Use a simple backstitch with a consistent, uniform stitch length to create clean, unbroken lines.
A six-strand floss will give you a bold line that stands out against the white fabric.
The power of this design comes from its simplicity and the tension between the structured cityscape and the abstract geometric pattern on the adjacent pillow.
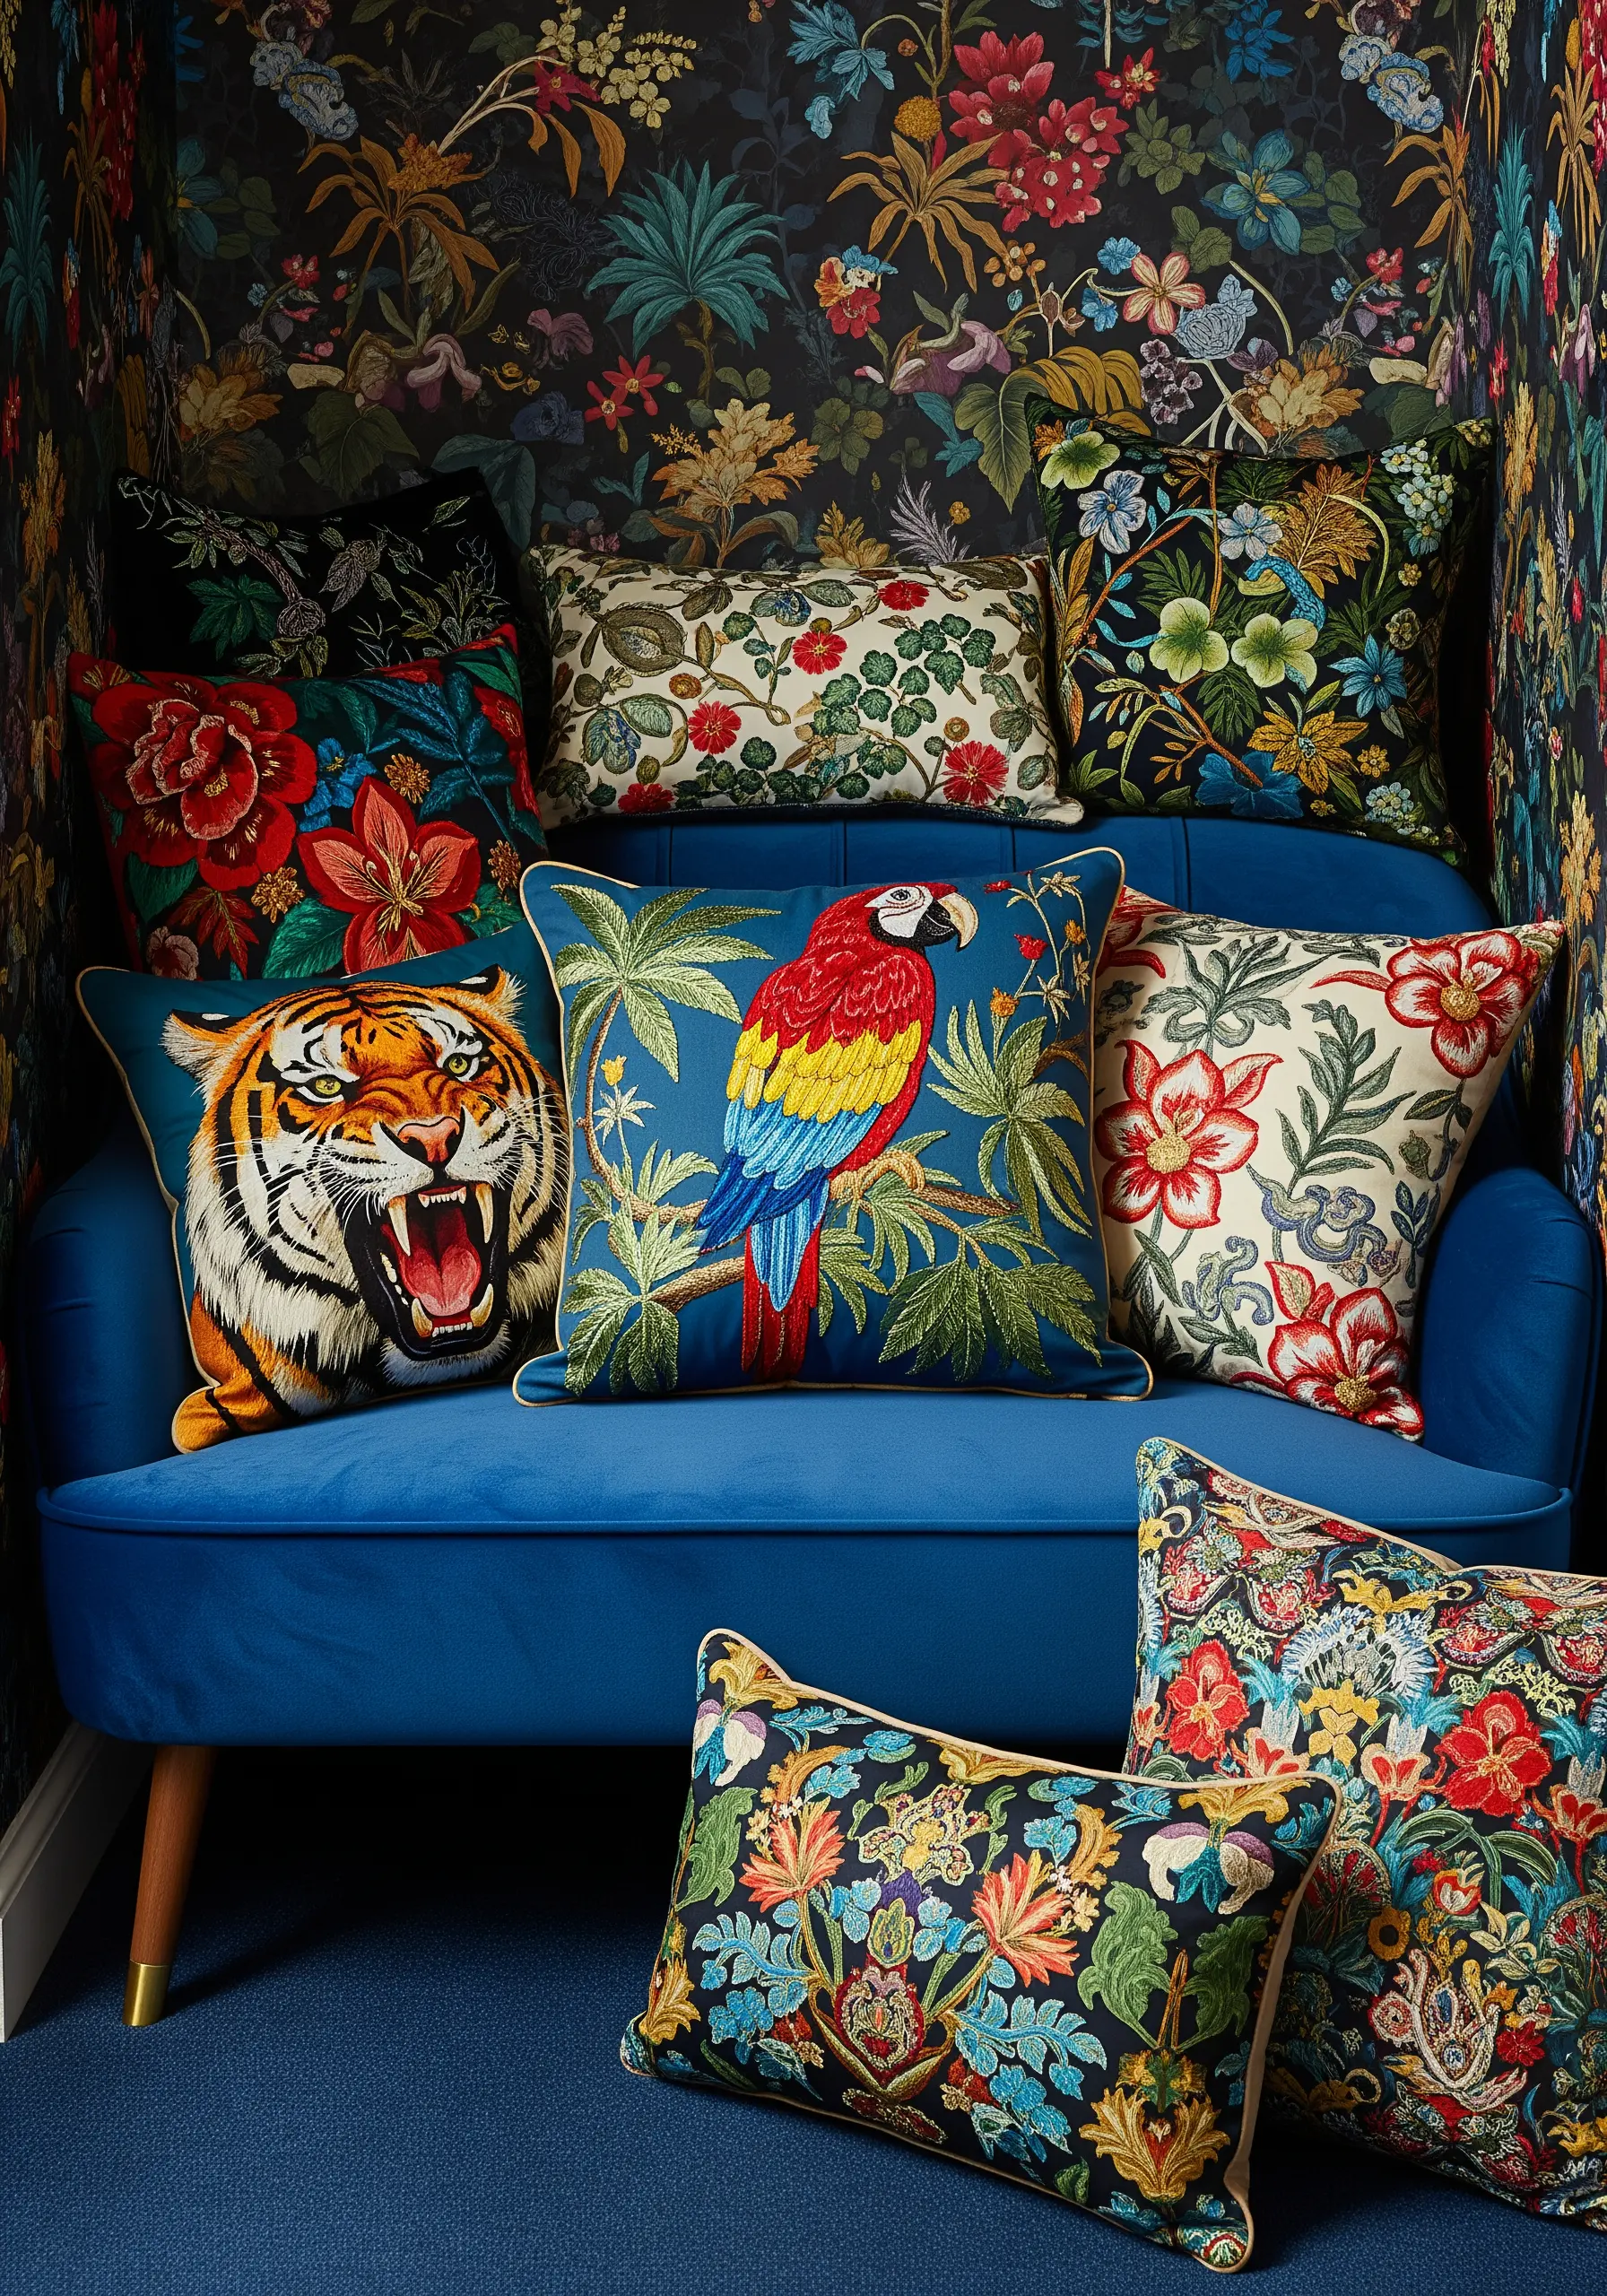
18. Vibrant Colors That Pop on Black Fabric
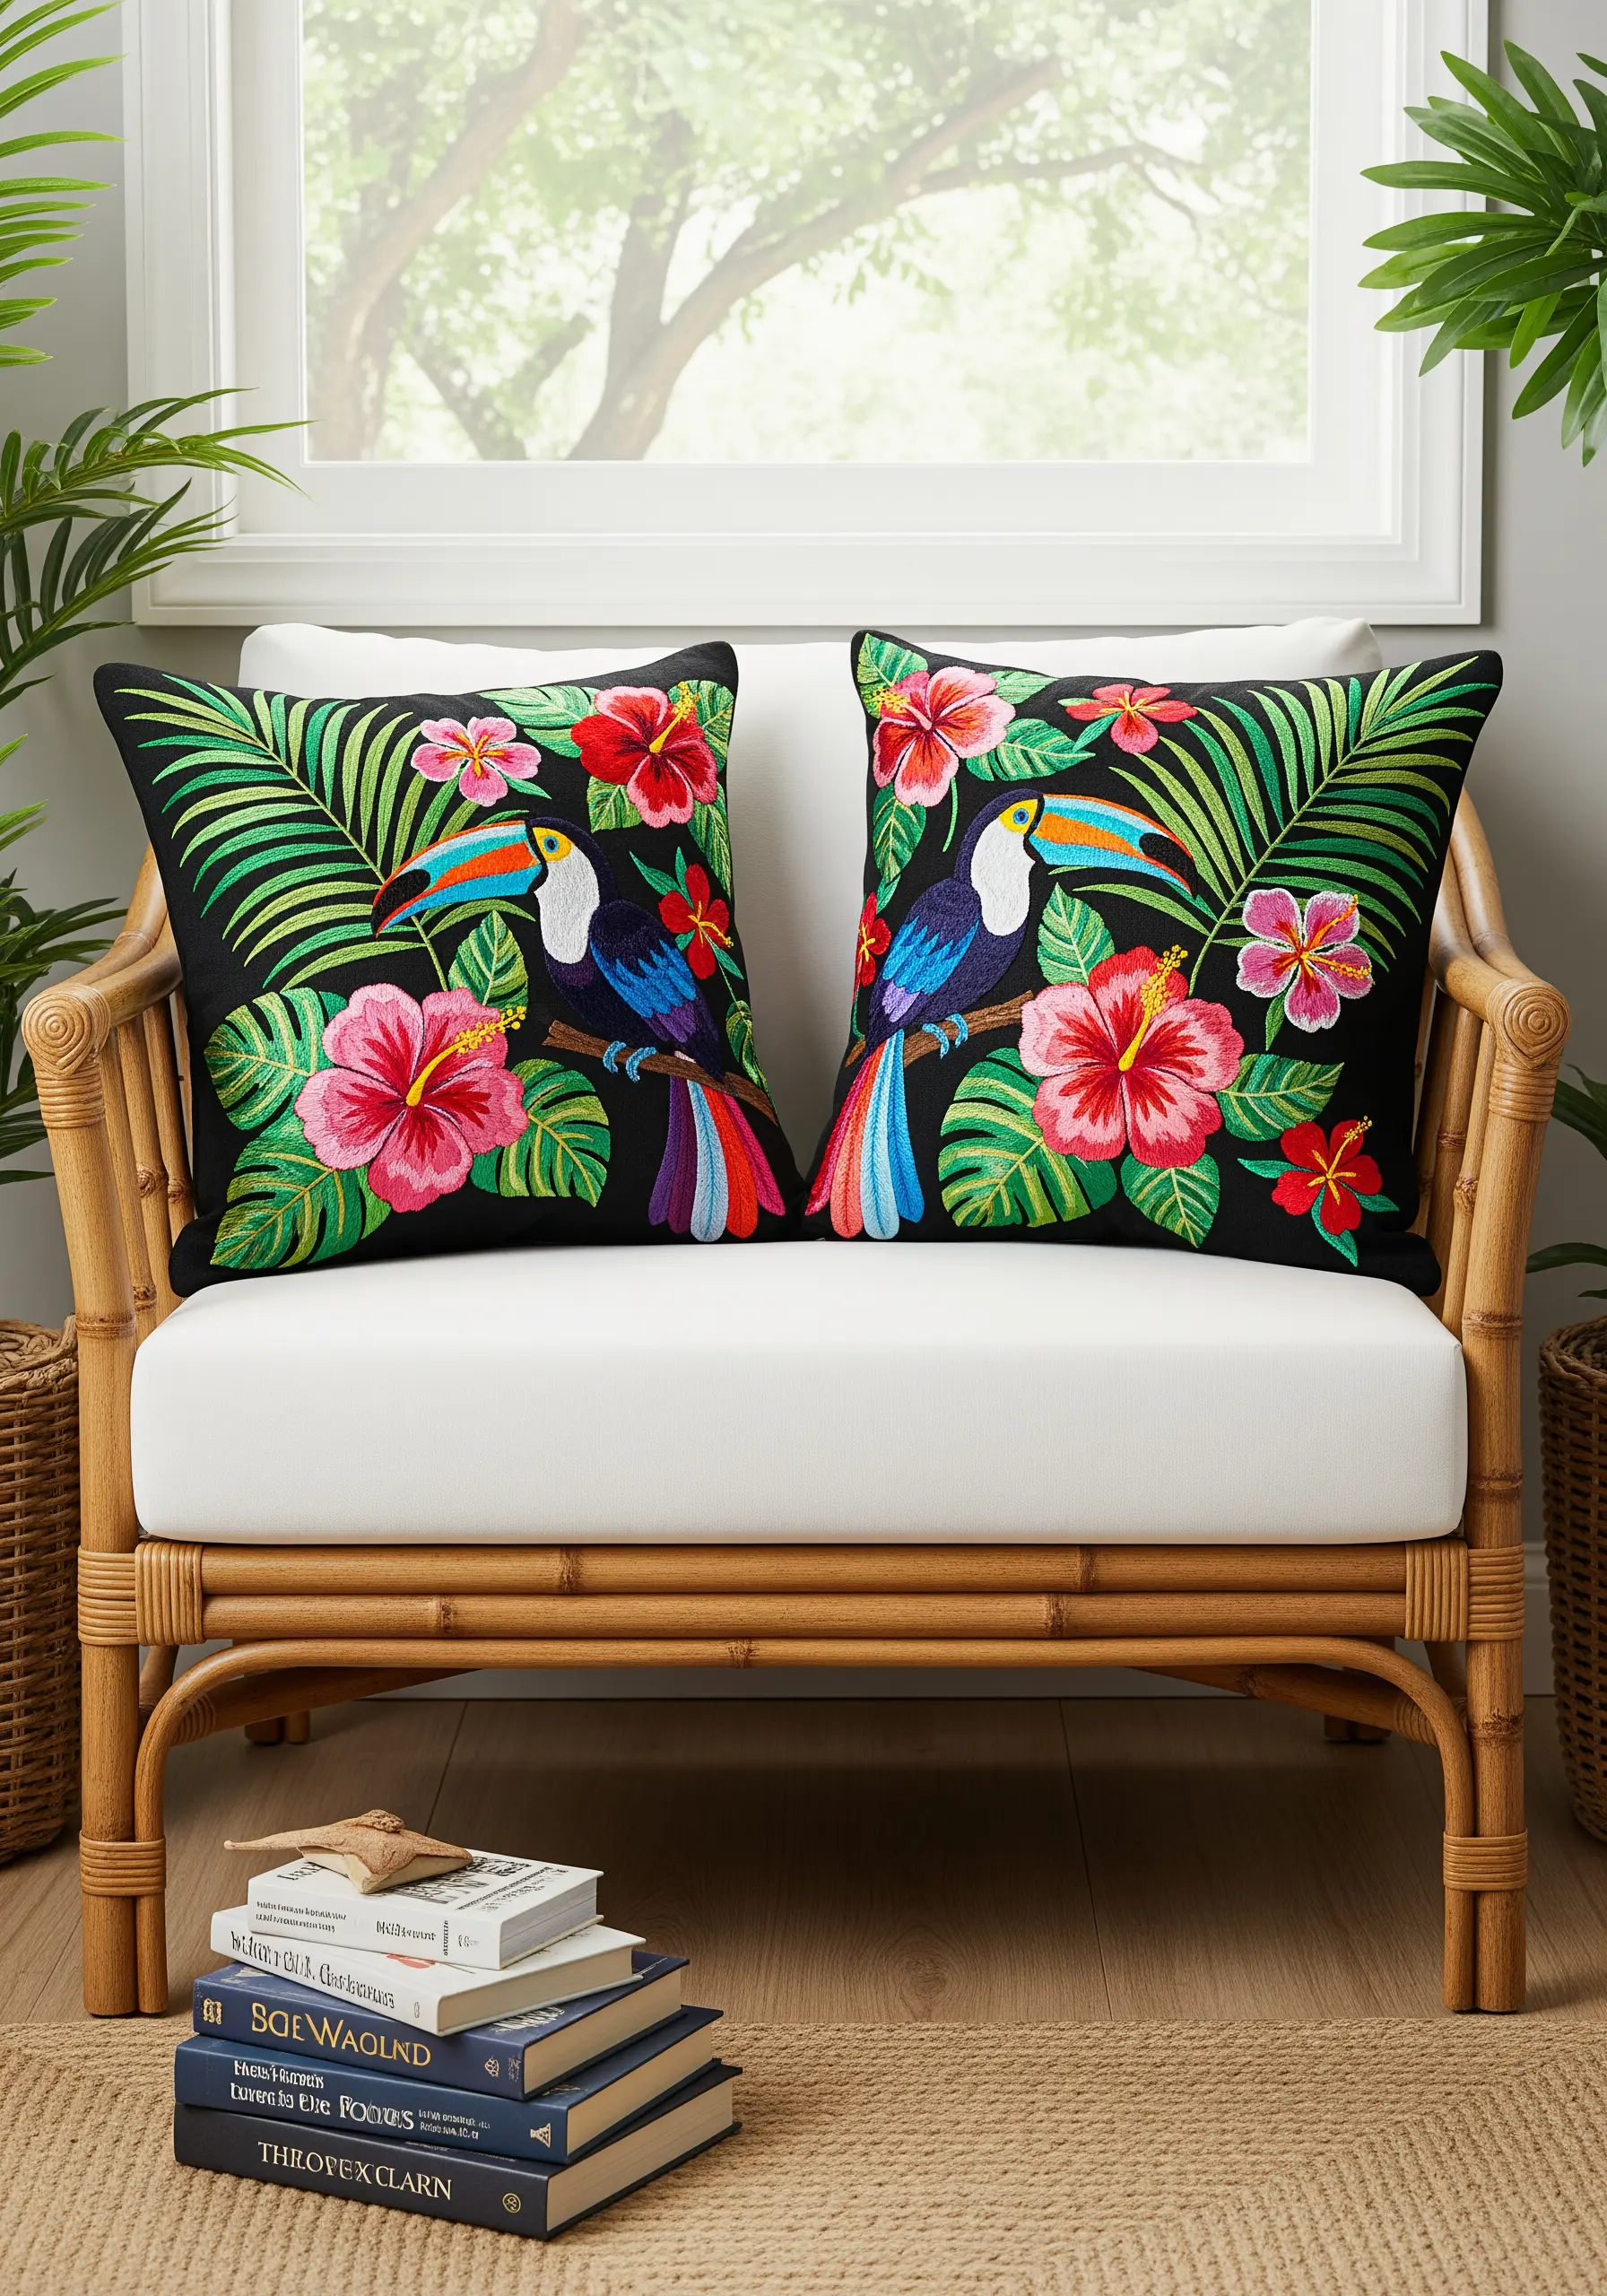
Make your tropical colors sing by stitching them on a black cotton or linen background.
The dark fabric absorbs light, making the thread colors appear more saturated and vibrant.
Use a high-sheen thread, like rayon or silk, to enhance this effect even further.
Fill your motifs with dense satin stitch to ensure full coverage and create a smooth, light-reflecting surface that brings your tropical botanical embroidery patterns to life.
19. Optical Illusions with Precise Satin Stitch

To create a successful optical illusion, every stitch must be perfect.
Use a dense satin stitch for the black and white bands, ensuring your stitches are laid perfectly parallel with no gaps.
The best way to achieve this is by using a fabric stabilizer with a printed grid to guide your work.
The stark contrast and flawless geometry are what create the mesmerizing, three-dimensional effect of these abstract thread illusion techniques.
20. Dreamy Pastels with Variegated Thread
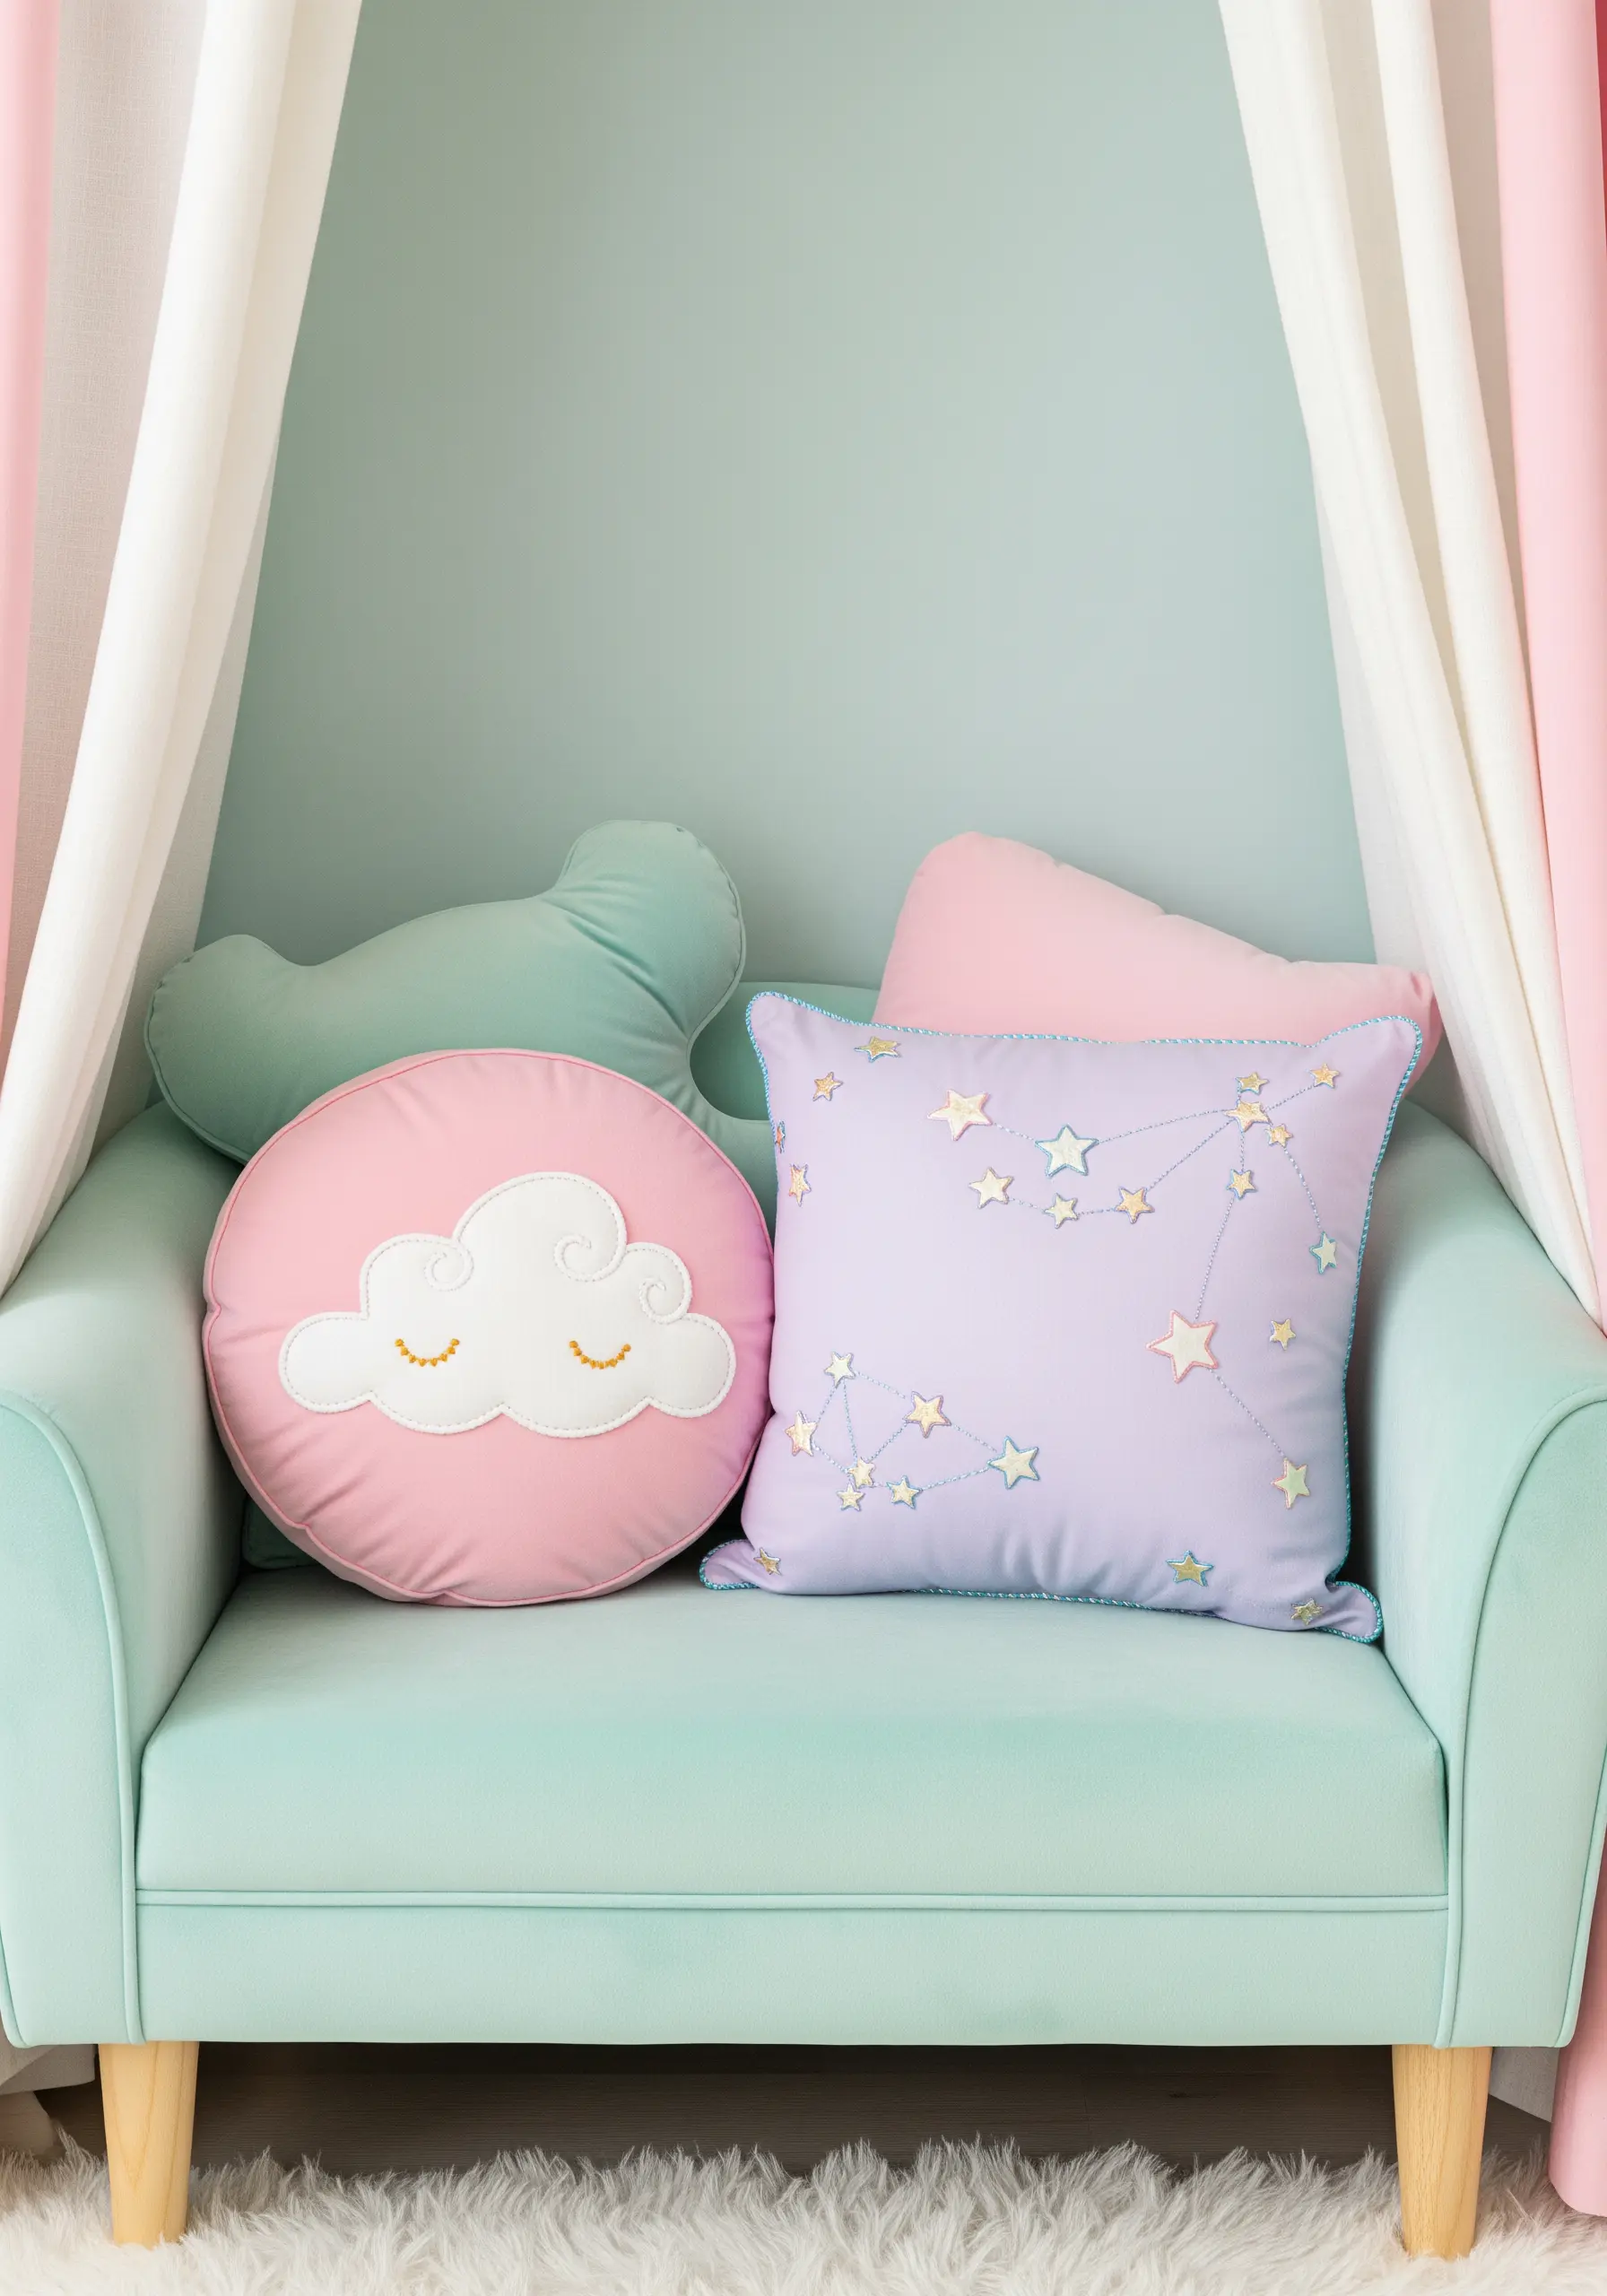
Add a subtle, watercolor-like shift of color to your embroidery by using variegated thread.
This type of thread has multiple colors dyed along a single strand, creating gentle transitions as you stitch.
It’s perfect for creating the soft, dreamy glow of constellations or a cloudy sky without needing to constantly change your thread.
Combine it with metallic accents for a touch of starlight magic.
21. Crisp Literary Quotes with Fine Backstitch

When embroidering text, legibility is paramount.
To capture the fine details of a serif font, use just one or two strands of six-strand floss.
A tiny, meticulous backstitch will give you the sharpest lines and cleanest curves, ensuring your favorite literary quotes are both beautiful and easy to read.
This is a perfect project for lovers of Dark Academia style who appreciate intellectual details.
22. Autumnal Richness with Layered Stitches

To give your autumn leaves a realistic, veined texture, start with a foundation of fishbone stitch.
Then, add the finer veins on top using a simple straight stitch or backstitch in a slightly darker or lighter shade.
This layering technique adds instant depth and detail.
Choose a warm, analogous color palette of rust, gold, and olive green to evoke a cozy, autumnal feeling that complements your seasonal wall art projects.
23. Opulent Texture with Bead Embroidery

Elevate your cushions from simple decor to objets d’art by incorporating beadwork.
Outline your geometric patterns with a couched metallic thread, then fill the sections with seed beads, bugle beads, and small crystals.
Stitch the beads on with a strong nylon thread, securing every few beads with a knot on the back.
The way the different facets catch the light creates a luxurious, jeweled effect that is impossible to achieve with thread alone.
24. Expressive Portraits with Continuous Line Stitching
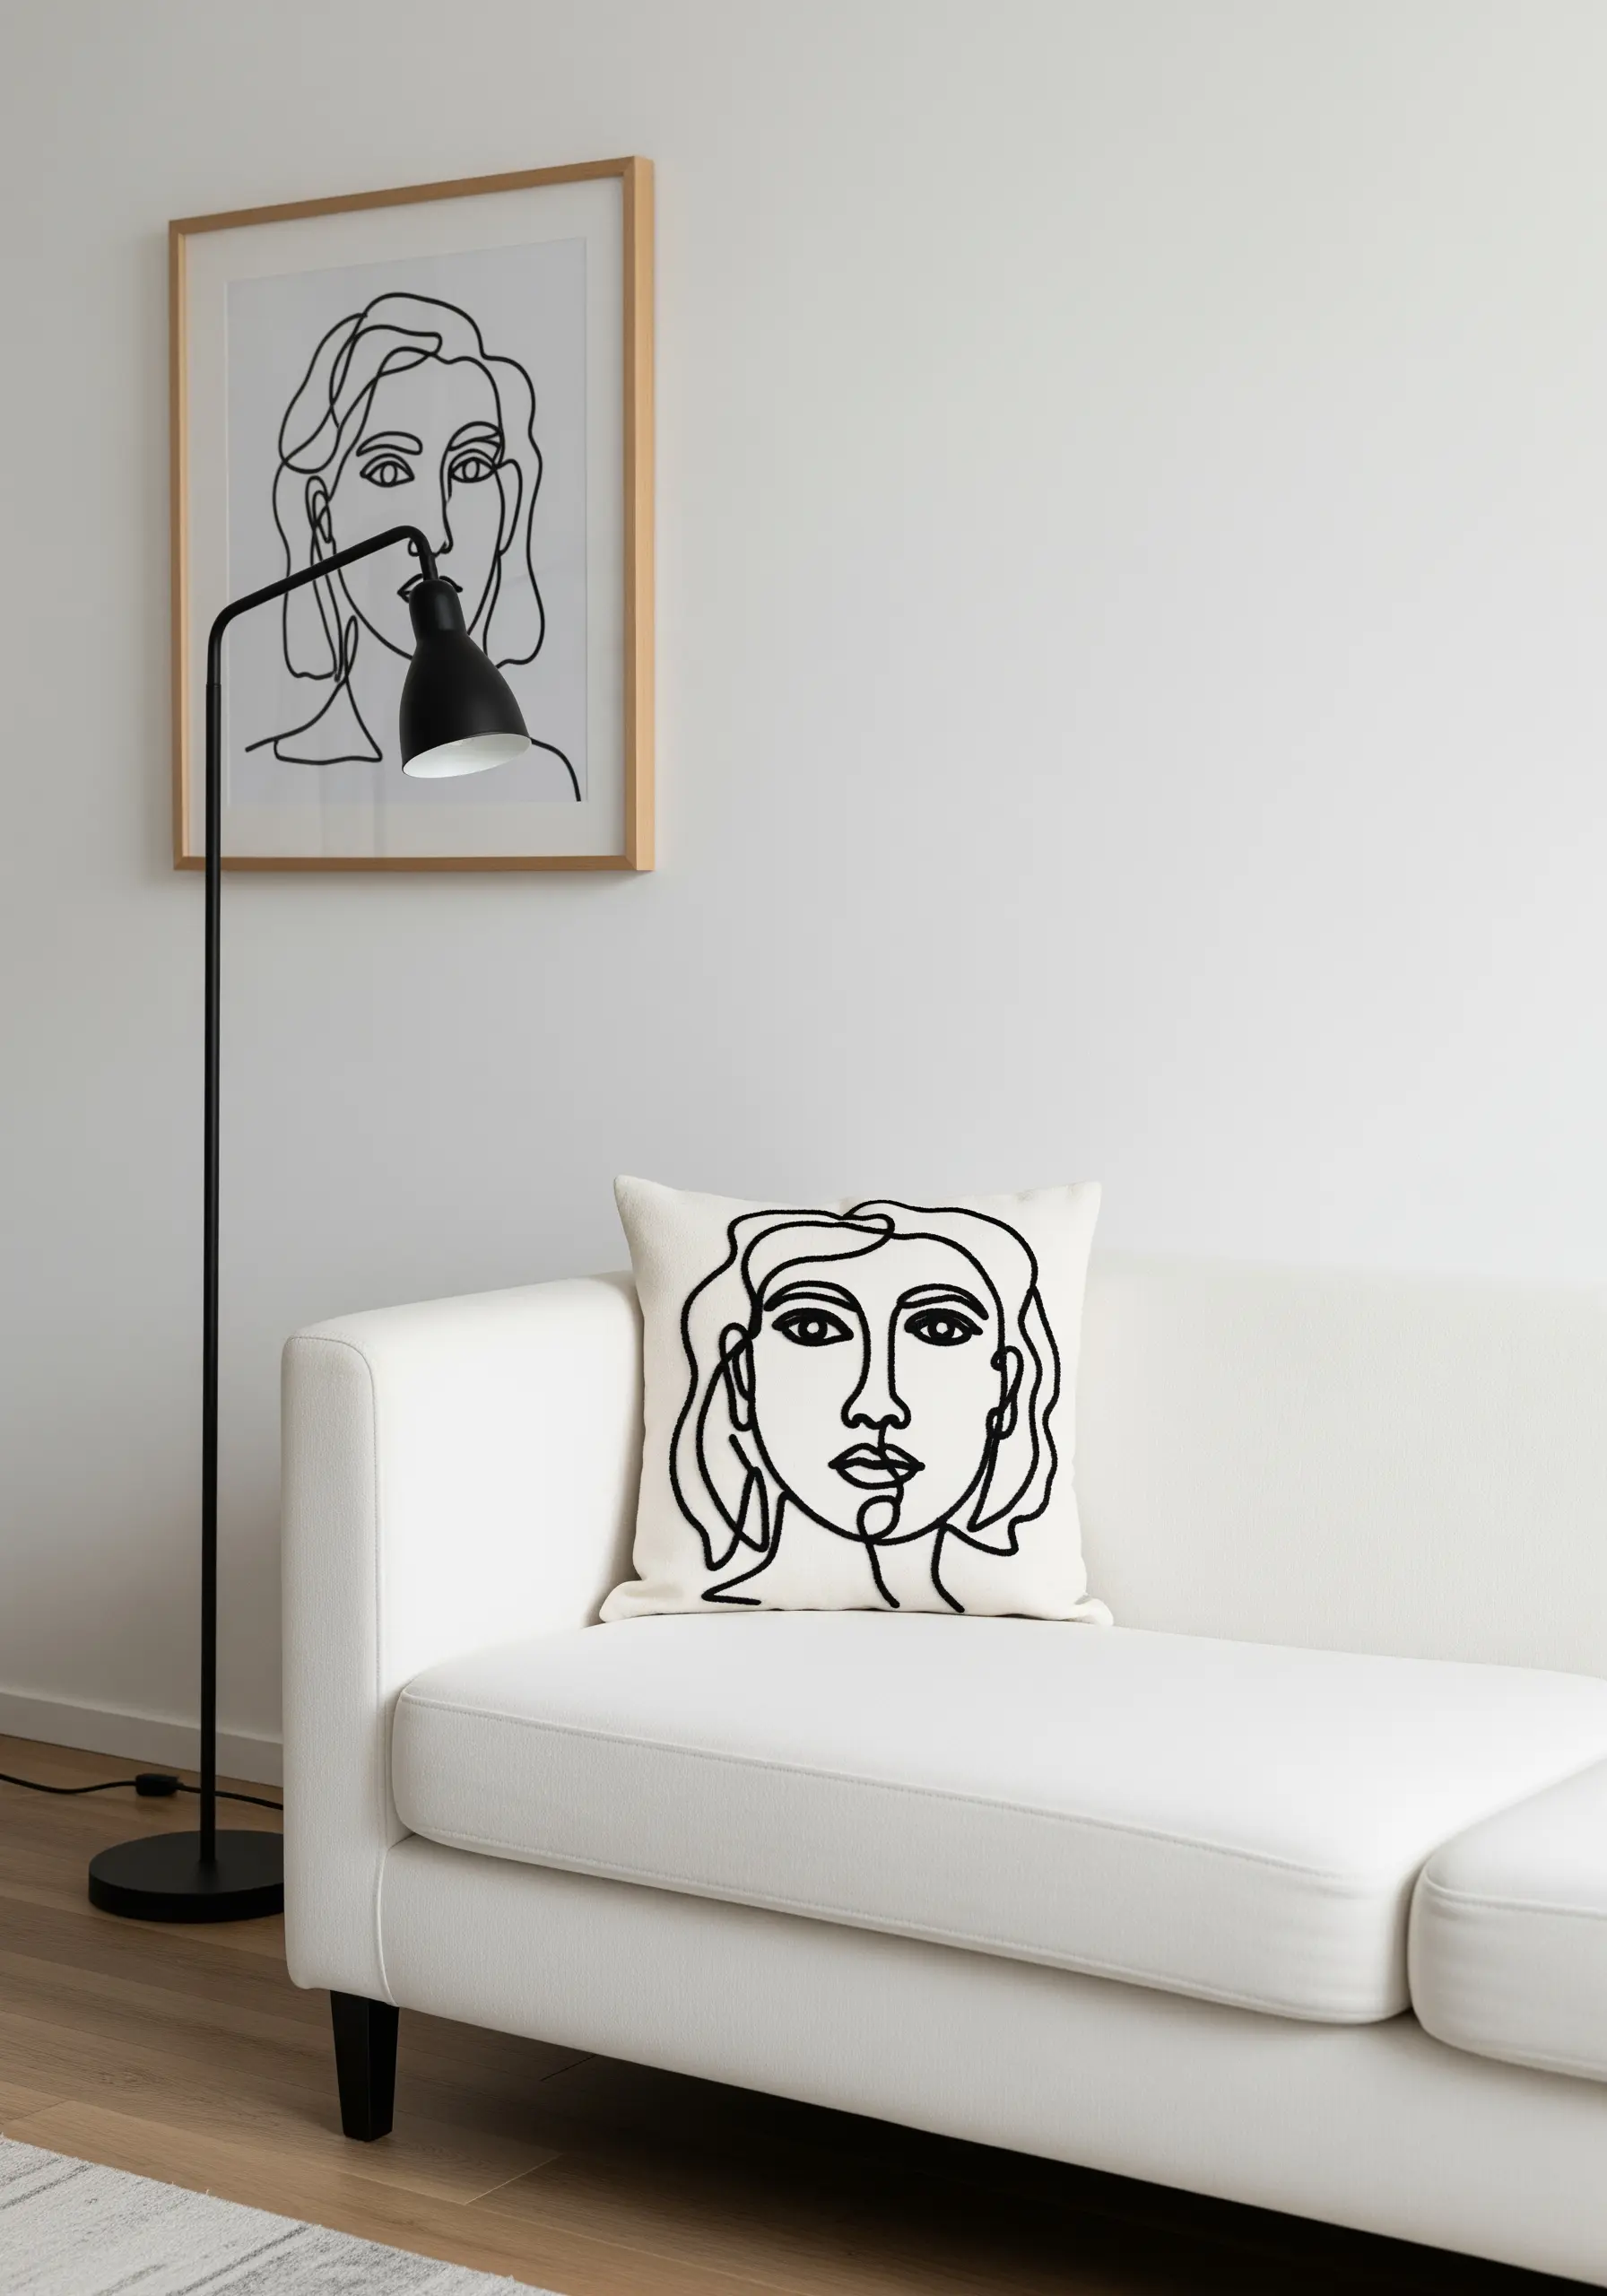
Capture the fluid energy of a line drawing by embroidering your design with a single, continuous thread where possible.
Use a stem stitch or a whipped backstitch, which are excellent for creating smooth, flowing curves.
The technique forces you to simplify the form, resulting in a powerful, expressive piece.
Pairing your embroidered cushion with a matching piece of wall art creates a cohesive and sophisticated modern look.
25. Three-Dimensional Roses with Silk Ribbon
For stunningly realistic and voluminous flowers, switch from floss to silk ribbon.
Create a spider web stitch base with five or seven spokes, then weave the ribbon over and under the spokes until the circle is filled.
Pulling the ribbon with varying tension will create the look of unfurling petals.
This technique allows you to build floral-inspired ribbon embroidery ideas that literally stand off the cushion’s surface.
26. Scandinavian Folk Art with Bold Satin Stitch

The charm of Scandinavian folk art lies in its clean, graphic simplicity.
Recreate this style using a limited color palette—typically red and white—and dense, perfectly flat satin stitch fills.
To keep your satin stitches even, you can draw parallel guide lines on your fabric with a water-soluble pen.
The contrast between the bold red thread and the simple linen fabric creates a timeless and cheerful design.
27. Dynamic Shading on a Detailed Octopus
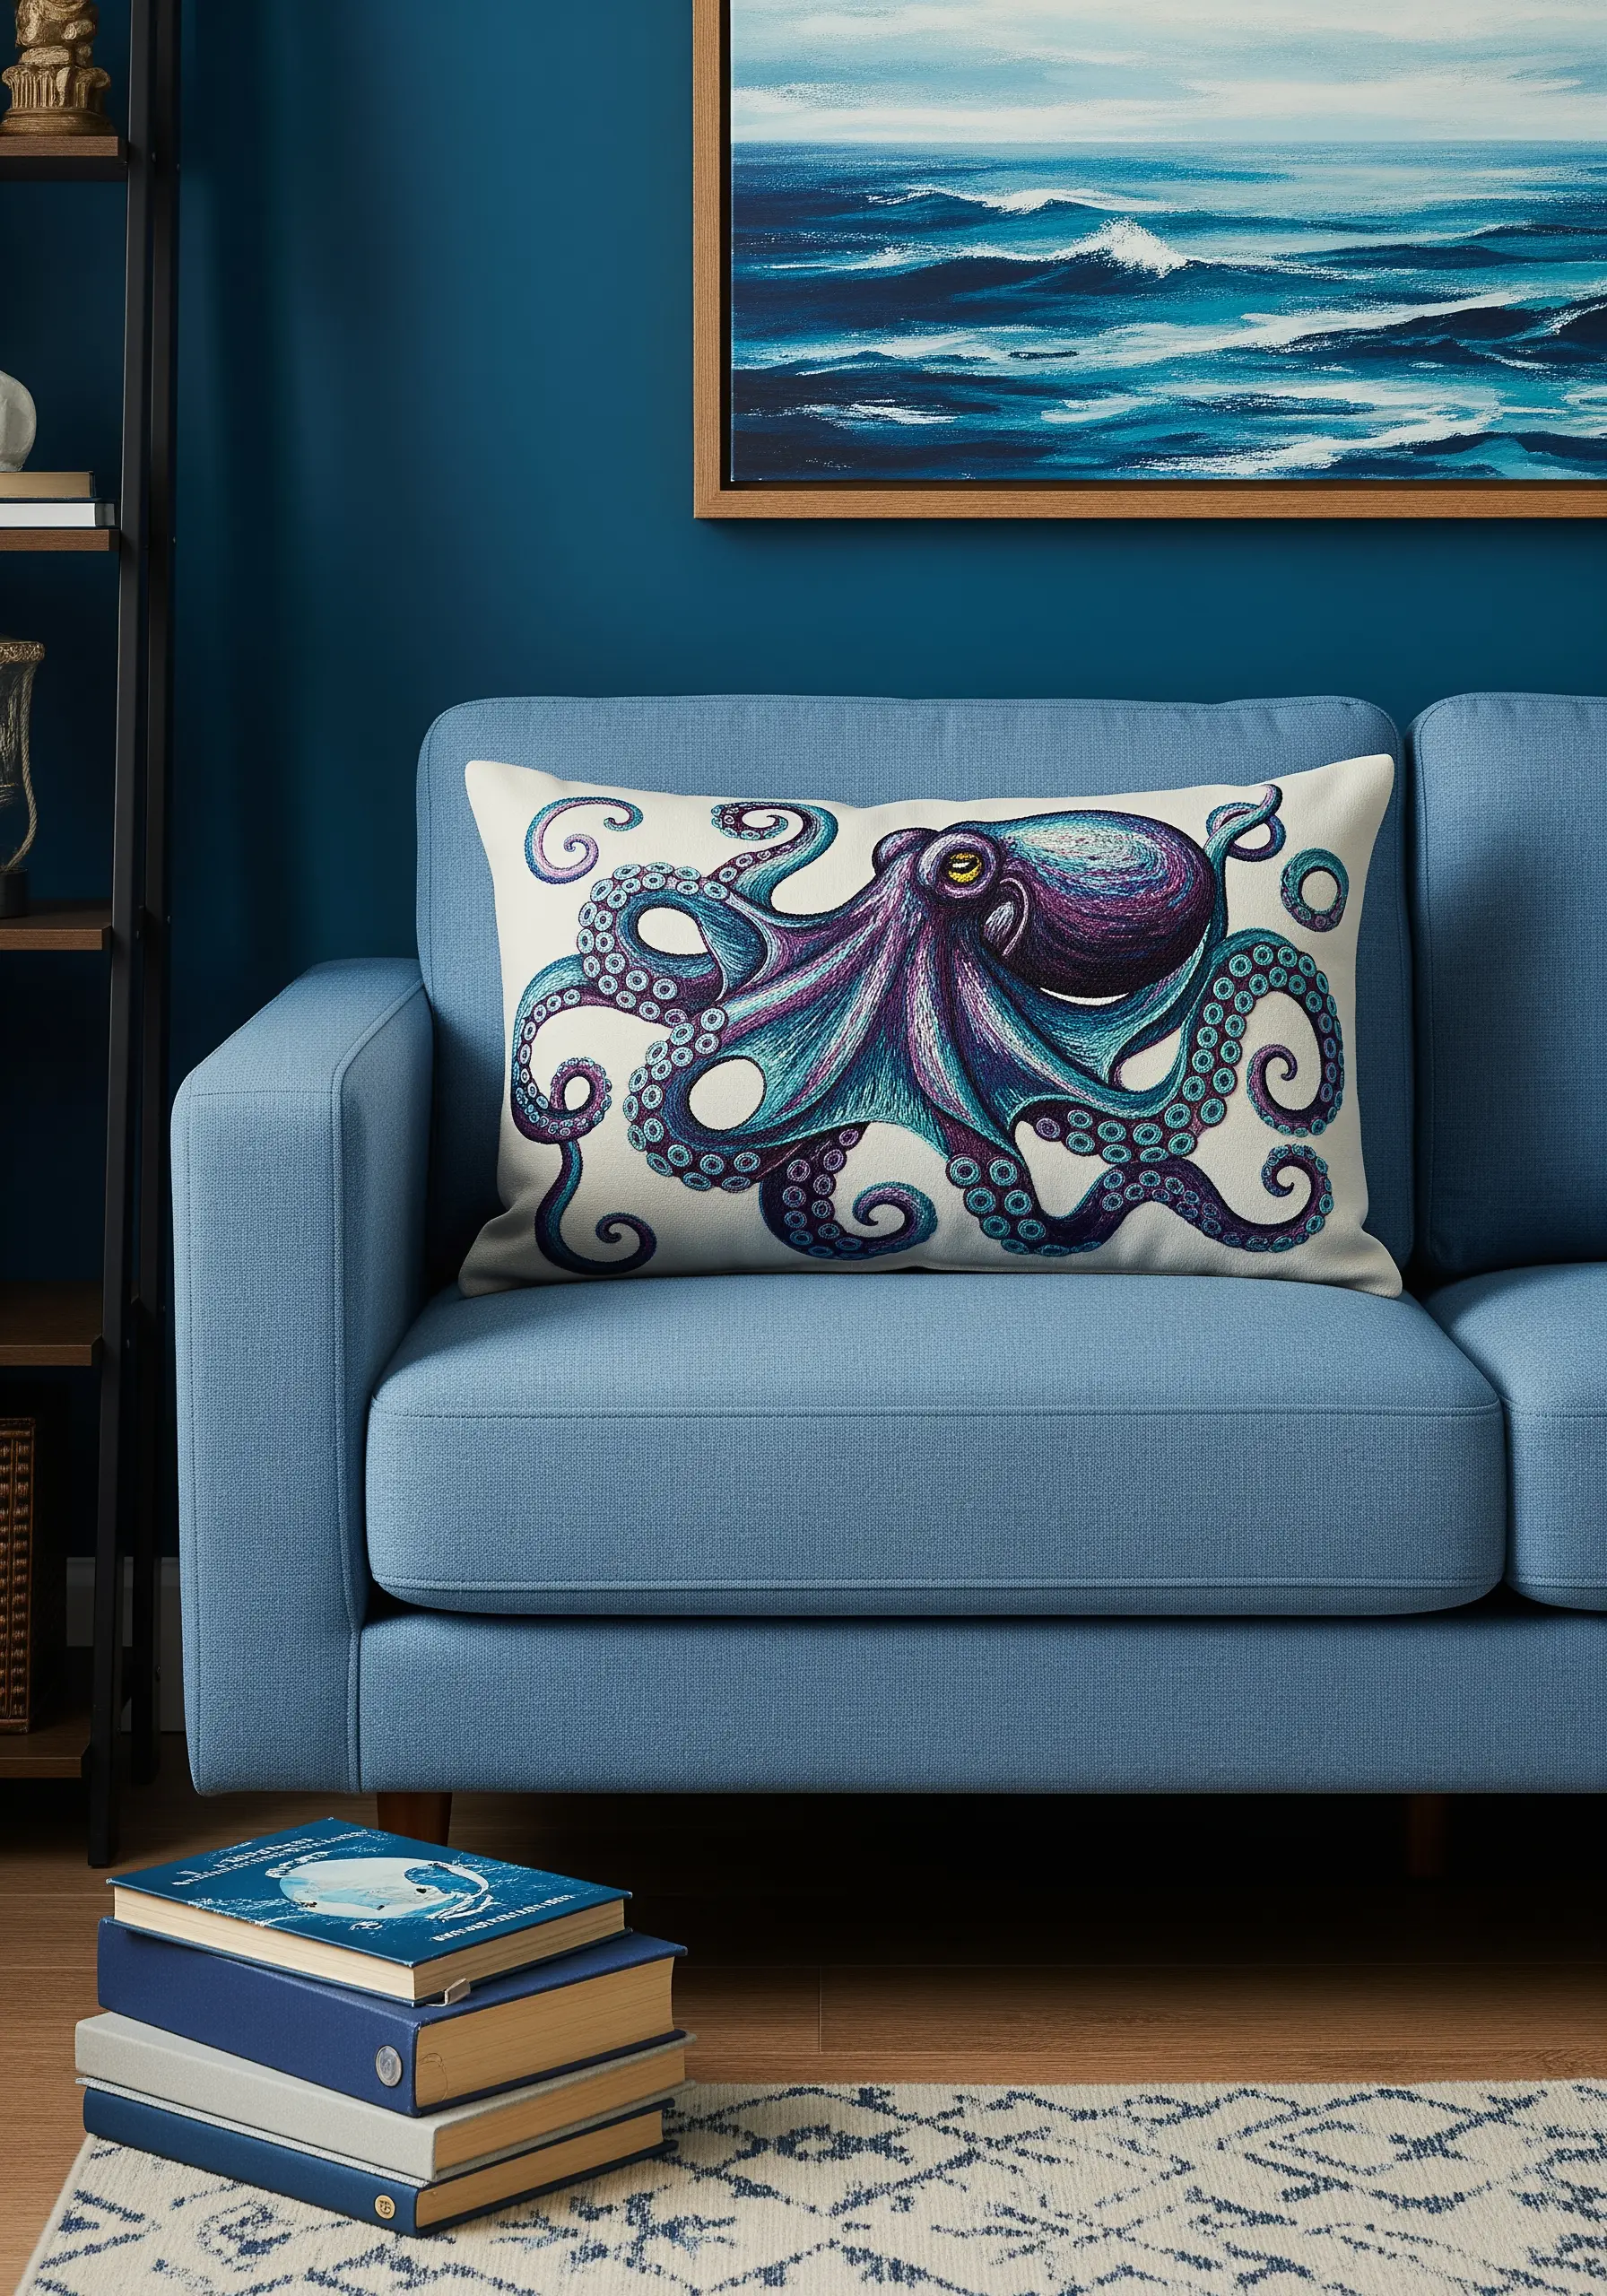
To capture the iridescent quality of an octopus, use multiple shades of thread within each section.
Employ a long-and-short stitch to blend purples, blues, and teals seamlessly, creating a smooth gradient that suggests light and movement.
For the suckers on the tentacles, use small, tightly packed French knots to add a contrasting, bumpy texture.
This combination of smooth shading and textural detail makes the creature feel alive.
28. High-Tech Glow with Specialty Threads
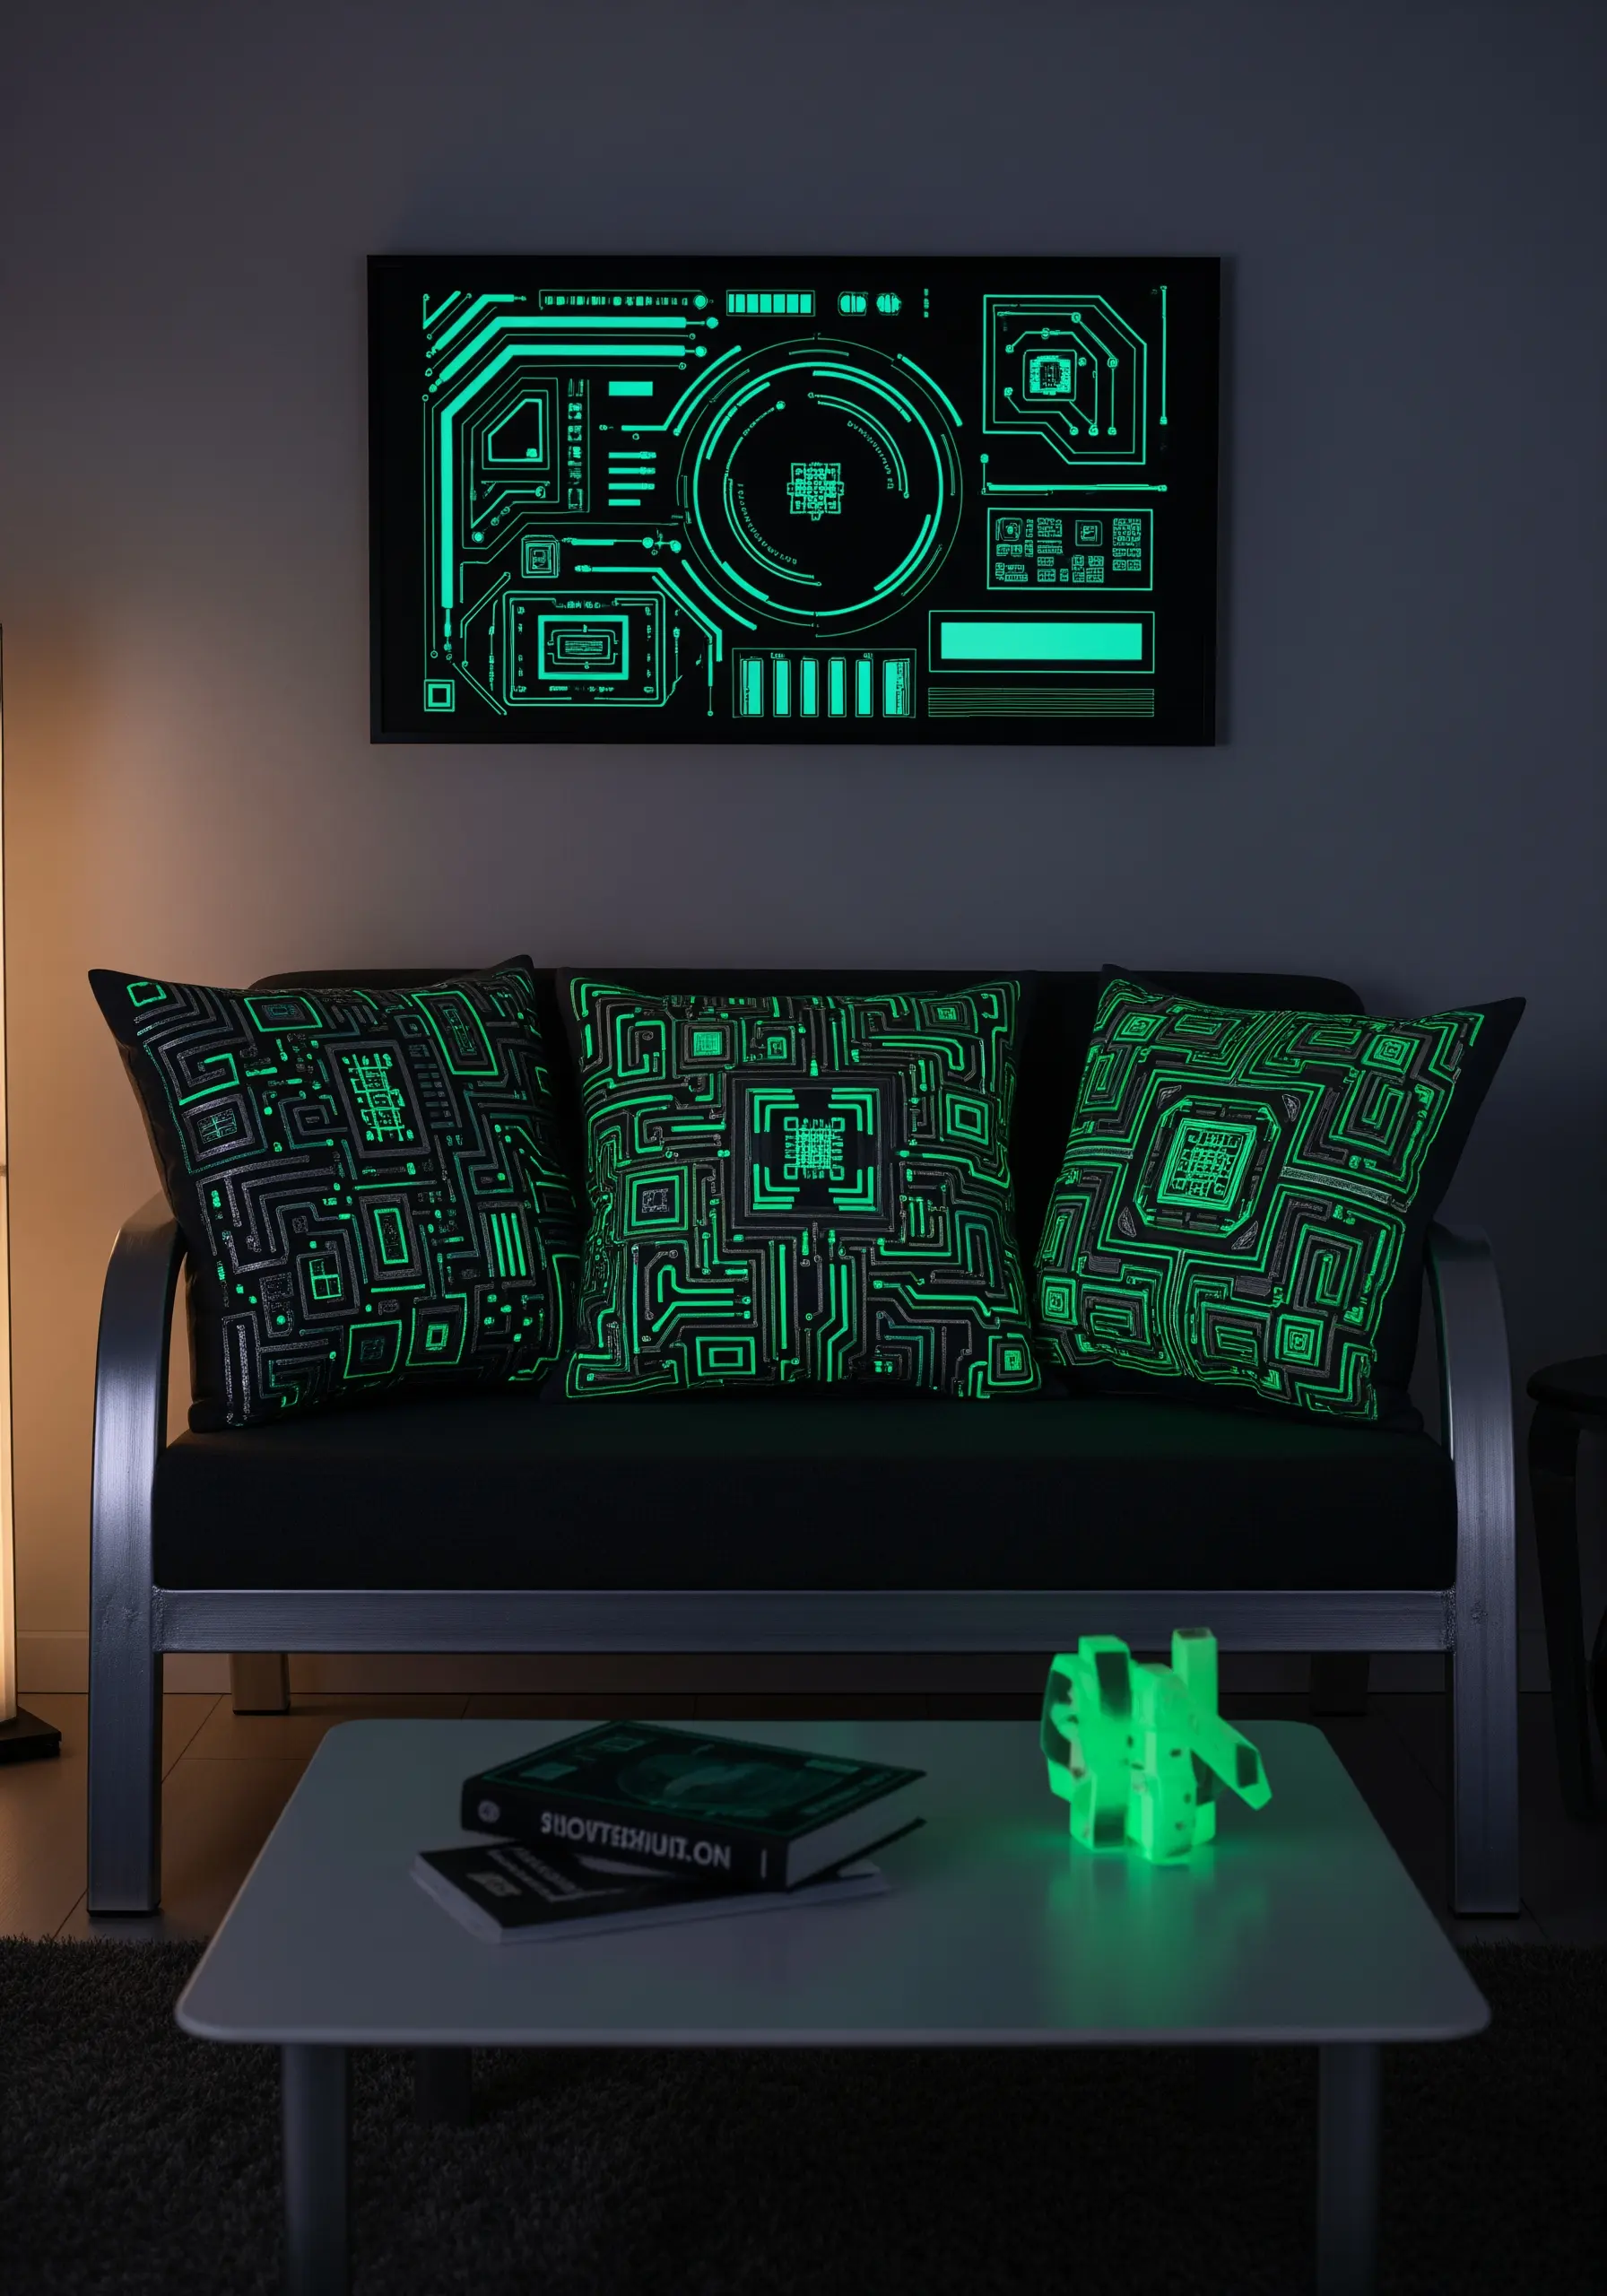
Create a design with a secret second life by using glow-in-the-dark embroidery floss.
Stitch a precise, geometric pattern like a circuit board on a dark fabric using a simple backstitch.
During the day, it’s a cool, graphic design; at night, it transforms into a luminous piece of art.
Just a few minutes of exposure to bright light is all it takes to ‘charge’ the thread.
29. Tapestry-Like Geometrics with Brick Stitch

To achieve the dense, woven look of a Southwestern textile, use the brick stitch as a filler.
This stitch involves creating offset rows of straight stitches, mimicking the pattern of a brick wall.
It creates a solid, textured fill with no gaps, perfect for bold geometric designs.
Maintain a very tight and even tension to ensure the pattern looks crisp and uniform, just like a traditional woven rug.
30. Whimsical Woodland Details
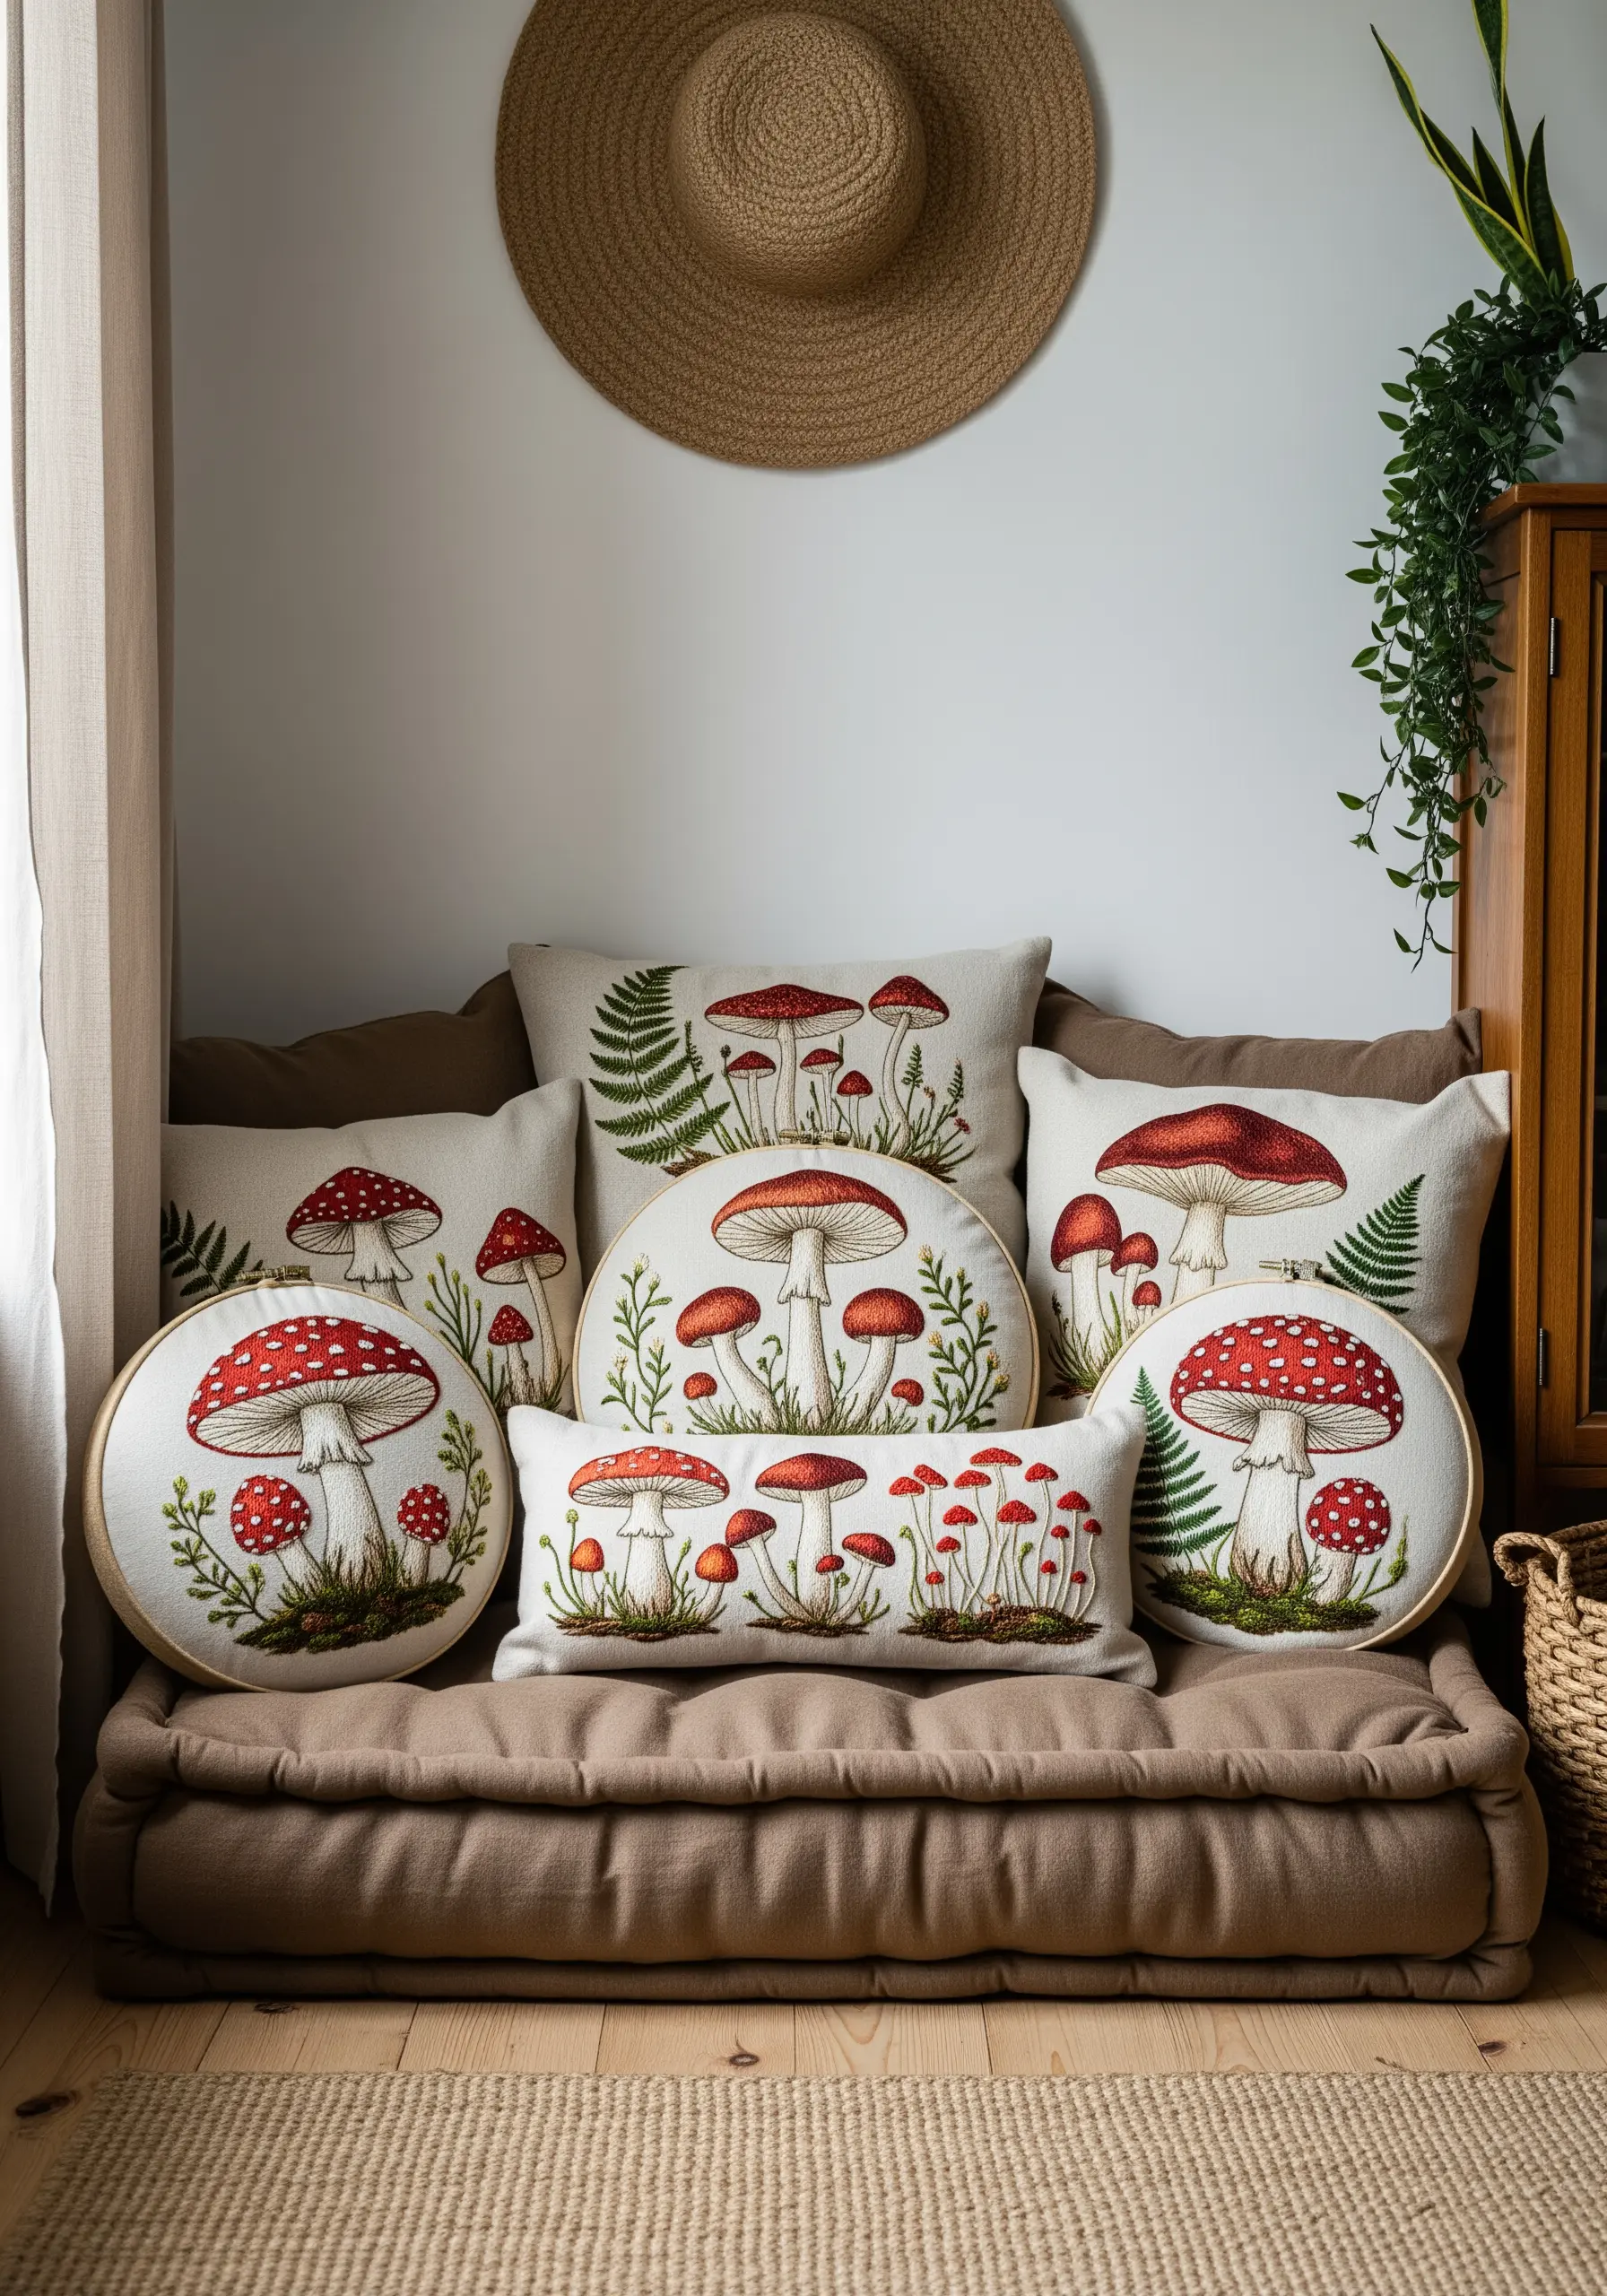
Bring a charming woodland scene to life by focusing on small textural details.
Use a padded satin stitch for the mushroom caps to give them a rounded, dimensional feel—simply add a few layers of straight stitches underneath before covering them with the final satin stitch.
For delicate ferns, use the fly stitch to create the individual fronds, which gives them a light, airy quality.
These forest floor botanical stitch ideas create a magical, storybook cushion collection.
31. Comic Book Style with Bold Outlines

To capture the iconic pop art look, use a heavy, bold outline for all your shapes.
A thick chain stitch or a stem stitch worked with all six strands of floss in black will create the strong, ink-like line you need.
Fill the interior colors with a flat, even satin stitch.
For an authentic touch, you can even replicate Ben-Day dots using tiny, evenly spaced French knots in a contrasting color, making your iconic pop art stitch motifs come alive.
32. Fuzzy Insect Textures with Turkey Work
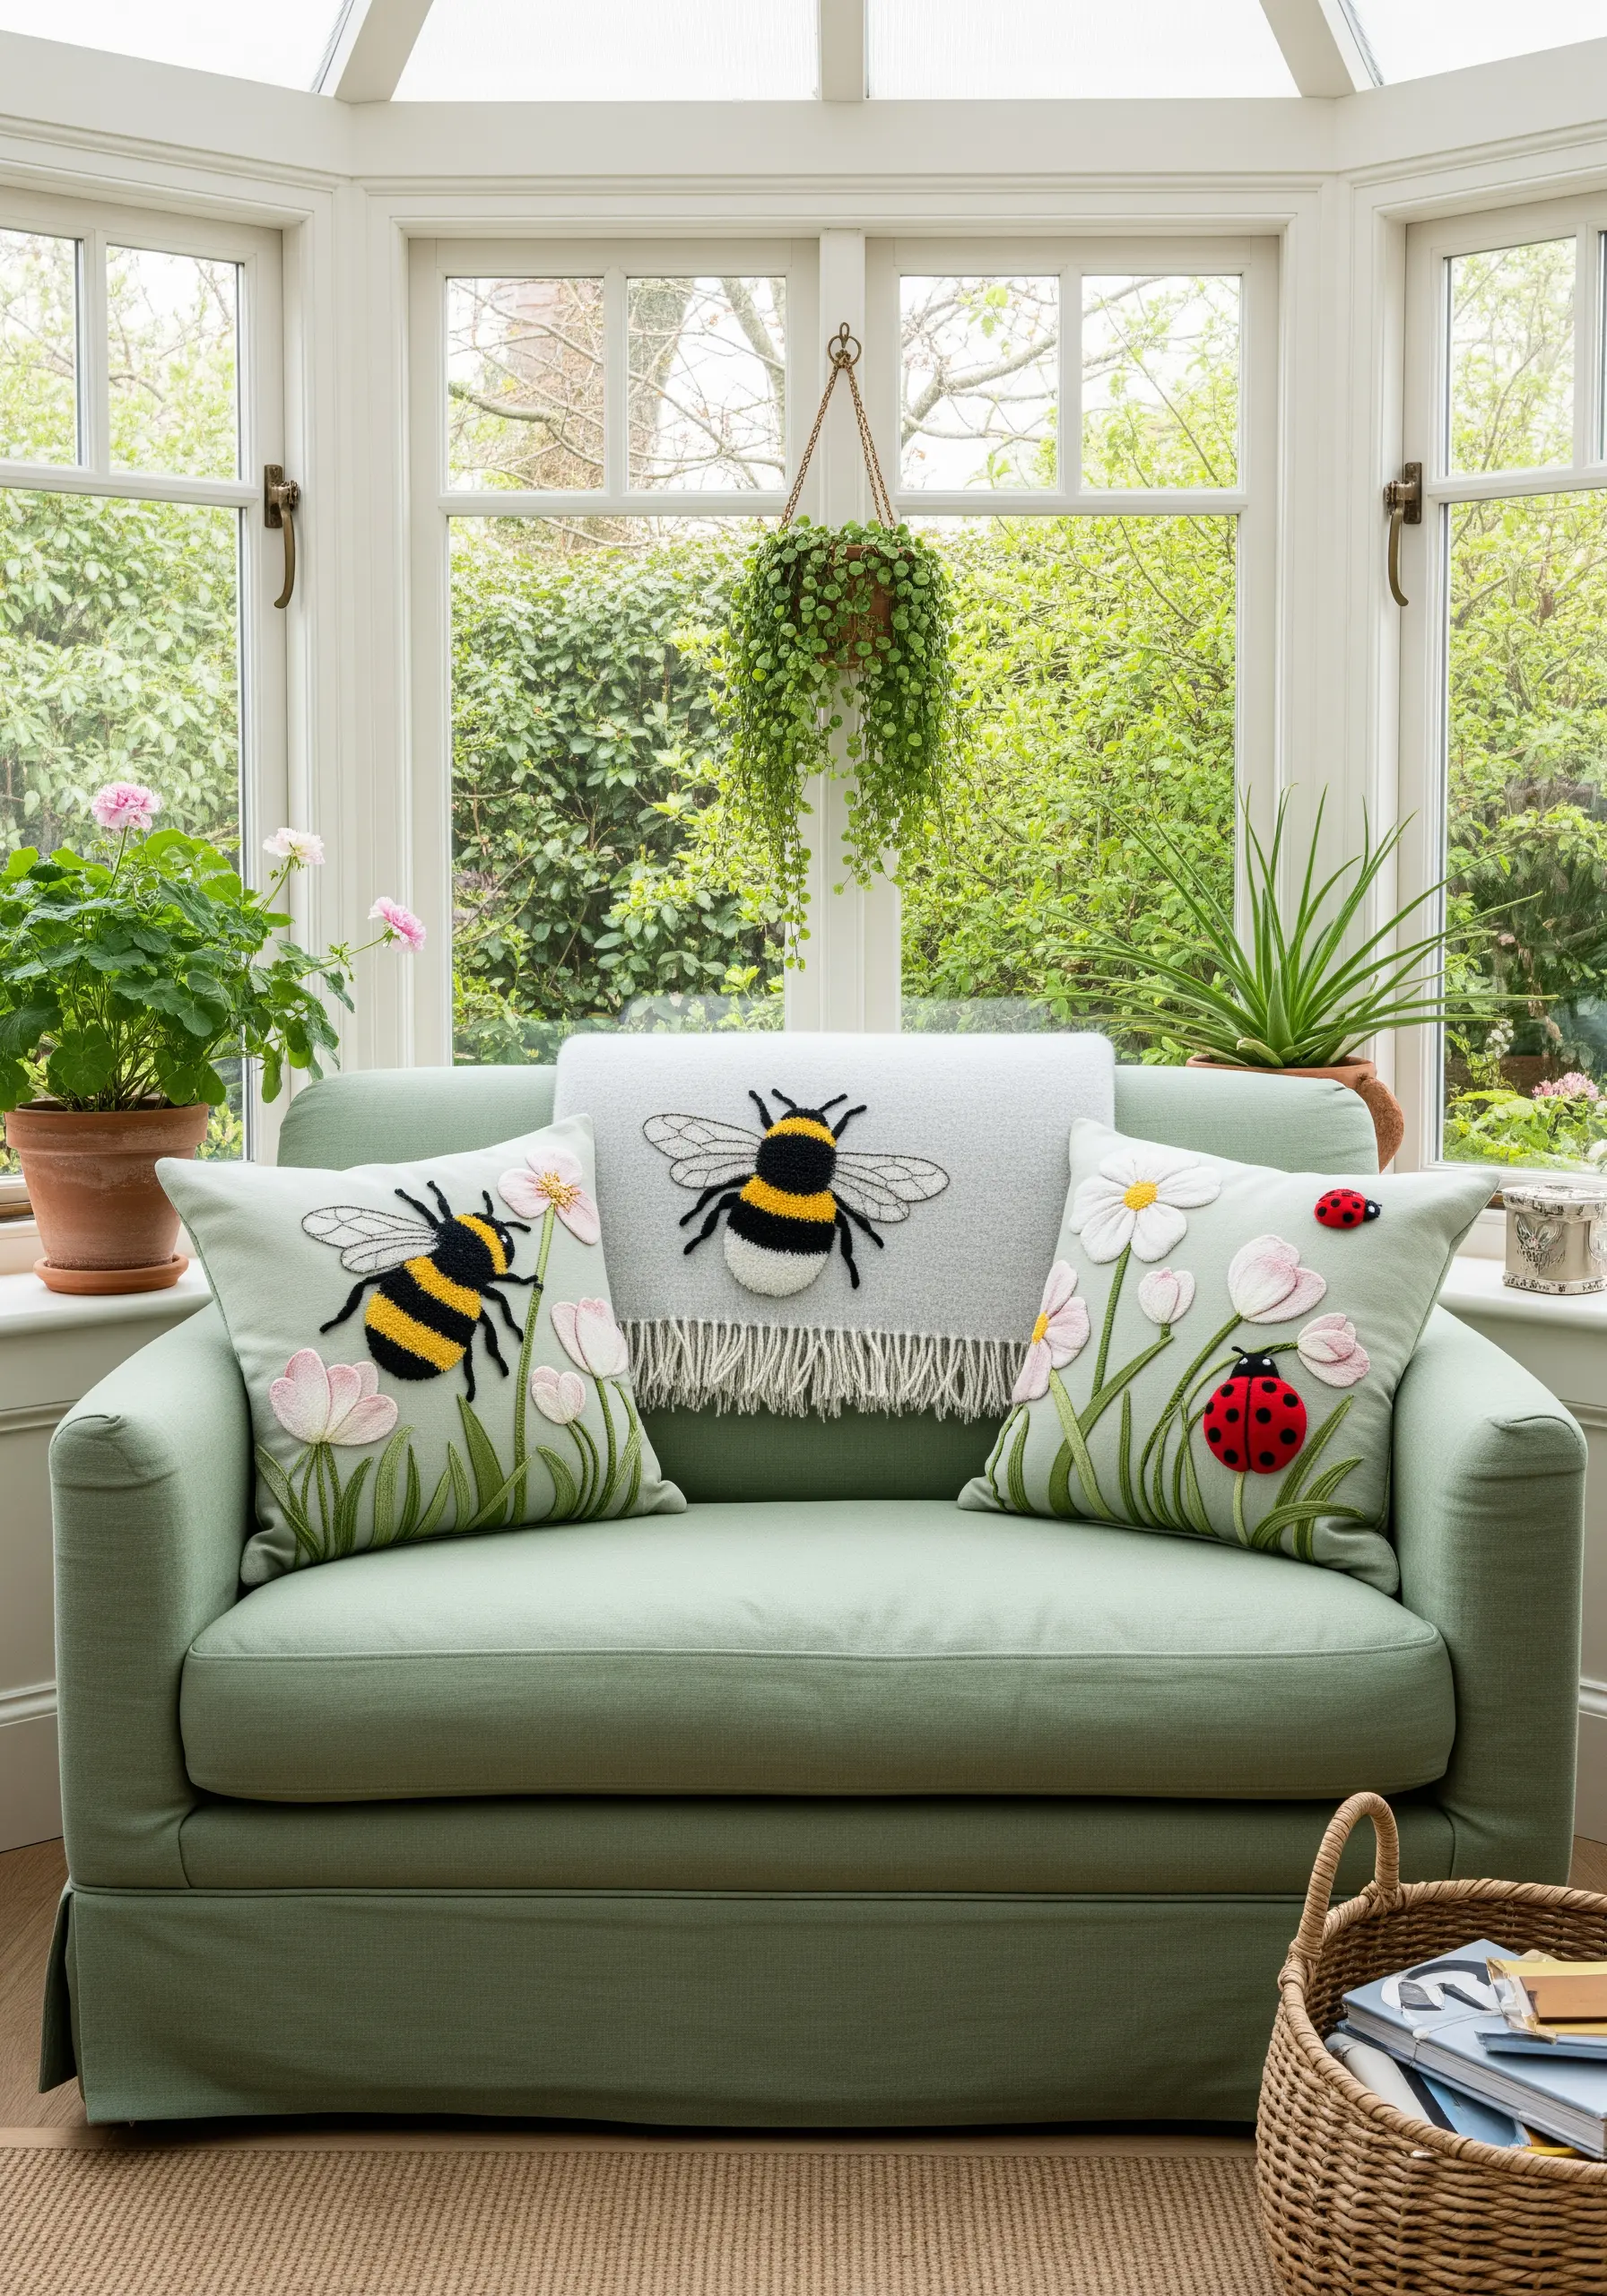
Create a wonderfully fuzzy, 3D body for a bumblebee using the turkey work stitch (also known as the Ghiordes knot).
This technique creates loops of thread on the surface of the fabric, which you can then snip with scissors and trim to your desired length and shape.
It’s the perfect way to add a realistic, tactile element to insects, animals, or even fluffy clouds, and adds a playful dimension to your bird & butterfly embroidery patterns.
33. Chinoiserie Elegance on Lustrous Silk

Stitching on silk or satin fabric requires a delicate touch, but the results are unparalleled in their elegance.
Use a fine, sharp needle to avoid snagging the fabric and always work in a hoop with the inner ring wrapped in twill tape to protect the material.
Use silk floss for your embroidery, as its natural luster will perfectly complement the sheen of the background fabric.
A simple stem stitch for branches and satin stitch for the cranes is all you need for this sophisticated look.
34. Organic Contours with Topographic Lines
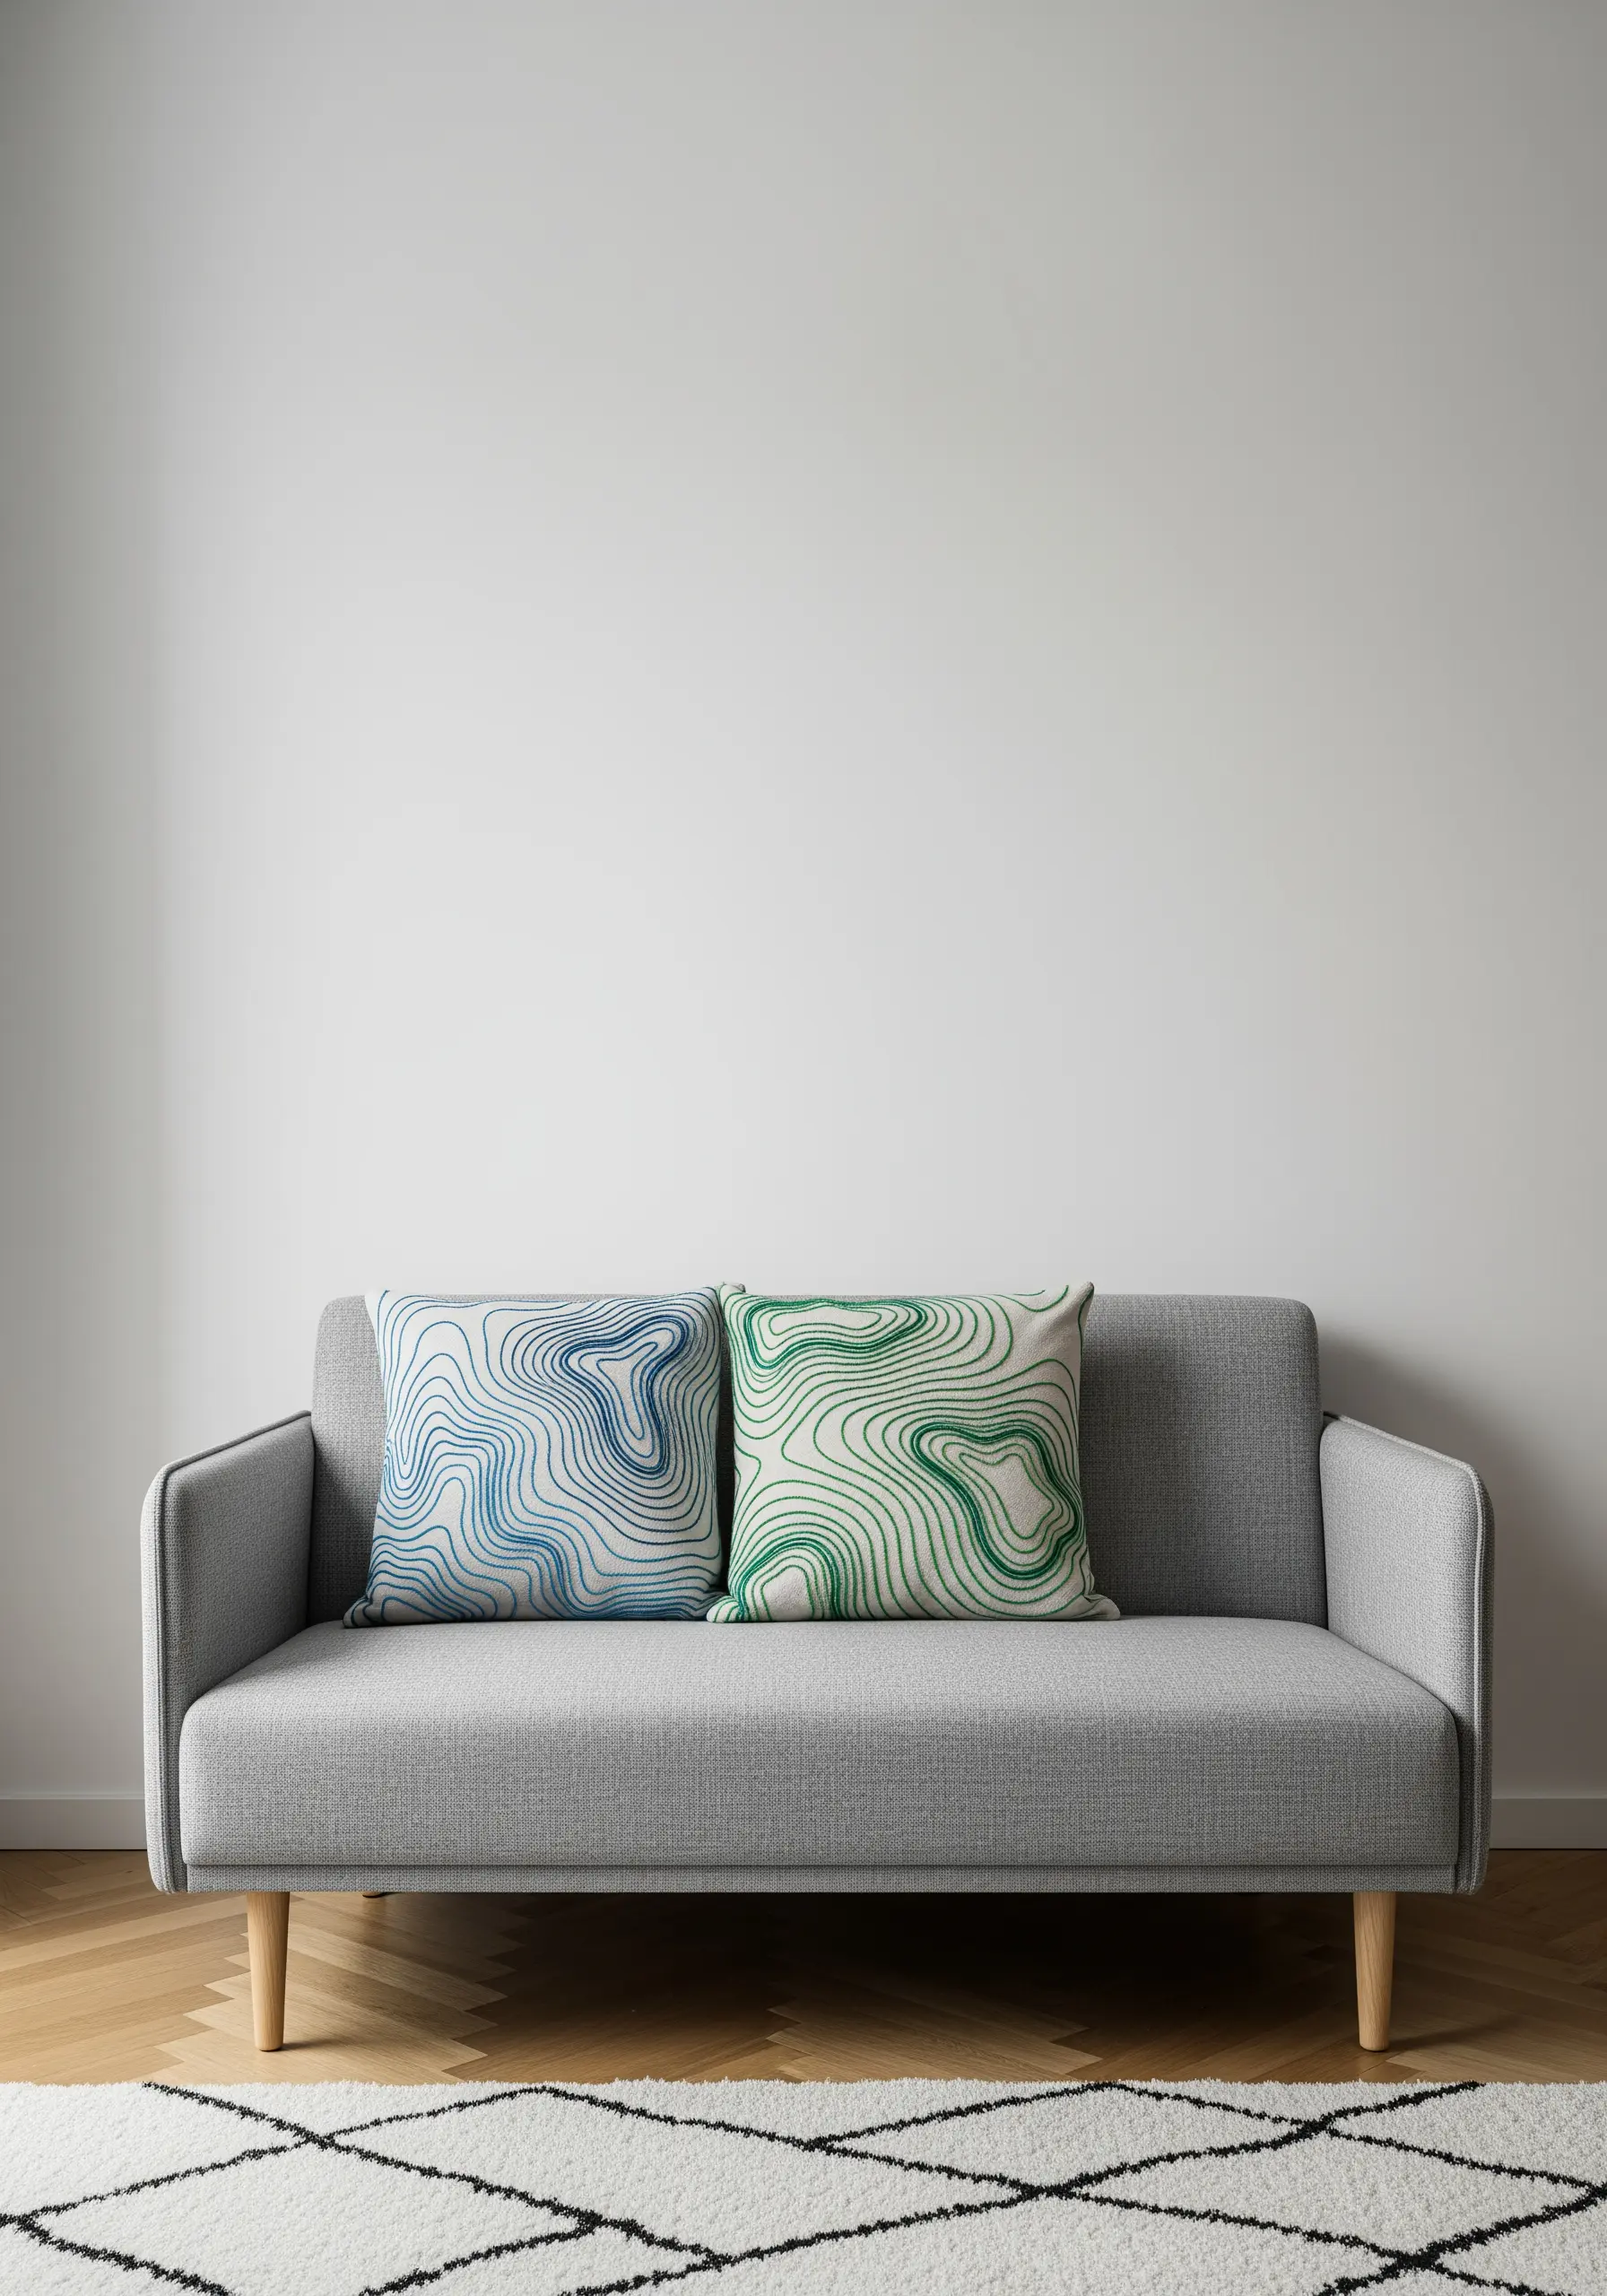
Transform a simple topographic map into a piece of modern art by focusing on the beauty of the lines themselves.
Use a single, continuous line of backstitch or stem stitch to trace the contours, creating an organic, flowing pattern.
You can create a sense of elevation by using a slightly thicker thread or a darker shade for the lower contour lines.
This minimalist design is both intellectually interesting and aesthetically calming.
35. Gothic Romance with Moody Palettes
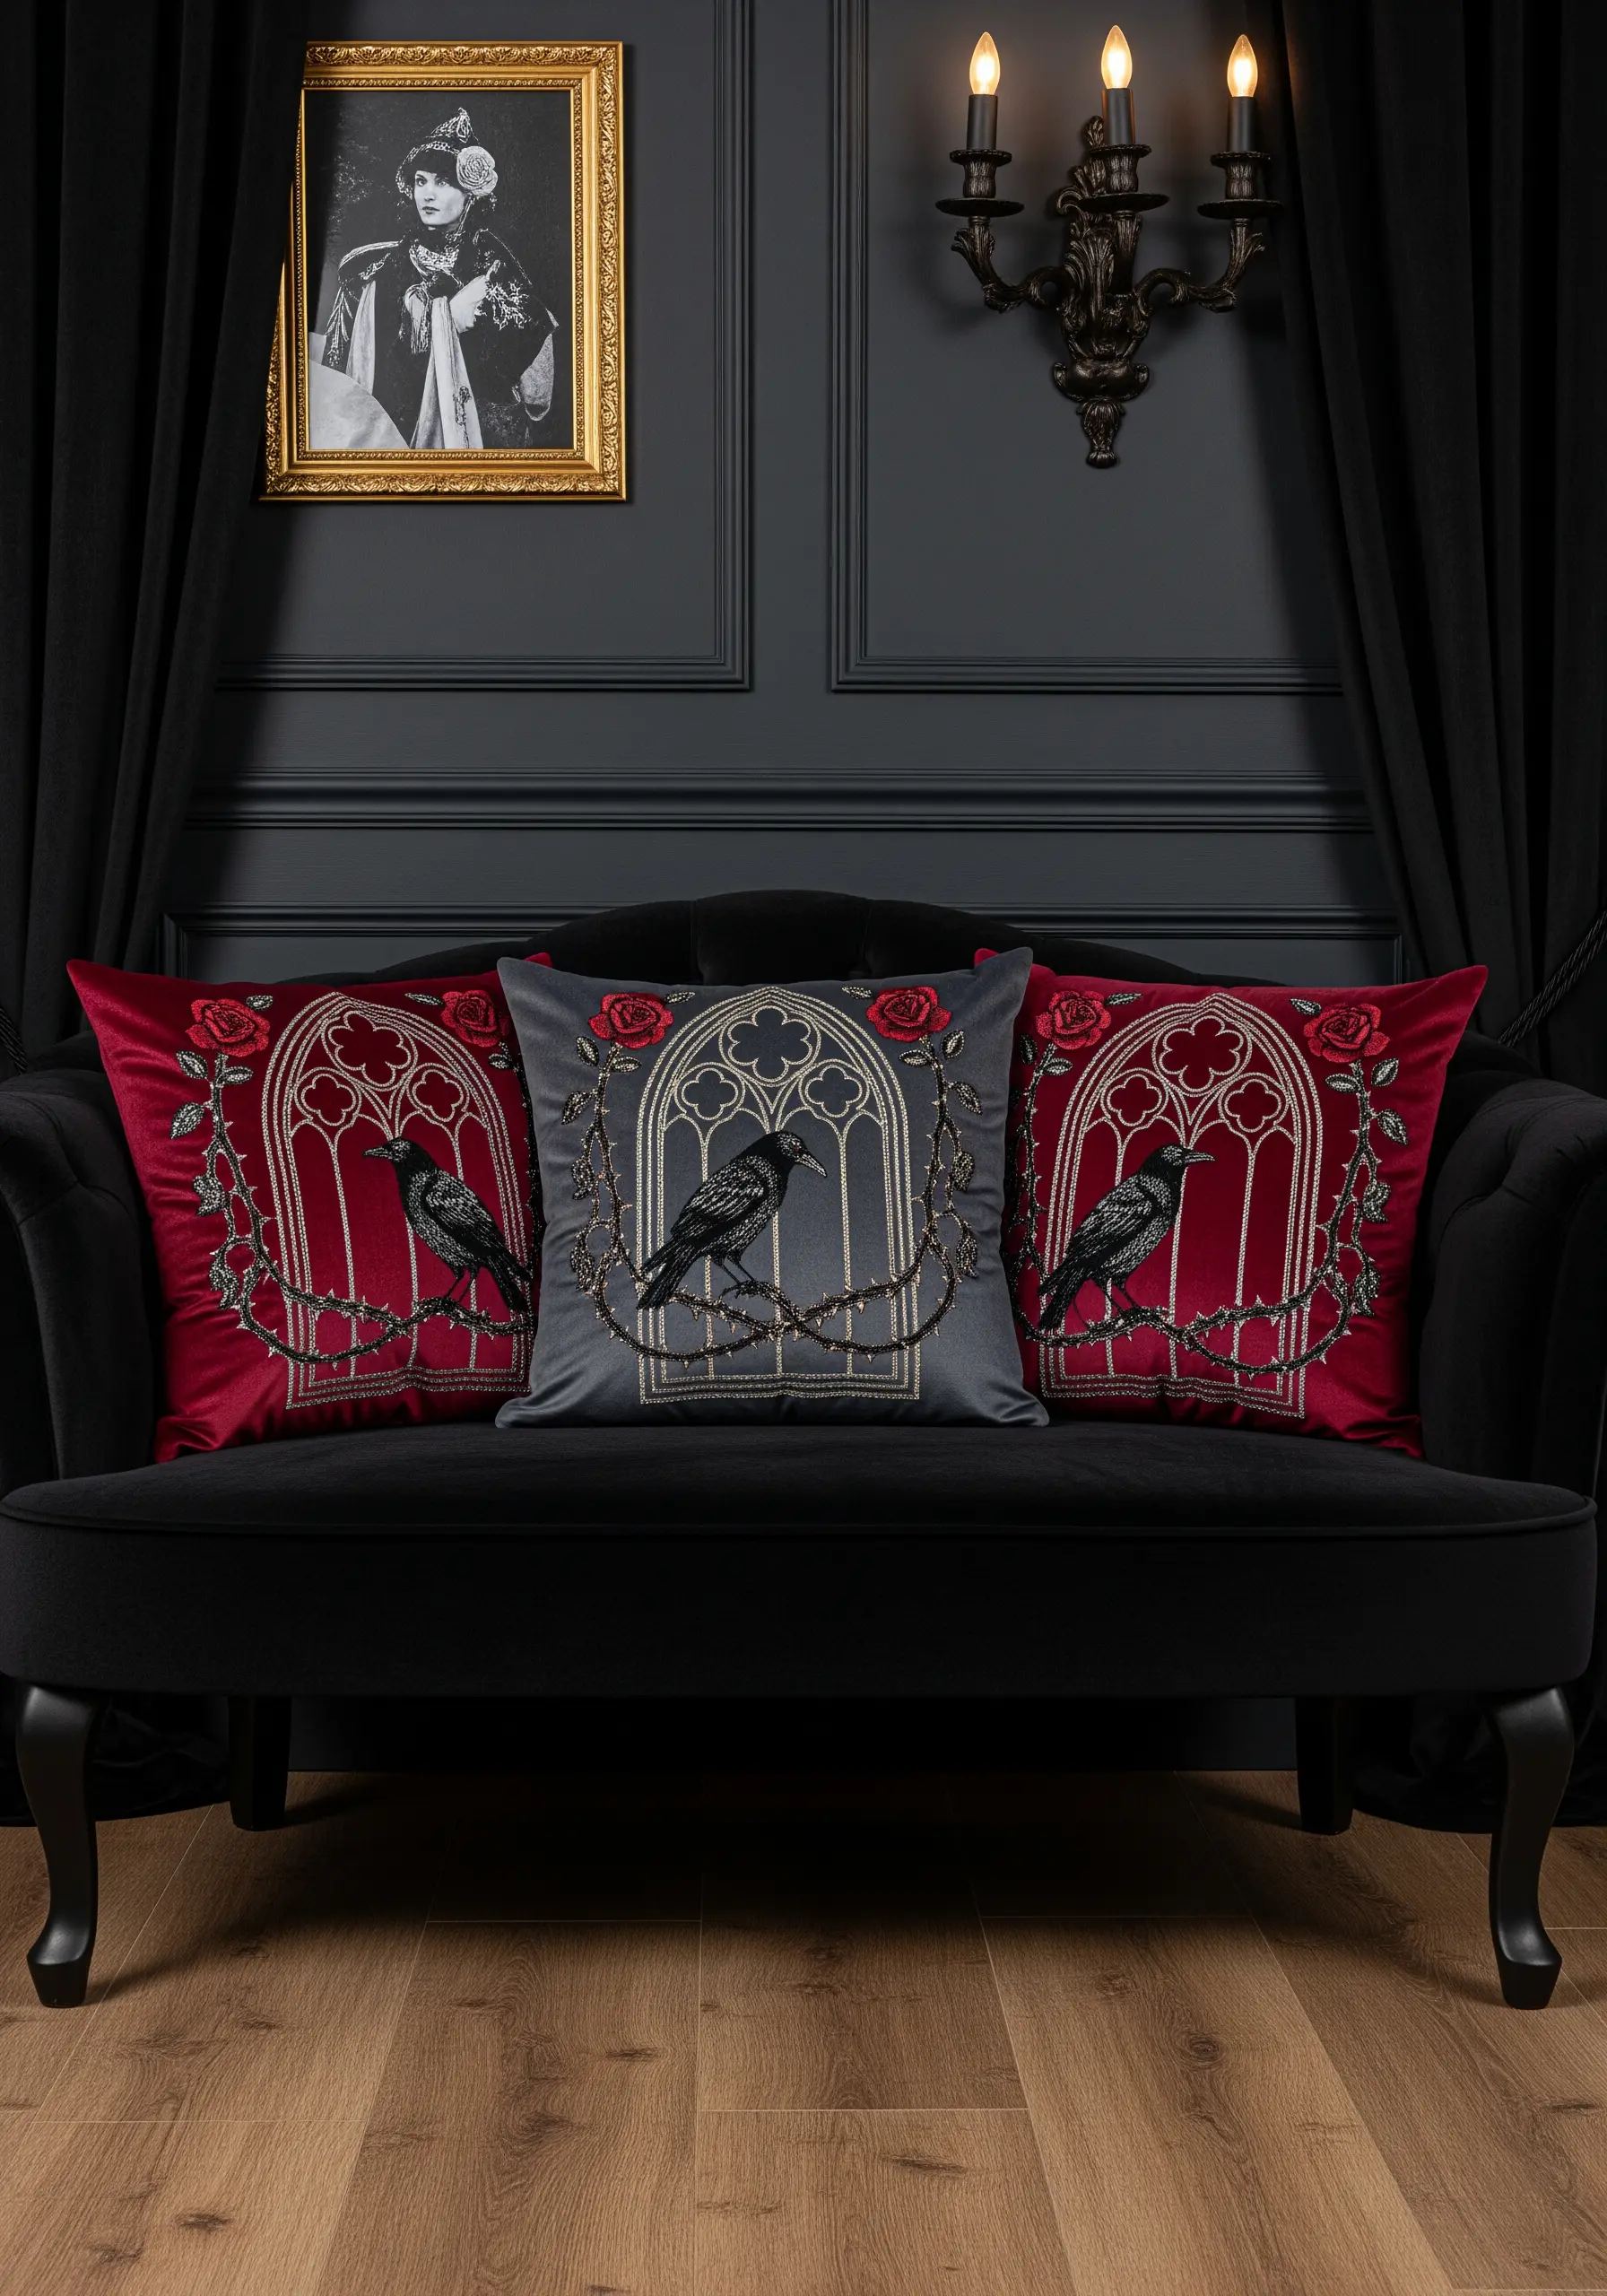
Create a dramatic, gothic-inspired design by combining dark, rich colors with metallic accents.
Use a deep burgundy or charcoal grey fabric as your base.
Embroider thorny rose vines and architectural elements with a silvery-grey or pewter metallic thread to catch the light.
For the raven, use a black thread but vary your stitches—satin stitch for the shiny eye and long-and-short stitch for the feathers—to create texture and dimension even in monochrome.


