

If you’ve ever wanted your embroidery to feel more alive, to lift off the fabric with texture and dimension you can almost touch, then it’s time to embrace silk and satin ribbon.
Unlike flat embroidery floss, ribbon has body, sheen, and a natural ability to fold and drape. A simple looped stitch, when made with ribbon, suddenly becomes a voluminous petal. A French knot transforms into a perfect rosebud. The material itself does so much of the beautiful work for you.
In these ideas, you won’t just find inspiration—you’ll find the specific techniques that make these lush, 3D florals possible. Forget complex, intimidating patterns. With a few foundational stitches, you can learn to sculpt with ribbon, creating pieces that have depth, movement, and an elegance that thread alone cannot replicate.
1. Sculptural Peony with Layered Petals
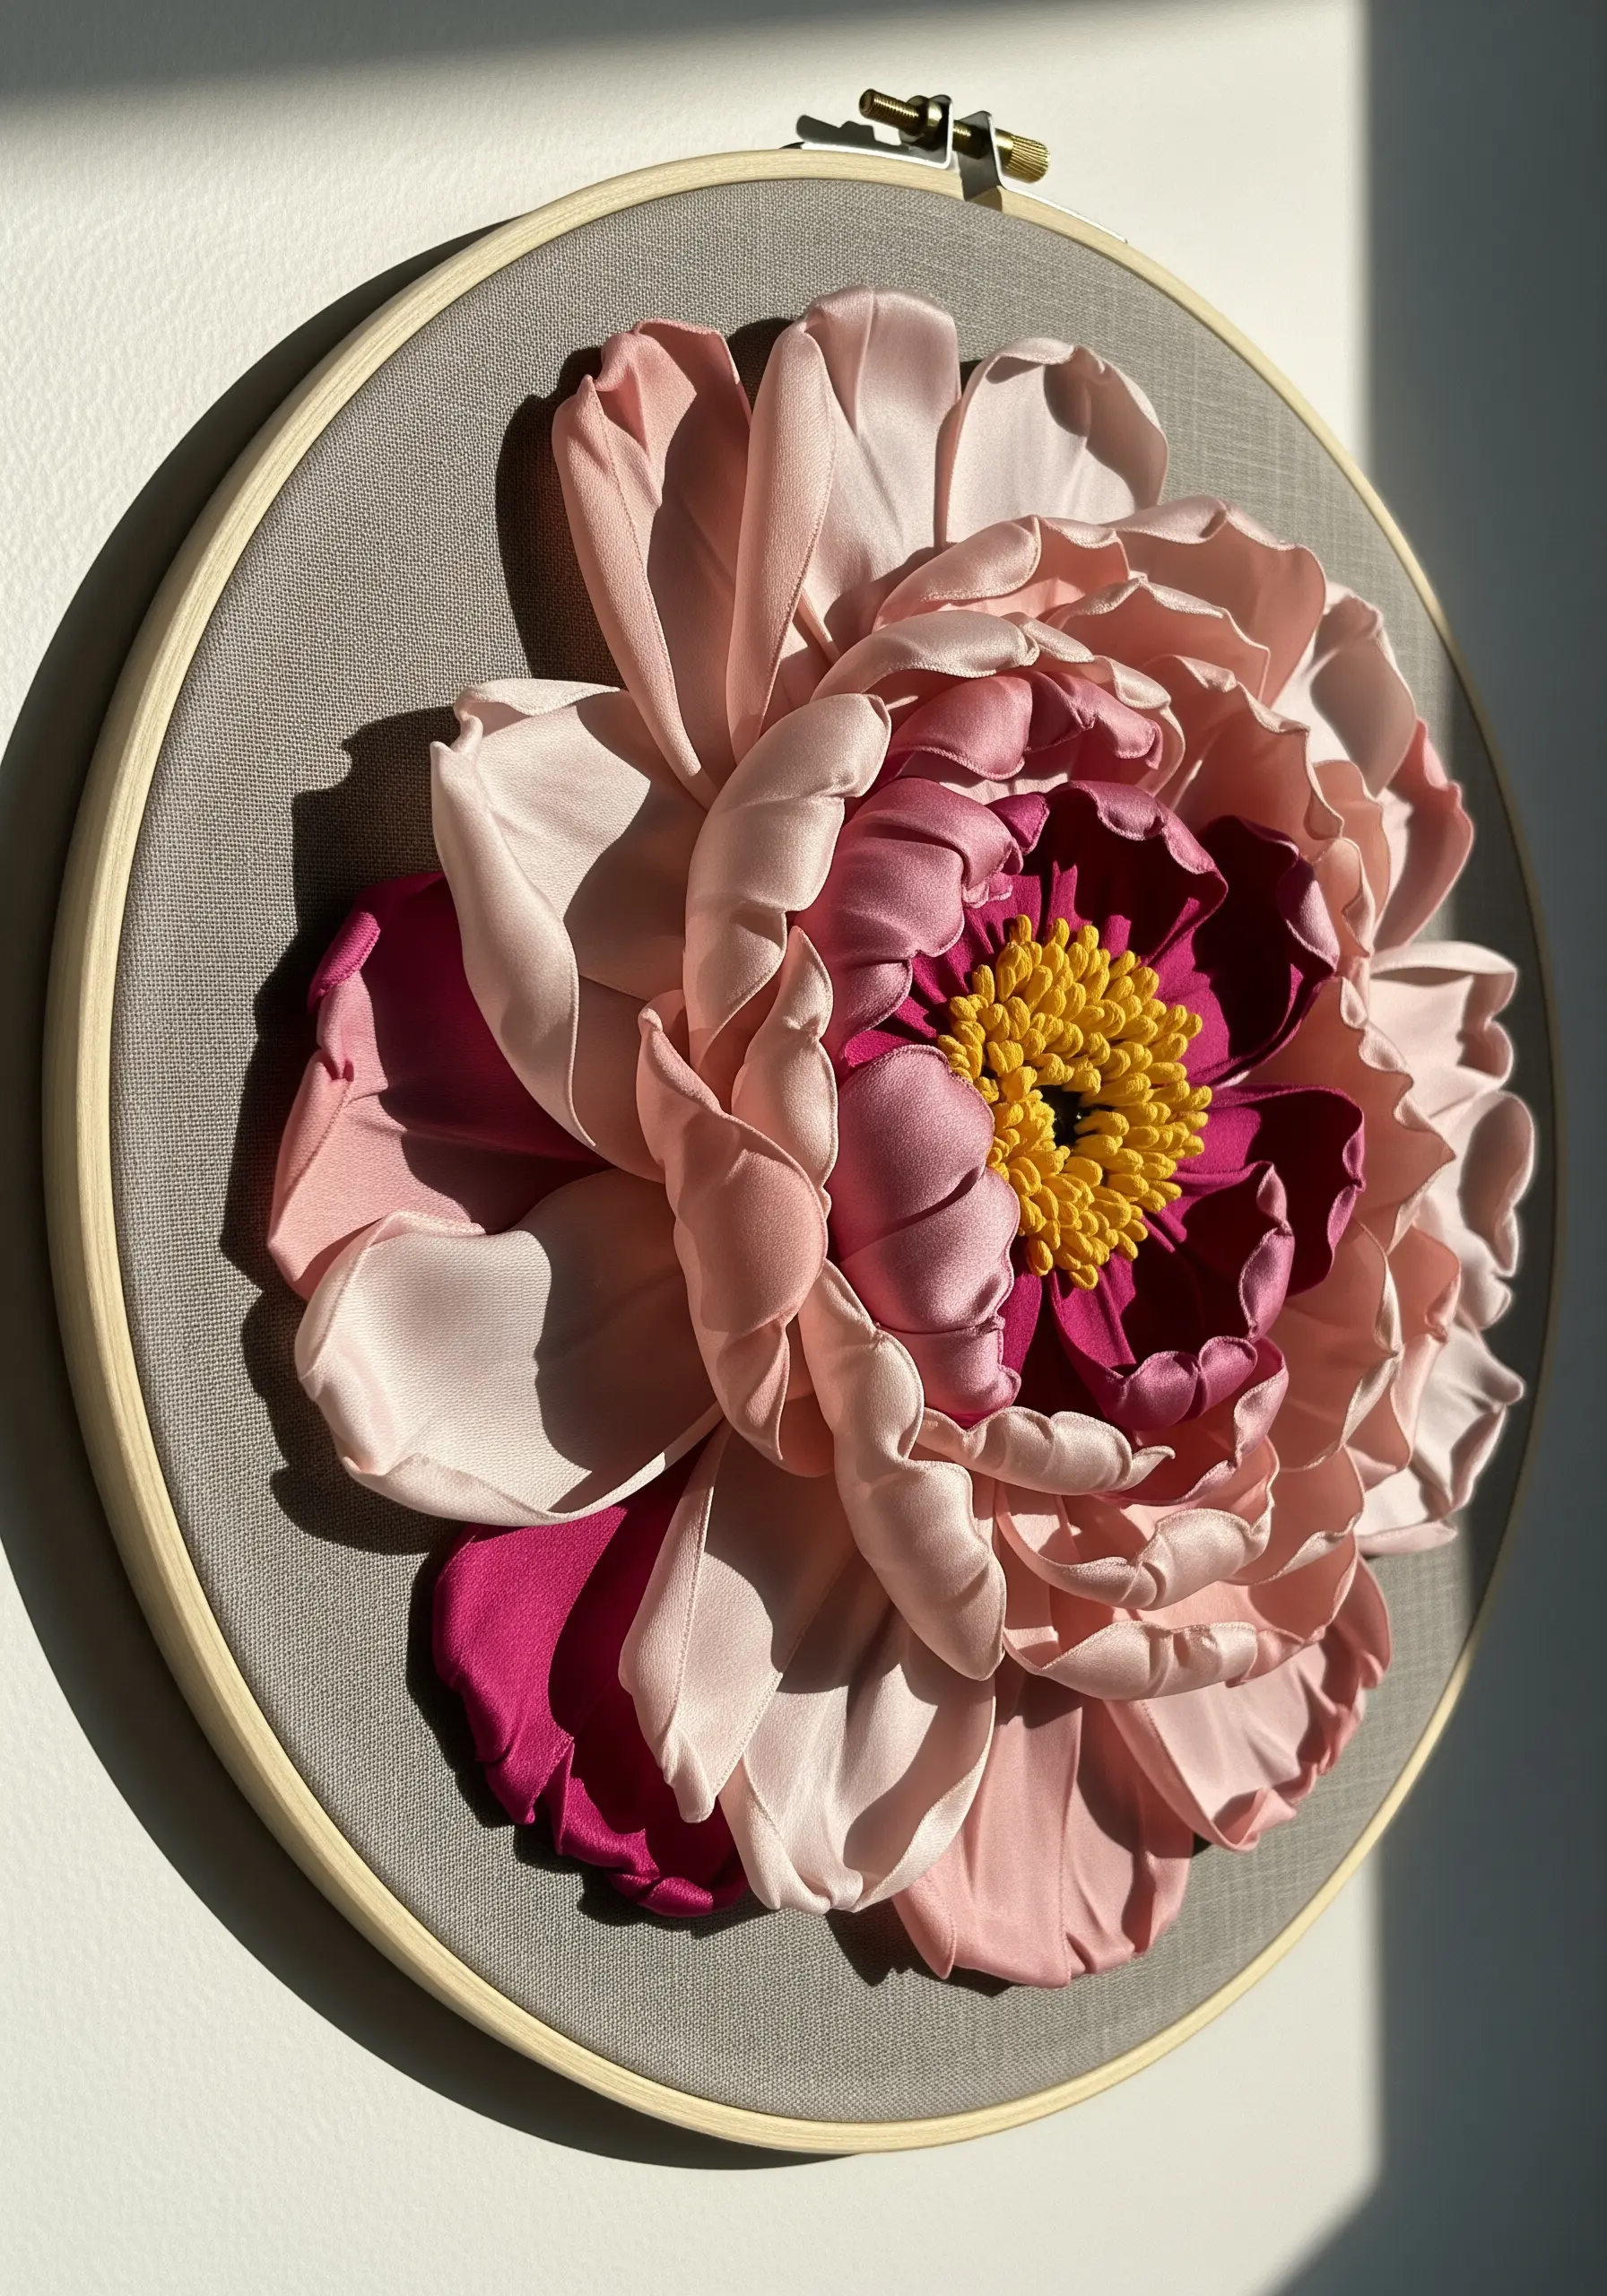
To achieve this peony’s lush volume, create each ribbon petal individually before stitching it to the fabric.
Cut varying lengths of wide silk or satin ribbon, fold them to mimic a petal’s curve, and use a lighter to gently seal the raw edges to prevent fraying.
Arrange the petals in concentric circles, starting with the largest on the outside and working your way in, overlapping each layer to build realistic depth.
Use a gradient of colors—from a deep magenta at the core to a pale blush on the outer edges—to create the illusion of light and shadow, which gives the flower its lifelike form.
Finish the center with a dense cluster of yellow French knots to mimic stamens, adding a final touch of realistic texture.
2. Cascading Wisteria on Velvet
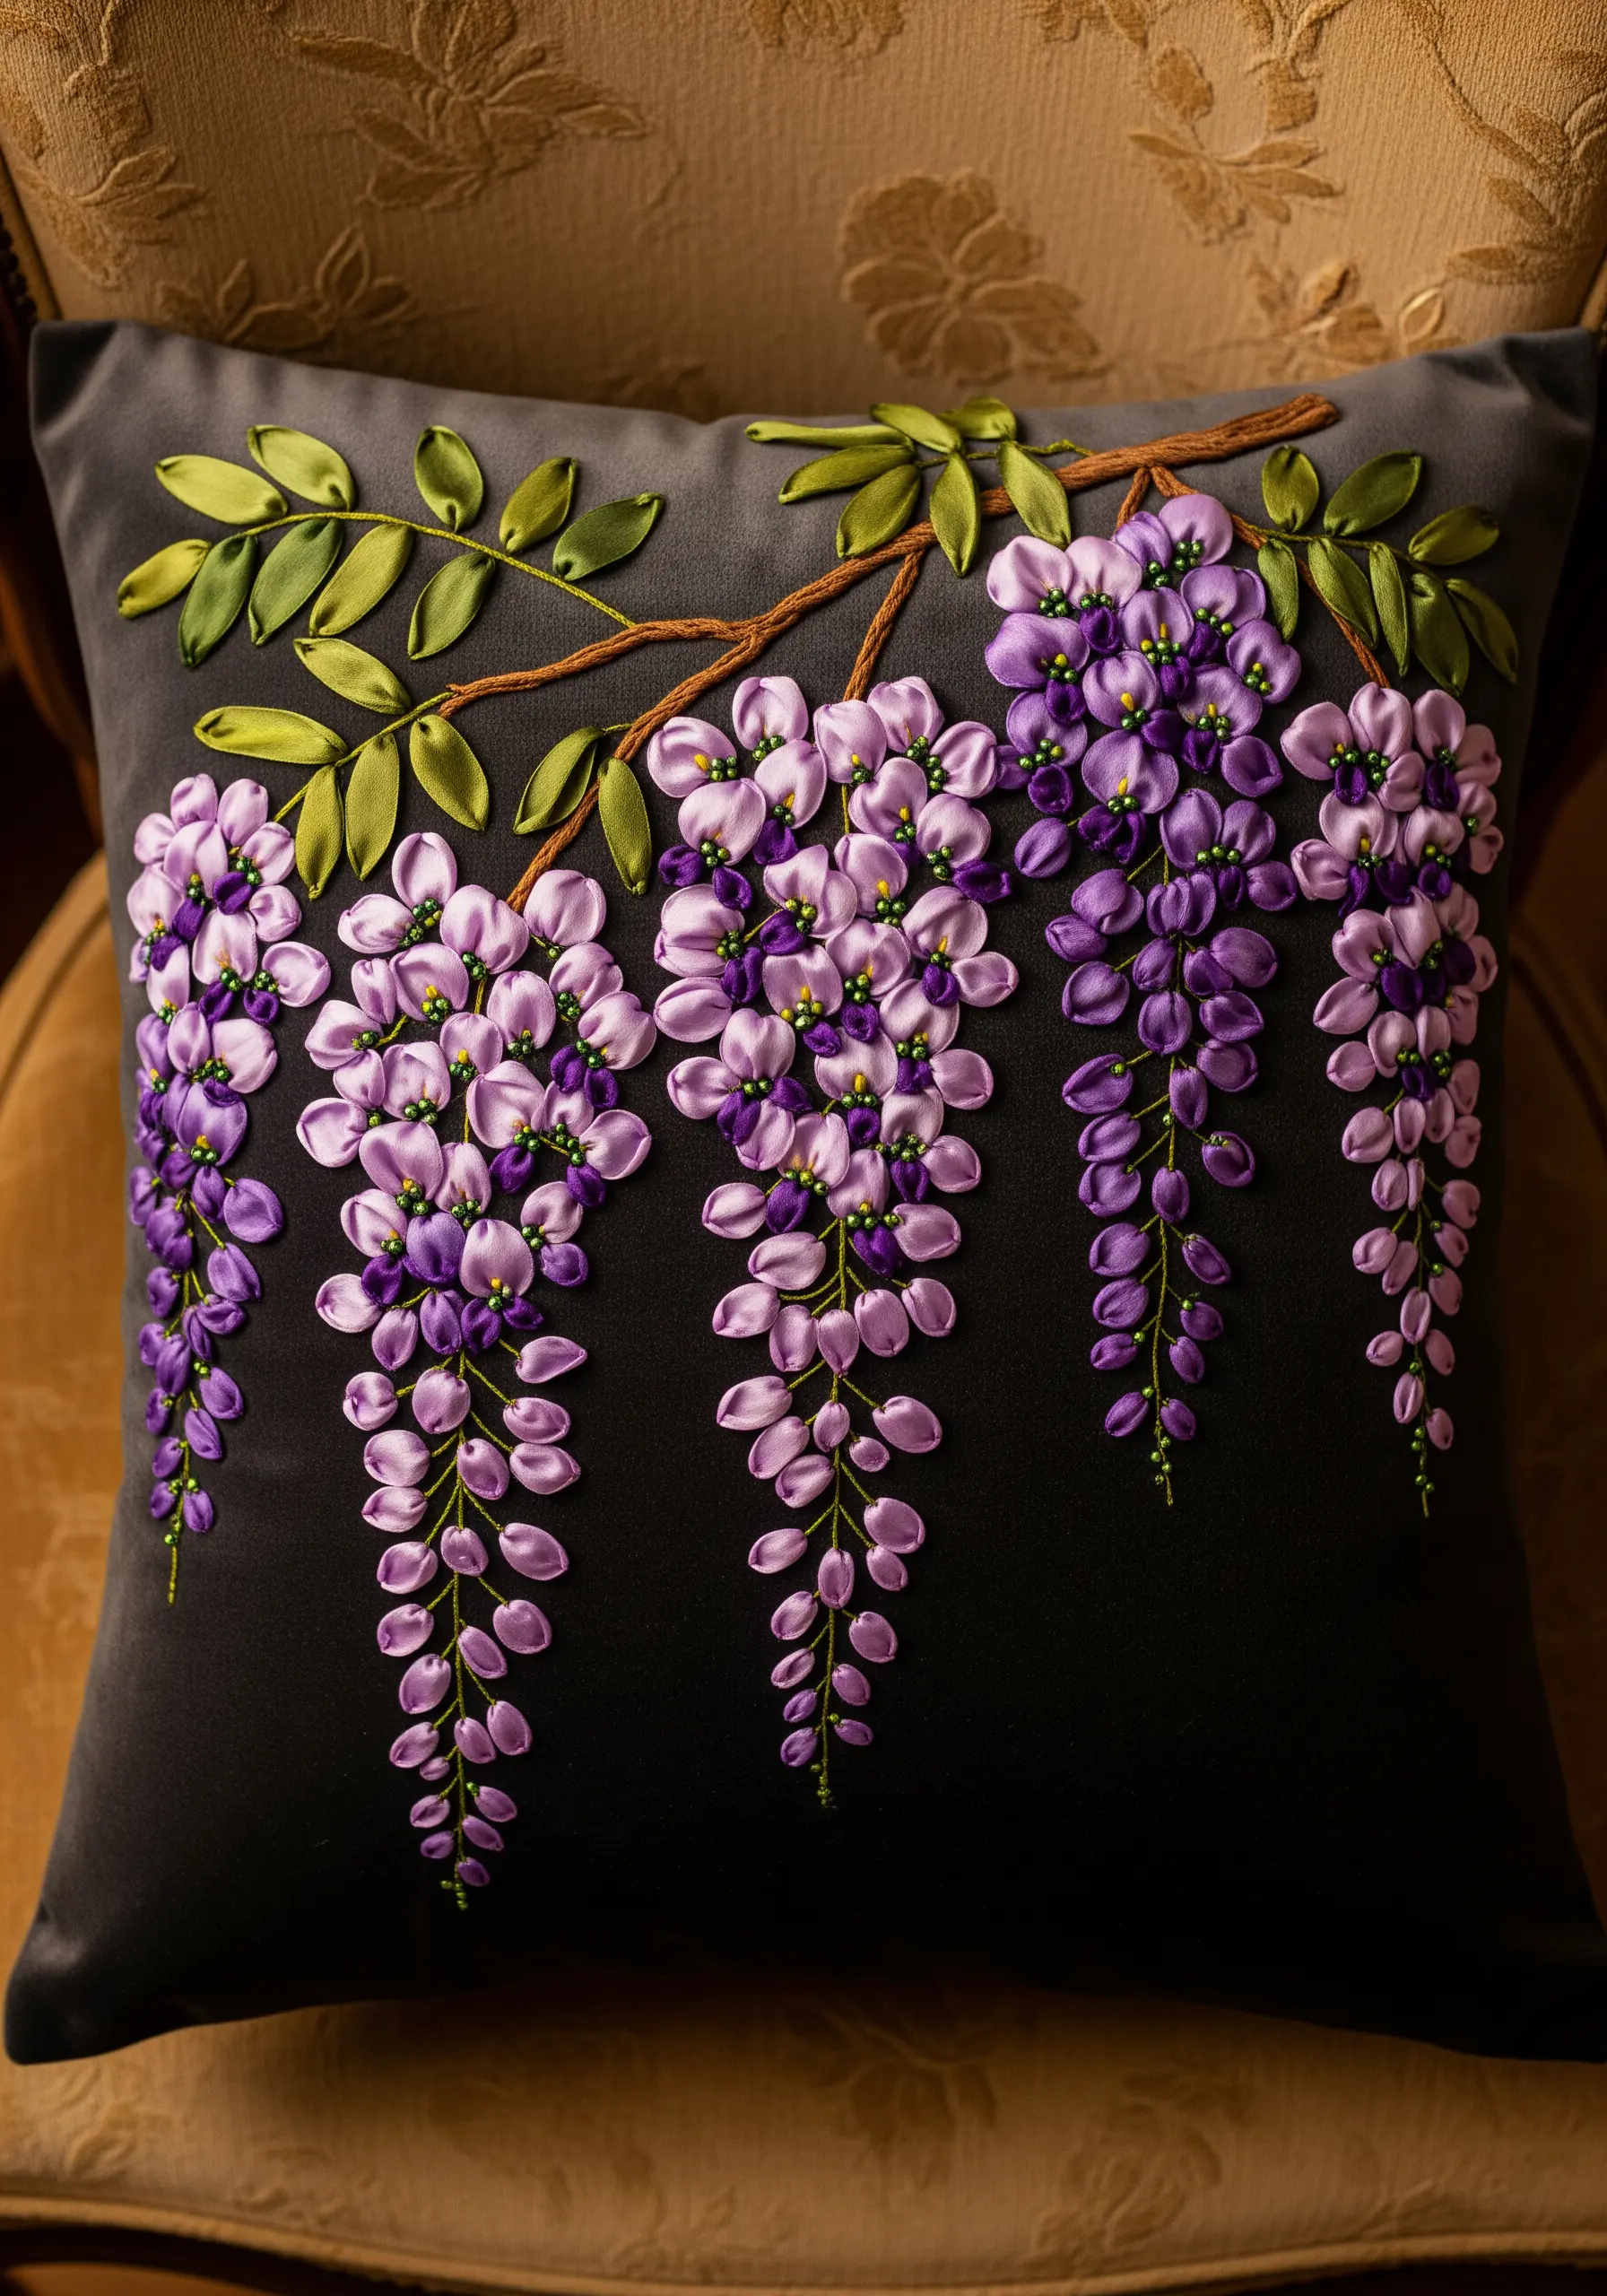
Create the elegant drape of wisteria by using the lazy daisy stitch with a narrow, soft silk ribbon.
Vary the length and tension of each stitch to make the florets appear to hang naturally, with tighter loops at the top and looser ones toward the bottom.
Stitch the clusters in a gentle curve to follow the vine’s path, overlapping shades of lavender and violet to add visual depth.
Working on a dark, plush fabric like velvet makes the ribbon’s sheen pop, creating a luxurious contrast that highlights every stitch.
Add tiny green seed beads or French knots at the base of each floret for a polished, detailed finish.
3. High-Contrast Denim Jacket Florals
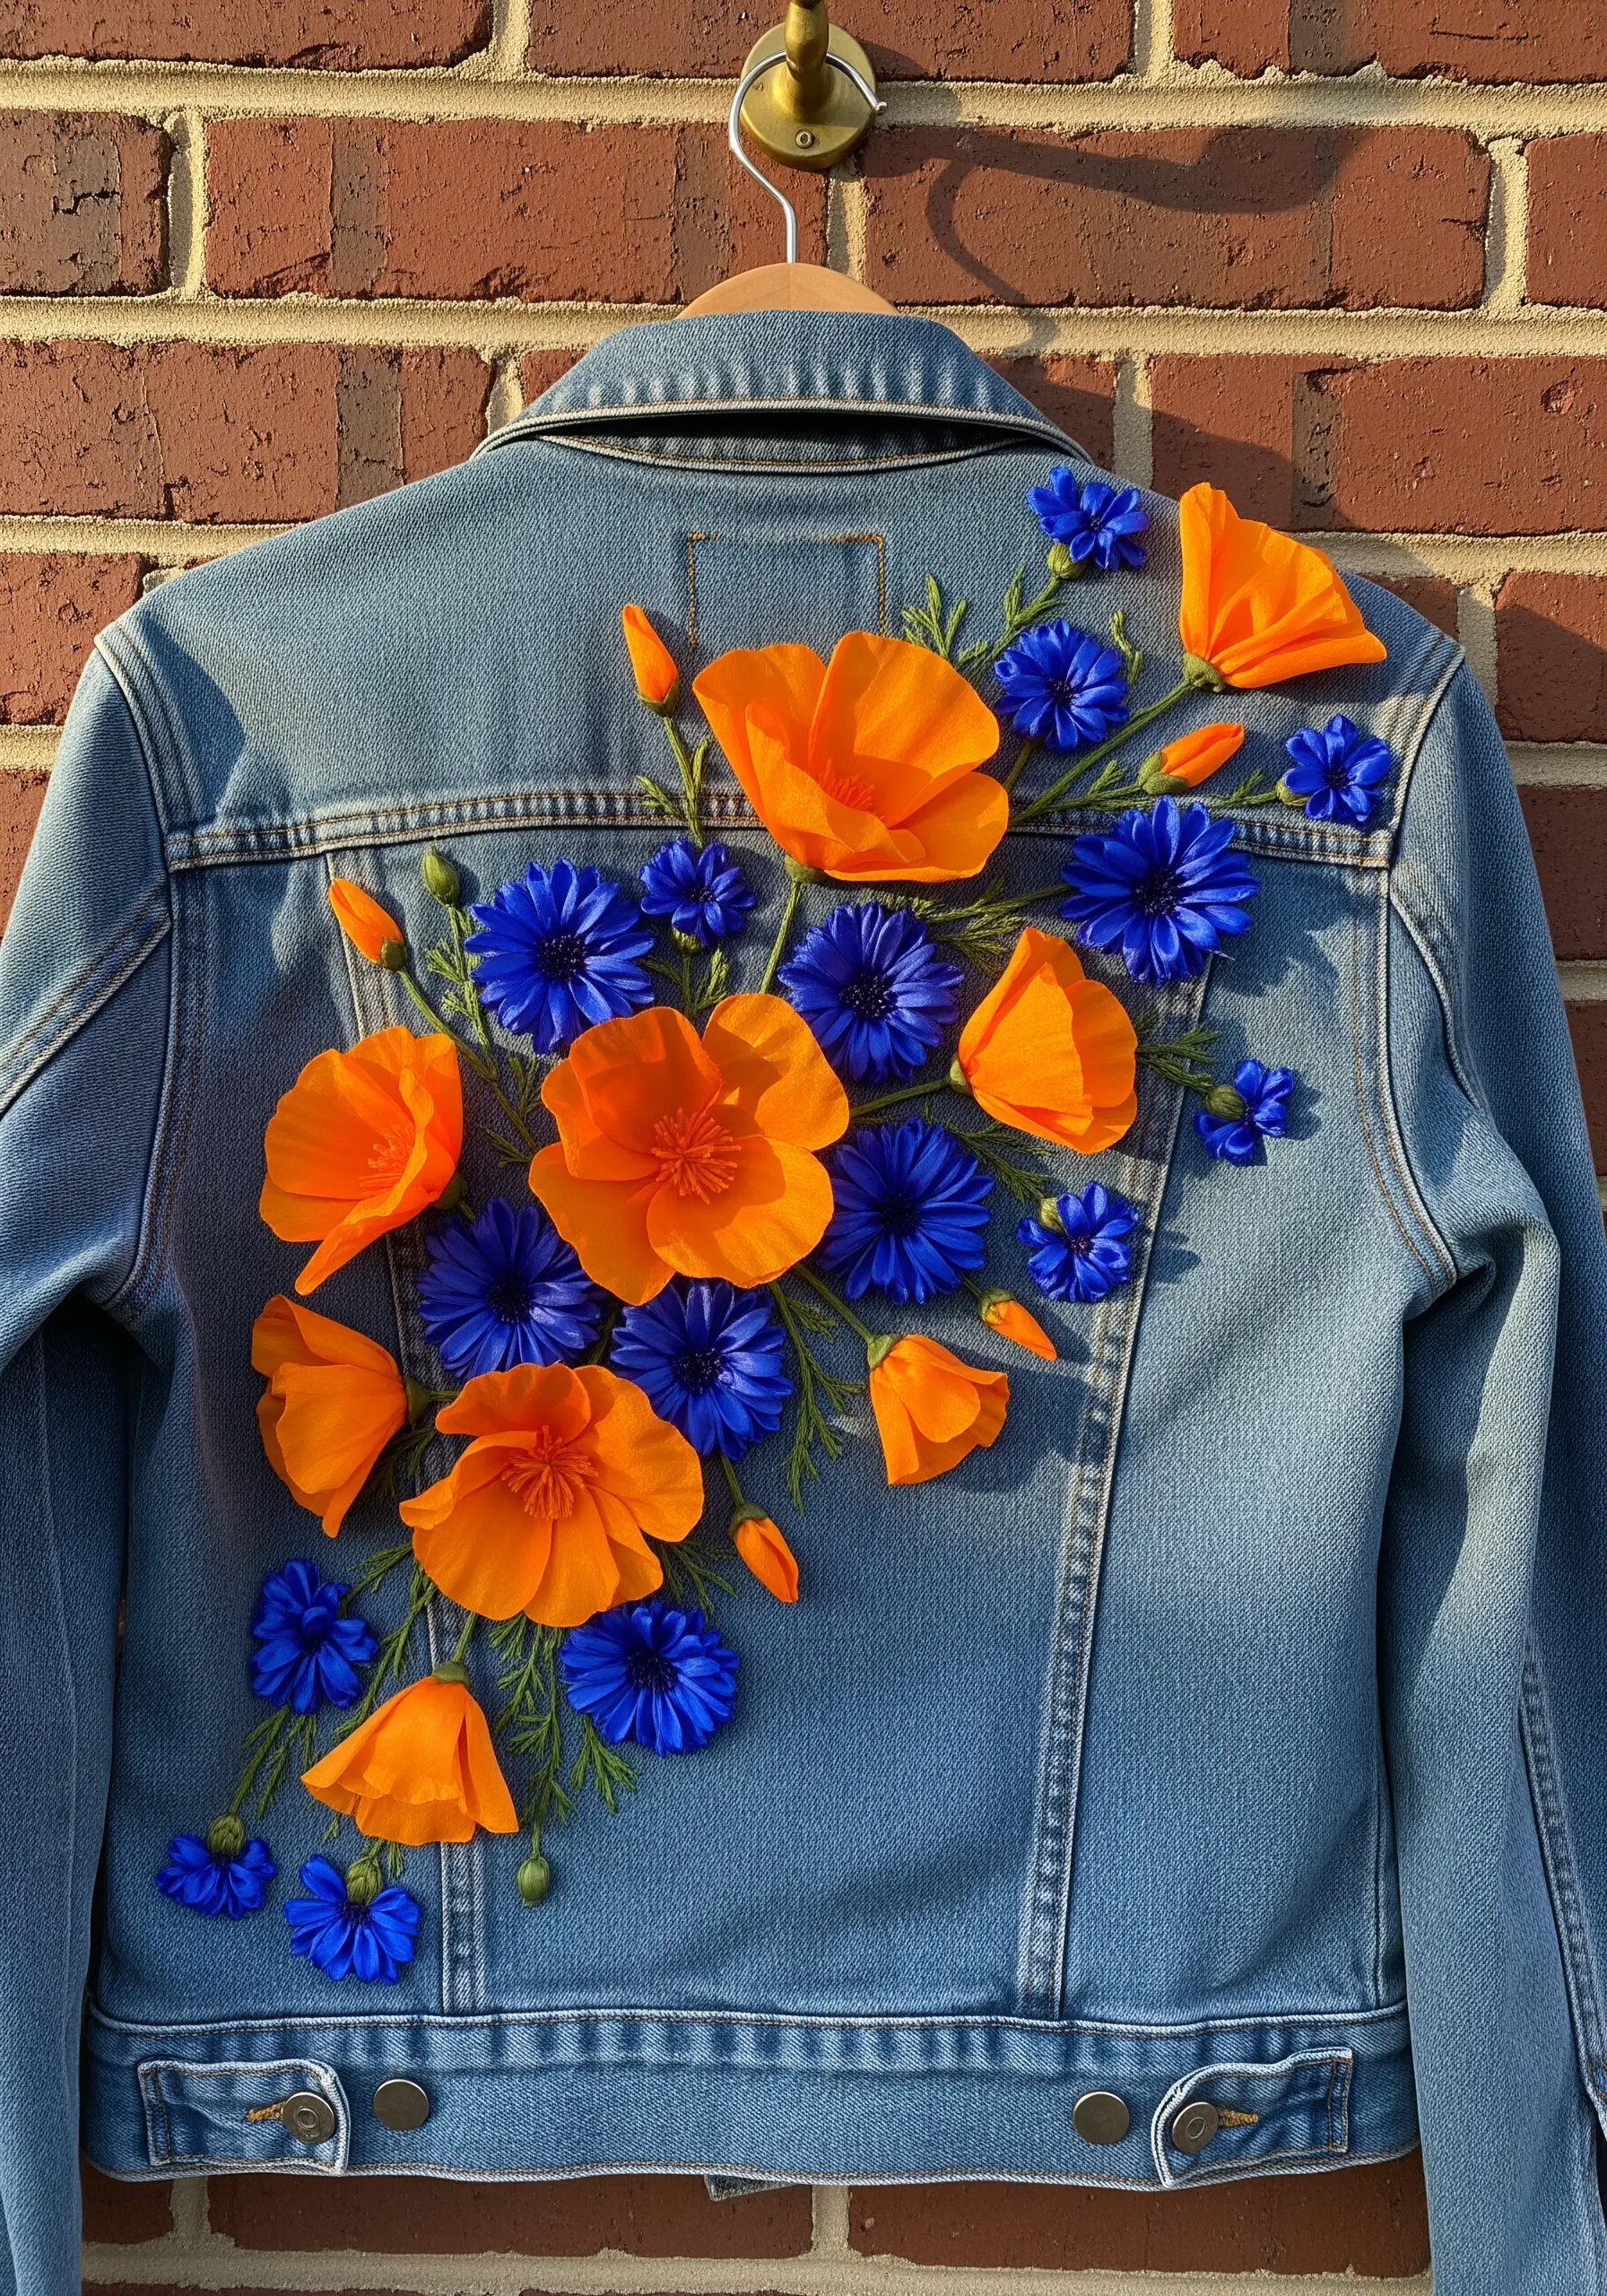
When embellishing denim, choose a bold, high-contrast color palette, like this vibrant orange and cobalt blue, to ensure your work stands out against the textured fabric.
To make the poppies, use a running stitch along one edge of a wide ribbon, pull to gather it into a circle, and secure it firmly to the jacket.
For the cornflowers, use a narrower ribbon and create radiating straight stitches, packed closely together to form a dense, textured bloom.
Always use a stabilizer on the inside of the jacket to prevent the fabric from puckering and to support the weight of the ribbon.
This technique turns plain denim jackets into wearable statement art.
4. Miniature Ribbon Roses for Delicate Surfaces
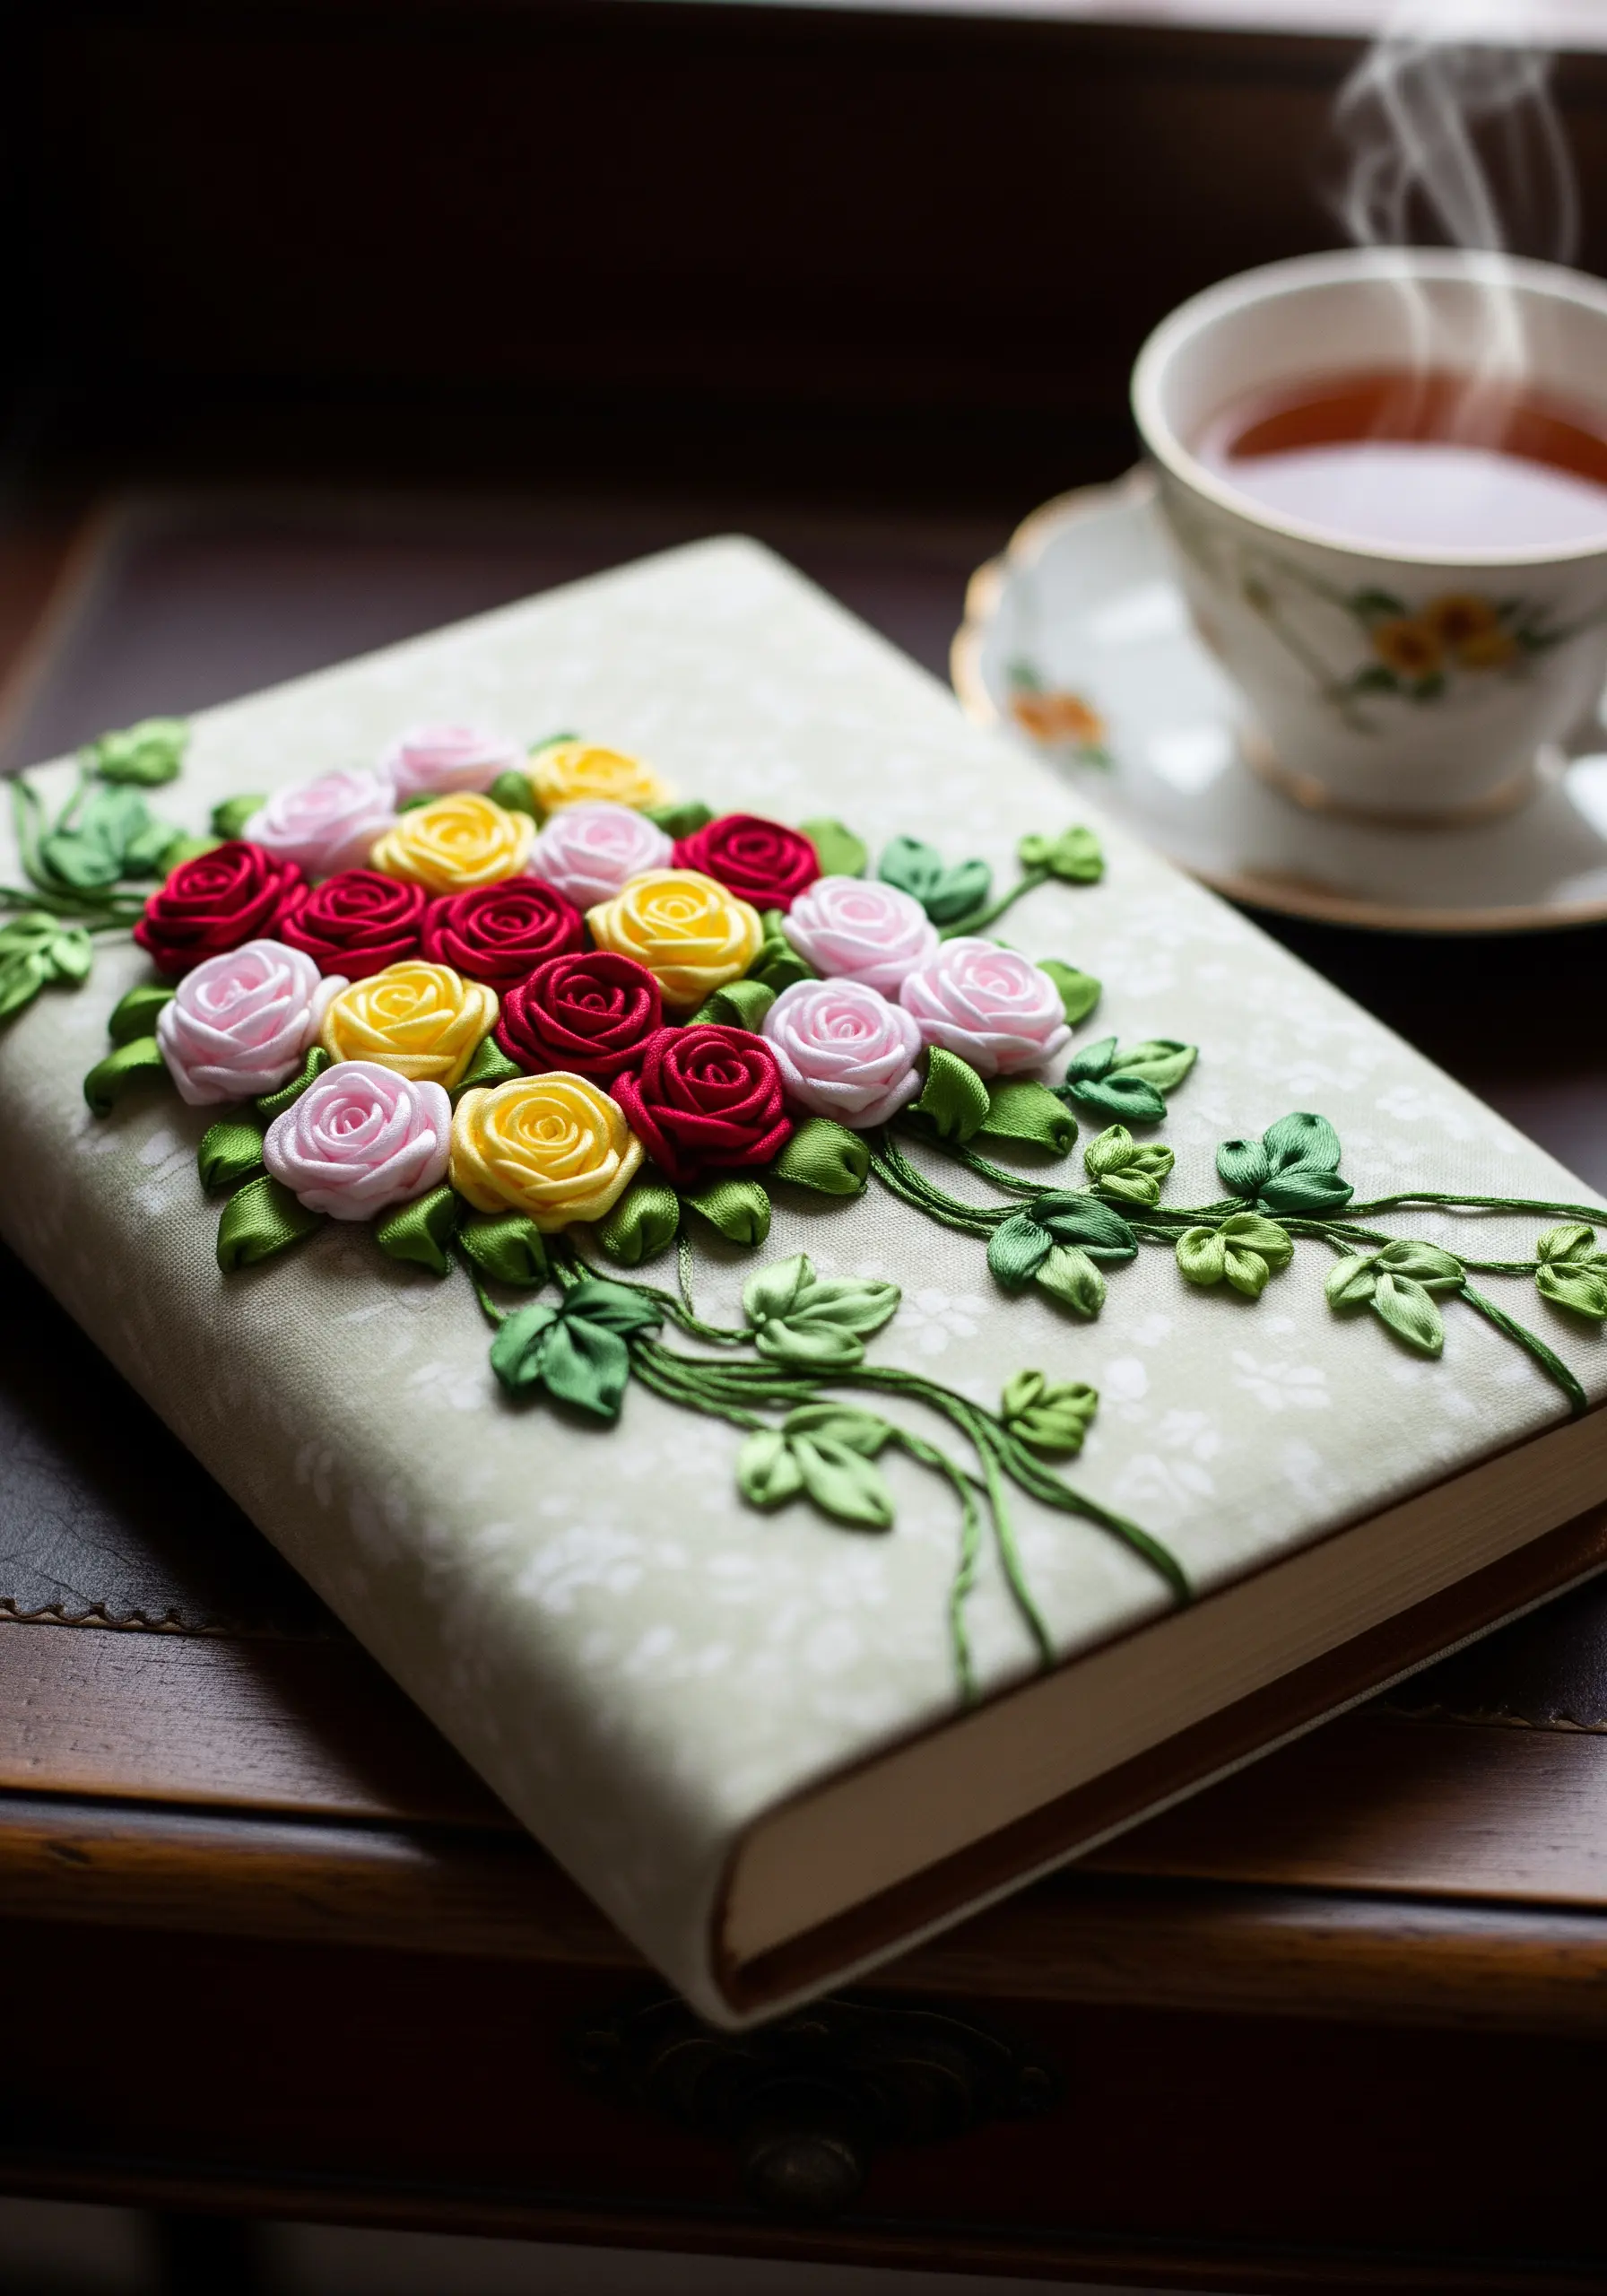
To create these tightly coiled roses on a delicate book cover, use the woven wheel (or spider web) stitch as your foundation.
Start with a star of five straight stitches in regular embroidery floss, then weave a narrow silk ribbon over and under each spoke until the wheel is completely covered.
Pull the ribbon gently for a flat rose or leave it looser for a more dimensional, open bloom.
Using a thin, pliable silk ribbon is essential here, as a stiffer satin ribbon would be too bulky for such a small and refined scale.
Frame the bouquet with delicate stem-stitched vines and lazy-daisy leaves for a classic, romantic composition.
5. Translucent Sunflowers on a Lampshade
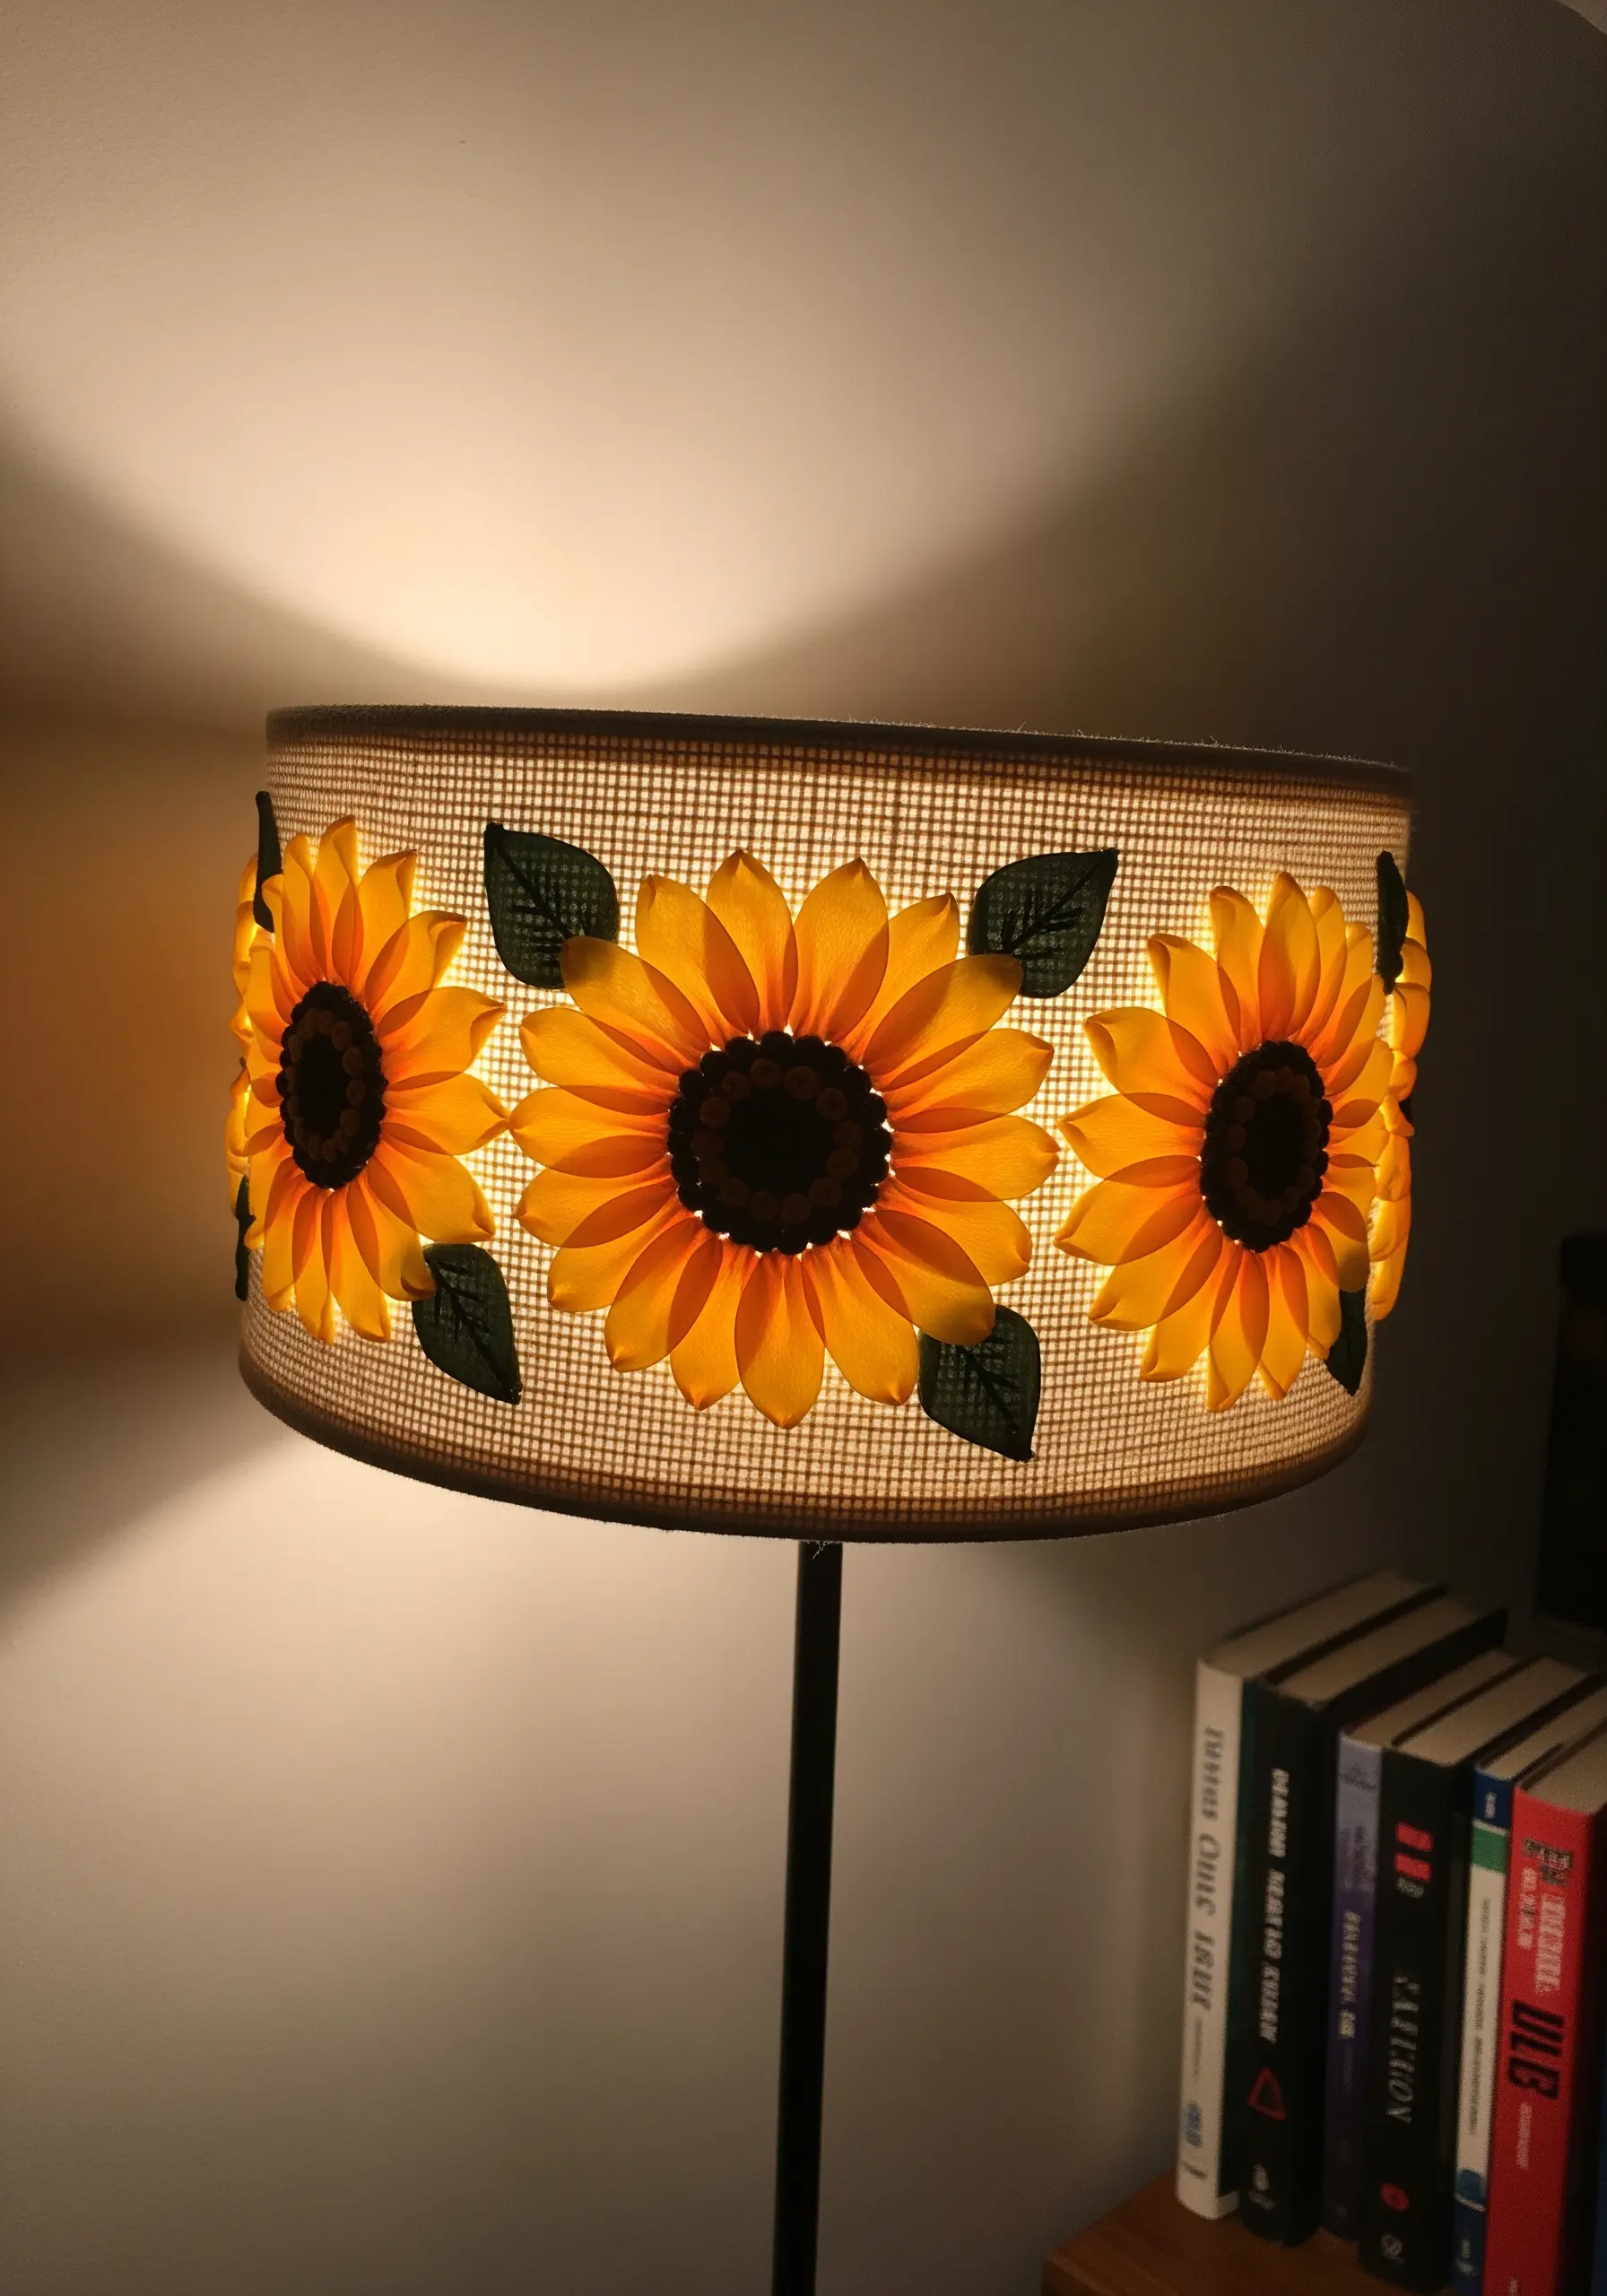
Embroidering on a lampshade requires working with a fabric that allows light to pass through, like burlap or a loose-weave linen.
Form the sunflower petals using individual loops of wide, semi-sheer ribbon, securing each one at the base to create a radial pattern.
The magic happens when the lamp is turned on—the light illuminates the ribbon from behind, making the petals glow and creating a warm, ambient effect.
Use a dark, textured center made from French knots or couched chenille thread to ground the design and provide contrast against the luminous yellow petals.
6. Wildflower Meadow Table Runner
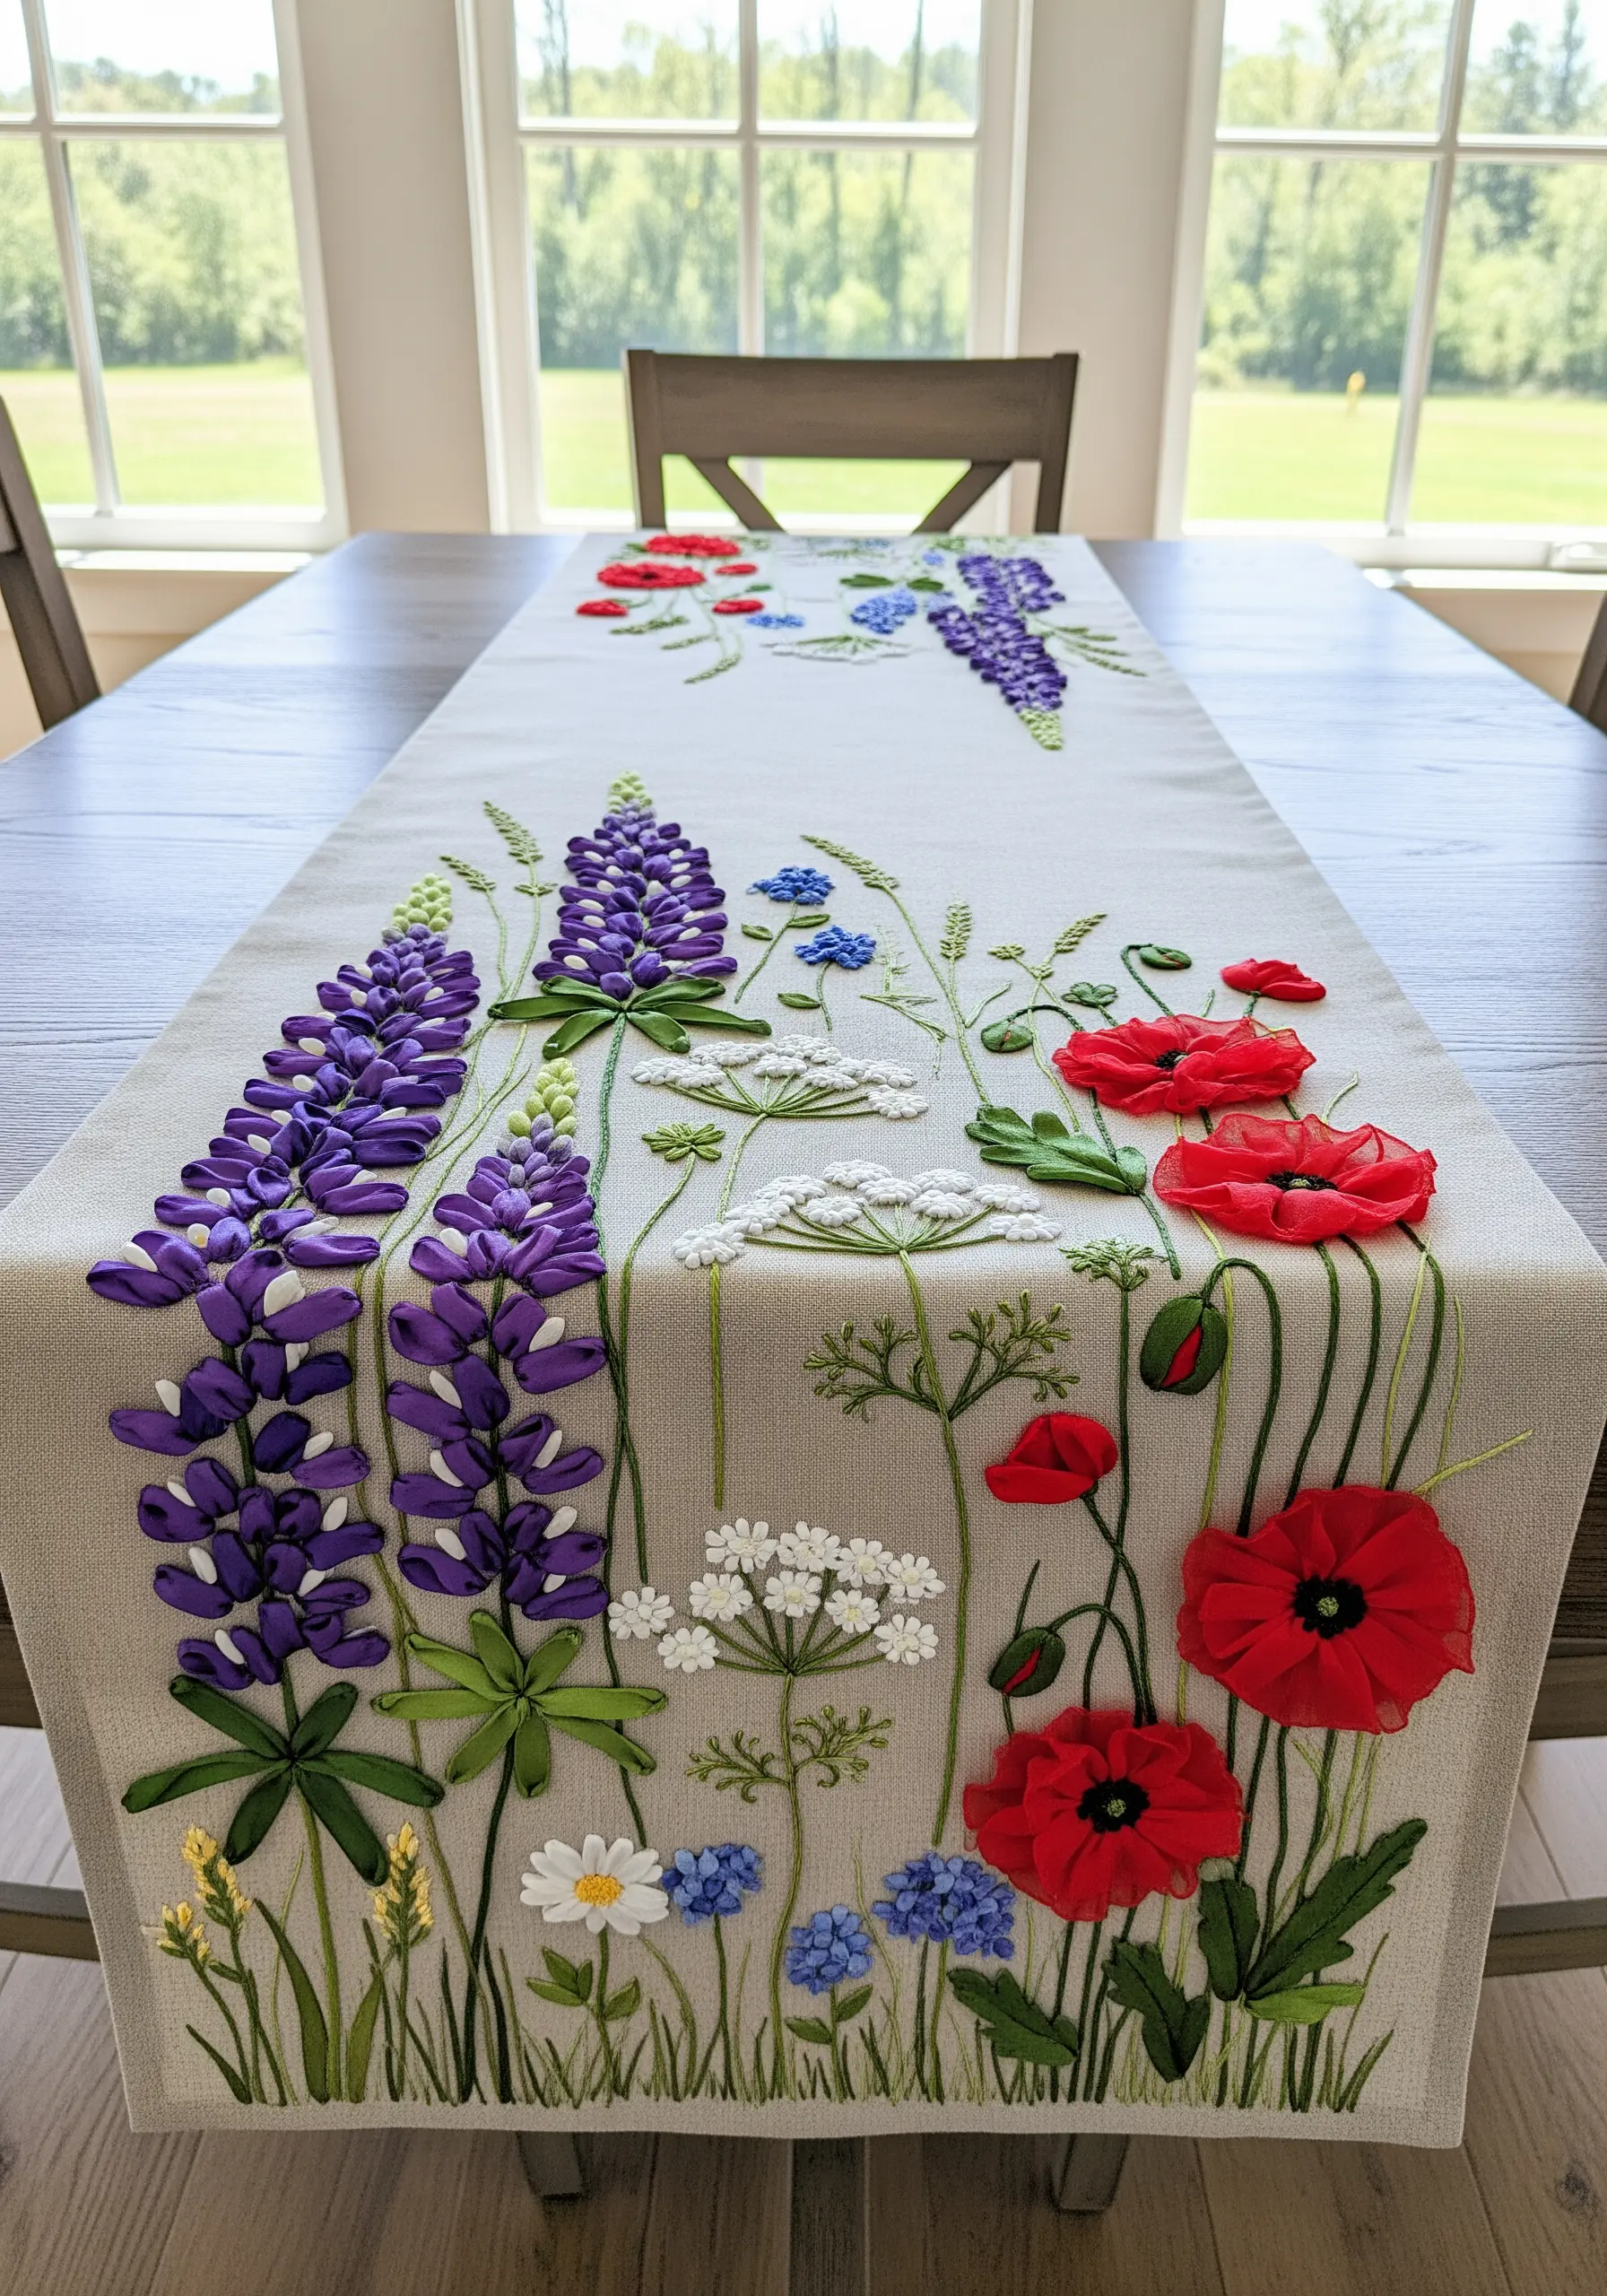
To compose a balanced wildflower meadow, vary the height, scale, and texture of your botanicals.
Create tall lupines by stacking rows of looped ribbon stitches, place vibrant poppies made from gathered ribbon at different levels, and scatter delicate Queen Anne’s lace using white French knots on thread stems.
This variation creates a sense of depth and movement, drawing the eye across the entire length of the runner.
Anchor the scene with a base of simple green straight stitches to represent grass, unifying the diverse floral elements into a cohesive landscape.
This approach transforms simple table linen embroidery into a piece of narrative art.
7. Textural Hydrangea Clusters
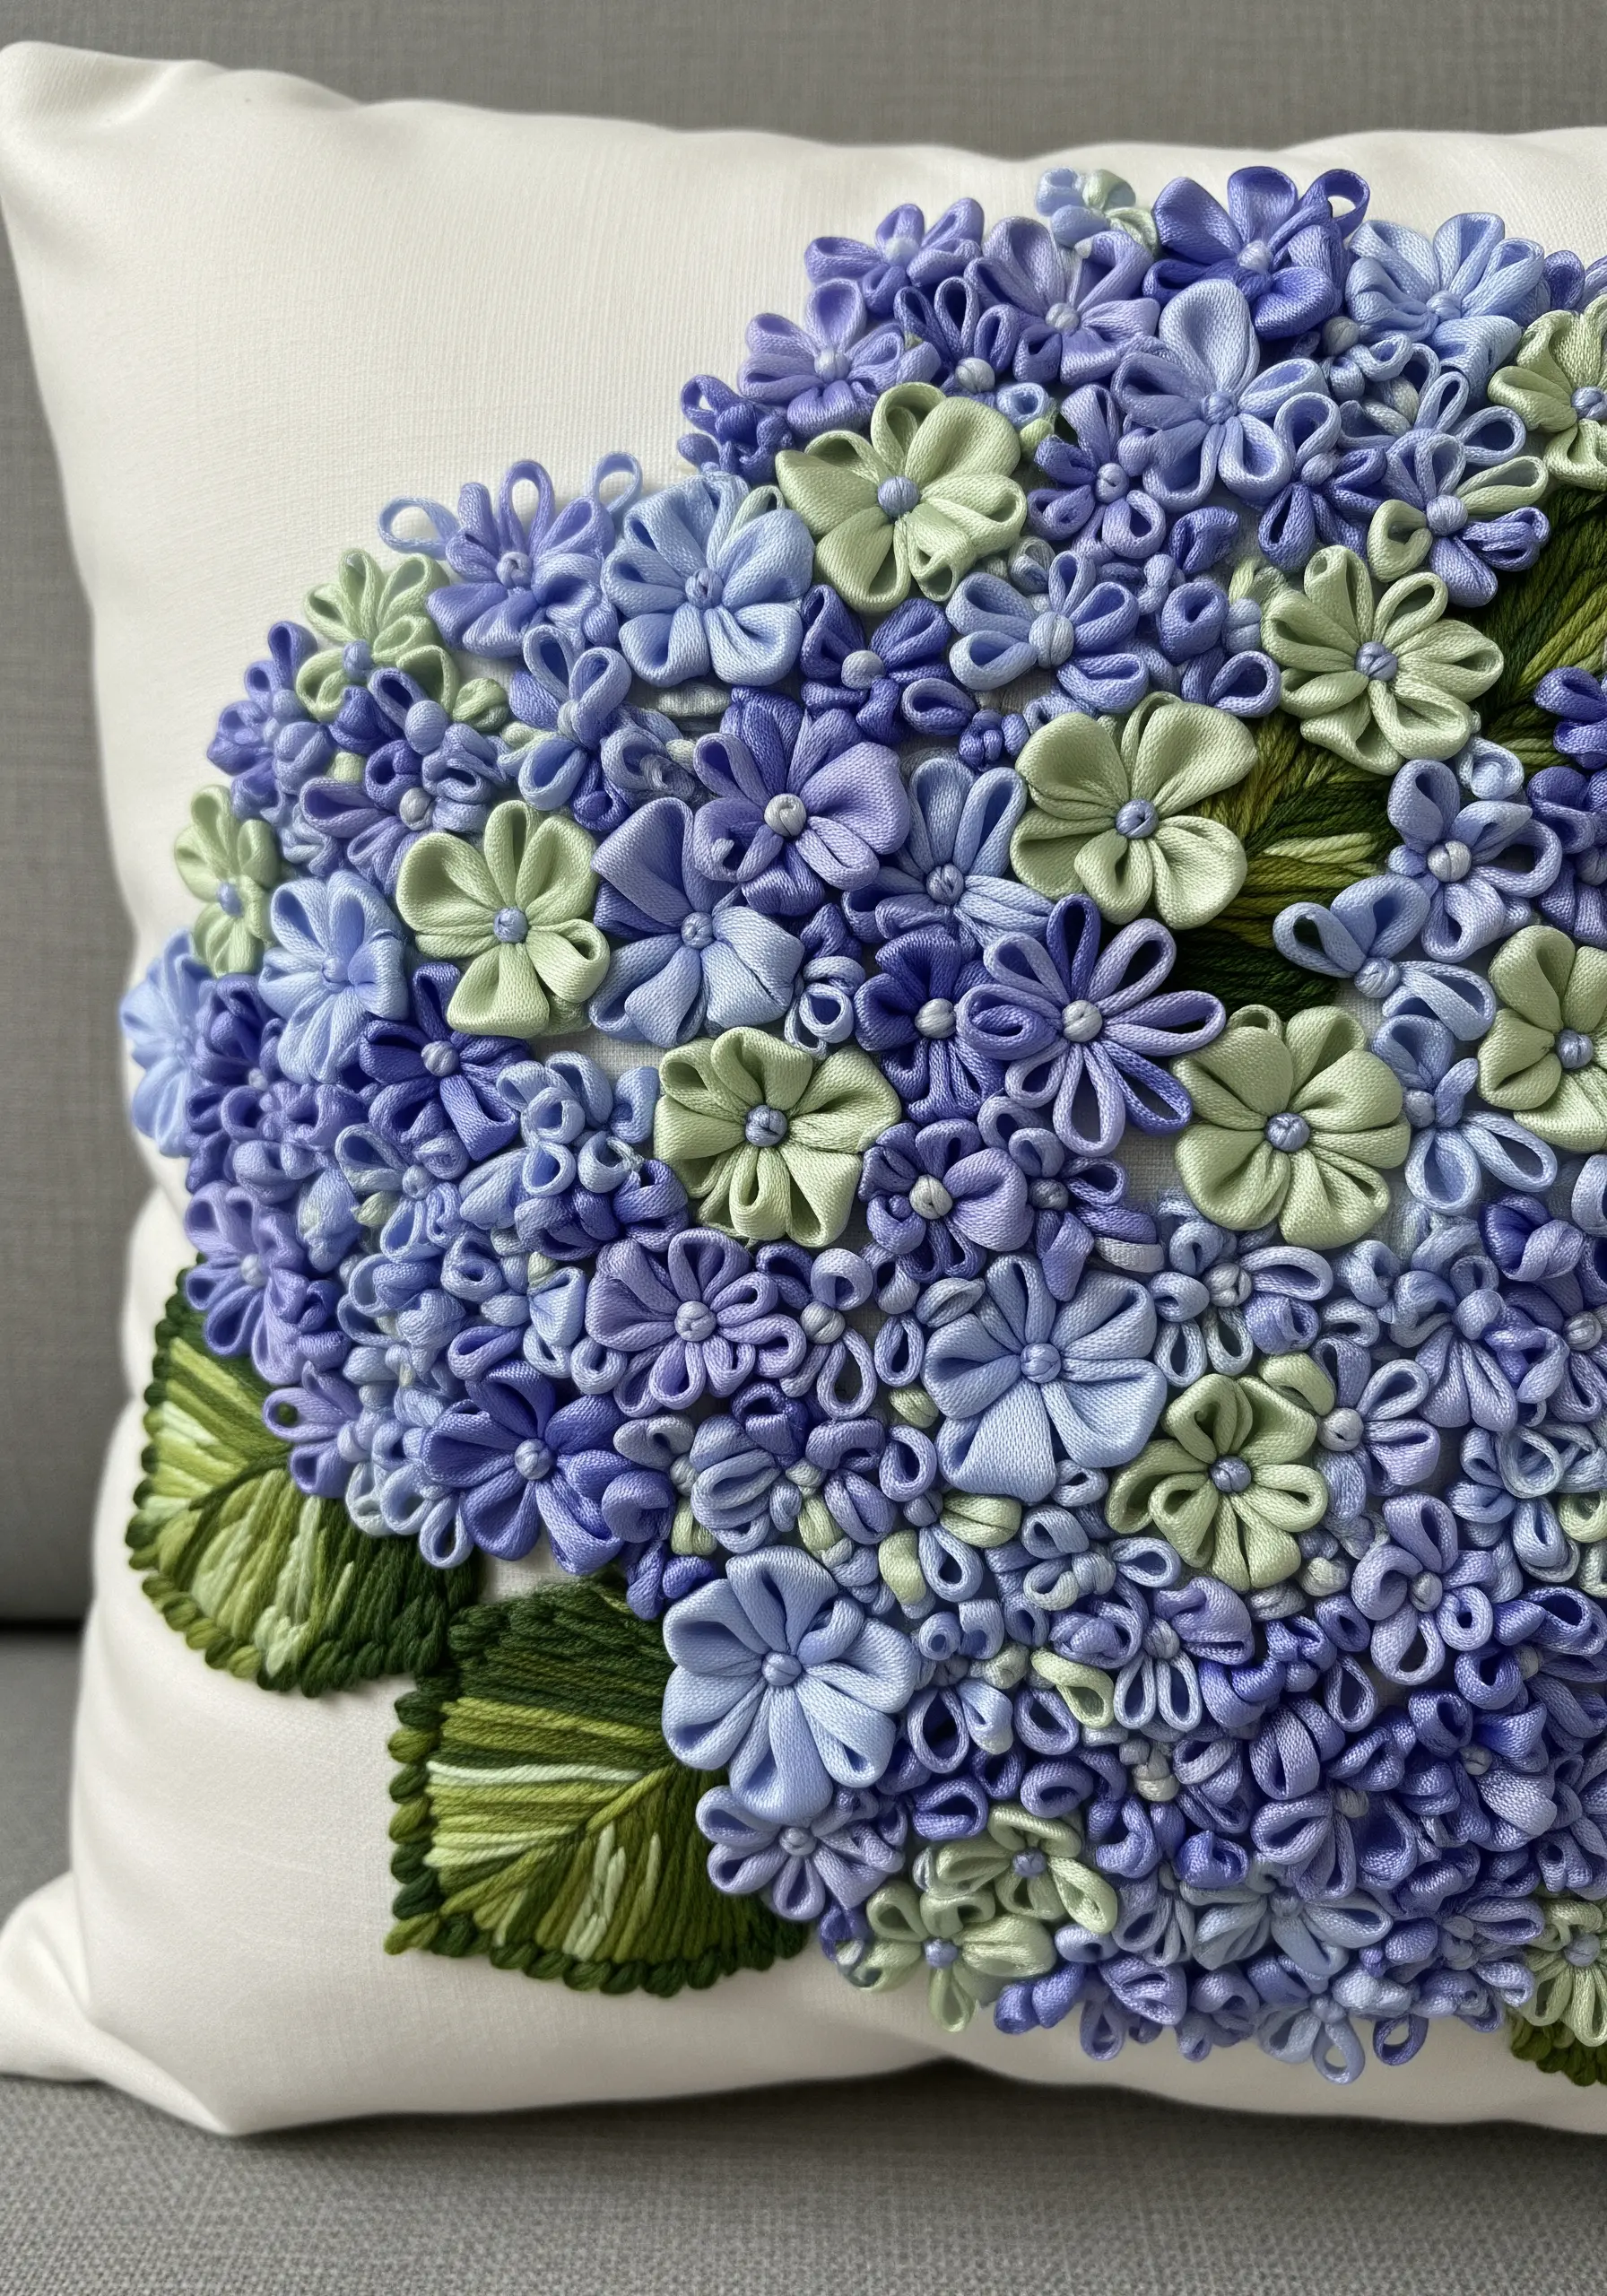
The key to a realistic hydrangea is building dense, multi-tonal clusters of small florets.
Use the Japanese ribbon stitch or a small looped stitch, pulling each one tight to create a five-petaled flower shape.
Work in sections, tightly packing the stitches together and slightly overlapping them to create the characteristic spherical form of the bloom.
Incorporate several shades of a single color family—like periwinkle, lavender, and pale blue—and add touches of a complementary color like celery green to mimic a real hydrangea’s color variation.
Combine this with broad, satin-stitched leaves to provide a smooth textural contrast to the intricate floral clusters.
8. Sculptural Magnolia on a Tote Bag

For a single, dramatic bloom like this magnolia, focus on creating smooth, perfectly formed petals that hold their shape.
Cut each petal from a wide, high-quality satin ribbon. You can discreetly stitch a fine, flexible wire along the back edge of each petal before attaching it to give it structure and allow you to shape it precisely.
Add a subtle blush of color to the base of the petals using fabric markers or paint to enhance their realism.
Arrange the petals around a vibrant, thread-stitched center to complete this elegant and durable statement piece for your tote bag.
9. Scottish Thistle Wreath with Mixed Textures
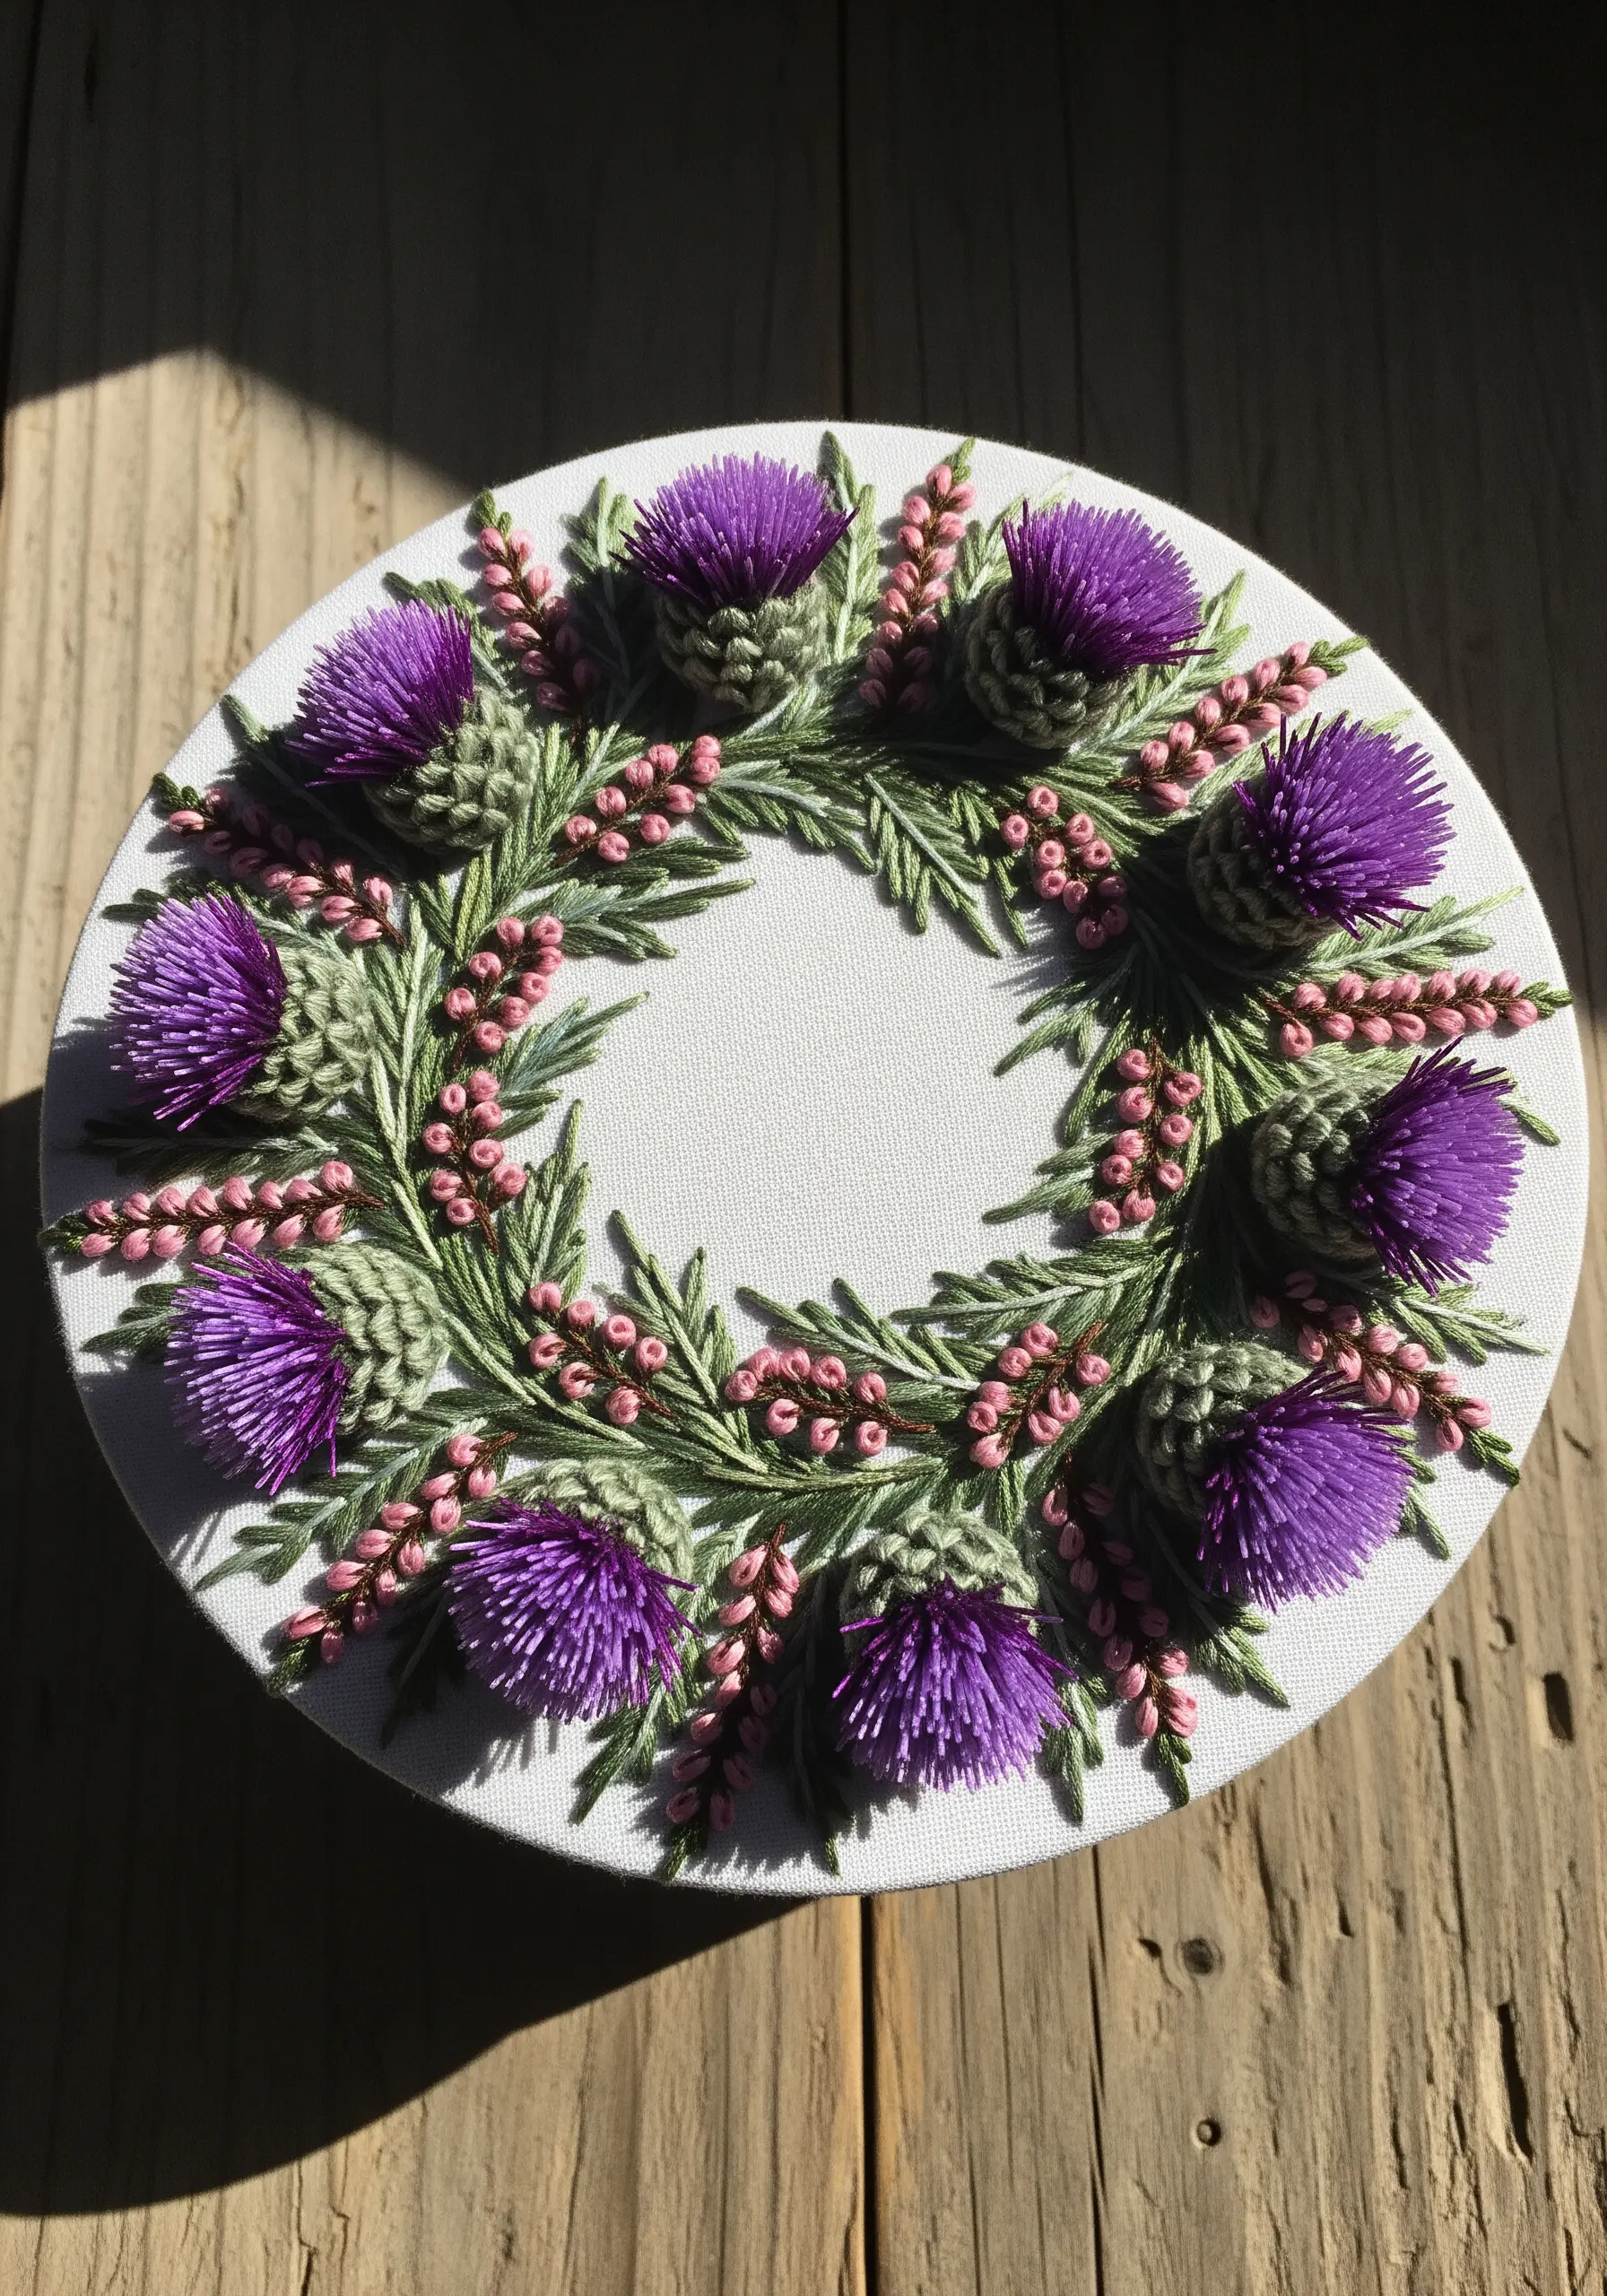
Create the iconic texture of a Scottish thistle by combining ribbon embroidery with traditional thread techniques.
Form the spiky purple flower head using turkey work or a detached woven picot stitch with embroidery floss, trimming the loops to create a brush-like effect.
For the spiny green calyx below, use layered straight stitches or ribbon stitches with a variegated green ribbon to suggest texture and form.
Fill out the wreath with delicate pink French knot clusters and simple folded ribbon leaves, providing a soft contrast to the thistle’s bold structure.
This is one of those mixed fiber projects that achieves a complex look with simple, distinct steps.
10. Ethereal Organza Cherry Blossoms

To capture the delicate, translucent quality of cherry blossoms, switch from satin to a sheer organza ribbon.
Cut simple five-petal flower shapes from the organza, gently singe the edges with a flame to prevent fraying and add a slight curl, then layer two or three shapes for each blossom.
Attach them to the fabric with a single bead or French knot in the center, allowing the petals to remain free and three-dimensional.
For a truly artistic effect, let some blossoms and loose ribbons fall beyond the main canvas, creating a sense of movement as if petals are drifting on the breeze.
This turns simple embroidered wall hangings into immersive art installations.
11. Vibrant Hibiscus Brooch

To create a dimensional, wearable piece like a brooch, work on a stiff felt or stabilizer backing rather than directly on fabric.
Form the hibiscus petals by folding and gathering a vibrant red ribbon, stitching each one securely to the felt base to build the flower’s shape.
The prominent stamen is key; craft it by wrapping yellow thread around a wire or a rigid core, adding tiny red French knots or beads to the tips.
Once all elements are stitched, carefully cut the flower from the felt backing, leaving a small, clean border. Then, simply glue or stitch a pin-back to the reverse side.
12. Minimalist Calla Lily Embellishment

The elegance of a calla lily comes from its simple, sculptural form, which you can replicate with a single piece of wide, white satin ribbon.
Create the iconic shape by folding the ribbon into a cone, curling the top edge outward, and securing the base with a few discreet stitches.
For the central spadix, use a dense wrap of yellow embroidery floss around a small piece of cotton padding or felt to give it thickness.
This minimalist approach is particularly effective on textured surfaces like bath towels, where the smoothness of the ribbon provides a beautiful contrast.
13. Desert Bloom Cactus Garden

Combine ribbon and thread to create a cactus garden with wonderful textural variety.
Use padded satin stitch or woven filling stitches with green embroidery floss to create the solid, rounded bodies of the cacti.
Then, introduce vibrant pops of color and dimension with bright pink and yellow ribbon flowers, using simple looped or gathered stitches.
This contrast between the matte, dense texture of the thread and the lustrous, 3D quality of the ribbon makes the entire composition feel more dynamic and alive.
It’s a perfect example of how combining fibers can elevate nature-inspired embroidery.
14. Forget-Me-Nots on a Velvet Headband
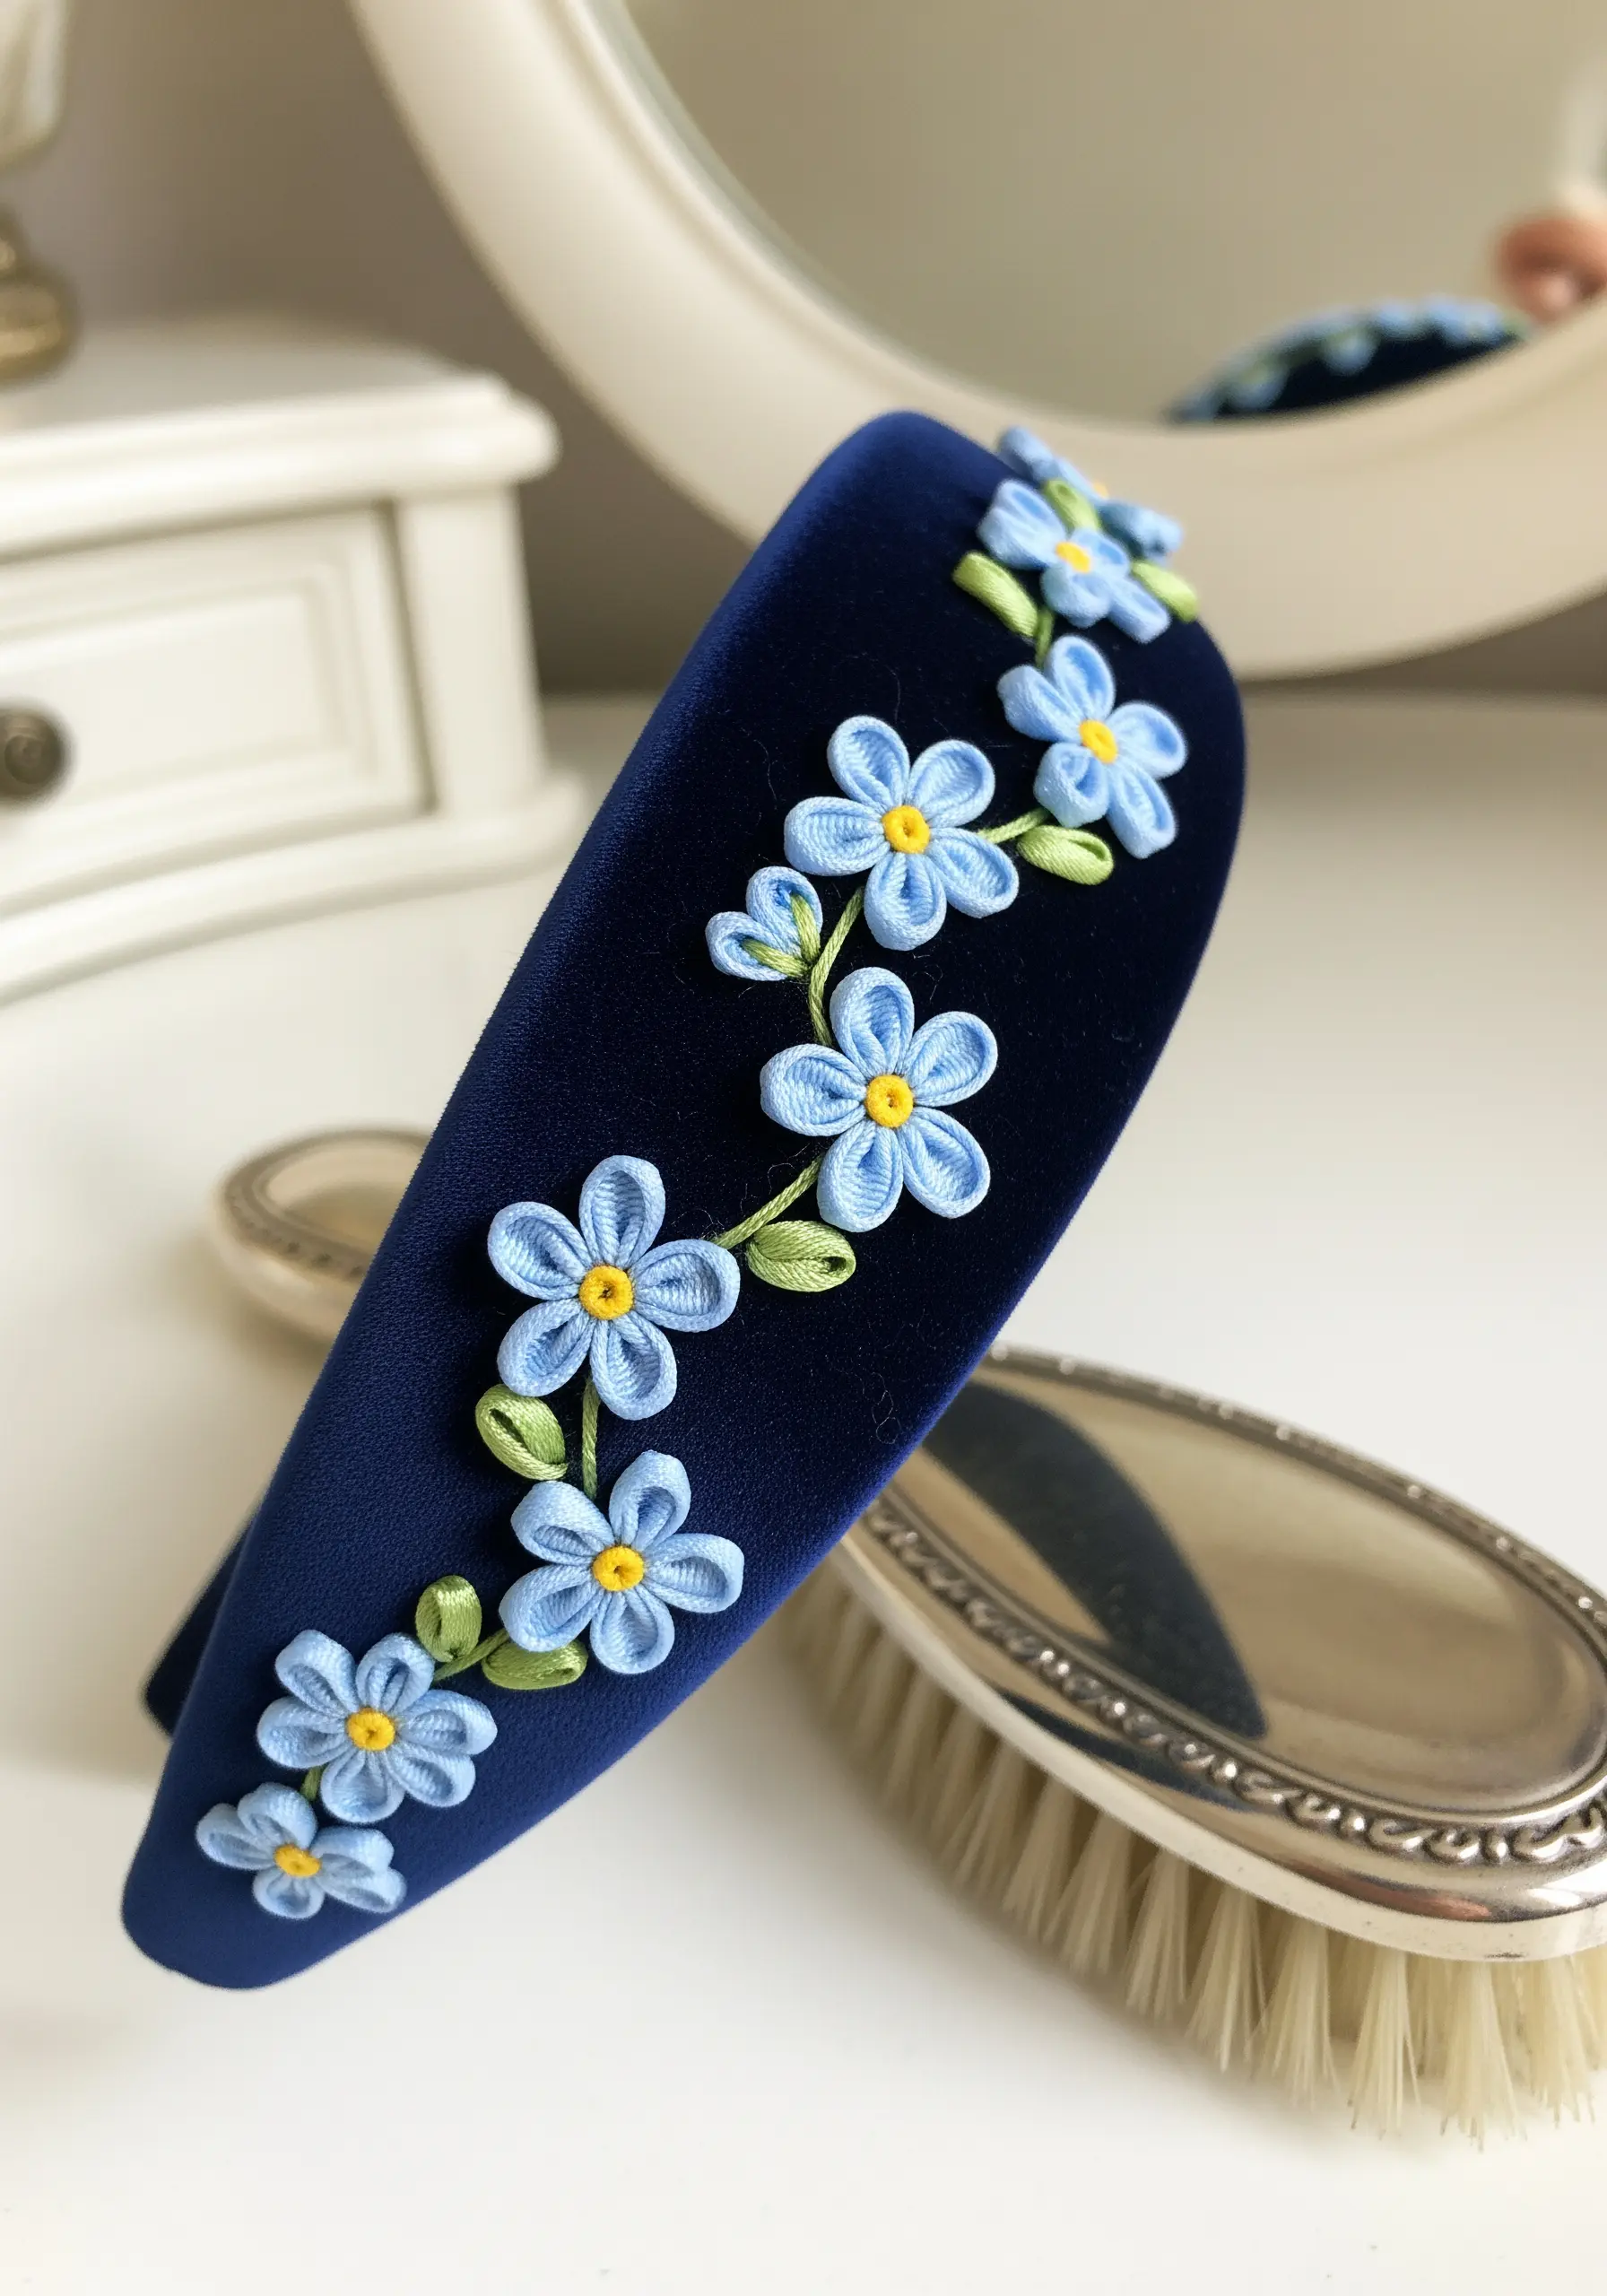
For embellishing a curved, soft surface like a headband, small and secure stitches are essential.
Use a very narrow blue ribbon to create tiny lazy daisy stitches for the forget-me-not petals, ensuring each stitch is pulled taut and anchored firmly into the velvet base.
Add a single yellow French knot to the center of each flower for a delicate, realistic detail.
To avoid a rigid look, arrange the flowers in a gentle, meandering vine rather than a straight line. This creates a more organic and graceful flow that complements the accessory’s shape.
15. Architectural Bird of Paradise

Capturing the sharp, dramatic form of a Bird of Paradise requires a more sculptural approach to ribbon work.
Use a wire-edged ribbon for the orange and blue petals, which allows you to bend and shape them into the flower’s signature sharp points and curves.
For the stem, wrap multiple shades of ribbon and thread together to create a smooth, blended gradient that looks incredibly realistic.
The contrast between the sharp, architectural petals and the smooth, rounded stem is what gives this piece its striking visual impact against the rich teal satin.
16. Framed Dahlia Bouquet

To create the dense, layered petals of a dahlia, use a folded ribbon stitch, also known as a stacked ribbon stitch.
Work in concentric circles, starting from the outermost ring of petals and building layers inward. Make the outer petals slightly longer and the inner ones shorter and more tightly packed to create a spherical shape.
Grouping dahlias of complementary colors like deep magenta, orange, and yellow creates a rich, autumnal palette that feels cohesive and visually warm.
Placing the finished bouquet in a deep shadow box frame protects the delicate 3D elements and turns your embroidery into a stunning piece of wall art.
This is a wonderful way to create framed embroidery art pieces with incredible depth.
17. Delicate Nursery Floral Mobile
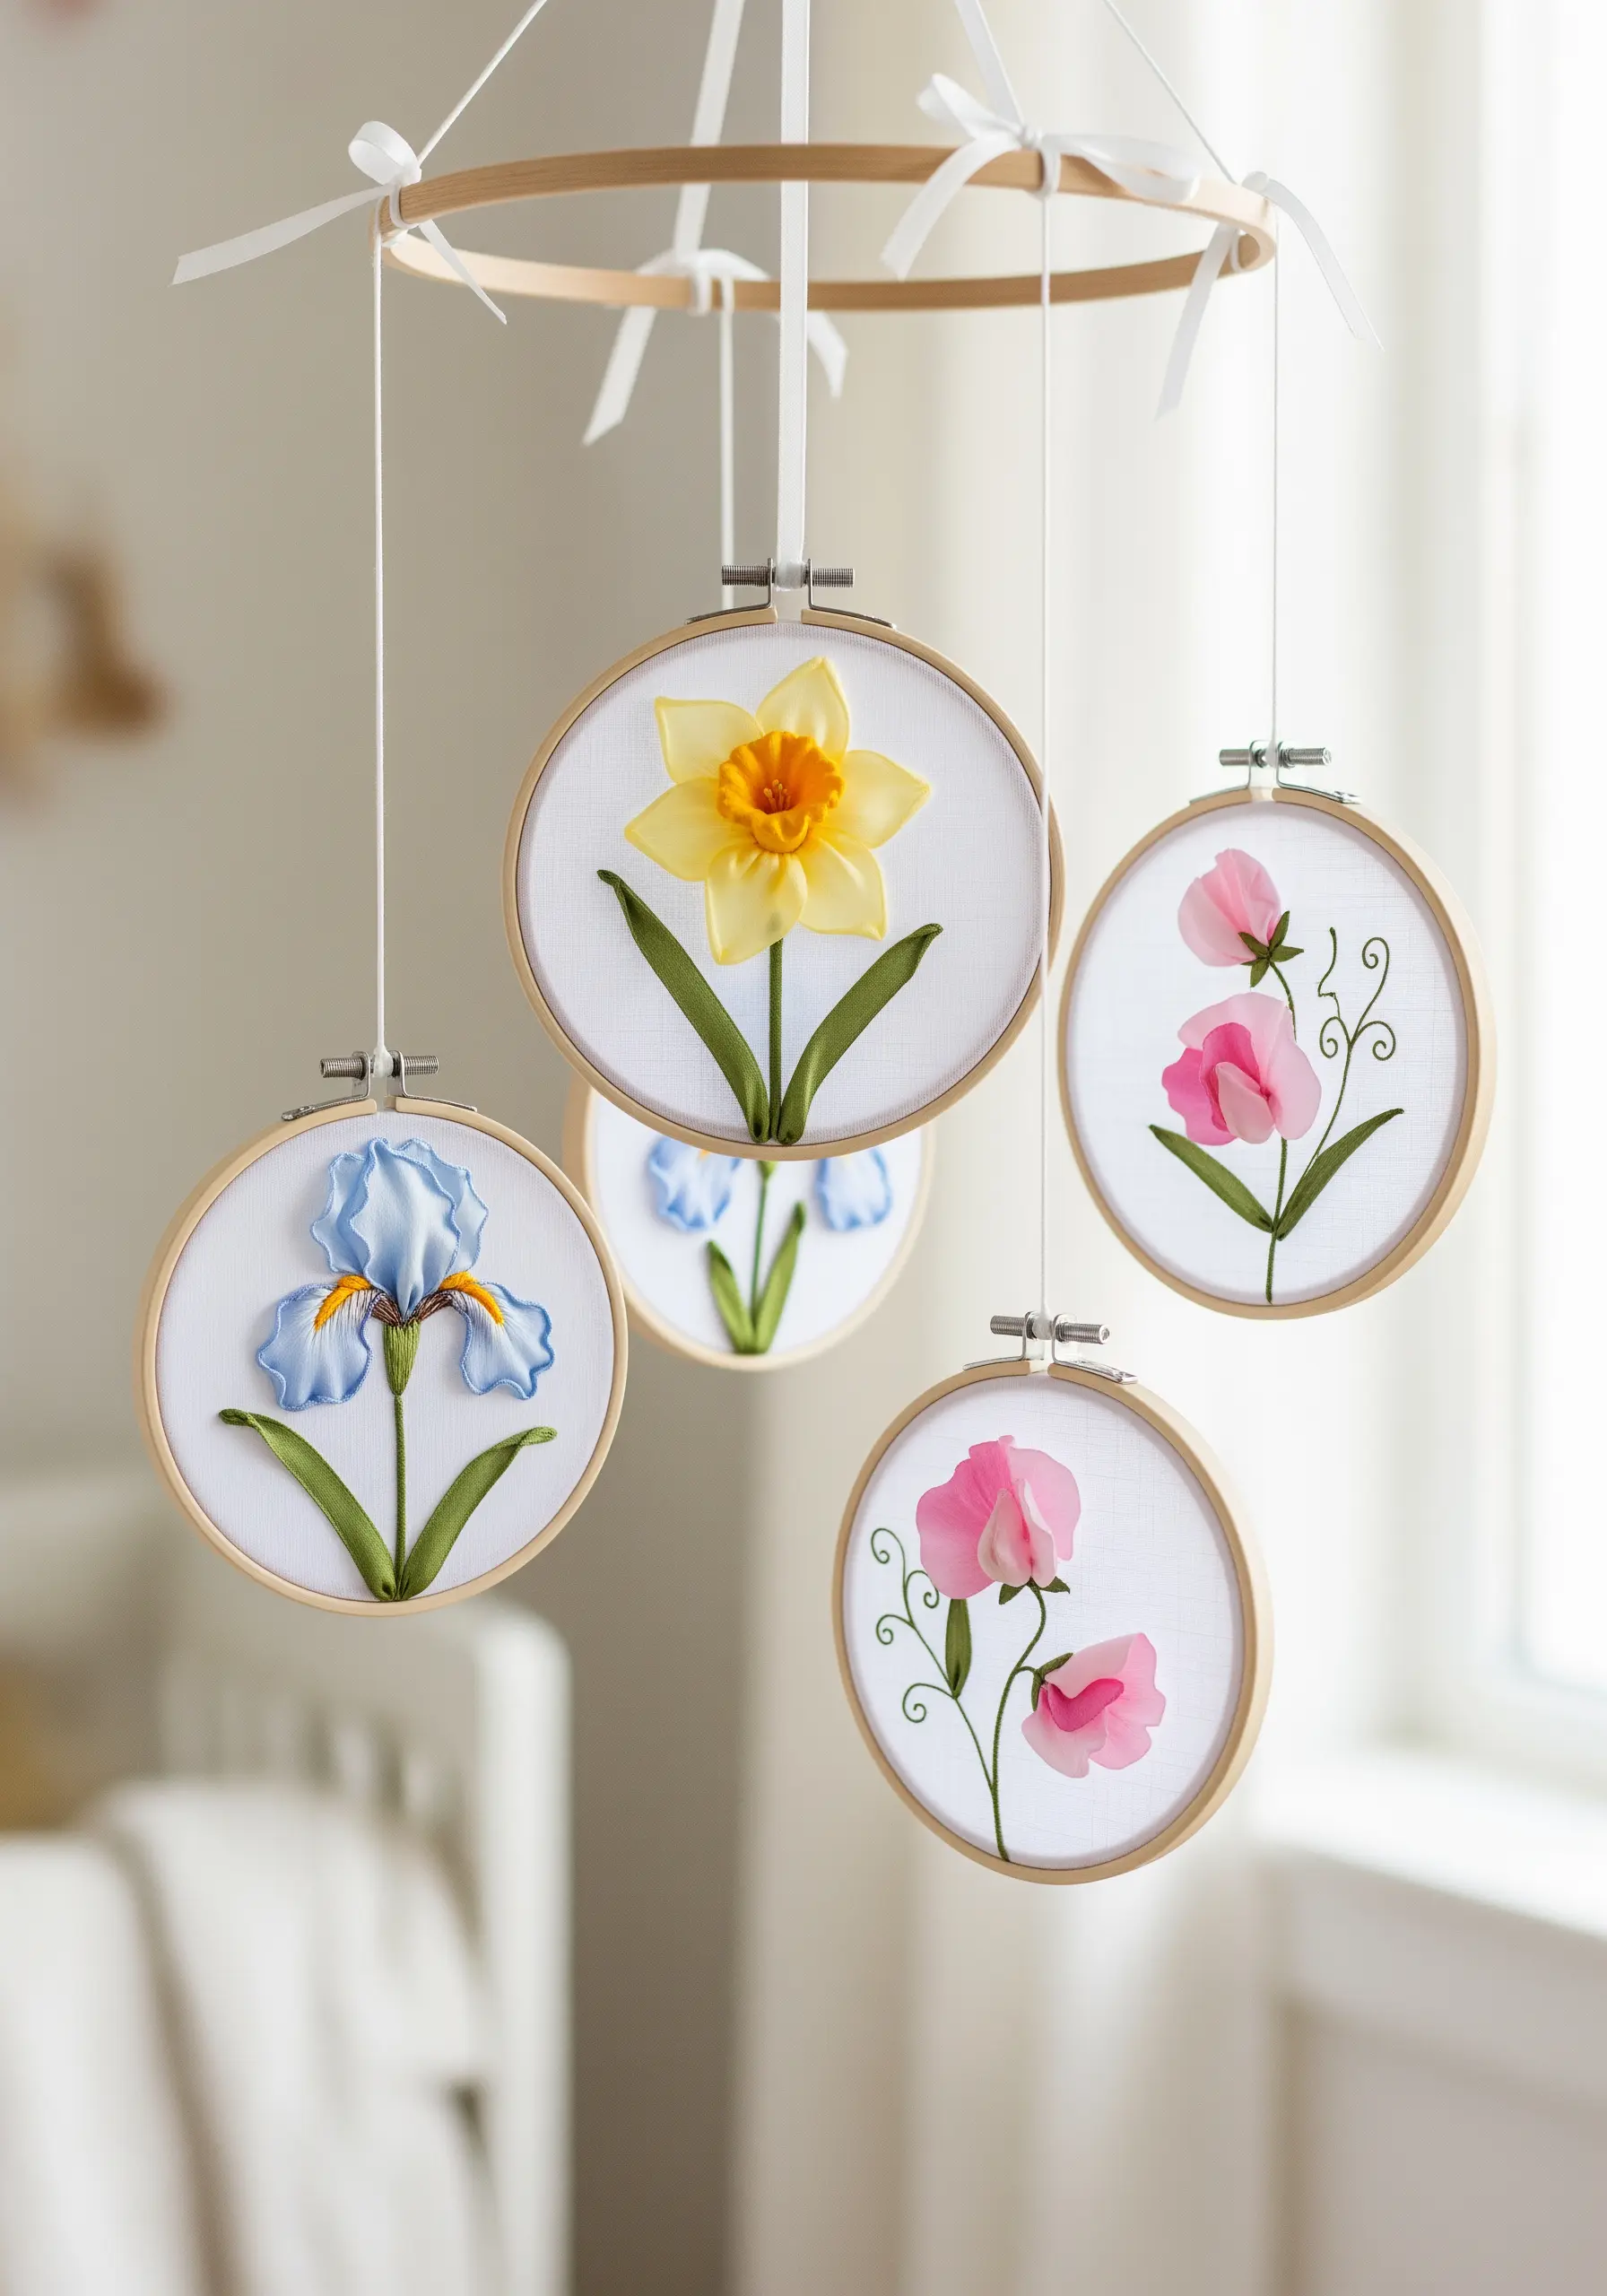
When creating a mobile, the key considerations are weight, balance, and visibility from all angles.
Work on lightweight fabric in small, individual hoops. Use simple, clean ribbon stitches to create classic floral shapes like daffodils and irises.
Keep the designs minimal and uncluttered to maintain a calming aesthetic suitable for a nursery.
Instead of creating a single, heavy piece, suspending multiple fun hoop art projects from a central ring creates gentle, independent movement.
Securely tie the hoops with satin ribbon for a cohesive and polished finish.
18. Intricate Passion Flower Collar

A complex design like the passion flower is an exercise in layering different textures and techniques.
Create the base petals with smooth, white folded ribbon. For the distinctive corona filaments, stitch a dense fringe of fine purple and white thread radiating from the center.
The central reproductive parts can be sculpted from green ribbon and tipped with thread-wrapped stamens, adding the final layer of detail.
Building this on a sturdy base and adding a fringe of thread tassels transforms it from a simple motif into a piece of avant-garde wearable art.


