
Sometimes, the most profound inspiration isn’t found in bright, loud colors, but in the quiet, complex textures right under our feet.
The grit of sand, the smooth surface of a river stone, the layered richness of soil—these elements teach us about texture, form, and patience. You can translate that same quiet depth into your embroidery, moving beyond just filling in shapes to building surfaces that feel authentic and grounded.
This collection explores how to use French knots to create a pebbled shore, how couching can mimic the sweep of wind over dunes, and how simple thread choices can capture the cool solidity of rock.
It’s about stitching with intention, finding beauty in subtlety, and creating pieces that feel as timeless as the earth itself. Let’s begin.
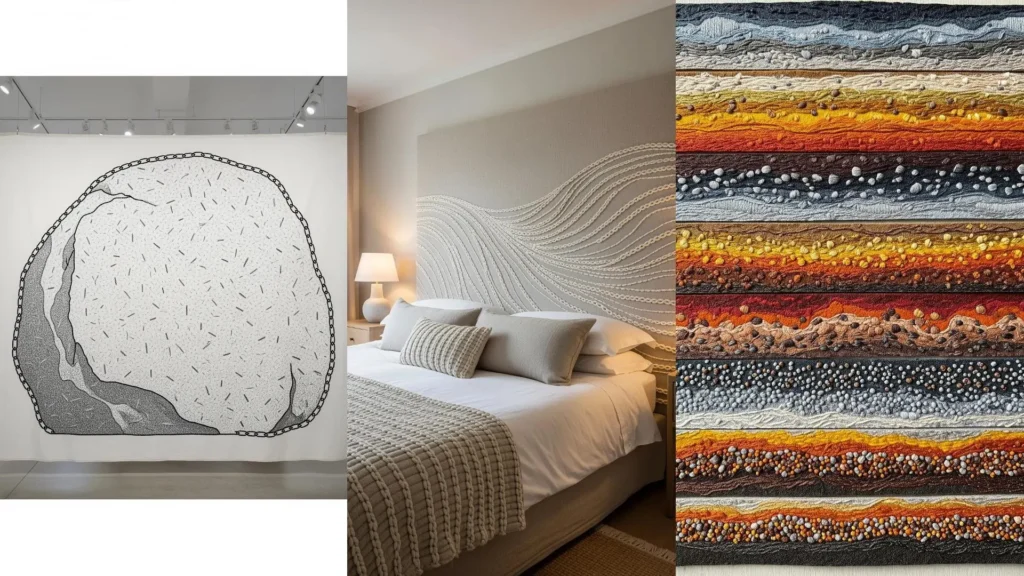
1. Build Soil Layers with Contrasting Textures
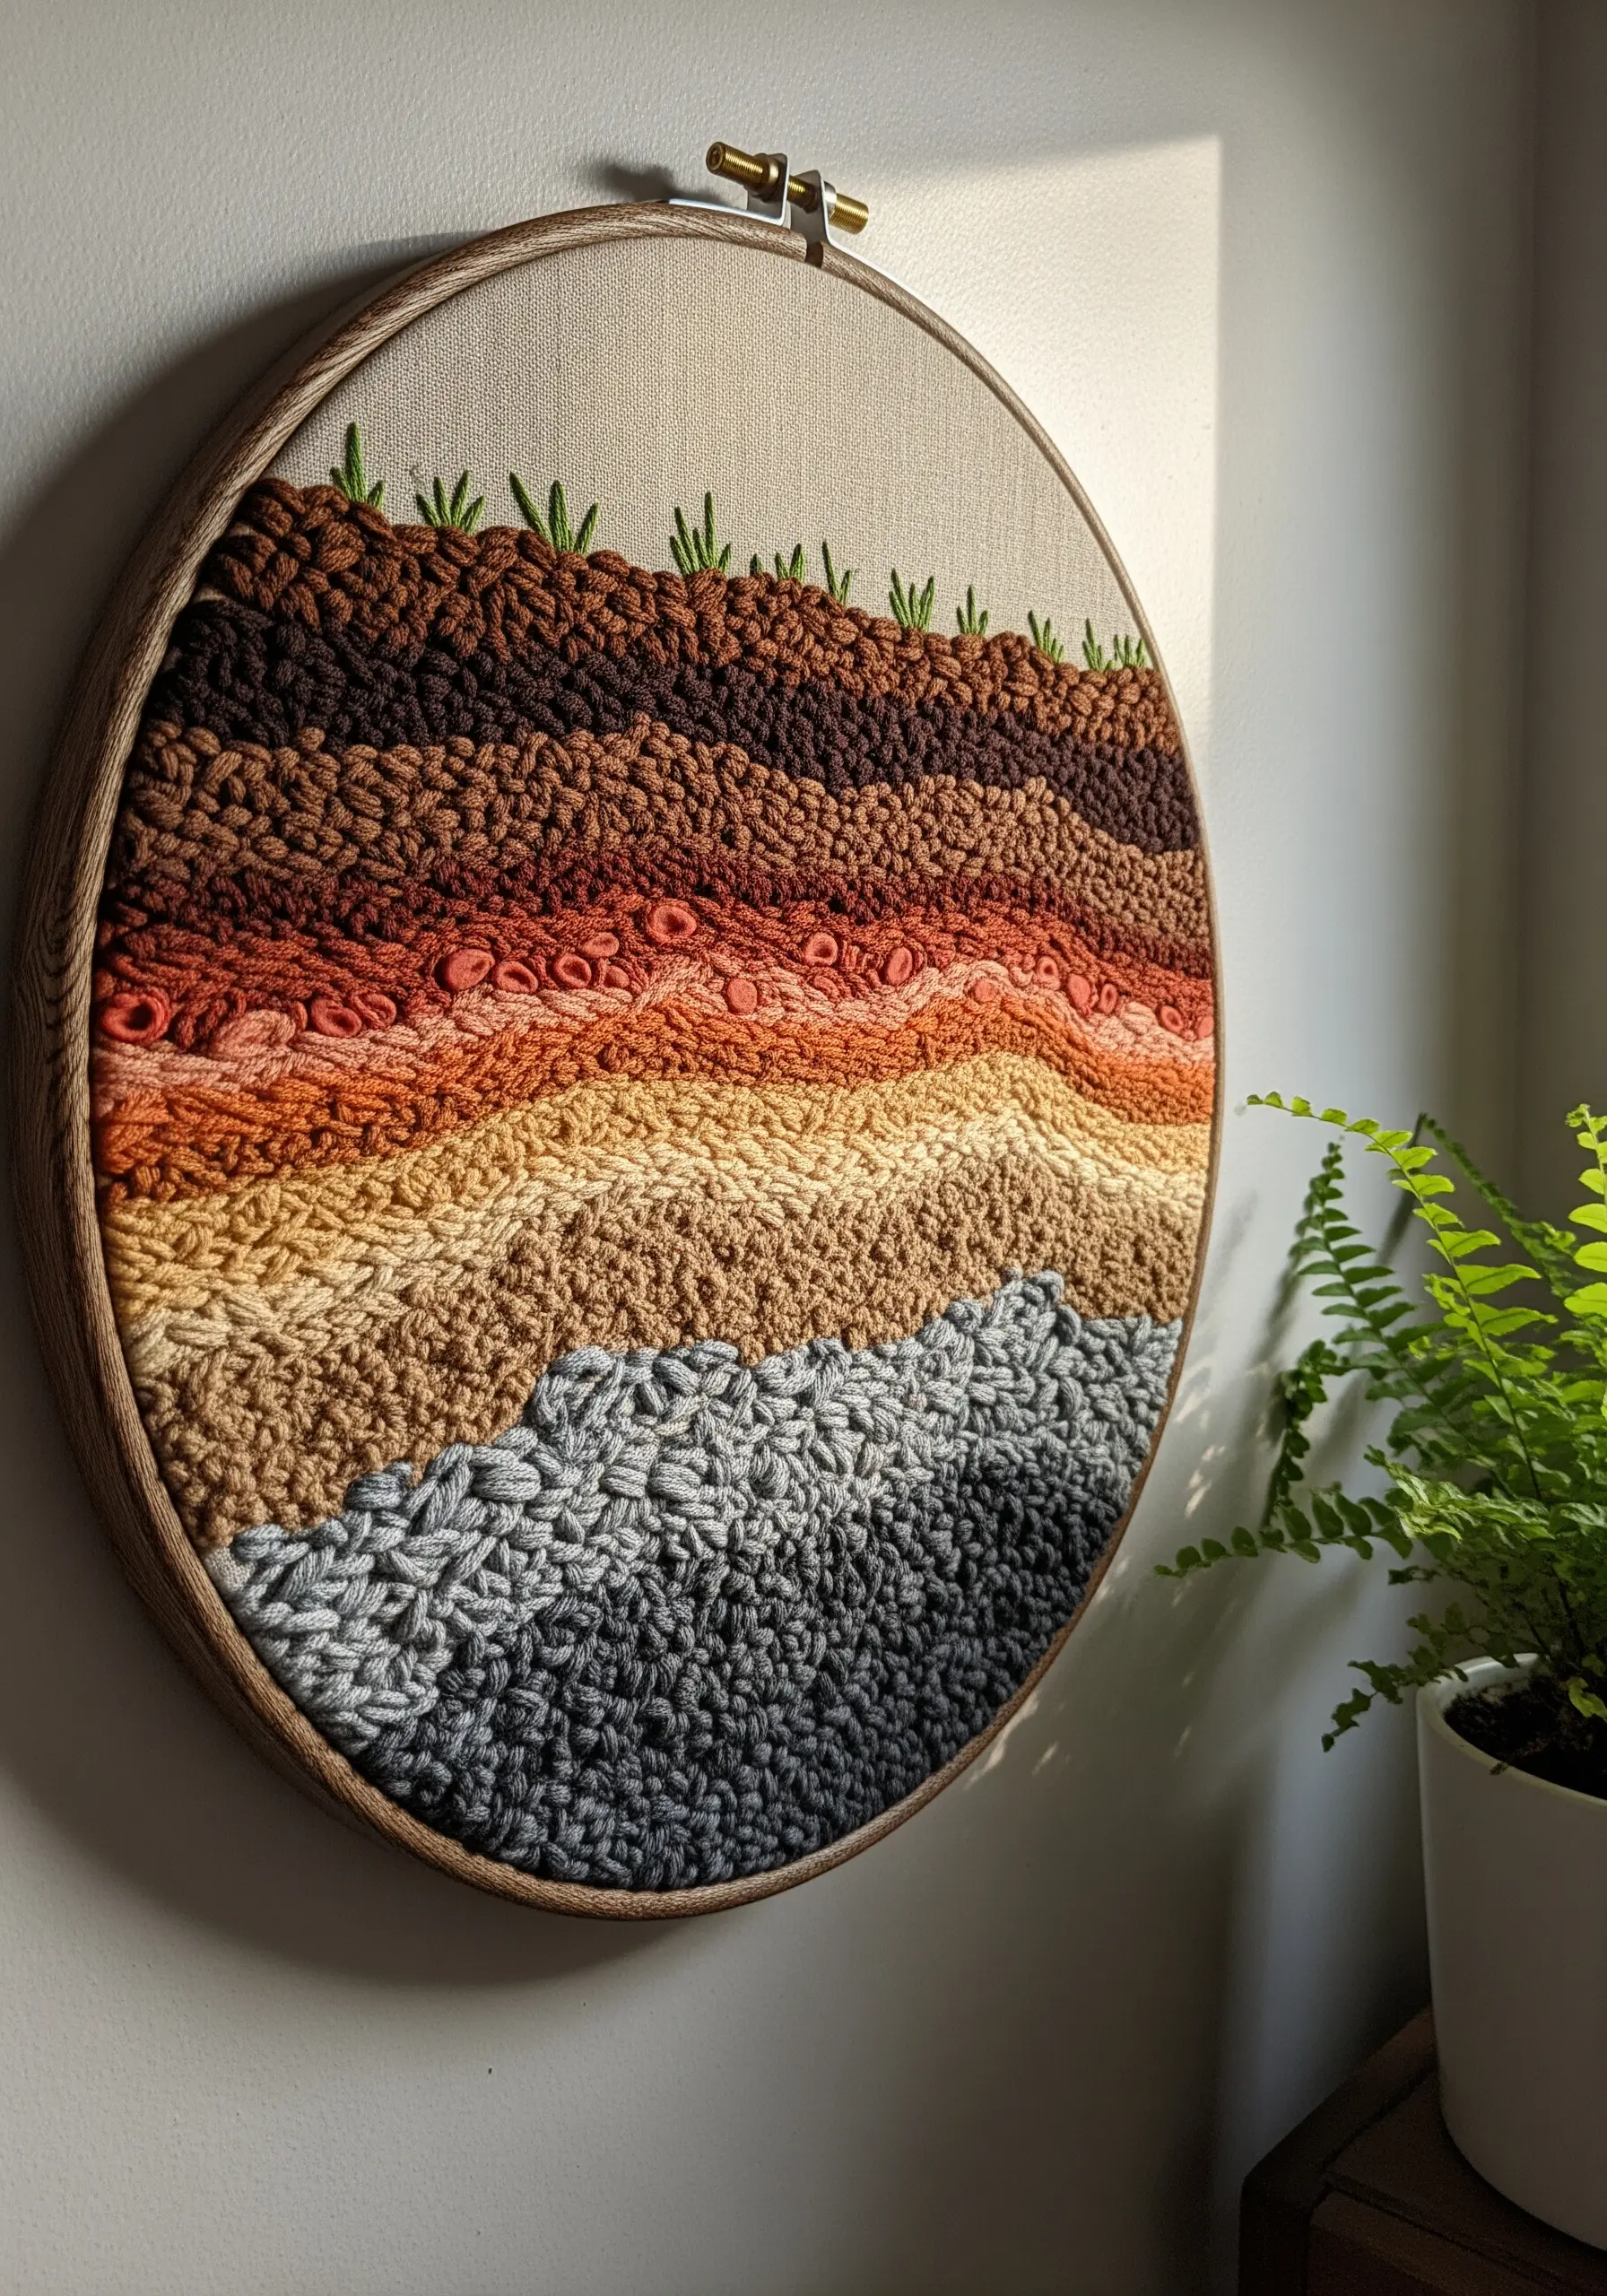
Create the rich, layered look of soil by dedicating different stitches to each horizon.
Use dense French knots for the topsoil, packing them tightly with all six strands of floss for a thick, crumbly texture.
For subterranean layers, switch to a flatter stitch like the chain stitch or even couched yarn, which creates clear, undulating lines of sediment.
This contrast between knotted and linear textures gives the piece immediate depth and a satisfyingly tactile quality.
Varying the colors from dark, humus-rich brown to terracotta clay and sandy beige makes the geological story even clearer.
2. Stitch Serenity with Zen Garden Lines
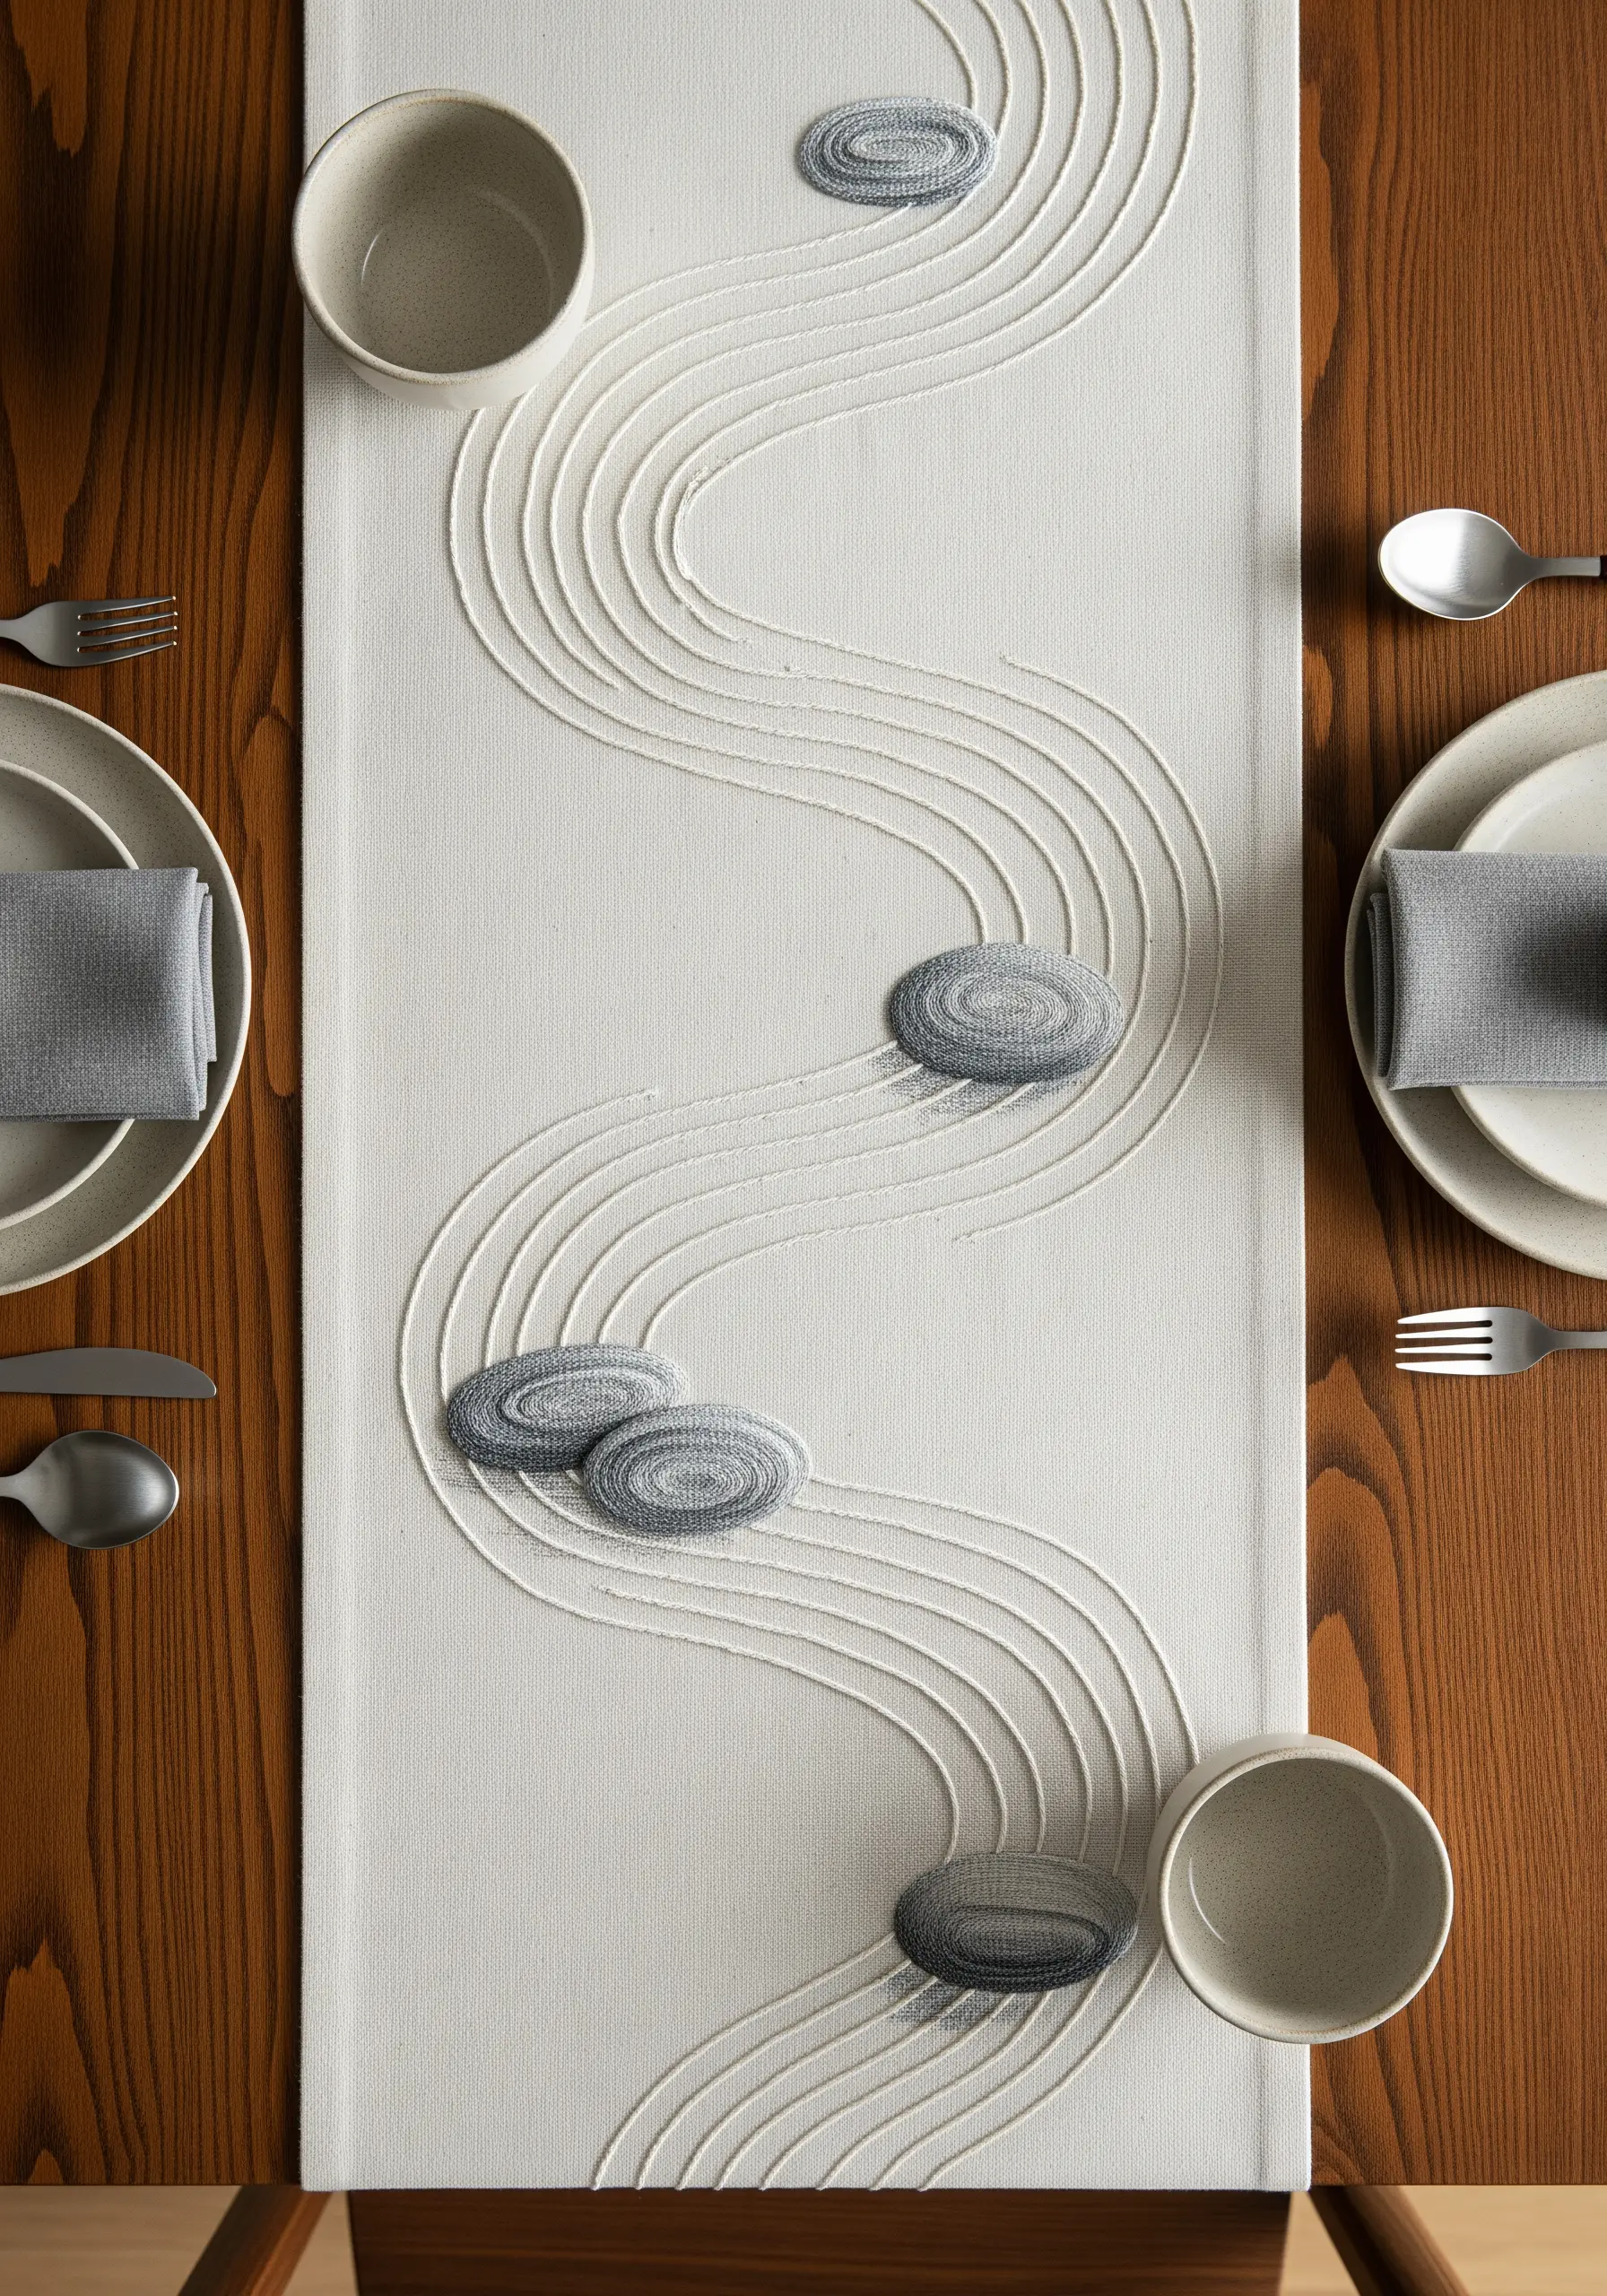
Capture the calm of a Zen garden by using minimal stitches for maximum effect on a table runner or wall hanging.
Use a couching stitch for the raked sand lines; laying down a thicker perle cotton and tacking it with a finer thread creates perfectly smooth, continuous curves that a standard stitch cannot replicate.
For the stones, use concentric ovals of split stitch, subtly shifting from dark grey to light grey thread to mimic the way light hits a smooth surface.
The clean space of the un-stitched linen is just as important as the stitches themselves, creating a composition that feels balanced and peaceful.
3. Design a Monumental Canyon Triptych
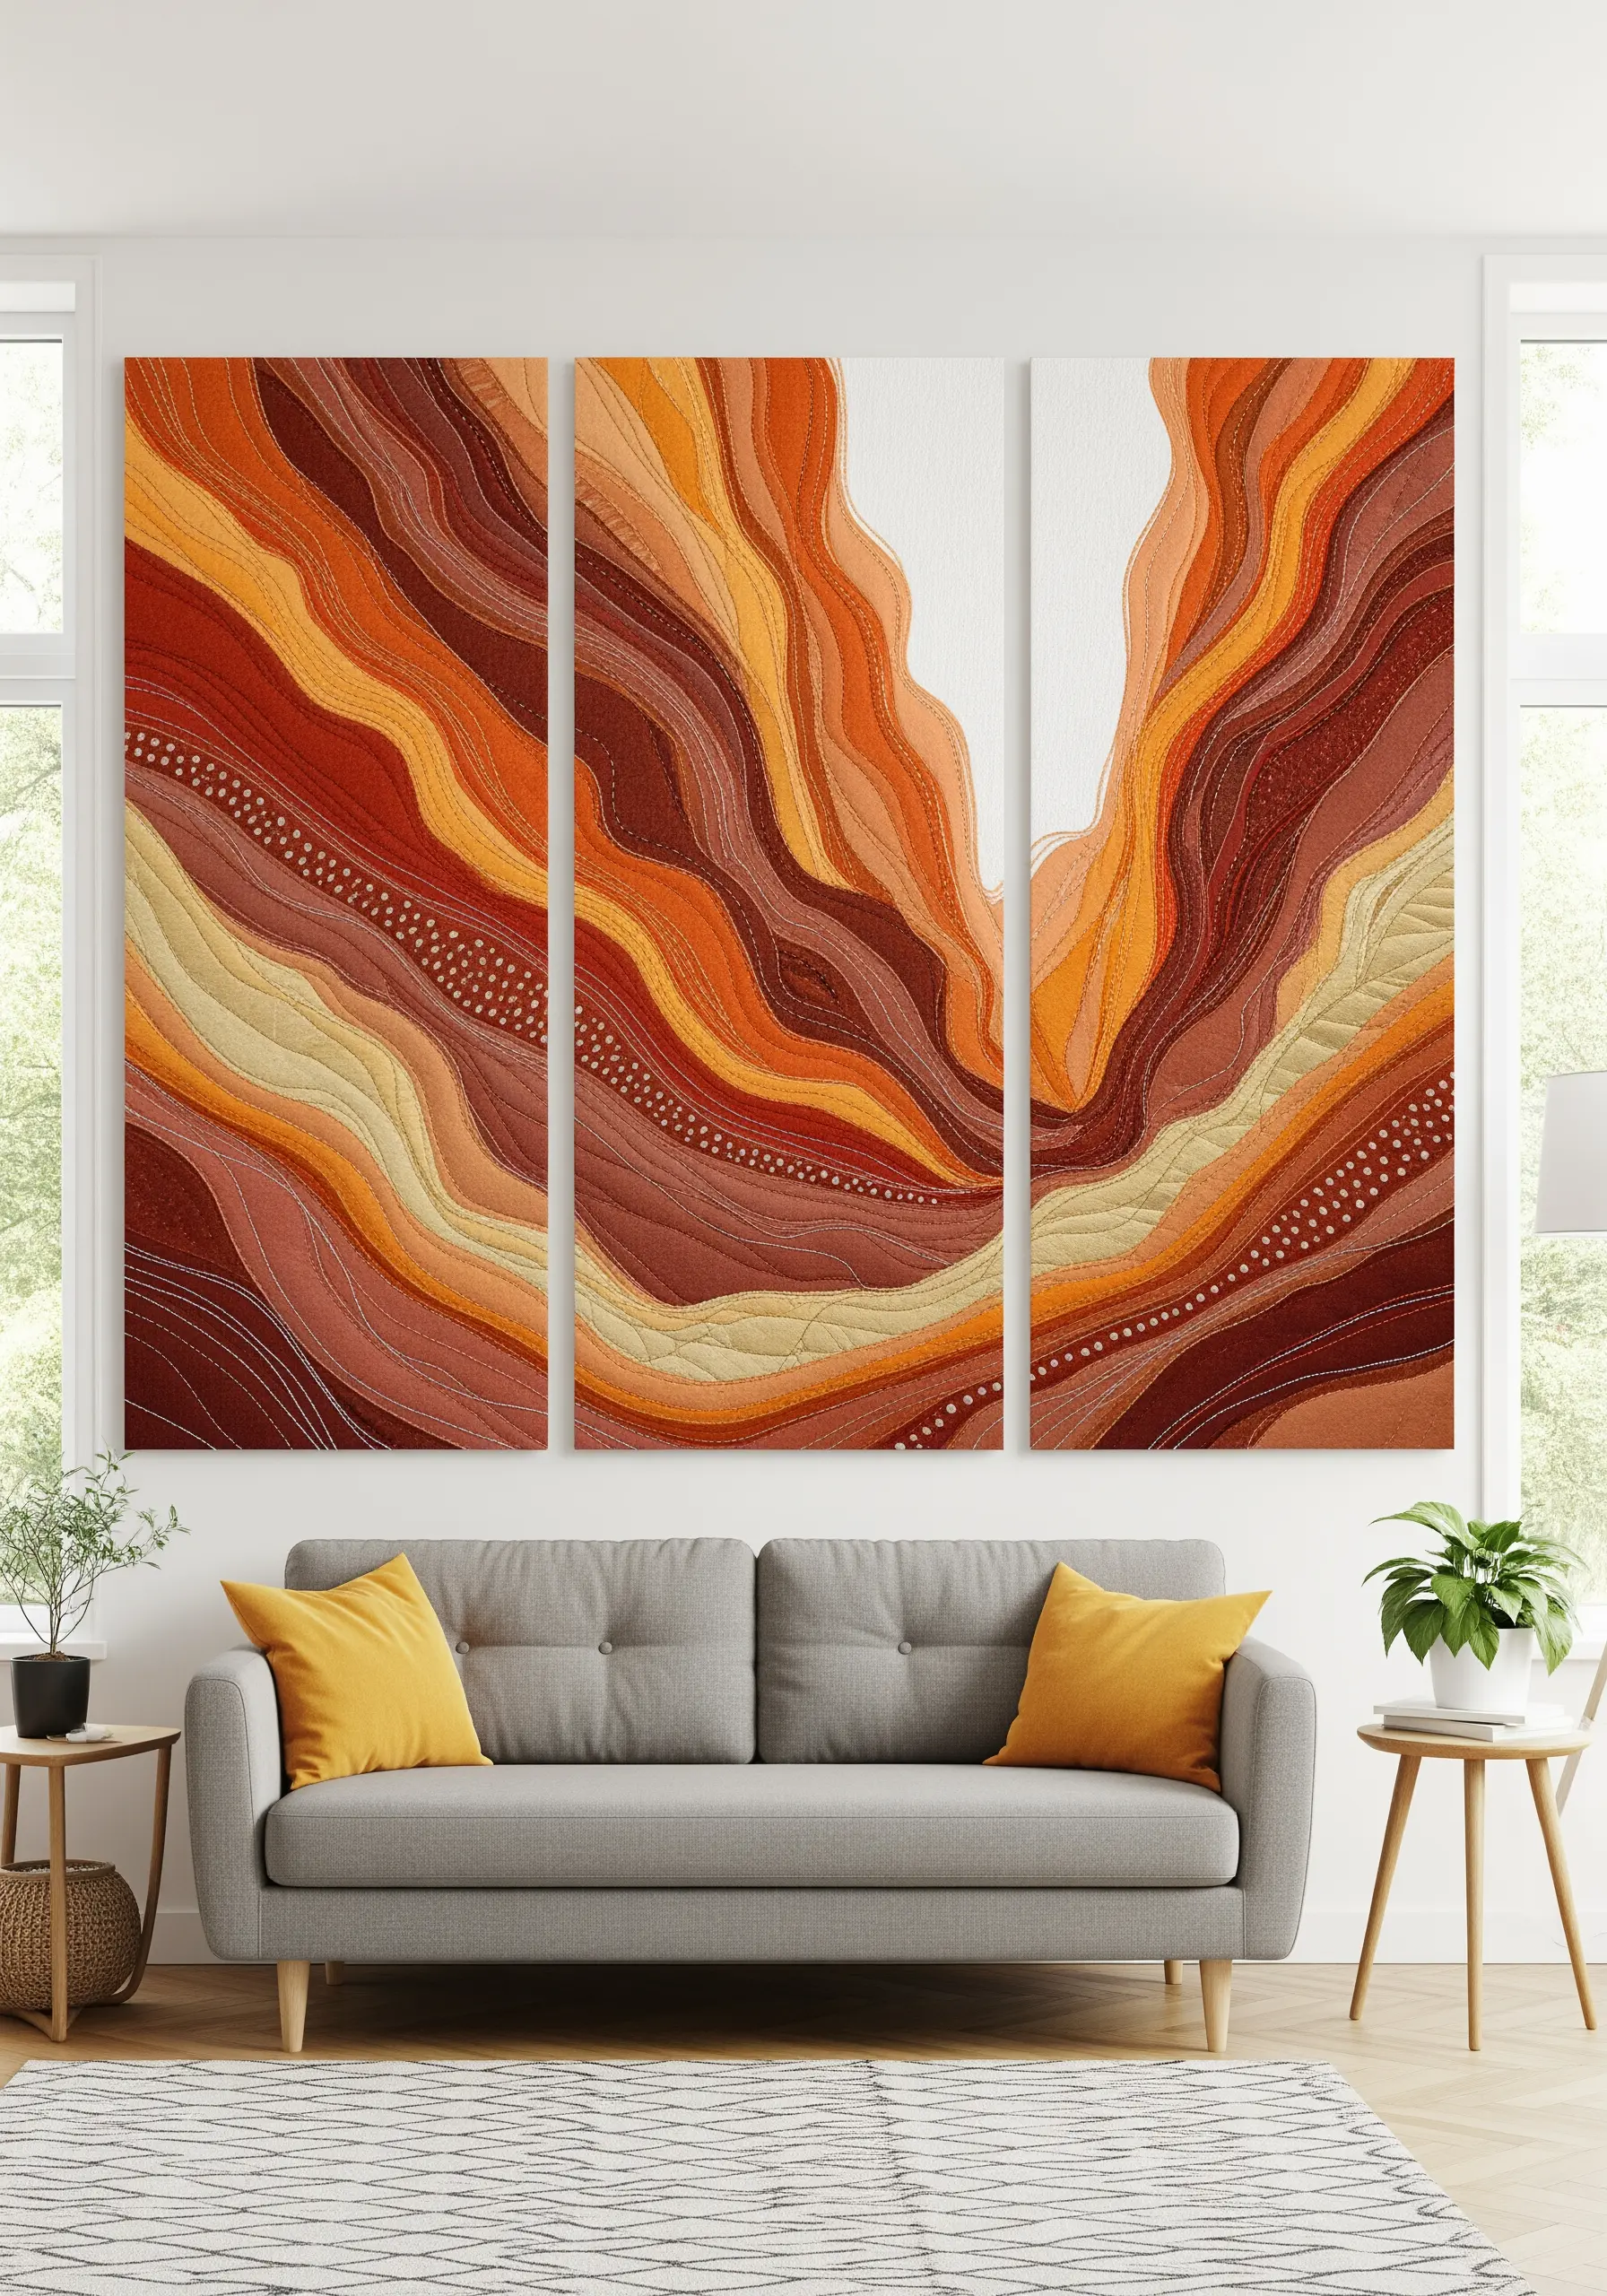
Transform a large wall by translating the grandeur of canyon strata into a quilted triptych.
Break your design into three vertical panels to make the project manageable and add to the modern, gallery-like presentation.
Use free-motion machine embroidery or simple hand-stitched running stitches that follow the curves of the rock layers. This quilting technique adds texture and reinforces the fabric panels.
Incorporate a few lines of metallic thread to catch the light, suggesting mica deposits within the rock and adding a touch of unexpected elegance.
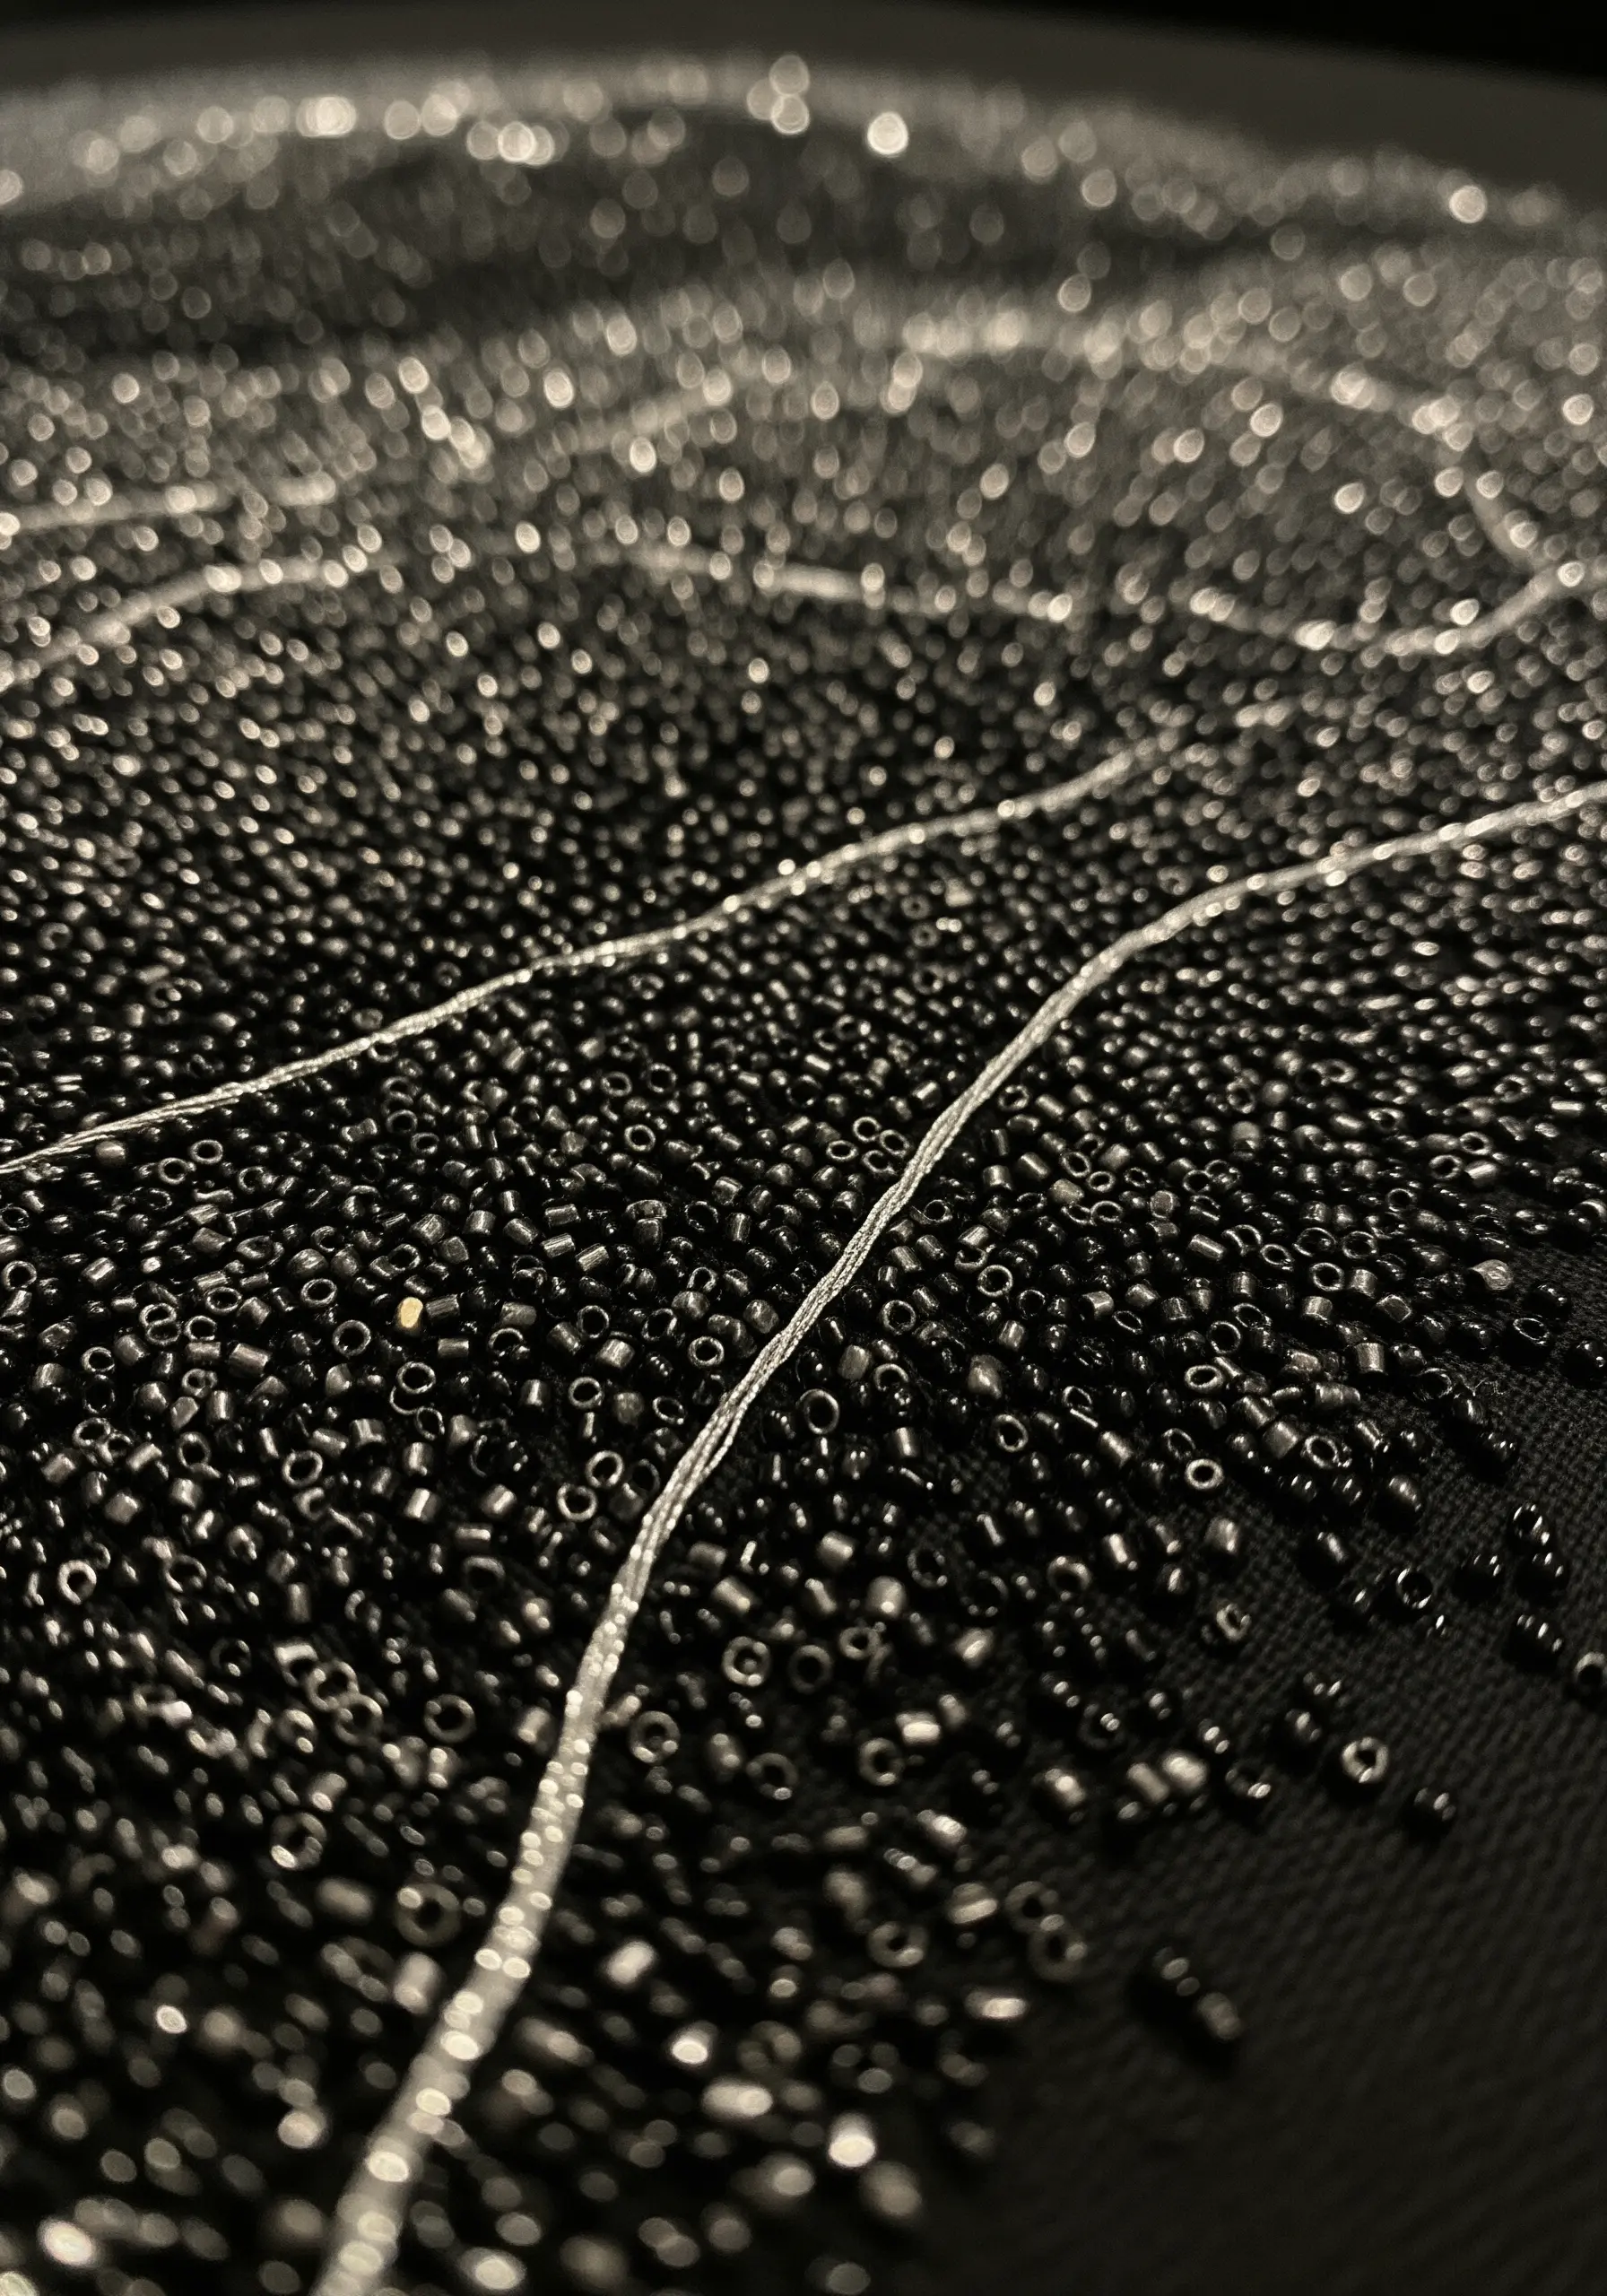
4. Craft a Luminous Geode with Beads and Crystals
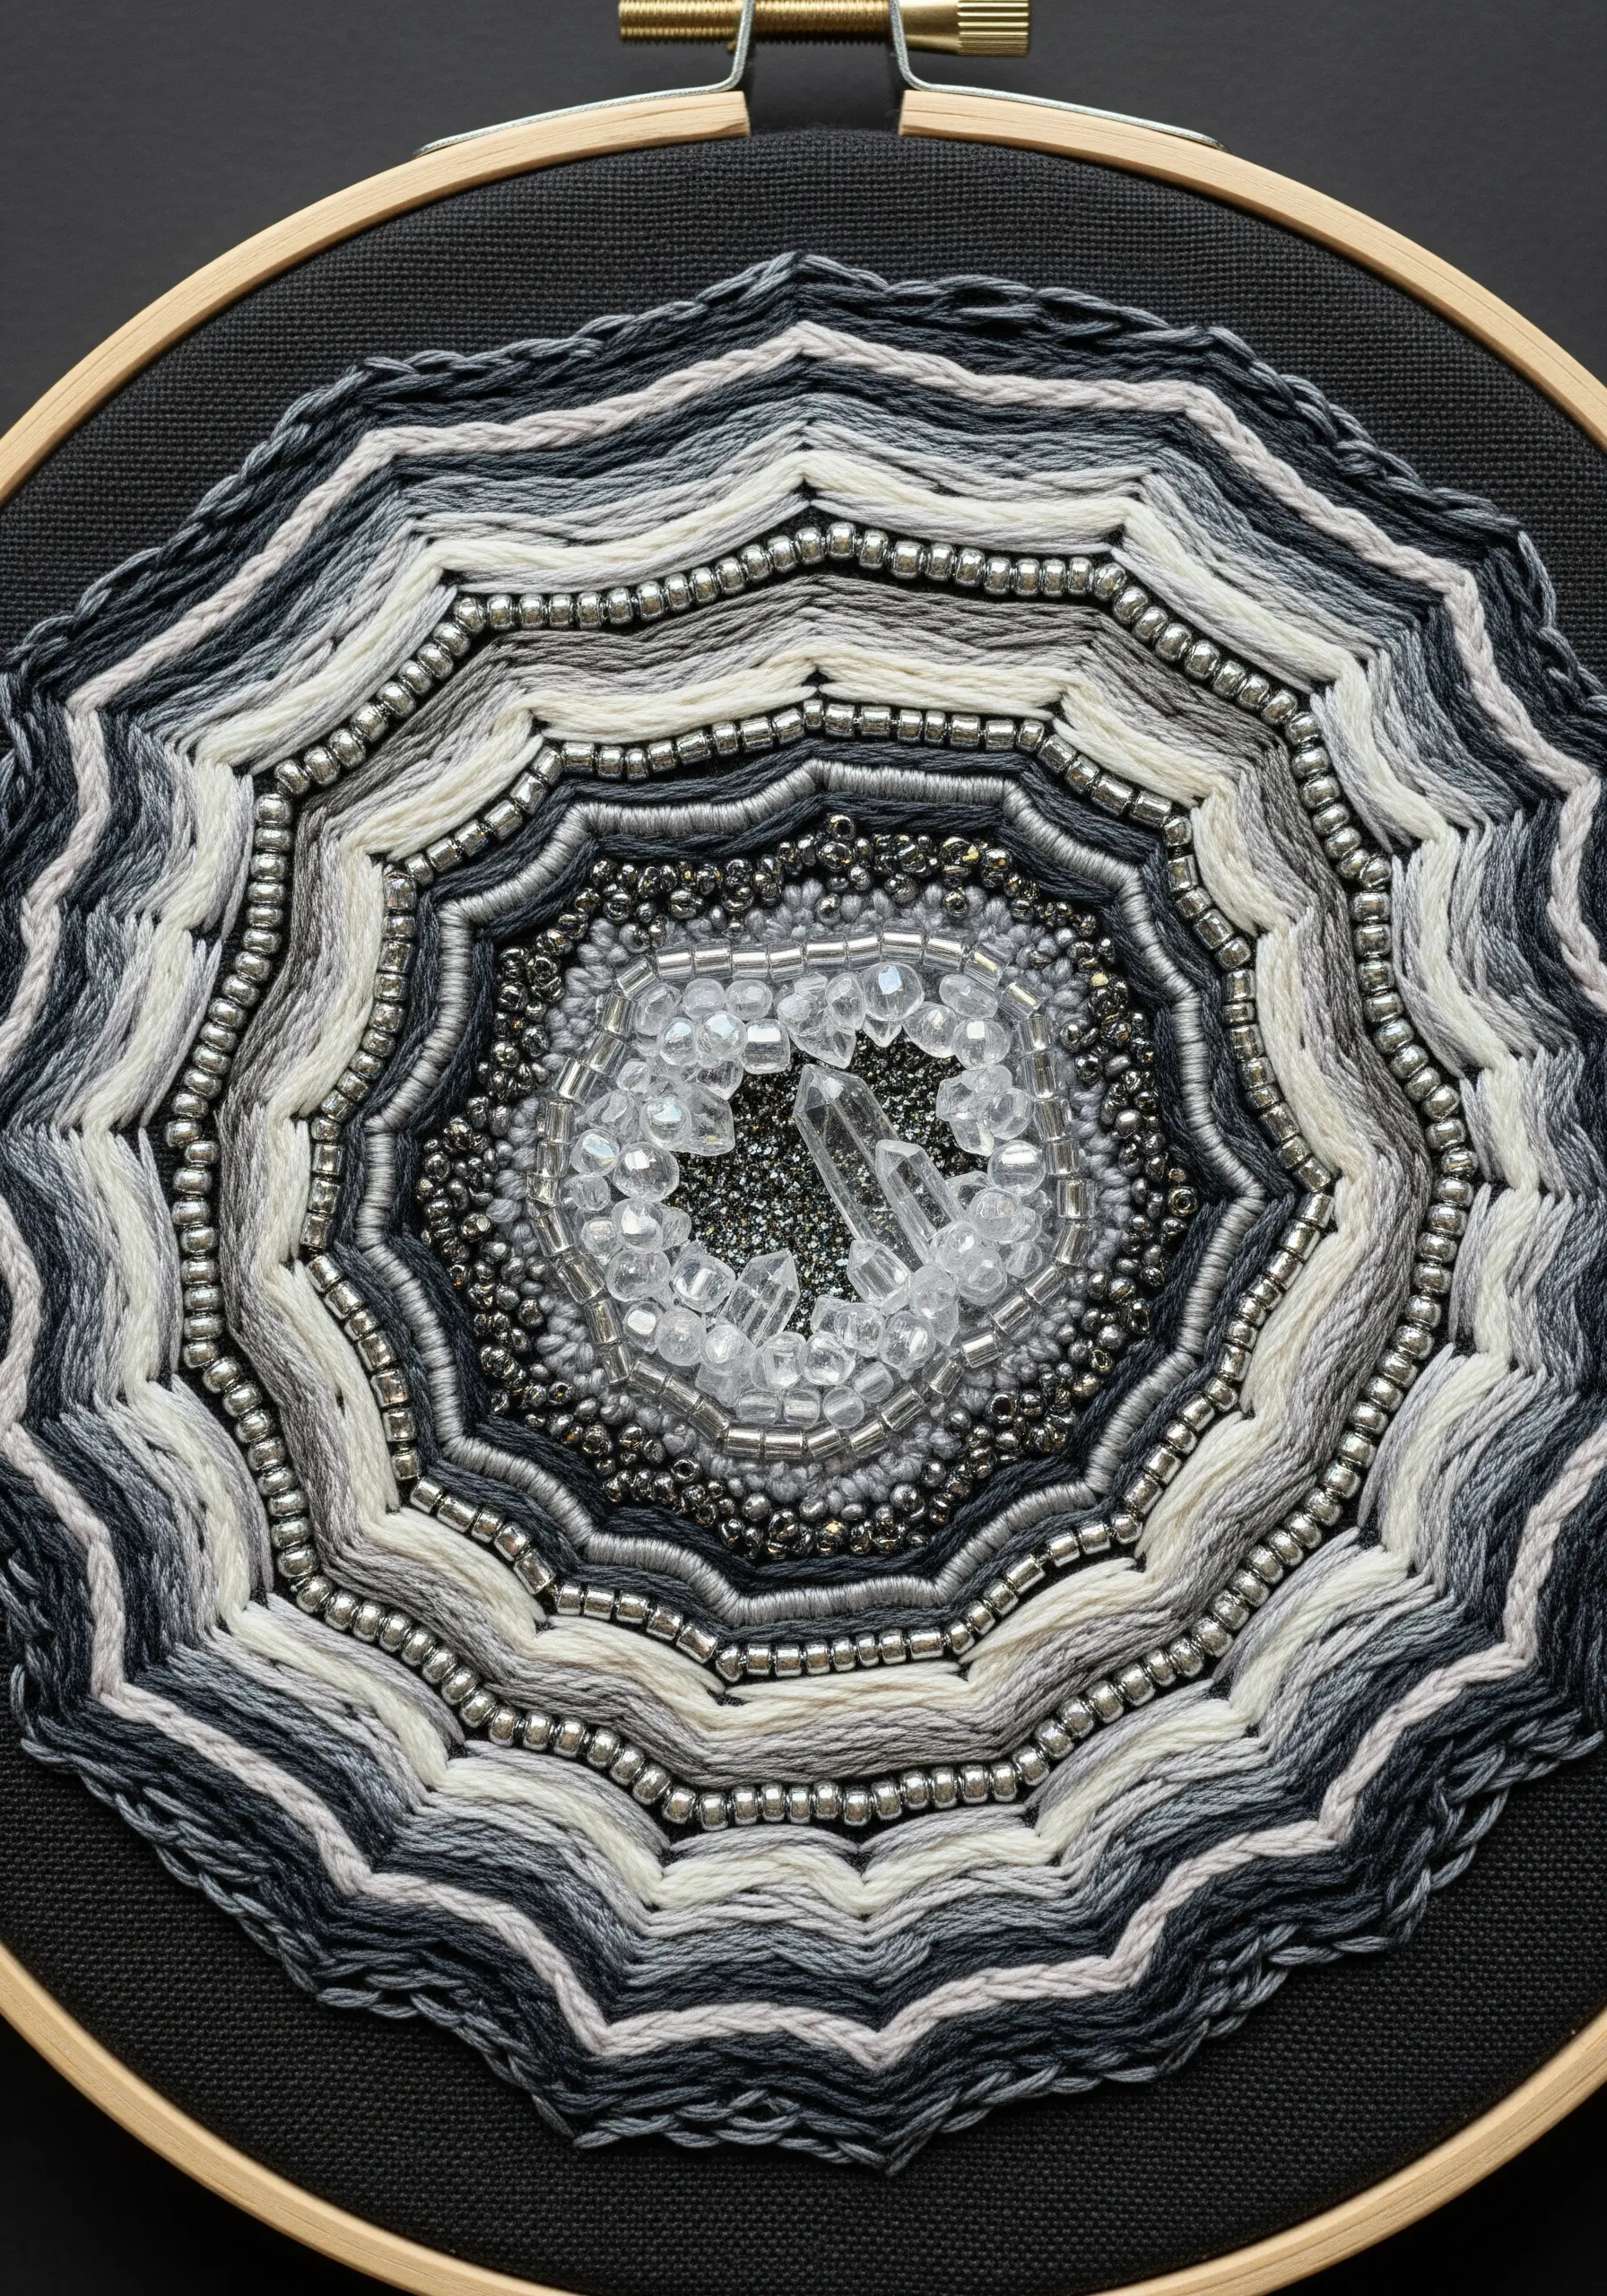
Create the breathtaking texture of a geode by combining thread with beads and other materials.
Use a dense field of seed beads and bugle beads at the center to replicate the sparkling, crystalline structure of druzy quartz.
For the outer bands, couch down thick, variegated yarn or use rows of padded satin stitch to build smooth, concentric layers.
Stitching on dark fabric makes the whites, greys, and metallics of your geode appear more luminous and dramatic.
For a true focal point, secure a small, real quartz crystal in the very center before you begin beading around it.
5. Fill Stone Silhouettes with Tactile French Knots
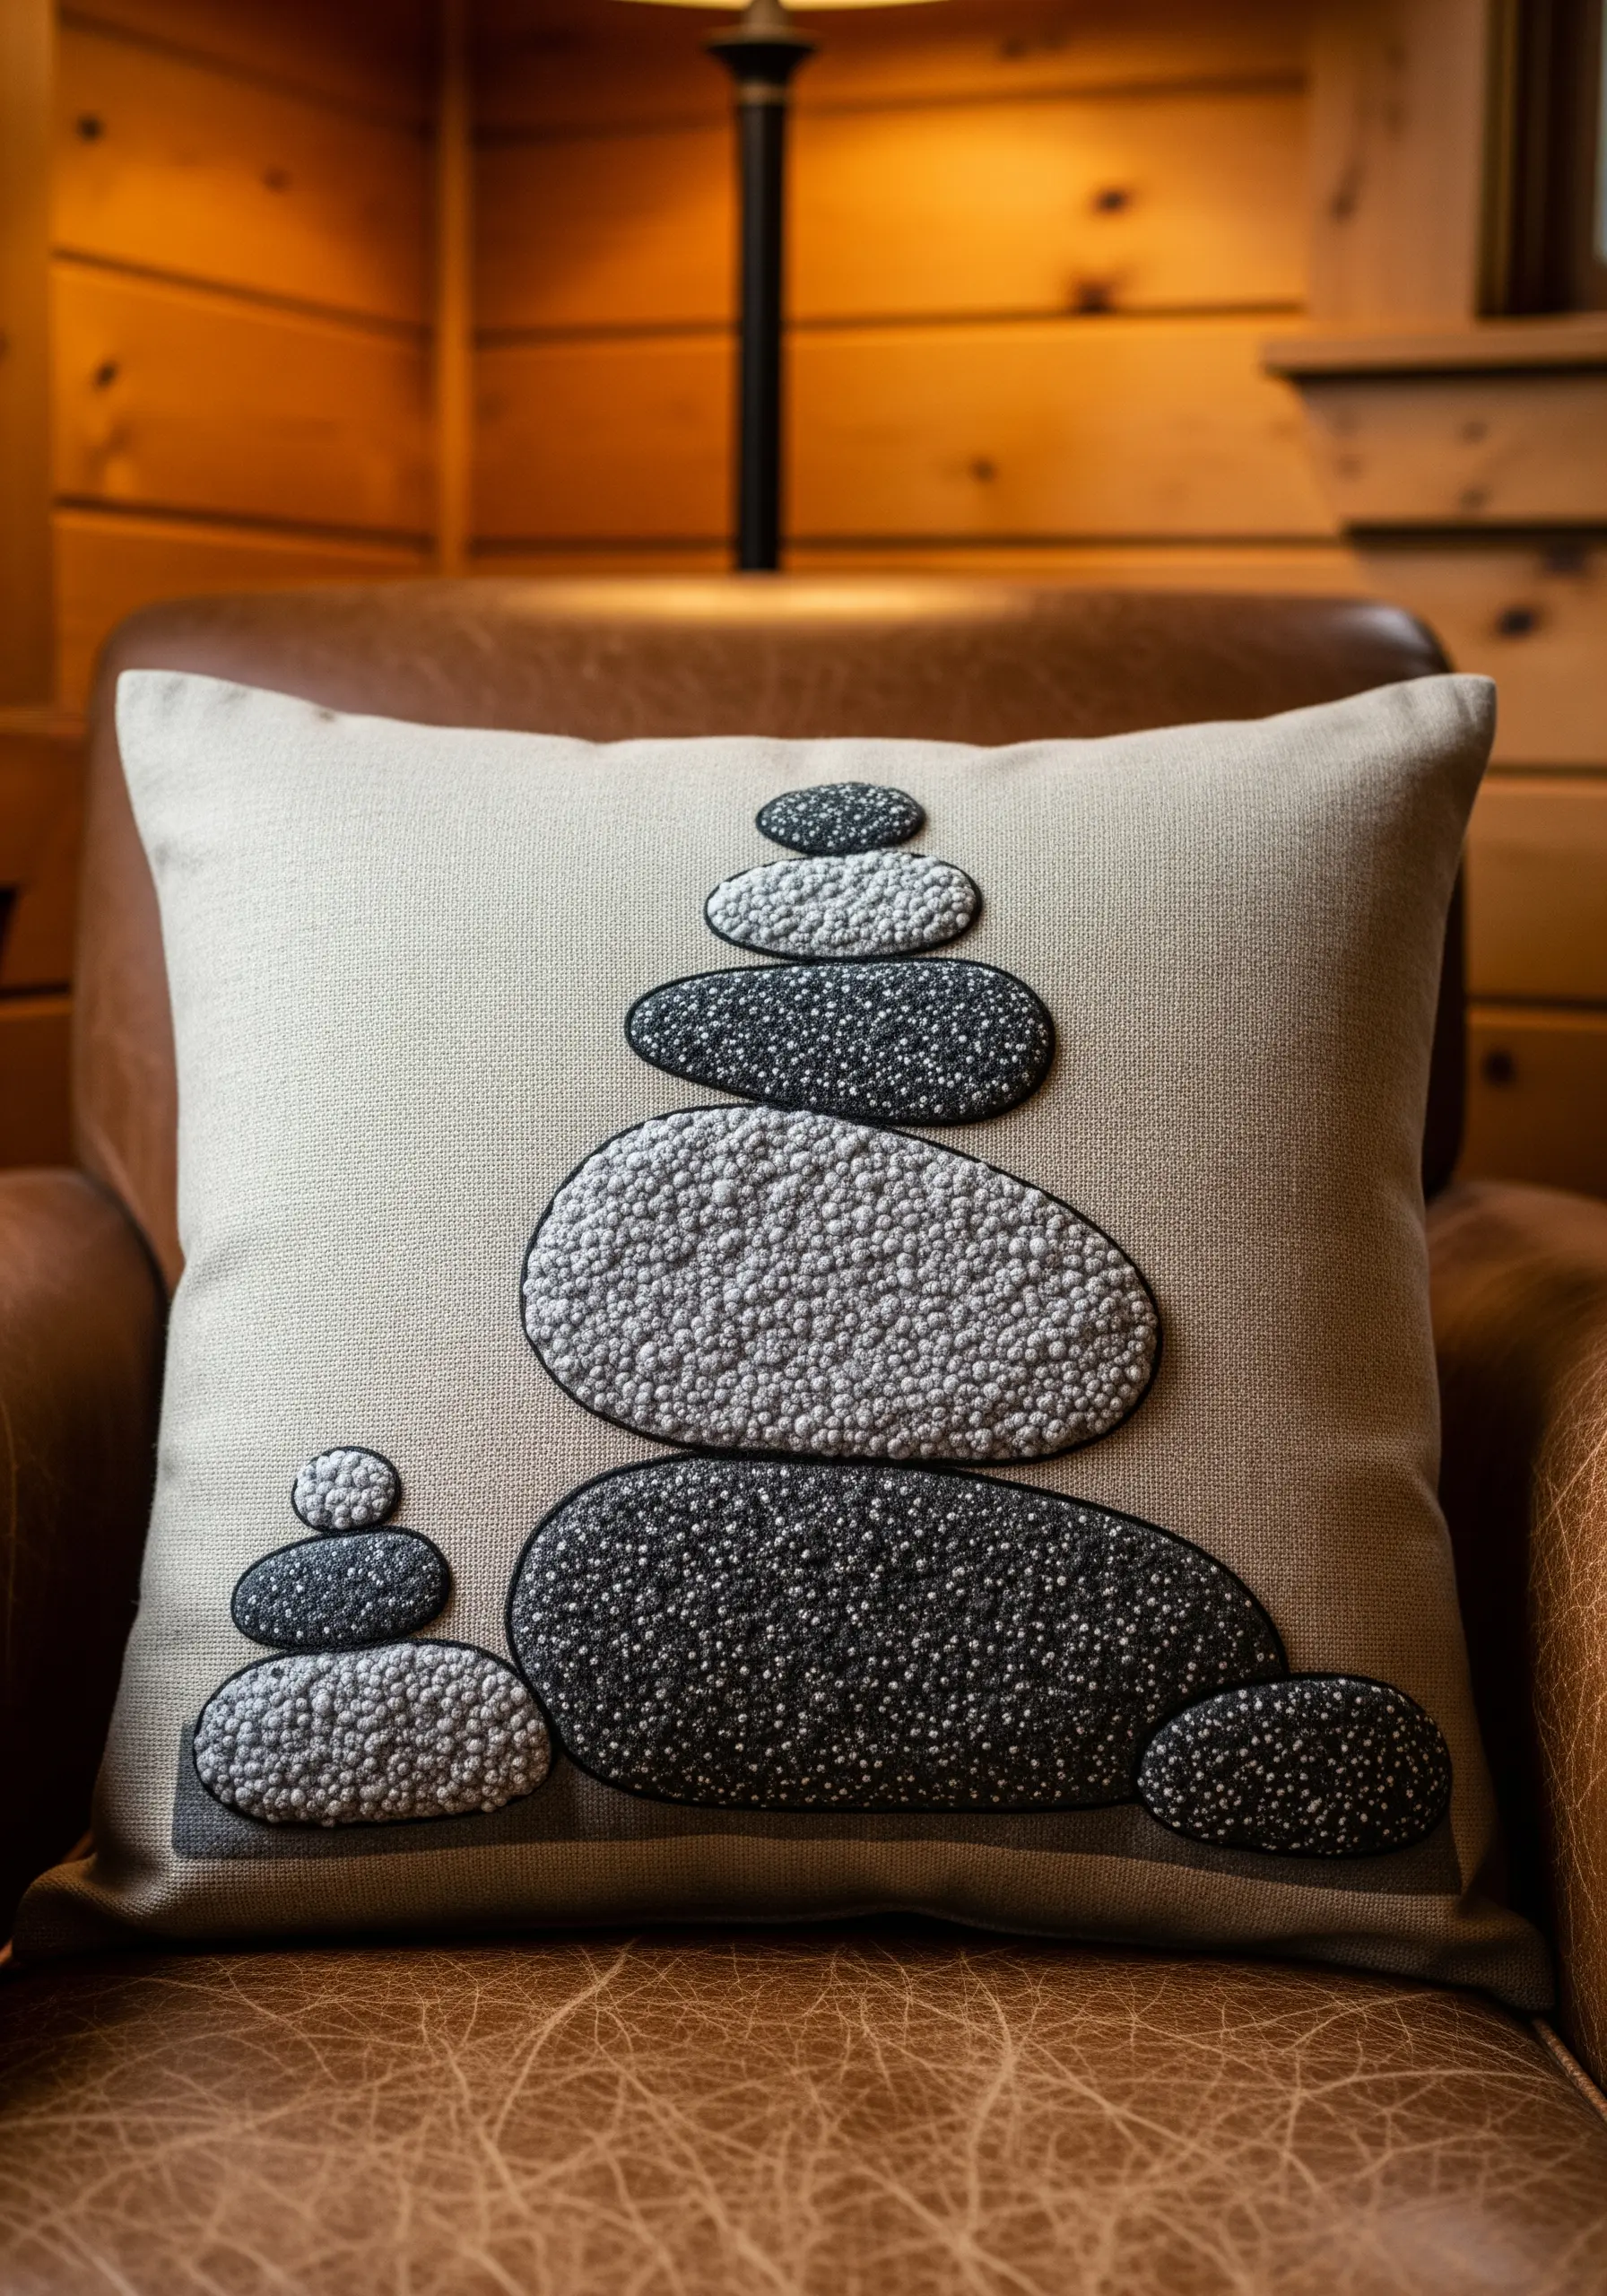
Give stacked stone motifs a wonderfully pebbly and three-dimensional feel by filling appliqué shapes with knots.
Start by cutting your stone shapes from felt or a non-fraying linen blend and appliquéing them to your base fabric.
Outline each shape with a crisp backstitch or split stitch to create a defined edge.
Then, completely fill the interior of each stone with tightly packed French knots, using variegated grey or black thread to give the surface natural-looking dimension and texture.
6. Capture Arid Textures with Cracked Earth Stitching
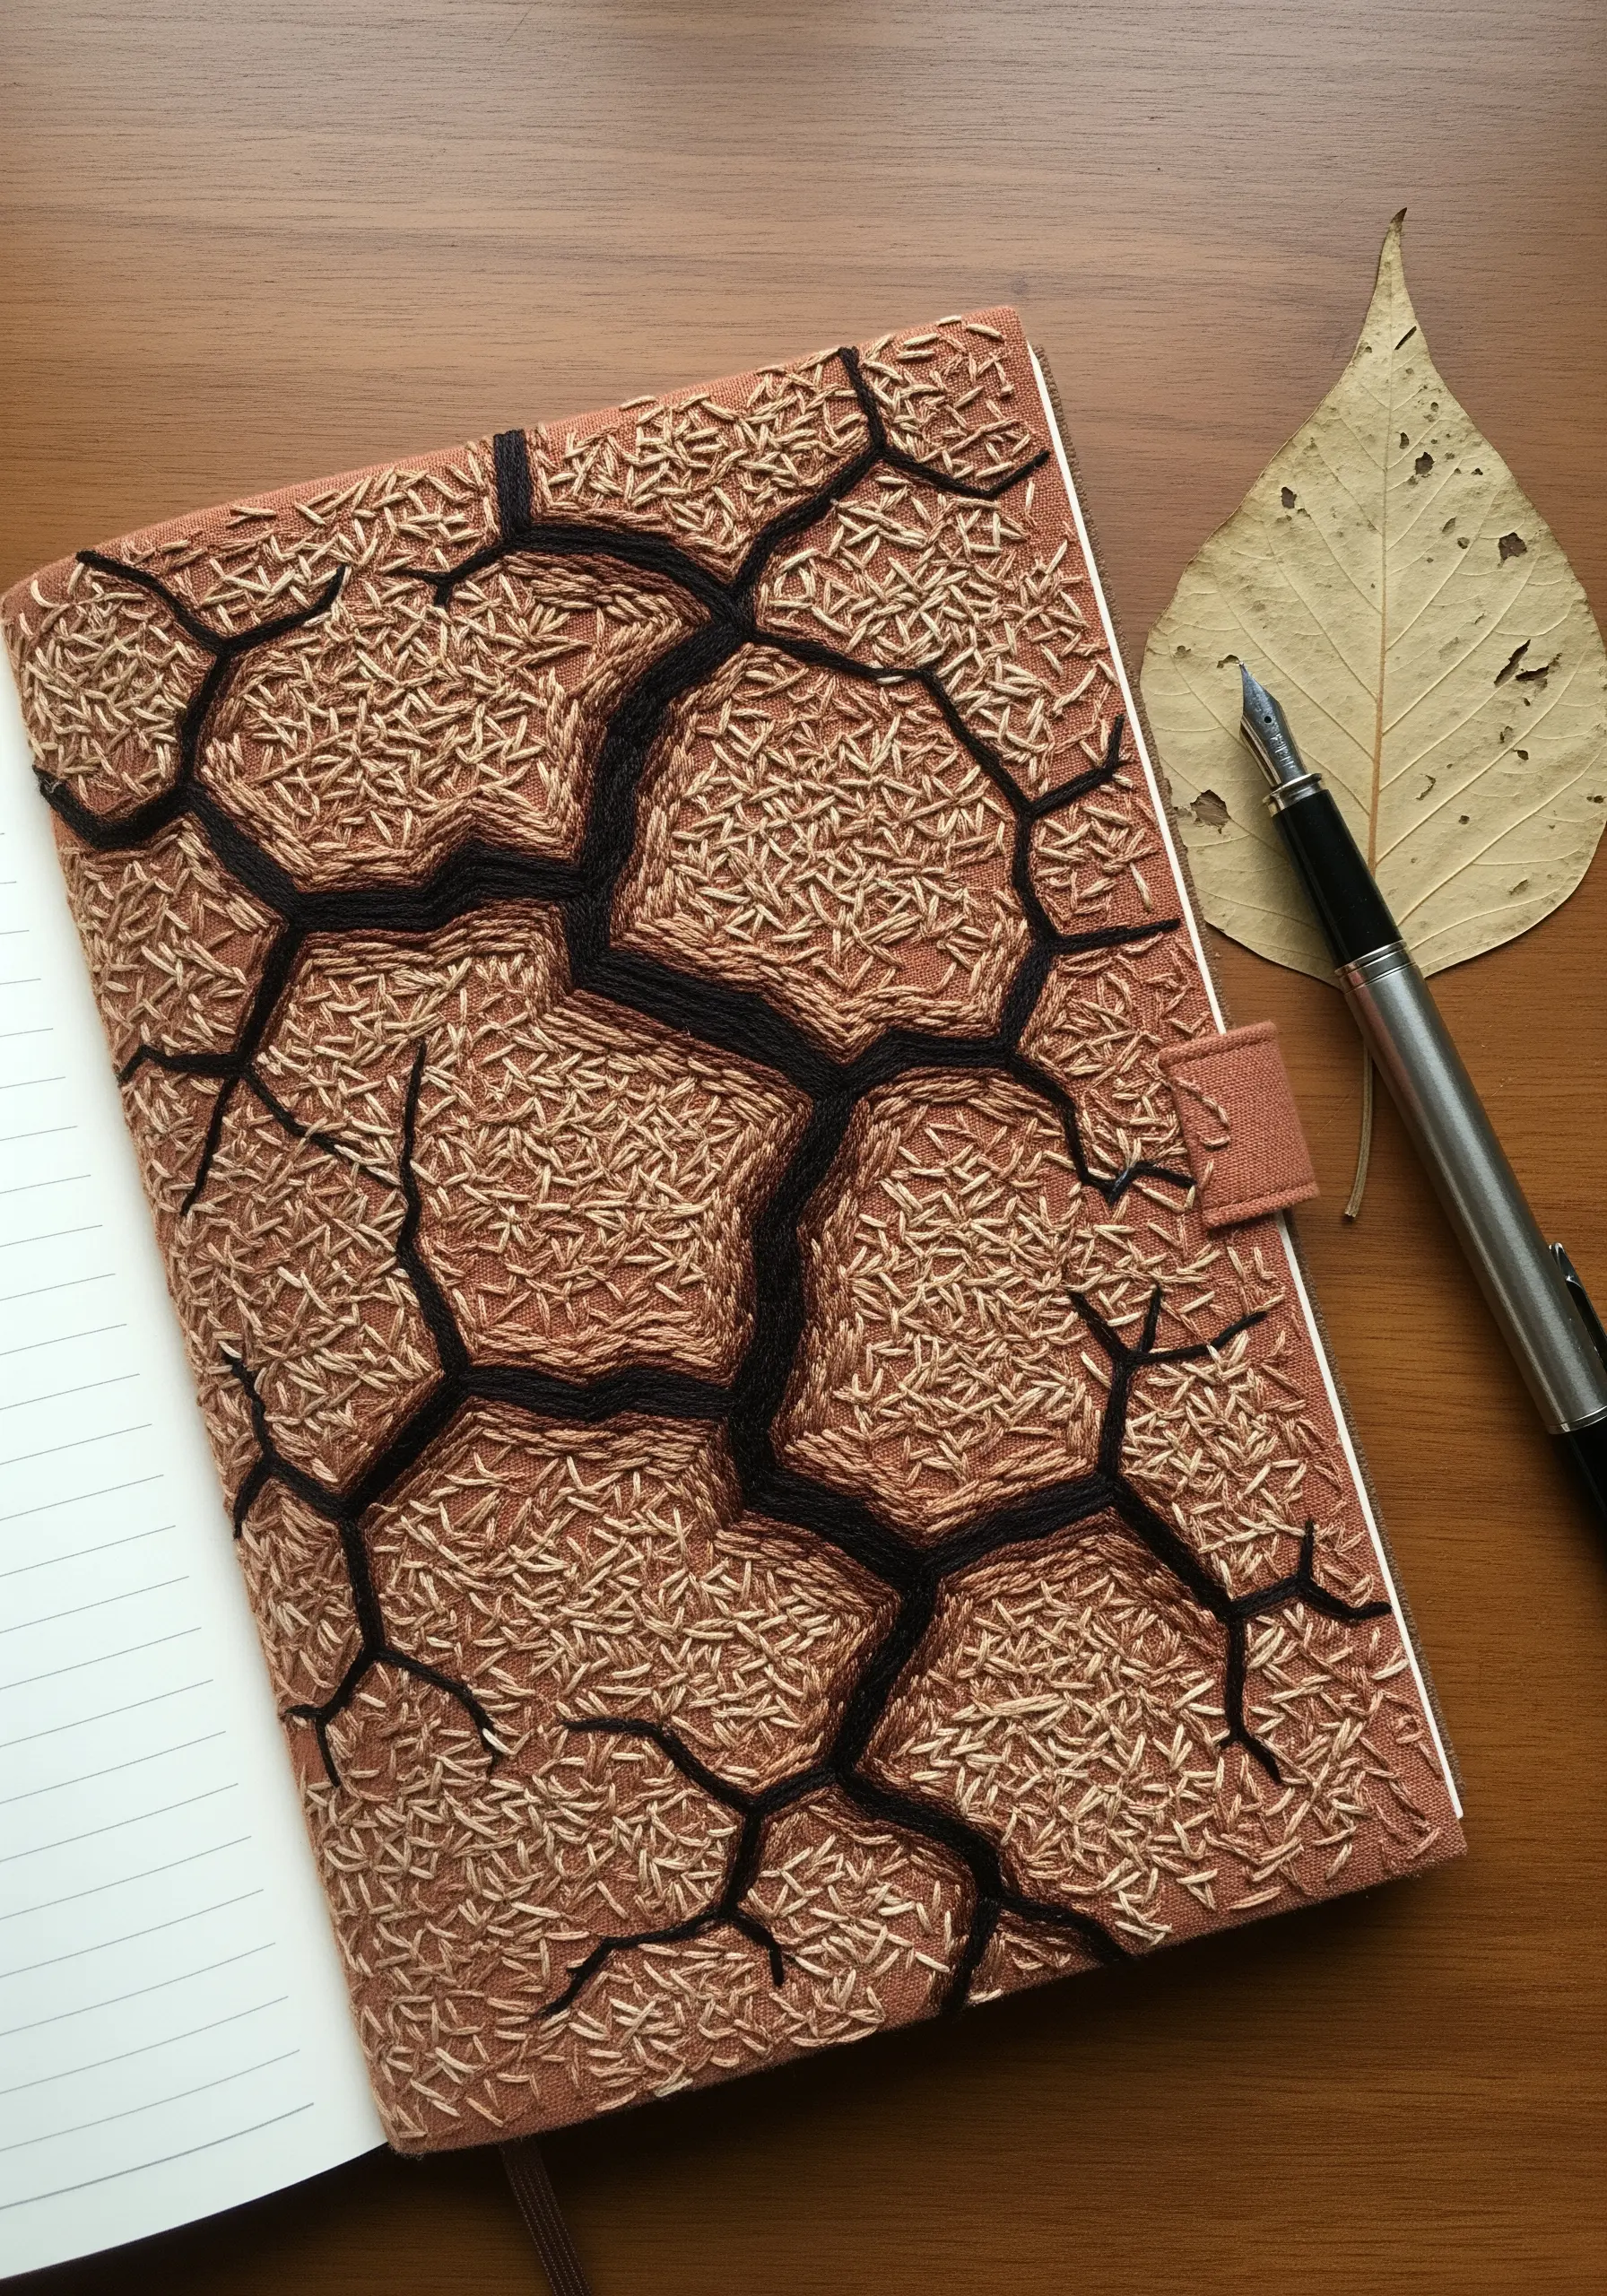
Recreate the powerful pattern of parched earth by contrasting bold lines with delicate fill stitches.
First, establish the deep cracks by couching down a thick black yarn or using a heavy chain stitch. This creates the primary structure of your design.
Next, fill the sections of ‘earth’ with randomly scattered seed stitches using a lighter, earthy-toned thread.
This contrast—between the strong, dark outlines and the light, airy fill—is what makes the texture so convincing and visually striking.
7. Sculpt Flowing Dunes on a Wall Hanging
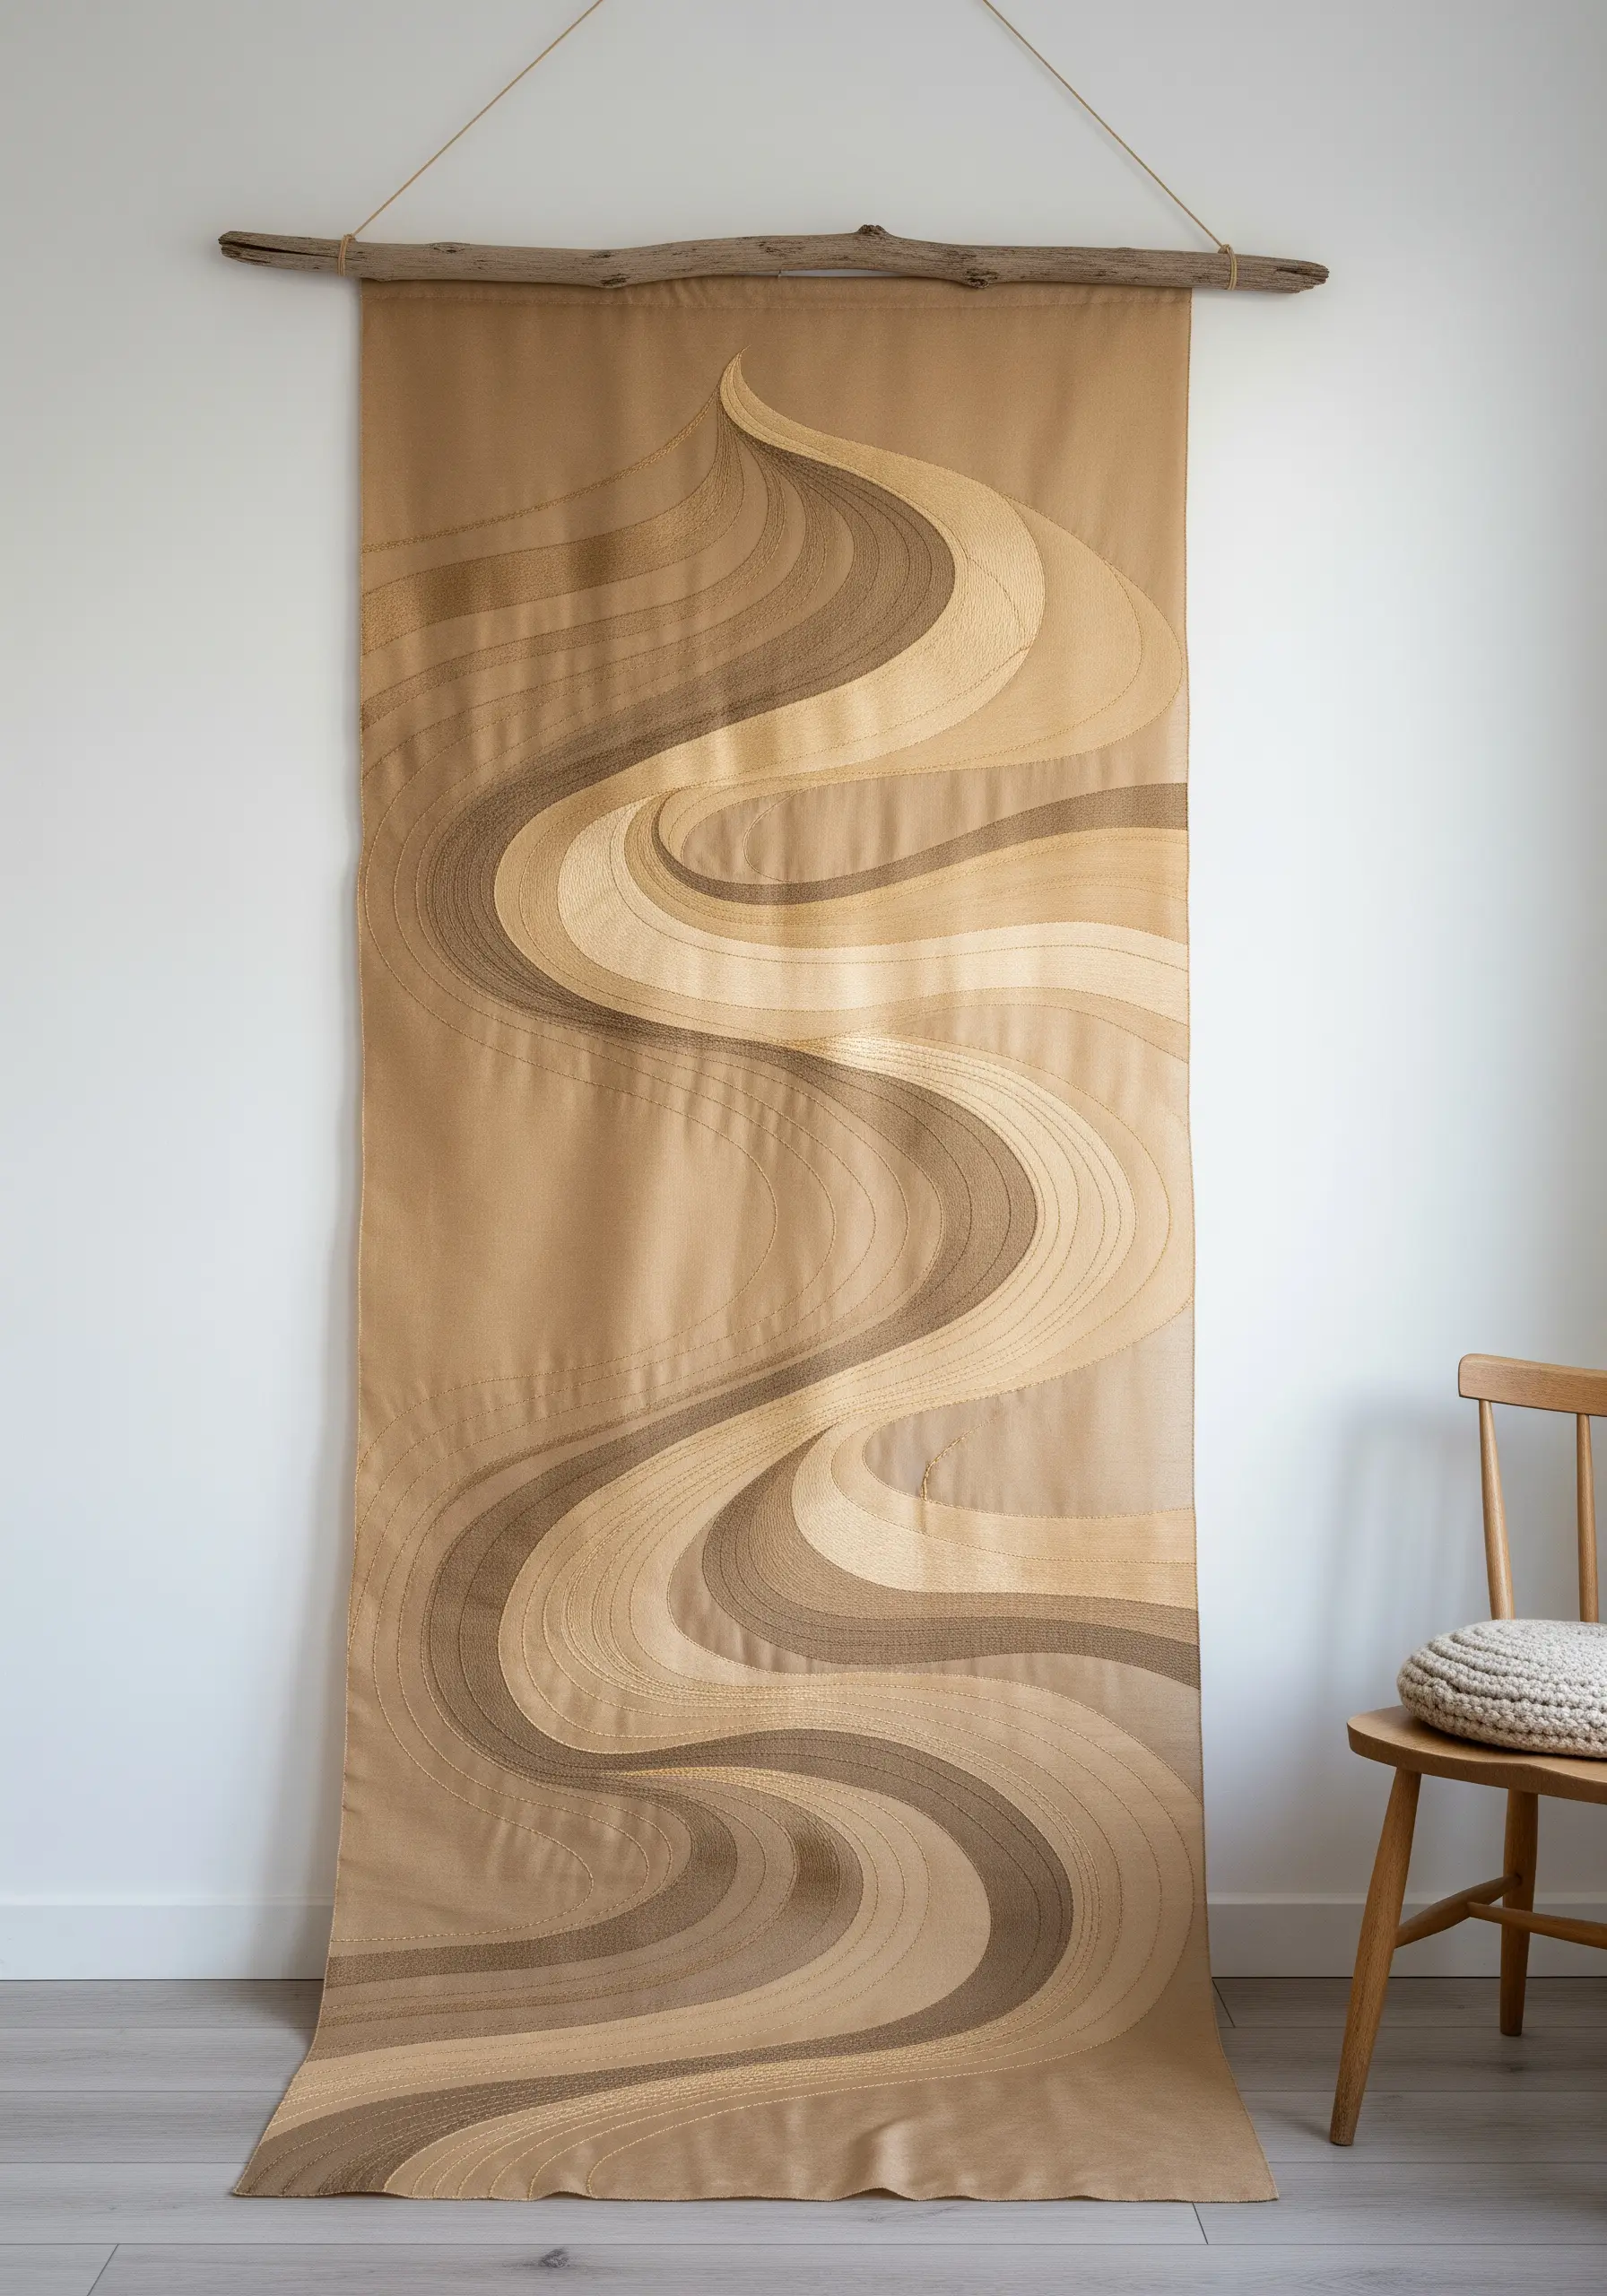
Suggest the movement of sand and wind with elegant, tone-on-tone satin stitching.
On a neutral linen or cotton canvas, use a machine satin stitch in varying widths to create sweeping, curved lines.
By using a thread that is only slightly different in color or sheen from the background fabric, you create a subtle design that plays with light.
The raised texture and soft shine of the thread against the matte fabric gives the illusion of depth and movement, transforming a simple cloth into a piece of minimalist art.
8. Create a Triptych of Polished and Porous Stones

Showcase your stitch versatility by creating a trio of small hoops, each depicting a different stone texture.
For a smooth, water-worn river stone, use a long-and-short stitch with a single strand of silk floss to achieve a seamless, light-reflecting surface.
To create a granite-like texture, fill a shape with dense French knots using variegated grey and black thread.
For a porous, volcanic rock, experiment with raised stitches like bullion knots or woven picot stitches, leaving small gaps between them.
Displayed together, this triptych becomes a sophisticated study in texture.
9. Weave Delicate Lines Through a Field of Beads
Create a stunning graphic effect by interrupting a dense field of beads with fine, stitched lines.
Before you begin beading, stitch your design—in this case, gentle waves—using a simple backstitch with a contrasting thread.
Then, carefully fill the surrounding space with seed beads, stitching them on one by one. Nestle the beads snugly against your stitched lines to create a sharp, defined edge.
This technique reverses the typical embroidery process, using thread to create negative space within a heavily textured surface.
10. Stitch Concentric Agate Rings on Felt Coasters
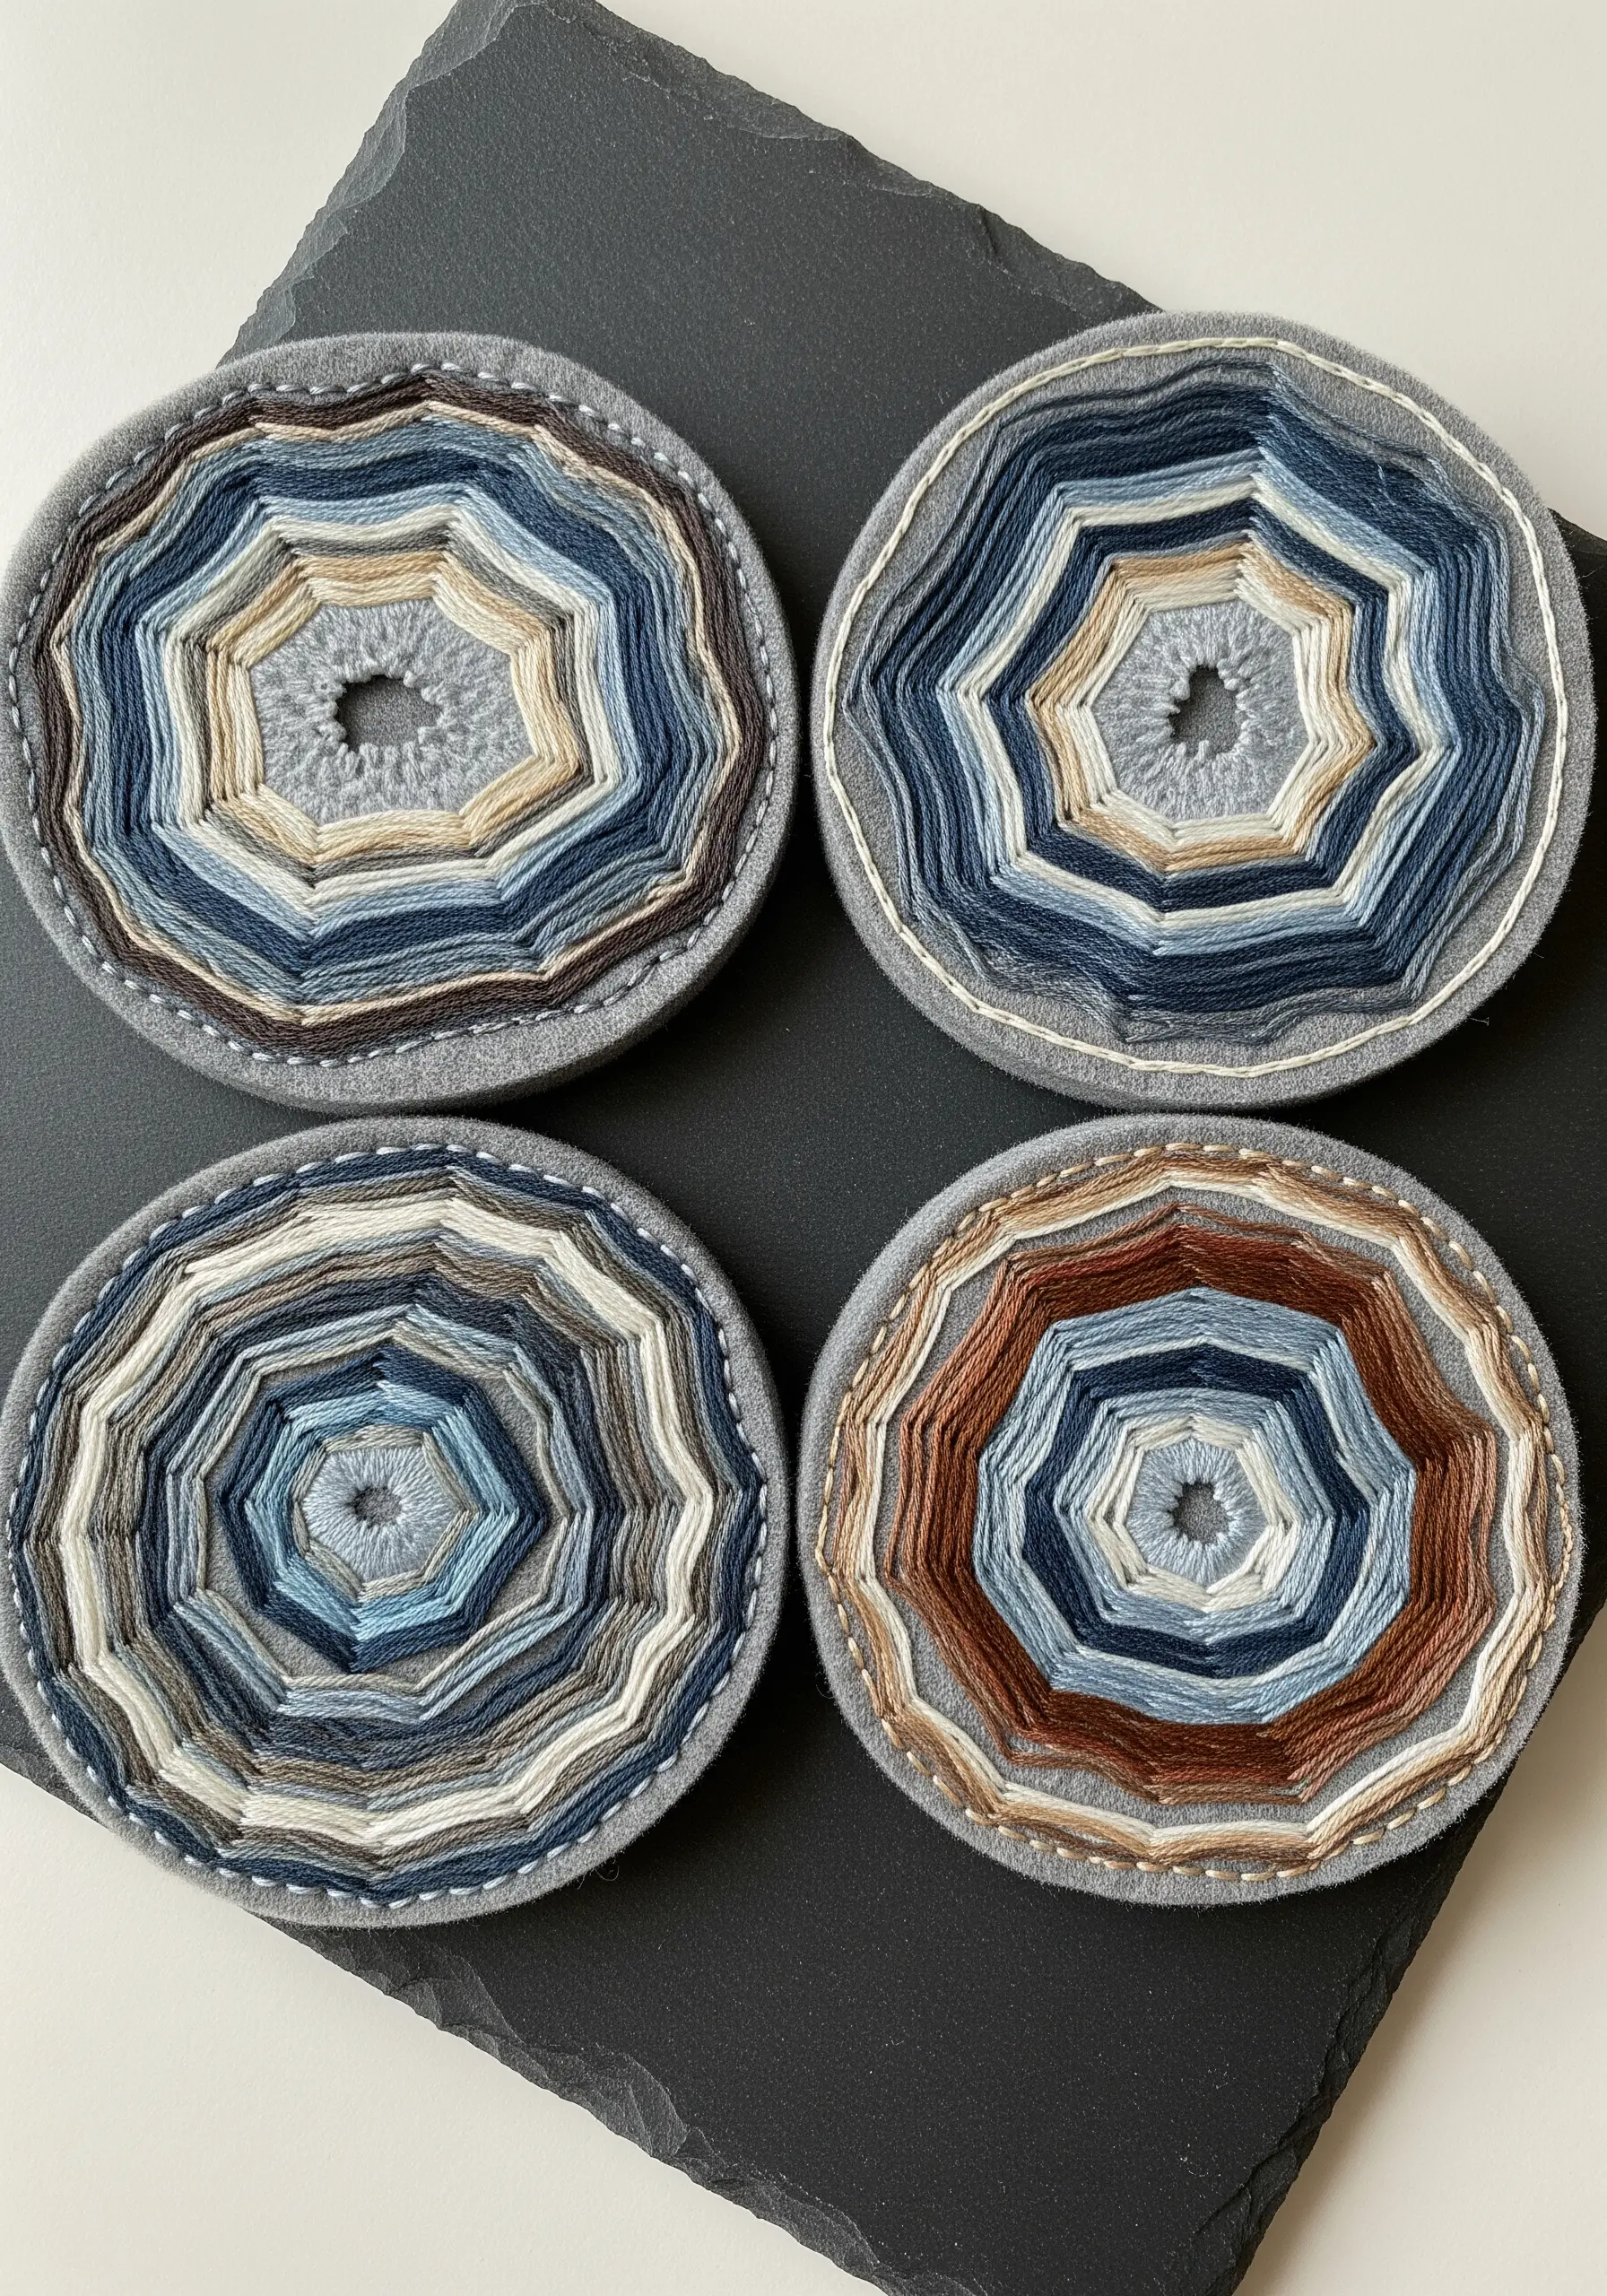
Quickly create beautiful, durable coasters that mimic the layered look of agate slices.
Using a sturdy felt base prevents puckering and provides a soft landing for glasses.
Instead of tedious fill stitches, simply couch down variegated yarn or multiple strands of embroidery floss in concentric, organic rings.
This technique is not only fast but also results in a lovely raised texture that highlights the layers. A simple running stitch around the edge provides a clean finish.
11. Layer Appliqué and Chain Stitch for Bold Motifs
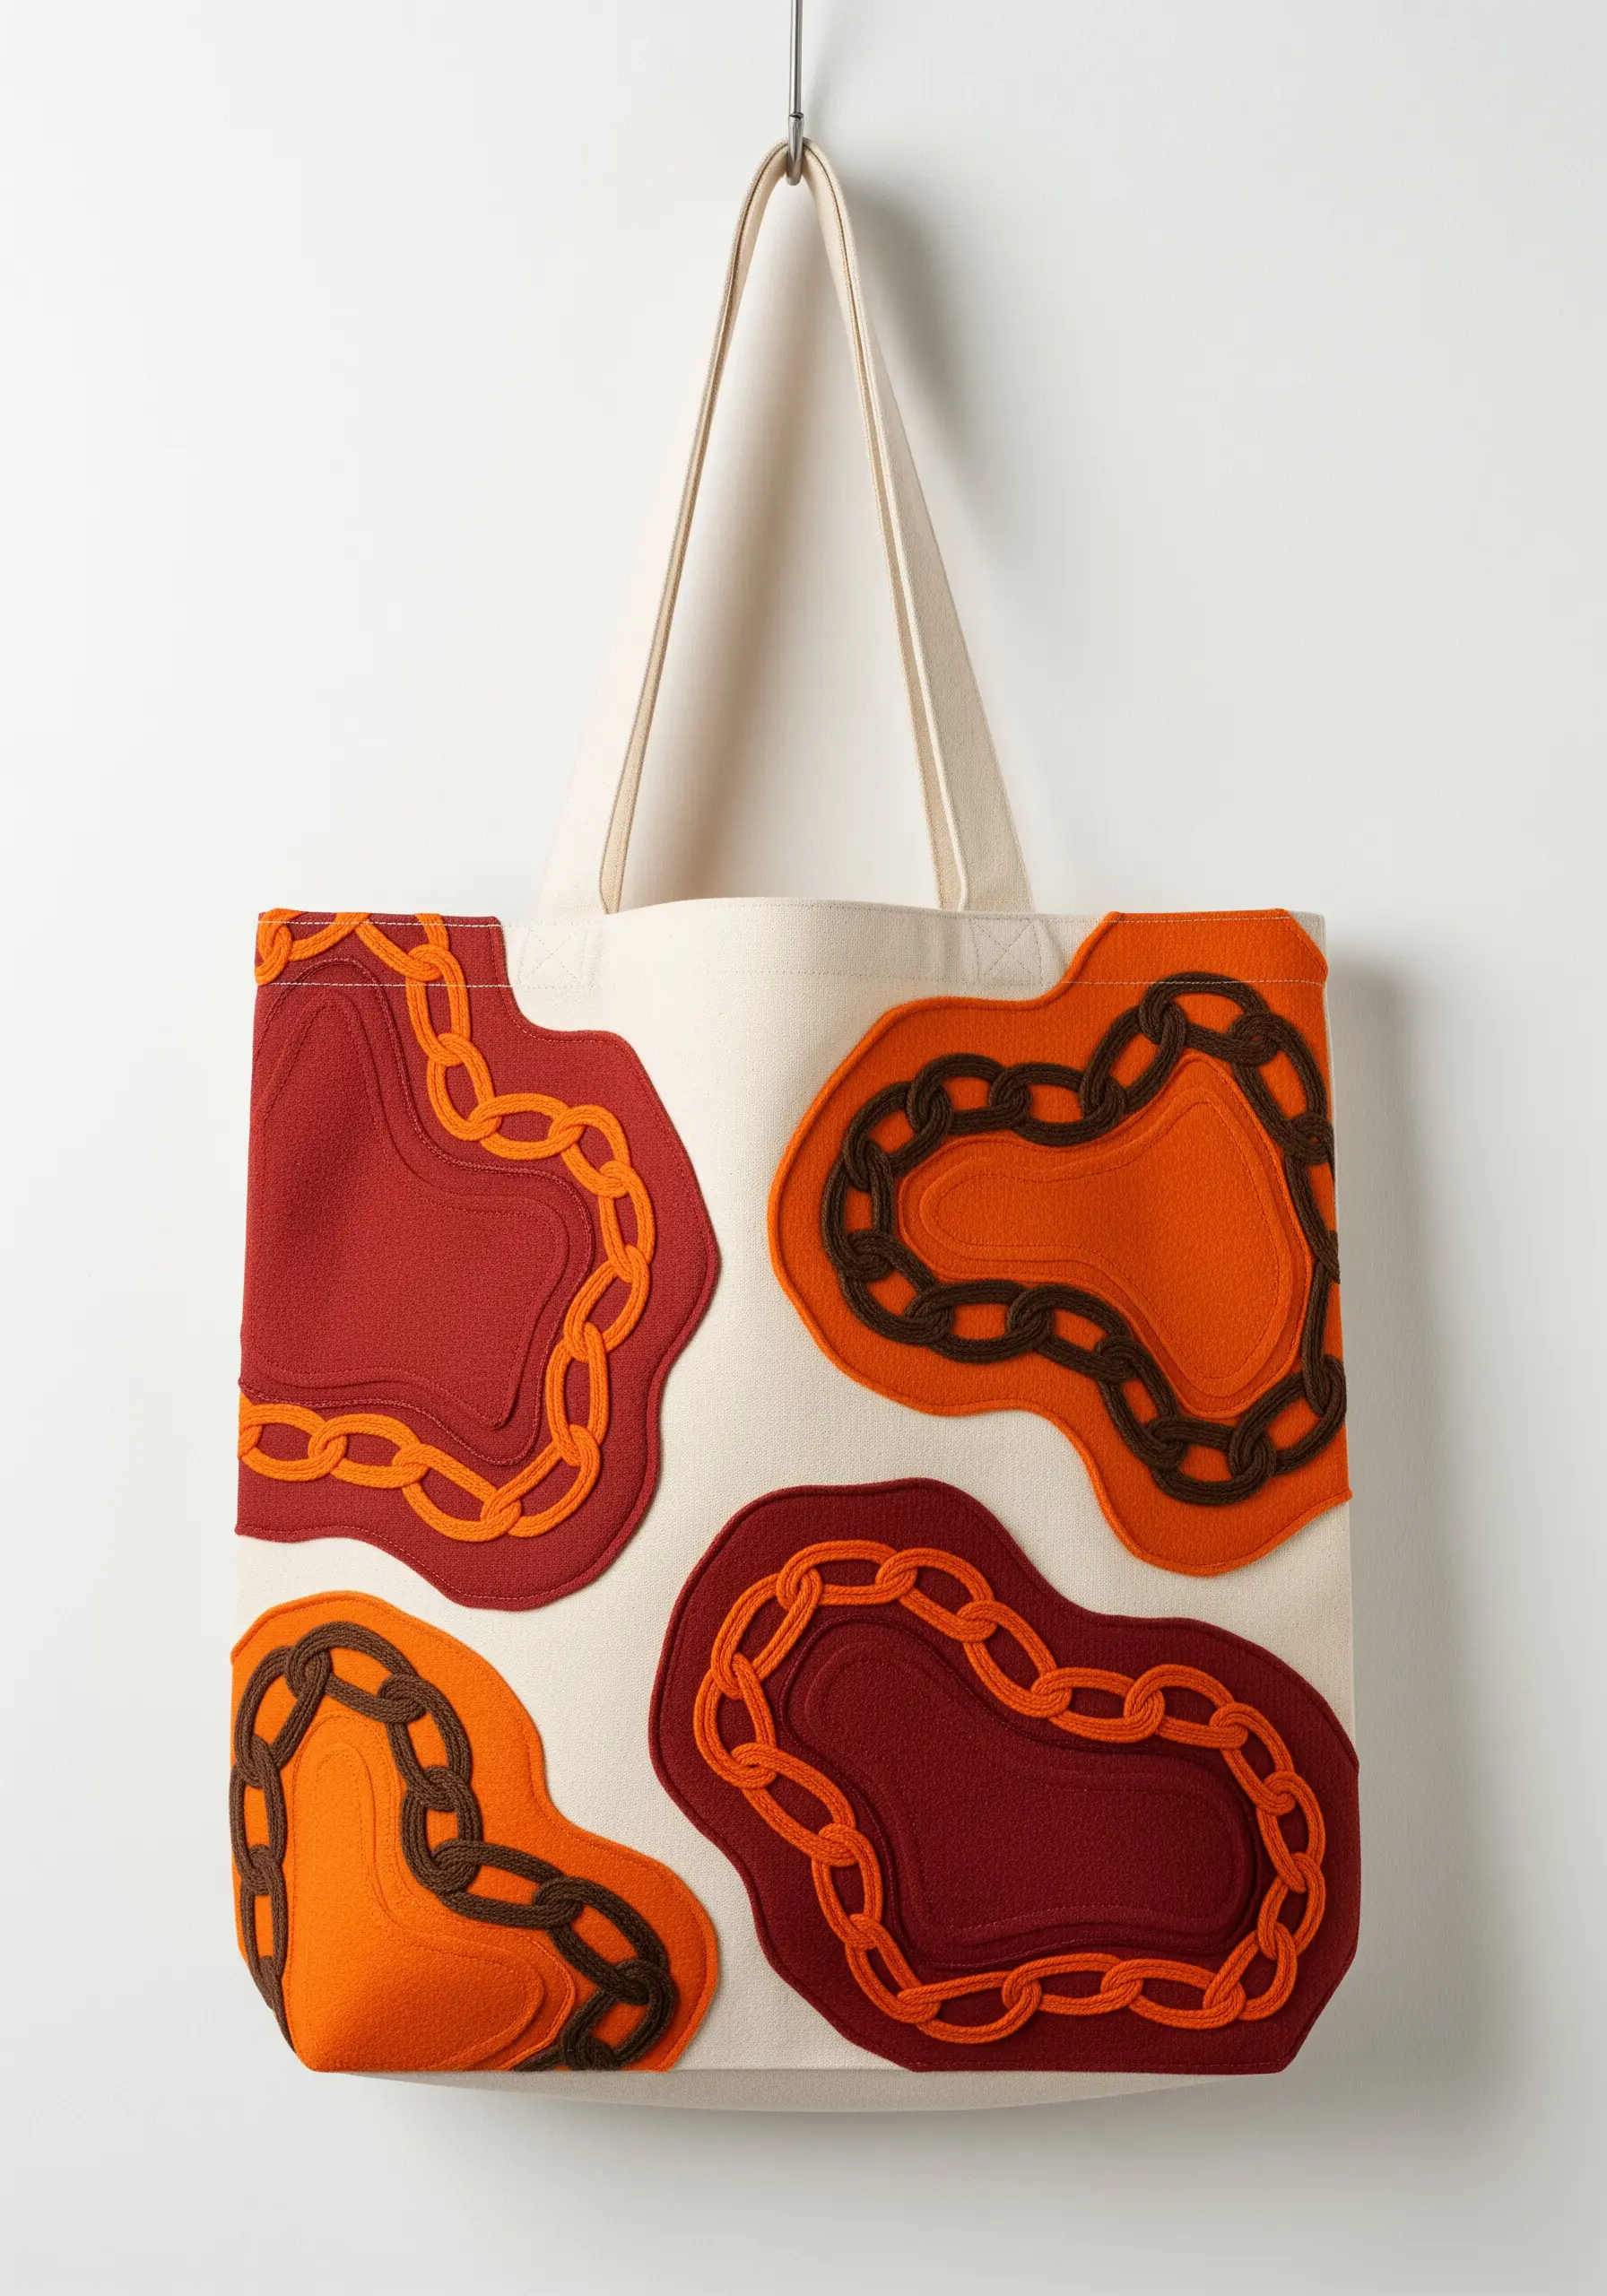
Combine the clean shapes of appliqué with the bold texture of chain stitch for a durable, graphic design on a tote bag or jacket.
This is a perfect example of fabric collage embroidery, where layers build the visual interest.
Cut organic, stone-like shapes from felt or sturdy canvas and stitch them onto your base fabric.
Then, trace the inner edge of each shape with a thick, contrasting chain stitch. This adds a second layer of texture and definition, making the whole design pop.
12. Construct a Photorealistic Pebble Beach with Knots

For a true statement piece, commit to building a complex texture with thousands of knots.
Use French knots and colonial knots in a wide palette of greys, creams, and sandy beiges to form the beach.
Vary the number of strands you use (from two to six) and the tightness of your knots to create pebbles of different sizes and shapes.
For the ocean foam and waves, switch to directional straight stitches and seed stitches to create a powerful textural contrast against the dense, round knots of the shore.
13. Recreate Fossil Spirals with Whipped Backstitch
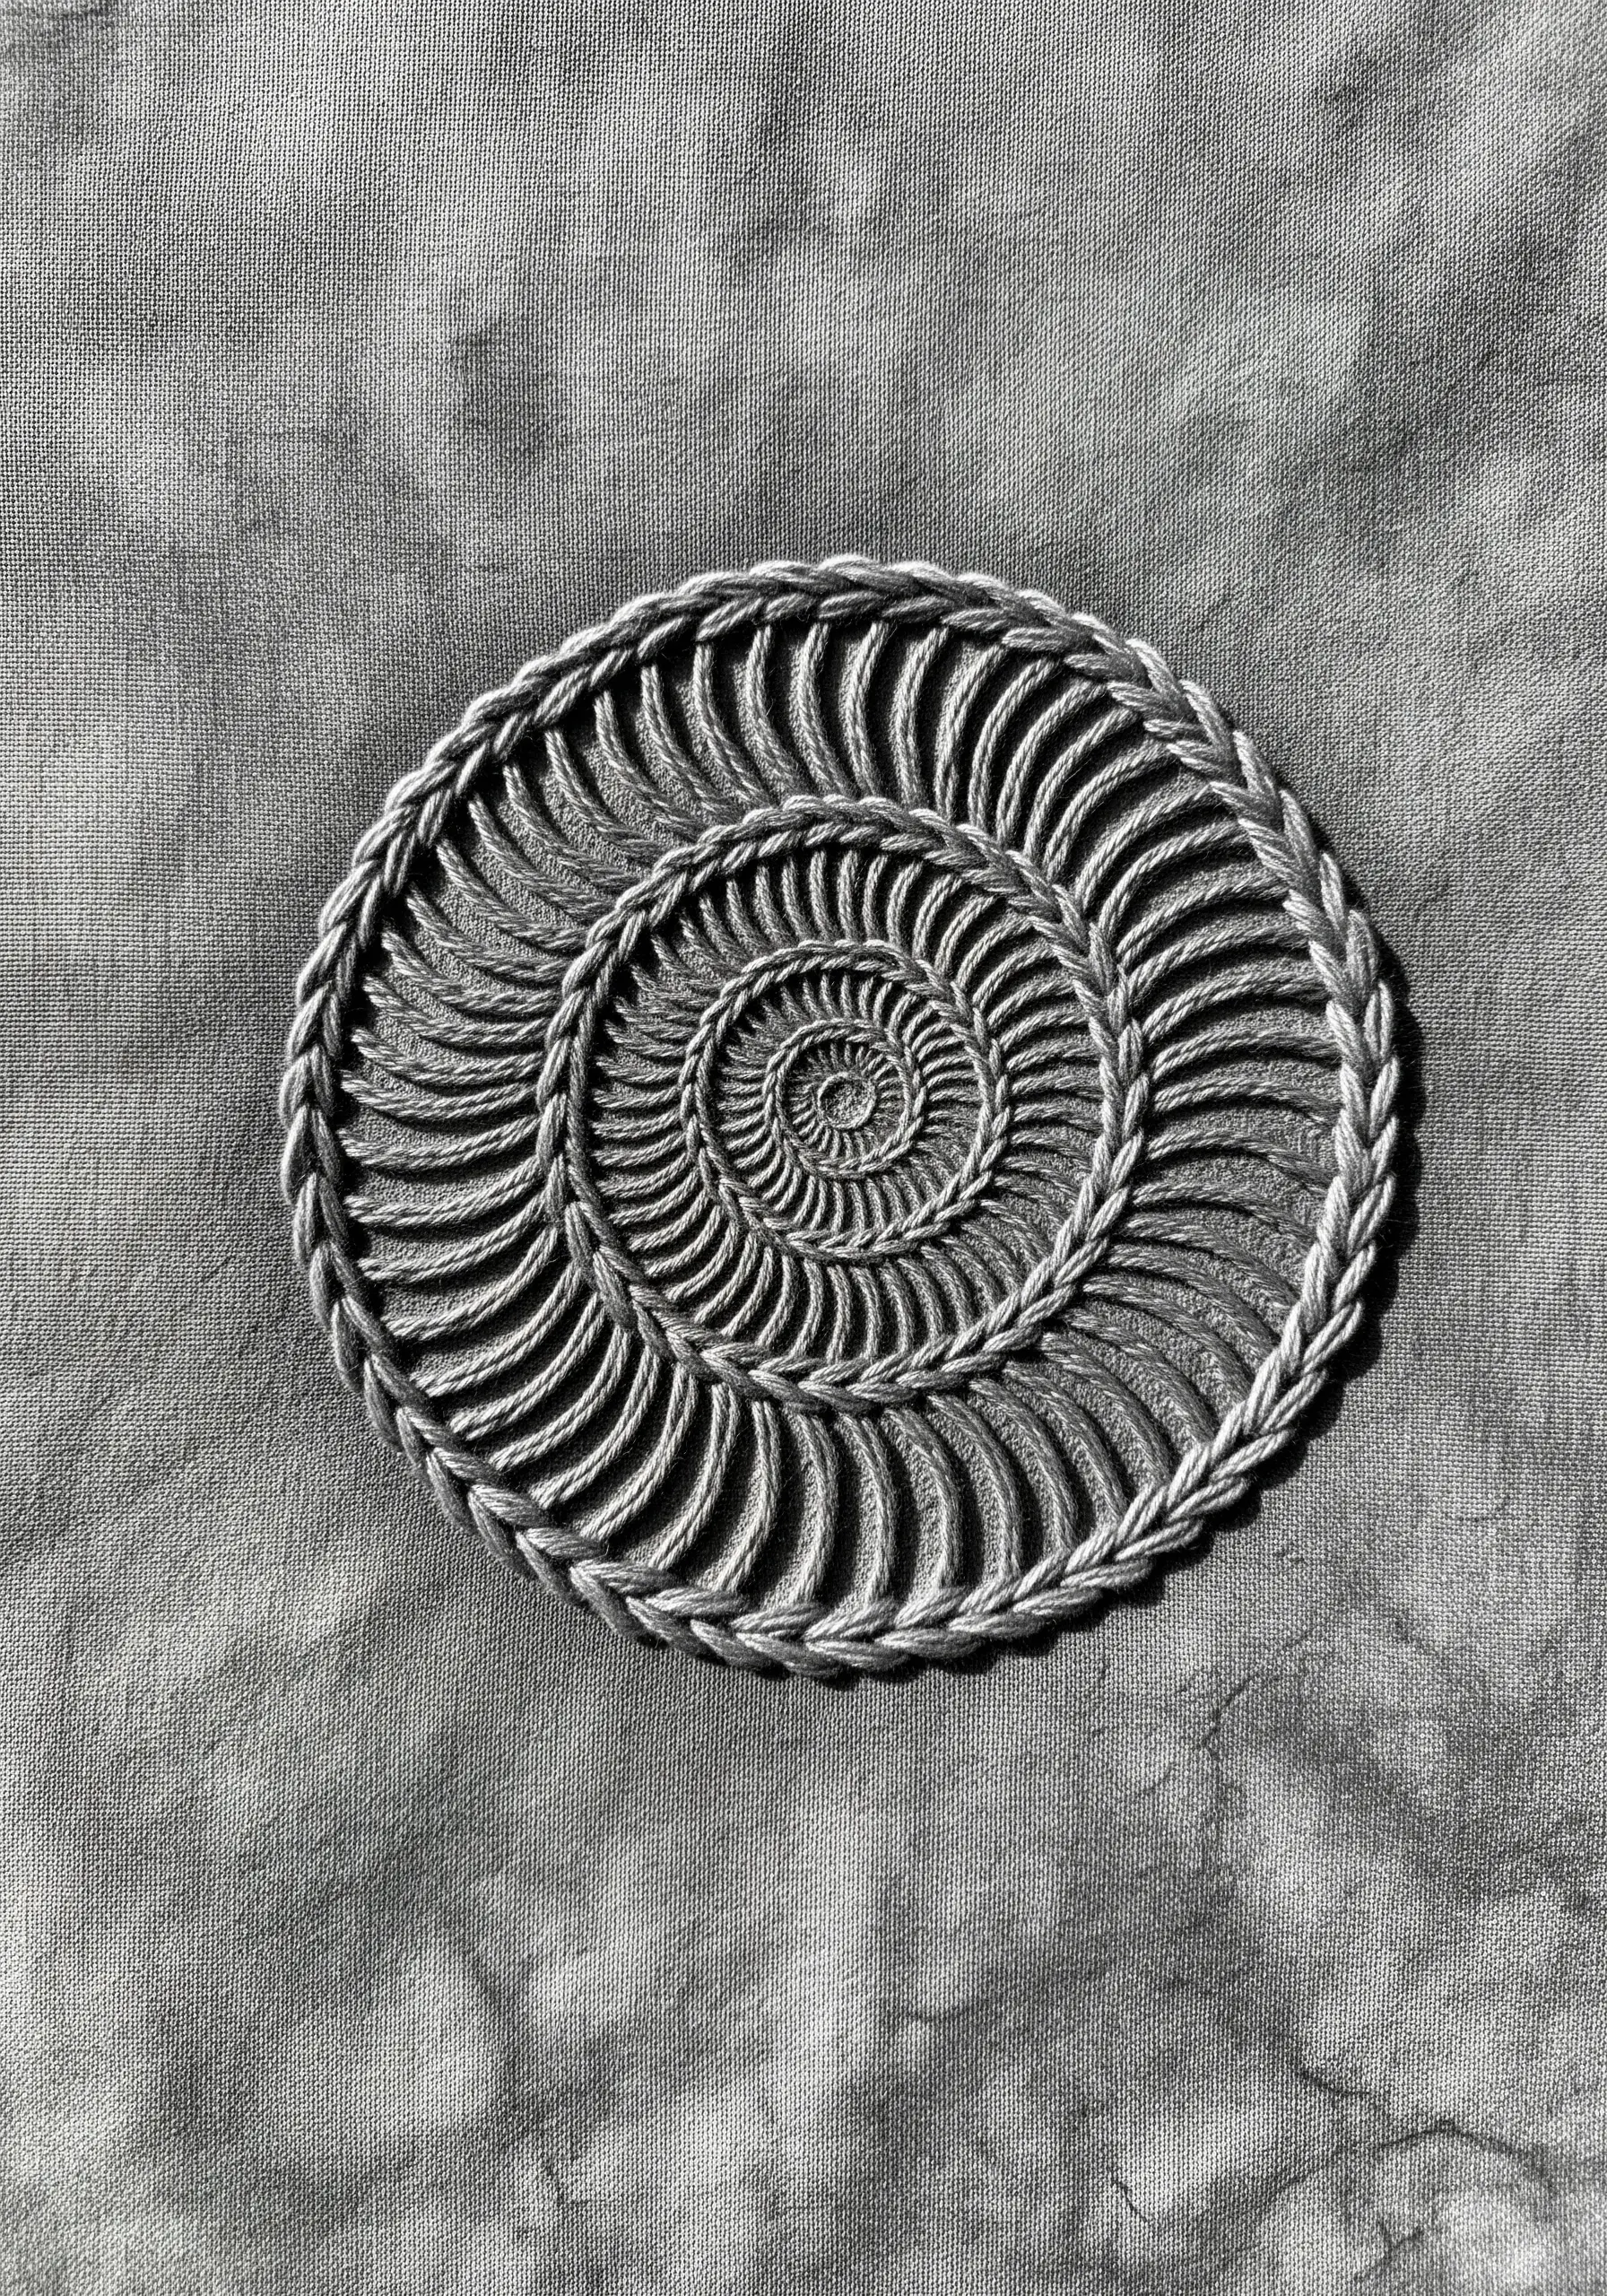
Give your embroidered lines the smooth, raised quality of a fossil shell by using a whipped backstitch.
First, lay down your foundational spiral using a standard backstitch with a sturdy thread like perle cotton.
Then, take a second thread (either matching or slightly contrasting) and weave it through the backstitches without piercing the fabric.
This ‘whipping’ action covers the gaps in the backstitch, creating a solid, rope-like line that has a beautiful, sculptural quality perfect for ammonites or nautilus shells.
14. Add an Earth-Tone Border to Sheer Curtains
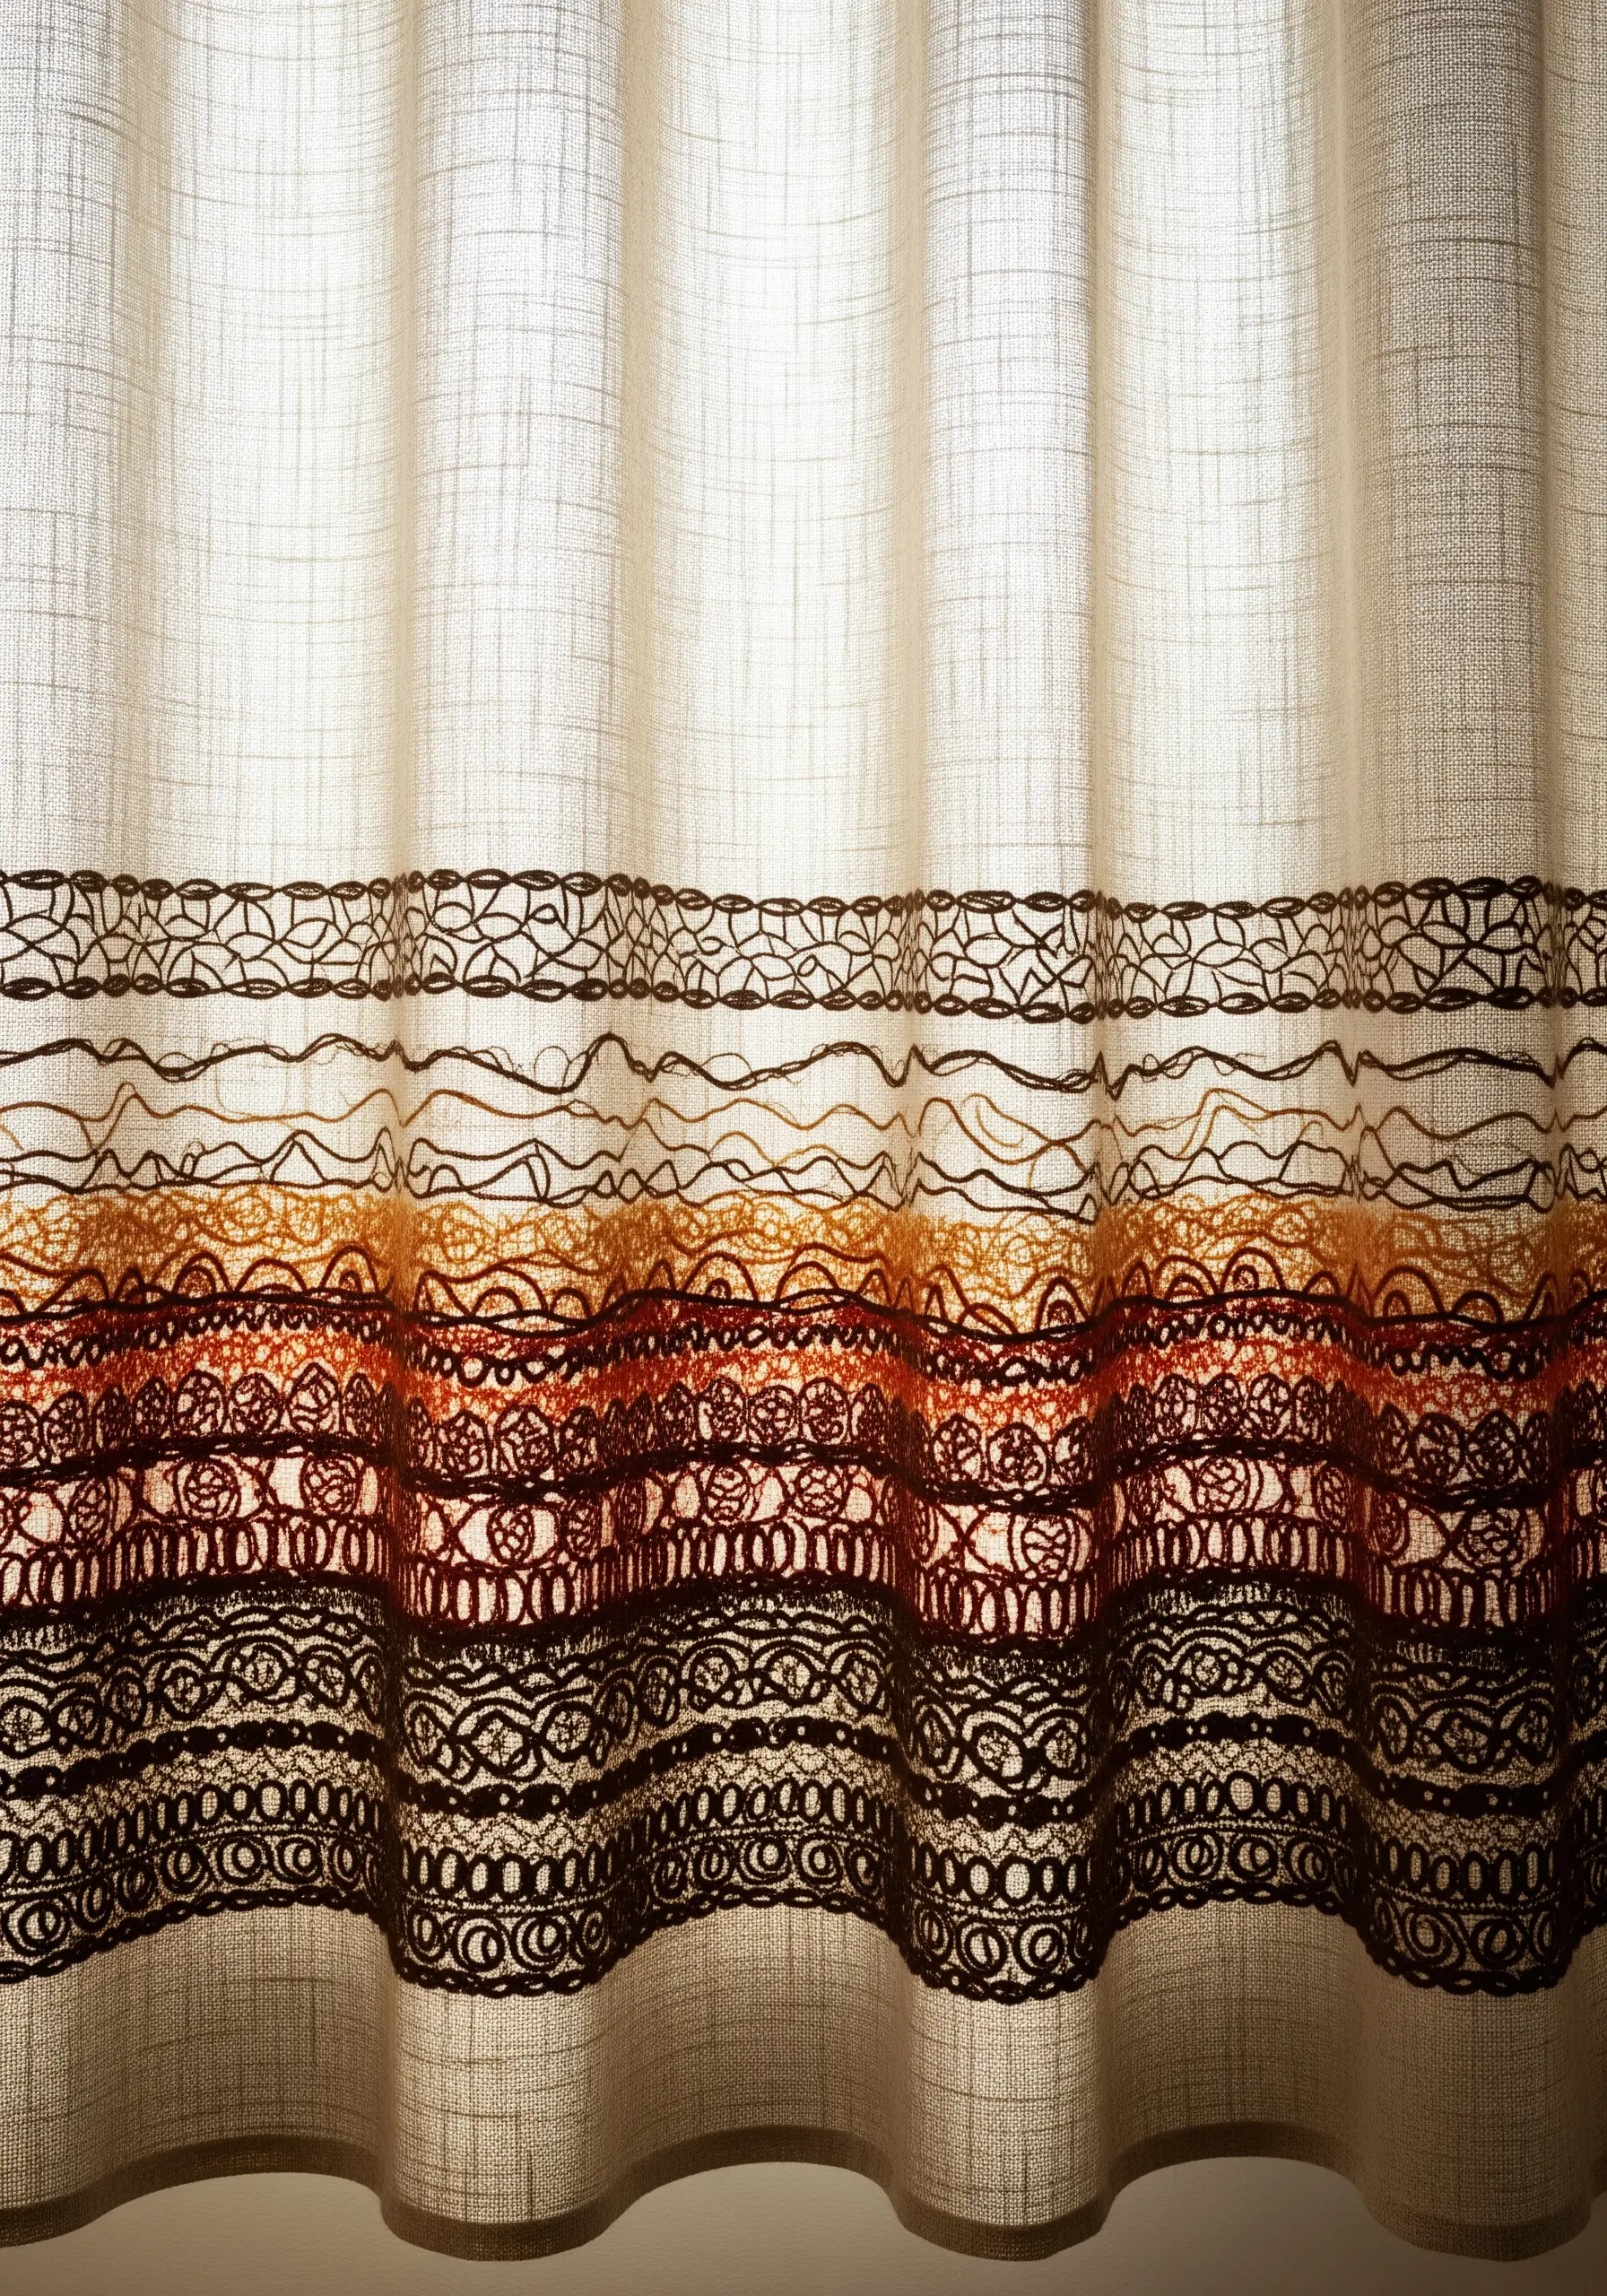
Embroidering on sheer fabric creates a magical, light-filtering effect, but it requires the right technique.
Always use a stabilizer on the back of the fabric while you stitch; a water-soluble stabilizer is perfect because it washes away completely, leaving no trace.
Choose open, airy stitches like fly stitch, detached chain stitch, or drawn thread work. These decorative stitches add pattern and color without blocking the light, resulting in a border that feels both substantial and ethereal.
15. Curate a Geological Stitch Sampler
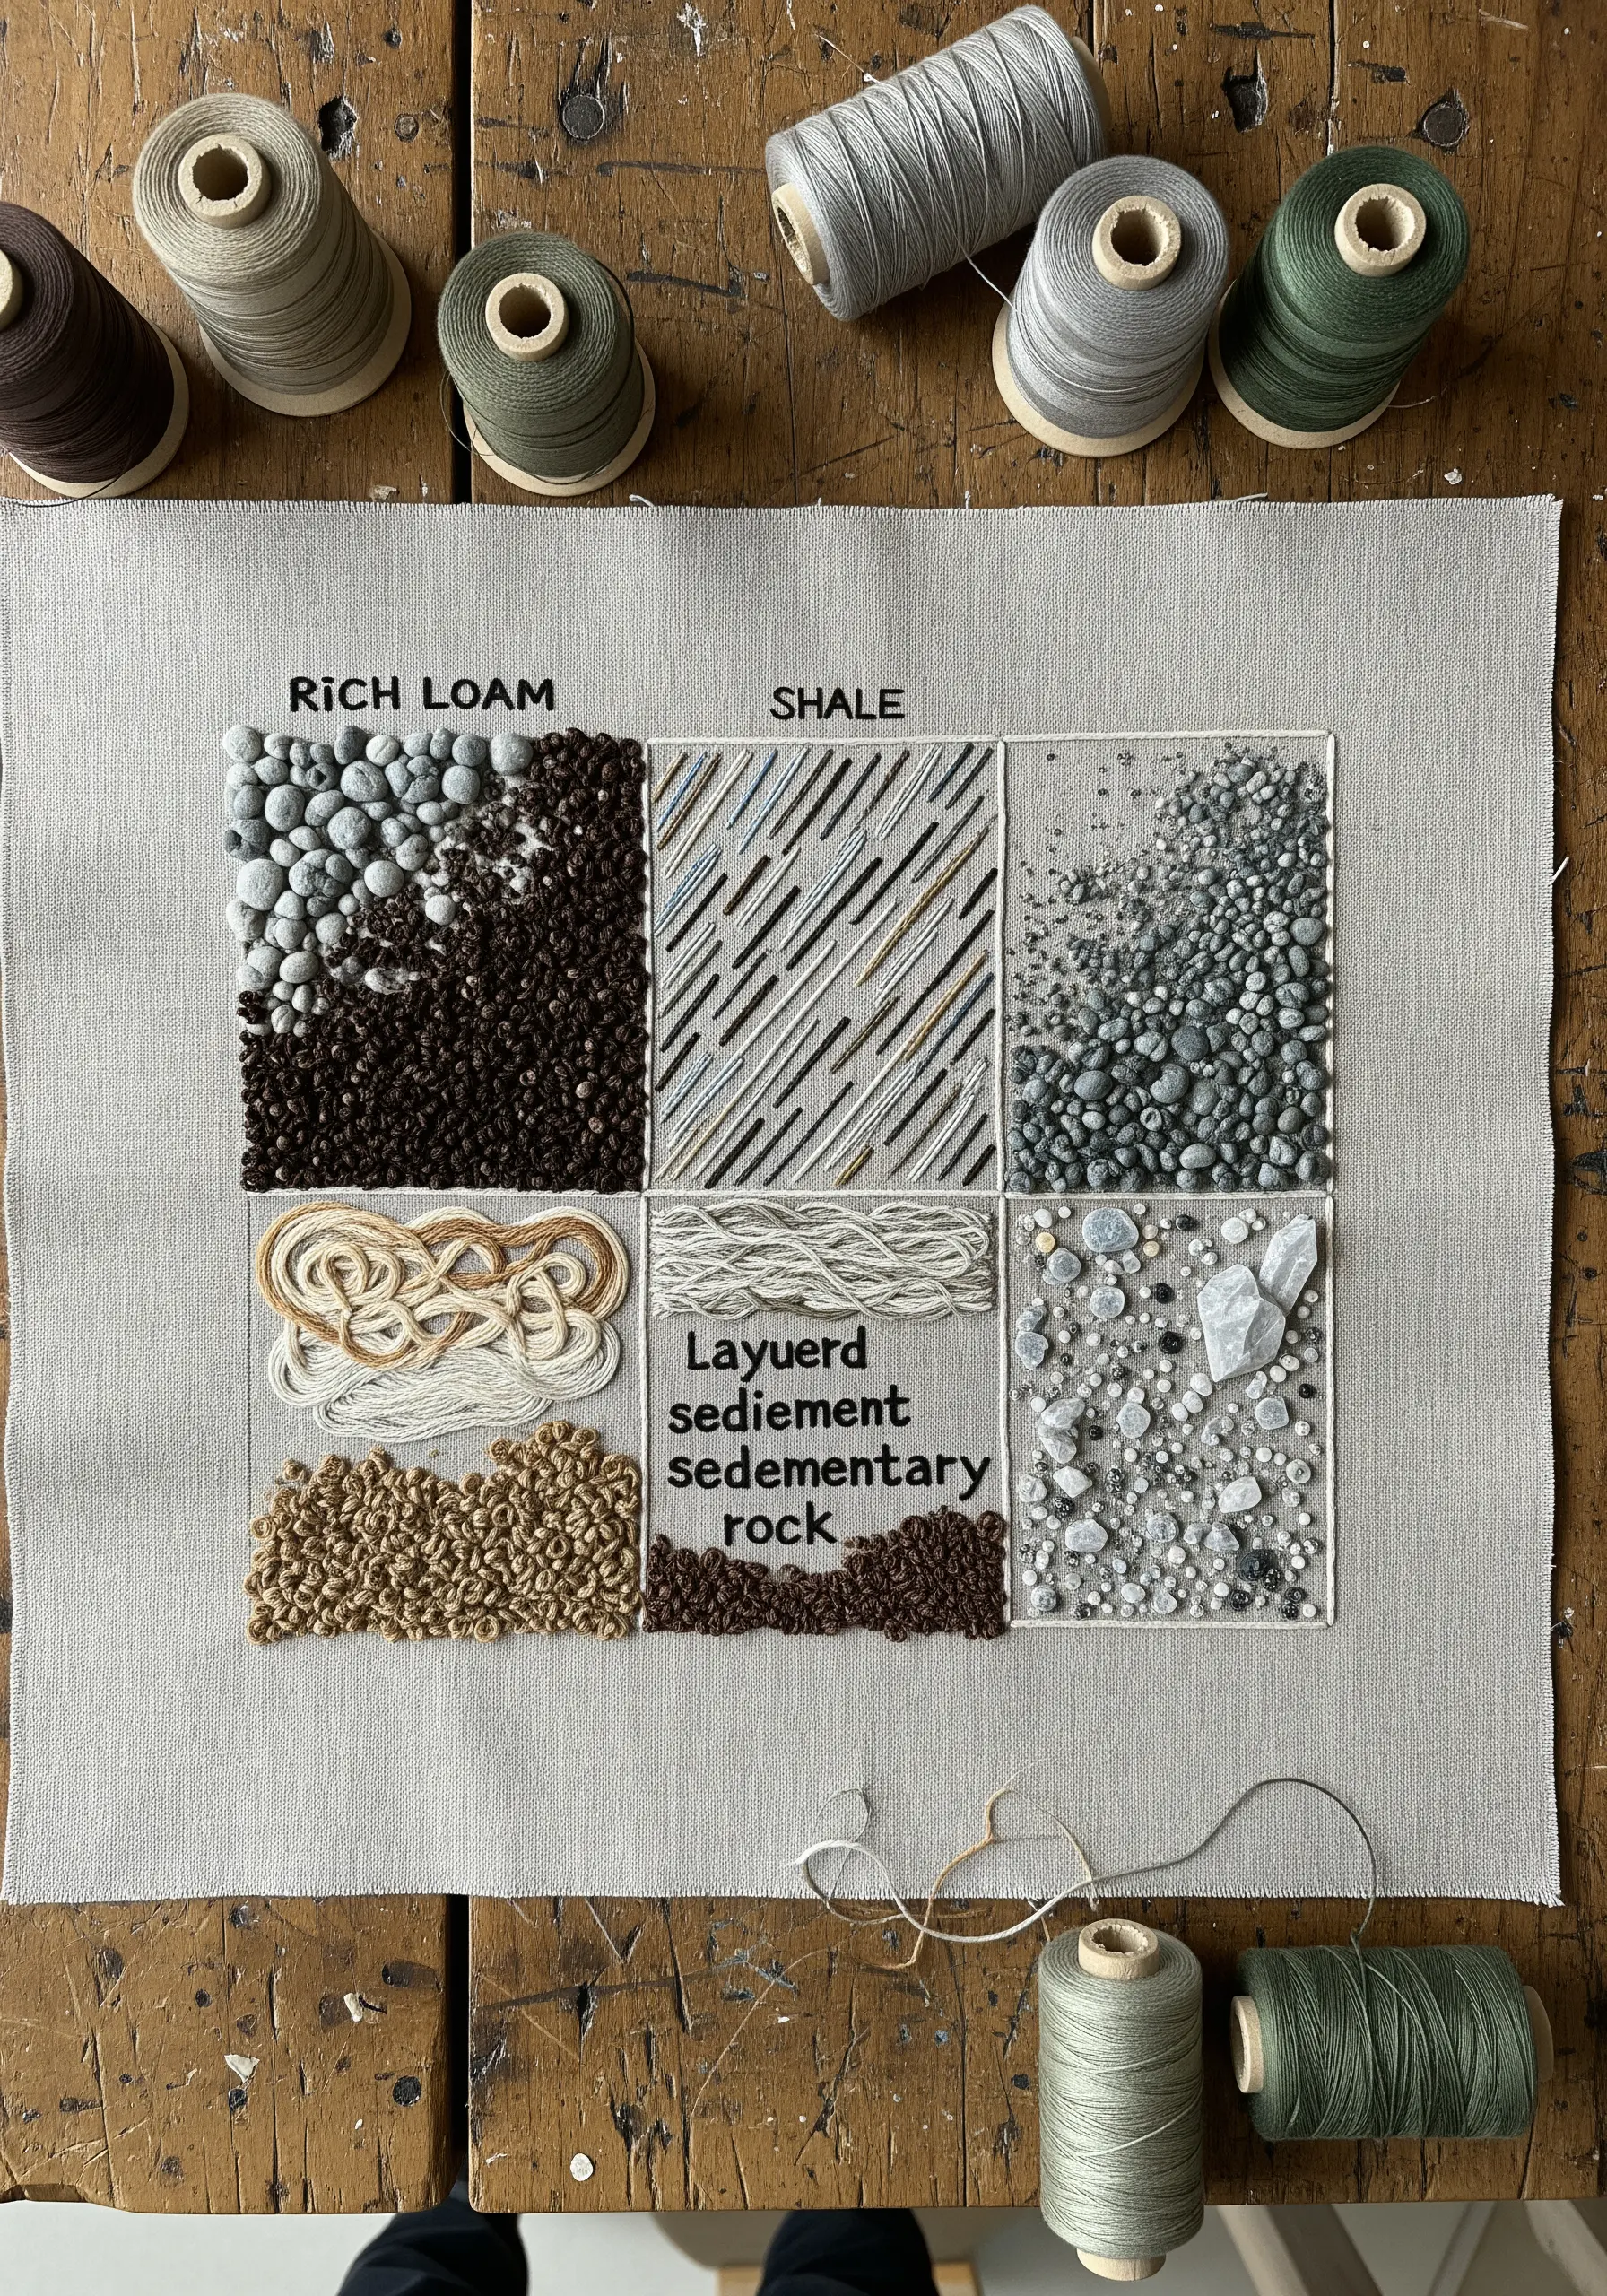
Turn your stitch practice into a work of art by creating a sampler dedicated to geological textures.
Divide your fabric into a grid and assign a different earthen texture to each block: French knots for gravel, long straight stitches for shale, couched cord for sandstone layers, bullion knots for porous rock.
Consider adding other materials like tiny seed beads or real quartz chips for extra dimension.
Labeling each section with a simple backstitch transforms your sampler from a practice cloth into a beautiful, scientific-inspired reference piece.
16. Cultivate a Mossy Landscape with 3D Stitches
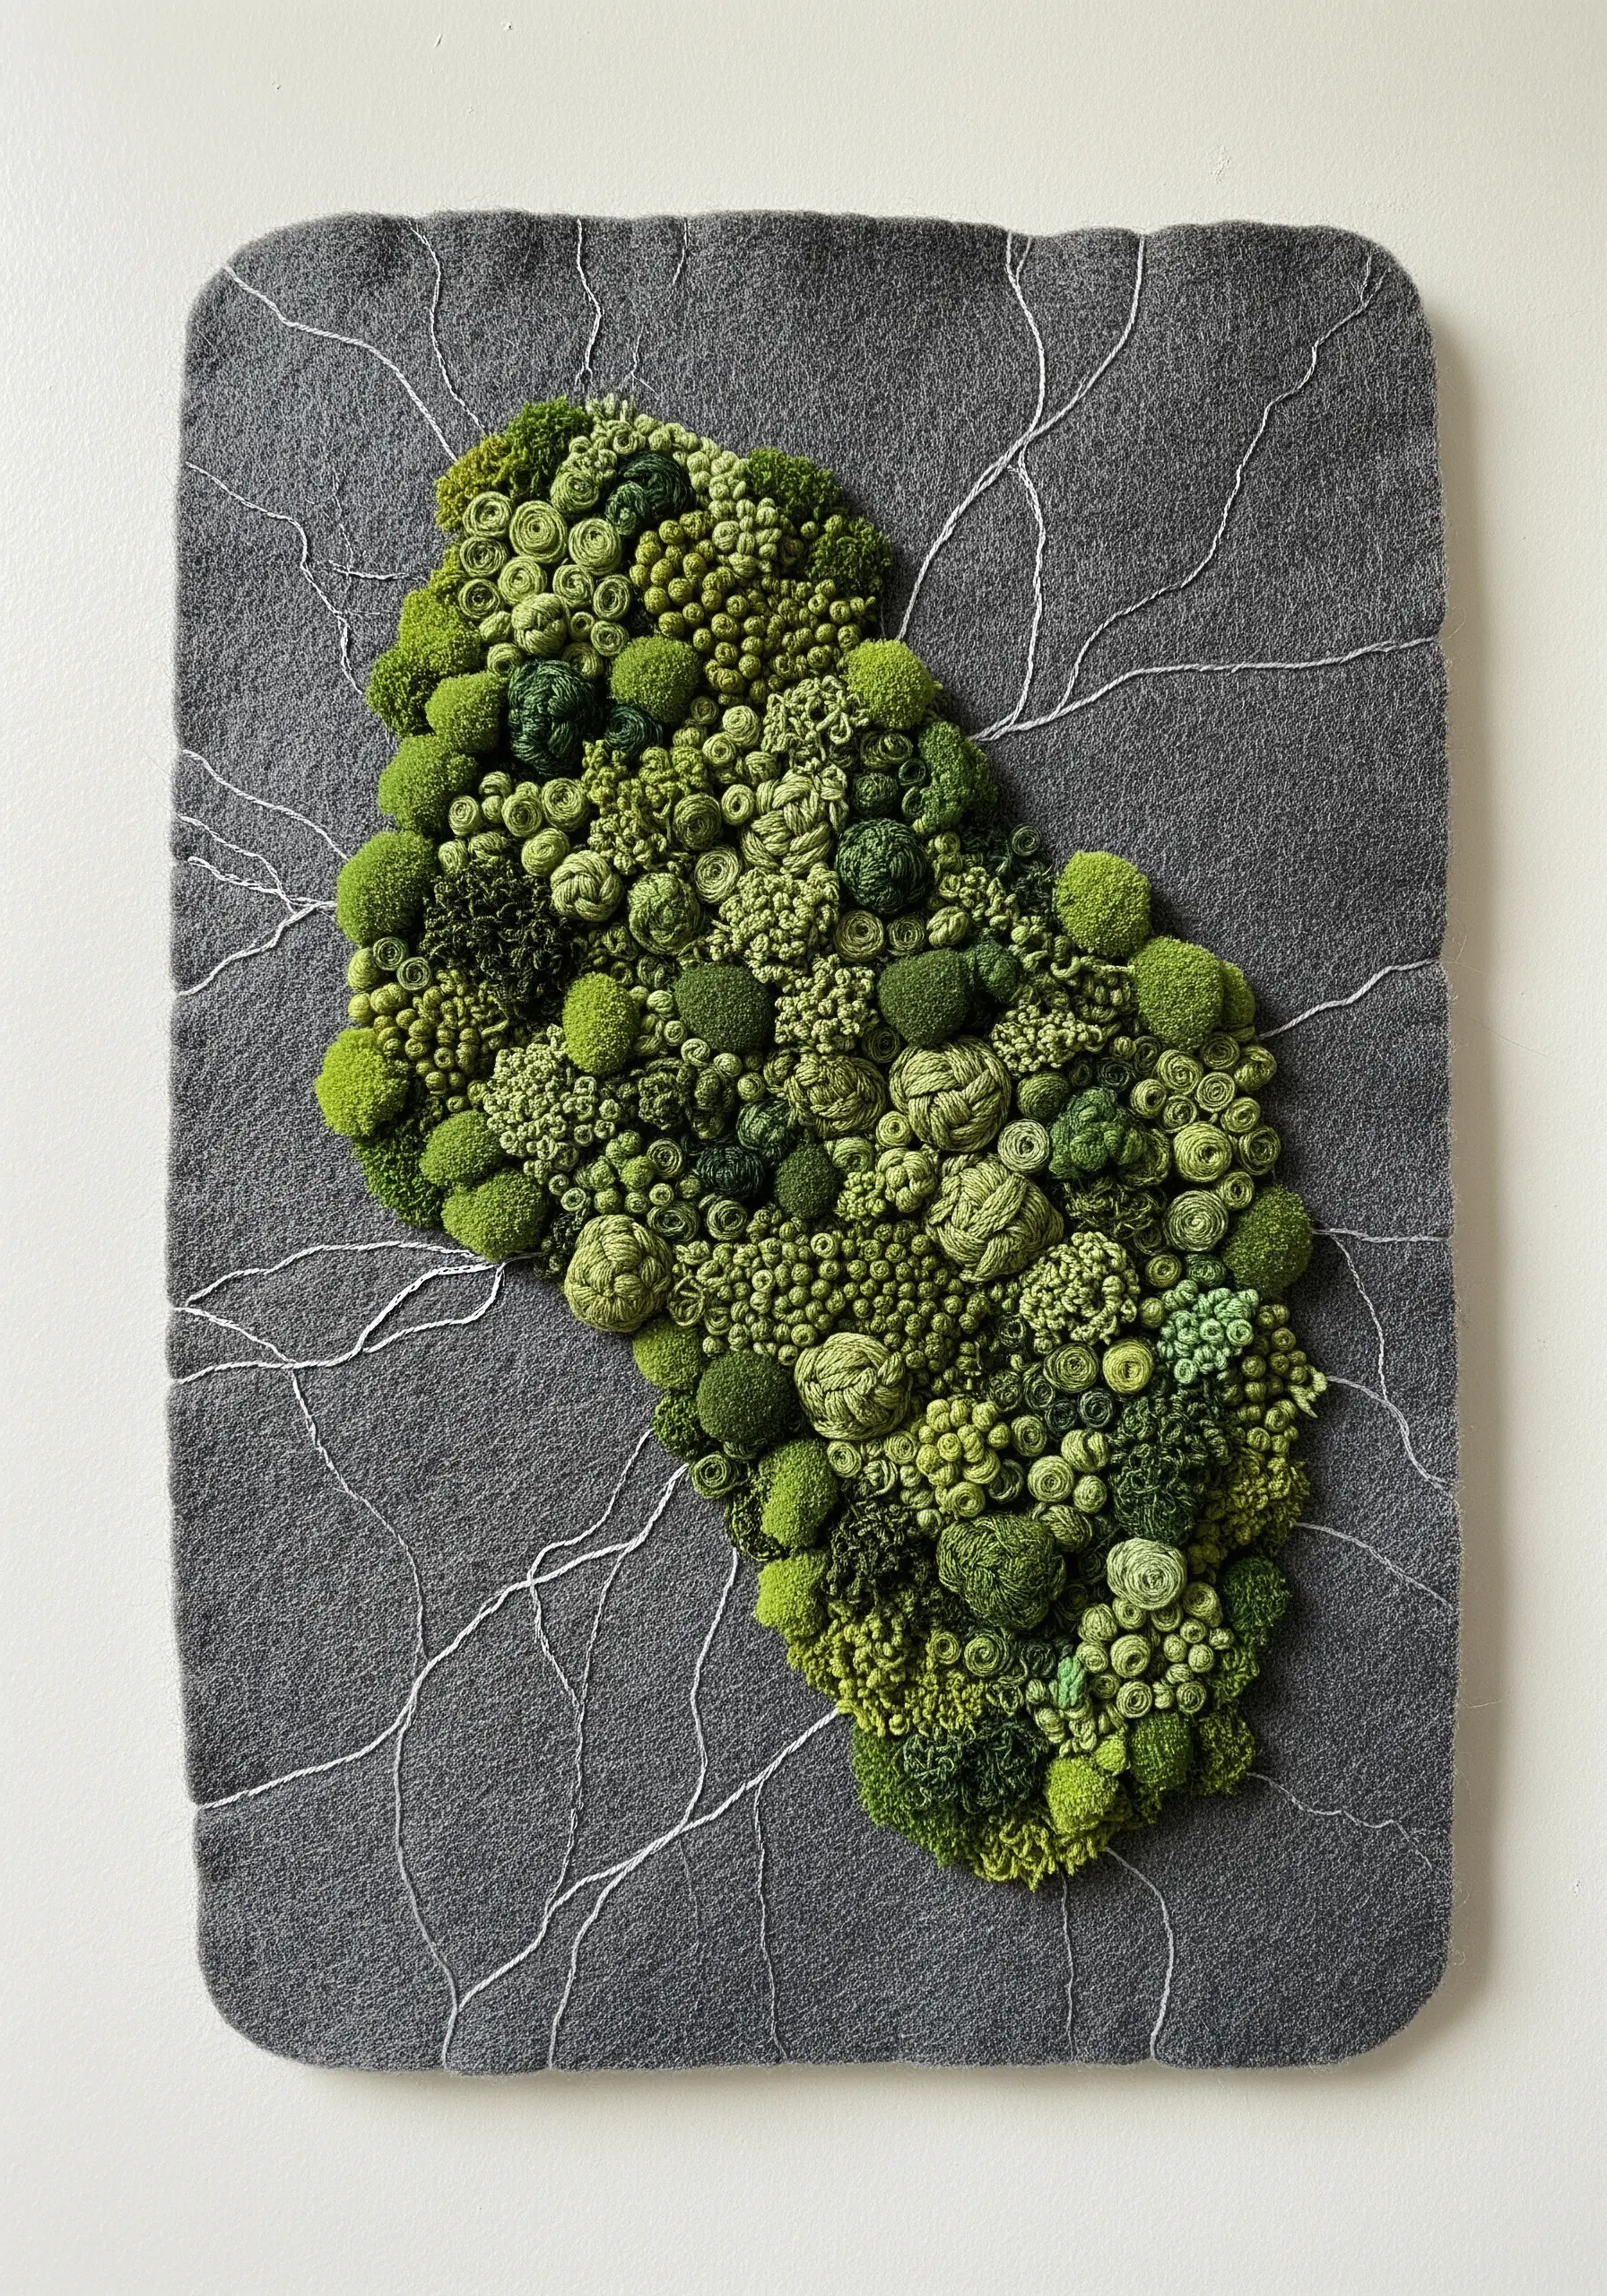
Build a lush, touchable patch of moss by layering three-dimensional stitches in multiple shades of green.
Use a sturdy felt base that can support heavy stitchwork without puckering.
Combine a variety of highly textural stitches: French knots for tight moss, long bullion knots for a slightly shaggier look, and cast-on stitches for plump, round mossy clumps.
Working with different types of thread, from matte wool to shiny perle cotton, will add another layer of realistic variation to your mossy creation.
17. Elevate a Headboard with Flowing Couching
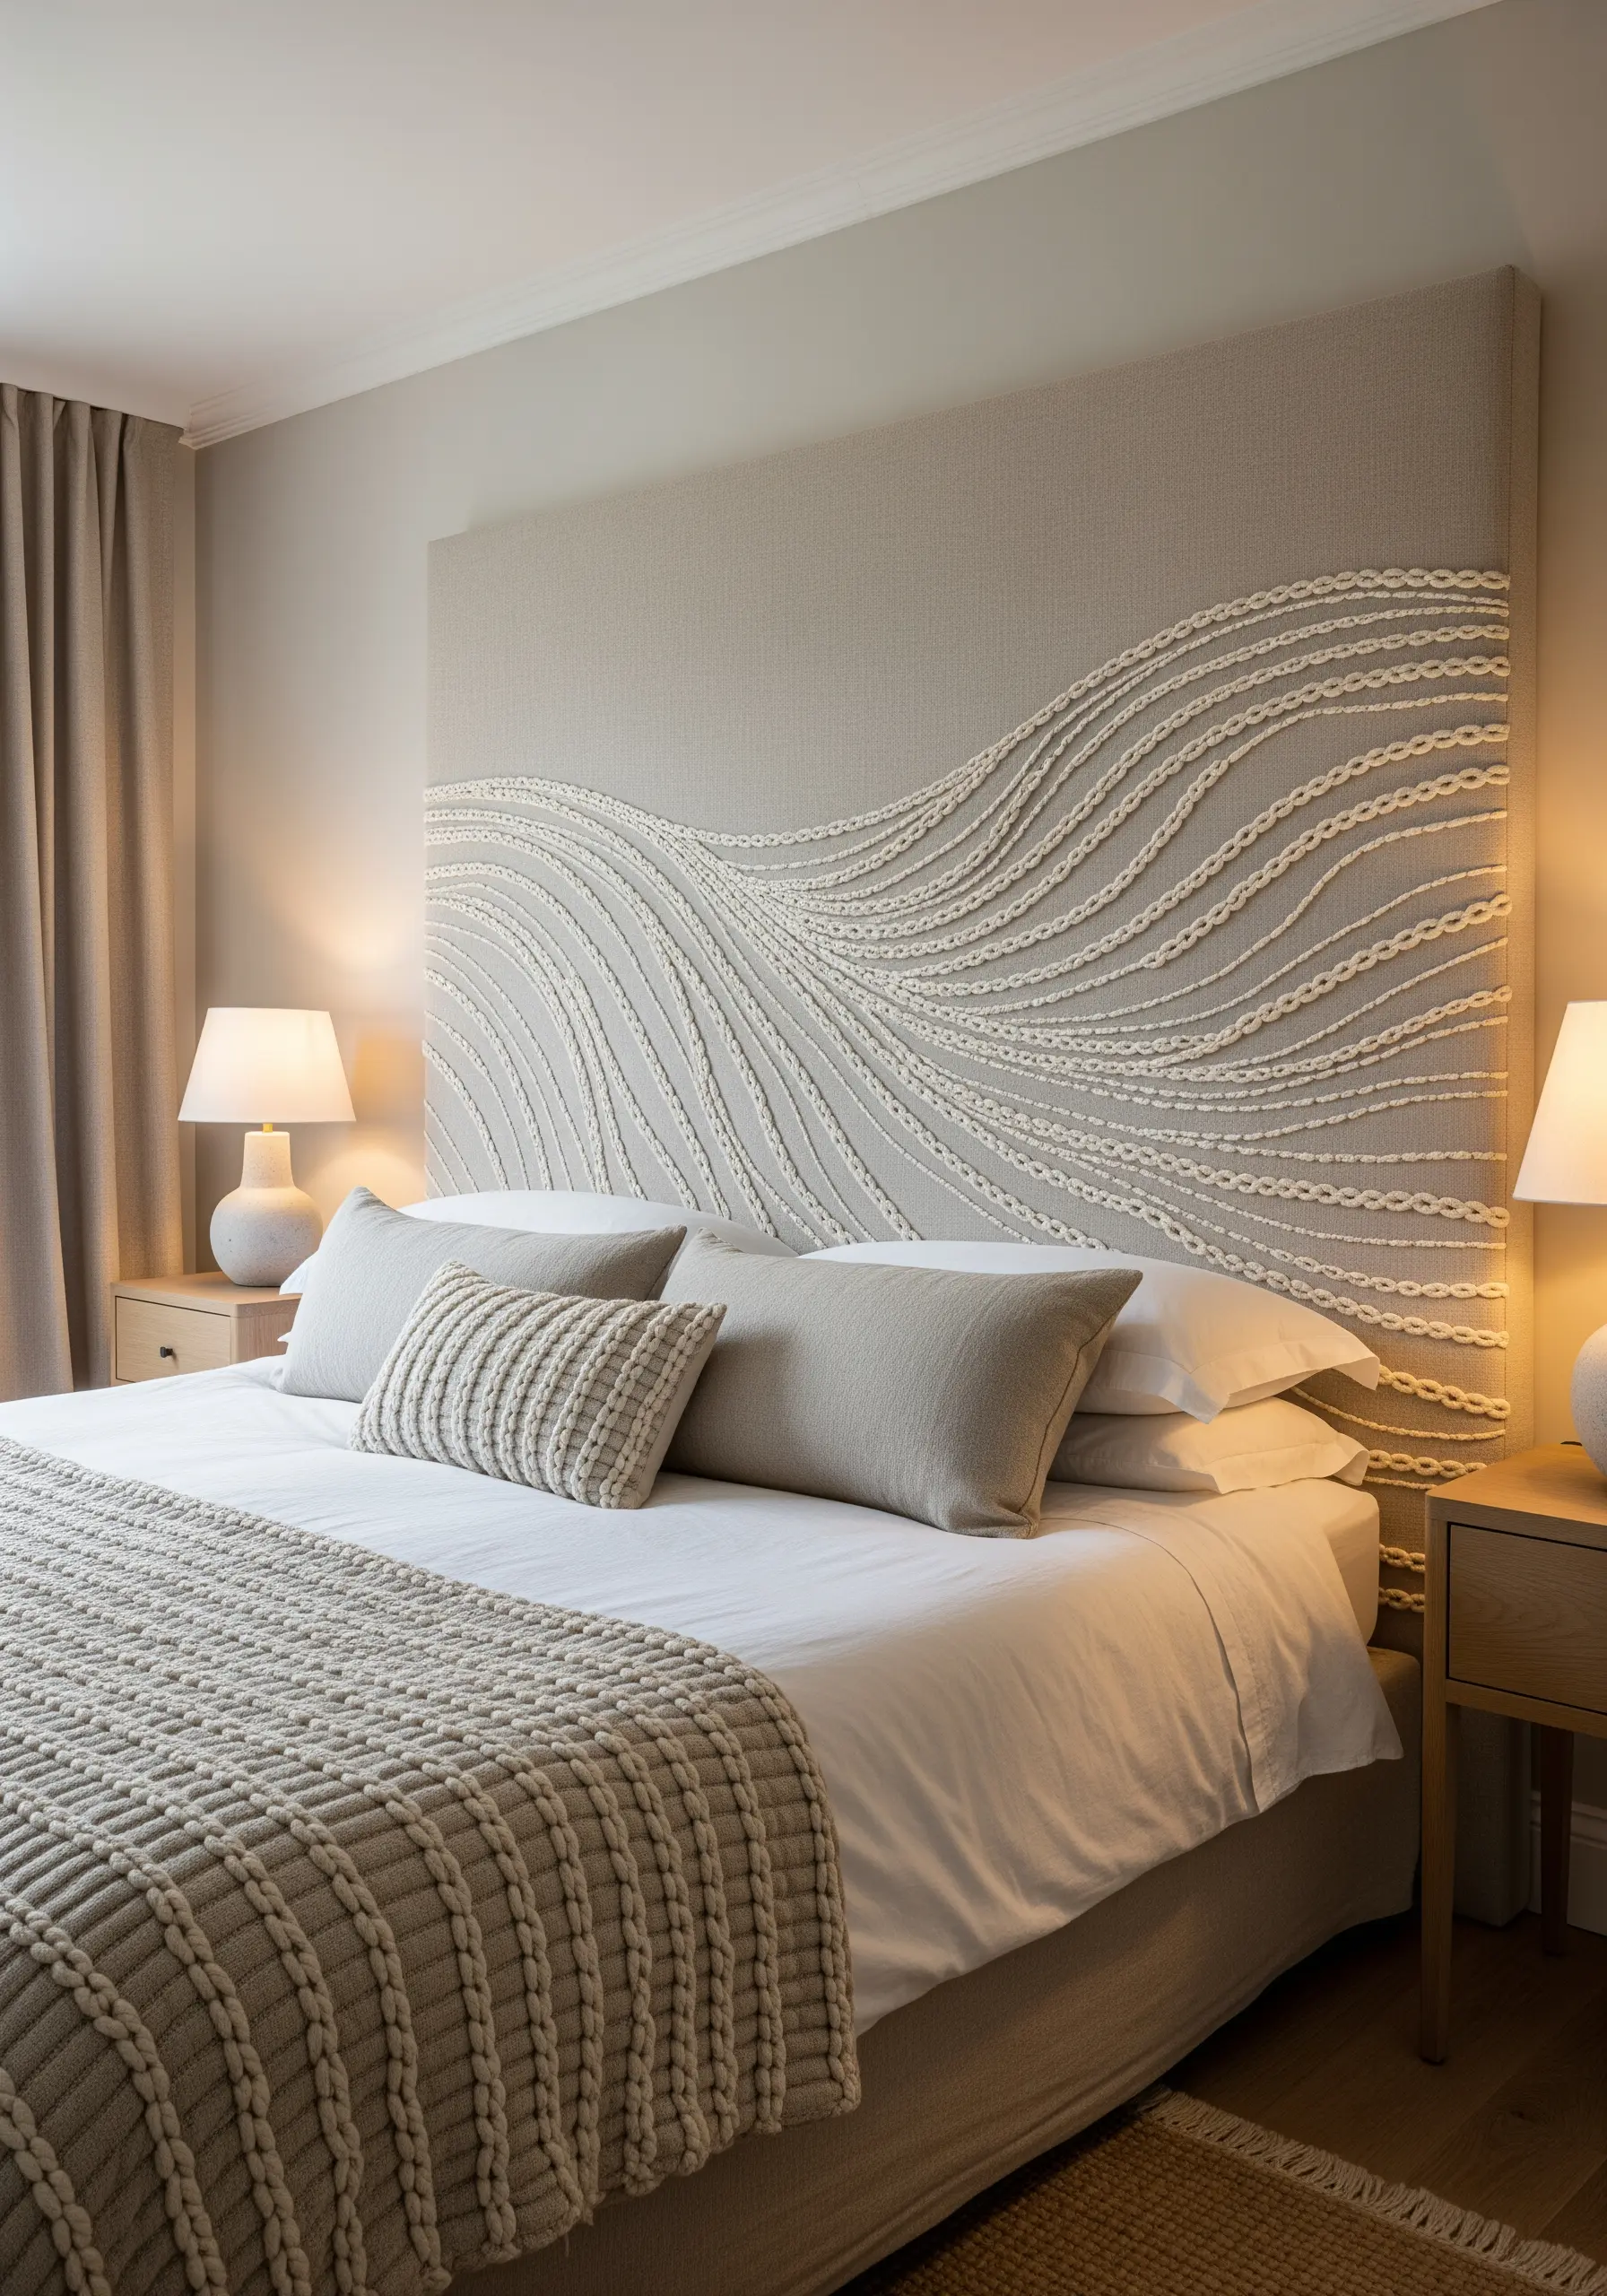
Turn a piece of furniture into a focal point with a large-scale embroidery project.
Couching is the perfect technique for adding bold, sculptural lines to upholstery.
Choose a thick, soft material like cotton piping cord or bulky yarn for your main lines. Use a strong, matching thread to tack it down onto the headboard fabric, creating sweeping, organic waves.
This technique adds incredible texture and a high-end, custom look to a bedroom, proving that embroidery can go far beyond the hoop.
18. Craft a Miniature Riverbed with Mixed Textures
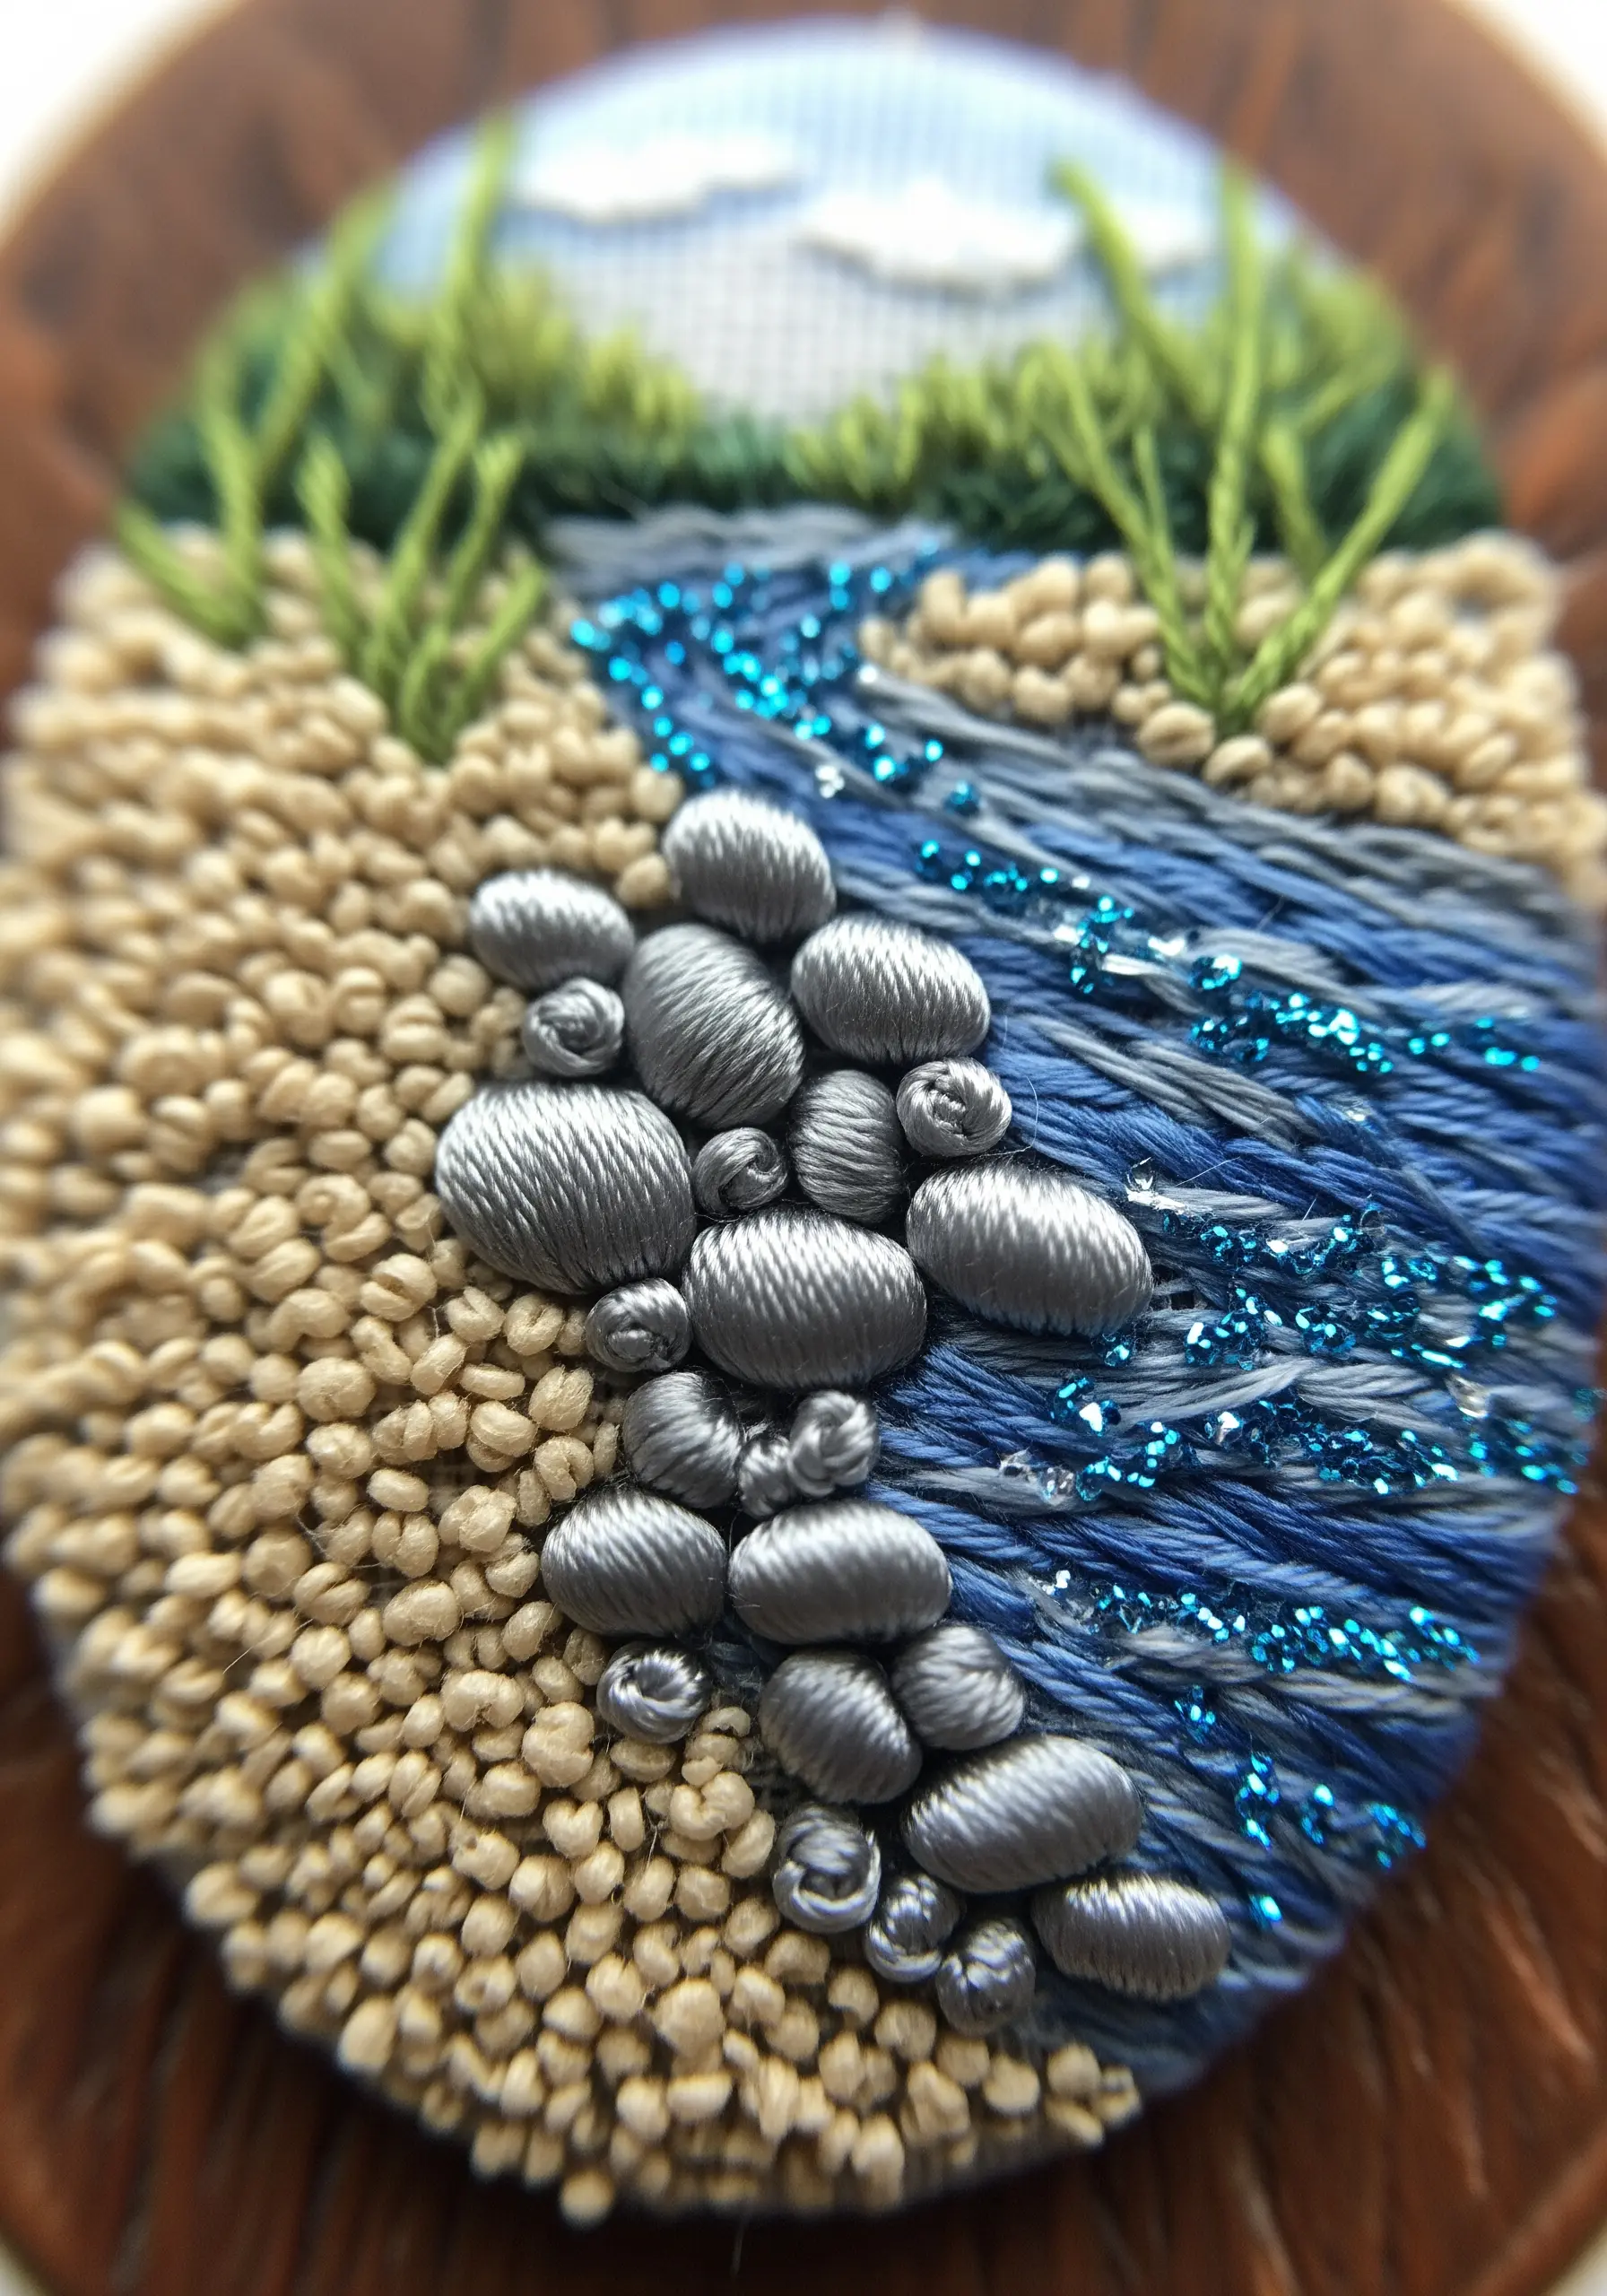
Create a dynamic miniature landscape by choosing stitches that perfectly mimic their real-world counterparts.
For the sandy bank, use dense, matte French knots in a beige or tan cotton floss.
For the river stones, switch to a smooth, padded satin stitch using a grey thread with a bit of sheen, which will catch the light like wet rocks.
Finally, render the water with long, flowing straight stitches in variegated blue, and add a few stitches of metallic thread or a sprinkle of glitter floss to suggest sparkling light on the surface.
19. Illuminate a Lampshade with French Knot Clusters
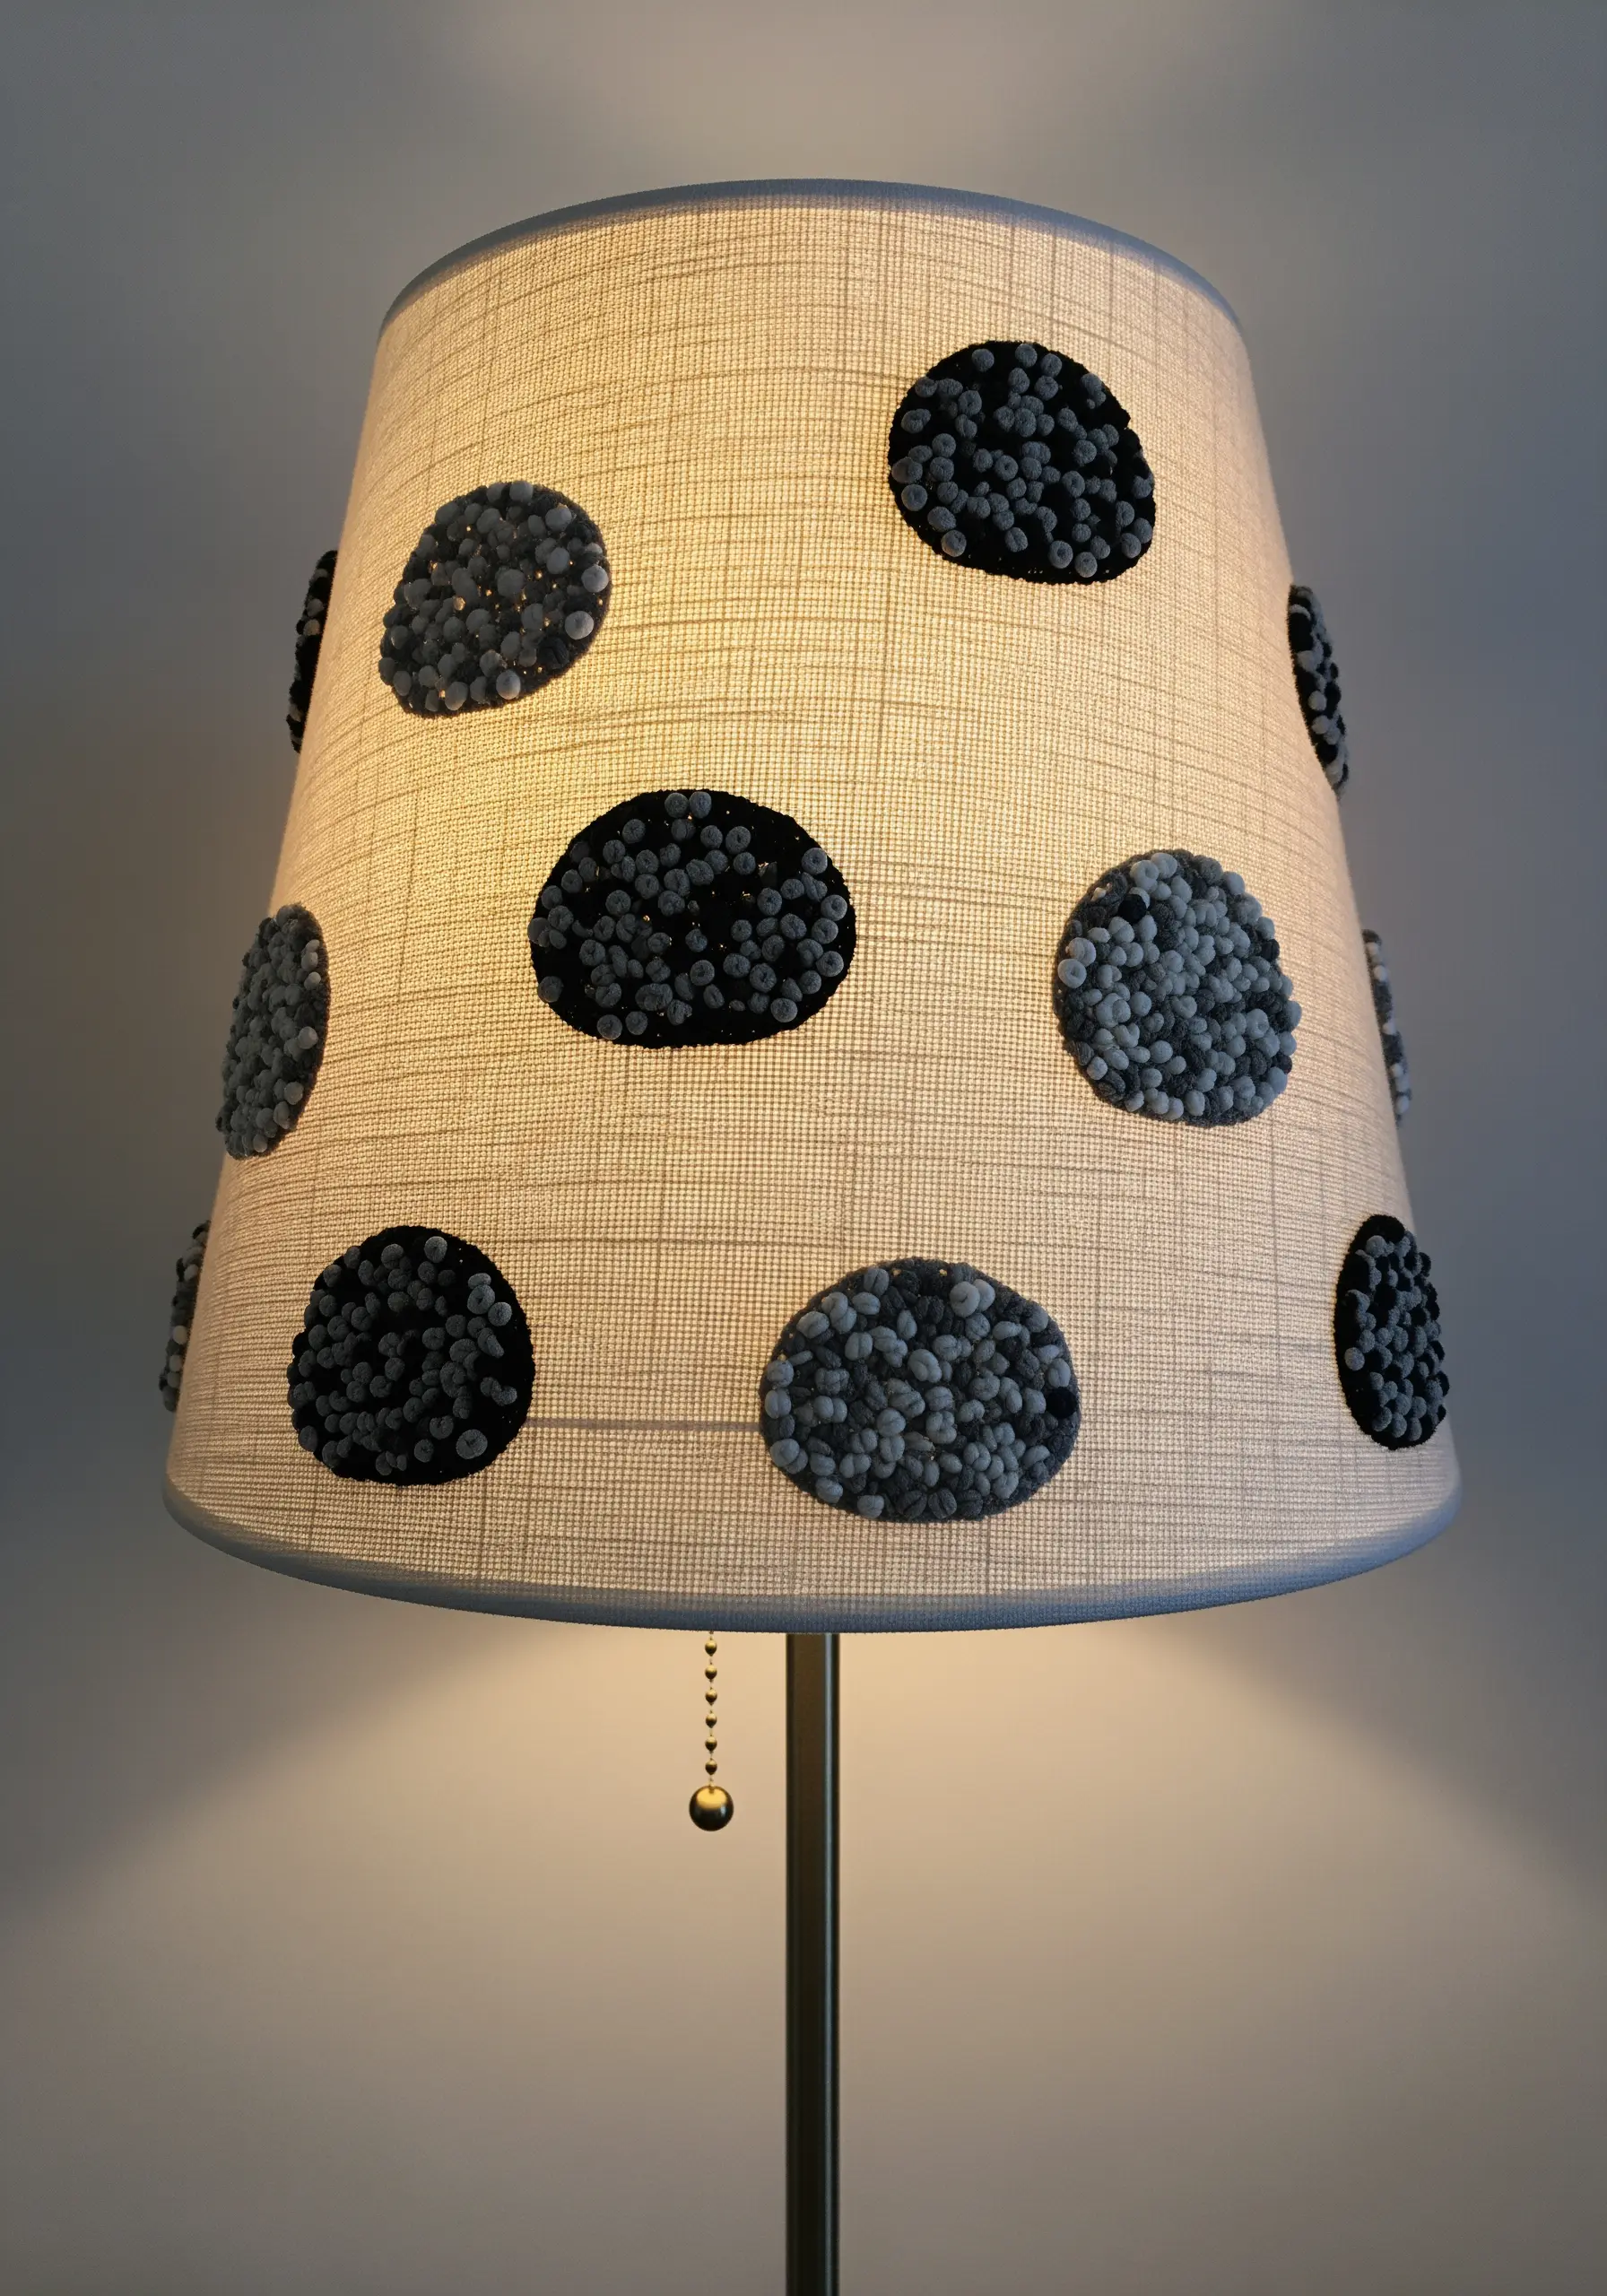
Add a playful, textural element to a plain lampshade with dots made from French knots.
To avoid damaging the shade, use a very sharp, fine needle and maintain gentle tension on your thread.
Group clusters of French knots together to form each polka dot shape. Using a variegated thread will give each dot subtle shifts in color, making them look more organic and stone-like.
When the lamp is turned on, the dense knots will create beautiful, soft silhouettes, adding a warm, handmade glow to the room.
20. Weave Sedimentary Layers into a Wall Hanging
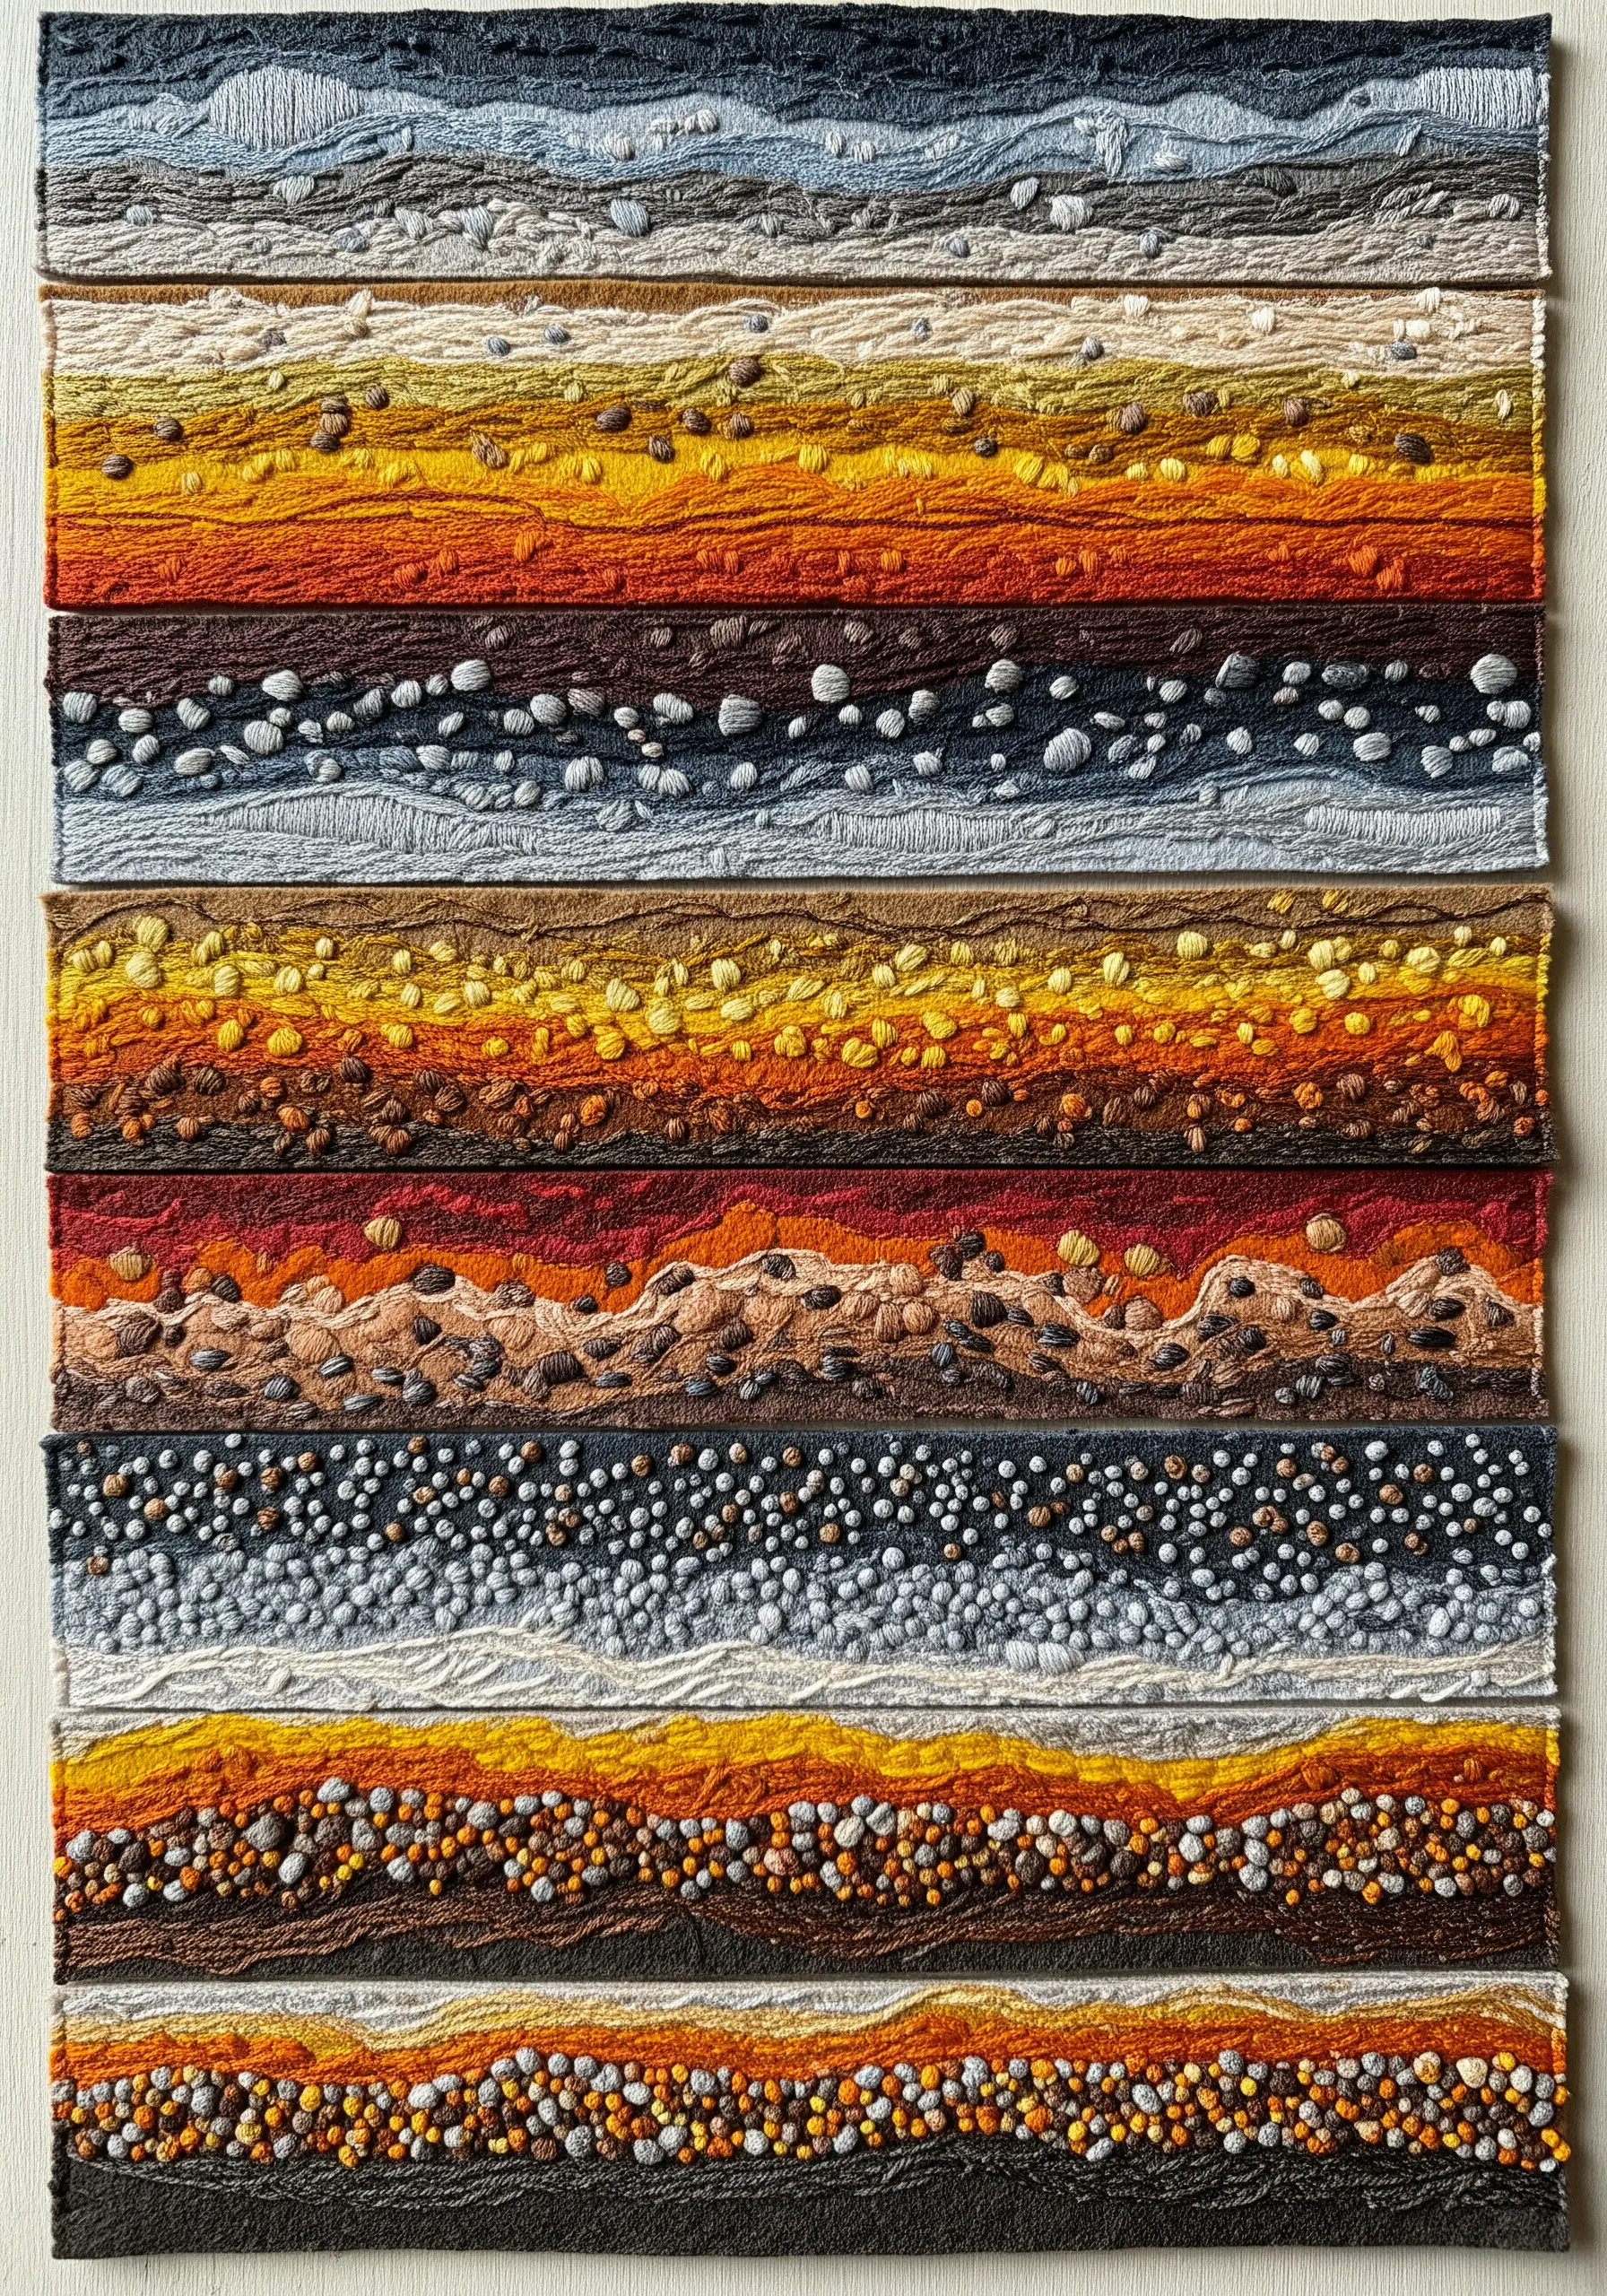
Tell a geological story in thread by creating a wall hanging with distinct, textured layers.
Assign a different stitch or technique to each horizontal band of color to represent different types of sediment.
Try a row of dense French knots for a pebbly conglomerate, followed by a layer of smooth, couched yarn for sandstone, and then a band of bullion knots for a more porous layer.
Keeping the edges between the layers slightly irregular and wavy will make the piece feel more natural and organic, as if it were a true cross-section of the earth.
21. Go Monumental with Minimalist Line Art
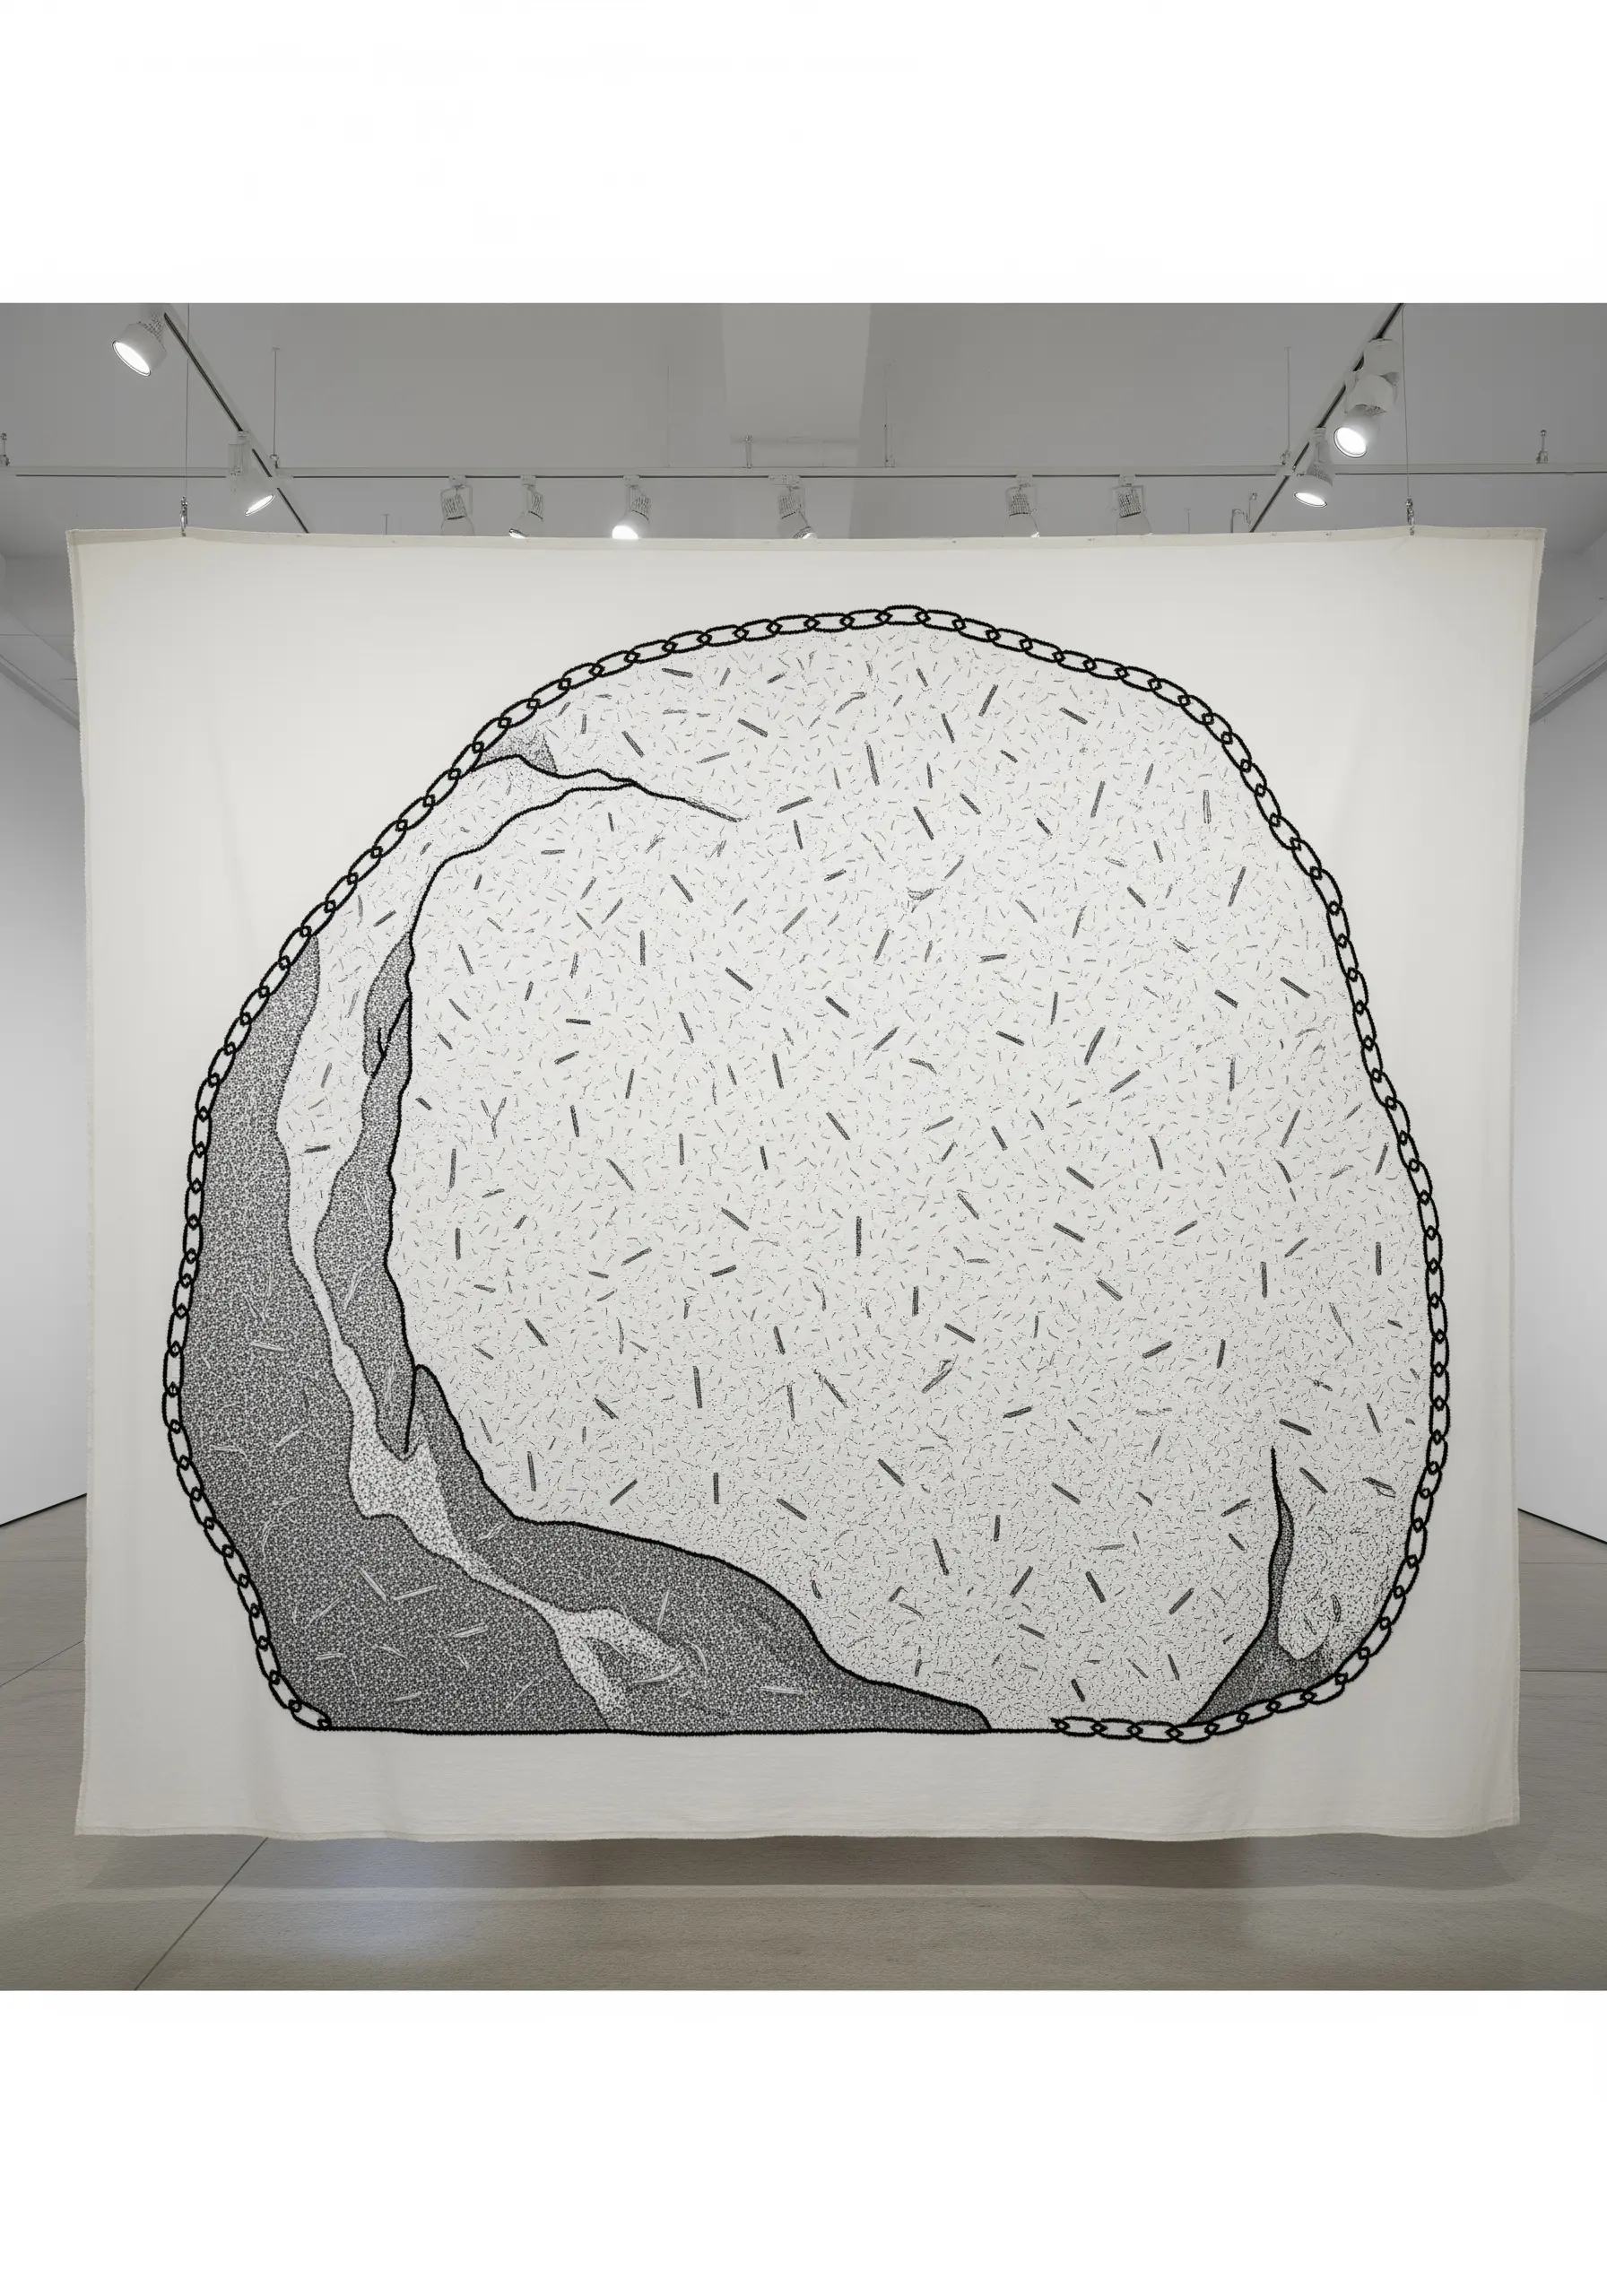
Prove that embroidery can command a space with this large-scale, minimalist approach.
Transfer a simple line drawing of a boulder onto a large piece of unprimed canvas or a simple cotton sheet.
Use a single color of thread—black provides the strongest contrast—and a consistent, clean stitch like a backstitch or stem stitch for the main outlines.
Add texture with sparsely scattered seed stitches or tiny straight stitches, suggesting the rock’s surface without overwhelming the clean power of the form.
This is how you turn a simple sketch into a monumental textile installation.
22. Embellish a Pocket with Abstract Patchwork
Transform a functional apron pocket into a small canvas for abstract, earth-toned art.
Create a fabric collage using scraps of canvas, linen, and textured cottons in shades of rust, ochre, and brown.
Arrange the patches in an organic, overlapping composition on top of the pocket.
Then, use decorative, visible stitches like running stitches, seed stitches, and cross stitches to tack the pieces down. This technique, inspired by Japanese Boro, is both beautiful and reinforcing.
23. Create a Crystal Patch with Satin Stitch Facets
Capture the sharp, reflective quality of a crystal cluster by mastering directional satin stitch.
The key to making the facets look three-dimensional is to change the angle of your satin stitches for each distinct plane of the crystal.
This simple shift in stitch direction causes the light to reflect differently off each section, creating a powerful illusion of depth and form.
For a clean, professional finish, outline the entire patch with a fine metallic thread using a backstitch or couching stitch.
24. Embellish Corners with Concentric Couching
Add a bold, graphic statement to the corner of a napkin, scarf, or pillowcase with couching.
This technique is ideal for creating clean, curved lines quickly. Simply bundle several strands of floss or a fine yarn together, lay it on your fabric in a circular pattern, and tack it down with a single, contrasting strand.
By layering concentric and overlapping circles, you can build up a design that feels like a topographic map or the rings of a polished stone, adding sophisticated weight to any corner.
25. Sculpt a 3D Cliff Face with Fabric and Thread
Push the boundaries of embroidery with this highly textural, sculptural technique that goes beyond the flat surface.
This is a form of abstract fabric collage embroidery where you build up dimension first.
Layer torn strips of heavy fabric like canvas, padding some areas with scraps of batting to create the protruding rock formations.
Then, use long, expressive running stitches or free-motion machine stitching to define the cracks and strata. The raw, frayed edges of the fabric become an essential part of the rugged texture.
26. Craft a Serene Nursery Mobile with Stitched Stones

Create a calming, handmade mobile perfect for a modern nursery by focusing on soft forms and subtle details.
Construct the clouds and ‘stones’ from soft felt. Before stuffing and sewing the stone shapes closed, add a simple grid of running stitches or backstitches across the surface.
This minimal embroidered detail adds a layer of sophisticated texture without being overstimulating.
The gentle contrast between the smooth white clouds and the lightly textured grey stones creates a peaceful and tactile object for a restful space.
27. Add a Subtle Band of Texture to a Cuff
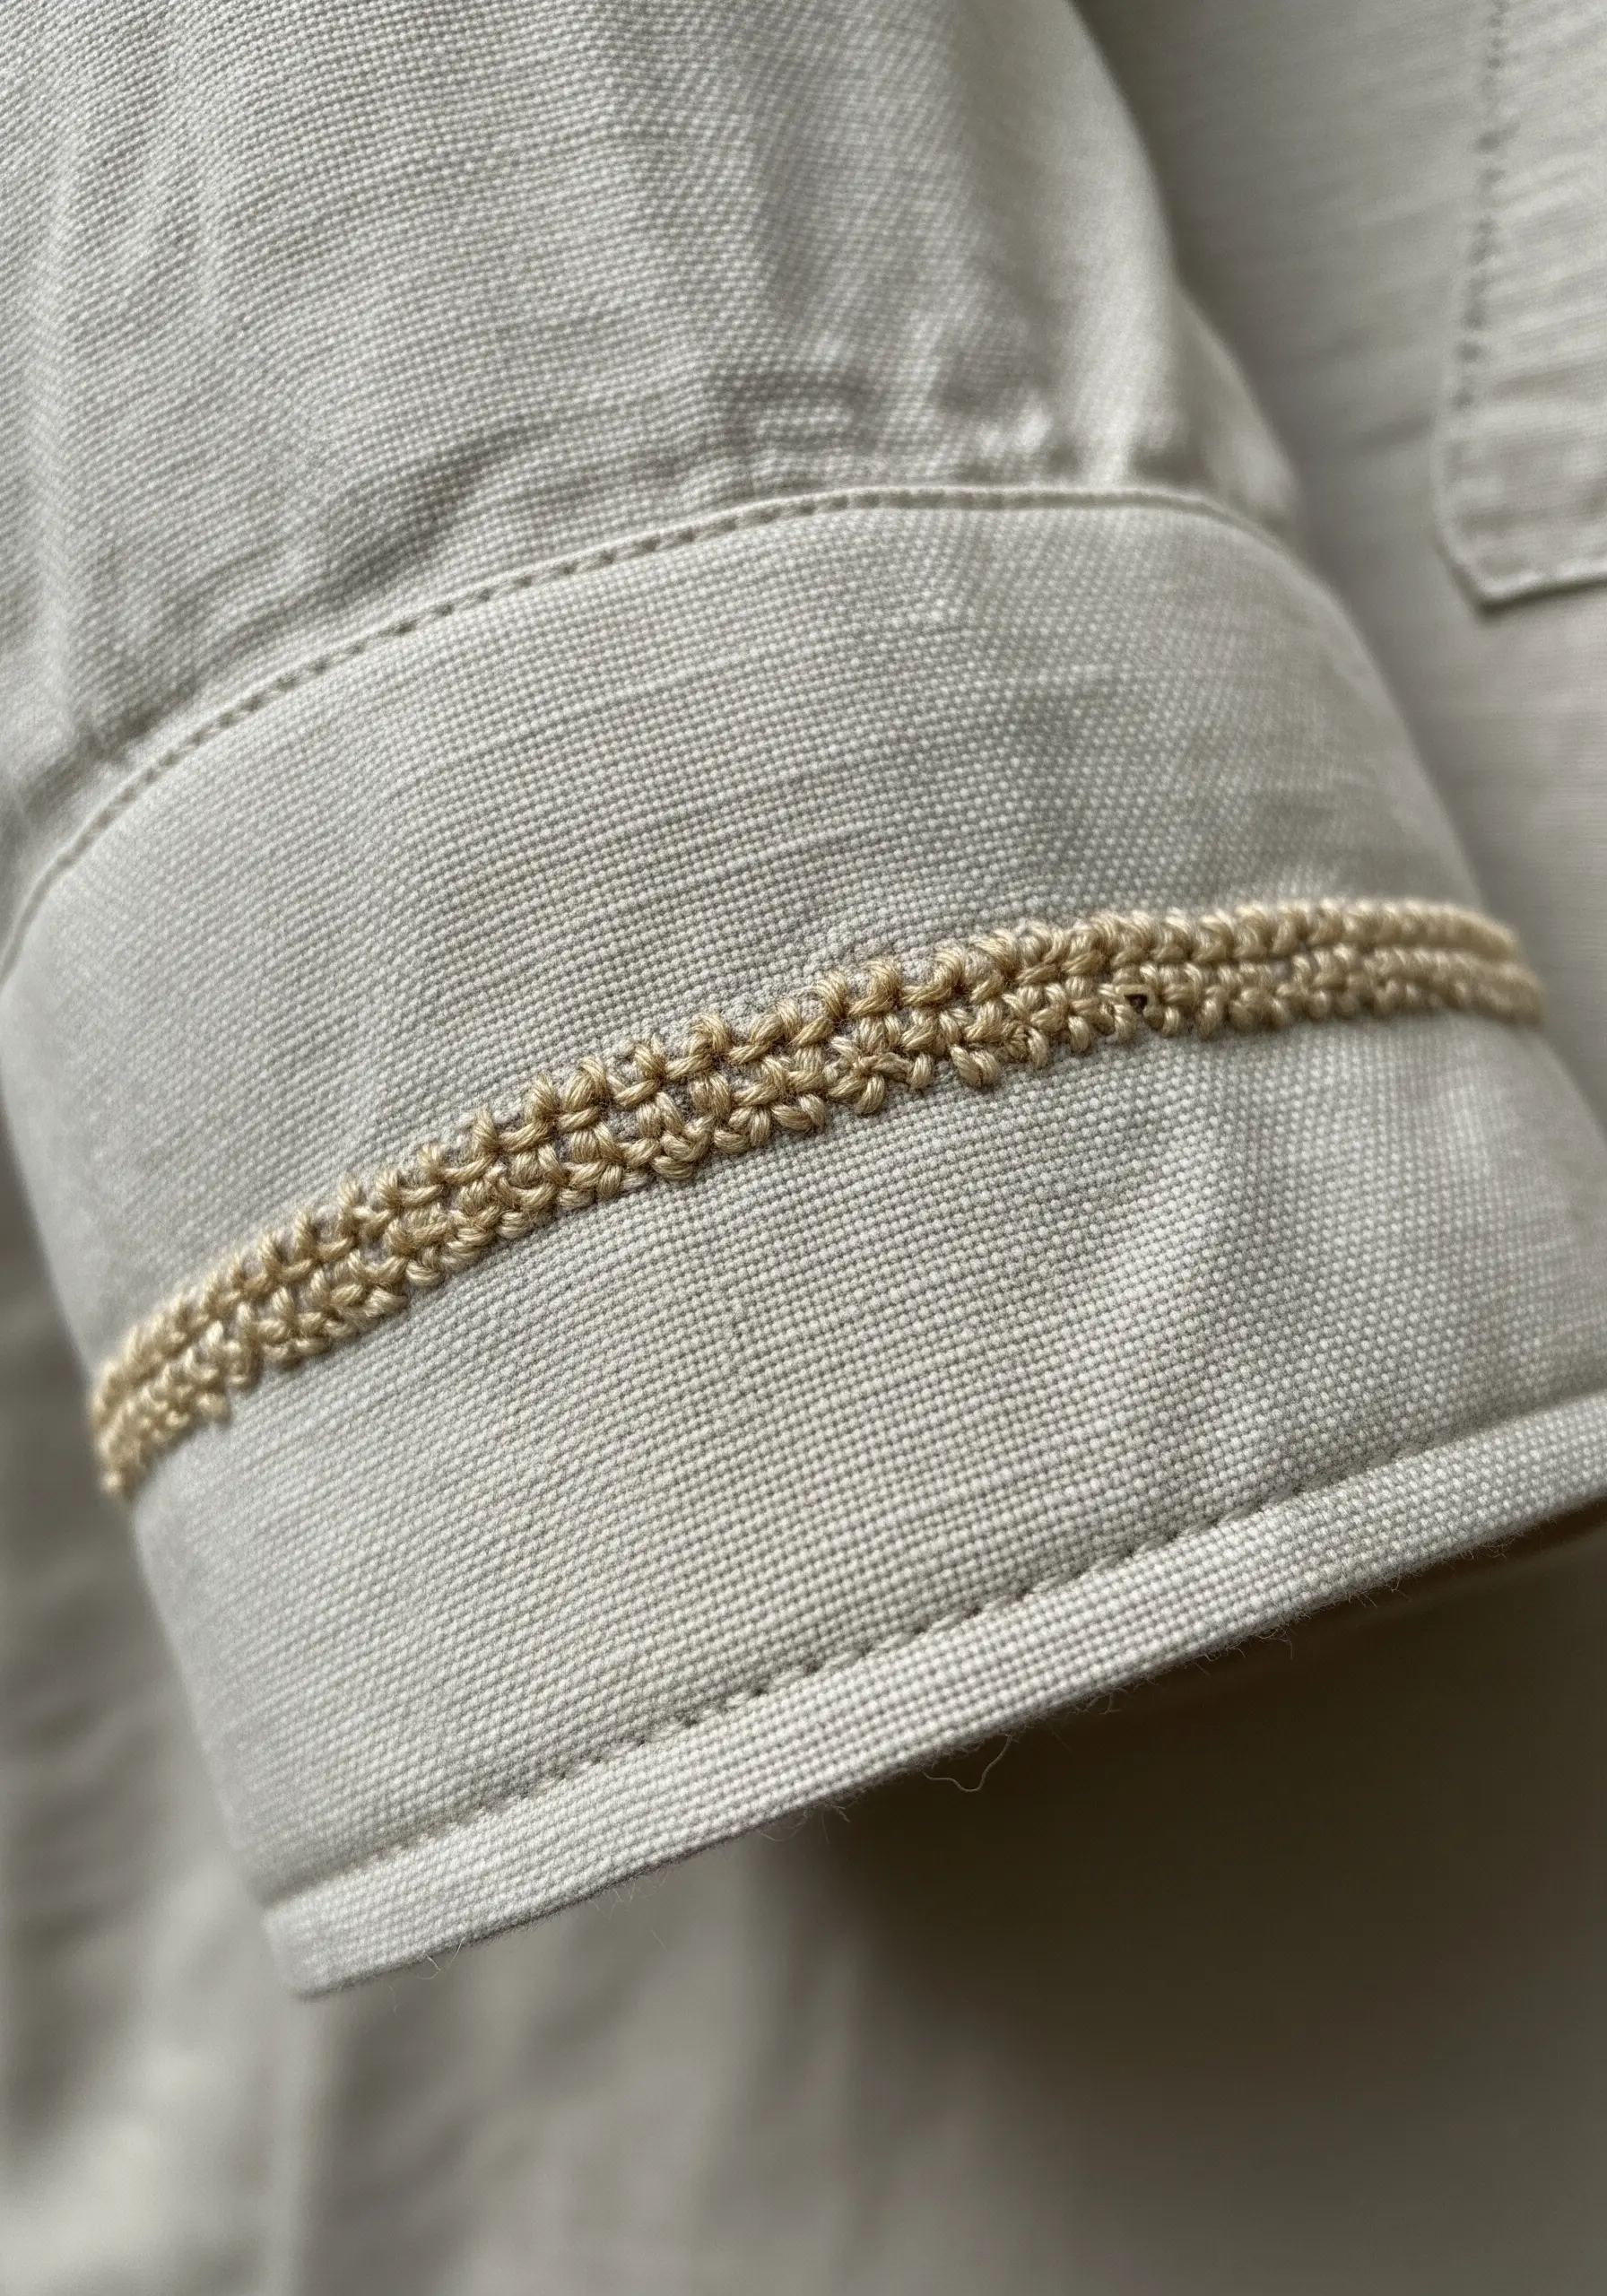
Elevate a simple garment with a small, considered detail that speaks to craftsmanship.
Choose a decorative but flat stitch, such as a sheaf stitch or a knotted stitch, to create a textured band around a shirt cuff.
The secret to an elegant, high-end look is to use a thread that is only one or two shades different from the base fabric.
This tone-on-tone approach creates a subtle, textural embellishment that is felt as much as it is seen, adding a touch of quiet luxury.
28. Adorn a Pouf with Mandala-Inspired Stitchwork
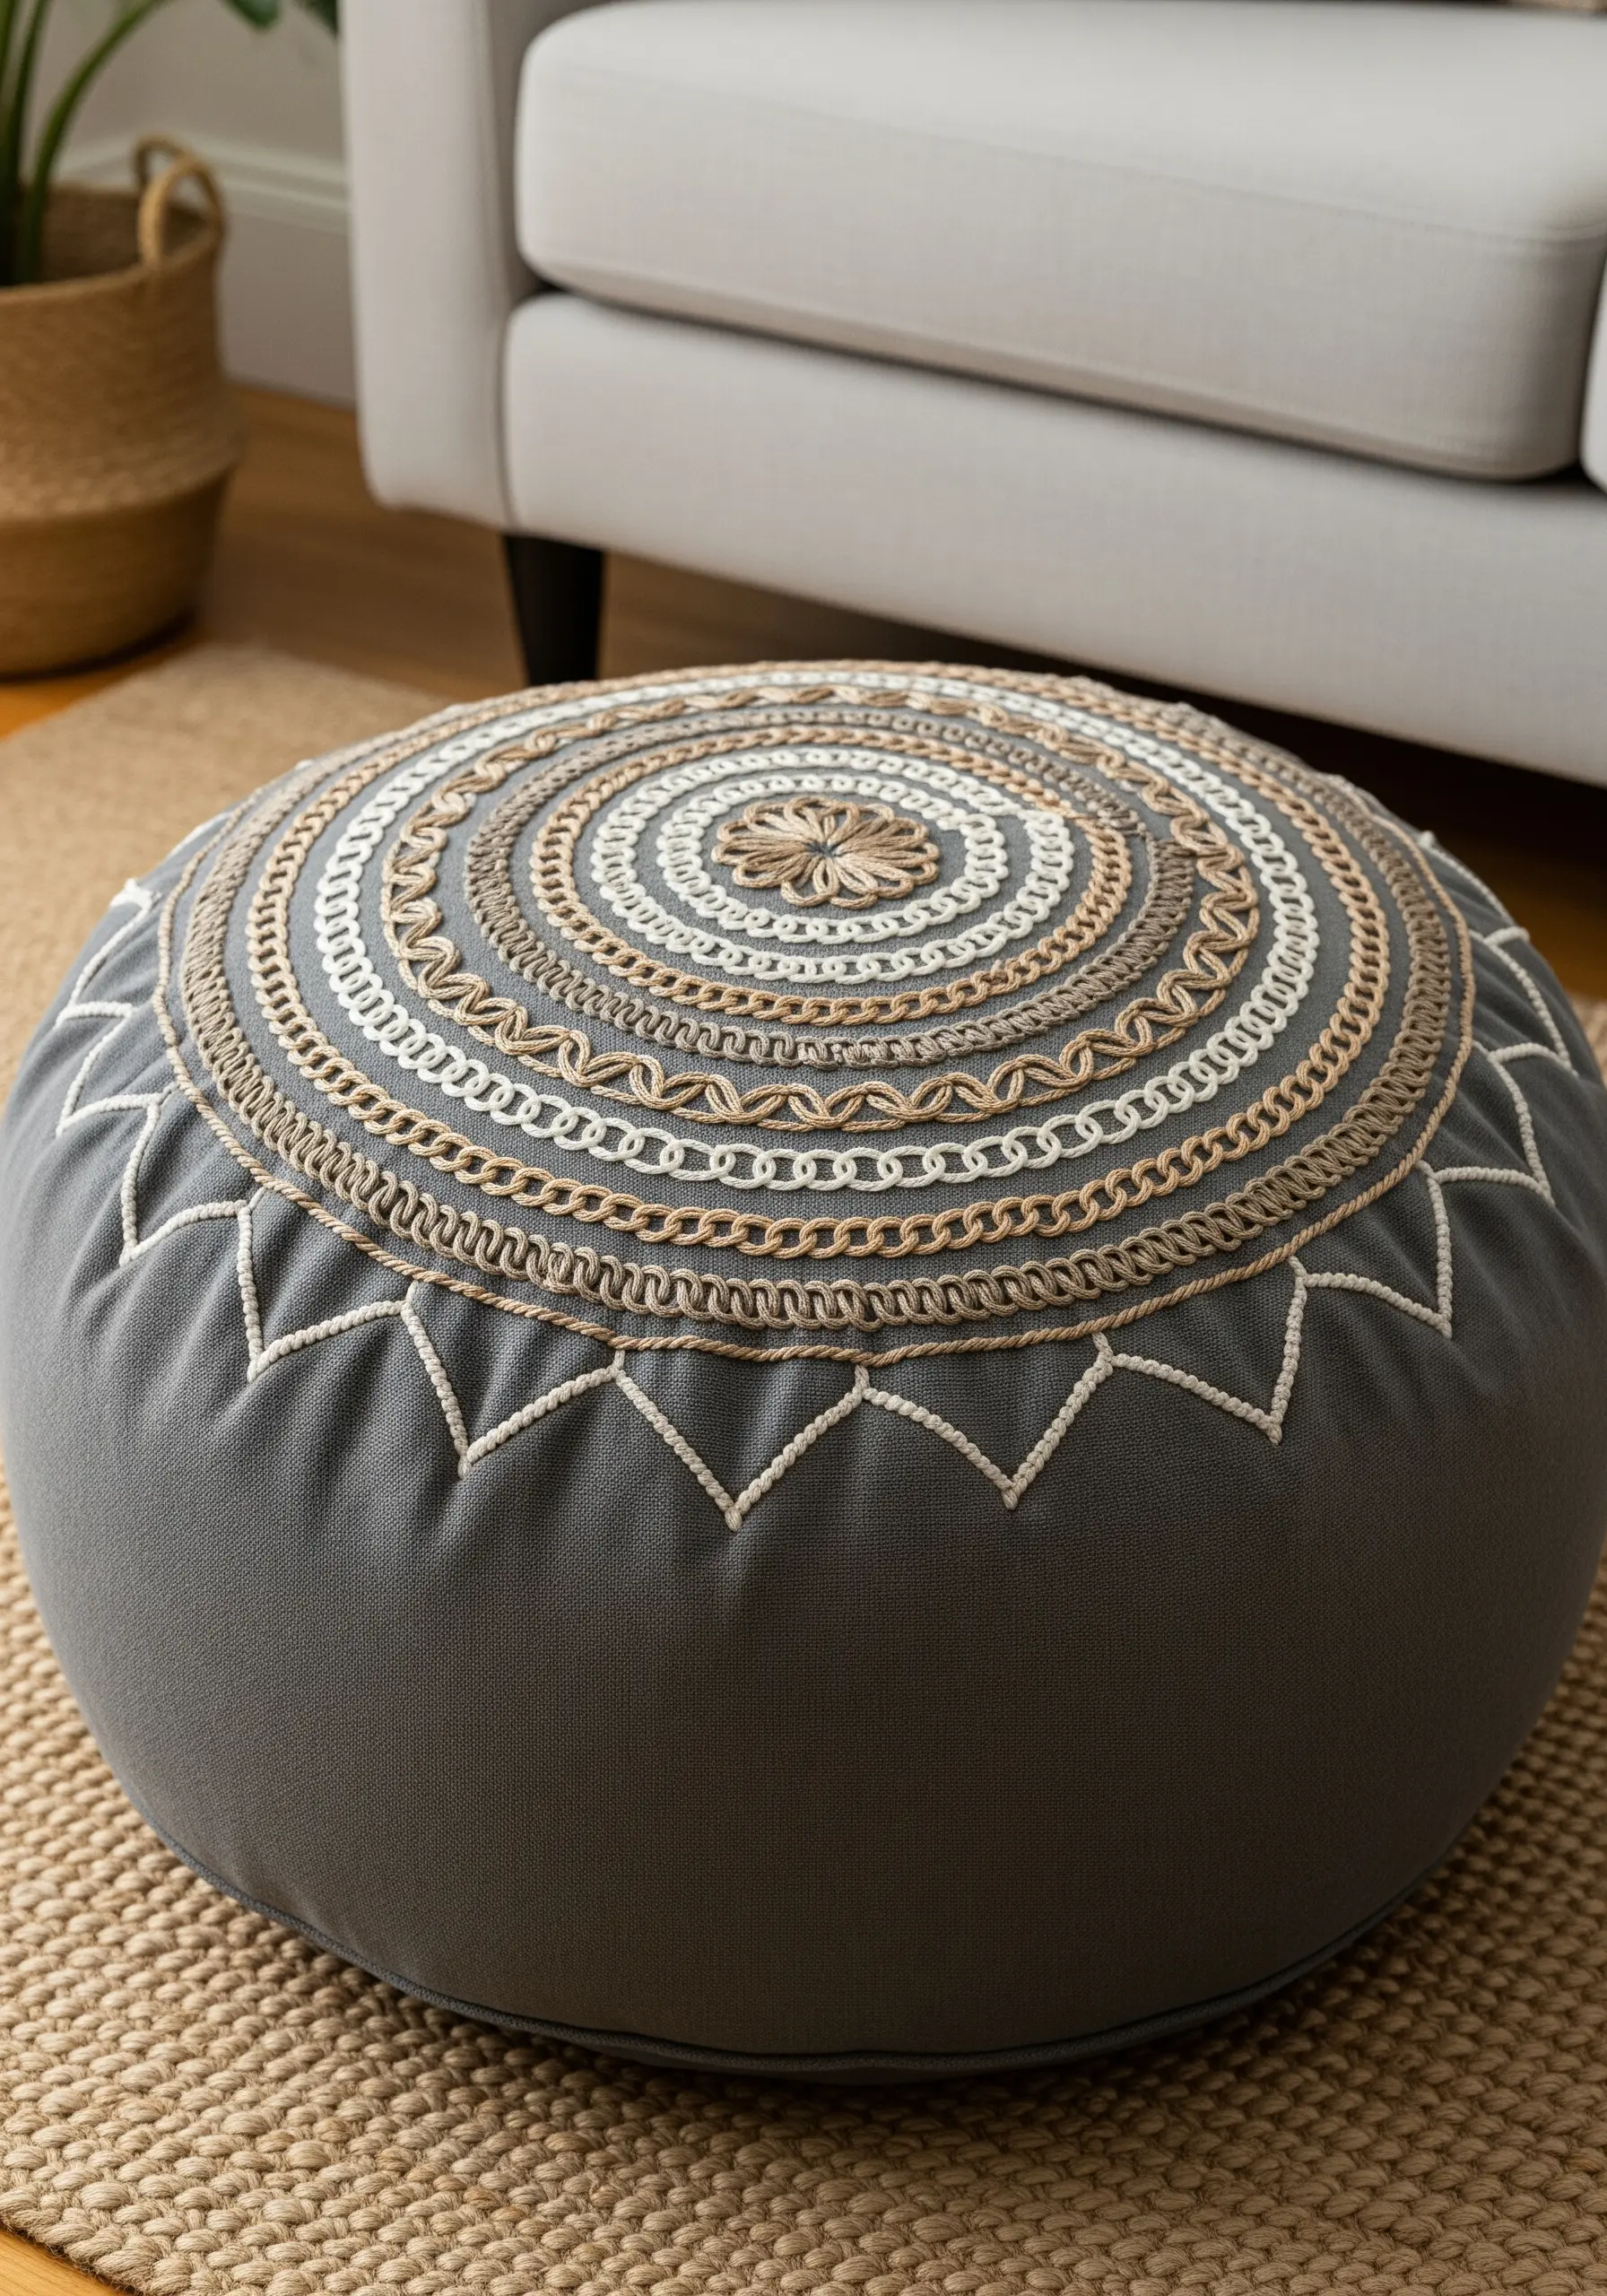
Turn a functional piece of furniture like a floor pouf into a decorative centerpiece.
A round surface is the perfect canvas for a mandala-style design that radiates from the center.
Because a pouf will see daily use, choose durable, textural stitches that can hold up to wear. The chain stitch, braided chain stitch, and couching are all excellent choices.
Incorporate different materials, like thick cotton floss and thinner jute cord, to create varied textures within your repeating patterns.


