
There comes a moment in every creative journey when you want your work to feel less like a hobby and more like an expression of your distinct voice. If you’re looking to move beyond simple stitches and into a world of rich texture and dimension, the key isn’t just practice—it’s permission. Permission to mix, to play, and to combine materials in ways that feel exciting and new.
Think of yarn not just as thread, but as a sculptural element. See fabric scraps not as waste, but as a color palette waiting to be assembled. Rope, roving, felt, and even wire are all part of your new toolkit. By blending these materials, you’re not just making a project; you’re building a tactile story.
Here, you’ll find ideas designed to shift your perspective. We’ll explore how to combine weaving with embroidery, macrame with felt, and punch needle with collage. These aren’t just tutorials; they are starting points for you to discover the incredible depth and personality your work can achieve when you embrace the beauty of mixed fibers.
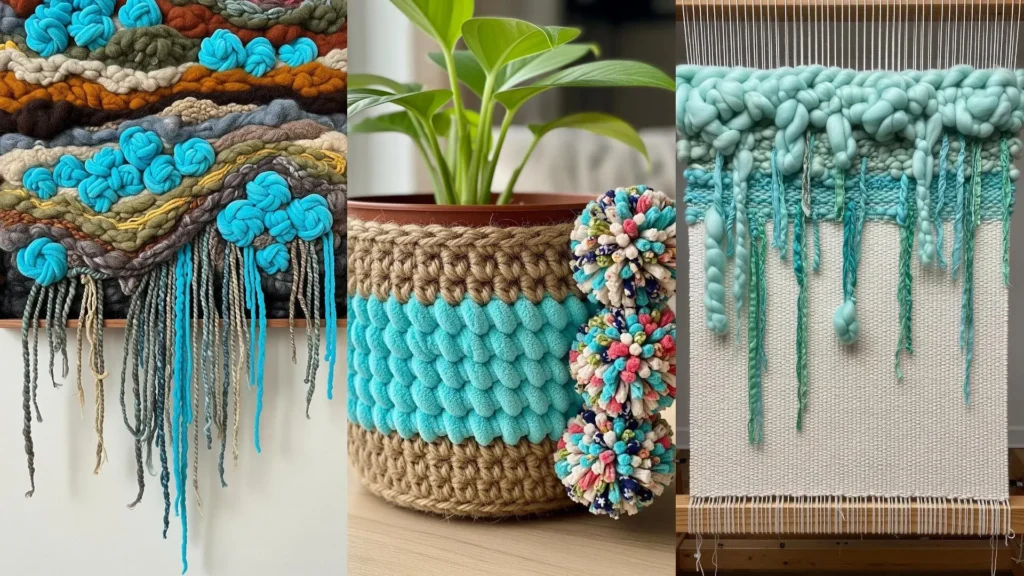
1. Weave a Story with Layered Textures
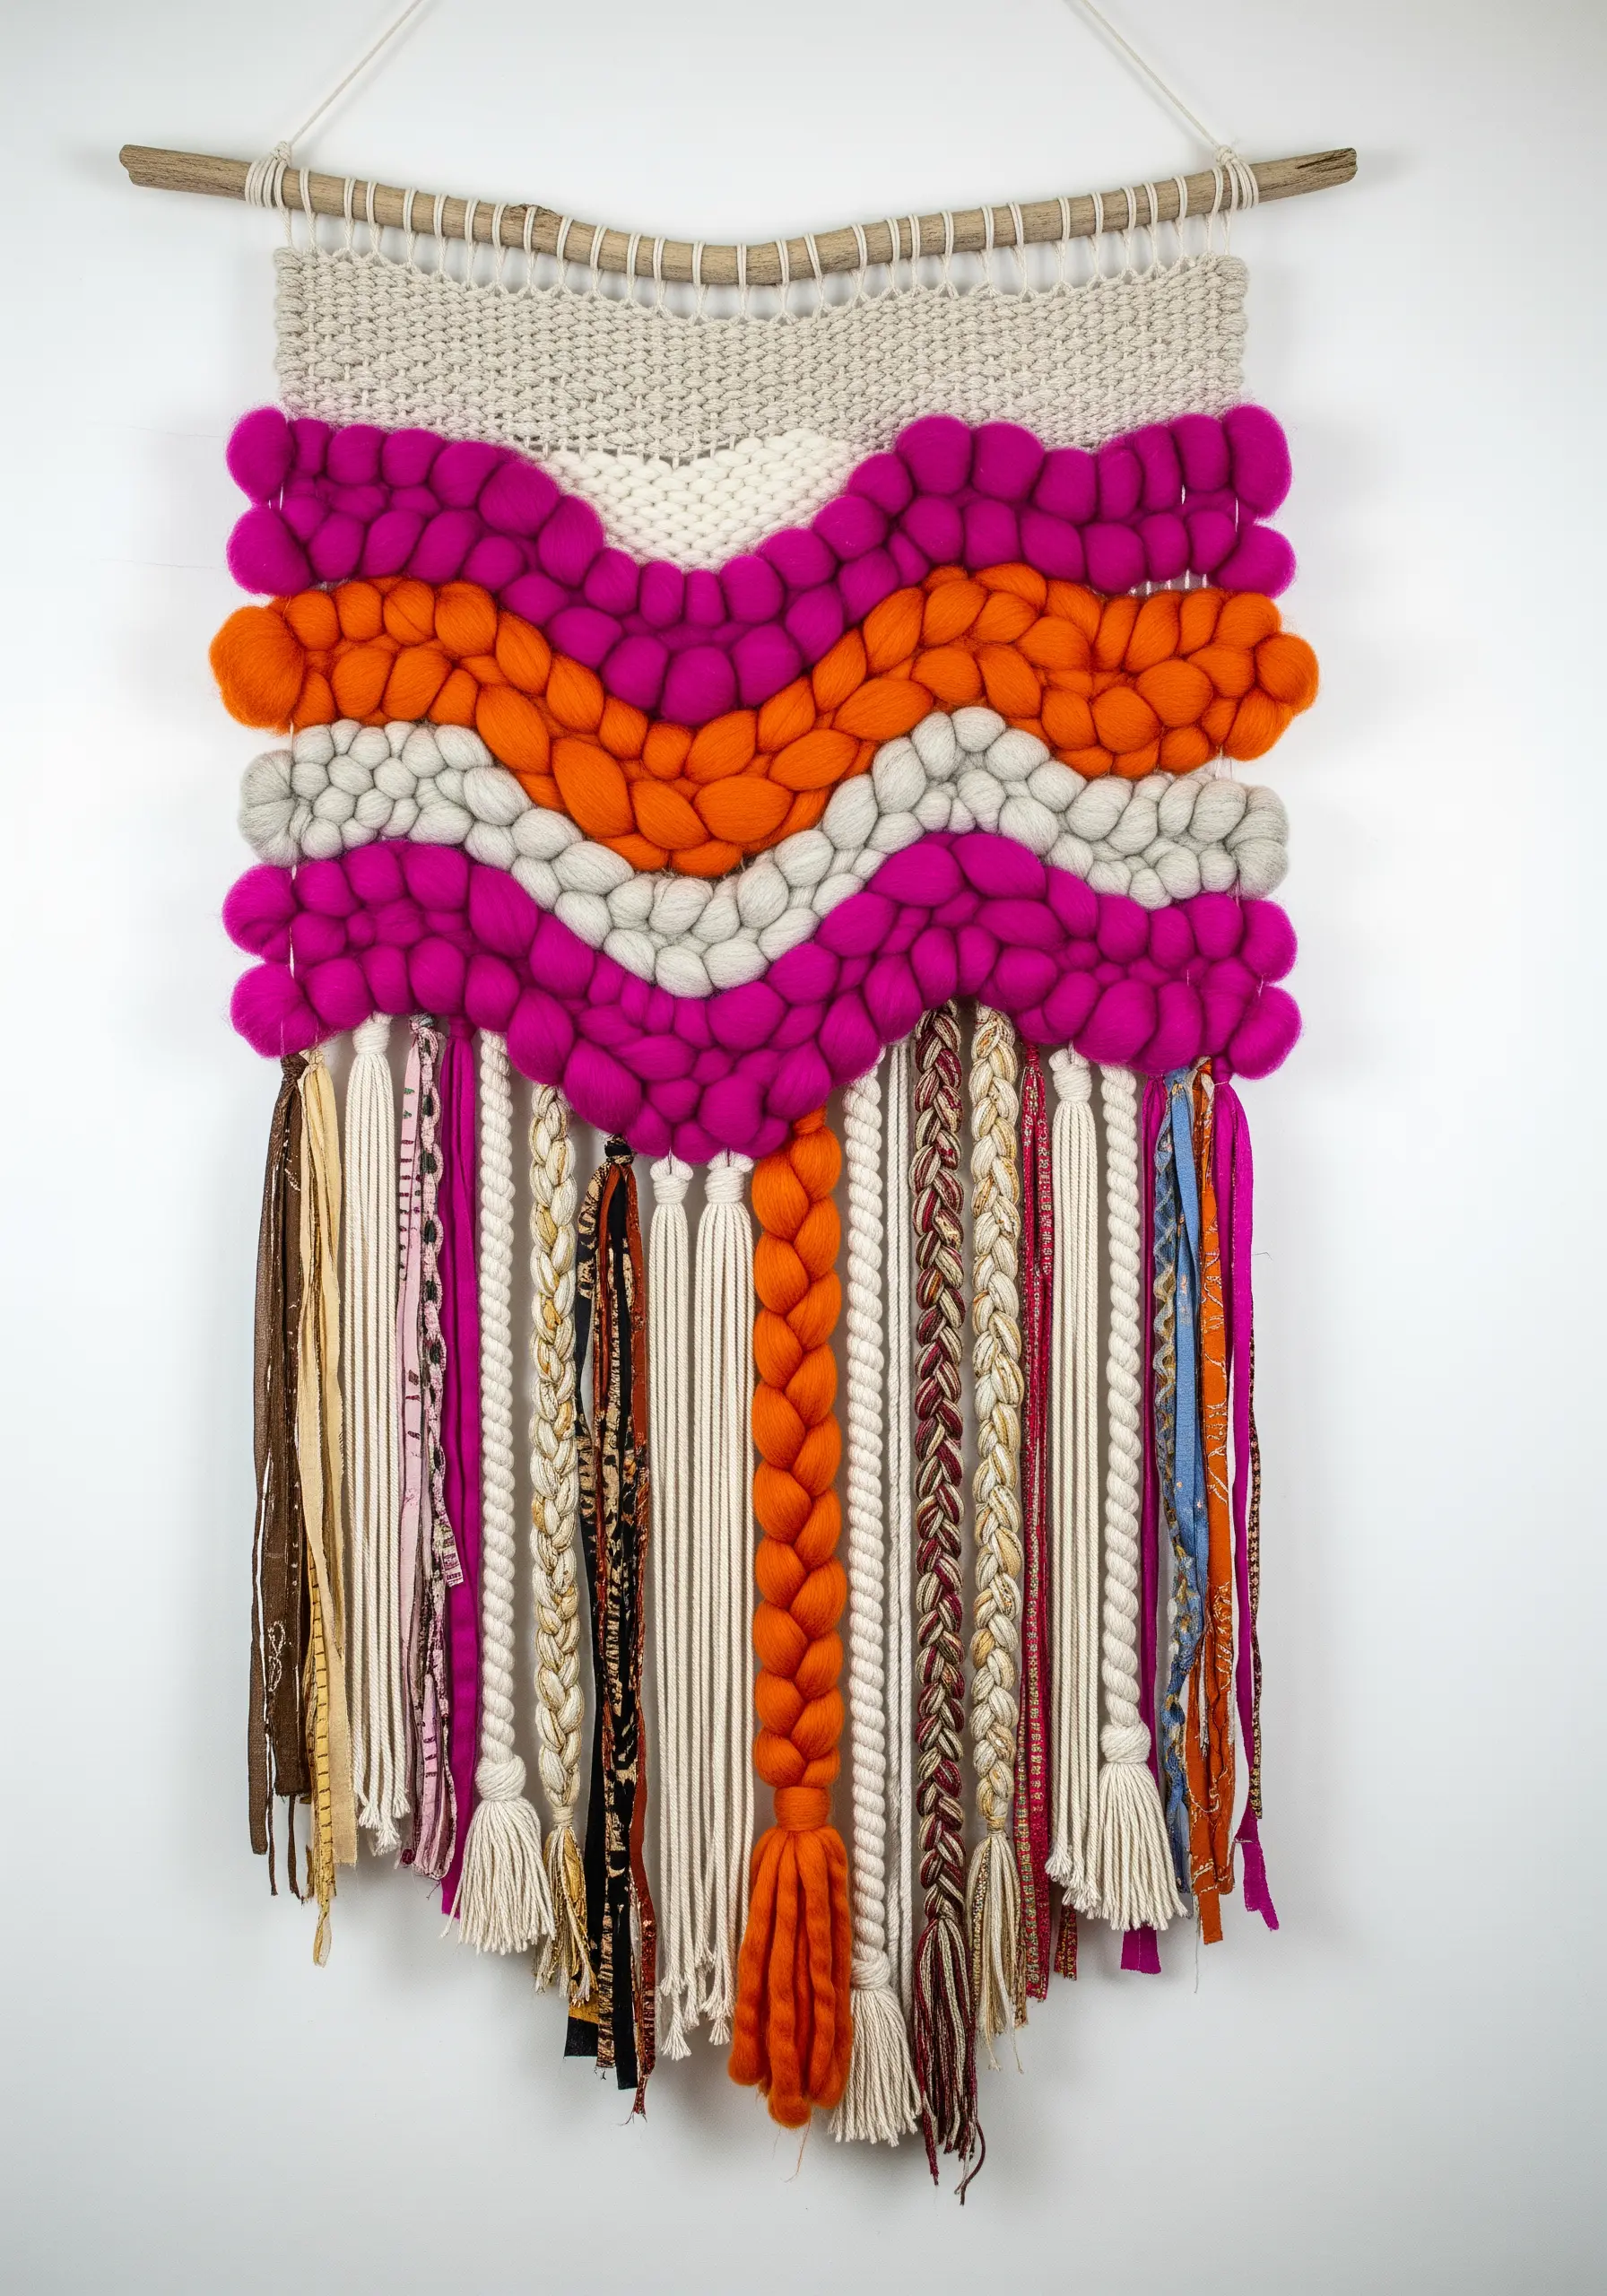
Move beyond flat surfaces by building a composition with varied fiber weights.
Start with a woven base of neutral yarn, then introduce high-impact texture like chunky, unspun roving in bold colors.
Create movement by weaving in undulating waves rather than straight lines—this adds a natural, organic feel.
For the final layer, add braided yarns, fabric scraps, and ribbons as a fringe, transforming a simple weave into one of the most dynamic mixed-fiber wall hangings.
The contrast between the tight weave, plush roving, and delicate fringe is what gives the piece its sophisticated, handmade energy.
2. Shape Your Narrative with Yarn Coiling
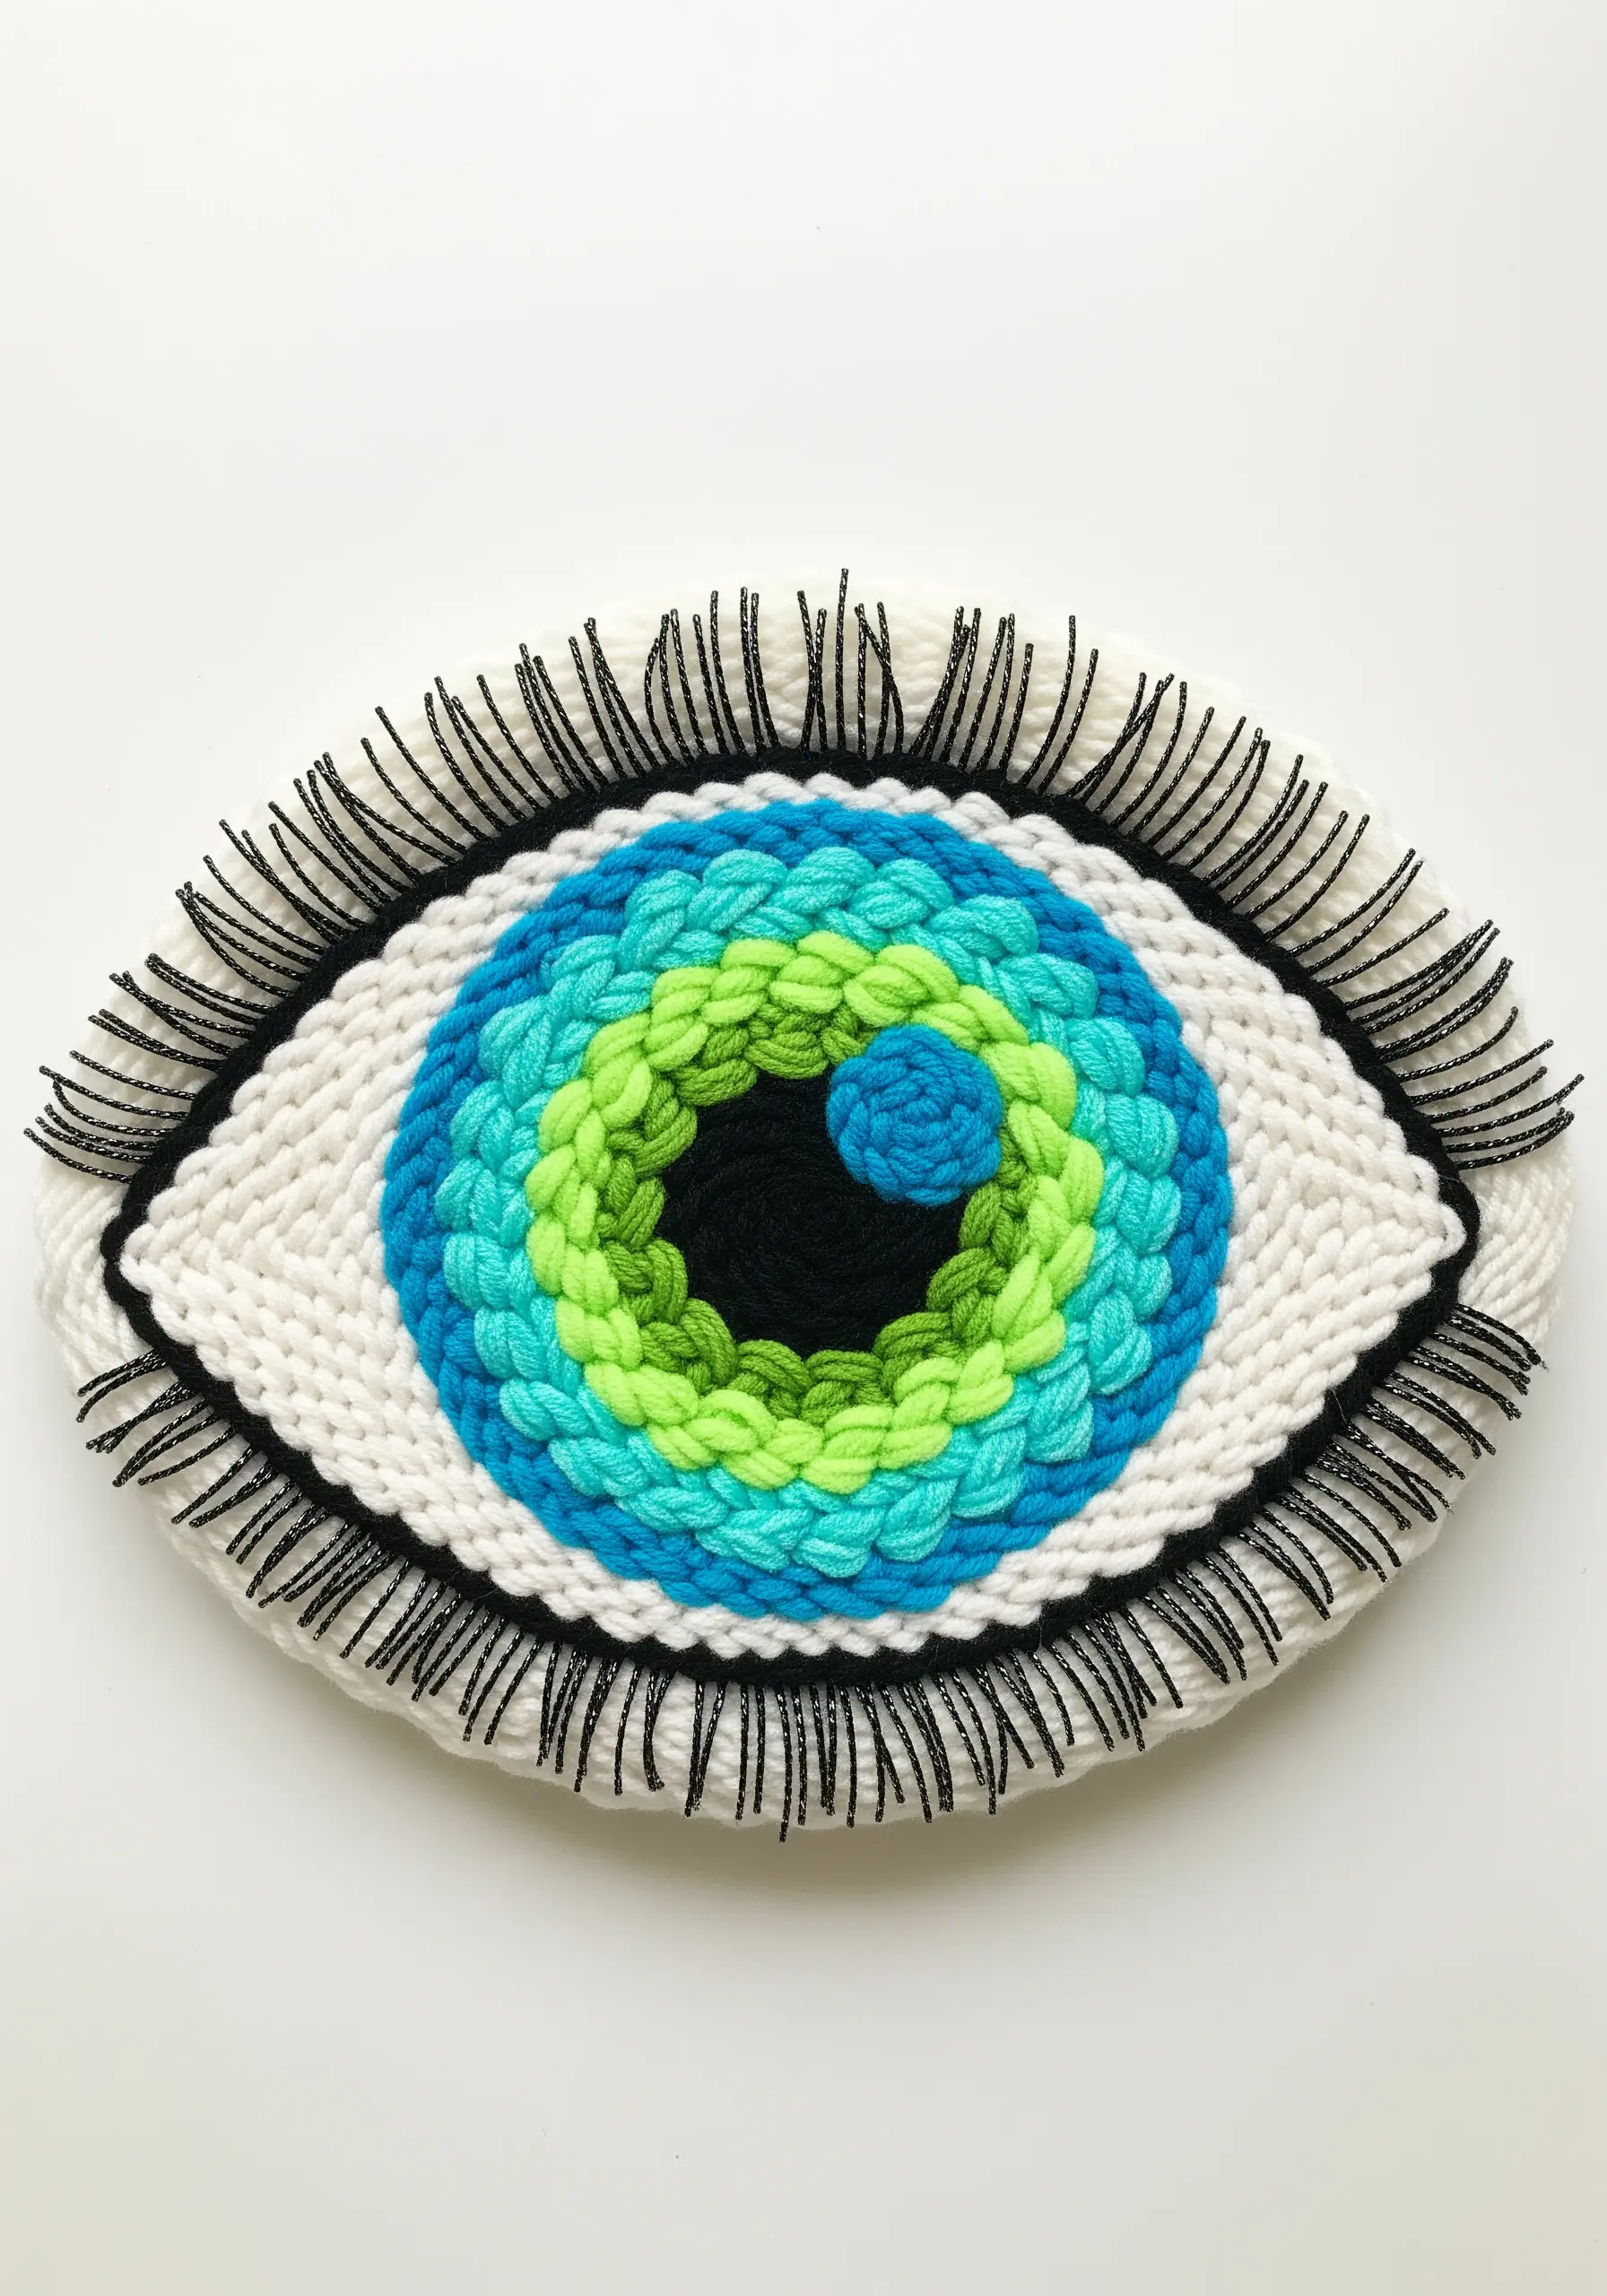
Instead of a traditional square loom, try building your design outward from a central point using a coiling technique.
Wrap a core rope or thick yarn with your chosen colors, stitching each new round to the previous one to build your shape.
This method gives you complete control over the form, allowing you to create organic or graphic motifs like this eye.
To create the sharp eyelashes, stitch individual black threads radially around the edge, ensuring they stand stiffly for a dramatic, graphic outline.
It’s a perfect way to make colorful yarn wall art ideas that are sculptural and bold.
3. Construct Sculptural Forms with Wrapped Rope
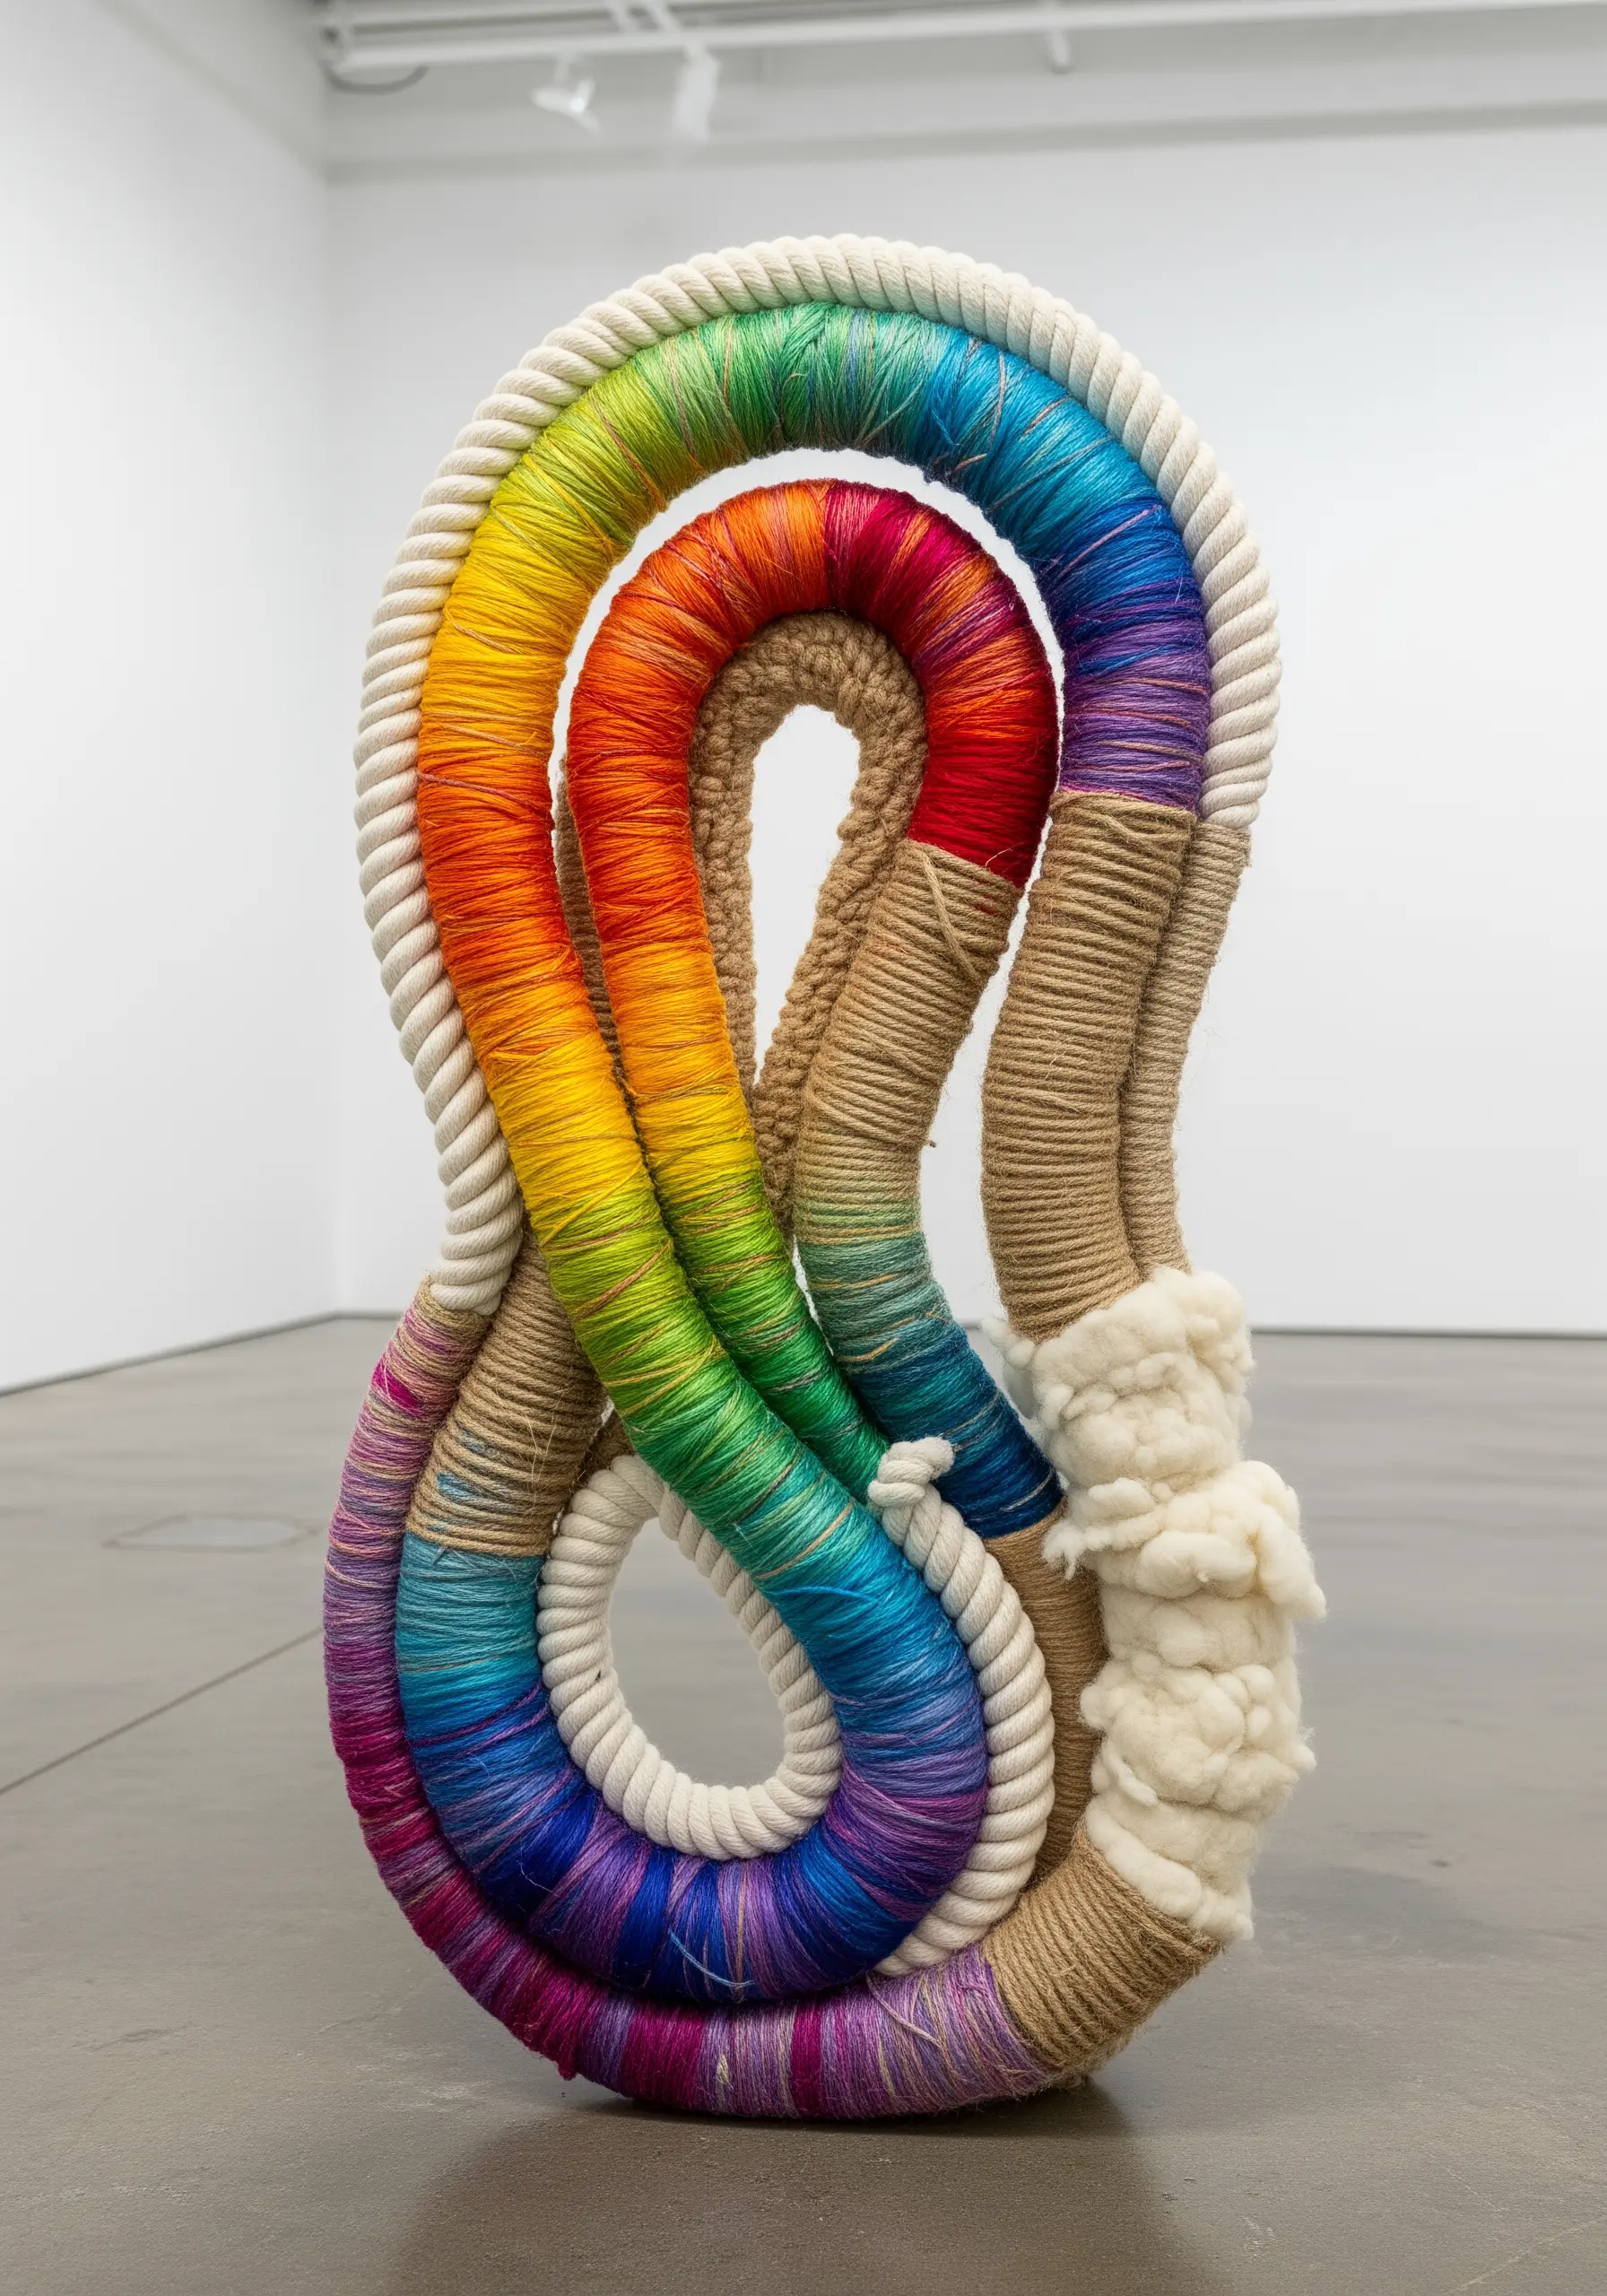
Transform humble rope into a striking sculpture by wrapping sections with colorful embroidery floss or fine yarn.
Plan your color gradient first, arranging your threads from warm to cool to ensure a seamless transition.
Secure the ends of your wrapping threads discreetly with a dab of fabric glue or by tucking them under the coils.
Bend and secure the thick rope into a self-supporting shape, creating one of those fiber art installations that turn simple fibers into extraordinary art right in your home.
Leave some sections of the rope exposed to create textural contrast between the raw jute and the smooth, vibrant yarn.
4. Frame Your Embroidery with Dimensional Yarn
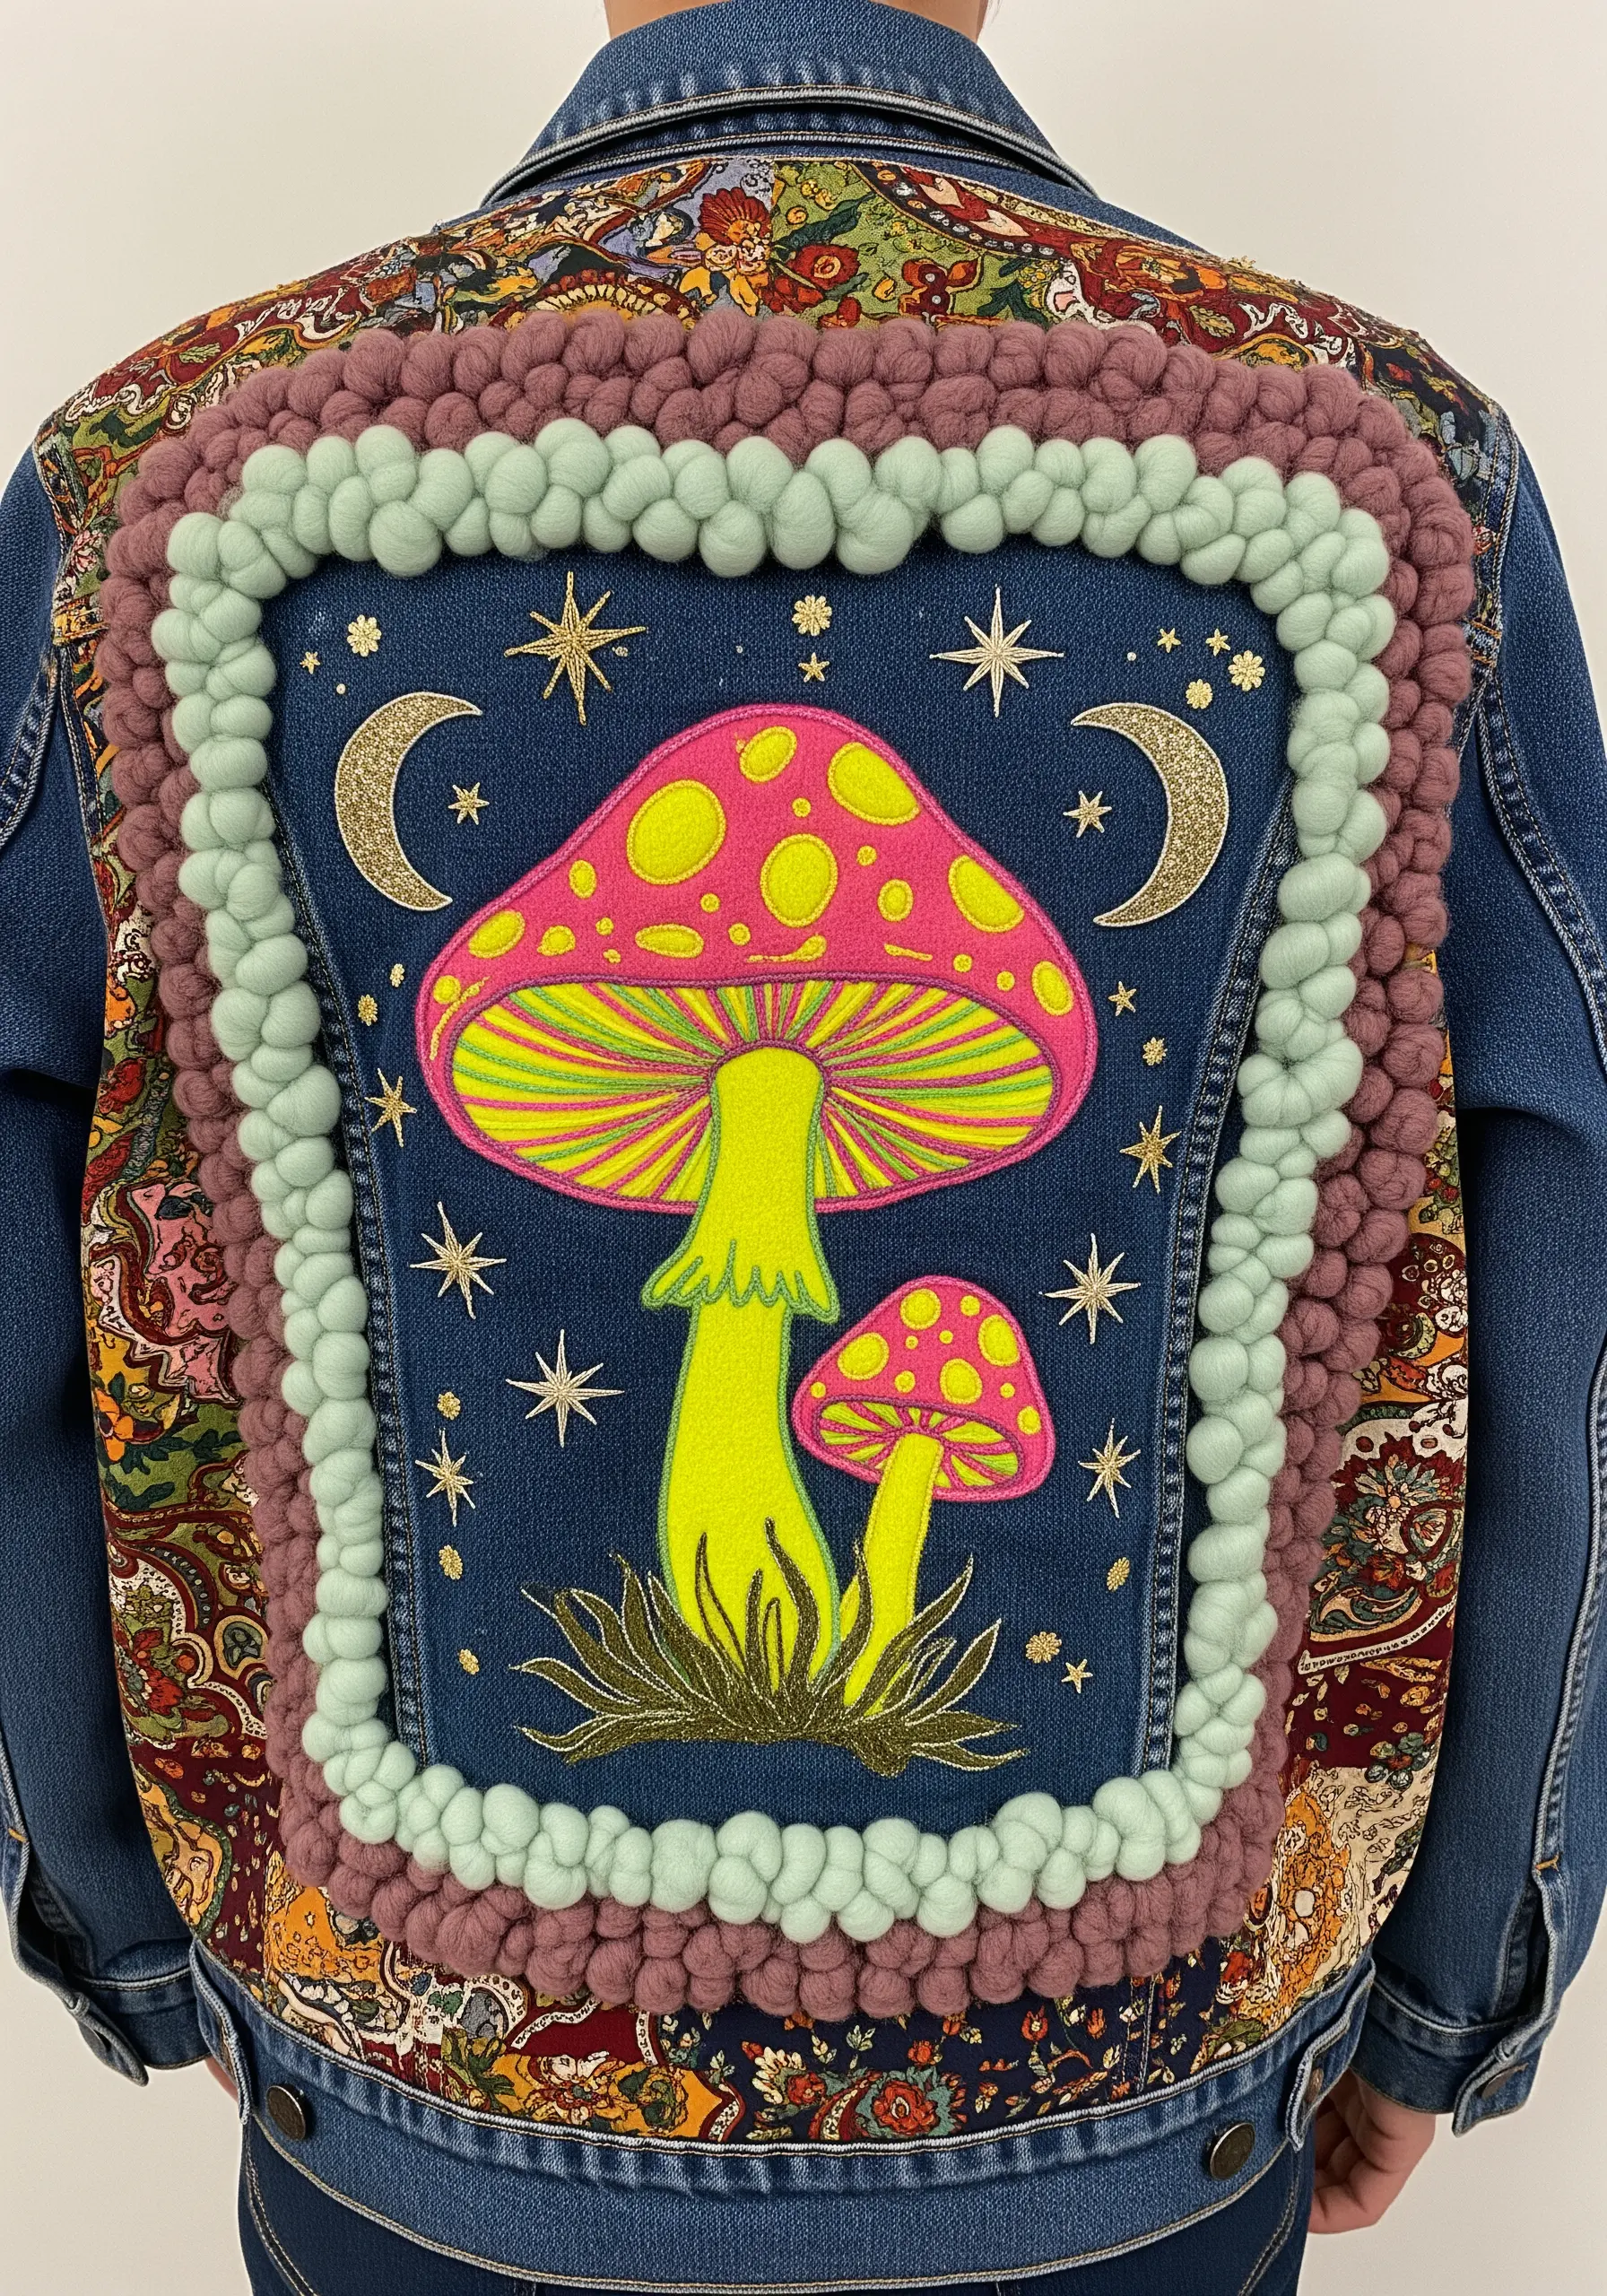
Elevate an embroidered patch or appliqué by giving it a plush, textural frame.
After stitching your central design onto a jacket or fabric panel, outline it with couched chunky yarn or use a punch needle to create a raised border.
This technique physically lifts the design from the surface, adding depth and a playful, tactile quality.
Select a yarn color that complements your embroidery but also provides a soft contrast, turning simple apparel into wearable art.
This is a go-to method for creating funky streetwear embroidery designs with a professional, high-impact finish.
5. Blend Punch Needle Loops with Soft Roving

Achieve a dynamic surface by combining the uniform loops of punch needle with the untamed texture of wool roving.
Create your main design with a punch needle, focusing on clean color blocking and dense, even loops for a carpet-like feel.
Then, introduce cloud-like puffs of roving by needle-felting them directly onto your foundation cloth or stitching them down with a few anchoring threads.
This combination of controlled loops and soft, sculptural fiber is key to many playful mixed-fiber art projects, adding both visual interest and a delightful tactile contrast.
6. Embellish Macrame with Felt and Fabric
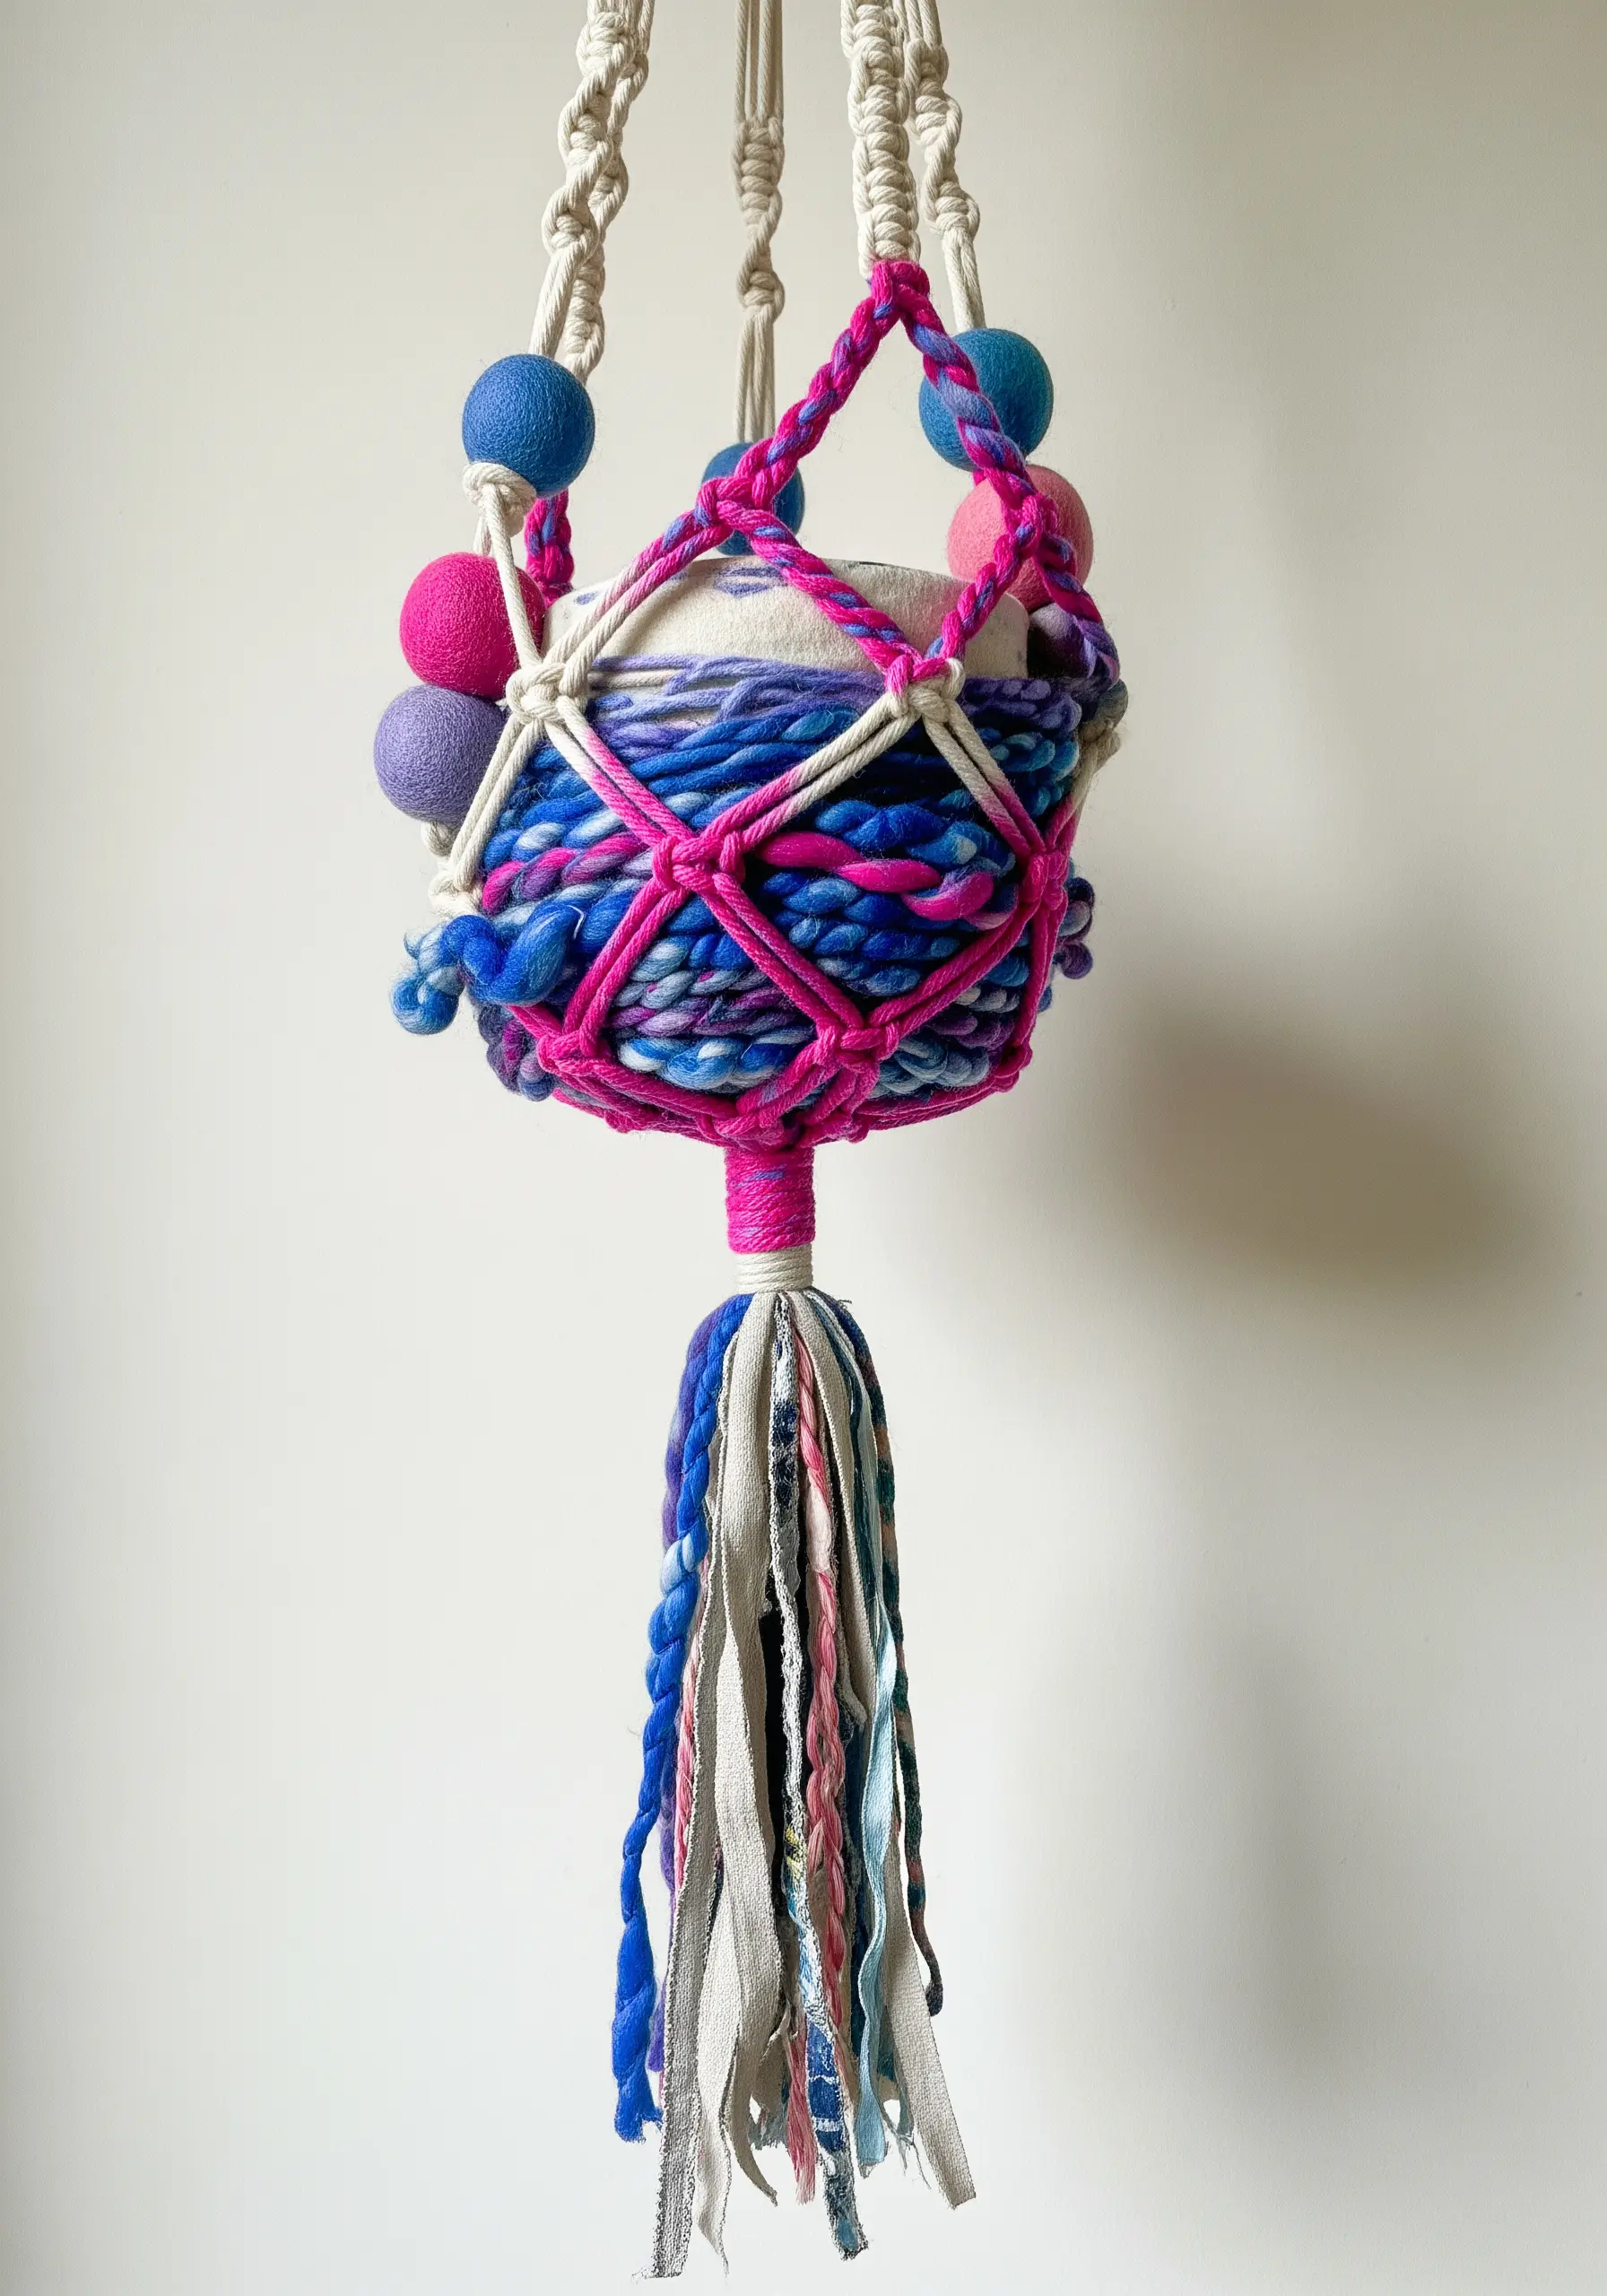
Give your macrame projects a personalized, maximalist twist by incorporating different fibers.
Weave colorful felted wool balls directly into your knotwork as you go; their texture provides a soft counterpoint to the tightly knotted cord.
Instead of a standard tassel, create a fuller, more eclectic one using fabric scraps, ribbon, and unraveled chunky yarn.
This technique is perfect for upgrading simple patterns into unique pieces, like these small DIY planters.
7. Sculpt a Landscape with Fabric and Fiber
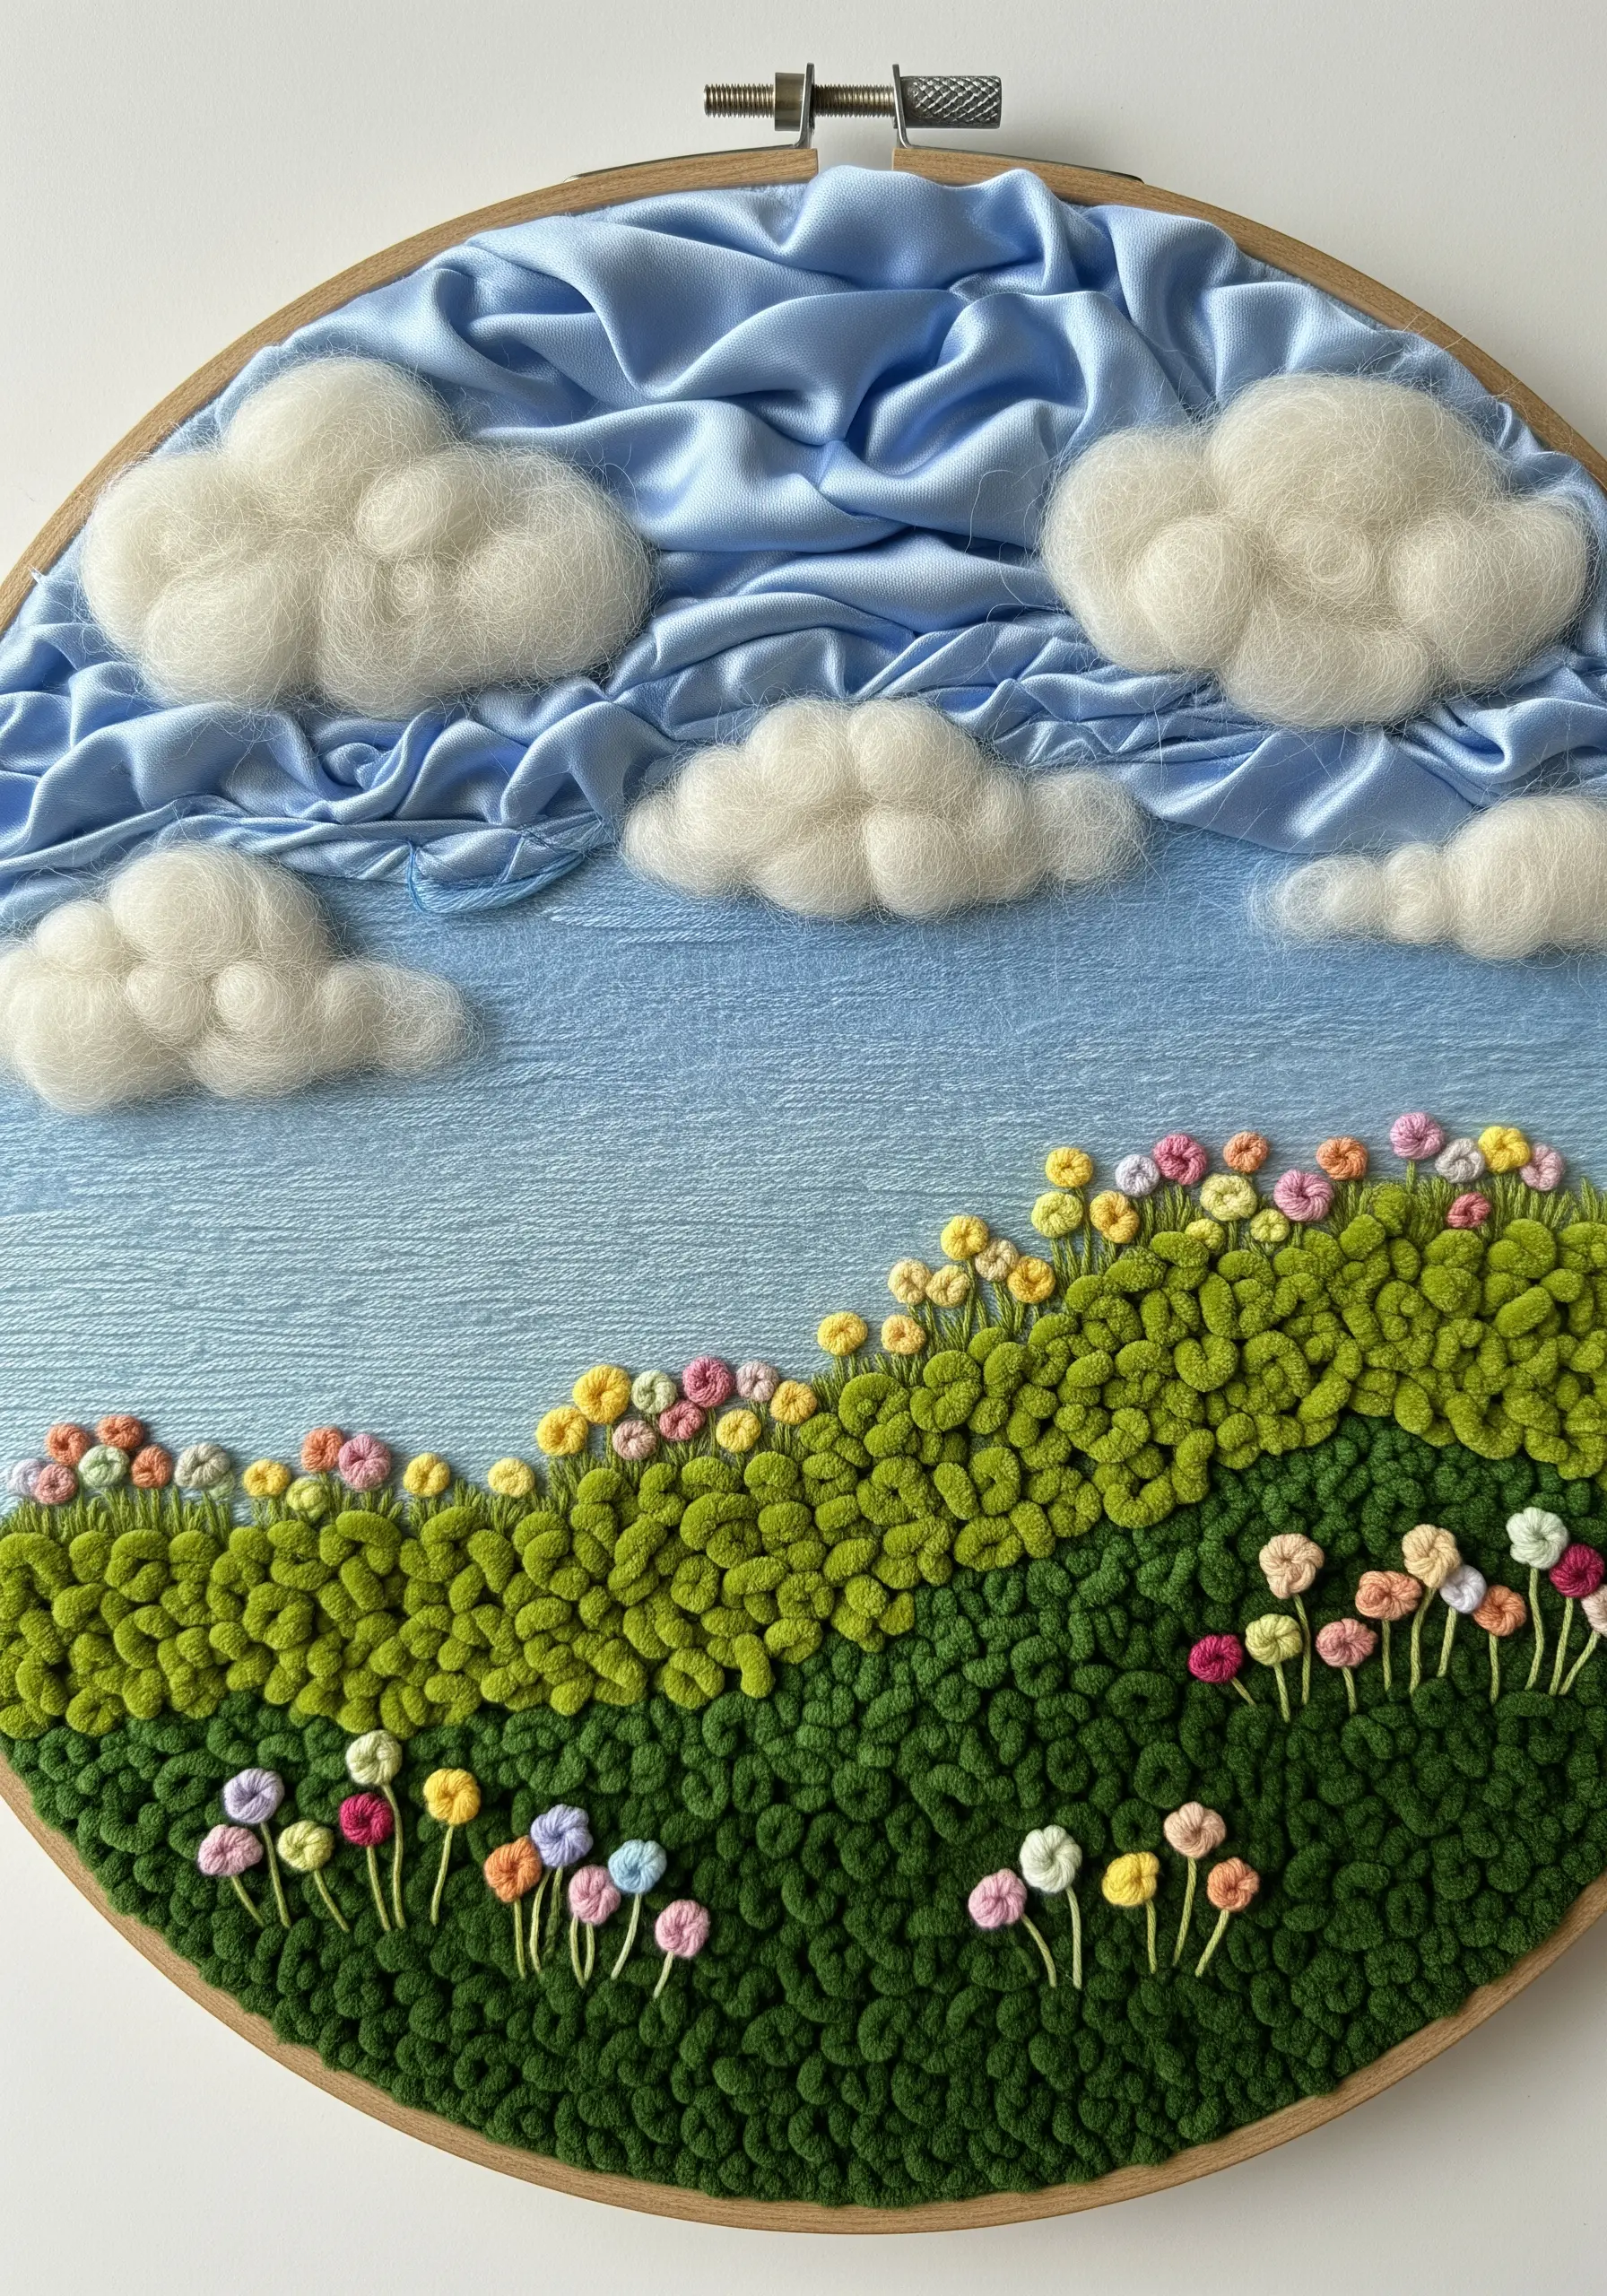
Create depth in your hoop art by using mixed materials to represent different natural elements.
For a dynamic sky, gather and ruche a piece of blue silk or satin onto your background fabric before adding other elements.
Use needle-felted wool roving to form soft, three-dimensional clouds that sit atop the fabric sky.
Build up the foreground with dense French knots or turkey work using chenille yarn or tapestry wool to mimic a lush, textured meadow.
This layering method results in dreamy, nature-inspired embroidery designs that feel almost alive.
8. Curate a Gallery Wall with Varied Fiber Art
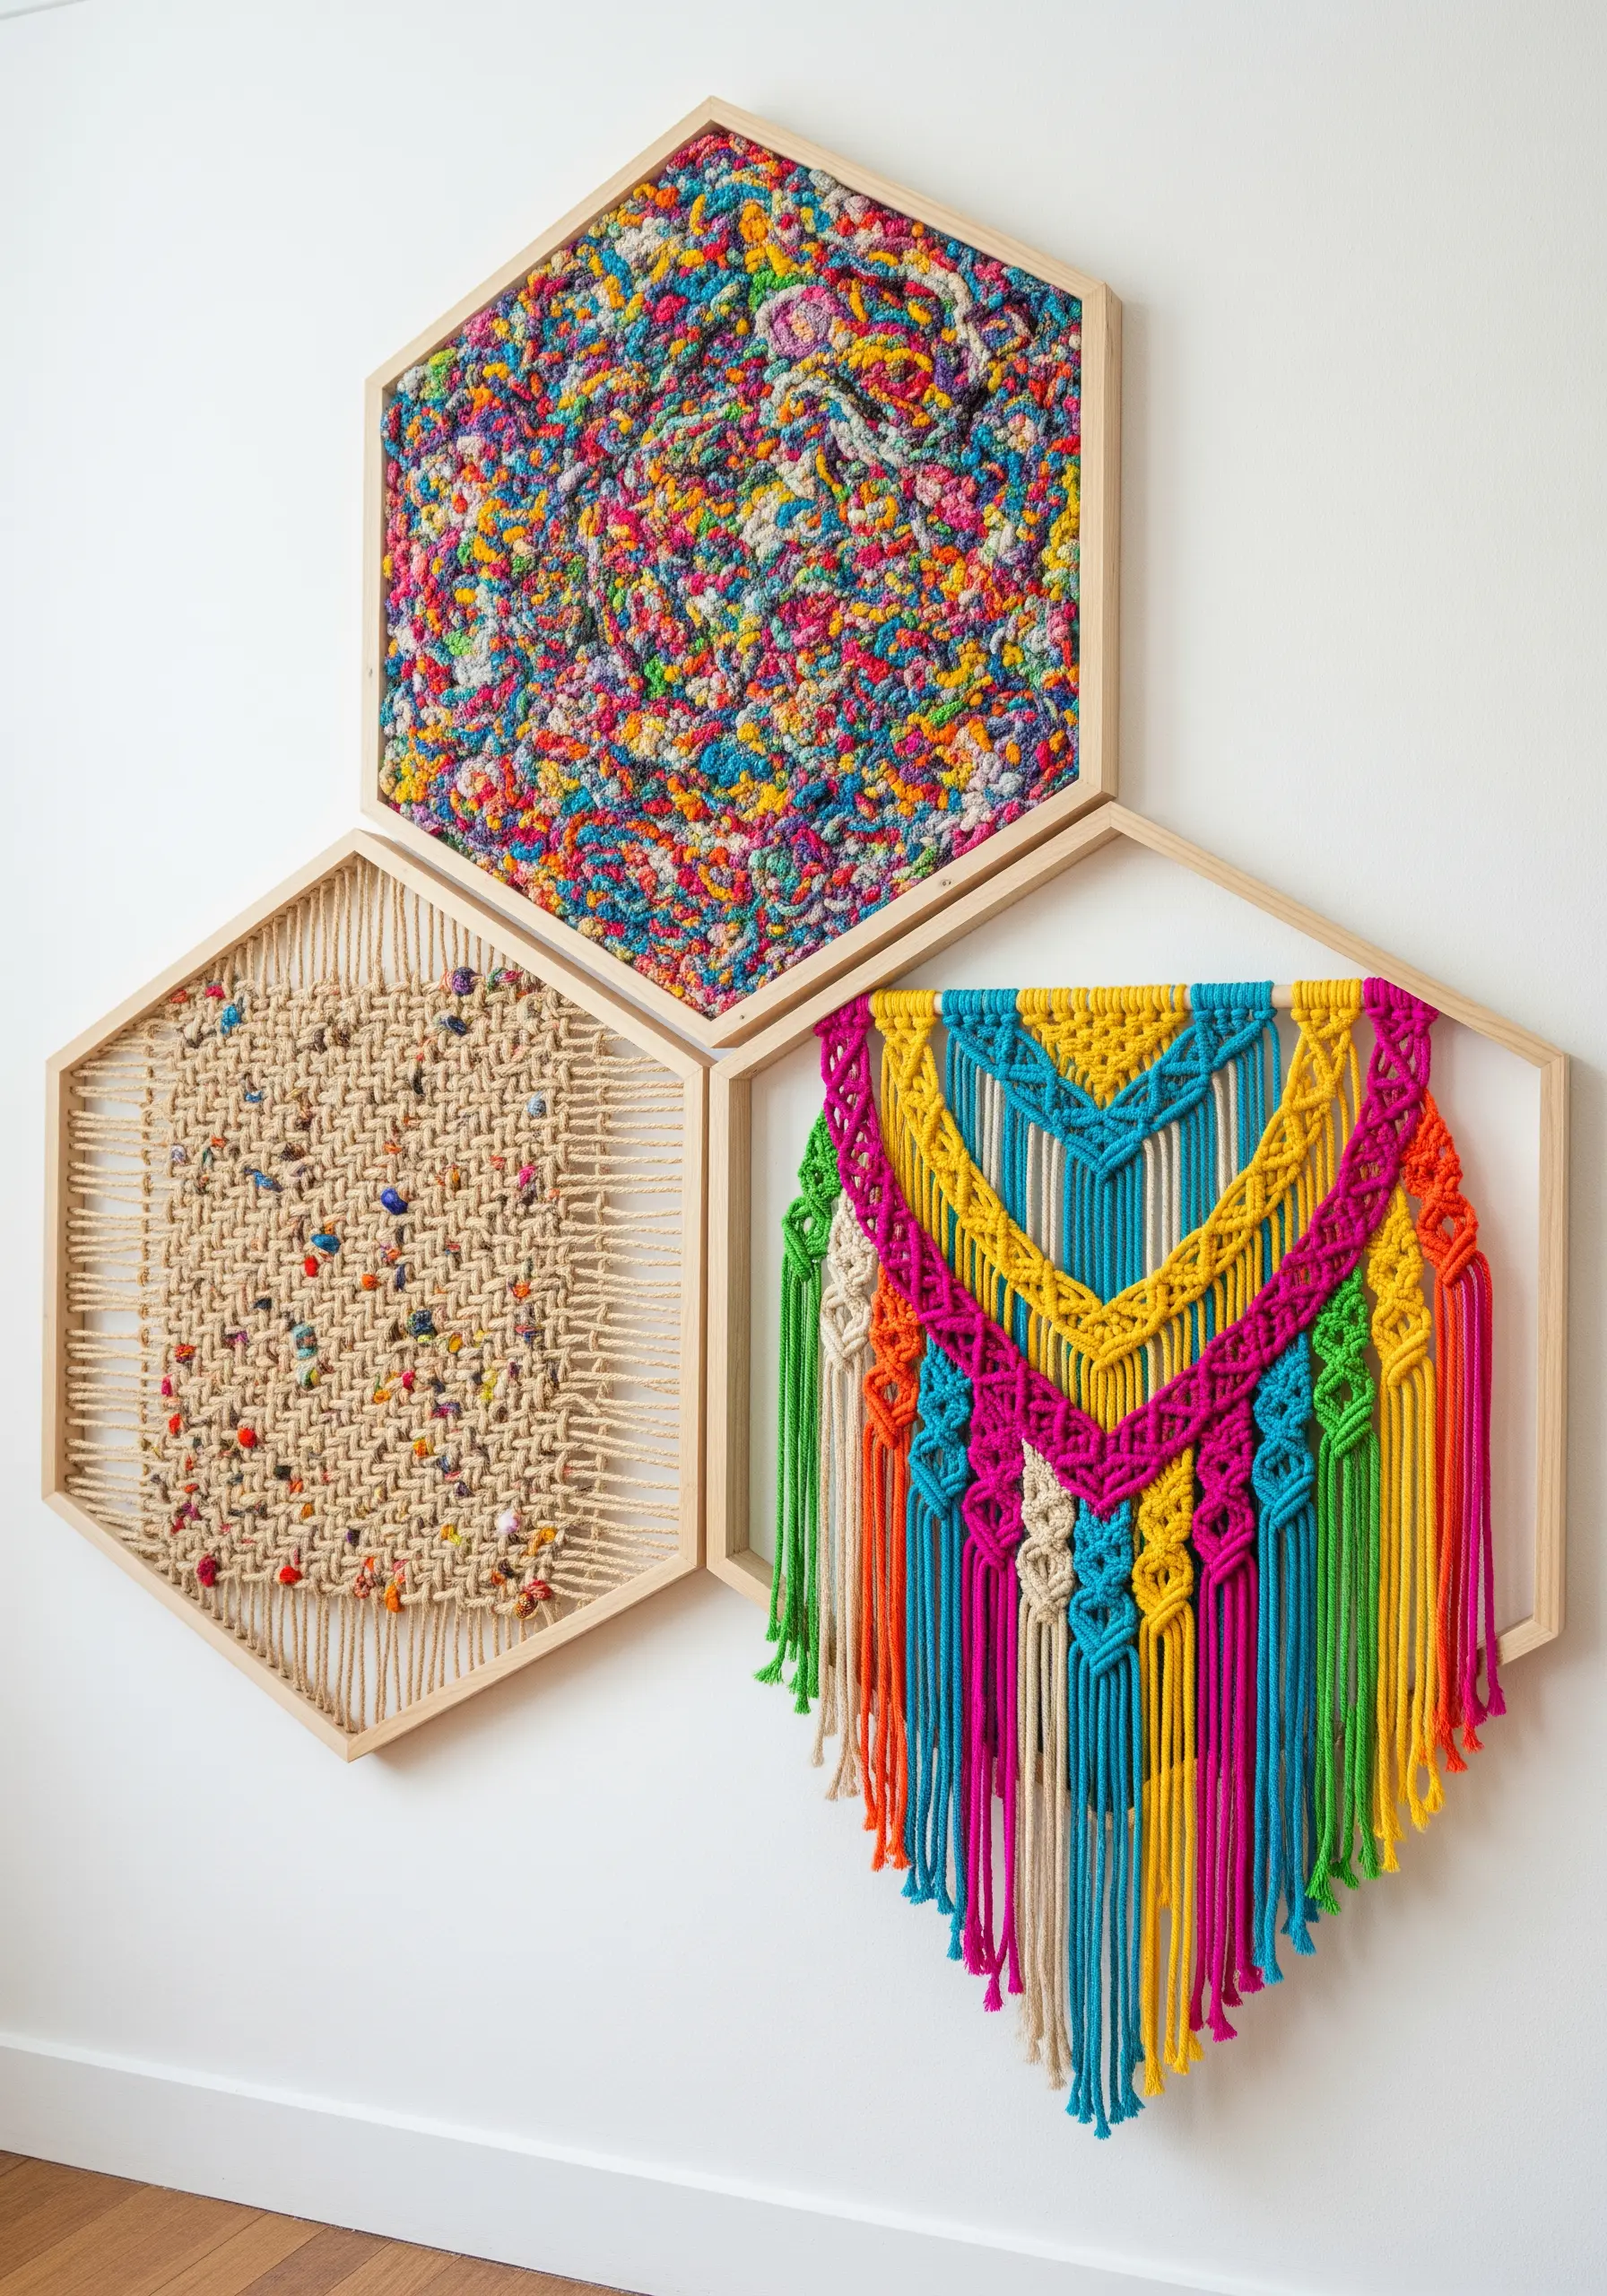
Tell a cohesive visual story by grouping different fiber techniques within a unified framing concept.
Use identical frames, like these hexagons, to create a sense of harmony, even when the internal pieces are wildly different.
Combine a densely textured latch hook piece with a minimalist woven design and a vibrant macrame hanging.
This approach allows you to experiment with multiple crafts without your display feeling chaotic, turning your wall into one of those inspiring hoop art projects that looks curated and intentional.
9. Translate Fiber Techniques into Wearable Art
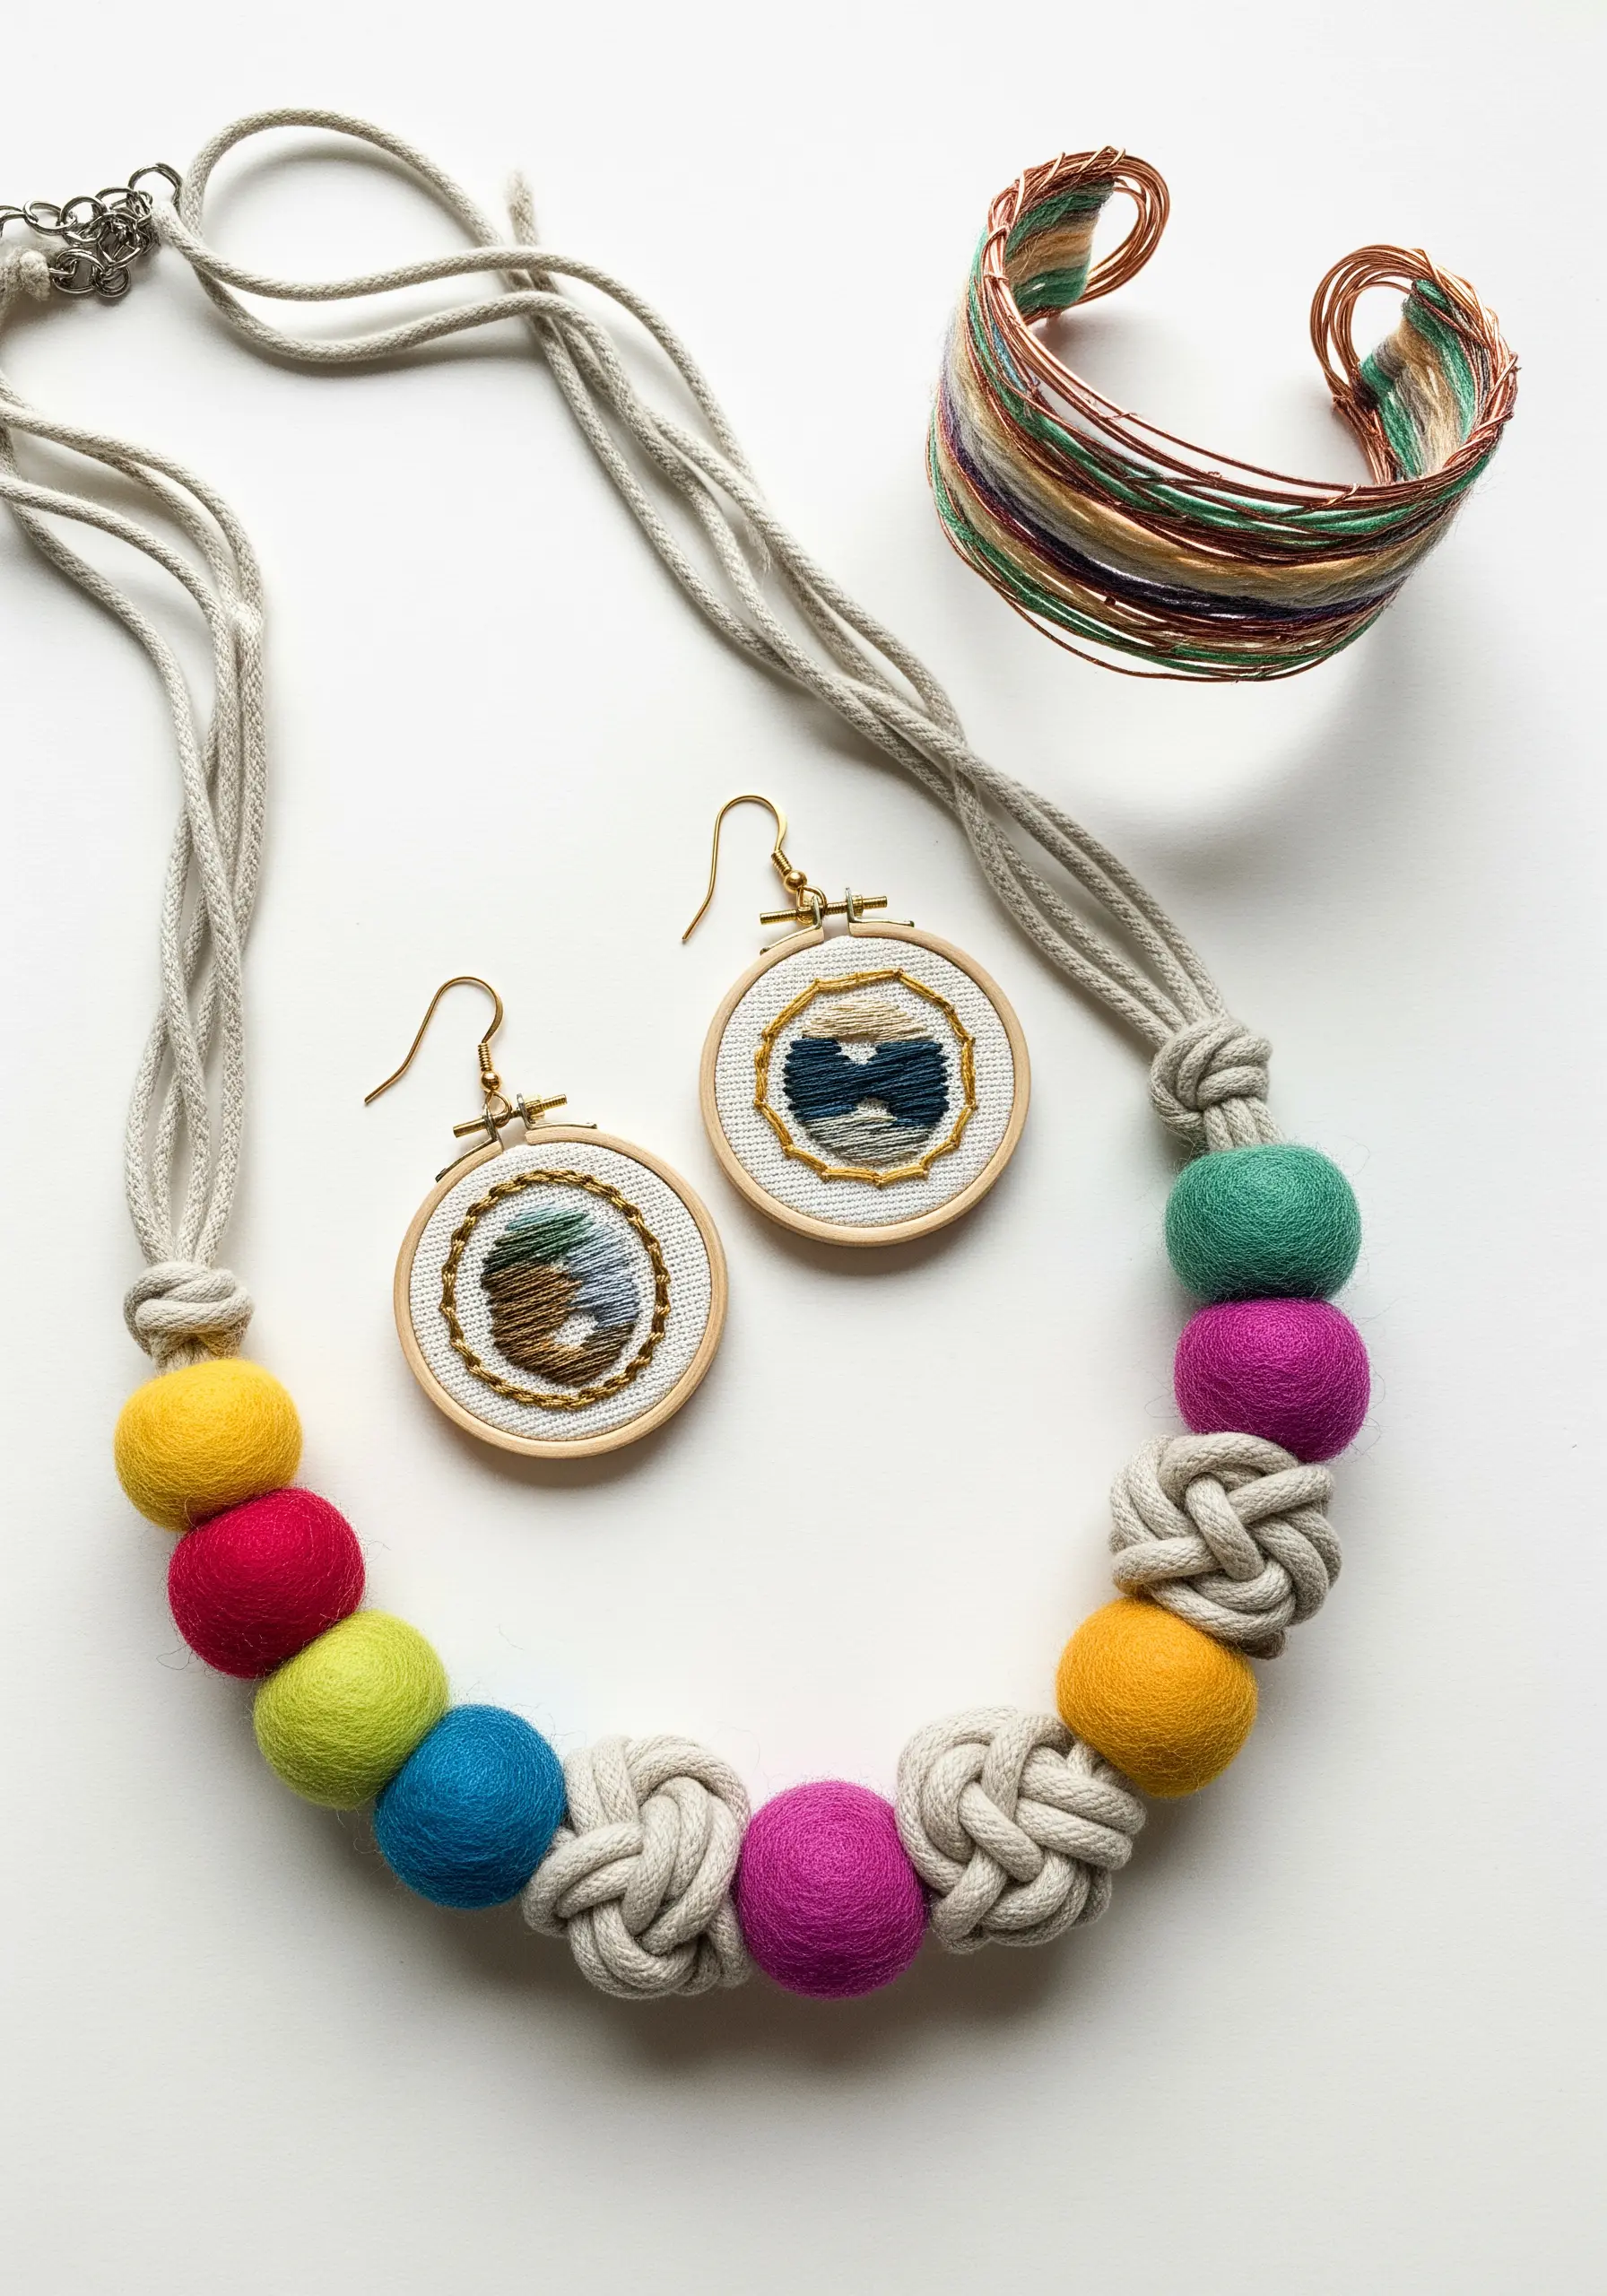
Miniaturize your favorite fiber skills to create unique jewelry.
Use tiny embroidery hoops as pendants or earrings, filling them with abstract satin stitches or woven thread patterns.
For a necklace, alternate chunky felted wool beads with knotted cord for a bold, textural statement.
You can even wrap fine wire with colorful threads to form a cuff bracelet.
These are more than just accessories; they are handmade embroidered jewelry and accessories that make perfect gifts and personal statements.
10. Reinvent Everyday Objects with Yarn Wrapping

Transform a plain lampshade frame into a functional piece of art by wrapping it with yarn.
Create visual interest by alternating between tightly wrapped solid sections and sparsely wrapped areas that let light filter through.
Incorporate chunky braided yarn as horizontal bands to add a sculptural, three-dimensional element.
This simple yet effective technique turns functional items into handmade accents that make your space look Pinterest-perfect, casting a warm, colorful glow.
11. Give Character to Dolls with Mixed-Fiber Details
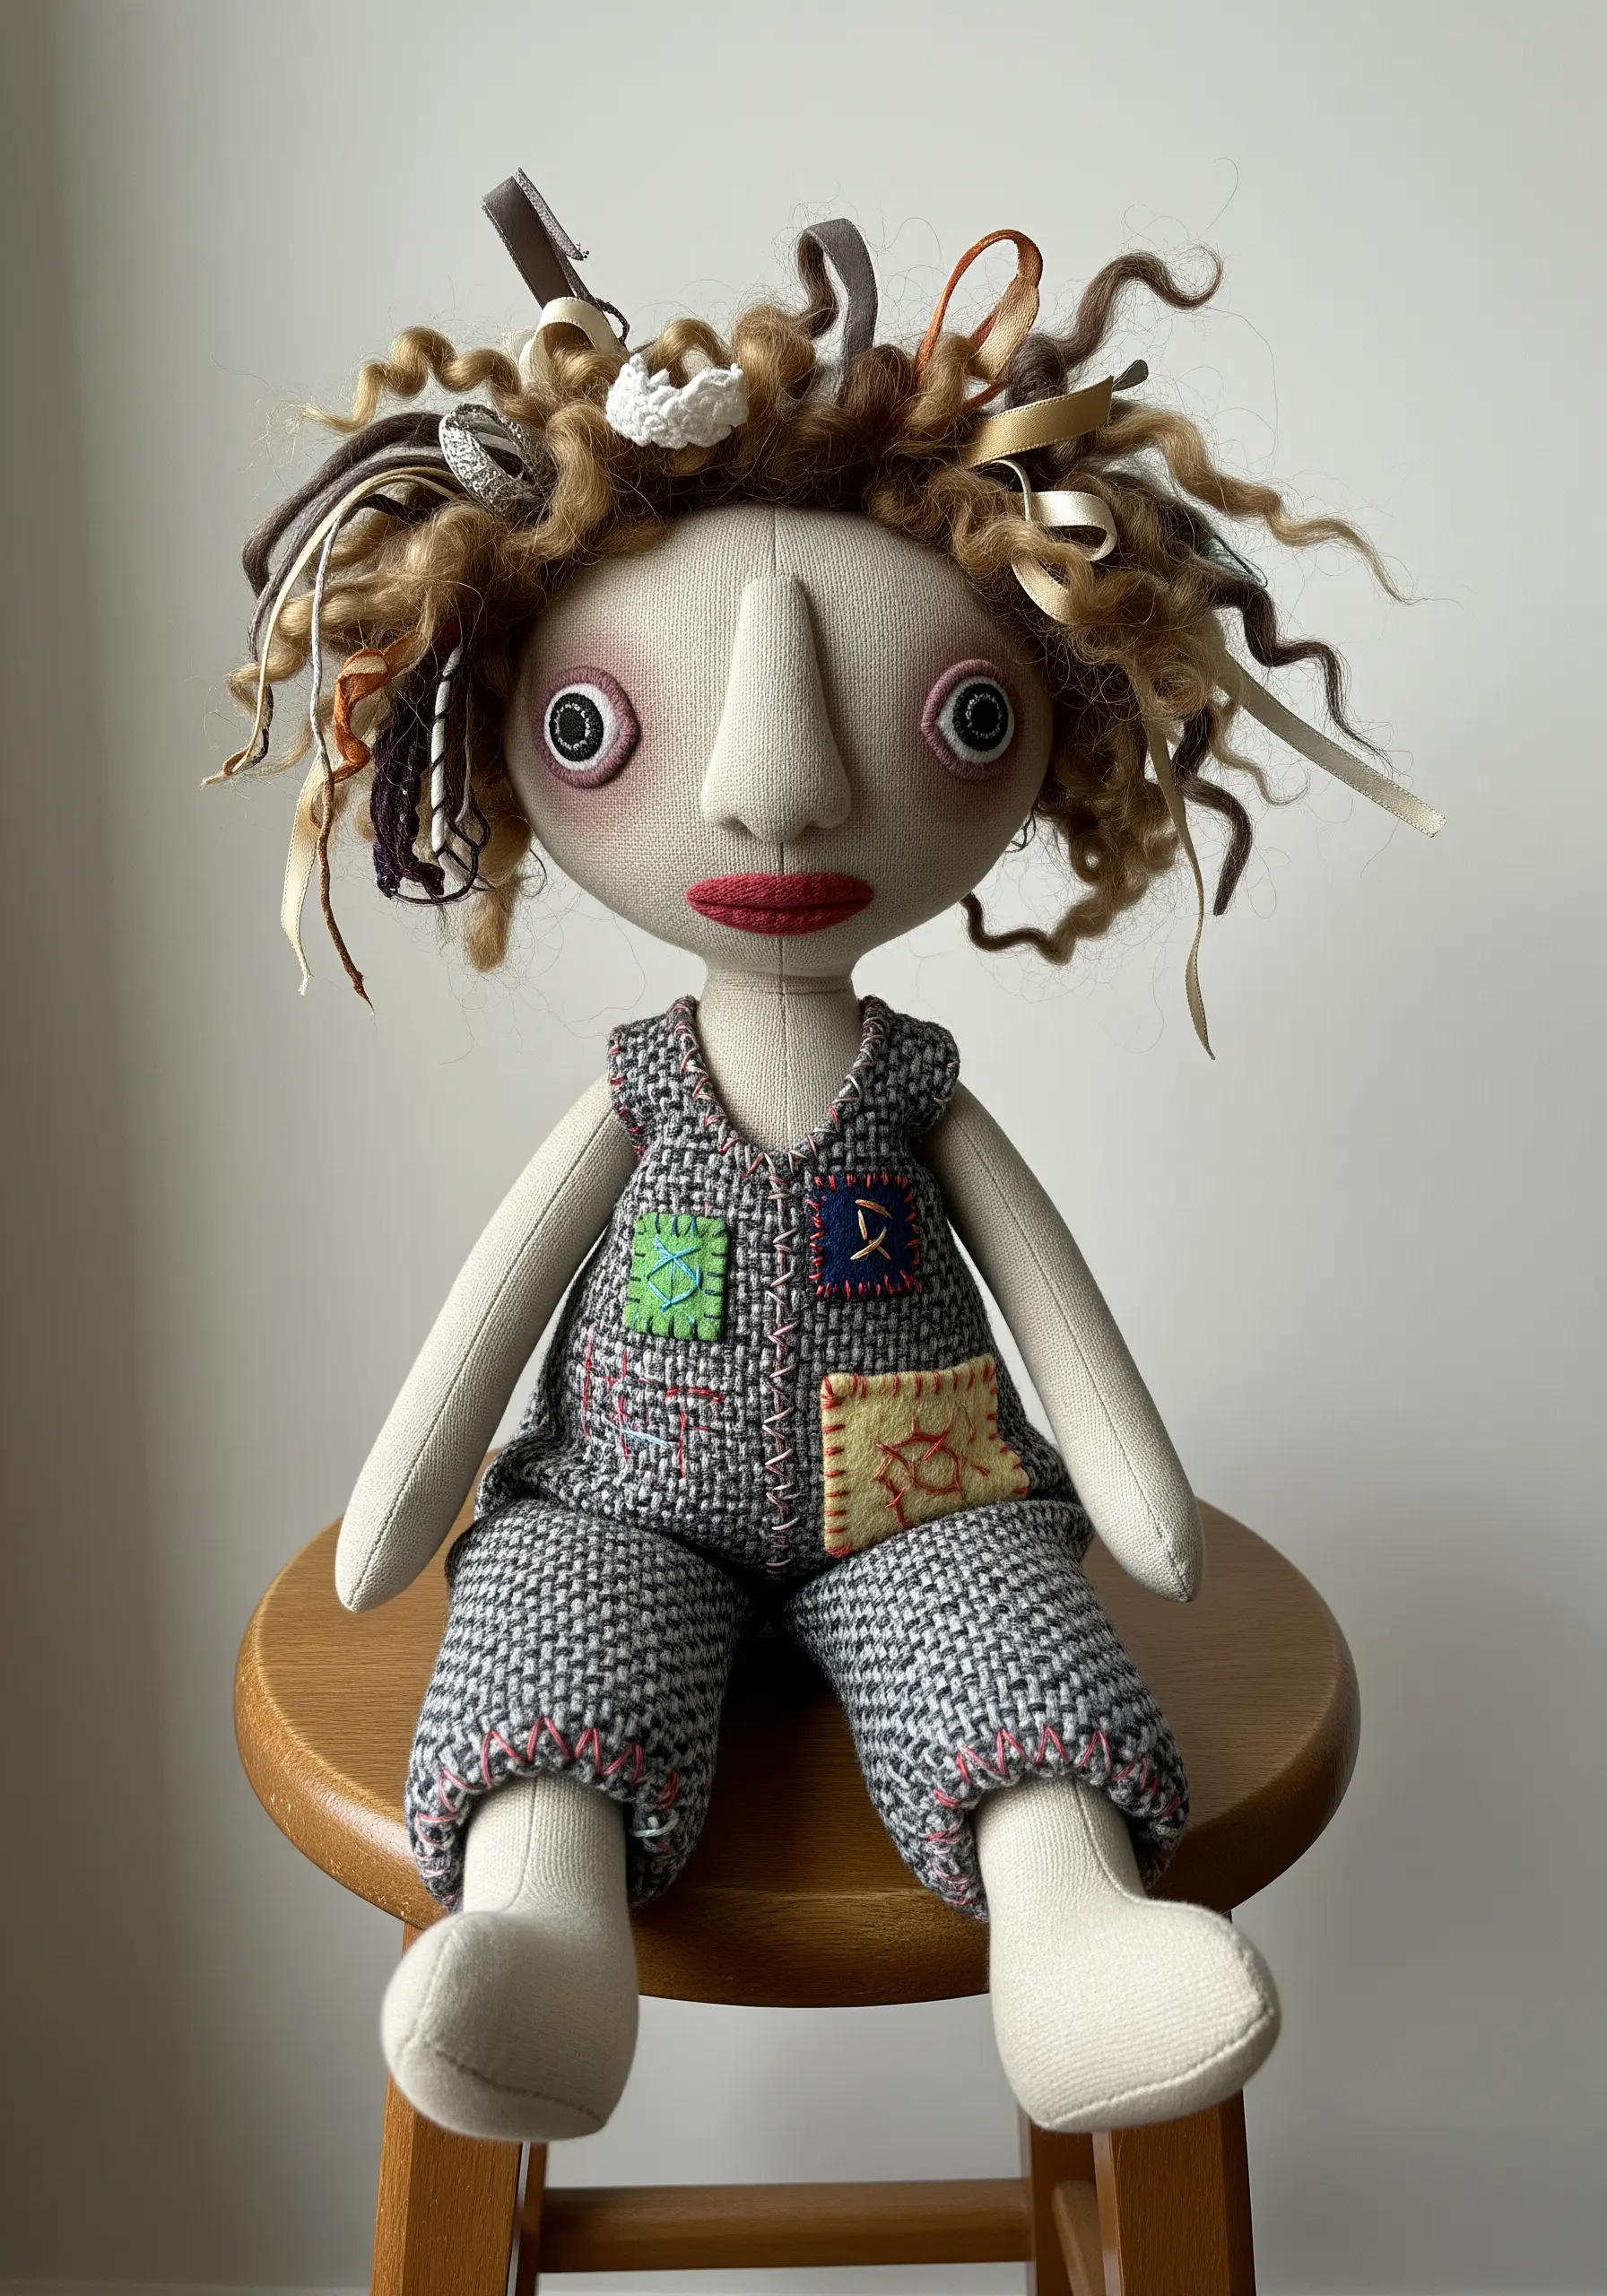
Bring an art doll to life by using a variety of textiles to build its personality.
For hair, use chunky, curly yarn mixed with scraps of ribbon and lace to create a wild, untamed look.
Instead of drawing on clothes, use appliqué with contrasting fabrics and add visible mending stitches for a rustic, hand-sewn feel.
These tactile details—the softness of the hair, the texture of the patches—are what make handmade art objects so expressive and memorable.
12. Craft Plush Florals with Dimensional Stitches
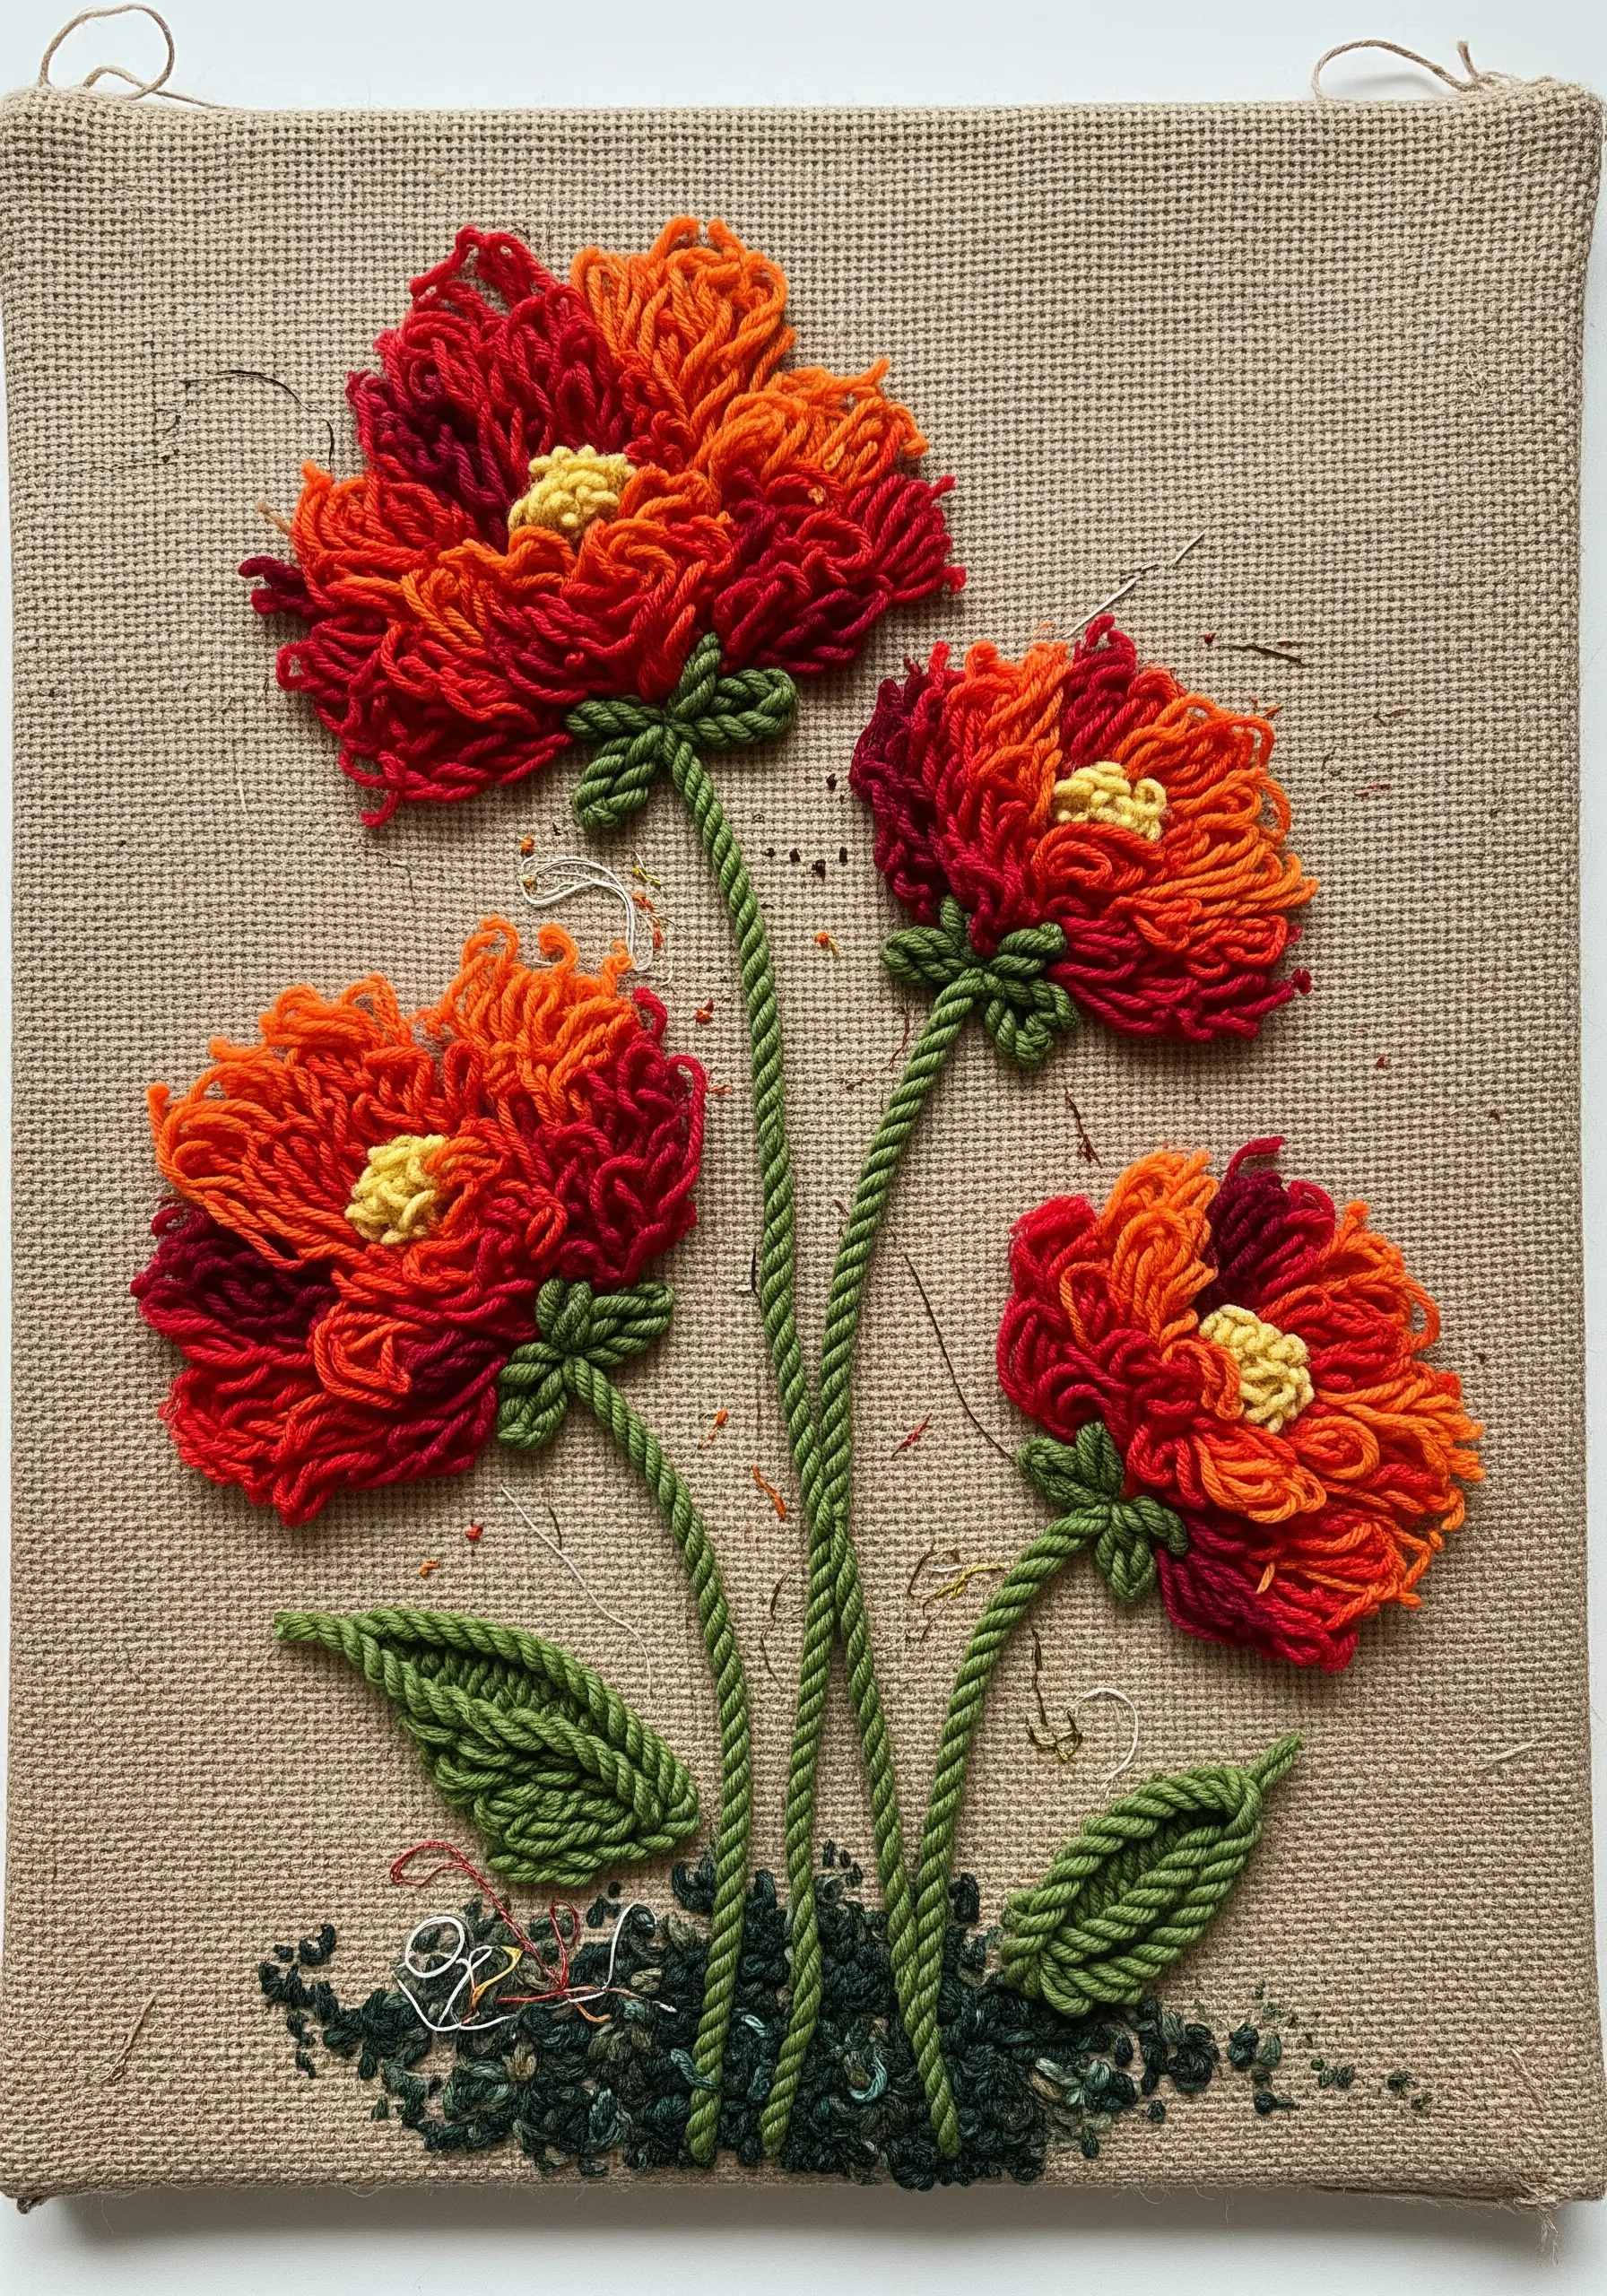
Create flowers that leap off the canvas by using stitches that build height and texture.
Use the turkey work stitch with variegated yarn for the petals, leaving the loops uncut for a dense, plush effect or snipping them for a shaggy look.
For the flower’s center, a cluster of French knots in a contrasting color and texture provides a focal point.
Define the stems by couching down thick, twisted cord, which gives them a clean, sculptural line.
These techniques are perfect for creating poppy-inspired stitches that add bold emotional beauty to your work.
13. Construct a Vessel with Coiled Rope and Fabric
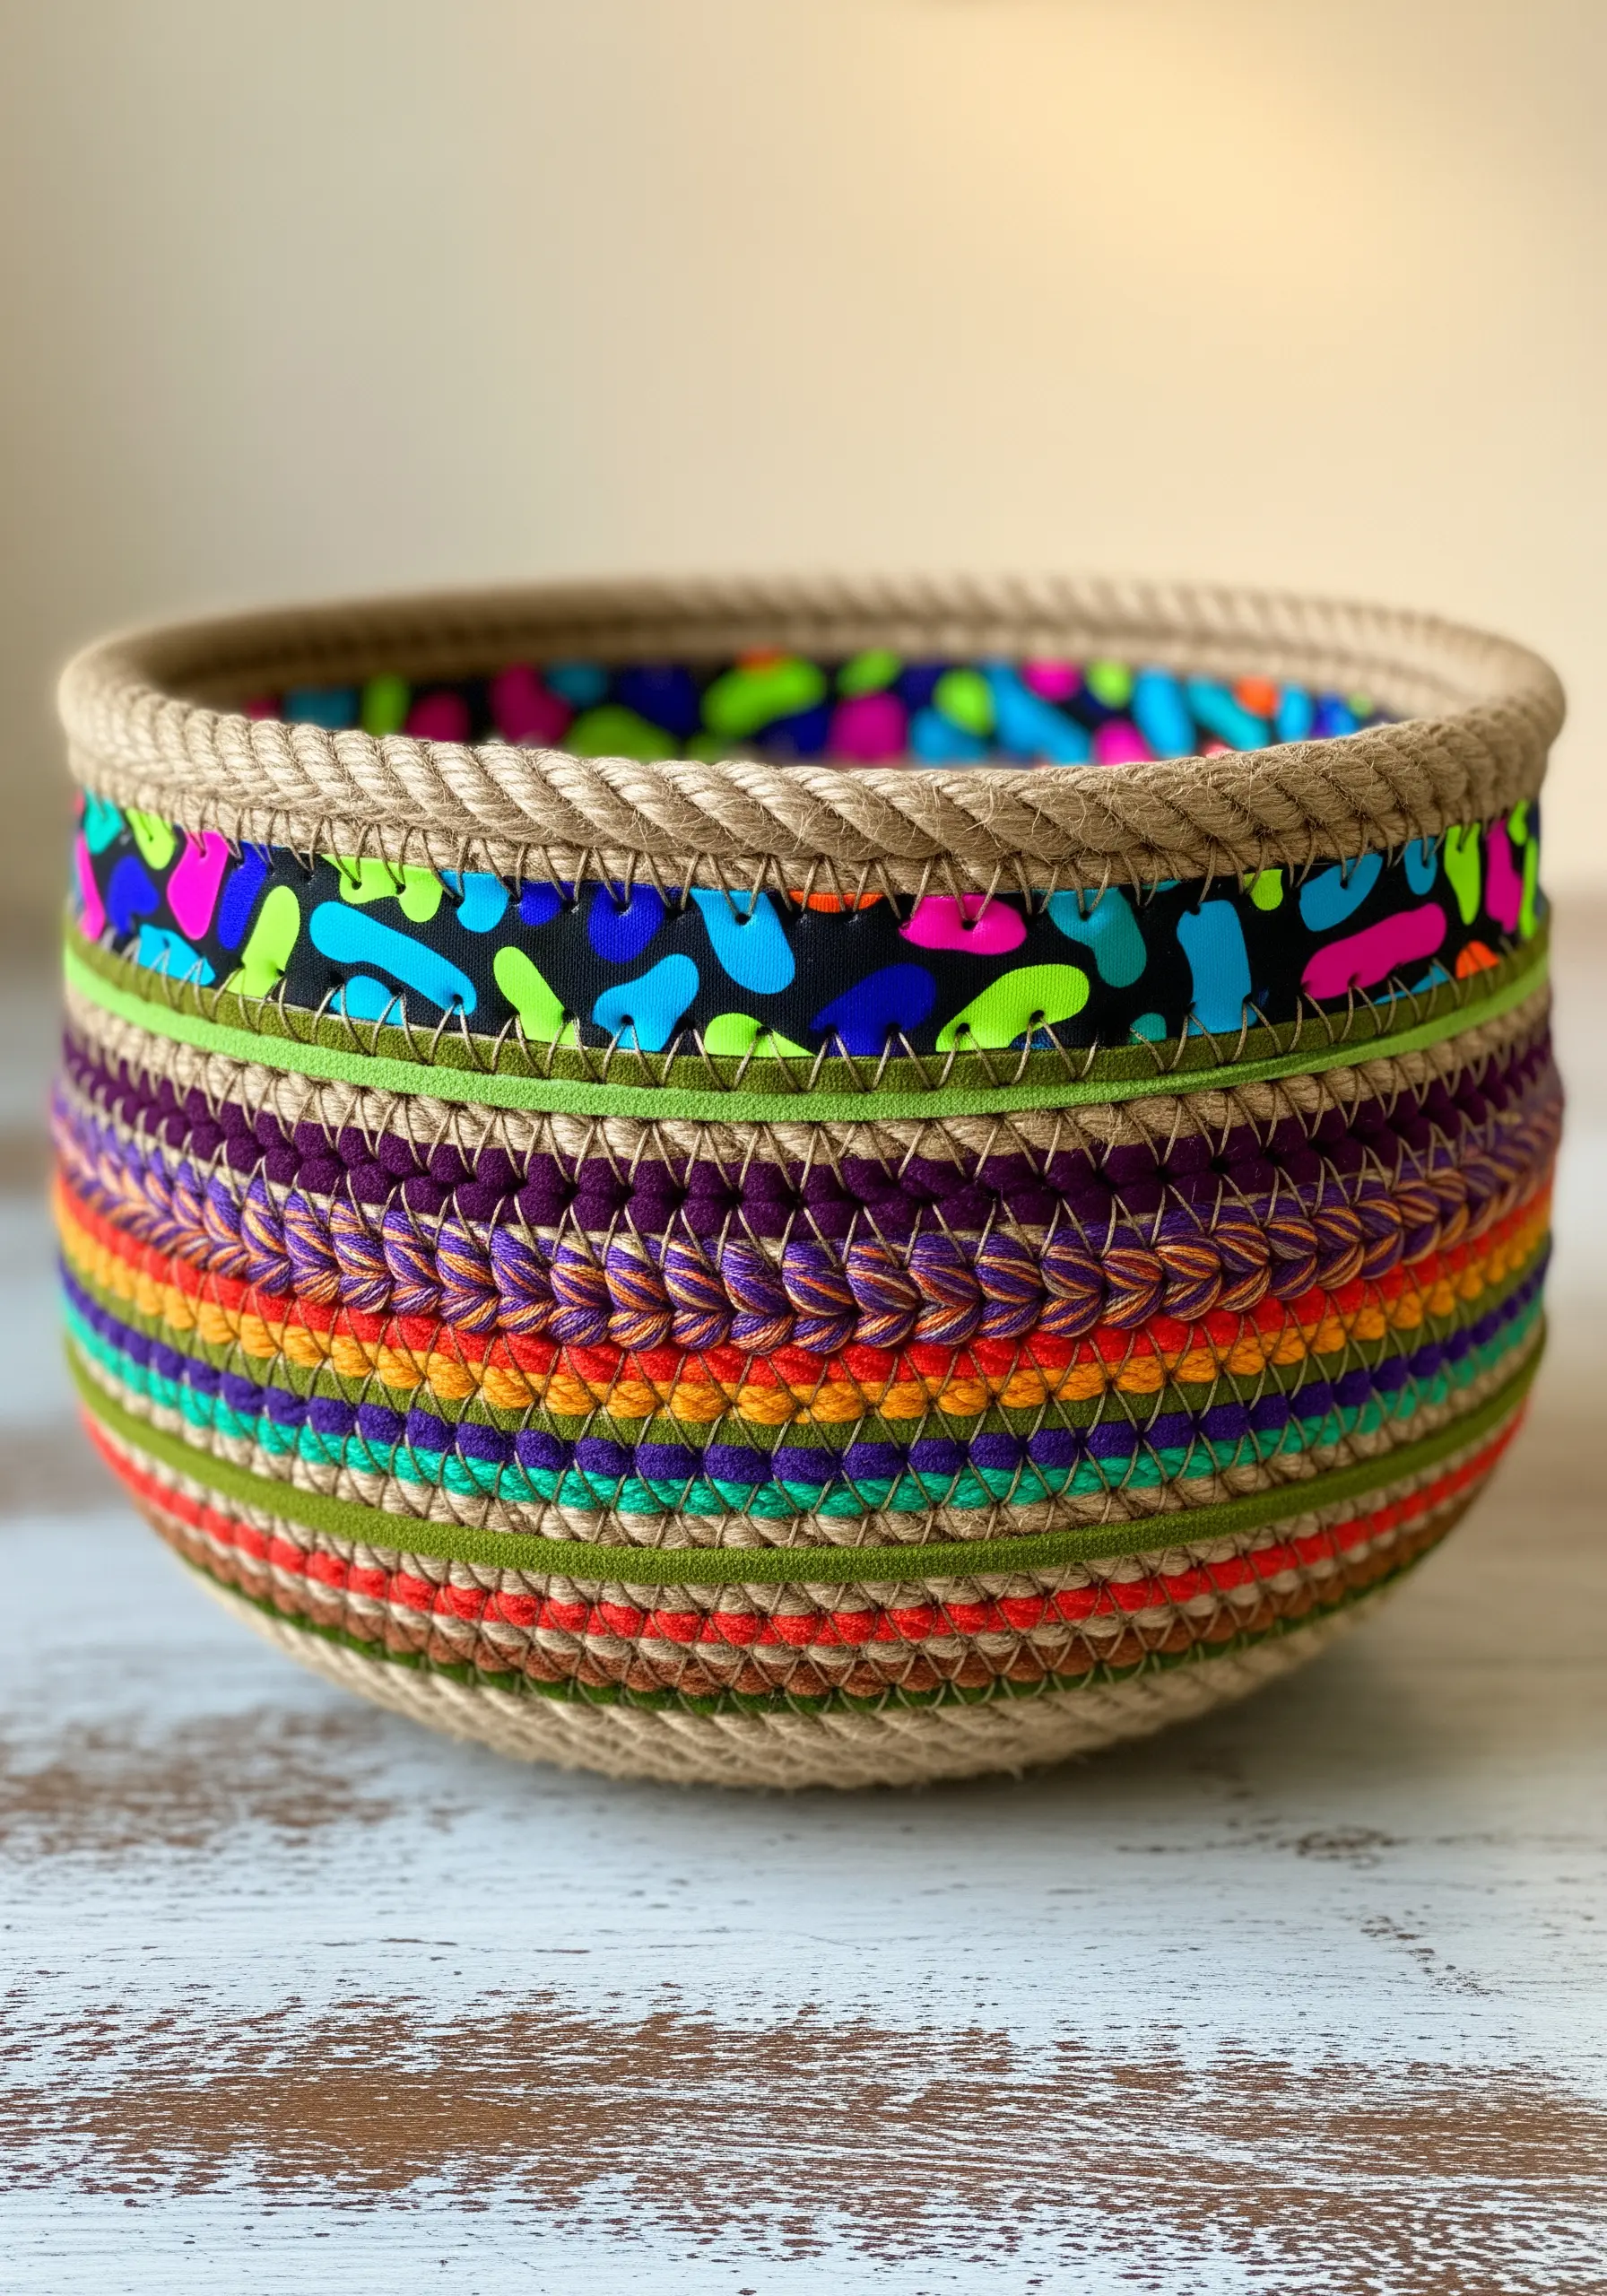
Build a sturdy and stylish basket using rope as your base and colorful threads or fabric as your binder.
Start by coiling a clothesline rope into a flat circle for the bottom, stitching it together as you go.
As you build the walls, wrap sections of the rope with vibrant fabric strips or embroidery floss before coiling and stitching them into place.
This method allows you to create bold patterns and turns a simple container into one of those DIY fabric crafts that feel expensive but cost almost nothing.
14. Modernize a Dreamcatcher with Asymmetrical Design
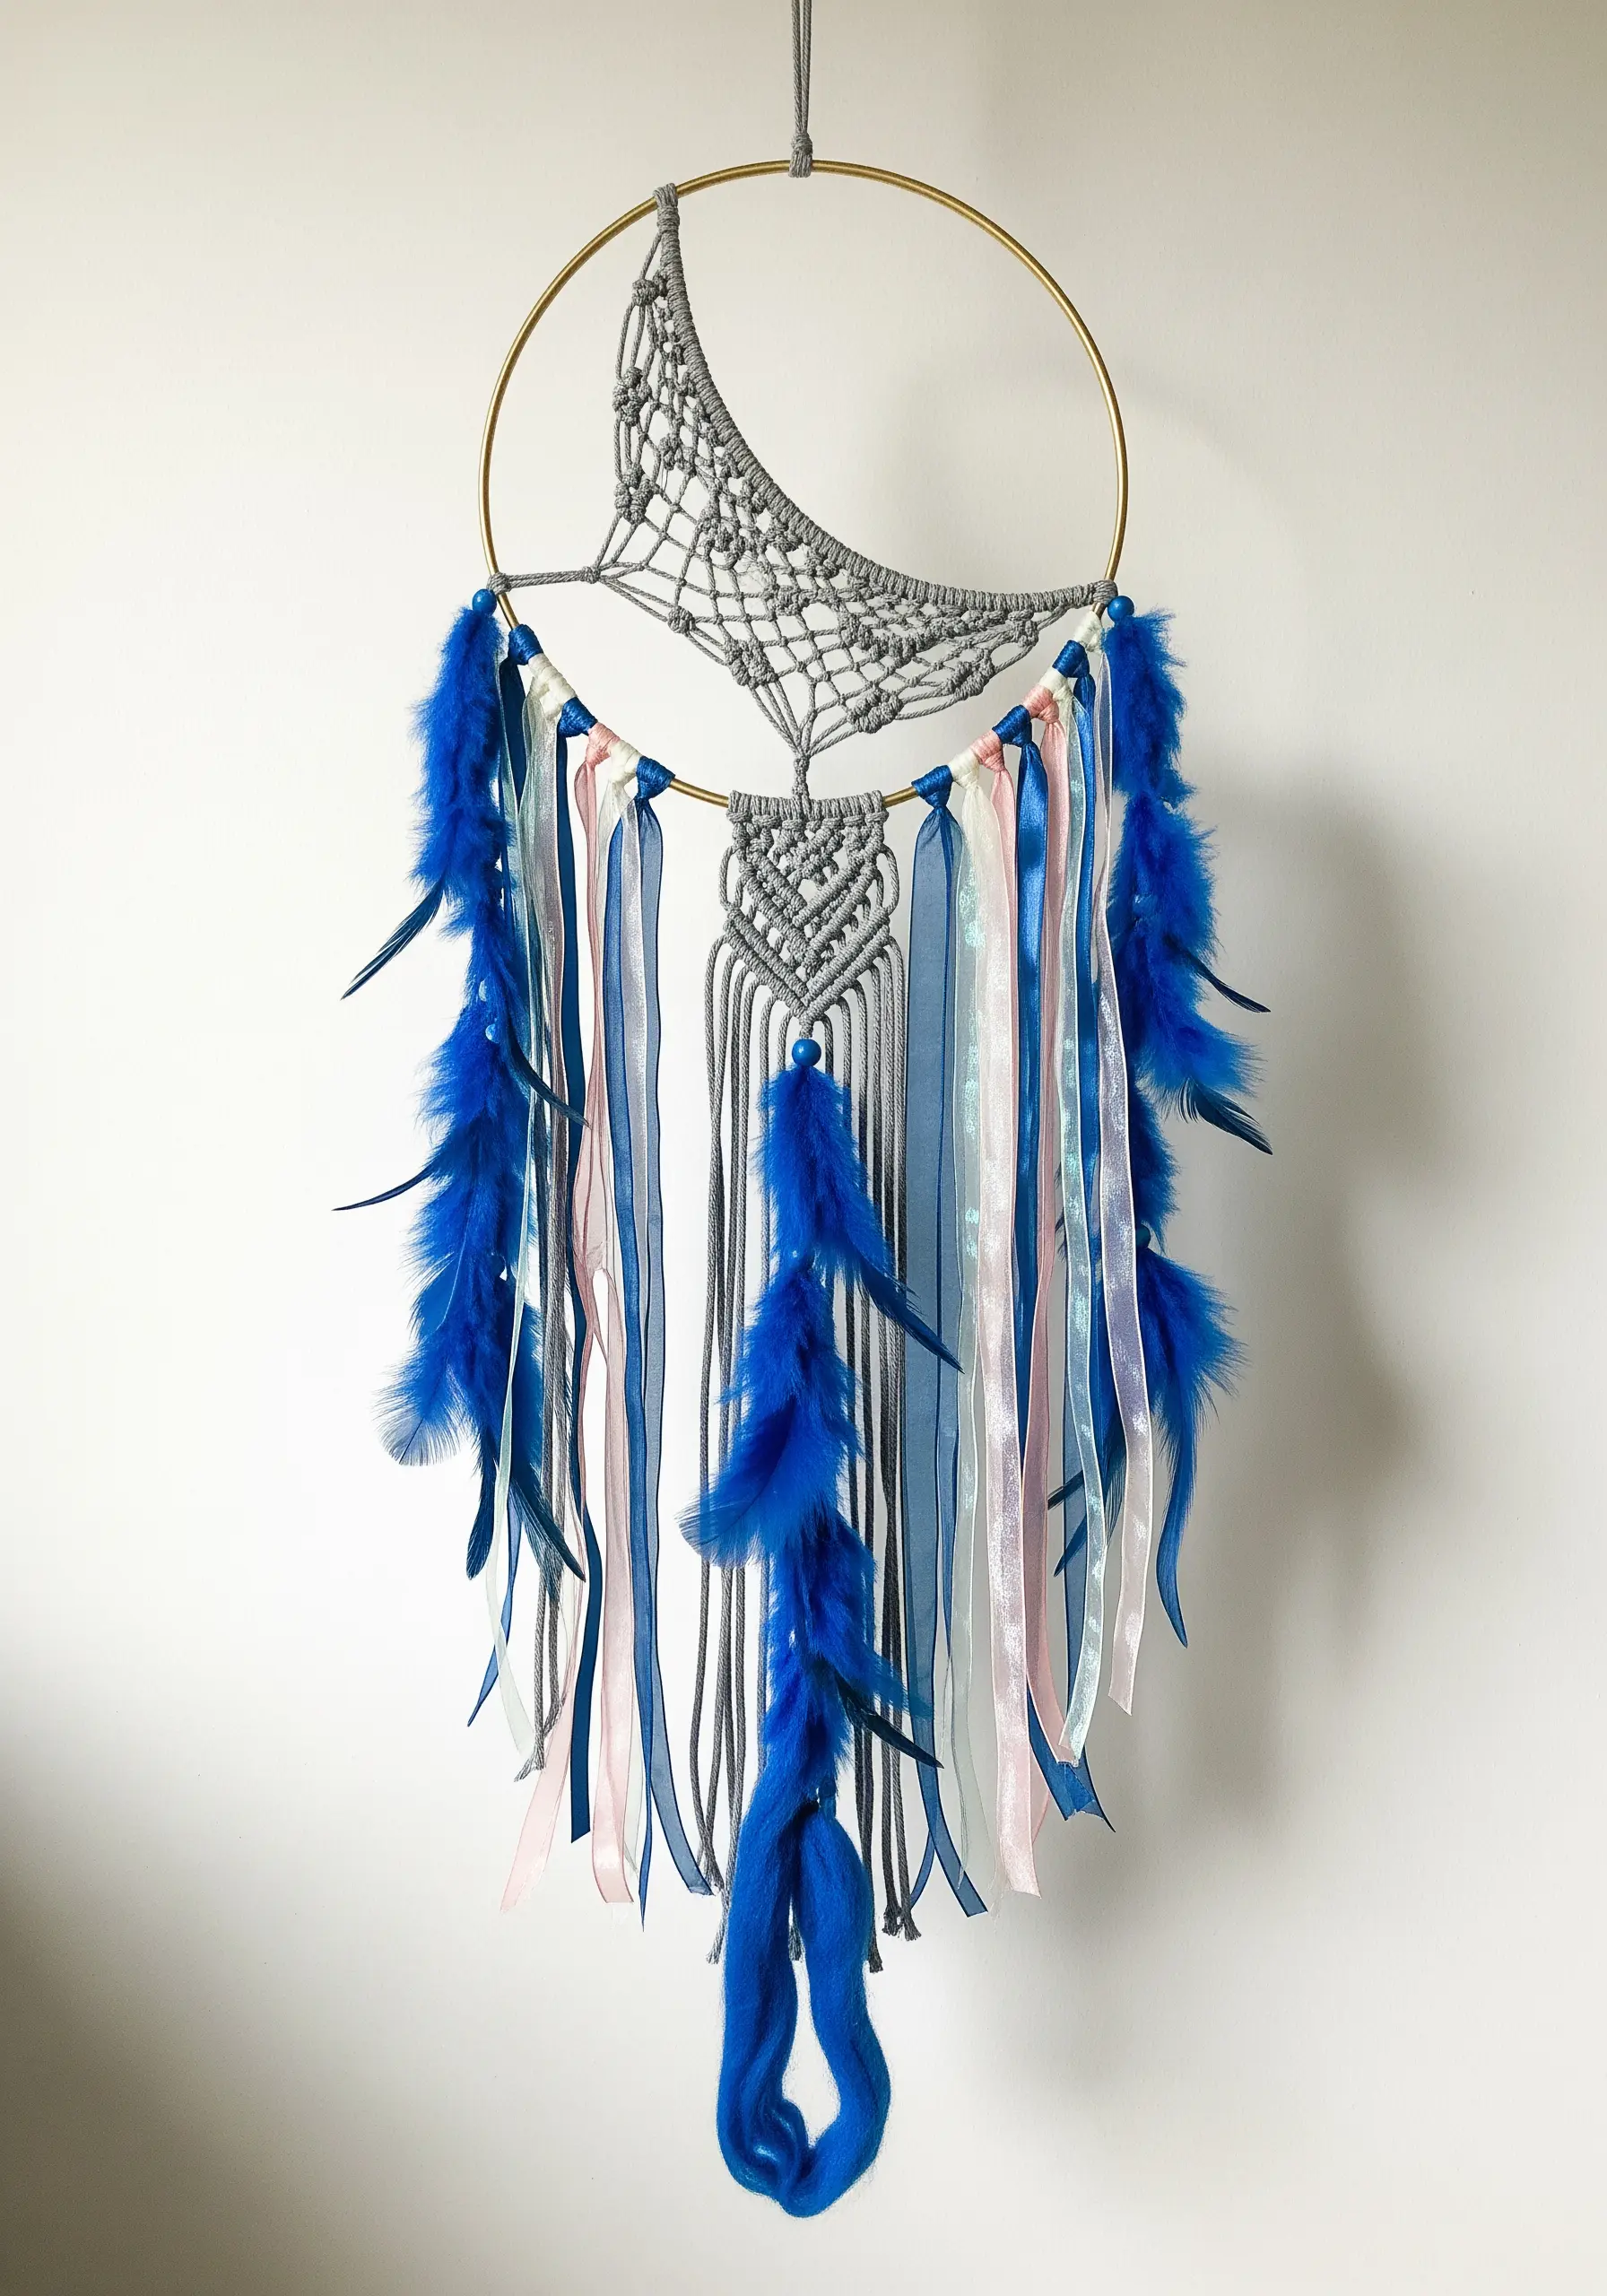
Reimagine the traditional dreamcatcher by playing with balance and materials.
Instead of centering your macrame webbing, create an off-center crescent moon shape, leaving negative space in the hoop for a modern feel.
For the tails, mix textures freely: silky ribbons, dyed feathers, chunky wool roving, and braided cords.
This approach transforms a classic craft into one of your own unique, boho-inspired wall hoop embroidery ideas that feels personal and artistic.
15. Frame a Mirror with Graphic Fiber Art
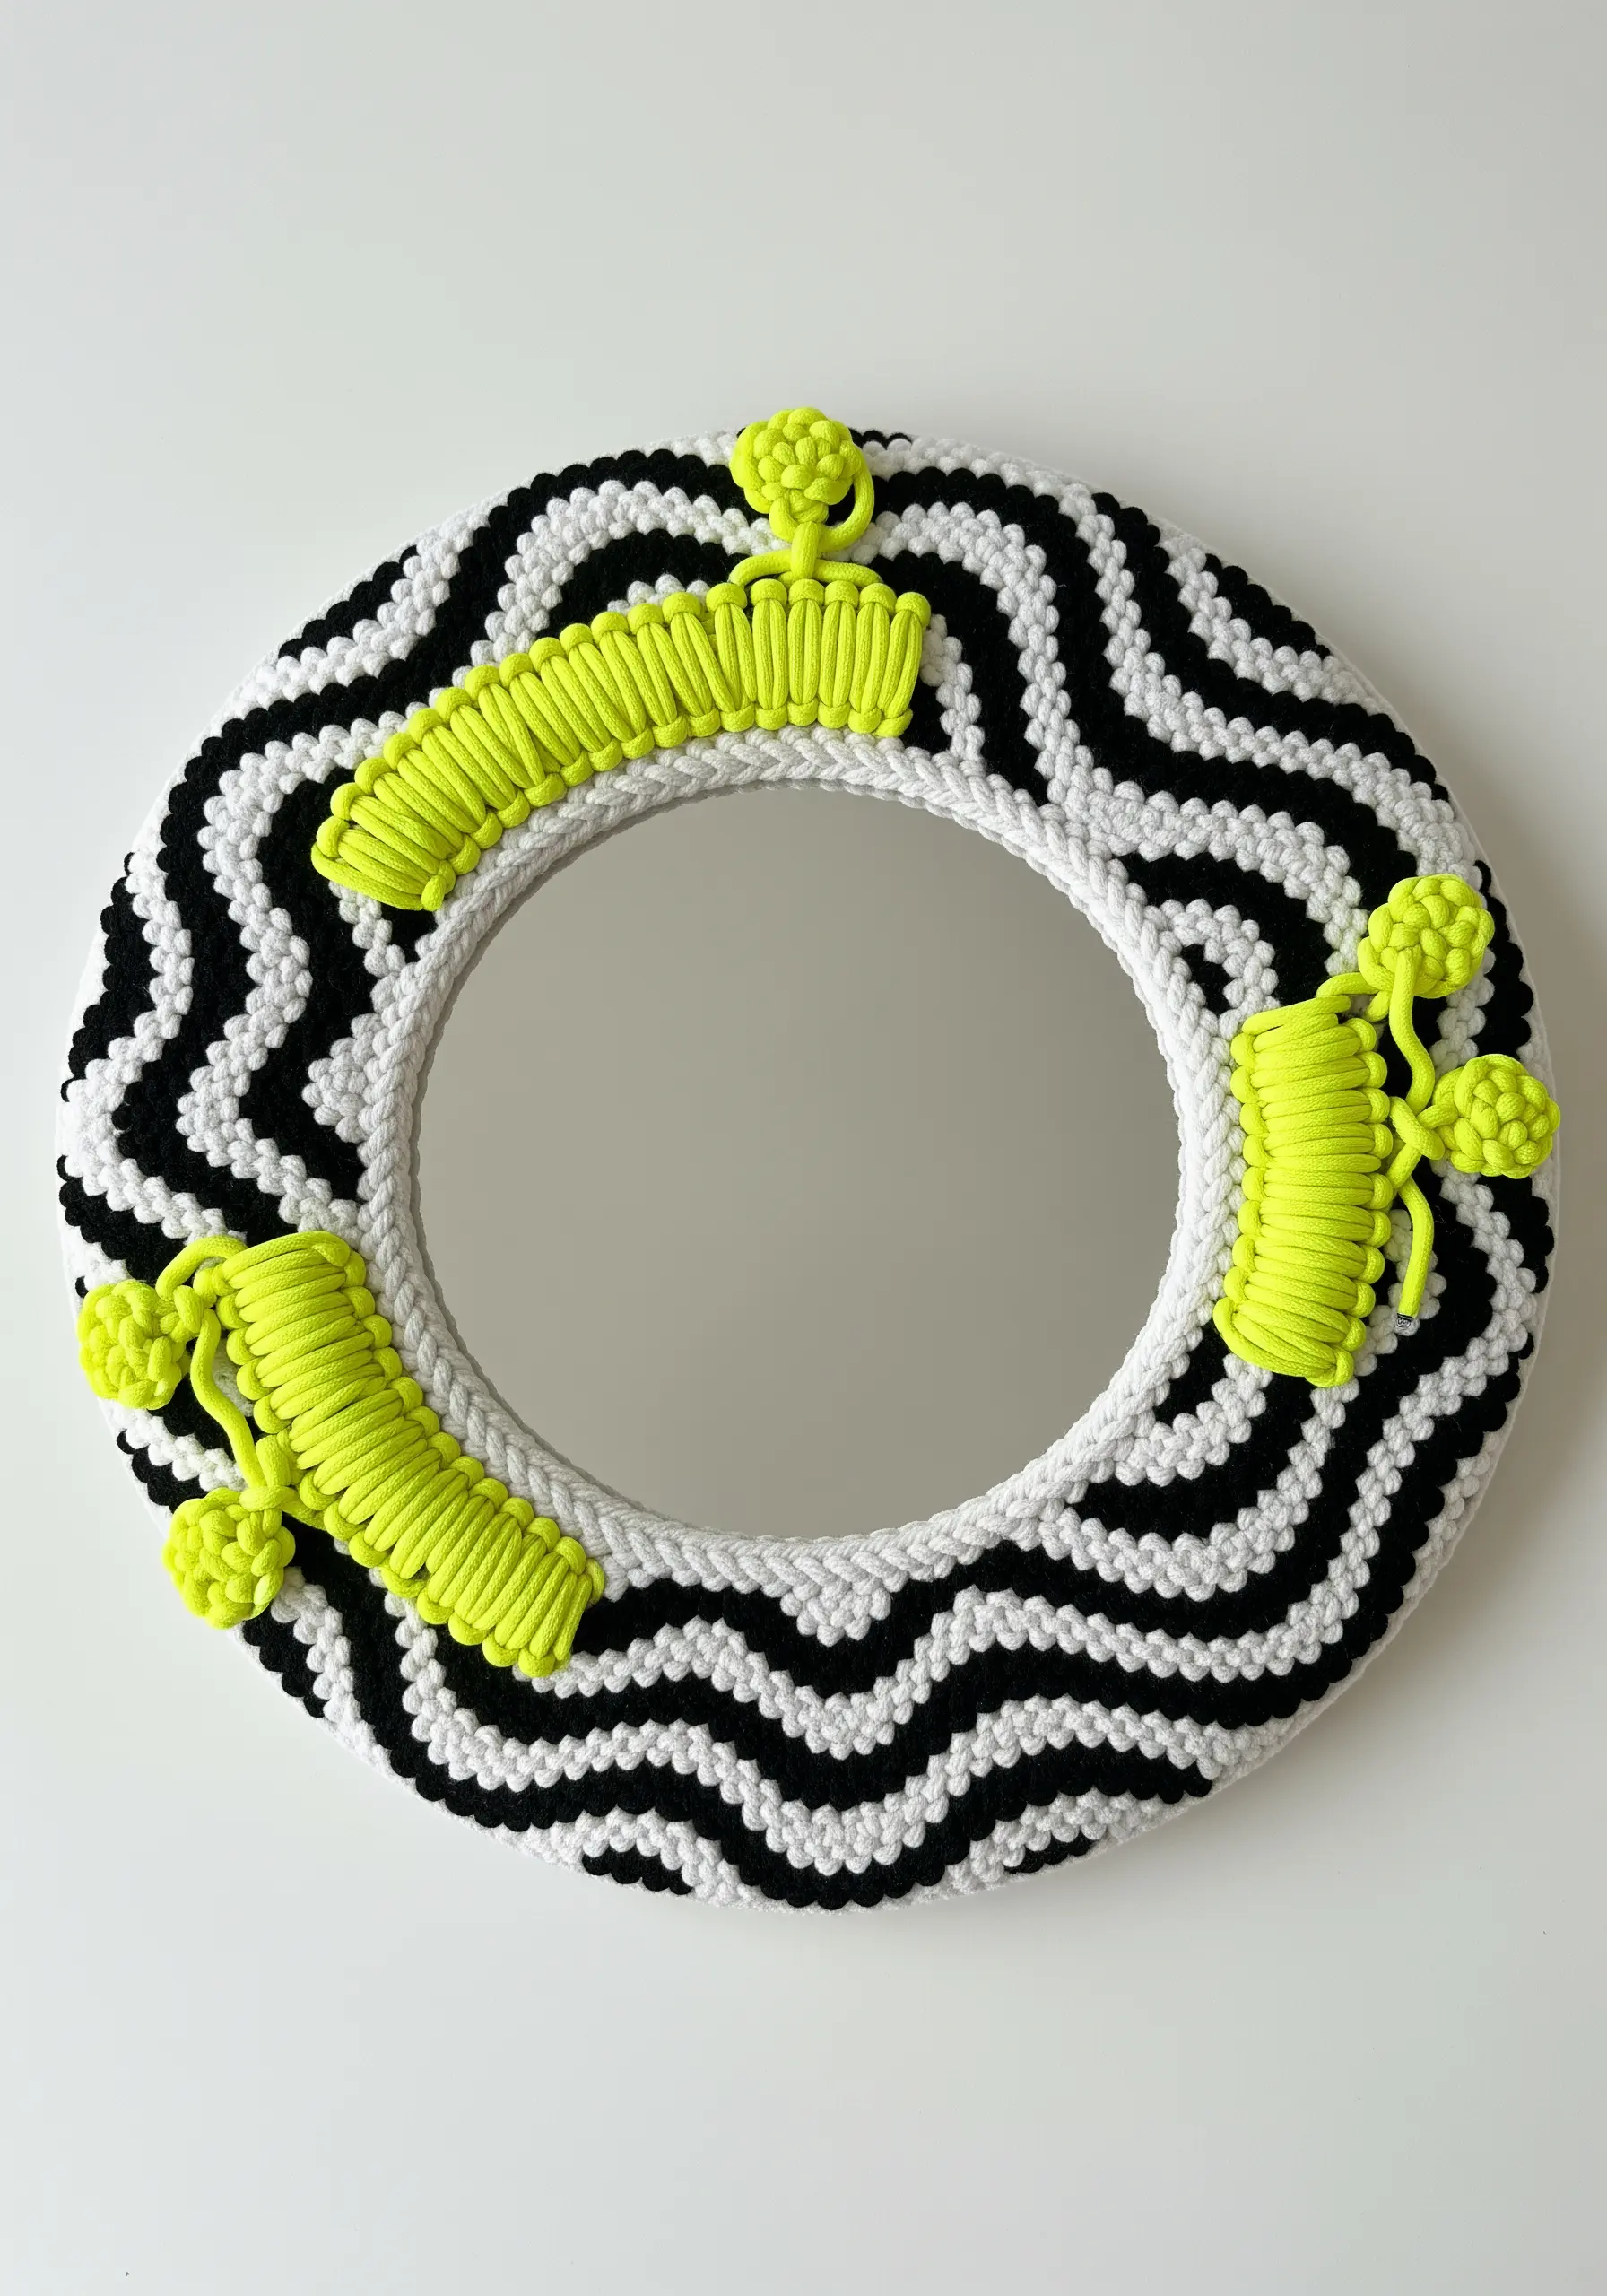
Turn a functional mirror into a statement piece by creating a bold, textural frame.
Use a coiling or wrapping technique around a circular base, alternating high-contrast colors like black and white to create a graphic pattern.
Introduce a third color and a different technique, like the wrapped neon bundles here, to add focal points and break up the pattern.
This project is one of those creative, aesthetic embroidery pieces that make your room pop while also being entirely functional.
16. Paint with Texture Using Roving and Knots
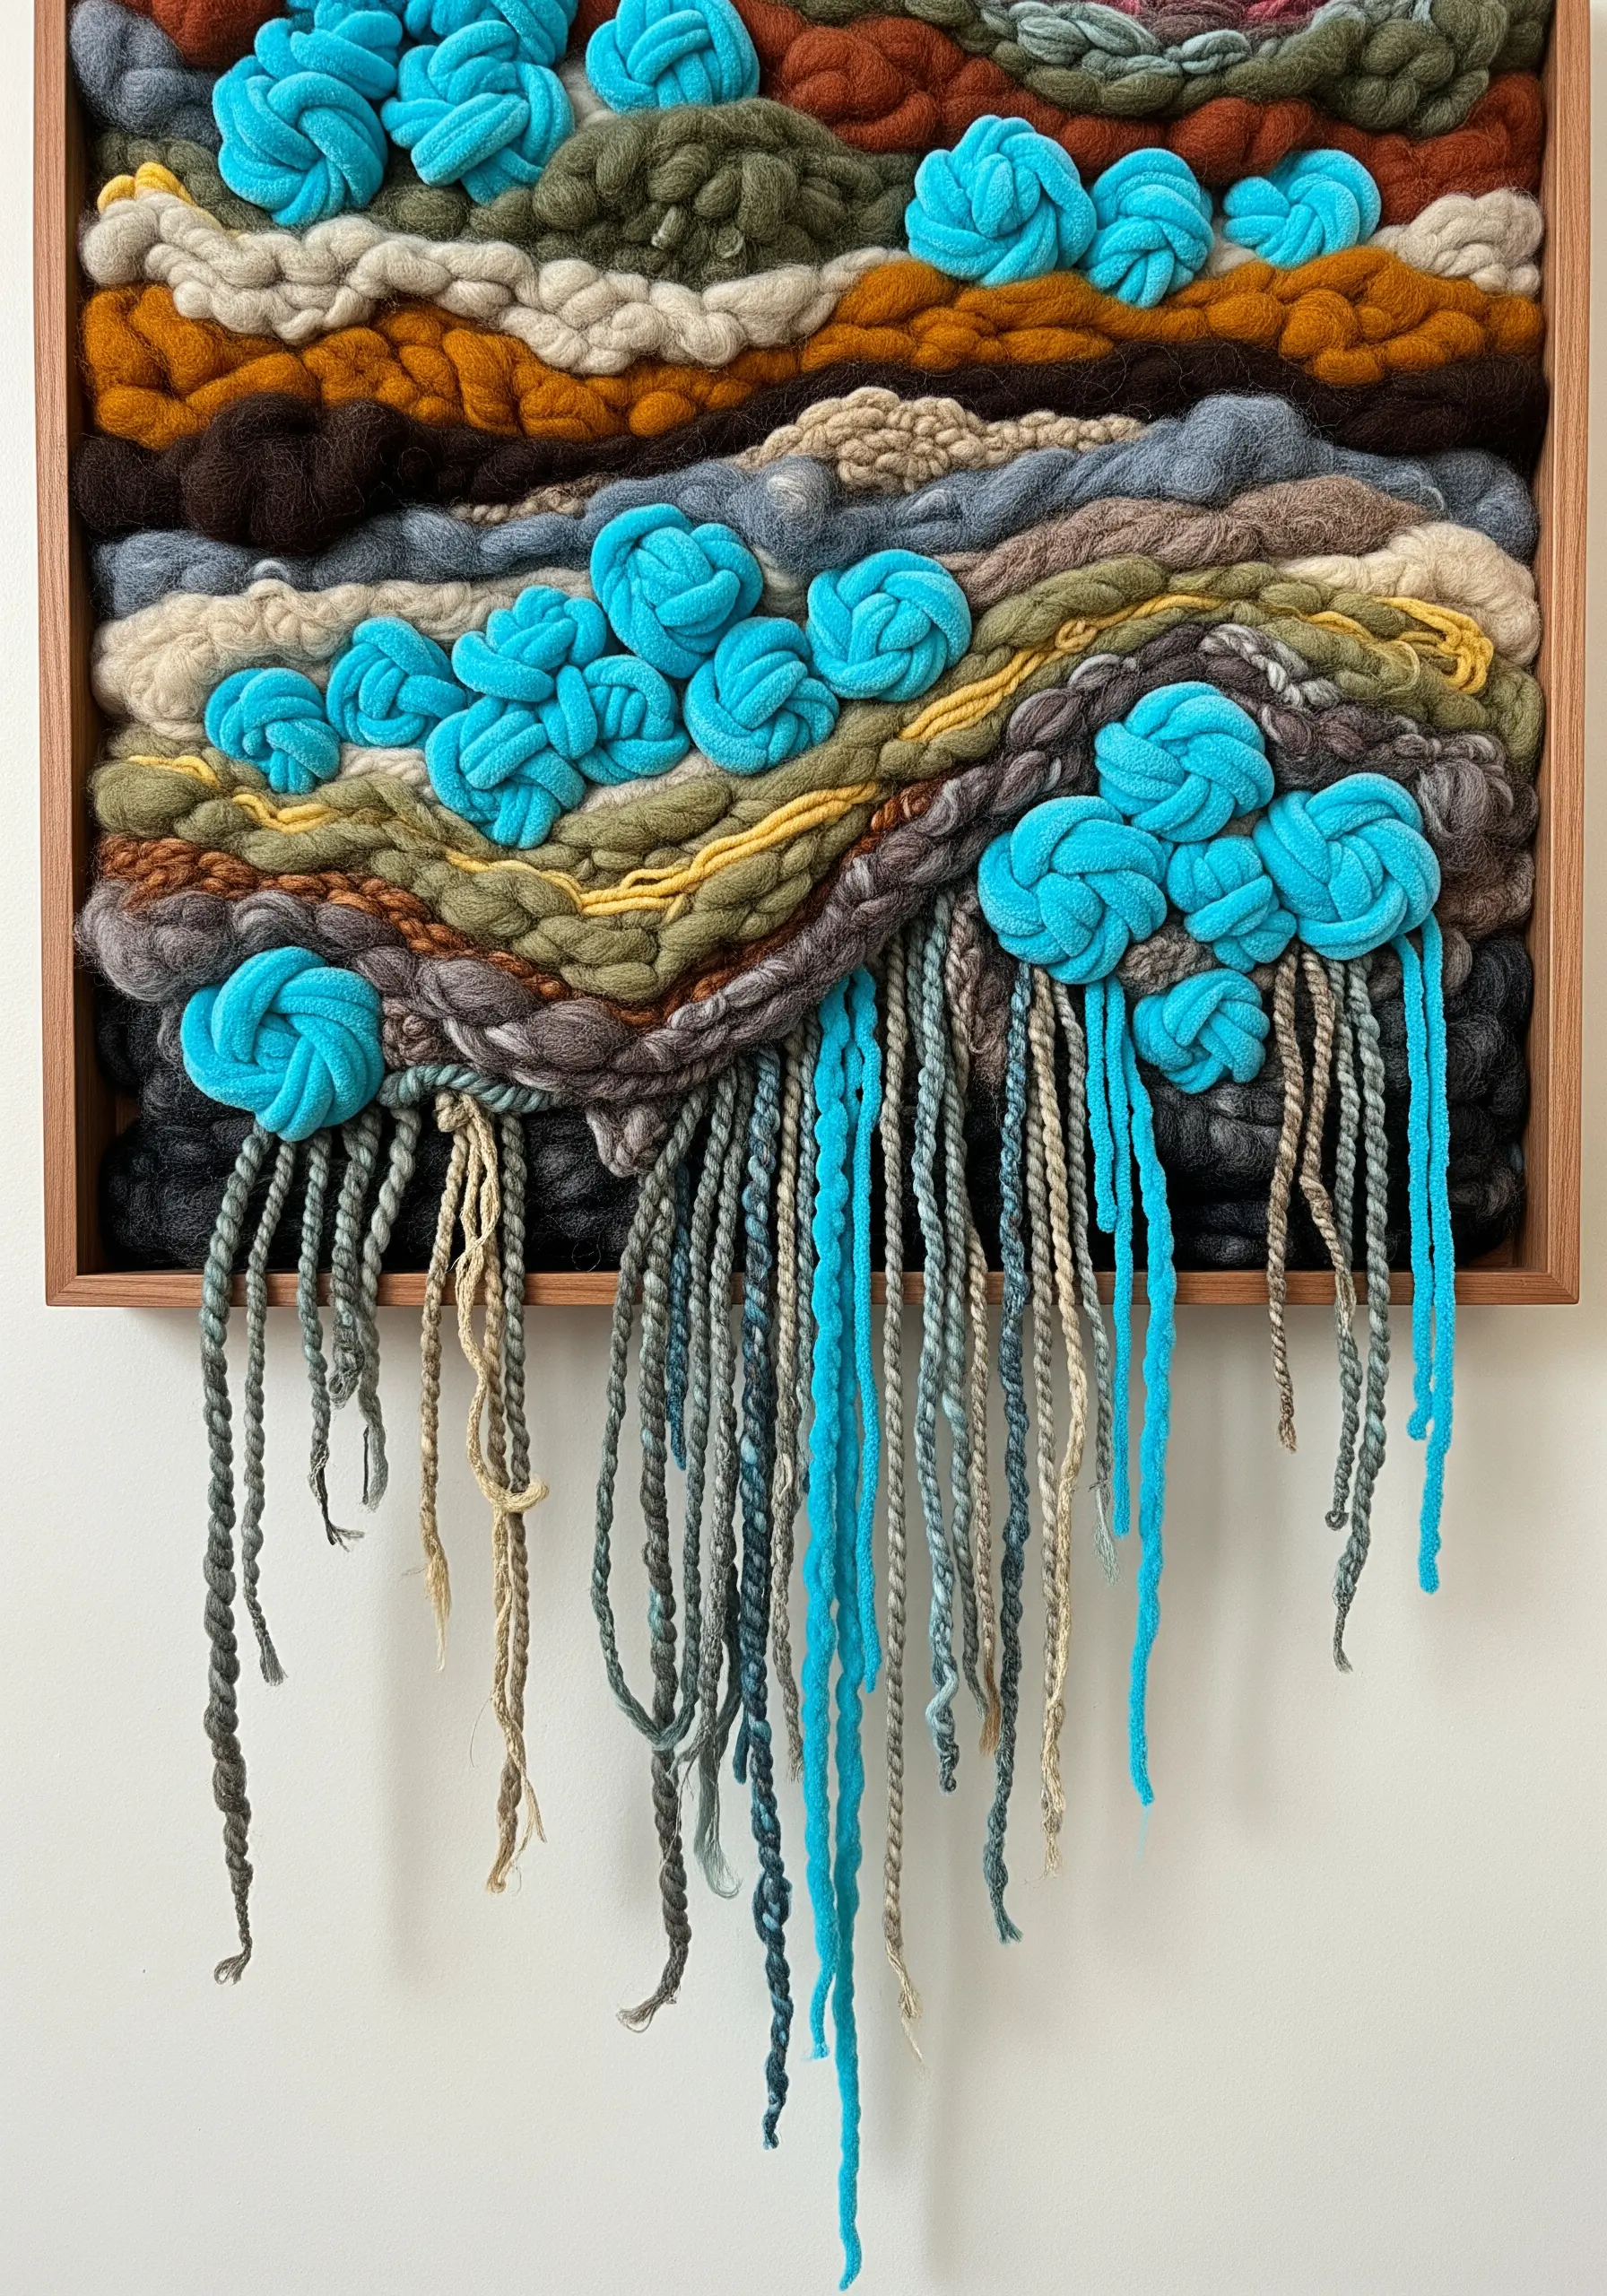
Think of your yarn and roving as paint, creating an abstract landscape through texture and color.
Lay down thick, chunky bands of roving to create a soft, undulating background.
Weave in thinner, twisted yarns to add fine lines and definition, mimicking the layers of earth or sea.
For a pop of unexpected texture, add sculptural knots like the bright blue clusters, which draw the eye and create focal points within the piece.
This is how you create organic texture embroidery designs that add life to any room.
17. Weave a Pixelated Scene
Create a retro, pixel-art aesthetic by using weaving or latch hook techniques on a grid.
Map out your design on graph paper first, assigning one square to each knot or pass of the weft thread.
This methodical approach allows you to render complex scenes with a distinct, nostalgic digital vibe.
Use a limited, high-contrast color palette with pops of neon to enhance the futuristic feel.
It’s the perfect way to make modern embroidered tapestry designs that are both graphic and narrative.
18. Compose a Collage with Fabric, Lace, and Stitch
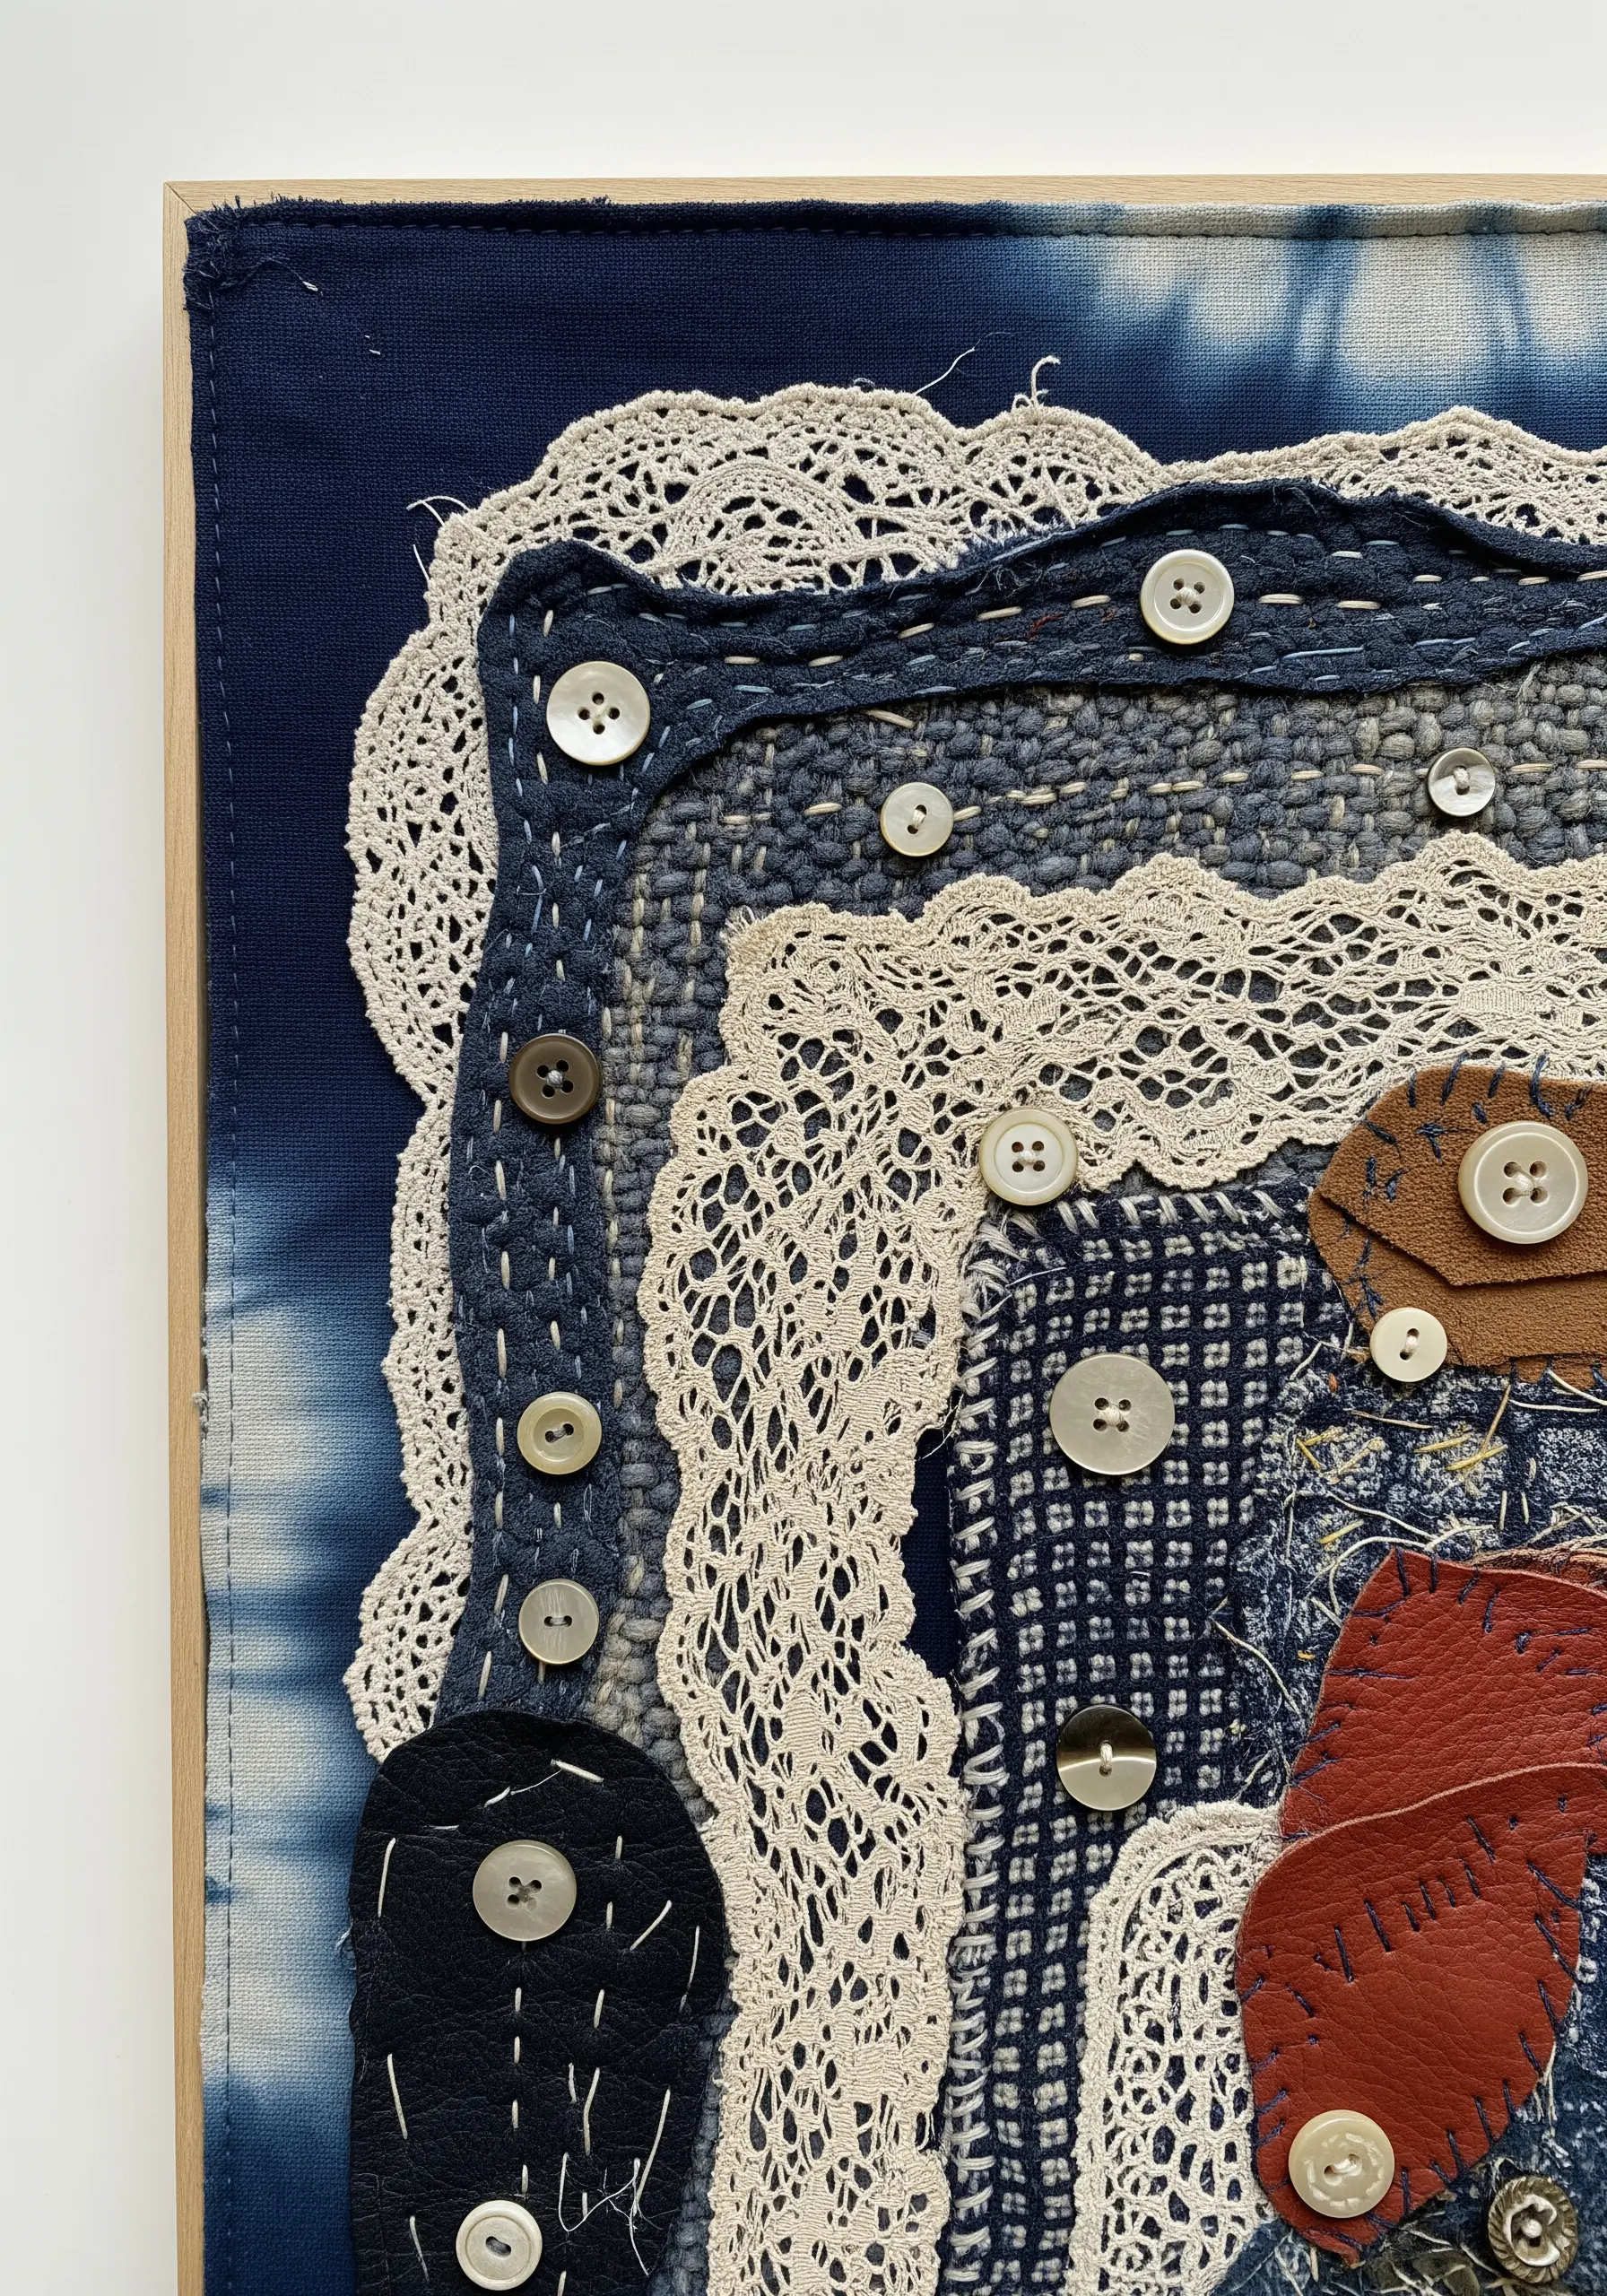
Build a deeply personal piece by layering meaningful fabric scraps, vintage lace, and even pieces of leather.
Arrange your materials on a backing fabric, considering how their textures and colors interact.
Instead of hiding your stitches, use a contrasting thread and simple running stitches (like in sashiko) to visibly connect the layers.
Add buttons or other found objects as final embellishments, turning forgotten scraps into art.
This is the essence of creating scrap fabric collage embroidery ideas—it’s about memory and texture.
19. Combine Crochet with Unconventional Fibers
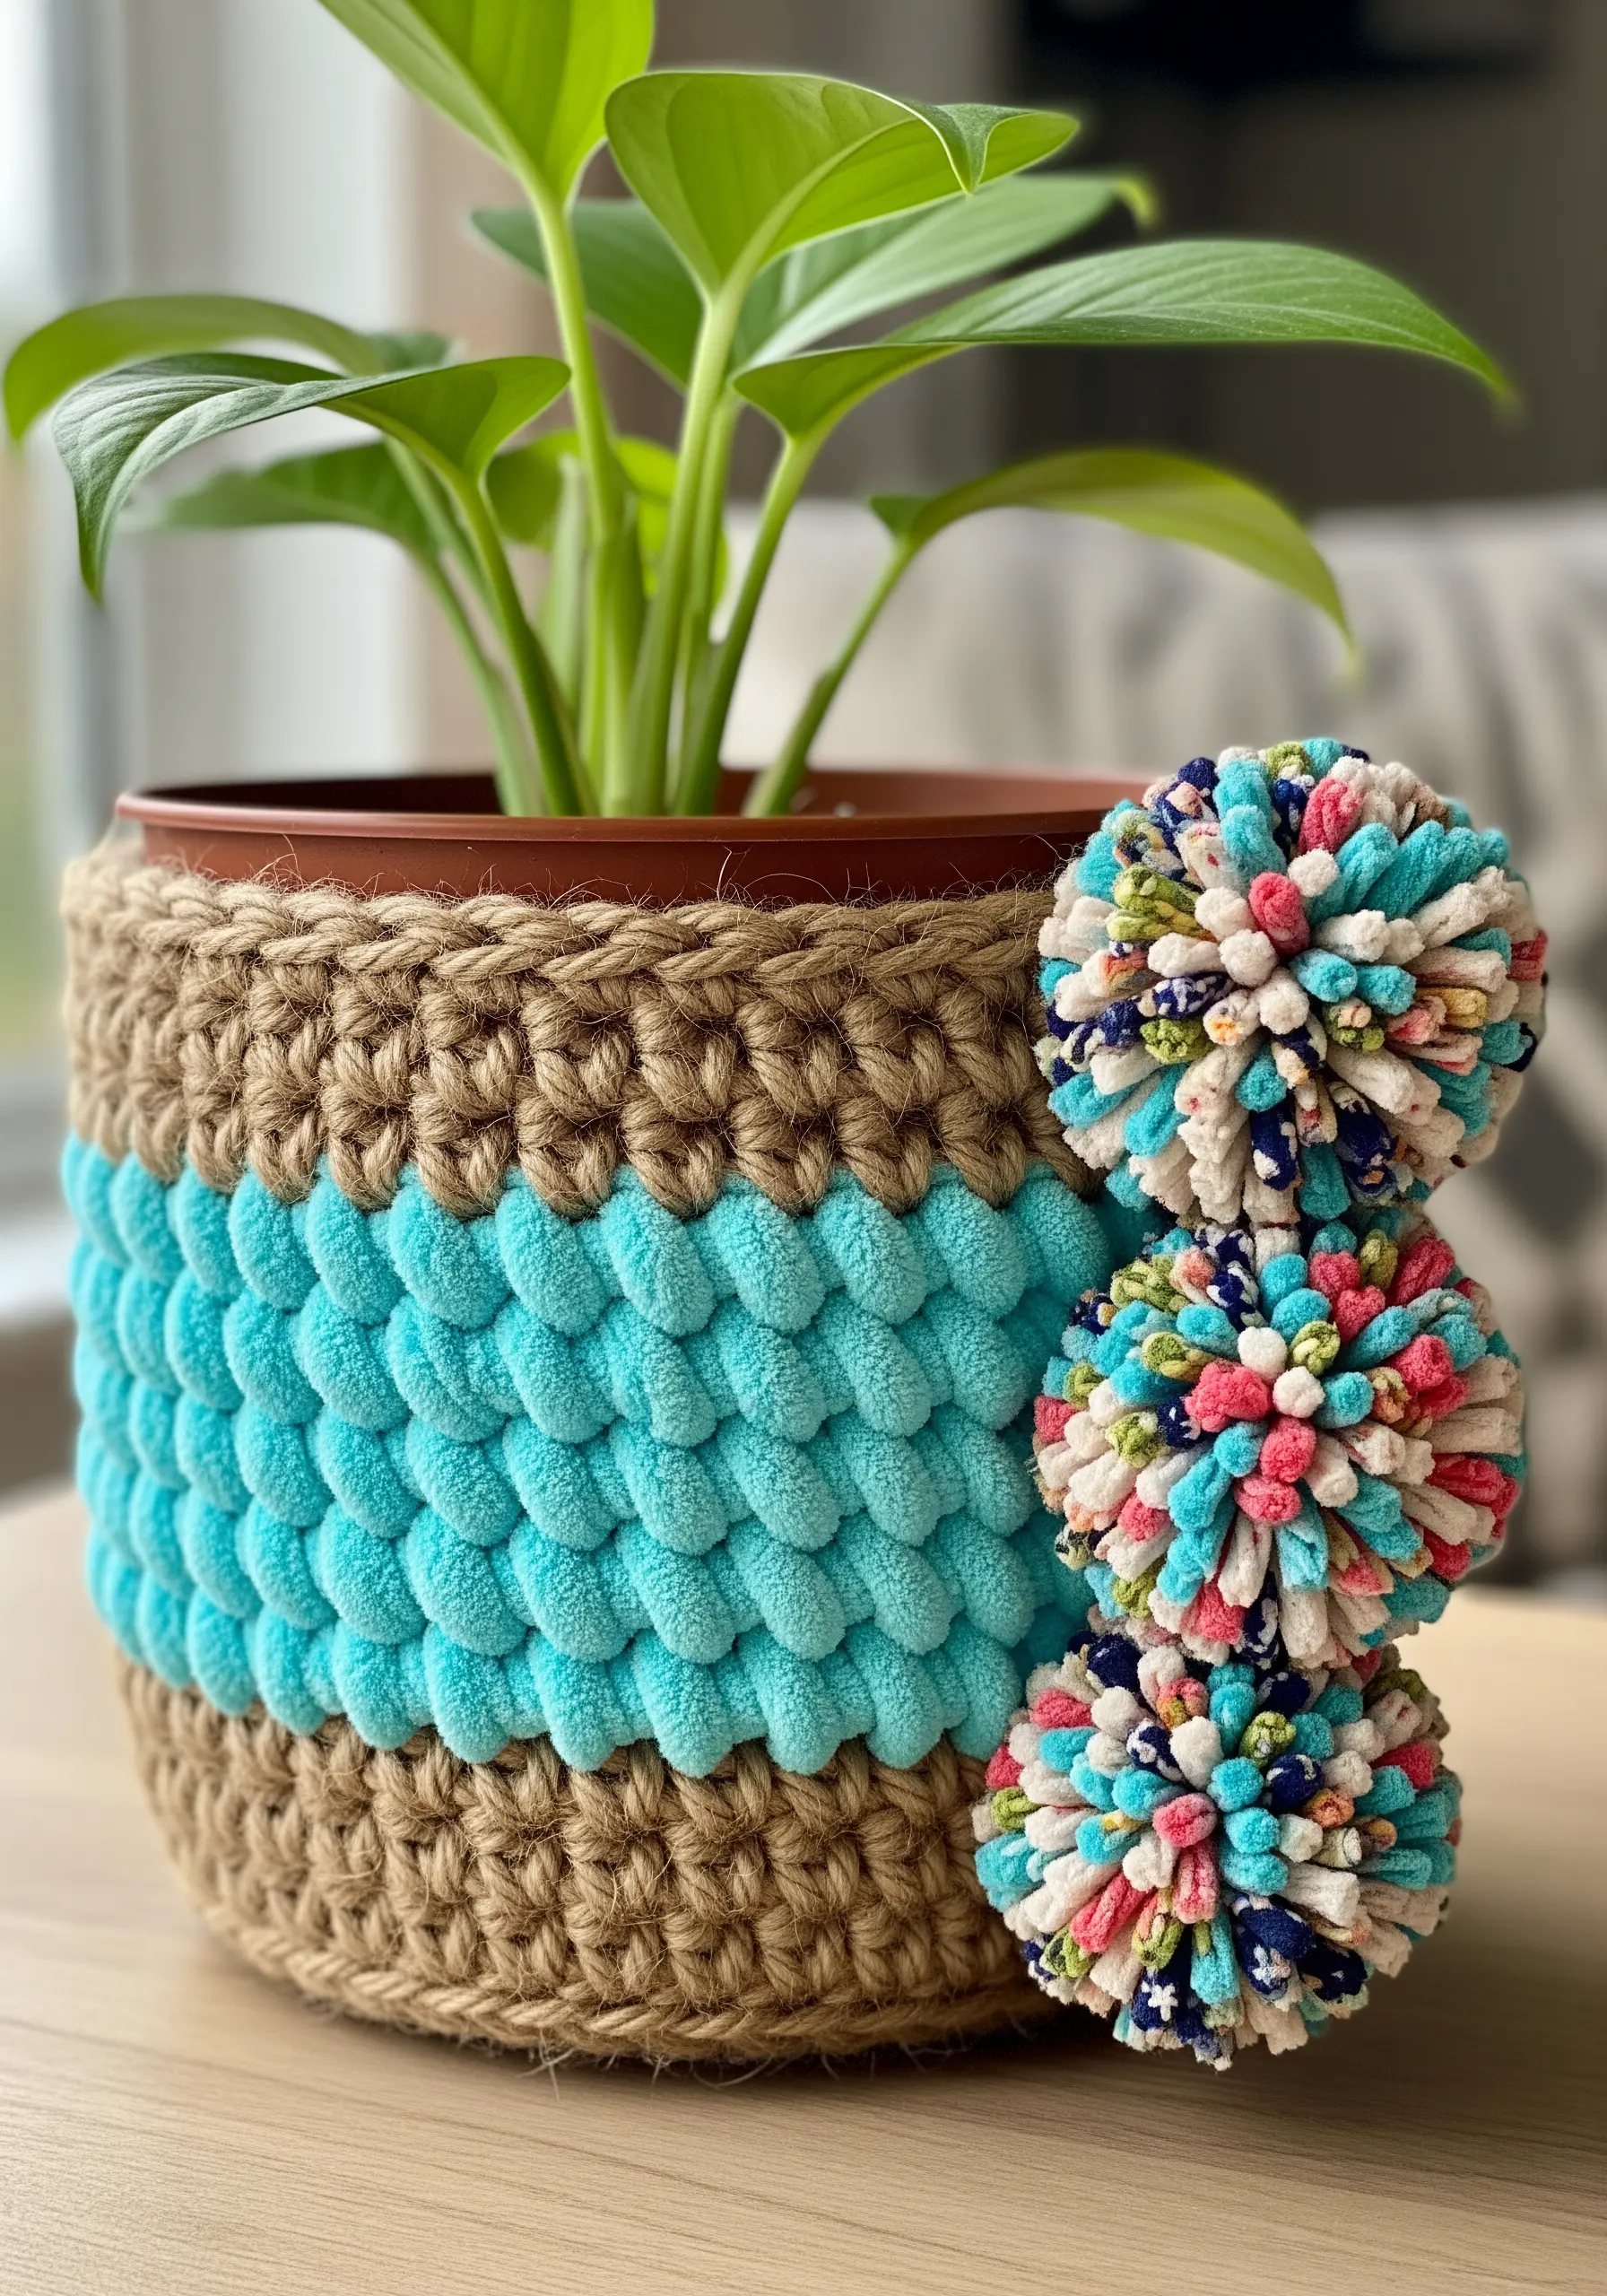
Add visual and tactile interest to your crochet projects by mixing different types of yarn within a single piece.
Use a sturdy, natural fiber like jute for the structural parts of your project, like the top and bottom of this plant pot cover.
For the central band, switch to a super-soft, plush chenille yarn and use a textured stitch like the bobble stitch to maximize its softness.
Finish it off with playful pom-poms made from patterned fabric scraps for a final, funky touch.
These handmade organic pieces thrive on unexpected material combinations.
20. Craft a Celestial Mobile with Felt and Fiber
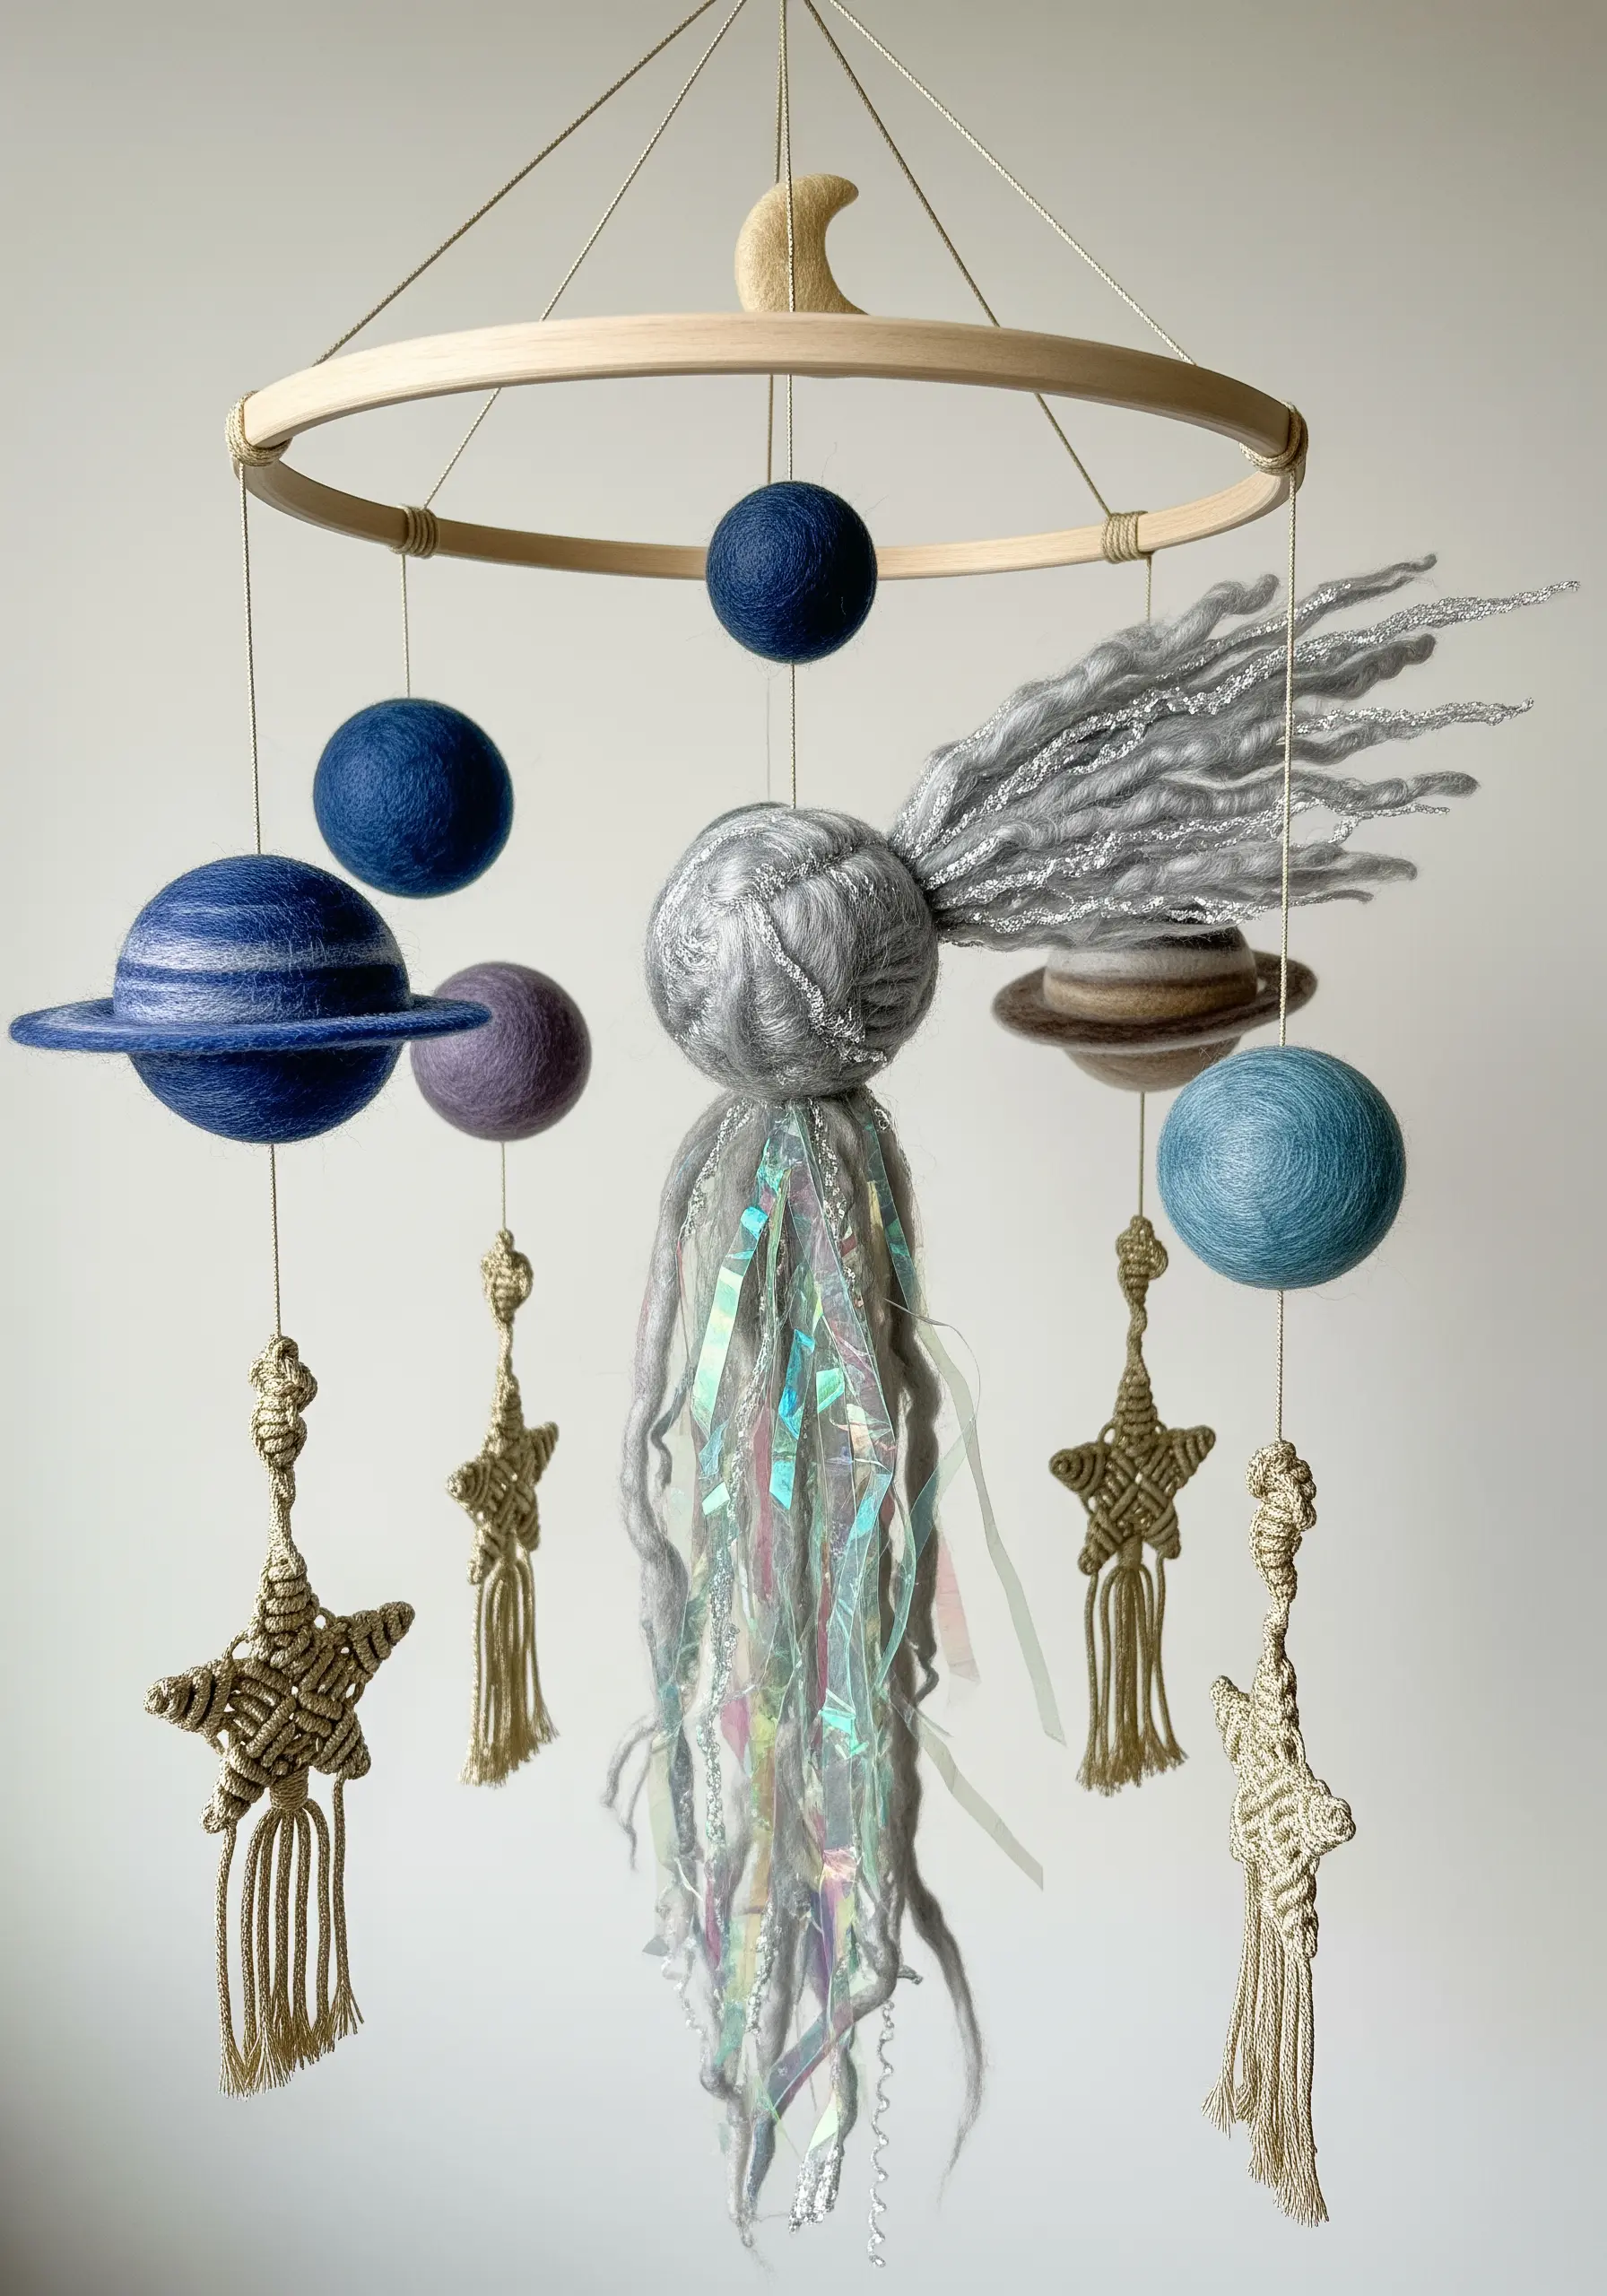
Construct a whimsical solar system using needle felting and macrame techniques.
Create solid, dense planets by wet-felting or needle-felting wool roving into spheres, blending colors to create marbled or ringed effects.
For a touch of magic, craft a comet from a felted core, then attach a tail of specialty fibers like sparkly Angelina fiber, silk, and iridescent ribbons.
Suspend everything with knotted macrame stars, creating celestial fiber art installations perfect for a nursery or creative space.
21. Create a Waterfall Effect in Your Weaving
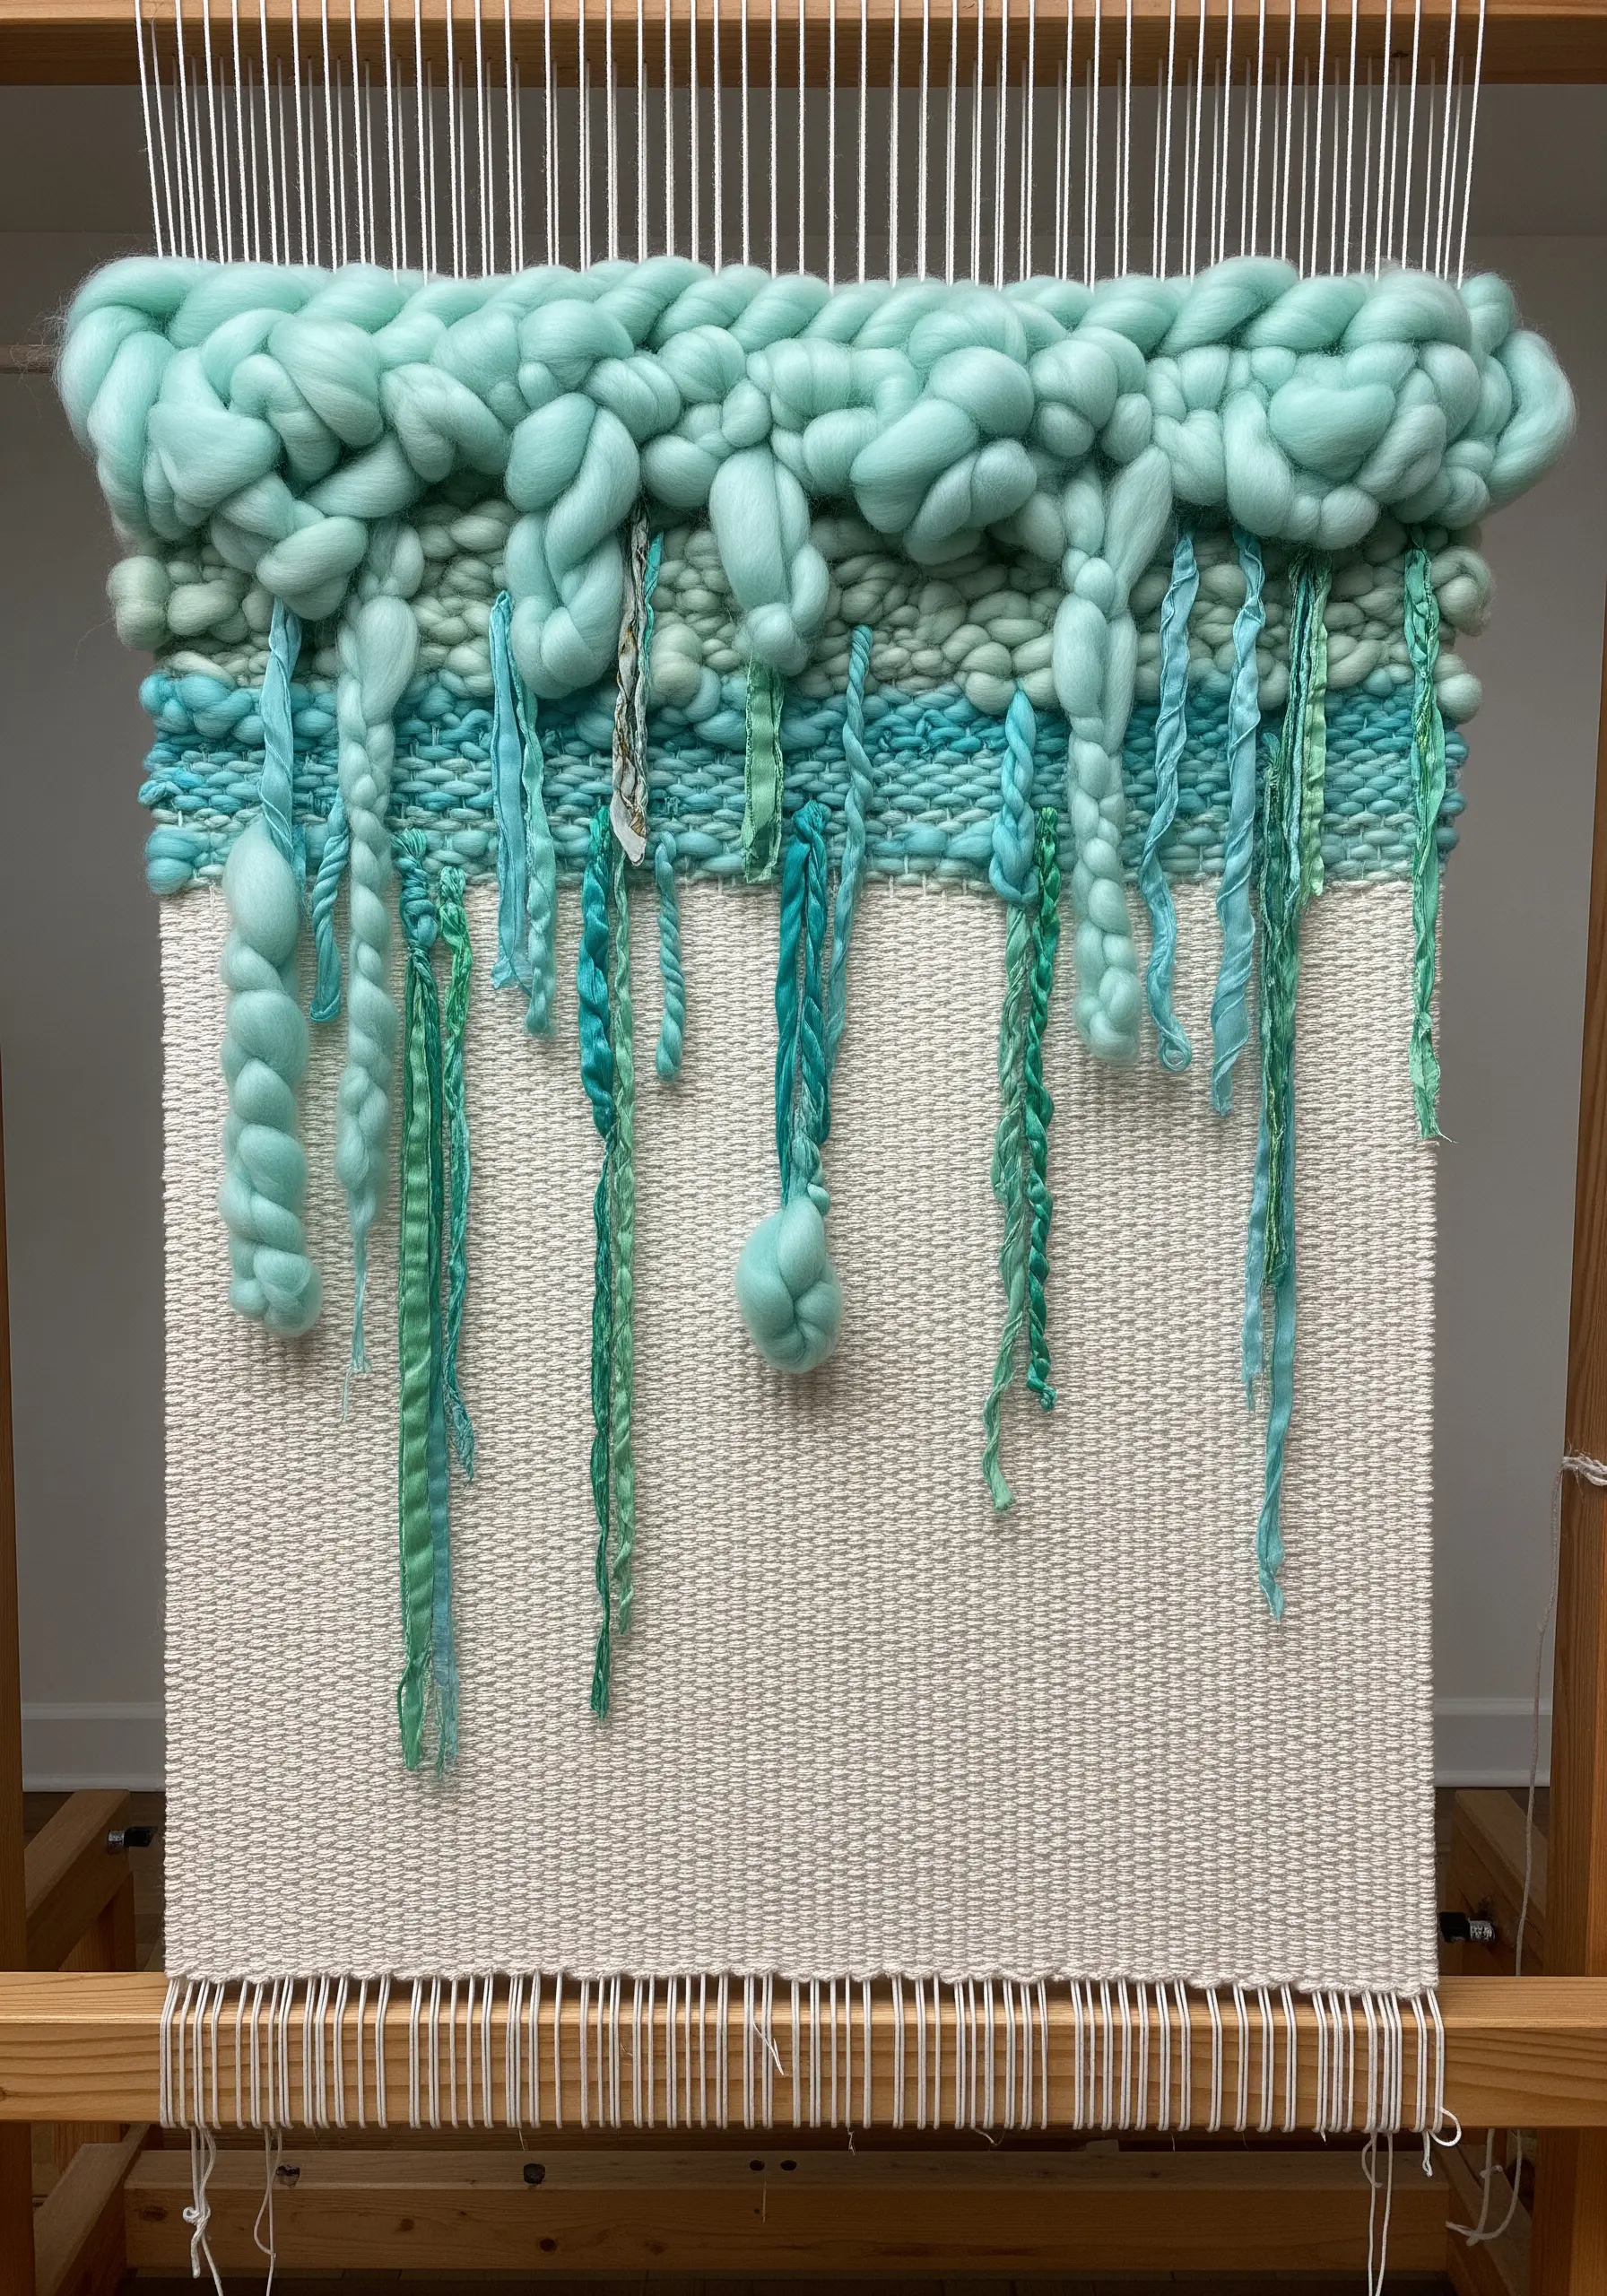
Introduce dramatic, cascading texture into your weaving by allowing your materials to hang loose.
After establishing a solid woven base, start incorporating unspun wool roving, fabric strips, or thick yarn, but don’t pull them all the way through.
Let long sections dangle from the front of your weave, varying the lengths and textures to create an organic, waterfall-like effect.
This is one of the mixed-fiber embroidery techniques you’ll wish you knew sooner, as it adds incredible movement and dimension with minimal effort.
22. Fuse Macrame and Weaving for Geometric Impact
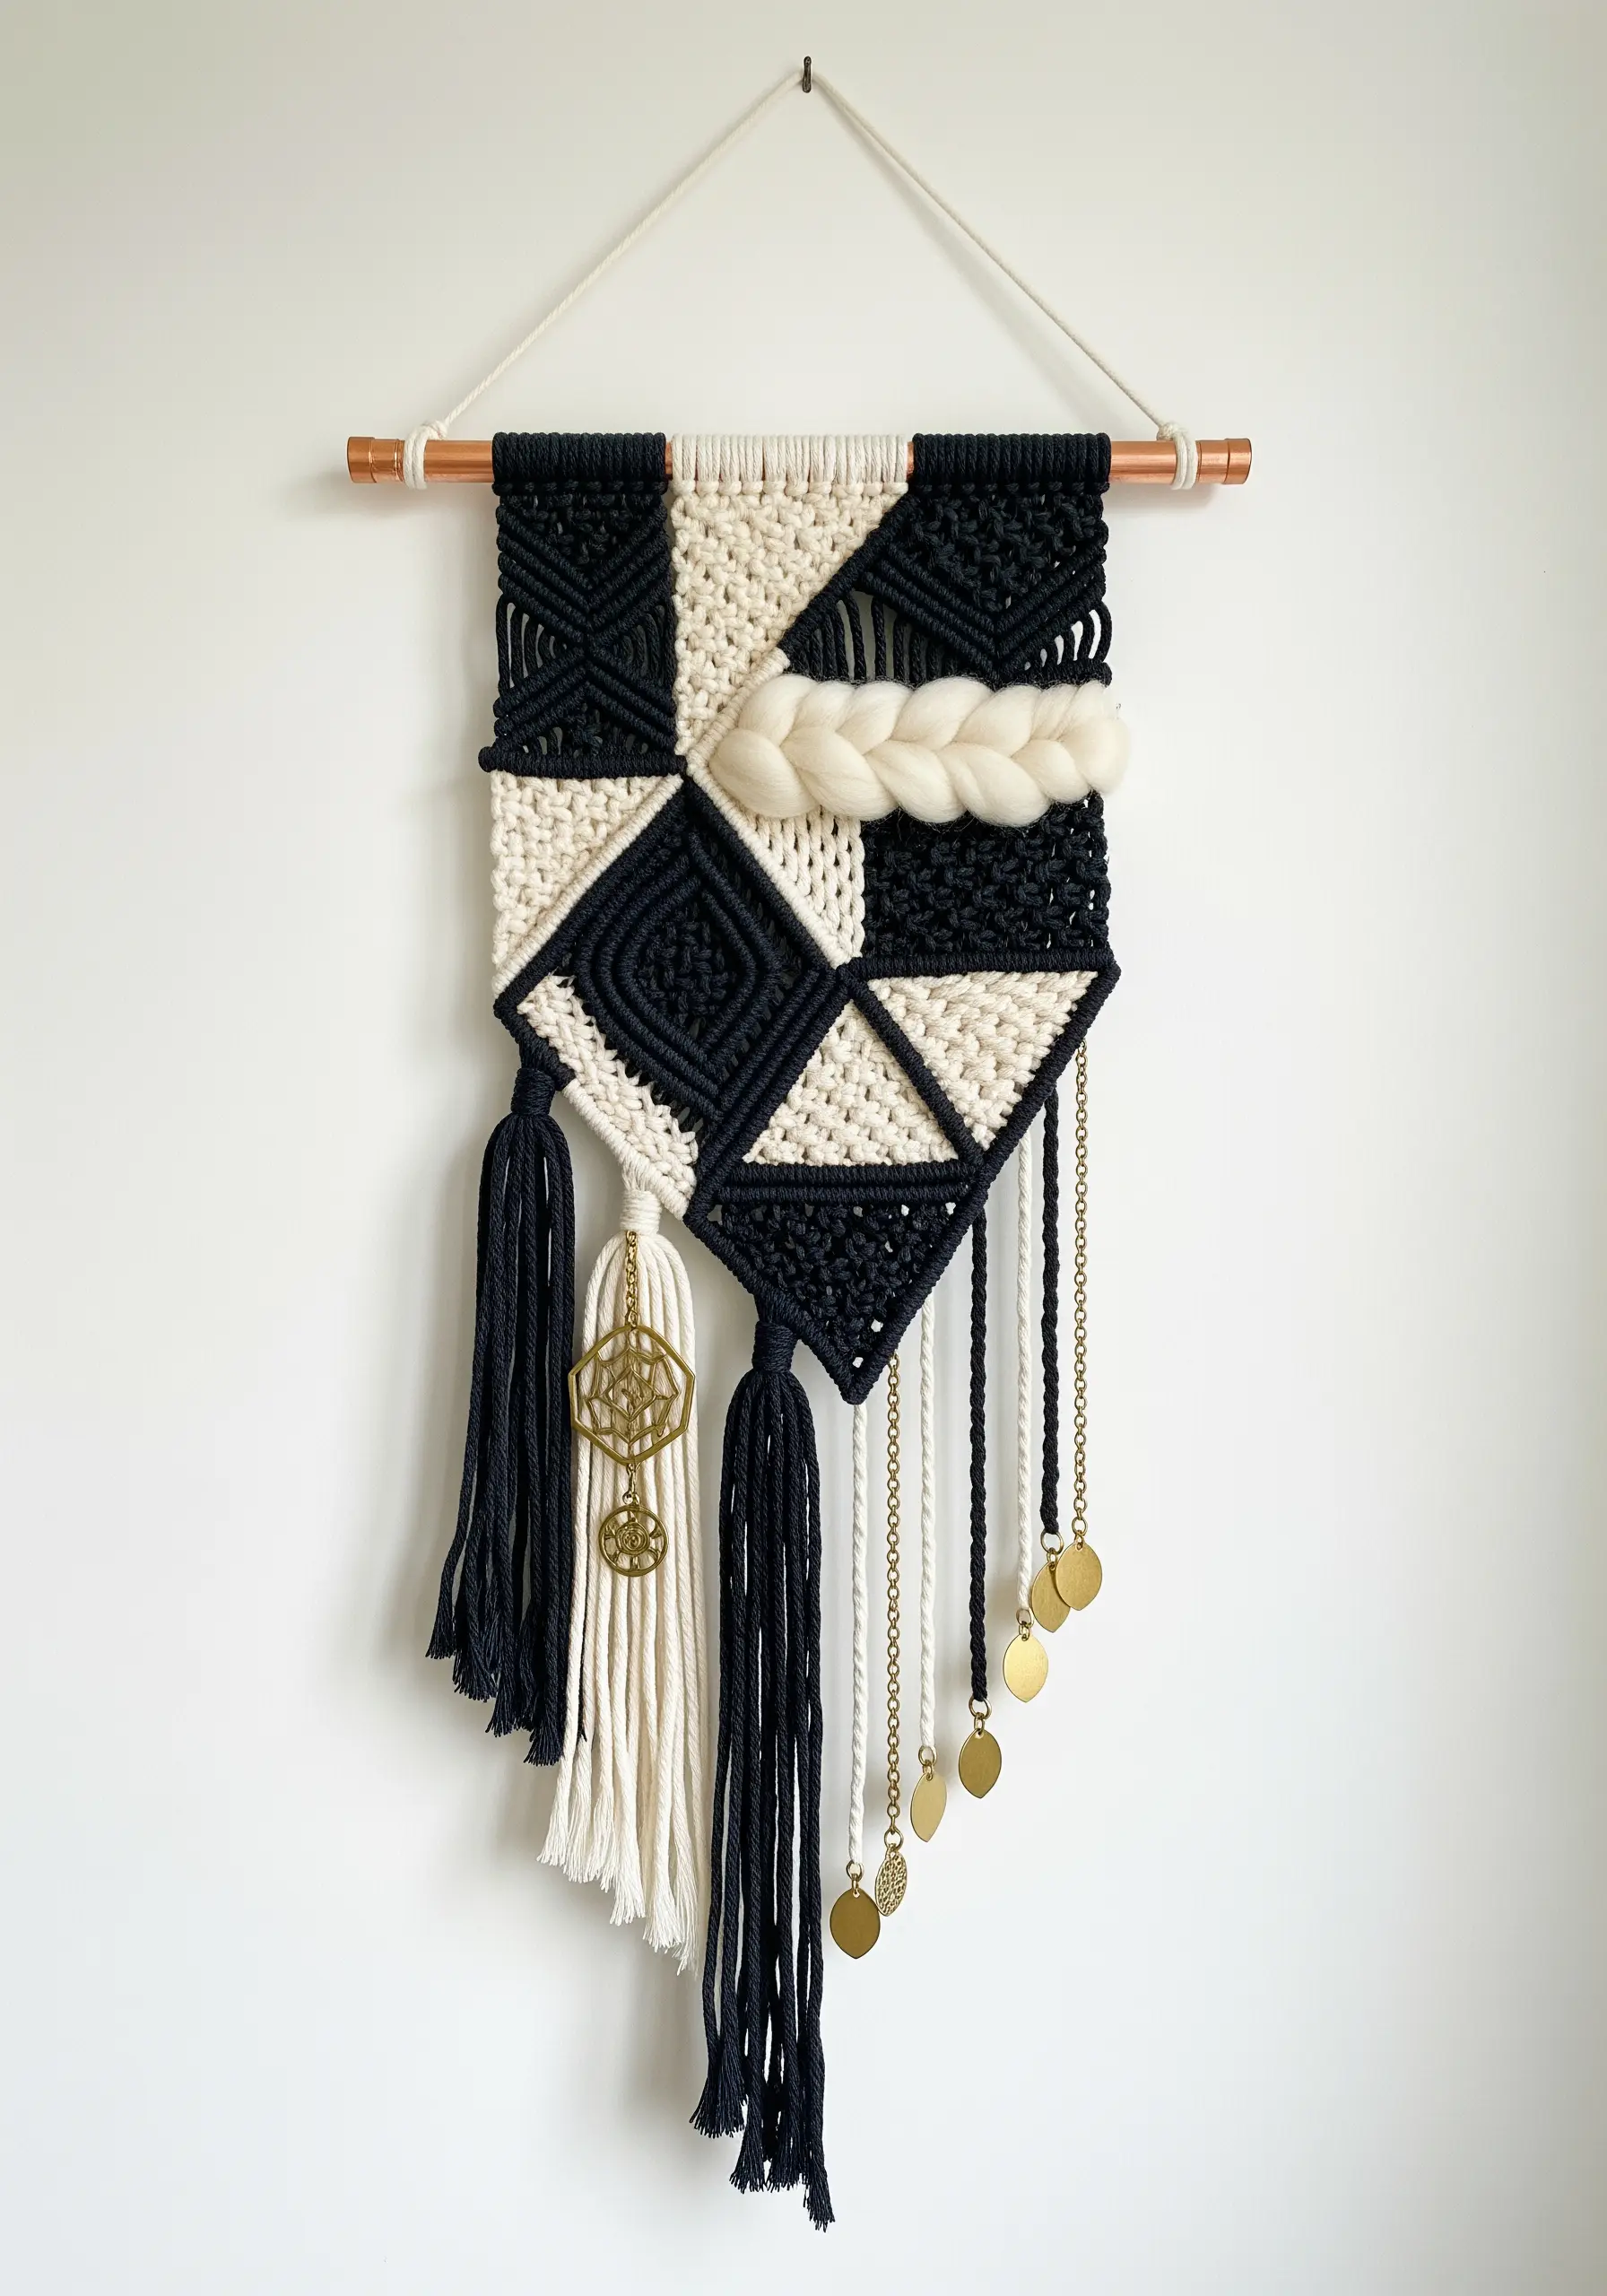
Combine the structure of macrame with the fill of weaving for a graphic wall hanging.
Use macrame knots, like the square knot and clove hitch, to create a bold geometric framework of diamonds and lines.
Then, use the open spaces within your framework as mini-looms, weaving contrasting colored yarn through the cords.
Introduce a single, soft element like a chunky braid to break the sharp geometry, and add metallic charms for a final touch of shine.
These are the kinds of geometric abstract thread patterns that feel both ancient and modern.


