

Creating with your hands is one of the most rewarding ways to spend time together. These projects are more than just a way to keep busy—they are an invitation to slow down, explore textures and colors, and build something beautiful from simple materials.
Don’t worry about perfection. The charm of a handmade object lies in its unique character. A slightly crooked stitch or an uneven edge is a mark of the hands that made it, telling a story of learning and creativity.
Here, you’ll find ideas that focus on the joy of the process. From simple no-sew techniques to introductory stitches, each project is designed to build confidence and leave you and your child with a finished piece you can both be proud of.
1. Create Playful Felt Puppets with a Blanket Stitch Finish
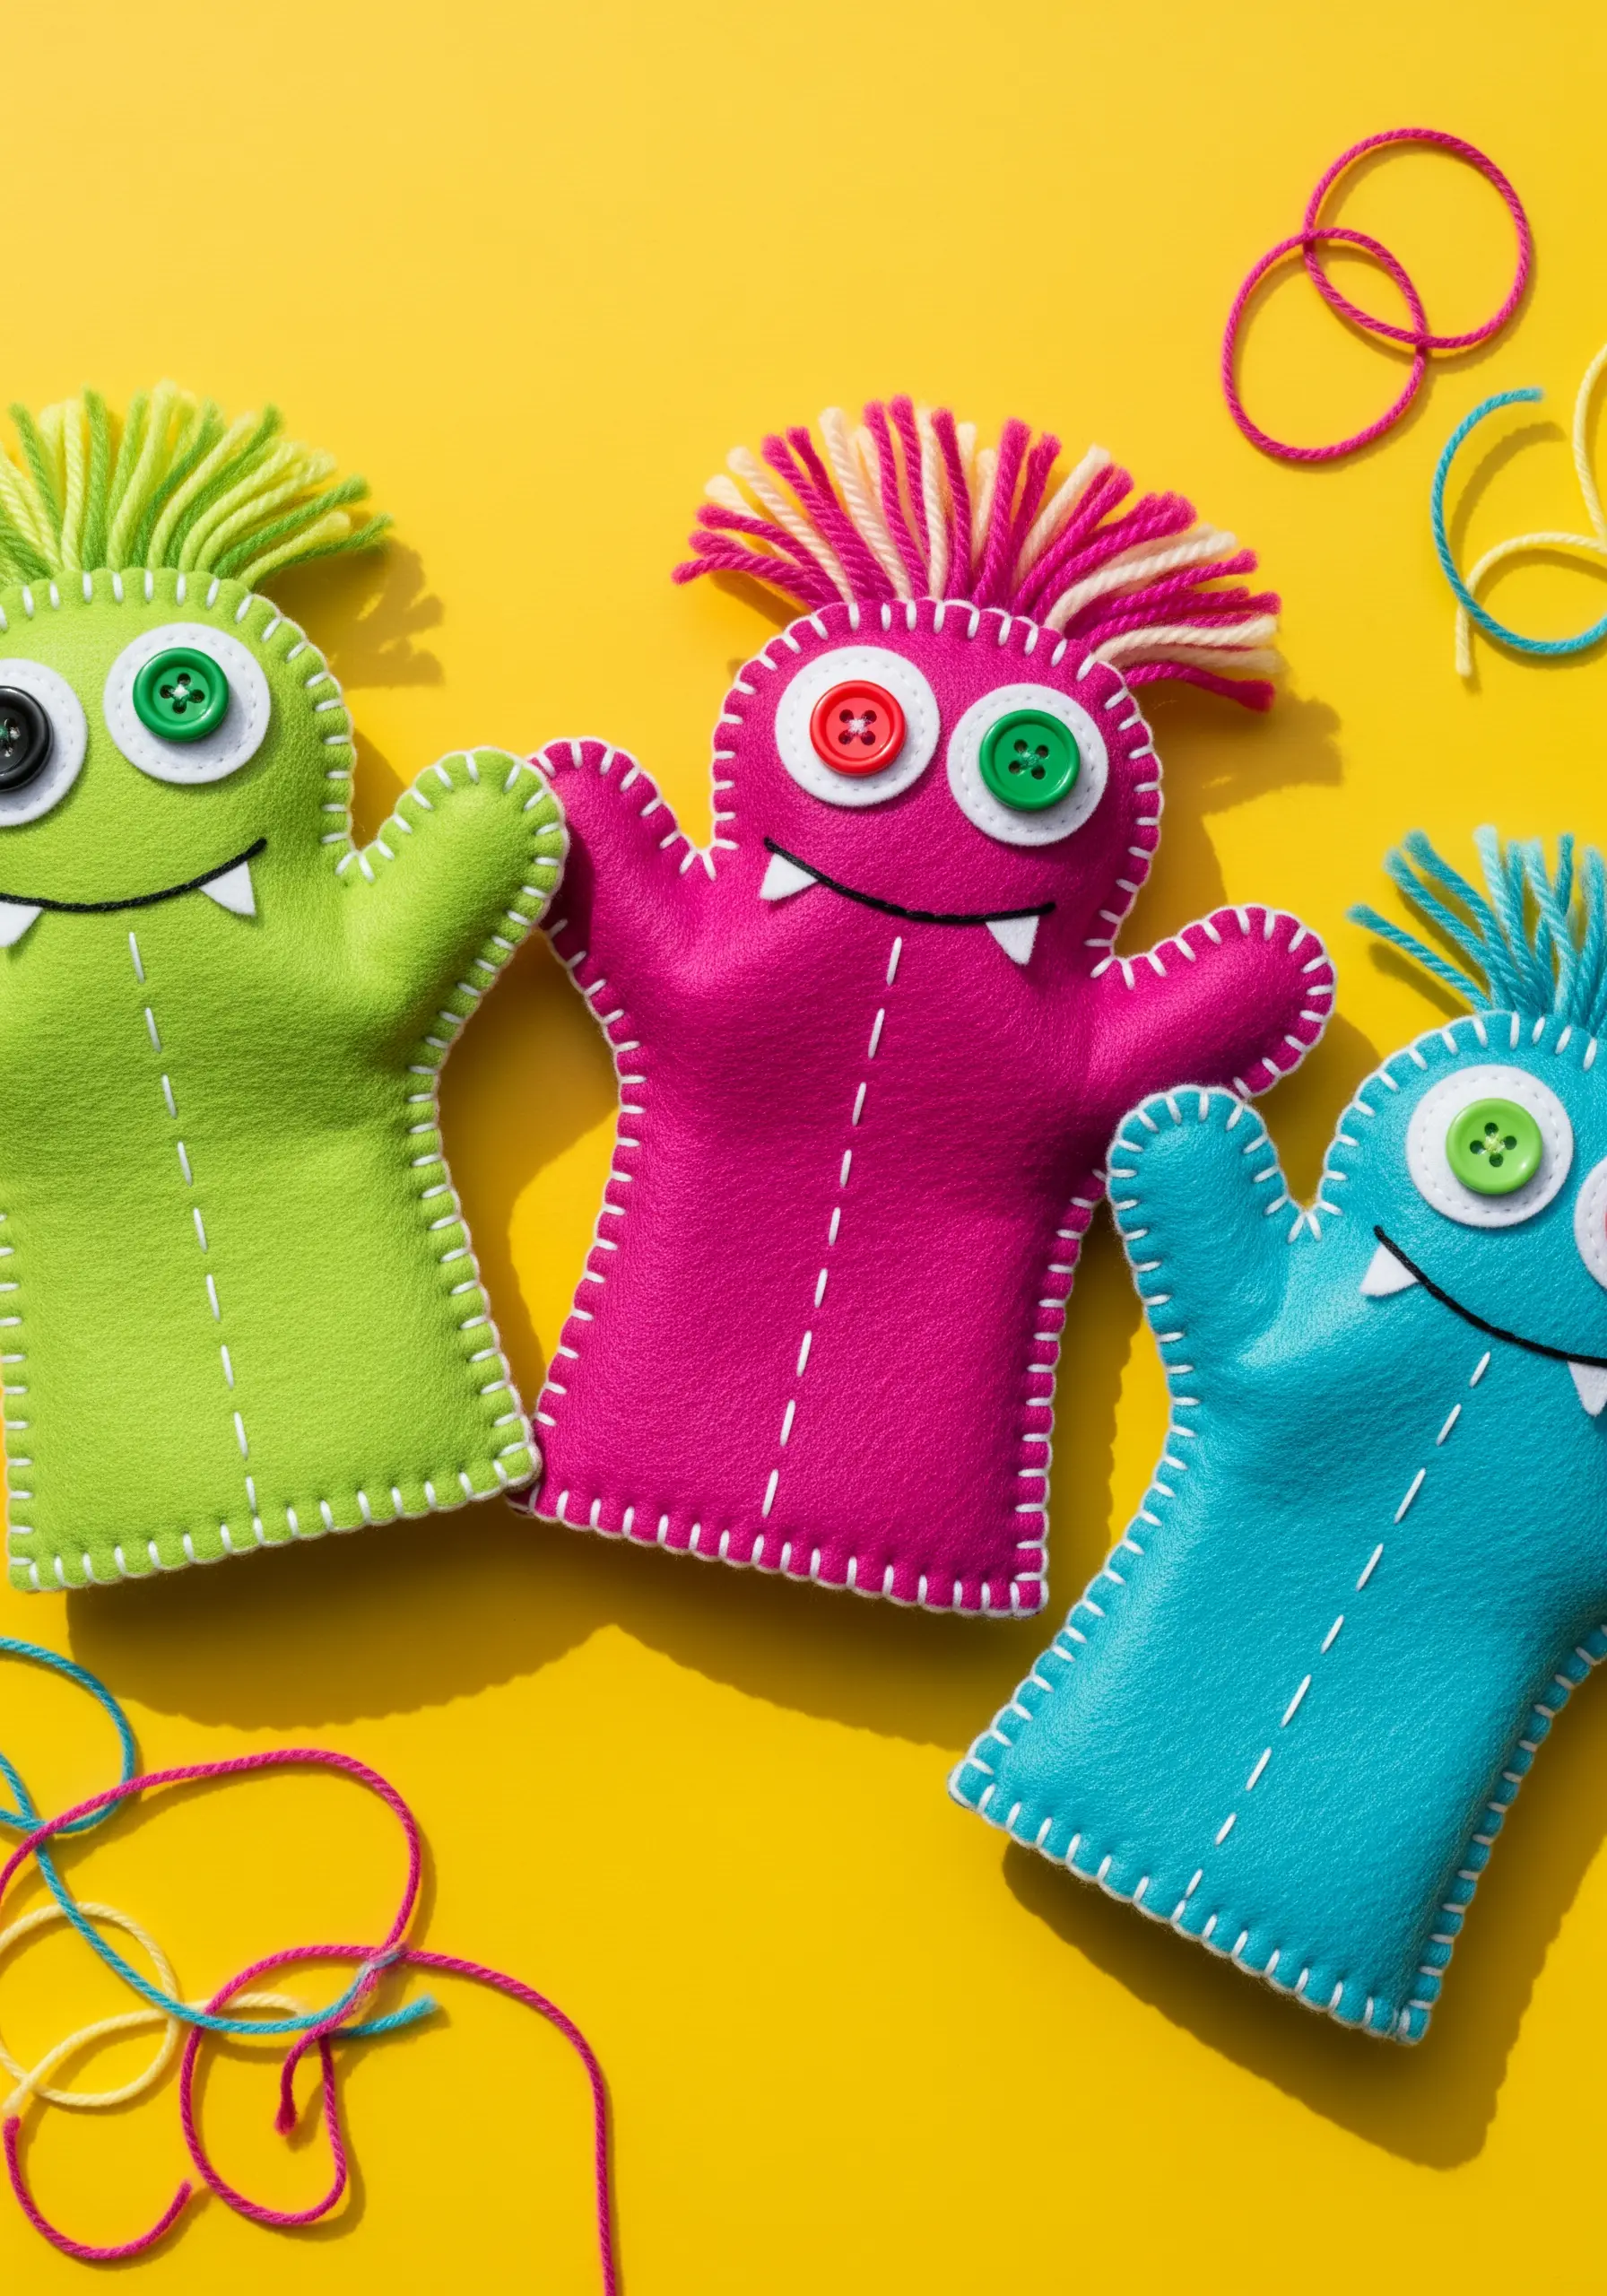
Felt is the perfect fabric for kids’ crafts because its edges don’t fray, making it incredibly forgiving.
Outline your puppet shapes with a simple blanket stitch using a contrasting, thick thread like pearl cotton or yarn.
This stitch not only secures the edges but also provides a clear, decorative border that helps guide little hands and makes the colors pop.
For the hair, wrap yarn around a piece of cardboard, tie it in the middle, and snip the loops to create a durable, fluffy tuft.
2. Master Simple Appliqué with an Owl Pillow
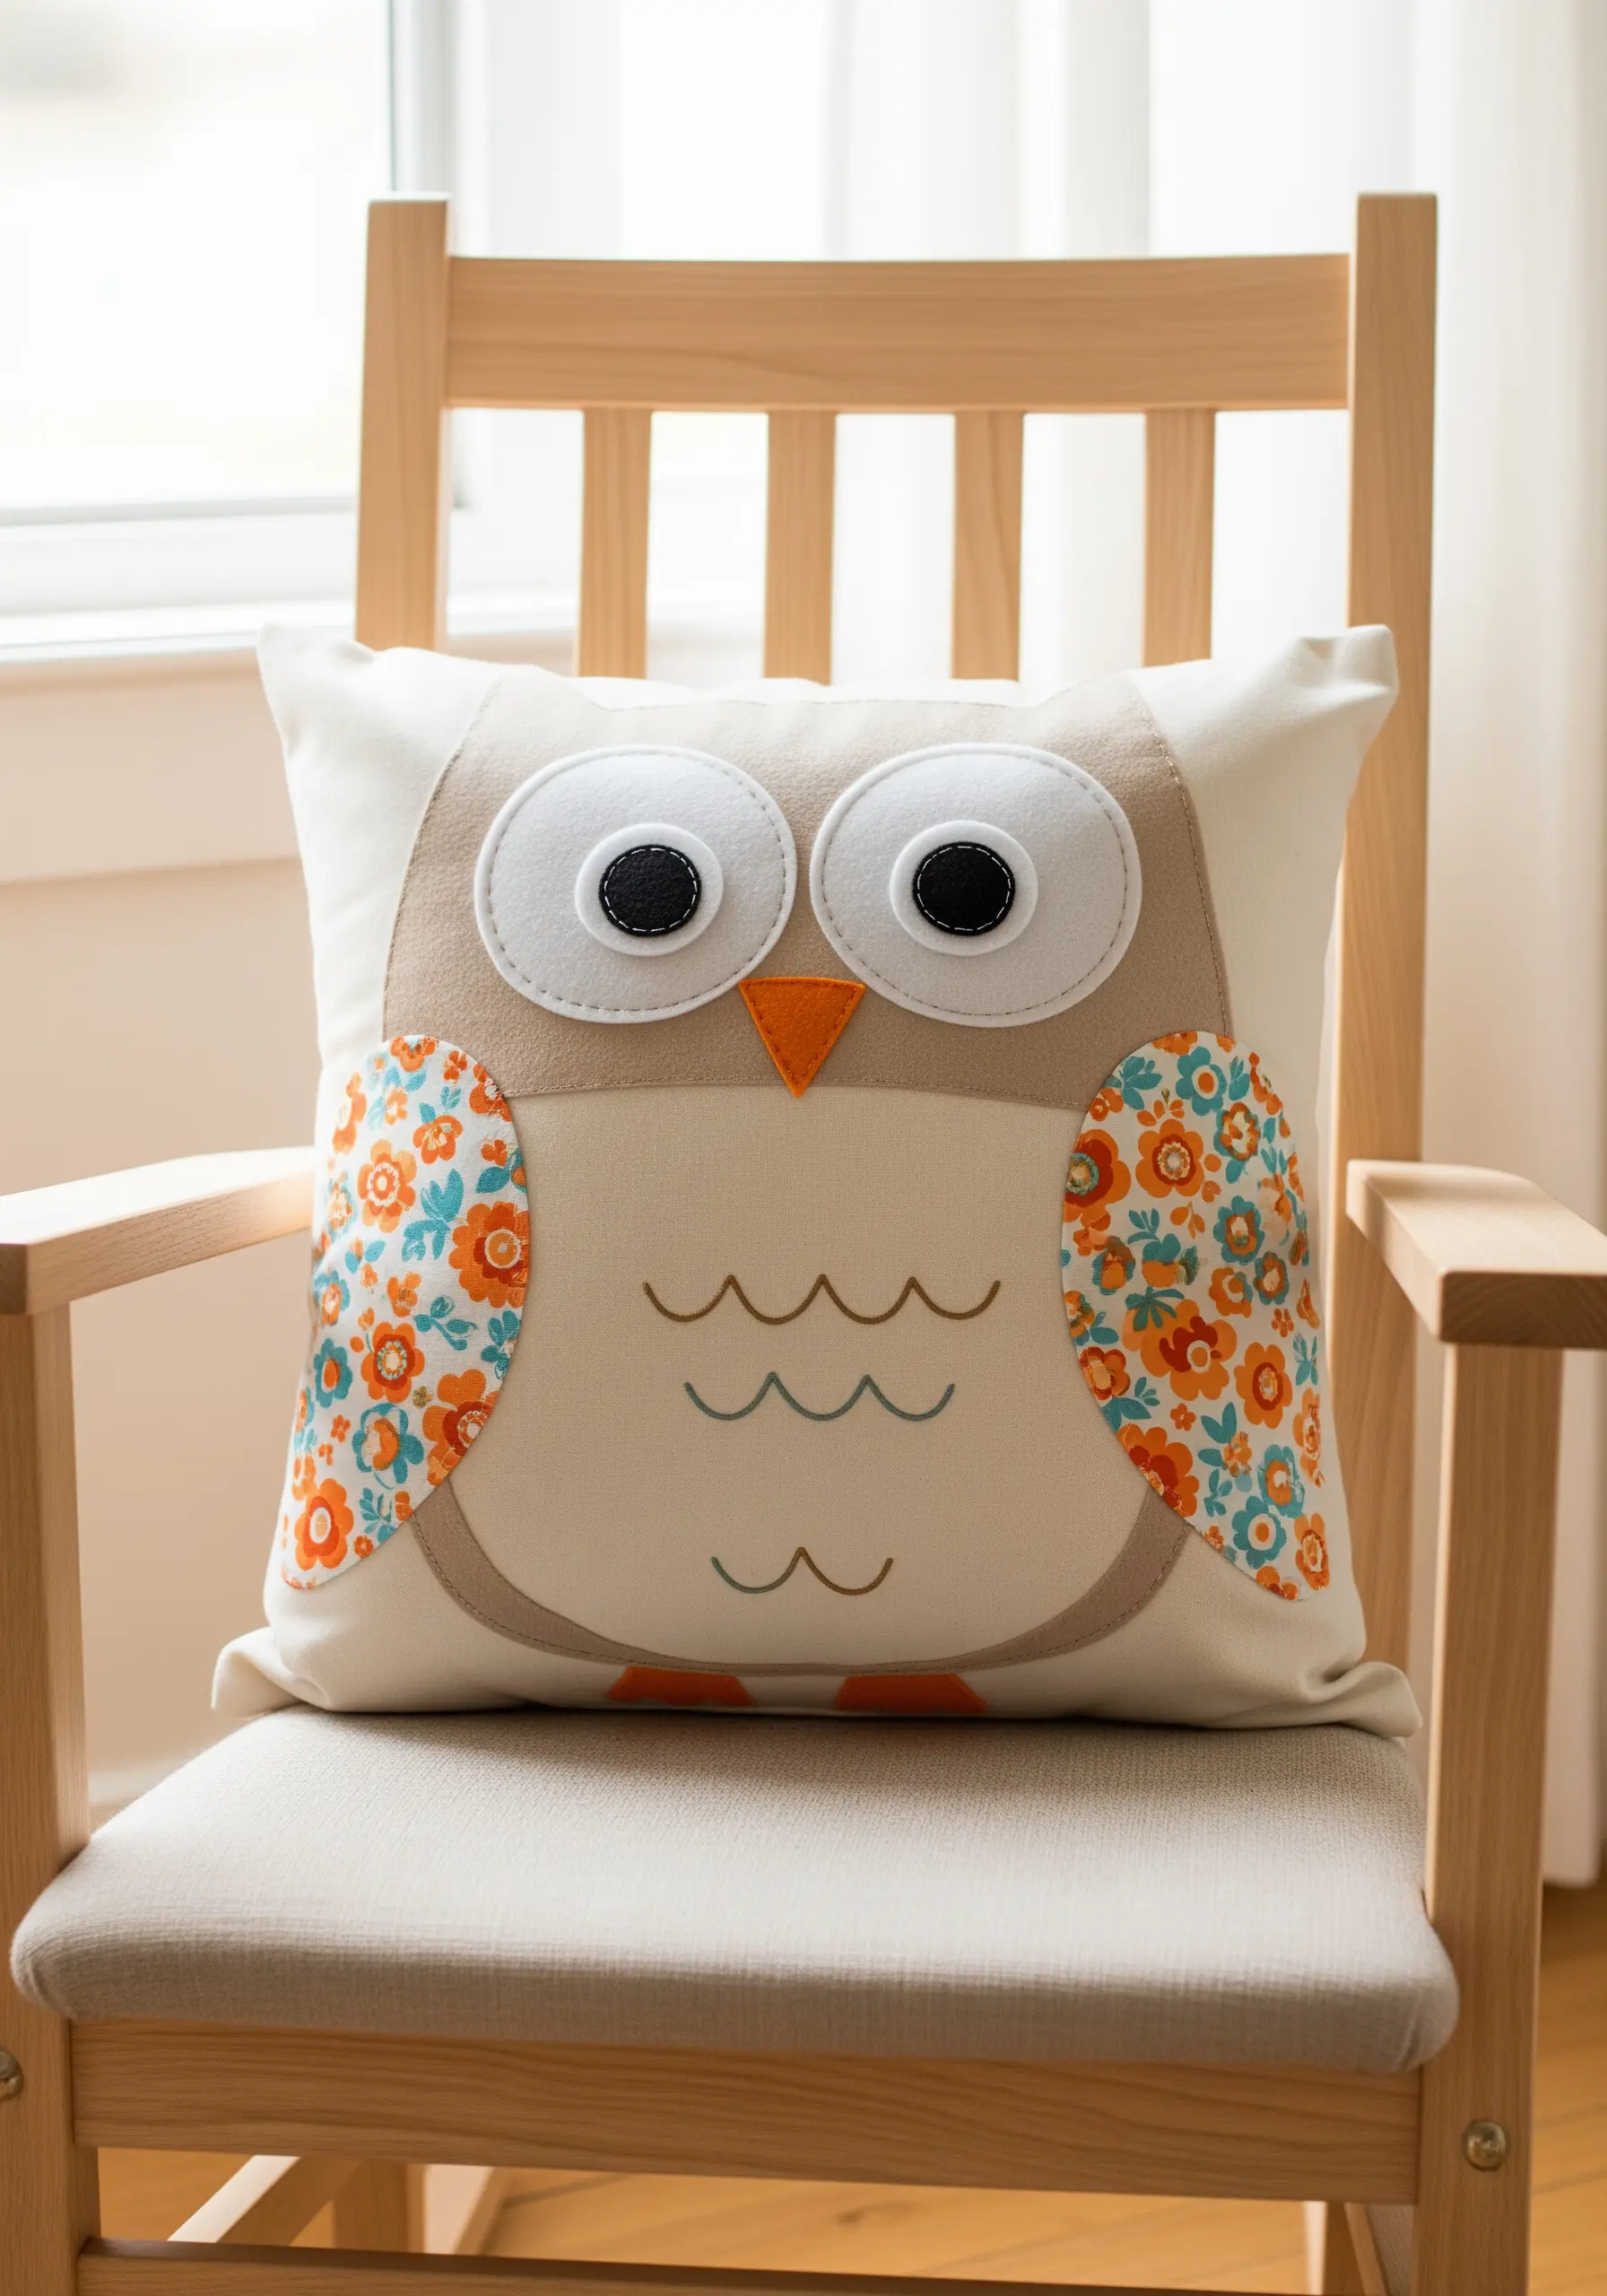
Introduce appliqué by using iron-on fusible web to secure your fabric shapes to the pillowcase before stitching.
This simple step prevents the pieces from shifting, ensuring a neat result even with beginner sewing skills.
Use a basic backstitch with three strands of floss to outline the felt and fabric pieces, creating a clean, illustrated look.
For details like the wavy belly feathers, let your child stitch freely with a running stitch—the slight imperfections will add personality and charm.
This is one of the most adorable forest animal embroidery ideas for a nursery.
3. Craft Personalized Fabric Bookmarks with Yarn Initials
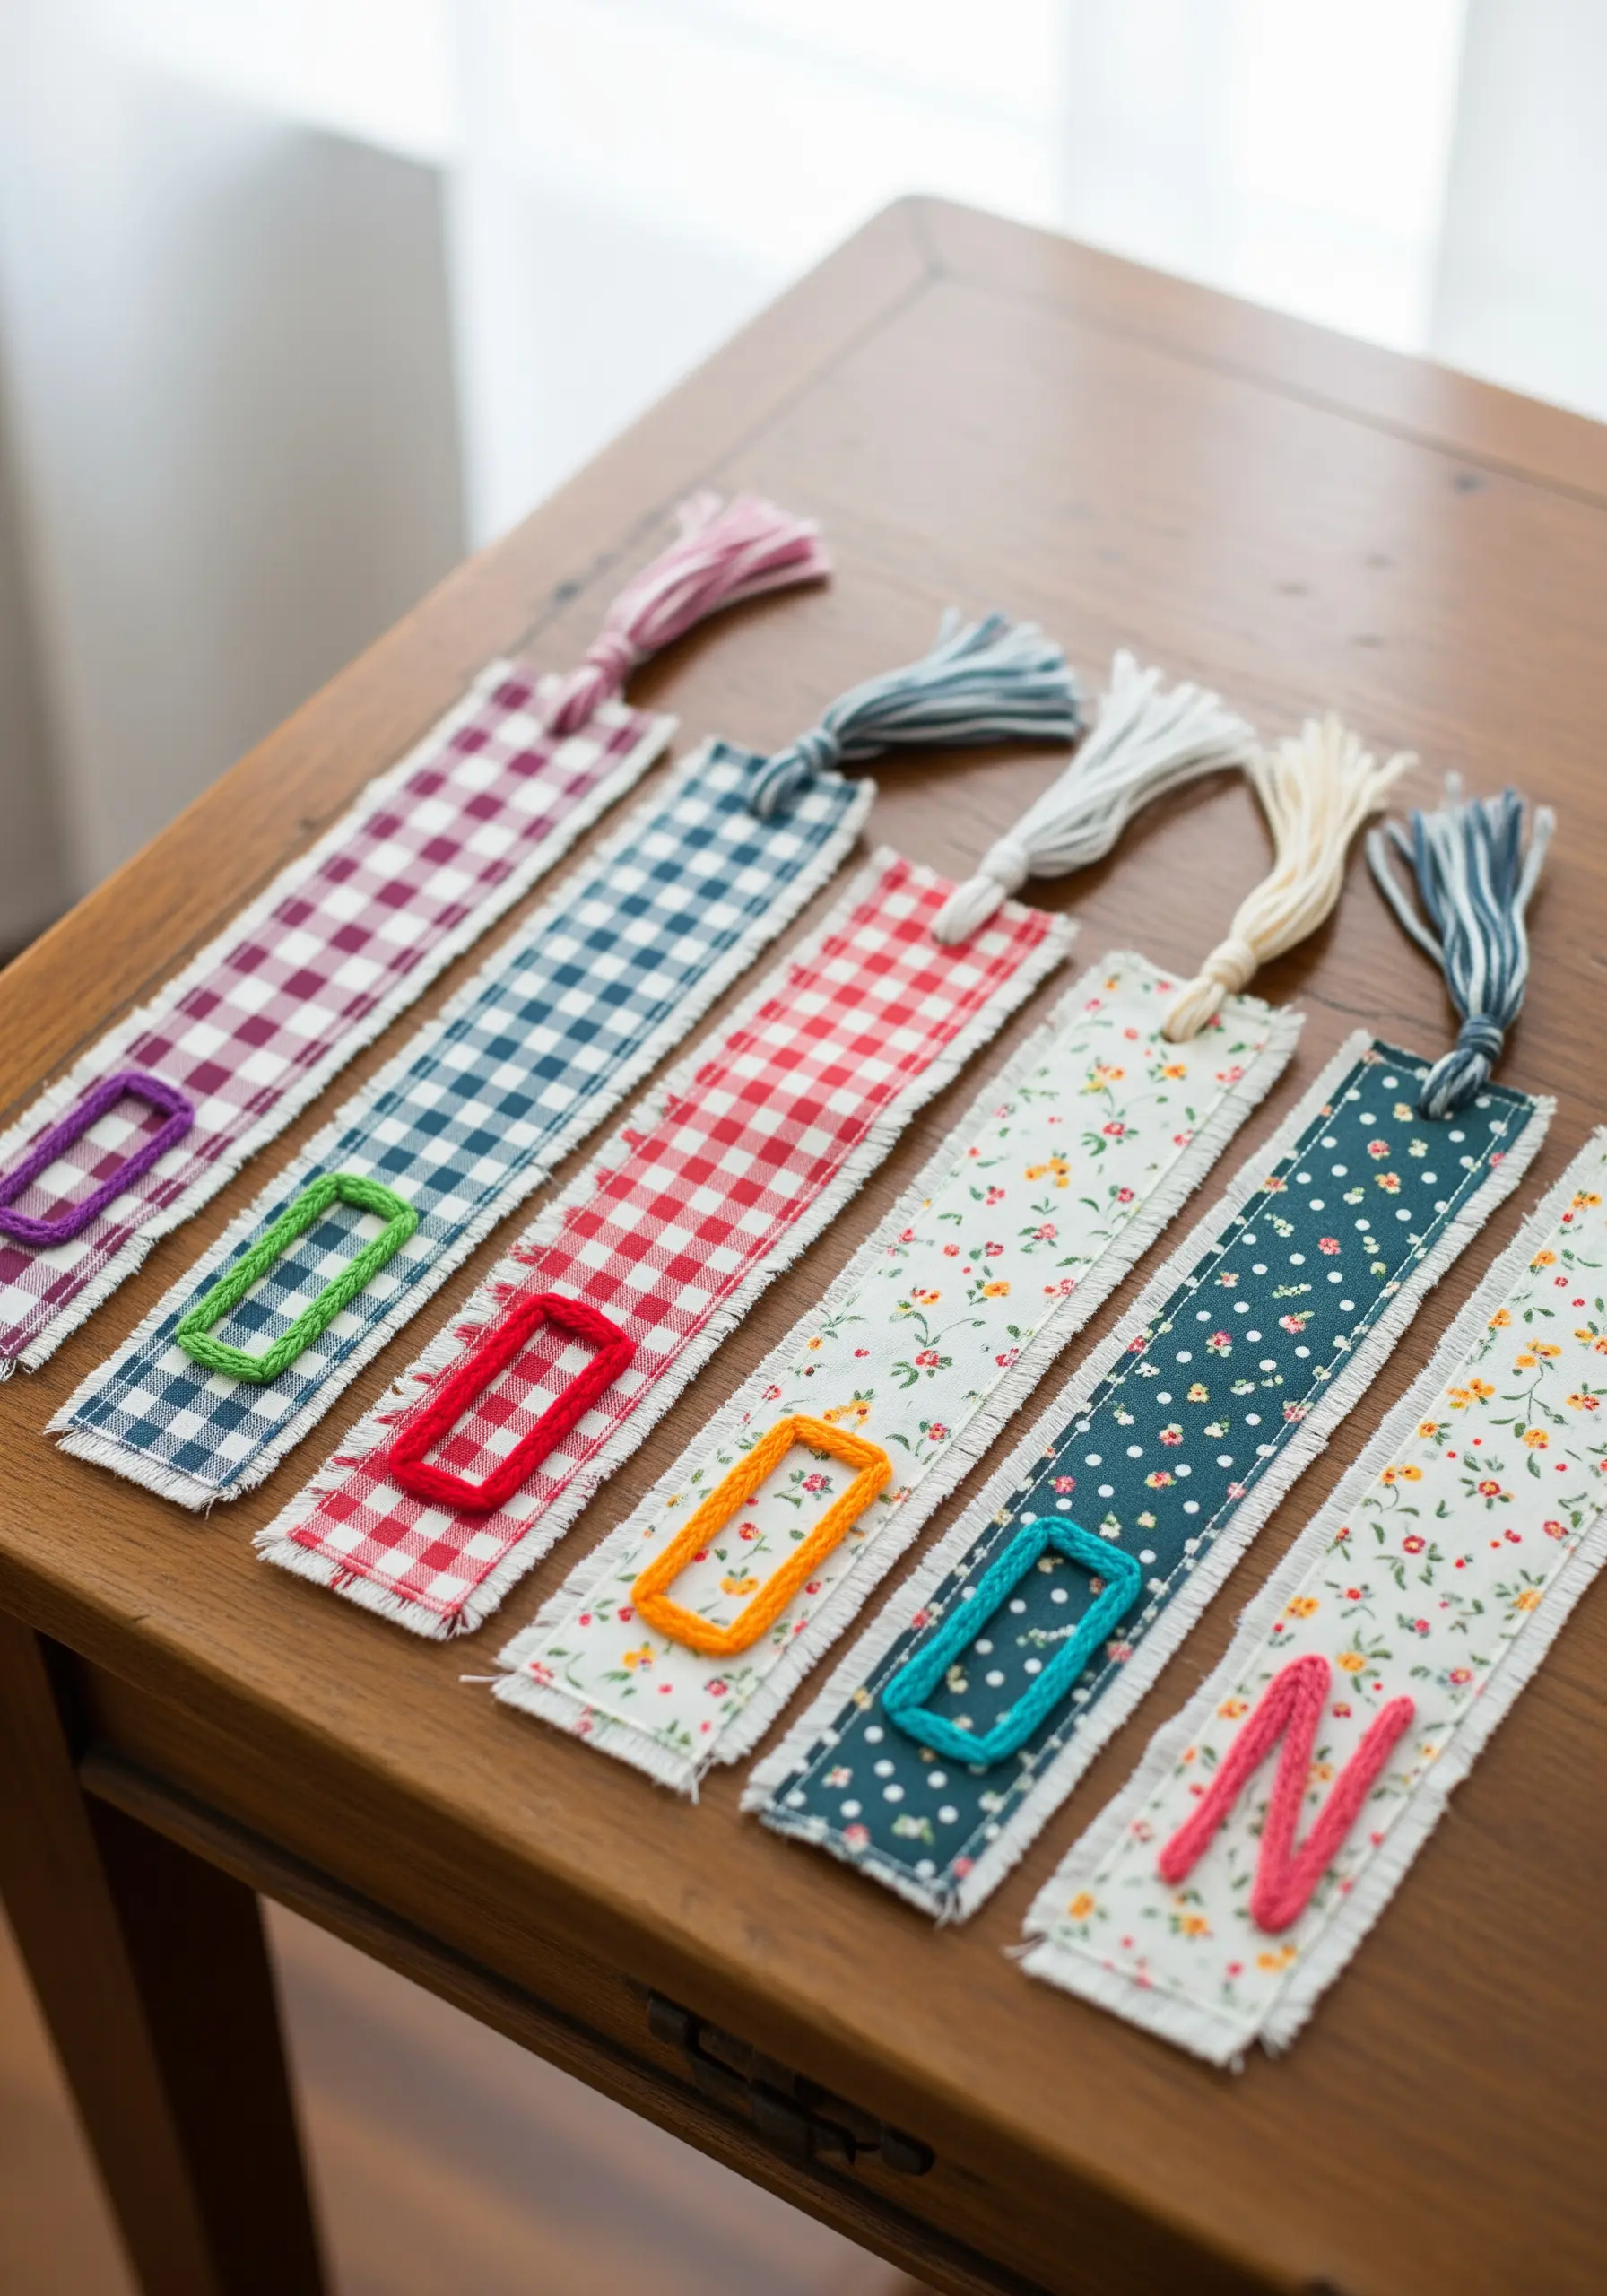
Turn fabric scraps into functional art by making simple bookmarks—no hemming required if you use a pinking shears for a decorative, non-fray edge.
For the initial, teach the satin stitch using chunky yarn instead of floss.
The thickness of the yarn fills the letter shape quickly, providing instant gratification and a wonderfully tactile texture.
Finish by creating a simple tassel from leftover yarn, a classic technique that adds a professional touch to these DIY cozy embroidery bookmarks.
4. Stitch a Bold Alphabet Banner with Felt

Create a vibrant alphabet banner using stiff felt, which holds its shape without needing any backing or interfacing.
Use a simple backstitch for the letters with a contrasting white thread to ensure they stand out against the bright colors.
To make the project faster for kids, pre-punch the stitch holes along the letter outlines with a pin or awl.
This provides a clear guide and makes it easier to pass the needle through the felt smoothly.
5. Introduce Cross-Stitch with a Geometric Fox Design
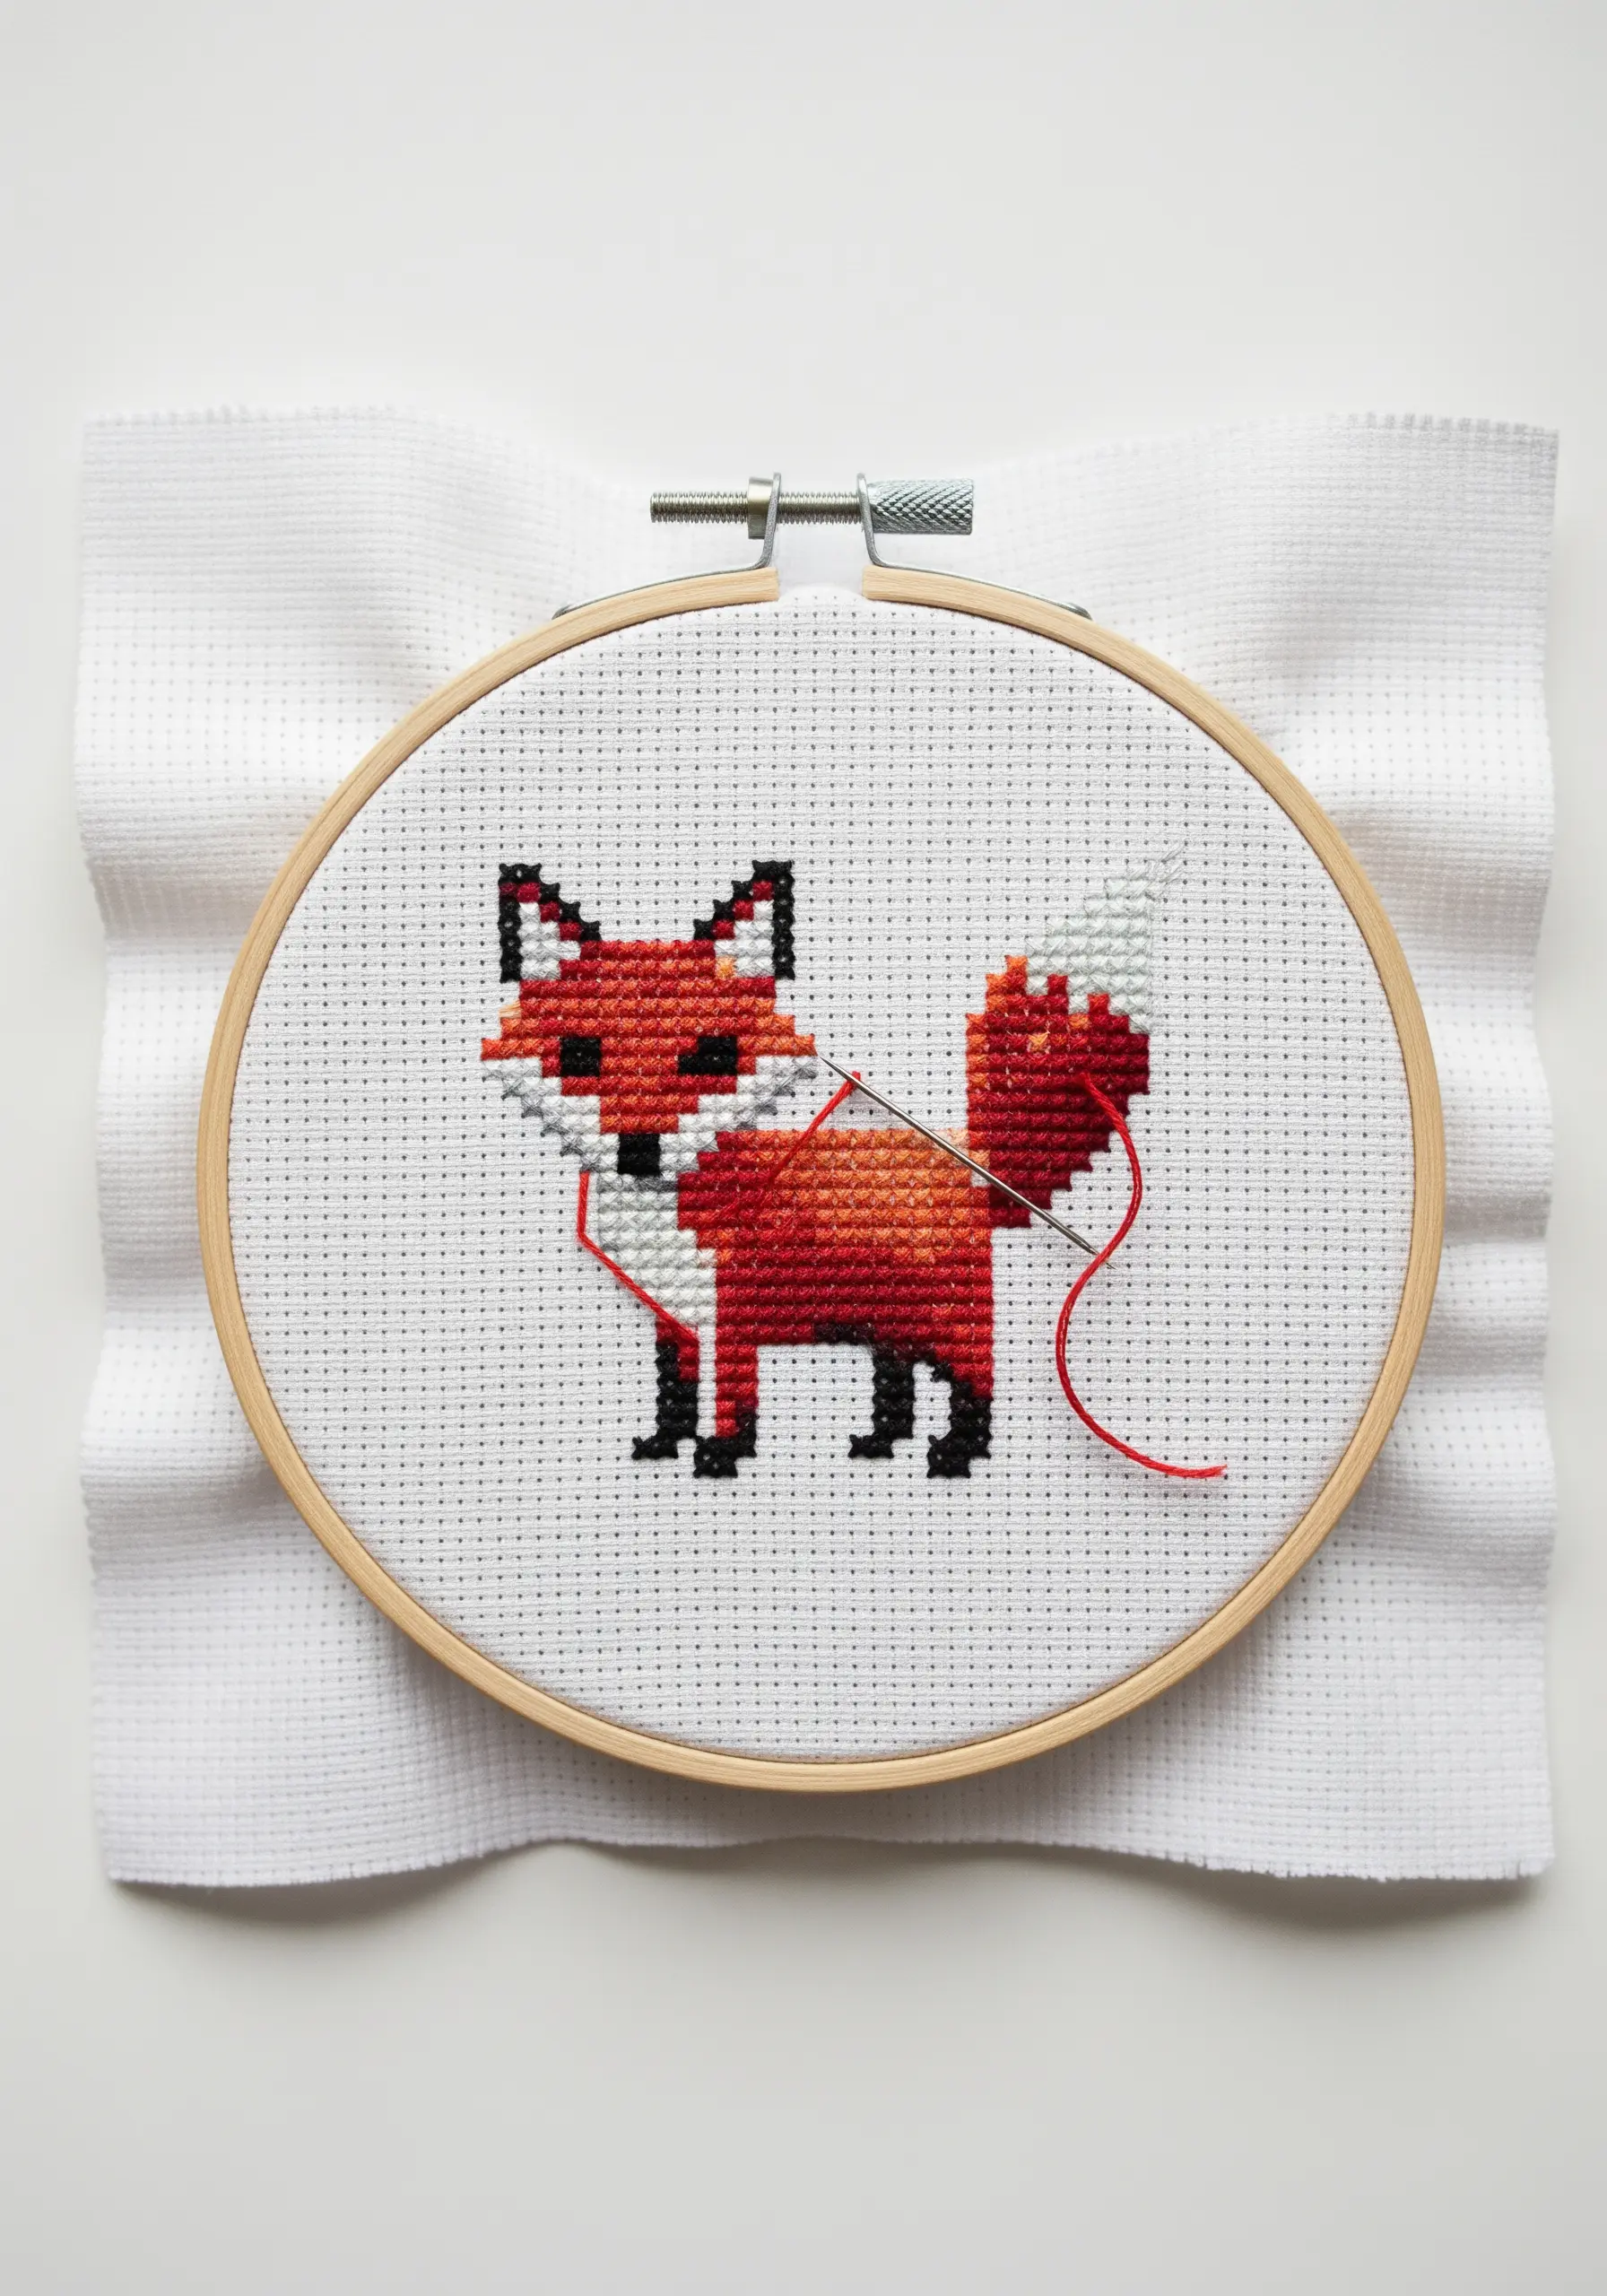
Cross-stitch is the perfect entry point to embroidery for kids because it’s structured and grid-based.
Start with a low-count Aida cloth (like 6 or 8-count) and a blunt tapestry needle, which makes it easy to find the holes and is safer for small fingers.
Pixelated animal designs break a complex image into simple, color-blocked squares, making the process feel like a paint-by-numbers game with thread.
This method builds confidence and teaches the fundamentals of stitch consistency.
6. Design a No-Sew Appliqué Tote Bag
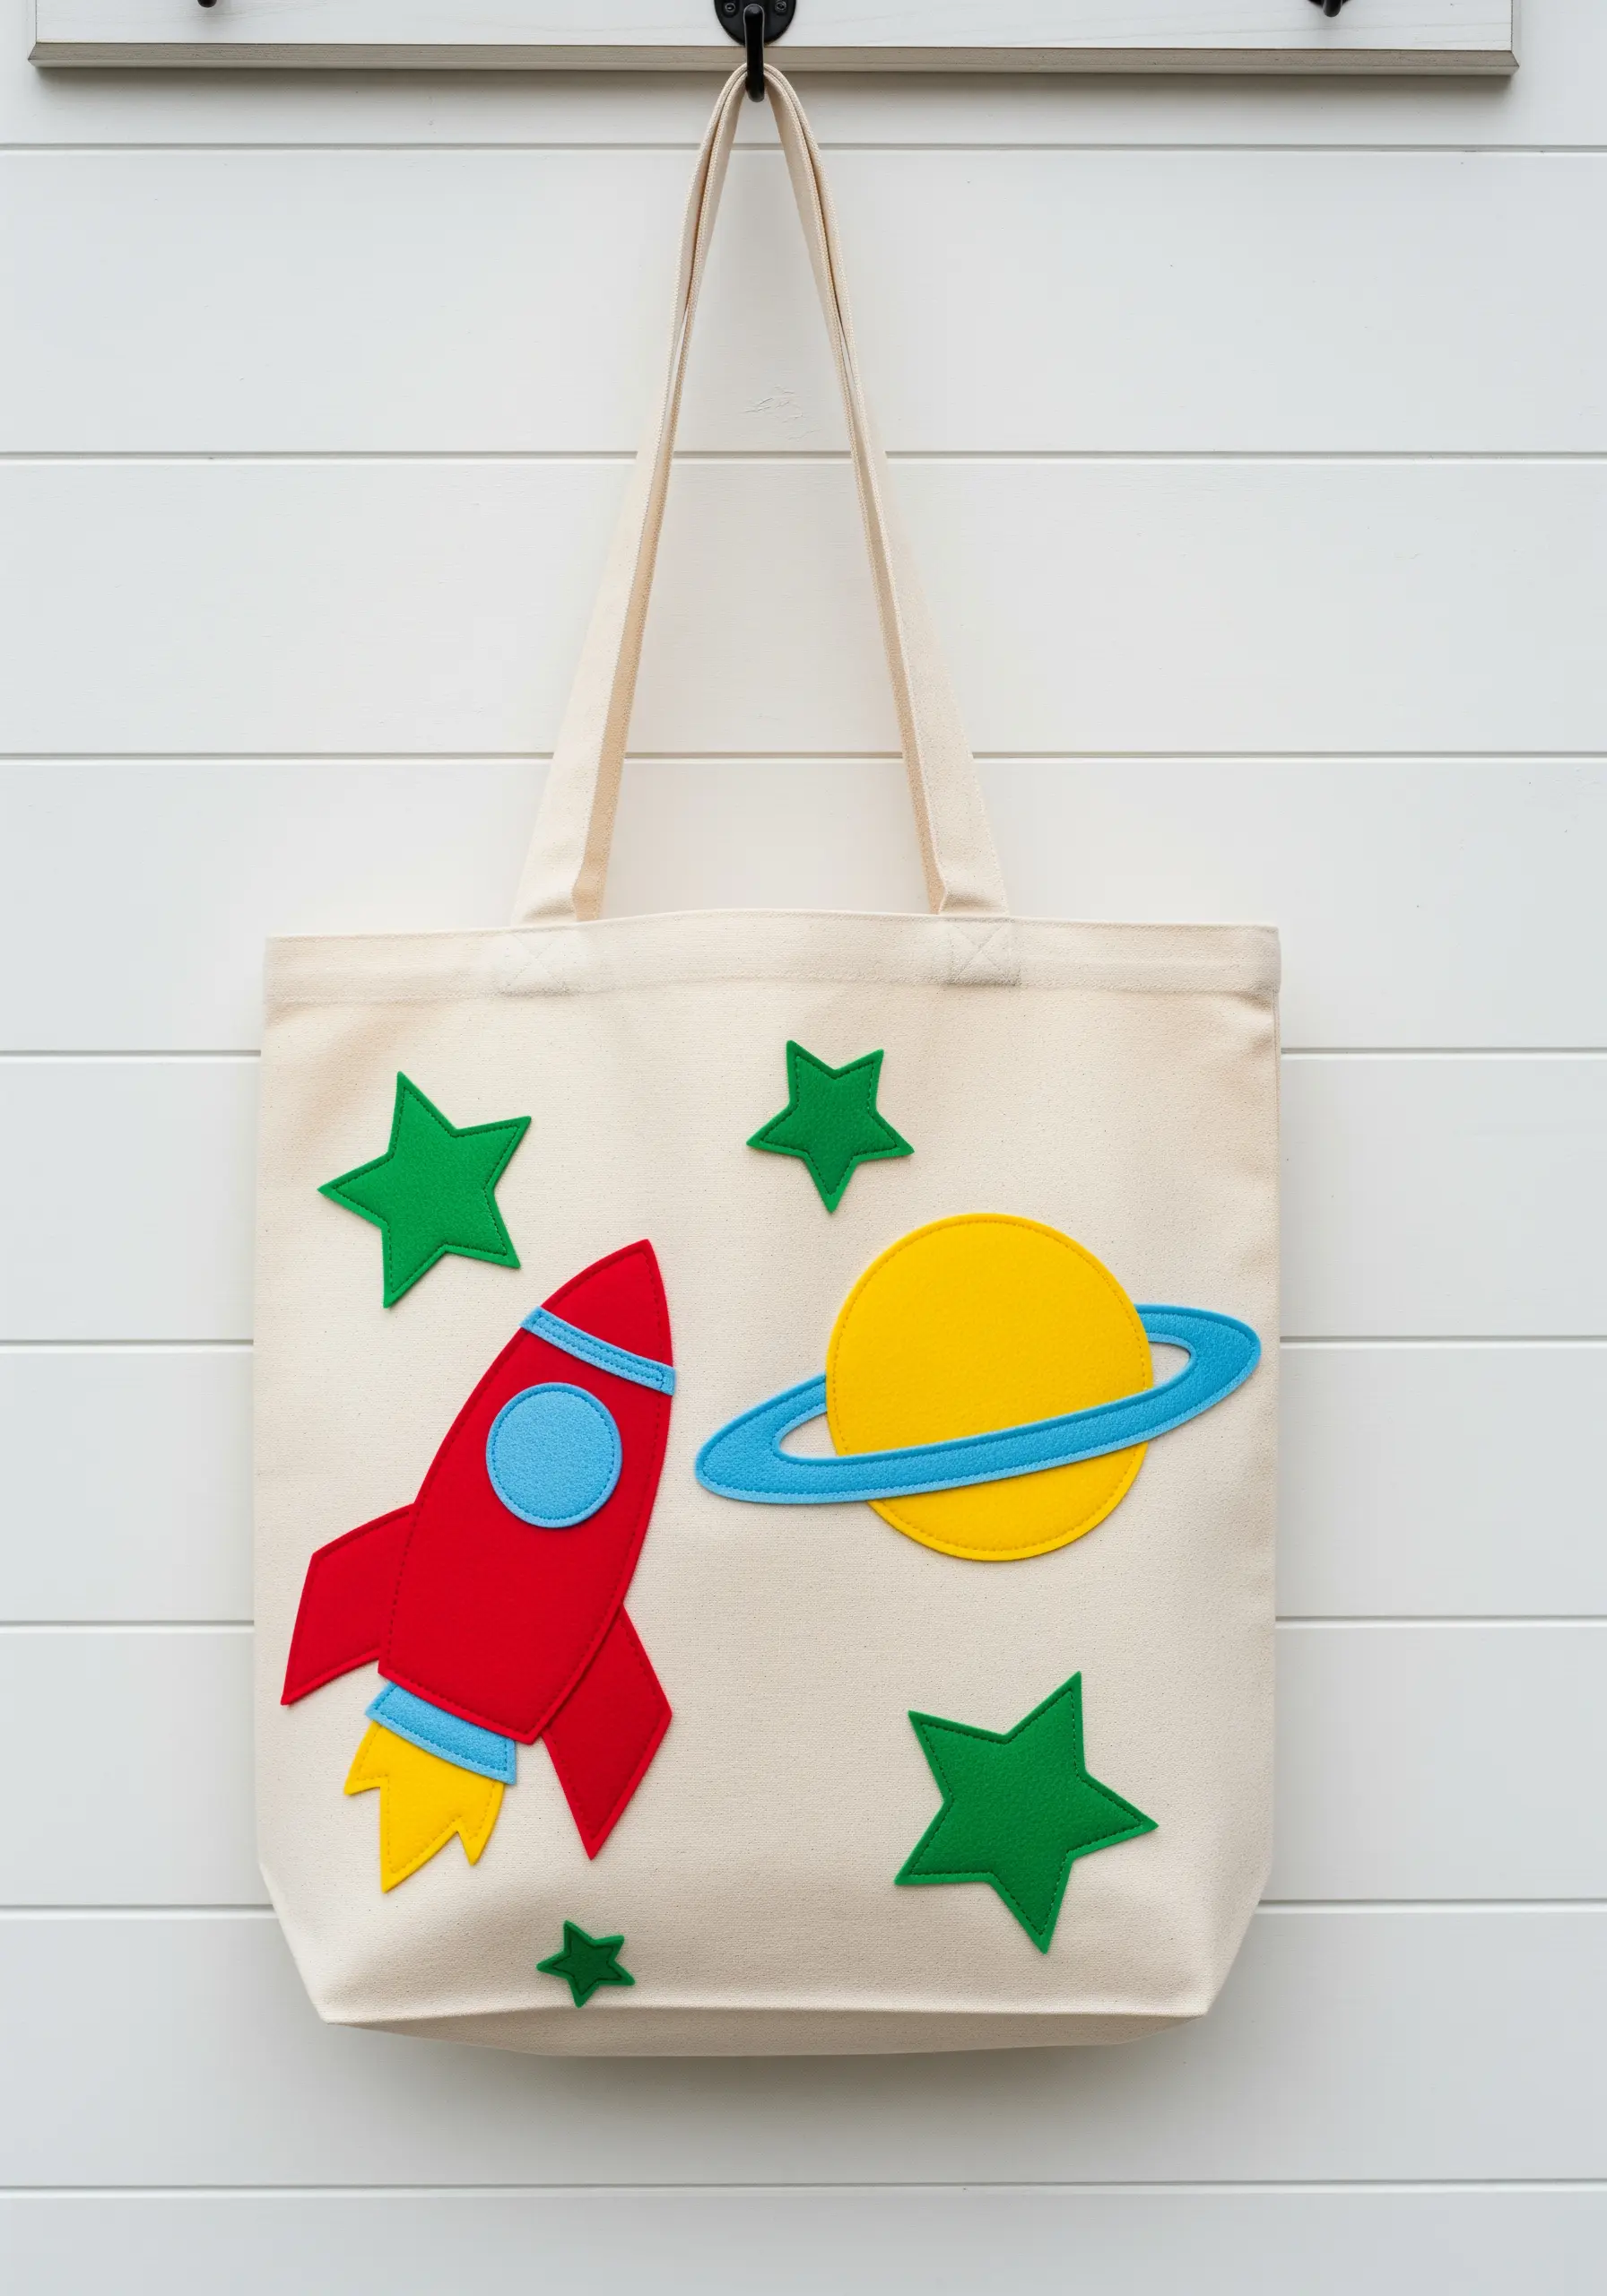
Elevate a plain canvas tote using felt and permanent fabric glue for a durable, no-sew project.
Cut out bold, simple shapes like planets and stars, as they are easy for kids to handle and arrange.
For a polished look, add a stitched border around the felt pieces. Use a simple whipstitch or blanket stitch to secure the edges and add a handmade touch to your tote bag collection.
This optional step introduces a basic sewing skill without overwhelming a young crafter.
7. Create a Textured Landscape with Fabric Scraps
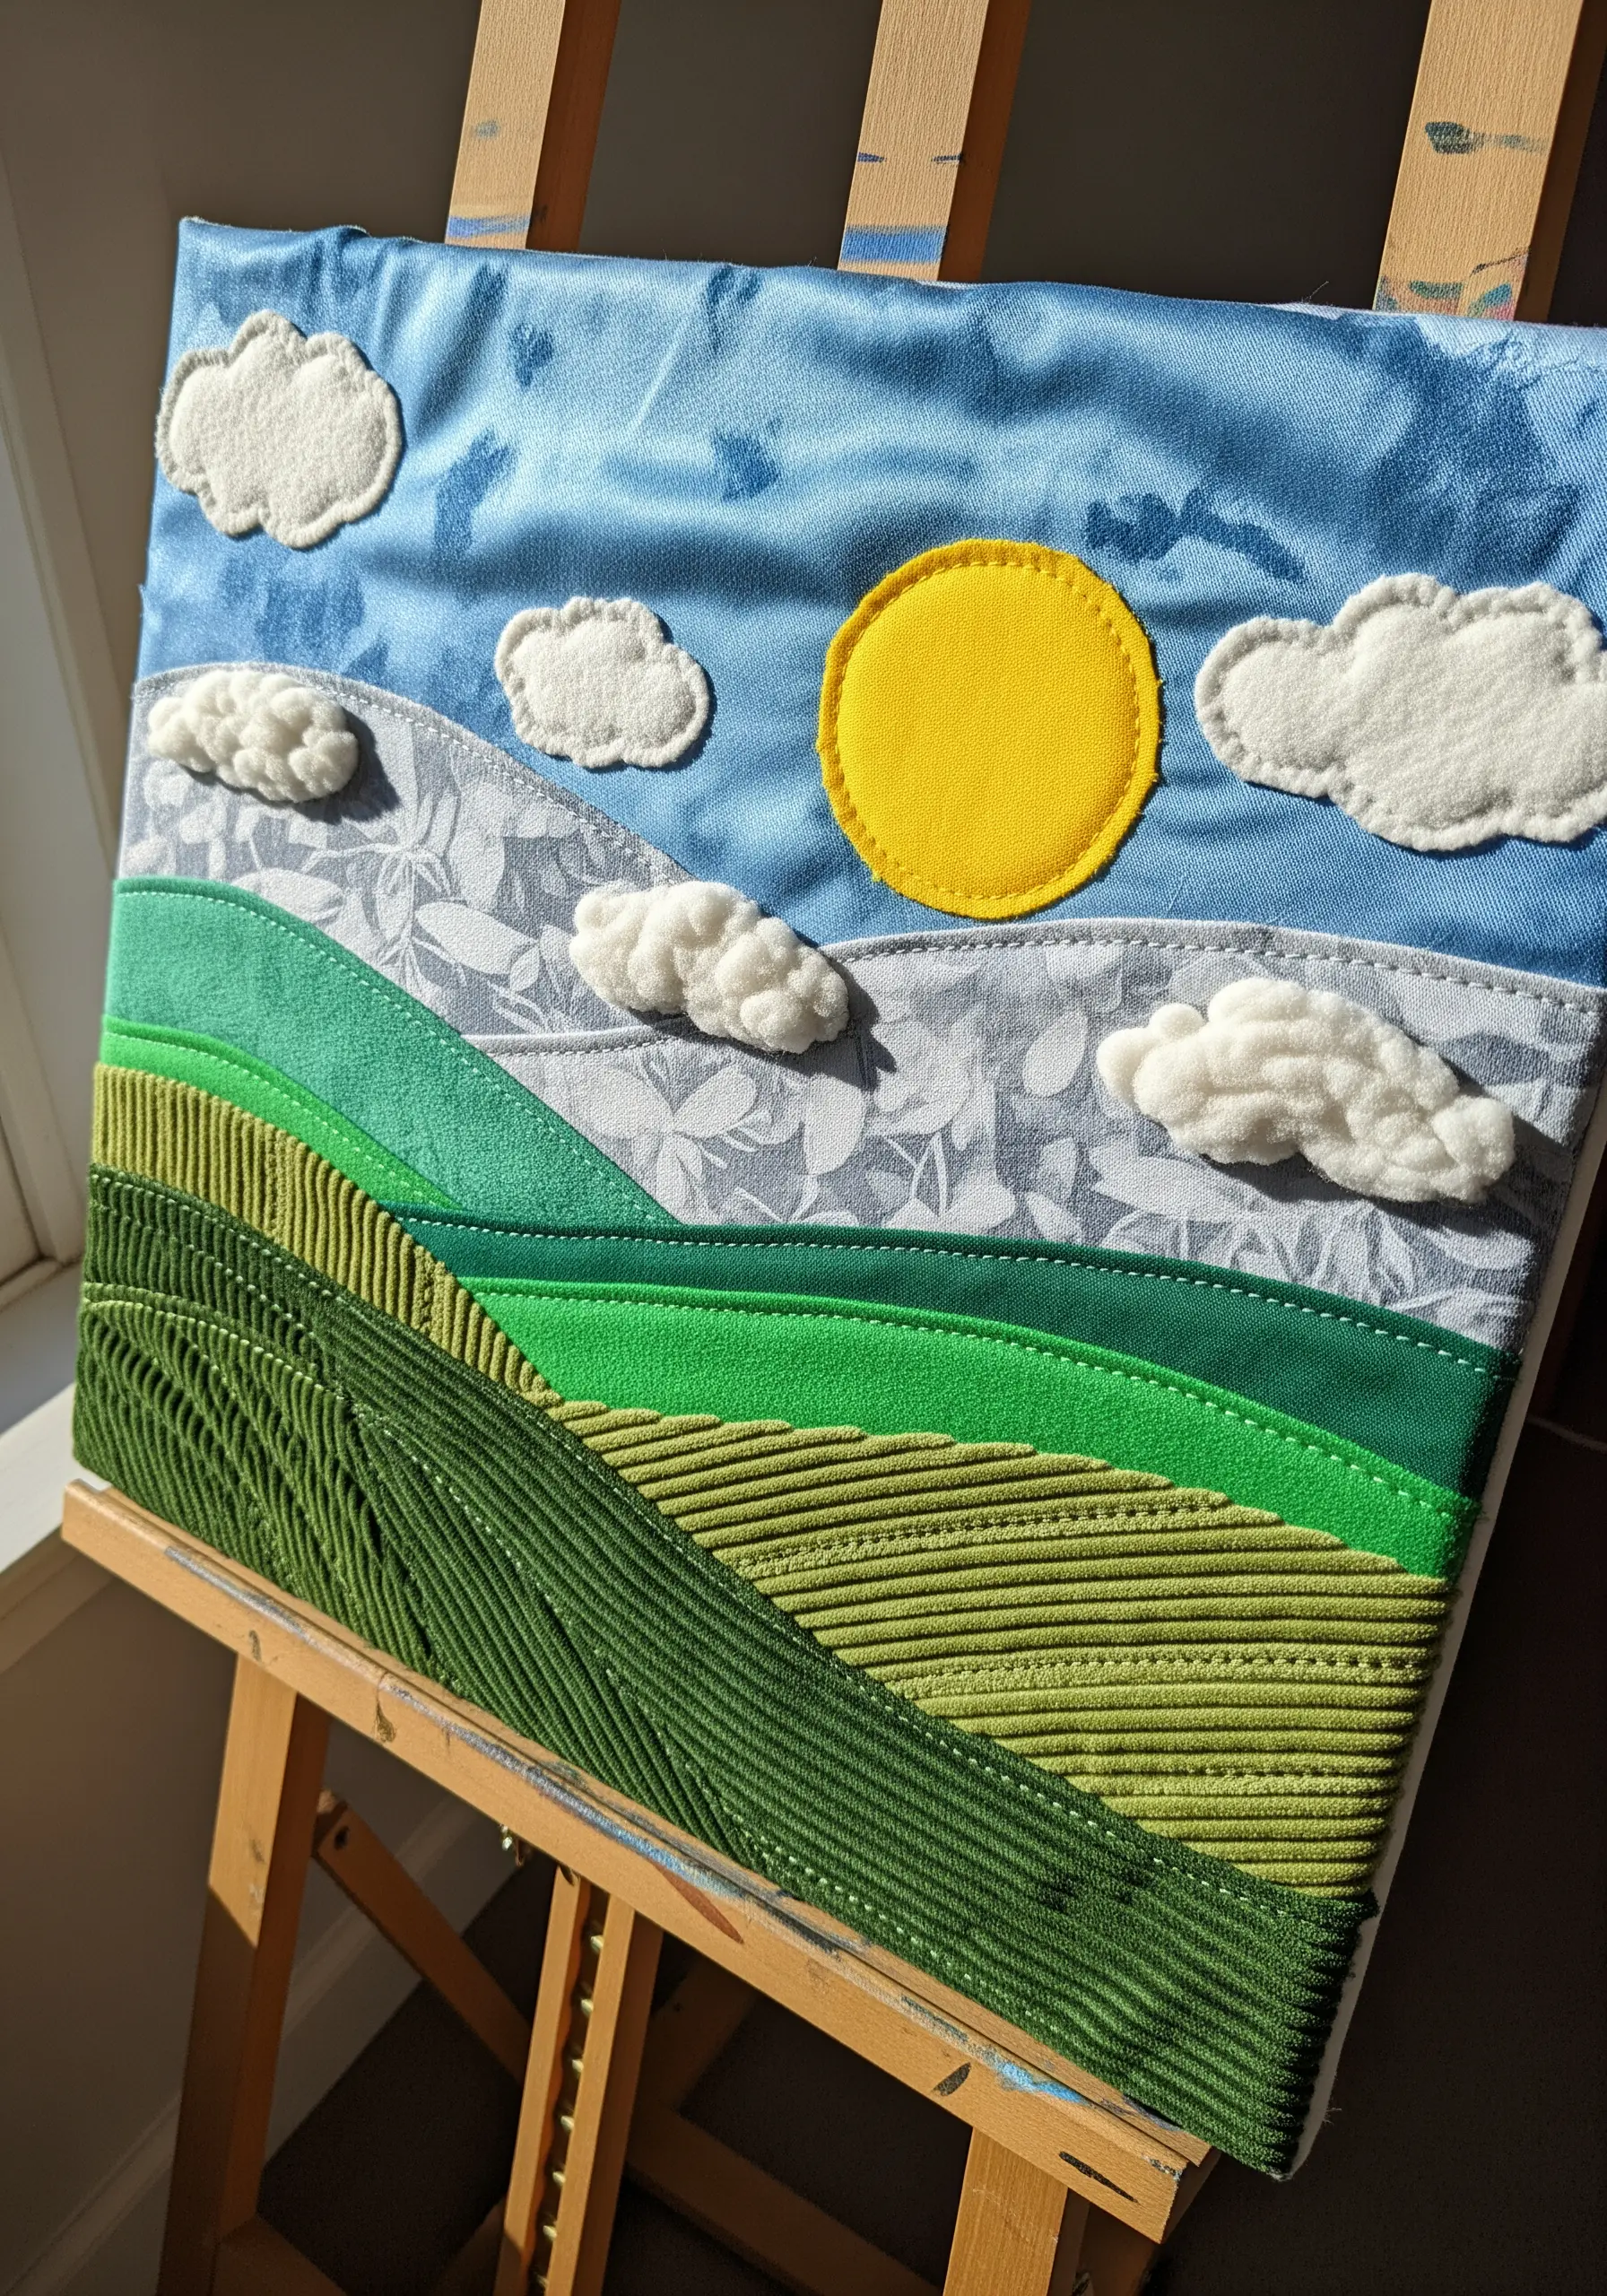
This project is all about sensory exploration through texture and layering.
Use a variety of fabric scraps—corduroy for fields, satin for the sky, and fleece for clouds—to build a tactile landscape on a canvas base.
Instead of intricate embroidery, use thick yarn and a simple running stitch to create the lines of the rolling hills.
The goal isn’t perfect stitching but creating visual interest and dimension, turning it into a scrap fabric collage embroidery masterpiece.
8. Make a No-Sew Fleece Tie Blanket
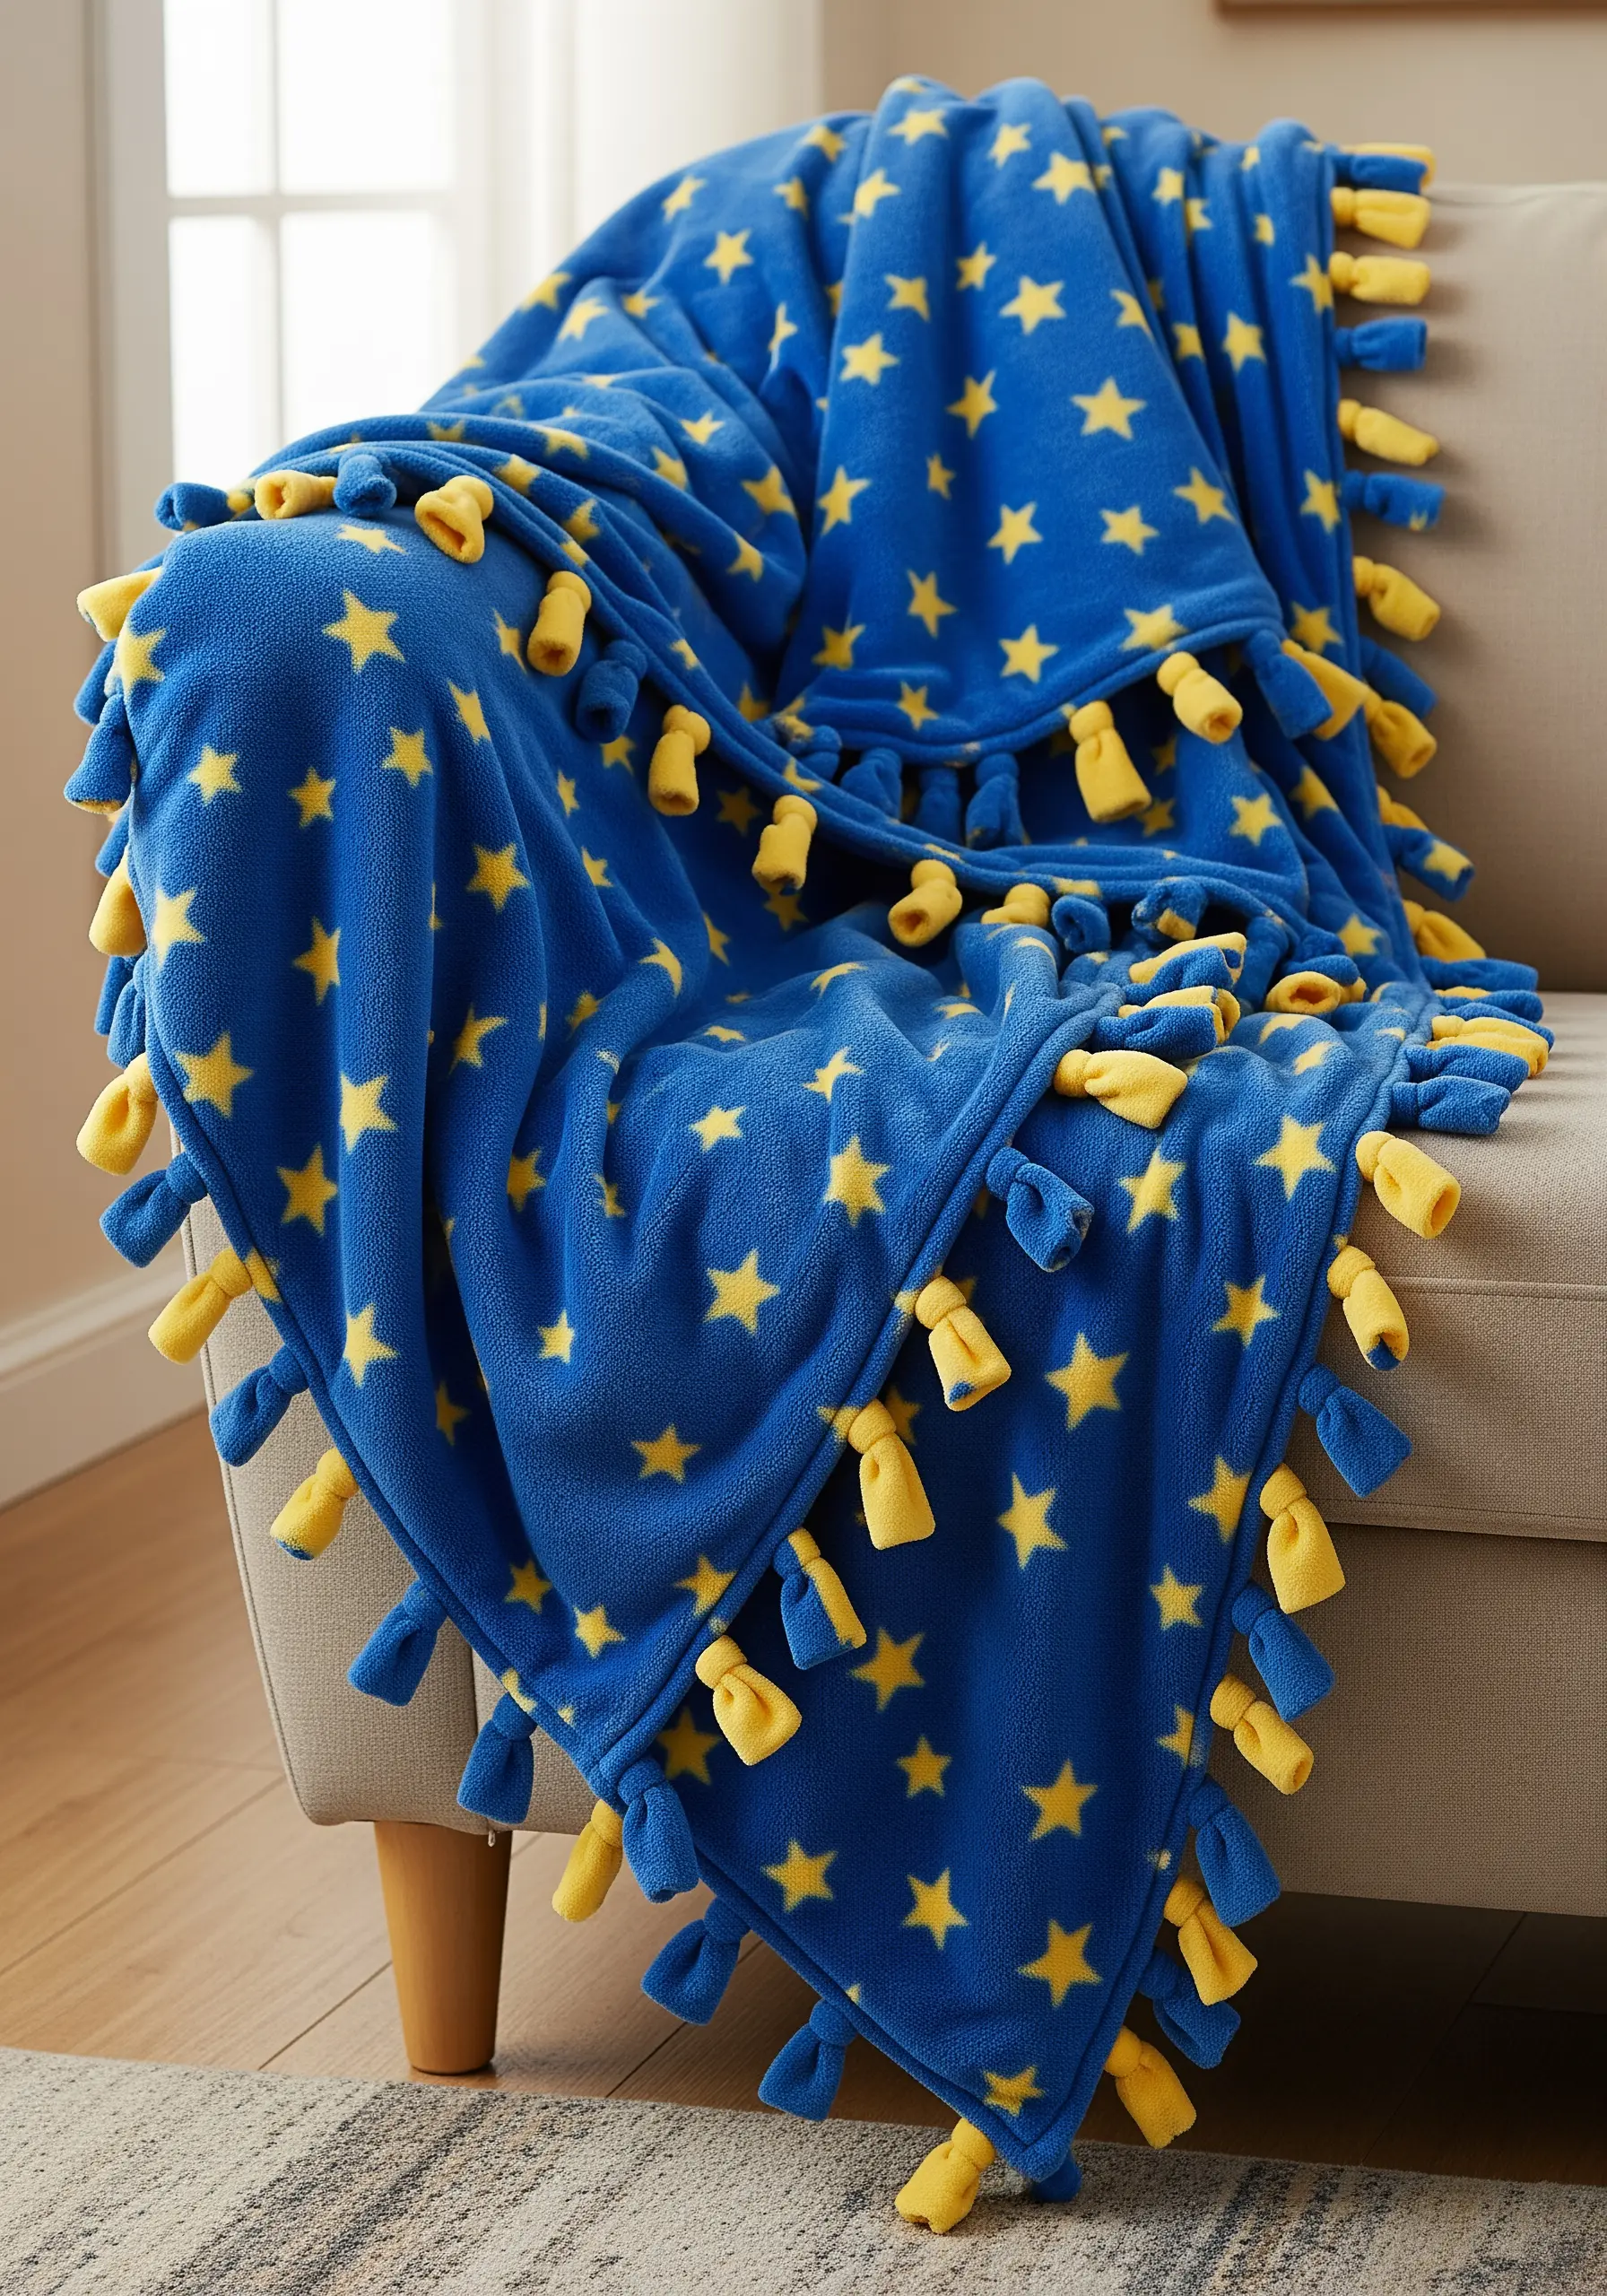
The no-sew tie blanket is a classic for a reason: it’s incredibly simple and yields a wonderfully cozy result.
Lay two pieces of fleece flat, cut matching slits around the entire perimeter, and simply tie the corresponding strips together in double knots.
The key to a flat, neat edge is ensuring your slits are of uniform length and spacing.
Use a ruler and a fabric marker to create guidelines before cutting for a professional-looking finish.
9. Stitch a Set of Felt Play Food
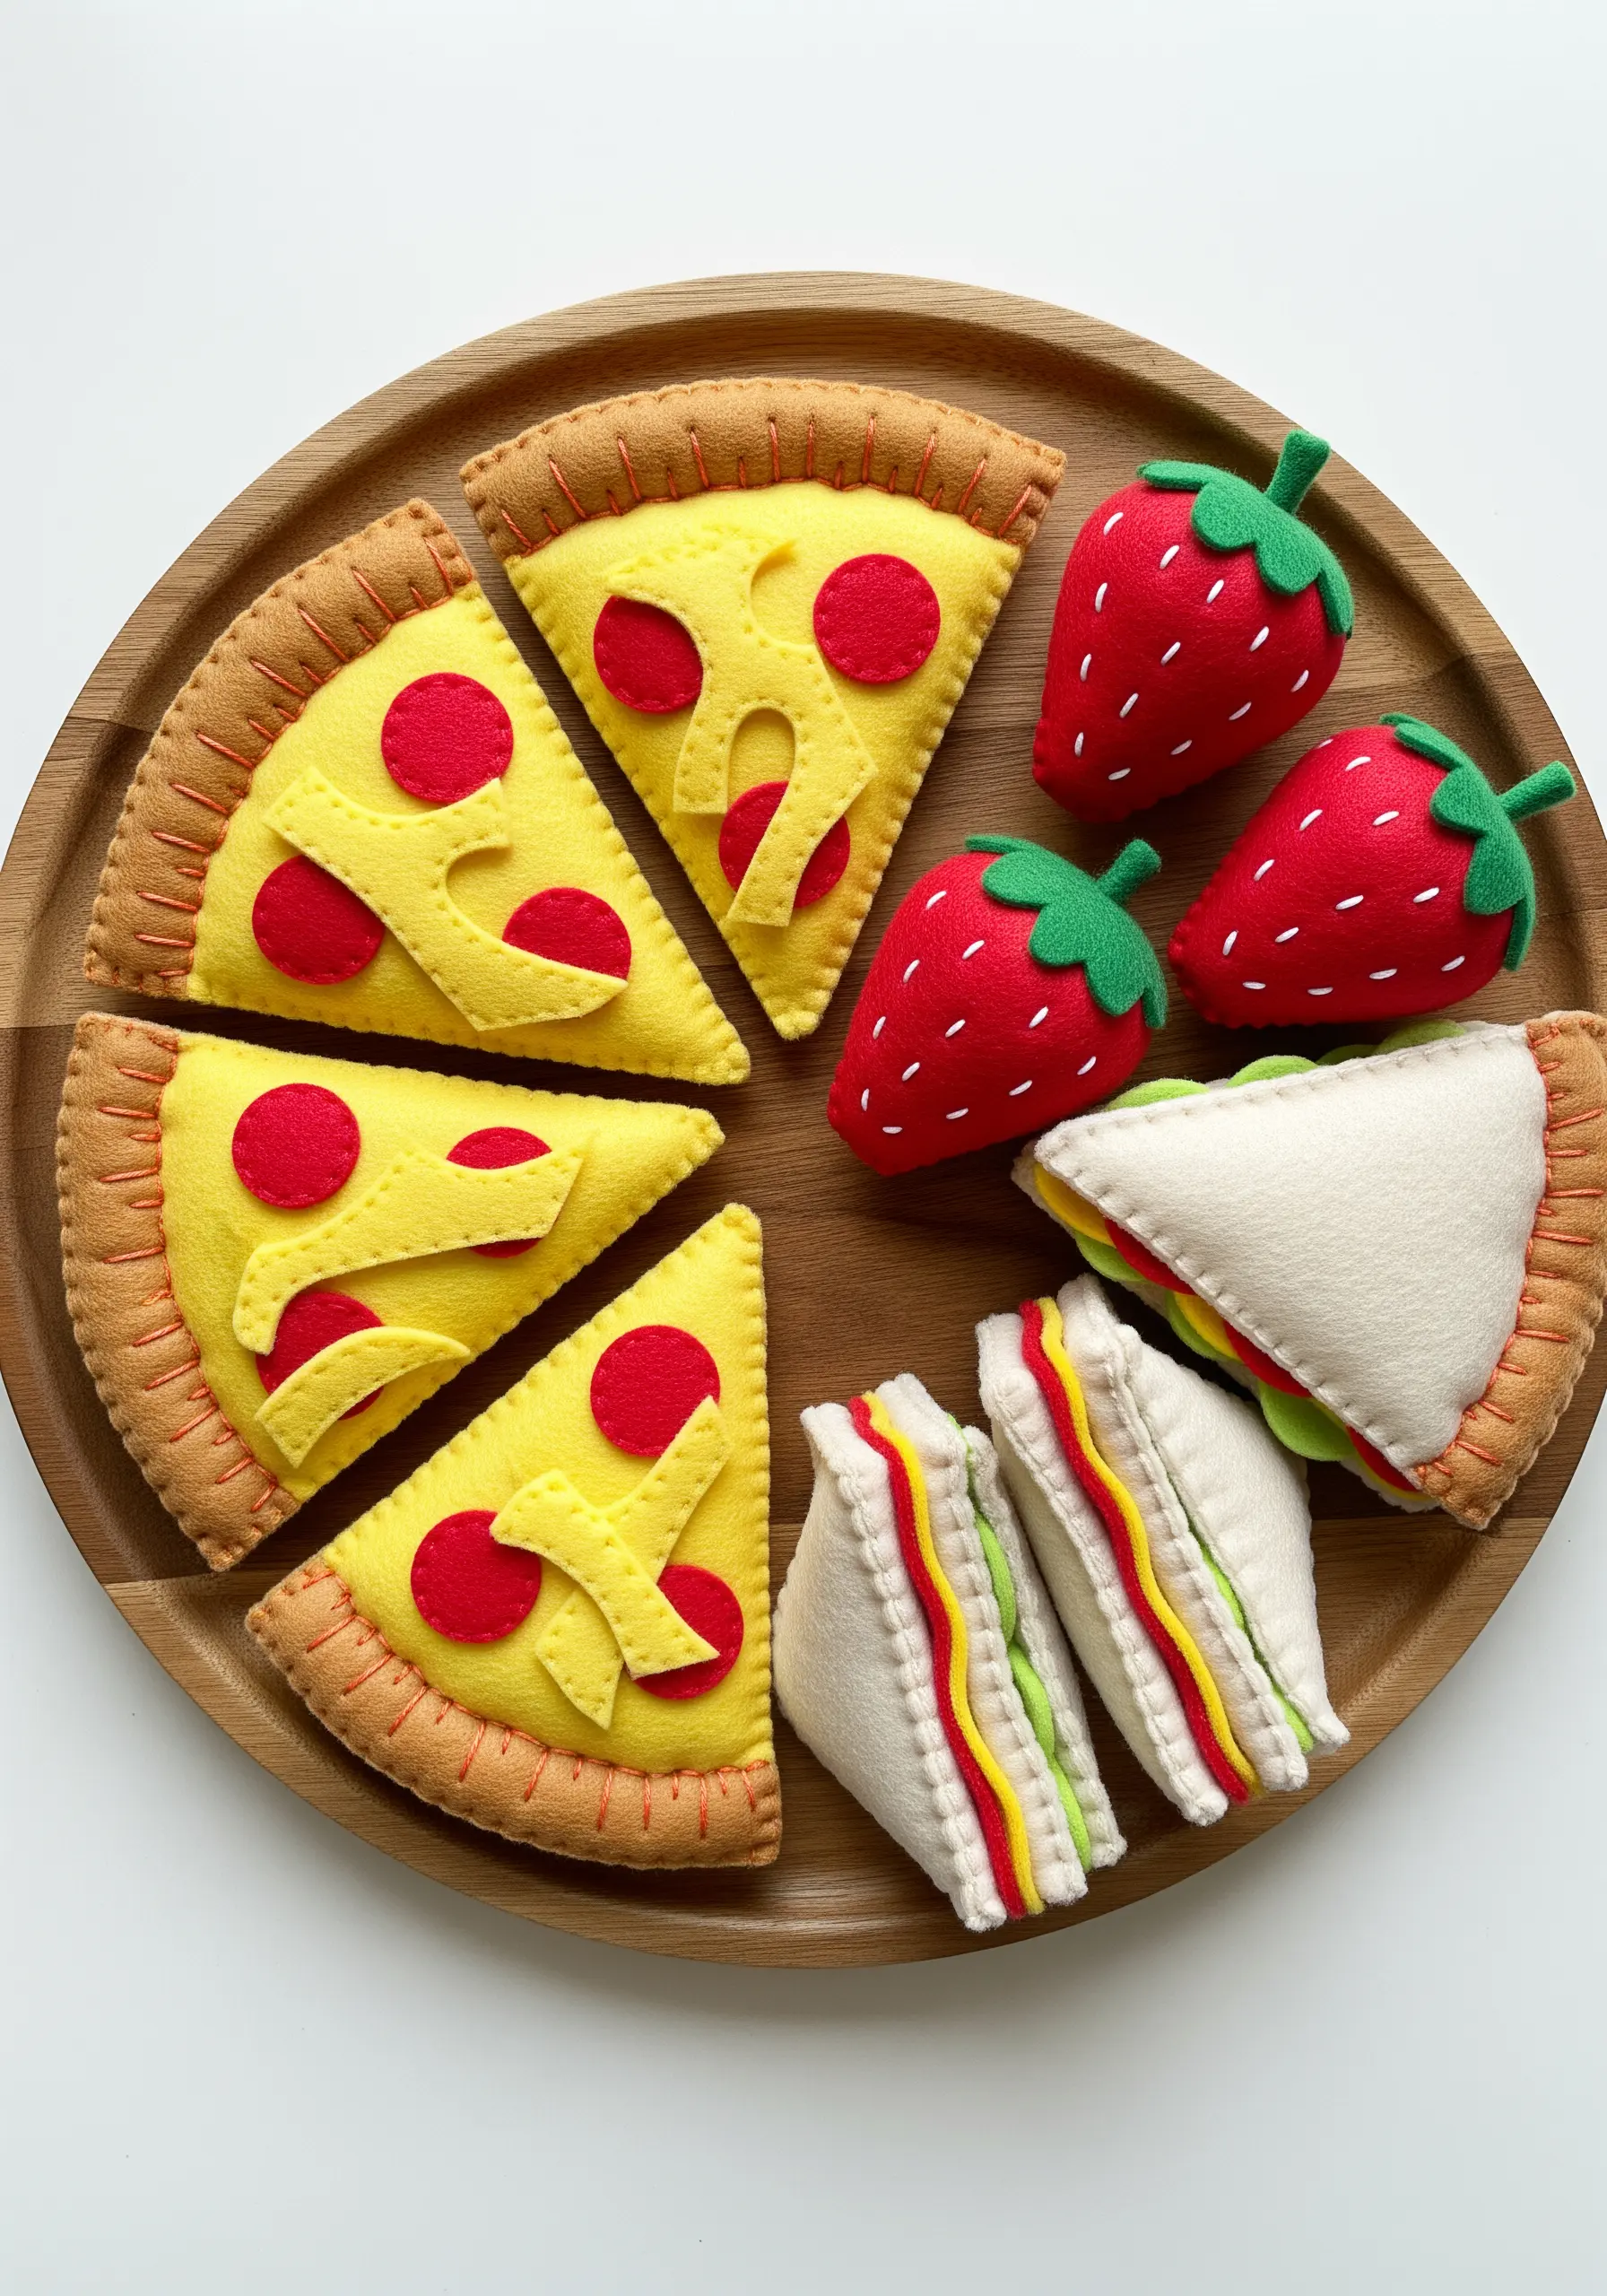
Felt’s sturdiness and vibrant colors make it ideal for creating durable play food.
Use a whipstitch around the edges with a matching thread color for a nearly invisible seam that holds up to playtime.
For details like pepperoni or seeds, use small dabs of fabric glue to hold them in place before adding a few simple stitches through the center.
This combination of gluing and minimal stitching makes the project faster and more accessible for kids.
10. Craft a Rainbow Wall Hanging with Wrapped Yarn

Transform cardboard and yarn into a striking piece of decor with this simple wrapping technique.
Cut a rainbow arch from sturdy cardboard and wrap it tightly with different colors of yarn, ensuring no cardboard shows through.
Secure the ends on the back with a knot and a touch of glue.
The textural contrast between the smooth yarn and fluffy cotton ball clouds is what makes this design so visually appealing. These are vibrant yarn wall art tutorials that beginners can actually do.
11. Cover a Notebook with Your Favorite Fabric
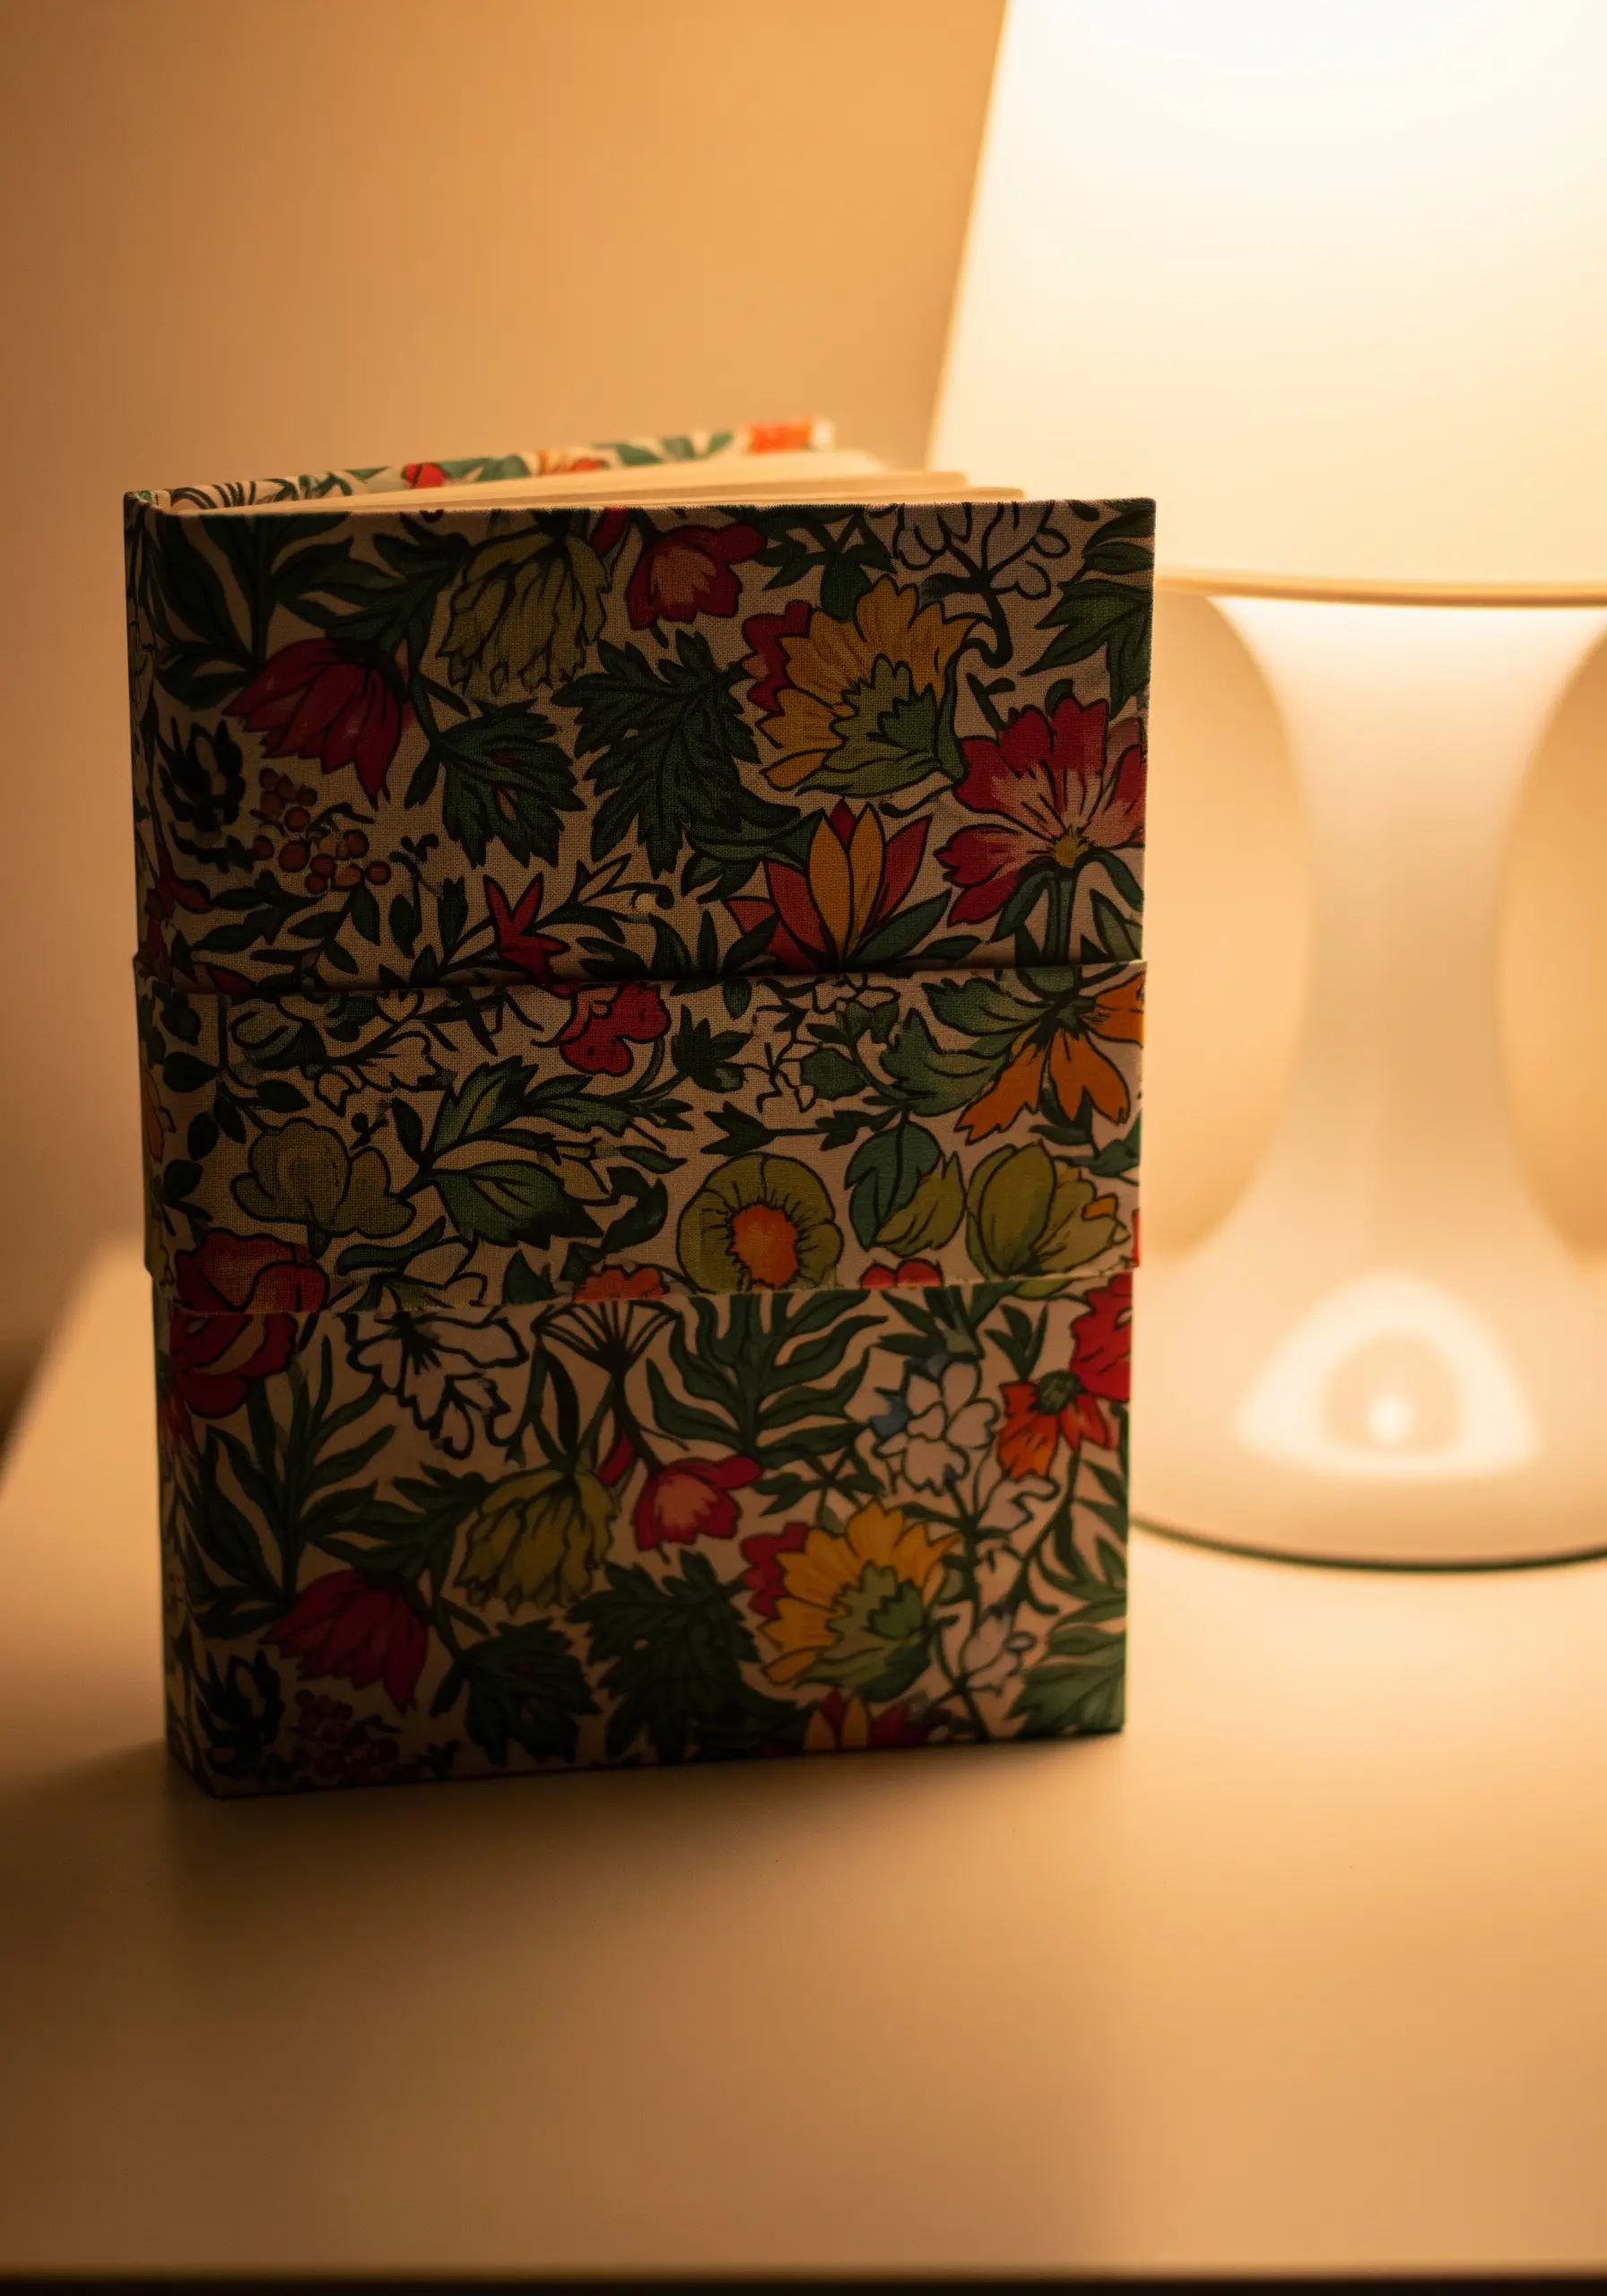
Personalize a plain journal with this easy fabric-covering technique that requires no sewing.
Use a spray adhesive or a thin layer of decoupage glue on the notebook cover, then carefully smooth your chosen fabric over it, pressing out any air bubbles.
Trim the excess fabric, leaving about an inch to fold over the inside covers for a clean, book-bound edge.
This project teaches precision with measuring and cutting, resulting in a beautiful and practical item.
12. Sew Soft Felt Stars and Moons for a Nursery Mobile

Create a dreamy nursery mobile with soft, stuffed felt shapes.
Cut two identical shapes, place them together, and use a simple whipstitch or blanket stitch around the outside edge.
Before you stitch it completely closed, gently push small amounts of polyester fiberfill inside with a pencil eraser to give the shapes a soft, three-dimensional form.
Using pastel-colored felt and matching thread creates a gentle, cohesive look perfect for dreamy baby clothing embroidery ideas and decor.
13. Create a Festive Garland from Fabric Scraps
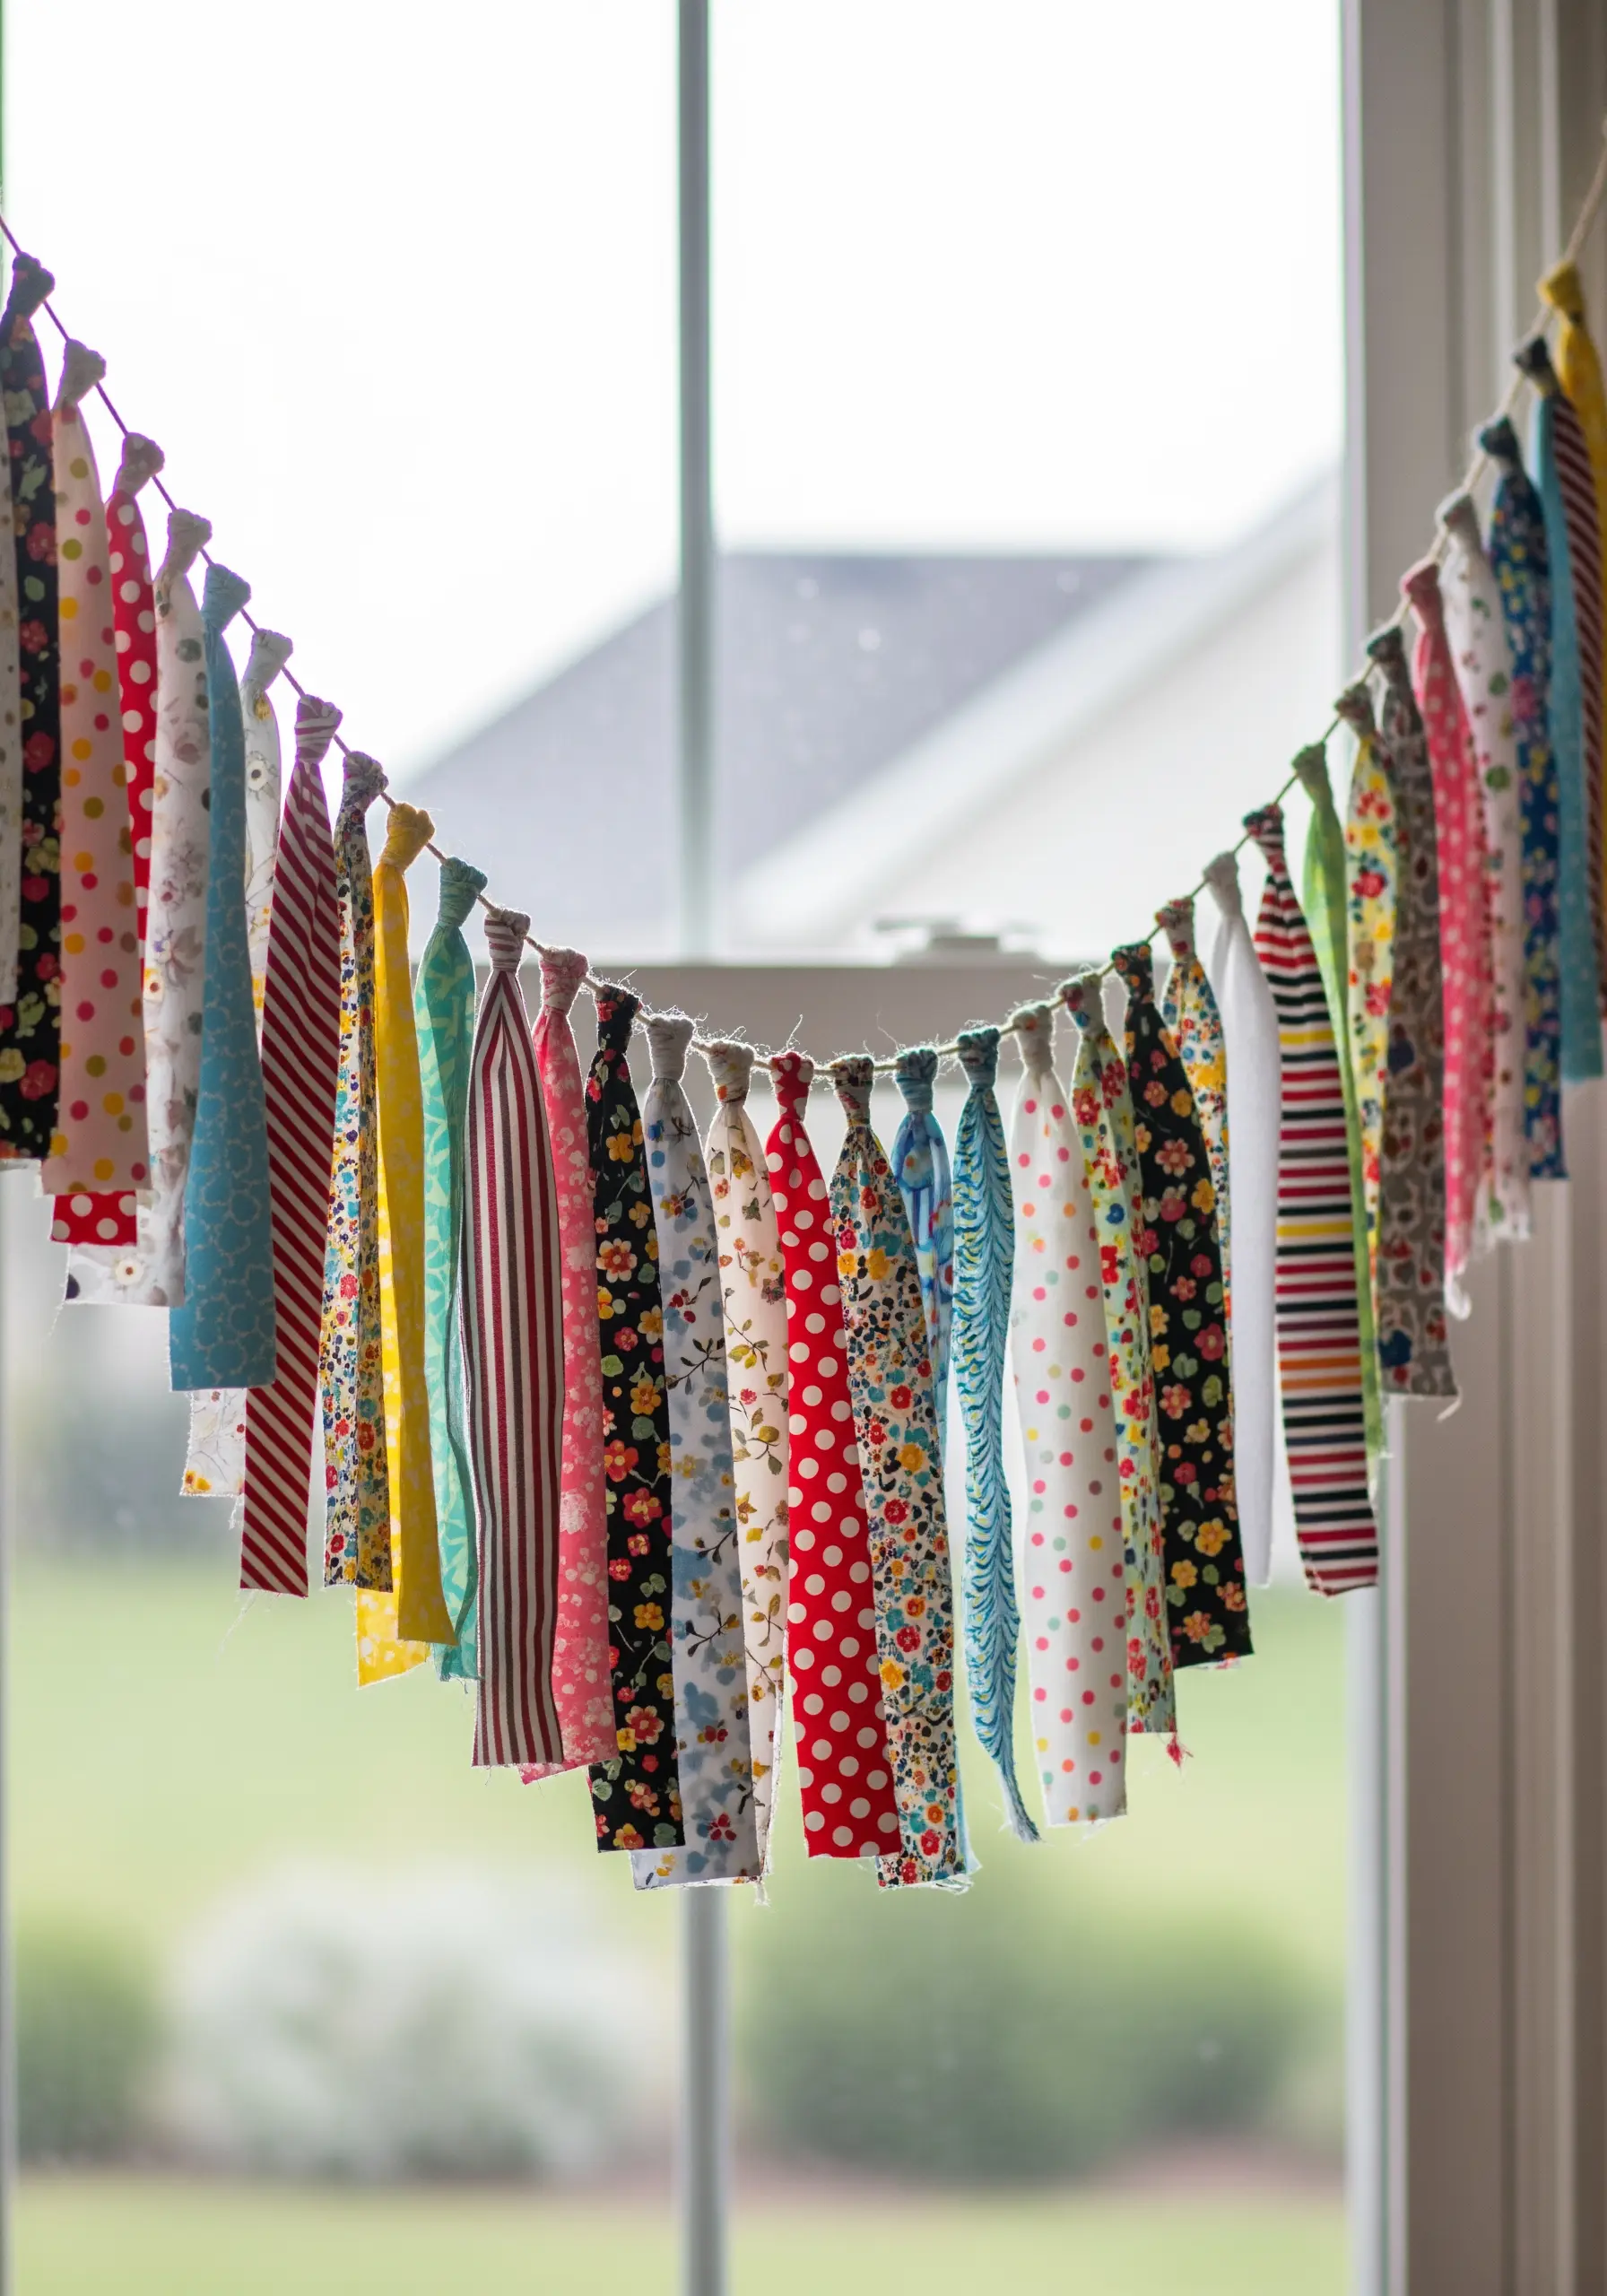
This is a perfect zero-waste project that uses up even the smallest fabric remnants.
Simply cut fabric into strips of similar length and tie them onto a long piece of twine or ribbon with a single, simple knot.
The beauty of this garland comes from the mix of colors and patterns, so encourage kids to experiment with different combinations.
It requires no sewing, gluing, or special tools, making it one of the most accessible fabric projects you can finish in a weekend.
14. Assemble a Bouquet of Layered Felt Flowers
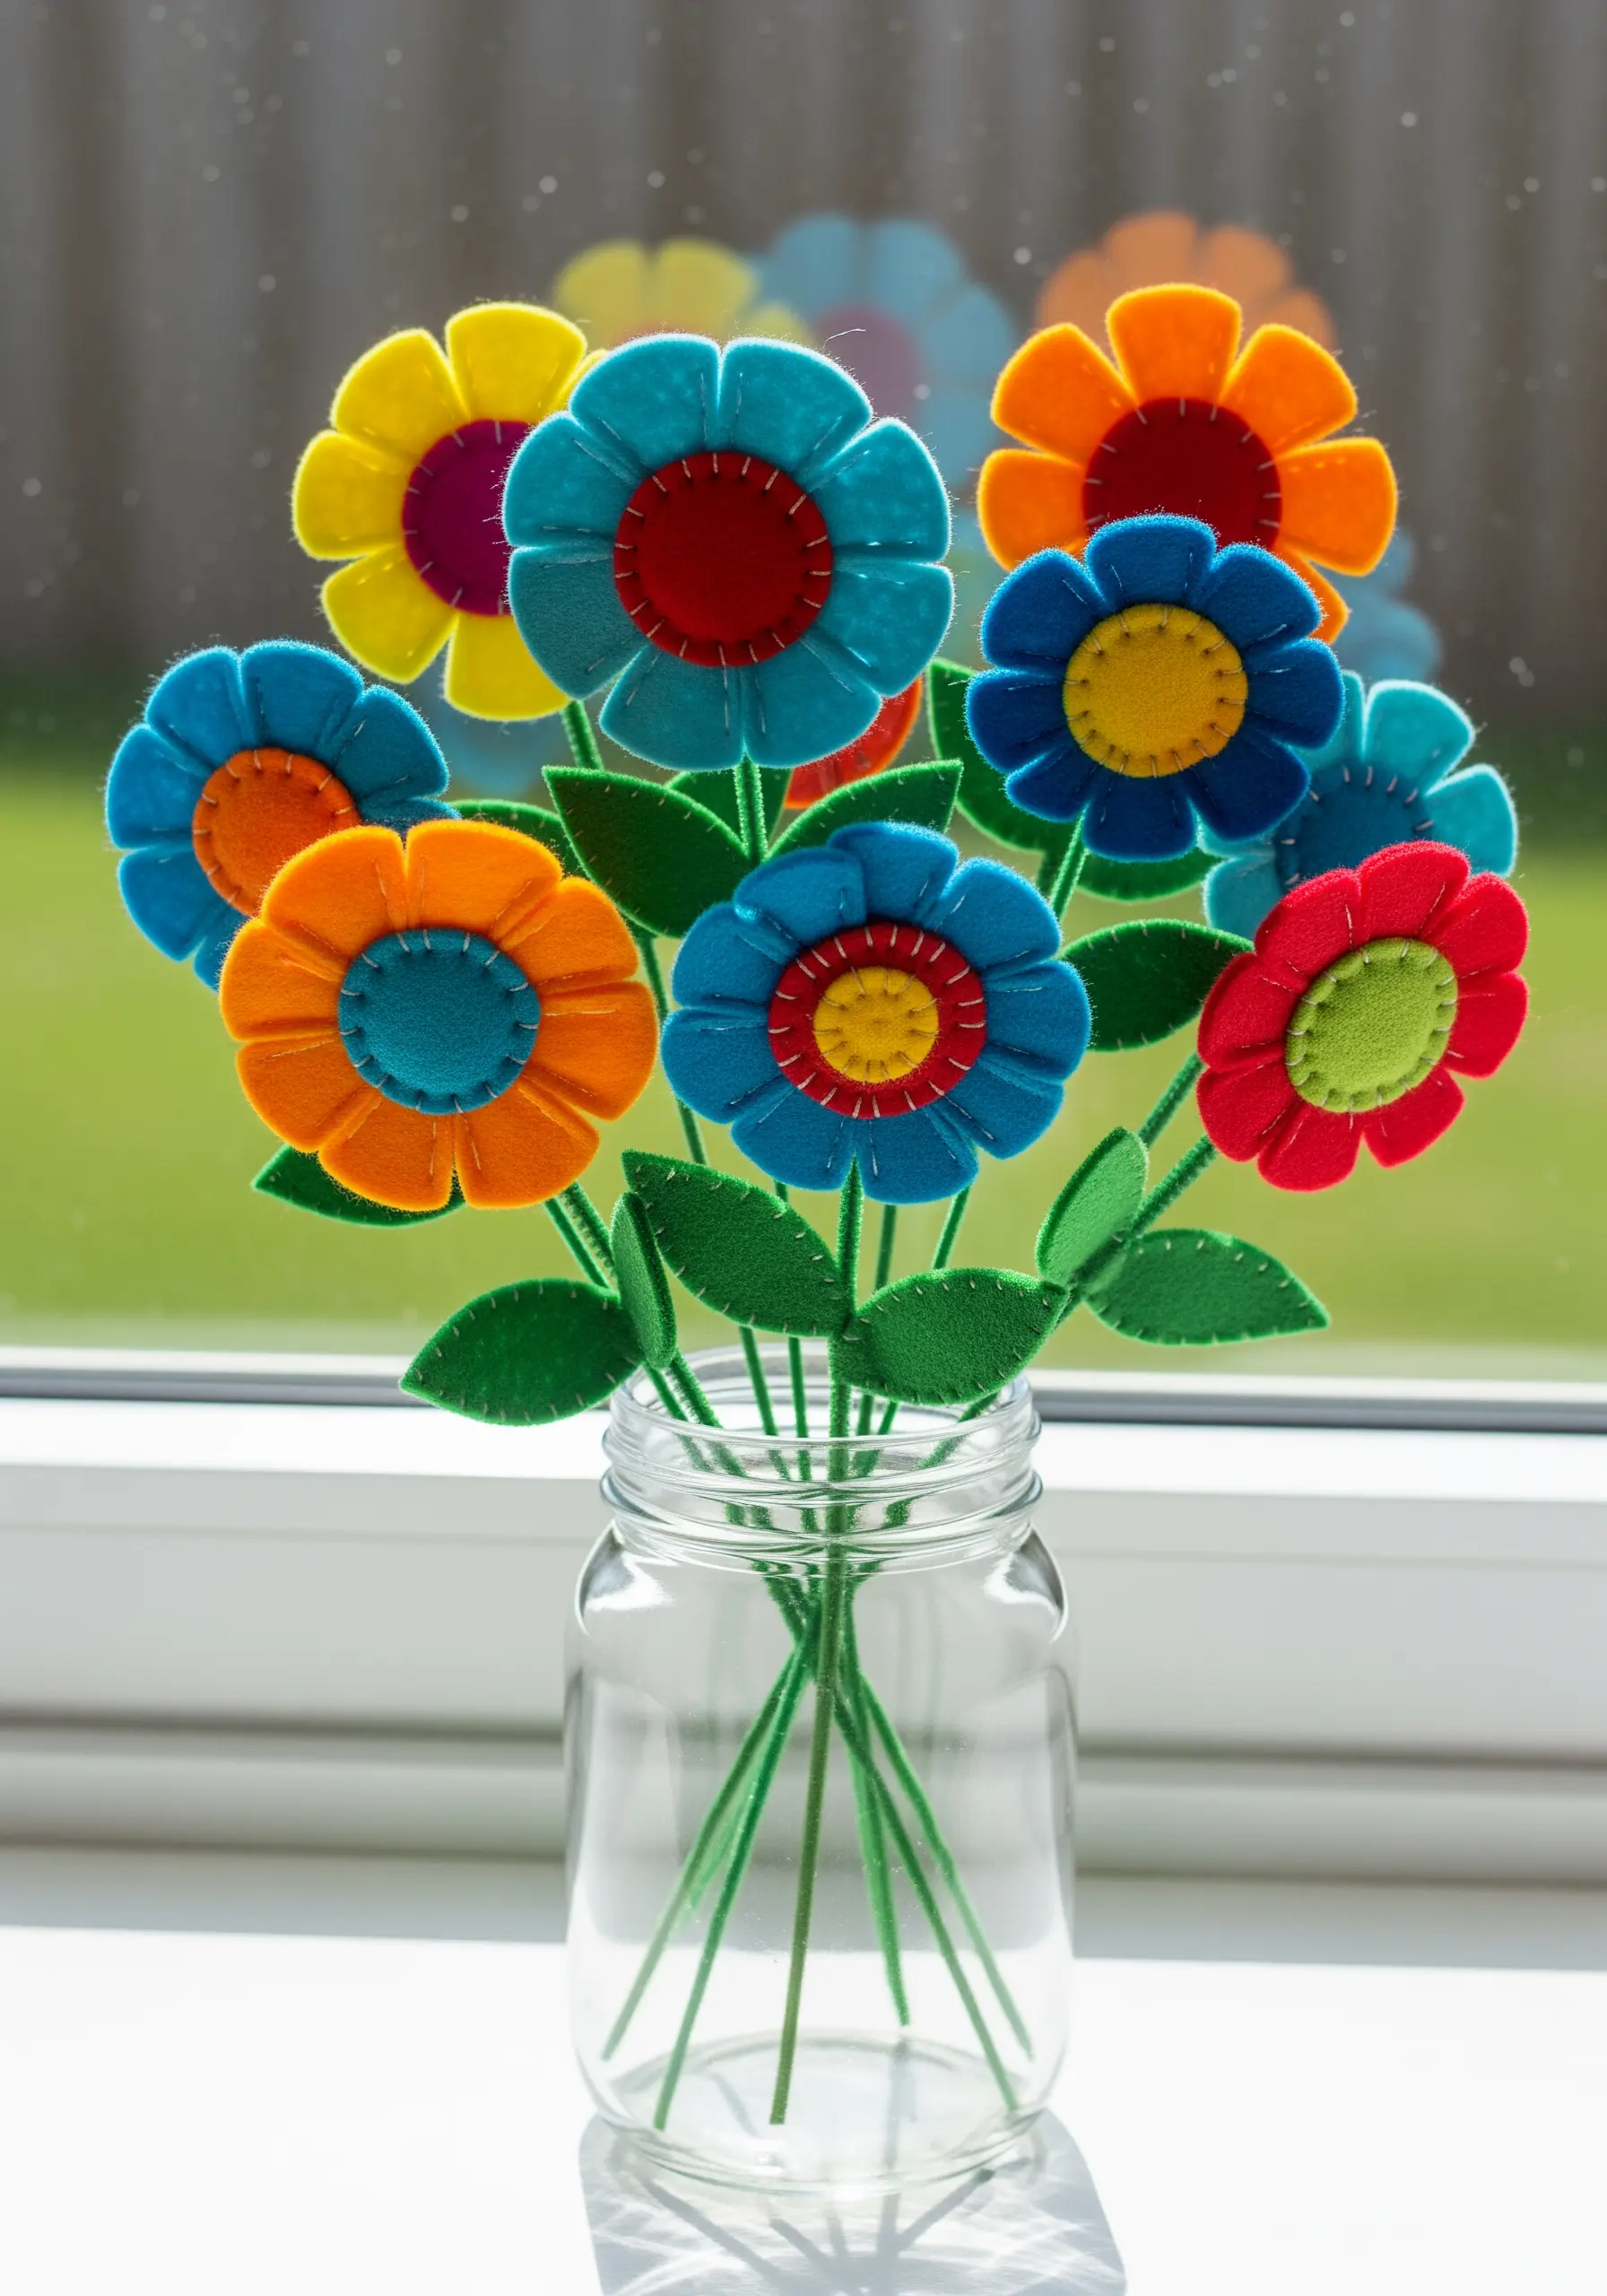
Build vibrant, everlasting flowers by layering different colored felt shapes.
Cut out petal shapes in various sizes and stack them, then secure the layers with a few central stitches or a decorative button.
Wrap green felt strips around floral wire to create sturdy stems, attaching stitched leaves along the way.
This project teaches basic construction and layering to create surprisingly realistic and cheerful blooms.
15. Upcycle Old Jeans into a Craft Supply Organizer
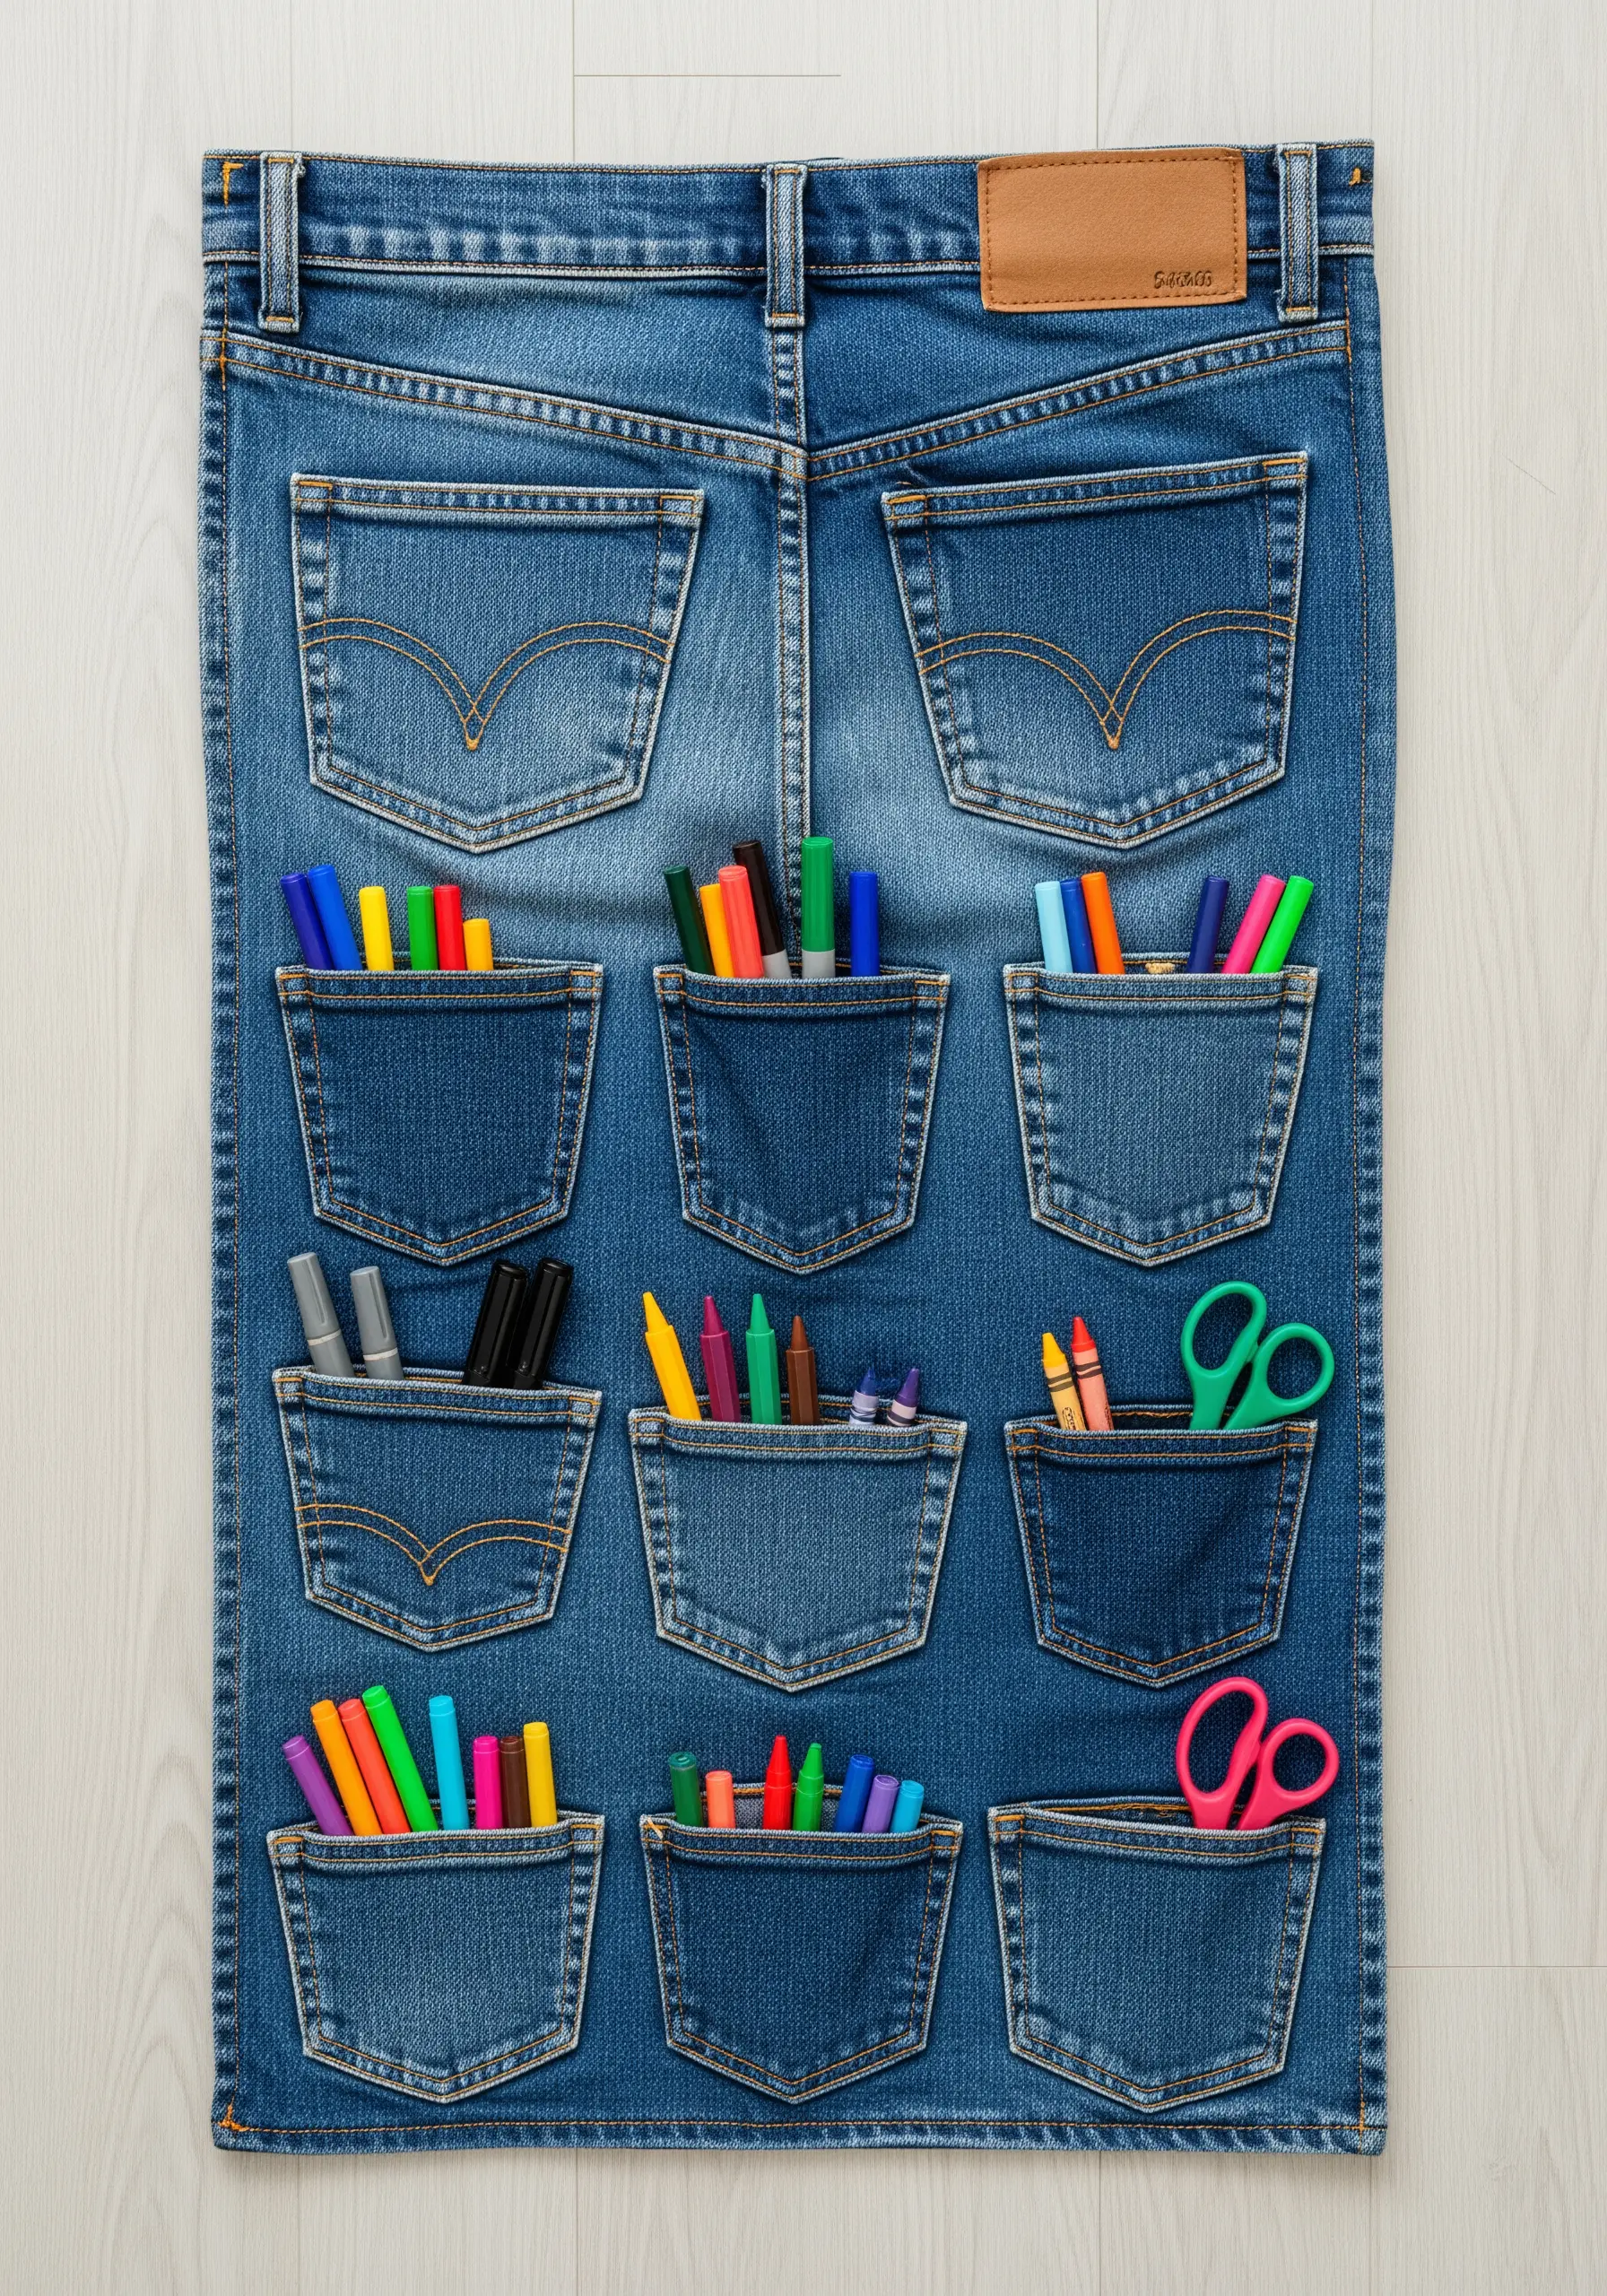
Give old denim a new purpose by transforming it into a functional wall organizer.
Cut the back panel from a pair of jeans, keeping the waistband intact for structure.
Then, carefully cut out the back pockets from other pairs and arrange them across the panel before sewing them in place.
Using a sewing machine with a denim needle makes this project quick, but it can also be hand-stitched with a thimble and strong thread for a rustic look.
16. Fashion Expressive Sock Puppets with Yarn Hair

The humble sock puppet is a timeless craft that sparks imaginative play.
Use a brightly colored sock as the base and bring it to life with googly eyes, felt shapes for a mouth, and vibrant yarn for hair.
To create the wild hair, stitch loose loops of yarn directly onto the top of the sock, then snip the loops to create a fun, spiky texture.
Use fabric glue for all components to keep it a no-sew activity.
17. Weave a Bowl from Fabric Strips
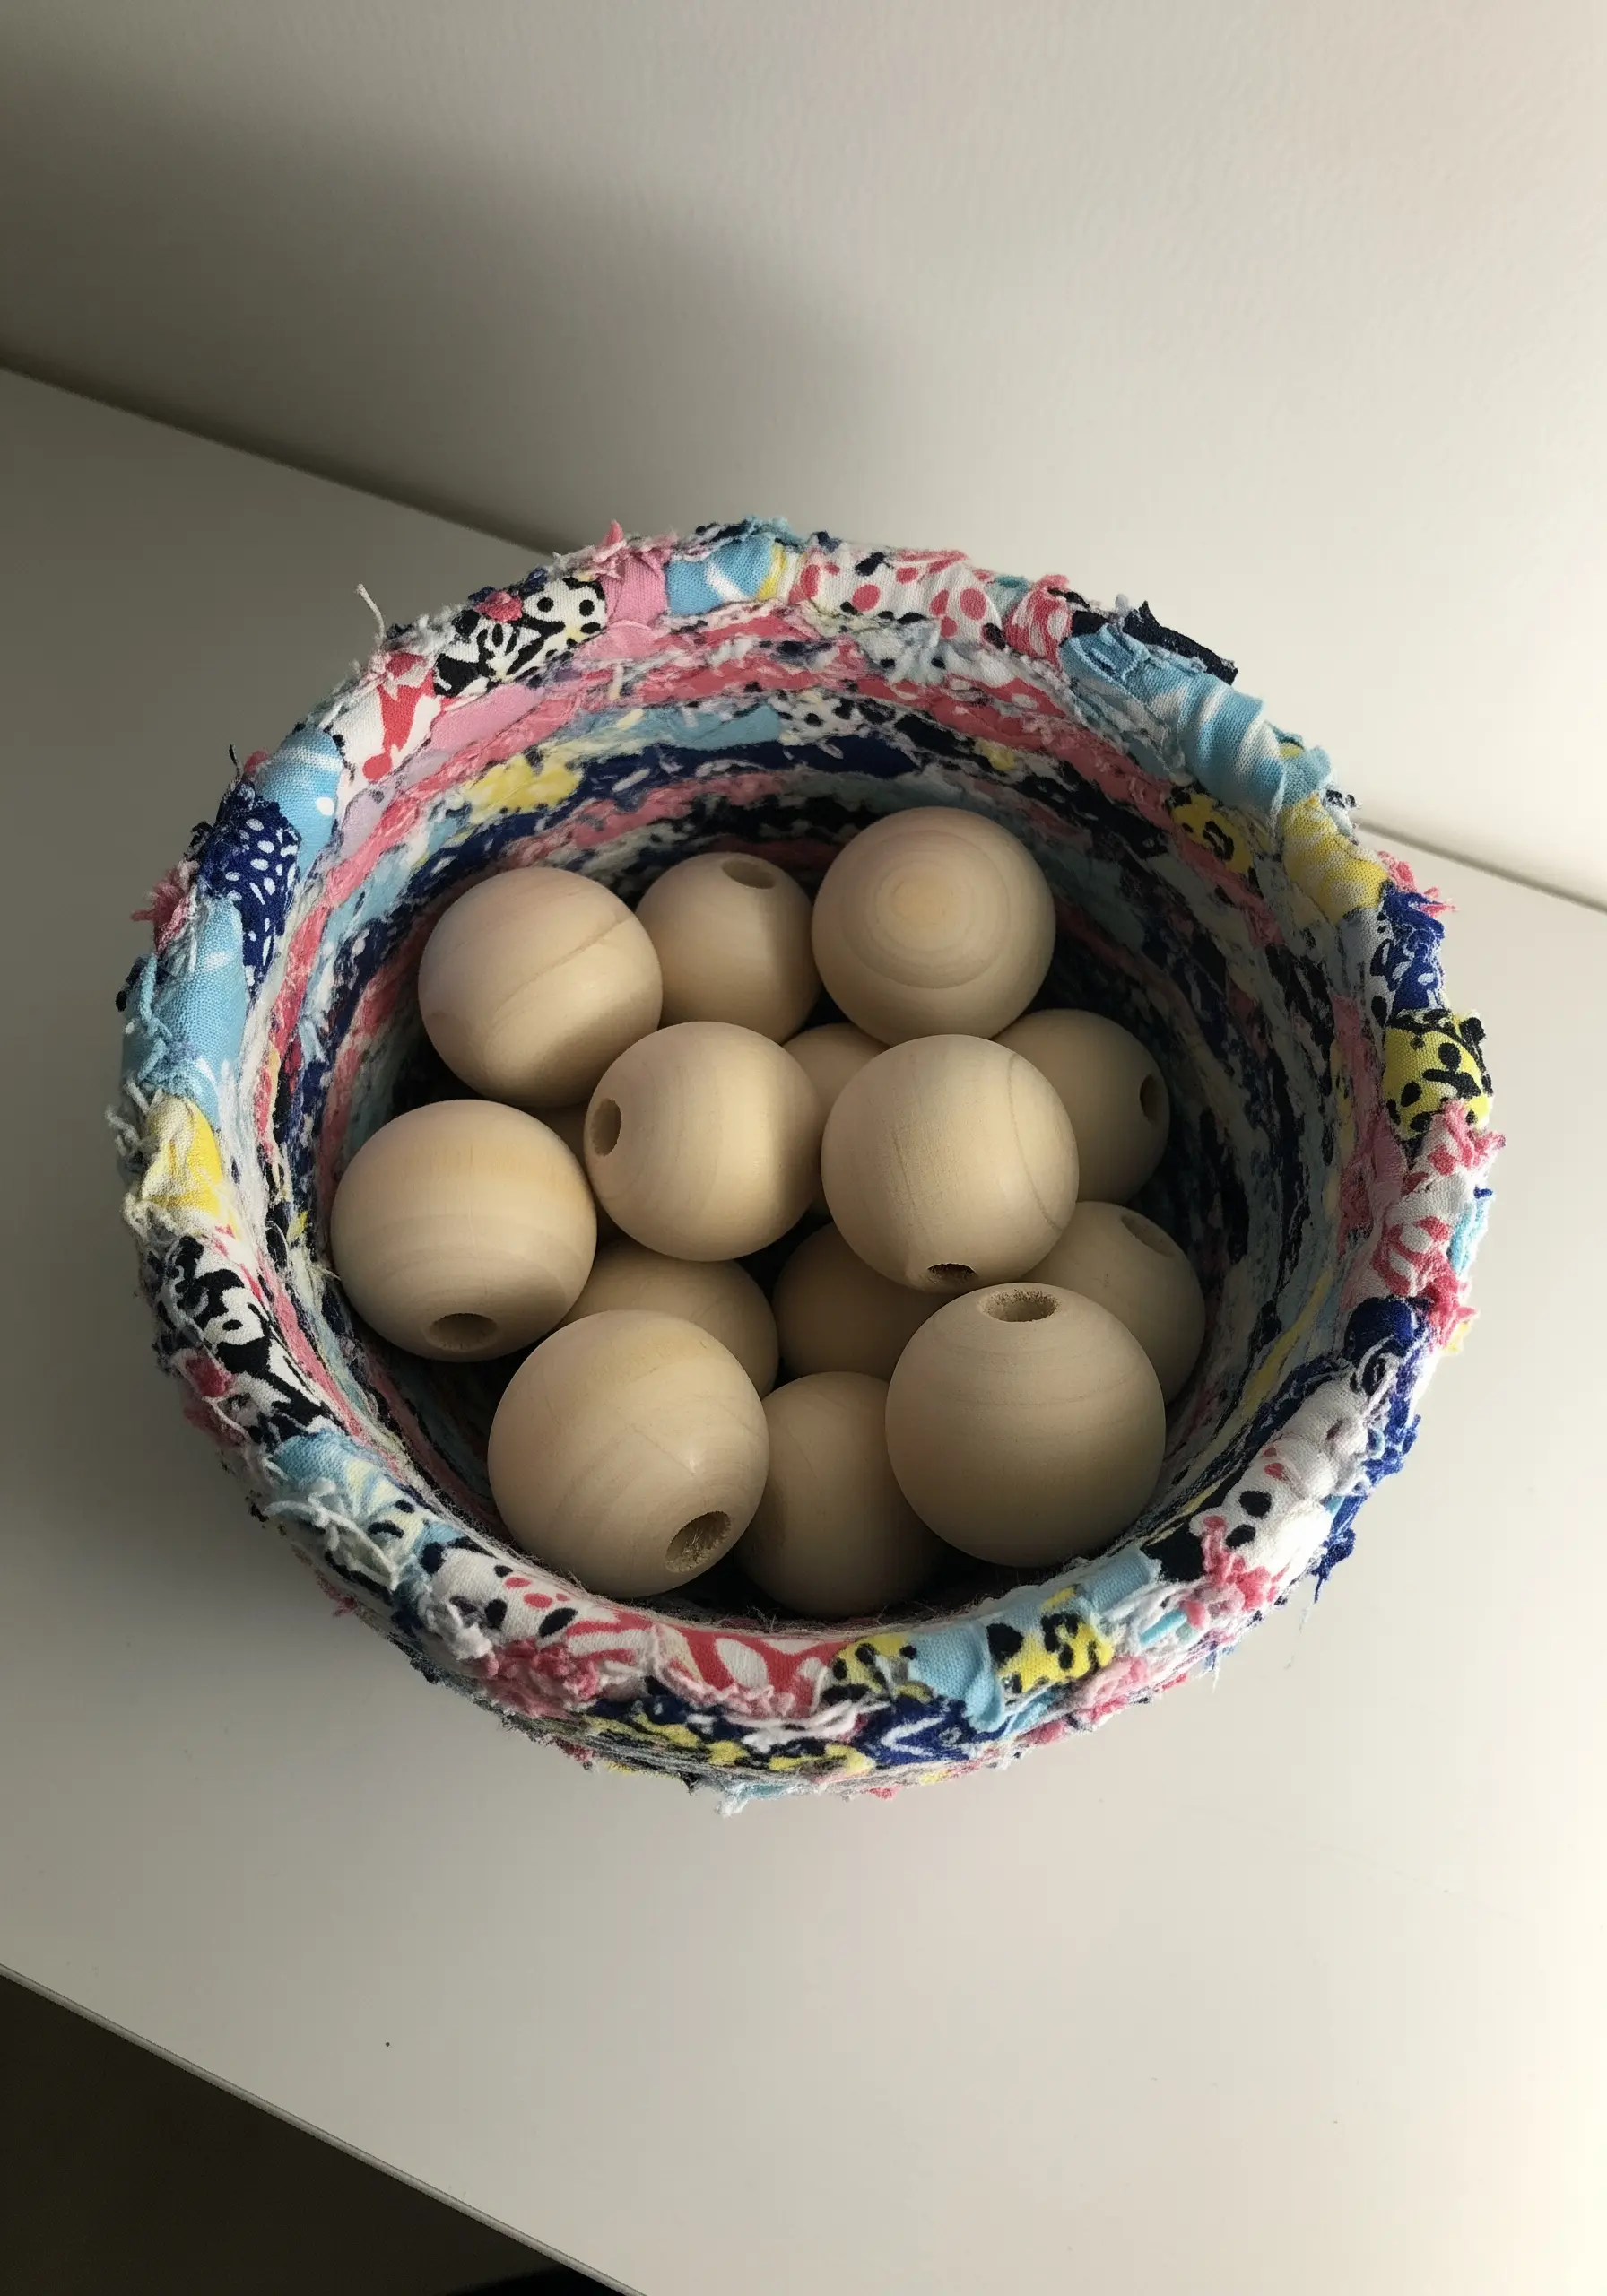
Introduce the basics of weaving with this coiled fabric bowl project.
Wrap strips of scrap fabric tightly around a thick rope or cord, securing the end with a stitch or glue.
Then, begin coiling the rope into a flat circle, stitching the coils together as you go with a sturdy thread.
As you build the base, start angling the coils upward to form the walls of the bowl. This is a wonderfully tactile project that builds patience and dexterity.
18. Stitch a Star Constellation with Lazy Daisy Flowers
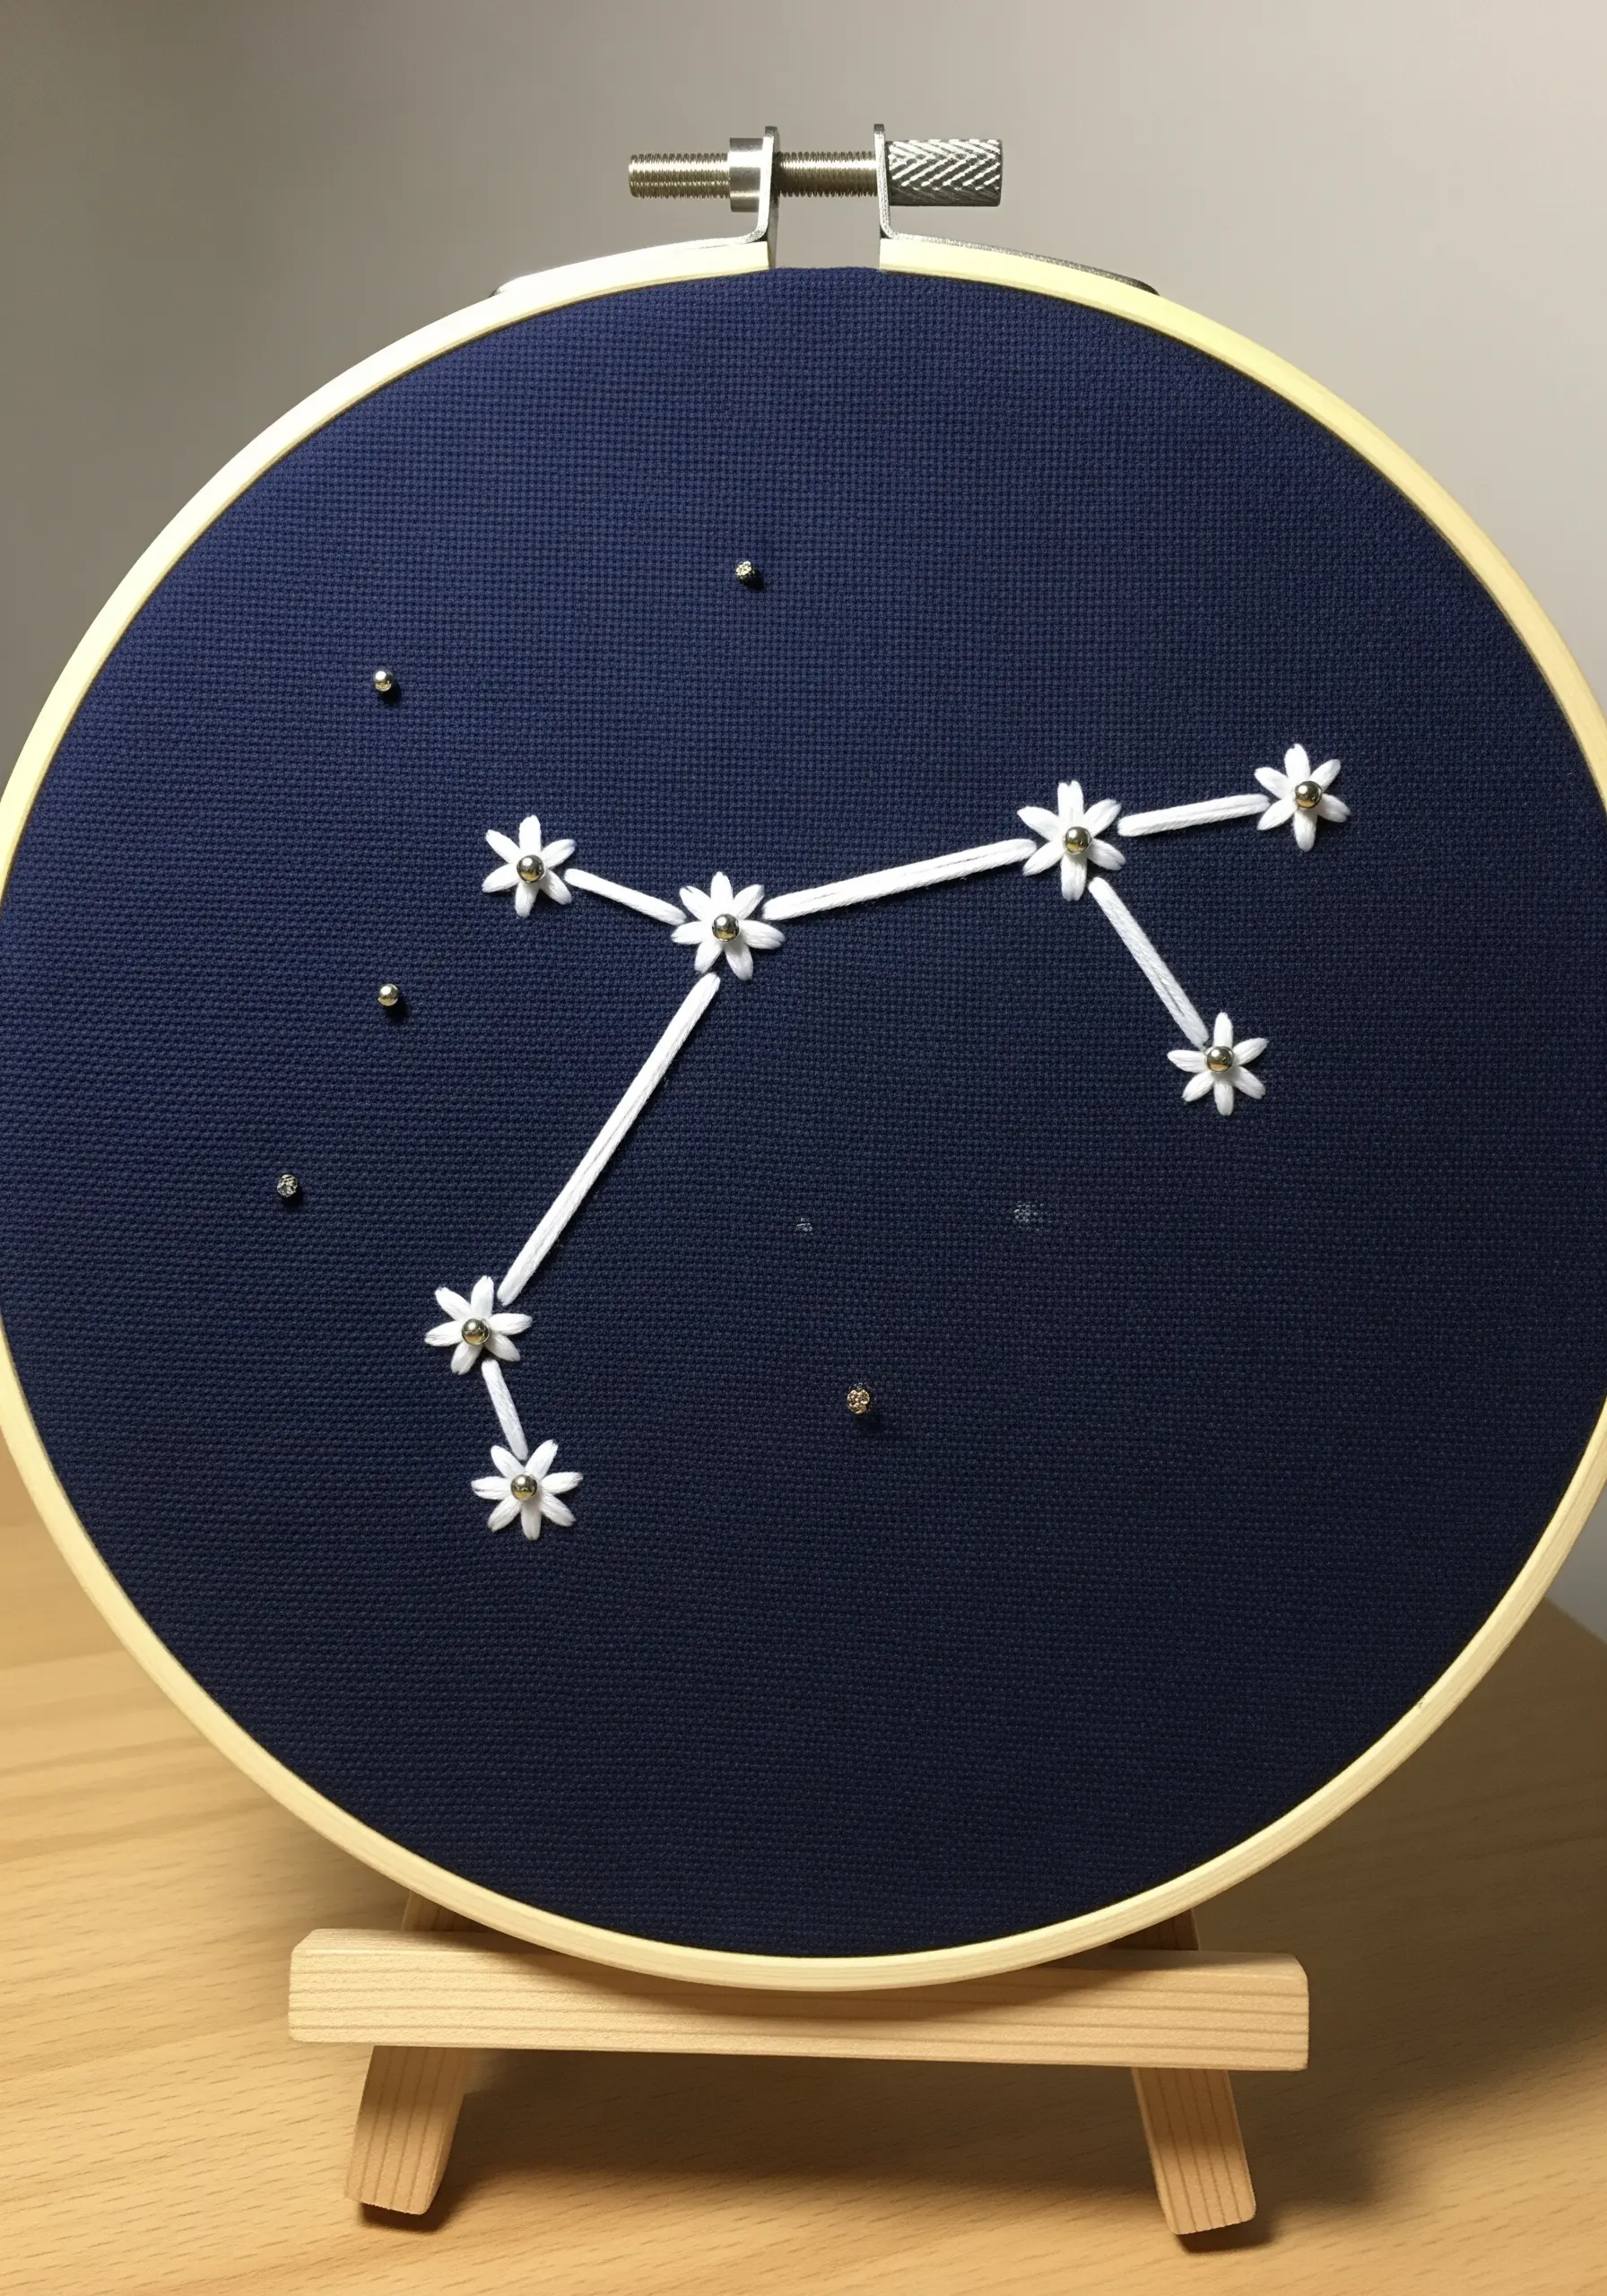
Combine astronomy and embroidery with a stitched constellation hoop.
On a dark navy or black fabric, lightly draw the constellation pattern with a chalk pencil.
Instead of simple French knots for stars, use the lazy daisy stitch to create tiny, five-petaled flowers at each major point.
Connect them with a clean backstitch. Adding a few seed beads or French knots as distant stars will add depth and sparkle to the finished piece.
19. Create a Caterpillar with Fabric Yo-Yos
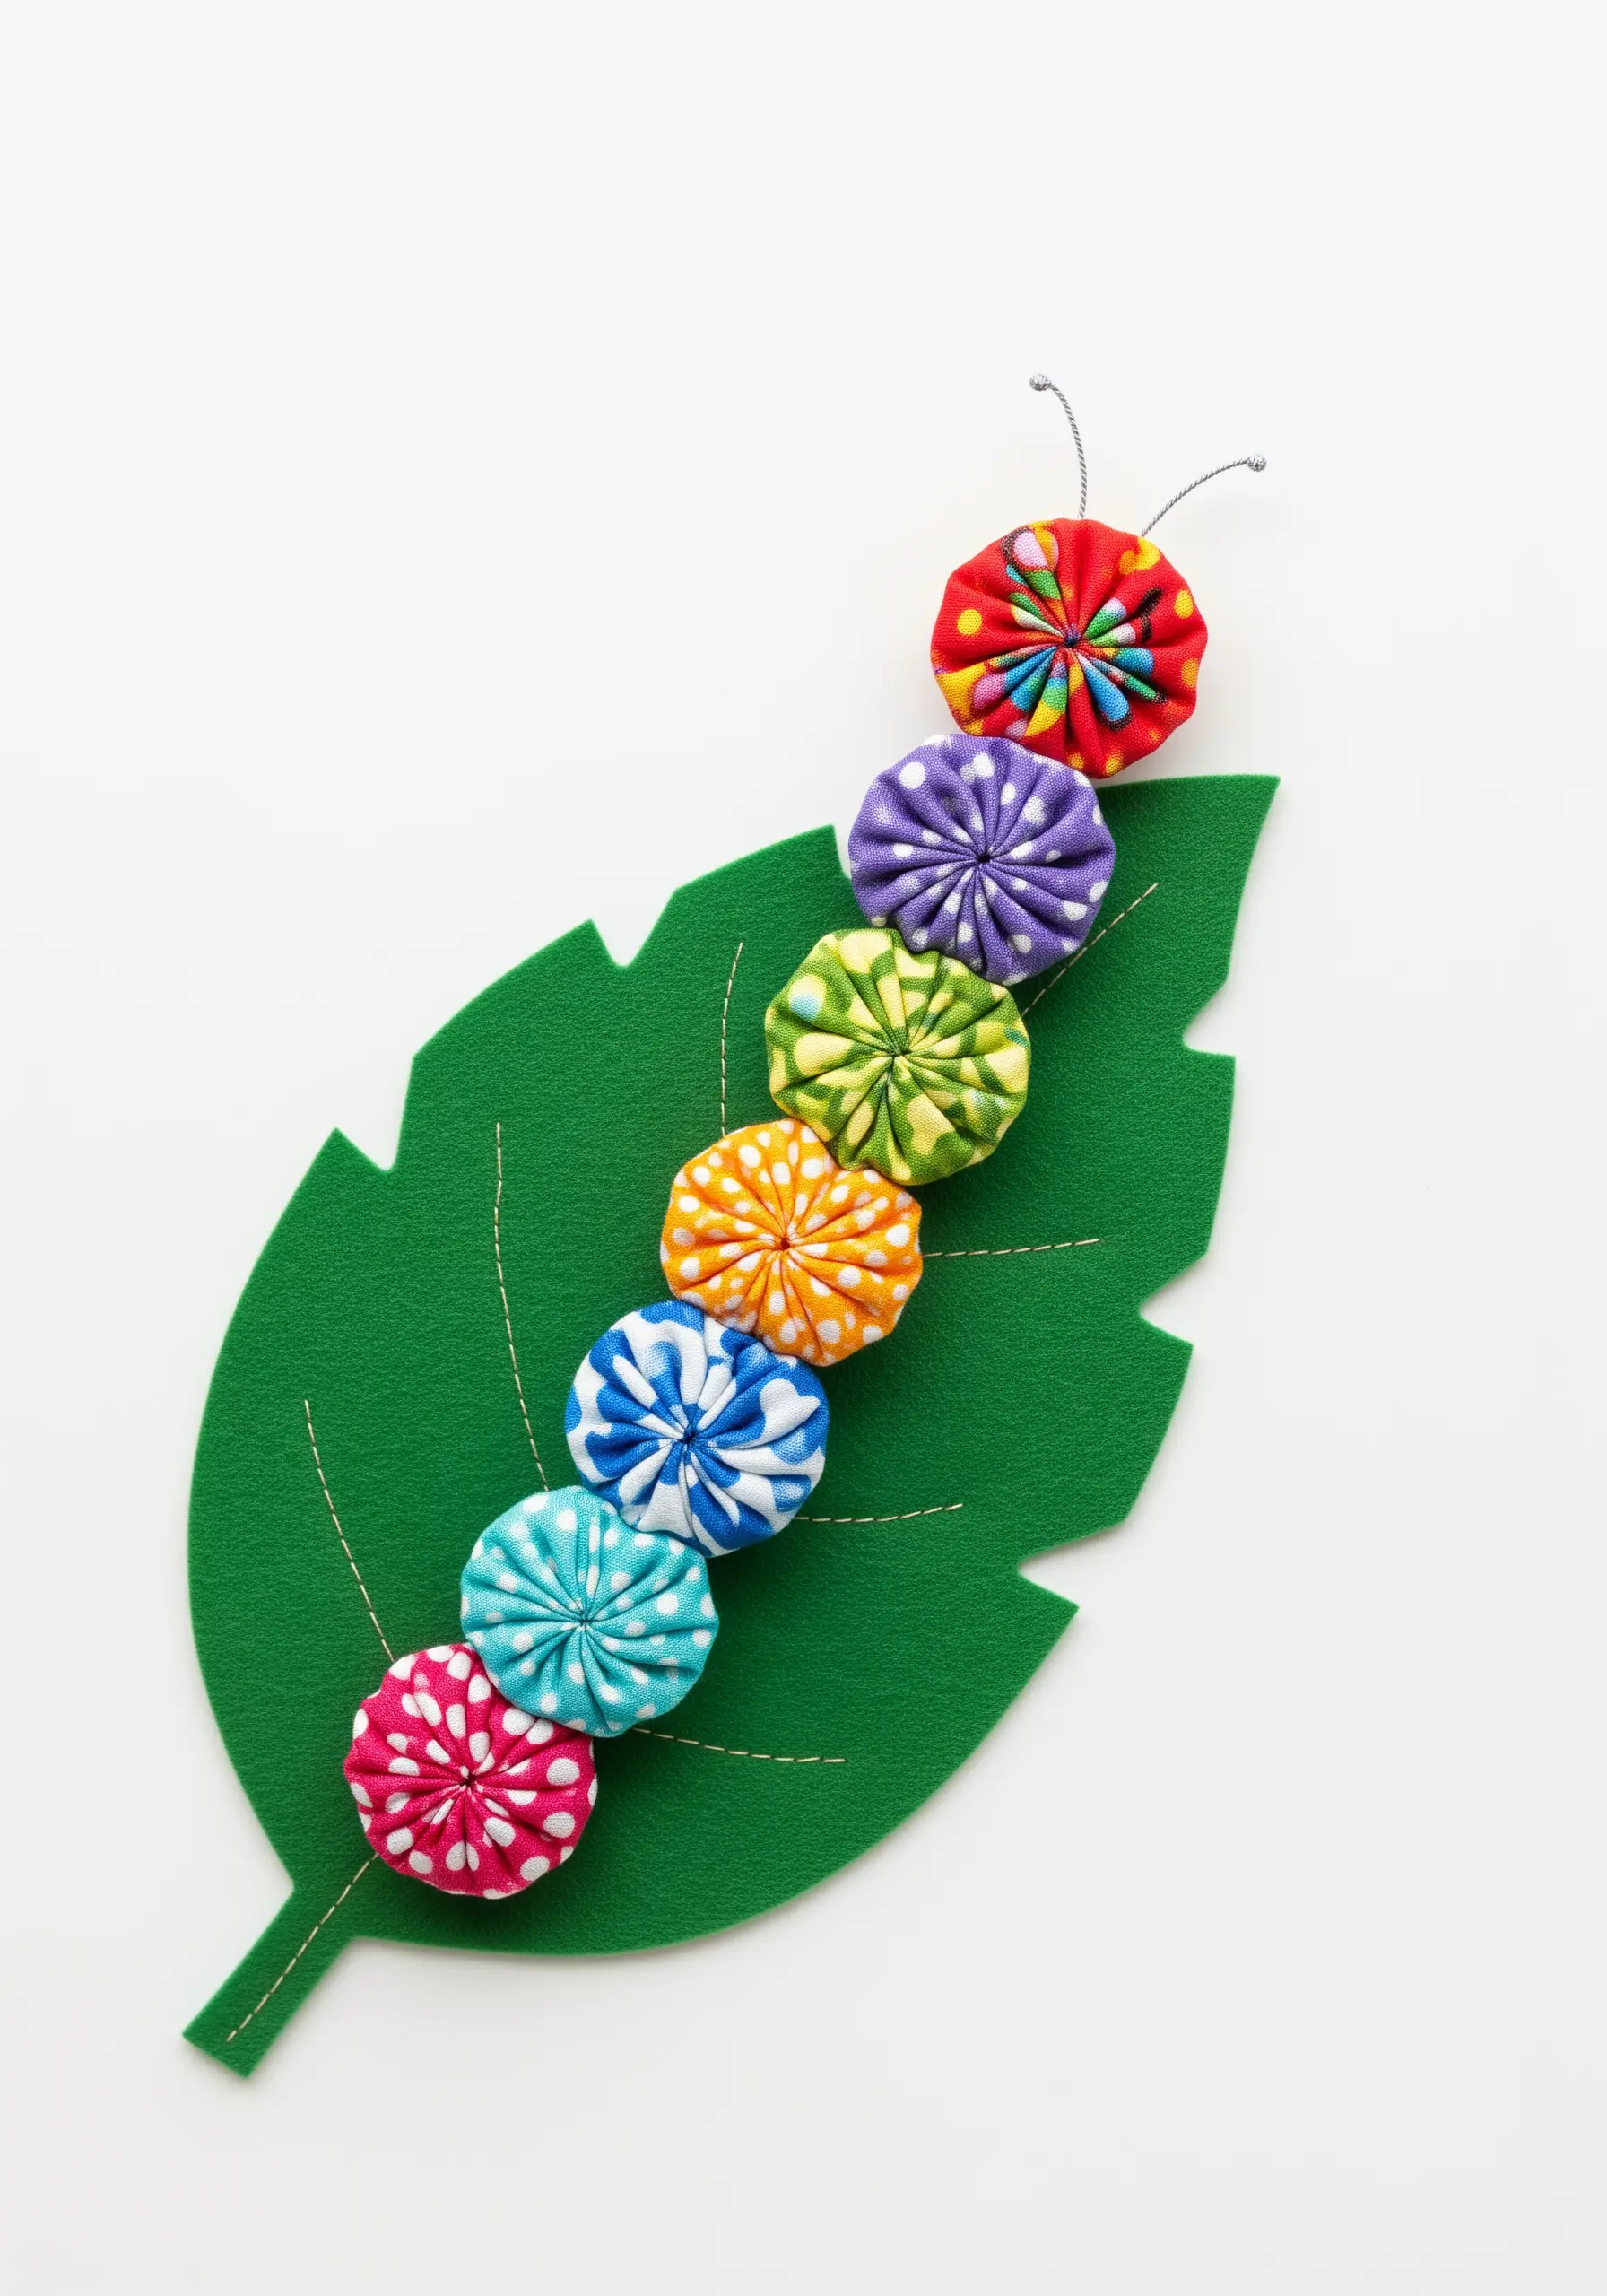
Fabric yo-yos, or Suffolk Puffs, are gathered circles of fabric that create charming, puffy discs.
To make one, cut a circle of fabric, sew a running stitch around the outer edge, and gently pull the thread to gather the fabric into a small pouch. Flatten it and knot the thread securely.
Stitch a line of colorful yo-yos together to form the body of a caterpillar, mounting it on a felt leaf for a playful finishing touch.
20. Design a Simple Patchwork Table Runner
Patchwork is an excellent introduction to the geometry of sewing.
Start by having kids arrange pre-cut squares of fabric (a charm pack is perfect for this) into a pleasing pattern.
Sew the squares together in rows, pressing the seams open with an iron as you go. Then, sew the rows together to form the runner top.
For a simple finish, layer the top with a backing fabric and stitch around the perimeter, leaving a small gap to turn it right-side out.
21. Make a Classic Rag Doll with Yarn Hair
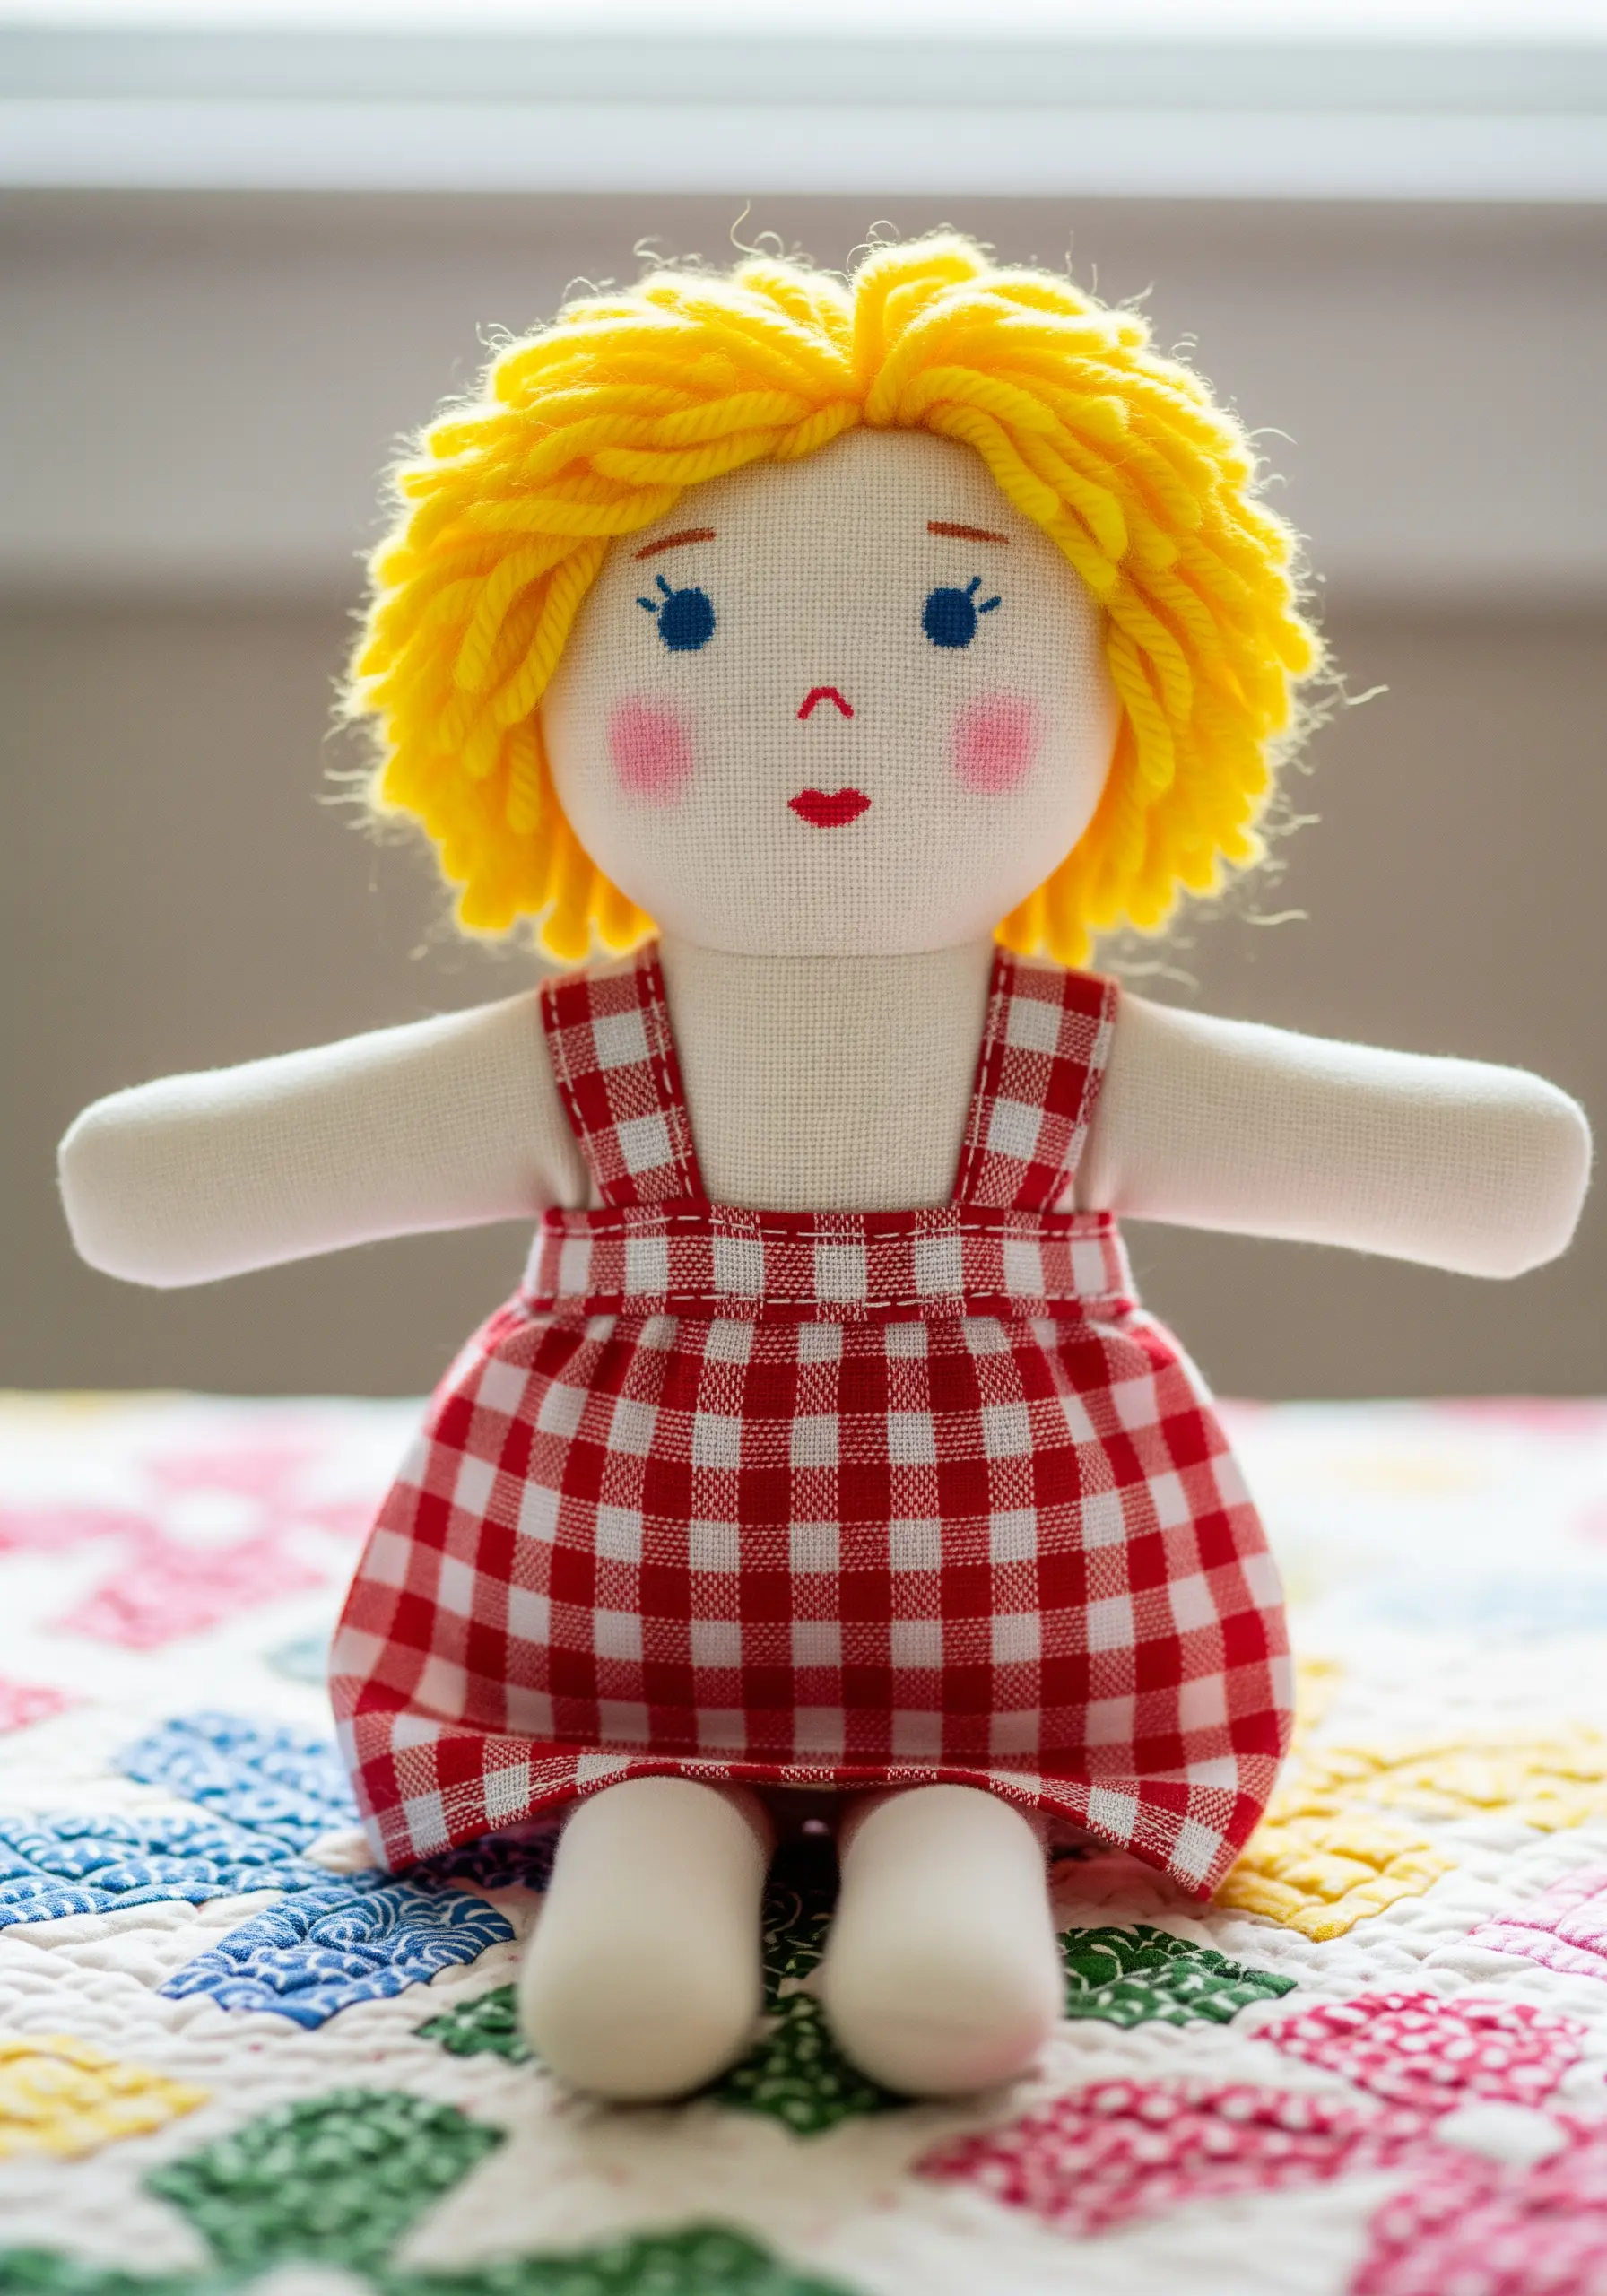
Crafting a rag doll is a beautiful way to create a cherished keepsake.
Use a simple doll pattern on plain cotton or linen fabric. After stuffing and closing the doll, the personality comes from the details.
For the hair, create a ‘wig’ by wrapping yarn around a book, tying it down the center, and then stitching this ‘part’ to the doll’s head.
Embroider the face with simple backstitches for the eyes and mouth to give it a sweet, timeless expression.
22. Print on Fabric with Leaves and Paint

Explore printmaking by using natural elements as stamps.
Gather interesting leaves and brush a thin, even layer of fabric paint onto the veiny side.
Carefully press the leaf onto a piece of cotton or linen fabric, applying gentle pressure all over to ensure a clear print.
Once dry, heat-set the paint with an iron (following the paint manufacturer’s instructions) to make the design permanent. It’s a wonderful way to connect crafting with nature.
23. Craft Superhero Cuffs from Faux Leather
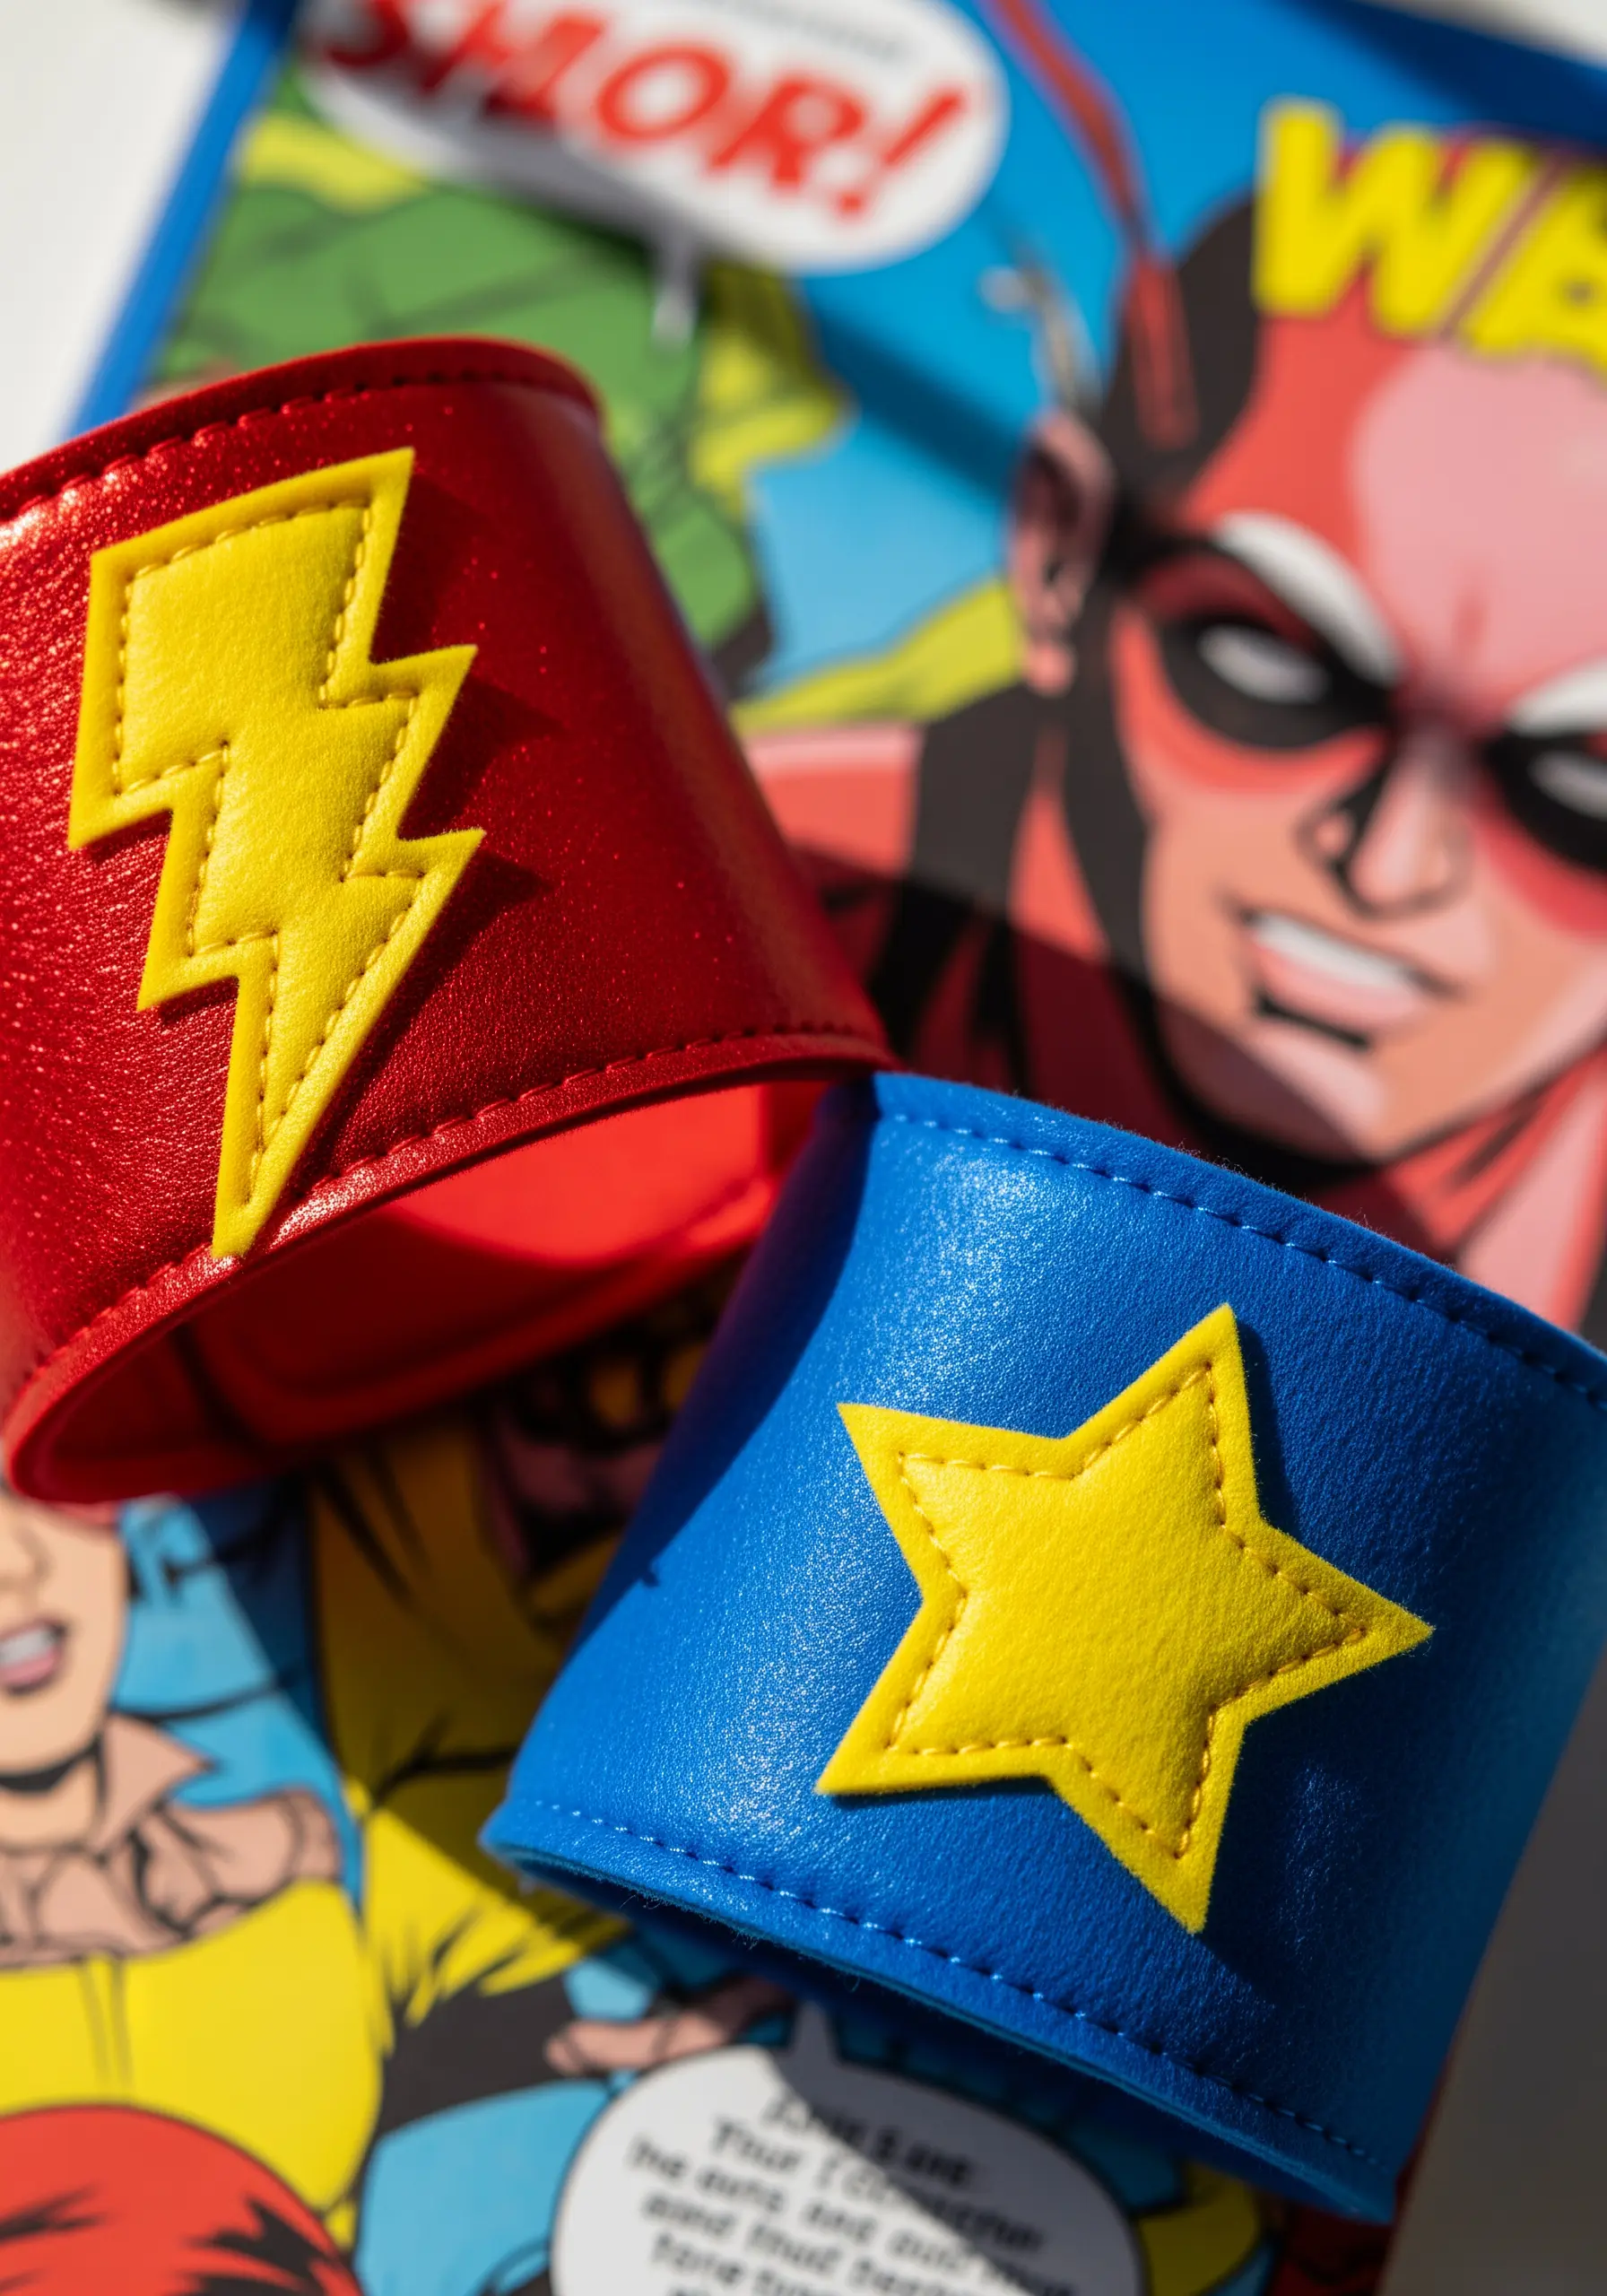
Faux leather or vinyl is a fantastic material for no-fray costume pieces.
Cut a basic cuff shape and add a Velcro or snap closure. Let your child design a simple, bold emblem like a star or lightning bolt from a contrasting color.
You can attach the emblem with strong fabric glue for a no-sew option, or stitch around the edge with a sewing machine for a more durable, professional finish.
This project empowers kids to bring their own heroes to life.
24. Try Needlepoint on Burlap for a Rustic Texture
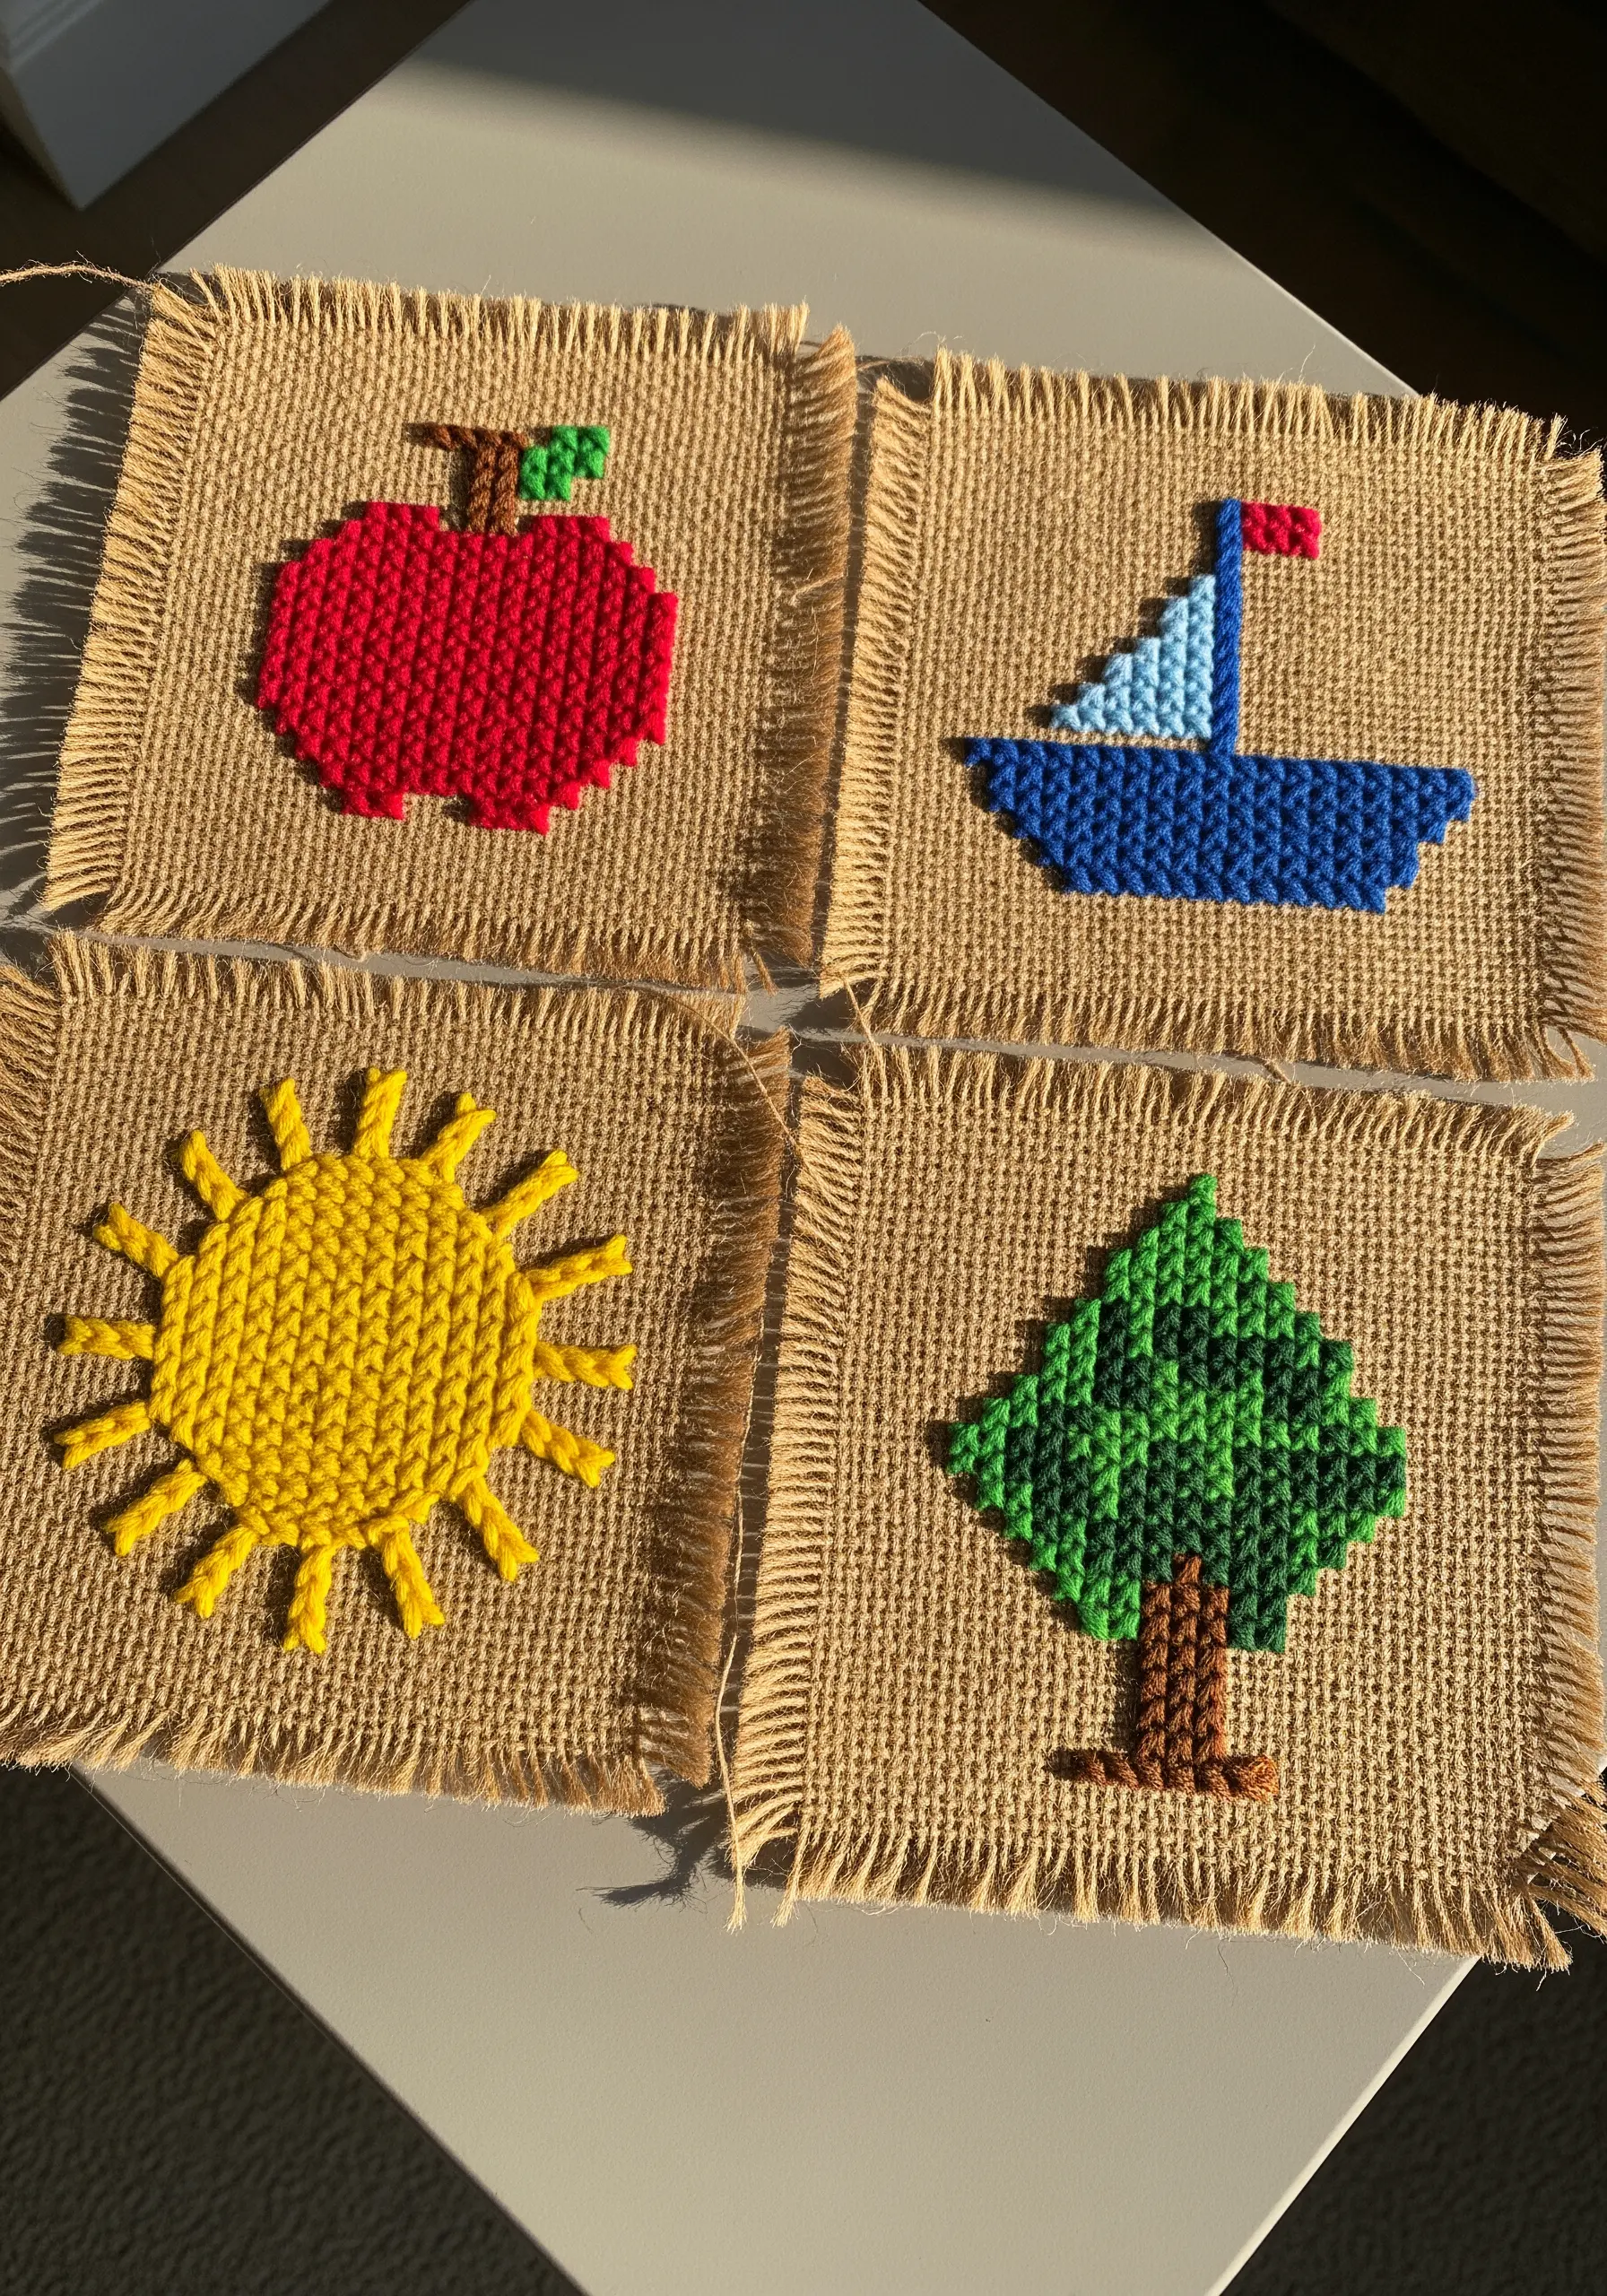
Introduce needlepoint basics using burlap as your canvas—its open weave is easy for beginners to see and stitch through.
Use thick, colorful yarn and a large, blunt tapestry needle to fill in simple, blocky shapes.
The tent stitch (a simple diagonal stitch) is perfect for covering the area quickly and creating a classic needlepoint texture.
The natural, rustic feel of the burlap provides a charming contrast to the bright yarn.


