

Perhaps you’ve found yourself staring at a finished piece, feeling like something is missing. You’ve mastered the stitches, chosen your colors, but it still lacks that spark—that quiet, confident polish you see in the work you admire.
The secret isn’t always in learning more complex techniques. Often, it’s about making a single, intentional choice that elevates everything else. It’s about understanding how one thread can change the light, how one stitch can create a texture that begs to be touched, and how negative space can speak as loudly as a dense fill.
This is where a touch of gold comes in. Not as overwhelming glamour, but as a deliberate accent. A whisper of metallic thread can turn a simple line into a highlight, a geometric shape into a piece of art, and a neutral palette into something truly special. Let’s explore how to use that single element to transform your work from simply ‘done’ to thoughtfully designed.
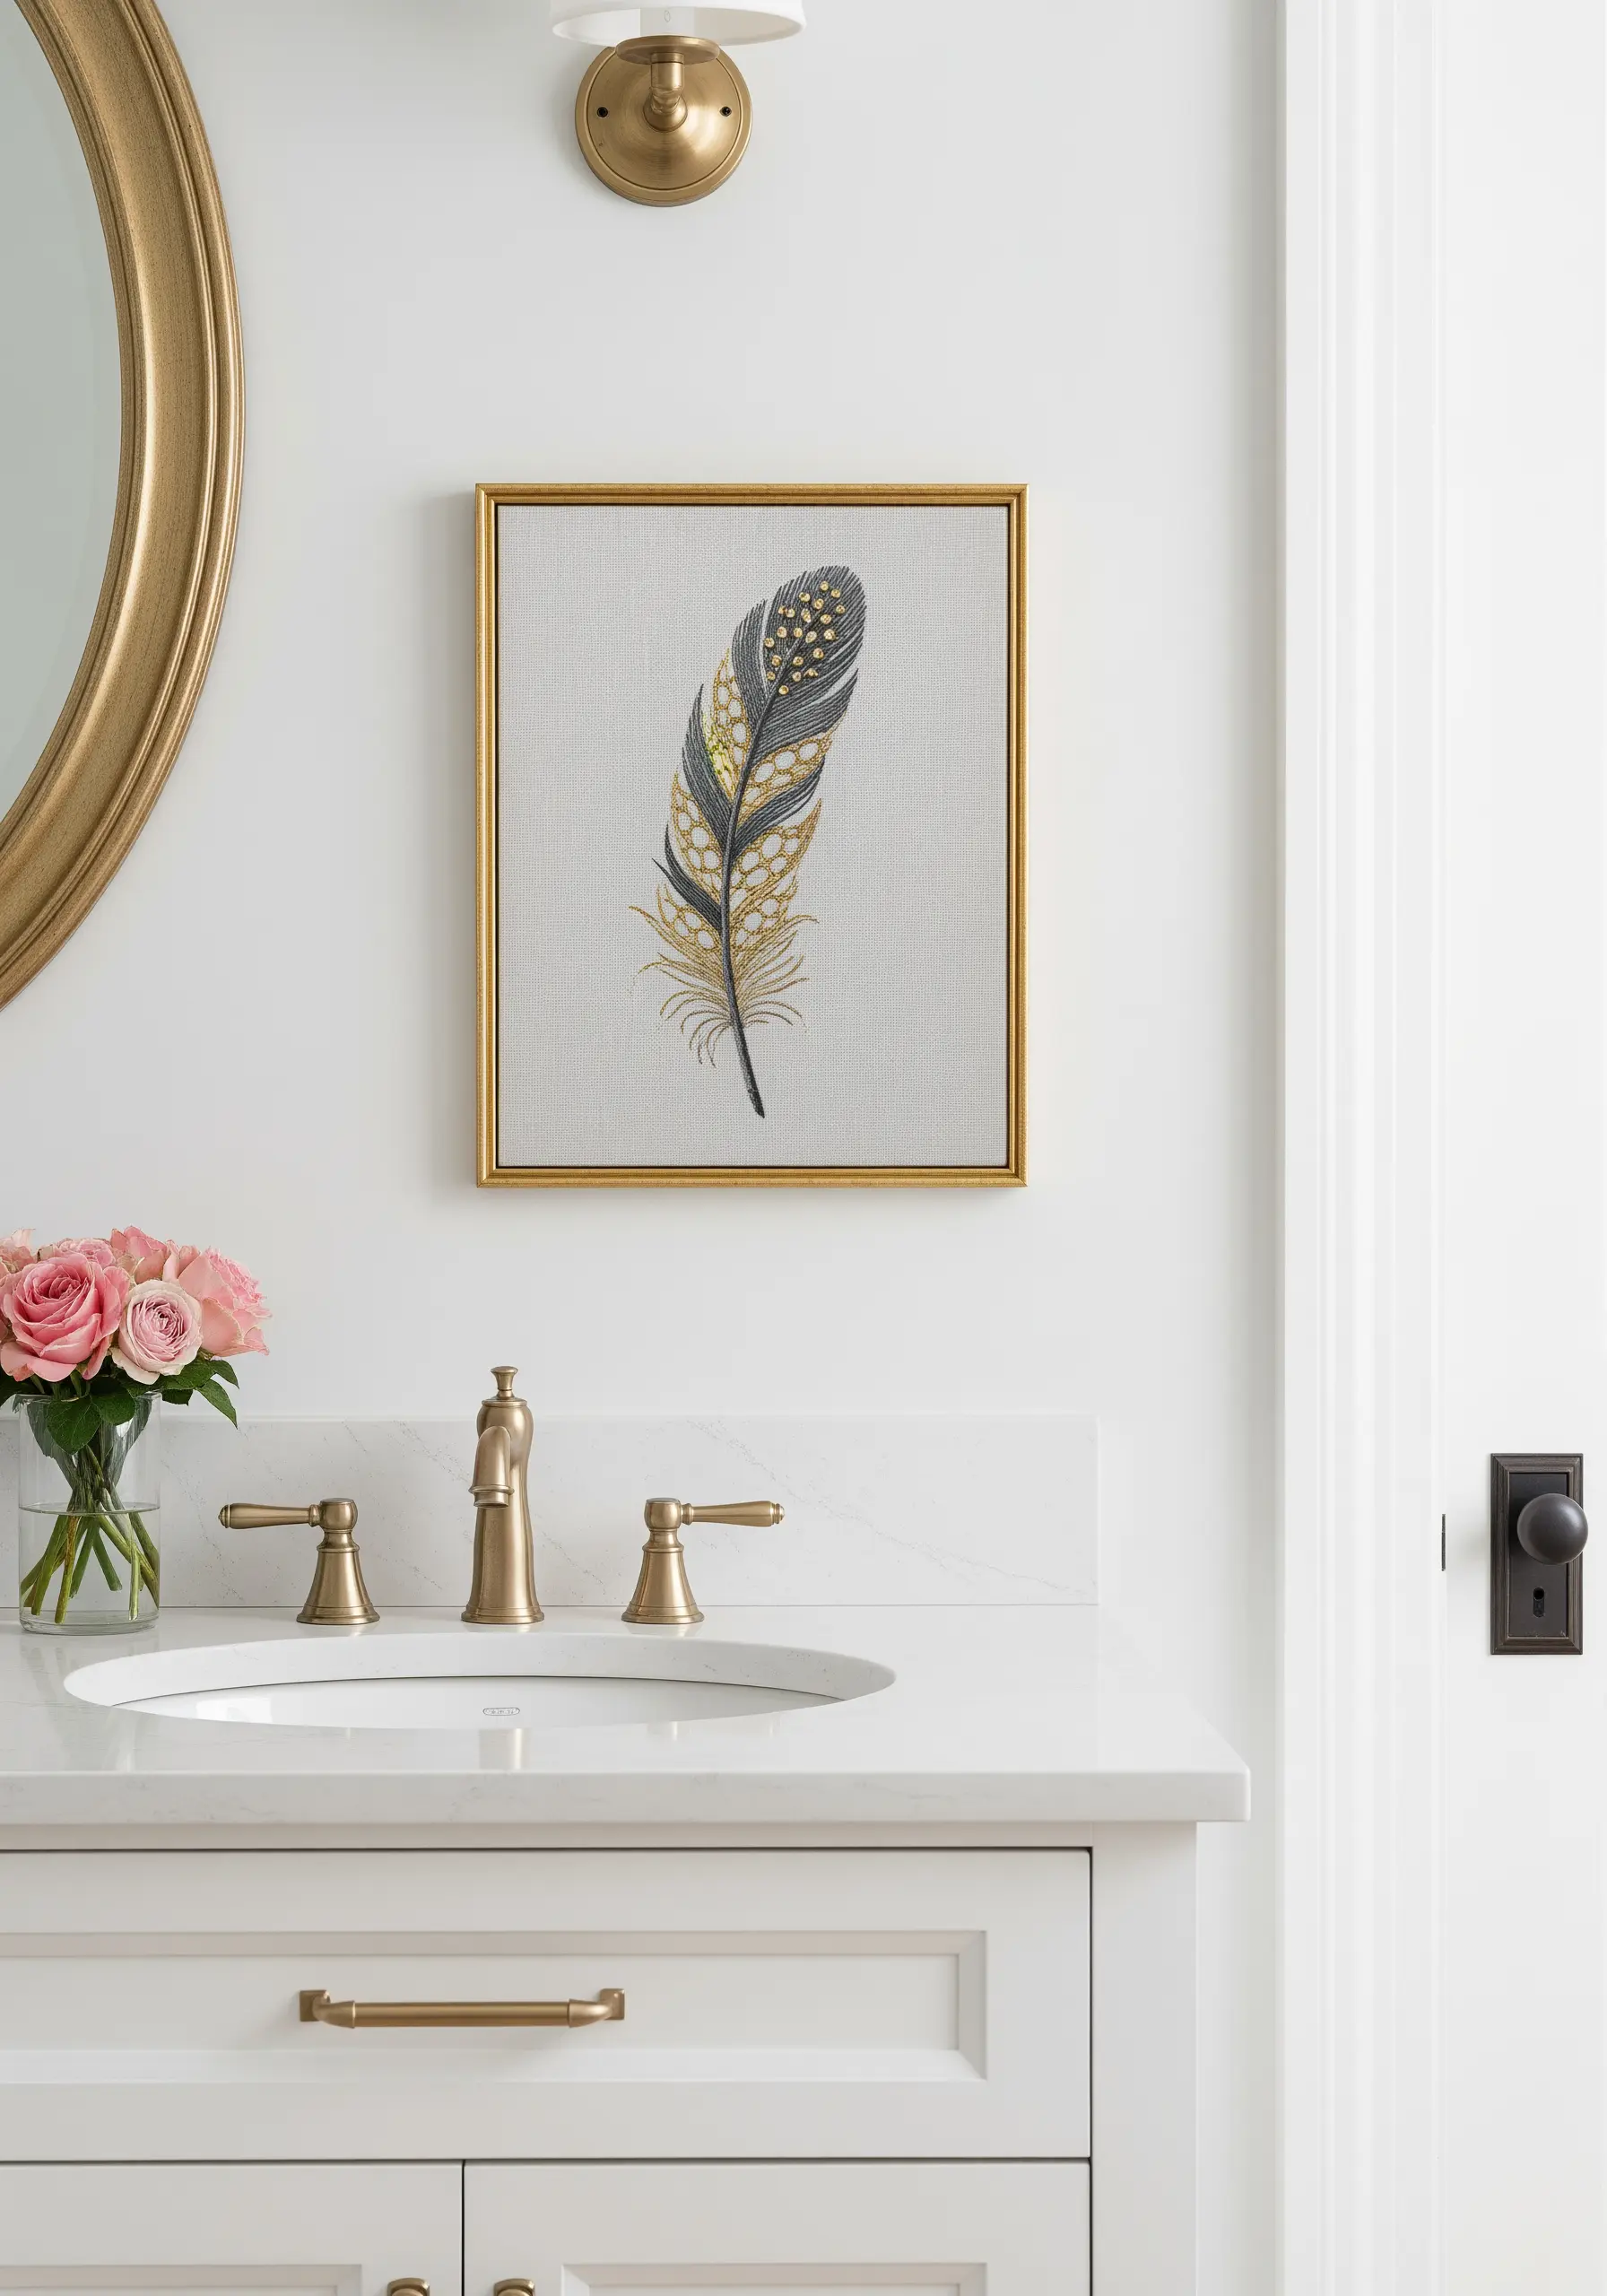
1. Stitch a Golden Fracture Inspired by Kintsugi
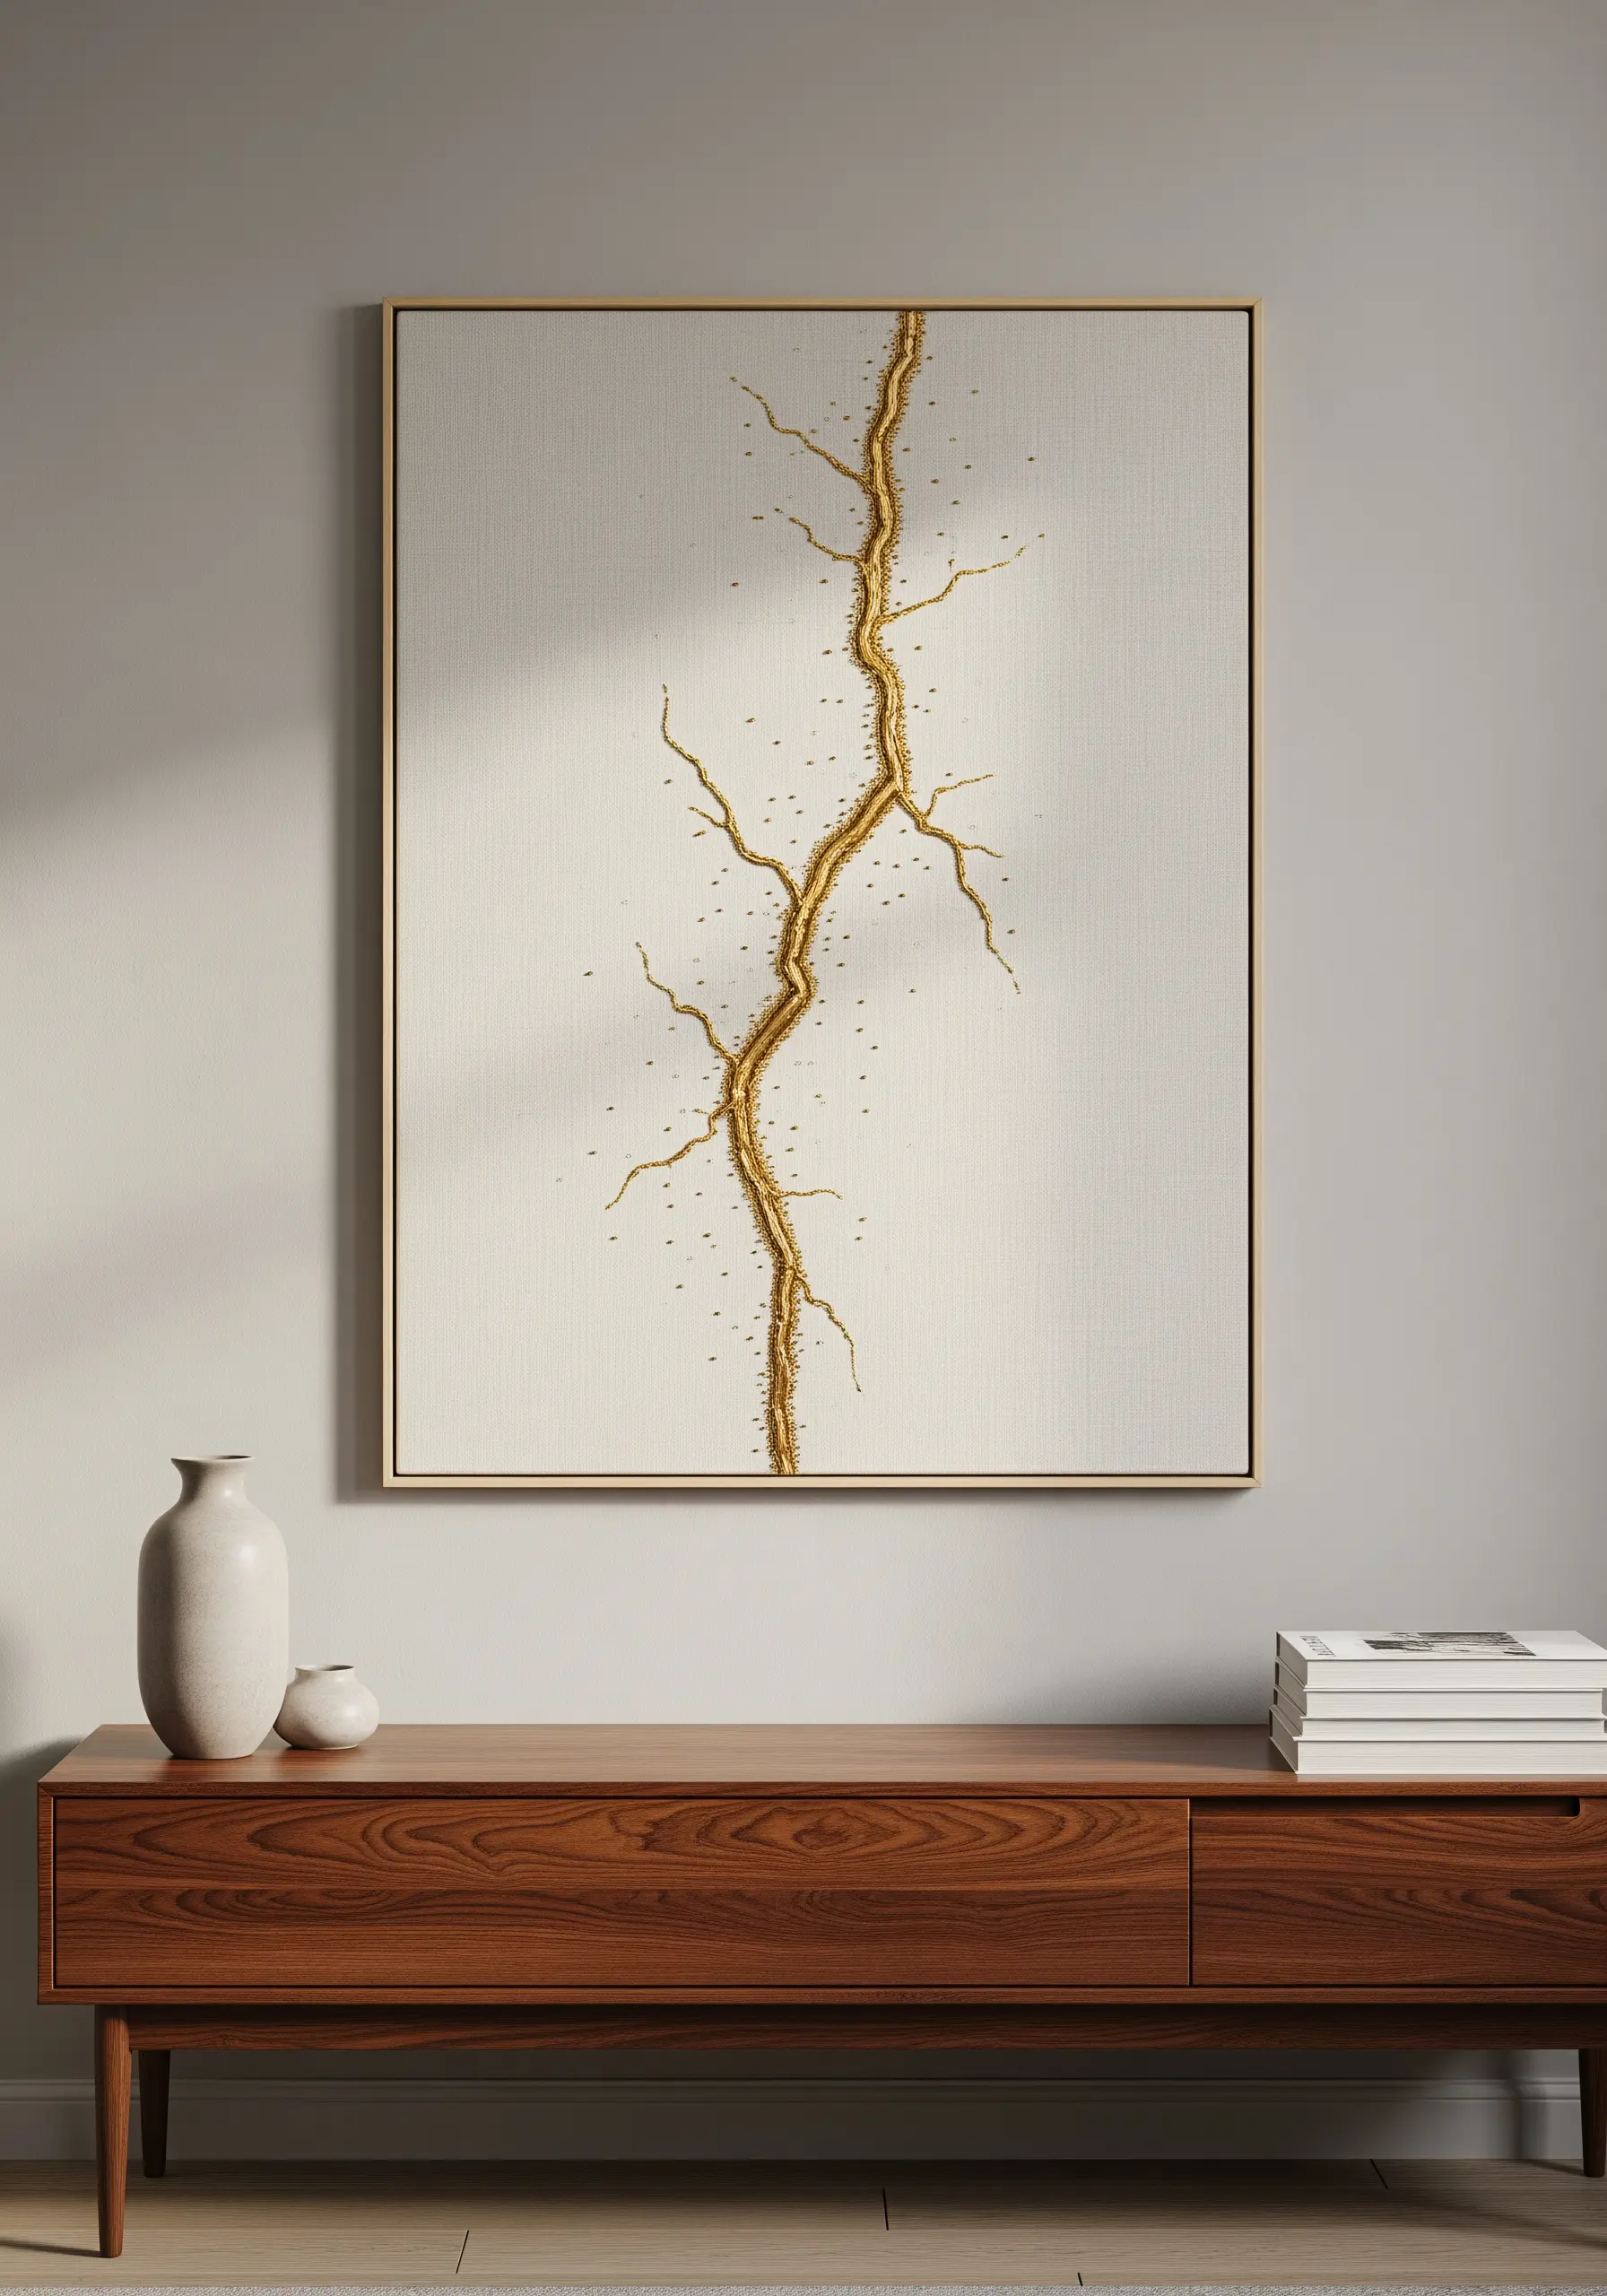
Embrace the Japanese art of mending broken pottery by creating a ‘repaired’ crack on neutral linen.
Use a couching stitch for the main gold lines—this involves laying down a thick metallic cord and tacking it into place with a finer, matching thread.
This technique allows you to create bold, sculptural lines that would be impossible with a standard stitch.
For the smaller, scattered fragments, use single French knots or seed stitches to add texture and a sense of delicate dispersal.
The contrast between the thick, controlled line and the tiny, organic dots makes the design feel both intentional and natural.
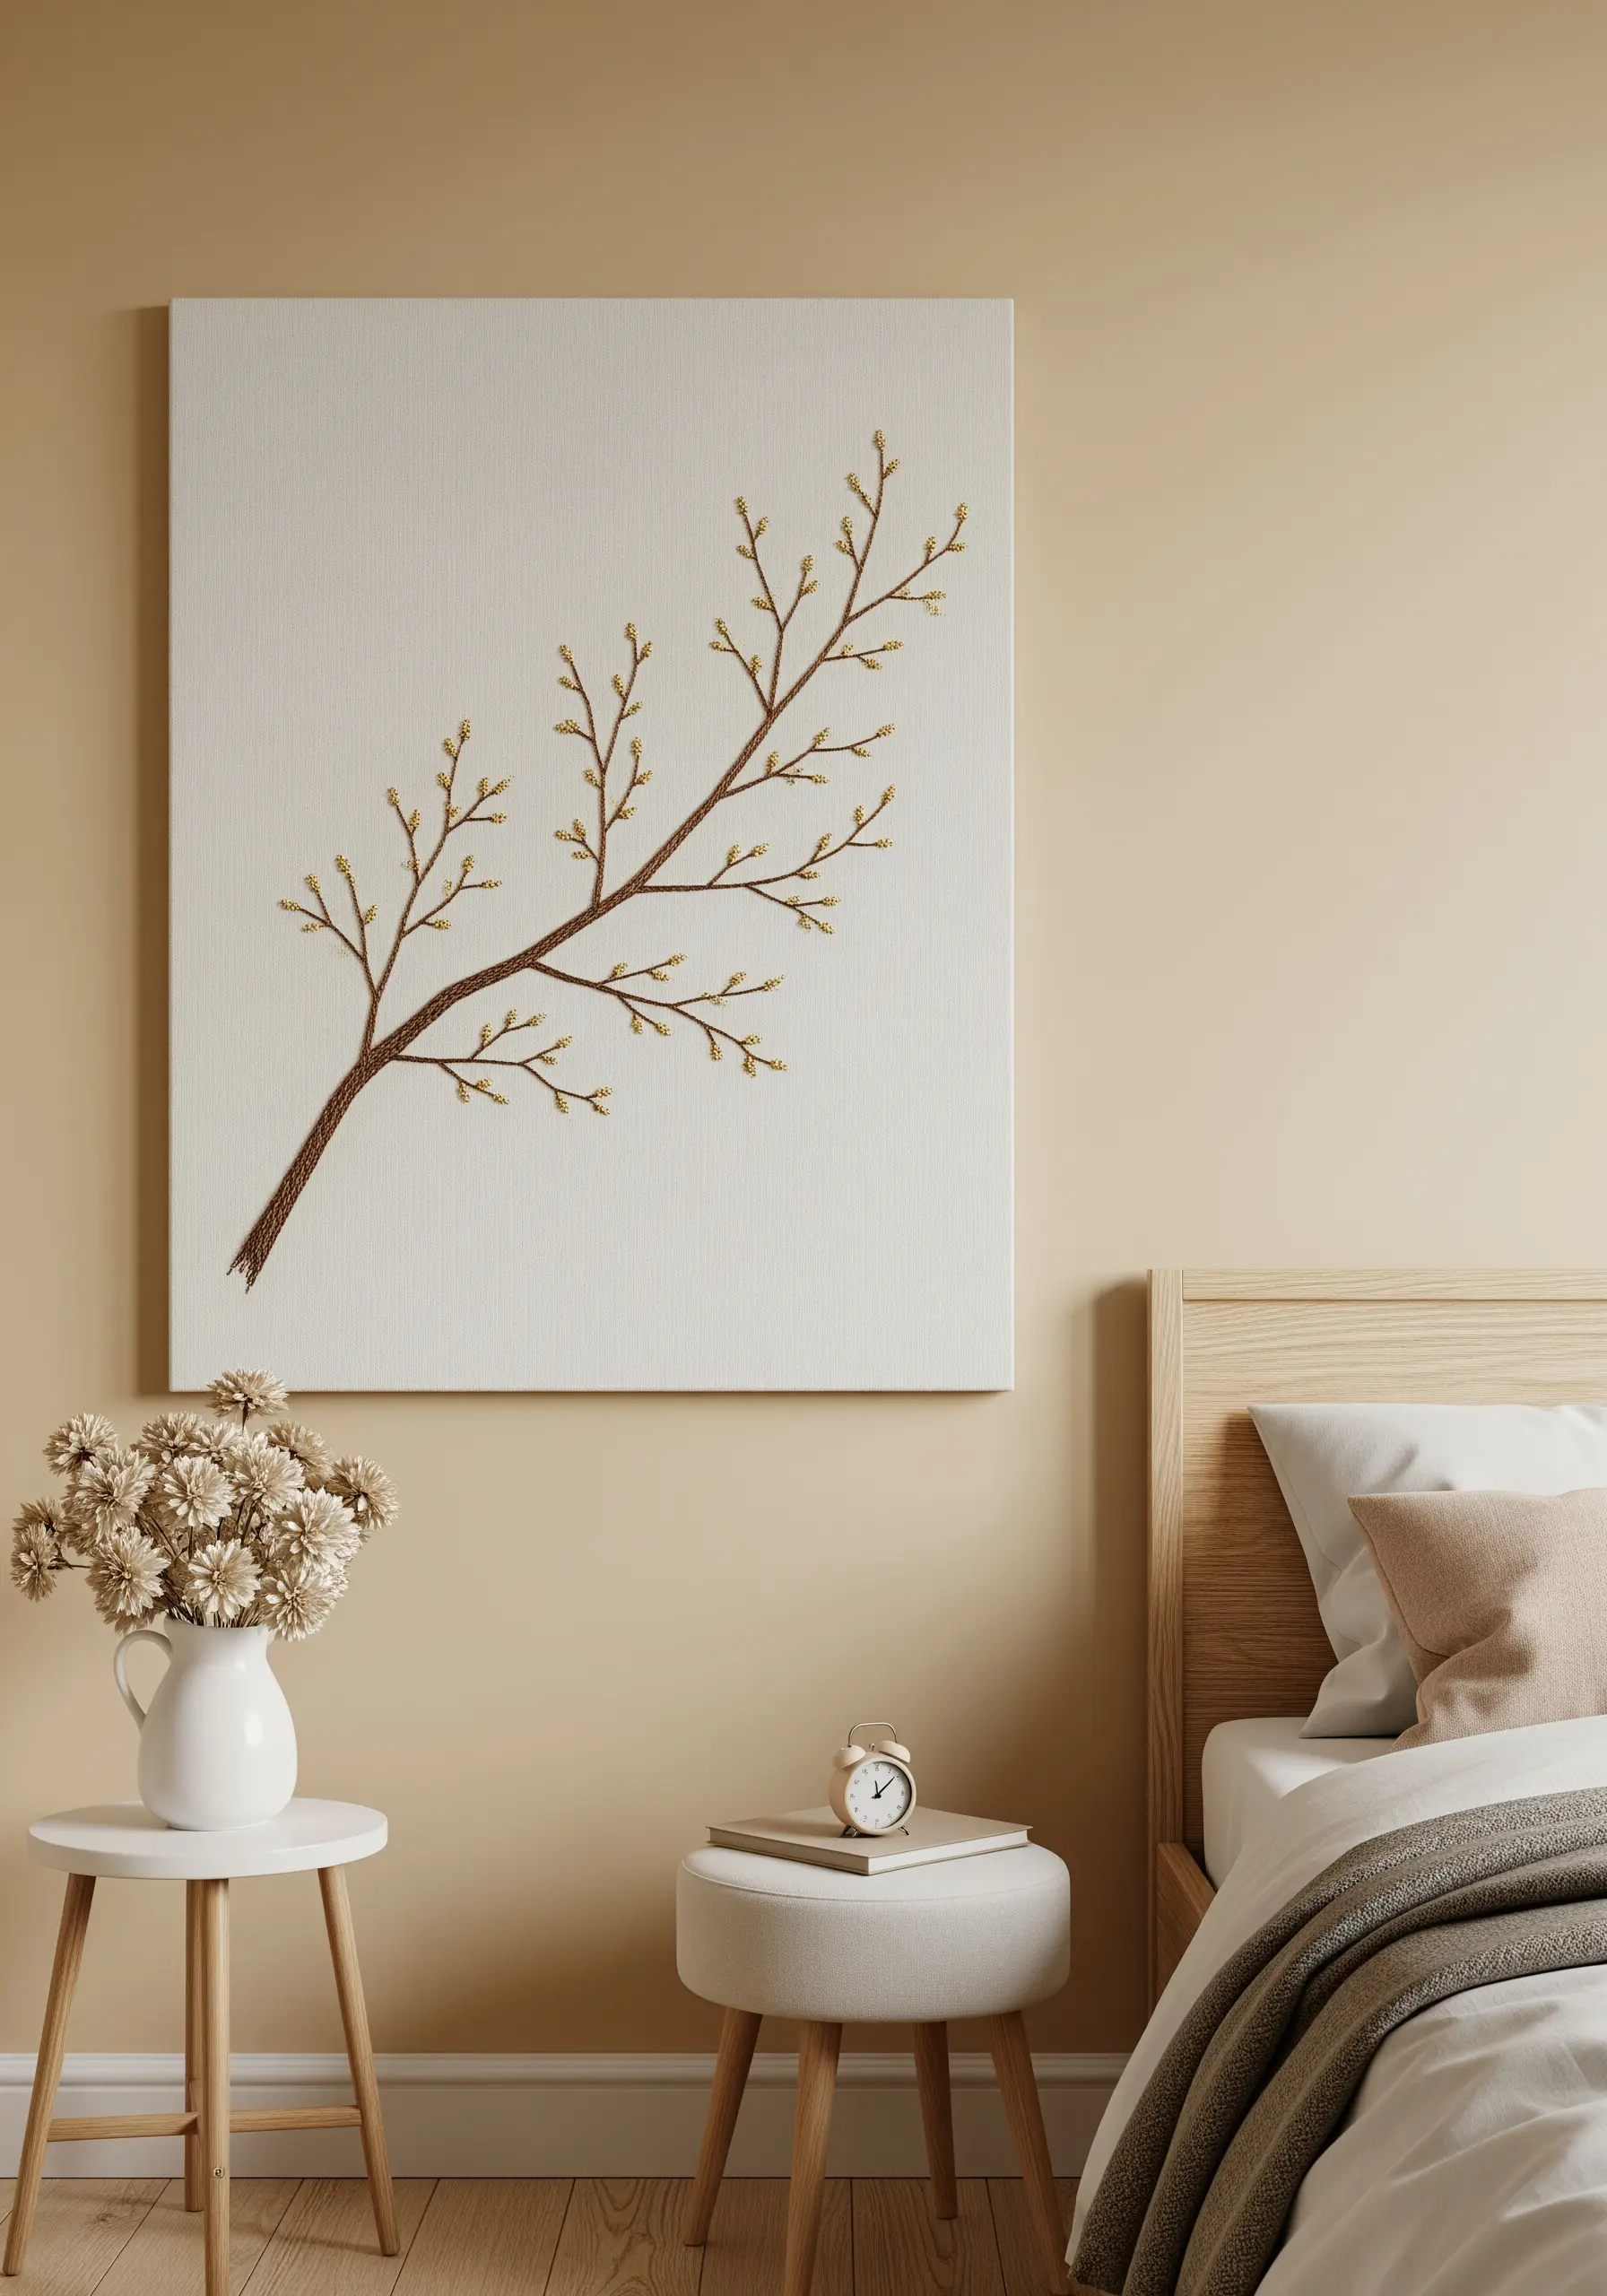
2. Illuminate a Bedroom with Satin-Stitched Moon Phases
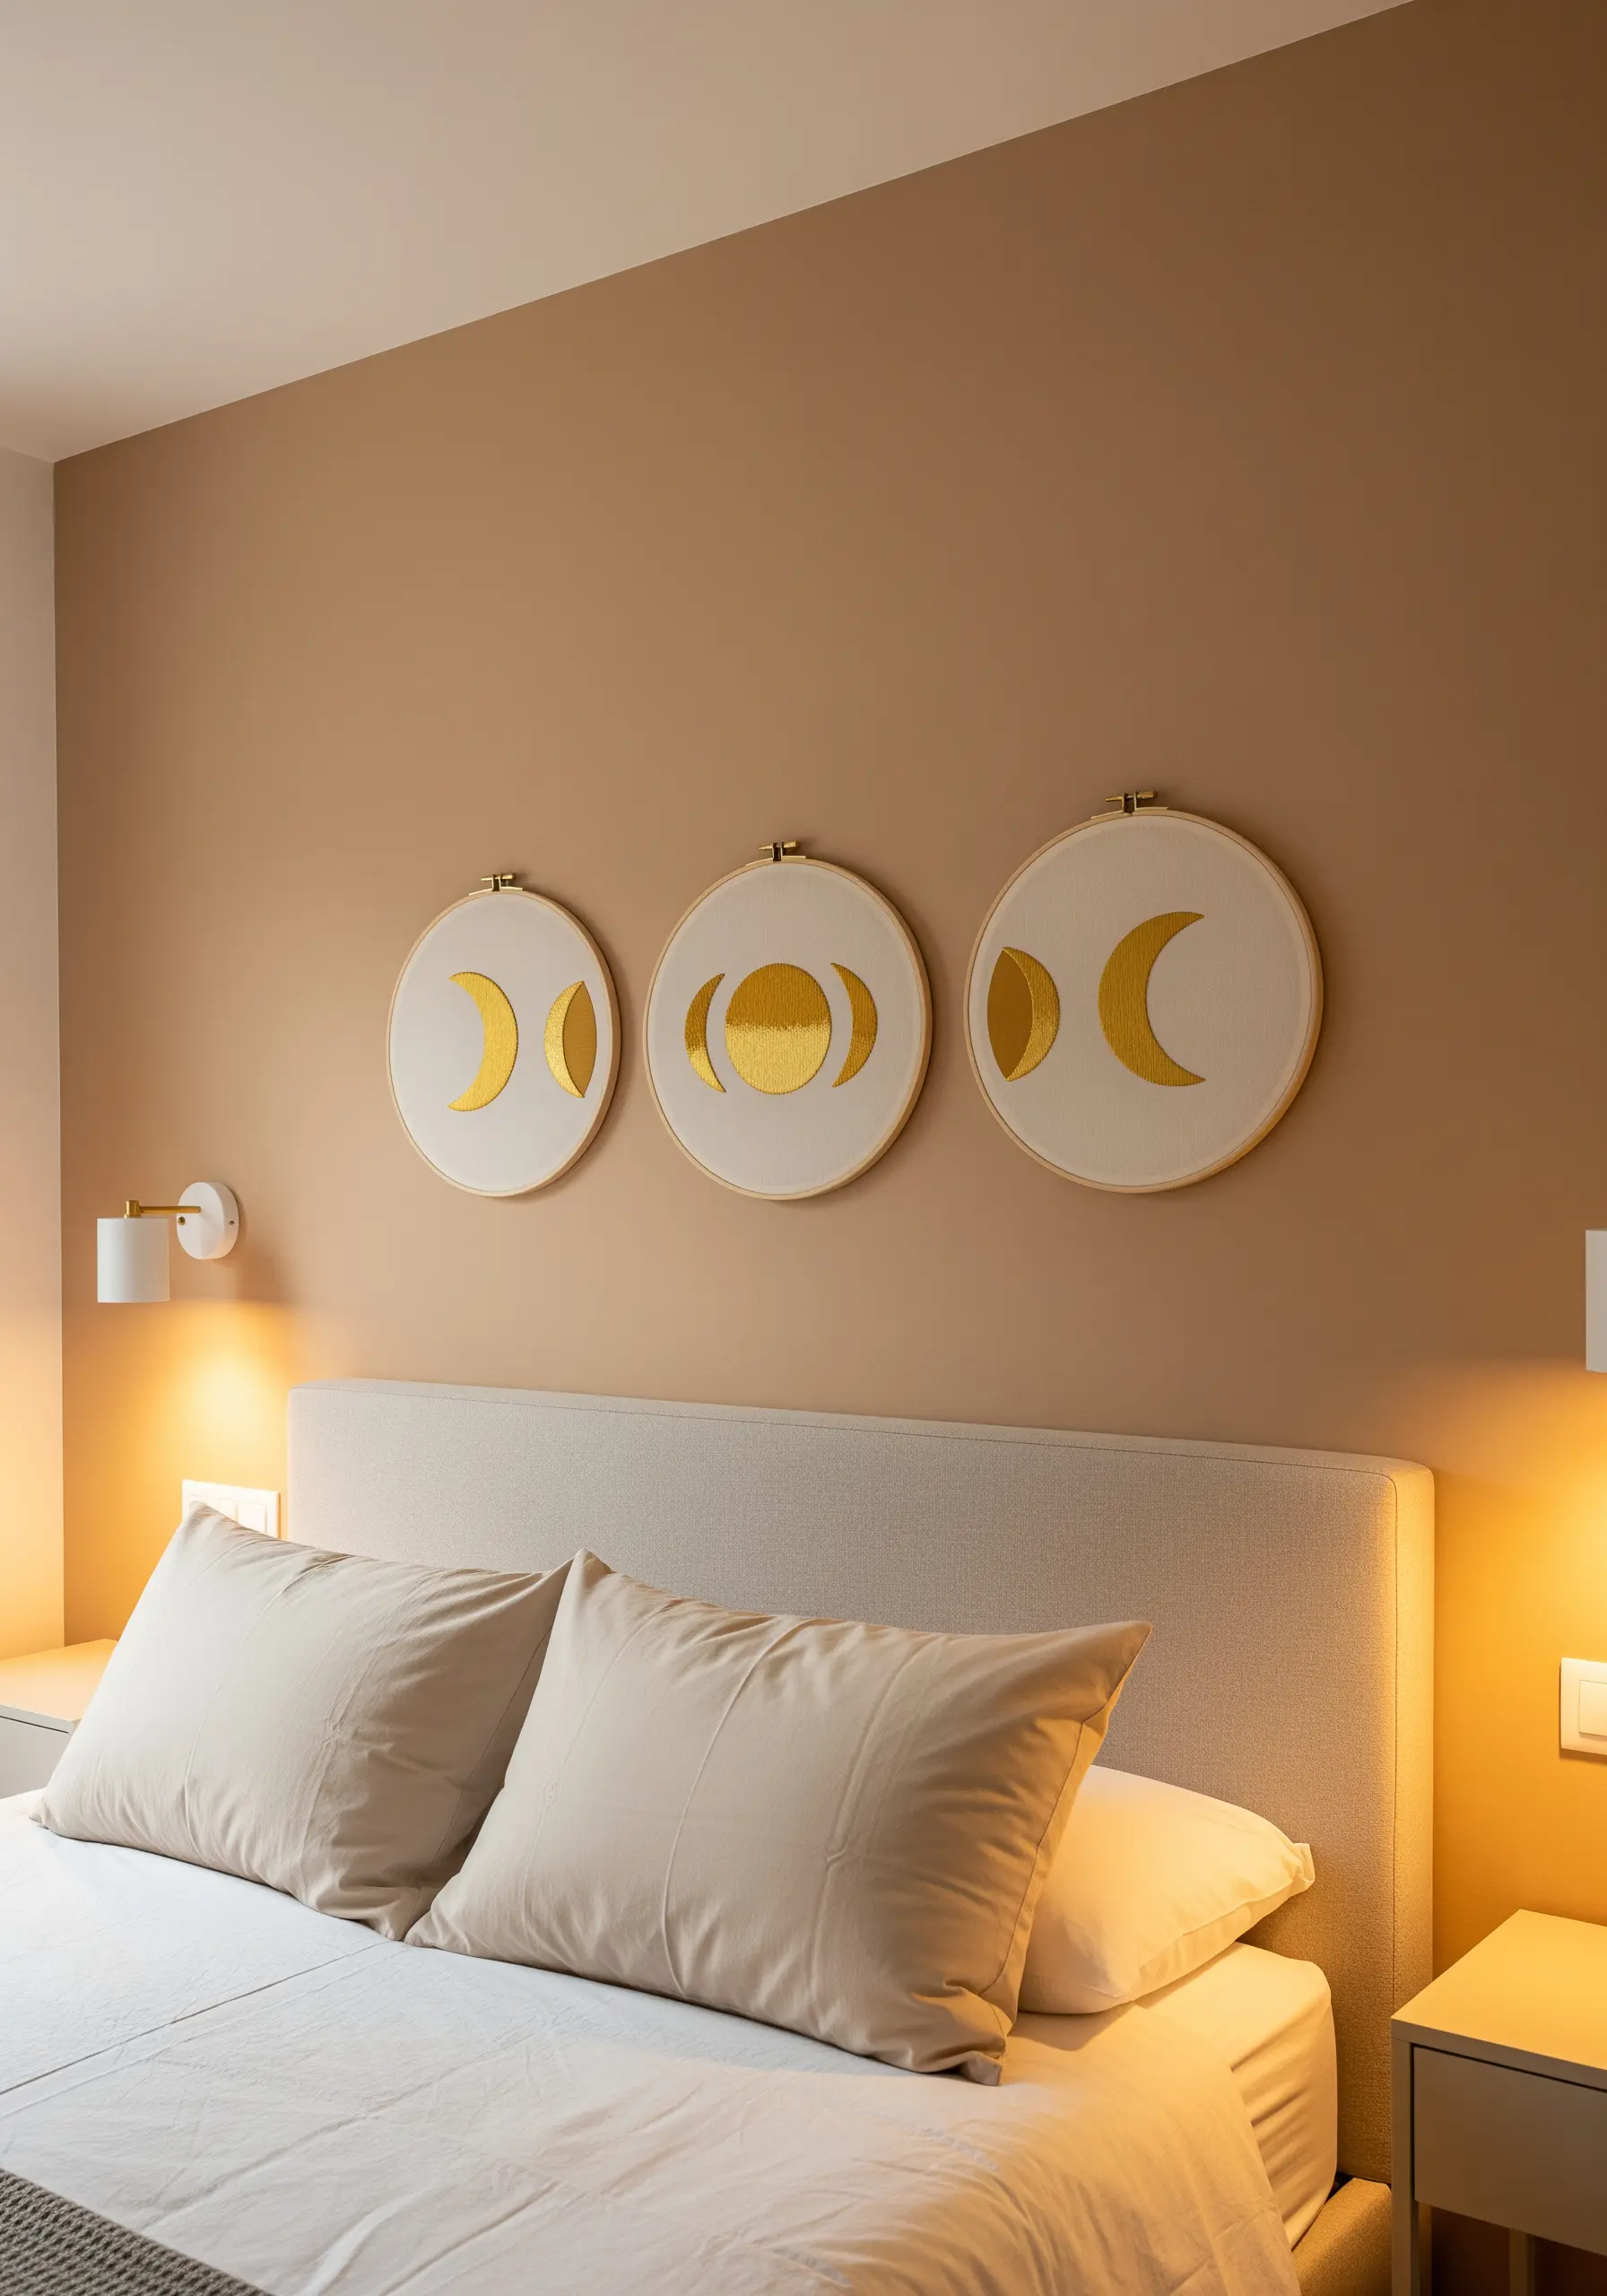
Create a serene focal point above a bed with a triptych of moon phases.
The key to a luminous, reflective surface is perfecting your satin stitch—ensure your stitches lay flat, close together, and all in the same direction.
For an even more luxurious sheen, use a high-quality metallic floss or blend a single strand of metallic blending filament with your regular cotton floss.
This adds a subtle, expensive-looking shimmer without the difficulty of working with pure metallic thread.
These bedroom wall embroidery ideas create a calm, celestial atmosphere perfect for a restful space.
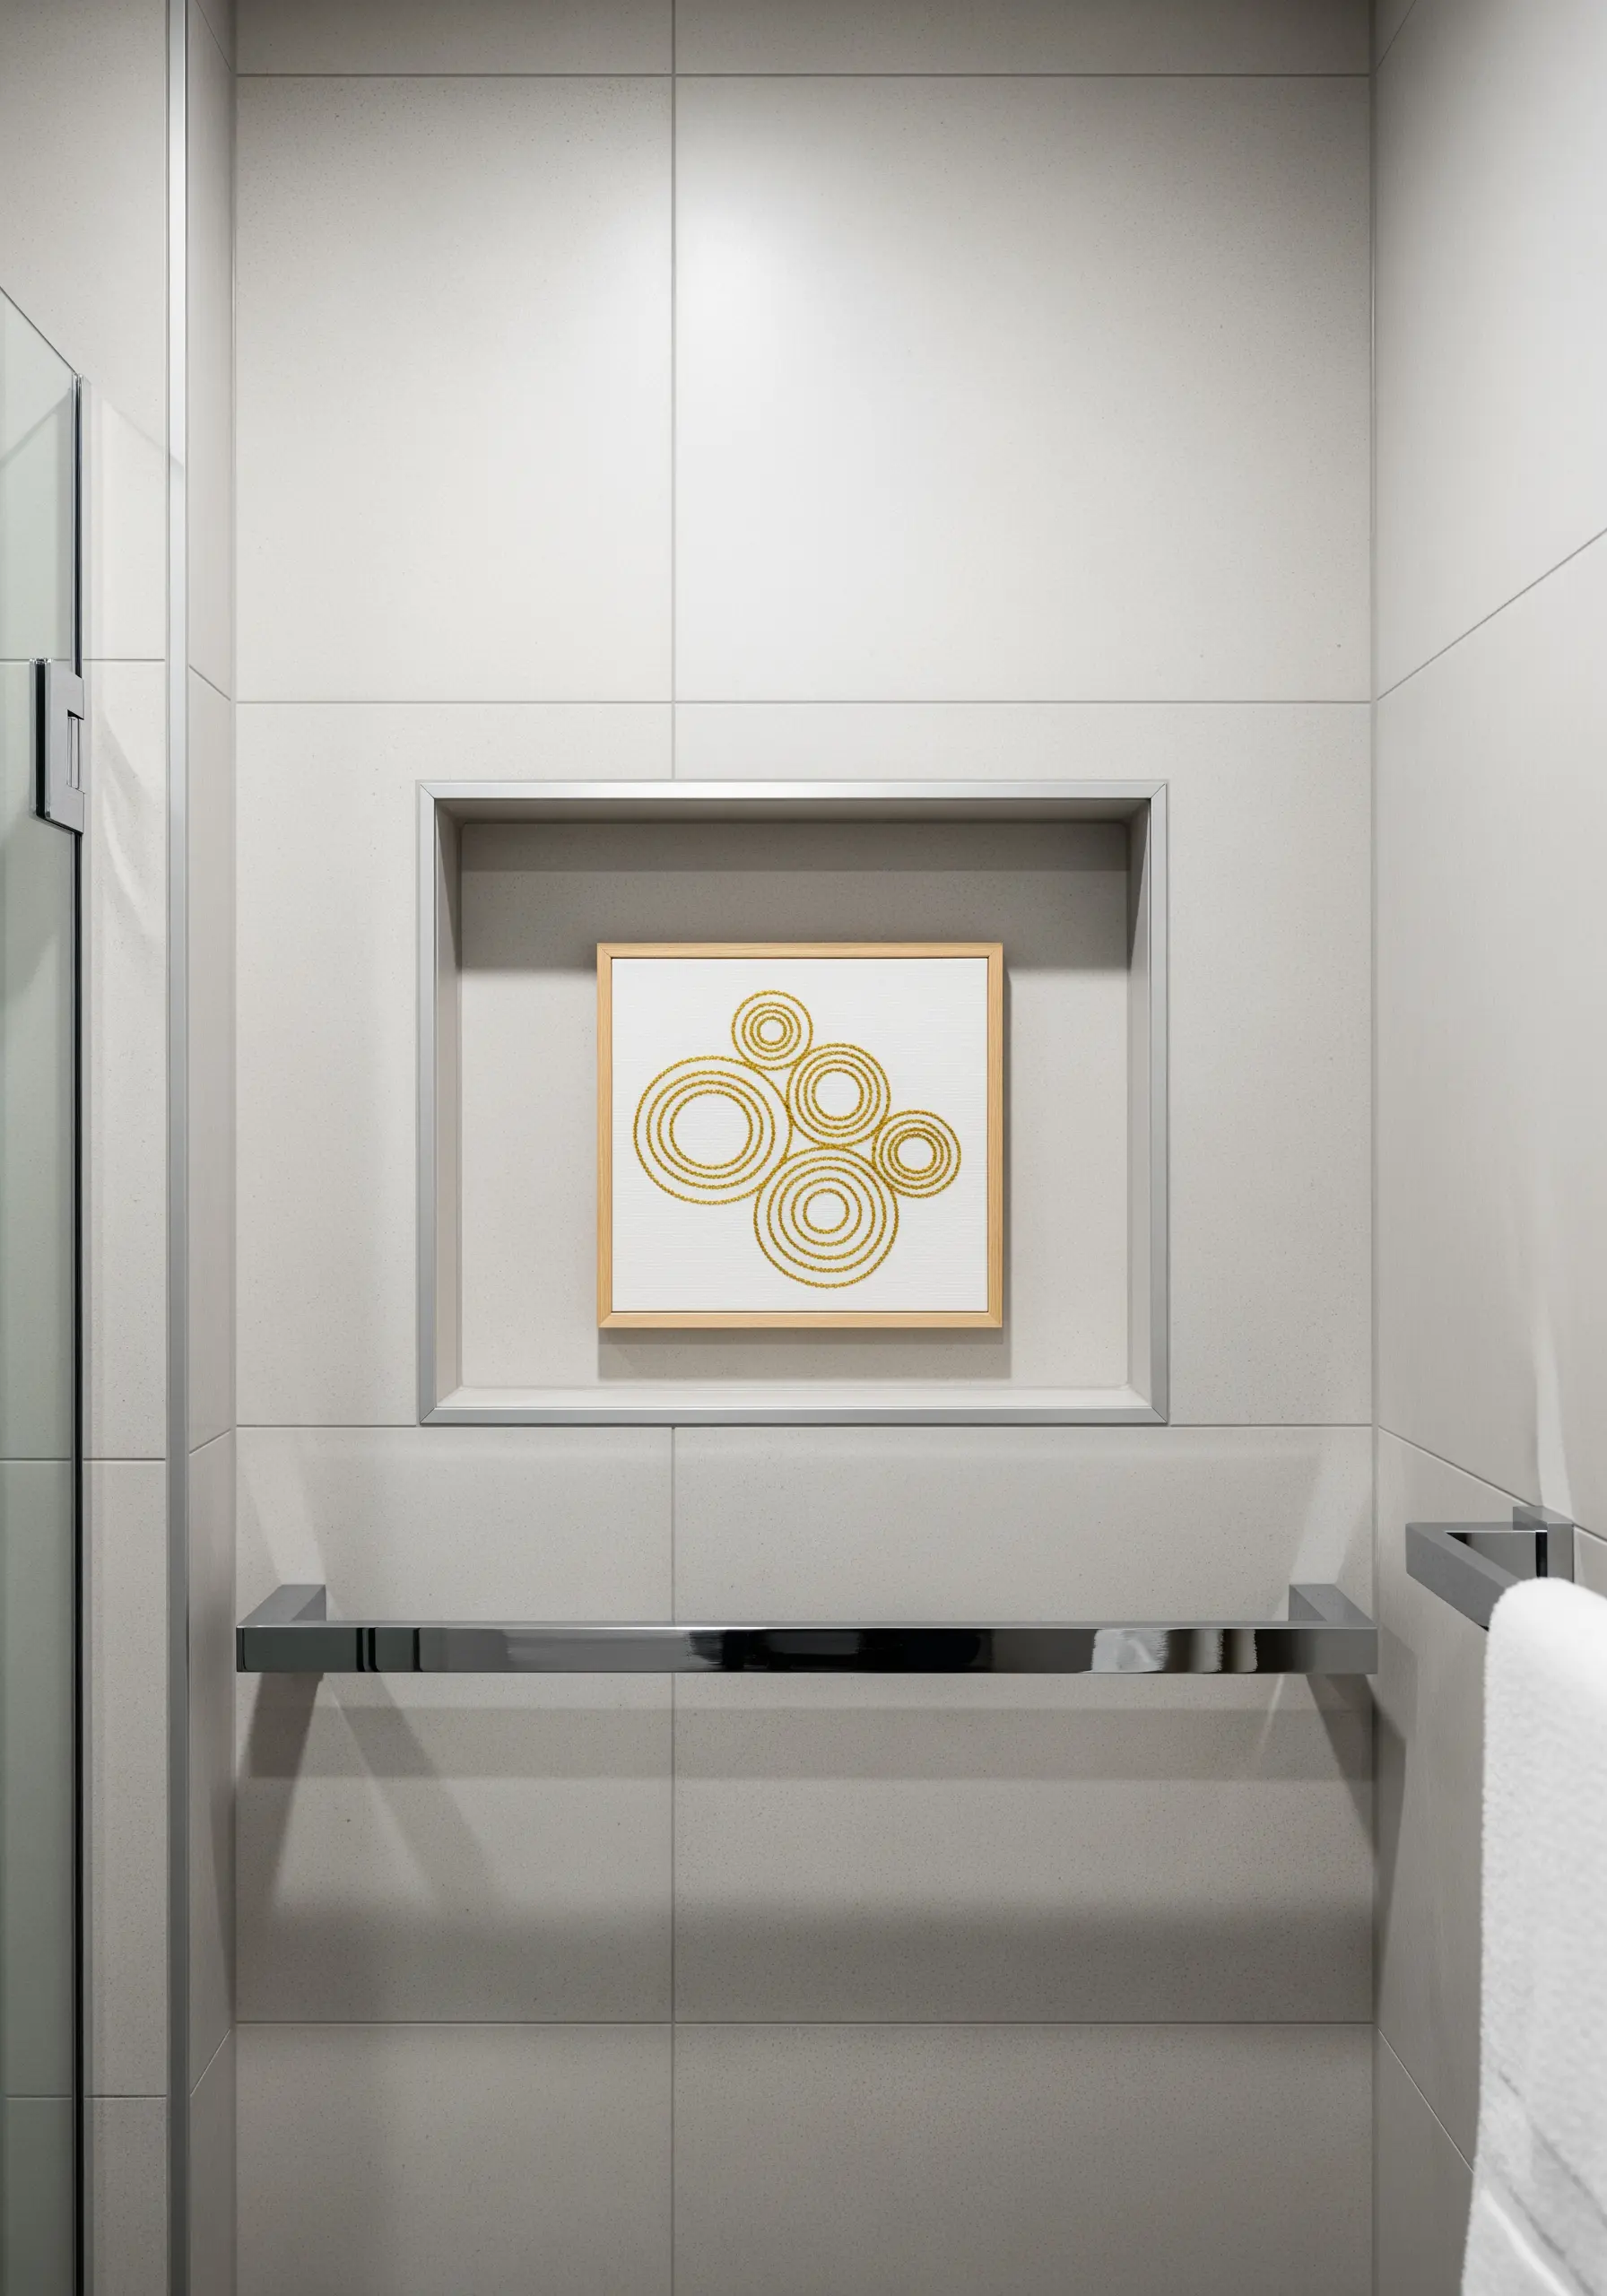
3. Master Precision with Concentric Gold Arches
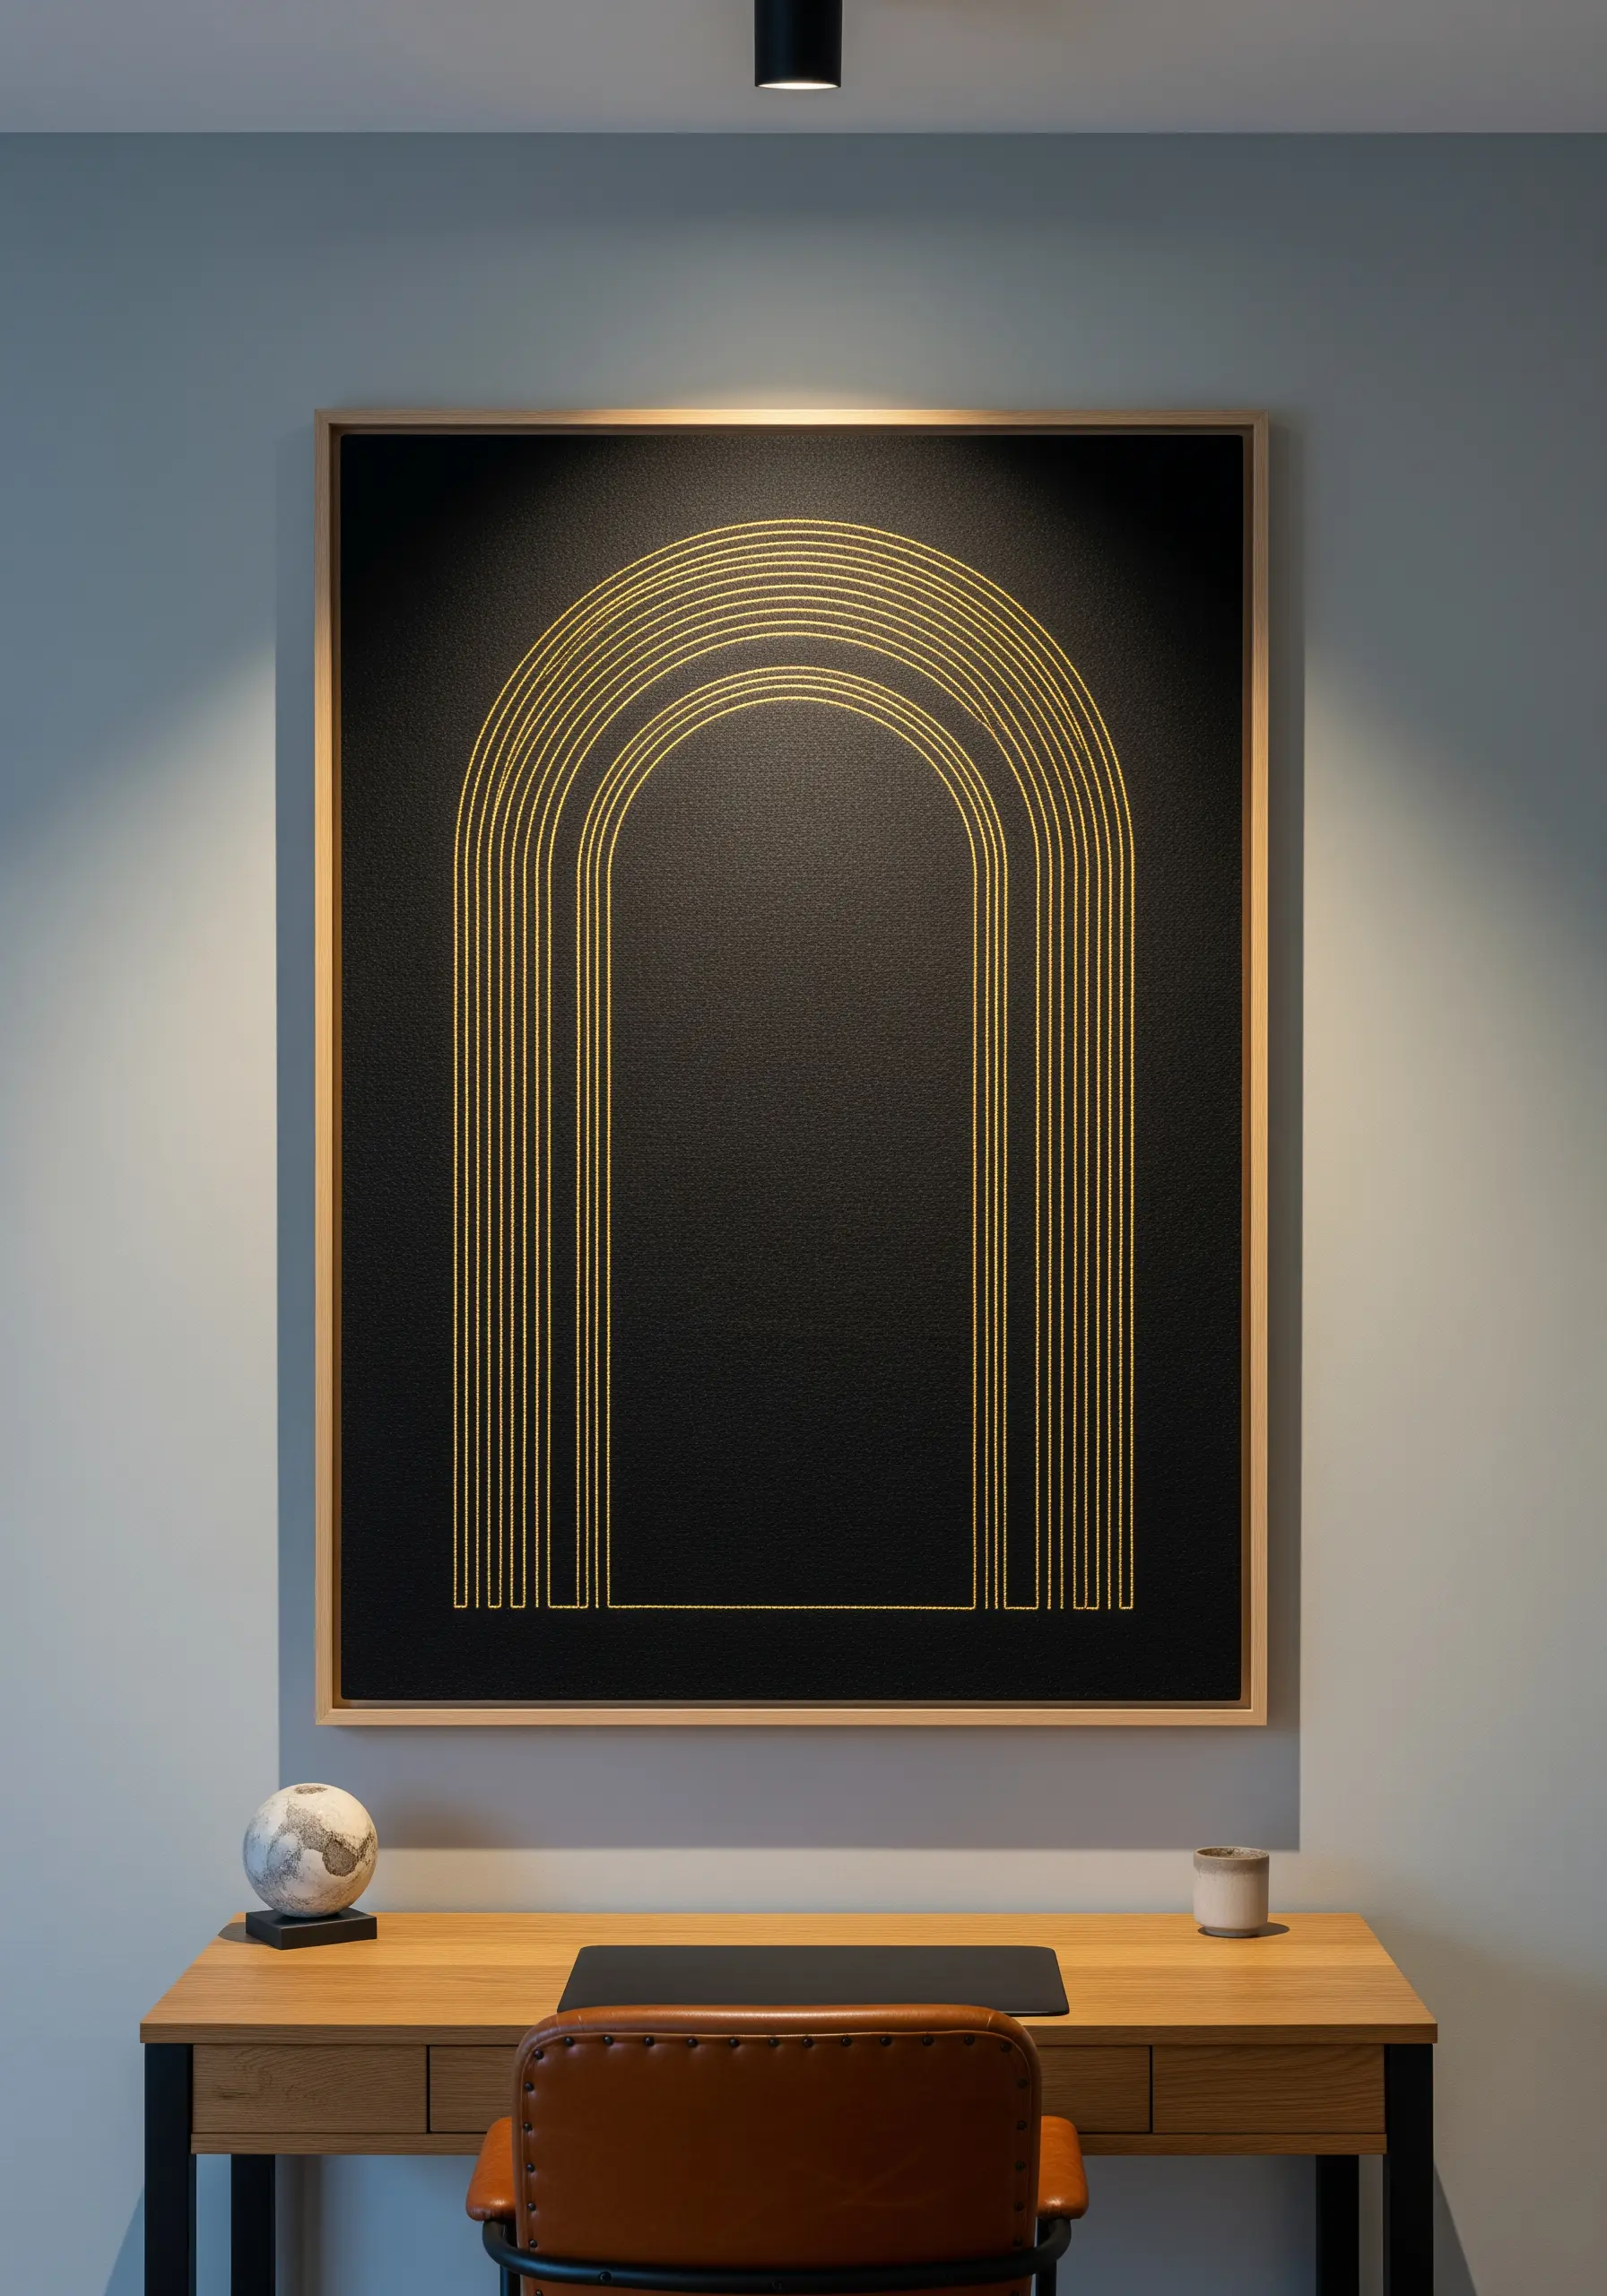
Achieve a bold, graphic statement by stitching precise geometric lines on high-contrast black fabric.
Use a simple backstitch or stem stitch with a bright gold metallic thread for clean, sharp definition.
To ensure perfect symmetry, draw your design onto the fabric first with a white gel pen or a chalk pencil, using a compass for flawless curves.
The negative space inside the arch is just as important as the stitched lines, creating a powerful sense of depth and focus.
This technique turns simple stitches into sophisticated, gallery-worthy luxury metallic thread wall decor.
4. Curate a Botanical Gallery with Mixed-Fill Techniques
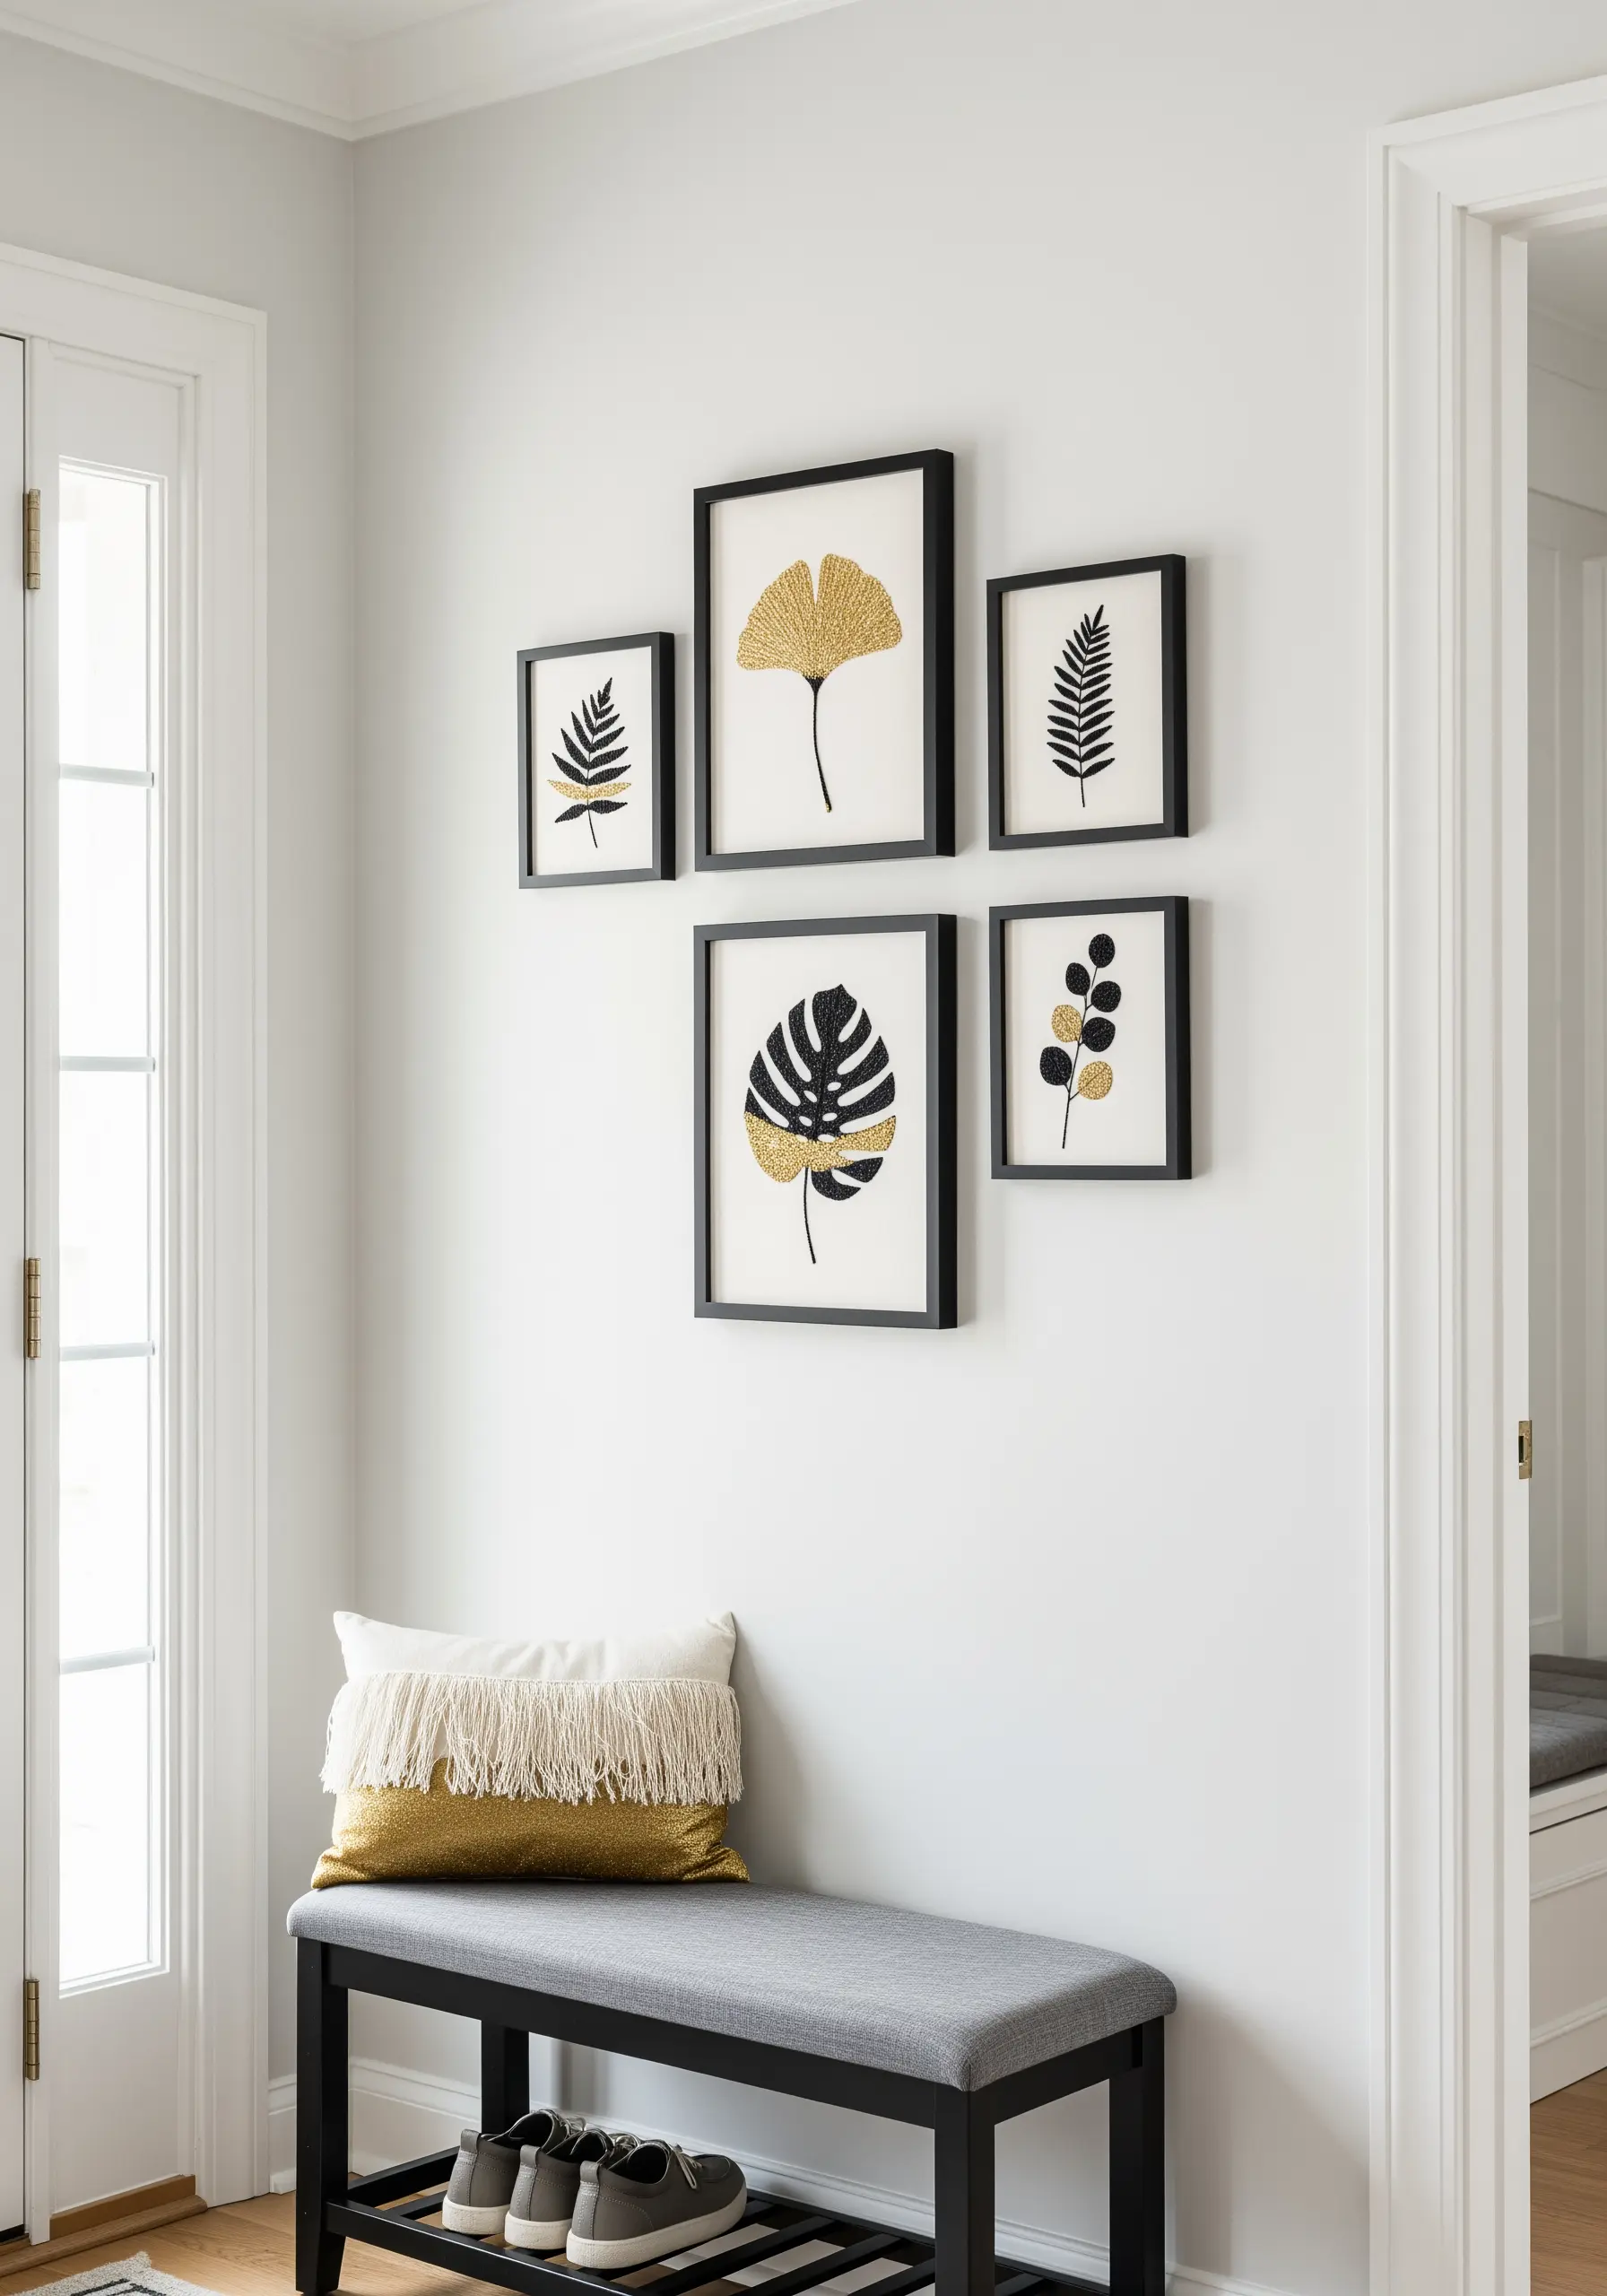
Elevate simple leaf motifs by combining filled and outlined elements within a single gallery wall.
For the gold sections, use a directional satin stitch, angling your stitches to mimic the natural flow of the leaf’s surface for maximum light reflection.
Contrast this with delicate black outlines using a single strand of floss and a neat backstitch.
This positive-and-negative space approach gives each piece a modern, graphic quality, turning a collection of minimalist embroidery patterns into a cohesive art installation.
5. Find Calm in Perfectly Spaced Parallel Lines

Create a serene, minimalist composition using the simple running stitch.
The success of this design lies in its precision: use a disappearing ink fabric pen and a clear quilting ruler to mark perfectly straight, evenly spaced guidelines.
Vary the thread colors subtly—alternating between ecru, white, and a soft gold—to add depth without overwhelming the quiet design.
Maintaining consistent stitch length and tension is crucial for achieving that clean, woven look that complements neutral colors in embroidery beautifully.
6. Chart the Stars with French Knots and Thread
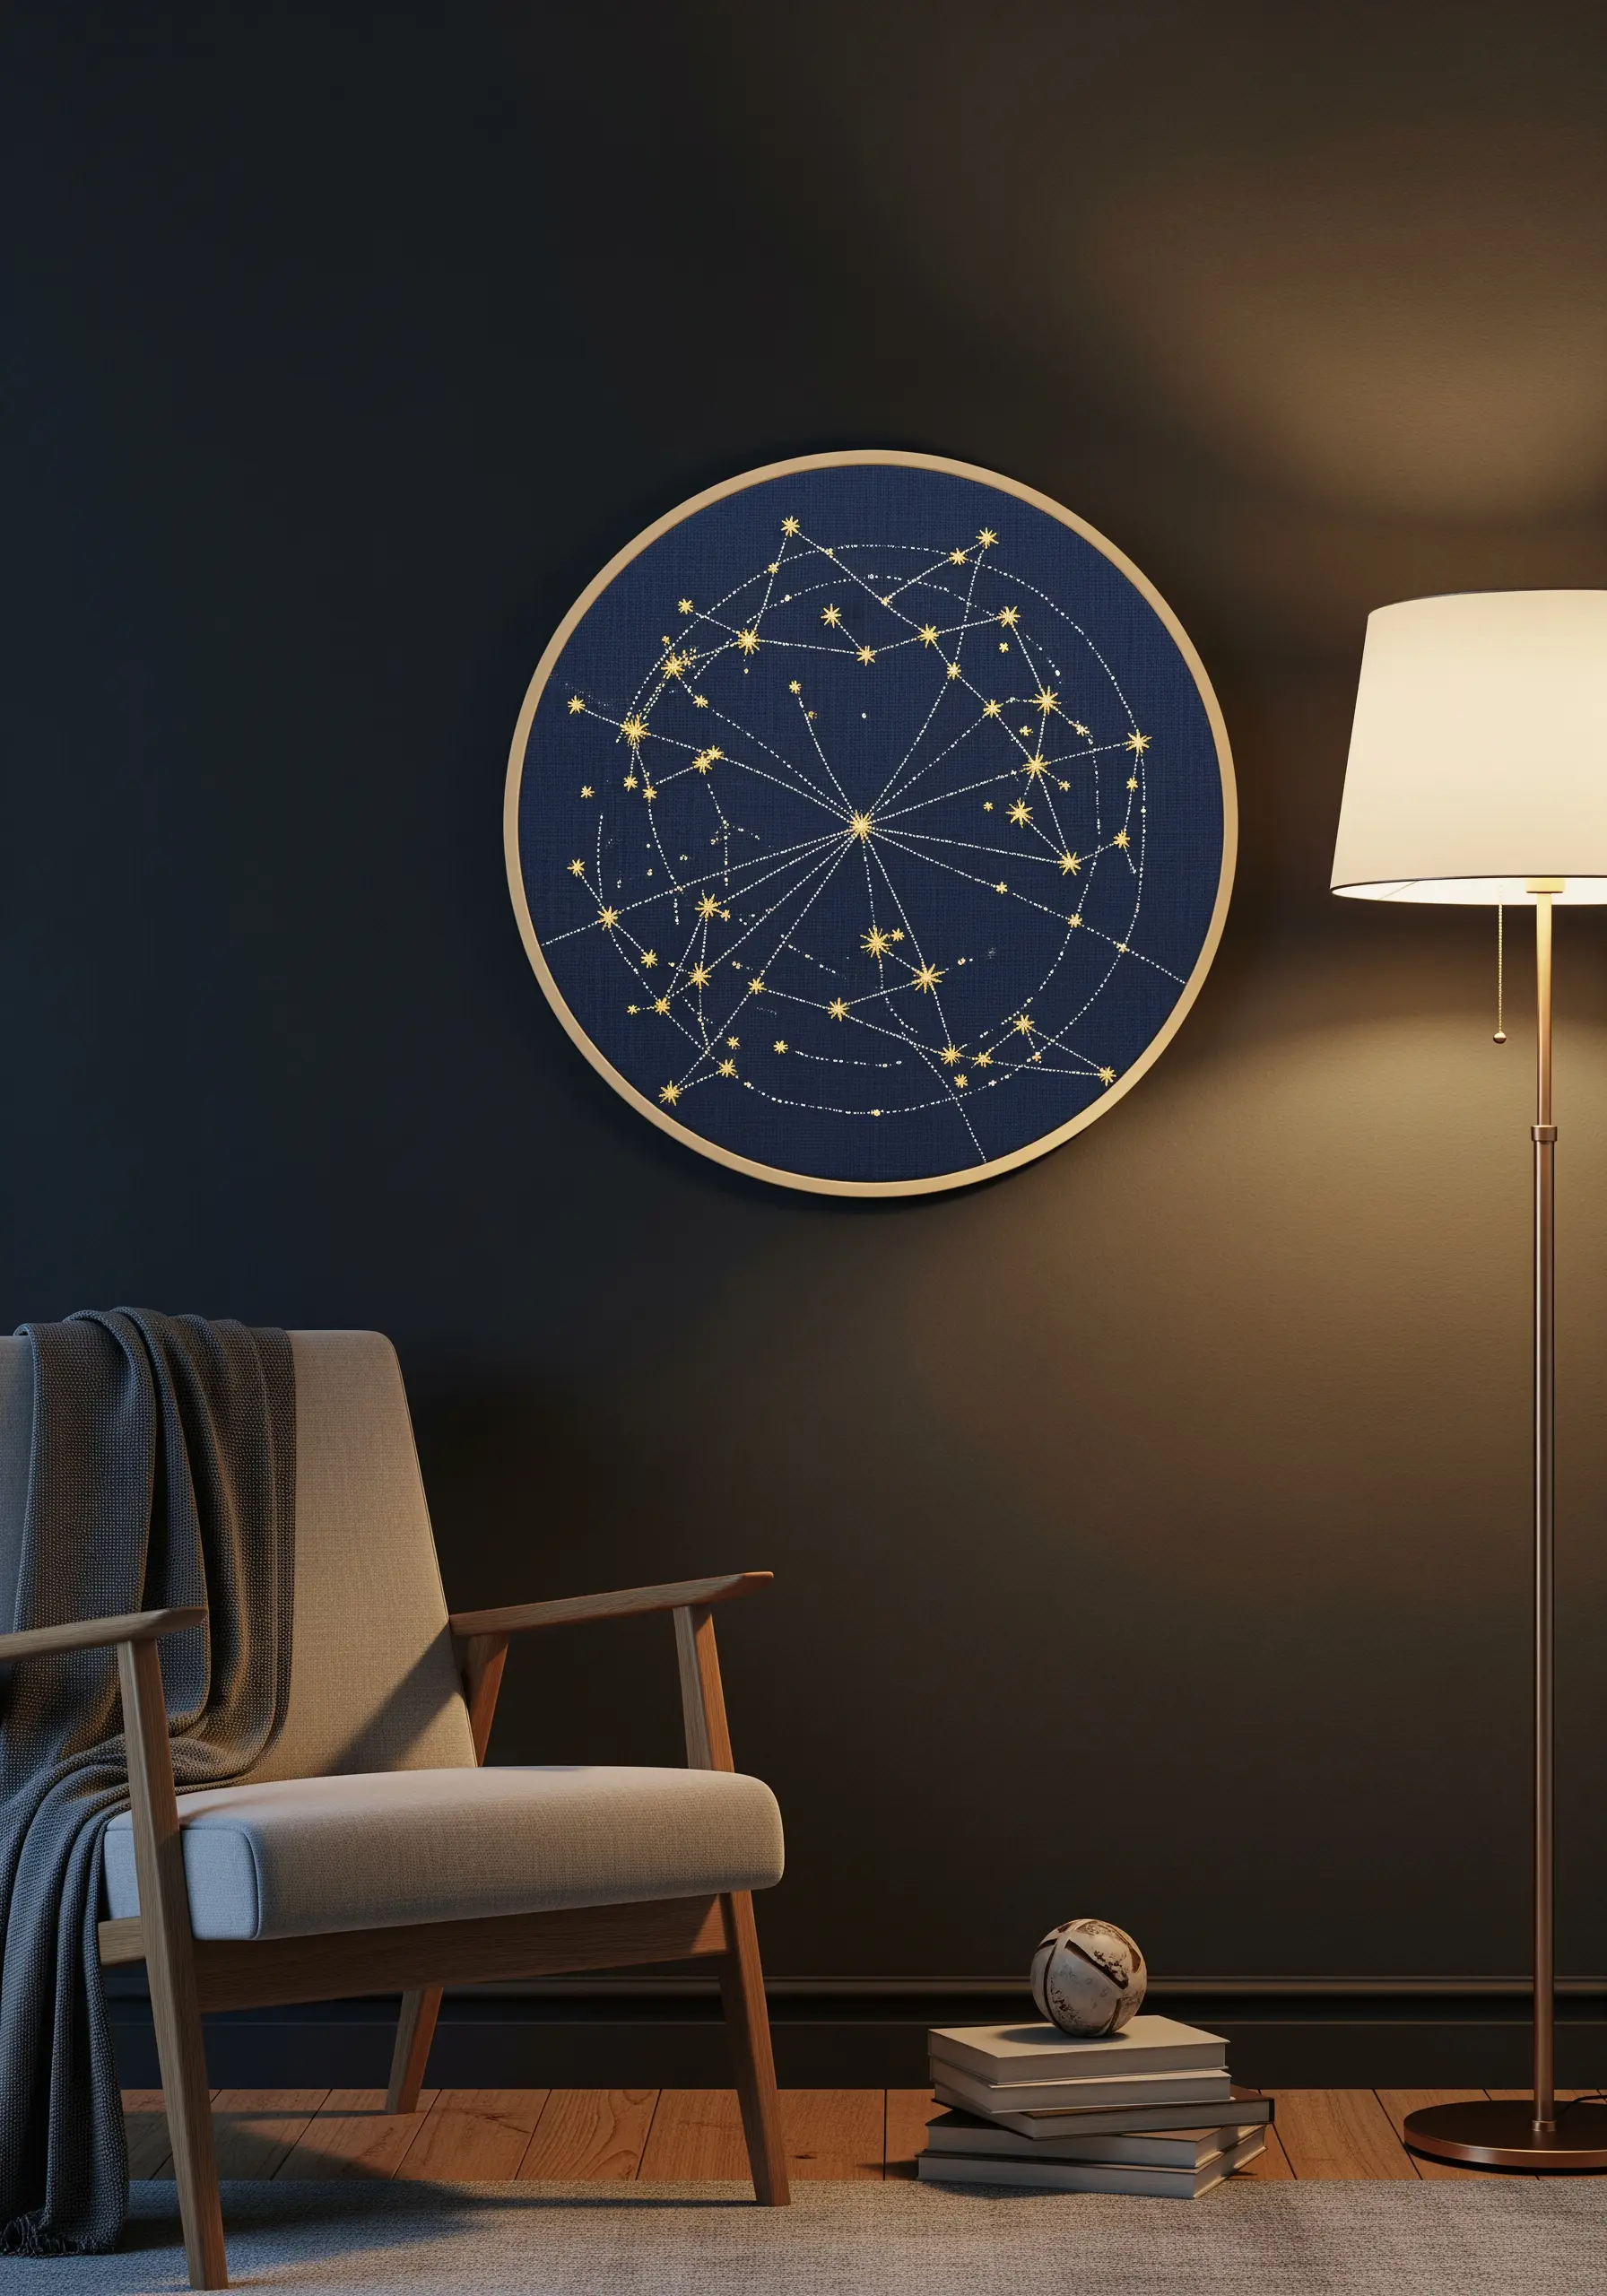
Map out a favorite constellation on dark navy or black linen for a dramatic celestial effect.
Use French knots for the stars, varying their size by changing the number of times you wrap the thread around the needle—one wrap for small stars, two or three for brighter ones.
Connect them with a fine, single-strand backstitch to create the constellation’s shape.
Using a high-shine gold metallic thread against the dark fabric mimics a starry night sky, making it a perfect piece for a cozy reading nook.
7. Sculpt a Portrait with a Single, Raised Line
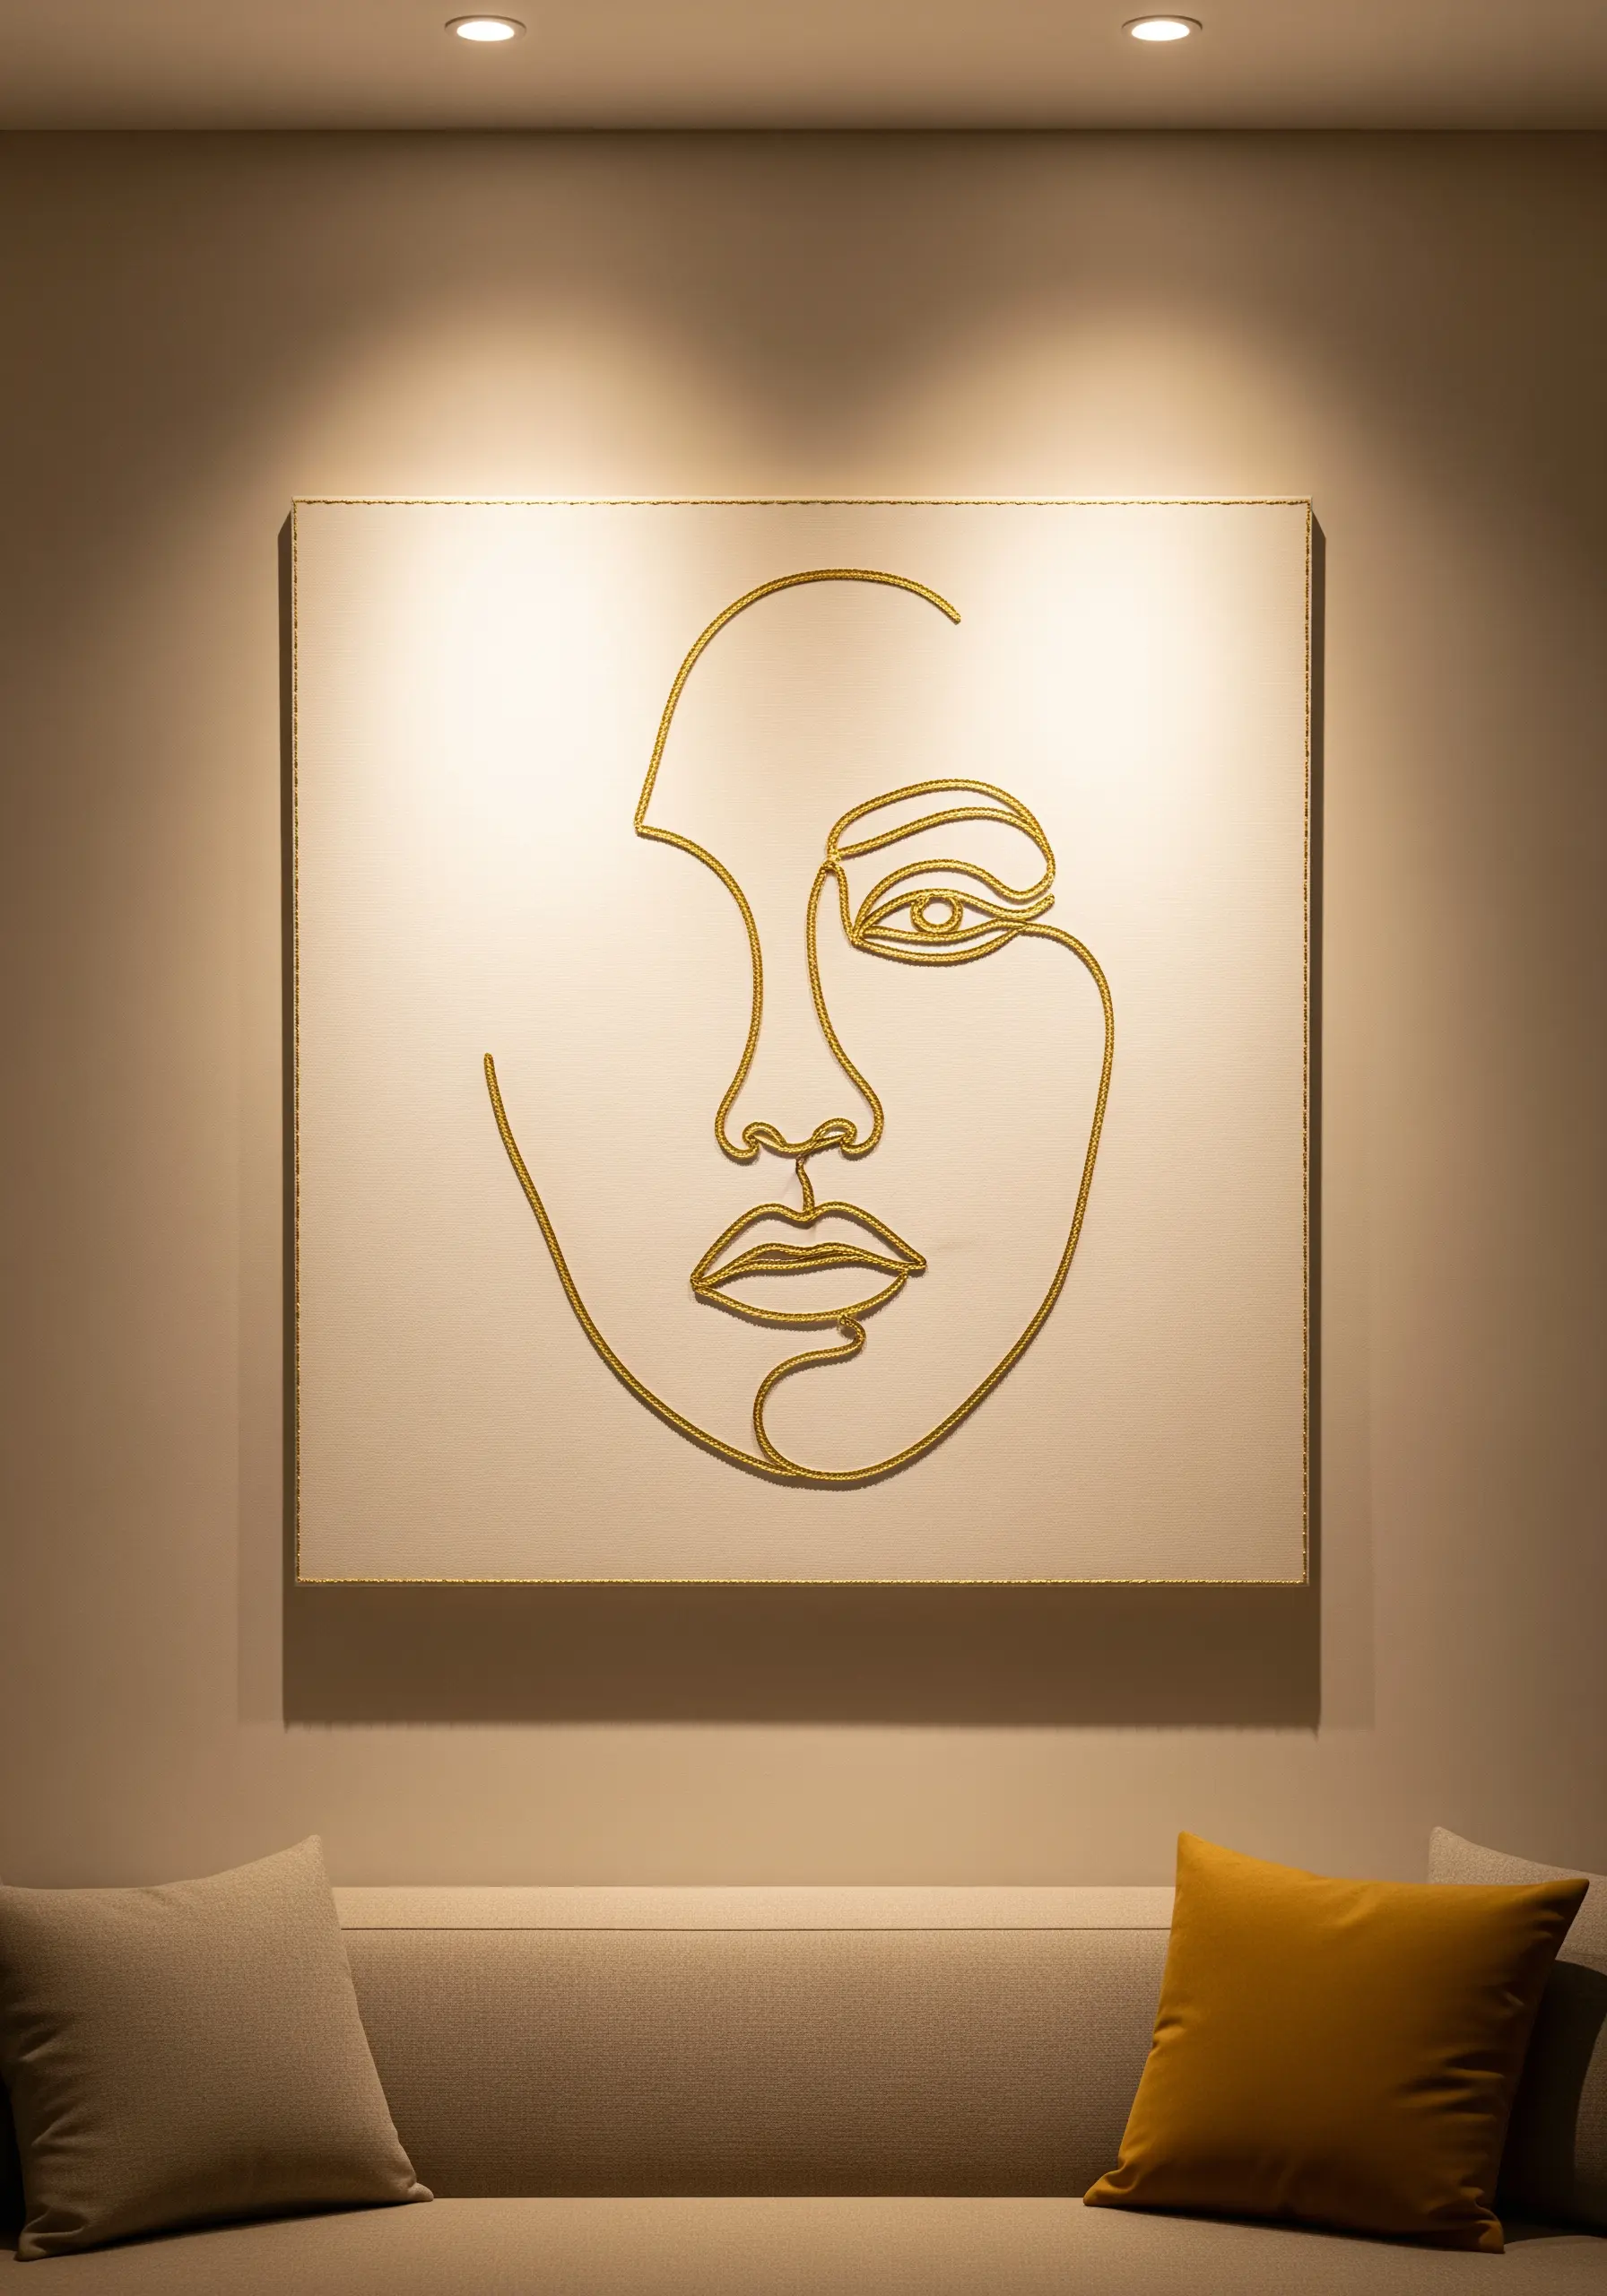
For a bold, three-dimensional line art piece, move beyond simple stitches and embrace couching.
Lay down a thick gold cord or metallic yarn on your fabric to form the portrait’s outline.
Then, use a finer, coordinating metallic thread to stitch over the cord at regular intervals, securing it firmly to the canvas.
This technique creates a stunningly clean, raised line with a continuous, unbroken sheen that elevates simple modern line art thread designs into sculptural art.
8. Balance Compositions with Line and Form
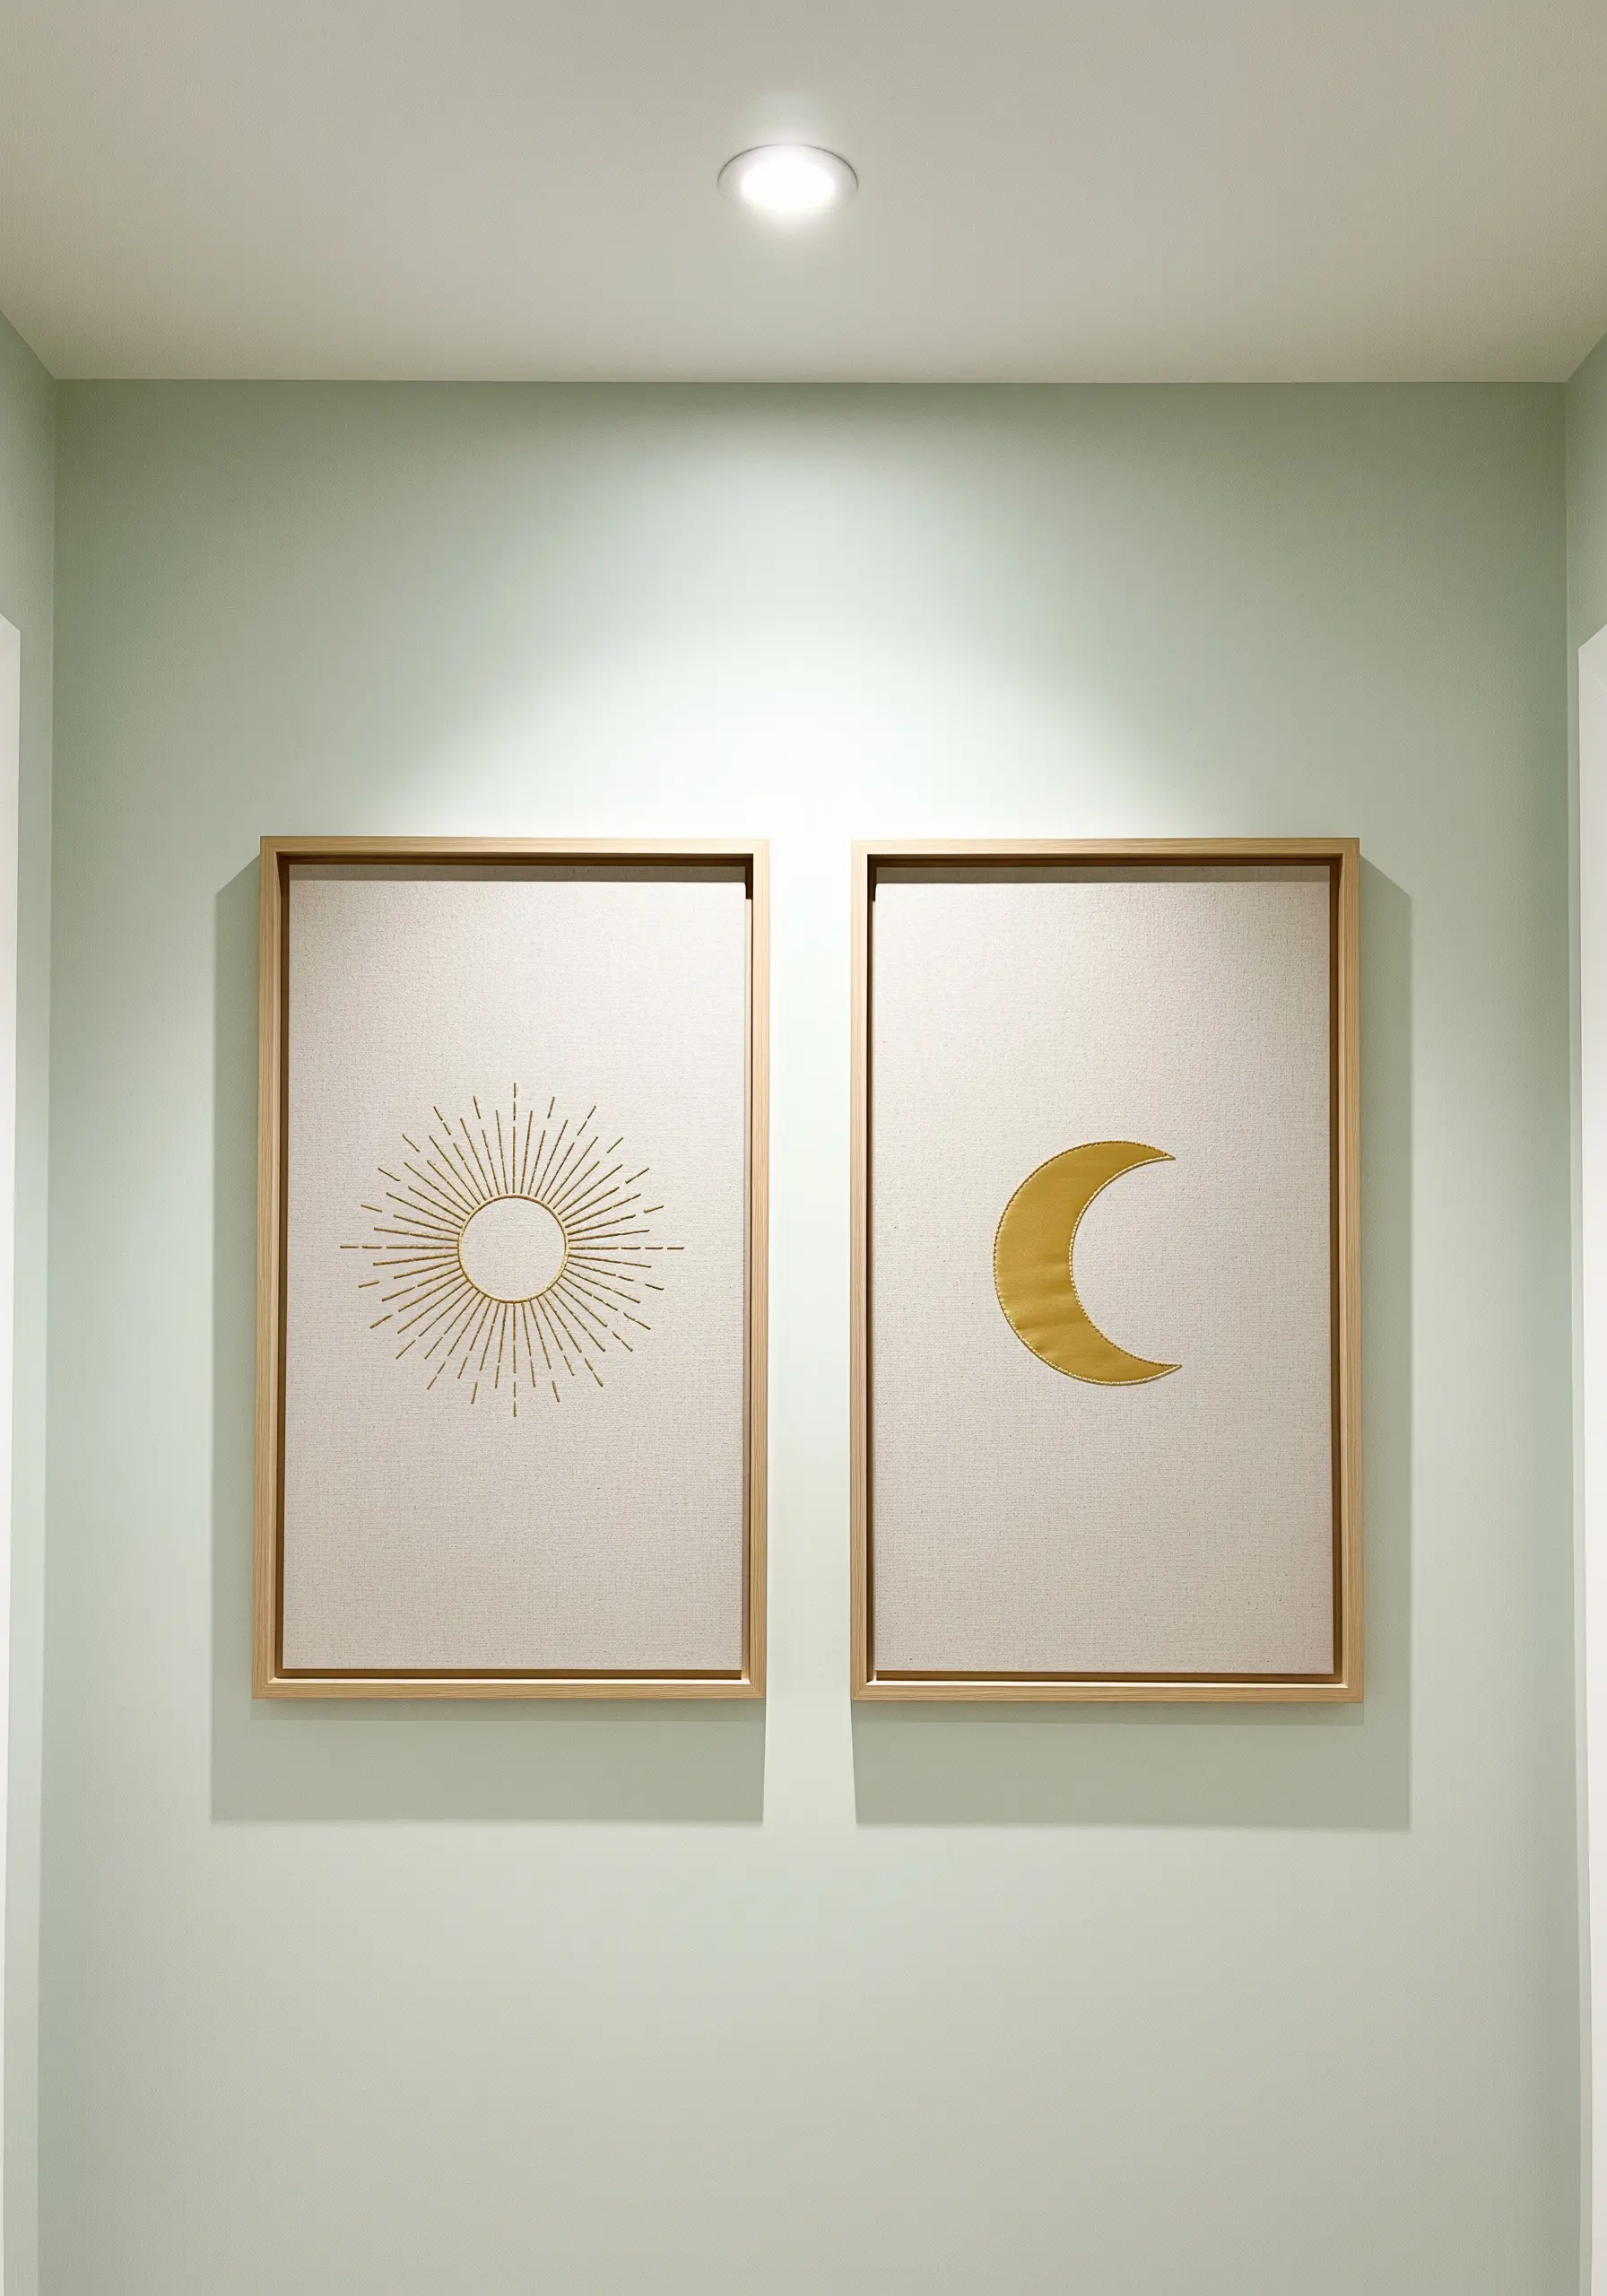
Create a compelling diptych by contrasting sparse lines with a solid, light-catching shape.
For the sun, use radiating straight stitches of varying lengths to create a feeling of energy and light.
For the moon, employ a dense satin stitch, ensuring every thread lies perfectly parallel to create a smooth, block of metallic shine.
This pairing works because it balances visual weight: the airy, open design of the sun is grounded by the solid, dense form of the moon.
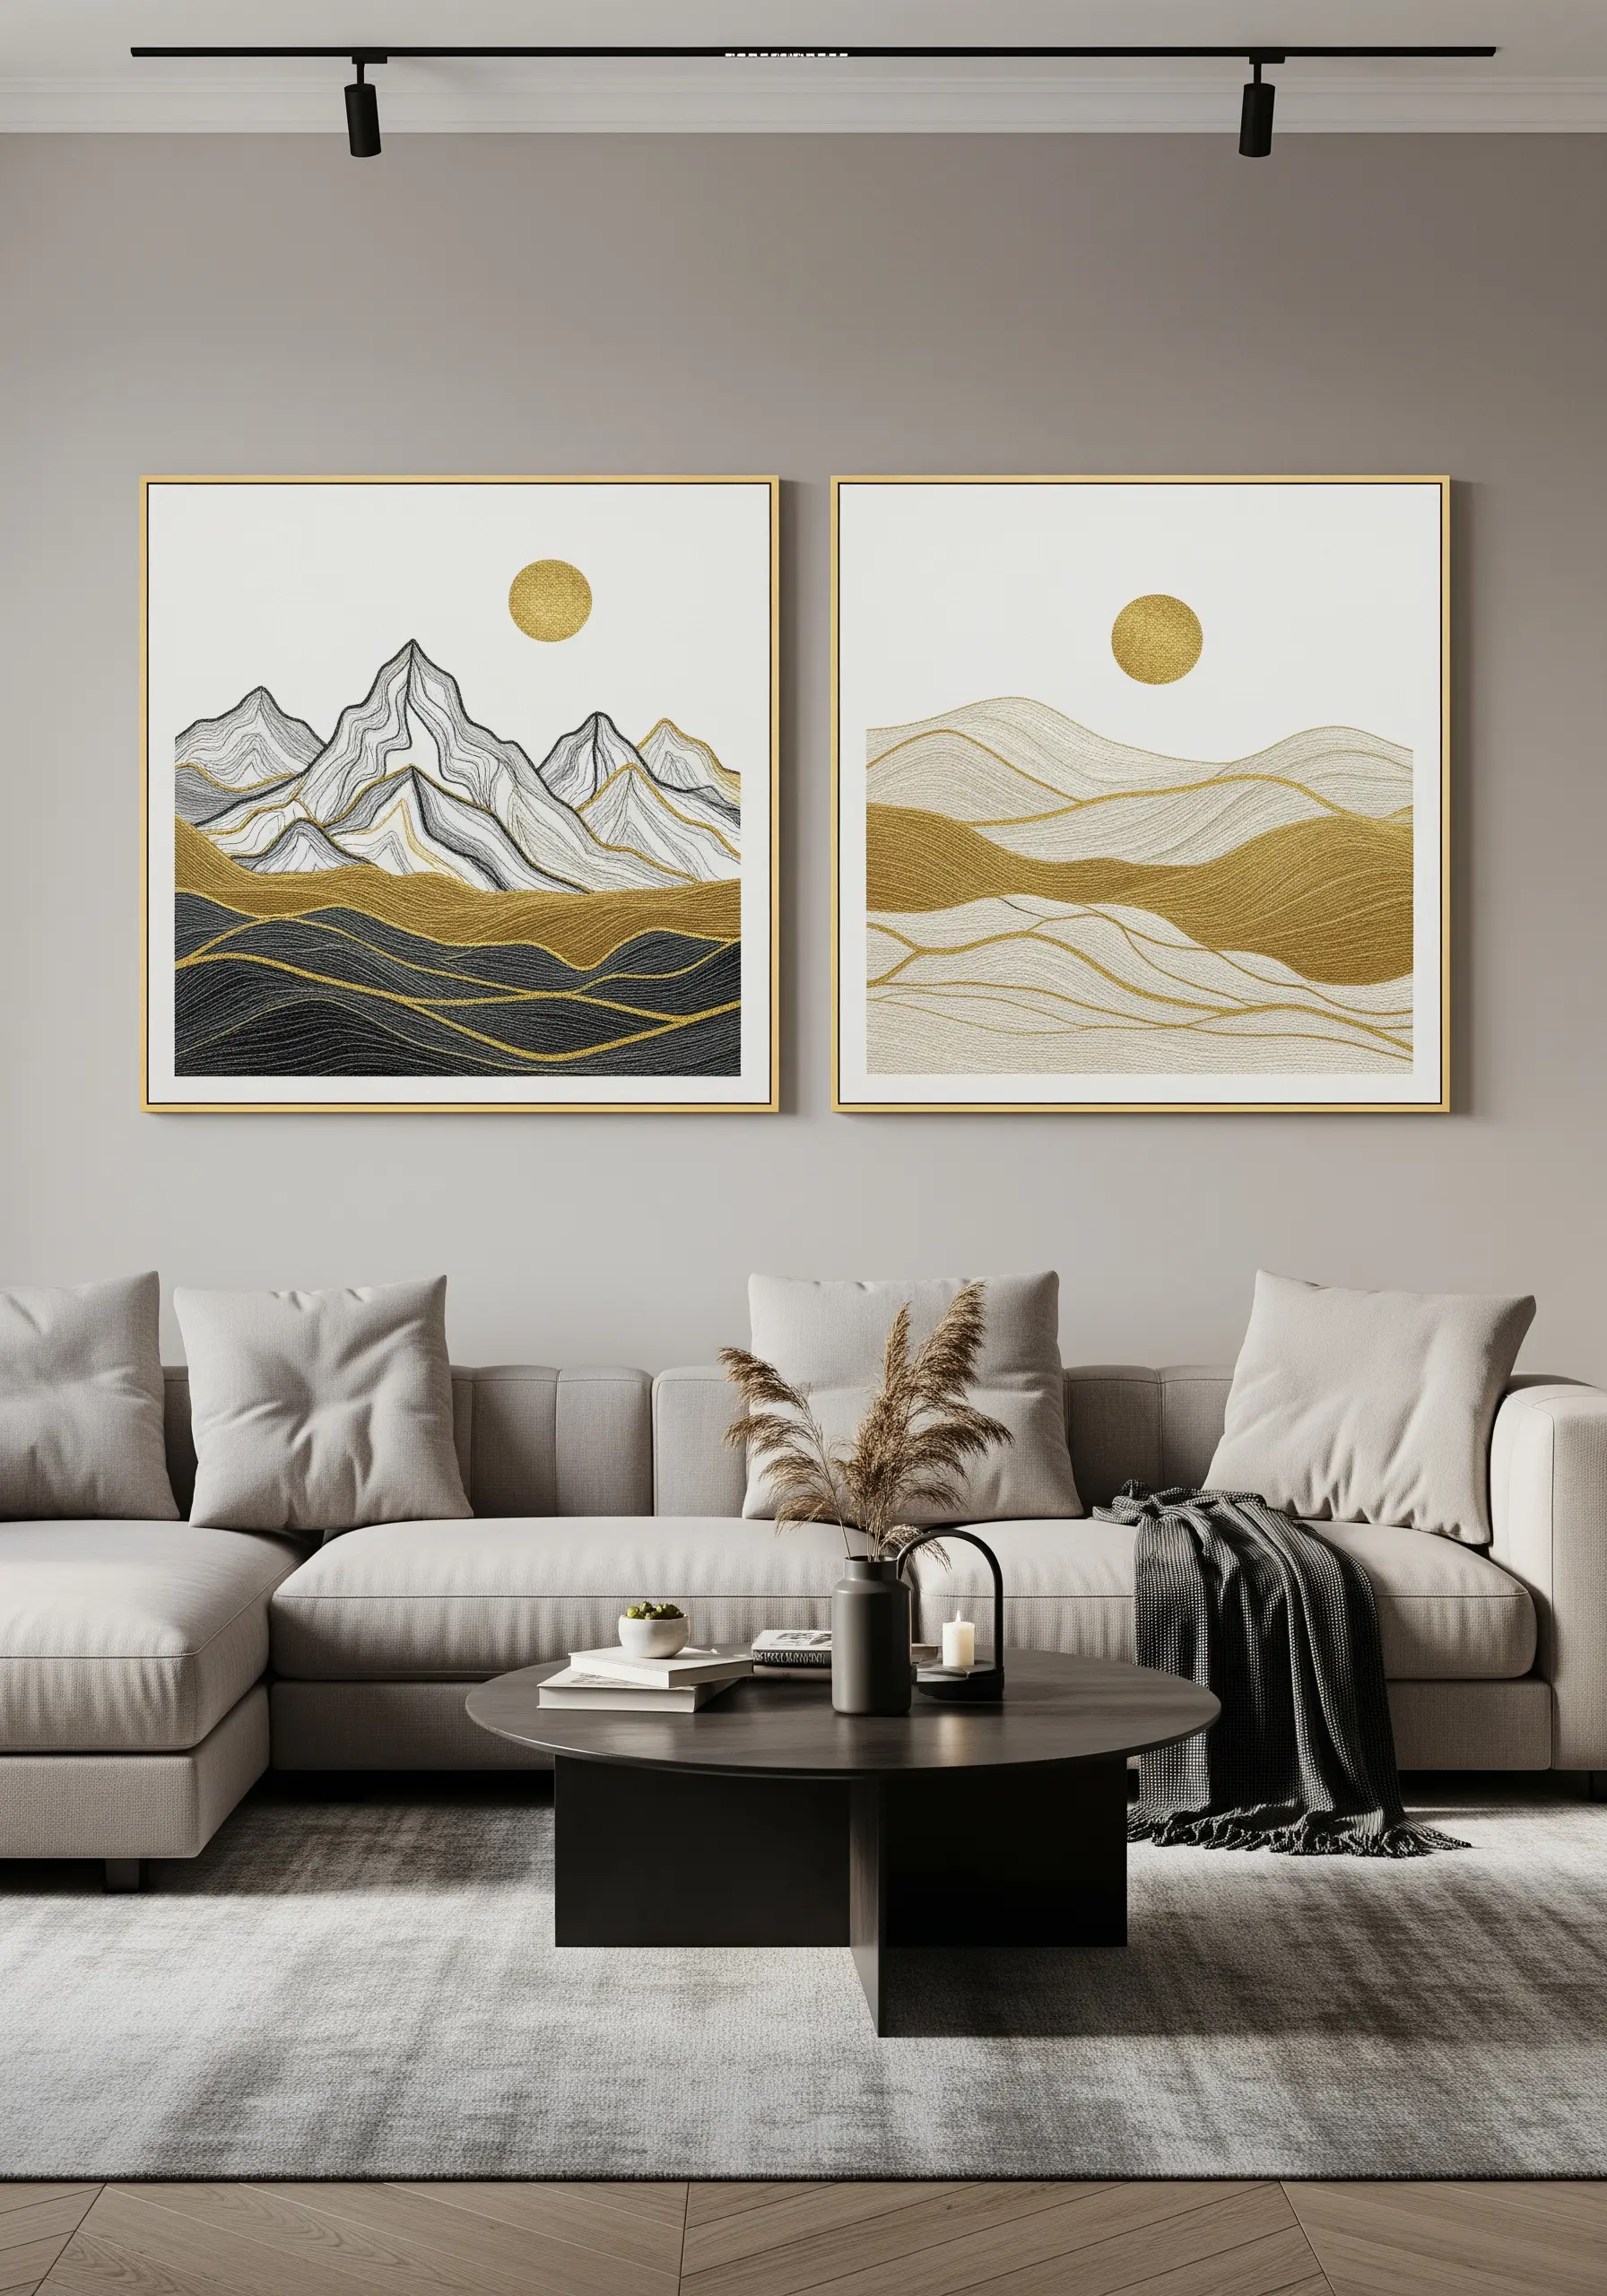
9. Capture a Landscape with Minimalist Outlines
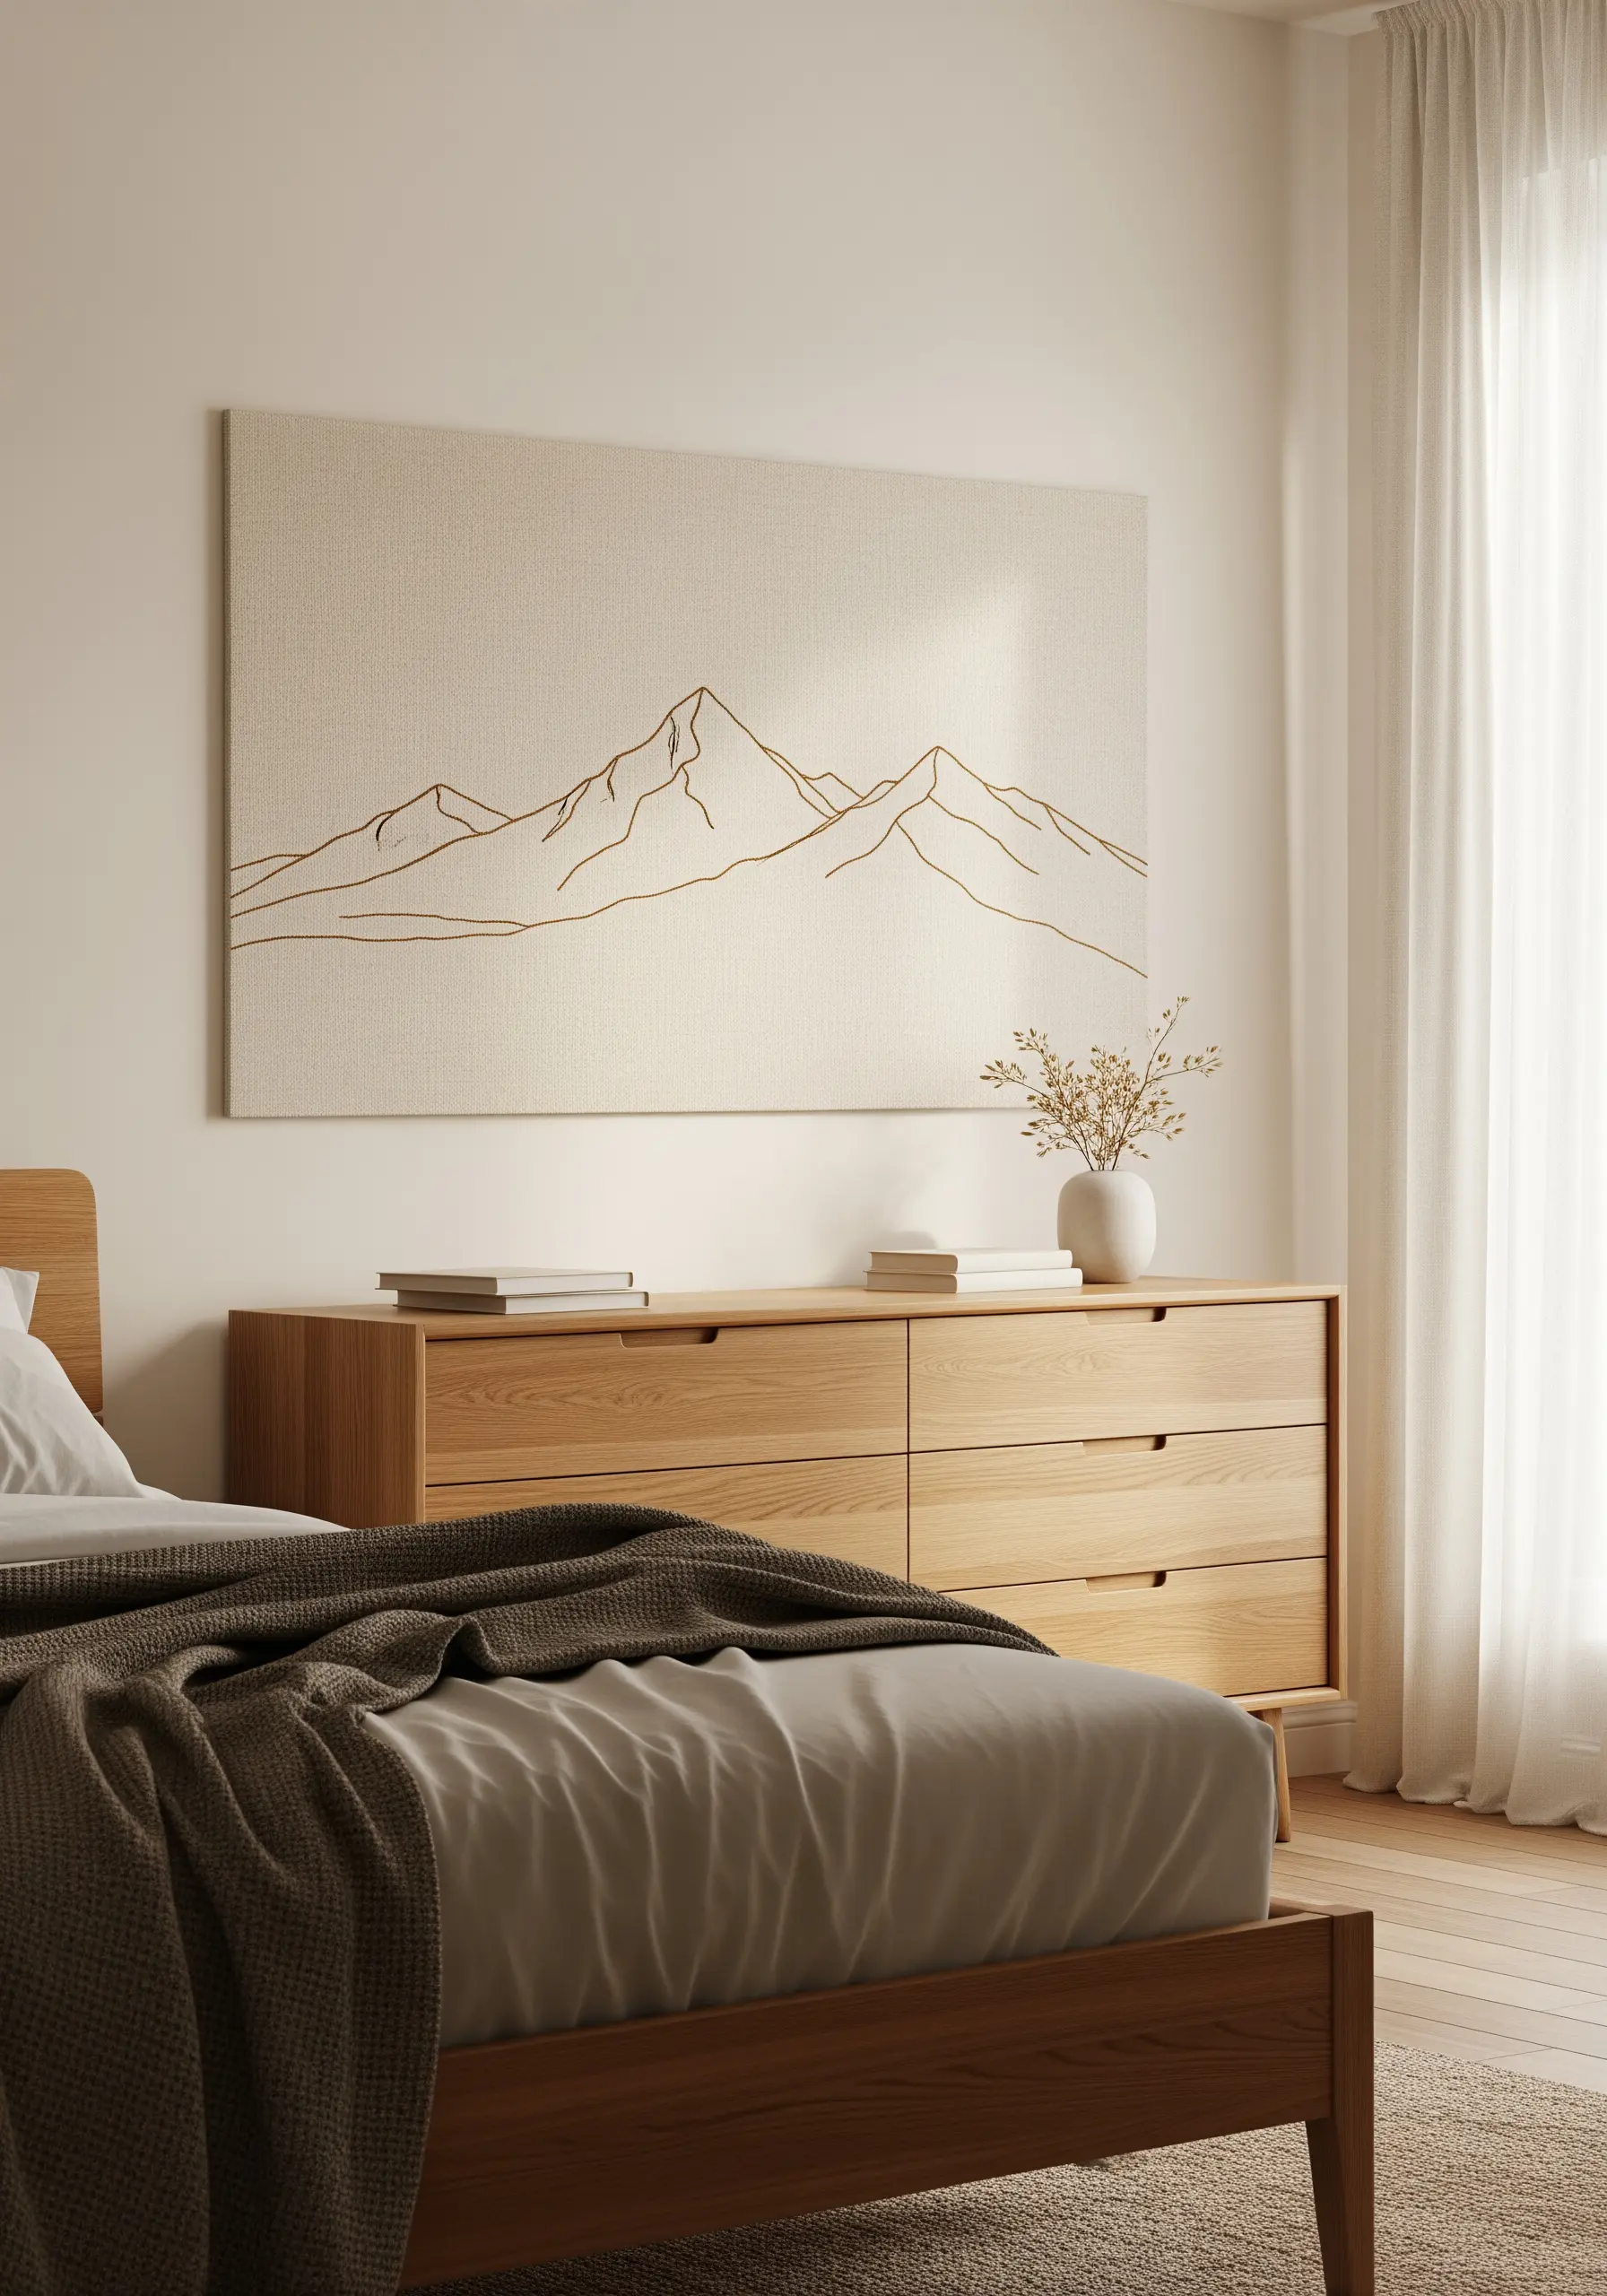
Suggest a mountain range with the quiet elegance of a single, continuous line.
Use a two-strand stem stitch or split stitch in a muted gold or bronze thread to achieve a clean, hand-drawn aesthetic.
The goal is not realism, but evocation. By keeping the lines minimal, you allow the texture of the linen fabric to become part of the landscape.
This is one of the most effective embroidery decor tricks for transforming small bedrooms into serene, uncluttered spaces.
10. Create a Flawless Sheen with Whipped Stitches
To achieve perfectly smooth, cord-like concentric circles, use a whipped backstitch.
First, create a foundation of simple backstitches along your circular pattern.
Then, take a second, blunt-tipped tapestry needle with the same thread and weave it under each backstitch without piercing the fabric.
This wrapping motion covers the segmented look of the backstitch, resulting in a continuous, raised line with an uninterrupted metallic shine.
11. Add Delicate Texture to Botanical Designs
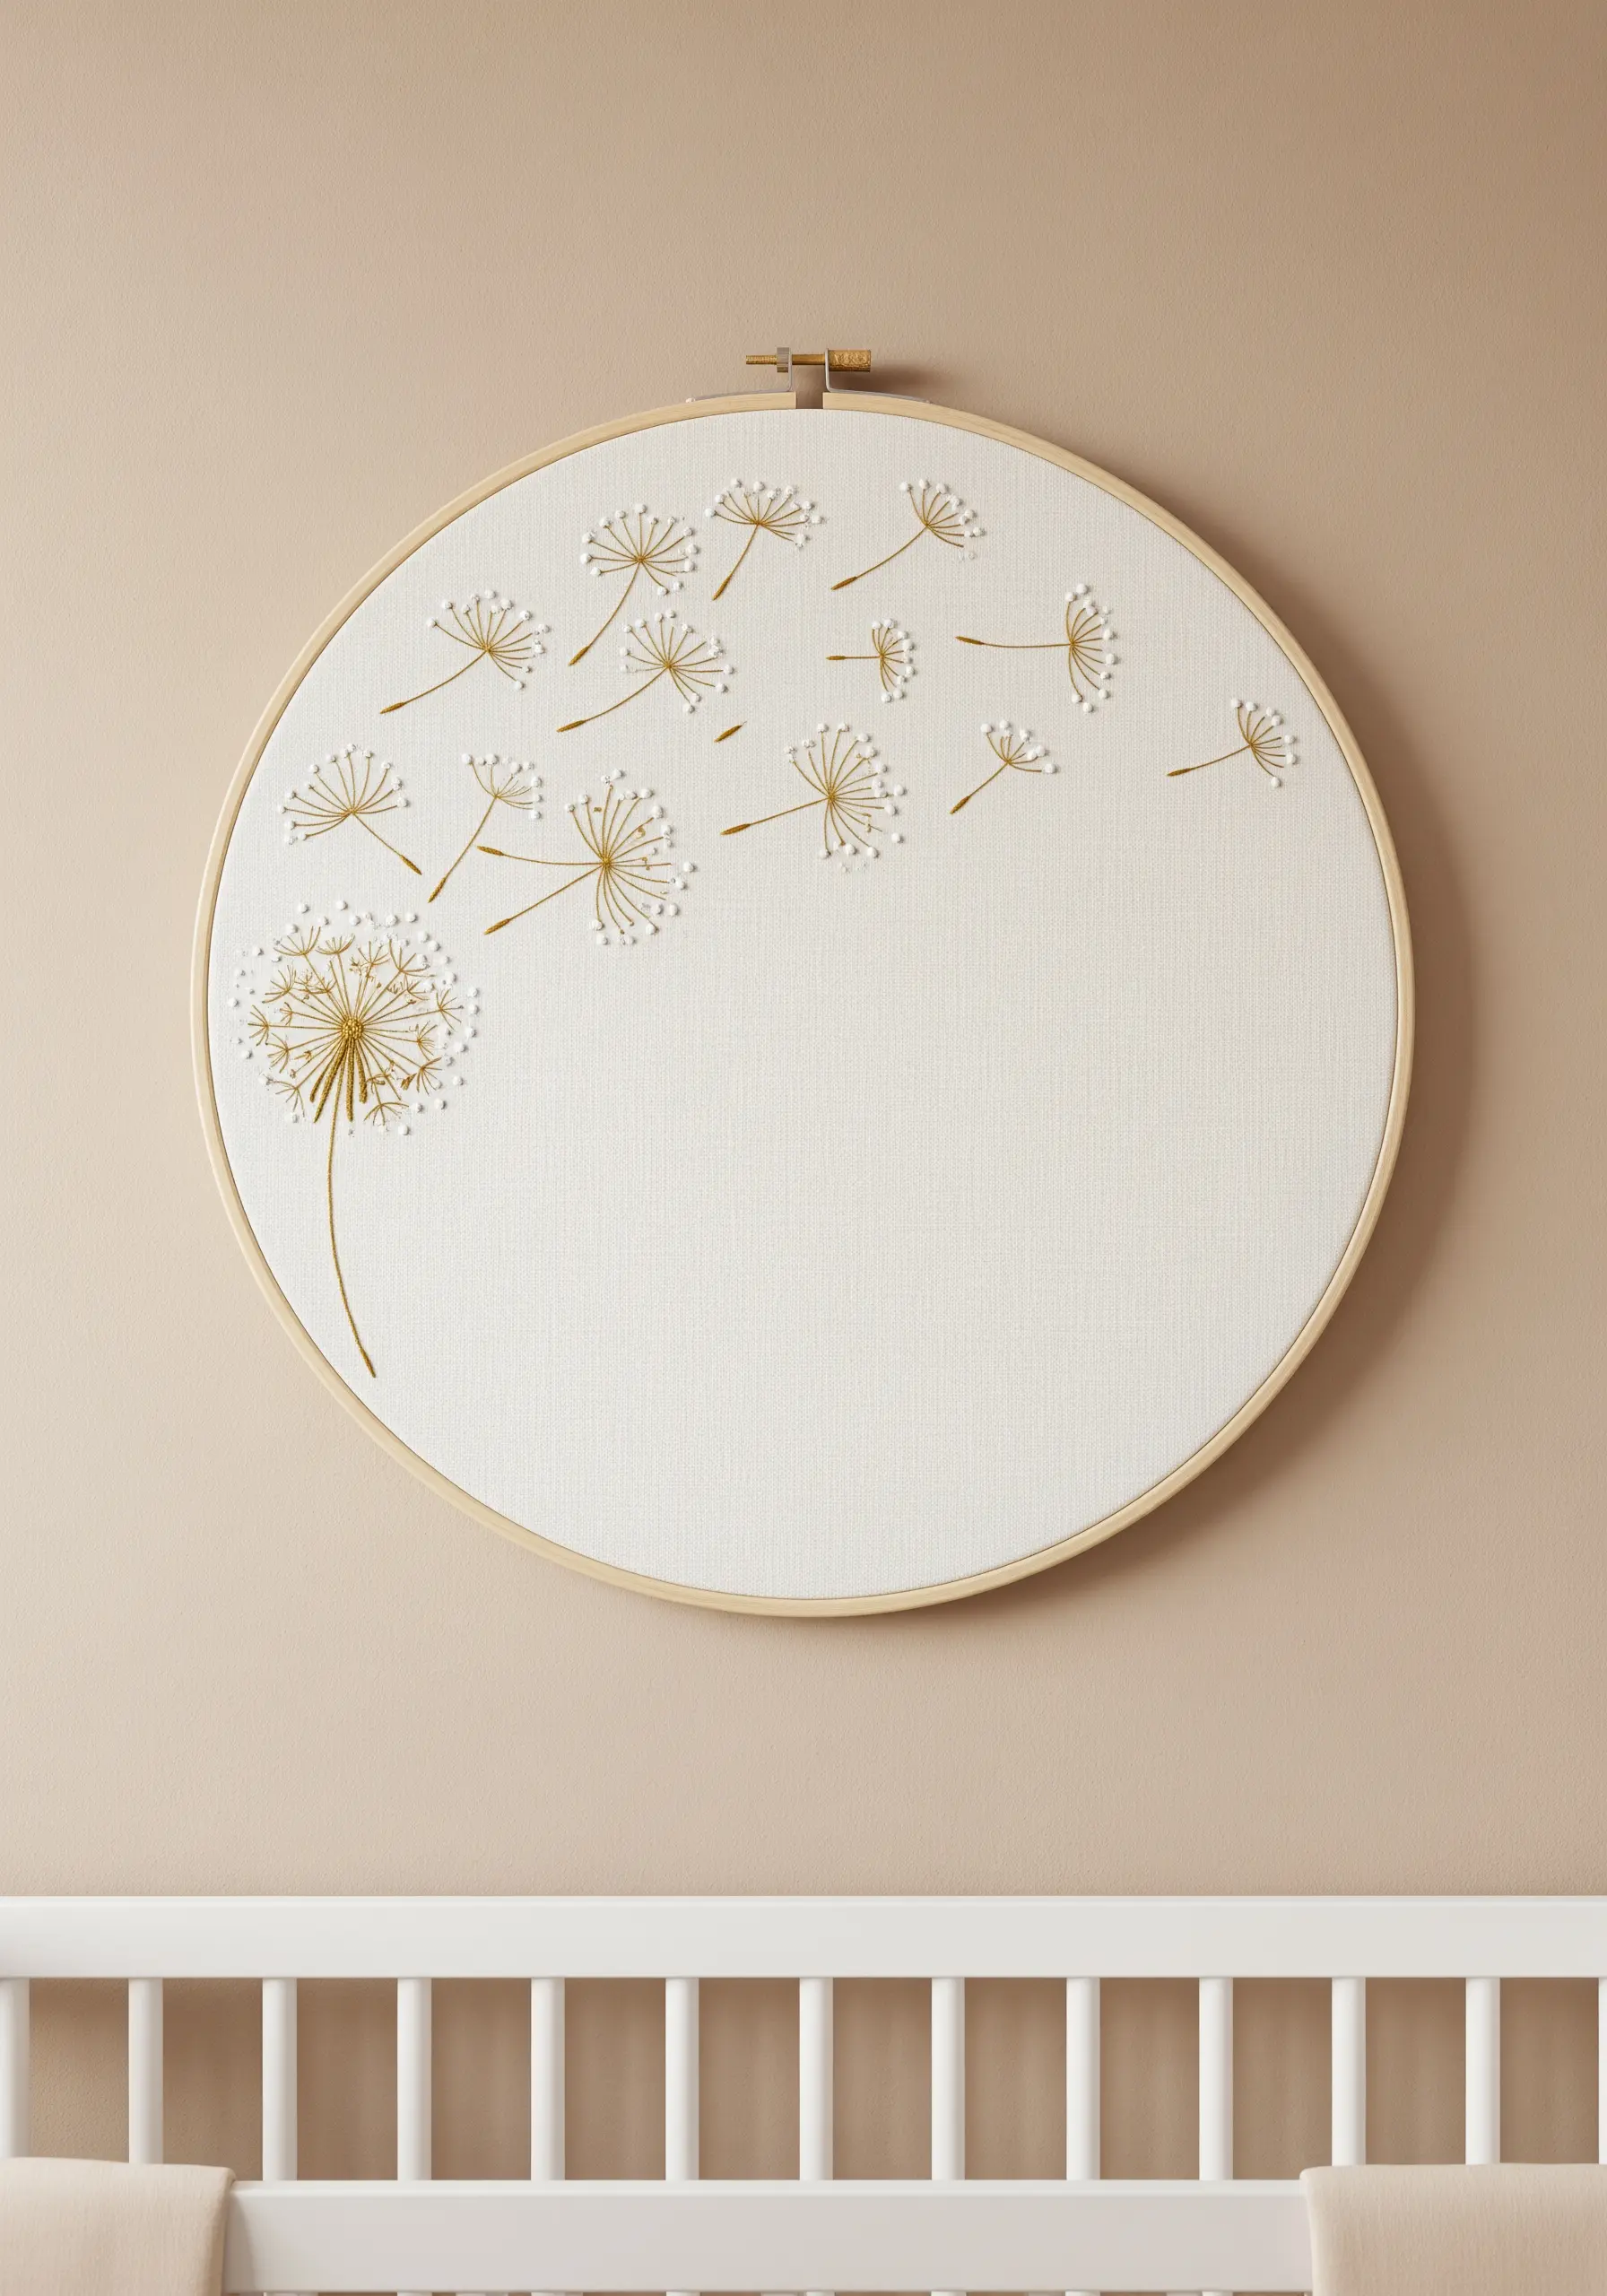
Bring a dandelion to life by combining three simple stitches for varied texture.
Use a stem stitch for the main stalk to give it a smooth, sturdy appearance.
For the larger seed puffs, create radiating straight stitches and cap them with a single French knot in a contrasting white or cream thread.
This tiny addition of a second color adds just enough detail to make the delicate florets feel dimensional and light, as if they could float off the fabric.
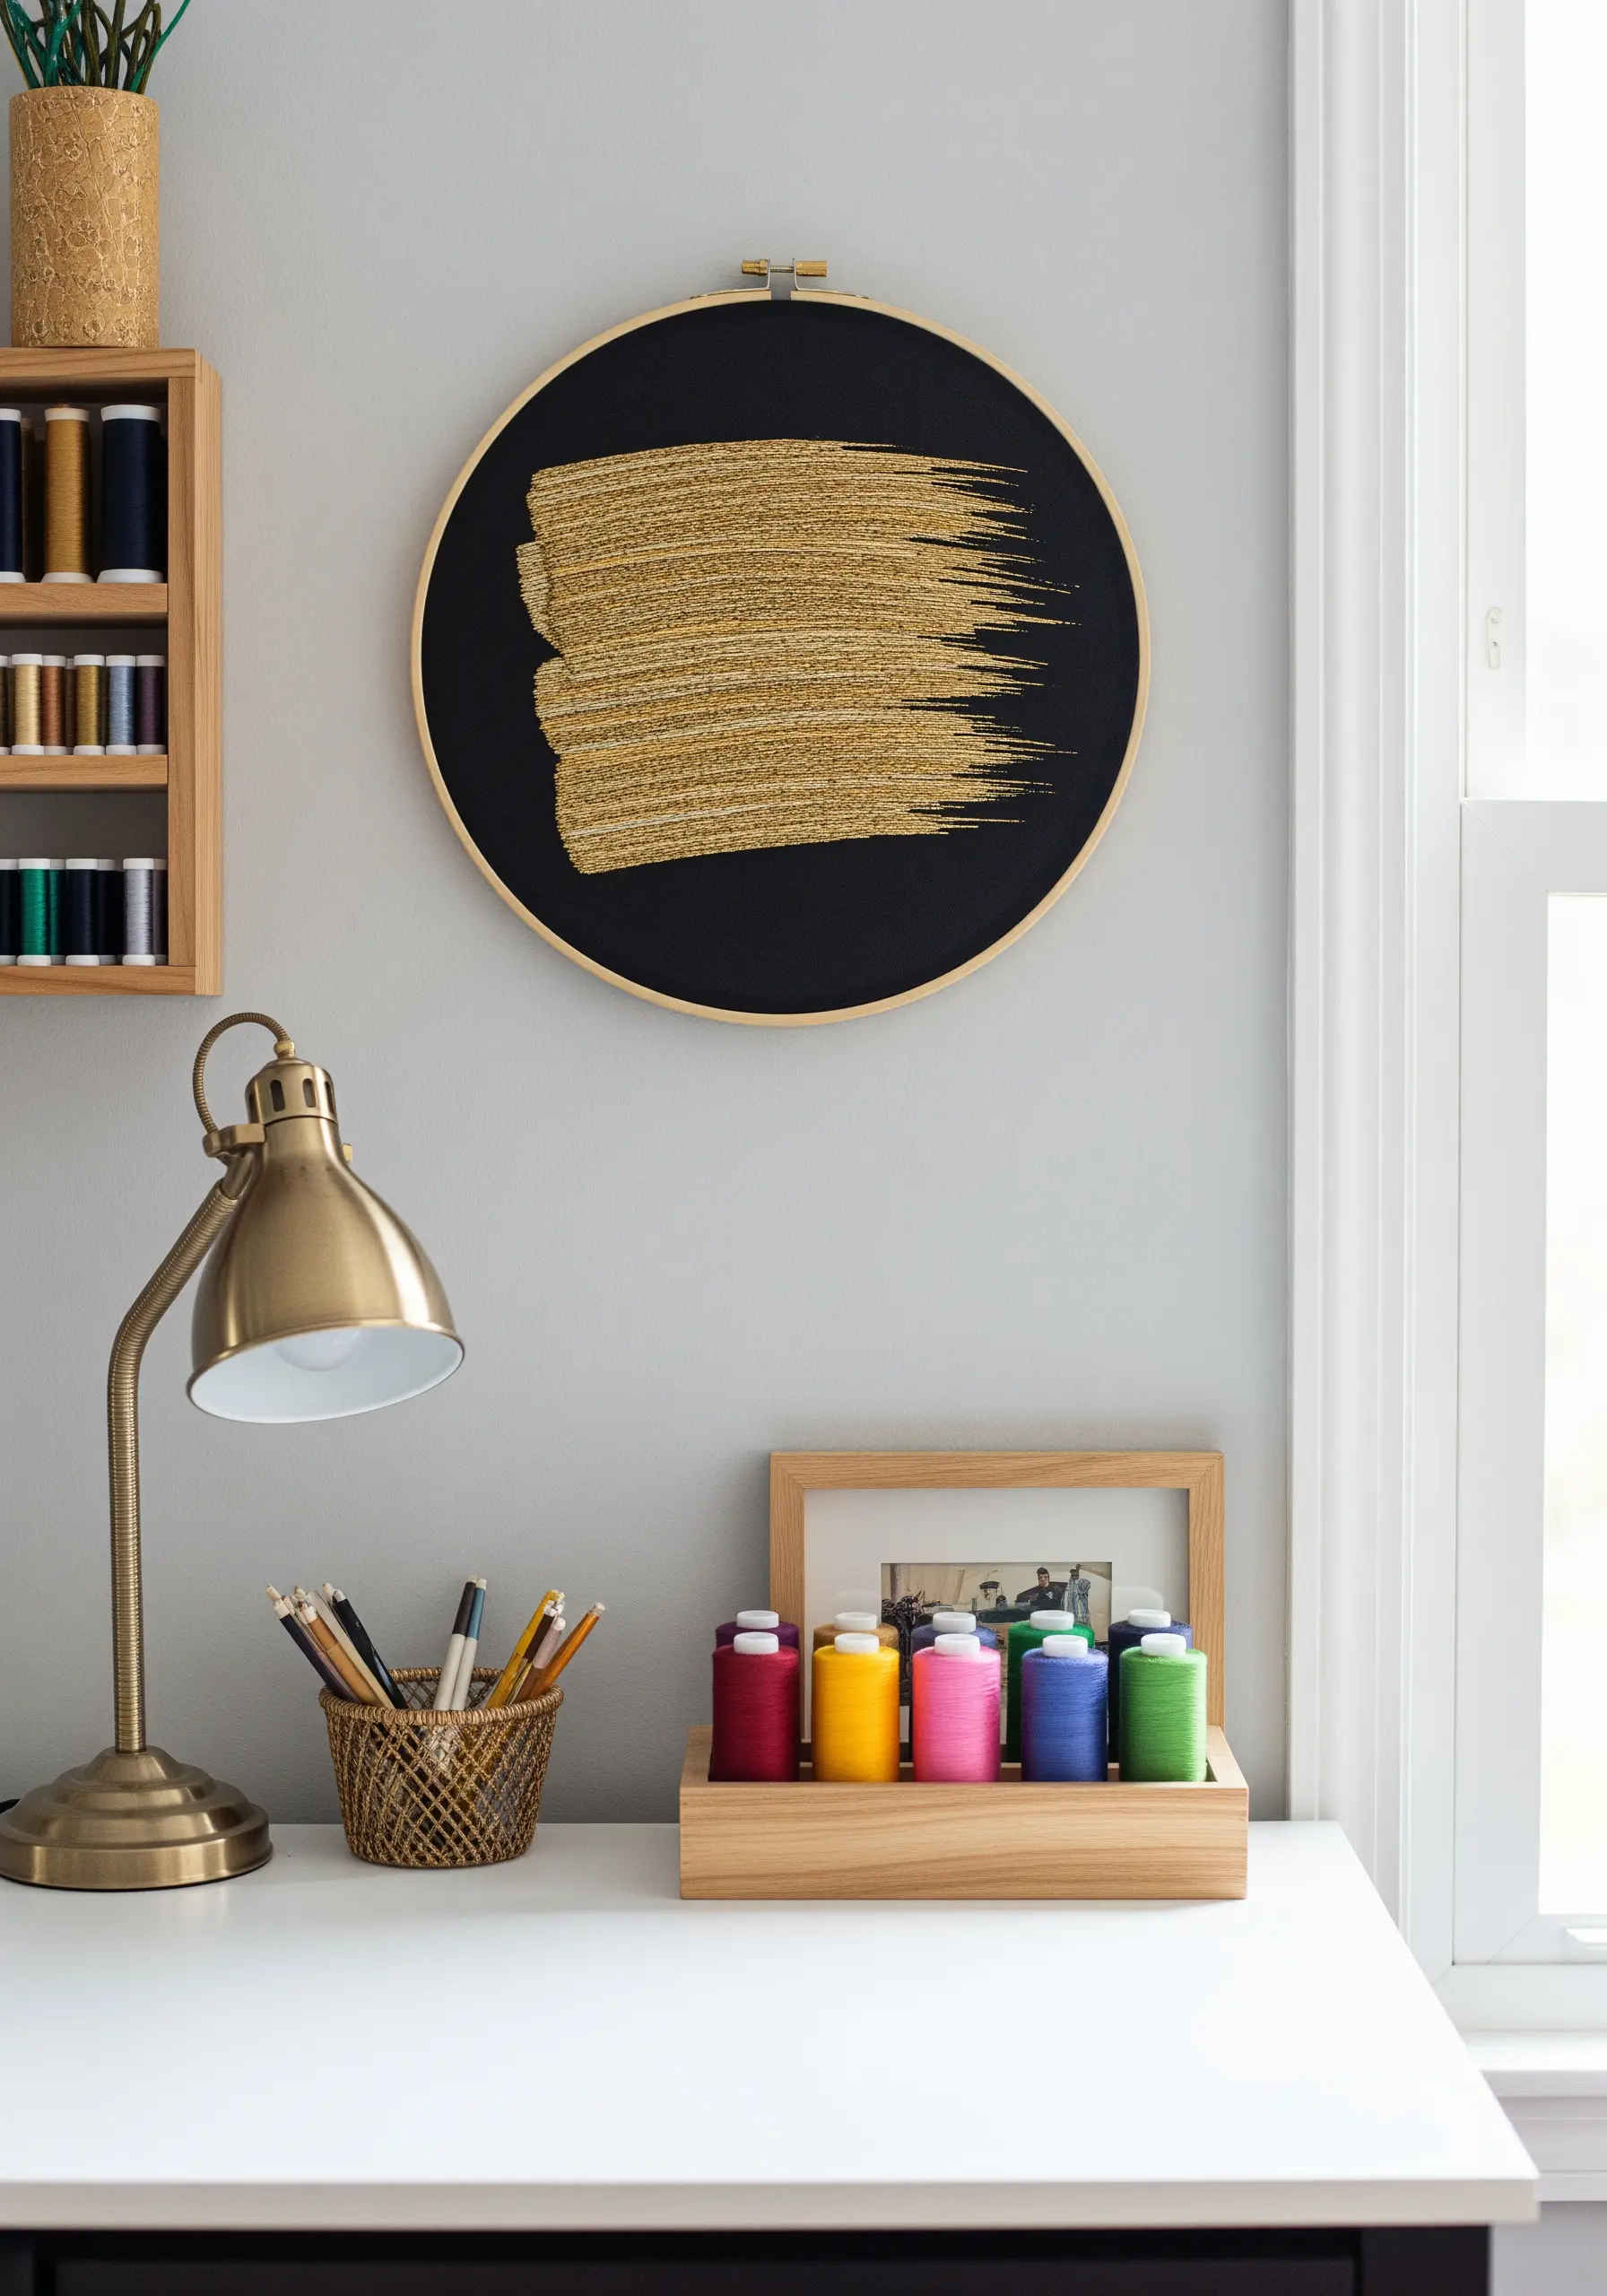
12. Paint with Thread for an Abstract Metallic Swipe

Create the dynamic energy of a painter’s brushstroke using dense, layered stitches.
Work with 4-6 strands of metallic floss and fill the shape with overlapping straight stitches of varying lengths and slight angles.
Don’t aim for perfect uniformity; the slight irregularities and the way the threads catch the light from different directions are what create the texture.
This form of abstract thread painting on black canvas is dramatic, modern, and deeply textural.
13. Explore Geometric Dimension with Yarn Wrapping
For a highly textural, almost sculptural effect, try a yarn wrapping or laid work technique.
Instead of stitching through the fabric, you can create a base grid and wrap yarn tightly around sections to build up geometric forms.
Use a sturdy frame or canvas and a thick, non-stretchy yarn in gold and white.
This method produces bold, dimensional patterns and is a wonderful way to create large-scale DIY yarn wall hangings with a clean, modern aesthetic.
14. Capture Art Deco Elegance with Directional Satin Stitch
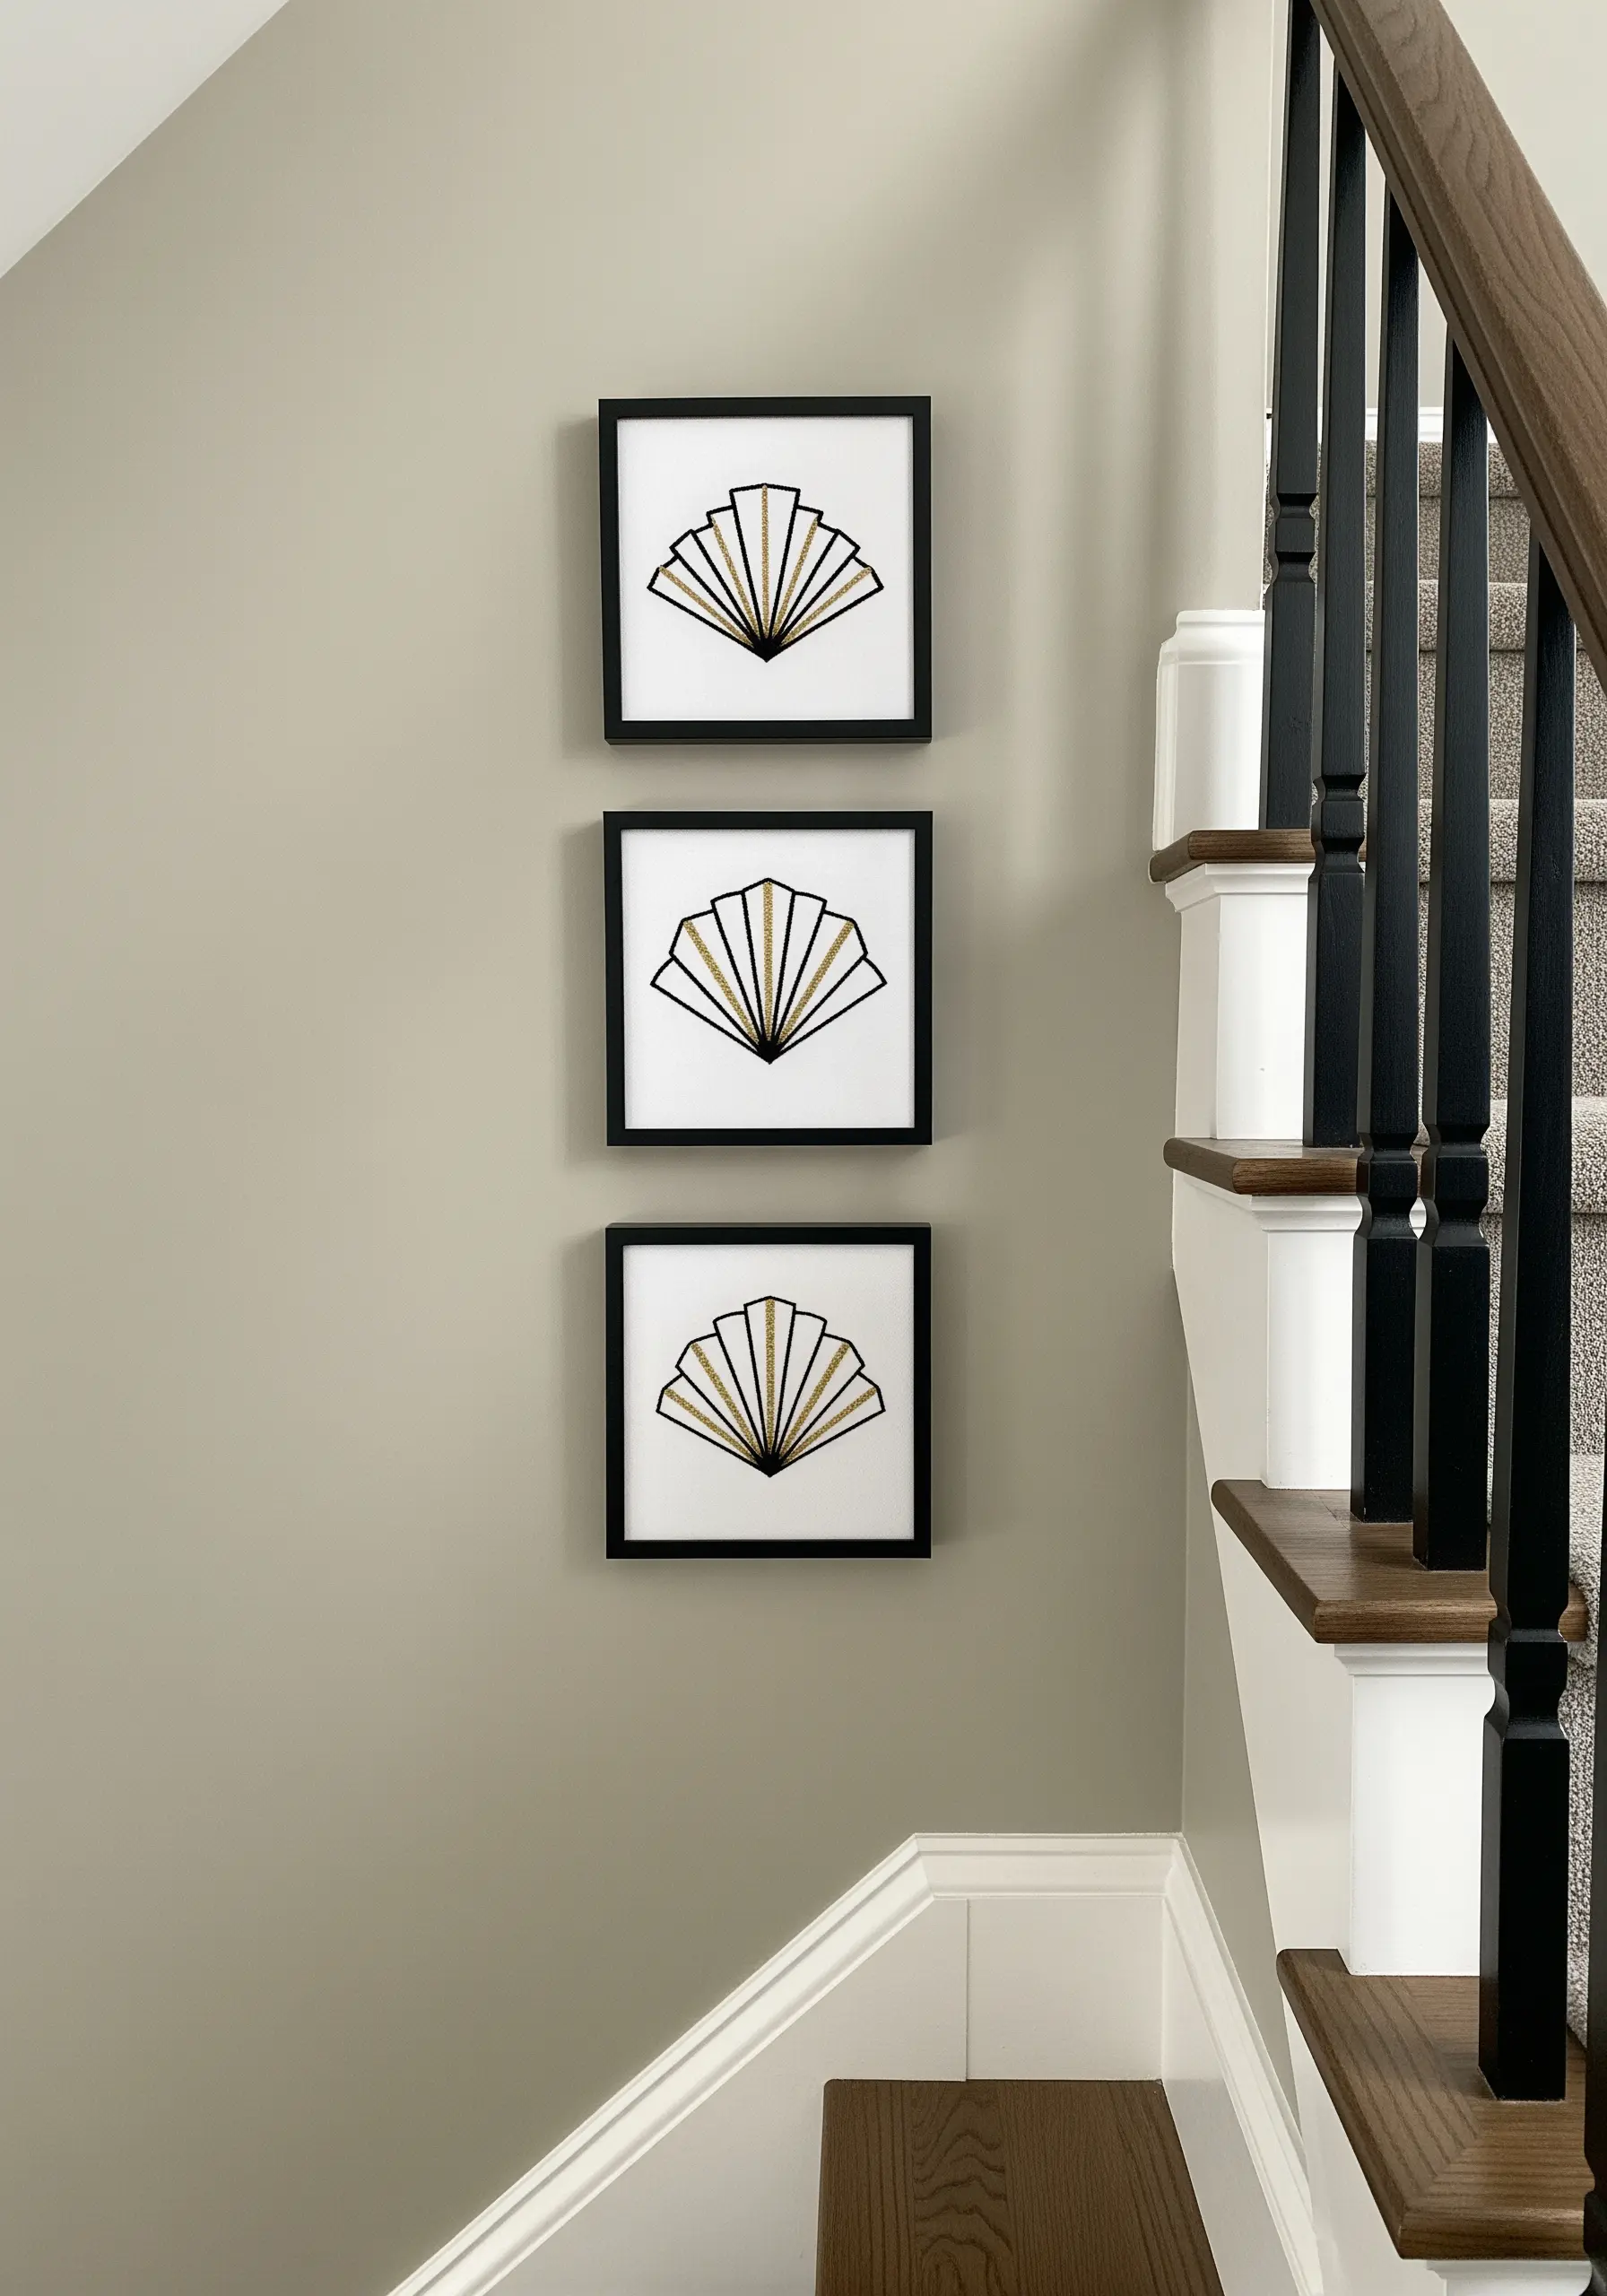
Recreate the glamour of the Art Deco era by focusing on precise, symmetrical fan shapes.
For the gold-filled sections, the direction of your satin stitch is everything. Angle the stitches so they radiate from the base of each fan segment.
This ensures the light hits each section differently, creating a dynamic shimmer that defines the shape.
Outline the entire motif with a crisp black backstitch to contain the sparkle and provide that classic, bold definition.
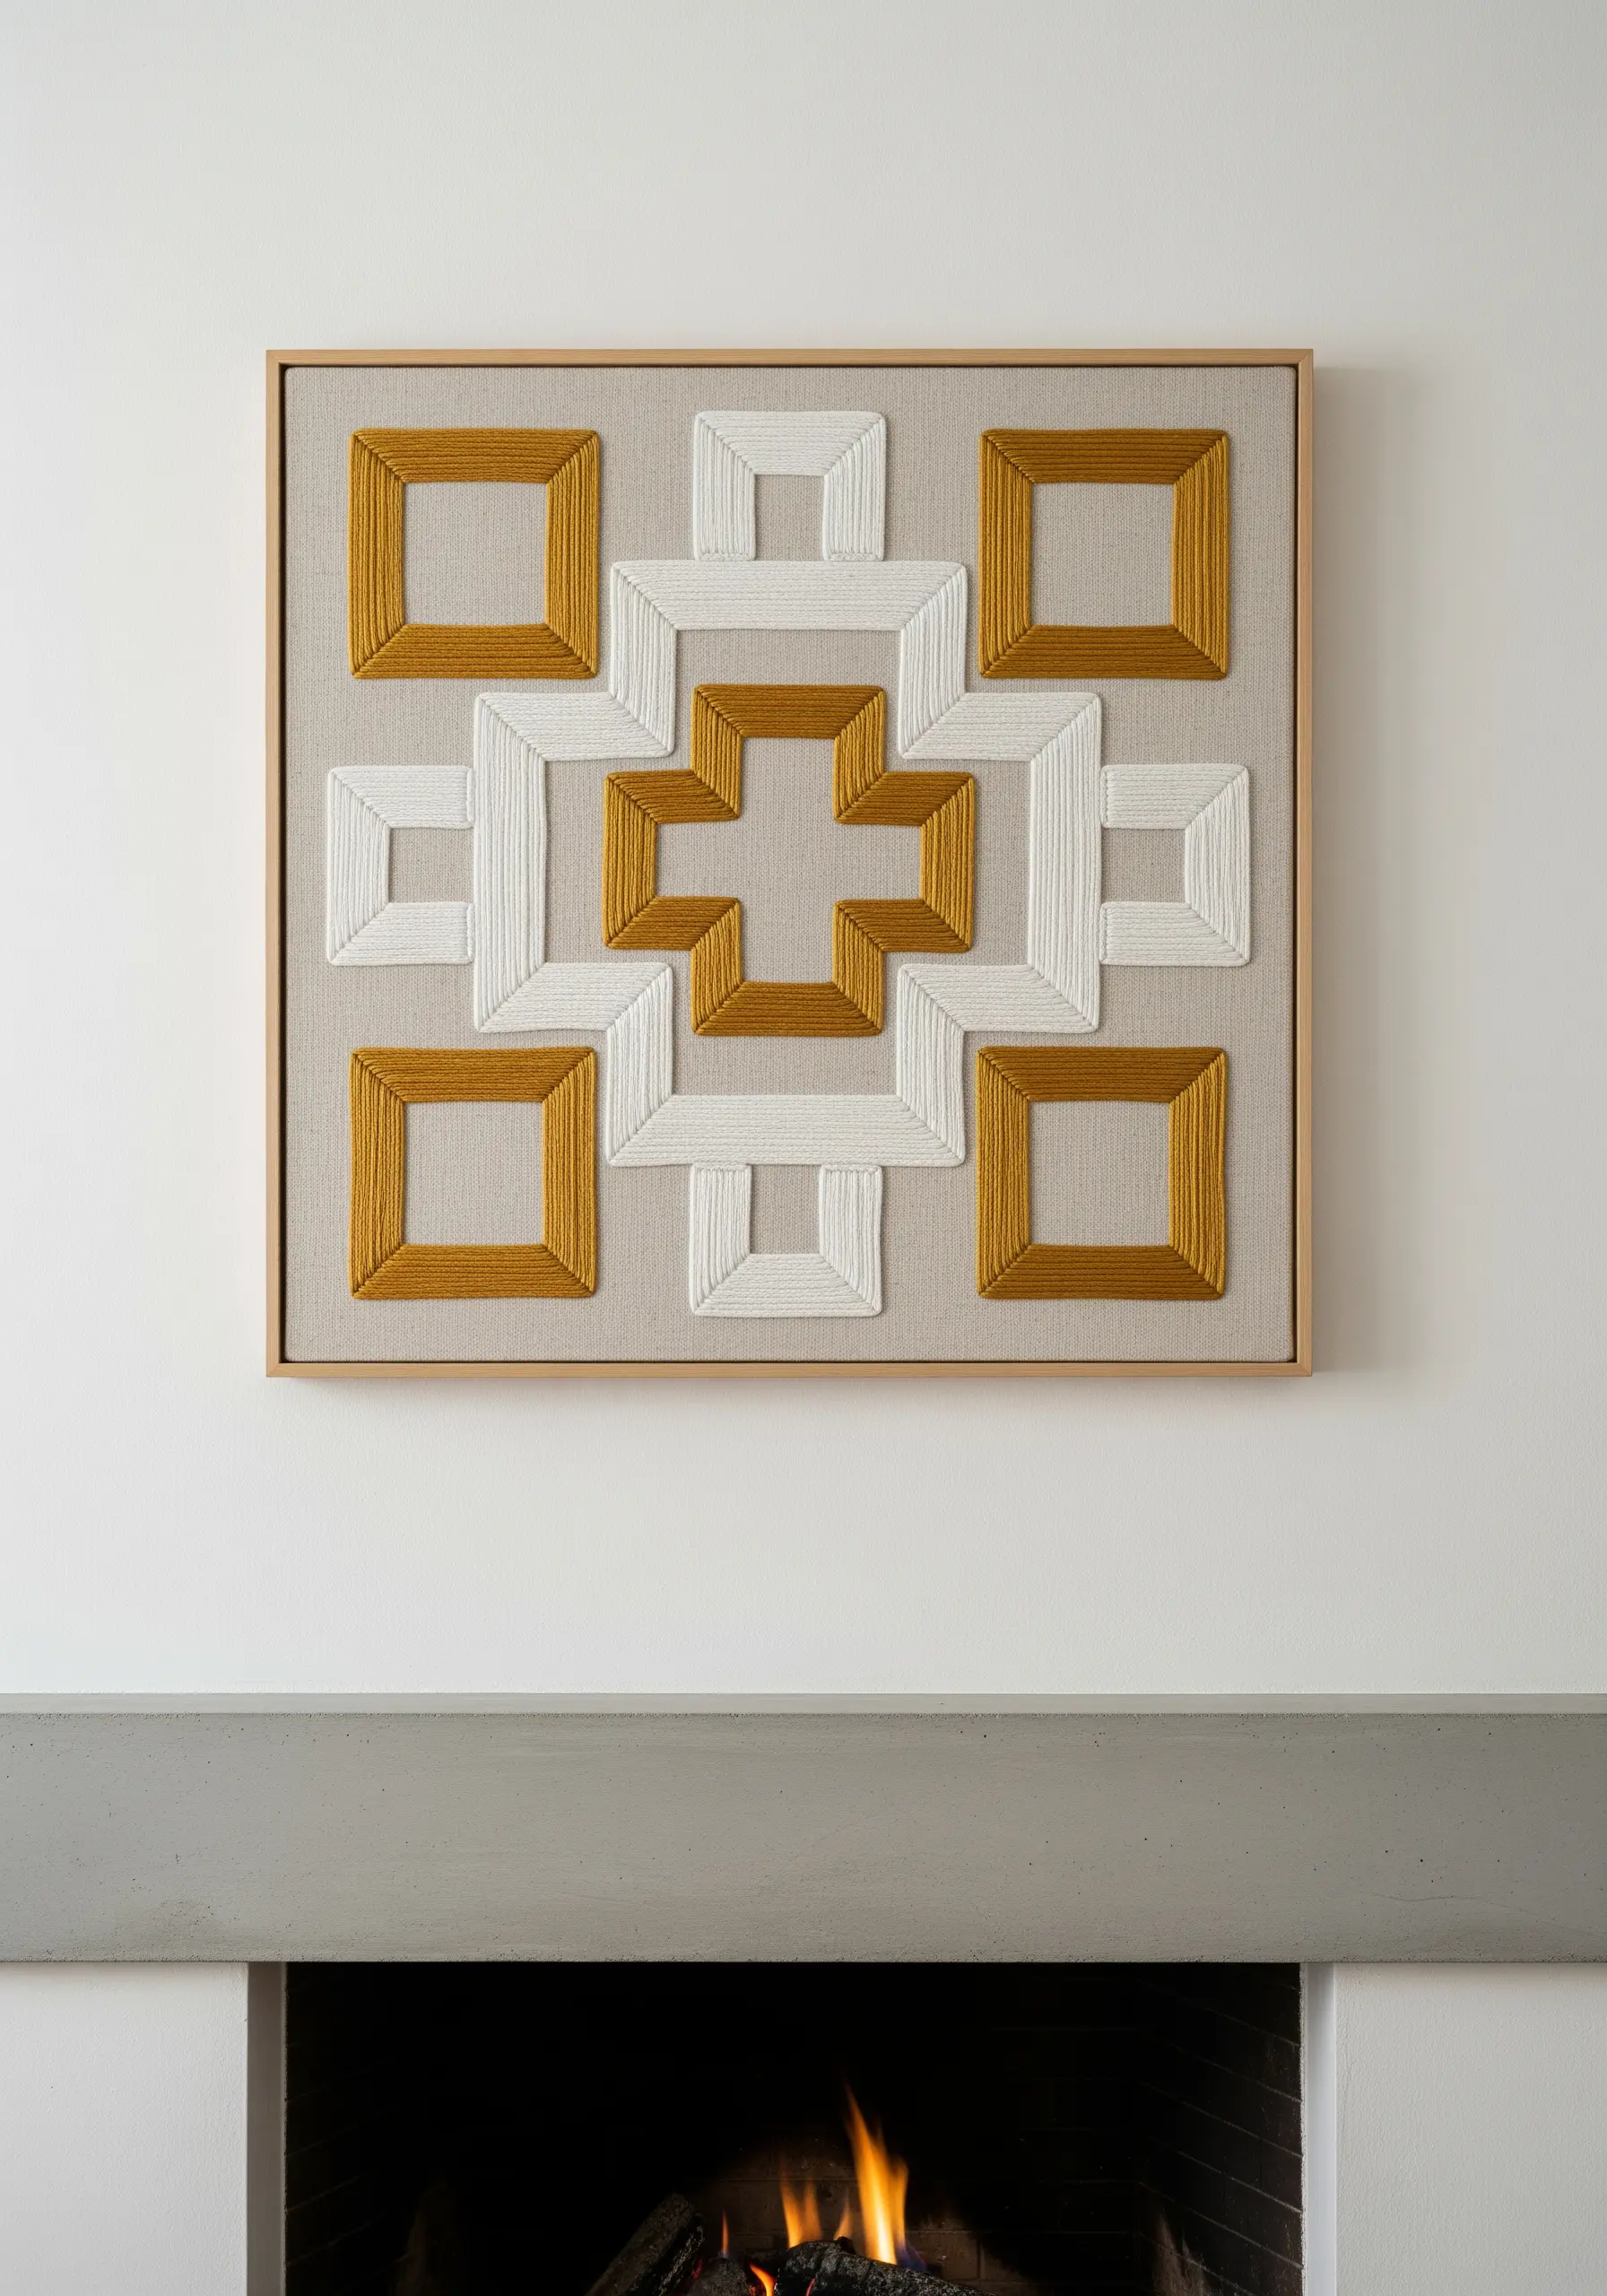
15. Combine Satin Fill and Outlines for a Polished Finish

For clean, defined geometric shapes like these honeycombs, stitch the satin fill first.
Don’t worry about getting the edges perfectly sharp. Once the shape is filled, use a single strand of the same gold thread to backstitch a neat outline around the perimeter.
This technique instantly sharpens the edges, hides any minor irregularities in your satin stitch, and gives the entire motif a crisp, professional look.
The combination of a smooth fill and a defined edge creates a pleasing textural contrast.
16. Achieve Flawless Curves on Large-Scale Banners
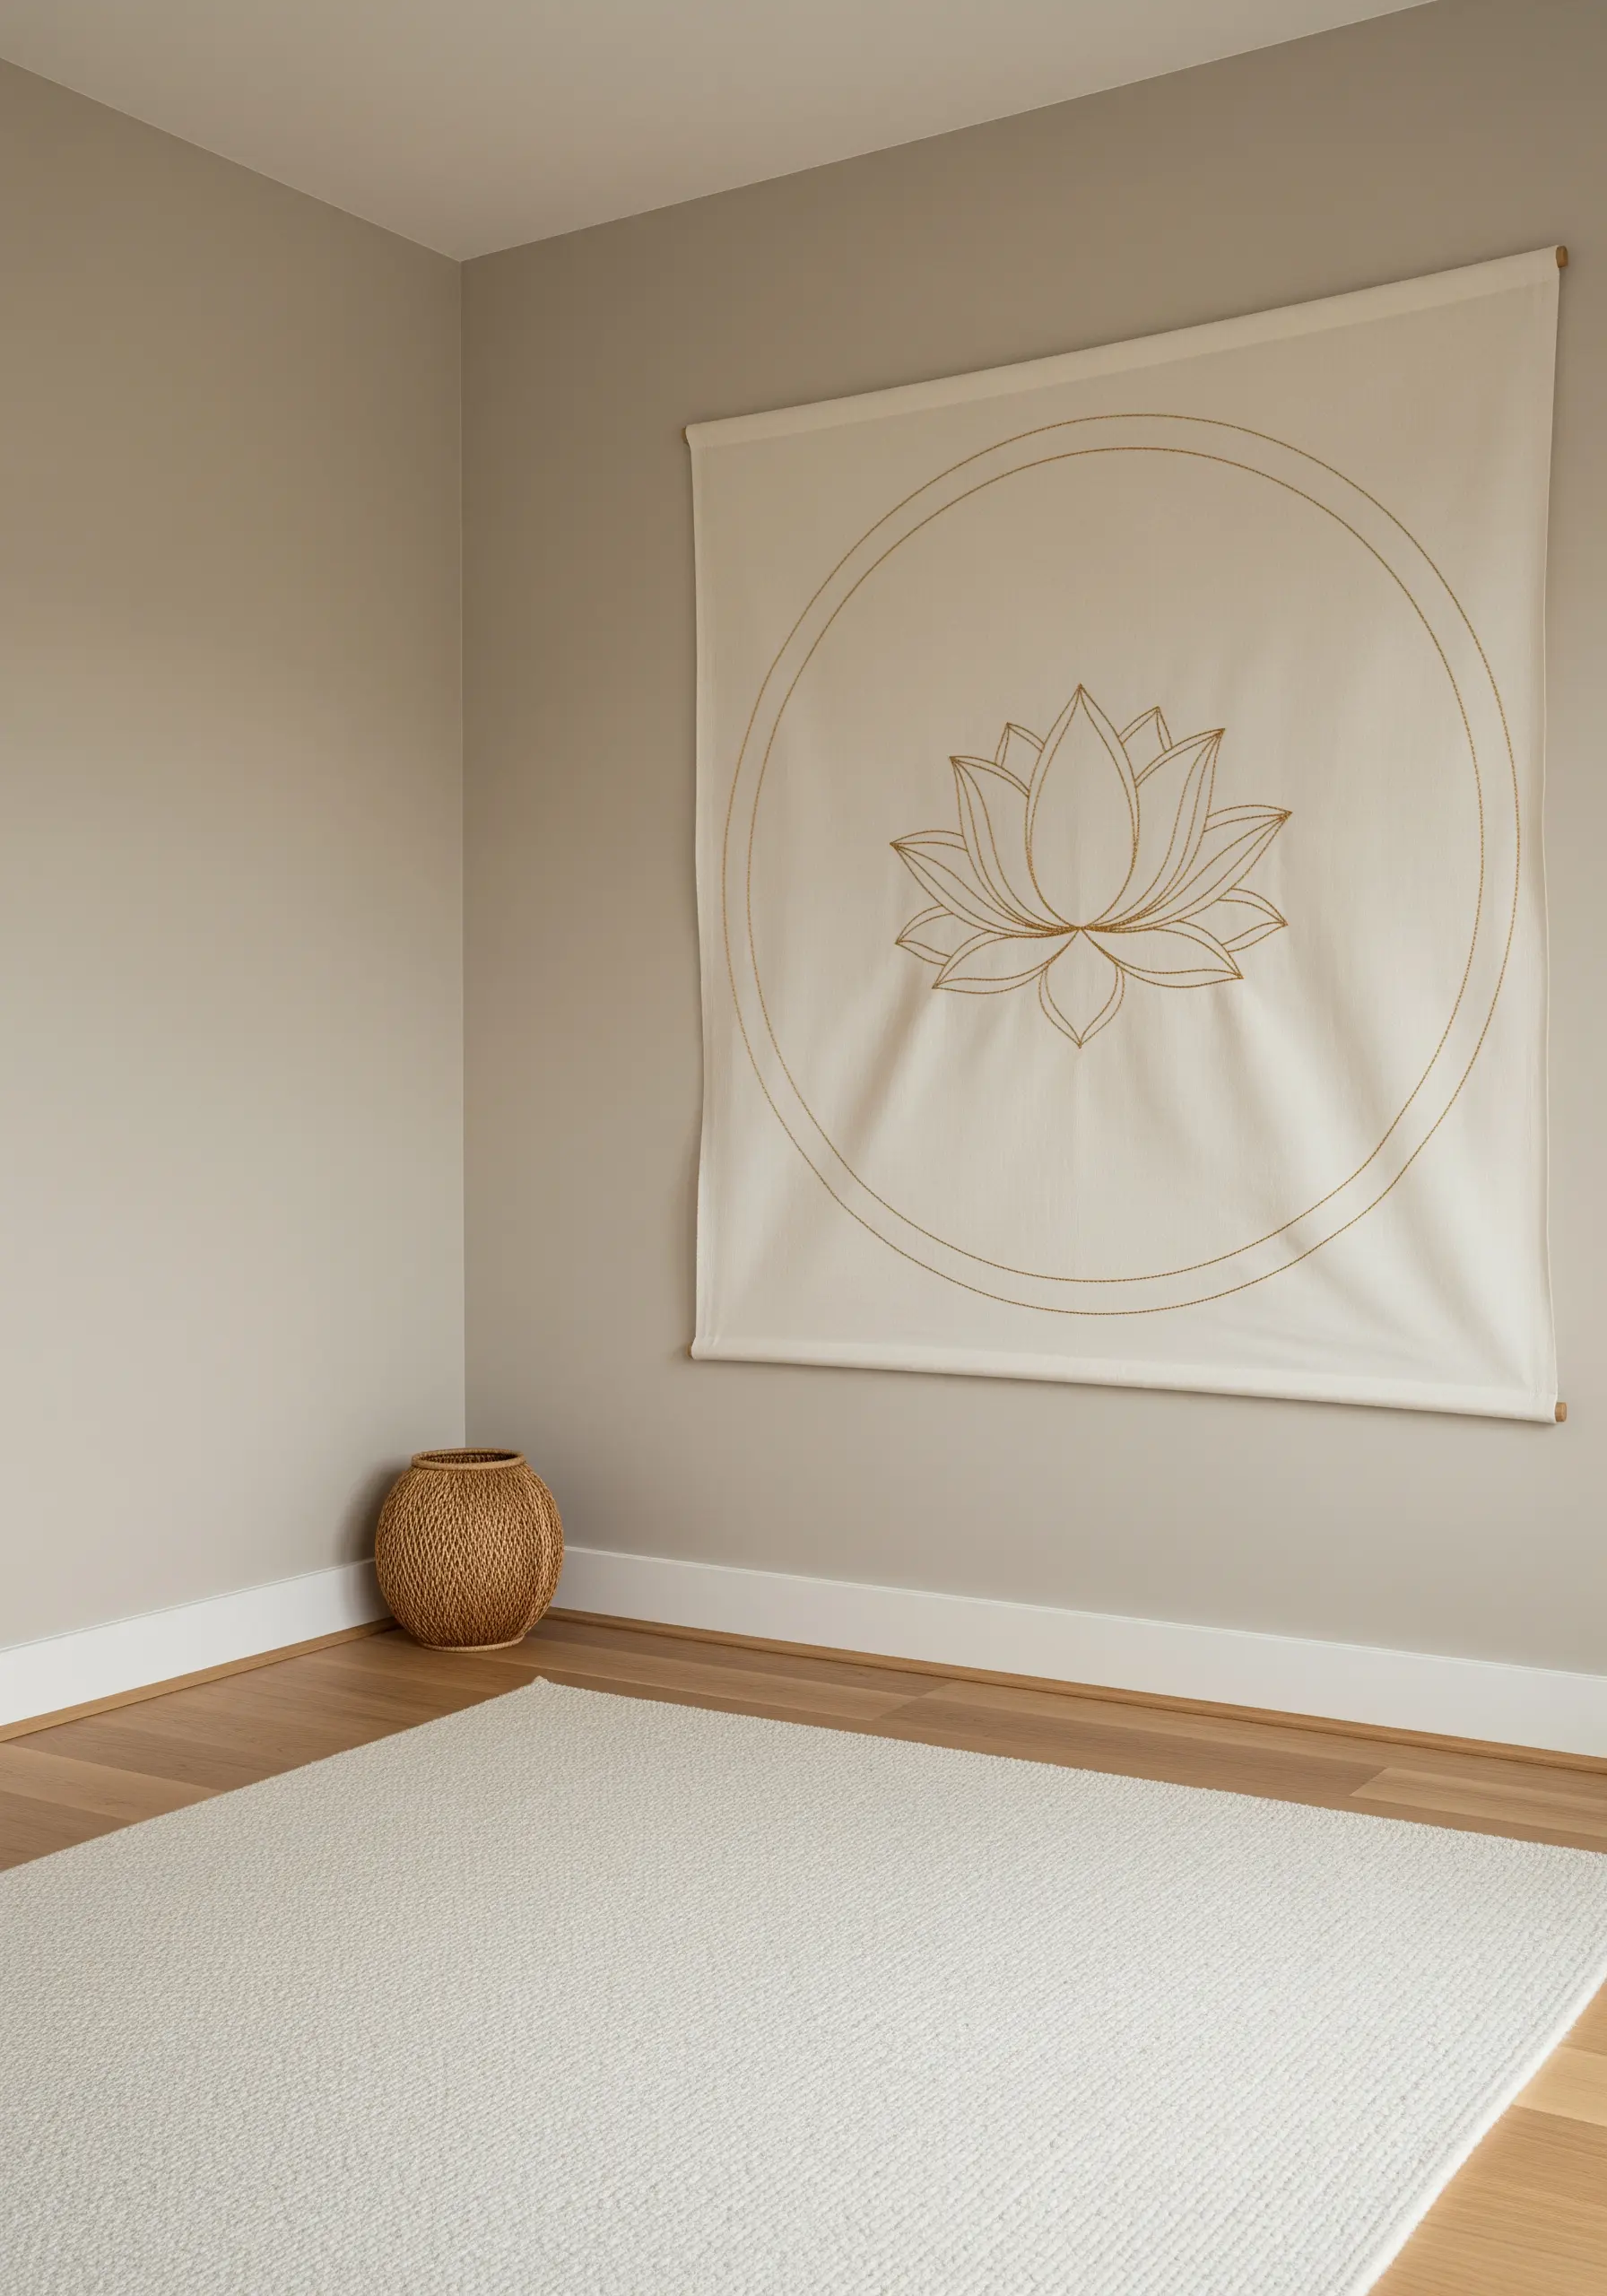
When working on a large, unstretched fabric piece like a wall banner, choose your stitch wisely to avoid puckering.
A stem stitch is ideal for smooth, flowing lines like this lotus outline because it gracefully handles curves without pulling the fabric.
Use a heavier thread, like a #8 pearl cotton, to give the lines enough visual weight to stand out on a large surface.
This ensures your hand-stitched aesthetic projects remain elegant and impactful, even at a larger scale.
17. Make a Single Element Shine with Fishbone Stitch
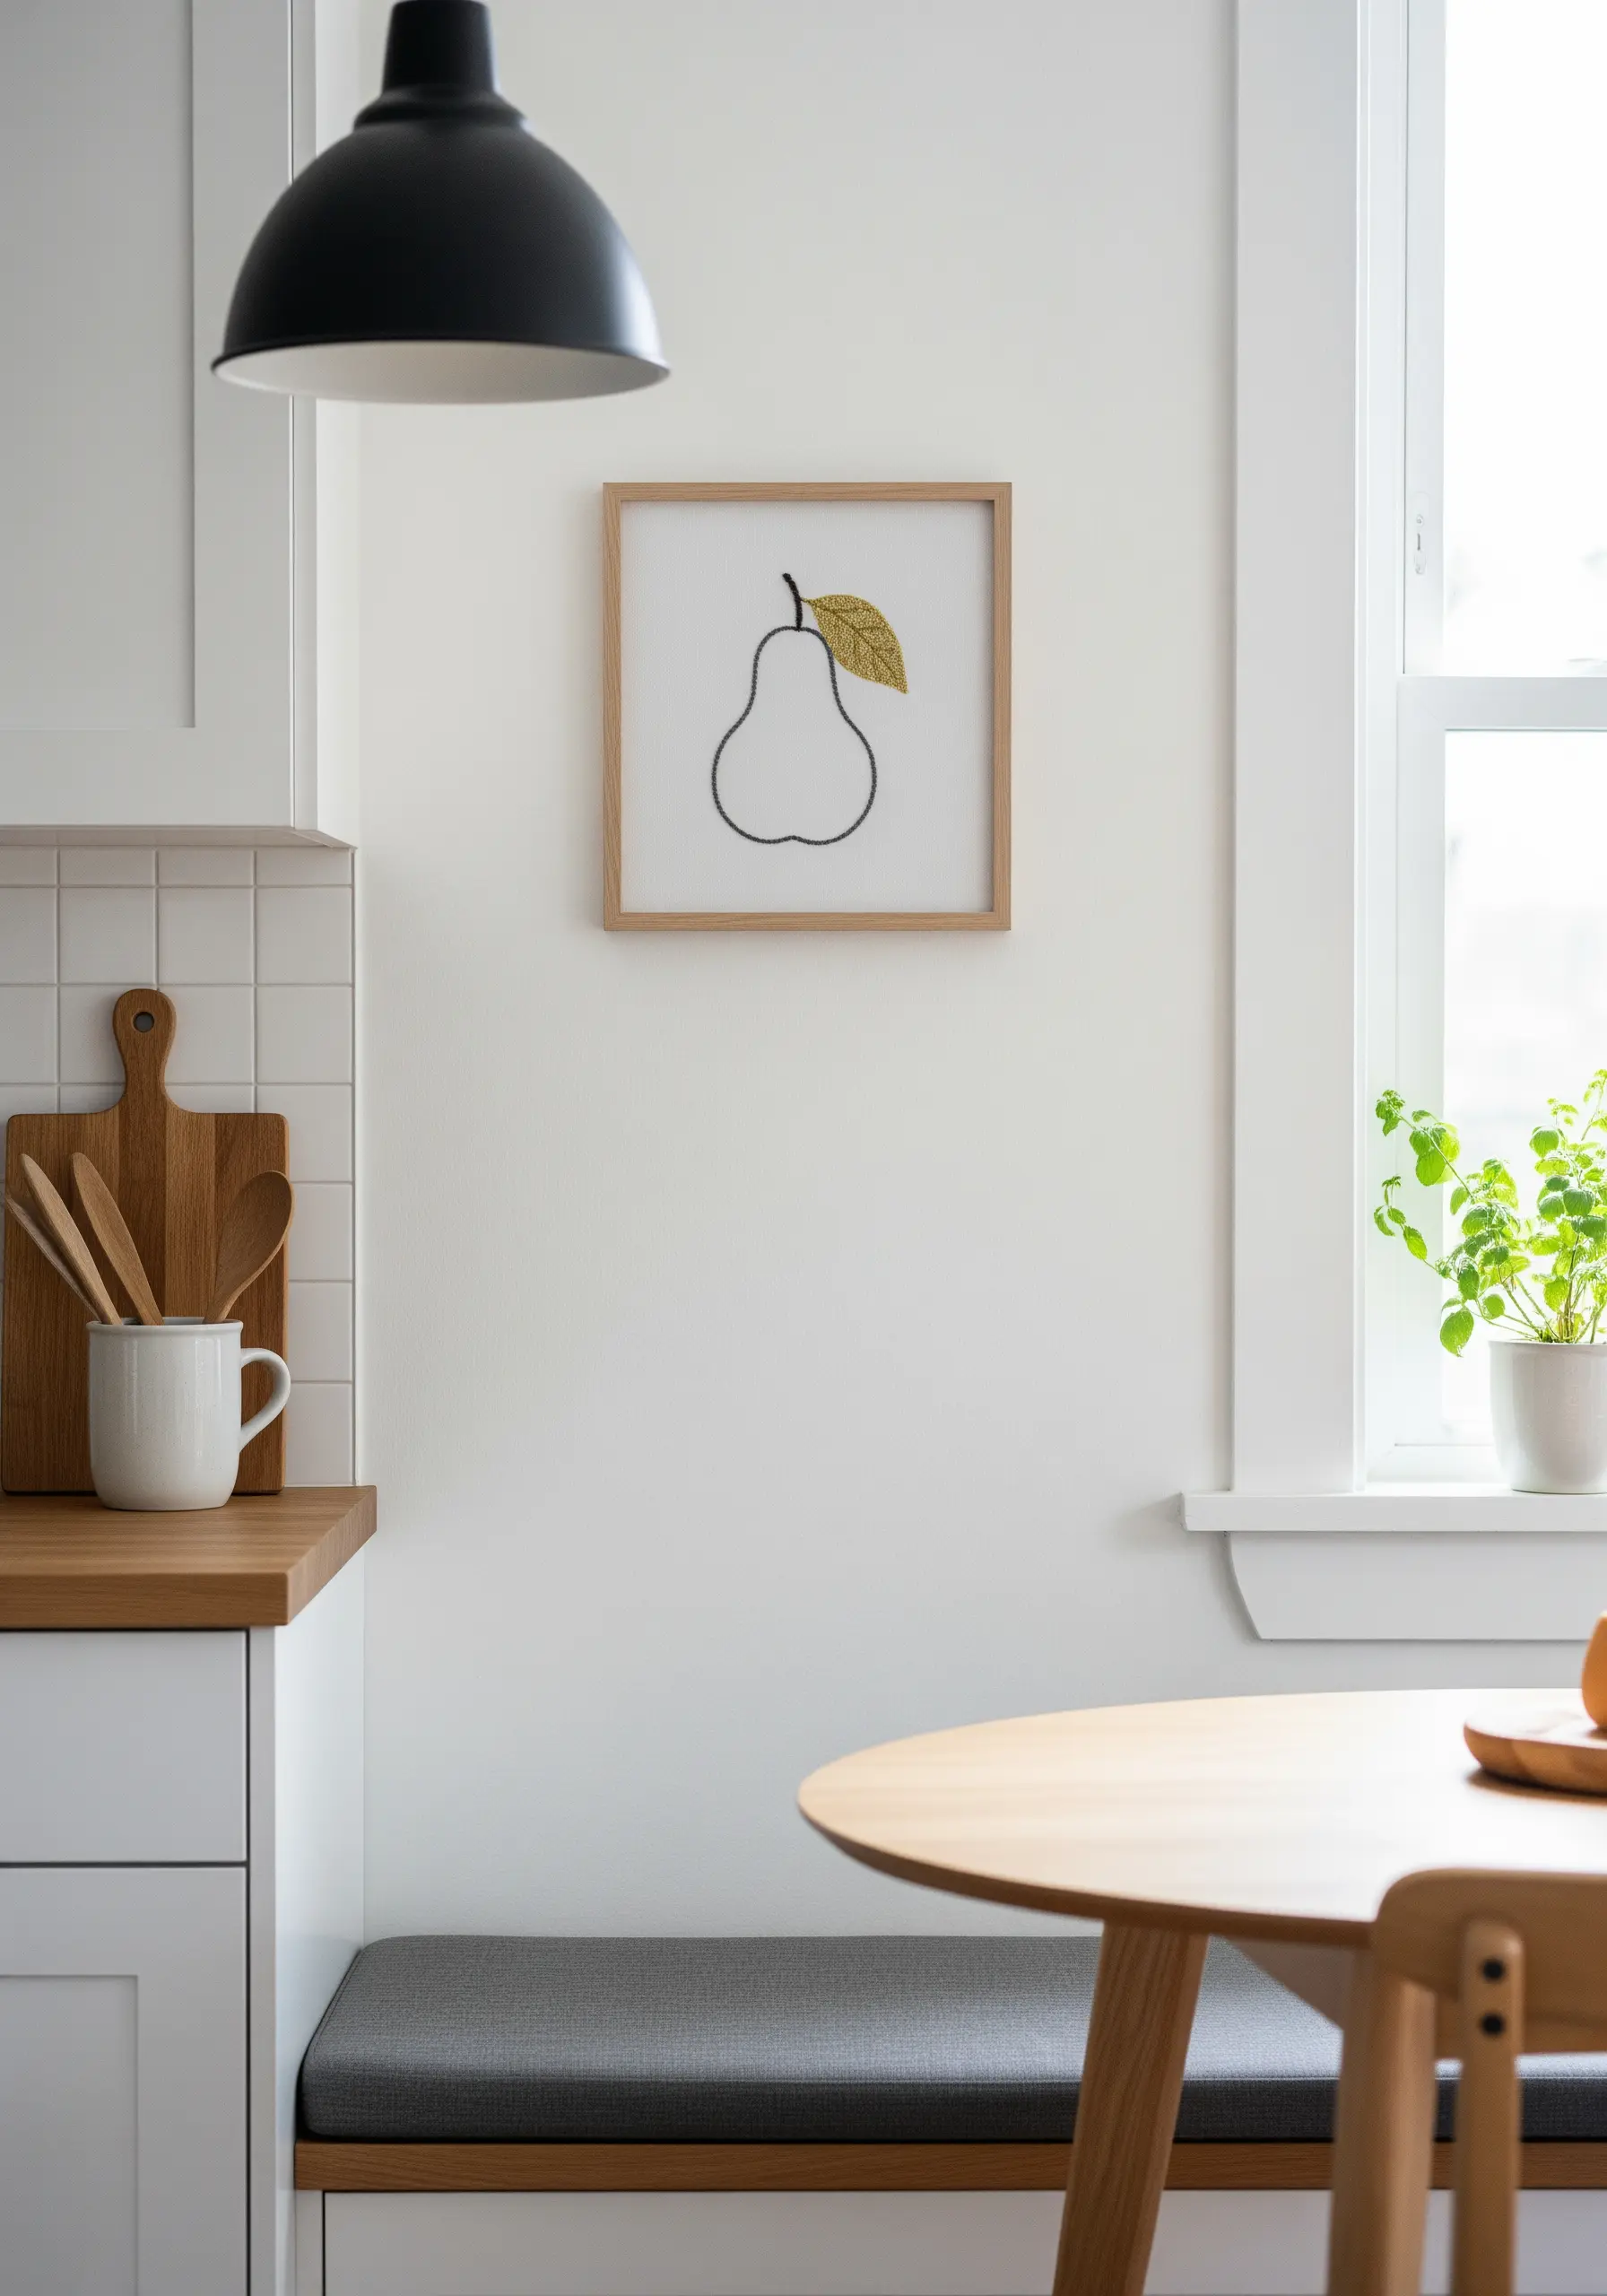
In a minimalist design, draw all the attention to a single, beautifully executed detail.
To create the subtly raised vein and angled threads on this pear leaf, use the fishbone stitch.
You’ll work from the tip of the leaf downwards, alternating stitches from left to right across a central guideline.
This technique naturally creates the texture and directional sheen of a real leaf, making a simple motif feel incredibly polished and alive.
18. Create Texture Through Repetitive Vertical Stitches
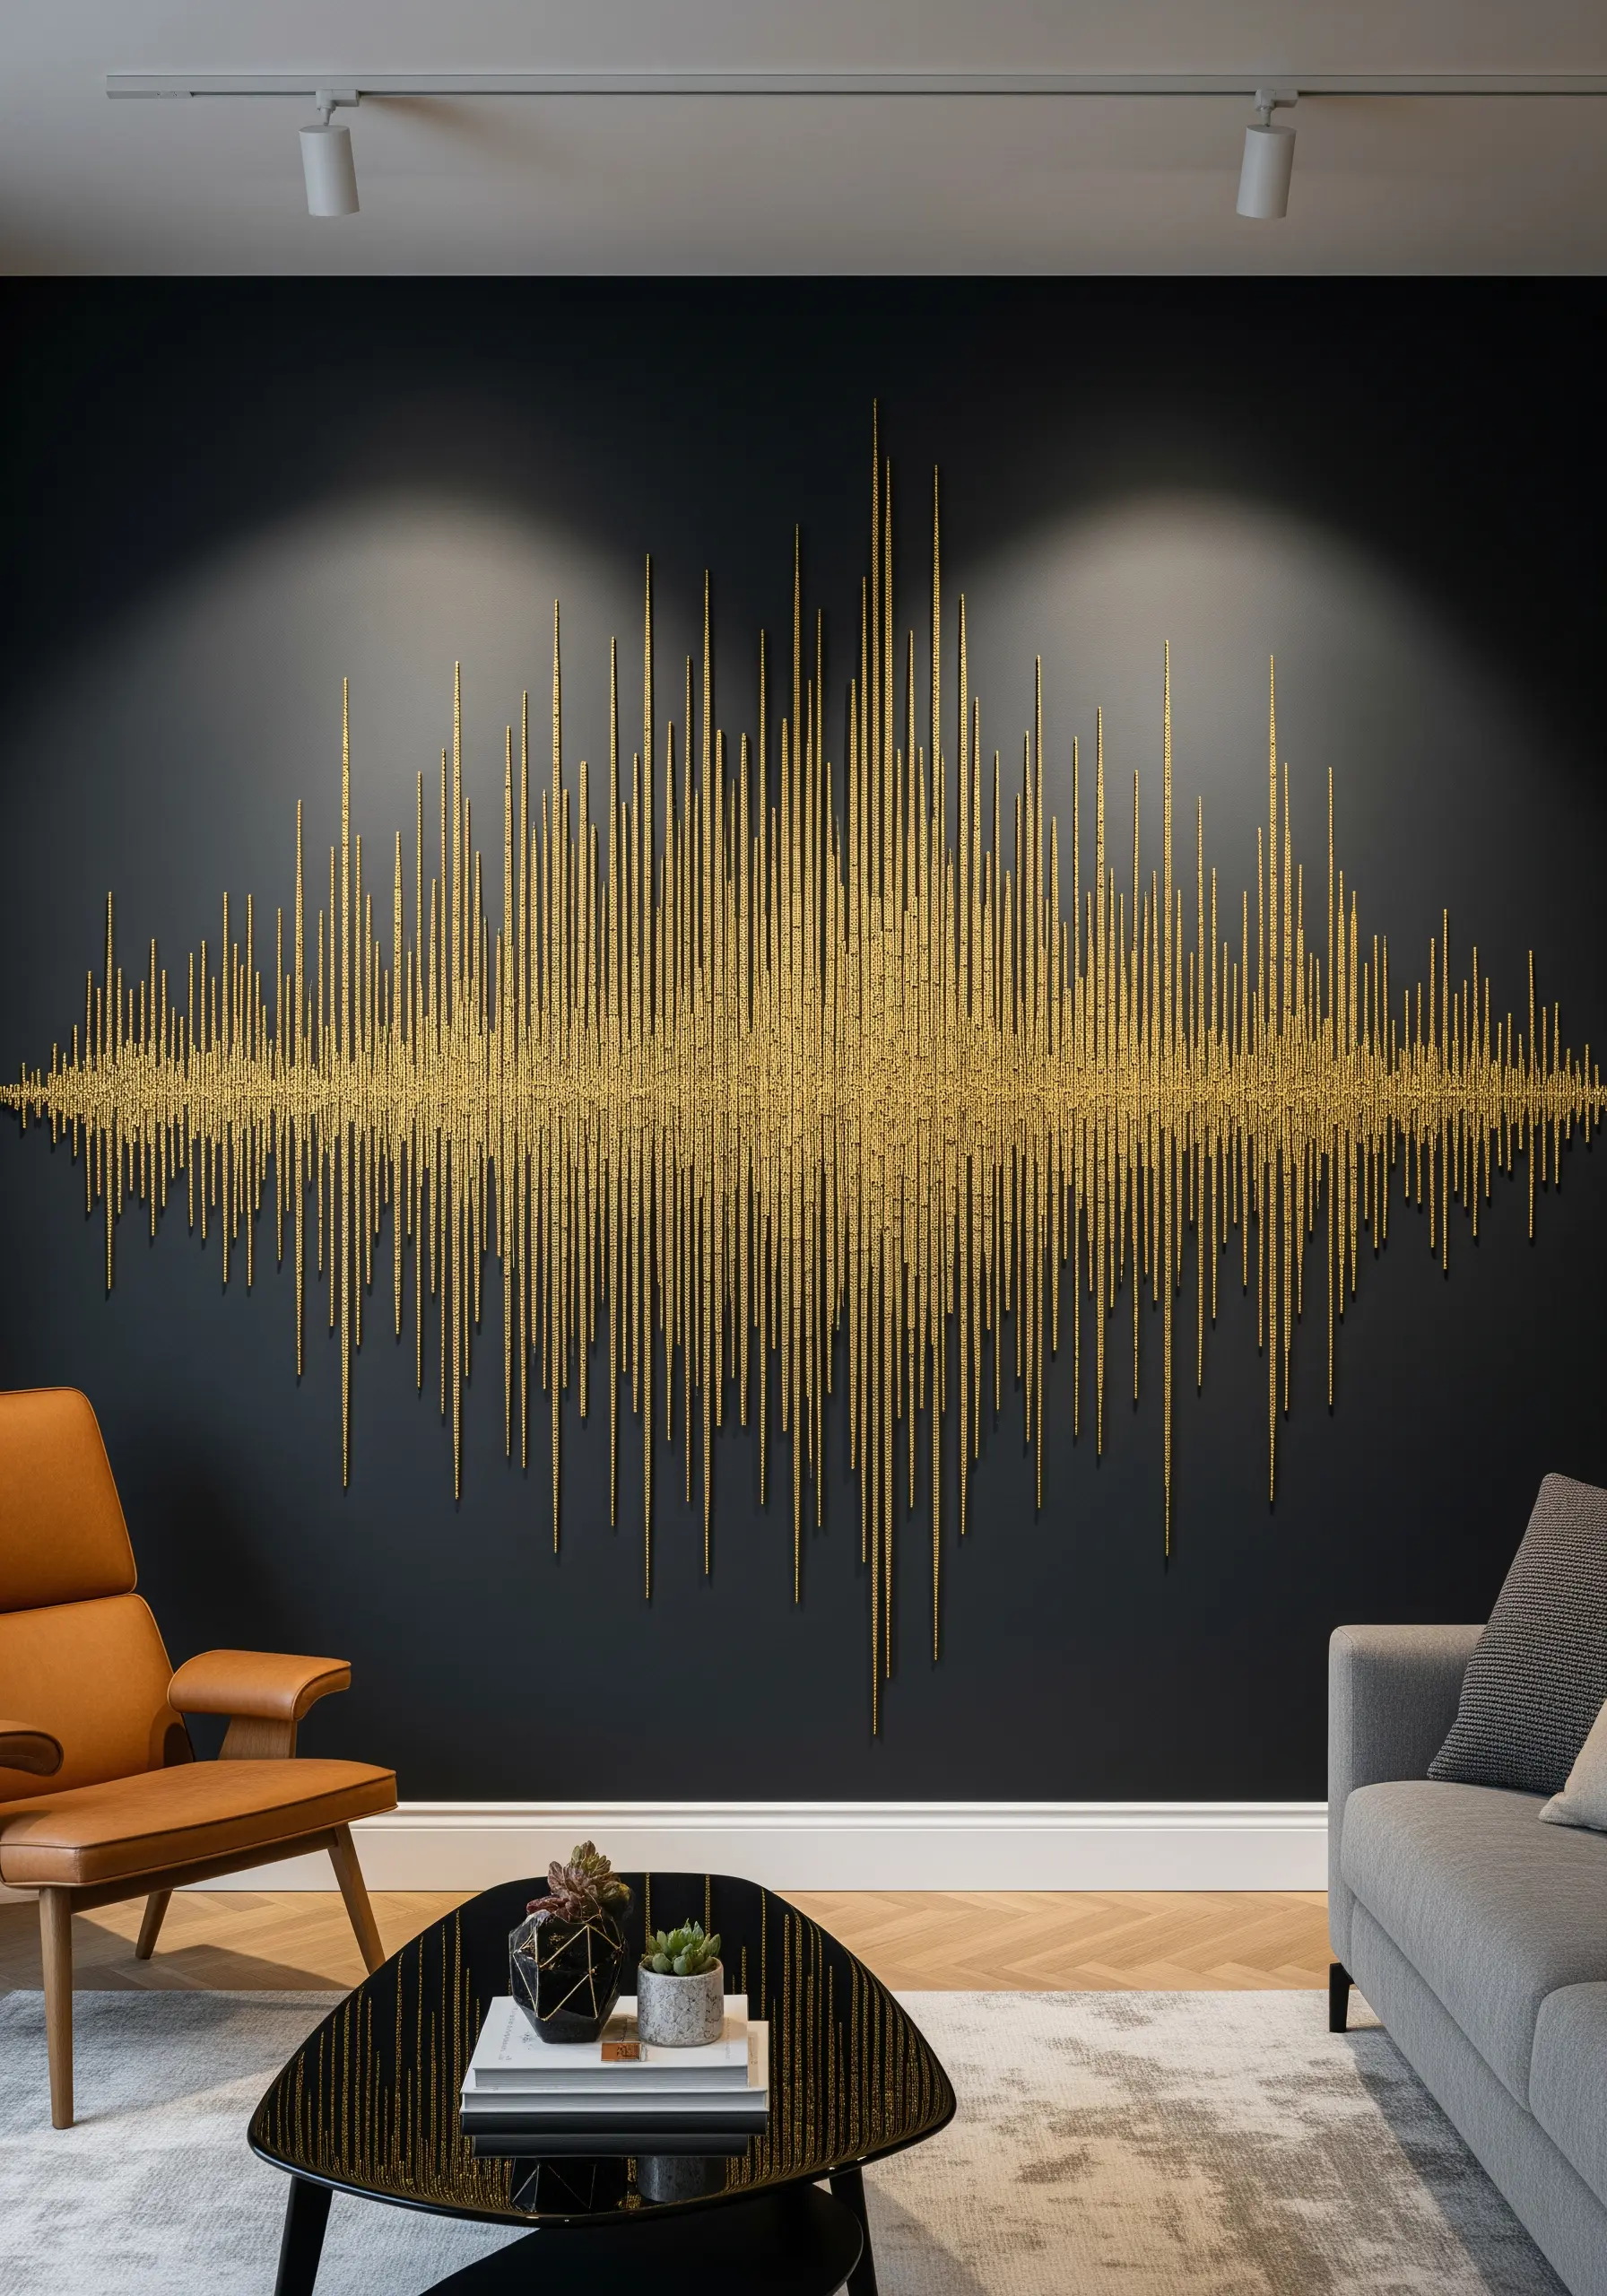
This soundwave design demonstrates the immense impact of simple, repetitive stitches on a massive scale.
Achieve this look by filling the entire shape with thousands of vertical straight stitches or seed stitches, packed densely together.
Use a high-quality metallic thread that won’t fray with repeated passes through the fabric.
The final result is a statement-size embroidered textile hanging with a rich, shimmering texture that seems to vibrate with energy.
19. Tell a Story with Contrasting Thread and Stitches
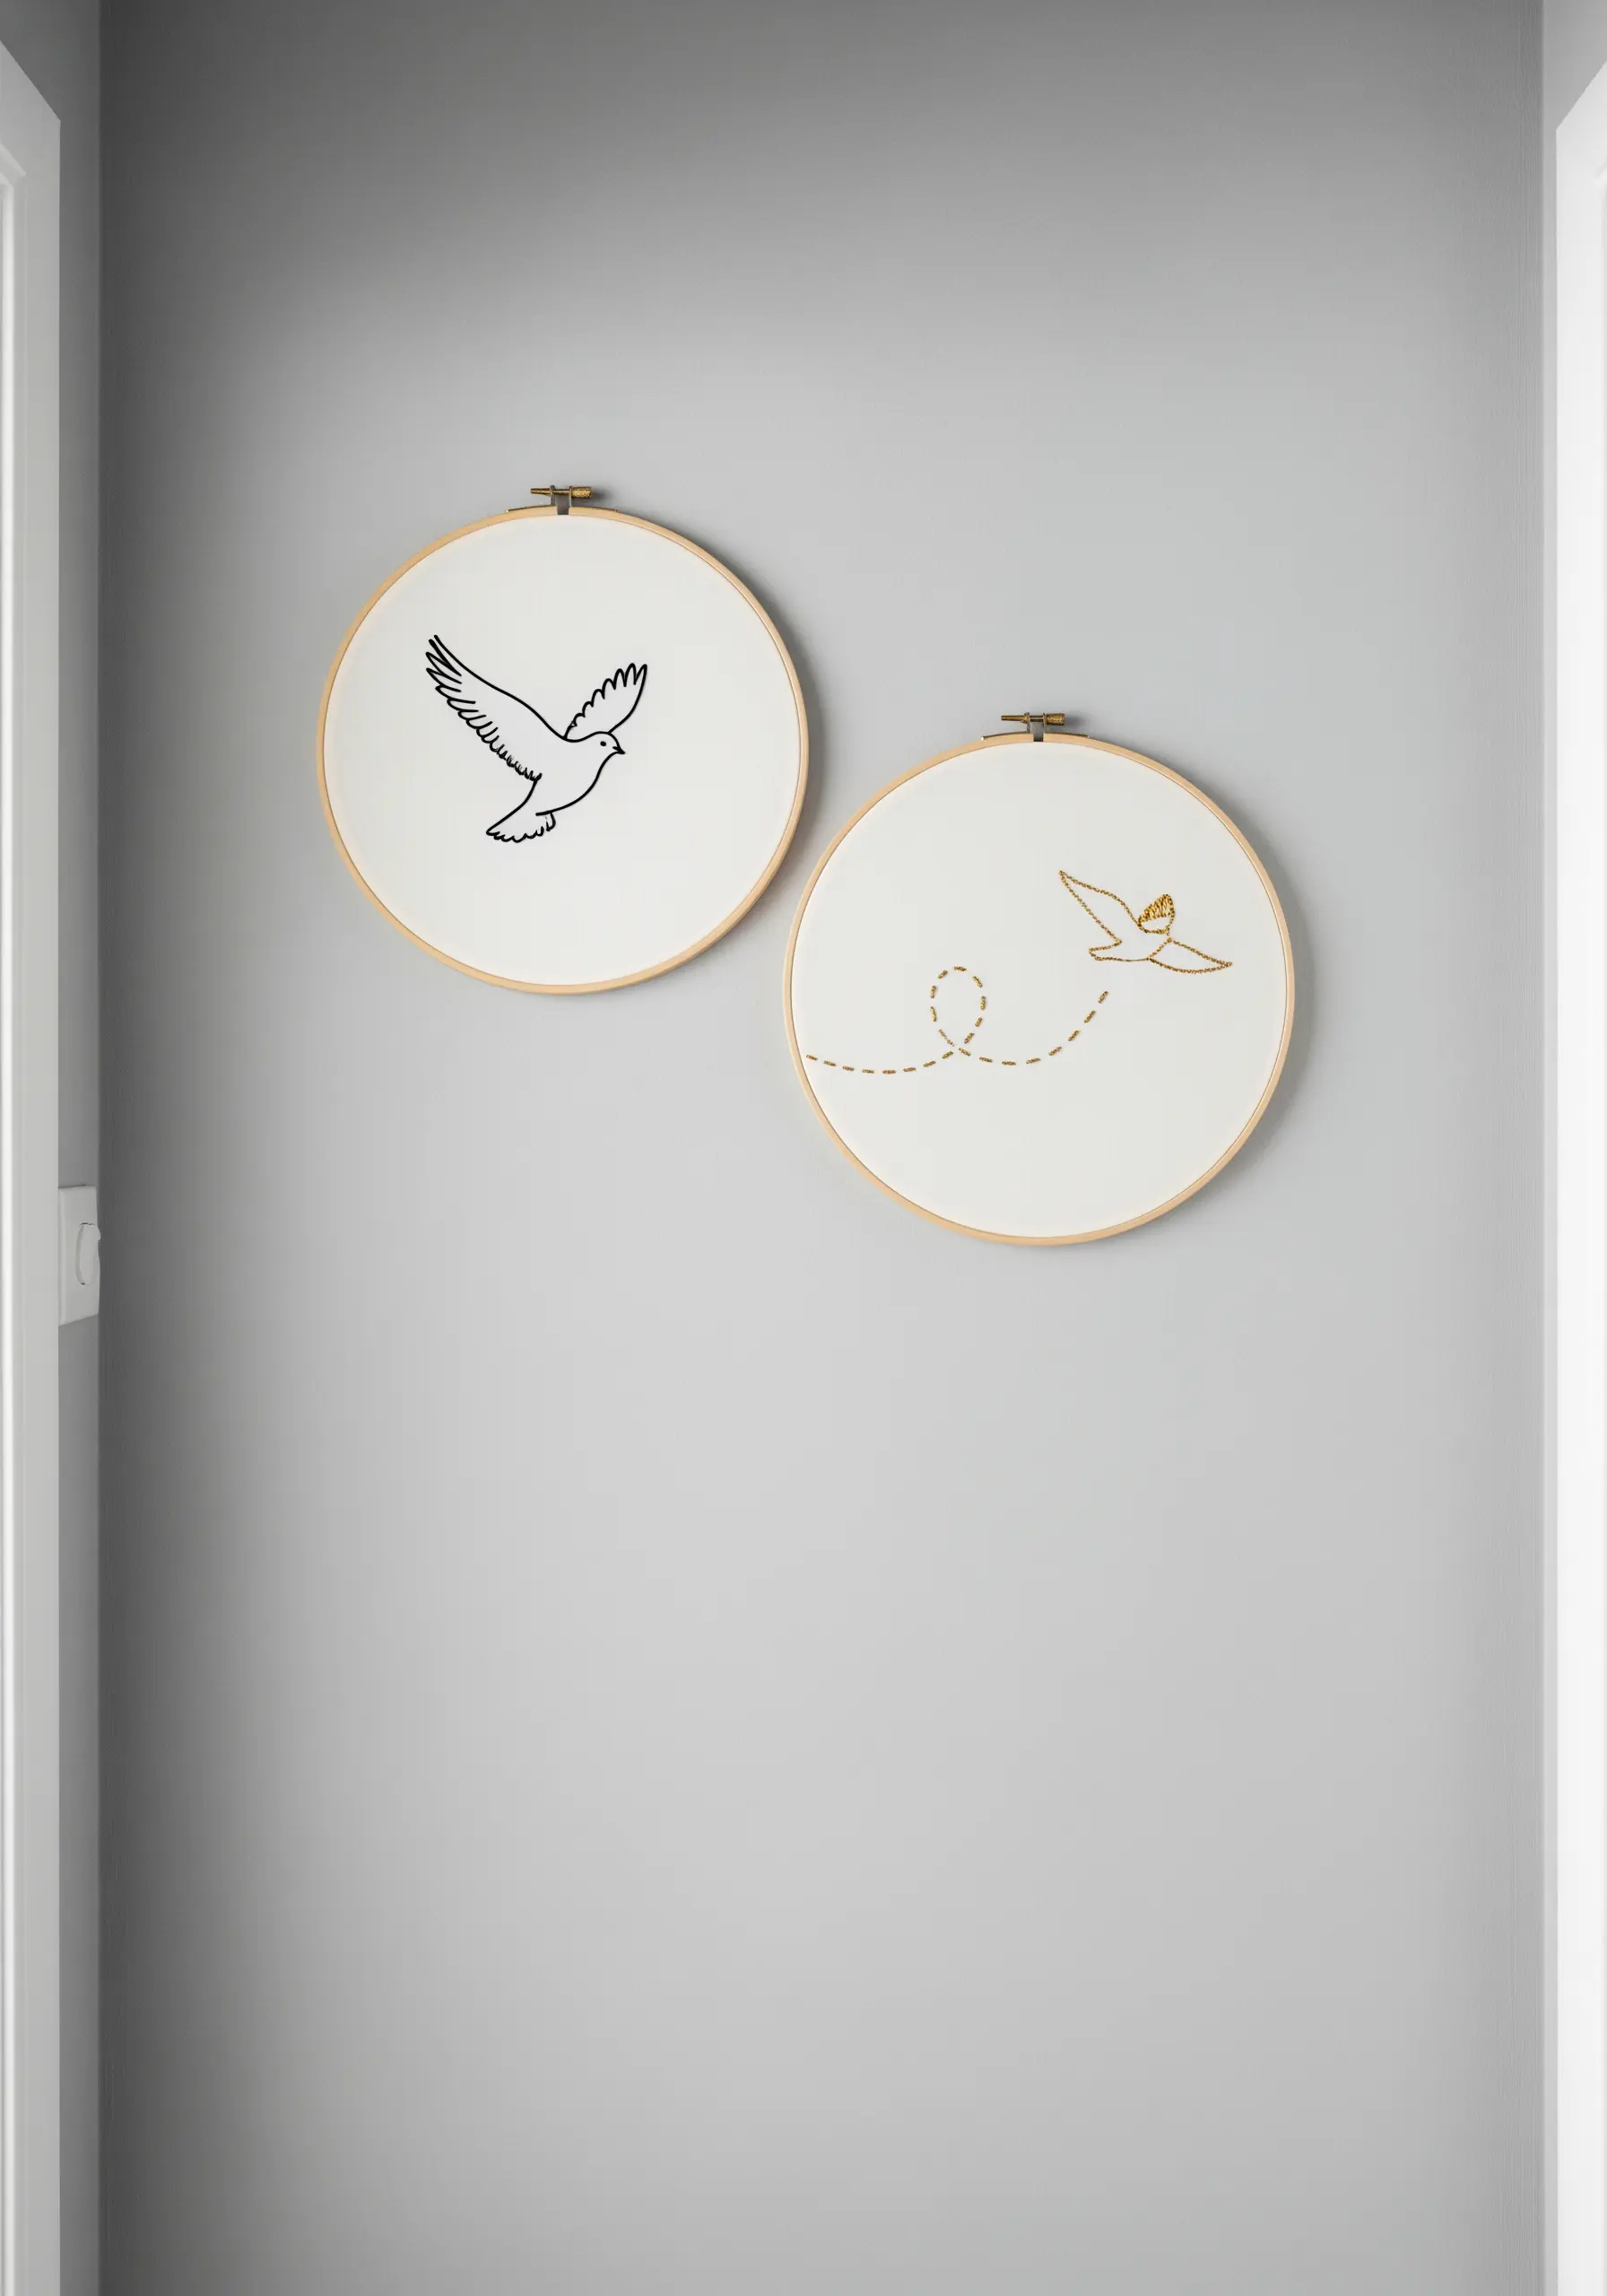
Use thread and stitch choice to create a narrative within your hoop art.
Render one bird in solid black satin stitch to give it weight and presence.
Stitch the second bird as a simple gold outline using a split stitch, making it feel lighter and more ethereal.
Connect the two with a playful, dotted trail of gold seed stitches to suggest movement and transformation.
This simple visual story feels both whimsical and meaningful.
20. Add Subtle Detail with Padded Appliqué
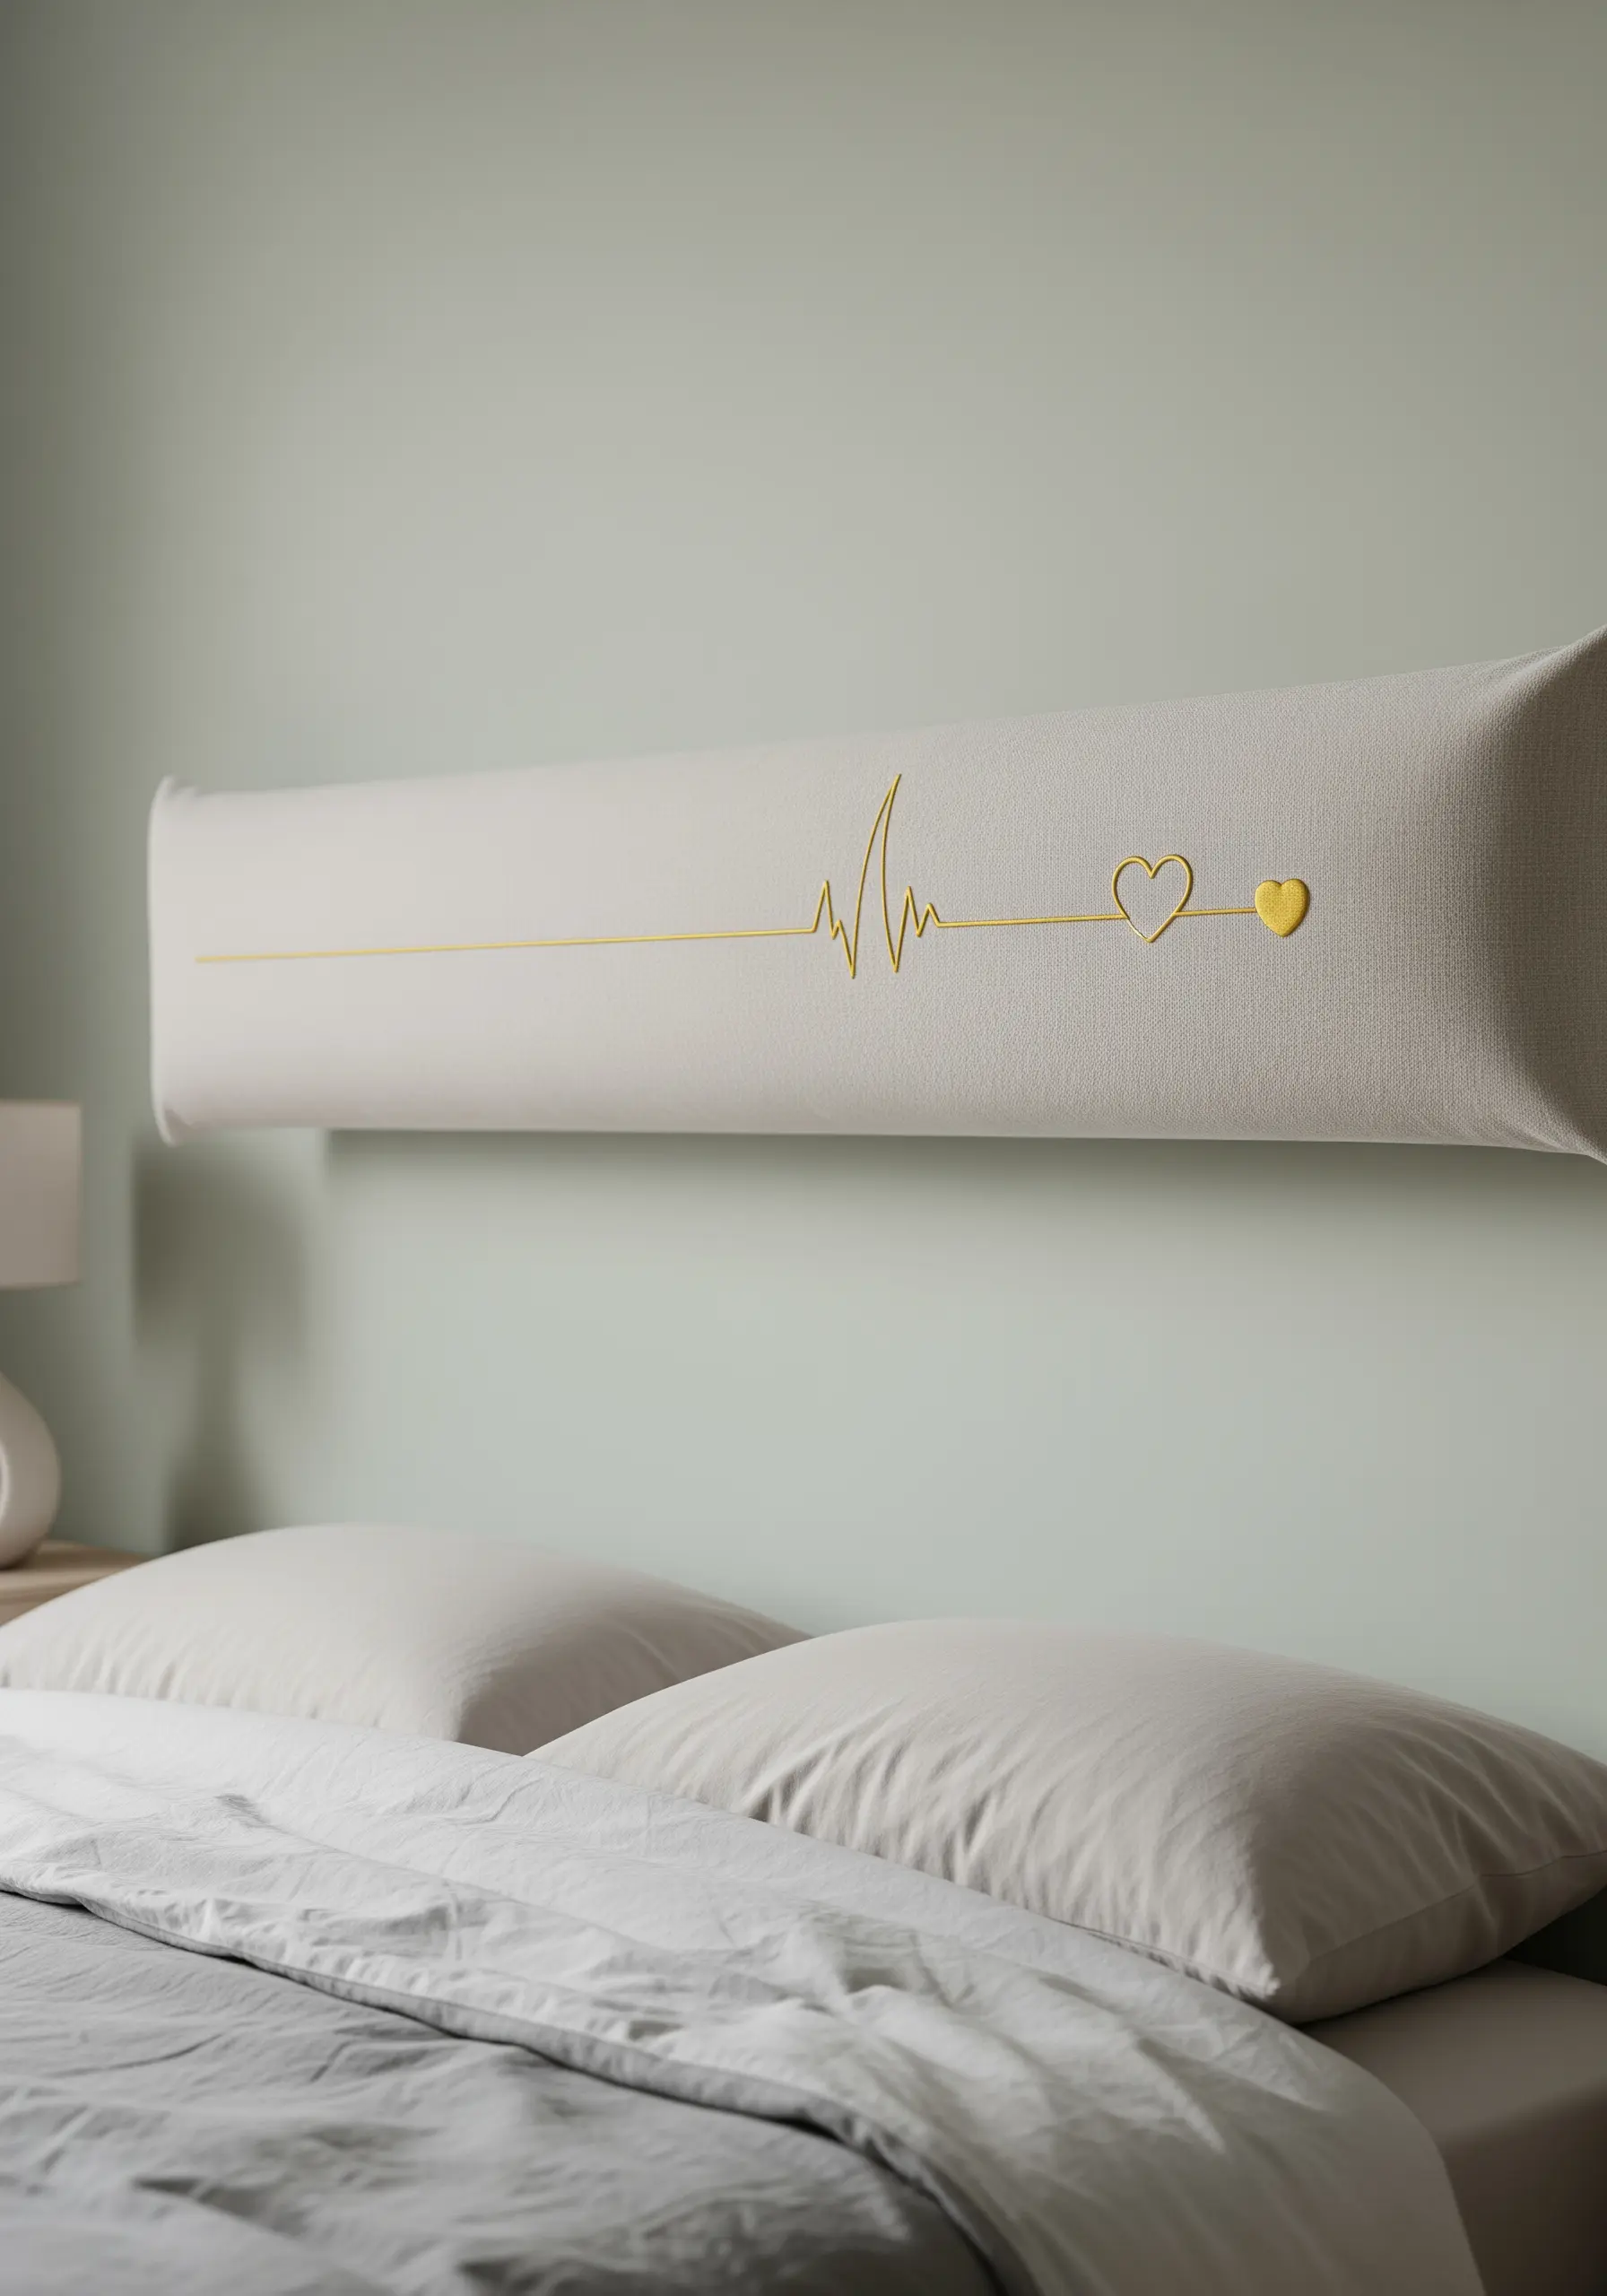
Elevate a simple headboard by adding a touch of personalized, dimensional embroidery.
The fine heartbeat line can be stitched directly onto the fabric using a stem stitch.
For the small heart at the end, create a padded appliqué. Embroider the heart shape onto a separate piece of fabric with a layer of felt behind it.
Cut it out carefully and attach it to the headboard with a few tiny, invisible stitches. This adds a soft, raised element that makes the design pop.
21. Radiate Energy with Precisely Stitched Sunbursts
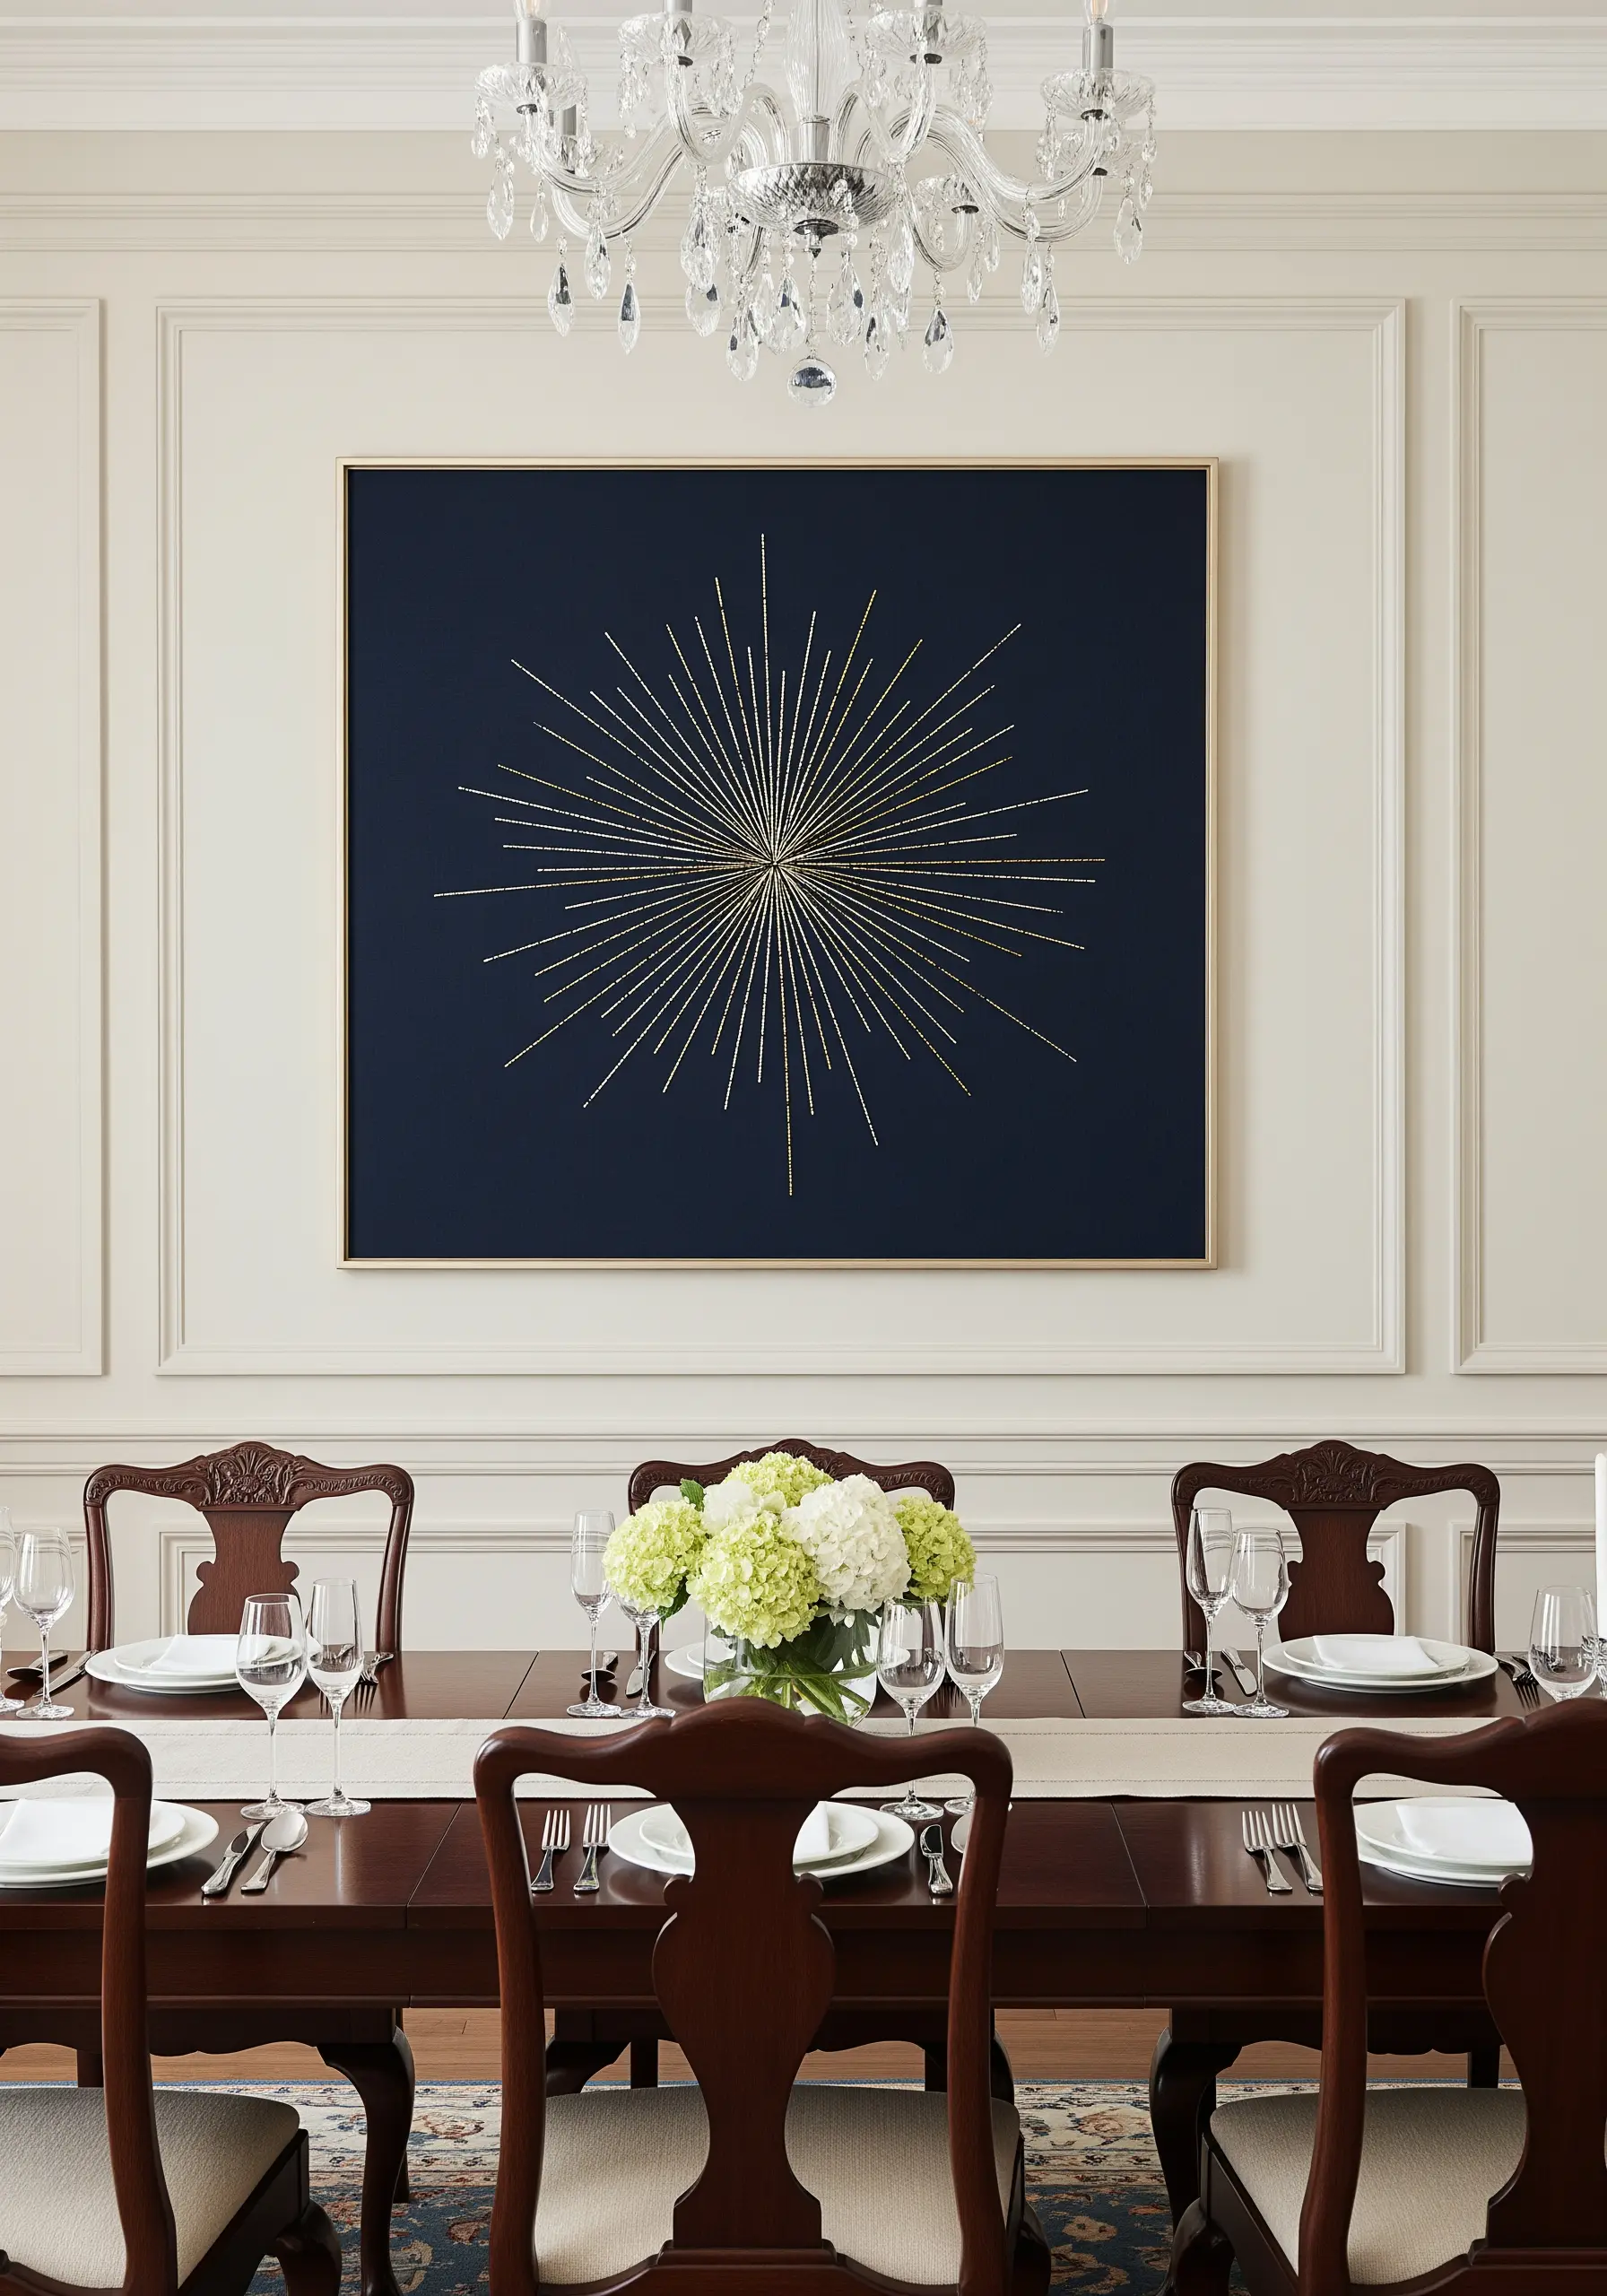
A sunburst or starburst motif is a powerful way to add energy to a formal space.
The key to a flawless result is meticulous preparation. Use a protractor and a water-soluble marker to draw perfectly spaced radiating lines from a central point.
Stitch over your guidelines with a bright metallic thread using a simple straight stitch.
When stitched on a dark, rich fabric like navy blue or black velvet, the gold thread creates a breathtaking, light-catching centerpiece.
22. Create Large-Scale Spirals with Couching
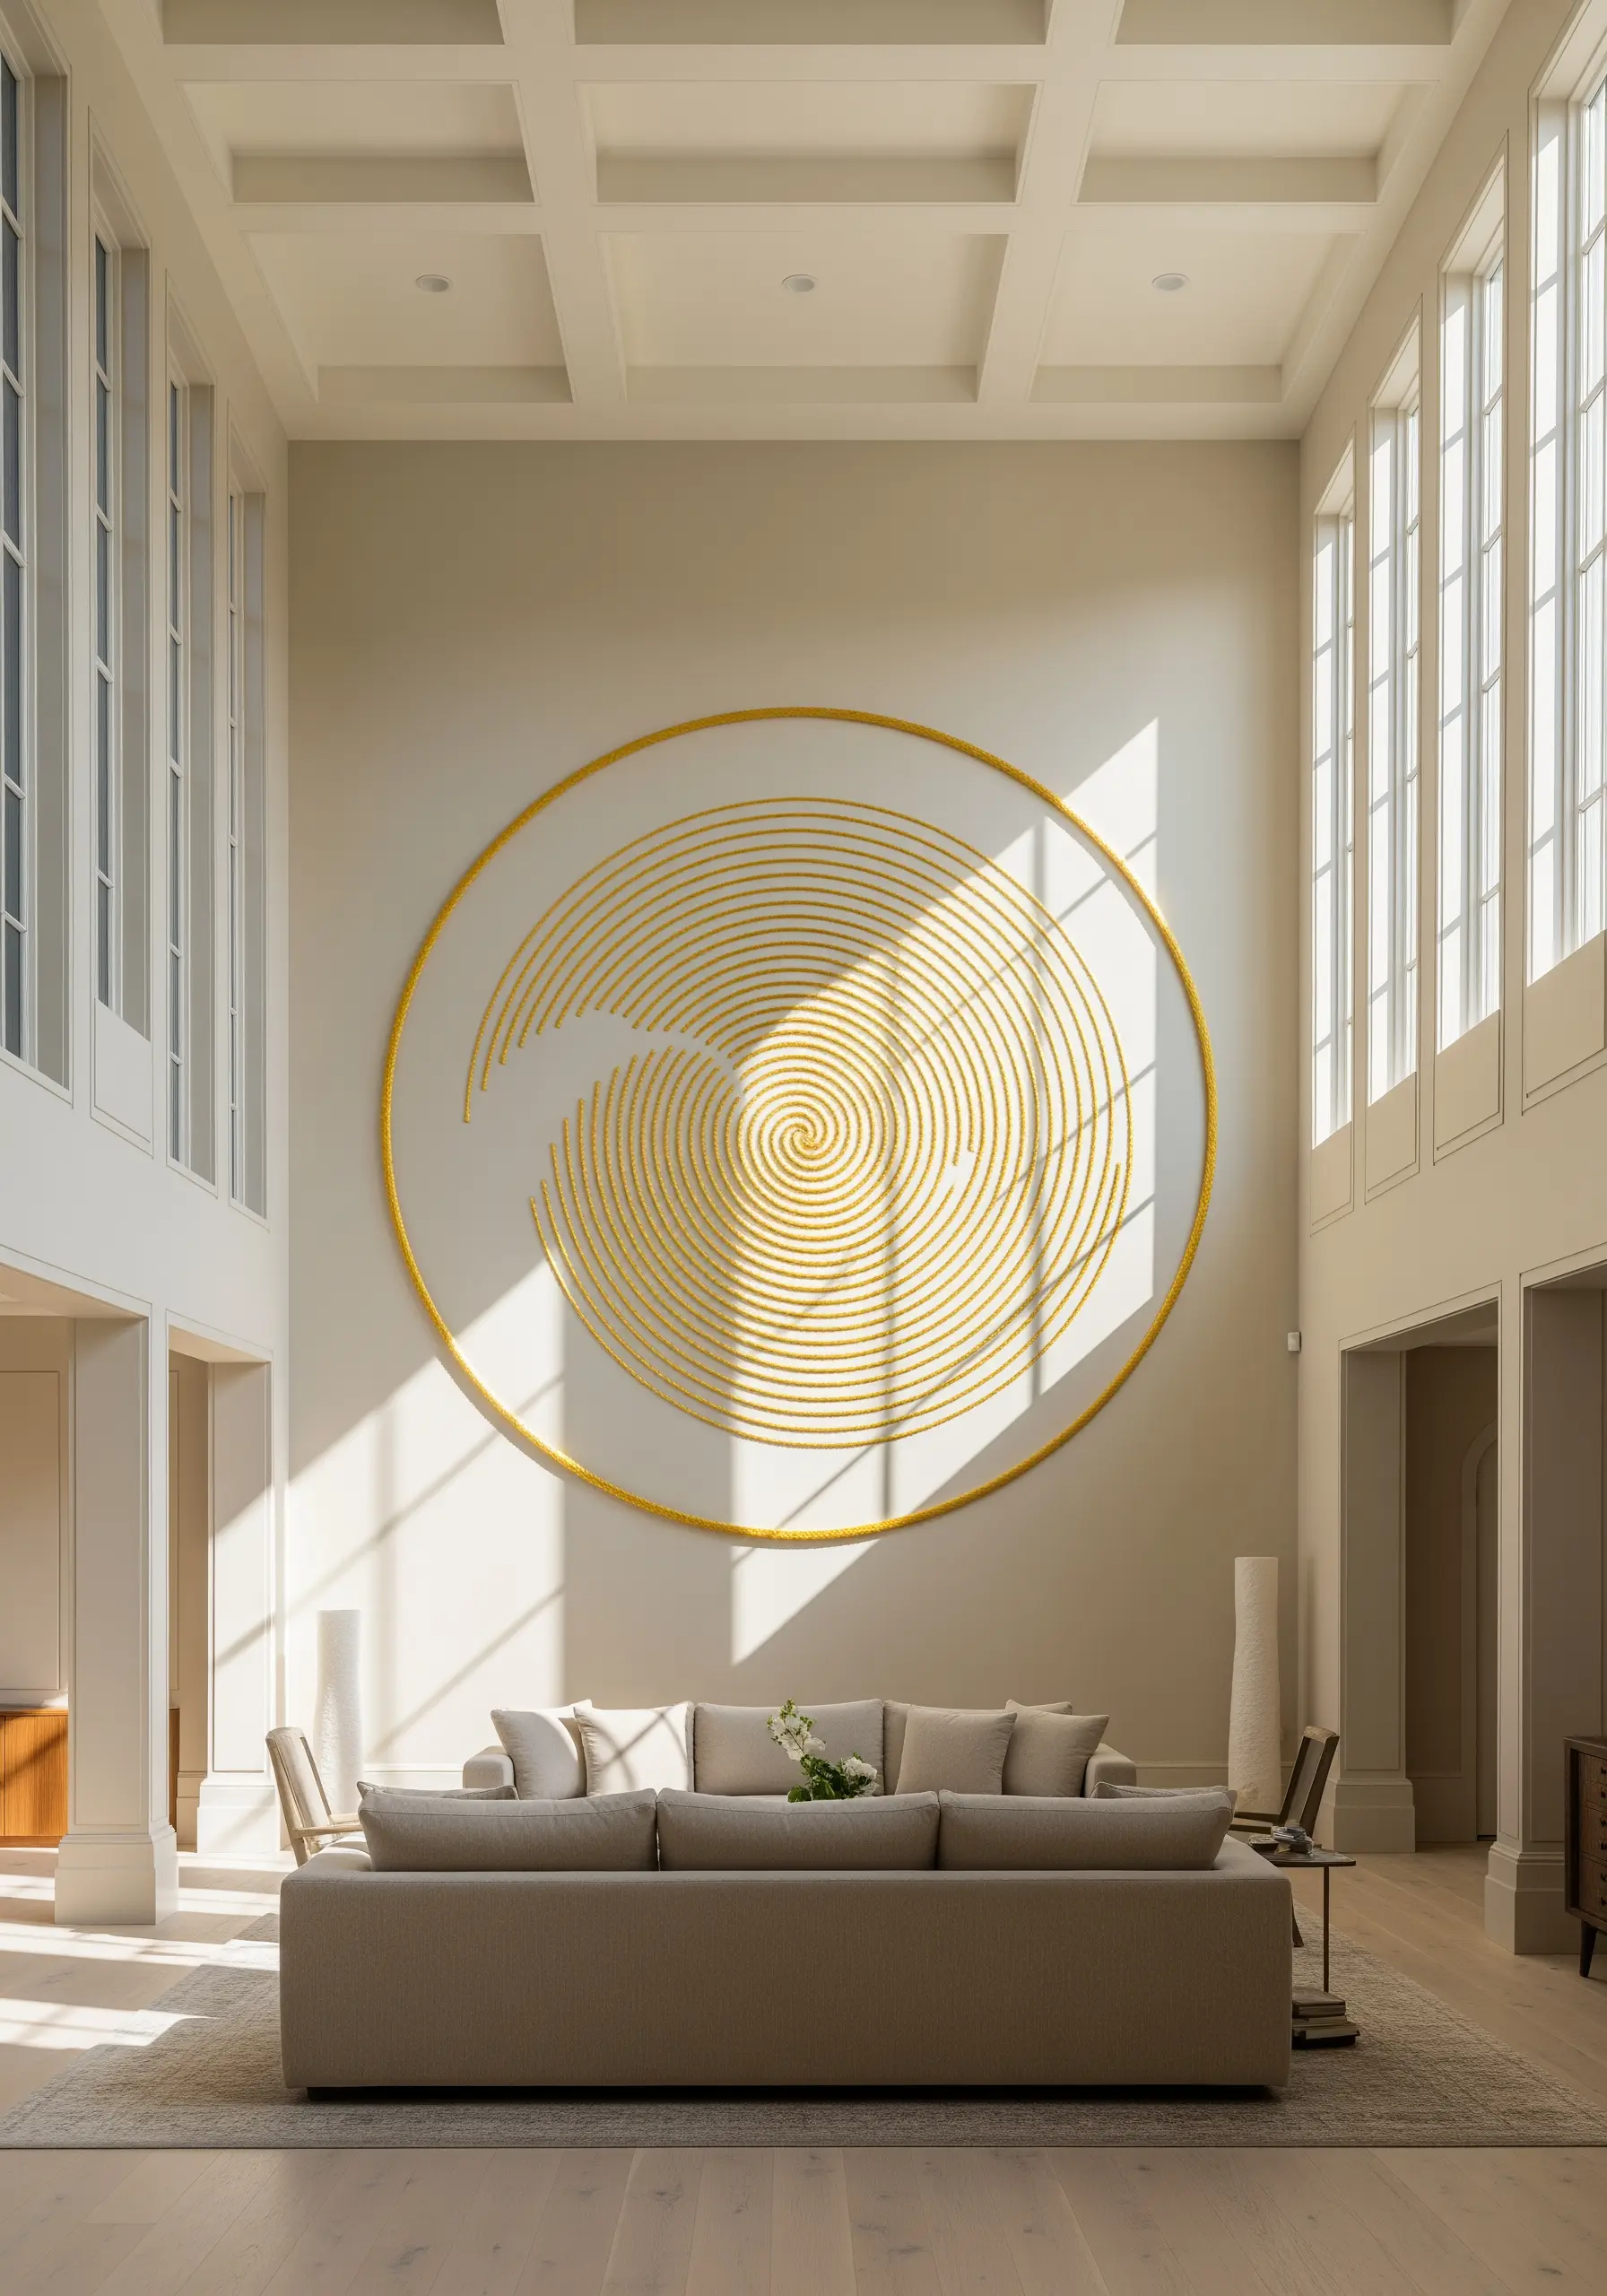
For an oversized, impactful design like this spiral, traditional stitching can cause significant fabric puckering.
Instead, use couching to apply a thick metallic cord or yarn directly onto the surface of the stretched canvas.
Lay the cord along your pre-drawn spiral pattern and use a fine, discreet thread (like a single strand of embroidery floss) to tack it down every half-inch.
This technique keeps the fabric perfectly flat and results in a bold, clean line that is ideal for large-scale abstract thread embroidery ideas.
23. Design a Cohesive Gallery with Geometric Motifs
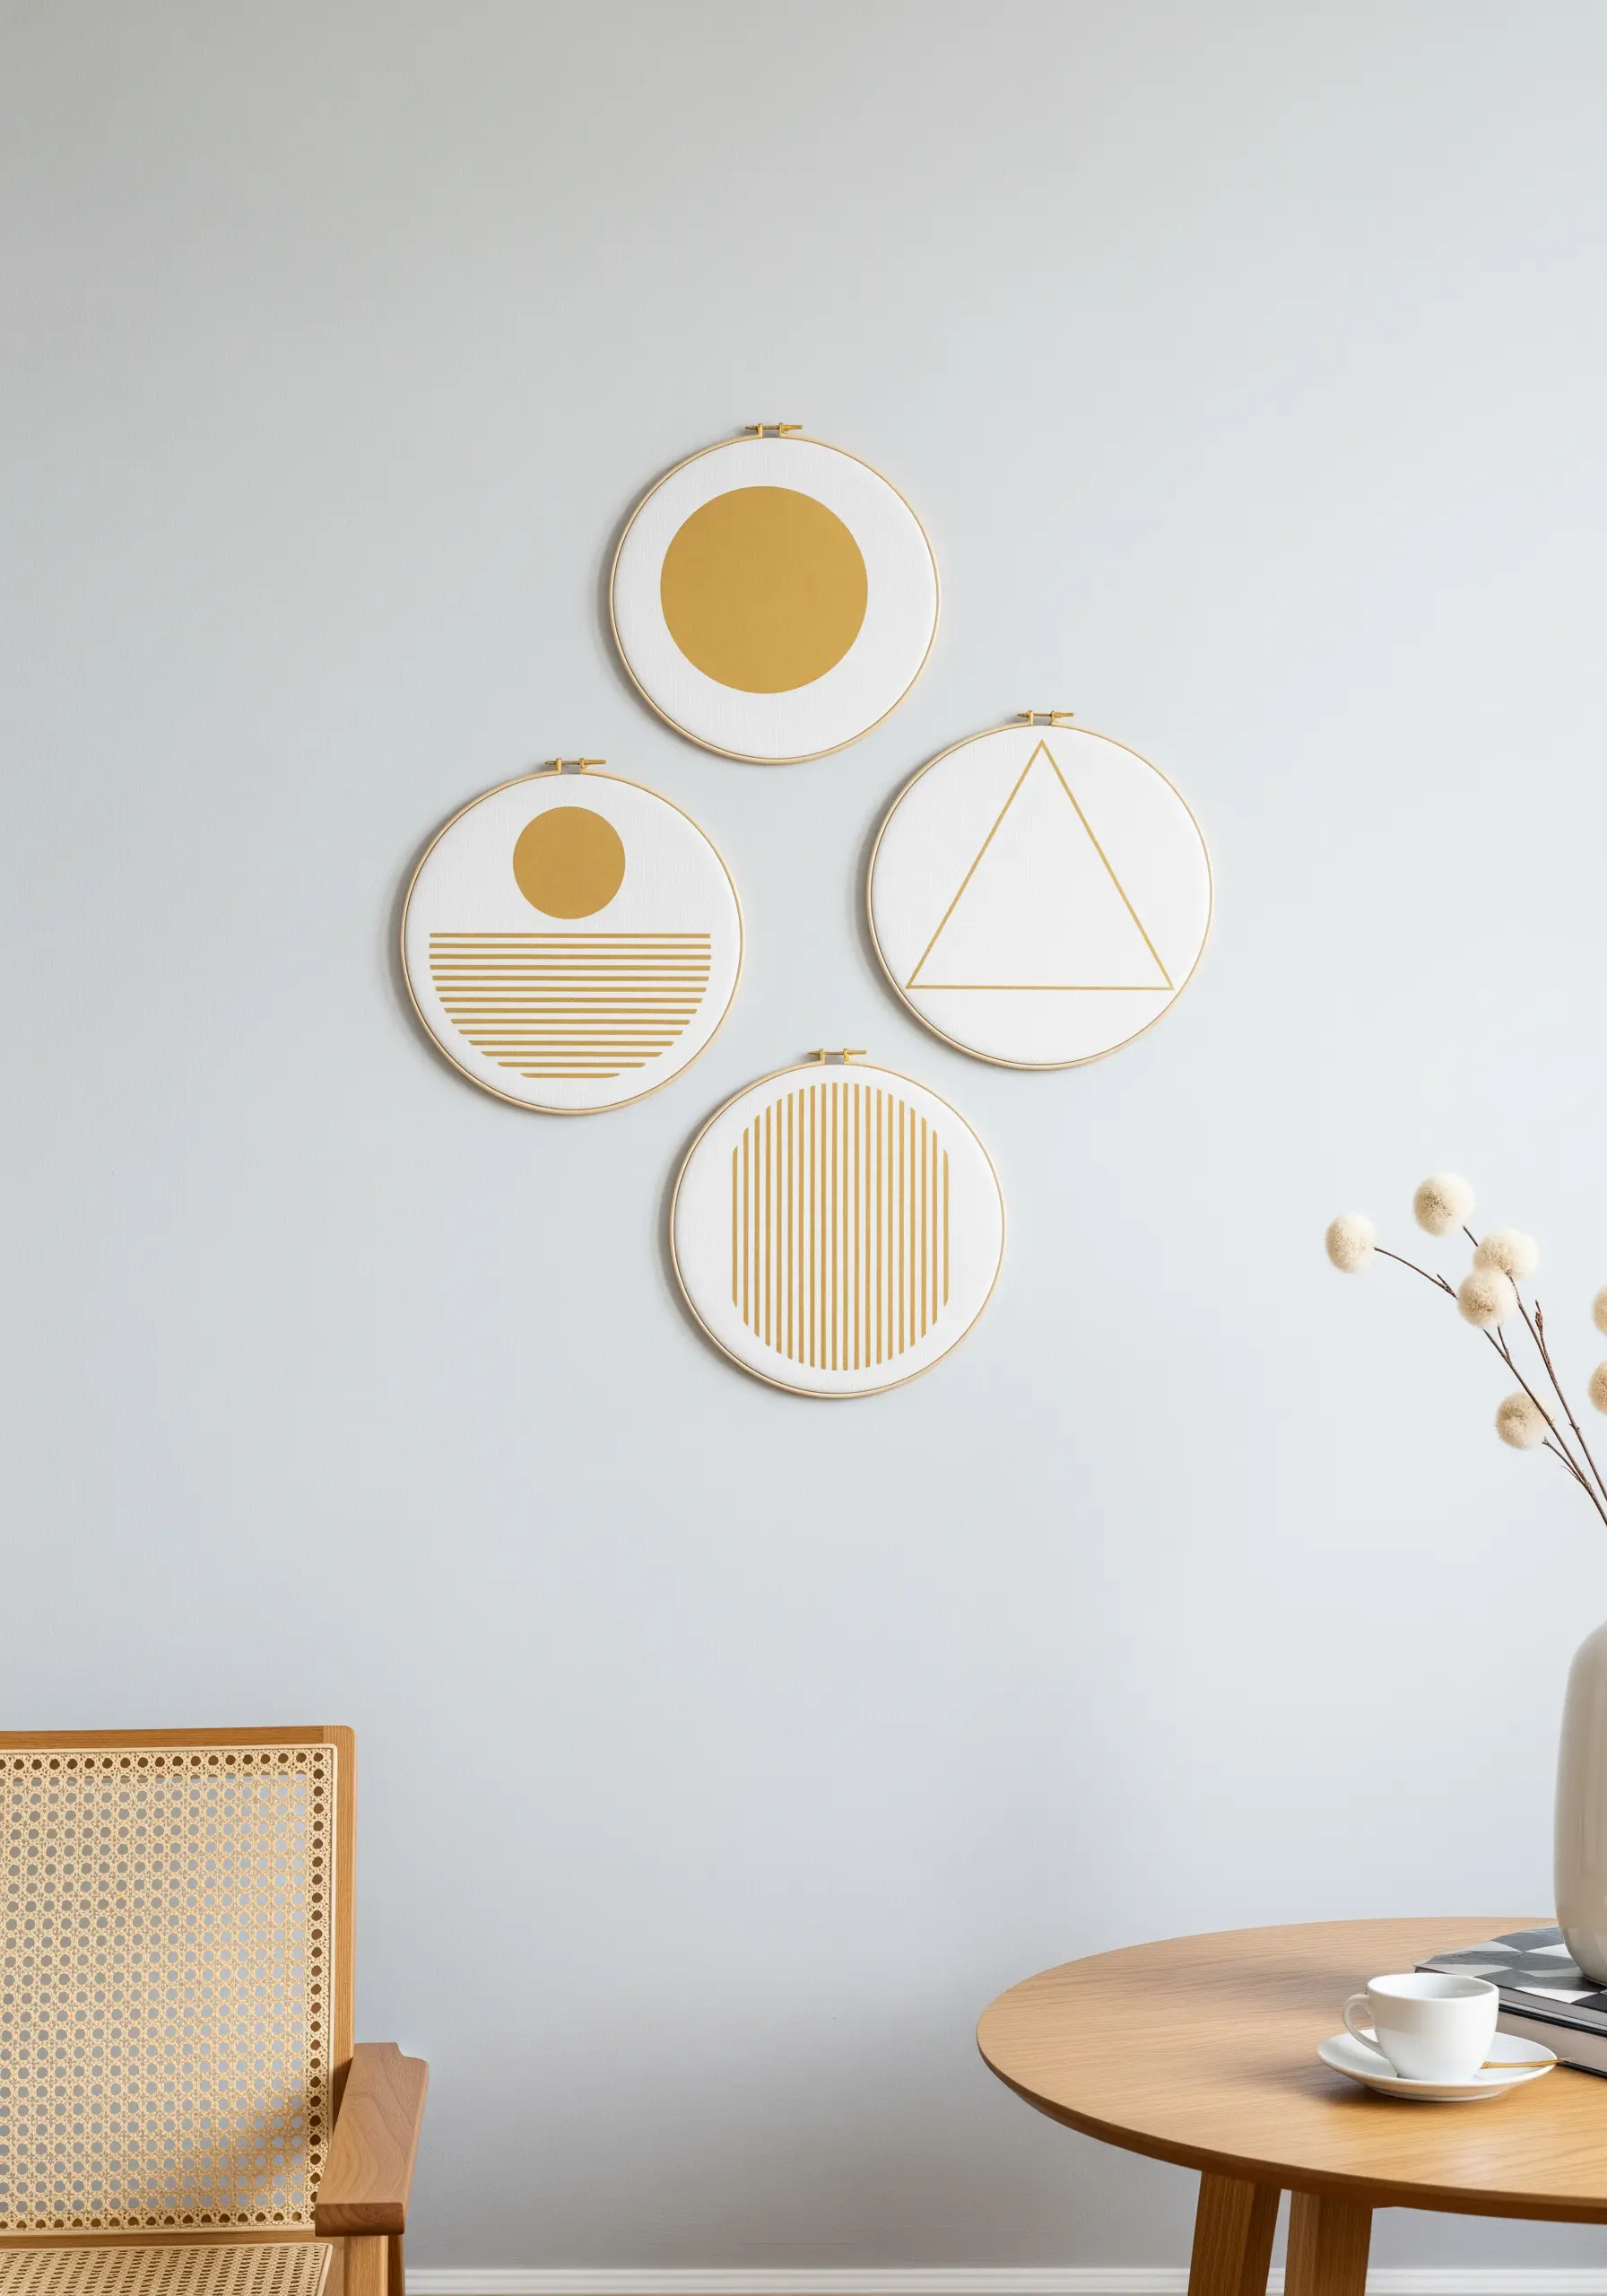
Create a balanced and modern art installation by planning your designs across multiple hoops.
Use a consistent color palette—in this case, just gold and white—and a shared language of geometric shapes like circles, lines, and triangles.
Vary the composition in each hoop, playing with filled shapes (satin stitch), negative space, and linear patterns (straight stitch).
Arranging them in a simple grid or a diamond shape turns individual hooped wall collage layouts into a single, unified piece of art.
24. Mimic Natural Textures with Purposeful Stitch Choices
Add subtle realism to botanical designs by choosing stitches that reflect natural textures.
Use a split stitch for the main branch; its slightly braided appearance mimics the texture of bark.
For the delicate new buds, switch to small, neat satin stitches in a bright gold thread.
This contrast between the matte, textural branch and the smooth, shimmering buds creates a sense of life and growth, making your gentle botanical embroidery stitches feel more dynamic.
25. Achieve a 3D Effect with Padded Satin Stitch
To make your gold accents truly stand out, give them physical dimension with padding.
Before you begin your satin stitch, lay down a foundation of stitches within the shape using a less precious thread, or cut a piece of felt just smaller than your shape and tack it down.
Then, work your final satin stitches over this padding. The raised surface catches the light dramatically, creating deep shadows and bright highlights for a luxurious, embossed look.
26. Blend Threads to Paint Abstract Landscapes
Create depth and movement in your landscapes by using the long-and-short stitch to blend colors.
Instead of hard lines, allow the gold, black, and white threads to flow into one another, creating soft transitions that suggest rolling hills and layered horizons.
Use single strands of floss for the most seamless blending. This technique transforms thread into paint, allowing you to create atmospheric nature-inspired framed embroidery designs with rich tonal variation.
27. Create an Expressive Abstract Mark
Capture the spontaneous energy of a brushstroke by varying your stitch direction and length.
Fill your abstract shape with dense straight stitches, but avoid making them all parallel.
Let some angle slightly, and ensure the edges are uneven and organic, just like a real stroke of paint. Using a glitter or metallic flake thread enhances the effect, as each tiny fiber will catch the light differently, adding to the sense of movement.
28. Build Intricate Detail with a Variety of Stitches
A complex design like a feather is the perfect canvas to practice modern texture layering embroidery techniques.
Use long-and-short stitch for the soft, shaded sections, alternating colors to create depth.
Incorporate tiny seed stitches for a speckled texture, and use French knots for bold, raised dots.
A whipped backstitch can create the smooth, solid shaft. Combining multiple stitches gives the final piece incredible richness and tactile appeal.
29. Define a Skyline with a Single, Flowing Line
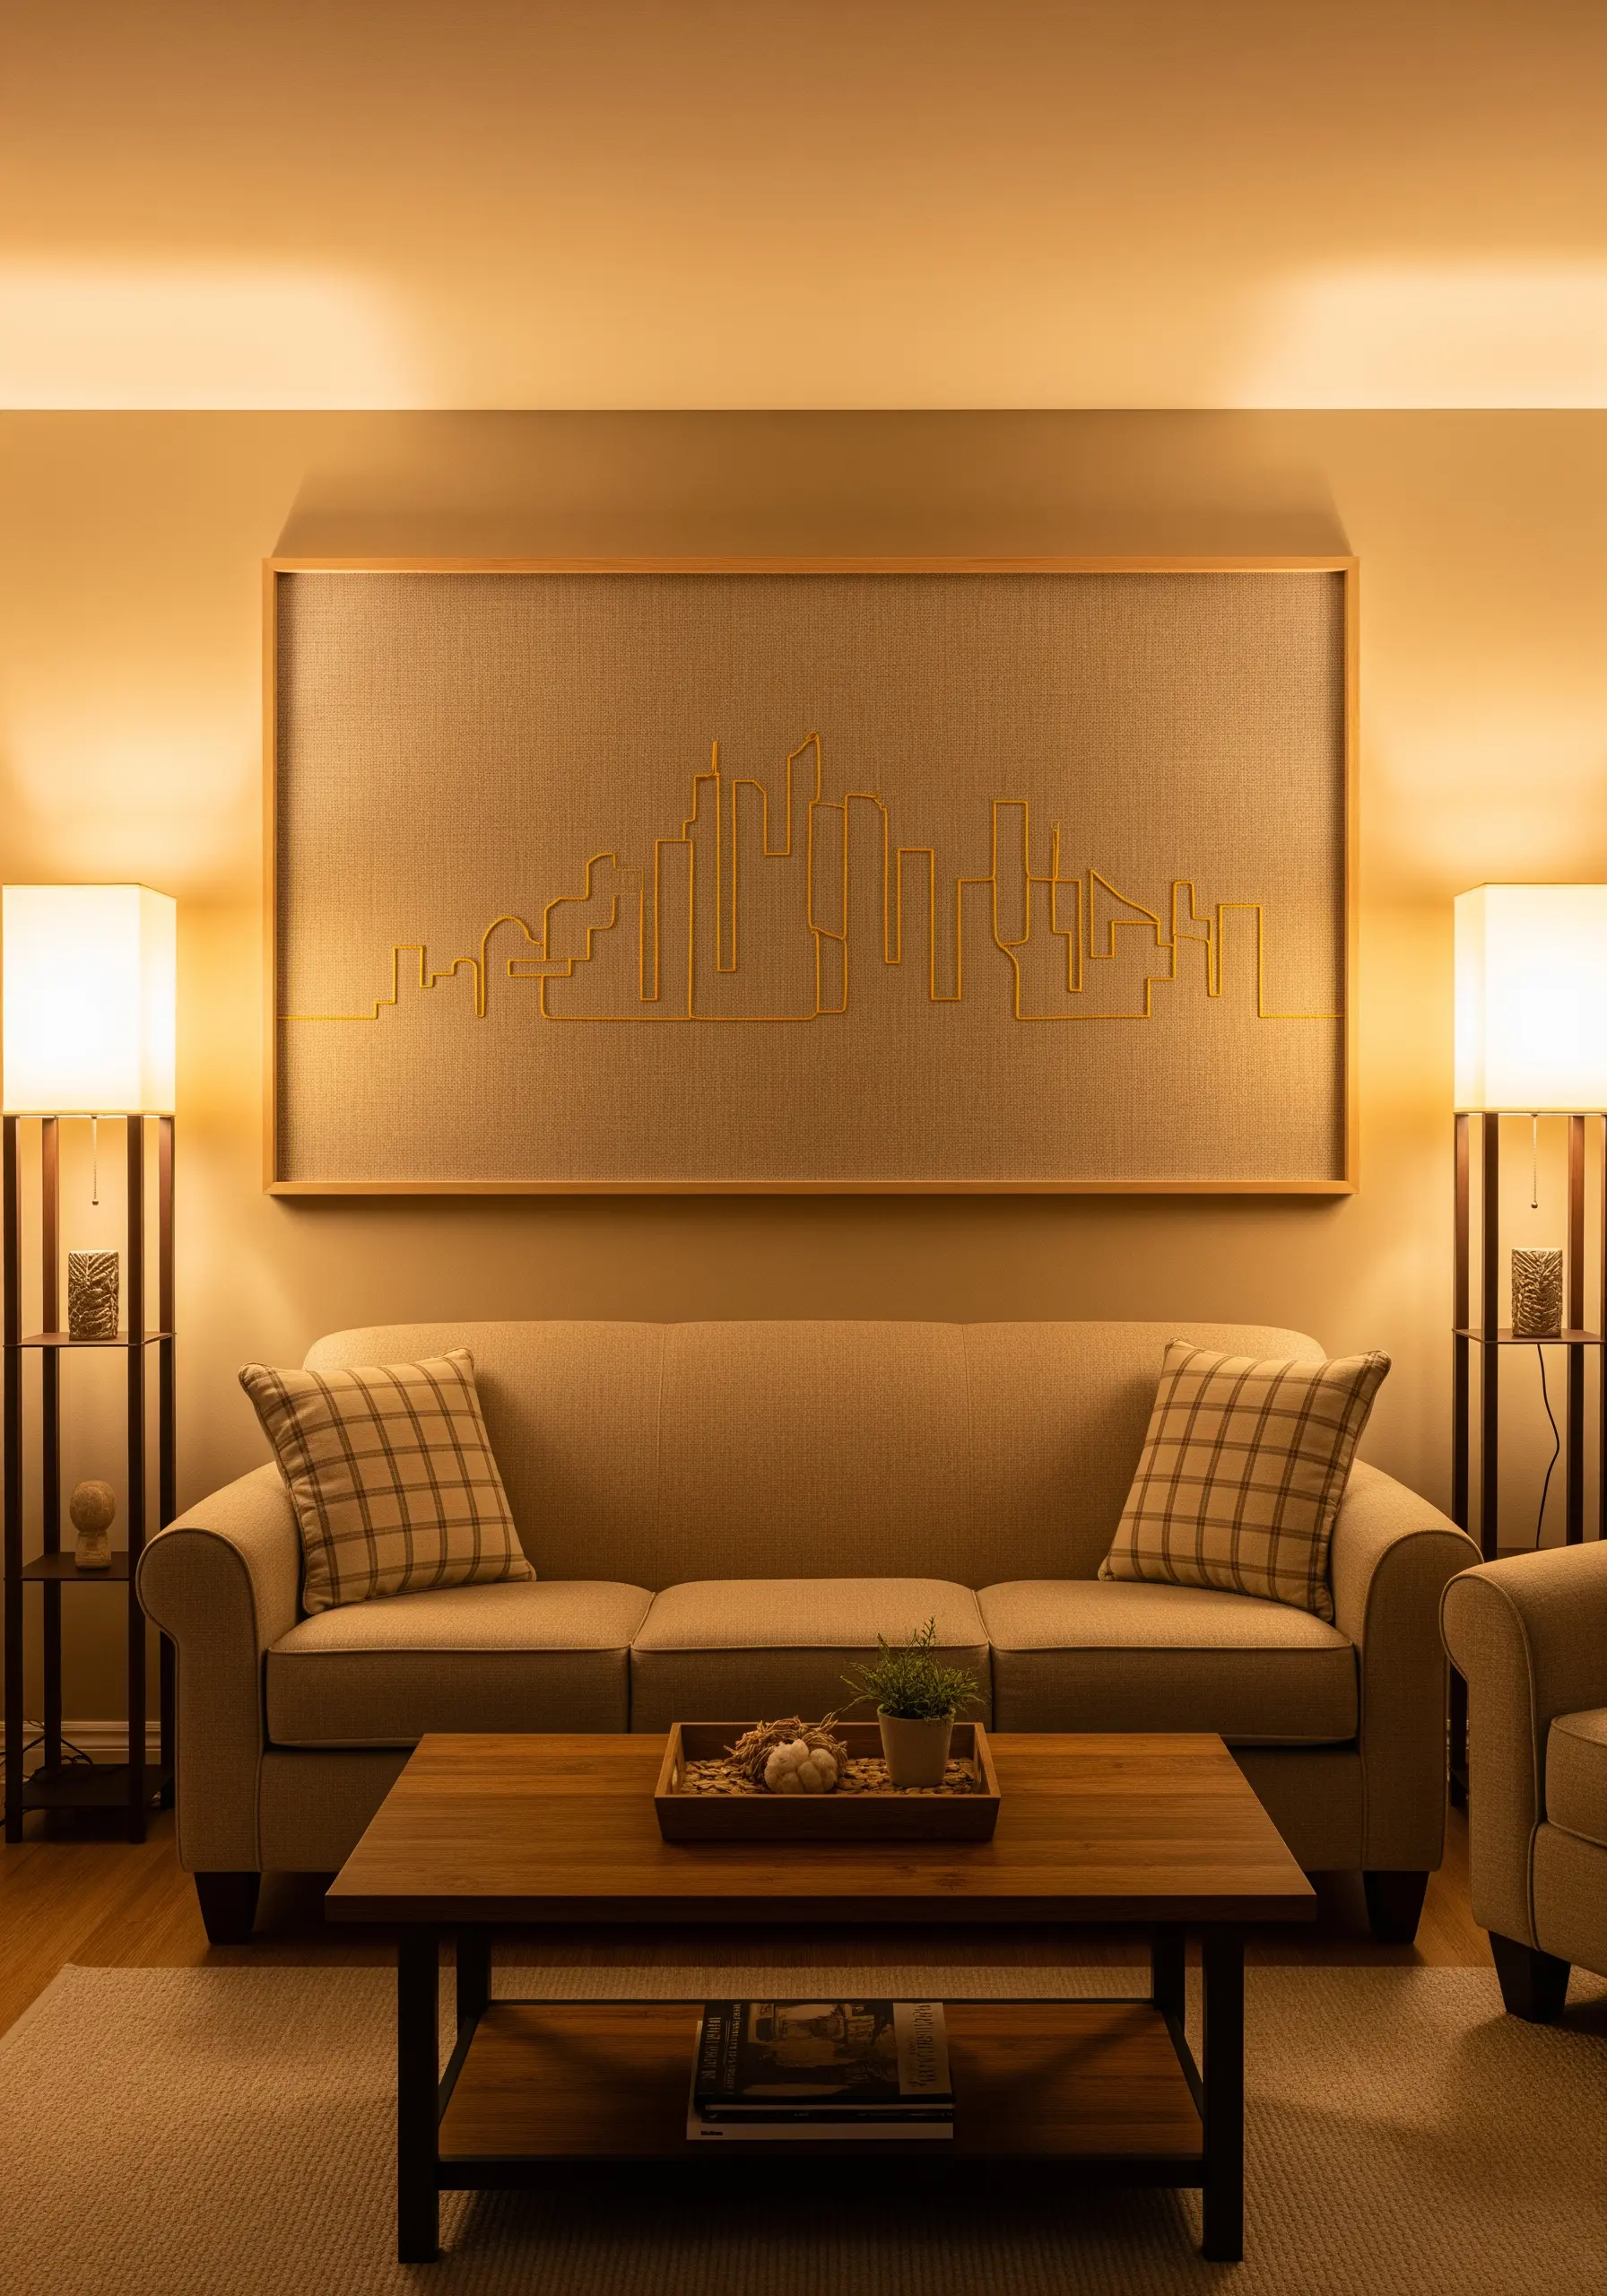
For a continuous, unbroken outline like this cityscape, the stem stitch is your best friend.
Unlike a backstitch, which can look slightly jagged around curves and corners, a stem stitch creates a smooth, rope-like line that flows seamlessly.
Use a #5 pearl cotton thread to give the line enough substance to stand on its own, creating a clean, graphic silhouette that feels both modern and handmade.
30. Imply Shimmer with a Textured Fill Stitch
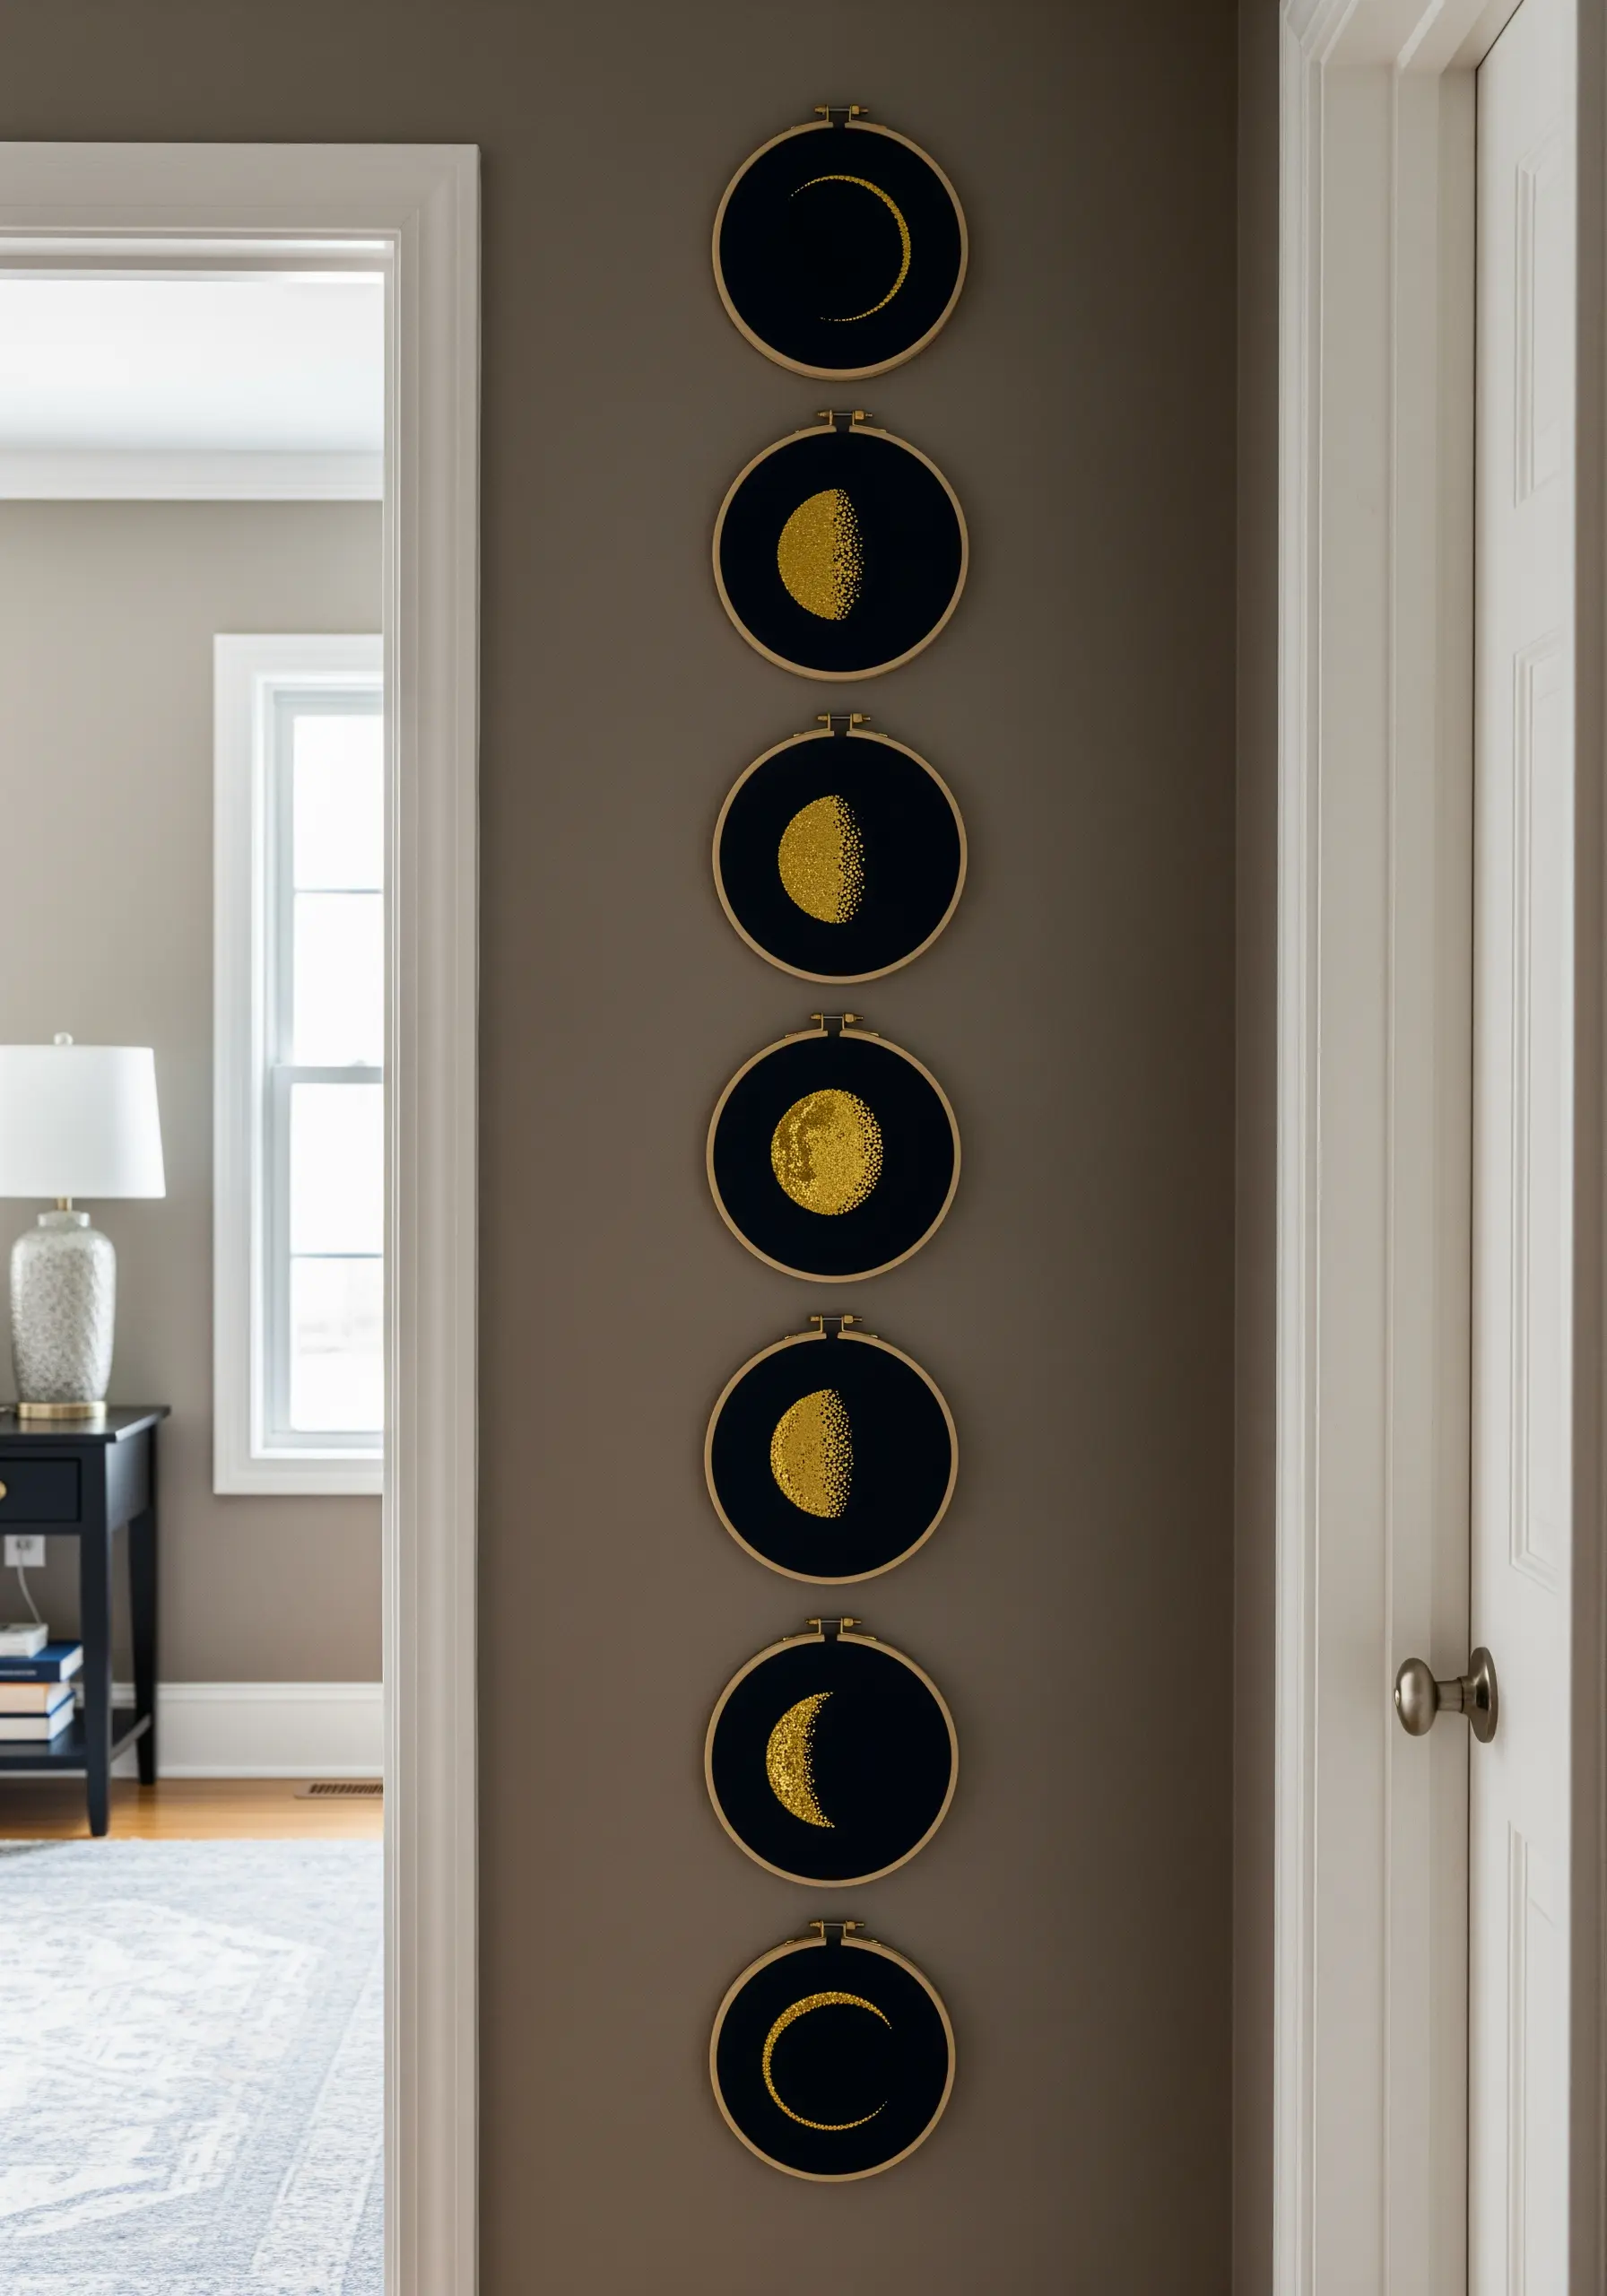
Instead of a solid satin stitch, fill your moon phases with hundreds of tiny seed stitches or French knots.
This technique, often called thread painting’s cousin, creates a stippled or pointillist effect.
The scattered stitches break up the light, producing a gentle, textured shimmer rather than a hard, metallic glare. It’s a more subtle and organic way to represent the moon’s glowing surface, especially on a dark fabric background.
31. Use Stitch Direction to Create Form and Contour
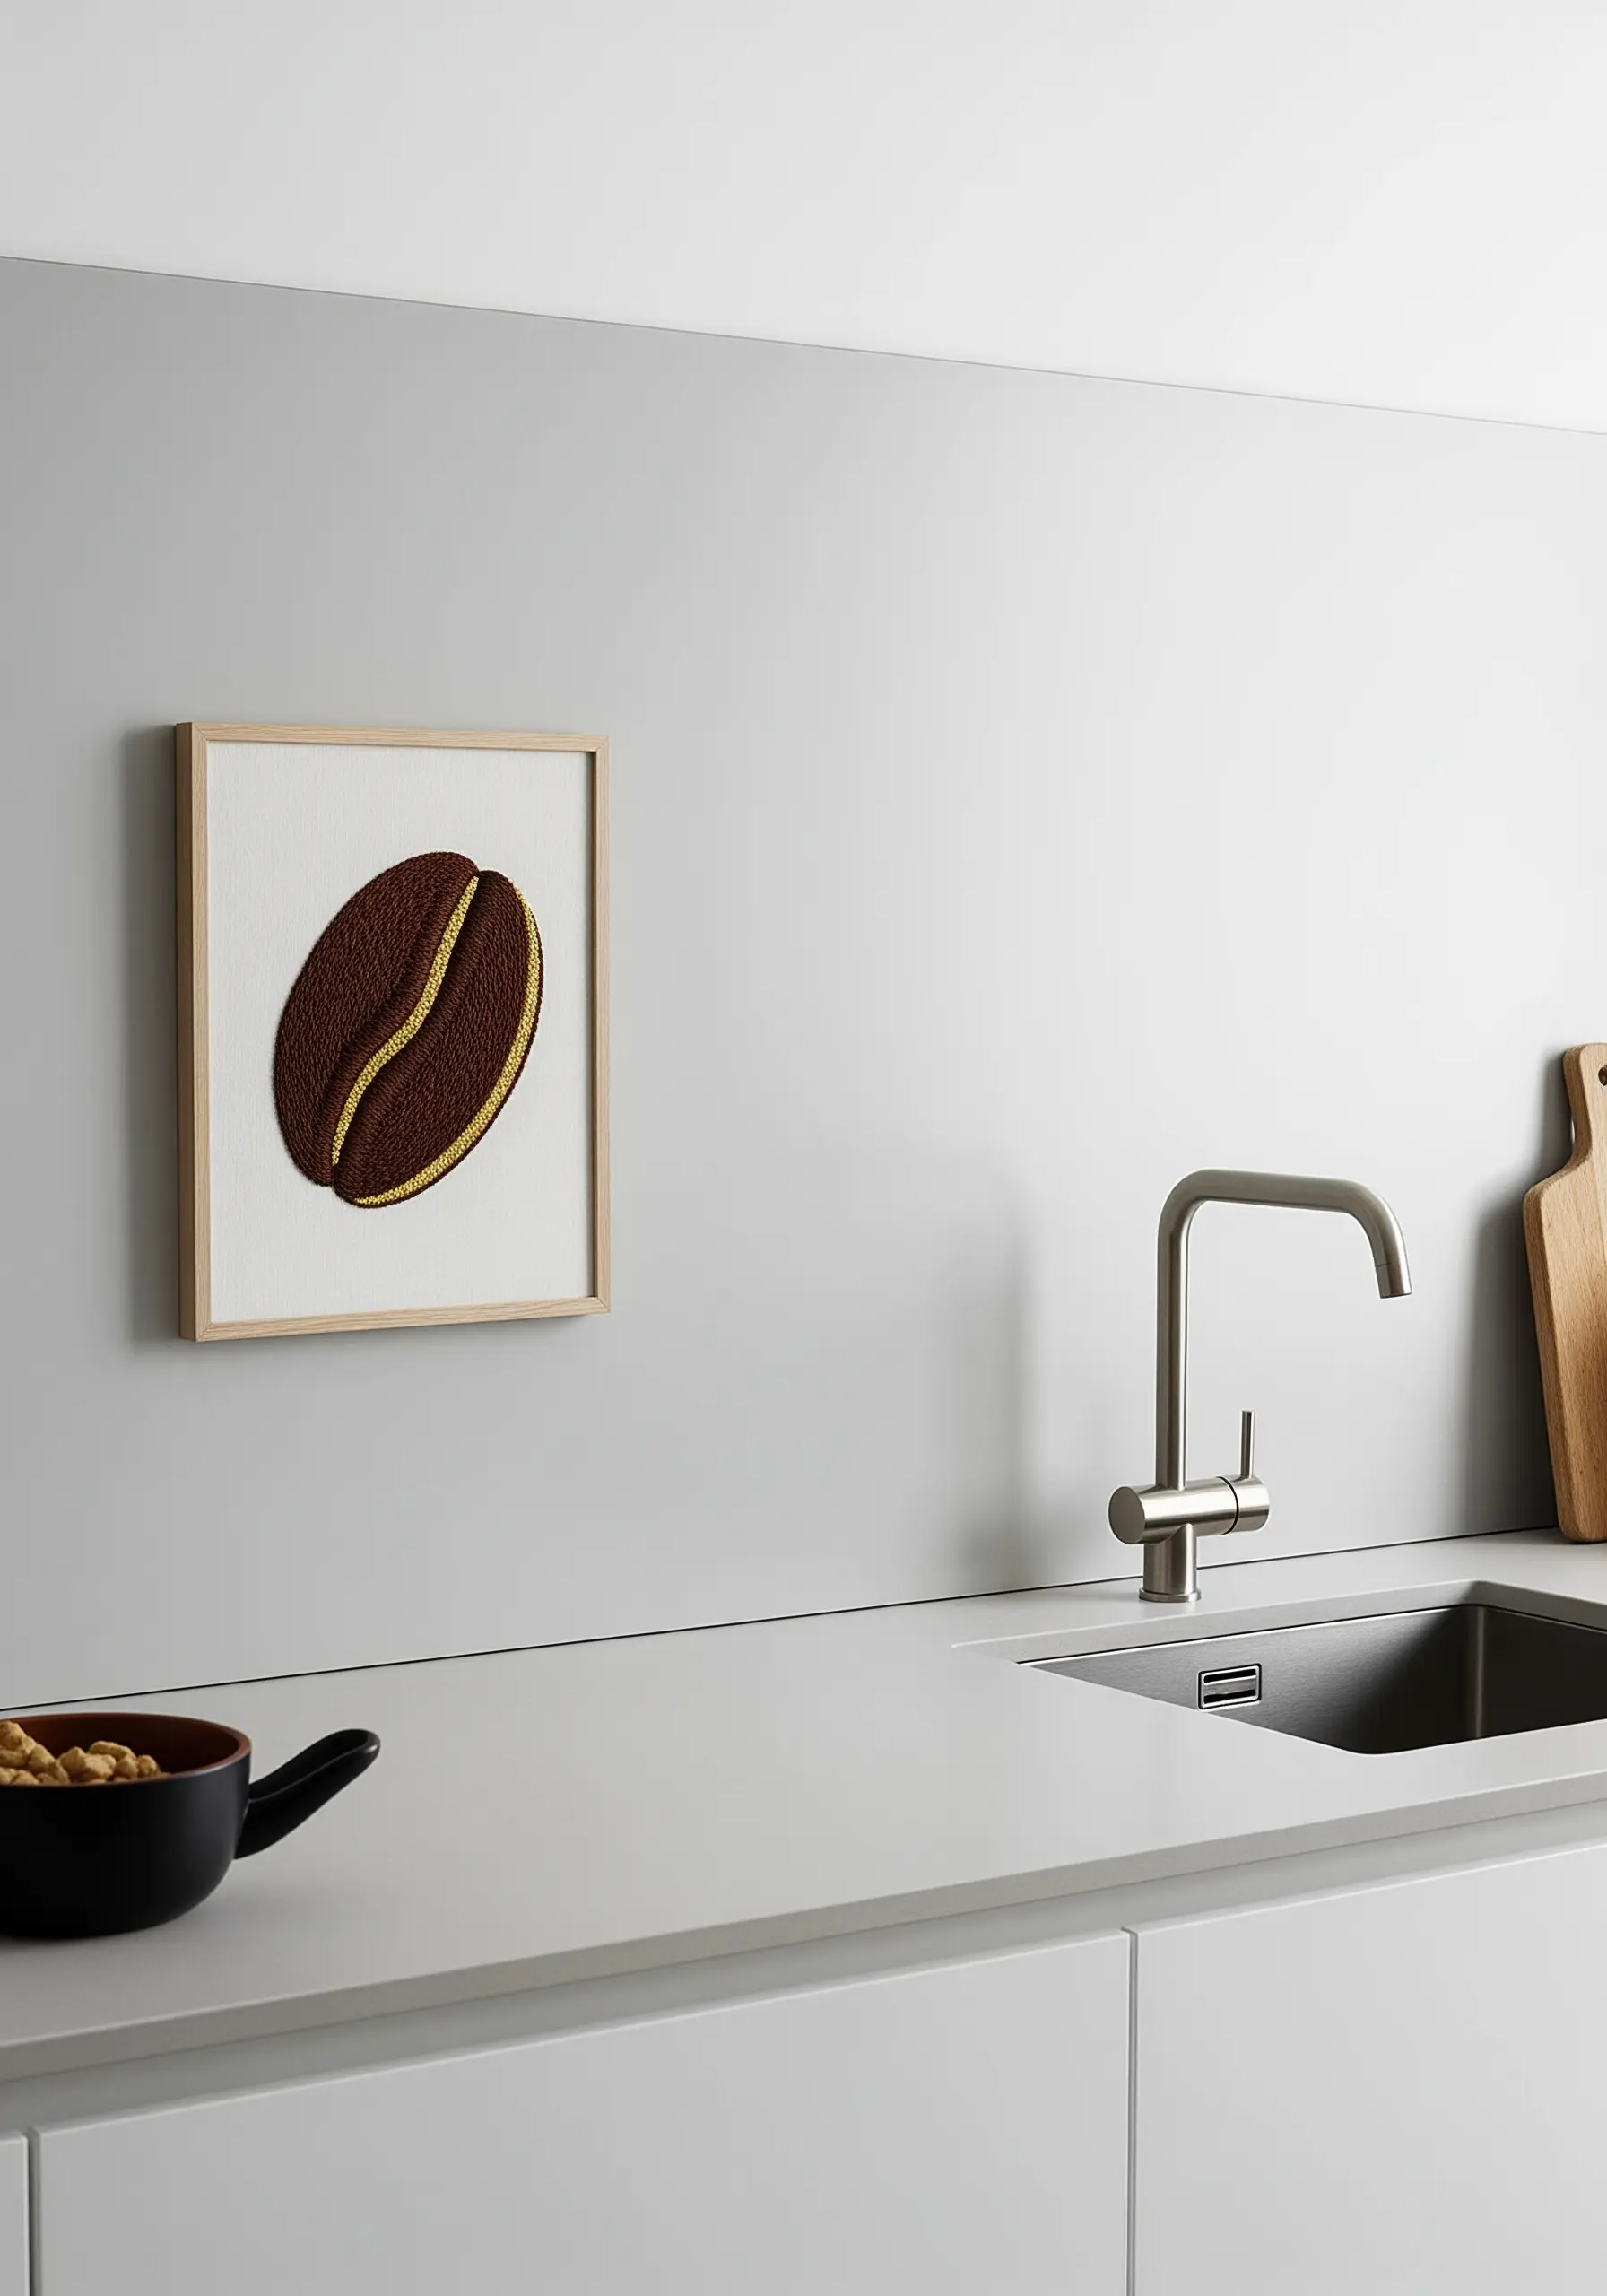
Make a simple shape like a coffee bean look three-dimensional by paying close attention to stitch direction.
Fill the main body with satin stitches that curve along with the bean’s rounded shape. This ensures light reflects off the surface in a way that mimics its natural contour.
Add the central highlight with a simple line of split stitch in a brighter gold, instantly creating the illusion of depth and shine on a flat surface.
32. Add Regal Elegance with Ornate Outlines
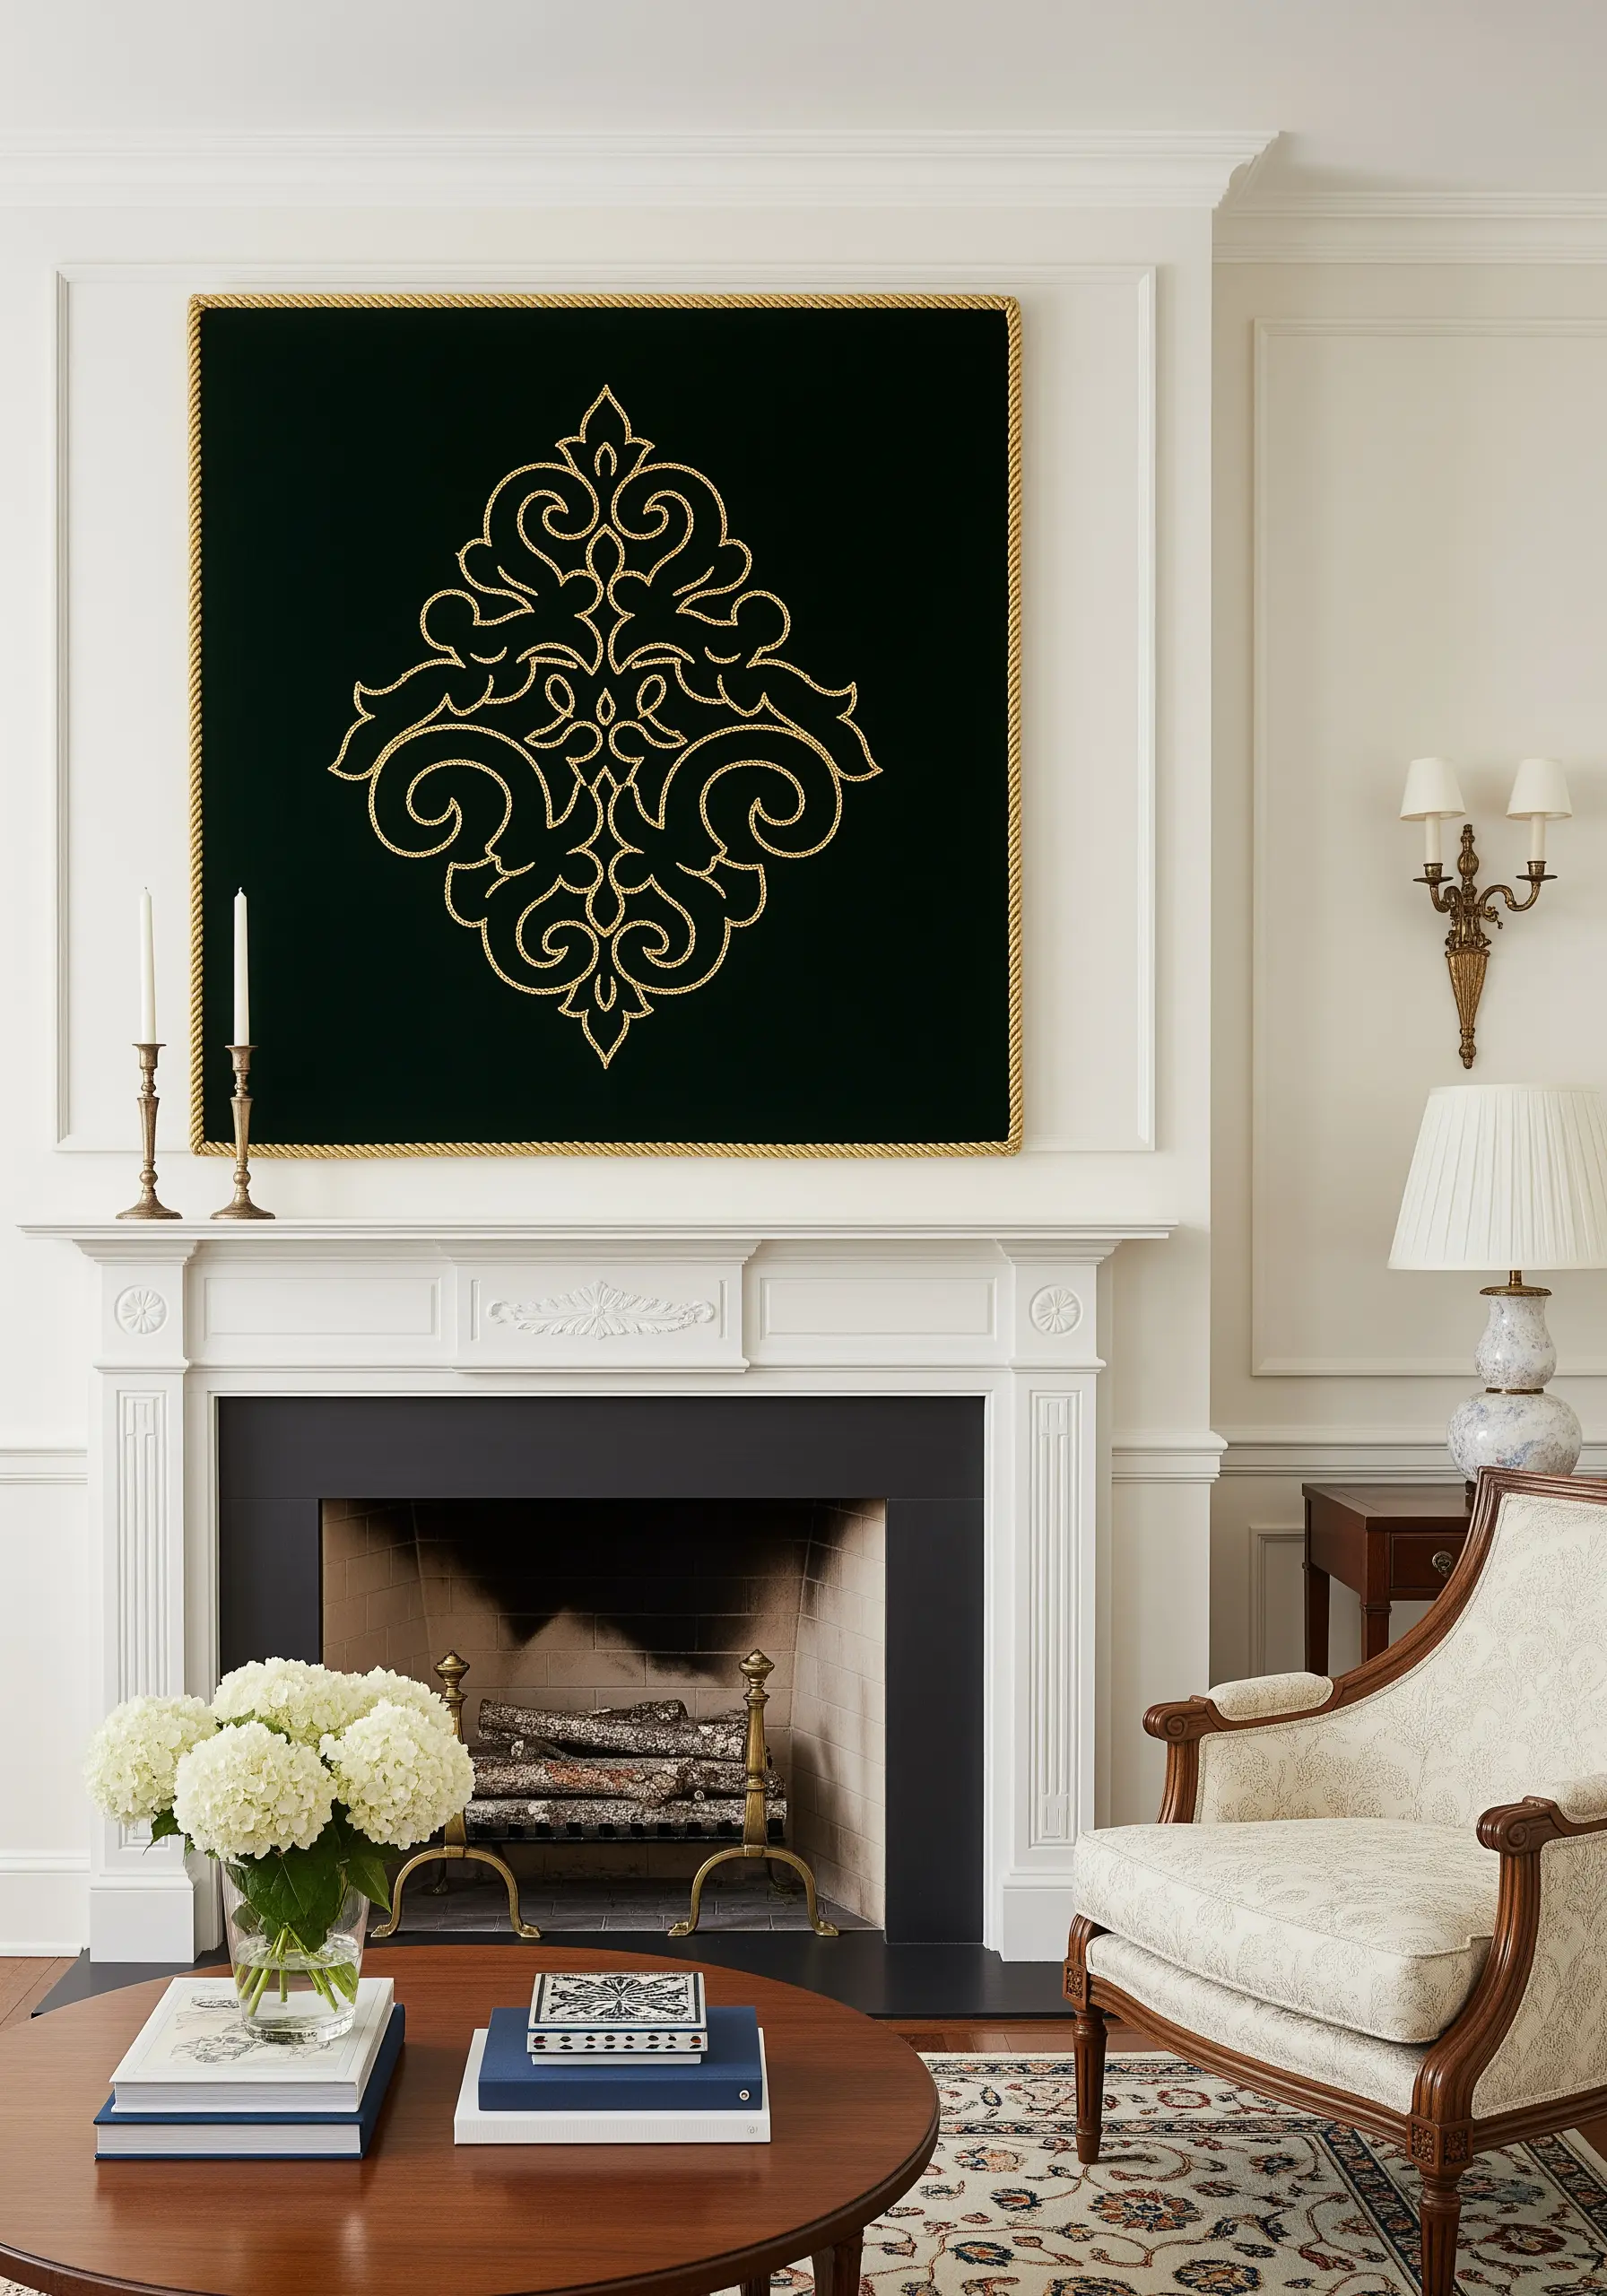
On a luxurious, deep-colored fabric like velvet or suede, a simple gold outline creates an immediate sense of opulence.
For intricate, scrolling patterns like this damask motif, use a whipped backstitch or a fine stem stitch to ensure the lines are smooth and pronounced.
Choose a non-tarnishing metallic thread to guarantee the piece retains its brilliance. Finishing the canvas with a gold rope trim ties the entire look together for a truly regal statement.
33. Create an Impression of Rain with Detached Chain Stitches
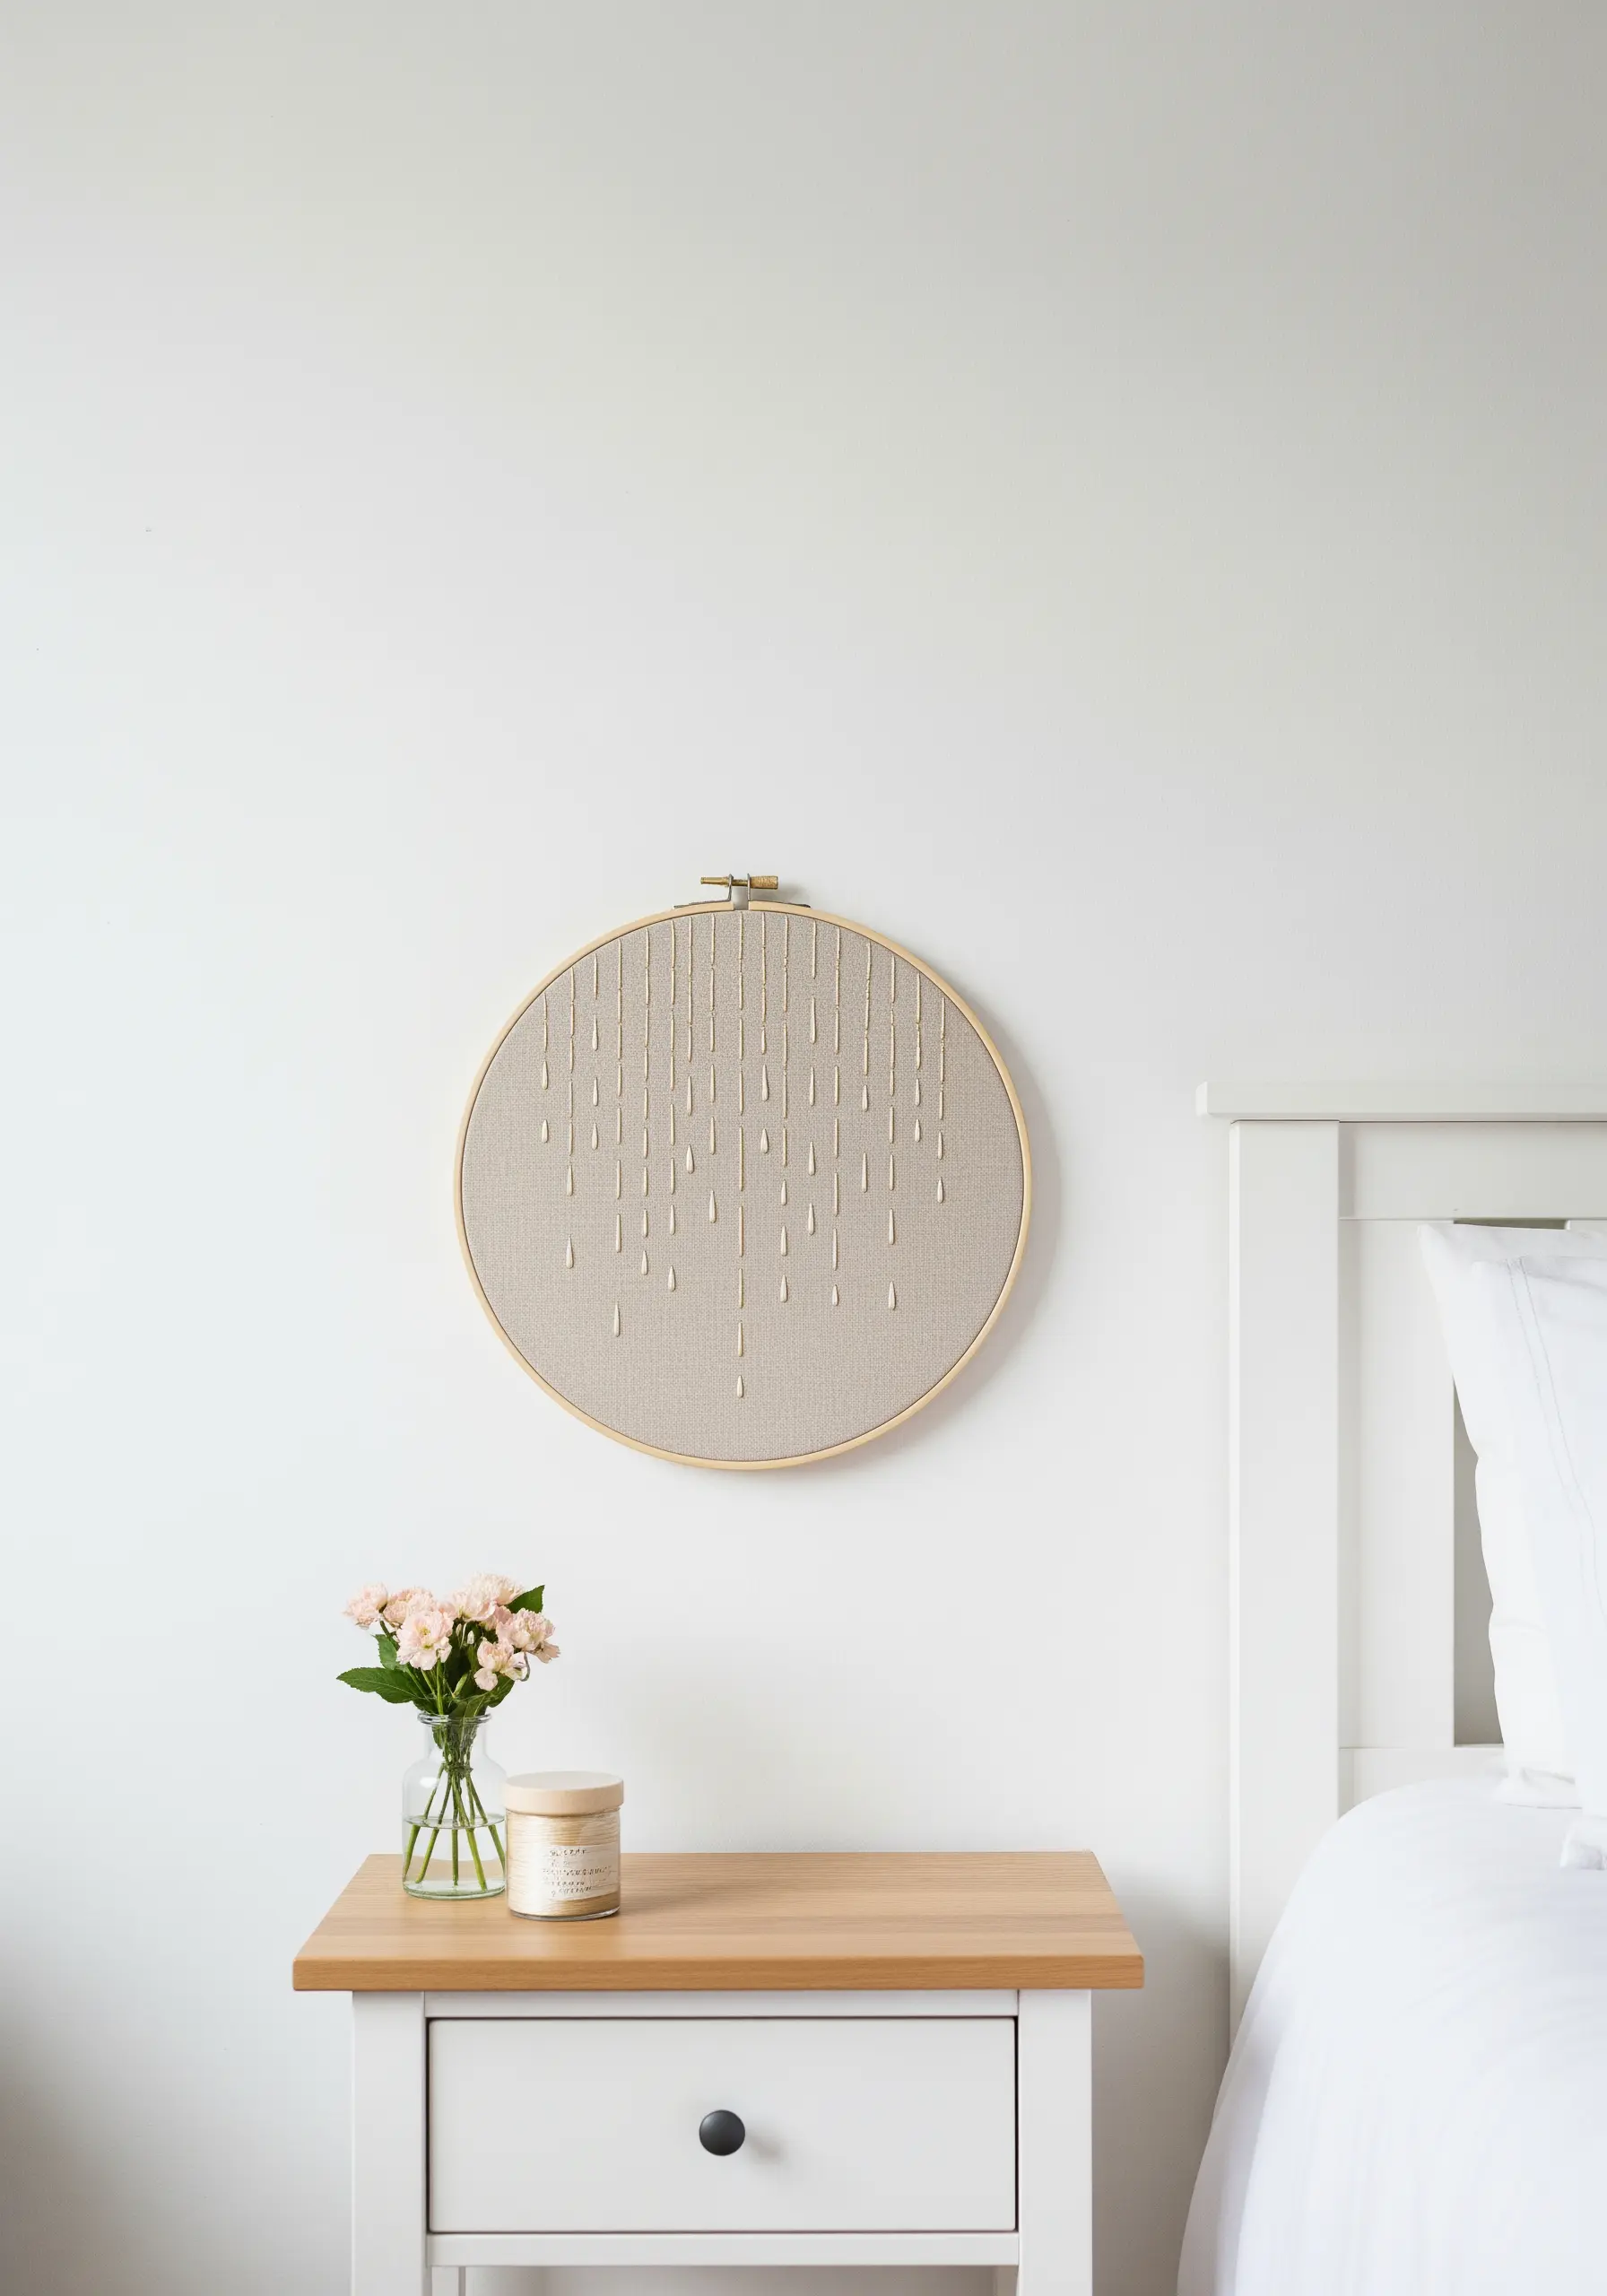
Evoke a sense of gentle movement with this beautifully simple design.
Use detached chain stitches—also known as lazy daisy stitches—of varying lengths to create the teardrop shapes.
To enhance the “drip” effect, begin each stitch with a single French knot at the top before making the loop. This adds a tiny bit of weight and dimension where the drop forms.
This is one of those simple embroidery projects for a cozy minimalist bedroom that feels both modern and poetic.


