

You have the threads, the fabric, and the desire to create something beautiful. But perhaps you feel your work is missing that final touch of polish—that seamless quality that transforms a hobby into art. Let’s move beyond just following patterns and start thinking about how stitch, color, and texture work together.
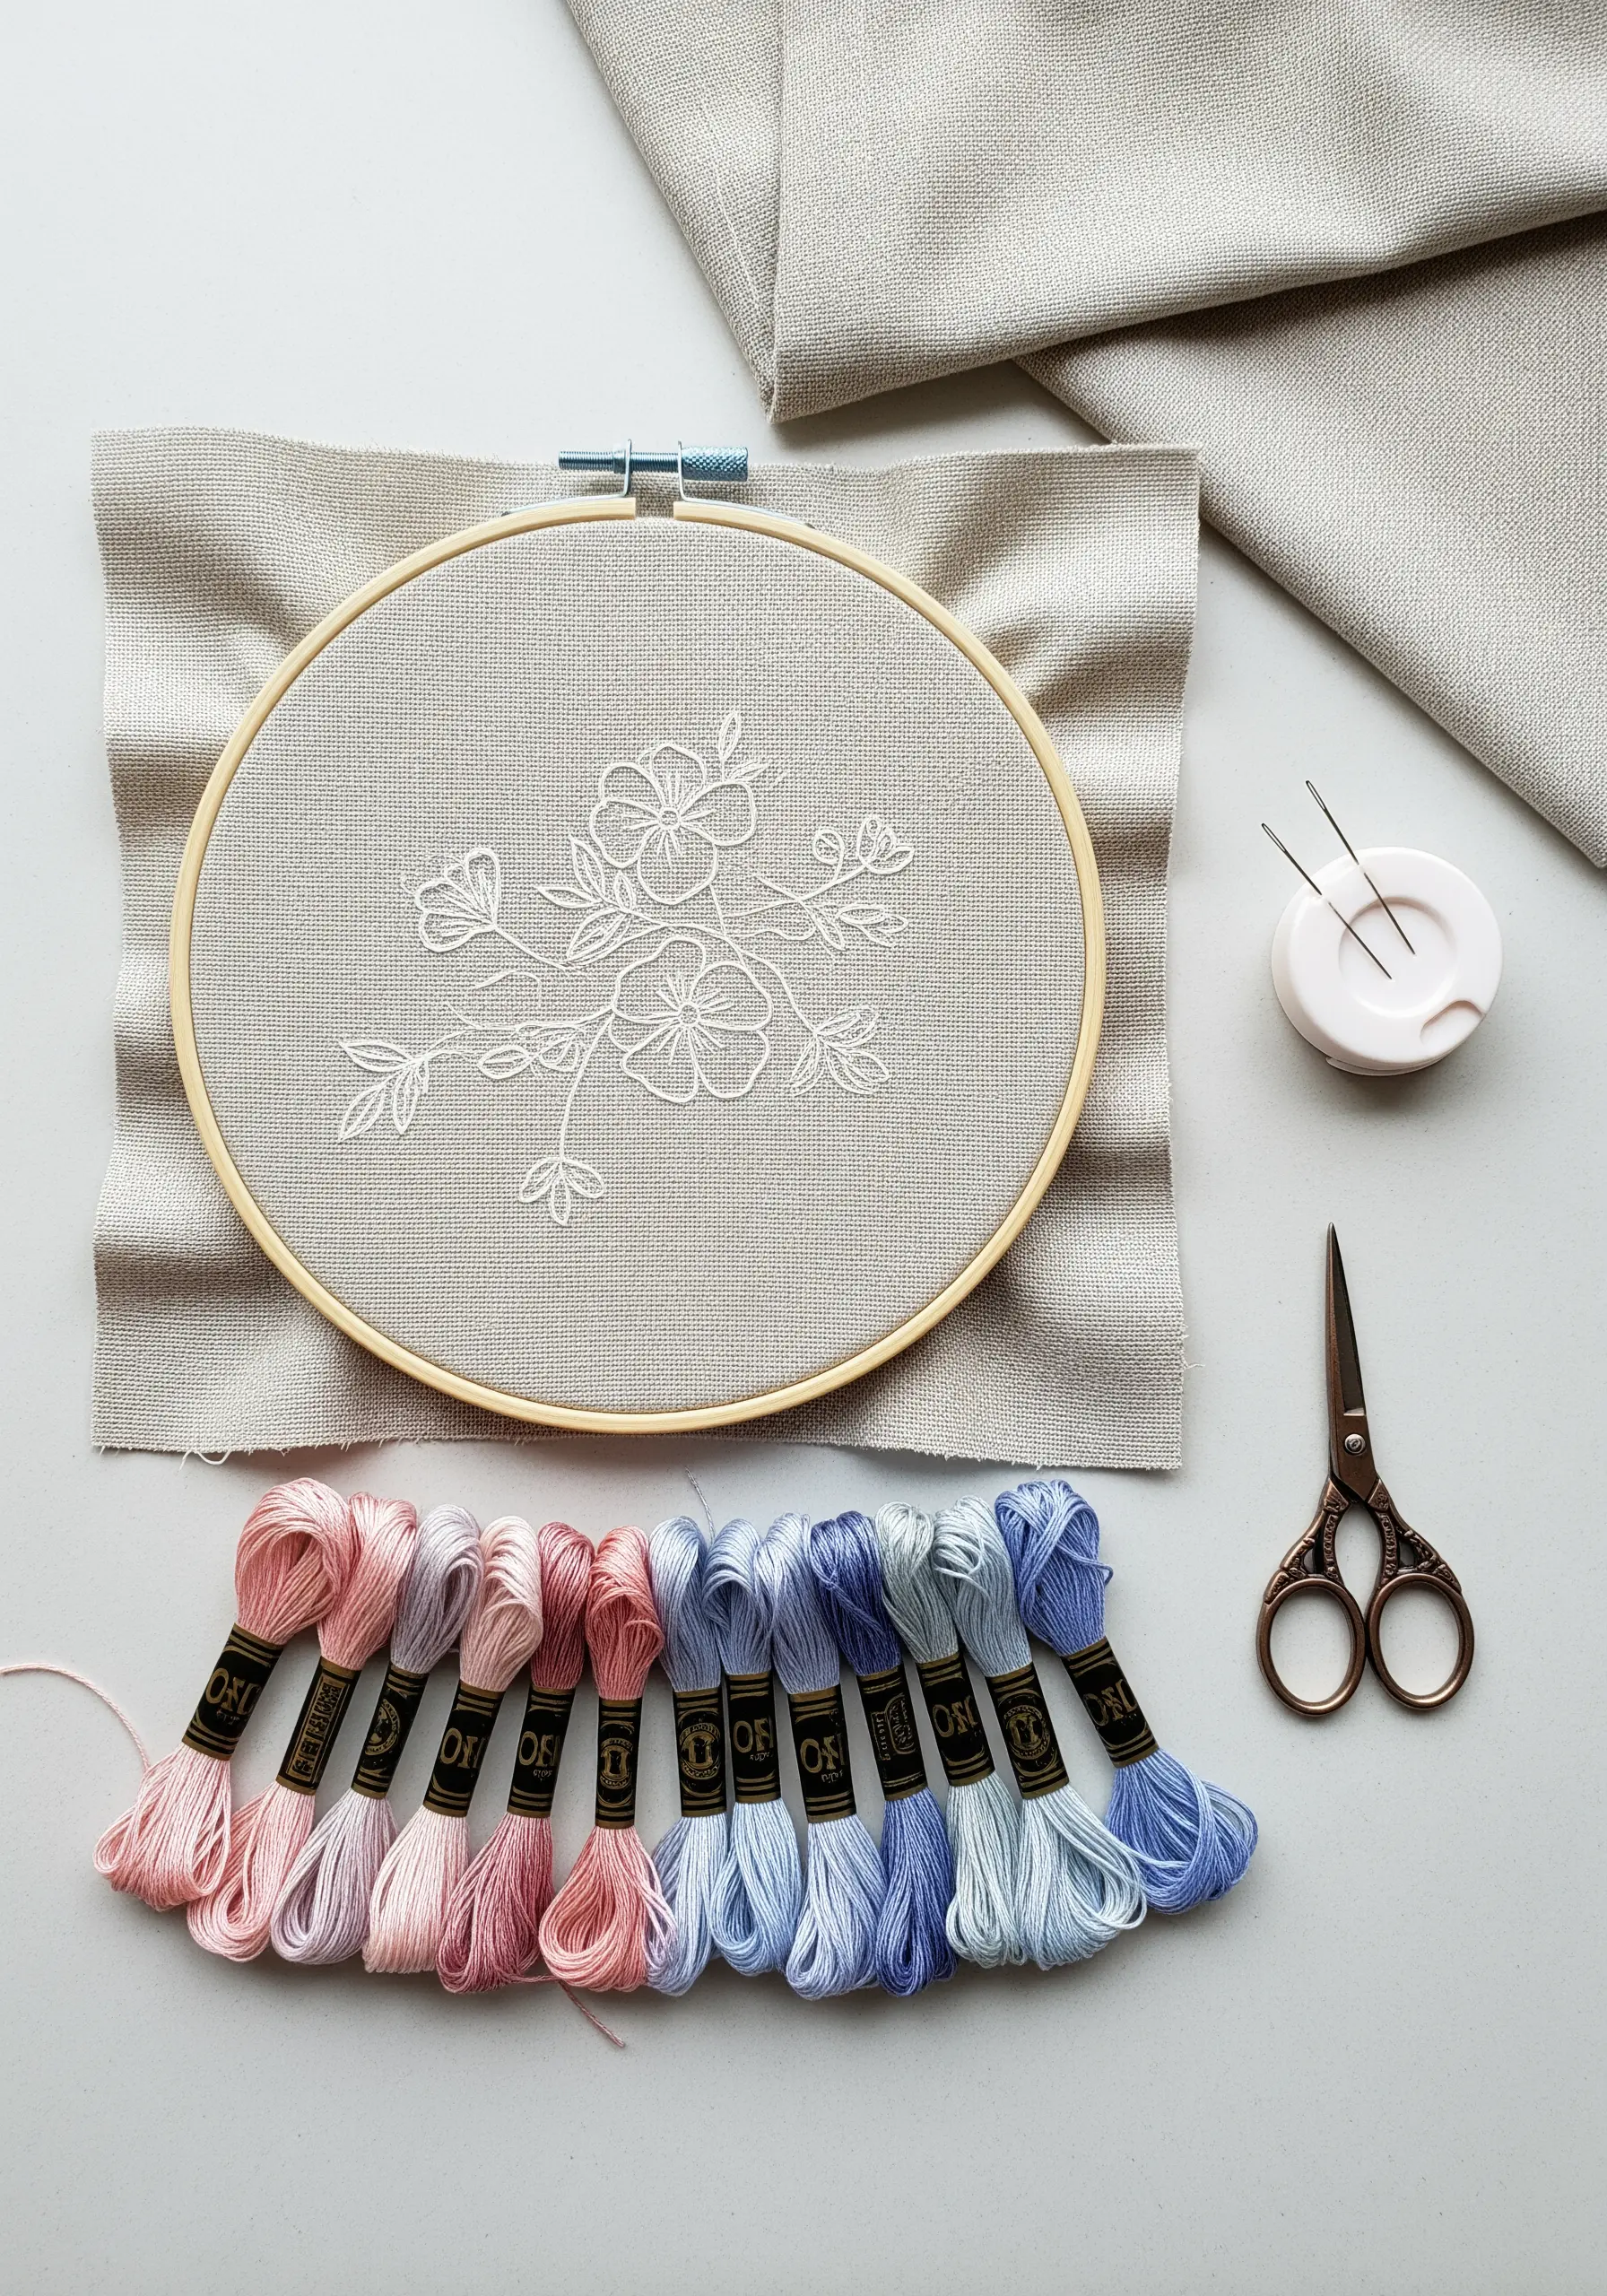
Pastel gradients are more than a color choice; they are a technique for breathing softness and light into your work. This is where you learn to blend colors not just side-by-side, but through the very structure of your stitches. It’s about creating flow, dimension, and a quiet, modern elegance that feels both intentional and deeply personal.
In these patterns, you’ll discover how to make your satin stitch smoother, your outlines sharper, and your textures more expressive. Consider this your guide to creating decor that doesn’t just fill a space, but elevates it with a calm, handcrafted confidence.
1. Achieve Architectural Depth with Angled Satin Stitch
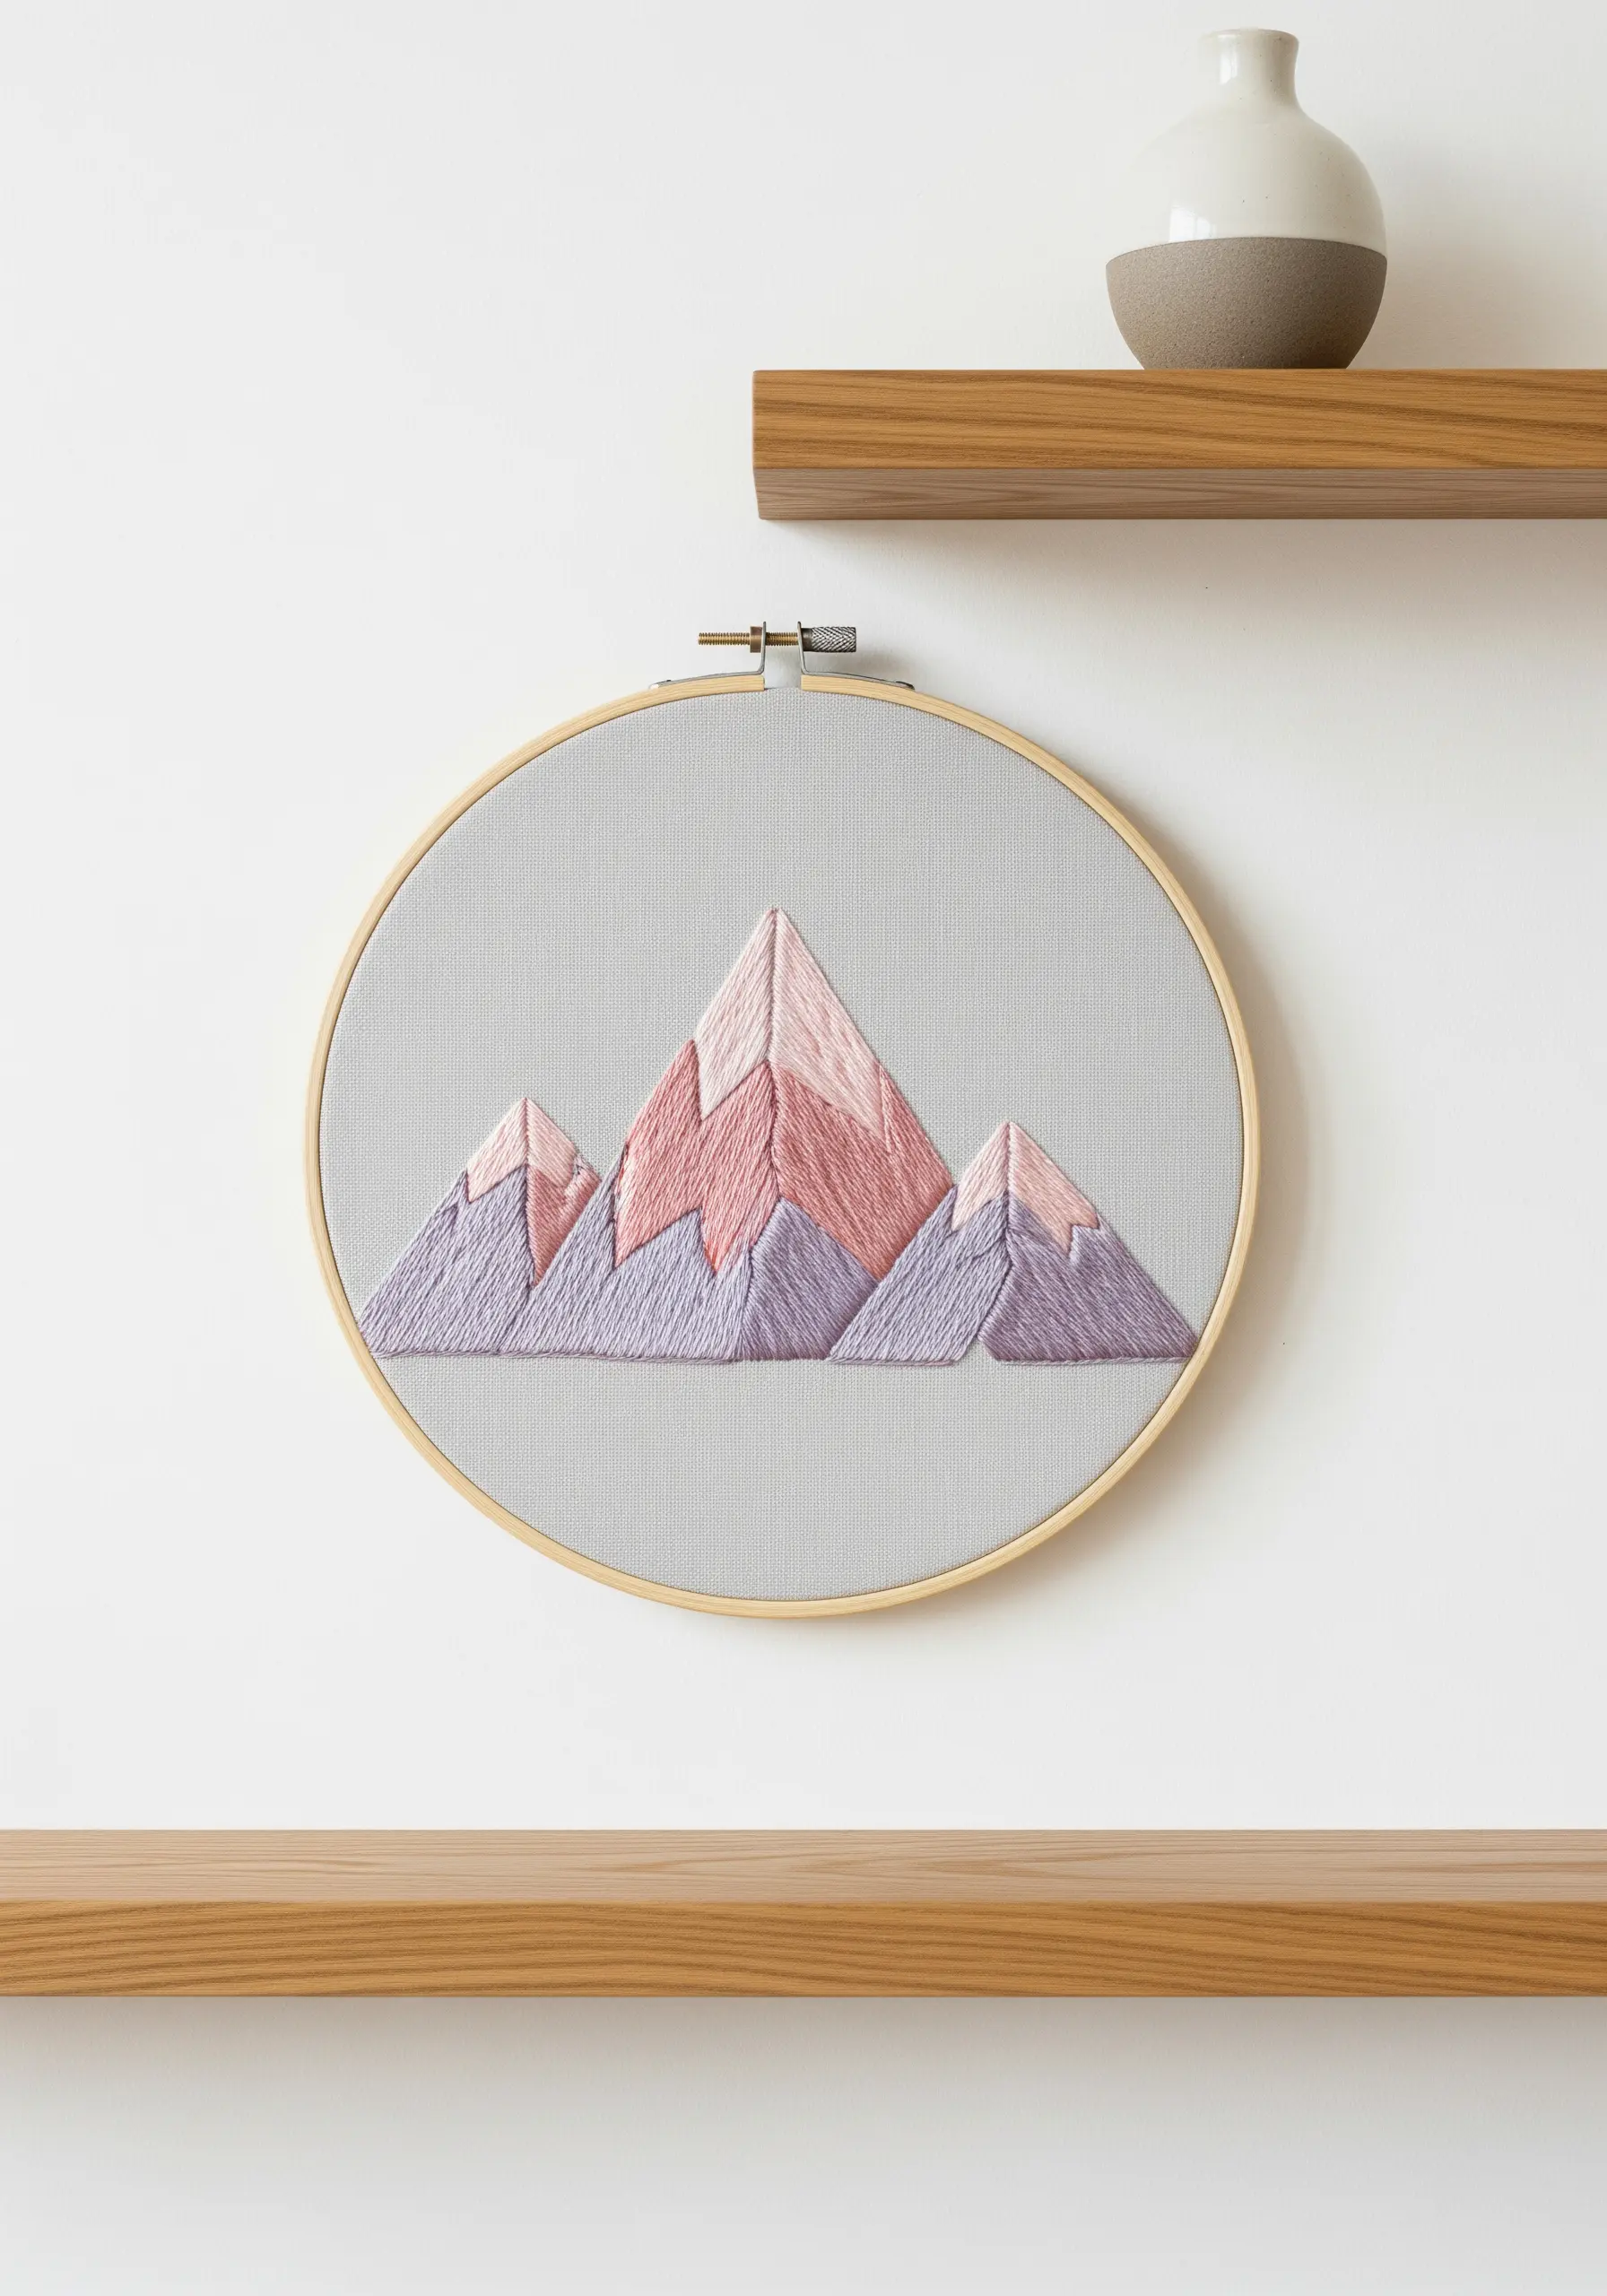
Transform flat geometric shapes into a dynamic landscape using a single technique: angled satin stitch.
For each facet of the mountain, intentionally change the direction of your stitches.
This simple shift causes the thread to catch the light differently, creating the illusion of shadow and dimension without changing colors within a single shape.
Use a high-quality, even-weave fabric like linen to ensure your satin stitches lay perfectly smooth and parallel, enhancing the crisp, clean aesthetic of your mountain landscape.
2. Build Woven Textures with Layered Straight Stitches
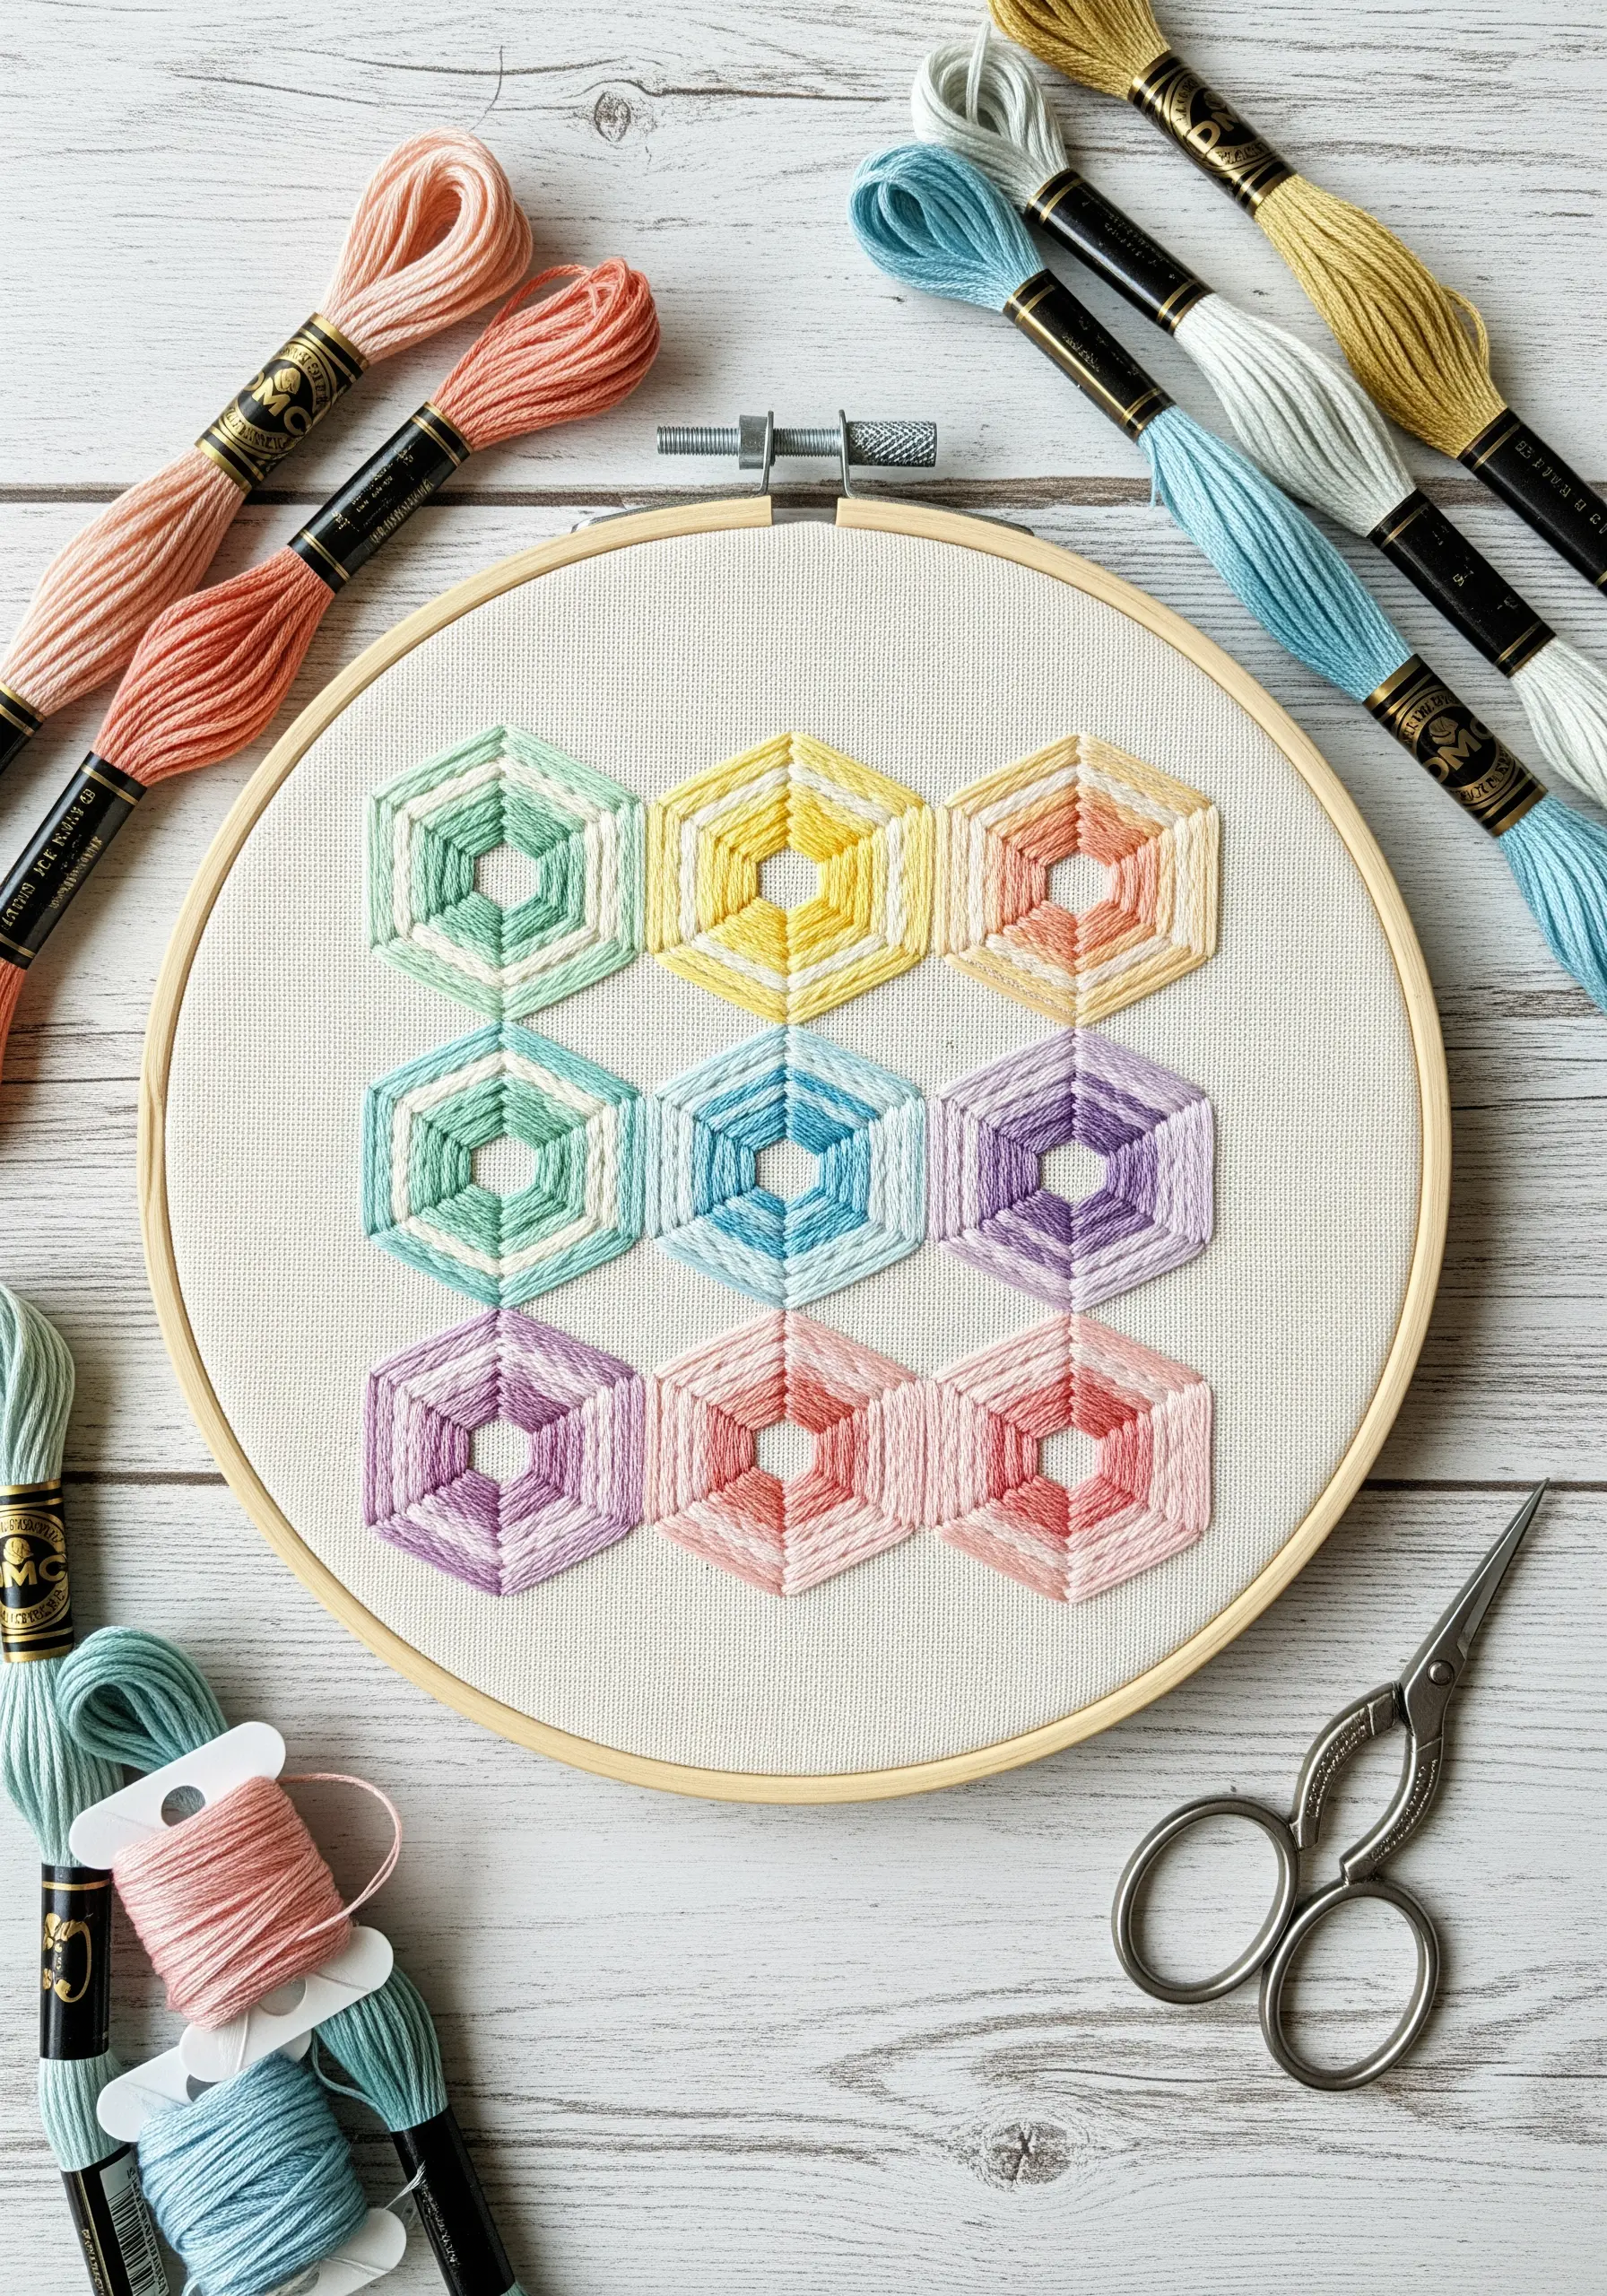
Create a stunning gradient effect by layering long straight stitches within a geometric outline, such as a hexagon.
Instead of filling the shape traditionally, work from the outside in, laying thread across the shape and slightly overlapping each new color.
This method builds a subtle, woven texture that adds dimension and visual interest.
It’s a meditative technique perfect for creating geometric framed embroidery patterns that feel both graphic and soft.
3. Combine Painted Backgrounds with Yarn Couching

Move your embroidery beyond the hoop by working on a painted canvas for a true mixed-media piece.
Start by painting abstract color blocks with acrylics to create a soft, modern backdrop.
Once dry, use a thick yarn or multiple strands of floss to couch the outlines of your botanicals, giving them a bold, raised profile.
This layering of paint and thread adds incredible depth, turning a simple design into botanical textile art.
4. Create Sunbursts with a Textured Anchor Point

Achieve this dramatic sunburst effect with long, radiating straight stitches anchored by a dense, textural center.
To create the gradient, simply alternate between two or three shades as you stitch each spoke.
The key to this design’s success is the contrasting center—use bullion knots or woven wheels to build a raised, intricate focal point.
This technique is perfect for embellishing functional items, making for warm and cozy pillow embroidery designs with a high-end feel.
5. Use French Knots for Pointillist Color Blending
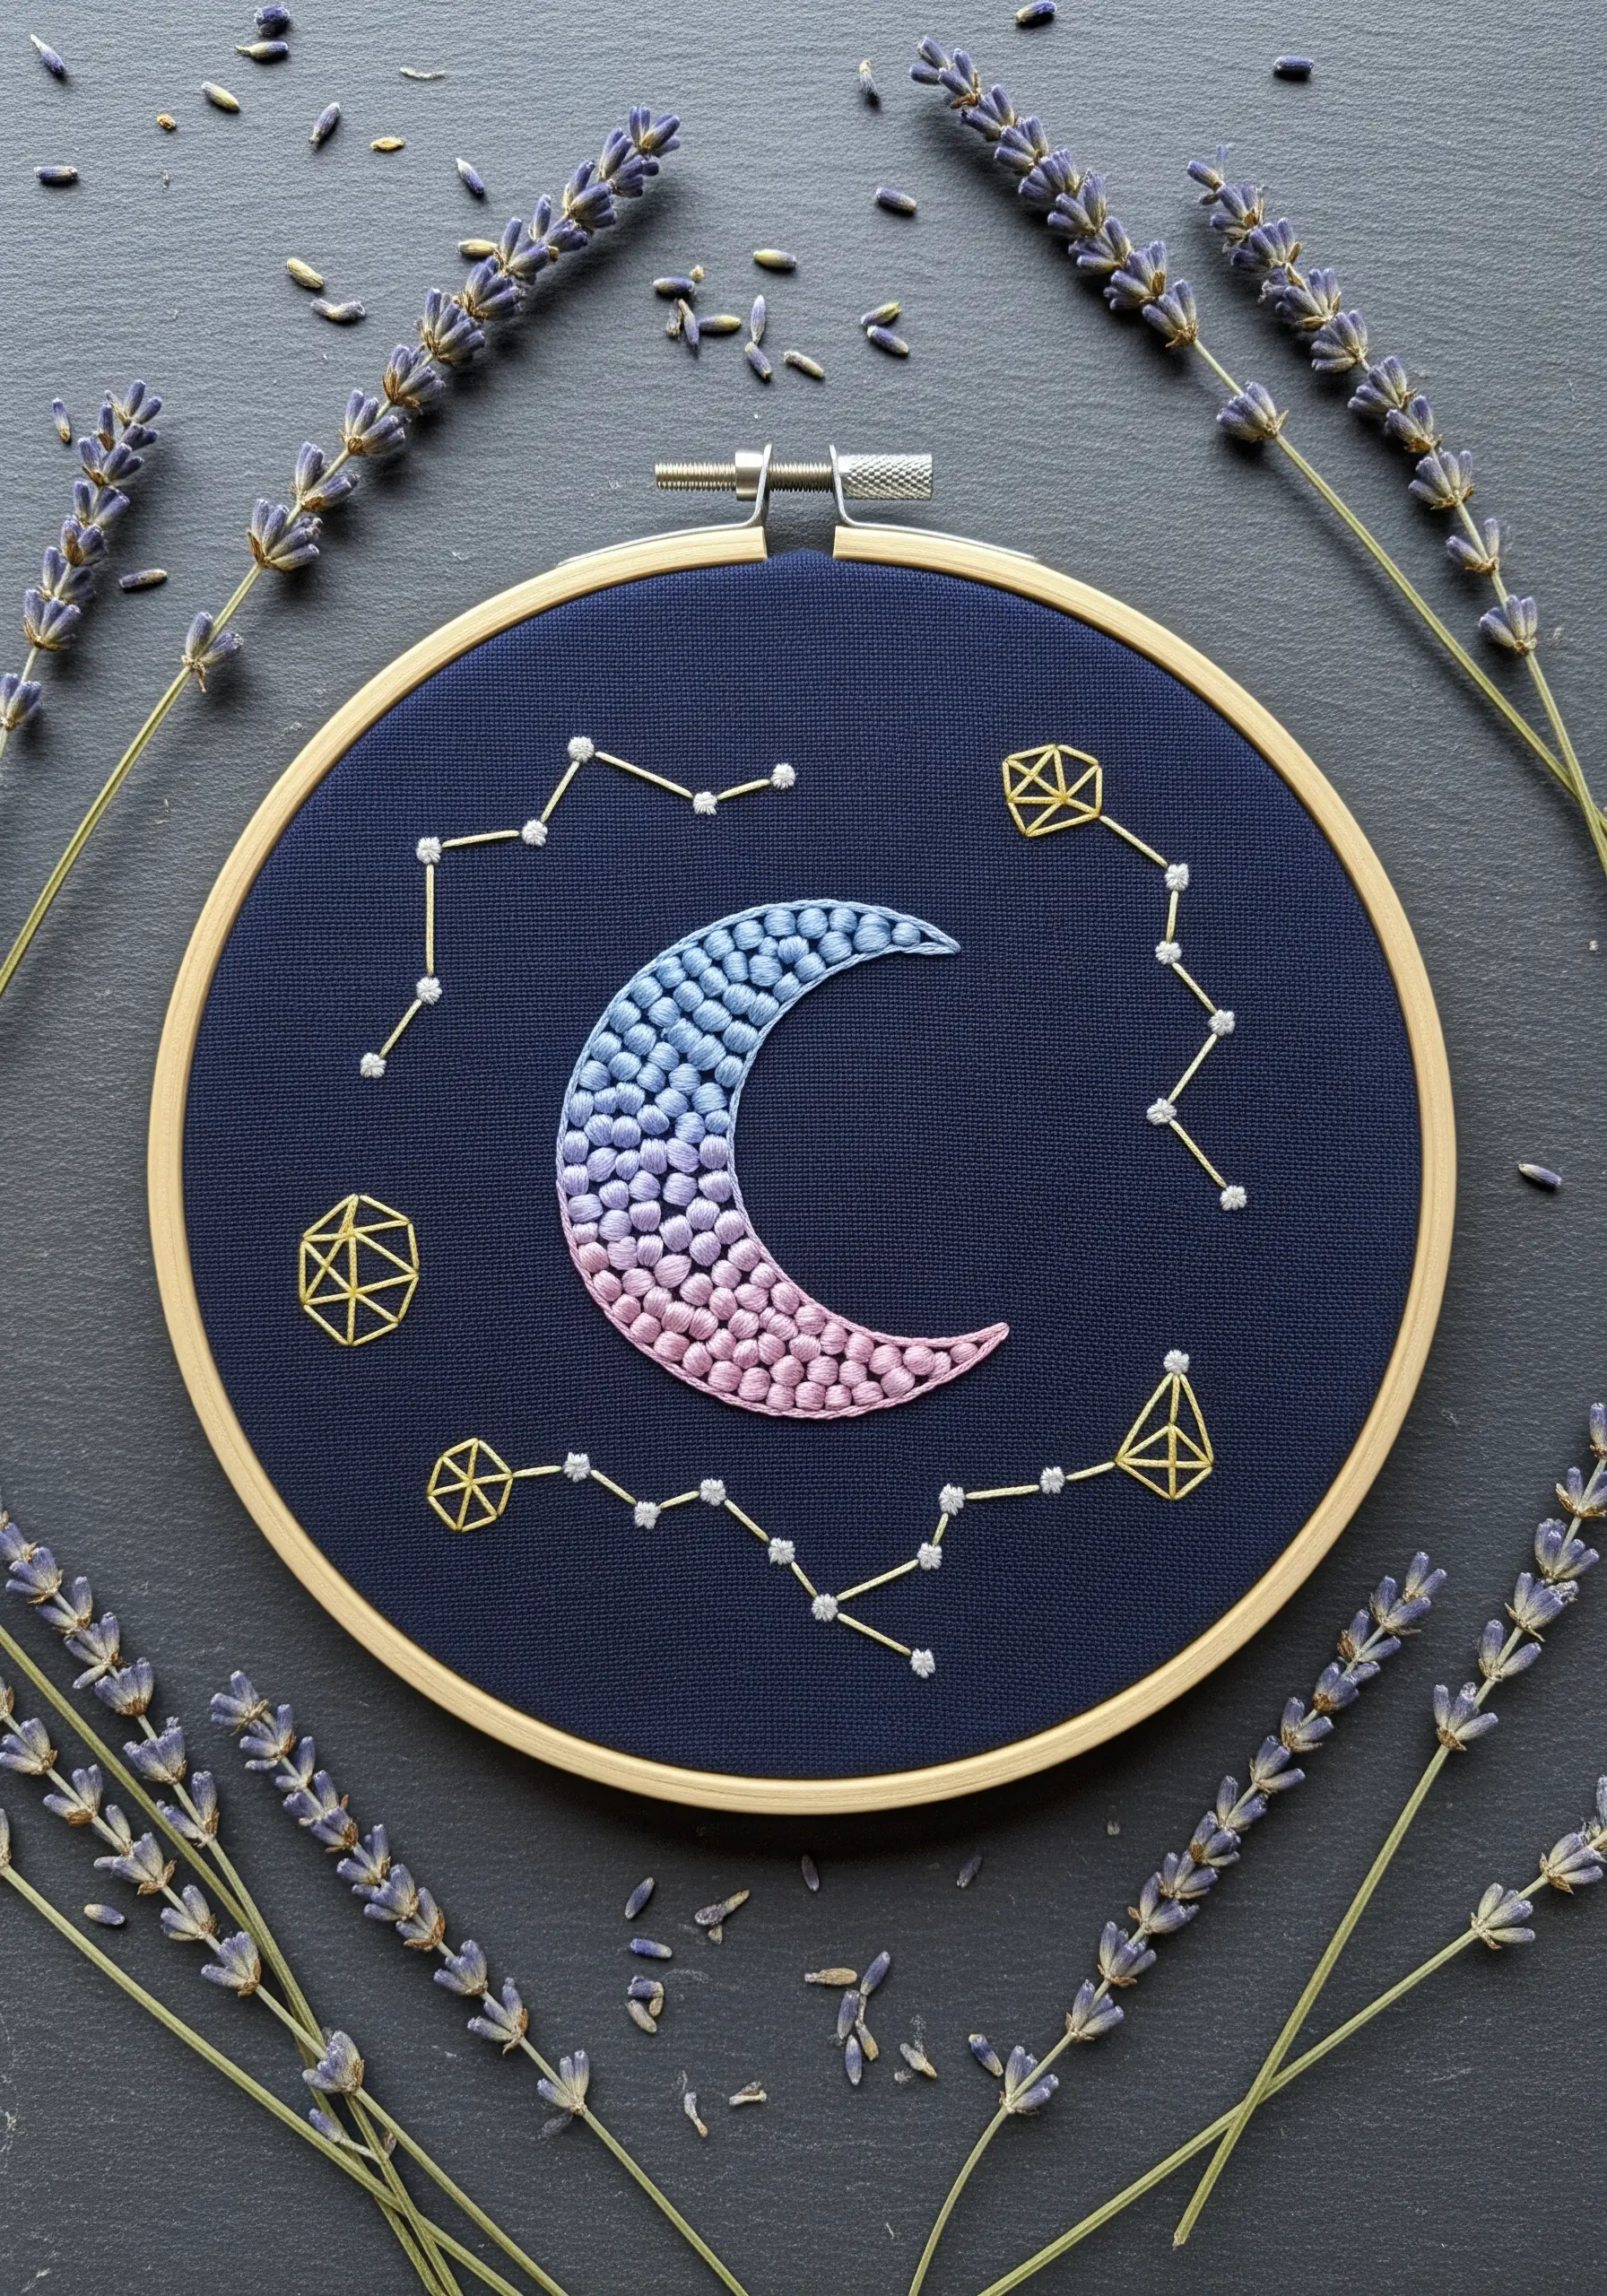
Create a seamless pastel gradient on a dark background using French knots as points of color.
Instead of blocking colors, scatter knots of adjacent shades where two colors meet to create a soft, stippled transition.
This pointillist approach gives the crescent moon a dreamy, textured glow that stands out beautifully against the navy fabric.
For the constellations, switch to a fine metallic thread and use simple straight stitches to add a delicate, celestial sparkle.
6. Design a Sampler with Textured Stitch Blocks

Elevate the classic sampler by turning it into a modern, quilt-like piece of boho-inspired textile wall art.
Divide your fabric into a grid and fill each block with a different stitch or pattern, such as satin stitch, seed stitch, or lattice work.
Organize your blocks by color family to create a harmonious gradient that flows across the piece.
Leaving some blocks empty (negative space) provides visual rest and gives the composition a contemporary, uncluttered feel.
7. Achieve Thick, Braided Lines with Chain Stitch

For bold, graphic shapes like these rainbows, use a chain stitch with thicker thread, like pearl cotton or multiple strands of floss.
The interlocking loops of the chain stitch create a dense, braided texture that gives your lines weight and dimension.
Place your rows of chain stitch tightly against one another to build solid bands of color, allowing the gradient to flow smoothly from one shade to the next.
This technique is ideal for tote bag embroidery patterns that need to be durable and visually striking.
8. Curate a Minimalist Herb Triptych
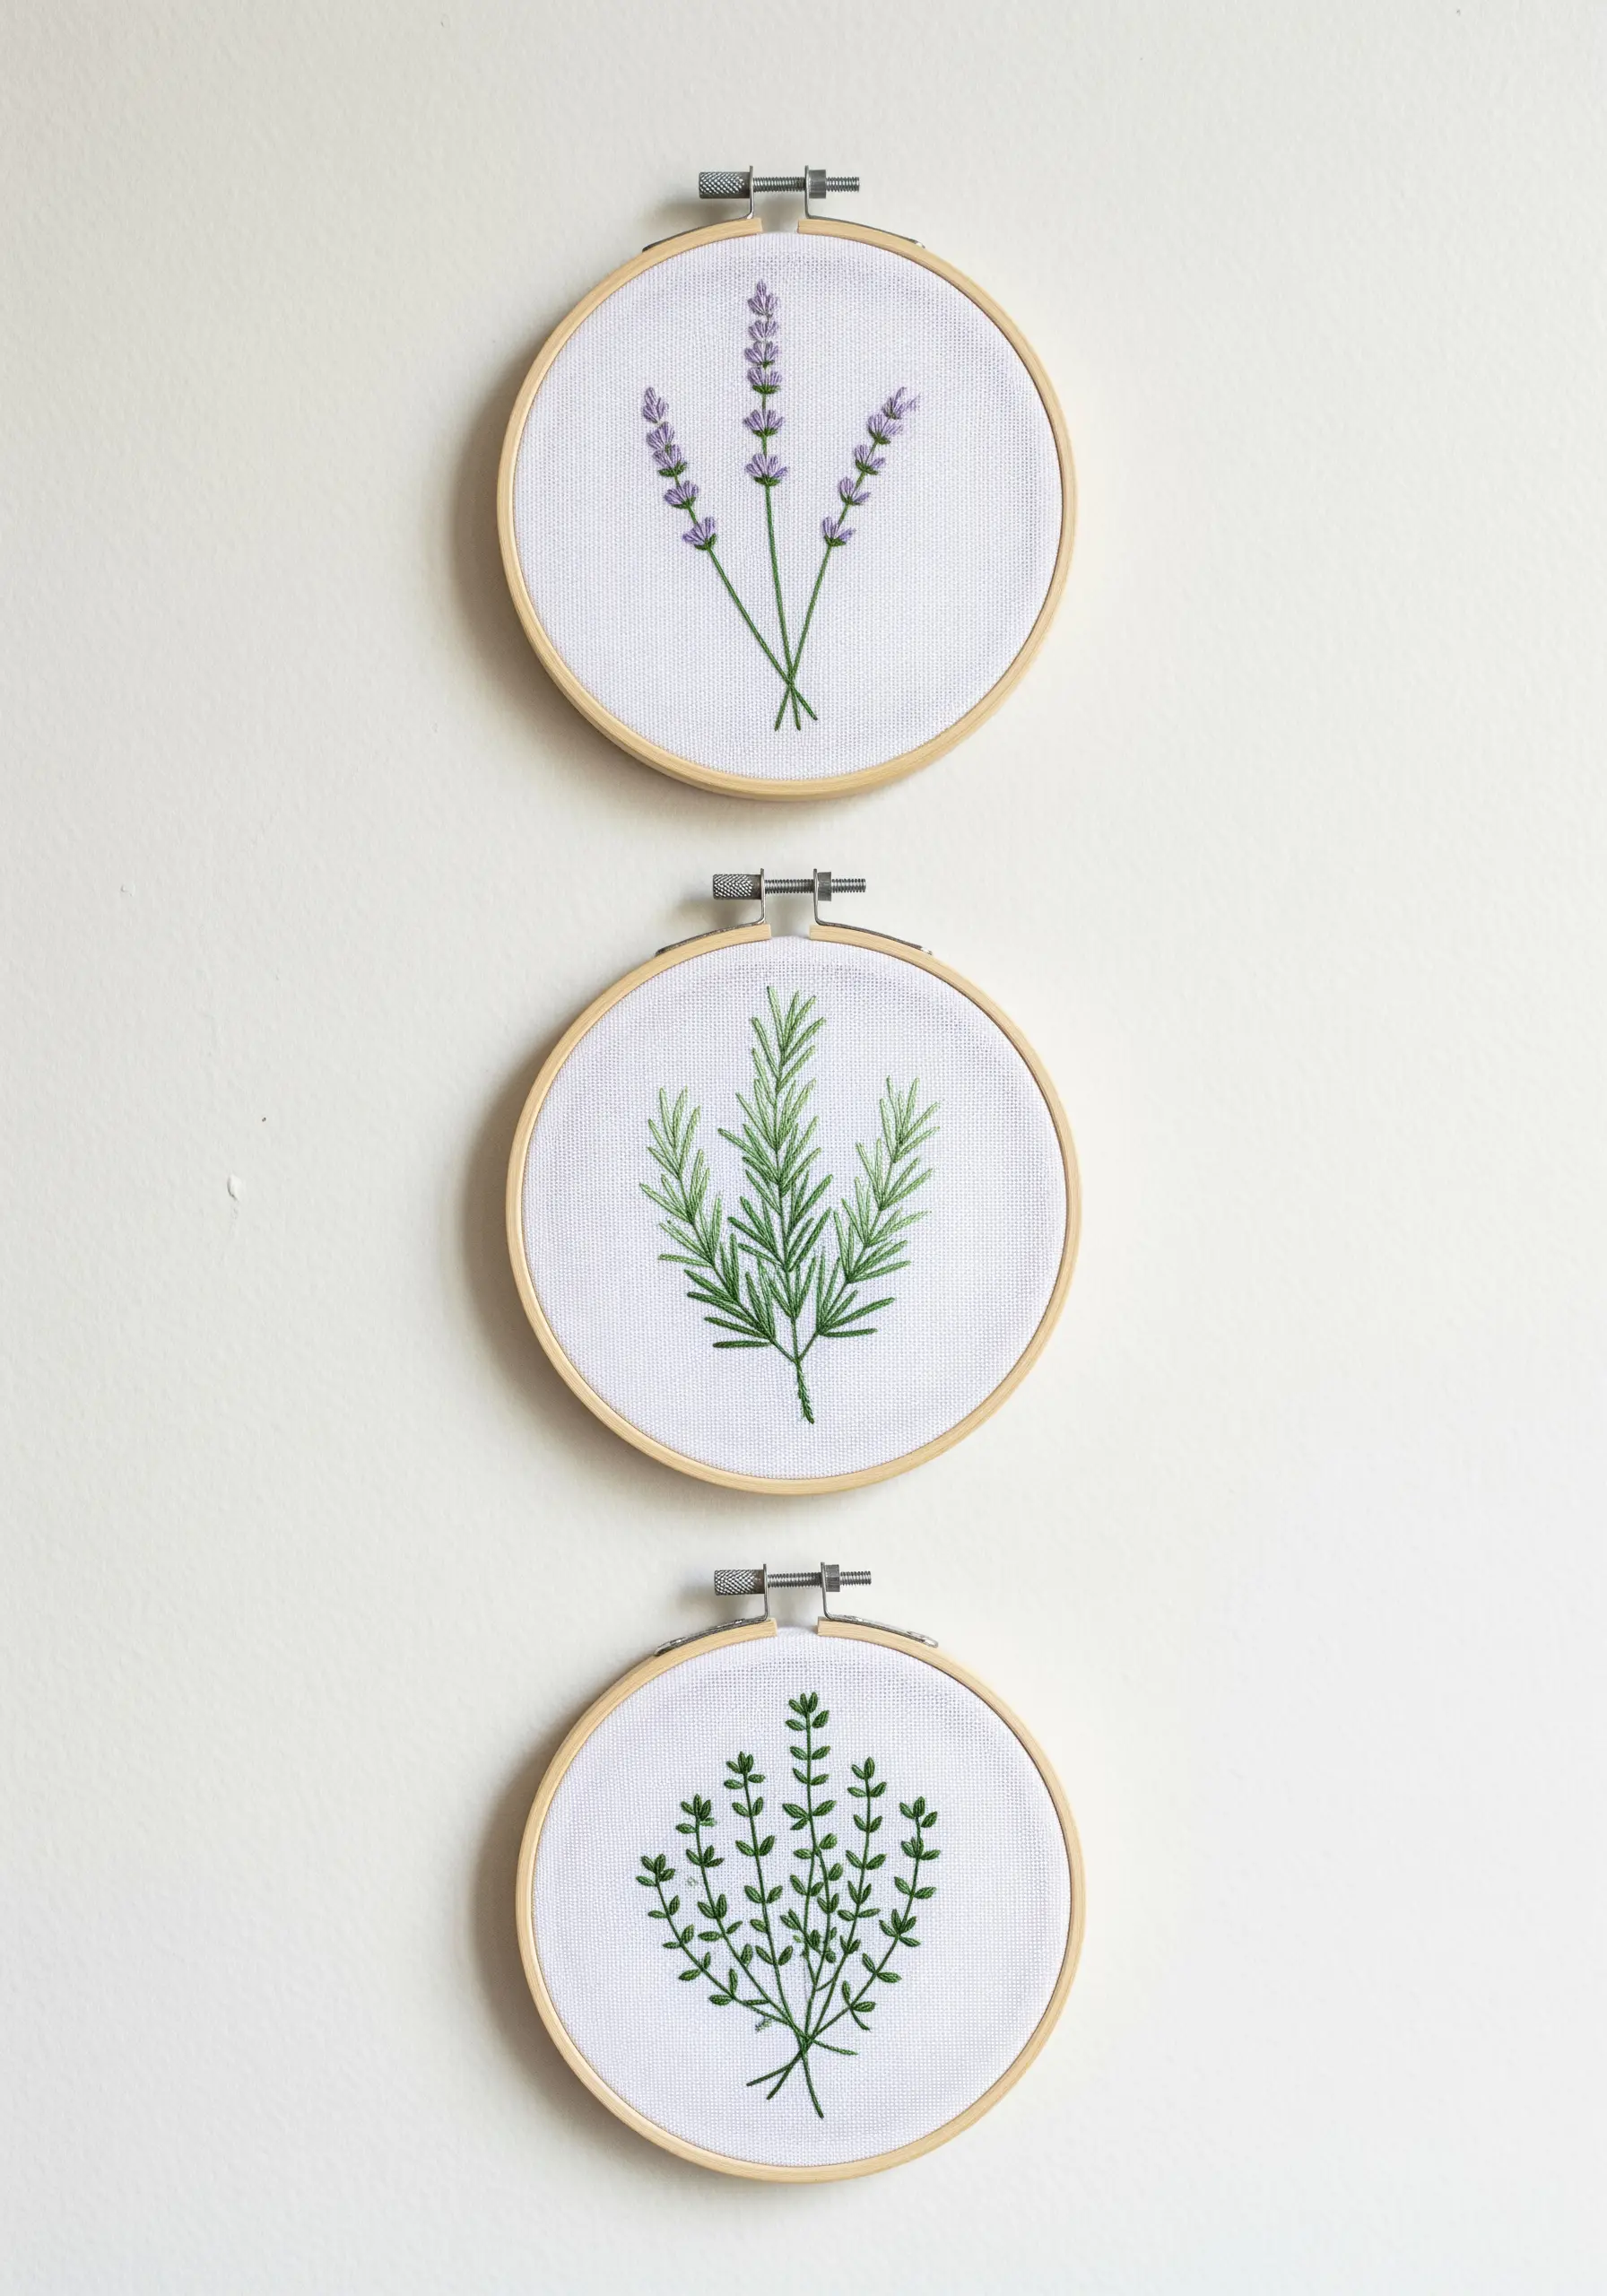
Create a cohesive and calming wall display by stitching a series of minimalist botanicals, each in its own small hoop.
Focus on a single plant per hoop—like lavender, rosemary, and thyme—and use a limited palette of greens and purples to unify the set.
The key is simplicity: use delicate stitches like stem stitch for the stalks and tiny satin stitches or French knots for the leaves and buds.
This grouping of mini fruit & herb embroidery frames adds a touch of modern cottage charm to any space.
9. Sculpt Abstract Waves with Varied Textures
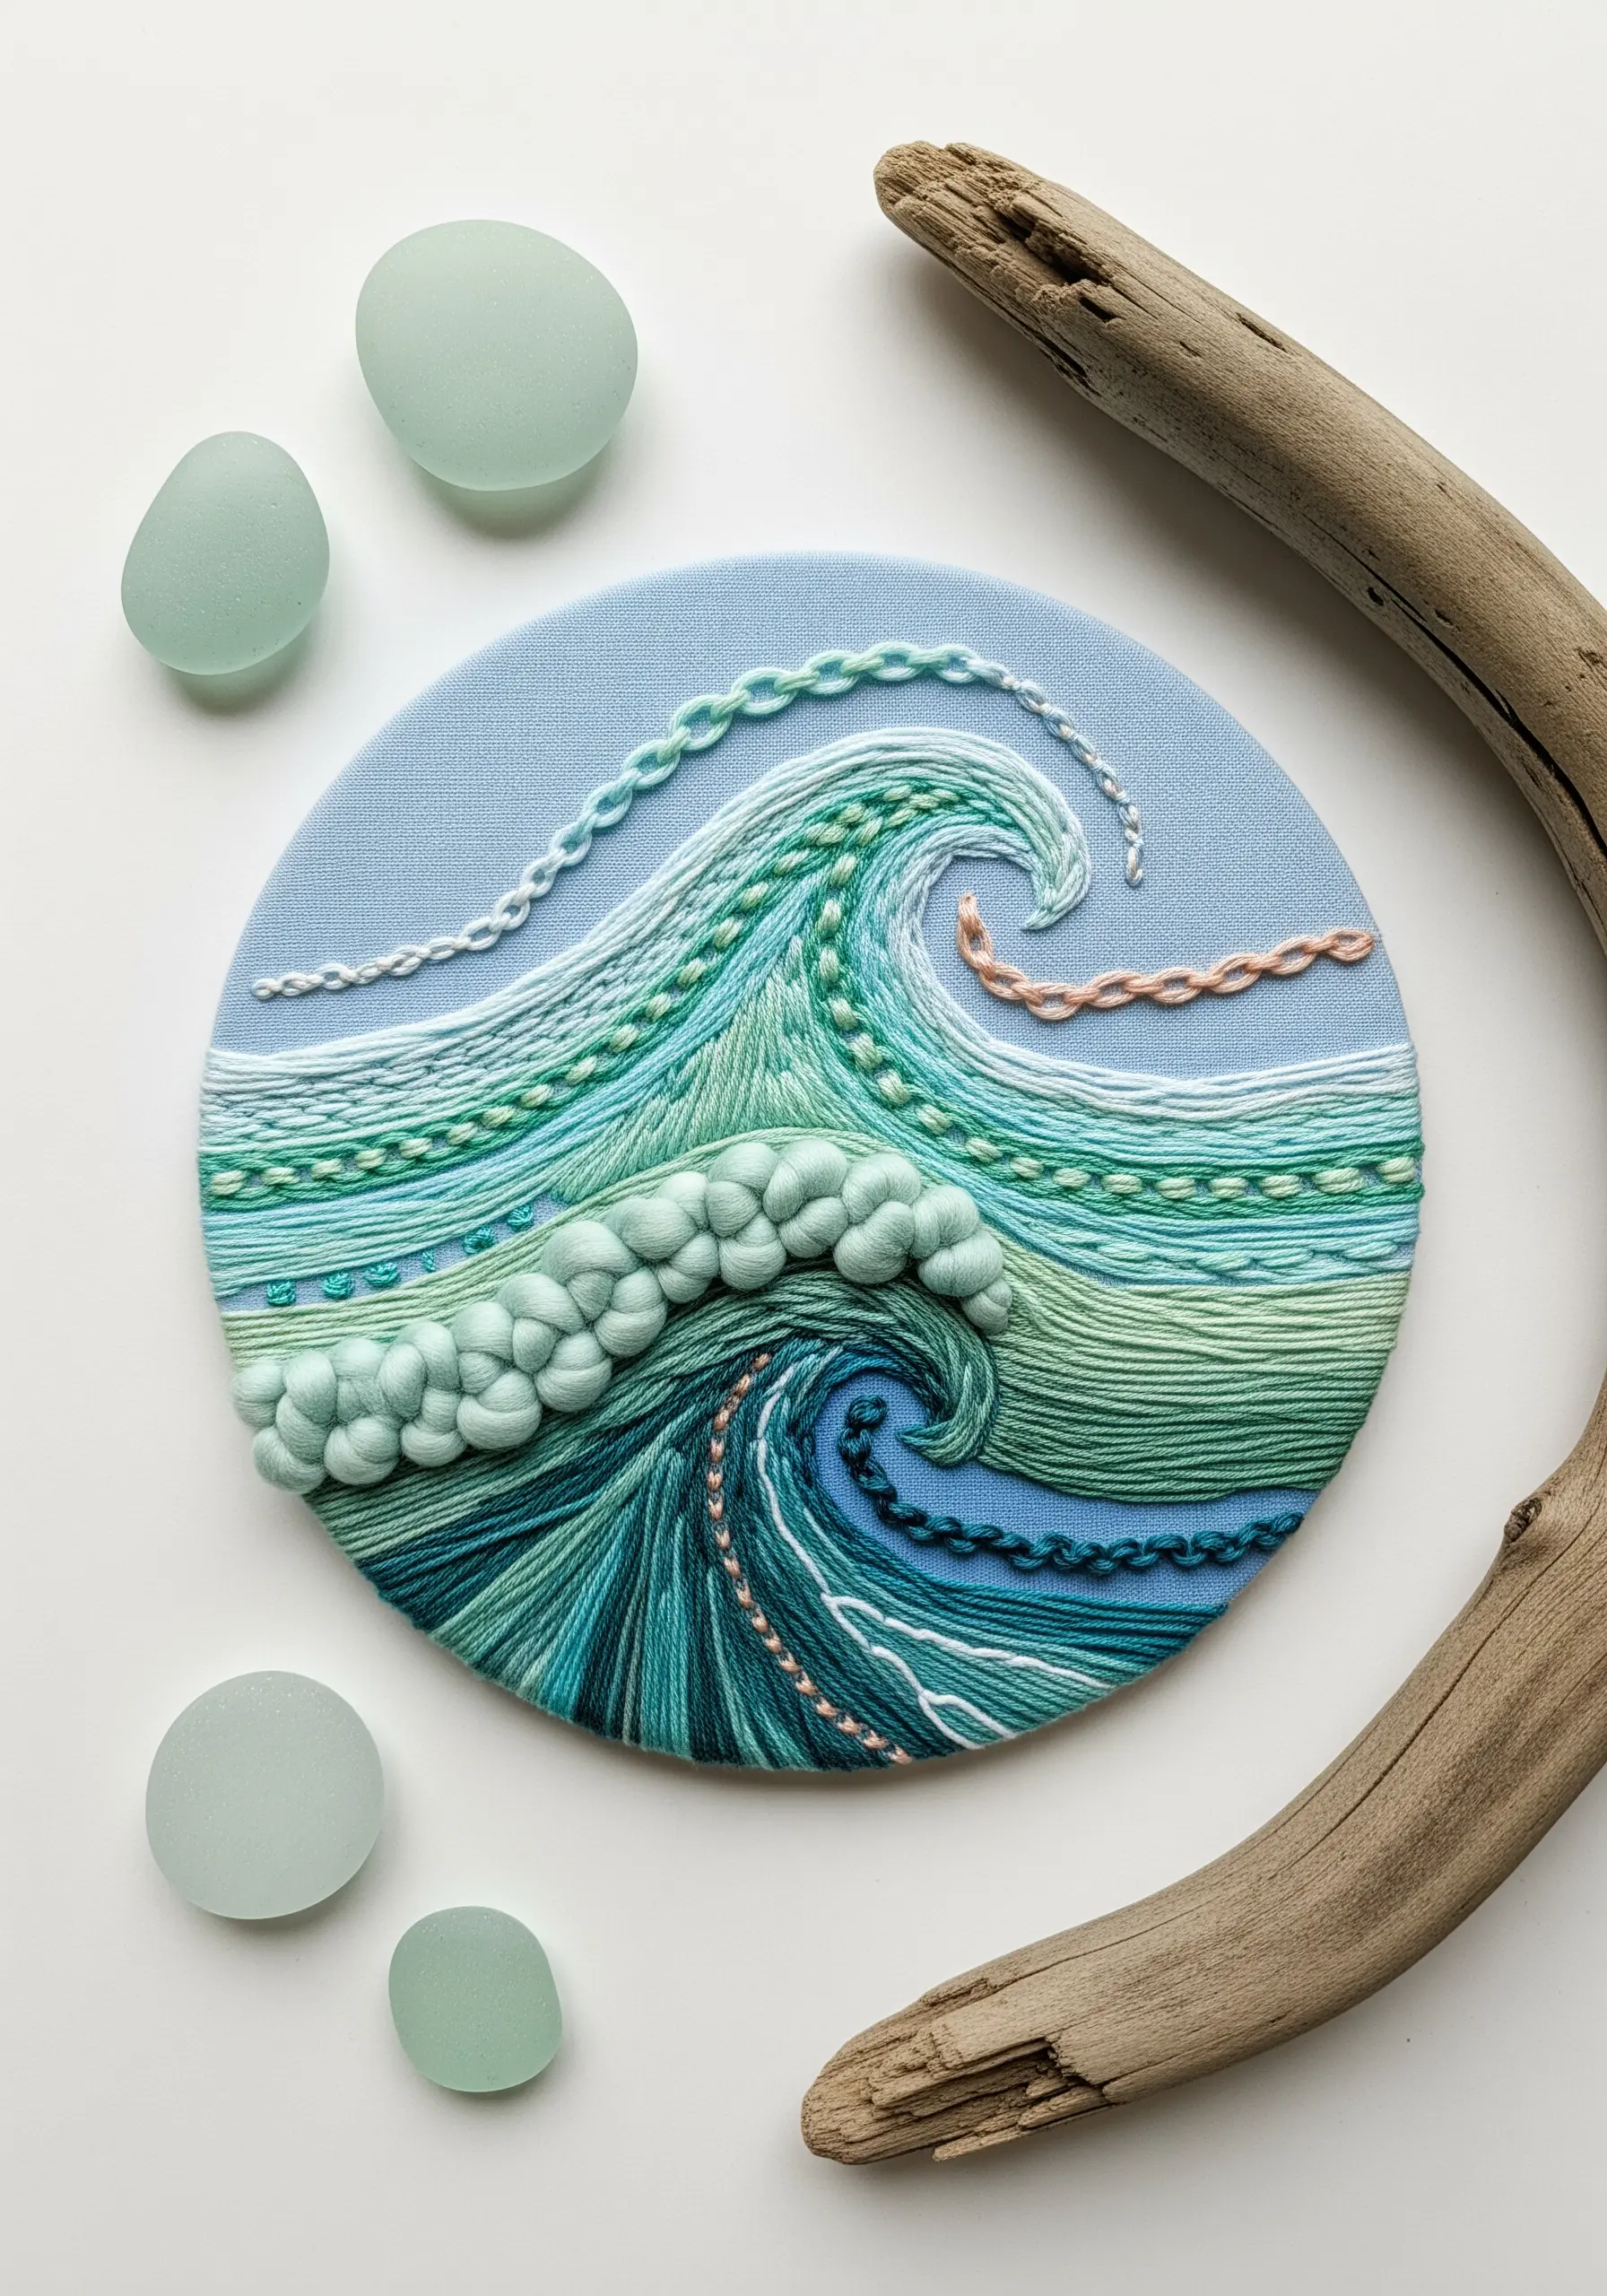
Capture the movement of the ocean by combining different stitches, threads, and textures in a single composition.
Use long-and-short stitch for the flowing water, couching thick yarn for the crest of the waves, and bullion knots for the sea foam.
Varying the thickness of your thread—from single strands to chunky yarn—creates a sense of depth and energy.
This approach transforms a simple hoop into a piece of abstract thread texture that feels dynamic and alive.
10. Create Whimsical Florals with Padded Satin Stitch

Give your flower petals a subtle, 3D lift with padded satin stitch.
Before you lay down your final satin stitches, fill the shape with a base layer of small seed stitches or straight stitches.
Then, stitch your satin stitch over this padding, causing the shape to become slightly raised and rounded.
This technique adds a soft, sculptural quality, making these whimsical floral embroidery ideas perfect for decor that invites a closer look.
11. Embellish Functional Items with Simple Stitches

Turn everyday items like trivets or coasters into bespoke decor with minimal effort.
Choose simple, repeating stitches like French knots, running stitches, or satin-stitched triangles.
The key to a modern aesthetic is consistency in your stitch size and spacing.
Using a single pastel color on a neutral background creates a design that is subtle, sophisticated, and perfect for a calm, minimalist kitchen space.
12. Master Thread Painting for a Realistic Gradient

Achieve a smooth, painterly gradient with the long-and-short stitch, the foundation of thread painting.
Start with one color at the base of the leaf, making stitches of varying lengths that follow the natural direction of the veins.
For the next color, bring your needle up through the previous stitches, interlocking the new color with the old.
This technique creates a seamless blend that is ideal for capturing the delicate color transitions in delicate leaf embroidery.
13. Fill Large Areas with Textured Seed Stitch
When faced with filling a large area, move beyond satin stitch and embrace the texture of seed stitch.
This stitch is simply a series of small, randomly placed straight stitches that build up to create a lovely, textural surface.
To create a gradient, stitch blocks of solid color next to each other, allowing the edges to be slightly uneven for a soft, clouded effect.
This method is not only faster than satin stitch for large spaces but also creates beautifully abstract nature-inspired embroidery motifs.
14. Add Metallic Highlights to Gradient Designs

Elevate your pastel gradients by incorporating a fine metallic thread for outlines or accents.
Here, a silver metallic thread is used to define the edges of the Celtic knot design, providing a crisp contrast to the soft lavender gradient.
When stitching with metallics, use a shorter length of thread and a needle with a larger eye to prevent fraying and tangling.
This subtle touch adds a hint of luxury, perfect for table linen embroidery motifs.
15. Direct Your Stitches to Mimic Natural Forms
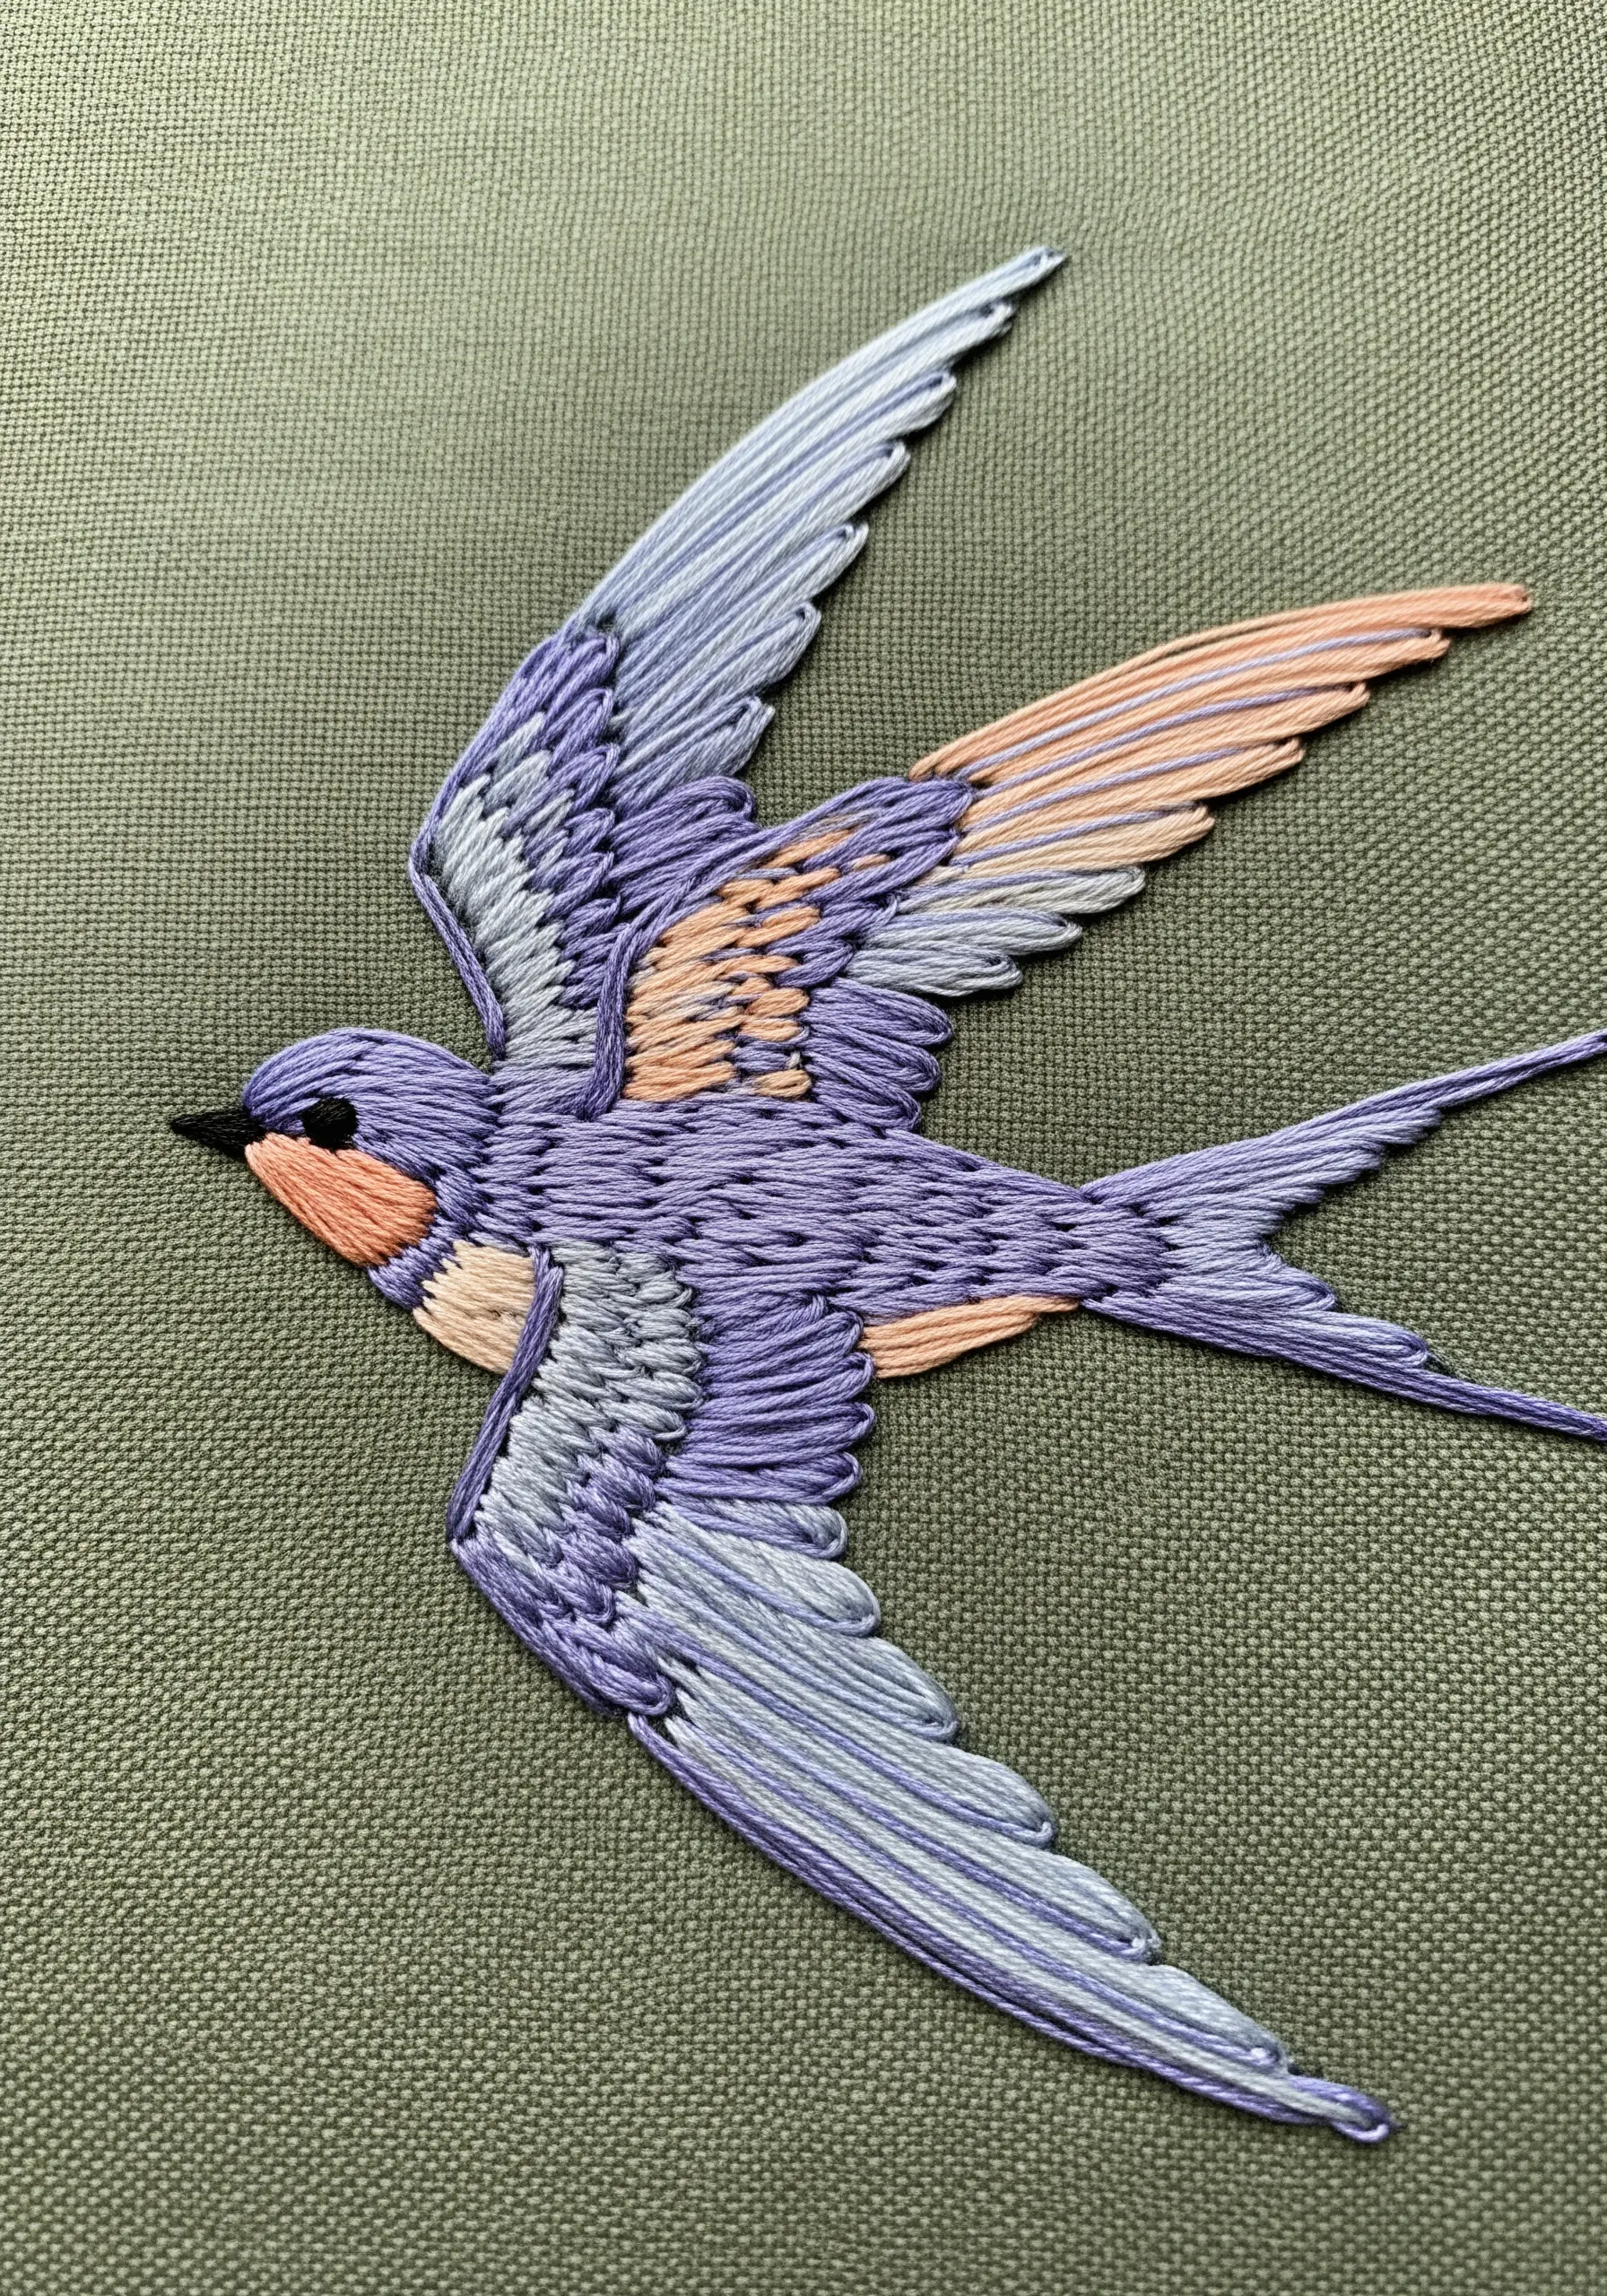
When embroidering birds or animals, let the direction of your stitches define the form and texture.
Instead of filling shapes uniformly, angle your long-and-short stitches to mimic the flow of feathers on a wing or the curve of a muscle.
This creates a sense of movement and realism, turning a simple fill stitch into a sculptural tool.
This is a core technique for creating bird & butterfly embroidery patterns that make fabric come alive.
16. Create a Subtle Pattern on a Lampshade
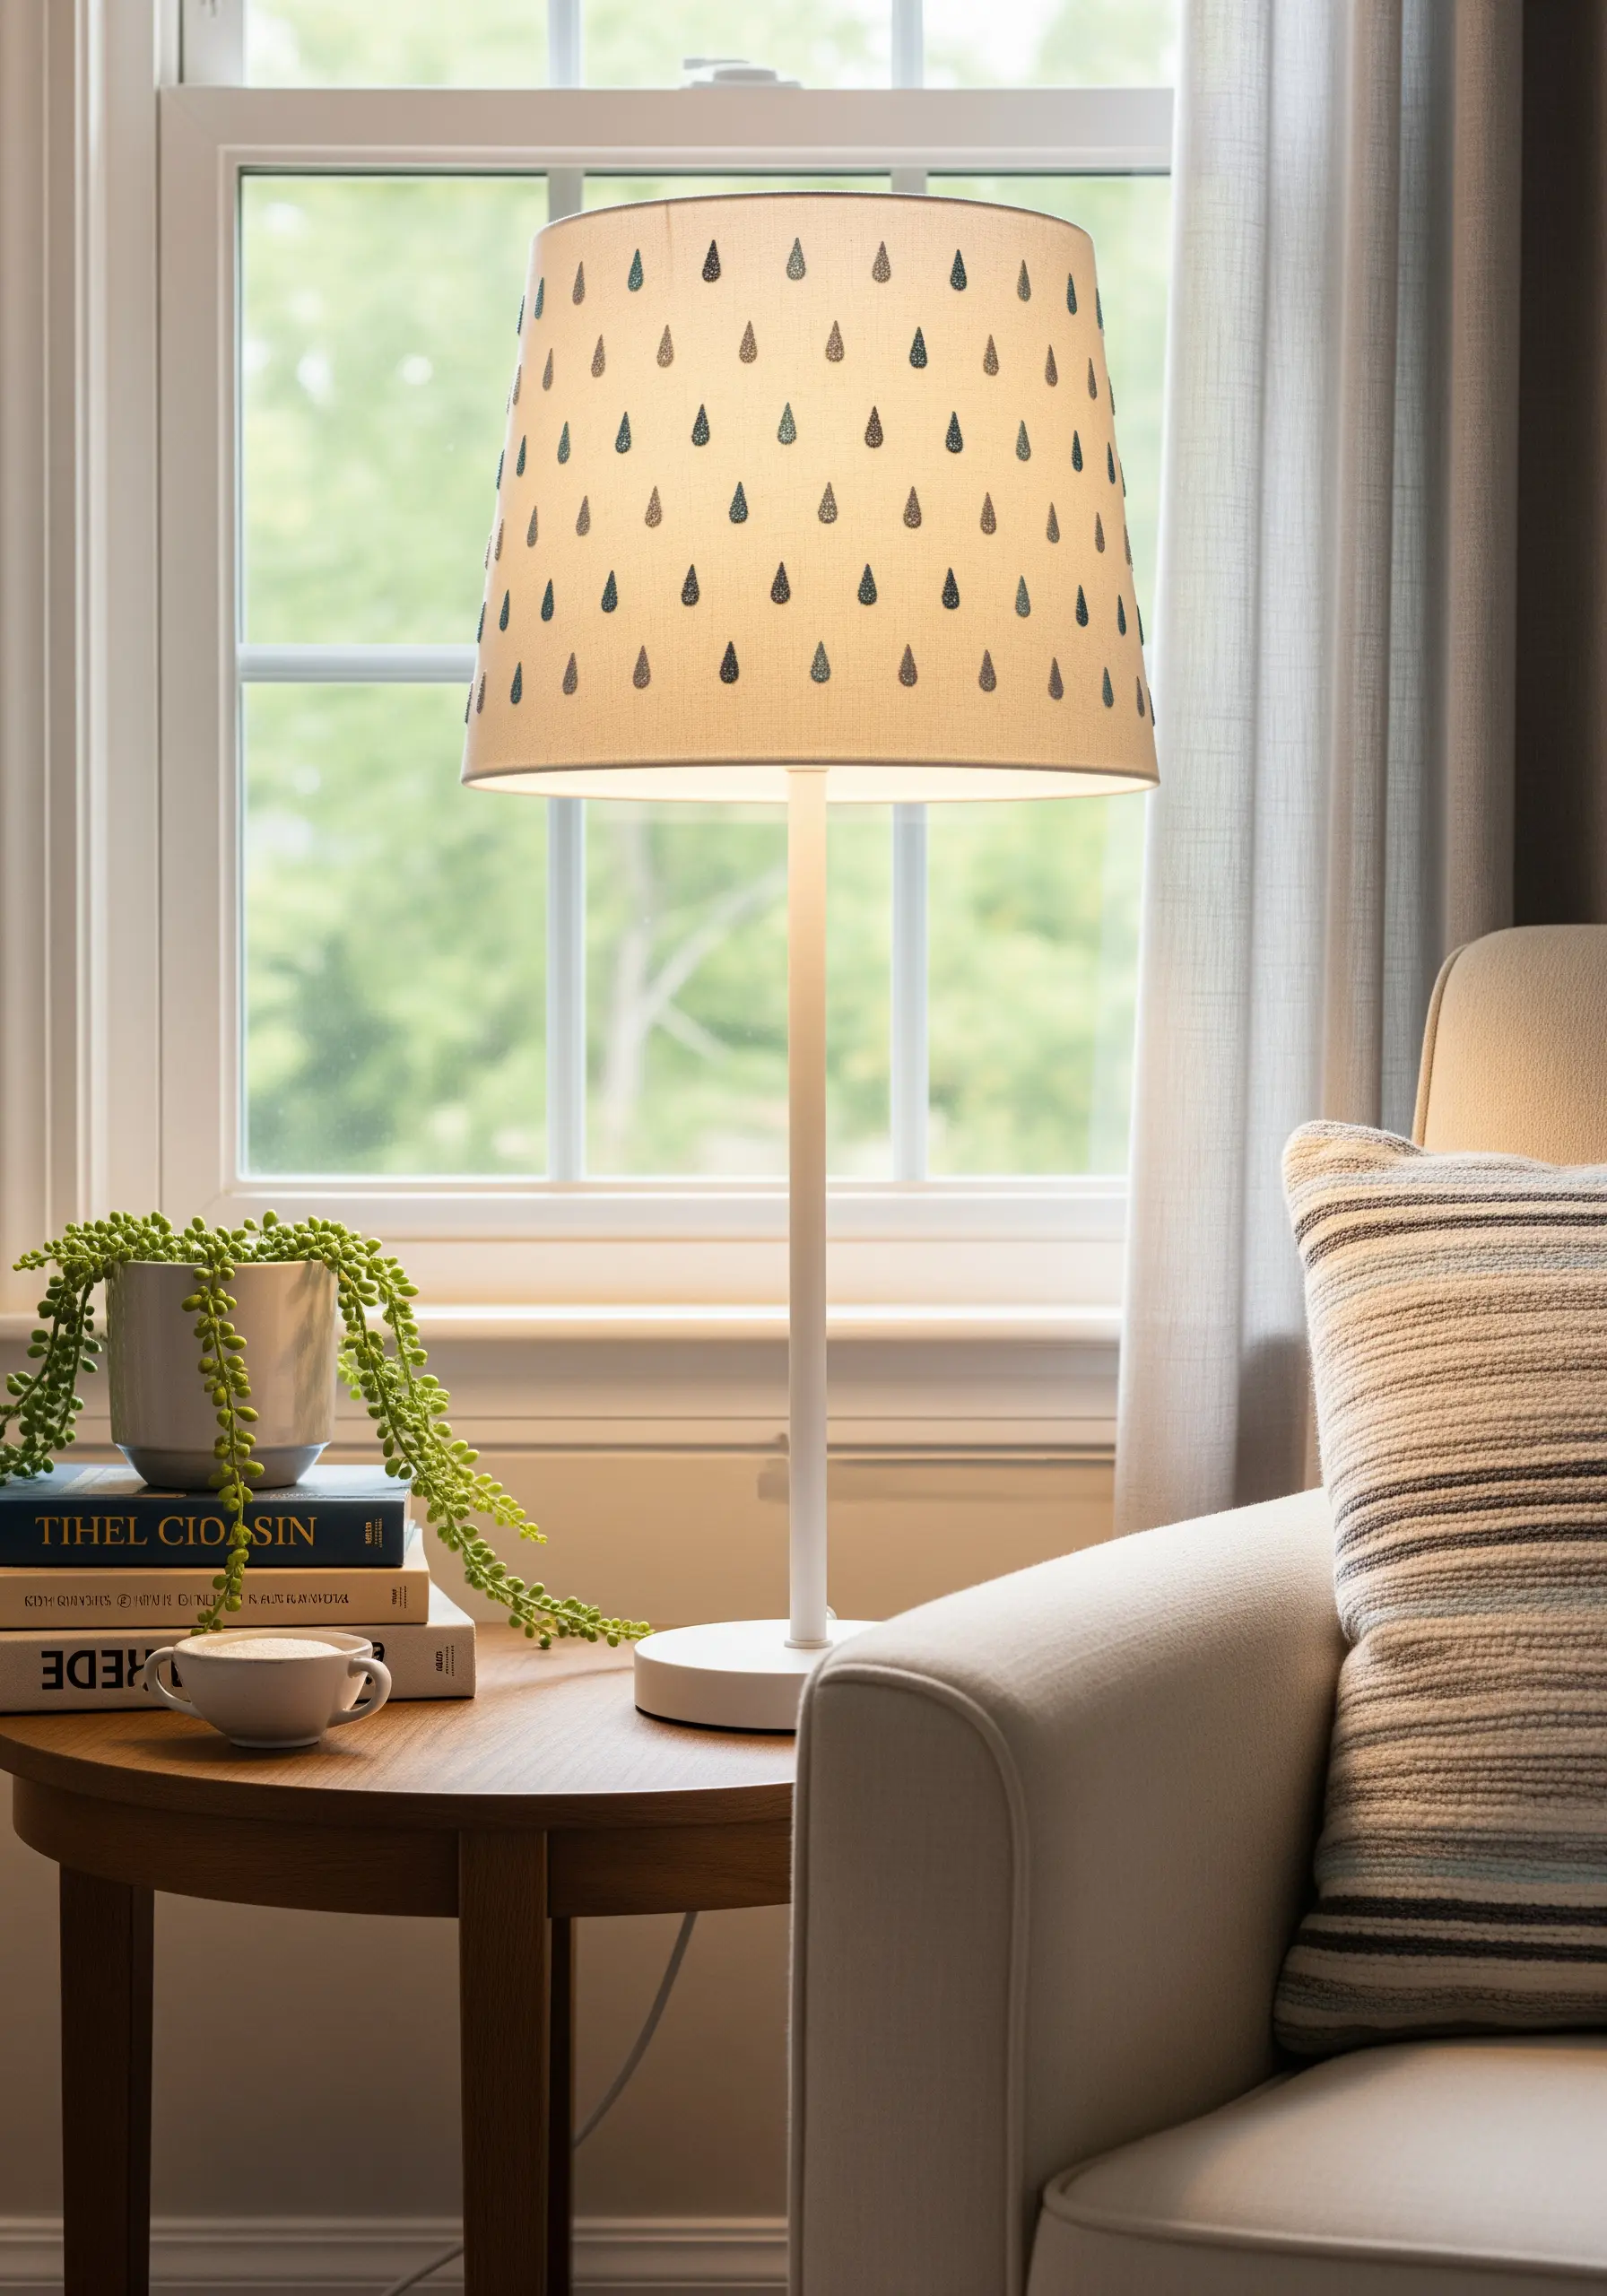
Embellish a plain lampshade to create a source of soft, patterned light in your room.
Use a simple repeating motif, like these teardrops, and a cool-toned gradient palette for a calming effect.
The key is to use only two or three strands of floss to keep the design delicate, allowing the light to shine through the fabric without being blocked by heavy stitching.
This is one of the easiest embroidery project ideas to refresh your apartment decor and add a personalized touch.
17. Design Your Own Textured Patches

Create a collection of modern, textural patches to embellish clothing or arrange as unique wall art.
Cut felt into your desired shapes and fill them with dense stitching—try vertical satin stitches for a smooth finish or woven stitches for a more intricate look.
By limiting your palette to a few complementary pastel gradients, the collection feels cohesive and curated.
These tiny hoop embroidery crafts are perfect for adding to tote bags, jackets, or pouches.
18. Craft a Modern Stitch Reference Sampler
Turn your stitch practice into a beautiful piece of decor that is both functional and decorative.
Instead of a traditional layout, arrange your stitches in clean, horizontal rows and organize them by color to create a gradient effect.
Use a modern, sans-serif font for the stitch labels to give the sampler a contemporary feel.
This is not just practice; it’s a way to create inspirational small hoop samplers that document your skills in style.
19. Embroider Directly onto a Journal Cover

Personalize a fabric-bound journal by embroidering a design directly onto the cover.
Choose a simple, graphic motif like this sunburst, which uses satin stitch and straight stitches for a clean, modern look.
A sharp needle and a thimble are essential for working through the thick cardstock of the cover.
This project turns an everyday object into a meaningful keepsake and one of the most creative embroidery gifts you can make.
20. Use Directional Satin Stitch for Foliage
Instead of outlining and filling your leaves, use directional satin stitch to create the entire shape.
Think of each leaf as two halves, and angle your stitches from a central vein outwards towards the edge.
This technique not only fills the space but also creates a subtle, built-in line that mimics a real leaf vein.
It’s an efficient and elegant way to create leaf vein details without adding extra steps.
21. Create a Woven Gradient Braid
Achieve this beautiful, thick braid effect using long, overlapping satin stitches.
Start by drawing a basic braid pattern. Fill one section at a time, ensuring your stitches are long enough to tuck under the next overlapping section.
To create the seamless gradient, introduce a new color with each ‘turn’ of the braid.
This dimensional design works wonderfully as a standalone piece of abstract thread layering on a narrow canvas or as a border element.
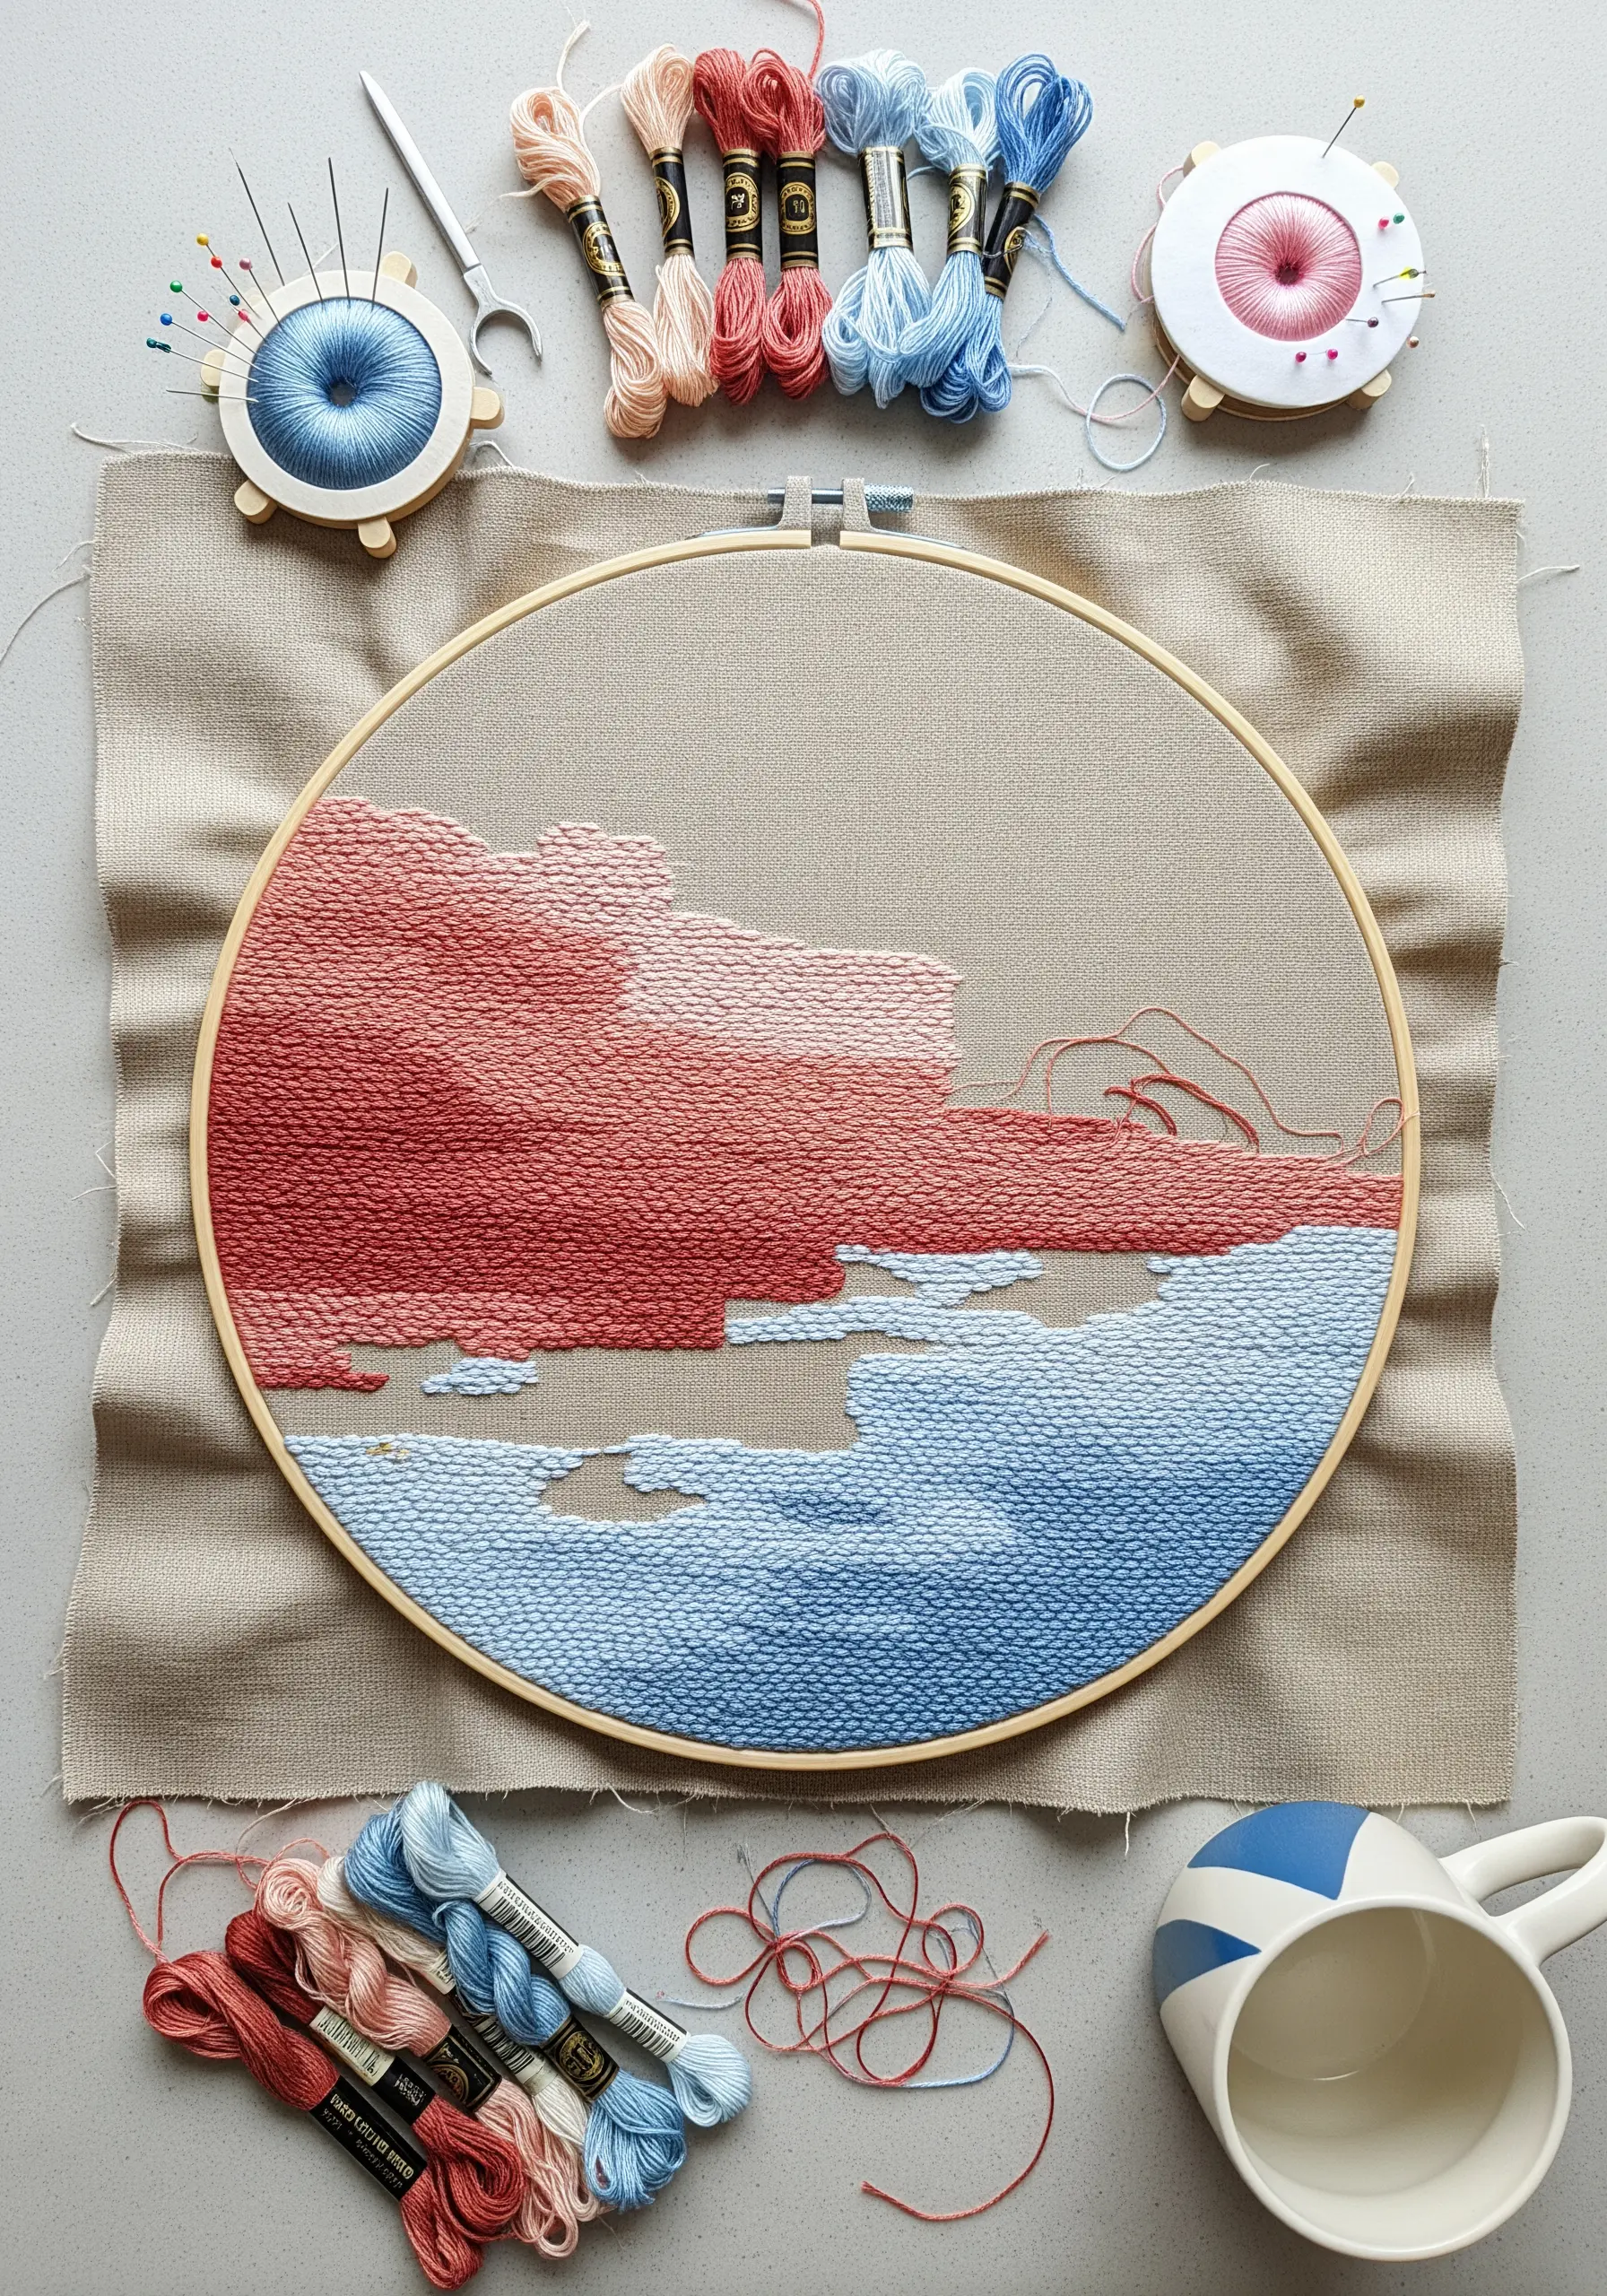
22. Stitch a Triptych of Minimalist Landscapes
Capture the essence of a landscape with simple, horizontal bands of color.
This technique relies entirely on straight stitches pulled taut across the hoop, creating a clean, modern aesthetic.
To achieve the gradient, simply switch your thread color every few rows.
Grouping three hoops together as a triptych turns these minimalist embroidery hoops into a cohesive and impactful art installation.
23. Add a Touch of 3D with Stumpwork
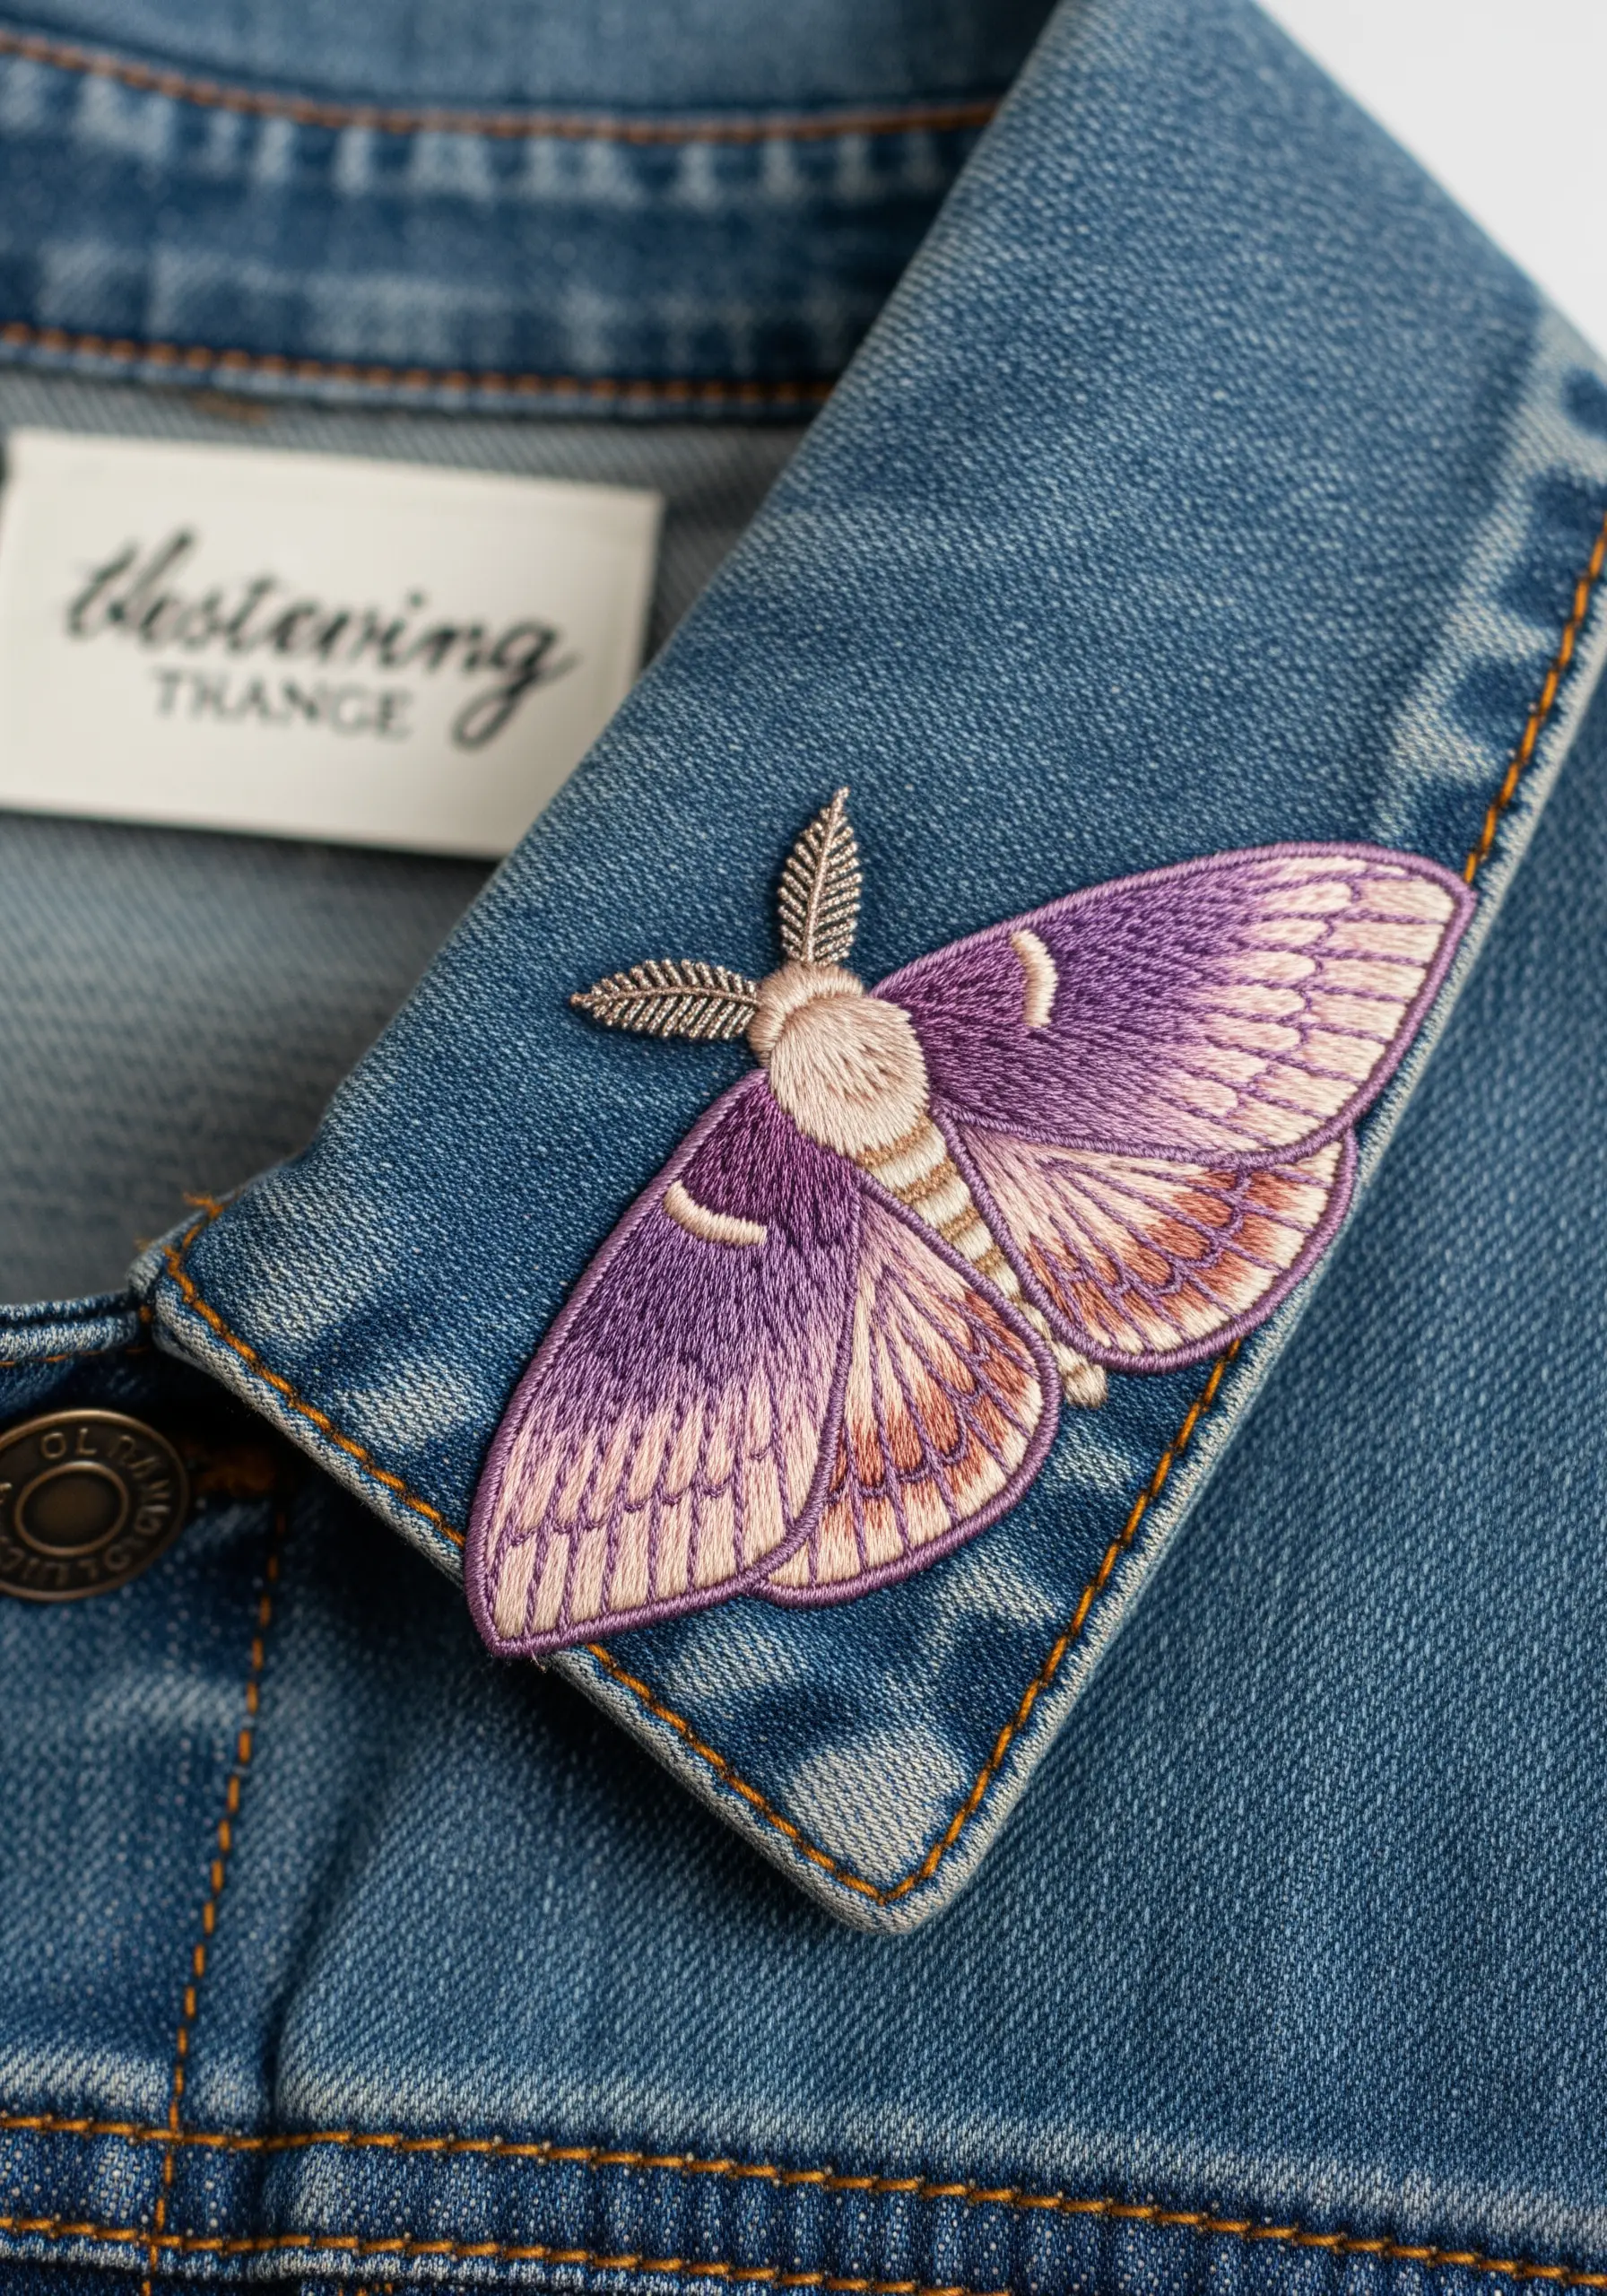
Elevate a simple moth or butterfly by stitching the wings separately and attaching them to the body for a 3D effect.
Embroider the wings on a separate piece of fabric with a wire stitched along the edge for support. Cut them out and carefully attach them to the main piece.
This stumpwork technique makes the moth appear as if it’s about to take flight, perfect for adding a surprising detail to a denim jacket collar.
24. Arrange Simple Motifs in an Artistic Grid

Turn a very simple embroidered motif, like a single leaf, into a sophisticated piece of art through repetition and arrangement.
Stitch the same leaf shape multiple times, but vary the pastel gradient within each one to create visual interest.
Arranging them in a neat grid on a neutral background creates a calm, contemporary piece that feels intentional and curated, ideal for minimal embroidery wall designs.
25. Embrace the Elegance of Tone-on-Tone Stitching
Create a subtle, high-end look by stitching with a thread color that is only a few shades lighter than your fabric.
This tone-on-tone technique emphasizes texture over color, allowing the detail of your linework to take center stage.
Here, a simple white outline on natural linen feels incredibly refined and elegant.
This approach is perfect for creating minimalist line art nature embroidery that adds quiet sophistication to your decor.
26. Construct Soft Nursery Mobiles with Felt and Texture
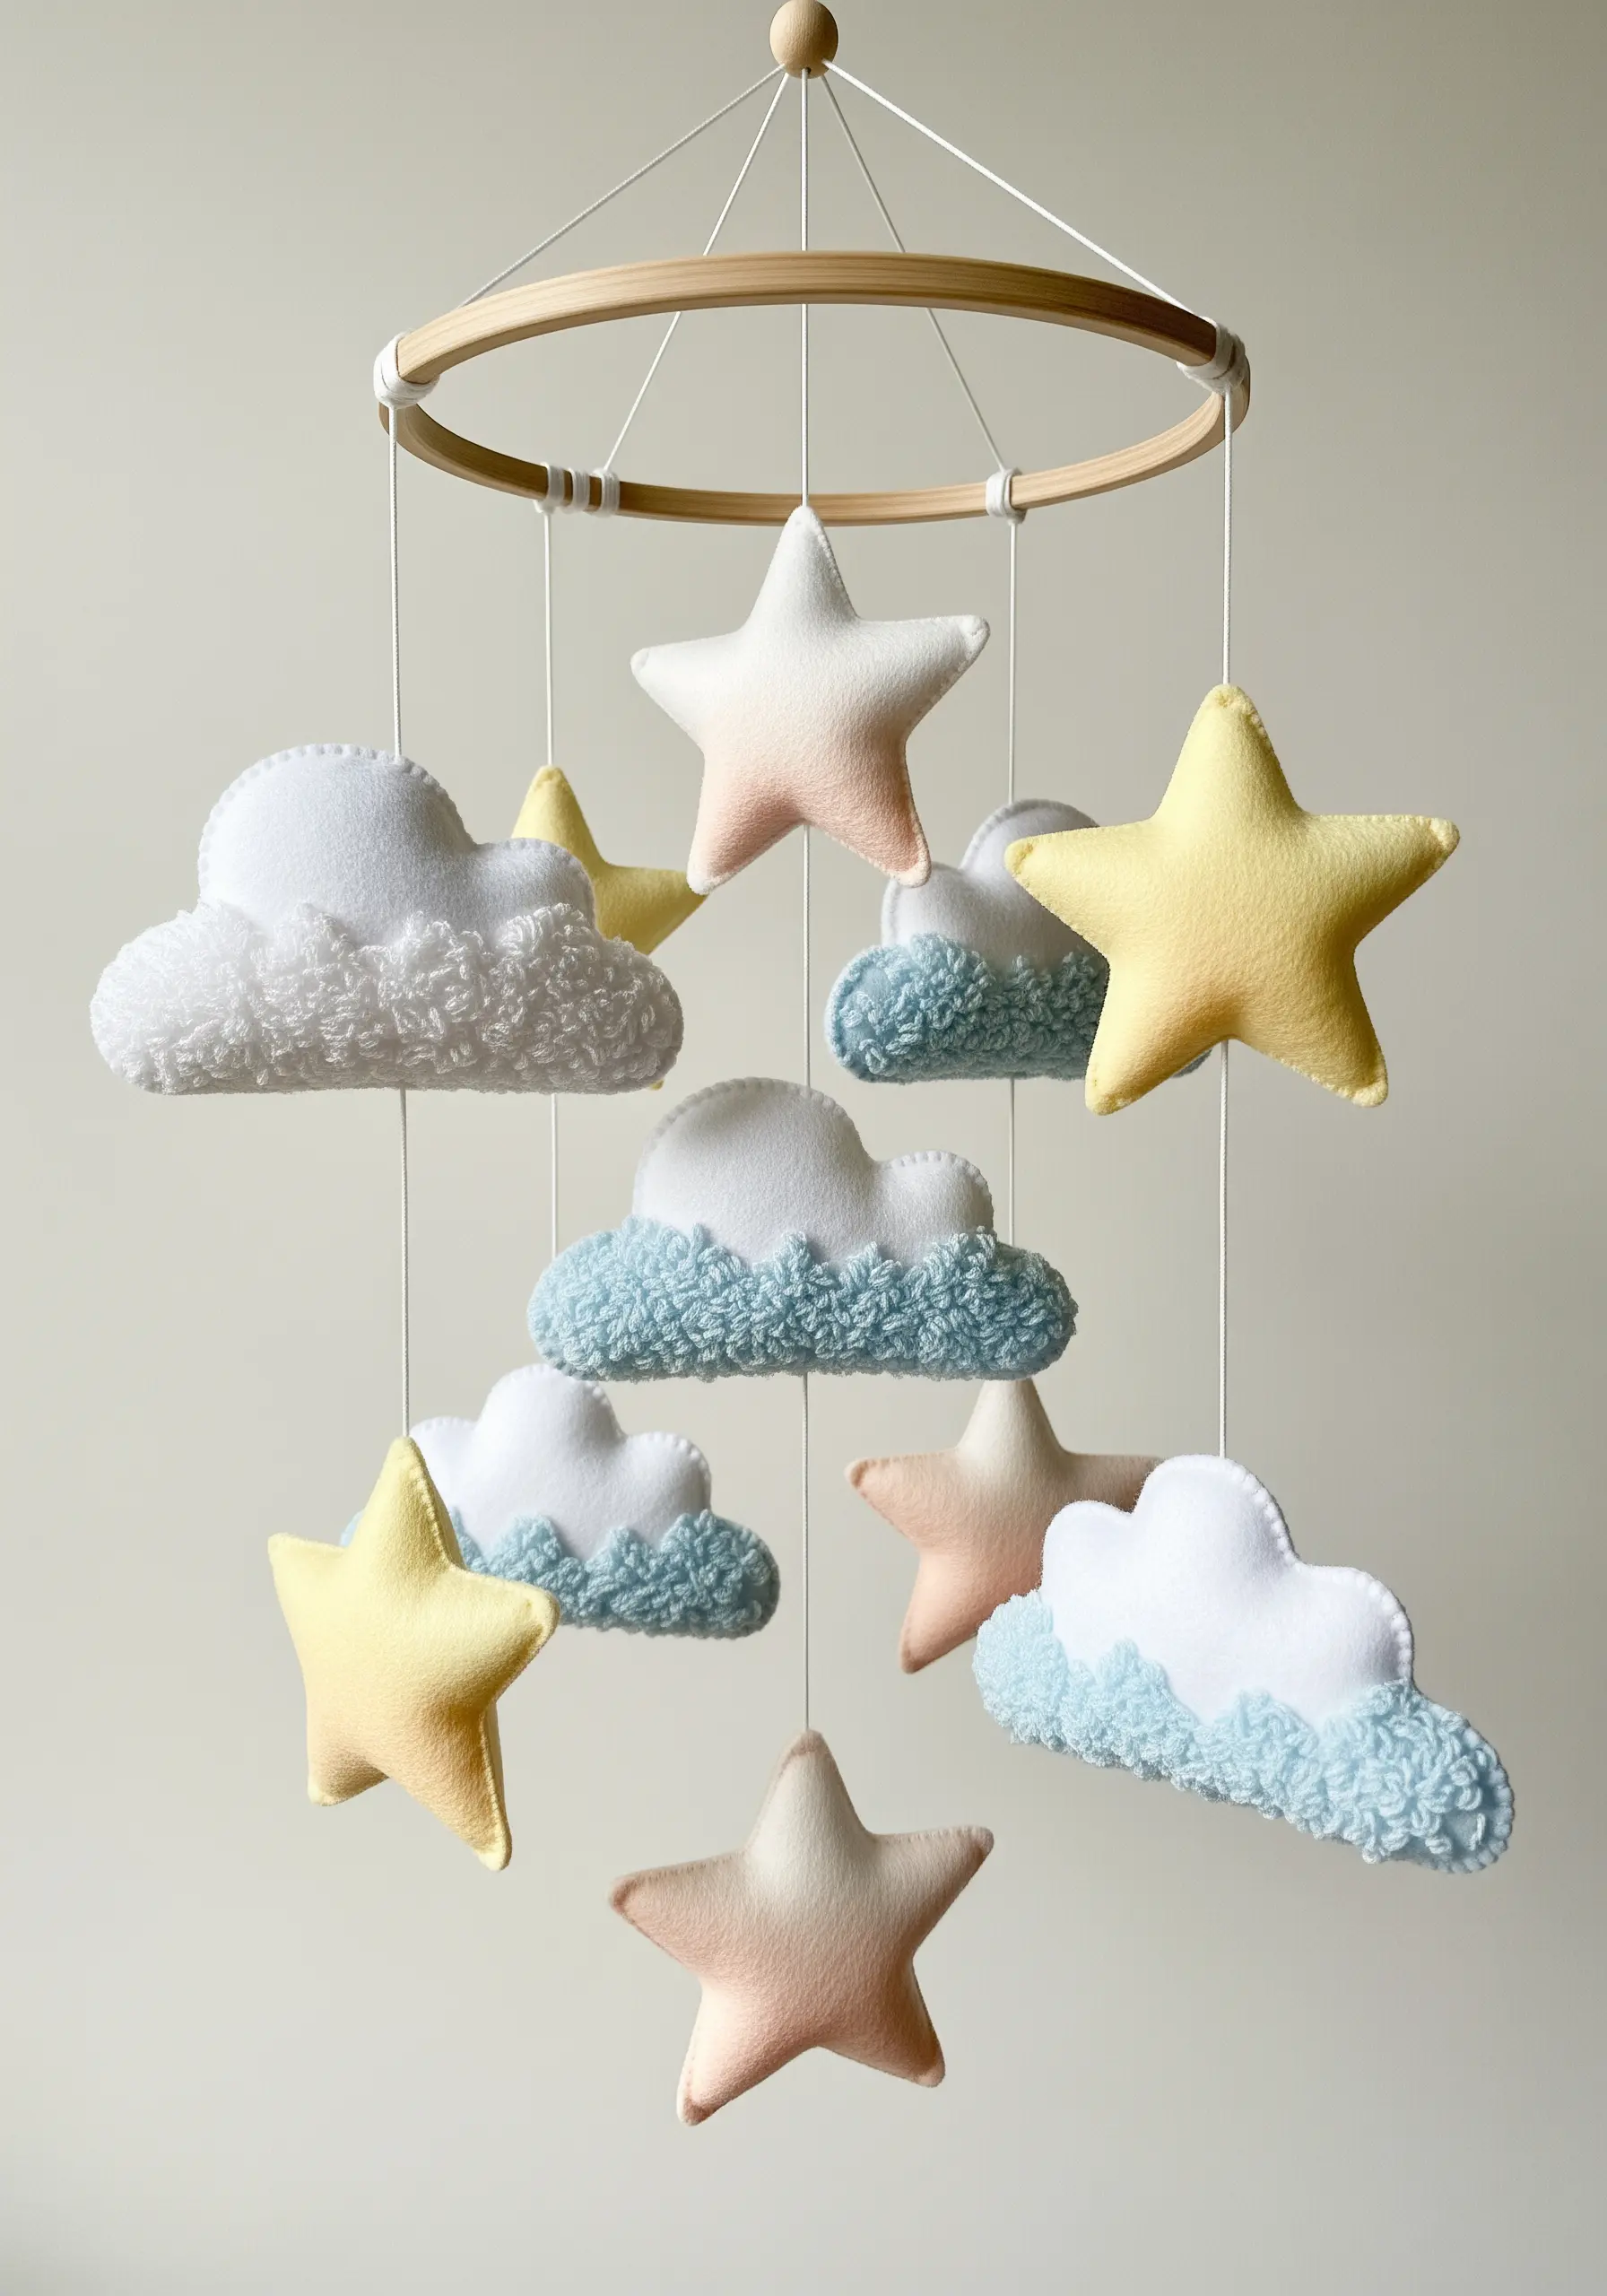
Combine soft felt appliqué with simple embroidery to create a dreamy nursery mobile.
Cut your cloud and star shapes from felt, and use a light airbrush of fabric paint or pastels to create the soft gradients before assembling.
Add textural details like French knots or looped stitches to the clouds for a fluffy appearance.
This gentle introduction to fiber art results in beautiful cloud-soft embroidery hoops and mobiles.
27. Create Sharp Geometric Borders with Satin Stitch
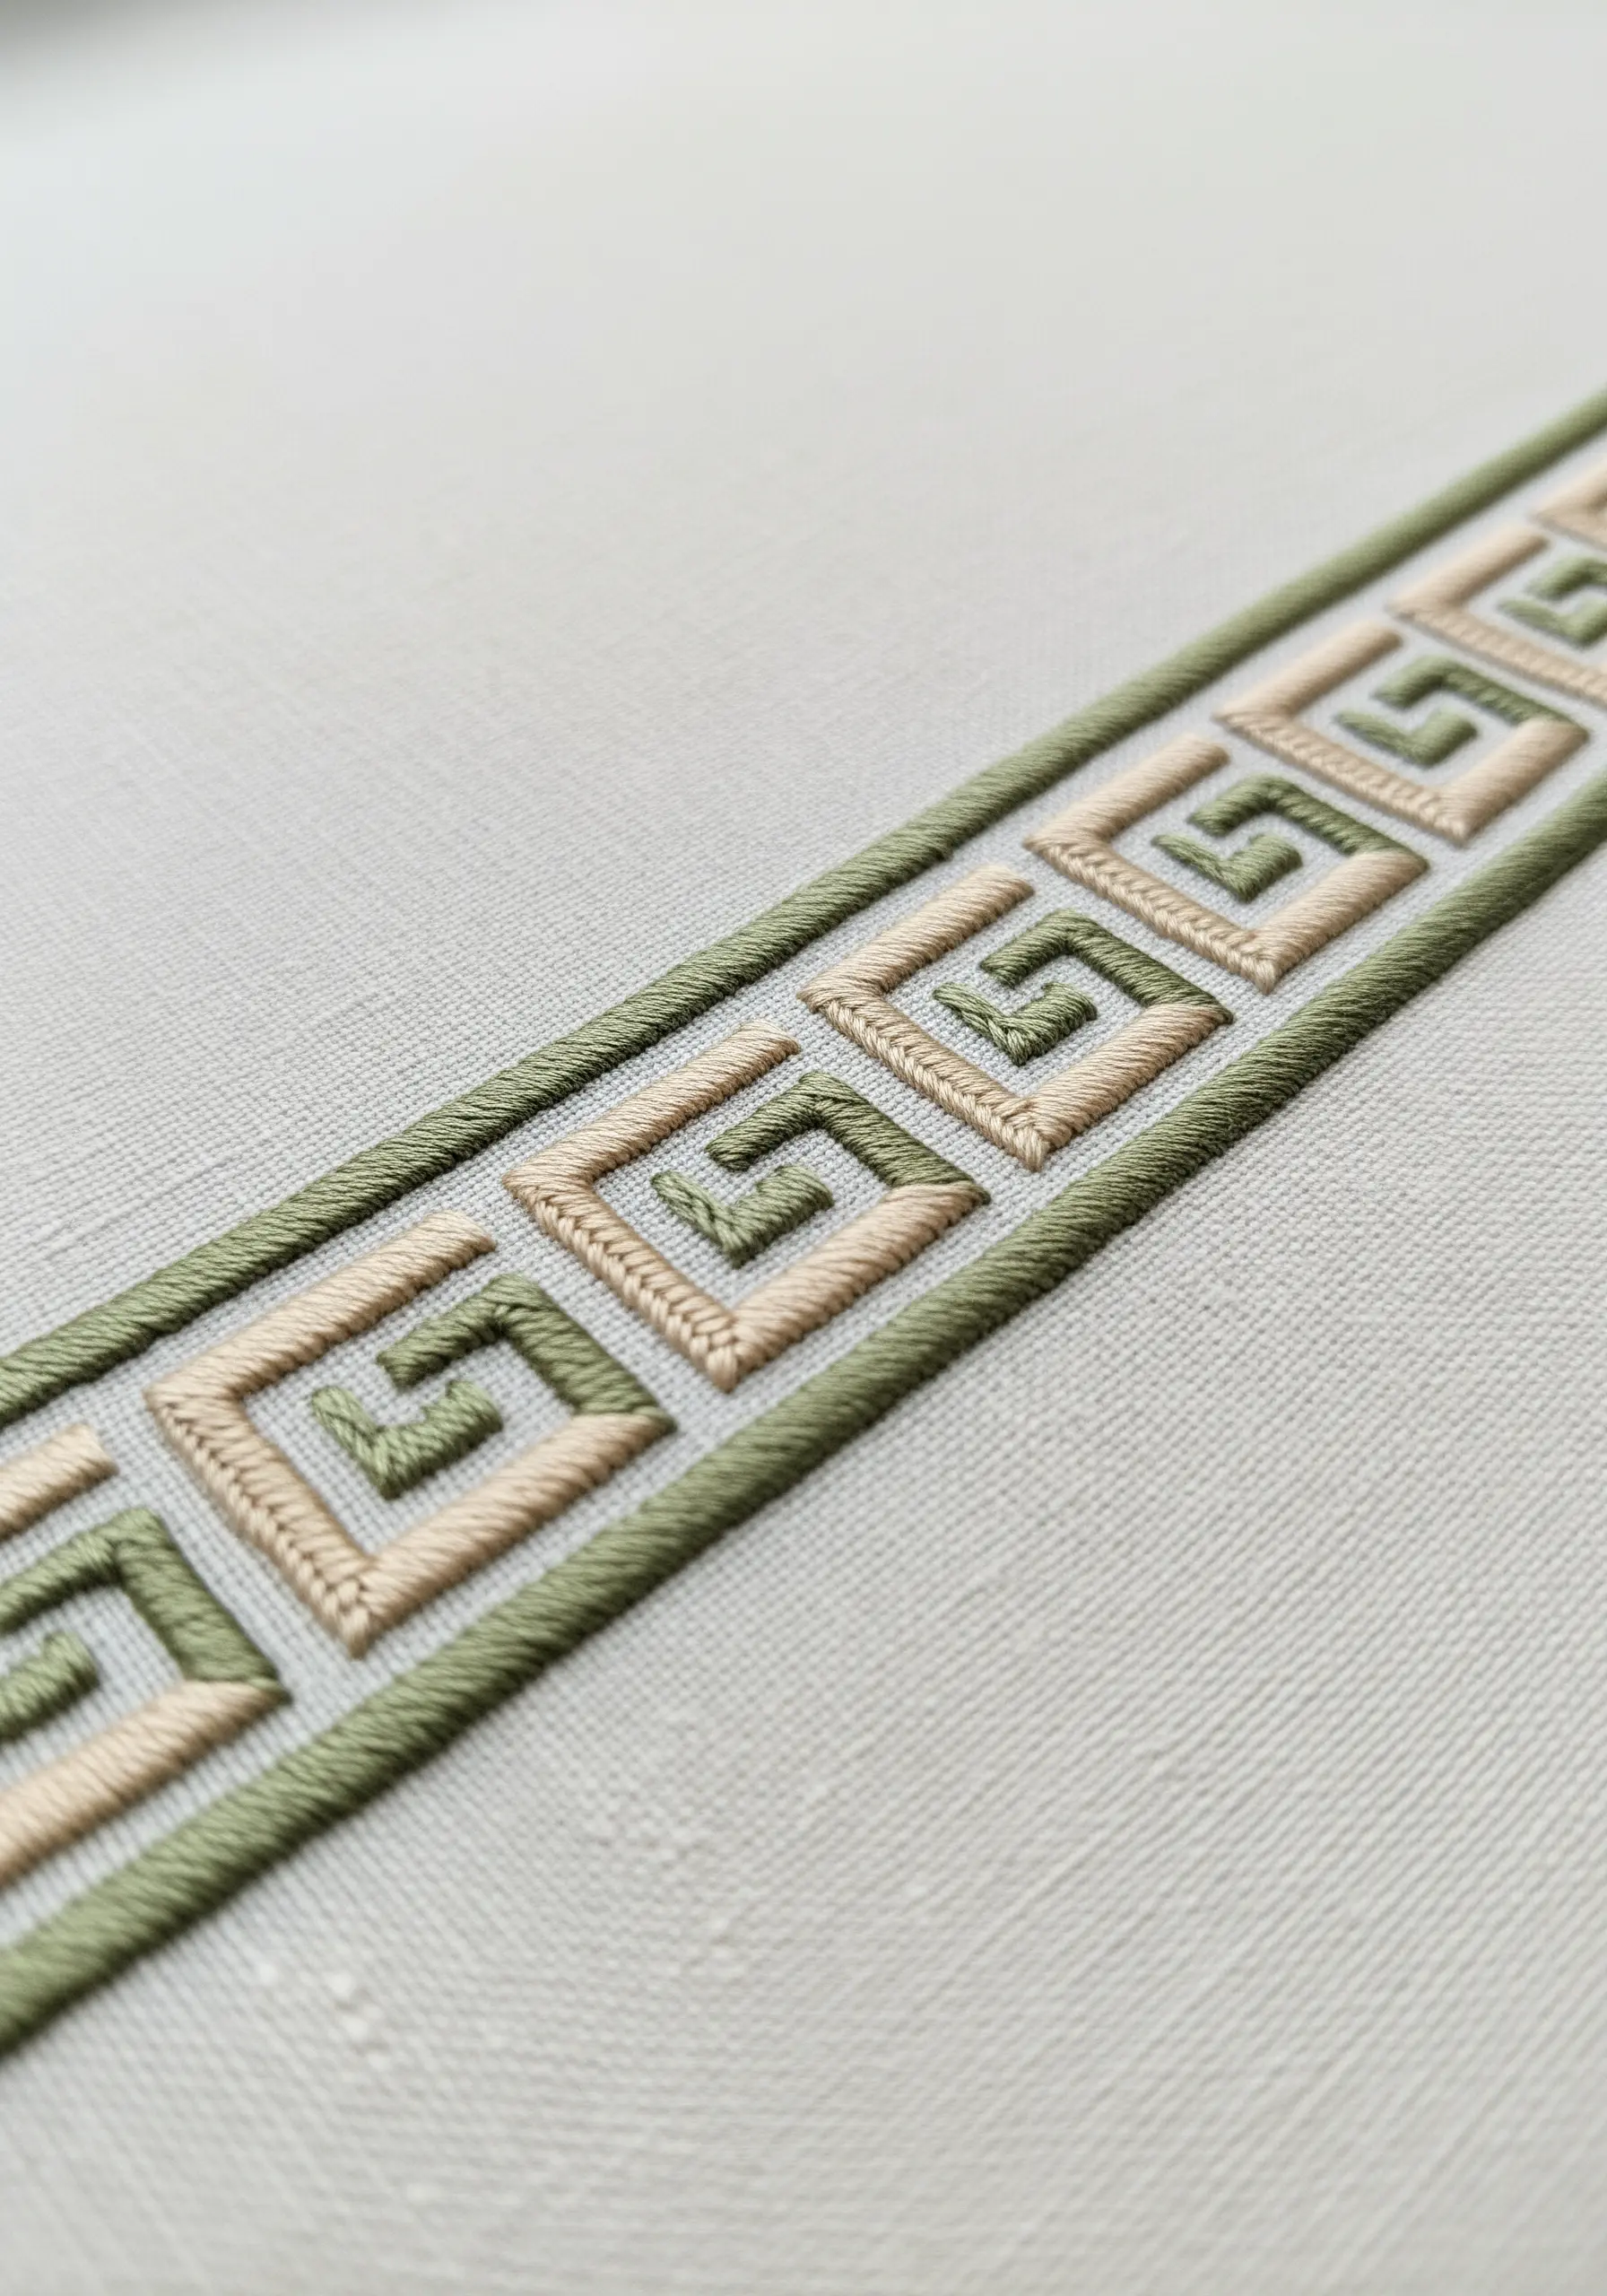
For a crisp, geometric border, outline your shape with a split stitch before filling it with satin stitch.
The split stitch outline acts as a raised edge, helping you guide your needle for perfectly clean lines.
Alternate two complementary colors, like soft green and beige, to create a pattern that feels both classic and modern.
This technique is ideal for adding a polished finish to embroidered table runner ideas.
28. Cover Surfaces with Coiled Thread Appliqué
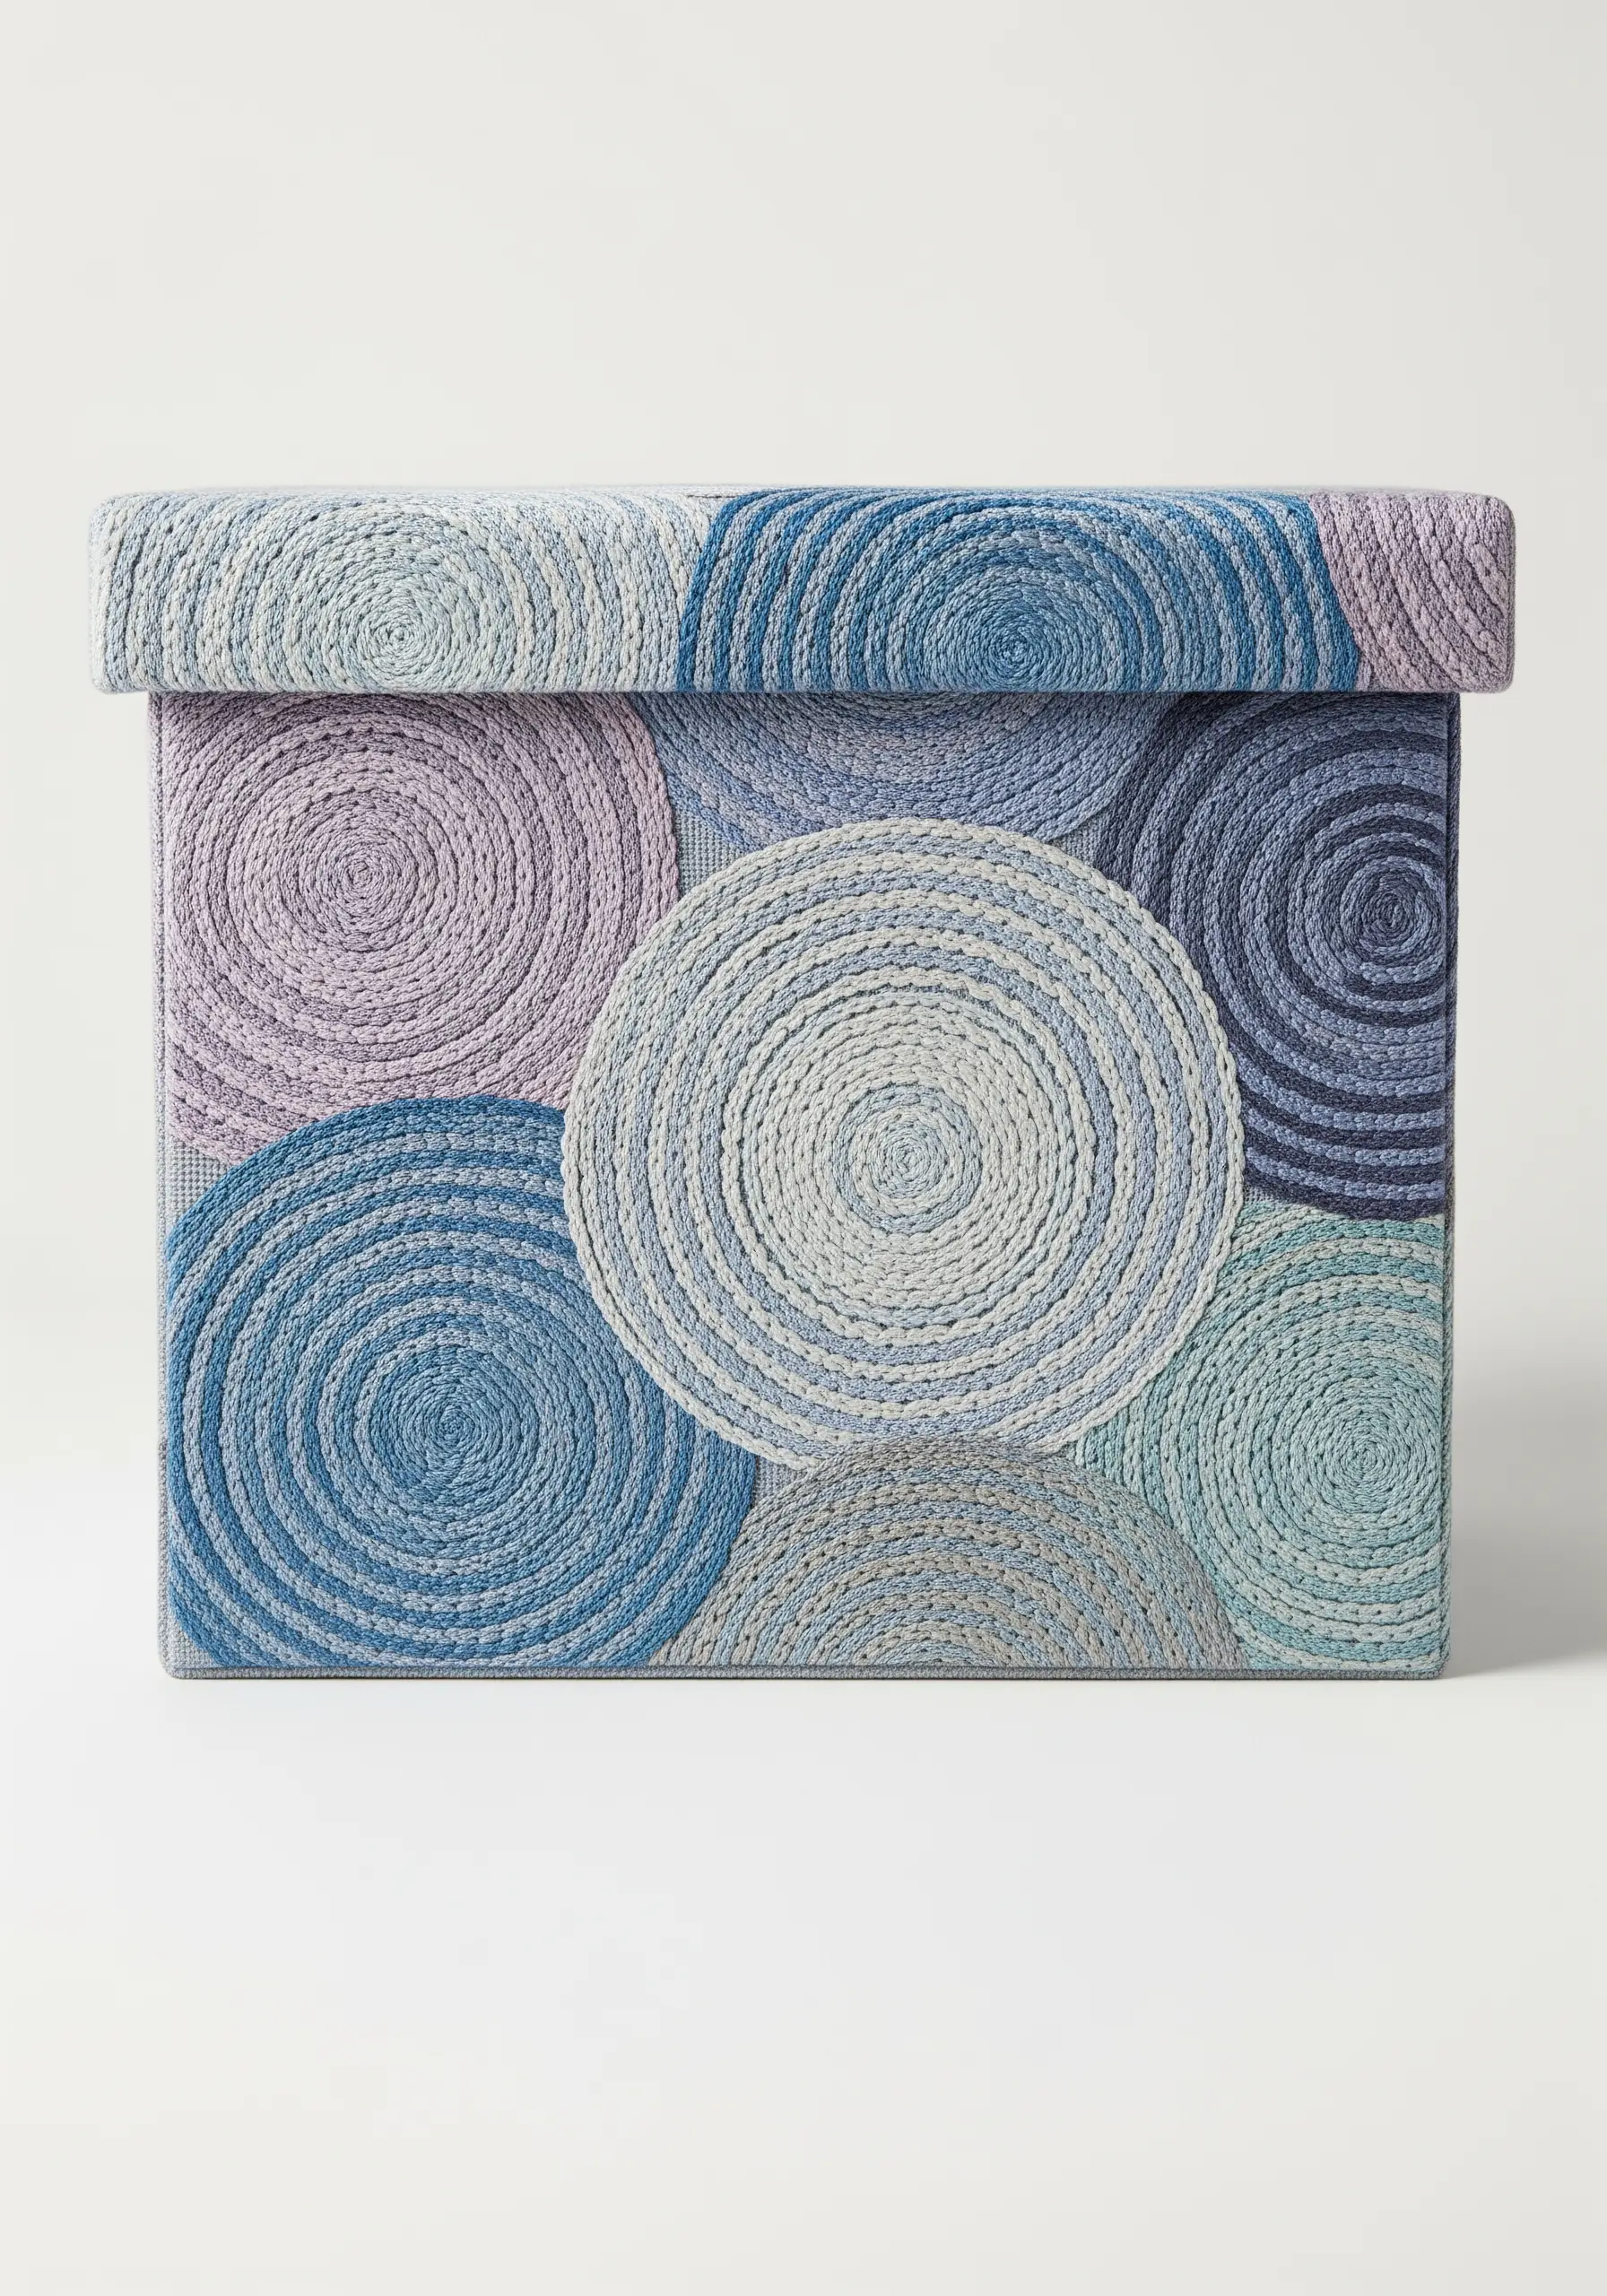
Create a highly textured, graphic surface by couching coiled ropes of thread onto fabric.
To make your ropes, twist multiple strands of embroidery floss together. Then, arrange the rope in a tight spiral and use a single, contrasting thread to stitch it down.
By varying the colors of your coiled circles, you can create a dynamic, overlapping pattern that turns a simple storage box into a piece of functional art.
29. Use Linework to Add Depth to Botanicals
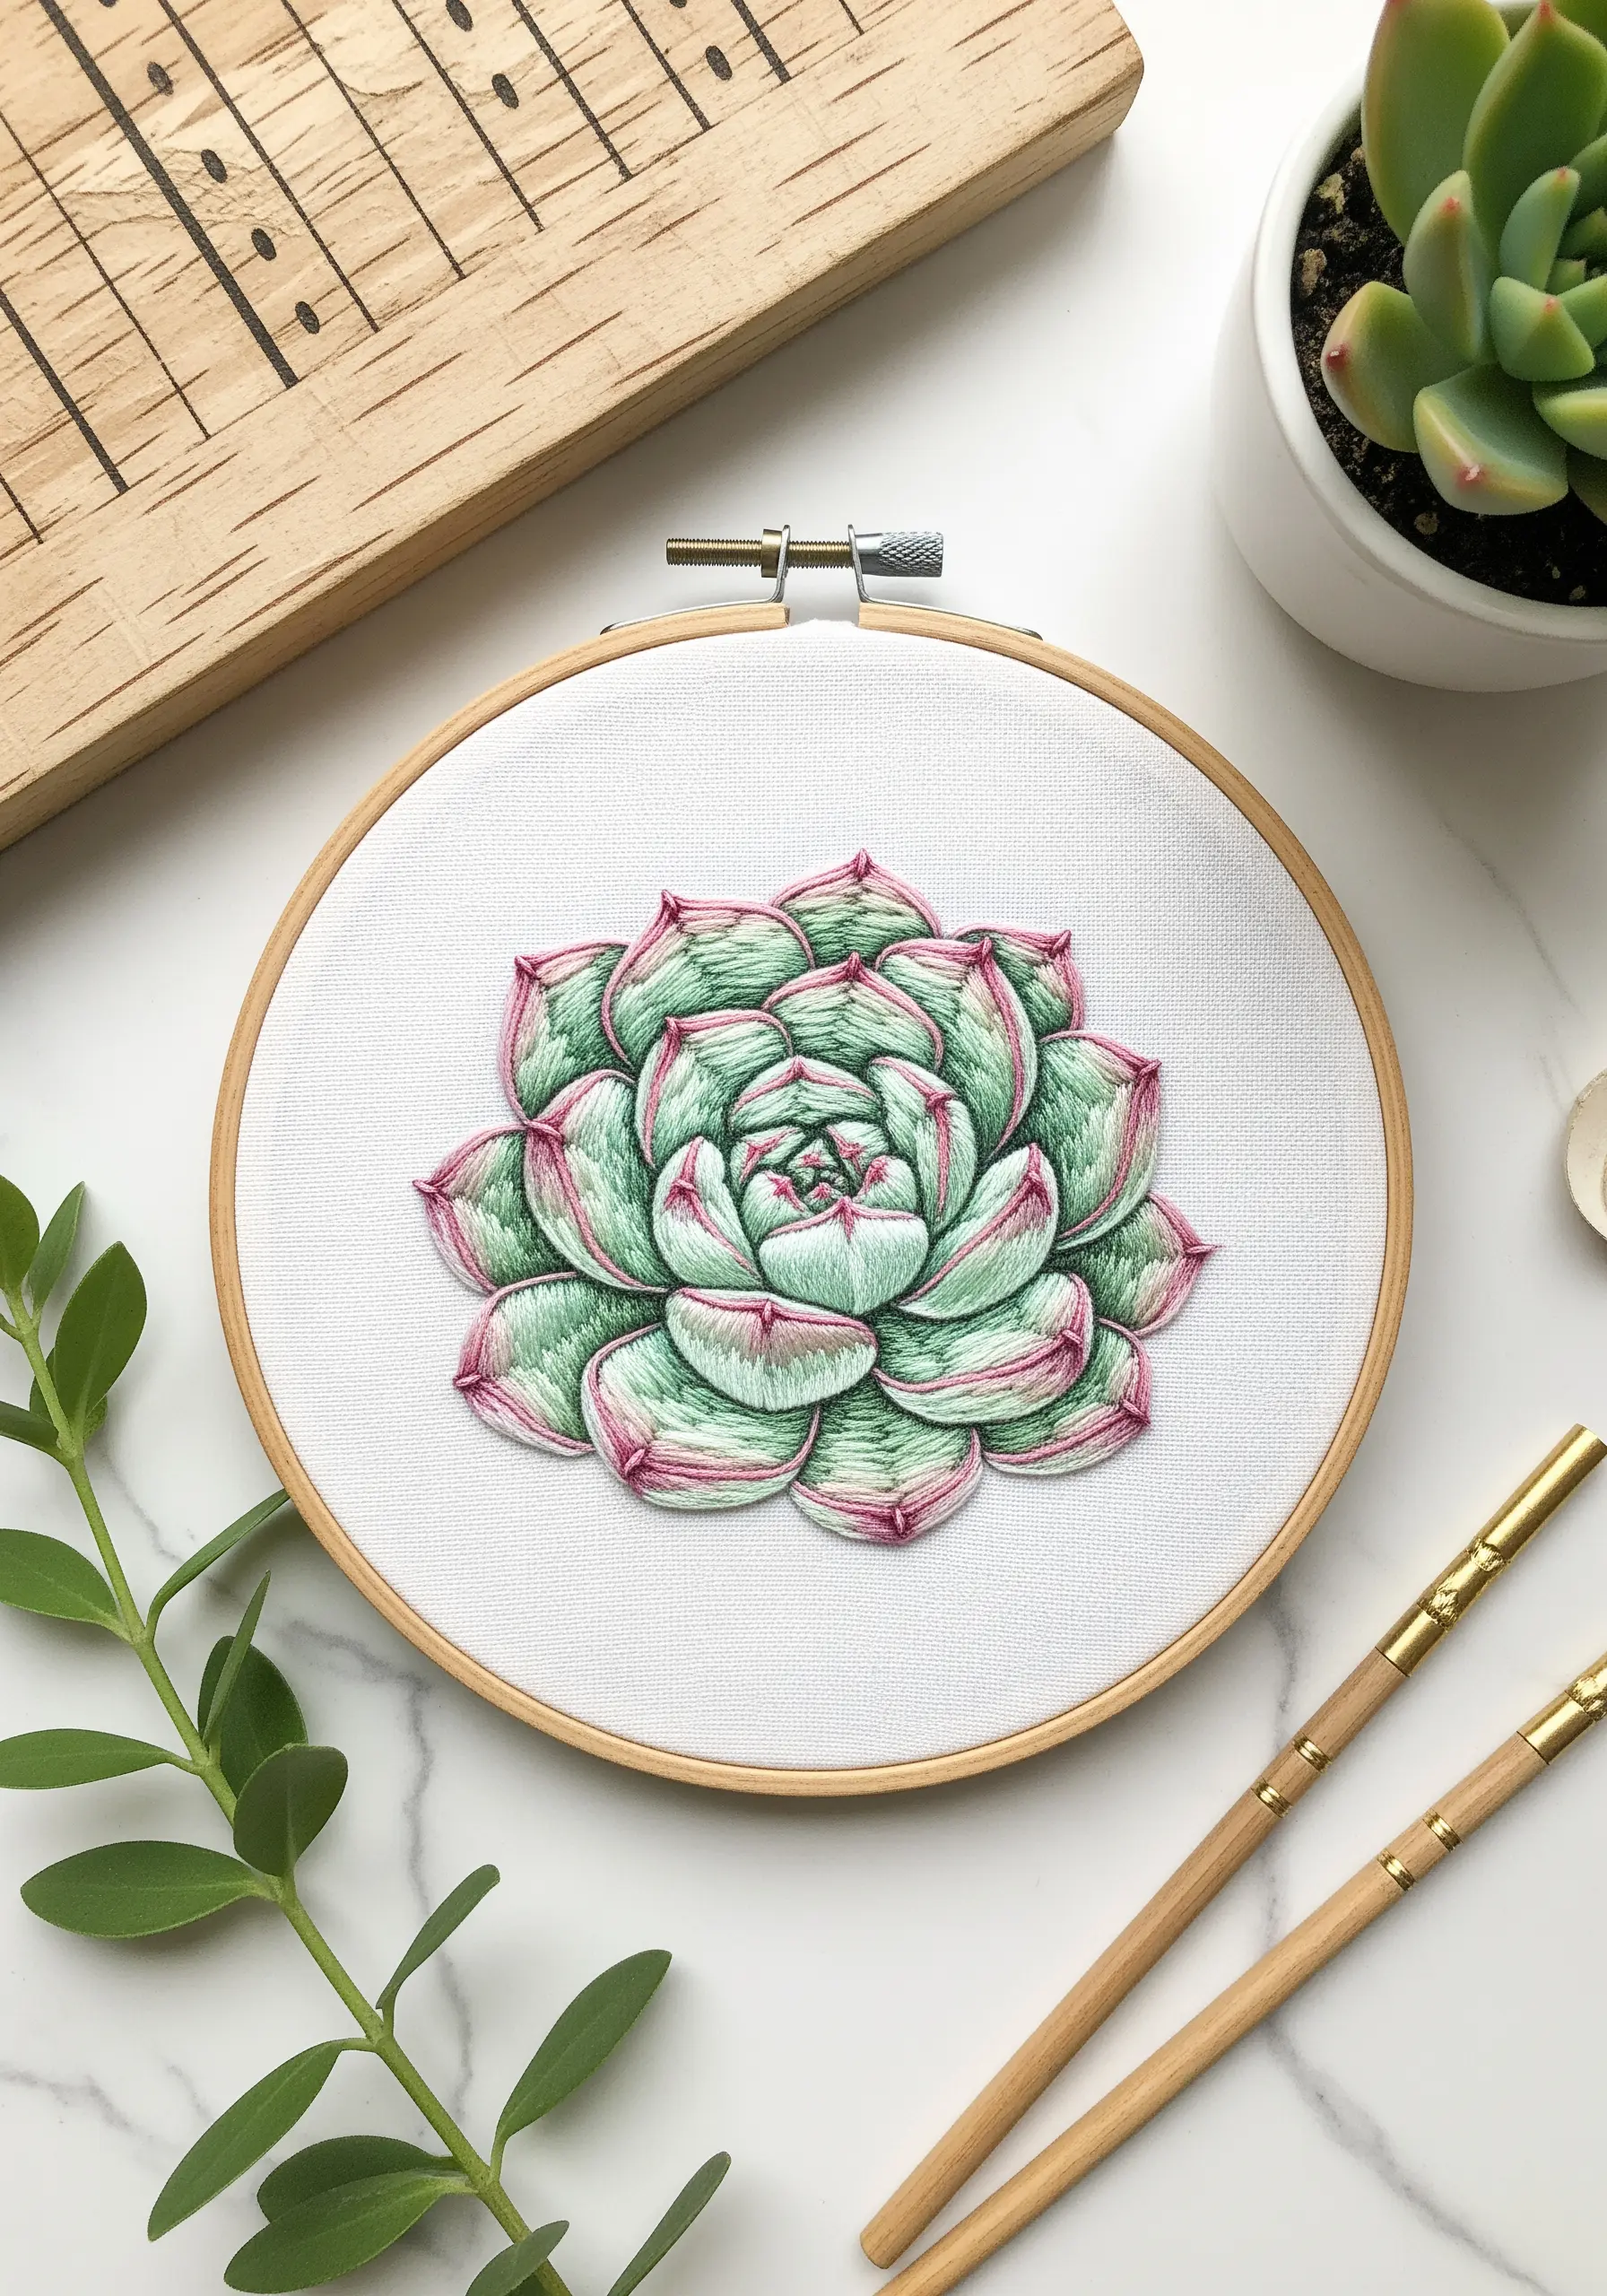
Give your embroidered succulents a realistic, illustrative quality by incorporating fine black outlines.
First, fill the petals with a soft green-to-pink gradient using long-and-short stitch.
Then, go back with a single strand of black thread and use a delicate backstitch to add shading lines and define the edges of each petal.
This simple addition of linework creates stunning depth and contrast.
30. Capture Light and Movement with Variegated Thread
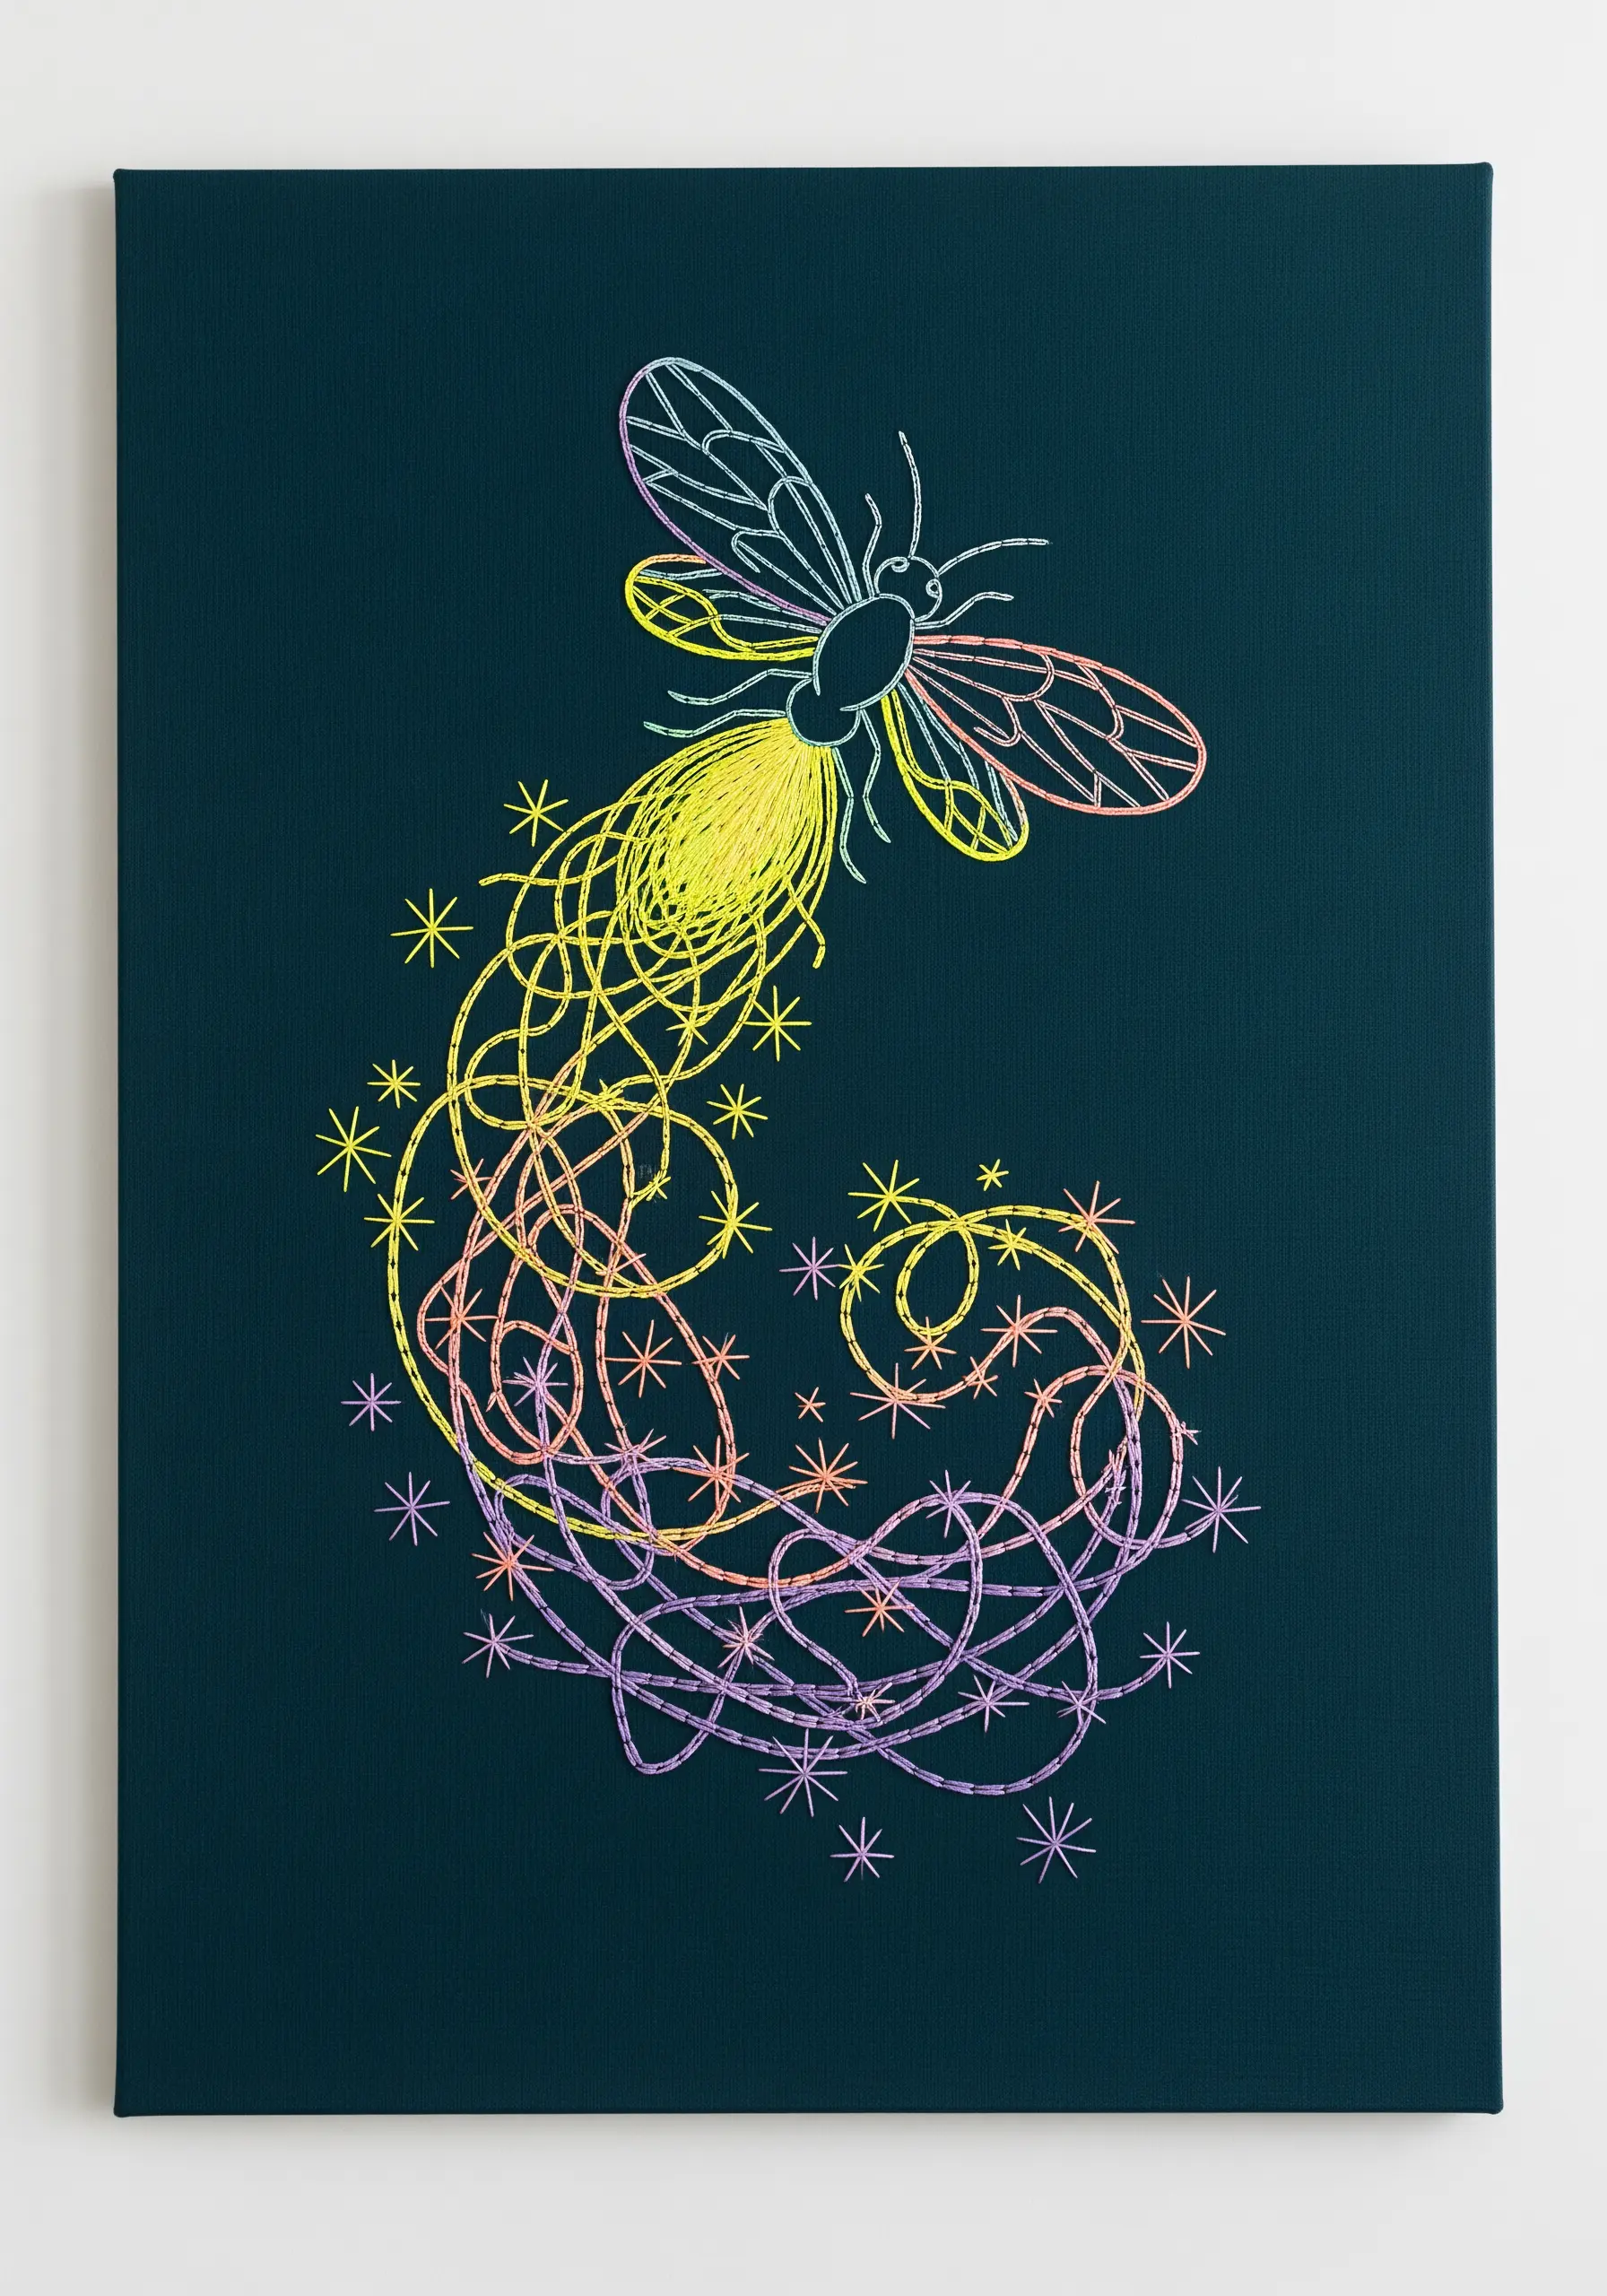
Instead of switching colors manually, let variegated thread do the work for you to create a magical, swirling effect.
A single strand of variegated floss contains multiple colors that change as you stitch, perfect for the whimsical light trail of a firefly.
Use a free-form, looping stitch to let the colors blend and flow naturally.
This is a wonderfully simple way to achieve complex-looking abstract thread embroidery ideas.
31. Document Color Palettes as Abstract Art

Turn your color experiments into a piece of minimalist art by creating a stitched color chart.
Use a simple shape, like these ovals, and fill each one with satin stitch in a different color.
Arrange the shapes in a vertical line to show the progression of a gradient or color story.
This is not only a beautiful way to display your thread collection but also creates neutral tone thread palettes for elegant, minimal wall decor.
32. Tackle Large Furnishings with Geometric Stitches

When embroidering a large surface like a pouf or ottoman, choose a repeating geometric pattern that is easy to scale.
The lazy daisy and straight stitch combination used here creates a starburst or flower motif that can be repeated endlessly.
Organizing the motifs in concentric circles and transitioning through a rainbow pastel palette creates a stunning, high-impact piece that feels cohesive and intentional.
33. Create Reusable Art with Paper Embroidery

Try stitching on heavy cardstock to create unique gift tags, cards, or miniature art pieces.
Use a needle to pre-punch your holes along the pattern lines before you begin stitching to avoid tearing the paper.
Simple geometric shapes and minimalist florals work especially well, as the crispness of the paper enhances the clean lines.
These paper embroidery projects are quick to complete and make for thoughtful, handmade gifts.
34. Design Custom House Numbering with a Personal Touch

Create a warm, welcoming entryway by crafting a custom embroidered house number sign.
Use a padded satin stitch to give the numbers a raised, three-dimensional look that is easy to read from a distance.
Adding a simple botanical element, like a single leafy branch, softens the design and adds a touch of cottage charm.
This is a unique way to create personalized wall embroidery gifts for a housewarming.
35. Weave a Modern Tartan with Straight Stitches

Build a modern, pastel tartan pattern using a simple woven stitch technique.
First, lay down a grid of horizontal and vertical straight stitches. Then, use a blunt tapestry needle to weave your contrasting colors over and under the base stitches.
This method creates a beautiful, integrated pattern without ever piercing the fabric on the weaving step.
It’s a perfect way to add detail to functional items like this storage basket.
36. Add Bold Texture with Thick Yarn Couching

For a project that makes a big statement quickly, swap fine embroidery floss for chunky yarn.
Create a rainbow gradient effect by couching thick, soft yarn onto the surface of a floor cushion in a spiral pattern.
The yarn adds a plush, highly textural element that is both visually striking and inviting to the touch.
This technique is a great entry point into larger yarn wall art techniques and home decor projects.


