

Your travel memories deserve more than a photo album. They hold feelings, scents, and textures that can be woven directly into a piece of art. With just a small hoop and a few strands of thread, you can distill the essence of a place into a tactile souvenir that tells a story only you can.
Think of each mini hoop as a stitched postcard—a single, focused memory. A Parisian café, a Japanese wave, a desert sunset. Alone, they are beautiful moments. But when you group them, they create a narrative, a visual journal of your adventures that brings life and personality to even the smallest of walls.
You don’t need to master hundreds of complex stitches. The magic is in your choices: the color palette that captures a city’s mood, the texture that mimics a landscape, and the composition that arranges your memories into a cohesive story. Let’s explore how to turn your wanderlust into intentional, modern art.
1. Curate a Cohesive Parisian Vignette
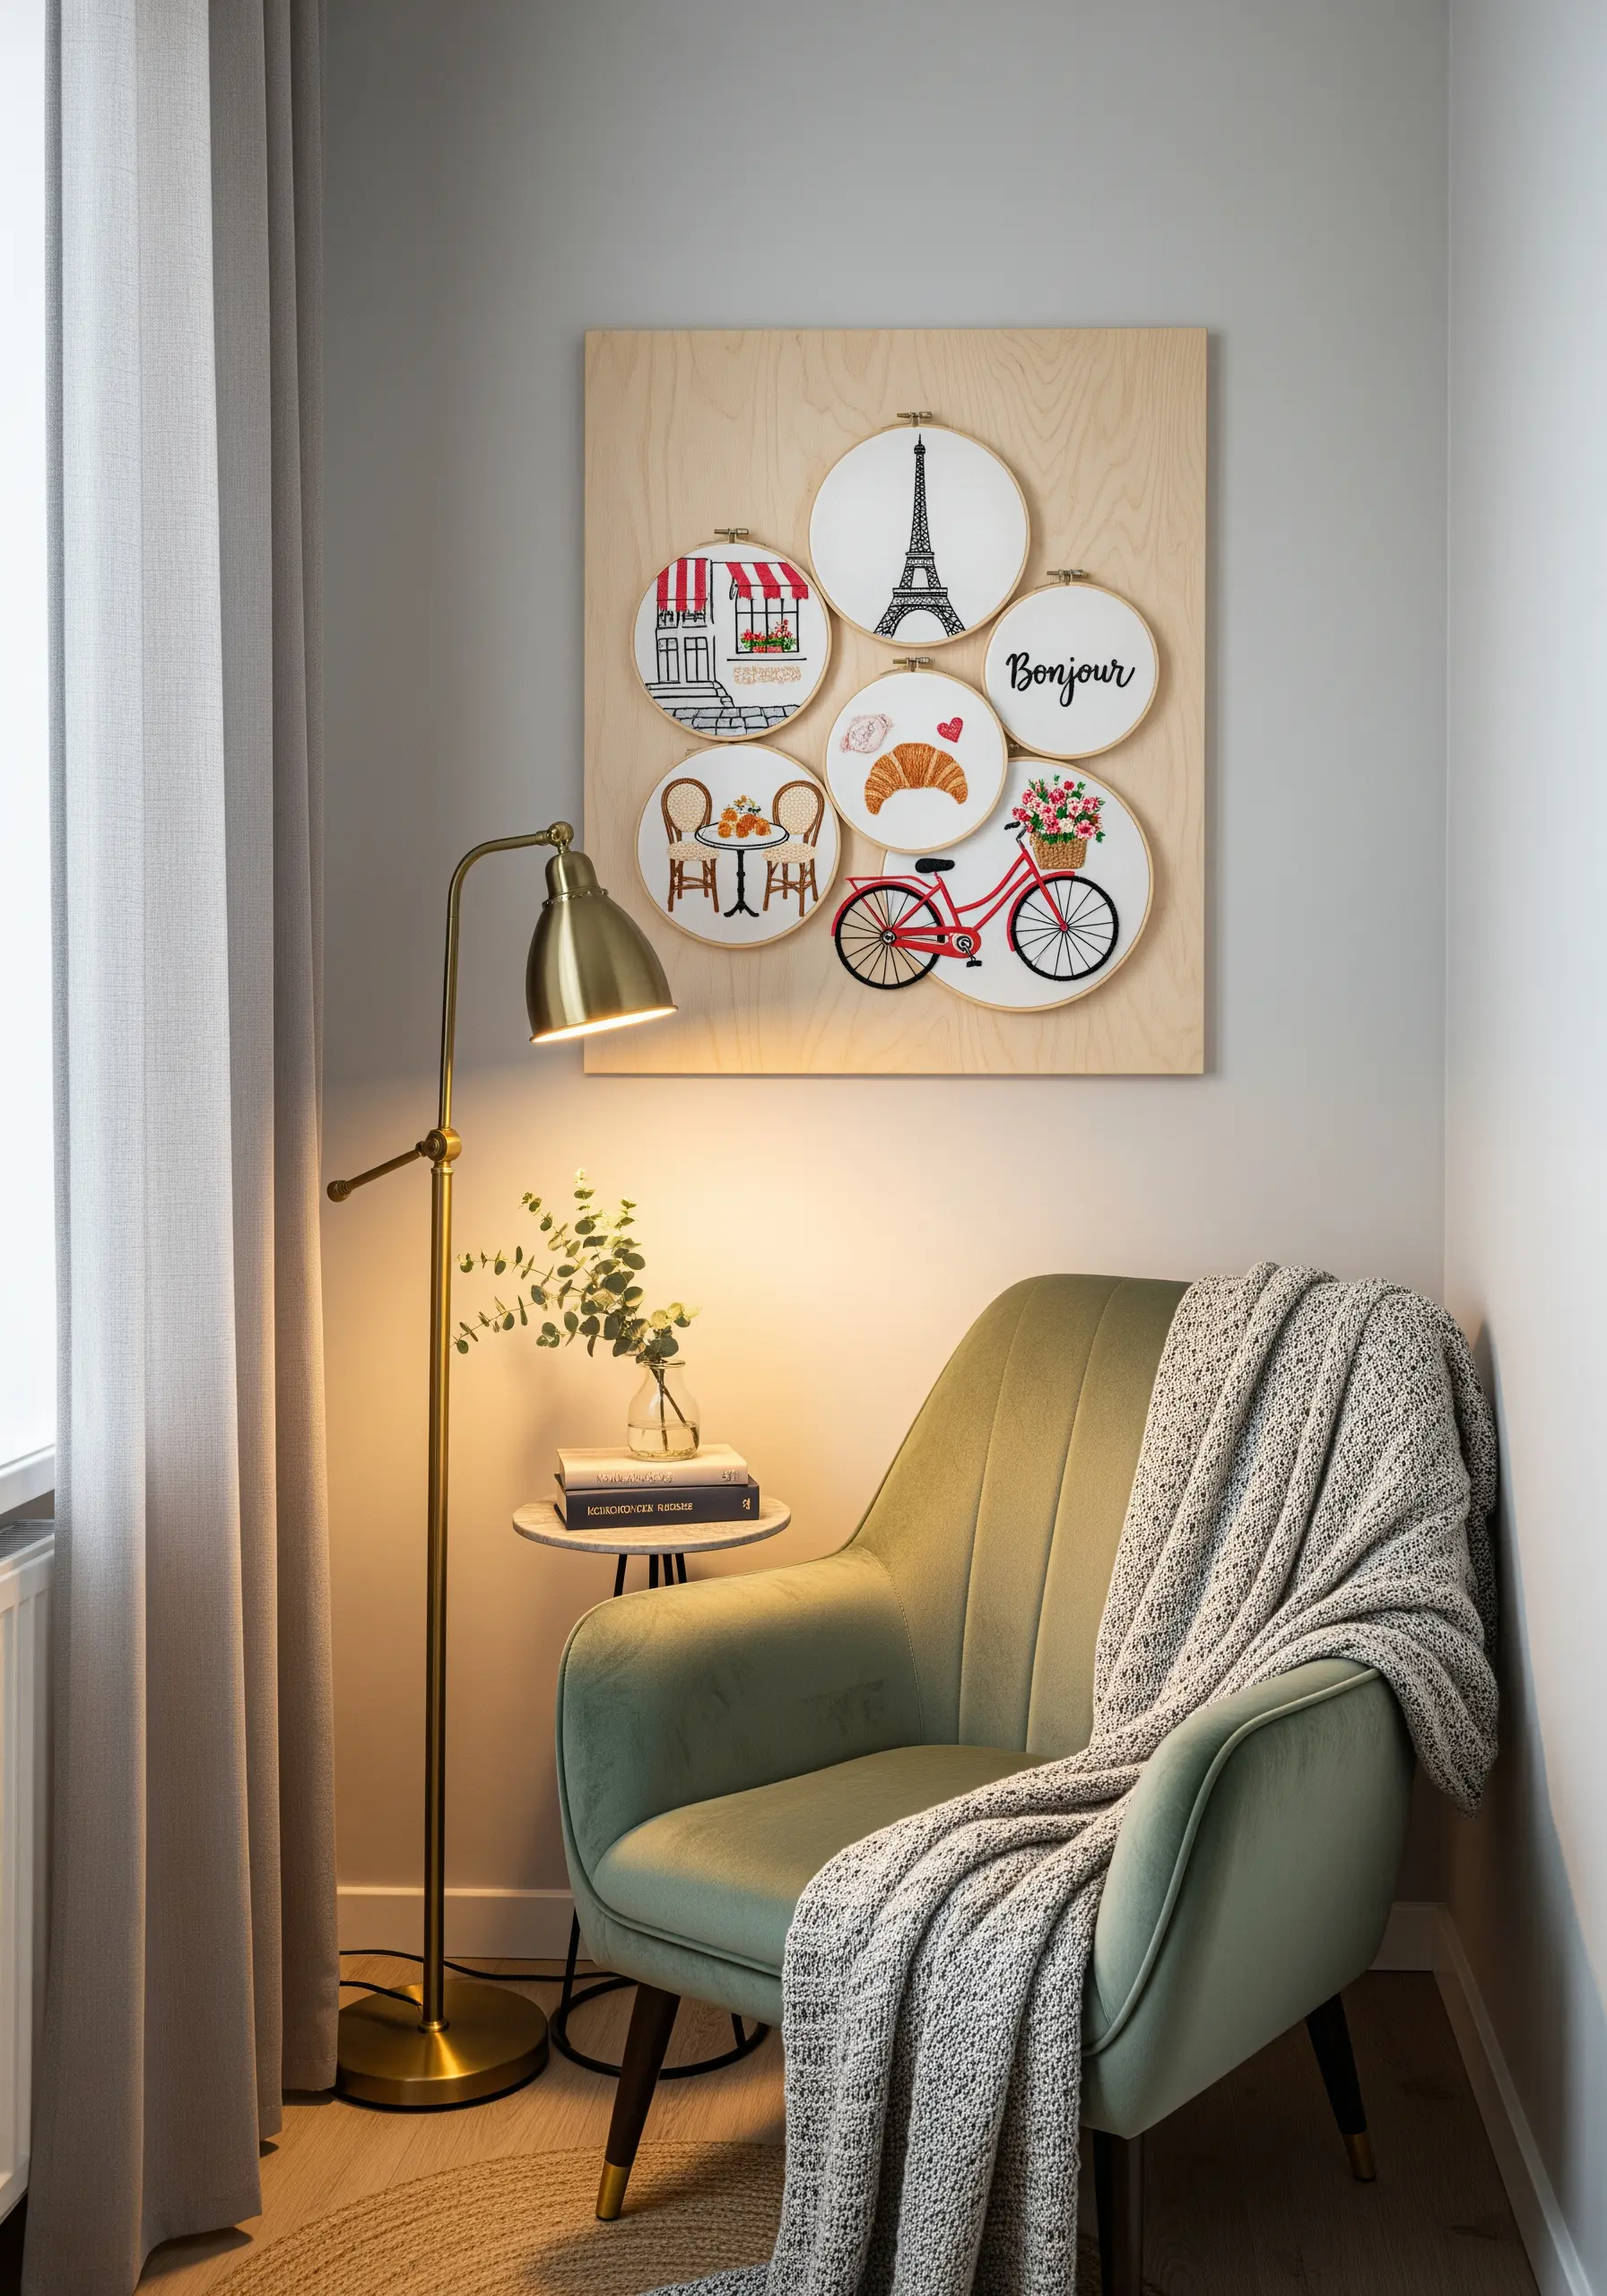
Group your travel-themed hoops on a single wood panel to create a unified art piece rather than a scattered collection.
This technique turns individual projects into a single, intentional statement, perfect for a cozy reading nook.
To establish visual hierarchy, use a single strand of black floss for delicate outlines like the Eiffel Tower, and two or three strands for filled motifs like the croissant to give them more presence.
Limit your palette to three core colors—in this case, red, black, and a warm neutral—to ensure your story feels cohesive, not chaotic.
2. Design a Modern Japanese Grid Display
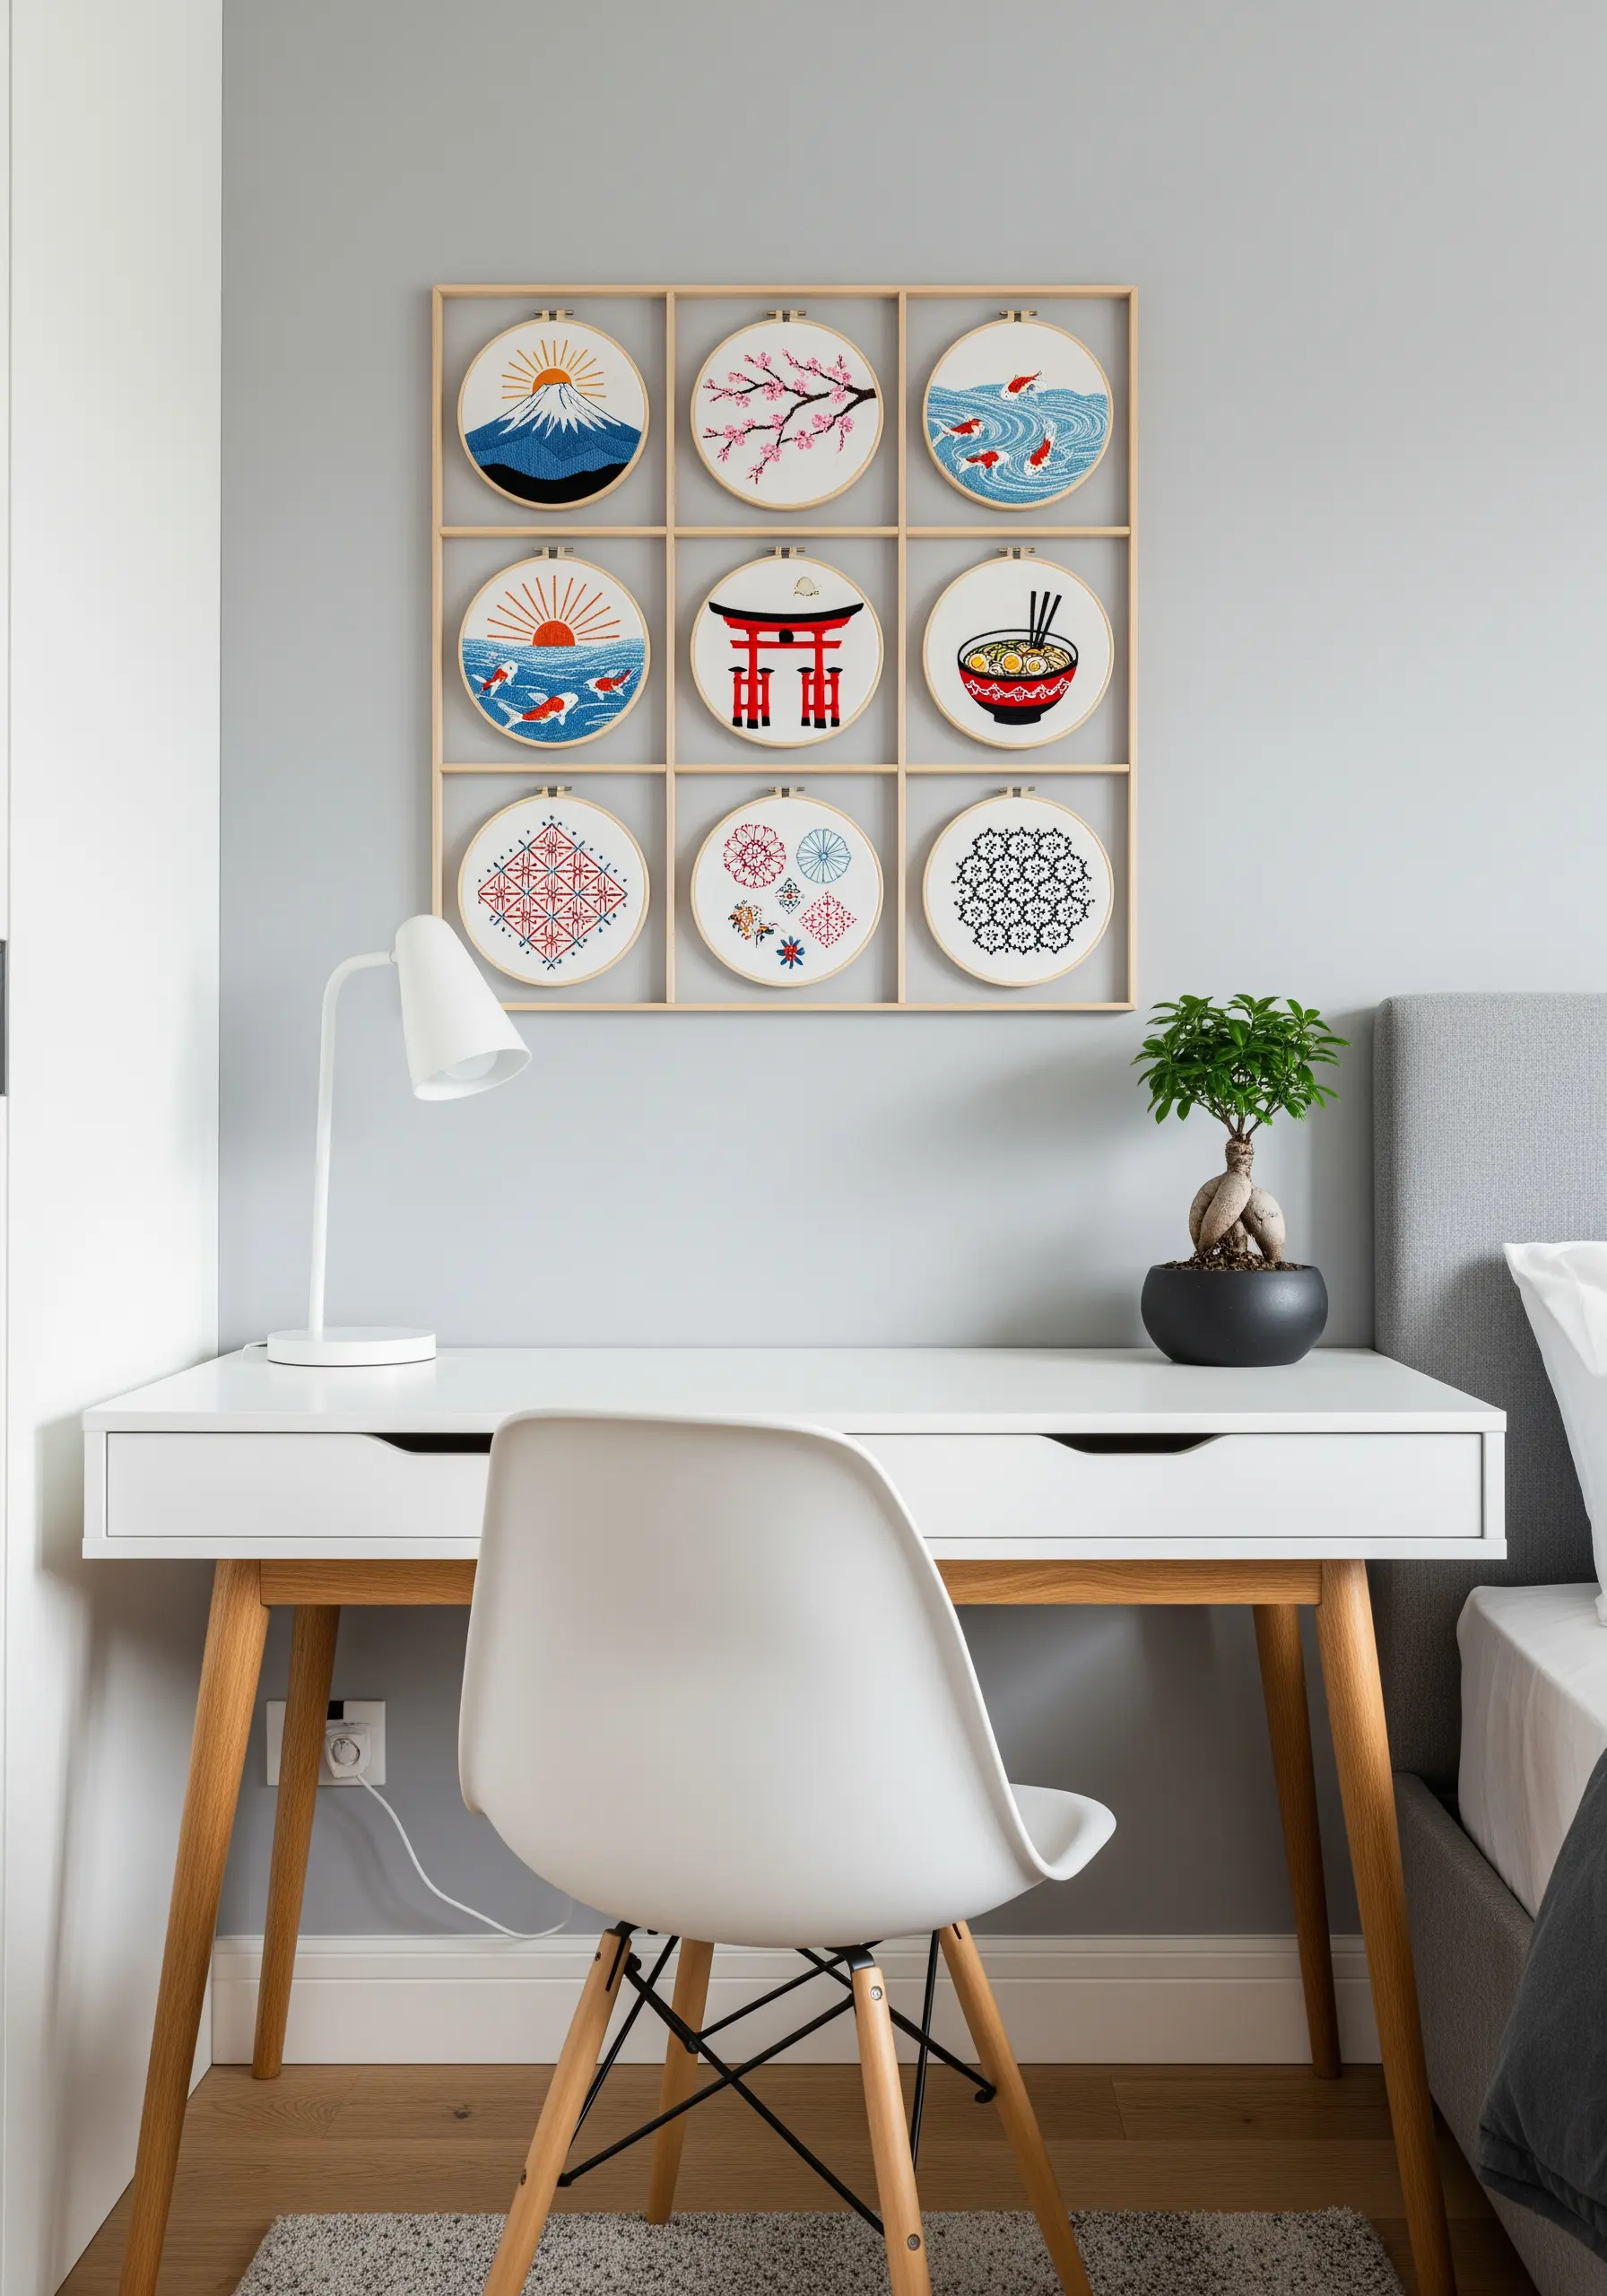
Arrange identically sized hoops in a precise grid to transform your embroidery into a modern, graphic art installation.
This structured approach works best with a consistent color story—here, pops of red-orange unify diverse motifs like koi fish, cherry blossoms, and geometric patterns.
For the wave motifs, ensure your satin stitches are laid closely and uniformly in the same direction to mimic the glossy sheen of water.
Use a crisp, lightweight linen fabric; its natural texture provides a sophisticated backdrop that prevents simple designs from looking too stark.
Such hooped wall collage layouts bring a sense of order and calm to a workspace.
3. Create a Vertical Narrative with Varied Hoop Sizes
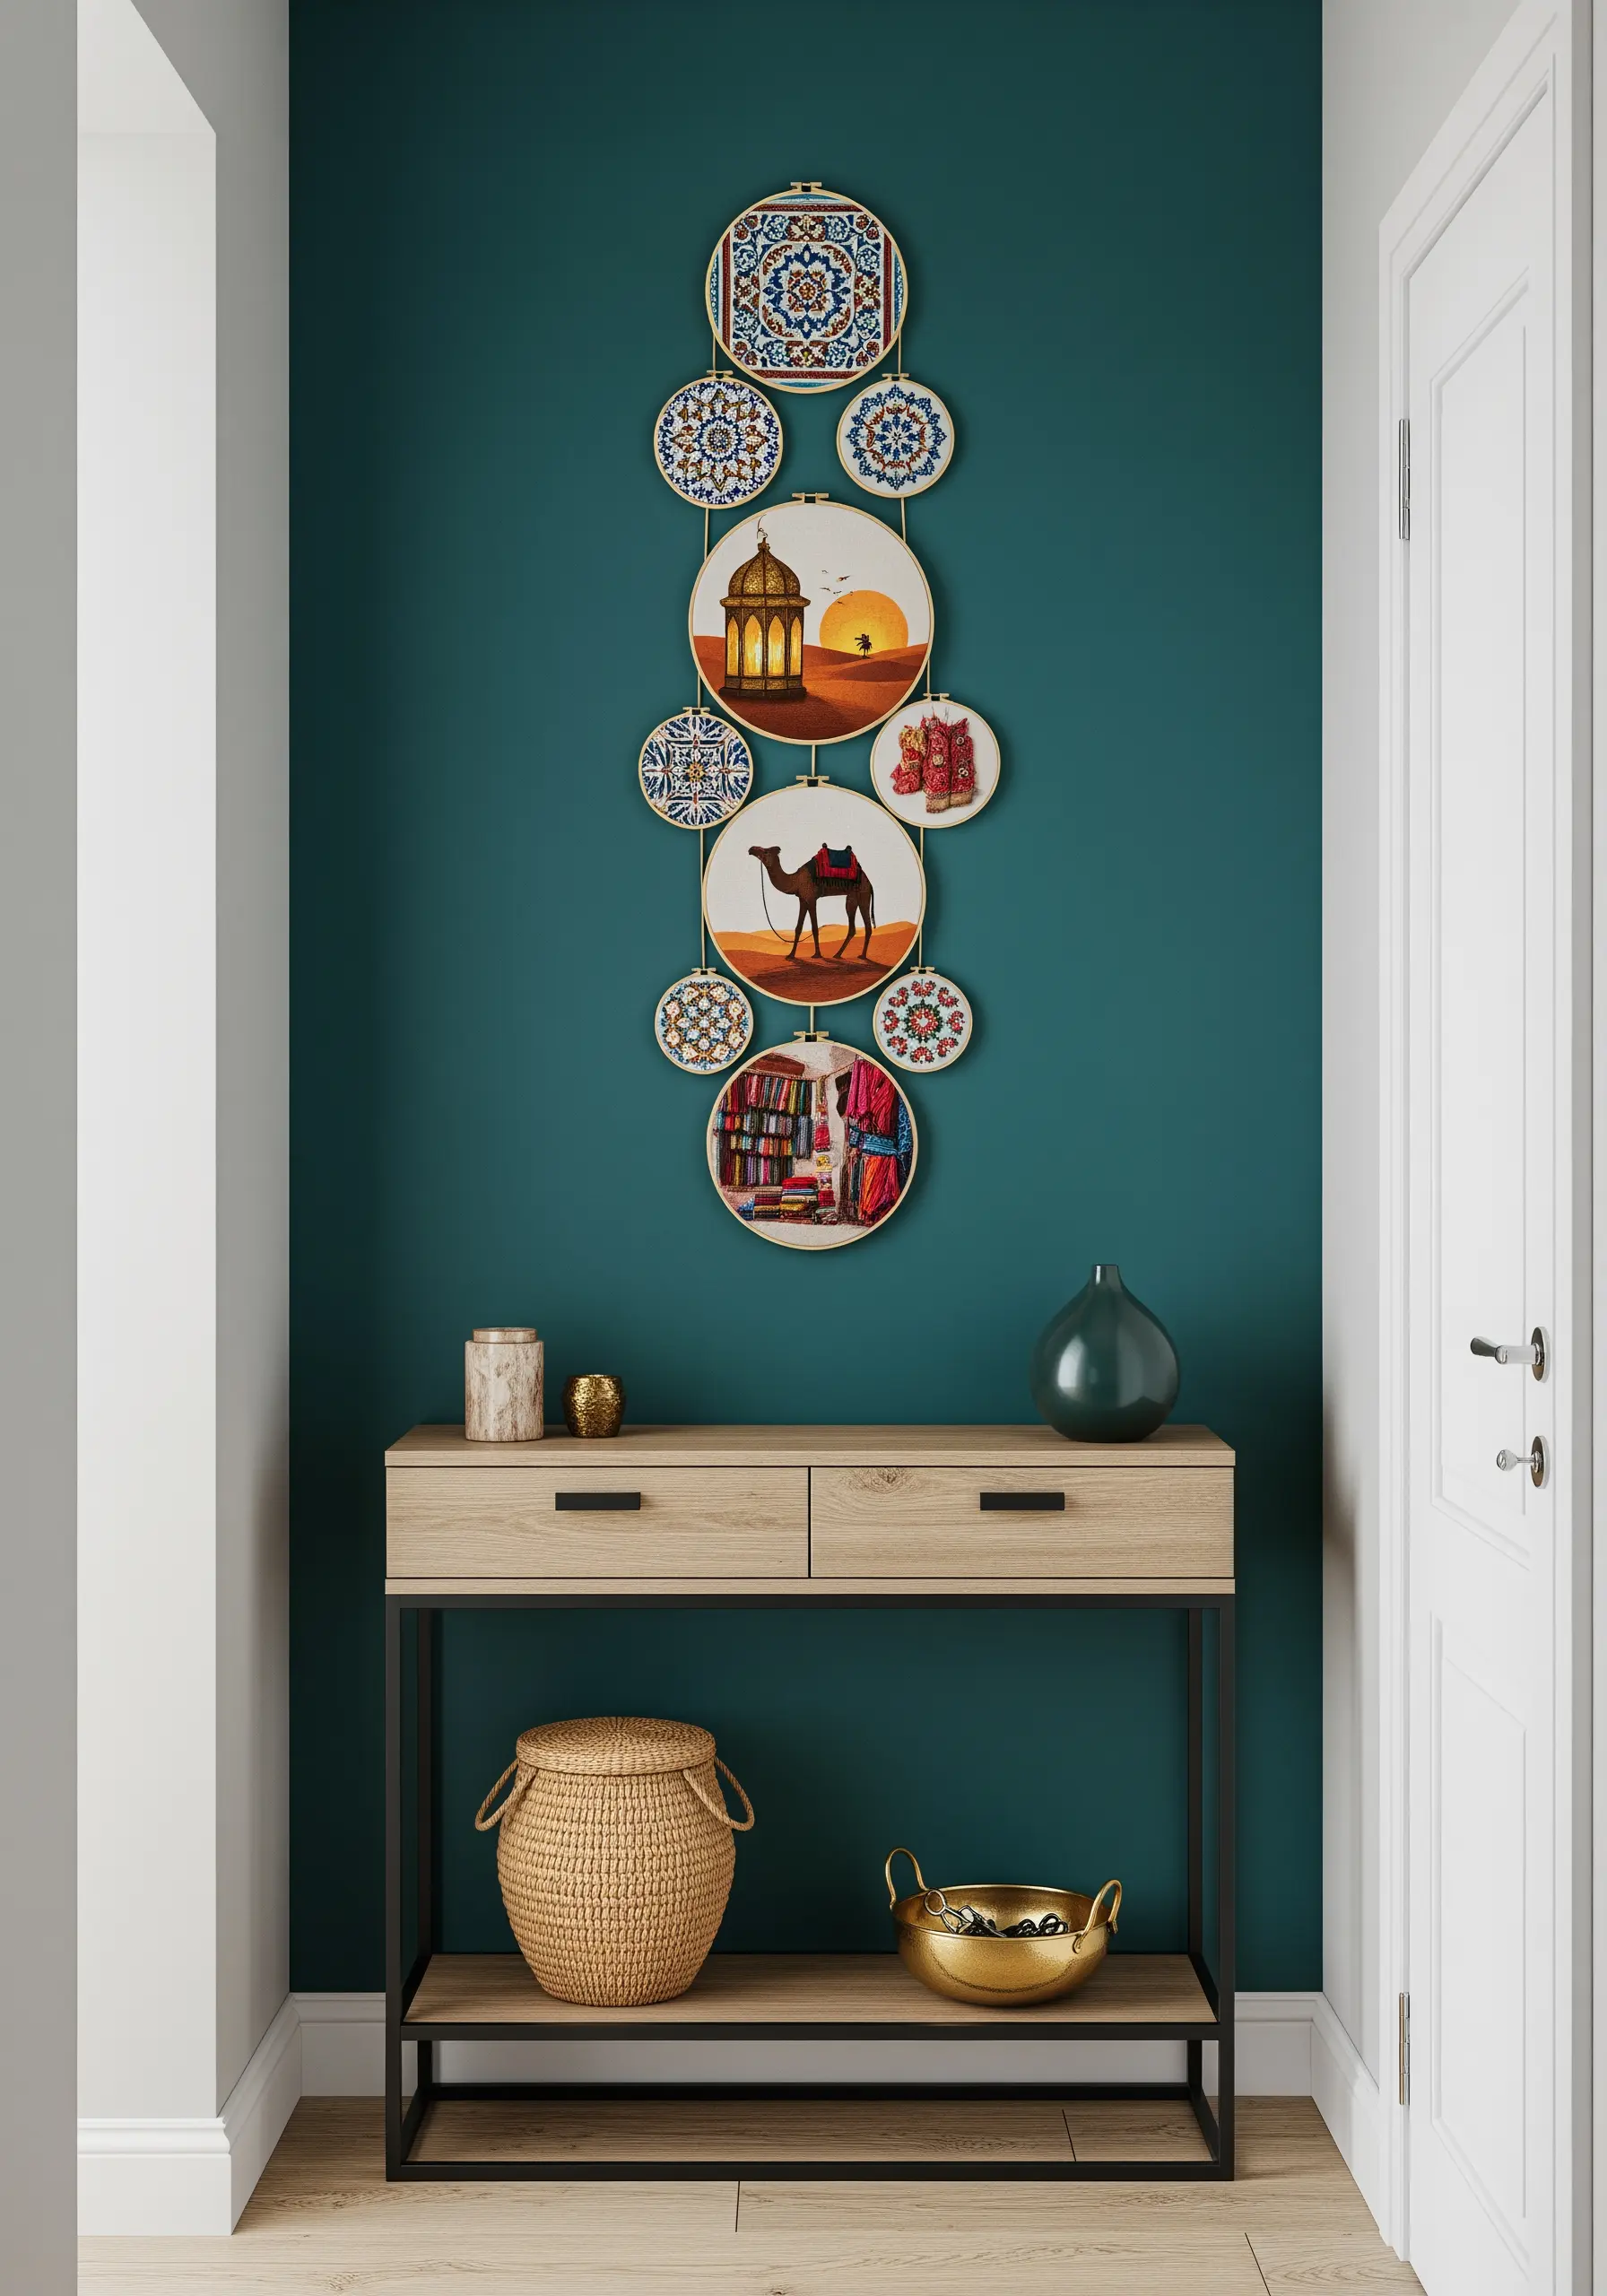
Tell a story along a narrow wall by staggering hoops of different sizes in a vertical cascade, guiding the eye from one moment to the next.
Incorporate metallic gold thread for elements like the lantern to add a subtle shimmer that catches the light and creates a focal point.
Use dense French knots or seed stitches for the desert sand to build a tangible texture that contrasts beautifully with the flat satin-stitched sunset.
For intricate patterns, trace your design onto a water-soluble stabilizer. It provides a clear guide and dissolves completely, leaving your stitches clean and precise.
4. Master Negative Space in a Mountainscape Collection
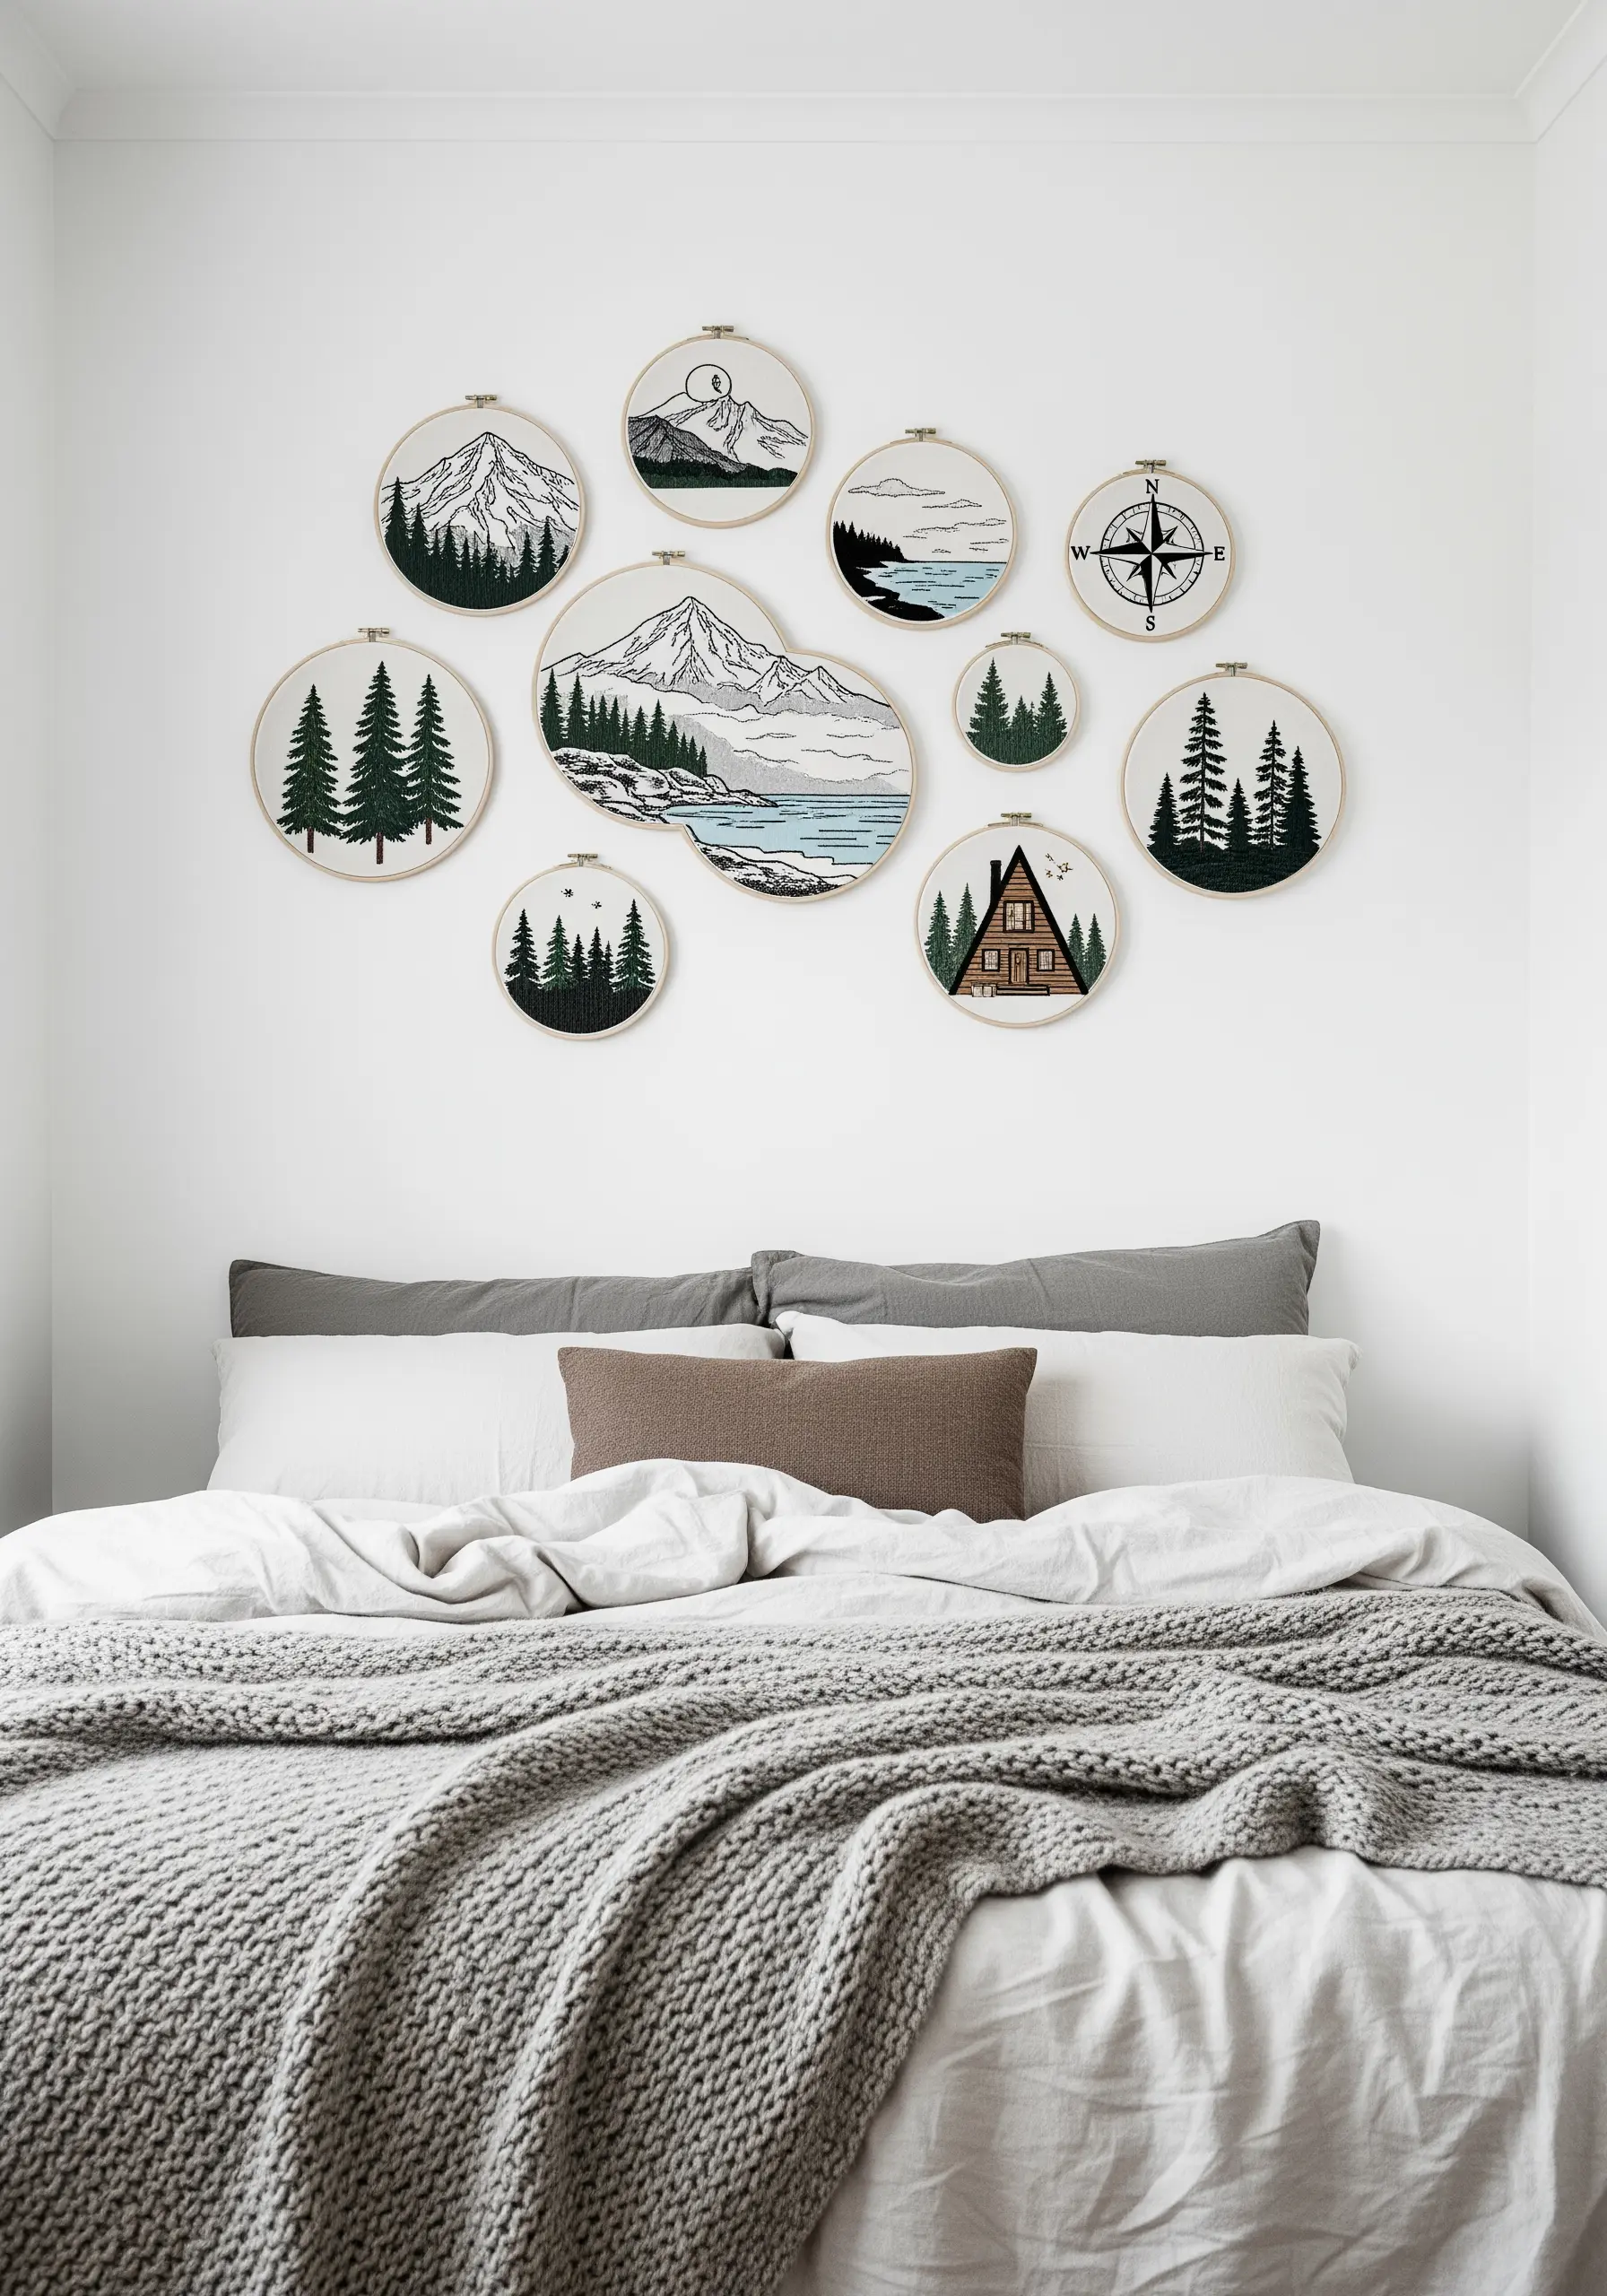
Use the unstitched fabric as a design element to create a minimalist, airy composition that feels modern and uncluttered.
Vary the direction of your satin stitches in the mountains and water to suggest different planes and reflections without changing colors.
Combine a large central hoop with smaller satellite hoops to create a dynamic focal point that draws the viewer in.
For dense tree foliage, use clusters of French knots with a dark green thread over a base of lighter green satin stitch to create depth and realistic texture.
These minimalist embroidery designs inspired by nature are perfect for creating a serene bedroom retreat.
5. Capture the Amalfi Coast with Thread Painting
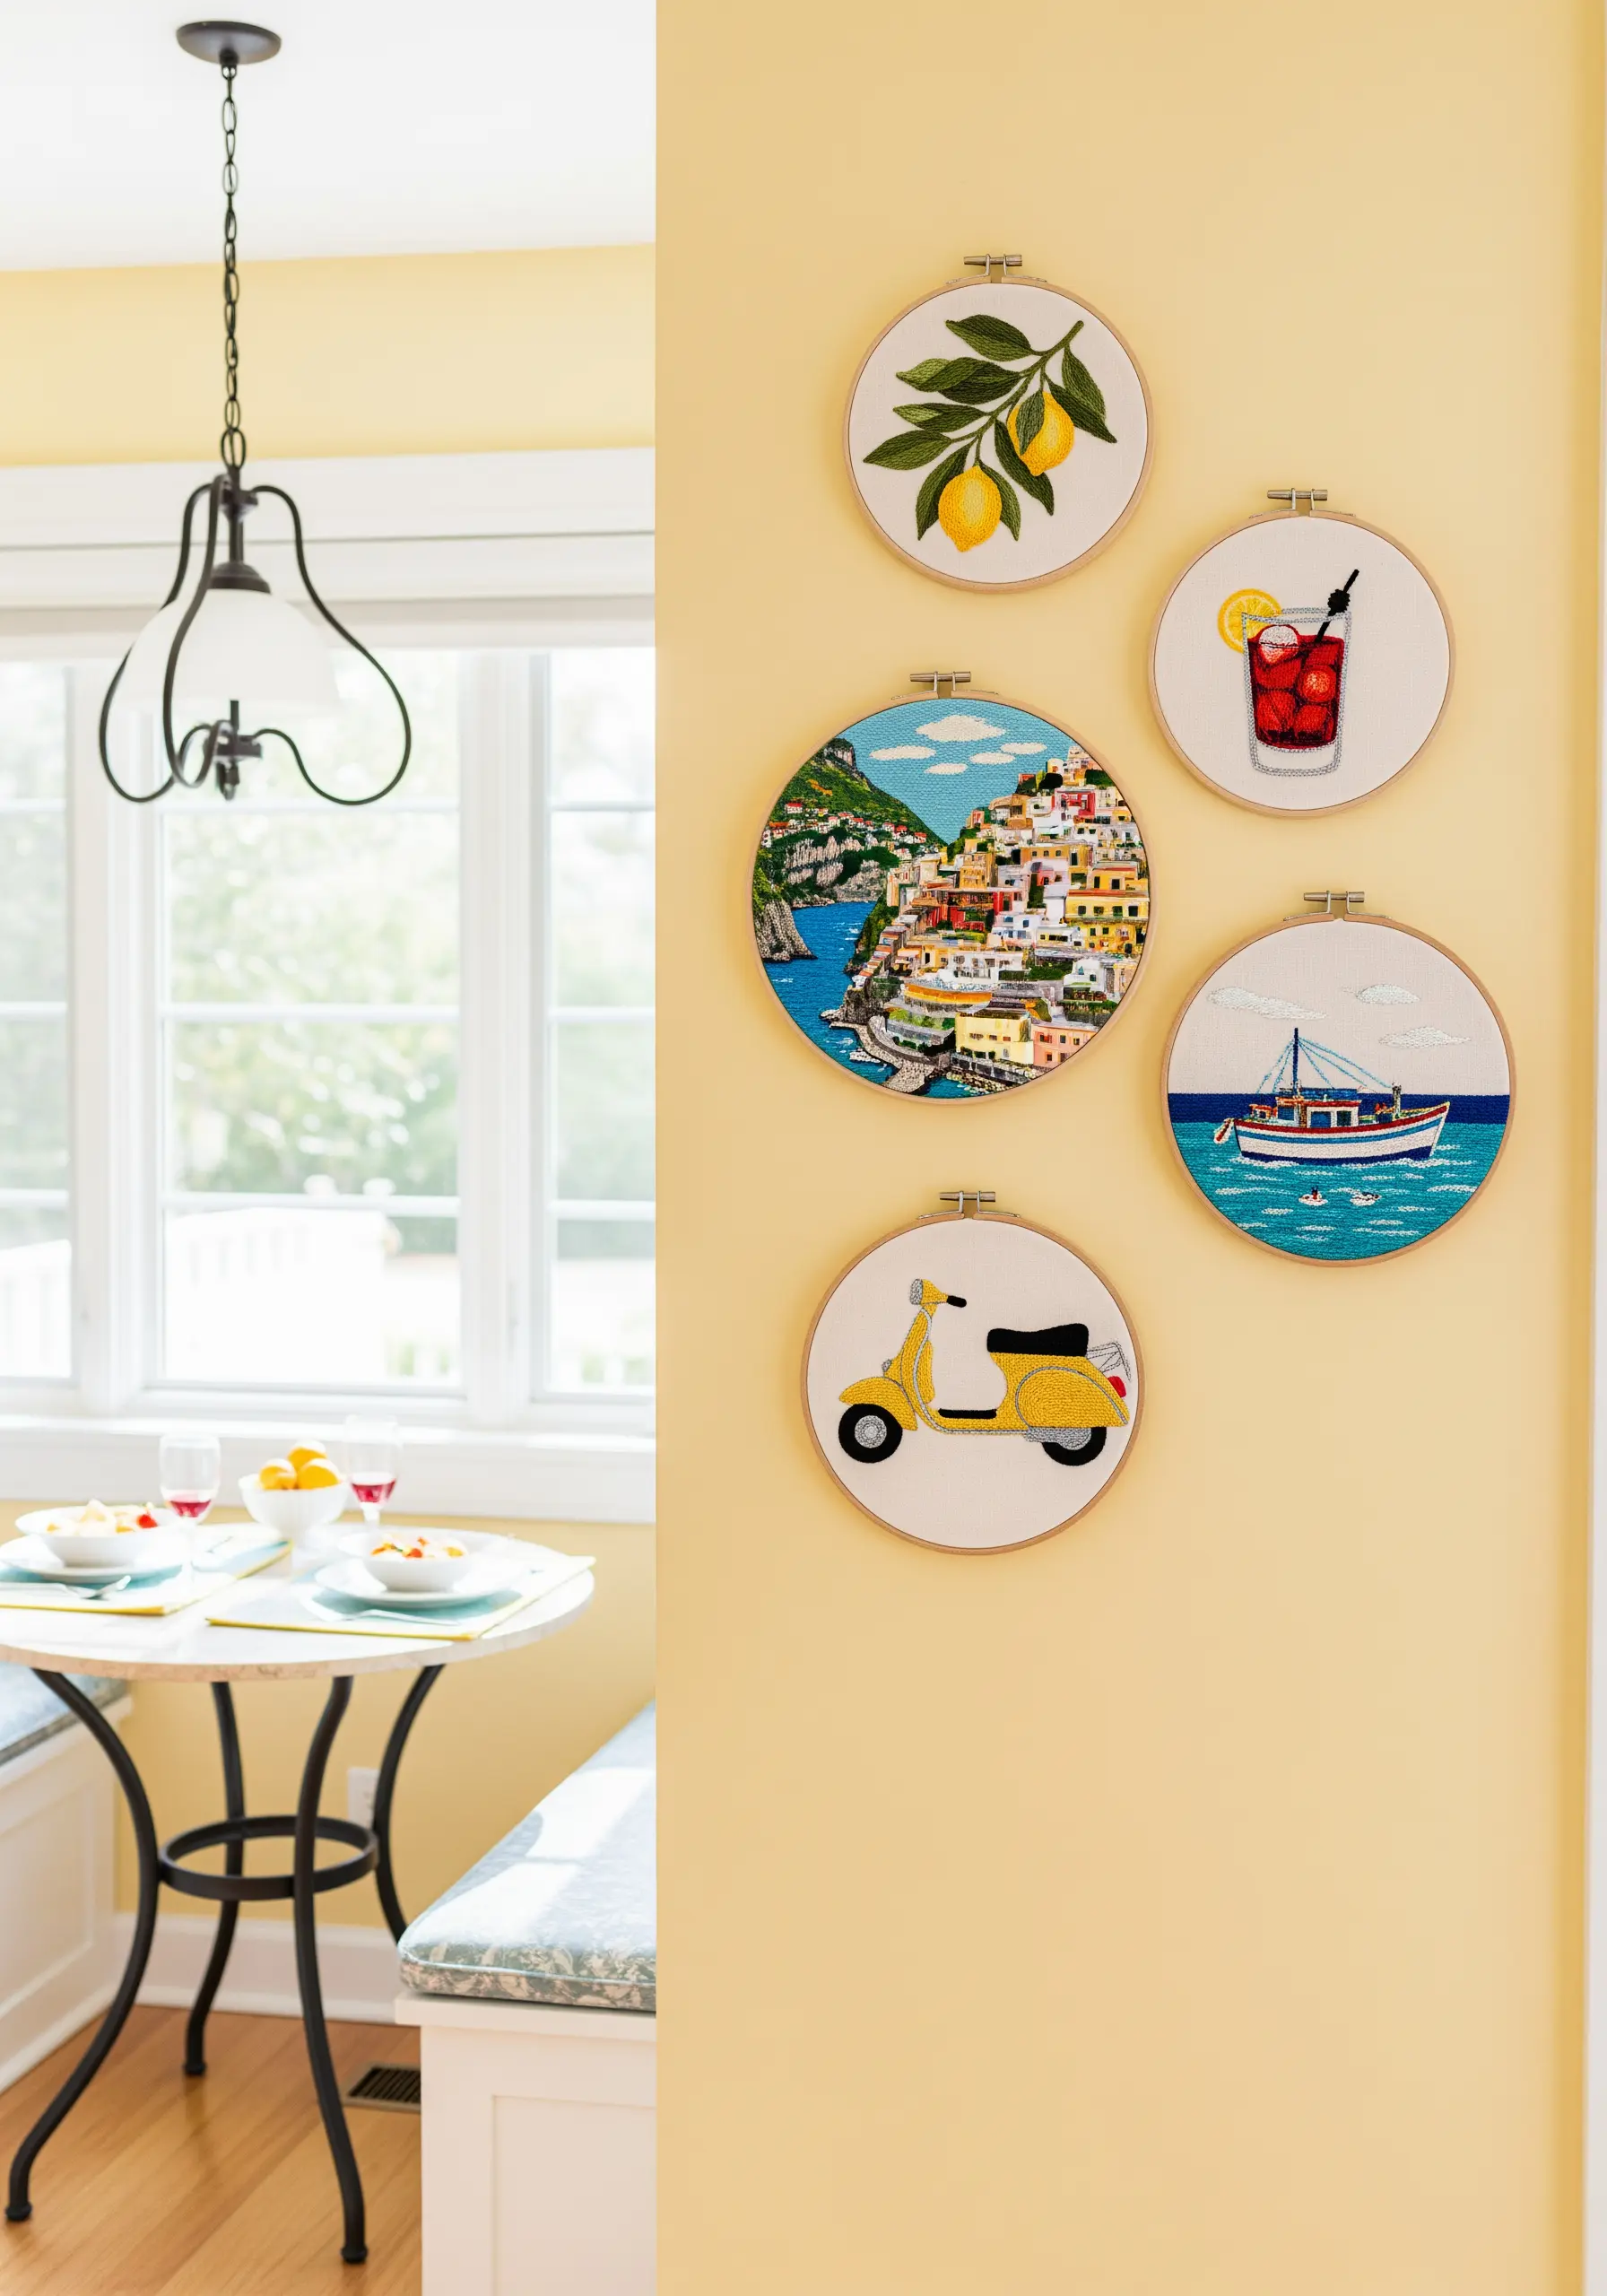
For complex scenes like a coastal village, simplify buildings into blocks of color using long-and-short stitch instead of outlining every detail.
This thread painting technique creates a rich, painterly effect that captures the essence of a place without overwhelming the design.
To make your colors pop, choose a high-contrast fabric. The off-white canvas makes the vibrant blues, yellows, and terracotta tones feel more luminous.
For a clean finish on lettering or fine lines, use a single strand of floss and a whipped backstitch, which smooths the curves and creates a solid, raised line.
6. Tell a London Story with Iconic Silhouettes
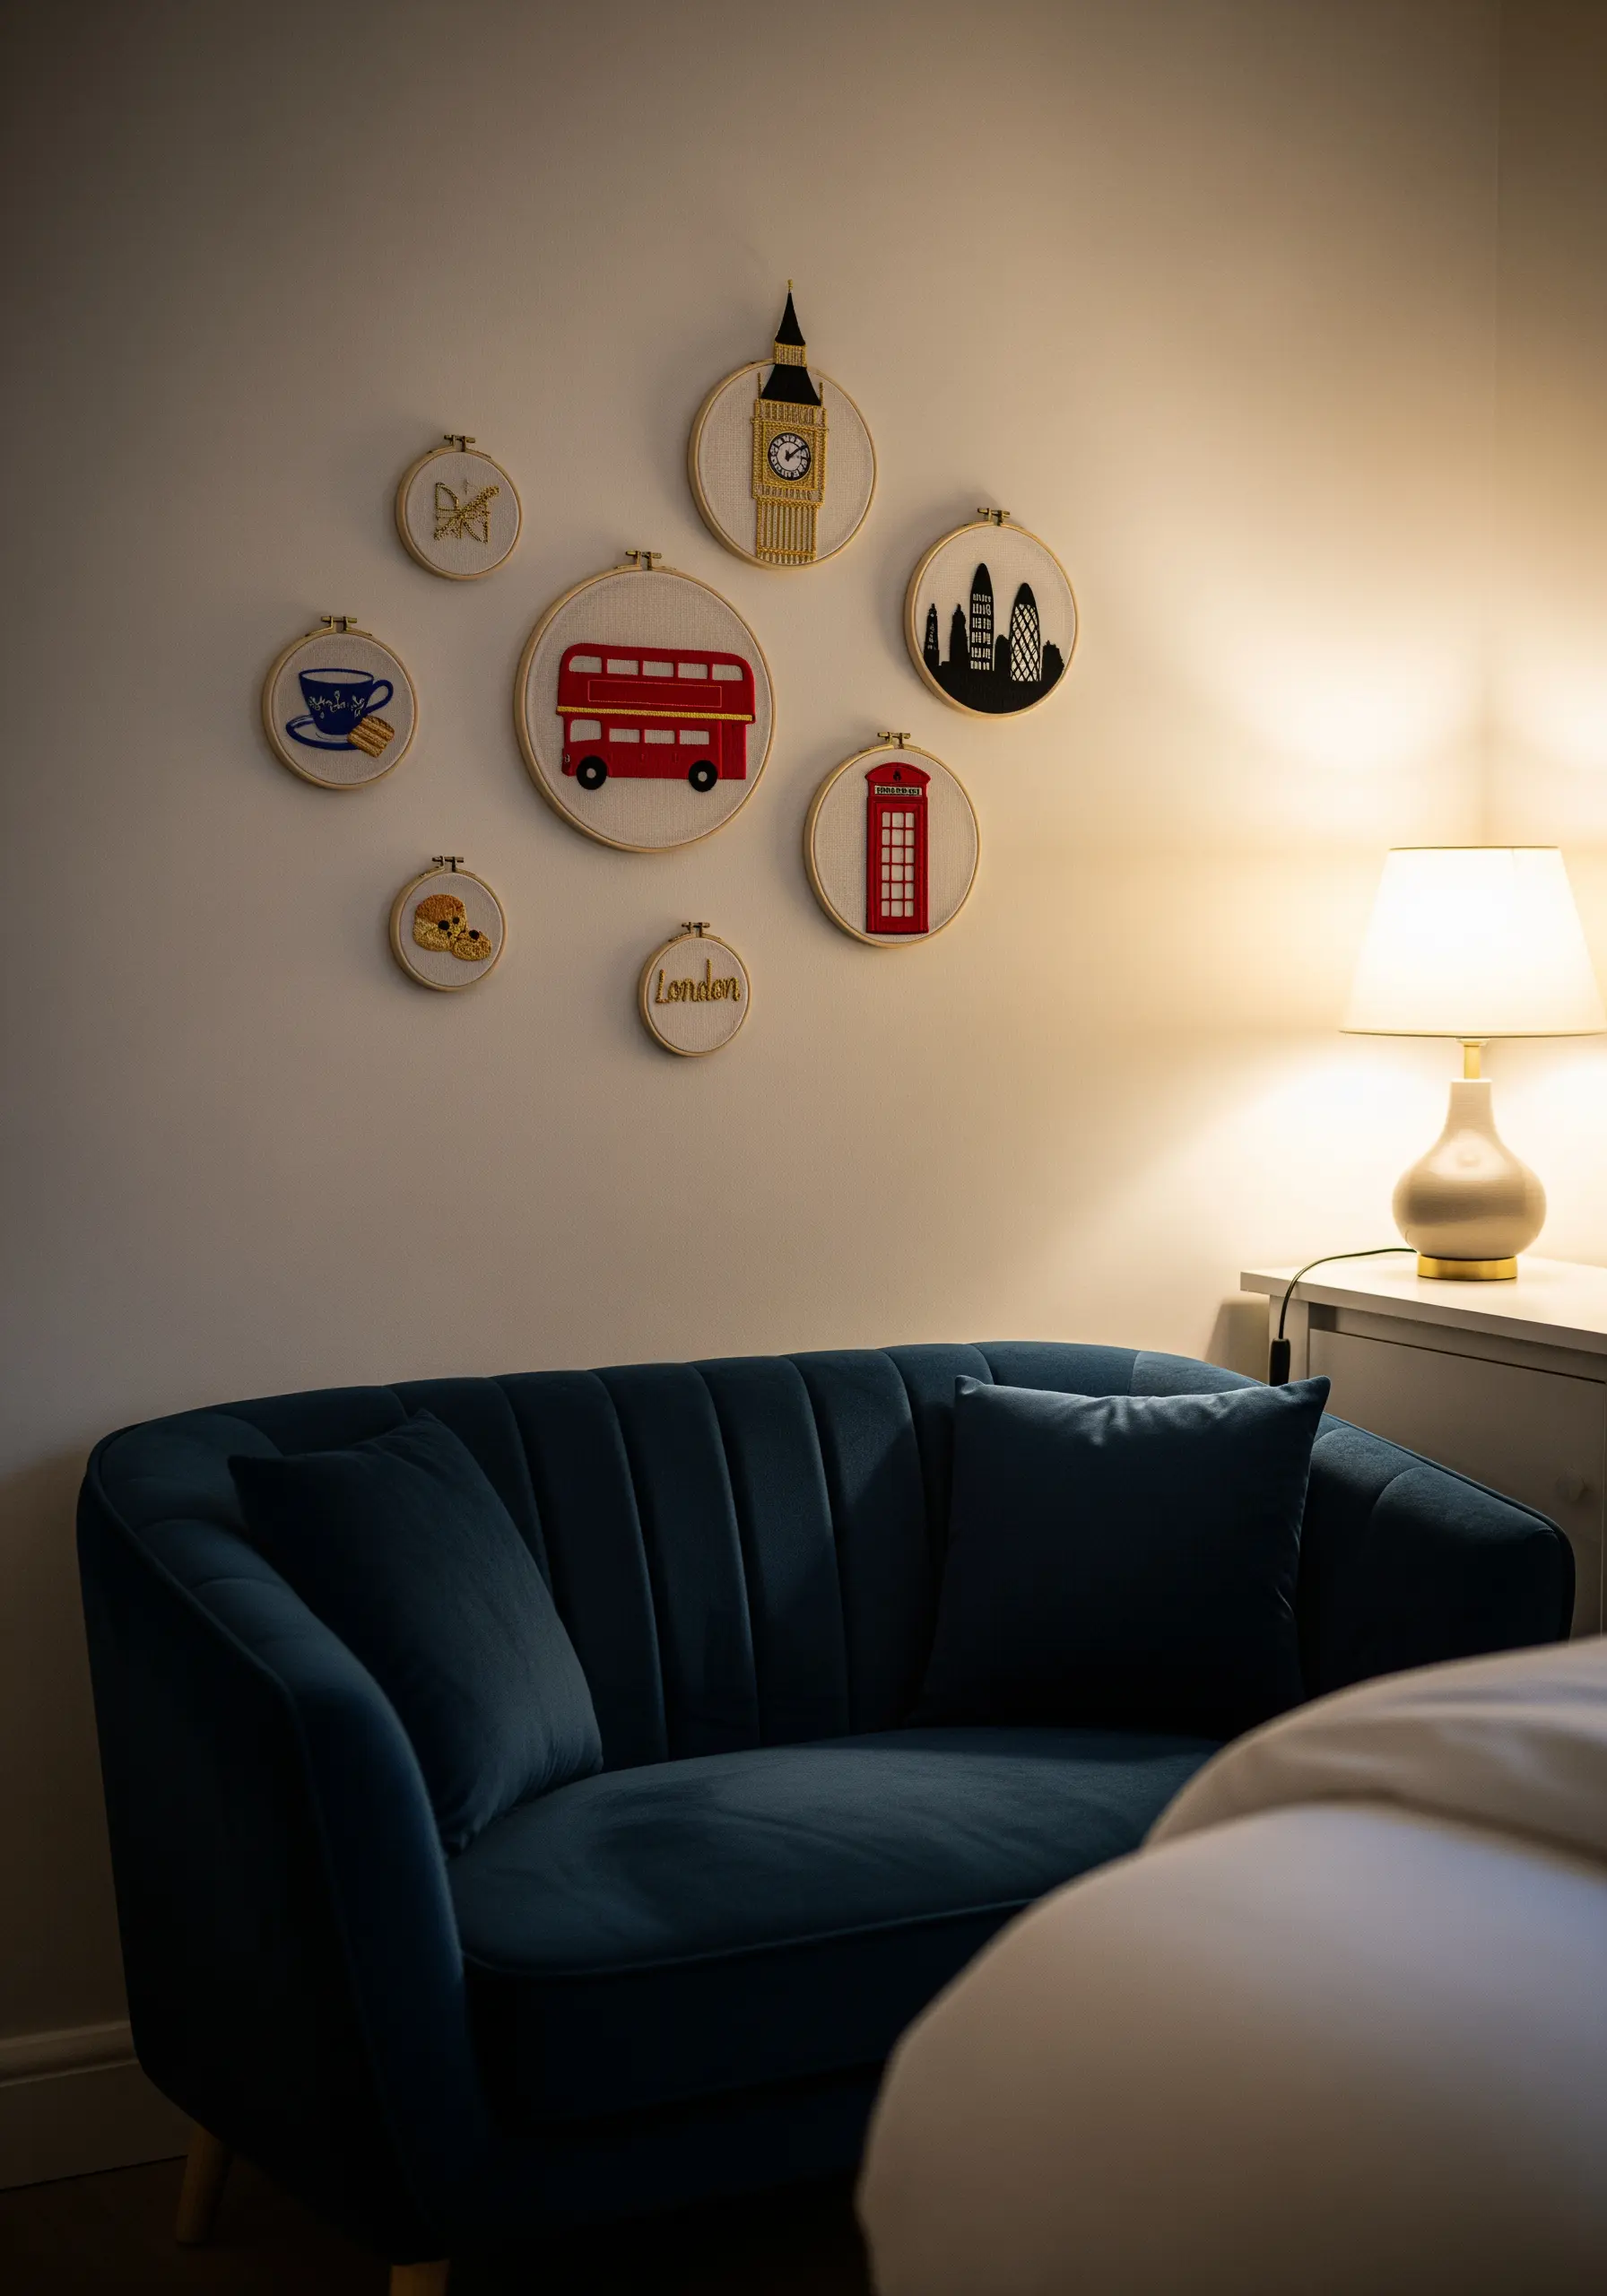
Simplify famous landmarks into clean, graphic silhouettes. This approach makes them instantly recognizable and quick to stitch.
Use a bold, primary color palette—like the iconic red of a double-decker bus—to create a strong visual anchor for your collection.
When stitching text, use a fine-tipped, heat-erasable pen for your guidelines to ensure perfect placement and spacing before committing to the thread.
Varying the hoop sizes adds visual interest and allows you to give more prominence to a central, more detailed piece like Big Ben.
7. Stitch a Vertical California Road Trip
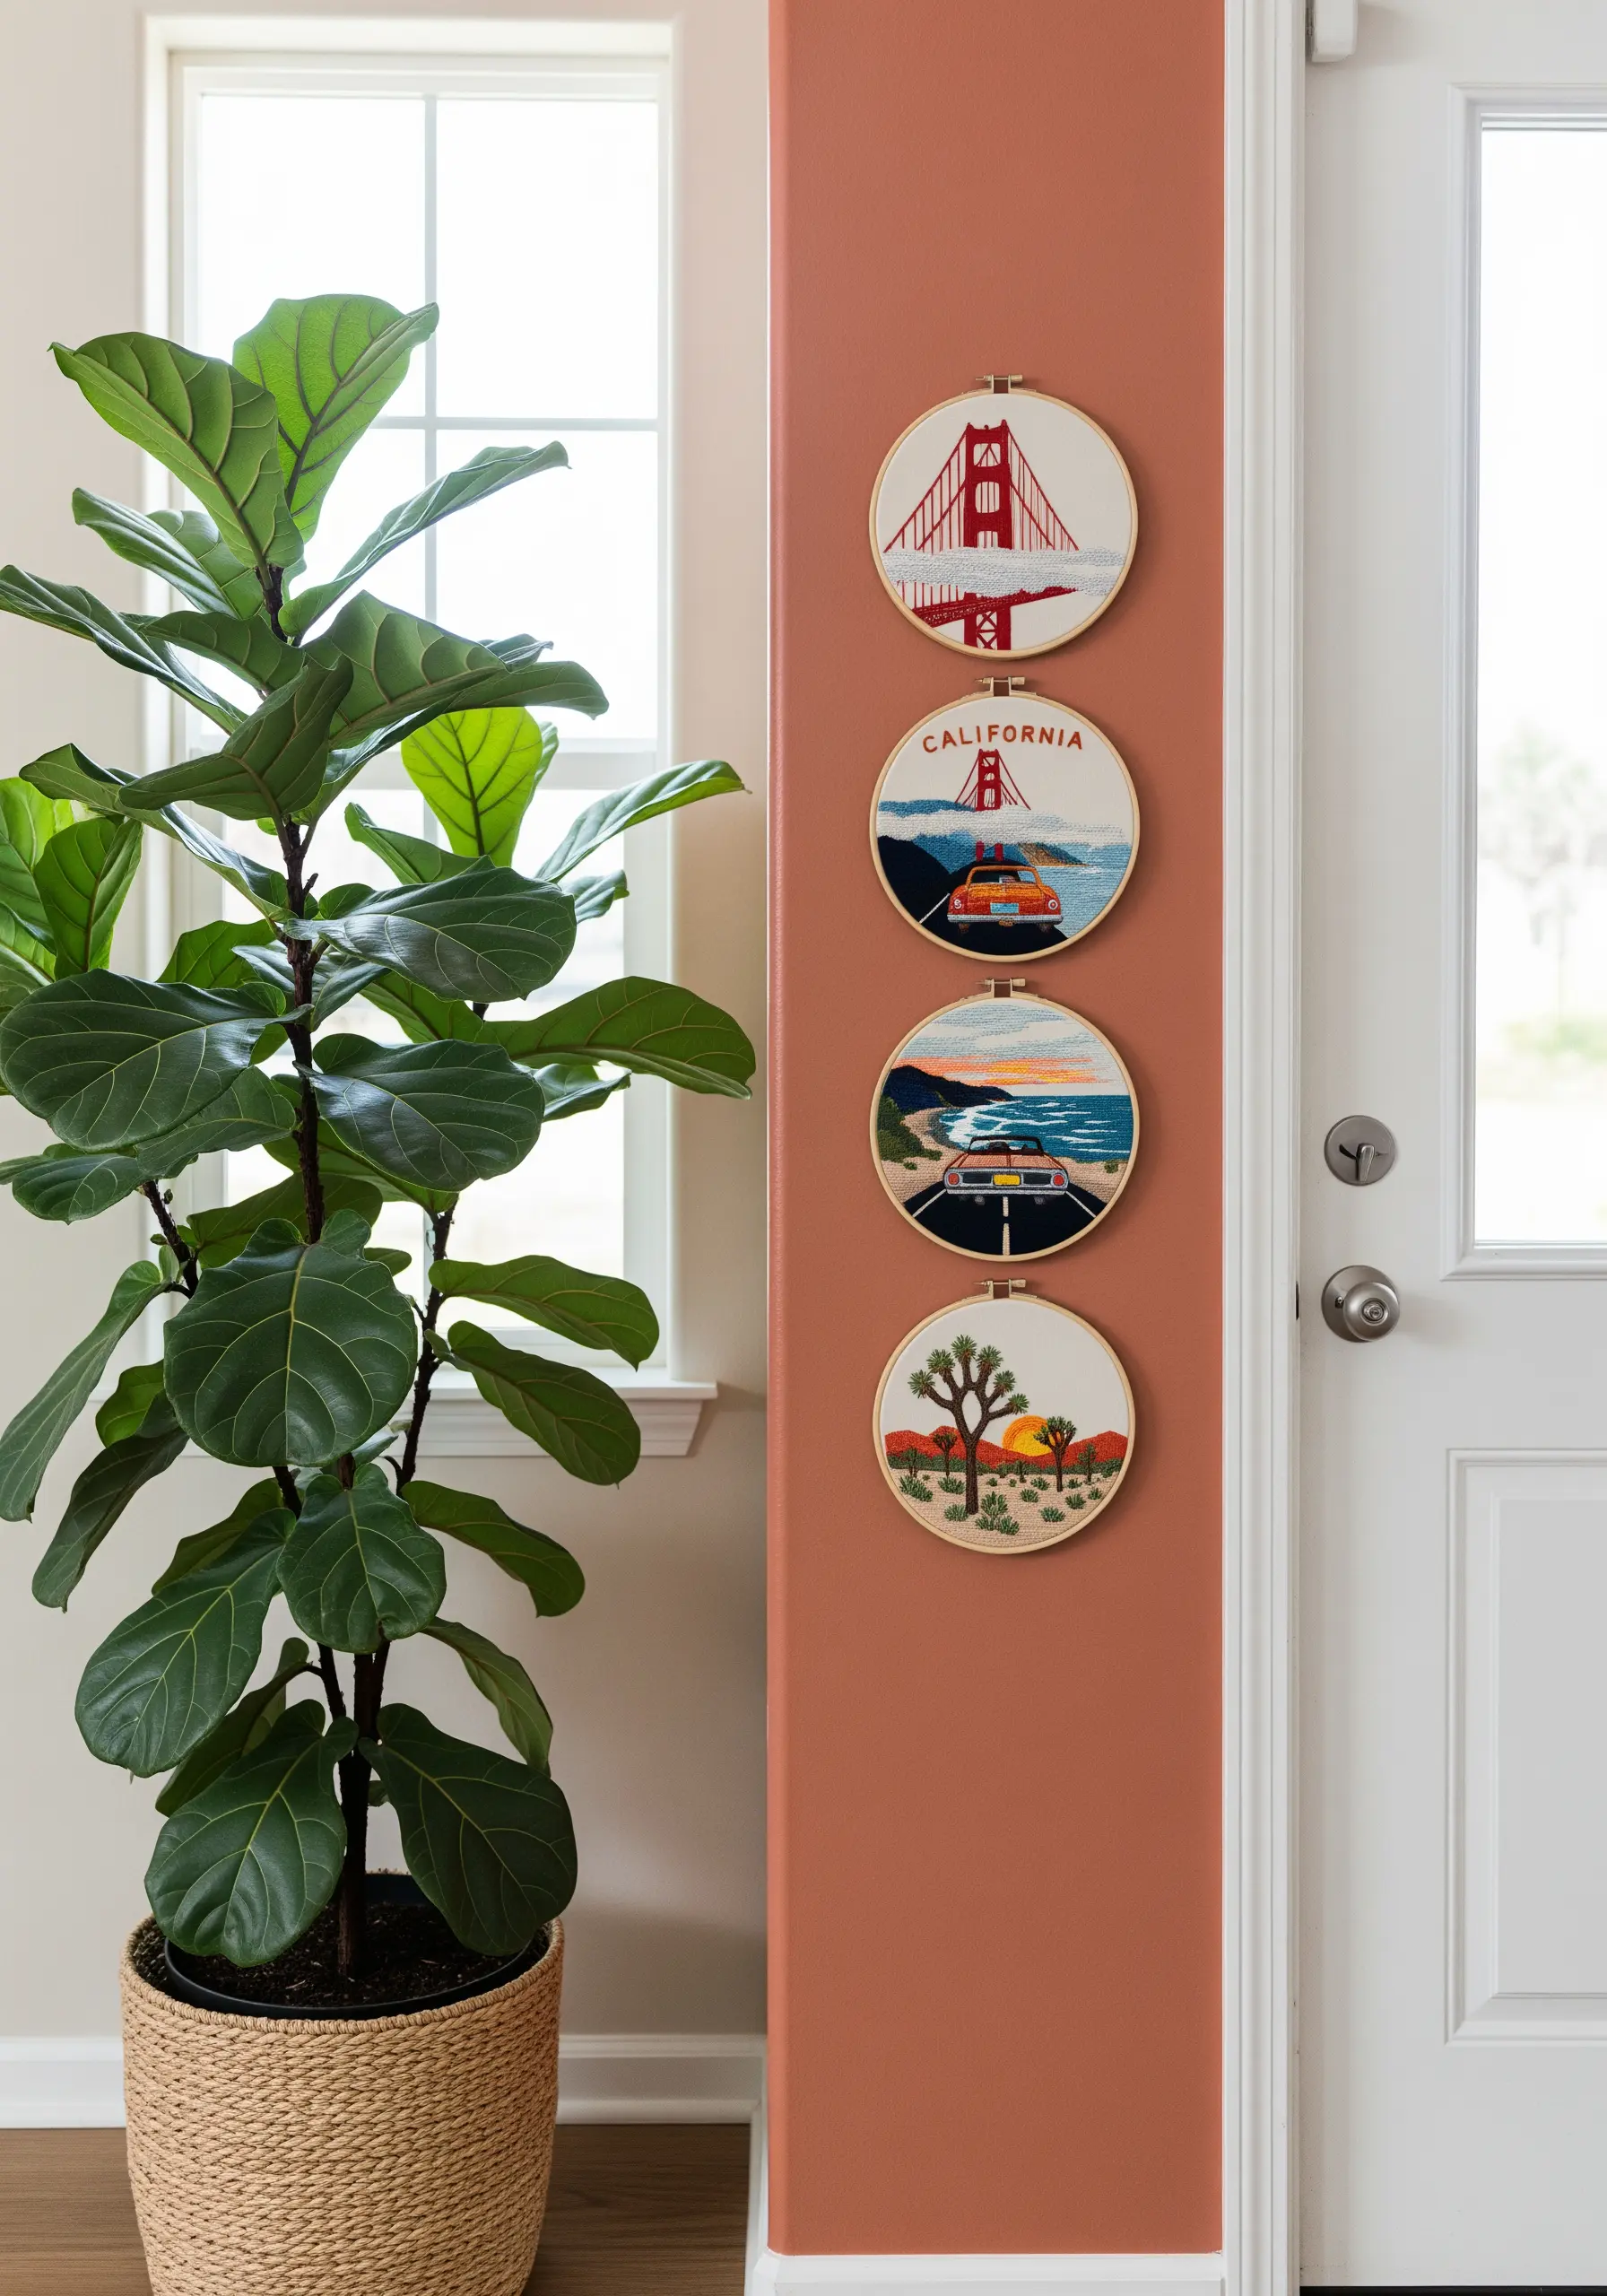
Use a simple vertical stack to tell a linear story, like a road trip, guiding the viewer’s eye from one destination to the next.
Achieve a smooth gradient in the sunset sky by blending three or four shades of floss with the long-and-short stitch, ensuring your stitches are angled consistently.
For the Joshua trees, use a stem stitch with a slightly thicker thread (three strands) to give the branches a defined, dimensional quality.
This display style is perfect for narrow wall spaces, like beside a doorway, turning an overlooked area into a feature.
8. Unify a Collection with a Strict Color Palette

Create a sophisticated and harmonious display by limiting your entire collection to just two or three colors, like the iconic blue and white of the Greek isles.
This disciplined approach forces you to focus on form and line work, resulting in a clean, elegant aesthetic that feels intentional.
Add a single pop of a contrasting color—like the vibrant pink bougainvillea—to serve as a deliberate focal point that energizes the entire set.
Arranging the hoops in a straight, evenly spaced line reinforces the sense of order and calm, making it ideal for a bathroom or spa-like space.
9. Frame a Central Idea with Thematic Motifs
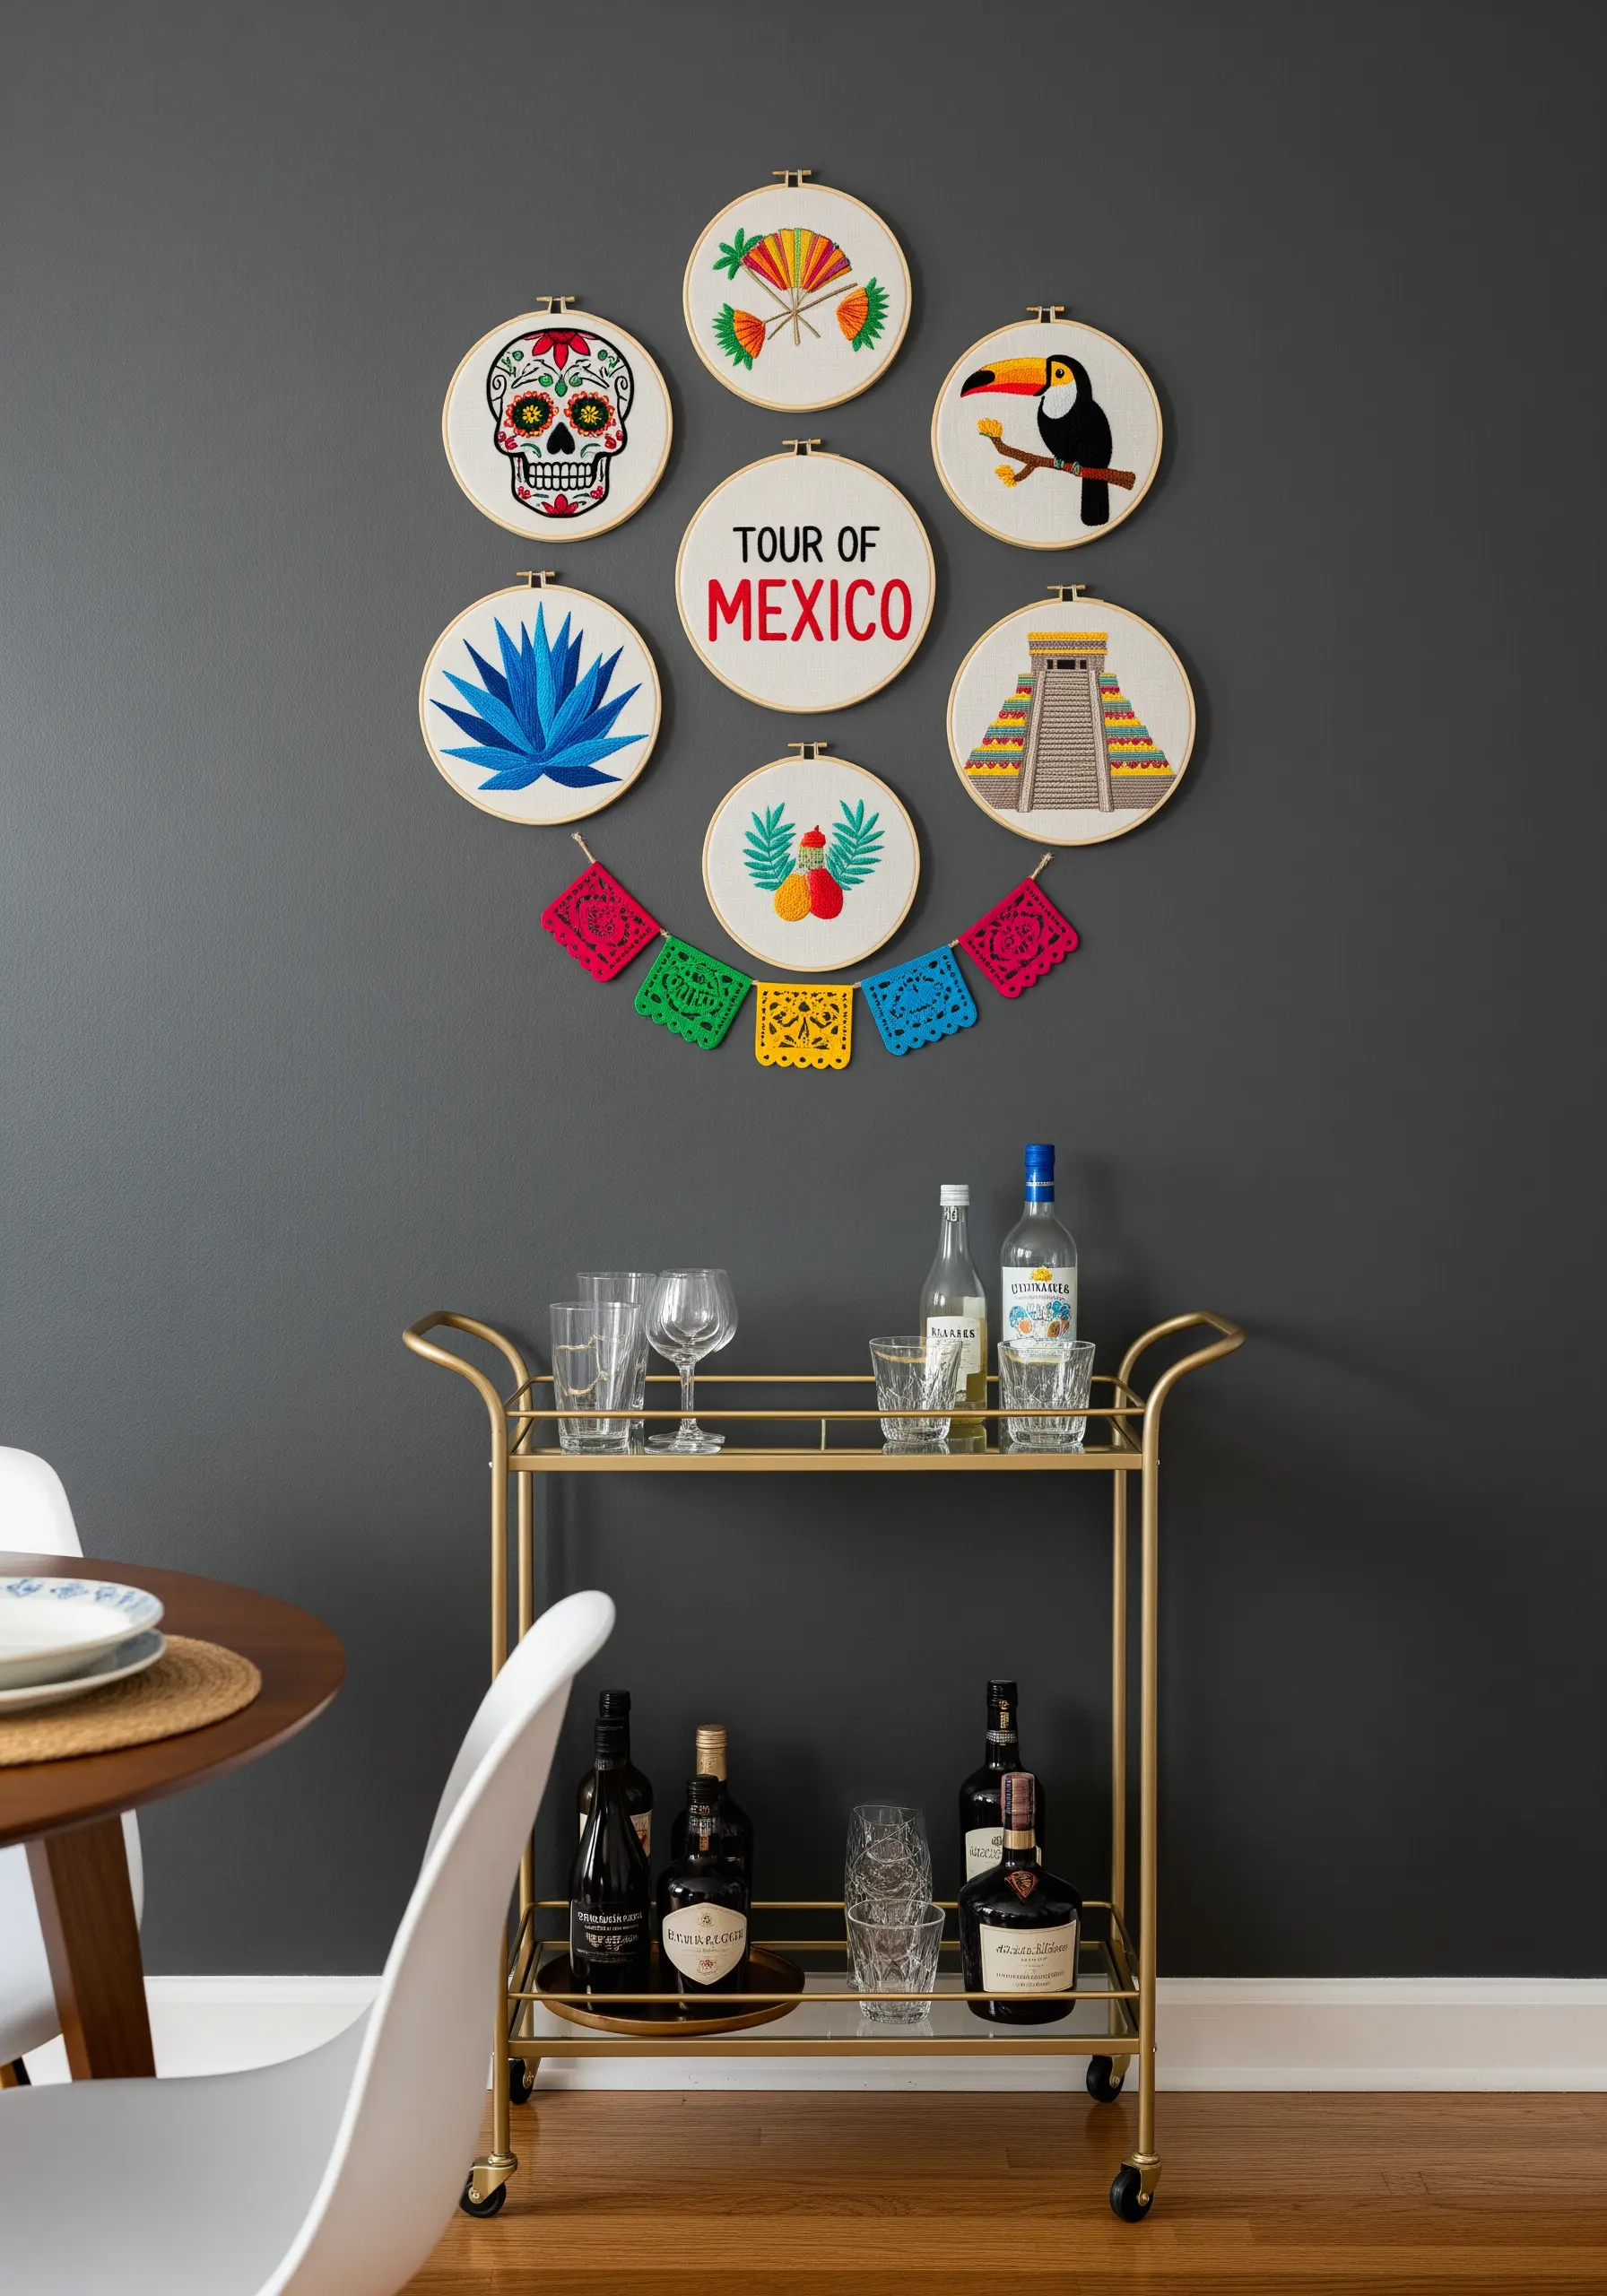
Use a central hoop with text to anchor your collection, and arrange smaller, symbolic hoops around it to illustrate the theme.
For the sugar skull, use a contrasting color for the outline—like black against white—to make the intricate details sharp and readable.
To create the spiky texture of the blue agave plant, use detached chain stitches (lazy daisies) pulled taut and arranged in radiating lines.
Incorporate small, non-embroidery elements like the papel picado banner to add a layer of authentic, mixed-media texture to your display.
10. Create a Dreamy Narrative with Soft Textures
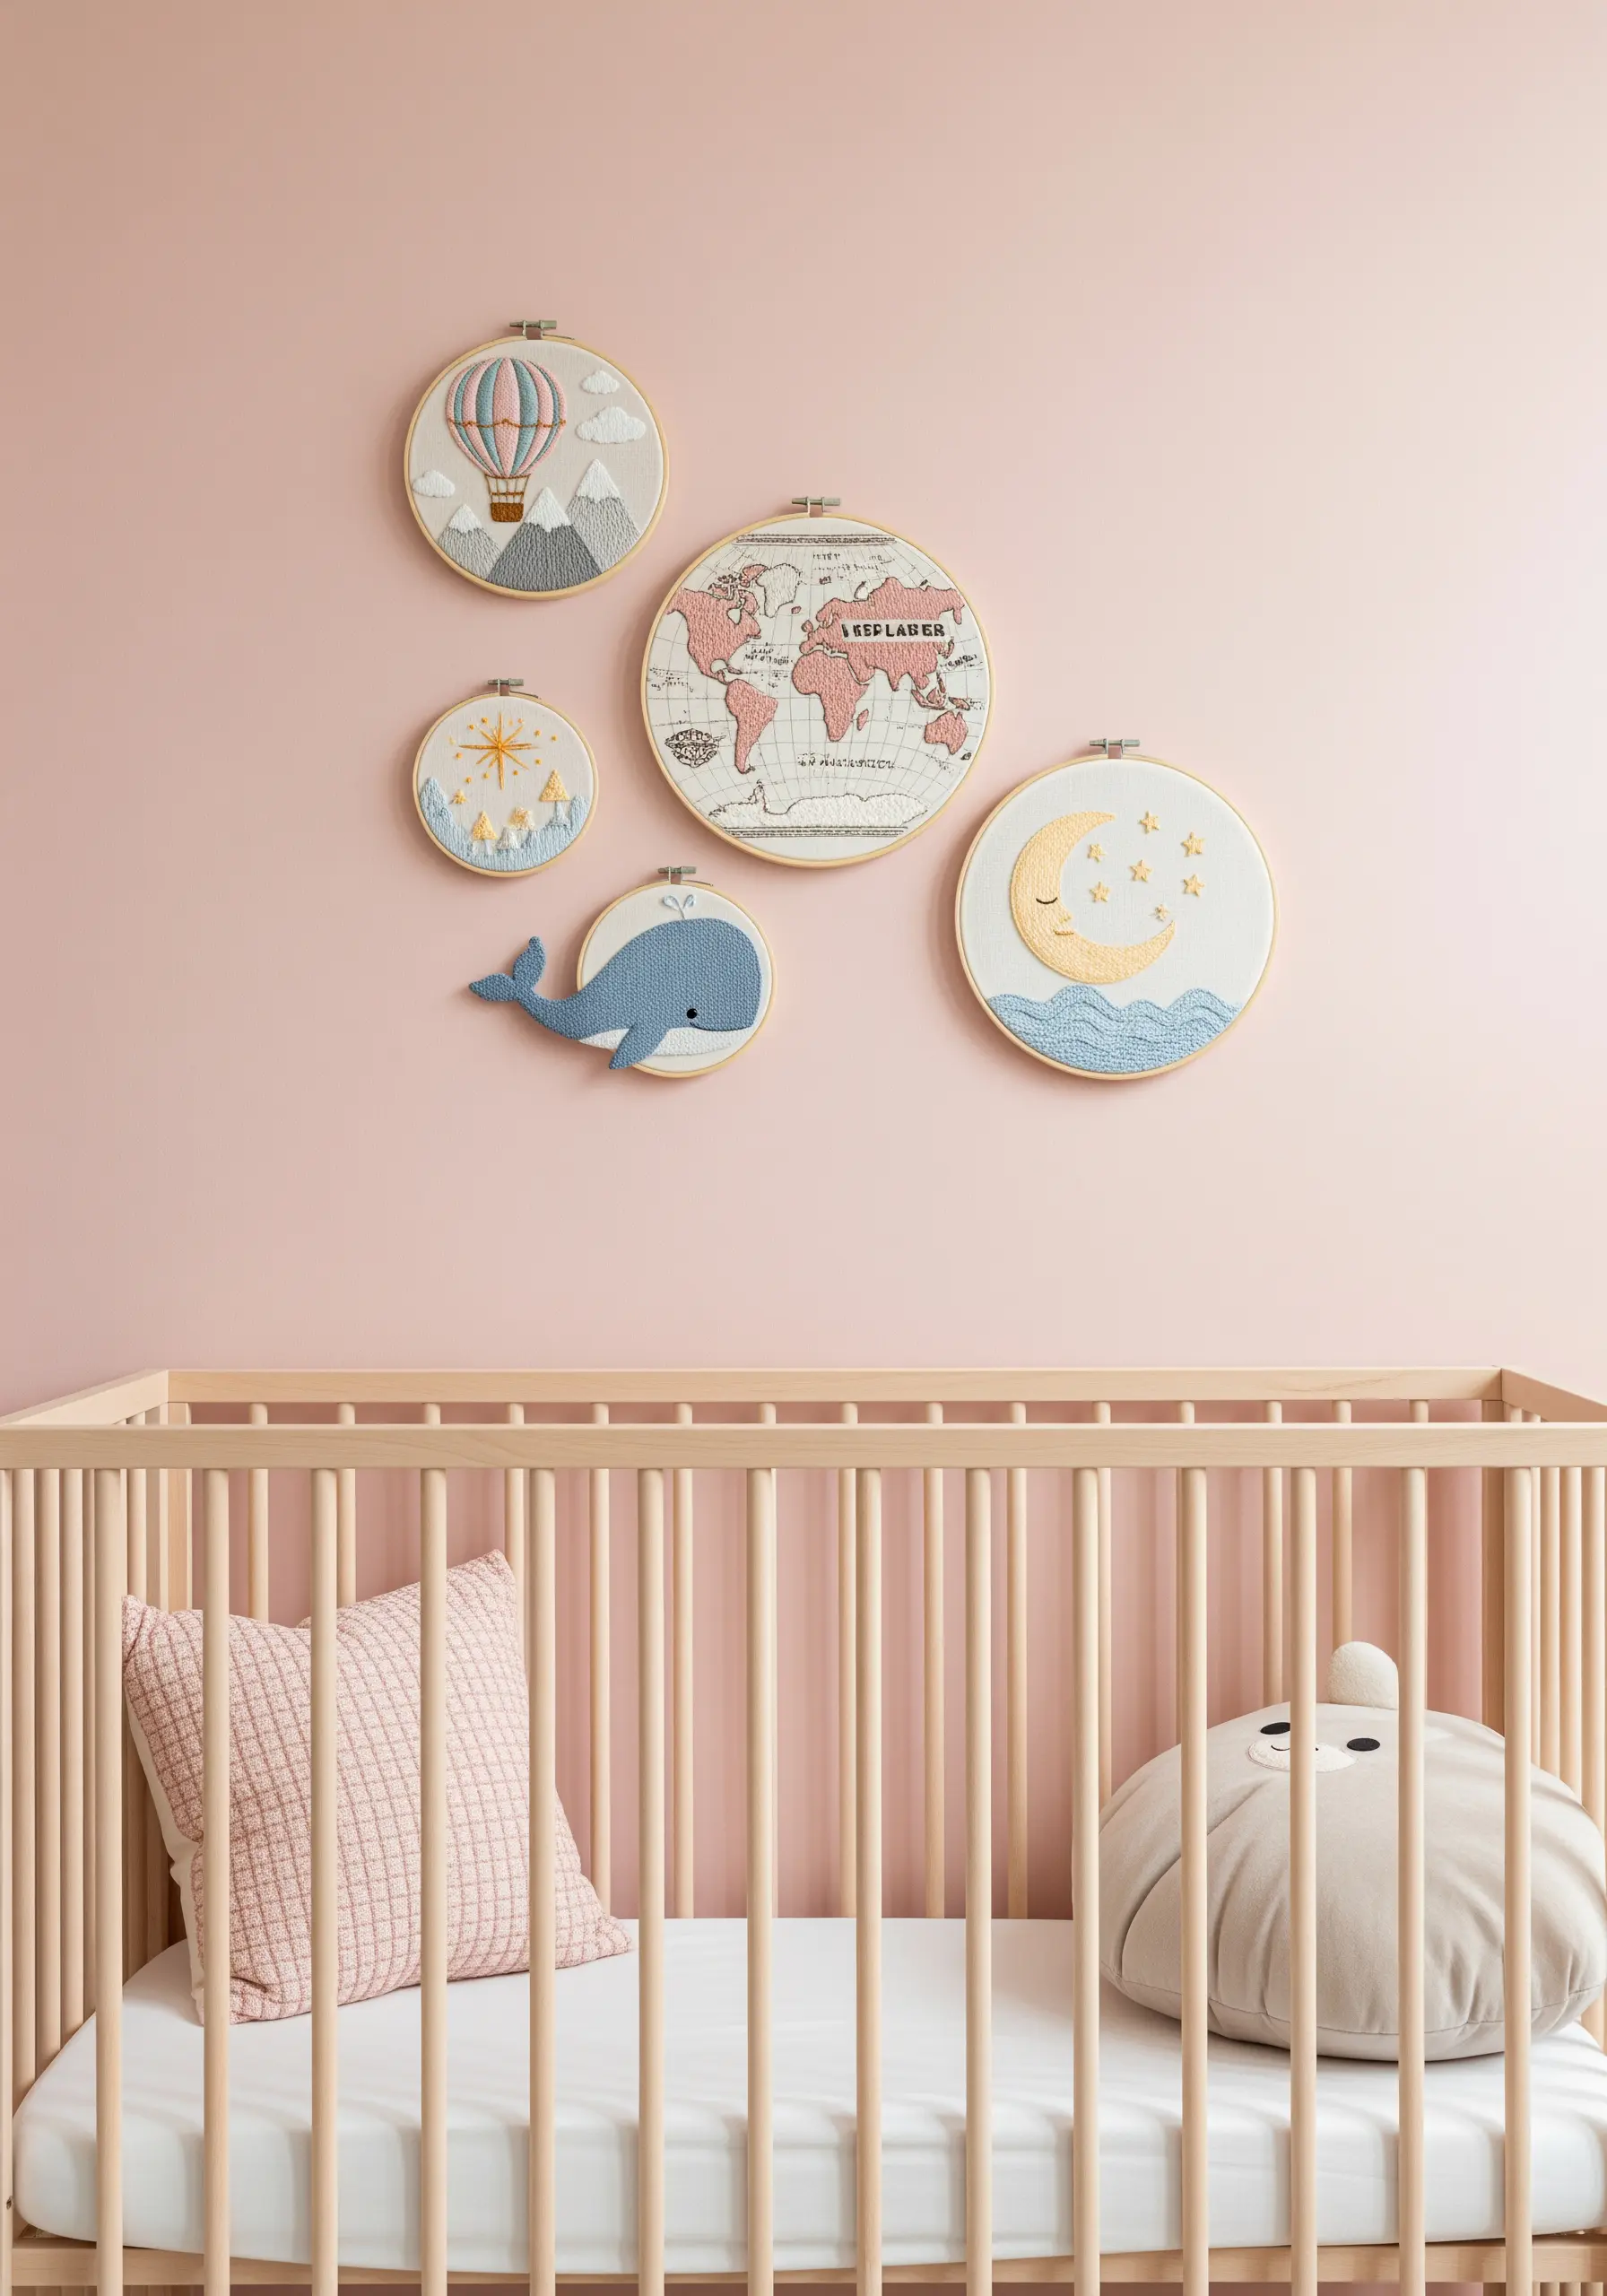
Soften your travel story with a gentle, pastel color palette and whimsical motifs, perfect for a nursery or a serene bedroom.
Incorporate couch stitching with a thicker yarn or chenille thread for the whale’s body to introduce a soft, three-dimensional element that invites touch.
For the clouds and waves, use dense clusters of French knots in varying sizes and shades of off-white and blue to build a plush, cloud-like texture.
Stitching a vintage-style map adds a classic storytelling element that grounds the more imaginative pieces in your collection.
11. Integrate Your Hoops into a Functional Workspace
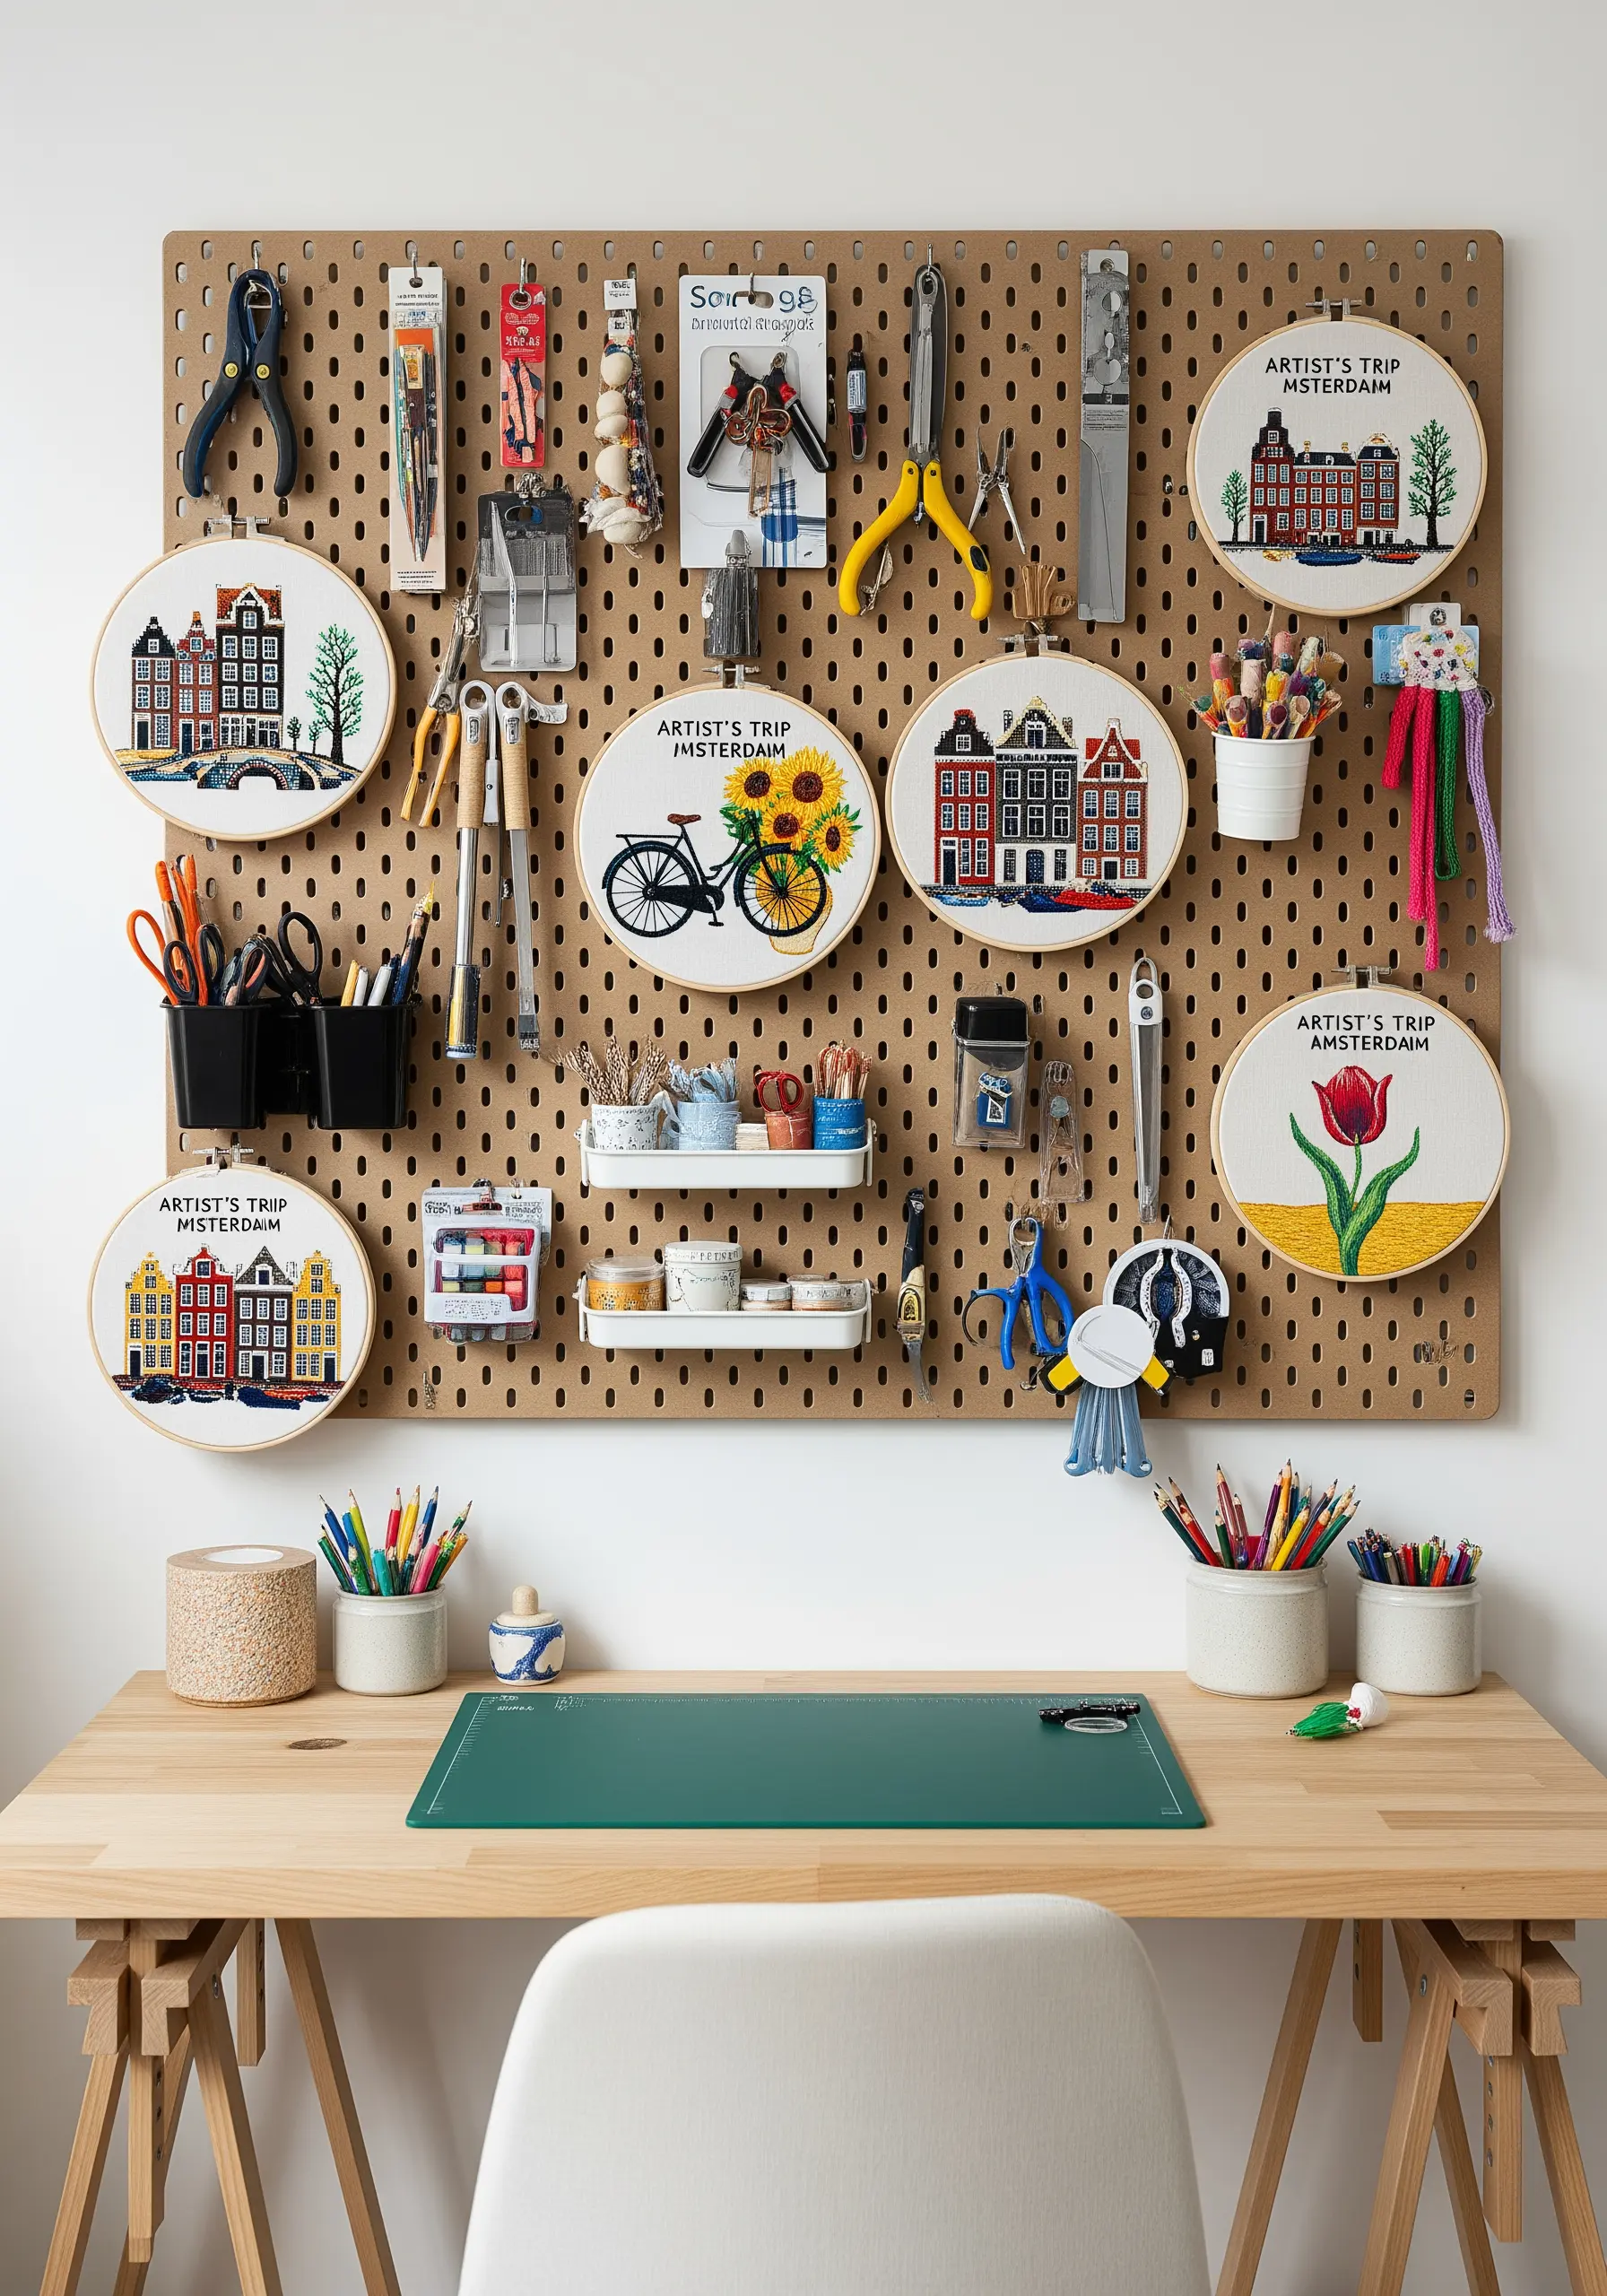
Display your travel hoops on a pegboard to seamlessly blend your art with your tools, turning a functional space into an inspirational one.
Keep the designs graphic and clean to stand out amongst the visual clutter of supplies. Simple outlines and bold color blocks work best.
Use the pegboard’s grid to your advantage, creating a balanced but asymmetrical layout that feels organic and creative.
This approach allows you to easily rotate your finished pieces, keeping your workspace feeling fresh and reflective of your current projects.
12. Motivate Your Space with Adventure-Themed Hoops
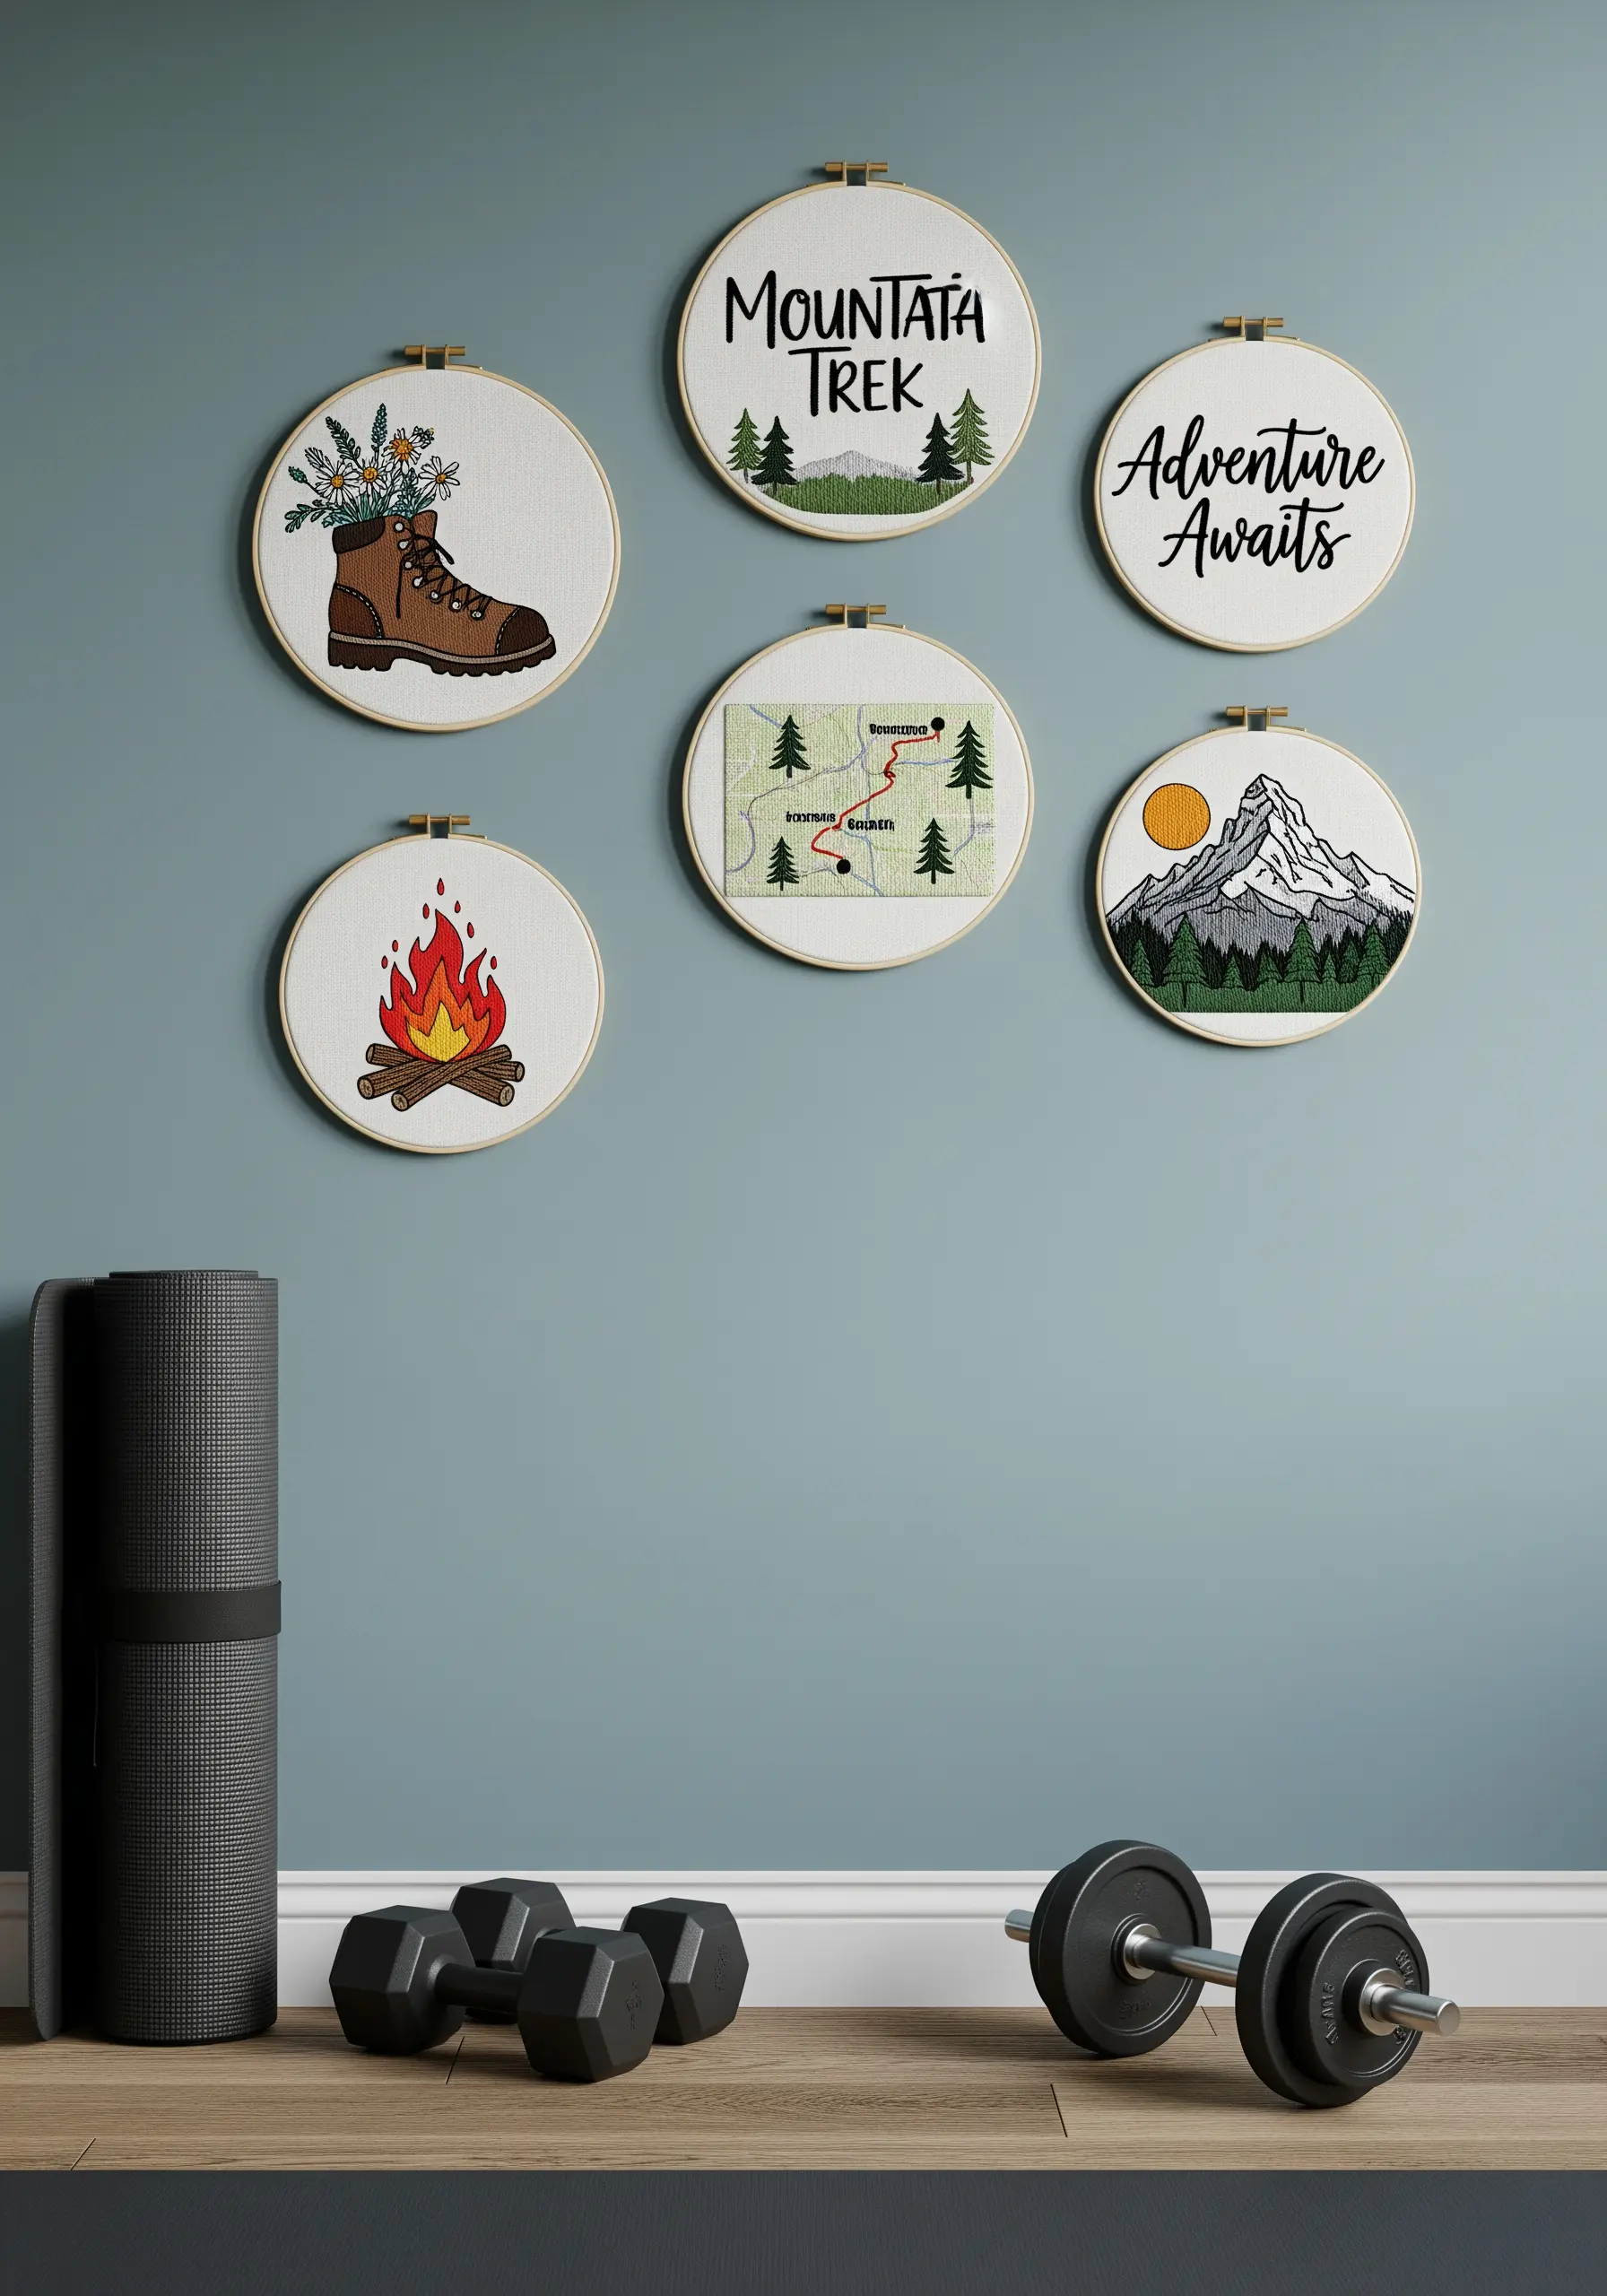
Group hoops with a mix of inspirational quotes and thematic icons to create a motivational gallery wall for a workout space or office.
For crisp, modern lettering, use a split stitch for the outline before filling with satin stitch. This creates a sharp edge that prevents the letters from looking fuzzy.
To render the hiking boot laces, use a couching stitch—laying down a thicker thread and tacking it in place with a thinner one—for a realistic, raised effect.
A simple two-color palette for the mountain and sun motifs keeps the designs graphic and easy to read from a distance.
13. Evoke Richness with Symmetrical Layouts
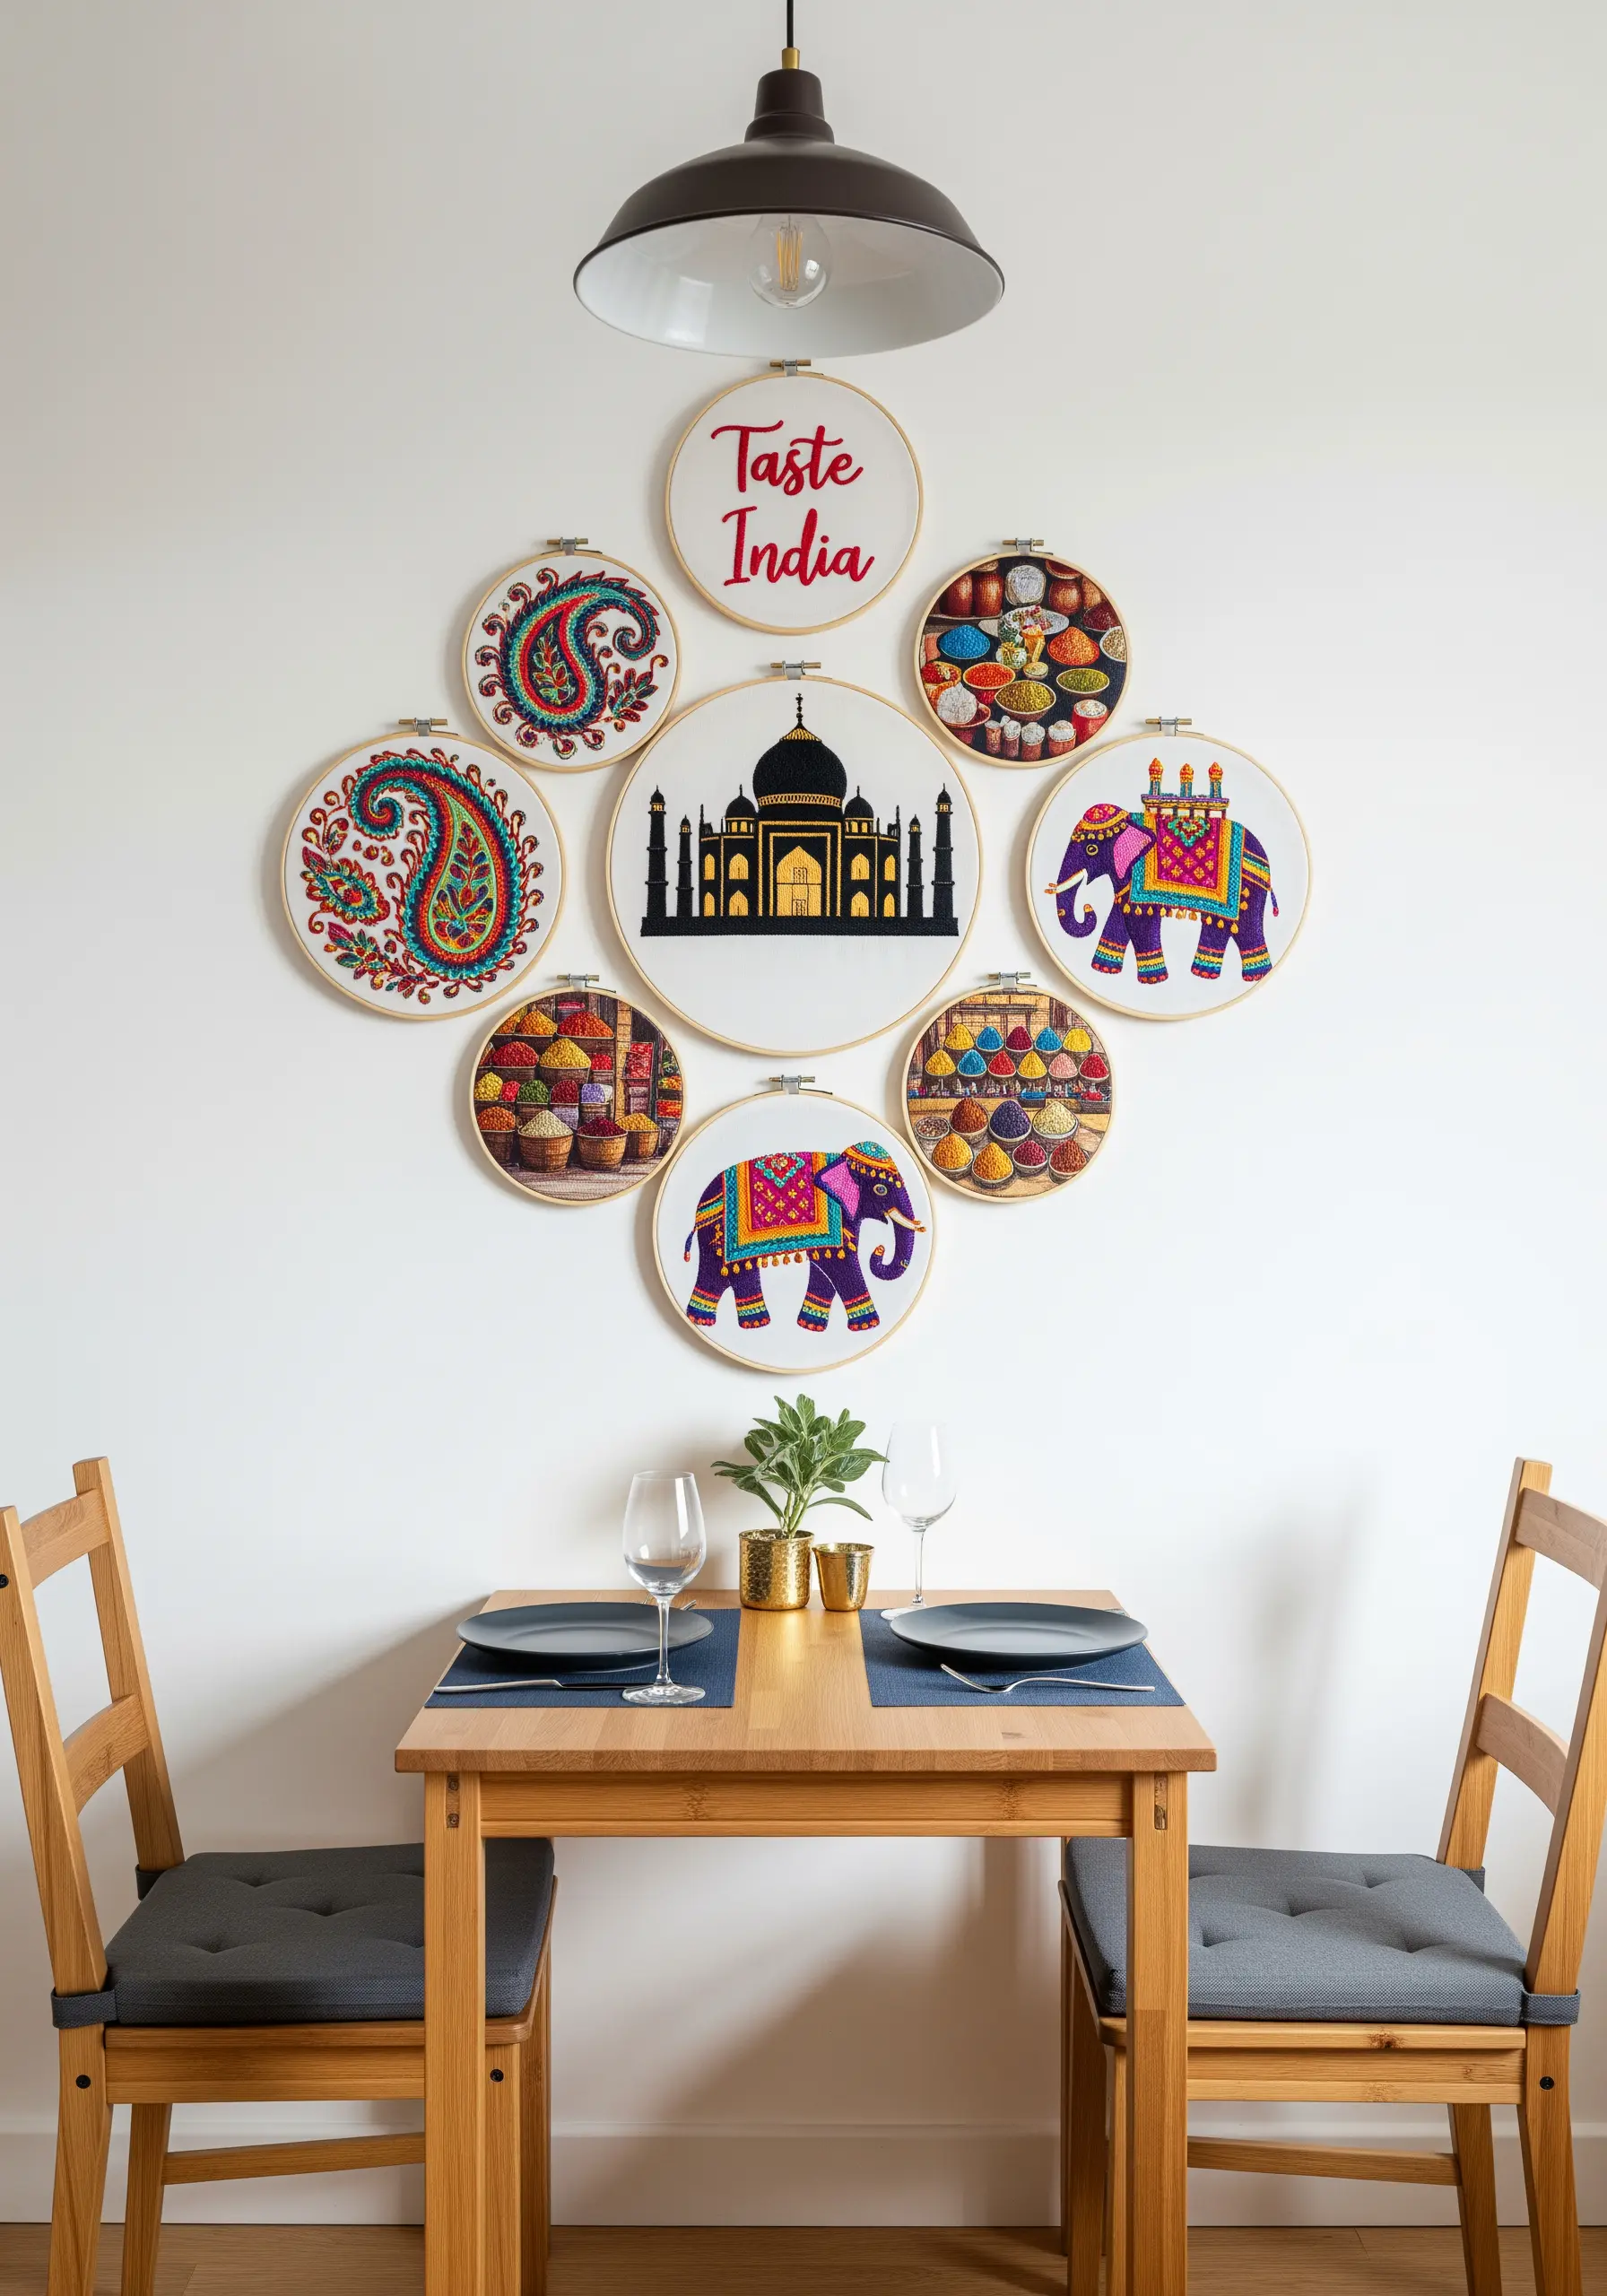
Arrange your hoops in a symmetrical, diamond-like formation to create a sense of formality and abundance, perfect for a dining area.
When stitching intricate paisley patterns or elephants, use a vibrant, multi-colored variegated floss to achieve beautiful color shifts without constantly changing threads.
Fill large areas, like the Taj Mahal, with a vertical satin stitch using a single, pale color. This creates a subtle sheen that mimics marble and makes the dark outlines pop.
The symmetry of the layout brings a sense of balance and grandeur, elevating the collection to a sophisticated statement piece.
14. Stitch Architectural Sketches for a Literary Feel
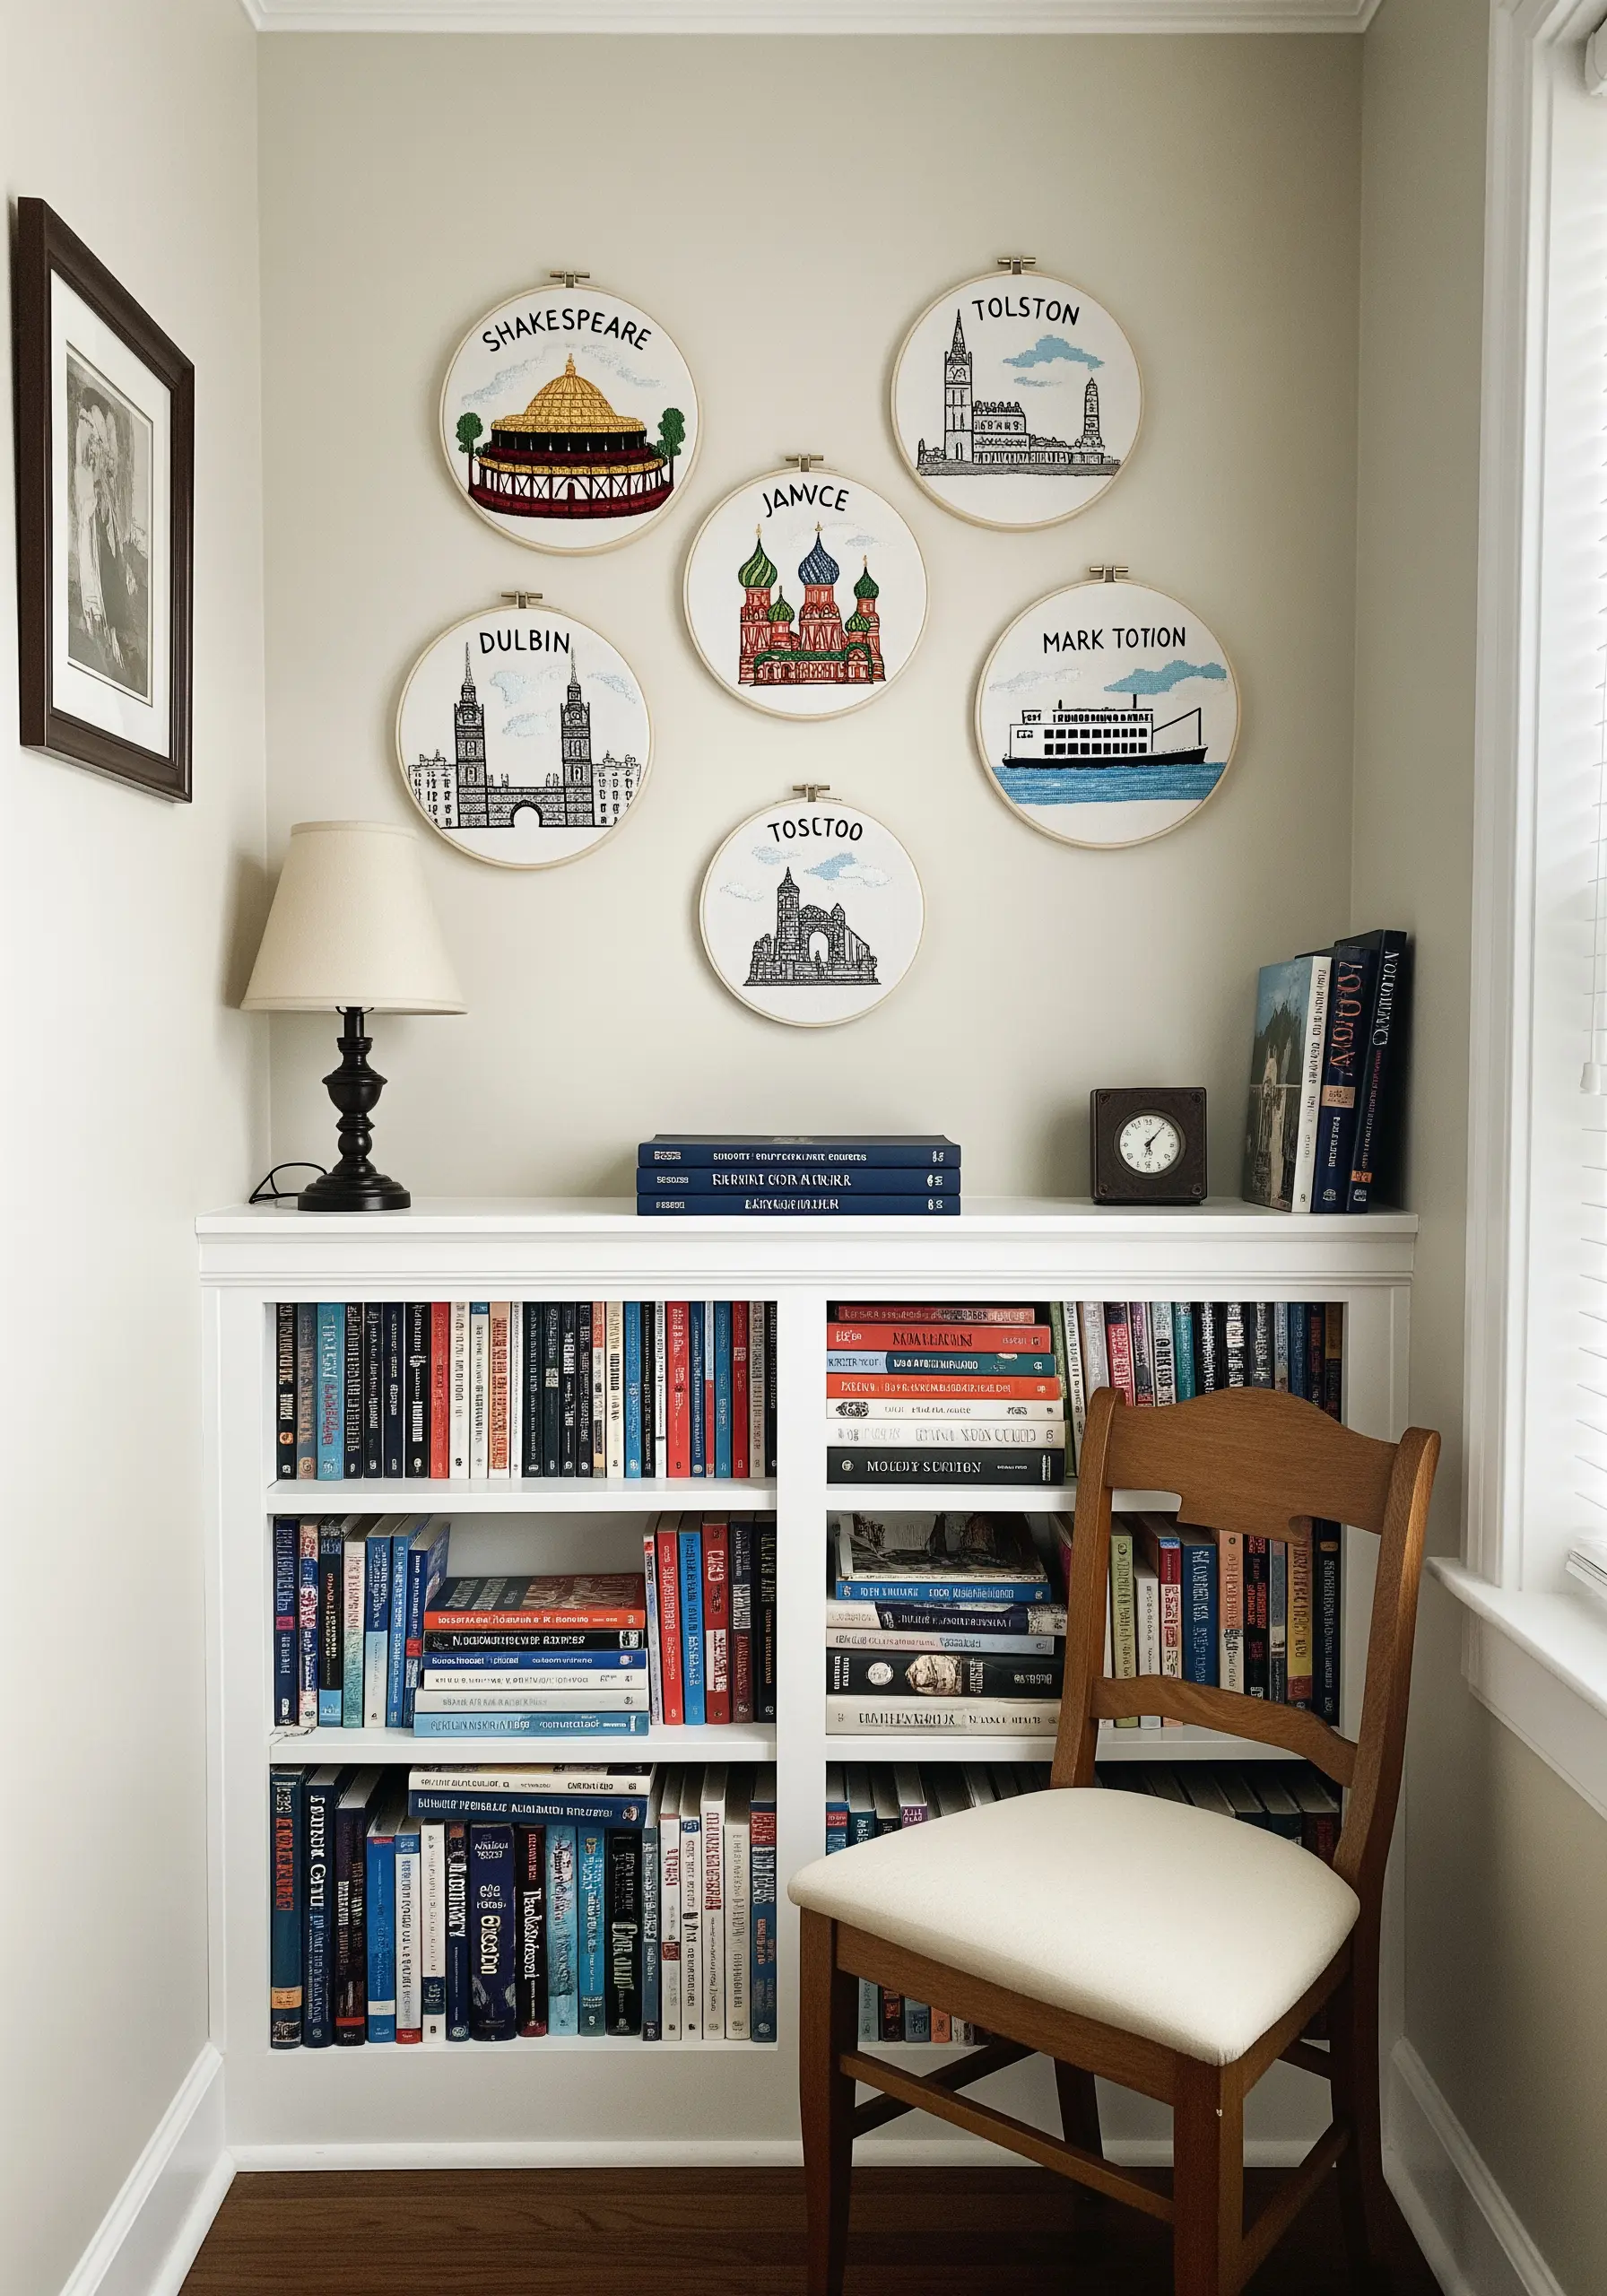
Capture architectural landmarks using a simple, sketch-like style with just one or two colors of thread for a sophisticated, literary mood.
Use a backstitch for all the outlines to maintain a consistent, hand-drawn quality across the entire collection.
To add subtle depth, use a light grey or blue wash of watercolor paint on the fabric before you start stitching the sky or water elements.
This minimalist approach is perfect for a library or study, as the designs feel like illustrations from a classic travel journal.
15. Mount Hoops on a Sculpted Background
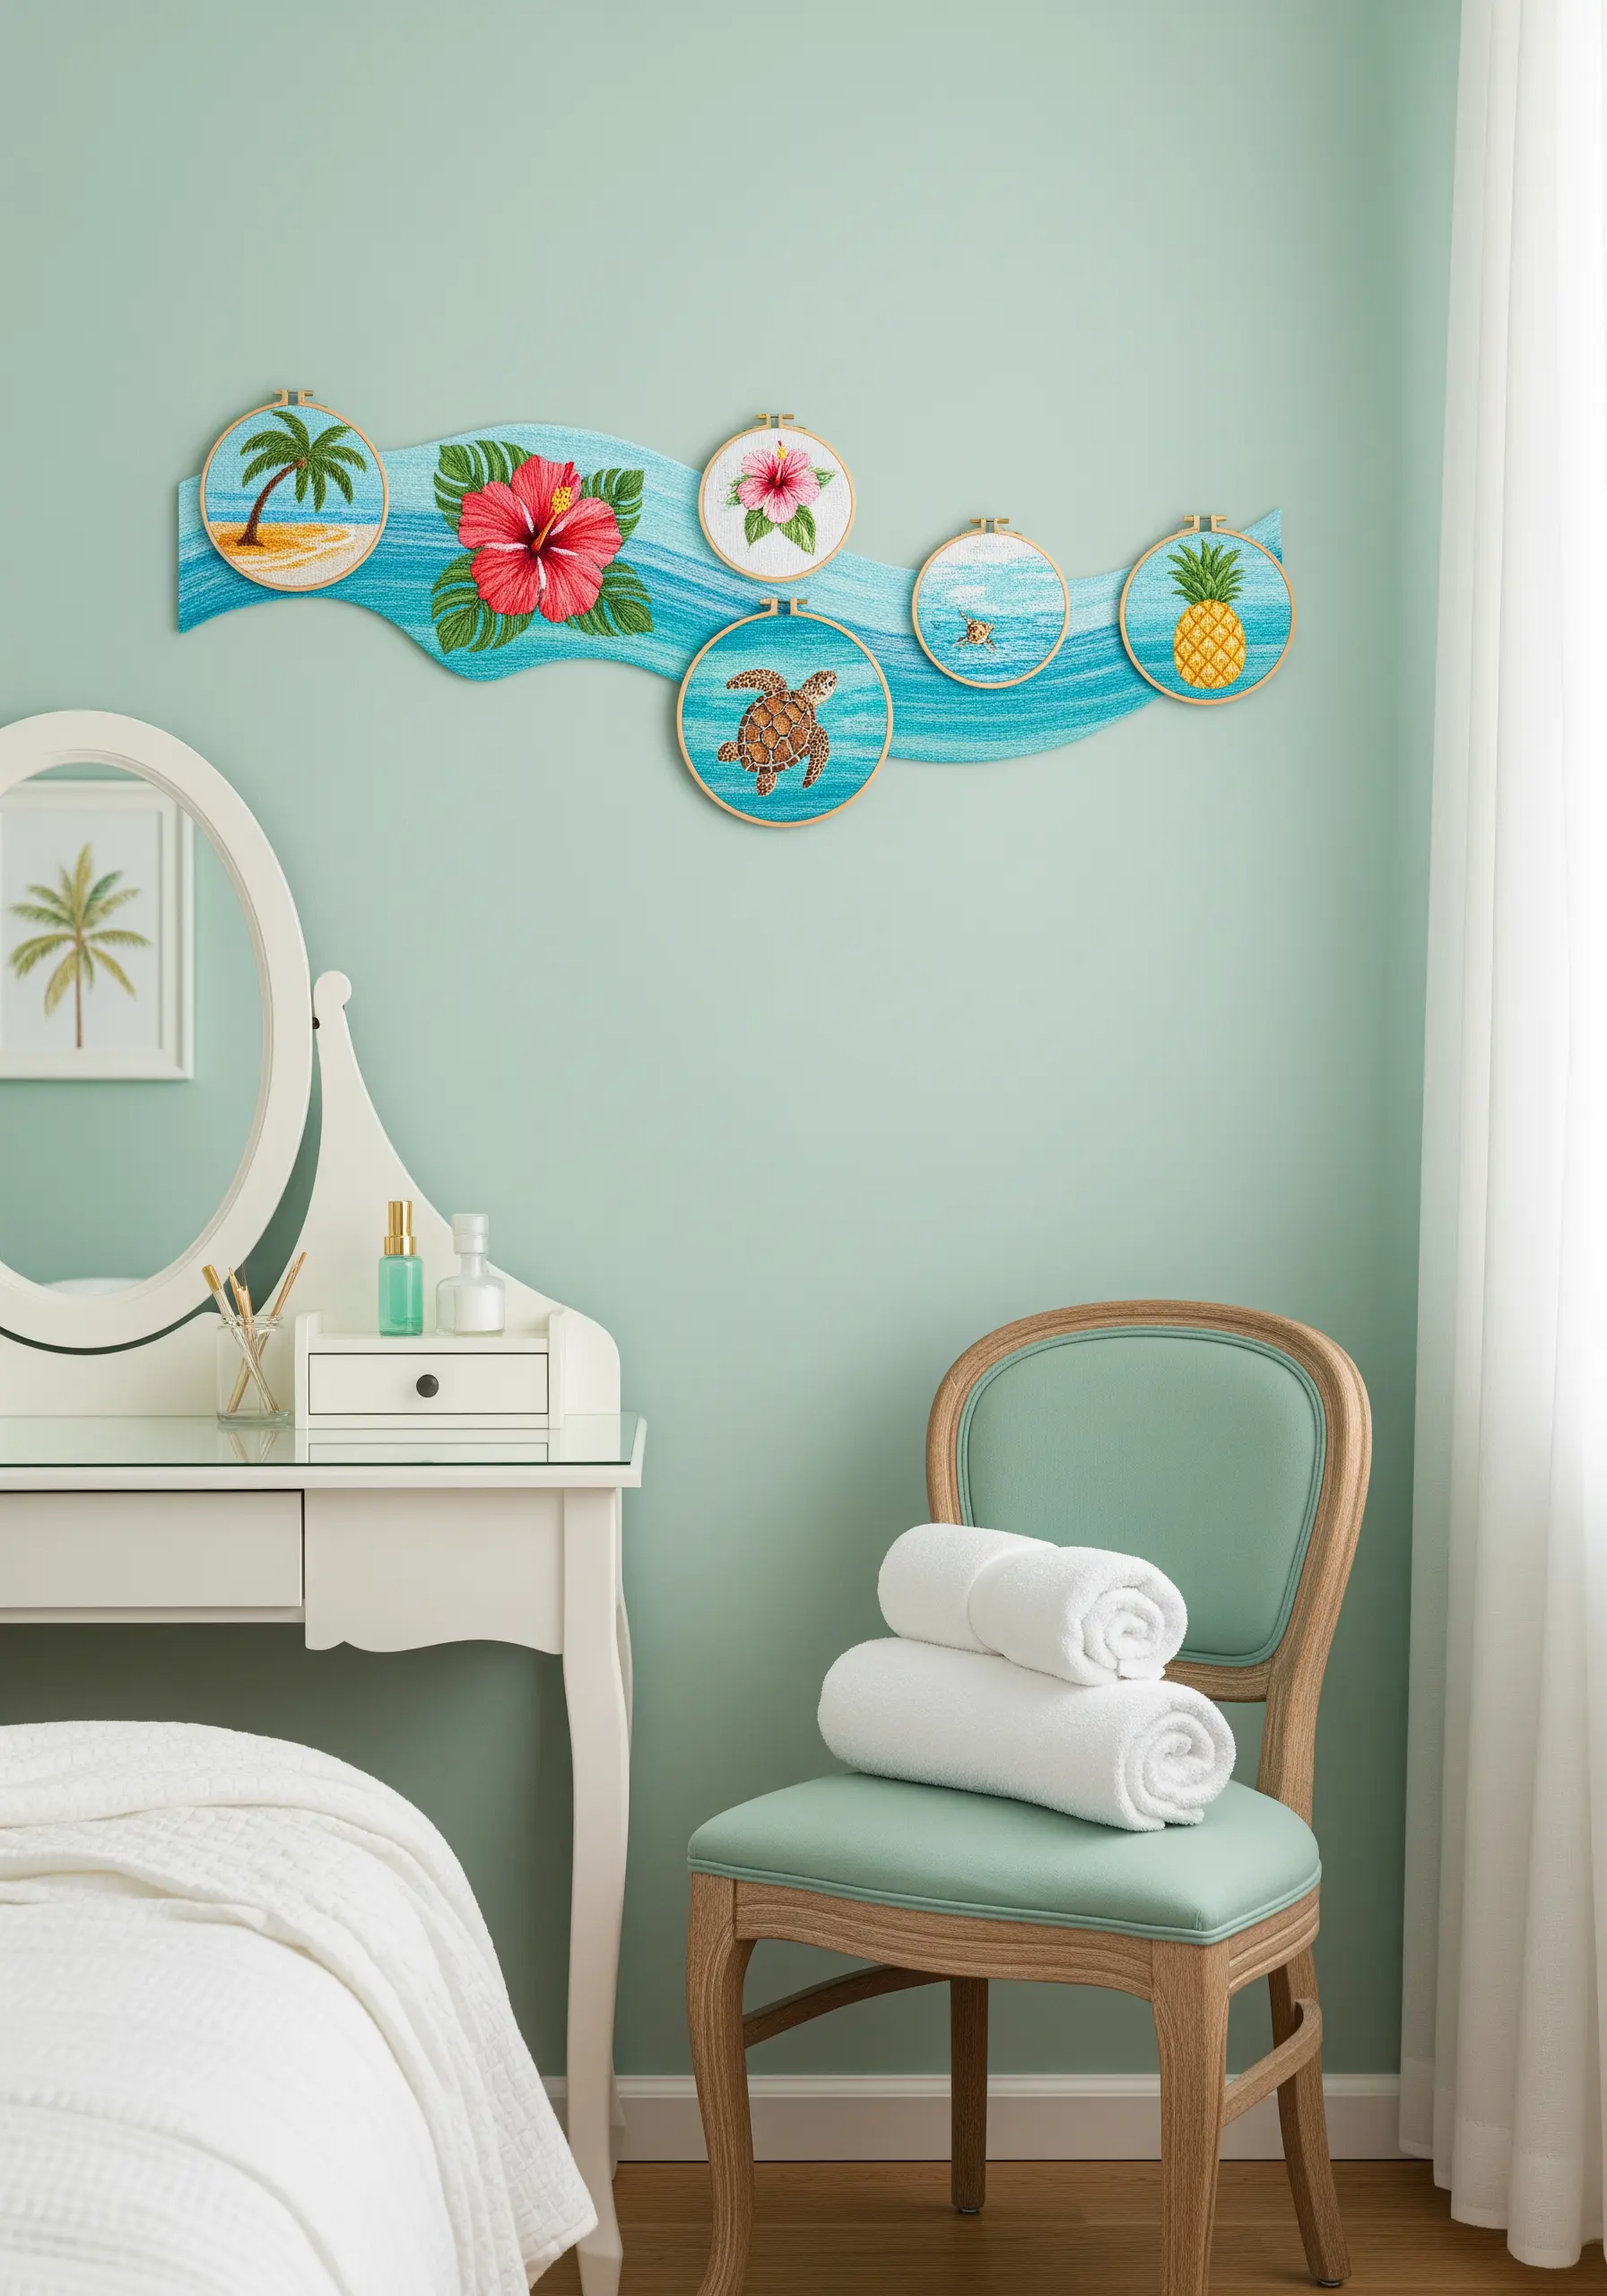
Elevate your hoop display by mounting them on a custom-cut, painted wood panel that complements the theme of your embroidery.
The wave-shaped backer board here physically connects the individual hoops, turning a collection into a single, cohesive art piece.
Use a long-and-short stitch to blend the colors in the hibiscus petals, creating a soft, realistic gradient from light pink to deep magenta.
For the sea turtle’s shell, use a variety of brown and tan shades in a satin stitch, changing the angle of your stitches for each scute to create texture and dimension.
16. Depict Ancient Stories with Graphic Details
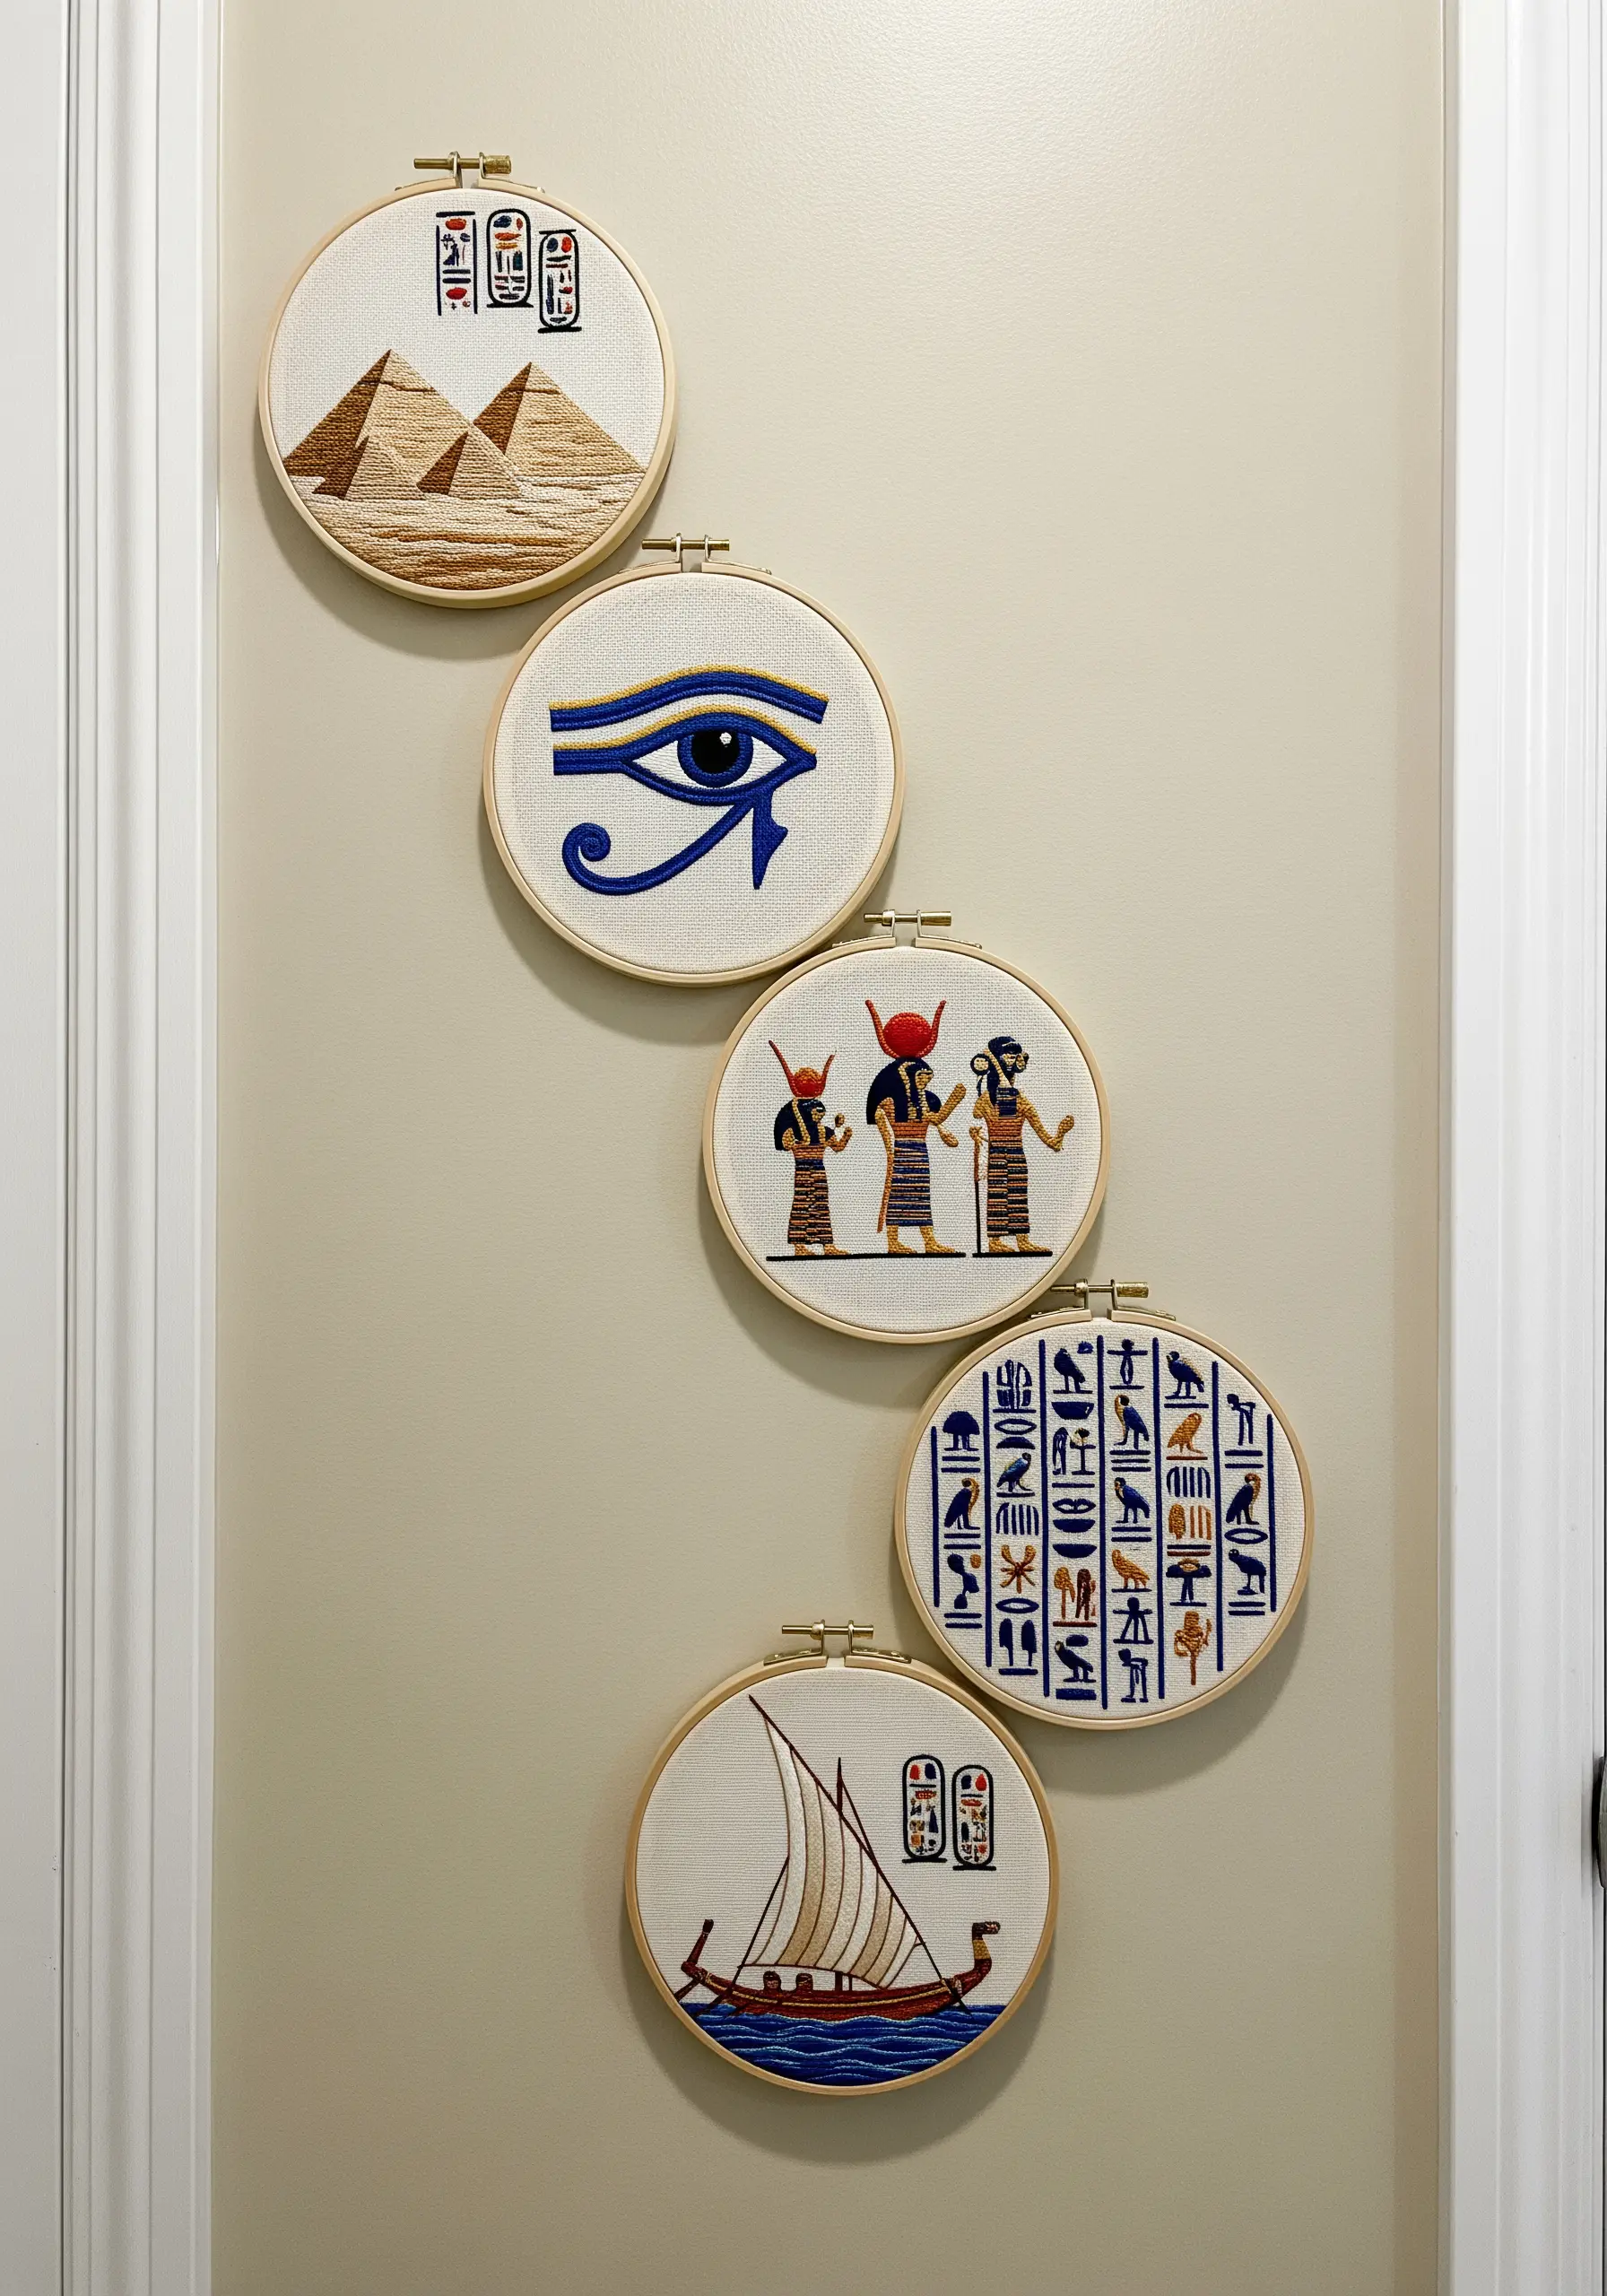
For historical themes like ancient Egypt, focus on strong, graphic elements and iconic symbols that are instantly recognizable.
Use a bold gold metallic thread for key details to evoke a sense of treasure and royalty. Couching it down will make it easier to handle than stitching with it directly.
To create the texture of the pyramids, use three shades of sandy brown floss and angle your satin stitches to align with the perspective of each face.
For the hieroglyphs, a simple backstitch in a dark color on a light background ensures that these intricate symbols remain crisp and legible.
17. Blend Stitches to Paint a Vibrant Sunset
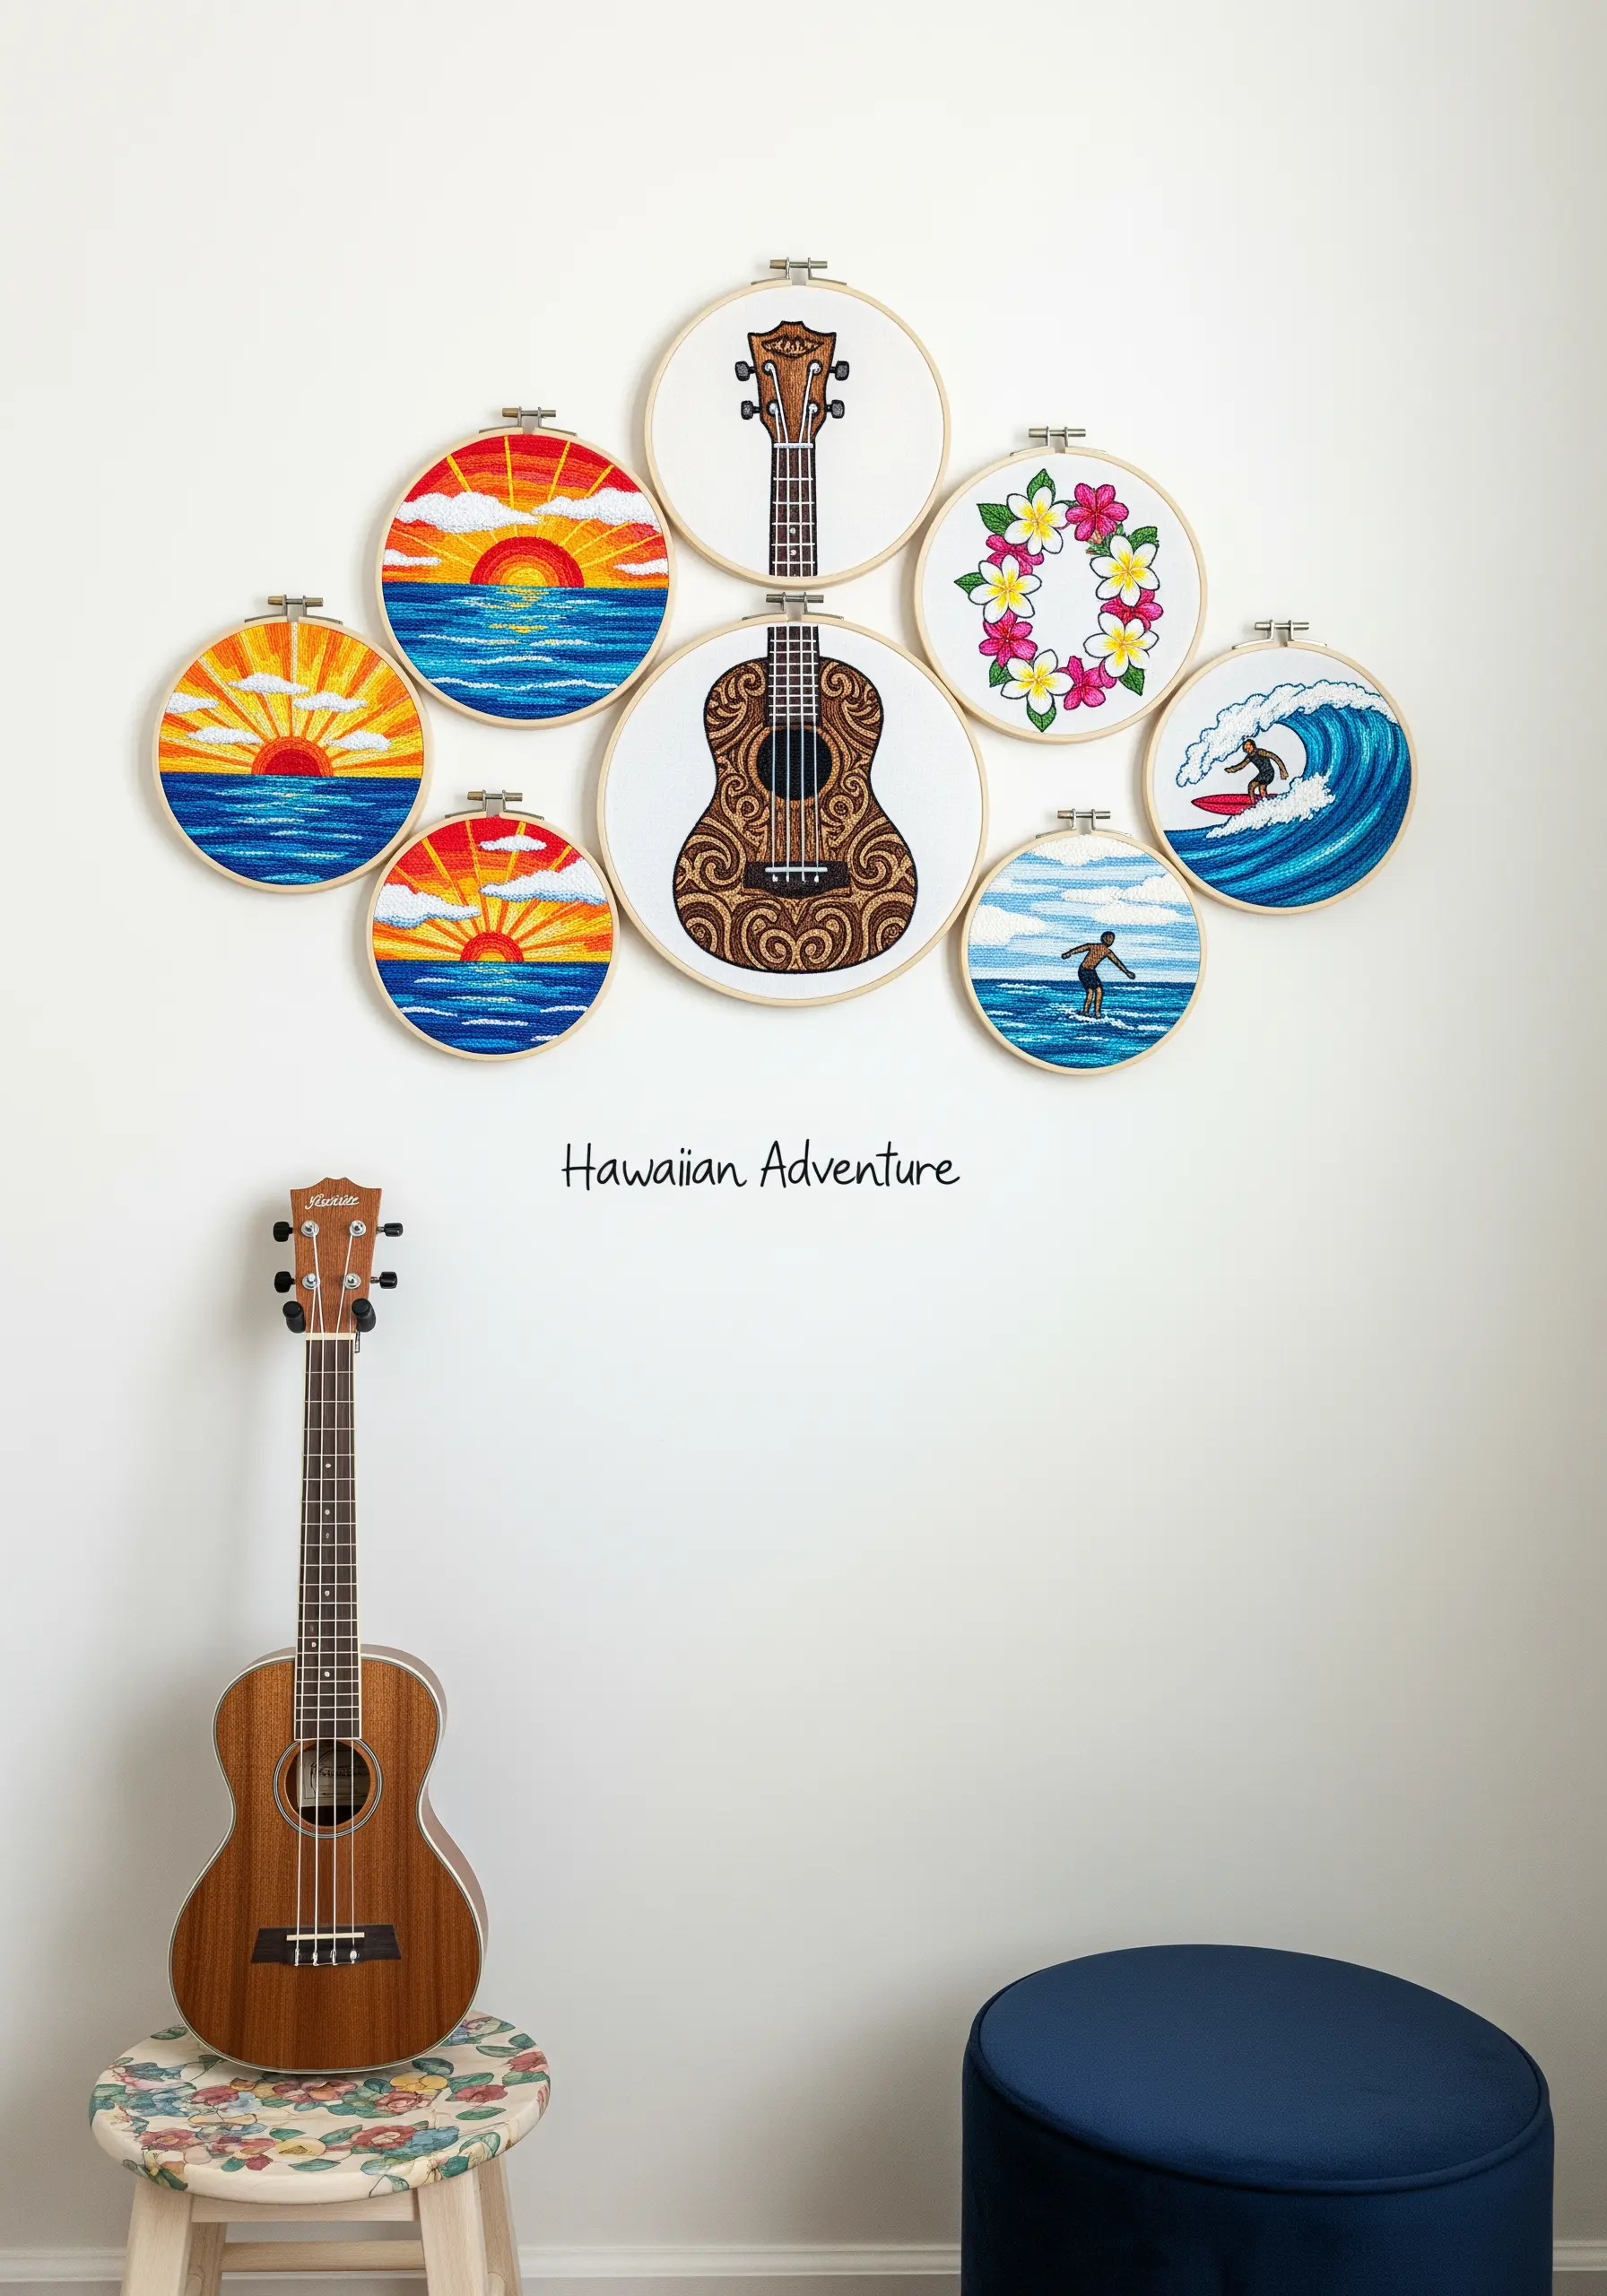
Capture the intense colors of a Hawaiian sunset by using a needle painting technique, blending reds, oranges, and yellows with angled long-and-short stitches.
To create the foamy crest of a wave, use a dense scattering of French knots in white and pale blue over the darker blue base.
For the intricate patterns on the ukulele, use a dark brown single-strand backstitch to achieve fine, precise lines that mimic wood carving.
An asymmetrical cluster of hoops in varying sizes feels energetic and dynamic, perfectly capturing the lively spirit of a surf adventure.
18. Reflect Natural Landscapes with an Earth-Tone Palette
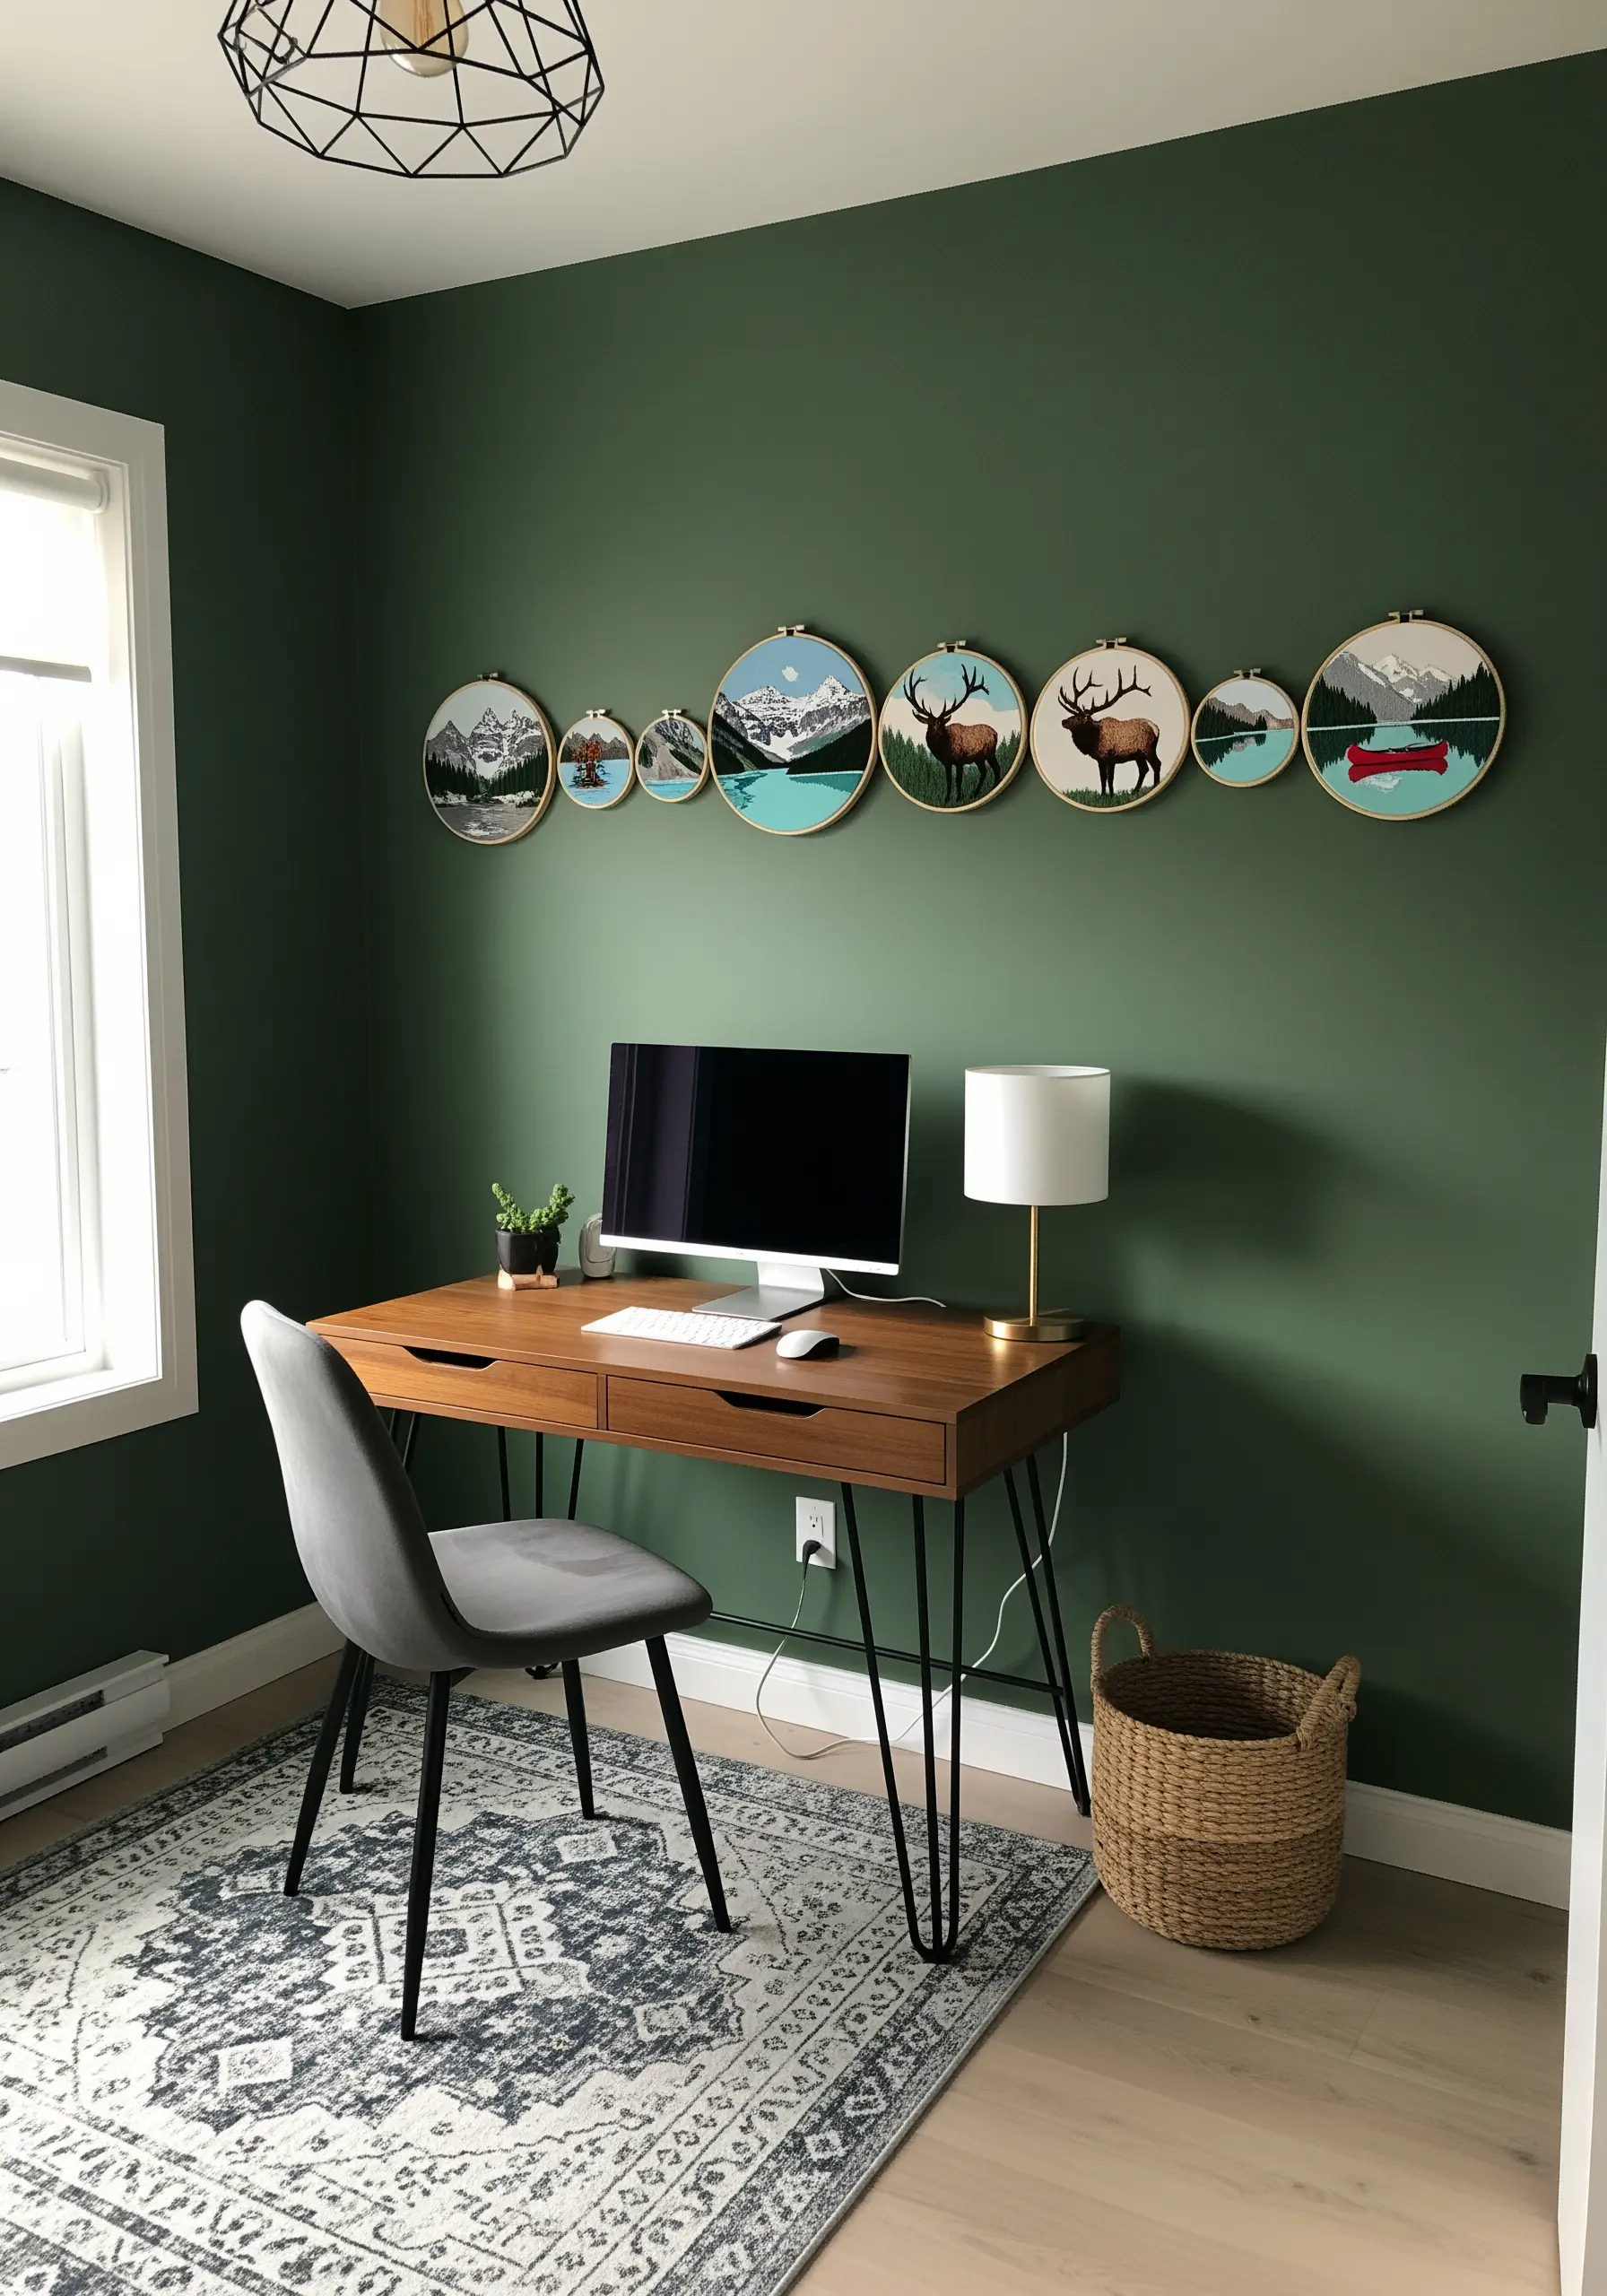
Choose a thread palette that directly mirrors the natural environment of your theme—like the deep greens, turquoise blues, and earthy browns of the Canadian Rockies.
Use a satin stitch for the water, keeping your stitches long and horizontal to create a calm, reflective surface.
For the elk’s antlers, use a light beige stem stitch to create clean, branching lines that stand out against the darker background colors.
Displaying the hoops in a gentle, wave-like line creates a sense of rhythm and flow that echoes the rolling landscapes within the art.
19. Capture a Vibe with Typography and Bold Graphics
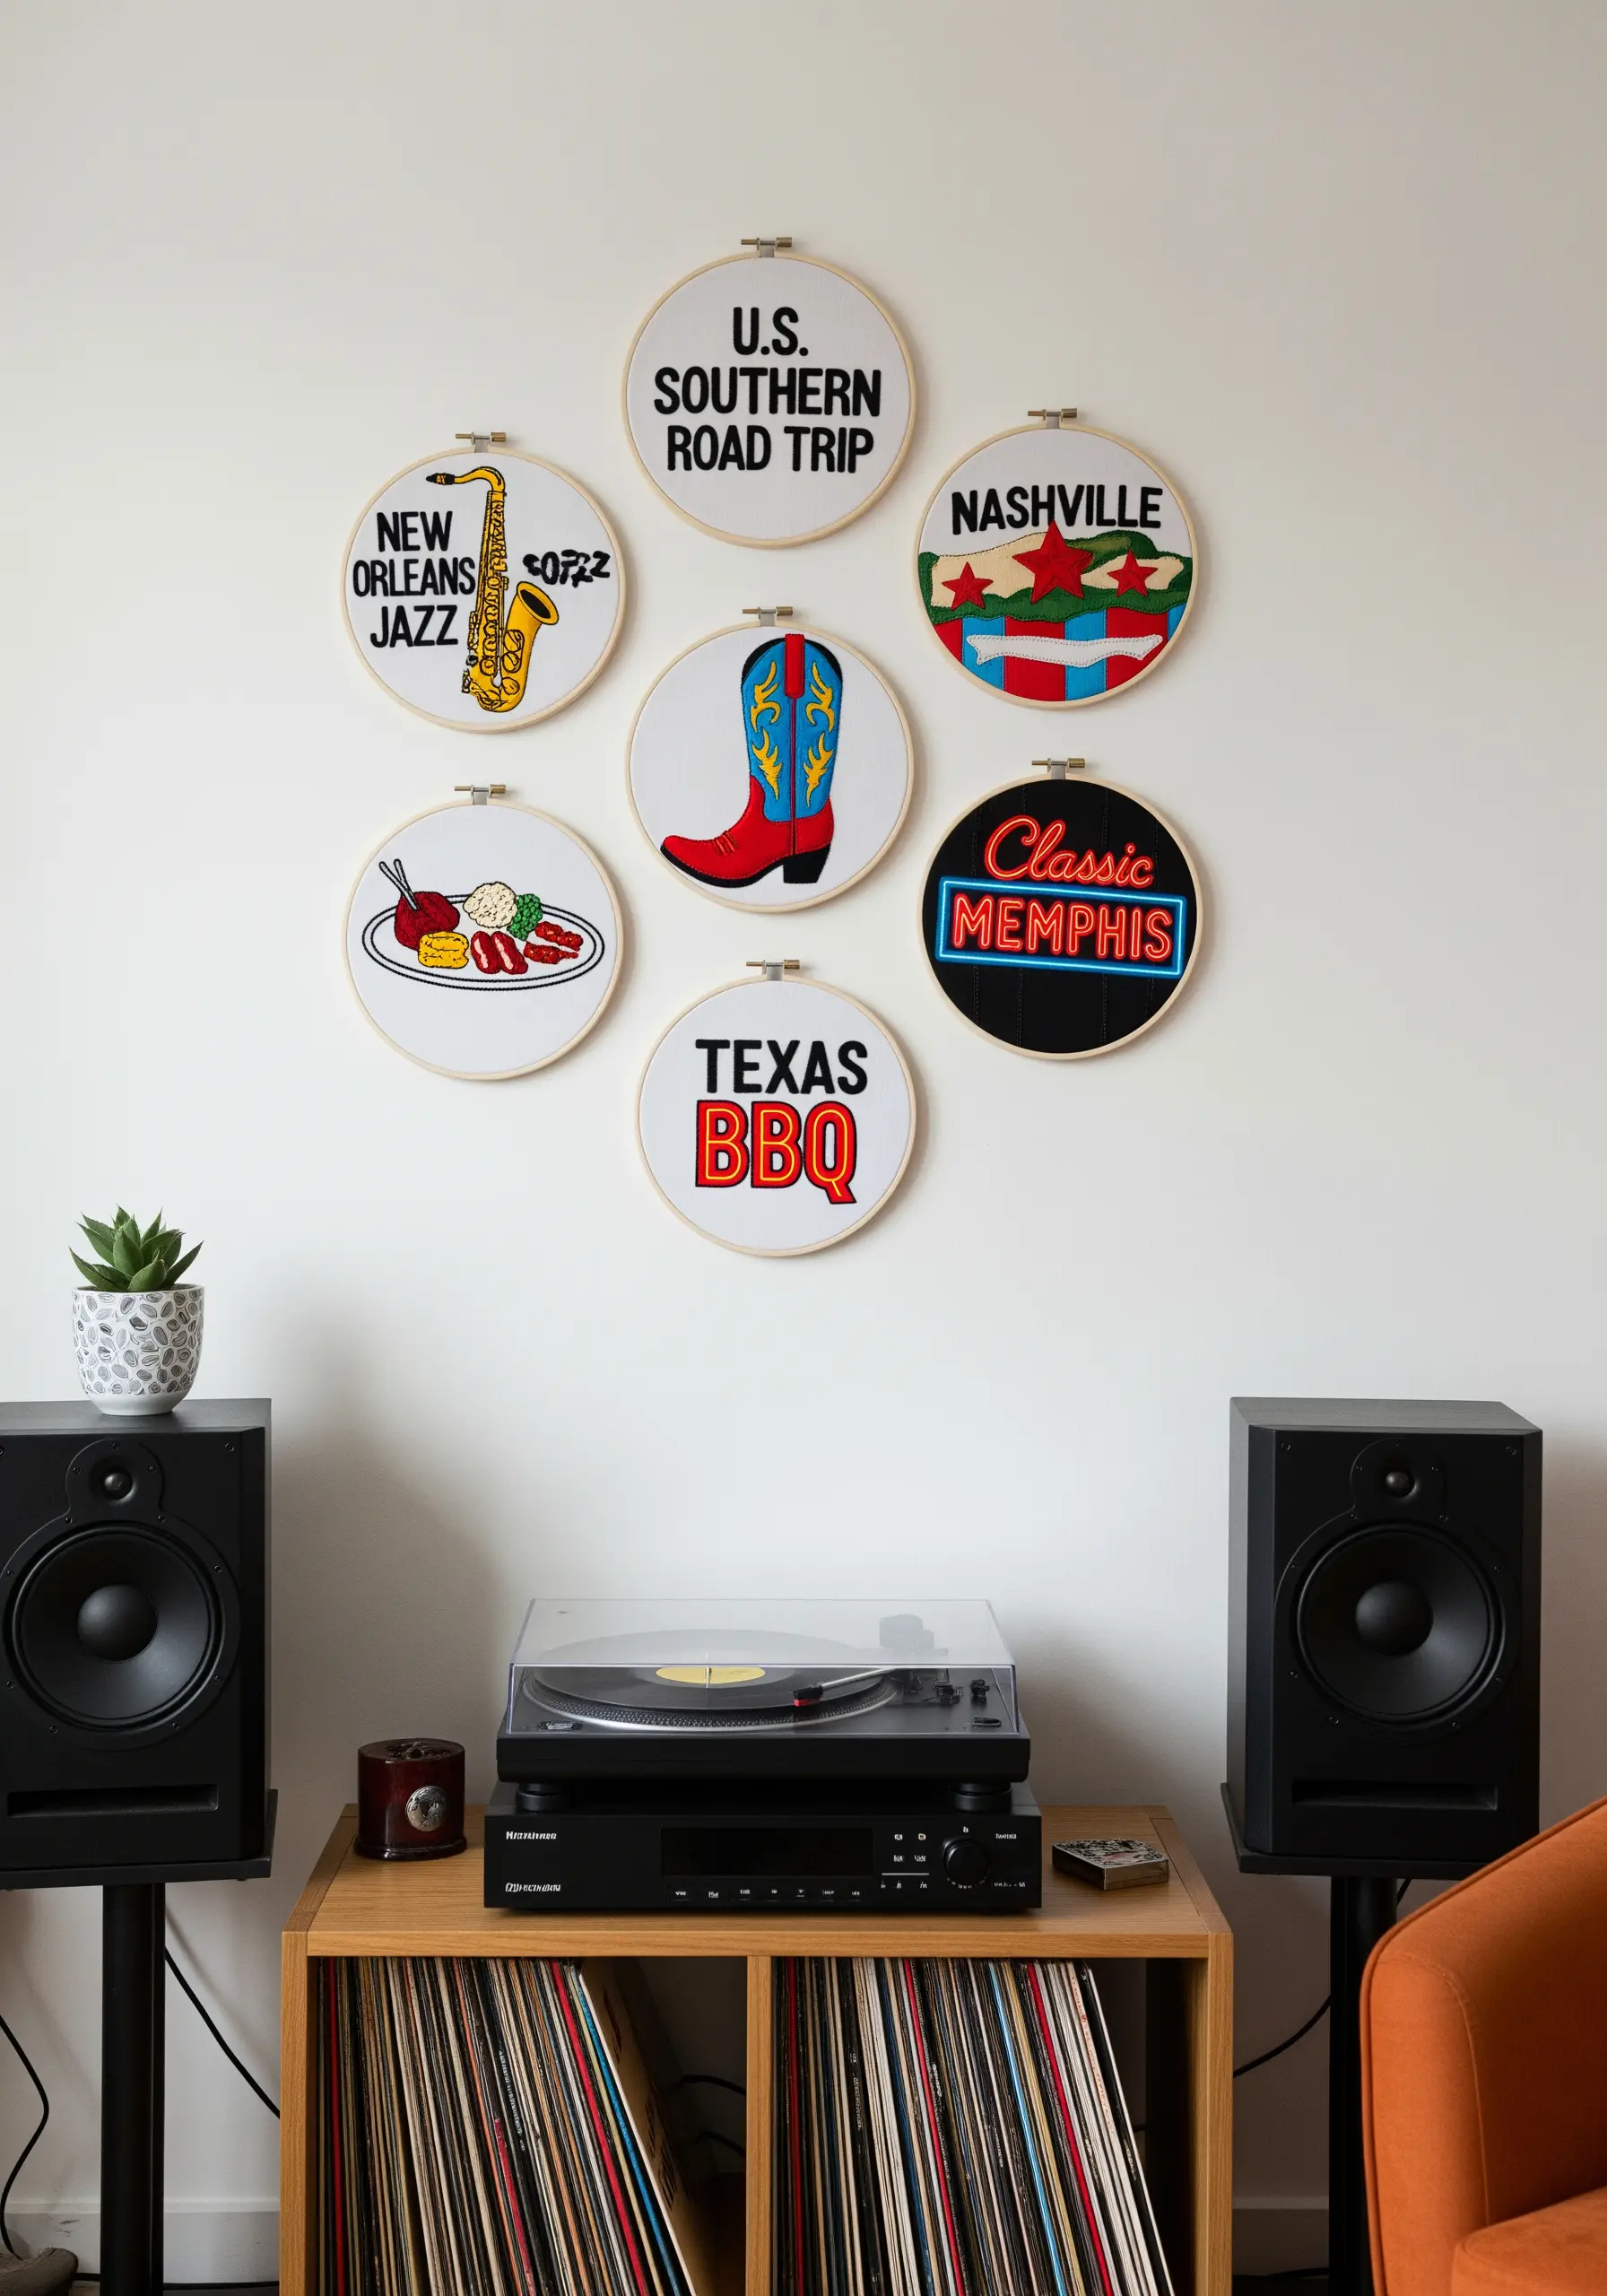
Combine bold typography with iconic graphics to distill the essence of a place or experience, like a Southern U.S. road trip.
To create the glowing effect of a neon sign, outline the letters in a dark color, then fill them with a bright satin stitch, and finally, add a highlight with a lighter shade down the middle.
For complex shapes like the saxophone, focus on a clean outline using a split stitch to ensure the form is clear and recognizable.
The circular arrangement with a central focal piece (the cowboy boot) creates a balanced composition that feels complete and well-considered.
20. Evoke Serenity with Minimalist Zen Stitching
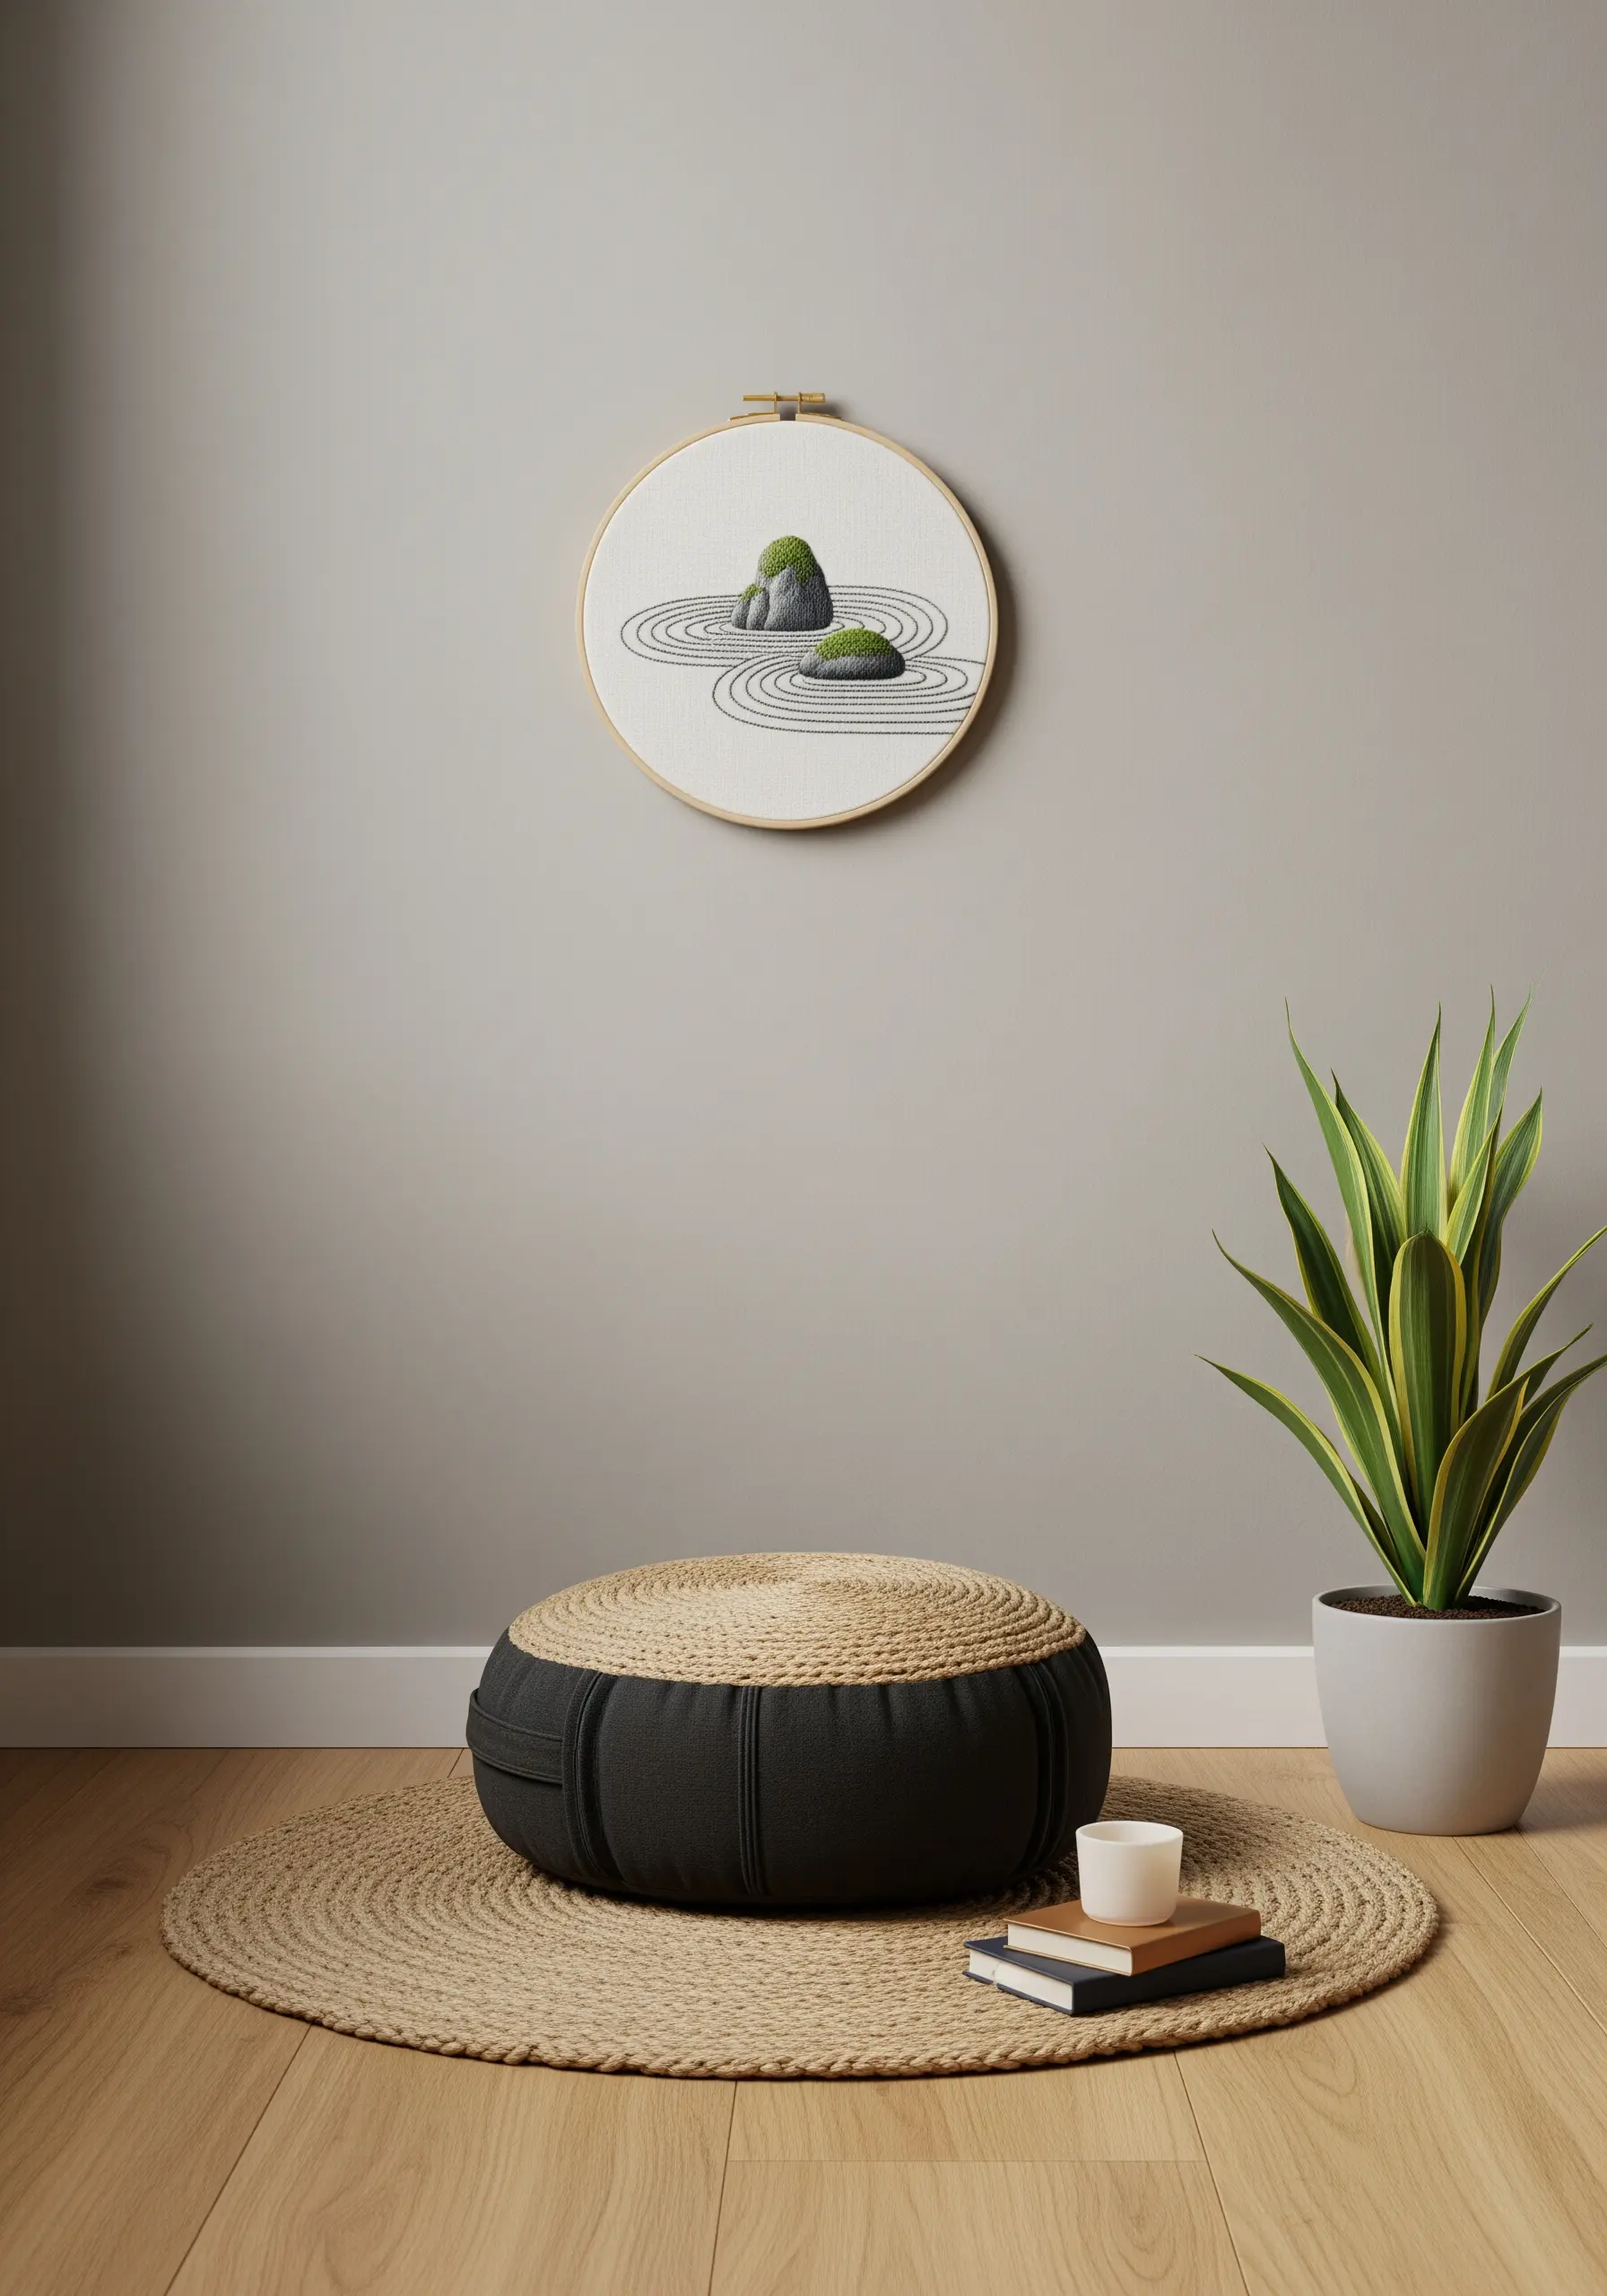
Create a sense of calm and focus with a single, minimalist hoop that embodies tranquility, such as a Zen garden.
Use a simple backstitch or stem stitch with a dark grey or black thread to draw the raked sand lines, letting the negative space do the talking.
For the mossy rocks, build up texture with multiple layers of French knots in several shades of green, creating a dense, three-dimensional effect.
This single-hoop approach proves that a travel story doesn’t need to be a large collection; one perfectly executed piece can capture an entire feeling.
21. Tell a Story with Indigenous Art Styles
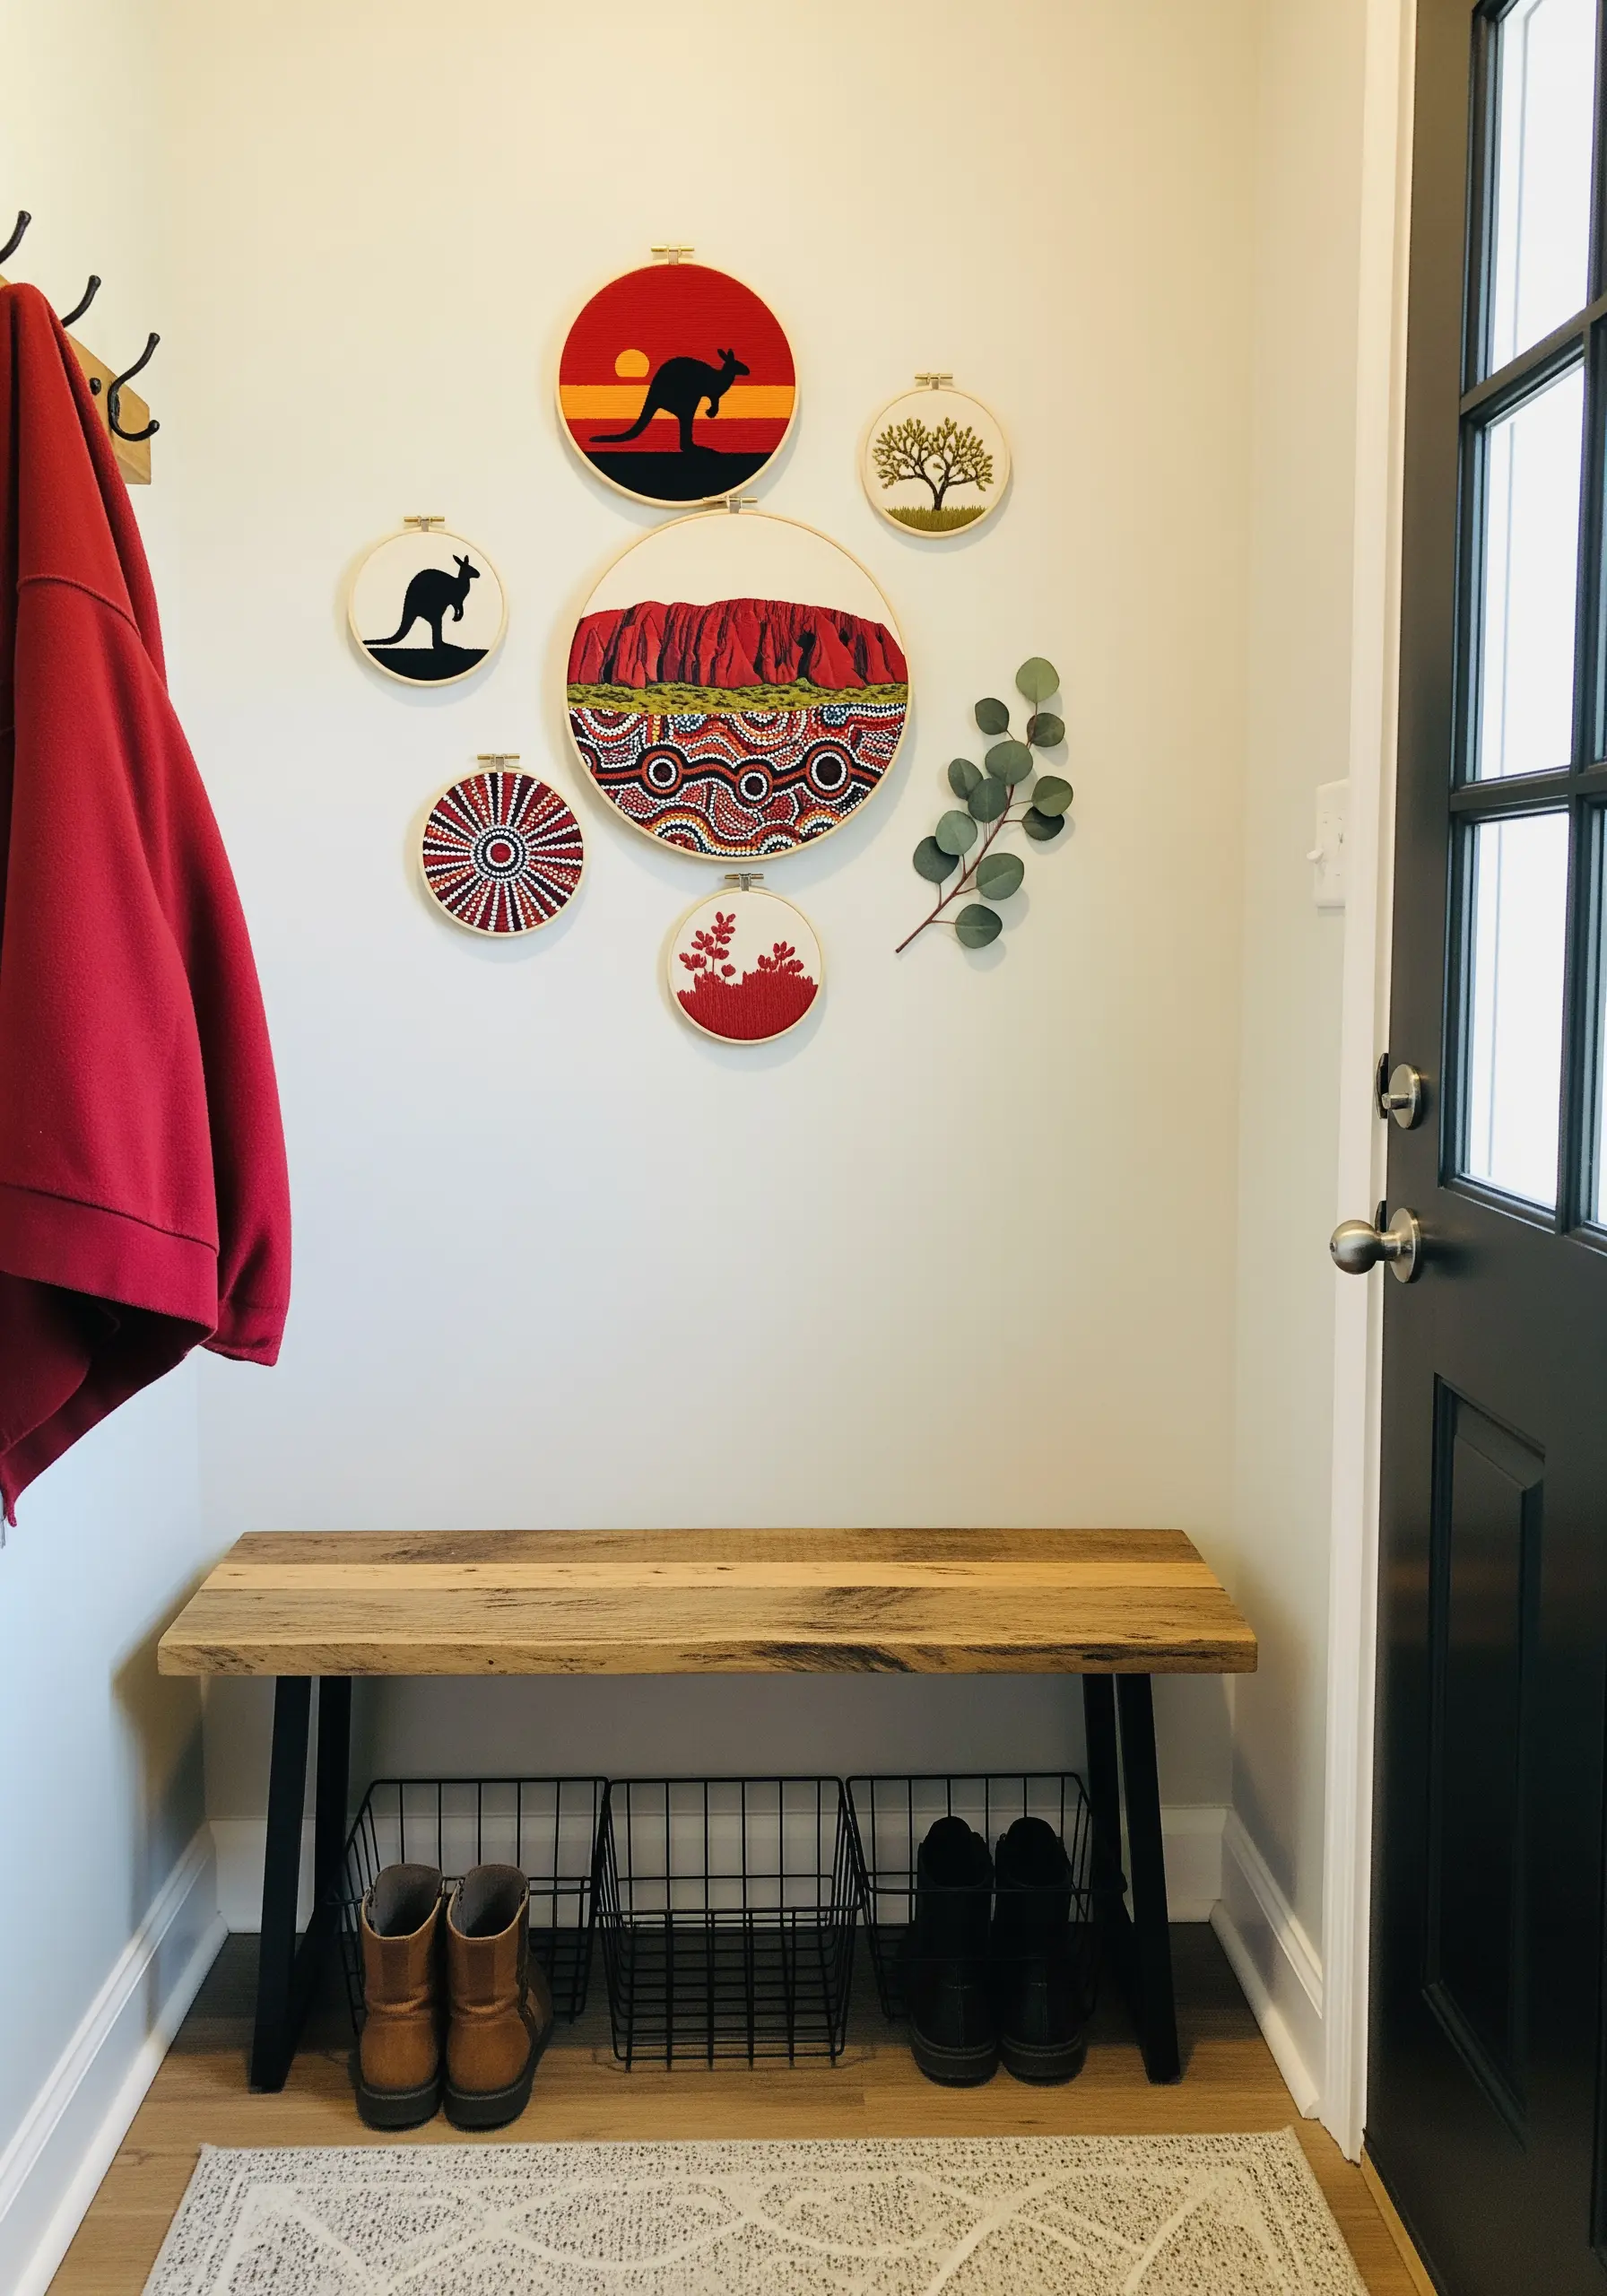
Pay homage to a region by incorporating local art styles, like the dot painting technique of Indigenous Australian art, translated into French knots.
Use a wide range of vibrant colors for the knots, placing them close together to create a rich, textured pattern that fills the shape of Uluru.
Contrast the detailed, colorful hoops with simple, two-tone silhouettes of native animals and trees to create visual balance.
Adding a sprig of preserved eucalyptus to the display connects the stitched art to the natural world it represents, adding a beautiful sensory layer.
22. Stitch a Scandinavian Folktale
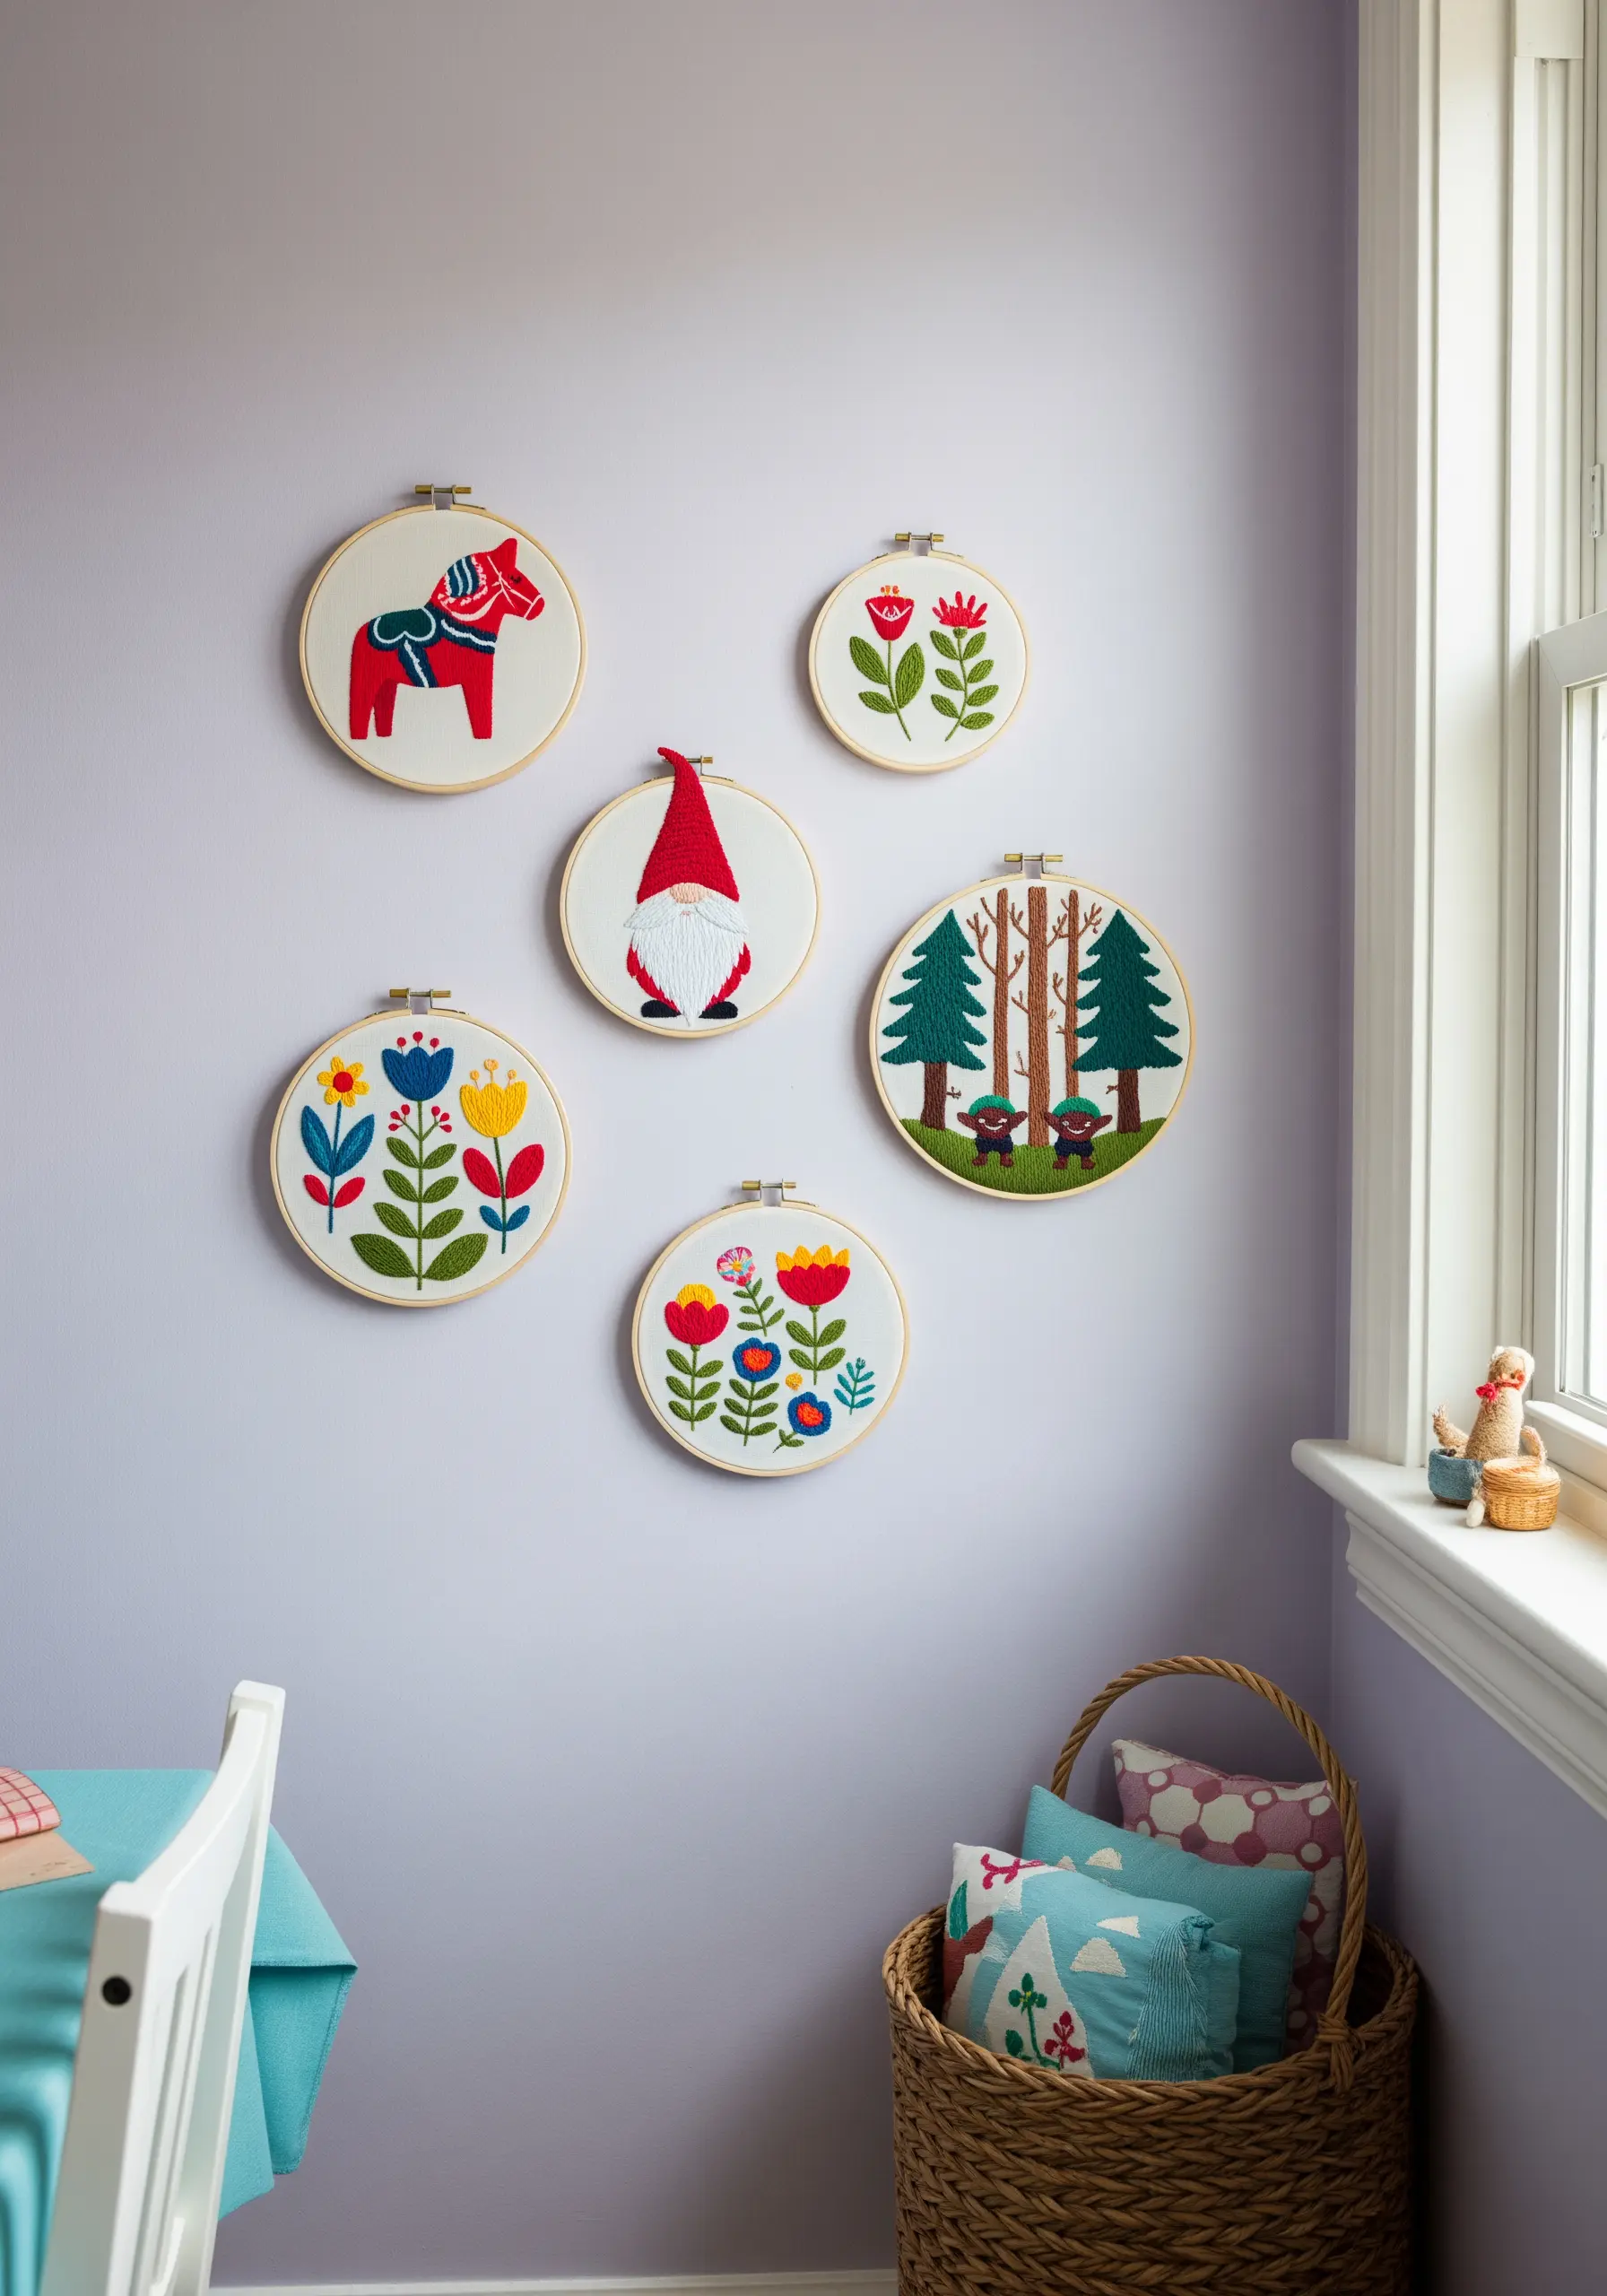
Capture the charm of Scandinavian folk art with flat, graphic shapes and a bright, cheerful color palette of red, blue, and yellow.
Use a clean, dense satin stitch to fill all your shapes. The key to this style is flawless execution and sharp, well-defined edges.
For the Dala horse, ensure the decorative harness details are stitched last, over the red fill, so they sit on top and look crisp.
This style of cute and quirky framed embroidery is perfect for adding a touch of playful whimsy to a child’s room or a creative corner.
23. Create a Vintage Transportation Gallery
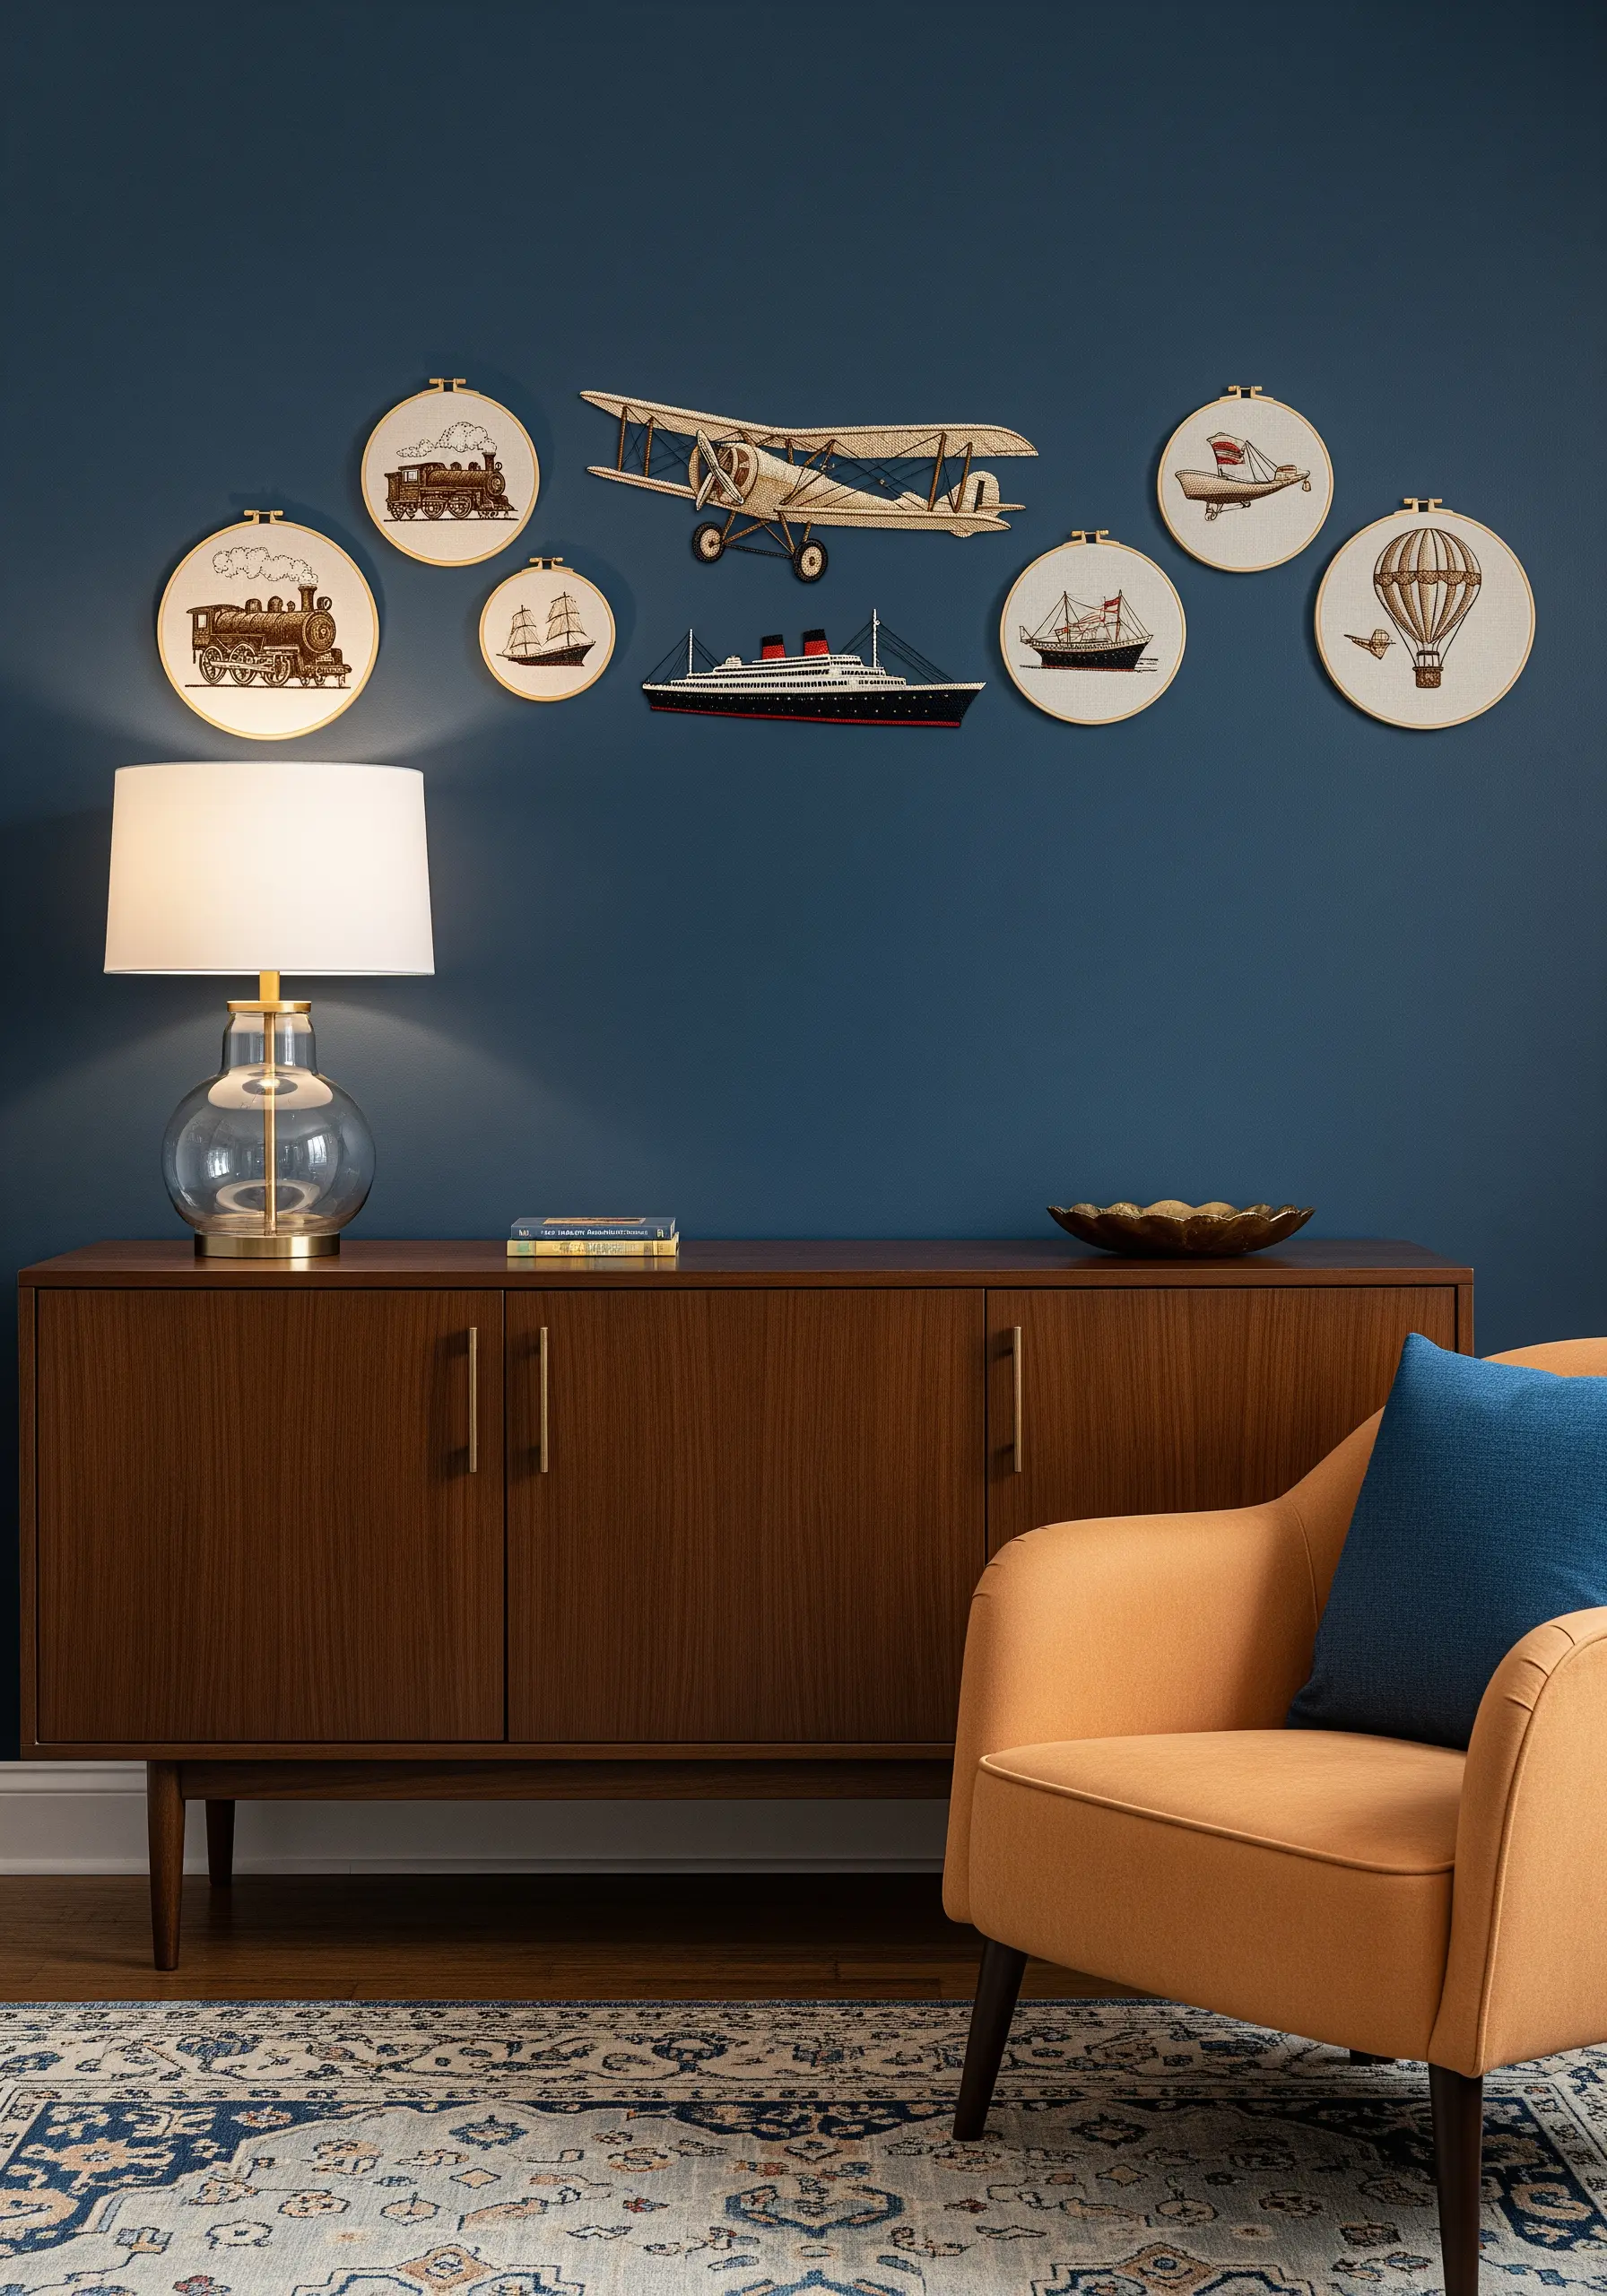
Evoke a sense of nostalgia by focusing on vintage modes of transport, stitched in a sepia-toned or monochrome palette.
Mount laser-cut wooden models alongside your hoops to create a dynamic, multi-dimensional display that breaks the circular format.
Use a single color of thread in varying shades (or by using one, two, or three strands) to create depth and shading, similar to a pencil sketch.
The combination of stitched art and 3D objects adds a sophisticated, museum-like quality to your wall decor.
24. Build a Mixed-Media Travel Shrine
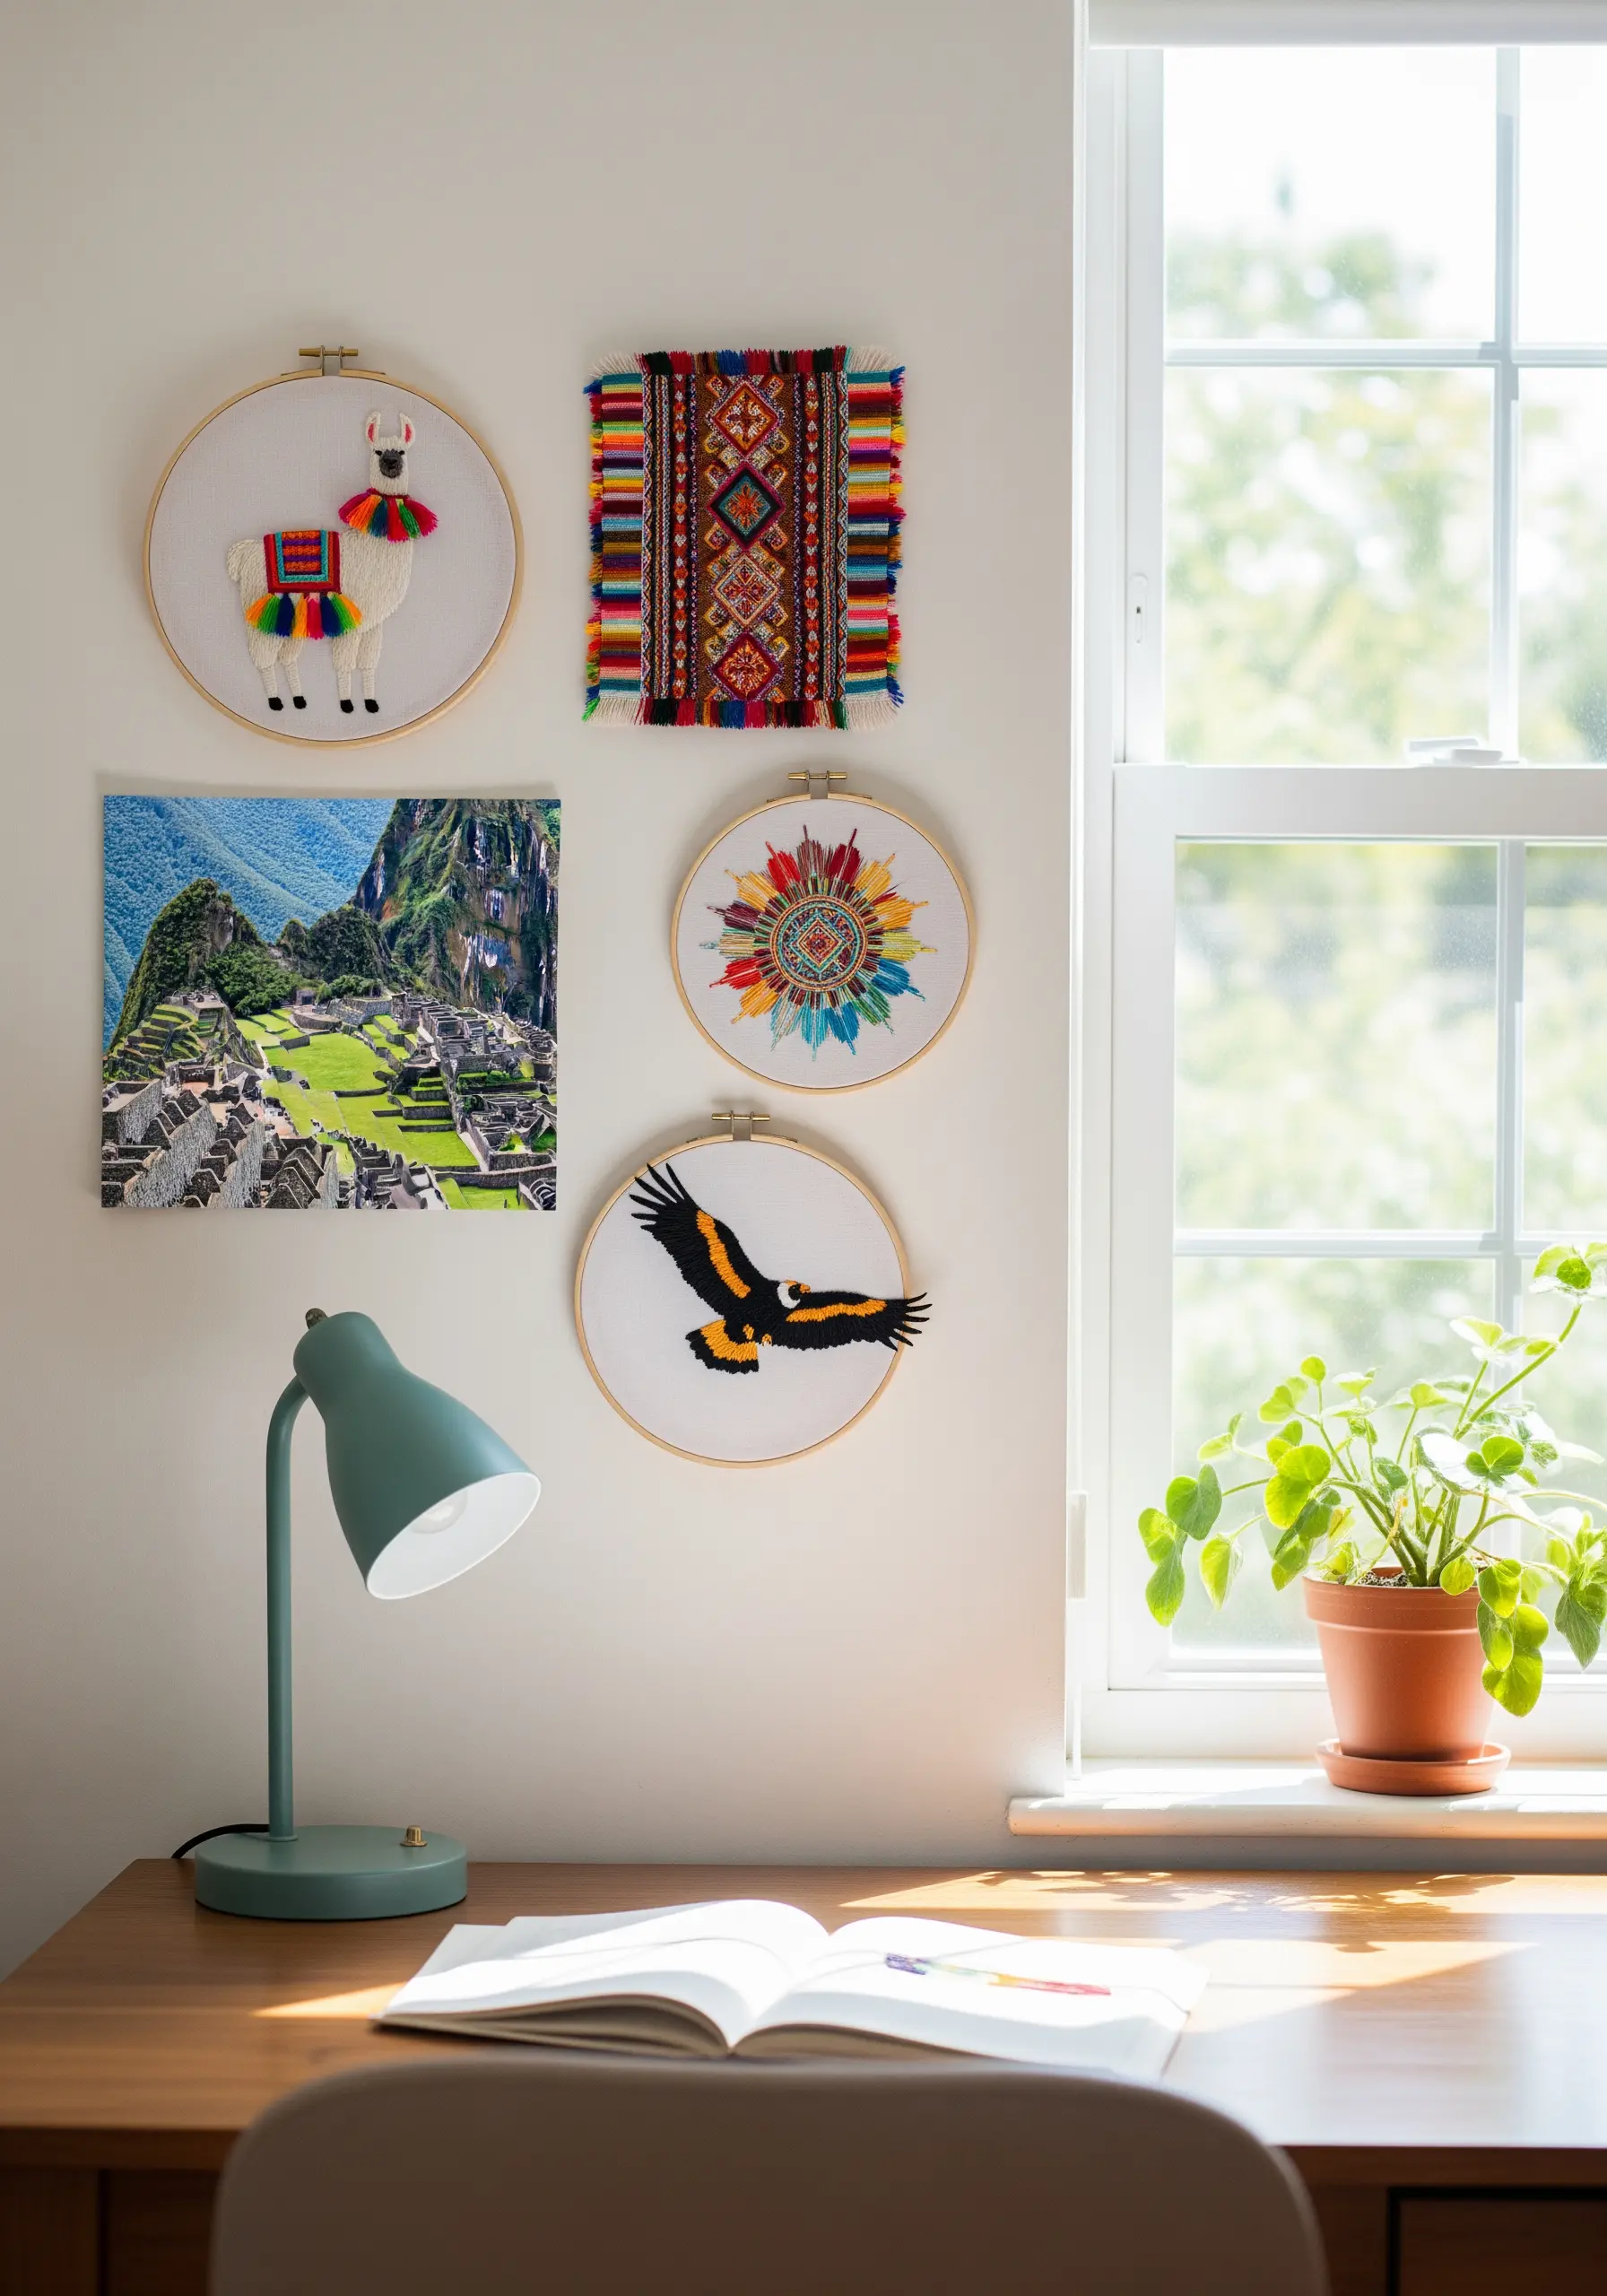
Go beyond the hoop by creating a gallery wall that combines your embroidery with photographs, woven textiles, and other meaningful souvenirs.
For the llama, use turkey work or long pile stitches for the fuzzy neck, and then trim them to create a soft, dimensional texture.
Use a vibrant variegated thread for the sun mandala to achieve effortless color blending that looks complex and beautiful.
This creative mixed-media embroidery approach allows you to tell a richer, more personal story, turning a corner of your room into a true travel shrine.


