

Sometimes, the desire isn’t for more complexity, but for more clarity. You have the skills, the threads, and the ideas, but you’re looking for that subtle shift that turns a simple project into a piece of personal, polished art.
This is where minimalism, geometry, and nature intersect. It’s about making each stitch count, using negative space as intentionally as you use thread, and understanding how simple lines can create profound beauty. It’s not about doing less; it’s about making every choice matter more.
Here, you’ll find techniques that focus on precision, texture, and composition. Think of this as a quiet conversation about elevating your craft—transforming pillows, linens, and wall art with stitching that feels both modern and timeless. You can start right now, with the materials you already have.
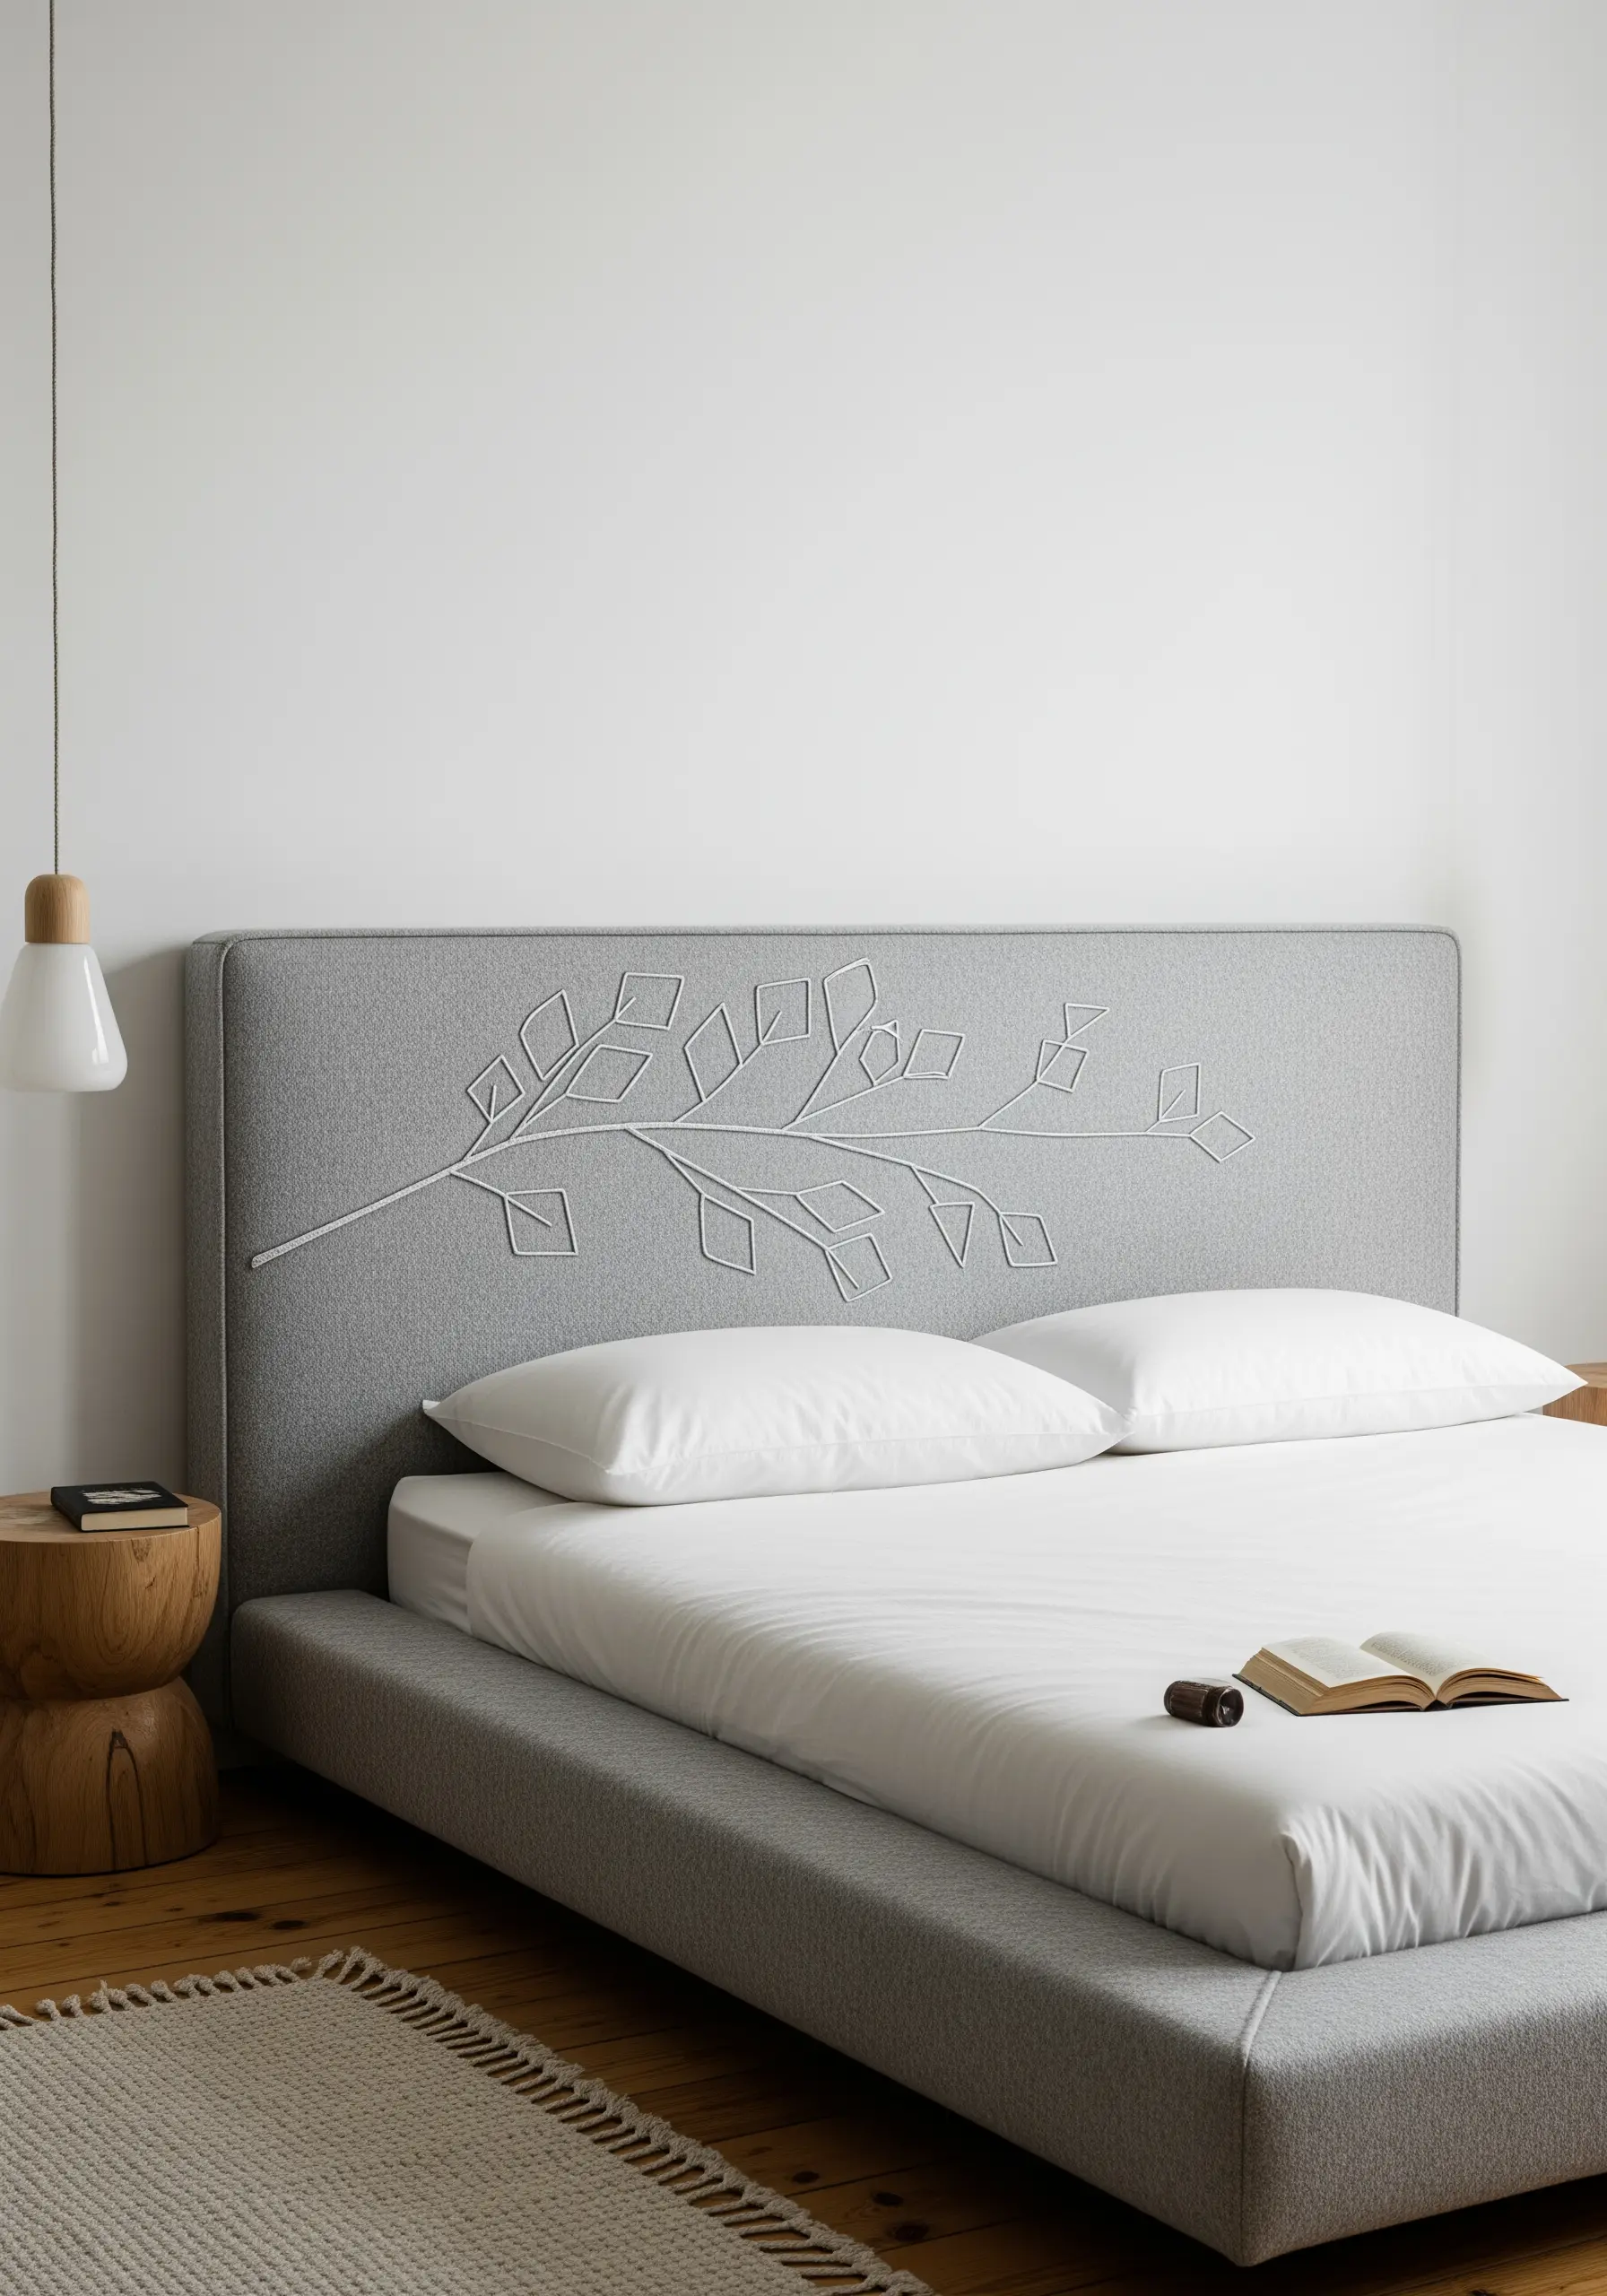
1. Stitch a Minimalist Landscape on Upholstery
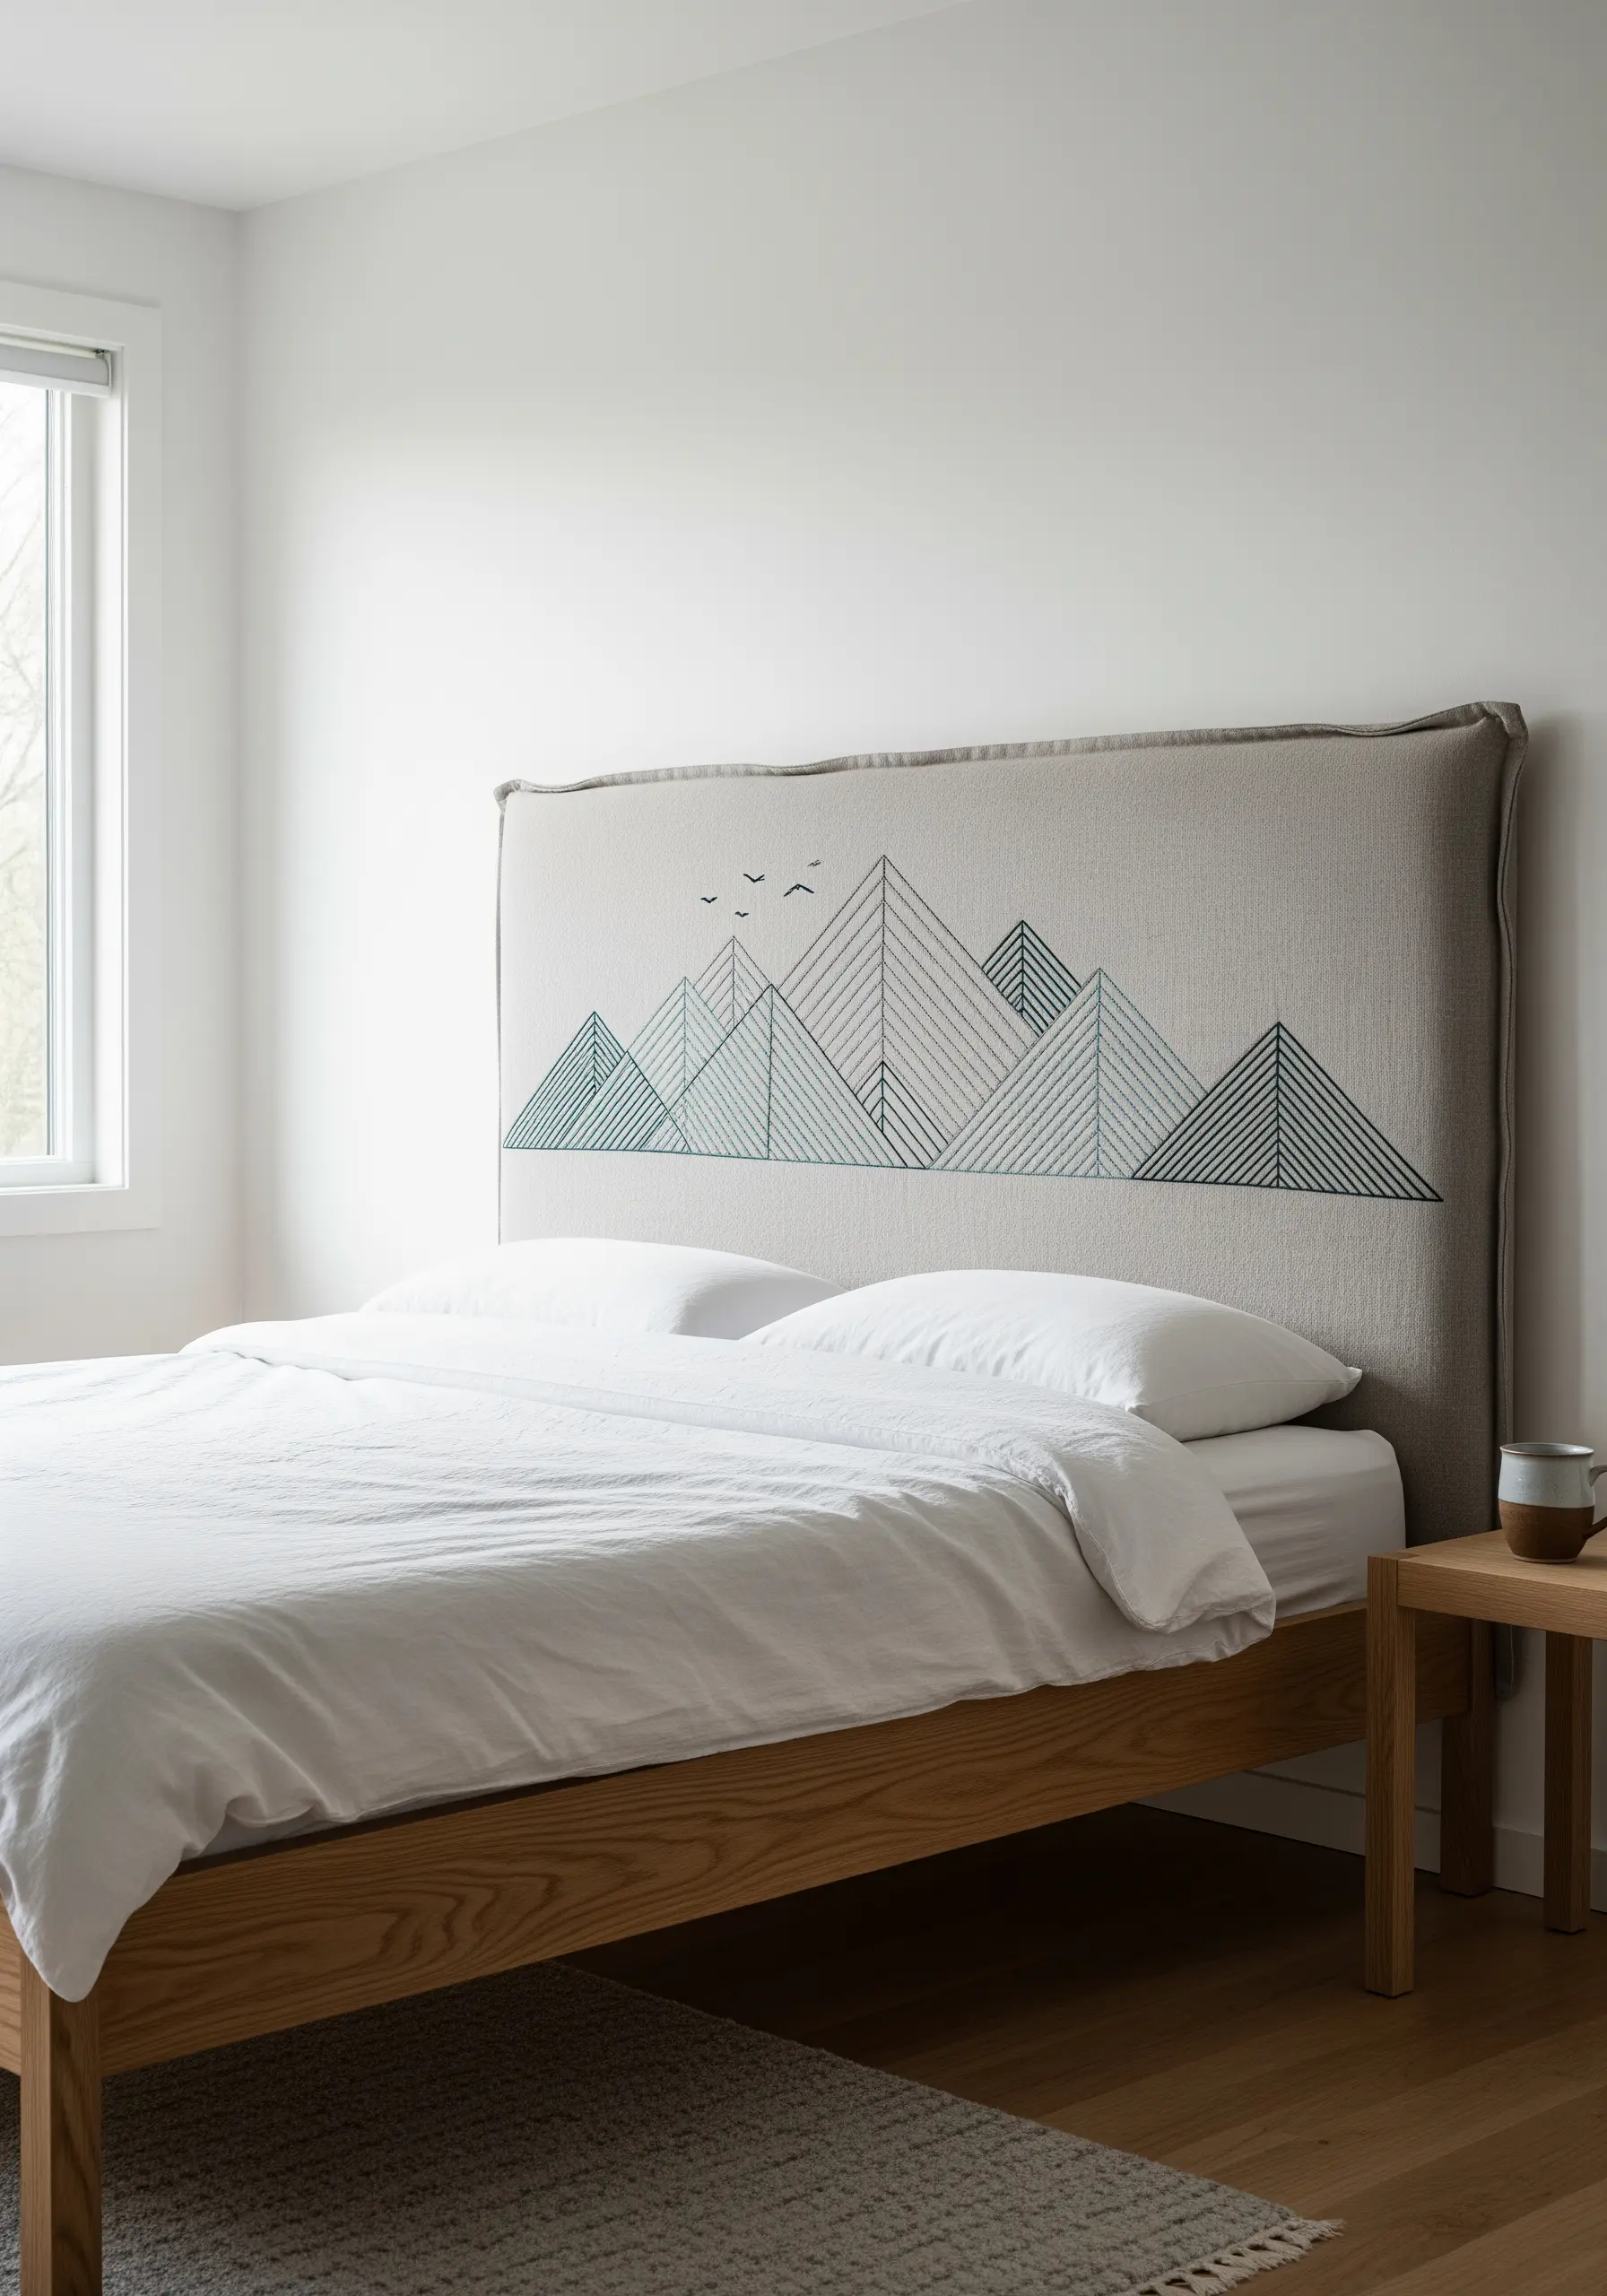
Transform a simple headboard into a statement piece with large-scale line art.
Use a heavy-weight thread, like Perle cotton, to ensure your design stands out against the textured fabric.
A simple backstitch is all you need for these clean, geometric mountain lines.
To prevent puckering on such a large surface, use a temporary adhesive stabilizer on the back of the fabric section before you begin stitching.
This technique adds a custom, built-in feel to furniture, making your embroidery an integral part of your home’s design.
2. Isolate a Pop of Color in a Repeating Pattern

Create a strong focal point in a monochrome design by adding a single, vibrant element.
Stitch the honeycomb grid with a simple backstitch in black thread to establish the pattern without overwhelming the composition.
Then, use a contrasting satin stitch for the bee’s body, which adds both color and a smooth, raised texture that draws the eye.
This deliberate use of color turns a simple geometric pattern into a playful story, giving the piece personality and focus.
3. Capture Fluid Motion with Parallel Stitches
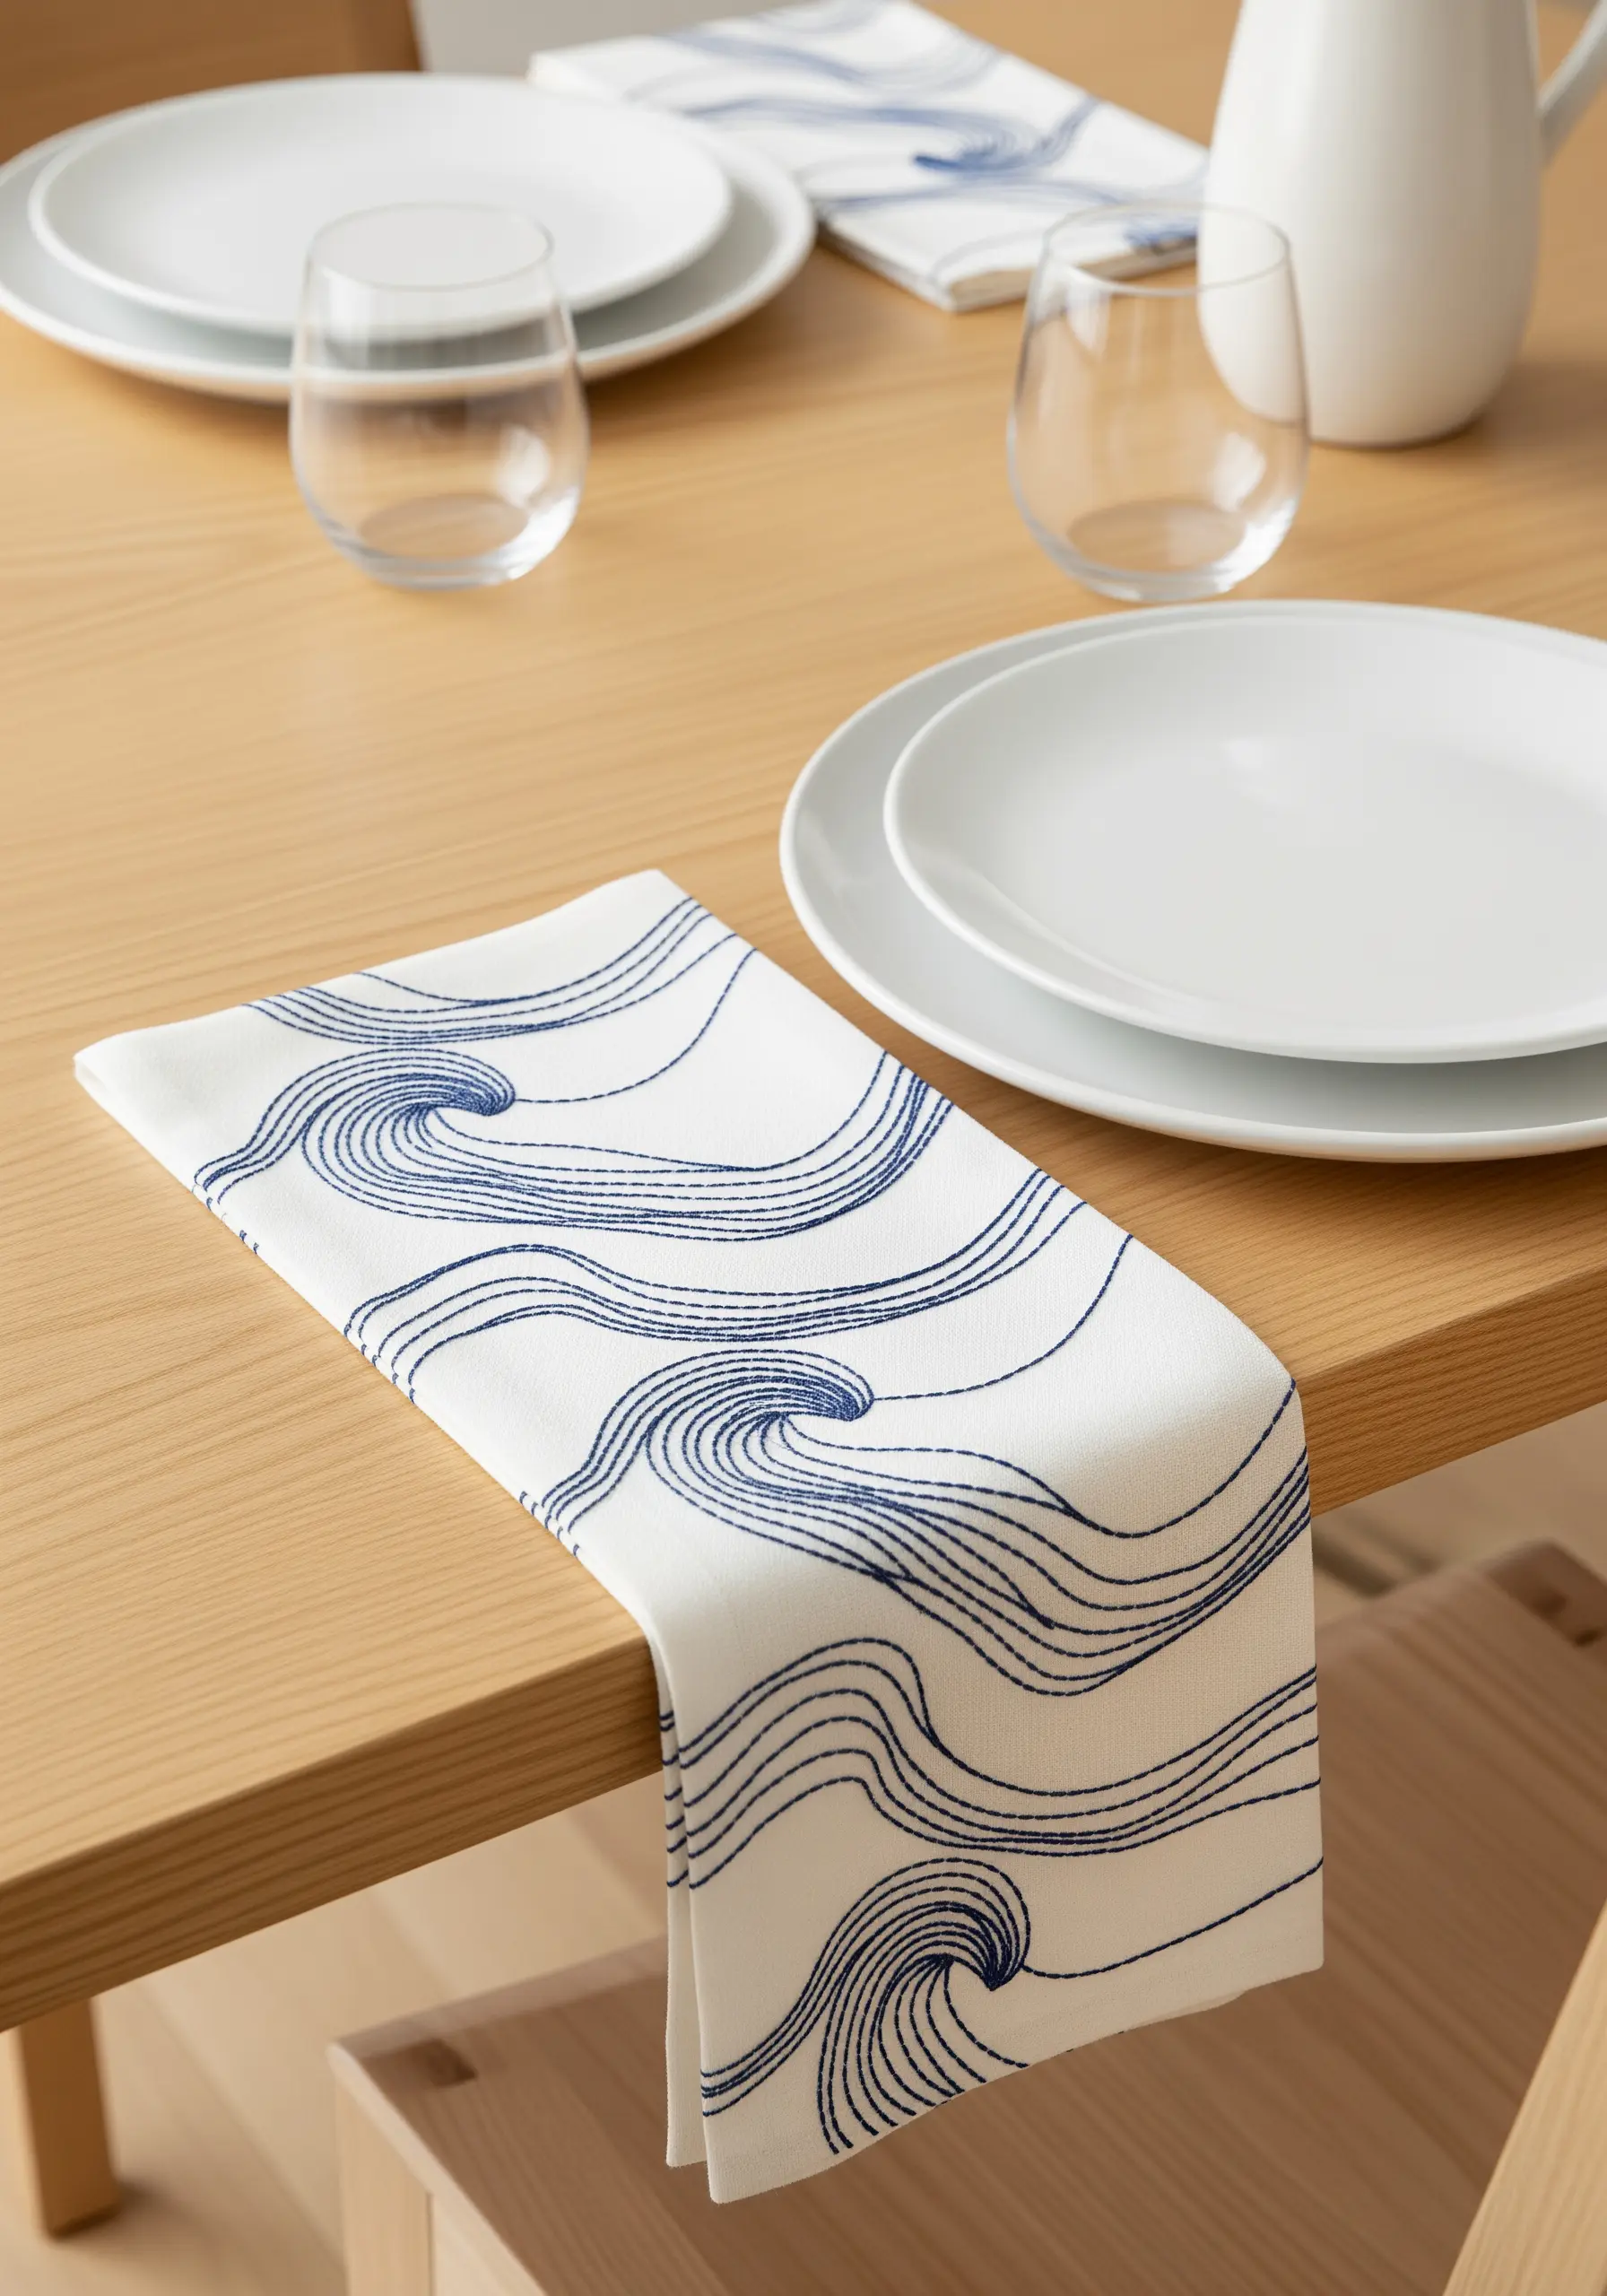
Evoke the movement of water by stitching parallel, flowing lines on crisp table linen.
Use a consistent running stitch or backstitch, allowing the curves and density of the lines to create the illusion of waves.
The key is to vary the space between your lines—tighter clusters suggest depth and shadow, while wider spacing creates a sense of light and calm.
A single, rich blue thread on a white or off-white fabric creates a classic, clean aesthetic that feels both modern and timeless.
This is one of the most elegant minimal ocean-inspired embroidery ideas for bringing natural energy to your home decor.
4. Add Delicate Line Work to Chunky Textures
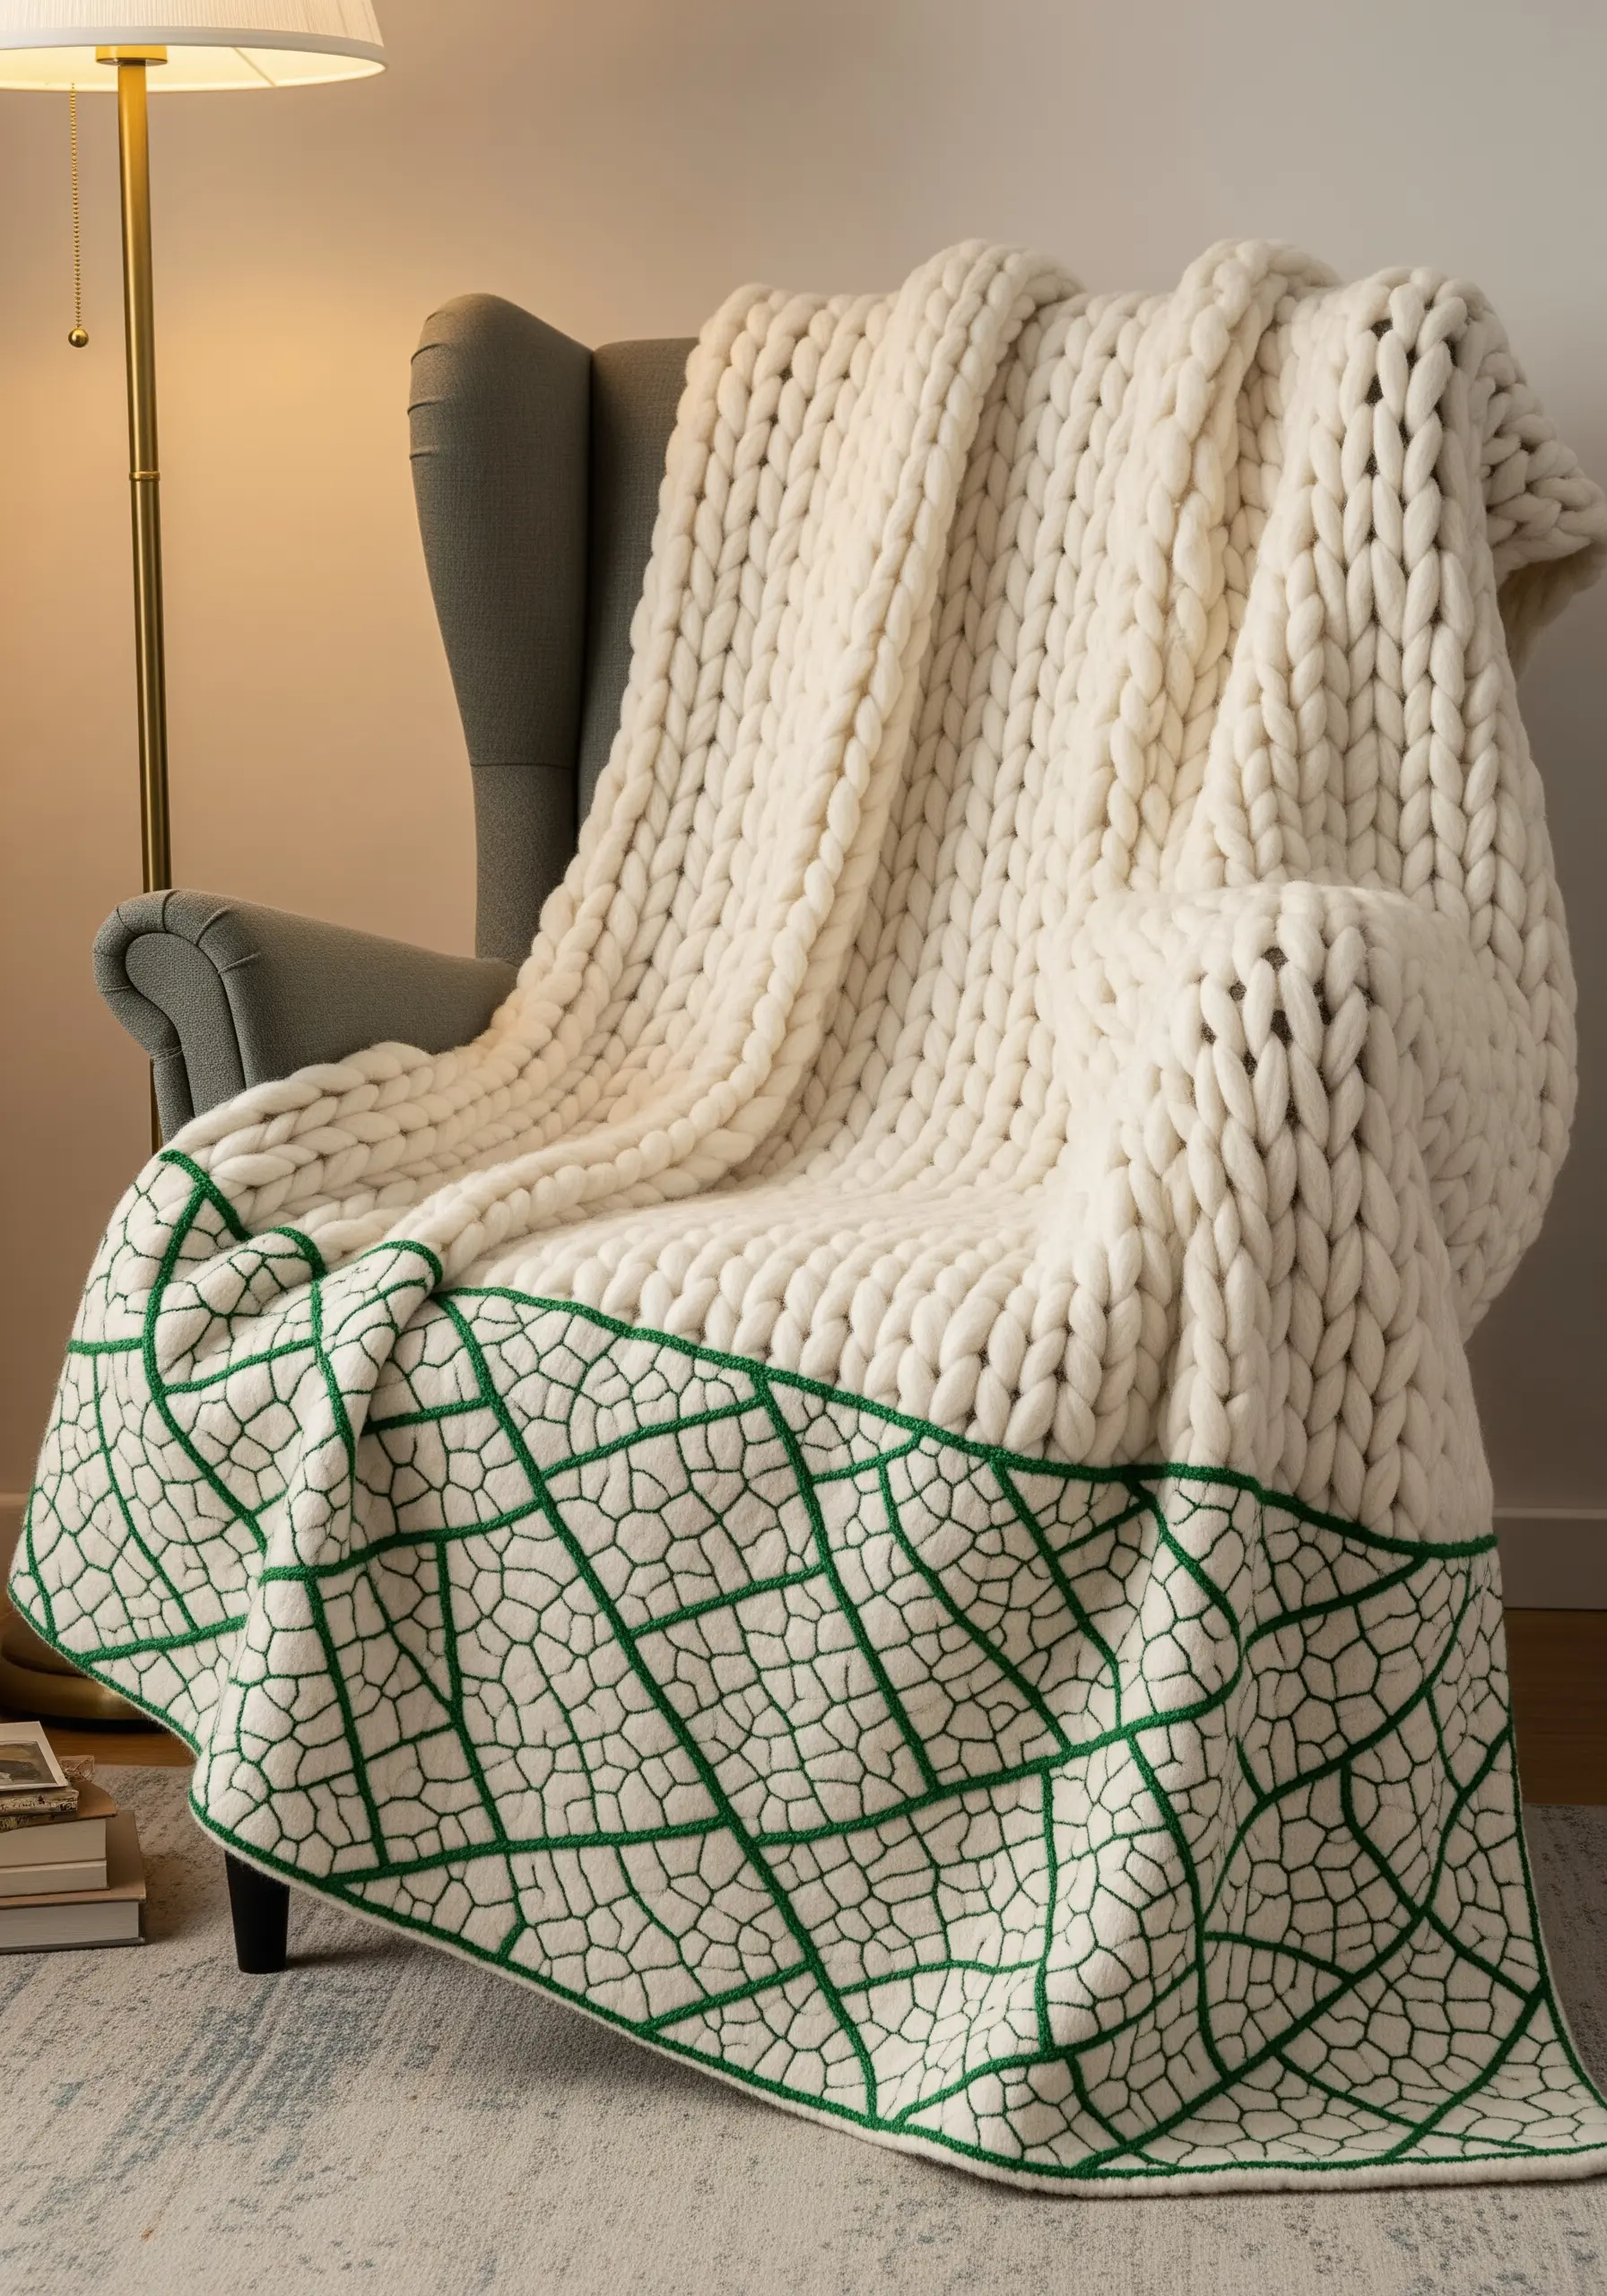
Embellish a heavily textured surface like a chunky knit blanket without distorting its structure.
Instead of stitching through the thick wool, use a couching stitch: lay your contrasting thread (the green ‘veins’) on the surface and use a finer, matching thread to tack it down at regular intervals.
This technique allows you to add intricate patterns to textiles that would otherwise be impossible to embroider directly.
The visual contrast between the delicate, sharp lines and the soft, bulky knit creates a stunning textural dialogue.
It’s a perfect way to add leaf vein details to unconventional surfaces.
5. Combine Knots and Lines for Textural Contrast
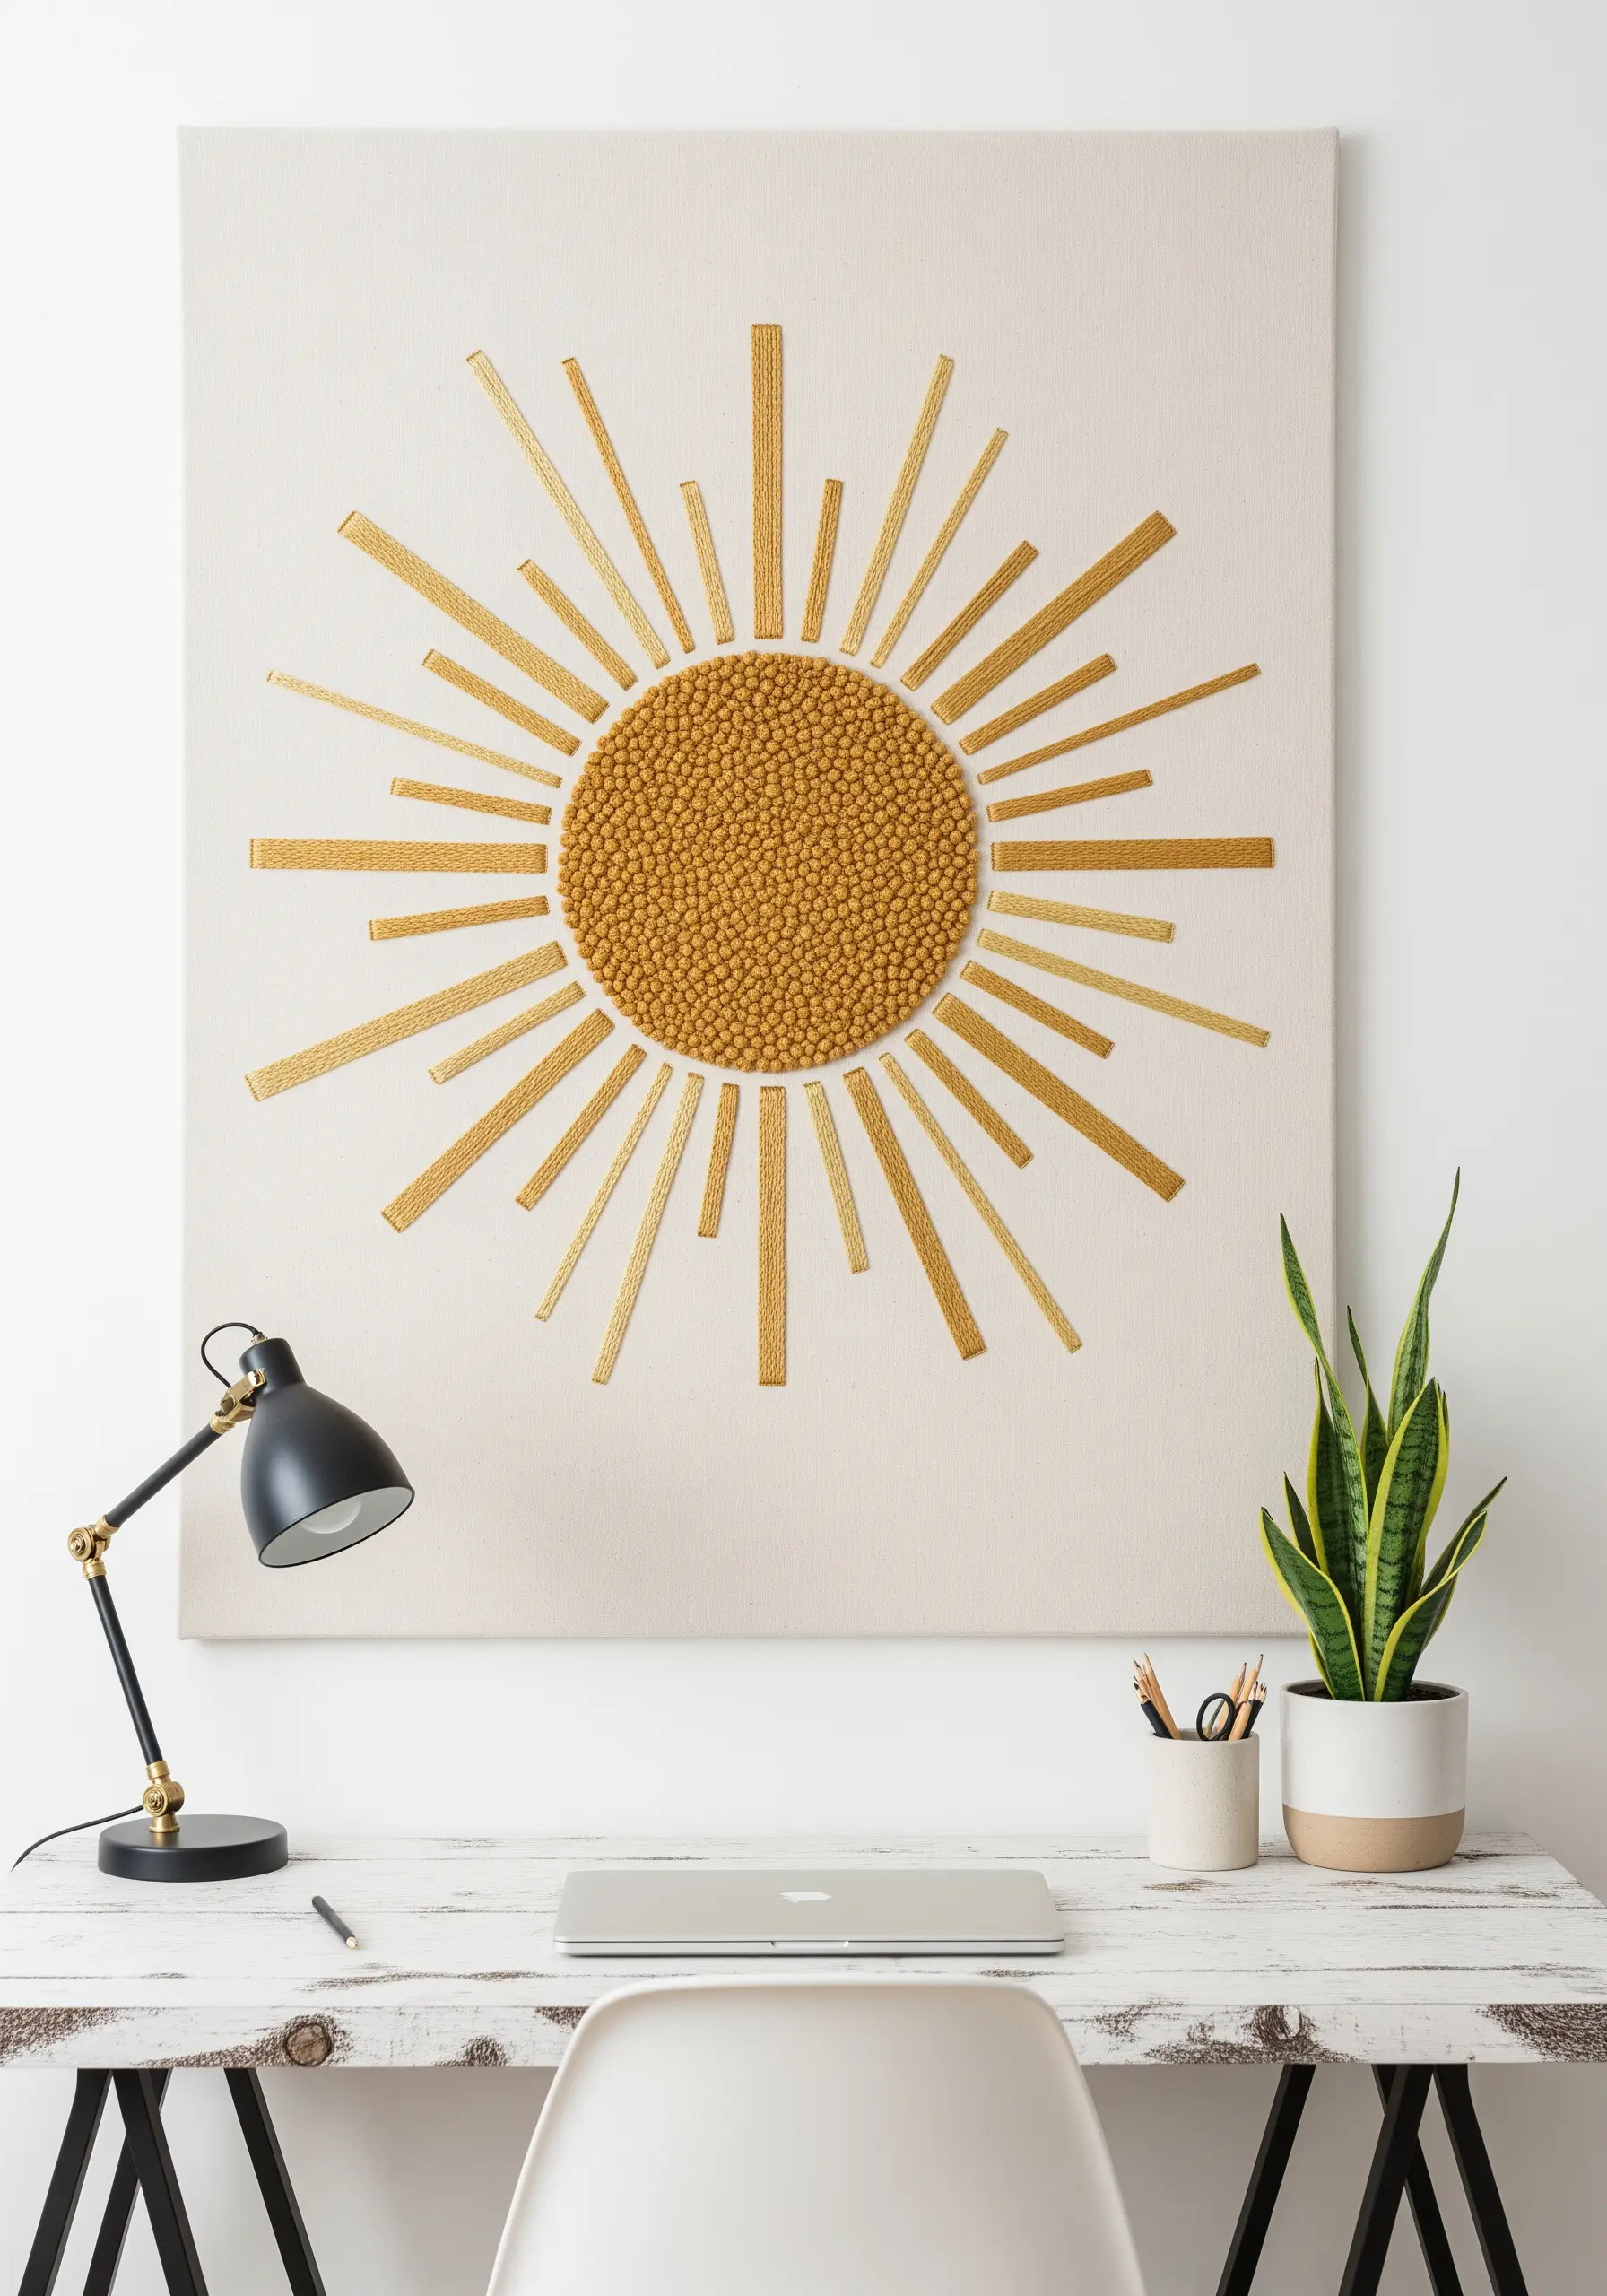
Build a dynamic design by pairing two distinct textures that play with light differently.
Fill the sun’s center with tightly packed French knots to create a dense, bumpy surface that absorbs light and feels tactile.
For the rays, use flat satin stitch bars, which create a smooth, light-reflective surface.
This contrast between the matte, nubby texture of the knots and the satin sheen of the rays gives the piece an incredible sense of depth and energy.
6. Embroider on Sheer Fabric for an Ethereal Effect
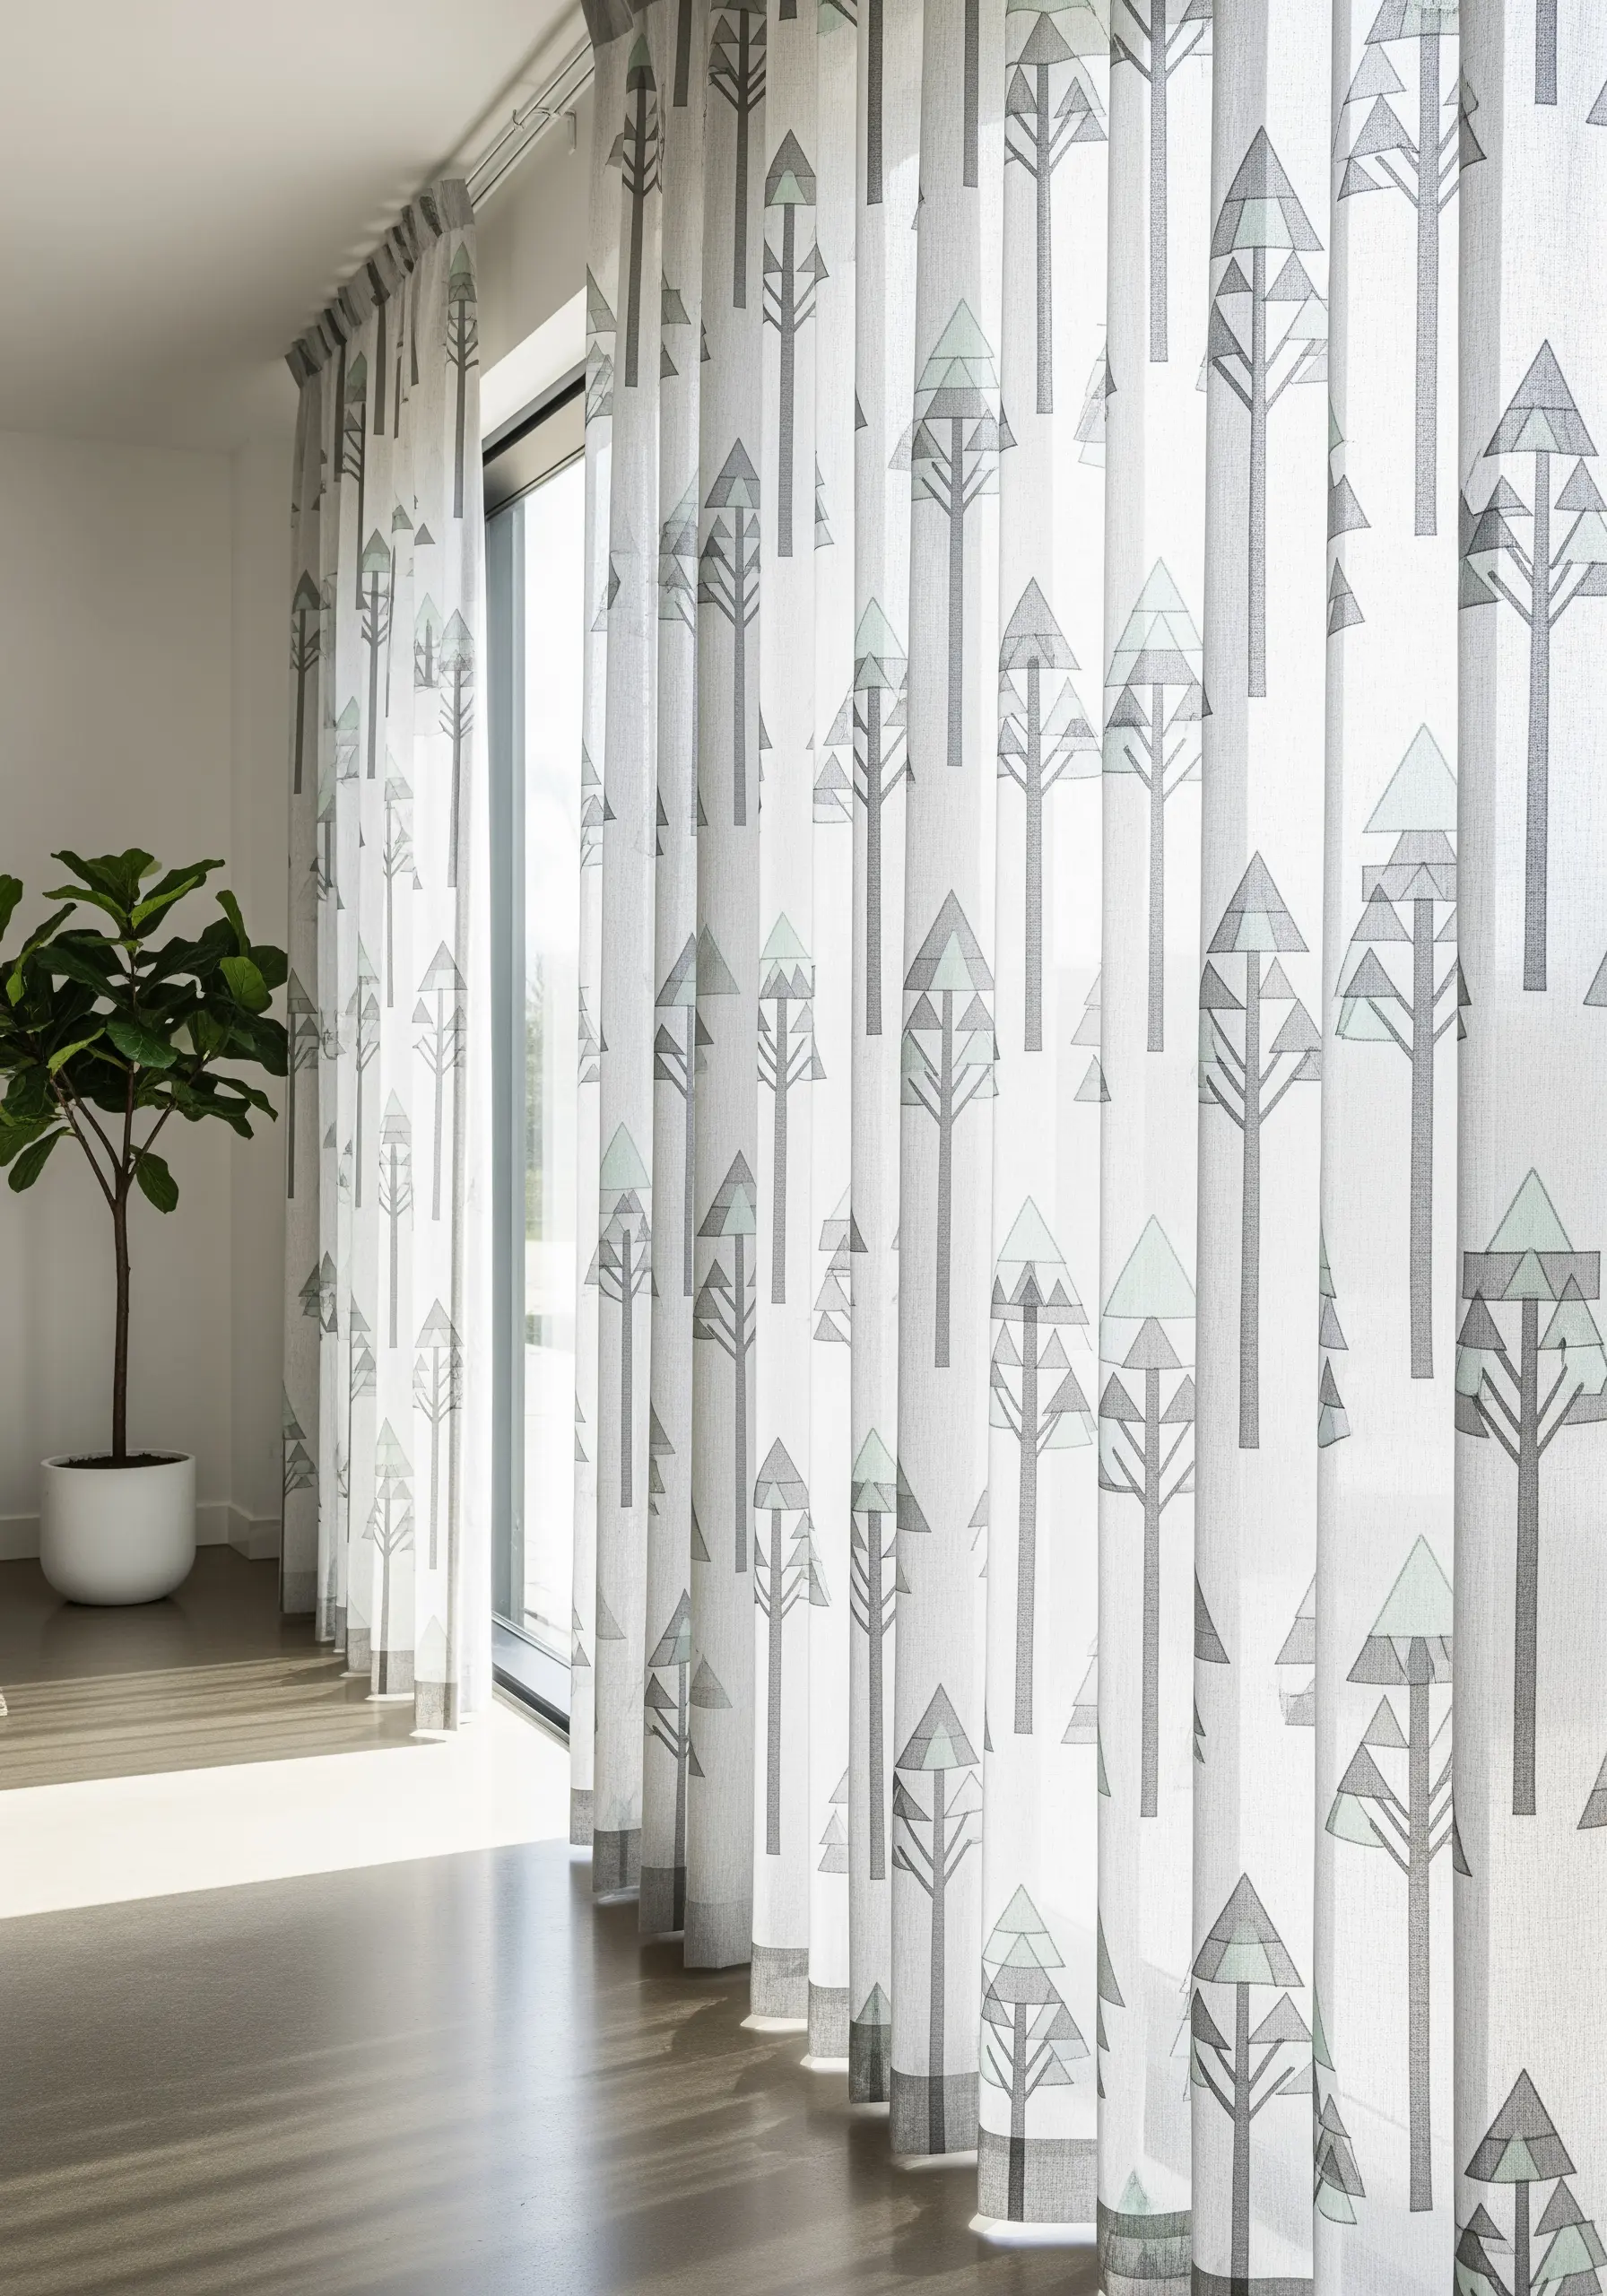
Stitch geometric patterns onto sheer curtains to create a design that interacts beautifully with light.
The essential tool for this is a water-soluble stabilizer; hoop it with the fabric to provide support and prevent puckering, then wash it away when you’re done.
Use simple backstitches and fill small areas with seed stitches instead of dense satin stitches to maintain the fabric’s drape and transparency.
The resulting embroidery appears to float, casting delicate shadows that shift throughout the day.
7. Create Visual Rhythm with Overlapping Circles

Develop a sense of movement and connection in your design by layering simple geometric shapes.
Use a whipped backstitch or a chain stitch to create a clean, rope-like line for your circles, giving them substance and definition.
Map out your pattern first to ensure the overlaps feel intentional and balanced, creating a gentle, flowing rhythm down the length of a table runner.
This approach elevates simple table linen embroidery motifs from static decorations to dynamic compositions.
8. Achieve High Contrast with Celestial Designs

Make your stitches pop by choosing a dark, solid background fabric and a bright, light-reflecting thread.
A deep navy or black cotton provides the perfect night sky canvas, allowing a simple white or silver metallic thread to shine.
Use tiny star stitches or single French knots for the stars and connect them with a crisp backstitch for the constellation lines.
This high-contrast approach ensures that even the most delicate lines are visible and impactful, making it perfect for inspiring hoop art projects.
9. Master Subtlety with Tone-on-Tone Stitching
Create an elegant, high-end look by embroidering with thread that is only a few shades different from your base fabric.
The magic of this technique lies in texture, not color. Use a dimensional stitch like a stem stitch or a padded satin stitch to make the design physically stand out.
This creates a subtle pattern that reveals itself through shadow and light, adding sophistication without creating visual clutter.
Explore tone-on-tone embroidery techniques to achieve a refined, minimalist aesthetic that feels both quiet and confident.
10. Illustrate Delicacy with Negative Space
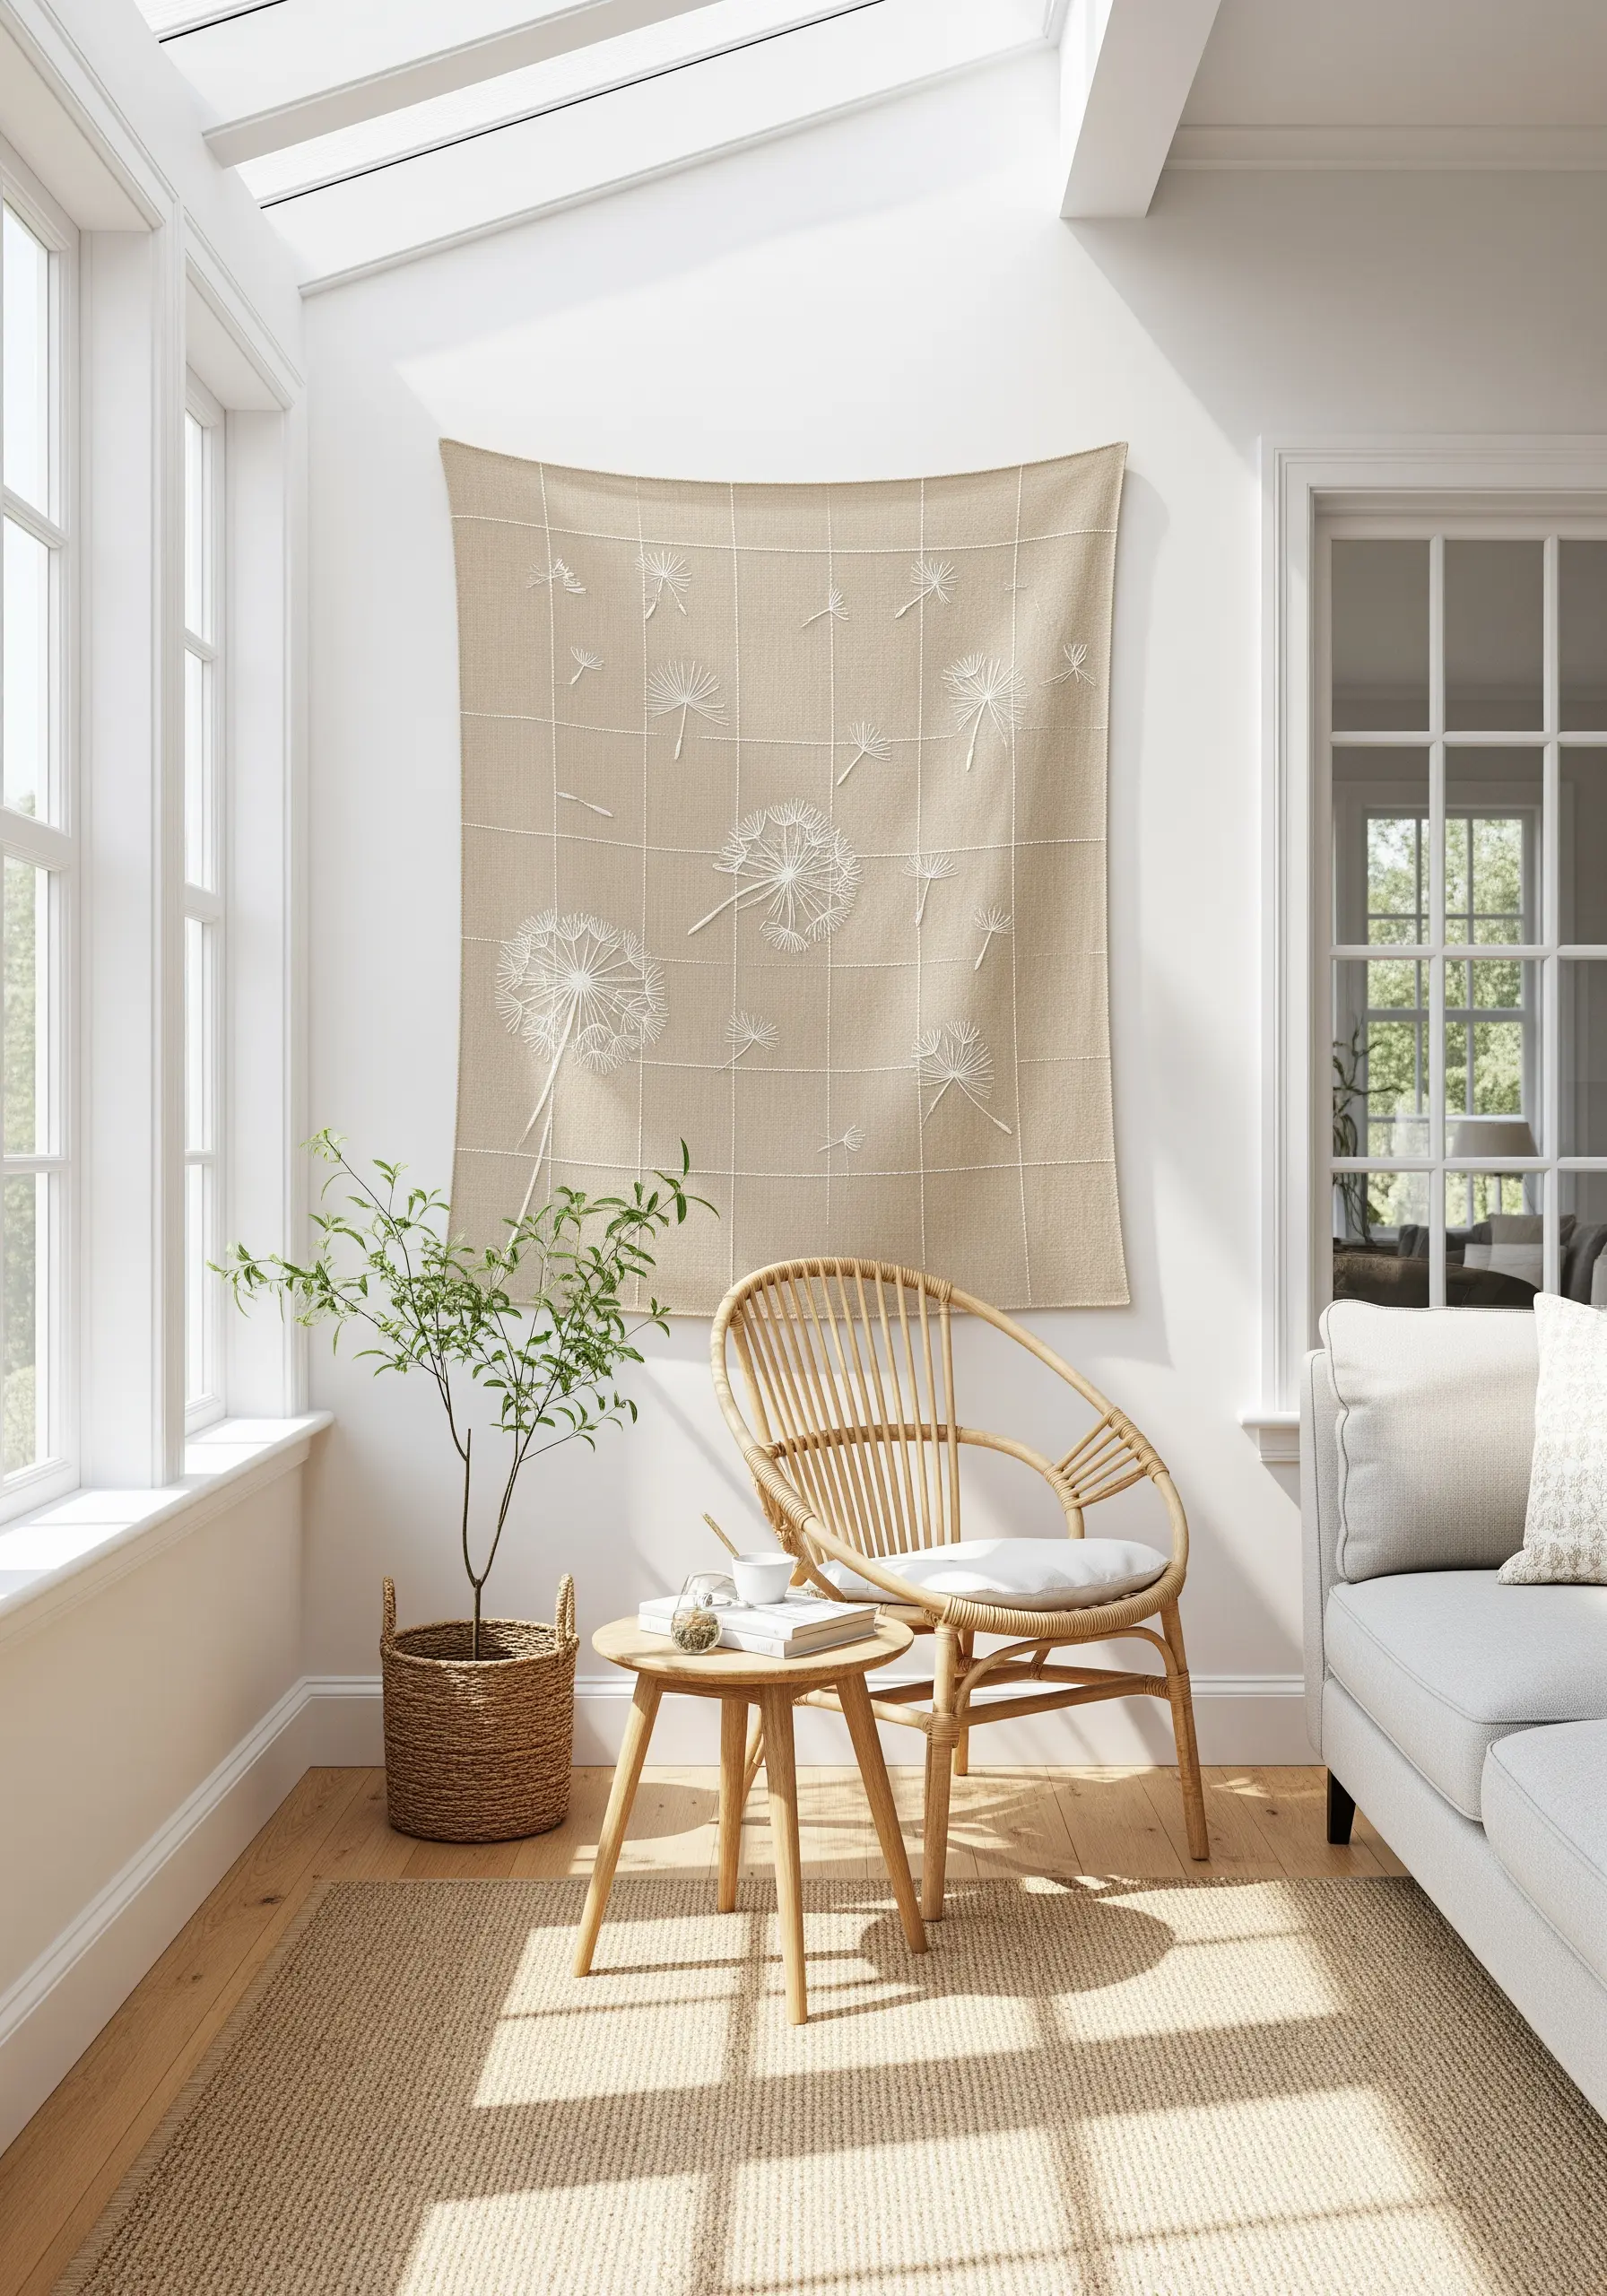
Tell a story of lightness and air by focusing on what you *don’t* stitch.
Use radiating straight stitches for the dandelion heads, keeping them light and open.
For the floating seeds, use tiny, scattered seed stitches or single detached chain stitches, letting them drift across the fabric.
The generous use of un-stitched background, or negative space, is what gives this design its sense of freedom and movement. Intentionally combine thread and negative space to give your work room to breathe.
11. Build Sculptural Forms with Couching
Move beyond flat stitches and create raised, three-dimensional designs by couching thick fibers onto a canvas base.
This technique involves laying down thick yarn, cord, or rope and stitching over it with a thinner thread to hold it in place.
By layering different colors and textures of yarn, you can build up topographic, landscape-like forms that have physical depth.
Try abstract thread layering techniques like this to turn your embroidery into a piece of fiber sculpture.
12. Frame an Organic Shape with Sharp Geometry
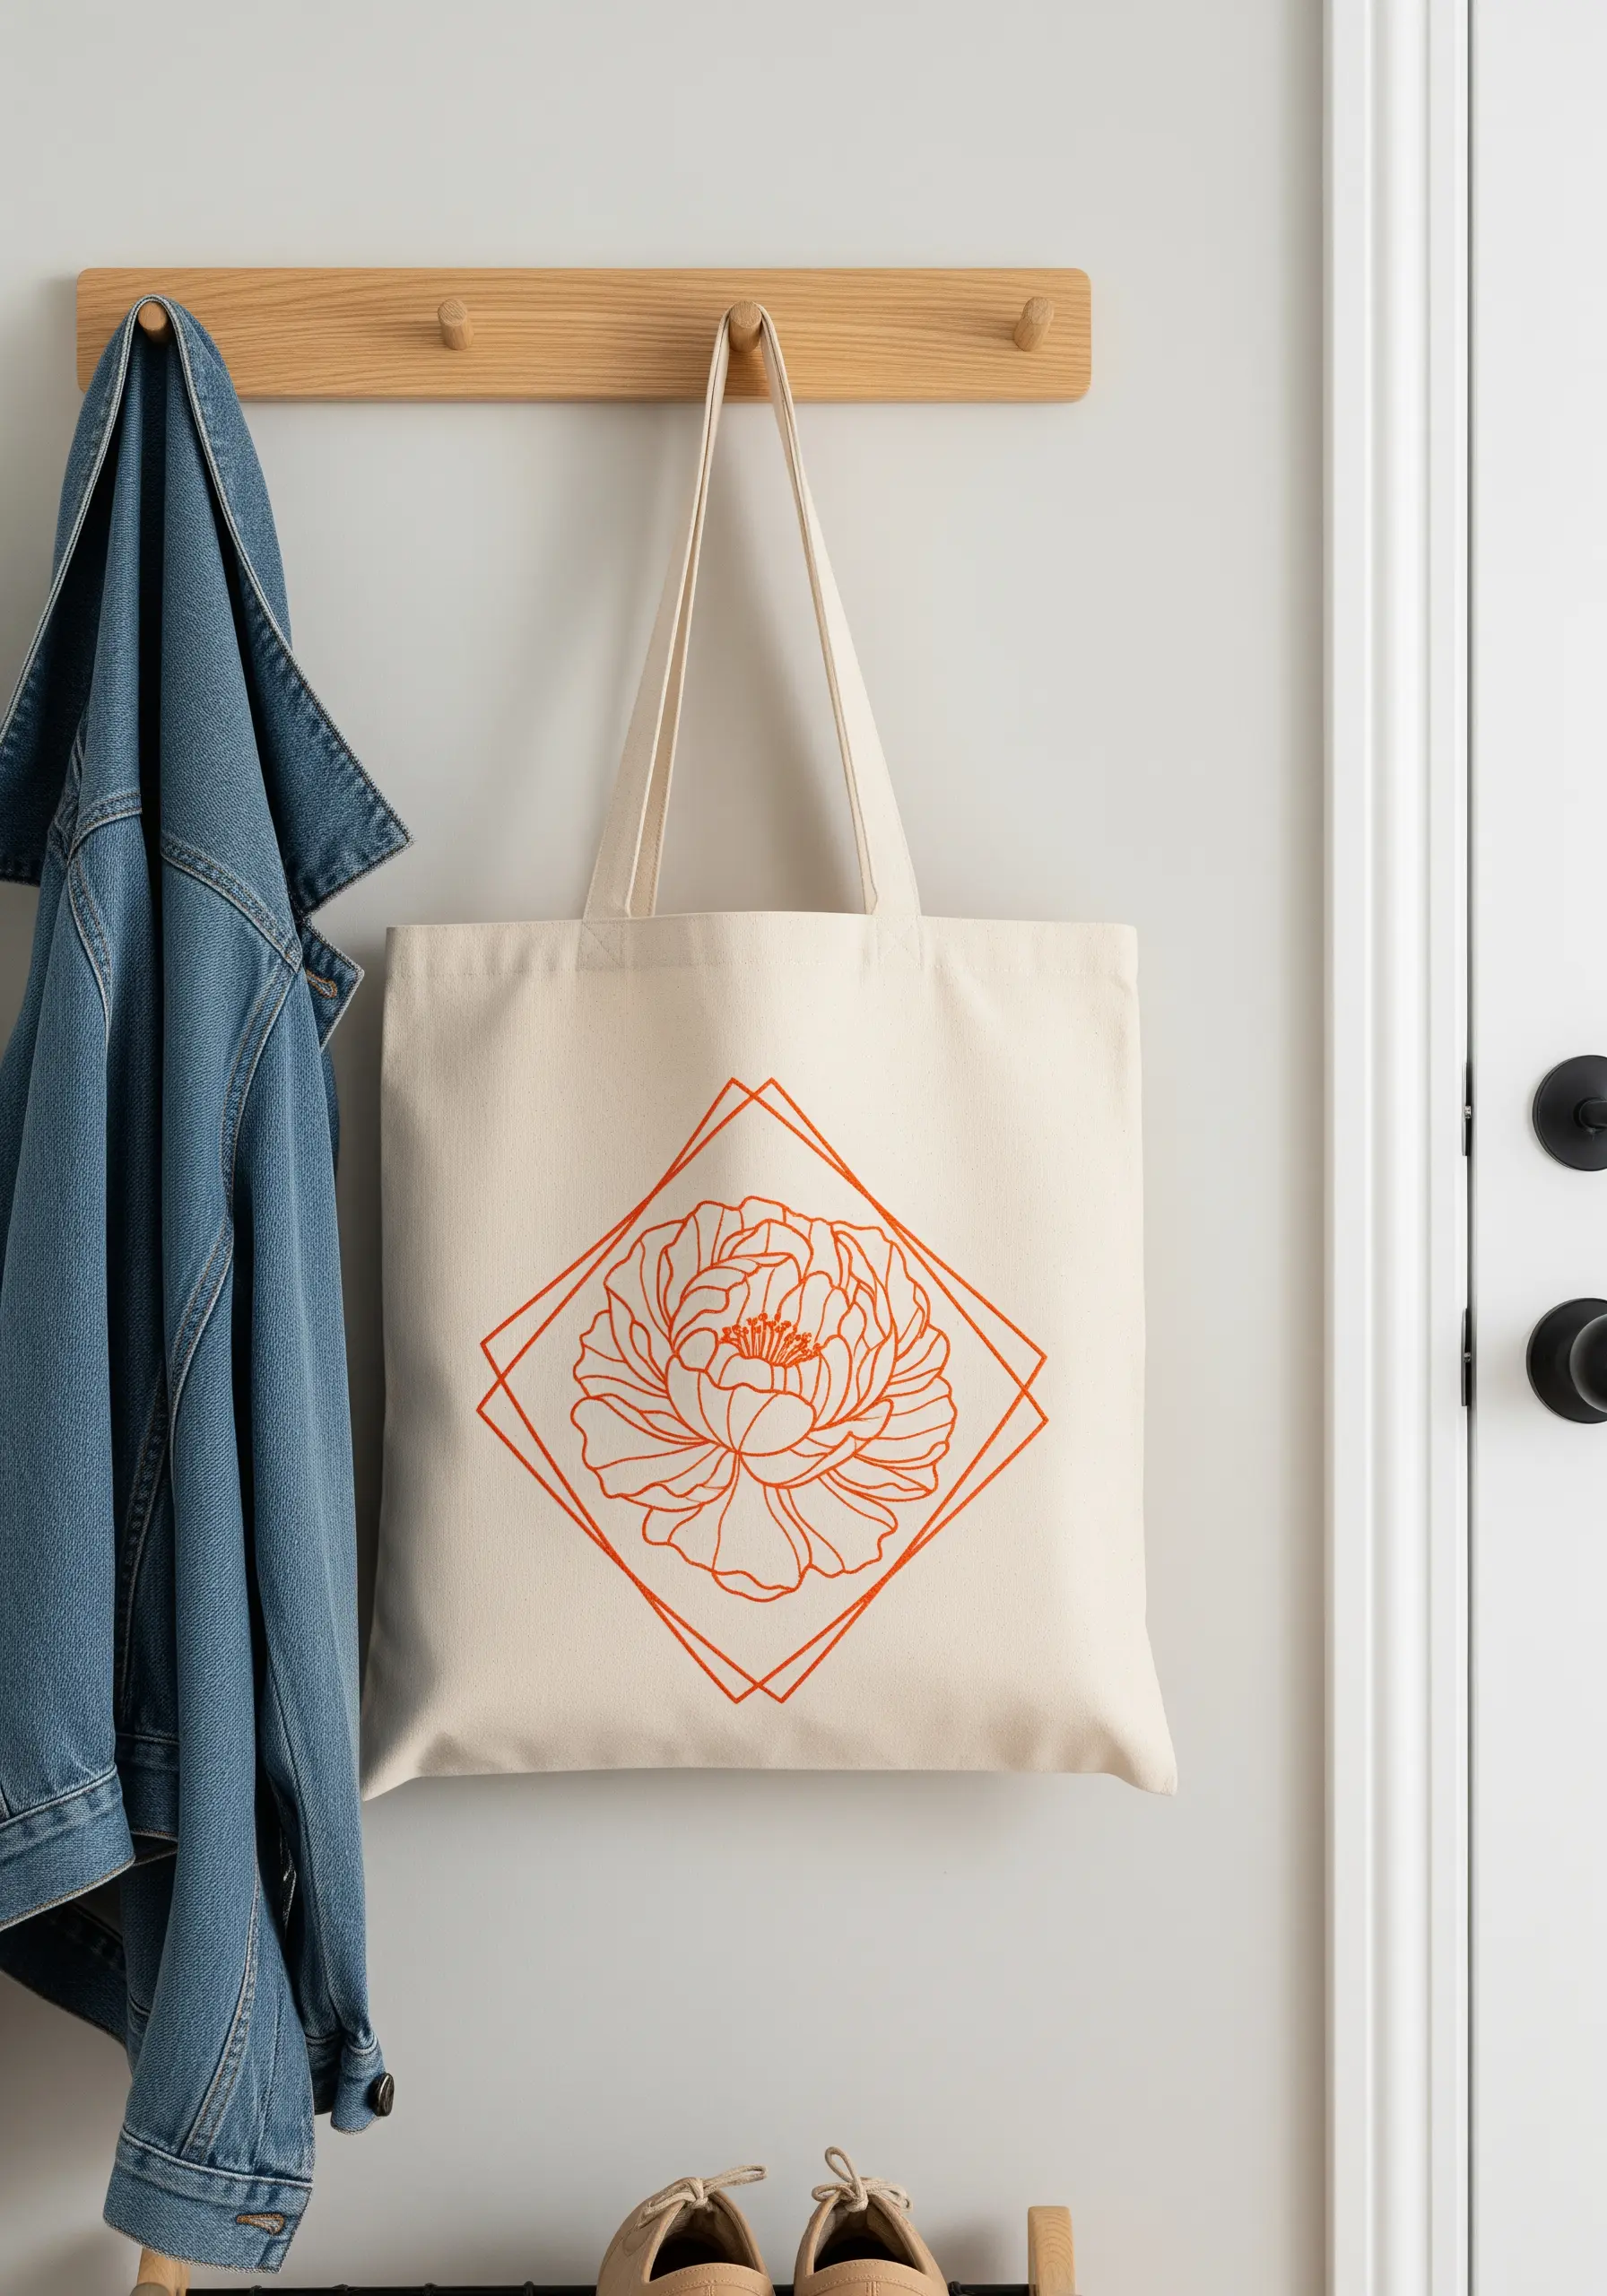
Create a striking visual balance by containing a soft, natural motif within a crisp geometric frame.
Stitch the floral element using a delicate stem stitch or split stitch to maintain the elegance of the line art.
Then, use a precise backstitch for the surrounding diamond shape. This contrast—organic versus structured—elevates both elements.
This is a powerful composition tool for modern tote bag embroidery patterns, making them feel intentional and curated.
13. Create a Cohesive Series with a Shared Motif
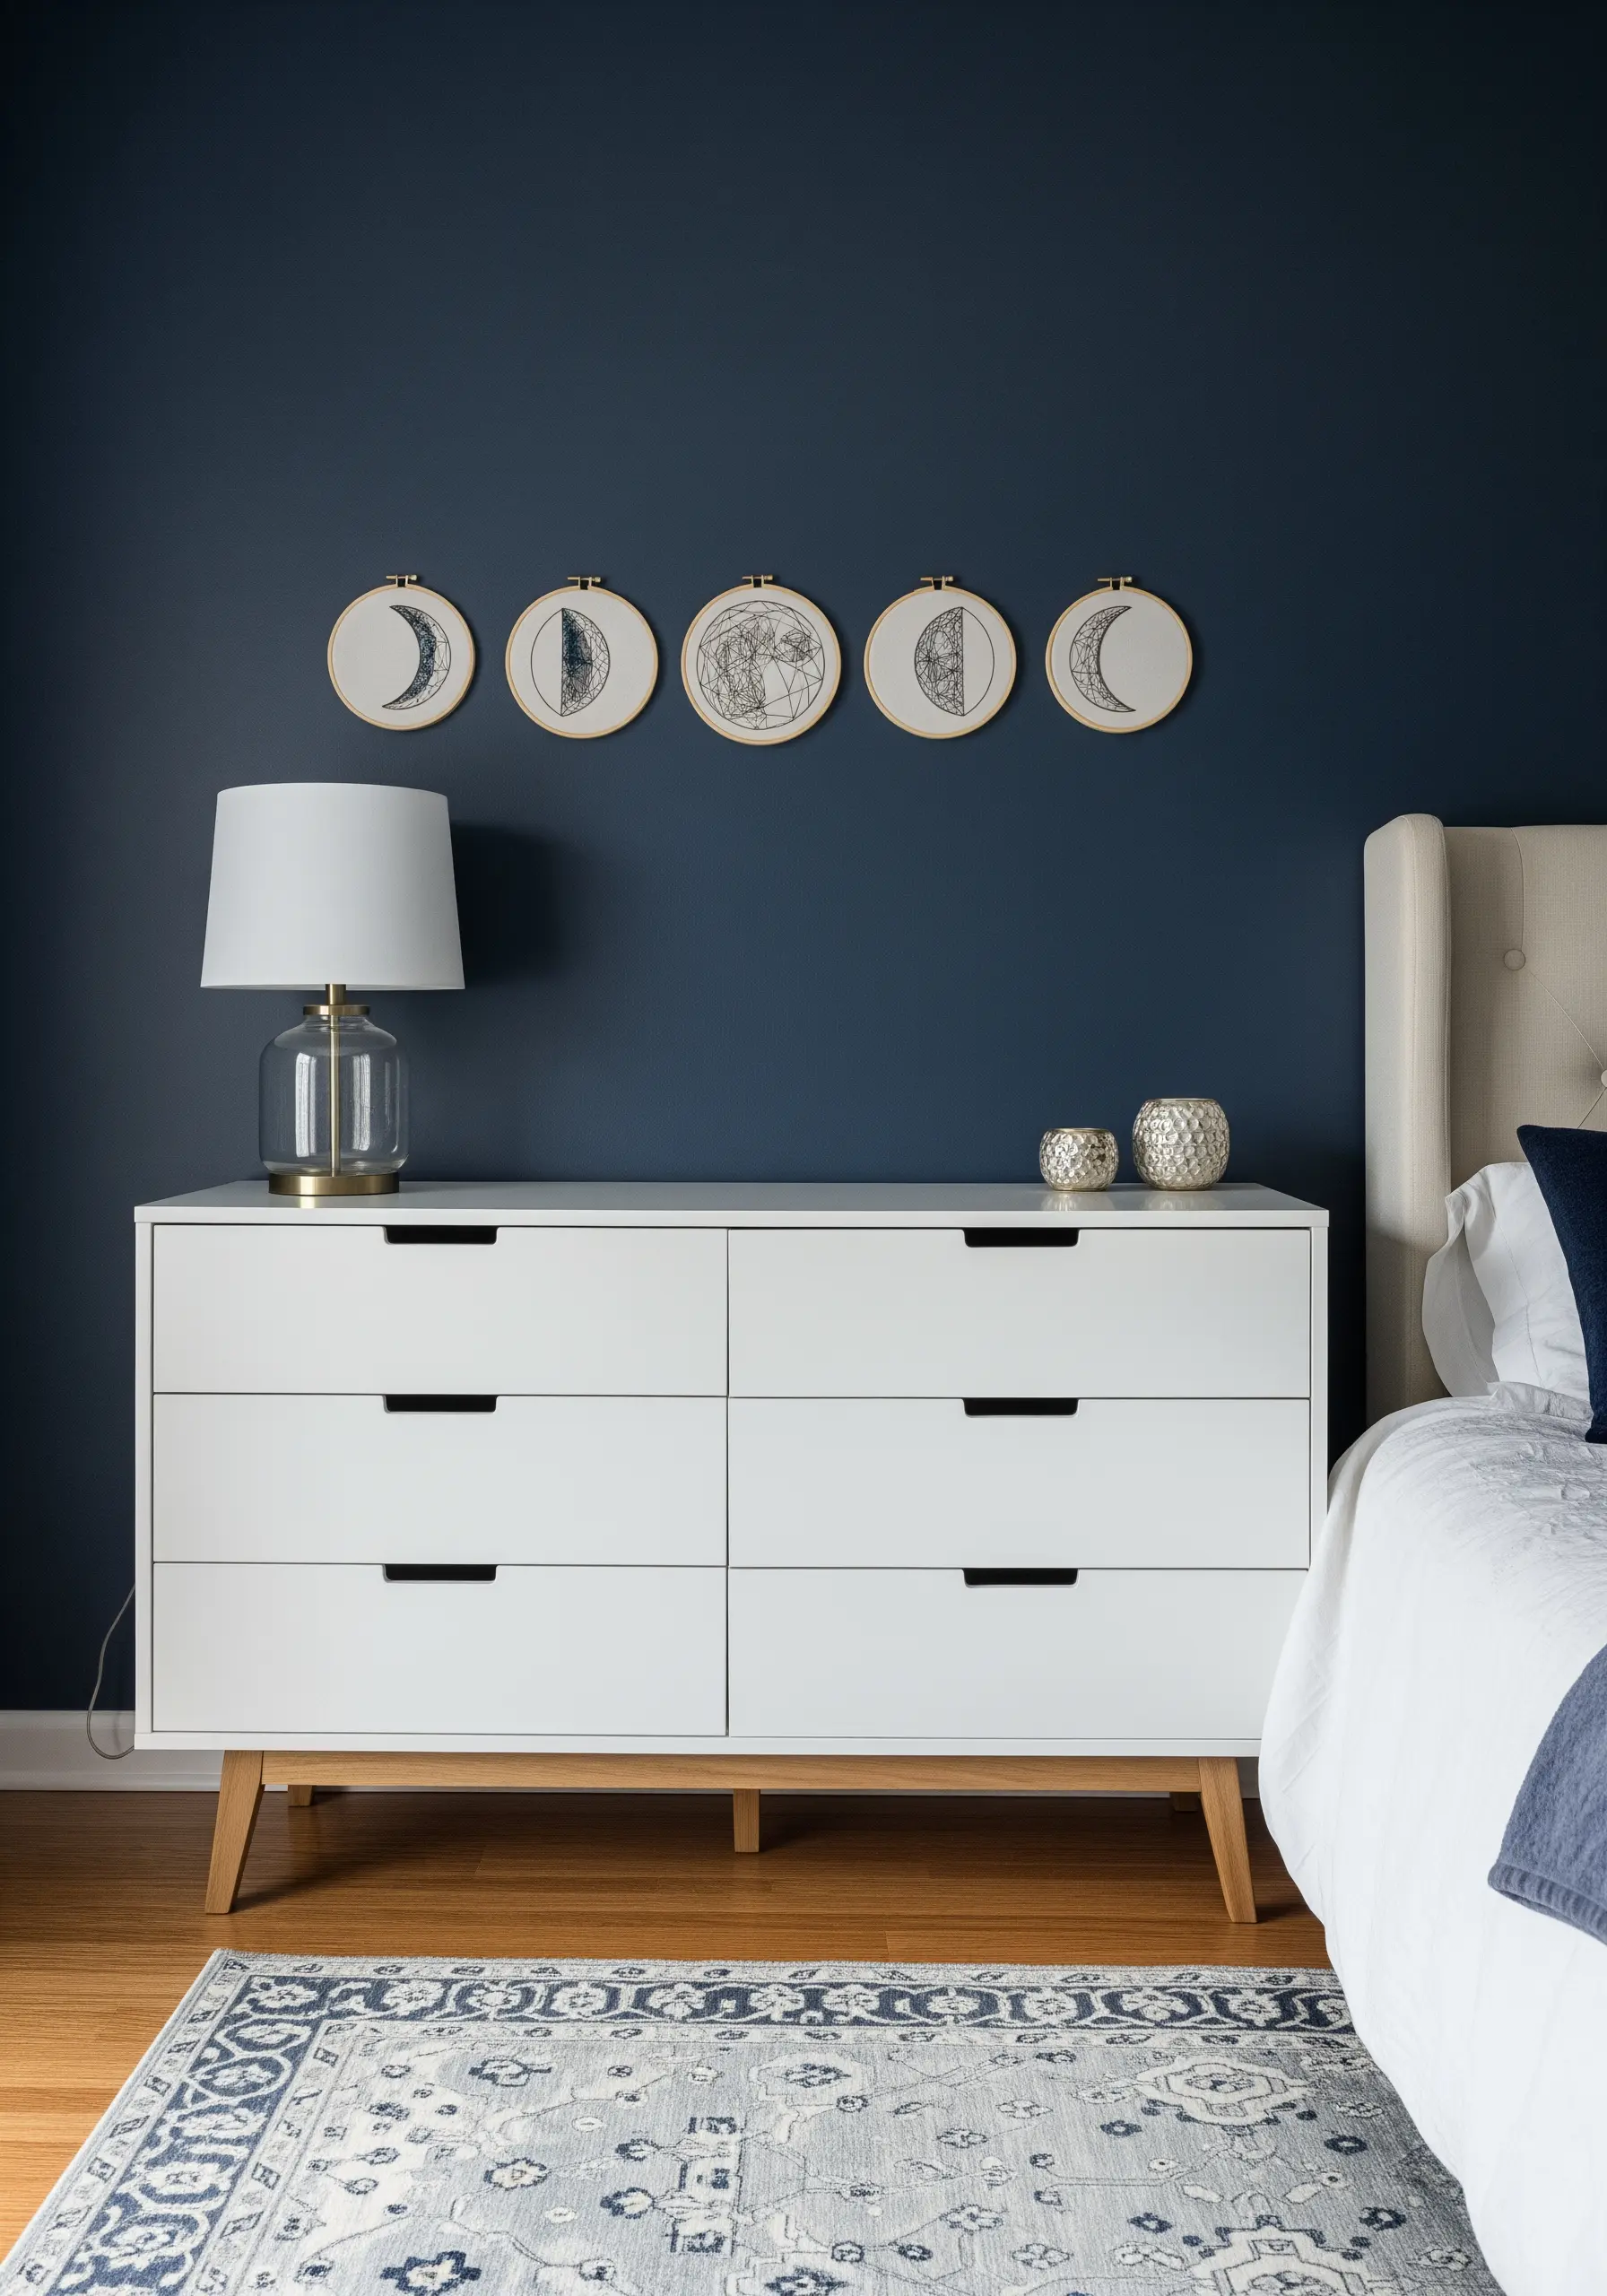
Amplify the impact of your work by designing a series of small hoops that explore a single theme.
By stitching the phases of the moon, each in its own hoop, you create a narrative that is stronger than a single piece.
Use a consistent palette and set of stitches—like black thread on natural linen—across all pieces to ensure they feel connected.
Displayed together, they form a sophisticated gallery wall that tells a quiet, cohesive story.
14. Design a Sophisticated Border with Fishbone Stitch
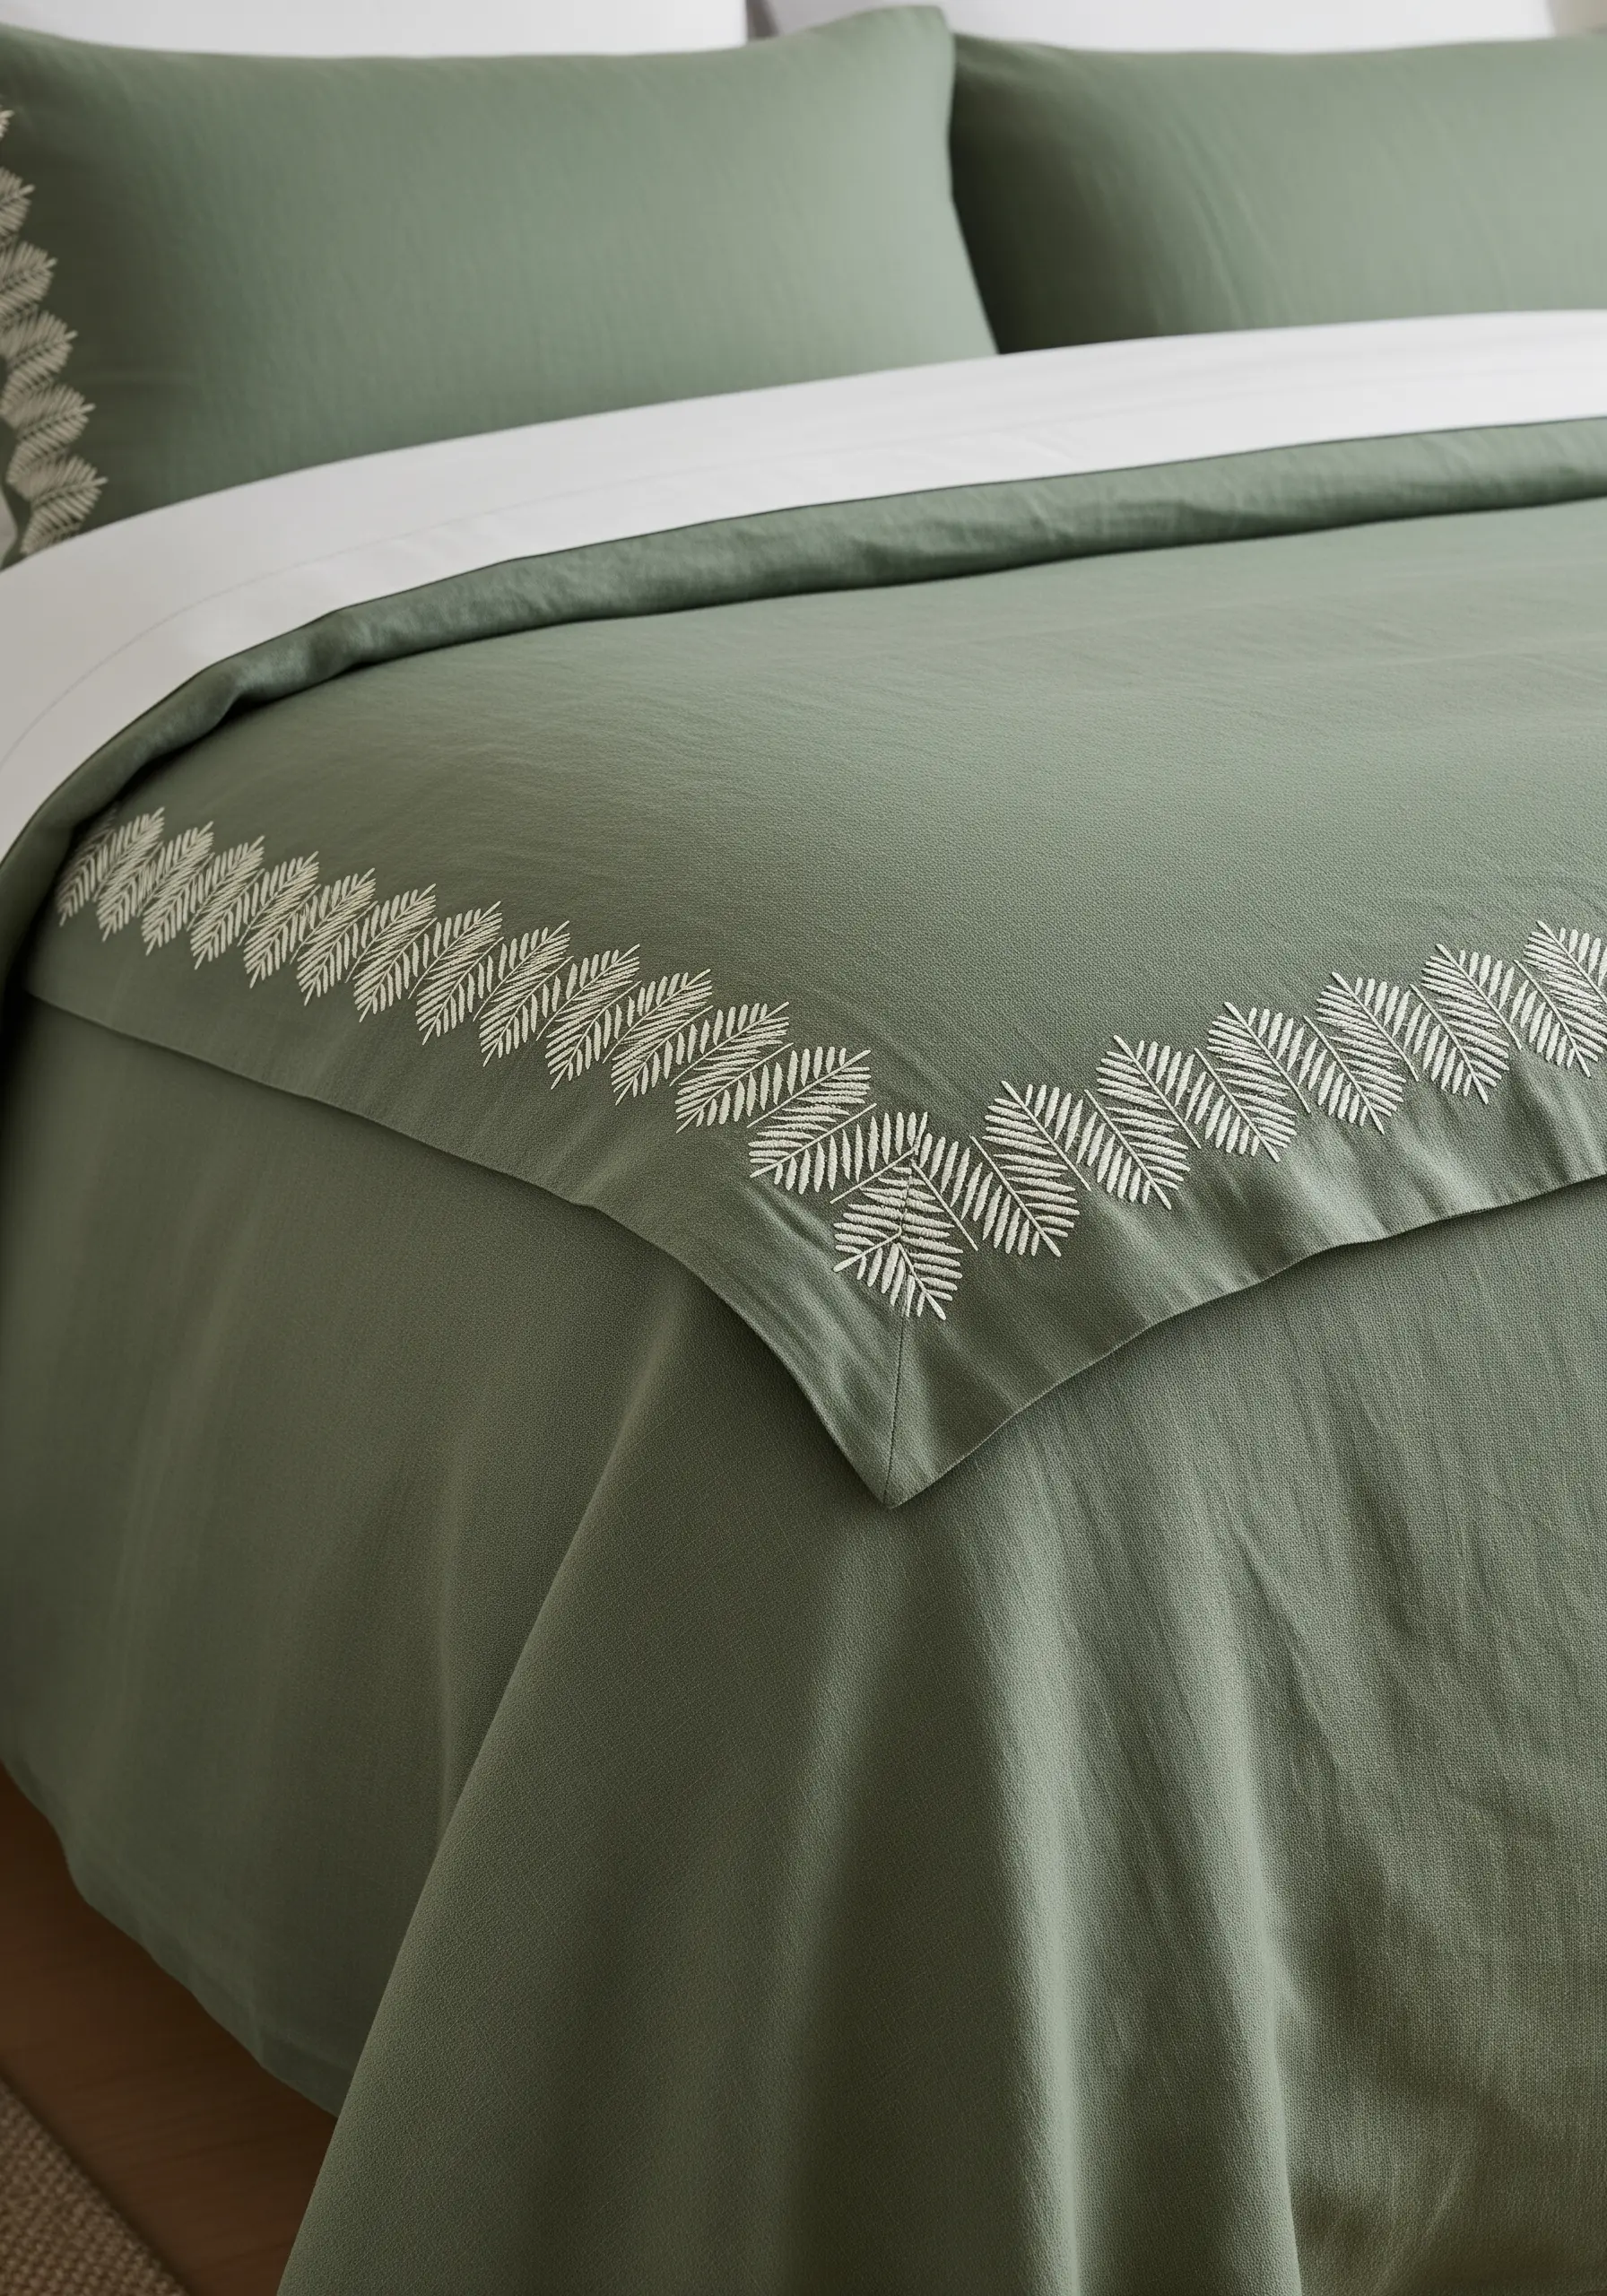
Add a bespoke, high-end finish to bedding or table linens with an elegant embroidered border.
The fishbone stitch is perfect for creating small, stylized leaves with a built-in central vein, giving them a touch of realism and texture.
Arrange these stitched leaves in a repeating pattern along the edge of a duvet cover or pillowcase for a polished, cohesive look.
These delicate leaf embroidery stitches instantly elevate simple textiles into treasured heirlooms.
15. Use Satin Stitch for Geometric Color Blocking

Treat your thread like paint by filling small, defined shapes with blocks of smooth color.
To achieve those crisp, clean edges, first outline each geometric section with a split stitch or backstitch in the same color.
Then, fill the shape with satin stitches, using the outline as a firm boundary. This prevents the edges from looking fuzzy and uneven.
Experiment with bold color blocking embroidery patterns to create vibrant, graphic designs that feel modern and energetic.
16. Split a Single Scene Across Multiple Panels
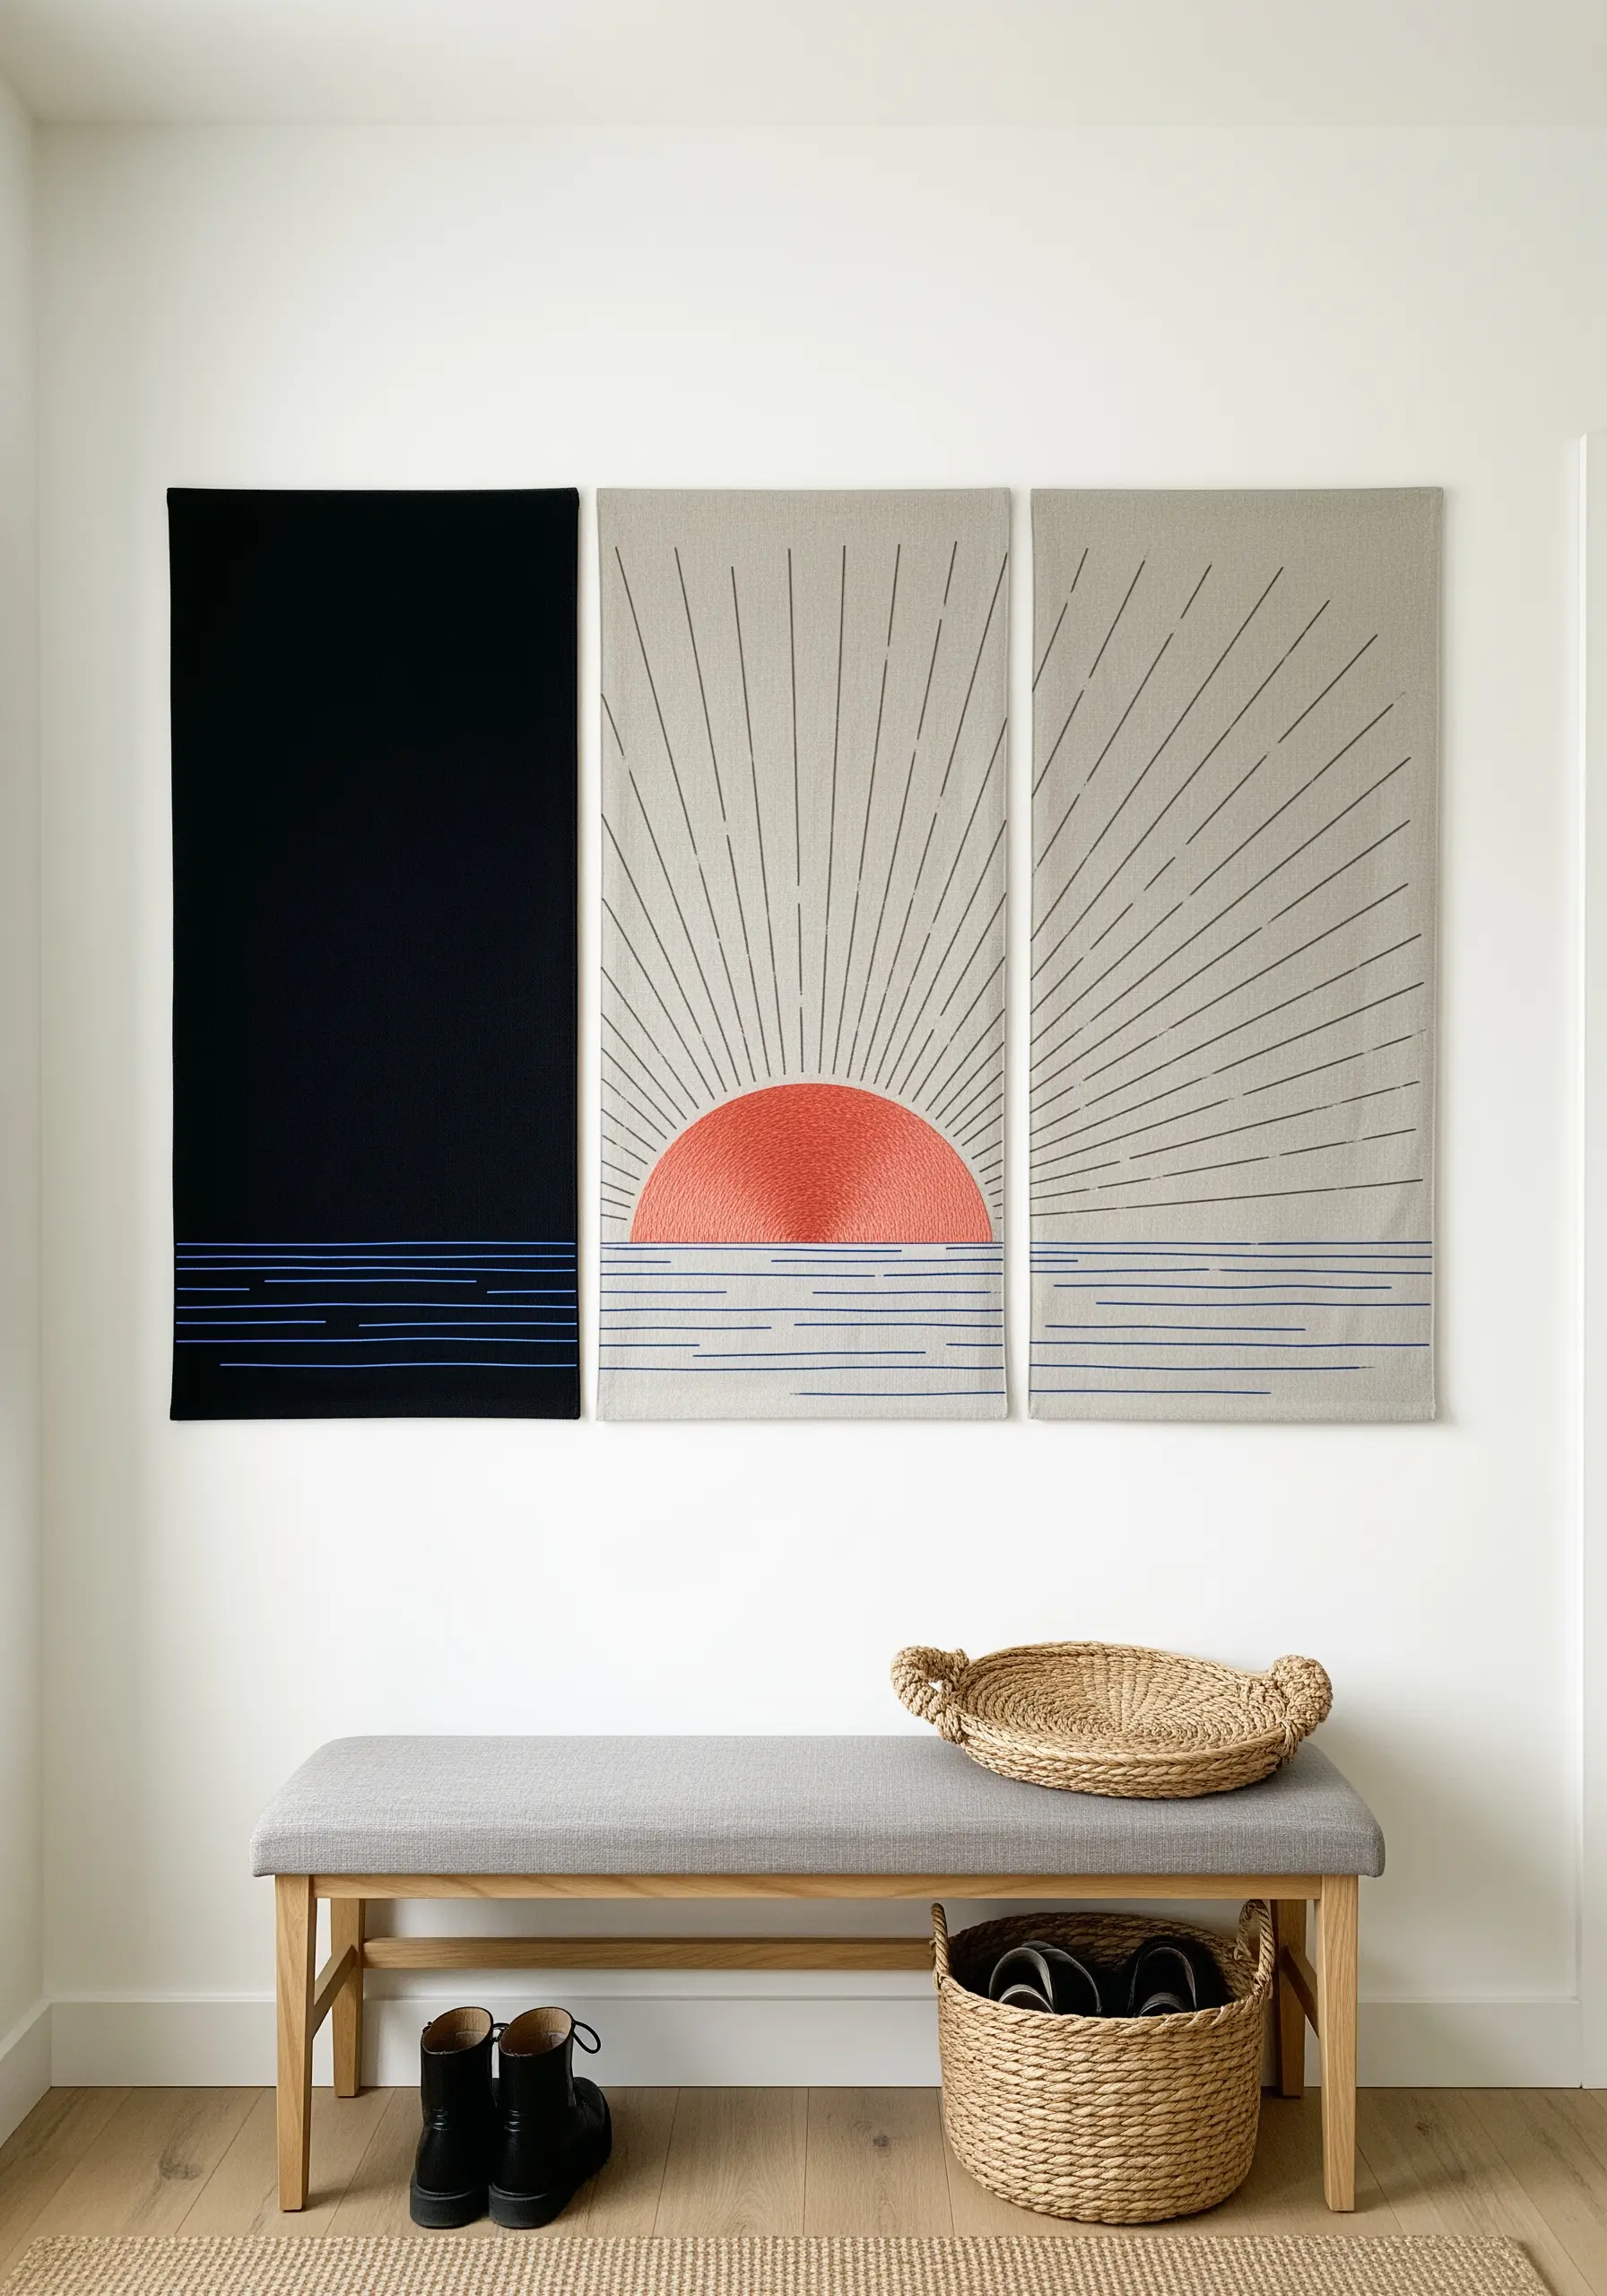
Create a large-scale, impactful piece of art by dividing one continuous design across a triptych of fabric panels.
This technique allows you to work on a more manageable scale while achieving the effect of a major installation.
Ensure your design lines up perfectly by transferring the entire pattern first, then cutting the fabric into panels.
The narrow gaps between the panels become part of the composition, adding a modern, graphic quality to your abstract line art embroidery styles.
17. Add a Graphic Touch to Functional Objects
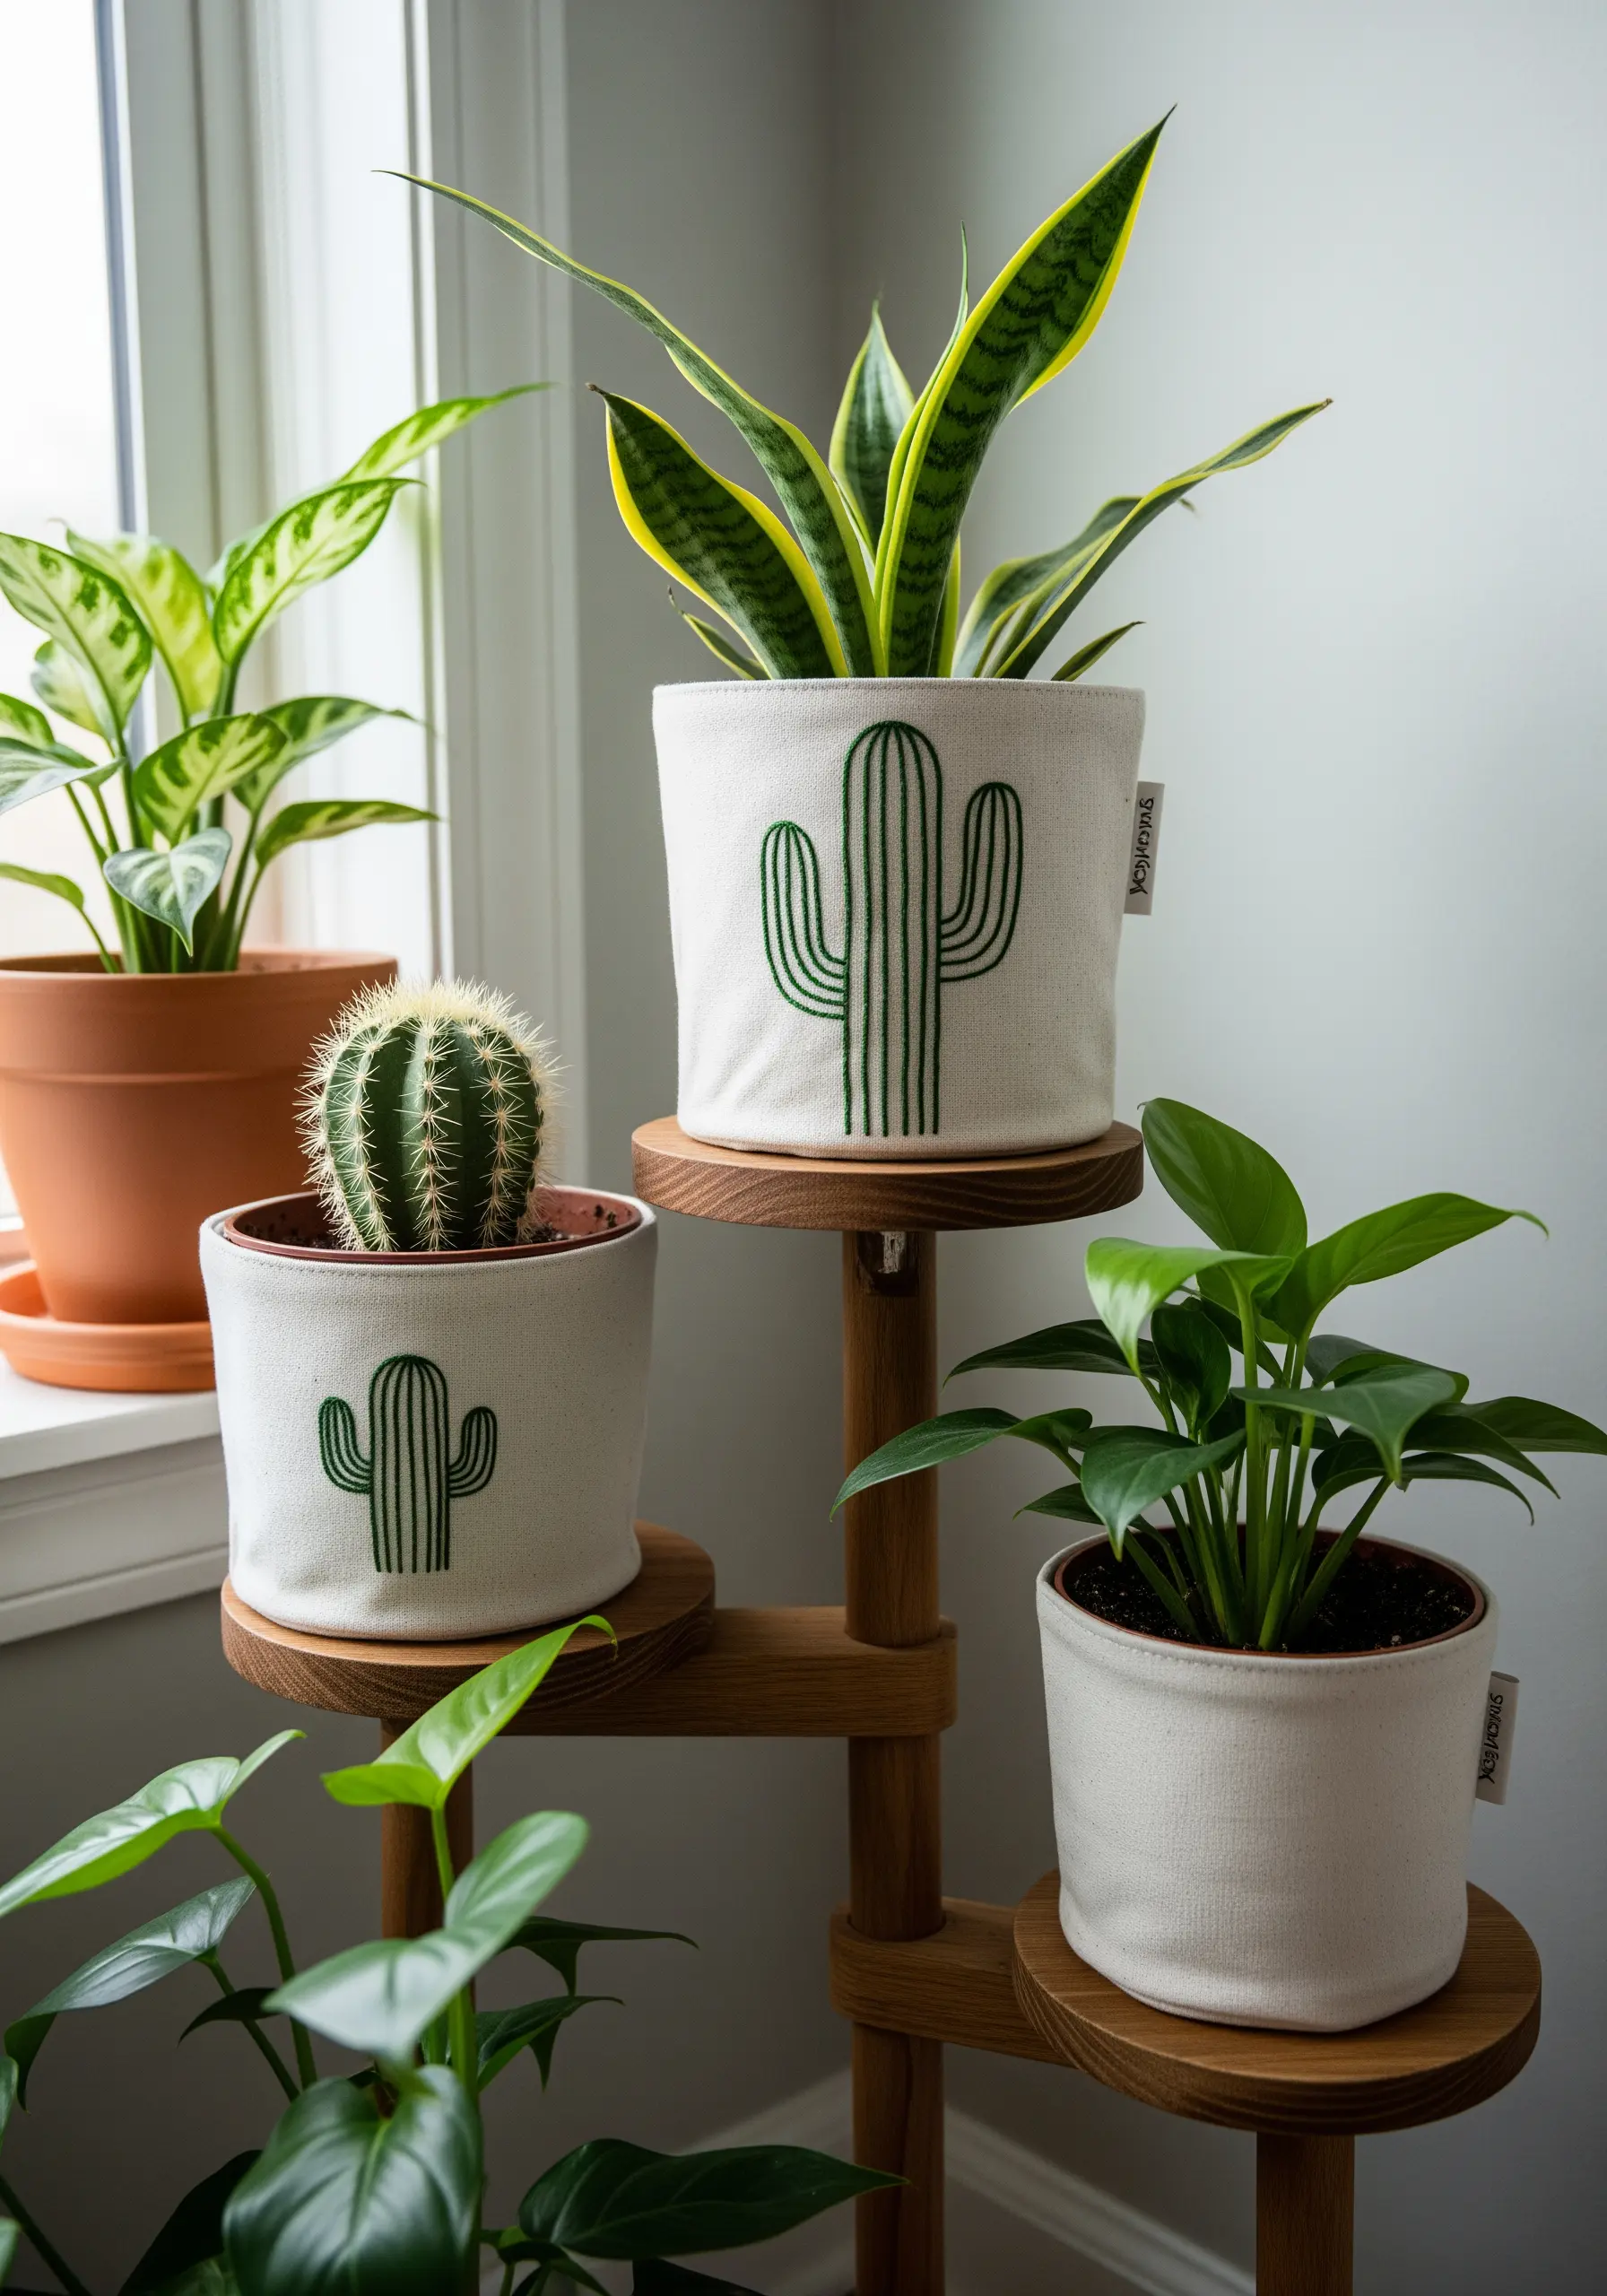
Personalize everyday items like canvas planters with simple, bold line art embroidery.
For a clean, graphic cactus, use parallel rows of a thick stitch like the stem stitch. This creates defined lines that are quick to execute and visually effective.
Choose a high-contrast thread color to make the simple design pop against the neutral canvas.
This is a fast and satisfying way to infuse handmade charm into small DIY planters and other home accessories.
18. Frame Your Composition with a Stitched Border
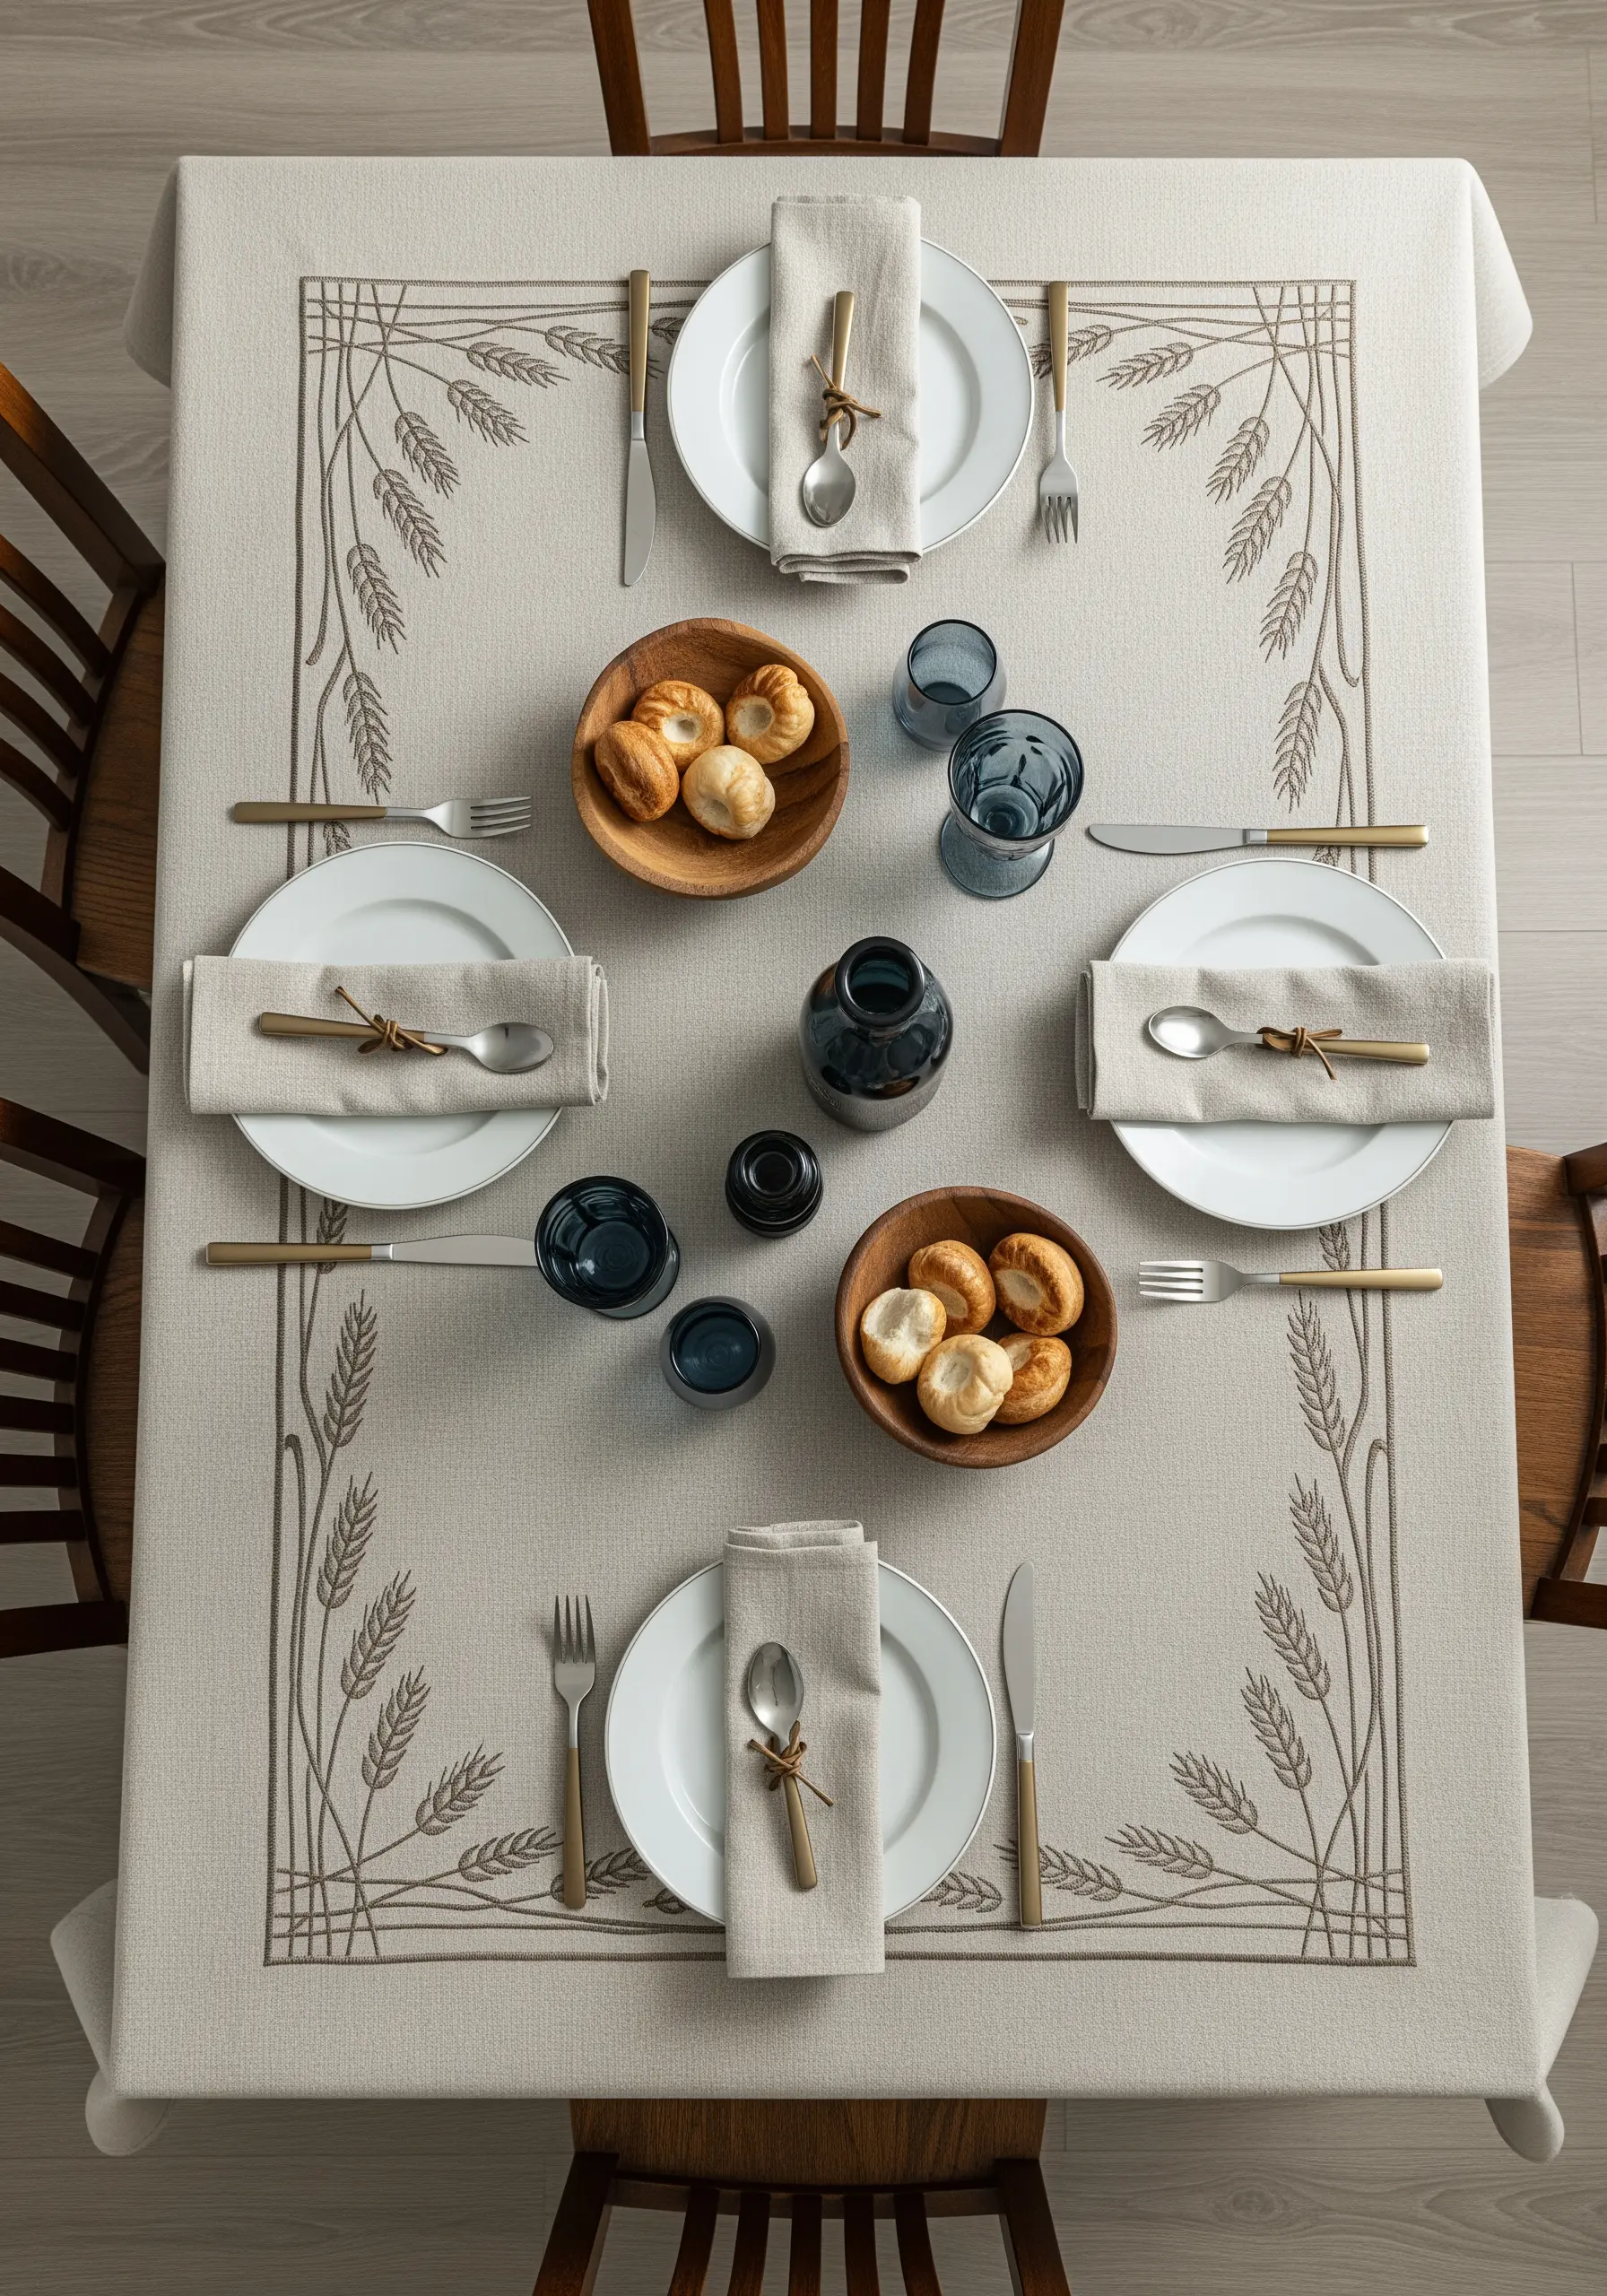
Give your table linens a formal, finished look by enclosing your central design within an elegant stitched border.
Combine simple geometric lines with delicate, nature-inspired motifs like wheat sheaves at the corners for a classic aesthetic.
A simple backstitch or stem stitch is perfect for this type of line work, ensuring clarity and precision.
This framing technique contains the design, drawing attention to the center of the table and creating a sense of occasion. It’s a hallmark of many cultural table linen embroidery styles.
19. Stitch with Metallics on Velvet for Pure Luxury

Create a truly opulent effect by pairing the sheen of metallic thread with the deep pile of velvet.
To prevent your stitches from sinking and disappearing into the fabric, use a layer of topping stabilizer (like Sulky Solvy) over the velvet while you stitch.
A single strand of gold thread is all you need for a delicate yet impactful ginkgo leaf, stitched with a long-and-short stitch to create a subtle shading effect.
This combination of materials is perfect for gold thread luxury wall art projects and high-end upholstery.
20. Embellish with an Intellectual, Subtle Motif

Add a layer of meaning to your embroidery by choosing a design with a hidden story, like the Fibonacci spiral or golden ratio.
Use a single color thread, like a soft gold on white terry cloth, to keep the look minimal and elegant.
A simple backstitch provides the clean, precise lines needed for this geometric design.
This approach turns a simple set of towels into a conversation piece, reflecting a love for design, mathematics, and nature’s inherent patterns.
21. Create a Light, All-Over Pattern on a Large Scale
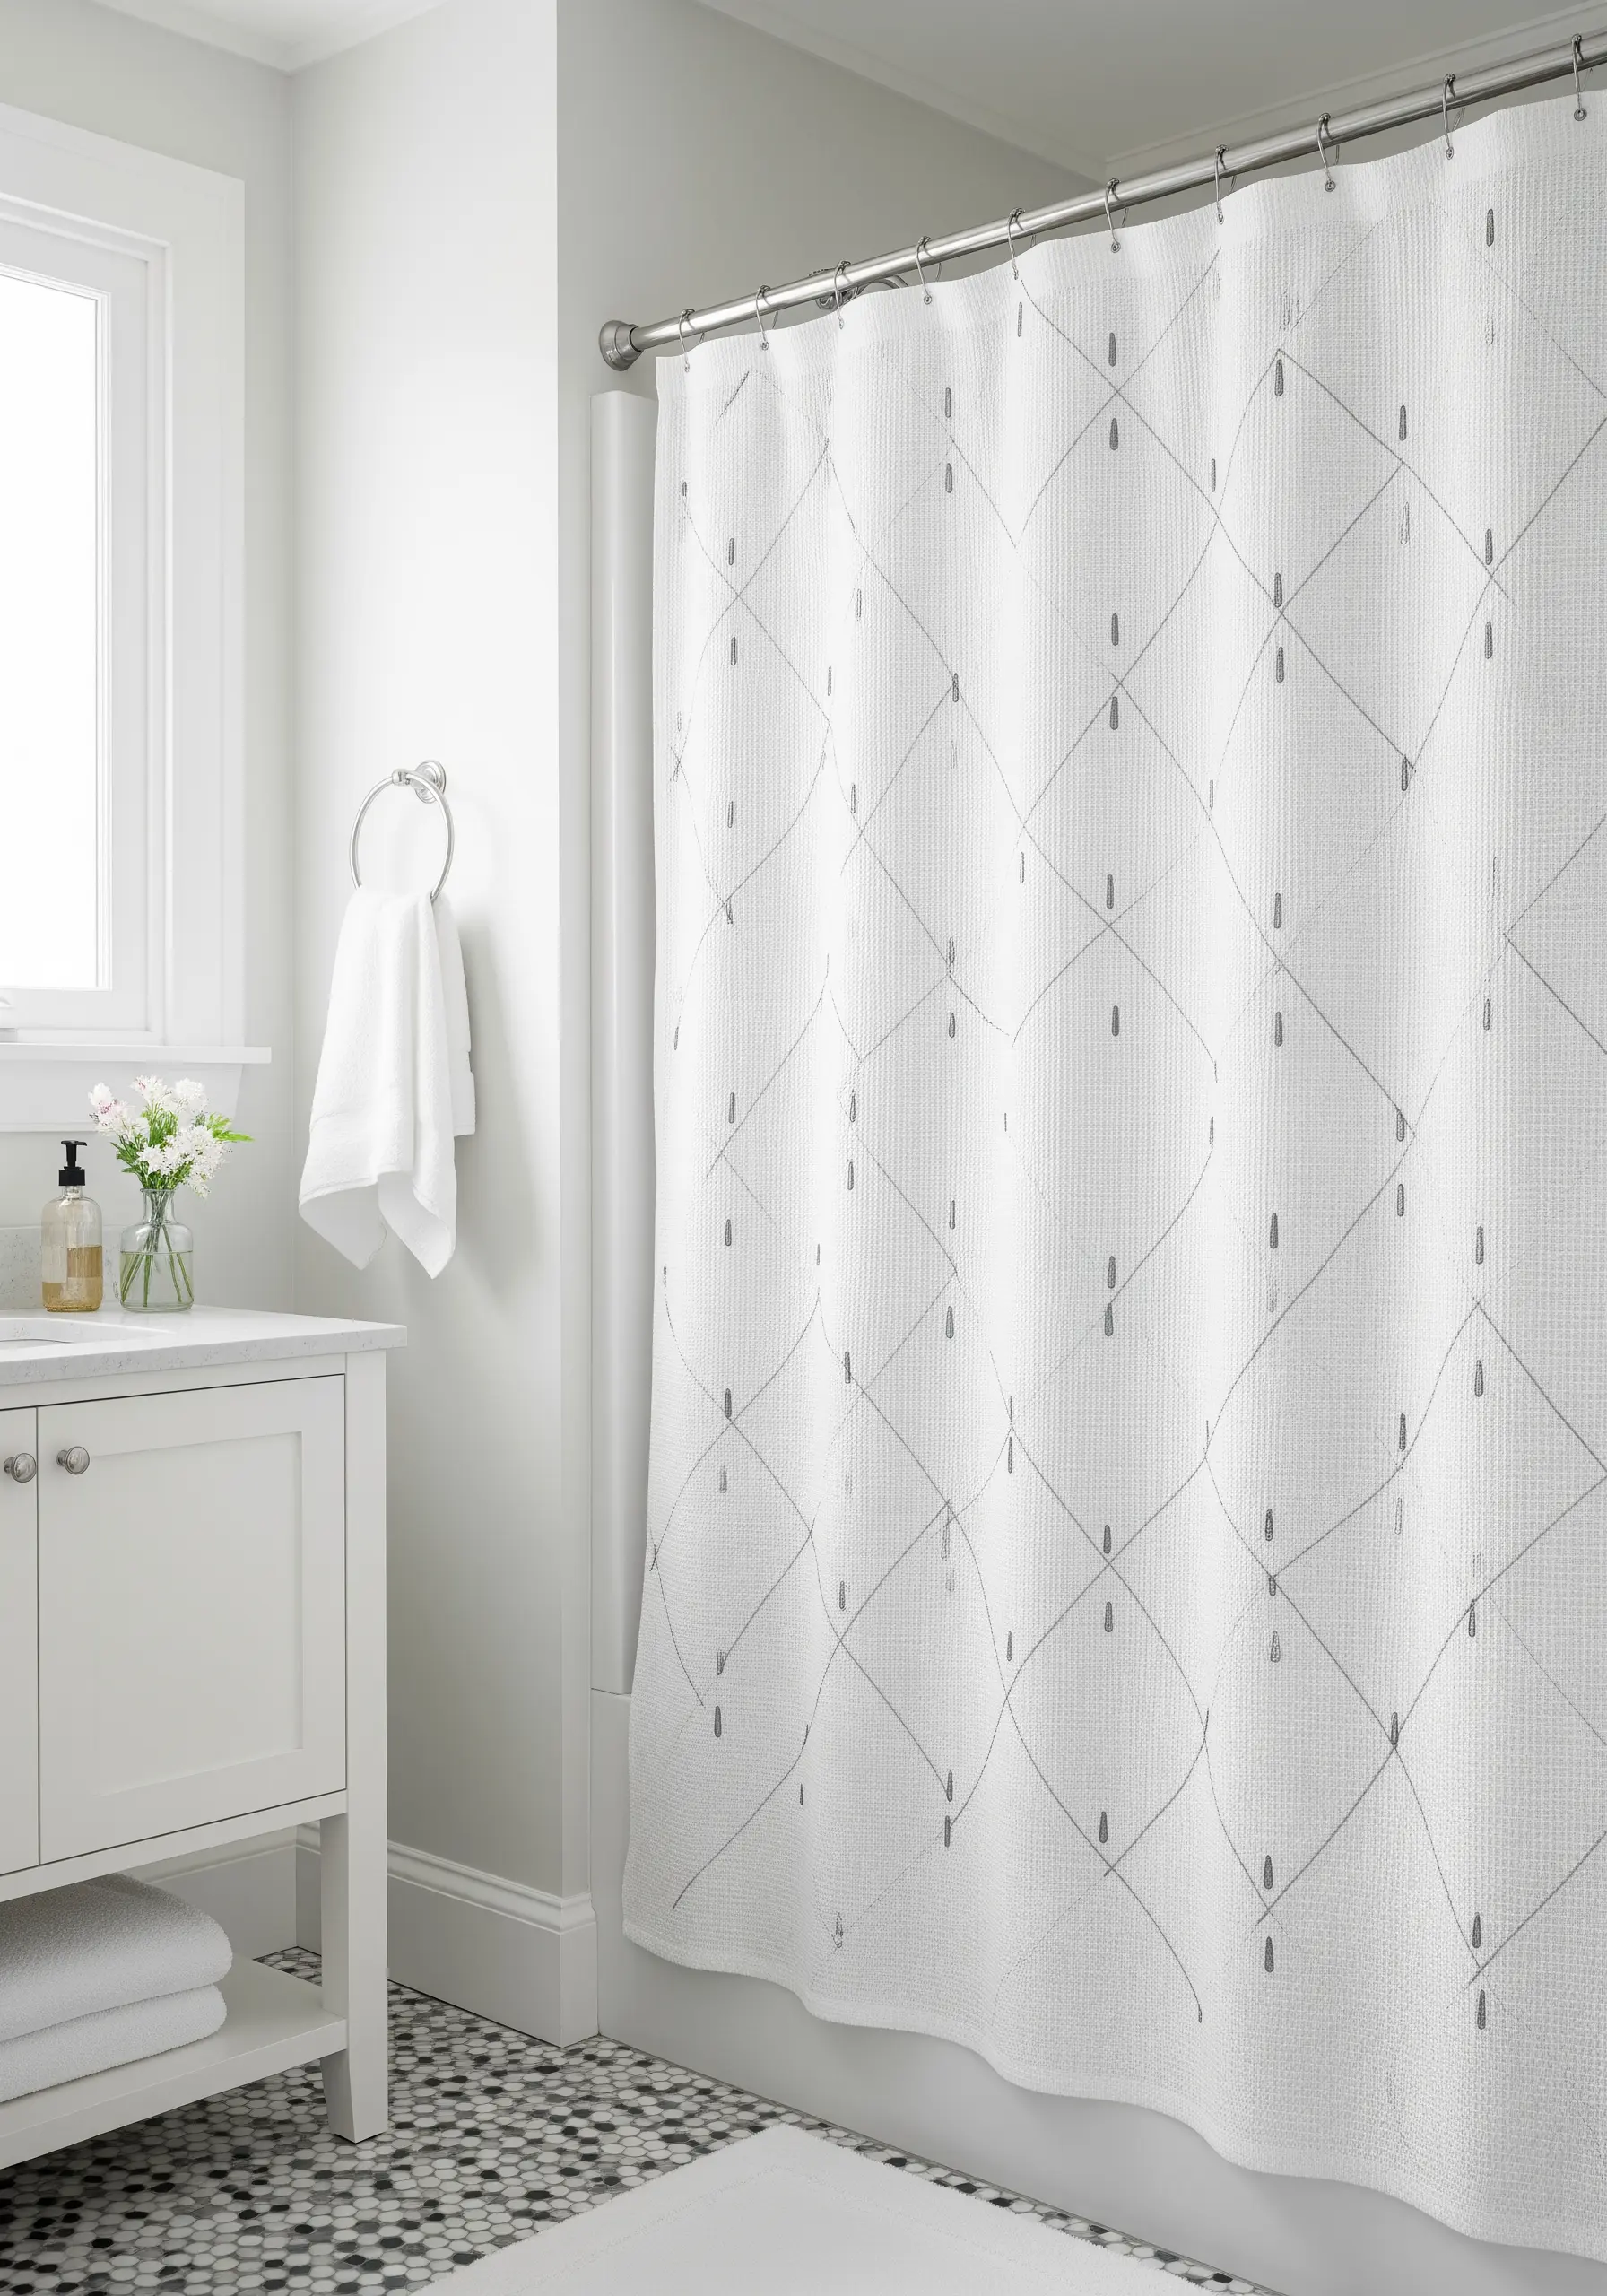
Embroider a delicate, repeating pattern on a shower curtain to add custom texture without overwhelming the space.
Choose a simple motif made of straight stitches and French knots, which are quick to complete and won’t pucker the fabric.
Use a light gray or silver thread on a white waffle-weave fabric for a subtle, spa-like feel.
A water-soluble stabilizer printed with a grid pattern can help you keep your repeating design perfectly spaced across the large surface.
22. Use Thick Yarn for Bold, Sculptural Outlines
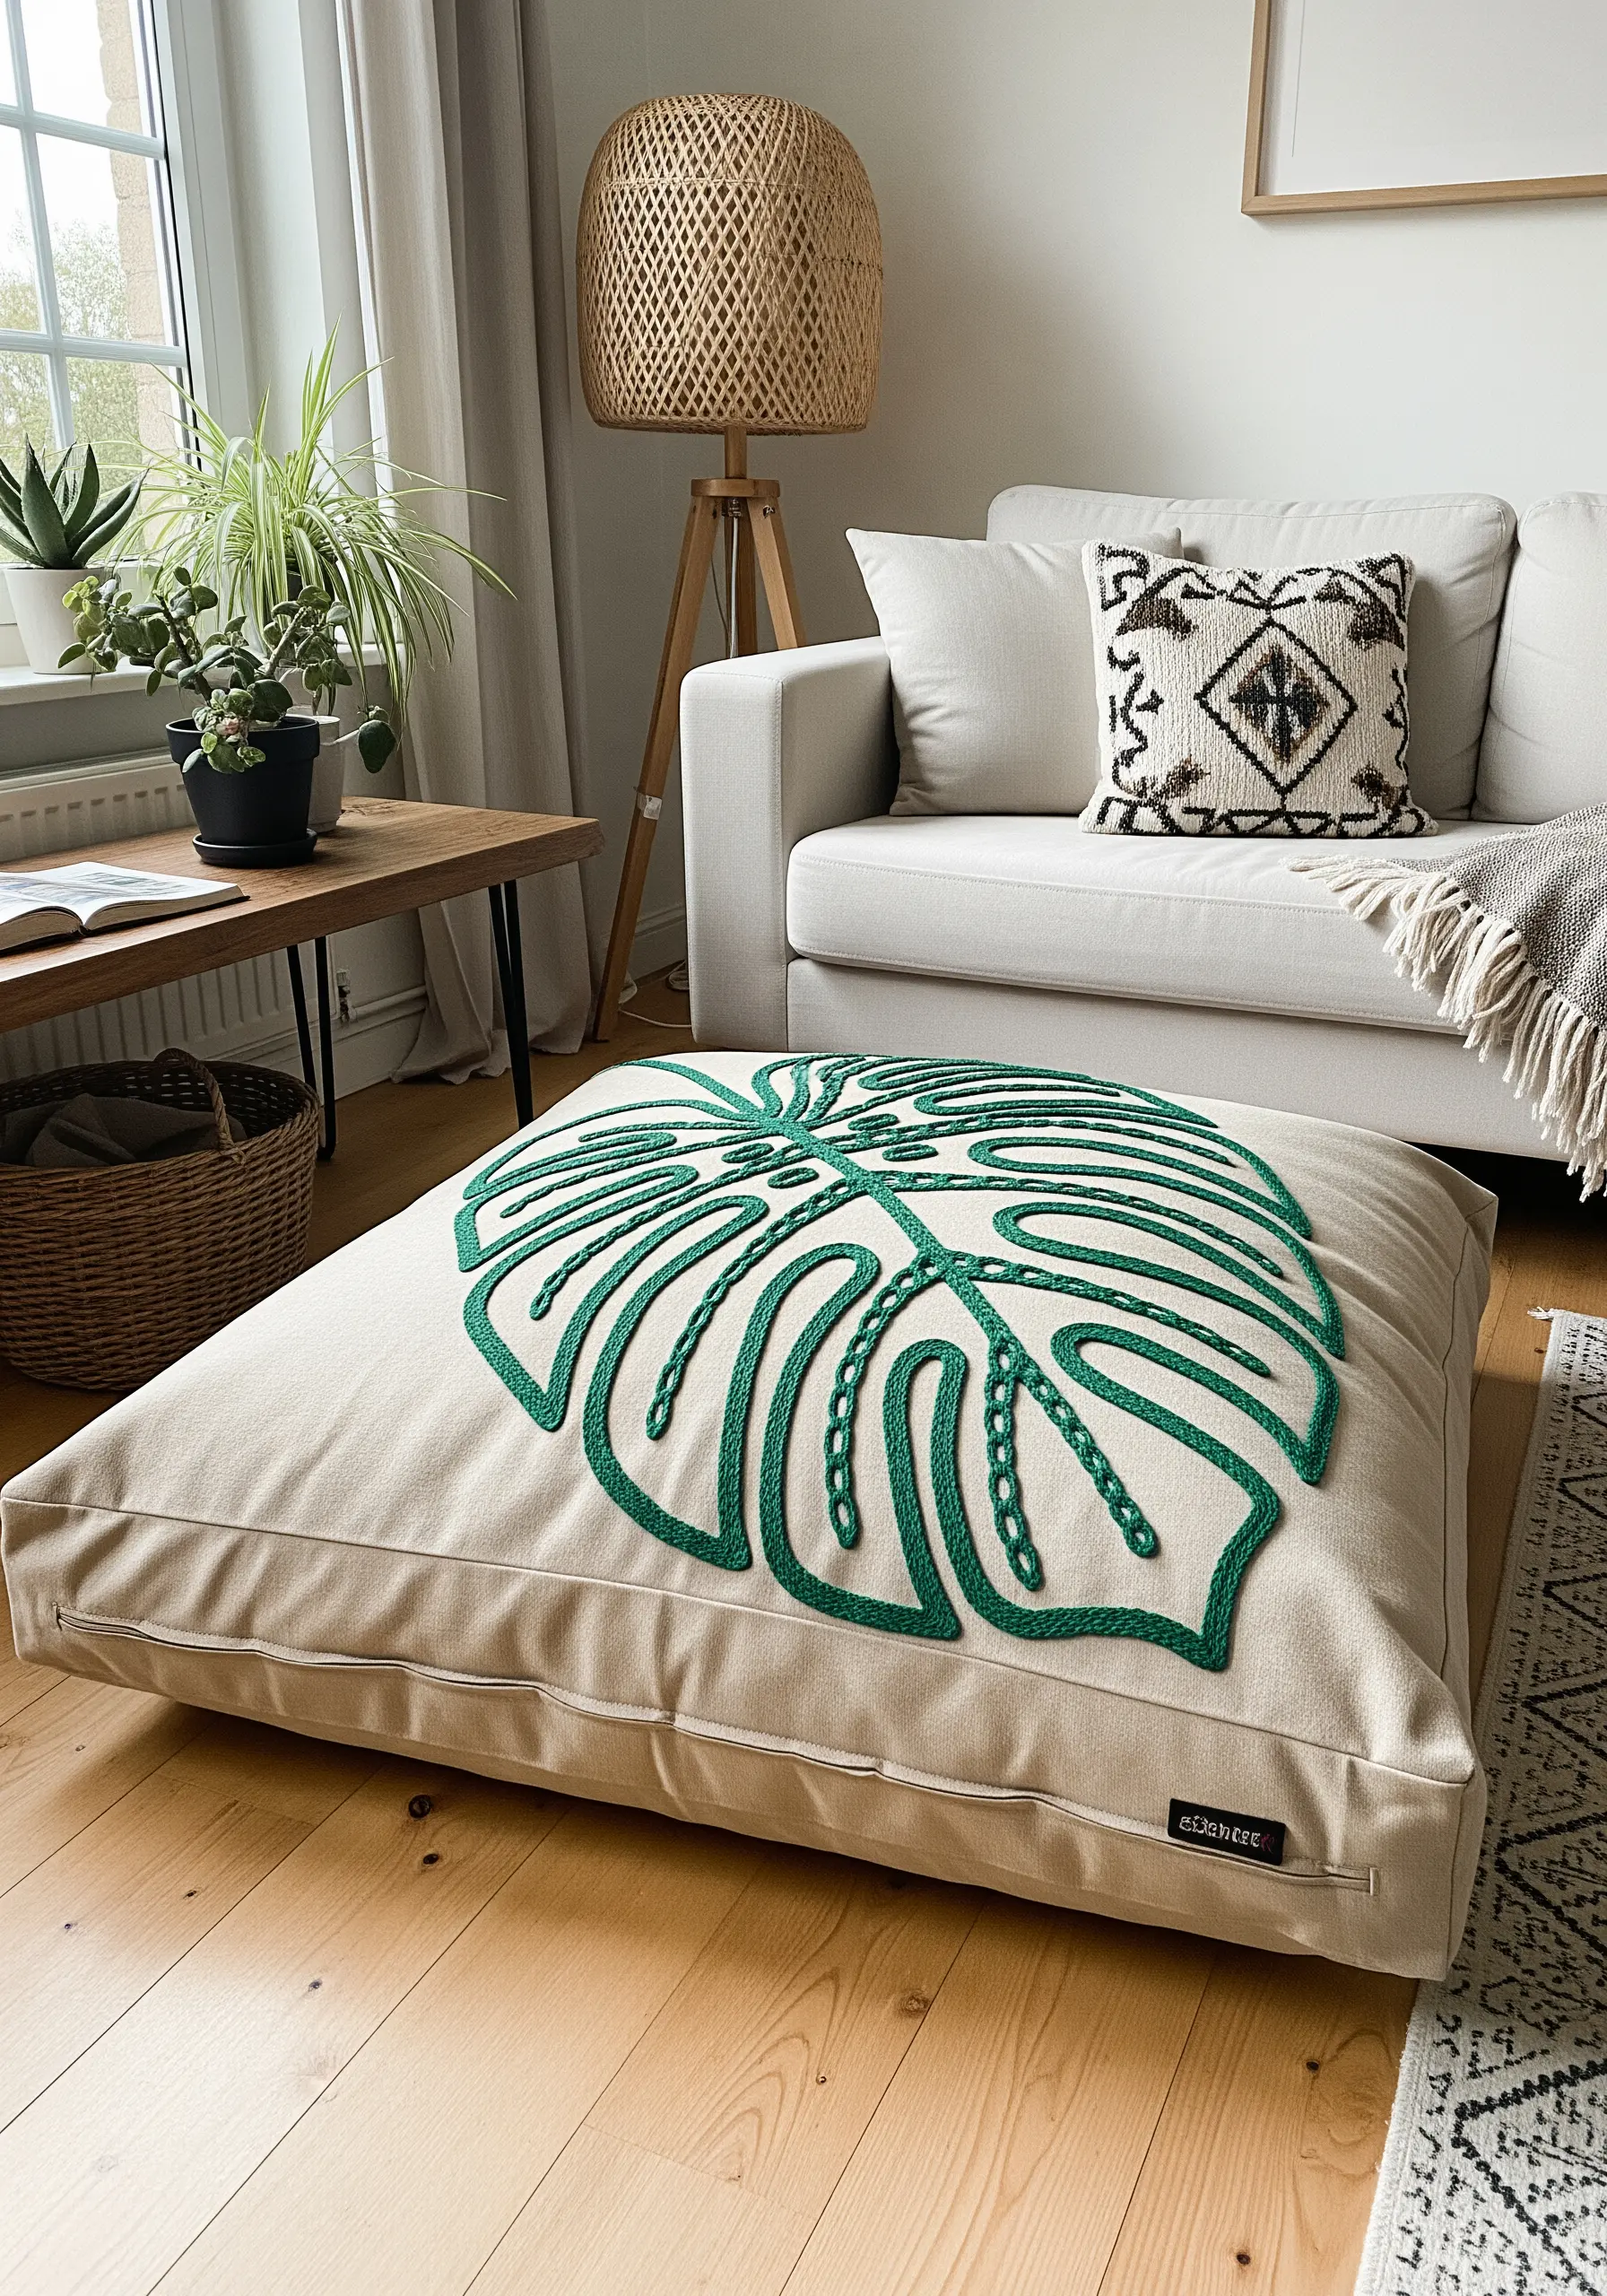
For a bold, graphic look on a large piece like a floor cushion, swap your embroidery floss for yarn.
Use a couching stitch to attach the thick yarn to the fabric surface, creating a highly dimensional and tactile outline that stands up from the canvas.
This technique is much faster than filling a large shape with satin stitch and adds a wonderful, sculptural quality.
It’s one of the best modern texture layering embroidery techniques for making a big impact.
23. Master Crisp Angles with Precision Backstitch
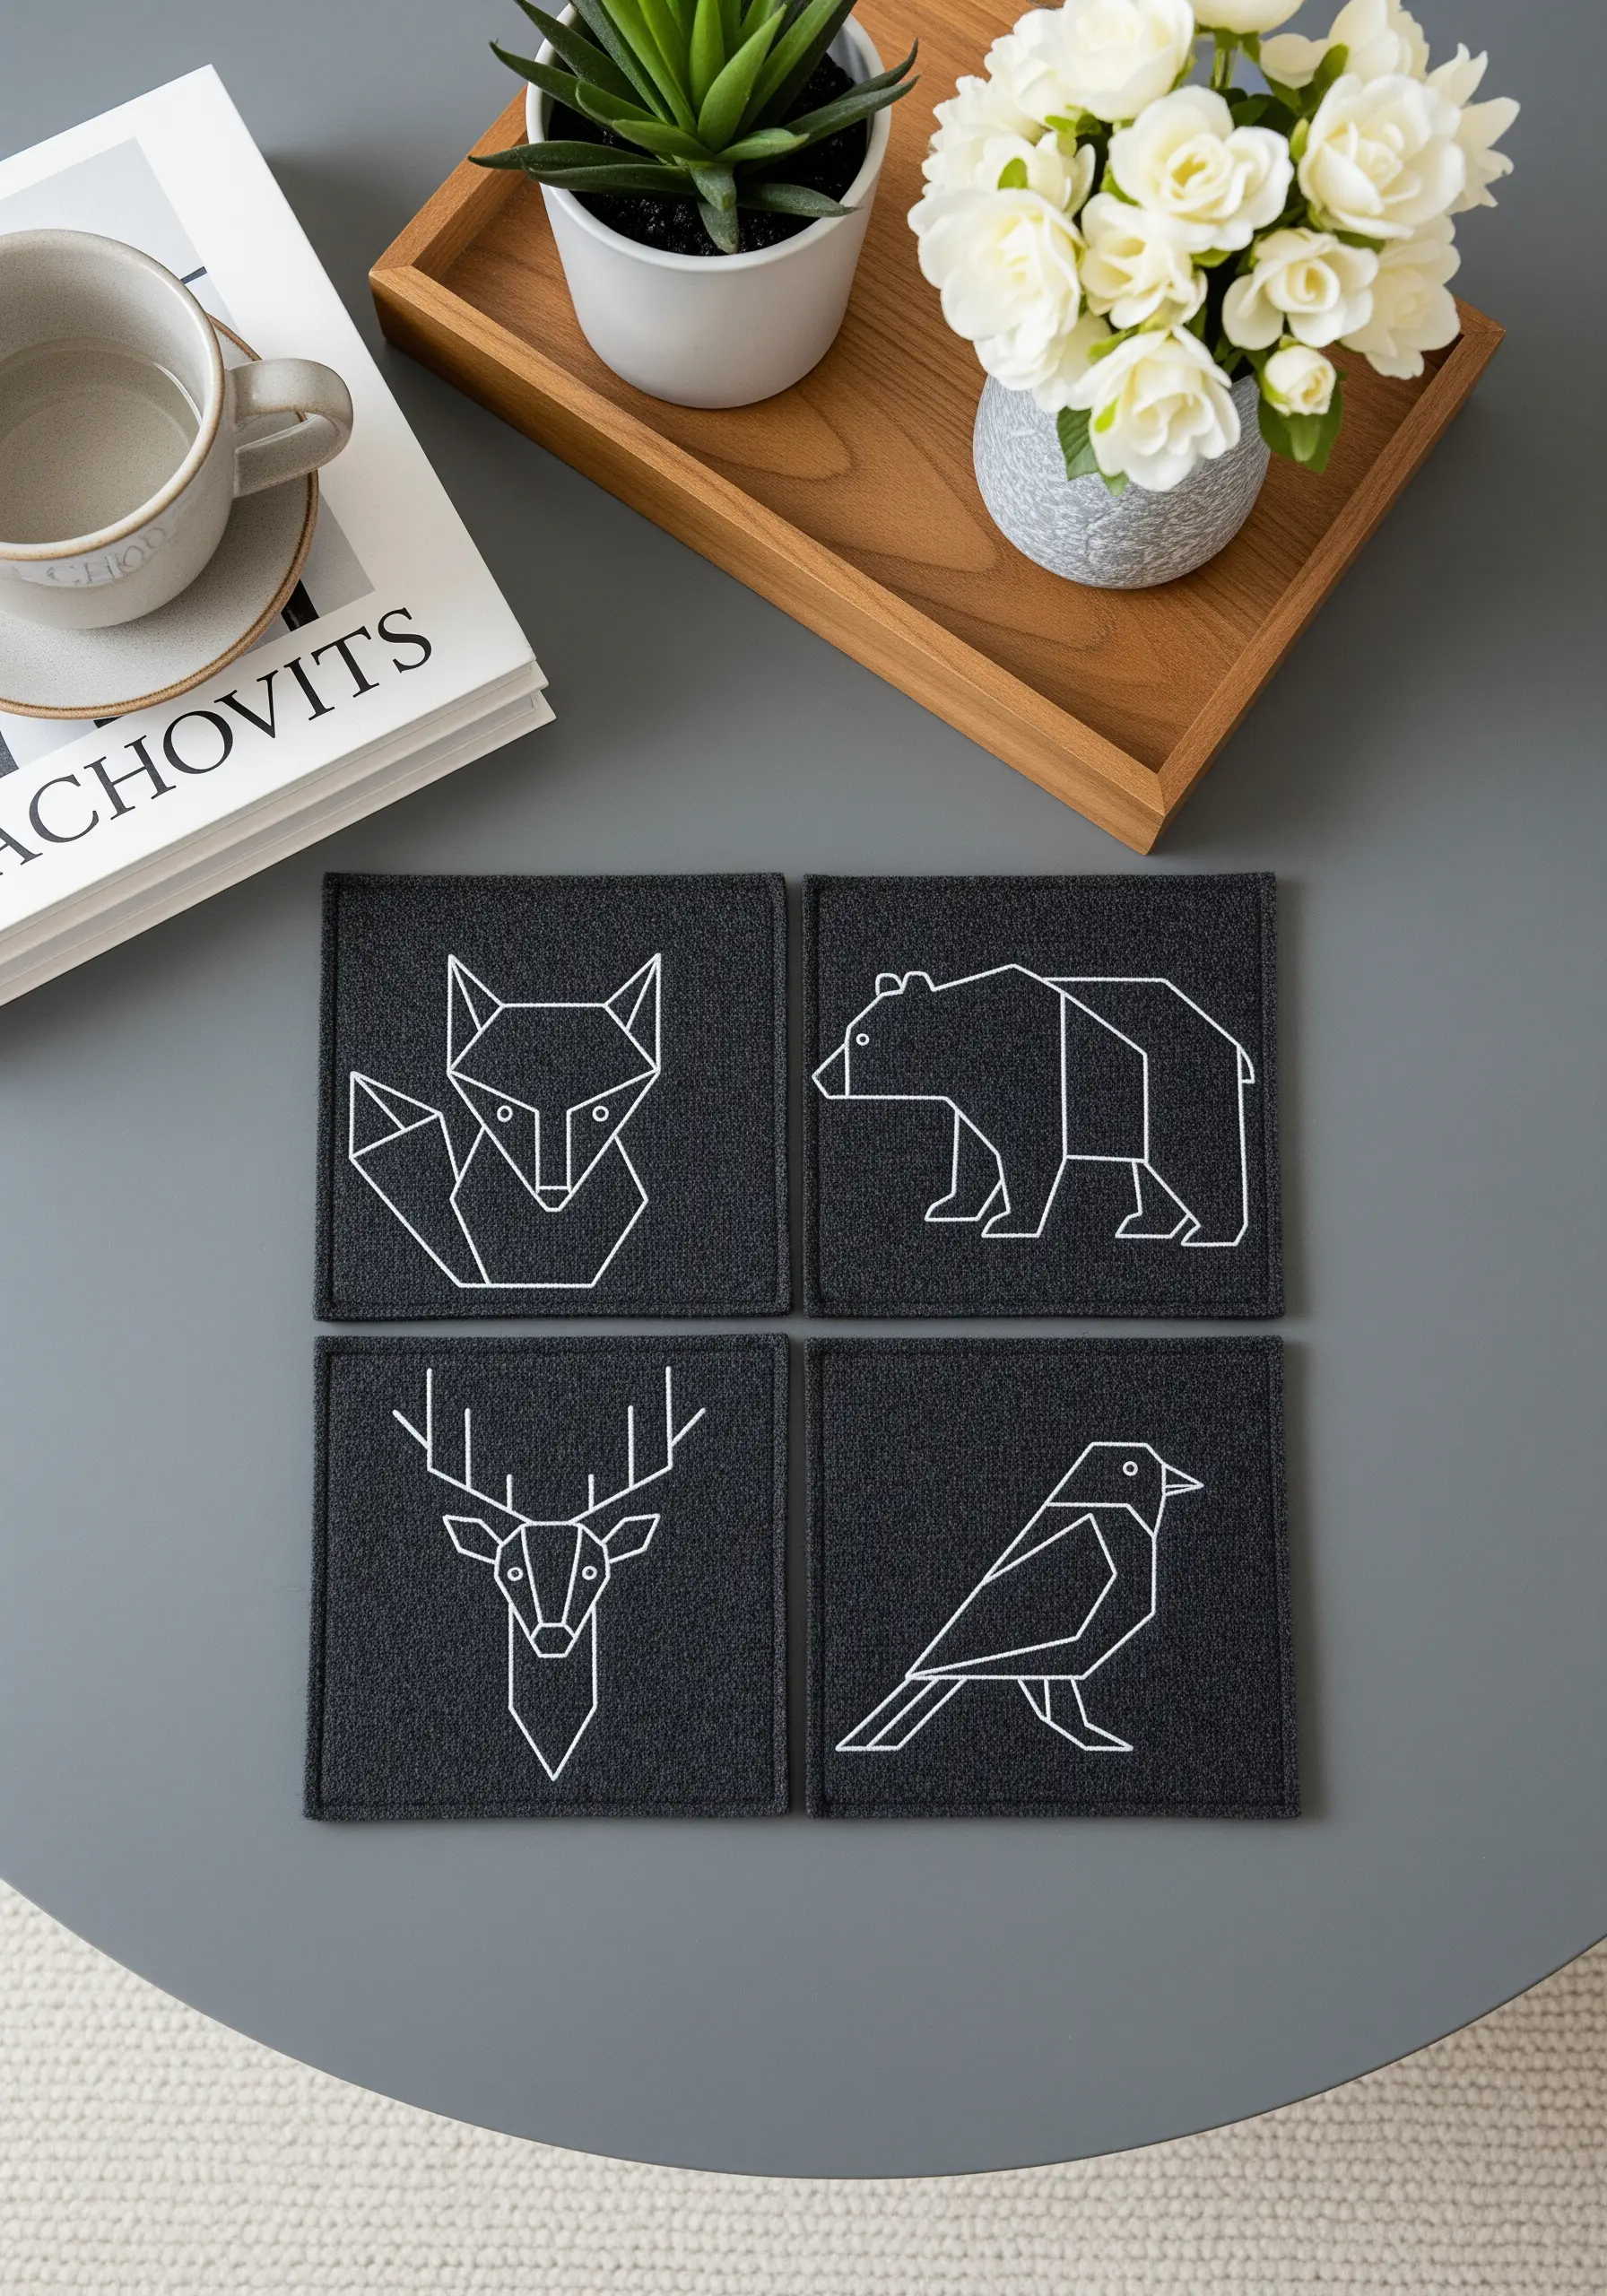
When stitching geometric animals or other angular designs, precision is everything.
Use a single strand of embroidery floss and a sharp needle to ensure your lines are as fine as possible.
A small, neat backstitch is the perfect choice for creating sharp points and perfectly straight lines. Keep your stitch length consistent for a clean, uniform look.
These minimalist line art animal designs rely on clean execution to achieve their modern, graphic appeal.
24. Integrate Pattern with a Subtle Stitched Grid
Add custom detail to upholstered furniture by stitching a simple grid directly onto the fabric.
Choose a thread color that is just one or two shades darker than the base fabric for a subtle, tone-on-tone effect.
A simple running stitch will create a delicate, dashed line that feels integrated and textural rather than printed.
This technique adds a layer of bespoke craftsmanship, making a standard piece of furniture look uniquely designed.
25. Layer Fabric and Thread to Build a Landscape

Create depth and texture in a landscape design by combining fabric appliqué with embroidery.
Cut your rolling hills from different shades of fabric and use an appliqué technique to attach them to your base, creating soft, layered forms.
Then, add fine contour lines with a simple backstitch or running stitch to suggest distance and topography.
This mixed-media approach combines the softness of fabric with the precision of thread, much like you see in mountain landscape thread painting techniques.
26. Use Line Weight to Suggest Depth and Perspective

Create the illusion of a three-dimensional scene on a flat surface by varying the thickness of your stitched lines.
For this bamboo forest, use three or four strands of floss for the stalks in the foreground to make them feel closer and more substantial.
For the stalks in the background, switch to a single strand of floss. This lighter line will naturally recede, creating a sense of depth.
This simple adjustment is a powerful tool in Japanese zen-inspired embroidery, adding dimension without complexity.
27. Construct Complex Shapes from Simple Stitches

Build an intricate snowflake motif by combining basic stitches in a structured, repeating pattern.
Start with a foundation of radiating straight stitches to form the main arms of the snowflake.
Then, add smaller straight stitches branching off the main arms to create the delicate, icy details.
Finish by placing a single French knot at the tip of each main branch to add a perfect, textural flourish. It’s a beautiful touch for festive season embroidery.


