

A small, thoughtful embroidery project is more than just a gift—it’s a quiet language of care, stitched one thread at a time. But often, the gap between the piece you imagine and the one you create feels vast. You wonder if your stitches are clean enough, if your colors harmonize, or if the finished object truly captures the feeling you intended.
Let’s close that gap. Here, you won’t find complicated patterns, but small, intentional shifts in technique that make all the difference. Think of this as a series of quiet conversations about thread, texture, and composition.
We will explore how the direction of a single stitch can change a shape, how a simple outline can create polish, and how choosing the right fabric can elevate your entire design. These are the details that transform your work from handmade to heartfelt art. You can do this, and you can begin right now.
1. Render Lavender with Dimensional Stitches
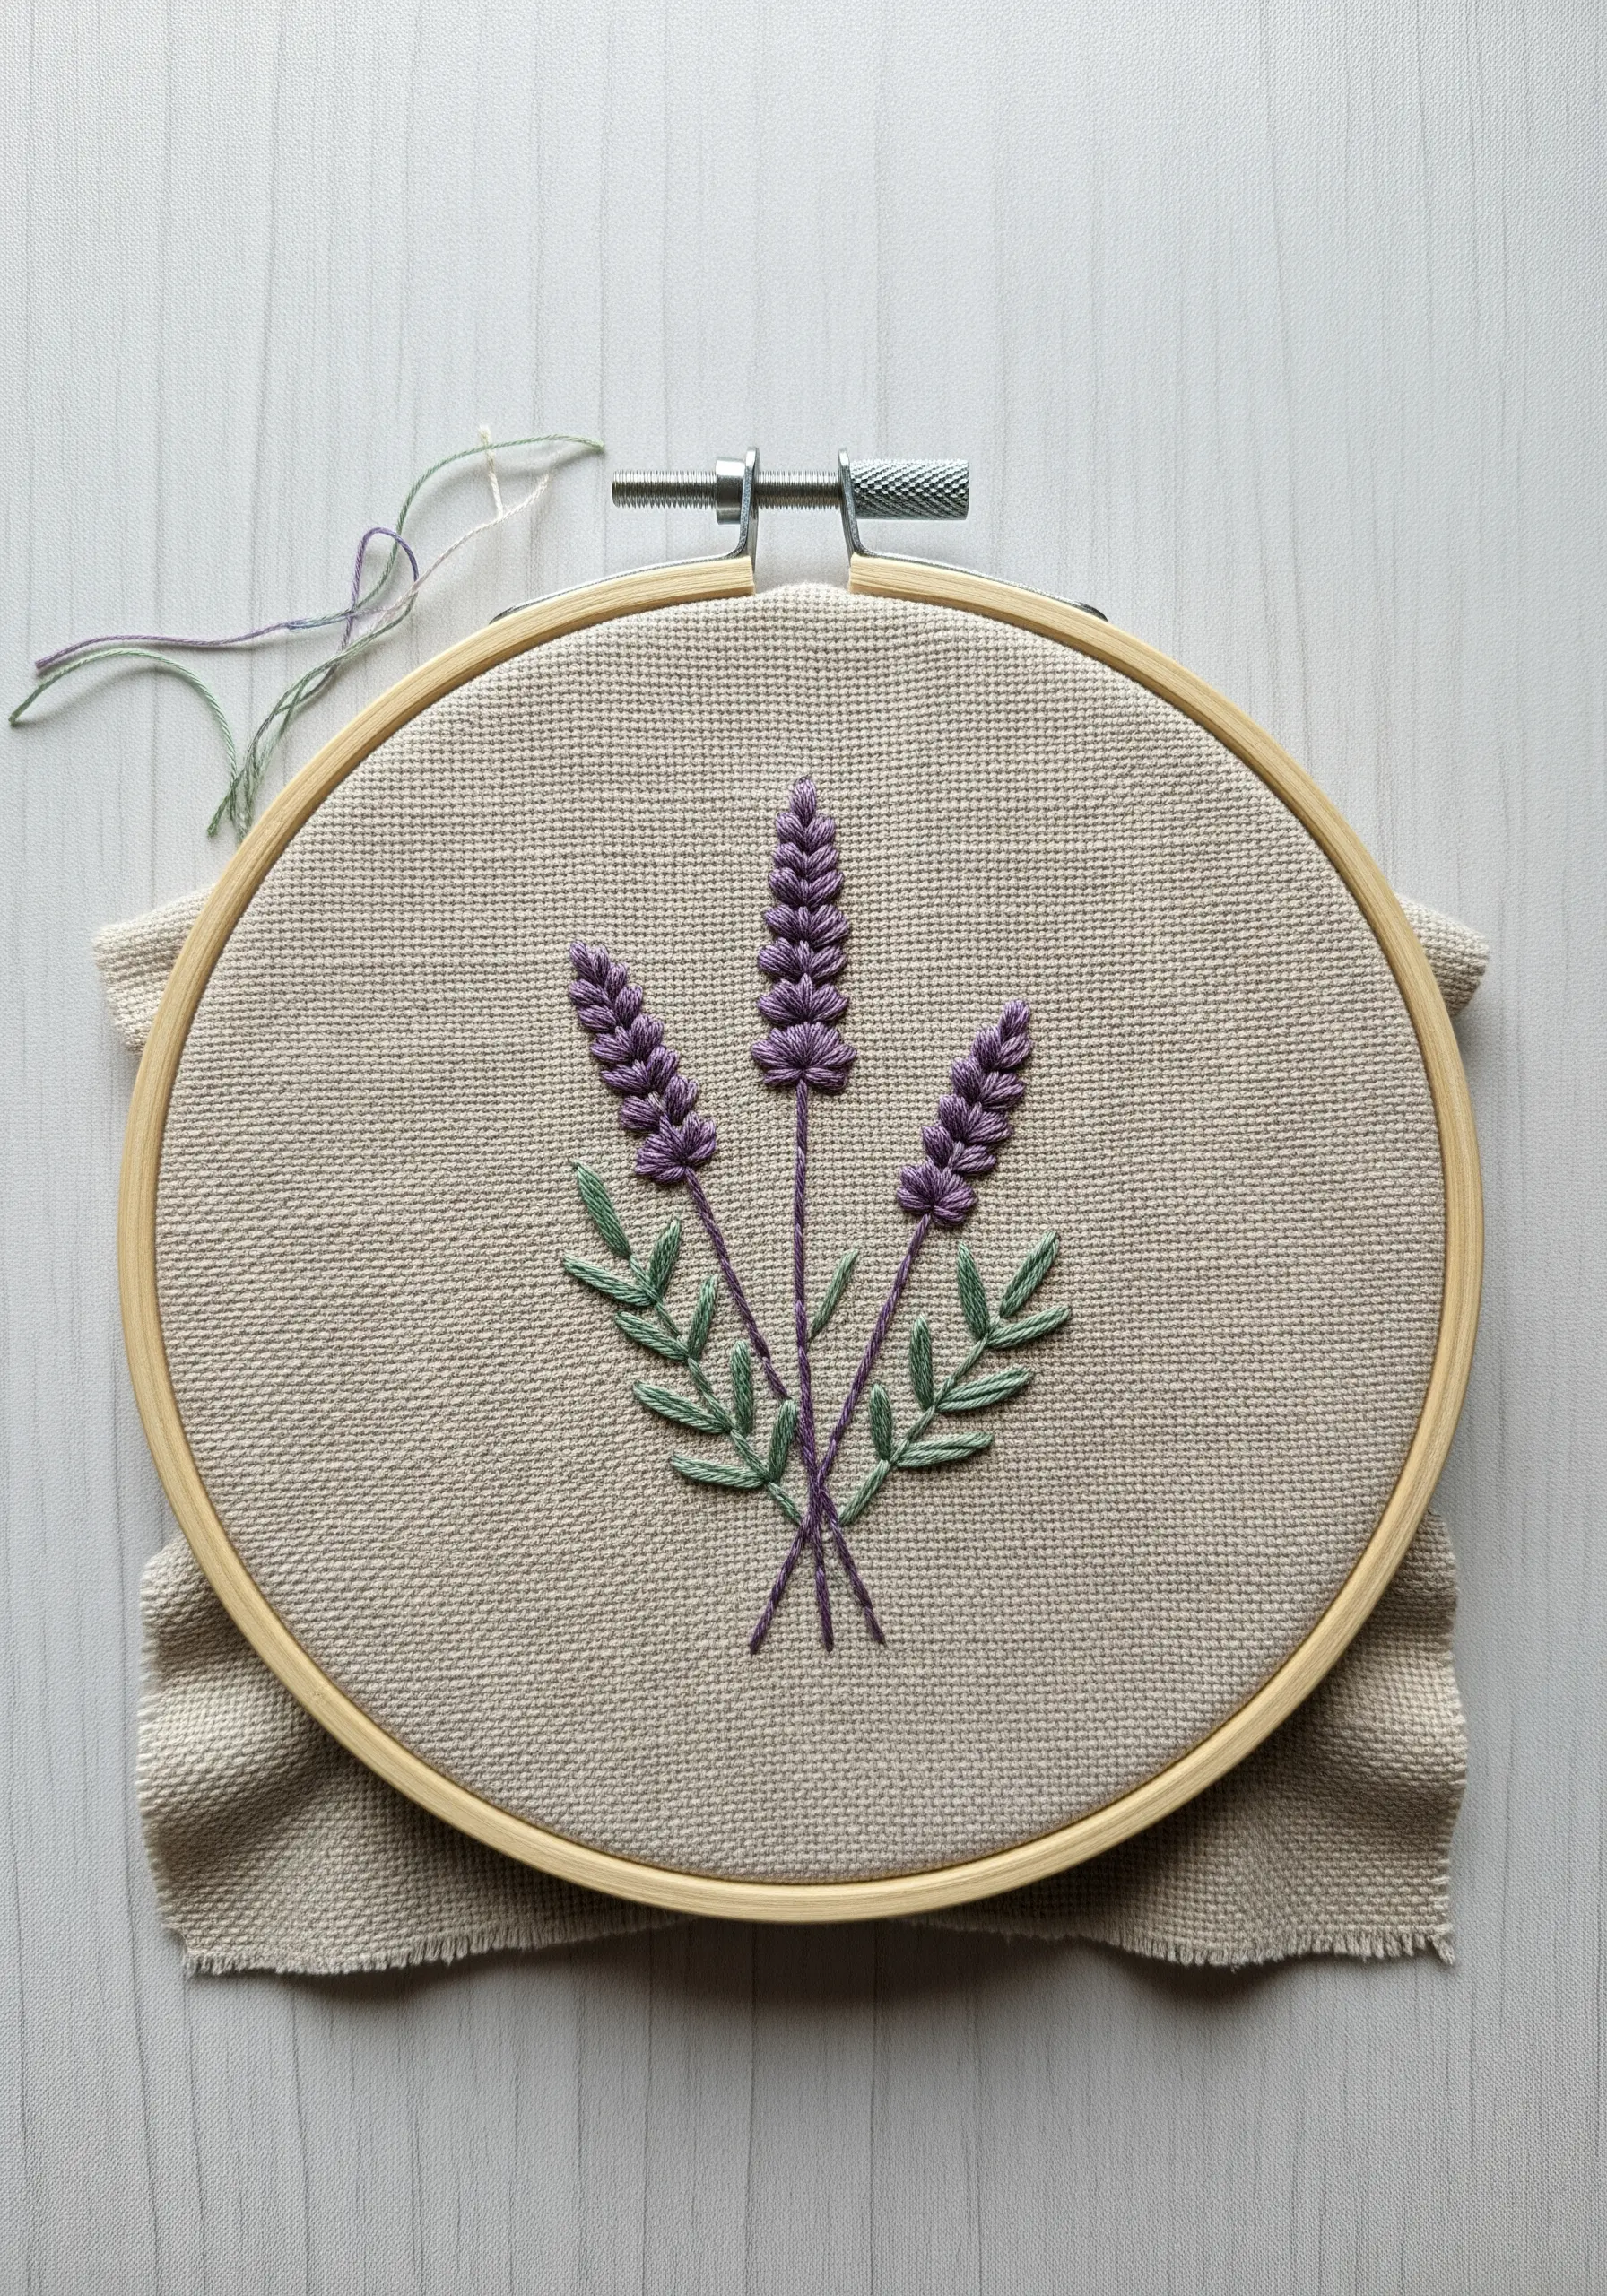
To create the textured buds of a lavender stalk, use a series of stacked lazy daisy stitches or closed fly stitches instead of simple French knots.
This method builds a more organic, elongated shape that mimics the real flower’s structure.
For the leaves, use the fishbone stitch to create a central vein and a natural, herringbone-like texture.
Stitch on a textured fabric like linen or evenweave cotton to enhance the rustic, botanical feel of the finished piece.
2. Achieve Realistic Fuzz with Thread Painting

Bring a bumblebee to life by using the long-and-short stitch for its fuzzy body, blending yellow, black, and white threads to create a soft, realistic gradient.
Use only one or two strands of floss for this technique; it allows for smoother color transitions and finer detail.
For the delicate, translucent wings, outline the shape with a single strand of light grey or off-white thread using a split stitch, then add a few straight stitches inside to suggest veins without adding weight.
This contrast between the plush body and the sheer wings creates a compelling, lifelike effect.
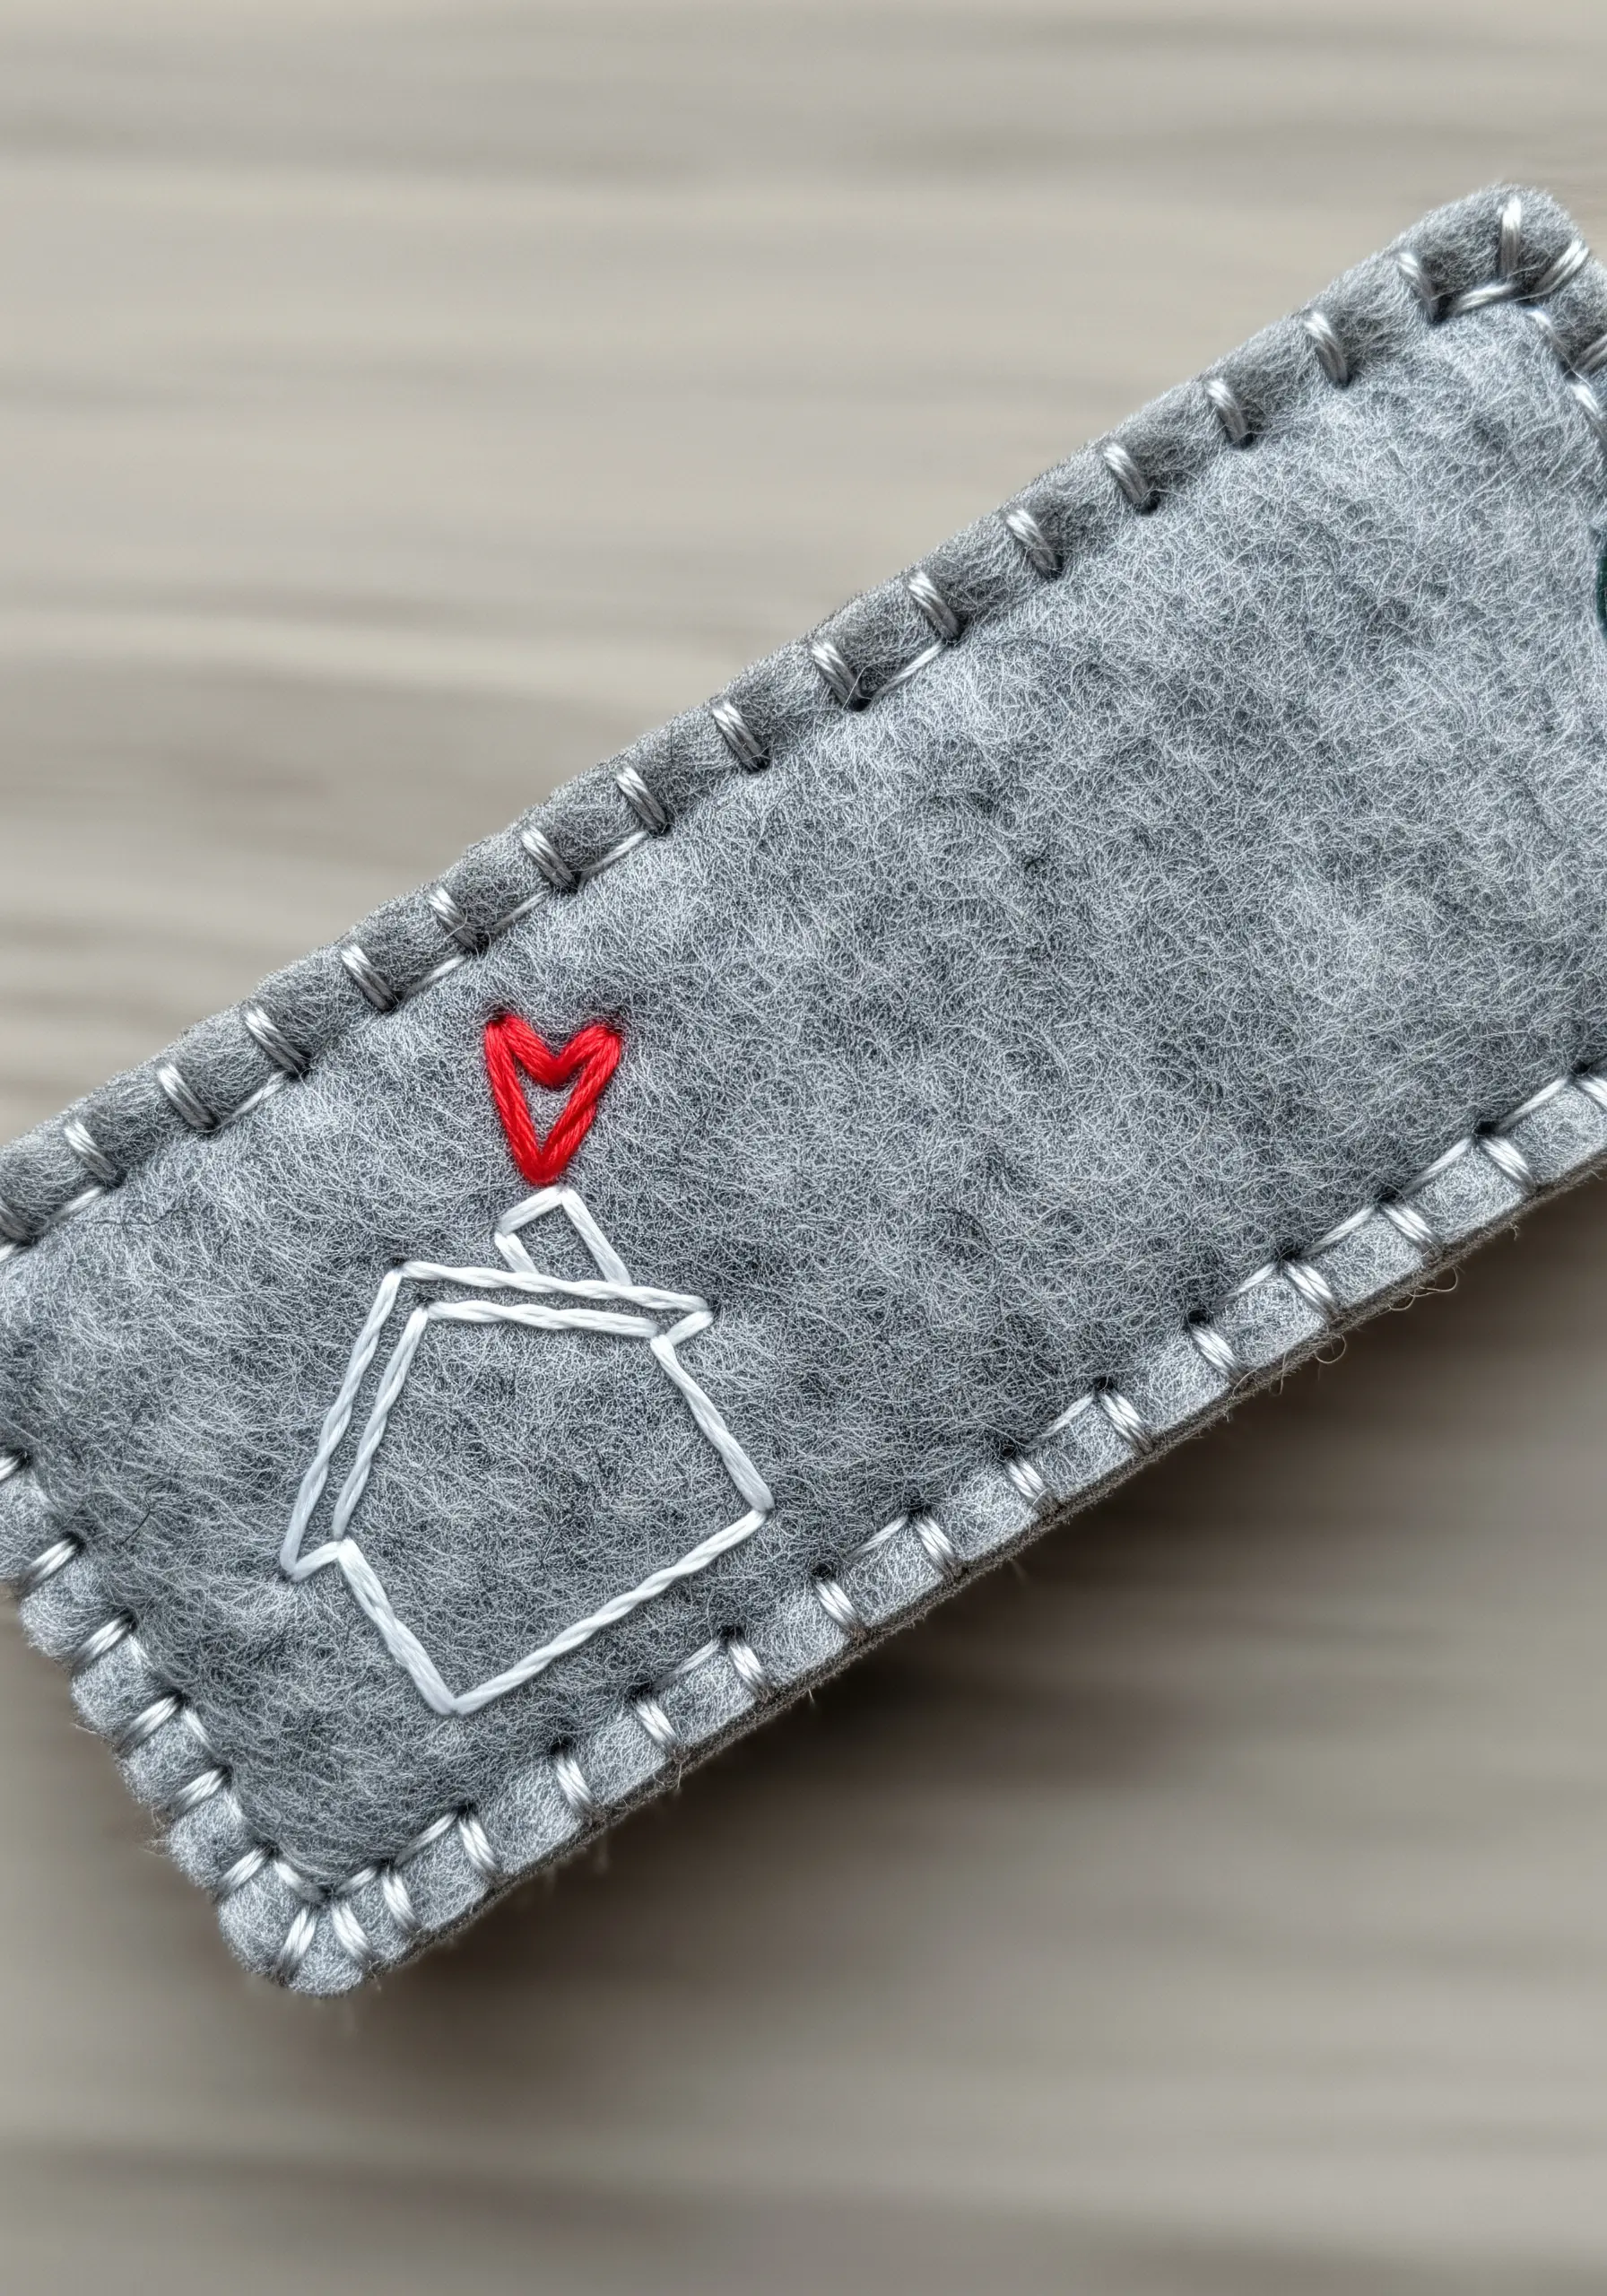
3. Master Clean Lines on Felt

When embroidering on felt, use a simple backstitch for crisp, graphic outlines like mountain ranges.
Choose a contrasting, high-quality six-strand floss and don’t separate the threads; the thickness ensures your design stands out against the dense texture of the felt.
For filled elements like a sun, a tightly worked satin stitch provides a smooth, solid block of color that contrasts beautifully with the fabric’s soft surface.
This technique turns a simple felt pouch into a modern, minimalist accessory.
4. Illuminate Dark Fabric with Metallic Thread
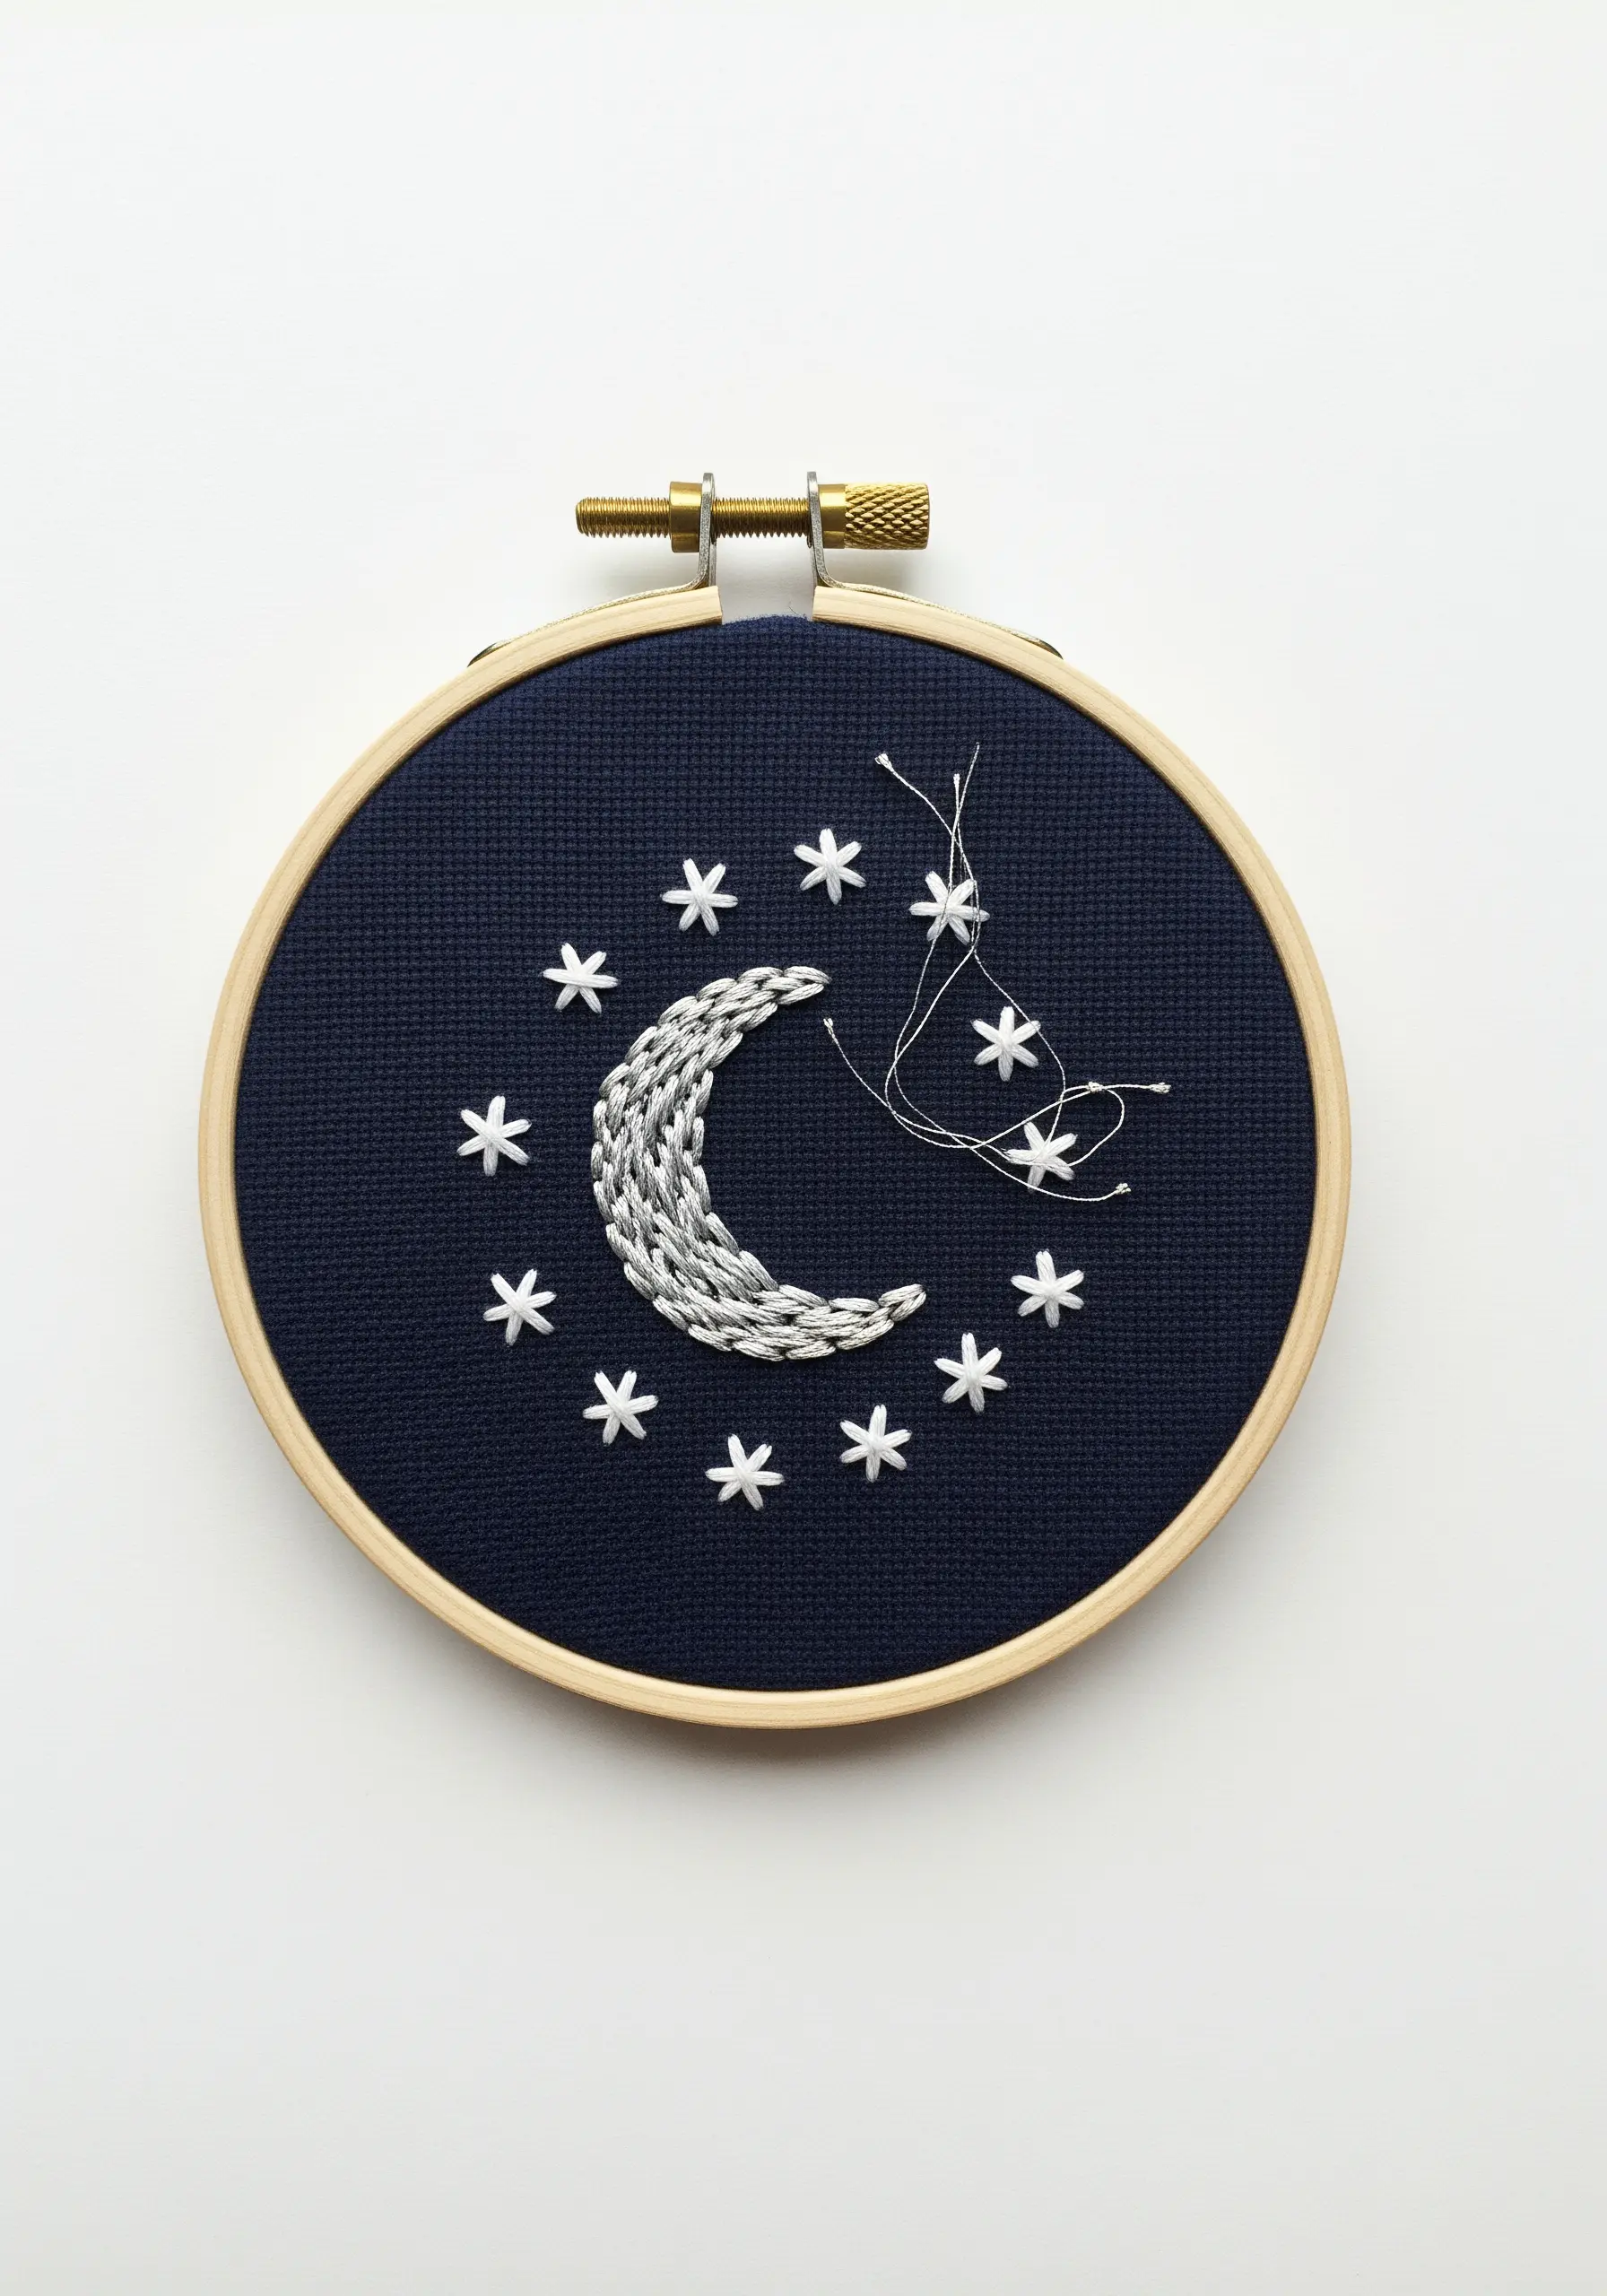
Create a striking celestial scene by stitching with metallic or silver thread on dark navy or black fabric.
To create the textured crescent moon, use a couching stitch—lay down a thicker metallic thread and tack it in place with a thinner, matching thread—for a raised, rope-like effect.
For the stars, use a simple star stitch or even a single lazy daisy stitch with a French knot center to add variety and sparkle.
This contrast of light on dark is essential for creating luminous night-blooming floral stitch themes and celestial designs.
5. Stitch with Precision on Paper

Embroidering on paper or cardstock creates an exceptionally clean and modern look, perfect for a handmade card or framed art.
First, lightly trace your design, then pre-pierce the stitching holes with your needle or a pin tool to prevent the paper from tearing as you stitch.
Use a fishbone stitch to create the fern’s intricate leaflets; its structure naturally forms the central stem and angled leaves in one fluid motion.
This is one of the many paper art projects that transform ordinary stitches into sharp, graphic statements.
6. Add a Whimsical Touch to Denim

Personalize a denim jacket with a small, playful motif that tells a story.
Use a sharp, sturdy needle to easily penetrate the thick fabric, and choose a bright white six-strand floss for high contrast.
A simple satin stitch can fill the body of a paper airplane, while a dashed backstitch creates a whimsical flight path.
These minimalist pocket embroidery ideas for jeans add a touch of personality without overwhelming the garment.
7. Build Playful Texture with Knots and Daisies

Create a delightful strawberry by combining three simple stitches for maximum texture.
Fill the body with a dense satin stitch, then scatter tiny French knots or seed stitches on top to represent seeds, adding dimension and realism.
For the leaves, a fishbone or satin stitch works well, but top it off with a few lazy daisy stitches to form small, charming flowers.
This layering of different textures makes the motif feel dynamic and tactile.
8. Elevate Line Art with a Whipped Backstitch

Transform a simple line-art design into a polished motif by using a whipped backstitch.
First, create your outline with a standard backstitch, then whip the stitches with a second pass of thread without piercing the fabric.
This technique creates a smooth, solid, and slightly raised line that looks far more refined than a simple backstitch, making it ideal for elegant designs on table linens.
It is one of the most effective DIY embroidery ideas for a calm minimalist kitchen space.
9. Capture Delicate Details with Single-Strand Thread

When stitching fine details like the gills of a mushroom, switch to a single strand of embroidery floss.
This allows you to create incredibly delicate, precise lines that would be impossible with thicker thread.
For the mushroom caps, use a long-and-short stitch to blend earthy tones, creating a gentle gradient that adds depth and realism.
Pairing these delicate details with broader stitches elevates simple forest floor botanical stitch ideas into miniature works of art.
10. Define Satin Stitch with a Sharp Outline
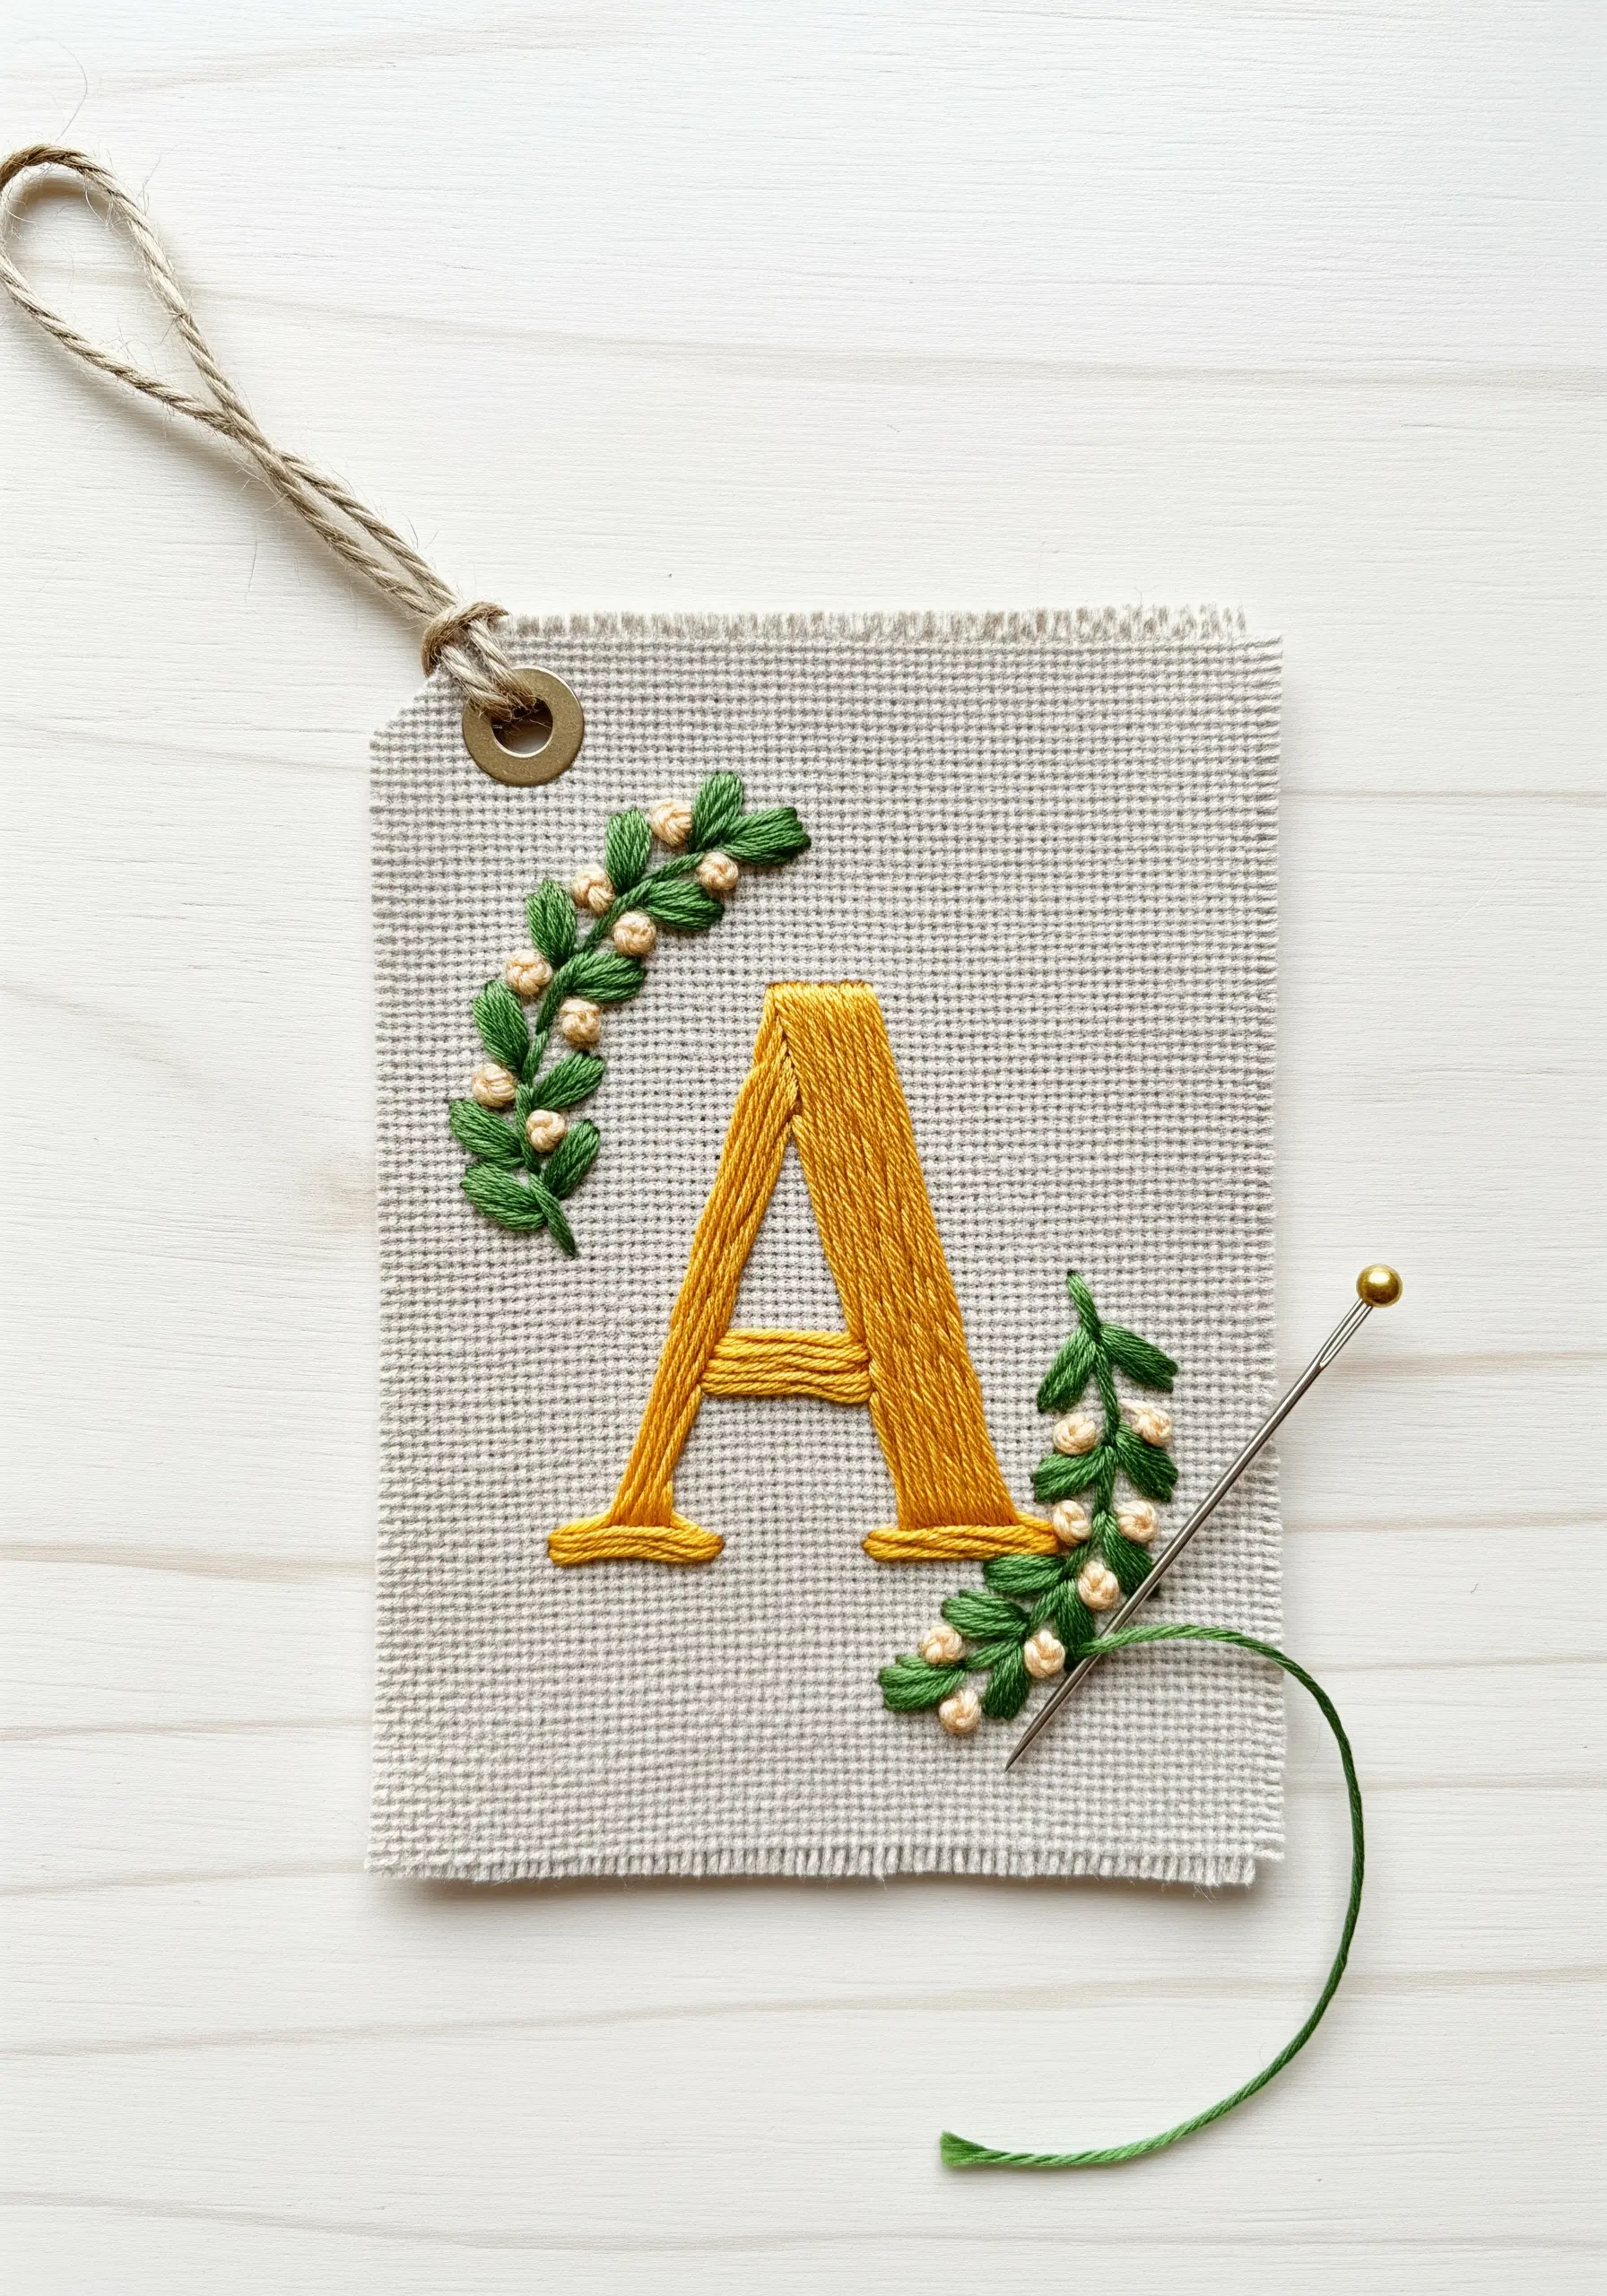
For a perfectly crisp satin-stitched monogram, always start by outlining the letter with a split stitch or backstitch.
This raised edge acts as a guide and a barrier, allowing you to tuck your satin stitches neatly underneath it for a clean, sharp finish.
For extra embellishment, add tiny beads or French knots to accompanying botanical elements.
This combination of techniques is perfect for creating elegant botanical monogram embroidery ideas.
11. Create Movement with Color Gradients
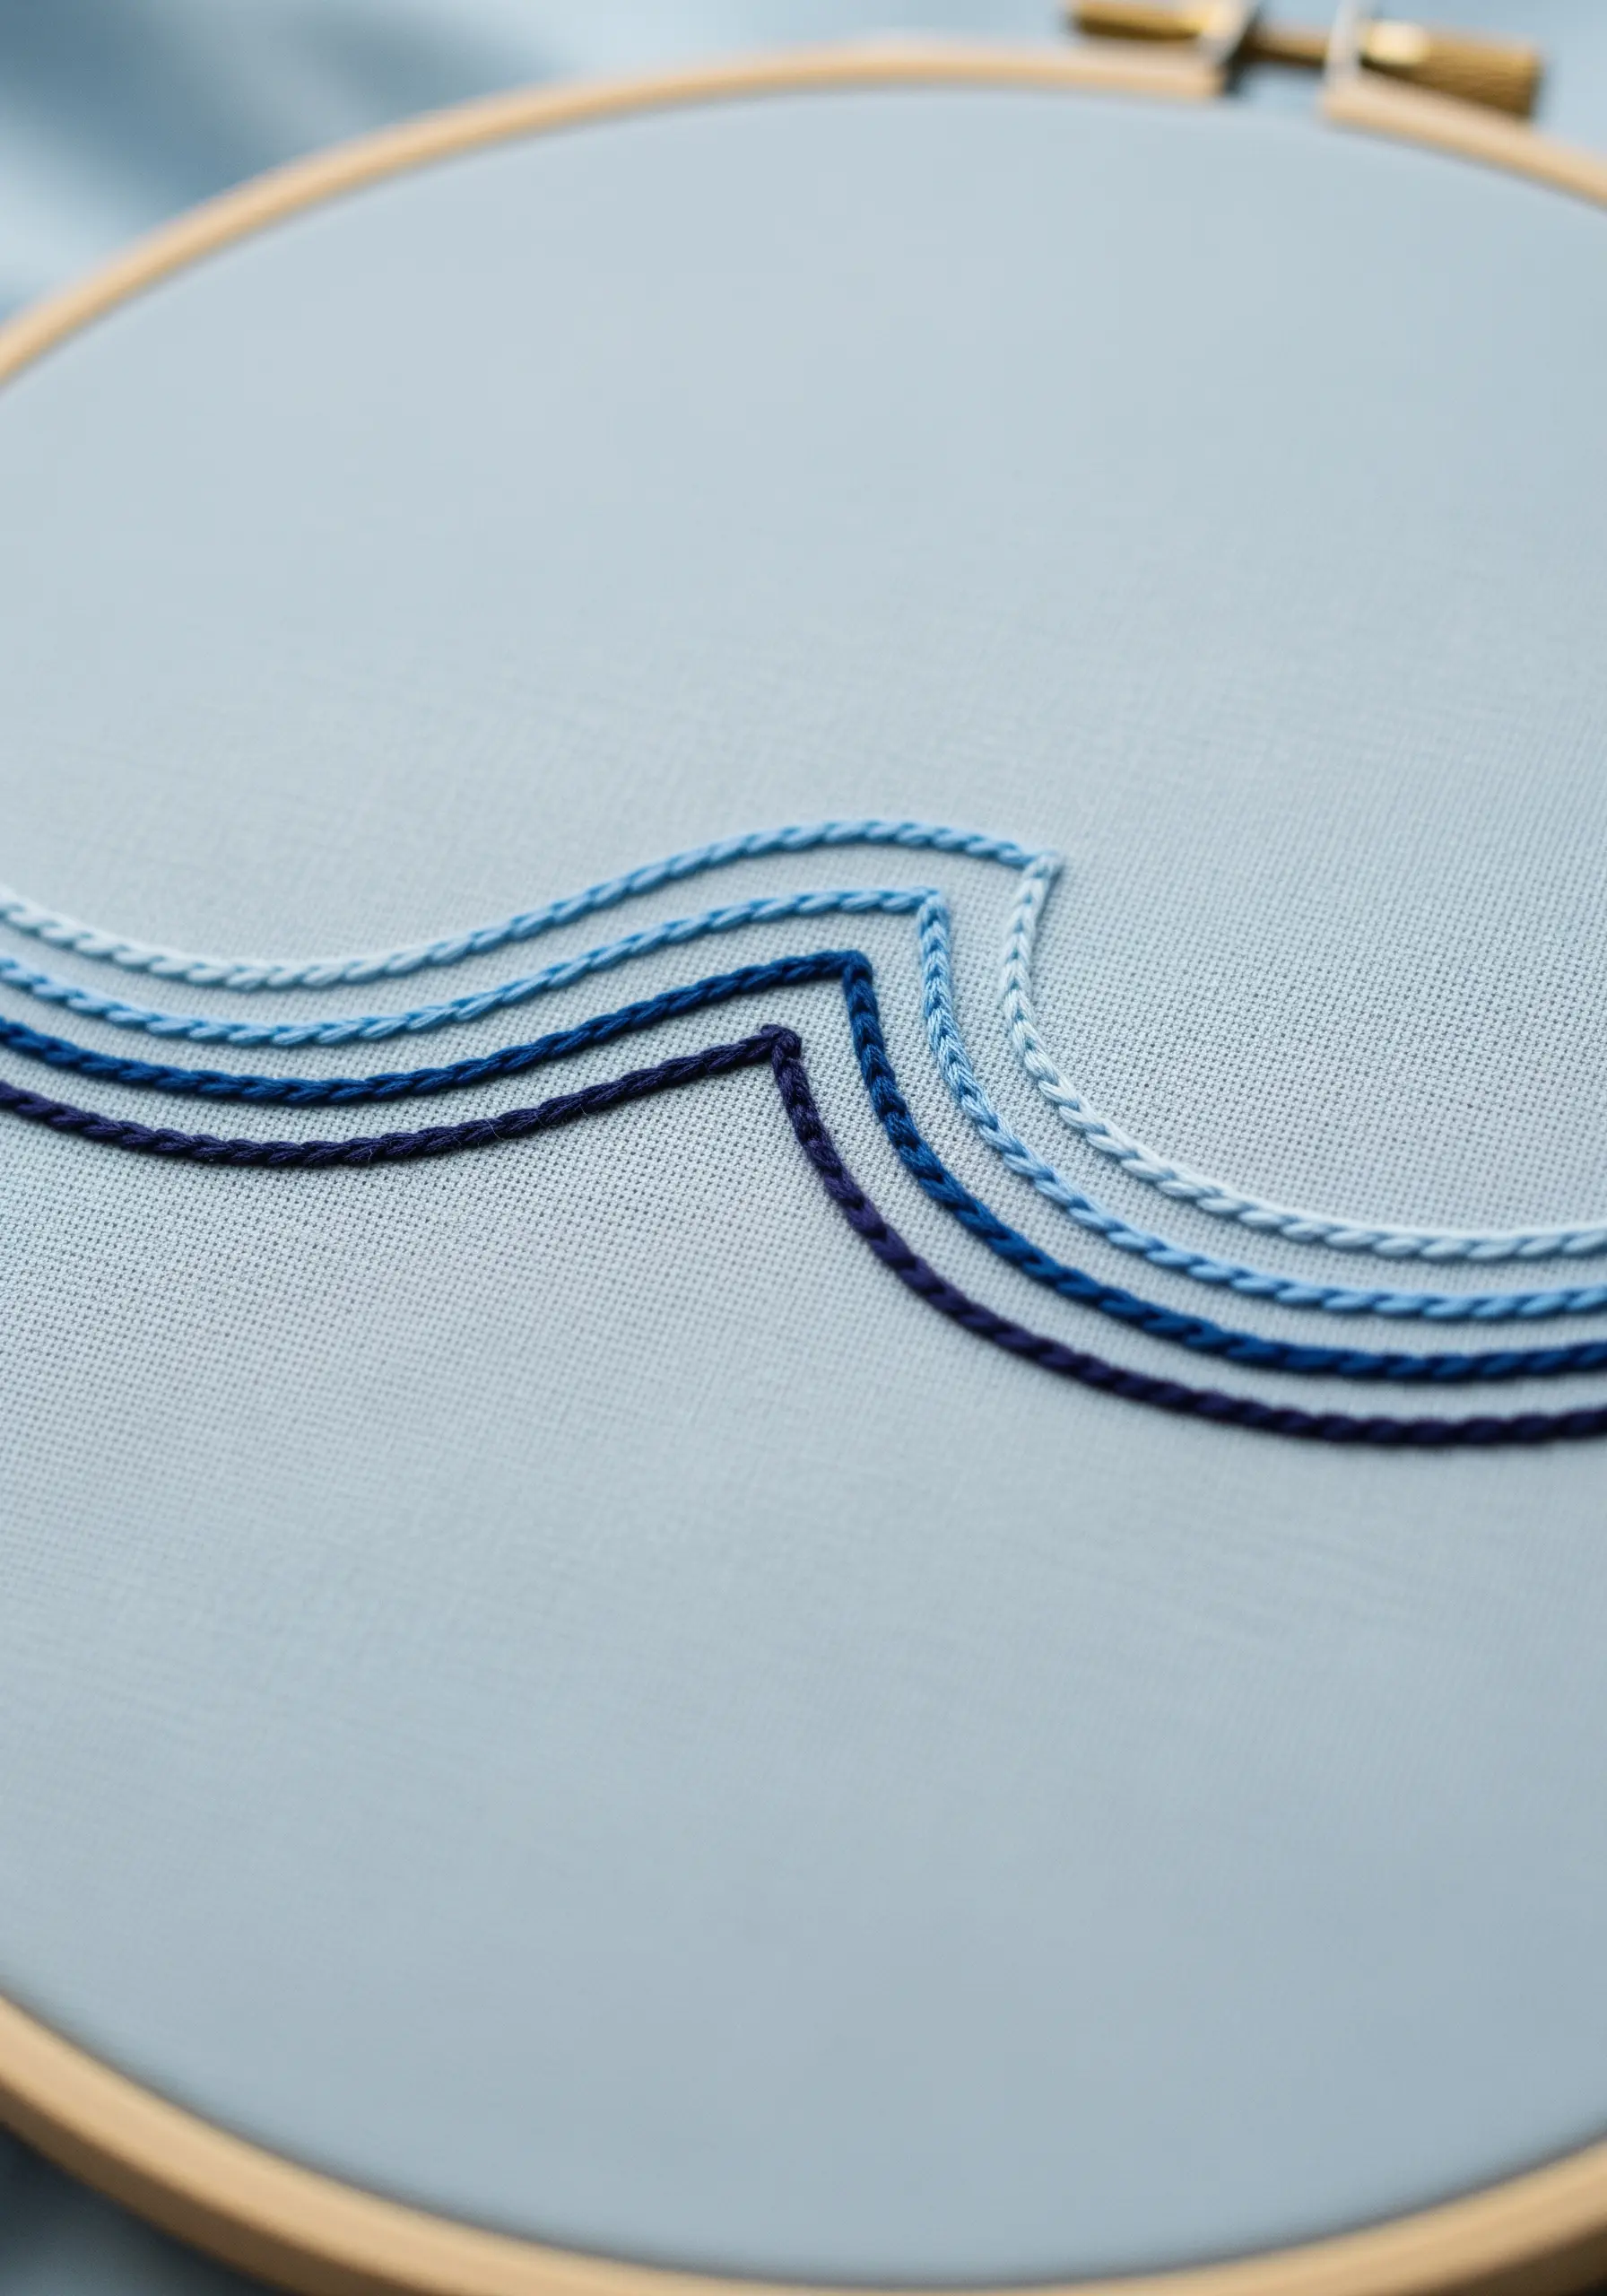
Evoke the sense of motion in abstract designs, like waves, by stitching parallel lines in a gradient of colors.
Choose four or five shades of the same color, from light to dark, and stitch each line with a consistent stitch like a stem stitch or chain stitch.
This technique creates a visual flow and depth with minimal effort, transforming a simple shape into a dynamic piece of art.
It’s a foundational concept for creating minimal ocean-inspired embroidery pieces.
12. Finish Felt Edges with a Blanket Stitch
For handmade felt items like keychains or ornaments, a blanket stitch is both decorative and functional.
It neatly secures two pieces of felt together while creating a beautiful, durable edge that prevents fraying and adds a professional touch.
Use a contrasting thread color to make the stitch a design element in itself, framing your central embroidery motif.
13. Radiate Energy with Straight Stitches
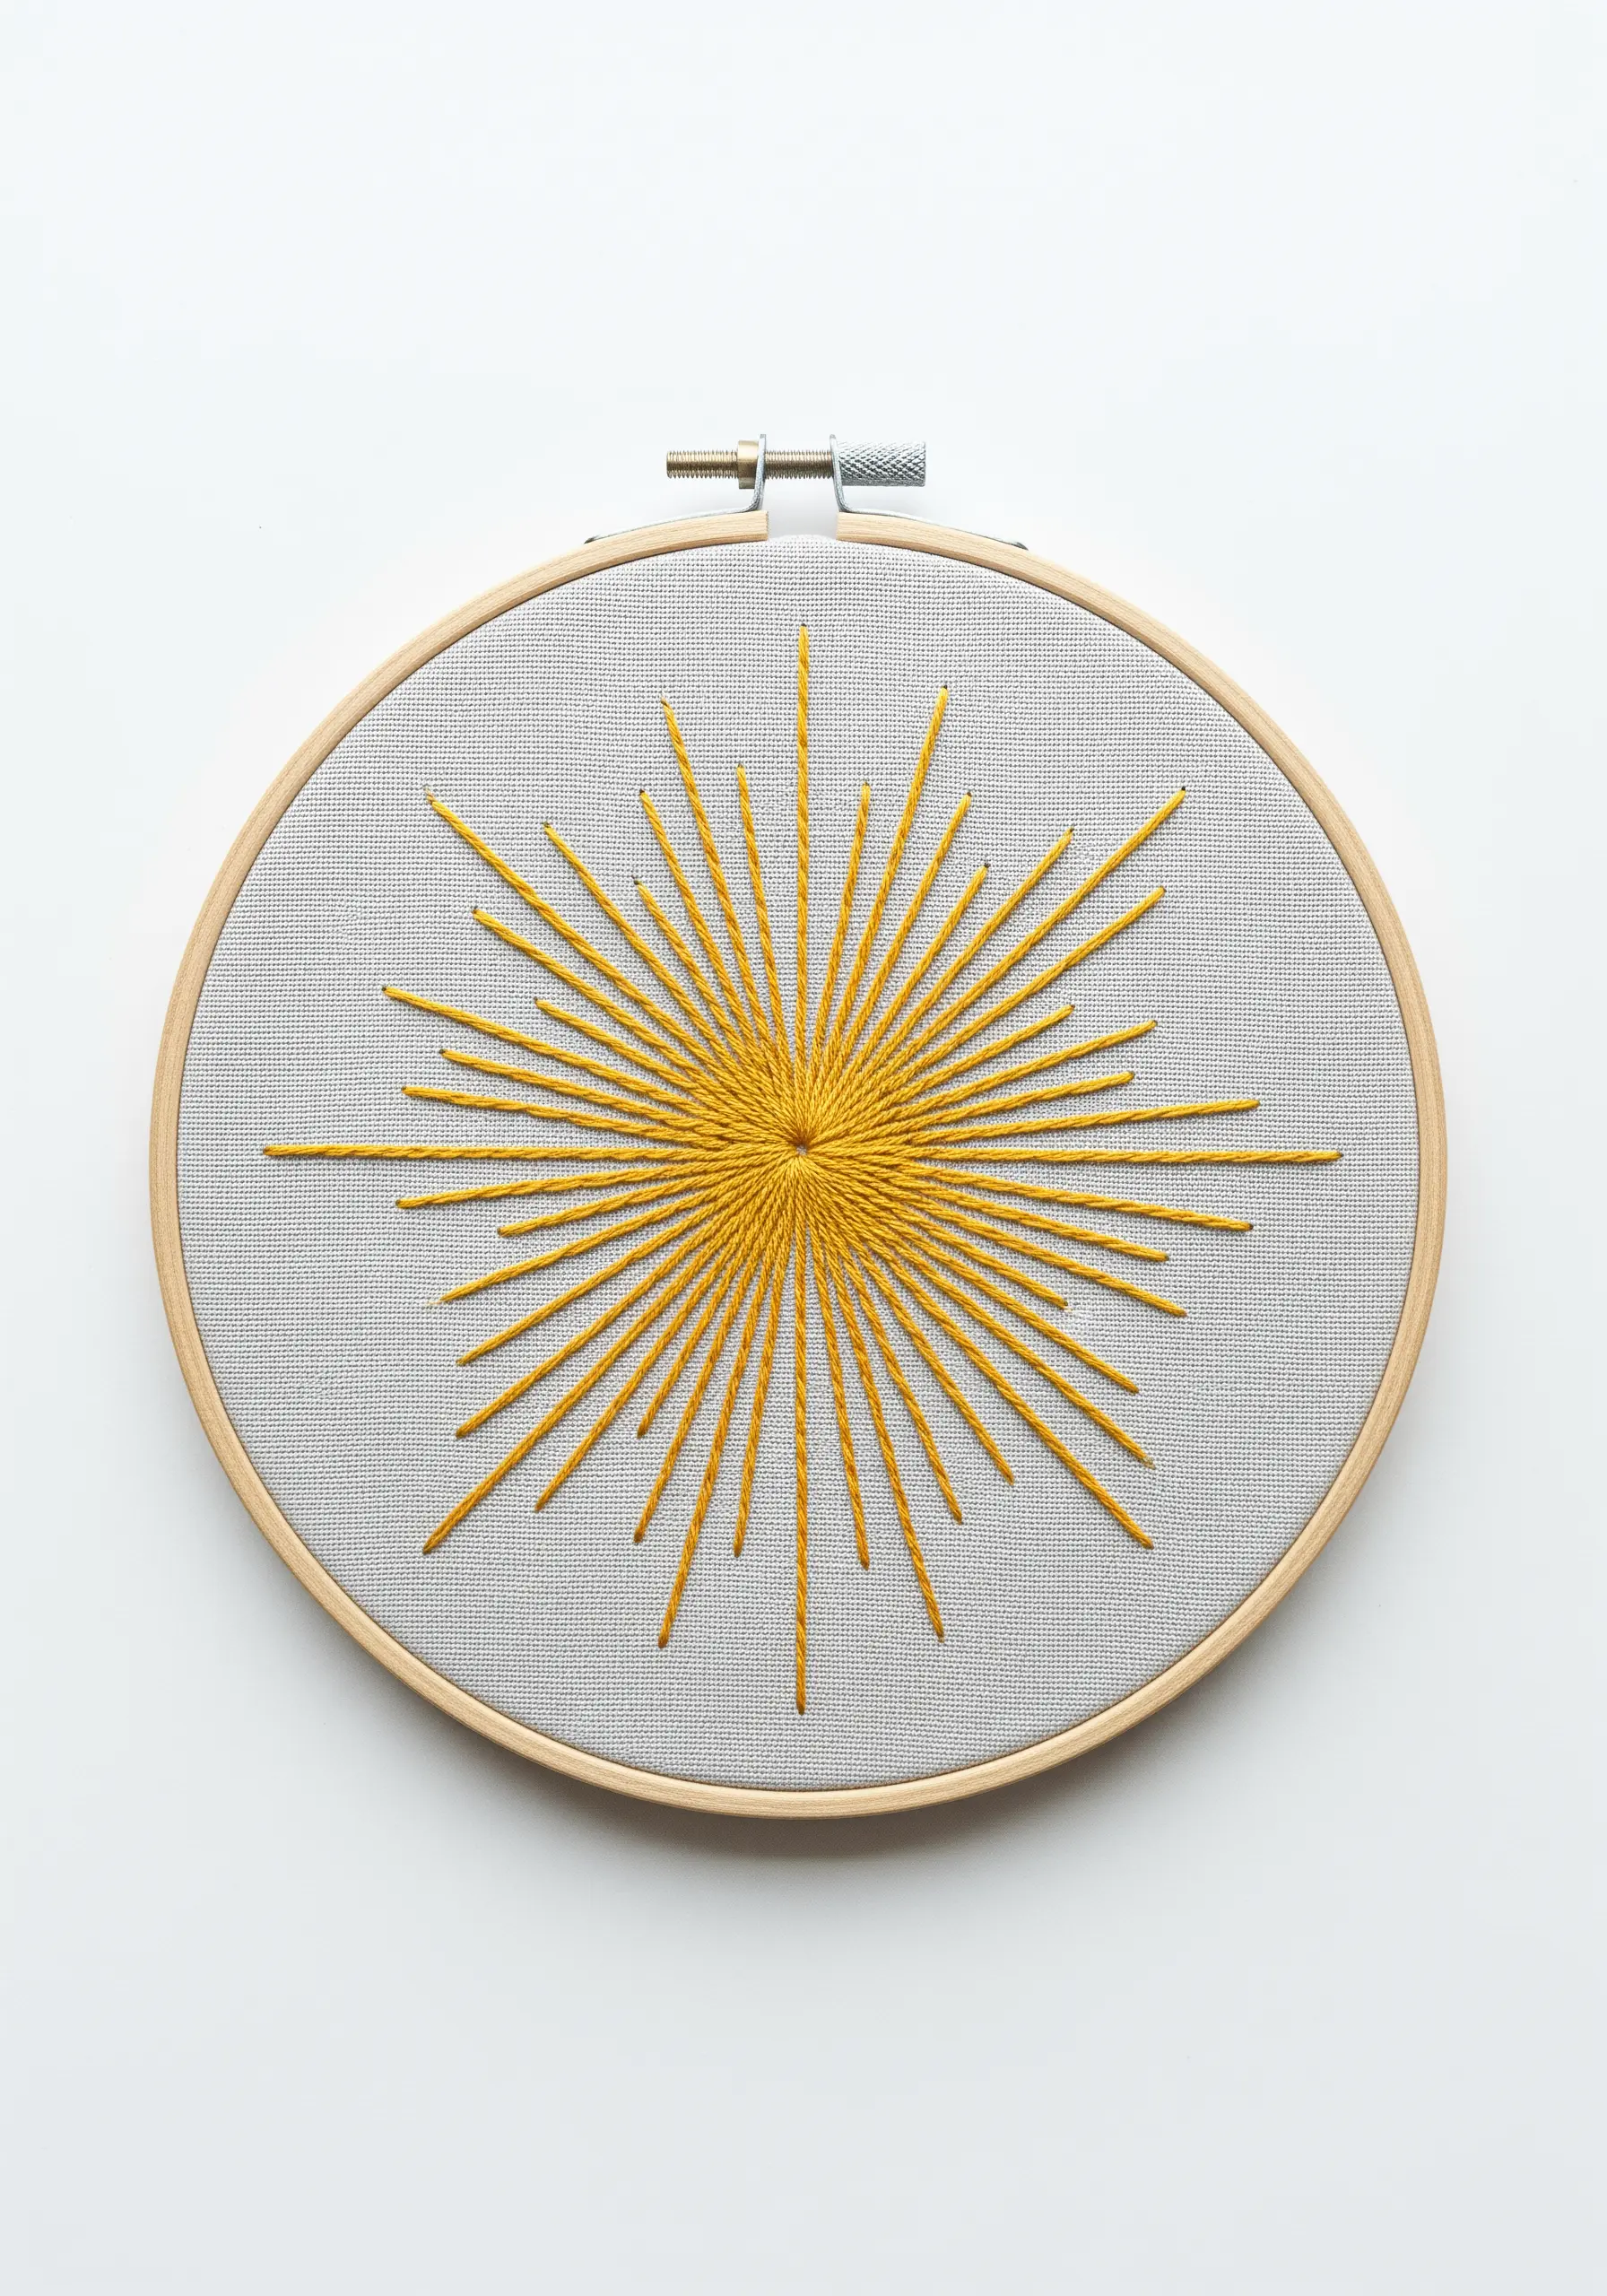
Design a powerful sunburst or starburst using only the straight stitch.
To ensure a balanced composition, lightly mark a central point and radiating guidelines on your fabric before you begin.
Vary the length of your stitches to create a dynamic, explosive effect, and use a thick, vibrant thread to make the design pop against a neutral background.
This project is an excellent exercise in mastering stitch tension and placement.
14. Embellish Apparel with Subtle Florals
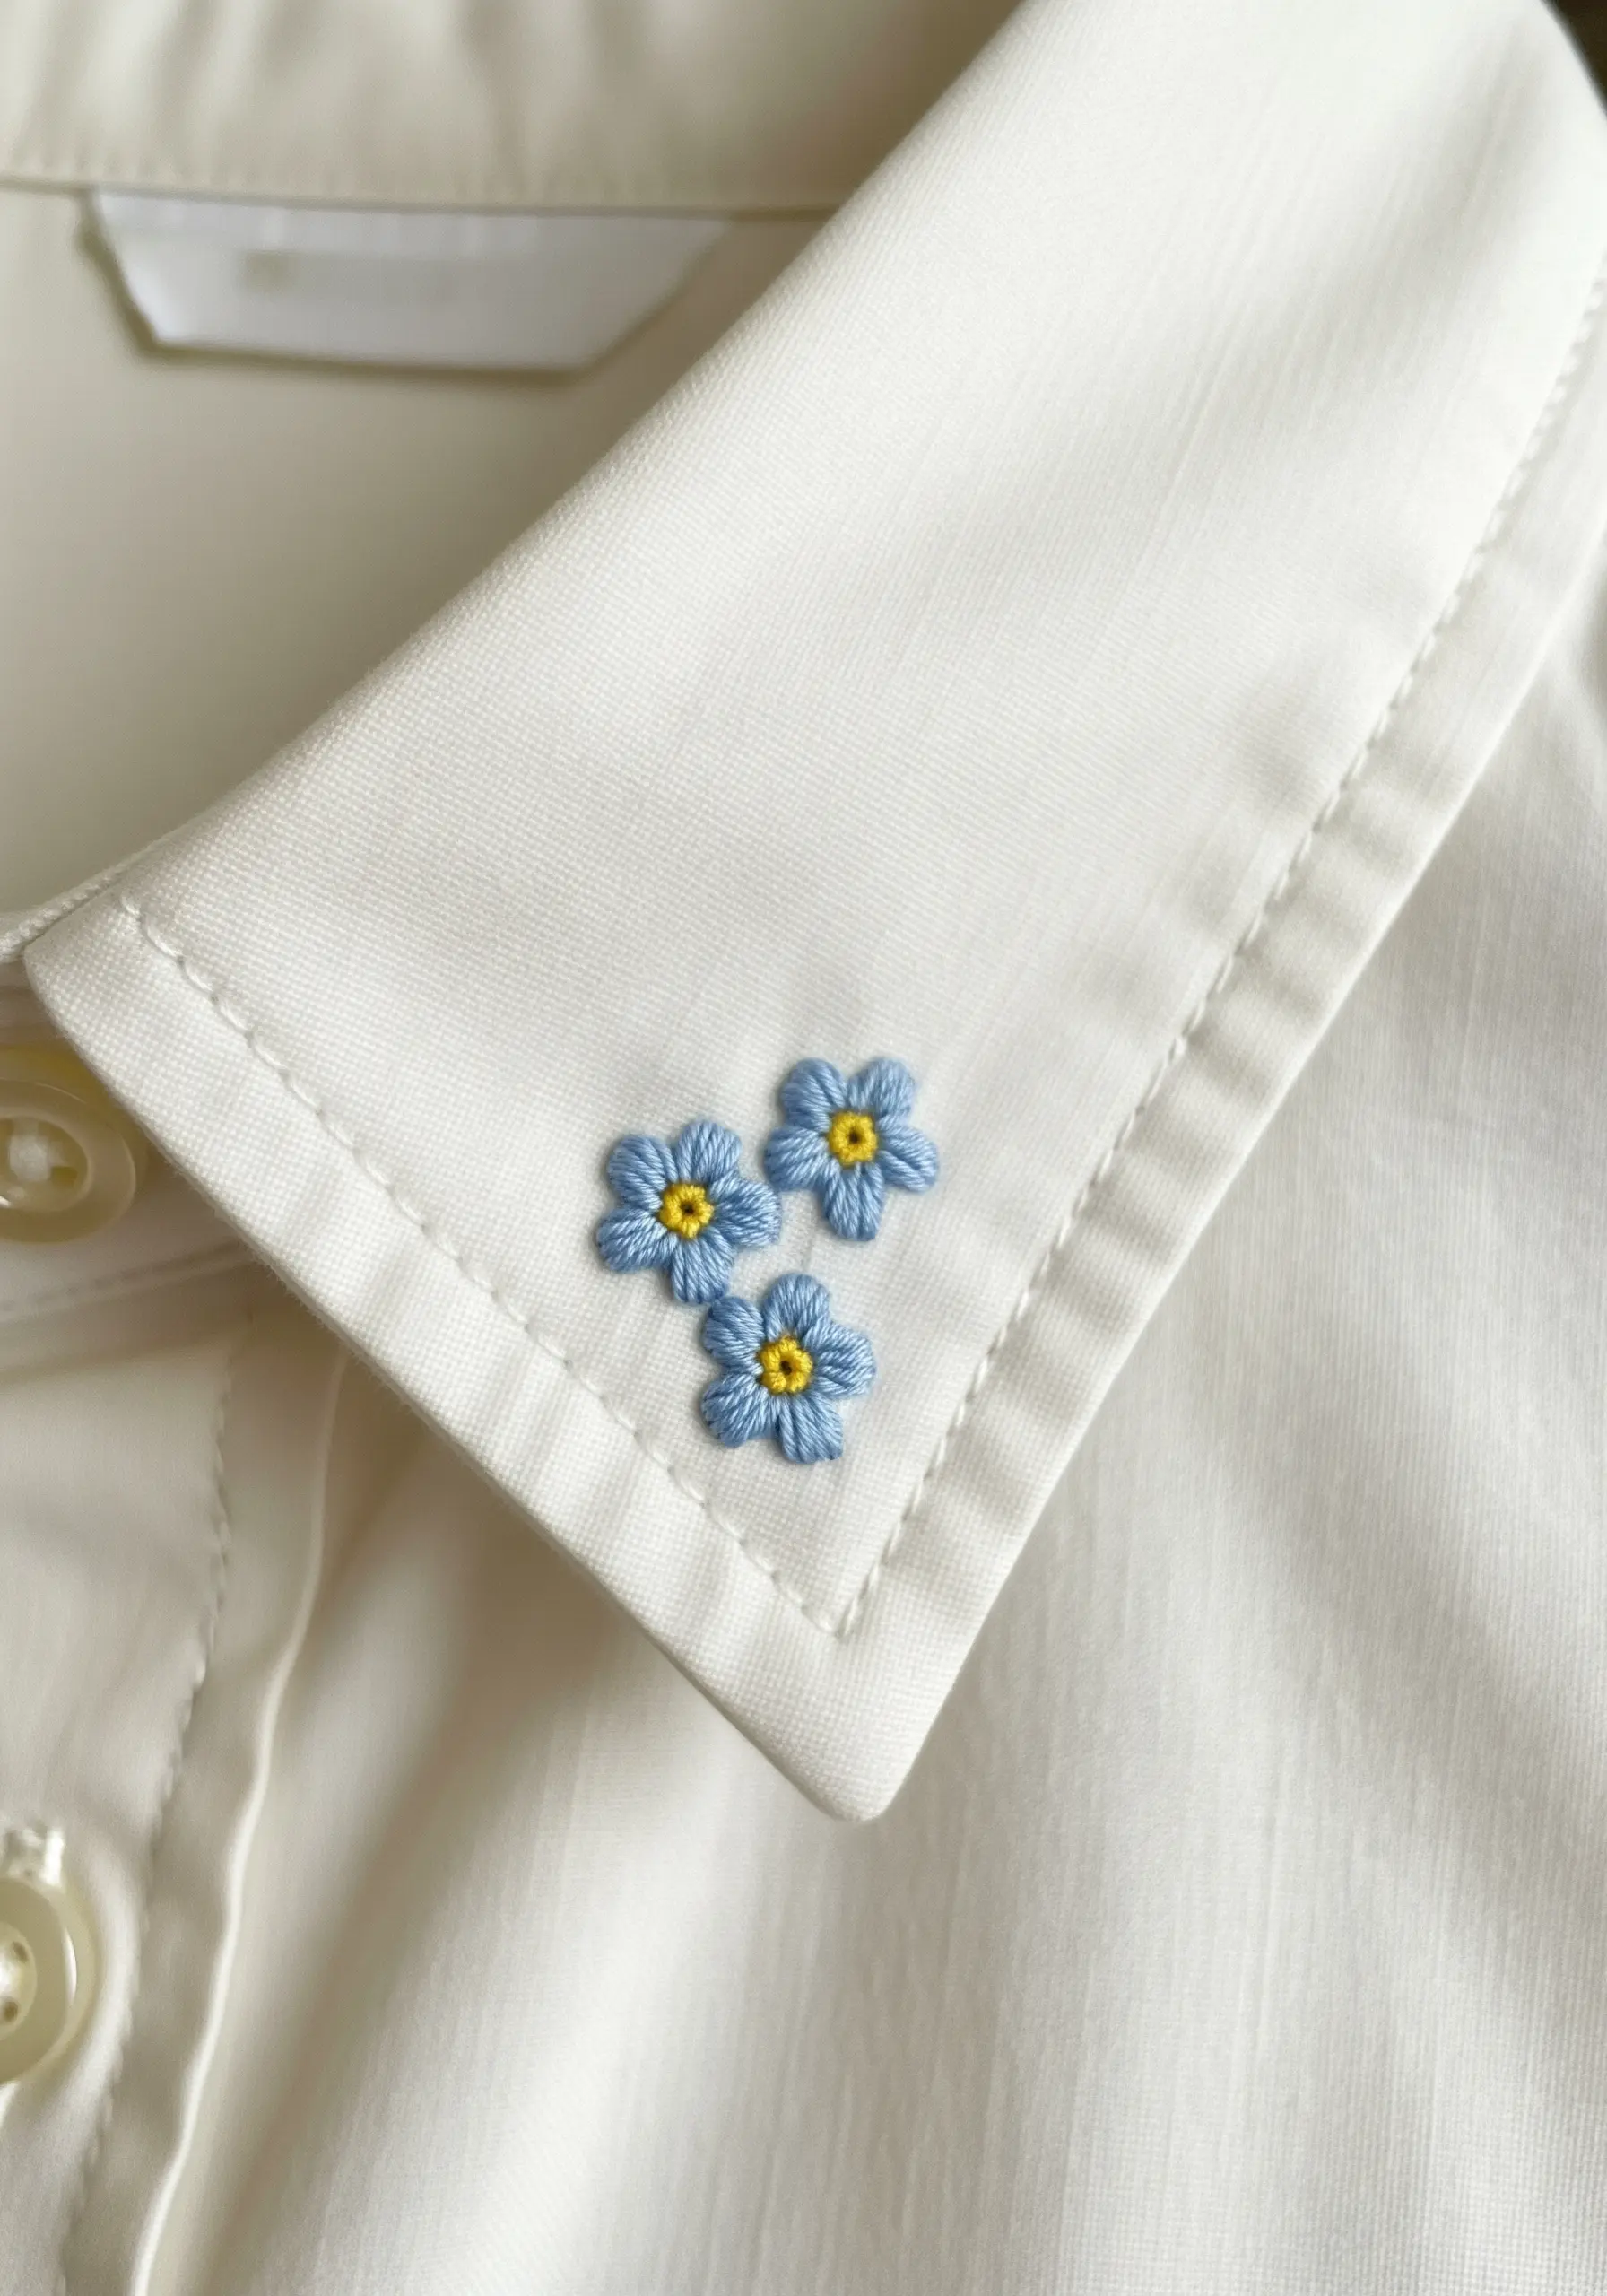
Add a touch of handmade elegance to a shirt collar or cuff with a tiny cluster of embroidered flowers.
Use five simple lazy daisy stitches for the petals and a single French knot for the center of each blossom.
By using only two or three strands of floss, the design remains delicate and refined, enhancing the garment rather than overpowering it.
These tiny floral motifs to fill empty spaces are perfect for understated personalization.
15. Frame a Minimalist Botanical

Create a modern piece of wall art by stitching a simple, graphic leaf outline and displaying it in a small frame.
Use a stem stitch or a whipped backstitch to create a bold, clean line that defines the shape of the monstera leaf.
The negative space within the leaf is as important as the stitched lines, creating a minimalist aesthetic that feels both clean and organic.
These modern botanical stitches inspired by houseplants are perfect for contemporary interiors.
16. Define Shapes with Directional Satin Stitch

When filling segments of a design like an orange slice, the direction of your satin stitches is crucial.
Angle your stitches so they radiate from the center outwards for each segment, which creates a realistic sense of form and light.
Enclose the entire design with a clean, raised border using a whipped backstitch or a tight chain stitch in a contrasting color to make the motif pop and give it a finished, patch-like quality.
17. Add a Personal Touch to Knitwear

Embroidering on a stretchy knit fabric like a beanie requires a special approach to prevent puckering.
Apply a temporary, wash-away stabilizer to the back of the area you plan to stitch; this will hold the fabric steady and prevent your design from distorting.
Use simple star stitches and straight stitches to create a delicate constellation, choosing a thread that contrasts gently with the knit for a subtle, sophisticated finish.
18. Create Depth with Color Blocking
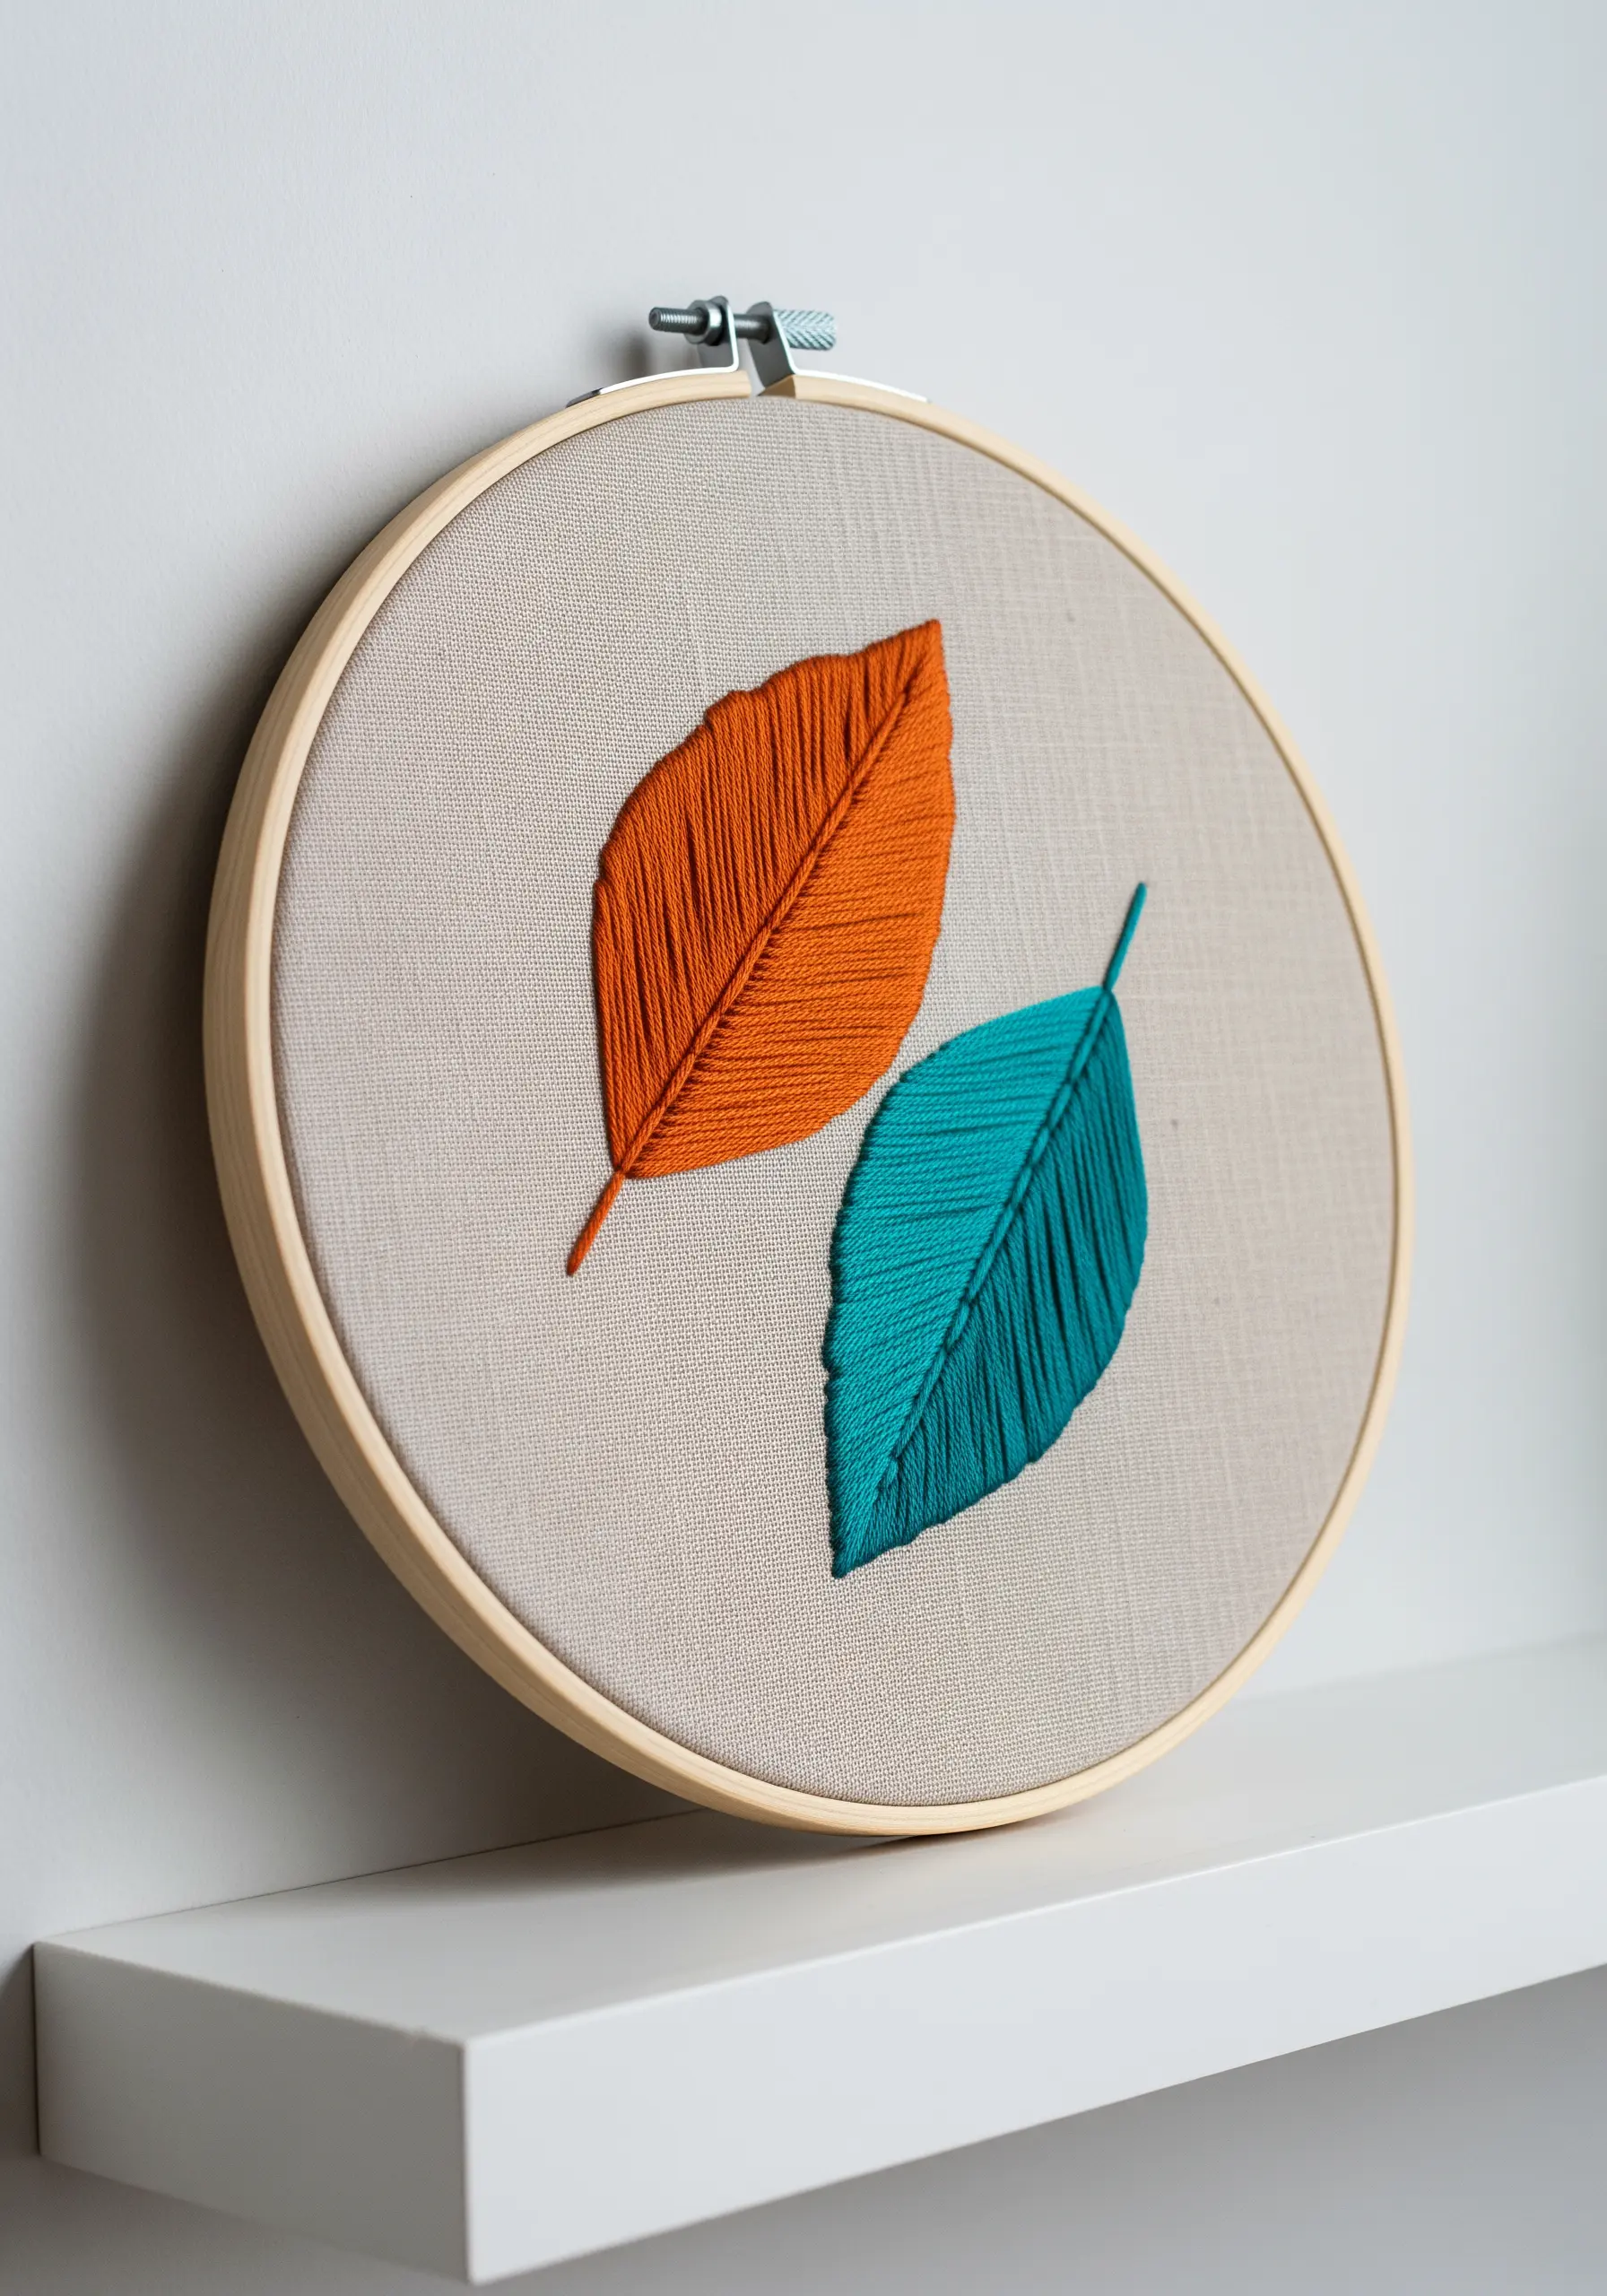
Instead of blending colors for realism, try using solid blocks of contrasting color for a bold, graphic effect.
Fill each leaf with a dense long-and-short stitch, but use a single, vibrant hue for each one, such as bright orange and teal.
This modern approach to thread painting creates a dynamic composition that highlights shape and color over realistic shading.
Even simple delicate leaf stitch techniques for realistic botanical embroidery shading can be reinterpreted for a contemporary look.
19. Use Cross-Stitch for a Graphic Fill
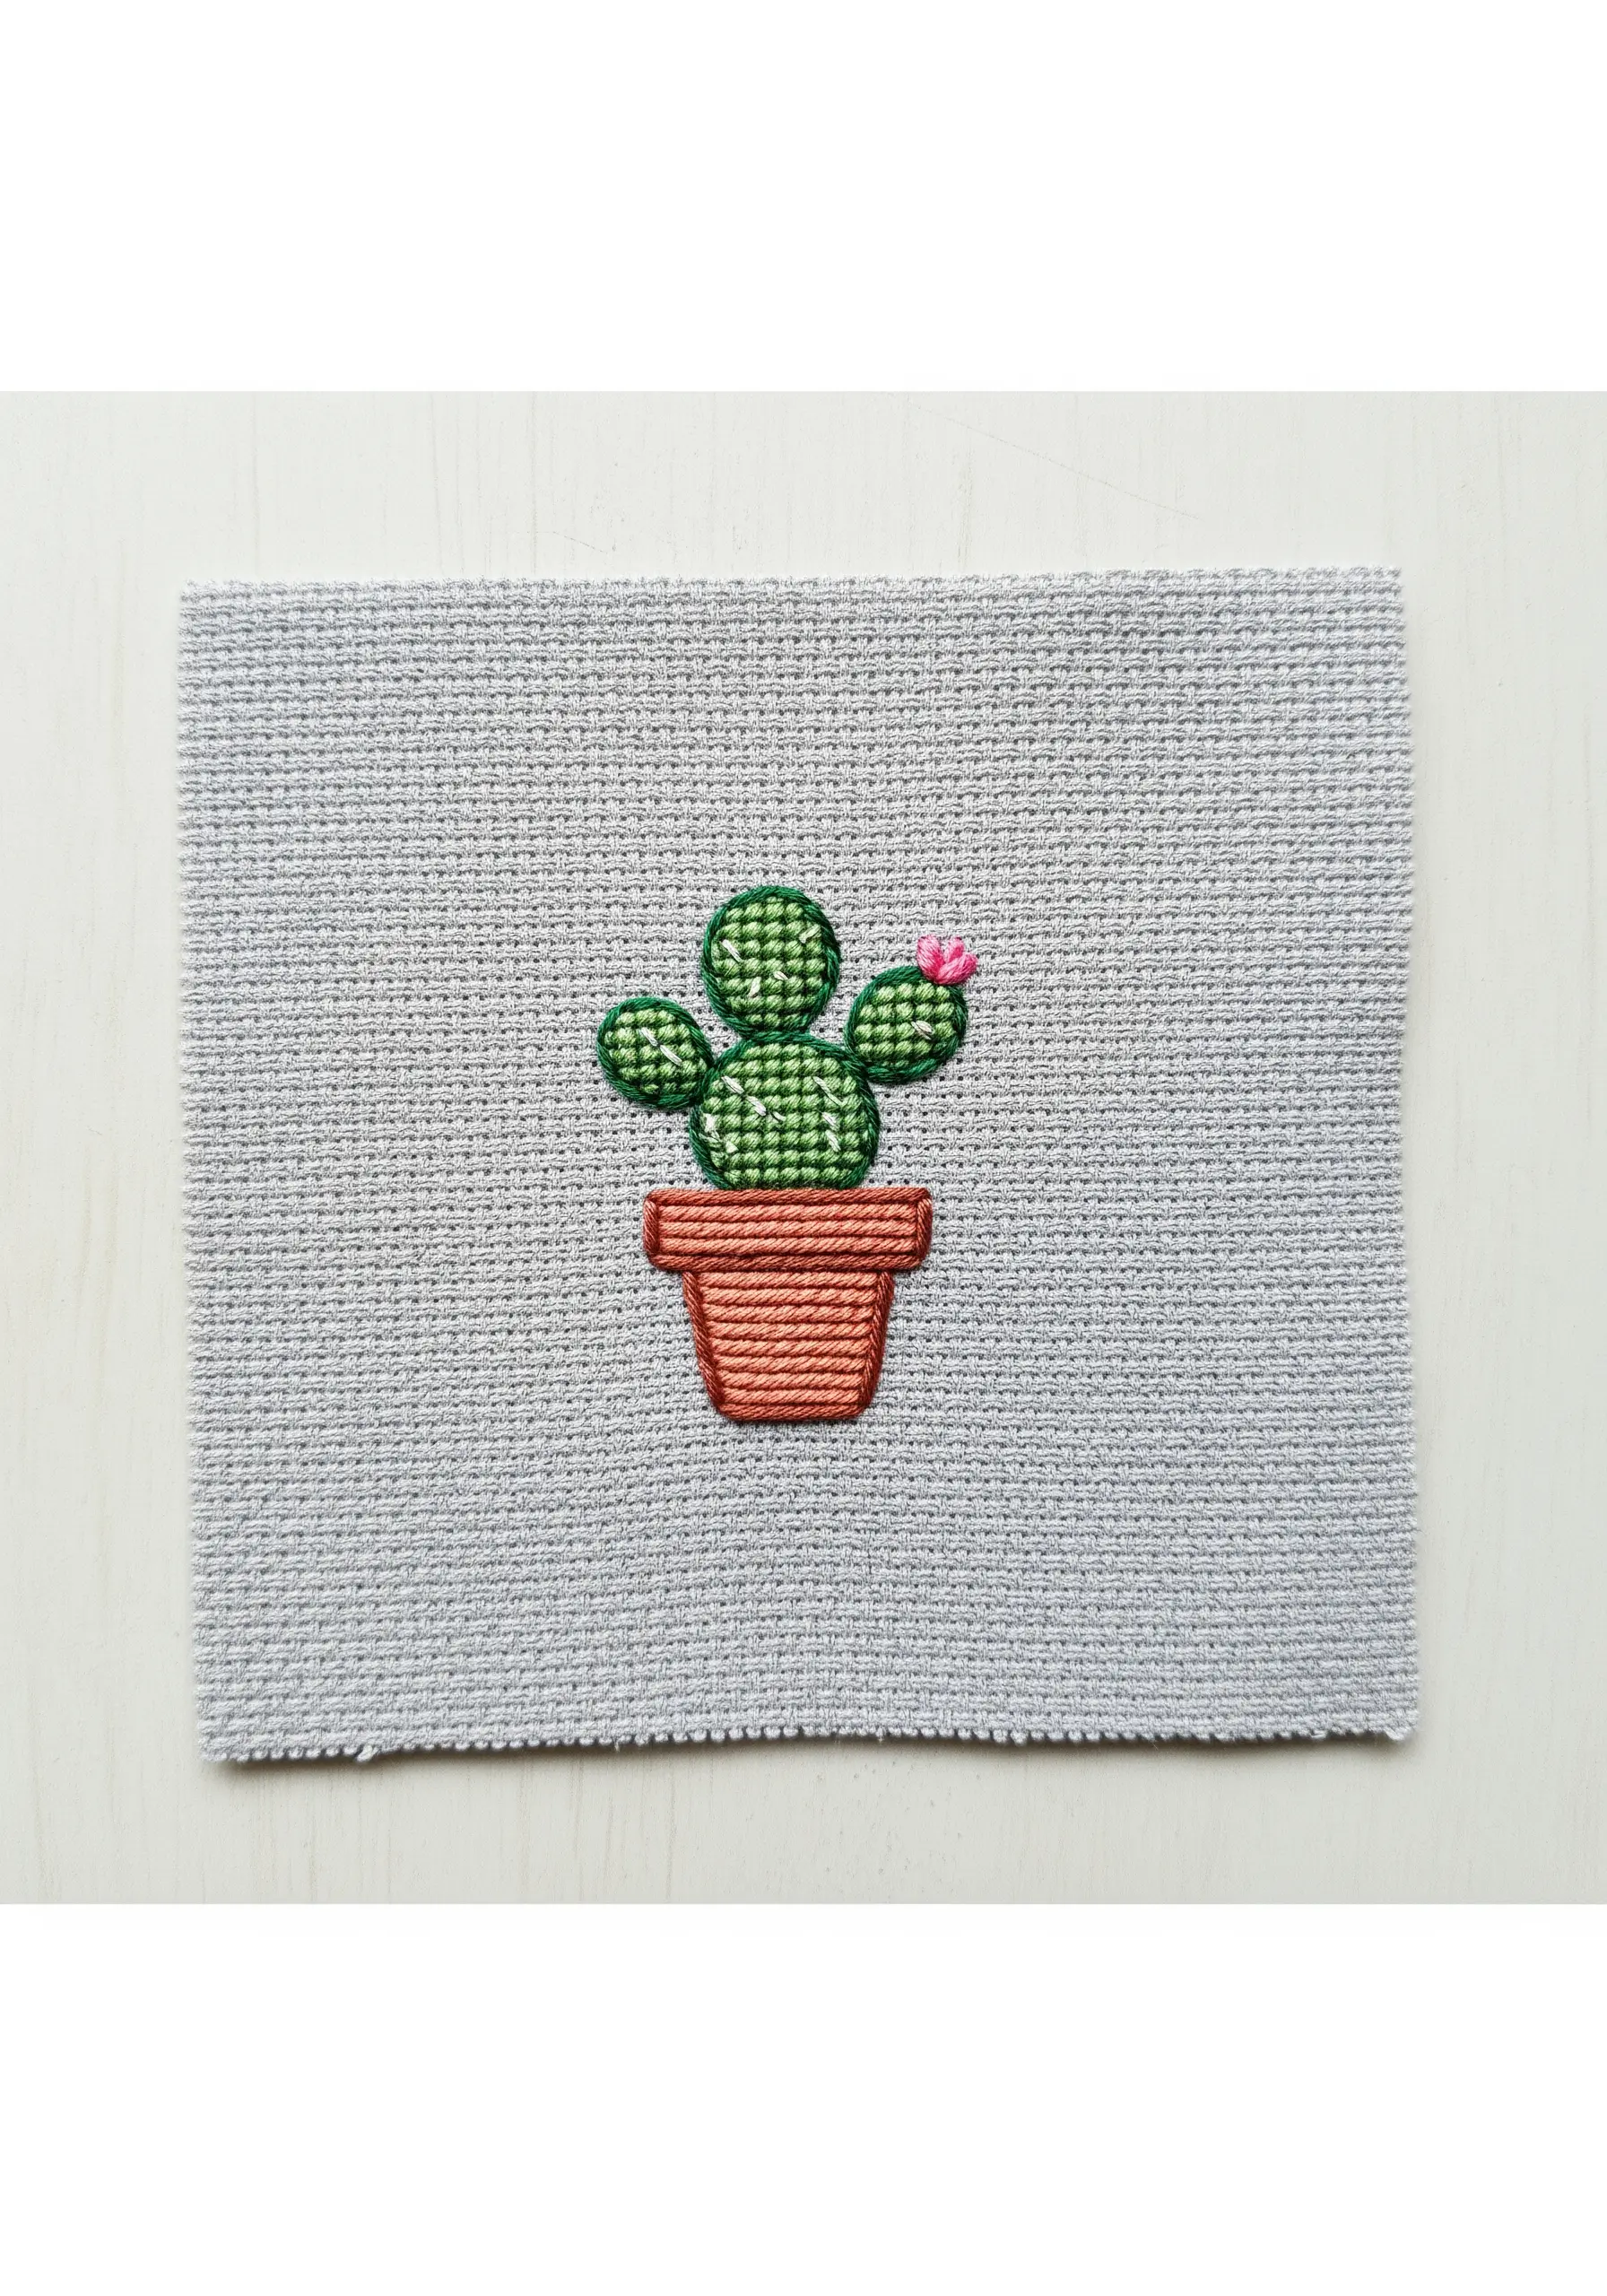
For a charming, pixelated effect, use cross-stitch to fill a simple shape like a cactus.
Working on Aida cloth, with its built-in grid, makes this technique straightforward and relaxing.
Fill the main body with green cross-stitches, then add a clean backstitch outline to define the shape and add details.
This method combines the texture of embroidery with the geometric precision of pixel art, perfect for creating cute, graphic motifs.


