
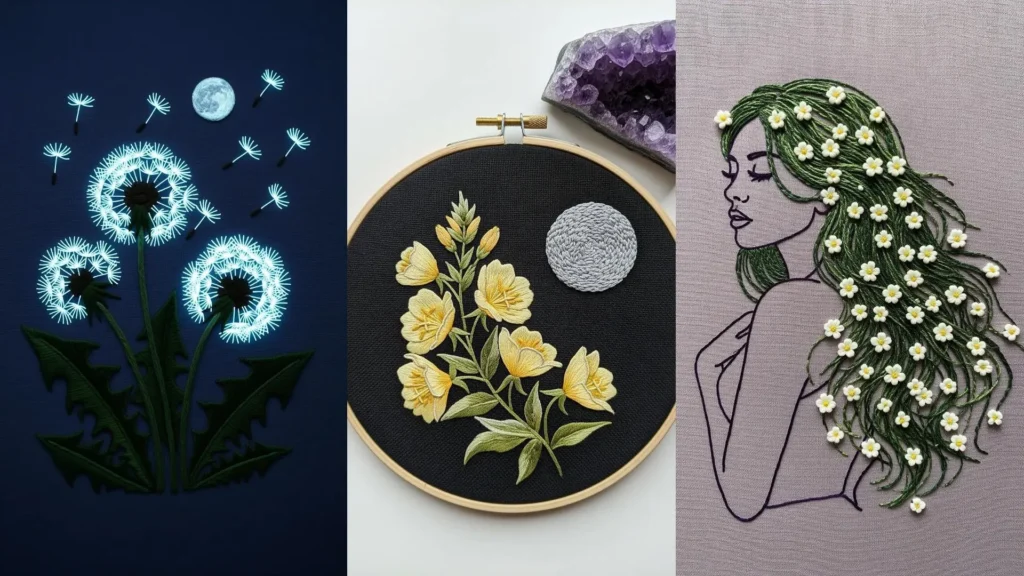
Have you ever wanted your embroidery to do more than just sit on the fabric? To capture a feeling, a time of day, a hint of magic? The secret isn’t in mastering hundreds of complex stitches, but in learning to see your thread and fabric as tools for sculpting with light and shadow.
Night-blooming florals offer the perfect canvas for this. Working on dark fabric isn’t a challenge to overcome; it’s an opportunity. It is the deep, quiet backdrop that makes every stitch of white, silver, or pale yellow thread appear luminous, as if lit from within. It’s where you can play with texture to mimic the moon’s surface or use a single metallic thread to suggest a distant star.
Here, you’ll find techniques designed to give your work that moody, atmospheric quality. We’ll explore how to make colors pop against the dark, how to blend threads for an ethereal glow, and how to use simple stitches to create scenes that feel both intimate and otherworldly. Let’s begin.
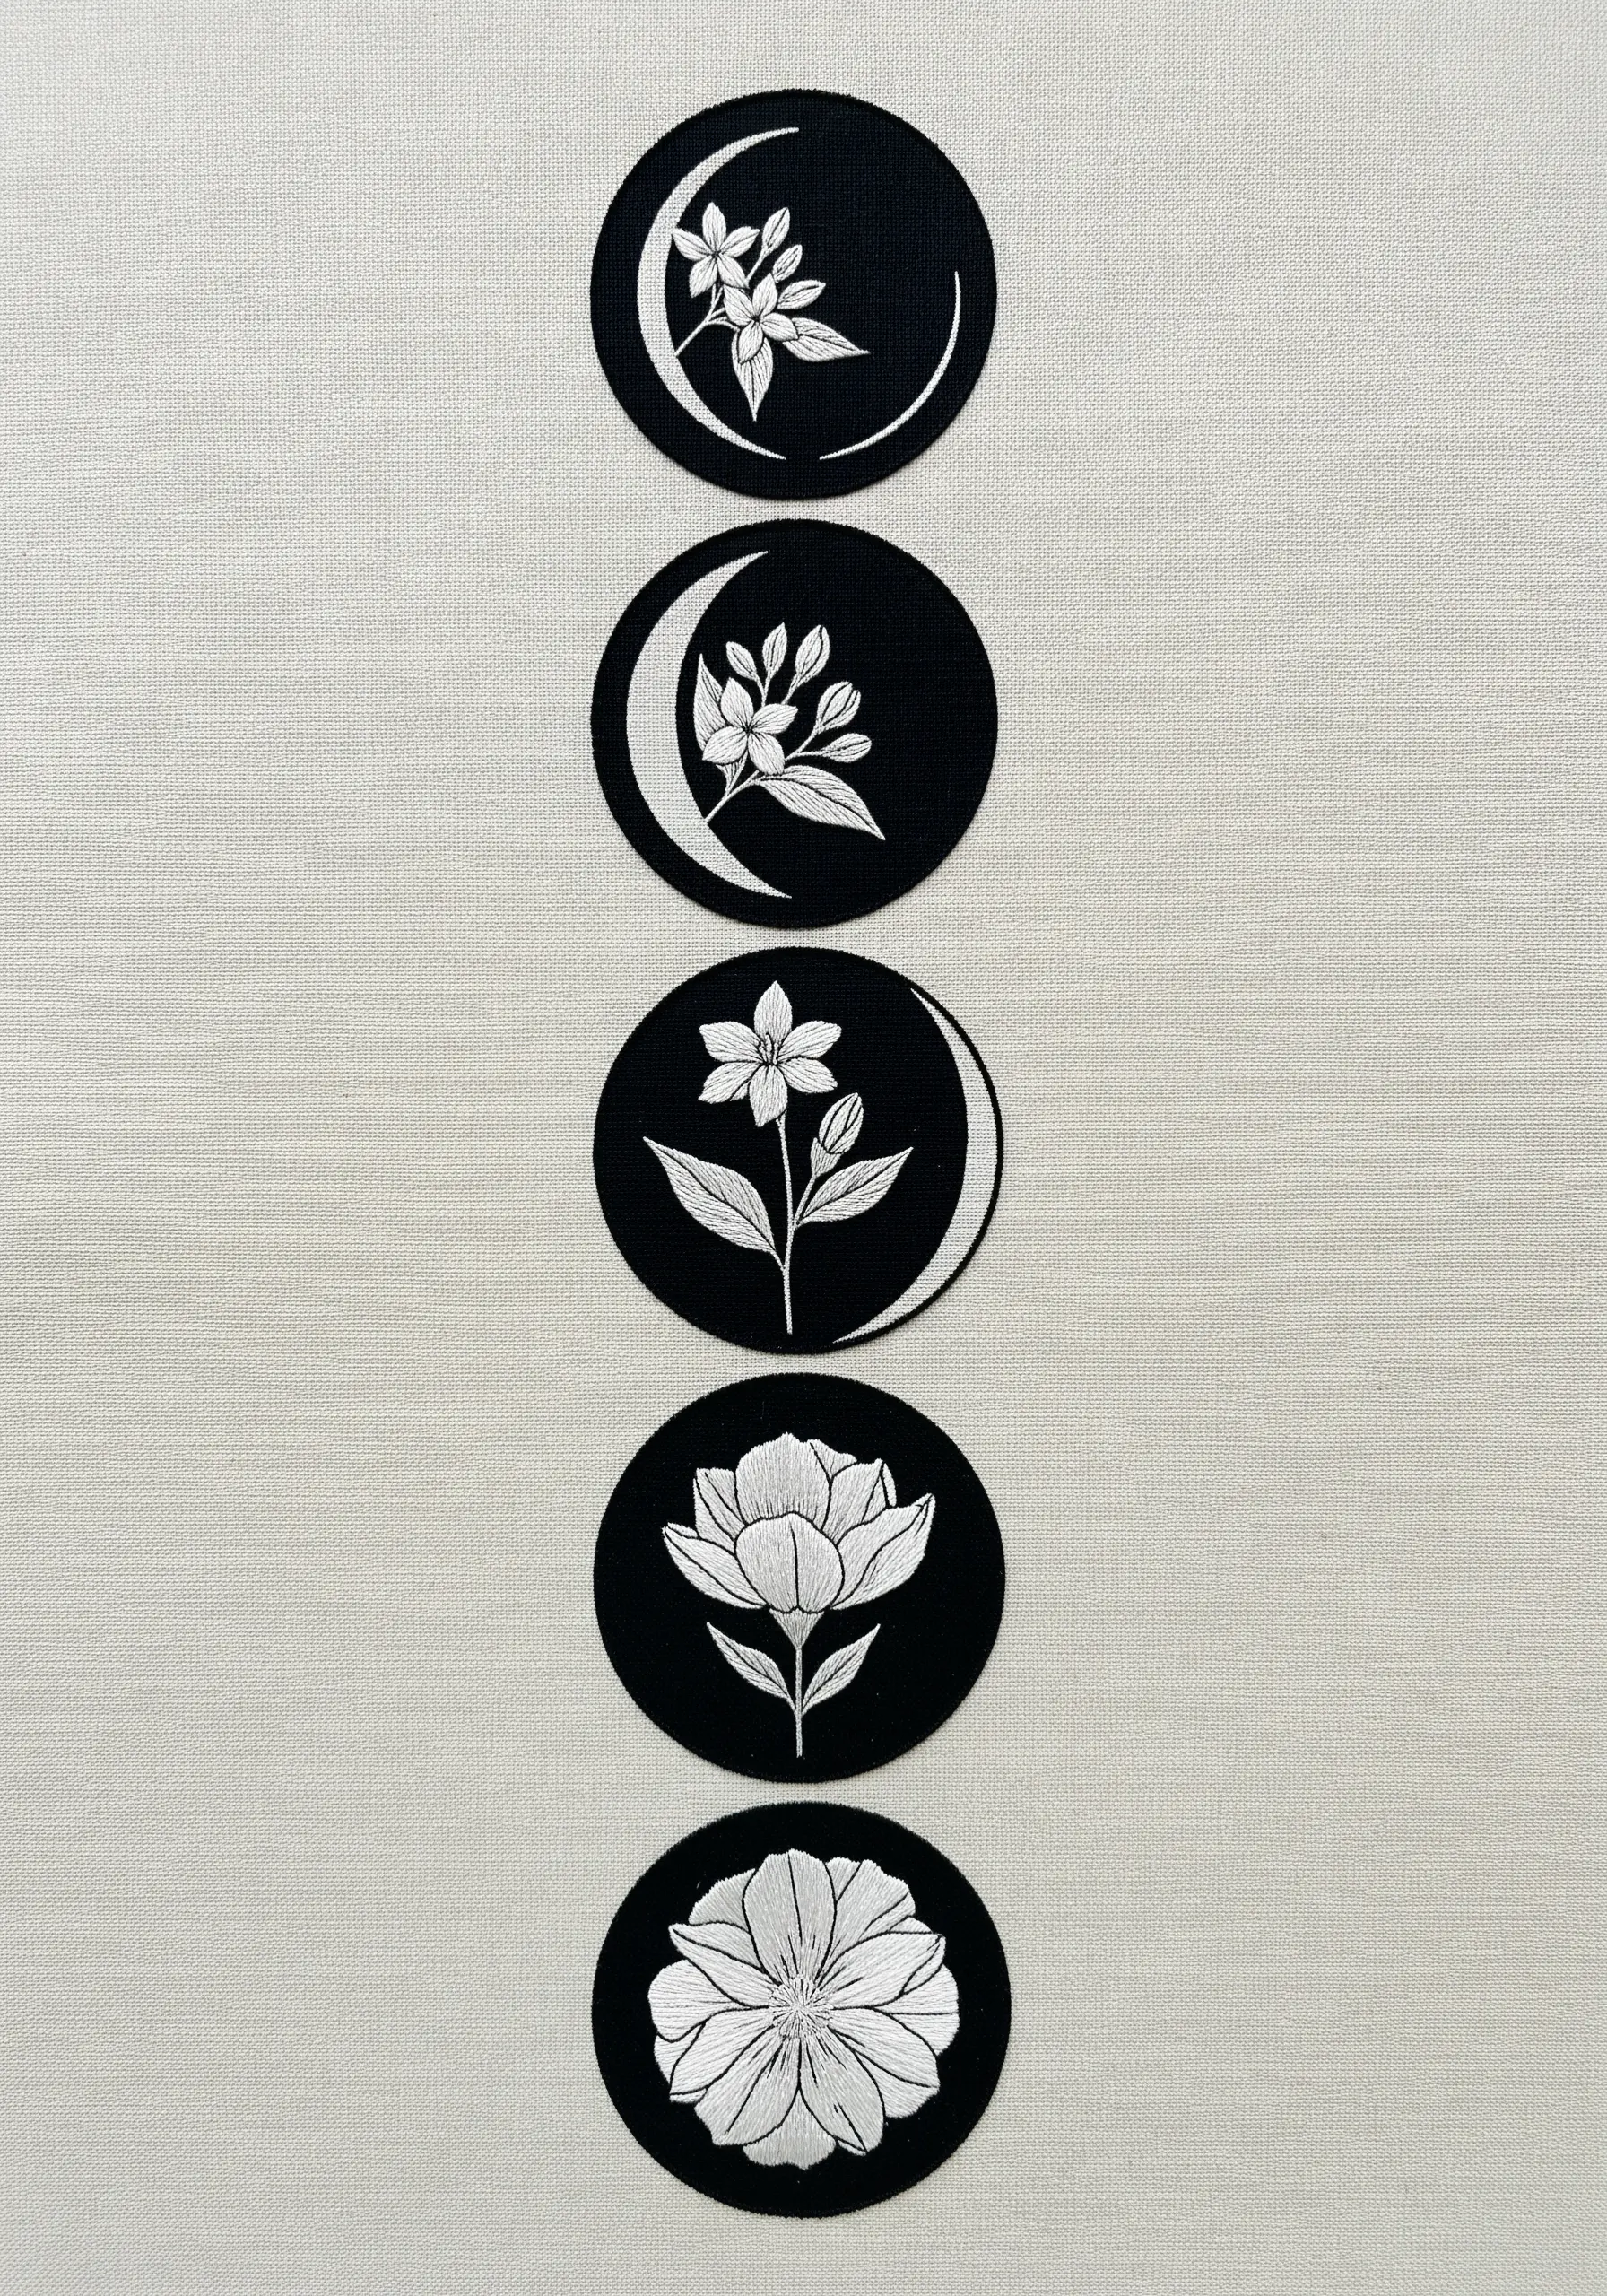
1. Crescent Moon with a Luminous Bloom
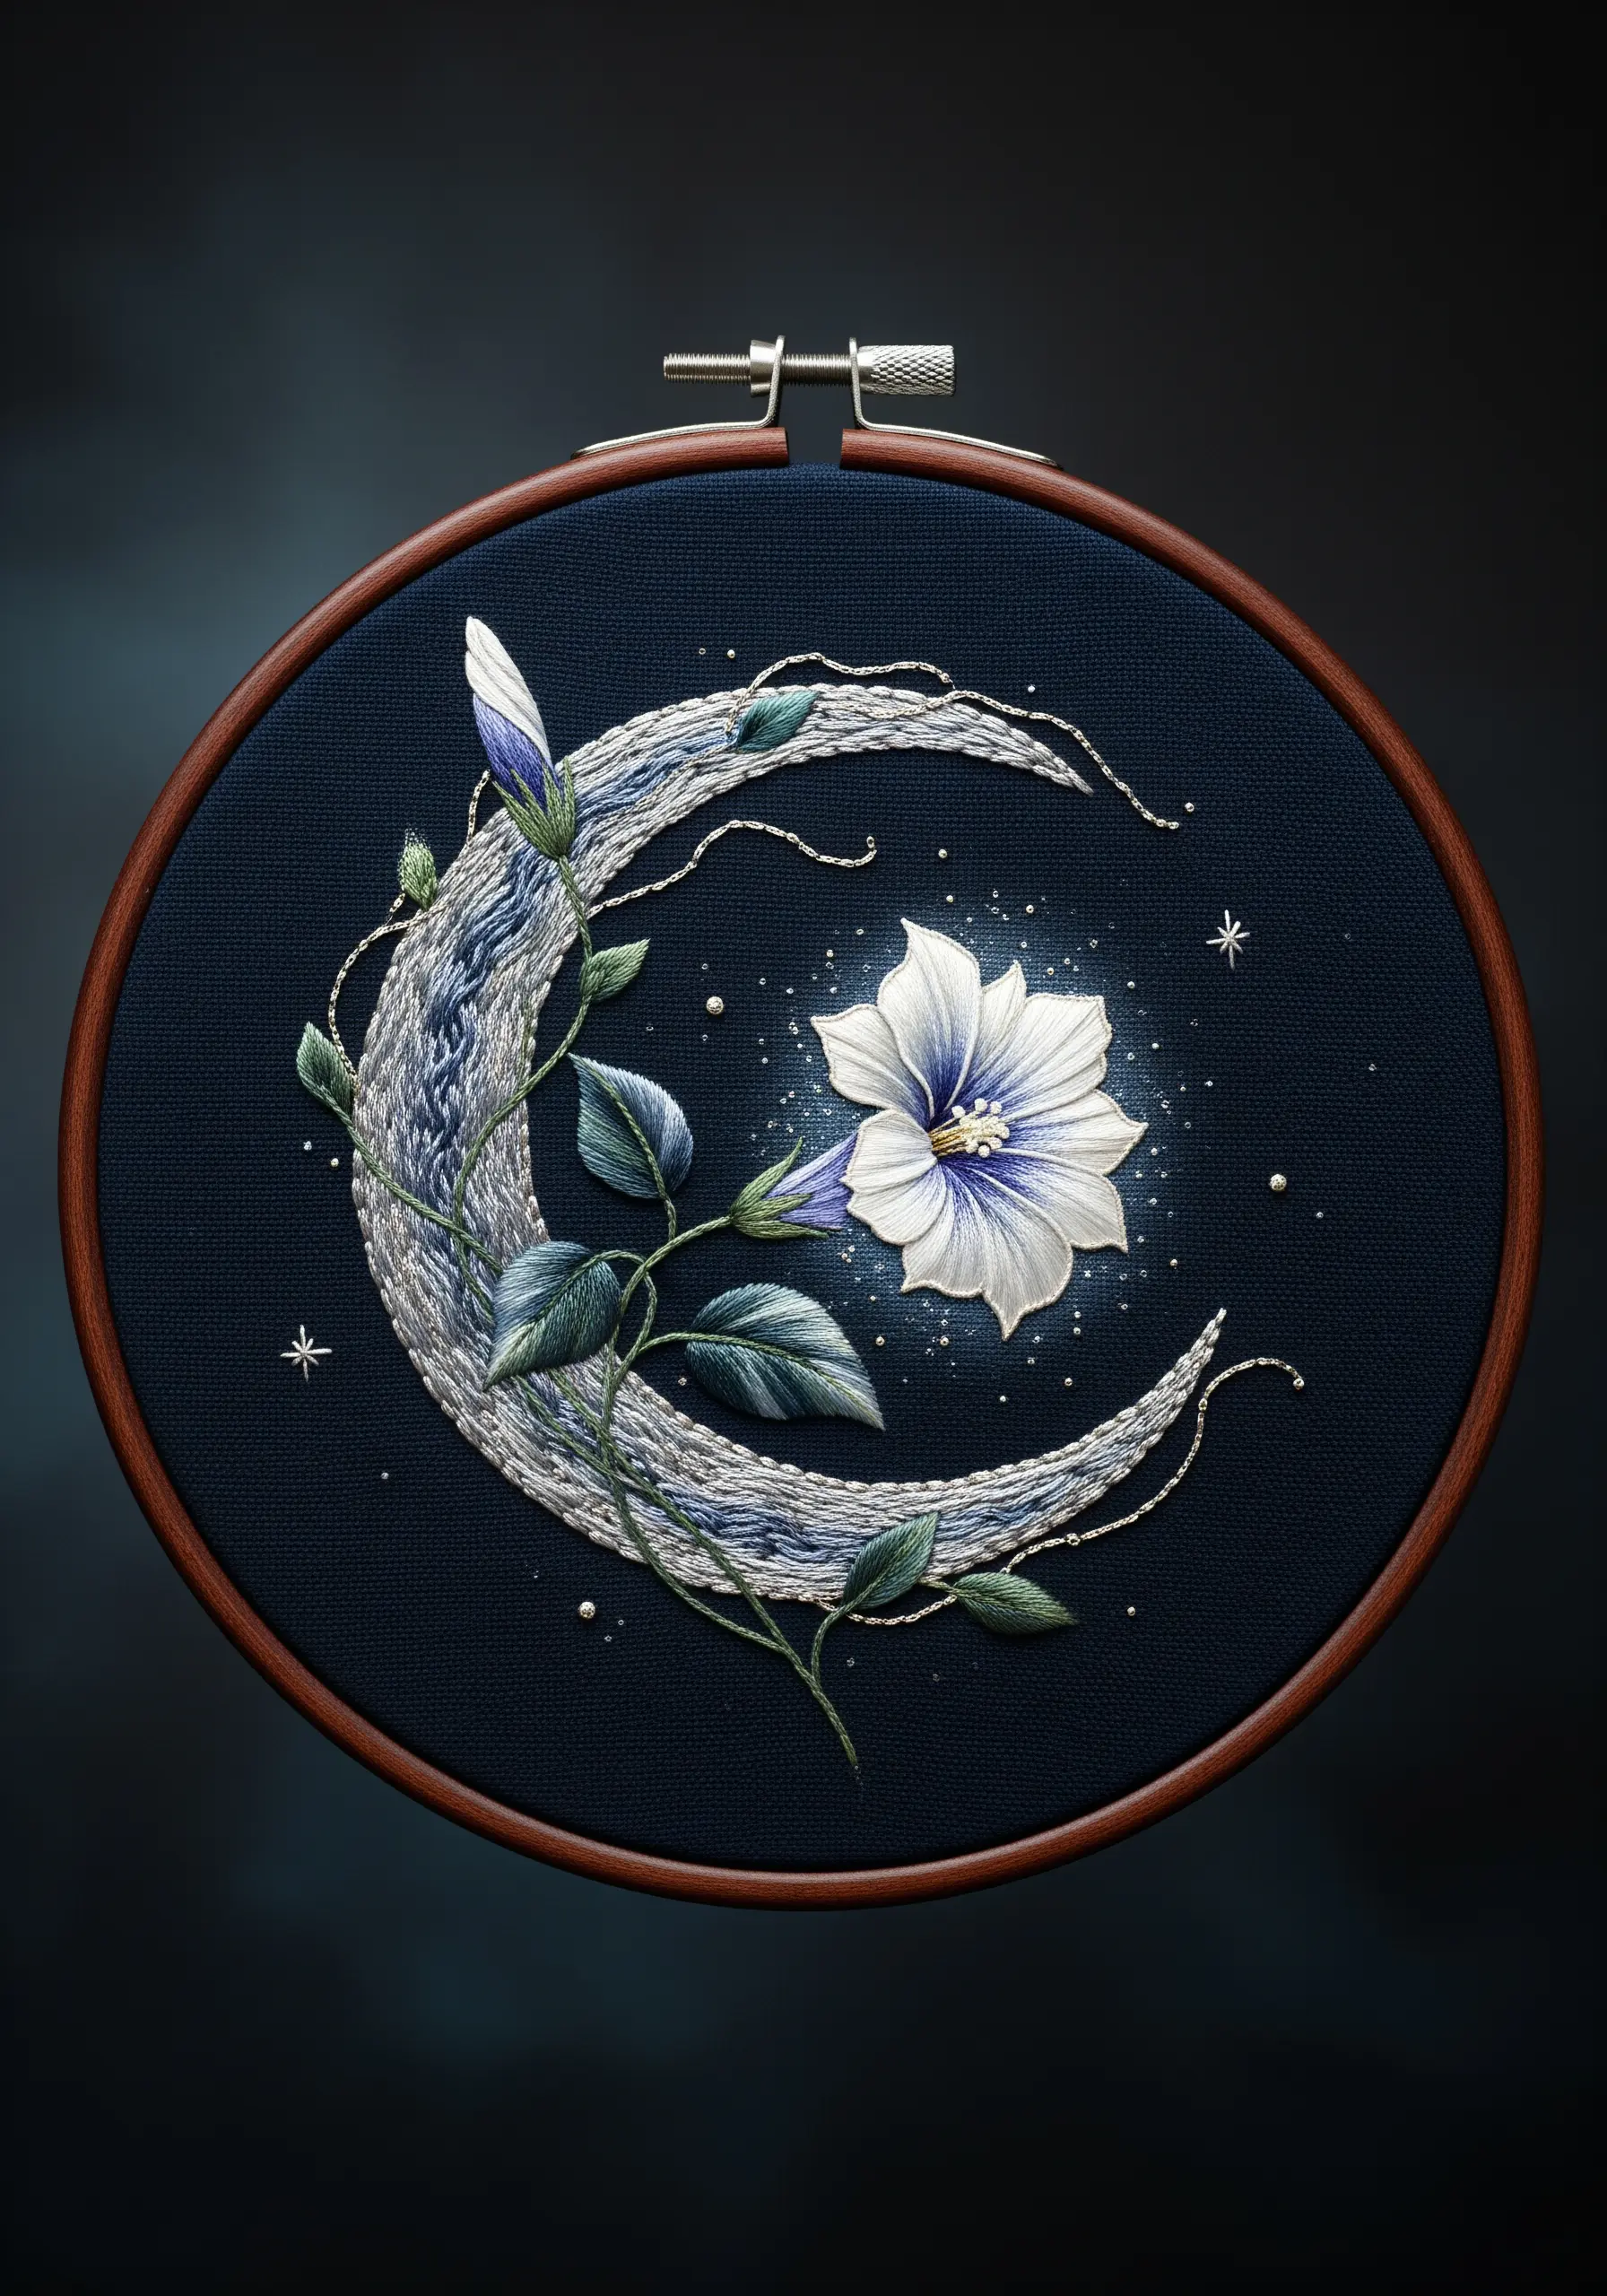
To create a moon that feels both textured and ethereal, use a whipped backstitch or a heavy chain stitch with a variegated grey and silver thread.
For the moonflower, stitch the petals using long-and-short stitch with a single strand of white floss over a light grey base.
This underlayer of grey prevents the dark fabric from showing through and gives the white petals an authentic, moonlit glow.
Finish by couching a single strand of fine metallic silver thread along the moon’s edge and scattering tiny star stitches to complete the celestial mood.
2. Evening Primrose Against a Stark Sky
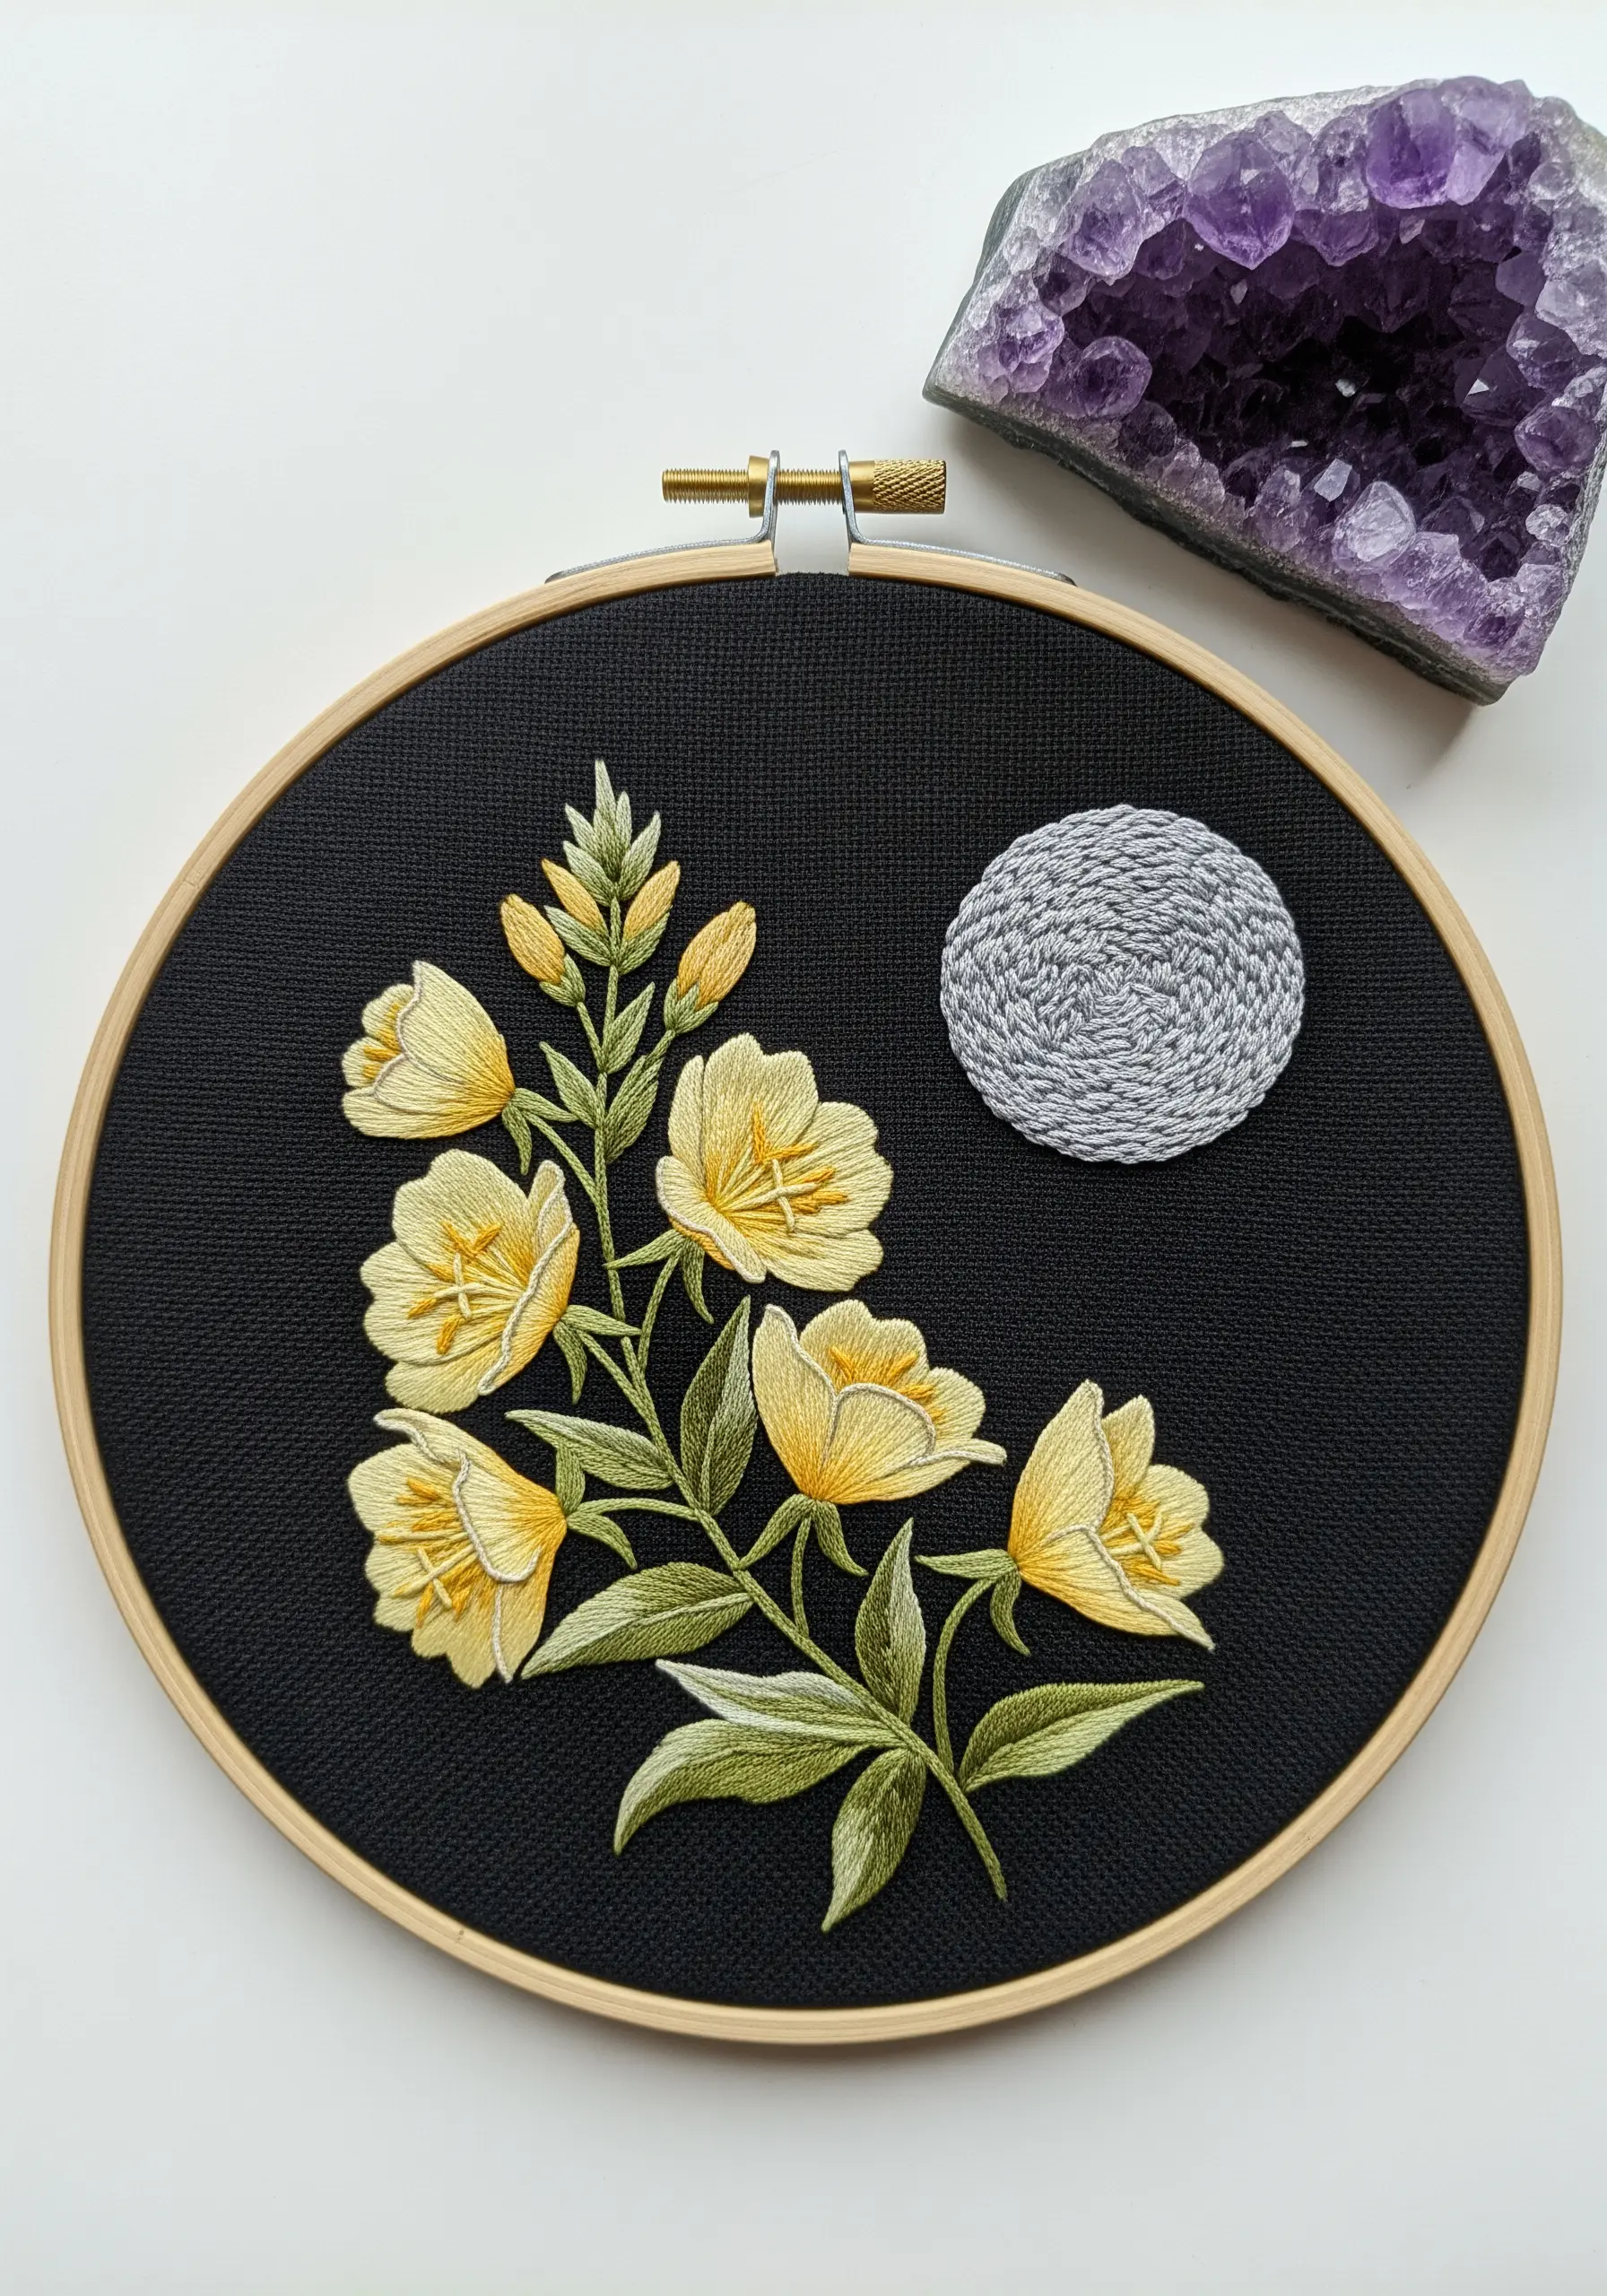
Making a pale color like yellow pop on black fabric requires a specific approach to avoid it looking thin or dull.
First, lay down a base of split stitches in white or cream floss where the petals will be.
Then, cover this base with your yellow satin stitches.
This foundation layer acts as a primer, making the yellow appear more vibrant and opaque.
For the moon, create a dense, flat texture with concentric circles of split stitch in a cool-toned grey, which contrasts beautifully with the warm yellow flowers.
3. The Hyper-Realistic Night-Blooming Cereus
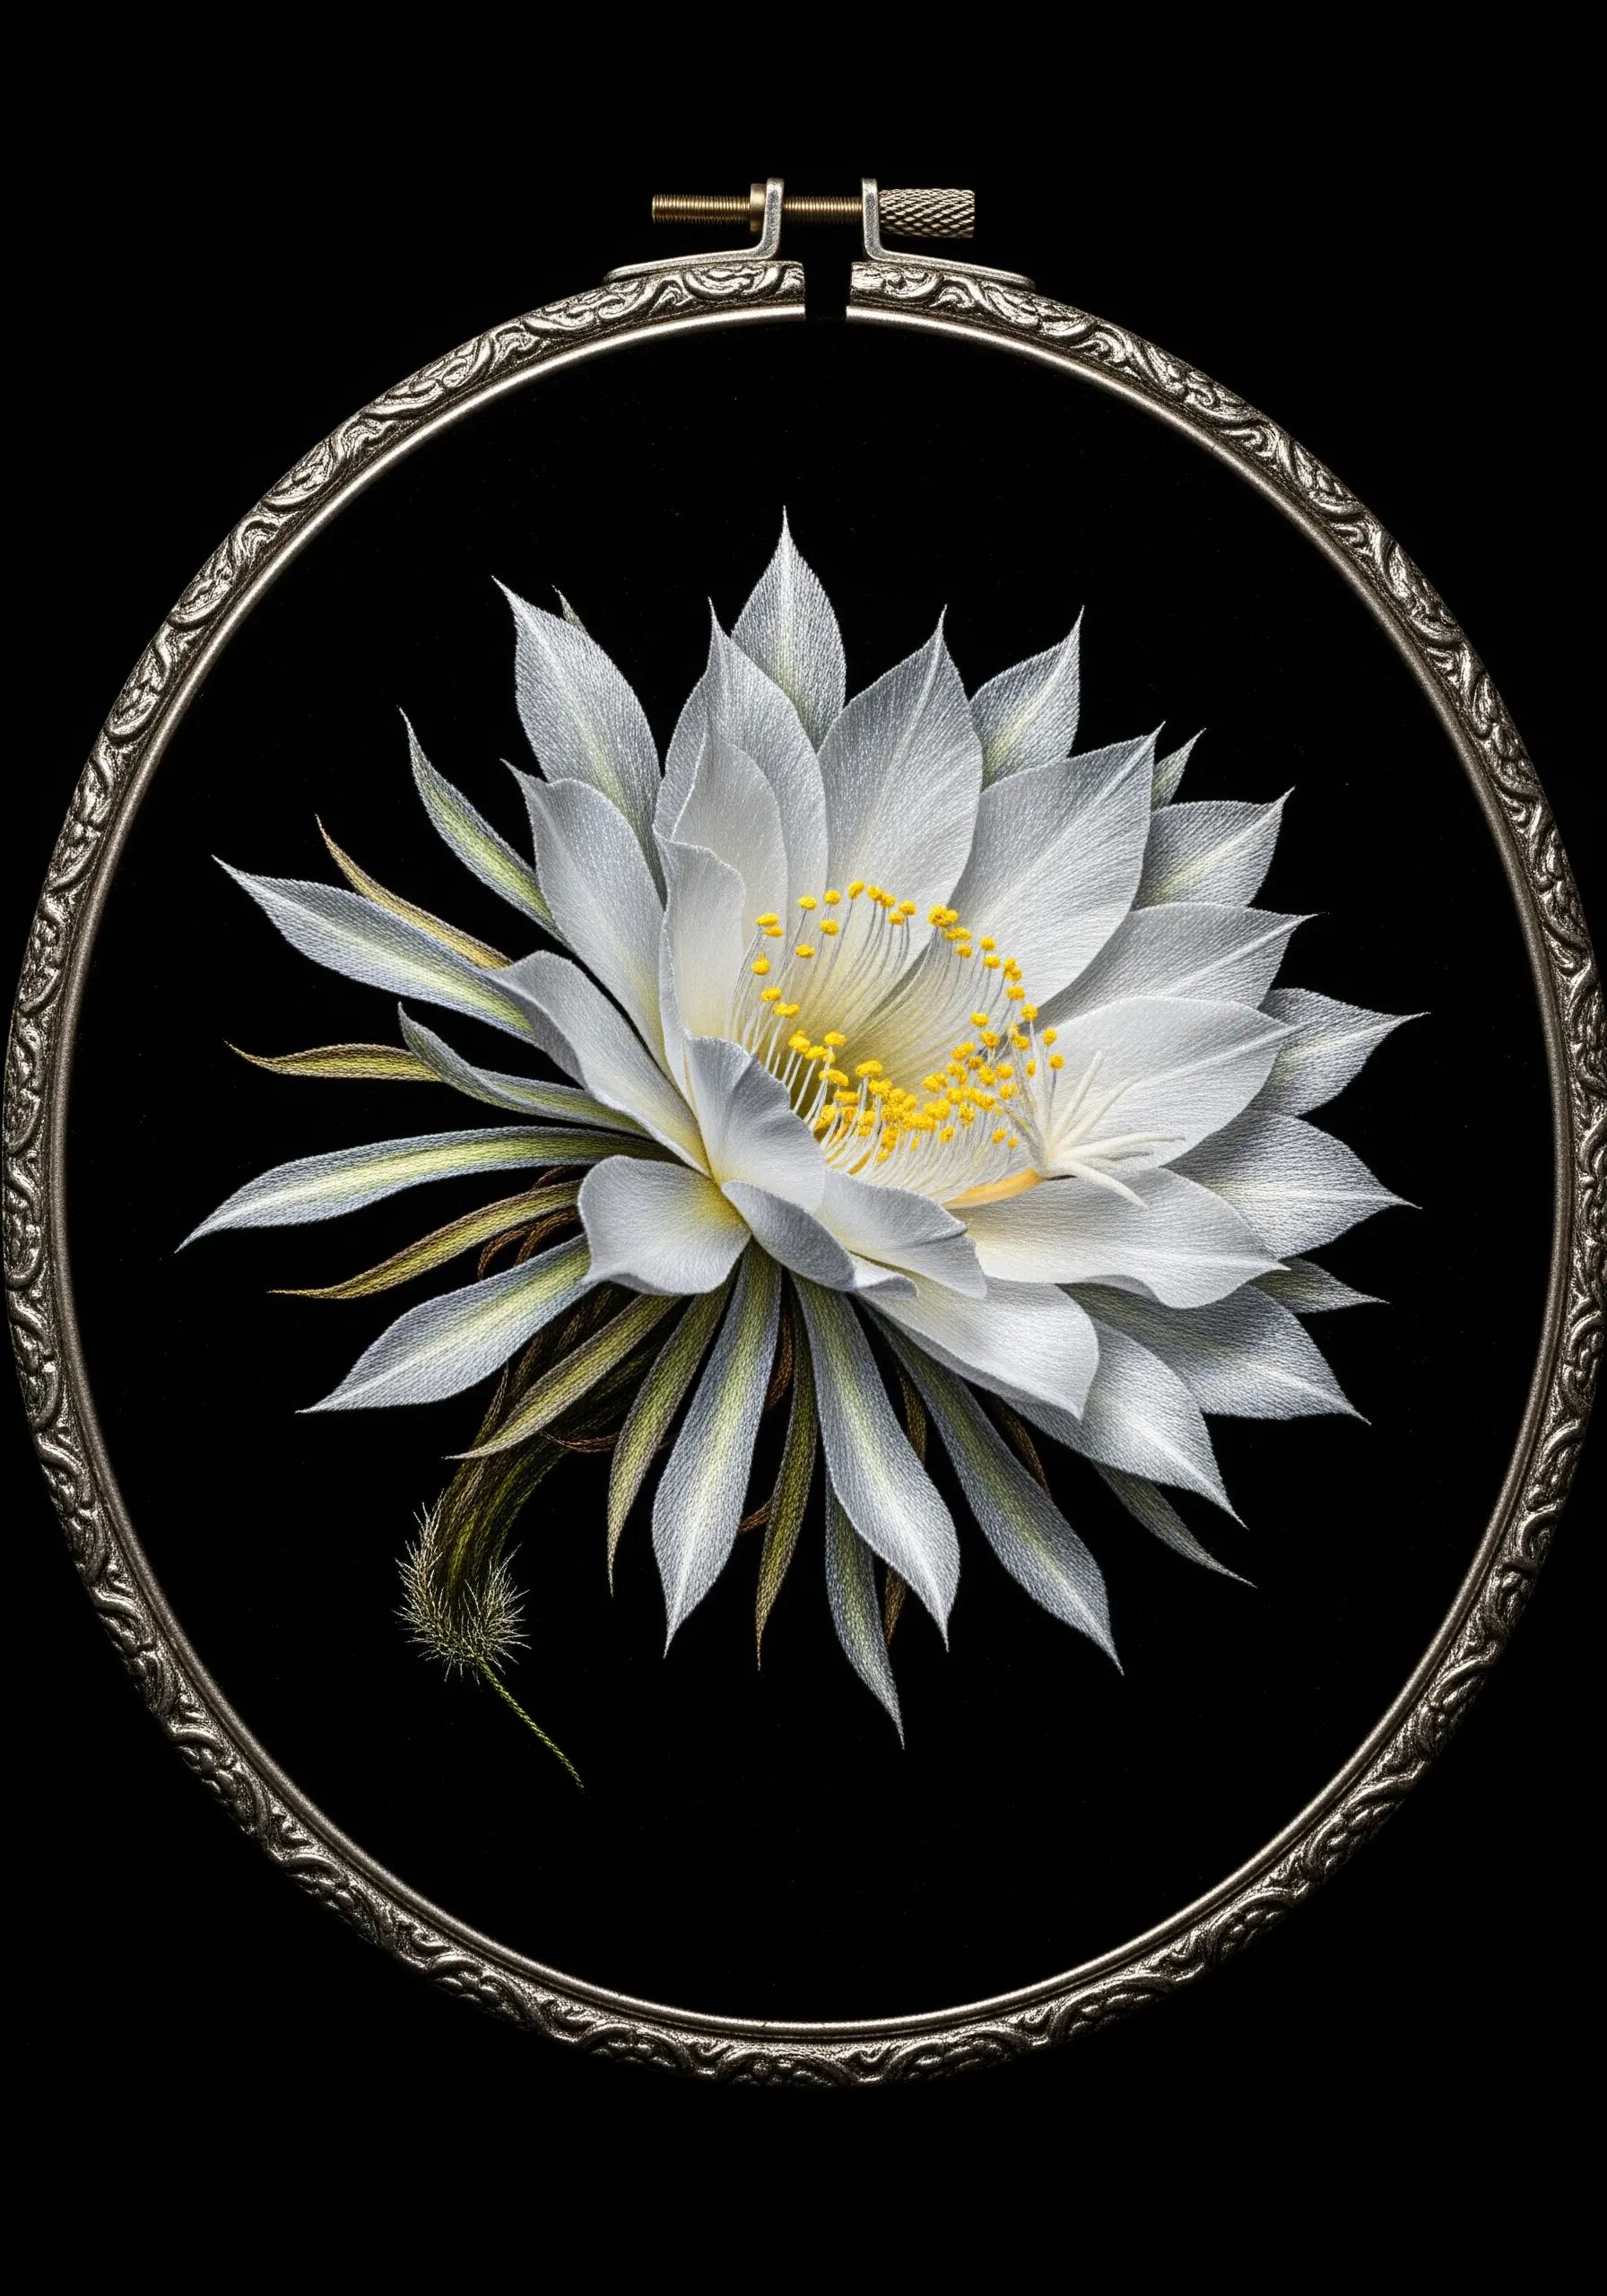
Achieving this level of realism is all about directional thread painting with a single strand of floss.
Study the flower and notice how the petals radiate from the center; your stitches must follow this exact direction to create naturalism and flow.
Use multiple shades of off-white, pale grey, and the slightest hint of green near the base to build dimension.
The sharp, spiky texture of the stem is made with tiny, dense straight stitches, providing a crucial textural contrast to the soft petals.
4. Iridescent Luna Moth with Phlox
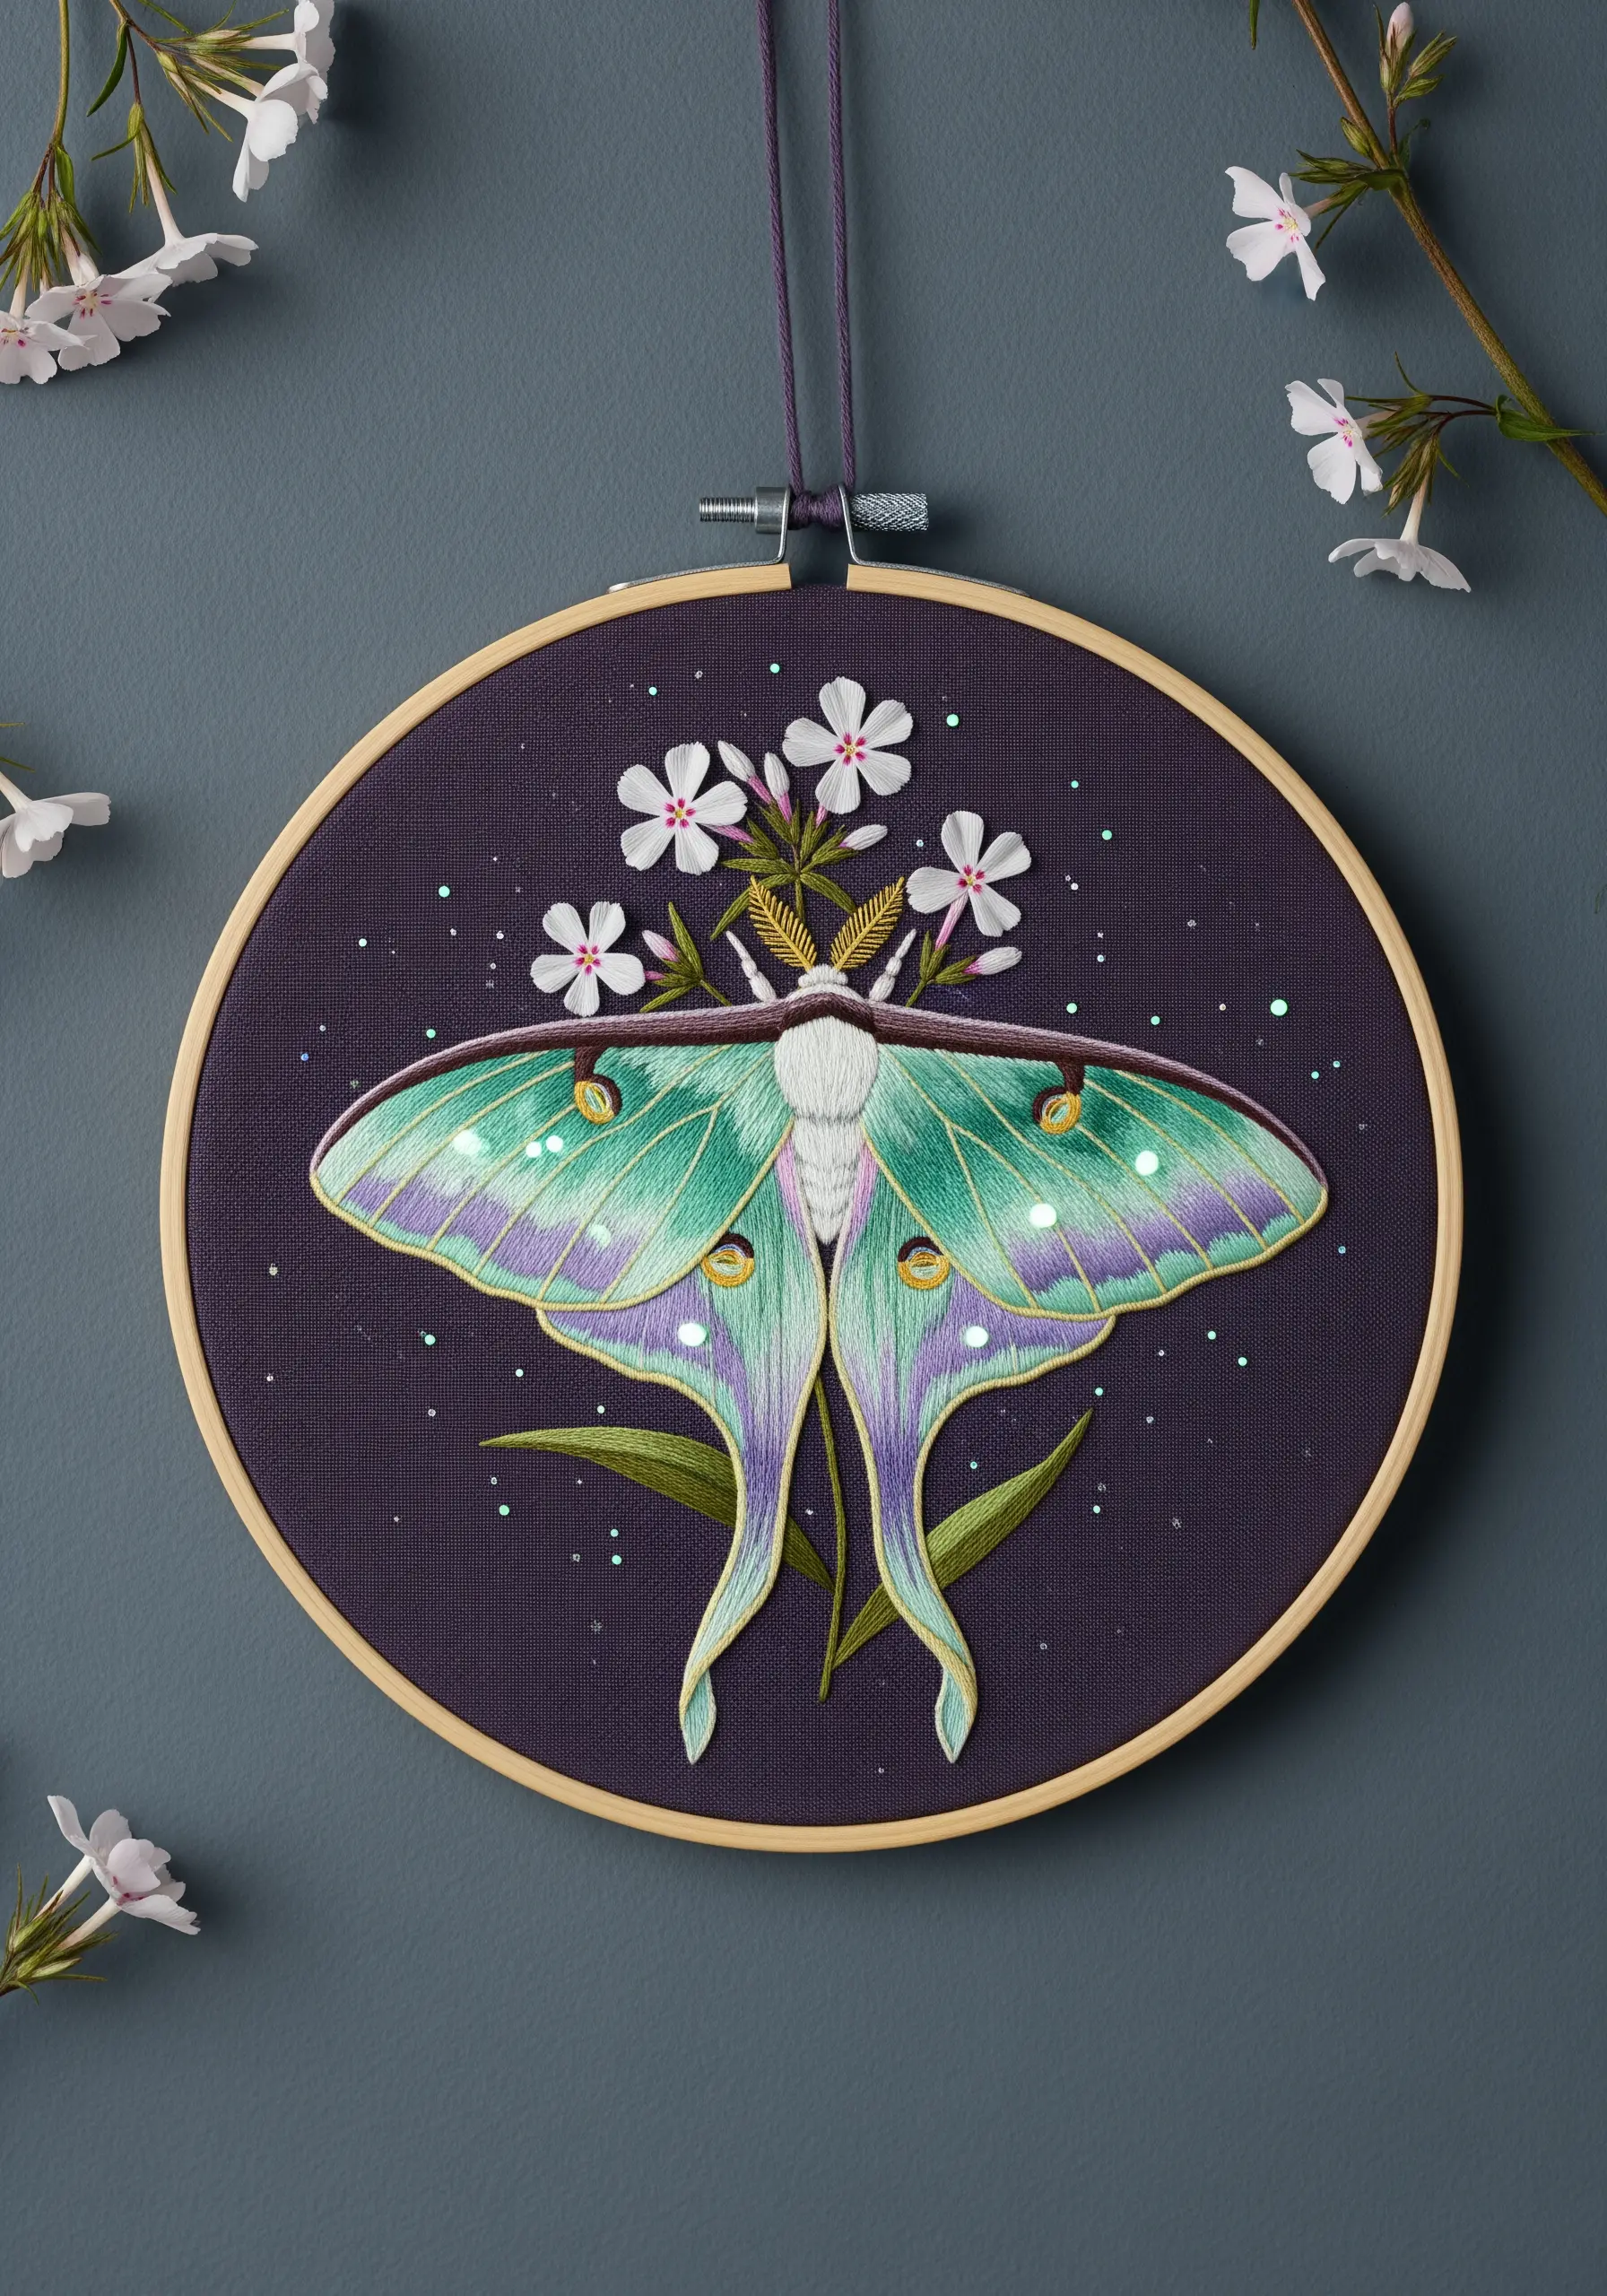
The magic of a Luna Moth’s wings lies in their iridescence, which you can replicate by blending single strands of mint green, pale lavender, and soft yellow floss.
Use the long-and-short stitch, allowing the colors to softly merge without creating harsh lines.
Stitch direction is critical: follow the natural veining of the wings to create a realistic texture and light-catching surface.
A few strategically placed seed beads or tiny French knots in metallic thread will mimic the dusty, sparkling quality of moth wings.
5. A Foxglove Field Under the Constellations
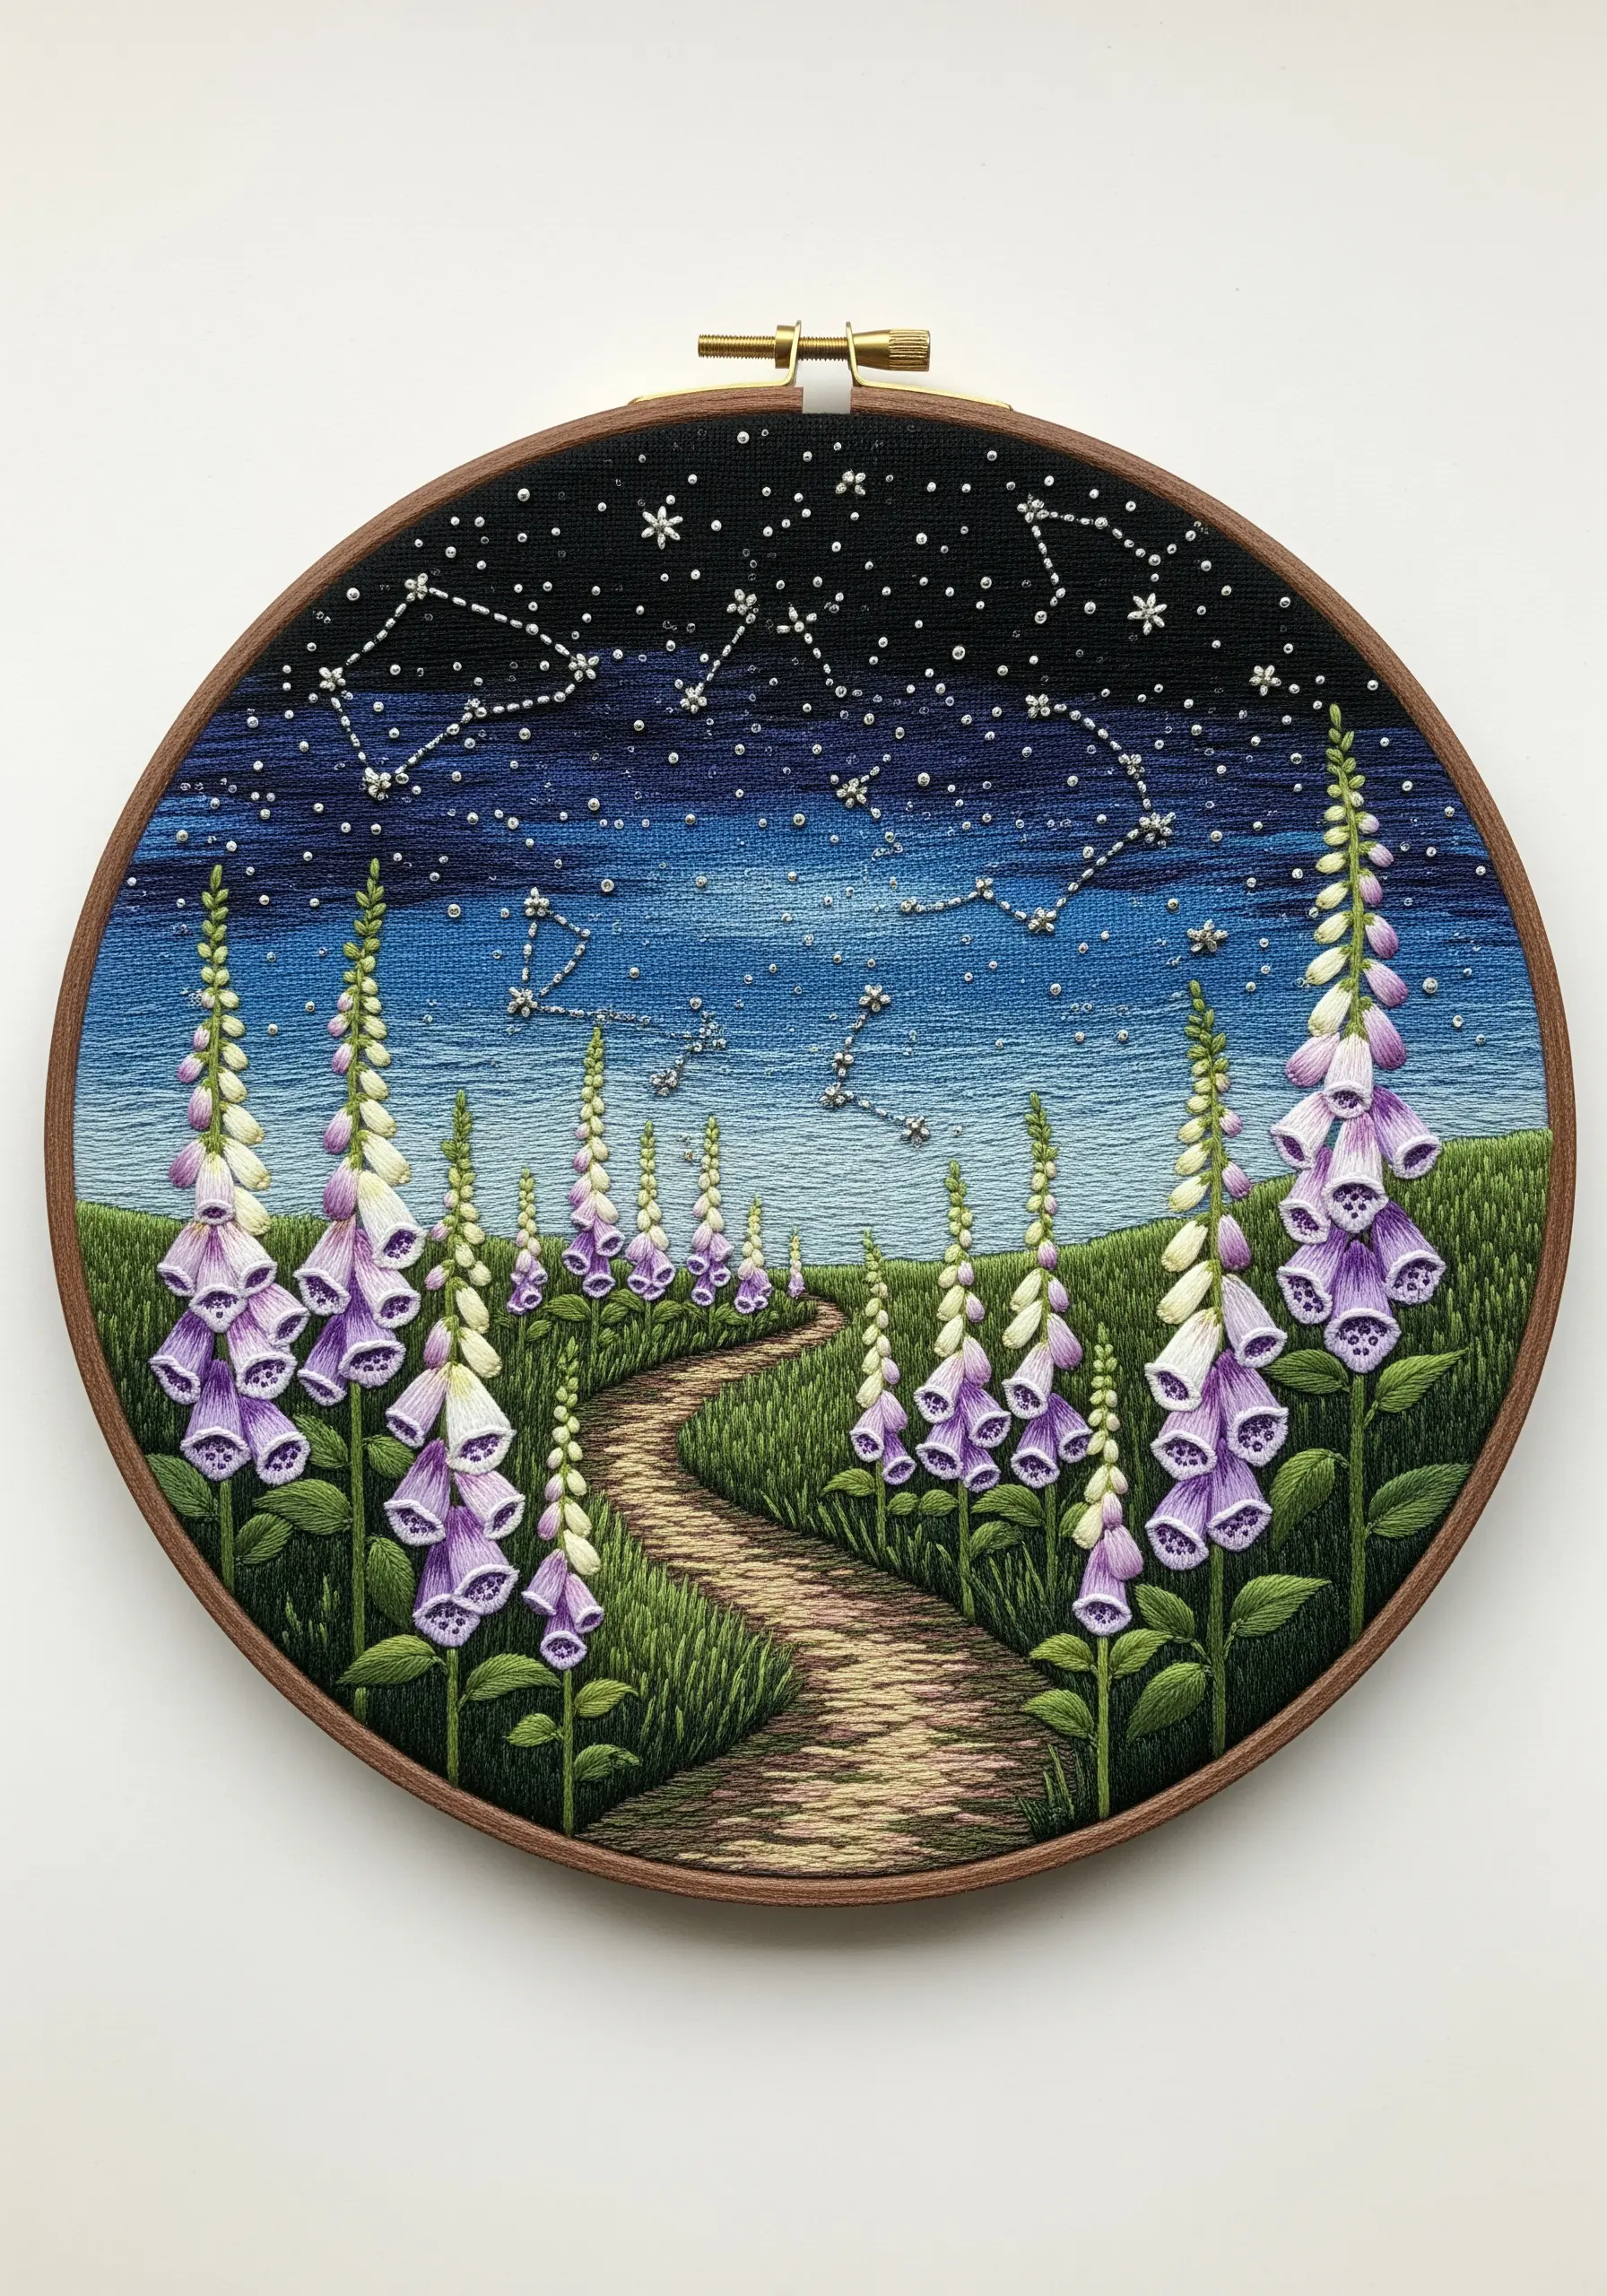
Create a sense of depth in this landscape by applying the rules of atmospheric perspective to your stitching.
Stitch the foreground foxgloves with richer color, higher detail, and more texture.
For the flowers in the mid-ground and background, use fewer strands of floss, cooler colors (add more grey or blue), and simpler stitches.
This technique makes the foreground pop and causes the background to recede, creating a believable, immersive scene.
The constellations are stitched with a fine, single strand of white or silver thread, using tiny straight stitches and French knots.
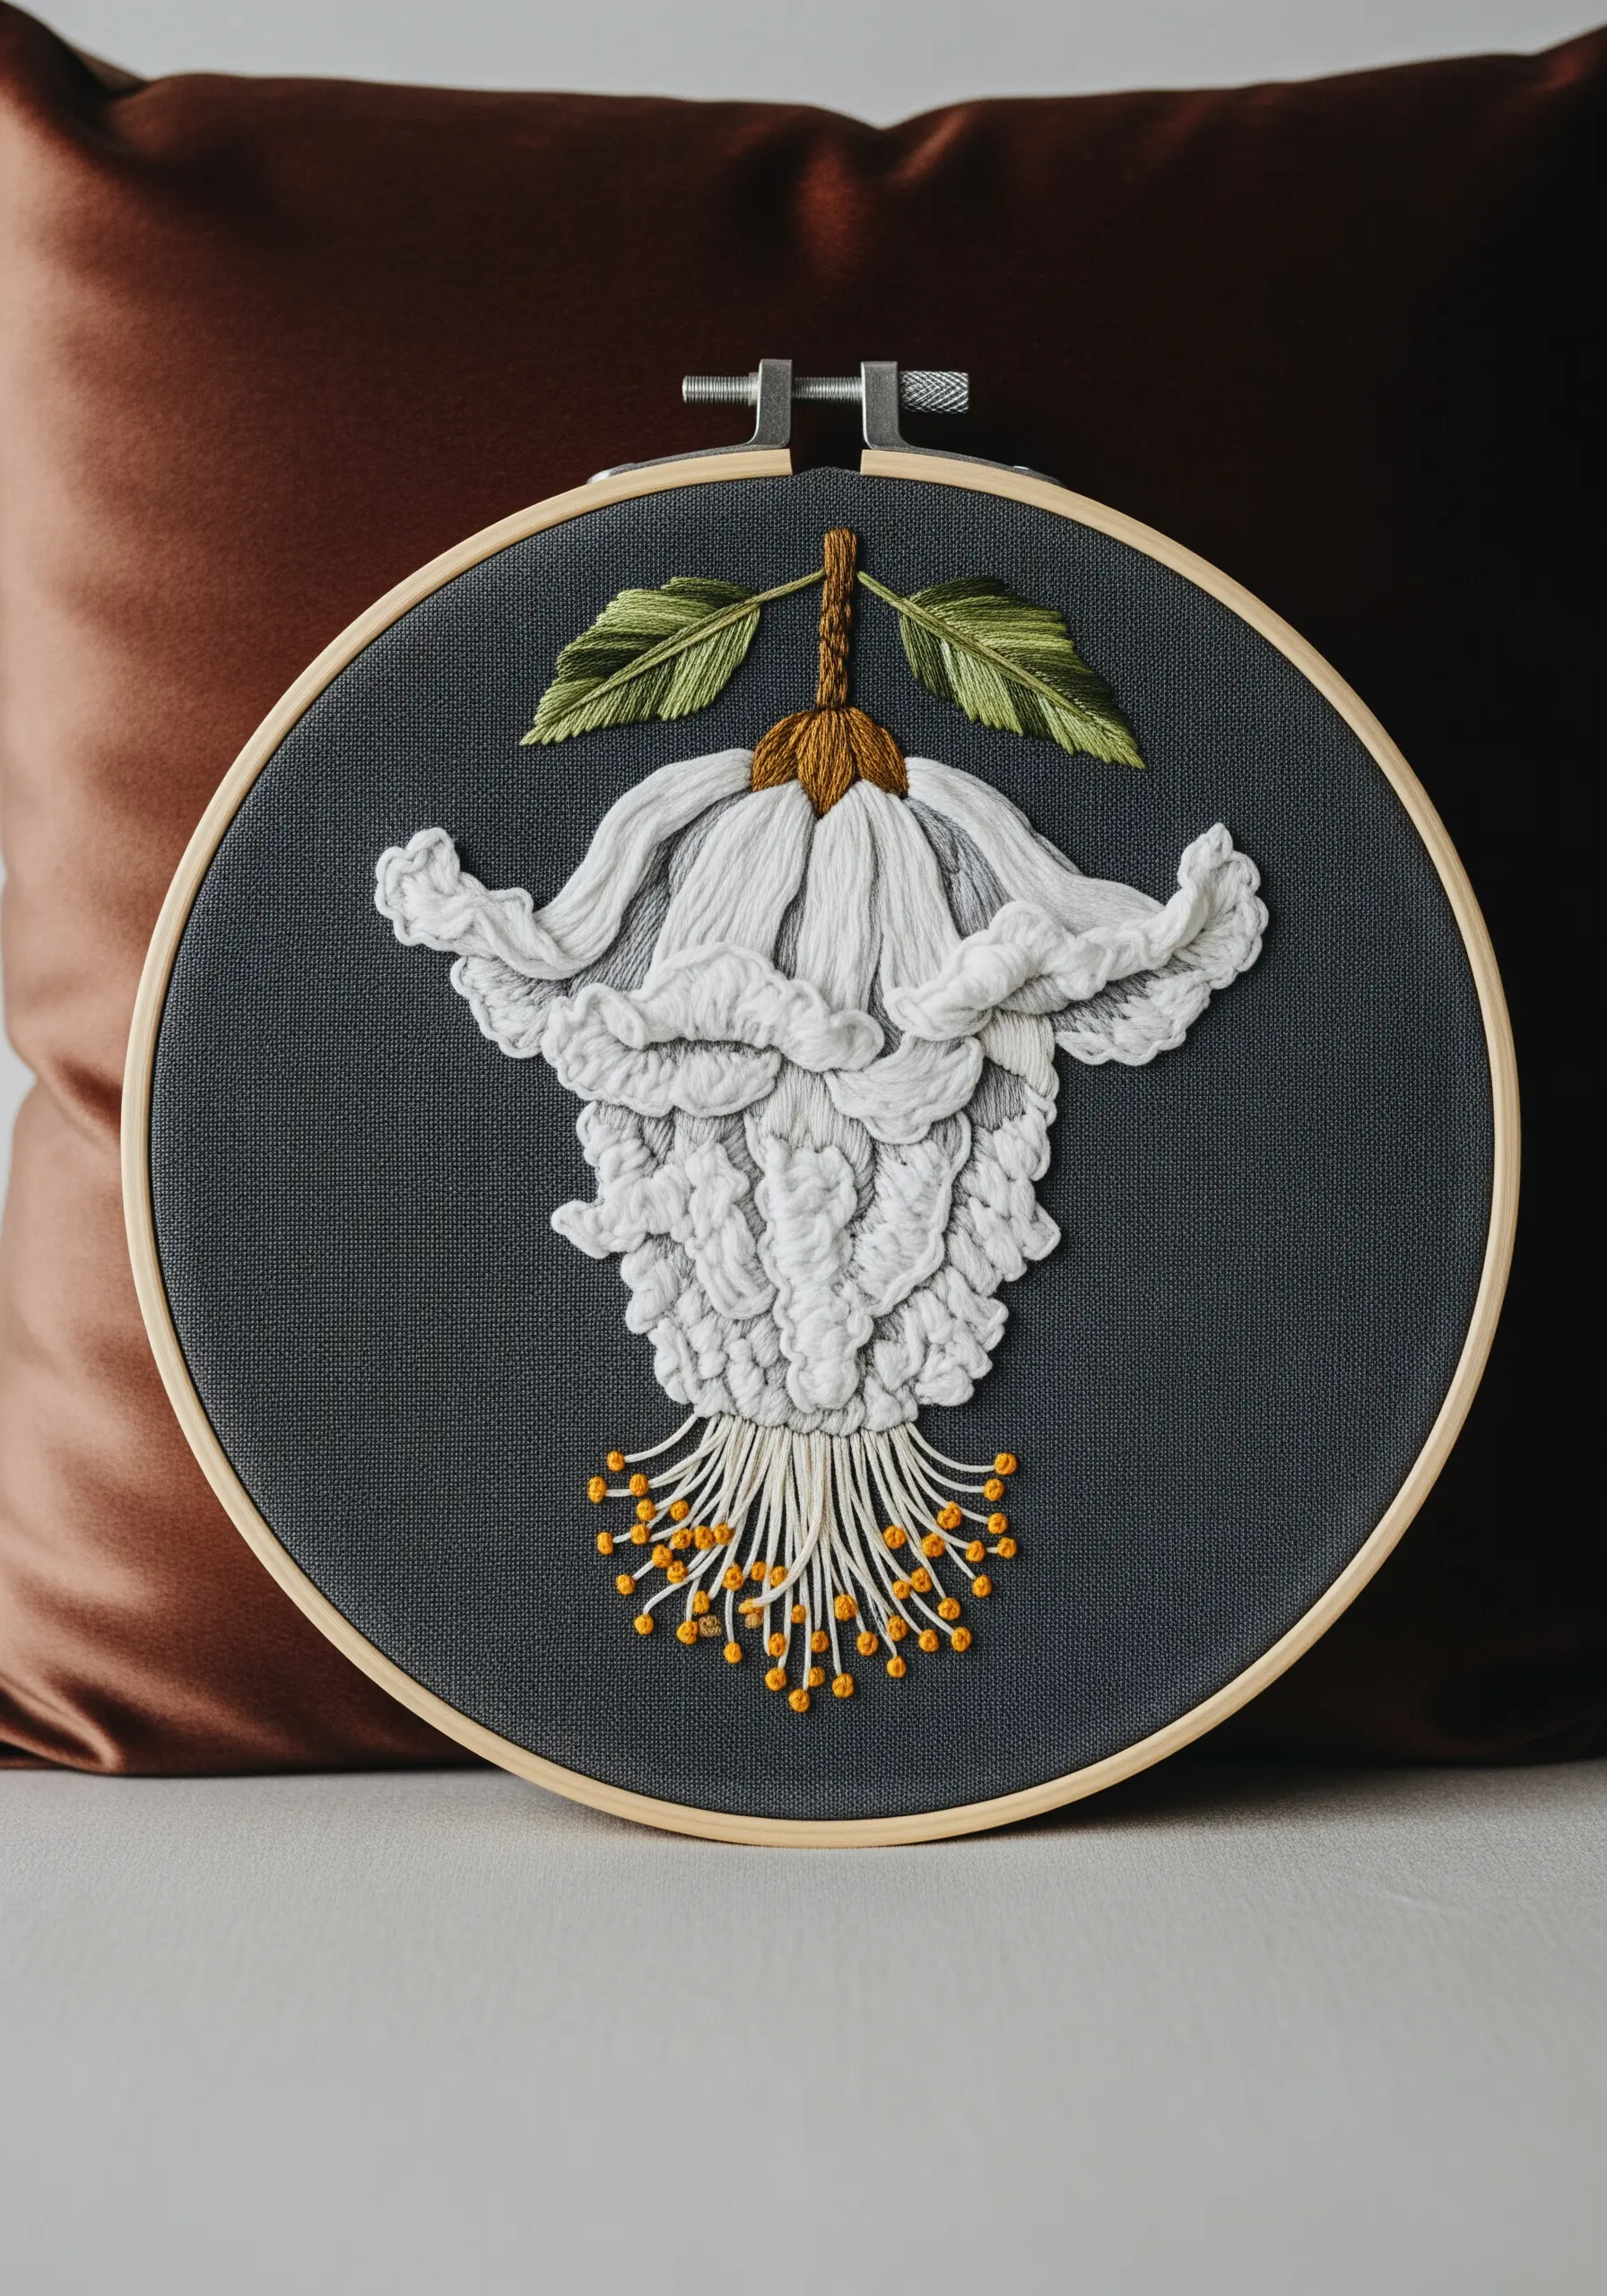
6. Cascading Angel’s Trumpet Blooms
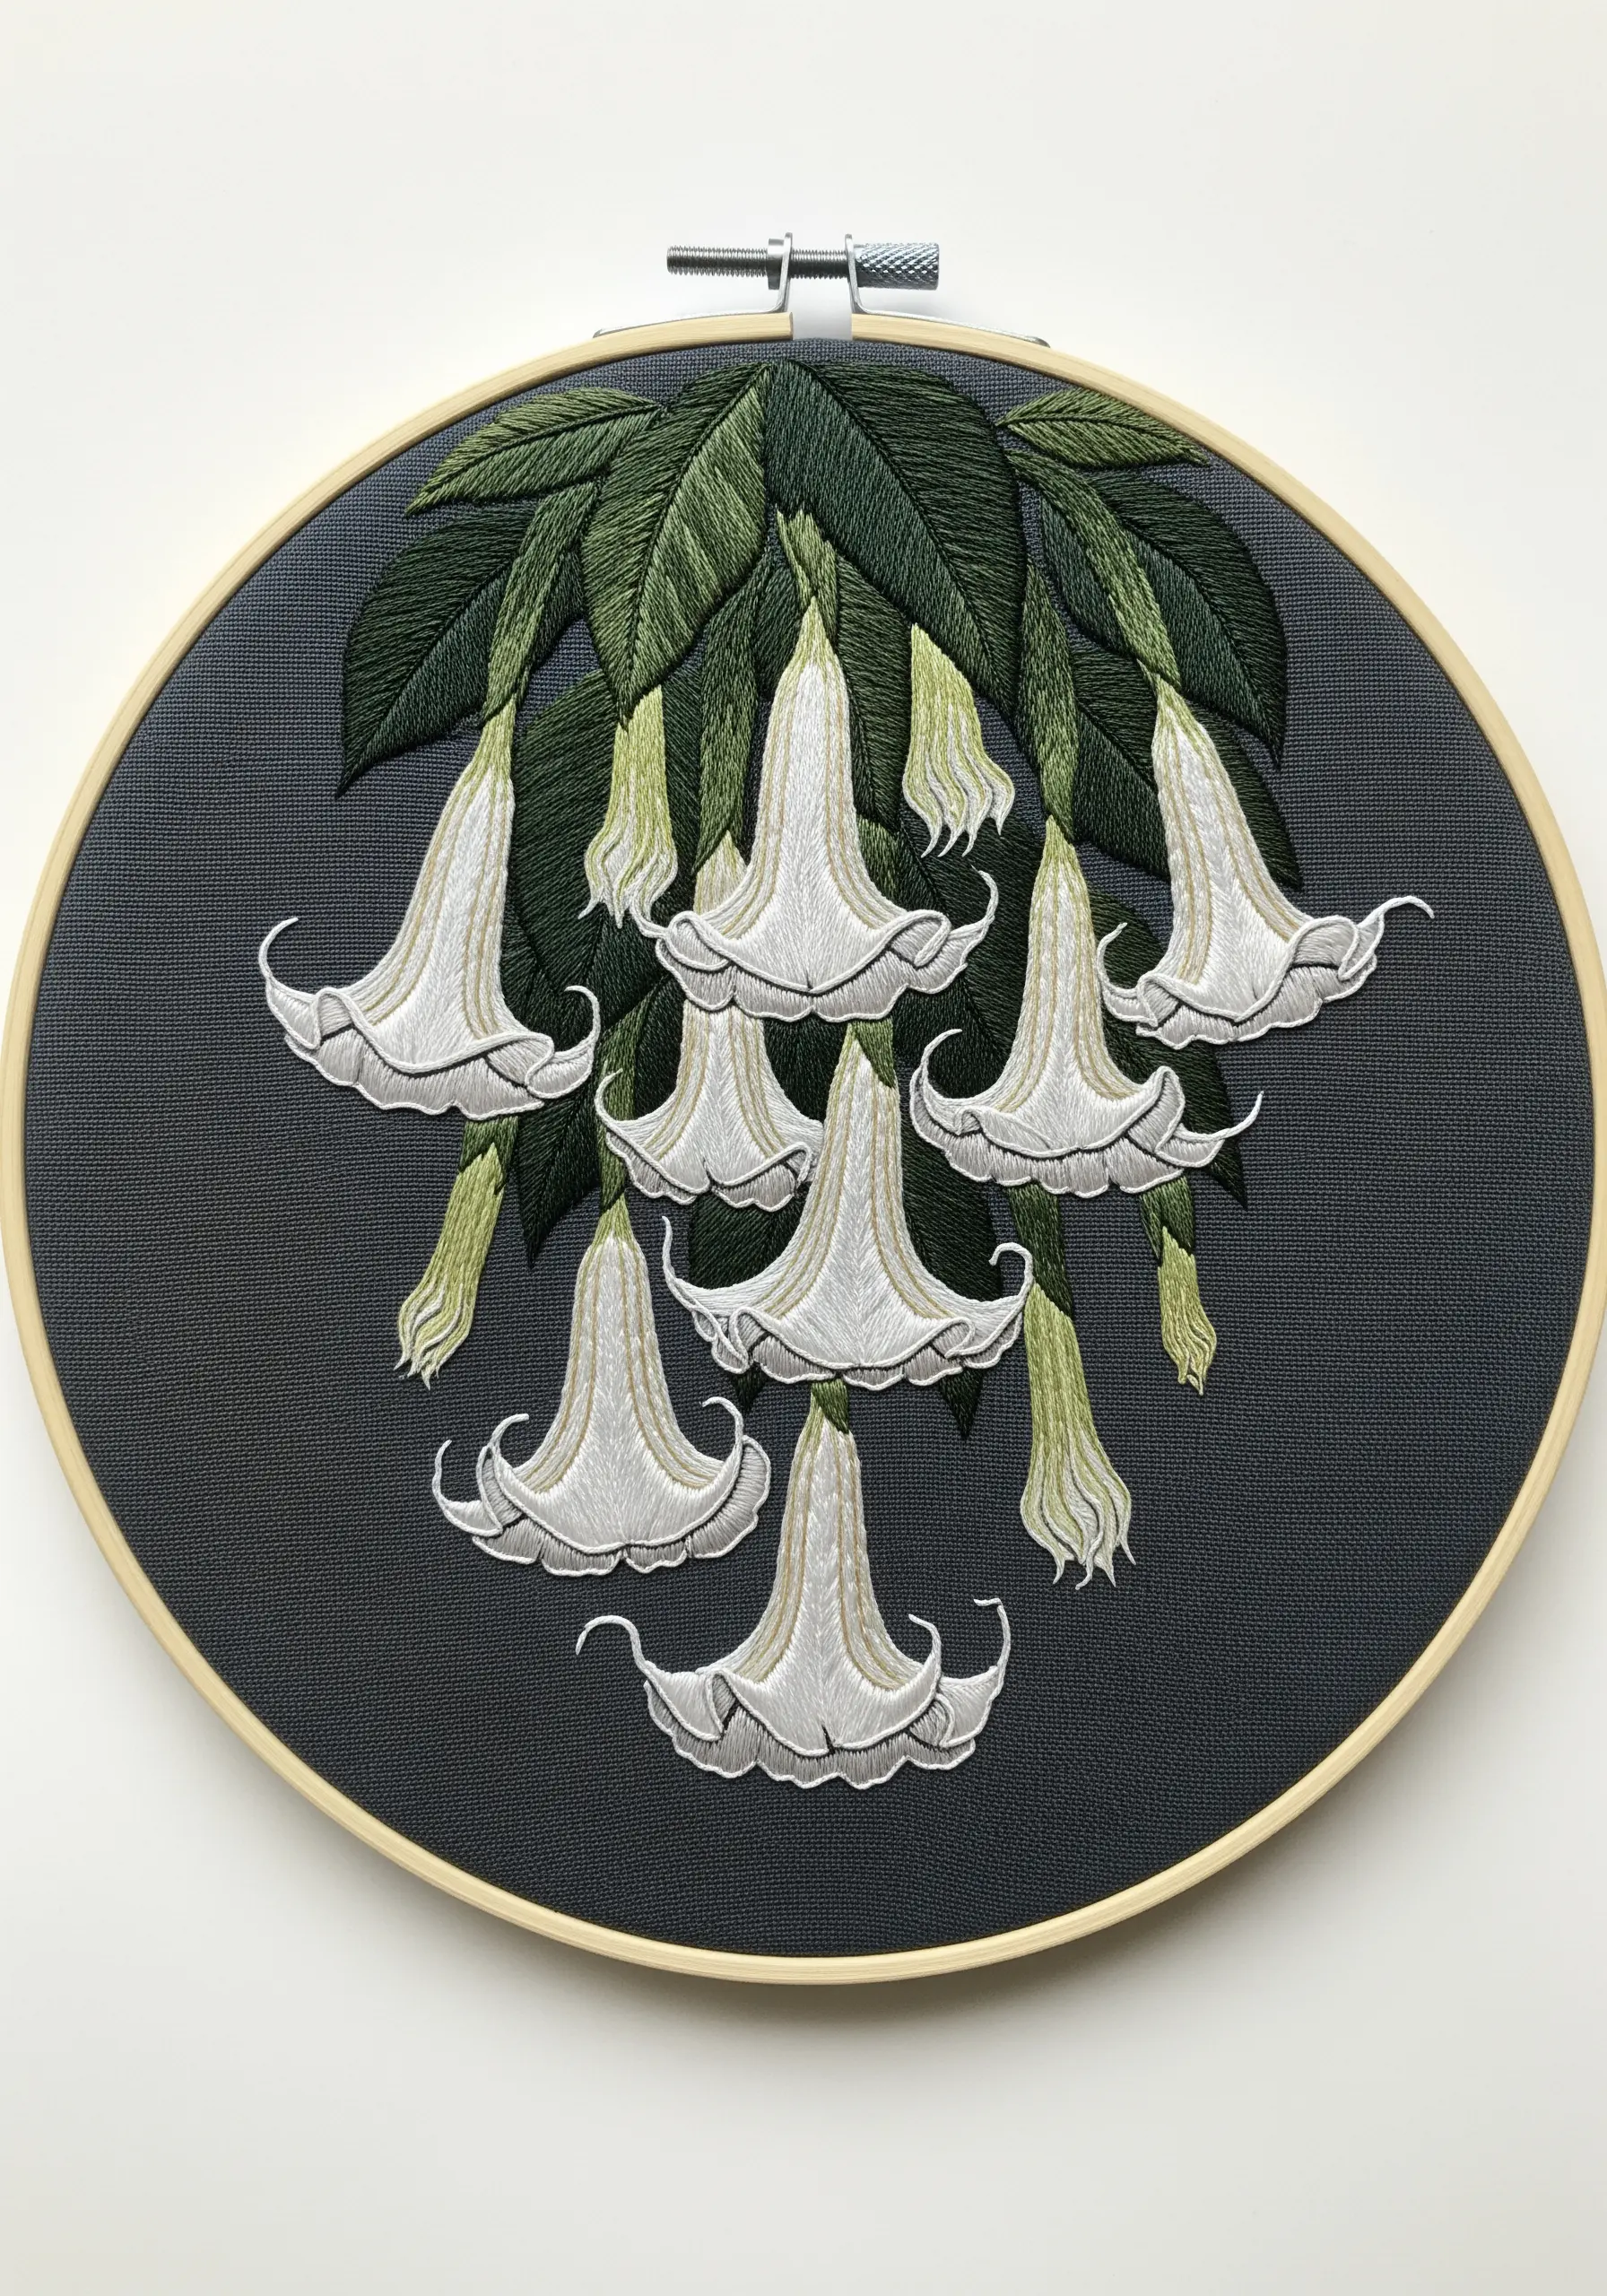
To give these hanging flowers their signature trumpet shape, directional shading is key.
Use long-and-short stitch, placing your lightest shades (white and cream) on the outermost, light-facing edges of the petals.
Blend in slightly darker tones like pale grey or light beige on the sides and where the petal curls inward to create the illusion of shadow and form.
The outlines are defined with a sharp split stitch, ensuring each bloom has a clean, elegant silhouette against the dark fabric.
7. Delicate Night-Scented Stock
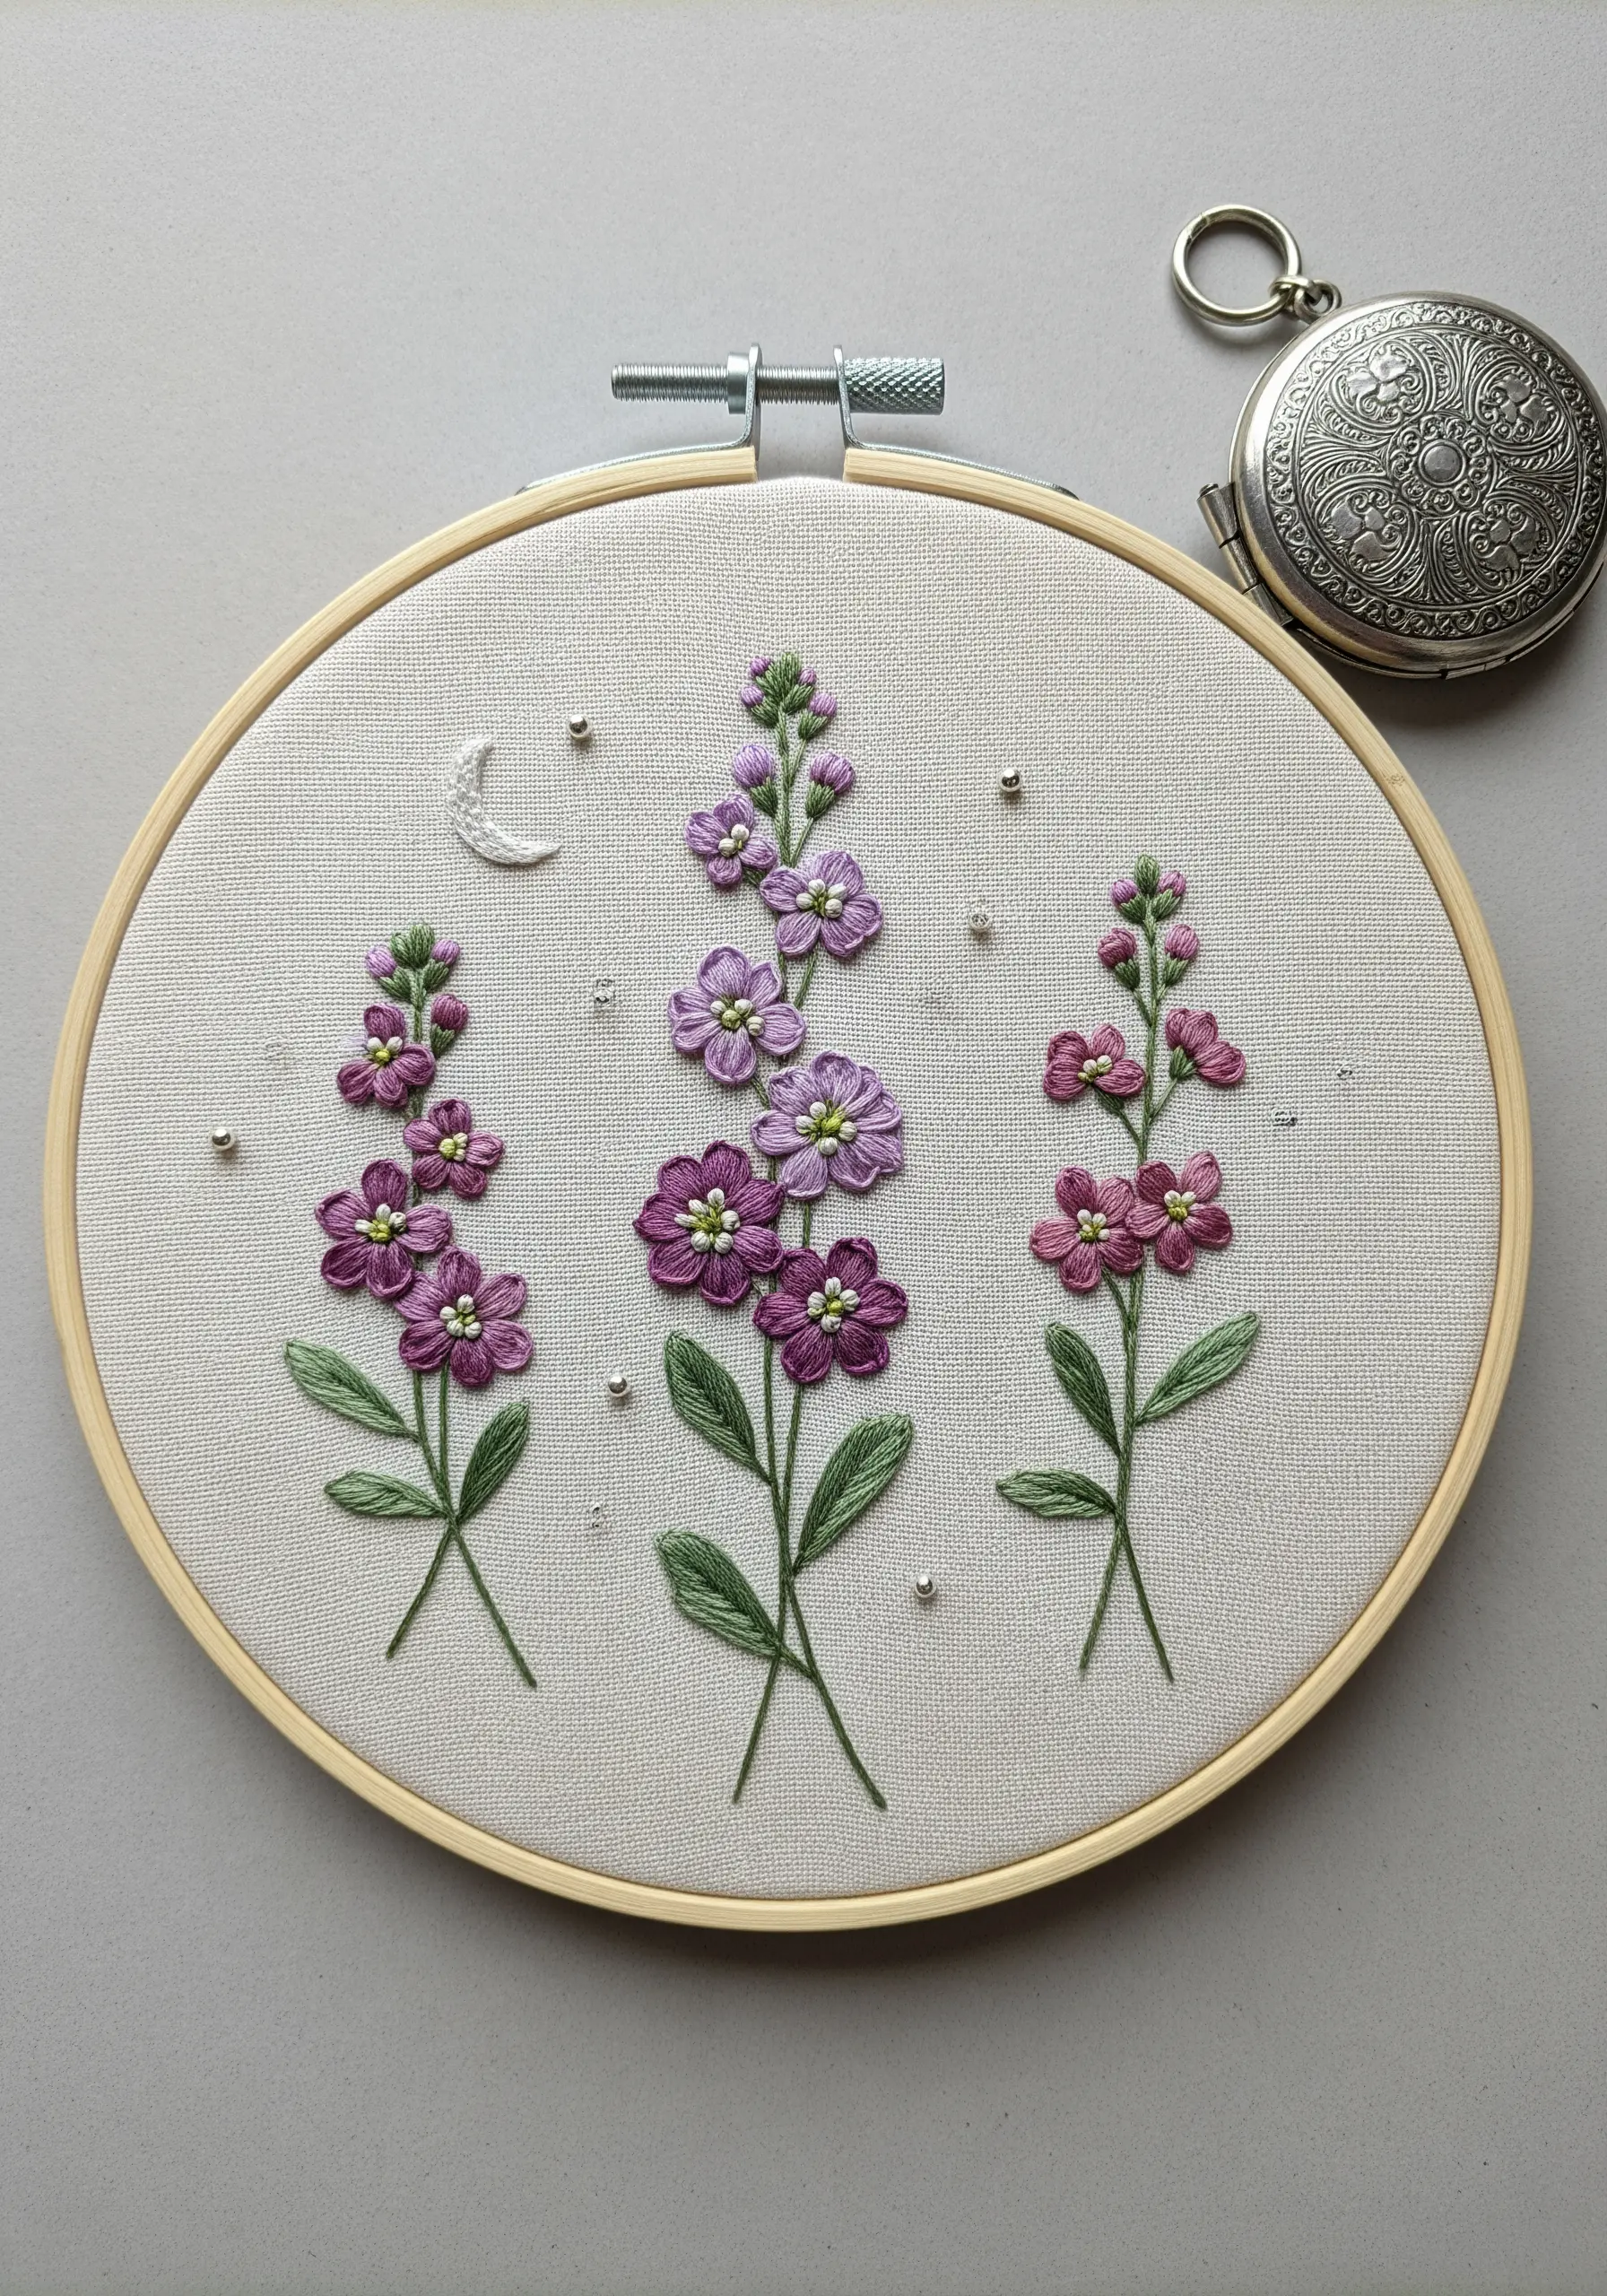
On a light fabric, you can create a gentle nocturnal scene by focusing on texture and subtle embellishment.
Use padded satin stitch for the flower petals to give them a soft, raised dimension that stands out against the flat background.
To achieve this, stitch a small satin stitch base layer, then cover it with your final satin stitches in the opposite direction.
Tiny silver beads scattered across the composition mimic stars or dew, adding a touch of magic without overwhelming the delicate florals.
8. Jasmine Vine with Flickering Fireflies
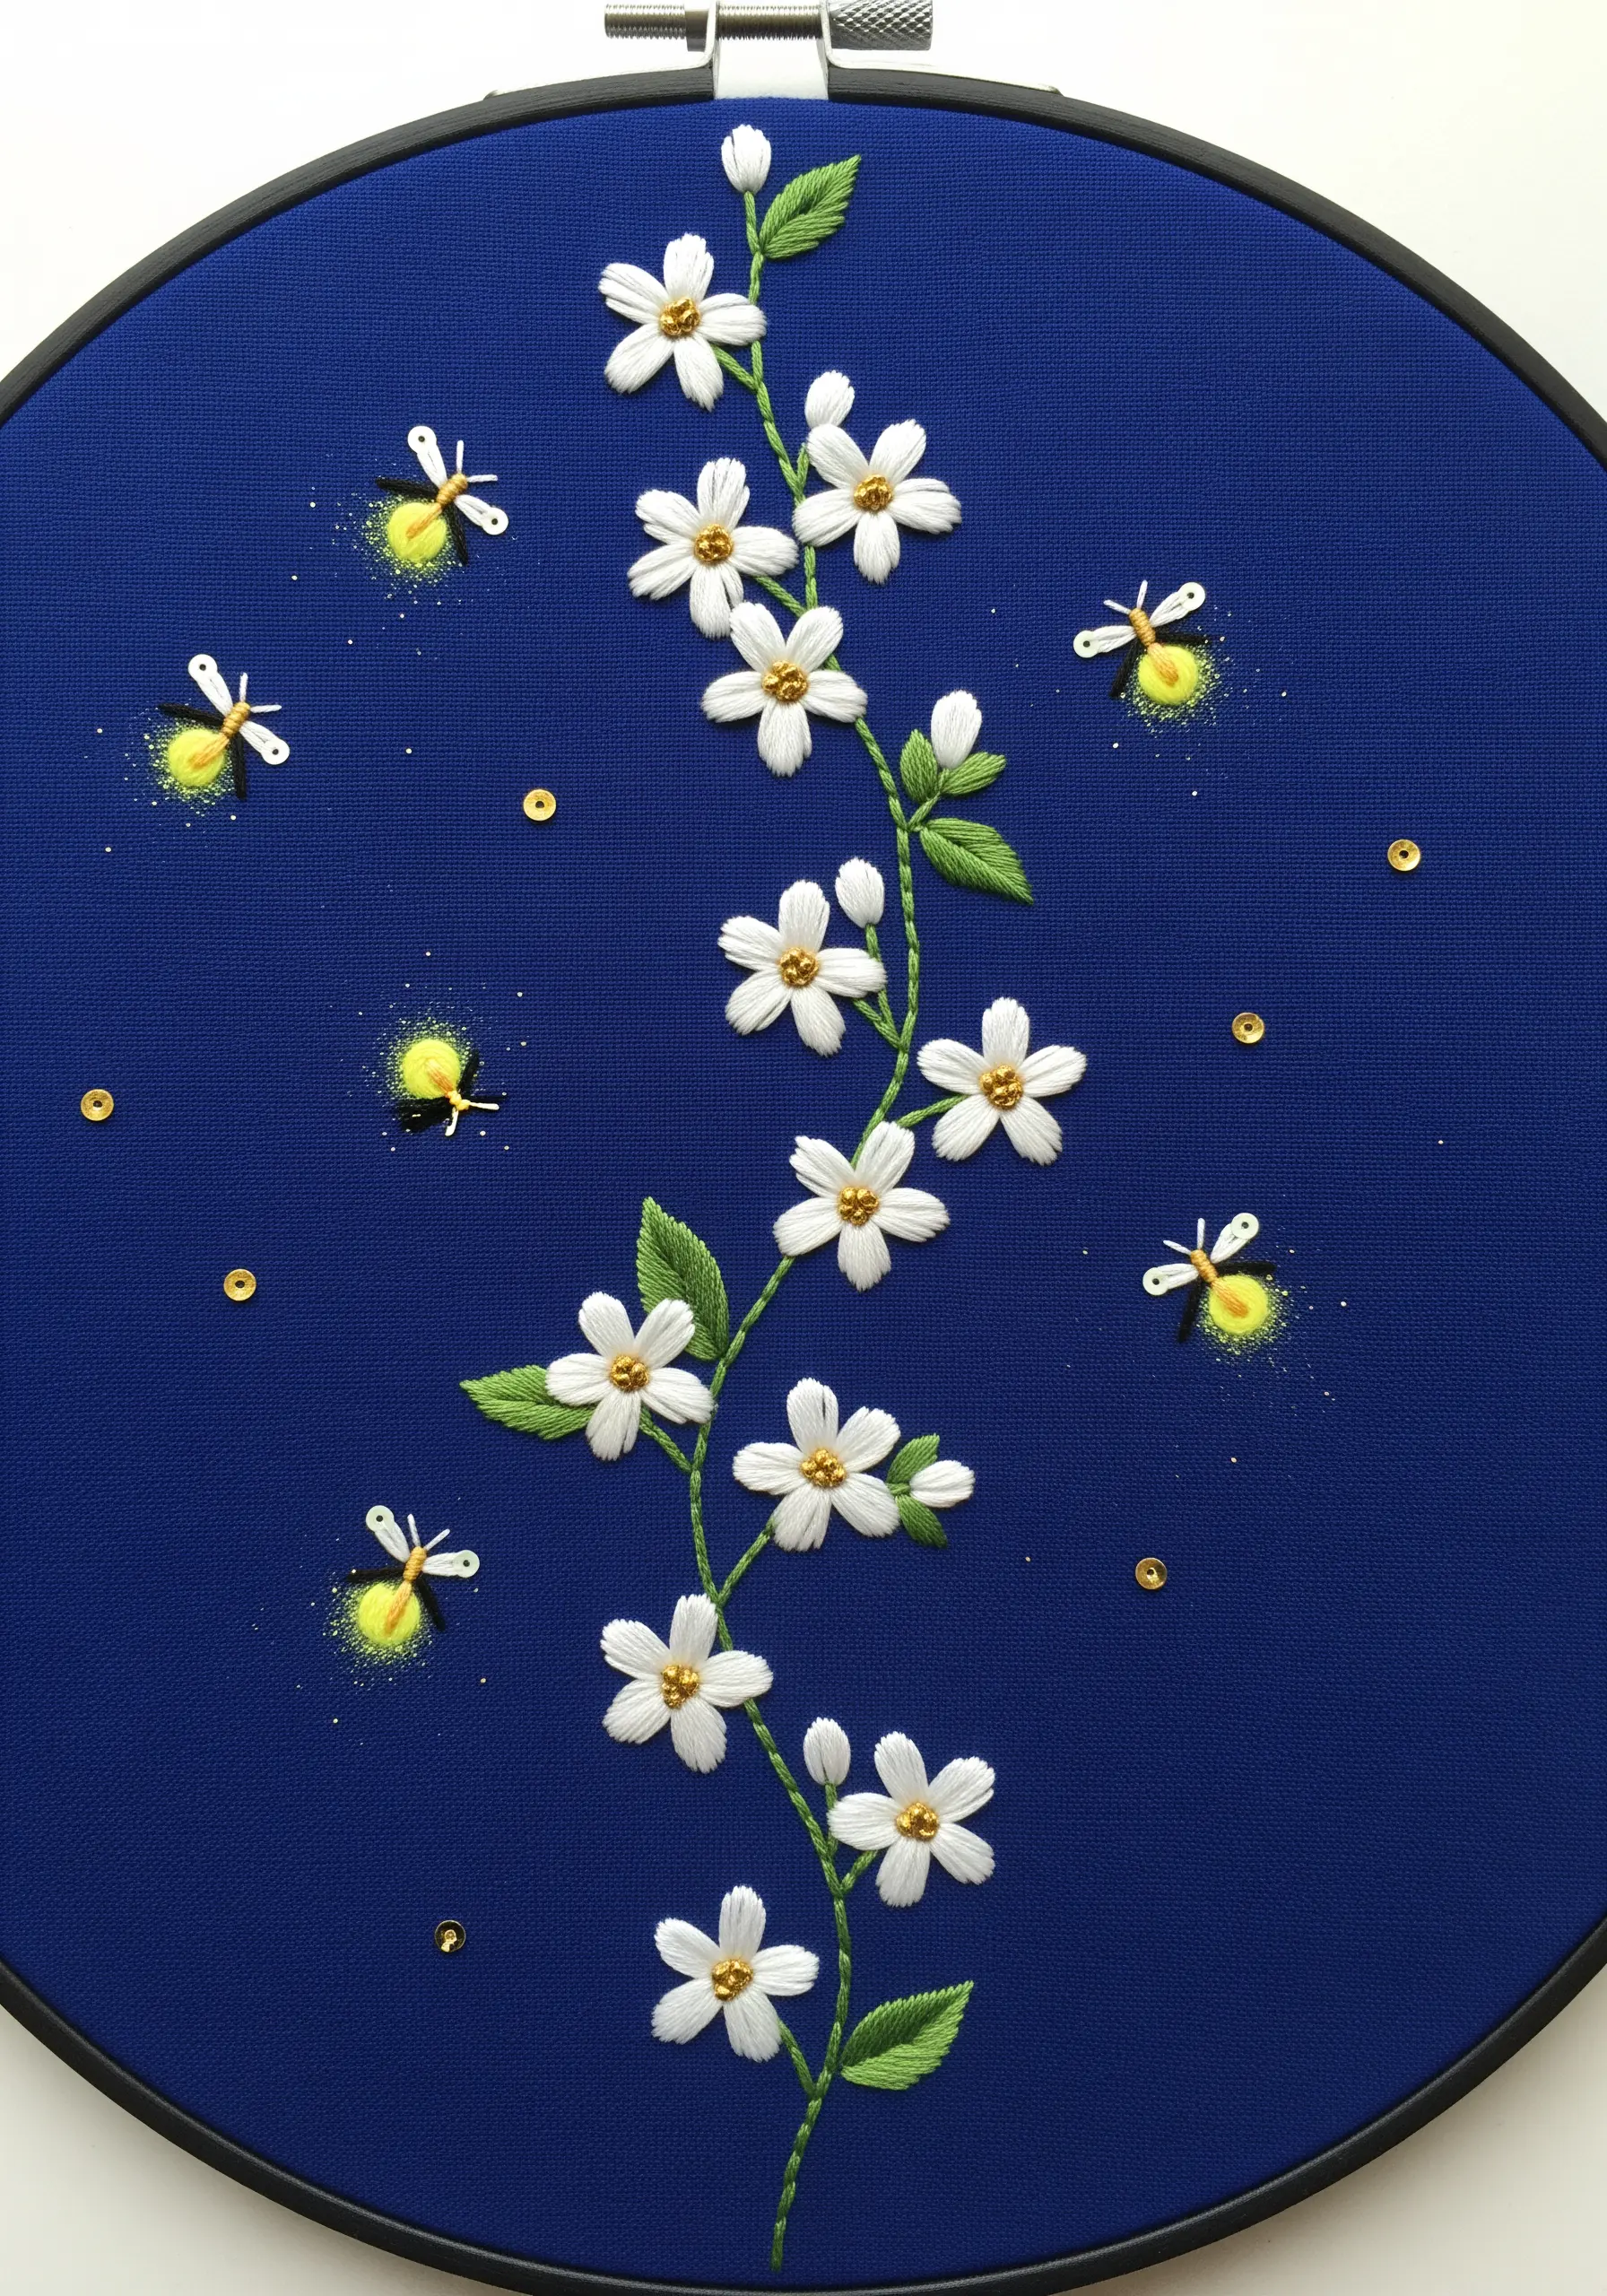
Capture the enchanting glow of fireflies by layering your stitches to create a halo effect.
First, make a dense cluster of French knots or a small satin stitch circle in a brilliant lemon yellow.
Next, surround this bright center with sparse, radiating straight stitches in a softer, paler yellow or even a glow-in-the-dark thread.
This two-step technique makes the light feel like it’s truly emanating from the firefly. Explore more night garden embroidery ideas to enhance this effect.
9. A Moonflower’s Geometric Grace
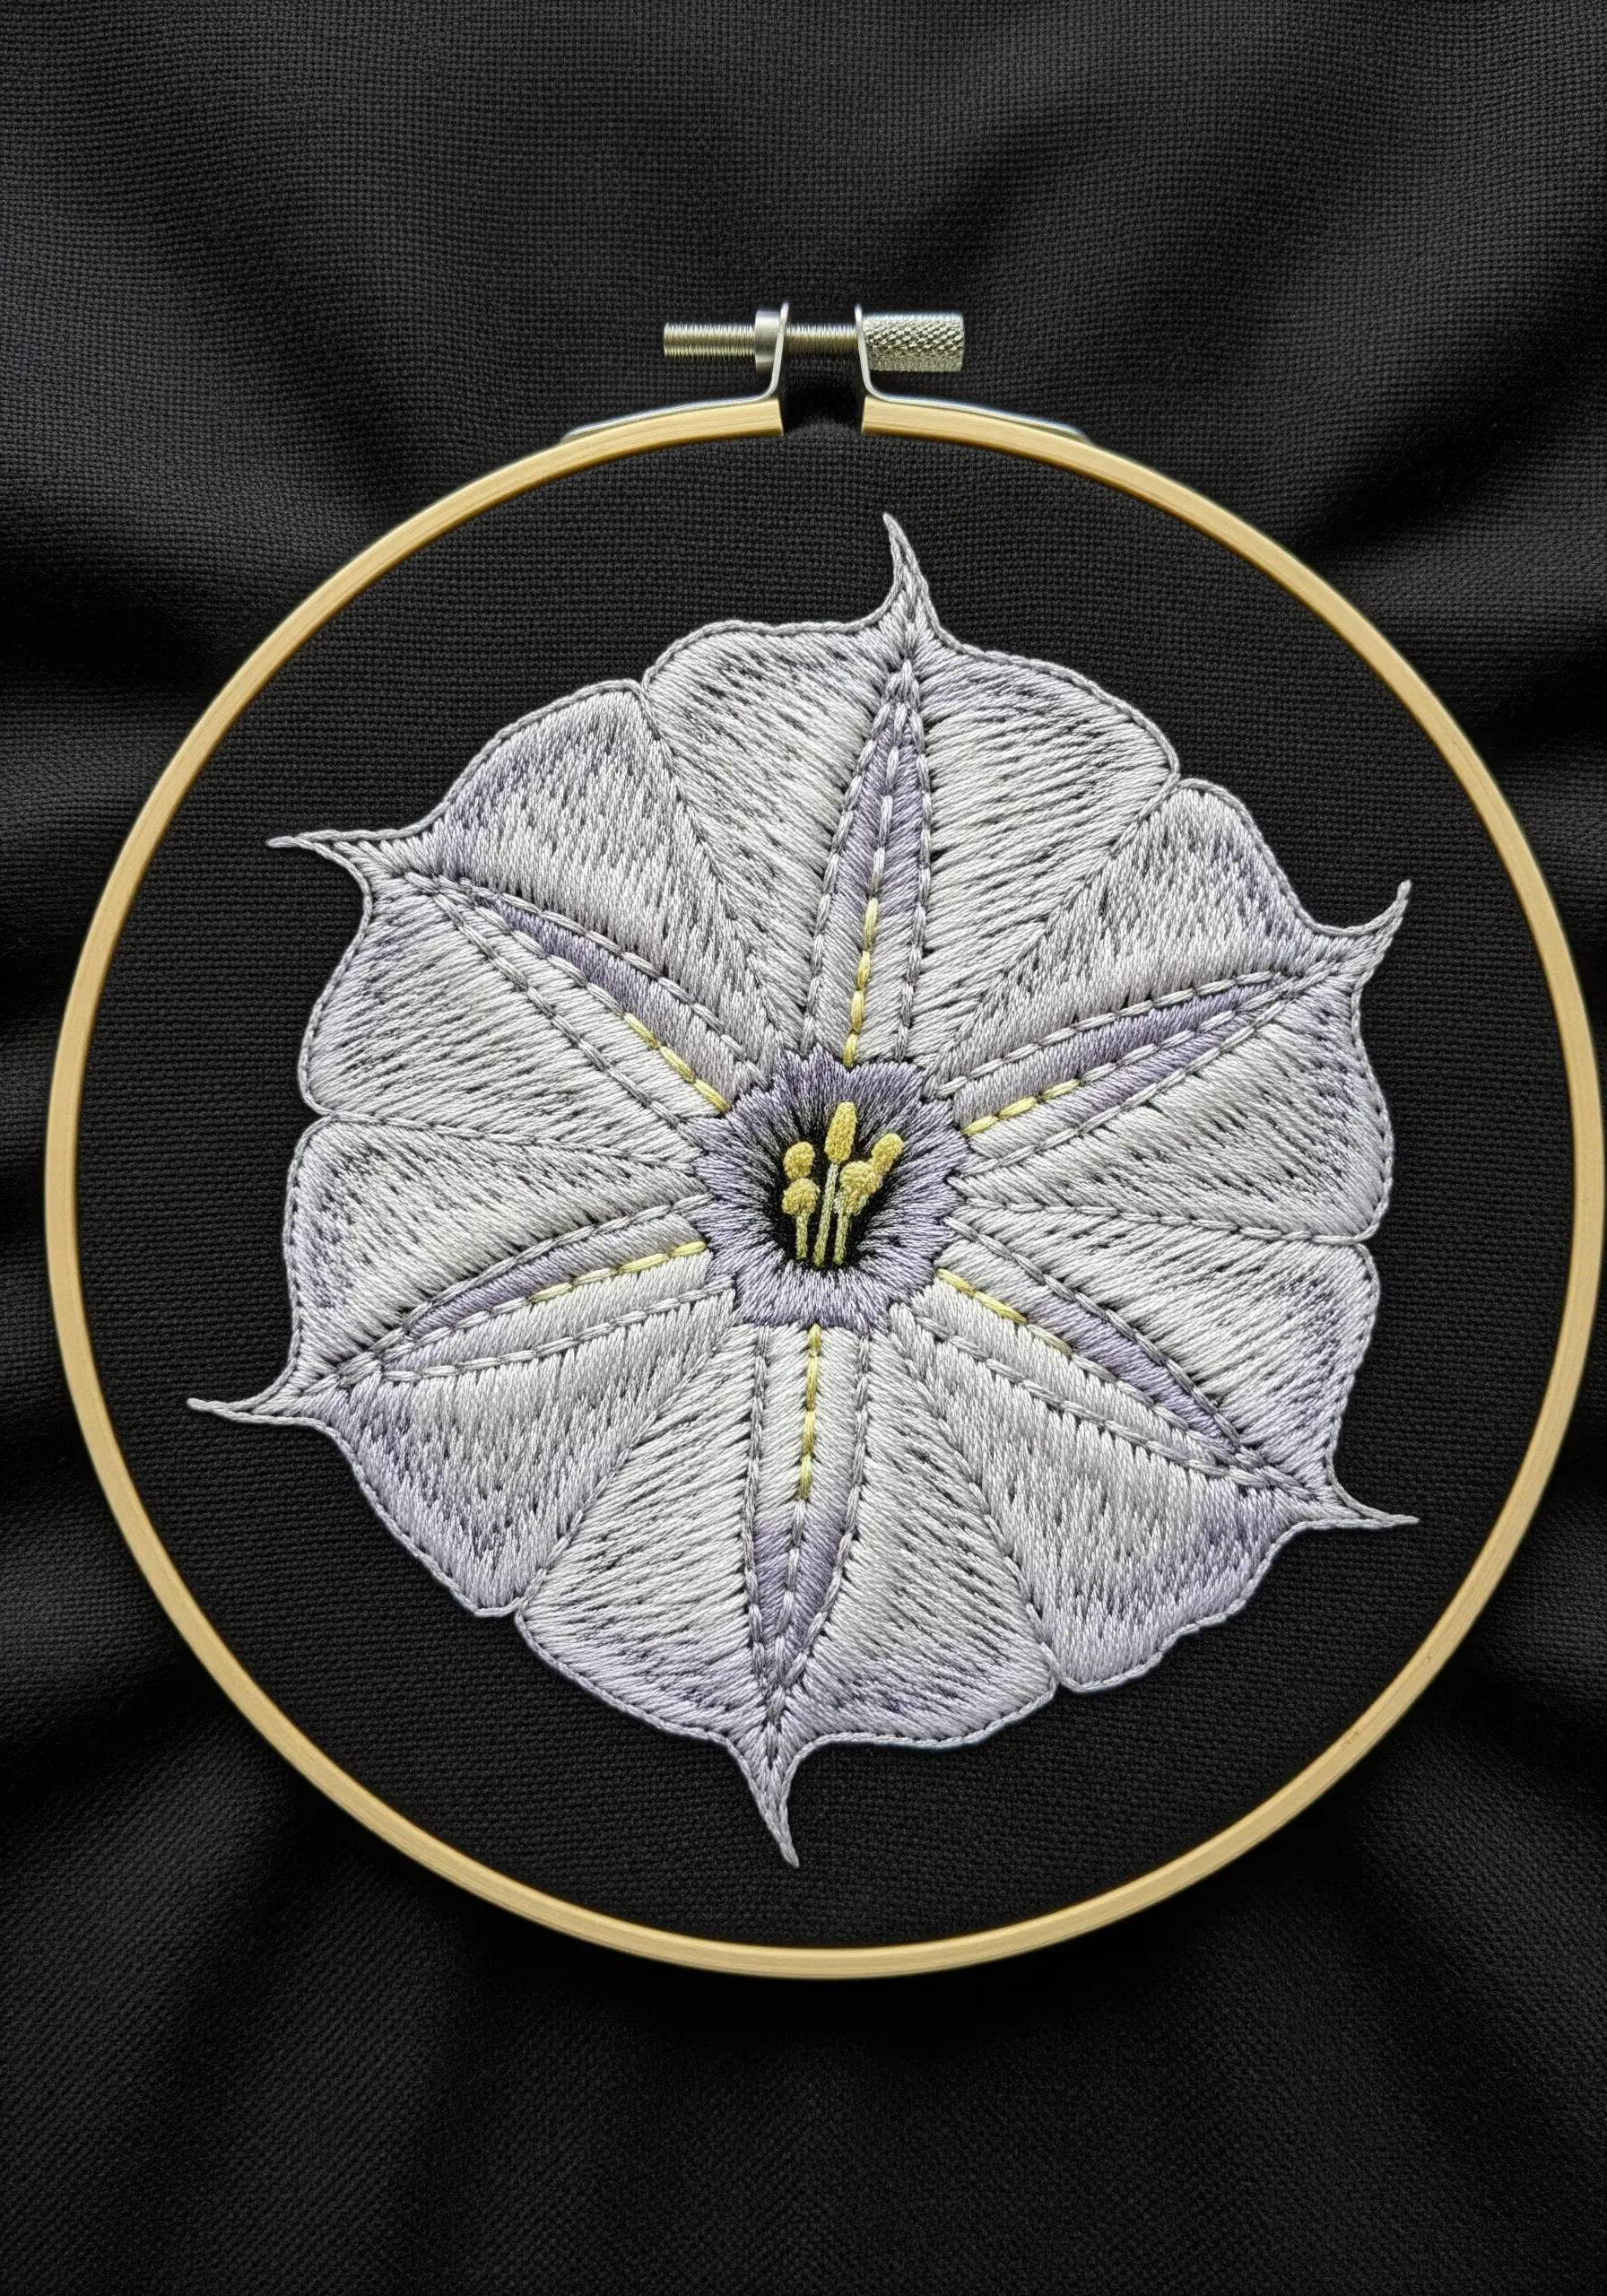
This top-down view of a Moonflower highlights its perfect radial symmetry, which you can emphasize with precise satin stitches.
Divide the petal sections and stitch each one with satin stitches angled toward the flower’s center.
To create the subtle, star-like pattern, use a single strand of pale lavender for the lines that define each petal’s fold.
This clean, geometric approach turns a simple flower into a striking mandala-like motif, perfect for minimalist designs.
10. Tuberose Blossoms as Constellations
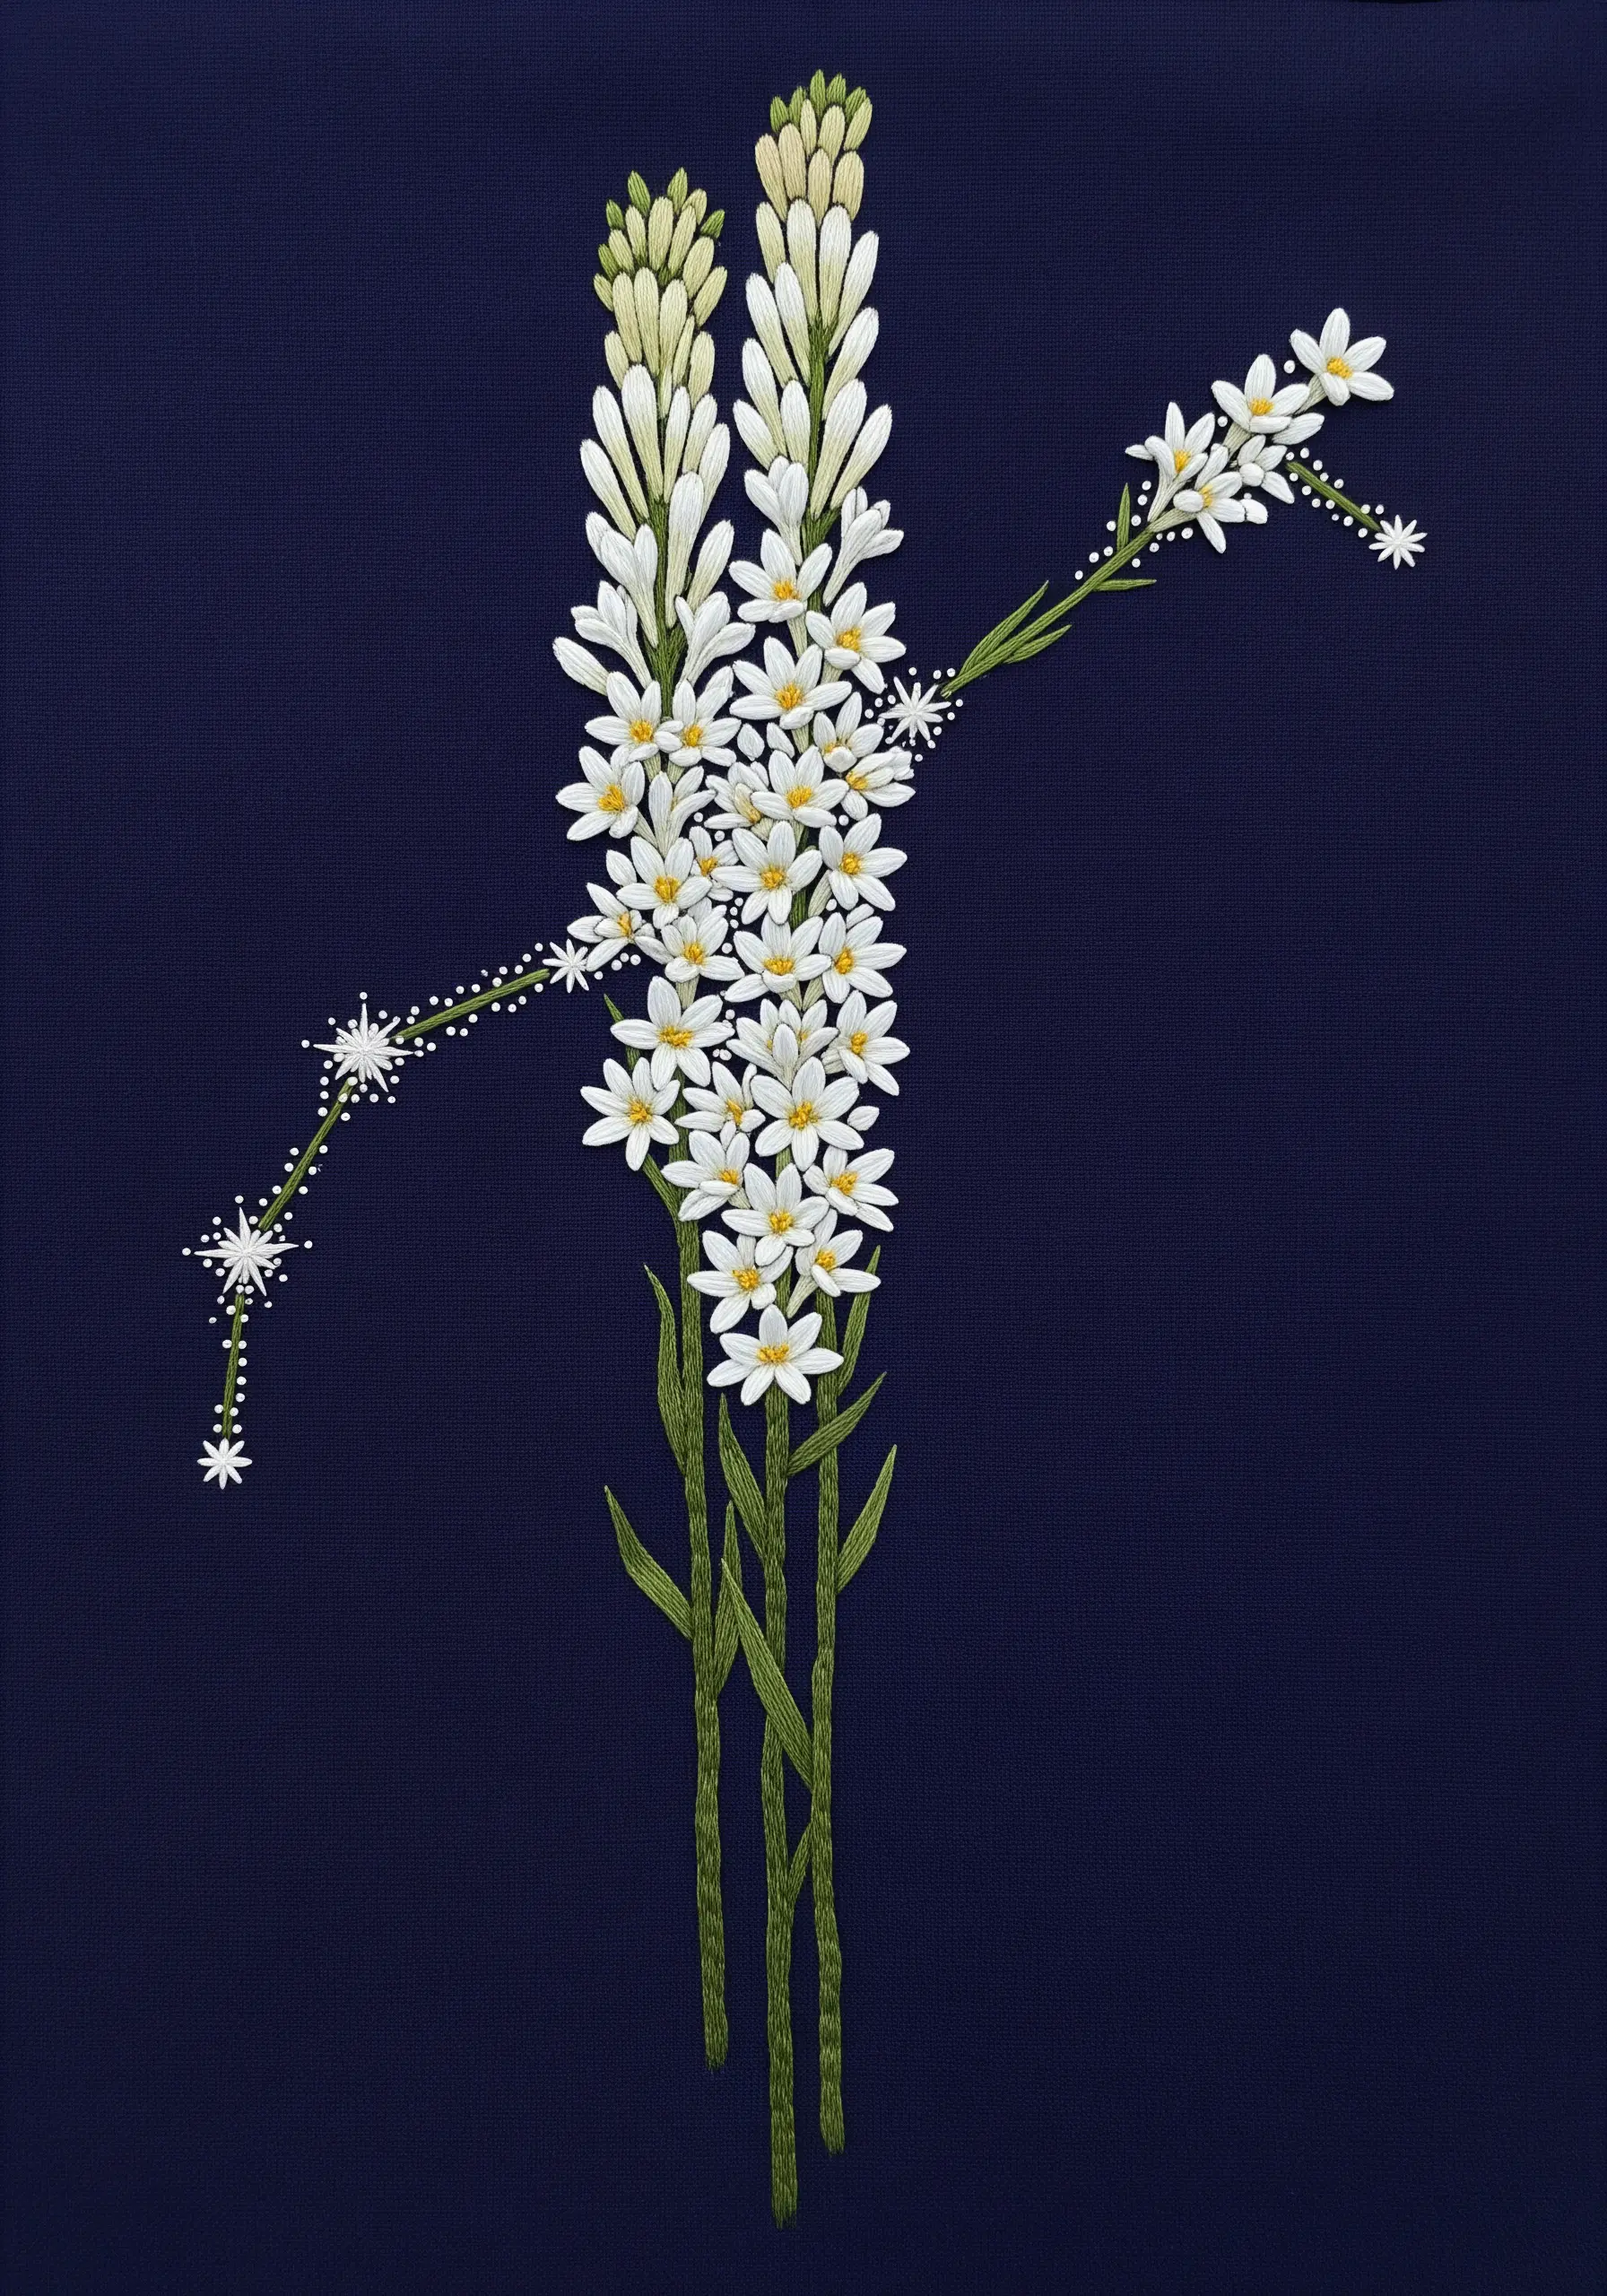
Merge the botanical and the celestial by using your floral arrangement as a guide for a constellation map.
After stitching the dense clusters of tuberose, use a single strand of metallic or bright white thread to connect the flowers with fine backstitches.
End your constellation lines with small starburst stitches or French knots to represent the stars.
This technique elevates a classic floral design into a piece of personal storytelling, mapping the stars onto the earth.
11. The Silent Watch of a Barn Owl
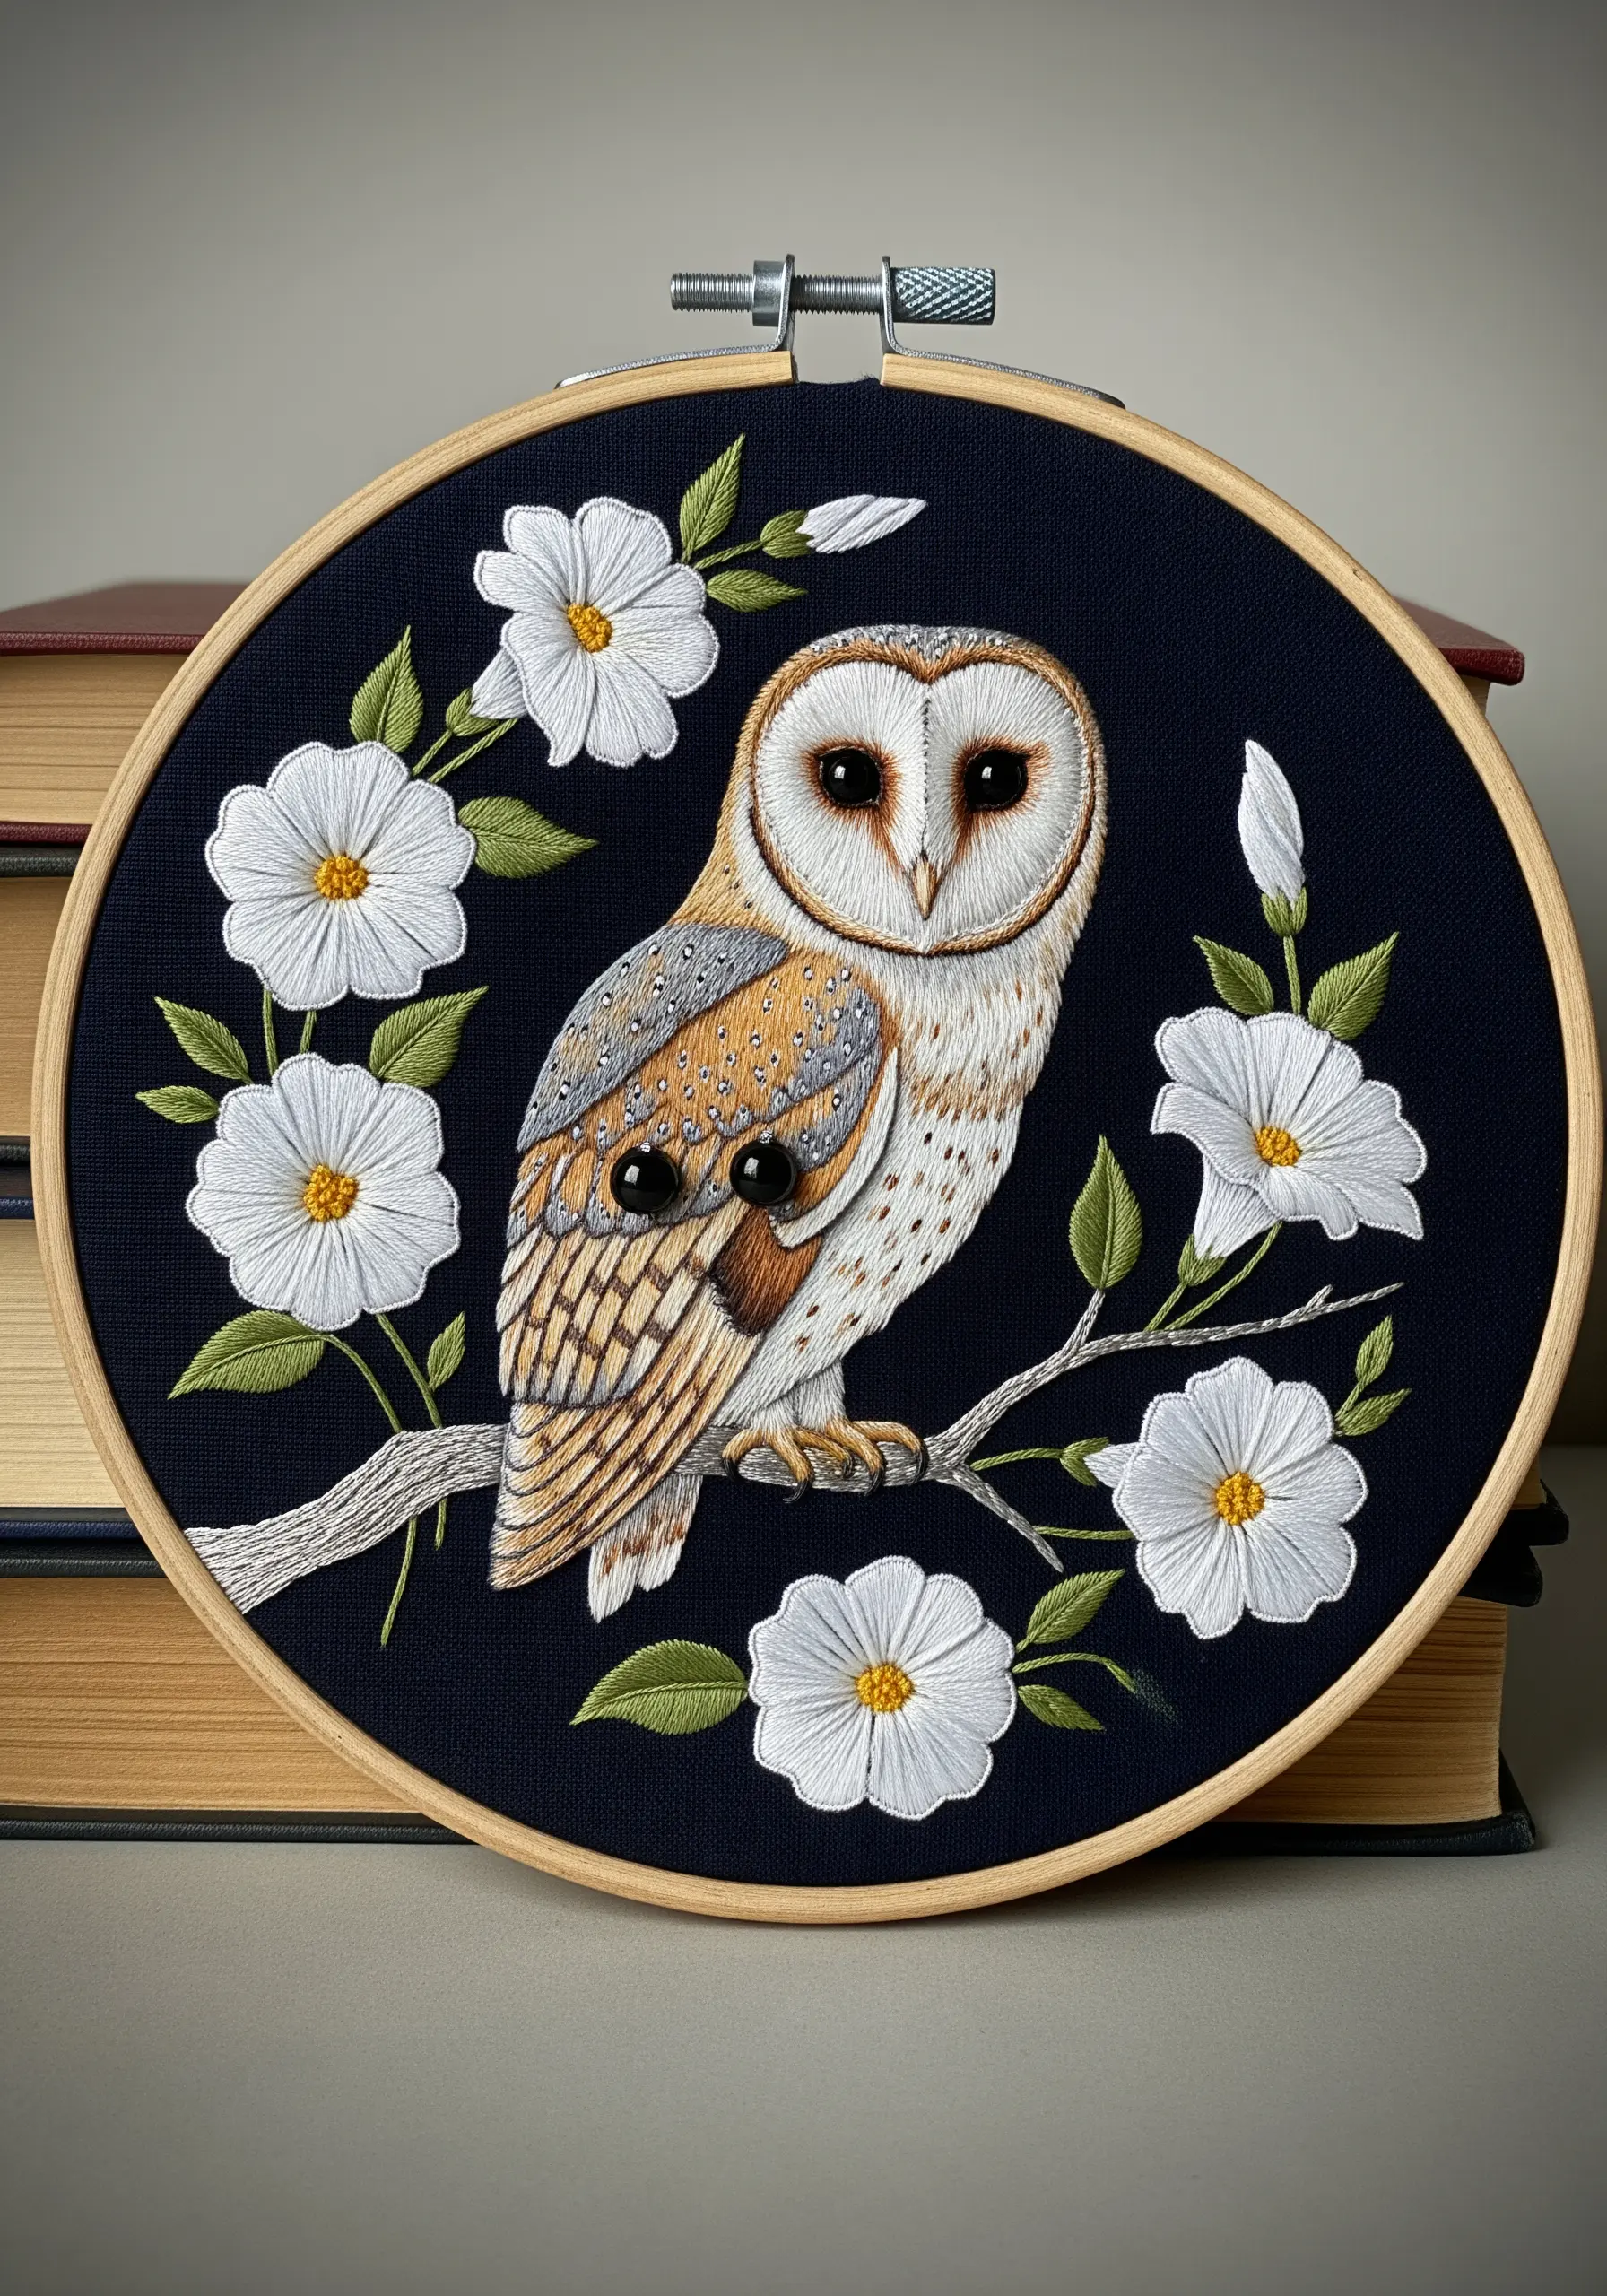
The key to realistic feathers is layering and stitch direction.
Use single-strand floss and short, overlapping straight stitches—a technique known as thread painting—to mimic the soft, downy texture of the owl’s chest and the structured feathers of its wings.
Always angle your stitches in the direction of feather growth. For the eyes, use a high-sheen black rayon thread or a tiny black bead to capture a lifelike reflection, making the owl feel present and watchful.
It’s one of the best ways to capture nature’s textures in thread.
12. Four O’Clock Flower Mandala

Create a vibrant floral mandala by arranging your blooms in a perfect circle, emphasizing radial symmetry.
To keep the design balanced, stitch the elements in opposite pairs—for example, stitch a pink flower at the top, then immediately stitch its partner at the bottom.
Alternate between open flowers and closed buds to add rhythm and visual interest to the composition.
The central ring of green leaves, stitched with a fishbone stitch, provides a calm anchor point for the explosion of color.
13. Moonlit Ferns in Monochrome
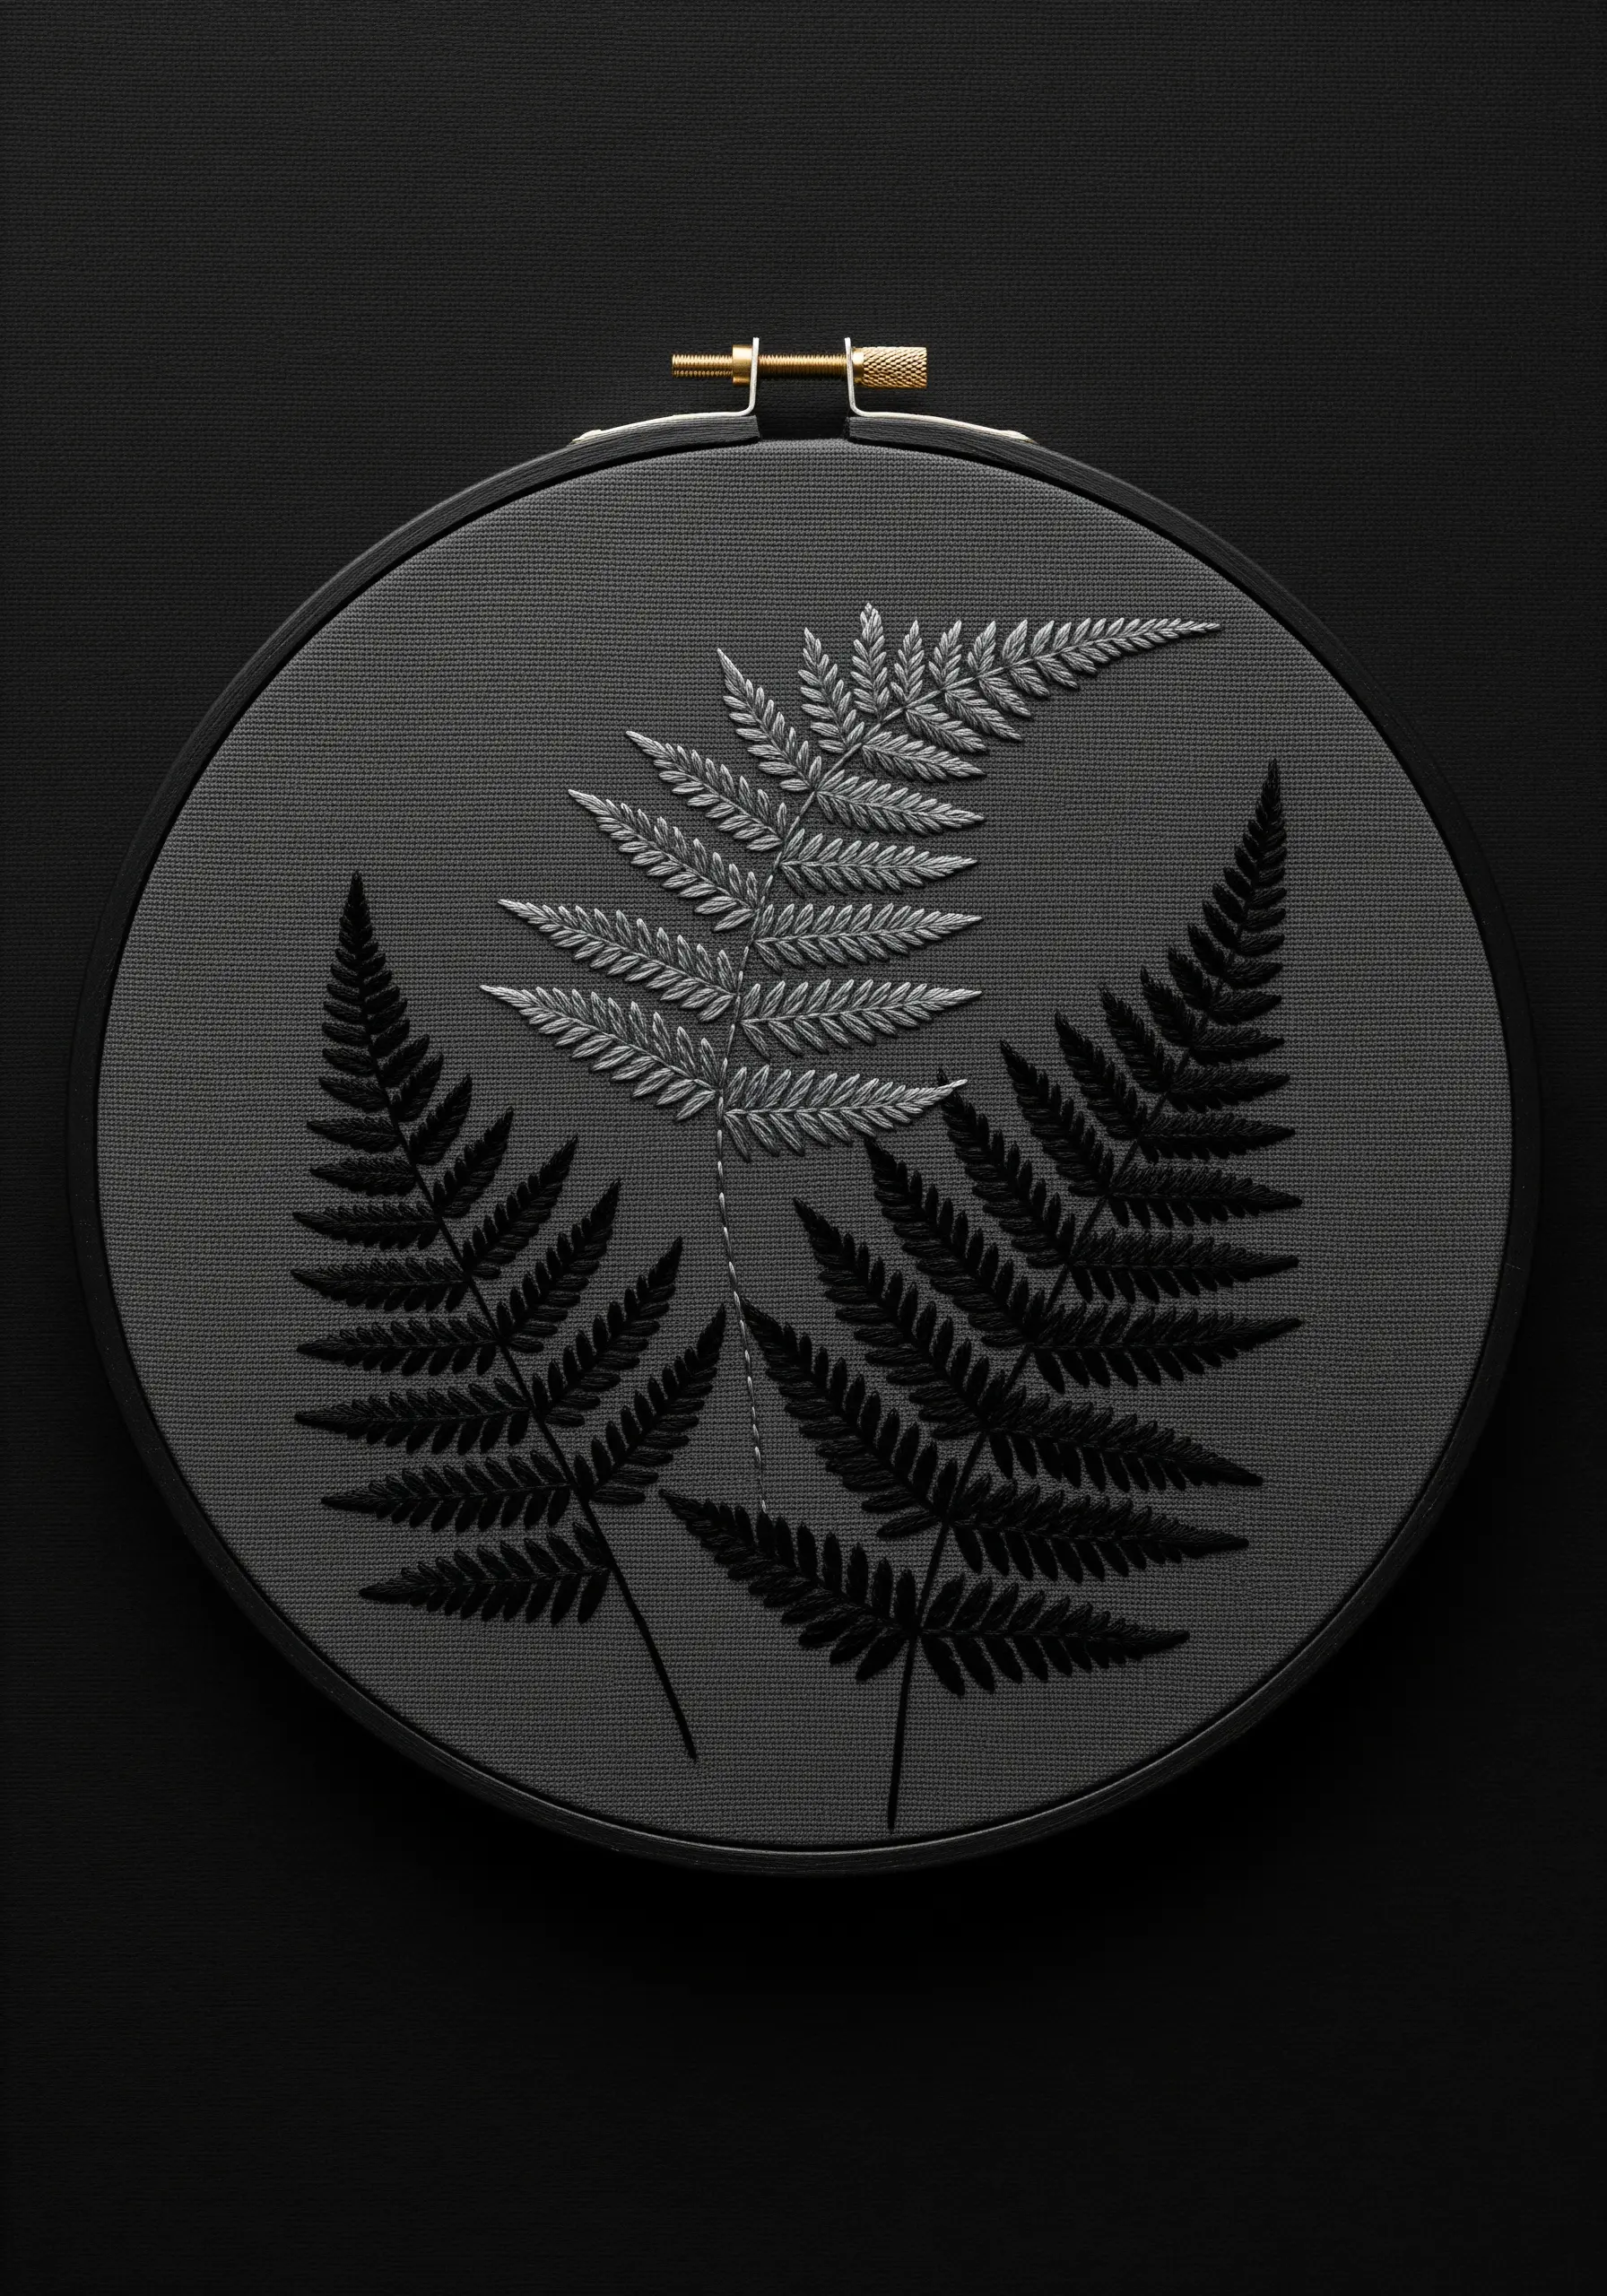
Explore the power of a limited color palette by using tone-on-tone stitching for a moody, dramatic effect.
On a dark grey fabric, use black thread for the background ferns to create a subtle, shadowy layer.
Bring the central fern forward by stitching it in a bright silver metallic or light grey thread, using a classic fishbone stitch for the fronds.
This contrast in value—not color—creates a powerful sense of depth and focus. Master more fern foliage stitch variations to enhance this effect.
14. A Fox Curled in a Floral Wreath
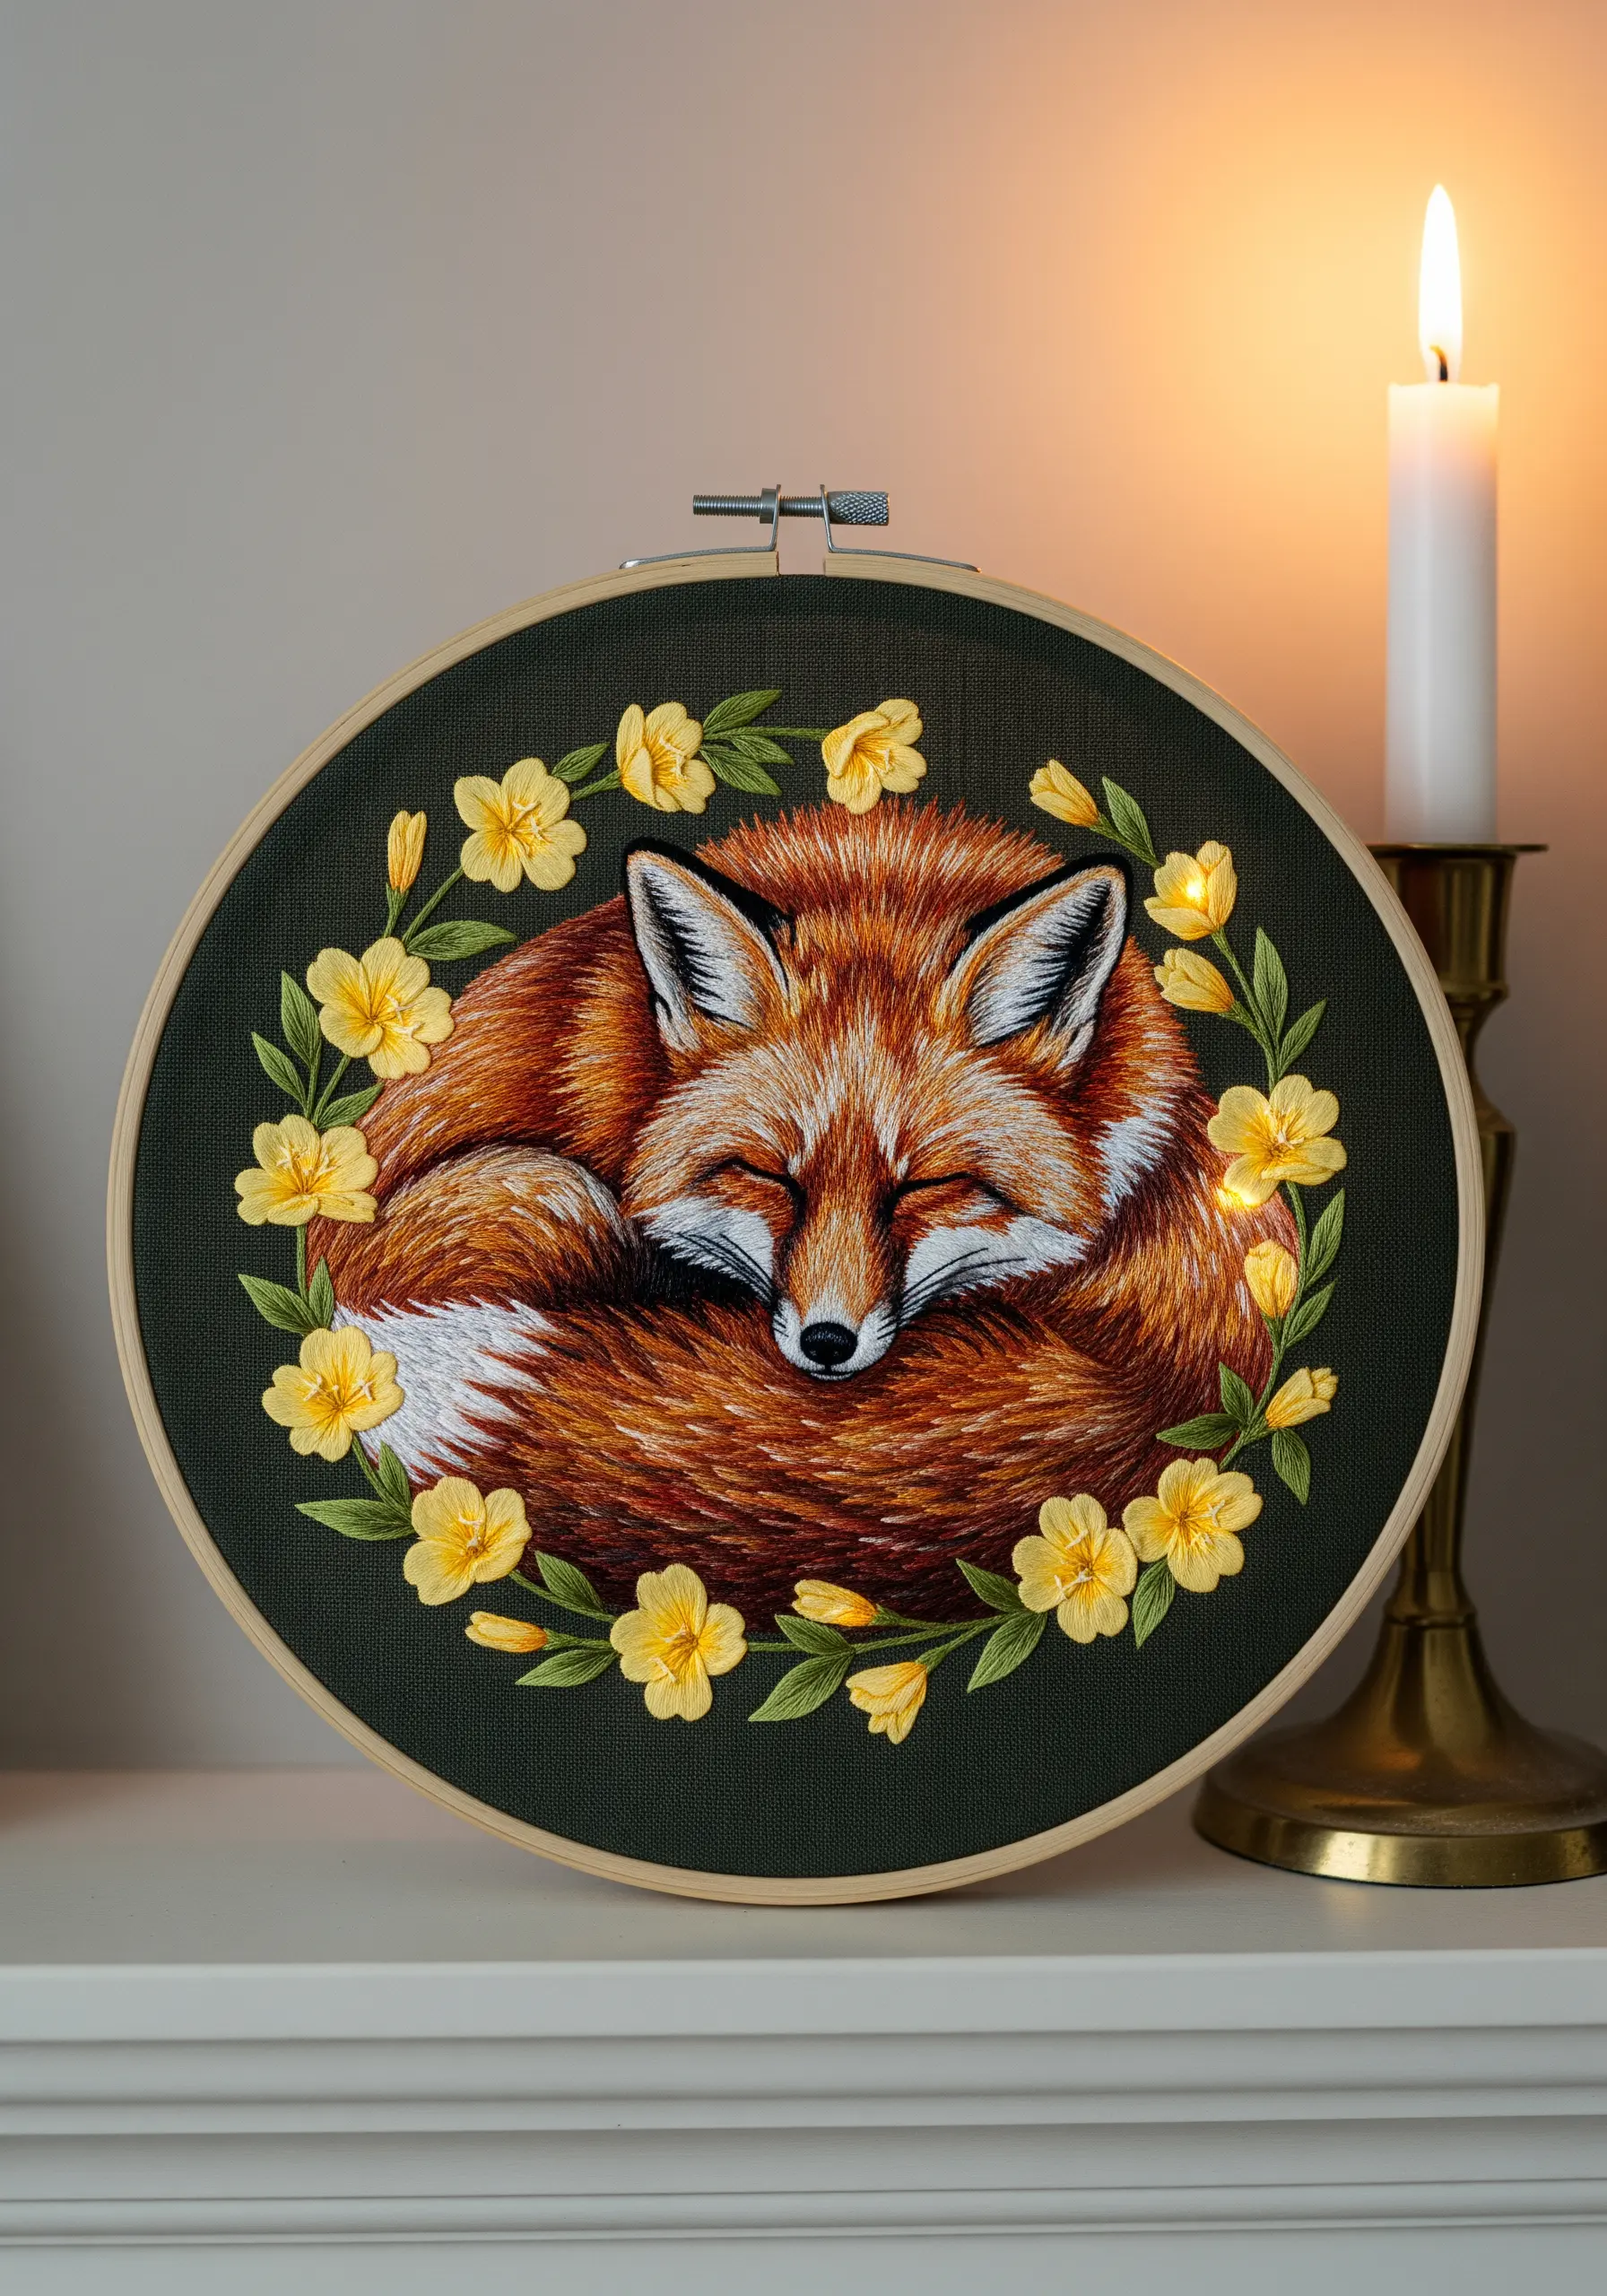
Achieving the soft, dense texture of fur relies entirely on long-and-short stitching with a single strand of floss.
Blend multiple shades of rust, orange, and brown, ensuring your stitches follow the direction the fur would naturally lie.
For the fluffiest areas, like the tail and chest, use slightly longer stitches and add highlights with cream and white thread.
The contrast between the soft, matte texture of the fox and the clean satin stitch of the yellow flowers makes the entire piece feel balanced and intentional.
15. White Ink Orchid Illustration
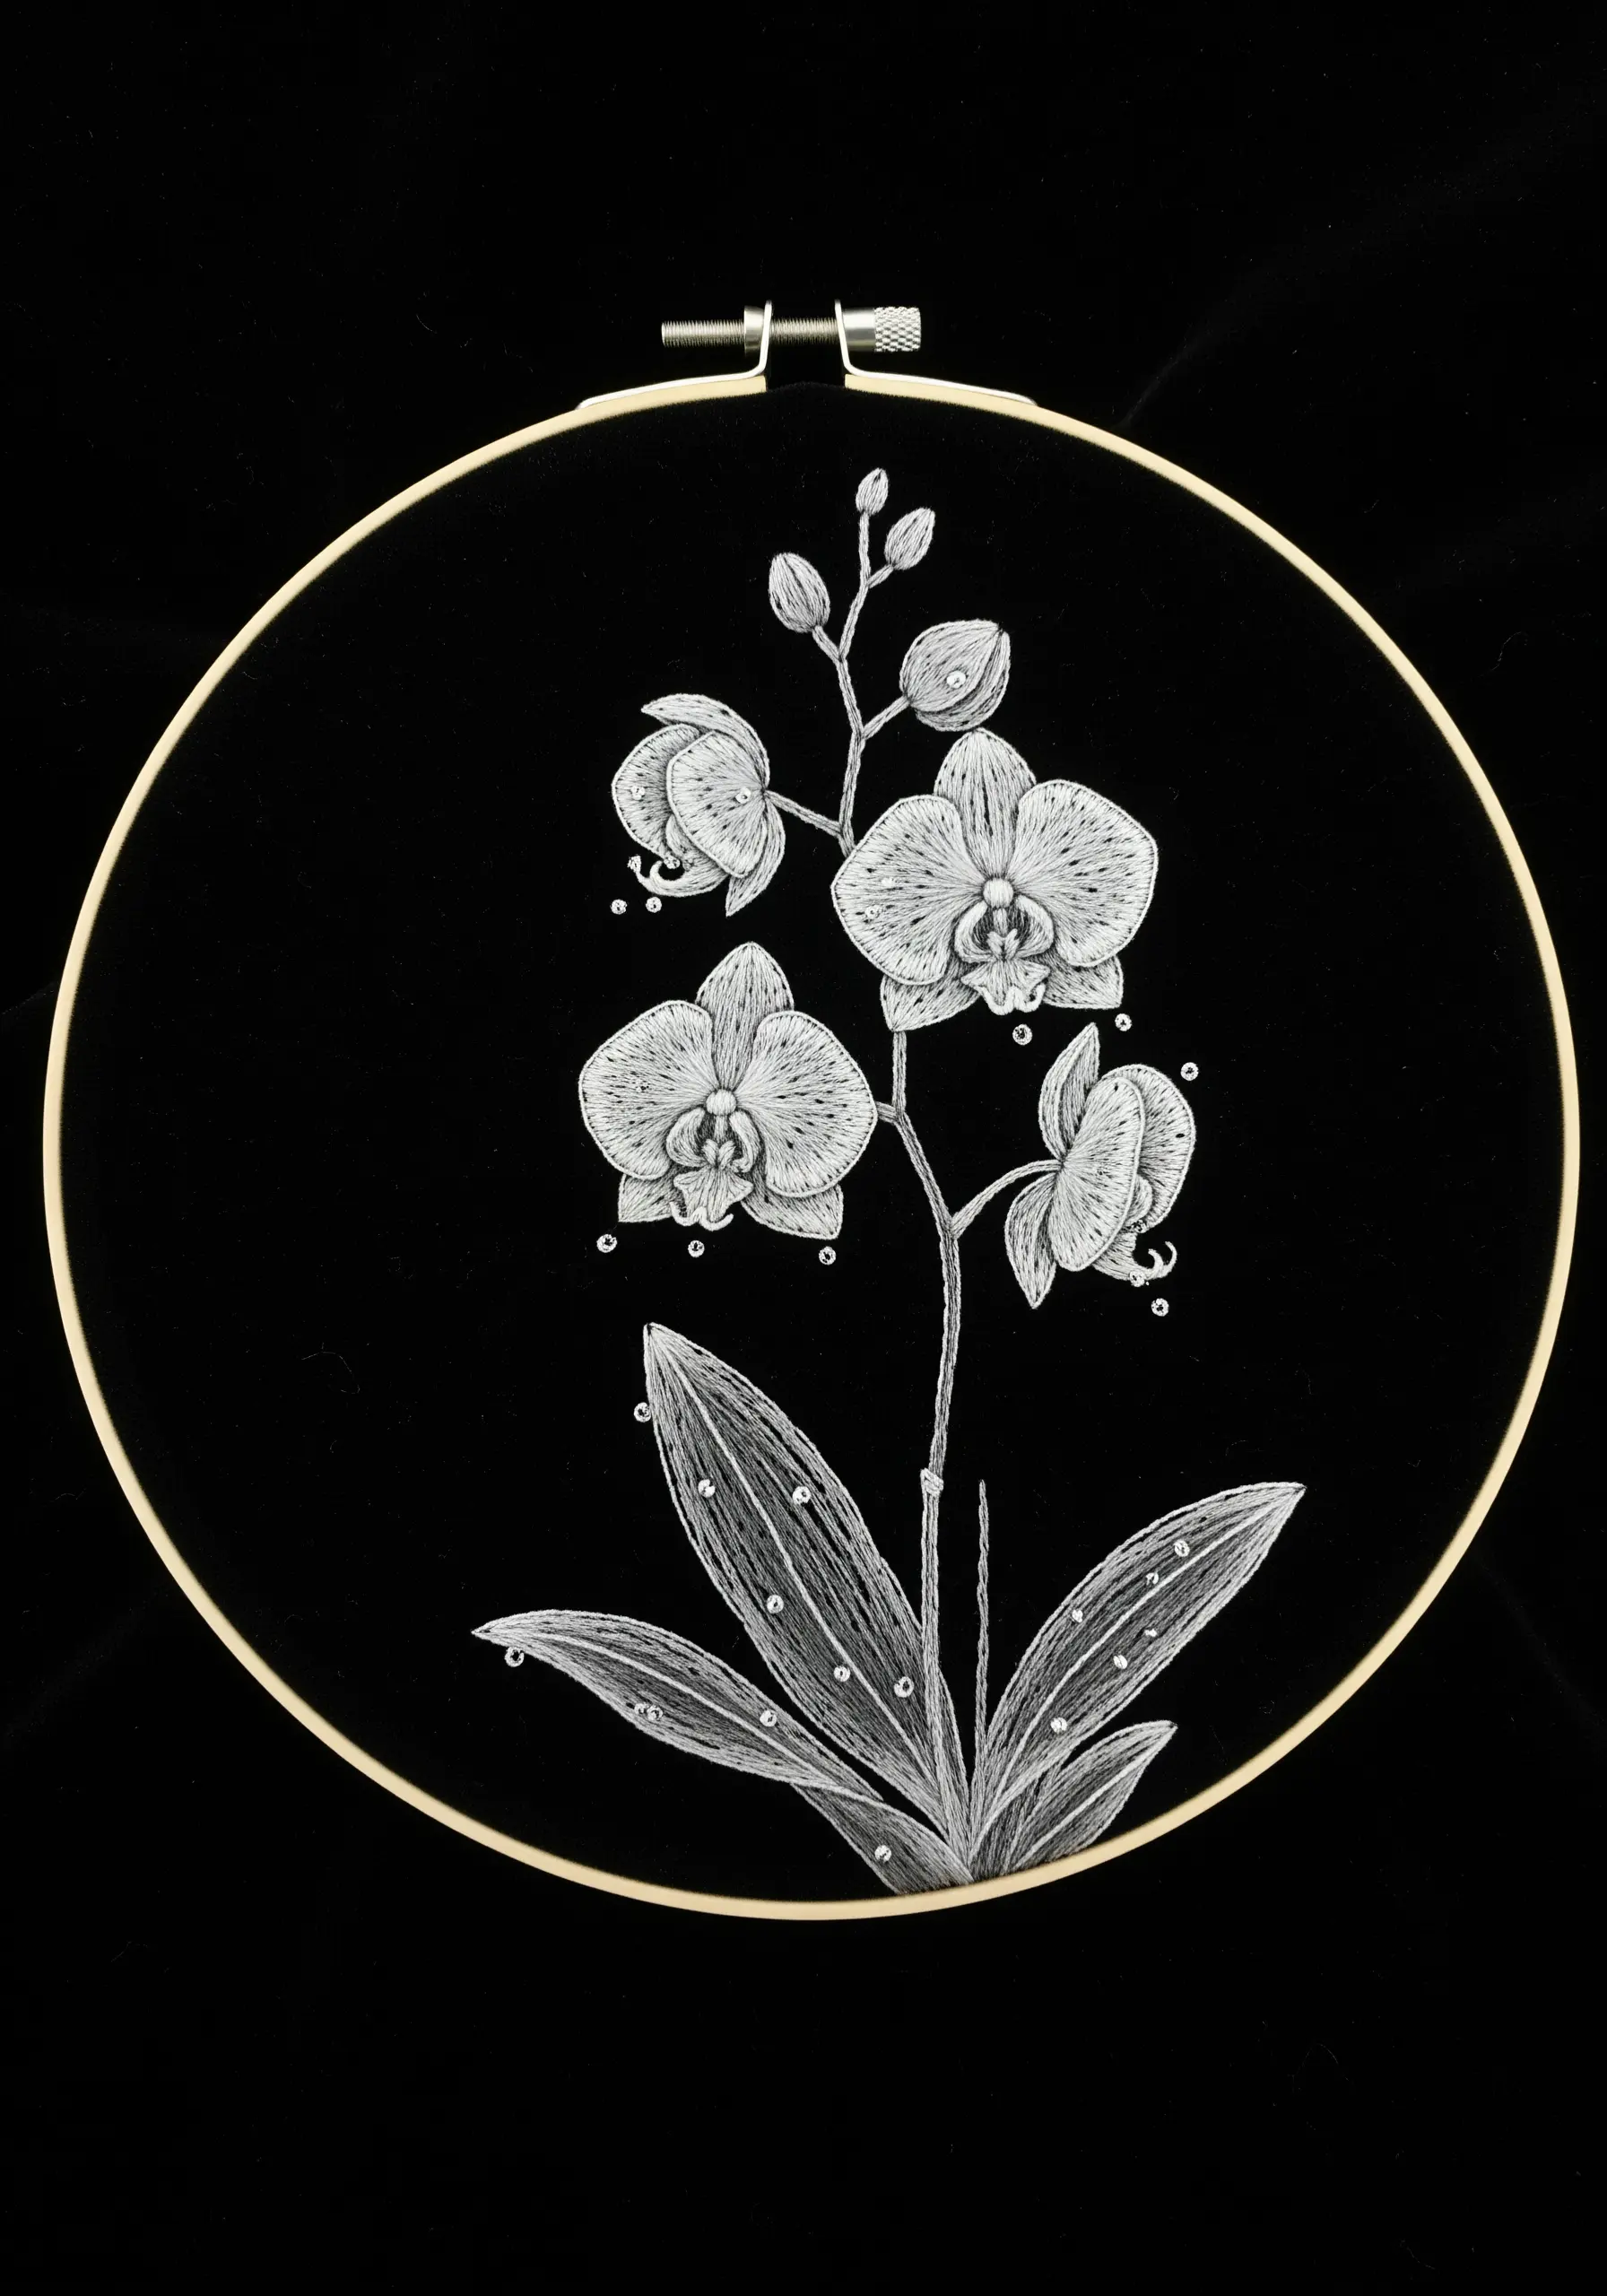
Recreate the look of a delicate white ink drawing by using a single strand of white floss on black velvet or fine-weave linen.
Focus on linework, using a precise backstitch or stem stitch for the outlines of the petals and leaves.
Create shading and texture not with color, but with stitch density—use tiny, closely packed seed stitches or sparse cross-hatching to build areas of light and shadow.
This minimalist approach turns your embroidery into a sophisticated botanical illustration.
16. Crystalline Amethyst and Night Phlox
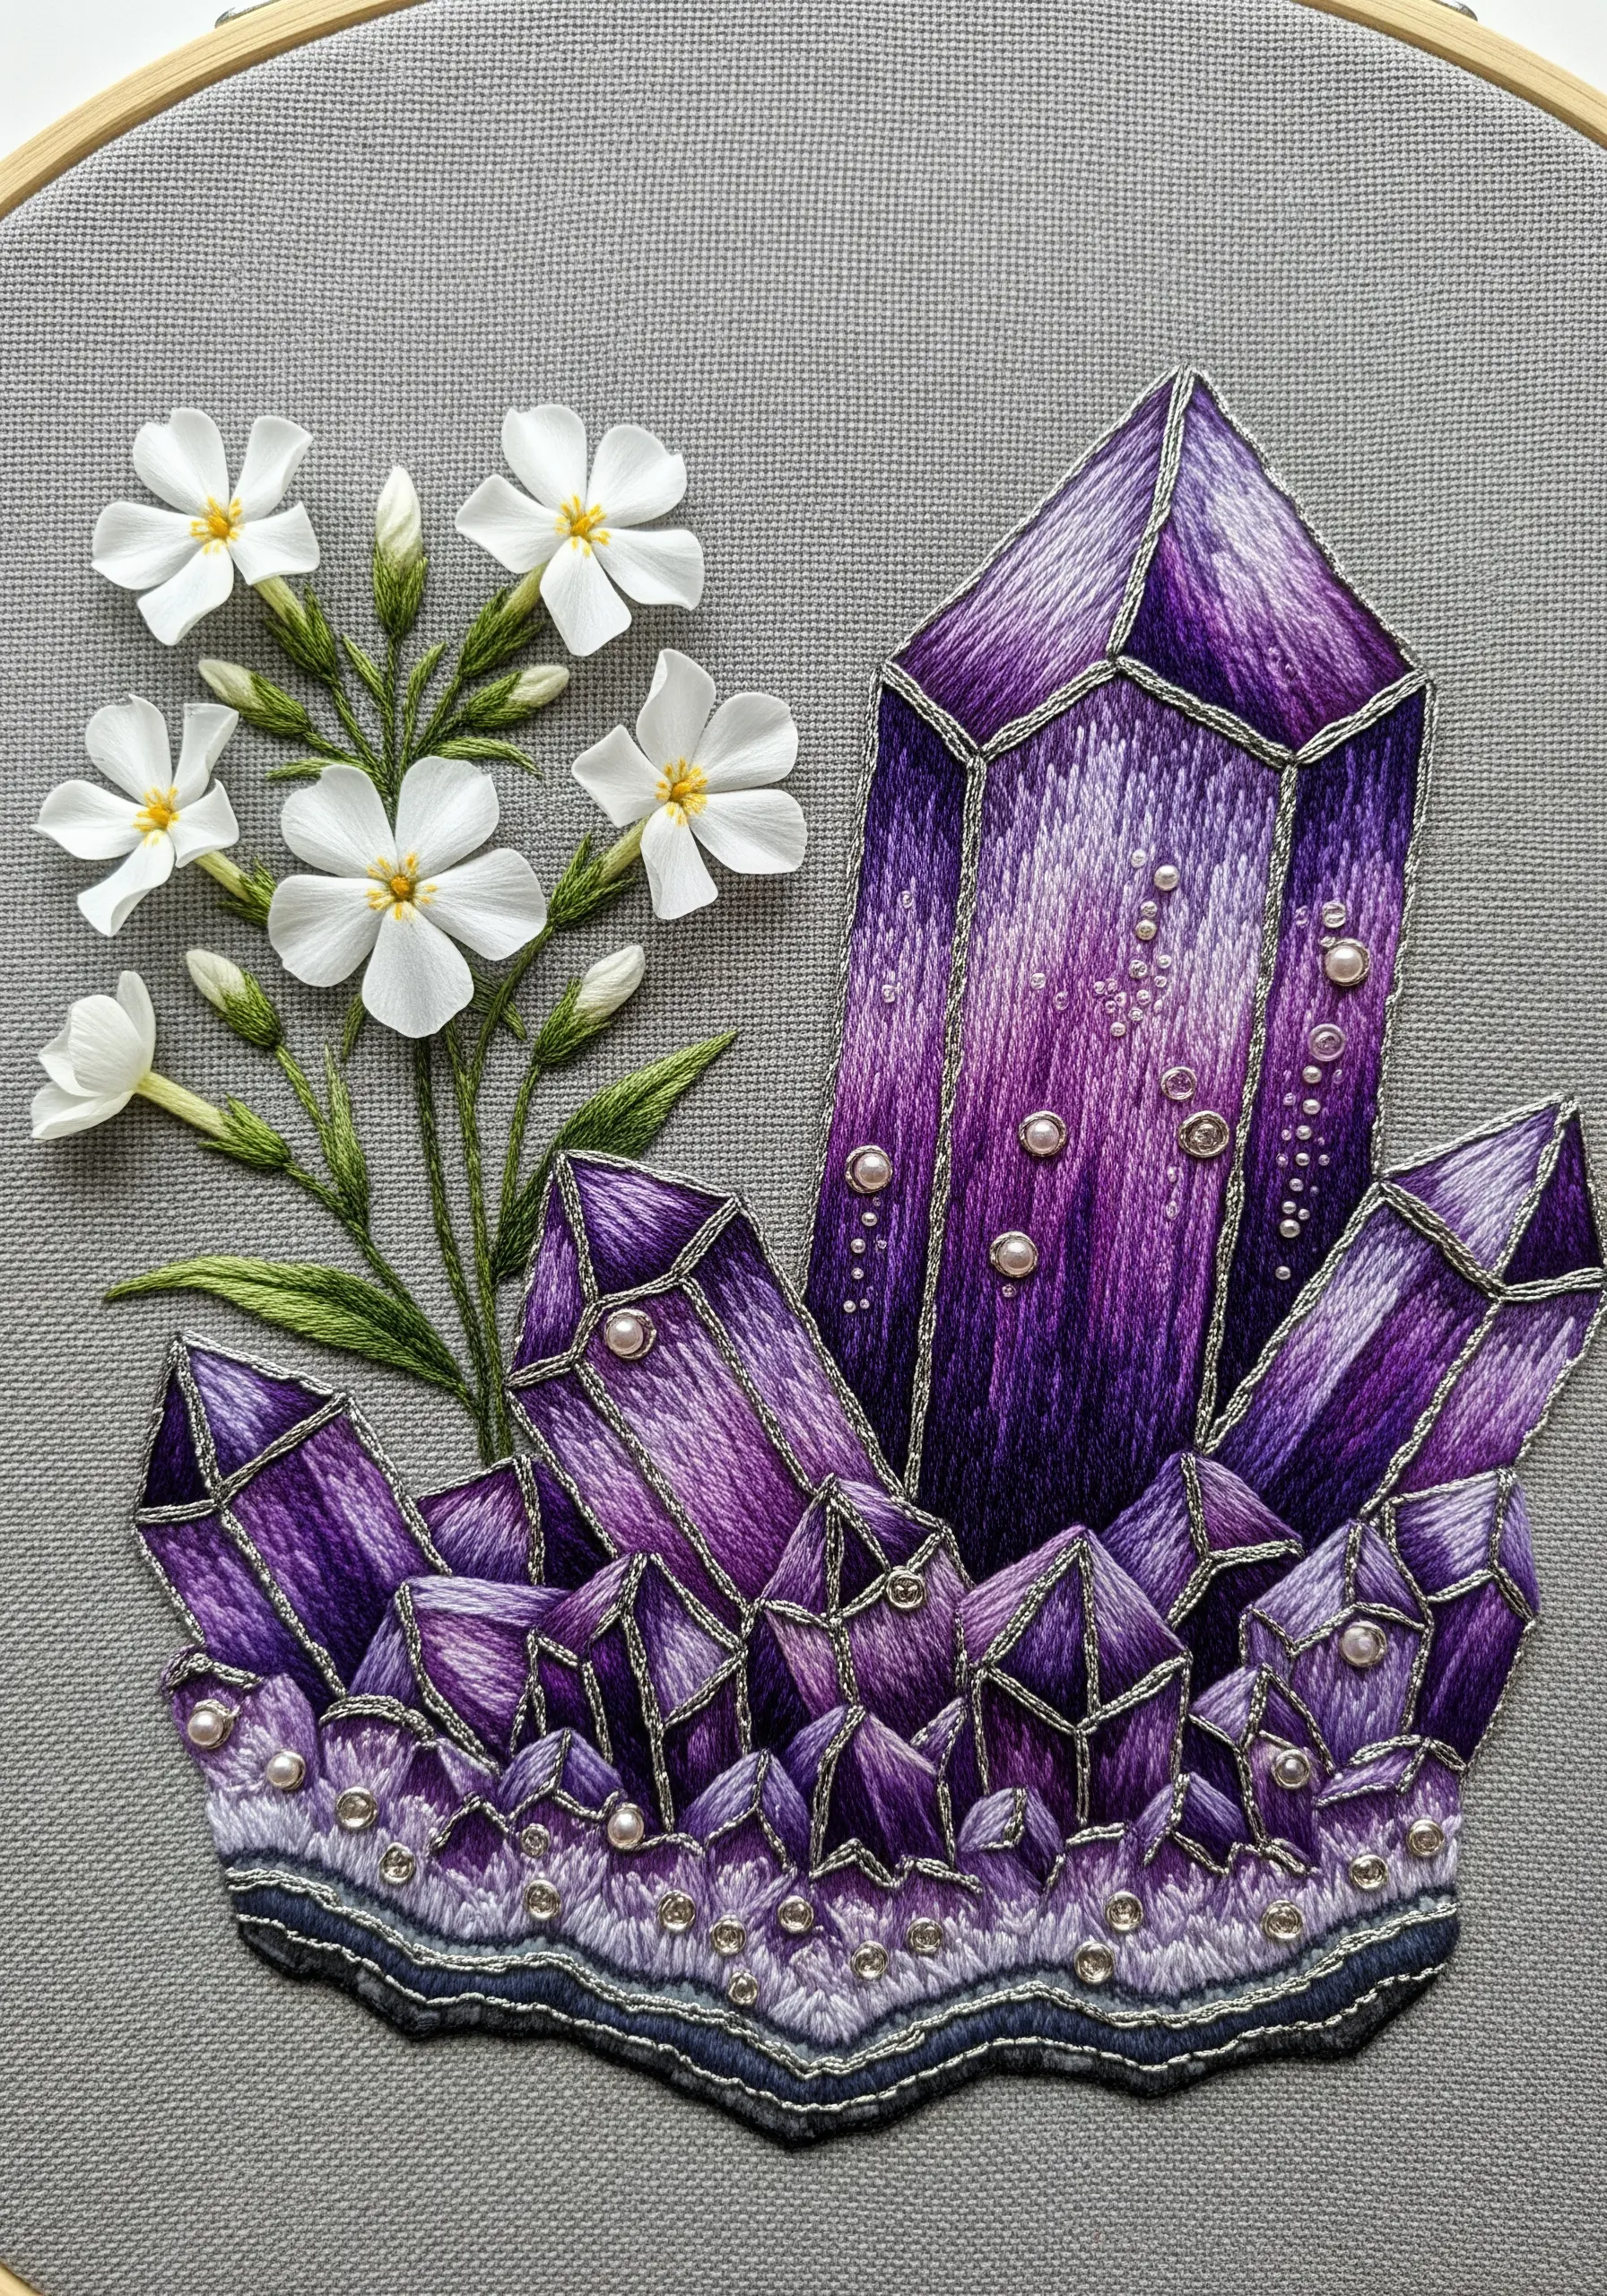
To capture the faceted, light-reflecting quality of crystals, the direction of your satin stitches is everything.
Divide each crystal into planes and fill each plane with satin stitches going in a single, consistent direction.
Vary the direction of the stitches in adjacent planes to create the illusion of light hitting the crystal from different angles.
Finally, outline each facet with a fine, sharp line of silver metallic thread using a couching stitch to define the edges and add a crystalline sparkle.
17. A Botanical Witch’s Herb Garden
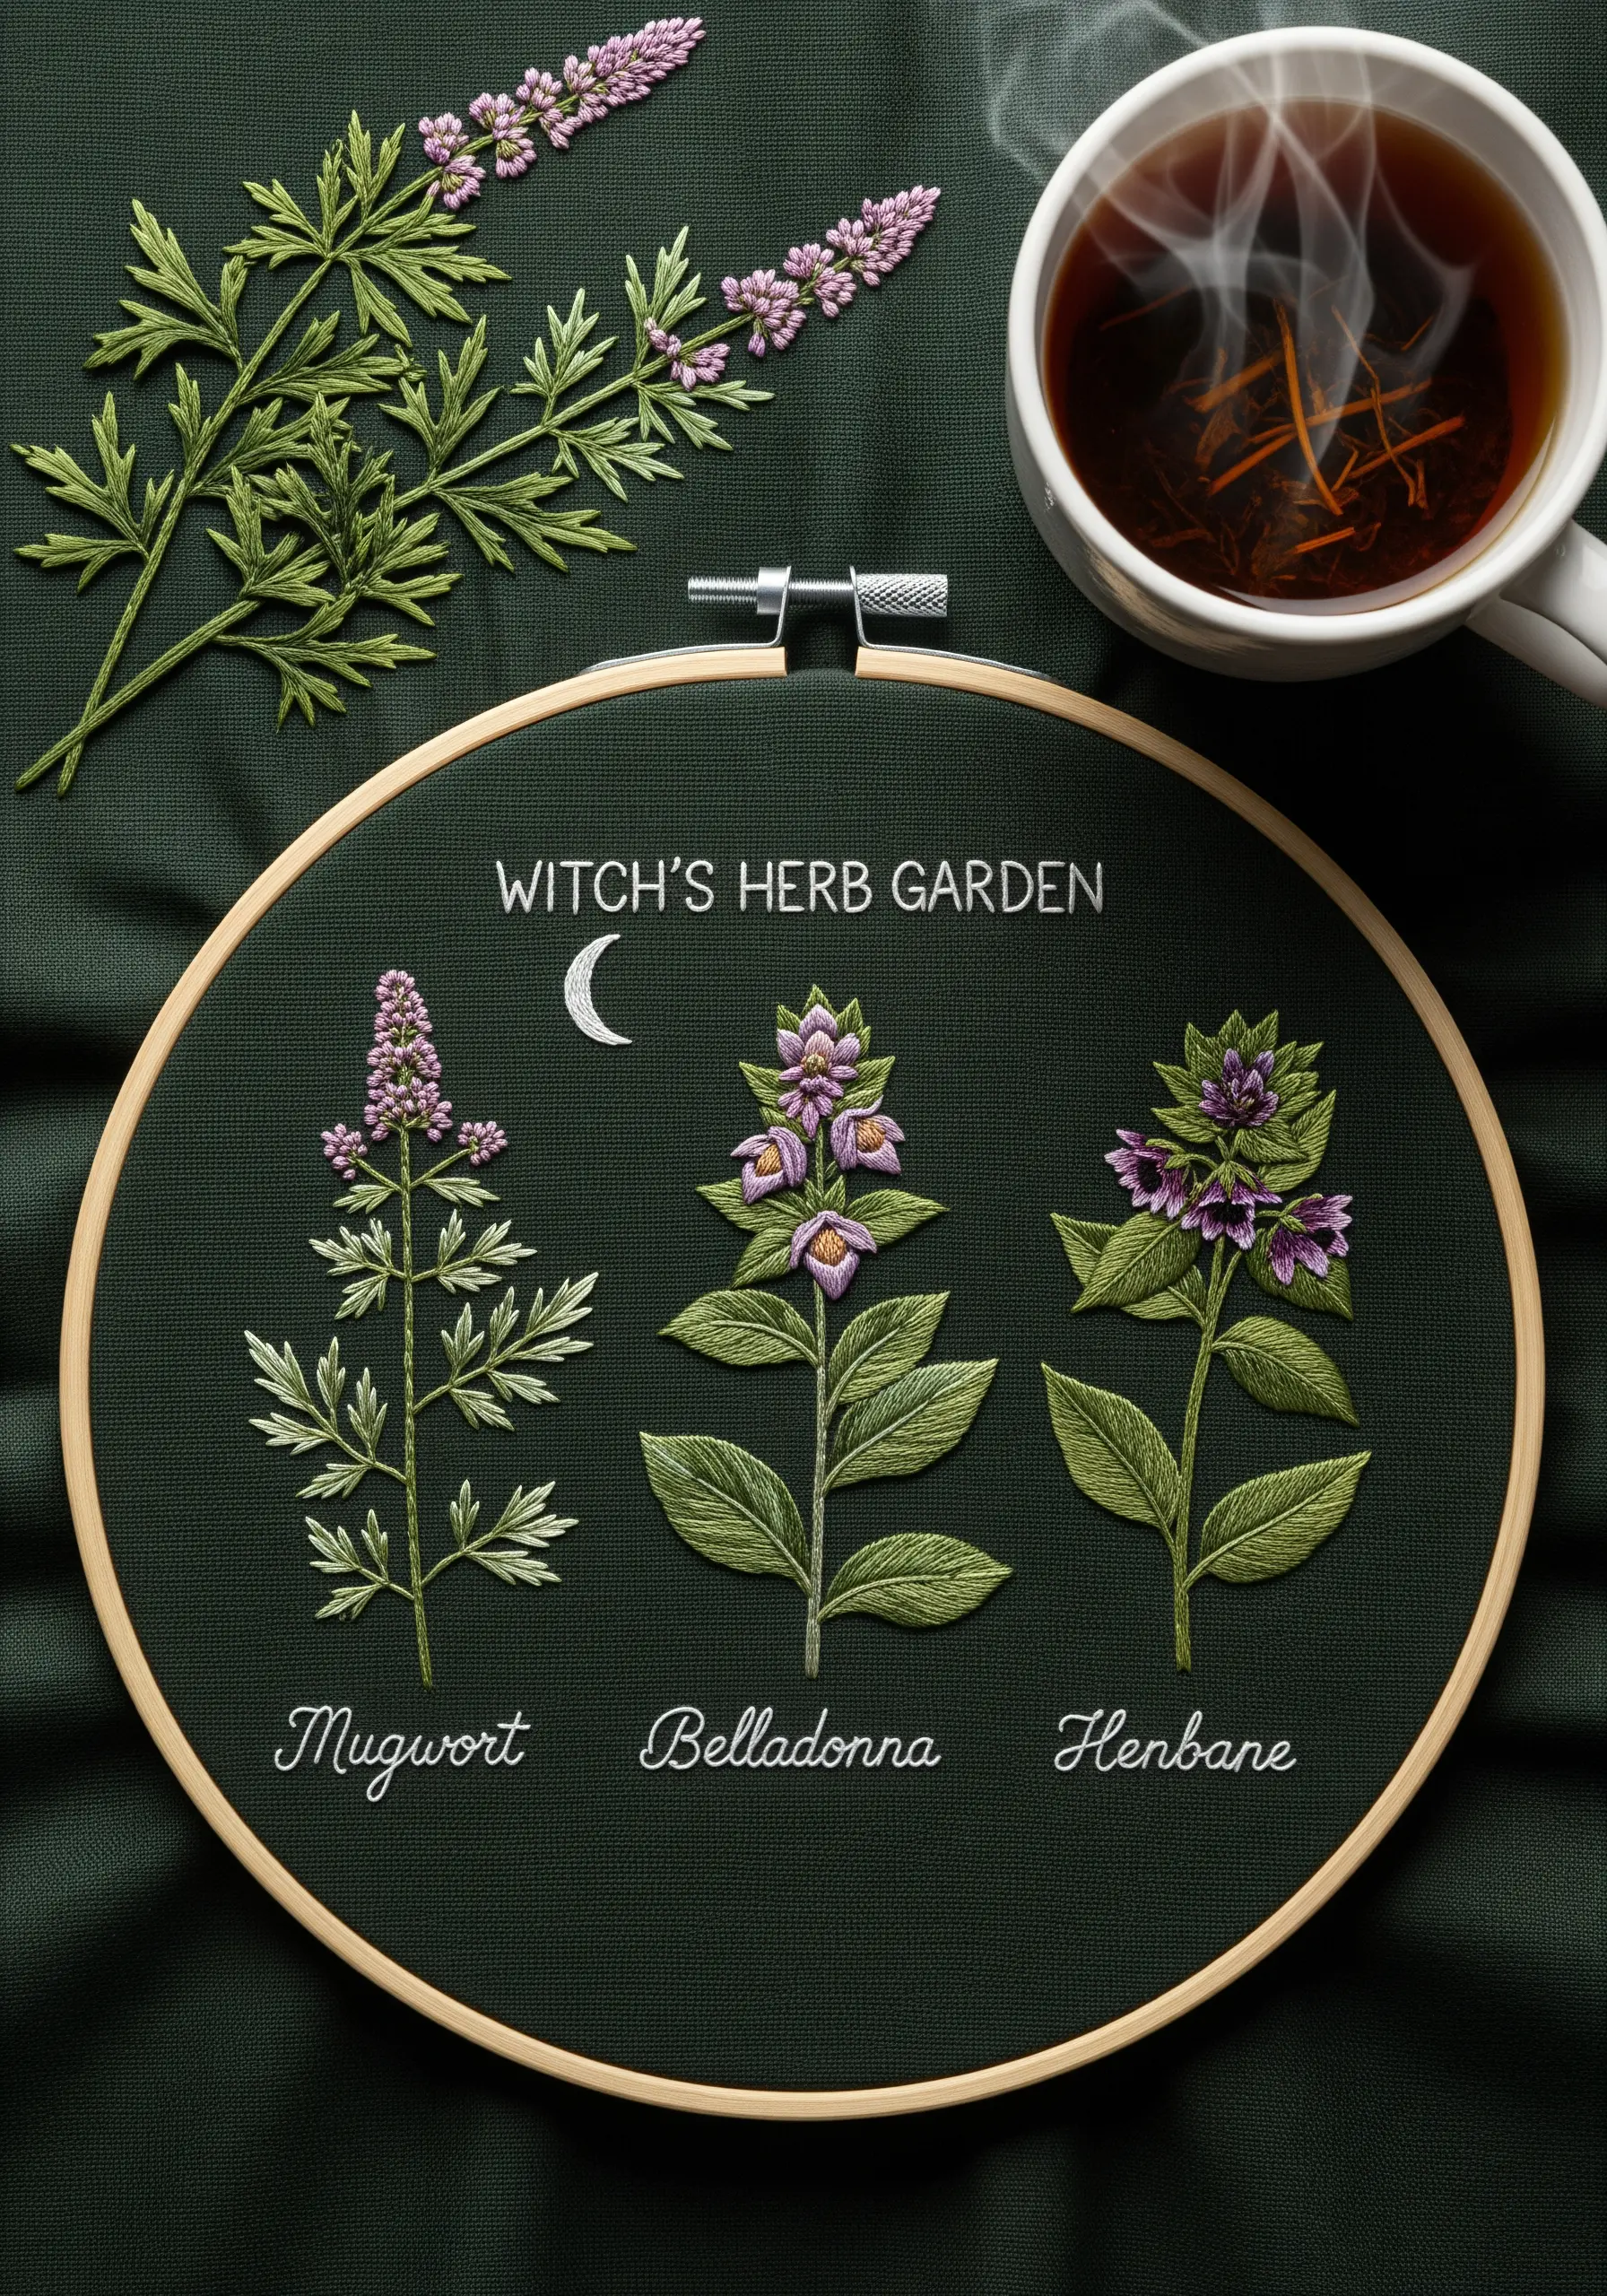
When creating a botanical chart, differentiate each plant with unique textural stitching.
Use French knots for the dense flower heads of Mugwort, lazy daisy stitches for the Belladonna blooms, and fishbone stitch for the sharp leaves of Henbane.
This attention to textural detail makes each herb instantly recognizable and adds a rich, tactile quality to the piece.
For the lettering, use a tiny, single-strand backstitch to ensure the names are crisp and legible, like in a vintage botanical print. These medicinal herb embroidery designs celebrate nature’s power.
18. The Constellation Rose
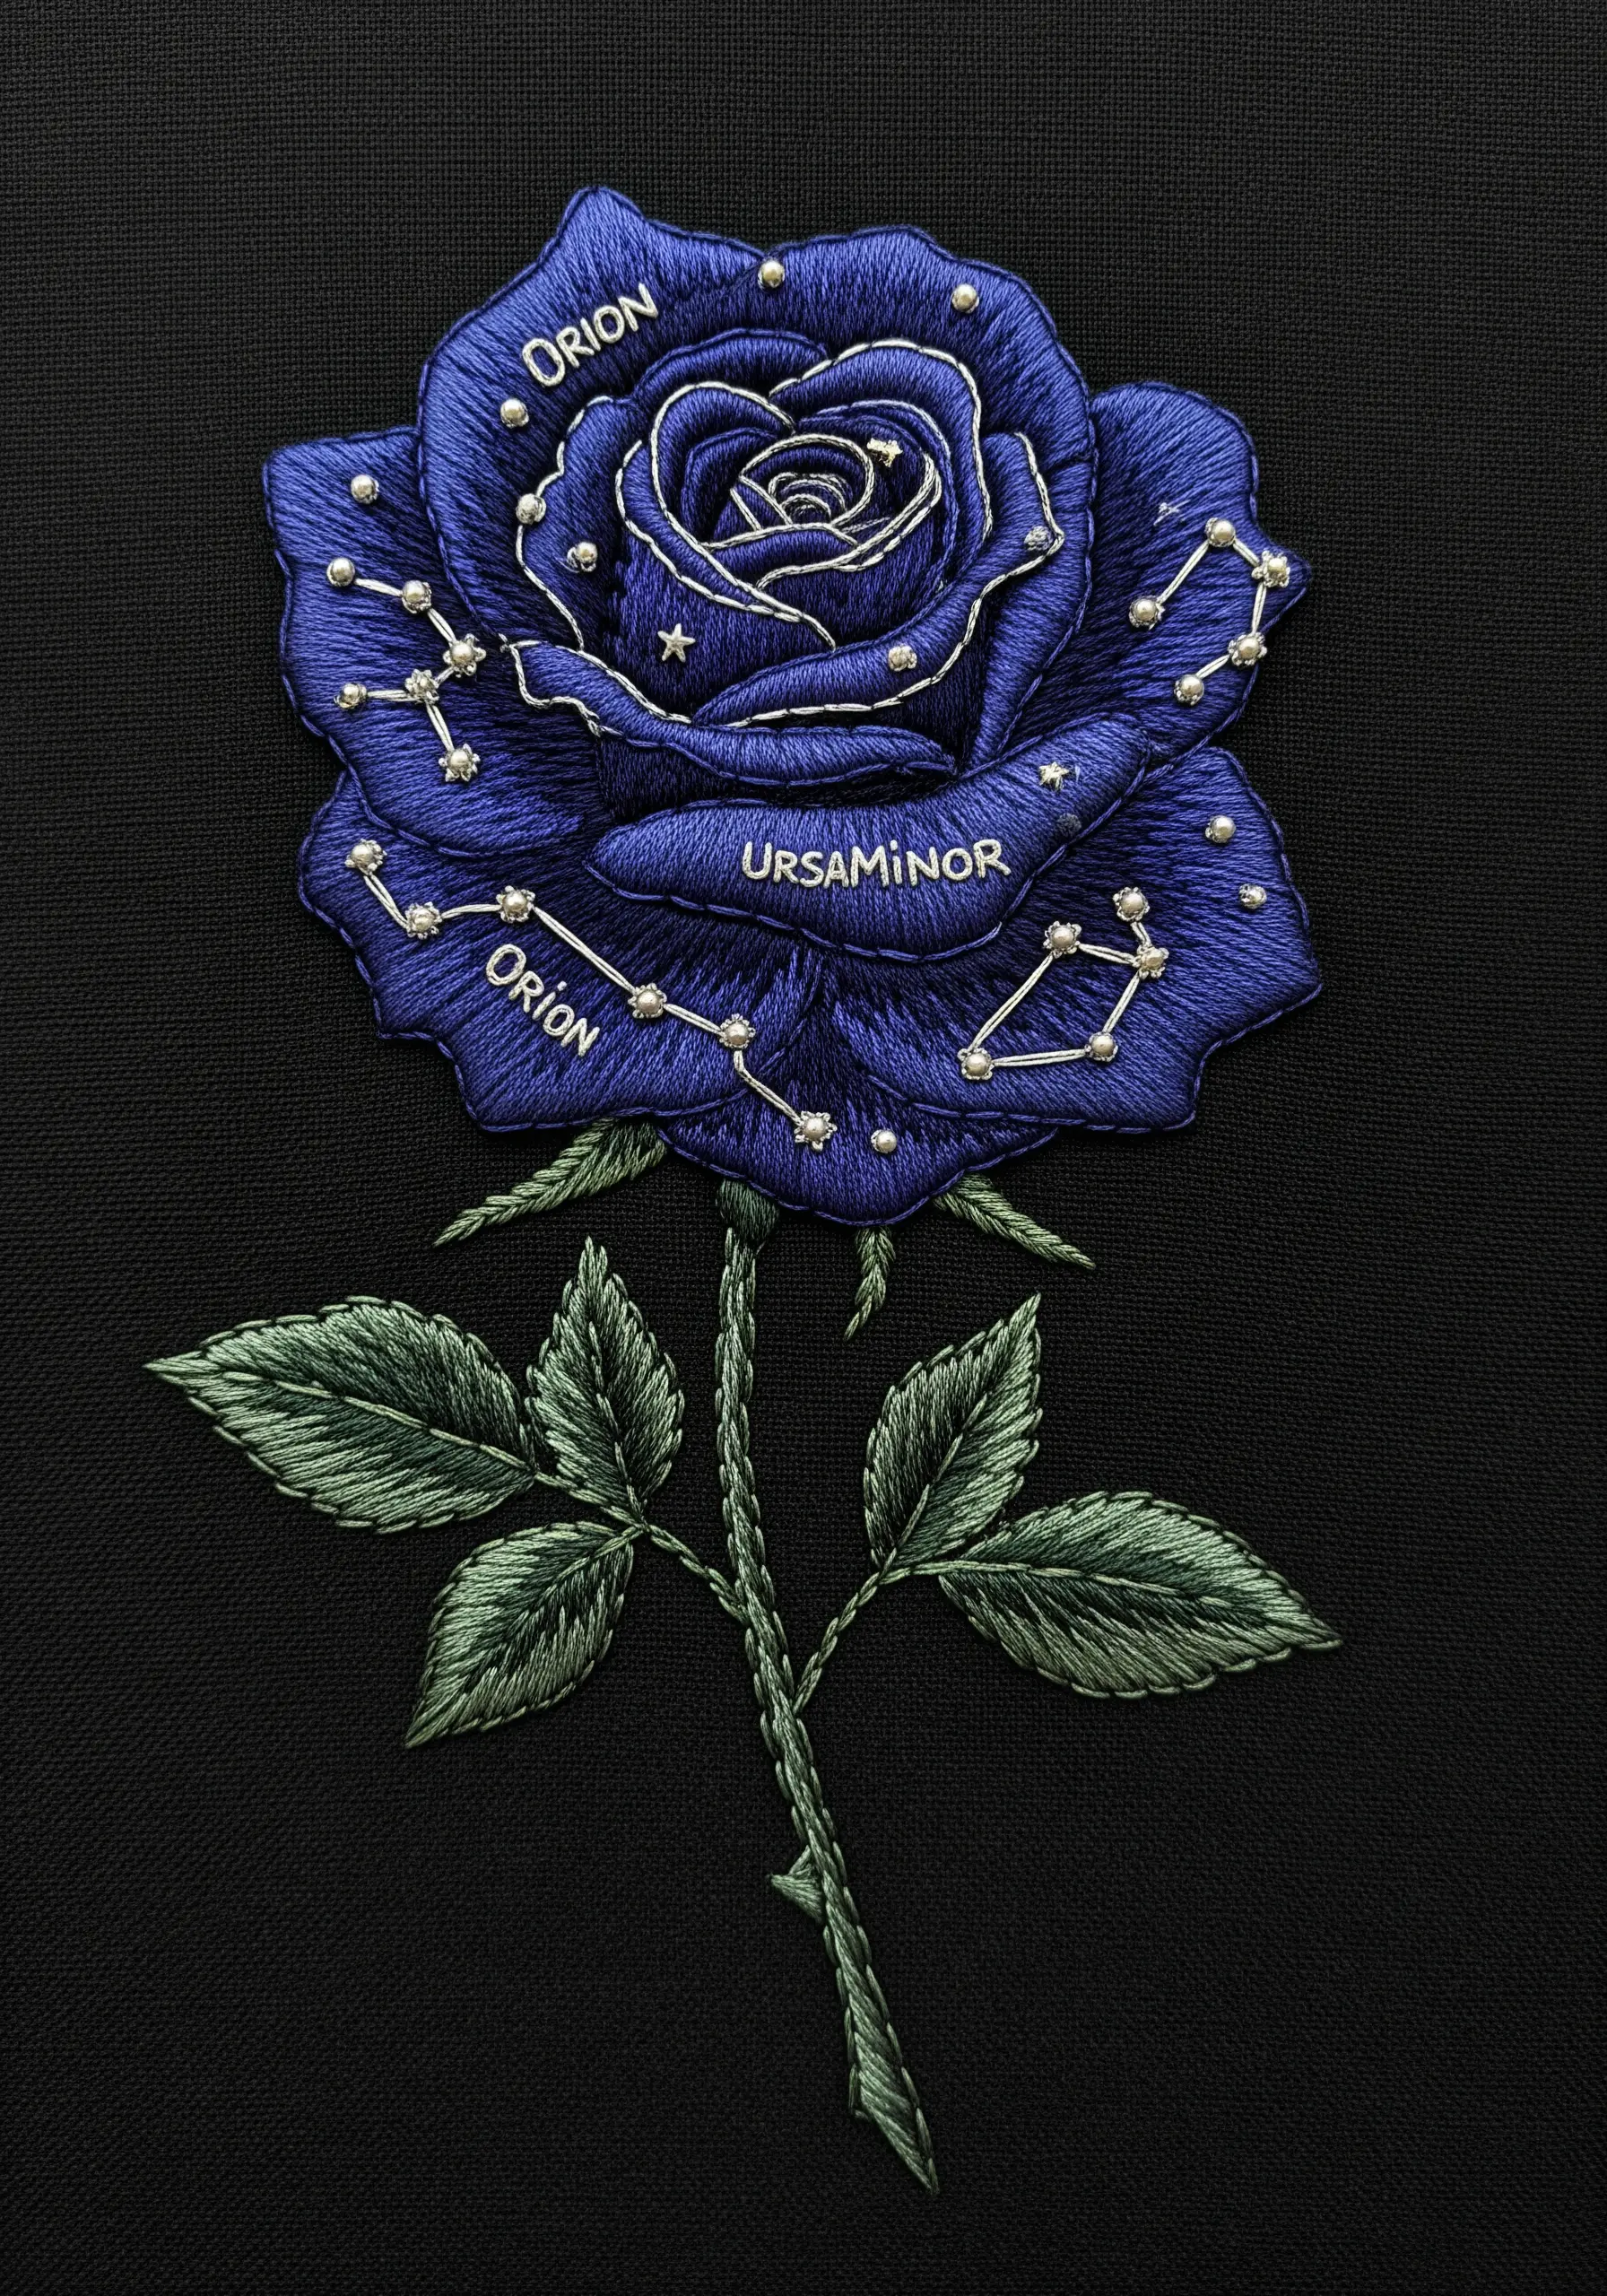
Turn a classic floral into a celestial map by stitching constellations directly onto the petals.
First, complete the rose using dense, directional satin stitch to create the shape and shadows of the petals.
Next, use a fine, single strand of silver metallic thread to add the constellation lines with a simple backstitch.
Use tiny silver beads or French knots for the stars. This layering technique adds a surprising and magical element of cosmic storytelling to a traditional subject.
19. A Spiderweb Glistening with Dew
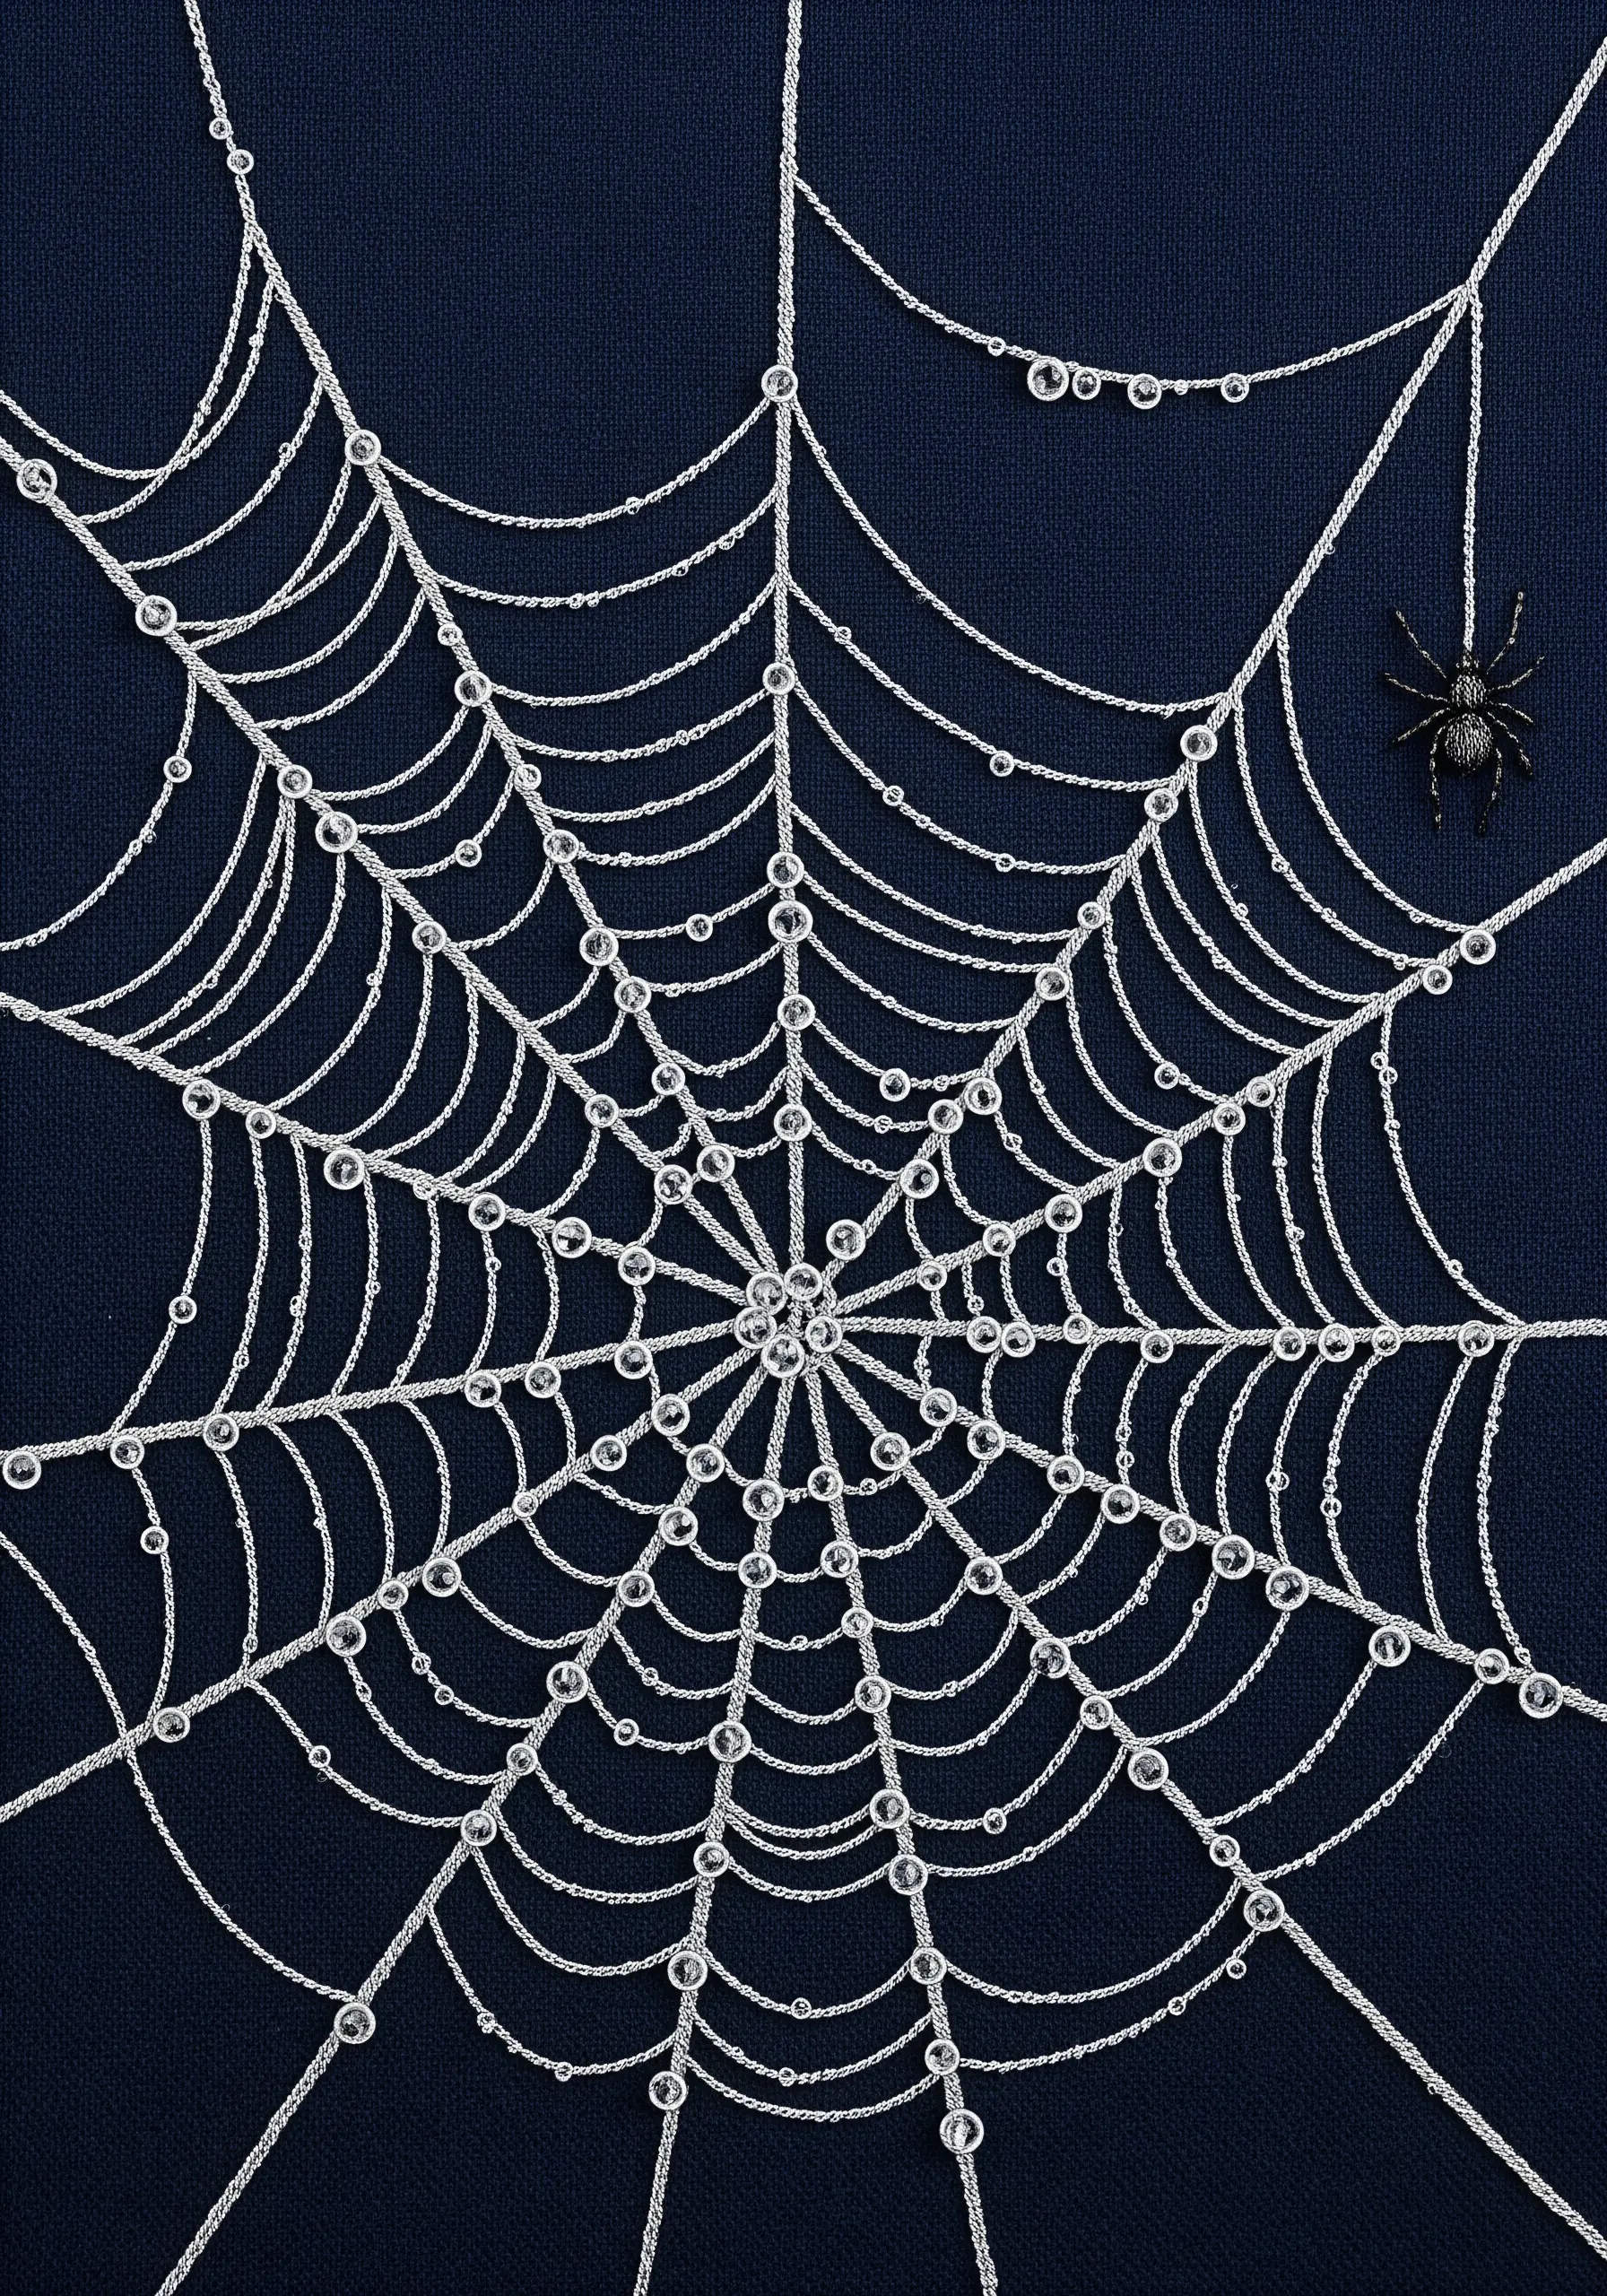
To create a spiderweb that looks both delicate and strong, use a whipped backstitch or couching stitch for the main structural threads.
This will give you smooth, unbroken lines that won’t sag or shift.
The magic comes from the dewdrops: use a high-quality silver metallic thread to make tiny French knots or attach small seed beads at irregular intervals along the web.
This small detail transforms the piece, making it feel like it was captured in the early morning light.
20. Bioluminescent Terrarium Scene
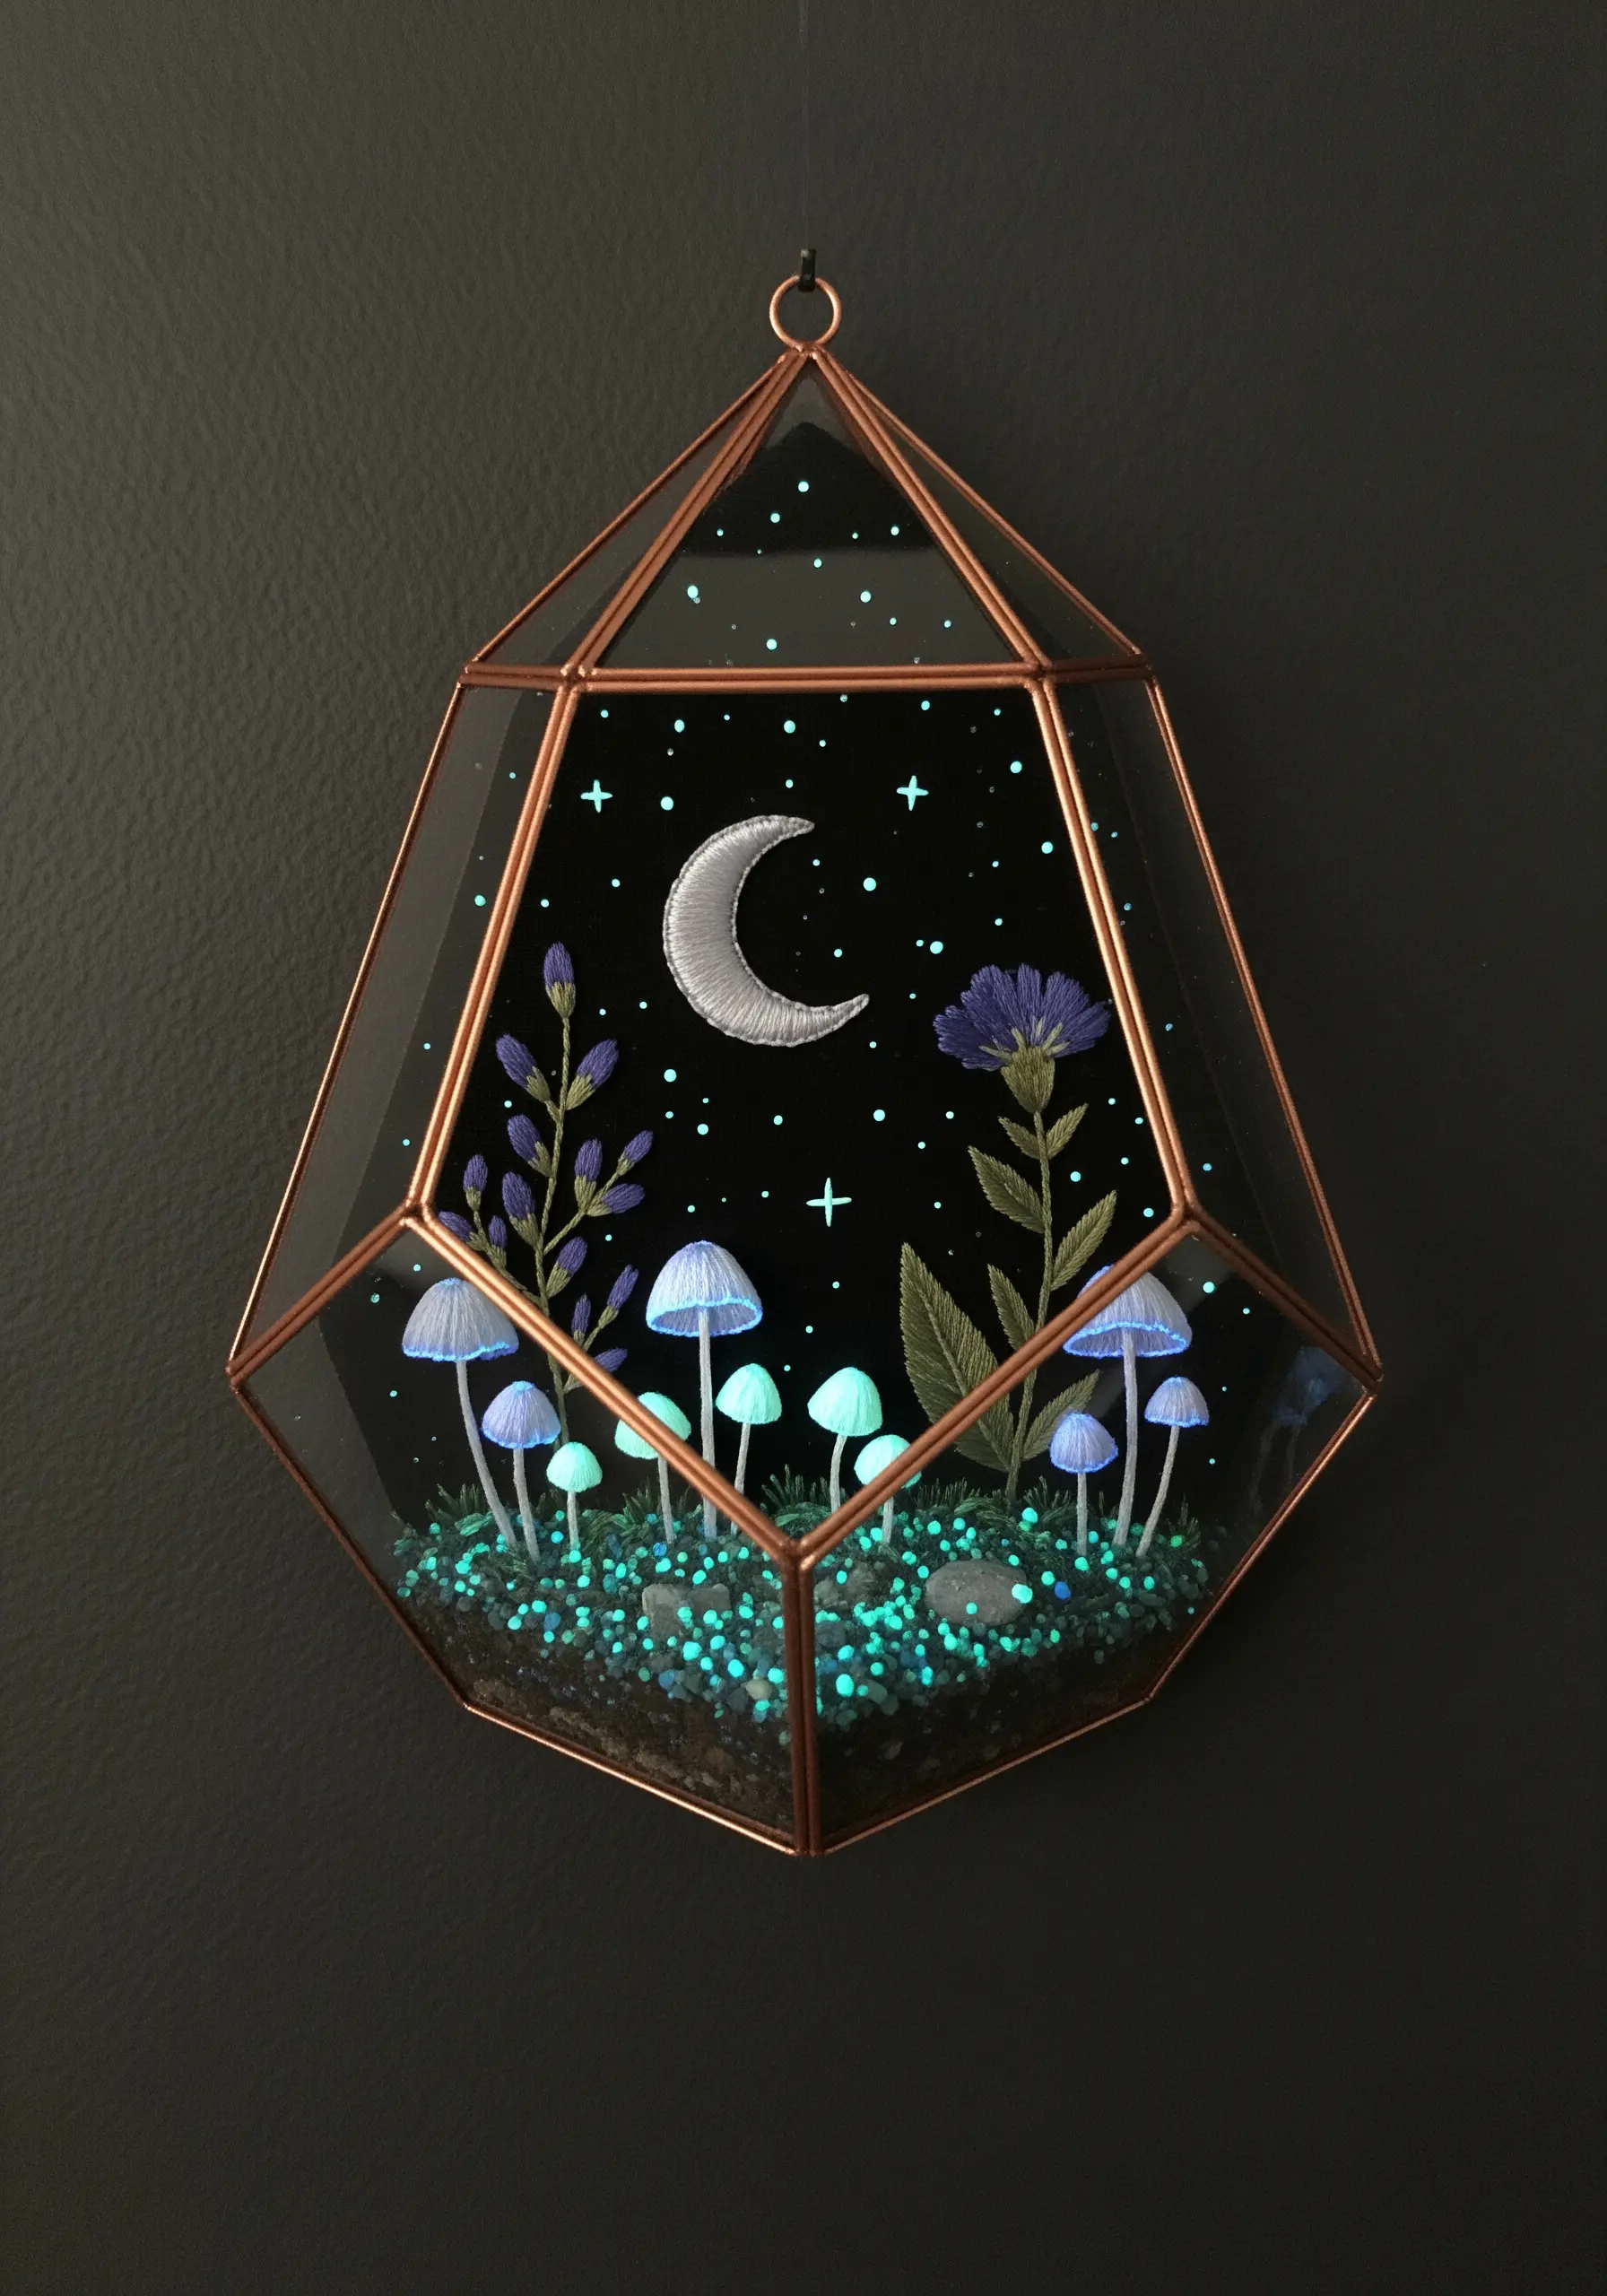
Create a secret world that comes alive in the dark by strategically using glow-in-the-dark thread.
Use this special floss for the gills of the mushrooms, the fireflies, or scattered as tiny star-like moss on the ground.
To charge the thread, simply expose the finished piece to a bright light source for a few minutes.
The contrast between the piece in daylight and its hidden, glowing version at night adds an element of pure magic and wonder.
21. A Moonlit Weeping Willow
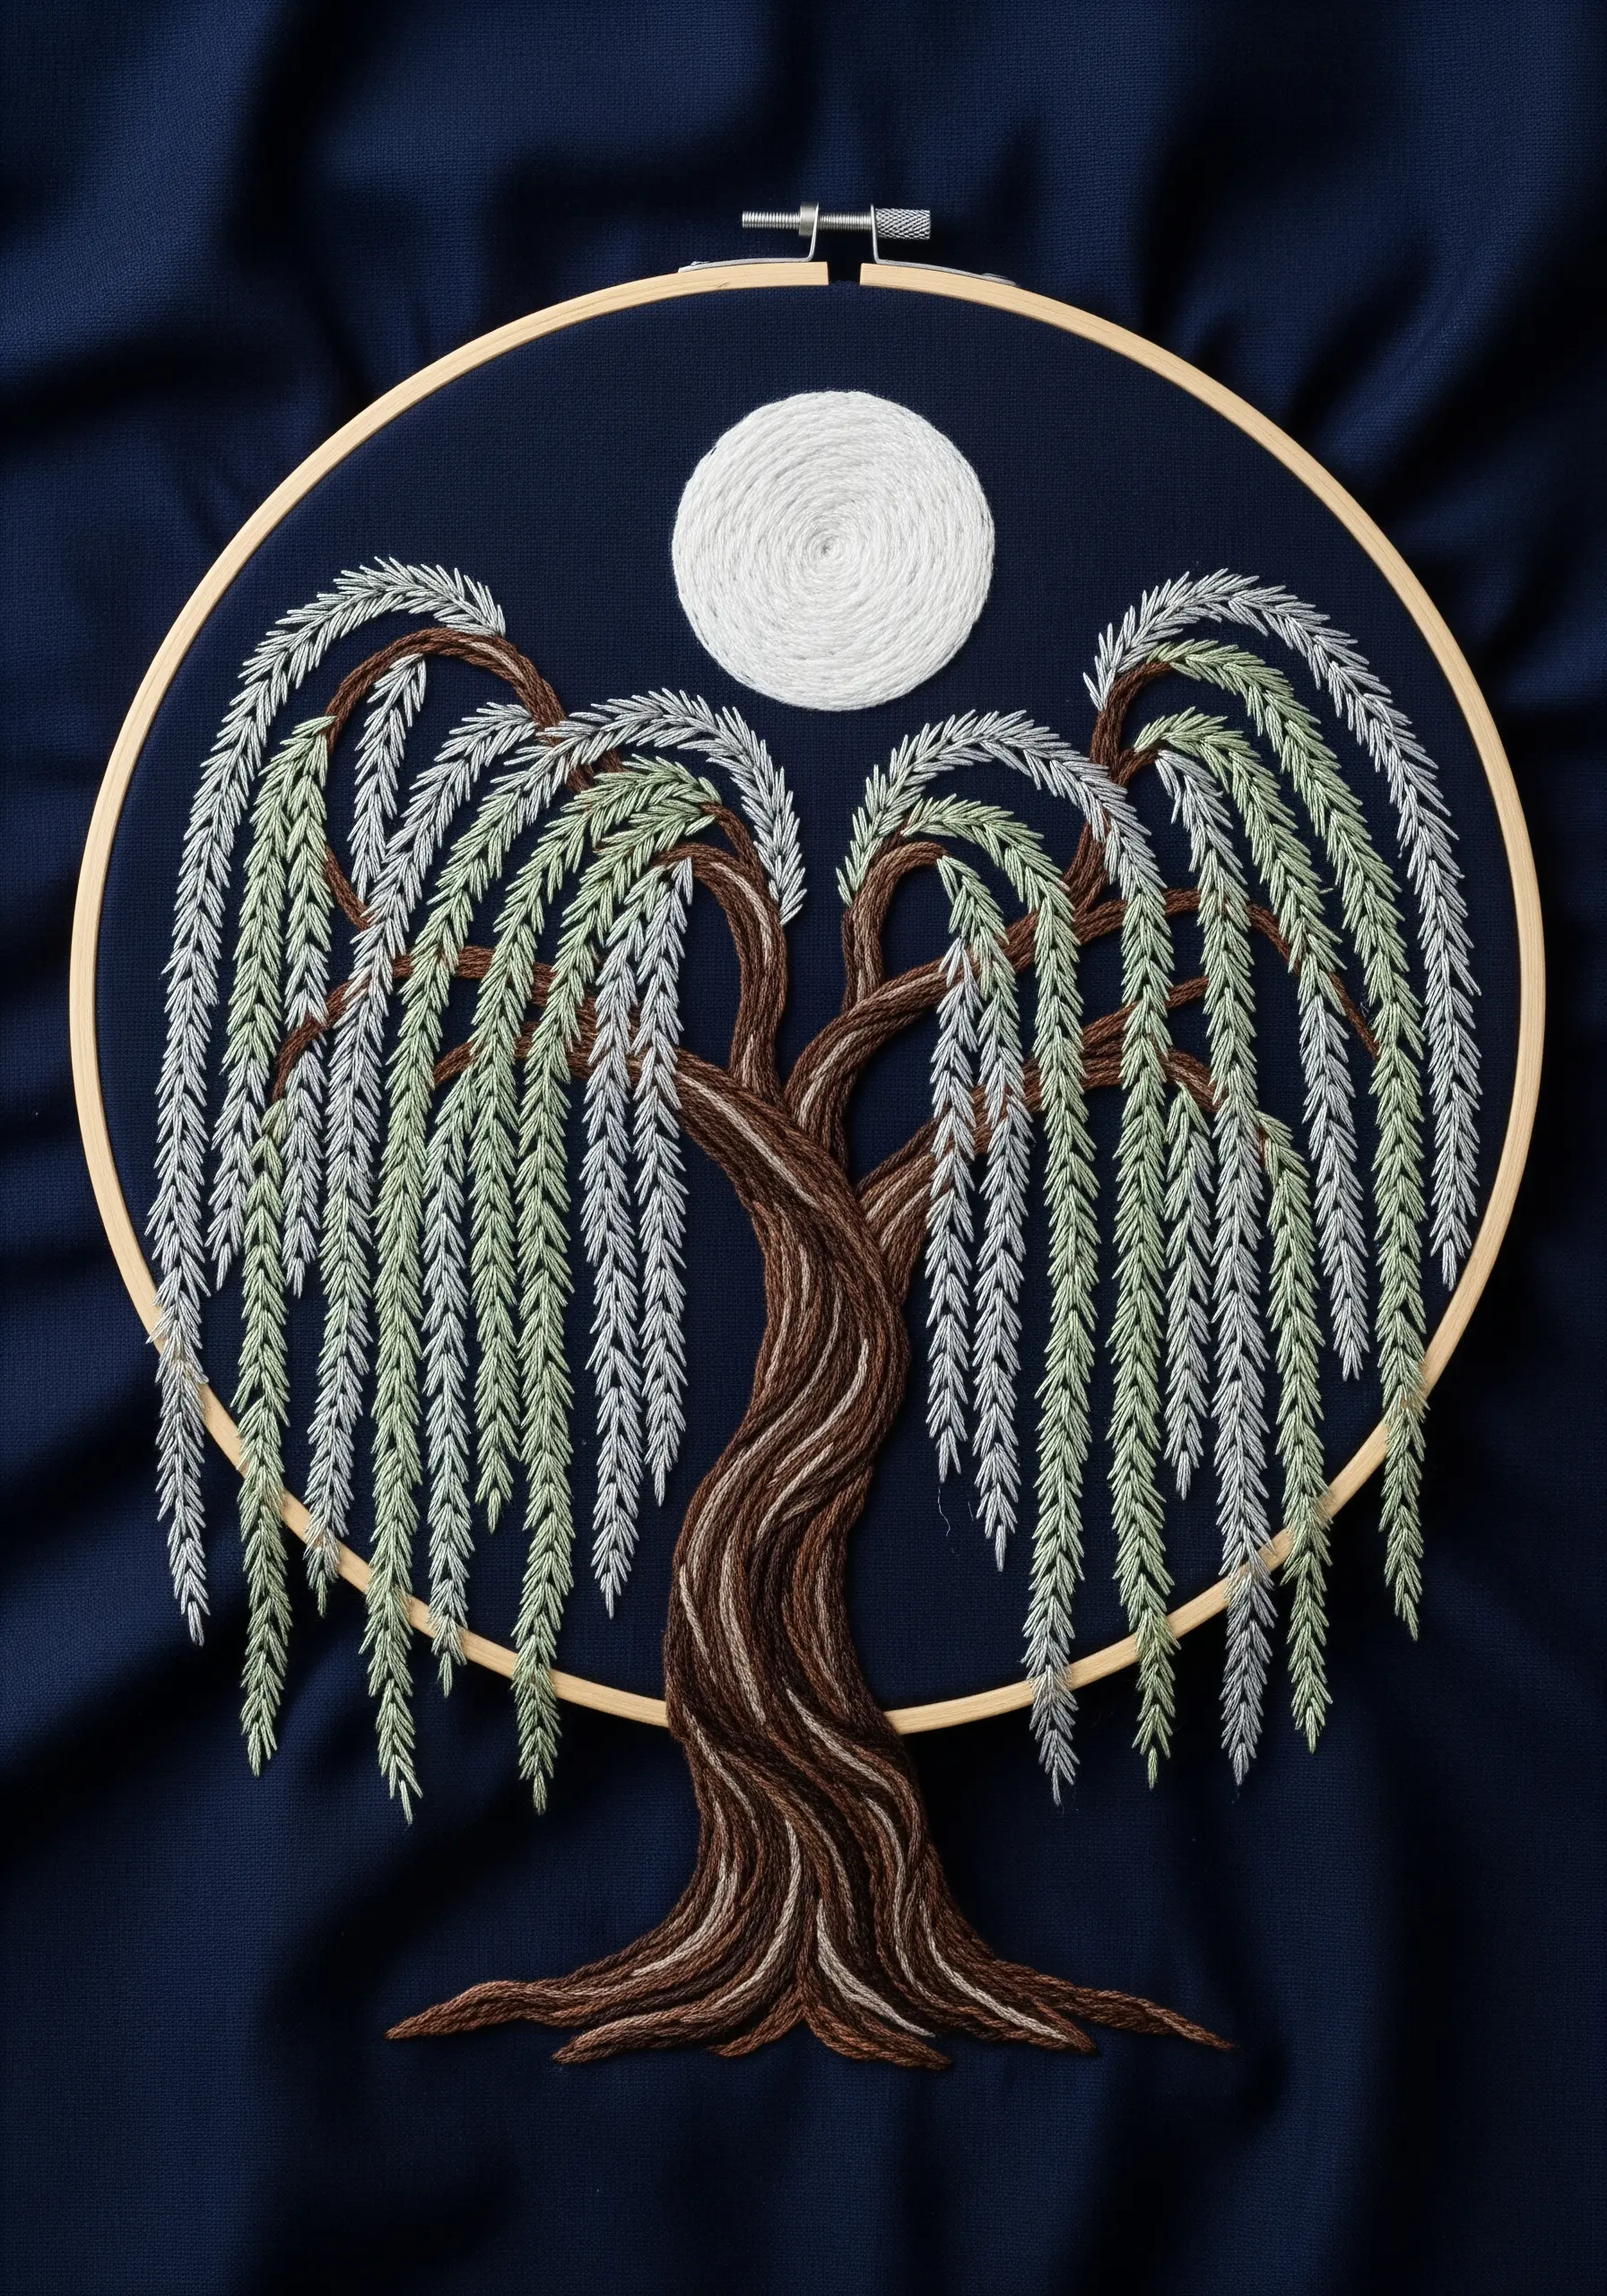
Capture the graceful, flowing movement of a weeping willow’s branches with long, vertical stitches.
Use a single, long straight stitch or a narrow fishbone stitch for each hanging leaf cluster.
To create a moonlit effect, don’t use just one color. Instead, blend single strands of sage green, silvery grey, and cream within the branches.
This subtle color variation gives the tree a shimmering quality, as if it’s reflecting the light of the full moon above.
22. Water Lilies on a Rippled Pond
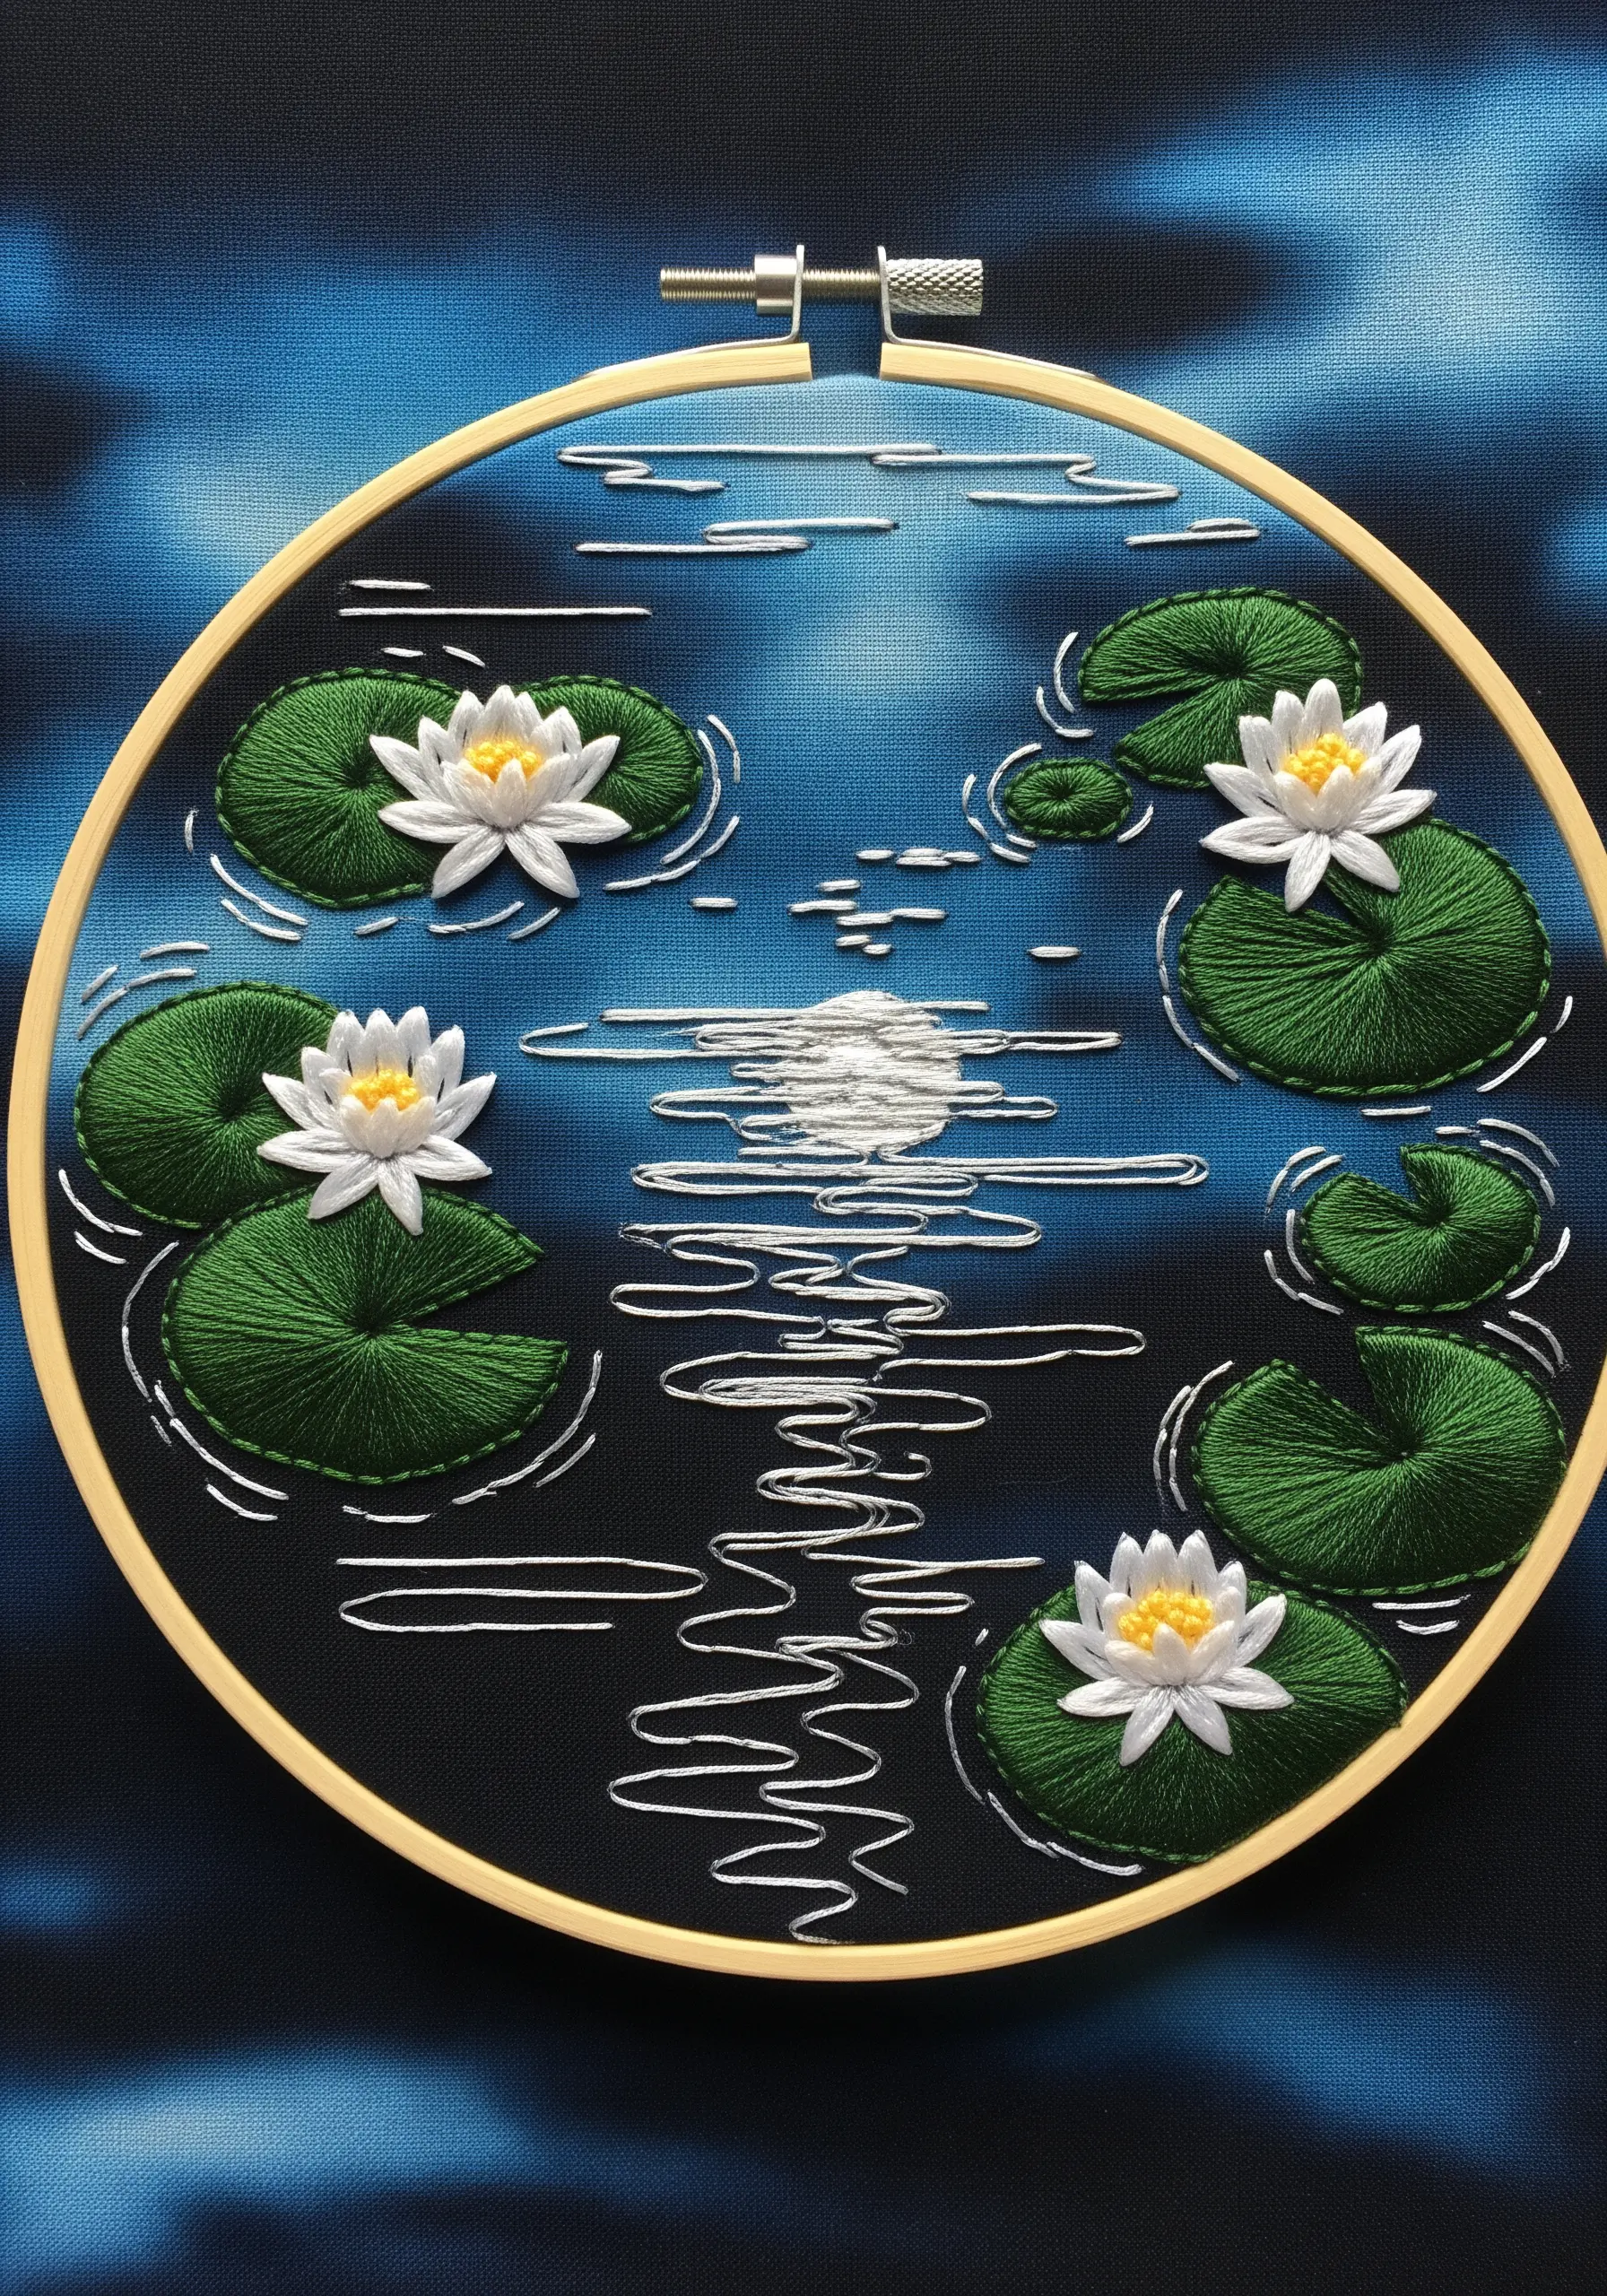
Suggest the surface of water and reflections without stitching the entire background.
Use sparse, horizontal straight stitches in white and silver thread to represent the moonlight hitting the water’s surface.
Make the stitches longer and denser directly under the moon to create a strong reflection, and shorter and more scattered further away.
This minimalist approach creates the illusion of a calm, moonlit pond and draws focus to the beautifully stitched lily pads and flowers.
23. Beaded Blackberries on a Delicate Vine
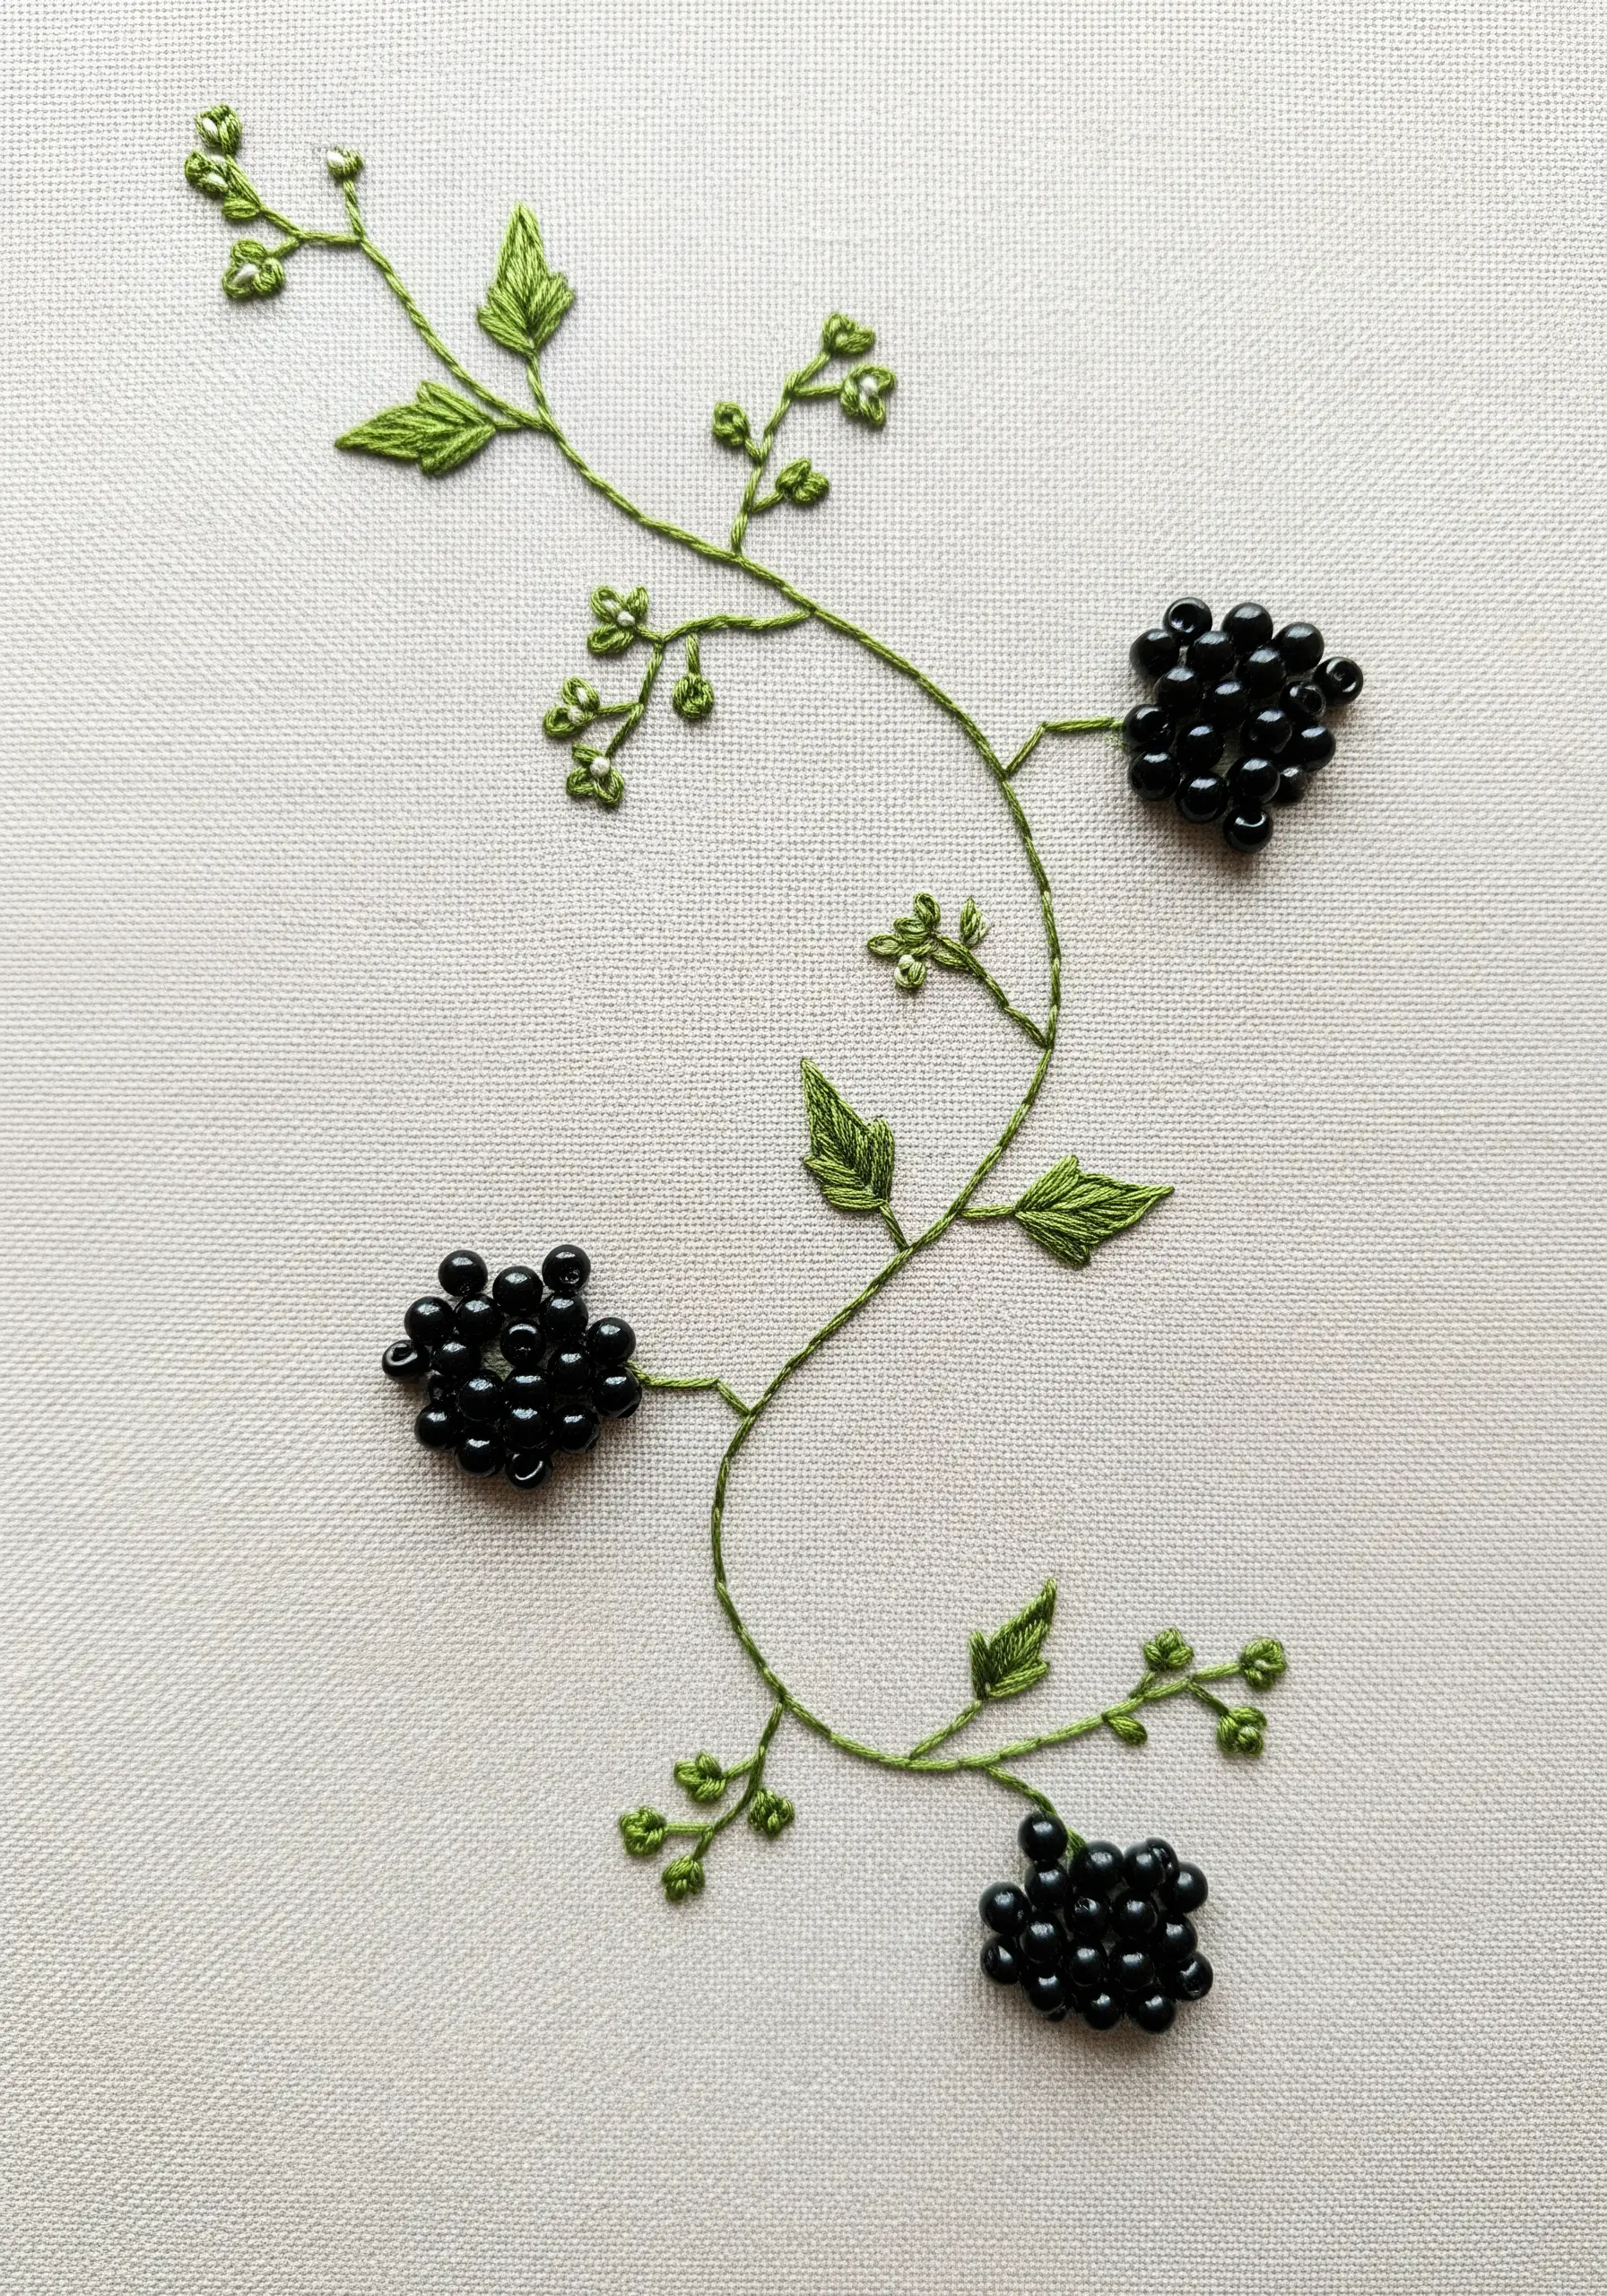
Incorporate beads to add a surprising and realistic texture to your botanical embroidery.
Instead of stitching the blackberries with French knots, cluster small, glossy black seed beads together to form the fruit.
This technique gives the berries a plump, juicy appearance and a subtle shine that contrasts beautifully with the matte finish of the floss-stitched leaves and stem.
Secure each bead with two passes of thread to ensure they are firmly attached.
24. The Architectural Beauty of a Thistle

A thistle offers a fantastic study in contrasting textures. For the spiky, architectural leaves, use a fishbone stitch with sharp, defined points.
Outline the leaves with a precise split stitch to emphasize their sharp edges.
For the soft, fuzzy flower head, use turkey work: create loops of thread and then snip them to create a brush-like, 3D effect.
This combination of sharp lines and soft texture makes the thistle feel incredibly lifelike.
25. Painterly Blending on a Moth’s Wing
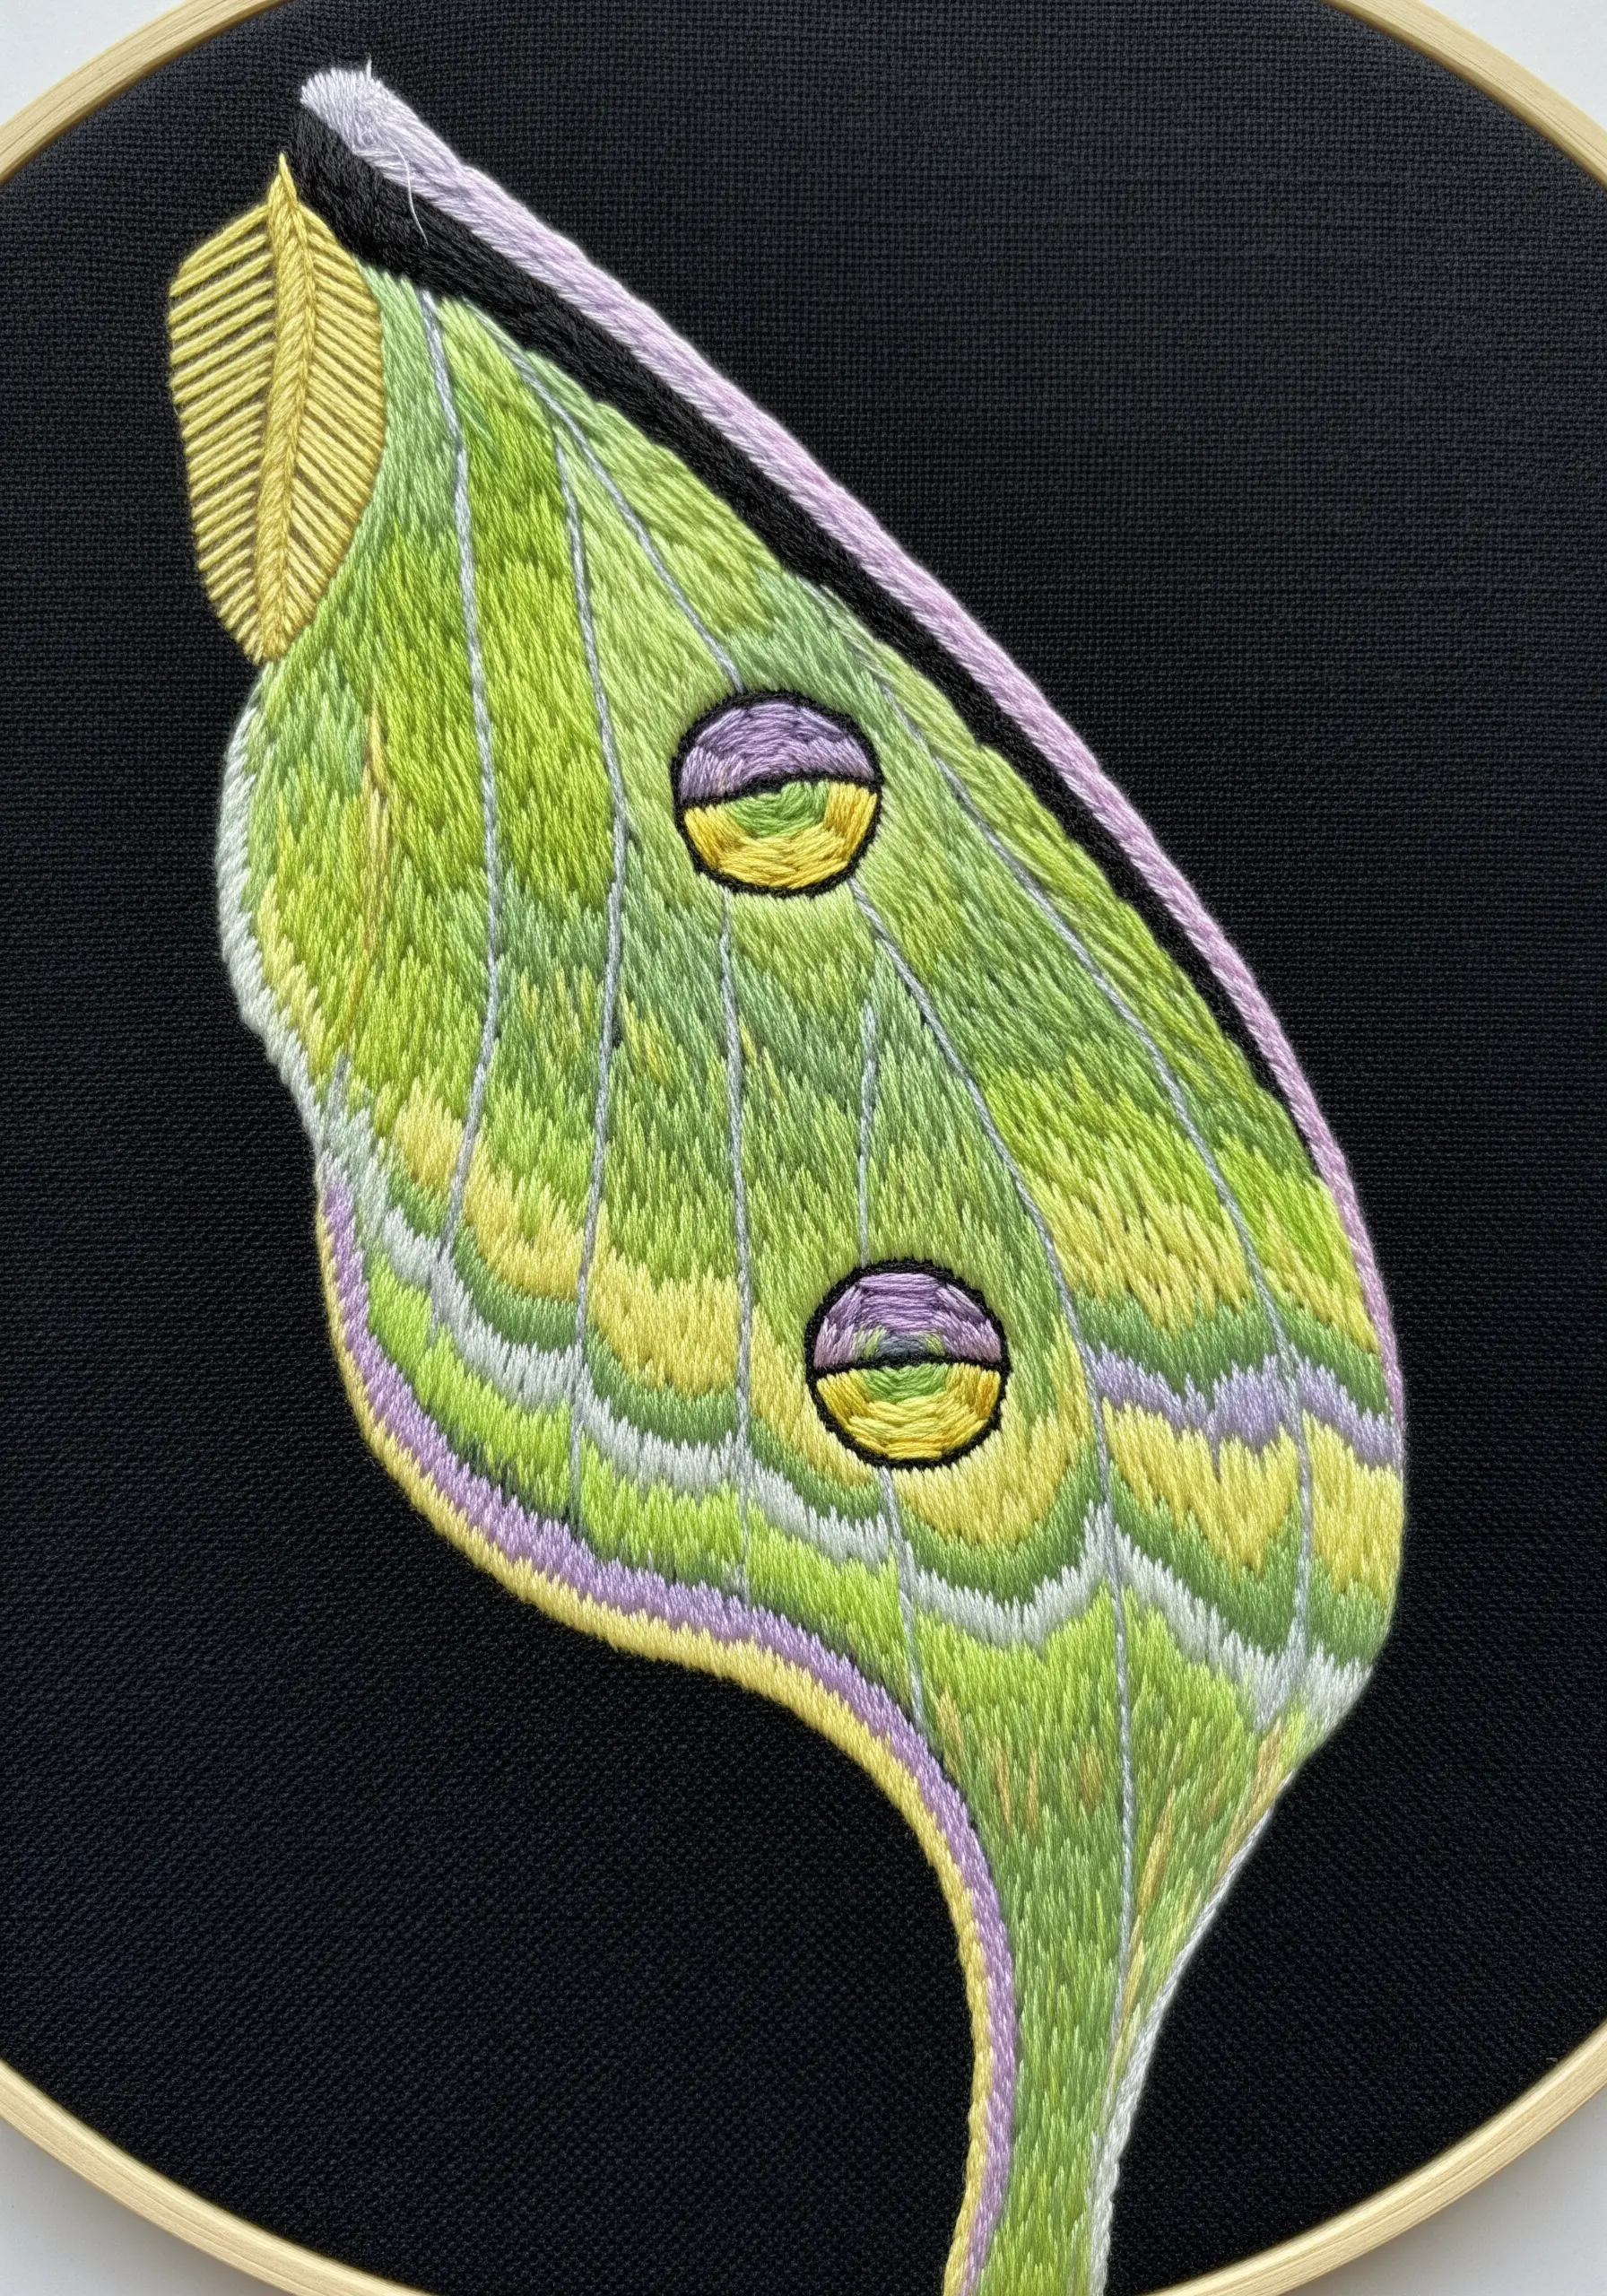
To achieve a soft, painterly effect like this, you must master the long-and-short stitch using only a single strand of floss.
Work in small sections, blending your colors by bringing your needle up through the middle of the previous stitch.
This splits the thread and creates a seamless transition between shades.
This is the core of floral thread painting techniques, and it’s perfect for creating the soft, powdery look of moth wings or delicate petals.
26. Sculptural Stitching for a Baobab Bloom
Create a heavily textured, sculptural flower using high-relief stitches.
The ruffled petals are made with layers of detached chain stitches (lazy daisies) packed closely together.
The central part of the flower is built up with dense French knots.
For the dramatic hanging stamens, use long straight stitches weighted with a tiny bead or a French knot at the end. This allows them to move freely, adding a dynamic, 3D quality to your work.
27. A Wreath of Mixed Night Flowers
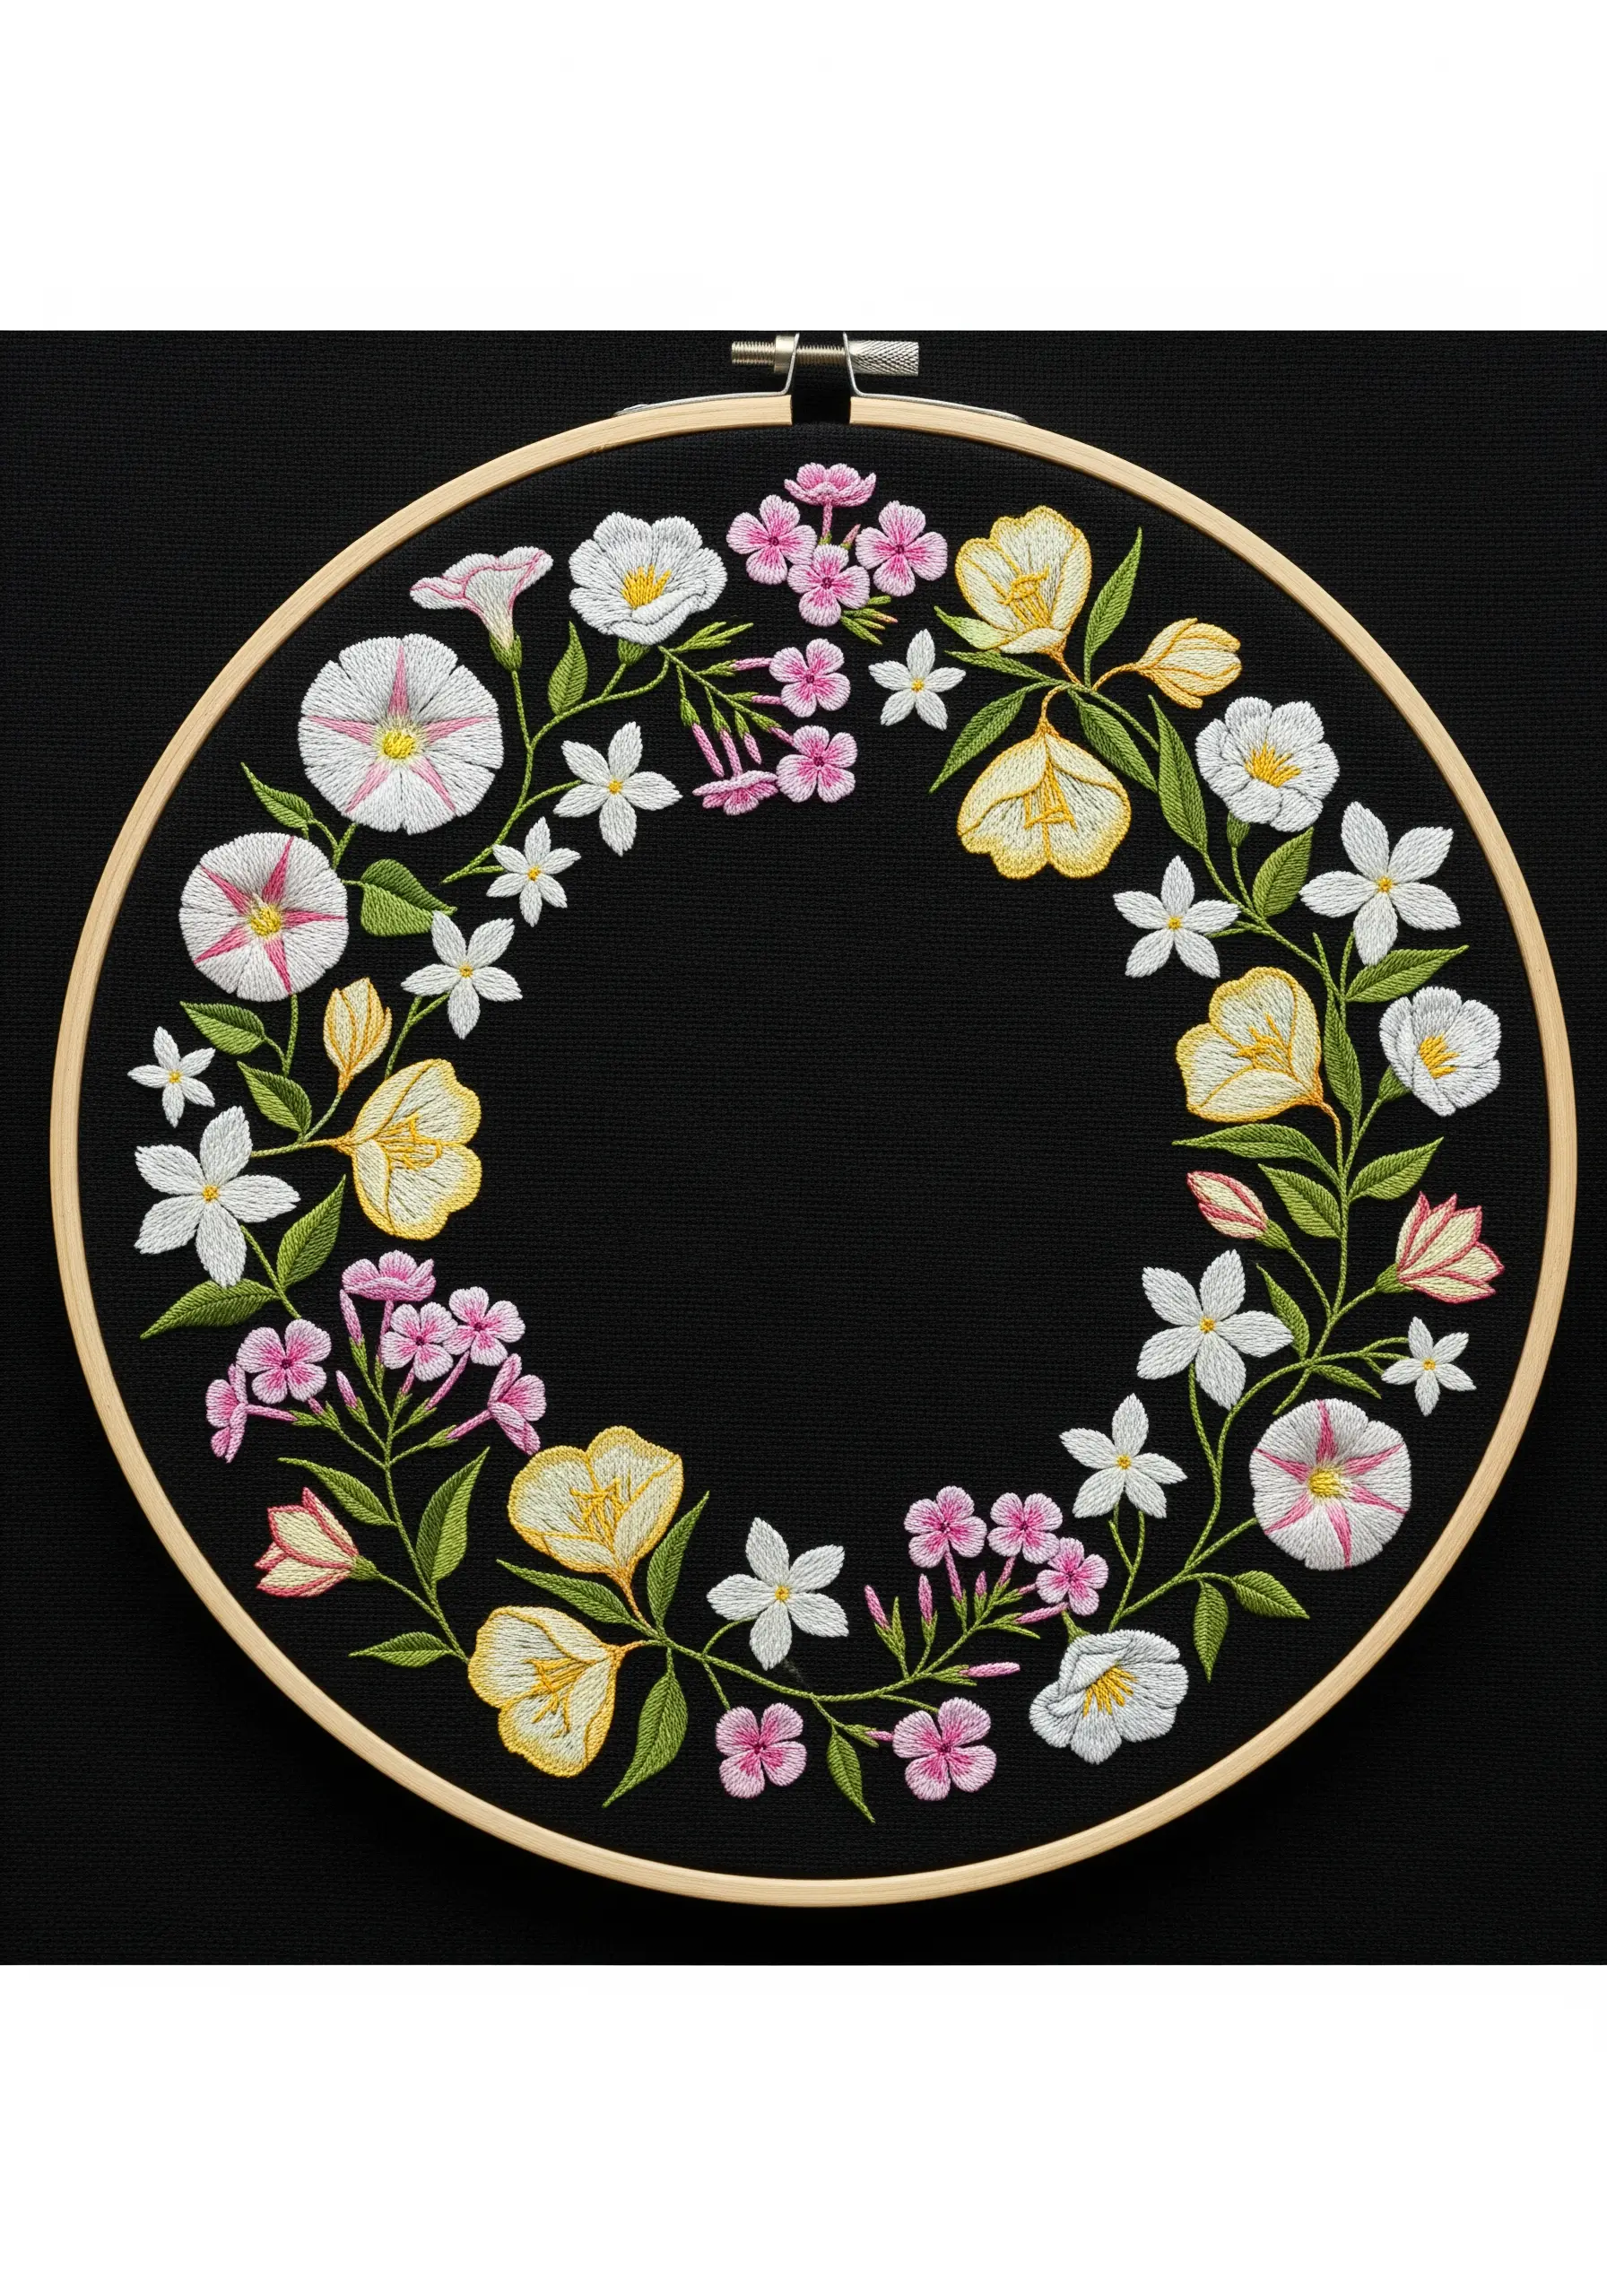
When composing a dense floral wreath, the key to a harmonious result is variety and balance.
Mix large, medium, and small flowers to create a visual rhythm. Combine different floral shapes—star-shaped jasmine, bell-shaped primrose, and rounder bindweed.
Use trailing stems and leaves stitched with a stem stitch to connect all the elements and guide the viewer’s eye around the circle. These principles are essential for all wild botanical wreath patterns.
28. Luminous Dandelion Seed Heads
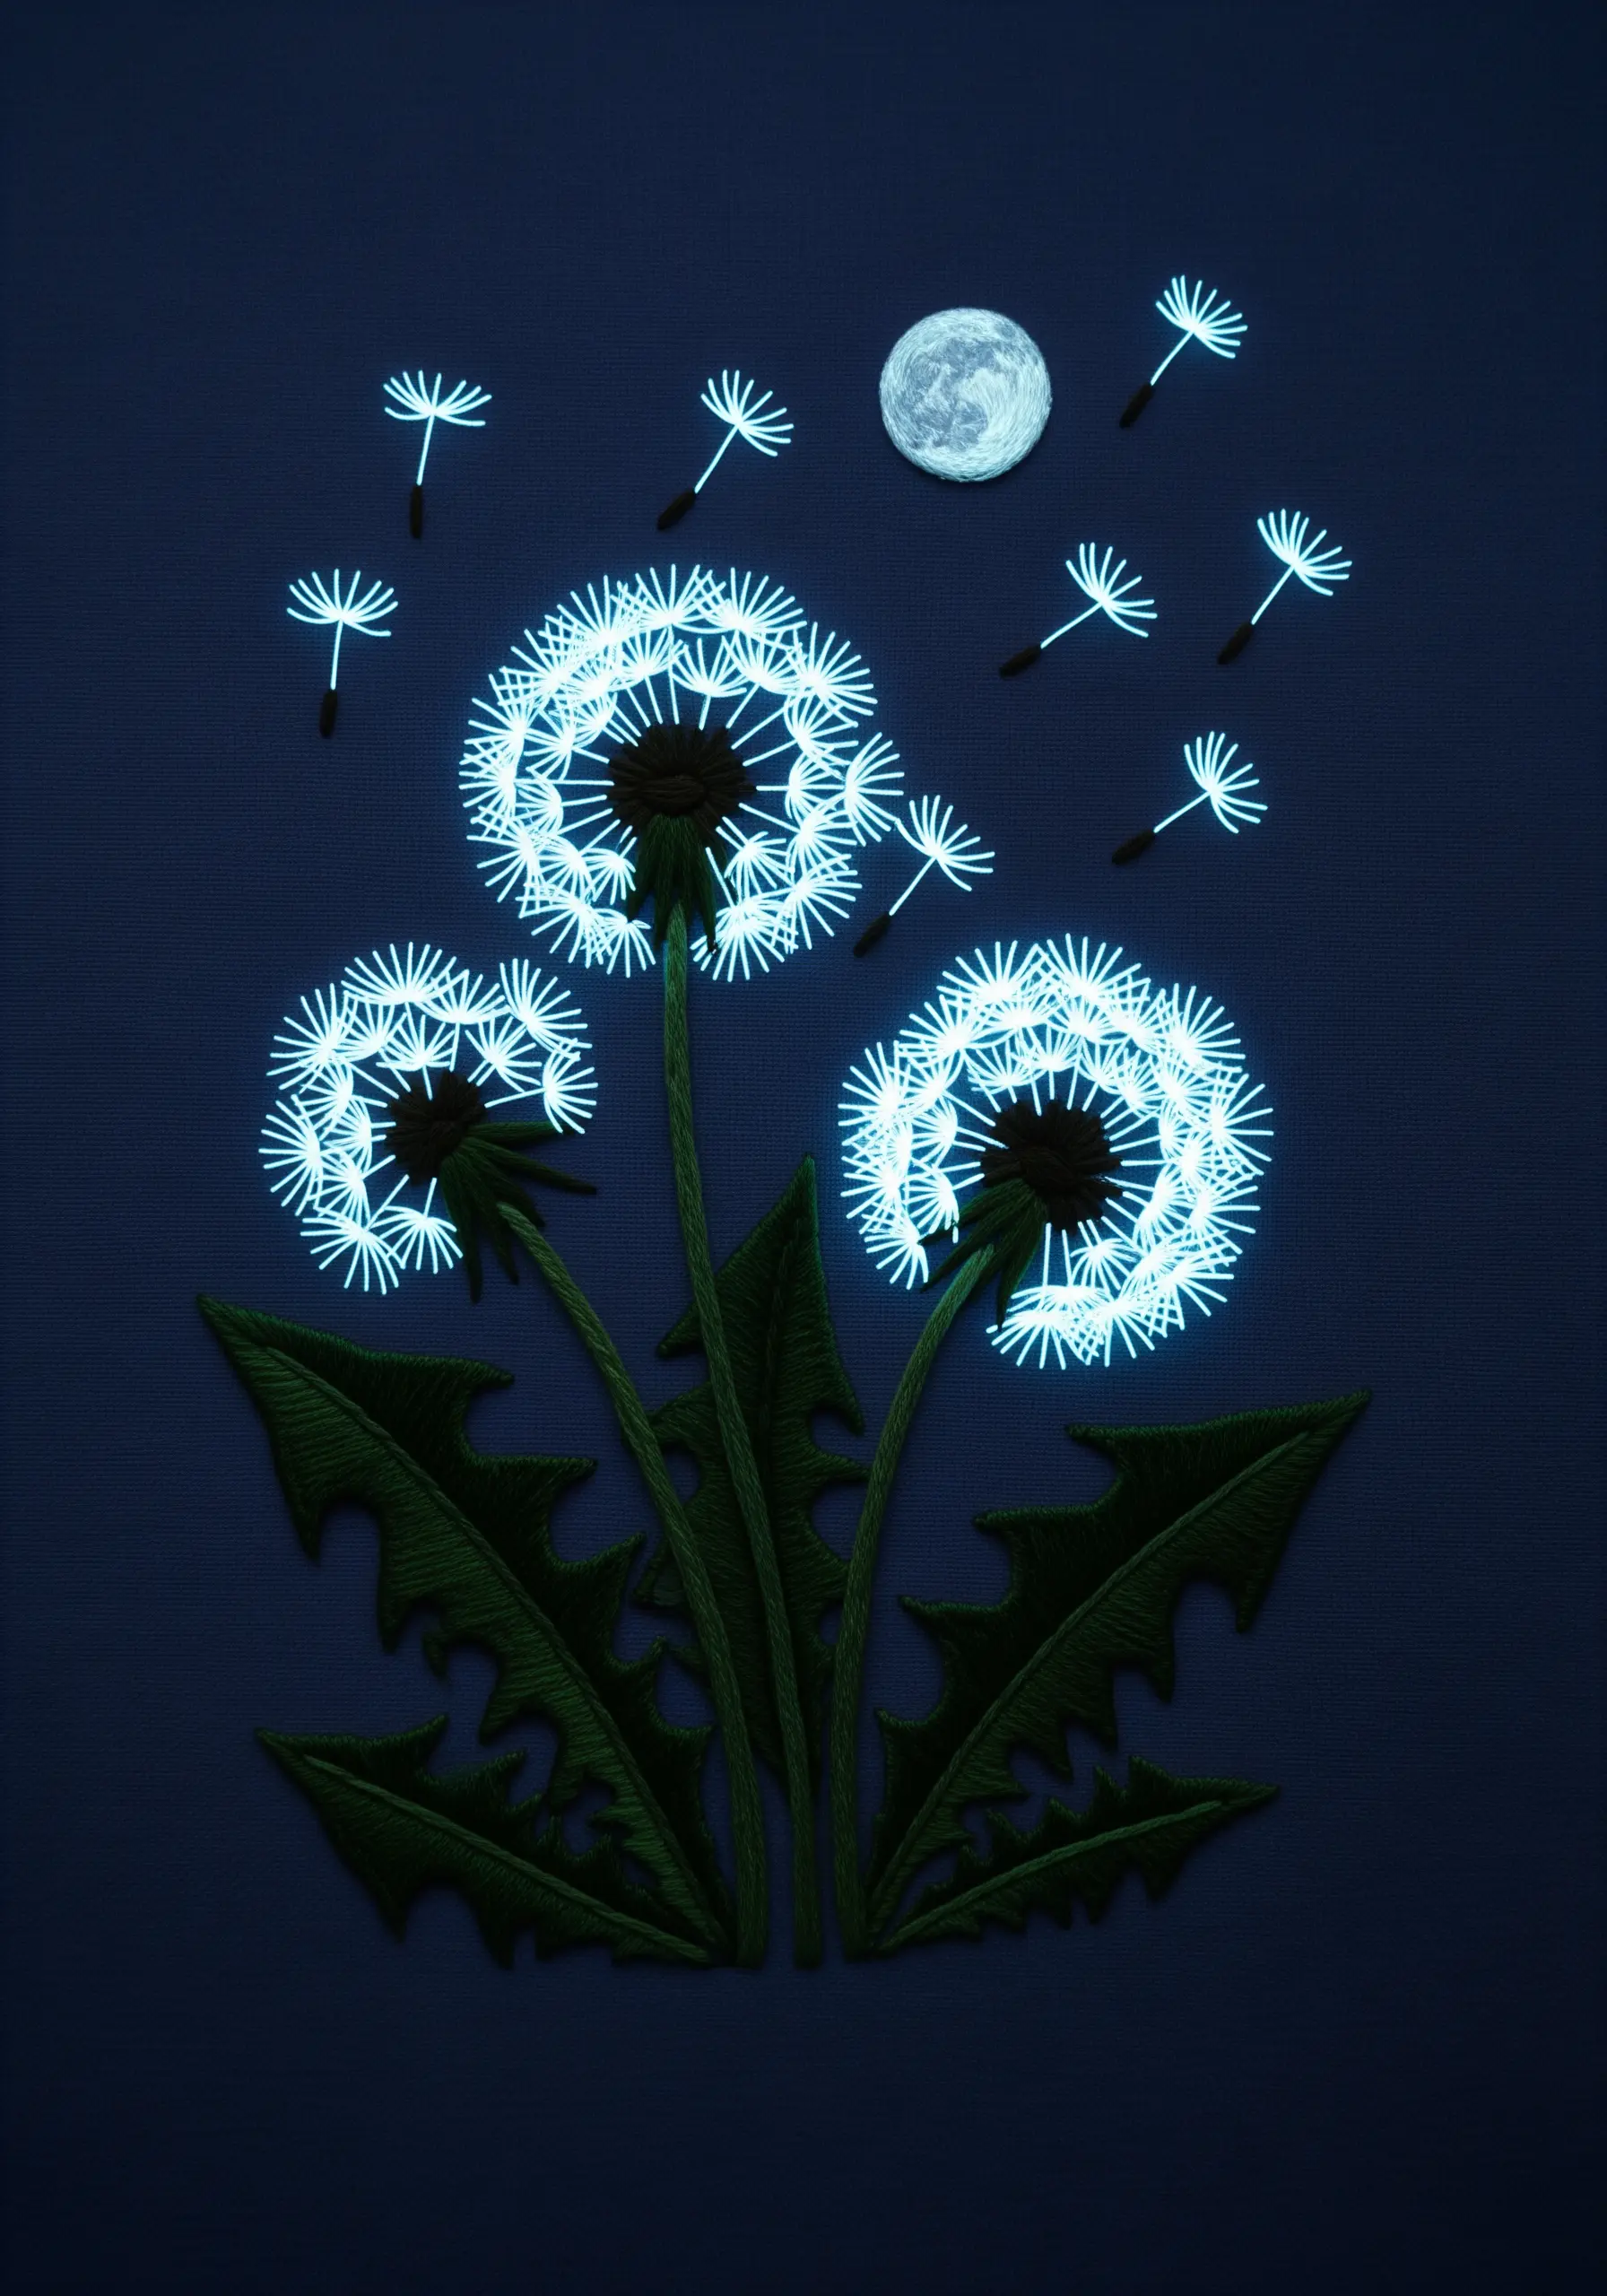
This magical effect is achieved by using a specialty glow-in-the-dark embroidery floss.
Stitch the entire dandelion seed head and the floating seeds with this thread, using simple straight stitches.
The stems and leaves can be stitched in regular green floss. In daylight, it appears as a delicate white-on-blue design.
In the dark, the piece transforms as the charged thread emits a soft, ethereal glow, revealing the magic within your stitches.
29. The Elegant Simplicity of Gladiolus
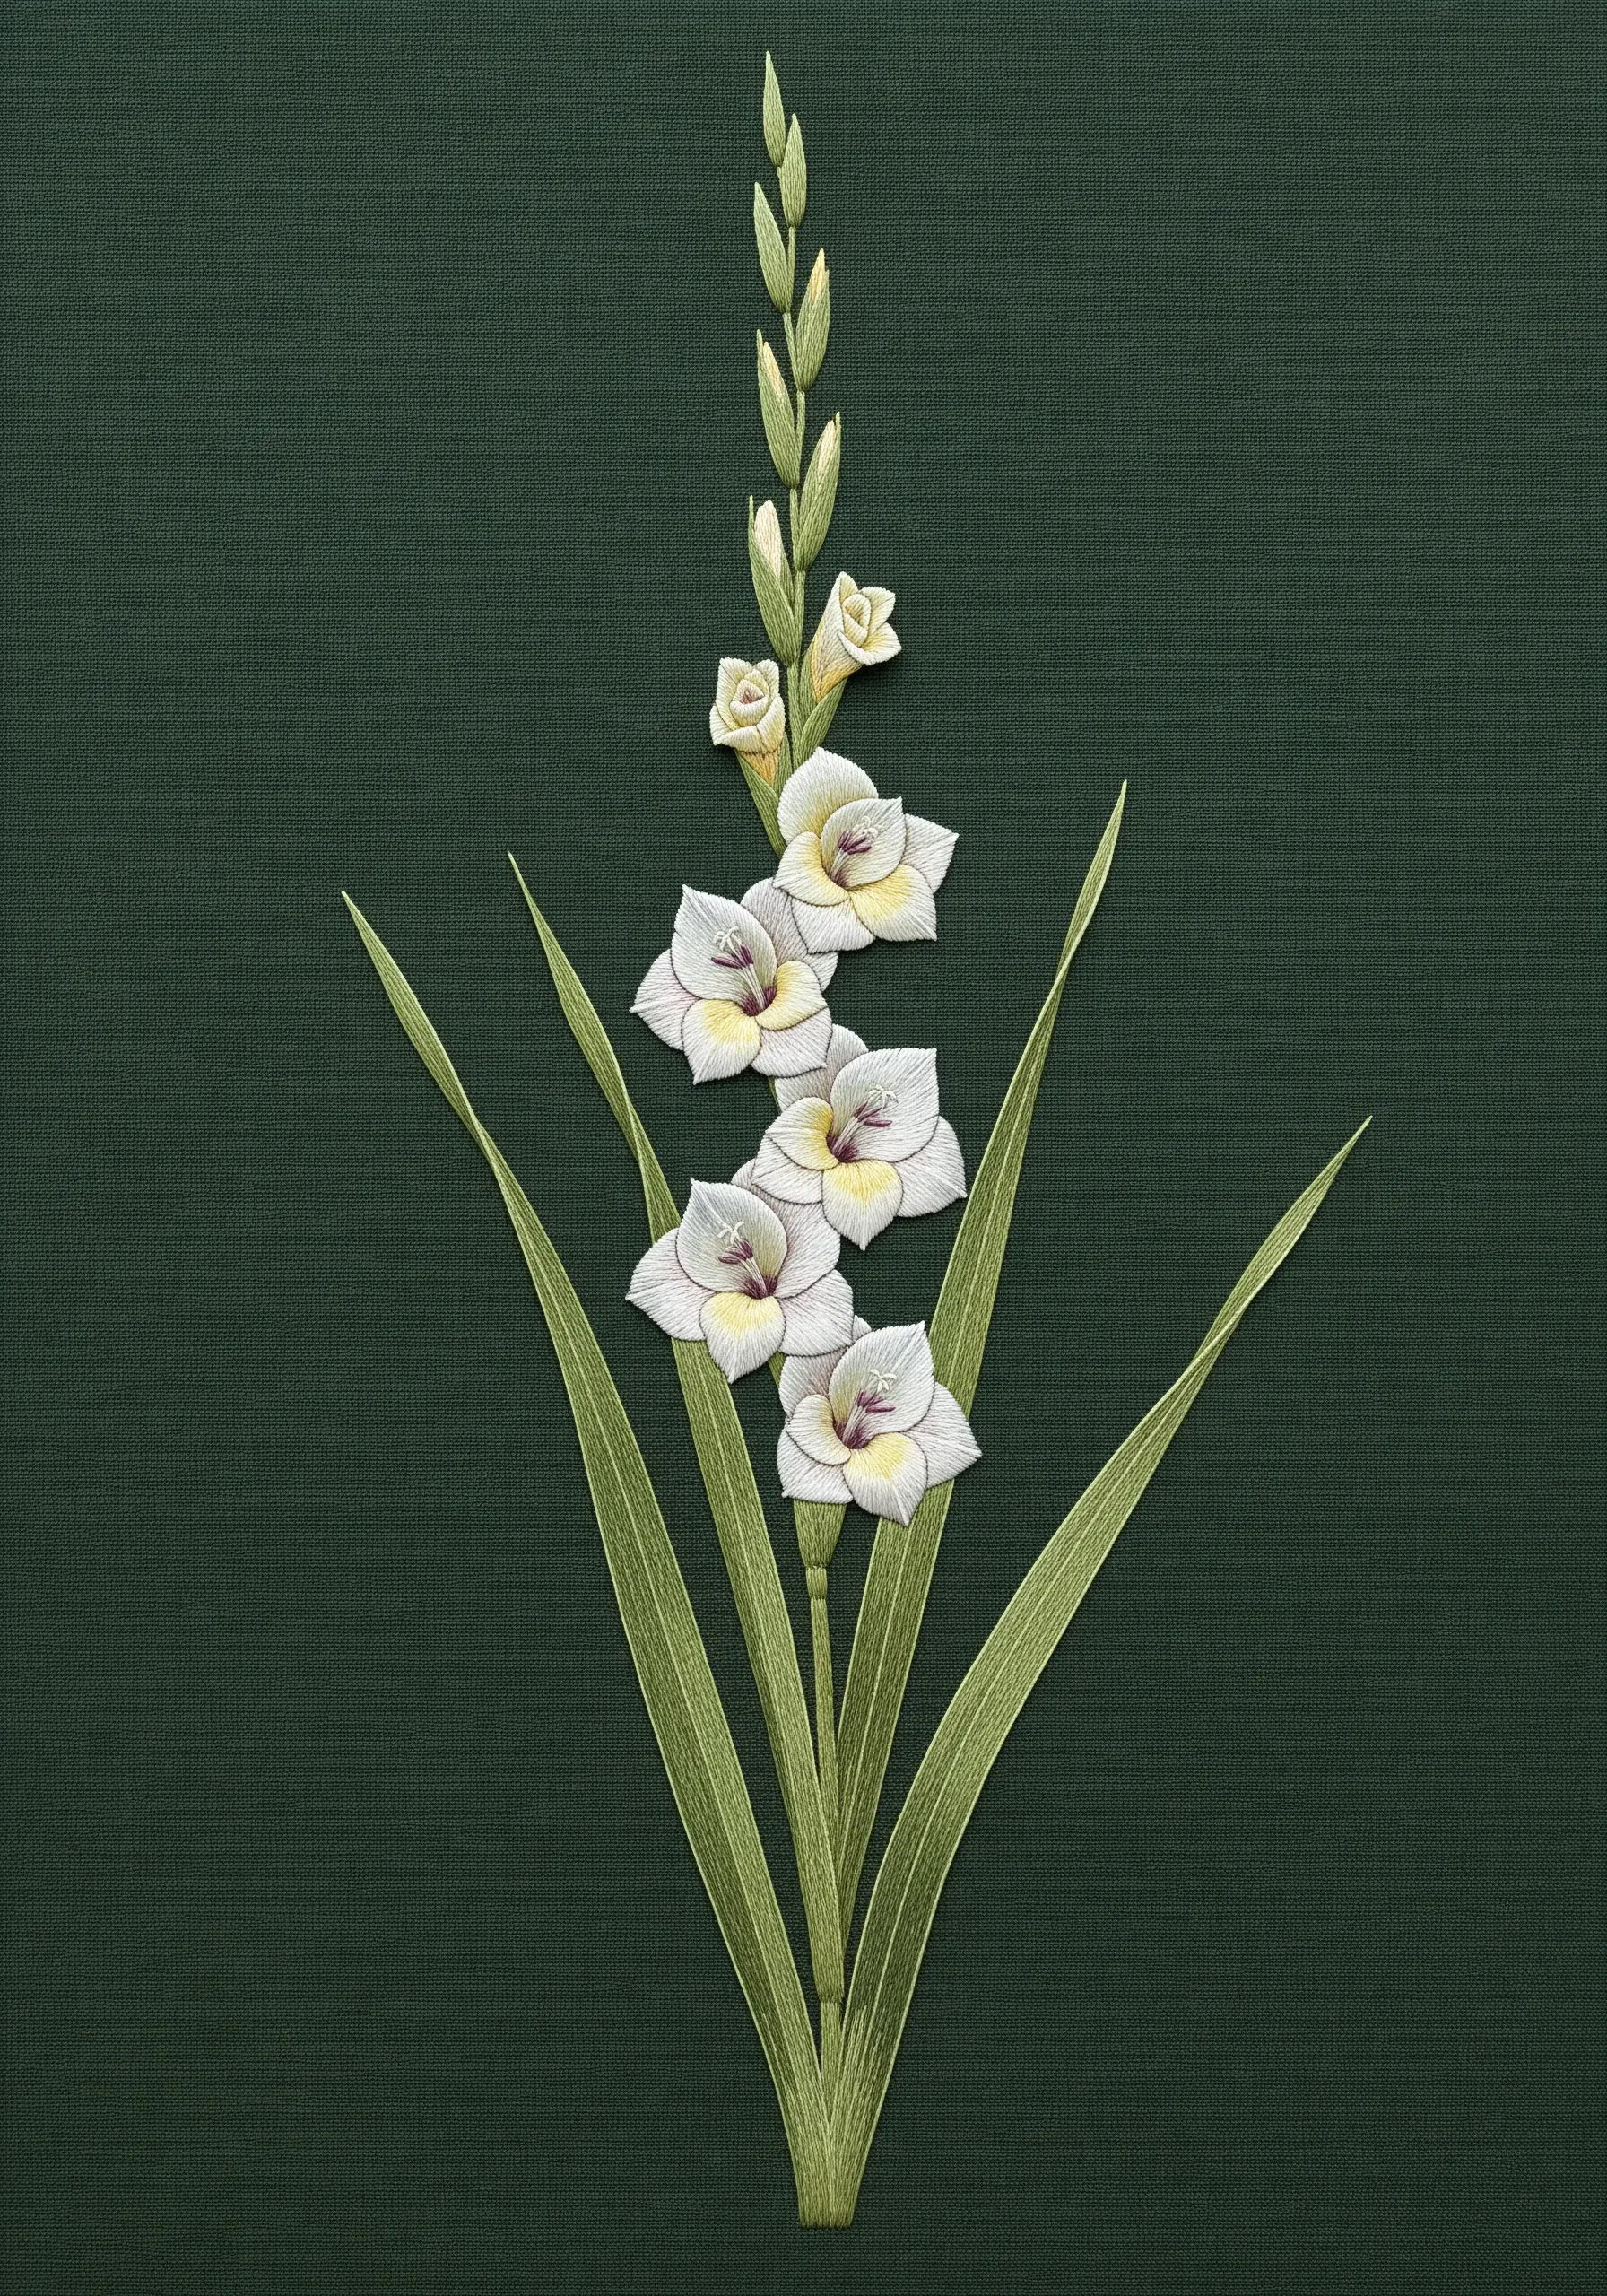
Sometimes, the most impactful designs are the most restrained. On a dark, muted fabric, let the form of the flower take center stage.
Use long, graceful satin stitches for the sword-like leaves, ensuring each stitch is smooth and lies flat.
For the delicate flowers, use just a few shades of cream, grey, and pale yellow to create soft dimension with long-and-short stitch.
The minimalist composition and precise stitching create a feeling of calm, modern elegance.
30. Night Flower Moon Phase Appliqué
Combine embroidery and appliqué for a sharp, graphic look. First, stitch your white-line floral designs onto small circles of black fabric.
Then, carefully cut out the circles, leaving a small margin if you want to turn the edge under.
Arrange the embroidered patches on your lighter background fabric and secure them with a tiny, neat whipstitch around the edge.
This technique creates incredibly clean, bold circular motifs that would be difficult to achieve with stitching alone.
31. Datura Flowers and Their Pollinators
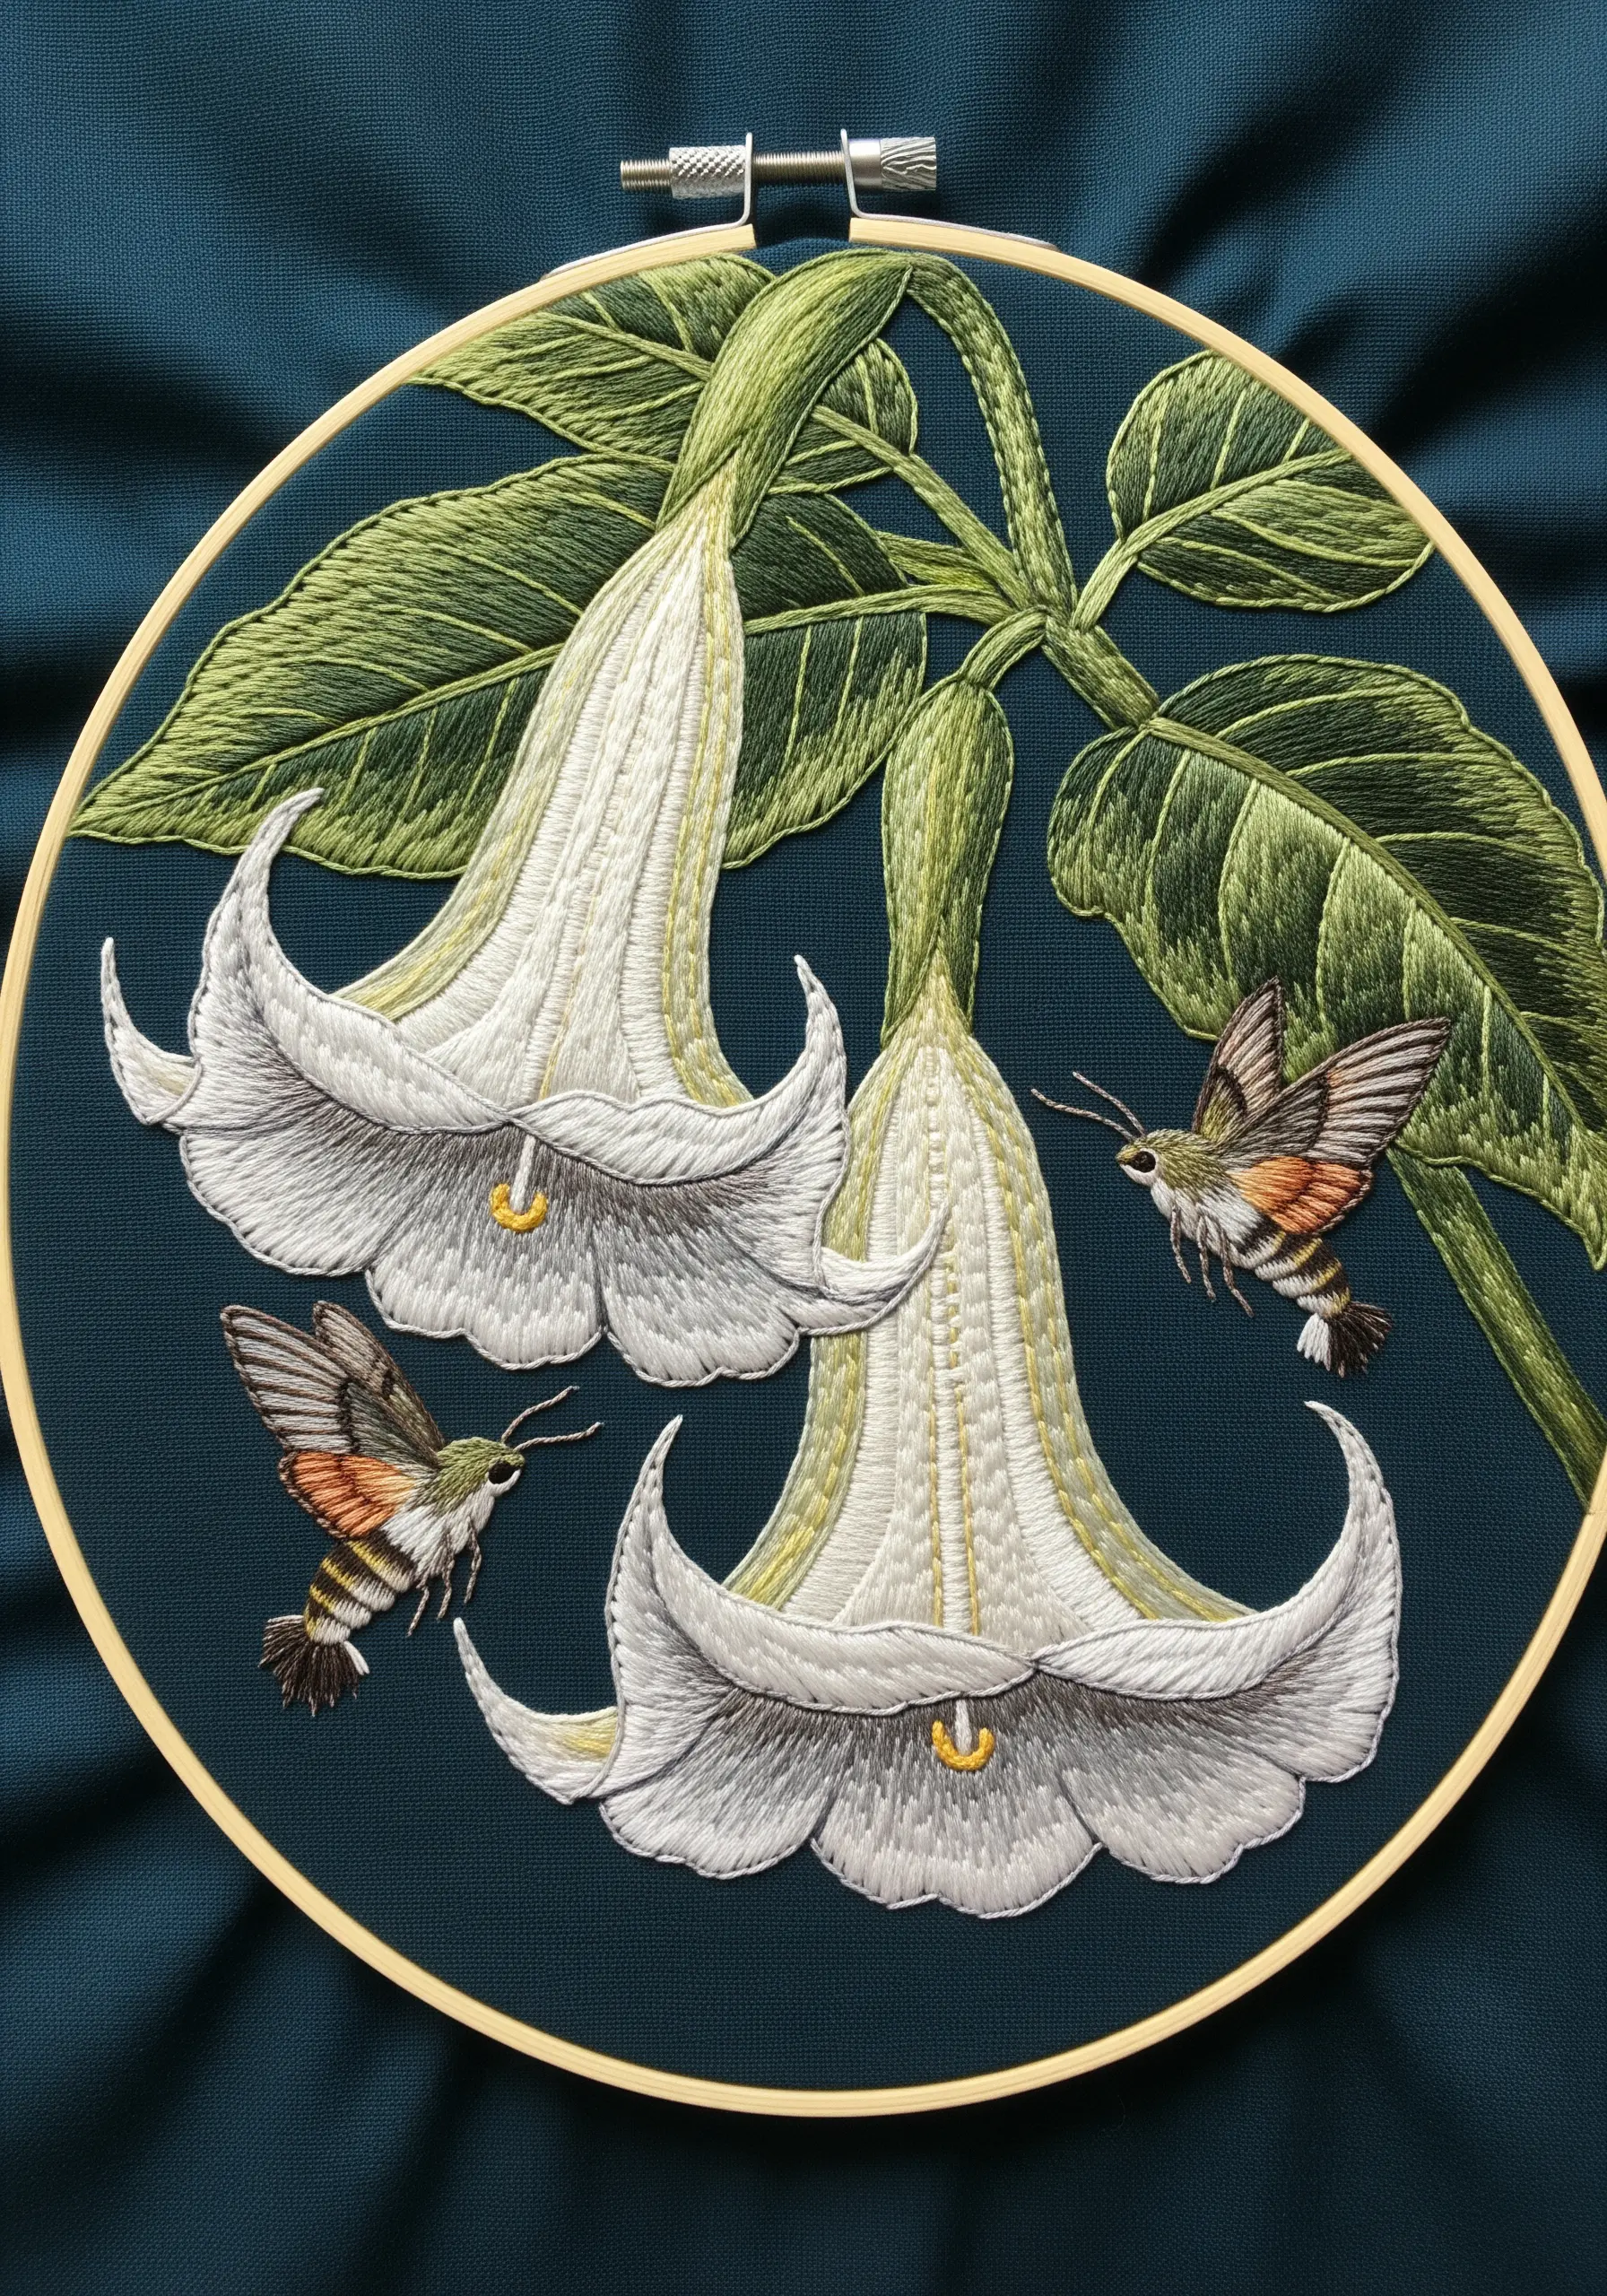
Bring your botanical embroidery to life by including the creatures that interact with it. Adding pollinators like these hawk moths creates a narrative and a sense of dynamic energy.
Use thread painting techniques for the moths, paying close attention to the patterns on their wings and bodies.
Position them so they appear to be approaching or hovering near the flowers. This simple addition transforms a static portrait of a plant into a snapshot of a living ecosystem.
32. A Magical Cluster of Glowing Mushrooms

Create a bioluminescent effect by combining different light-catching and light-emitting materials.
Use glow-in-the-dark thread for the mushroom stems and gills. Stitch the mossy log with variegated brown thread for realism.
Then, add tiny fluorescent seed beads or sequins to the moss and mushroom caps. These will catch any available light, while the special thread will glow on its own in the dark, creating a multi-layered magical effect.
33. The Delicate Structure of Queen Anne’s Lace

To capture the airy, delicate nature of a Queen Anne’s Lace flower head, rely on clusters of tiny French knots.
Use a single strand of white or off-white floss to keep the knots small and refined.
Vary the tightness and placement of the knots slightly to avoid a perfectly uniform look, which will make the flower feel more organic.
The long, thin radiating stems are created with a single, taut straight stitch, providing the underlying structure for the cloud of blossoms.
34. A Portrait with Wildflower Tresses
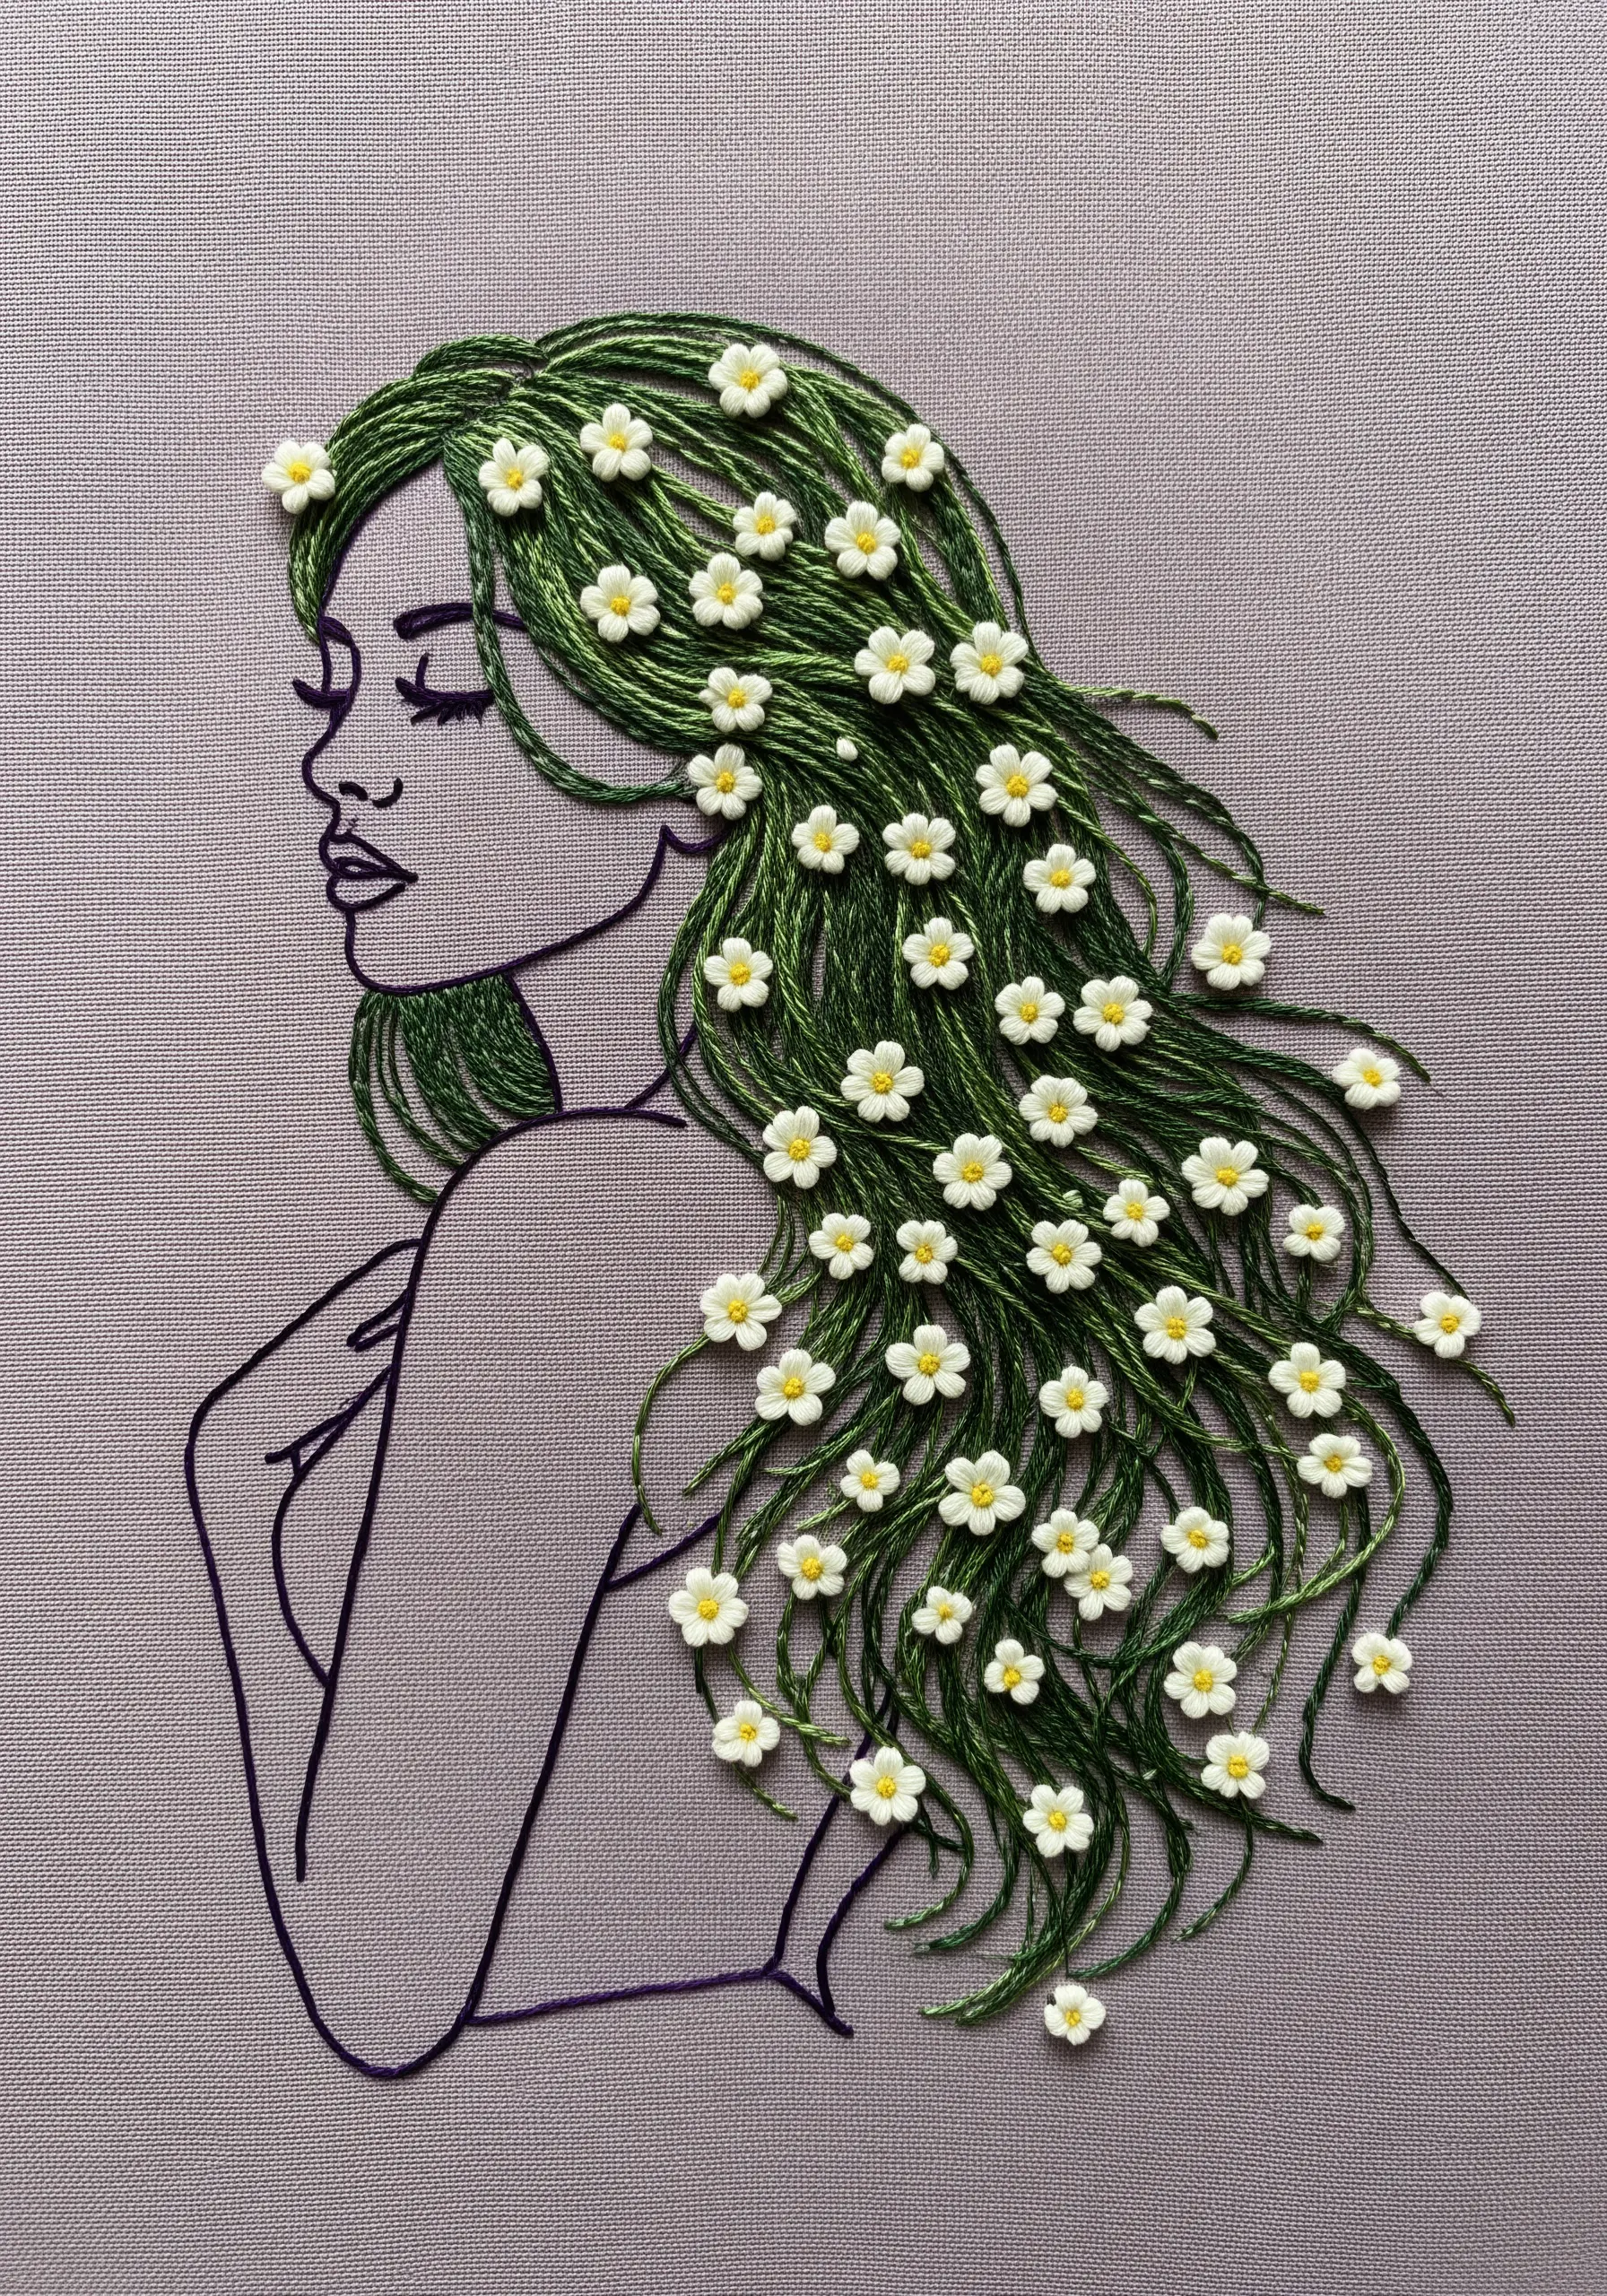
This design beautifully merges simple line art with rich, textural detail. First, create the outline of the portrait using a clean, two-strand backstitch.
Next, fill in the hair with long, flowing straight stitches in variegated green thread to create a base layer of color and movement.
Finally, scatter dozens of tiny lazy daisy flowers throughout the hair. This layering of techniques creates a stunning contrast between the simple lines and the three-dimensional, embellished texture.


