

Have you ever finished an embroidery project and felt it was missing a certain spark? You followed the pattern, used the right colors, but the final piece feels a little flat, a little less alive than you had imagined.
The secret to elevating your work often isn’t about learning dozens of complex new stitches. Instead, it’s found in small, intentional adjustments: changing the direction of a stitch to suggest a curve, using one less strand of thread to create a delicate detail, or combining two simple textures for a surprisingly rich effect.
Think of these ideas not as strict rules, but as gentle invitations to experiment. Each one is a quick study in how a simple shift in technique can transform your nature-inspired motifs from simple representations into expressive, tactile art. It’s time to pick up your needle and stitch with new confidence.
1. Add Dimension with Layered Knots
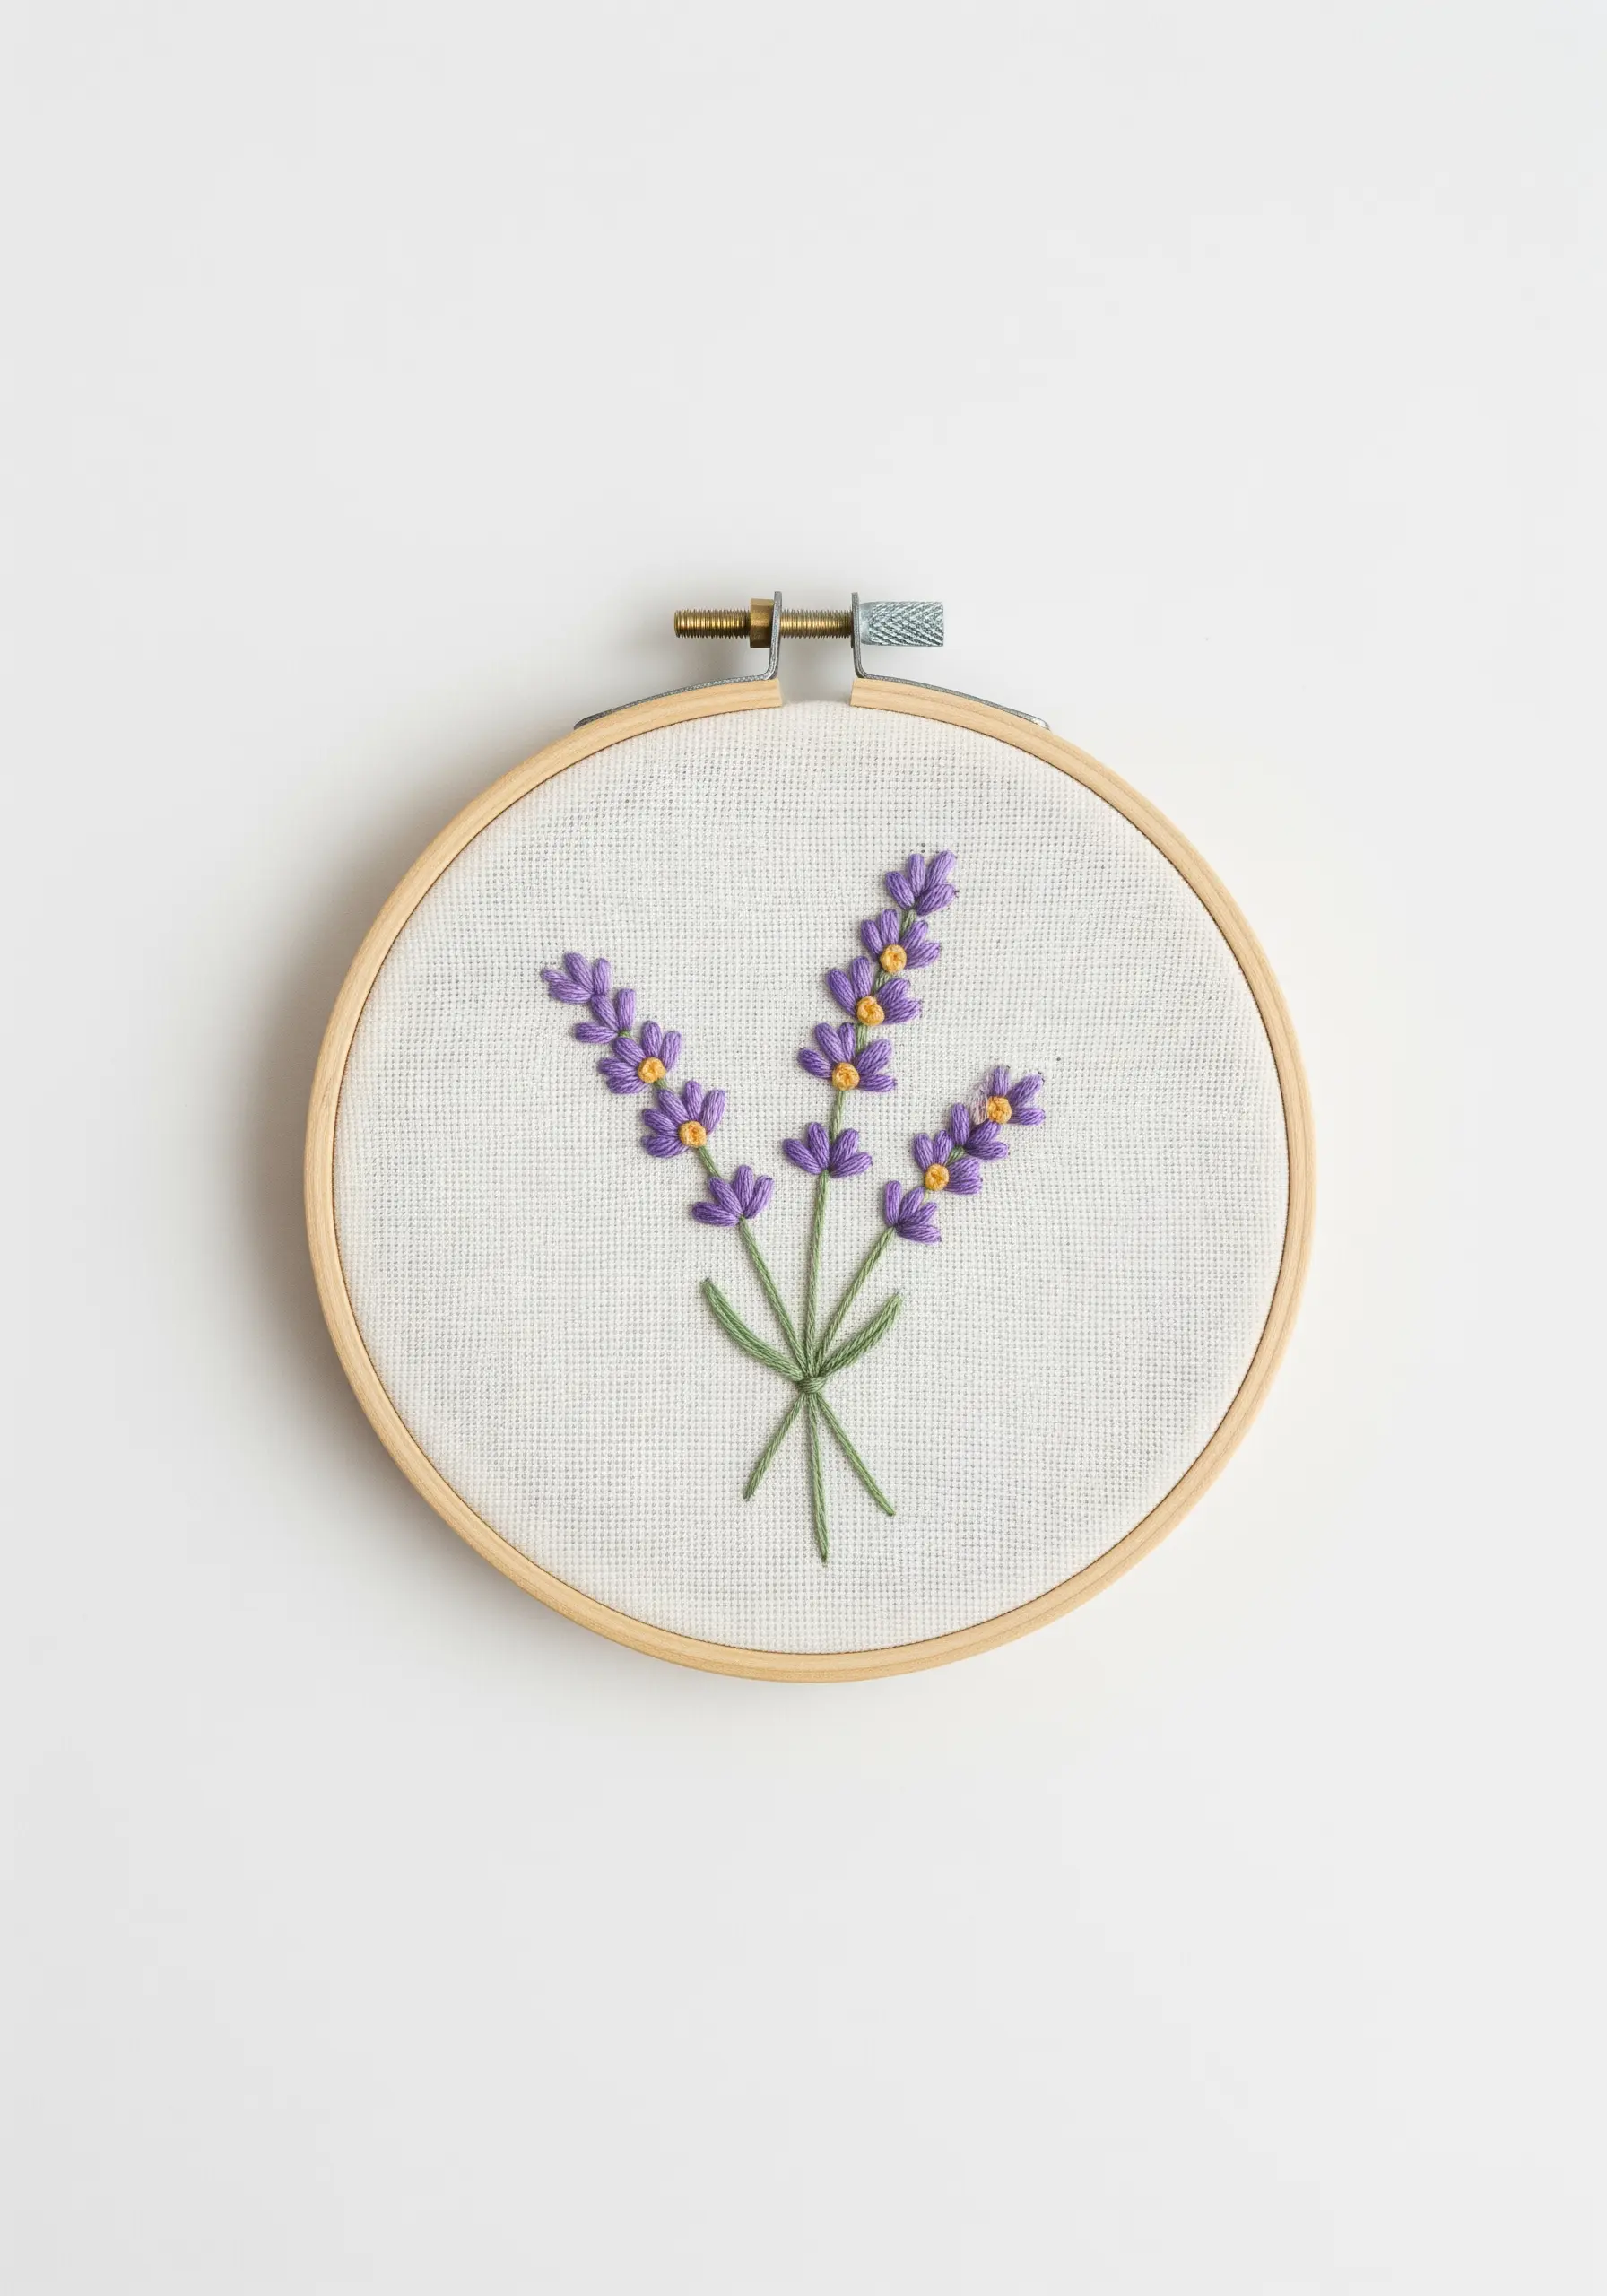
To give your lavender realistic texture, use French knots for the buds instead of simple straight stitches.
Vary the number of thread wraps around your needle (once for small buds, twice for larger ones) to create depth and a more organic cluster.
Use two slightly different shades of purple, stitching them randomly to mimic the natural color variations found in a real lavender sprig.
For the stems, a simple stem stitch provides a smooth, rope-like contrast to the textured buds.
2. Vary Your Line Weight for Dramatic Landscapes
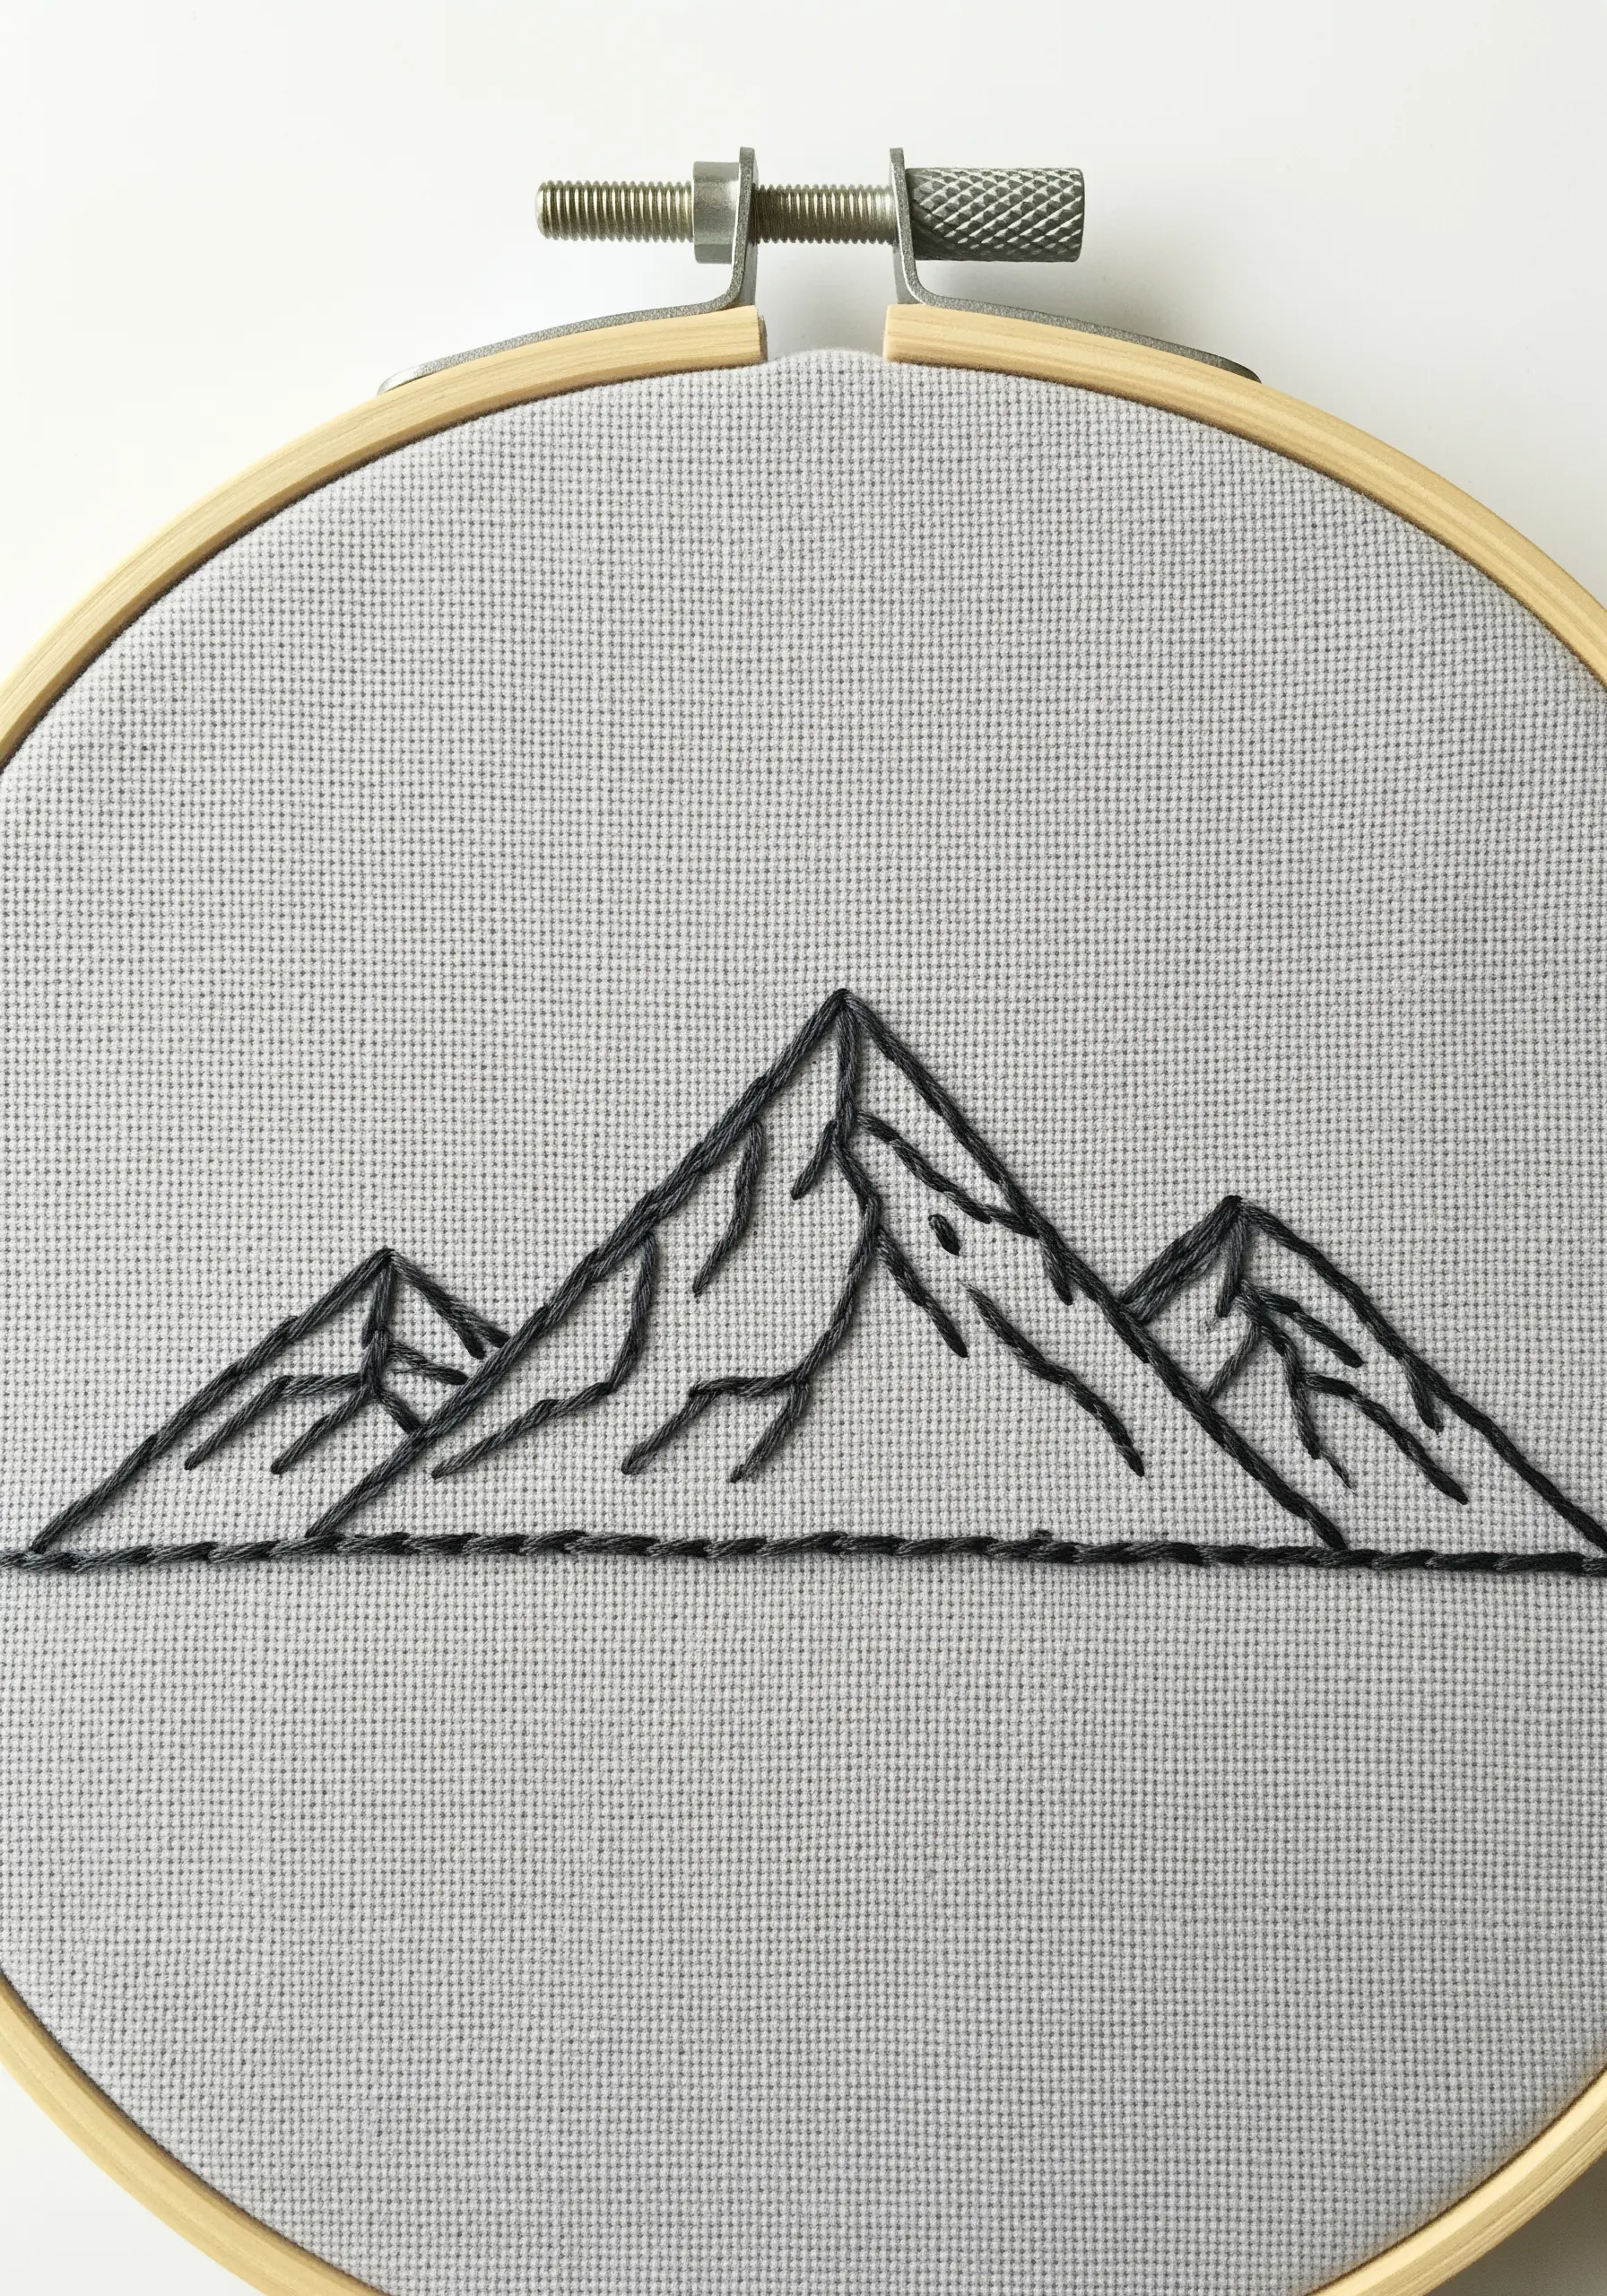
Create a sense of foreground and background in mountain scenes by adjusting your thread thickness.
Use a whipped backstitch with three or four strands for the main outlines, which creates a bold, solid line that commands attention.
For the finer interior details and shadows, switch to a single strand of the same color. This subtle shift in weight adds definition and realism without complicating the design.
This technique turns a simple line drawing into a more dynamic and minimalist landscape.
3. Master Directional Satin Stitch
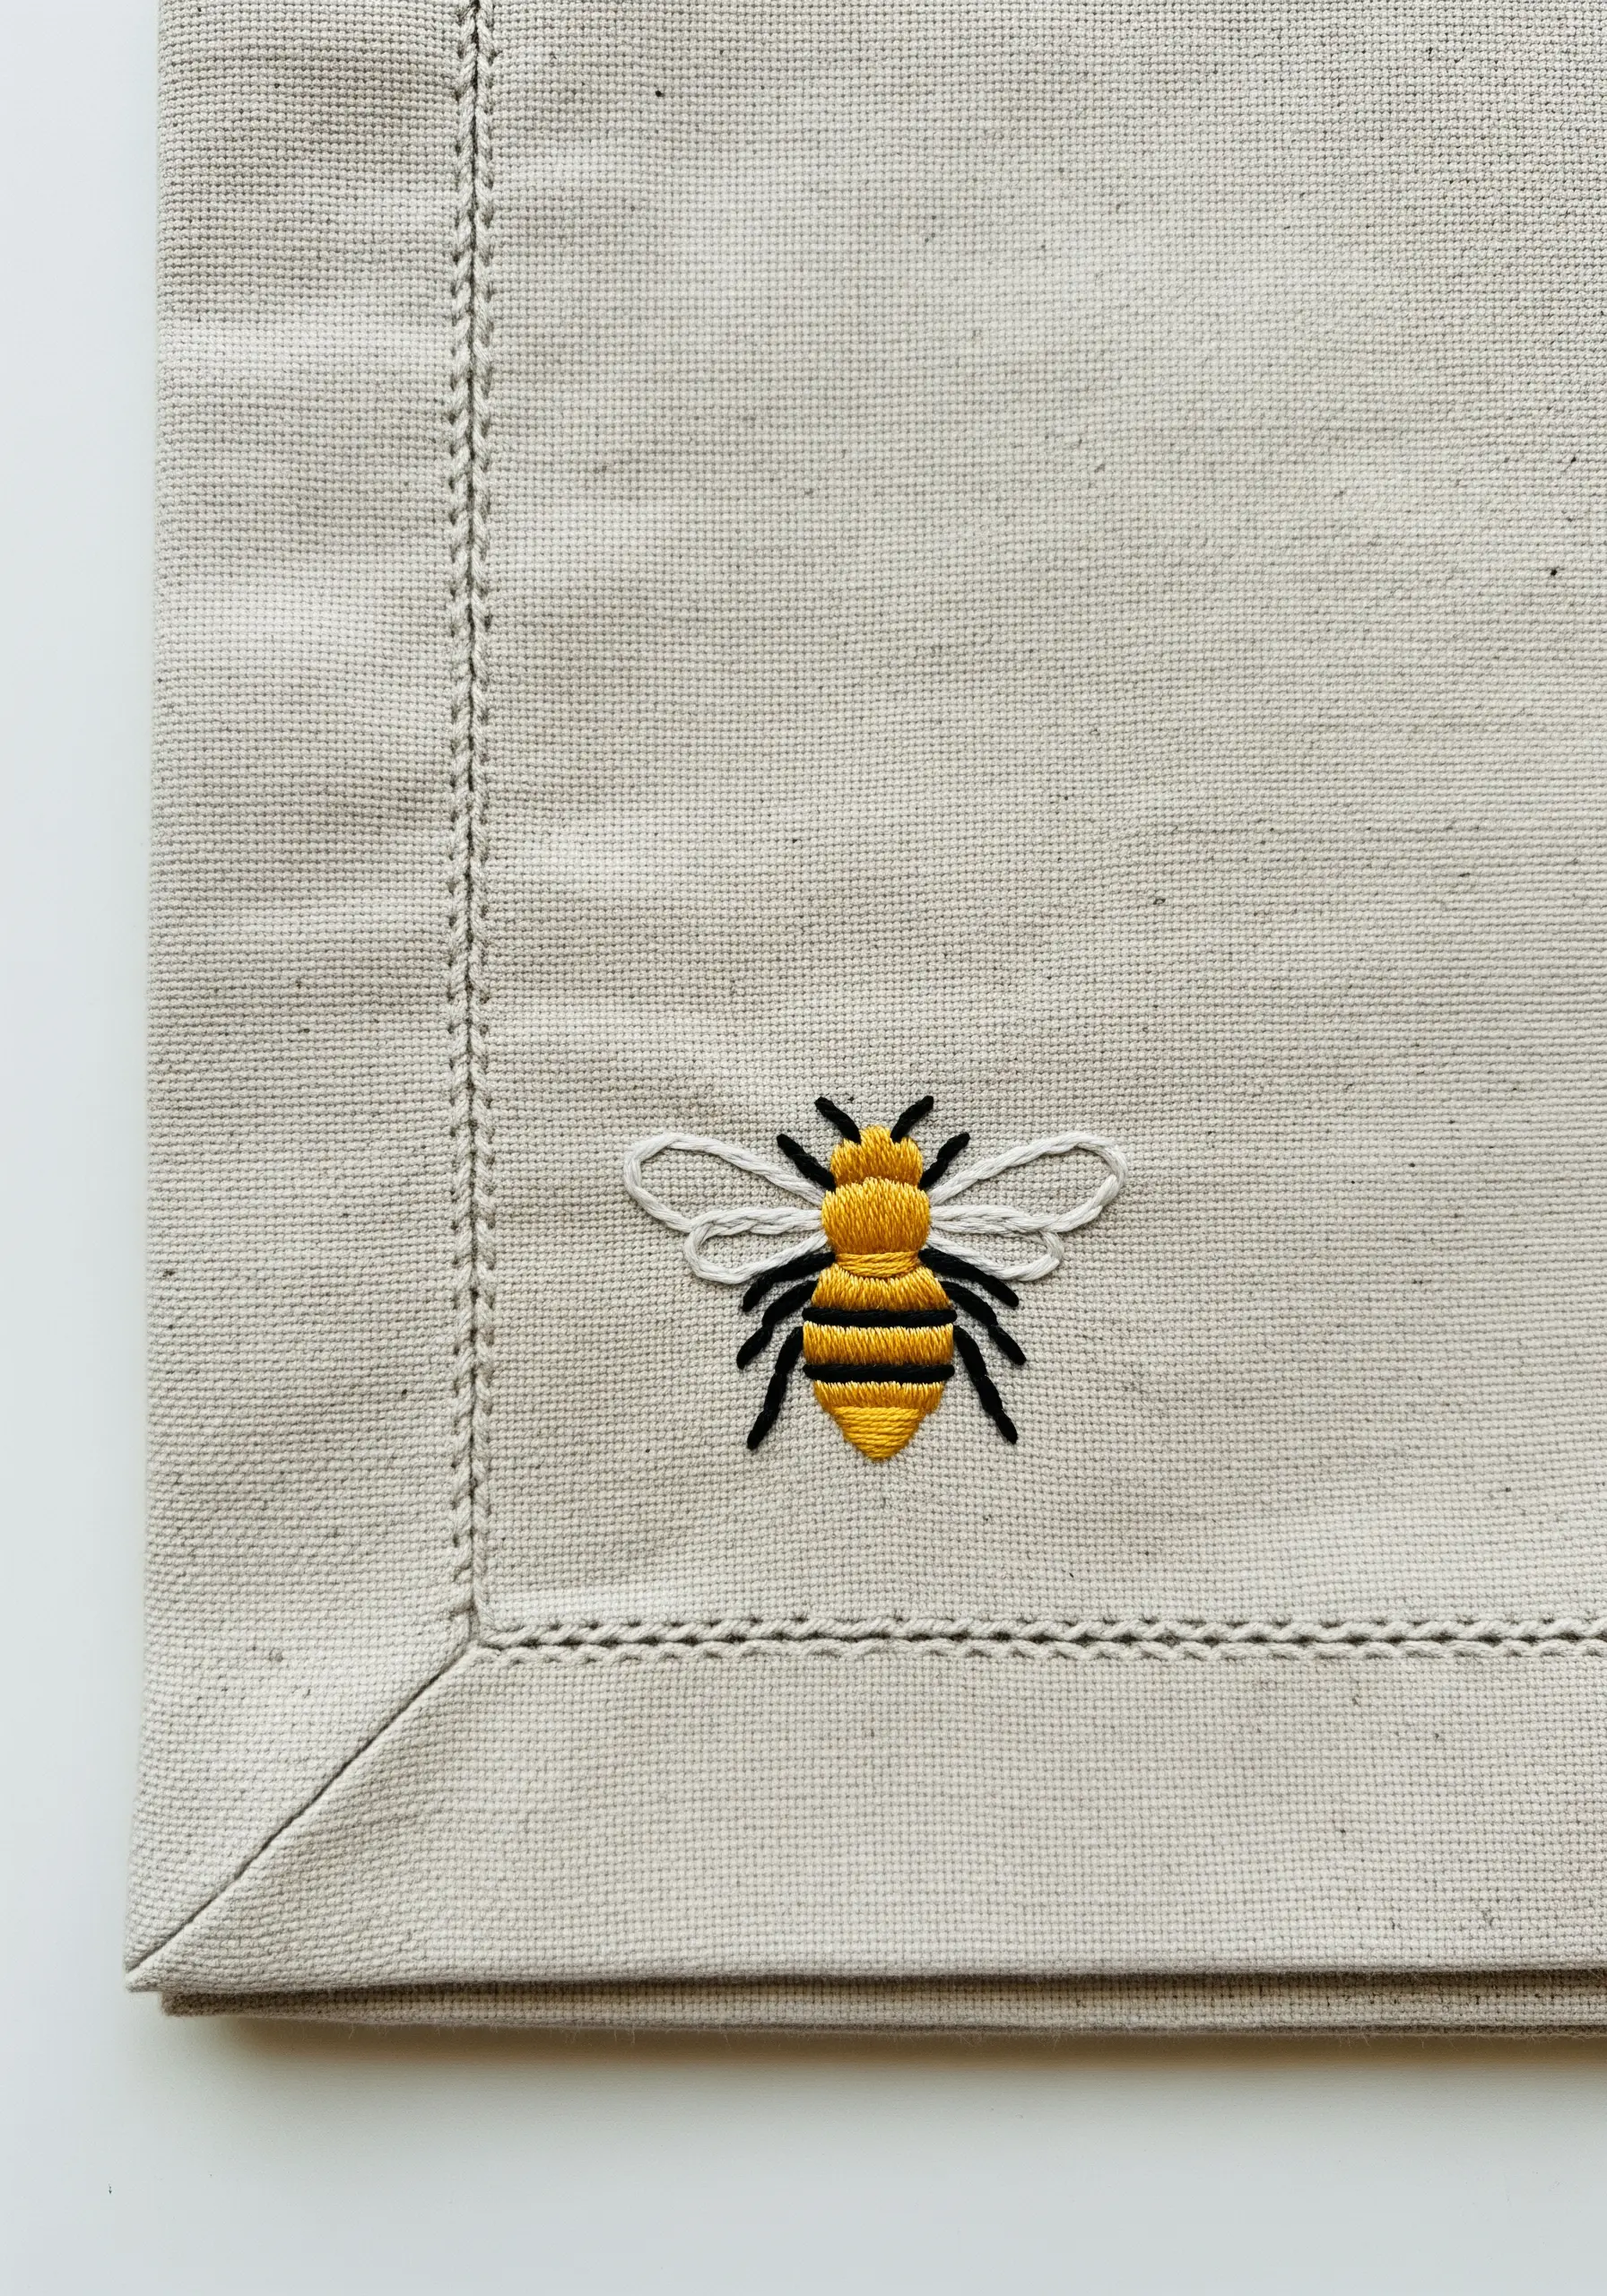
Bring a simple bee motif to life by paying close attention to the direction of your satin stitches.
Instead of stitching straight across, angle your stitches on the body segments to follow the natural curve of the insect. This simple adjustment creates the illusion of a rounded, three-dimensional form.
For the wings, use a delicate outline stitch with a single strand of white or pale grey thread to suggest transparency and lightness.
4. Achieve Delicate Realism with Fishbone Stitch
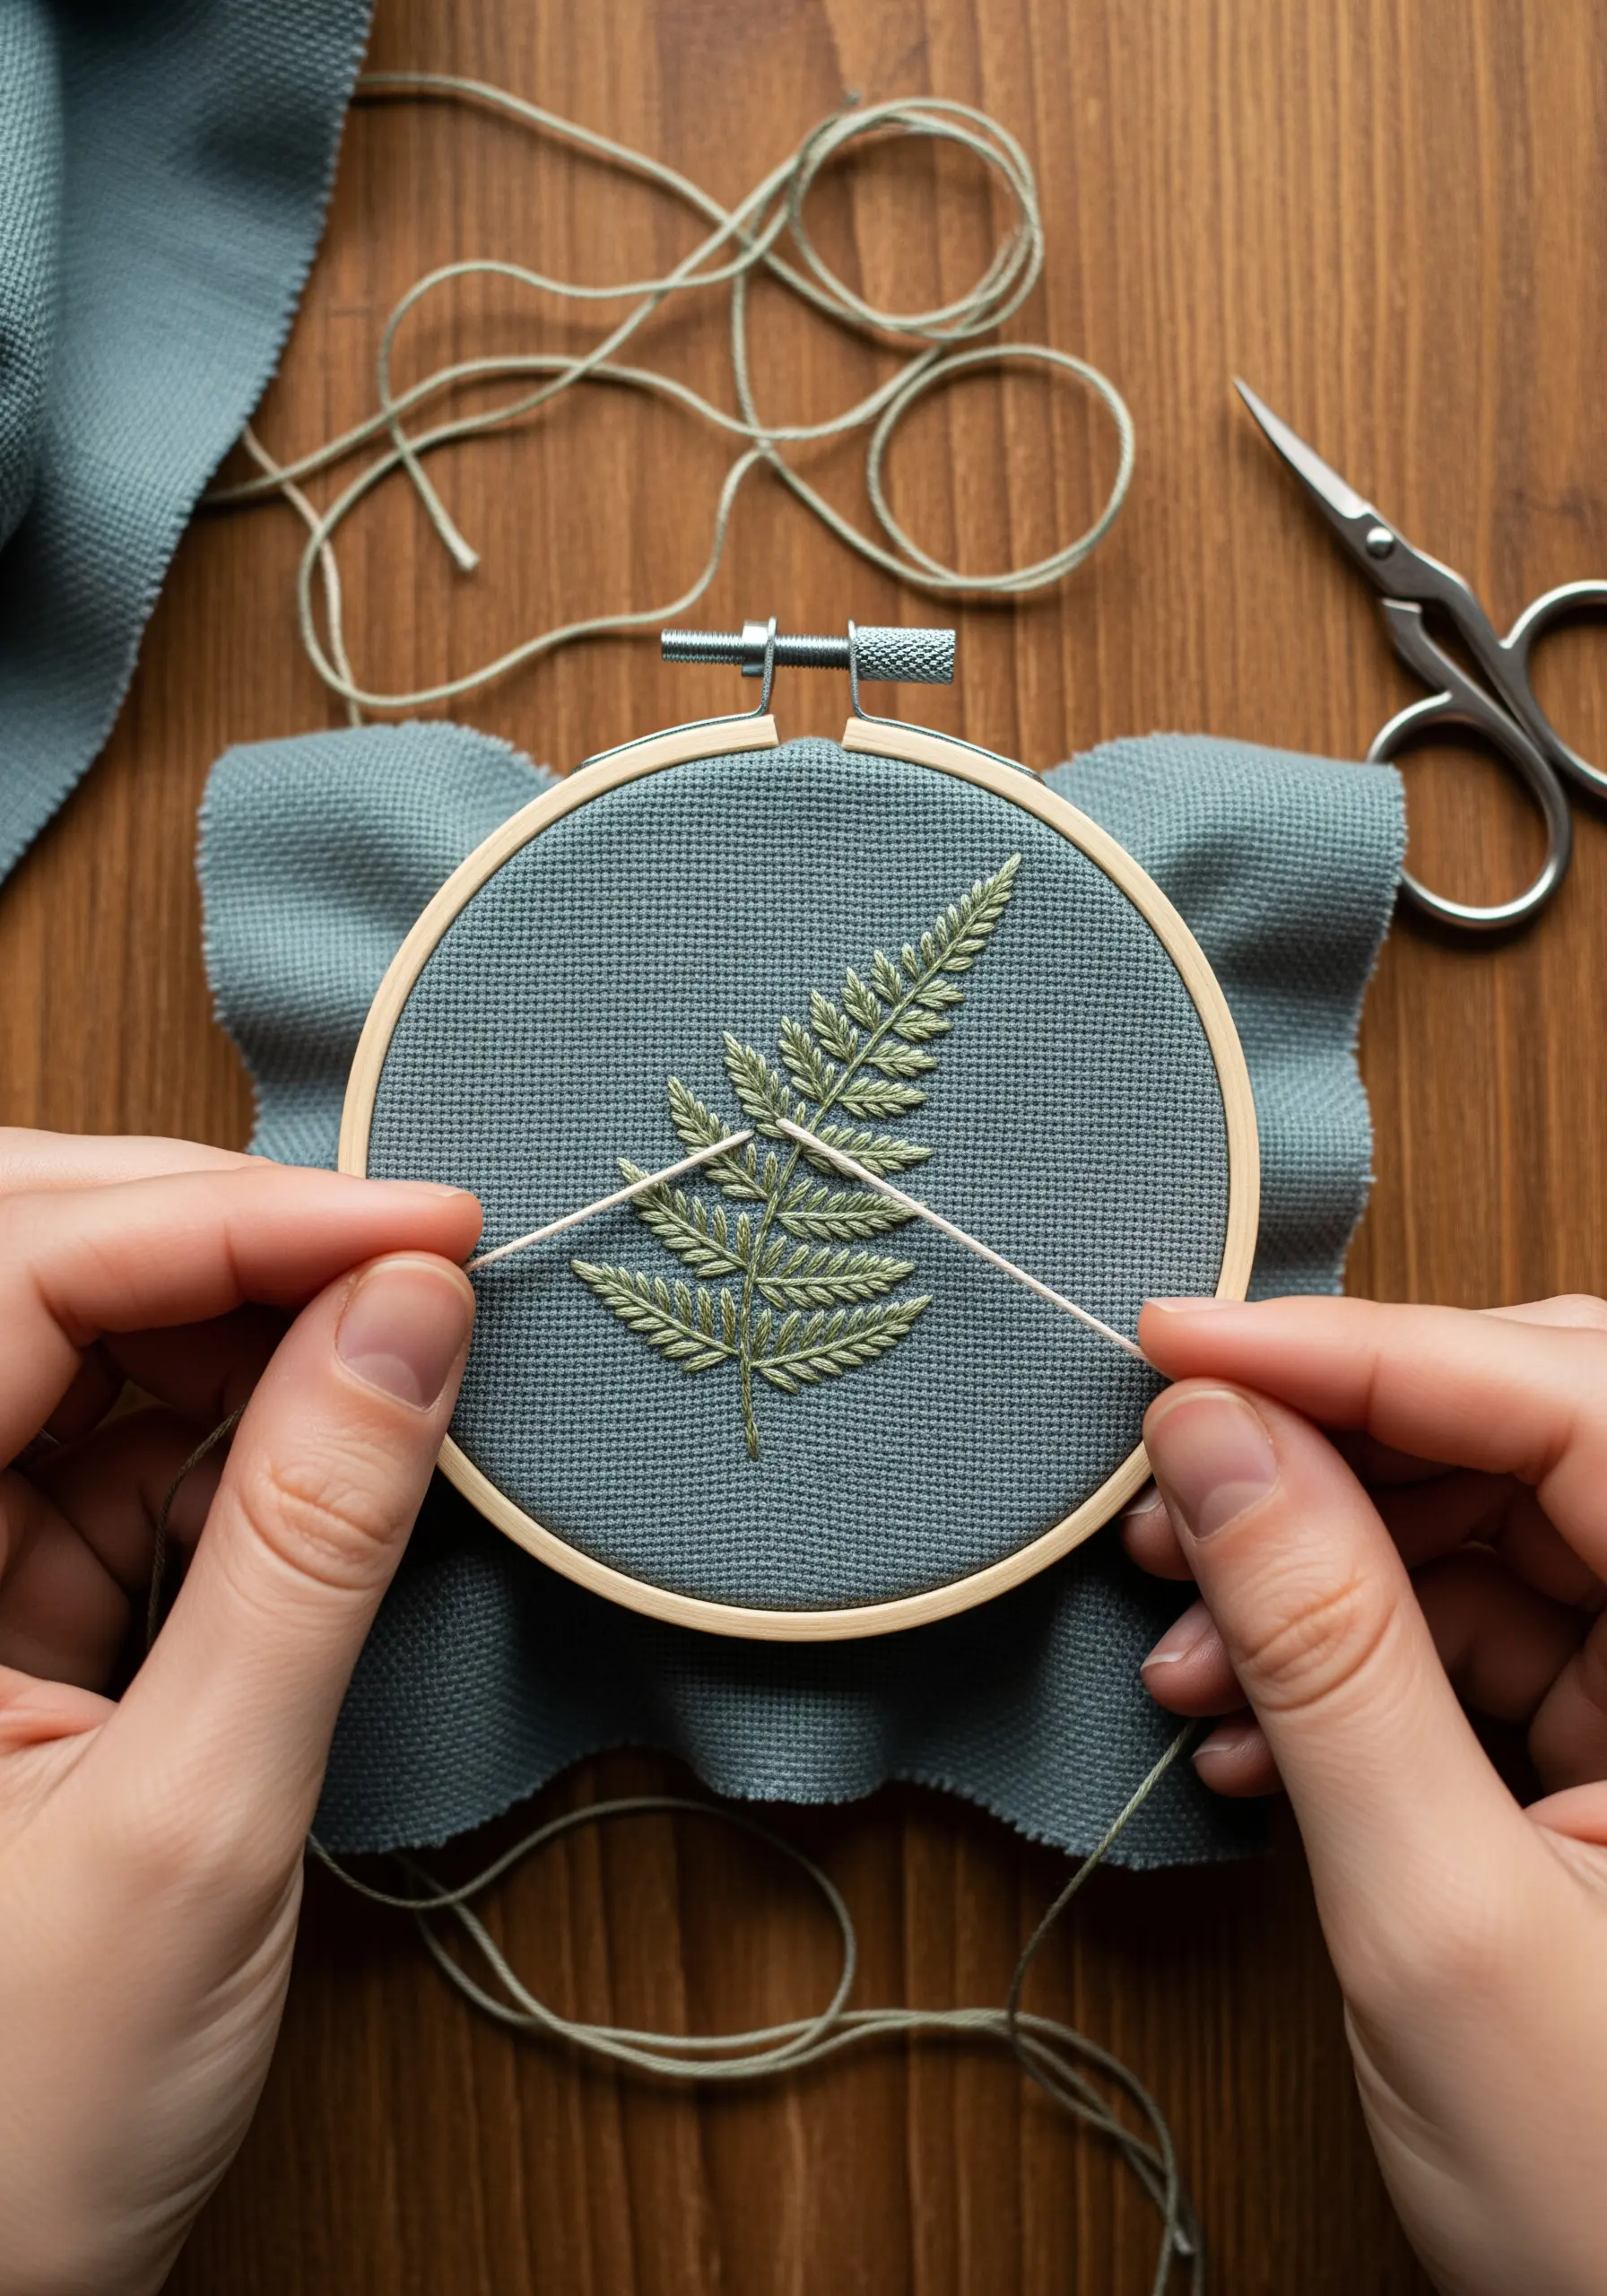
The fishbone stitch is your key to creating beautifully realistic leaves like this fern.
It works by creating a central spine and angled side stitches simultaneously, perfectly mimicking the structure of a leaf and its veins.
To create a sense of depth, use a slightly darker green for the leaves in the ‘back’ and a lighter, brighter green for those in the ‘front’.
Keep your stitches close together for a full, lush look, one of the best delicate leaf embroidery stitches to master.
5. Fill Shapes with Textural Chain Stitch

Instead of a flat satin stitch, fill your crescent moon with rows of chain stitch for a woven, rope-like texture.
Work in curved rows that follow the shape of the crescent. This technique not only adds dimension but also catches the light in a more interesting way than flat stitches.
For the stars, use a simple star stitch or even single detached chain stitches to keep the focus on the moon’s rich texture.
This method works beautifully on dark fabric, making the thread appear to glow.
6. Combine Knots and Straight Stitches for Contrast
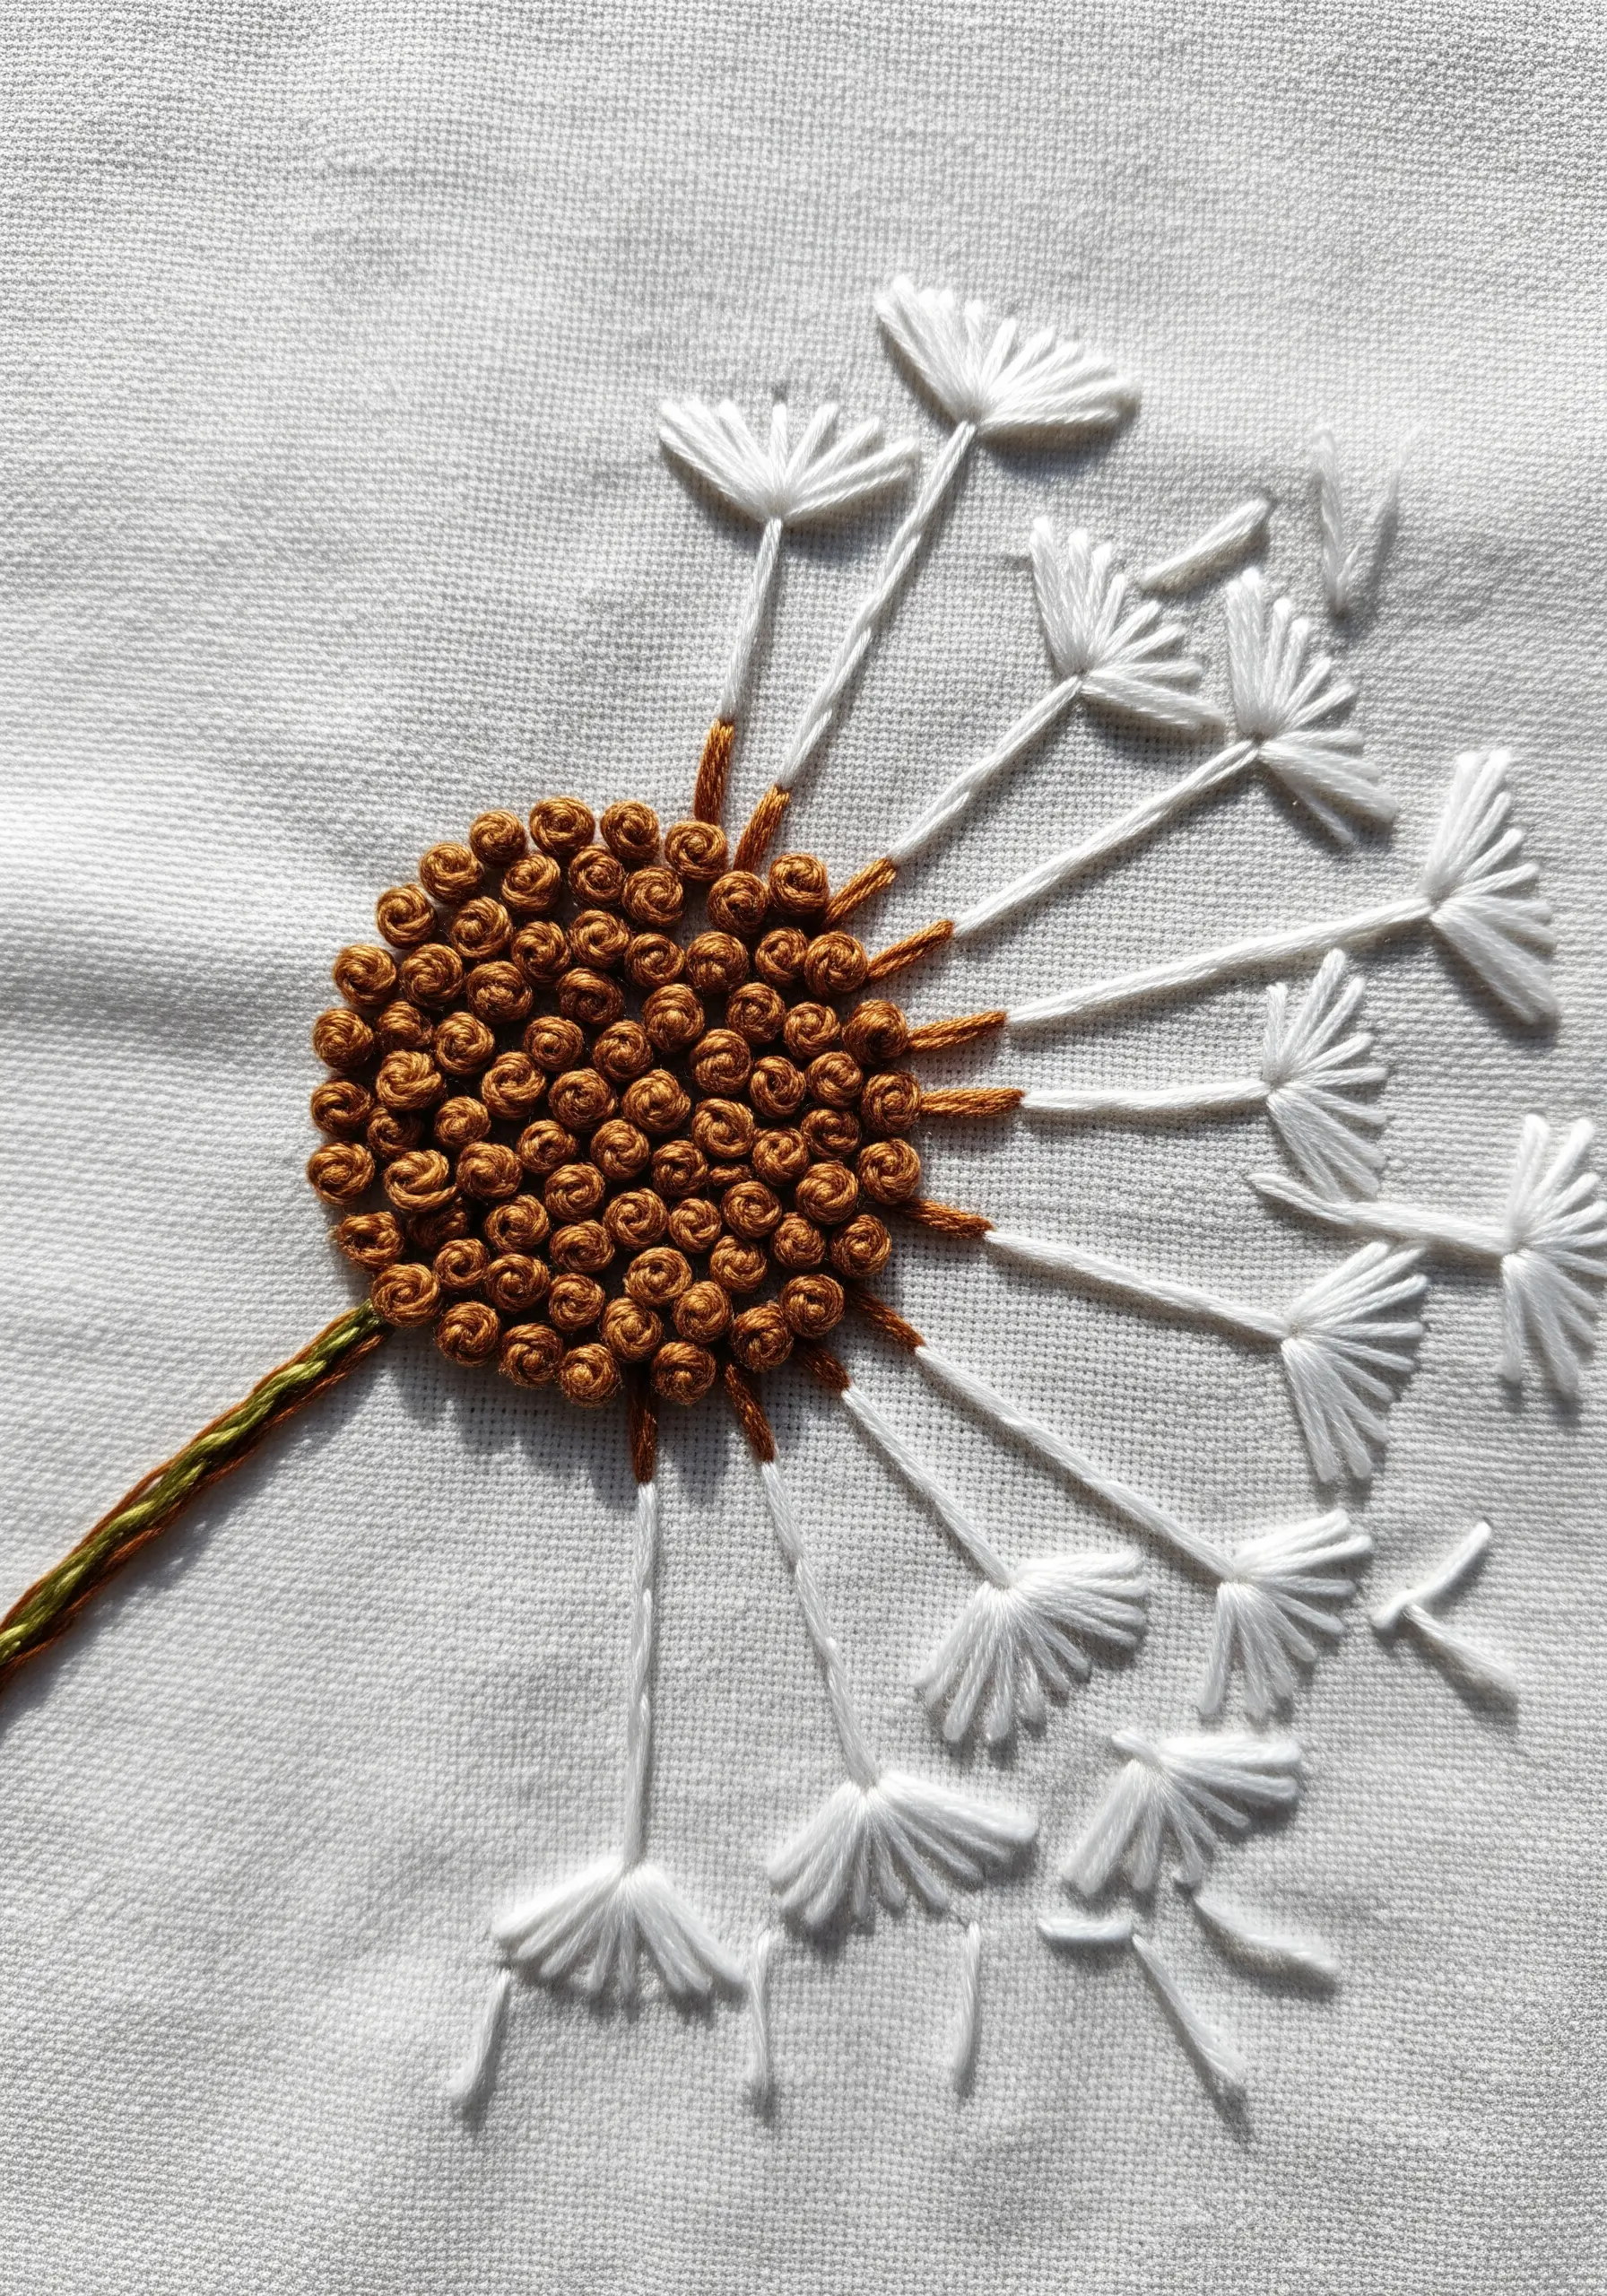
Create a visually compelling dandelion by contrasting two distinct textures.
Use a dense cluster of French or colonial knots for the seed head, which gives it a bumpy, three-dimensional feel.
For the delicate flying seeds, use a combination of a single long straight stitch for the stem and a fan of smaller straight stitches (or a detached chain stitch) for the pappus.
This juxtaposition of a heavy, clustered center and light, airy extensions makes the design dynamic and engaging.
7. Elevate Denim with a Bold Satin Stitch Motif
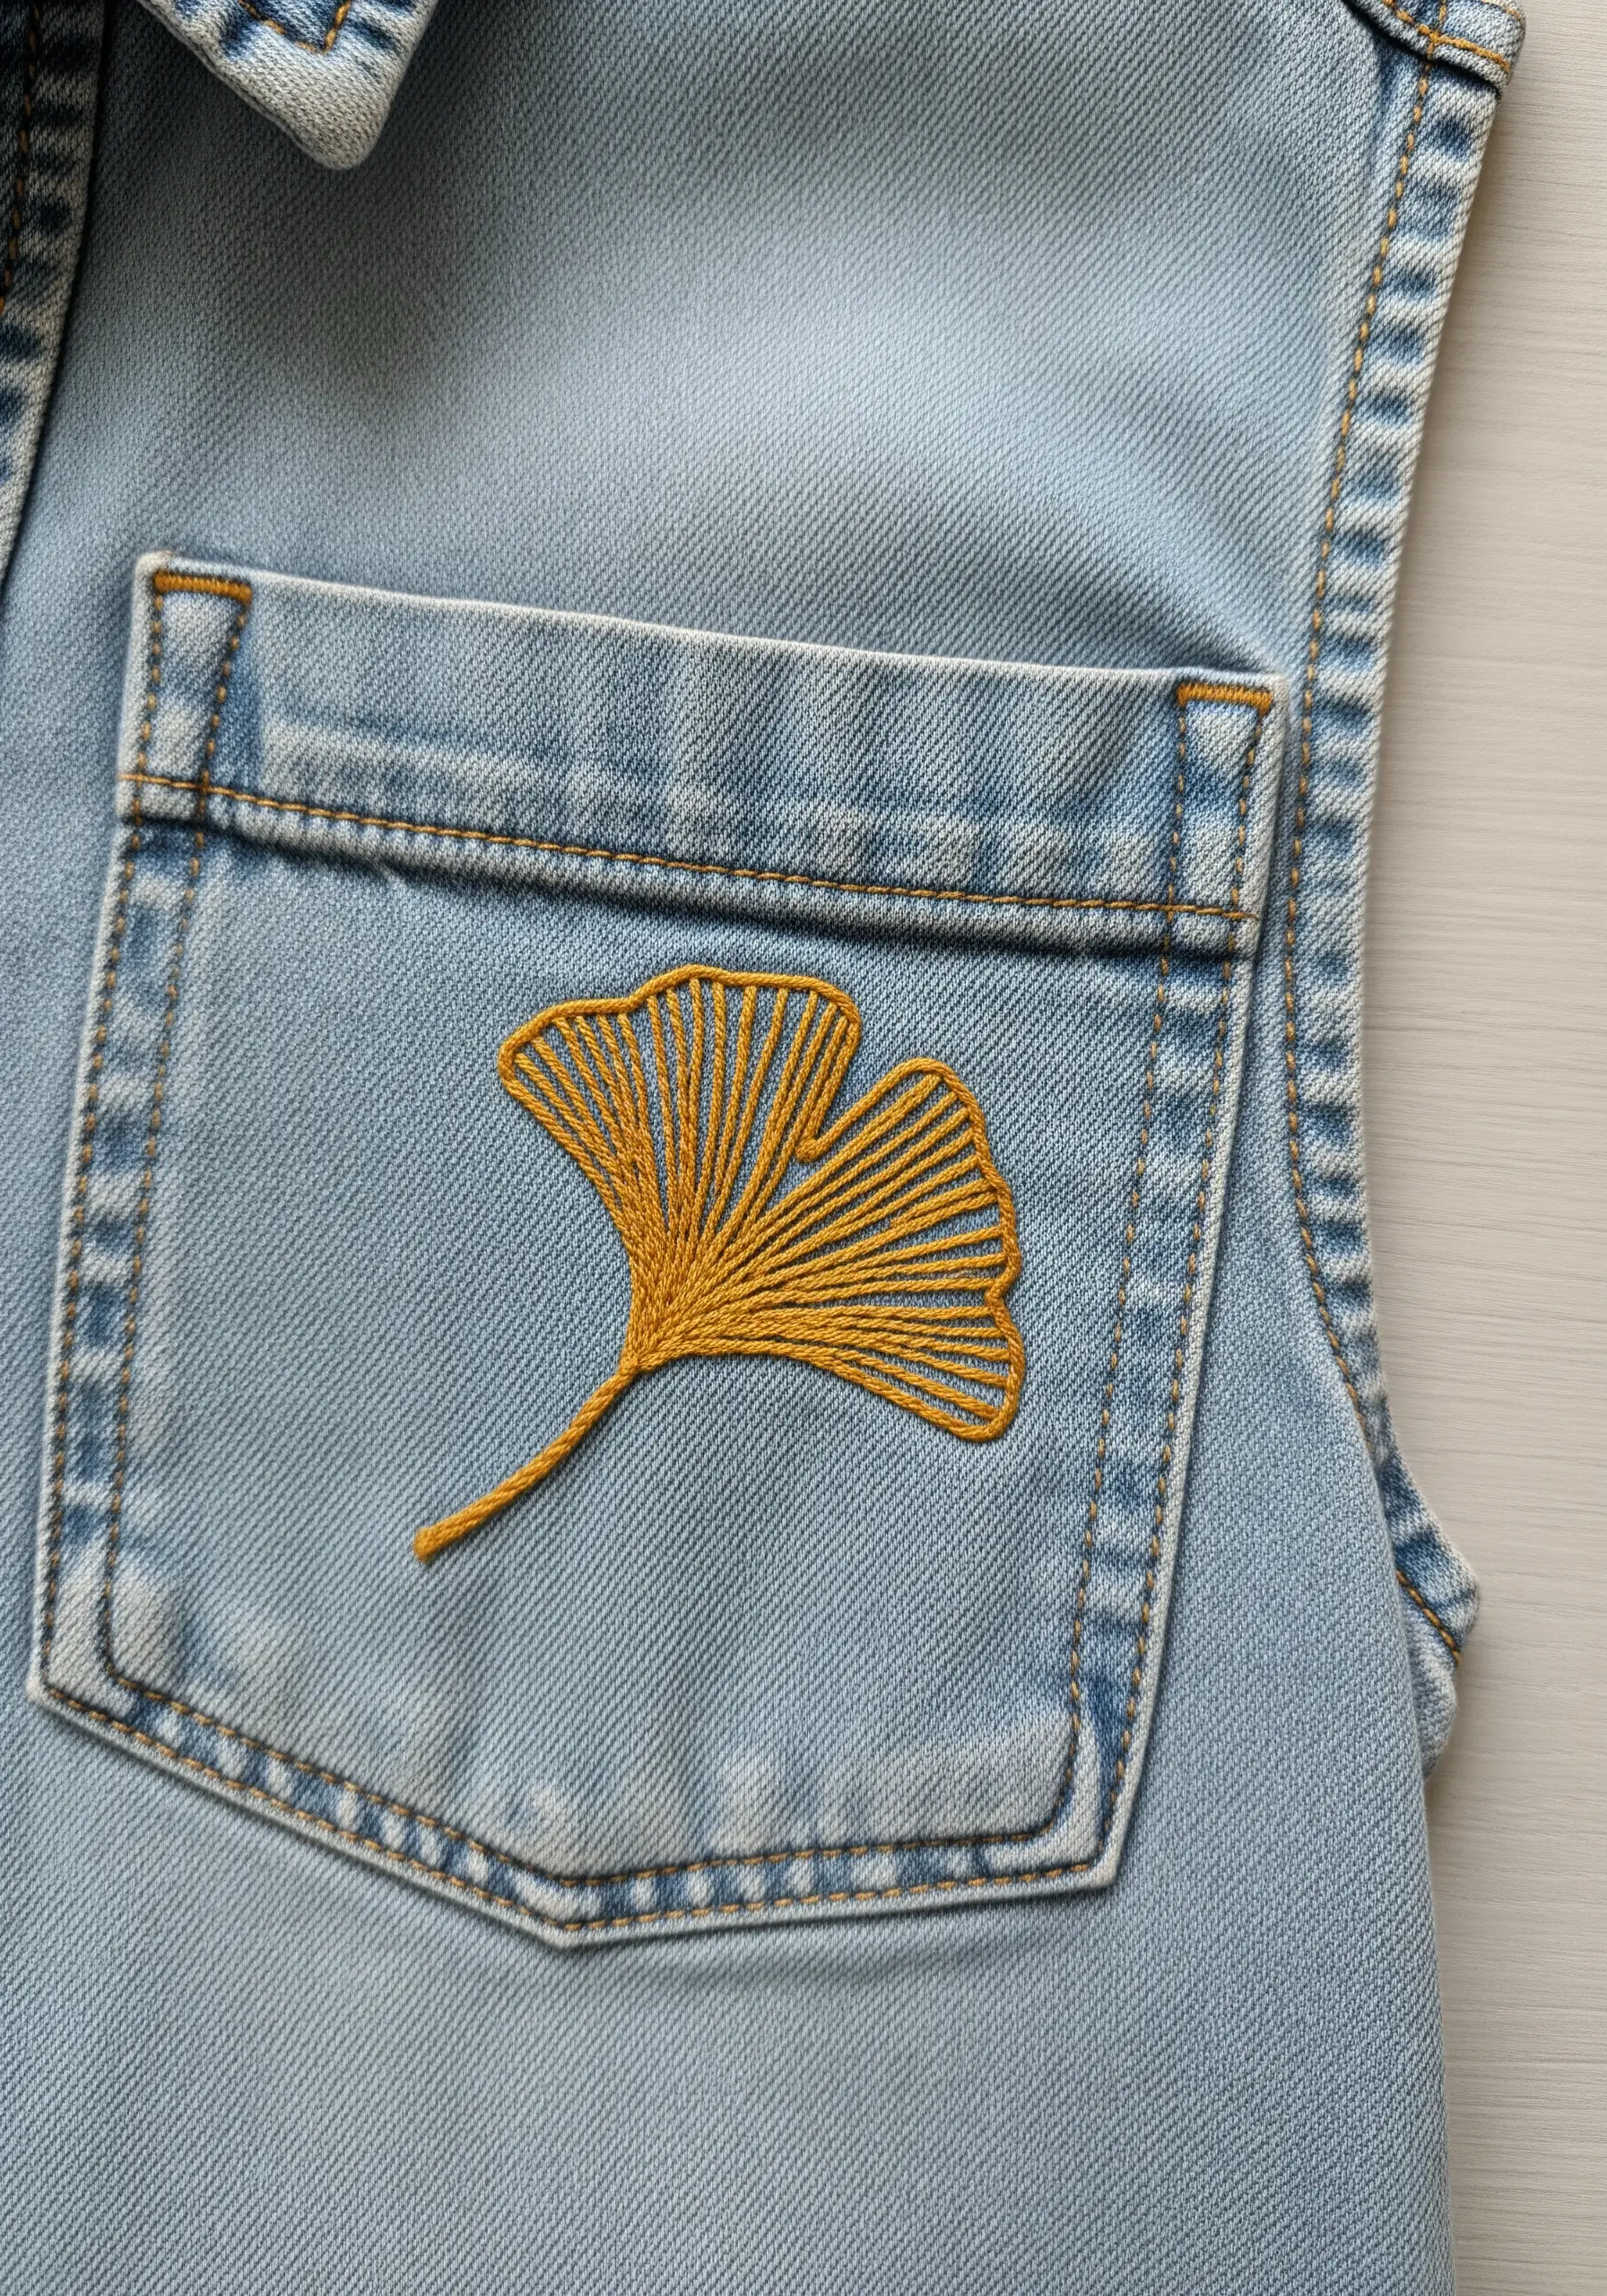
Stitching on denim requires a little preparation for a clean finish. Always use a tear-away or iron-on stabilizer on the inside of the garment to prevent the fabric from puckering.
A ginkgo leaf is perfect for this, as its shape is defined by long, radiating satin stitches that fan out from a central point.
Choose a high-contrast thread color, like this warm yellow, to make your design pop against the blue denim.
This is one of the easiest ways to add a personal touch to plain denim jackets.
8. Blend Colors with Long-and-Short Stitch

Give your mushrooms a soft, realistic gradient by using the long-and-short stitch technique on the caps.
Start with one color at the edge, making a row of alternating long and short stitches. Then, fill in the gaps with your second color, blending the two shades seamlessly.
Use tiny white French knots for the spots and clean, vertical straight stitches for the gills underneath. This combination of techniques adds a wonderful sense of realism.
9. Harness the Power of Negative Space
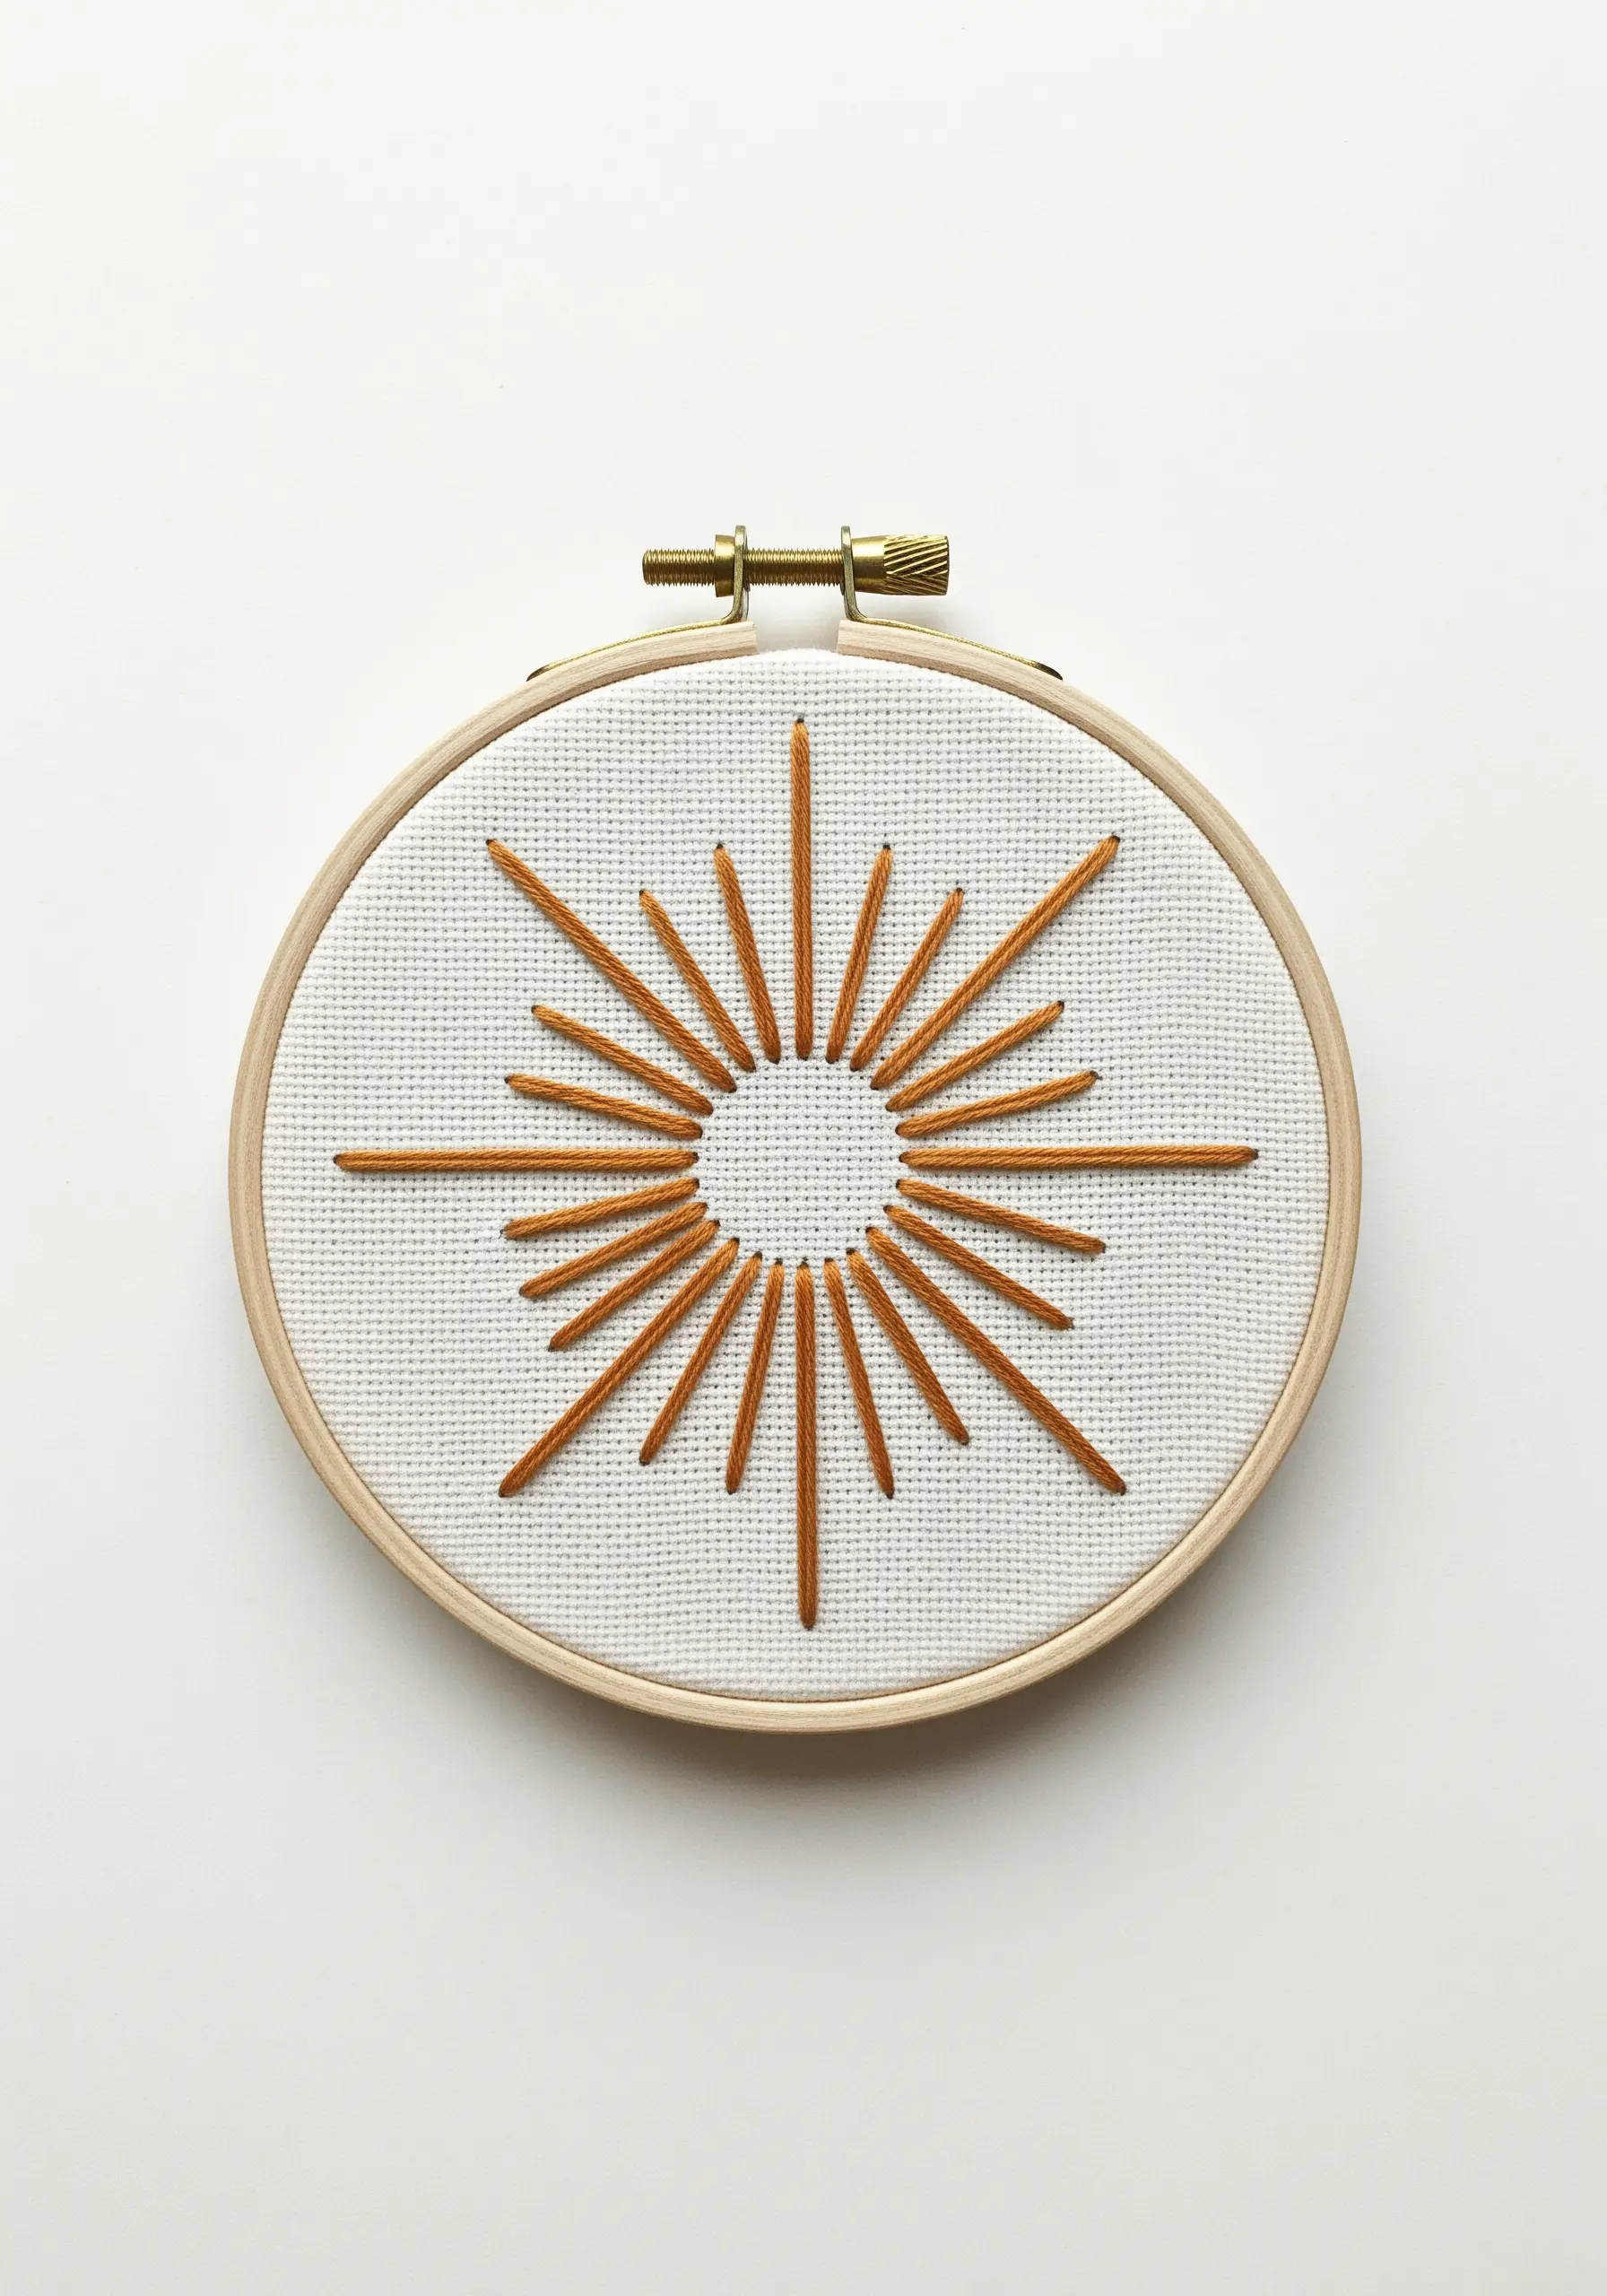
This modern sunburst proves that the space you *don’t* stitch is just as important as the space you do.
Create this motif with simple straight stitches radiating from an open center. The empty circle provides a focal point and gives the design a clean, graphic quality.
Maintain even tension on each stitch to ensure the rays lie flat and don’t pull the fabric. A disappearing ink pen is perfect for drawing guidelines.
10. Define Shapes with a Clean Outline
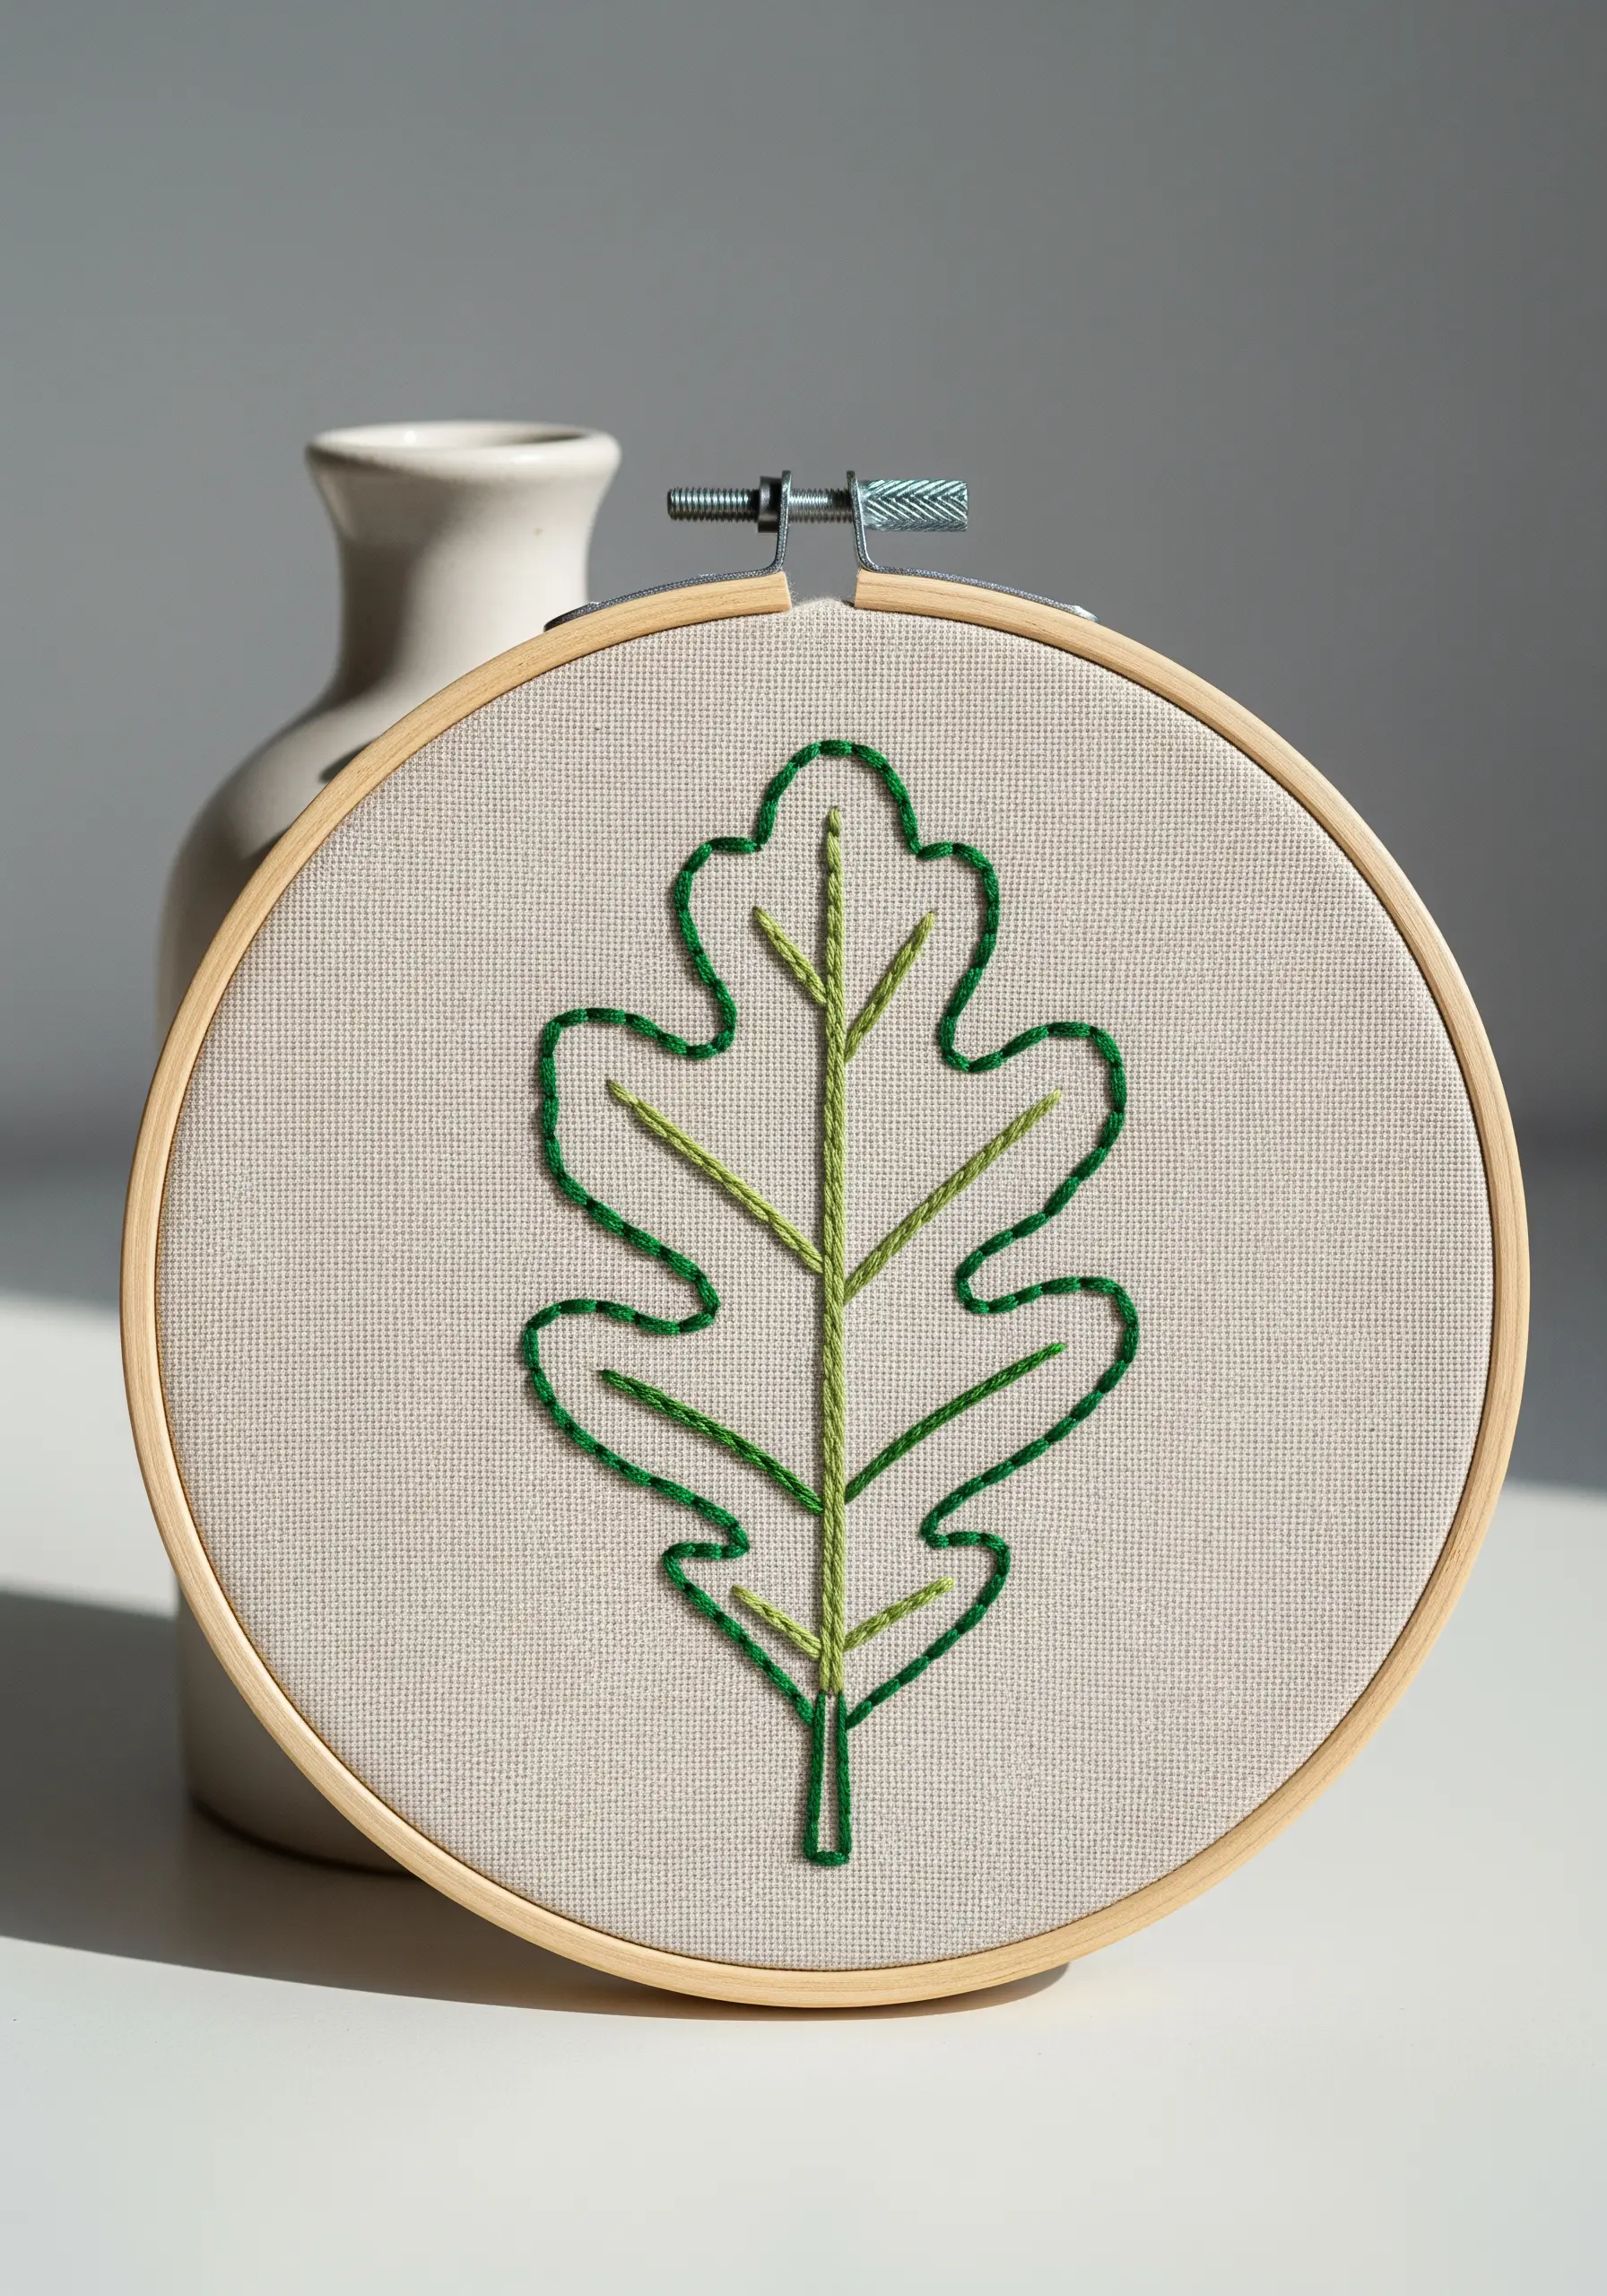
For a clean, illustrative style, focus on the outline. A split stitch or stem stitch using three strands of floss creates a bold, continuous line perfect for defining a leaf’s silhouette.
Add interior veins with a lighter shade of green and fewer strands (just one or two) to create a subtle sense of depth.
This technique is one of many minimal embroidery designs that relies on precision rather than complexity for its elegance.
11. Build 3D Texture by Layering Stitches
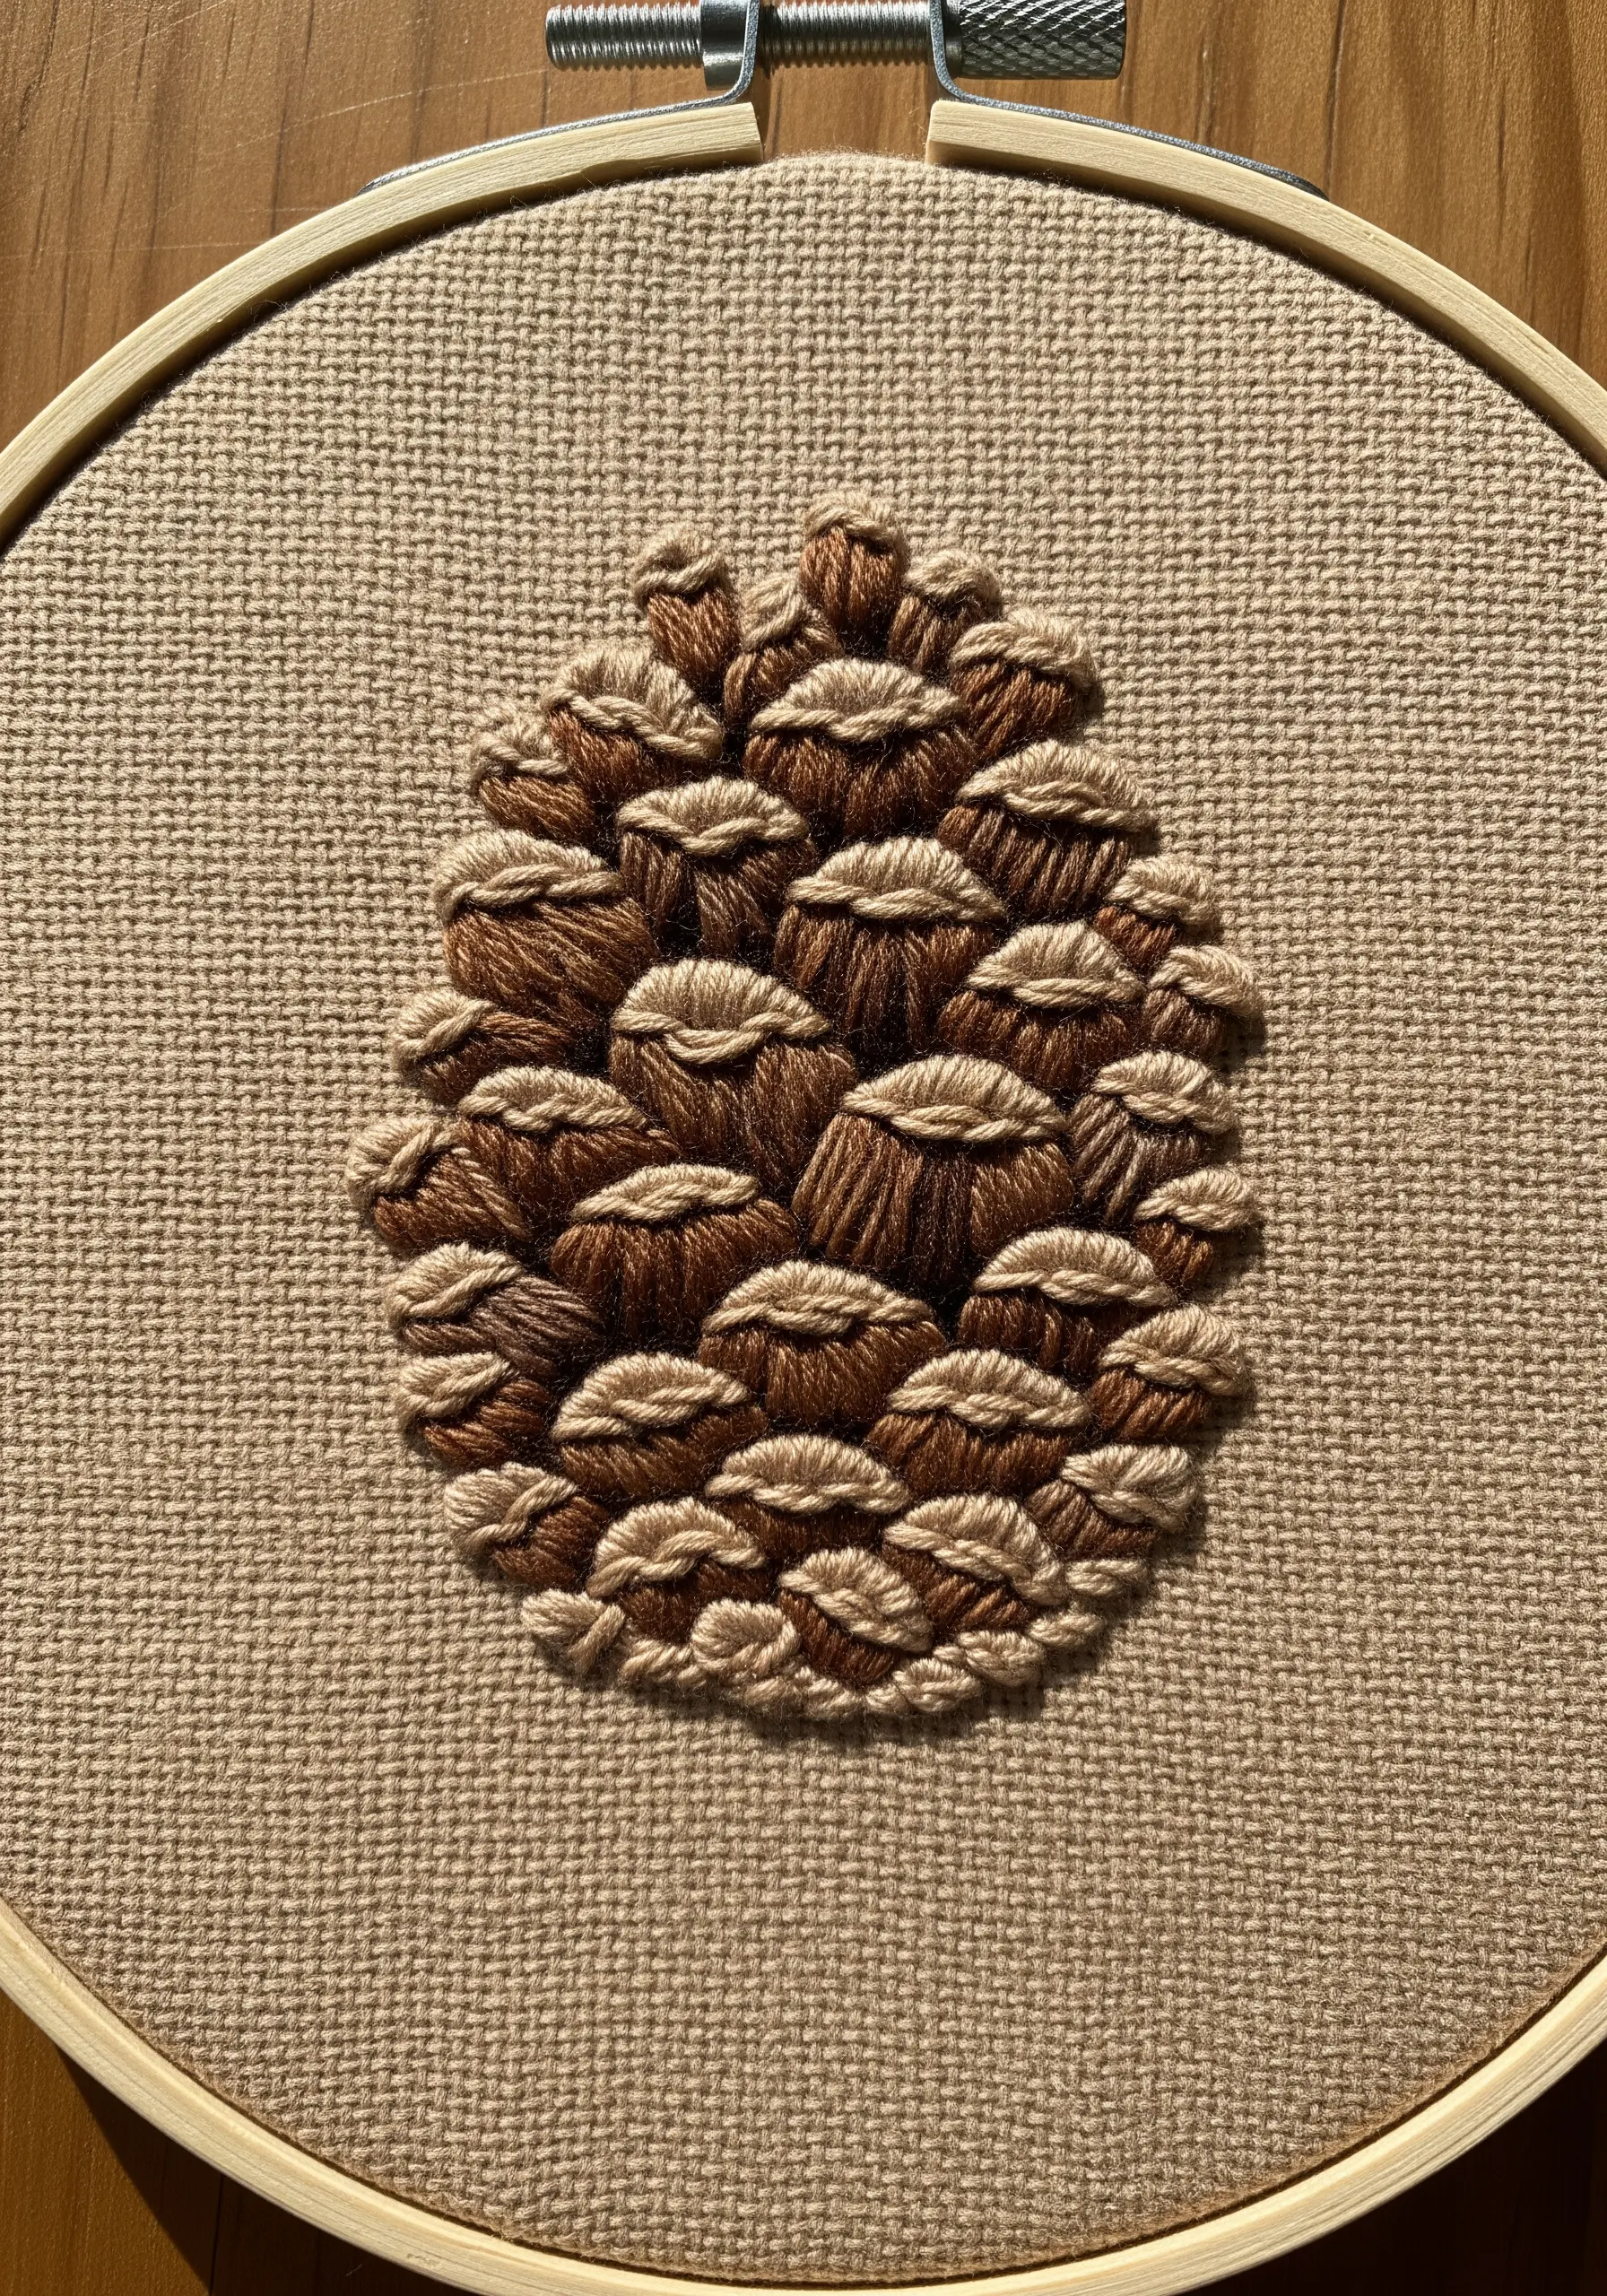
To create a realistic pinecone, think in layers. Begin stitching the bottom-most scales first and work your way up to the top.
For each scale, use a combination of satin stitch and a darker backstitch outline for definition. Physically overlap each new row of scales on top of the previous one.
This layering technique builds actual dimension, making the pinecone feel sculptural and incredibly tactile. This is one of the most effective creative ways to stitch natural textures.
12. Add Elegance to Apparel with a Border Motif
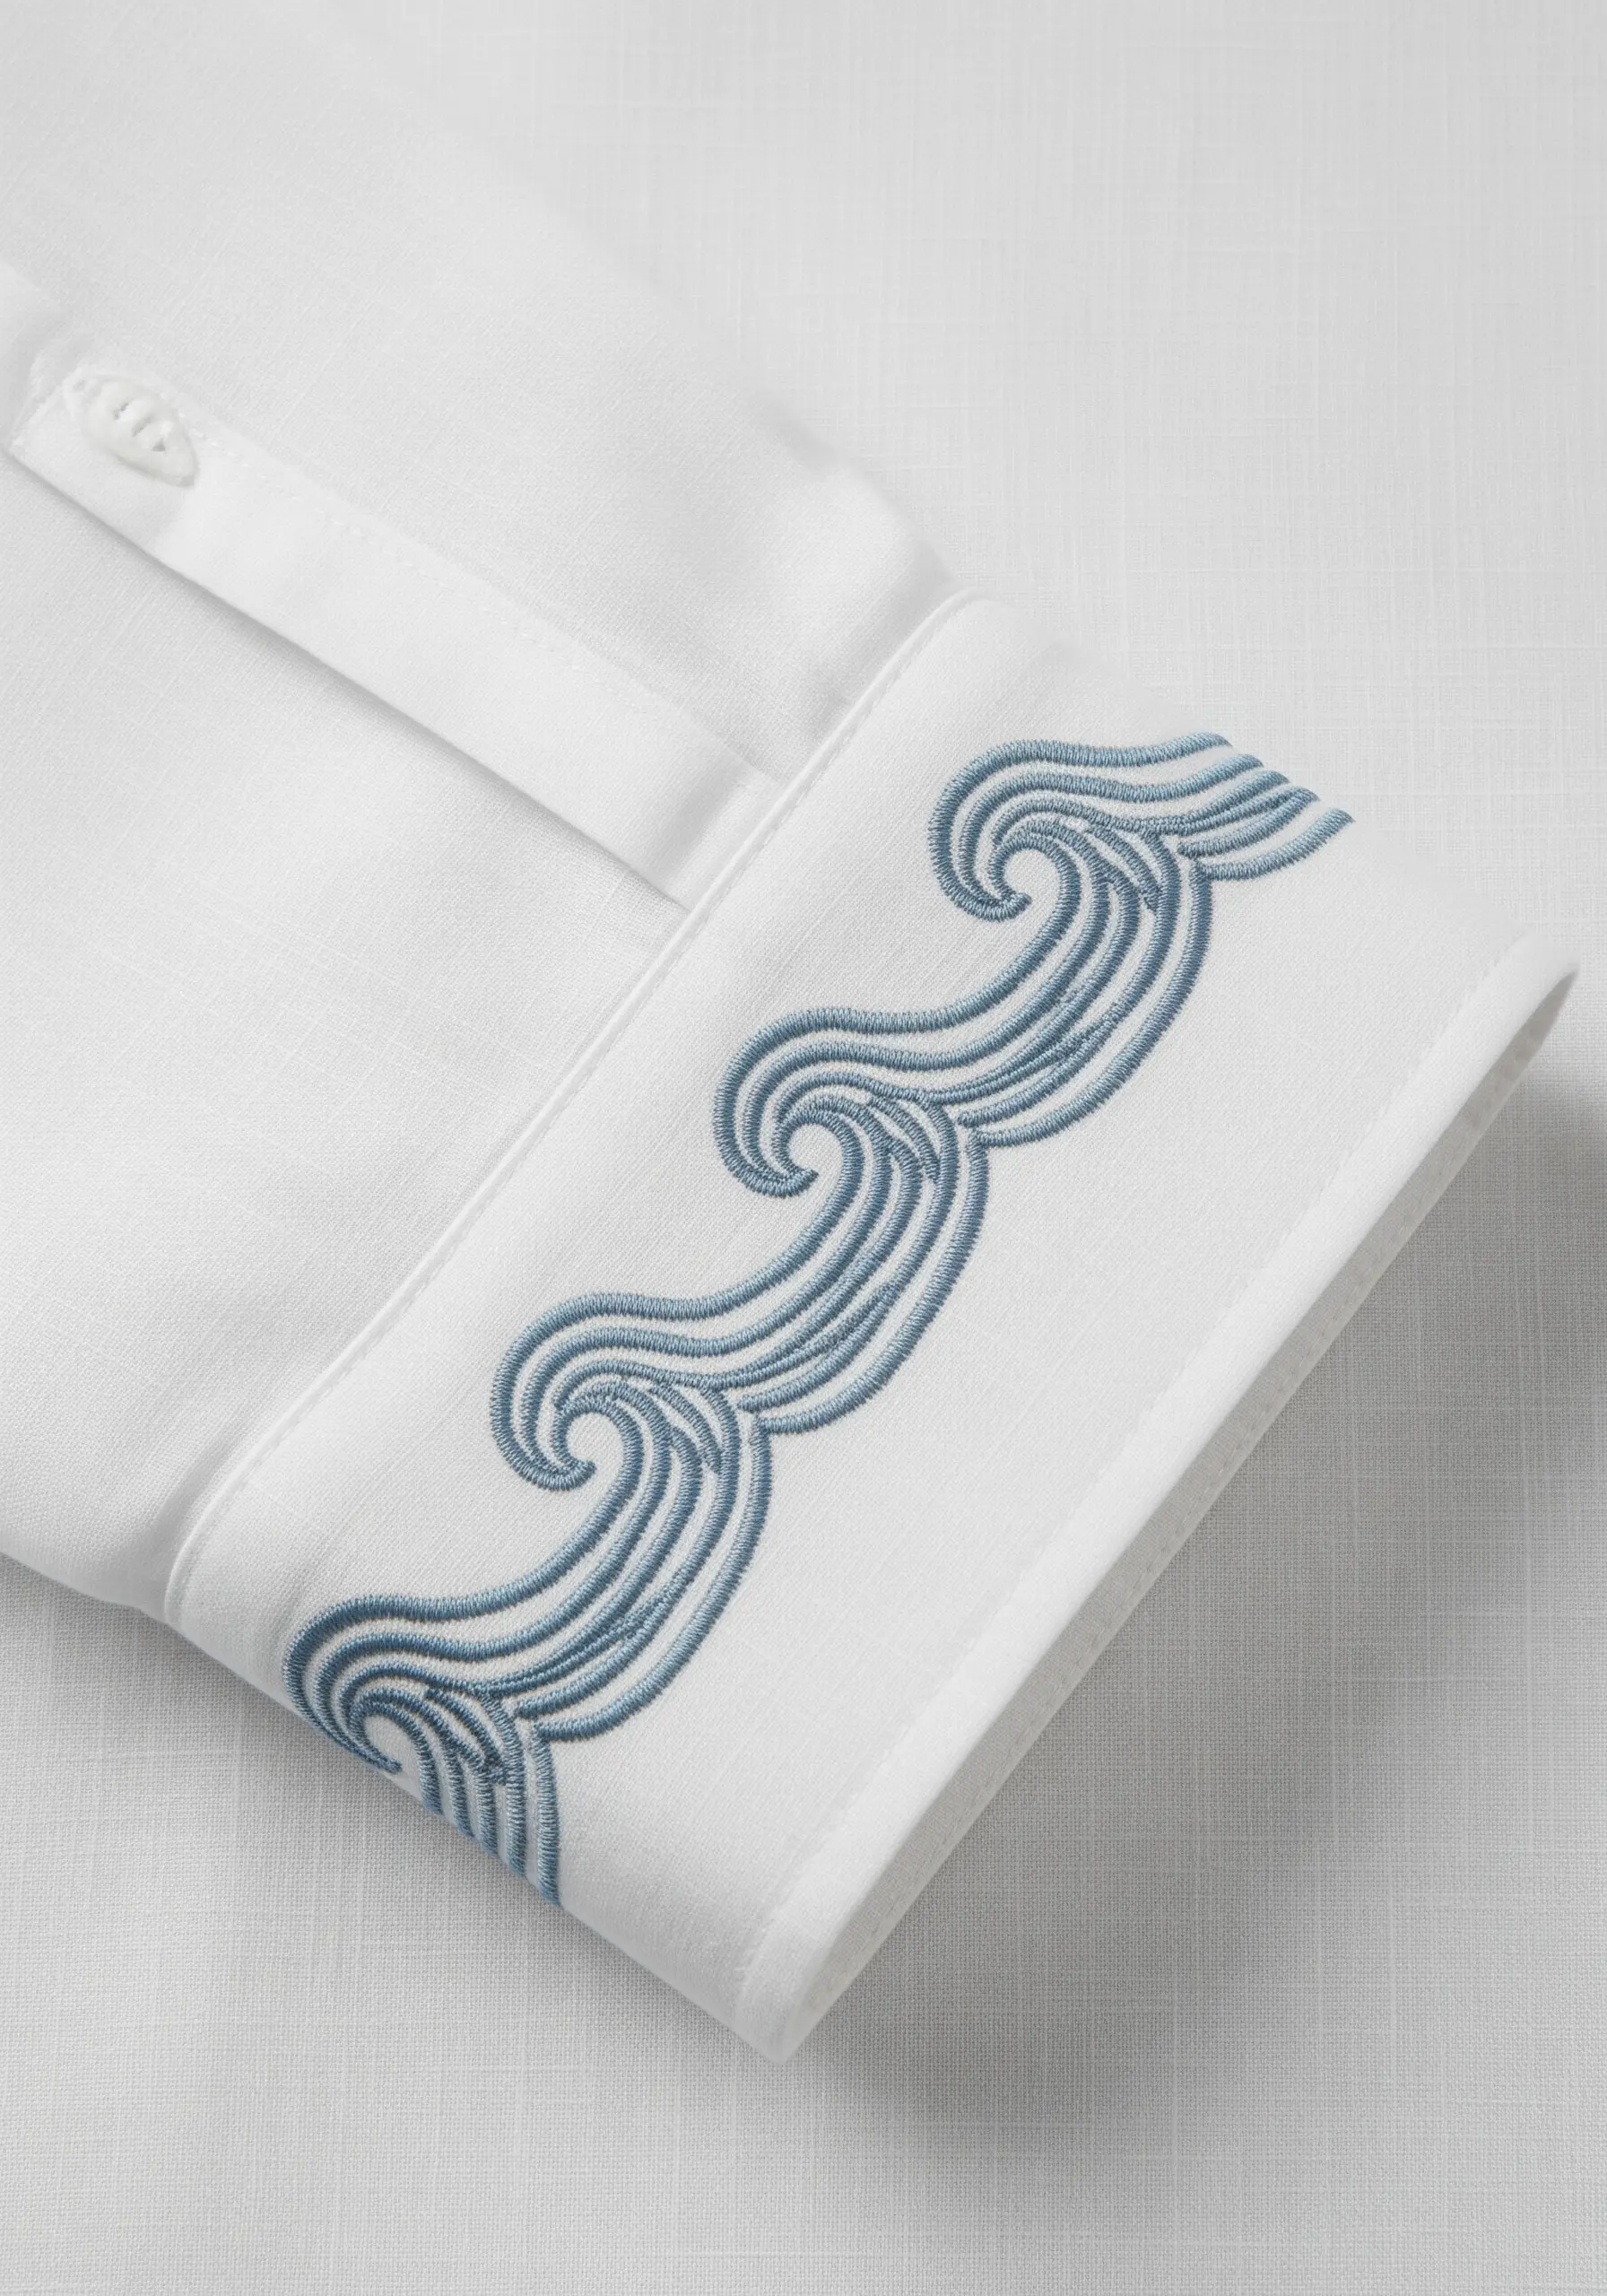
Transform a simple shirt cuff with a repeating nature-inspired pattern, like these stylized waves.
A dense satin stitch gives the motif a smooth, luxurious finish that stands out against the fabric.
Always use a quality stabilizer on the inside of the cuff. This prevents puckering and ensures your embroidery holds its shape through wear and washing.
The key to a professional look is consistency in stitch length and direction across the entire repeated pattern.
13. Recreate Downy Softness with Varied Stitches

Capture the delicate structure of a feather by combining several simple stitches.
Use a thin split stitch for the central shaft. Create the feather’s barbs with dense, angled straight stitches that mimic their natural growth pattern.
The secret to the soft, fluffy edge is adding tiny detached chain stitches (lazy daisies) along the perimeter. This small detail breaks up the hard outline and creates a convincing downy texture.
14. Suggest Detail with Minimalist Stitches
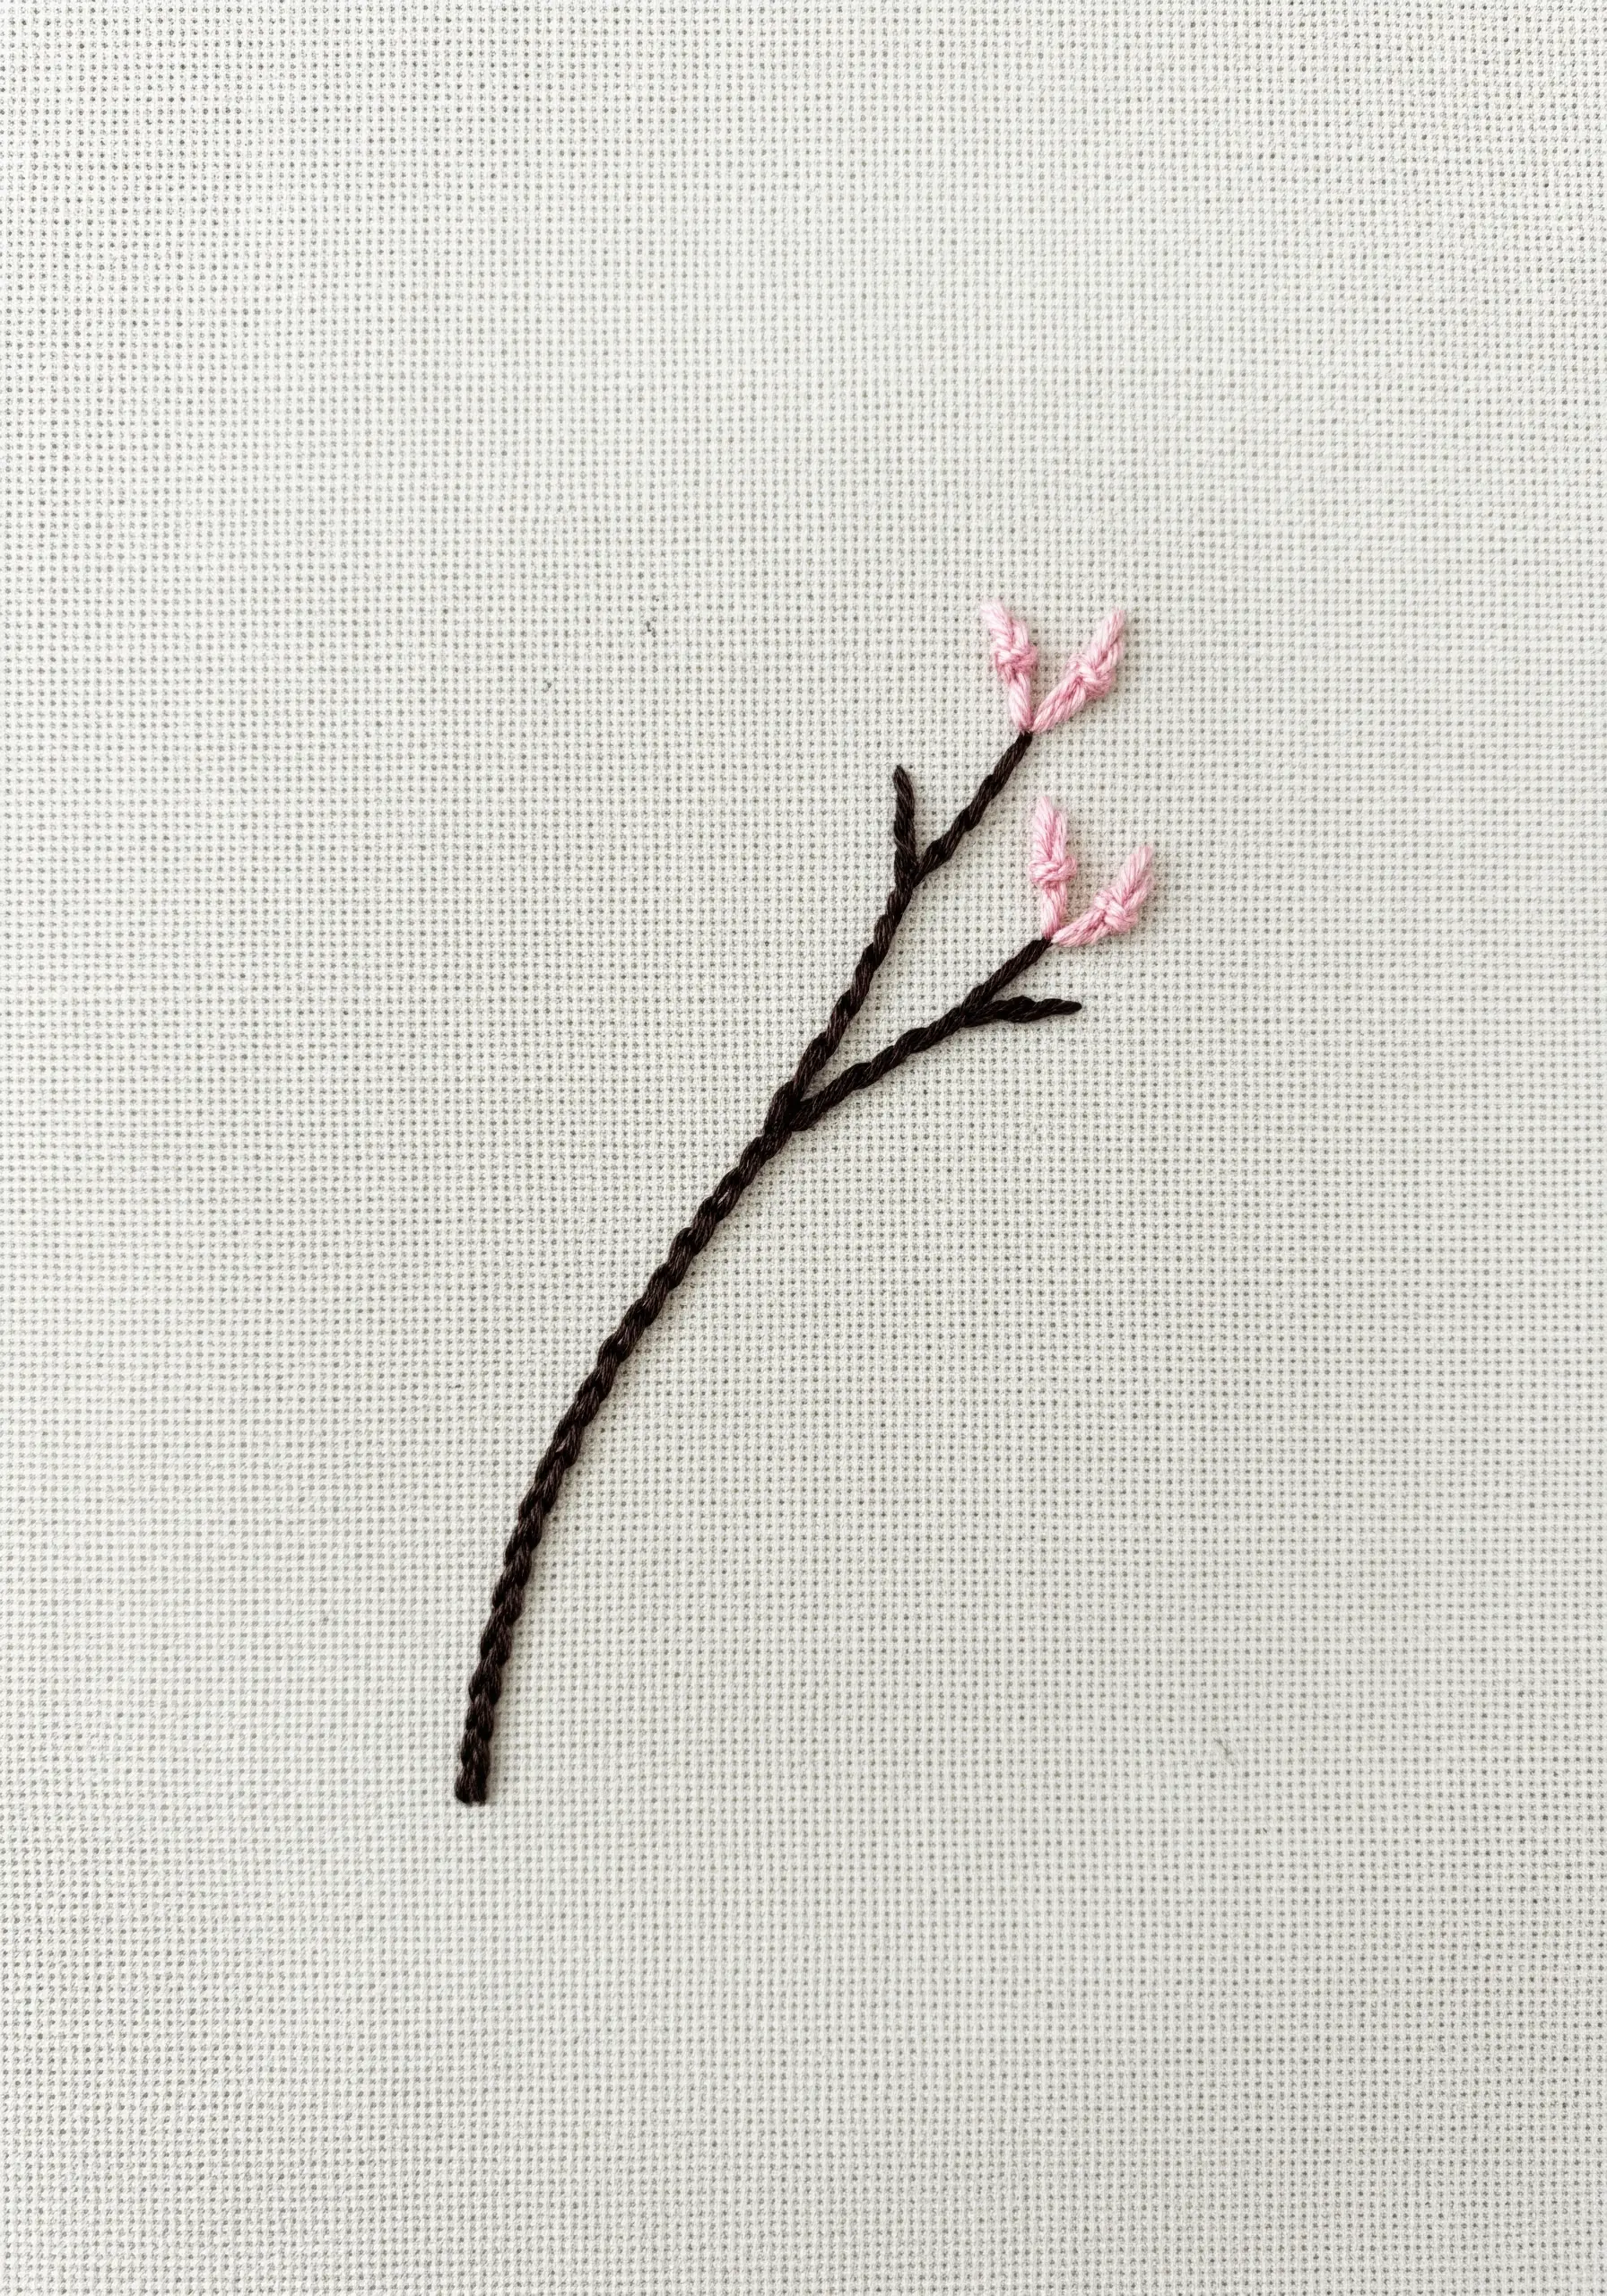
You don’t need to stitch every petal to evoke a blossoming branch. This minimalist approach is incredibly effective.
Use a whipped backstitch or stem stitch for the branch to give it thickness and a subtle, twisted texture.
For the blossoms, place a few tiny, deliberate lazy daisy stitches in a soft pink. Their careful placement suggests a tree in full bloom without overwhelming the design.
This is one of the most elegant minimalist botanical stitch designs for beginners.
15. Weave Petals for a Raised, 3D Effect
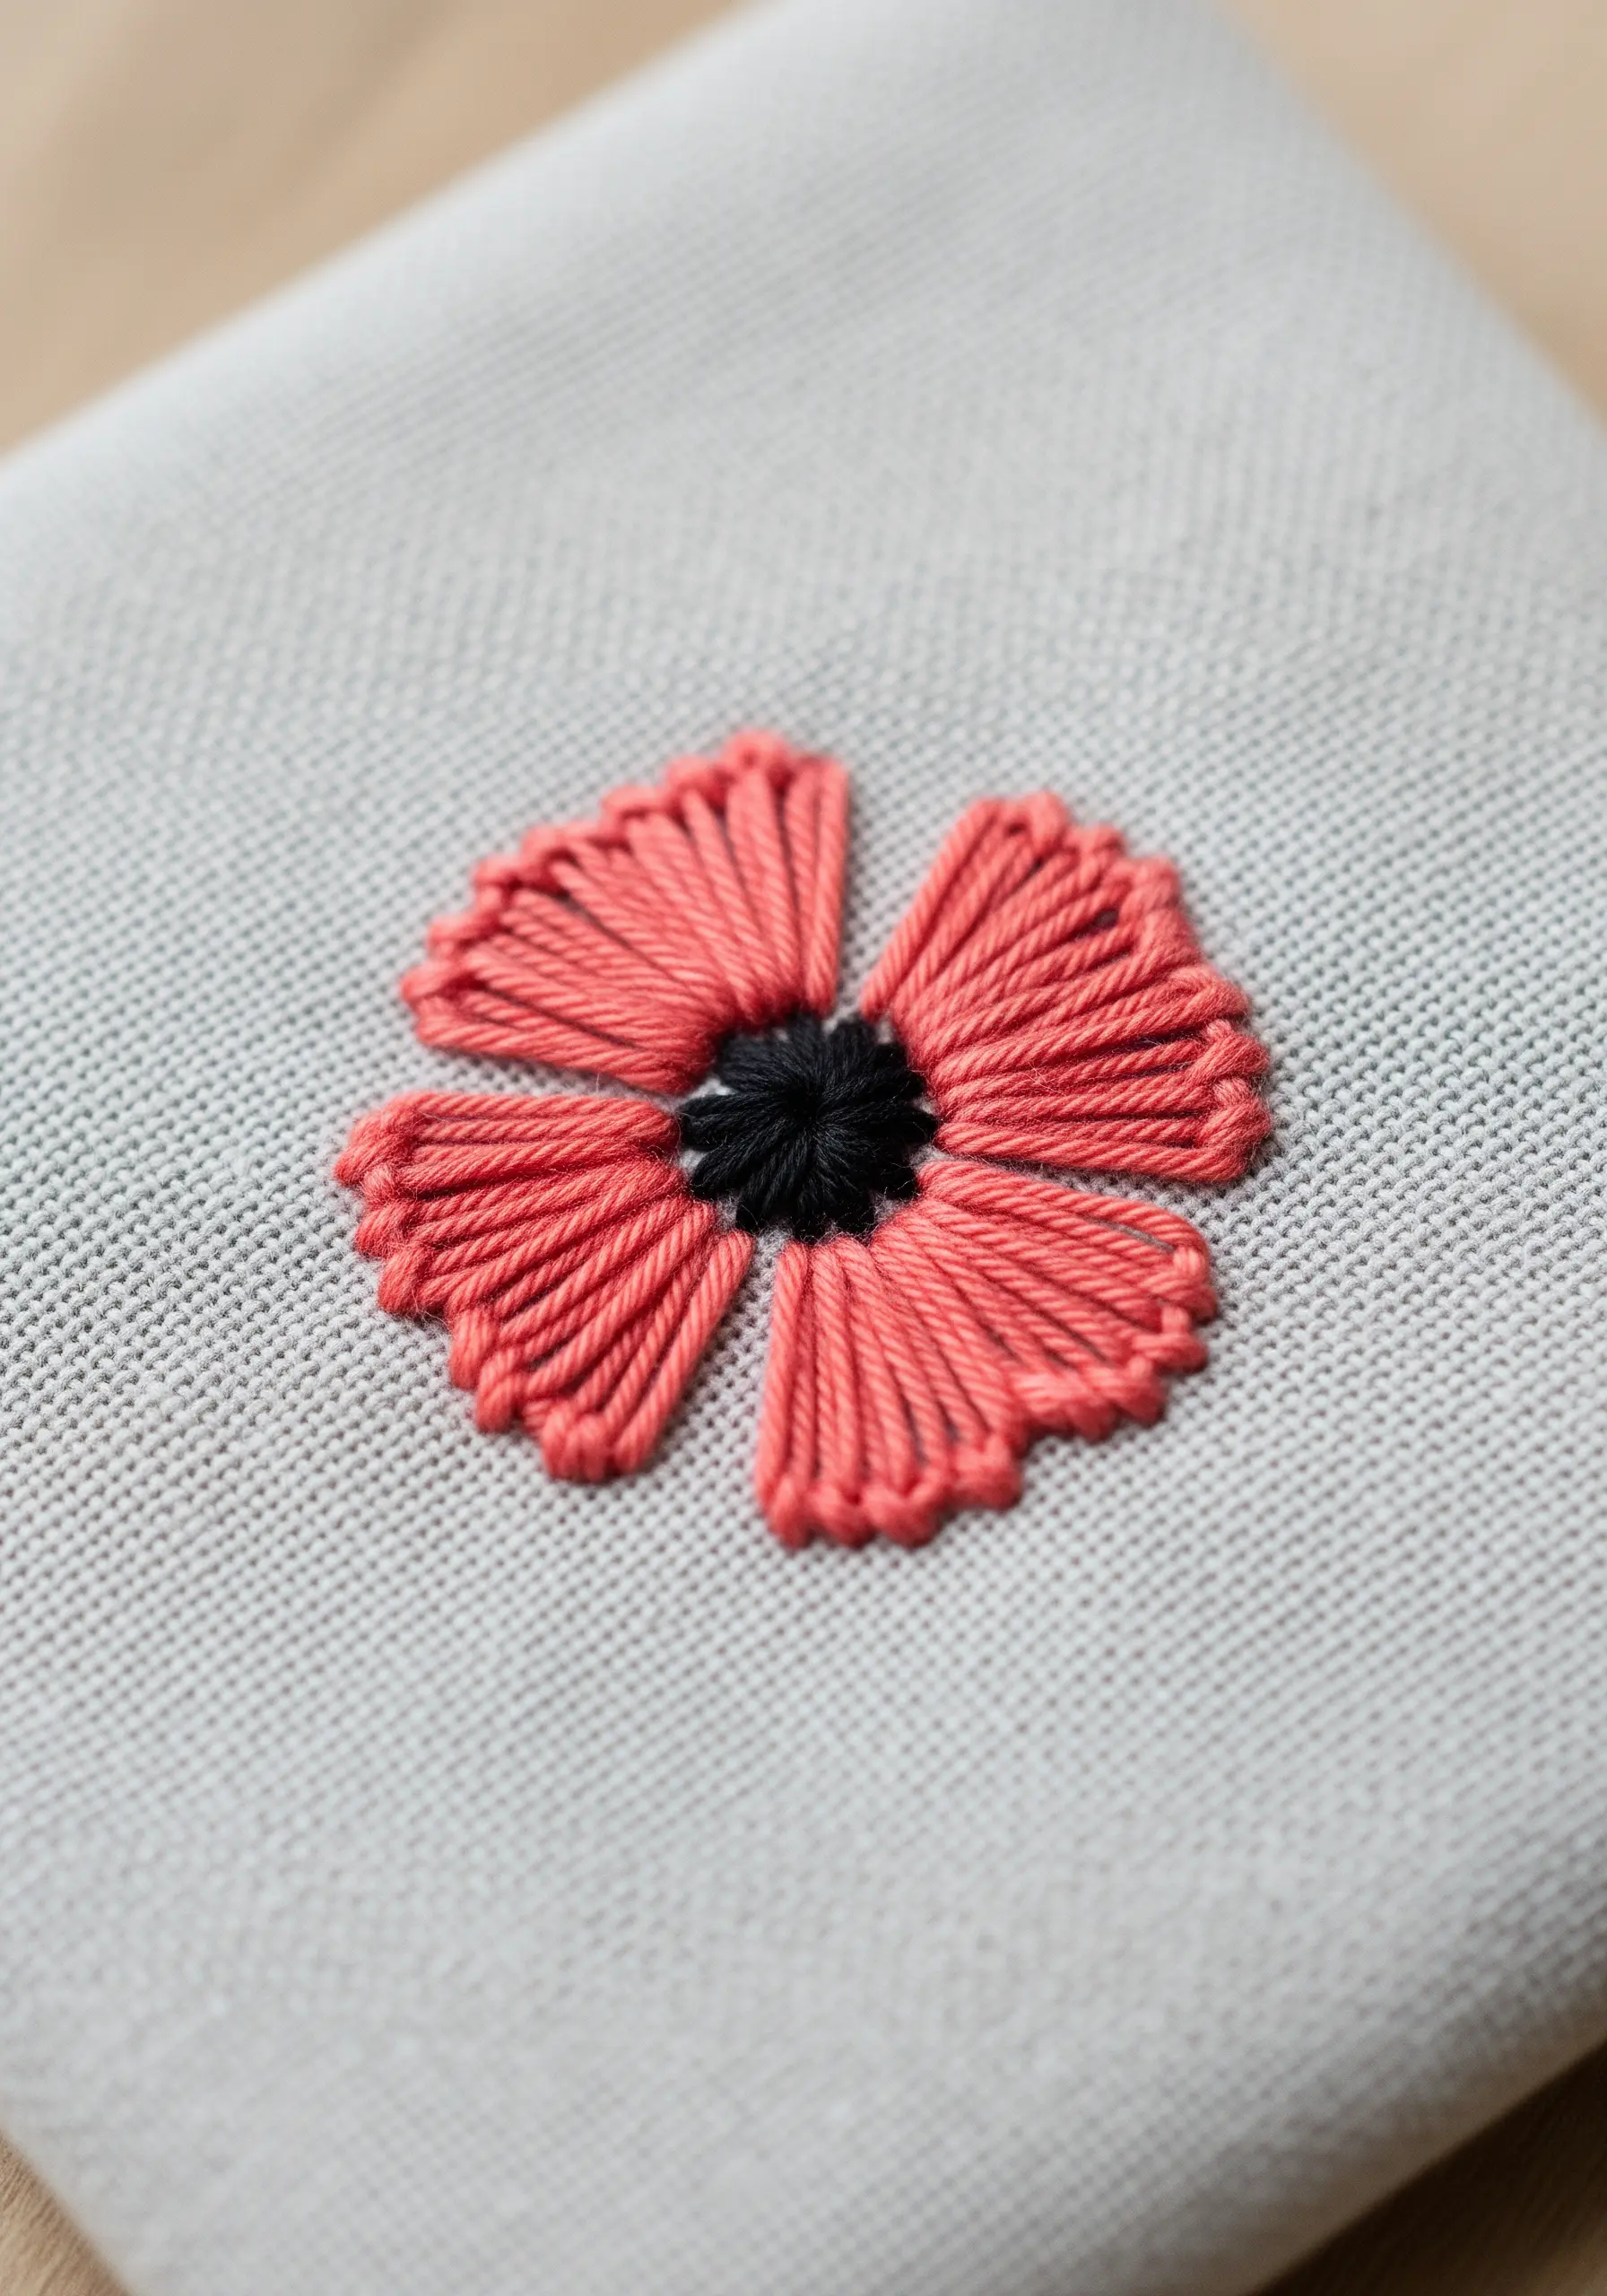
Create plush, dimensional flower petals using the woven wheel stitch (also known as the wagon wheel rose stitch).
First, create a foundation with an odd number of straight stitches, like a star. Then, weave your working thread over and under these spokes without piercing the fabric.
Continue weaving until the spokes are completely covered, forming a beautiful, raised circle. Grouping four of these together creates a stunning poppy or pansy.
16. Create an Acorn with Contrasting Textures
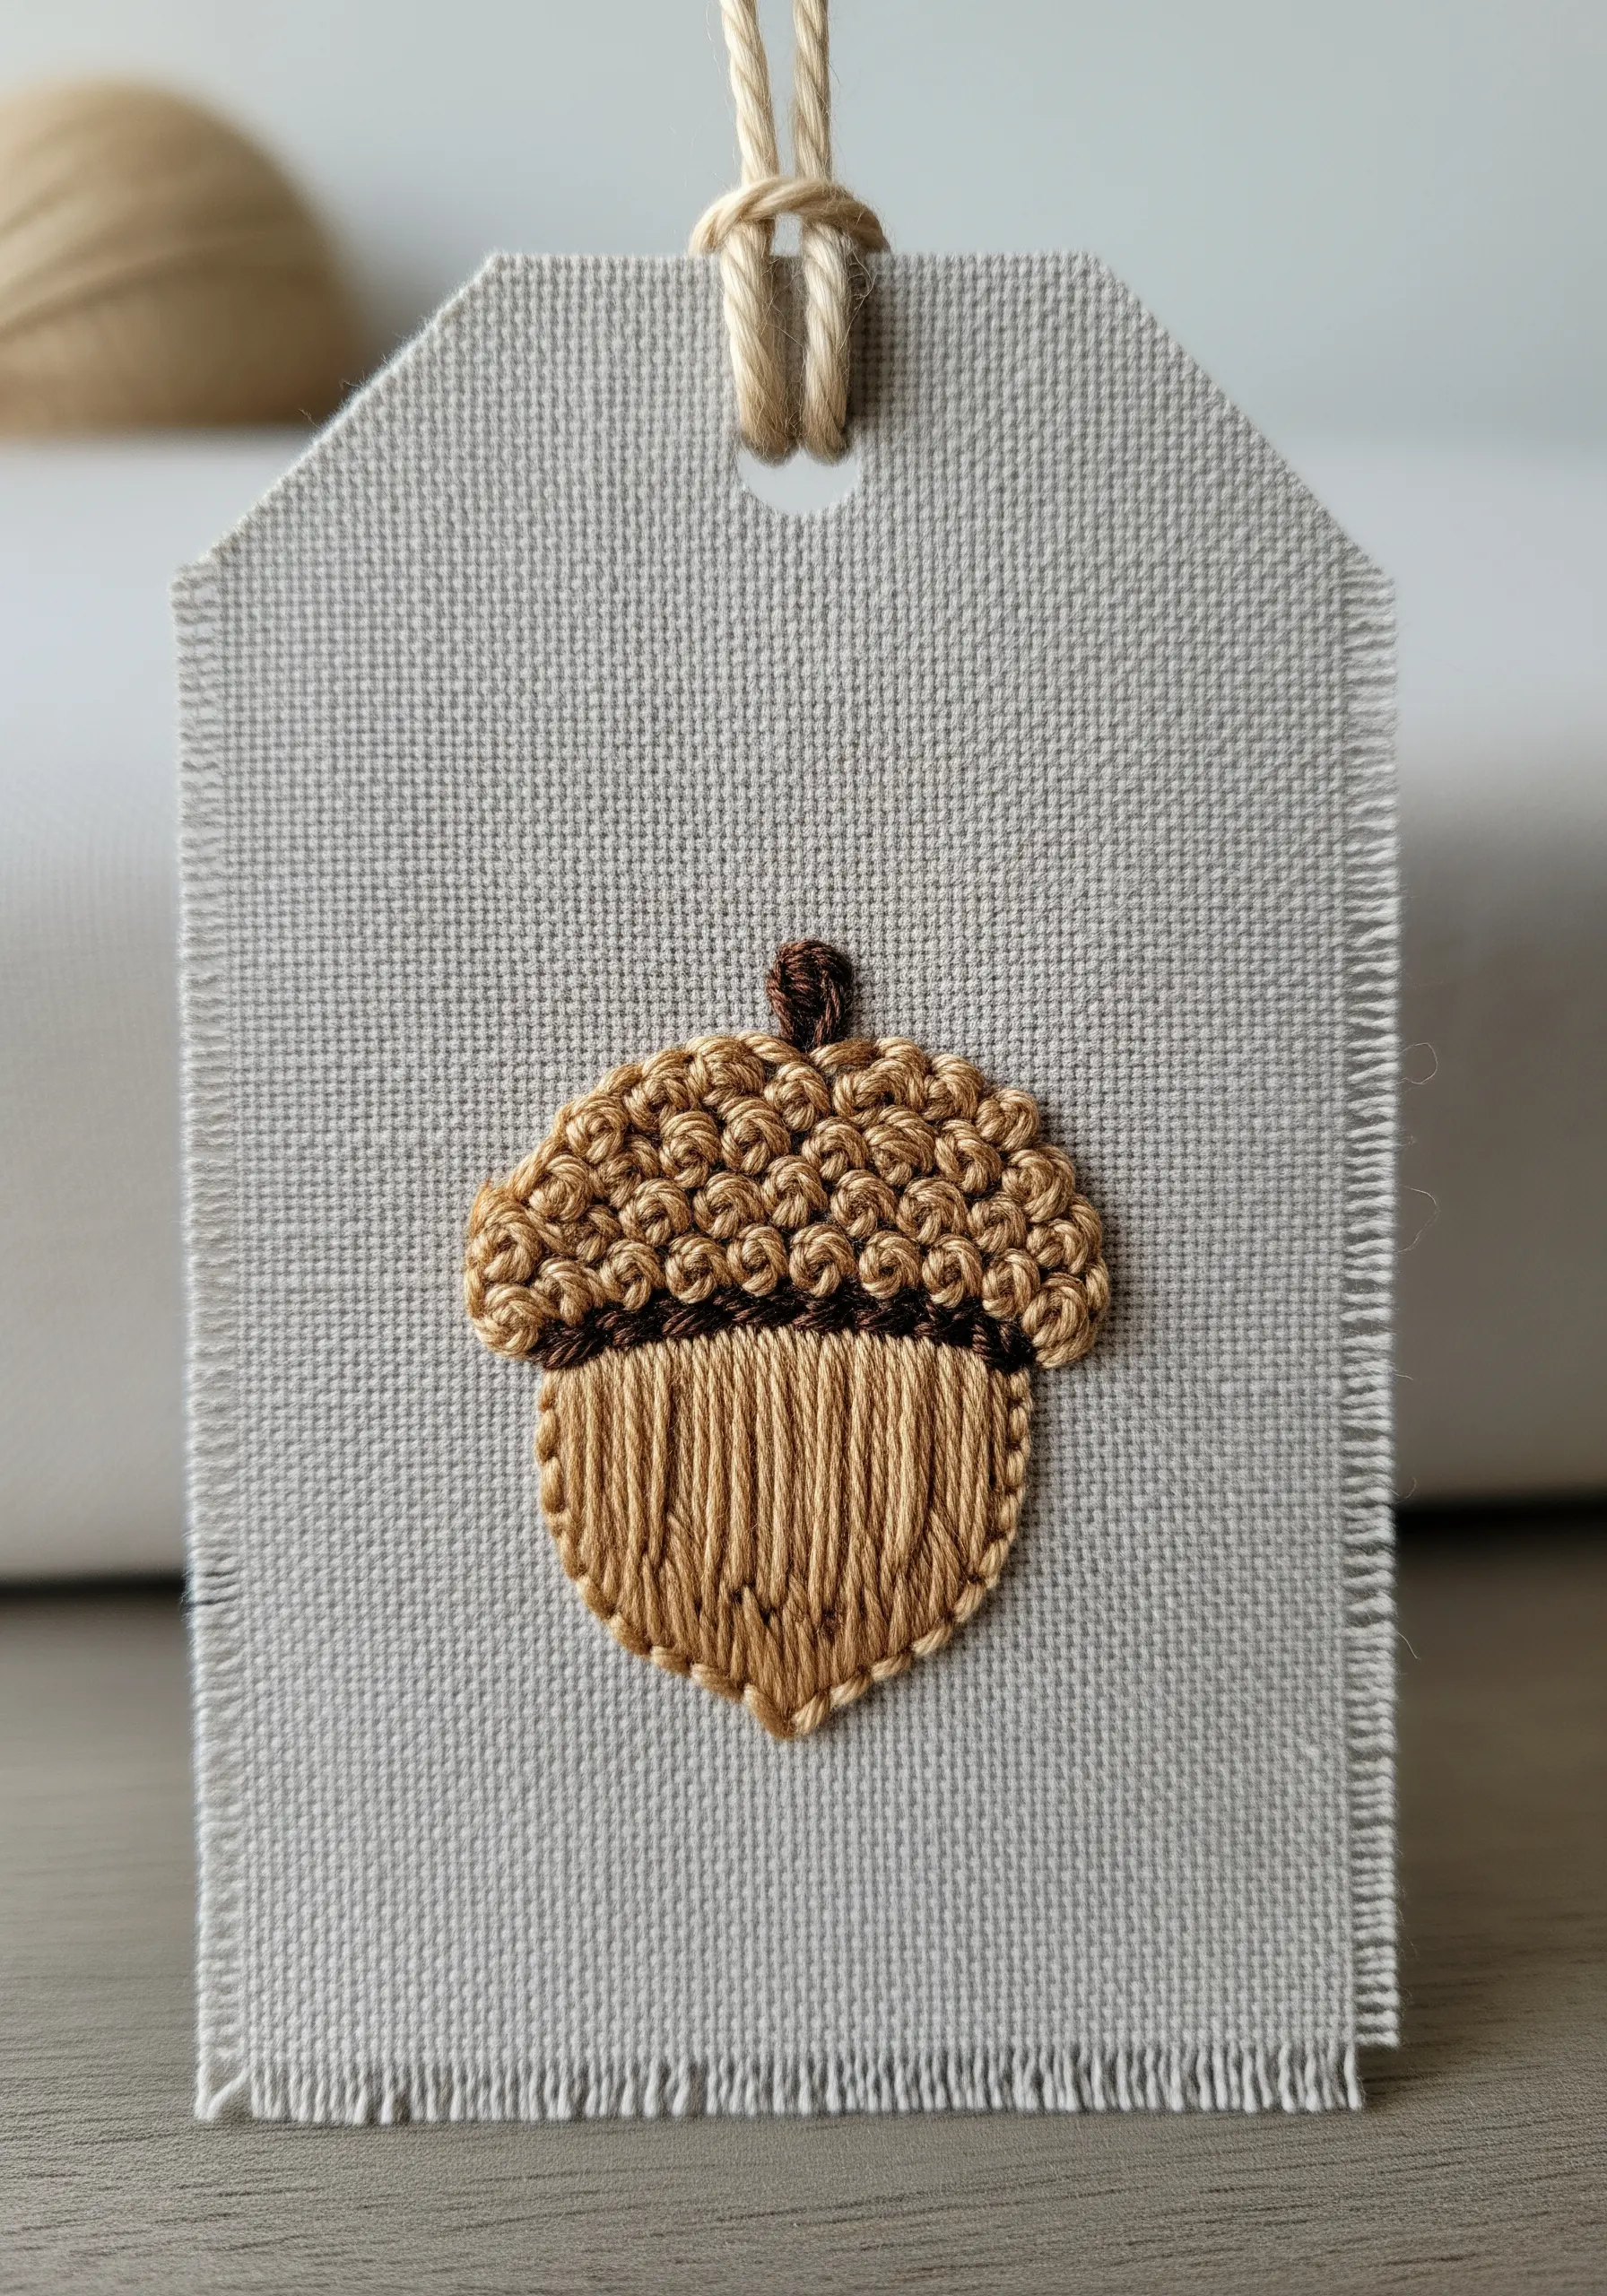
Elevate a simple acorn motif by using two highly contrasting stitch textures.
Fill the cap with a dense field of French knots. This immediately gives it a bumpy, realistic texture that distinguishes it from the nut.
For the nut itself, use smooth, parallel vertical satin stitches. The difference between the knotted cap and the sleek body is what gives this design its charm and visual appeal.
This is a great motif for handmade art objects like gift tags or ornaments.
17. Add Subtle Motion with Variegated Thread
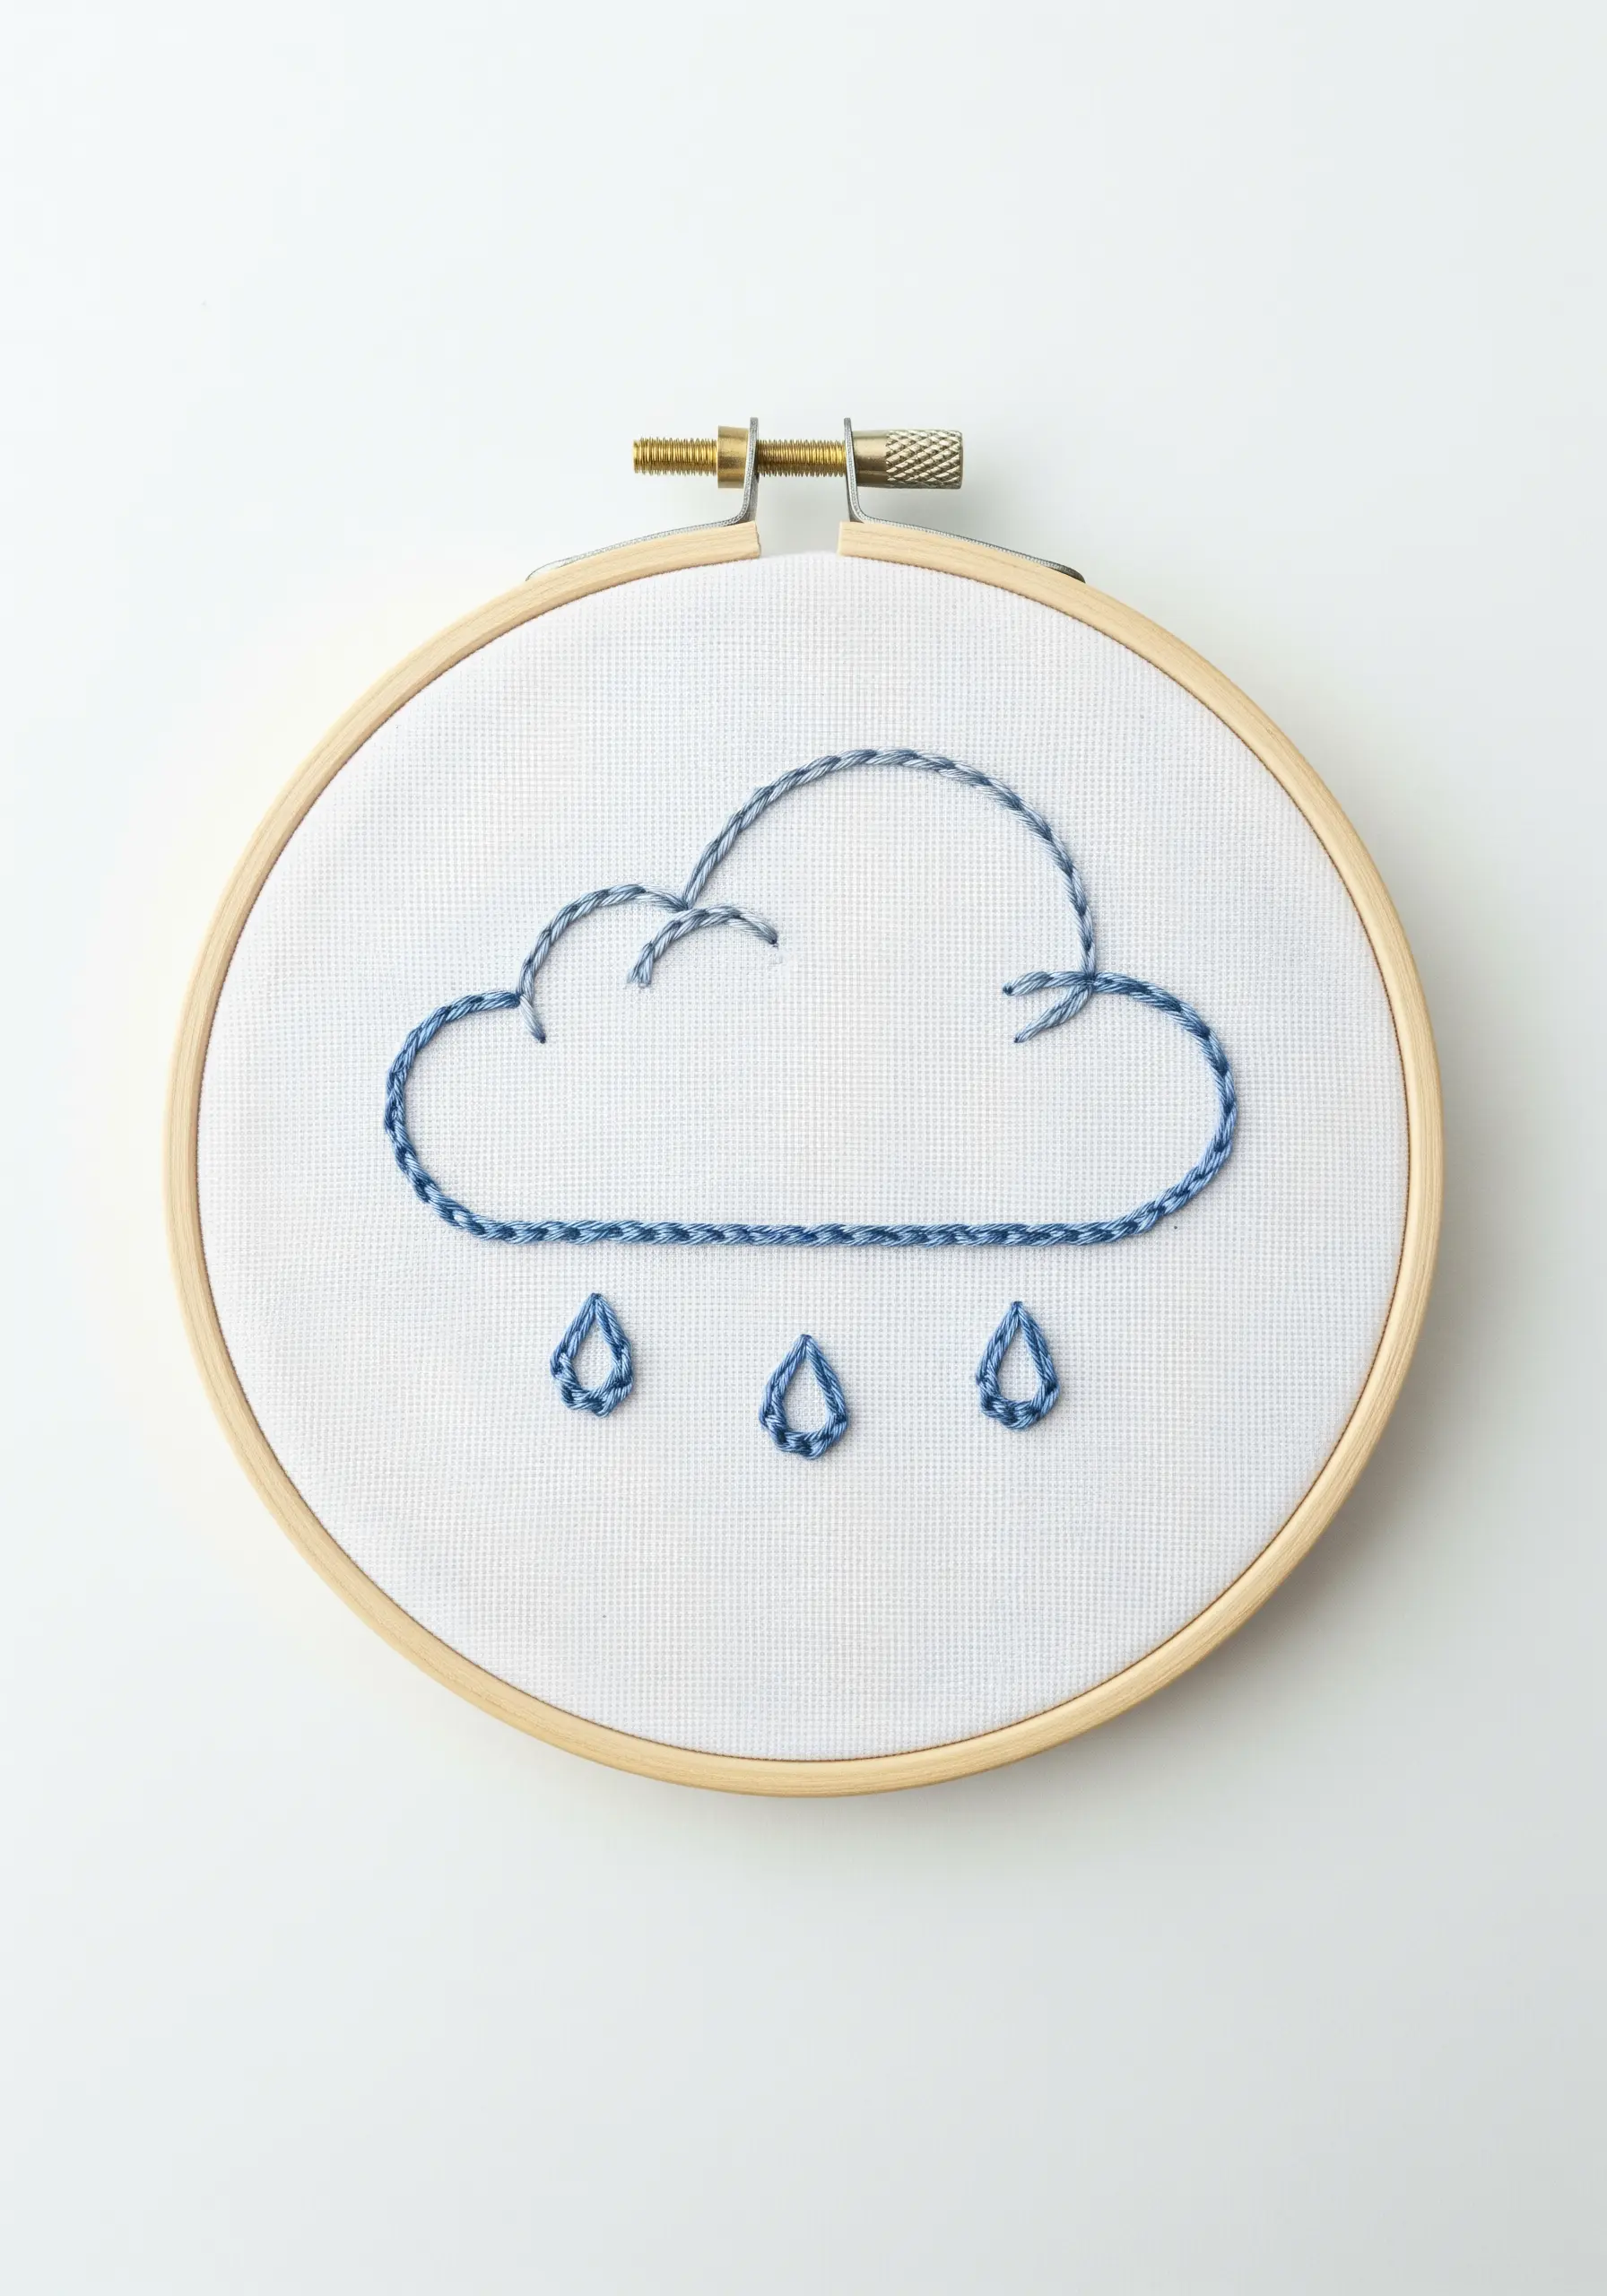
Give a simple line-art cloud more life by using a variegated thread.
As you stitch the backstitch outline, the thread’s natural color variations will emerge, creating subtle shifts from light to dark blue.
This technique adds a sense of depth and movement automatically, making the cloud feel more dynamic than one stitched in a solid color.
It’s a simple material swap that elevates a basic design without requiring any change in your stitching technique.
18. Draw with Thread to Create Tree Rings
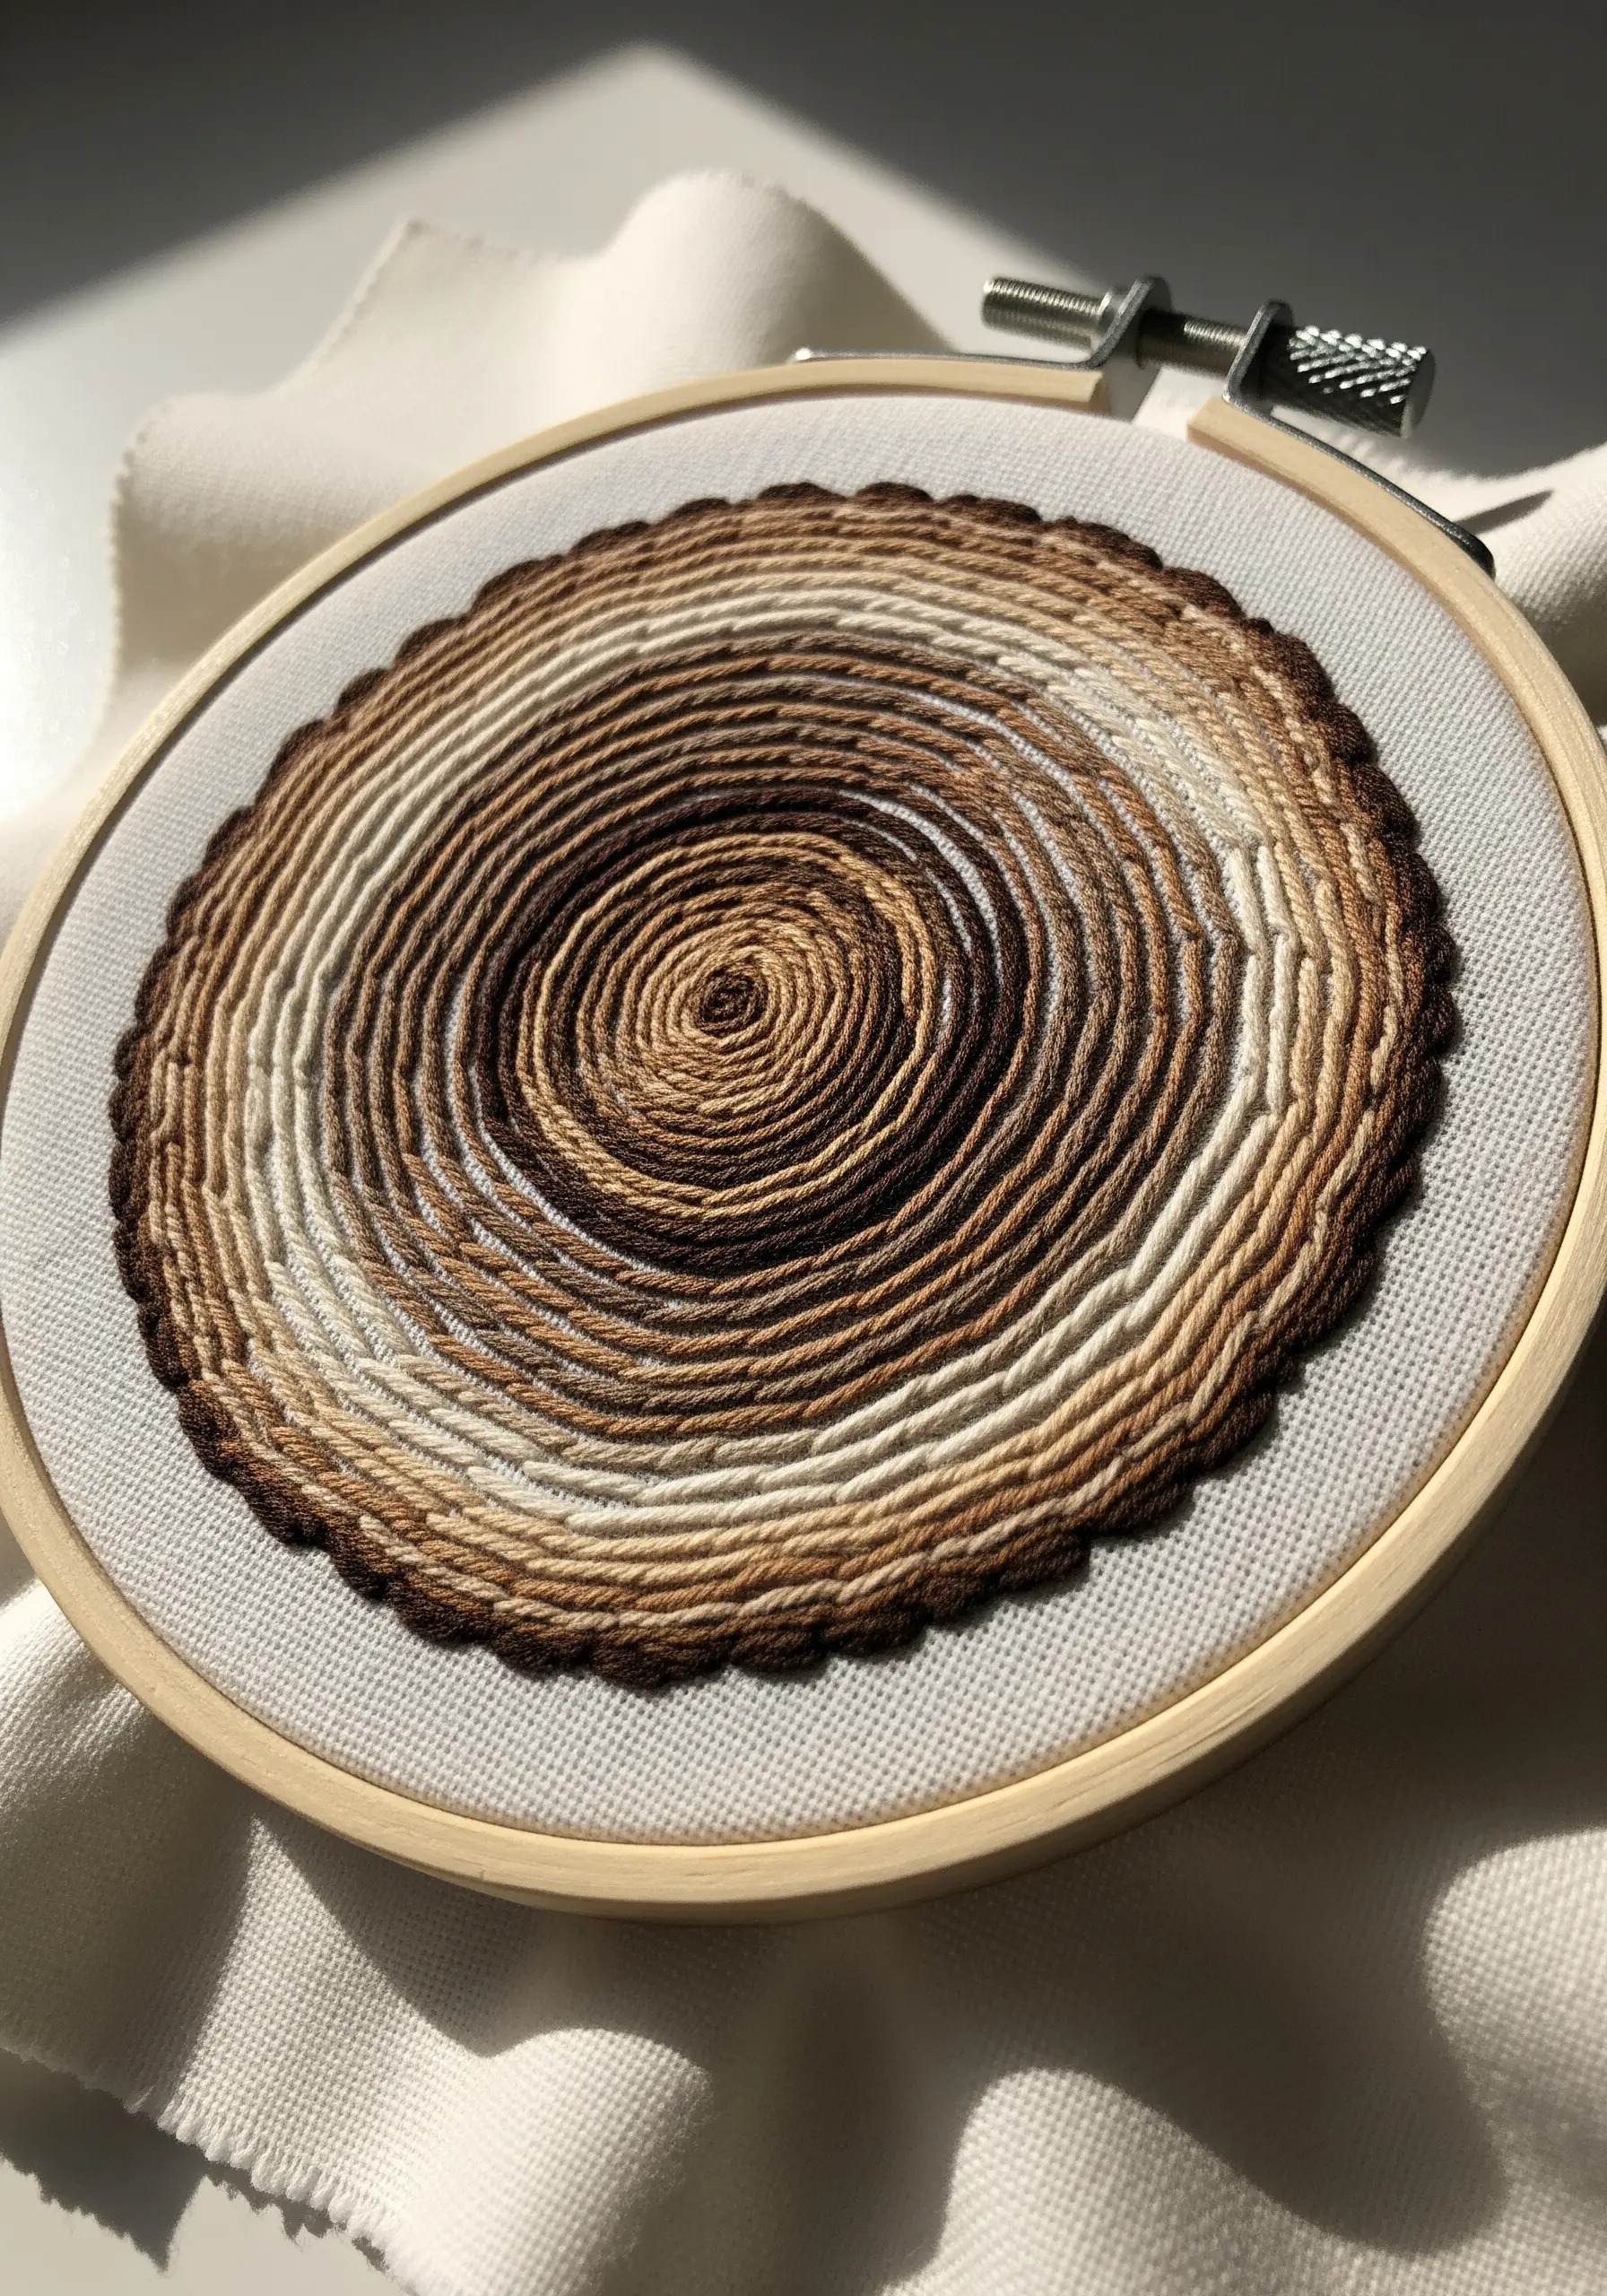
This mesmerizing tree ring effect is created with just one continuous stitch—a backstitch or running stitch—spiraling out from the center.
The magic comes from changing your thread color every few rows. Select four to five shades of brown, from dark espresso to pale sand, to mimic the natural growth rings of a tree.
This is a wonderfully meditative process that relies entirely on color placement for its stunning visual impact.
19. Make Stars Sparkle on a Dark Background
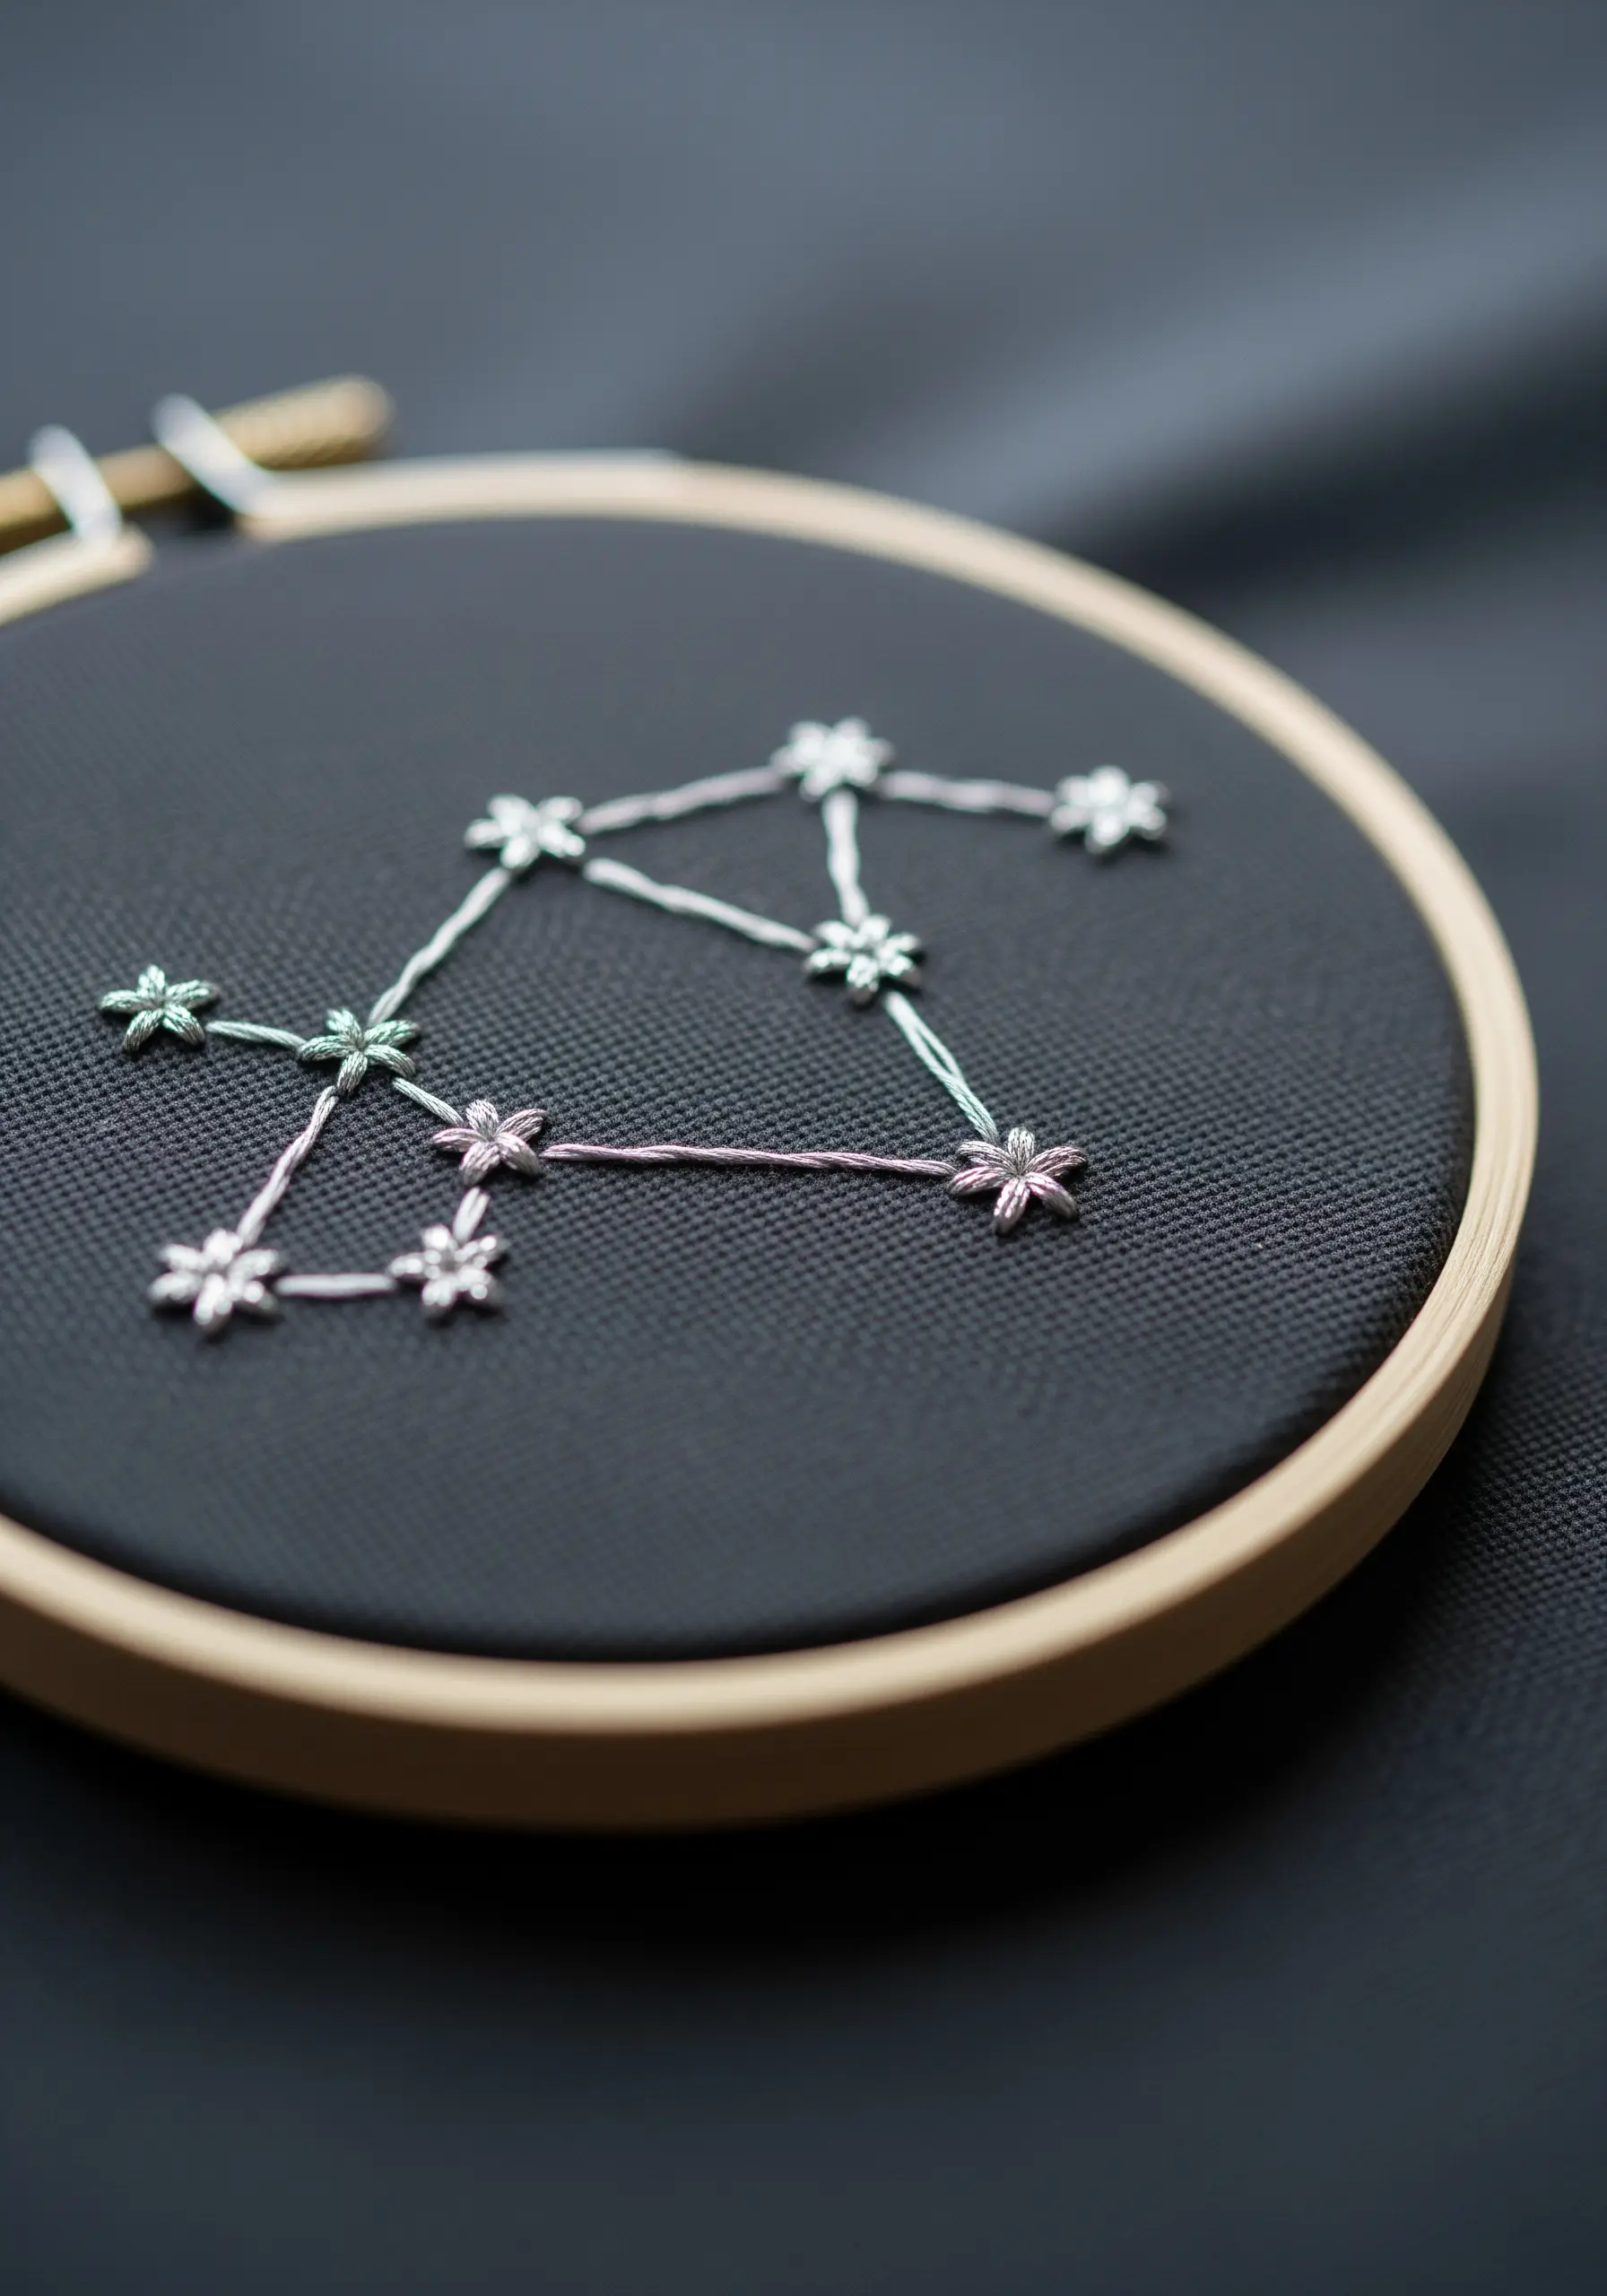
Create a striking celestial design by stitching with light thread on dark fabric. The high contrast makes the motif pop.
Use a simple star stitch for each point in the constellation. Connect them with a single, delicate strand of thread using a backstitch to keep the lines crisp and clean.
For an extra touch of magic, try using a metallic or glow-in-the-dark floss. This simple choice transforms the piece into a truly special work of framed embroidery art.
20. Use Padding for Plump, Realistic Berries
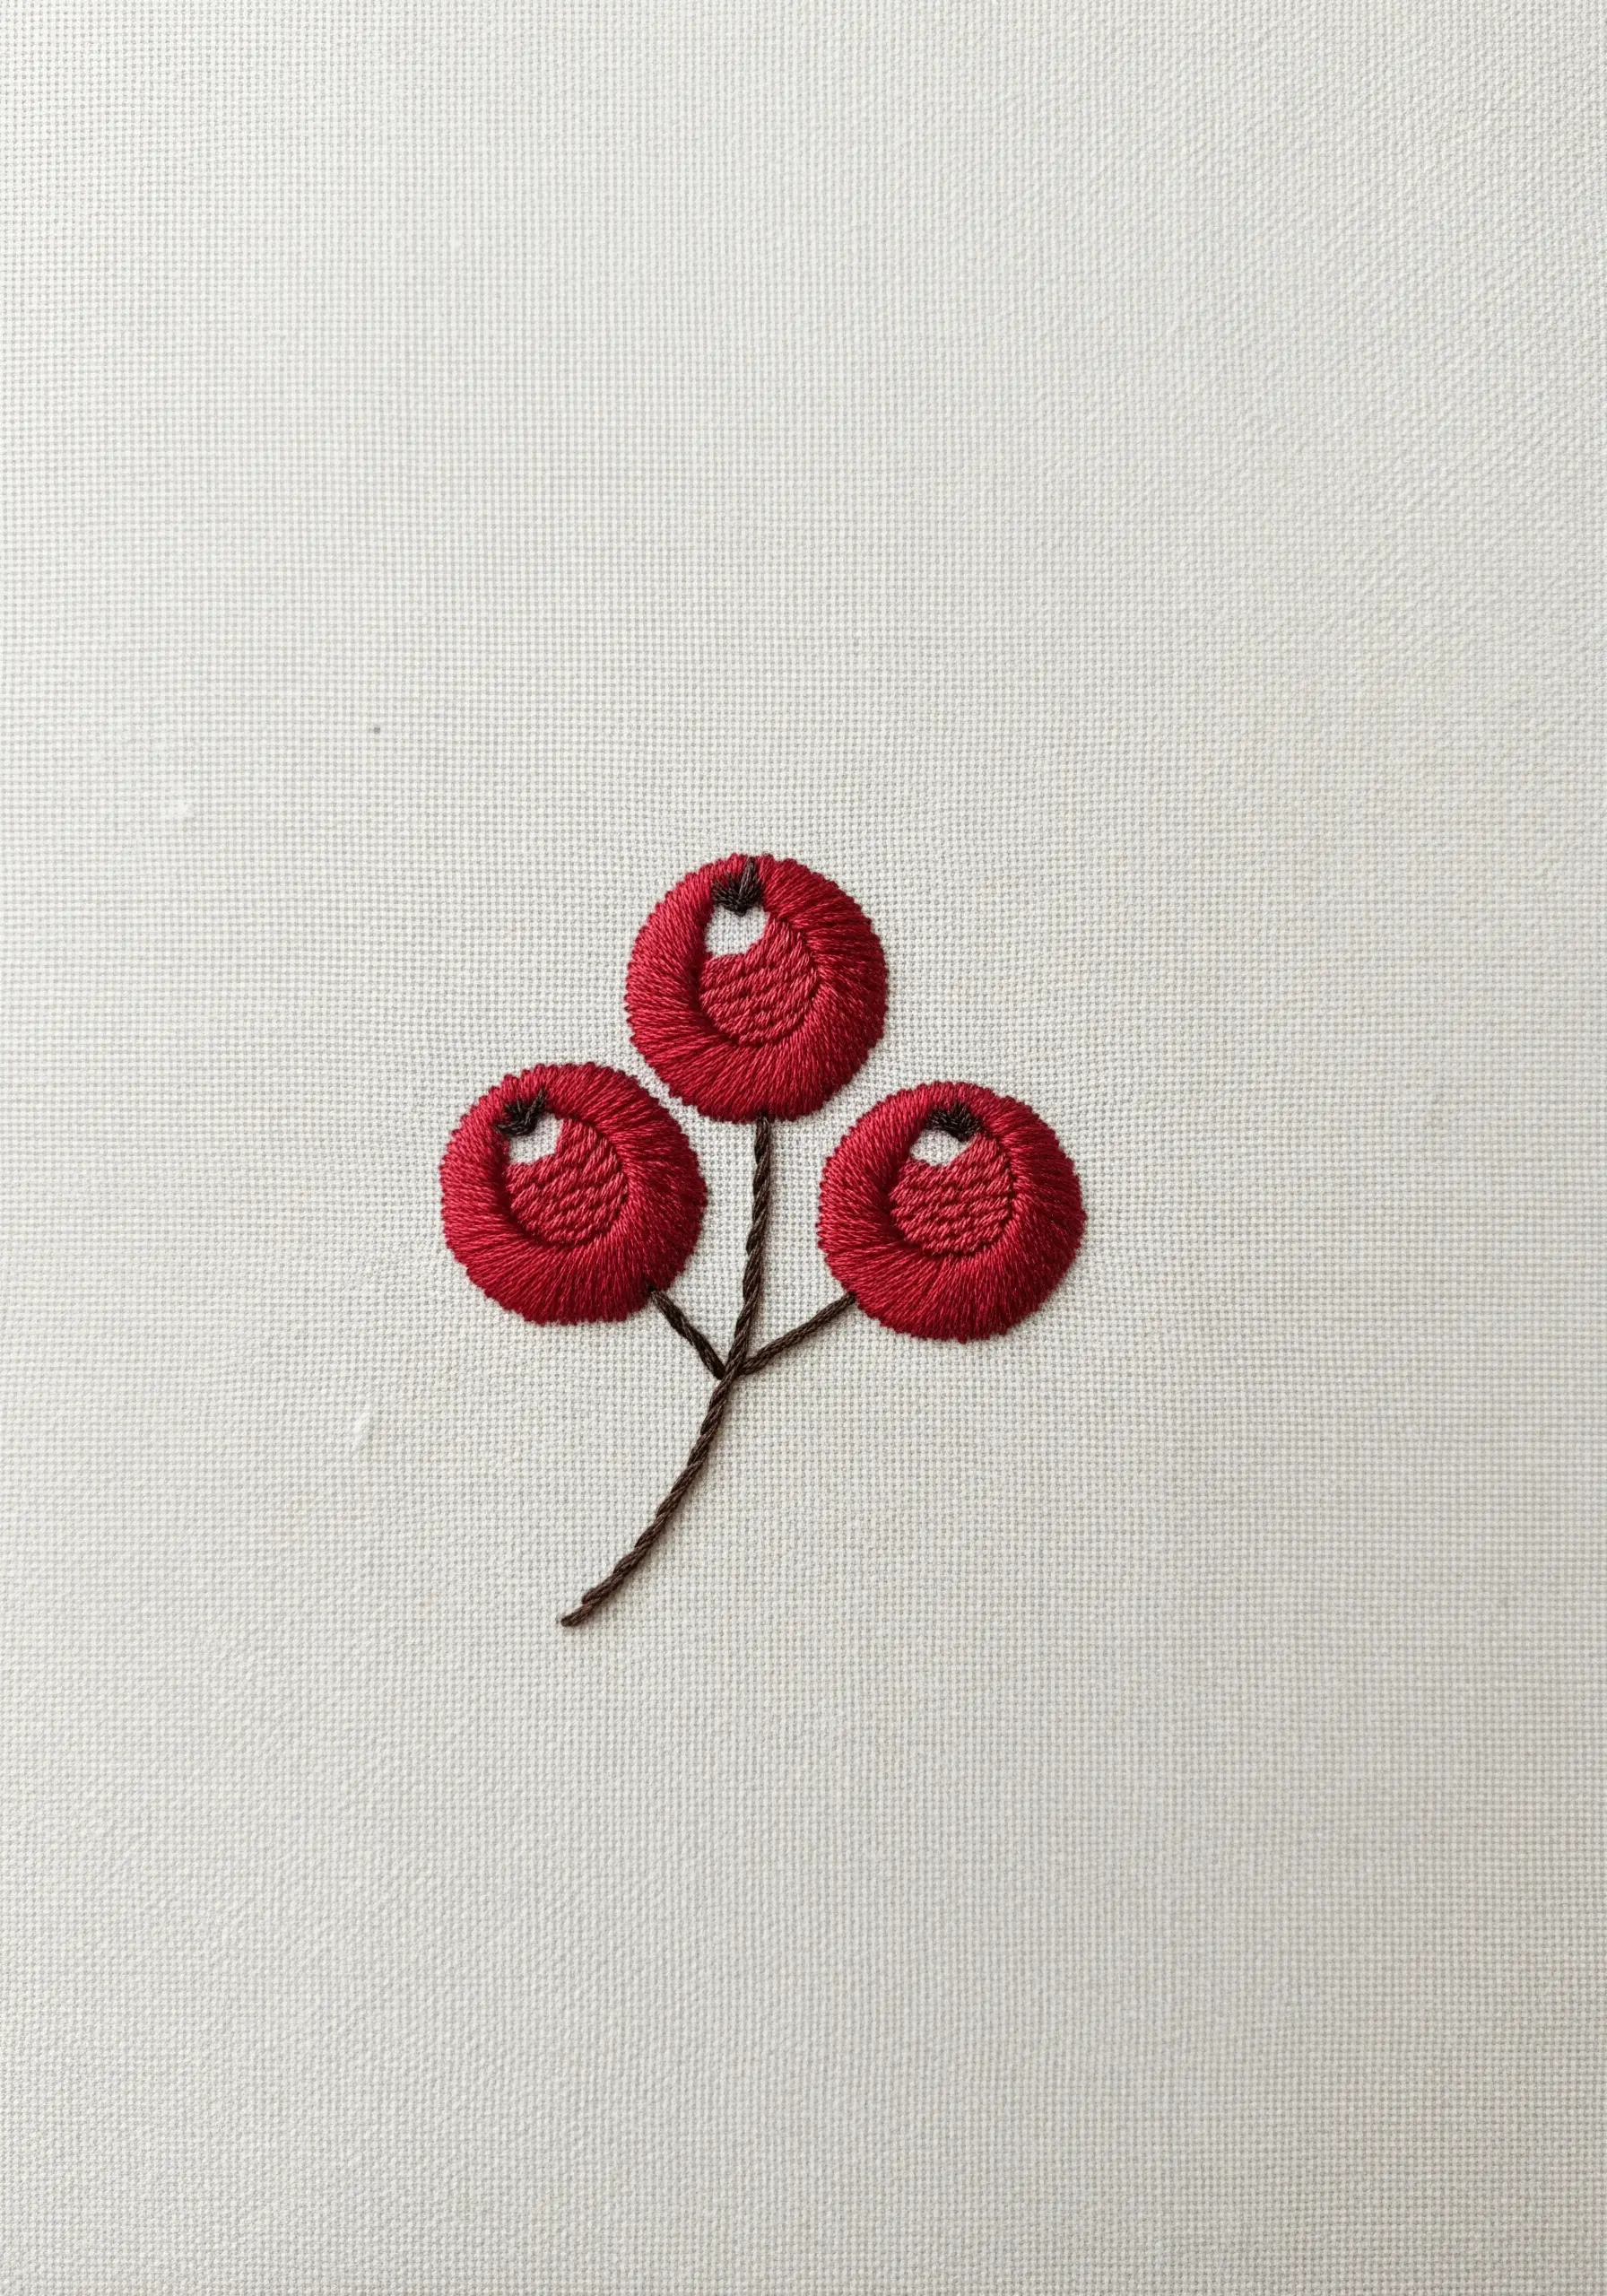
To make your embroidered berries look round and full, use a technique called padded satin stitch.
First, create a small under-layer of stitches within your berry shape. These don’t need to be neat. Then, cover this padding with your final, smooth satin stitches, working in the opposite direction.
This padding lifts the top layer of thread, creating a raised, three-dimensional effect that makes the berries look plump enough to pick.
21. Combine Simple Stitches for Intricate Detail
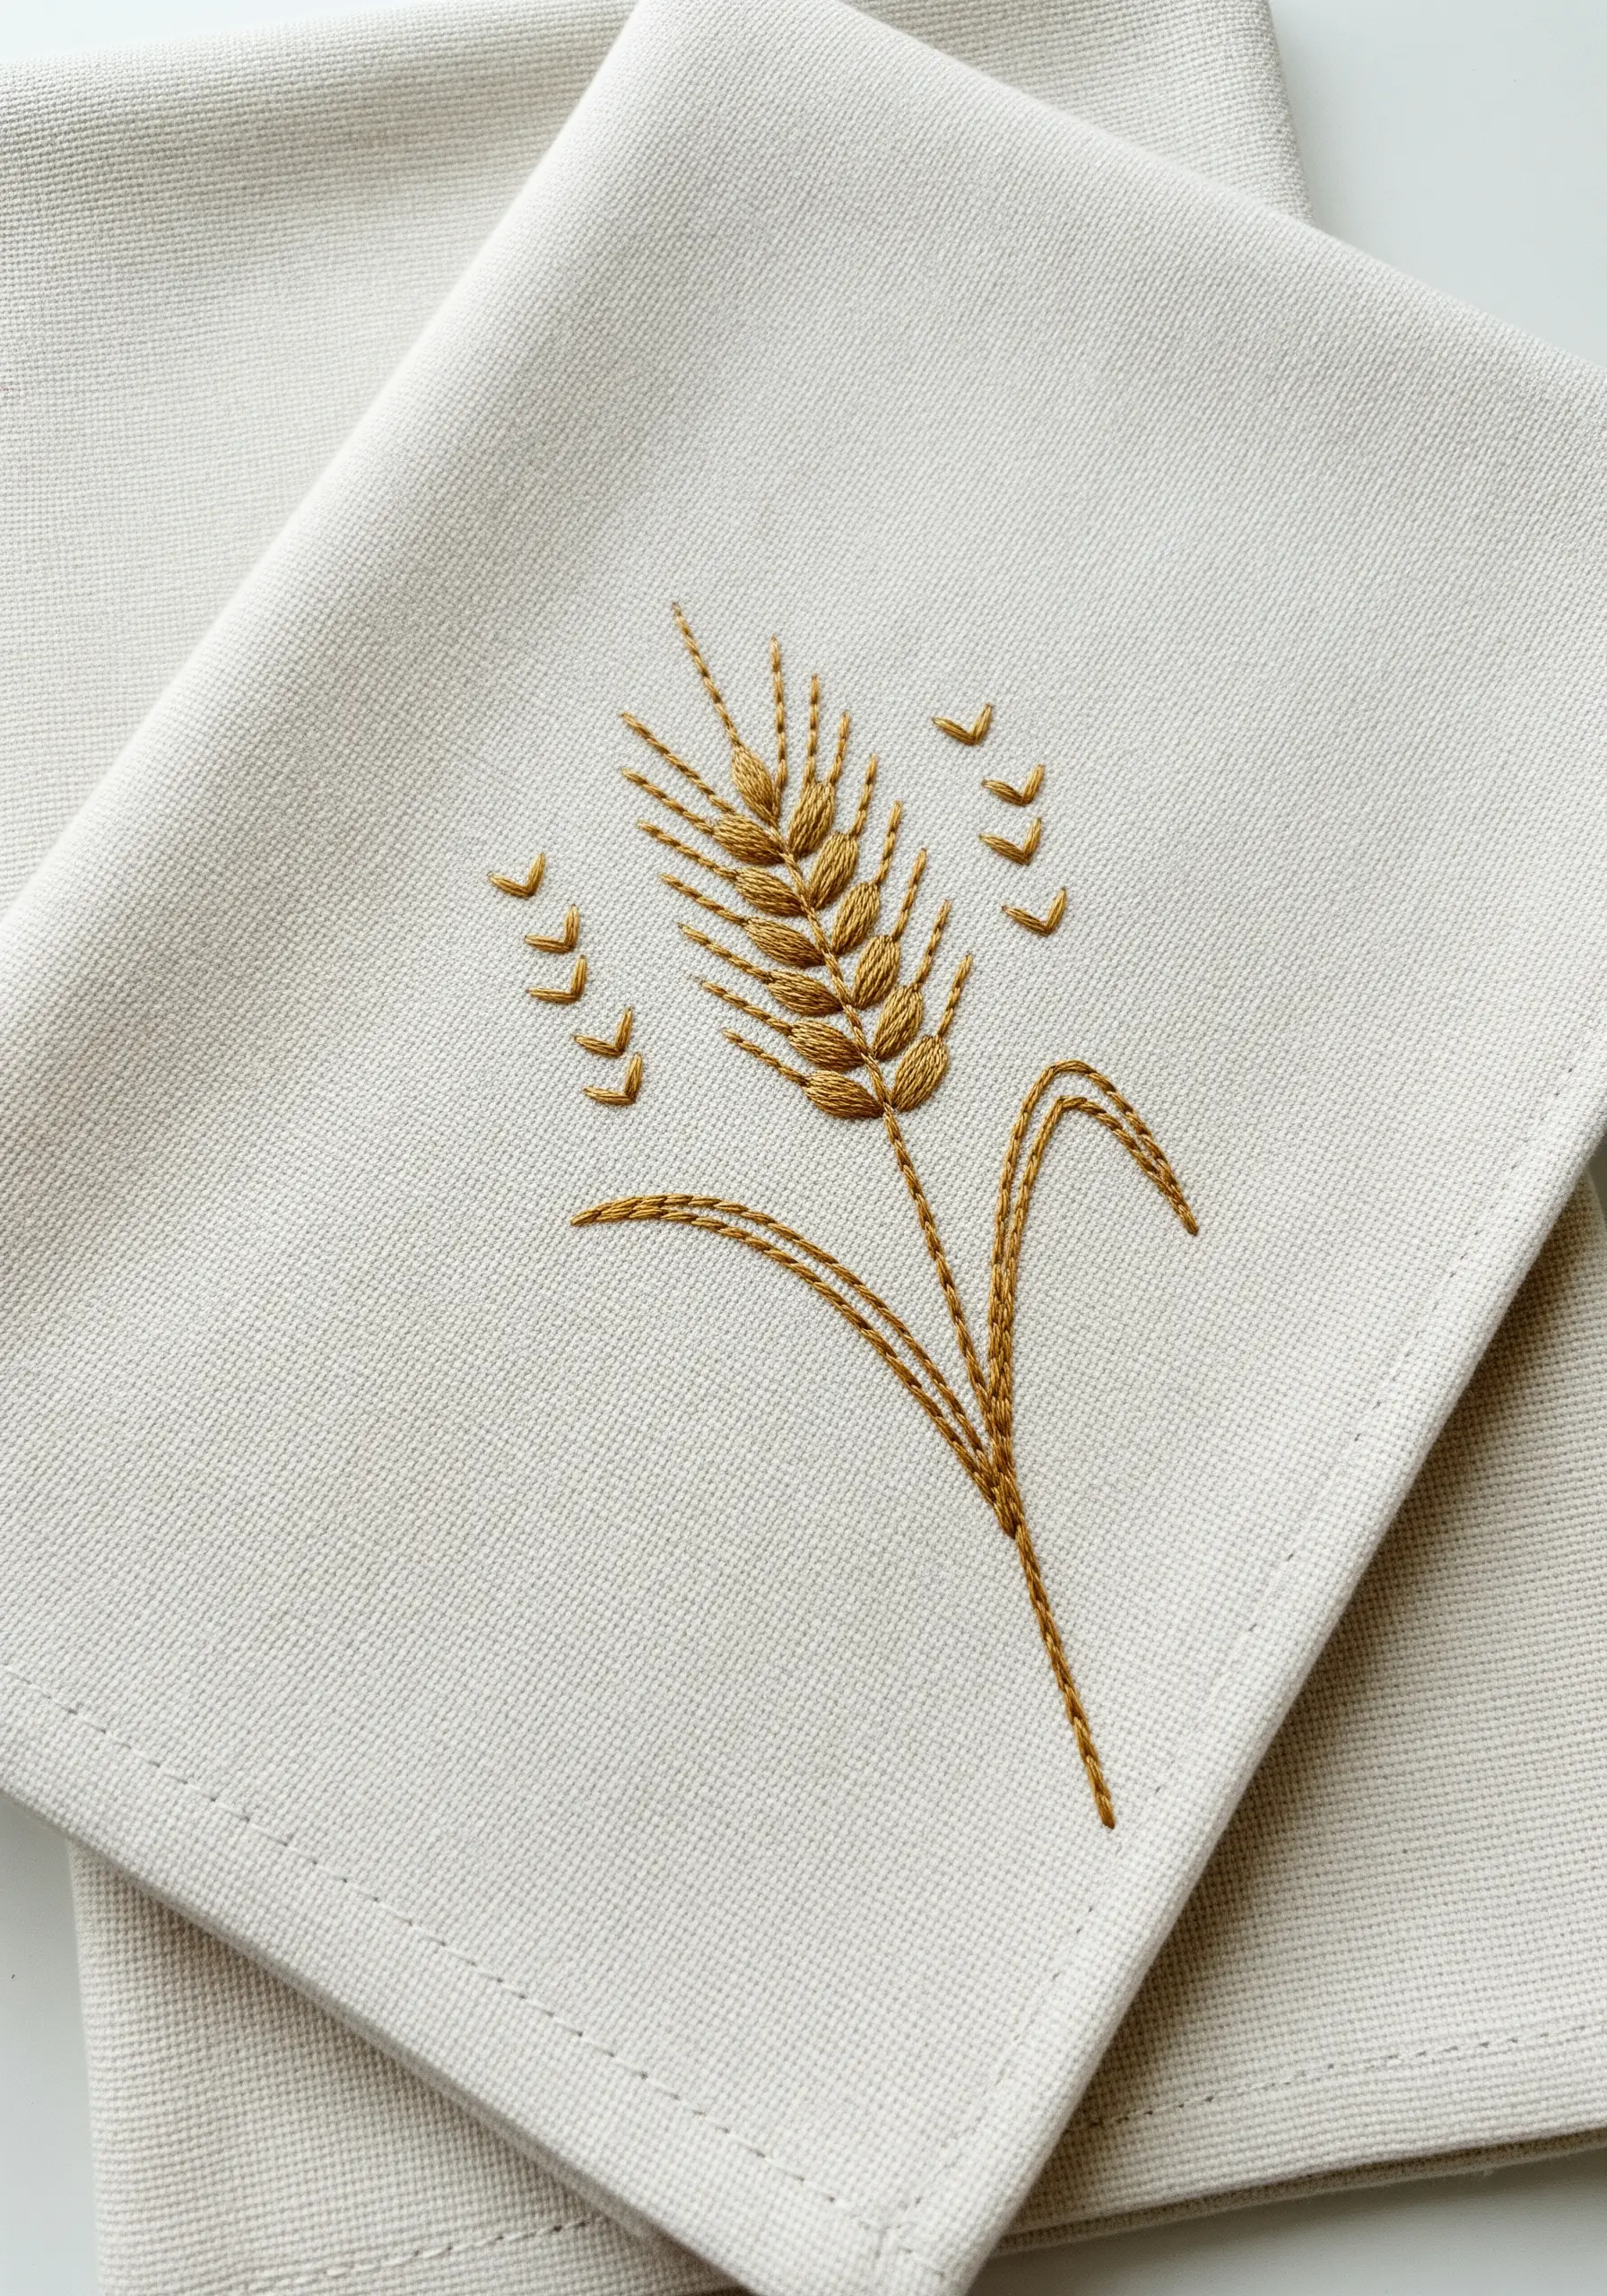
This elegant stalk of wheat looks complex, but it’s built from some of the most basic stitches.
Use a stem stitch for the main stalk to give it a sturdy, rounded appearance. Each grain is a single lazy daisy stitch or a small fishbone stitch.
The fine, airy bristles are created with delicate, long straight stitches. It’s a perfect example of how combining simple stitches can result in a detailed and sophisticated motif.
22. Achieve Precision with Geometric Satin Stitch
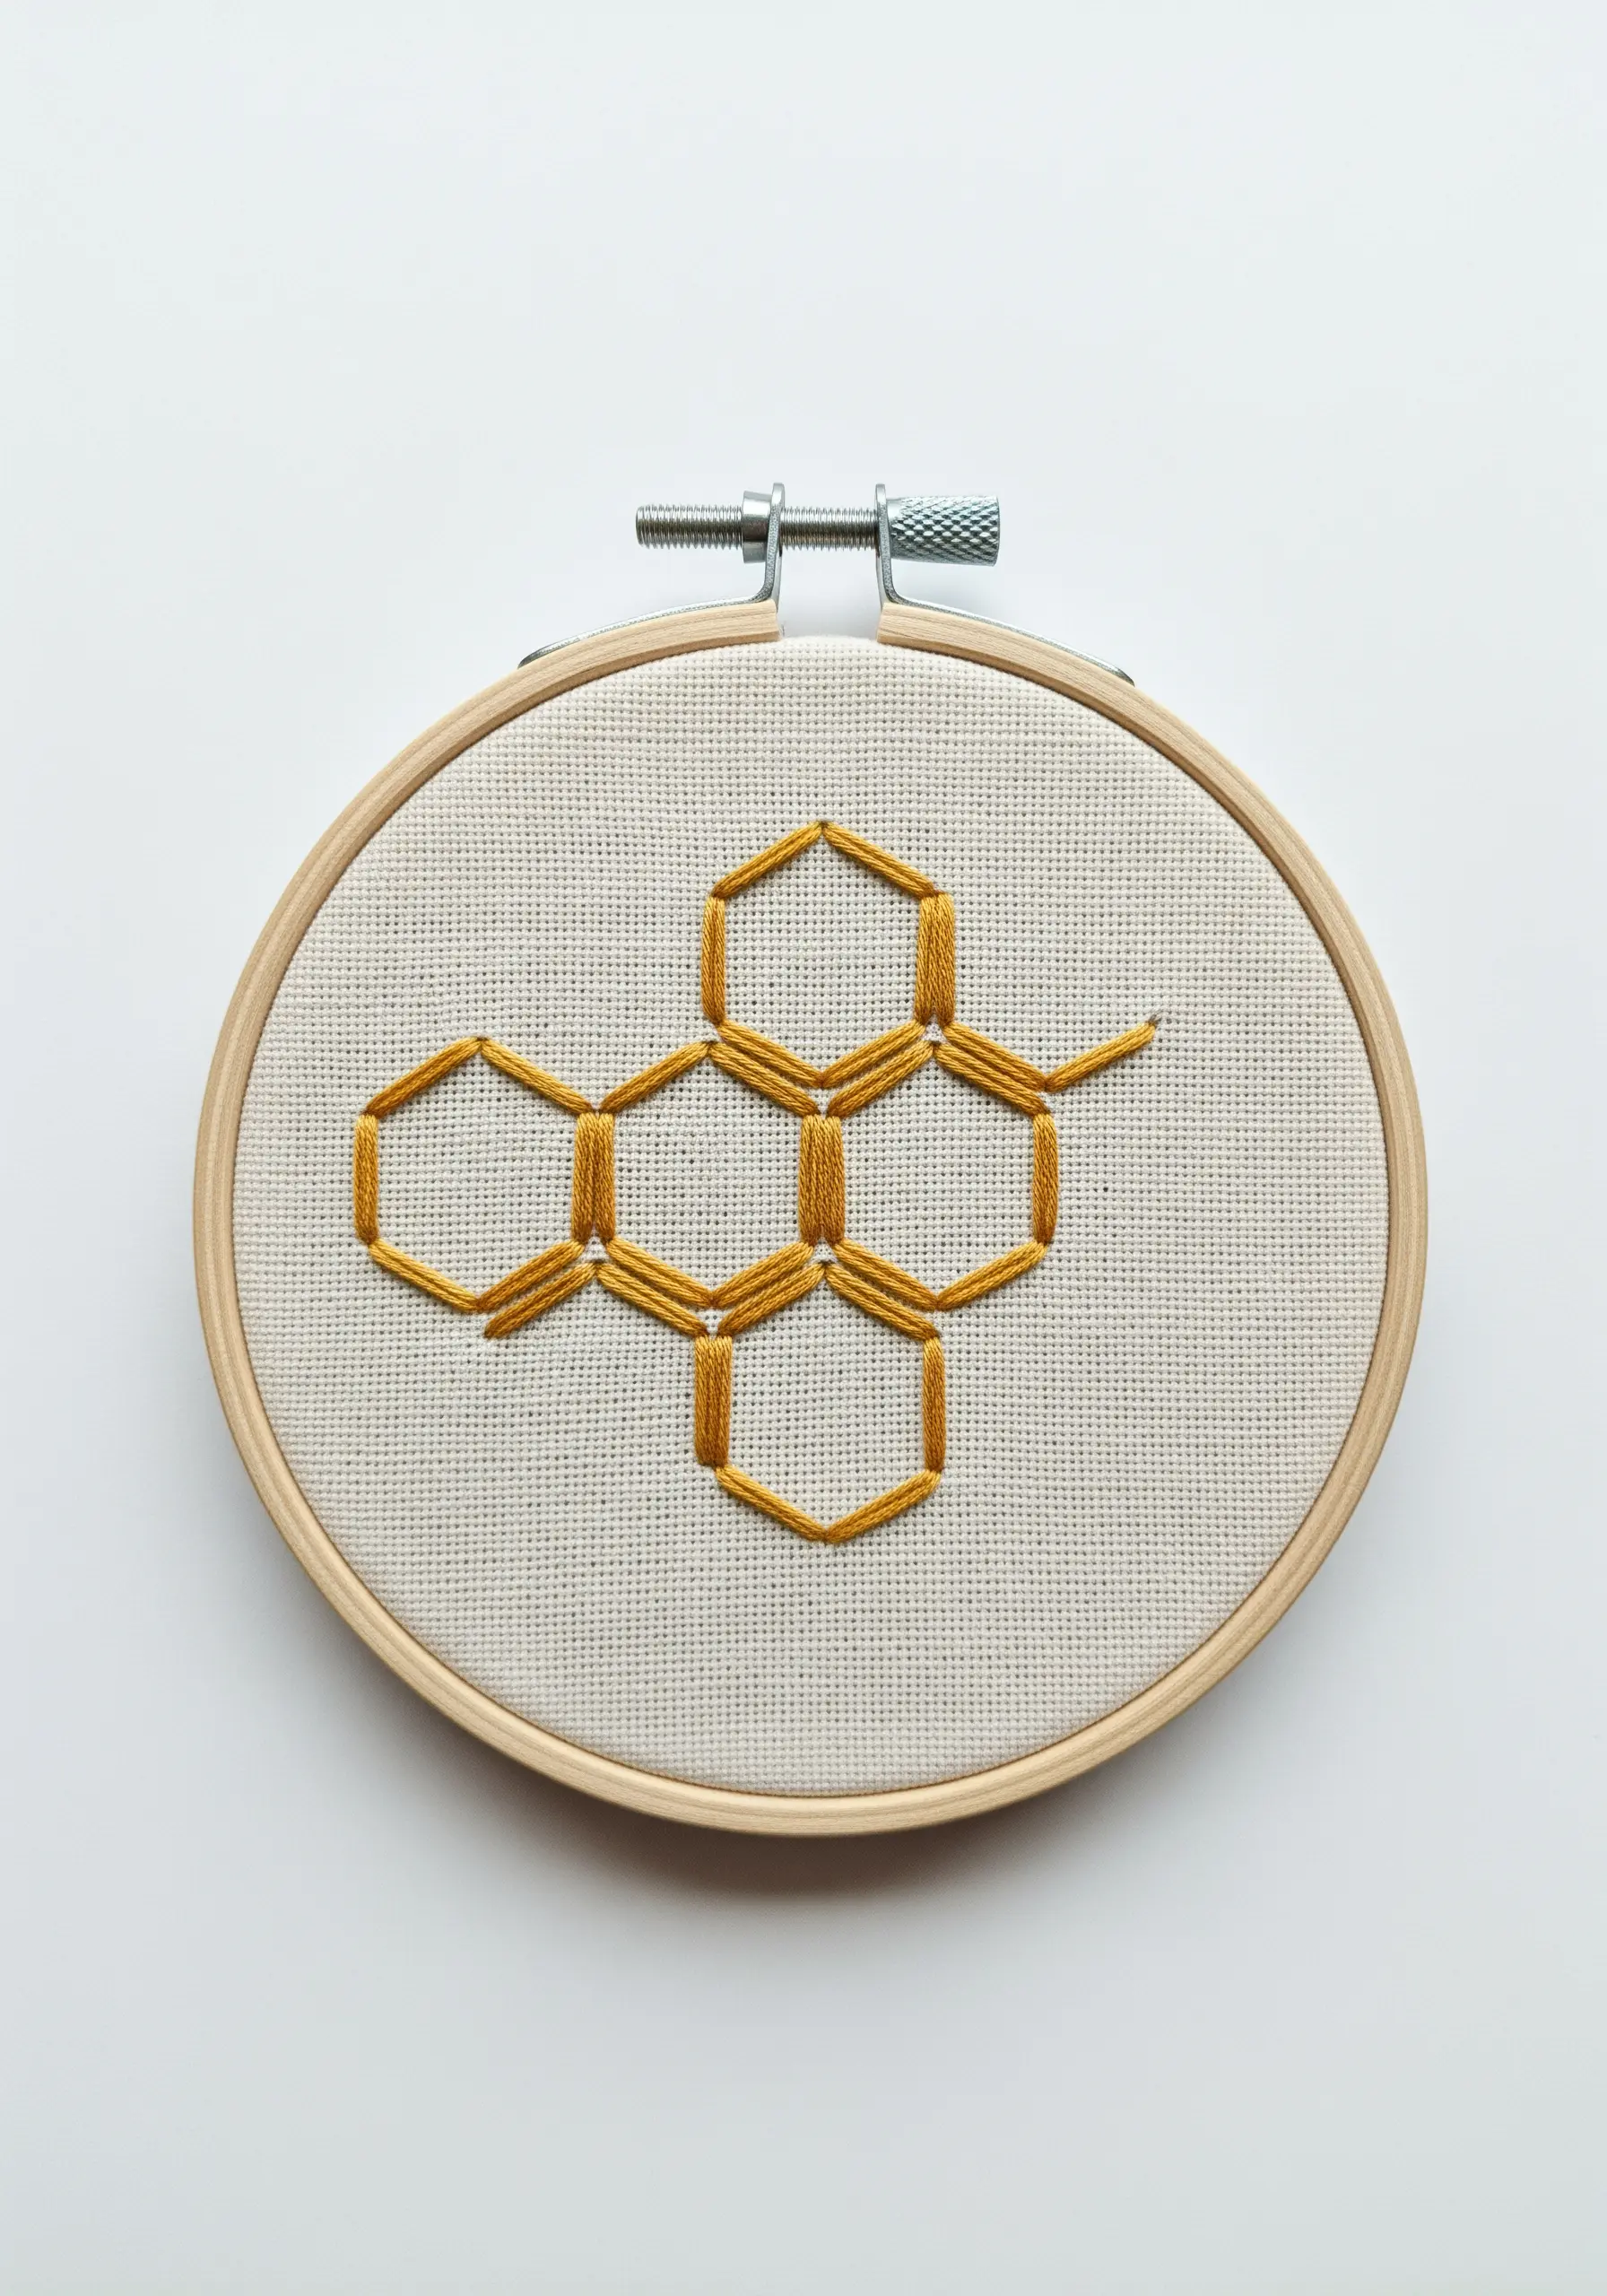
A geometric pattern like a honeycomb demands precision. Your goal is to make each satin-stitched section clean and uniform.
Lightly draw the honeycomb grid onto your fabric with a water-soluble or heat-erasable pen before you begin.
Keep your stitches perfectly parallel and ensure they go from edge to edge of each shape. The beauty of this design lies in its sharp lines and flawless fill.
This approach is perfect for minimalist stitched ideas where precision is key.


