

You sit with your needle and thread, ready to create something beautiful, but you feel a gap between the vision in your mind and the stitches on the fabric. You’re looking for that shift—the one that turns a simple hobby into intentional, polished art that truly feels like you.
The secret isn’t in mastering hundreds of complex stitches or buying expensive supplies. It lies in small, deliberate choices: adjusting your thread weight, embracing negative space, or pairing an unexpected texture with a simple line. It’s about how you use a stitch, not just which one you choose.
Here, you won’t find fleeting trends. Instead, you’ll discover 20 foundational ideas that empower you to make those choices with confidence. Each one is a simple adjustment that offers a significant, visible impact, helping you create decor that is not just handmade, but artfully made.
1. The Art of the Unbroken Line
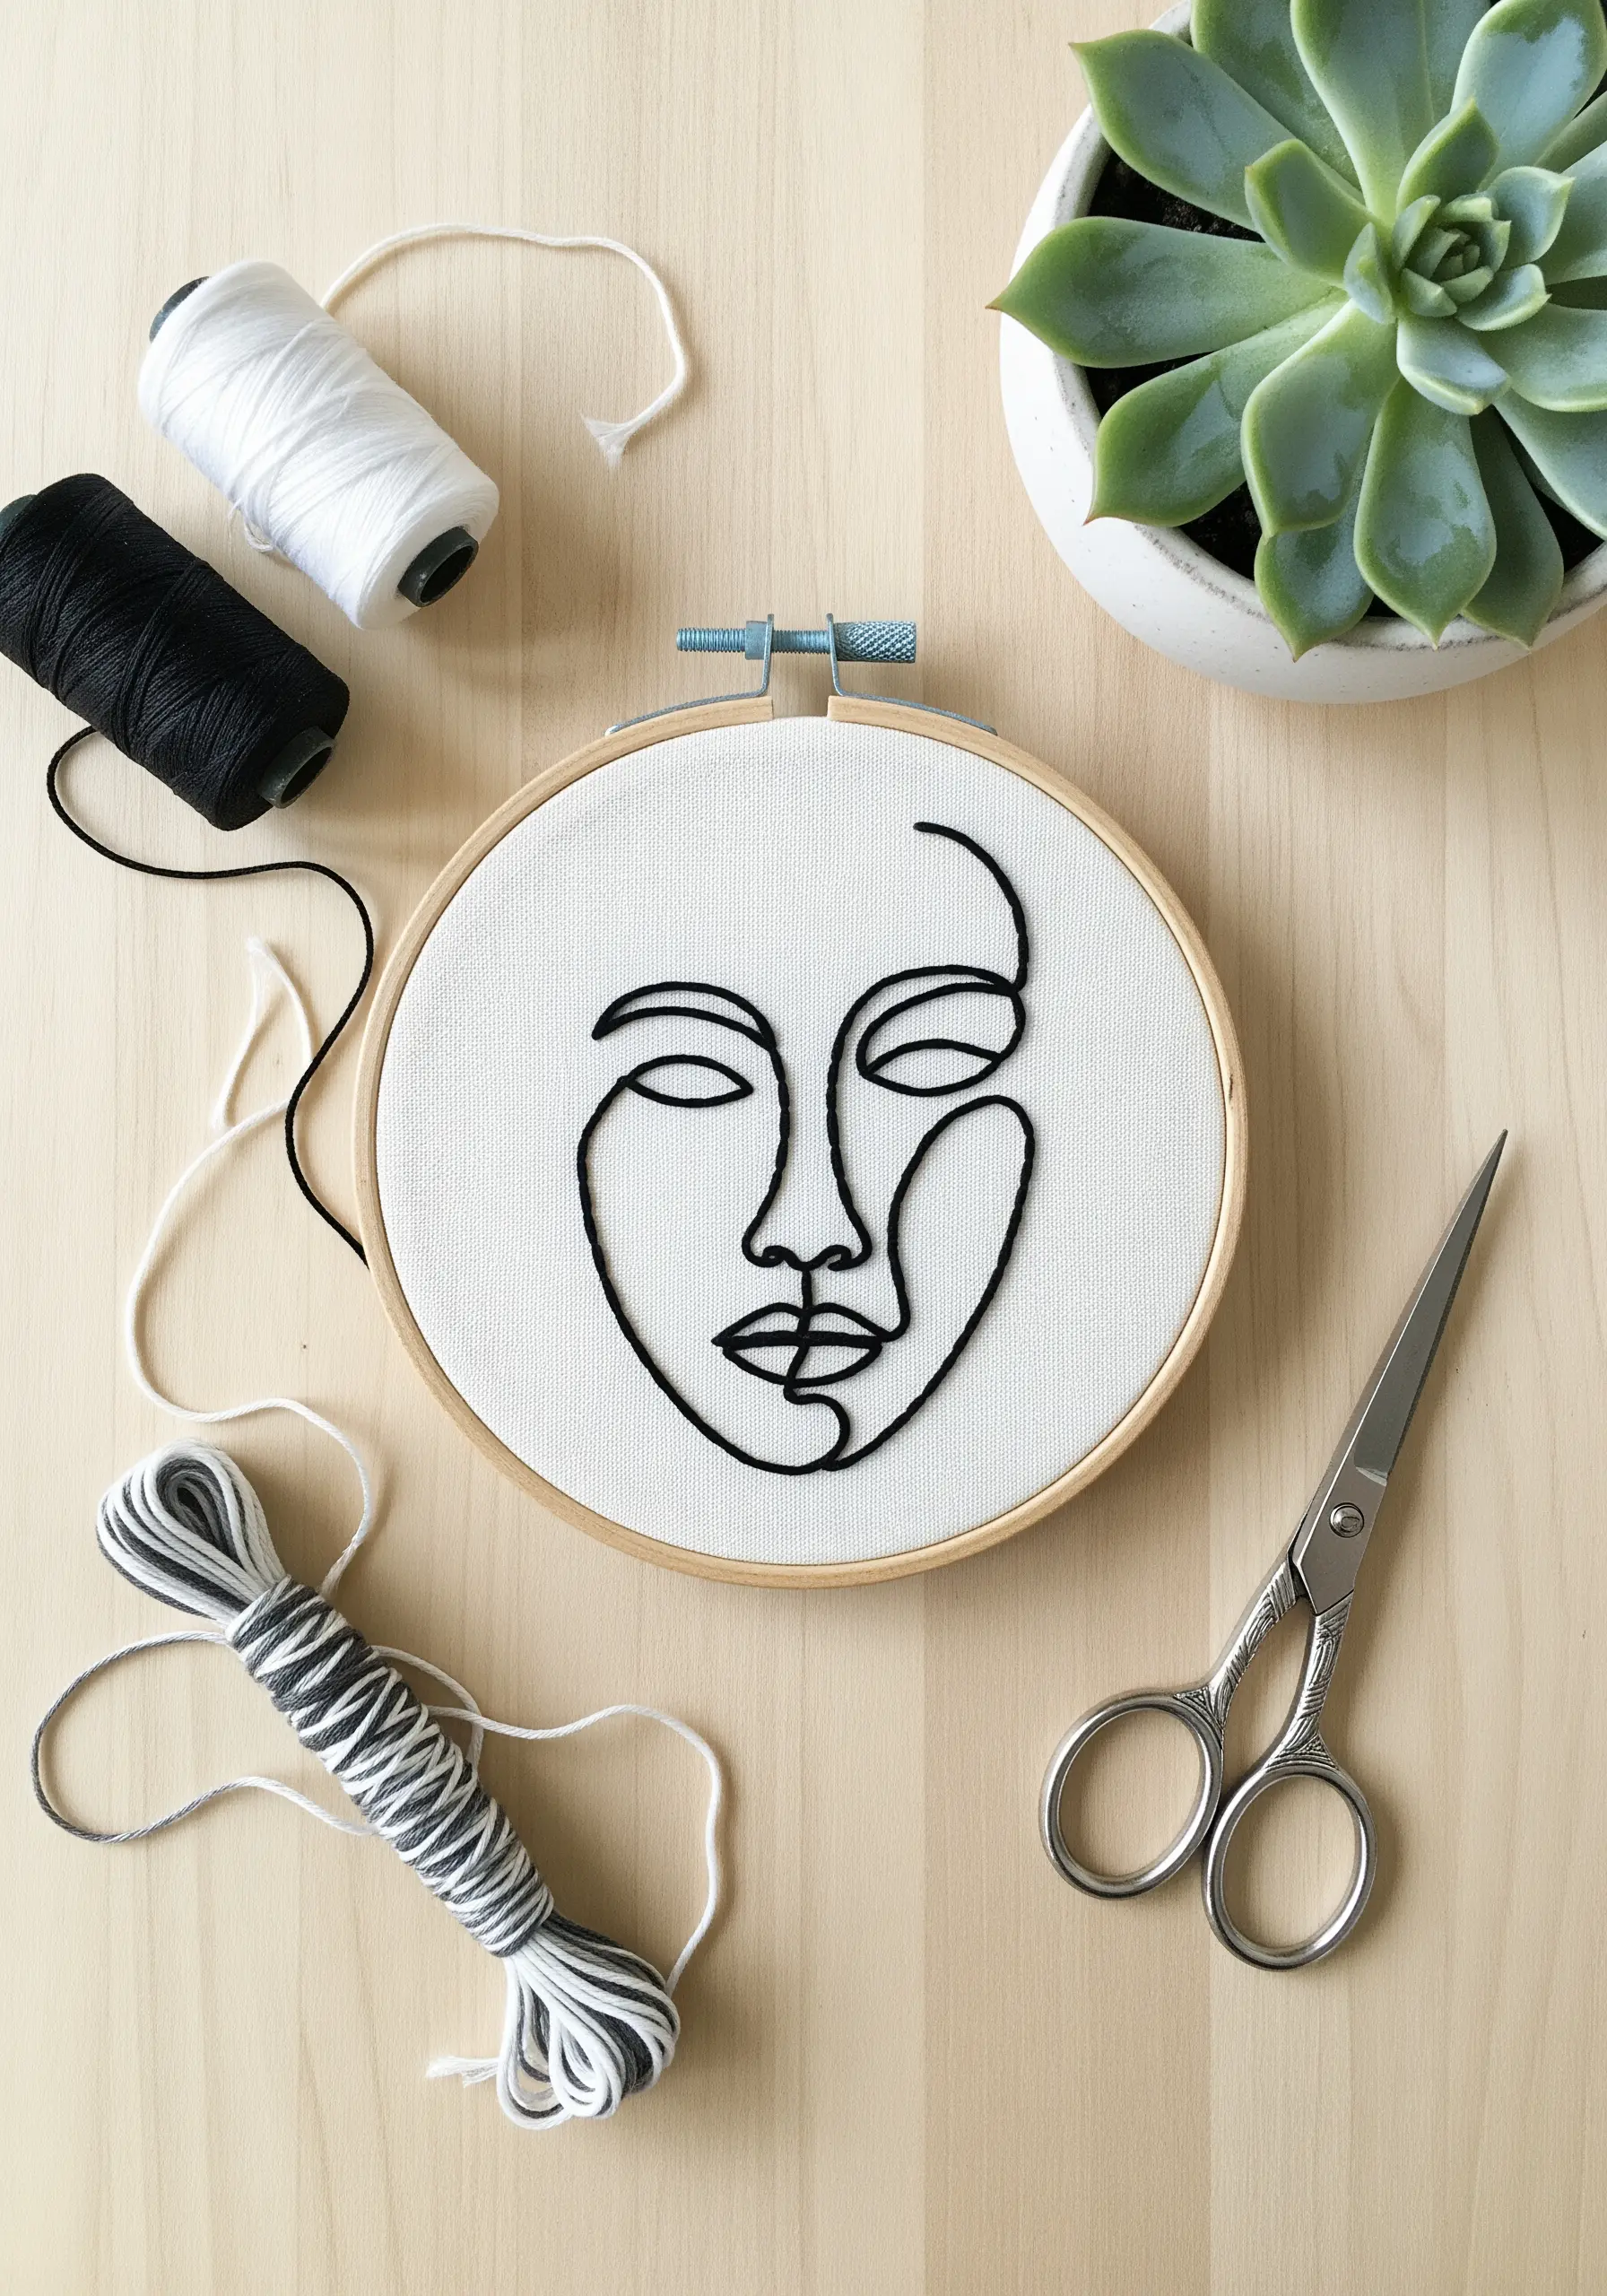
To create a fluid, continuous line, trace your design with a thick yarn or multiple strands of floss held together.
Secure it to the fabric using a couching stitch—small, discreet tacking stitches made with a finer thread in a matching color.
This technique gives you a perfectly uniform thickness that’s difficult to achieve with traditional outline stitches, creating a bold, graphic statement.
The key is spacing your couching stitches just far enough apart to hold the main thread securely around curves without interrupting its flow, transforming a simple outline into a piece of one-line embroidery wall art.
2. Weave Texture with Geometric Lines
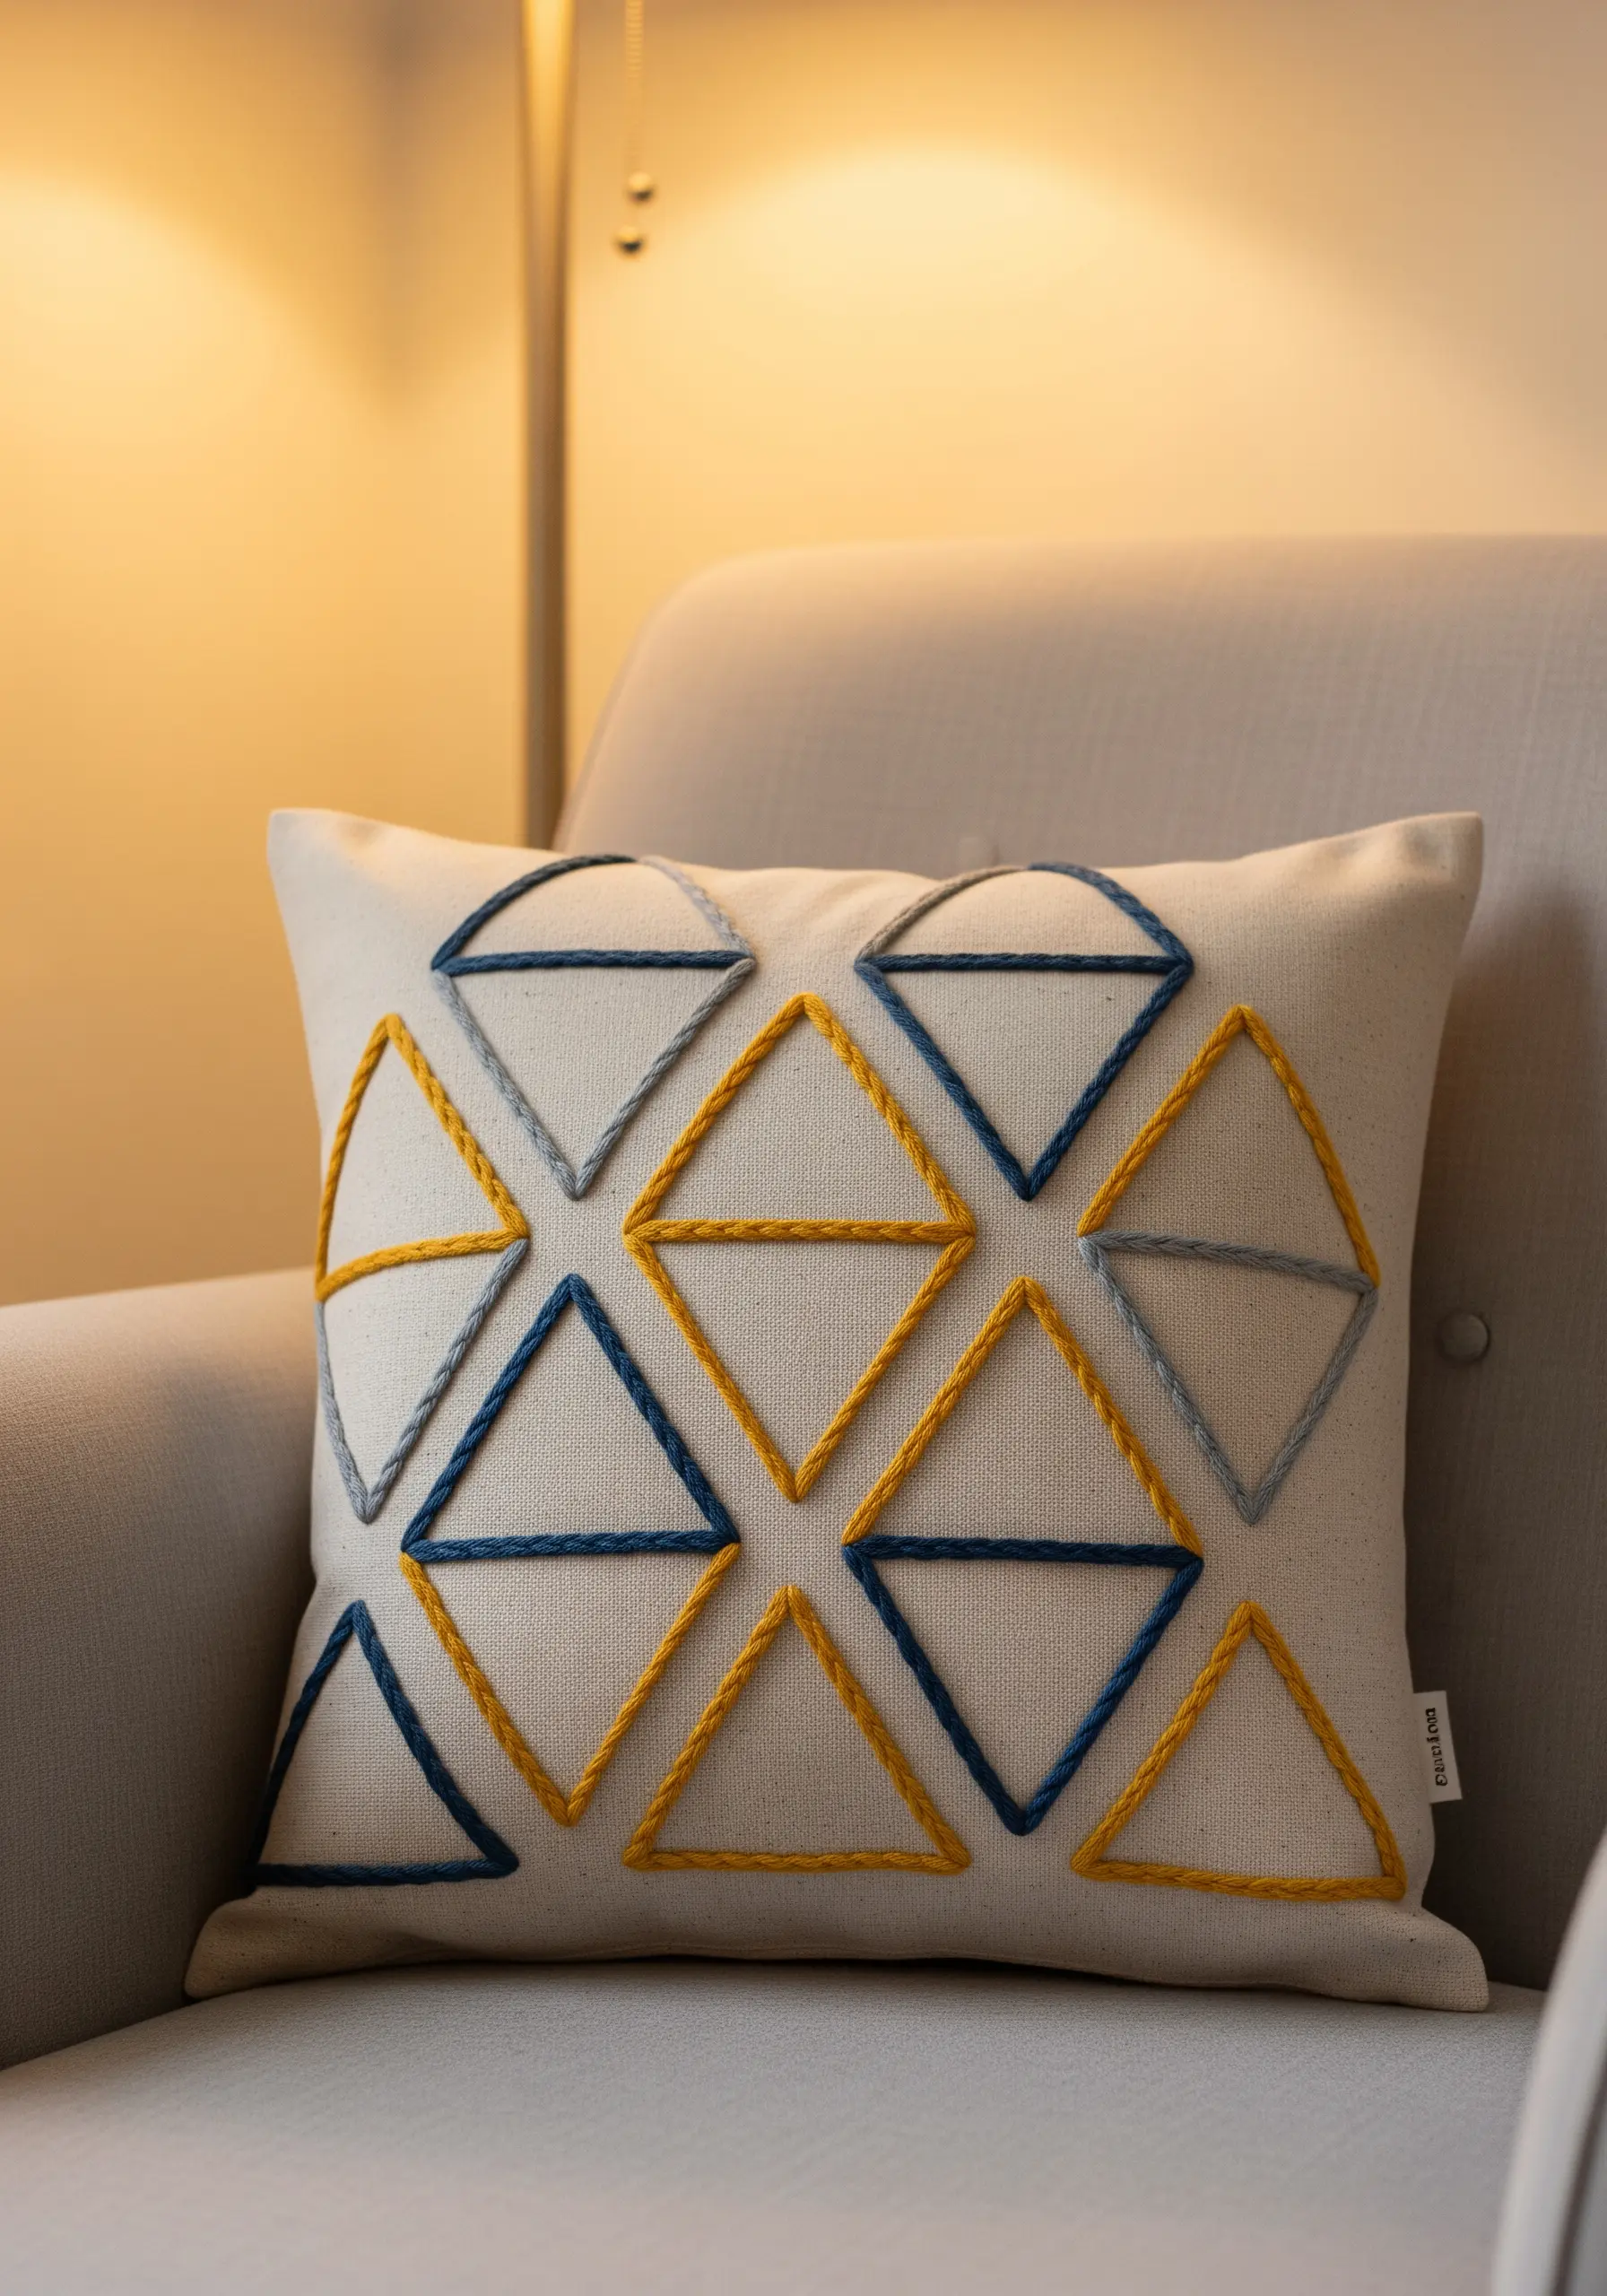
Transform a plain cushion cover with a bold geometric pattern using a heavy-weight thread, like tapestry wool or cotton yarn.
Stitch the design using a raised chain stitch or a whipped backstitch to create a dimensional, rope-like texture that invites touch.
This approach turns simple lines into a tactile element, adding depth and structure to the fabric surface.
The contrast between the soft cushion and the structured stitching makes for a sophisticated, high-impact design without complex fills, turning it into one of your new favorite embroidery cushion pillow ideas.
3. Stitching on Felt for a Polished Finish
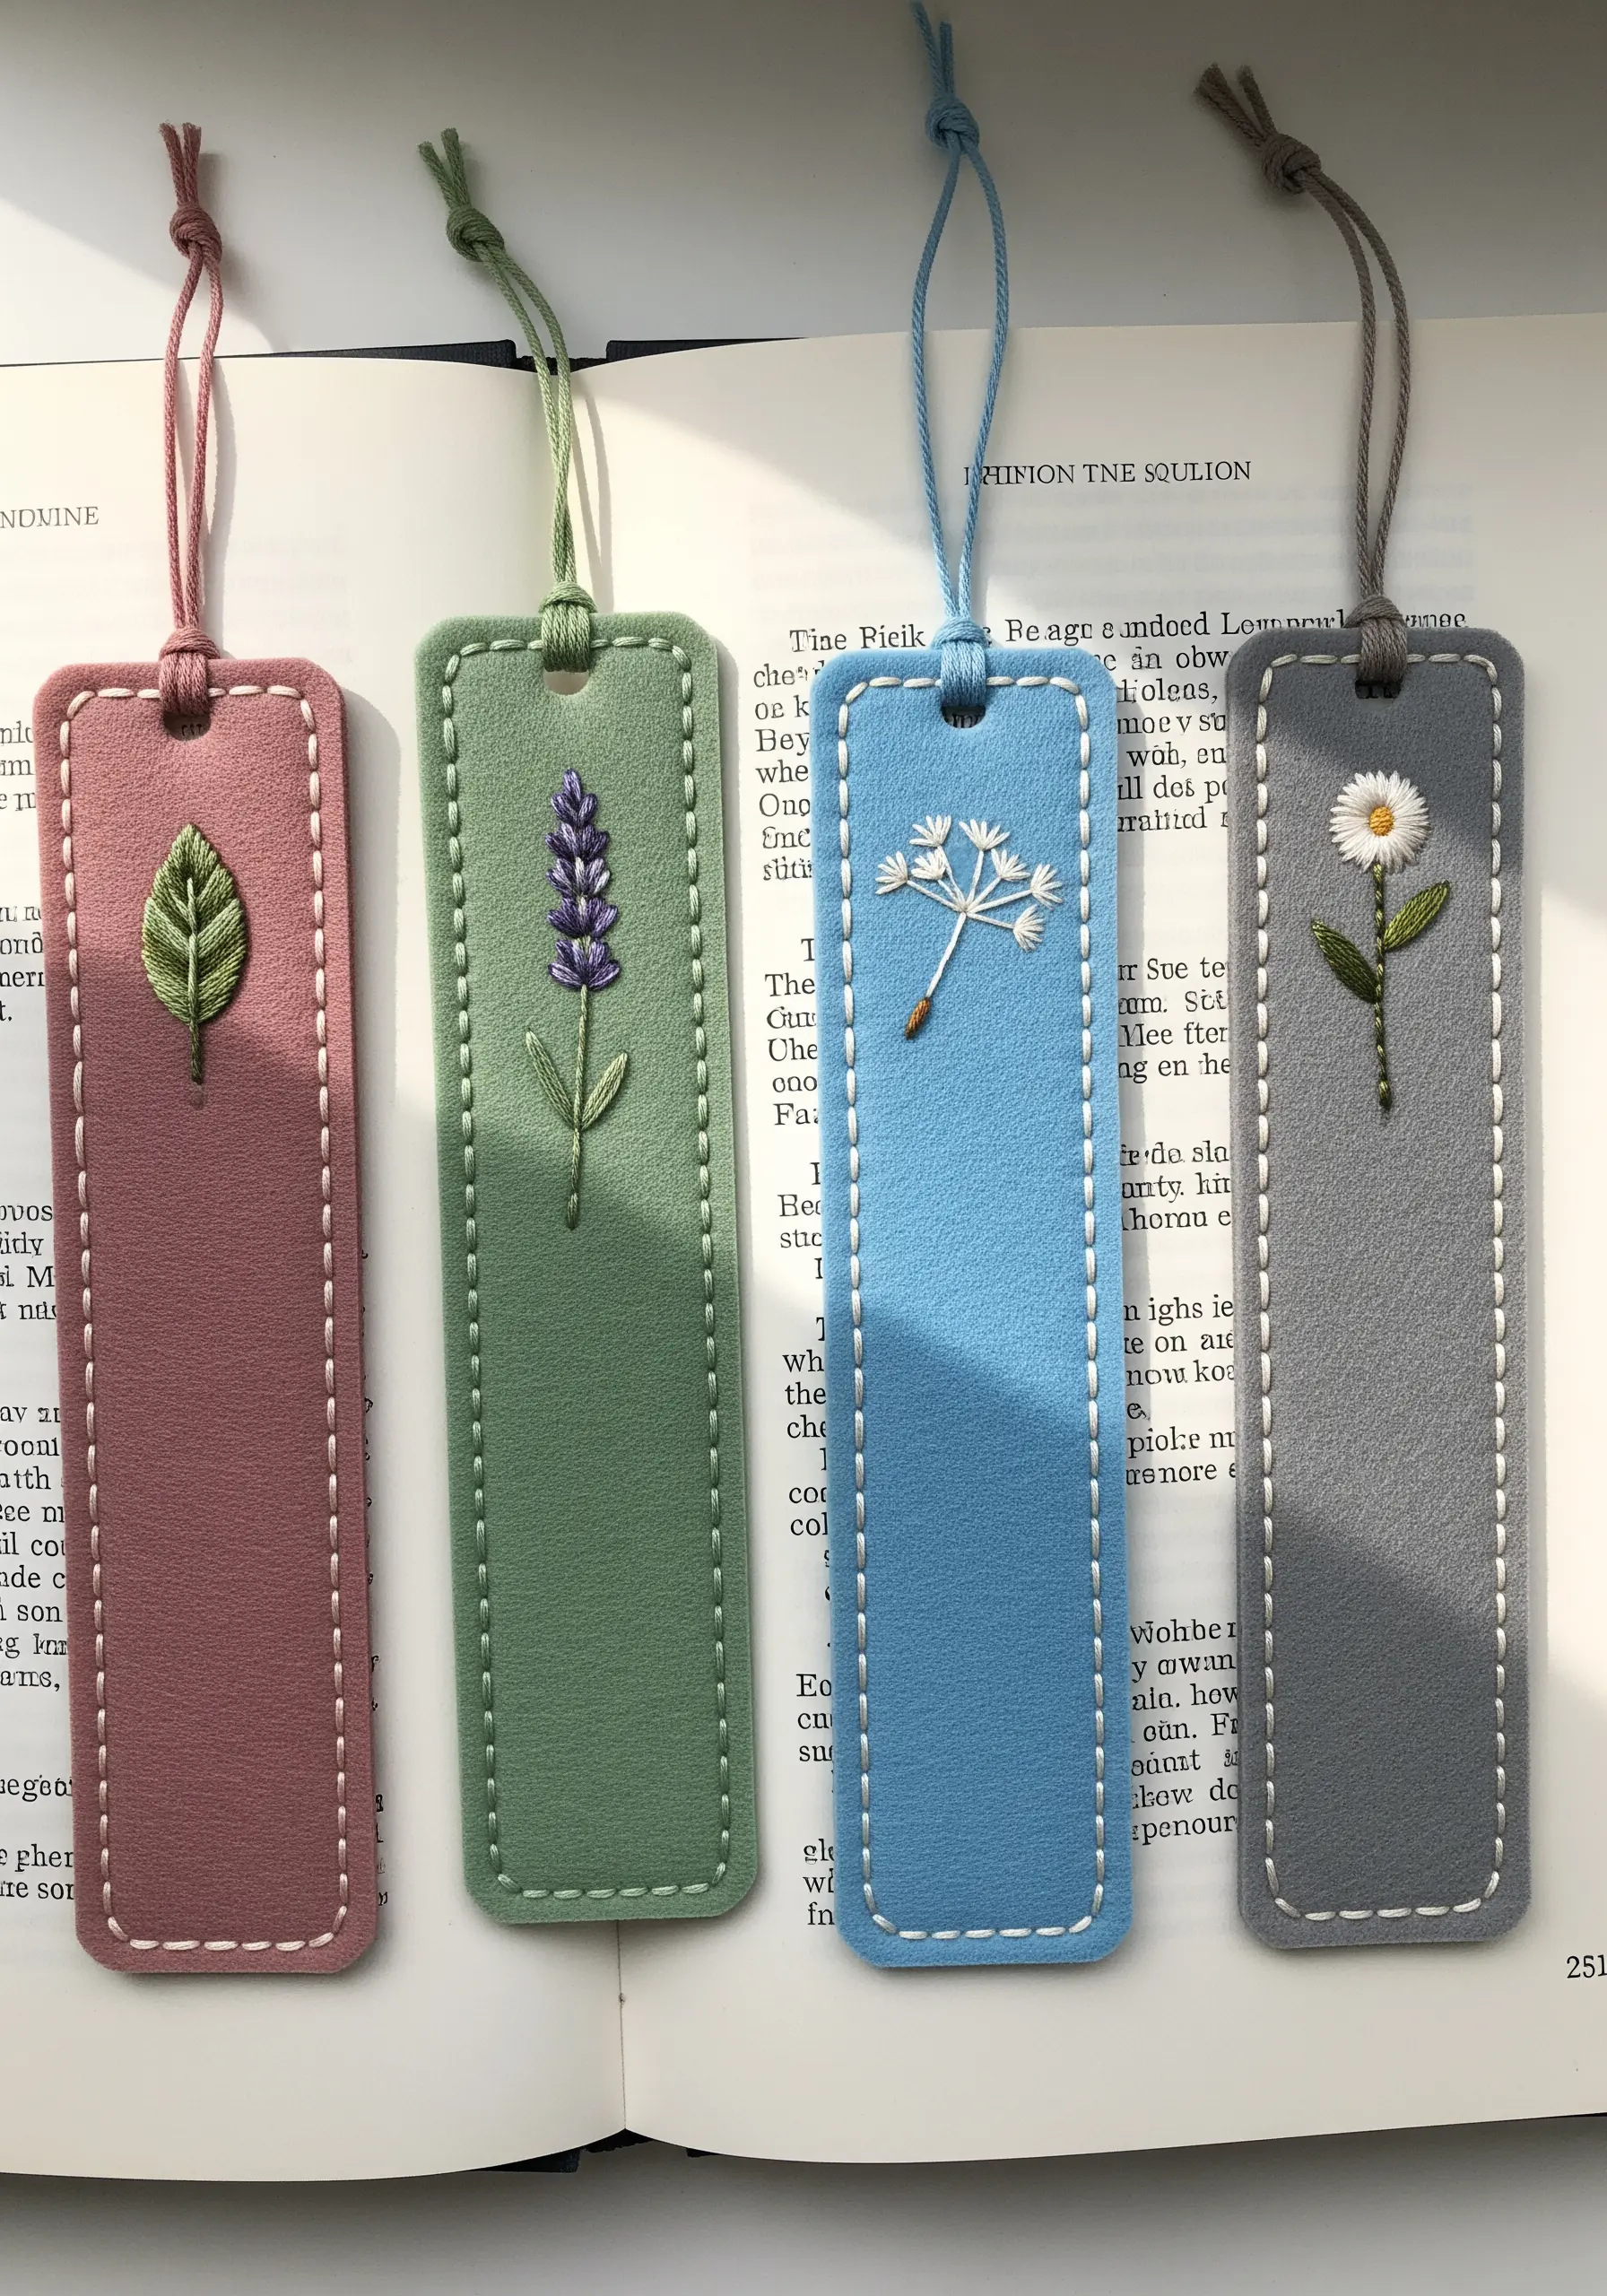
Embroidering on felt or faux suede creates a beautifully soft, non-fraying base for items like bookmarks.
To keep your stitches clean on this thicker material, use a sharp needle and a lightweight stabilizer on the back to prevent distortion.
For the delicate motifs, use just two or three strands of floss for the satin stitch leaves and French knots to maintain clarity.
The matte texture of the felt makes the slight sheen of the cotton floss pop, turning simple items into cozy embroidery bookmarks.
4. Functional Elegance with Minimalist Lines
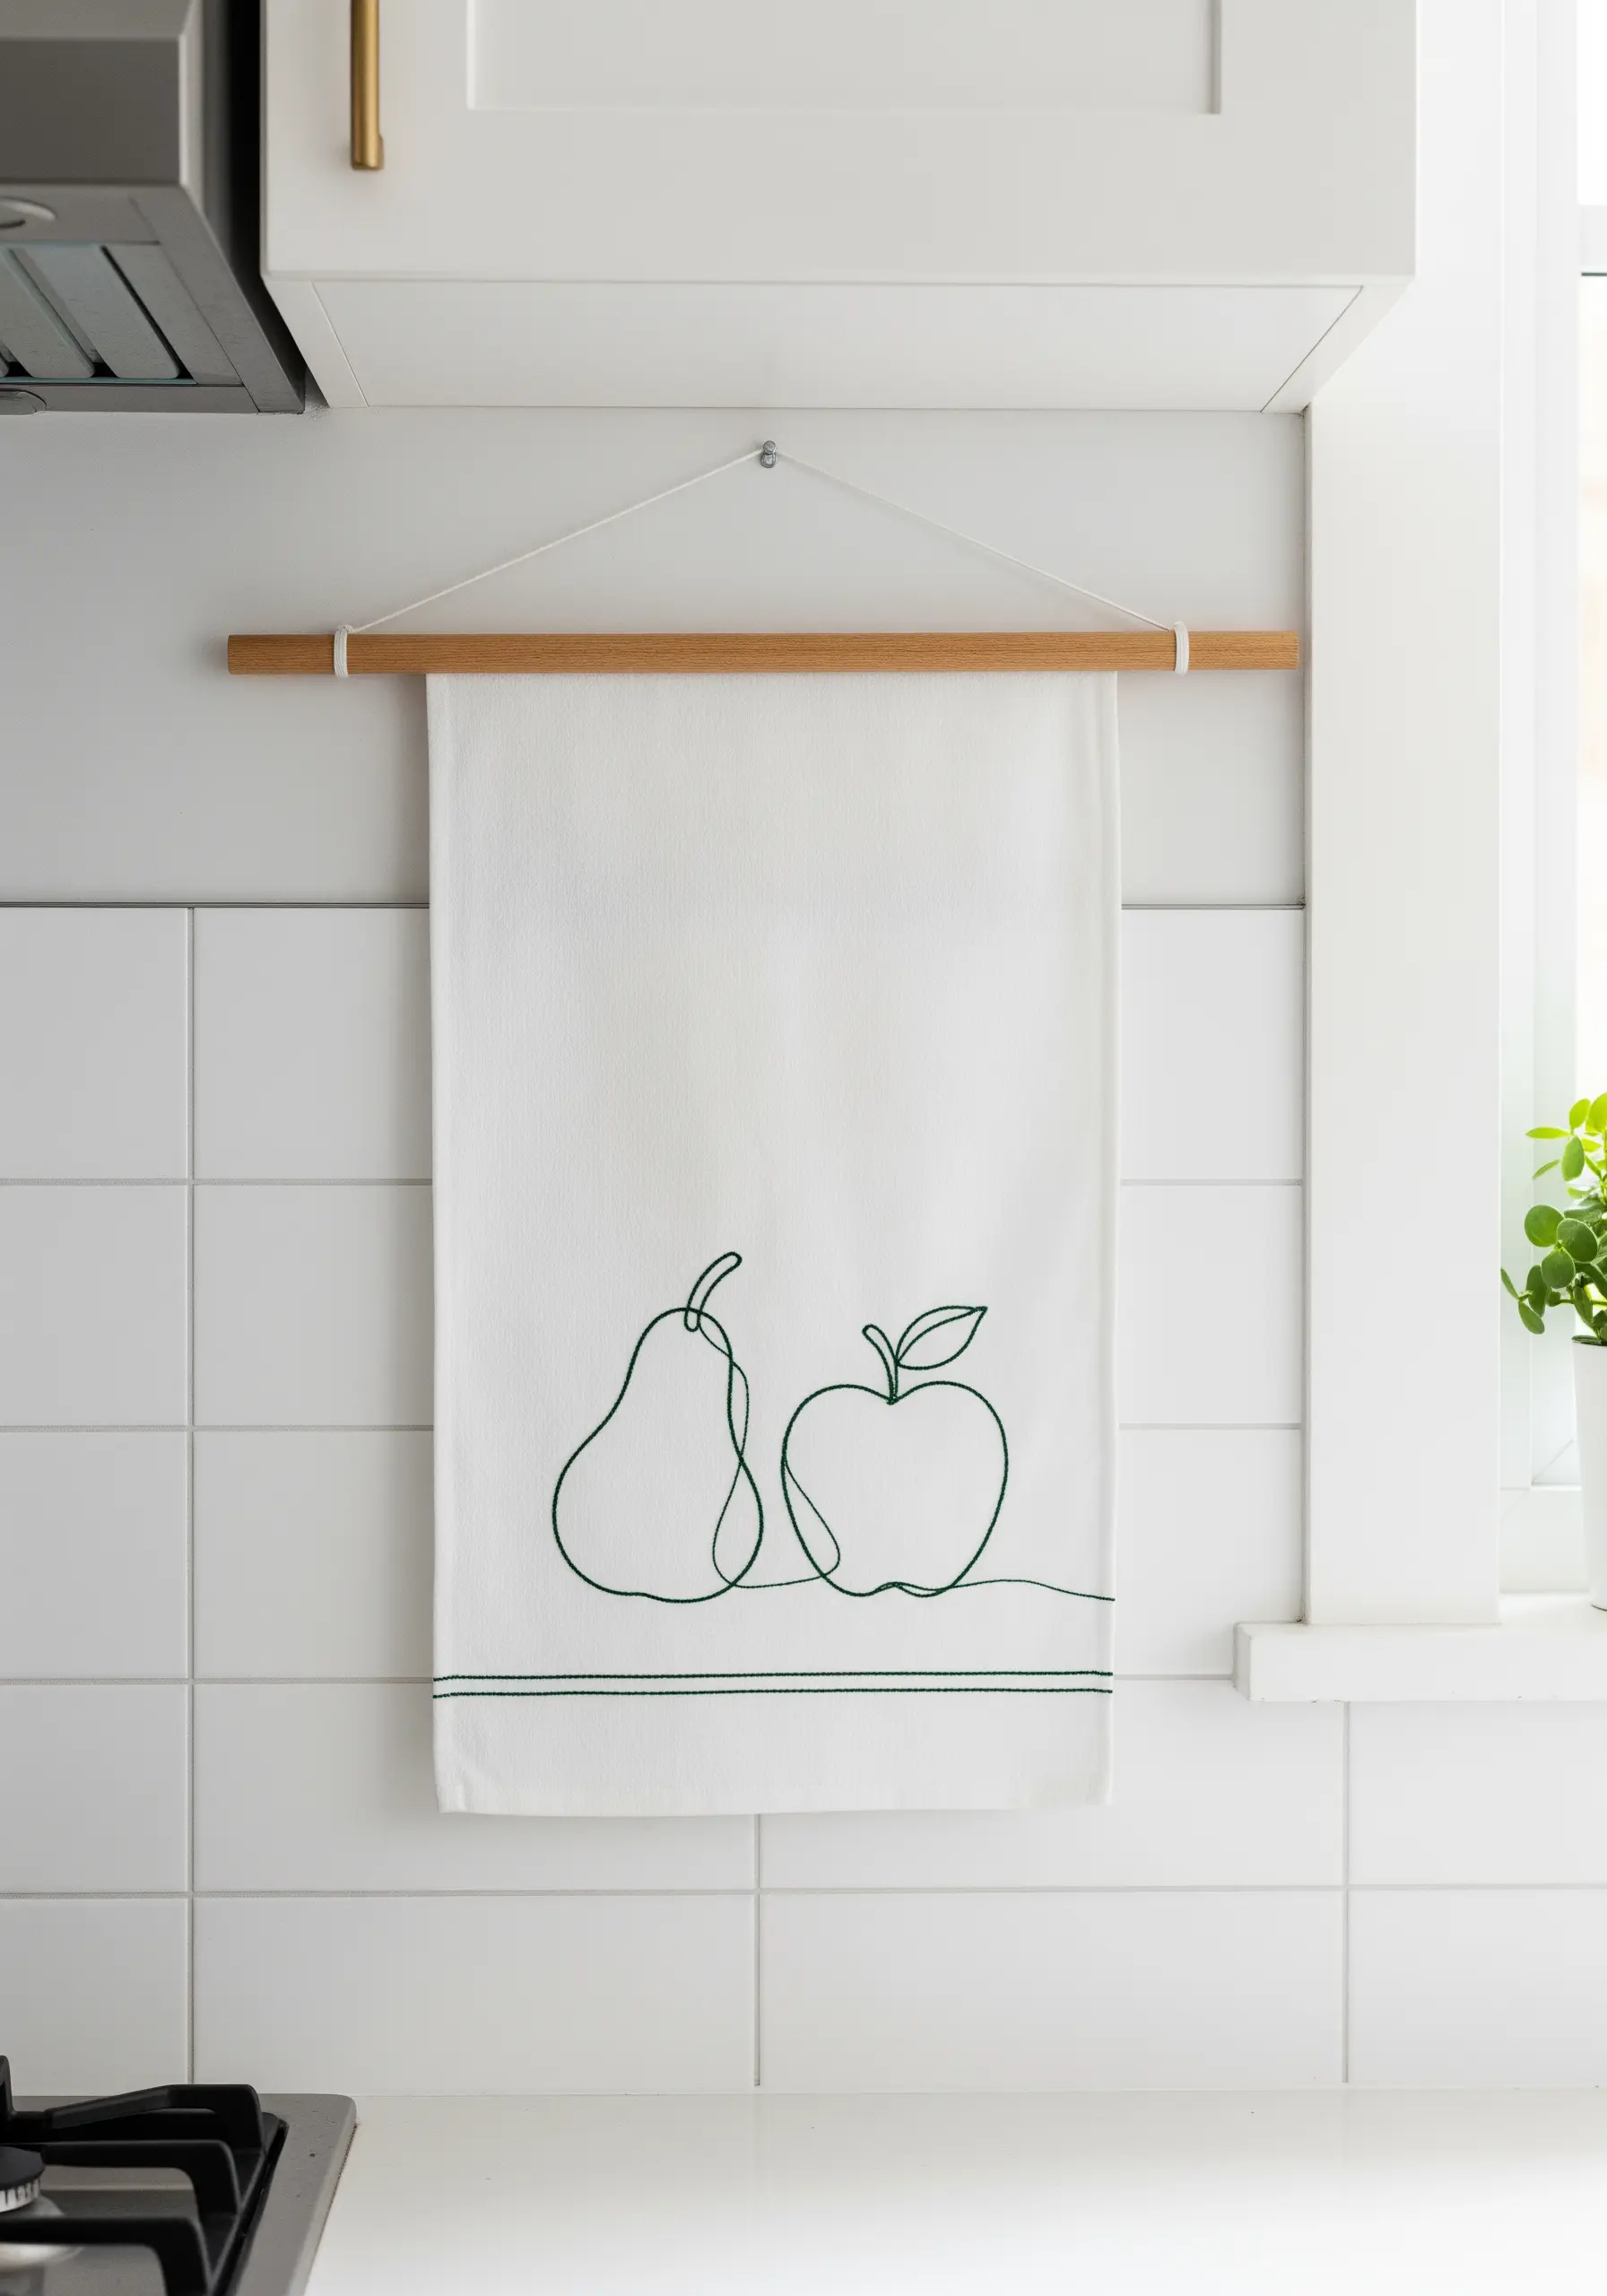
Elevate a simple kitchen towel with a clean, single-line drawing of fruits or botanicals.
Use a stem stitch with three strands of cotton floss for a line that is slightly raised and more durable than a simple backstitch, which is crucial for items that will be laundered.
Choose a smooth, tightly woven cotton or linen towel; the fabric’s stability ensures your lines remain crisp and won’t pucker after washing.
The beauty of this design lies in its use of negative space, turning a practical object into a piece of subtle, modern art for your kitchen with minimal fruit botanical embroidery patterns.
5. Create Bold, Tactile Lettering
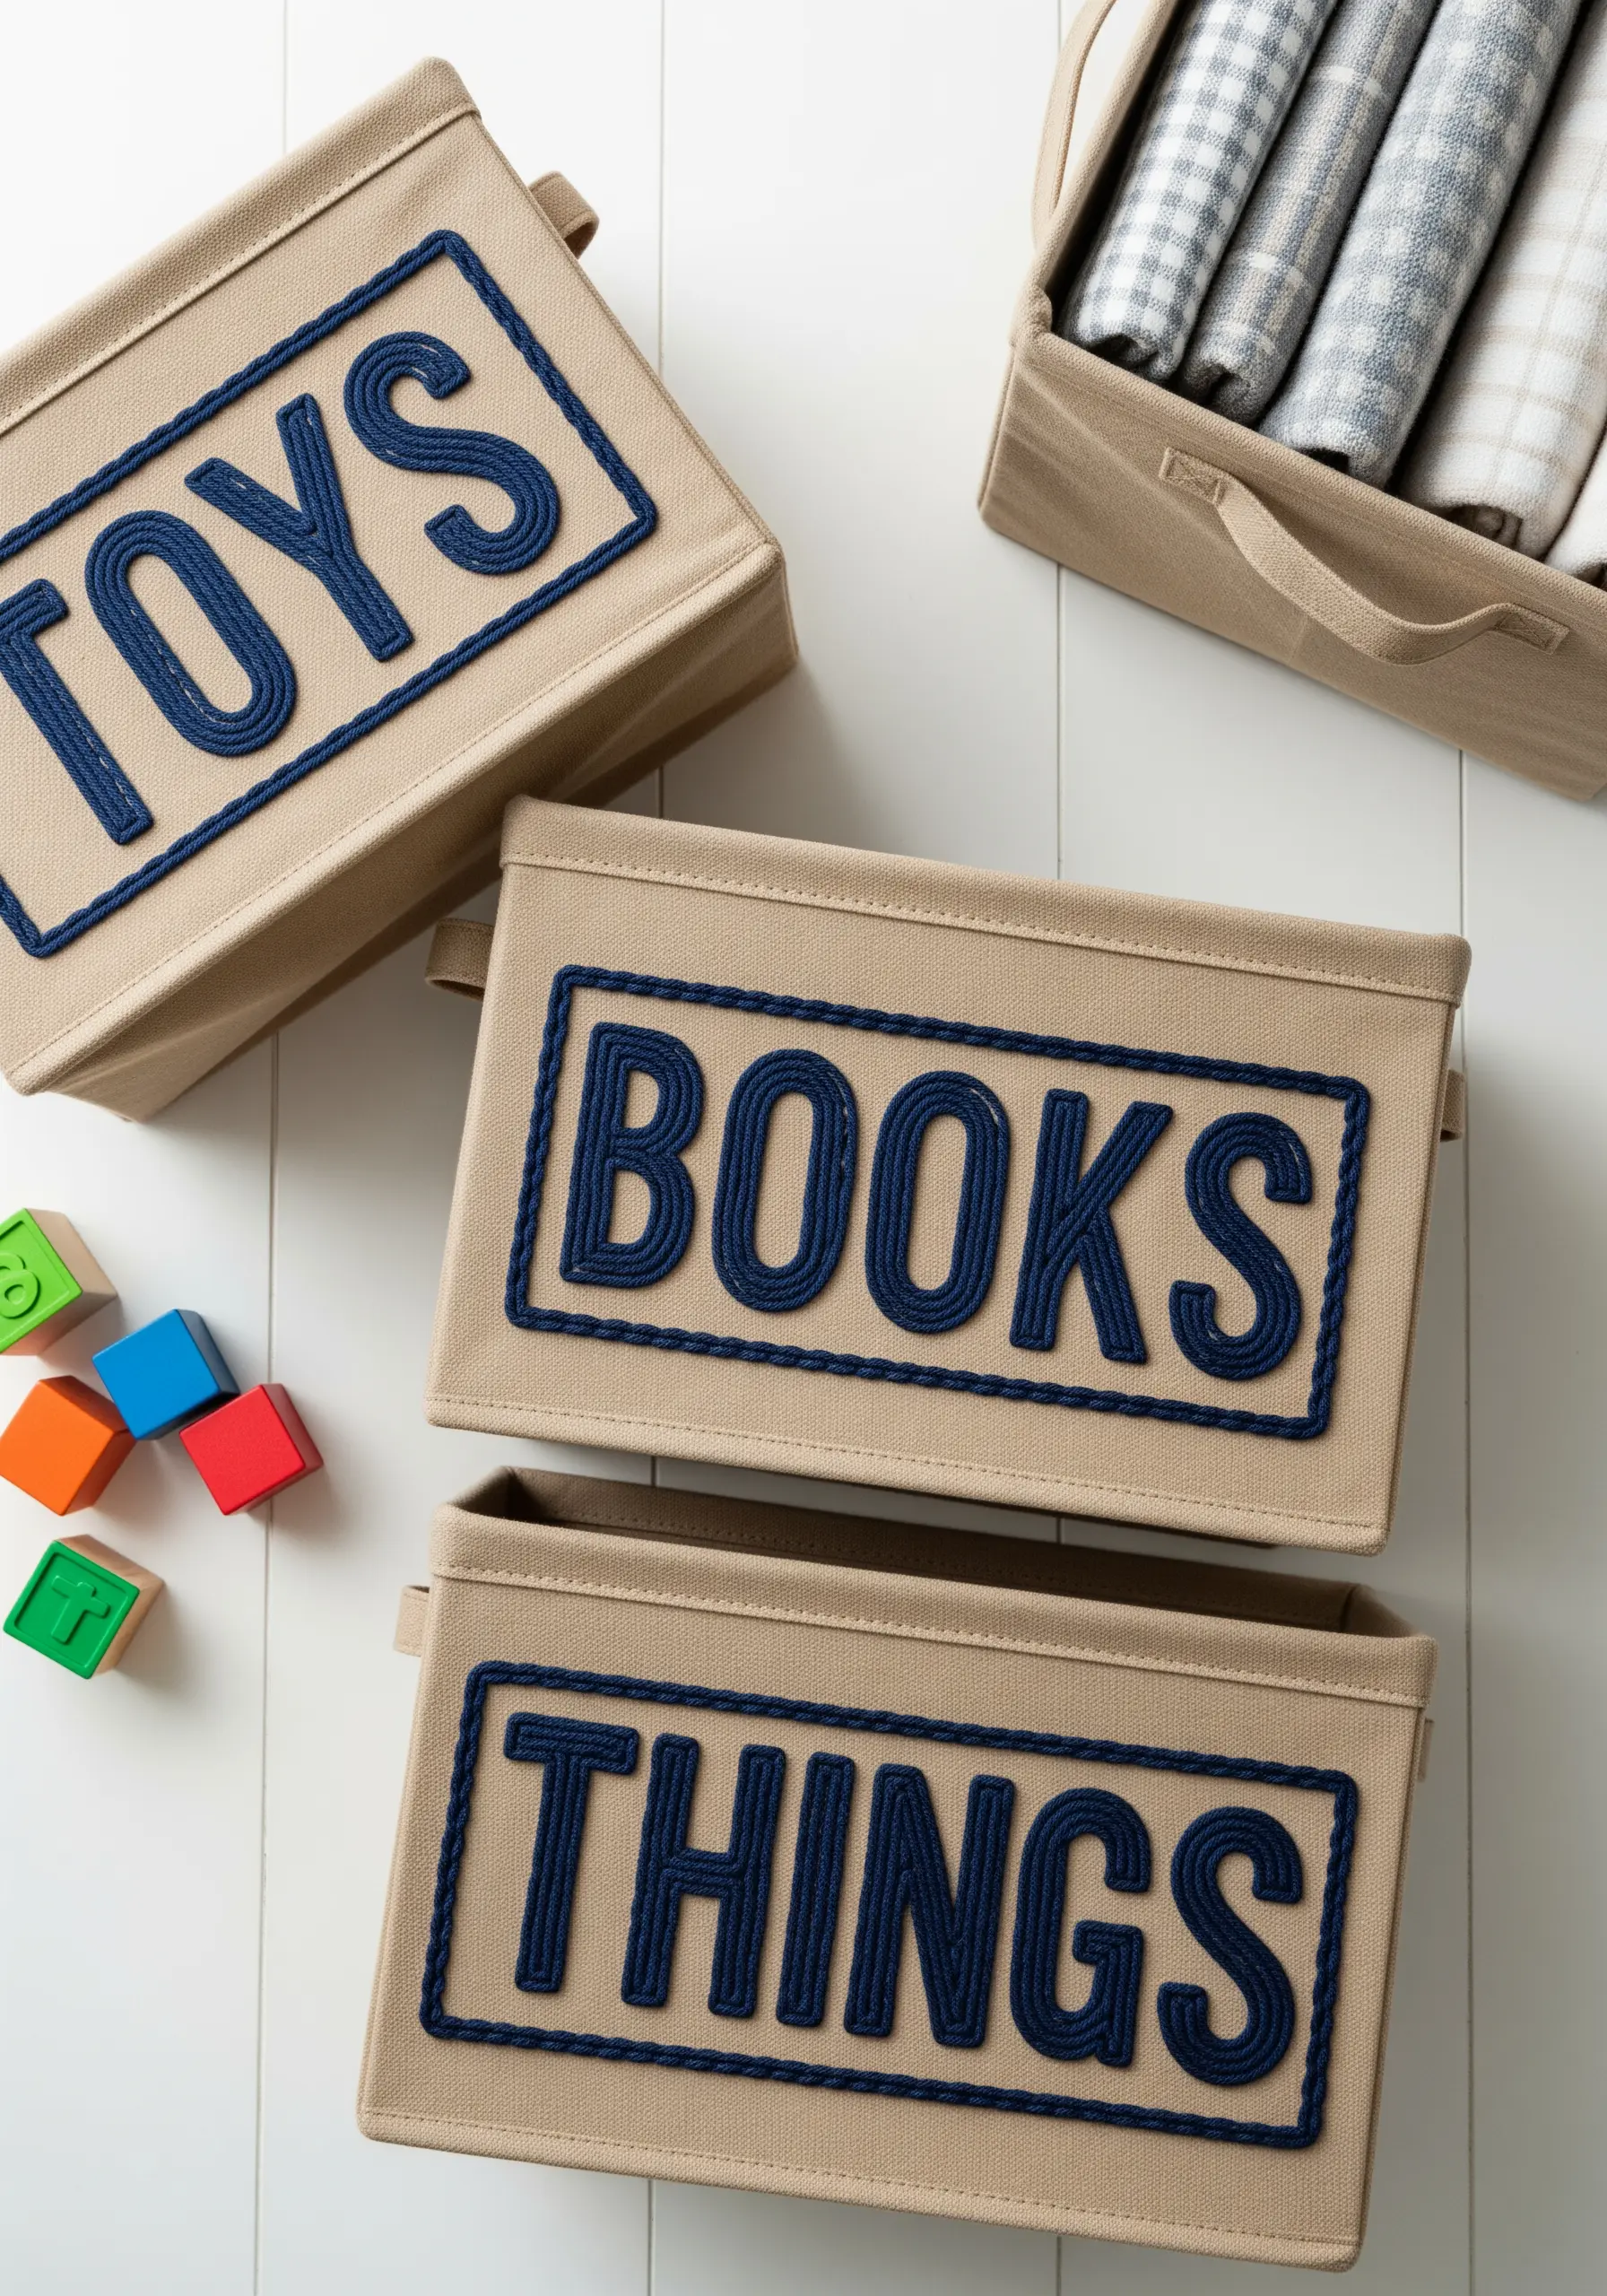
Turn simple storage labels into a design feature by using couching, a technique perfect for creating thick, dimensional lettering.
Outline your letters with a thick cord or yarn, then use a standard six-strand floss in a matching color to tack it down with small, evenly spaced stitches.
This method allows you to create bold, perfectly uniform text that stands out against the fabric, offering a high-end, customized look.
It’s an incredibly fast way to achieve a powerful visual impact and create your own contemporary typography stitch designs for home organization.
6. High-Contrast Graphics on Felt
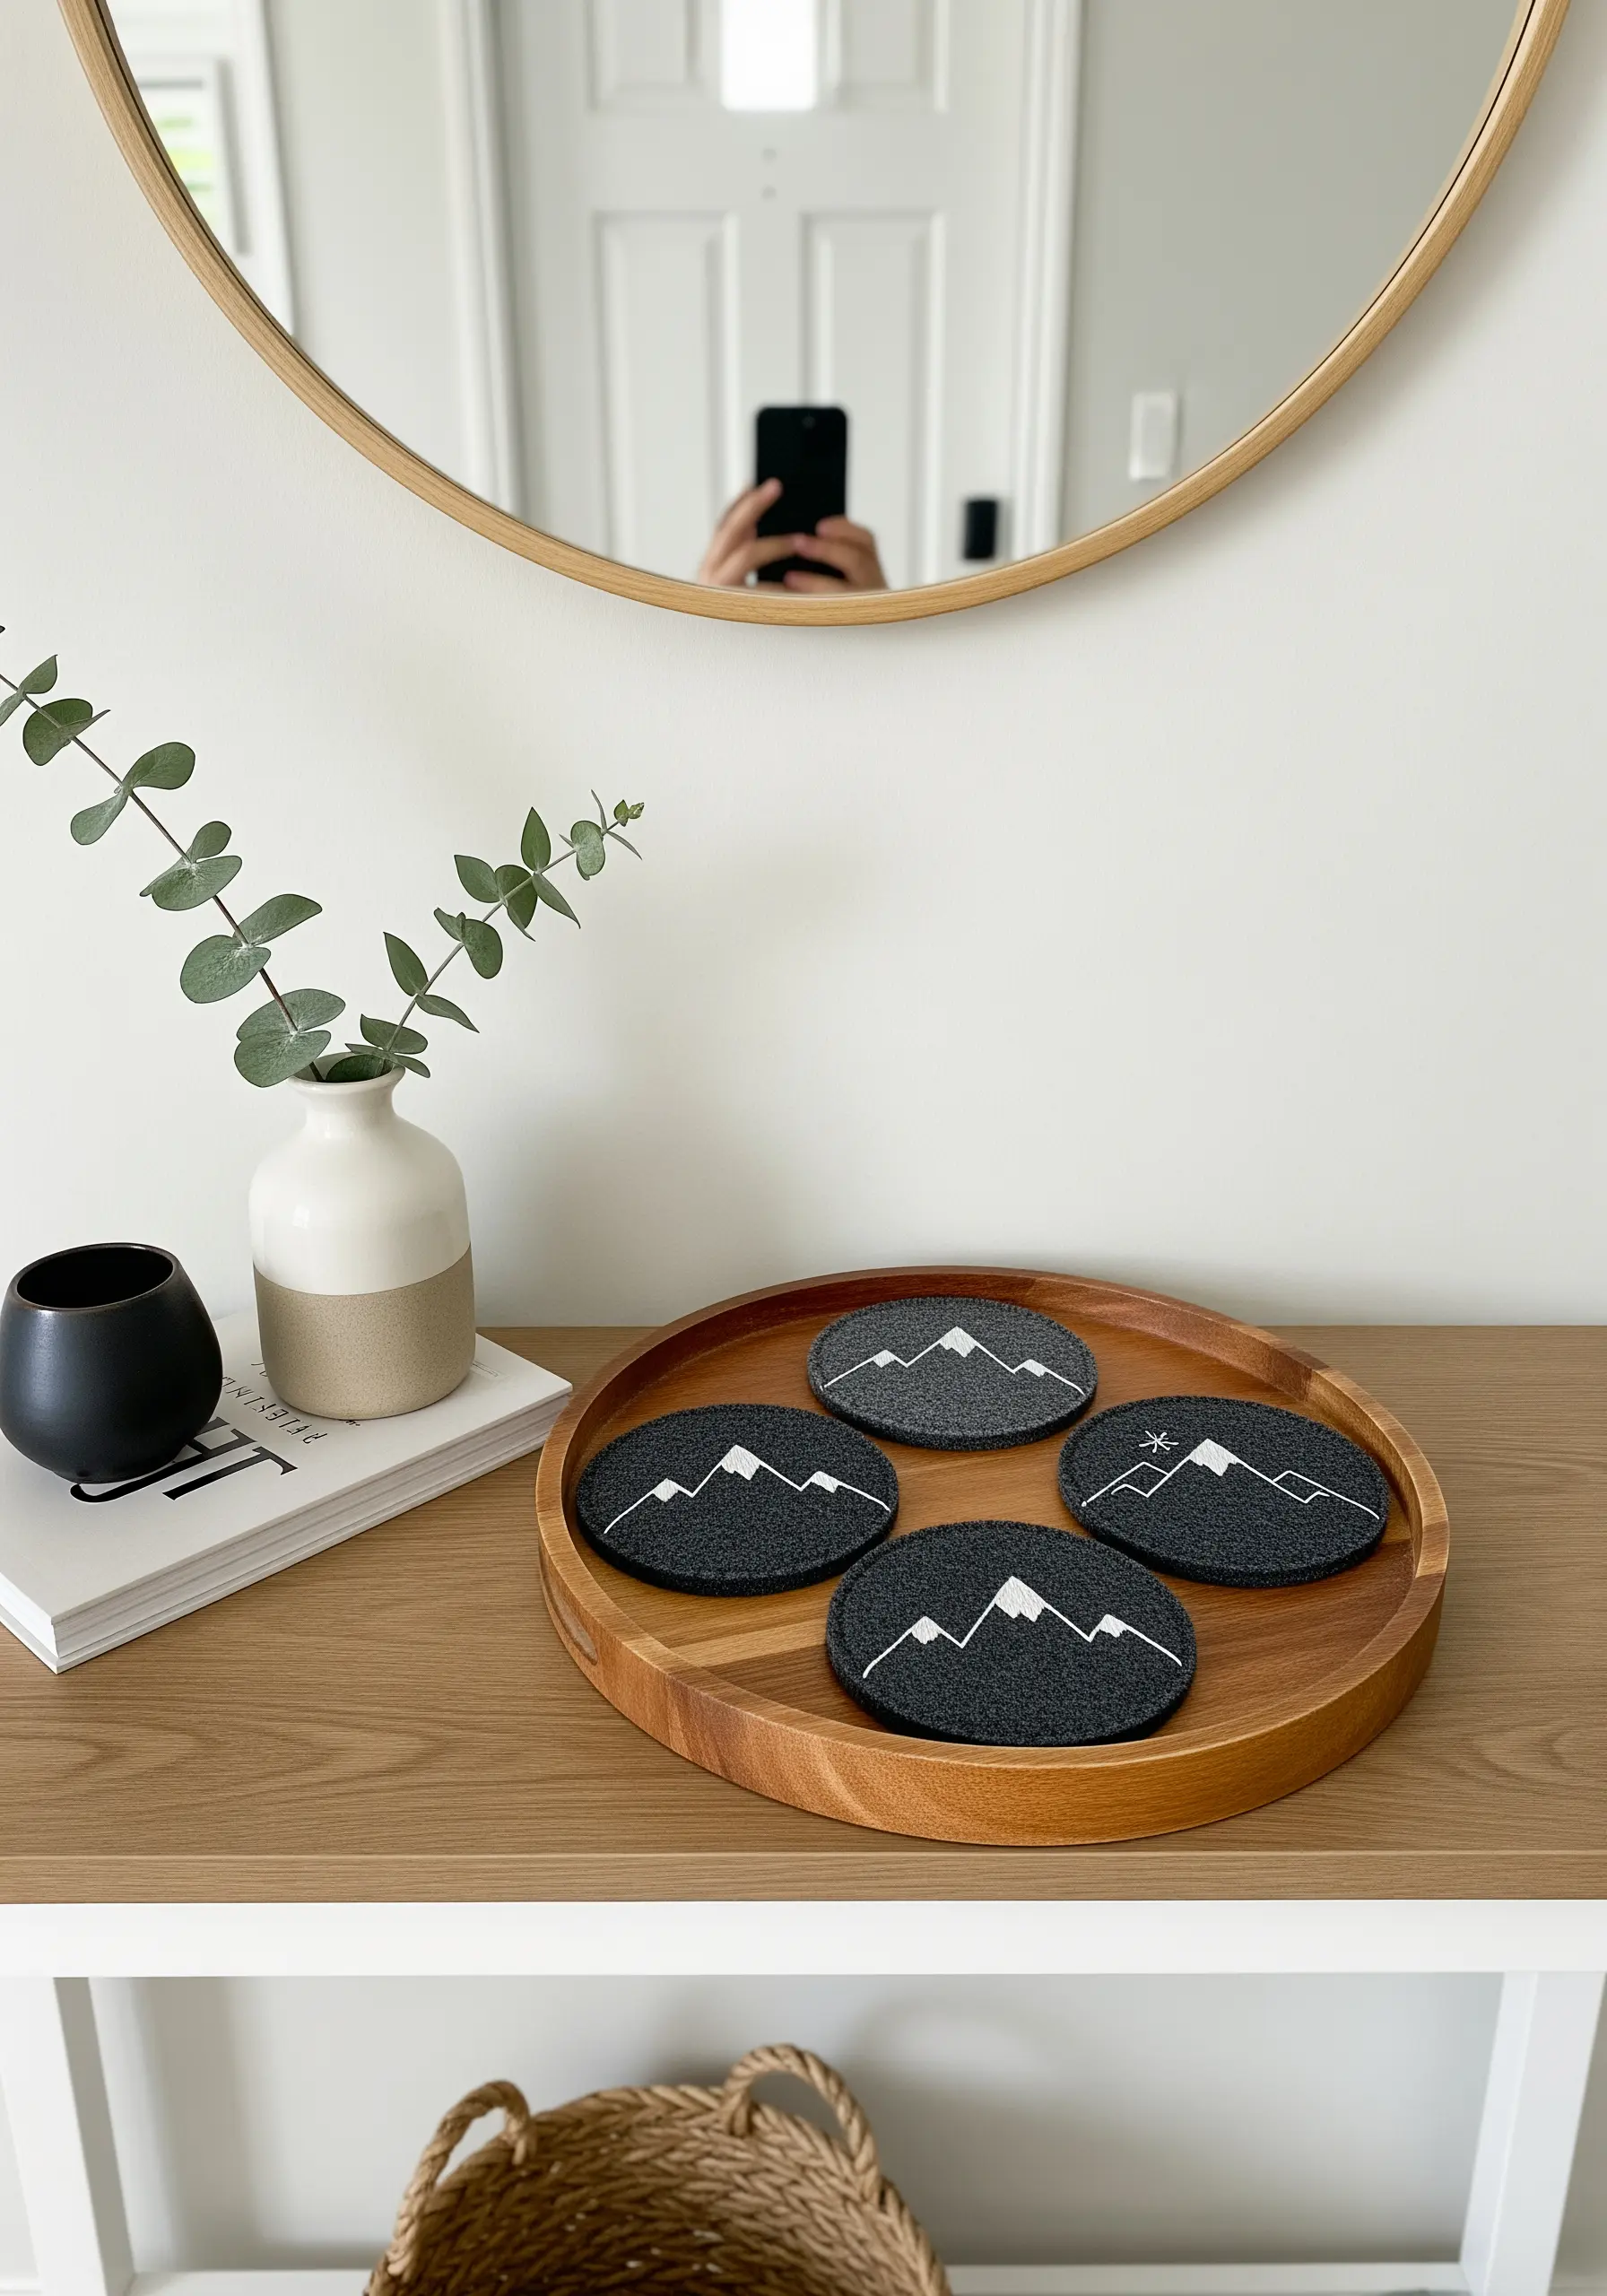
Create striking visual impact by stitching a simple graphic design with high-contrast thread on dark, dense felt.
Use a crisp backstitch or split stitch with a bright white or silver thread to ensure your lines are sharp and highly visible against the dark background.
The density of pressed felt provides a stable, no-fray canvas, making it easy to achieve clean lines without a hoop.
This technique is perfect for creating functional art like coasters, where the design feels both modern and purposeful, much like minimalist line art nature embroidery.
7. Paint with Thread on a Grand Scale

Create a stunning piece of large-scale wall art using nothing more than simple straight stitches.
Work with thick yarn or multiple strands of embroidery floss held together to cover the large surface area efficiently.
To create the smooth, layered effect of the sea, lay your stitches horizontally, keeping them parallel and tightly packed.
For the sun, stitch in a spiral from the center out to create a sense of light and energy, resulting in breathtaking abstract thread landscapes.
8. Mixed-Media Gift Tags
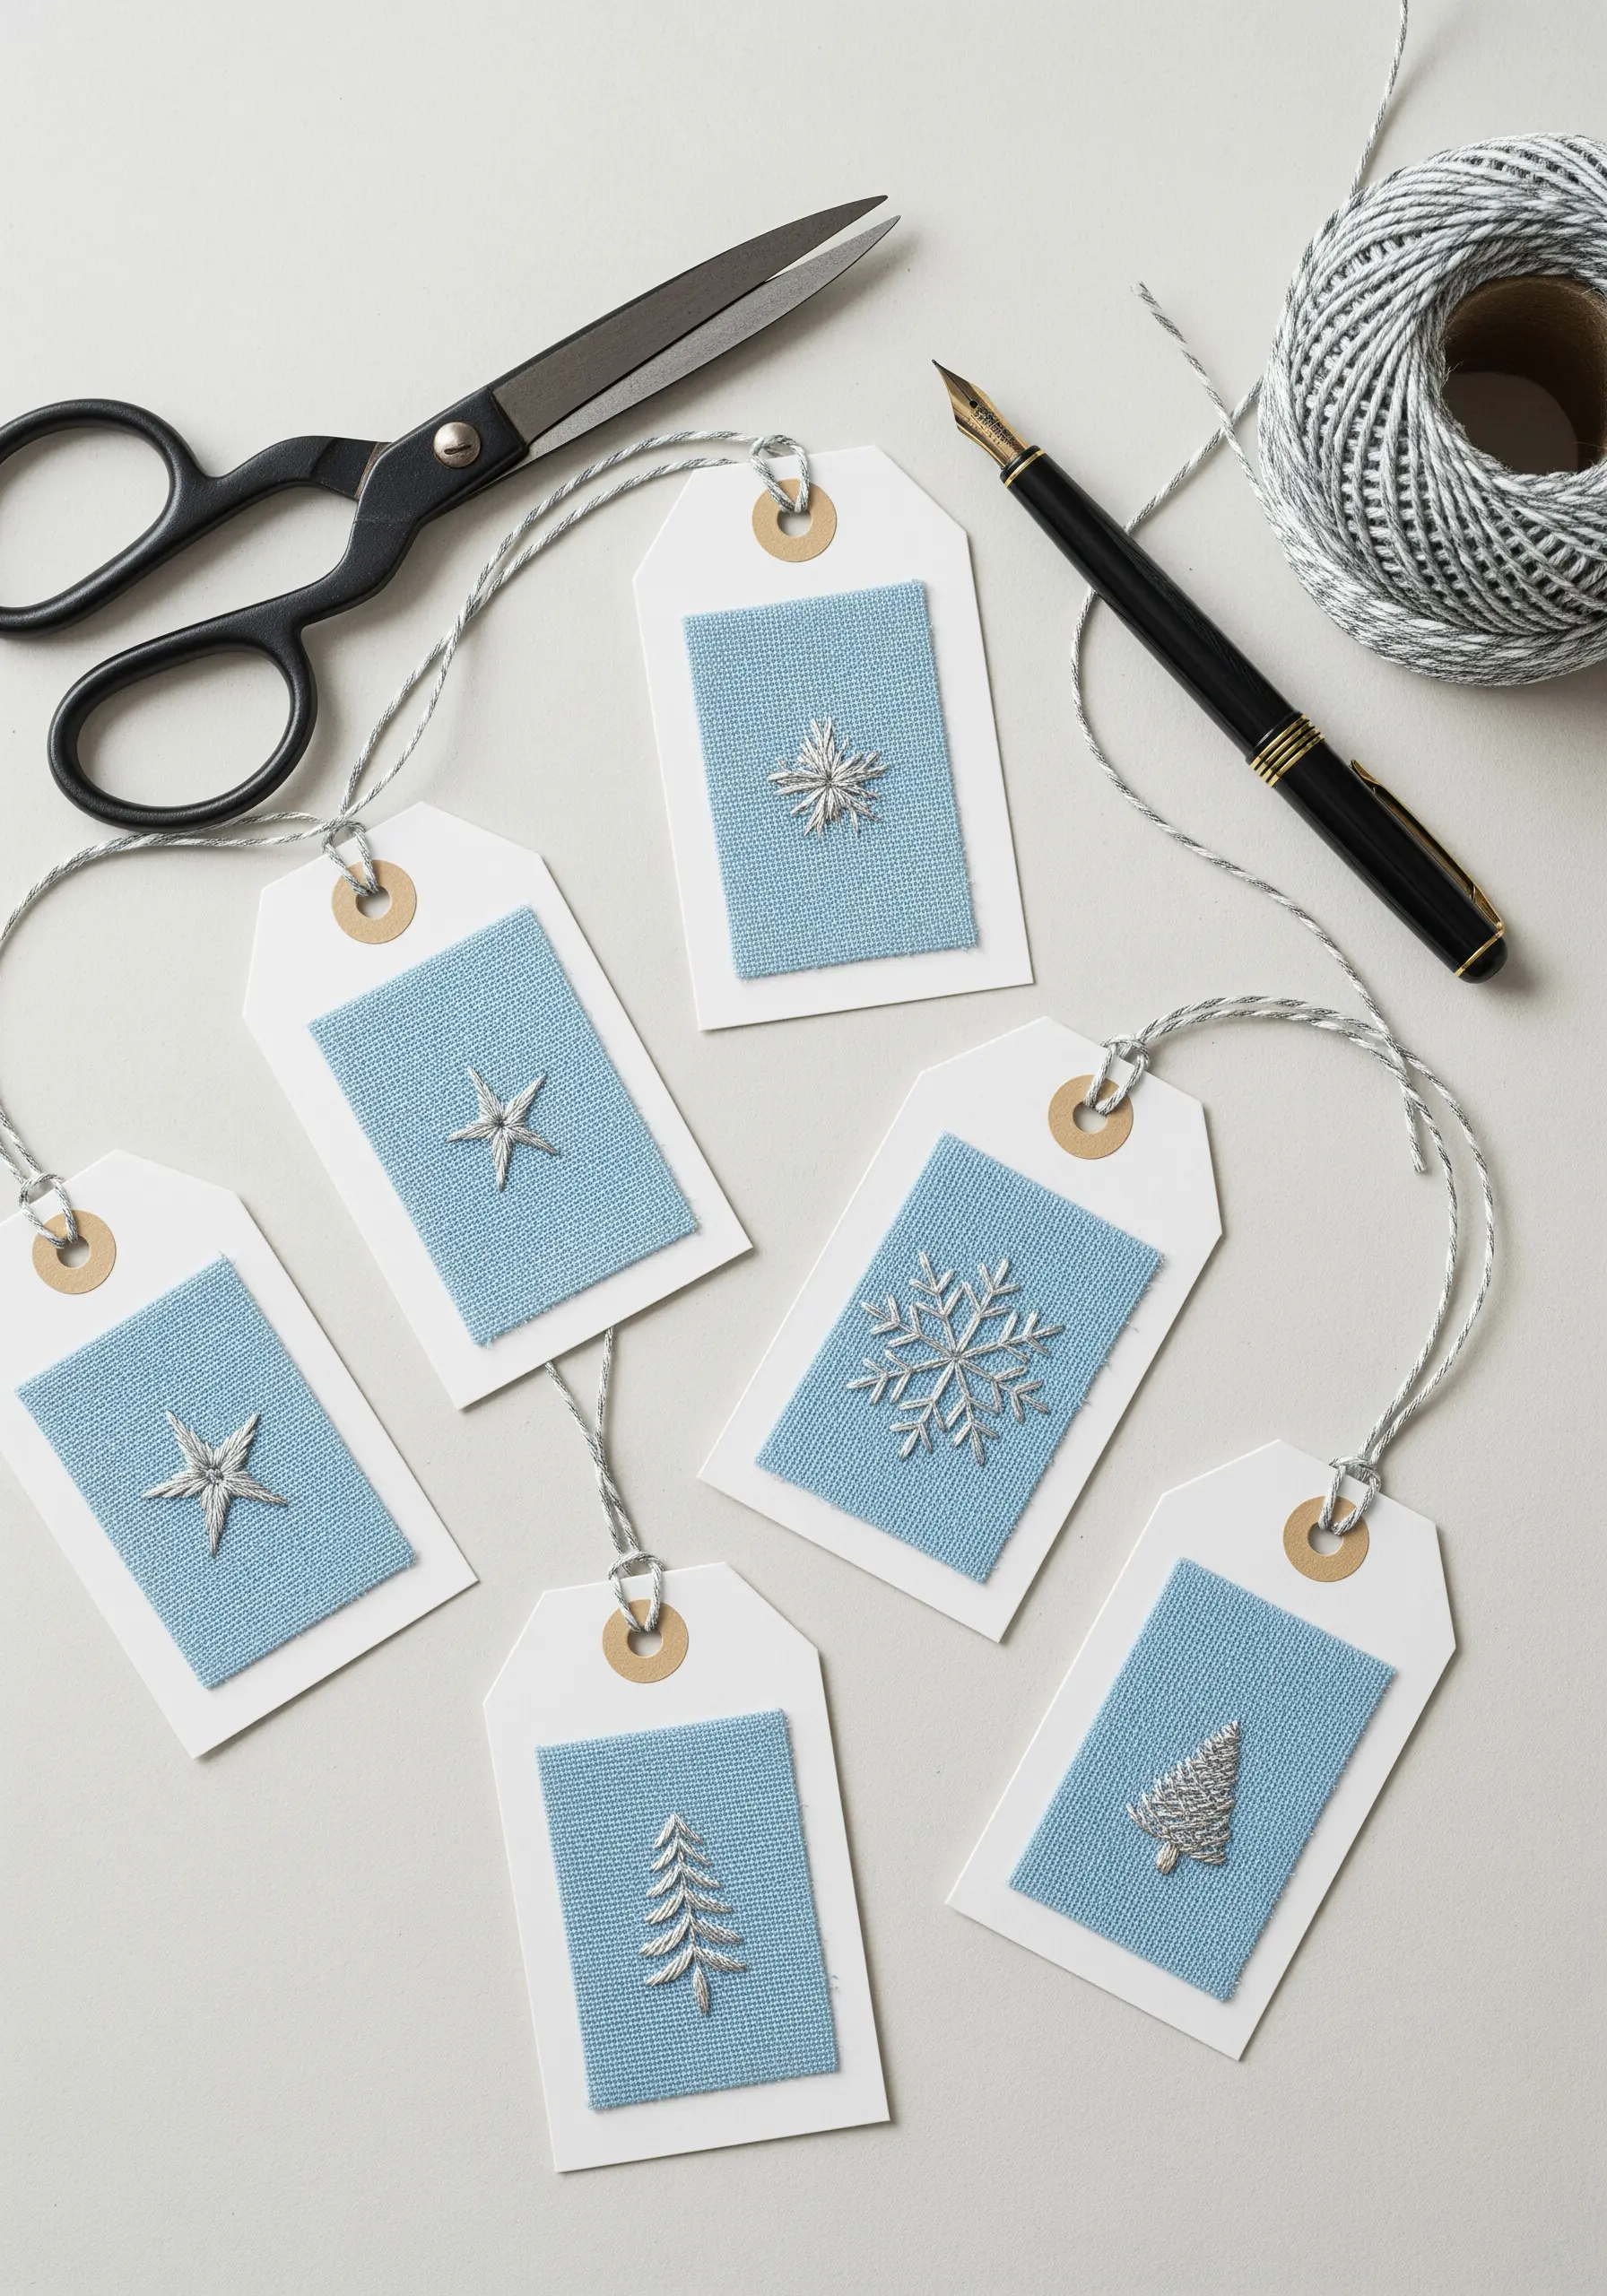
Elevate your gift-giving by creating mixed-media tags that combine paper, fabric, and the shimmer of metallic thread.
First, embroider your simple winter motifs on a small piece of linen. To prevent metallic thread from tangling, use shorter lengths and a thread conditioner.
Once stitched, neatly glue the fabric panel onto a sturdy paper tag. This layering adds texture and a handcrafted luxury feel.
This is a wonderful way to use up fabric scraps and create truly special DIY embroidered cards and mini-gifts.
9. Appliqué with an Embroidered Edge
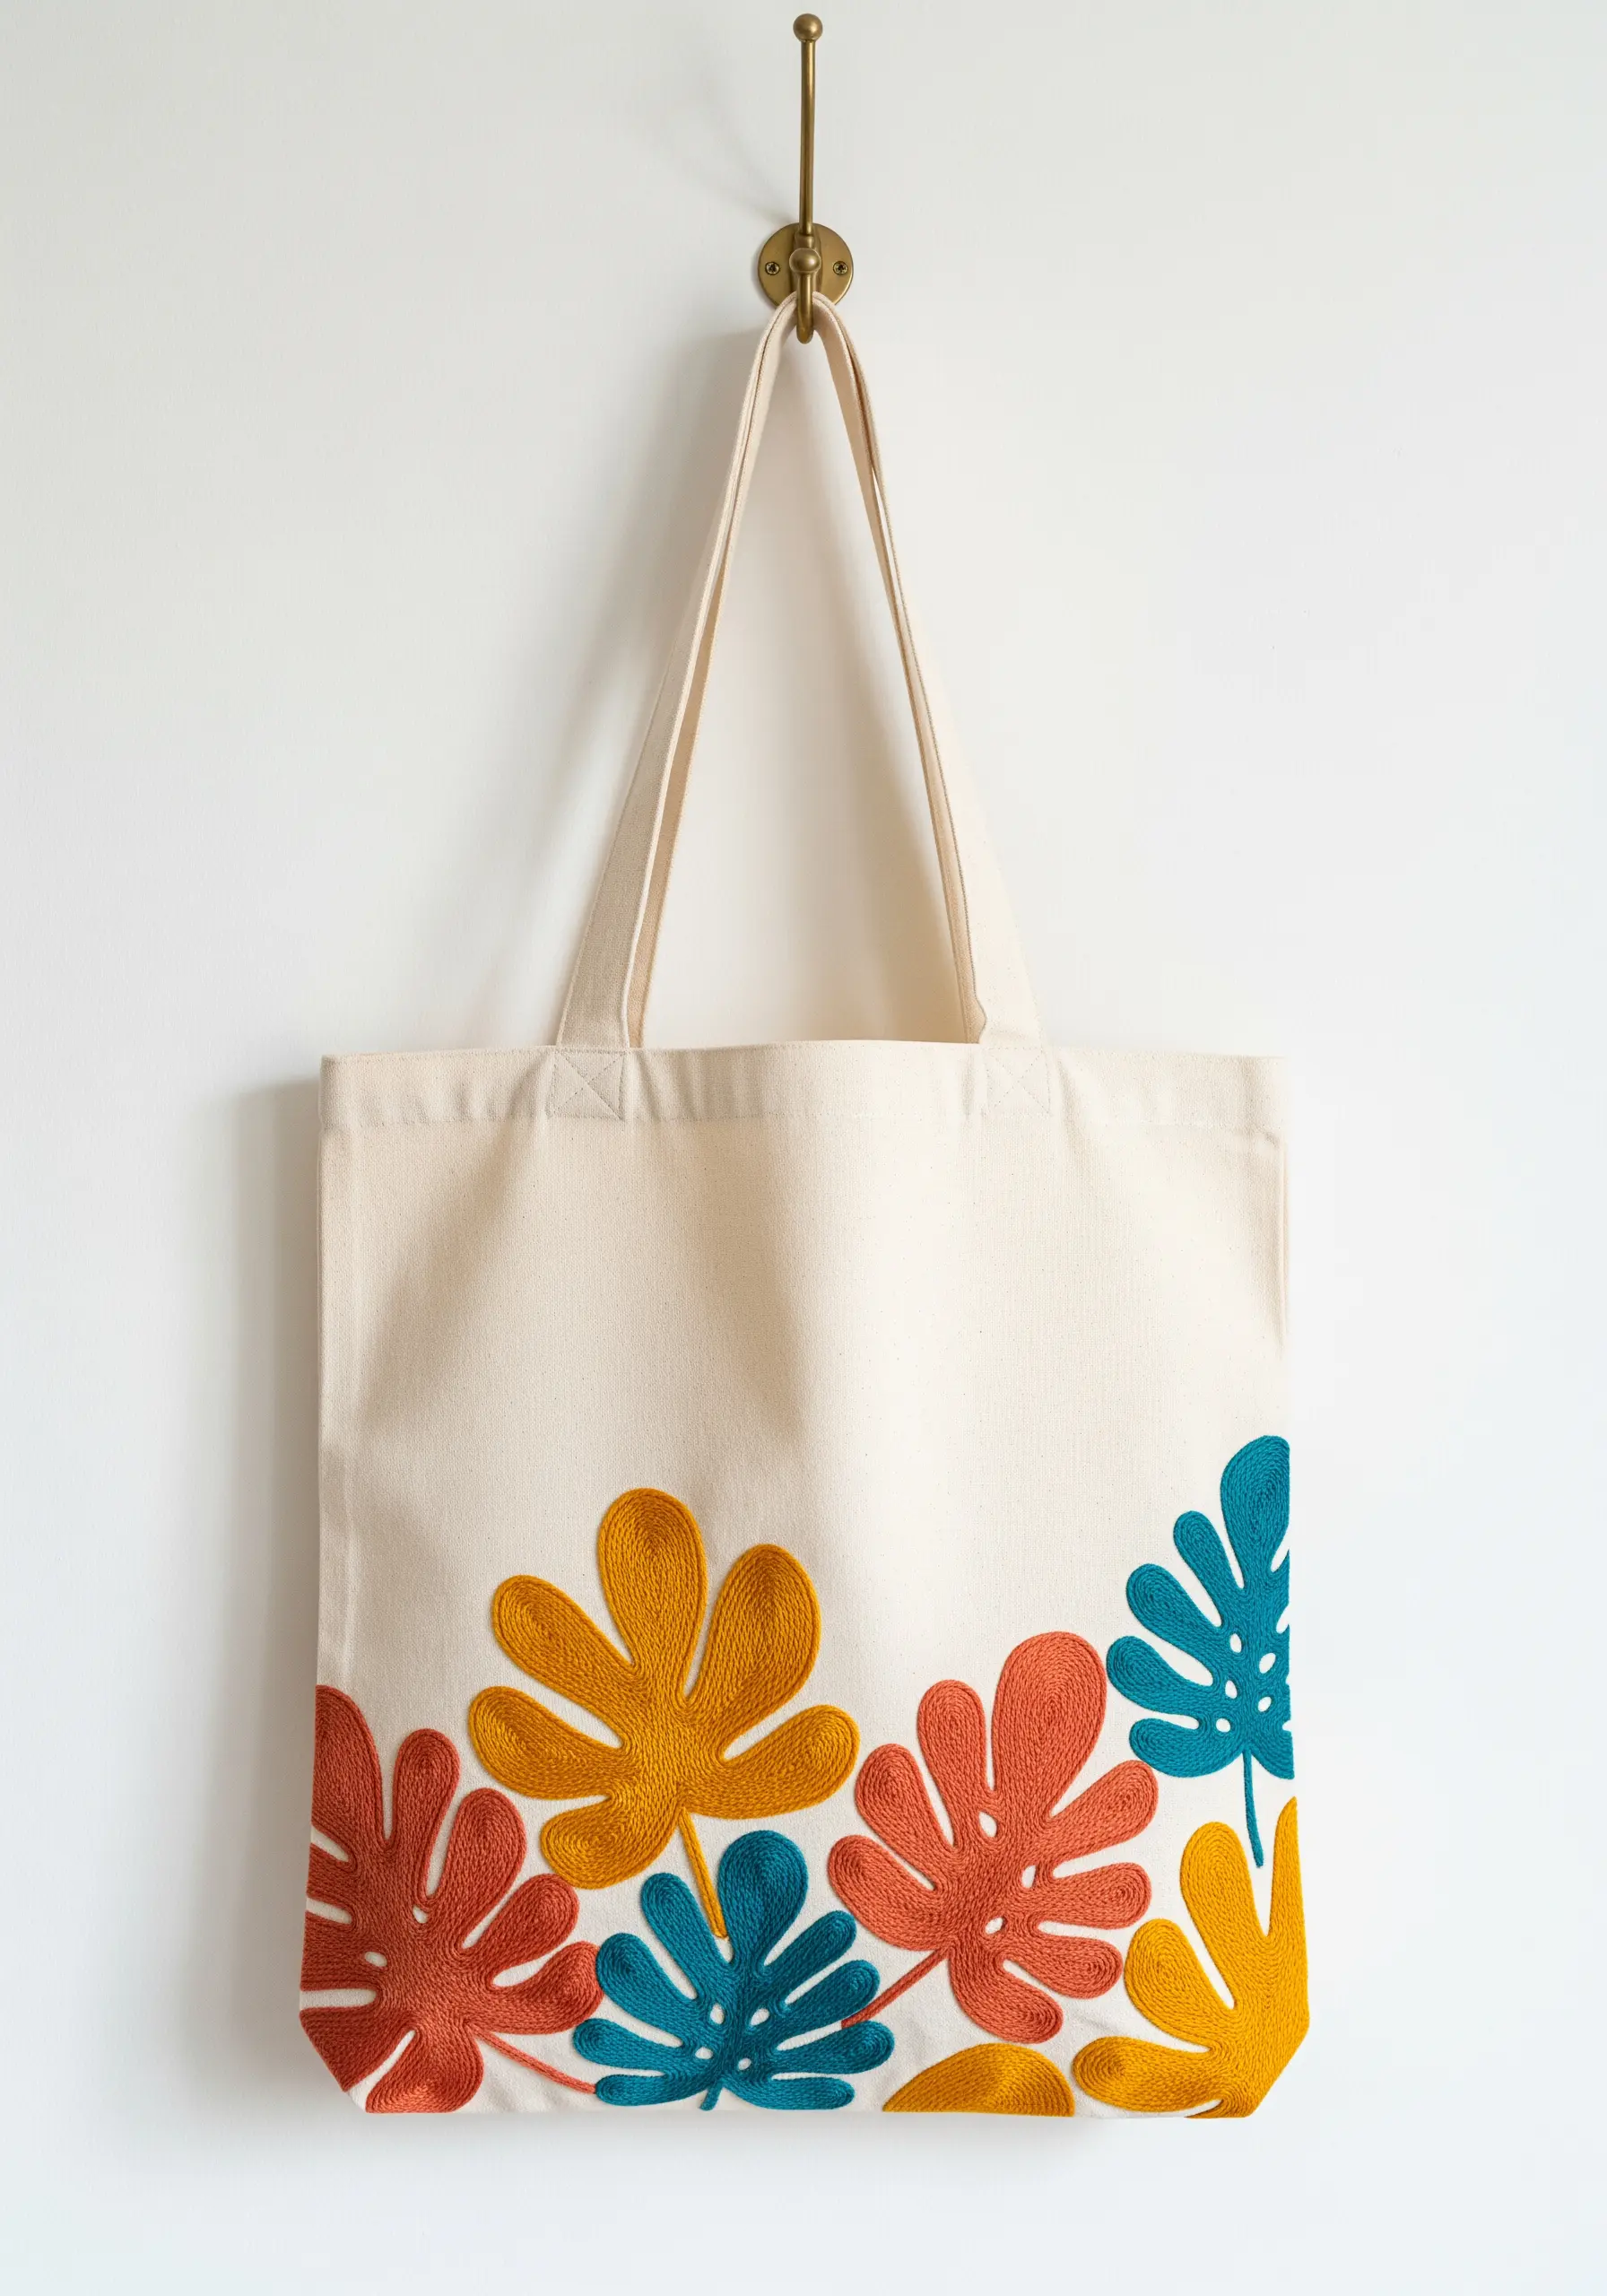
For a bold, graphic look on a tote bag, combine felt appliqué with a clean embroidered outline.
Cut your leaf shapes from colorful felt and secure them to the canvas bag with a temporary fabric adhesive or a few holding stitches.
Then, use a contrasting color of floss to stitch a clean blanket stitch or a simple backstitch around the edge of each shape.
This technique not only secures the appliqué but also adds a sharp, illustrative quality that makes the colors pop—perfect for botanical stitch art ideas.
10. Sophisticated Linens with a Single Motif
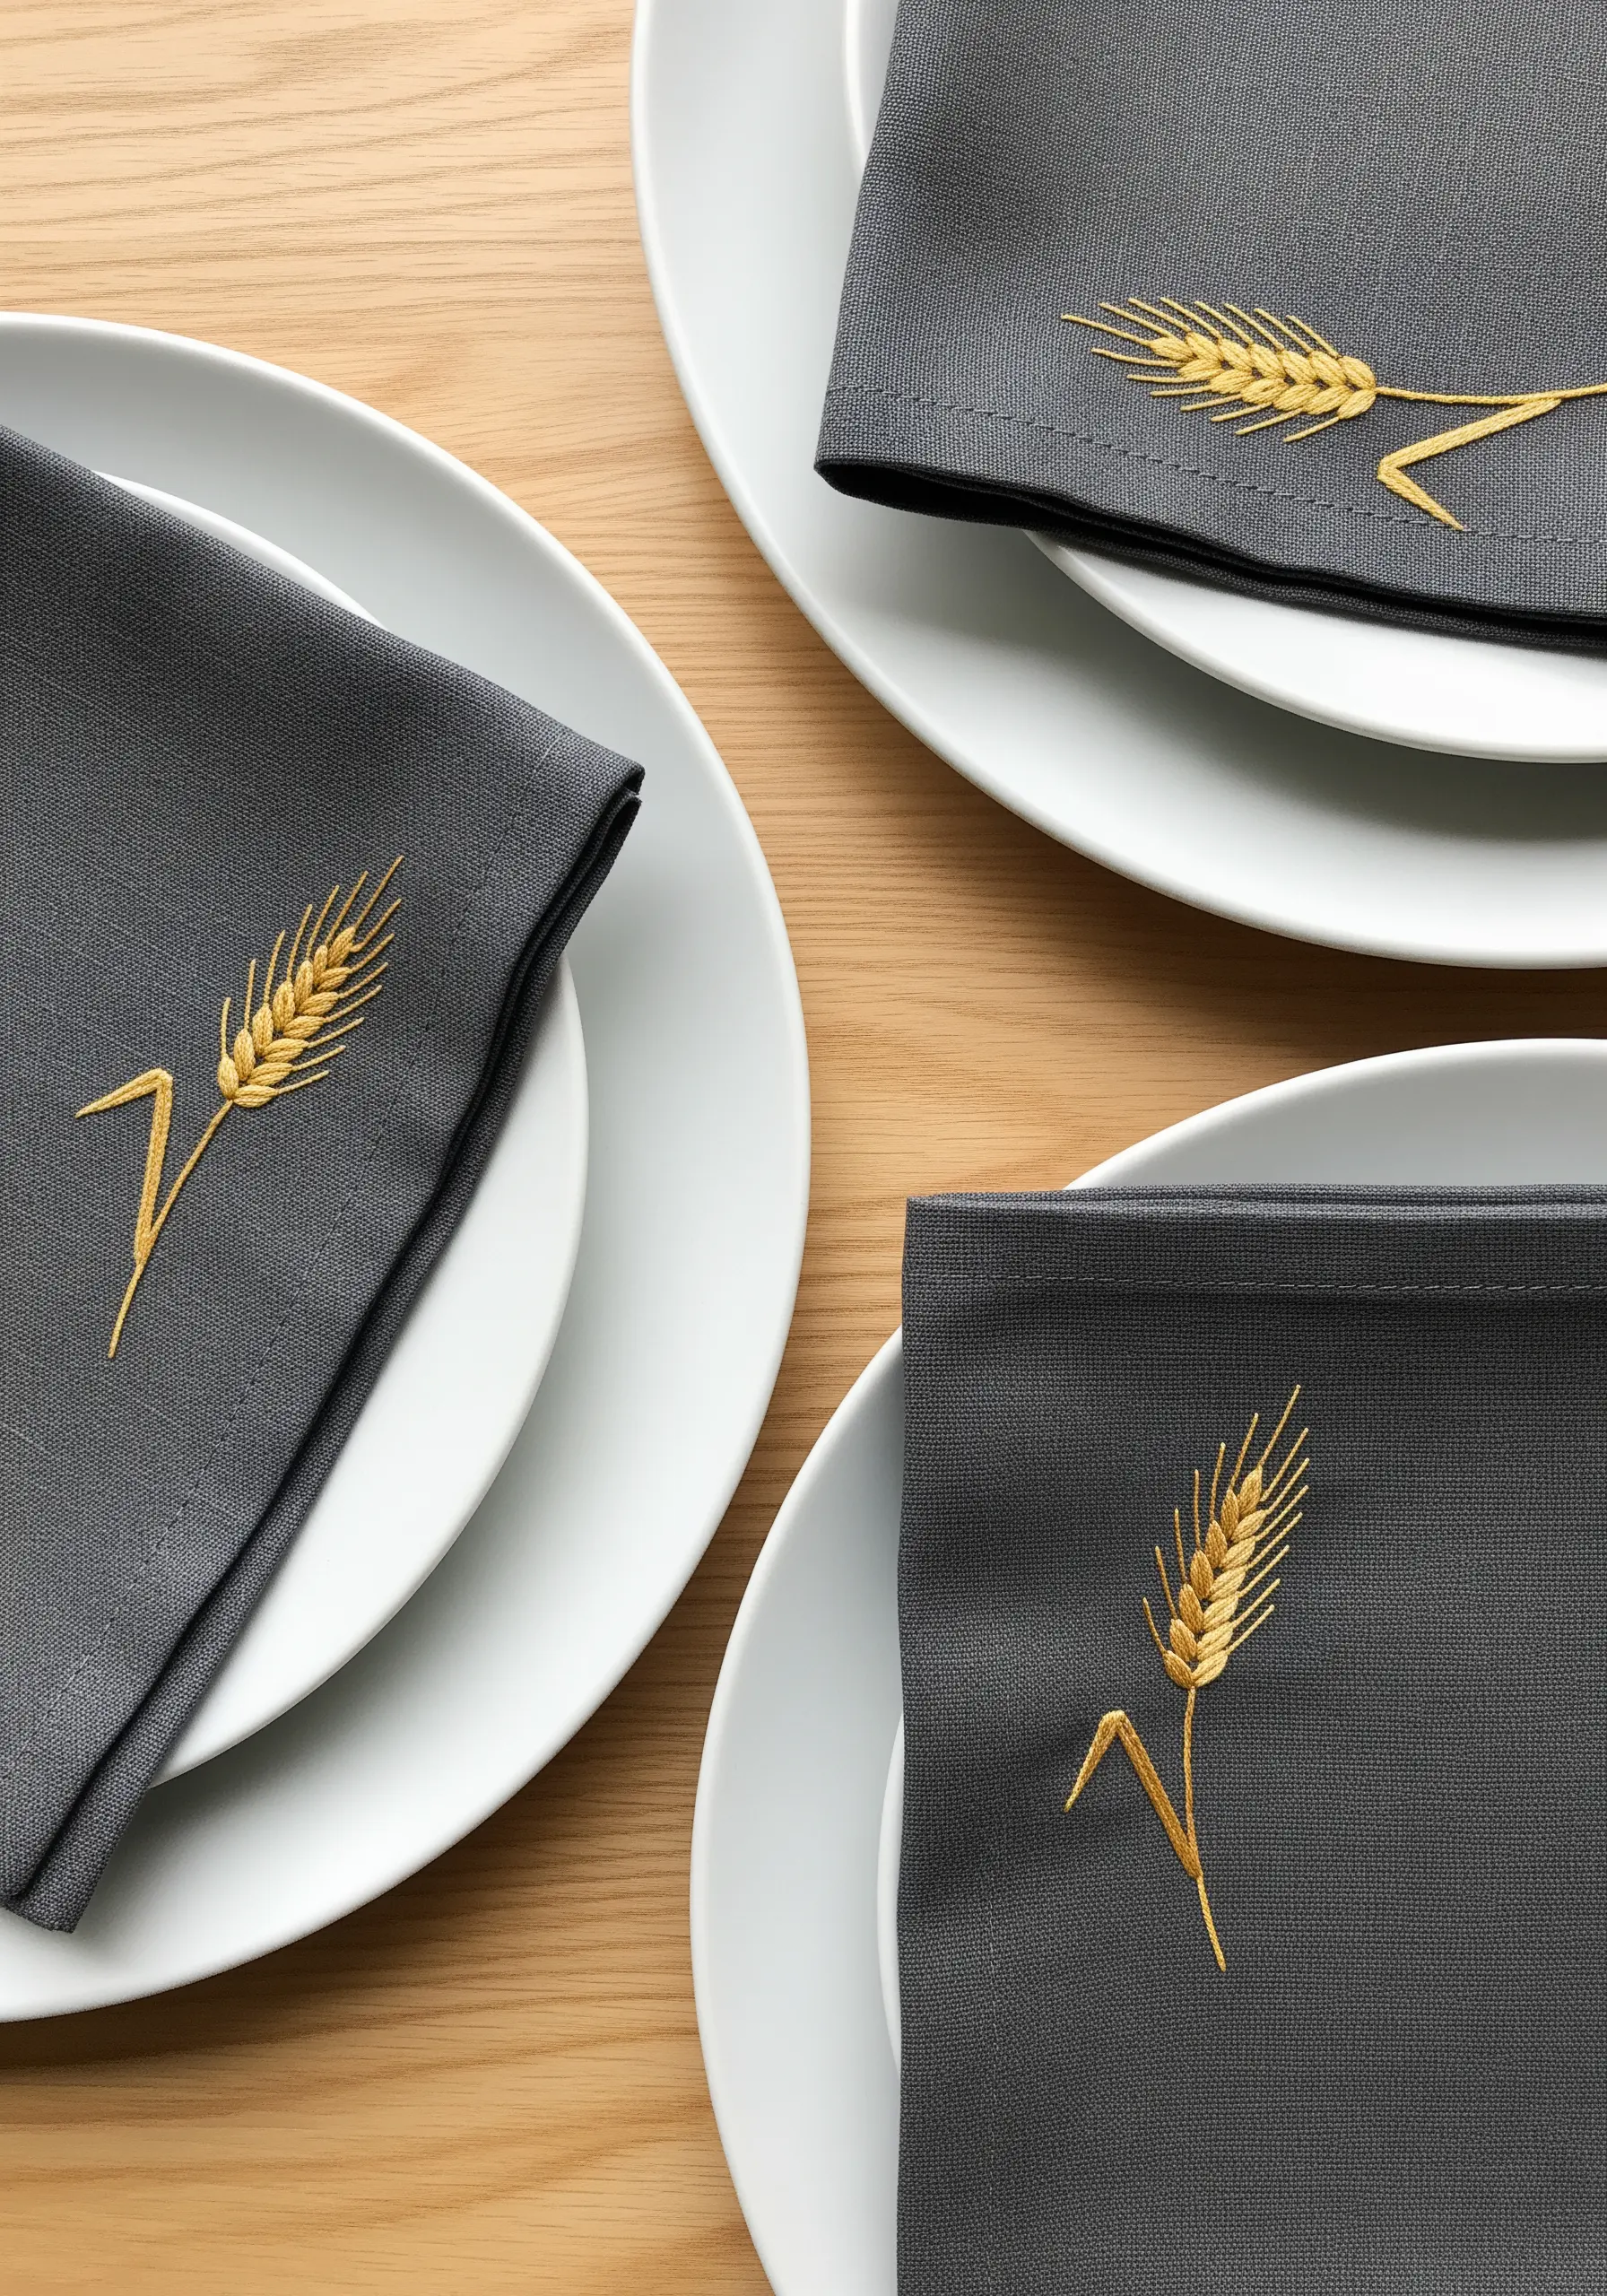
A single, beautifully executed motif is all you need to transform simple table linens into a sophisticated set.
For a realistic wheat stalk, use the fishbone stitch for the grains to create a woven texture, and a simple stem stitch for the stalk.
Stitching with a single shade of gold thread on a dark fabric creates a timeless, high-contrast elegance.
Place the design in a corner so it remains visible when the napkin is folded, adding a bespoke touch with these table linen embroidery motifs.
11. Scattered Motifs on Denim
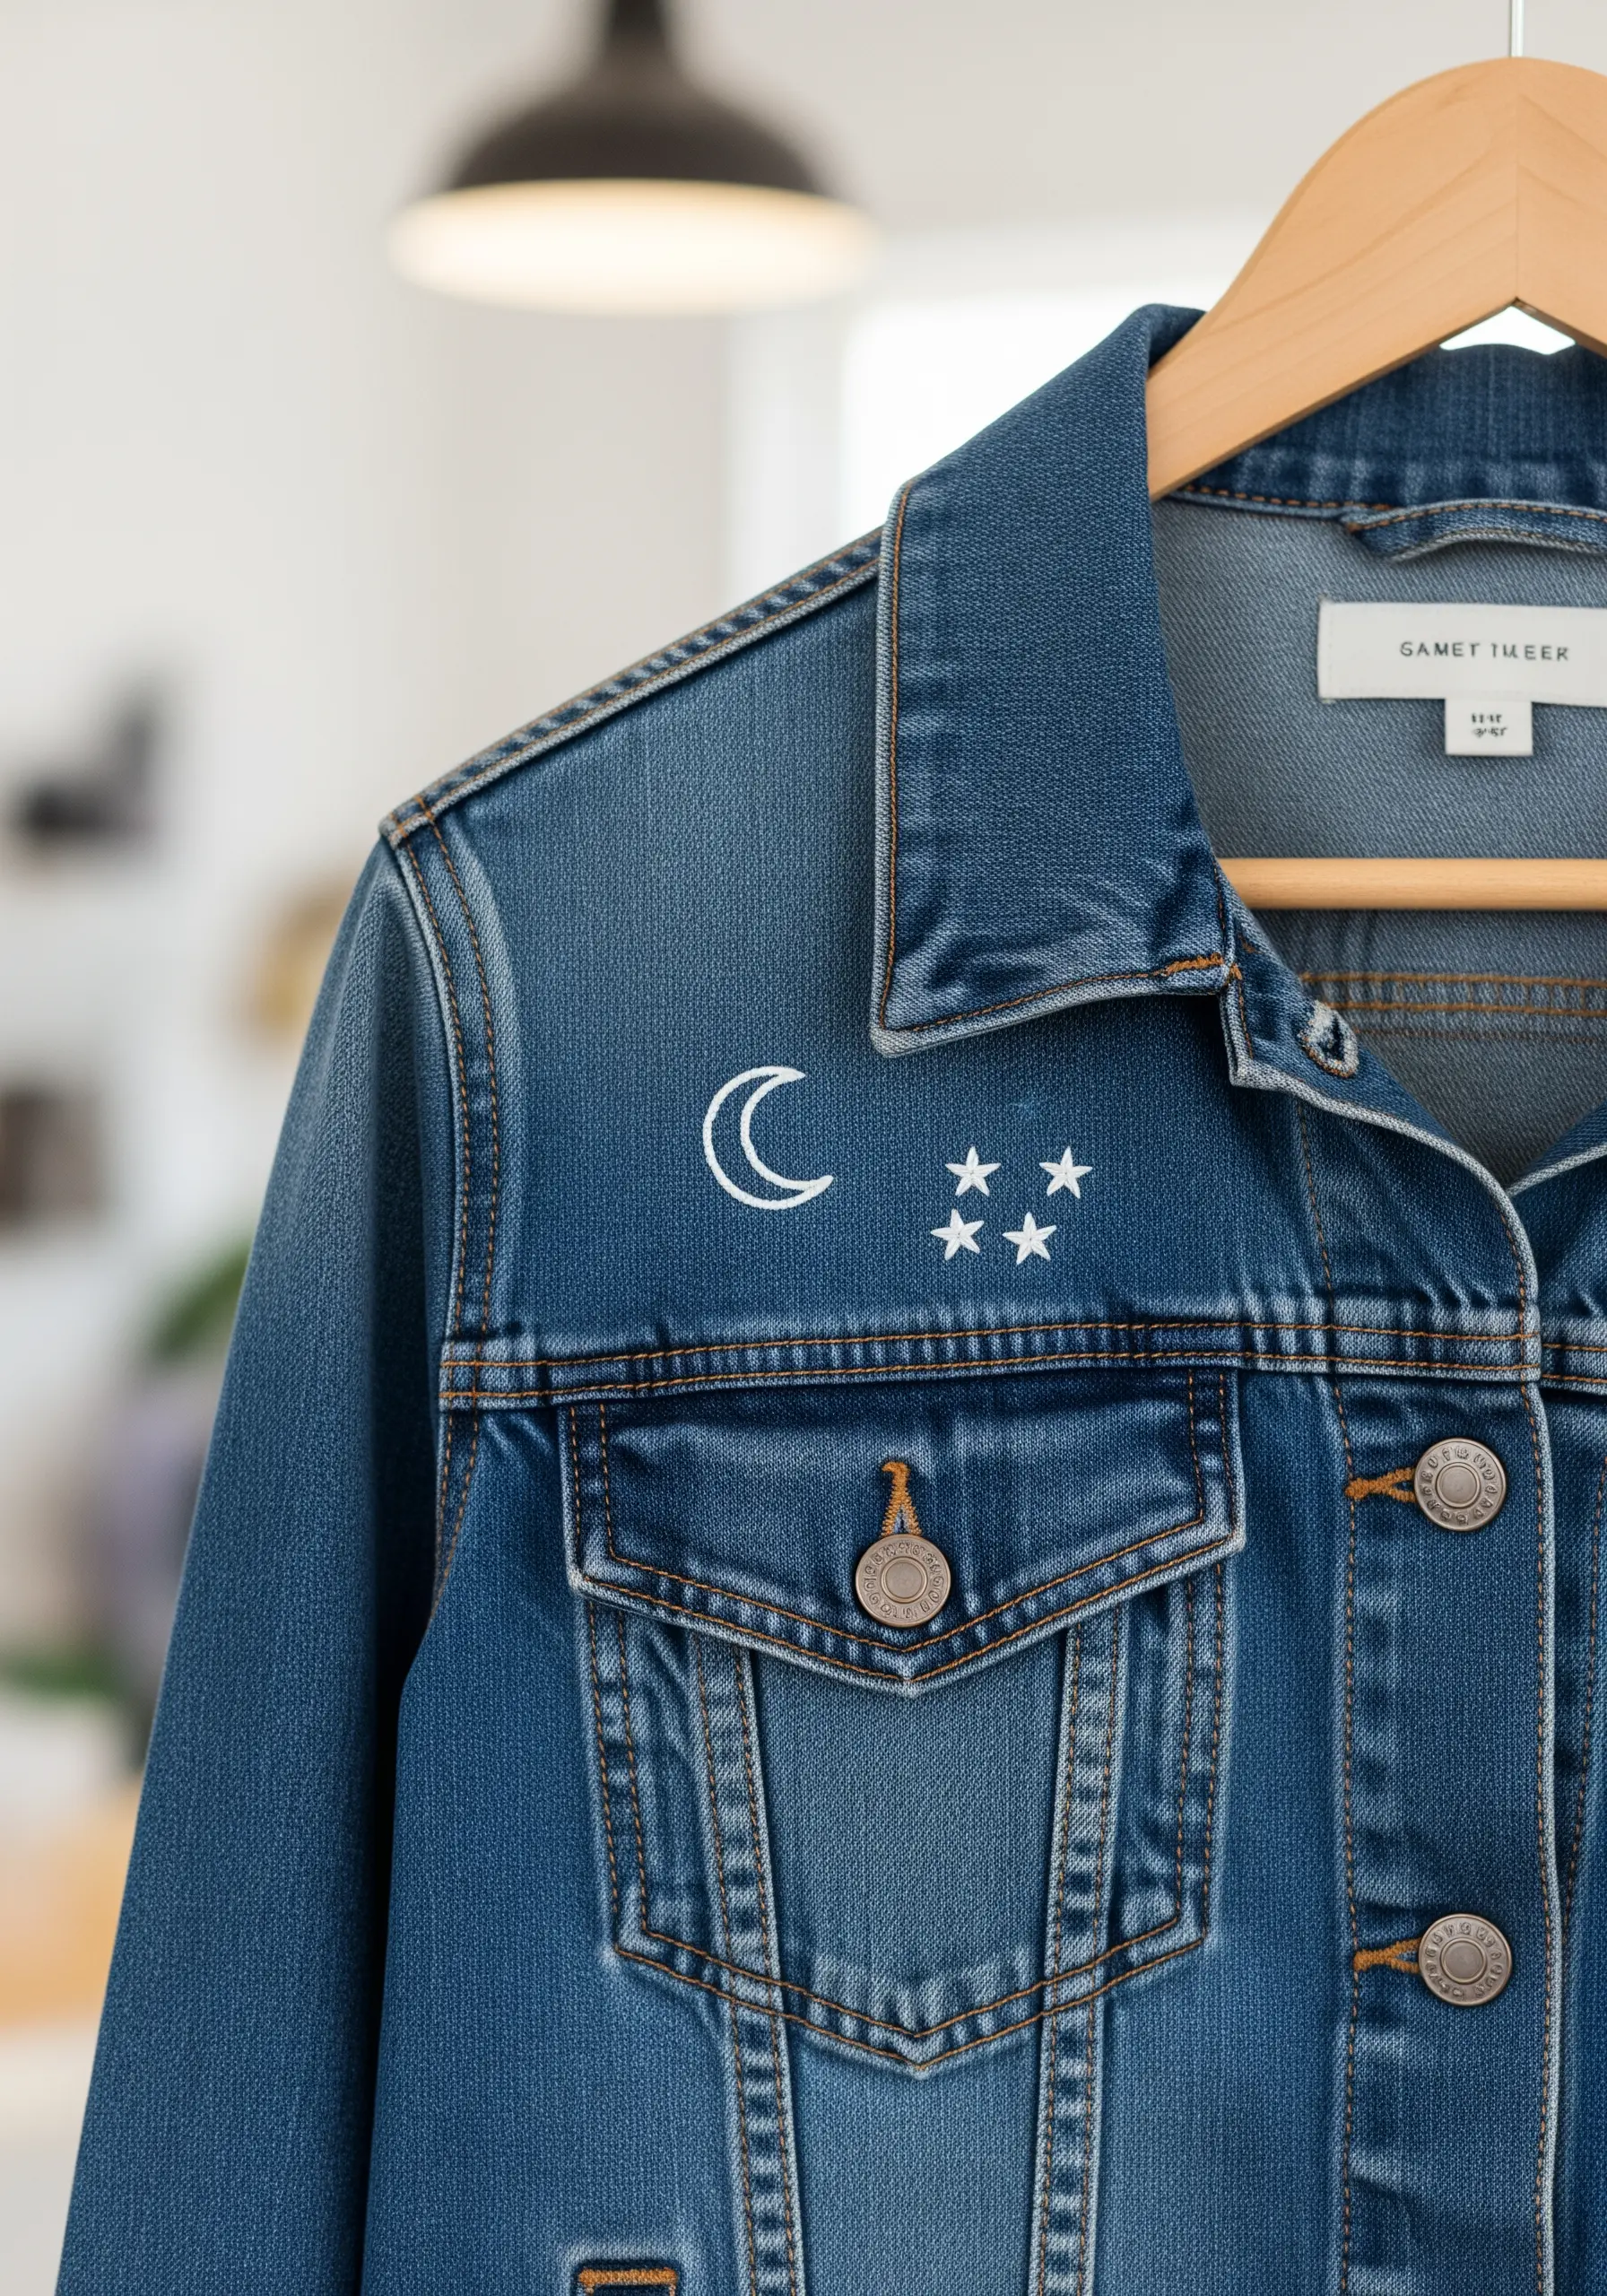
Personalize a denim jacket with a few thoughtfully placed mini-motifs for a touch of understated cool.
A simple satin stitch for the stars and a clean backstitch for the crescent moon are all you need. Use all six strands of floss for a bold look that stands out.
When stitching on denim, use a sharp, sturdy needle and a thimble. A small hoop will help keep the thick fabric taut.
Scatter the motifs asymmetrically across a collar or yoke—the negative space is what makes the design feel modern, proving that easy stitches that bring your plain denim jackets to life can be the most effective.
12. A Polka Dot Effect with French Knots

Create a playful, textured surface using one of the simplest stitches: the French knot.
To achieve this confetti-like pattern, scatter knots randomly across the fabric. Use a variety of colors to add vibrancy and visual interest.
You can vary the size of your knots by changing the number of floss strands or the number of times you wrap the thread around the needle.
This is a wonderfully meditative technique and one of the best small embroidery ideas that look complex but are super easy to make.
13. Art Deco Glamour on Velvet
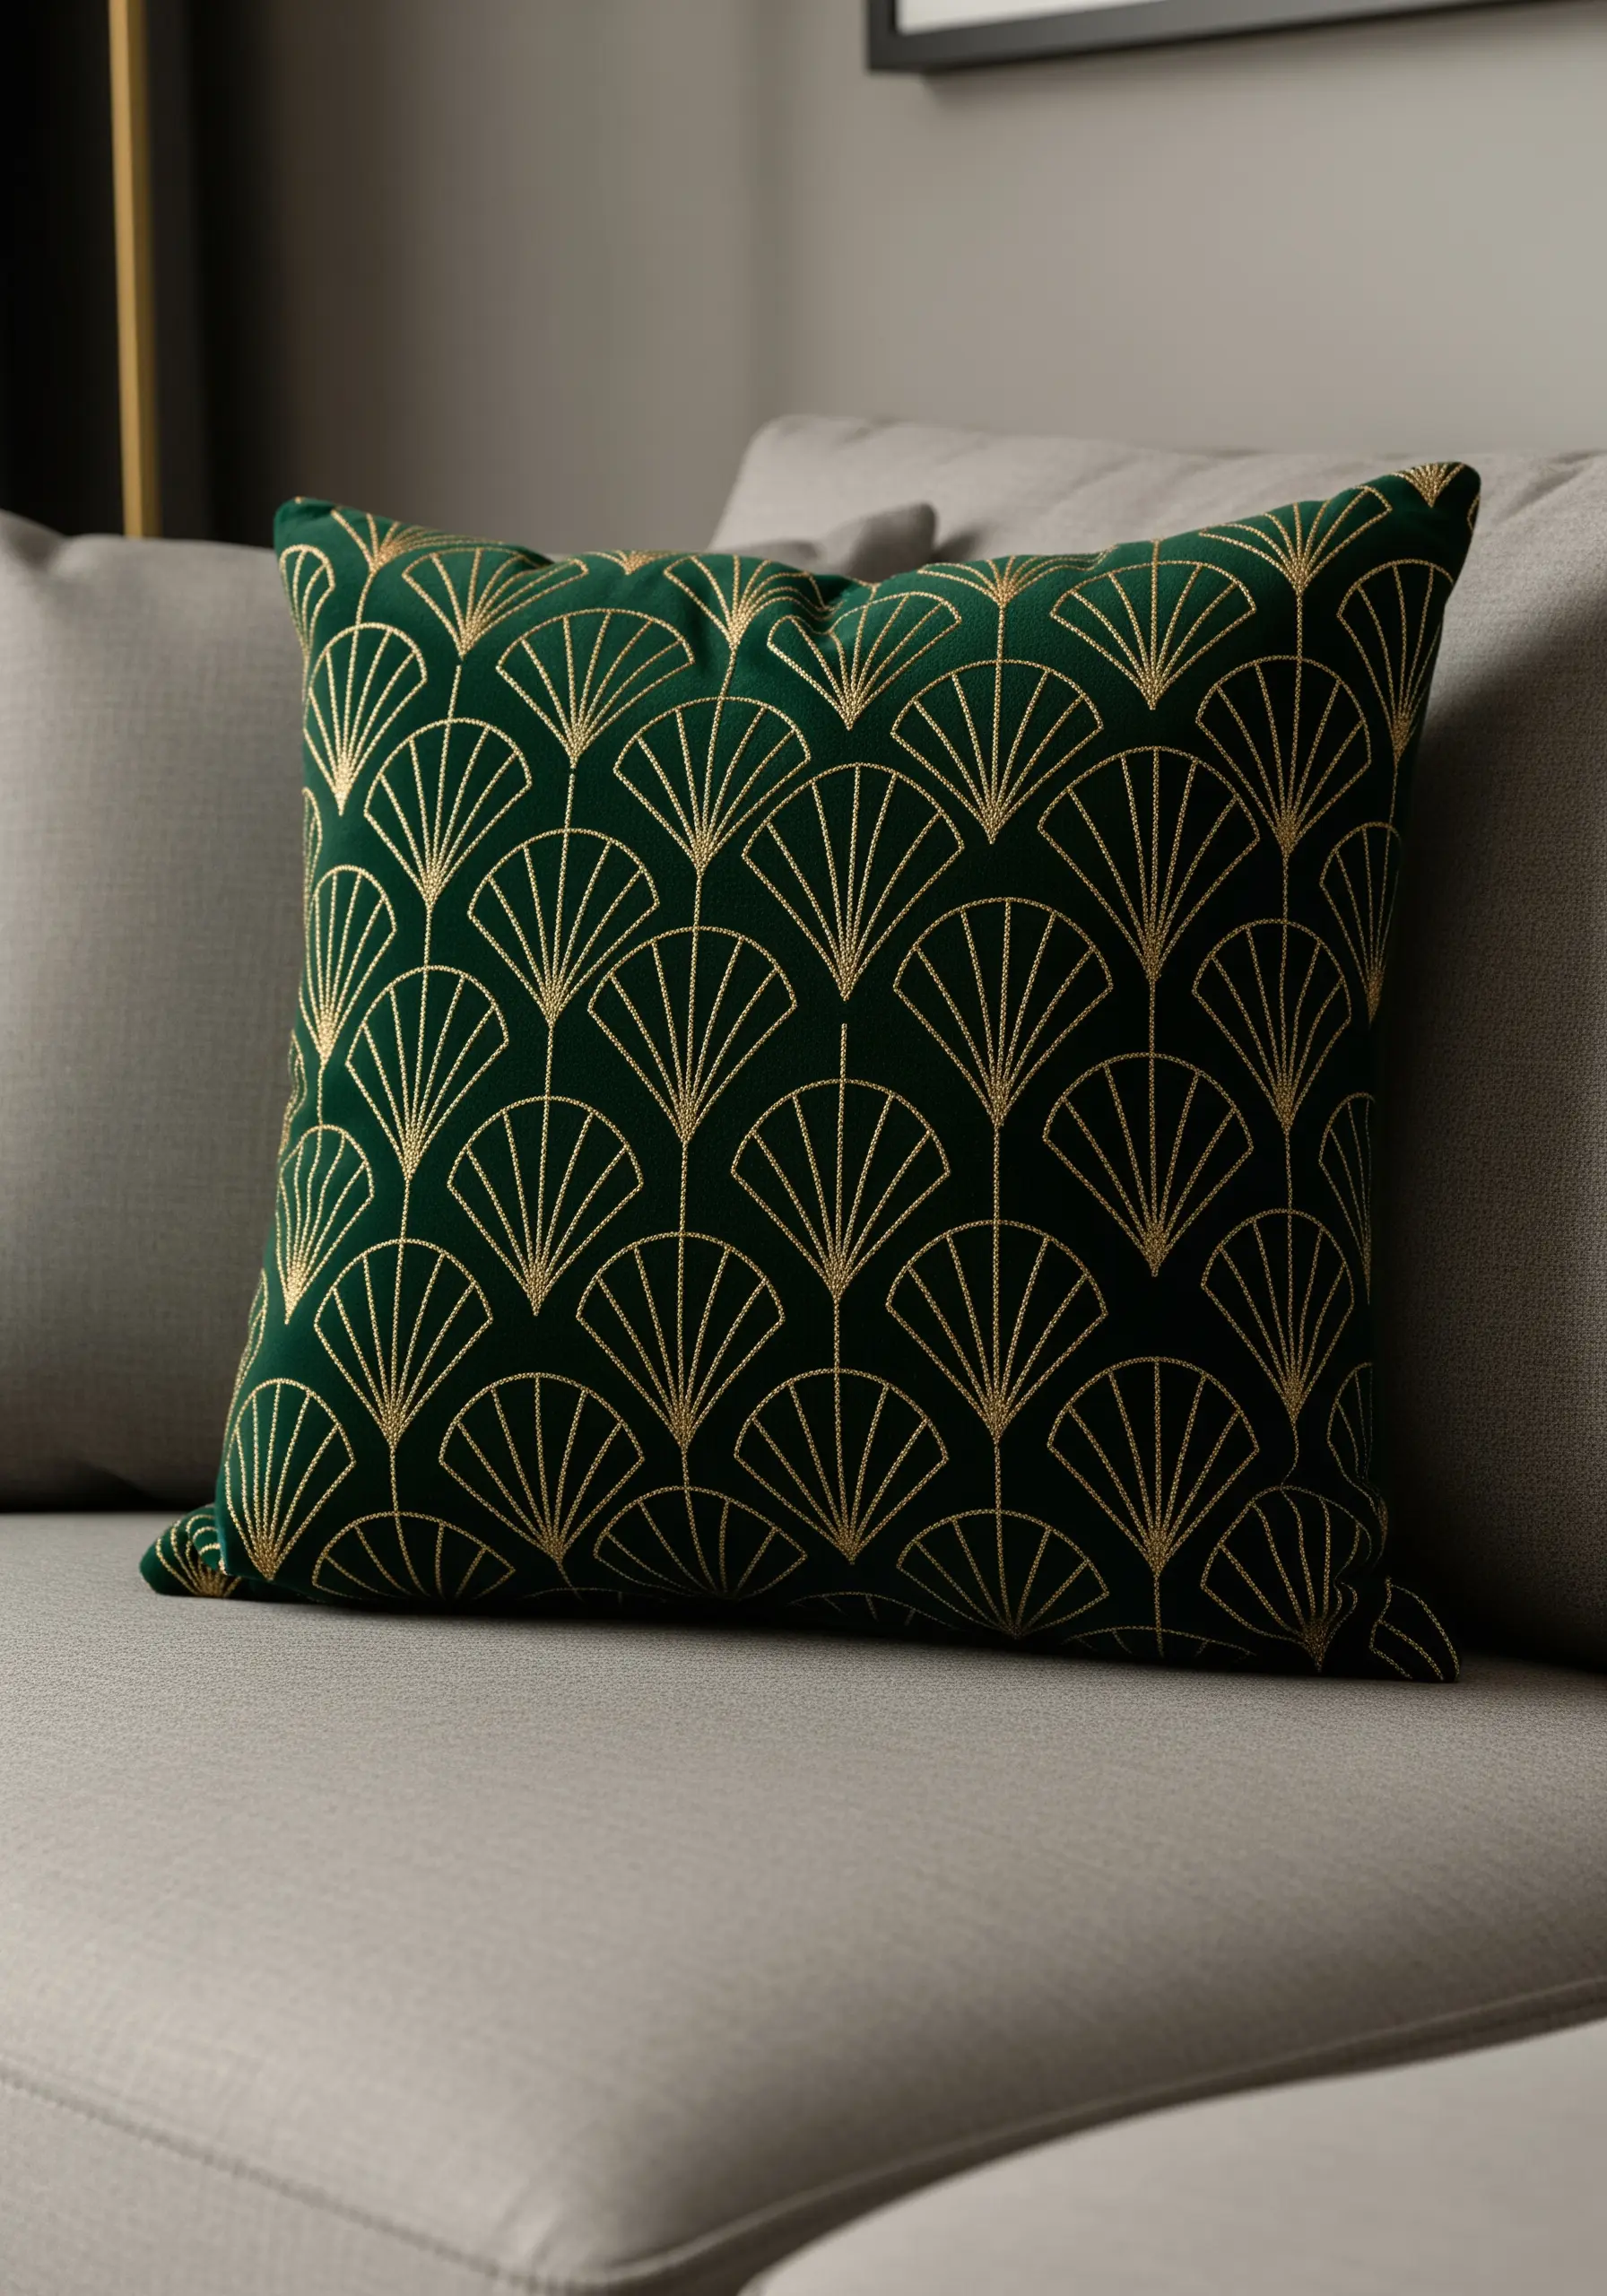
Evoke the luxury of the Art Deco era by pairing a geometric pattern with the rich texture of a velvet cushion.
Use a gold or brass metallic thread to stitch a repeating fan motif. A simple backstitch is all you need; the materials themselves provide the glamour.
When embroidering on velvet, always use a stabilizer on the back and avoid hooping the fabric directly, as it can crush the pile.
The way metallic thread catches the light against deep, matte velvet is the secret behind impressive gold thread cushion designs.
14. The Perfect Satin Stitch Monogram
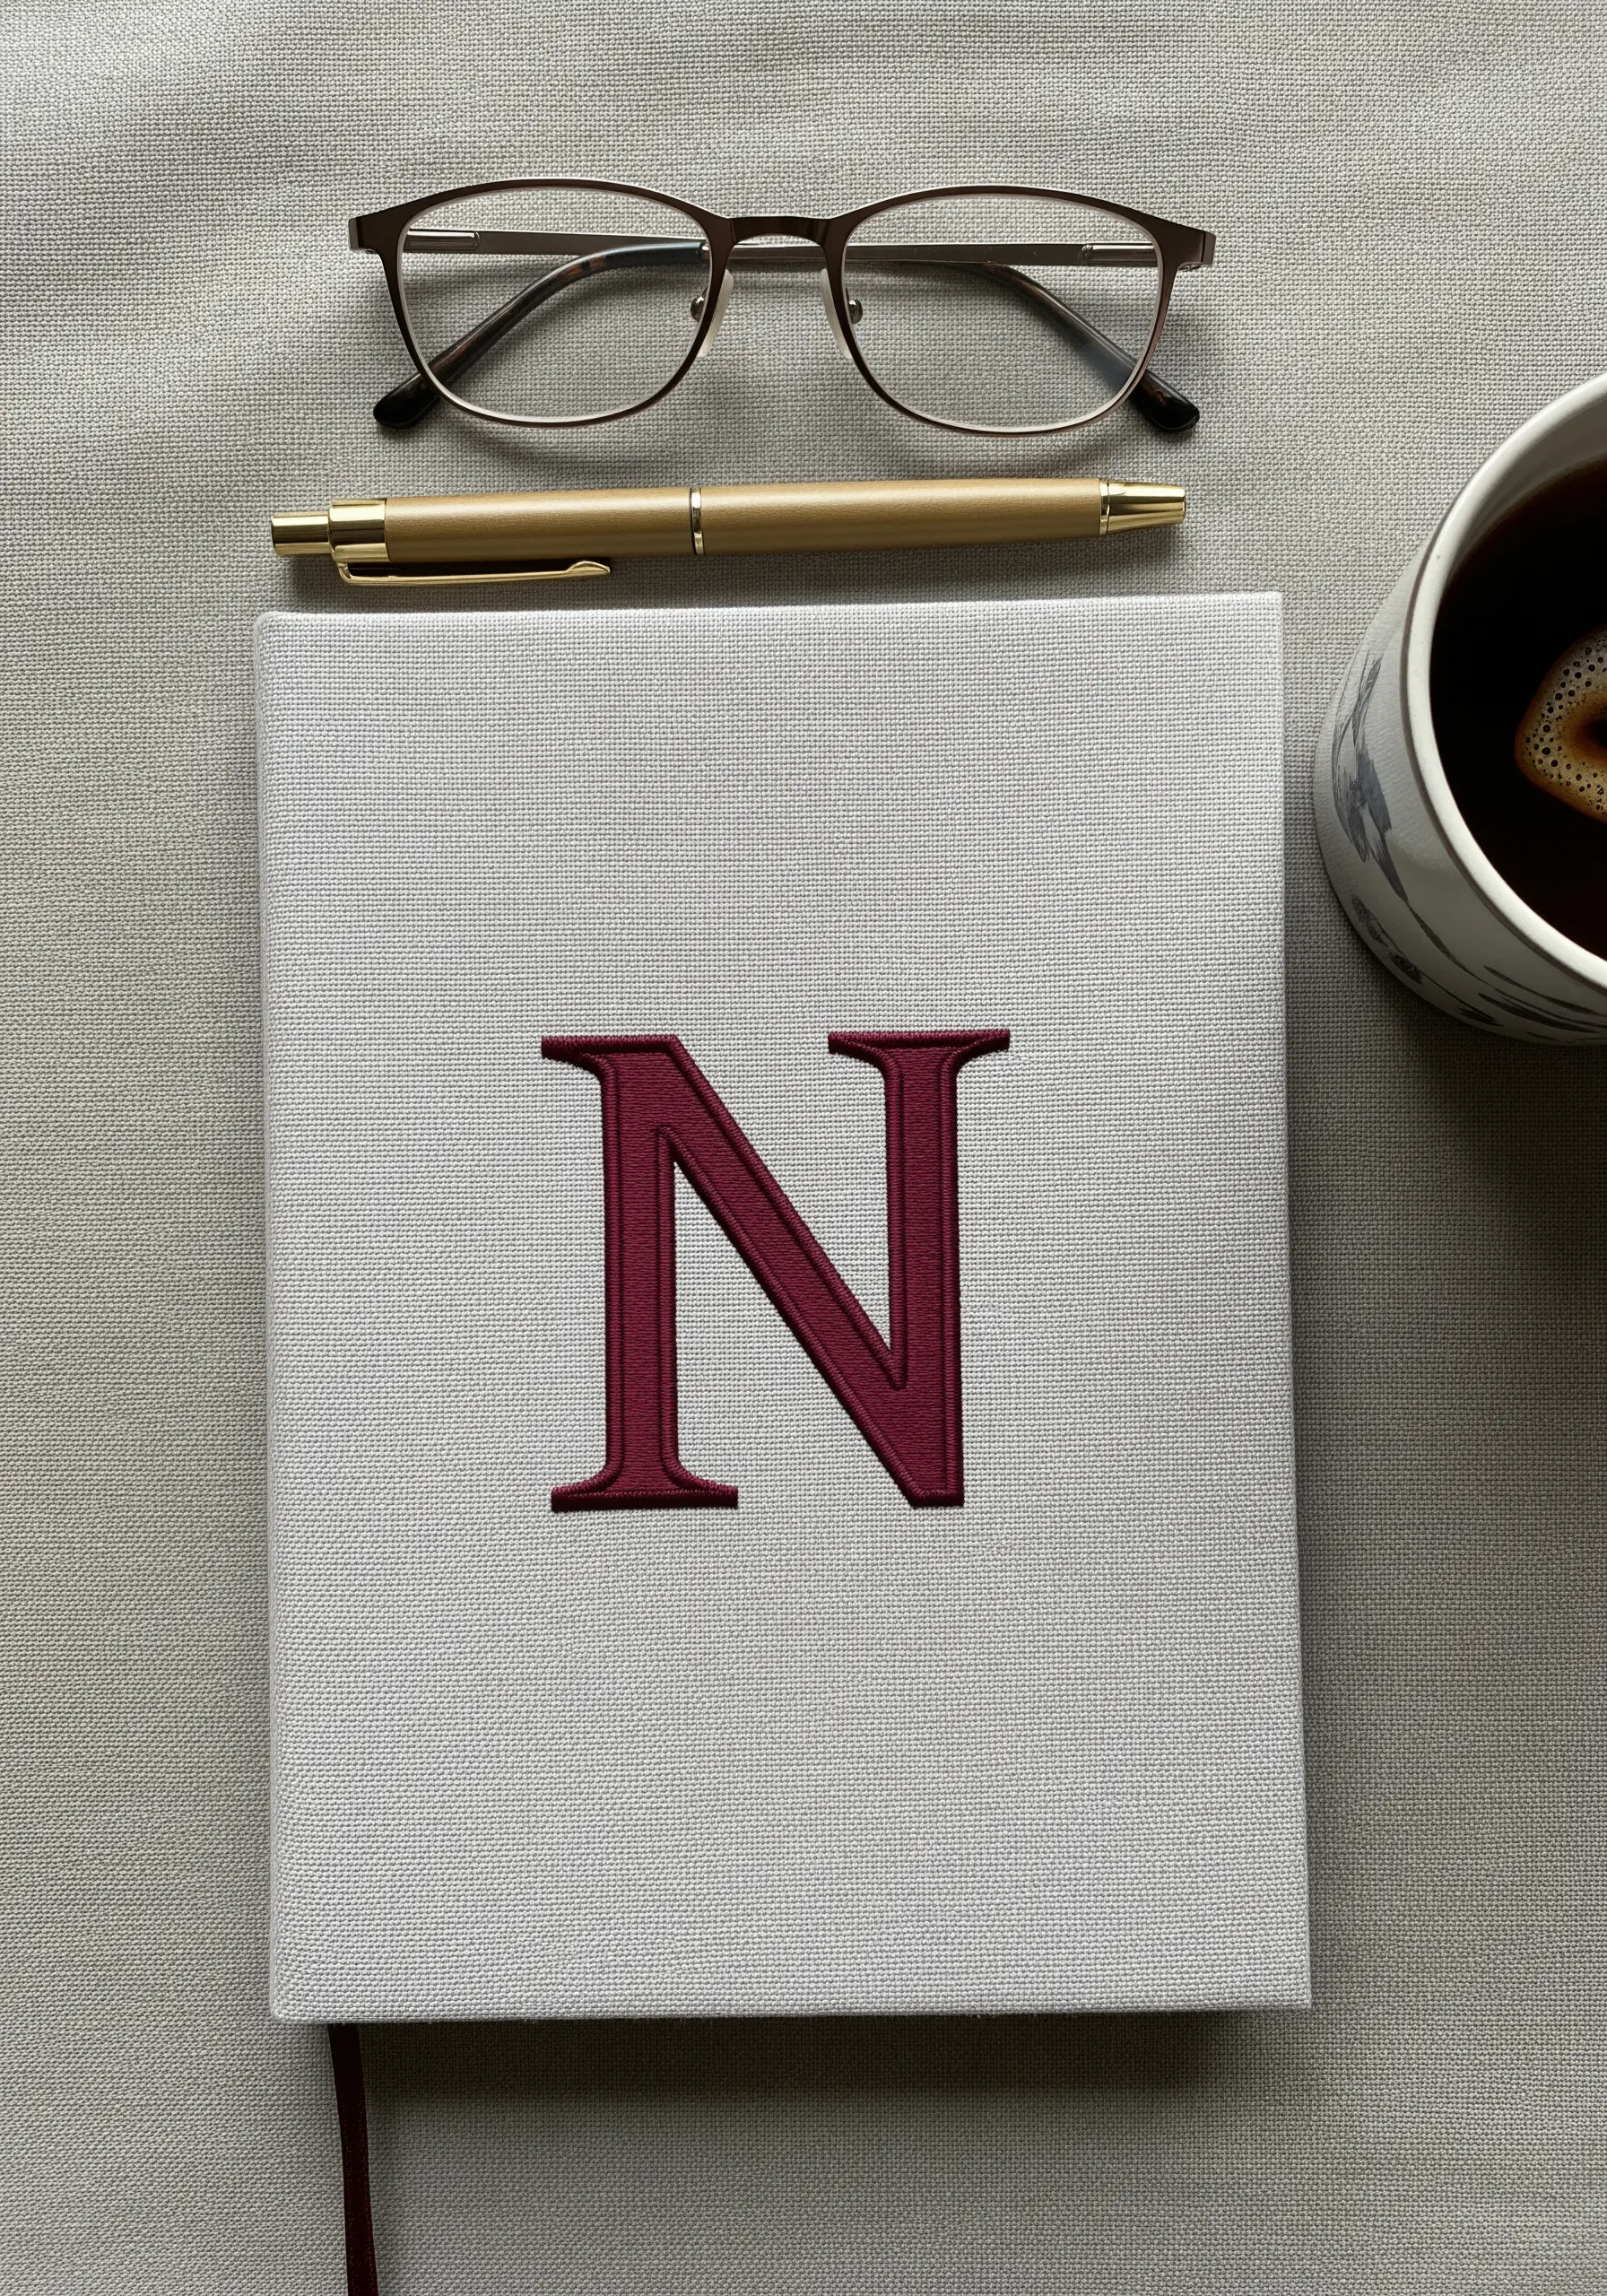
A perfectly executed monogram adds a timeless touch of personalization to a journal or notebook.
The secret to a flawless satin stitch is to first outline the letter using a split stitch. This raised edge gives you a firm boundary to stitch against, resulting in incredibly sharp edges.
Lay your satin stitches closely together, ensuring they are parallel and cover the split stitch outline completely.
This is the same technique used in high-end personalized monogram table linen embroidery ideas.
15. Minimalist Art with Simple Stitches
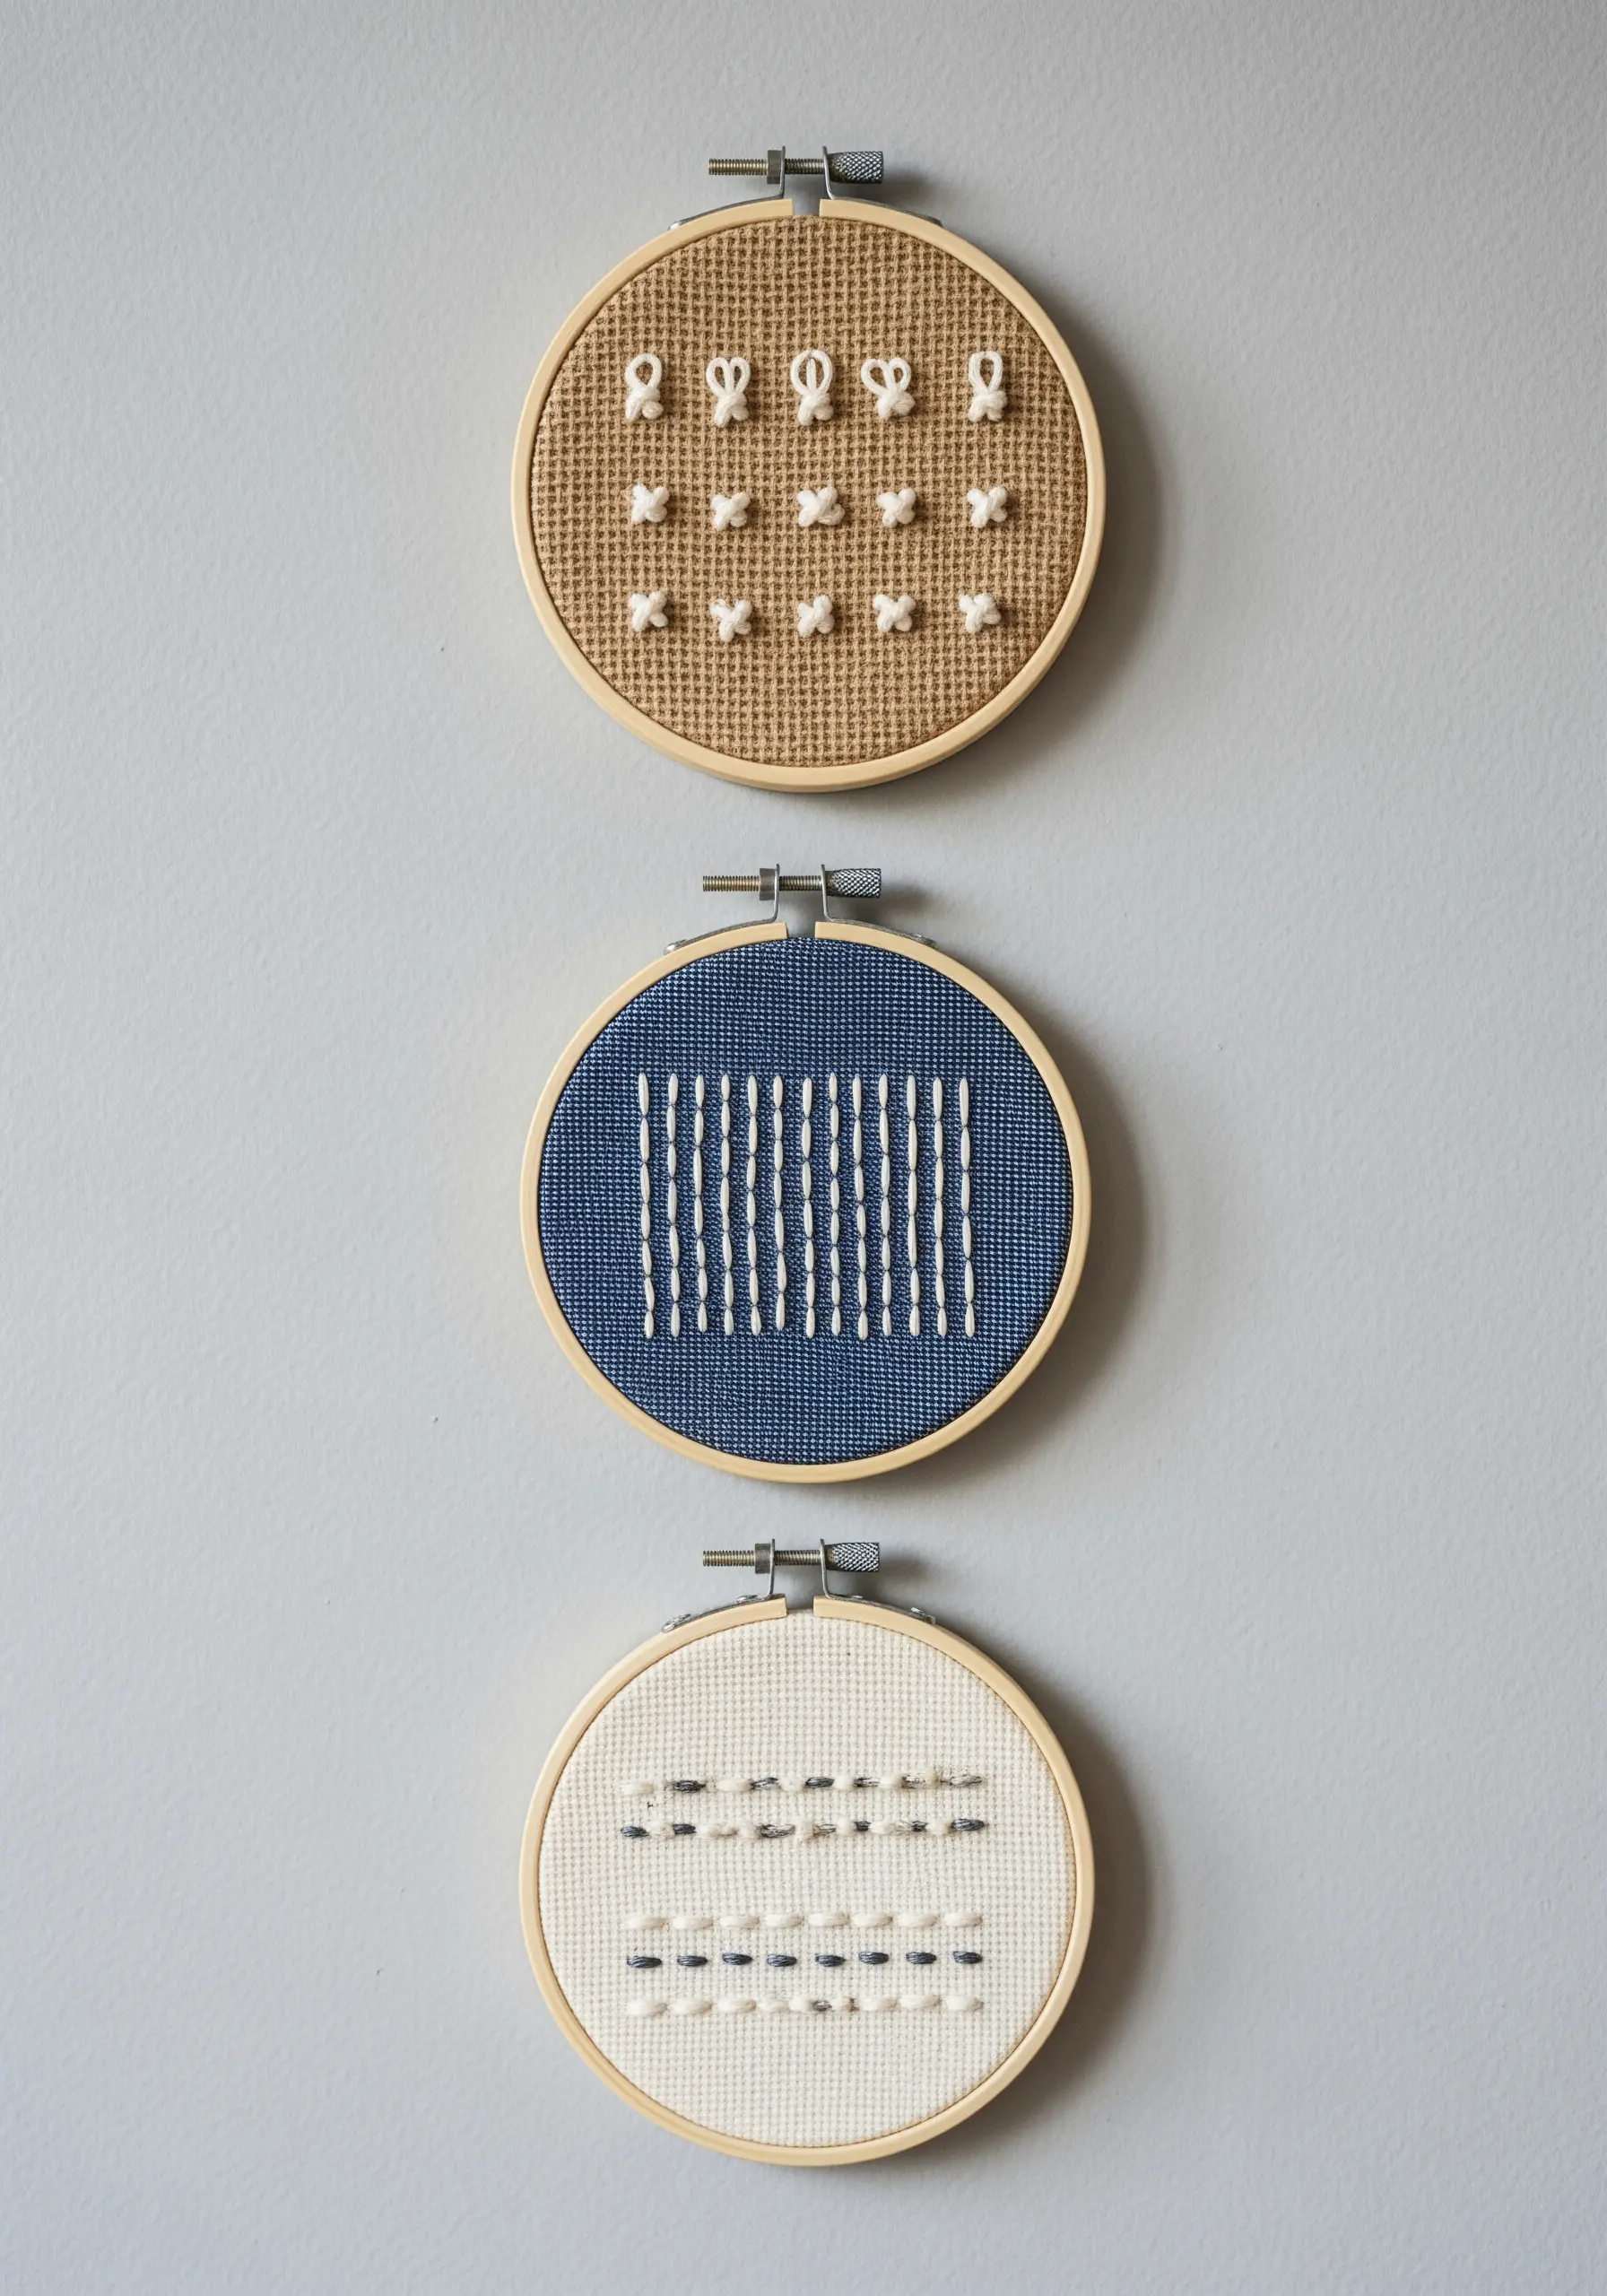
Turn basic stitches into modern, abstract art by creating minimalist samplers.
Choose a single stitch—like a colonial knot, straight stitch, or a simple cross—and repeat it in a grid or line formation.
Experiment with different base fabrics. A chunky knot on coarse burlap feels rustic, while a clean straight stitch on dark linen feels graphic and contemporary.
Grouping several of these minimalist hoop embroidery designs together creates a cohesive gallery wall that celebrates the beauty of thread and texture.
16. Delicate Botanicals for Scented Sachets
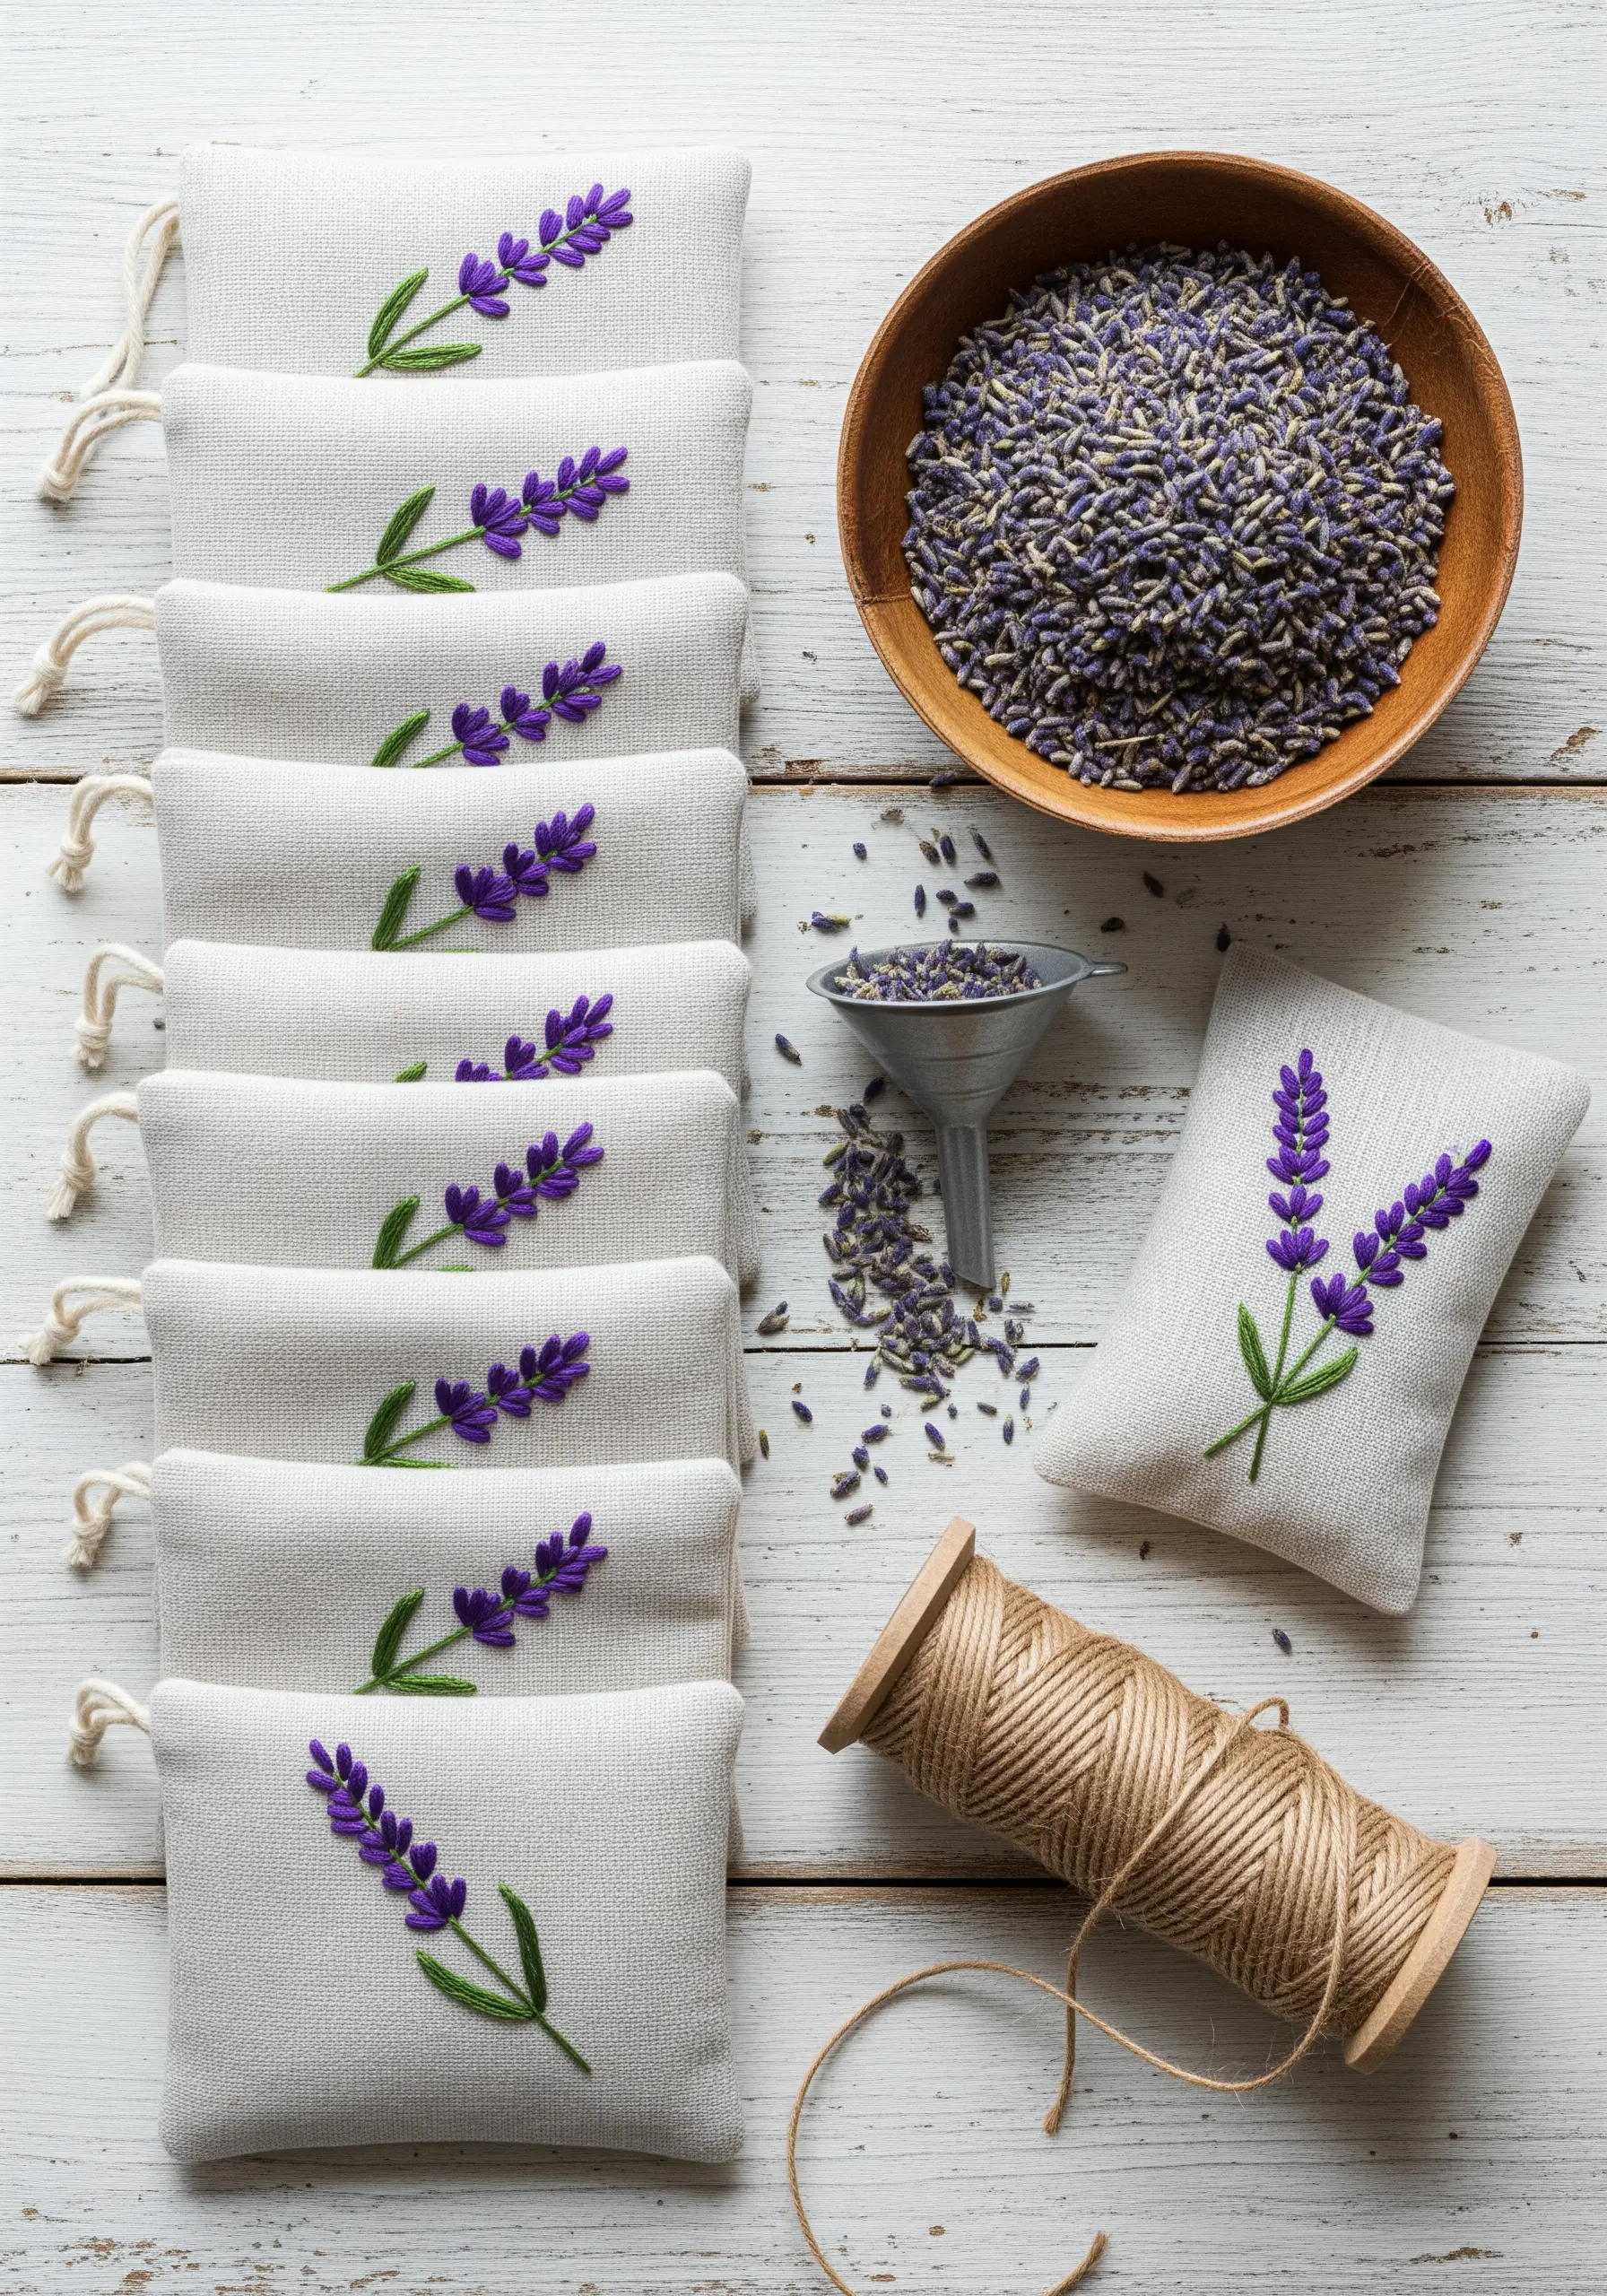
Embellish simple linen sachets with a delicate sprig of lavender for a project that delights multiple senses.
For the tiny lavender buds, use French knots or a short, straight satin stitch. Using just two strands of floss will keep the details crisp and prevent them from looking bulky.
A simple stem stitch in a contrasting green creates a graceful, curving stem.
This small-scale project is a perfect way to practice stitch consistency and is inspired by soothing lavender field embroidery ideas.
17. The Charm of the Simple Running Stitch
Create a sweet, storybook feel with the humble running stitch. Its simplicity is perfect for nursery decor and quick projects.
To keep your stitches looking polished, focus on maintaining a consistent length for both the stitches and the gaps between them.
Here, a running stitch outlines a simple felt appliqué shape, adding a layer of texture and a hand-drawn quality to the design.
This technique is wonderfully forgiving for beginners and helps you create cloud-soft embroidery hoops for nursery walls with ease.
18. A Decorative and Functional Edge
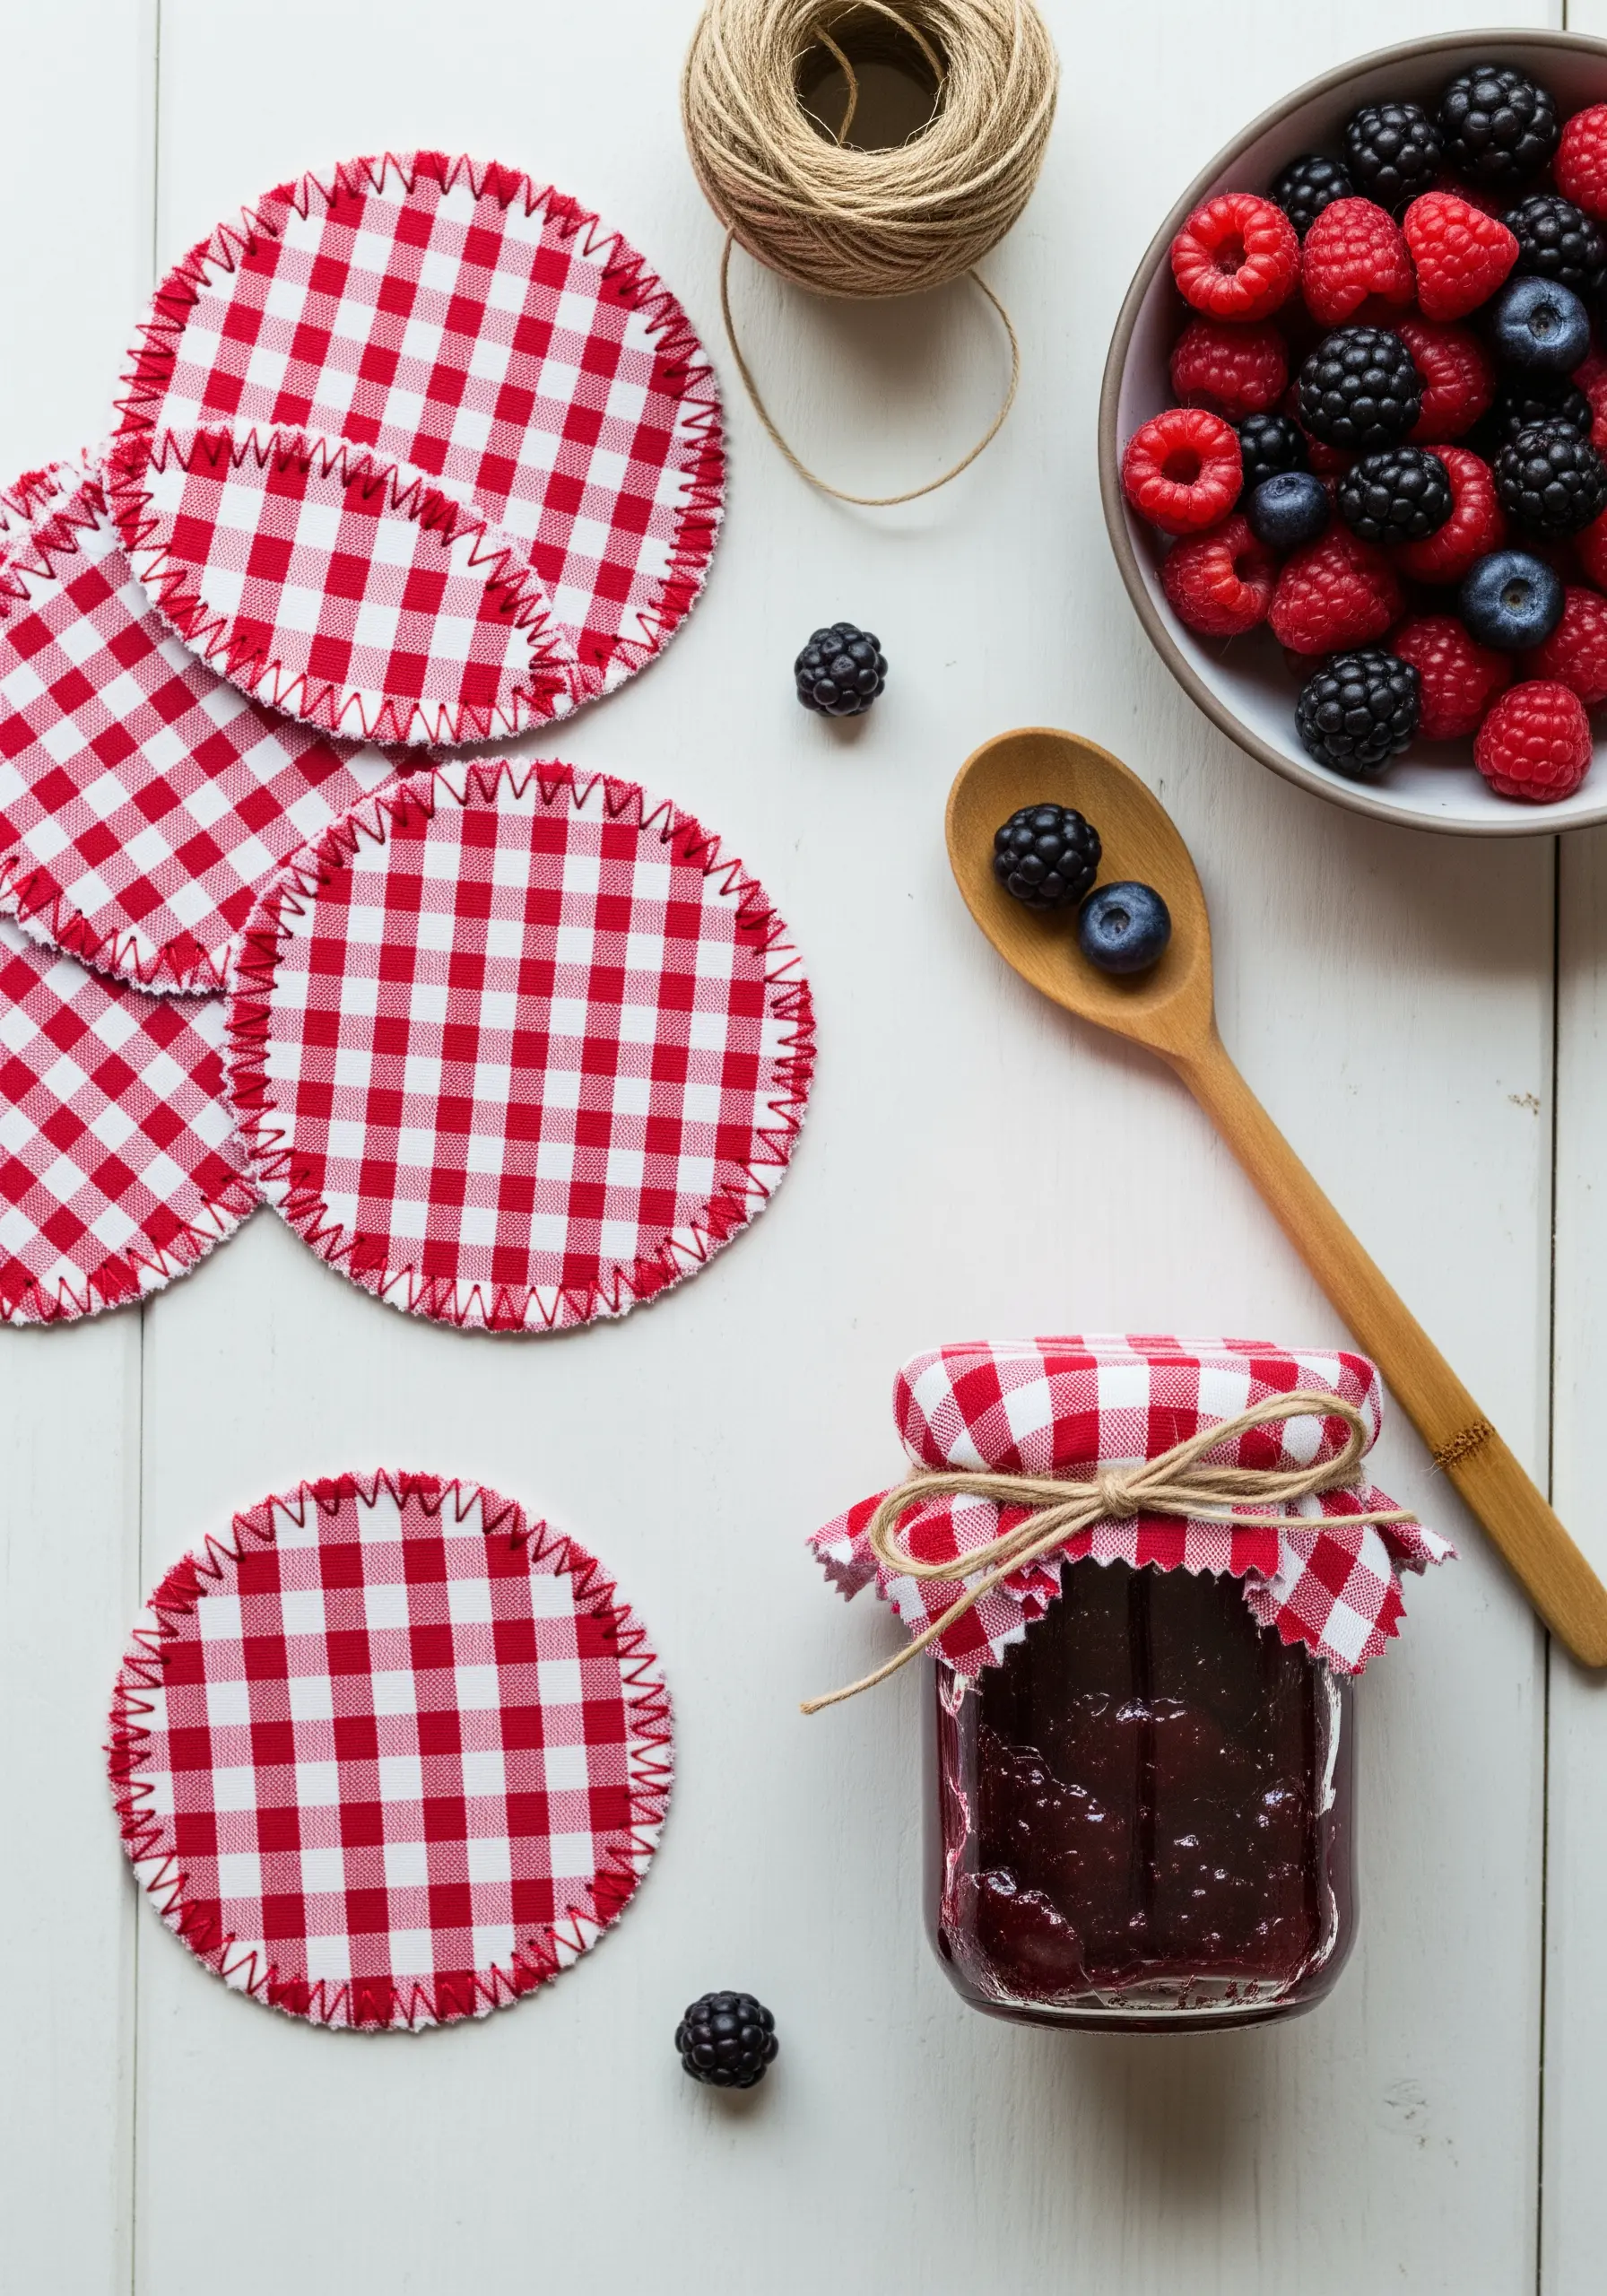
Instead of hemming, use a decorative stitch to finish the edges of small items like coasters or appliqués.
The blanket stitch is perfect for this, as it neatly encases the raw edge of the fabric, preventing it from fraying while adding a charming decorative border.
On a gingham fabric, you can use the checked pattern as a guide to keep your stitches perfectly even.
This is one of the best quick fabric projects that look like hours of work, creating a finished piece that feels rustic and thoughtfully made.
19. Create a Collection of Mini Pincushions
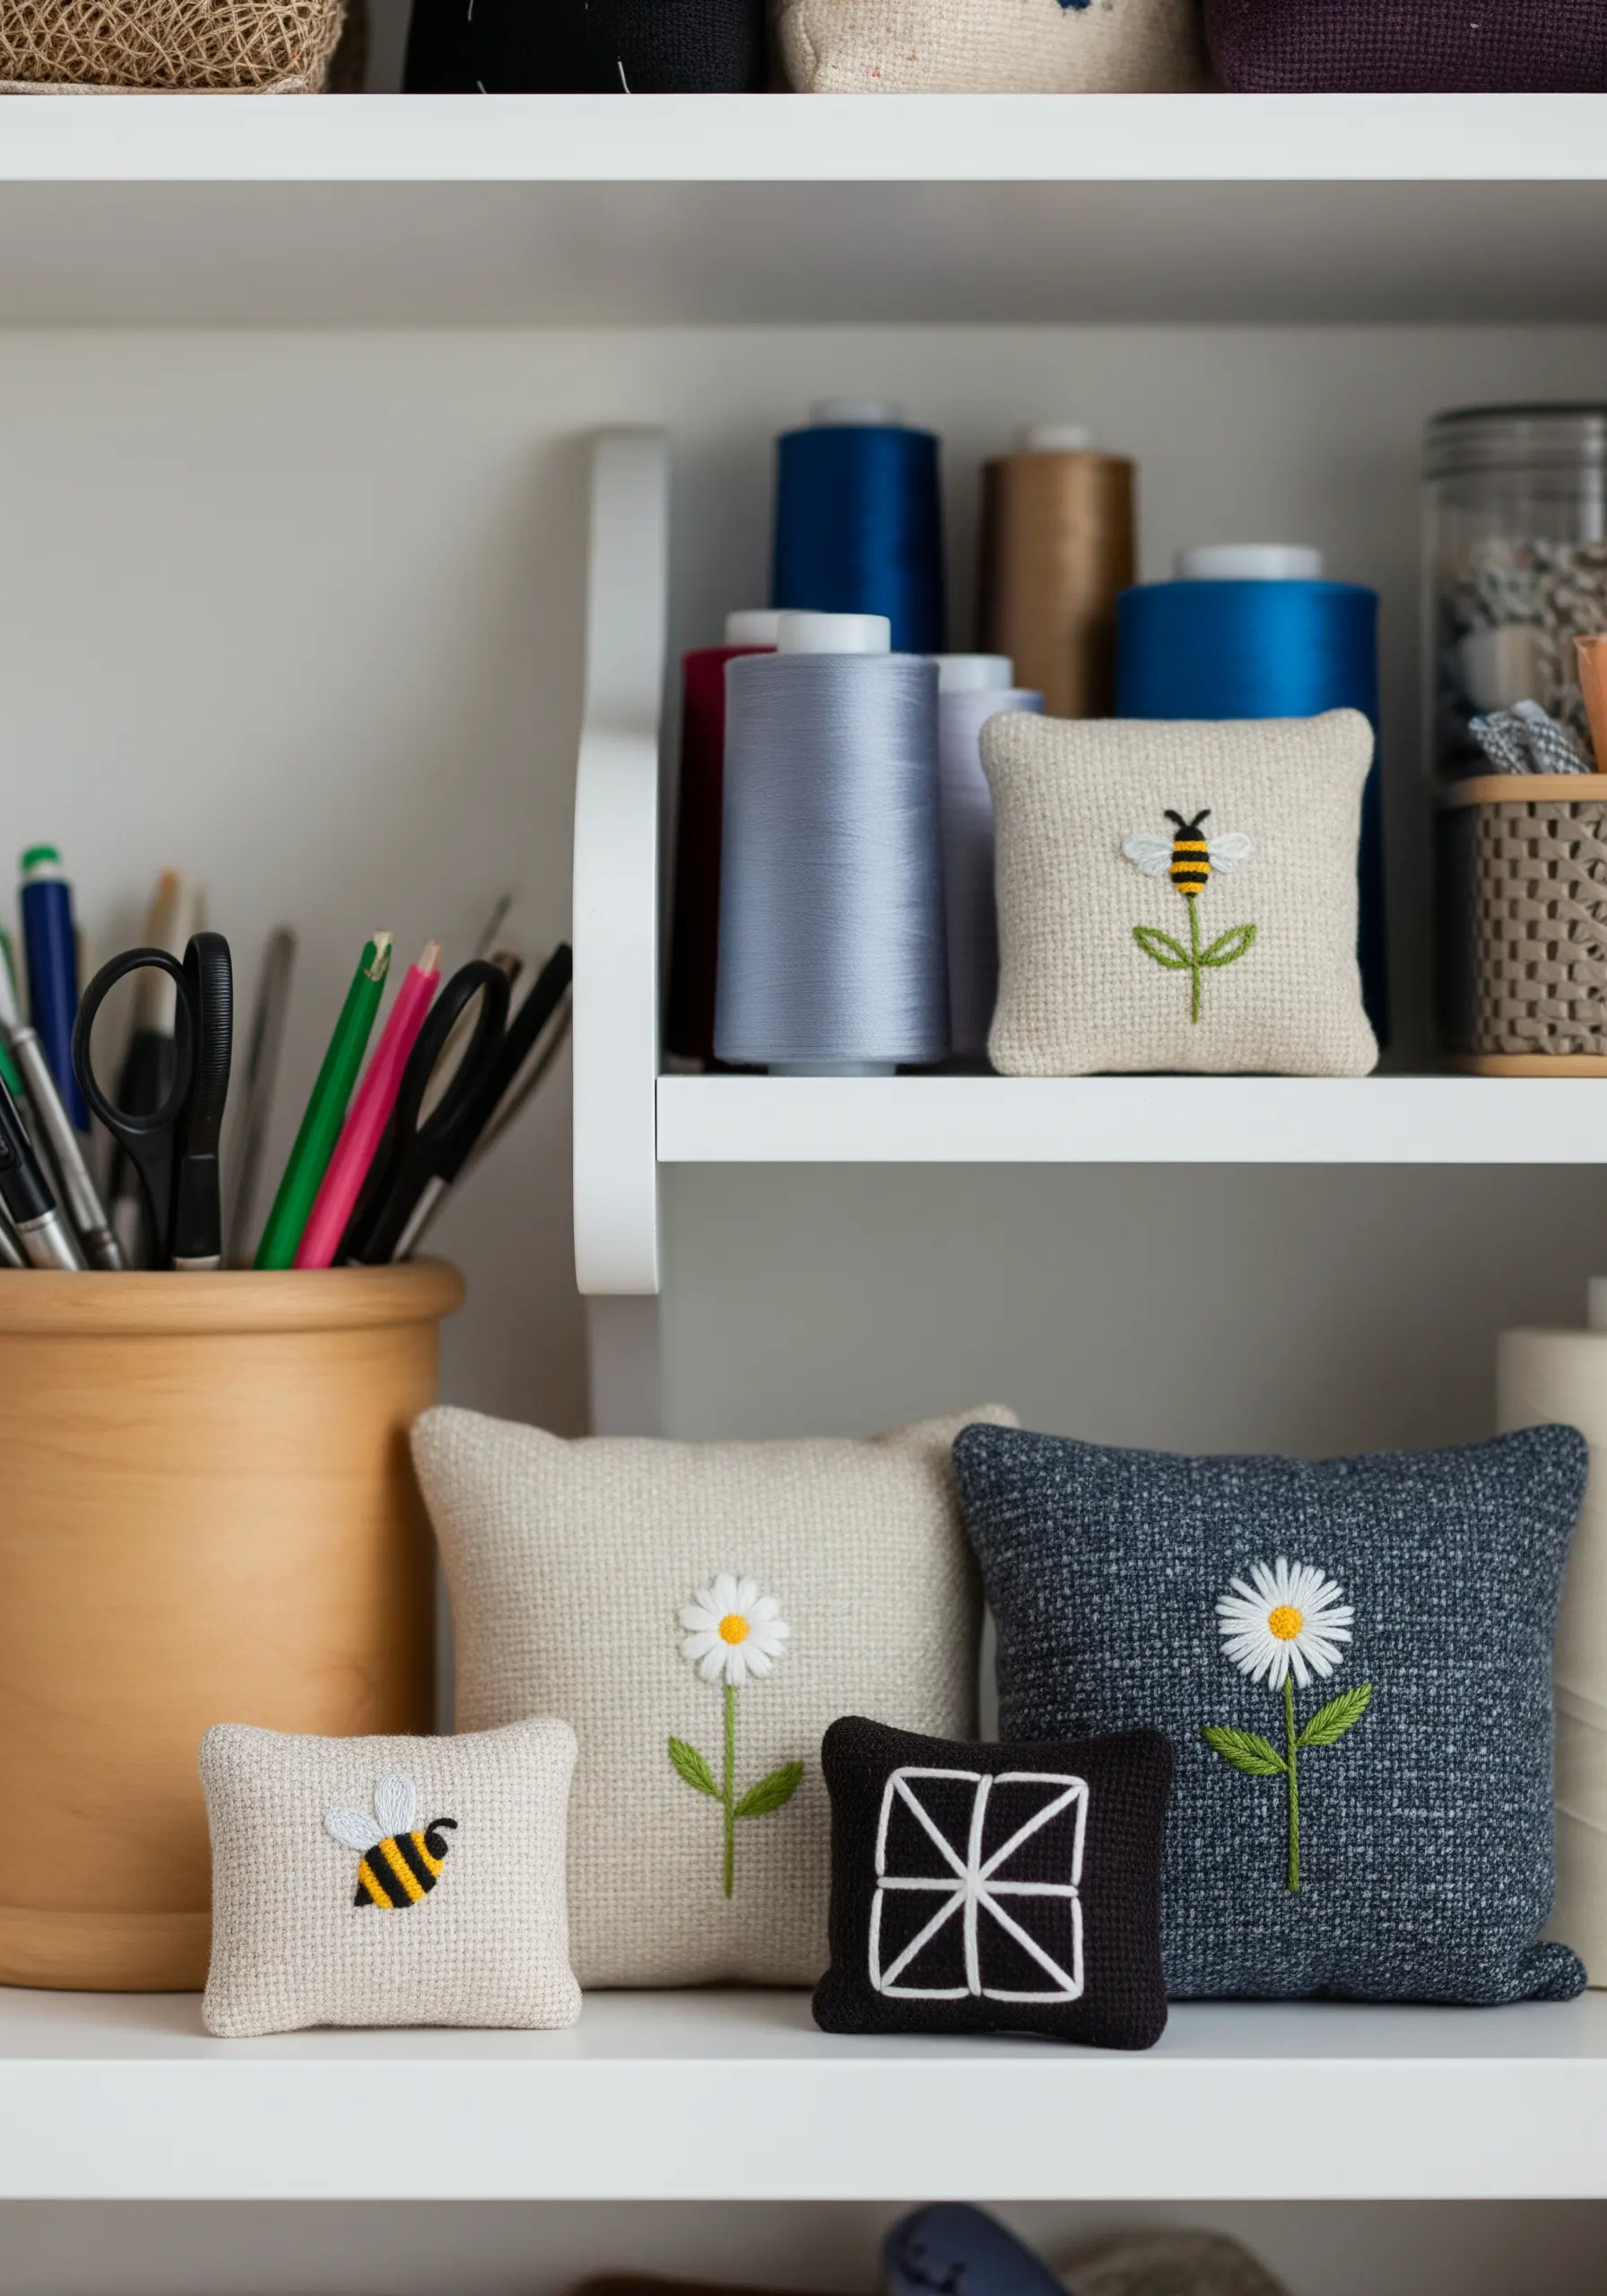
Even the smallest fabric scraps can be turned into charming and useful art objects like these tiny pincushions.
Choose a simple motif—a bee, a daisy, a geometric shape—and use basic stitches to bring it to life on a small square of fabric.
After stitching, sew two squares together, leaving a small opening. Turn it right side out, stuff it firmly, and whip stitch the opening closed.
Grouping these adorable mini embroidery ideas together on a shelf creates a delightful display that showcases your skills in miniature.
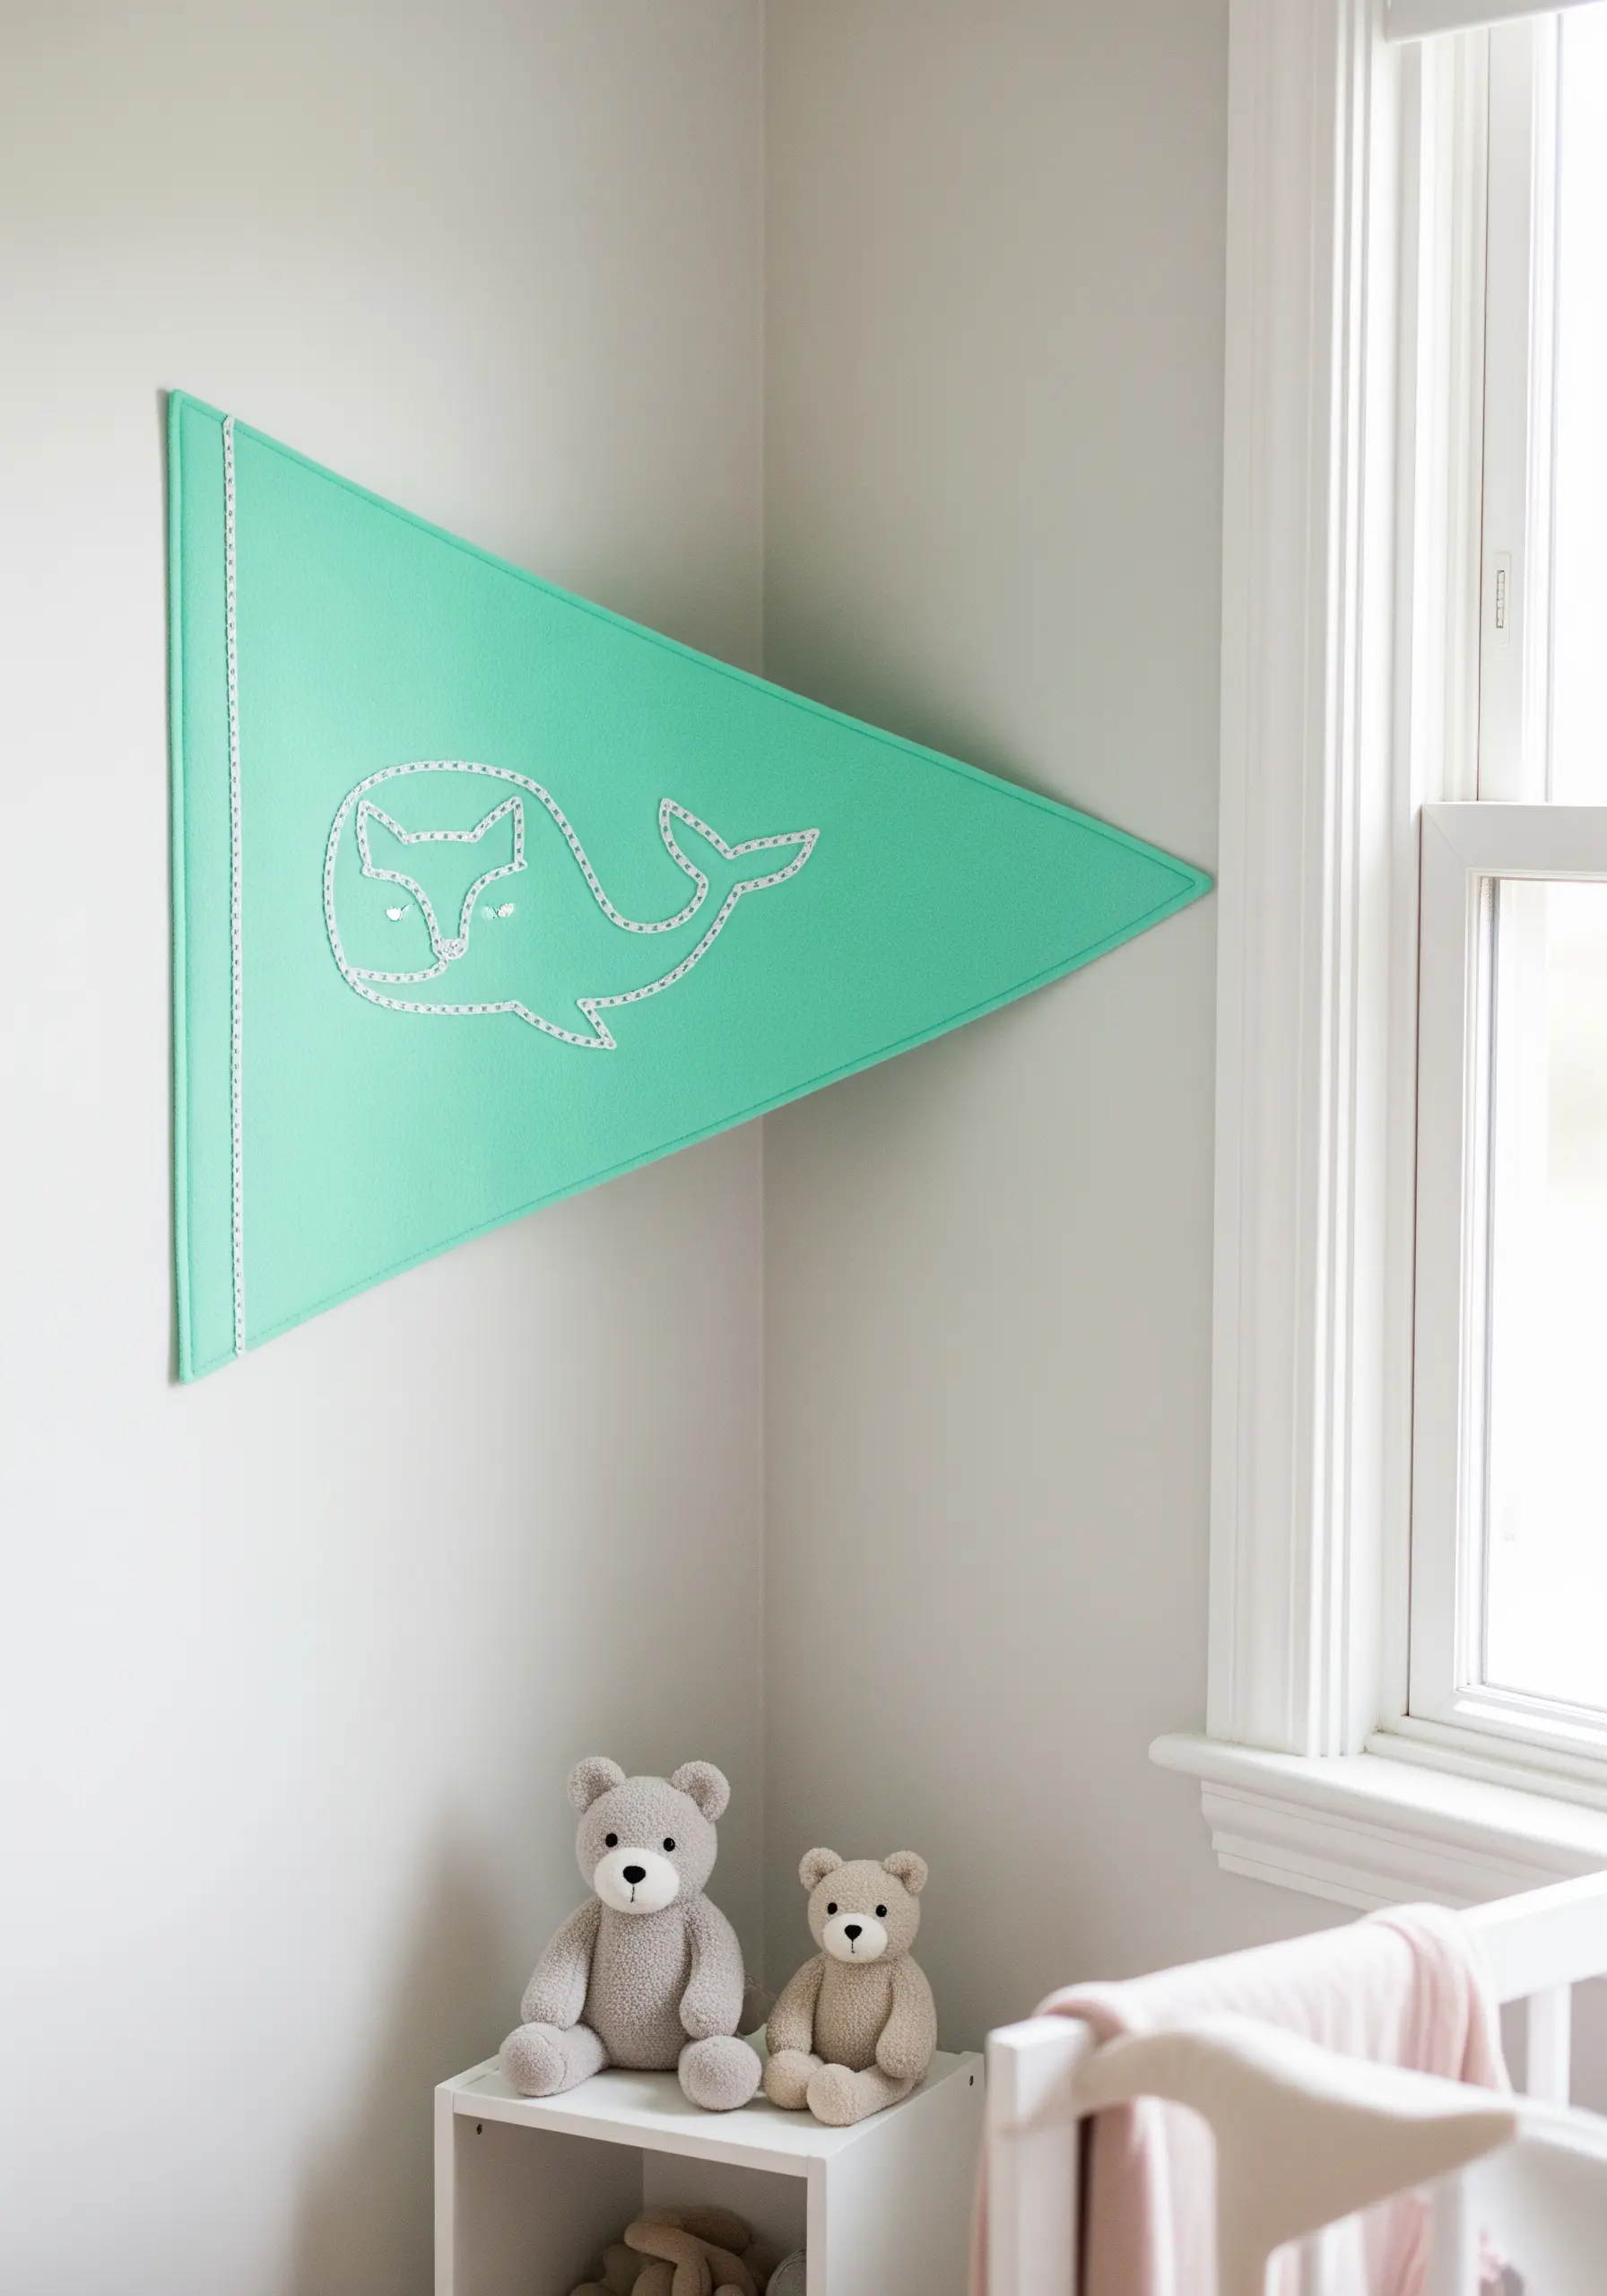
20. Frame a Functional Space with Thread
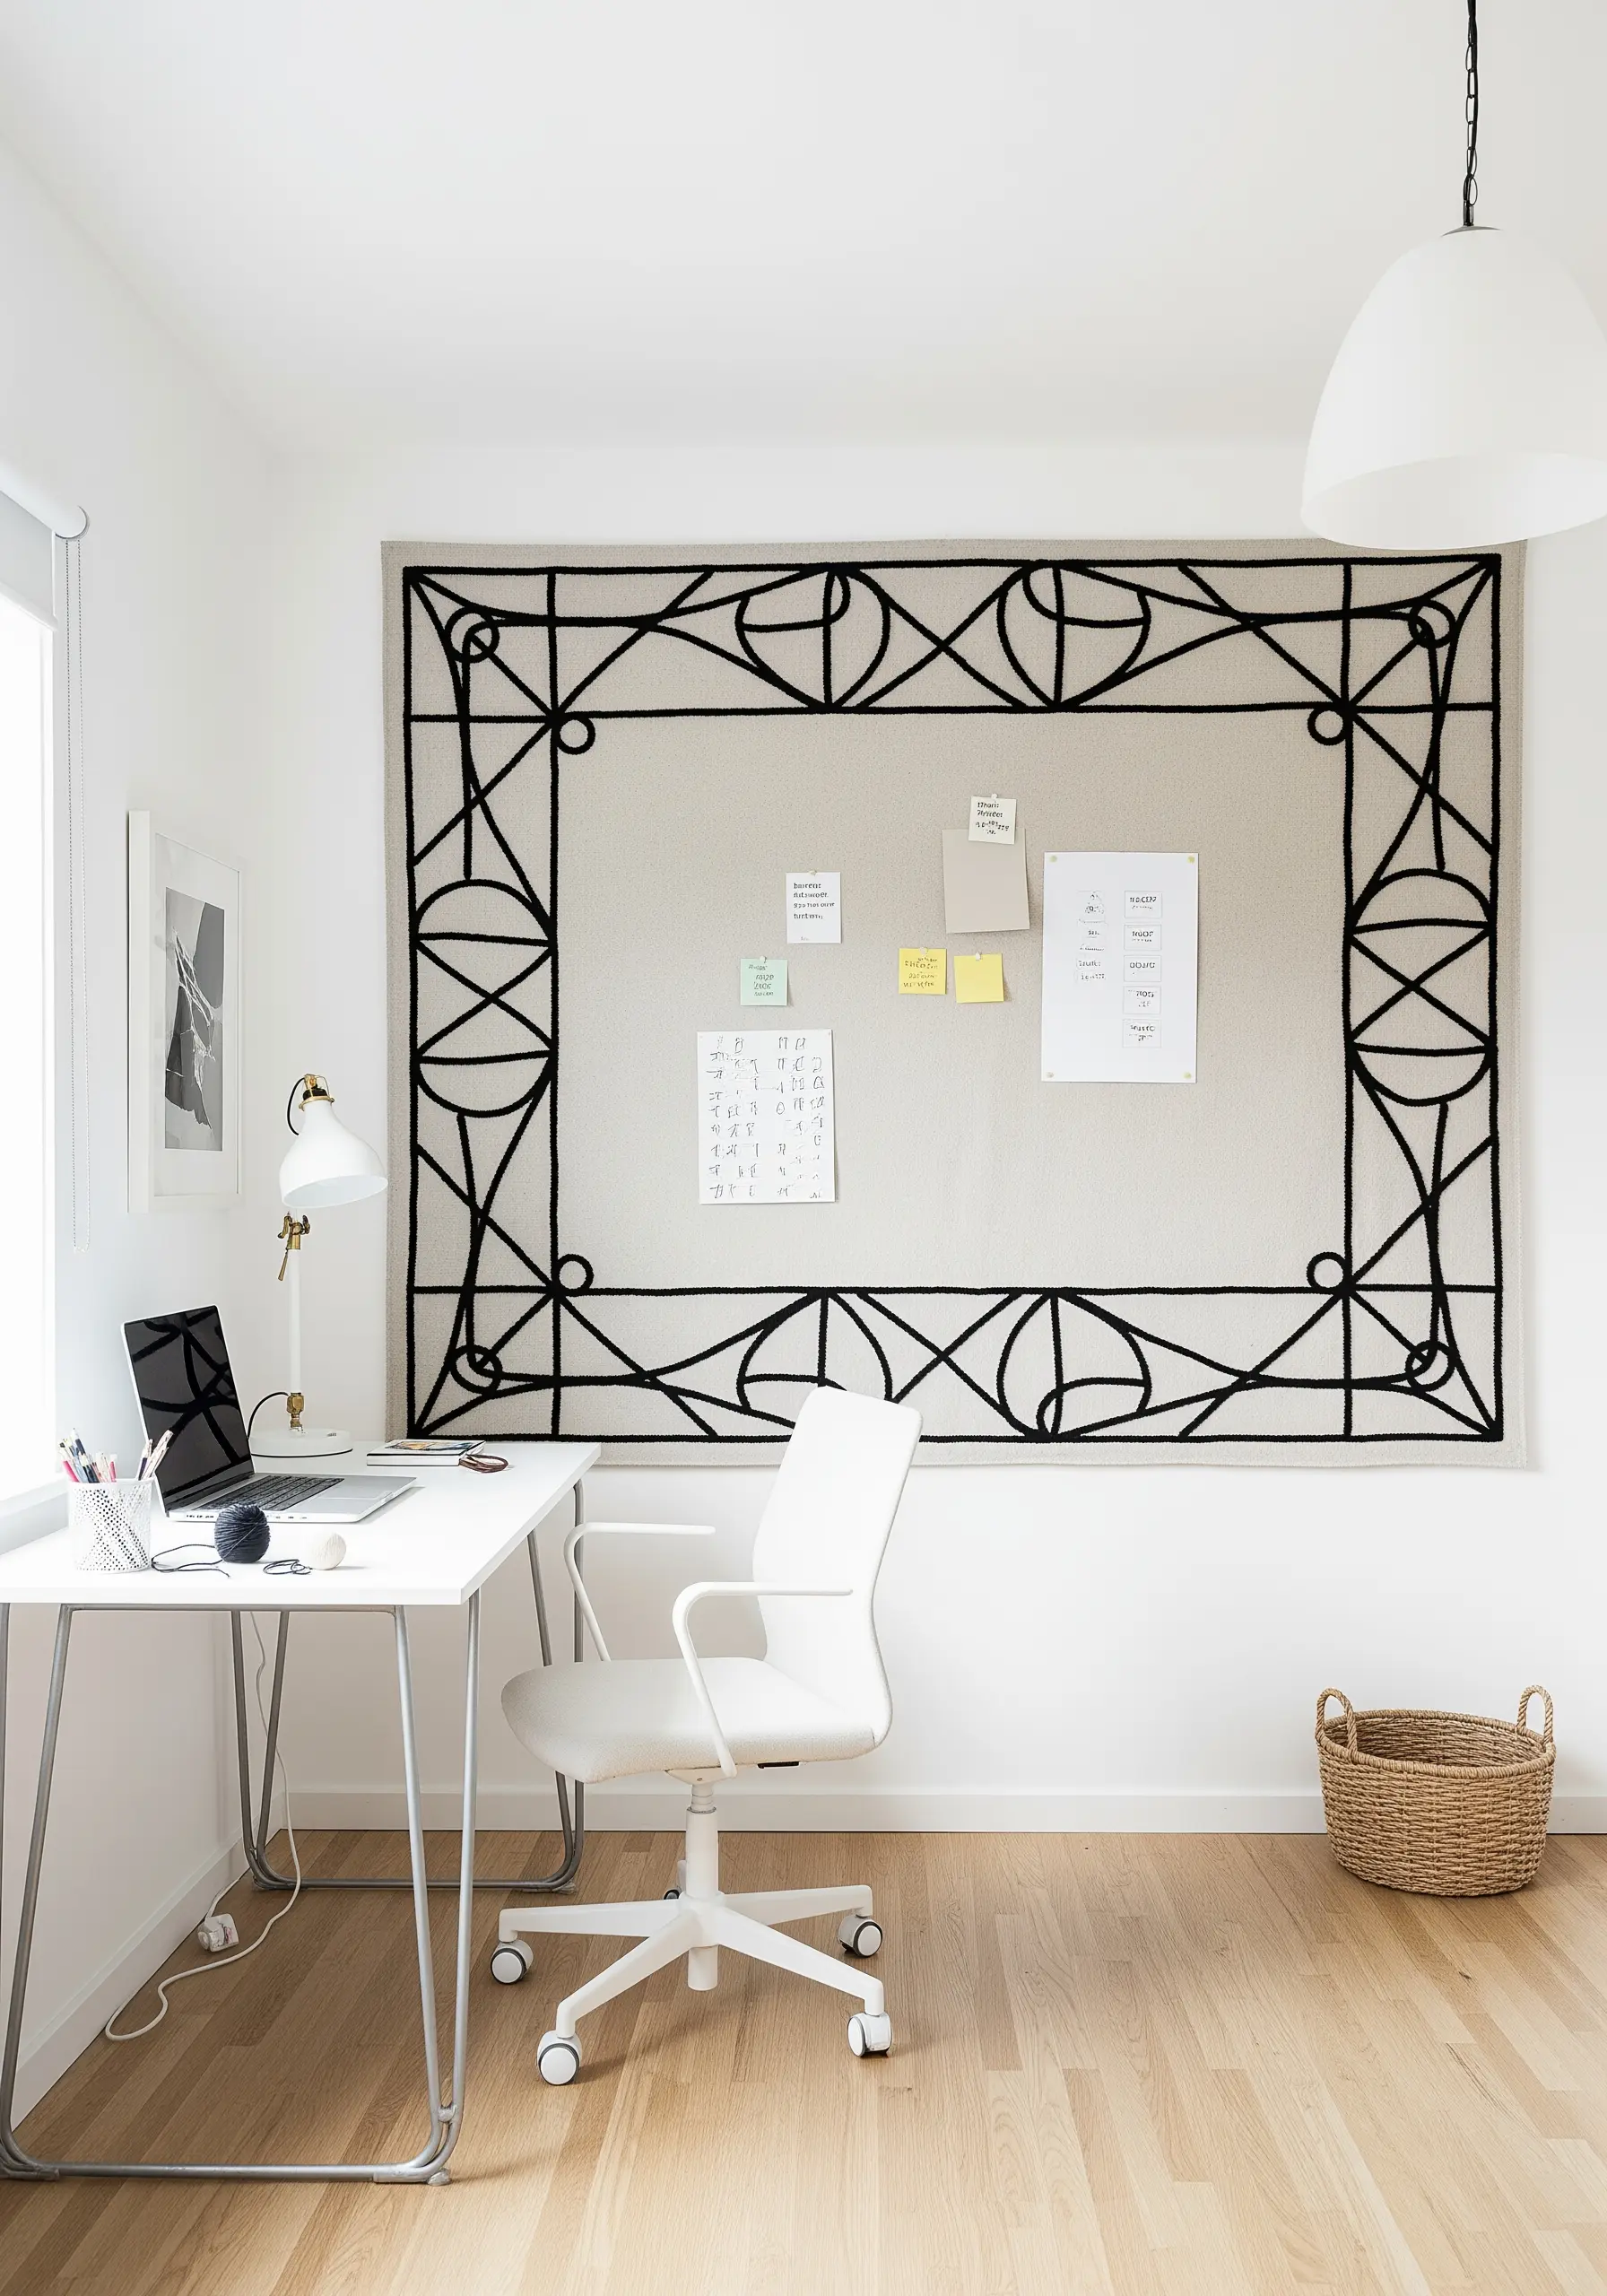
Define and elevate a functional area, like a bulletin board, by framing it with bold, graphic embroidery.
Use a thick, dark yarn and the couching technique to create a strong, continuous line that acts as an ornate frame.
Plan your design on paper first, then transfer the key points to your fabric-covered board. You can stitch directly into the board if it has a soft core, like cork or foam.
This is one of the most innovative embroidery decor ideas that make your workspace look effortlessly stylish and integrated.


