
It’s easy to feel stuck in a creative rut, repeating the same stitches and patterns until your work feels more routine than reflective. But what if the next step toward making something truly beautiful isn’t about learning a dozen complex techniques, but about refining the ones you already know?
Think about the materials you use. The weight of your thread, the texture of your fabric, the way a metallic floss catches the light against a dark velvet—these choices are as expressive as the stitches themselves. A simple running stitch, when done with intention, can look more sophisticated than a perfectly executed but poorly placed satin stitch.
Here, you won’t find overly complicated projects. Instead, you’ll discover small adjustments in technique and thoughtful combinations of materials that will make your work feel more polished, personal, and expensive. It’s time to create home accents that aren’t just handmade, but artfully made.
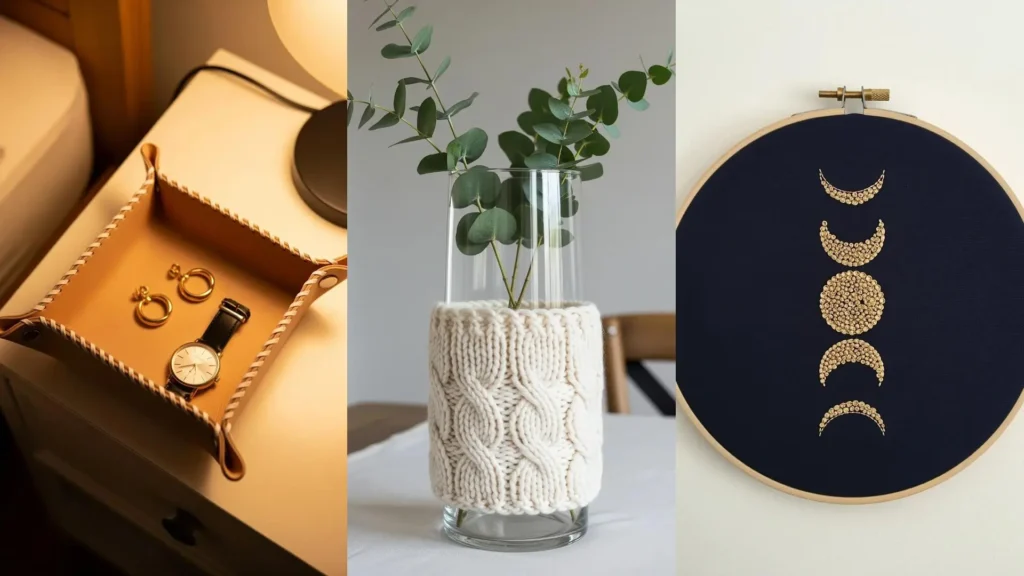
1. Elevate Felt with Metallic Thread
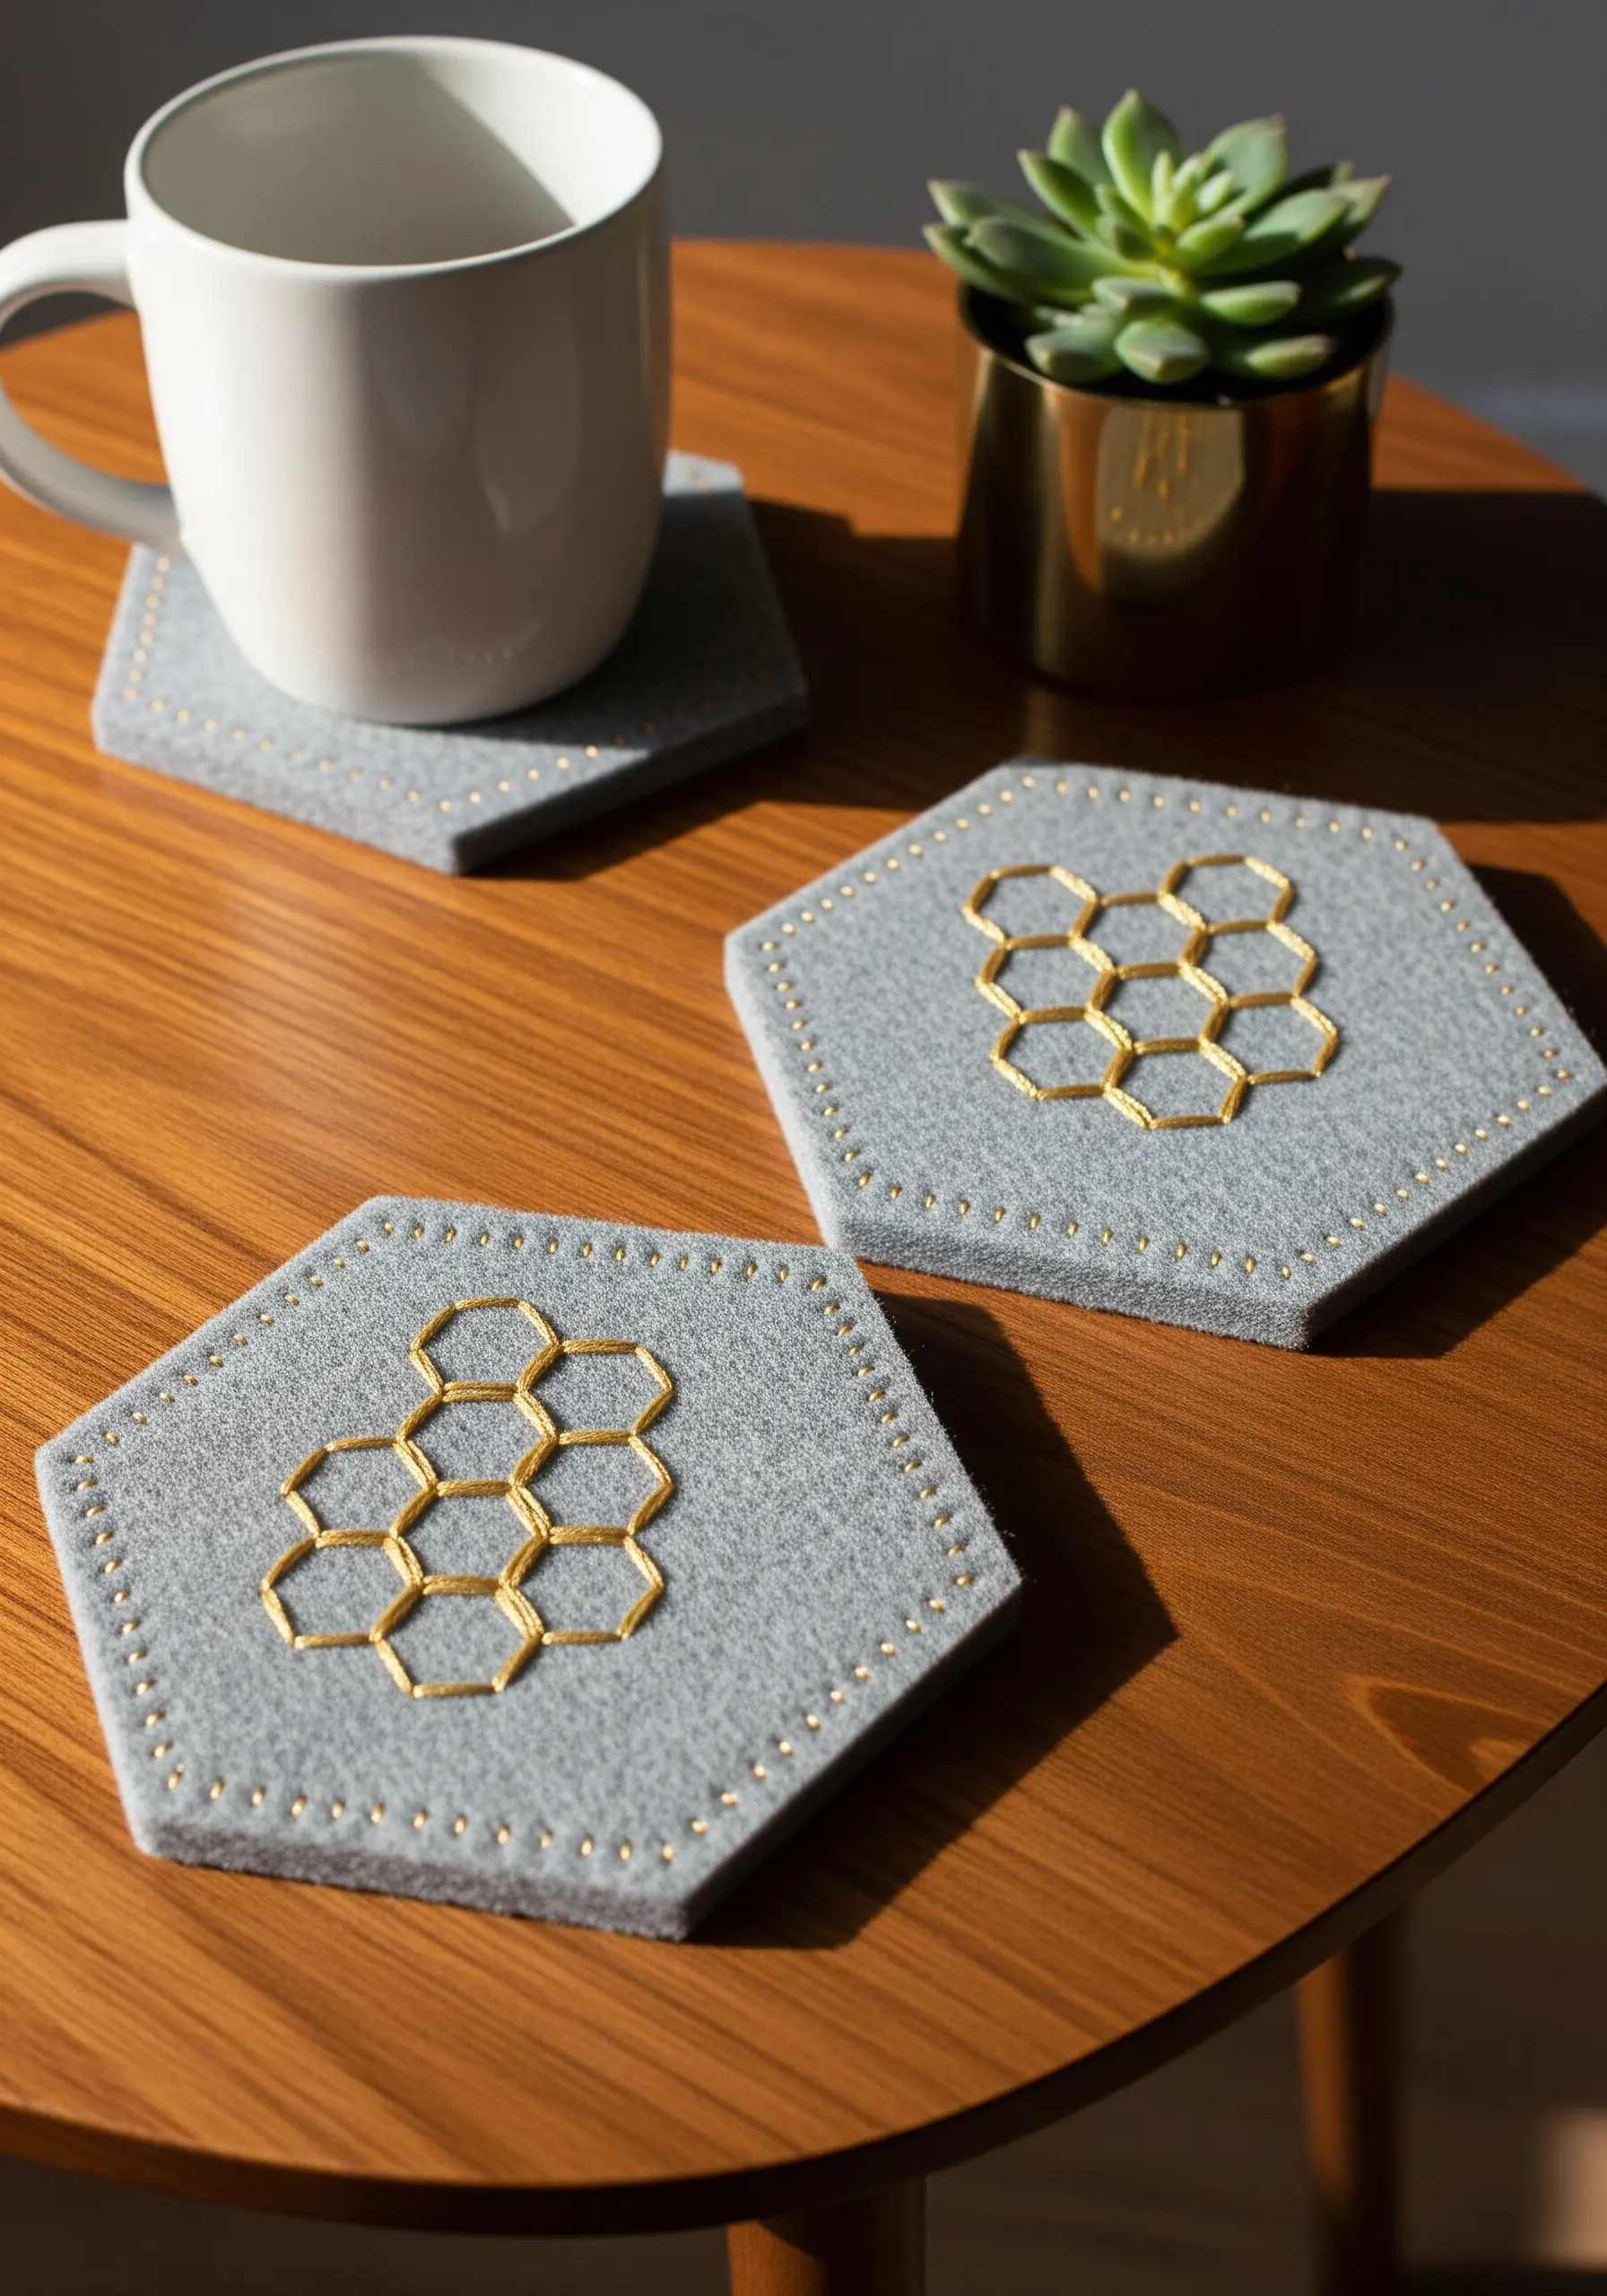
Transform simple felt coasters by combining a stable, non-fray fabric with the shimmer of metallic thread.
Use a backstitch or stem stitch to create the geometric honeycomb outline; the structure of these stitches prevents the metallic thread from slipping or looking uneven.
Frame the design with a simple running stitch along the border using the same metallic floss—this creates a cohesive, polished edge that feels intentional.
Working on felt means you don’t need a hoop, making this a quick and satisfying project you can finish in an afternoon.
2. Achieve Realism with Thread Painting

Create a lifelike botanical wall hanging using the long-and-short stitch technique, also known as thread painting.
To build depth, work with at least four shades of green, from a dark forest green for shadows to a pale lime for highlights.
Always direct your stitches to follow the natural growth lines of the leaf; for a monstera, this means angling them outward from the central vein.
This method blends colors seamlessly, giving the flat surface a three-dimensional quality that looks painterly and sophisticated.
3. Stitch on Velvet for Dramatic Contrast

Create a celestial trinket dish by embroidering on a rich, dark velvet.
First, secure the velvet over a piece of cardstock cut to fit the dish, then use a fine, sharp needle with silver metallic thread for the constellation lines.
For the stars, use tiny lazy daisy stitches or attach silver seed beads with a single stitch—the beads will catch the light beautifully against the matte velvet pile.
The combination of plush texture and metallic shimmer creates an object that feels incredibly high-end and personal.
4. Construct an Ornate Decorative Tassel
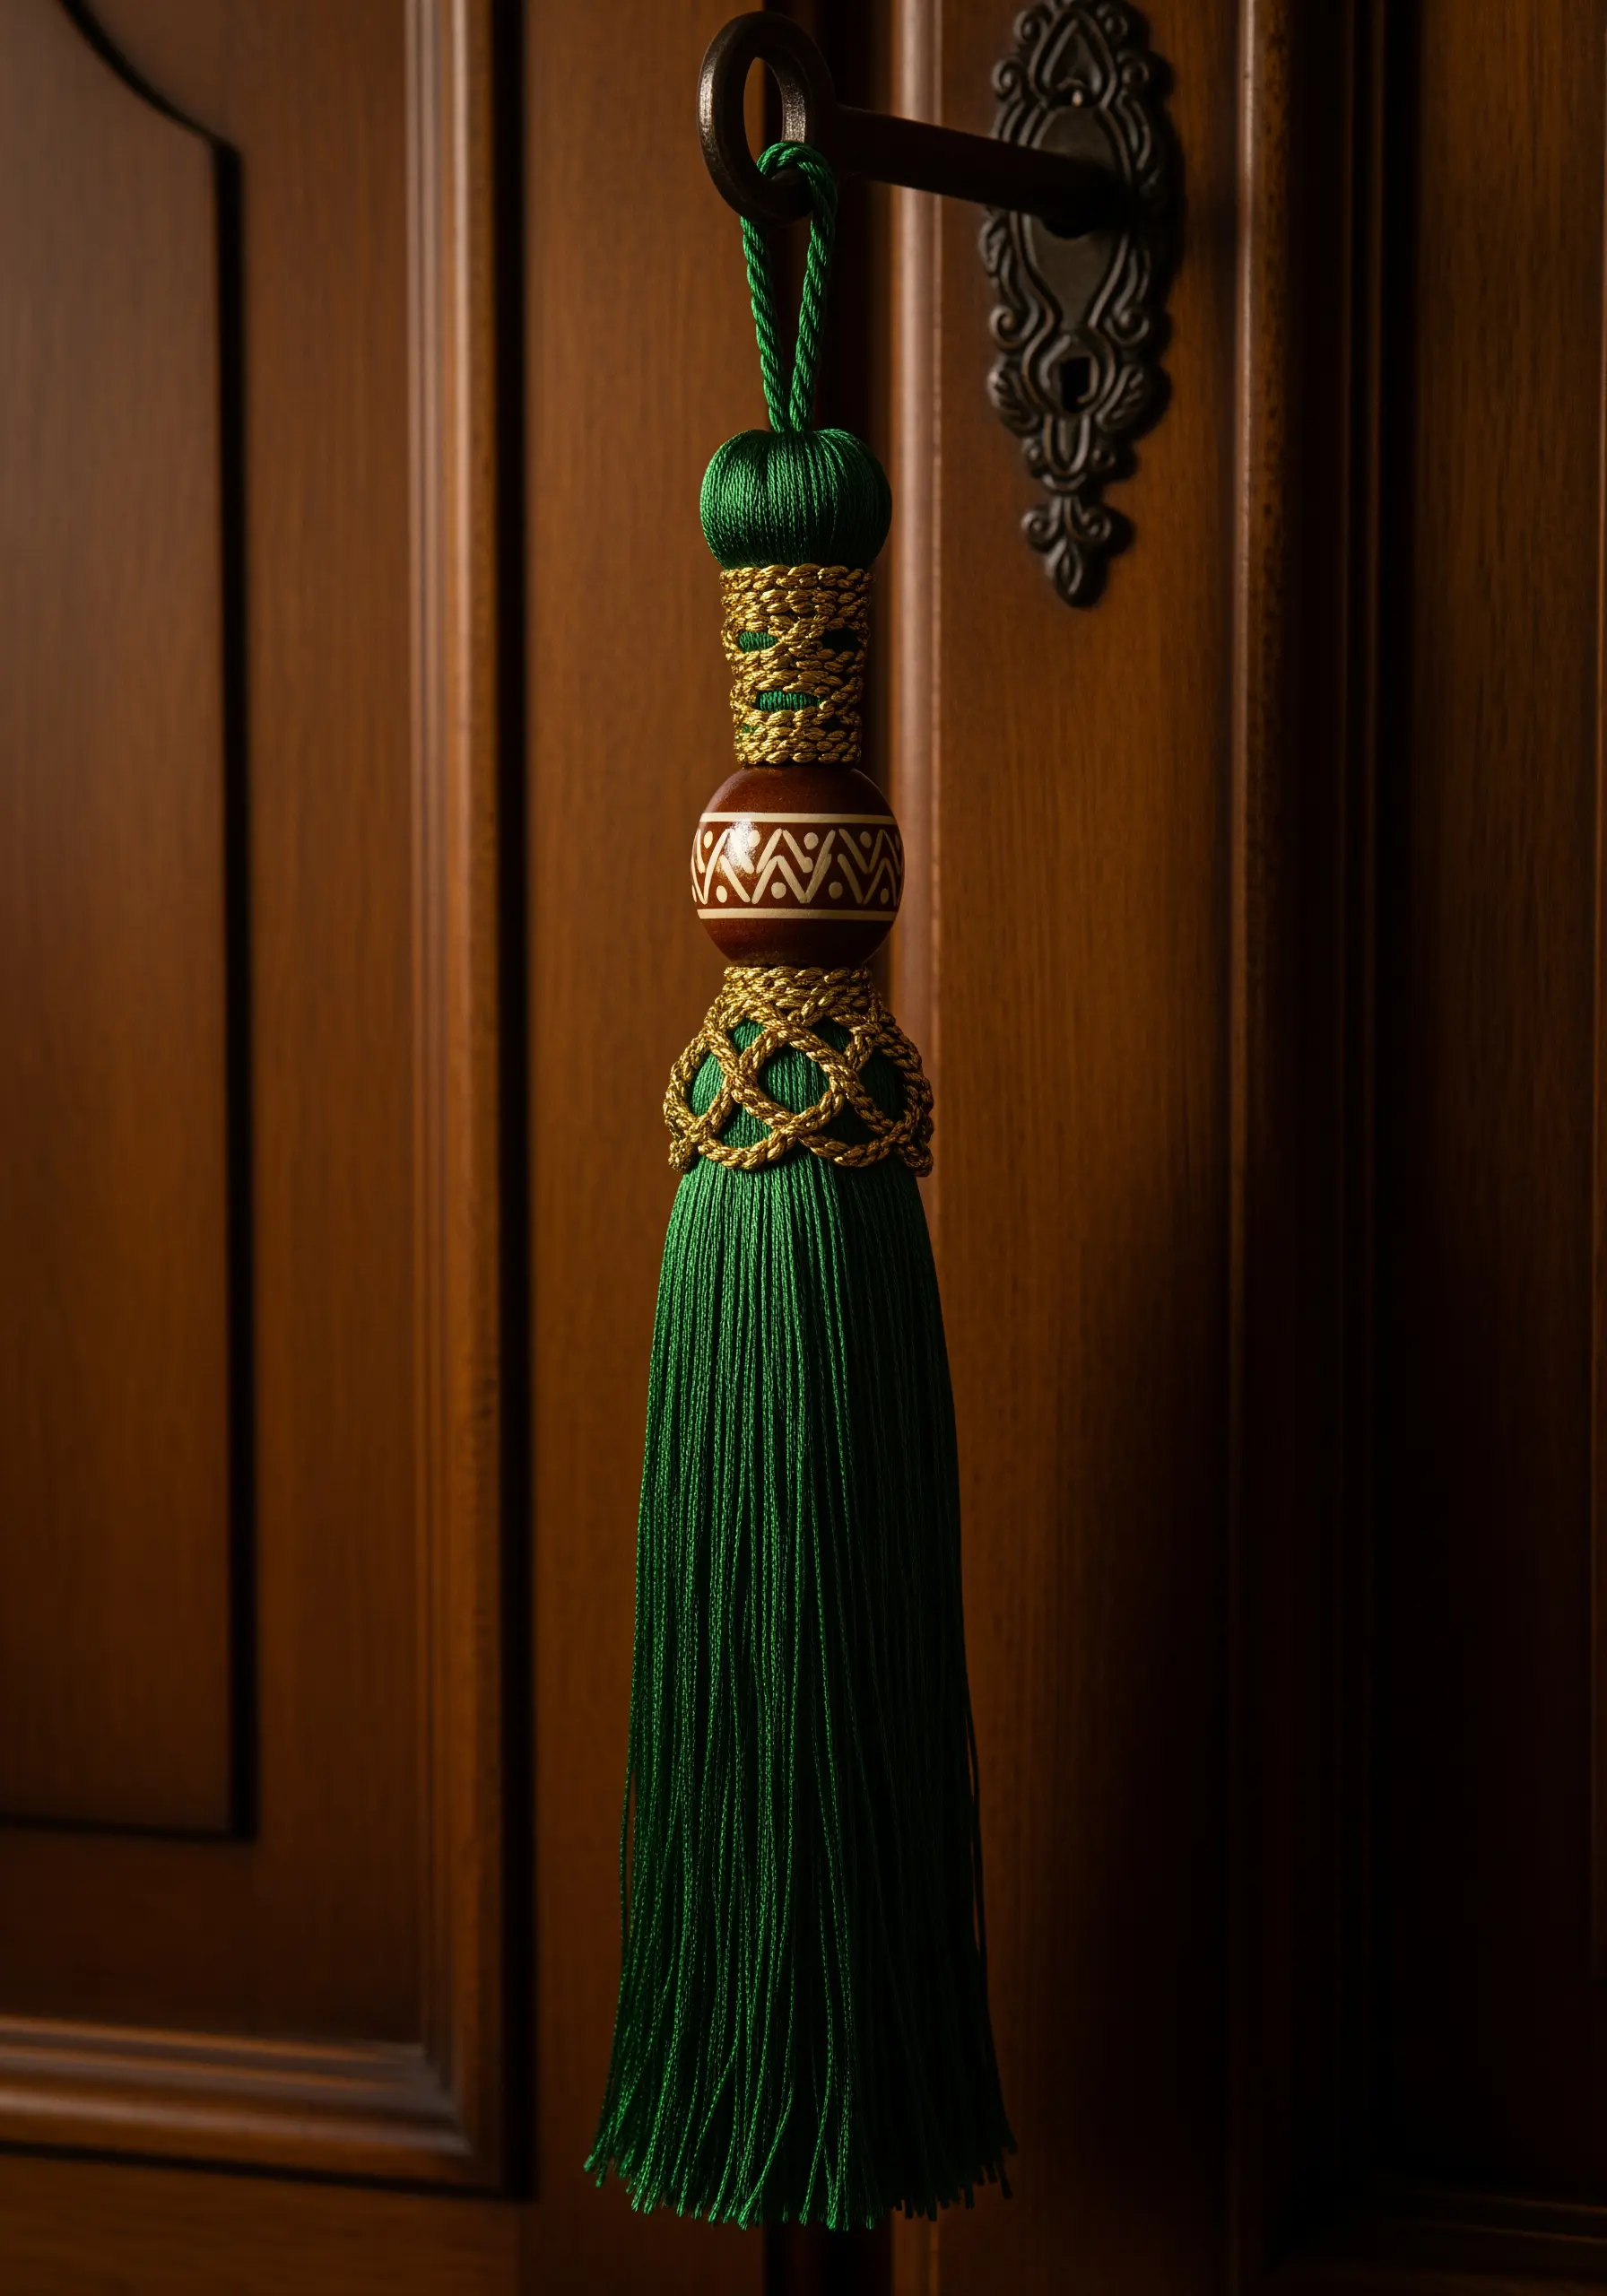
Build a luxe tassel not just by cutting thread, but by layering textures and techniques.
Start by making a classic tassel with embroidery floss, ensuring the threads are dense and hang evenly.
Create the embellished top by wrapping a wooden bead with thread and adding a band of macrame-style square knots using a contrasting metallic cord.
This project is about combining simple fiber skills—tassel-making, wrapping, and knotting—to create a single, opulent accent piece.
5. Add Subtle Elegance to Linen Napkins

Elevate plain linen napkins with a single, delicate botanical motif.
Use three strands of floss for the lavender—satin stitch for the buds and a simple stem stitch for the stalk—to give it just enough presence without overwhelming the fabric.
Instead of a complex border, add a hand-stitched running stitch in a contrasting but neutral color, like charcoal grey, just inside the hem.
This detail frames the design and gives the entire set a bespoke, heirloom-style feel.
6. Create Abstract Art with Punch Needle Texture
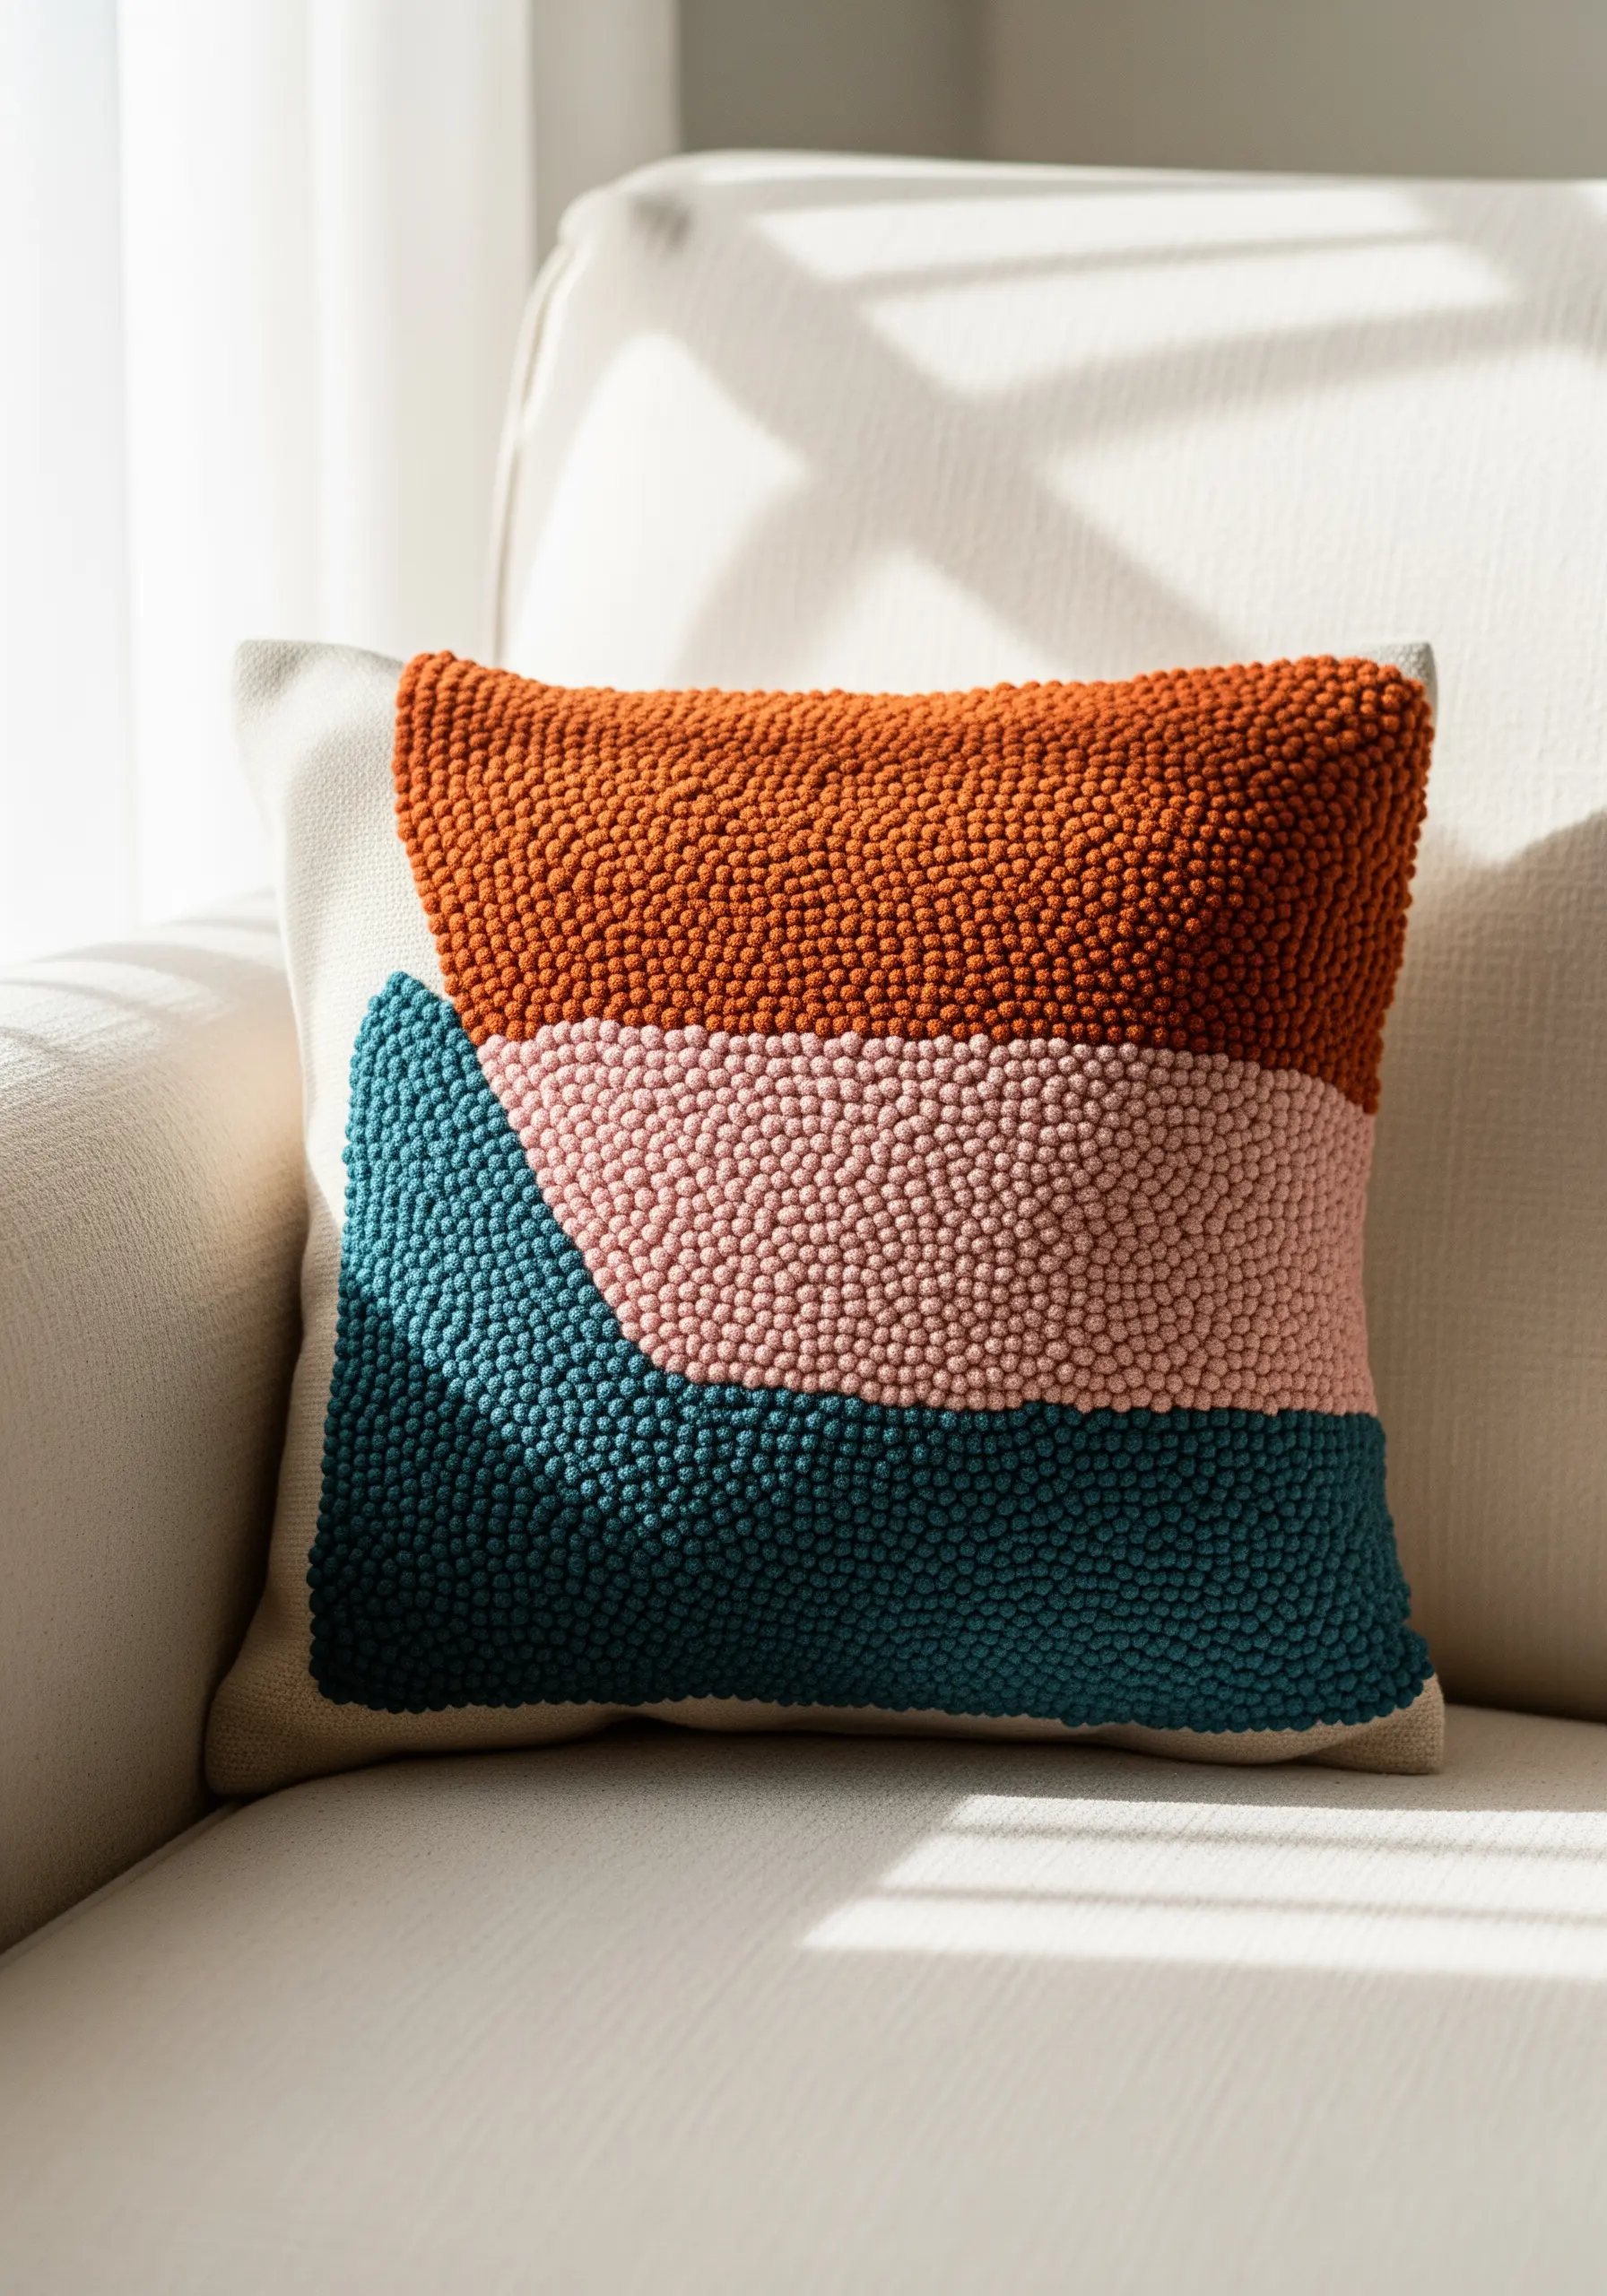
Move beyond flat stitches and explore the dense, satisfying texture of punch needle embroidery.
Design a simple color-blocked pattern with organic, flowing lines; the beauty of this technique is in the texture, not intricate detail.
Use a medium-weight yarn to create tight, uniform loops that resemble thousands of French knots, giving your cushion cover a plush, high-end feel.
The tactile quality of the looped pile is what makes this project look so luxurious and professionally crafted.
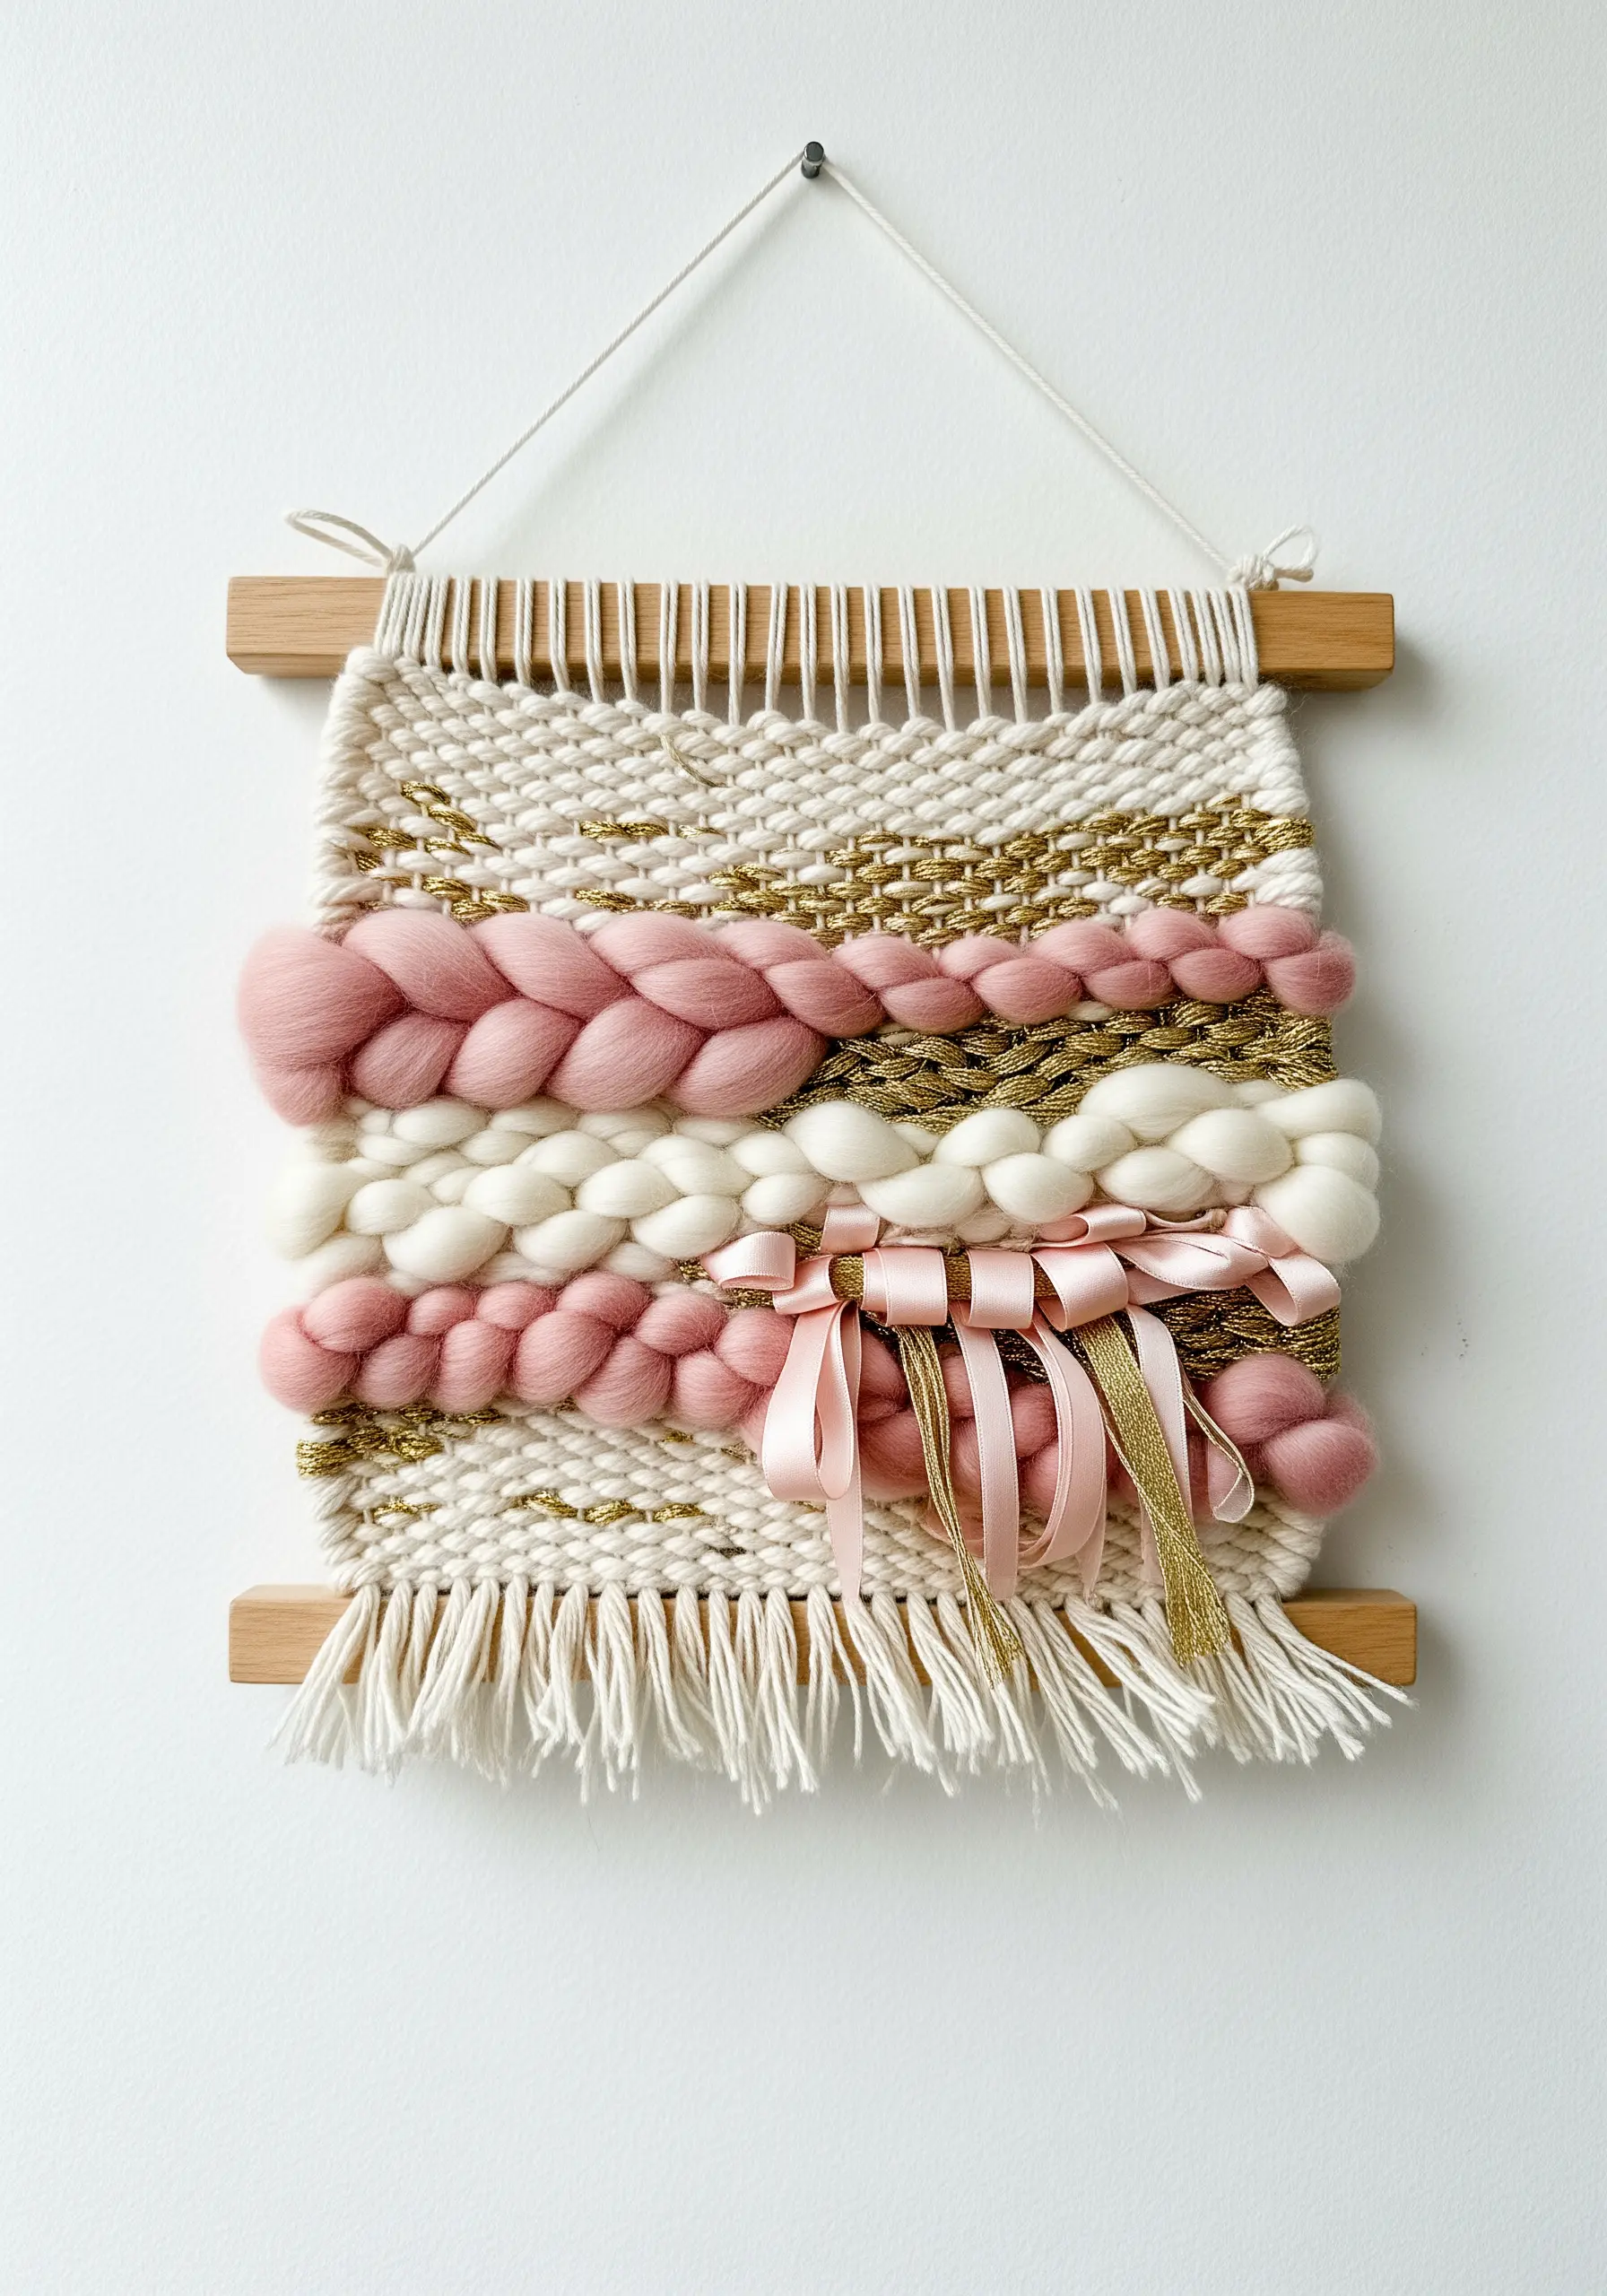
7. Combine Fabric and Paper for a Modern Bookmark
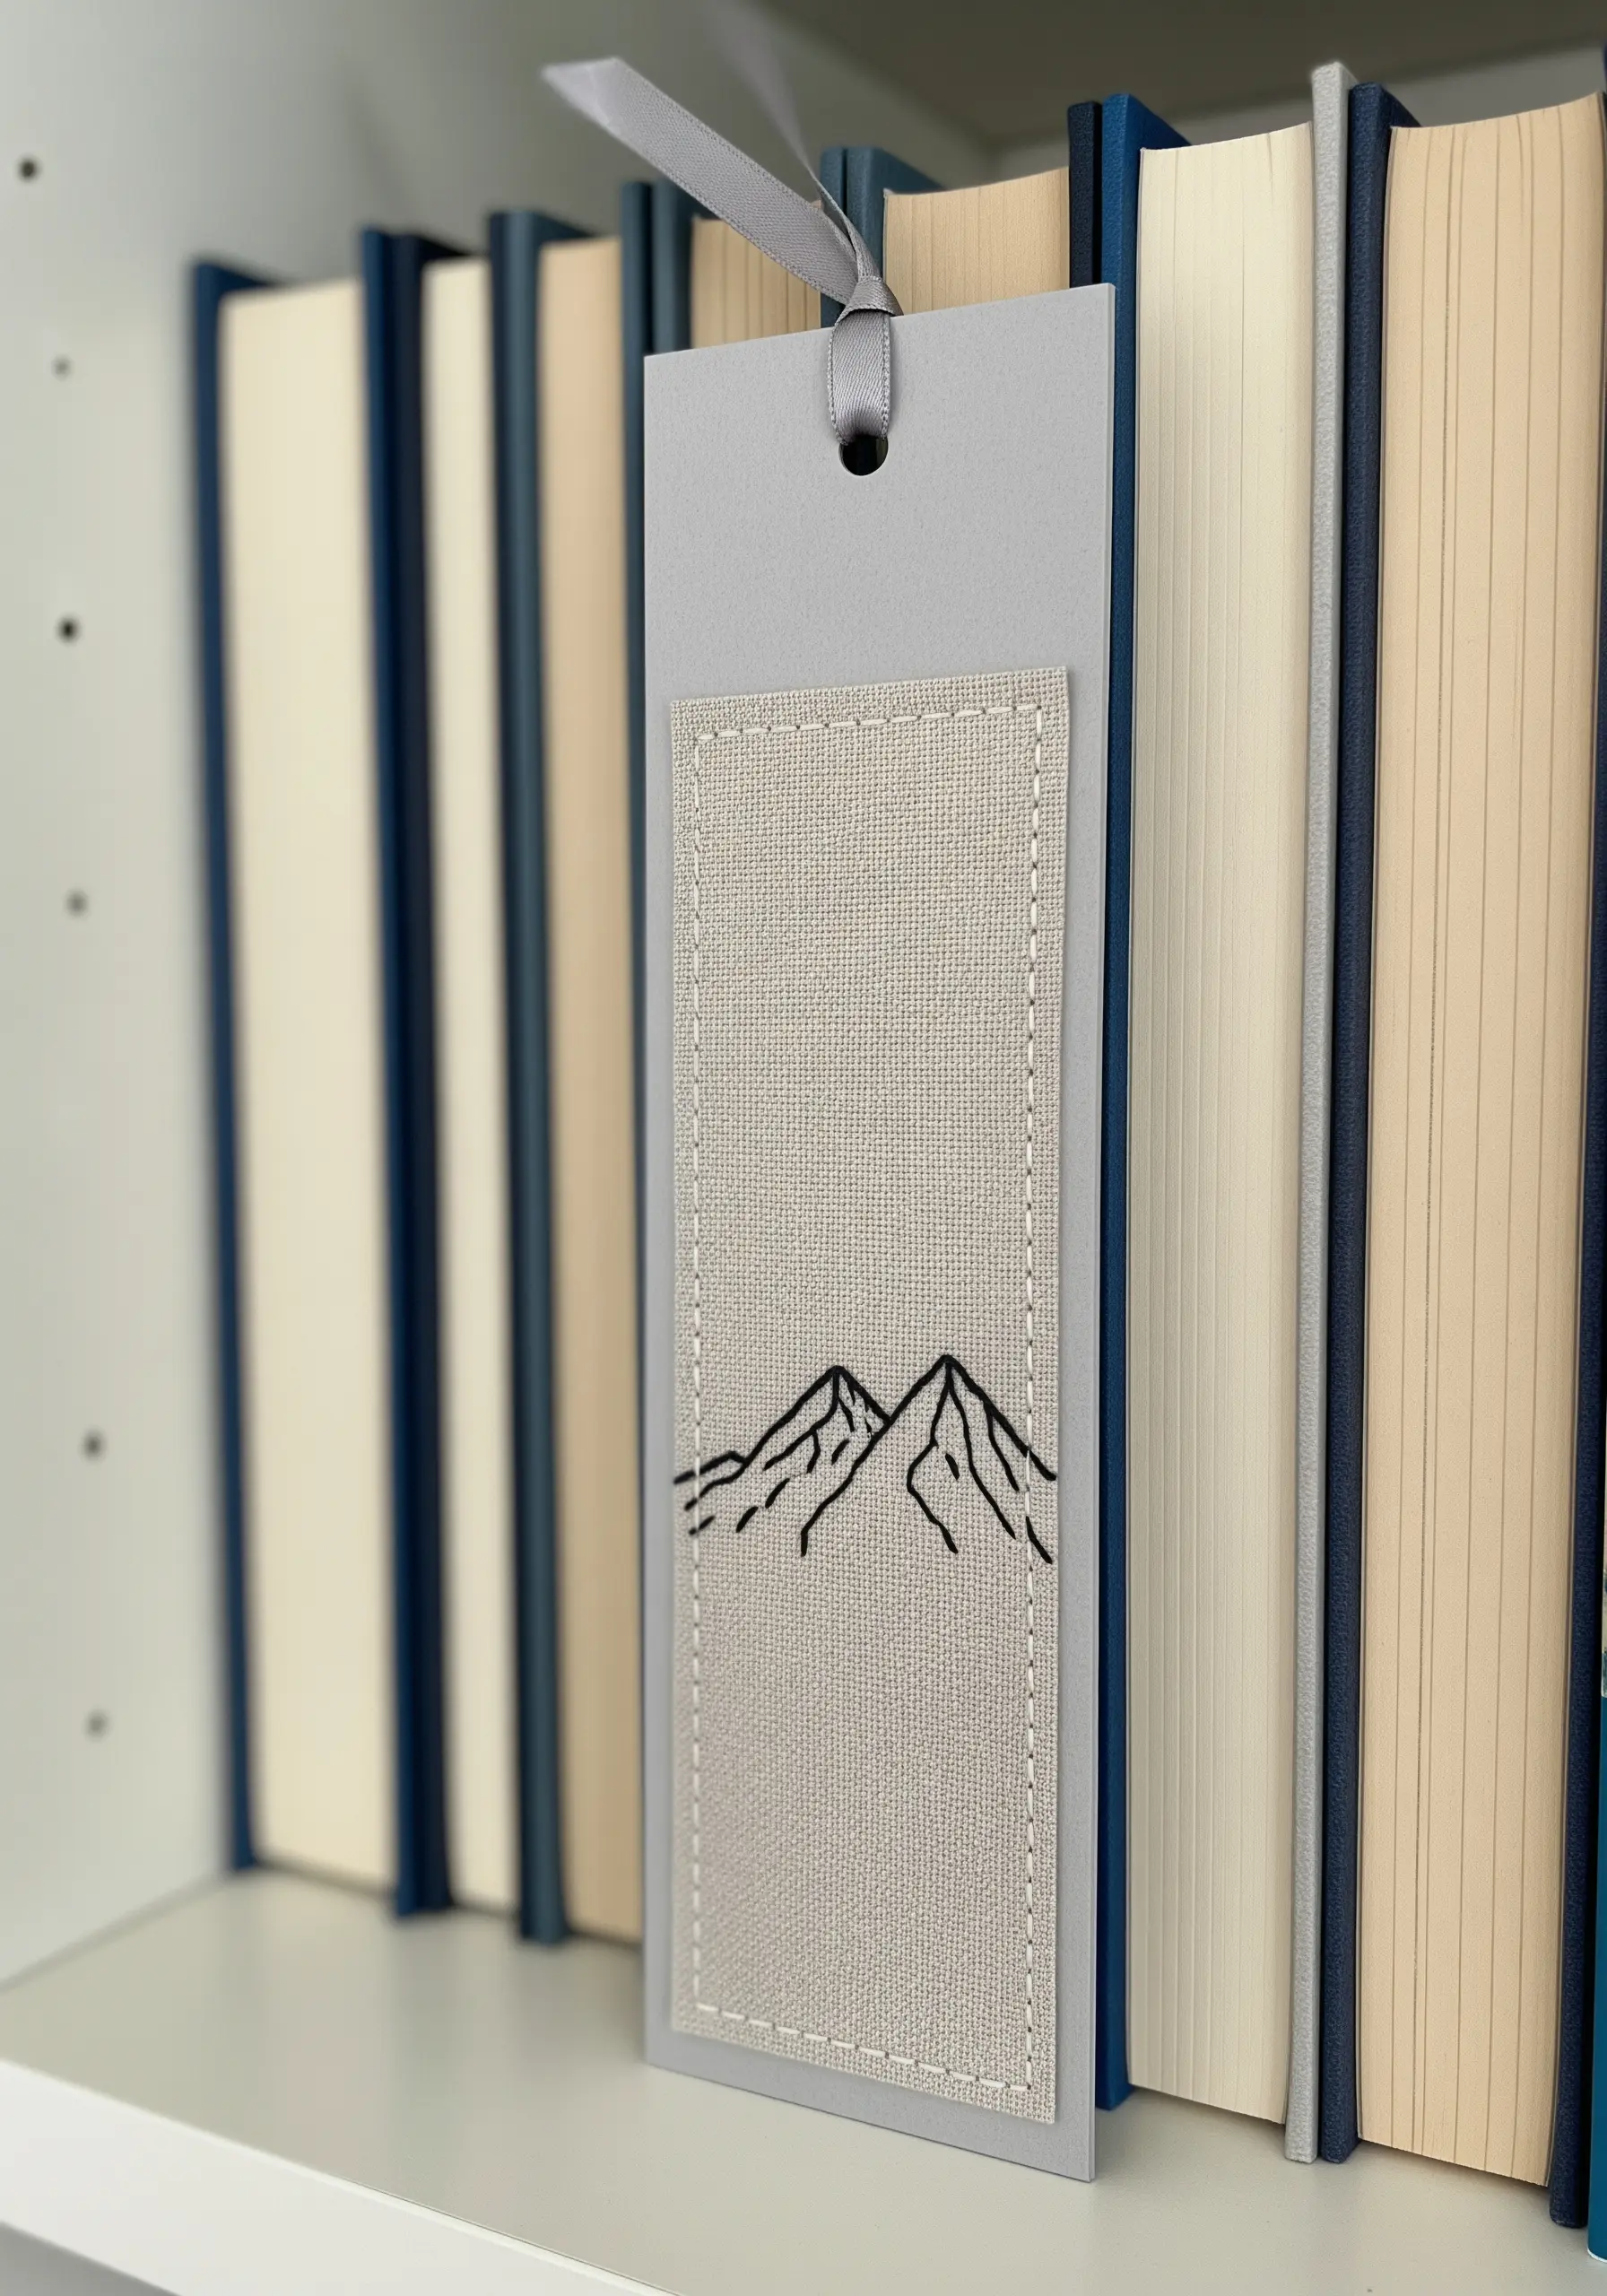
Elevate a simple bookmark by mounting a piece of stitched fabric onto high-quality cardstock.
Choose a durable, evenweave fabric like linen or canvas for your embroidery and stitch a minimal line-art design using a simple backstitch for clean, crisp lines.
After stitching, neatly trim and glue the fabric onto a slightly larger piece of cardstock, then add a machine-stitched or hand-stitched border for a sharp, finished edge.
This mixed-media approach gives a traditional craft a contemporary and graphic update.
8. Frame a Mirror with Macrame Knots
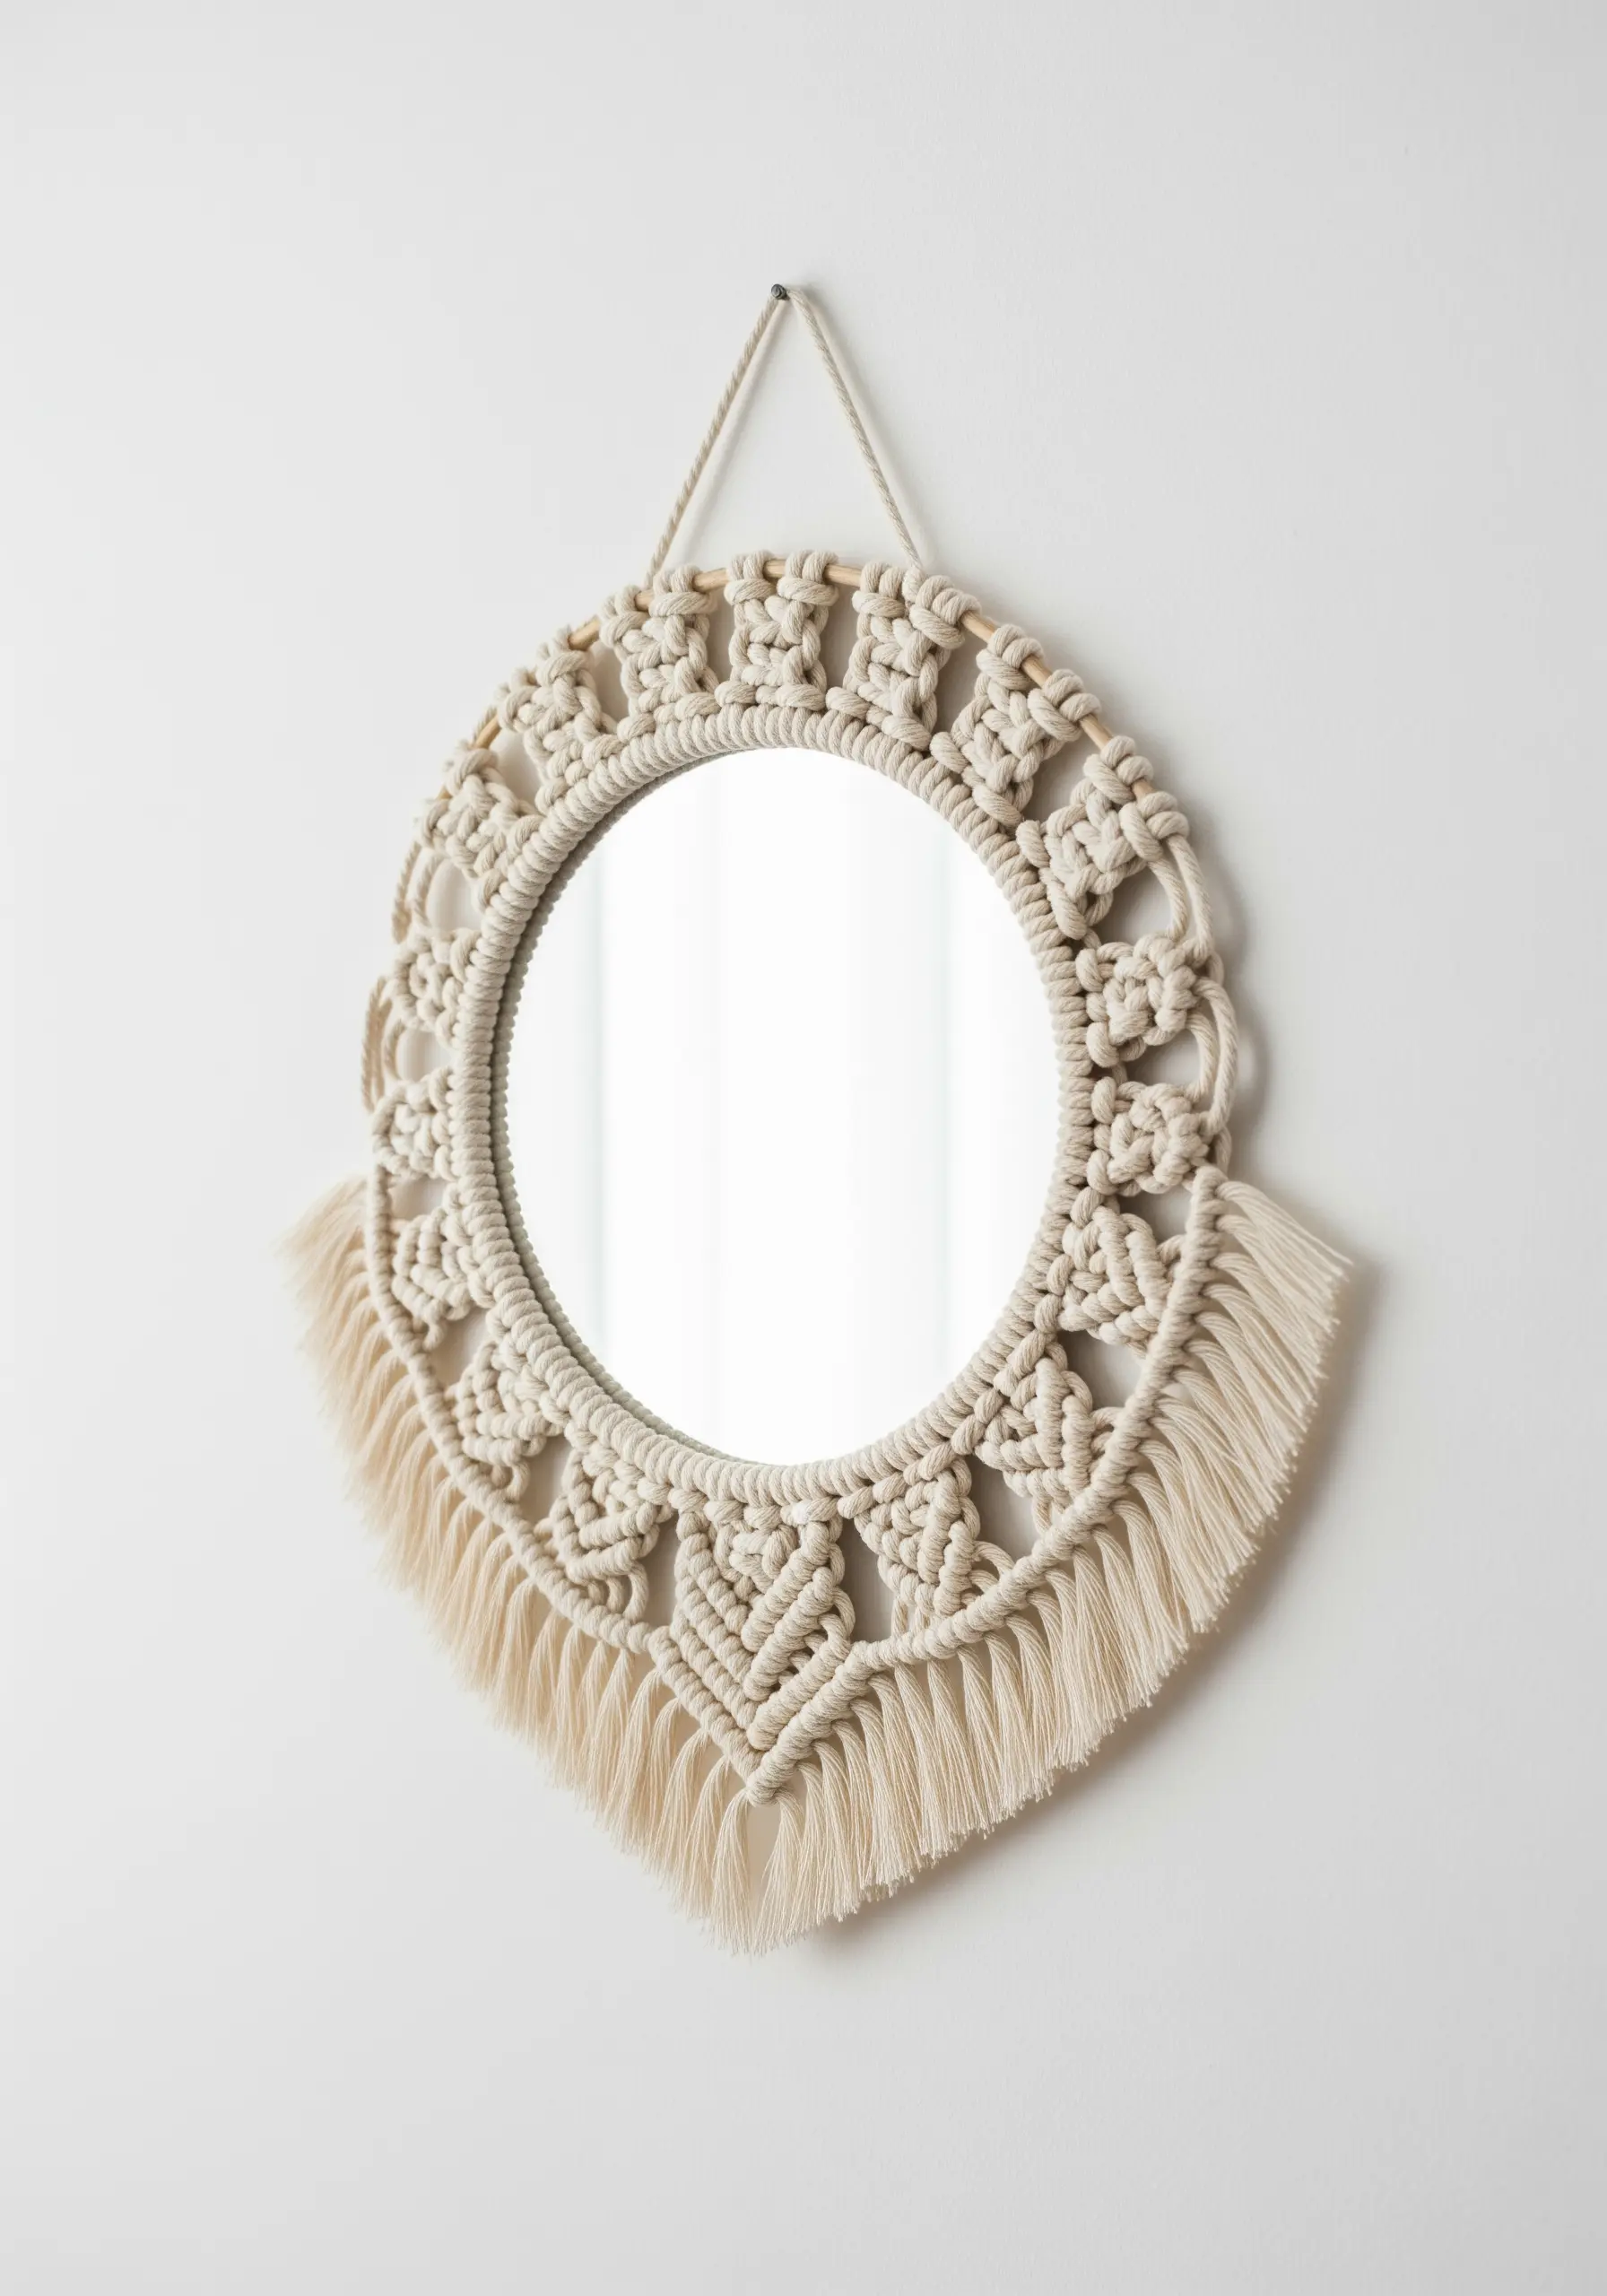
Turn a basic craft store mirror into a bohemian statement piece using simple macrame techniques.
Secure your cords to a metal hoop with a Lark’s Head knot, then build your pattern using repeating sections of square knots and double half-hitch knots.
The key to an expensive look is consistency in your knot tension and symmetry in your pattern.
Finish with a neatly trimmed fringe to add softness and texture, transforming the mirror into functional wall art.
9. Use Cross-Stitch for a Bold Graphic Pattern
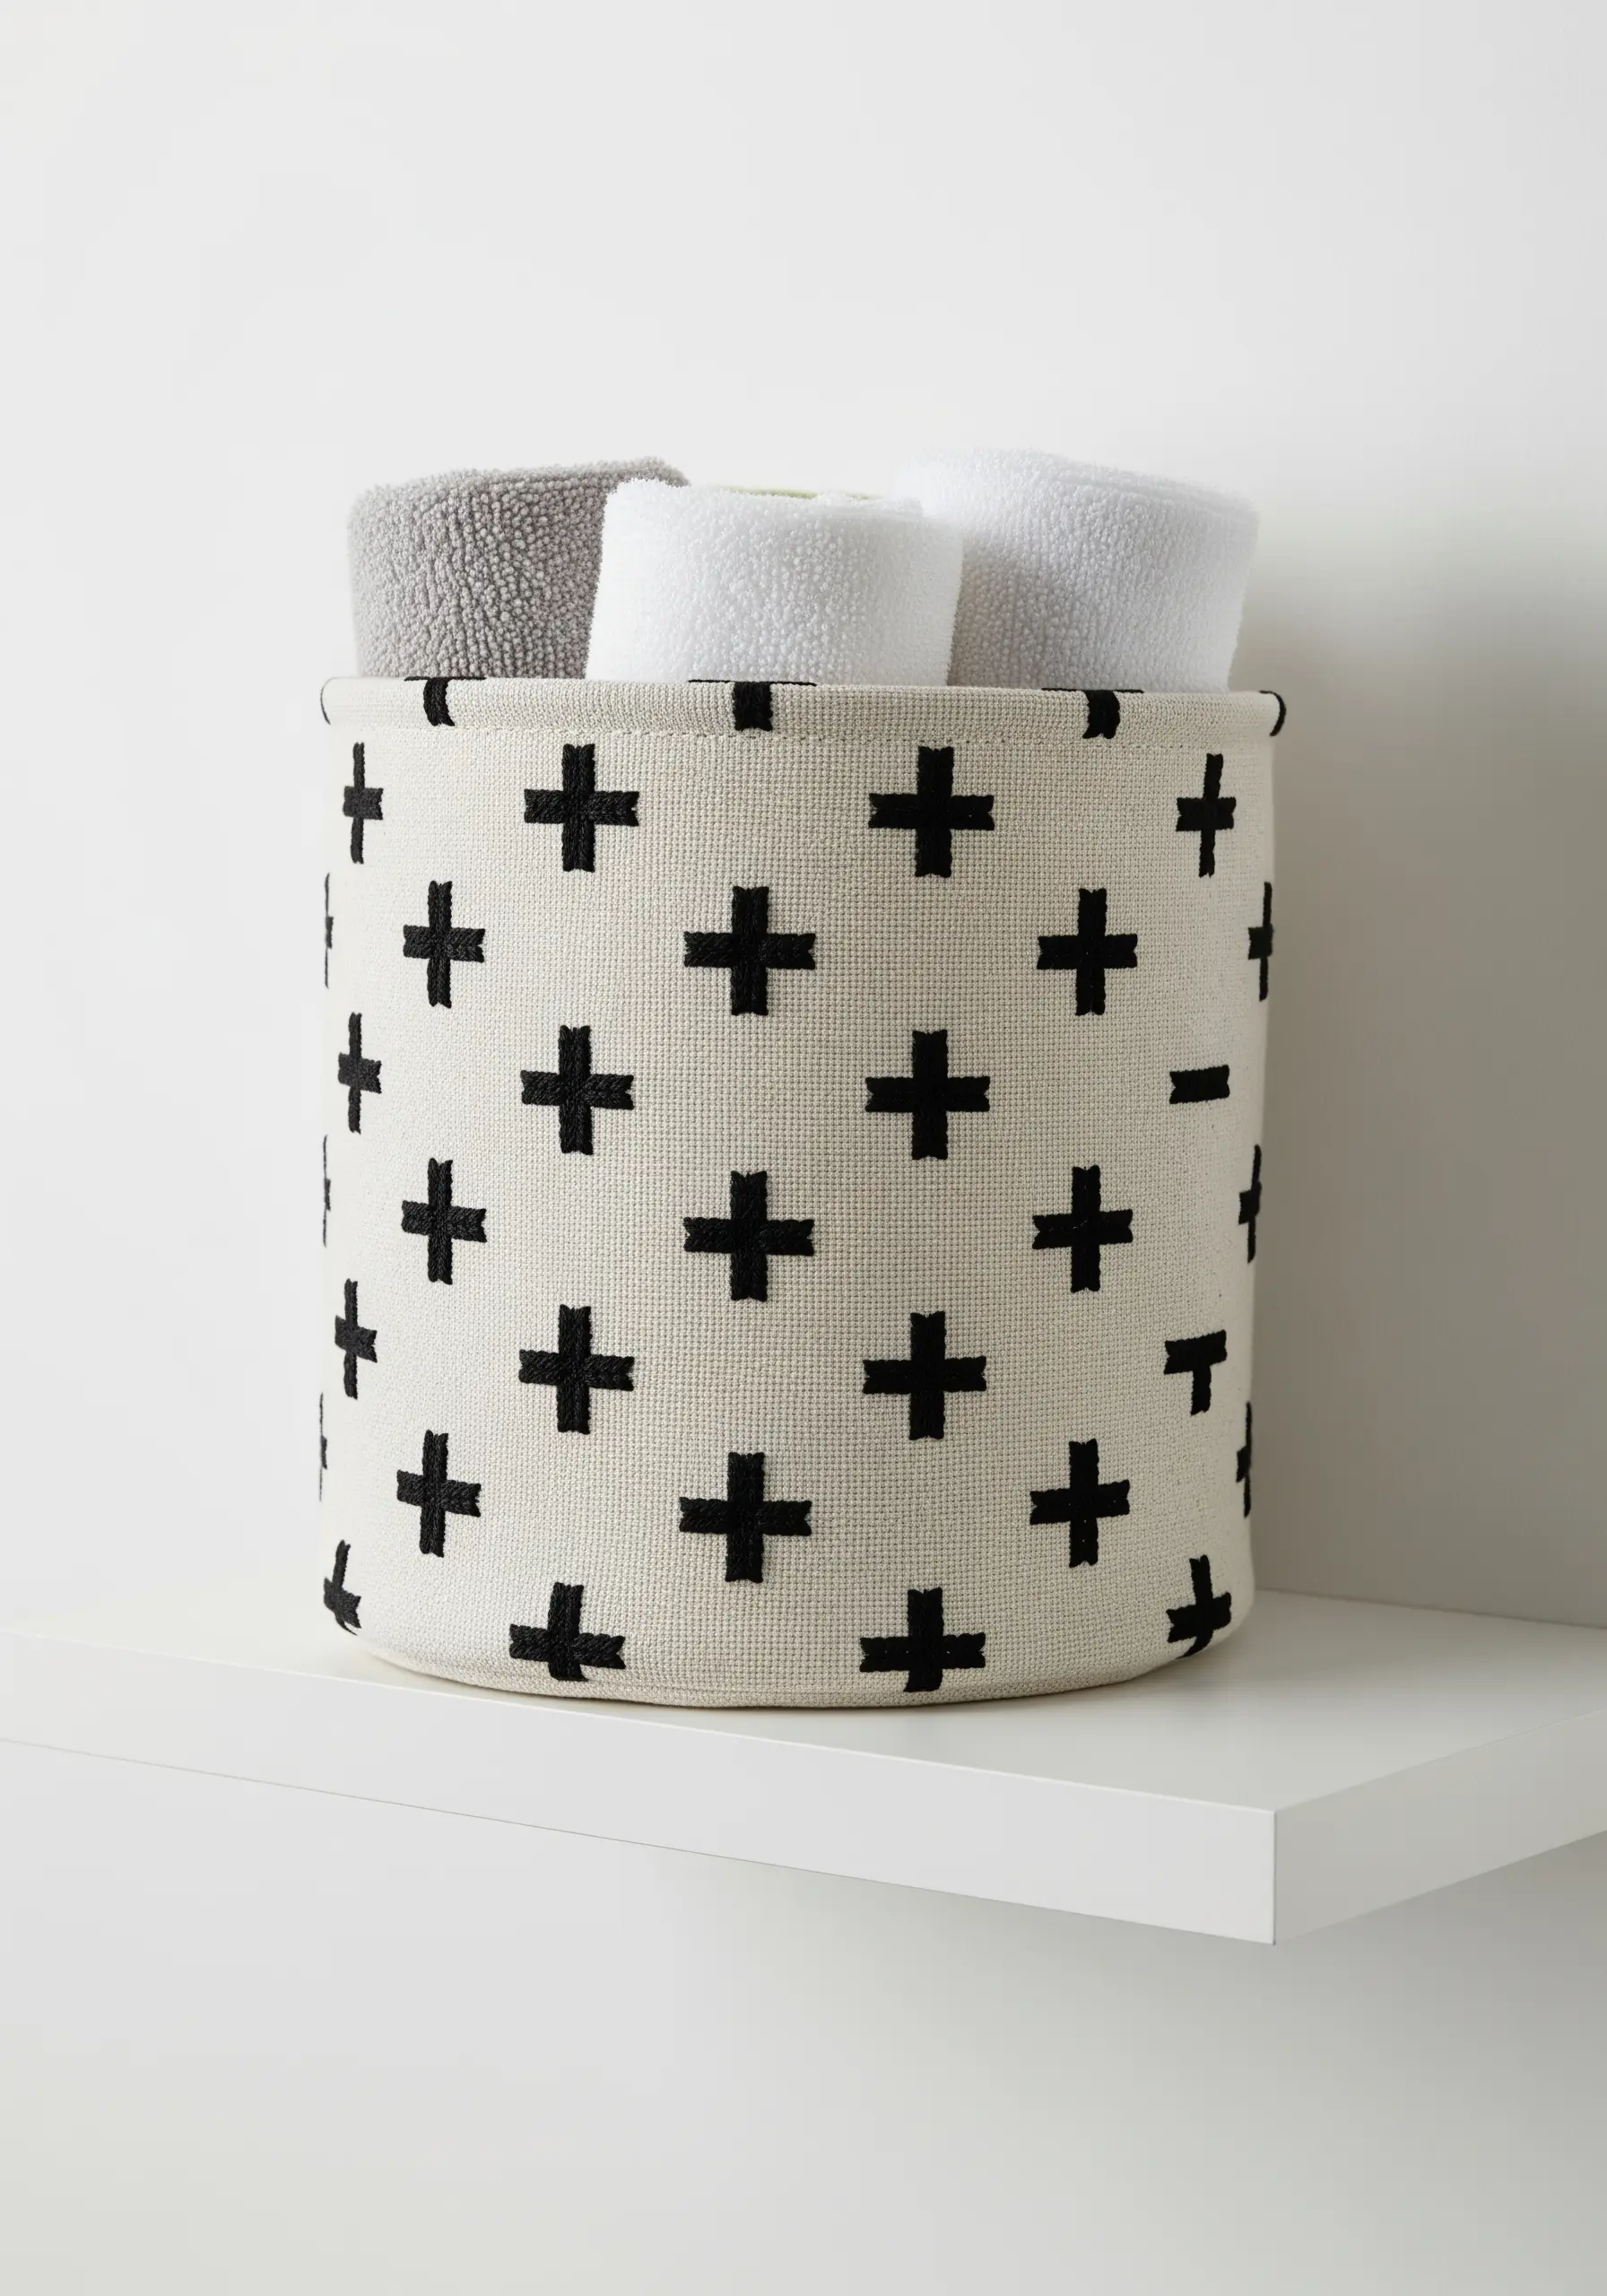
Give a plain canvas basket a modern, graphic update with a simple, repeating cross-stitch pattern.
Use thick, contrasting yarn (like black on a cream basket) to make the pattern pop.
The grid-like weave of a canvas or burlap basket acts as a natural guide, making it easy to keep your stitches uniform without needing to mark a pattern.
This technique is a fast and effective way to add a Swiss cross or other geometric motif for a clean, Scandinavian-inspired look.
10. Mix Materials for Textural Curtain Tie-Backs

Create unique curtain tie-backs by combining different fiber materials for textural contrast.
Braid a thick, rustic rope like jute for the main tie, giving it a natural, sturdy structure.
For the decorative ends, use brightly colored felted wool balls and add a simple running stitch detail with contrasting embroidery floss.
The interplay between the coarse braid and the soft, solid-colored felt makes the final piece feel layered and thoughtfully designed.
11. Apply Hand-Stitching to Leather Goods

Add a touch of artisanal quality to a simple leather valet tray with a decorative and functional hand-stitched edge.
Use a pre-punched leather blank or carefully pierce your holes with an awl for even spacing.
Thread a blunt tapestry needle with waxed linen thread and use a simple cross-stitch or whipstitch to join the corners and decorate the edges.
The contrast between the smooth leather and the texture of the thread highlights the handmade nature of the piece.
12. Craft a Modernist Collage with Fabric Scraps

Create a piece of abstract art by turning fabric remnants into a vibrant collage.
Choose fabrics with varying sheens and textures, like velvet, satin, and cotton, to add depth and visual interest.
Cut them into irregular, geometric shapes and arrange them on a dark, textured background fabric, overlapping the edges slightly.
Secure each piece with a simple, utilitarian running stitch in a neutral color—this keeps the focus on the interplay of color and texture.
13. Weave a Miniature Mug Rug

Explore the art of weaving on a small scale by creating a functional mug rug.
You can use a small lap loom or even a sturdy piece of cardboard to create your warp.
Work with a thick cotton yarn in a simple plain weave, introducing stripes of color for a clean, modern aesthetic.
Finish by cutting the warp threads and tying them into small bundles to create a neat fringe, giving your mini-tapestry a professional finish.
14. Bring a Motif to Life with Directional Satin Stitch
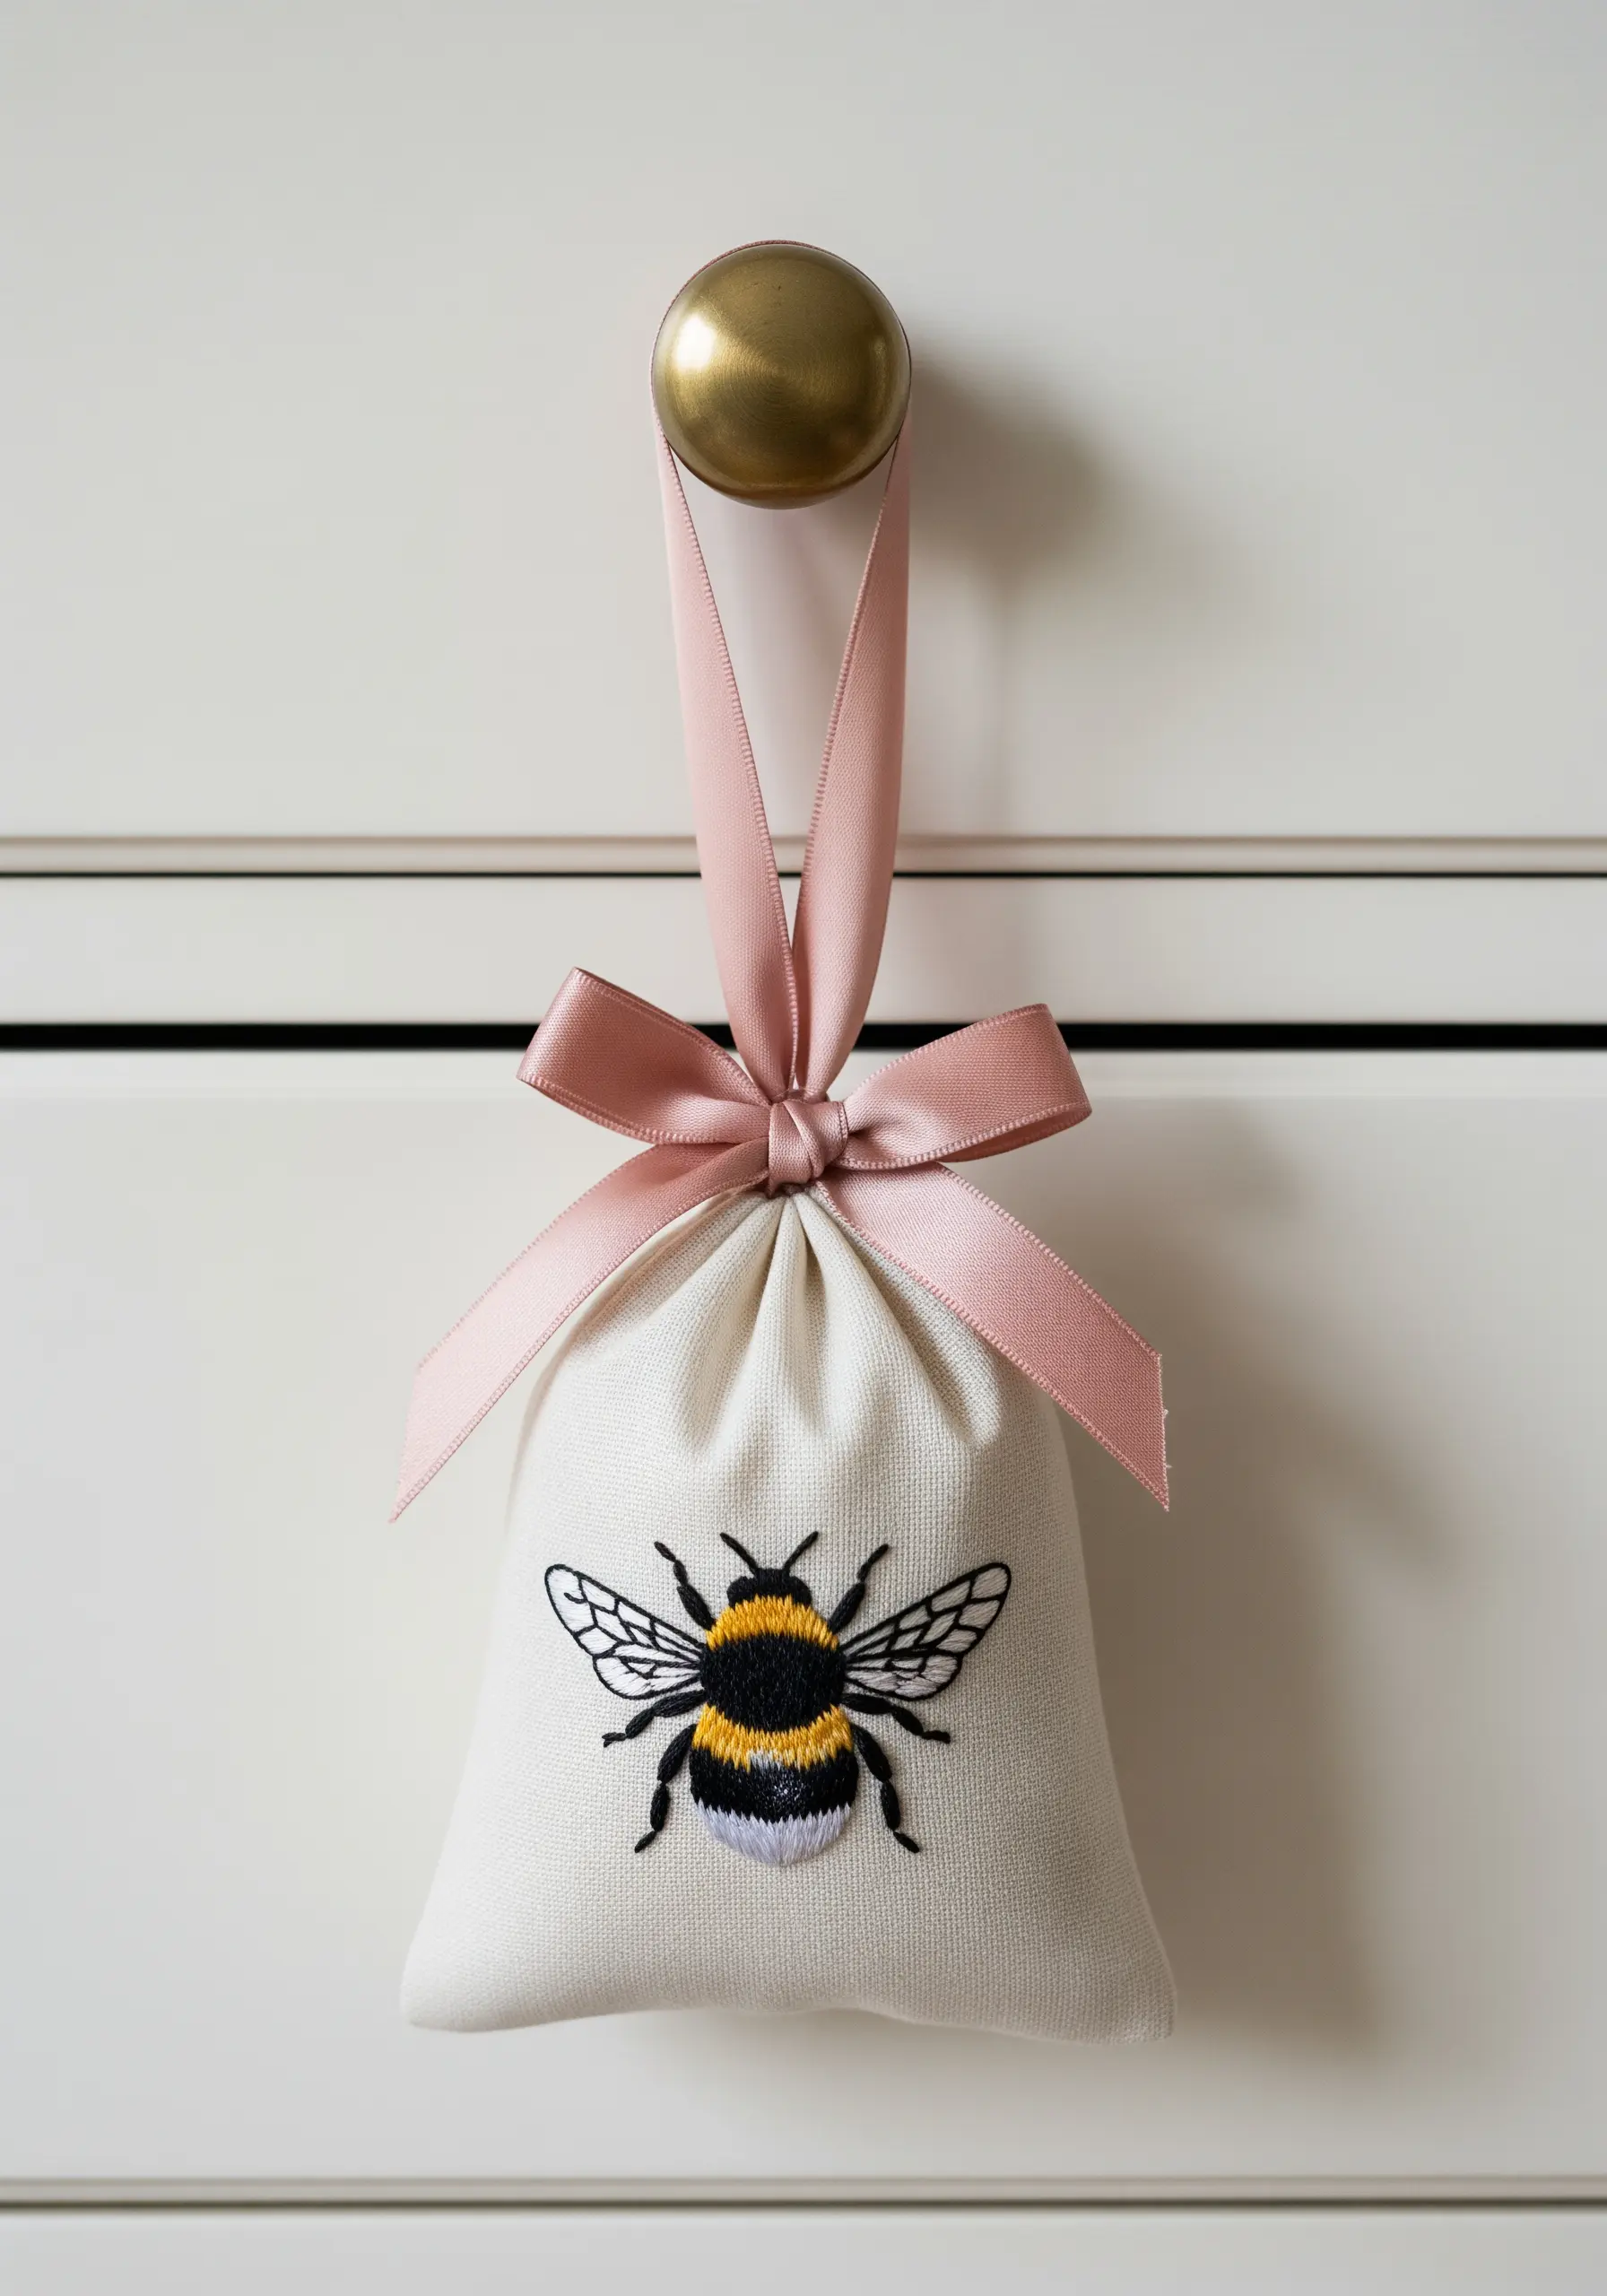
Make a simple bee motif feel three-dimensional by paying attention to the direction of your satin stitches.
For the yellow stripes, angle your stitches slightly outward from the center to create the illusion of a curved, plump body.
Work the black sections in the opposite direction to create a subtle textural contrast.
Finish with a fine backstitch outline for the wings and antennae to ensure every detail is crisp and defined, elevating a simple sachet into a cherished object.
15. Add a Cozy Knitted Texture to Glass

Soften the hard lines of a glass vase by wrapping it in a cozy, textural sleeve.
If you knit, a simple cable-knit pattern in a chunky, cream-colored yarn adds instant warmth and sophistication.
To achieve a similar look with embroidery, you can create a faux cable pattern on a piece of felt using bulky yarn and a combination of chain stitch and stem stitch to mimic the twisted ropes.
This accent works because it introduces a soft, handmade element to a sleek, modern object.
16. Create Luminous Art with Bead Embroidery

Craft a stunning piece of celestial wall art using bead embroidery instead of thread.
On a dark navy or black fabric, outline your moon phases and fill them entirely with tiny metallic seed beads, securing them two or three at a time with a matching thread.
The dense, textured surface of the beads will catch and reflect light, creating a shimmering, luminous effect that thread alone cannot achieve.
This technique turns a simple design into a captivating, high-impact piece of decor.
17. Embellish Kitchen Linens with Folk-Inspired Borders

Elevate a simple waffle-weave kitchen towel by adding a colorful, geometric border.
The natural grid of the waffle fabric is perfect for counted cross-stitch, eliminating the need for Aida cloth.
Choose a traditional Nordic or folk-art snowflake pattern and use classic colors like red and blue for a timeless, cheerful look.
This small detail transforms a utilitarian item into a piece of functional kitchen decor with handmade charm.
18. Achieve a Raised Monogram with Padded Satin Stitch
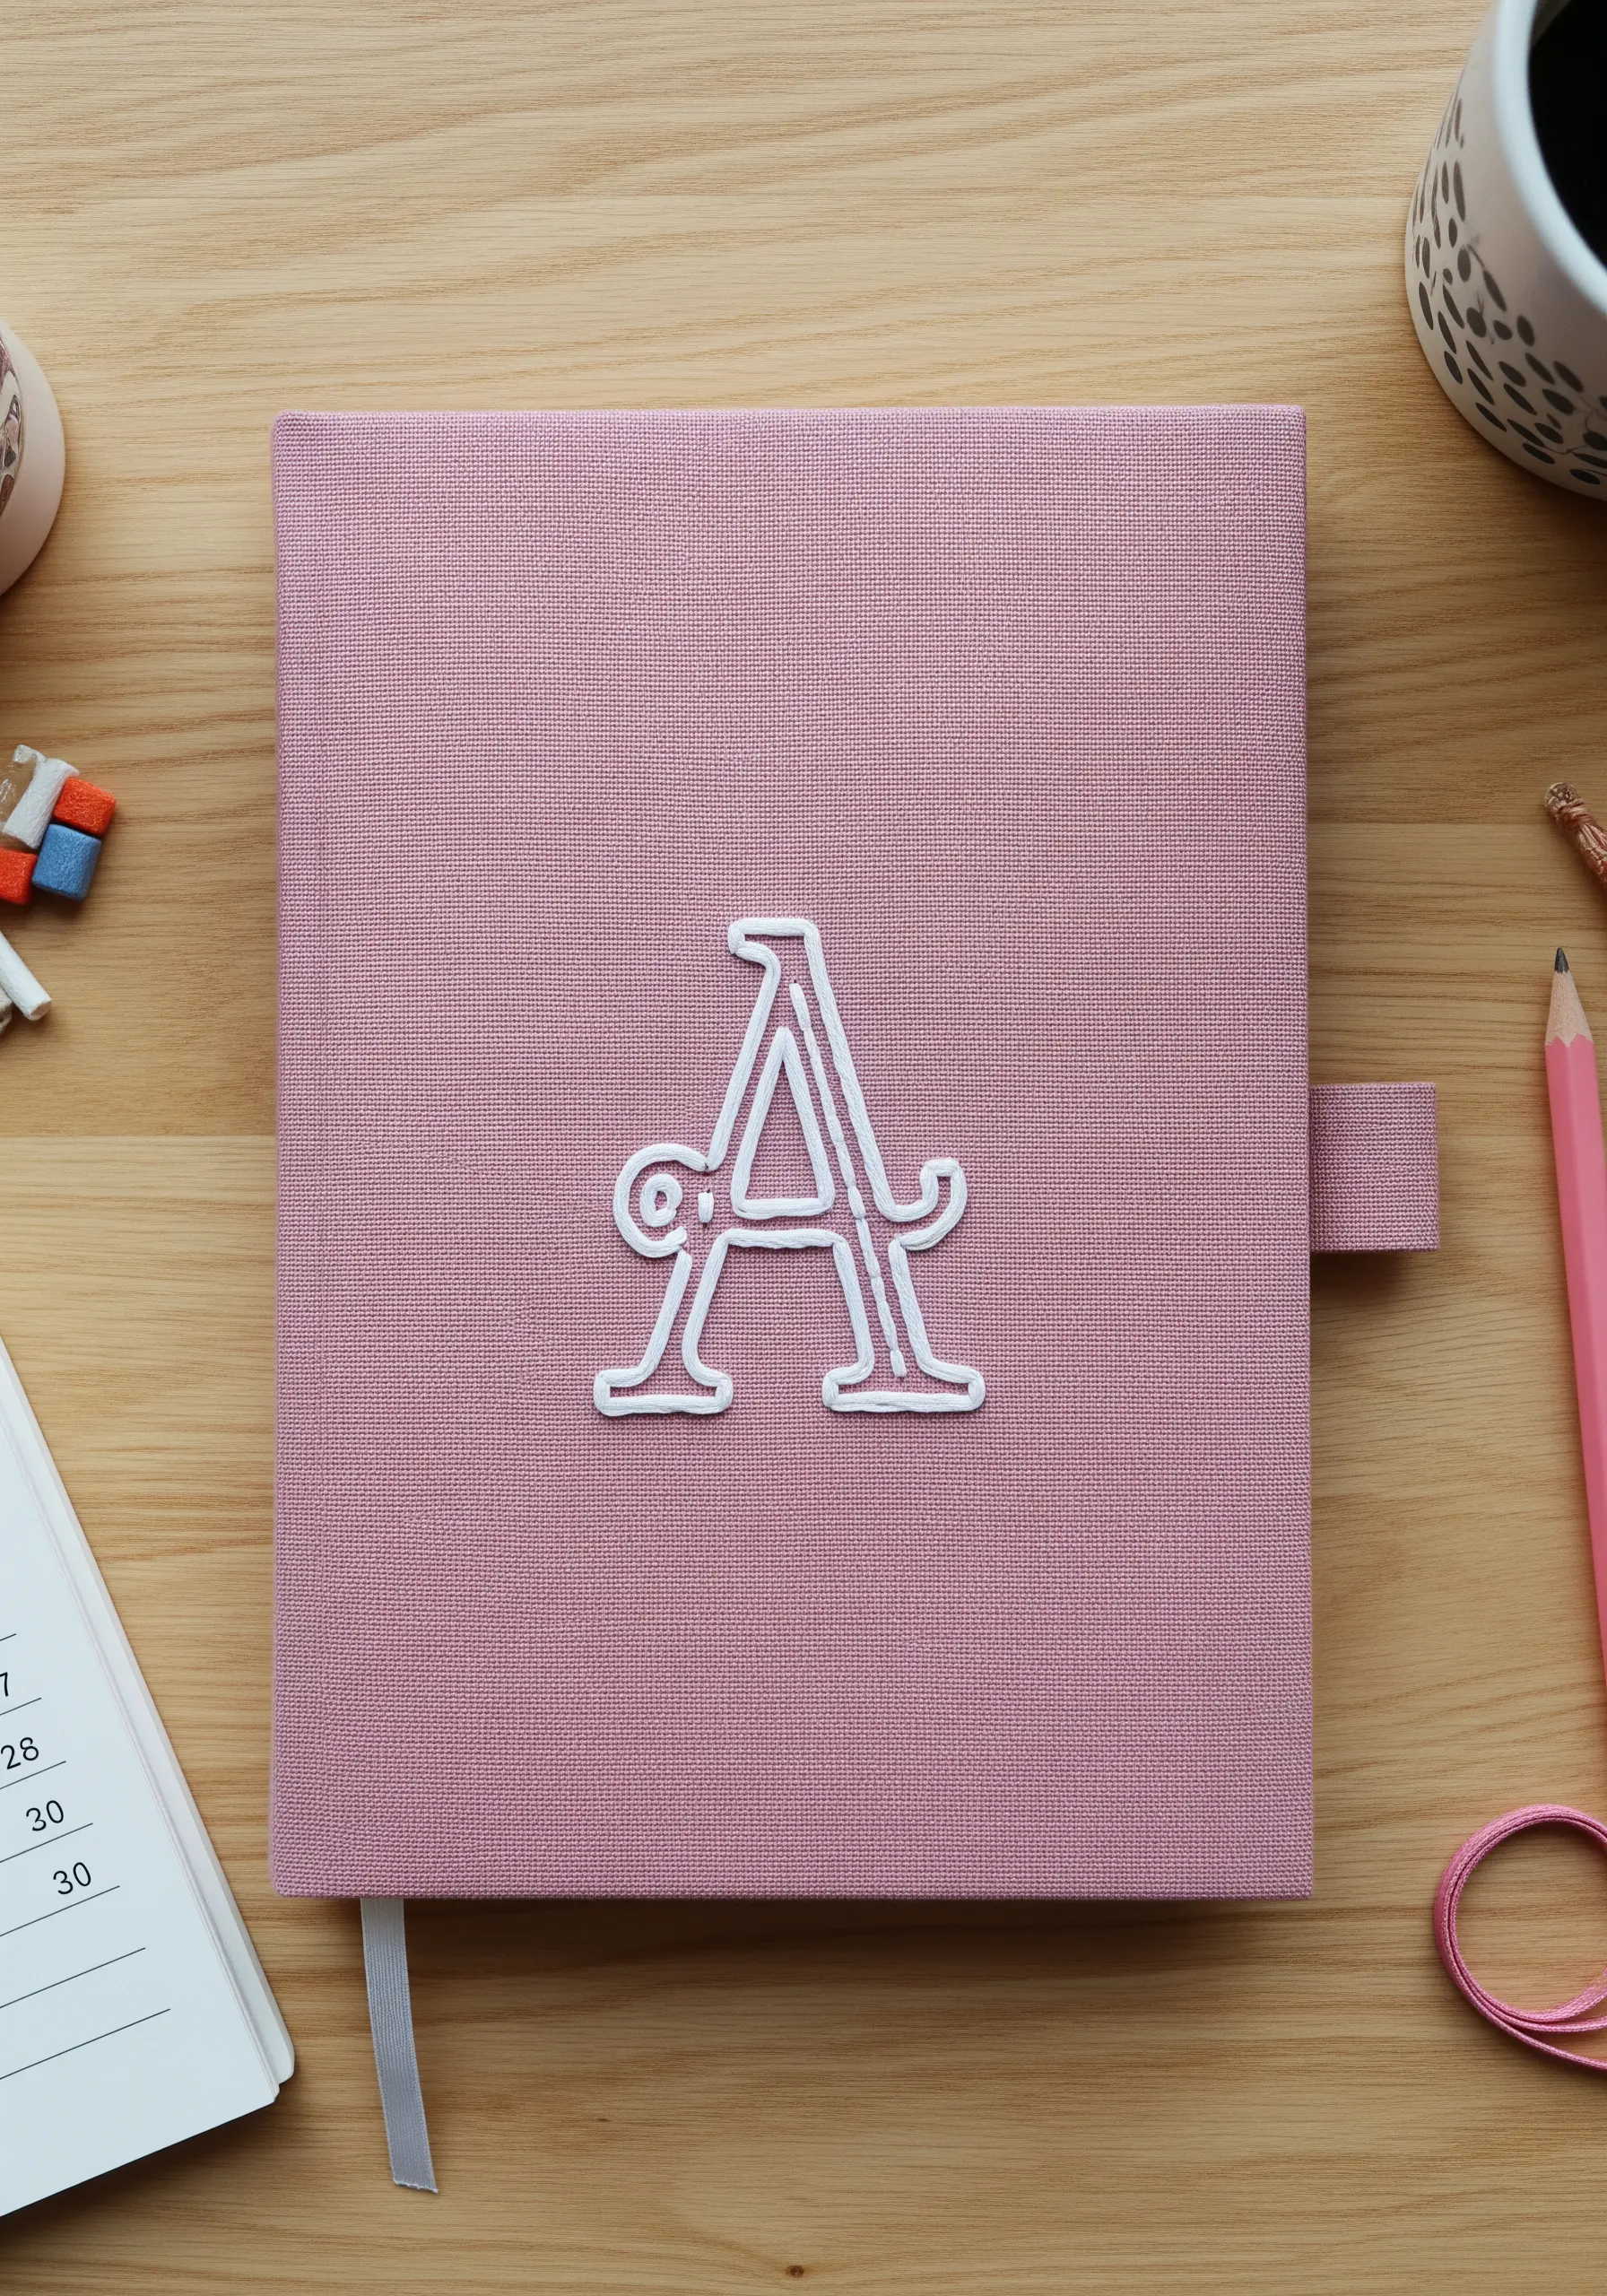
Give a monogram a professional, three-dimensional effect using padded satin stitch.
First, stitch a foundation of small, straight stitches or seed stitches within the outline of the letter.
Then, cover this padding completely with smooth, uniform satin stitches worked in the opposite direction.
This technique physically raises the embroidery from the fabric surface, giving the monogram a classic, embossed quality that looks incredibly refined on a journal cover or linen.
19. Integrate Wooden Beads into Macrame

Add another layer of natural texture and structure to your macrame projects by incorporating wooden beads.
Simply slide the beads onto your filler cords before tying containing knots (like square knots) below them.
This not only adds visual interest but also helps maintain even spacing and structure within your design.
Choose beads with a wide enough hole for your cord and a finish that complements your rope color for a cohesive, professional look.
20. Weave a Beaded Votive Cover
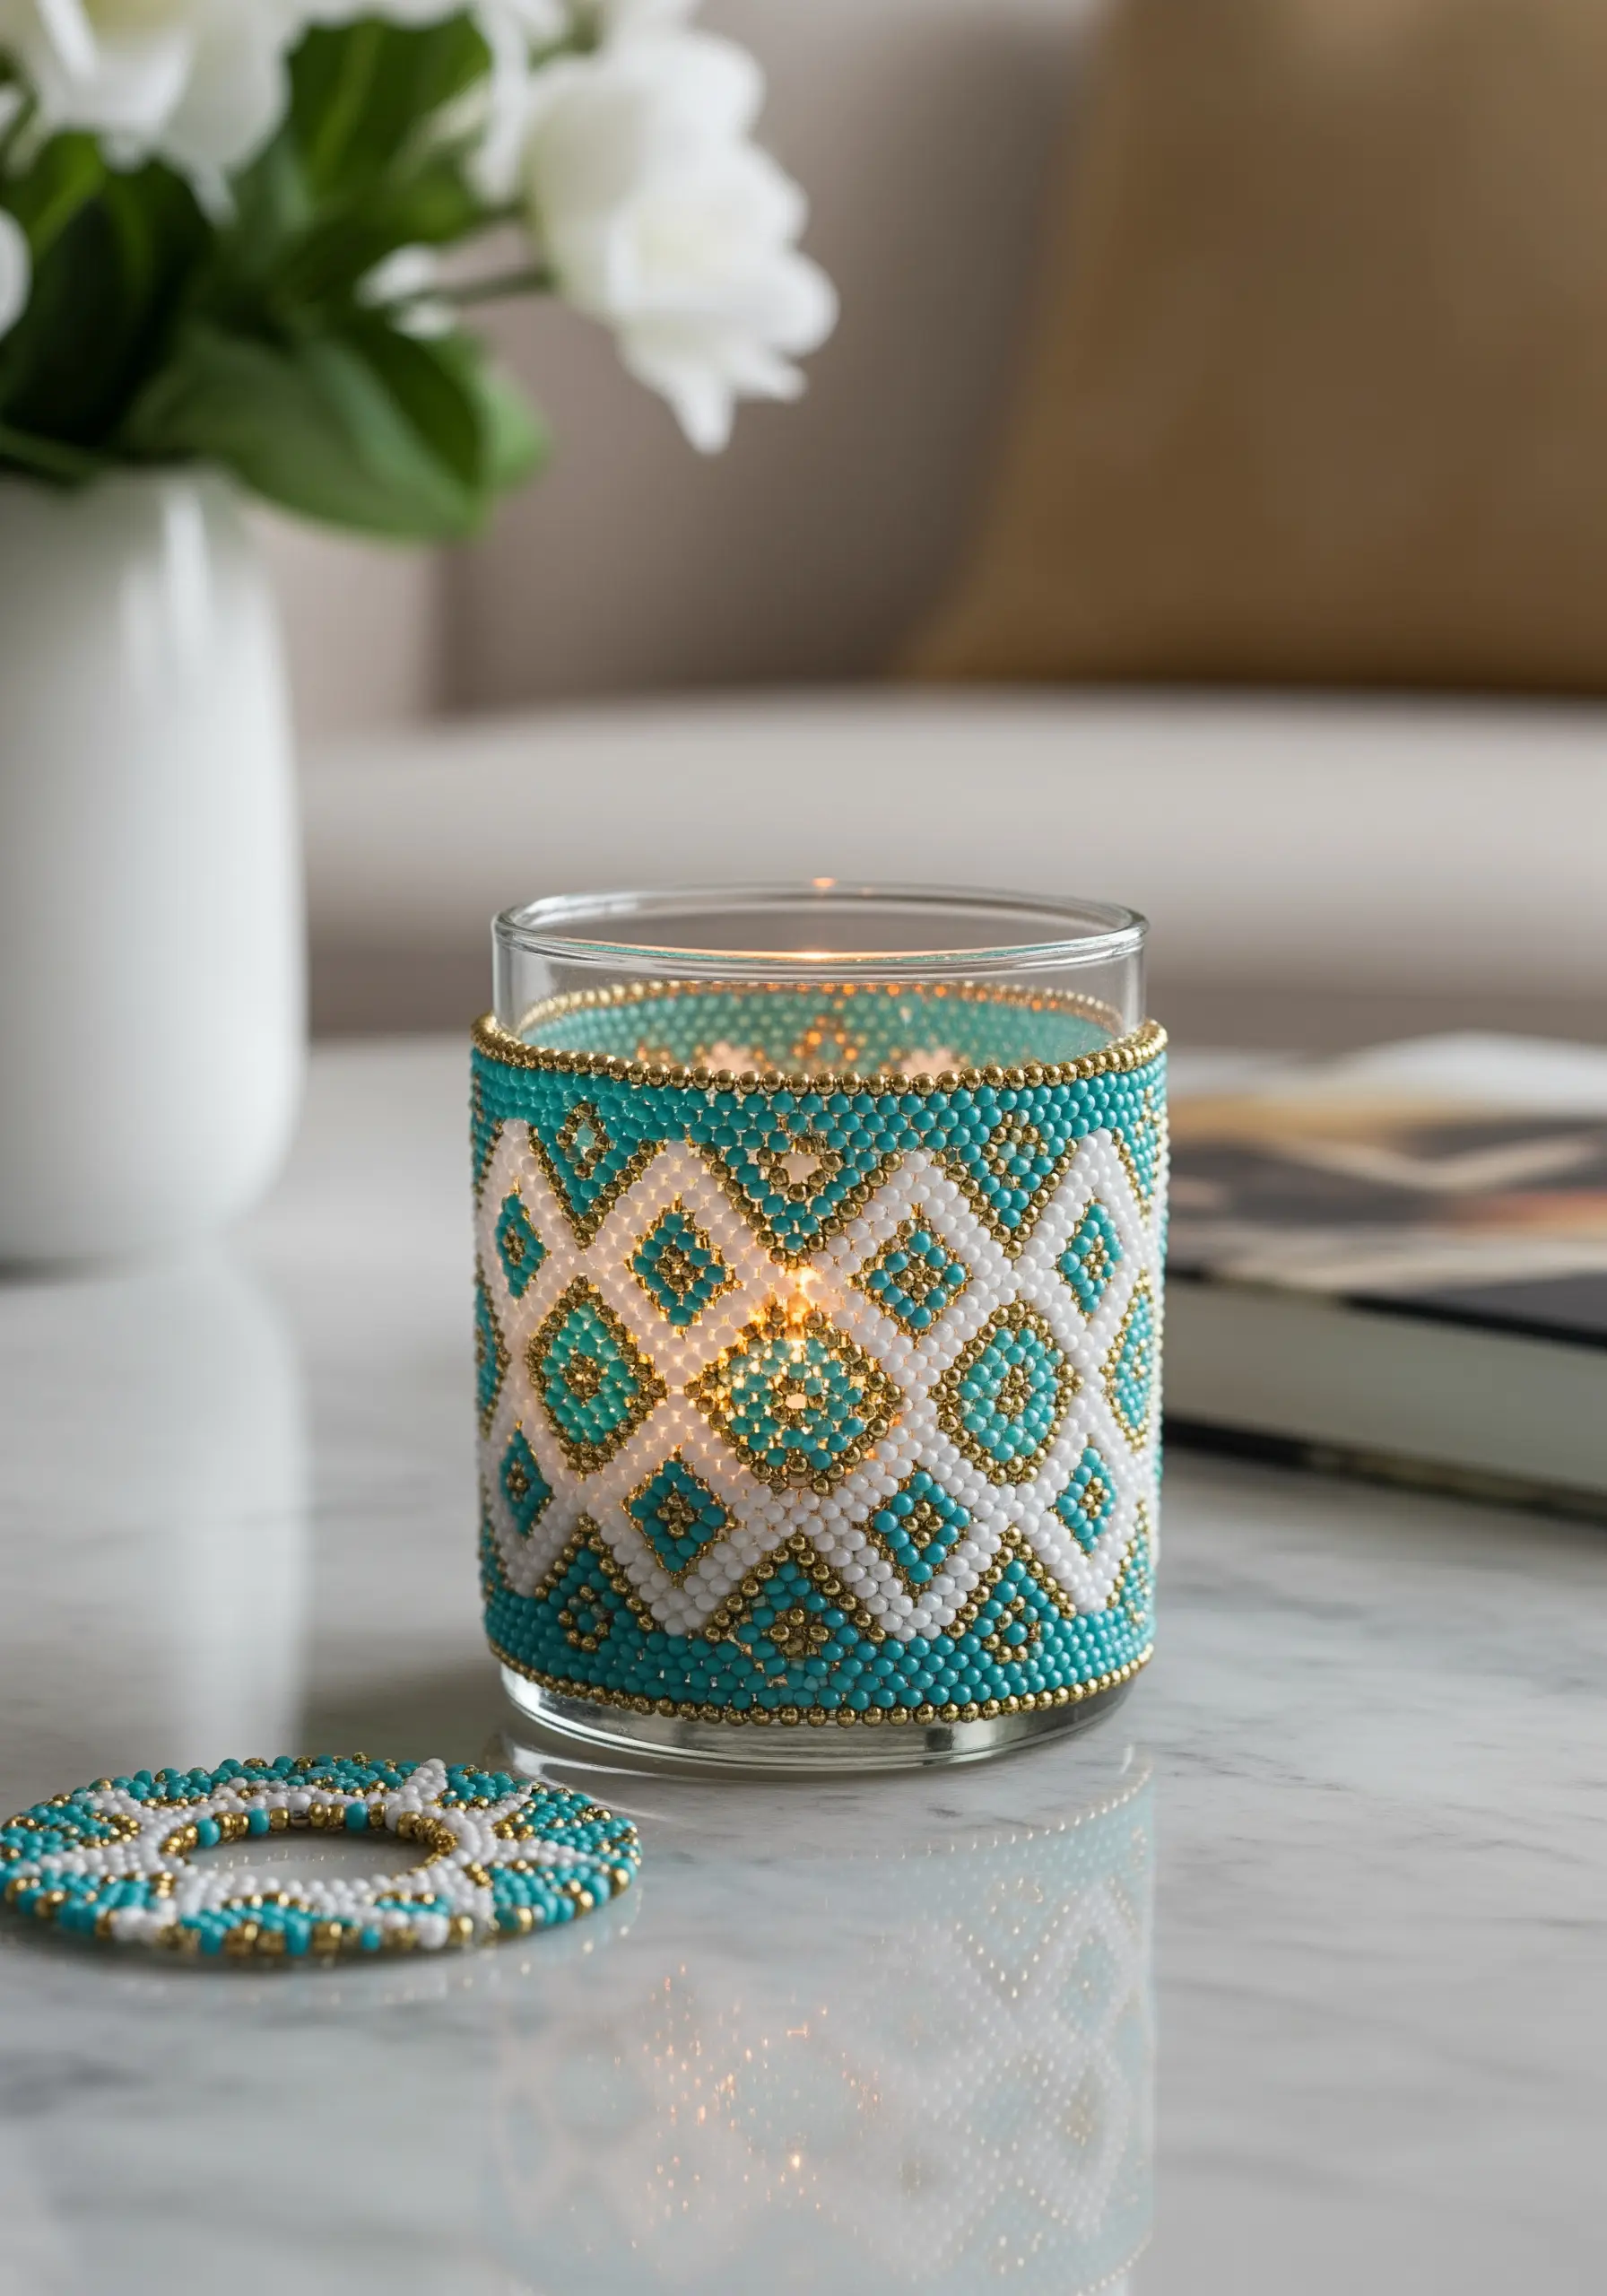
Create a stunning candle holder by weaving a decorative sleeve with seed beads.
Using an off-loom stitch like peyote or brick stitch, you can create a flexible, fabric-like strip of beadwork that can be wrapped around a simple glass votive.
Work a geometric pattern with contrasting colors, like turquoise, white, and gold, for a design that feels both modern and timeless.
When the candle is lit, the light will glow through the beads, creating a mesmerizing, intricate pattern.
21. Use Couching for Bold, Textured Outlines

Create a bold, graphic design on a pillow using the couching technique with a thick cord.
First, lay your cord or braided yarn along your design line—in this case, the outline of a sleeping cat.
Then, using a standard embroidery floss in a matching or contrasting color, make small, evenly spaced tacking stitches over the cord to secure it to the fabric.
This method is much faster than satin stitch for creating thick, textured lines and adds a wonderful sculptural quality to your work.
22. Create Art with Stitched Pleats and Tucks

Explore textile manipulation by creating a piece of art where texture, not color, is the focus.
This minimalist piece uses precise pintucks—tiny, stitched folds in the fabric—to create a grid of linear texture.
You can achieve this by folding and pressing your fabric, then sewing straight lines with your machine or by hand with a simple backstitch.
The play of light and shadow across the pleated surface creates a sophisticated, architectural effect that feels both modern and serene.
23. Craft a Coiled Rope Bowl
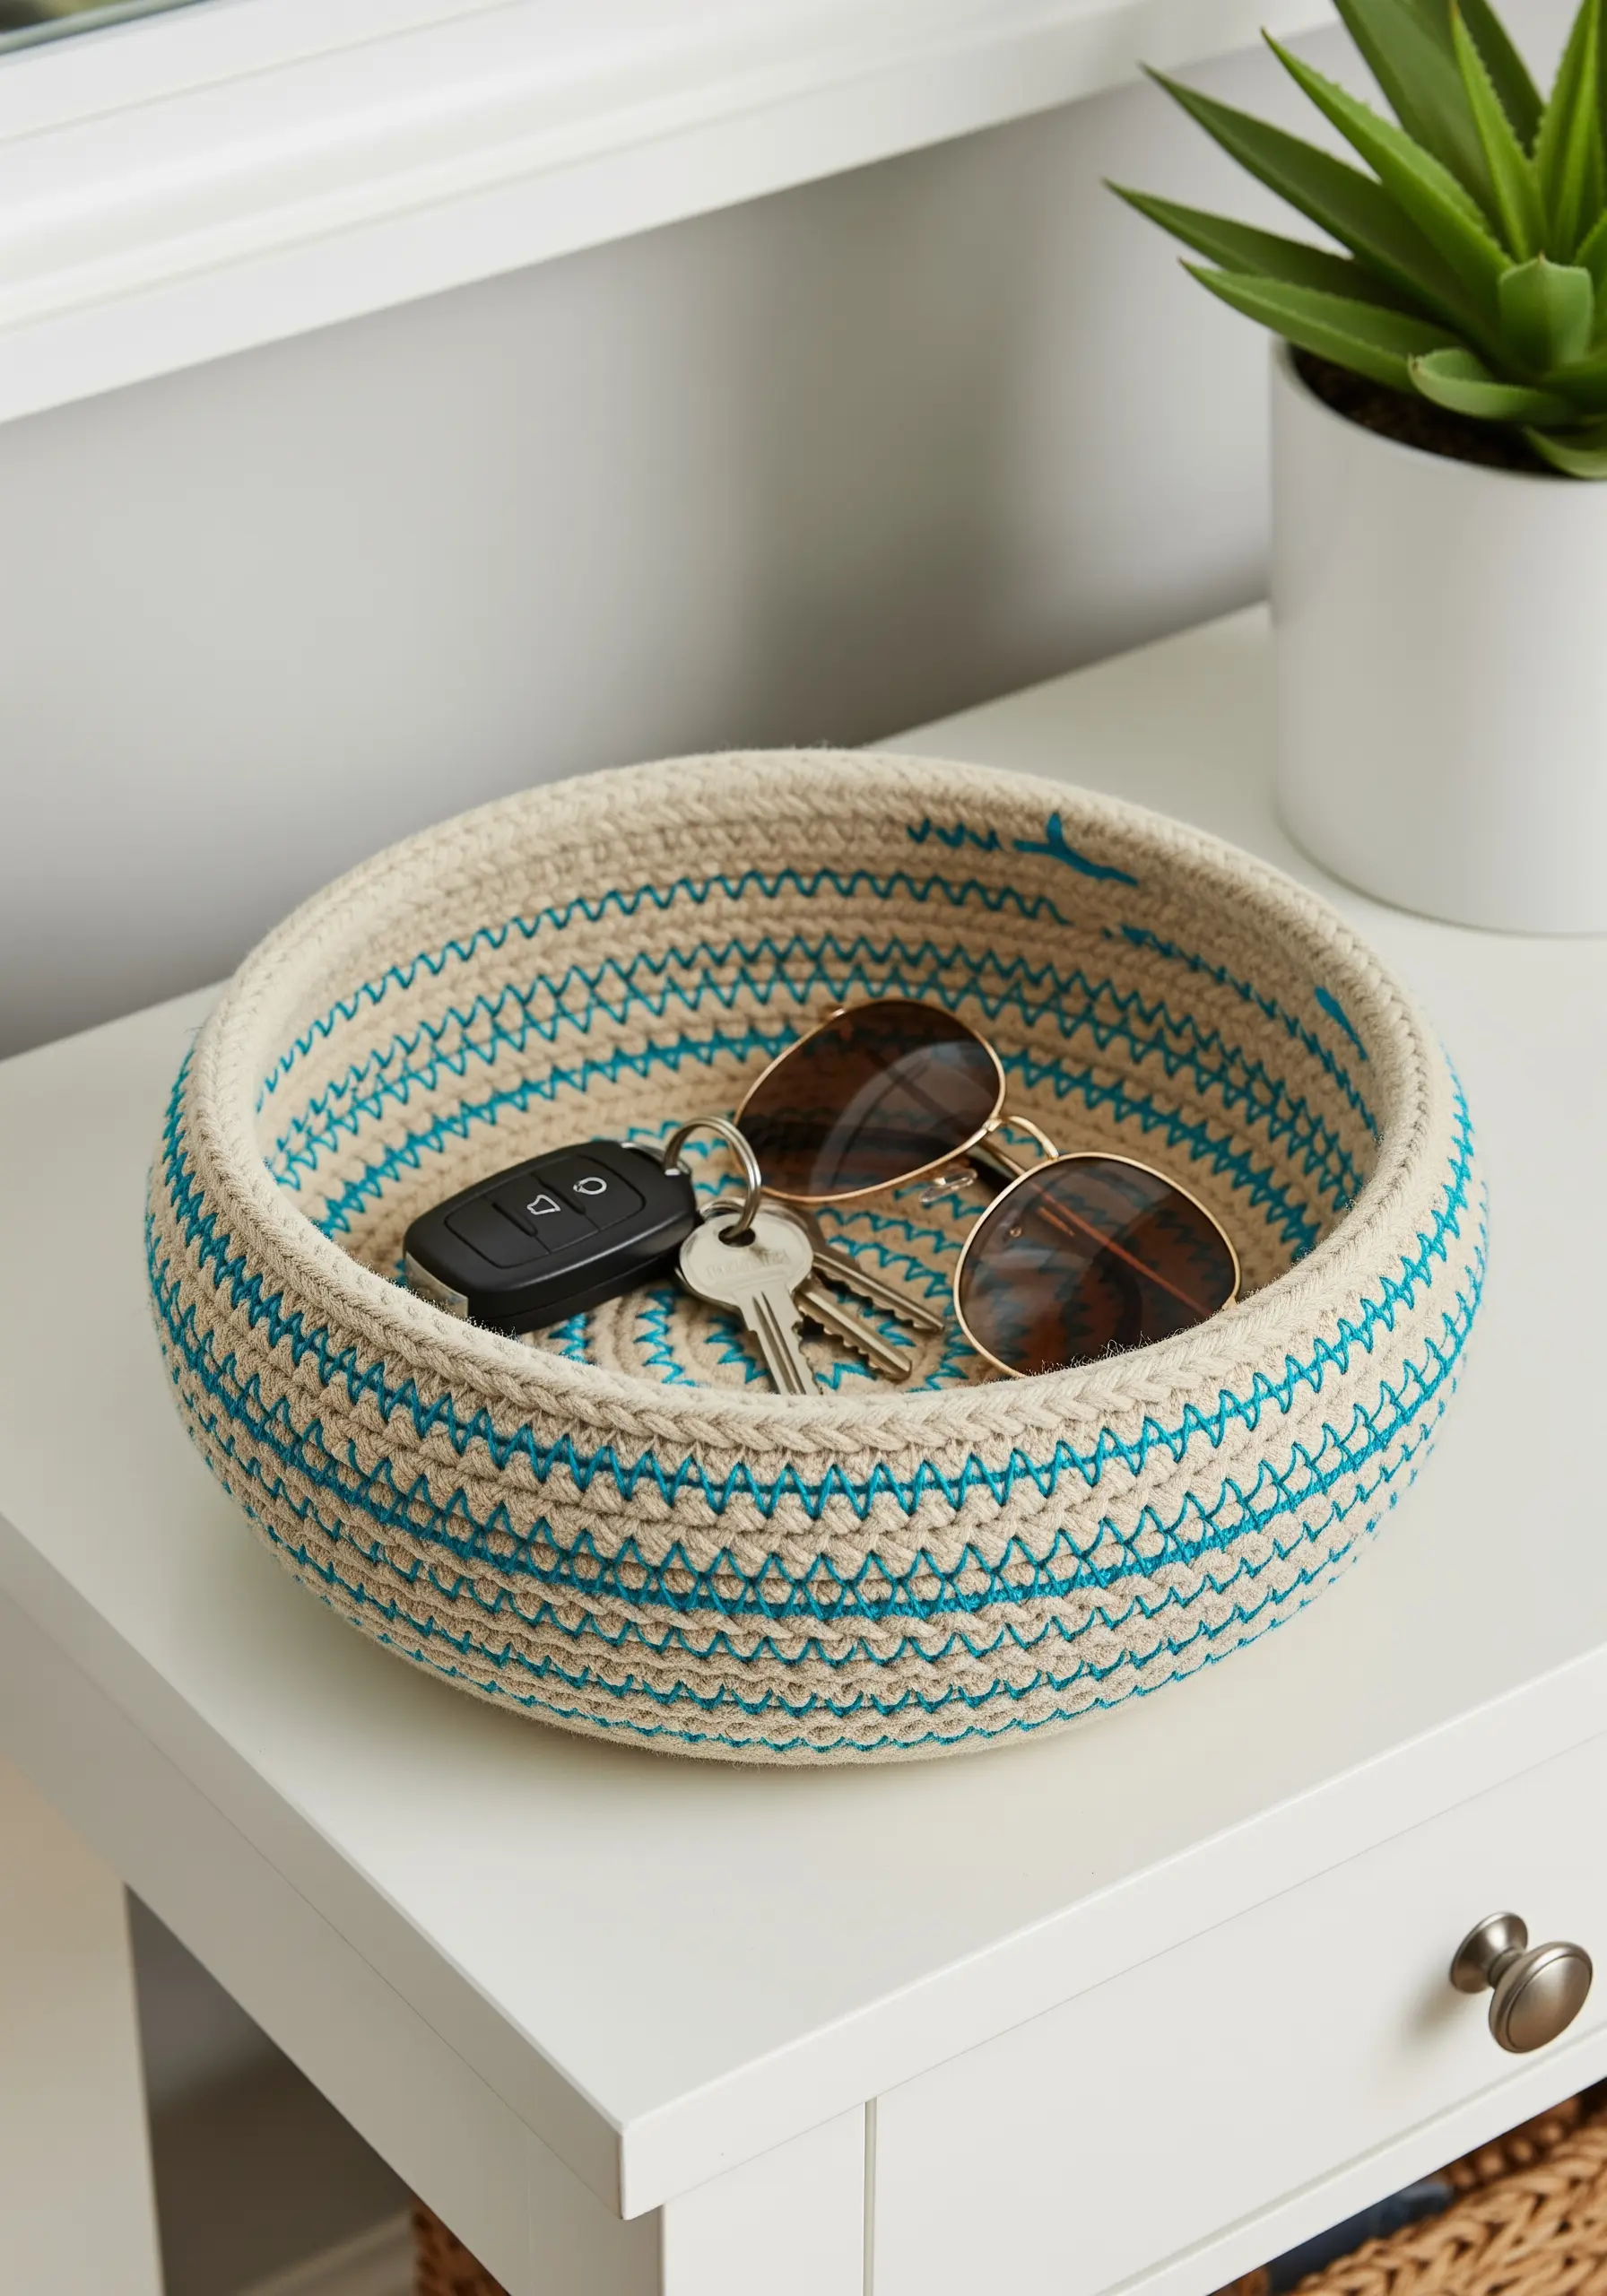
Turn humble cotton rope into a chic and functional catch-all bowl using your sewing machine.
Simply coil the rope into a flat base, then begin angling the sides up as you continue to stitch.
Use a wide zigzag stitch and a contrasting thread color to turn the construction method into a decorative element.
This technique is fast, sturdy, and a brilliant way to create custom-sized storage that looks modern and handmade.
24. Appliqué with Felt for Clean, Graphic Shapes
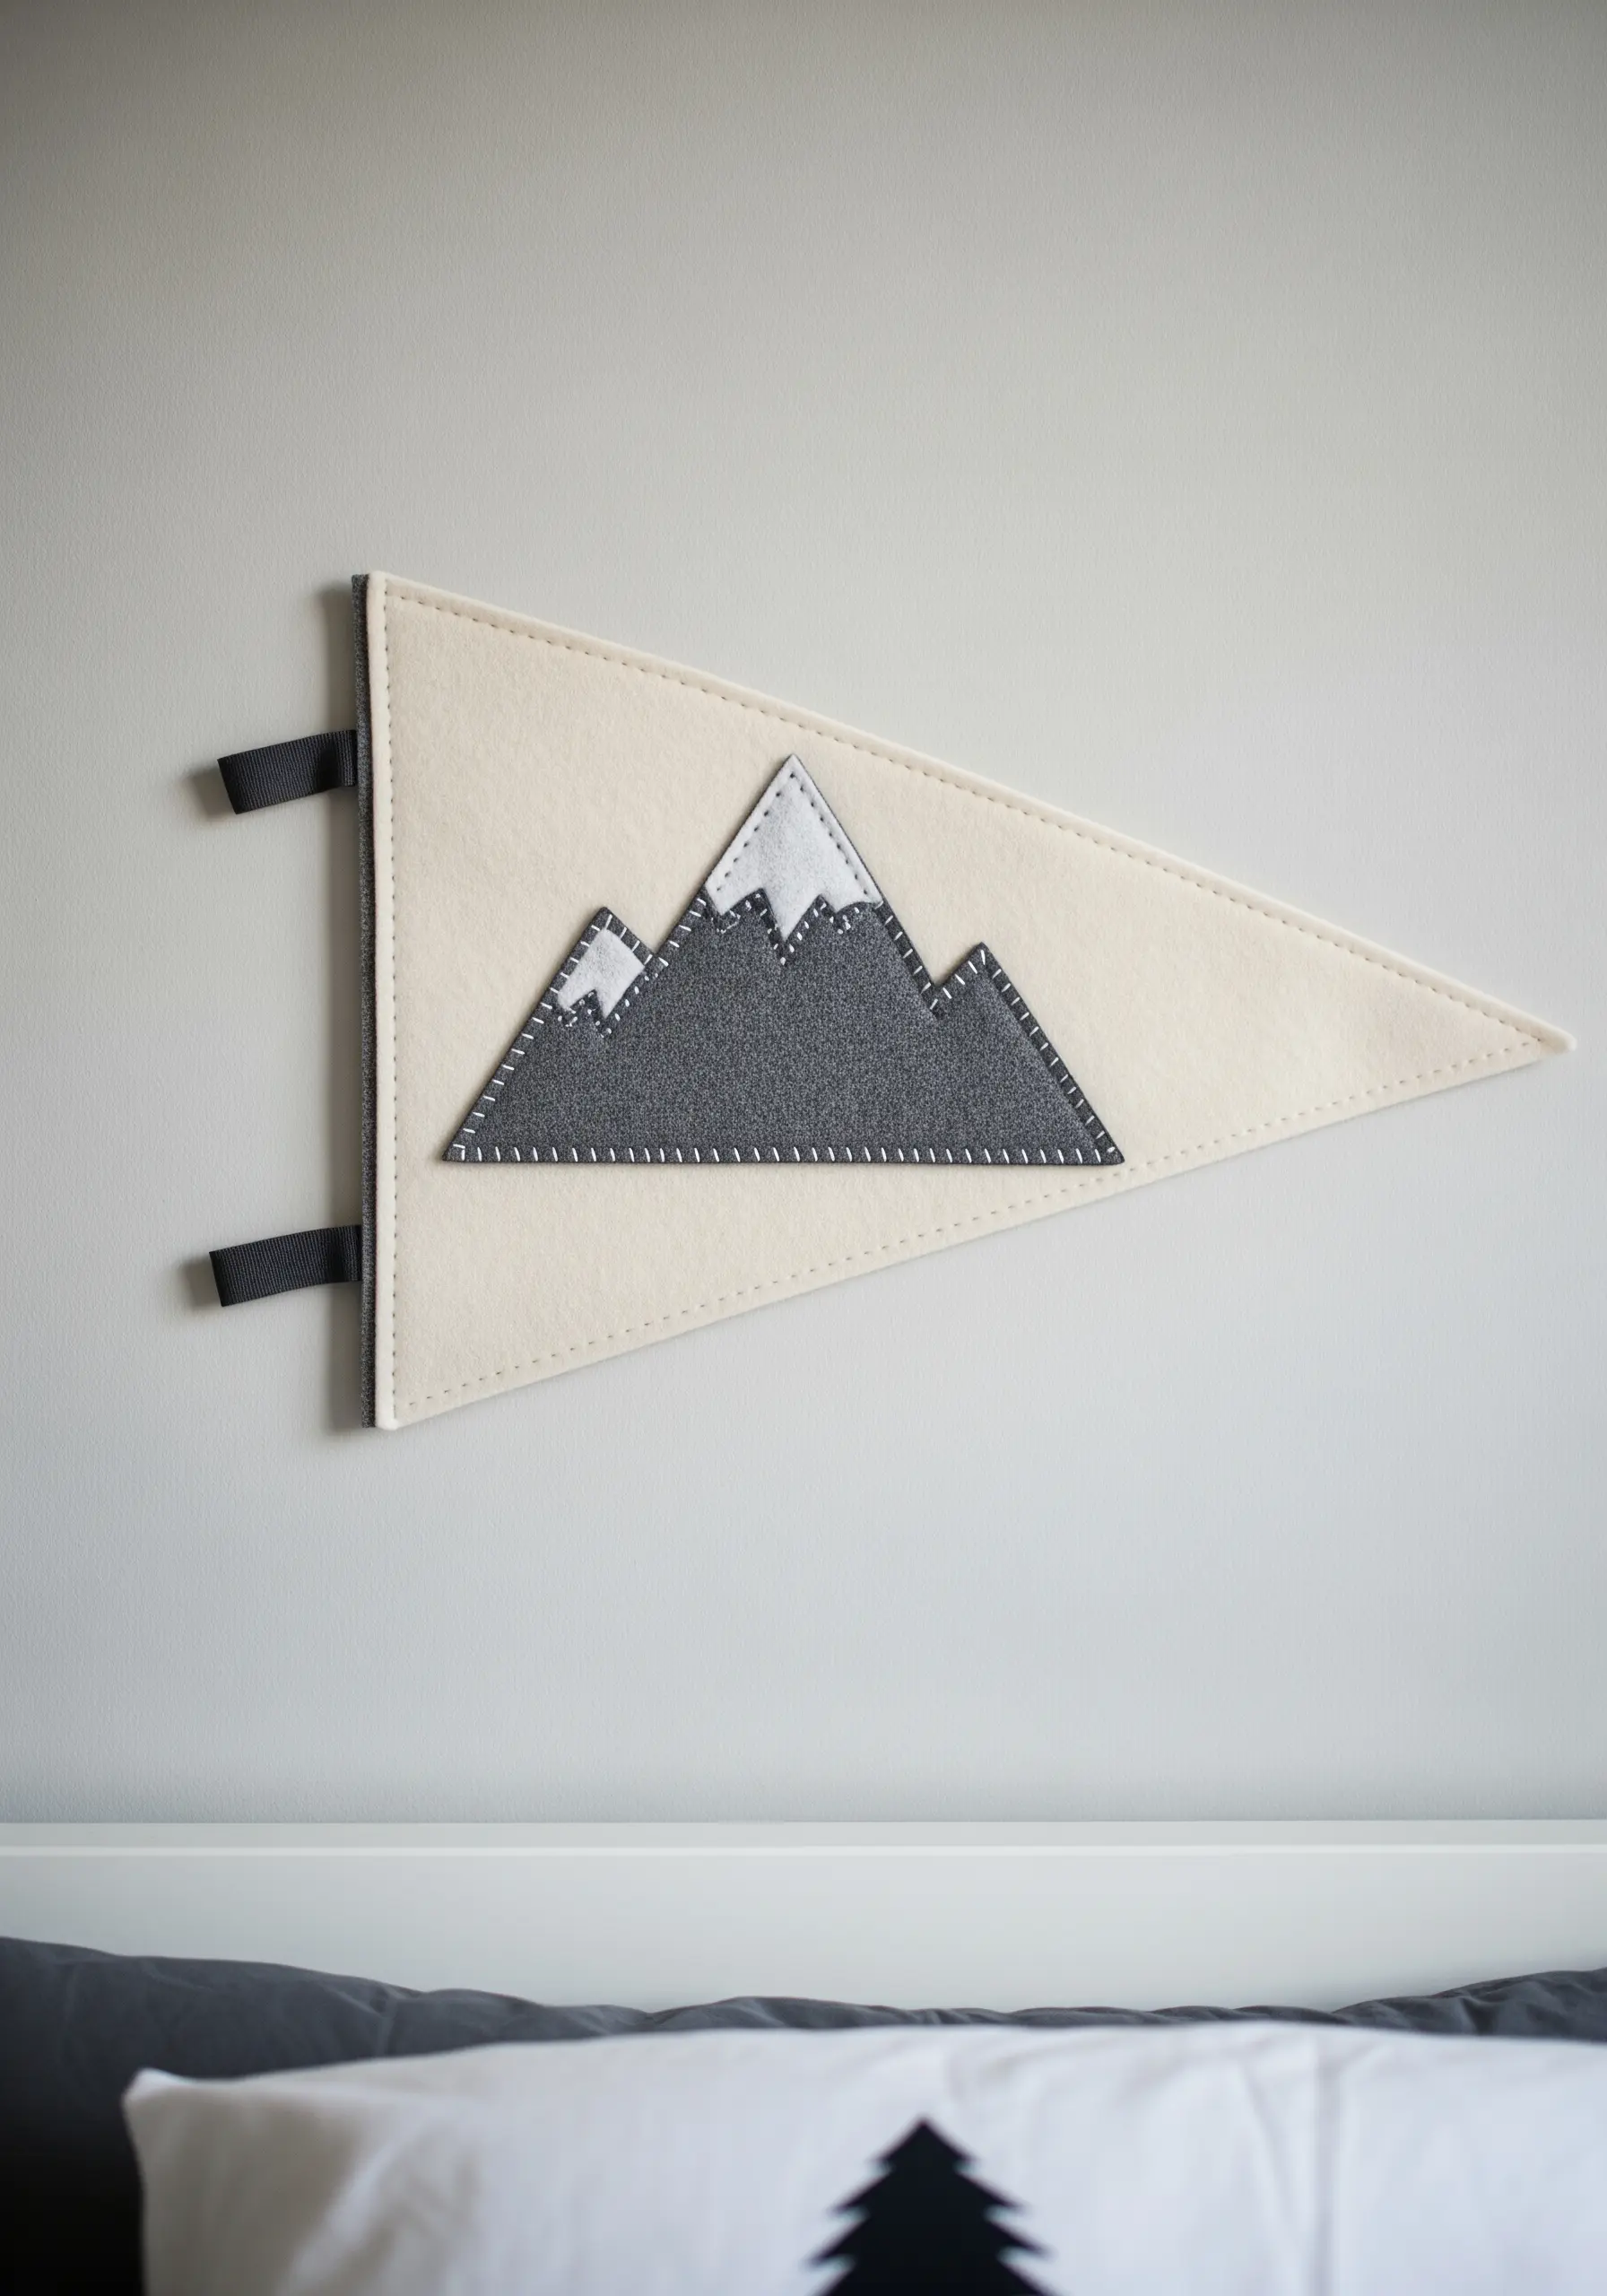
Create a modern felt pennant using the simple technique of appliqué.
Felt is the ideal material for this because it doesn’t fray, allowing you to cut clean, sharp shapes without needing to finish the edges.
Layer different colors of felt to build your design, like these grey mountains with white snow caps, and secure them with a simple, visible running stitch around the border.
The visible stitching adds a charming, handcrafted detail that complements the graphic nature of the design.
25. Embroider a Lampshade for a Silhouette Effect

Transform a plain lampshade into a piece of art by embroidering a design that comes to life when illuminated.
Choose a simple, delicate motif with fine lines, like these dandelion seeds drifting in the wind.
Use a dark-colored floss and a simple backstitch or stem stitch, piercing the lampshade material carefully with a sharp needle.
When the light is off, it’s a subtle detail; when it’s on, the design becomes a beautiful, glowing silhouette.
26. Embellish a Photo Frame with 3D Stitches

Give a plain picture frame a soft, personalized touch by adding a border of embroidered flowers.
First, wrap the frame tightly in a neutral, textured fabric like linen or burlap.
Then, use the lazy daisy stitch to create the petals and a French knot for the center of each flower. These stitches are simple but have a raised, three-dimensional quality.
This small detail turns a standard frame into a thoughtful, personalized gift or a charming piece of home decor.
27. Weave with Unconventional, Textural Materials
Create a dynamic woven wall hanging by moving beyond standard yarn and incorporating a variety of textures.
Introduce chunky wool roving, shimmering metallic ribbons, and even strips of silk into your weaving.
Alternate between a simple, flat plain weave and more sculptural techniques like soumak or thick braids to create areas of high texture.
The richness of the final piece comes from this interplay of different materials, sheens, and thicknesses.
28. Stitch Elegant Details onto Paper
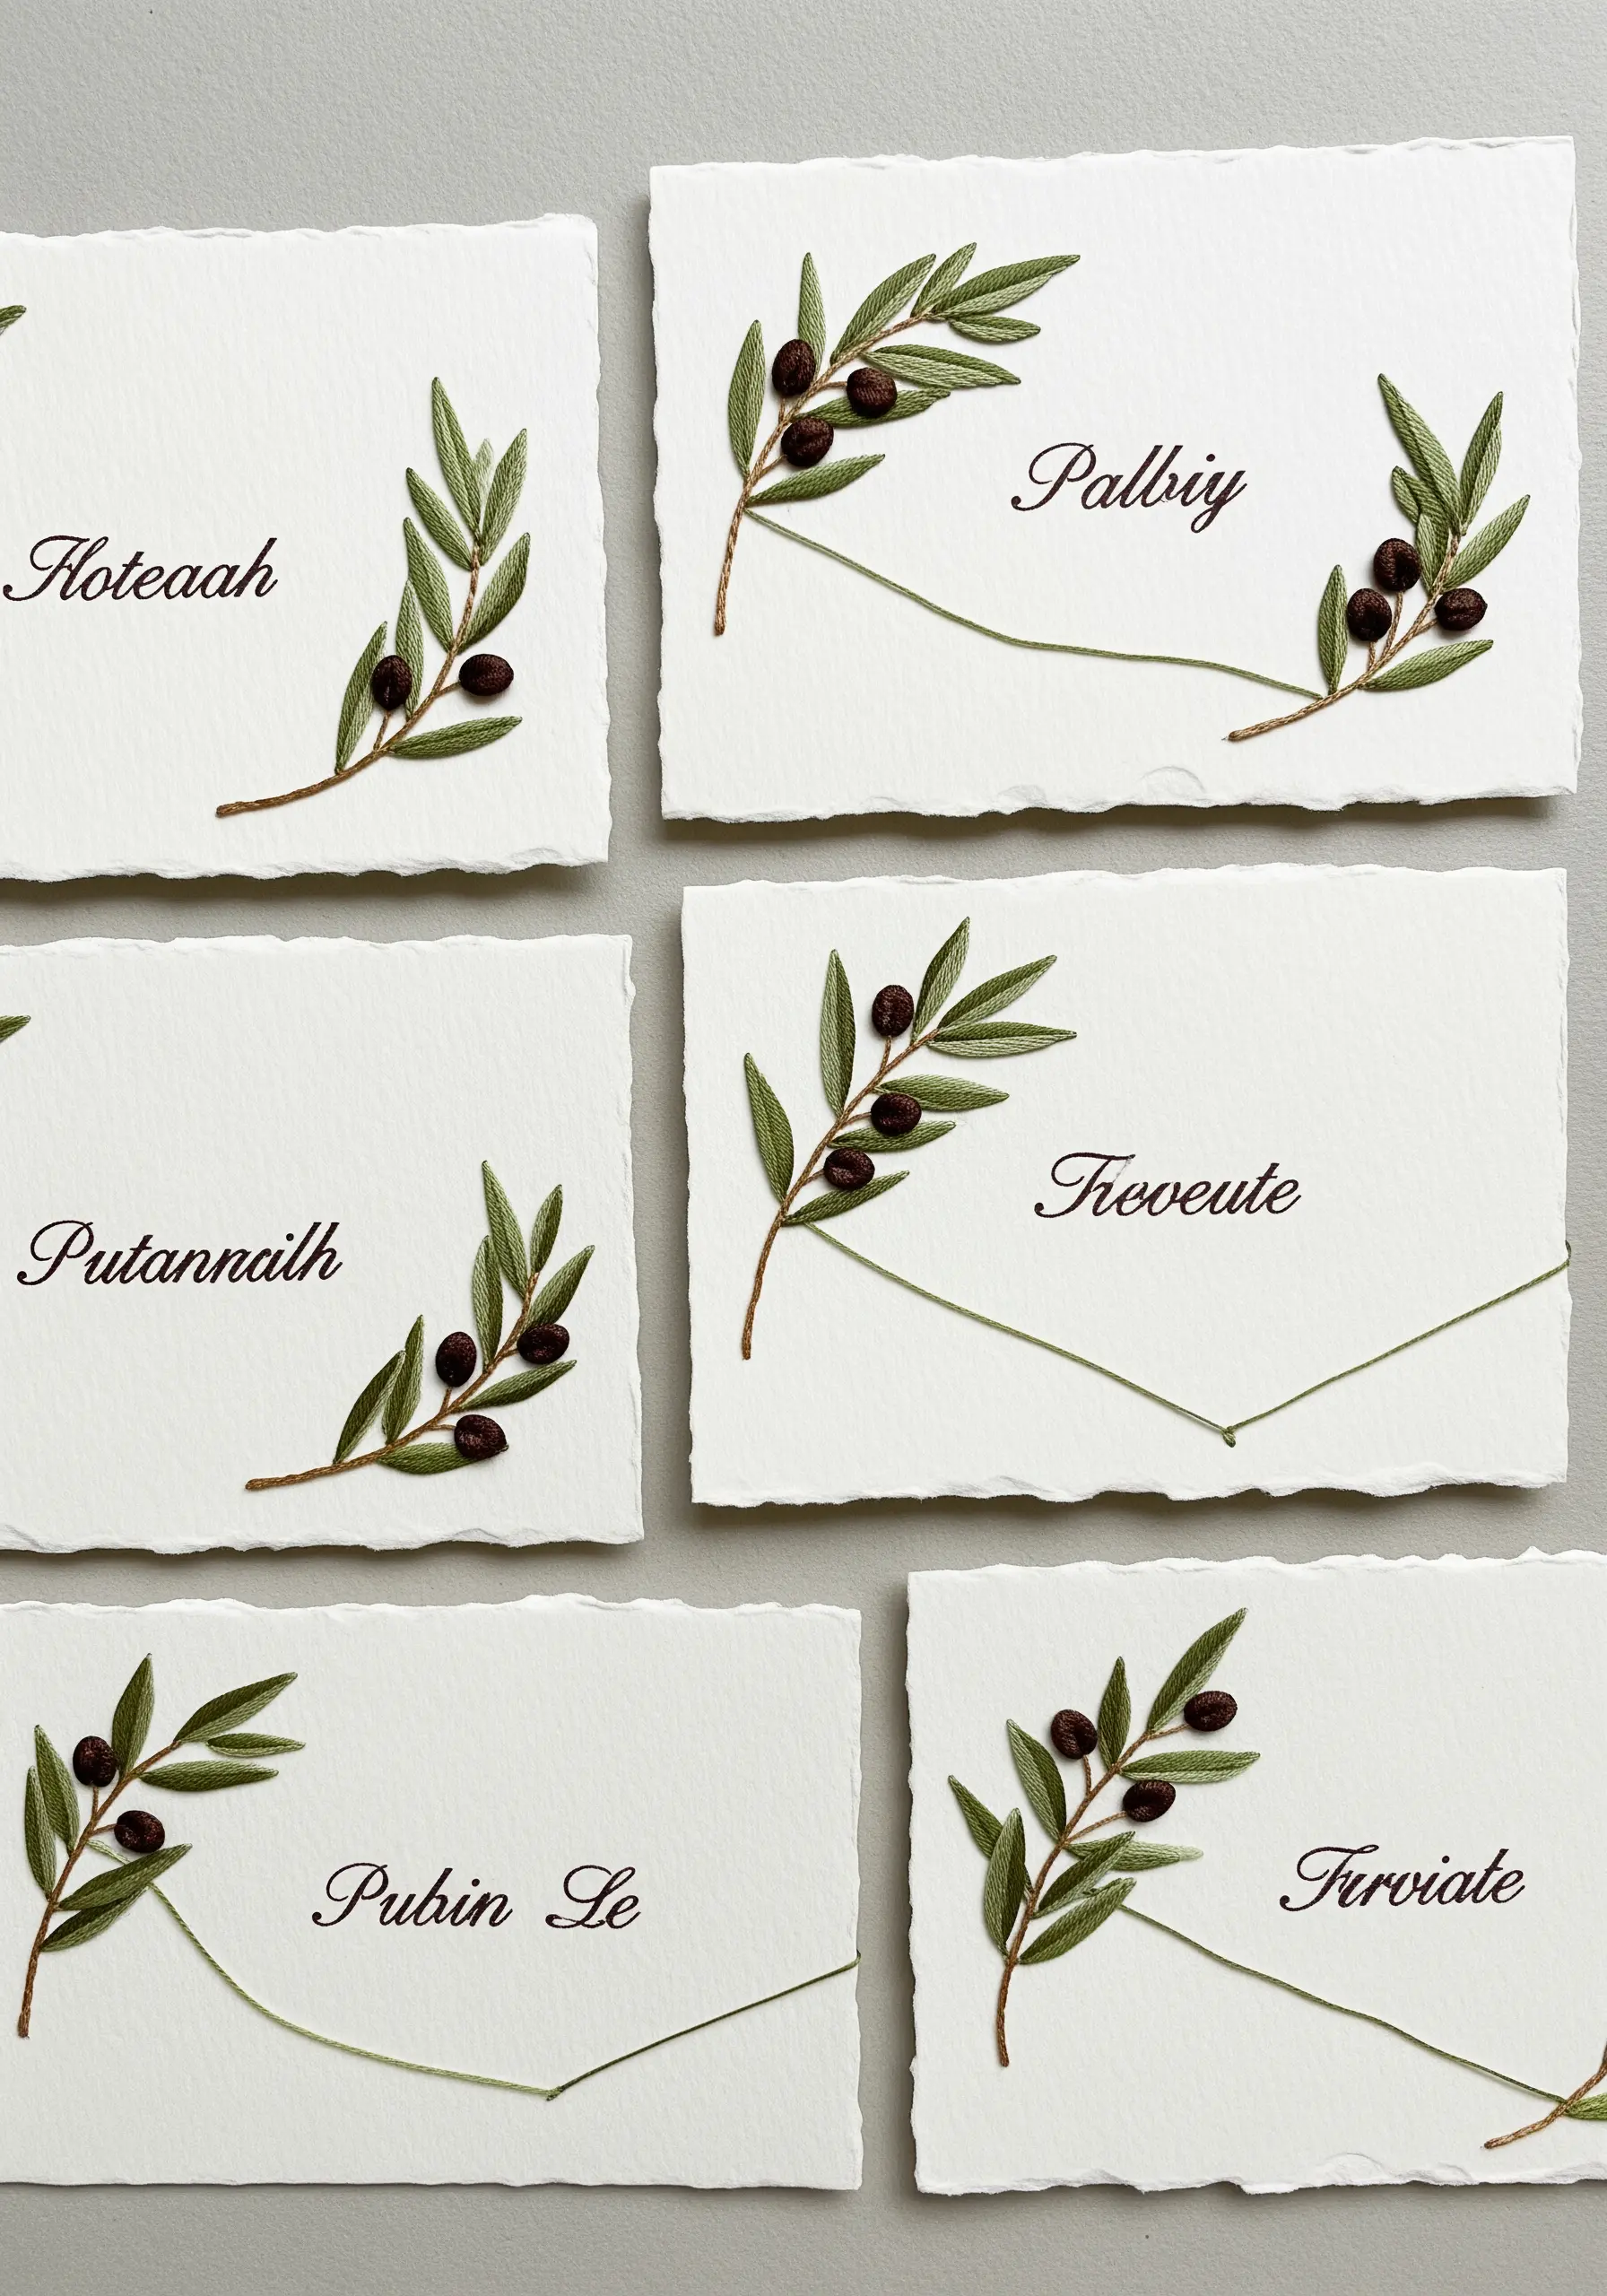
For an exceptionally refined look, try embroidering directly onto high-quality, deckle-edge paper.
Use a fine crewel needle and just one or two strands of floss to create delicate botanical designs like these olive branches.
Gently pre-pierce your holes with the needle to prevent the paper from tearing. Use tiny French knots for the olives and a delicate stem stitch for the branches.
This technique combines the texture of thread with the crispness of paper for stunningly elegant place cards or stationery.
29. Create a Triptych with Minimalist Hoop Art
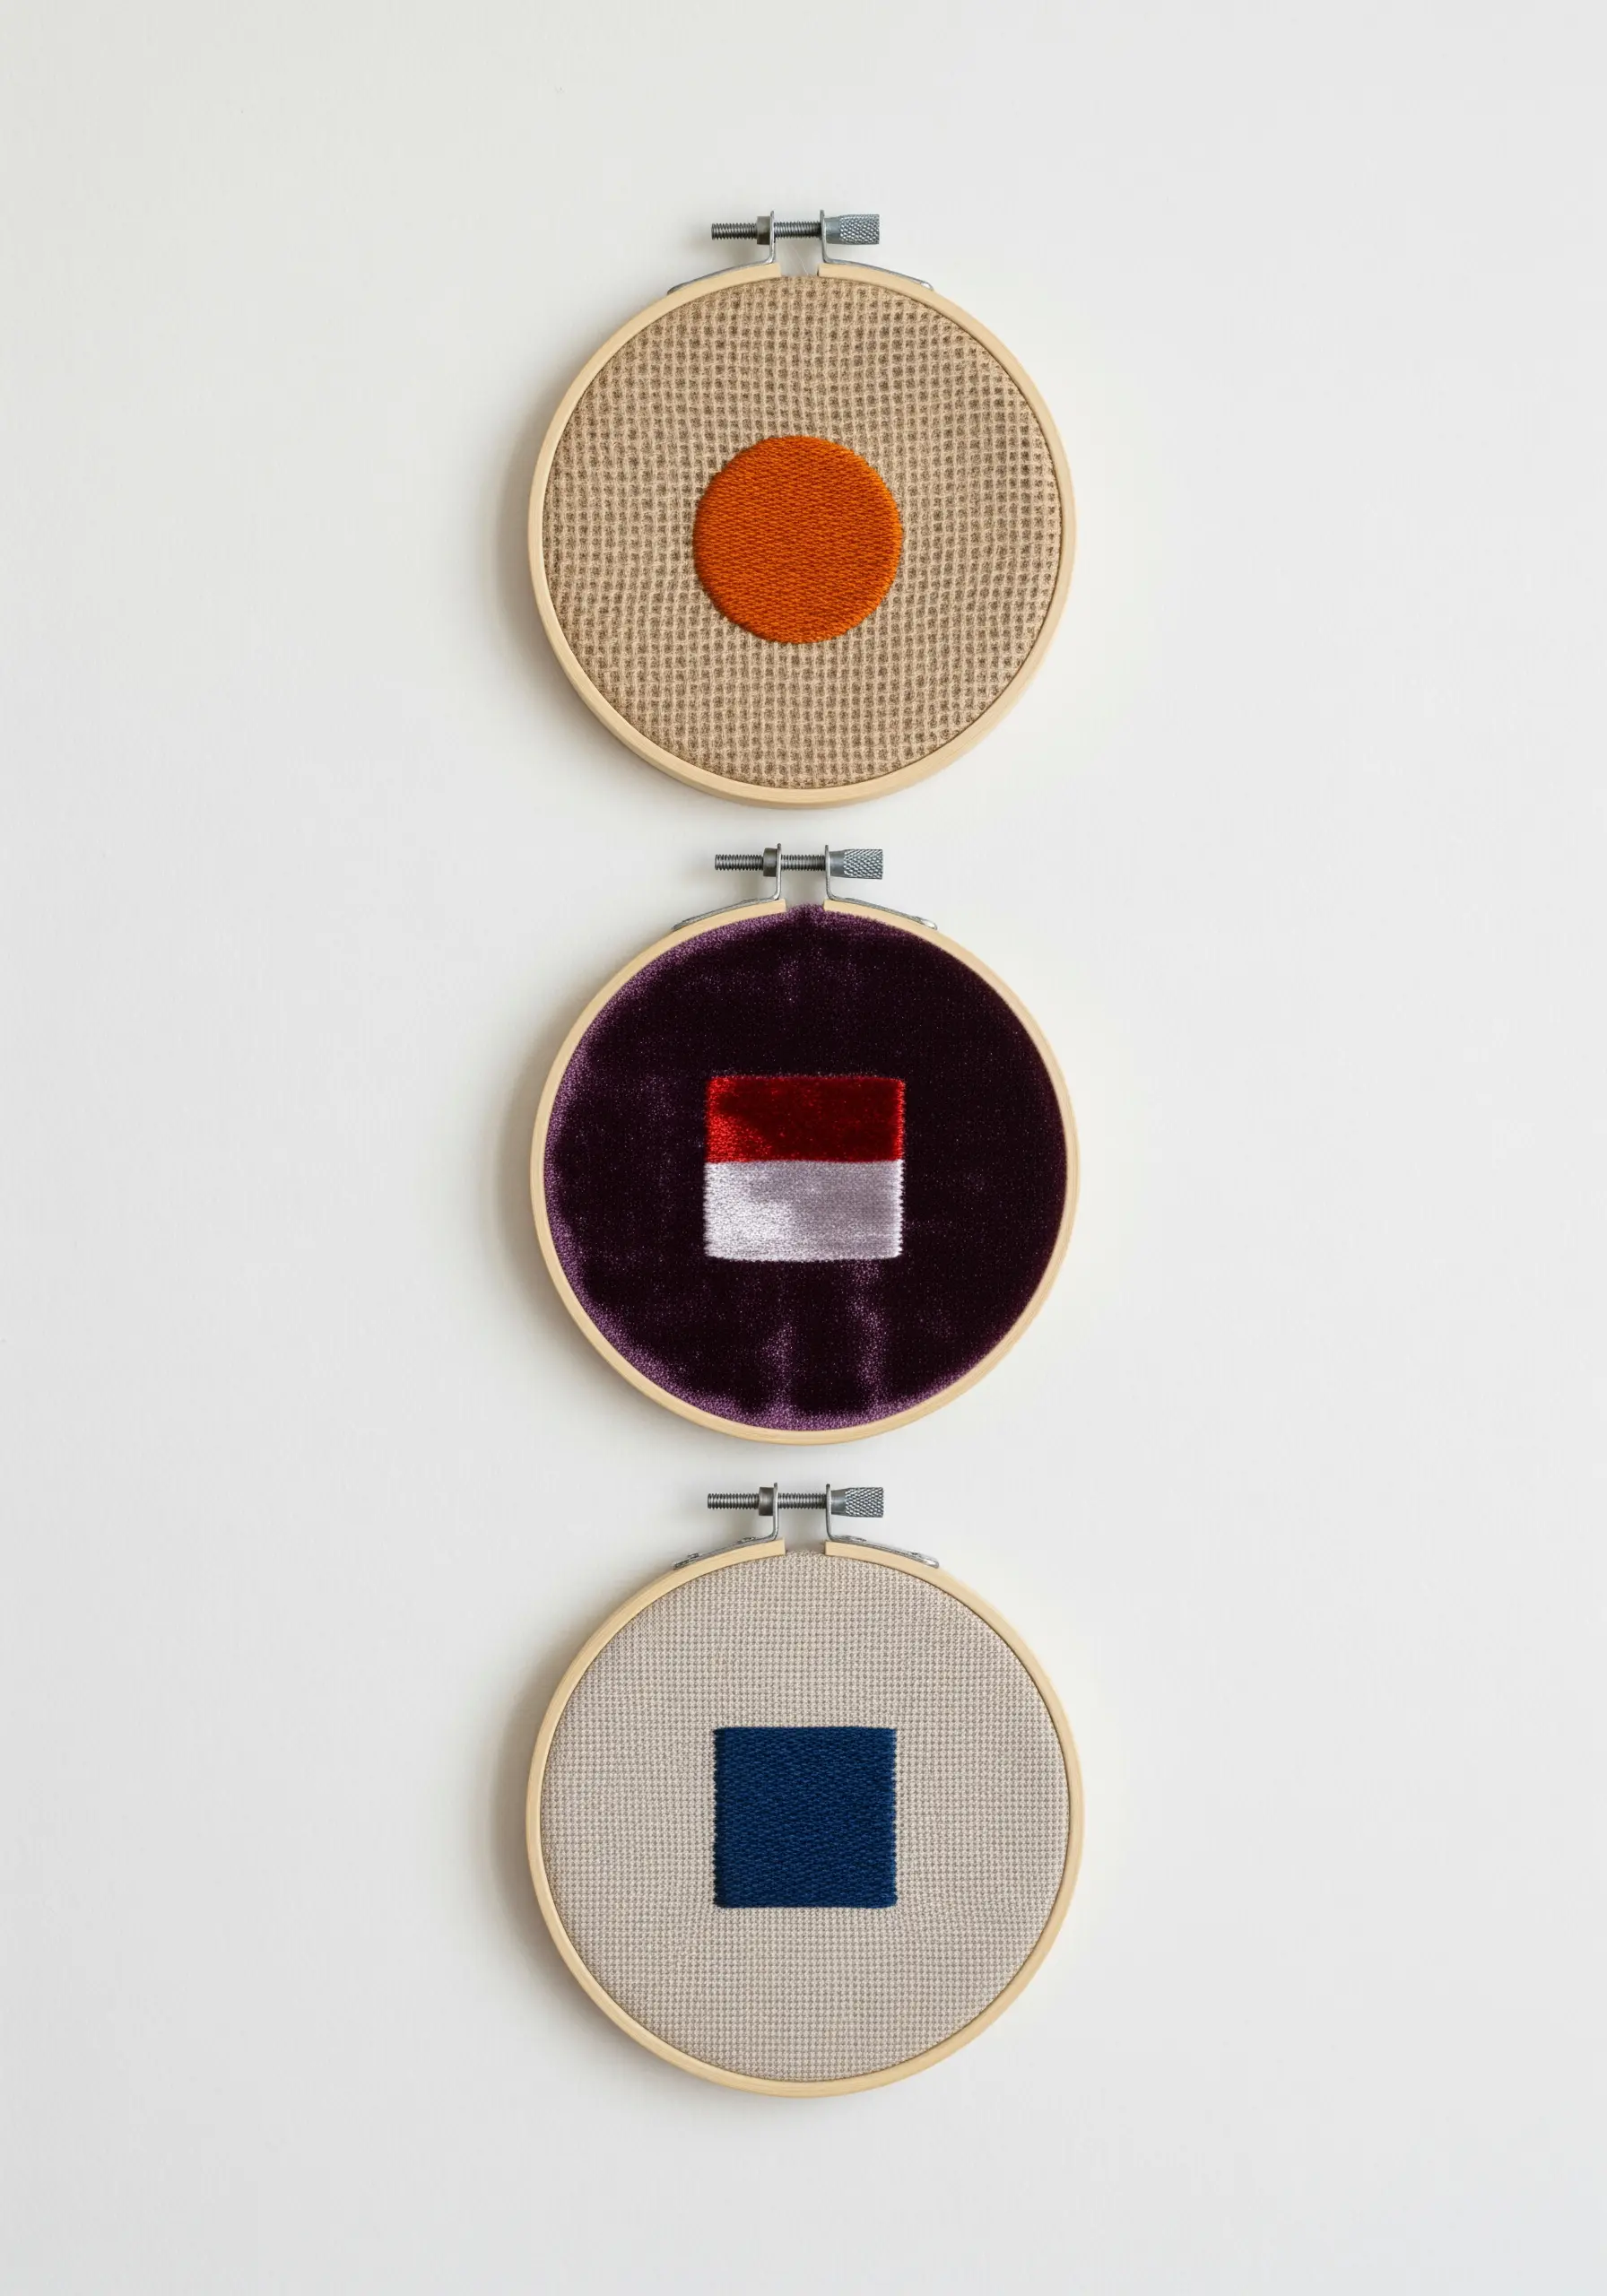
Make a significant visual impact by grouping several small, simple embroidery hoops together.
To keep the look cohesive, work with a limited color palette but vary the textures of your background fabrics—try burlap, velvet, and linen.
Stitch simple, solid geometric shapes using dense fill stitches like satin stitch or seed stitch.
This approach transforms minimalist embroidery into a larger, curated gallery-style display.
30. Add Dimension to Felt with Simple Stitches
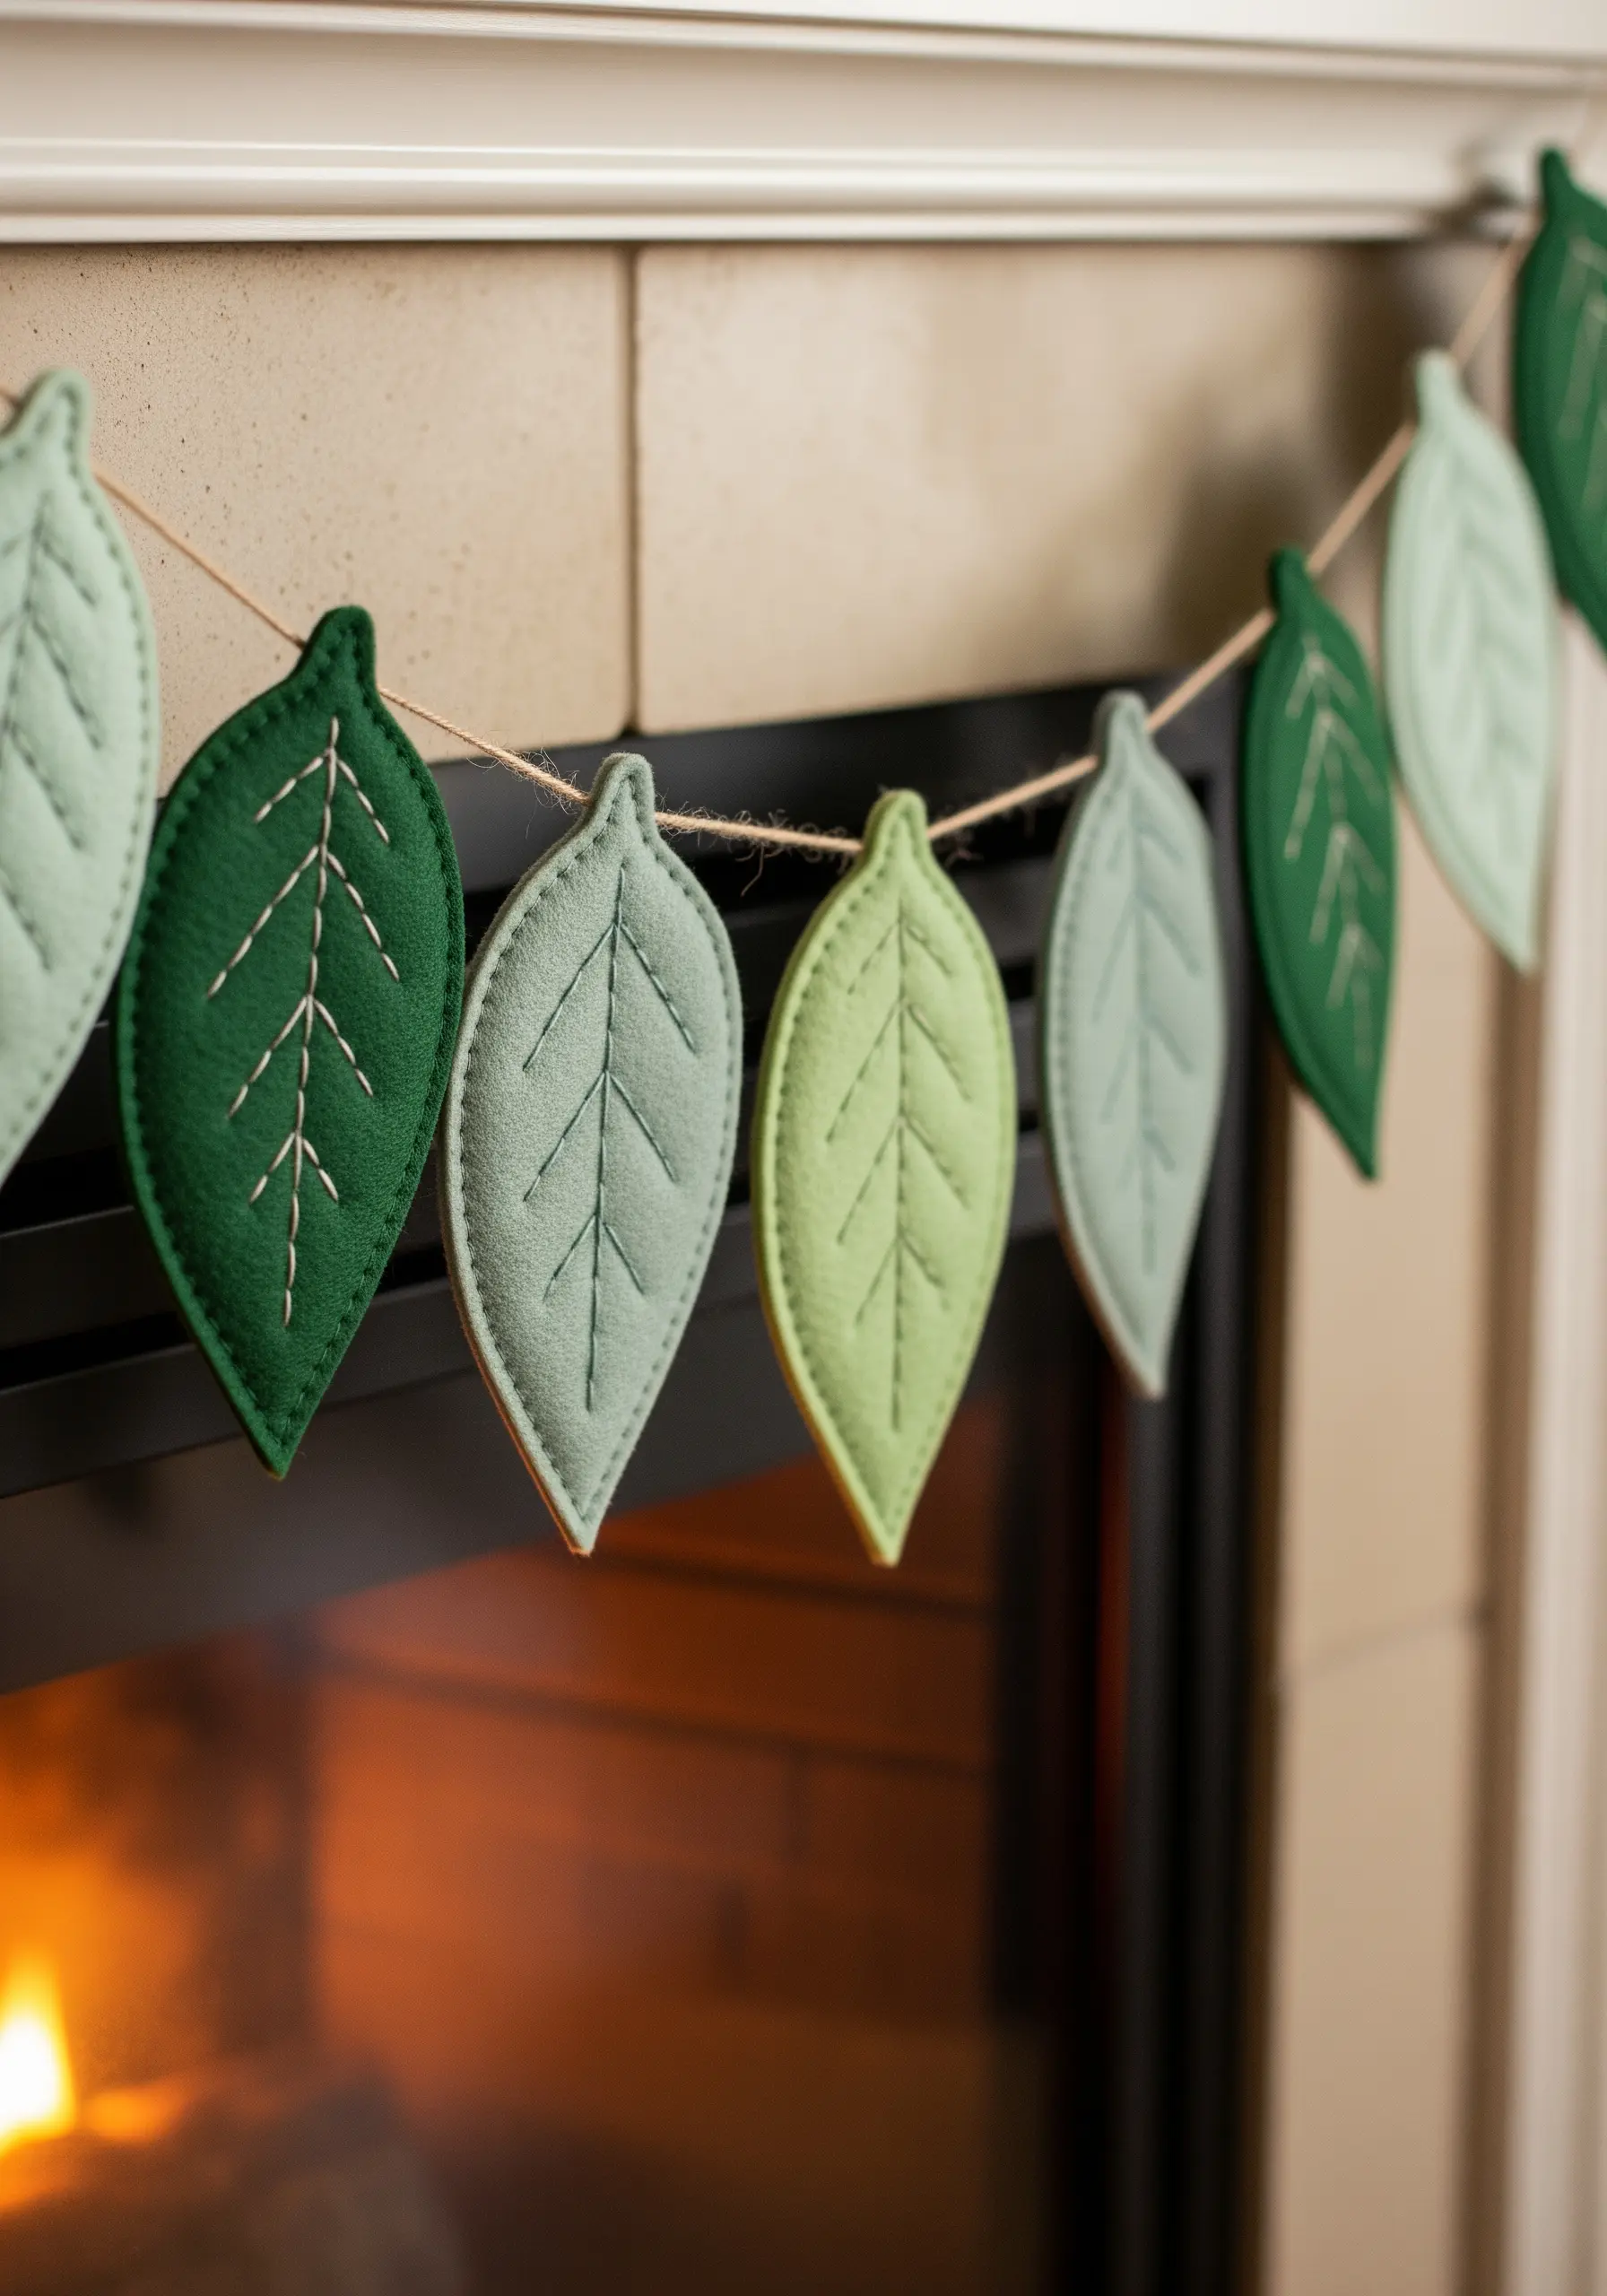
Enhance simple felt shapes by adding stitched details that create texture and dimension.
After cutting your leaf shapes, use a contrasting thread color to add the central vein and smaller offshoots with a basic backstitch or running stitch.
This small step makes the leaves look more realistic and adds a layer of handcrafted detail.
String them together on a piece of jute twine for a rustic, nature-inspired garland that feels thoughtfully made.
31. Define Furniture with Large-Scale Stitches

Transform a simple piece of furniture, like this navy pouf, by adding a bold, large-scale embroidered pattern.
Use a thick material like chunky yarn or cotton piping cord and a large-eyed needle to stitch your design.
A simple backstitch or stem stitch is perfect for creating a clean, graphic mandala or geometric pattern that stands out.
Finish the edges with a contrasting whipstitch to tie the whole look together, turning a plain pouf into a bespoke accent piece.


