

Even the smallest stitch can carry great intention. If you’ve ever wanted to move beyond following a pattern and truly begin designing with thread, the secret is to start small—on a cuff, a collar, or the corner of a tote bag.
These tiny canvases invite you to focus on the details that elevate your work: the subtle shift in thread color that creates a perfect gradient, the textural contrast between a smooth satin stitch and a nubby French knot, or the clean power of a single, perfectly placed line.
Think of your accessories not just as items to be decorated, but as surfaces for quiet expression. Here, you’ll find techniques to help you transform them with confidence, precision, and a modern sense of artistry. It’s time to make your mark, one thoughtful stitch at a time.
1. Render a Crisp Bee with Contrasting Textures

To prevent your tiny bee from looking flat, use a combination of stitches that create dimension.
Fill the body with a dense satin stitch using two strands of floss for a smooth, slightly raised effect.
For the delicate wings, switch to a single strand of white or pale blue thread and outline them with a fine backstitch or split stitch.
This contrast in thread weight and texture makes the wings appear translucent and light, giving the entire motif a polished, professional finish.
2. Master the Graphic Sunburst on Denim

The power of this design lies in its simplicity and the sharp contrast of coral thread against dark denim.
Use a backstitch for the curved base of the sun, ensuring each stitch is small and uniform to create a smooth line.
For the rays, use single straight stitches, pulling the thread taut but not so tight that it puckers the fabric.
To guarantee your rays are perfectly even, lightly mark their start and end points with a water-soluble pen before you begin stitching.
This technique elevates a simple motif into a clean, modern statement.
3. Create Realistic Lavender with French Knots

Give your lavender sprigs a lifelike, bumpy texture by using French knots instead of satin stitch for the blossoms.
Use two or three shades of purple and lavender thread, clustering the knots closely together at the top of the stem.
Vary the number of times you wrap the thread around the needle (once or twice) to create subtle differences in the size of each floret.
Finish with a simple stem stitch in green for the stalk, which provides a clean line that doesn’t compete with the textured blossoms.
This small adjustment adds depth and realism to floral tote bag embroidery motifs.
4. Achieve Dynamic Lines in Mountain Motifs
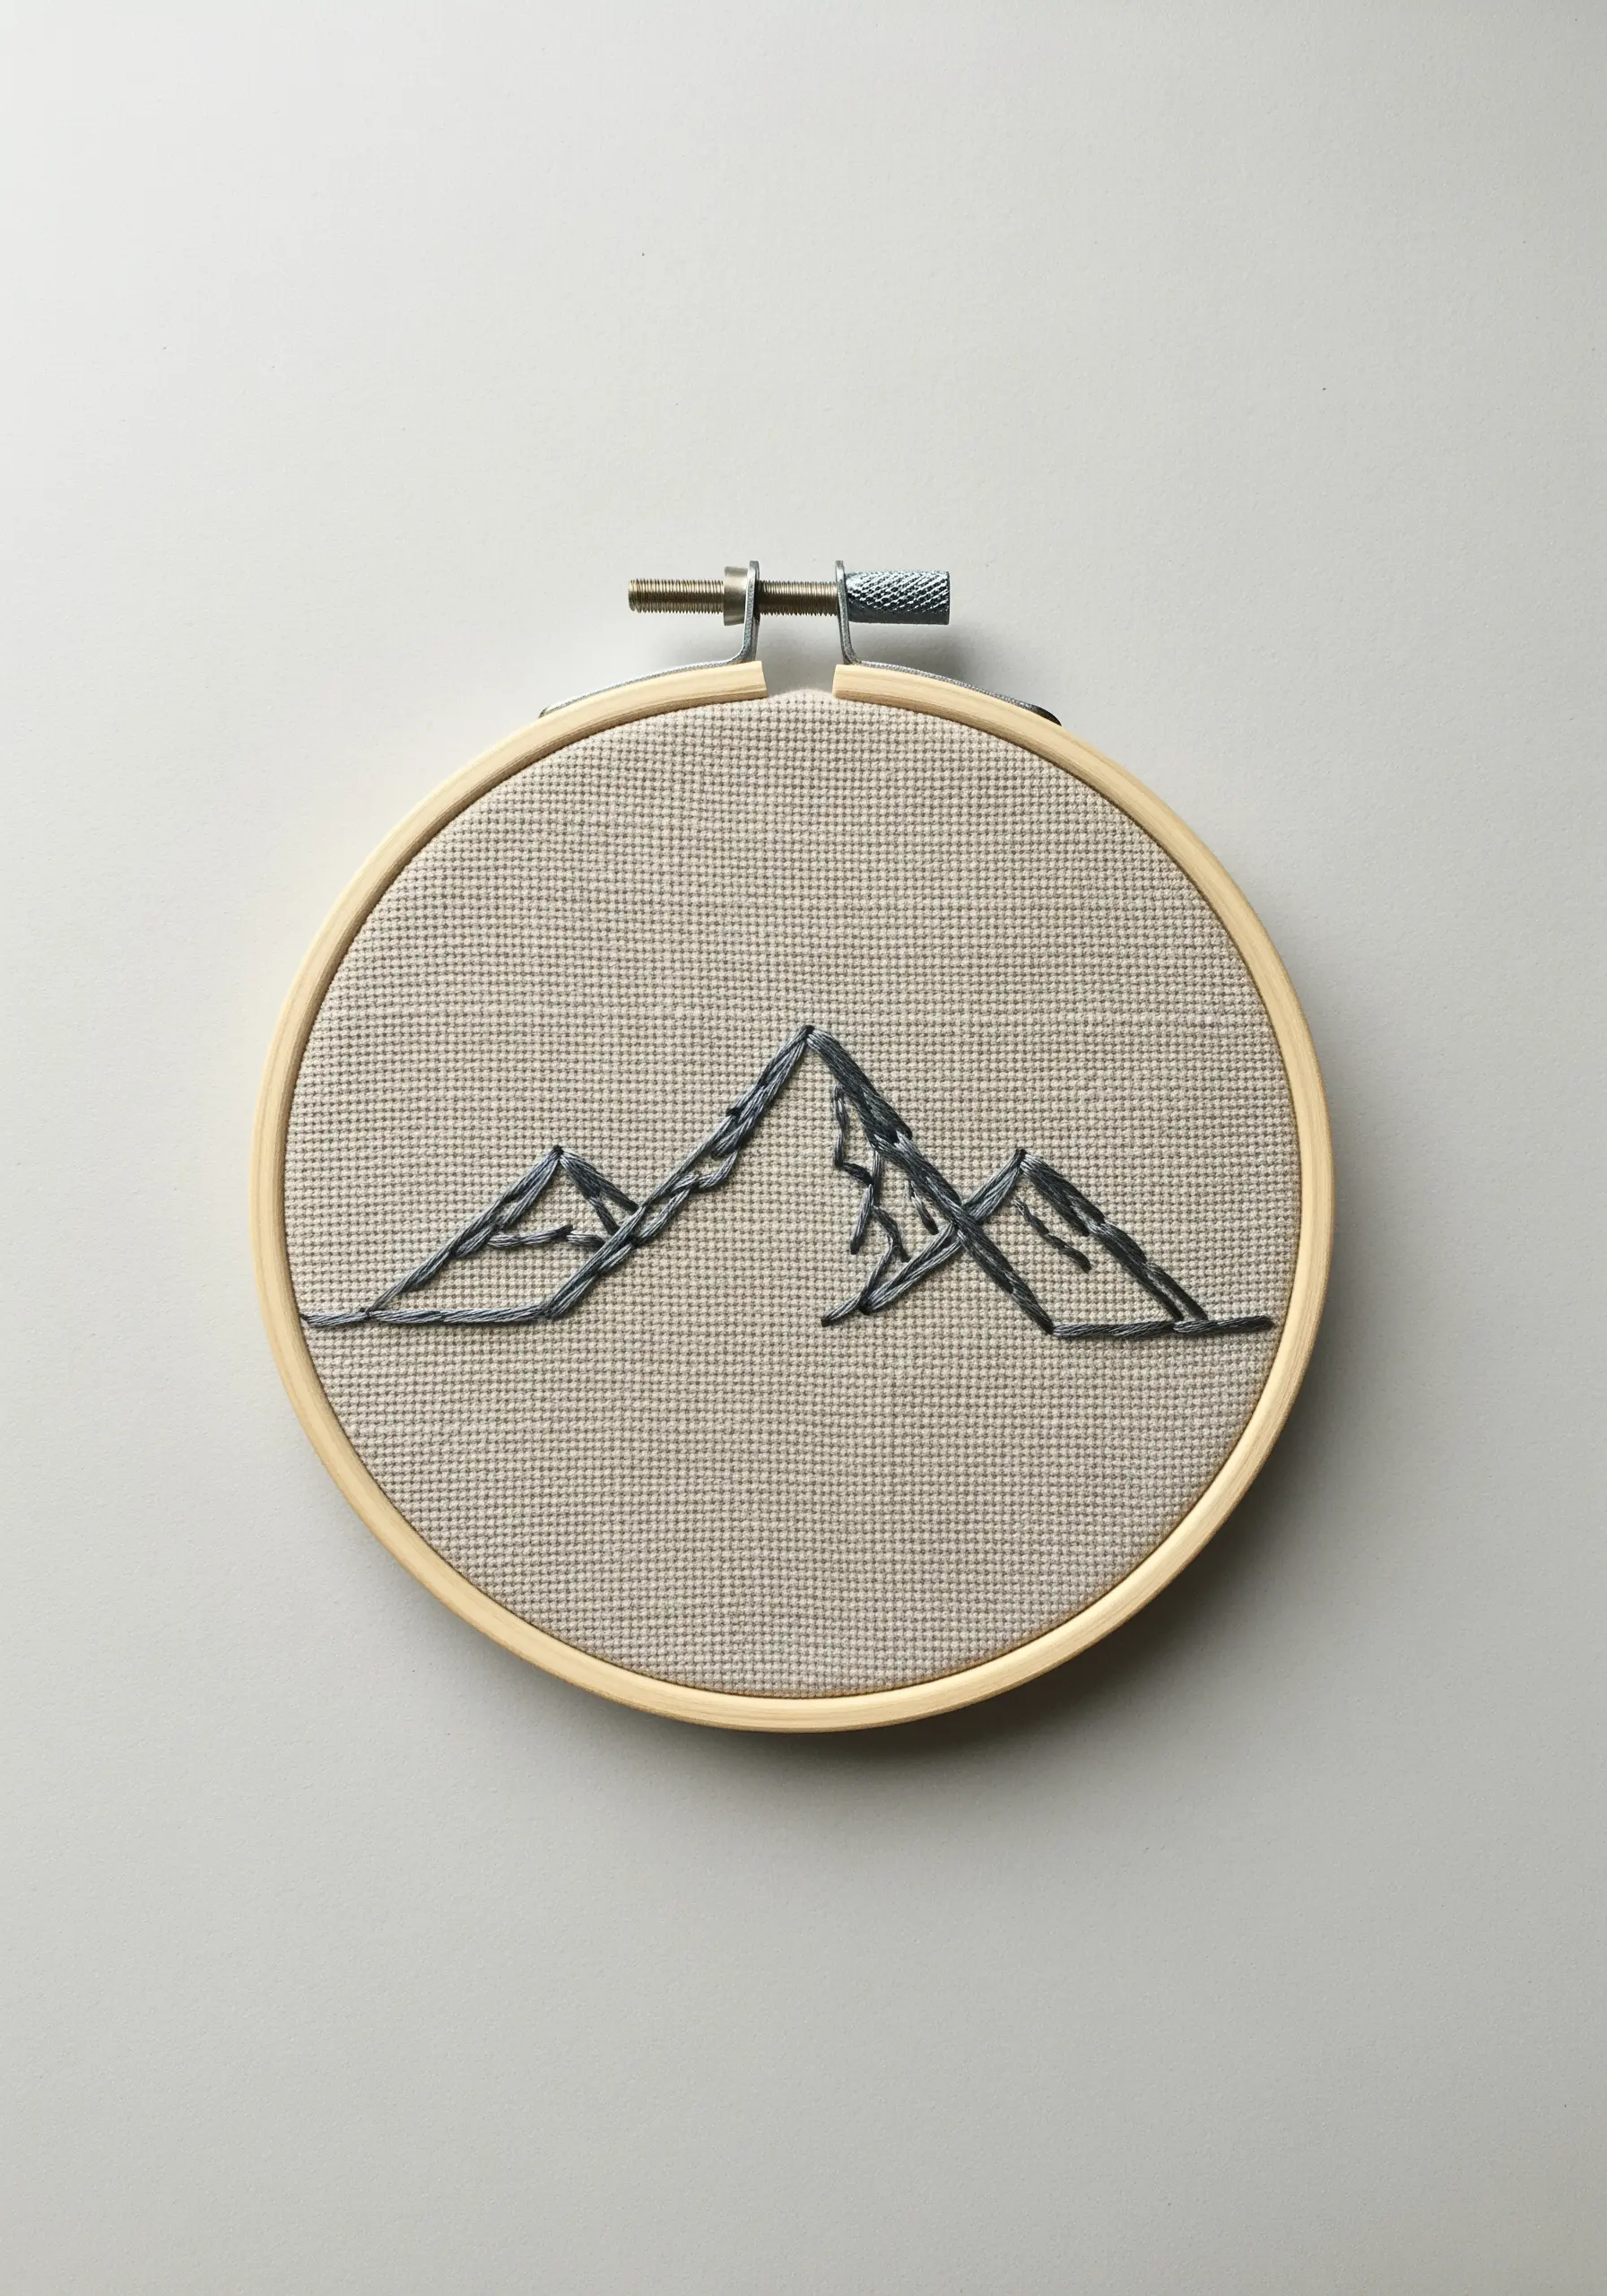
When embroidering a line-art landscape, the goal is to create a sense of energy, not a static drawing.
Instead of a uniform backstitch, vary your stitch length to mimic the jagged, unpredictable edges of a mountain range.
Use longer stitches for smooth slopes and shorter, more angular stitches for sharp peaks and rocky outcrops.
Using a slightly heavier thread, like three or four strands of floss, gives the lines presence and intentionality, turning a simple outline into a piece of minimalist line art.
5. Stitch a Luminous Crescent Moon
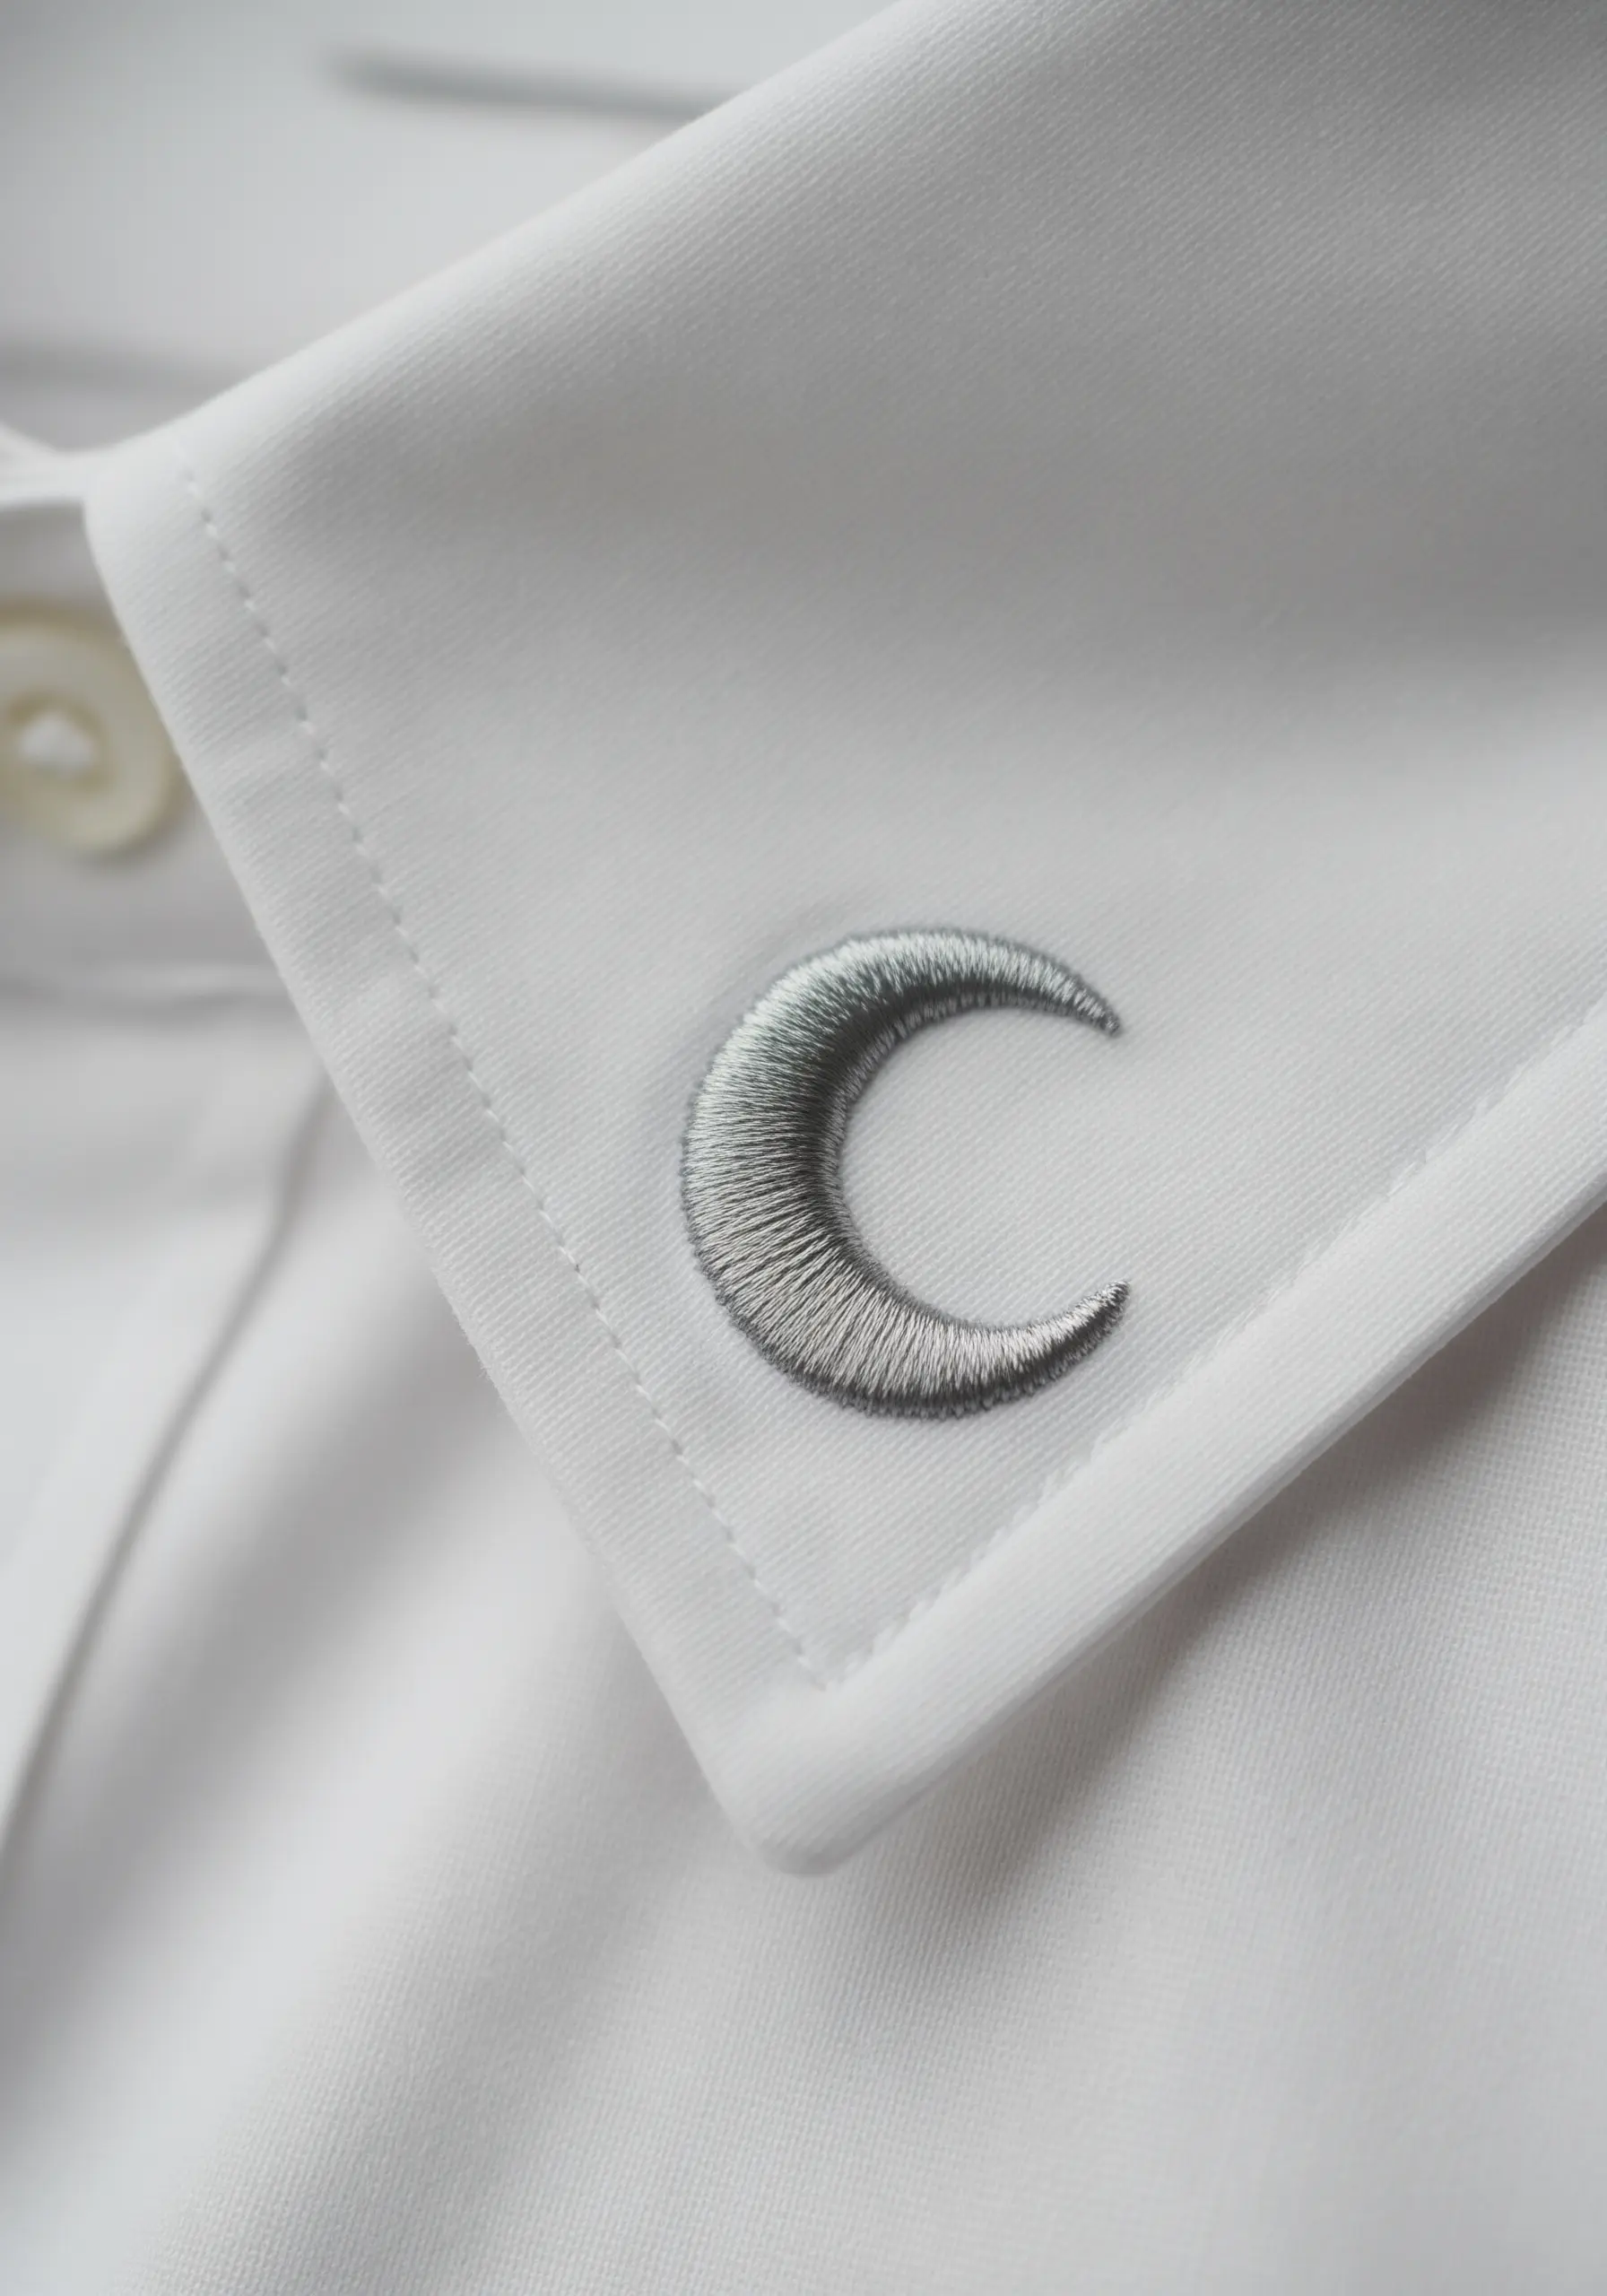
To give a small crescent moon a realistic, glowing appearance, thread painting with a gradient of colors is essential.
Start with the darkest gray on the outer edge, using angled satin stitches that follow the curve of the moon.
Gradually introduce lighter shades of gray and finally white toward the inner curve, slightly overlapping your stitches to blend the colors seamlessly.
This technique creates a beautiful 3D illusion of light and shadow, making the motif look luminous even on a plain shirt cuff.
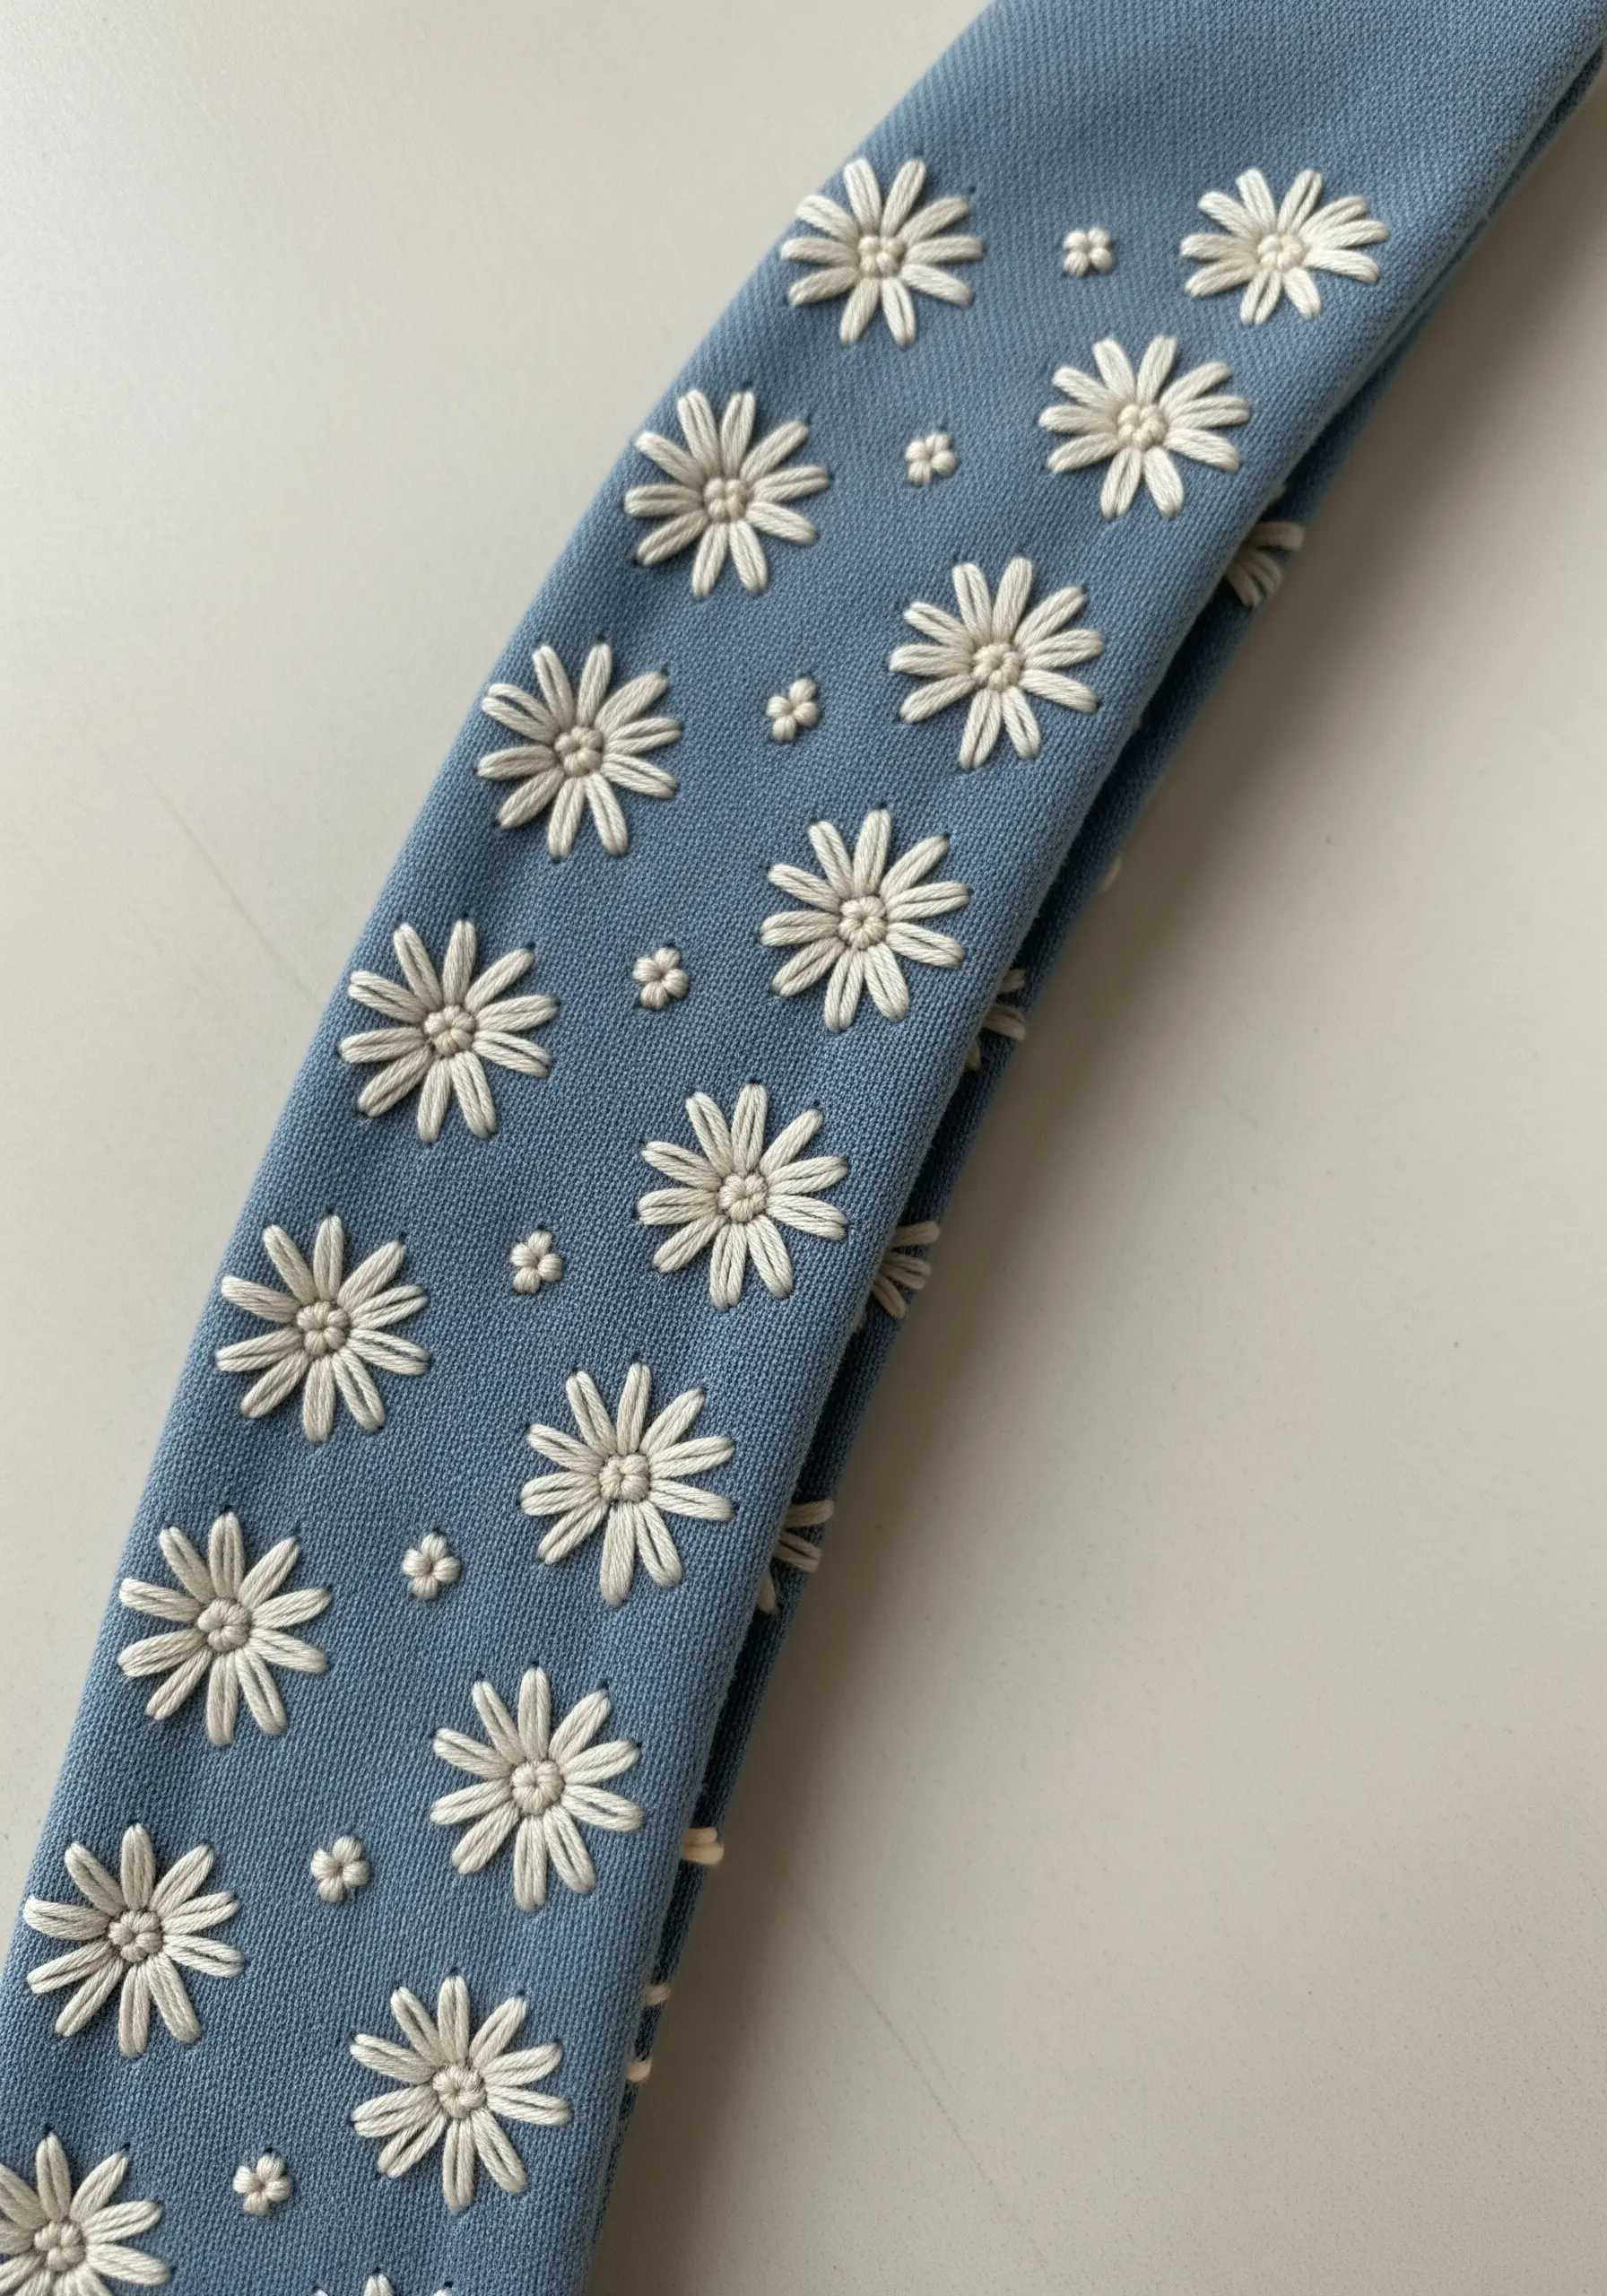
6. Add Subtle Elegance with Tone-on-Tone Stitching
For a sophisticated, high-end look, choose an embroidery thread that is only one or two shades different from your base fabric.
This tone-on-tone approach creates a subtle texture that catches the light without overwhelming the item.
Use a simple outline stitch, like a split stitch or stem stitch, to define the shape clearly.
The addition of tiny French knots adds just enough detail to draw the eye, perfect for personalizing napkins or other fine linens with minimal embroidery patterns.
7. Create Plump Berries on Felt

Felt is an ideal fabric for beginners because its matted fibers are stable and forgiving, requiring no stabilizer.
To create these full, round berries, use a woven wheel stitch (also known as a spider web rose stitch).
This stitch builds up thread in a circular pattern, resulting in a satisfyingly textured, three-dimensional shape that stands out beautifully.
Pair the bold berries with a simple stem stitch for the branches to keep the focus on the vibrant, raised texture.
8. Embroider Flowing Waves with Color Gradients

Capture the movement of water by stitching parallel, undulating lines in three to four shades of the same color family.
Arrange the colors from darkest to lightest to create a sense of depth and highlight.
A simple backstitch or split stitch is perfect for this, as it allows you to create smooth, consistent curves.
This technique is incredibly effective for adding a small but dynamic accent to denim cuffs, collars, or pockets, bringing a touch of nature-inspired art to your clothing.
9. Map a Delicate Constellation

Personalize a simple pouch or bag with a constellation that holds meaning for you.
Use a light-colored or metallic thread that will pop against a dark background fabric.
Stitch the stars using a simple star stitch or small, neat French knots for a bit of texture.
Connect them with a delicate dashed line using a running stitch to complete the celestial map. This design feels both personal and effortlessly chic.
10. Stabilize Knits for Flawless Pocket Art

Embroidering on stretchy fabrics like T-shirt jersey can be tricky, as the stitches can cause the material to pucker and warp.
The secret to a flat, professional finish is using a stabilizer. Apply an iron-on or stick-and-stitch stabilizer to the back of the area before you begin stitching.
It provides a rigid foundation that prevents the fabric from stretching, allowing you to create clean outlines and smooth satin stitches that won’t distort after washing.
This is one of the most important modern embroidery stitches every beginner needs to master for apparel.
11. Use Directional Satin Stitch for a Ginkgo Leaf

To capture the elegant, fan-like shape of a ginkgo leaf, the direction of your satin stitches is crucial.
Begin your stitches at the base of the leaf where it meets the stem, and angle them outwards towards the scalloped edge.
This technique naturally mimics the leaf’s veins and creates a beautiful sense of flow and realism.
Using a bold, single color on a plain background, like these white canvas sneakers, makes the intricate stitch work the true centerpiece.
12. Embroider Planets on Ribbed Beanies
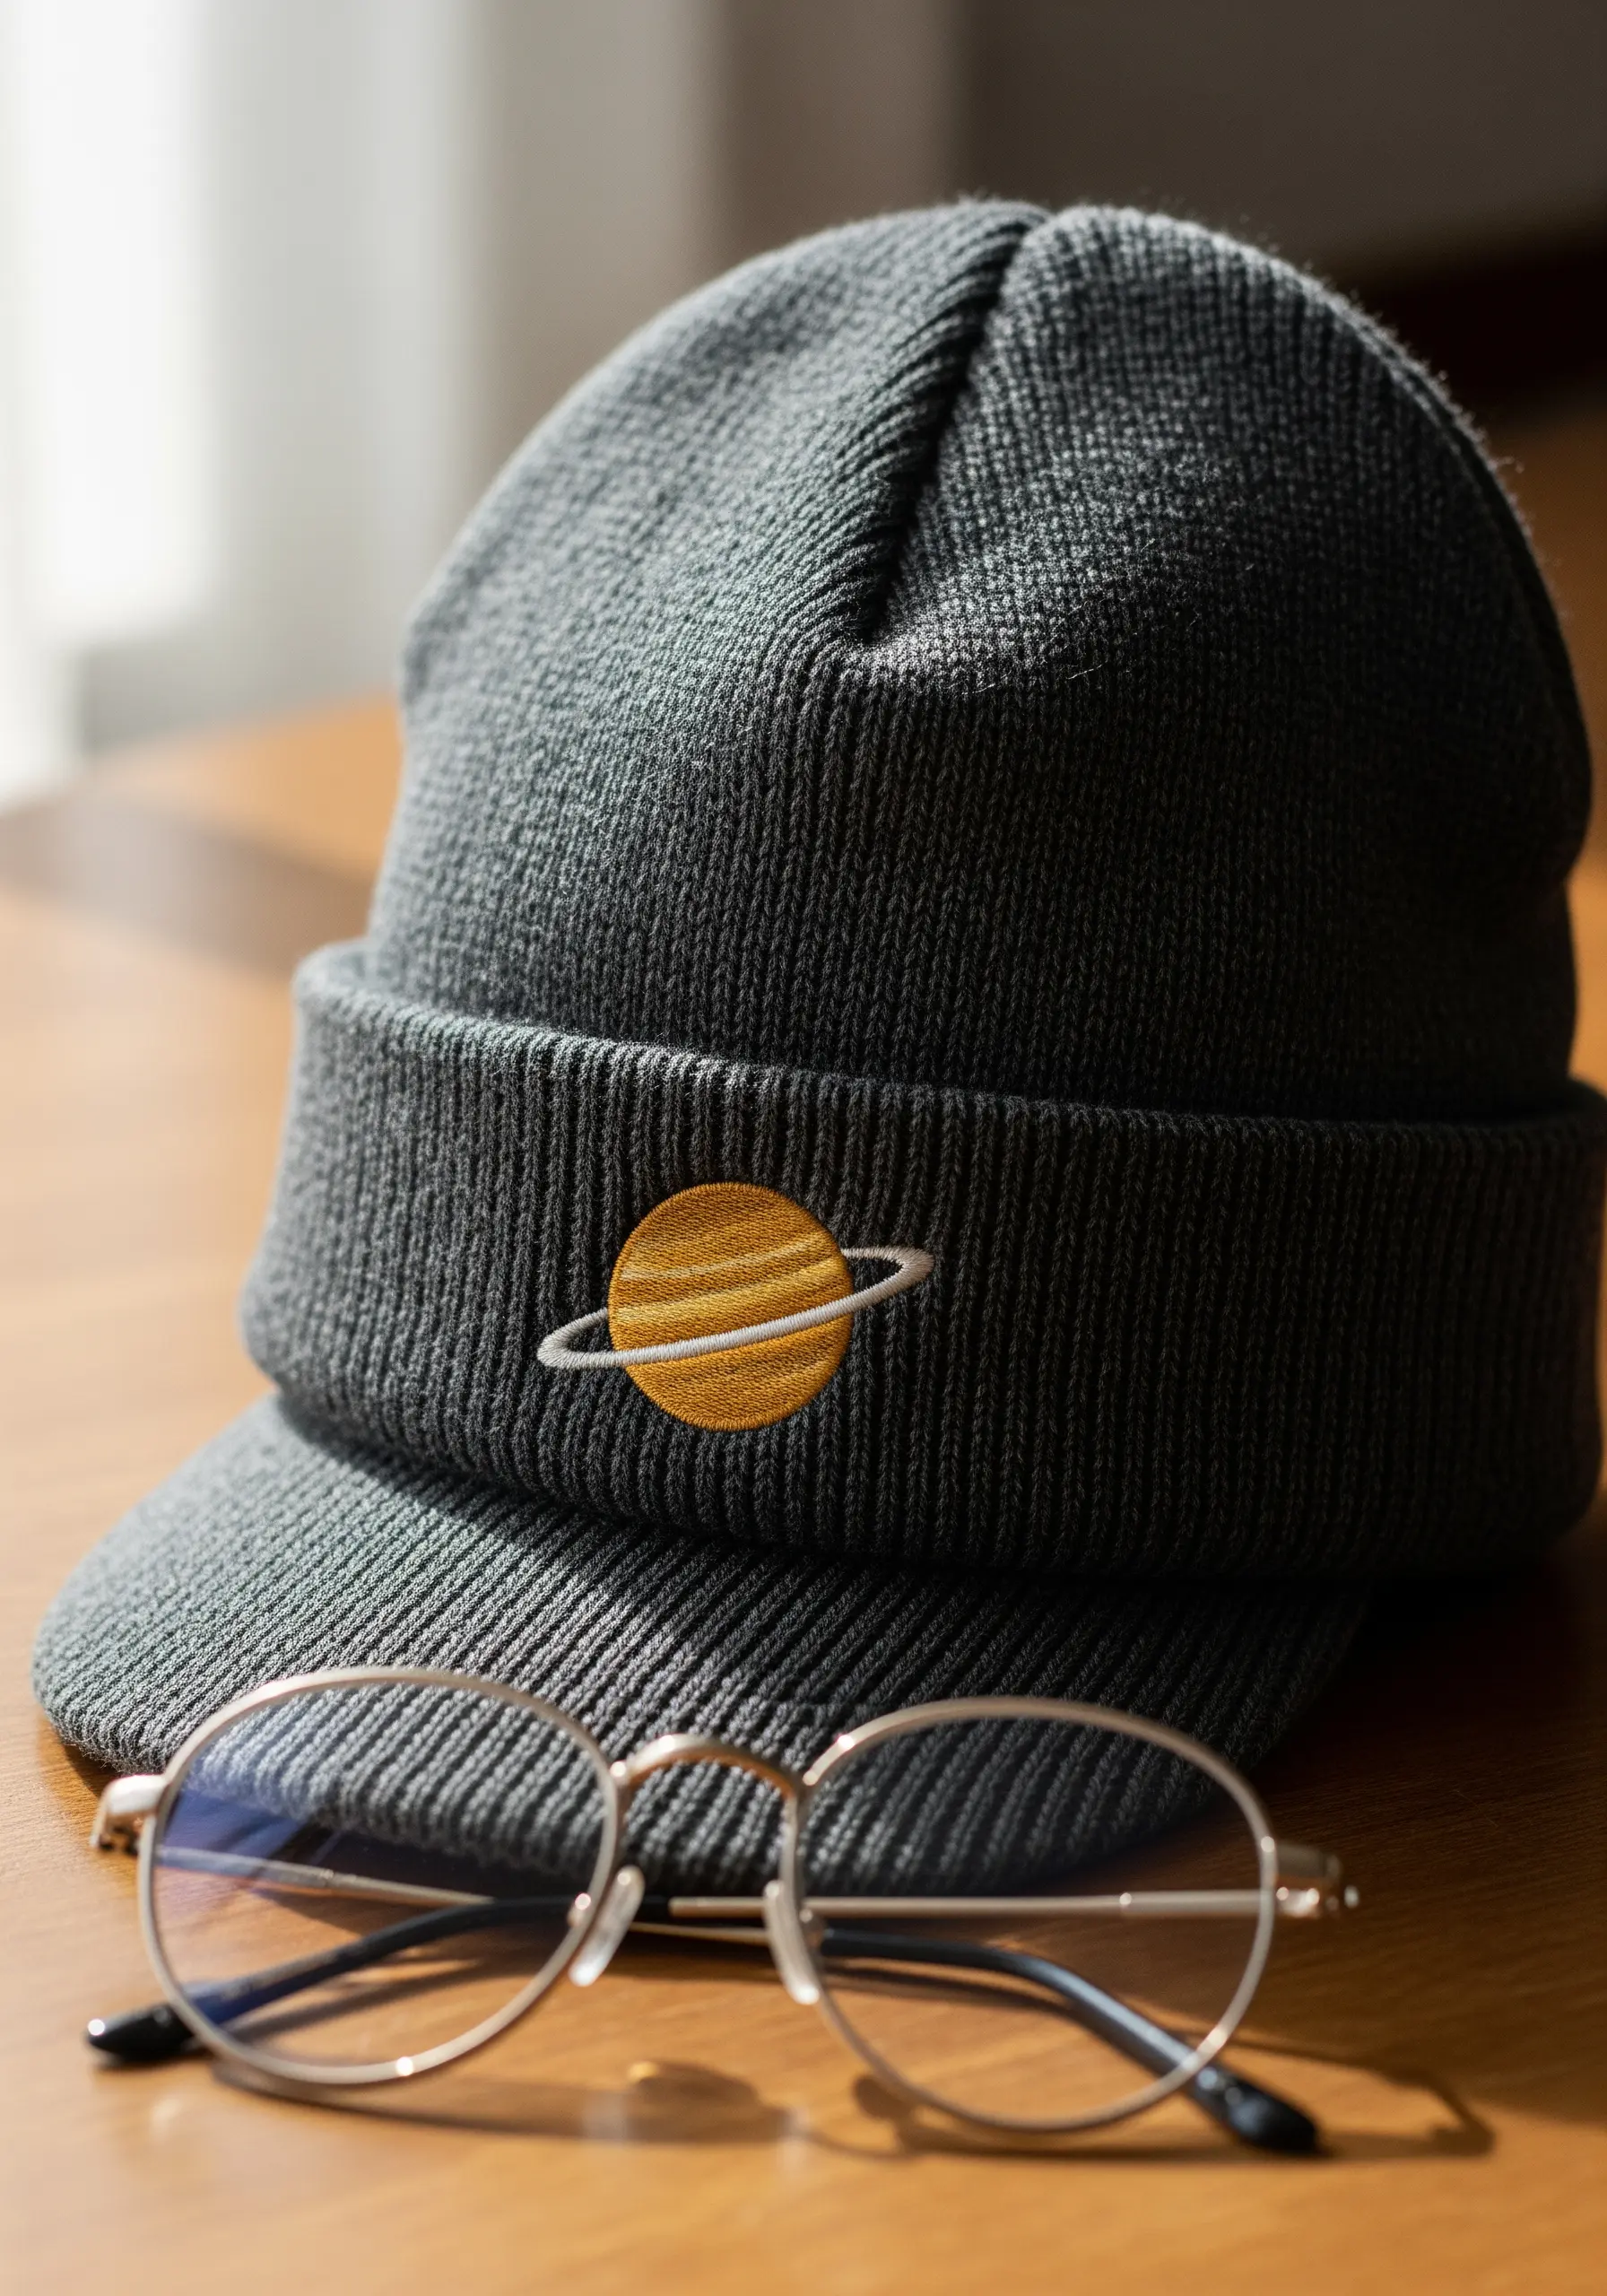
When stitching on a textured, ribbed knit, you need a design that is bold and simple to avoid getting lost in the fabric.
A satin-stitched planet is perfect. Use a lightweight, tear-away stabilizer on the inside to prevent the knit from stretching as you work.
Outline the planet’s ring with a clean backstitch in a contrasting color to ensure it stands out.
The smooth surface of the satin stitch creates a pleasing contrast against the ribbed texture of the beanie.
13. Achieve Perfect Color Blocking with Satin Stitch

This abstract design demonstrates the power of clean edges and consistent stitch direction in color-blocked embroidery.
To keep your satin stitches perfectly uniform, work on aida or even-weave fabric where you can count the threads.
Complete one colored section at a time, ensuring the stitches lie flat and snugly against each other without overlapping.
A split stitch outline done *before* you fill each shape helps create a crisp, defined border between the colors, resulting in a graphic, modern look.
These are great abstract thread illusion techniques for any project.
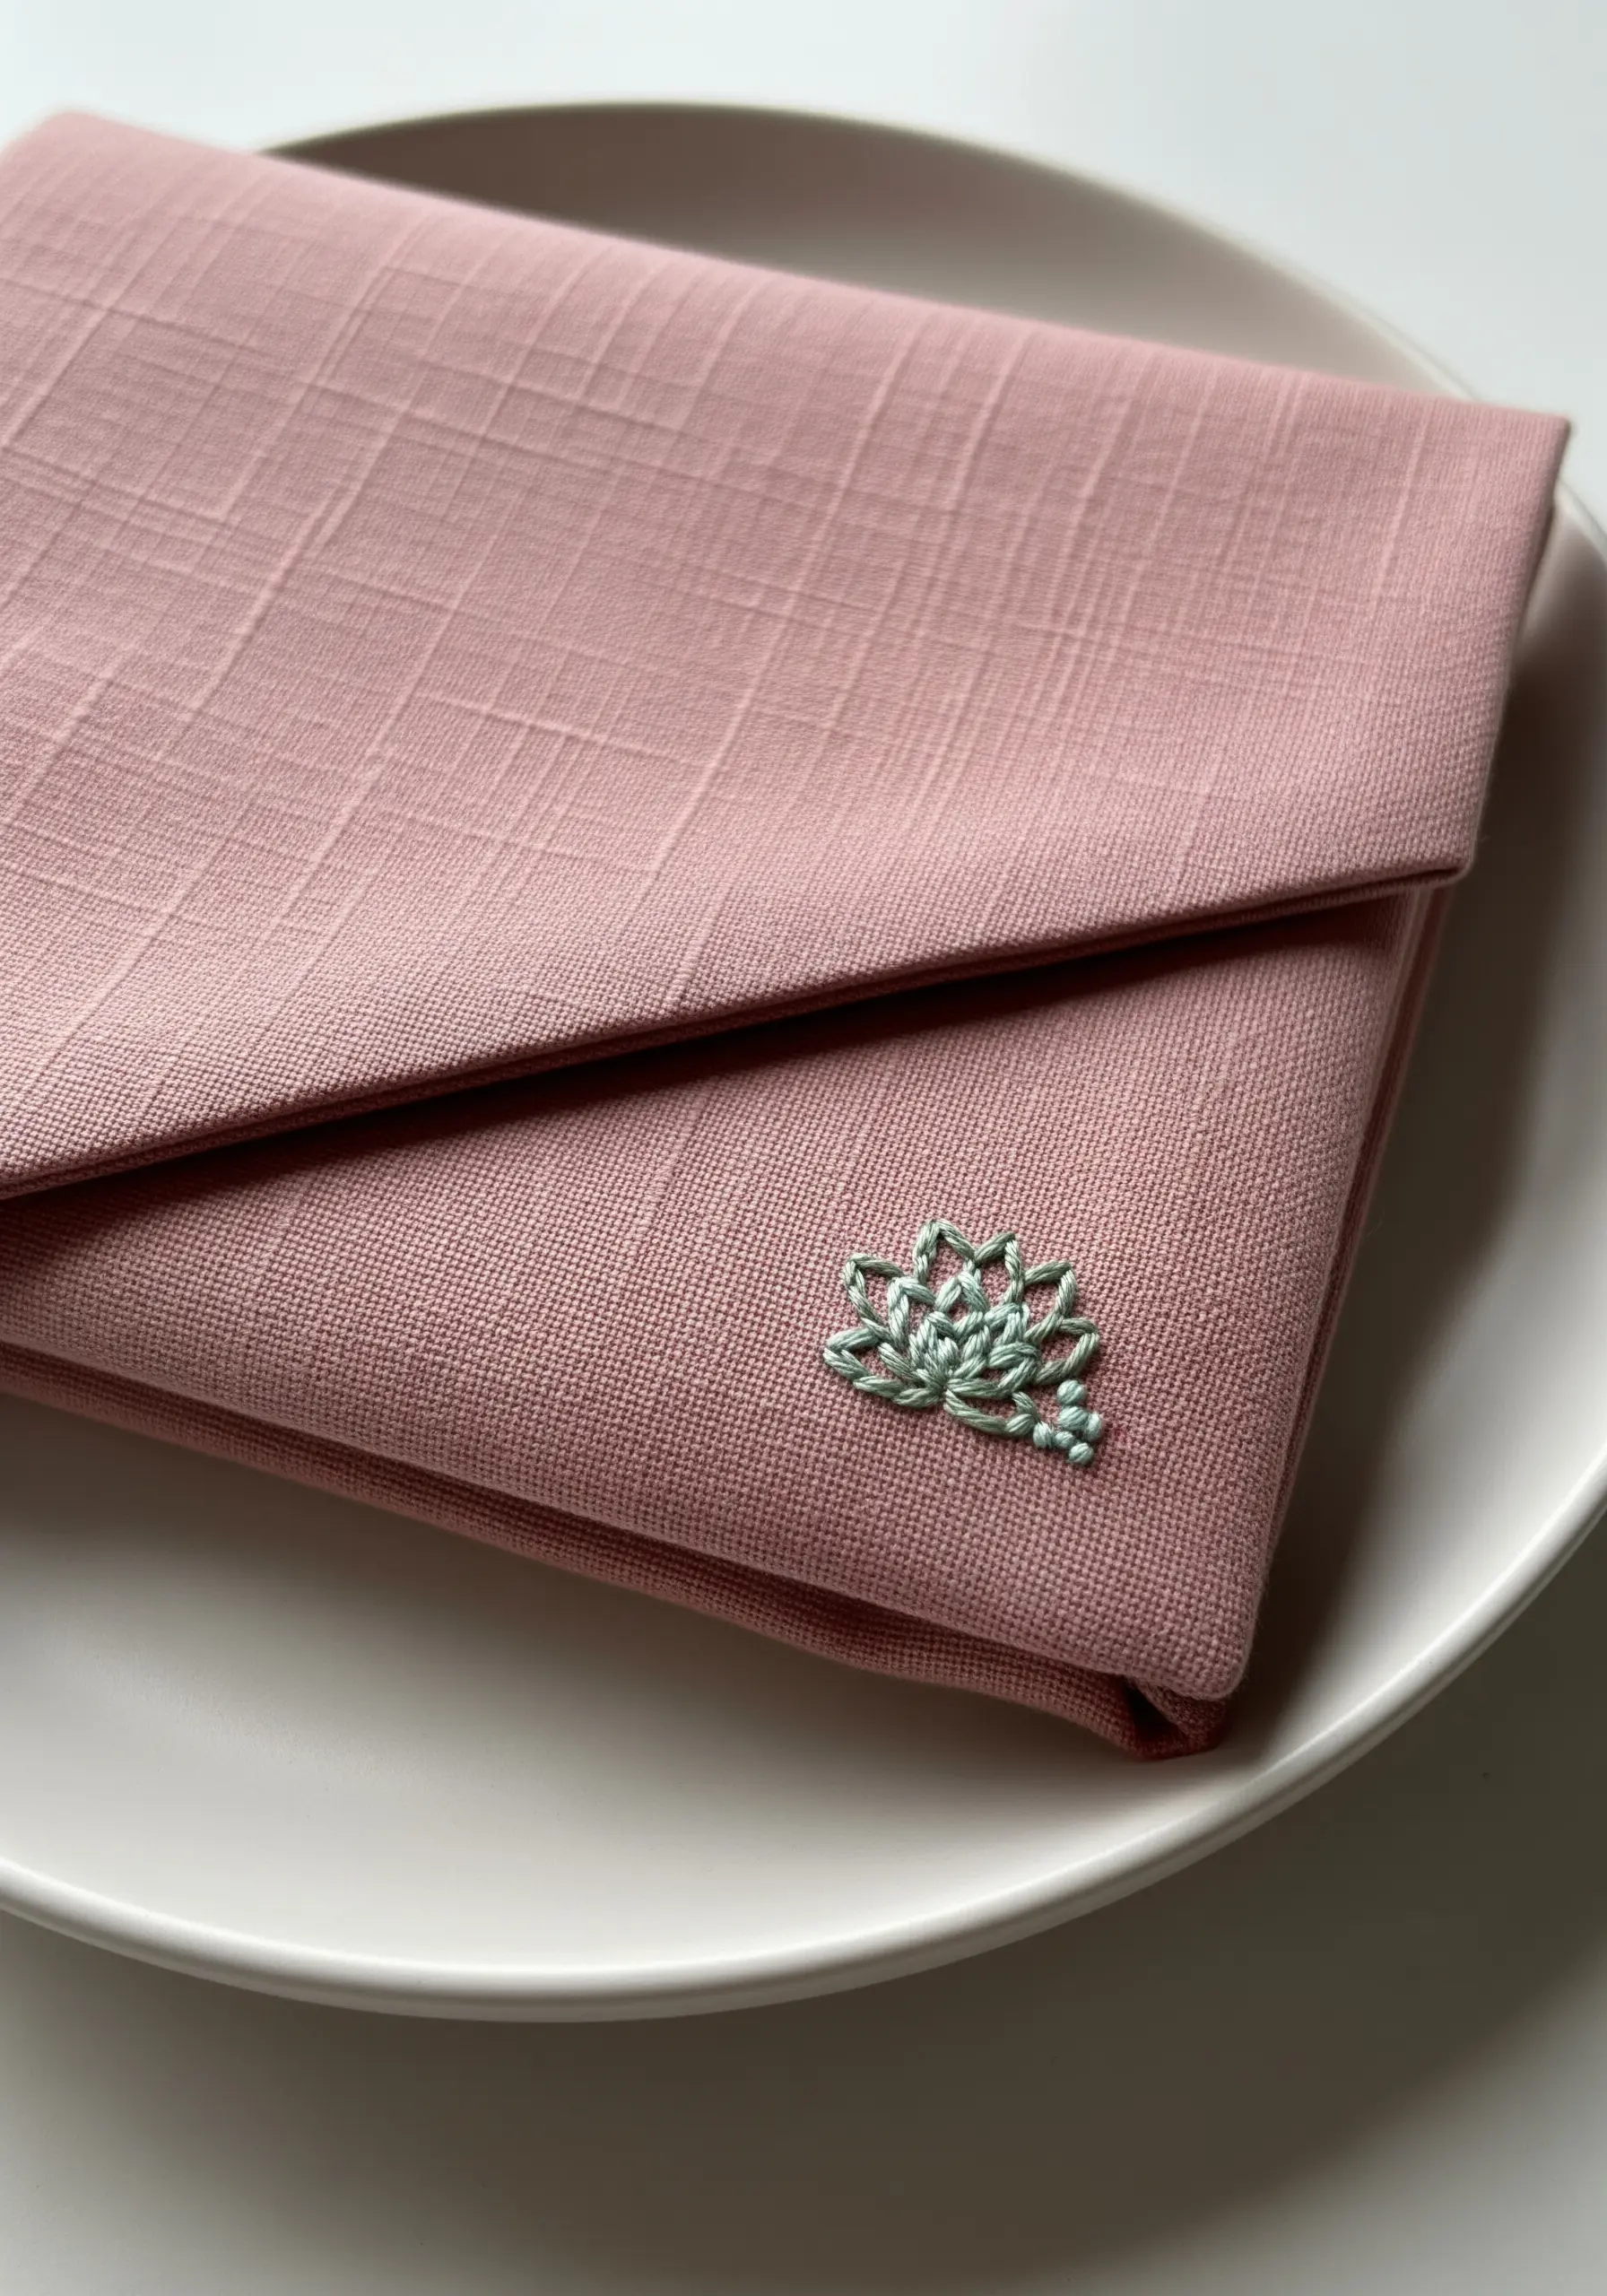
14. Stitch a Realistic Botanical Sprig
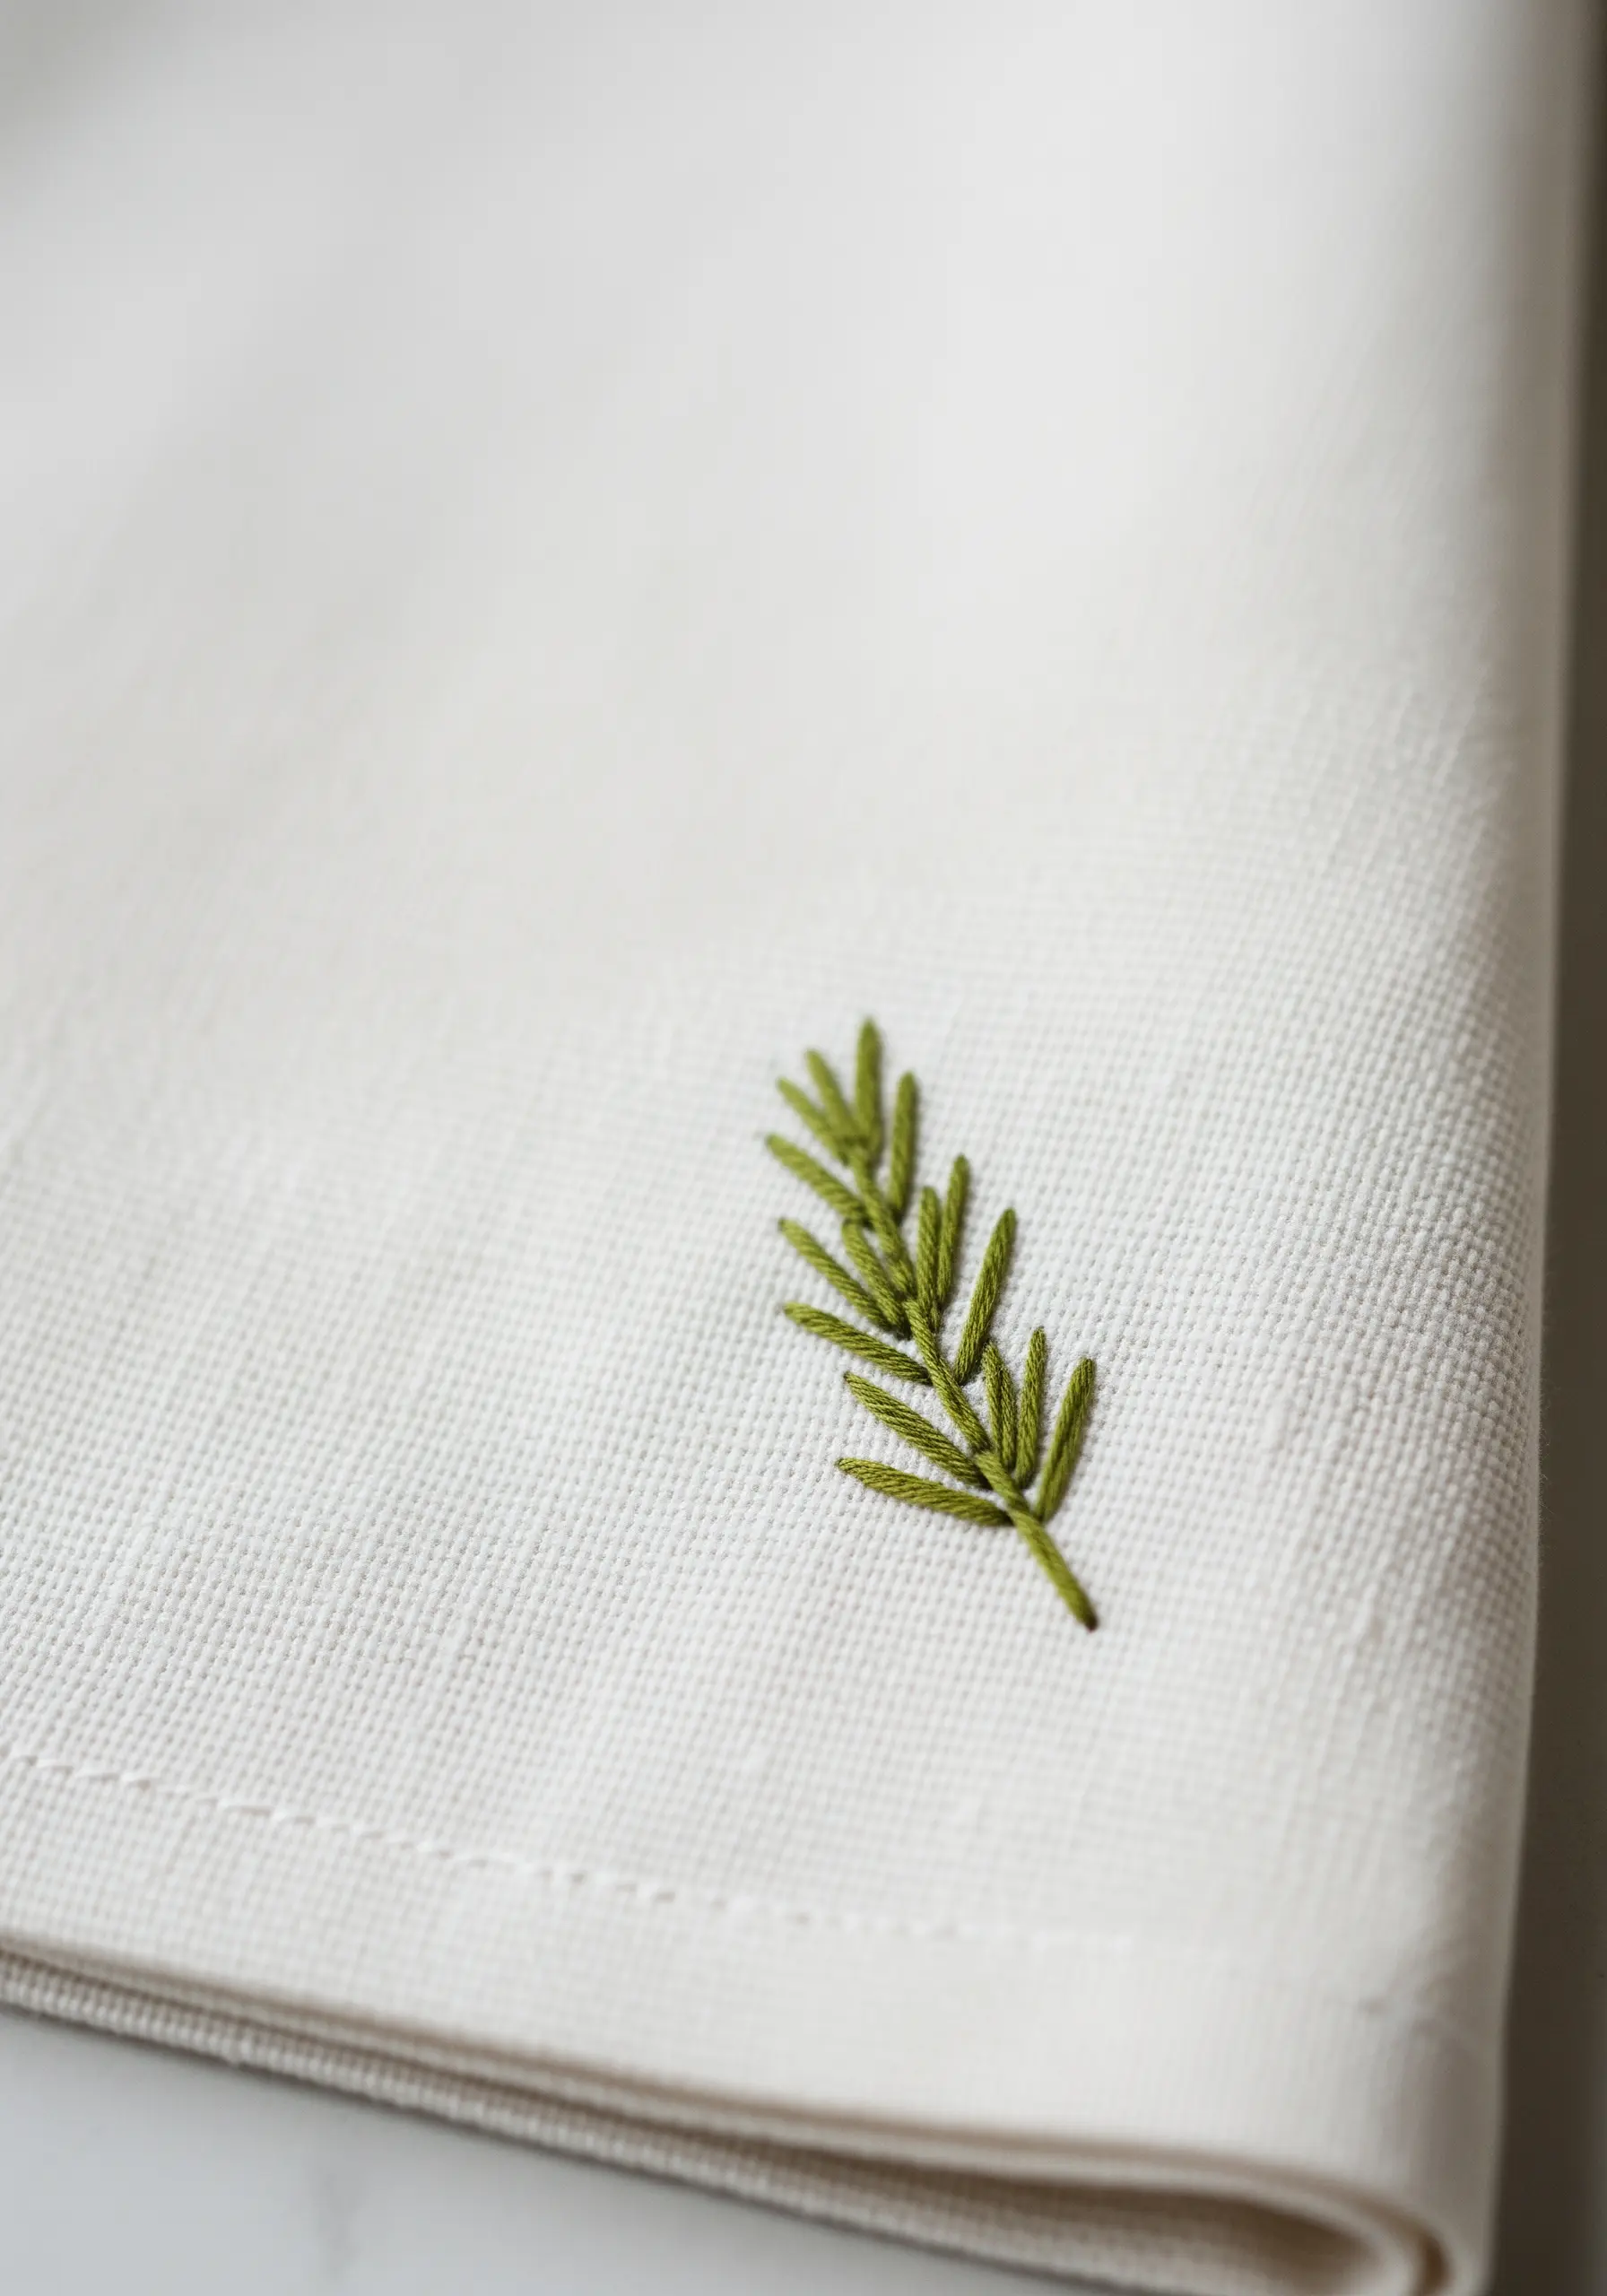
For delicate botanicals like this rosemary sprig, the fishbone stitch is your best tool for creating realistic leaves.
This single stitch cleverly forms both the leaf shape and a central vein in one fluid motion, giving your embroidery dimension and a natural look.
Use only two strands of floss to keep the design light and airy, especially on fine fabrics like linen.
This approach is perfect for adding a touch of understated, organic elegance to table napkins or handkerchiefs.
15. Create a Bold Silhouette with Dense Fill Stitch

A solid silhouette offers a powerful graphic impact, but only if the fill is perfectly smooth and opaque.
To achieve this, use a short-and-long stitch or a meticulously executed satin stitch with two or three strands of floss.
Before filling, outline the entire shape with a split stitch. This raised edge not only defines the silhouette but also acts as a guide, helping you keep the edges of your fill stitches perfectly clean.
This technique turns a simple shape into a striking focal point on a journal cover or jacket back.
16. Embroider on Velvet without Frustration
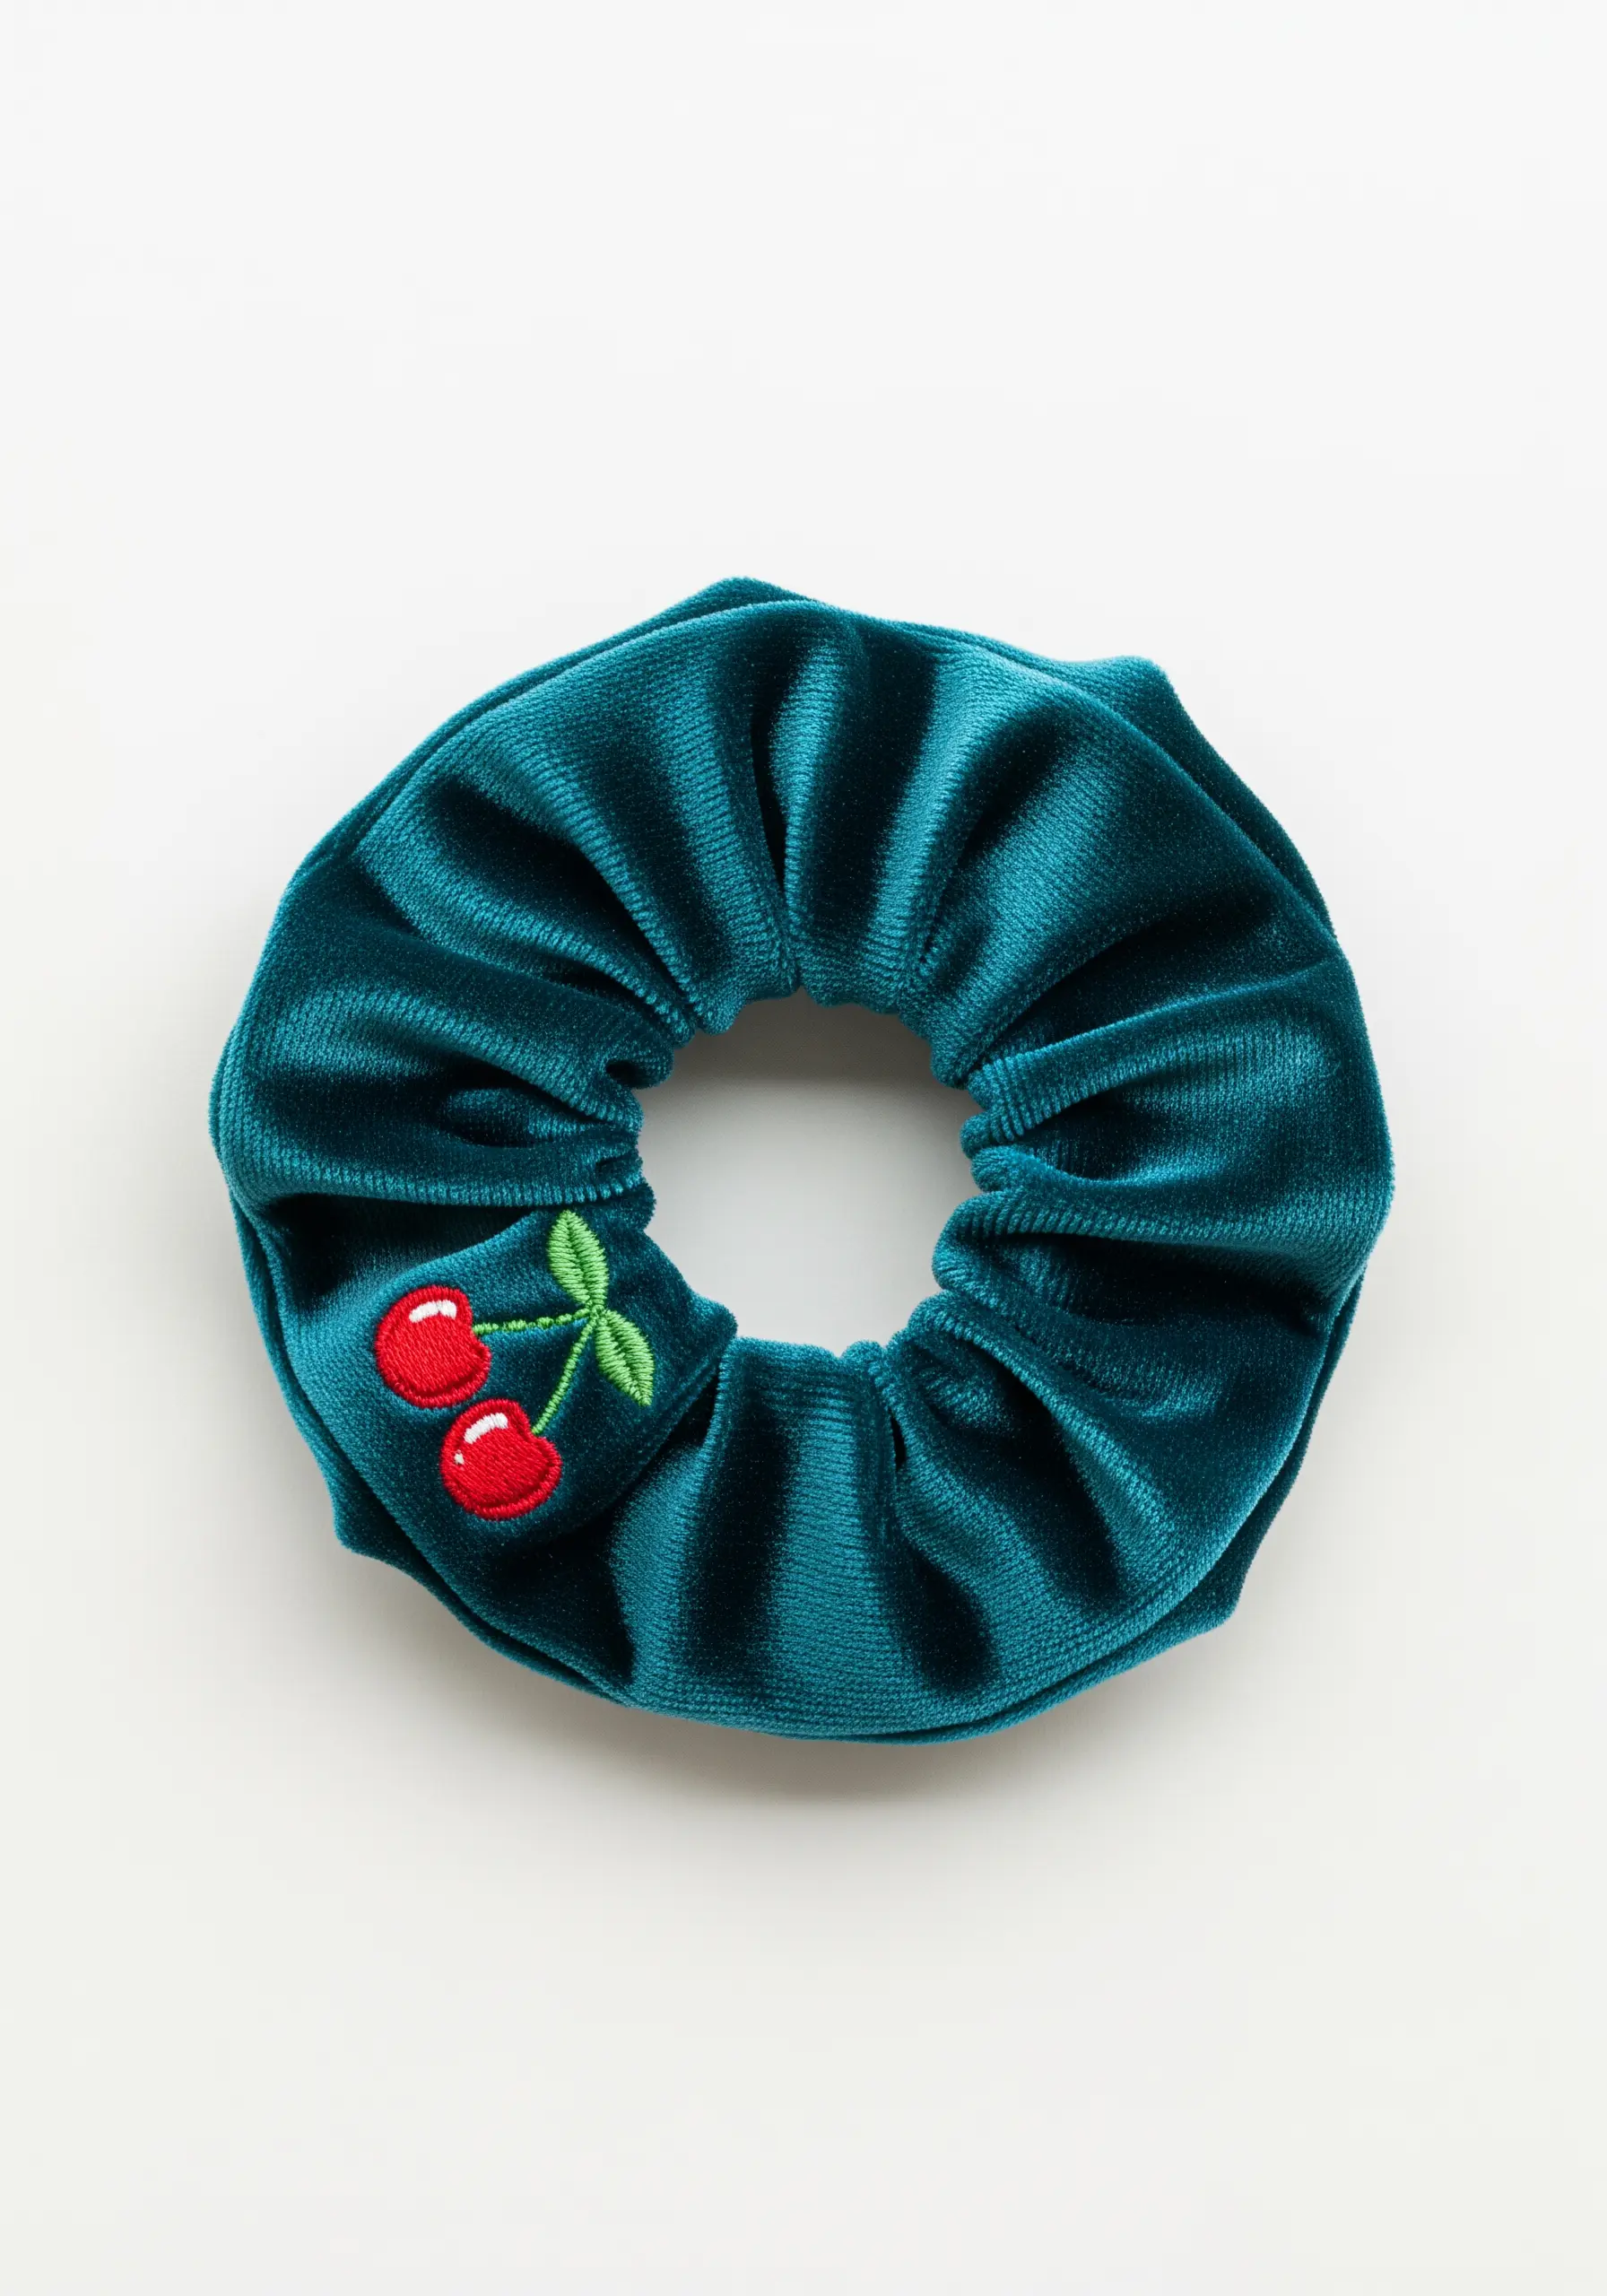
Velvet’s plush pile can be challenging, as stitches can sink and disappear. The key is to choose a design with simple, bold shapes.
Use a satin stitch for the cherries, which will sit nicely on top of the pile. Always back your work with a stabilizer to prevent the fabric from shifting.
Use a sharp, new needle that can pierce the dense fabric without snagging. The high sheen of the thread against the matte depth of the velvet creates a luxurious textural contrast.
17. Capture Whimsy with Detached Chain Stitches
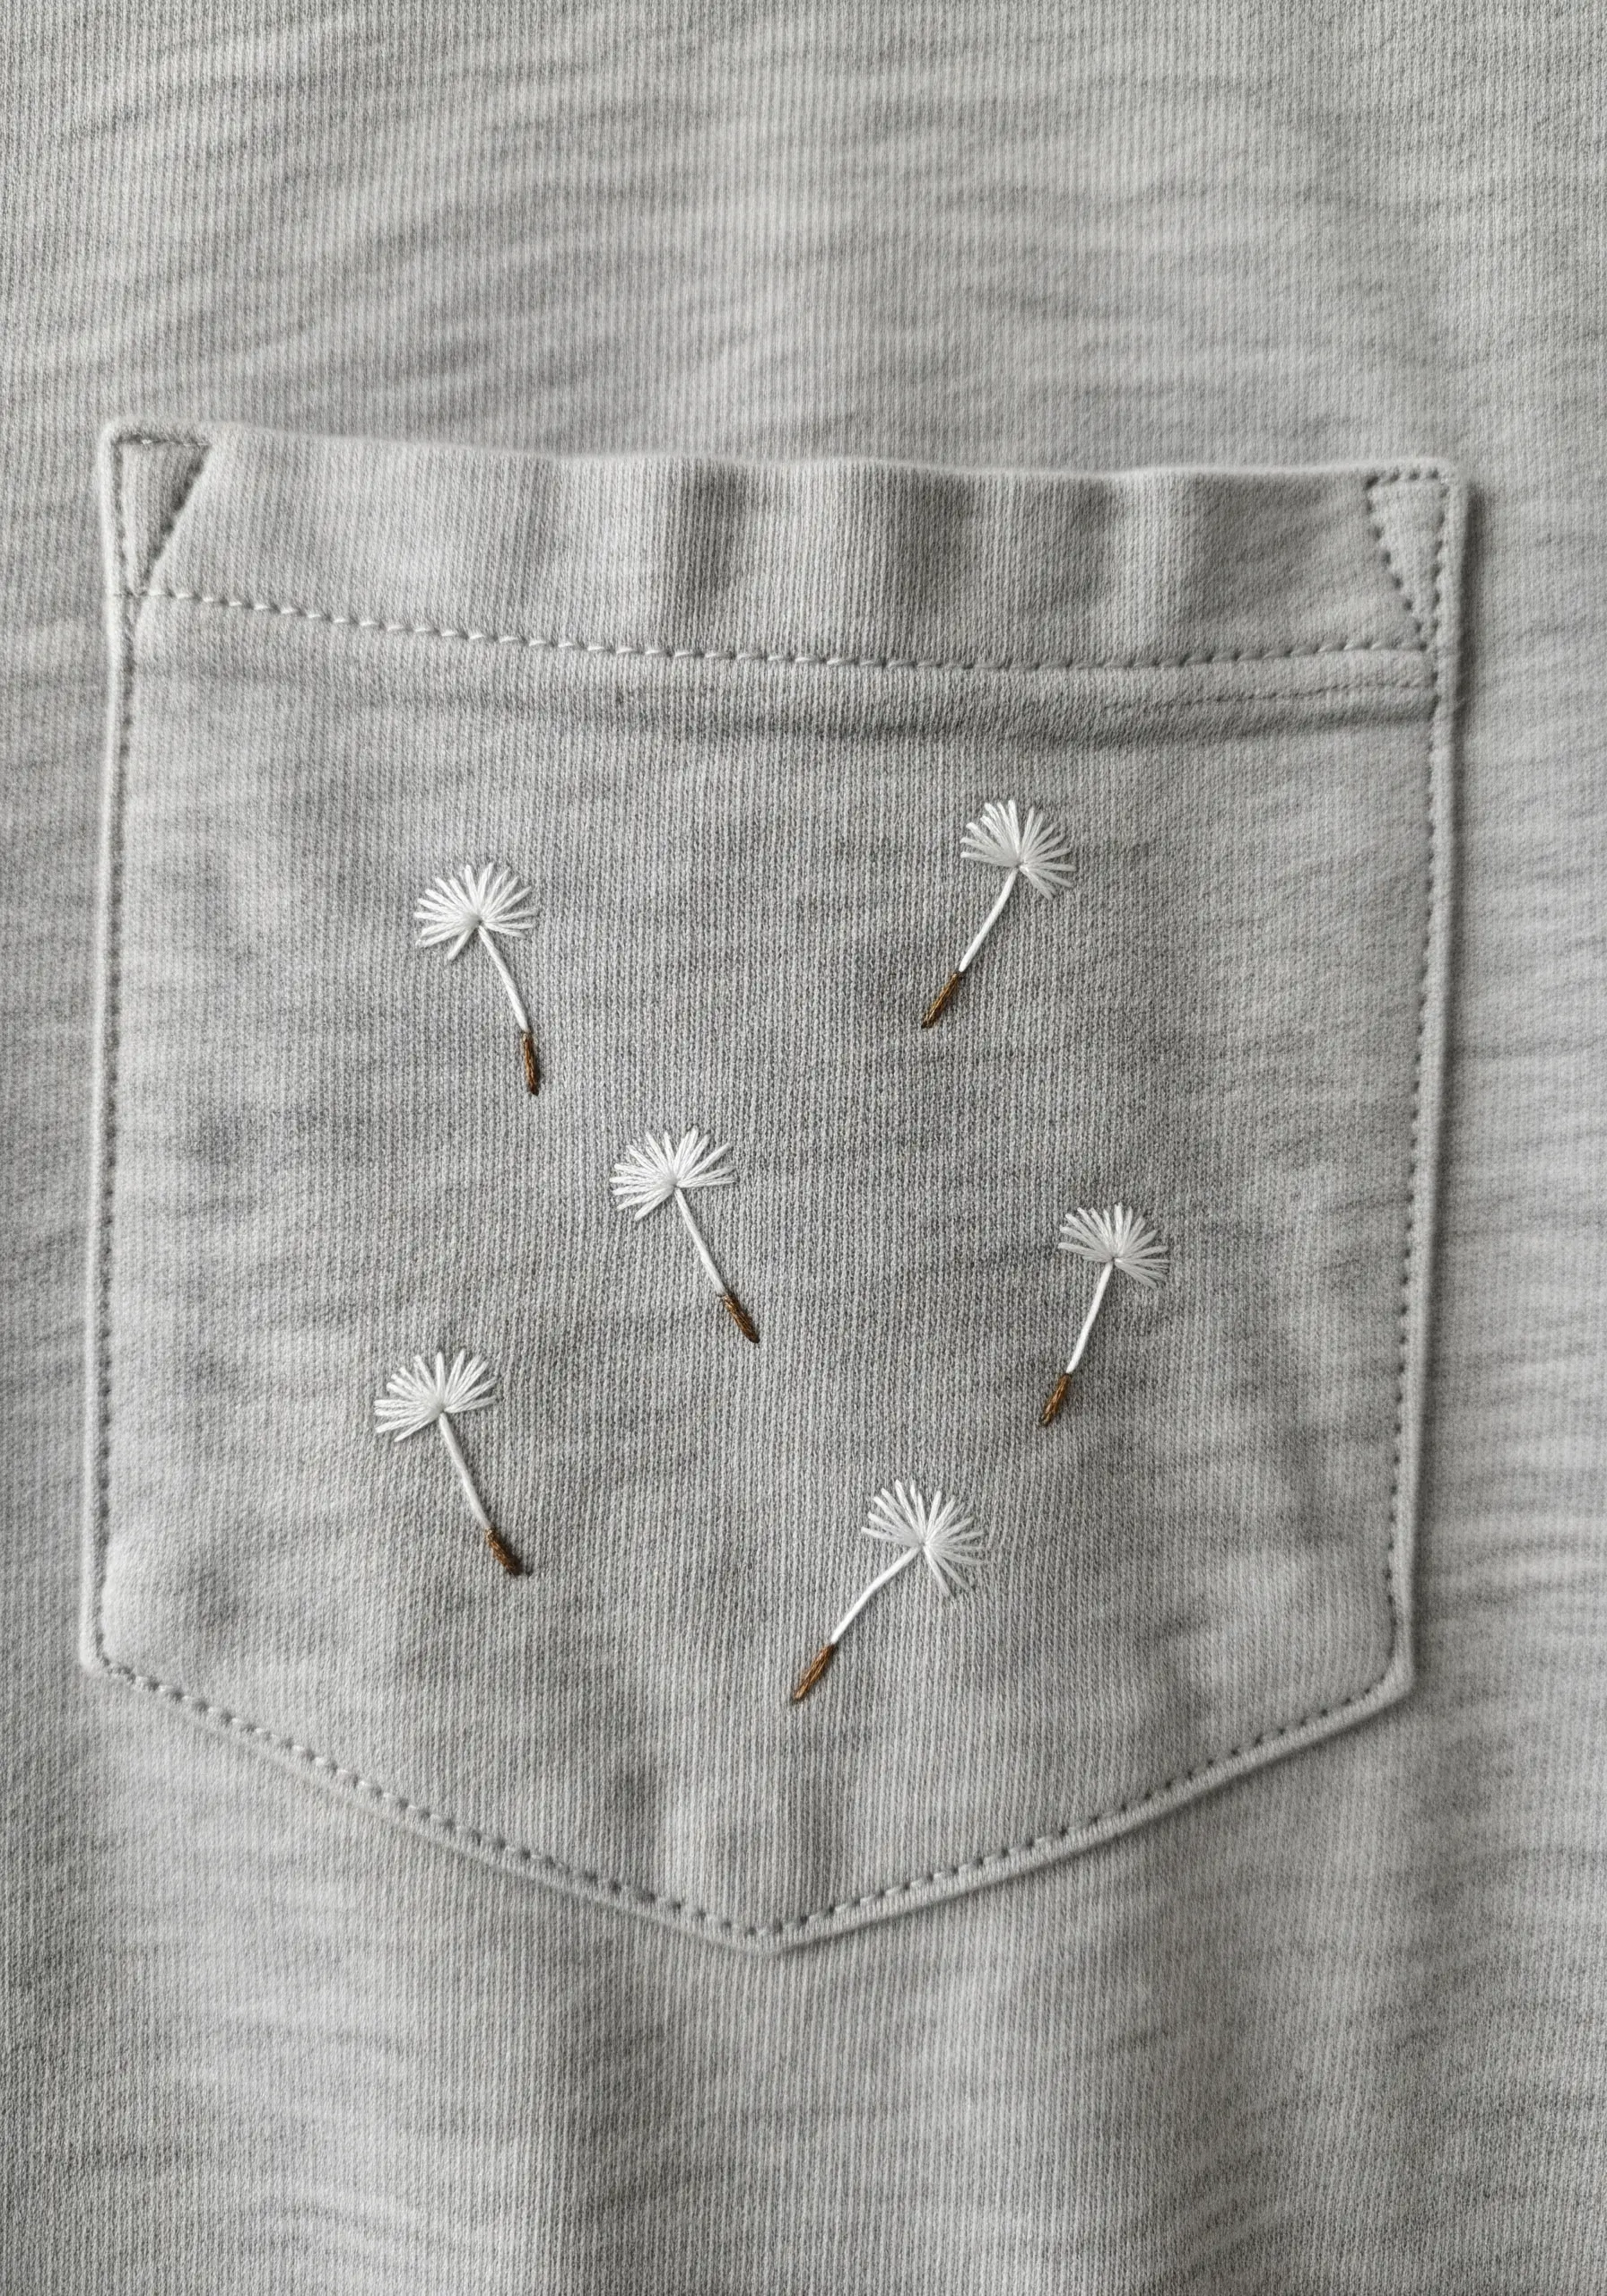
To create the airy, delicate look of dandelion seeds, a detached chain stitch (or lazy daisy) is the perfect choice.
Group five or six of these small, looped stitches together in a starburst pattern to form the fluffy parachute of each seed.
Use a single strand of brown thread for the stem with a simple straight stitch, and add a tiny knot at the end.
The scattered placement across the pocket creates a beautiful sense of movement and lightness.
18. Paint with Thread for an Artistic Touch

Mimic the energetic, textured look of a painter’s brushstroke by using short, layered straight stitches.
Don’t aim for perfect uniformity. Instead, vary the length and angle of your stitches, allowing them to overlap slightly.
This technique, a simplified form of thread painting, adds a wonderful sense of movement and artistic flair.
It’s an excellent way to add a small, abstract pop of color and texture to a laptop sleeve or pouch. These abstract thread painting ideas work on any surface.
19. Tell a Story with a Simple Running Stitch

You don’t need complex stitches to create a meaningful design. A simple running stitch is incredibly effective for creating dotted lines that imply movement and direction.
To keep your dotted line looking neat and intentional, focus on making each stitch and the space between them as consistent as possible.
Pair it with a clean backstitch outline for the main object, like this paper plane. The contrast between the solid and dotted lines creates a dynamic and charming visual narrative.
20. Achieve a Professional Monogram with Padding
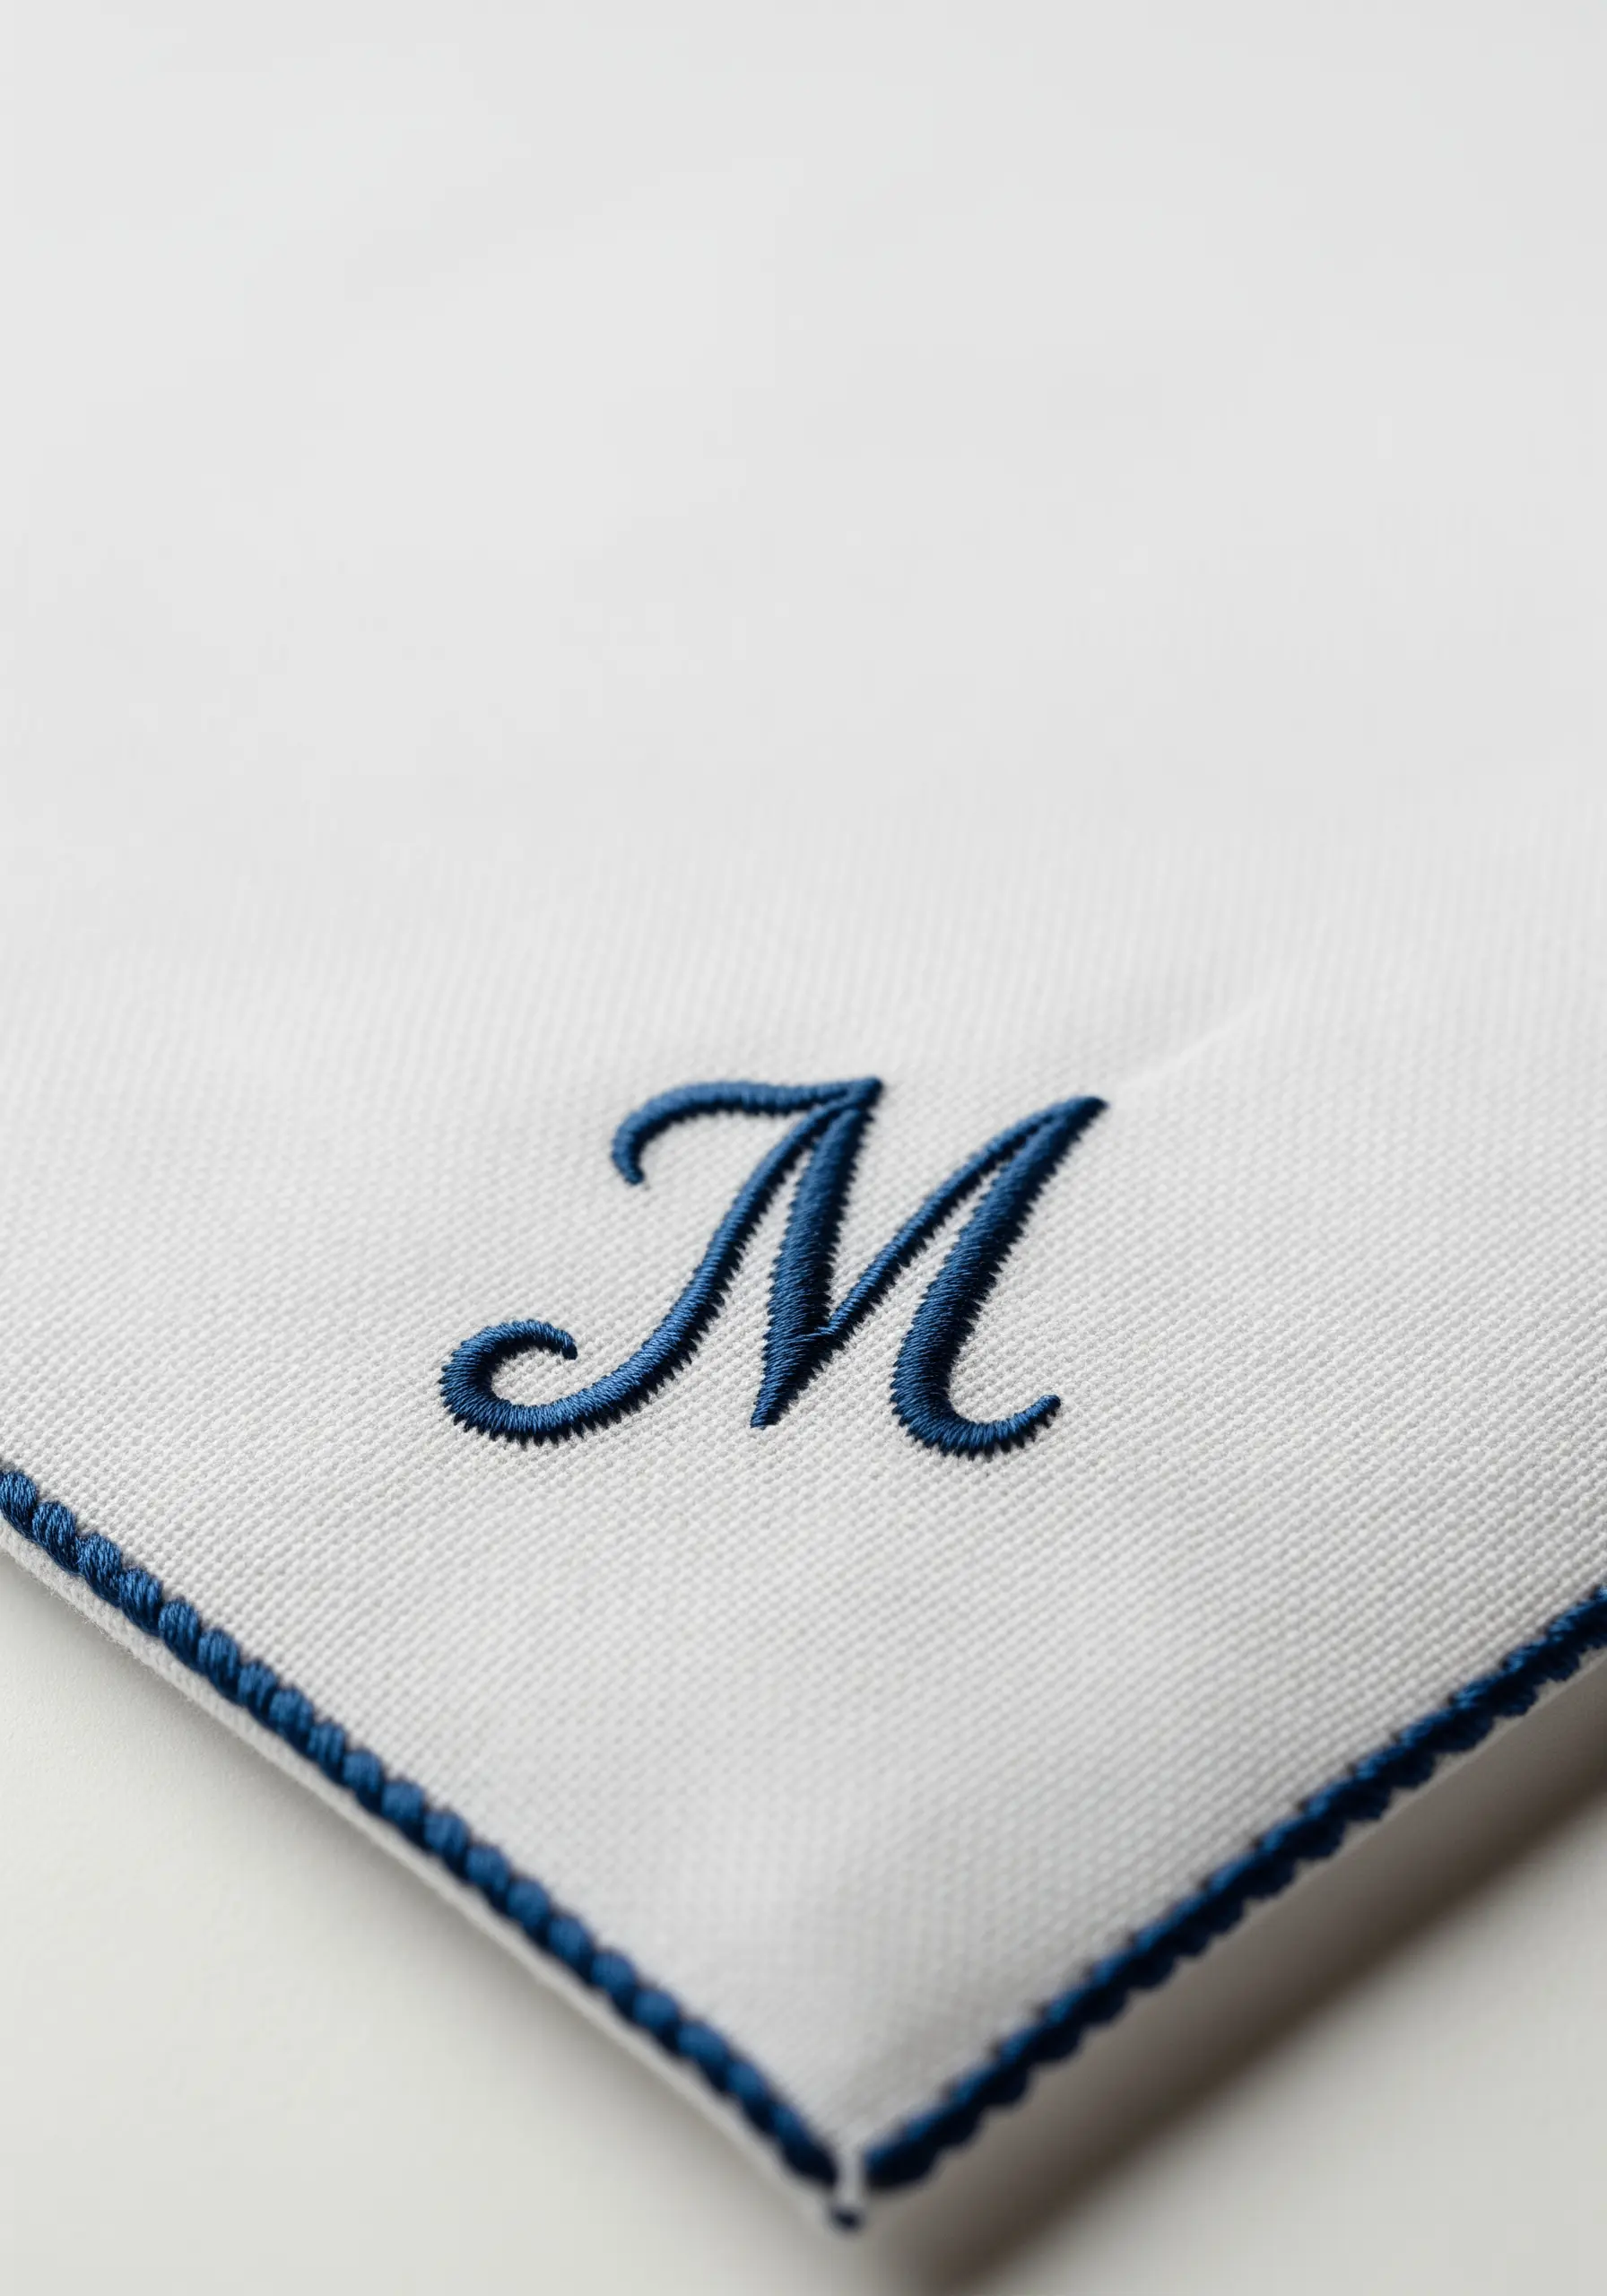
To make a satin-stitched monogram look truly luxurious and three-dimensional, you must add padding underneath.
First, stitch the outline of the letter with a split stitch. Then, fill the inside of the letter with small, horizontal straight stitches or seed stitches.
Finally, cover this entire padded base with vertical satin stitches. The underlying layer of thread pushes the top layer up, creating a beautifully raised, rounded effect that looks professionally done.
21. Design a Dense Floral Pattern with Simple Stitches
You can create a complex-looking pattern using just two basic stitches: the lazy daisy and the French knot.
The key to this design’s success is repetition and density. Arrange the lazy daisy flowers close together, varying their orientation to create a natural, scattered look.
Fill the small gaps between the flowers with clusters of three or four French knots. This technique adds another layer of texture and makes the overall design feel lush and complete.
22. Use Negative Space in Line Art

Even in the simplest designs, small details make a big difference. This minimal house outline uses a clean backstitch, relying on the un-stitched fabric to define the shape.
The single pop of color—a few vertical stitches for the door—instantly draws the eye and gives the piece a focal point and personality.
This technique of using a tiny, strategic accent color is a powerful tool for bringing minimalist designs to life.
23. Add a Subtle Sparkle to Stretchy Fabrics

When embroidering on fine, stretchy material like socks, a minimal design is best to avoid distorting the fabric.
A simple starburst, created with a few straight stitches radiating from a central point, is a perfect choice.
Use a fine metallic thread for a subtle catch of light. Be careful not to pull your stitches too tight; your tension should be just enough to keep the thread flat without puckering the sock when it’s worn.
24. Conquer Waffle Weave with a Solid Foundation
The deep grid of a waffle-weave towel can cause stitches to sink and look uneven. To combat this, you need to create a stable base for your embroidery.
Iron a cut-away stabilizer onto the back of the towel before you begin. For the fill, use a dense satin stitch, but first, outline each section with a split stitch.
This outline acts as a containing wall, ensuring your satin stitches have a firm edge to press against and remain on the surface of the textured fabric.
25. Create Bold Lines with Couching

For perfectly straight, bold geometric lines, a standard backstitch can sometimes look jagged or uneven.
Instead, try couching. Lay down a single, thick strand of floss (or even multiple strands held together) along your design line.
Then, using a second, thinner thread, come up from the back of the fabric and make tiny tacking stitches over the thick thread to hold it in place.
This method produces exceptionally clean, smooth, and substantial lines, ideal for minimalist and geometric art.
26. Harmonize Your Design with Plaid Fabric
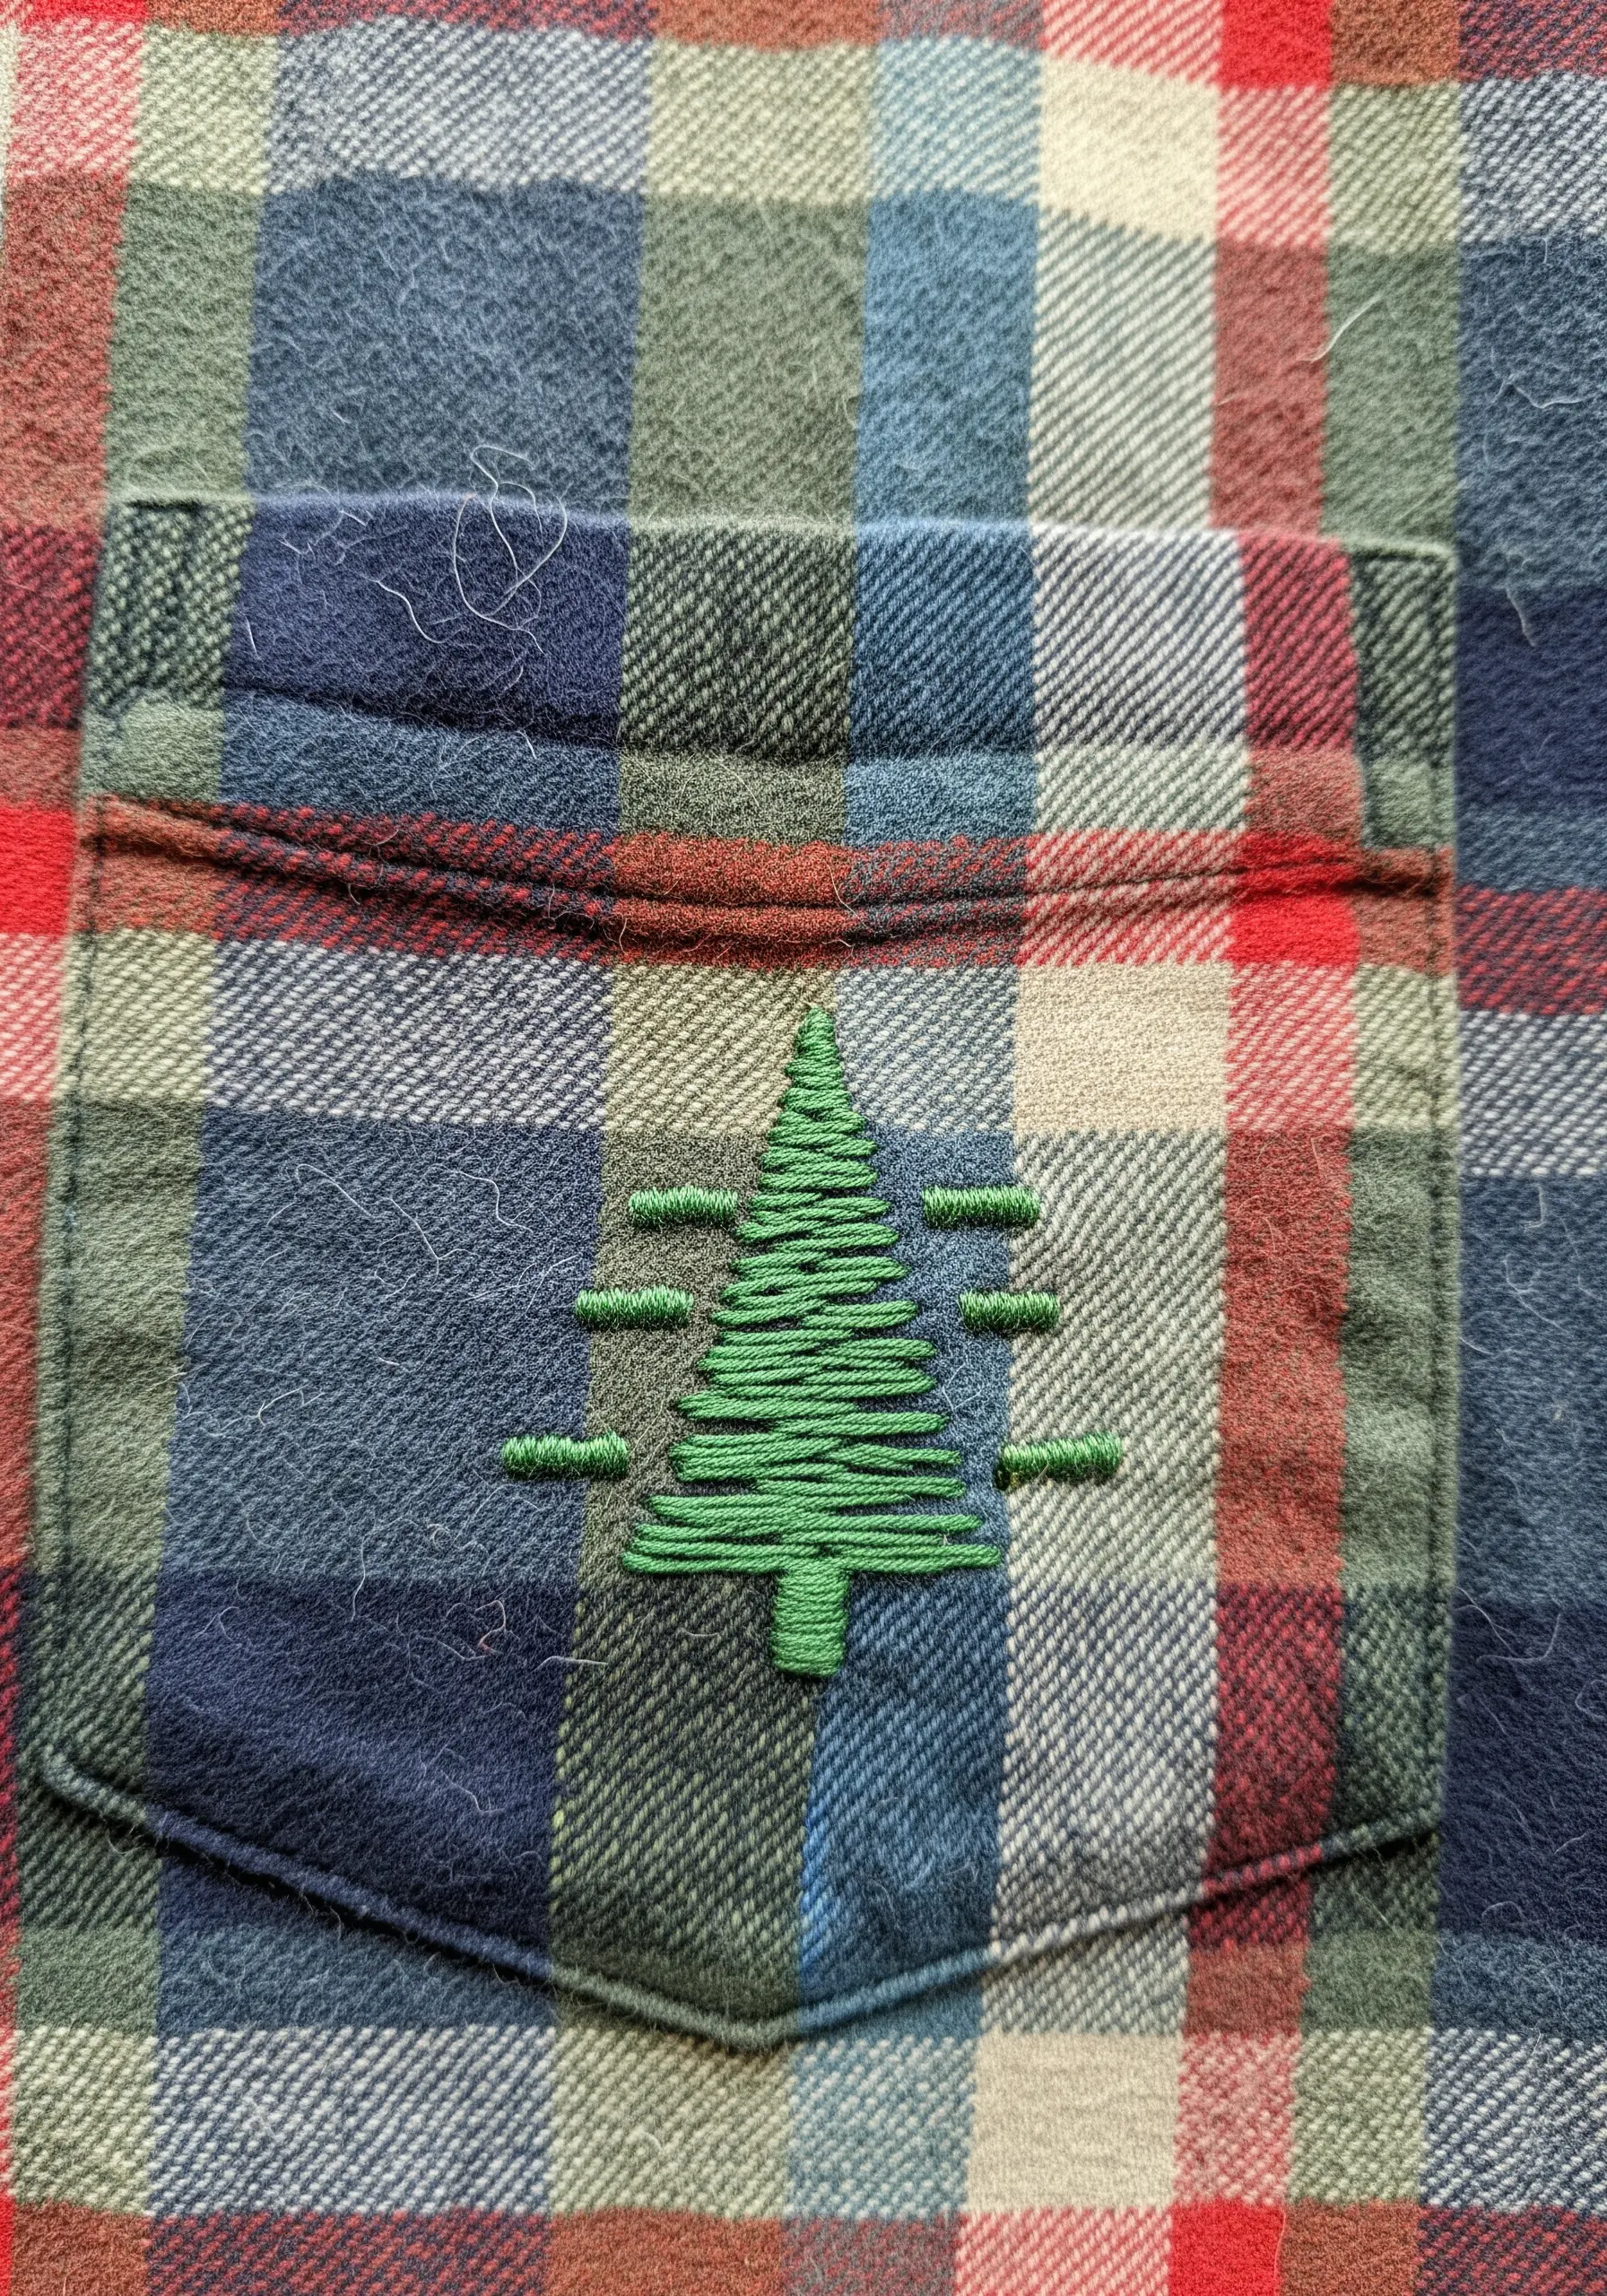
When embroidering on a busy pattern like plaid, the goal is to complement the fabric, not compete with it.
Choose a simple, graphic motif and select a thread color that is already present in the plaid pattern. This creates a cohesive, intentional look.
A satin stitch fill works well on flannel, as the soft texture of the fabric helps blend the stitches for a smooth finish. This is a great way to add small embroidery motifs to patterned clothing.
27. Stitch Clear Lettering on Heavy Canvas

To ensure your embroidered text is legible on a thick, textured material like a canvas yoga strap, you need a stitch that is bold and clean.
A two-stranded backstitch or a simple chain stitch provides the necessary weight and definition to stand out against the heavy weave.
Trace your letters carefully with a disappearing ink pen and focus on keeping your stitch length consistent, especially around curves, for a polished, readable result.
28. Create an All-Over Texture with Seed Stitch
Transform a plain pouch into a beautifully textured accessory with one of the simplest stitches: the seed stitch.
This stitch is just a series of small, individual straight stitches scattered across the fabric. The key to an elegant result is varying the direction of each stitch while keeping their size relatively consistent.
The final effect is a subtle, sophisticated pattern that adds tactile interest without overwhelming the eye, proving that small, simple stitches can be incredibly impactful.
29. Add a Sharp Accent to a Suit Lapel
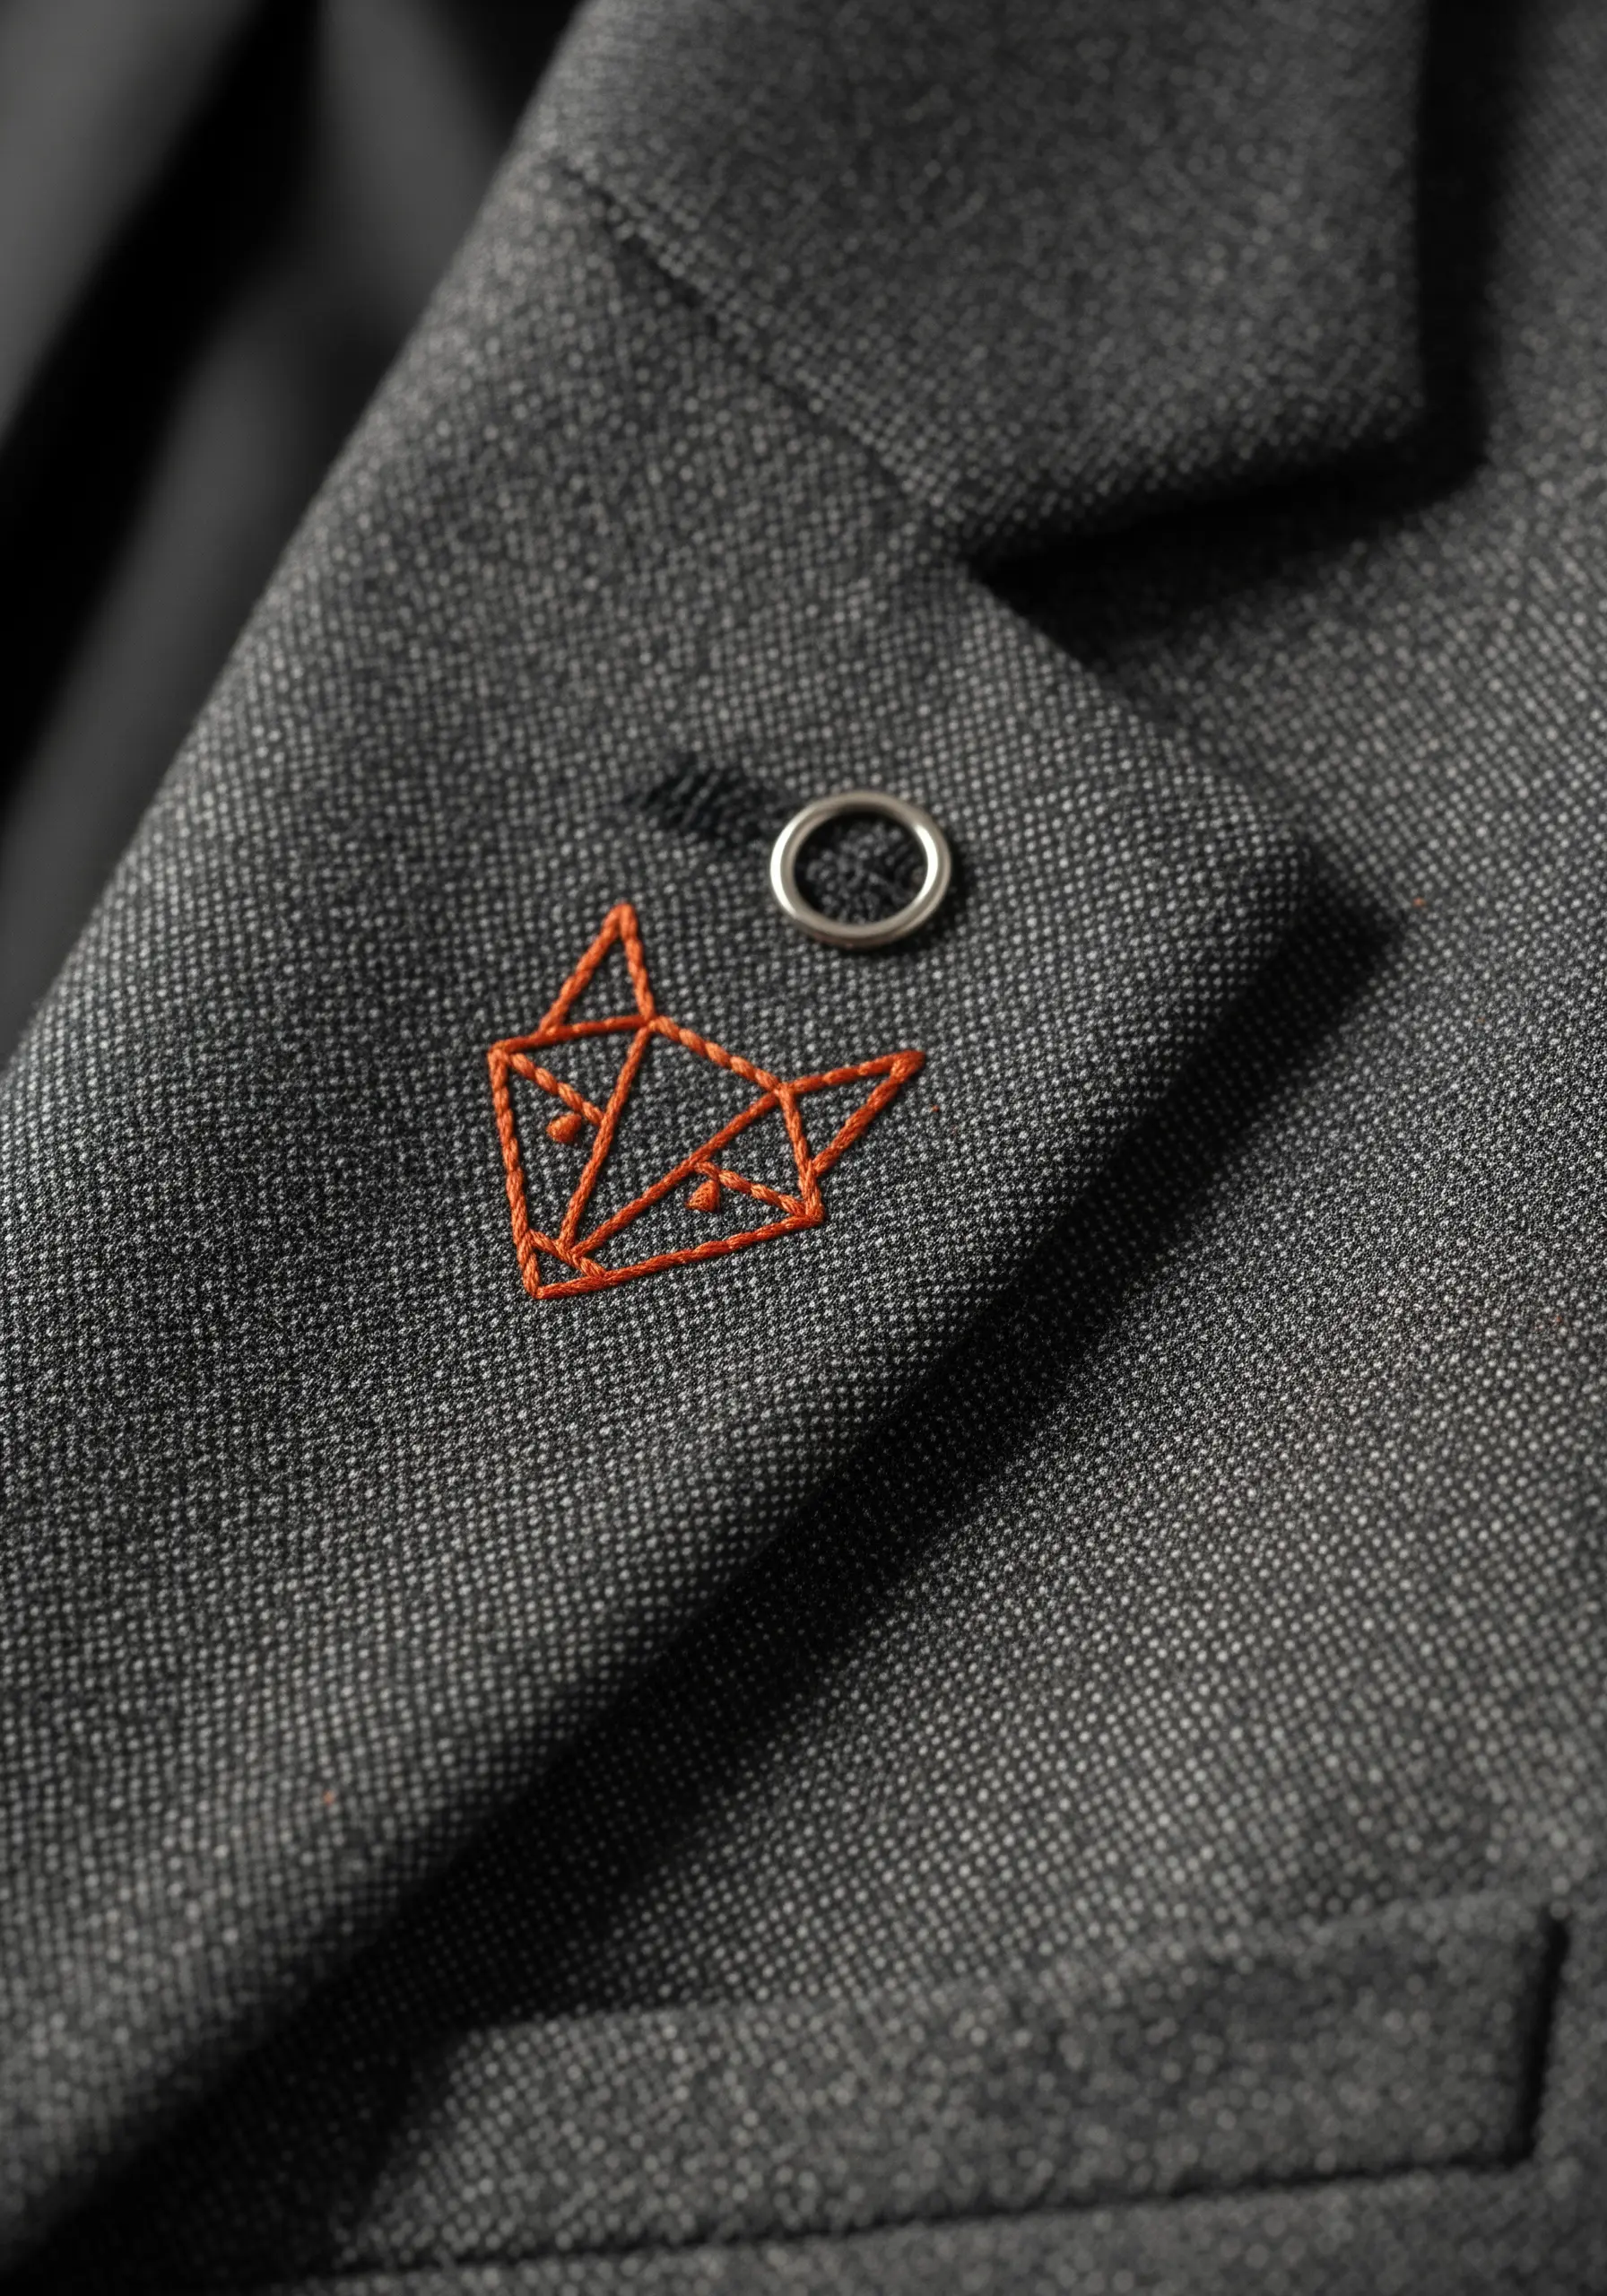
Adding a touch of embroidery to formalwear requires precision and restraint. A small, geometric design stitched on the lapel is a modern alternative to a lapel pin.
Use a fine, sharp needle and just two strands of floss to create crisp lines with a backstitch.
A bright, contrasting color like orange against charcoal gray makes a confident statement, while the clean, angular lines of the fox head keep it feeling sophisticated and sharp.
30. Build 3D Clouds with Colonial Knots
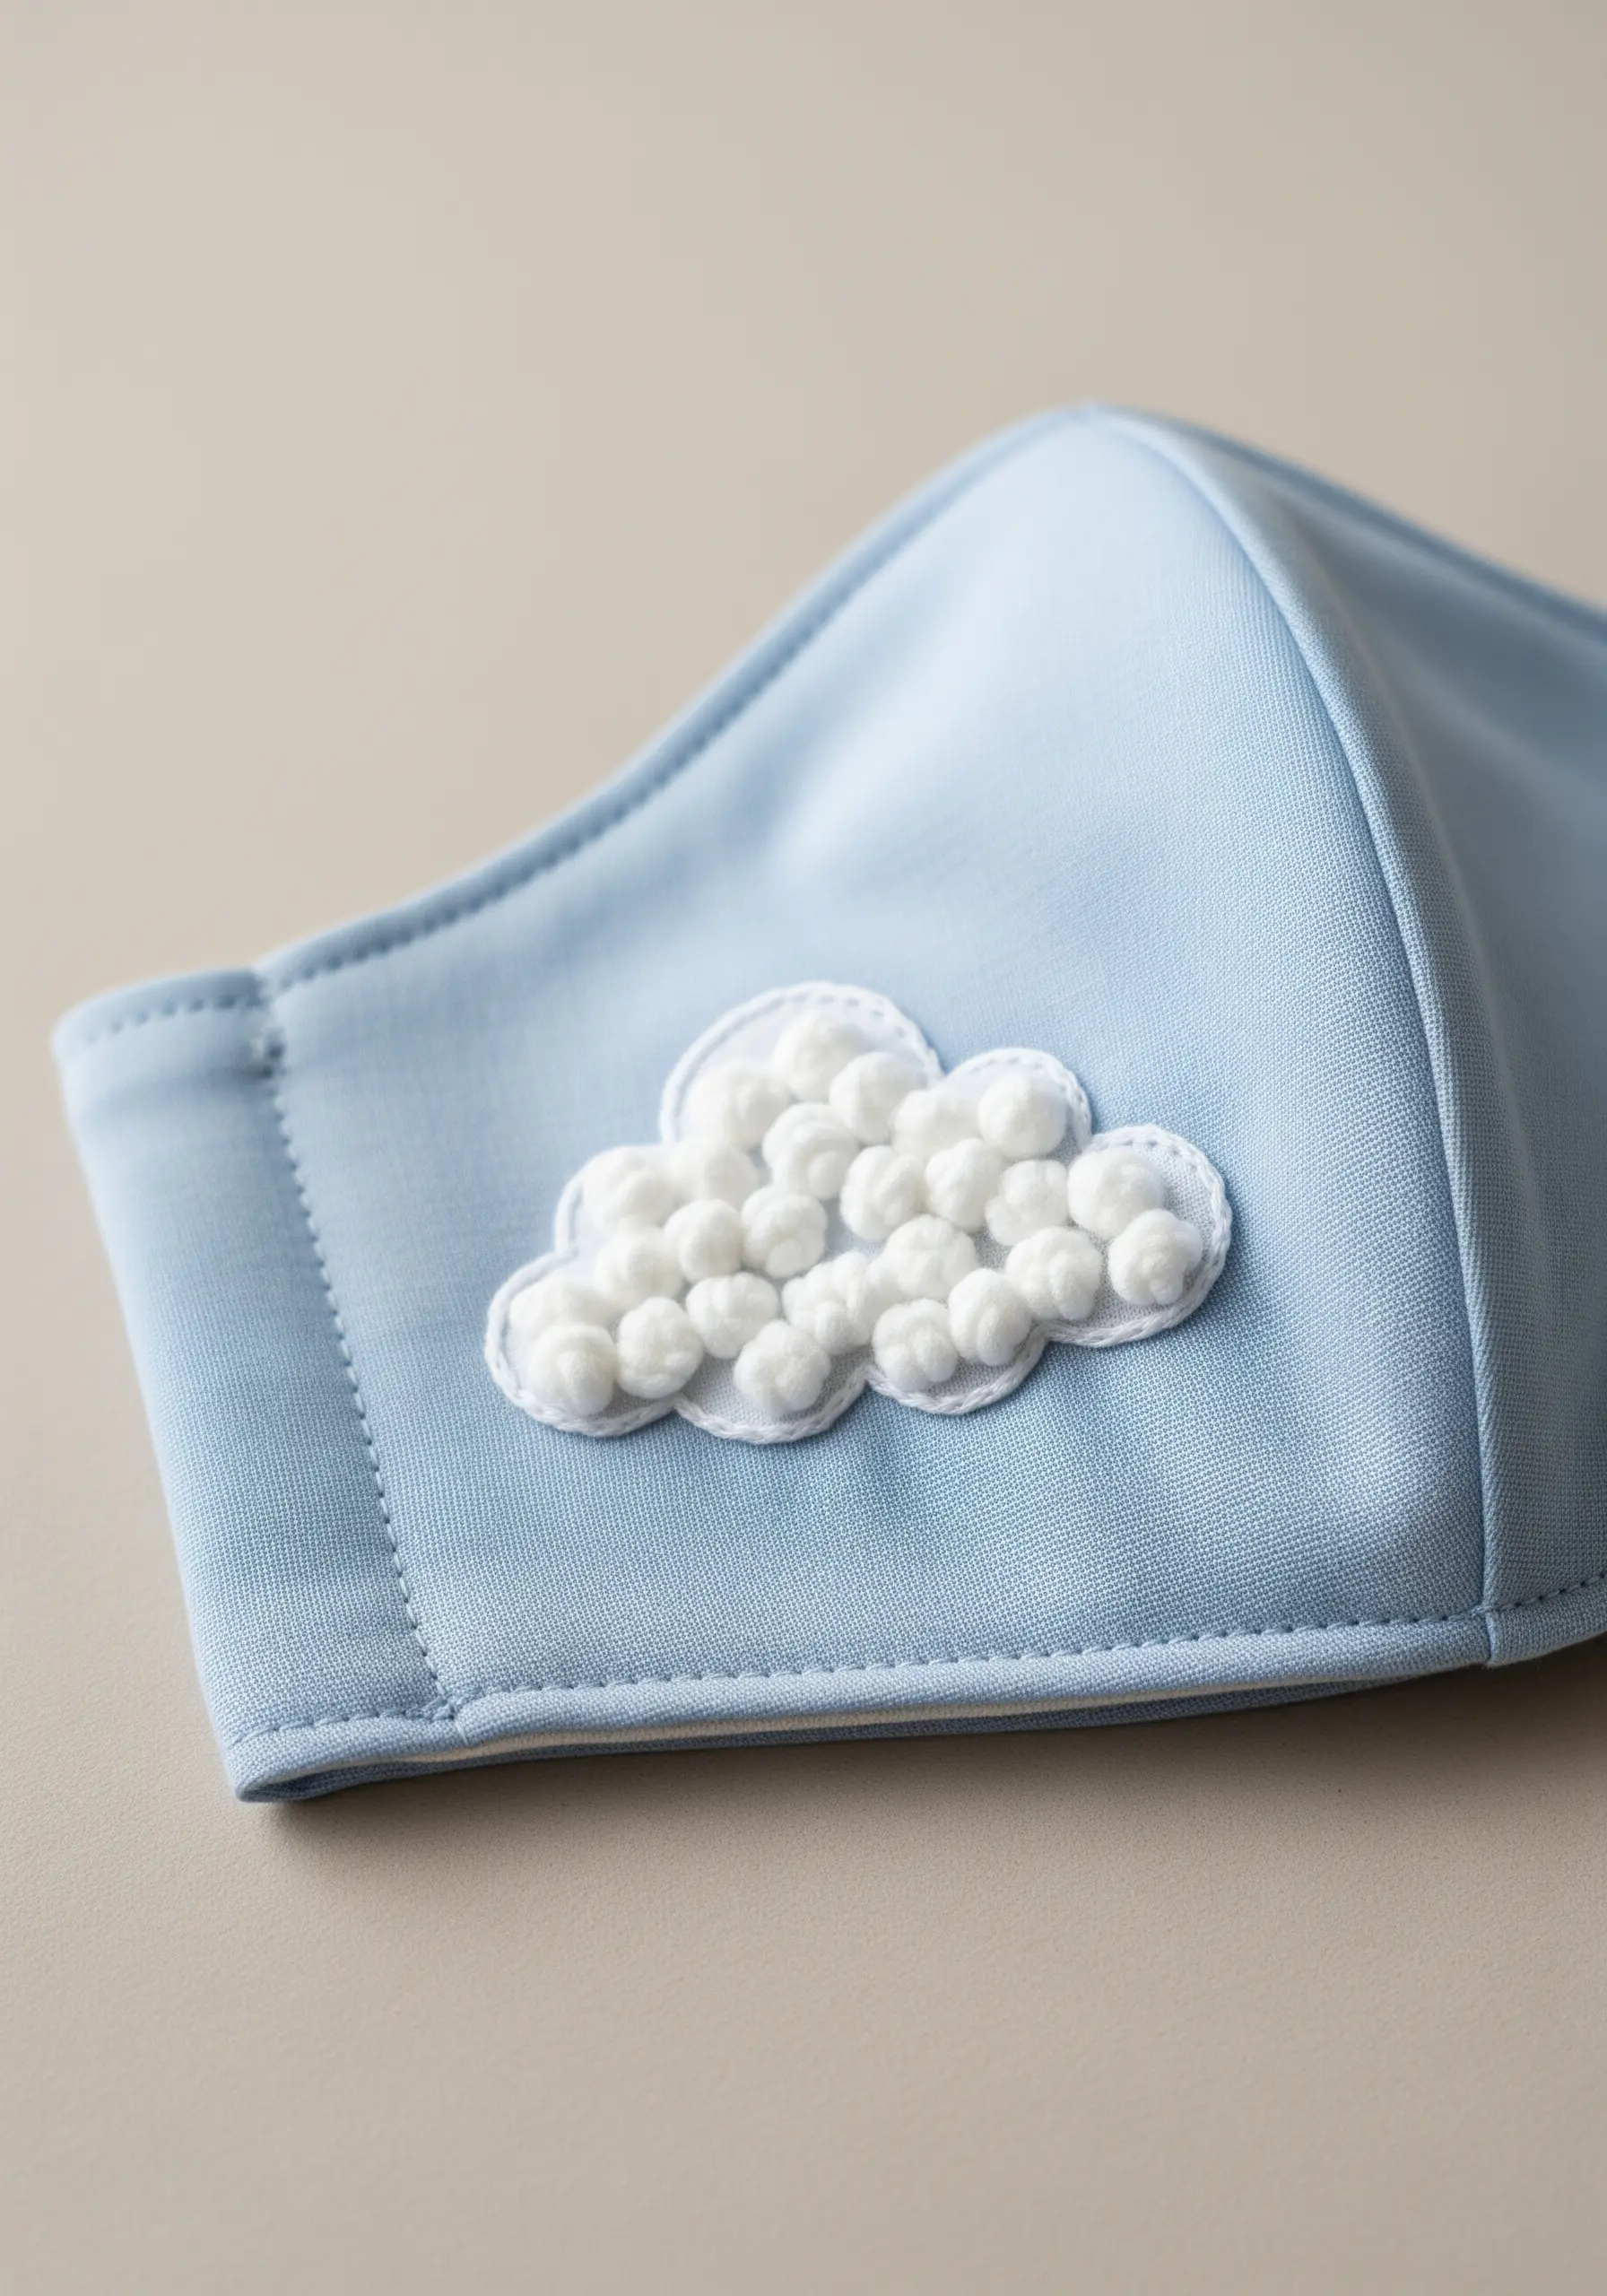
For a truly fluffy, three-dimensional cloud, fill the shape with tightly packed Colonial knots or French knots.
Colonial knots are slightly rounder and more robust, making them perfect for creating this plush, bumpy texture.
First, outline the cloud shape with a simple backstitch to create a defined edge. Then, fill the interior with knots, working from the outside in.
Using a slightly thicker thread, like pearl cotton, will enhance the raised effect even more.
31. Stitch Elegant Leaves on Linen

The fishbone stitch is a brilliant choice for creating leaves that look both elegant and lifelike. The stitch creates a central spine and angled sides simultaneously, perfectly mimicking a real leaf’s structure.
To create a subtle gradient, use two different shades of green thread in your needle at the same time. This adds instant depth and variation to your foliage.
This technique is perfect for elevating a simple set of linen coasters or napkins into a coordinated, boutique-quality set.
32. Add Embroidery to Any Surface with a Patch

What if you want to embroider on something you can’t stitch through, like thick leather or a finished bag?
The solution is to create an embroidered patch. Stitch your design on a piece of sturdy fabric like canvas or Aida cloth, leaving a small margin around the edge.
Fold the raw edges under and press them, then securely stitch the finished patch onto your accessory. This technique opens up a world of possibilities for customization.
33. Make a Statement with Unexpected Placement
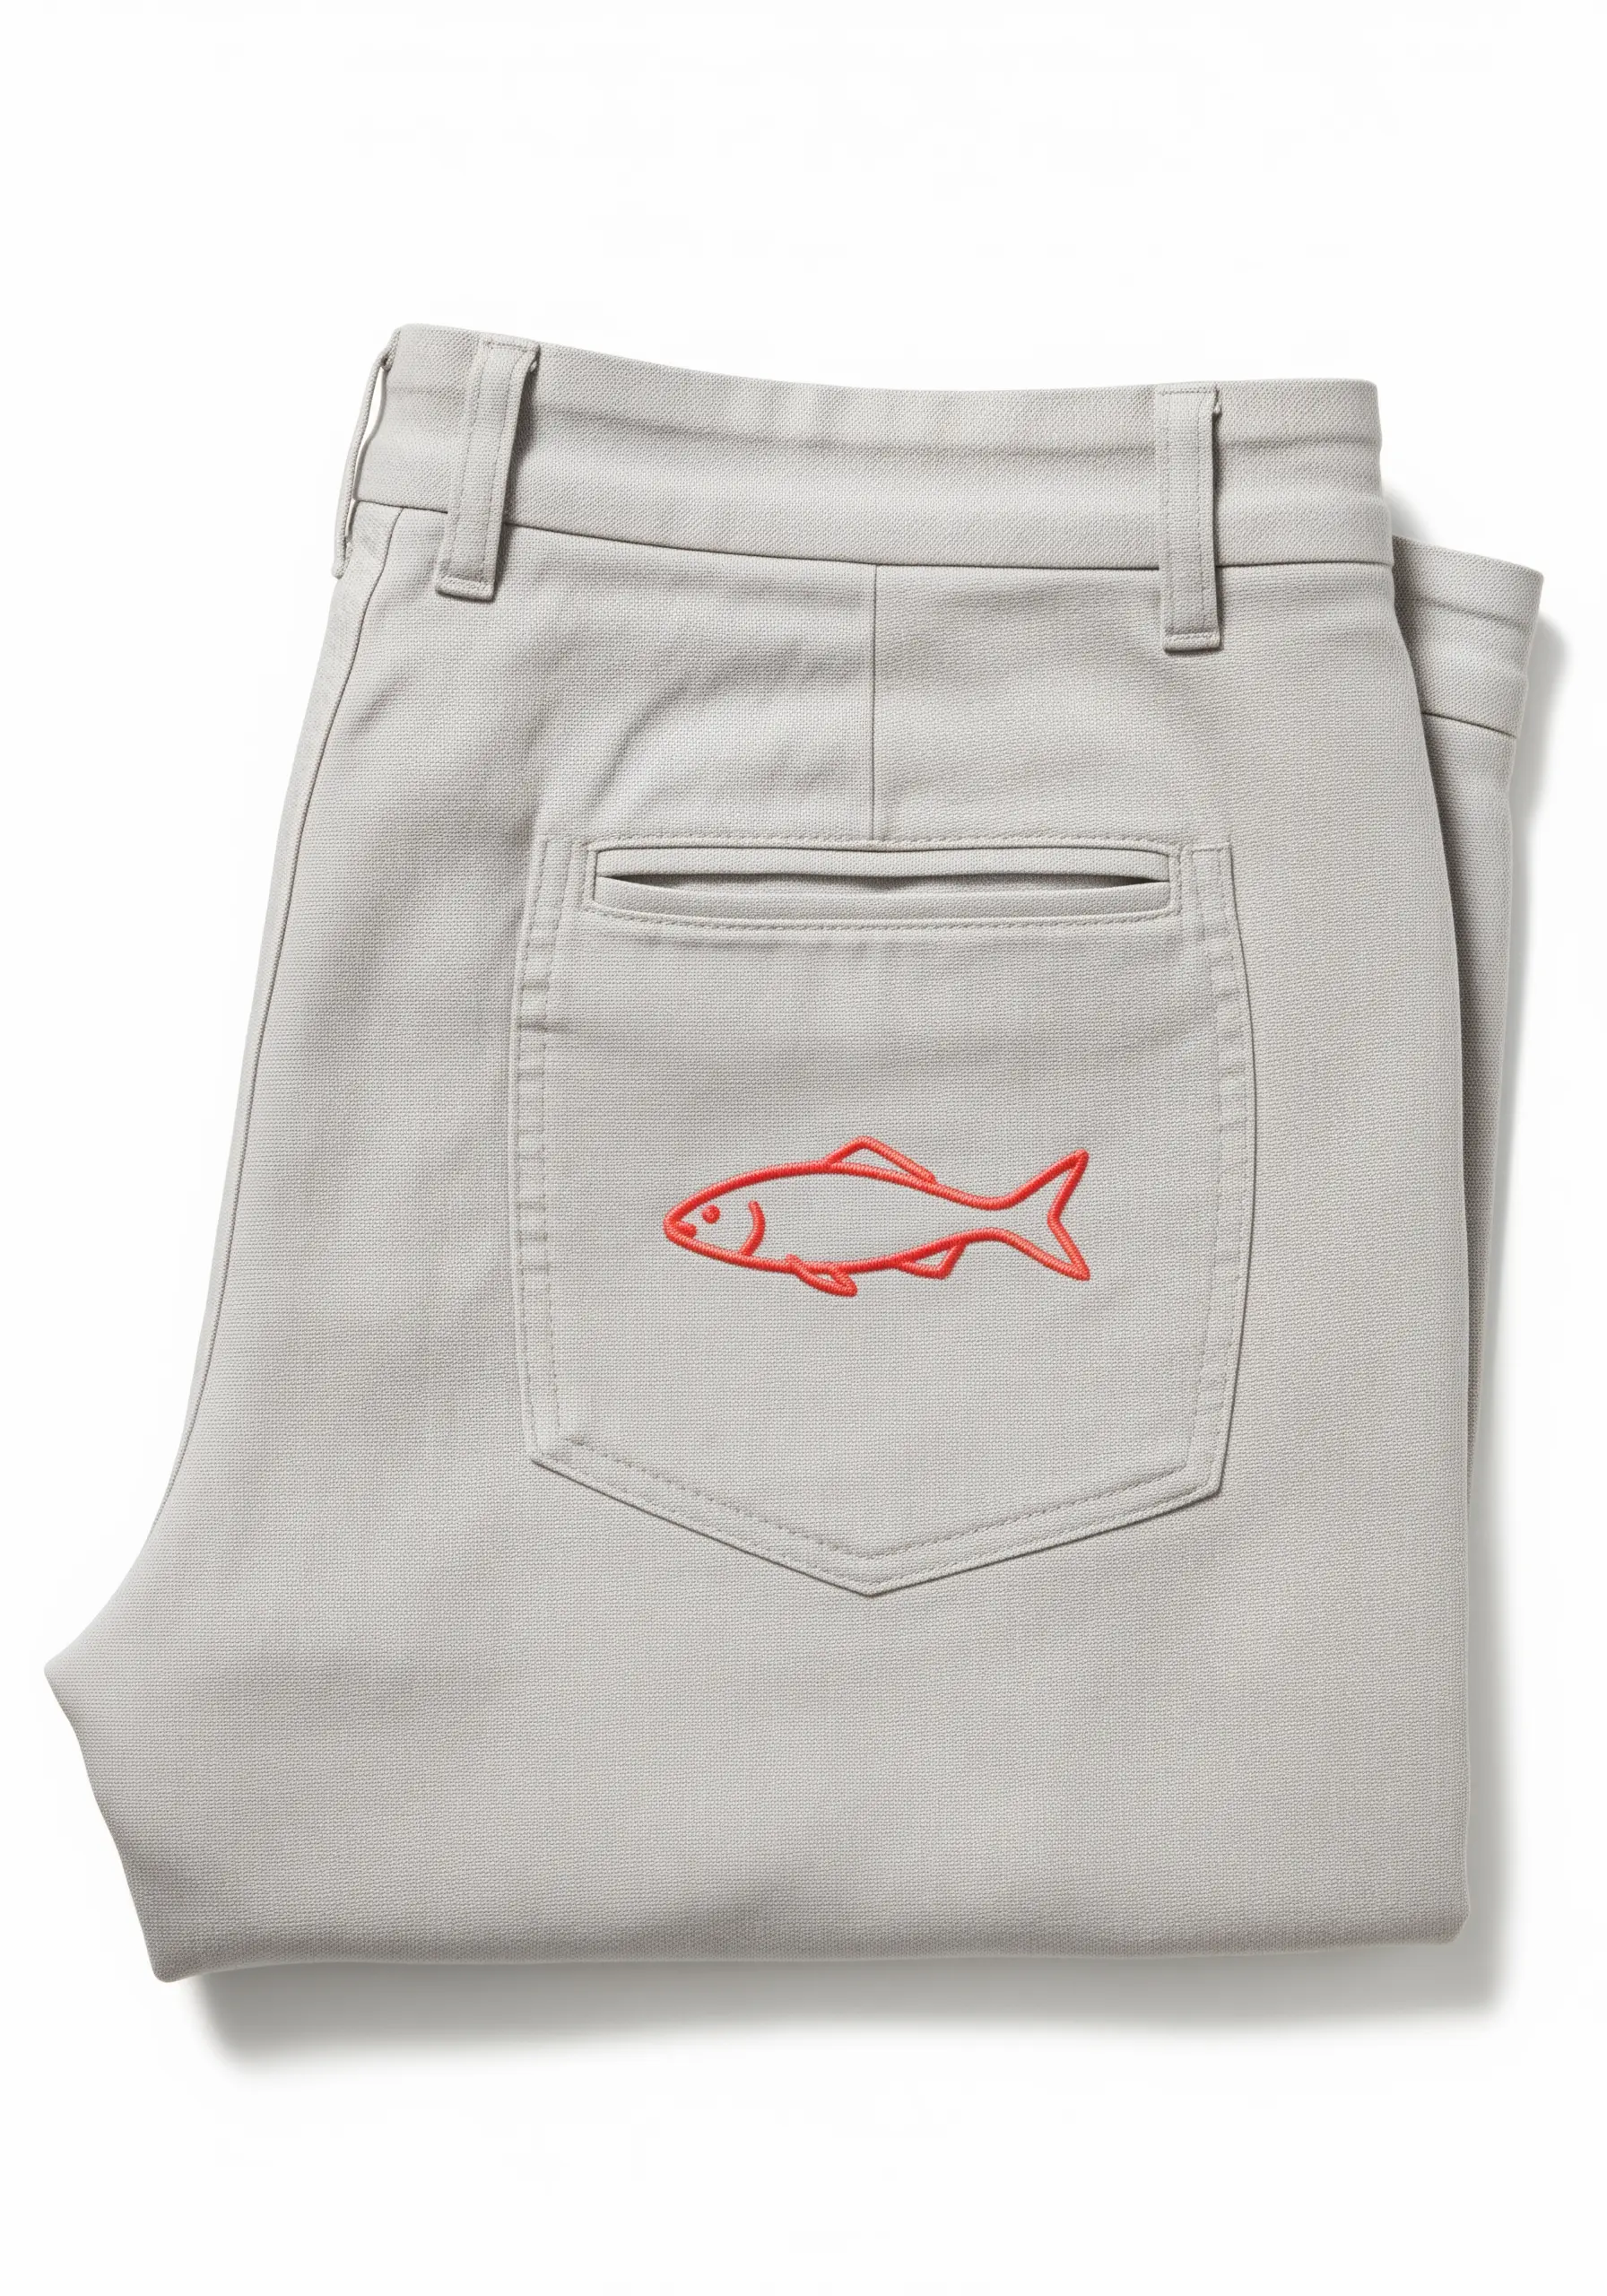
Sometimes, the most impactful design isn’t about complexity, but about placement. A simple backstitch outline of a fish becomes a witty, eye-catching detail when placed on the back pocket of a pair of trousers.
Choose a thread color that provides a strong, clean contrast against the base fabric.
This playful approach to embroidery shows that a tiny, well-placed motif can inject more personality into an item than a large, elaborate design.
34. Use Minimal Lines for Maximum Charm

You can convey a complete idea with just a few carefully placed stitches. This cat face uses a simple backstitch for the whiskers and ears and two tiny satin stitches for the nose and eyes.
The key to success with minimal line art animal designs is precision. Ensure your lines are clean and your stitches are even.
When stitching on knit gloves, use a light stabilizer inside and avoid pulling the thread too tight to prevent the fabric from gathering.
35. Embroider on Chunky Knits
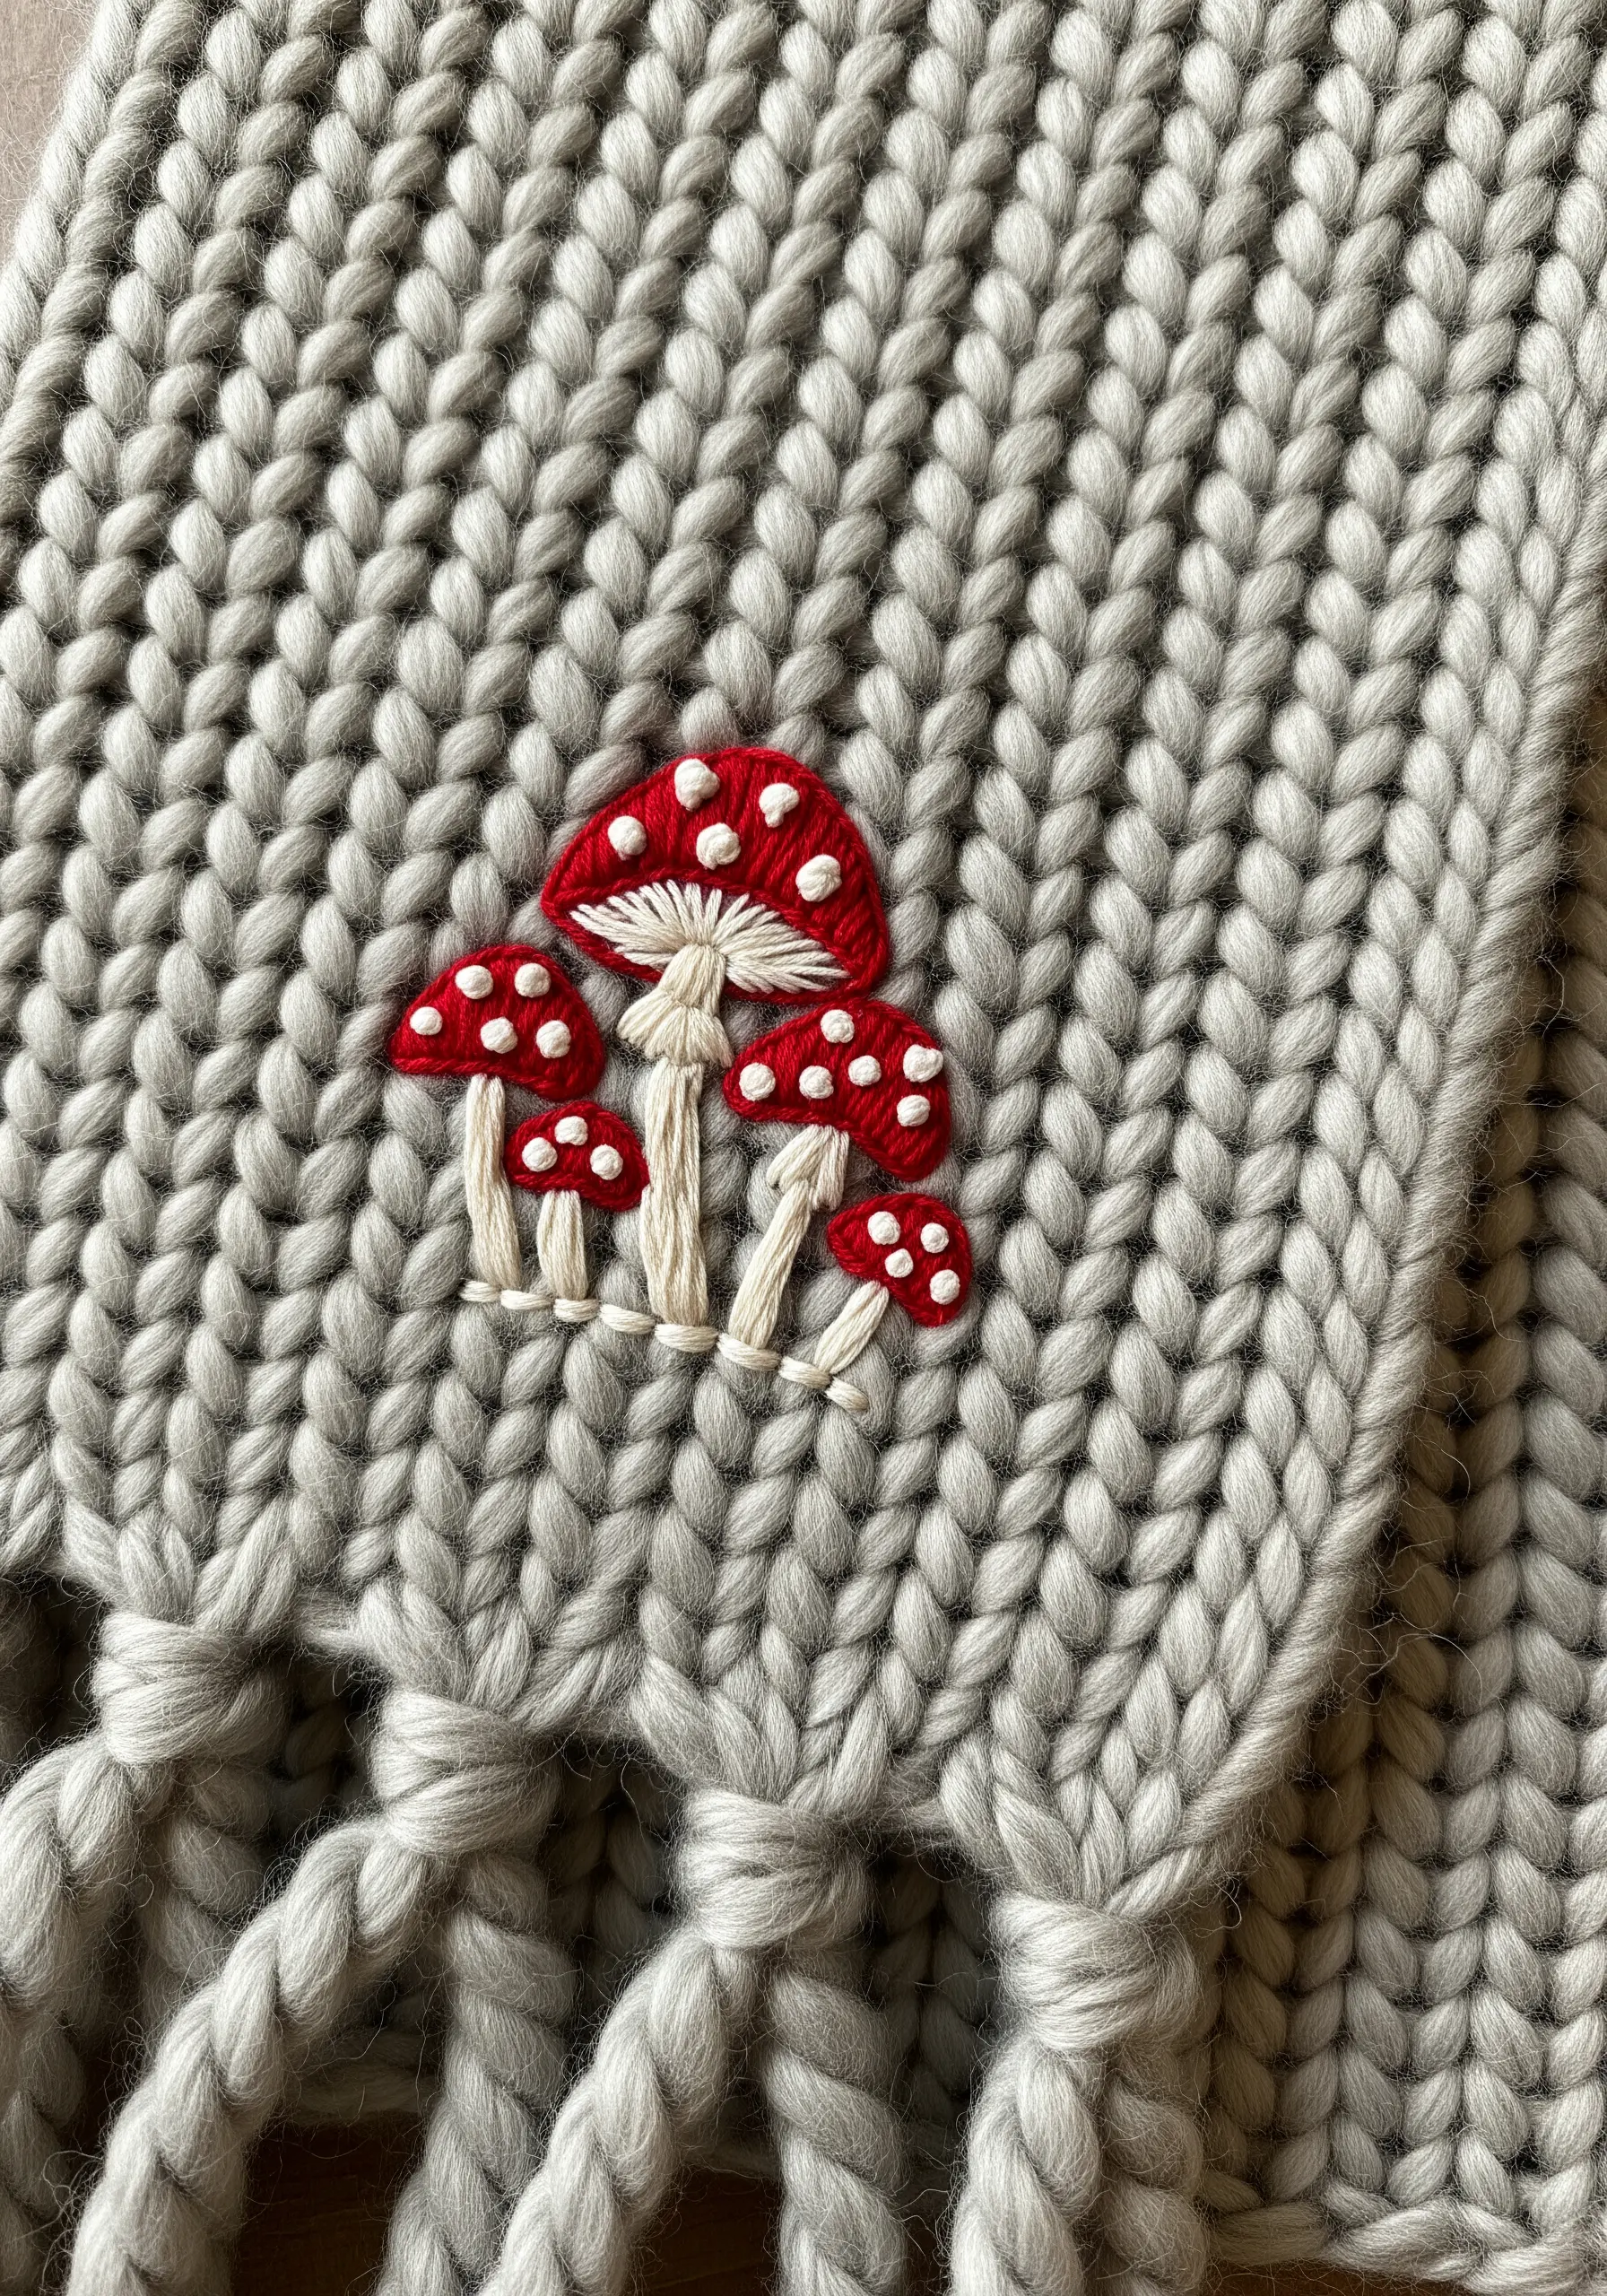
Stitching on a very chunky, open-weave knit presents a unique challenge. Instead of standard floss, switch to a thicker fiber like tapestry wool or yarn that matches the scale of the knit.
Use a blunt-tipped tapestry needle that can pass between the knitted loops without splitting them.
For the mushroom gills, try a series of vertical straight stitches. The satin-stitched caps and simple stem stitch stalks are bold enough to remain visible and not get lost in the deep texture of the scarf.


