

Sometimes you sit down to stitch, full of inspiration, but find your hands repeating the same few stitches. You want to create something that feels more polished, more intentional—but the path from a simple backstitch to a piece of art can feel unclear.
The secret to elevating your work isn’t about mastering dozens of impossibly complex techniques. It’s about making small, deliberate choices. It’s in the way you direct your satin stitch to create a curve, the decision to use three shades of green instead of one, or the contrast you create between a smooth petal and a textured, knotted center.
Think of each idea here not just as a final project, but as a small study. A chance to focus on one technique—shading, texture, or line—and see for yourself how a single, thoughtful adjustment can transform your embroidery from simple to stunning. Pick one that speaks to you, and let’s begin.
1. Lavender Sprigs with French Knot Texture
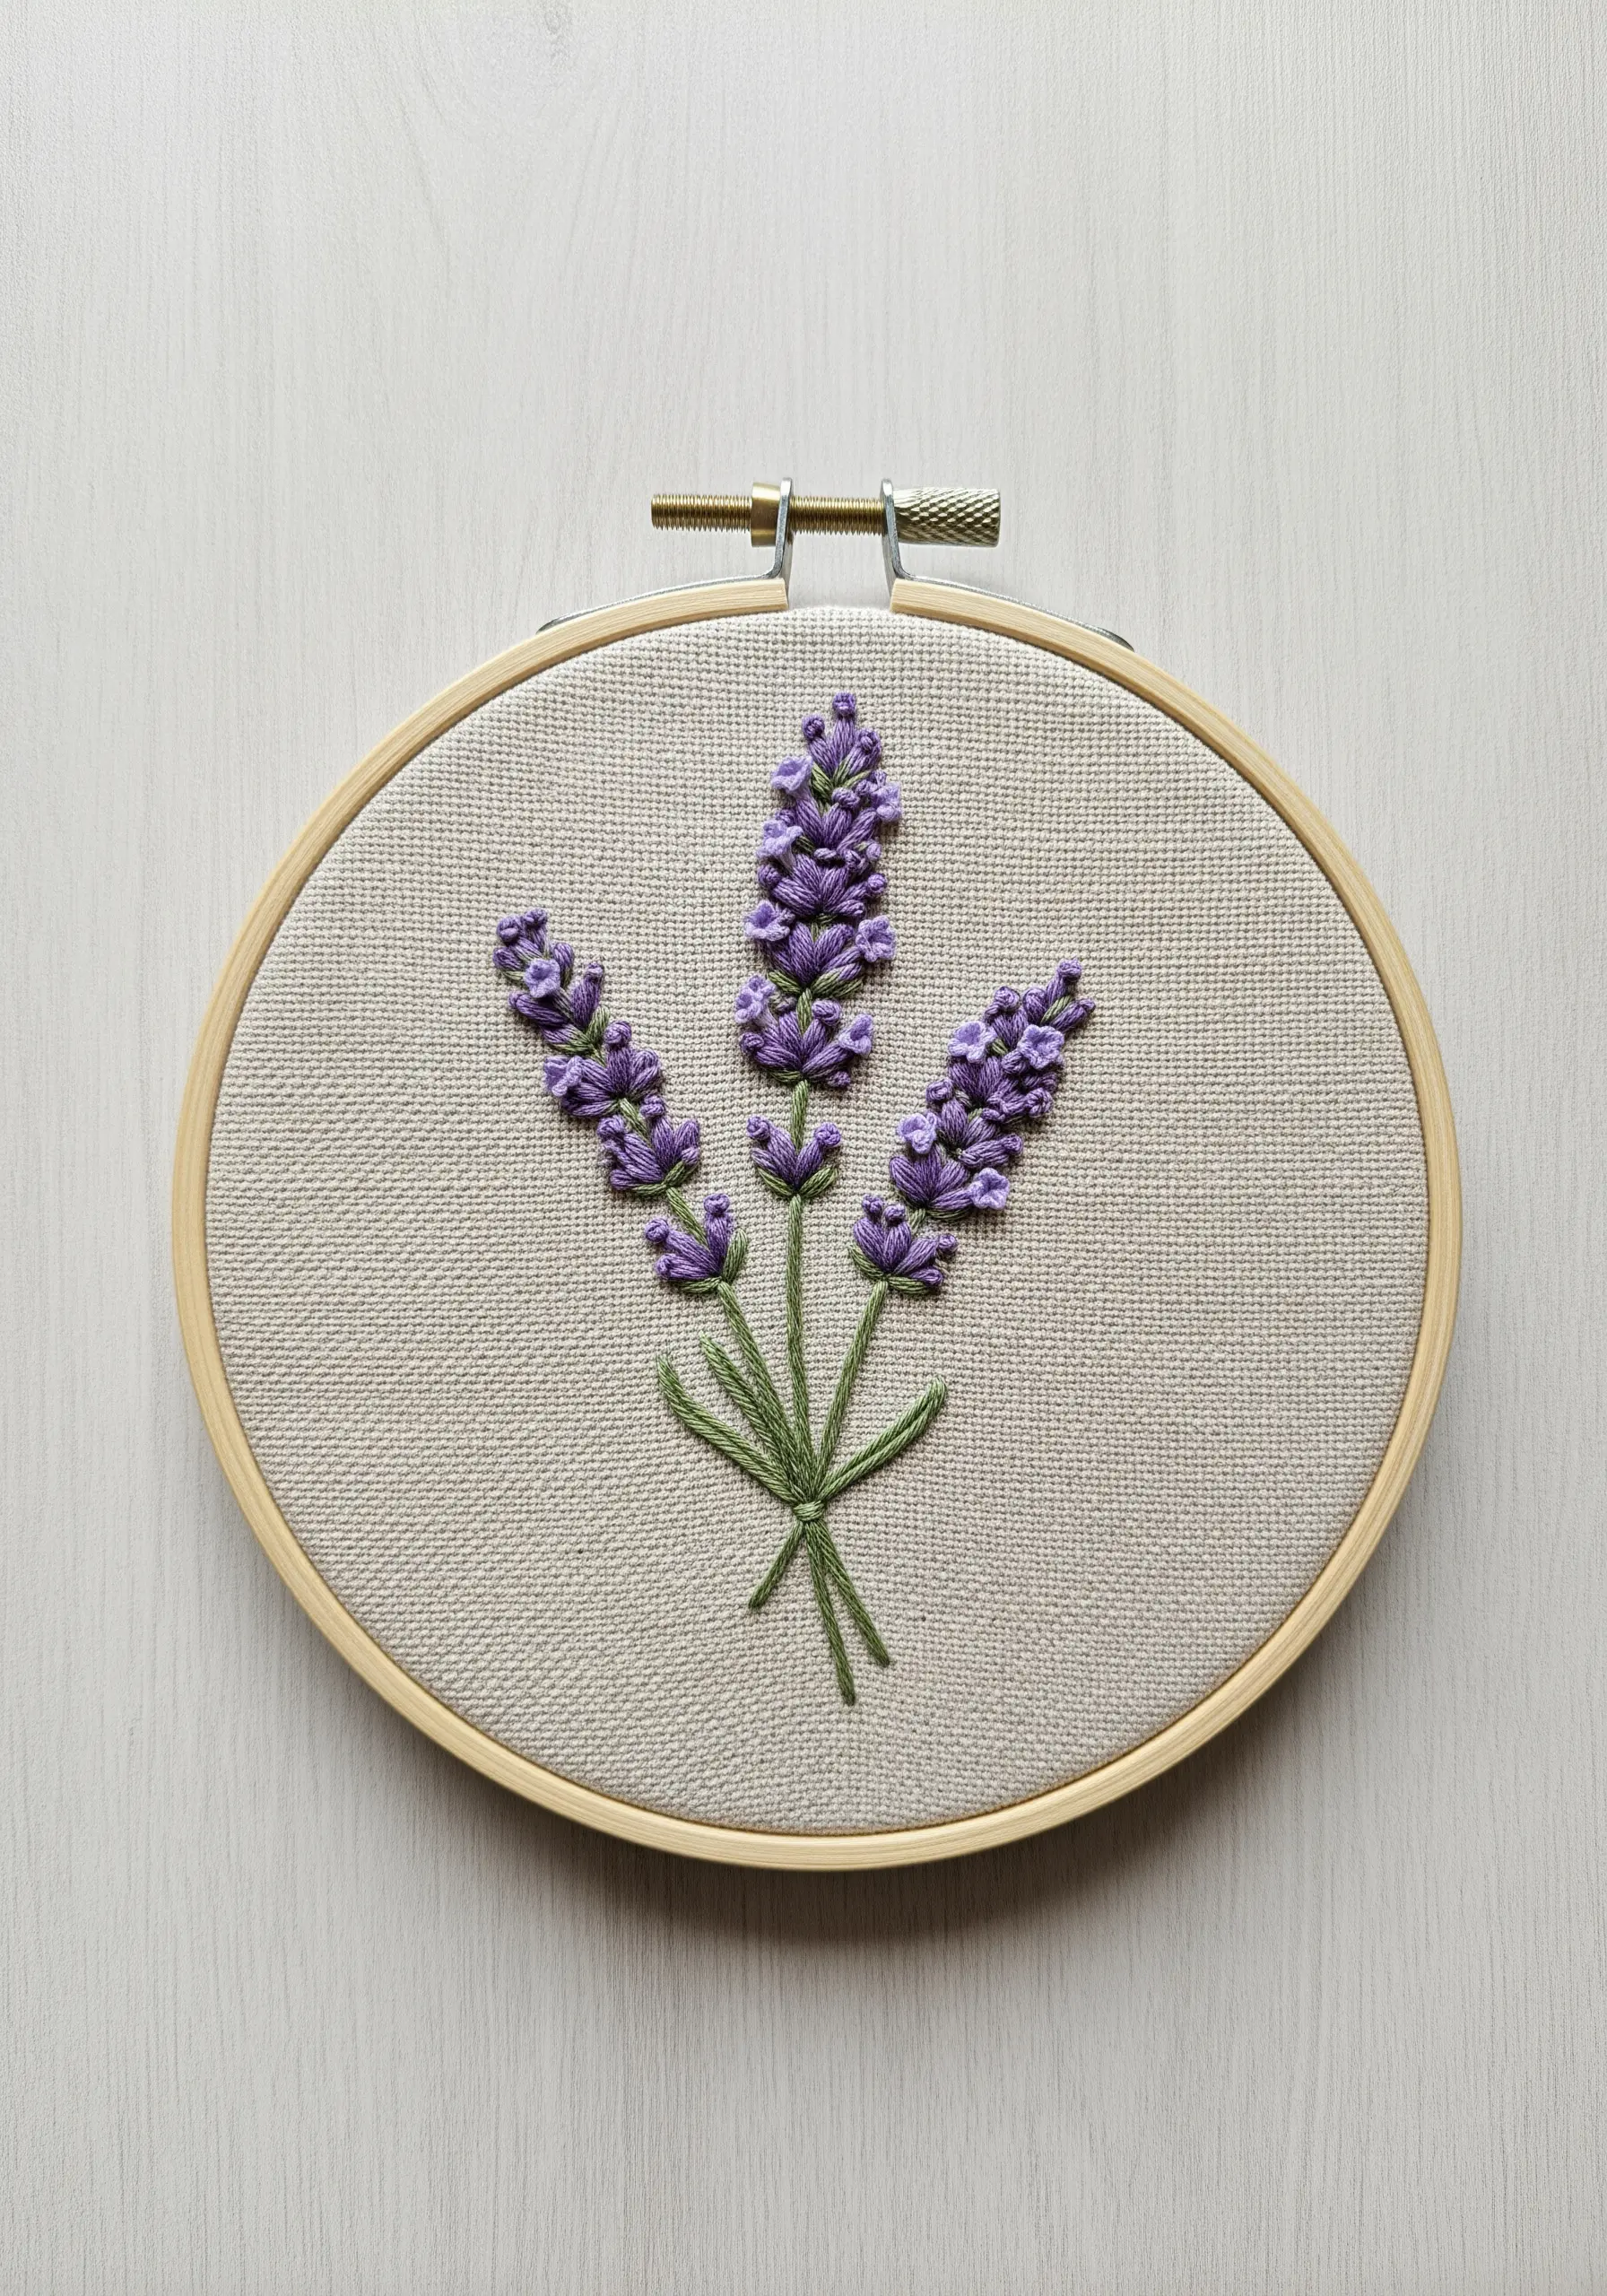
To give your lavender a realistic, raised texture, use French knots for the individual buds.
Vary the tightness and the number of times you wrap the thread around the needle (once or twice is enough) to create subtle differences in bud size.
Contrast the bumpy texture of the knots with clean, simple stem stitches for the stalks. This juxtaposition makes the floral heads pop.
Using three adjacent shades of purple and scattering them randomly will add visual depth and prevent the color from looking flat.
These lavender-inspired embroidery designs are perfect for creating a sense of calm in your space.
2. Mastering the Perfect Daisy Petal
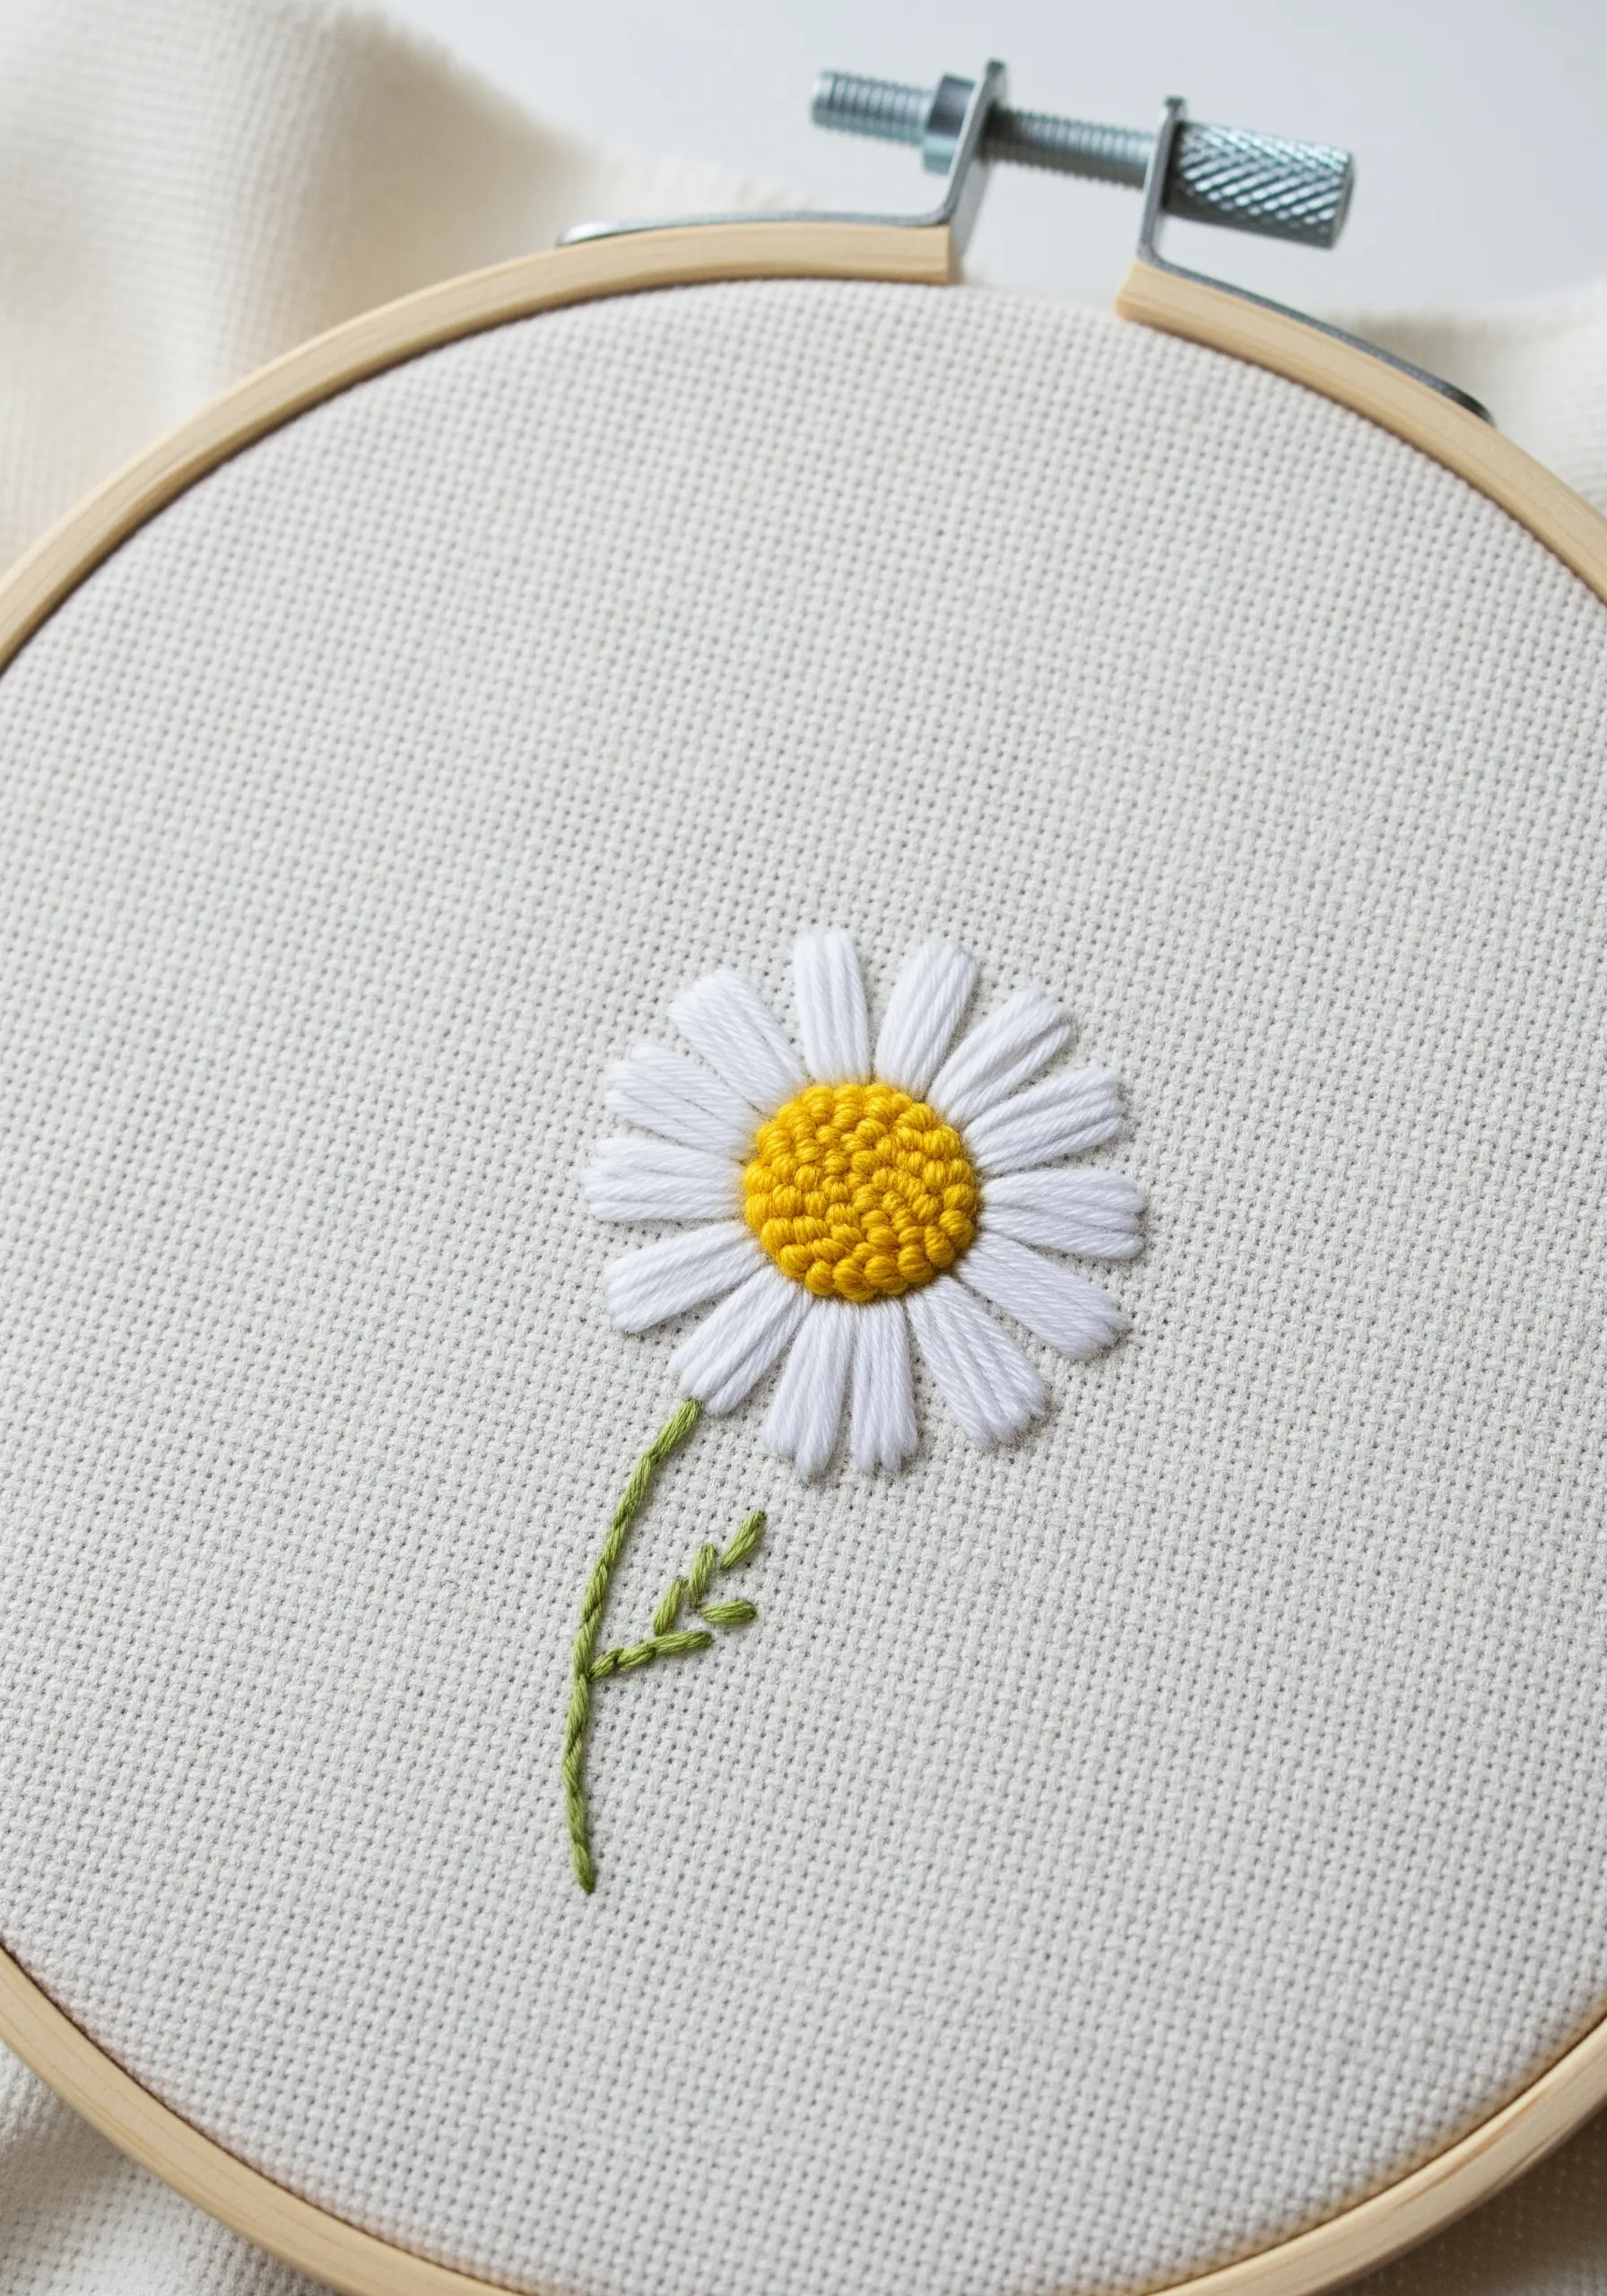
For exceptionally clean and uniform daisy petals, use a detached chain stitch, also known as a lazy daisy.
The key to a polished look is maintaining perfectly even tension for each stitch so the loops are identical in size.
For the center, fill the circle with tightly packed French knots using a contrasting color. This creates a dense, textural focal point that makes the smooth petals stand out even more.
Use a simple split stitch for the stem to create a delicate but defined line that doesn’t overwhelm the flower.
3. Embellishing Denim with Woven Wheel Roses
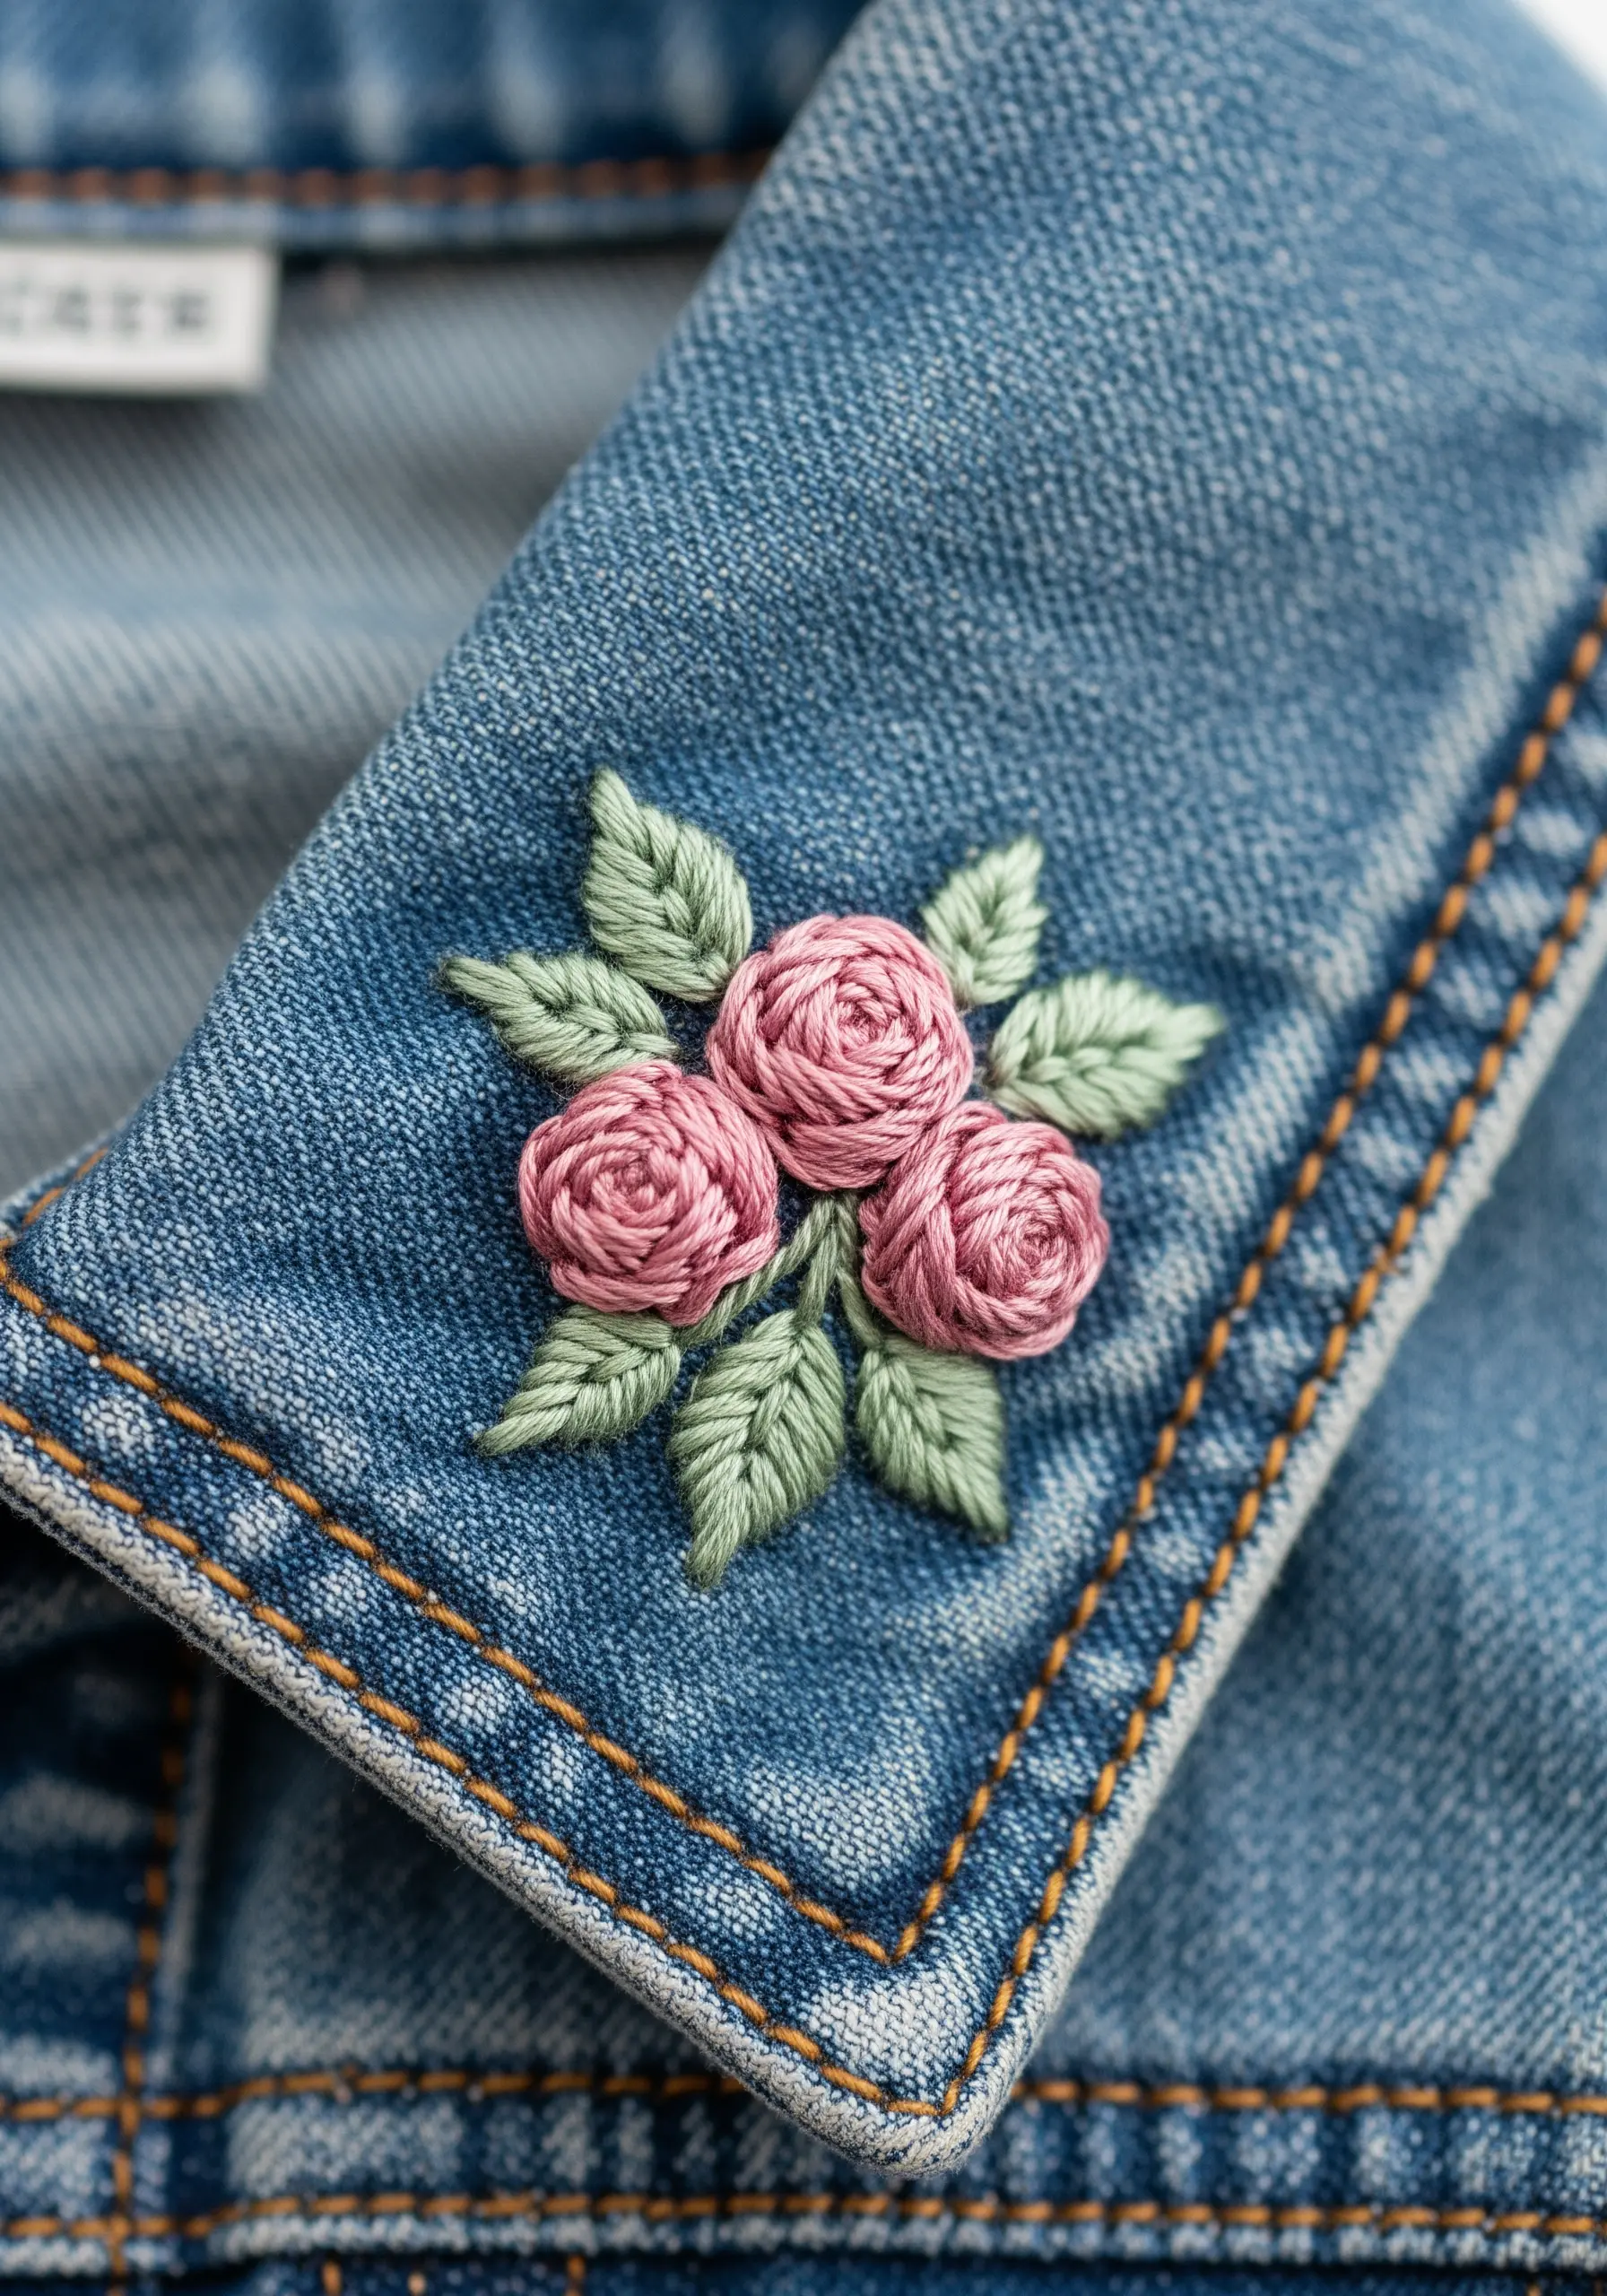
The woven wheel stitch is your best choice for creating dimensional roses on heavy fabrics like denim, where delicate stitches can get lost.
Create a foundation with five straight stitches forming a star, then weave your thread over and under these spokes without piercing the fabric.
Avoid pulling the thread too tightly; allow it to build upon itself to form a plush, raised rose that sits beautifully on the textured surface.
For the leaves, a fishbone stitch provides a clean shape with a built-in central vein, adding another layer of texture.
This is one of the most effective easy stitches that bring your plain denim jackets to life.
4. The Elegant Simplicity of a Leaf Wreath

To create a perfectly balanced and organic-looking wreath, use a light pencil or water-soluble marker to draw a circle as your guide.
Choose the fishbone stitch for your leaves. This stitch automatically creates a defined center line that mimics a natural leaf vein, adding subtle detail with minimal effort.
Slightly alter the angle of each leaf to create a sense of movement and avoid a look that is too rigid or symmetrical.
Using a single, rich shade of green thread results in a sophisticated and modern design that emphasizes form over color.
5. Capturing Whimsy with a Monochrome Dandelion
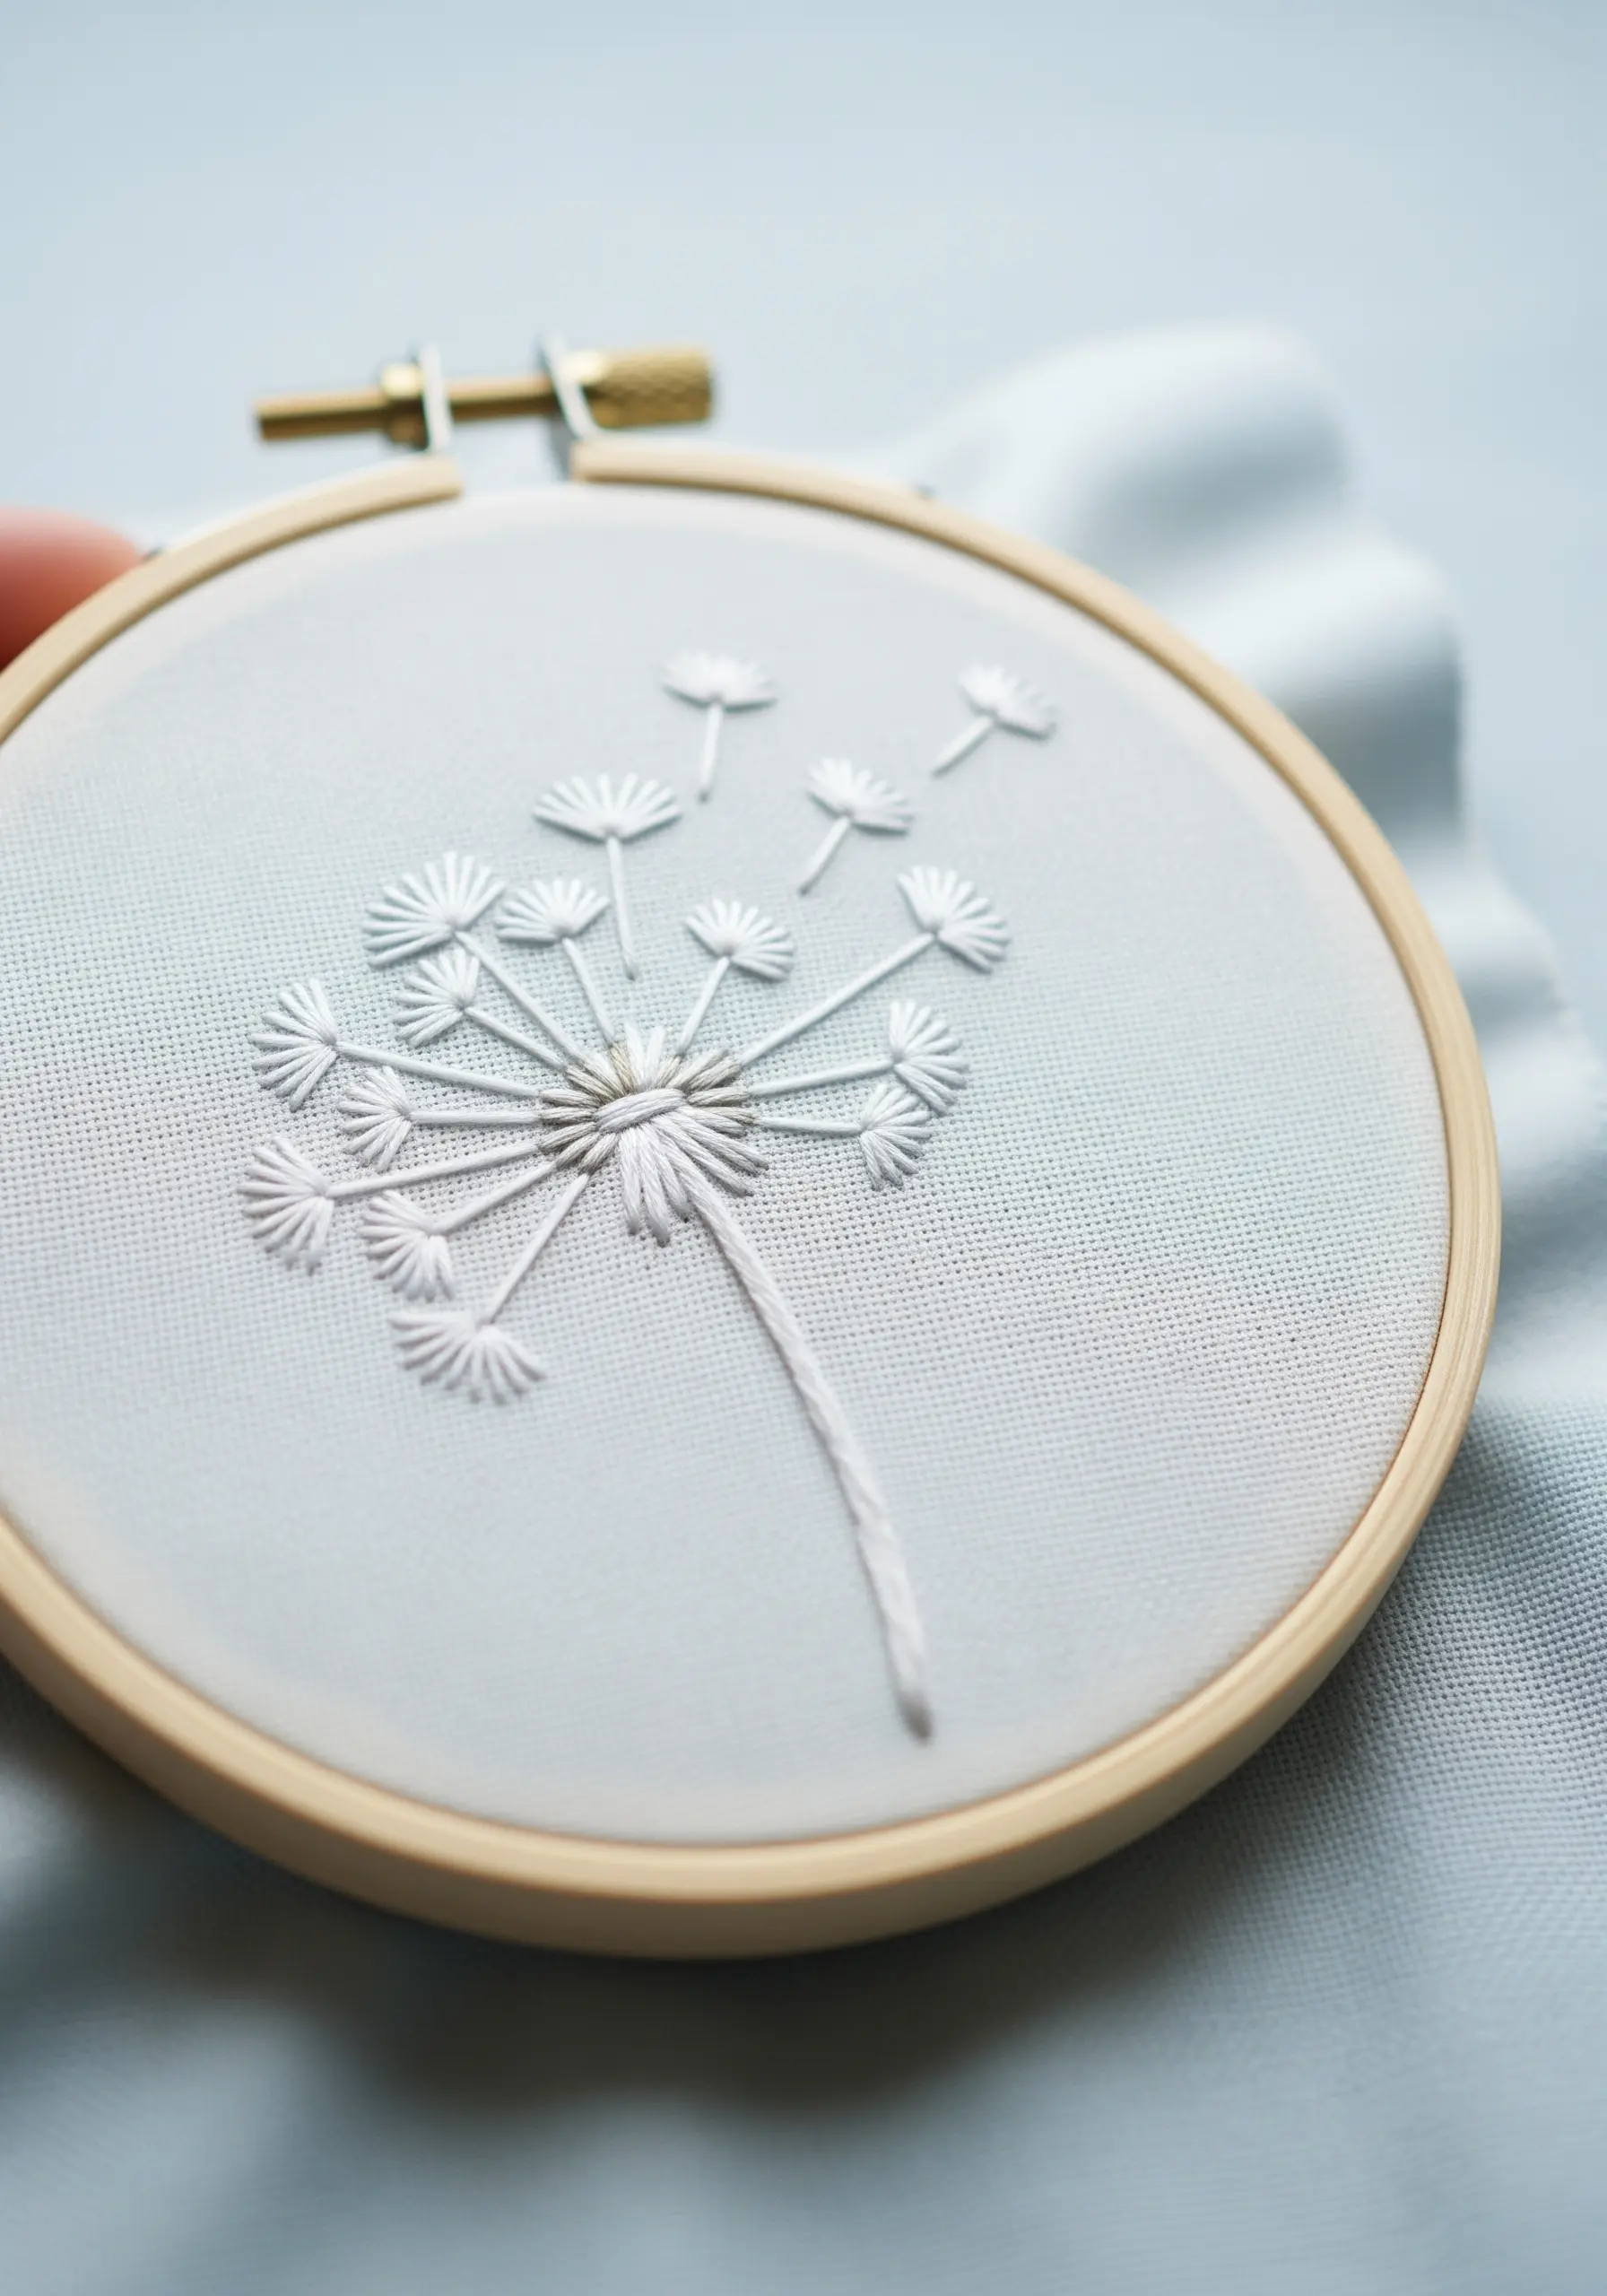
This design achieves its delicate, airy feel through a thoughtful combination of simple stitches in a single color.
Use detached chain stitches for the dandelion’s parachute-like seeds, connecting them to the center with long, fine straight stitches.
To give the stem substance without making it heavy, use a whipped backstitch. This technique wraps a second thread around a standard backstitch, creating a smooth, cord-like line.
Stitching white on white, or another tone-on-tone combination, creates an ethereal and sophisticated piece that focuses purely on texture and form.
6. Miniature Sunflower with Thread Painting
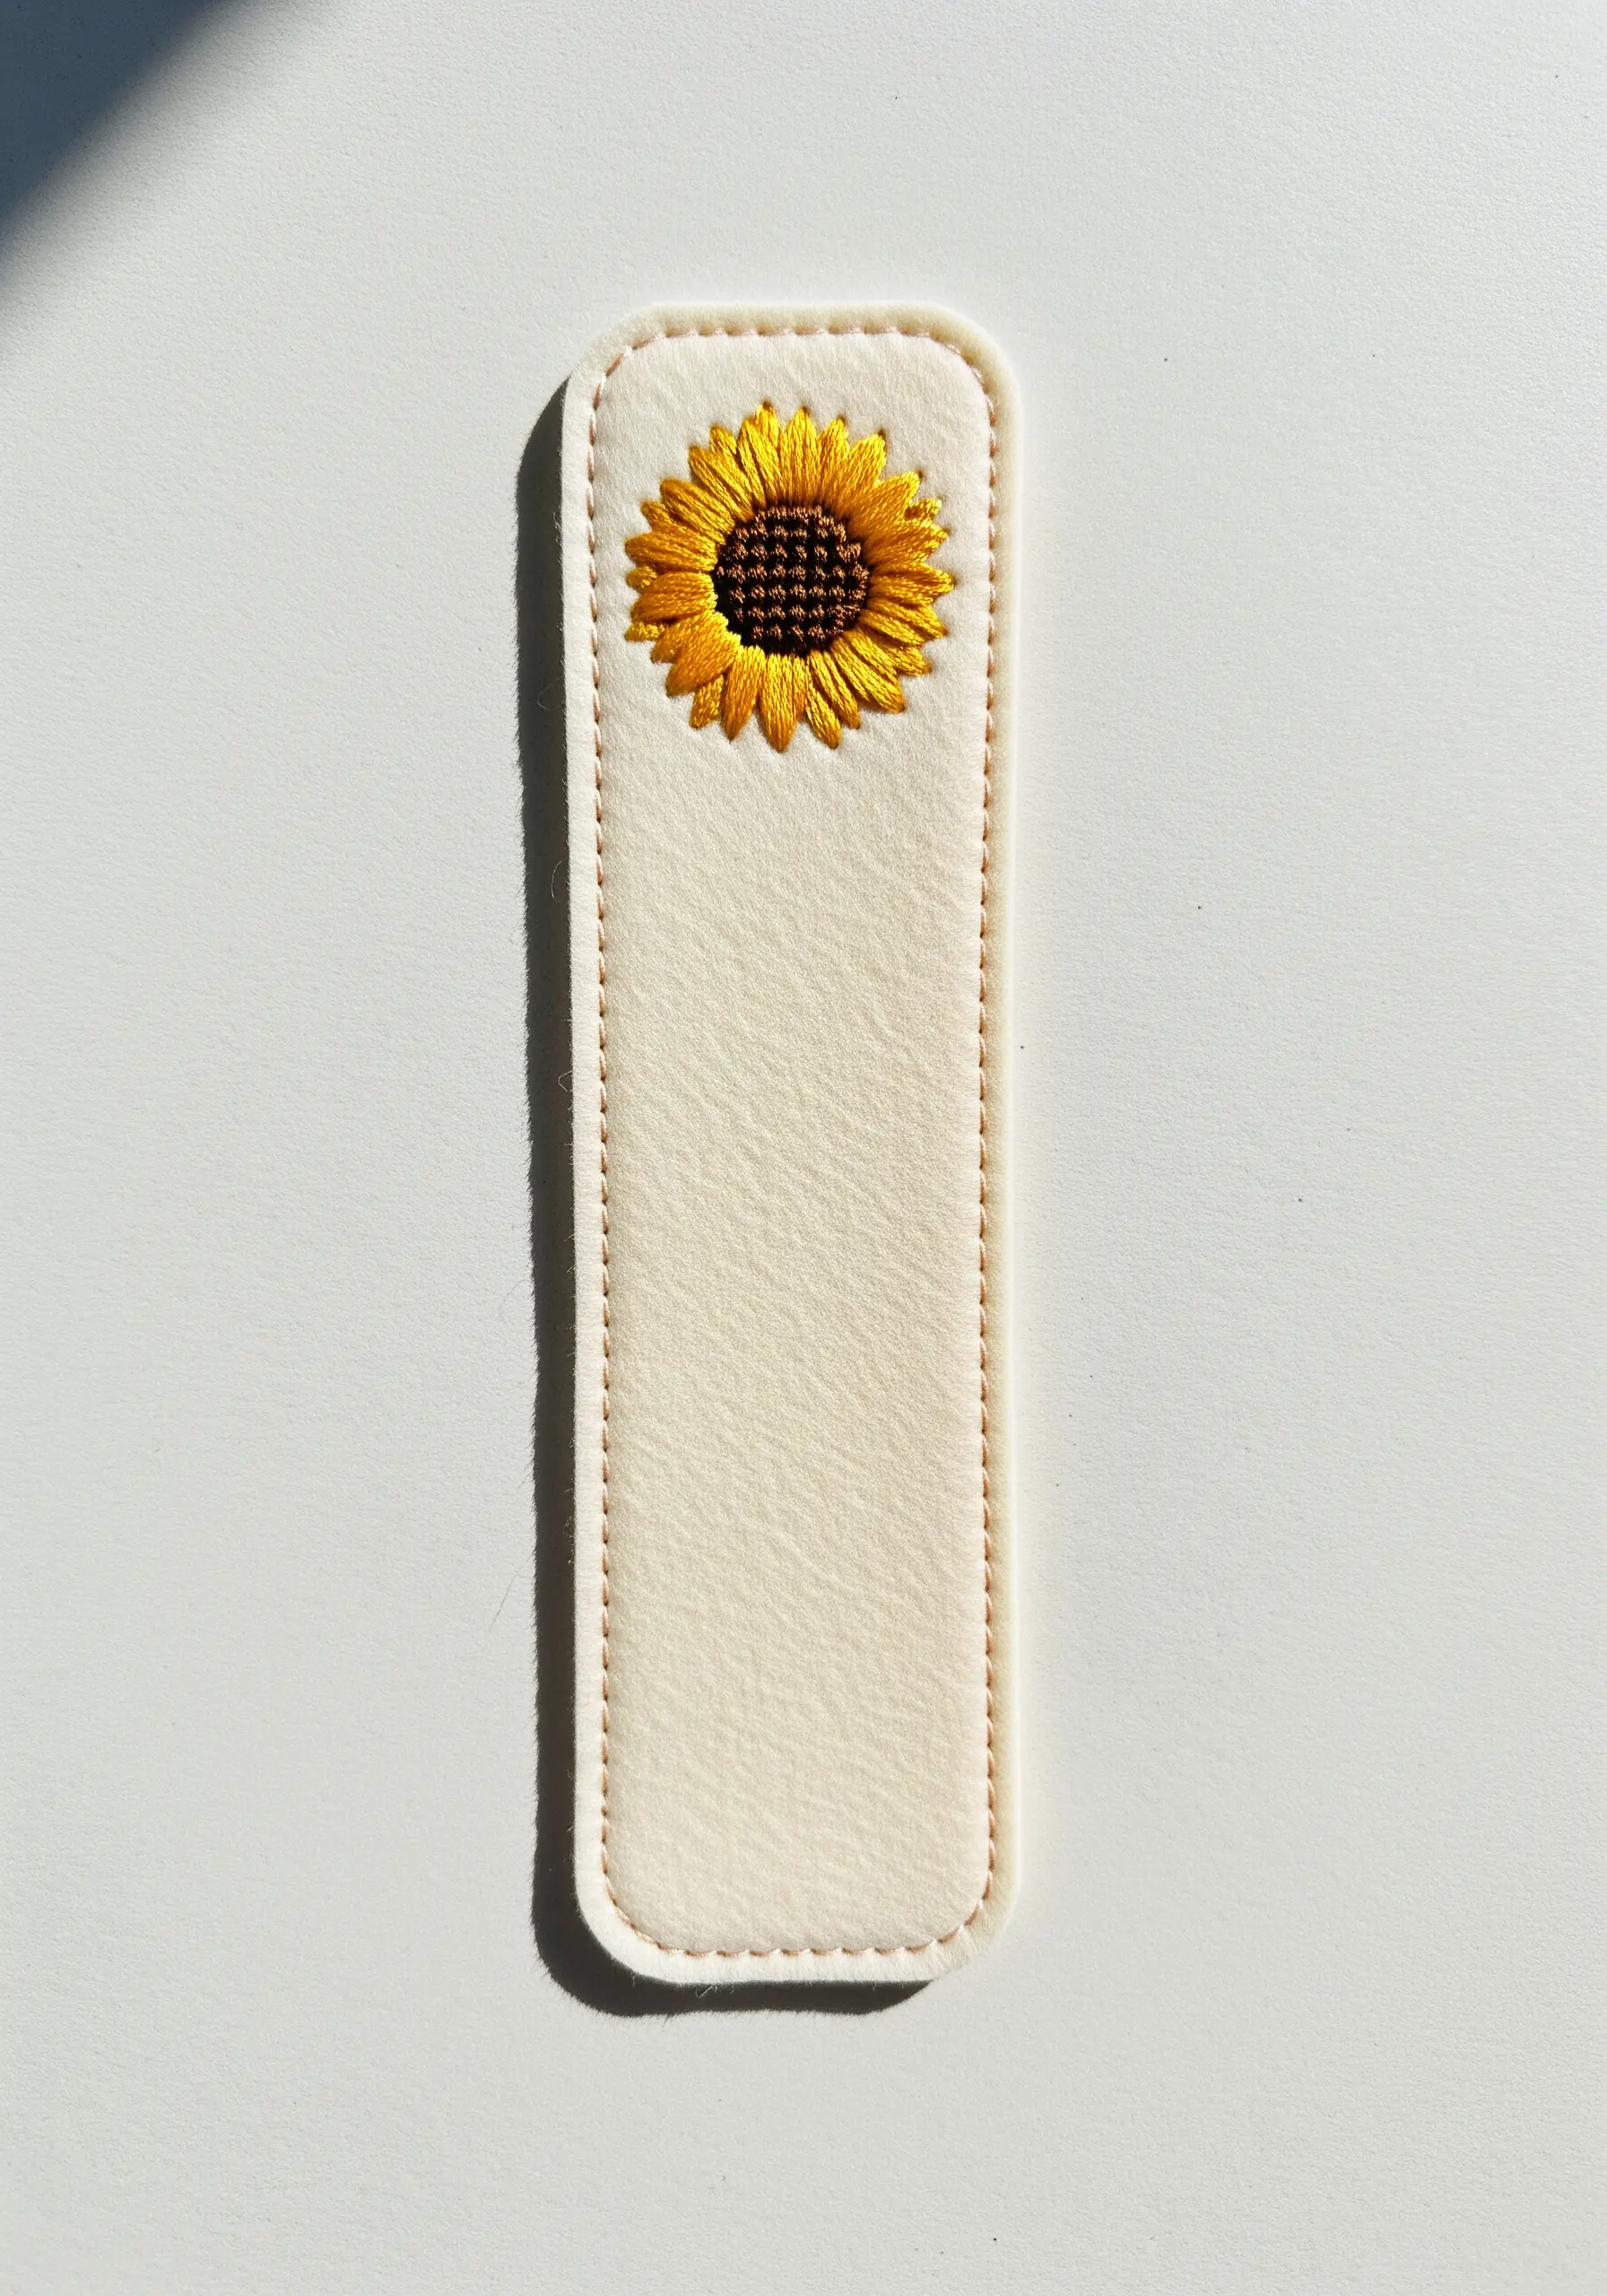
To achieve a realistic gradient on a small scale, you need to use the long-and-short stitch, often called ‘thread painting.’
Use a single strand of floss and blend three shades of yellow and gold, working from the dark center of the petals outwards to the lighter tips.
The stitches should be varied in length and overlap slightly to create a seamless blend, just like brushstrokes.
Stitching on a piece of firm felt provides a stable, non-fraying base perfect for functional items like bookmarks.
7. Modern Floral Line Art with a Bold Finish
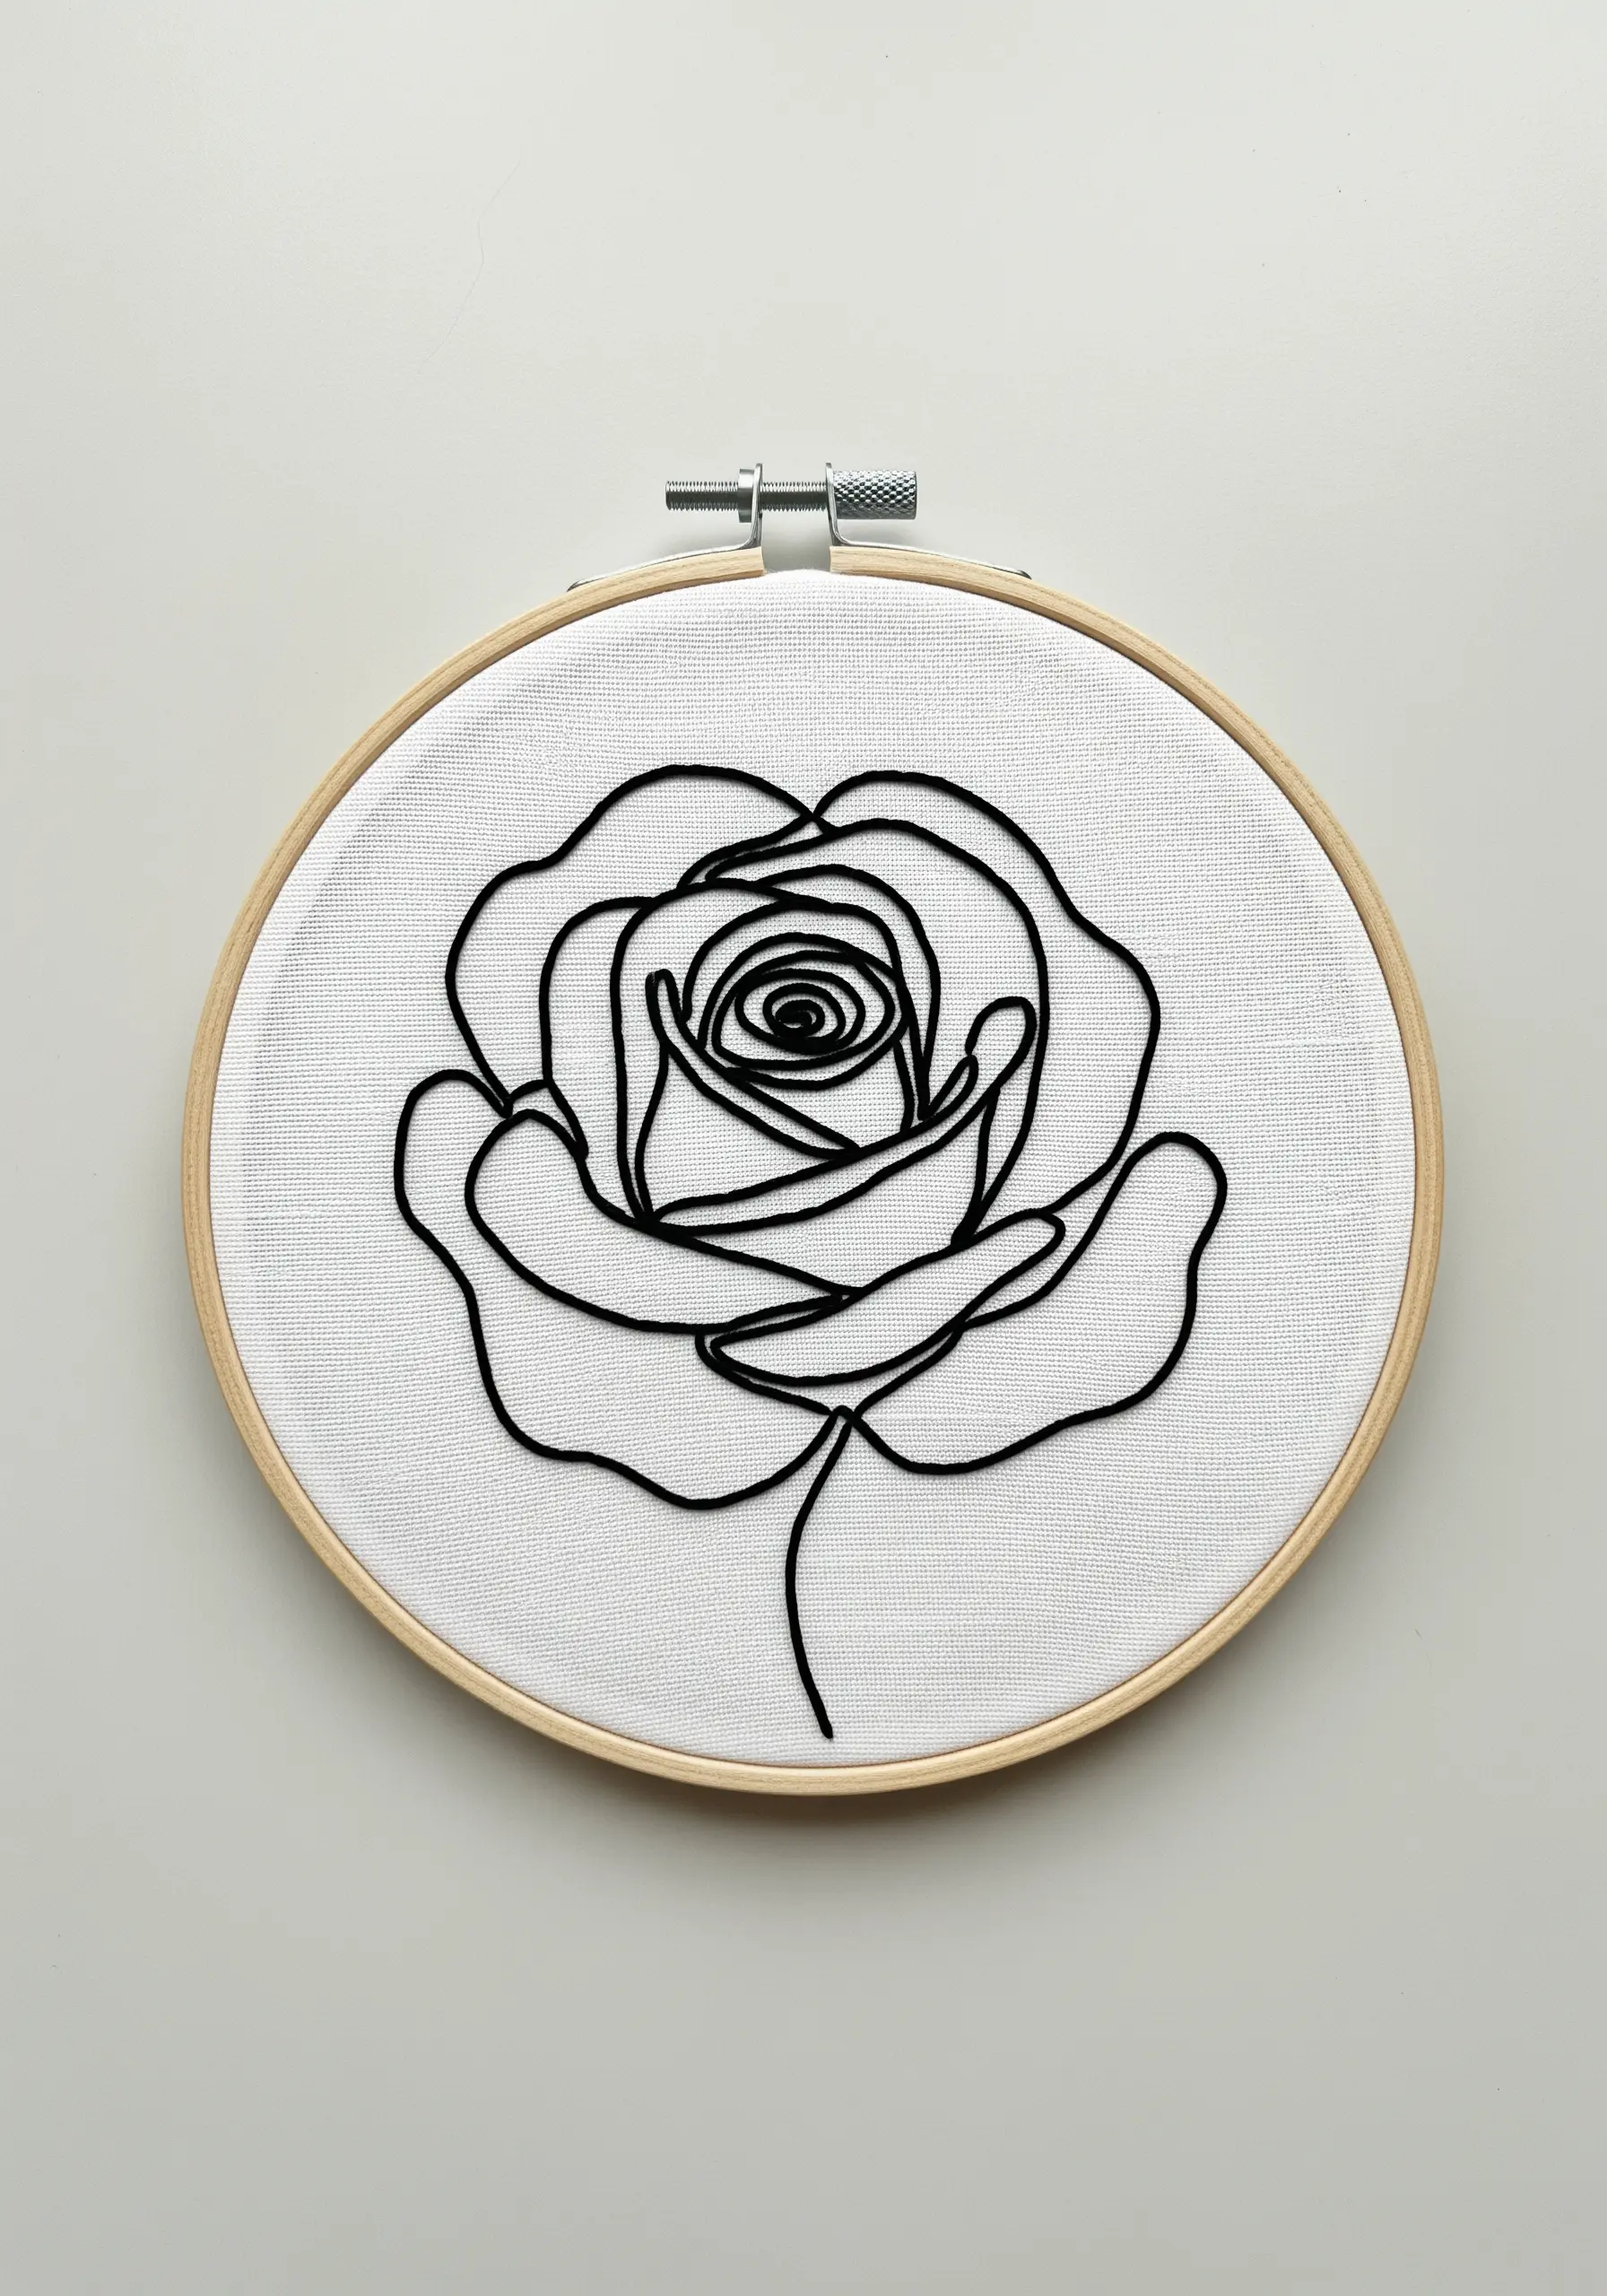
You can instantly elevate a simple line drawing by choosing a stitch that adds weight and presence.
Instead of a basic backstitch, use a heavier stitch like a chain stitch or a whipped backstitch to create this bold, continuous line.
Use all six strands of your embroidery floss, or even a thicker thread like Perle cotton, to give the design a graphic, almost sculptural quality.
This approach transforms simple outlines into confident abstract line art embroidery styles that make a statement.
8. Delicate Forget-Me-Nots on Fine Linen
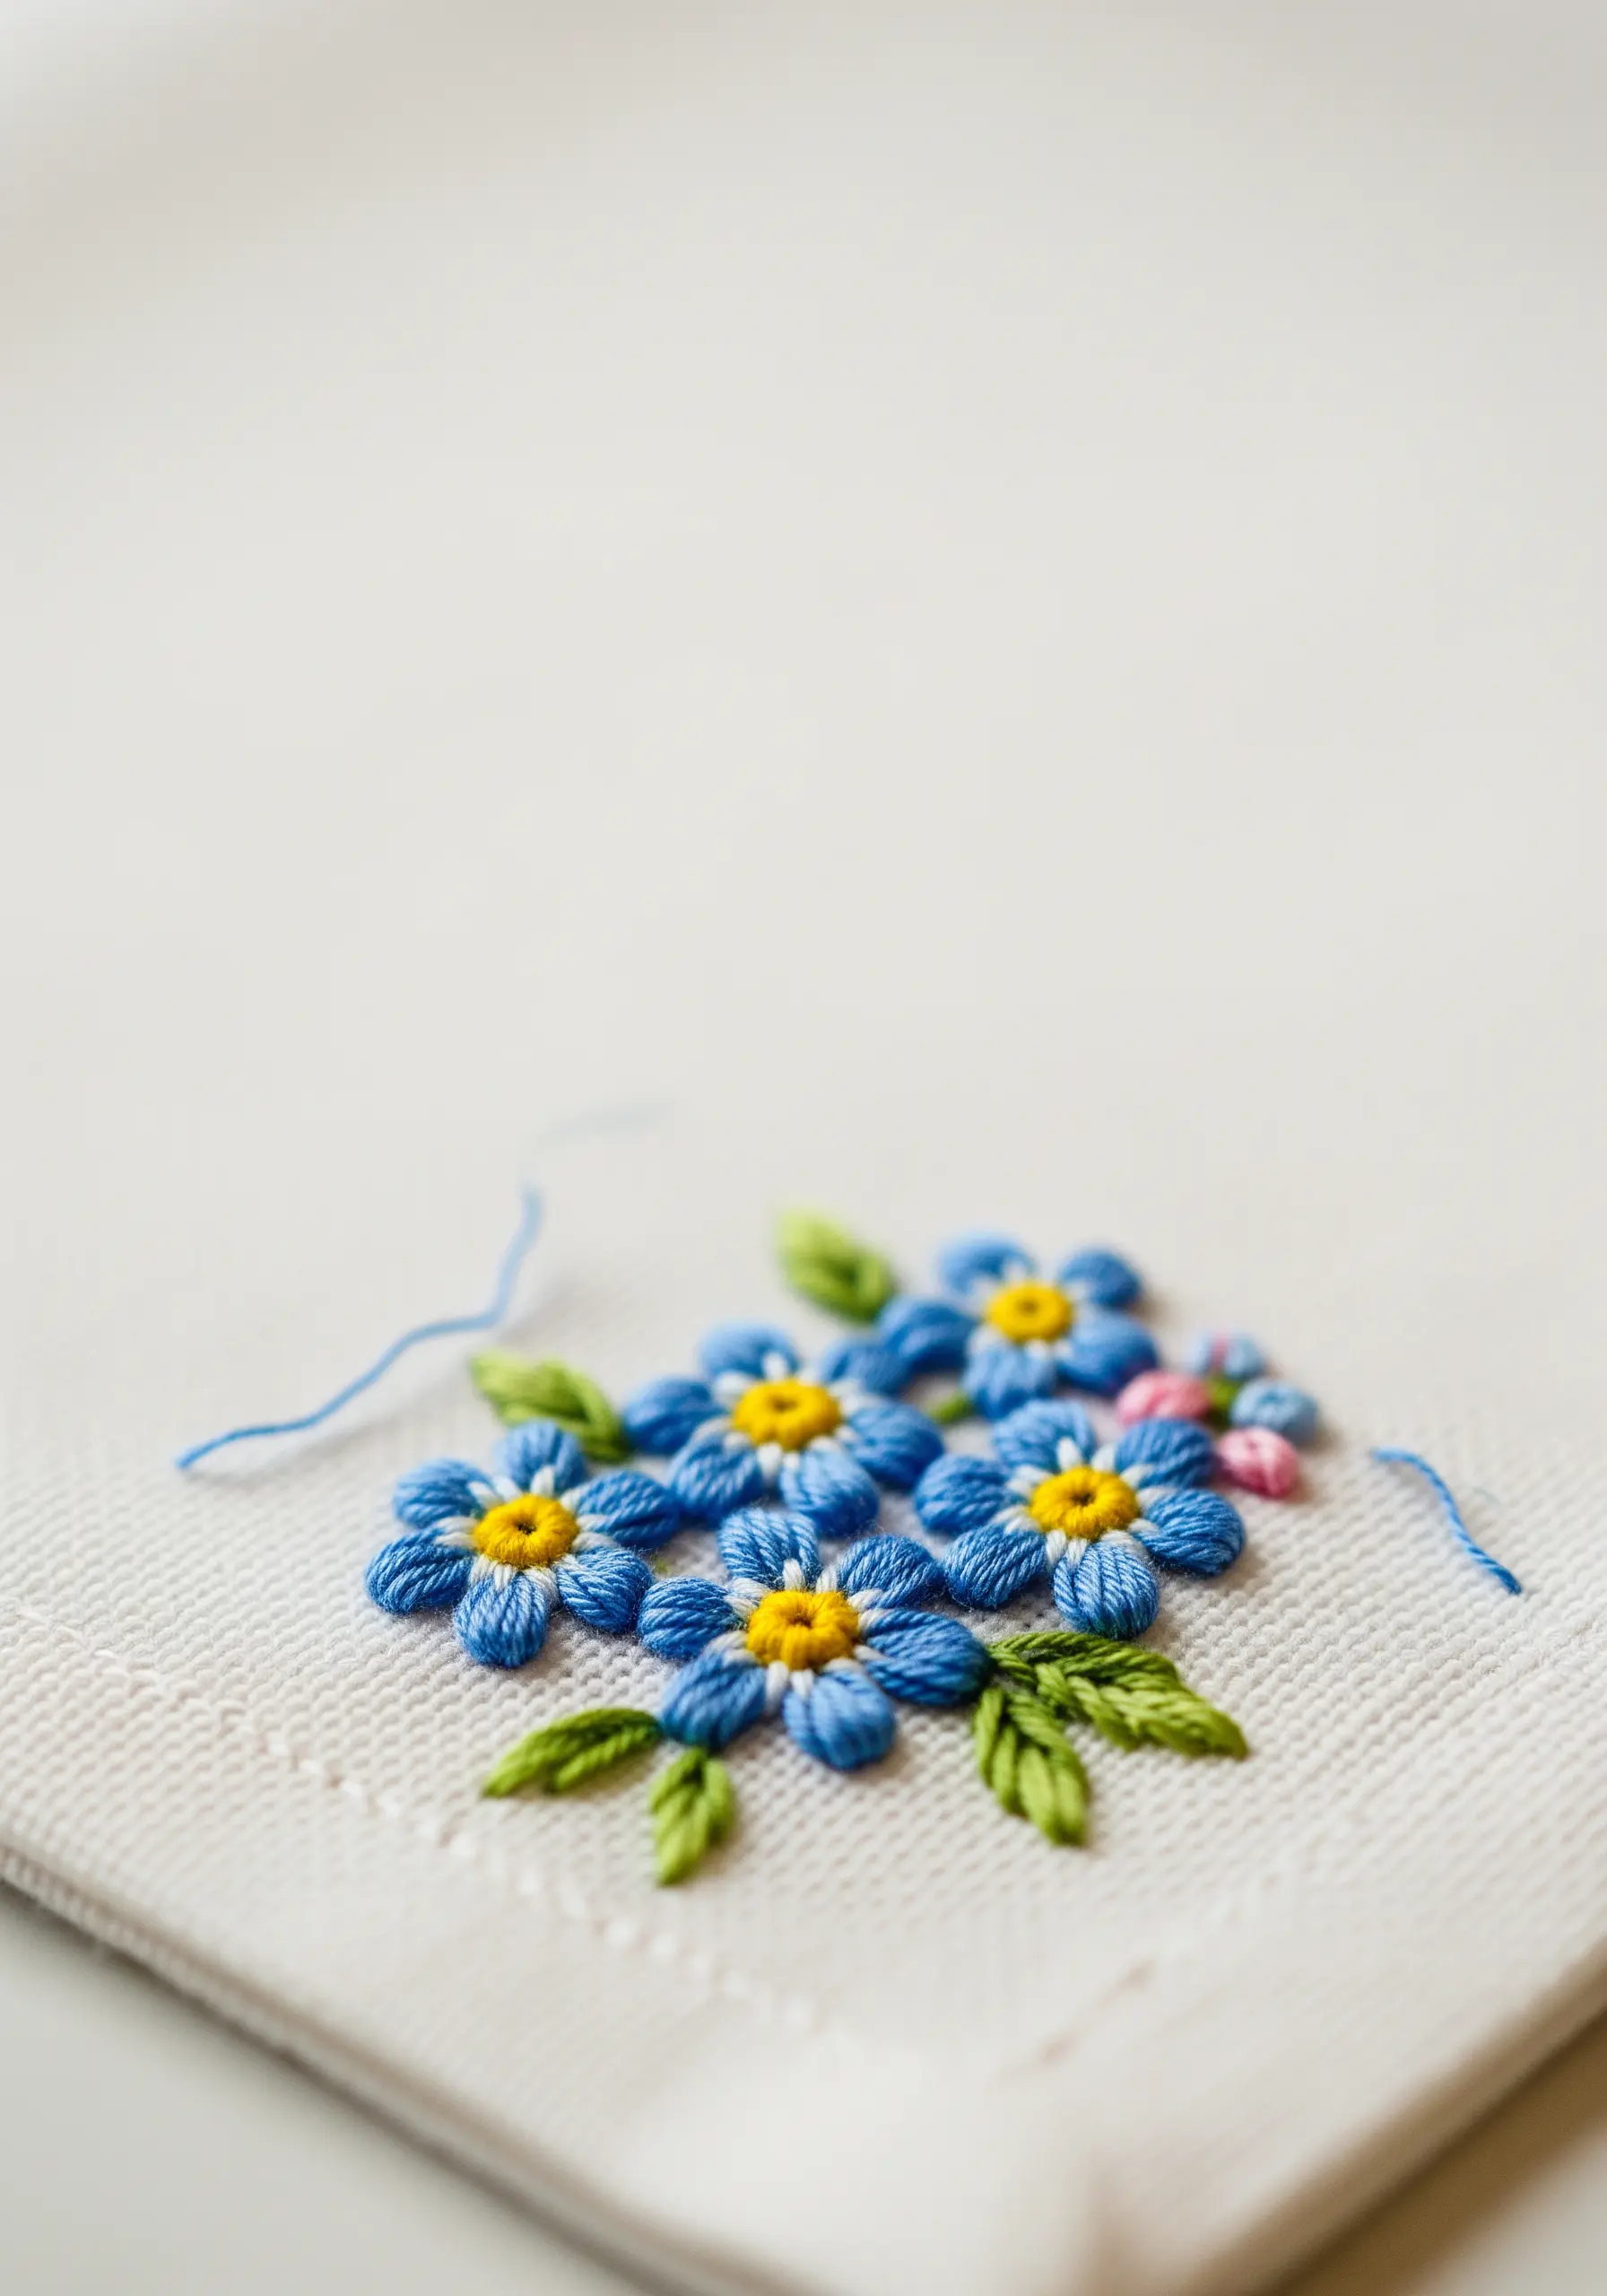
This classic floral is surprisingly simple to create. Use five individual detached chain stitches (lazy daisies) arranged in a pinwheel shape for the petals.
A single, bright yellow French knot placed in the center immediately defines the flower and adds a pop of contrasting color.
Stitching on a fabric with a visible weave, like linen or a cotton-linen blend, adds an heirloom quality and enhances the design’s delicate charm.
This is a perfect motif for adding a personal touch to the corner of a napkin or handkerchief.
9. A Minimalist Study in Satin Stitch
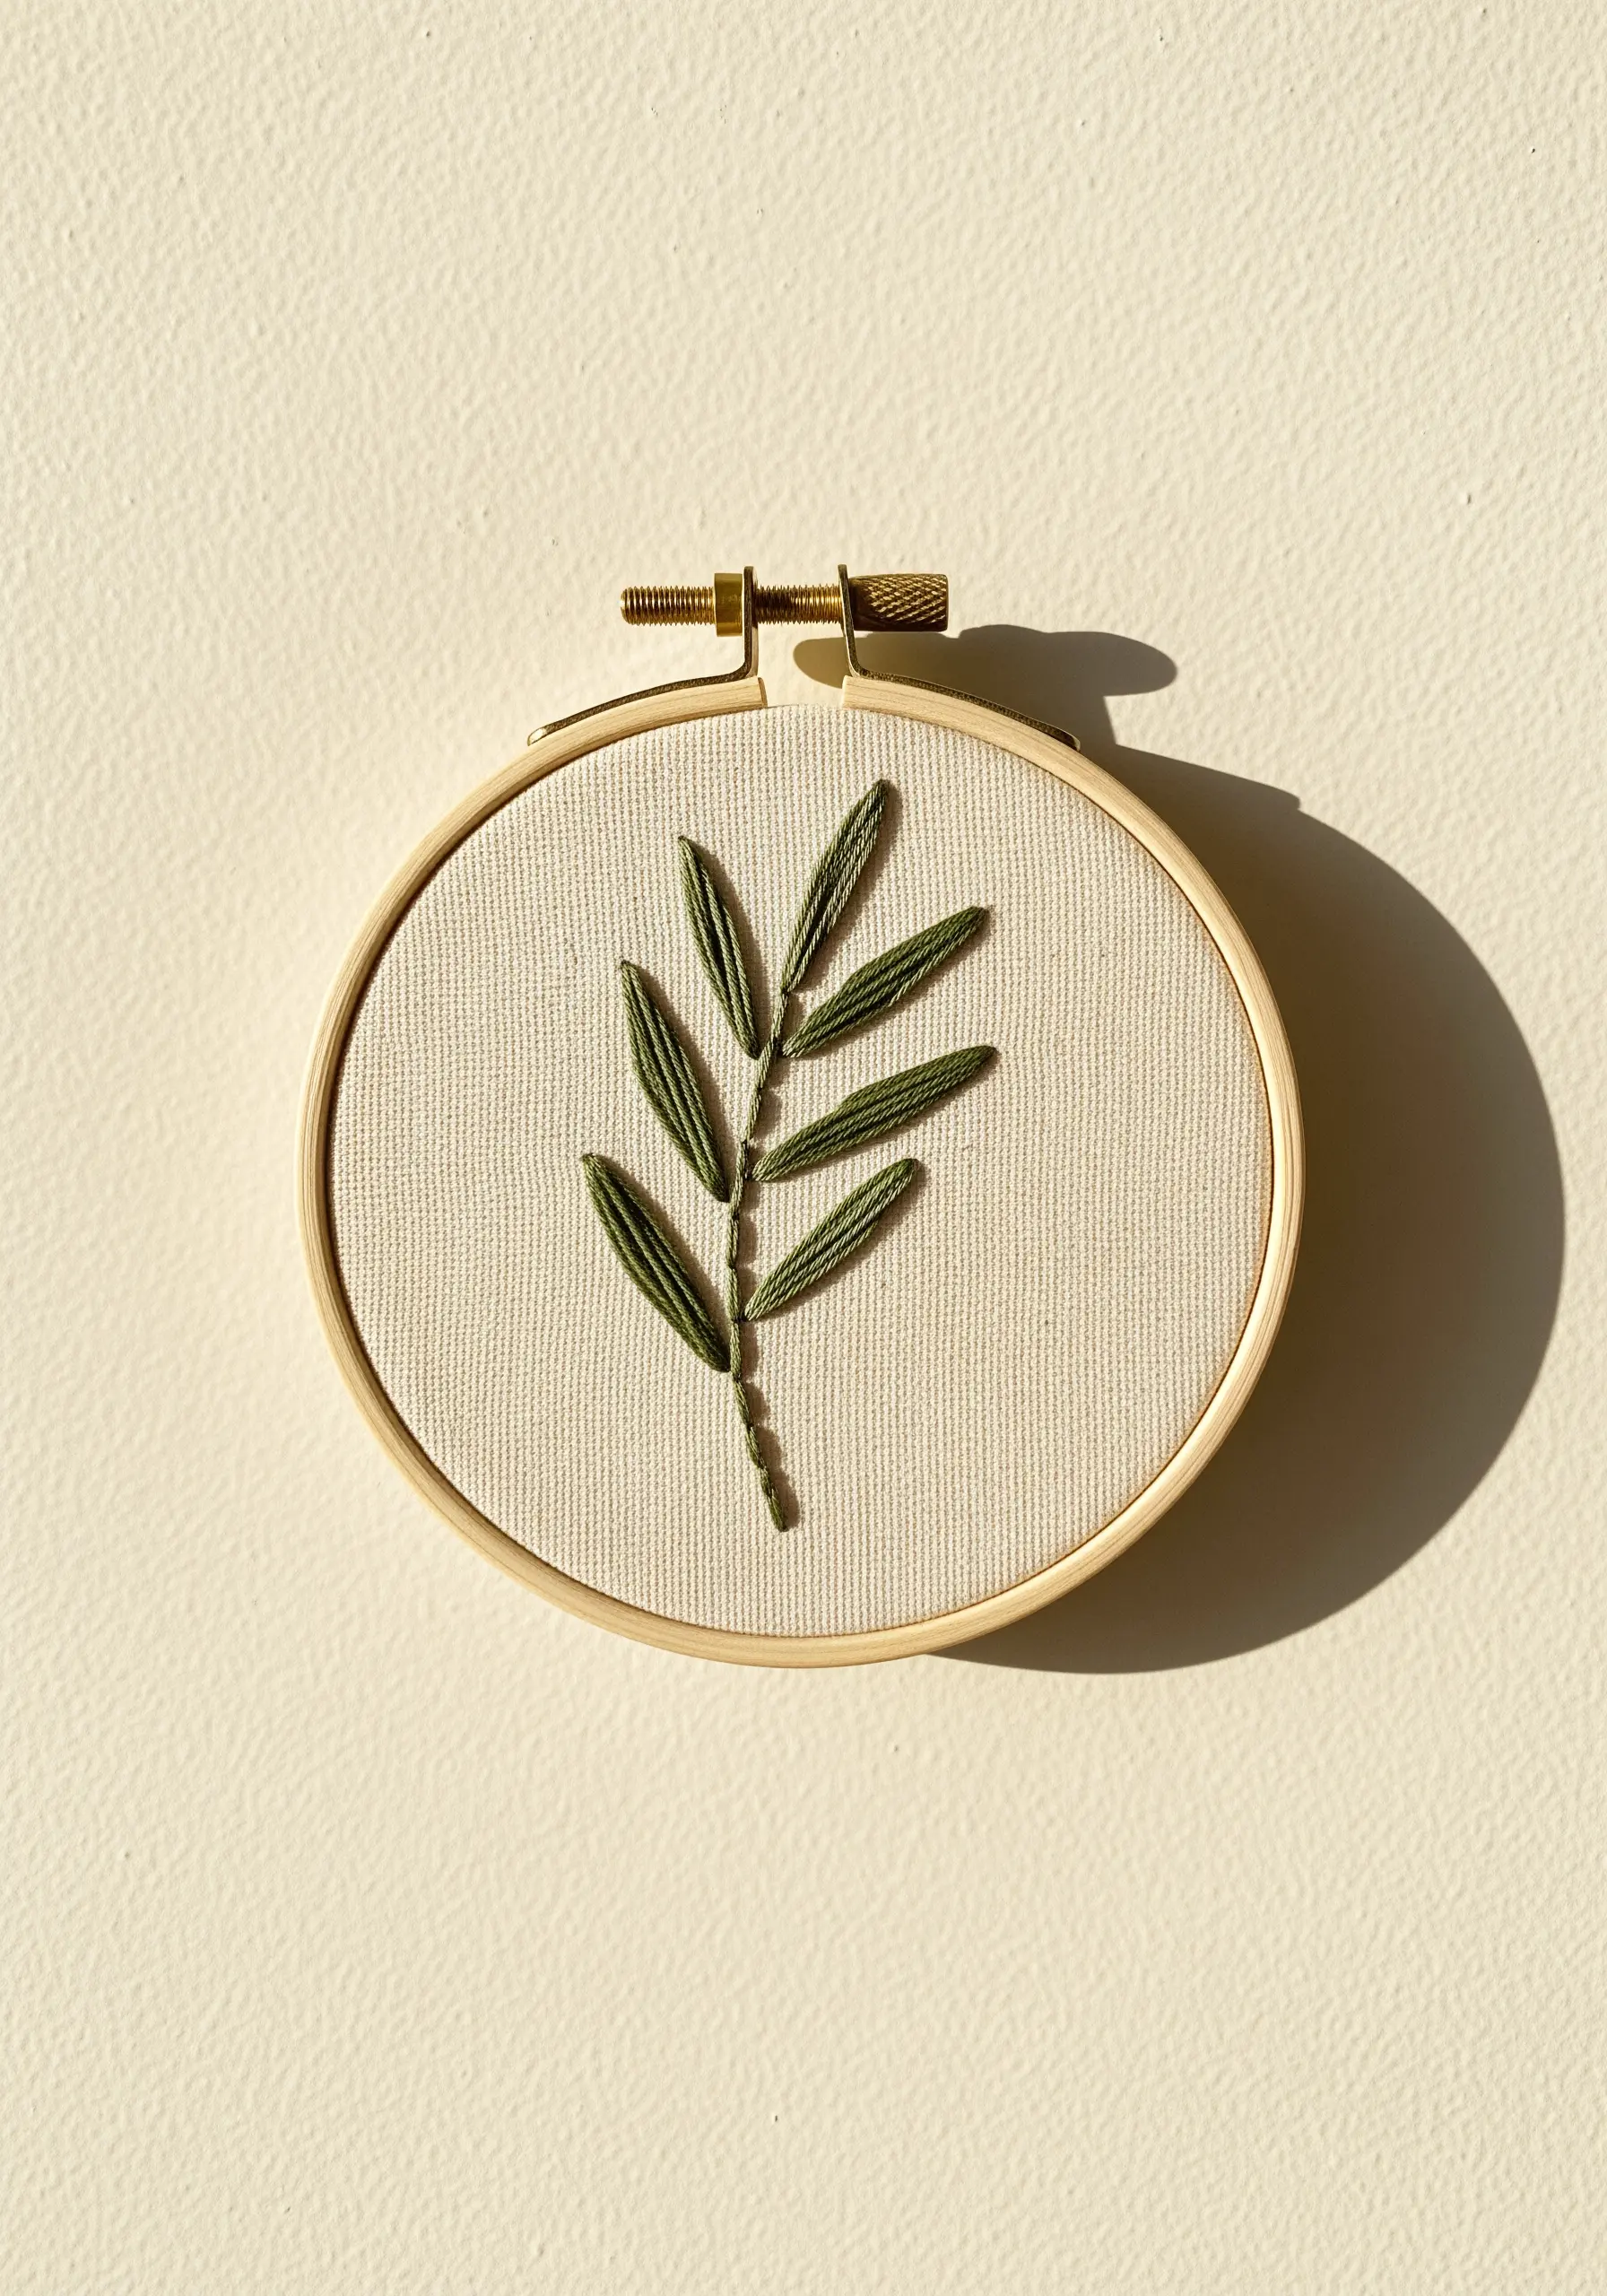
This simple branch is an excellent exercise in mastering the satin stitch. The goal is to create leaves that are smooth, dense, and uniform.
To achieve this, keep your stitches parallel and very close together, ensuring the thread lays flat against the fabric with even tension.
Slightly varying the angle of the stitches for each leaf will give the branch a more organic, less static appearance.
This is one of the most satisfying minimalist small hoop designs you can stitch in under one hour tonight.
10. Geometric Florals with Color Blocking
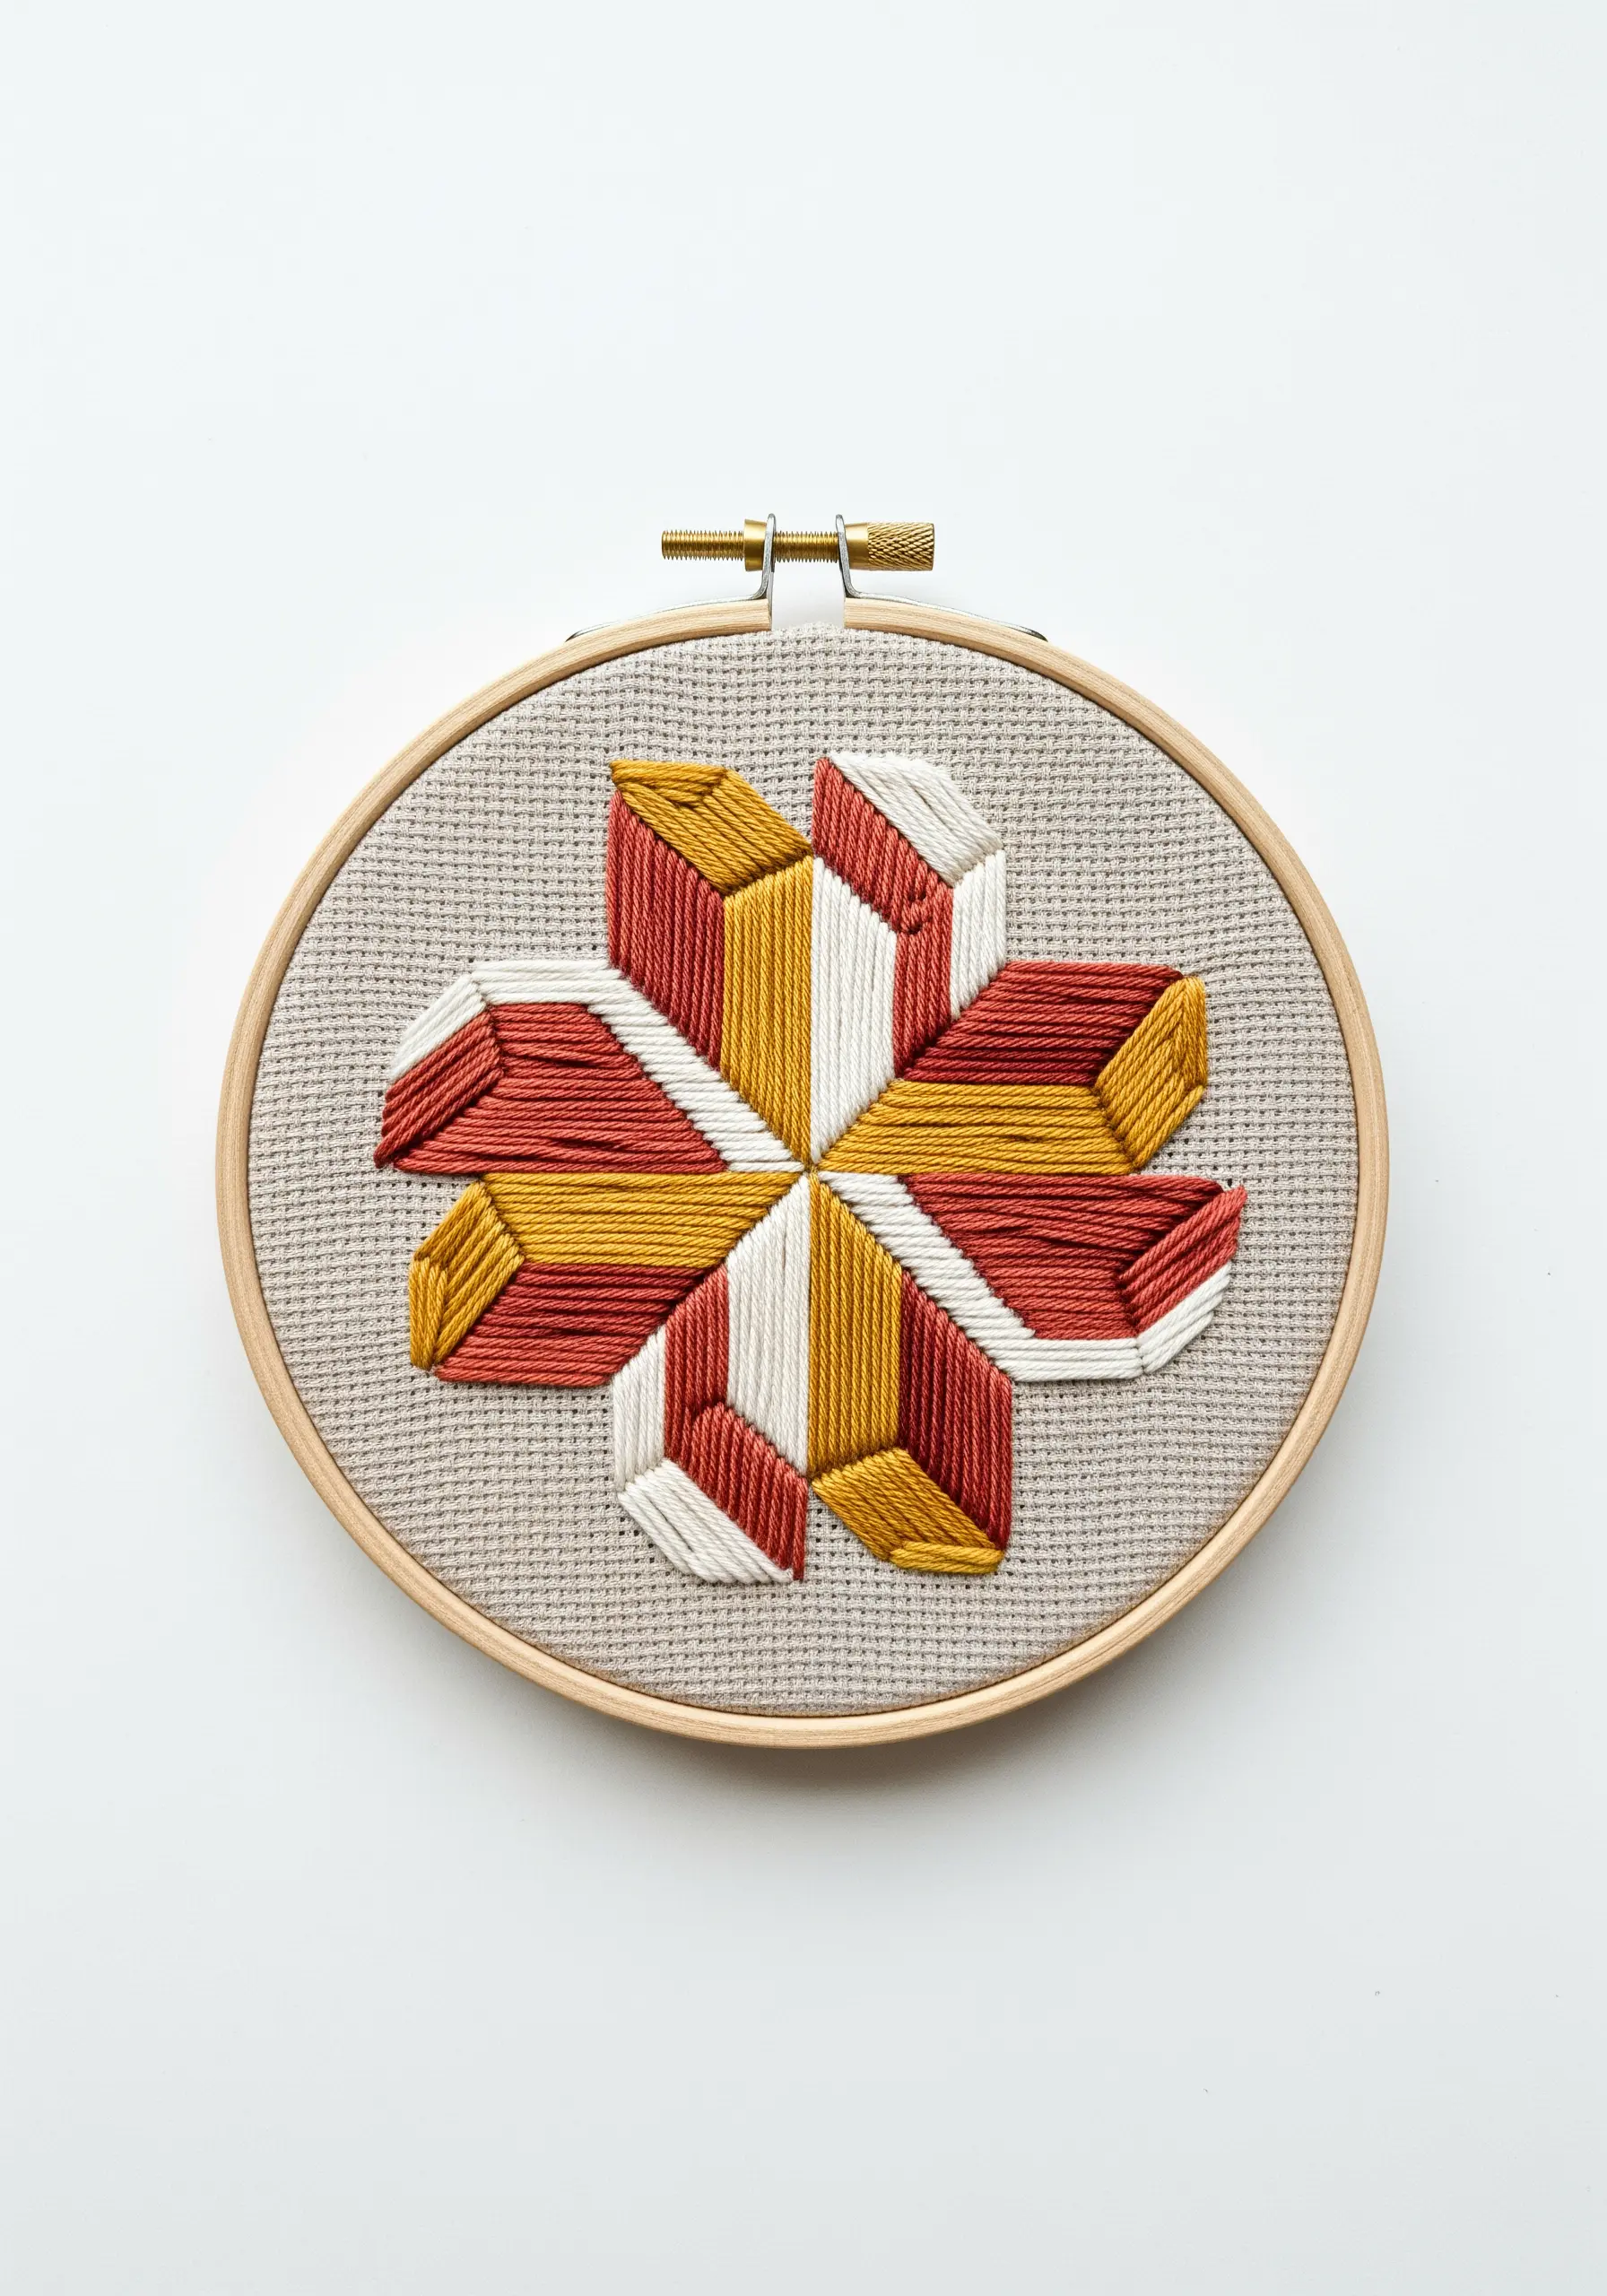
This design reimagines a flower as a series of geometric planes, relying on satin stitch and bold color choices.
To achieve those perfectly crisp edges between color blocks, first outline each shape with a split stitch.
This creates a slightly raised border that your satin stitches can tuck up against, guaranteeing a clean, sharp line that makes the geometric form pop.
A limited, high-contrast color palette of three or four shades enhances the modern, graphic quality of the piece.
11. A Soft Pastel Wildflower Bouquet
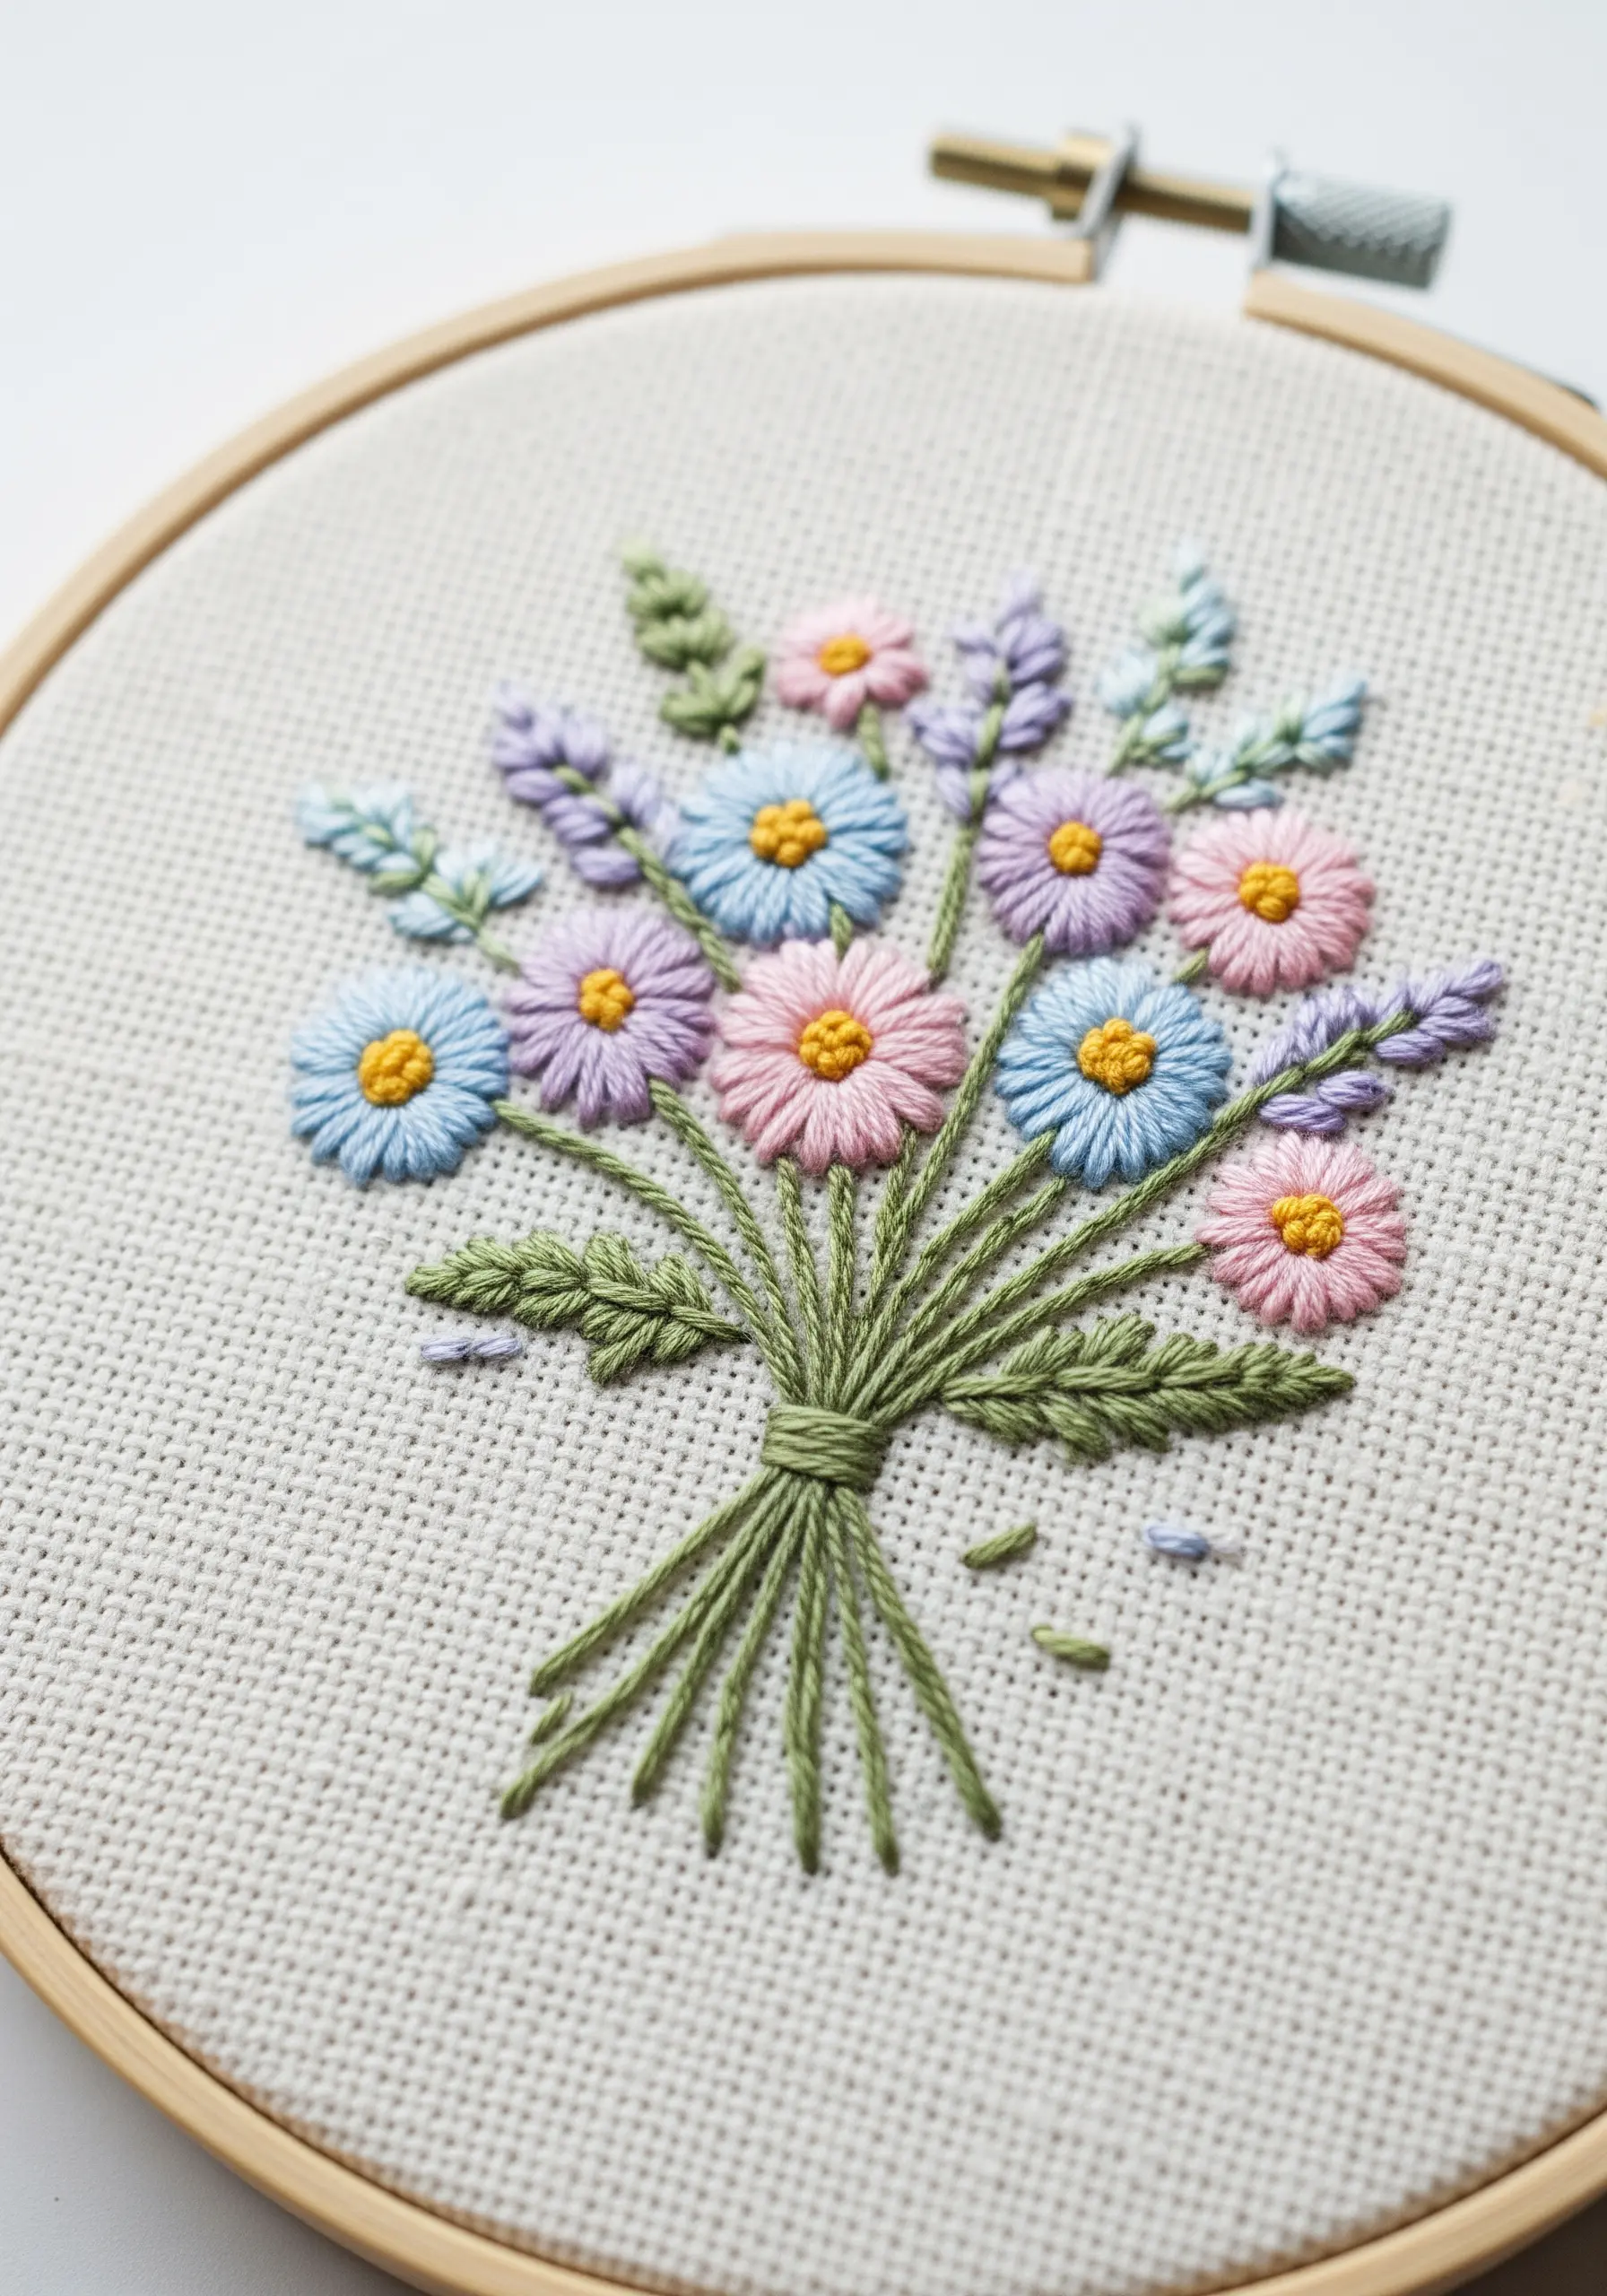
You can create a bouquet with beautiful variety and texture by combining just a few basic stitches.
Use lazy daisy stitches for the round flowers, French knots for the lavender-like sprigs, and fishbone stitch for the filler leaves.
Group the stems together at the base and secure them with a series of closely packed straight stitches to create the look of a hand-tied bouquet.
The soft, harmonious pastel palette ensures that even with multiple stitch types, the overall composition feels cohesive and gentle.
12. The Bold Impact of a Layered Poppy
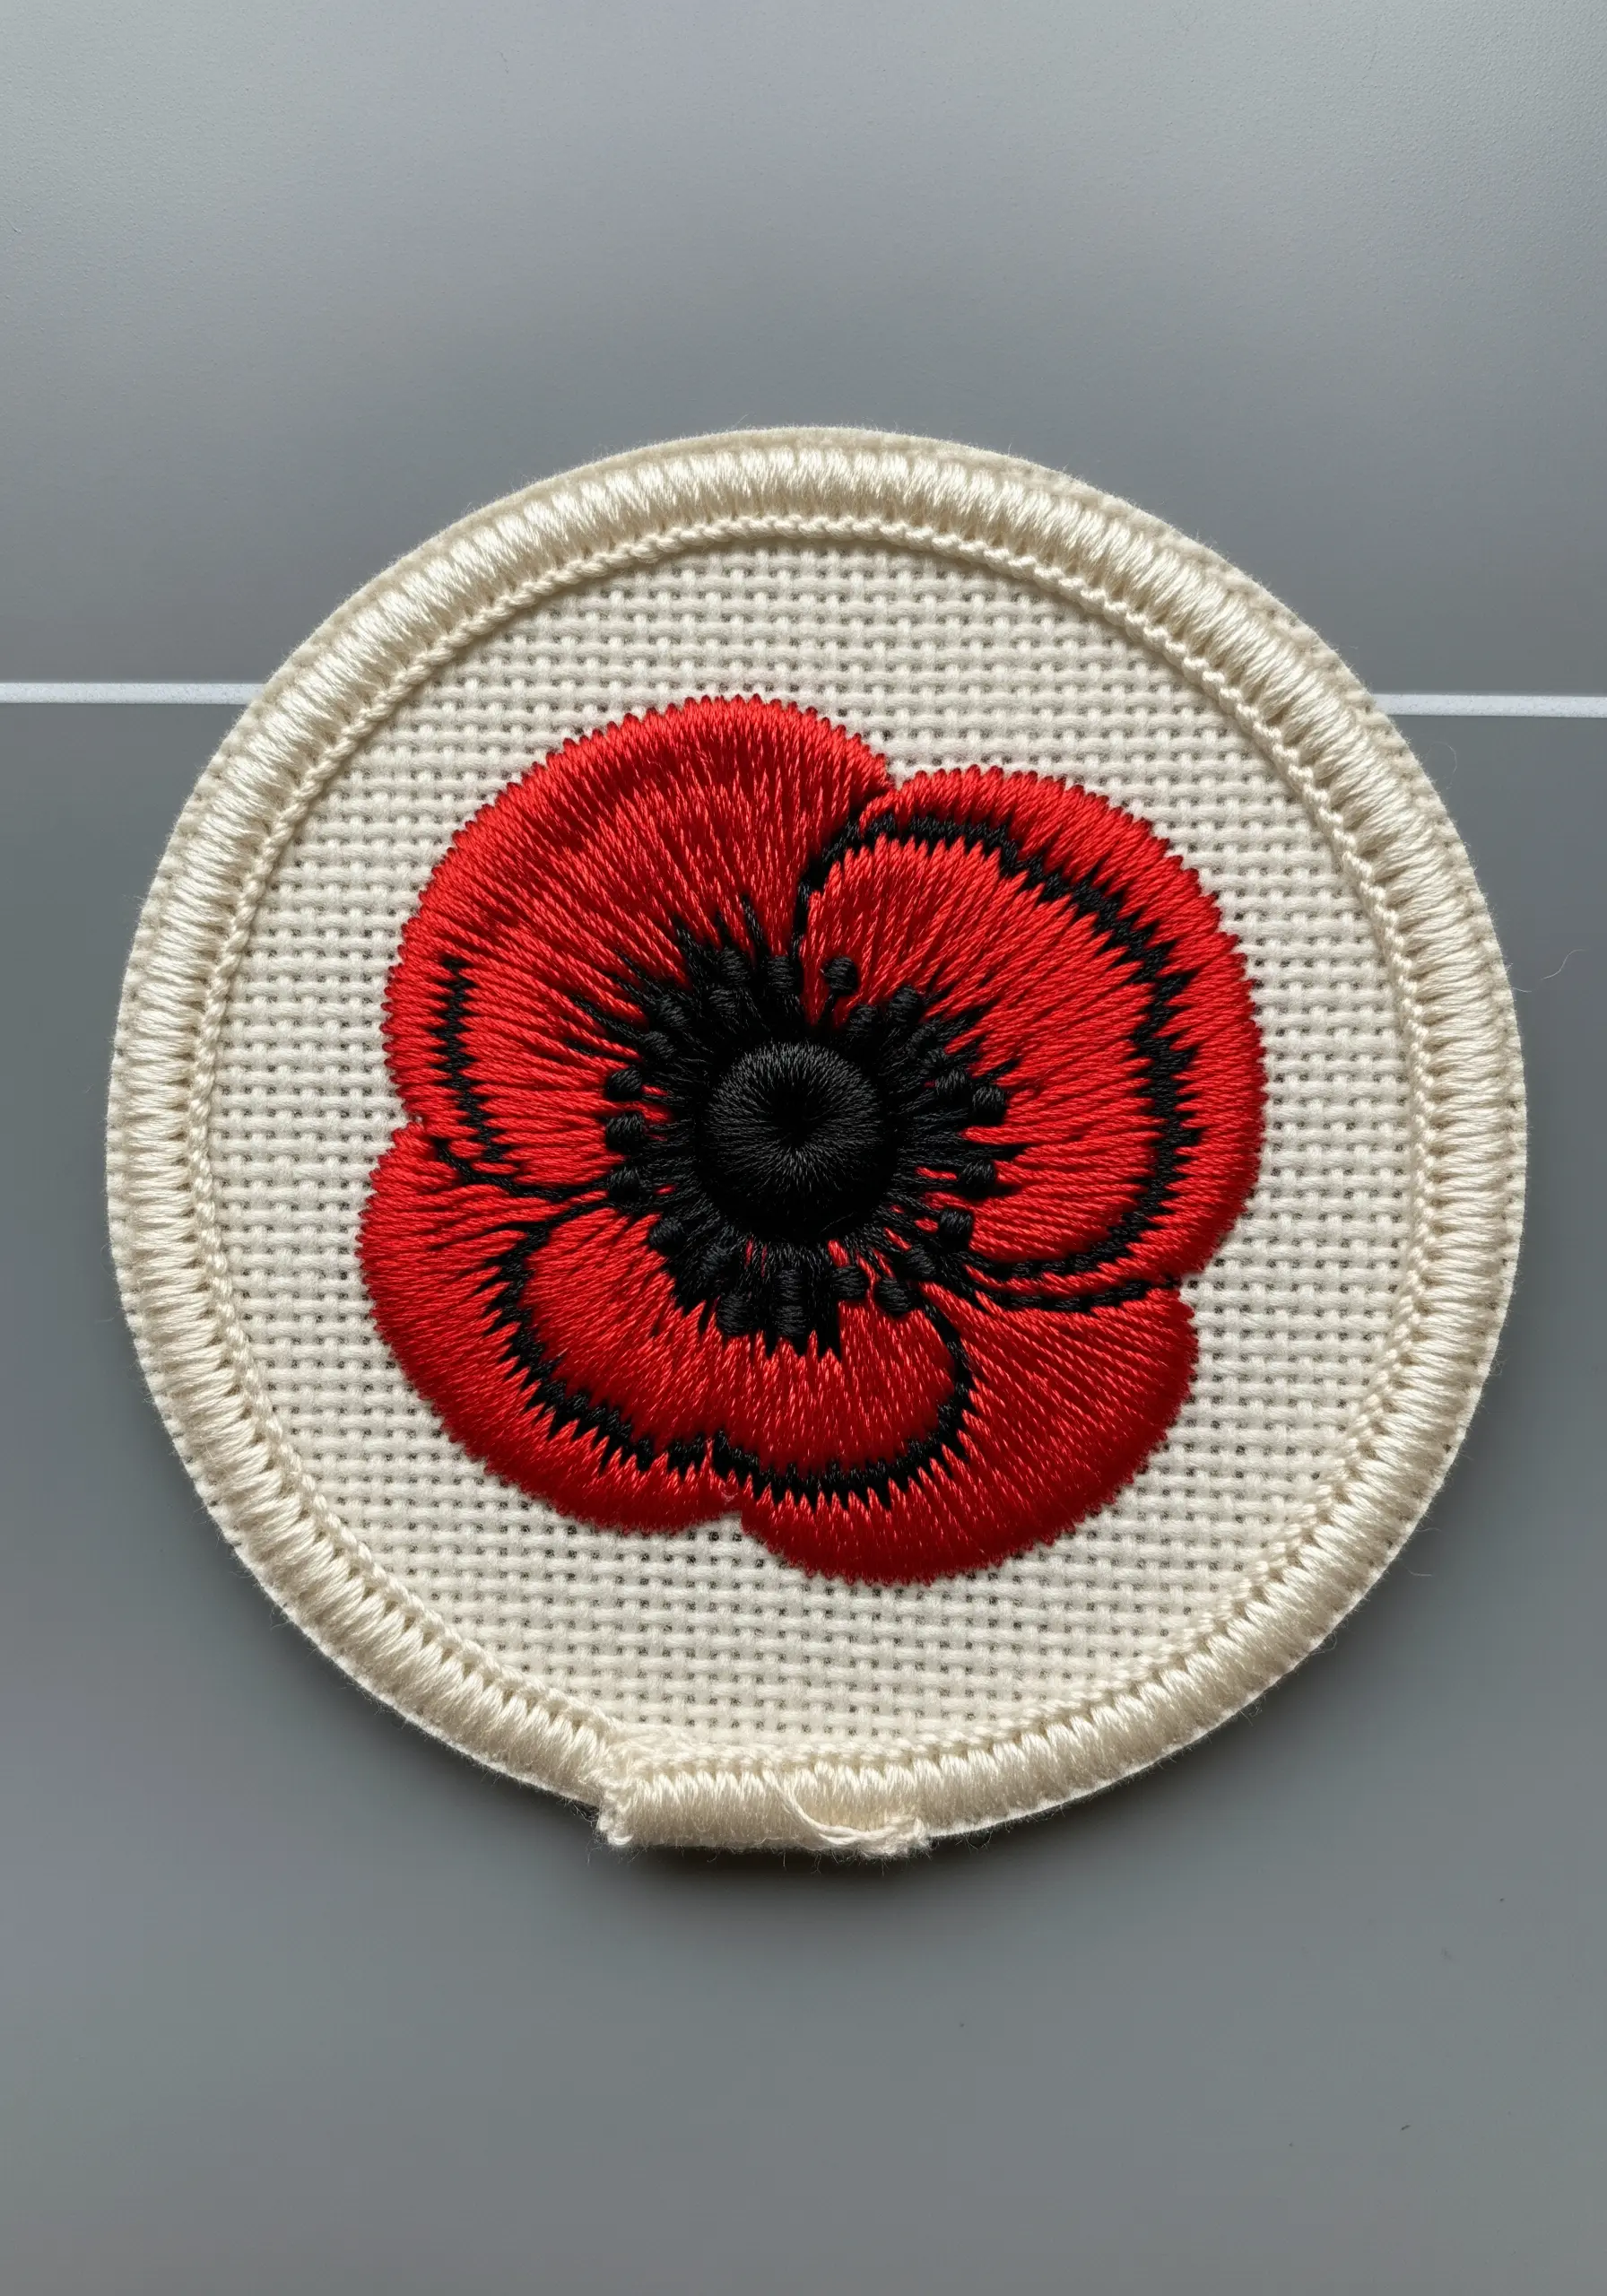
To give this poppy its graphic, illustrative power, you will build it in layers.
First, fill the petal shapes with a vibrant red satin stitch, angling your stitches toward the flower’s center to create a sense of movement.
Next, use a dense black satin stitch to add the bold outlines and interior details. This high-contrast layering is what creates the visual drama.
Finish with tightly packed black French knots in the center to complete the piece. This layering technique is ideal for making durable, statement patches.
13. Floral Crescent Moon with Negative Space
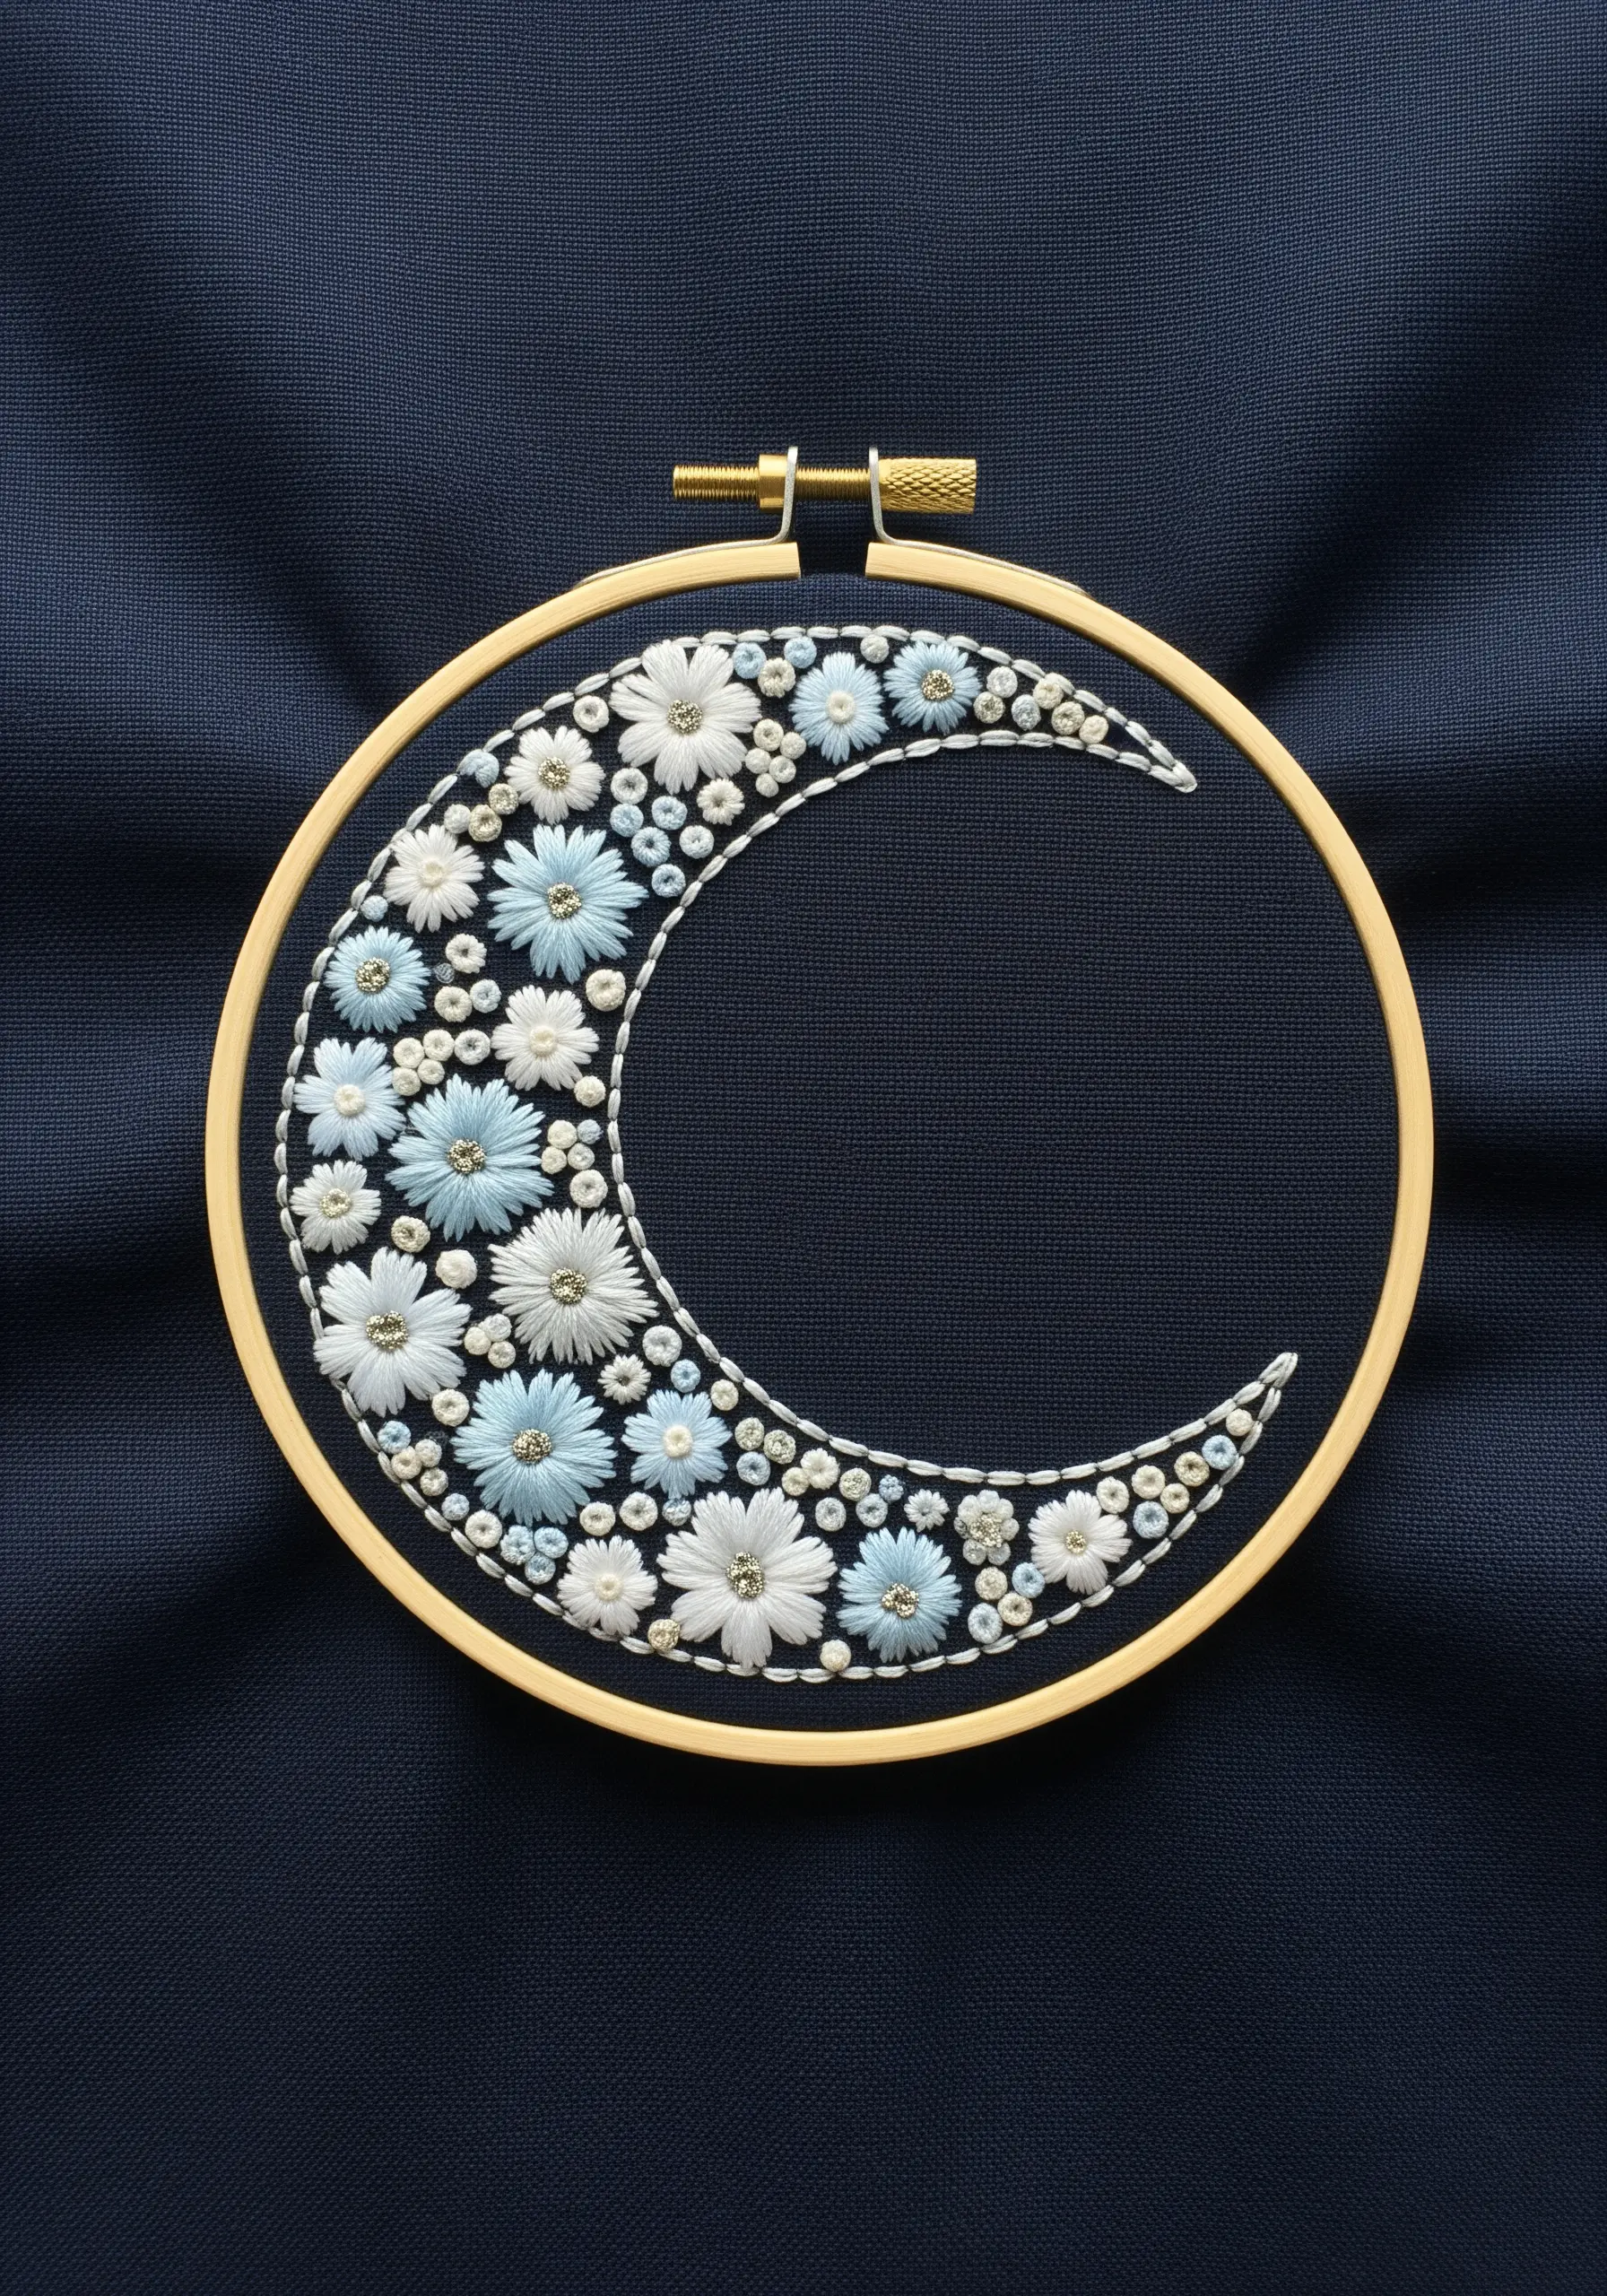
This design cleverly uses tiny floral motifs as a fill stitch, creating a celestial garden.
Outline your crescent moon shape, then fill it with a dense mix of miniature lazy daisy flowers, French knots, and tiny straight stitches.
Setting this intricate work against a dark, un-stitched background fabric makes the delicate details stand out dramatically.
The contrast between the textured, filled shape and the smooth negative space is what gives this piece its magic. These night-blooming floral stitch themes are always captivating.
14. An Abstract Tulip with Split Outlines
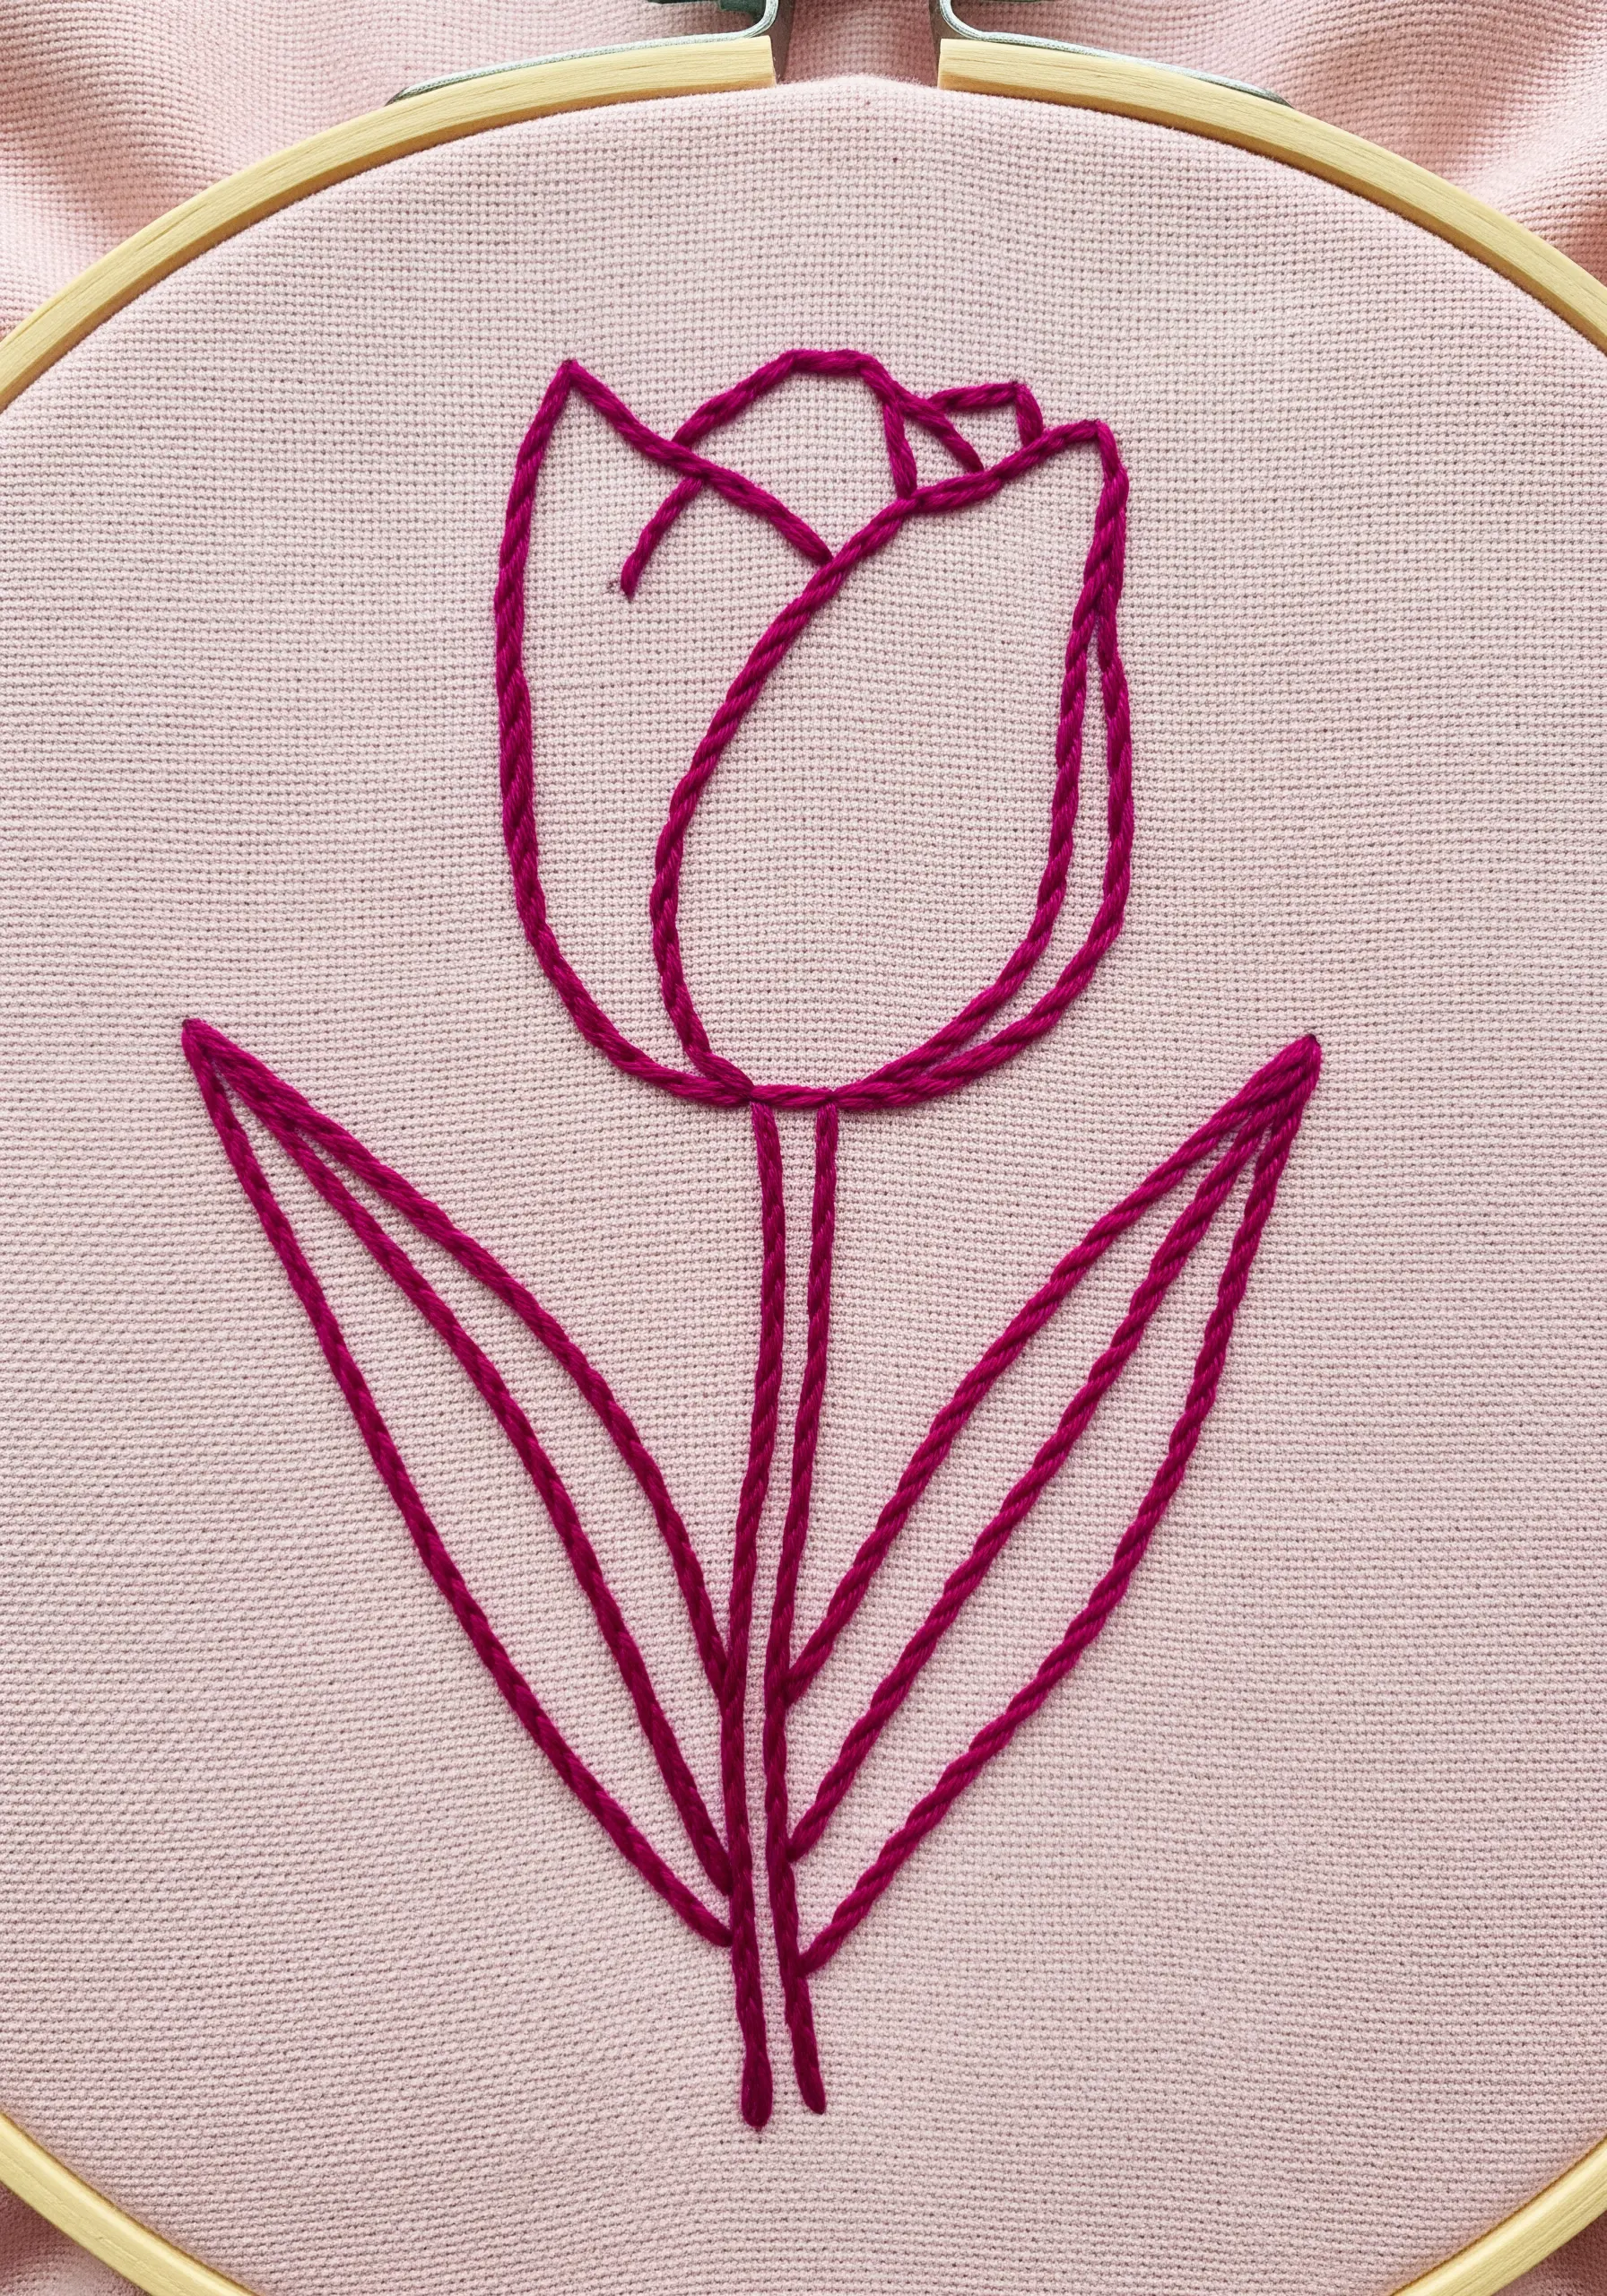
You can create a sense of dimension and modernity without any fill stitches at all.
Instead of a single outline, use two or three parallel lines of backstitch or split stitch to define the shape of the tulip.
This technique, known as split outlining, adds visual weight and a graphic quality to the design.
It’s a minimalist approach that feels intentional and sophisticated, perfect for a contemporary take on a classic flower.
15. Capturing the Form of Eucalyptus
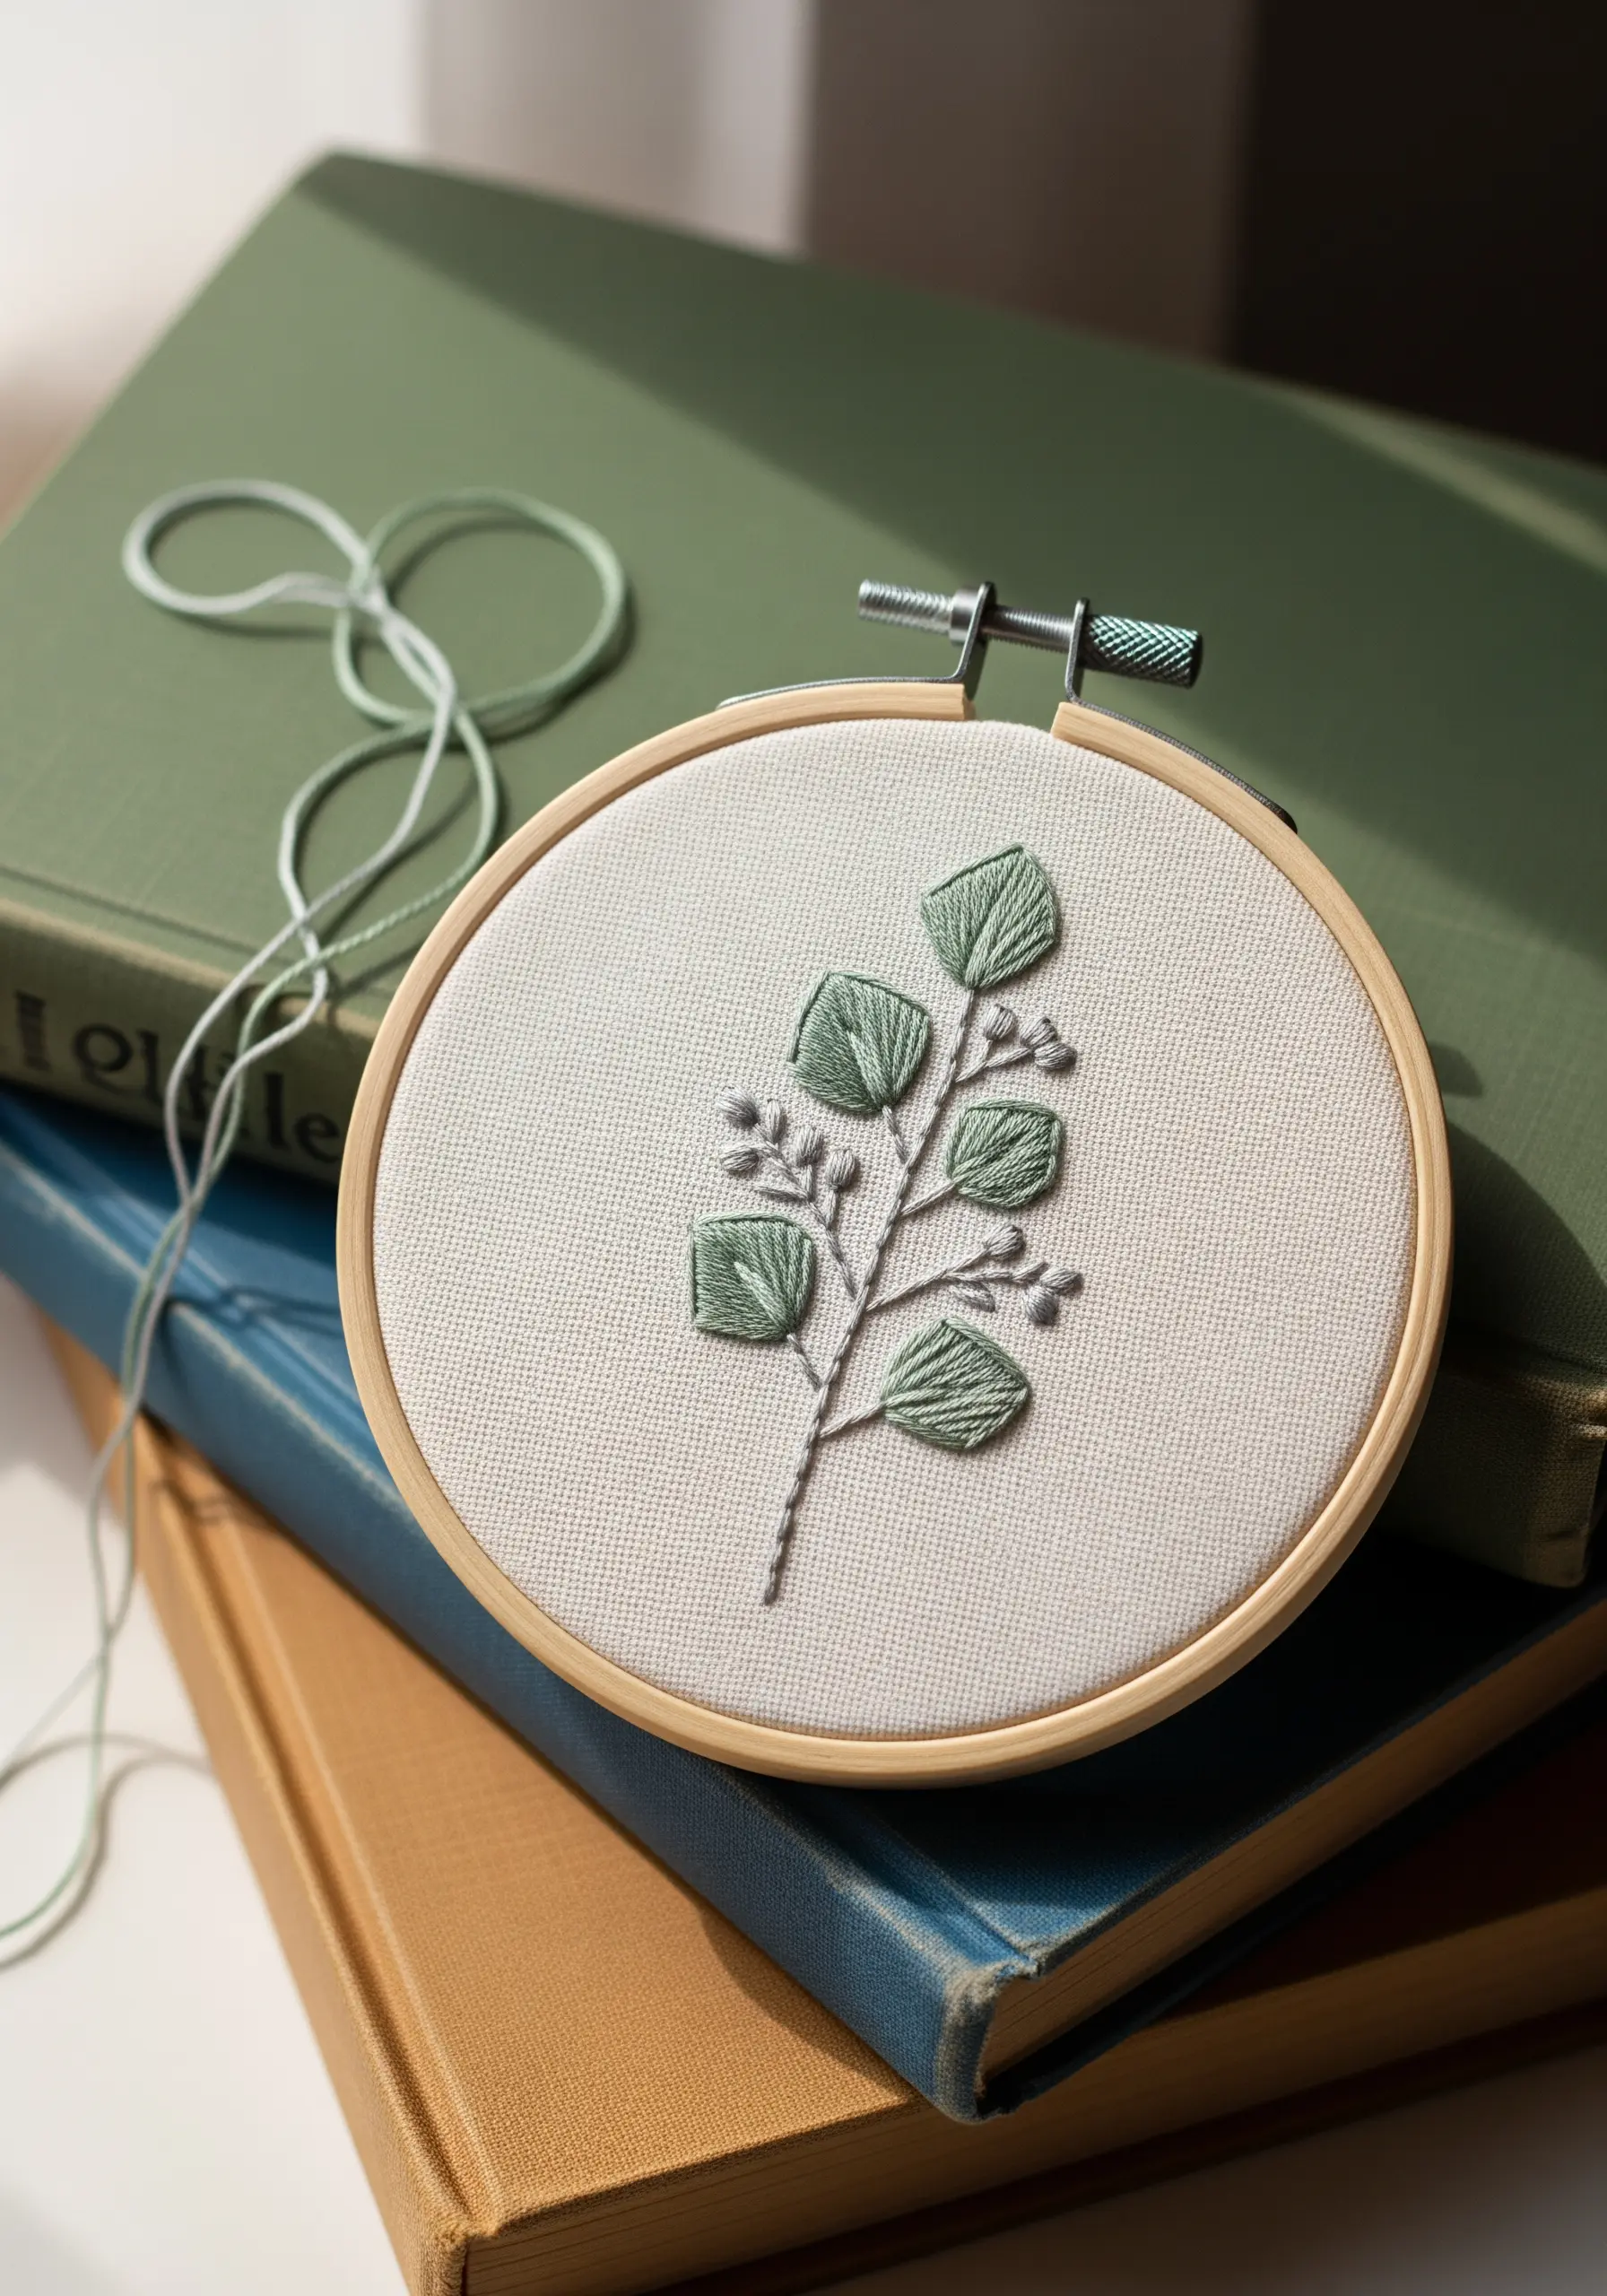
The fishbone stitch is the ideal choice for eucalyptus, as it perfectly mimics the leaf’s central vein and the way the foliage grows from it.
Select a soft, grey-green thread to accurately capture the plant’s signature muted color palette.
Use a simple backstitch in a slightly darker brown or grey for the stems. This provides structure without distracting from the beautifully shaped leaves.
Arrange the leaves in slightly irregular, overlapping patterns to give the branch a natural, organic feel.
16. Realistic Pansy Through Thread Painting
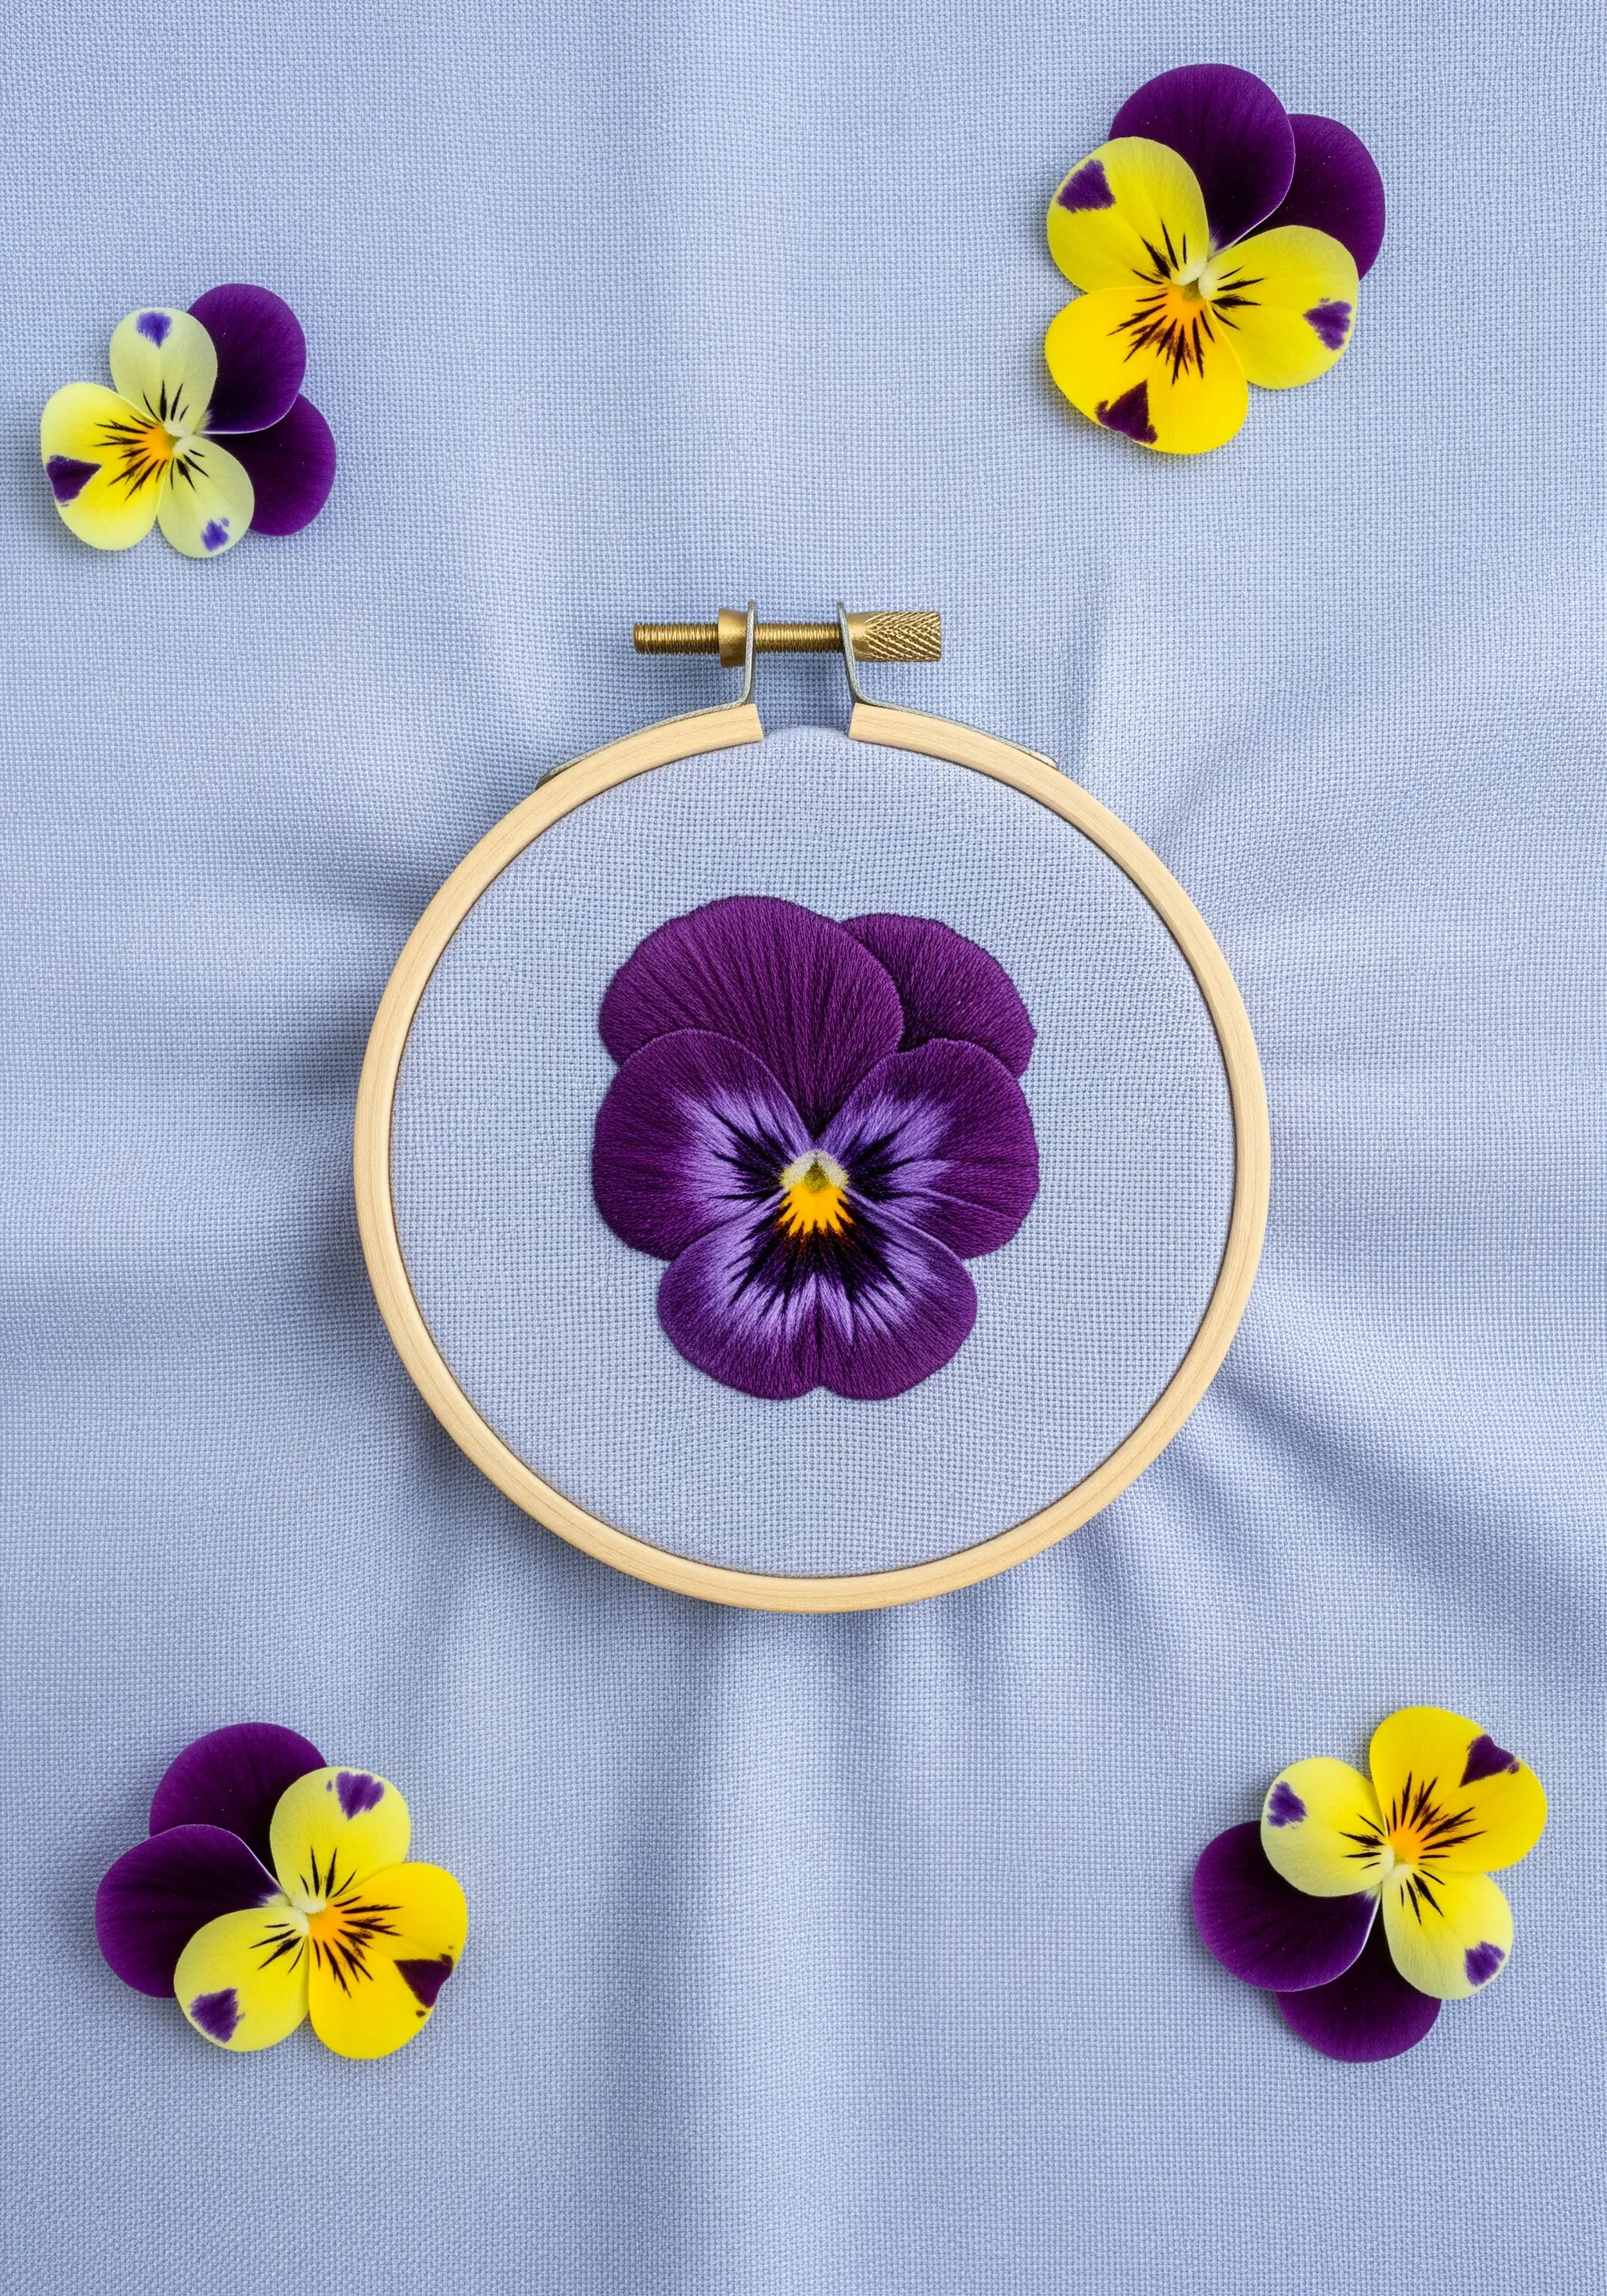
This breathtaking realism is achieved using the long-and-short stitch, also known as needle painting.
To create such smooth color transitions, you must use only a single strand of embroidery floss.
Work in sections, overlapping your stitches and blending different shades of thread in your needle to mimic the way a painter blends colors on a palette.
Direct your stitches to follow the natural curve and grain of the petals. This attention to detail is what brings the flower to life.
17. Rustic Wheat Stalk on Burlap Fabric
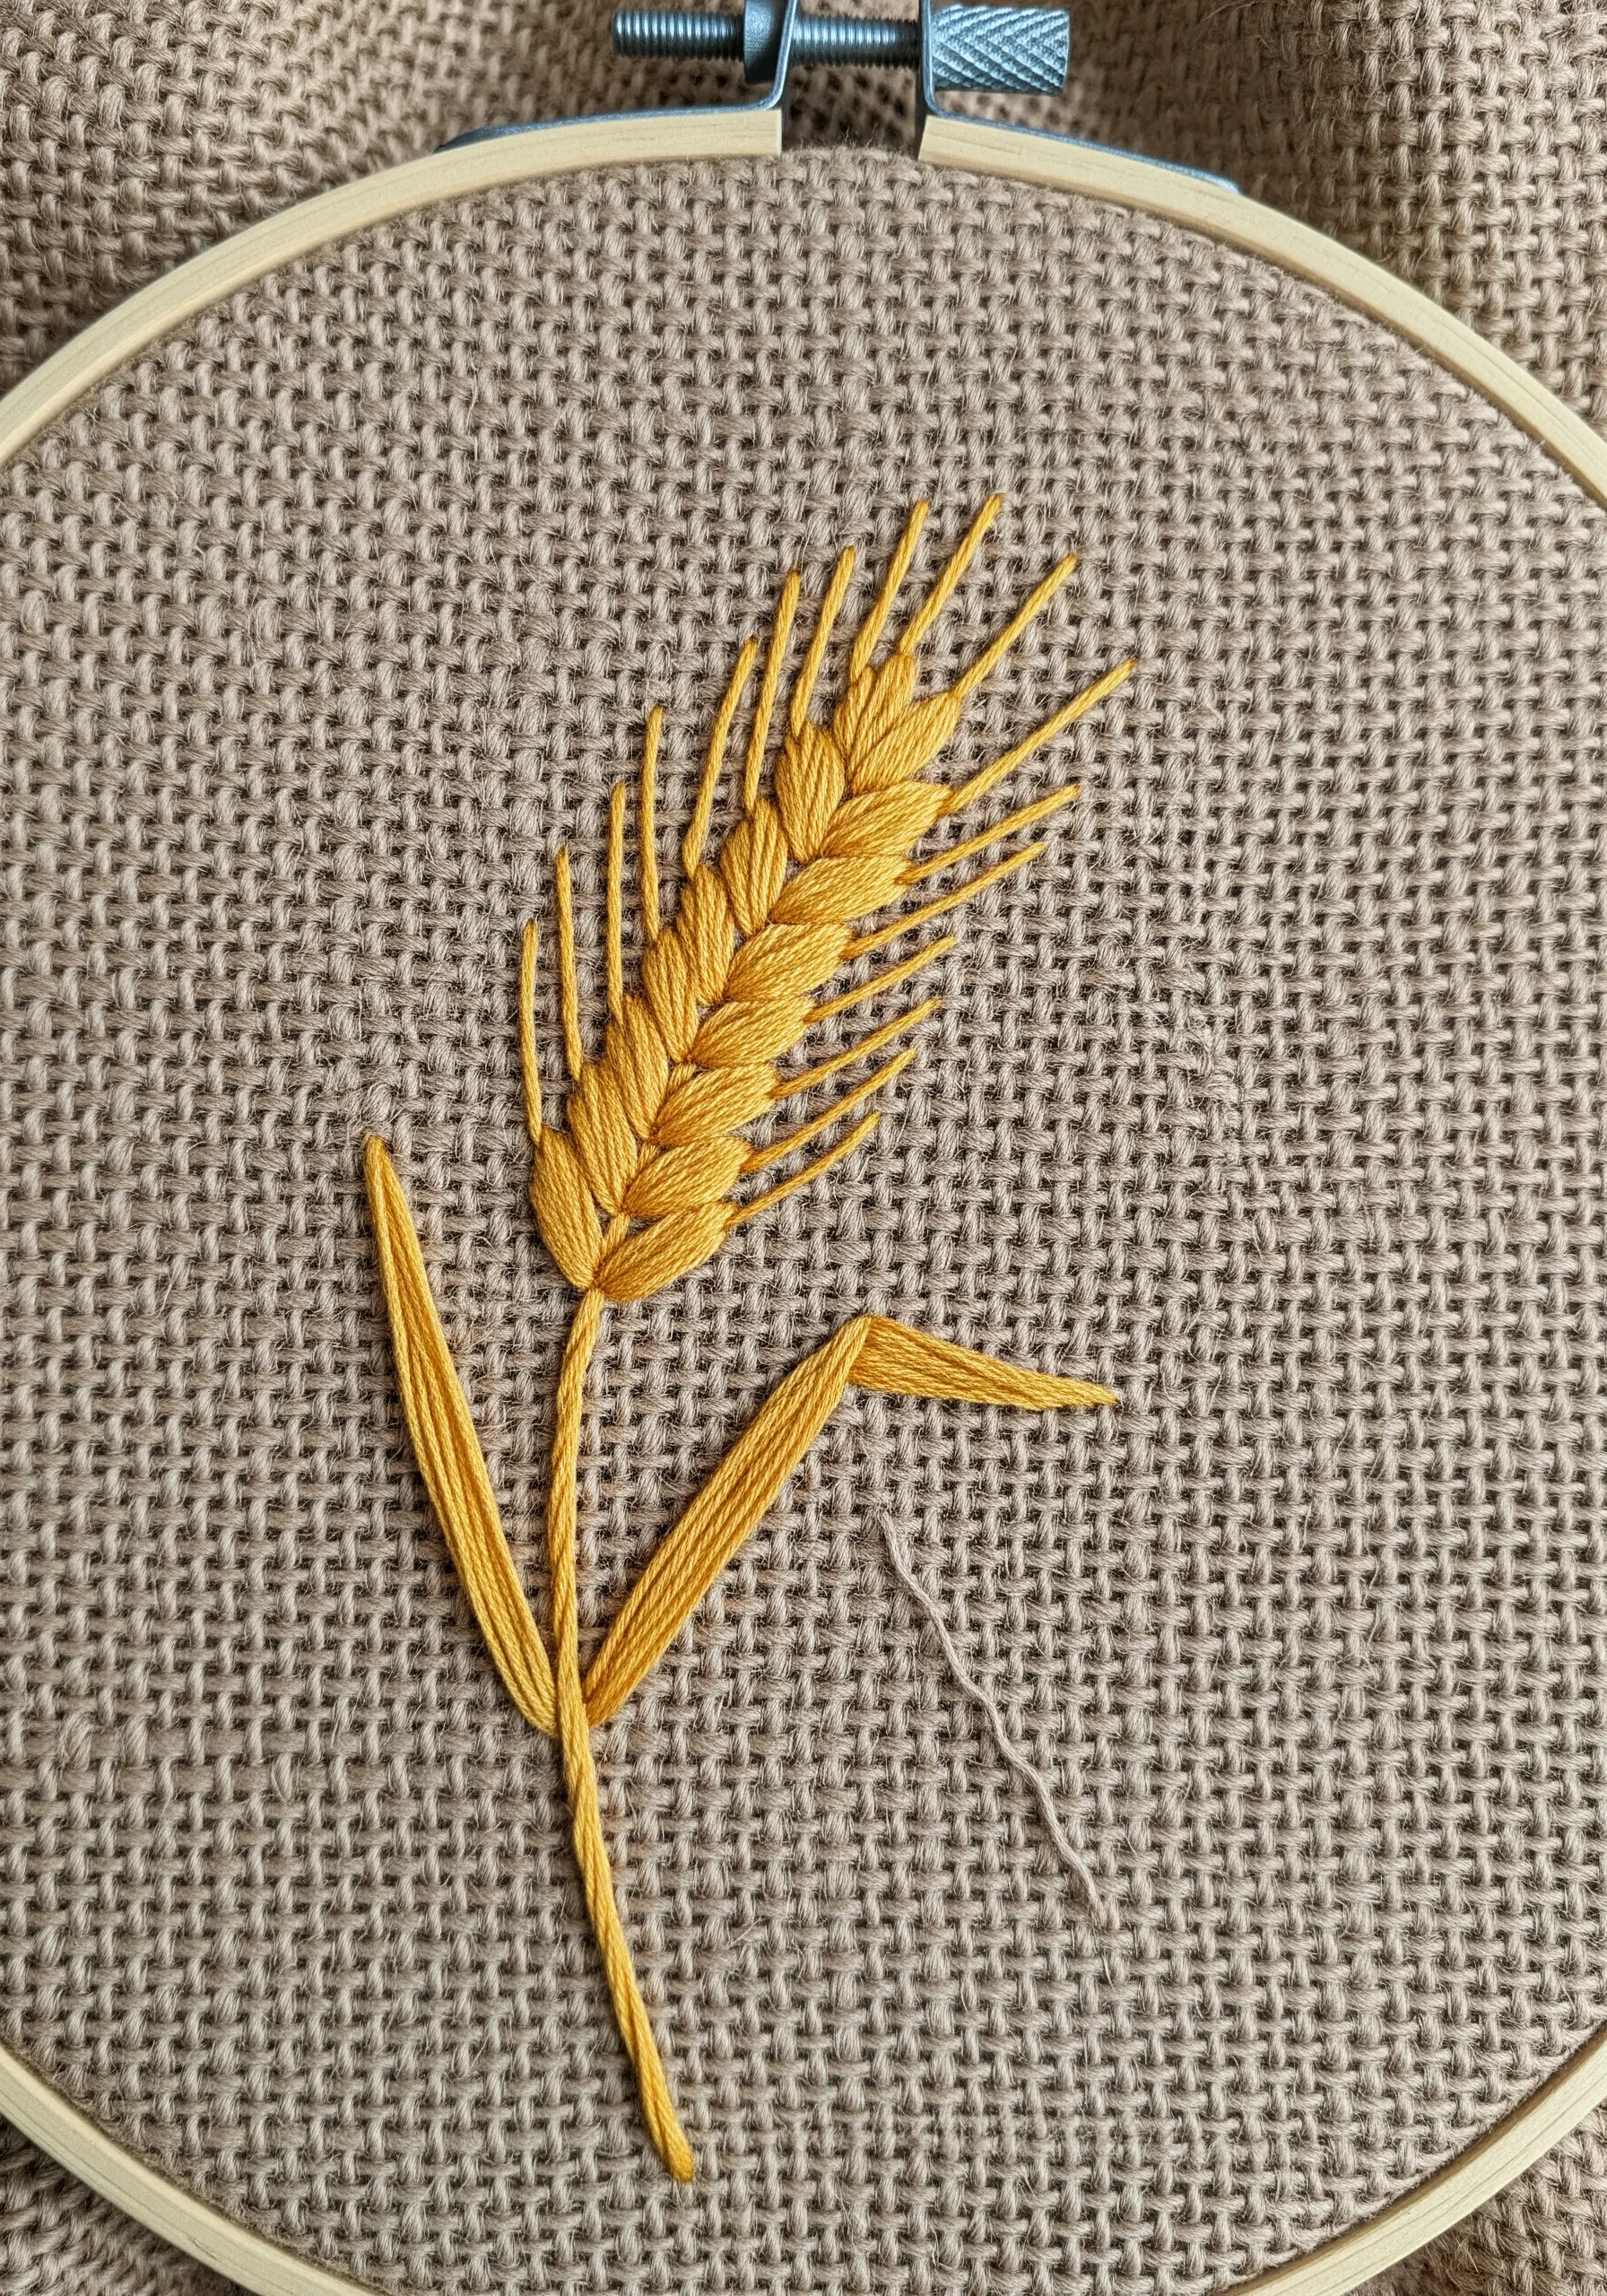
Elevate a simple design by choosing a fabric that enhances its theme. The coarse, open weave of burlap adds an immediate rustic texture that perfectly complements a wheat stalk motif.
Use a fishbone stitch for the head of the wheat and simple straight stitches for the long, delicate awns.
Because burlap has a loose weave, you’ll need to use a thicker thread—such as all six strands of floss or even fine yarn—to ensure your stitches are bold and visible.
This is a great example of how to create natural texture embroidery ideas by pairing the right thread with the right fabric.
18. A Pocket Full of Rainbow Blossoms
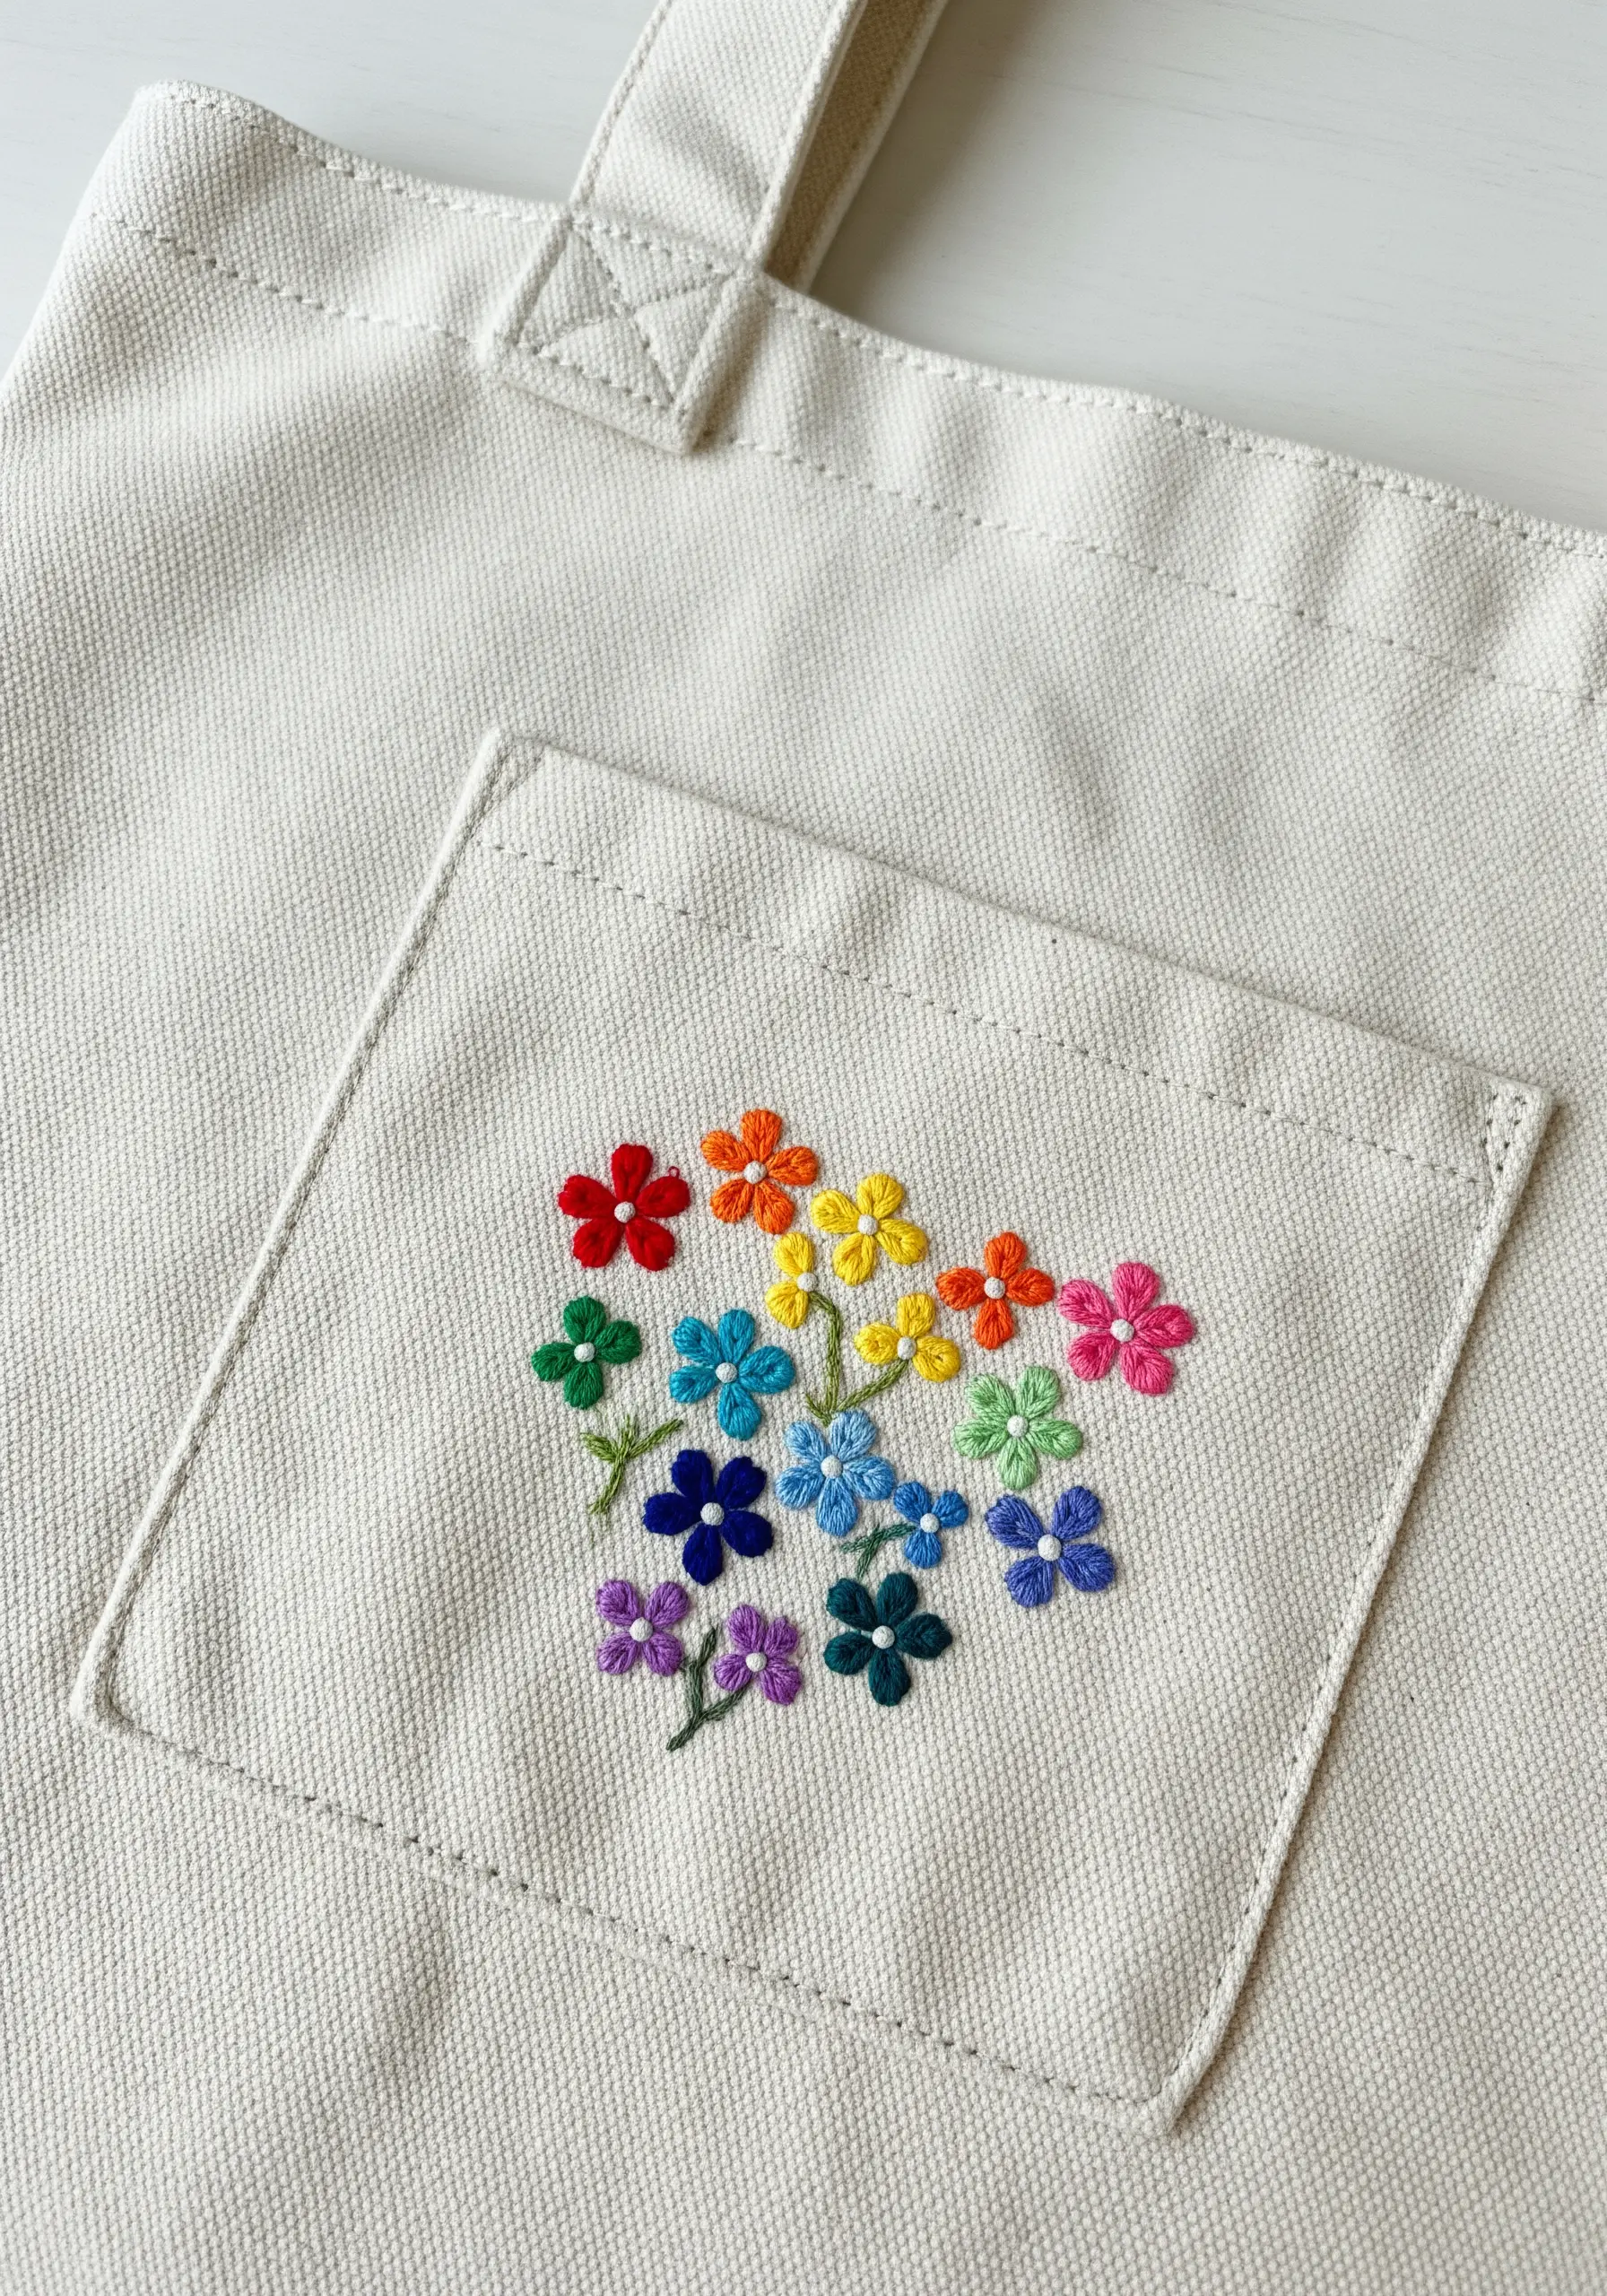
You can instantly personalize an everyday item like a tote bag with a joyful splash of color.
These simple flowers are created with five lazy daisy stitches for the petals and a single French knot for the center—a quick and satisfying combination.
Arrange the flowers in a rainbow gradient for a playful, eye-catching effect that feels both spontaneous and intentional.
This project is perfect for using up small scraps of leftover thread and makes for one of the most charming personalized tote bag embroidery designs.
19. White Dogwood in High Contrast
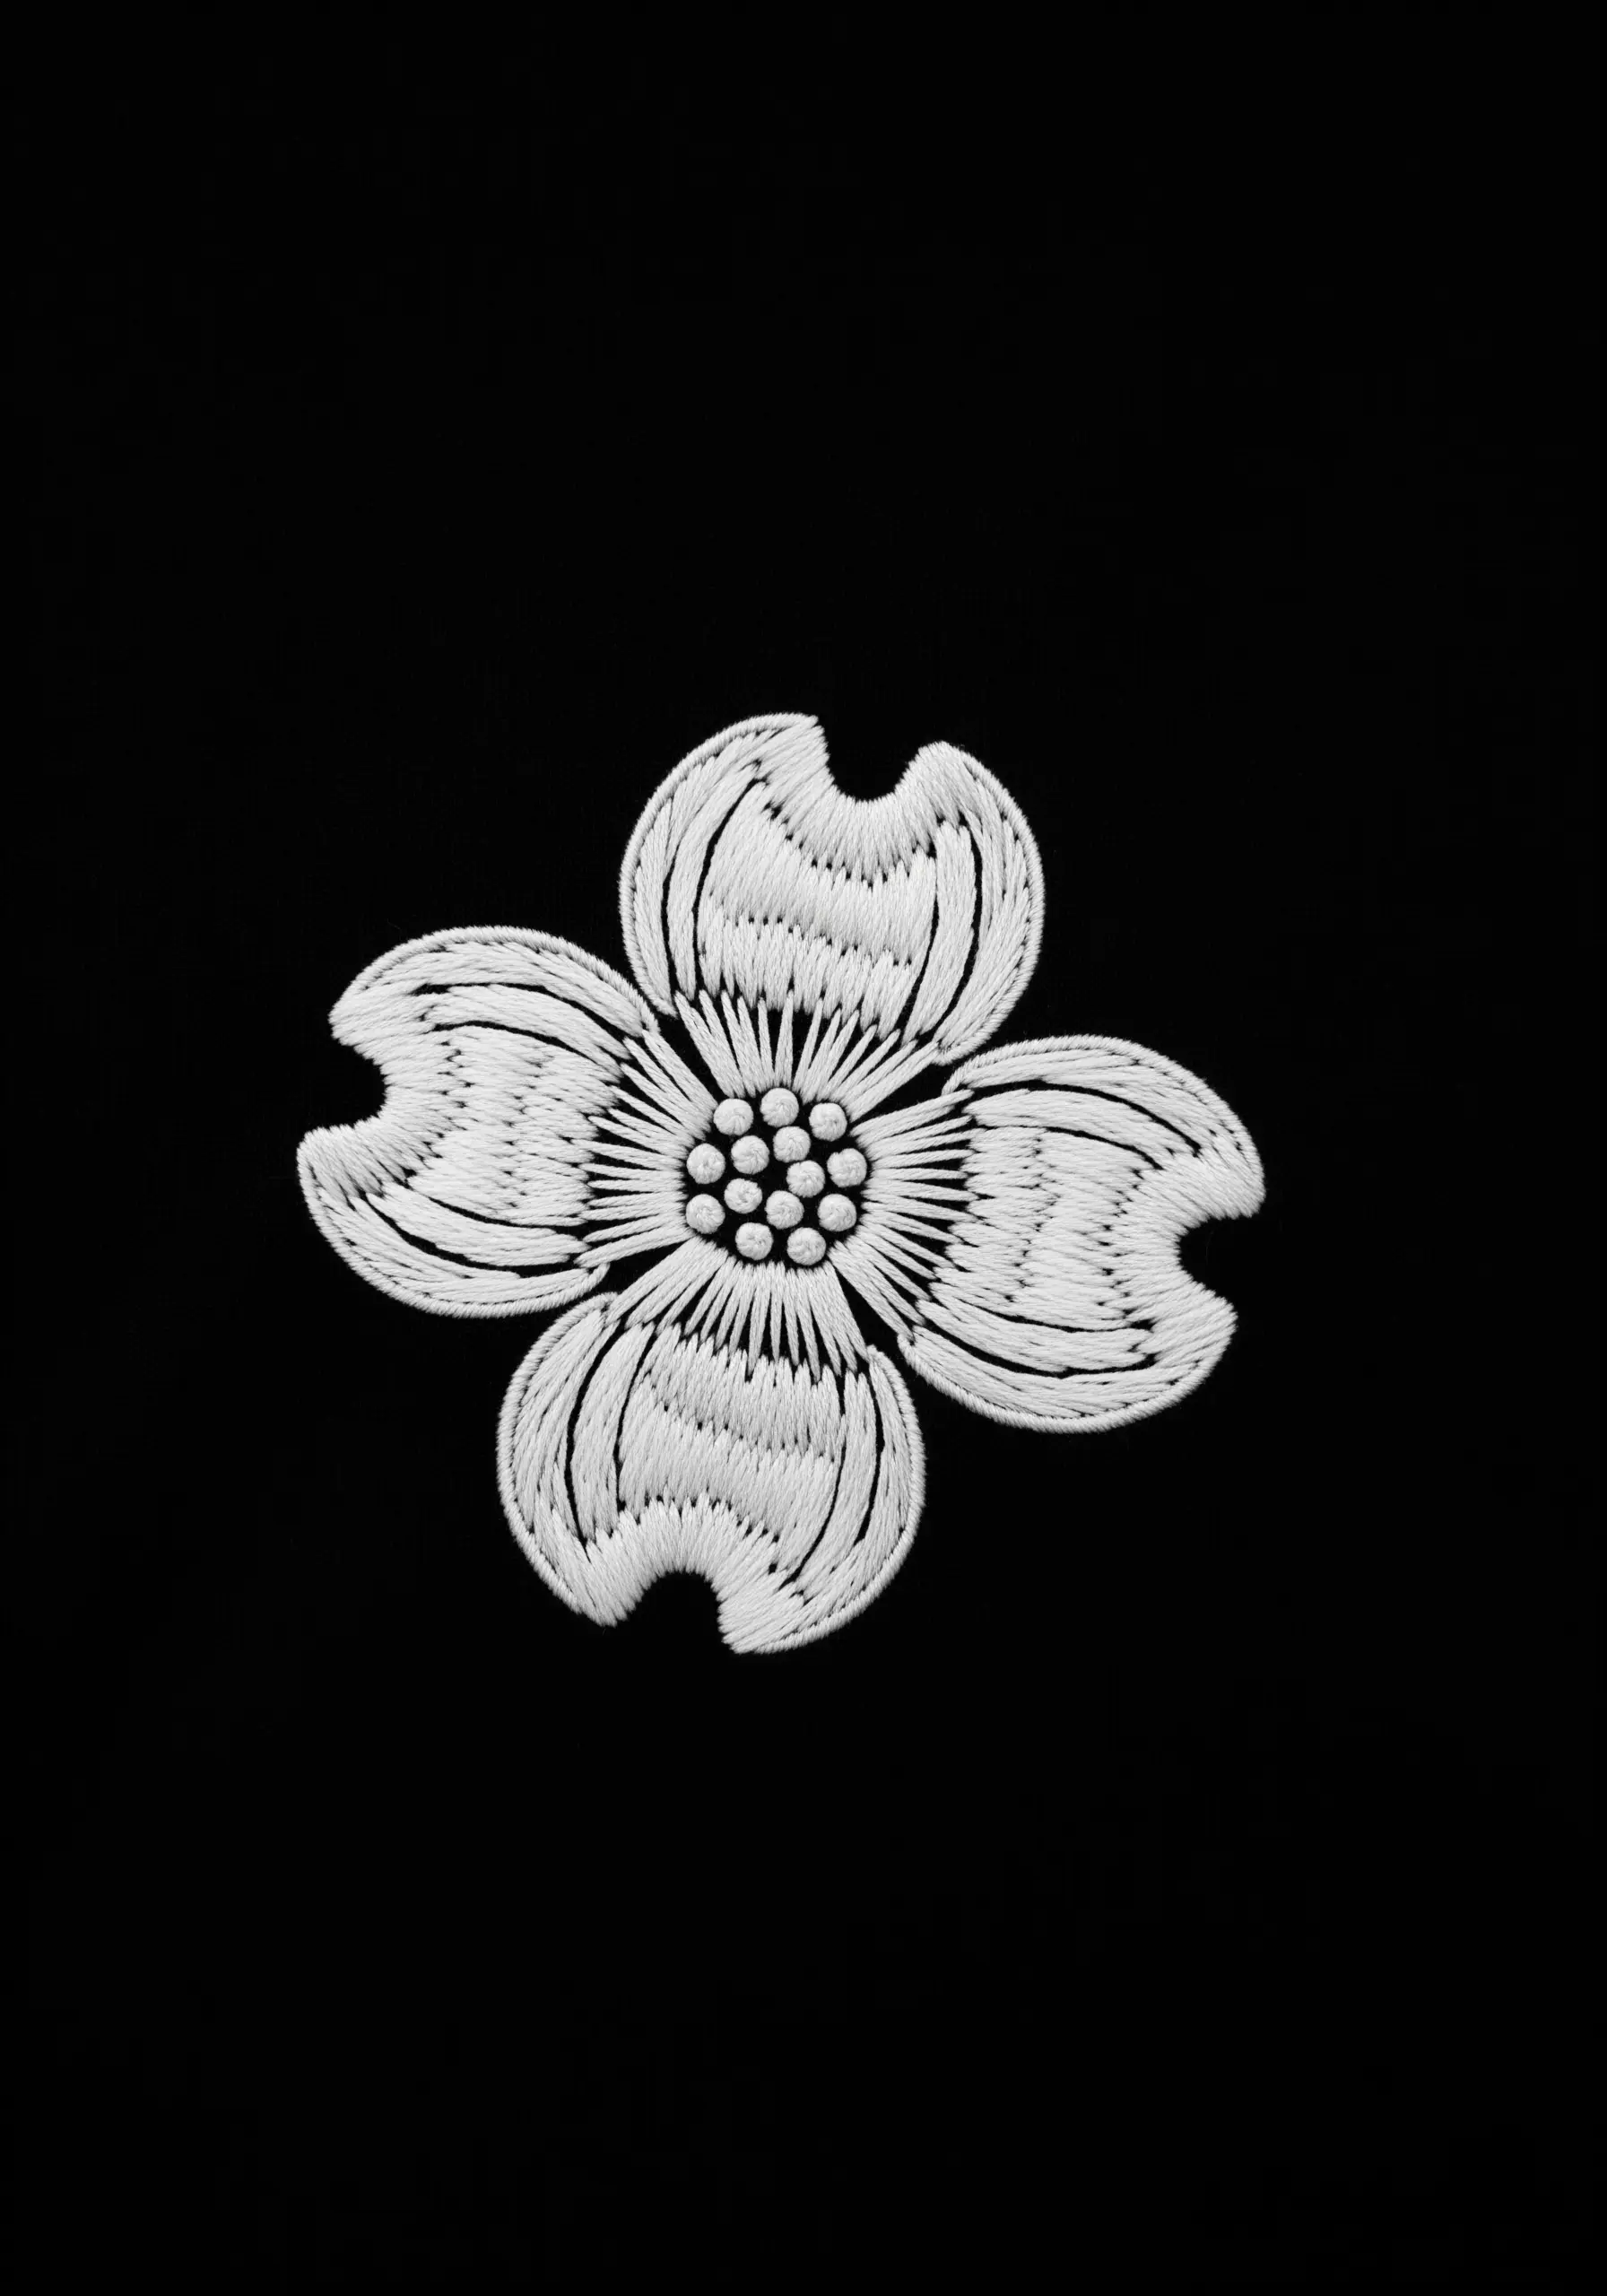
Stitching with white thread on black fabric is a timeless way to create immediate visual drama and sophistication.
Use a directional satin stitch to fill the petals, ensuring your stitches radiate from the center outwards to create texture and the illusion of movement.
The high contrast means every single stitch is visible, so focus on keeping your tension even and your edges clean.
A cluster of French knots in the center provides a final textural detail that completes this elegant composition.
20. Textured Succulent with Layered Stitches
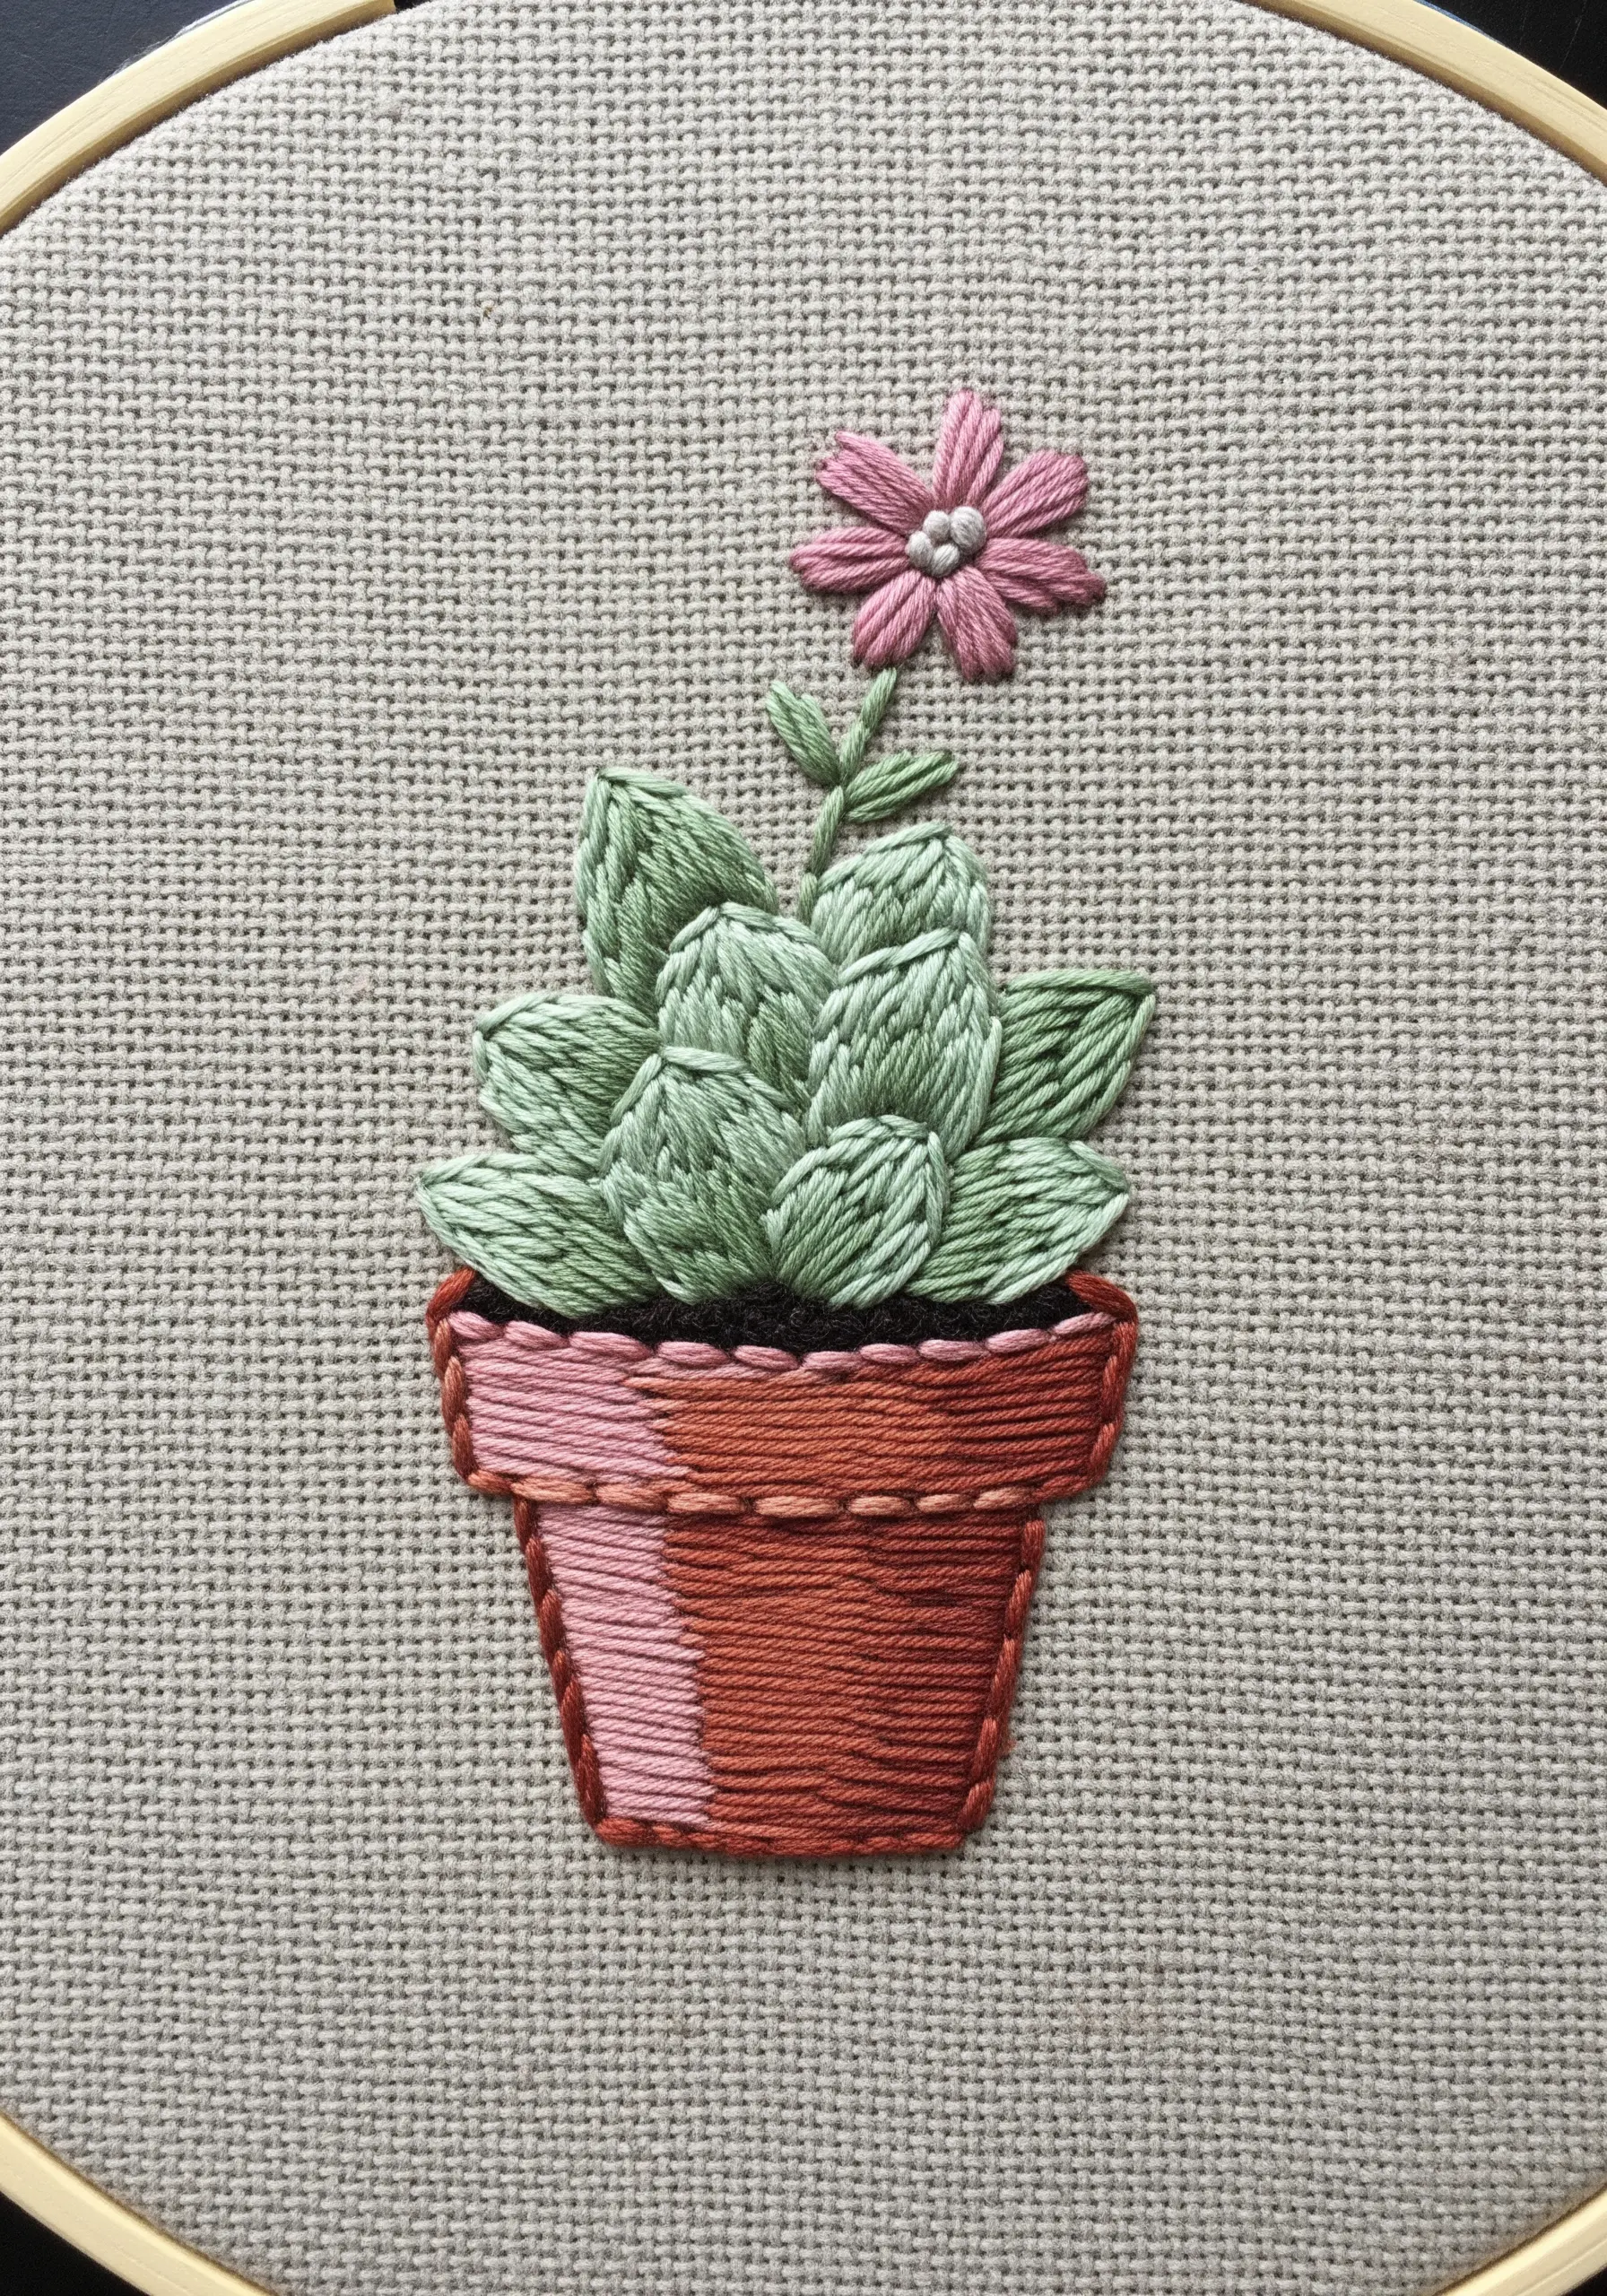
To mimic the plump, fleshy leaves of a succulent, avoid long, smooth stitches. Instead, build up the shape with layers of short straight stitches or small satin stitches.
Don’t aim for perfect uniformity; the slight irregularities and overlapping of the stitches will create a more natural, organic texture.
Use two or three shades of green to add highlights and shadows, which will enhance the three-dimensional feel of the plant.
This design is a fantastic way to explore how creative ways to stitch natural textures can bring a simple subject to life.
21. A Miniature Bee and Lavender Scene
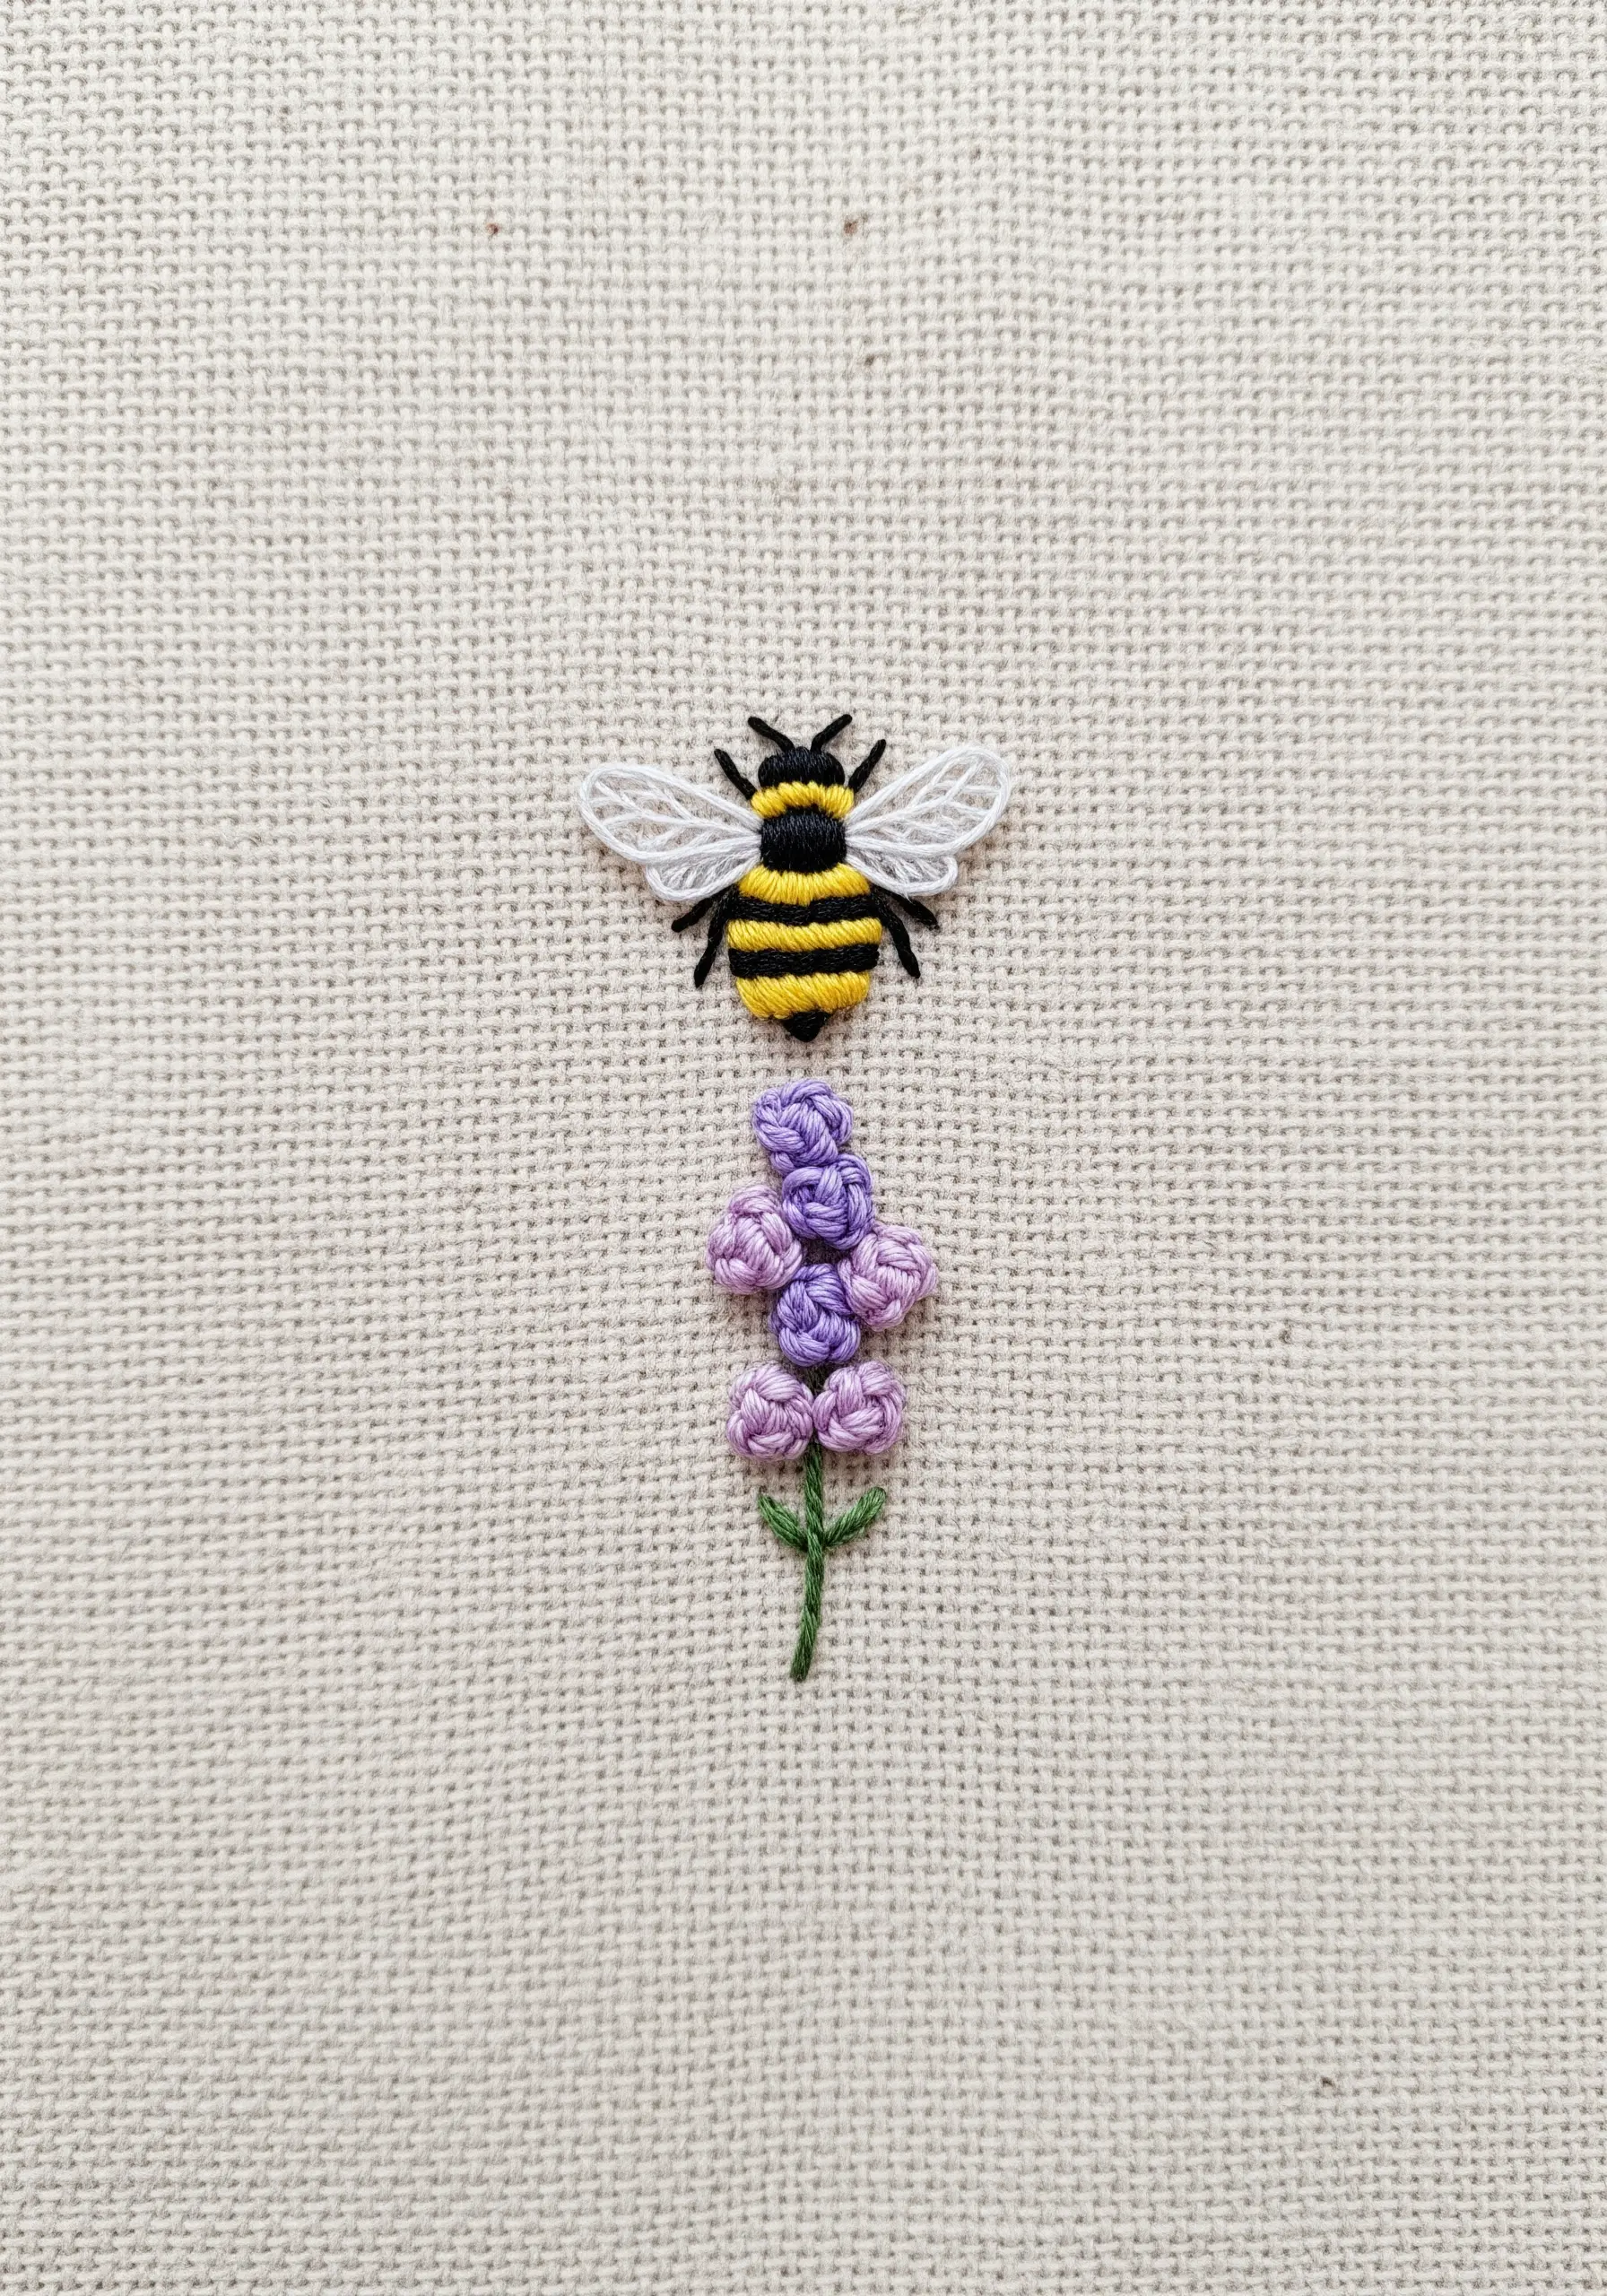
You can create a charming narrative by pairing a floral element with a tiny creature.
To give the bee’s body a raised, 3D effect, use a padded satin stitch. This involves laying down a few small straight stitches as a base before covering them with your final satin stitches.
For the delicate wings, simply outline the shape with a single strand of white or light grey thread. The translucency is more realistic than a filled-in shape.
These tiny animal embroidery designs add a touch of life and story to your work.
22. Defining Shapes with Negative Space
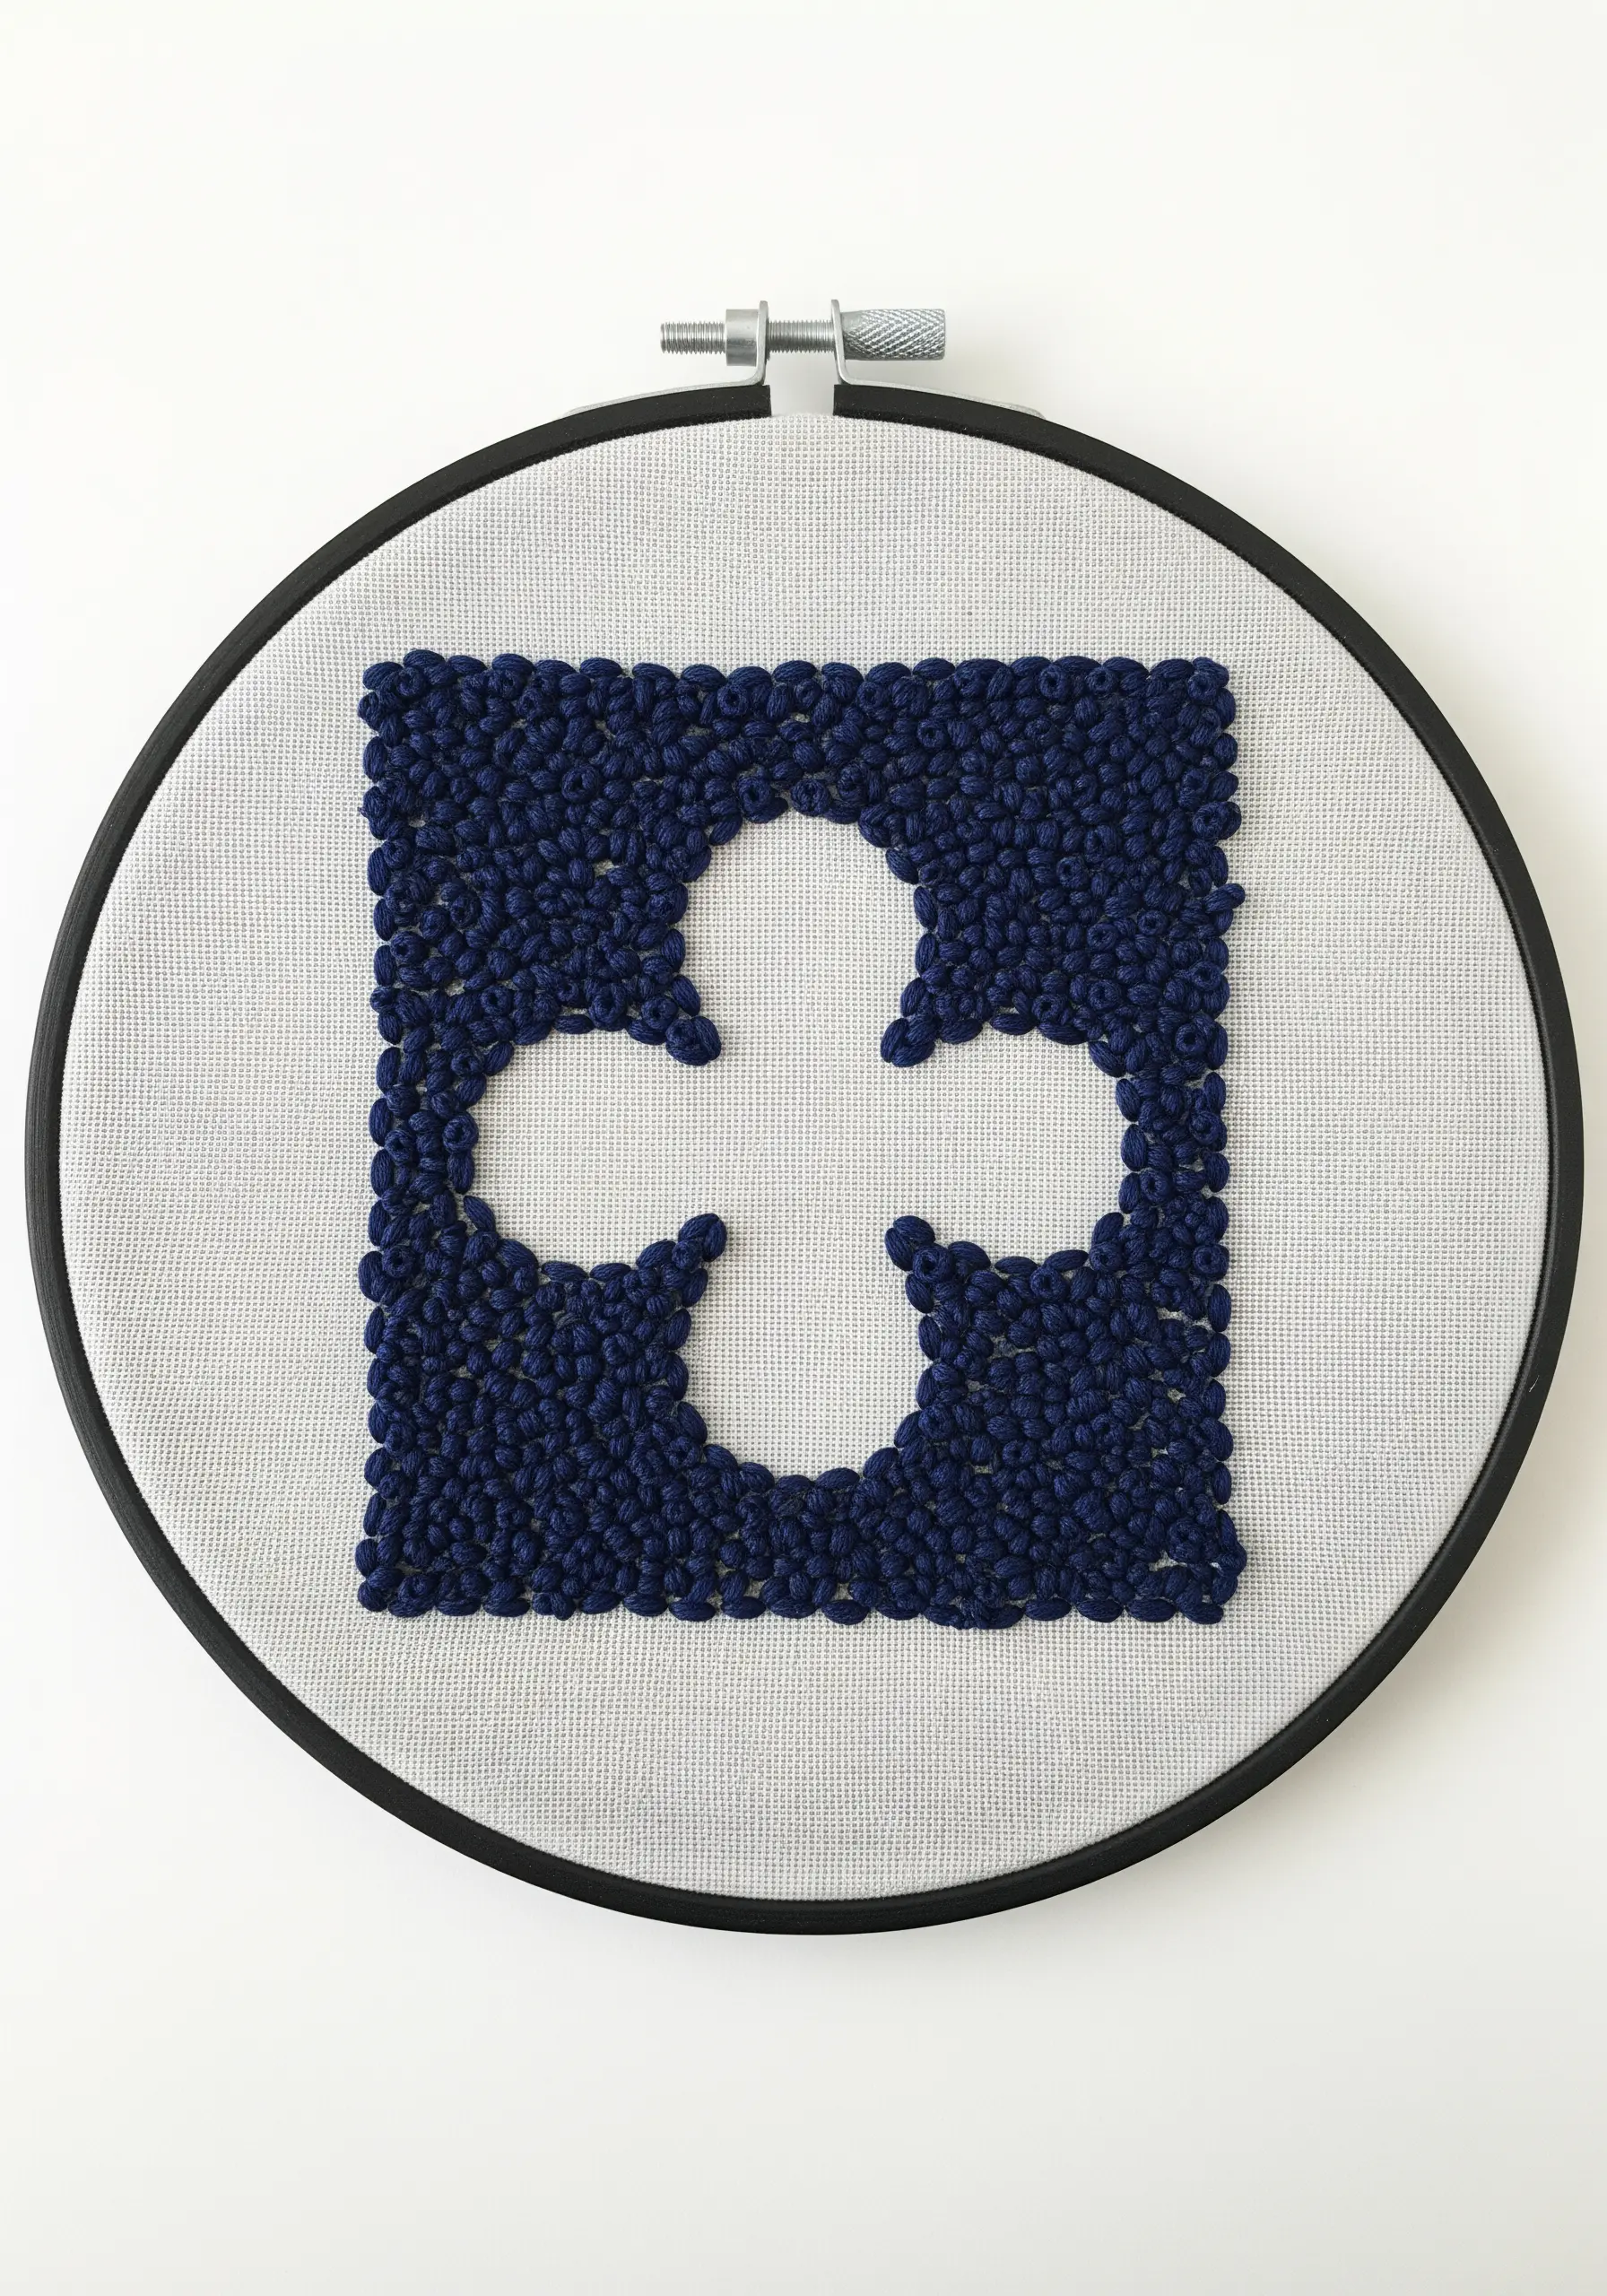
This advanced technique creates a shape by stitching the area around it, rather than the shape itself.
First, lightly trace your clover outline. Then, patiently fill the entire background with dense, tightly packed French knots.
The highly textured, knotted background forces the smooth, un-stitched fabric of the clover to become the focal point.
It’s a modern and sophisticated way to play with texture and one of the best ways to utilize abstract thread designs using negative space for a minimal chic look.
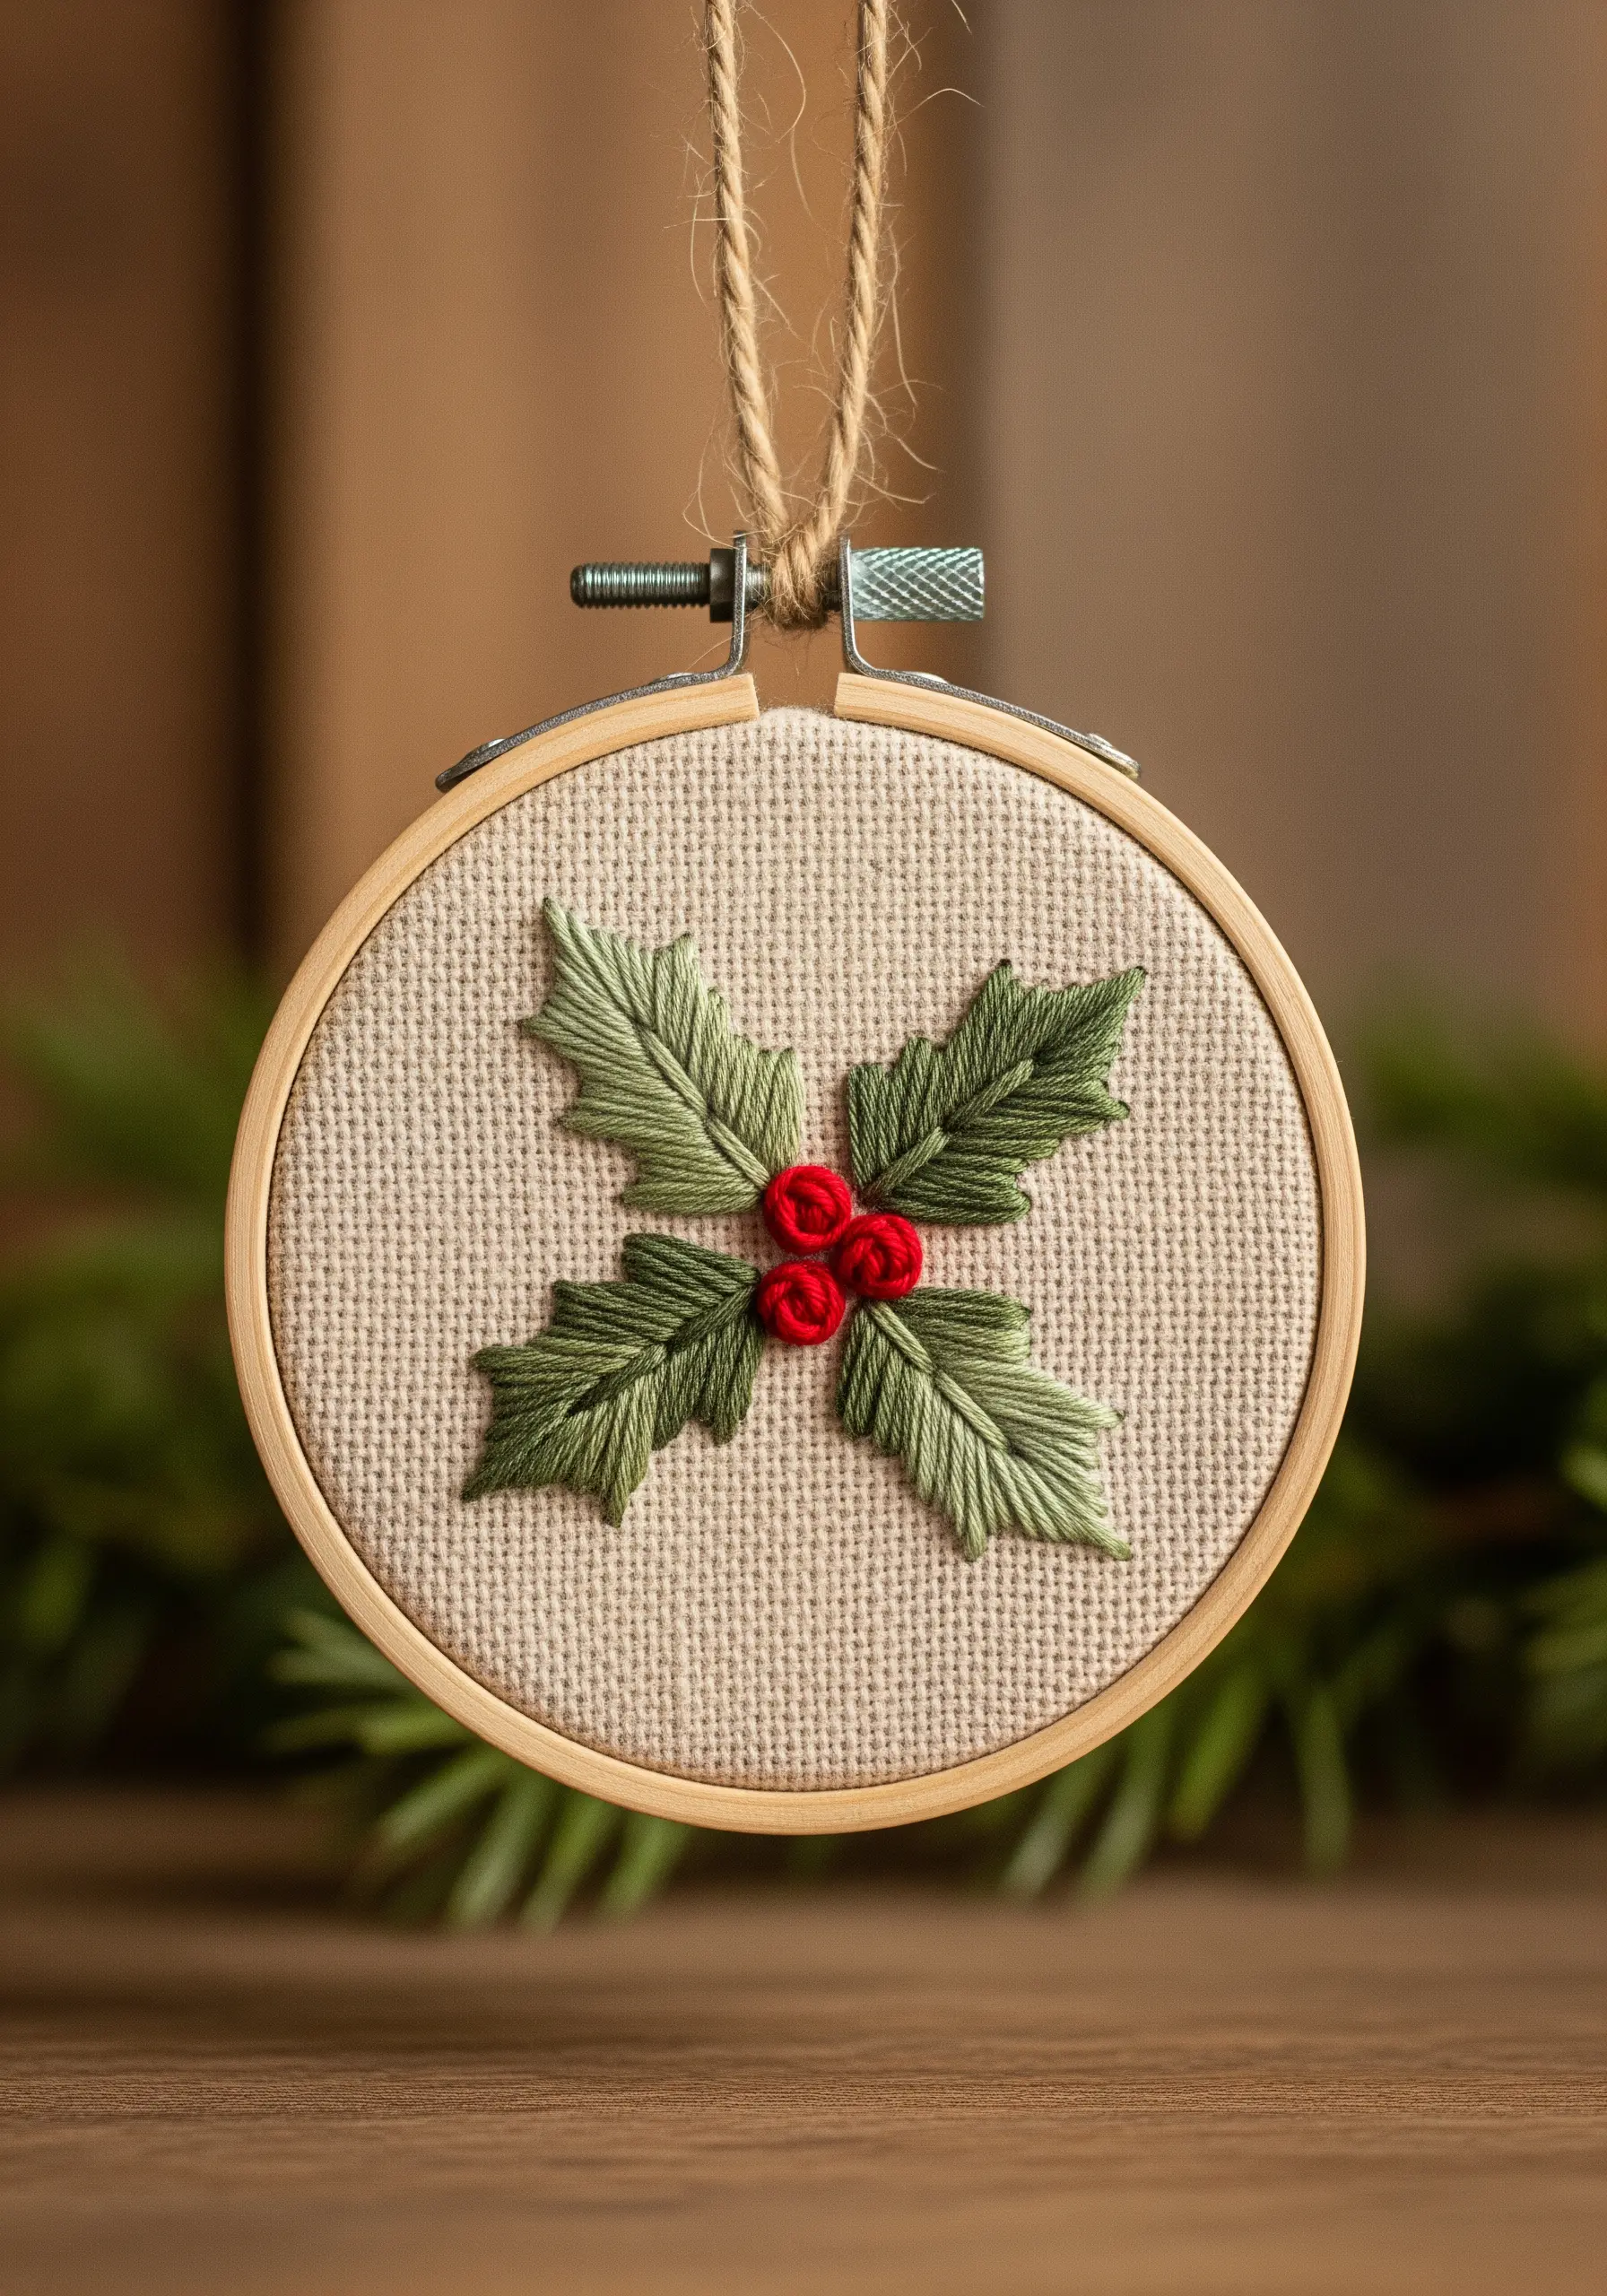
23. Crafting a Festive Holly Border
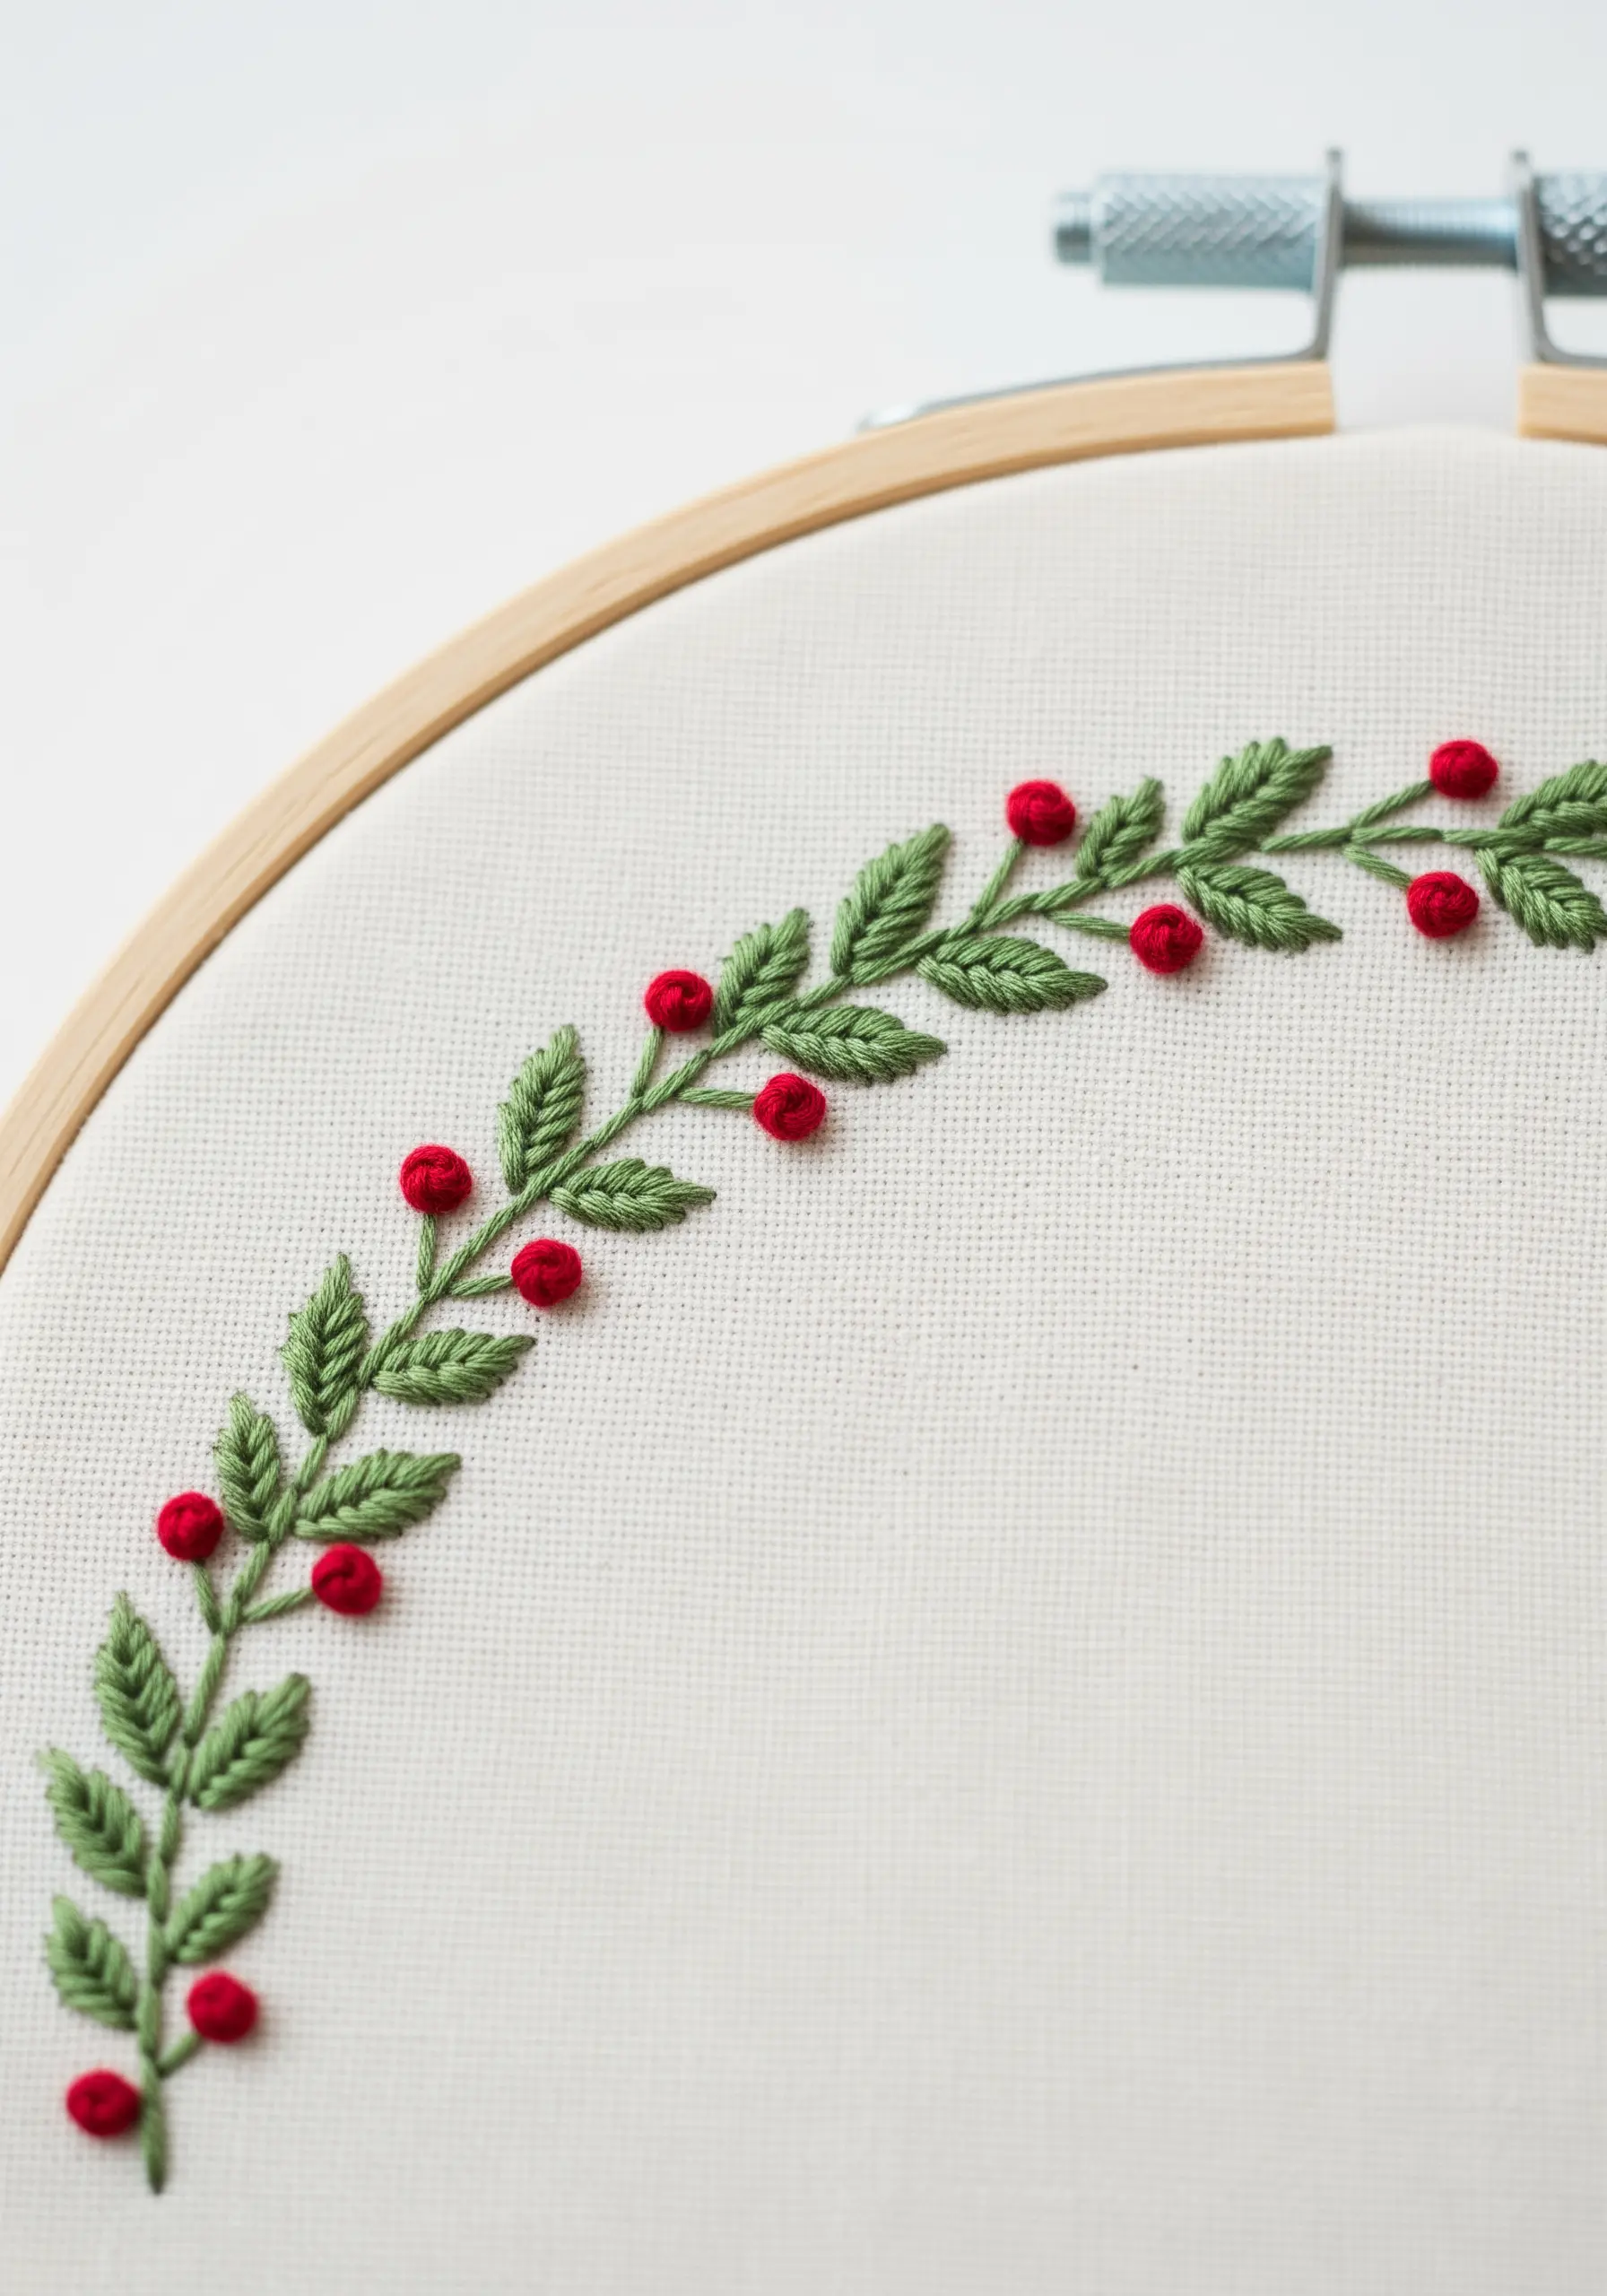
Turn a simple botanical motif into an elegant, flowing border that can adorn table linens or frame a piece of hoop art.
Use fishbone stitch for the holly leaves; its structure is perfect for creating the sharp points and central vein characteristic of the plant.
For the berries, a single bullion knot or a tight cluster of three small French knots will create a perfectly round, dimensional effect.
By repeating this simple combination, you can create a beautiful and continuous design.
24. A Shamrock with Dimensional Shading
The illusion of depth and dimension in this shamrock comes from meticulous thread painting.
Using a long-and-short stitch, blend at least three shades of green. Begin with the darkest shade at the center of each leaf and gradually work your way to the lightest shade at the outer edge.
The key is to direct all your stitches towards the center point of the shamrock. This radial stitching enhances the shape and creates a subtle, convincing highlight.
25. The Sculptural Peony Bud
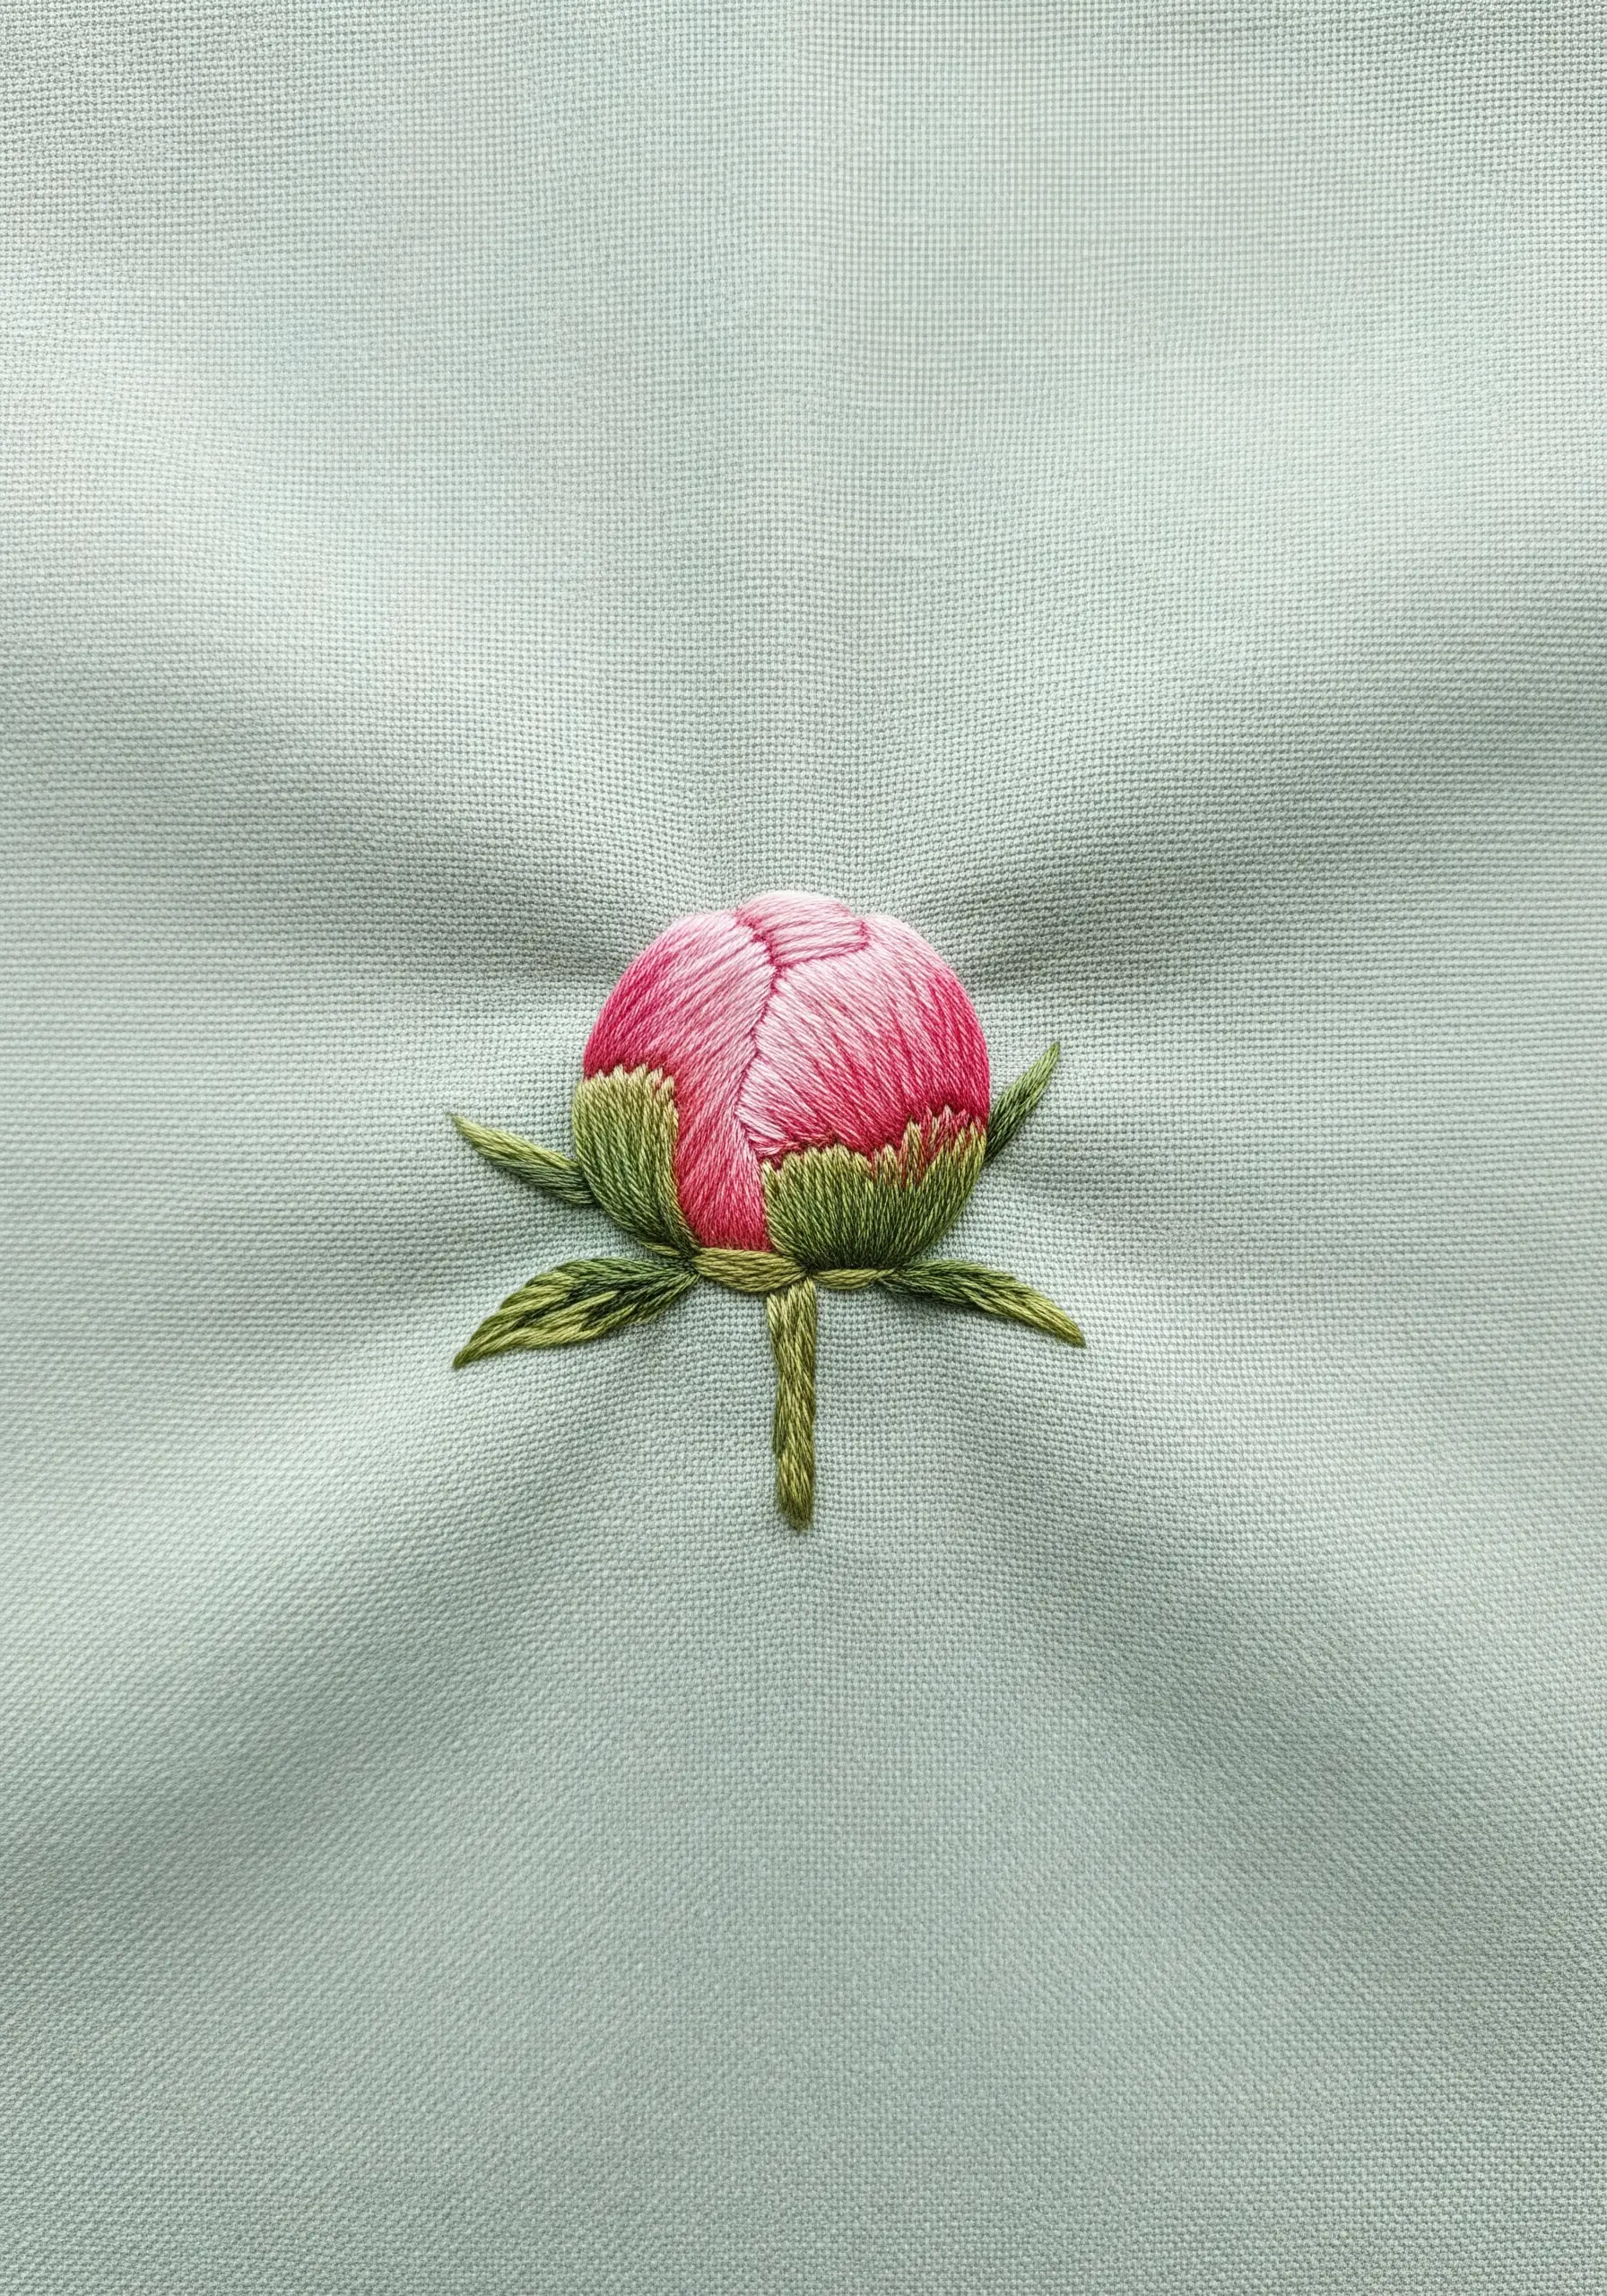
To capture the form of a flower bud whose petals are tightly wrapped, your stitch direction is crucial.
Use curved satin stitches that follow the rounded contour of the bud. Imagine you are wrapping the thread around a small sphere.
Subtly blend several shades of pink using the long-and-short stitch technique to create soft highlights and shadows that enhance the sculptural, three-dimensional effect.
This method lets you build full, plush petals without bulky threads or padding.
26. A Simple Saguaro with a Floral Touch
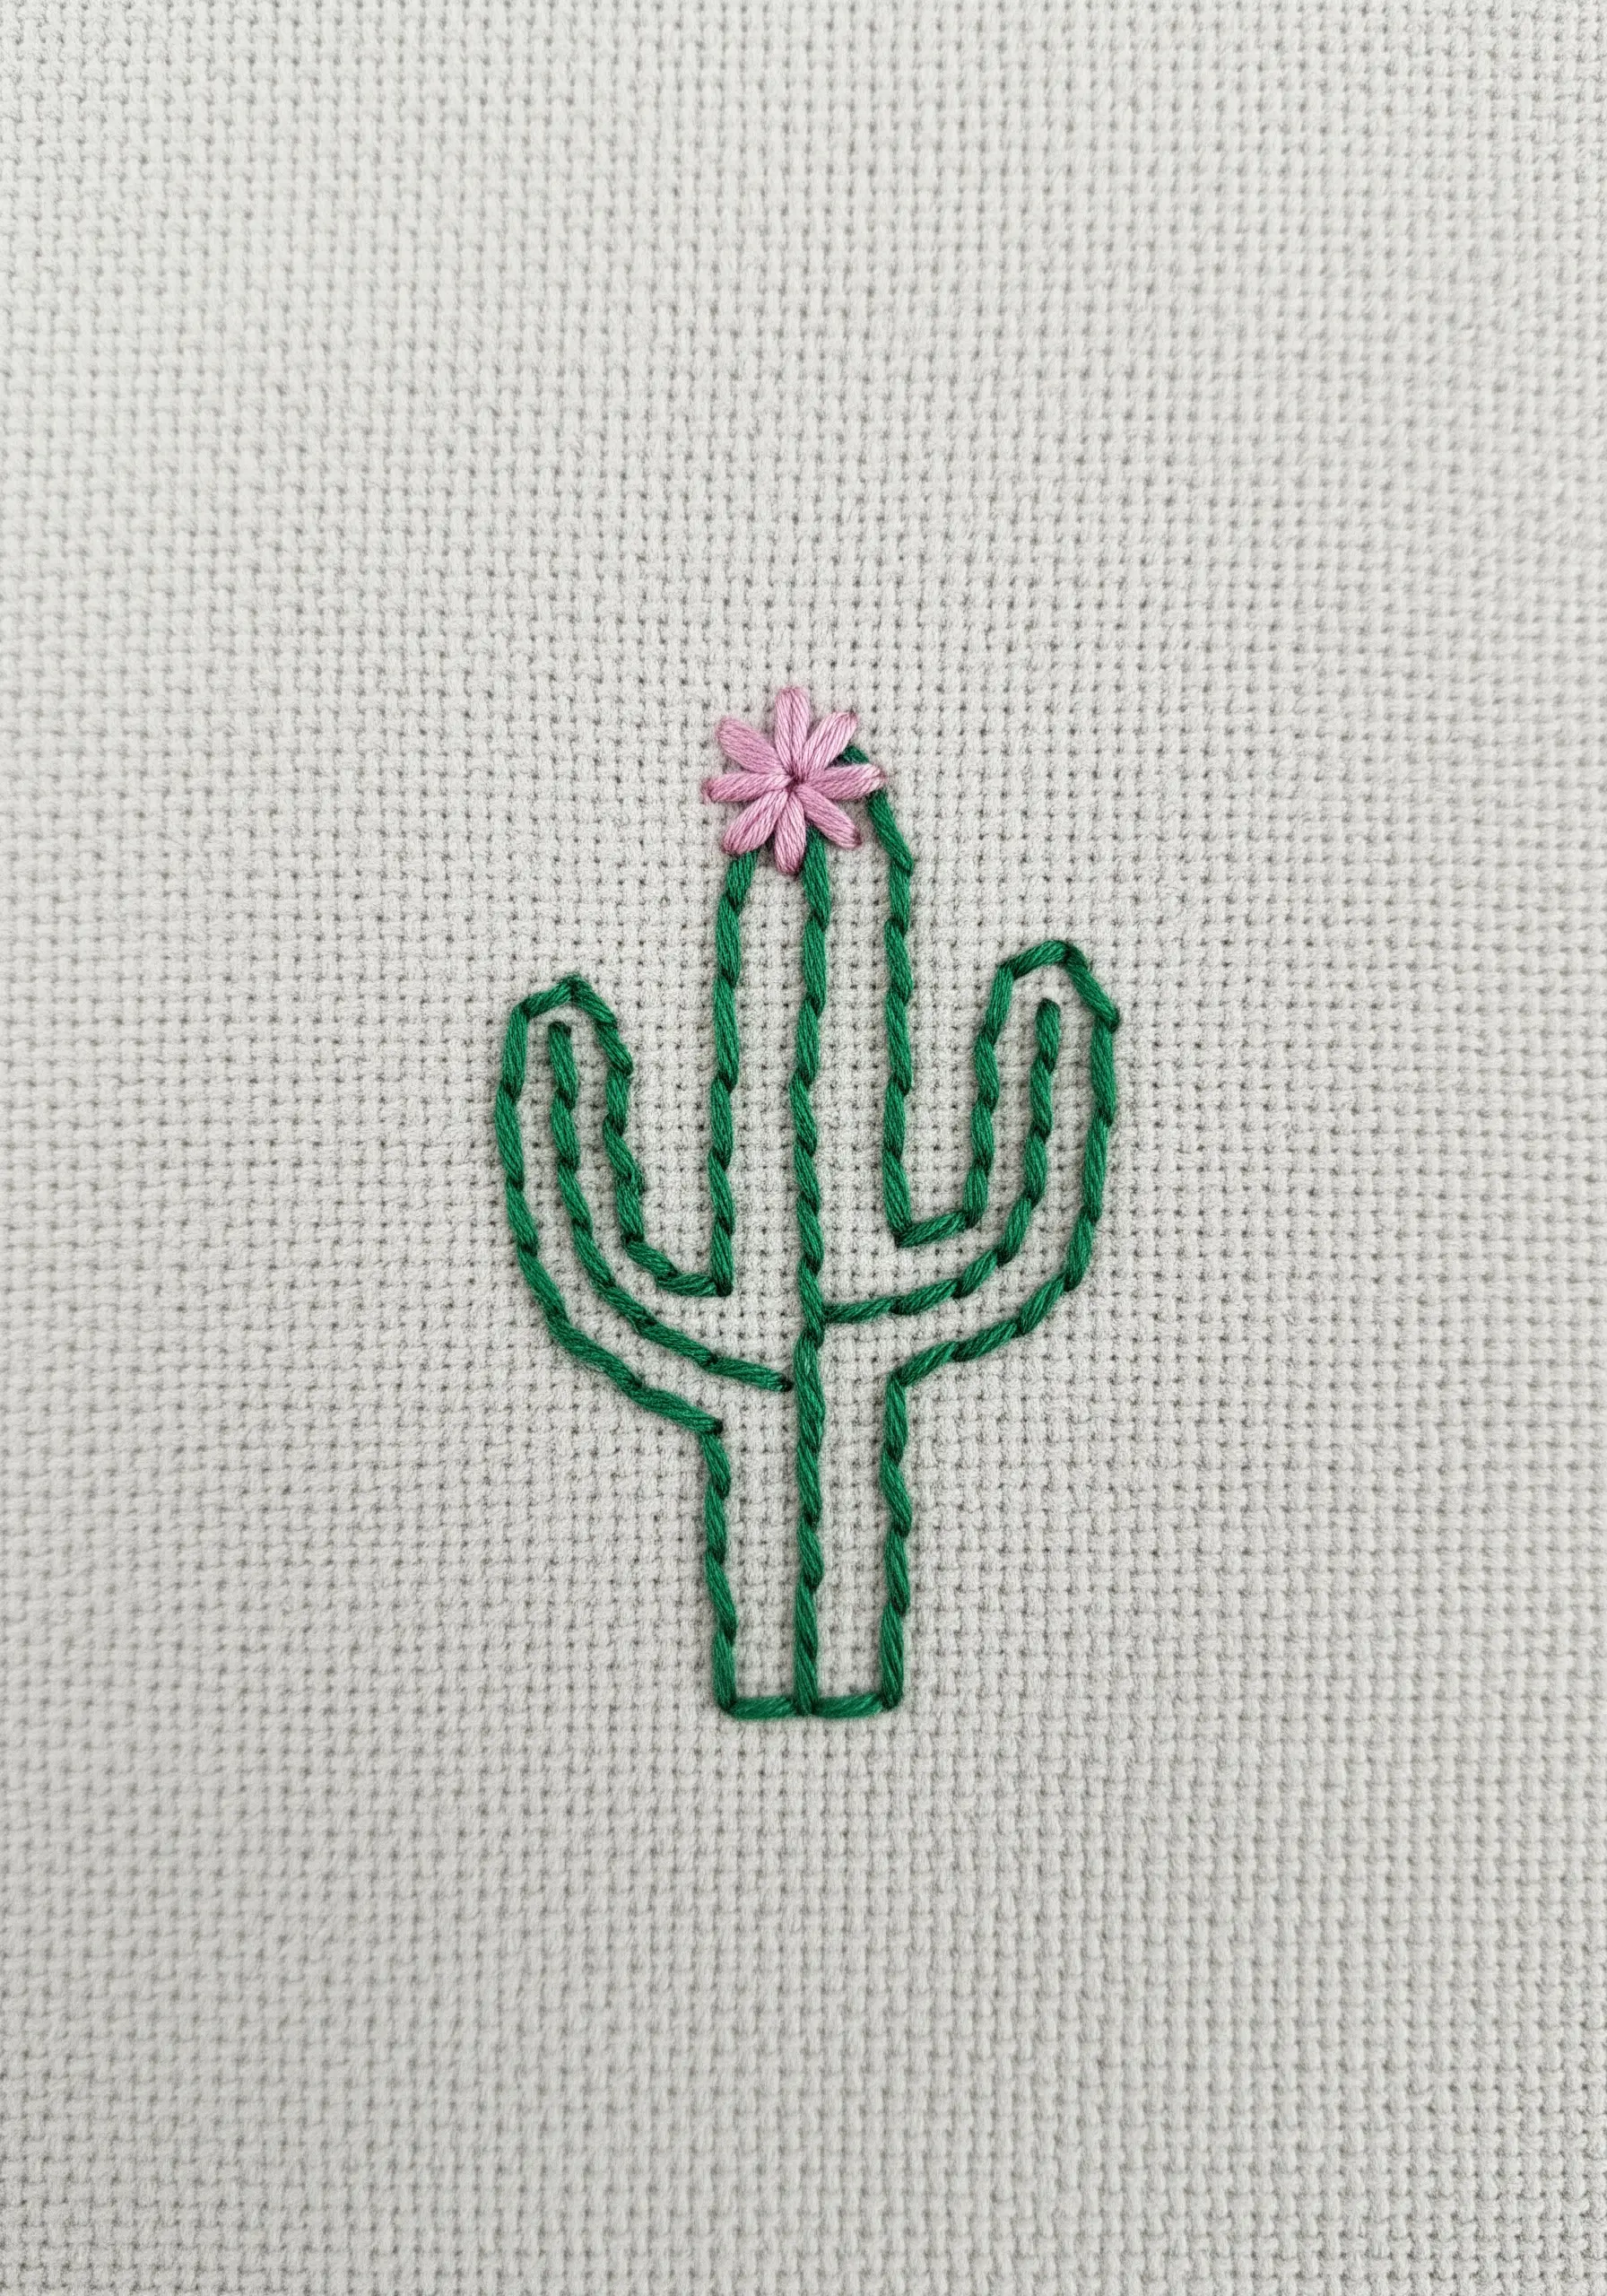
This design demonstrates the power of contrasting textures. Keep the main subject minimal and add one small, highly detailed element.
Use a clean backstitch or stem stitch for the cactus outline and add tiny straight stitches for the needles.
For the flower, use a woven wheel stitch. This creates a raised, textured blossom that immediately draws the eye and provides a beautiful contrast to the simple lines of the cactus.
This principle of contrast can be applied to any simple line-art floral.
27. Holly Leaves with Directional Satin Stitch
The realism in these holly leaves comes from a specific application of satin stitch.
Instead of stitching straight across the leaf, angle your stitches from the outer edge down towards a central dividing line.
This technique creates a V-shape pattern that perfectly mimics the natural vein structure of a leaf, adding depth and detail with a single stitch.
A few well-placed red French knots for berries complete this classic holiday motif, making it perfect for seasonal embroidery decor ideas.
28. The Graphic Elegance of a Ginkgo Leaf
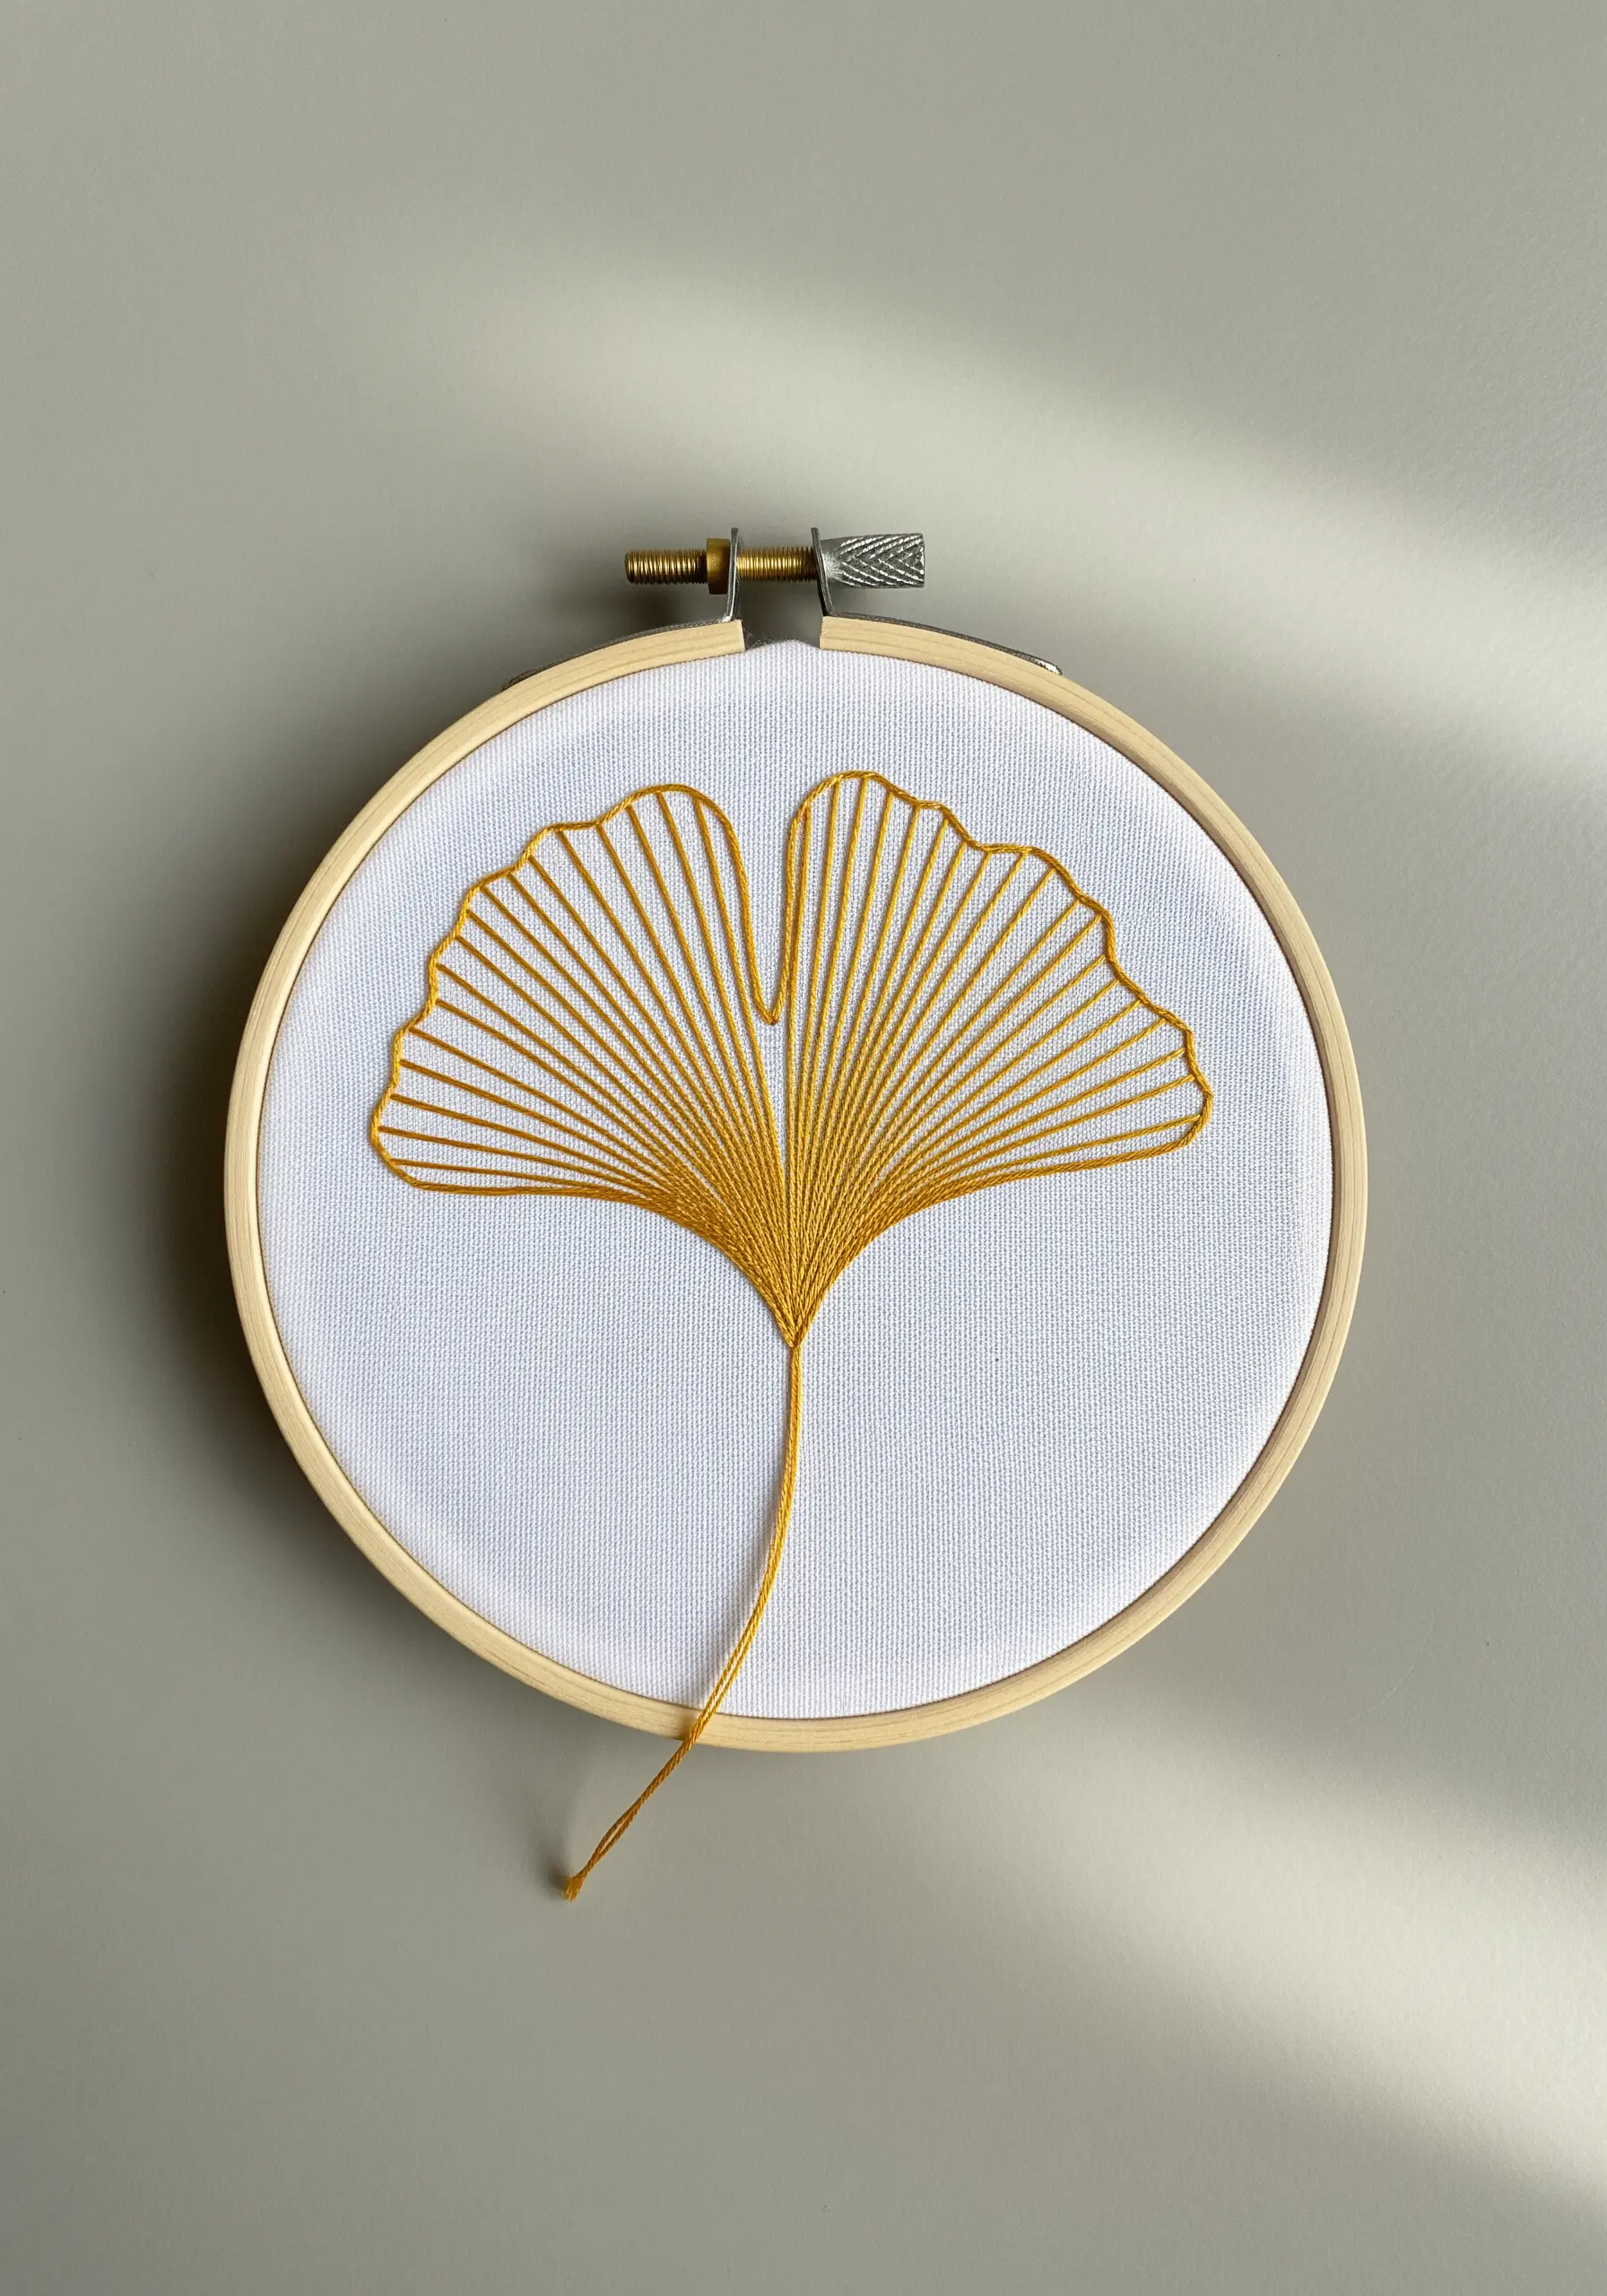
You can capture the unique fan shape of a ginkgo leaf using only radiating straight stitches.
Anchor your thread at the base of the leaf where it meets the stem, and then work all your stitches outwards from this single point.
Vary the length of each straight stitch to create the leaf’s iconic undulating outer edge.
This beautifully simple and meditative technique results in a modern, graphic design that emphasizes line and form.
29. Whispers of Flowers with Looped Stitches

Create these wonderfully airy and impressionistic blossoms by modifying the detached chain stitch.
After you form the loop, instead of securing it with a tiny tacking stitch, leave it open or anchor it loosely with a longer straight stitch.
Clustering these open loops together in various sizes creates a soft, delicate texture that suggests flowers without defining them rigidly.
Using a variegated thread in soft pastels would enhance the ethereal, watercolor-like effect of this technique.
30. Creating a Botanical Monogram
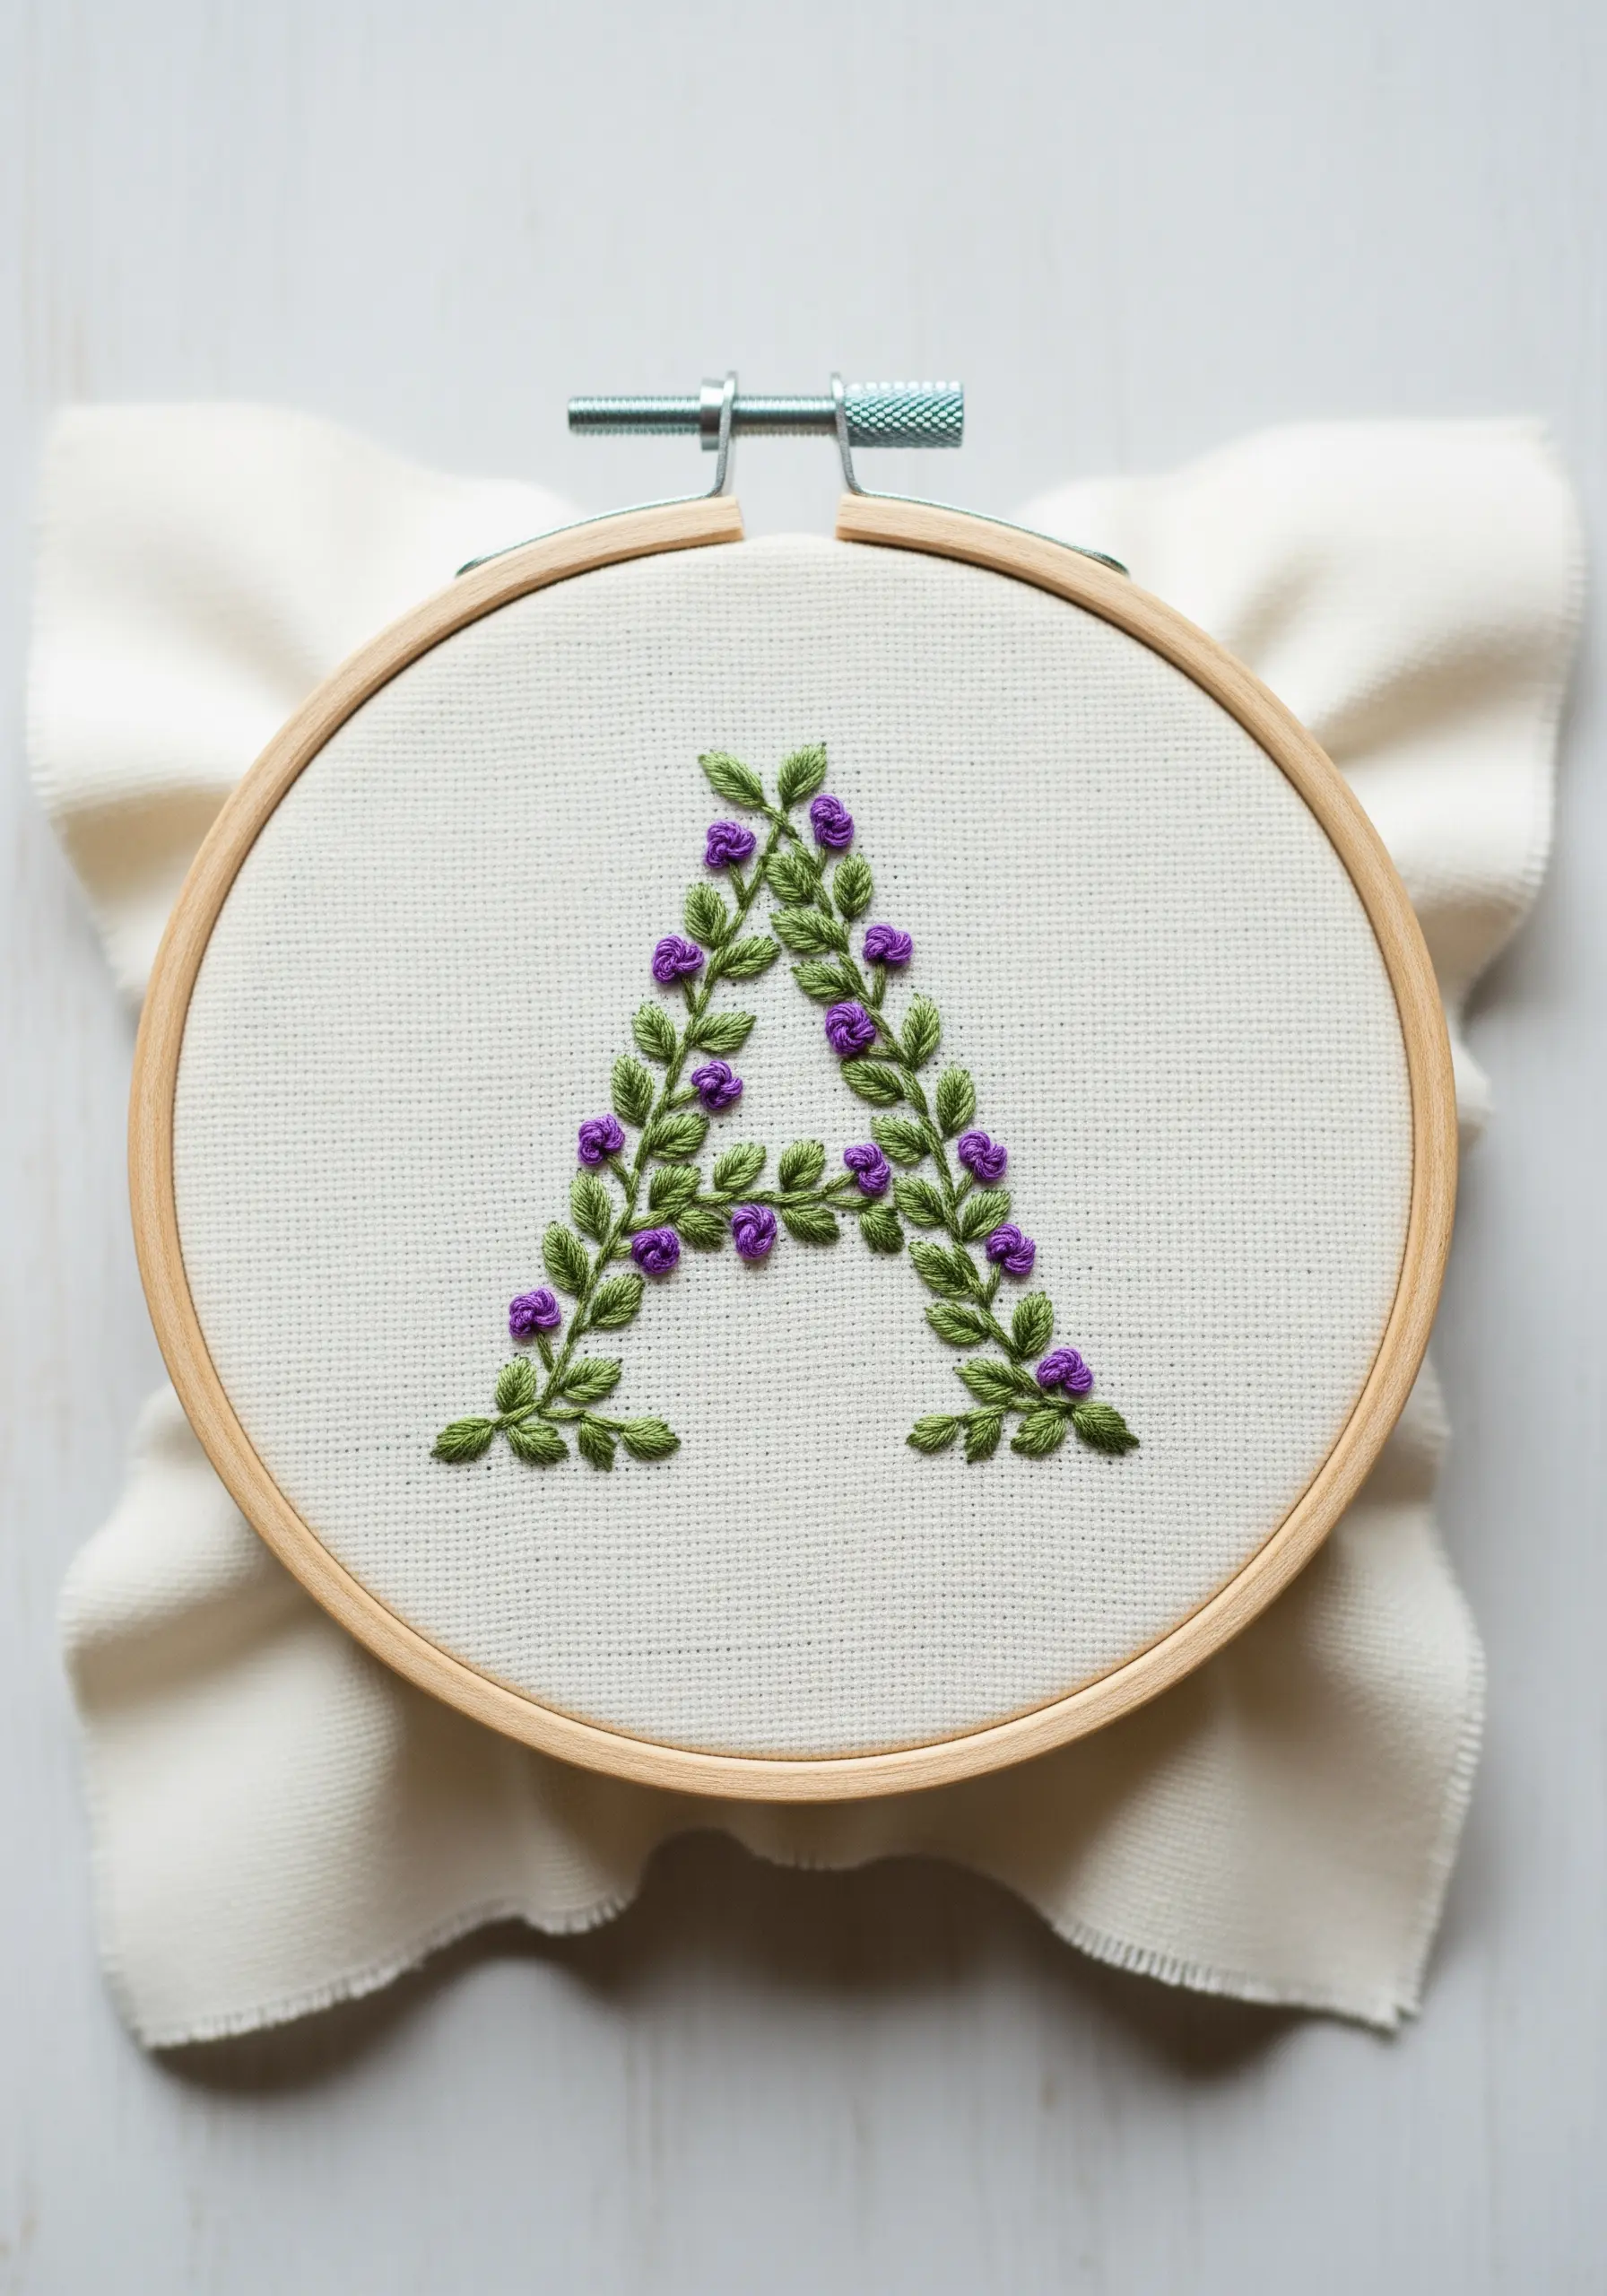
For a truly personalized piece, integrate botanical elements directly into a letterform.
First, establish the structure of the letter using a simple stem or backstitch to create twisting vines.
Then, embellish these vines with textural details. Add clusters of French knots for berries or buds, and scatter tiny fishbone stitches for individual leaves.
This approach transforms a simple initial into a lush, miniature garden, making it a perfect example of elegant botanical monogram embroidery ideas.
31. A Whimsical Carrot and Daisy Bouquet
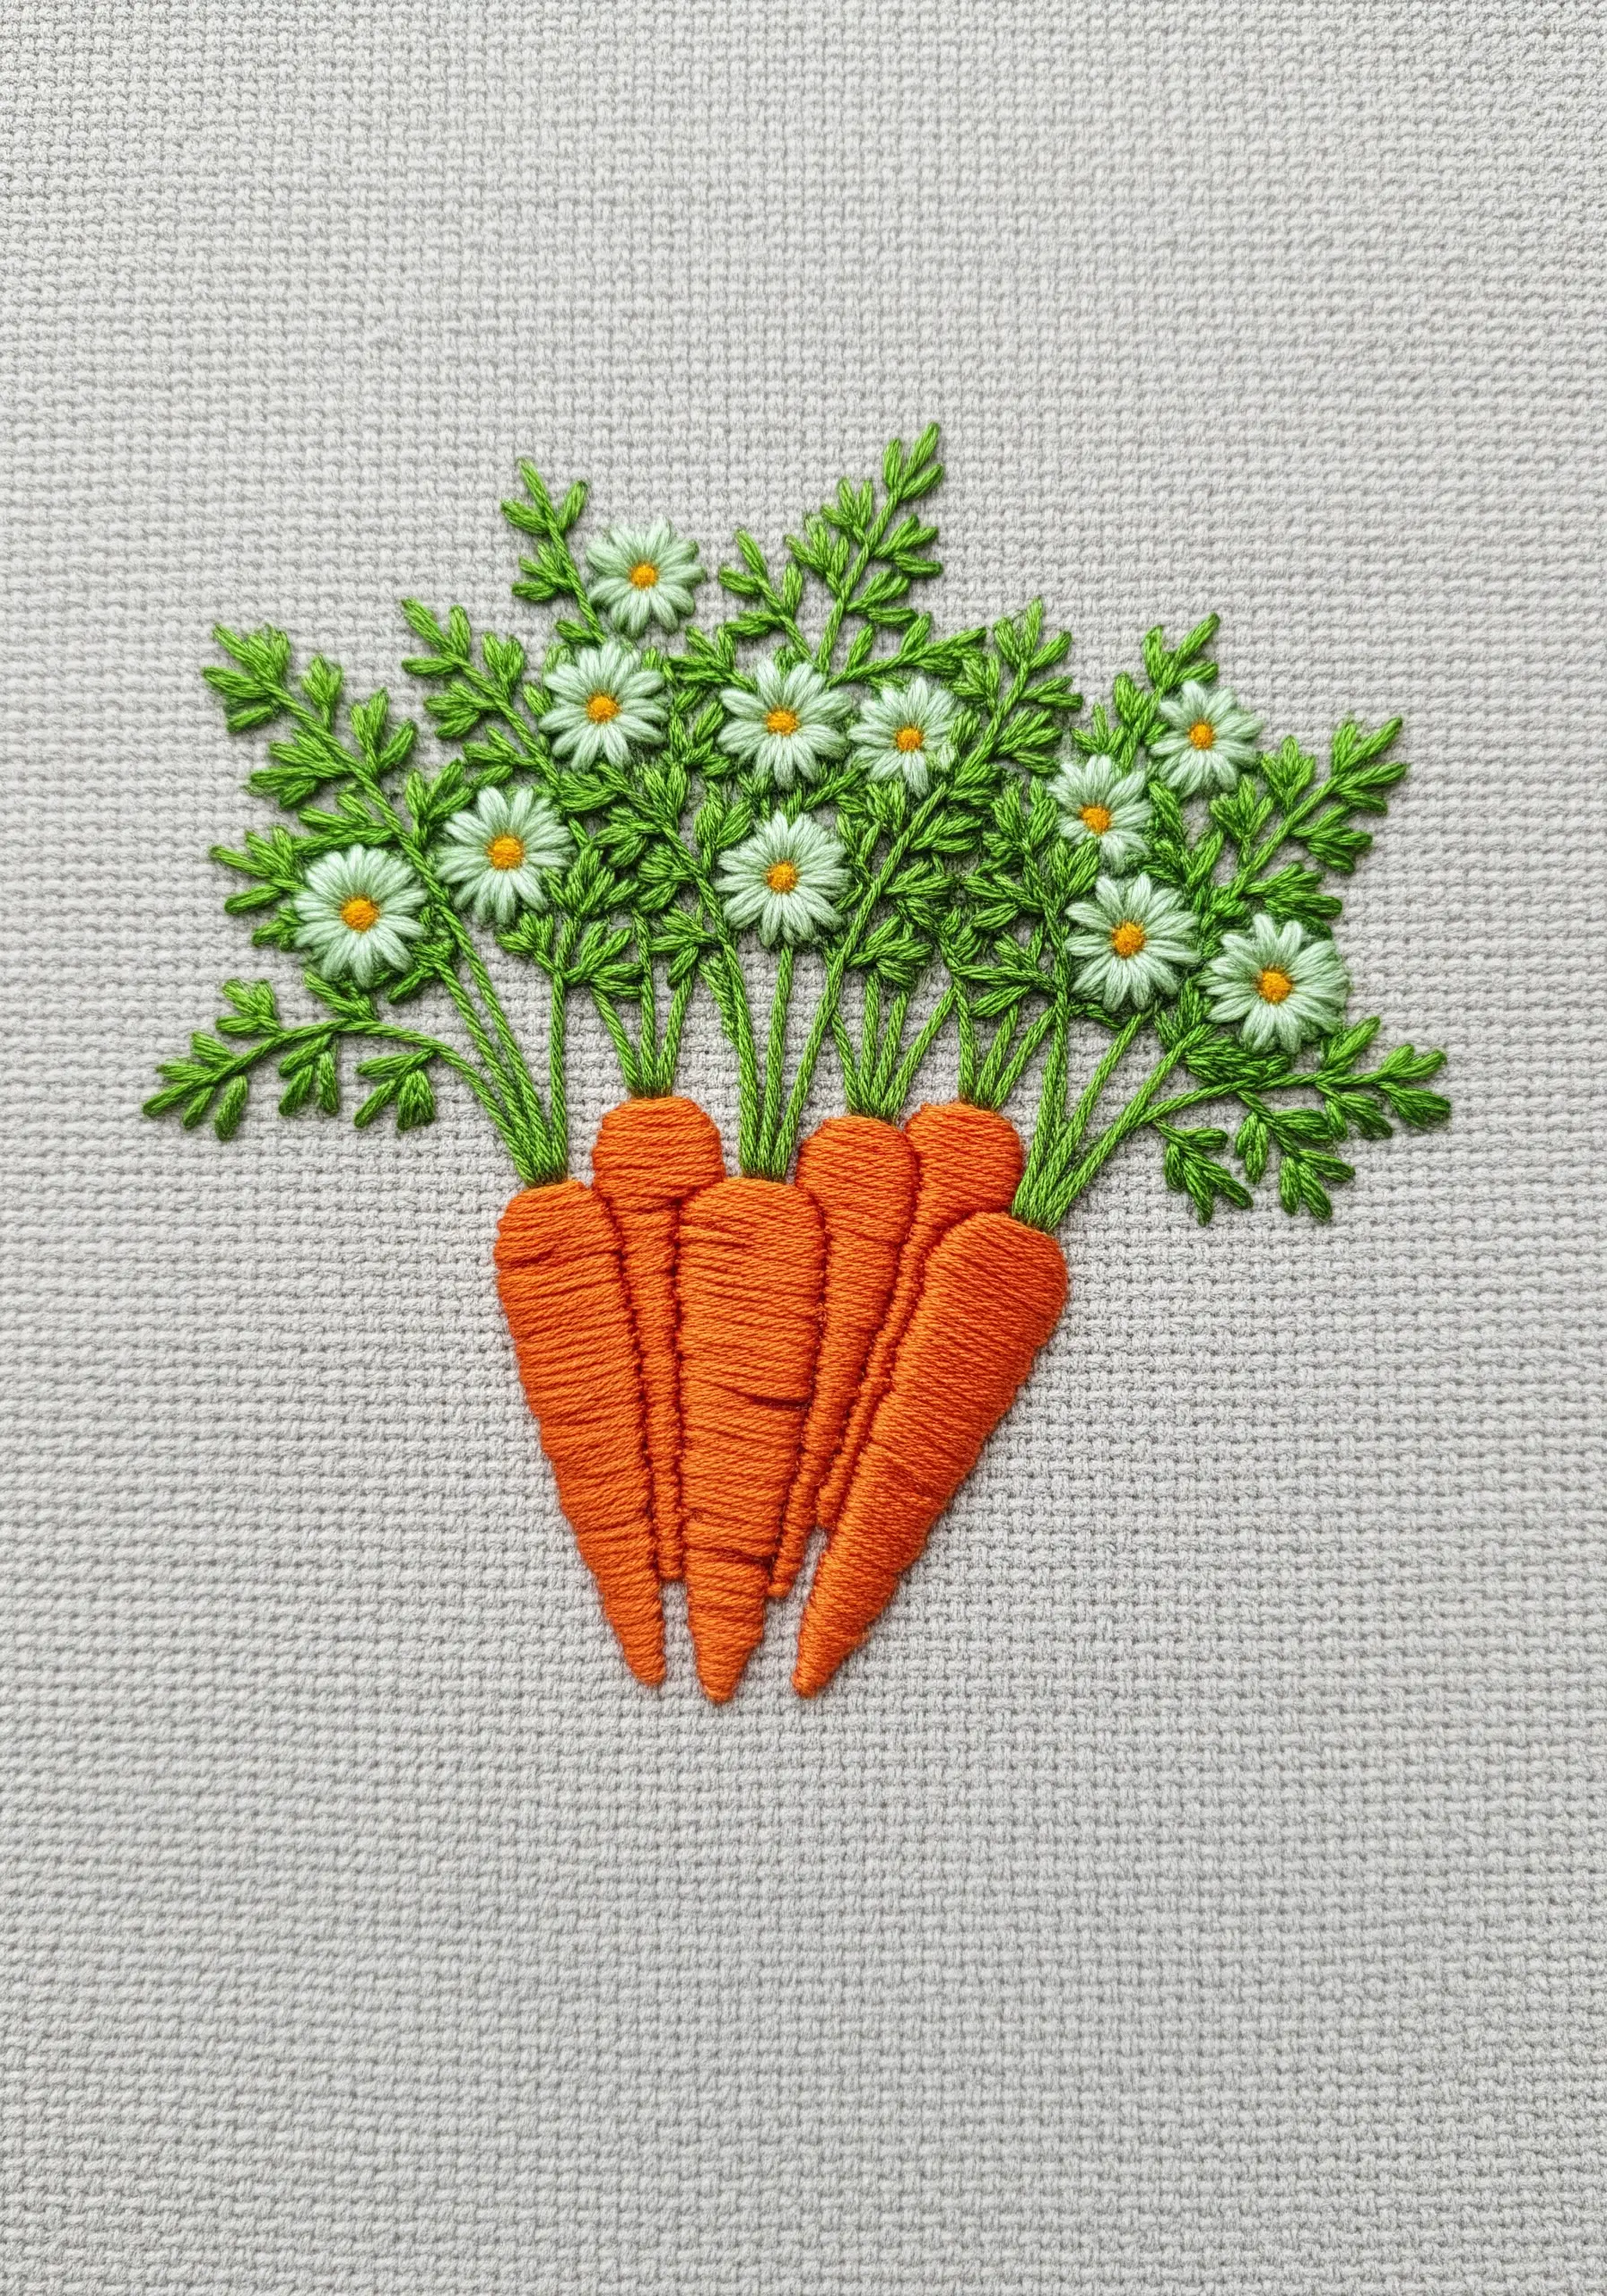
Step outside of traditional floral subjects by creating a playful, narrative composition.
Use a smooth satin stitch for the body of the carrots and a feathery fly stitch or straight stitches for their leafy green tops.
The real charm comes from tucking unexpected elements, like tiny lazy daisy flowers, among the carrot tops.
This design is a joyful reminder that embroidery can be whimsical and that creative composition is just as important as technical skill.
32. A Serene Lotus Filled with Knots
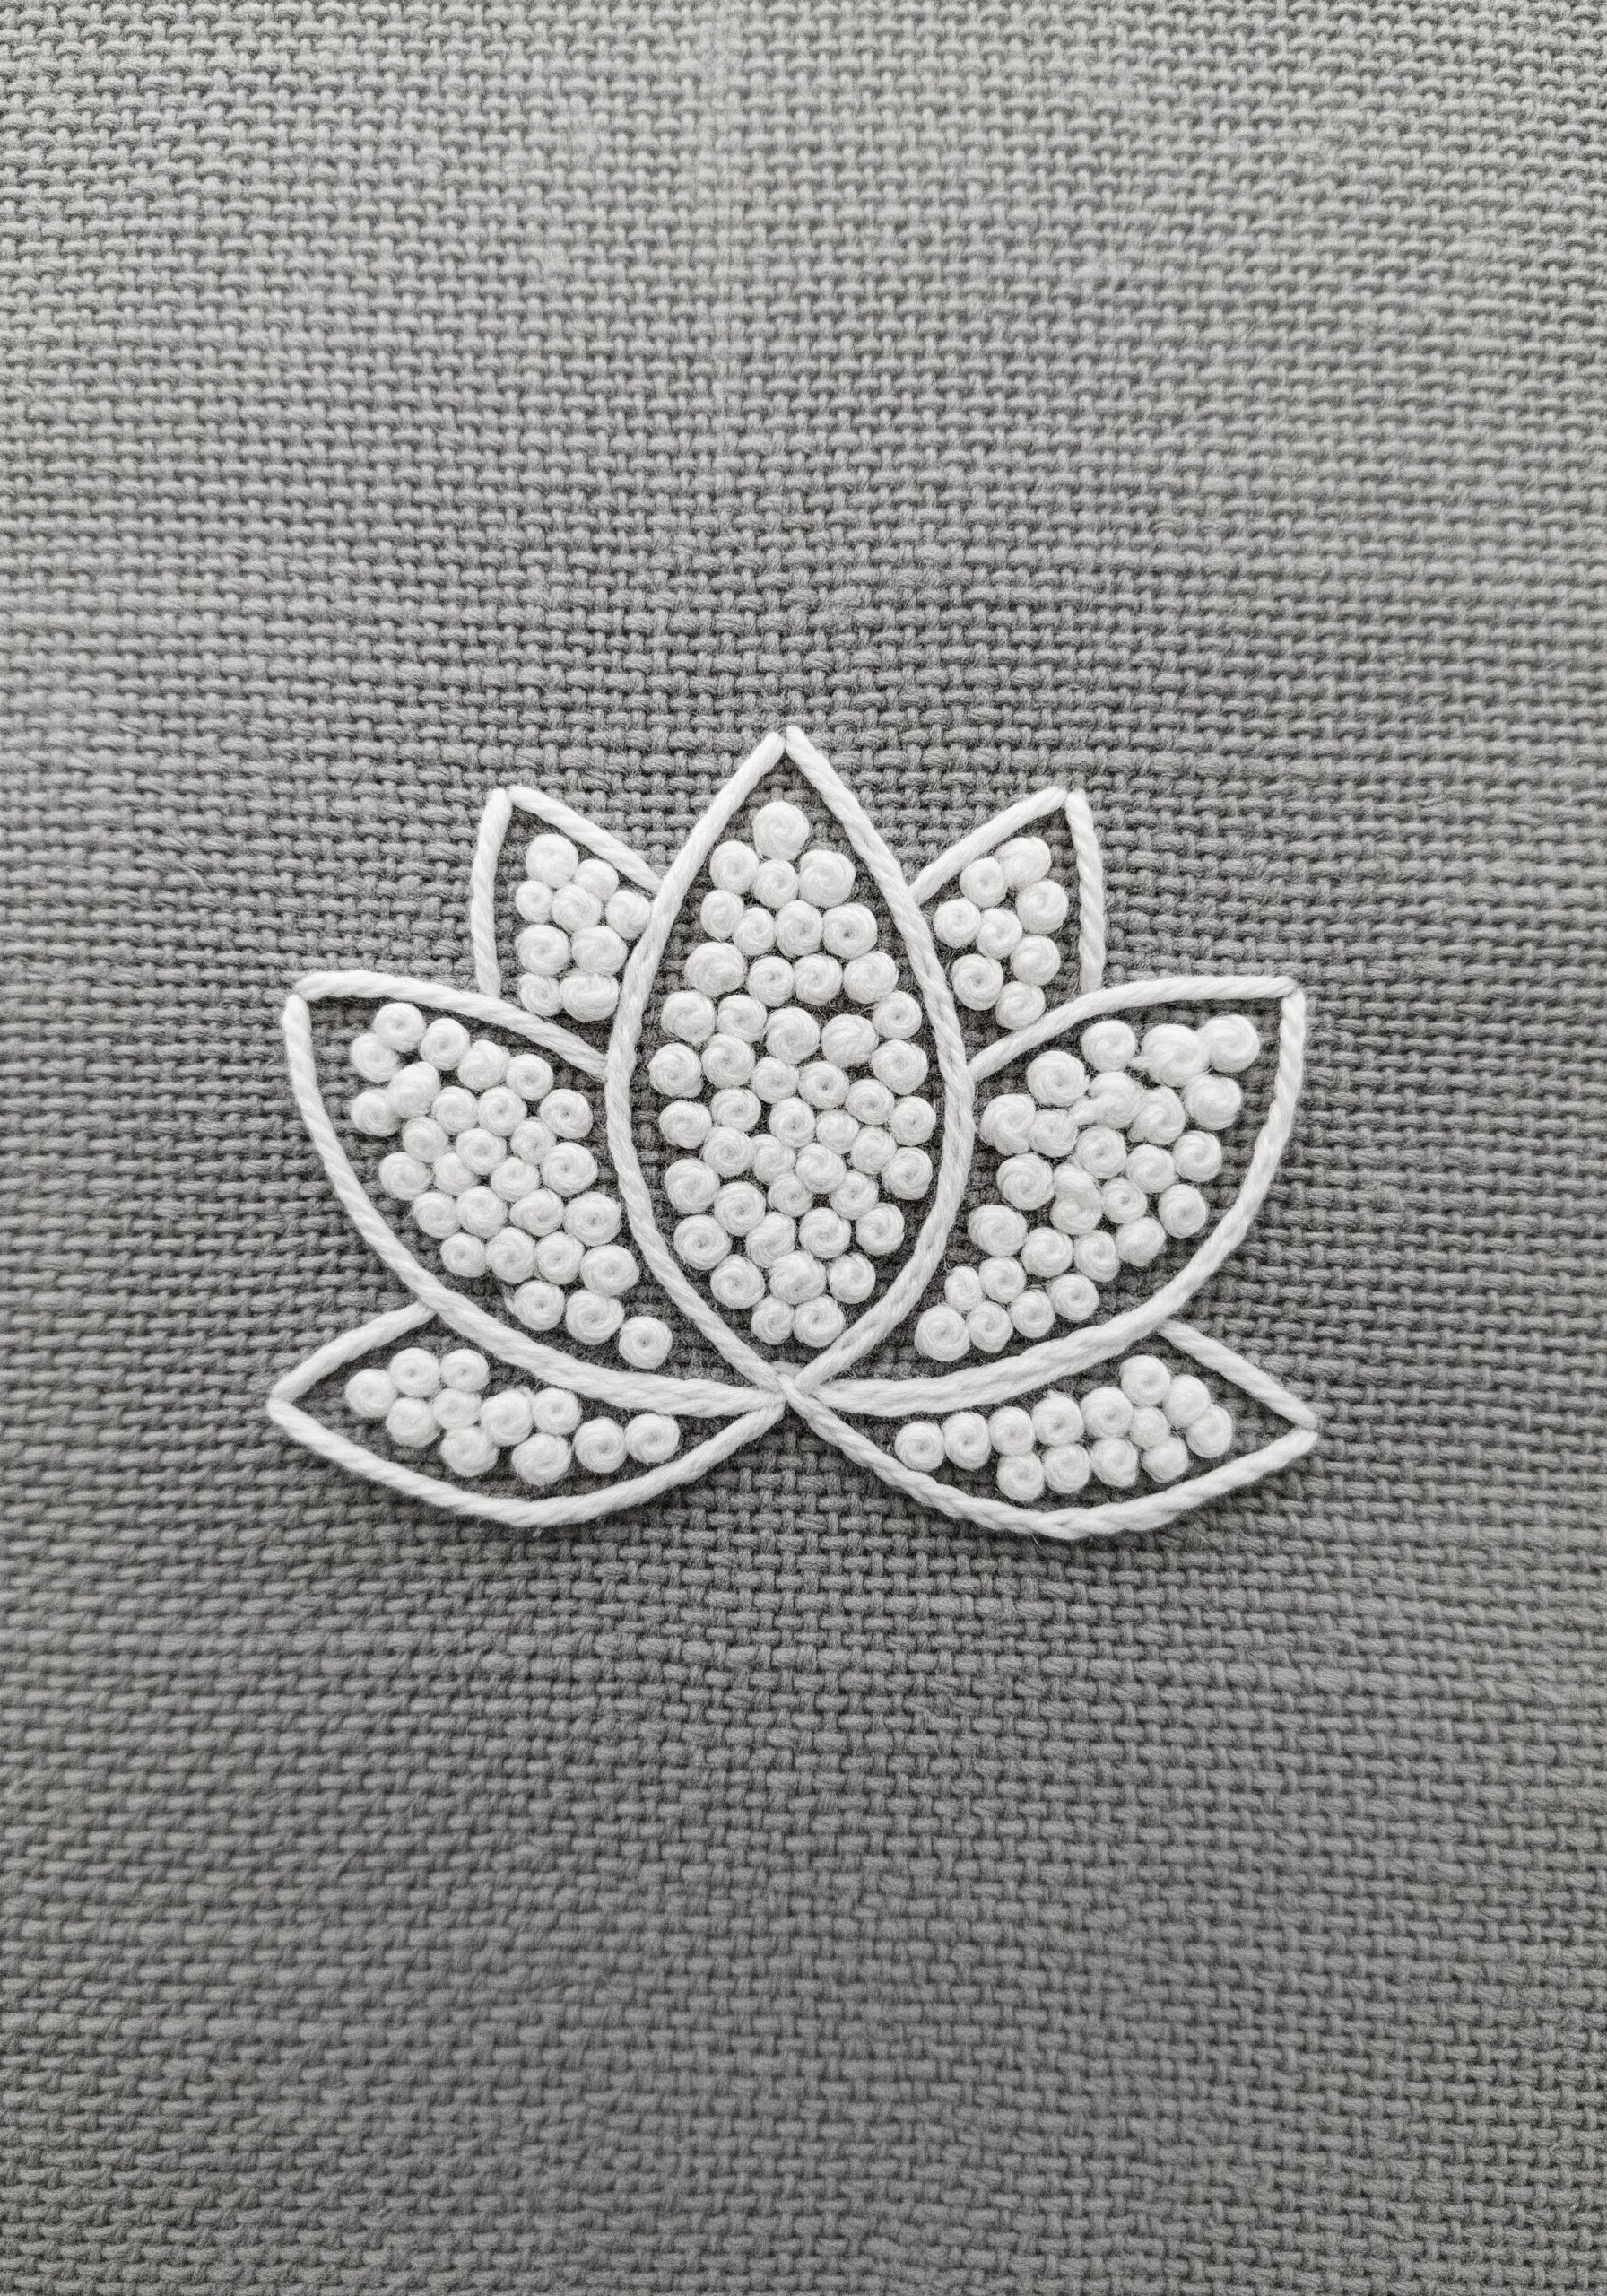
This technique uses a single stitch to create a rich, textural effect reminiscent of pointillism.
Begin by outlining your lotus shape with a neat backstitch or split stitch. This provides a crisp boundary for your fill.
Then, patiently fill each petal with dense, tightly packed French knots, ensuring you cover the fabric completely.
Using only white thread puts the focus entirely on the captivating texture created by the hundreds of tiny knots and the way they play with light and shadow.
33. A Charming Wildflower Meadow Border
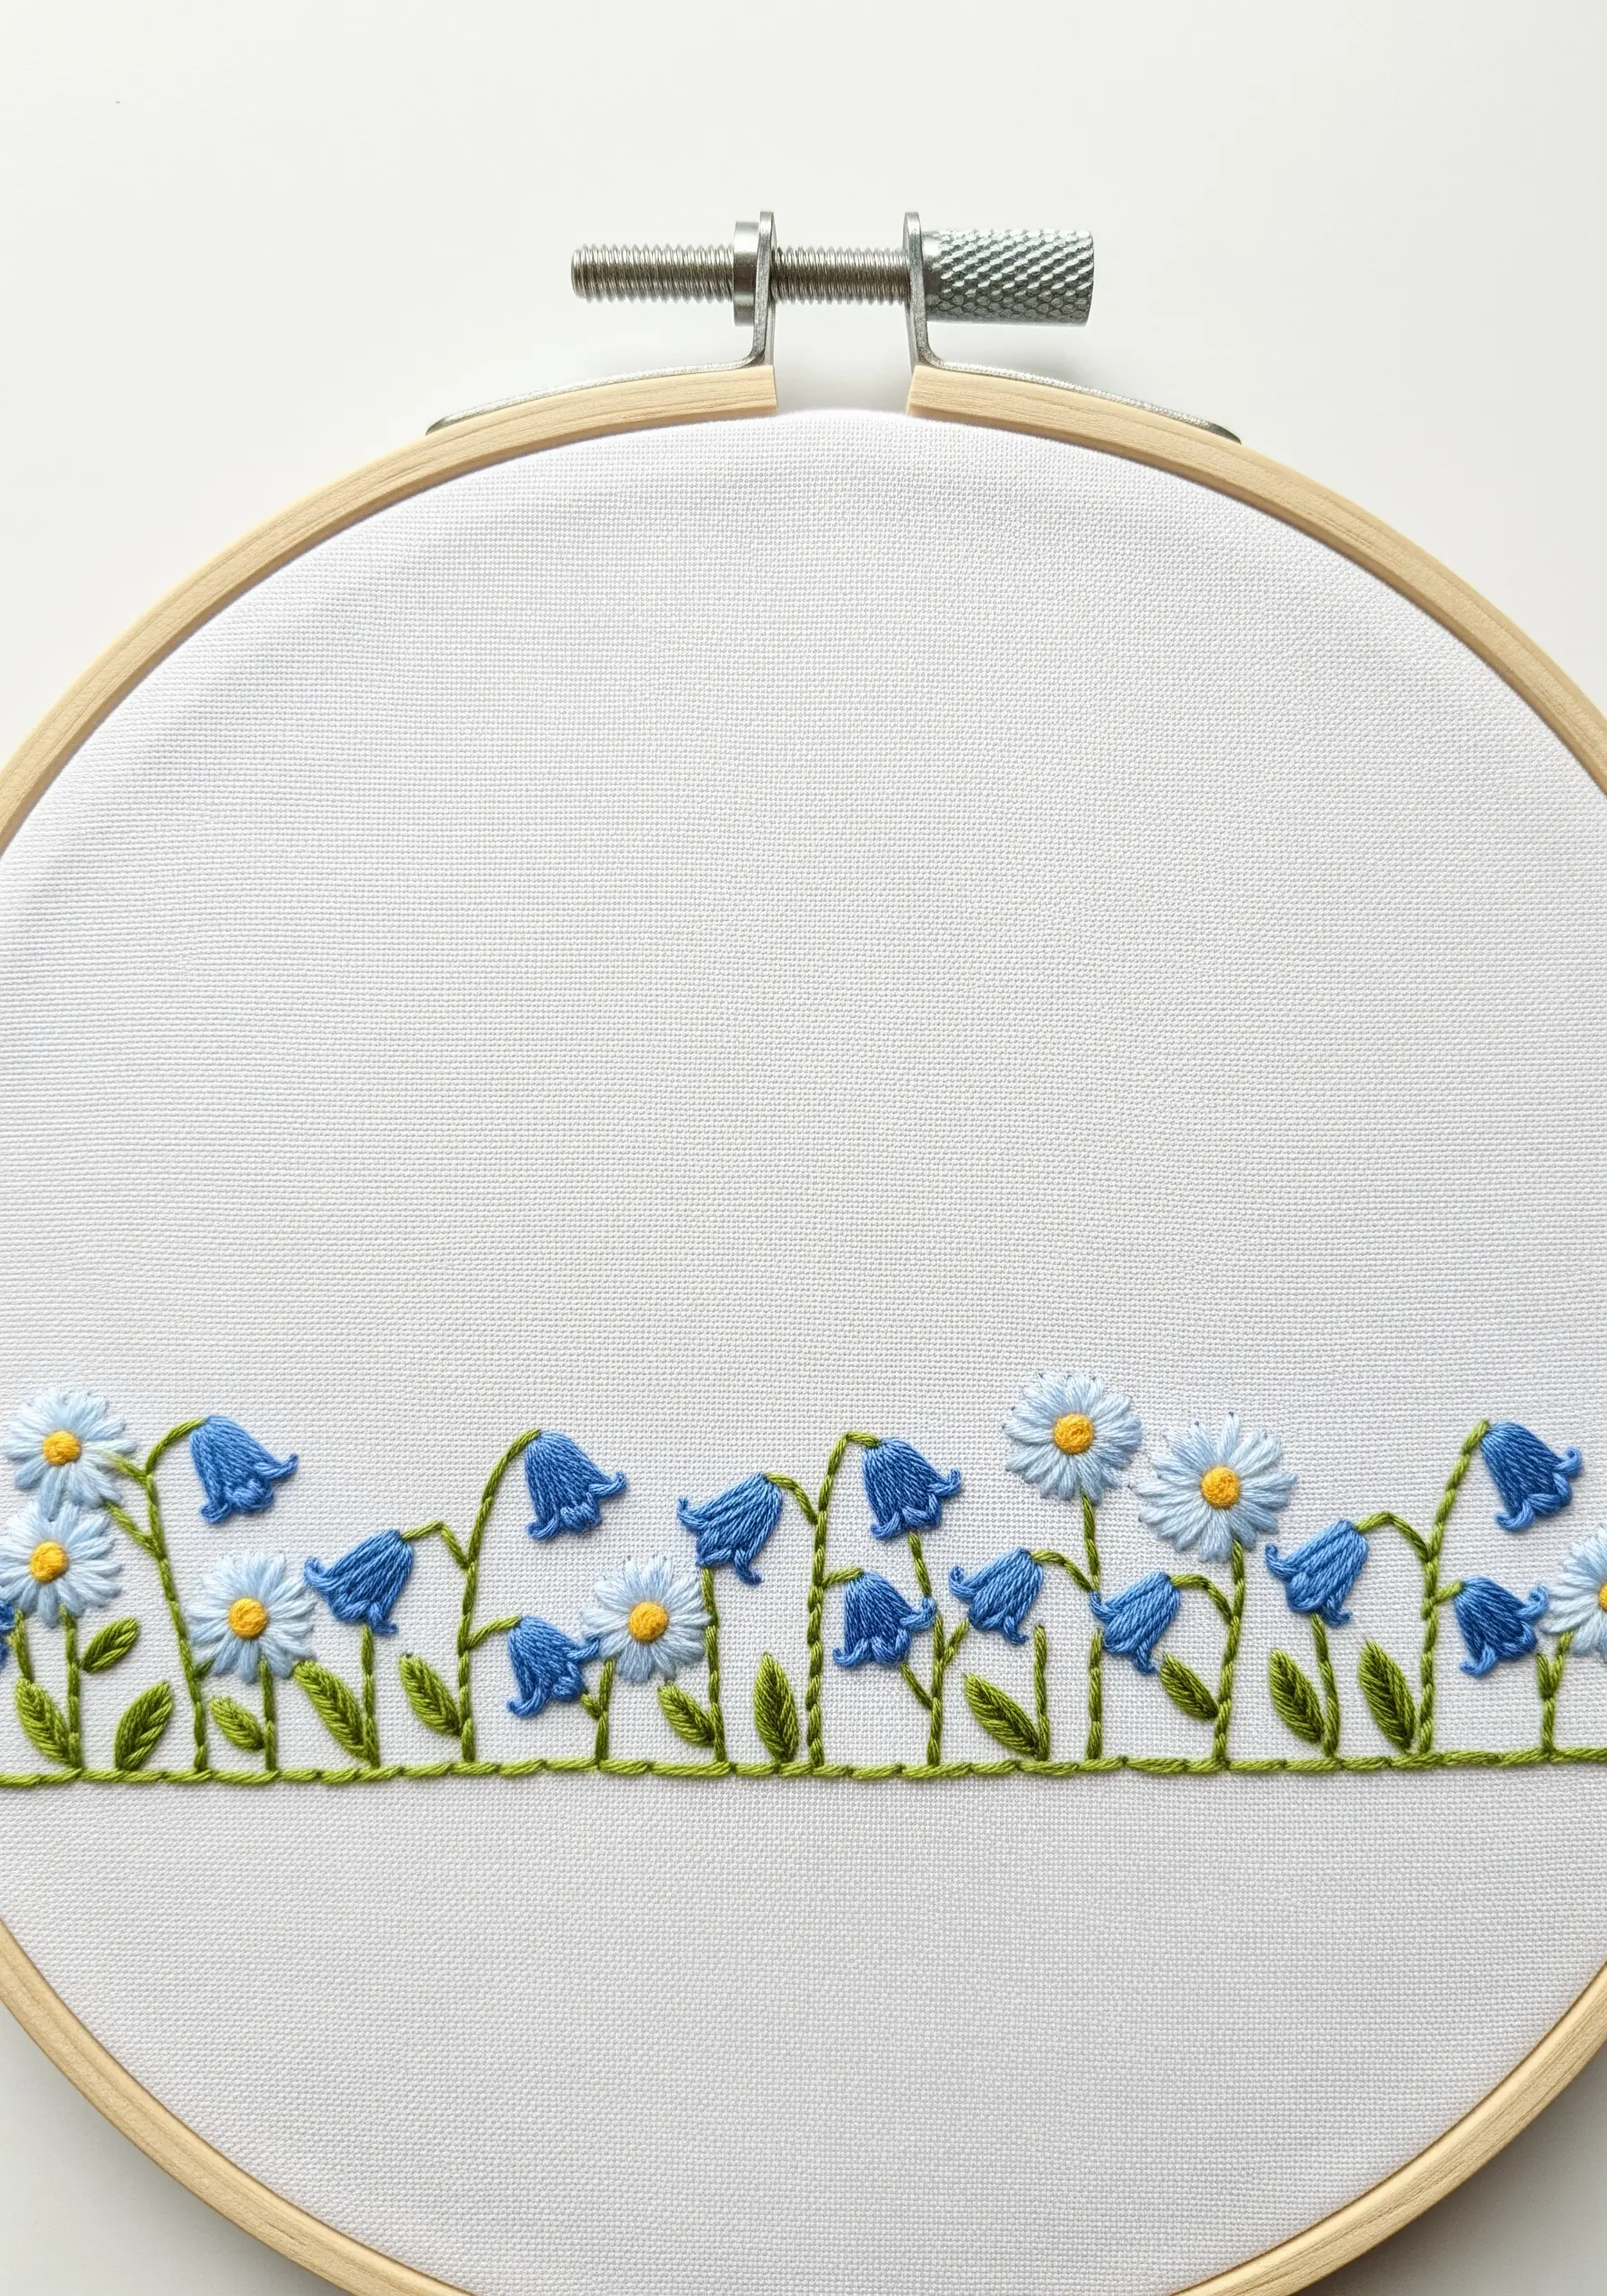
You can create the feeling of a spontaneous wildflower meadow by varying the height and type of your flowers.
First, ground your design with a simple line of stem stitch across the bottom of your fabric.
From this line, stitch your stems to different heights. Use a mix of stitches for the blossoms—lazy daisies for some, satin stitch for others, and French knots for buds.
This variety is the key to achieving a natural, dynamic border that feels like it grew organically on the fabric.
34. The Delicate Structure of a Fern
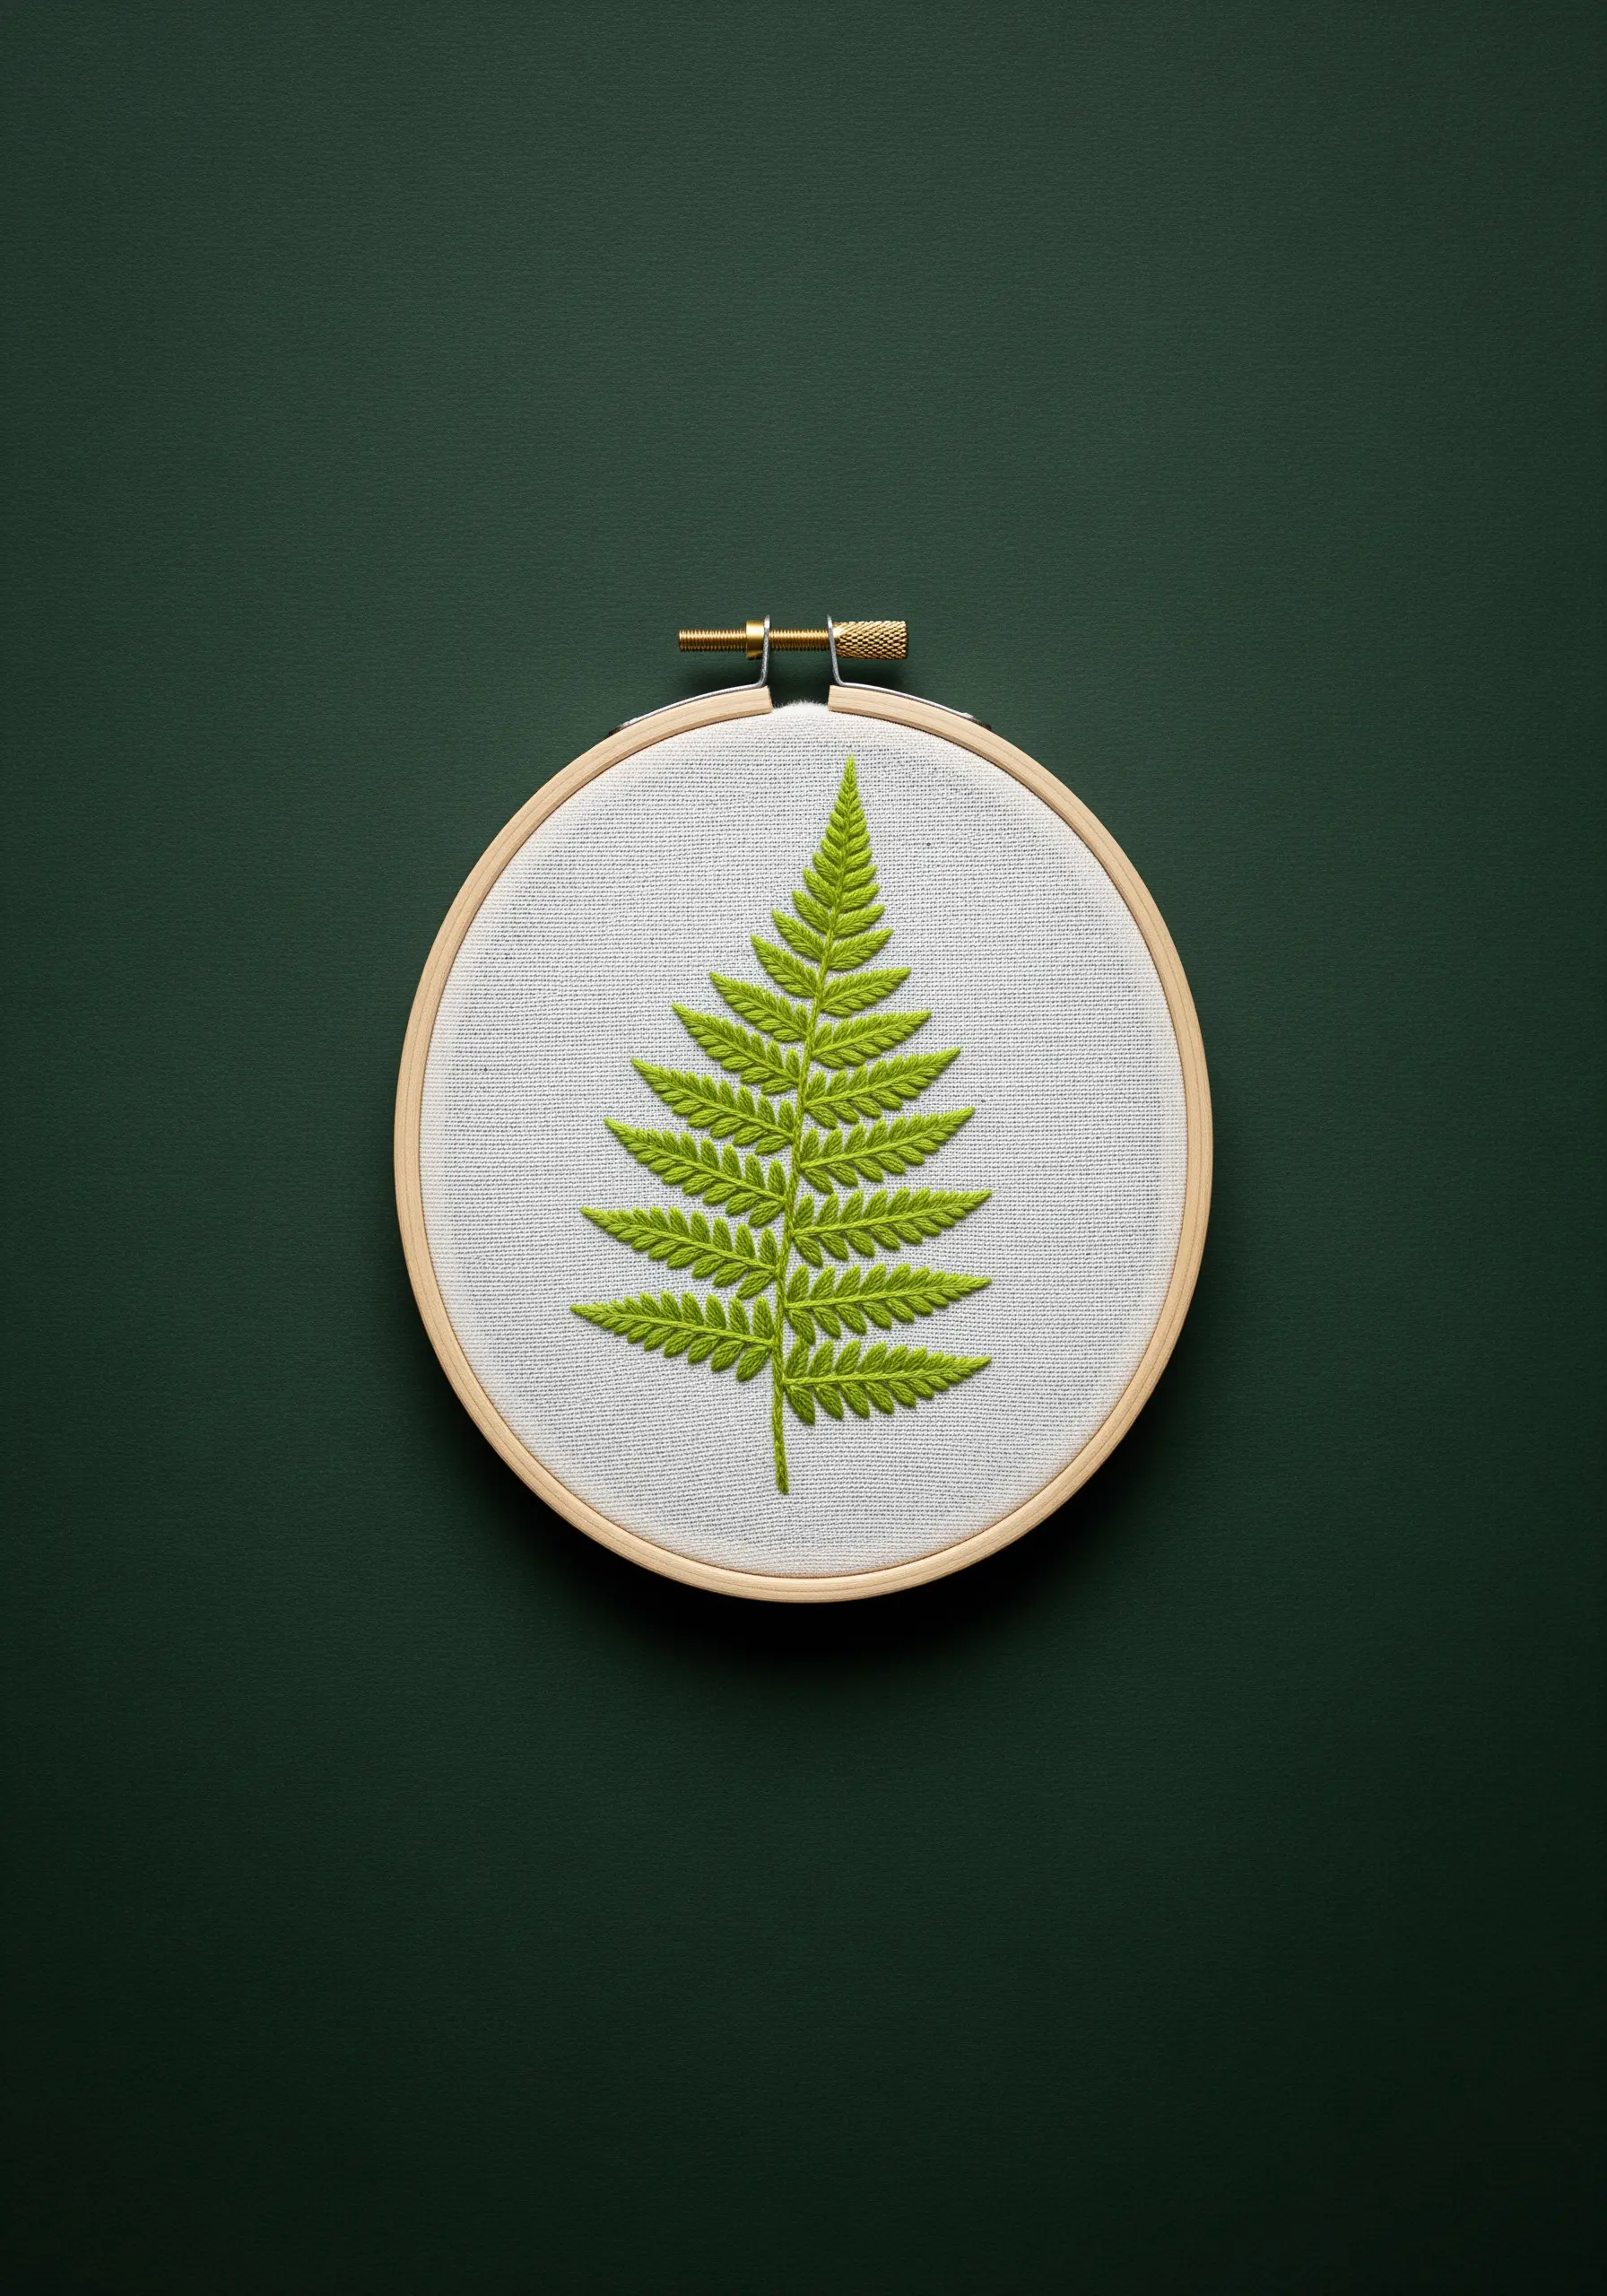
The beauty of a fern lies in its intricate, repeating patterns, making it a wonderful and meditative subject for embroidery.
Use a central stem stitch for the main stalk to give it a solid foundation. For the delicate fronds, use a fishbone stitch or small, angled straight stitches.
The key to a realistic result is maintaining consistency in the angle and size of your stitches, gradually making them smaller as you approach the tip of the fern.
This process is a perfect way to turn everyday nature into stunning art.
35. Impressionistic Cherry Blossoms
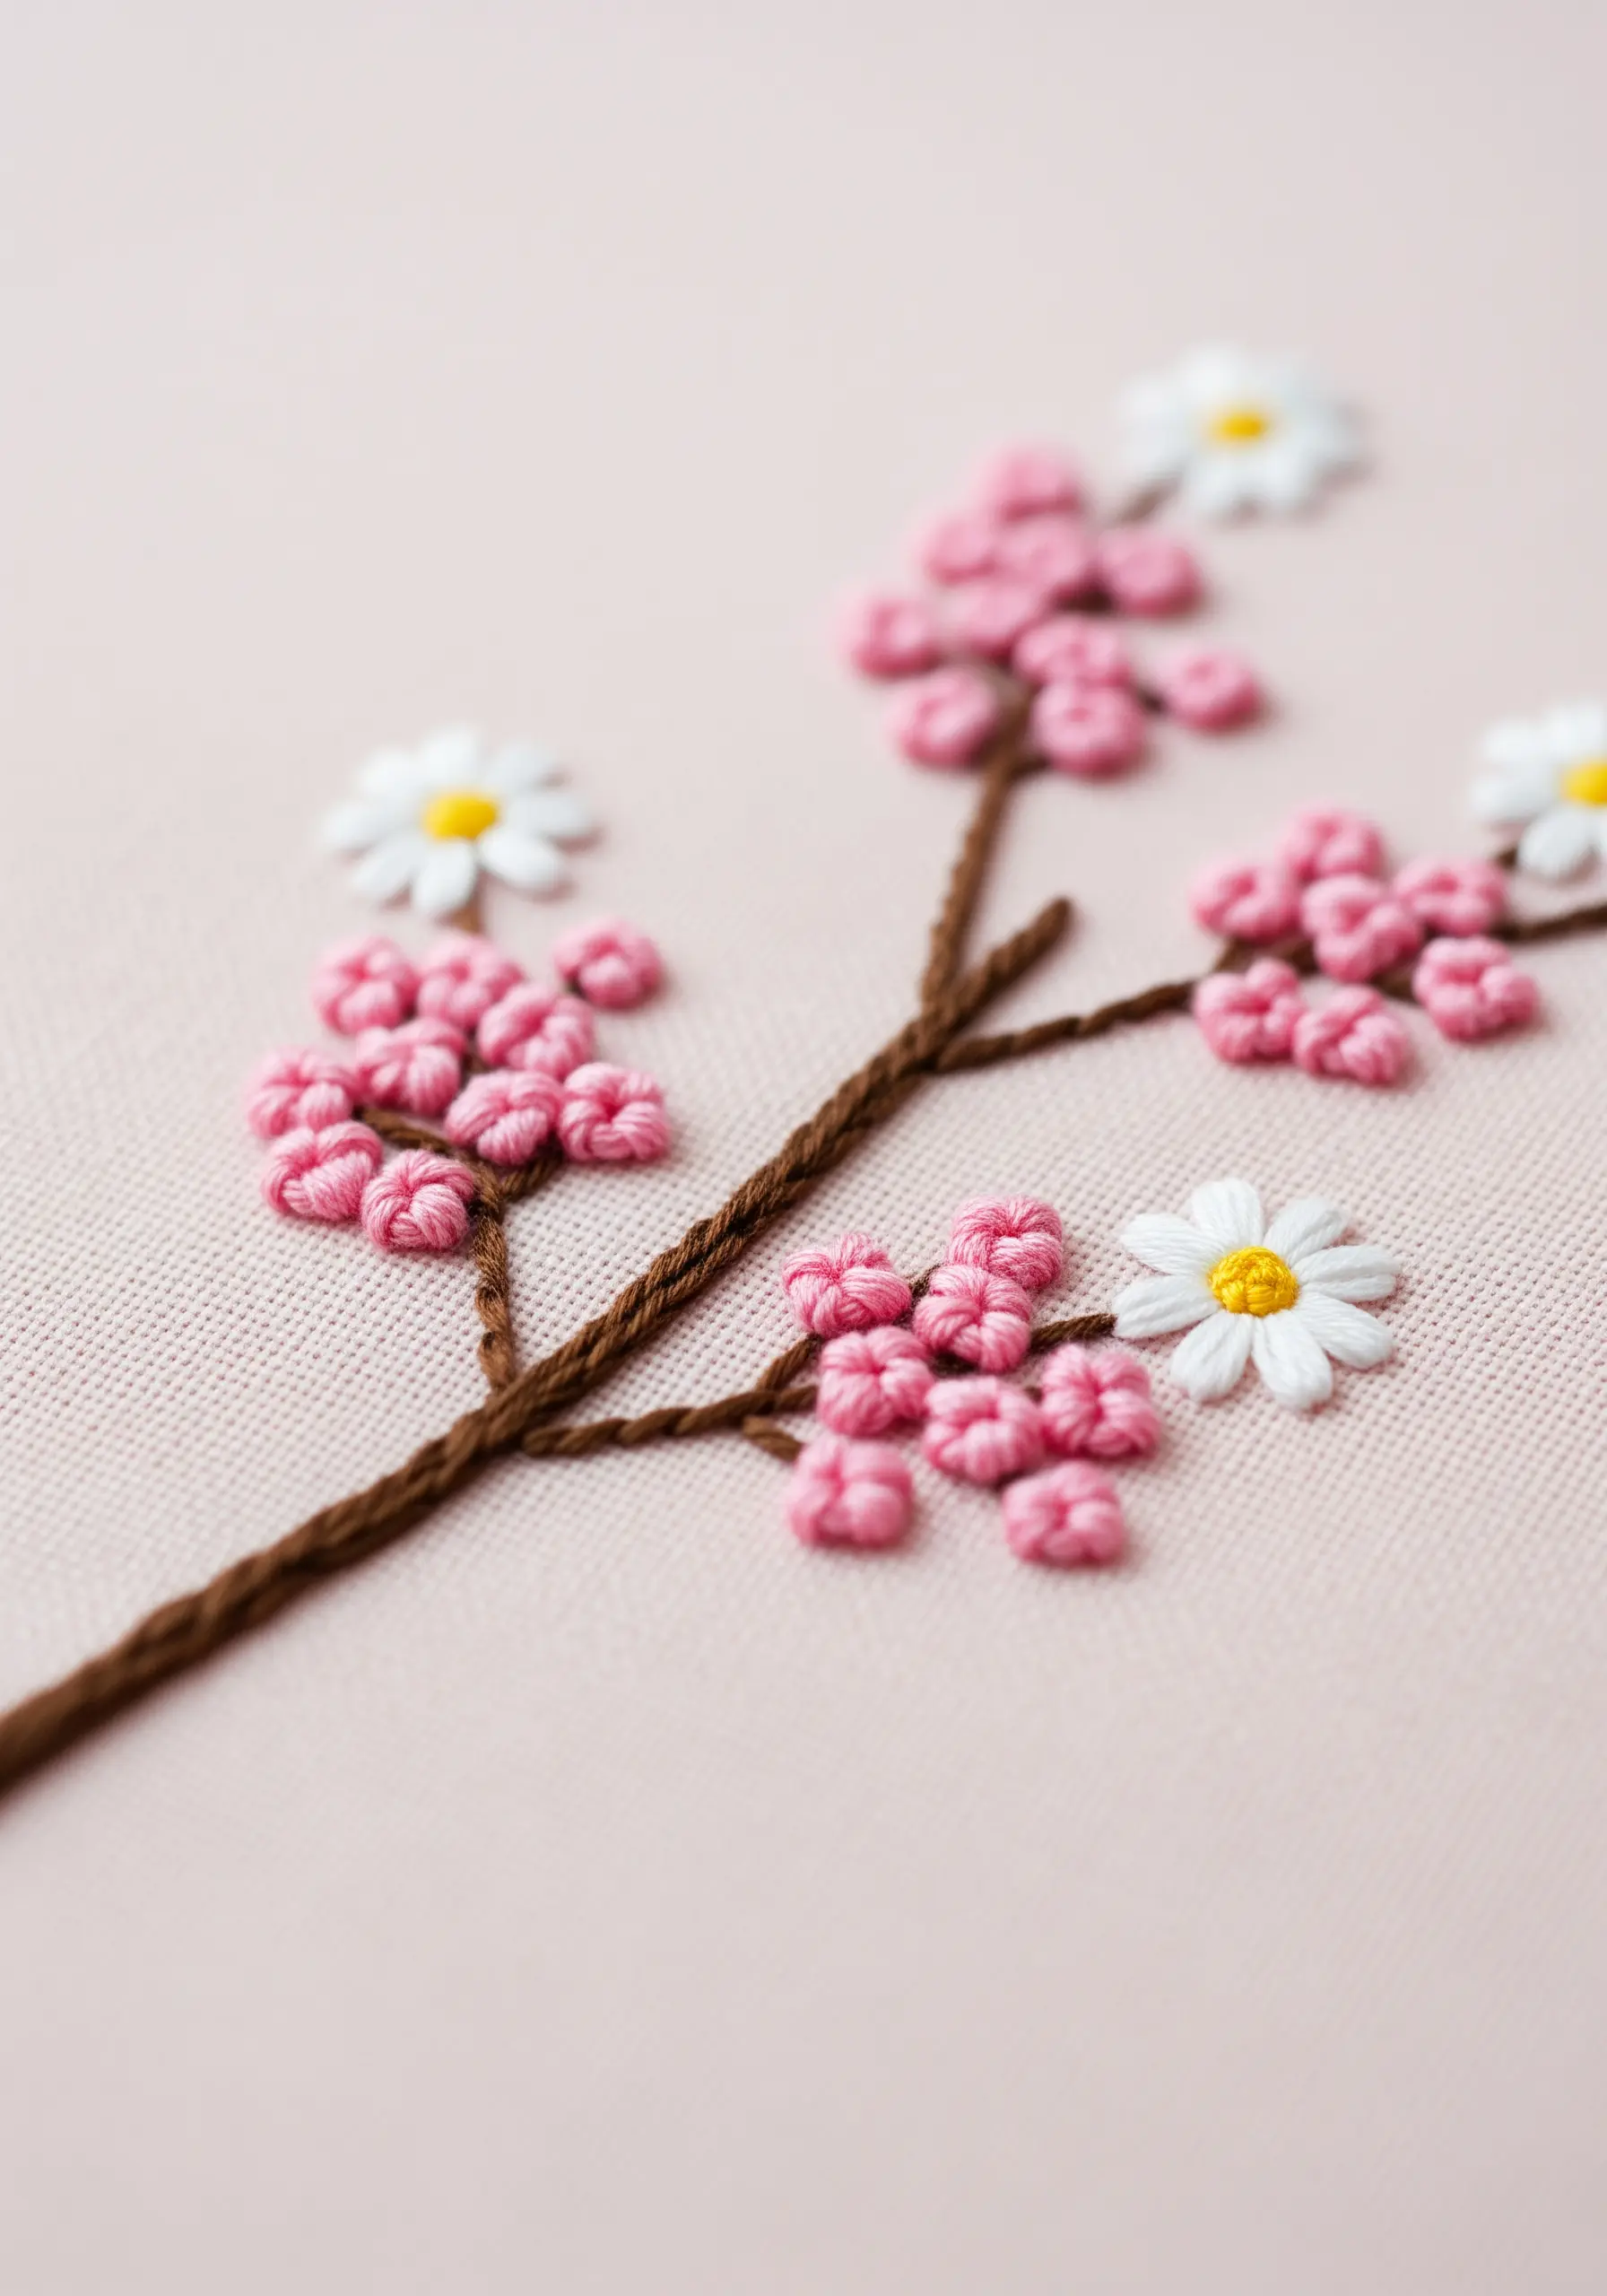
To capture the soft, clustered look of cherry blossoms, rely on the texture of French knots.
Group the knots closely together, varying their size slightly by changing your tension or the number of wraps around the needle.
For the branches, use a whipped backstitch. This stitch is thicker and smoother than a standard backstitch, giving the branches a more substantial, woody appearance.
Intersperse a few white lazy daisy flowers among the pink knots to create highlights and add another layer of delicate detail.
36. A Storybook Mushroom Scene
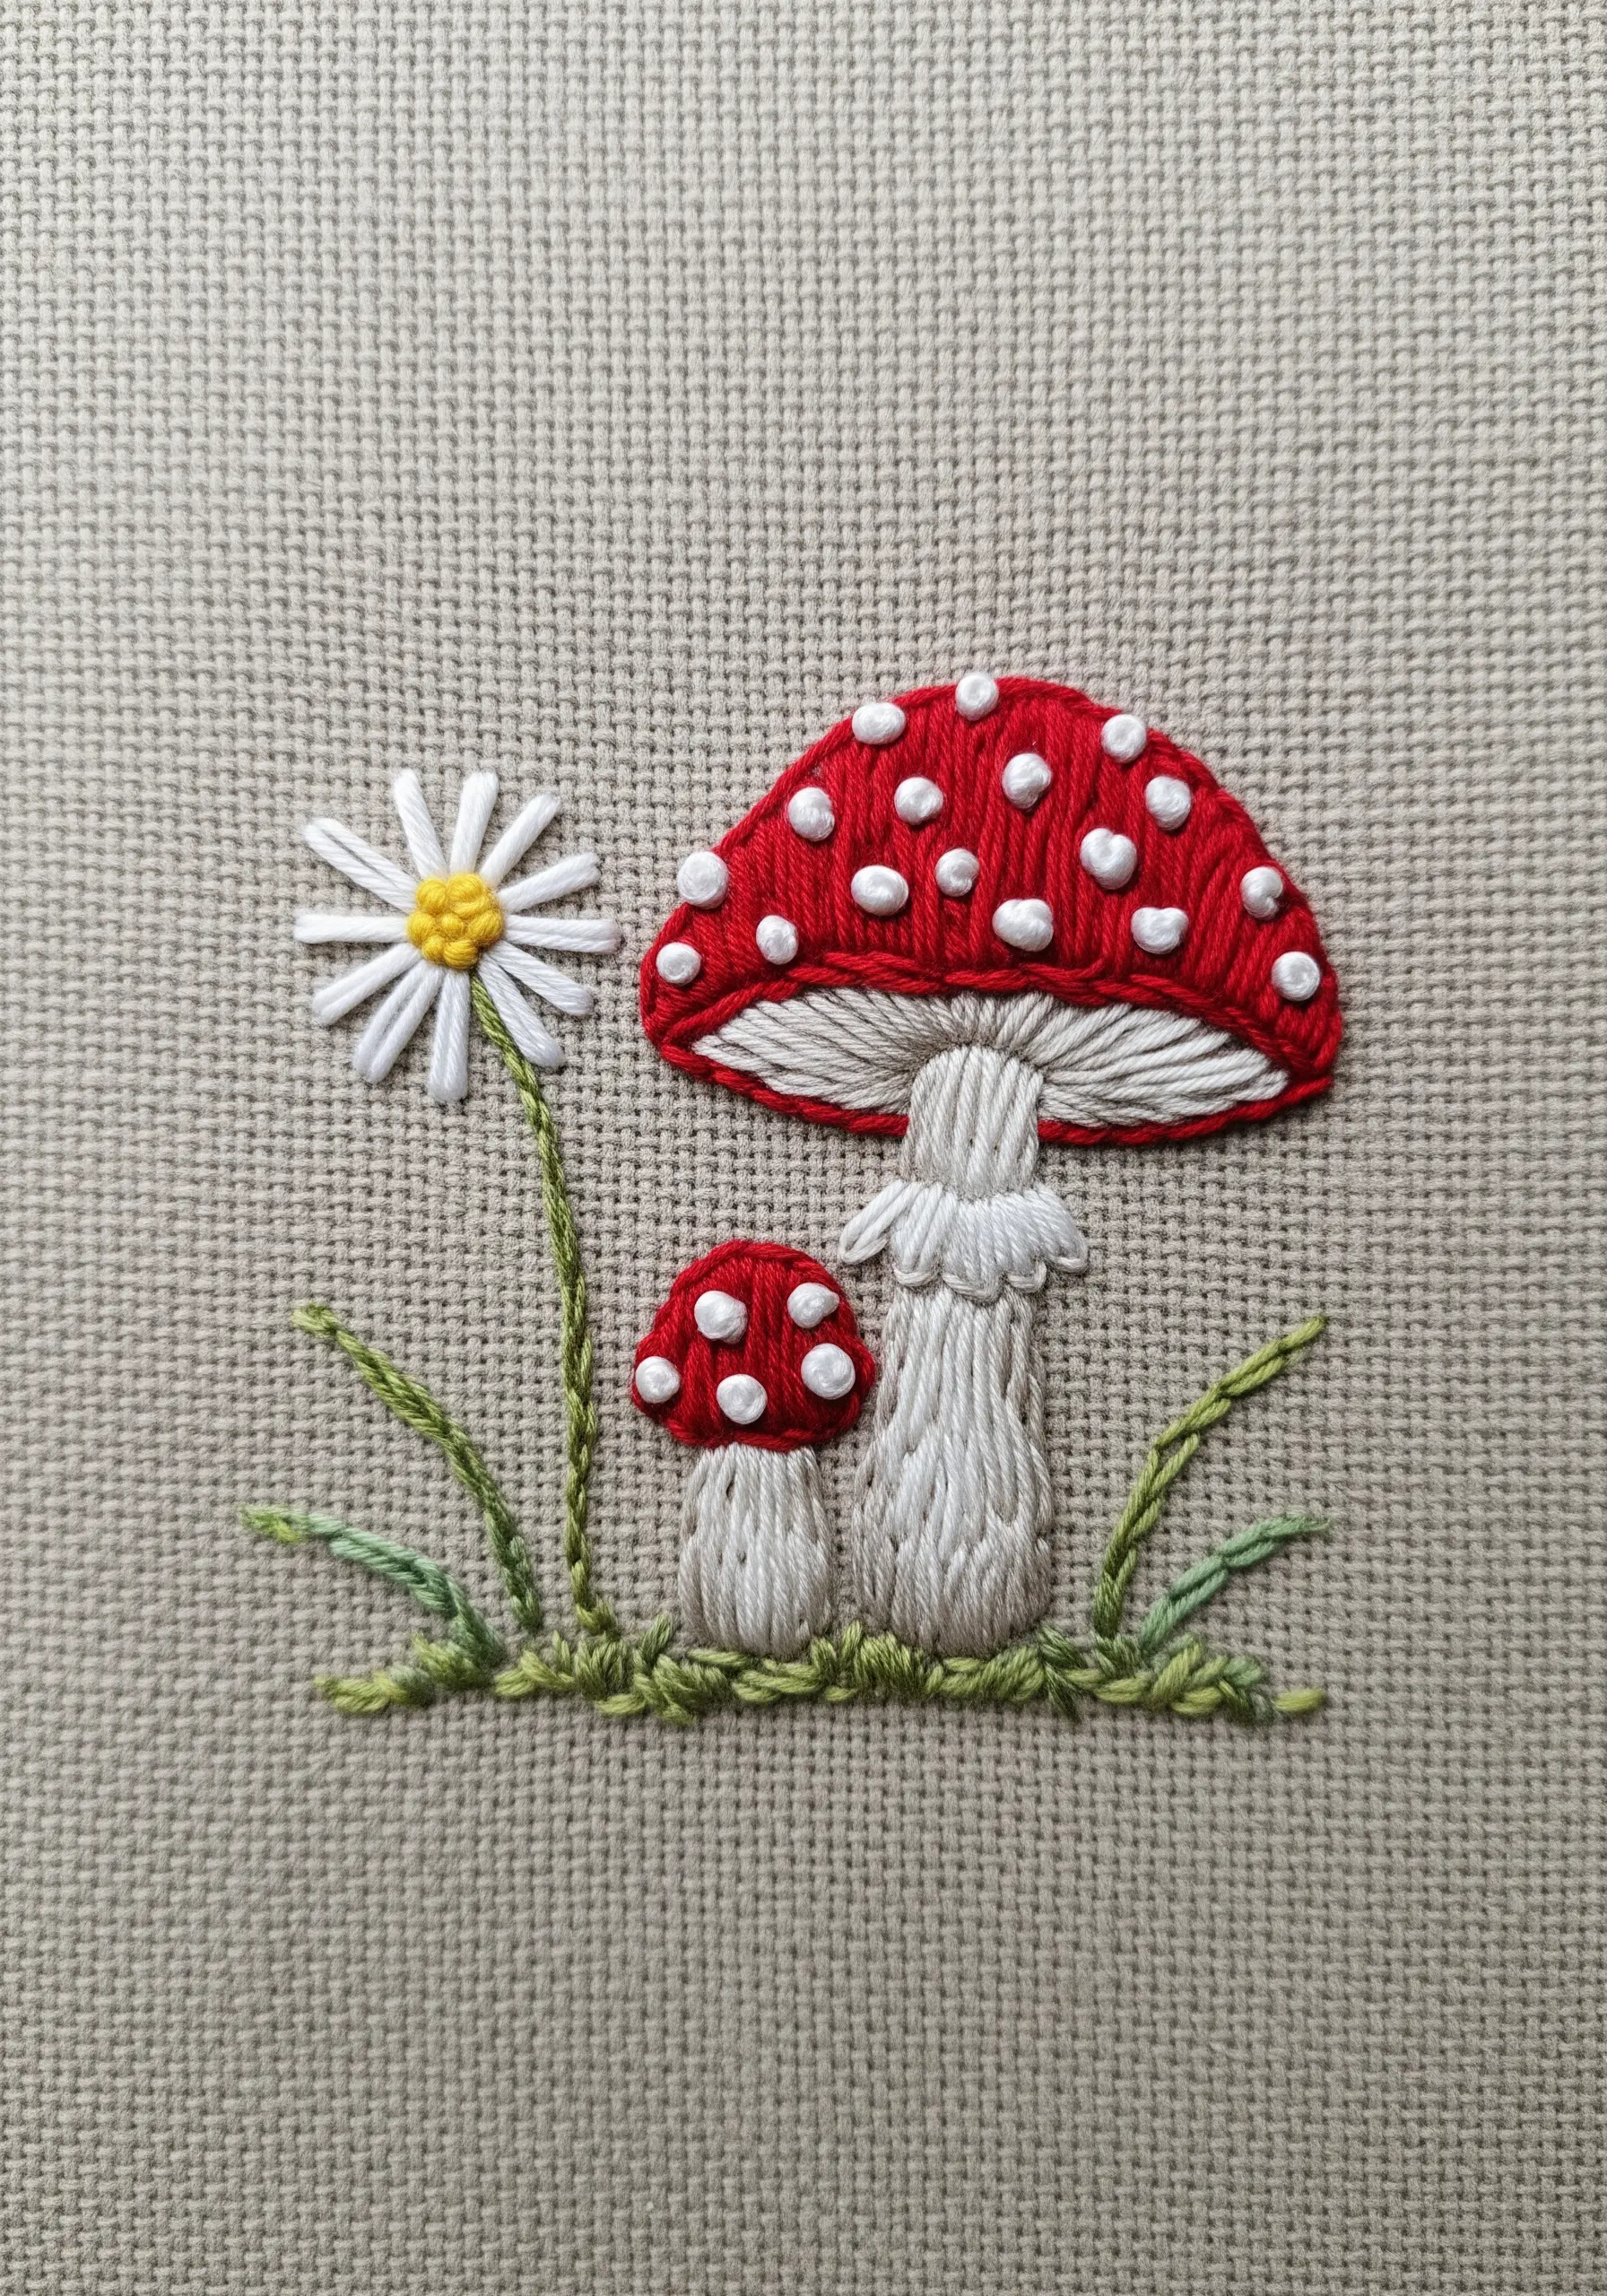
You can create a convincing three-dimensional effect on the mushroom cap using directional long-and-short stitch.
Blend two or three shades of red, and make sure your stitches follow the curve of the cap. This shading is what gives the mushroom its rounded, volumetric appearance.
Once the cap is filled, add the white spots on top using small, circular satin stitches.
This piece is a perfect entry point into stitching more whimsical and narrative forest floor botanical stitch ideas.


