

Stitching a mandala is more than a creative act; it’s a practice in mindfulness. The gentle repetition of forming stitches in a circular, symmetrical pattern can quiet the noise of the day, allowing you to focus completely on the tip of your needle and the pull of the thread.
Here, you won’t find overly complex instructions. Instead, you’ll discover how small adjustments in technique—the direction of a stitch, the weight of a thread, the play between texture and empty space—can transform a simple circle into a deeply personal and beautifully polished work of art.
These small hoop patterns are designed to be both achievable and satisfying. They invite you to sit down, take a breath, and create a small moment of calm and beauty, one stitch at a time. Let each one be a quiet conversation between your hands and your mind.
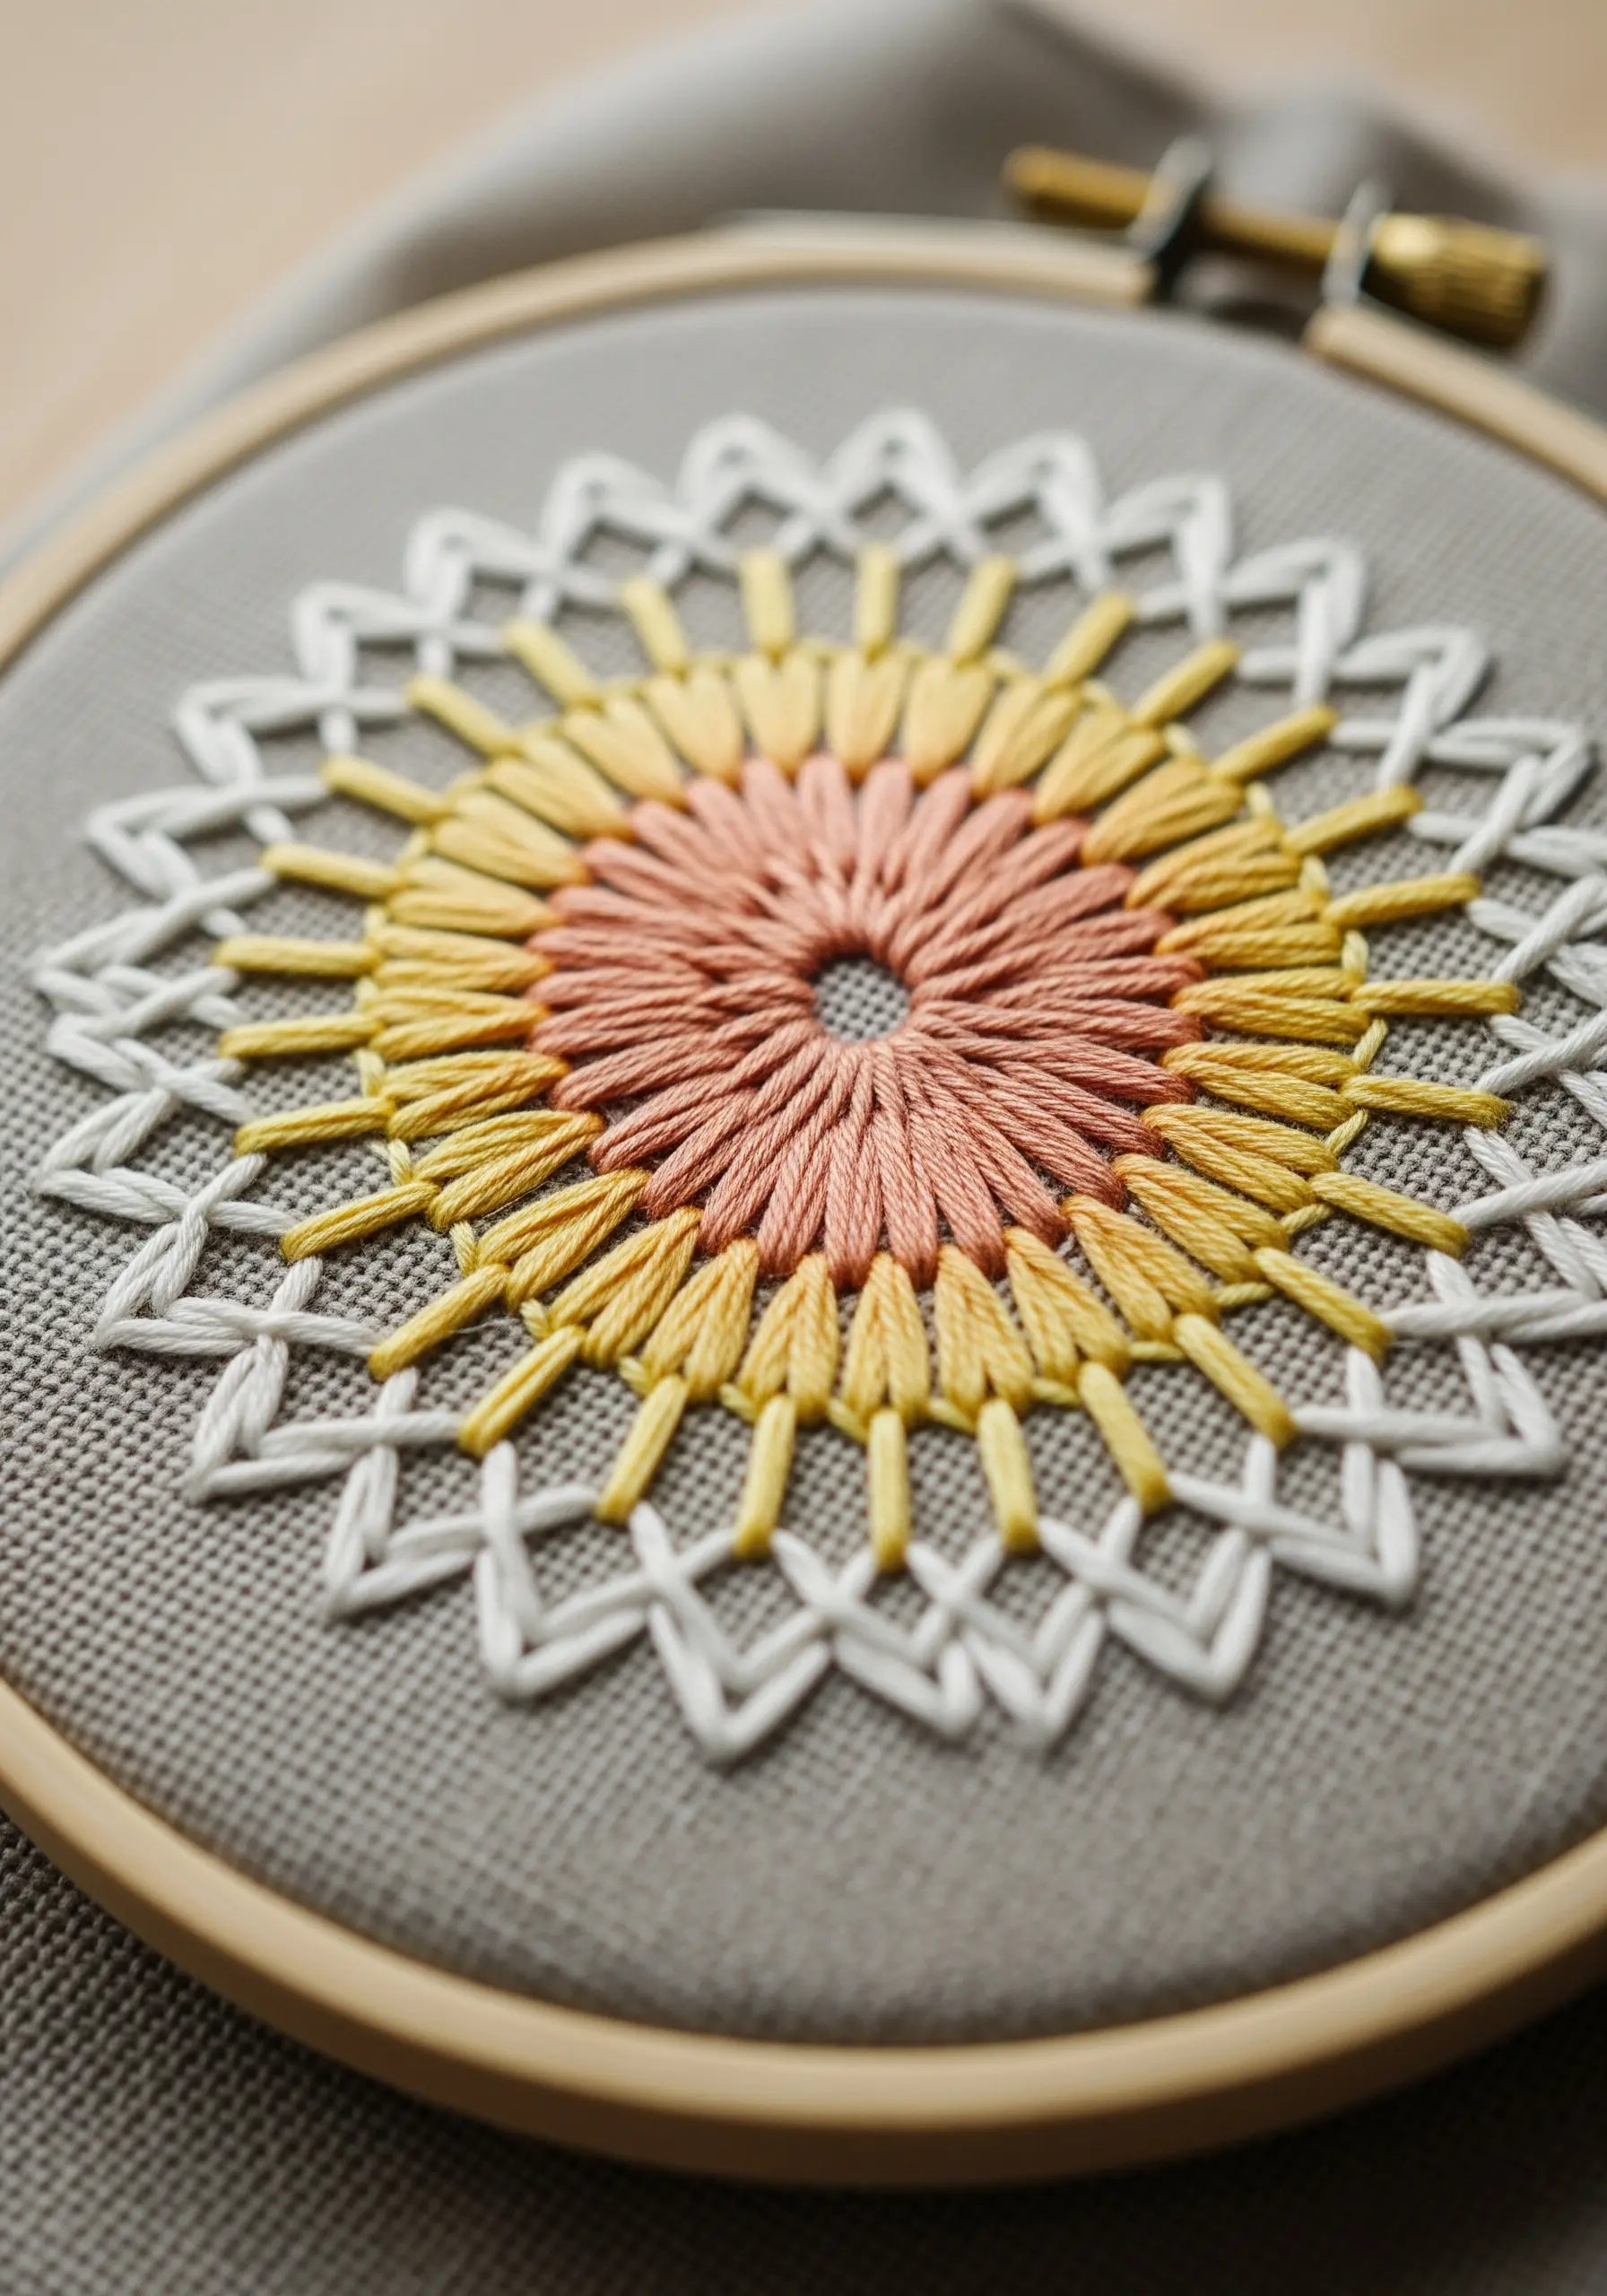
1. Radiate with Simple Straight Stitches
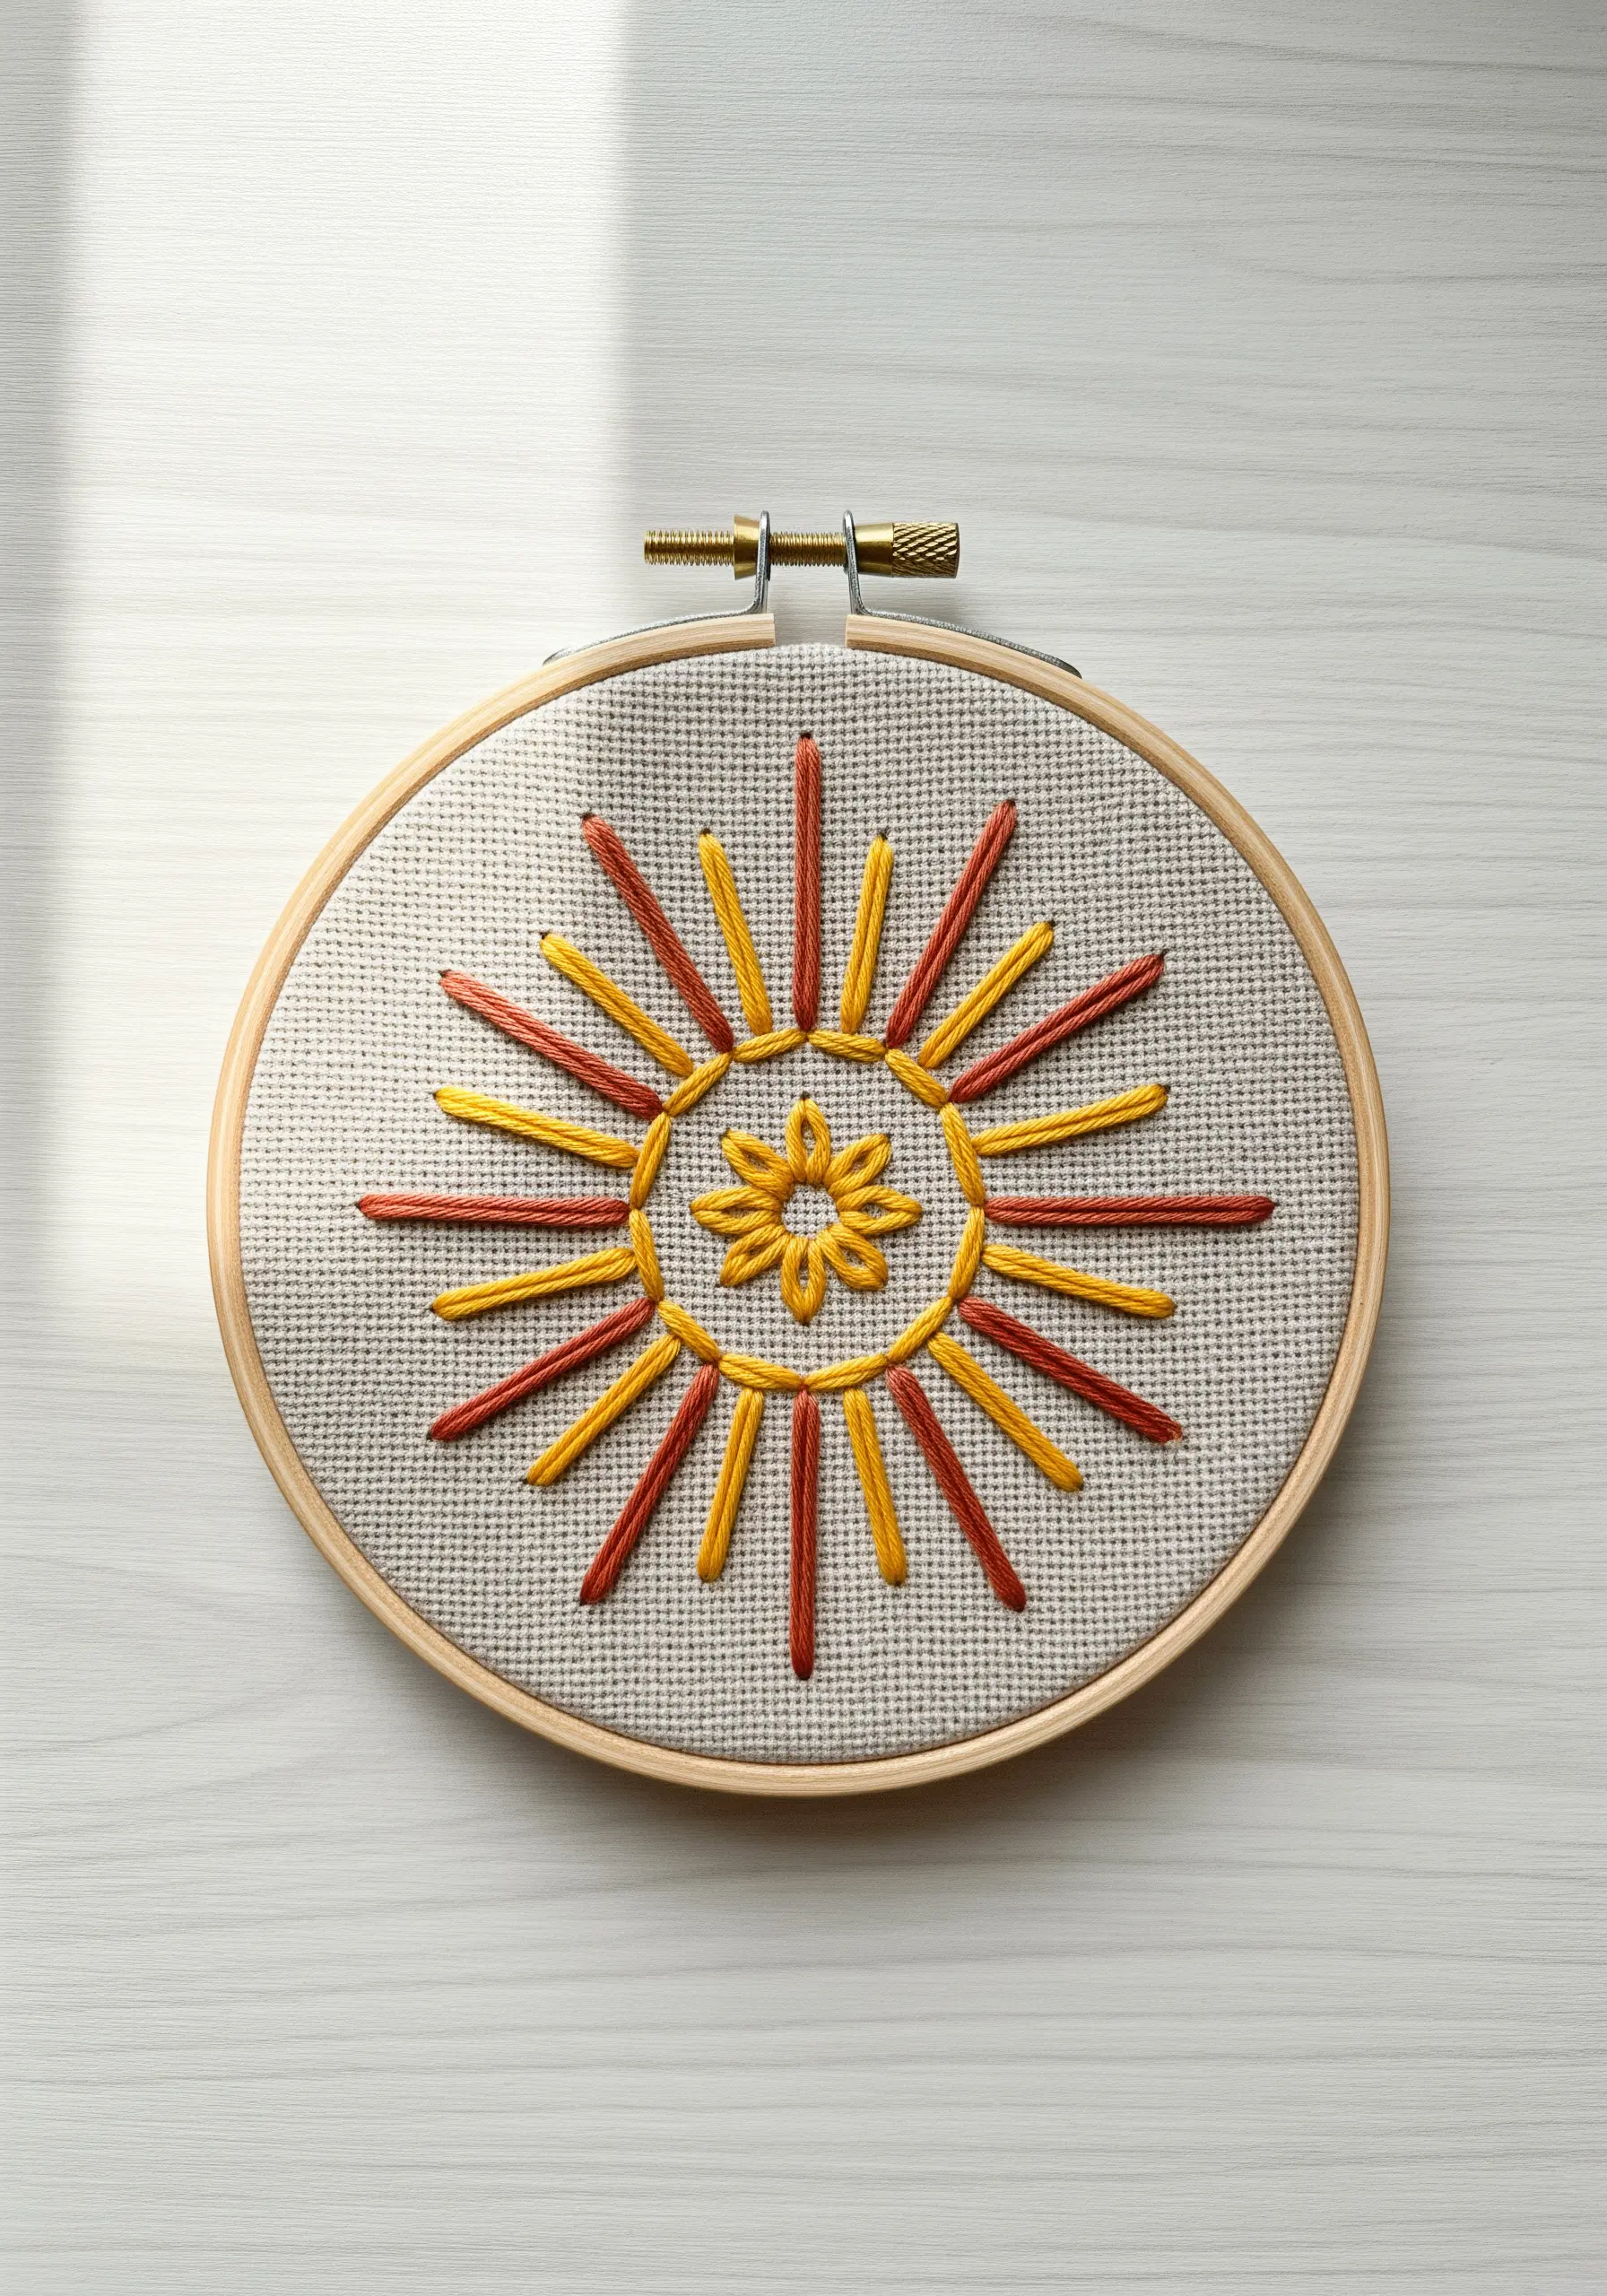
Create this vibrant sunburst using only the straight stitch.
The key to a polished look is absolute precision in your stitch length and placement, creating a pleasing radial symmetry.
Work on an evenweave fabric like Aida or linen, as the grid structure will help you keep the rays perfectly aligned and evenly spaced.
Use a full six strands of cotton floss to give your stitches a bold, graphic quality that stands out against the neutral fabric.
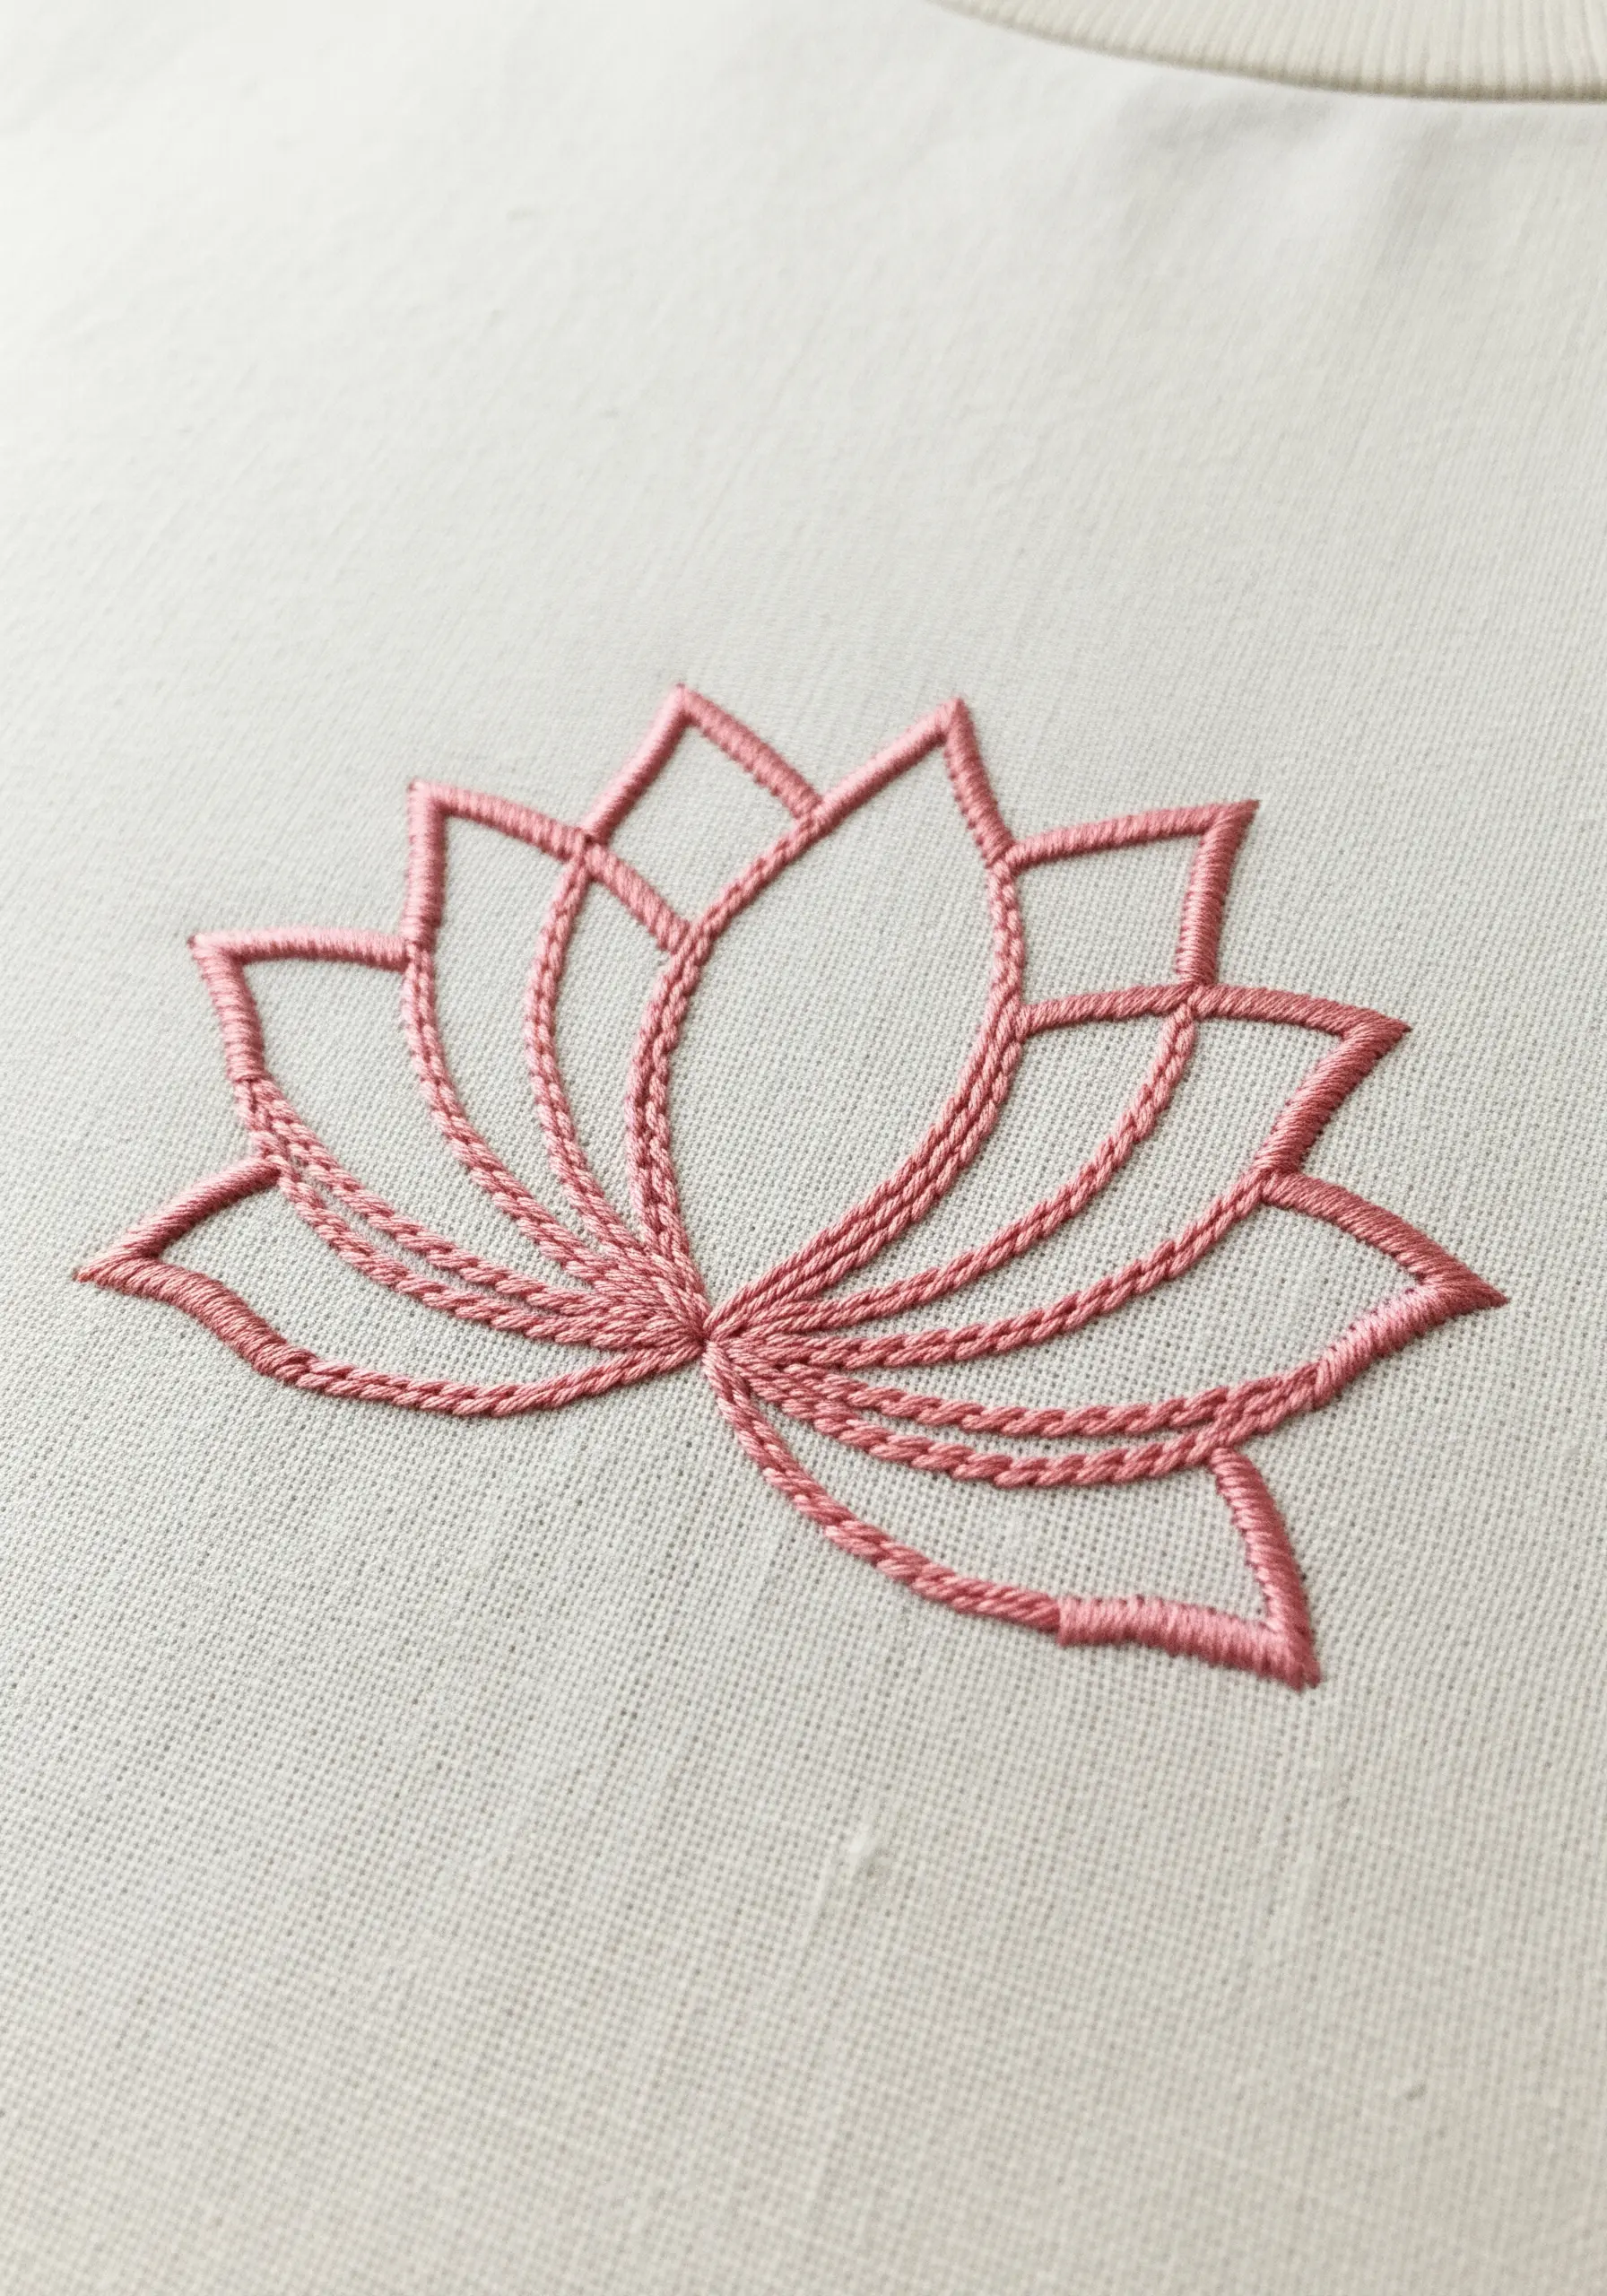
2. Create Soft Petal Volume with Satin Stitch
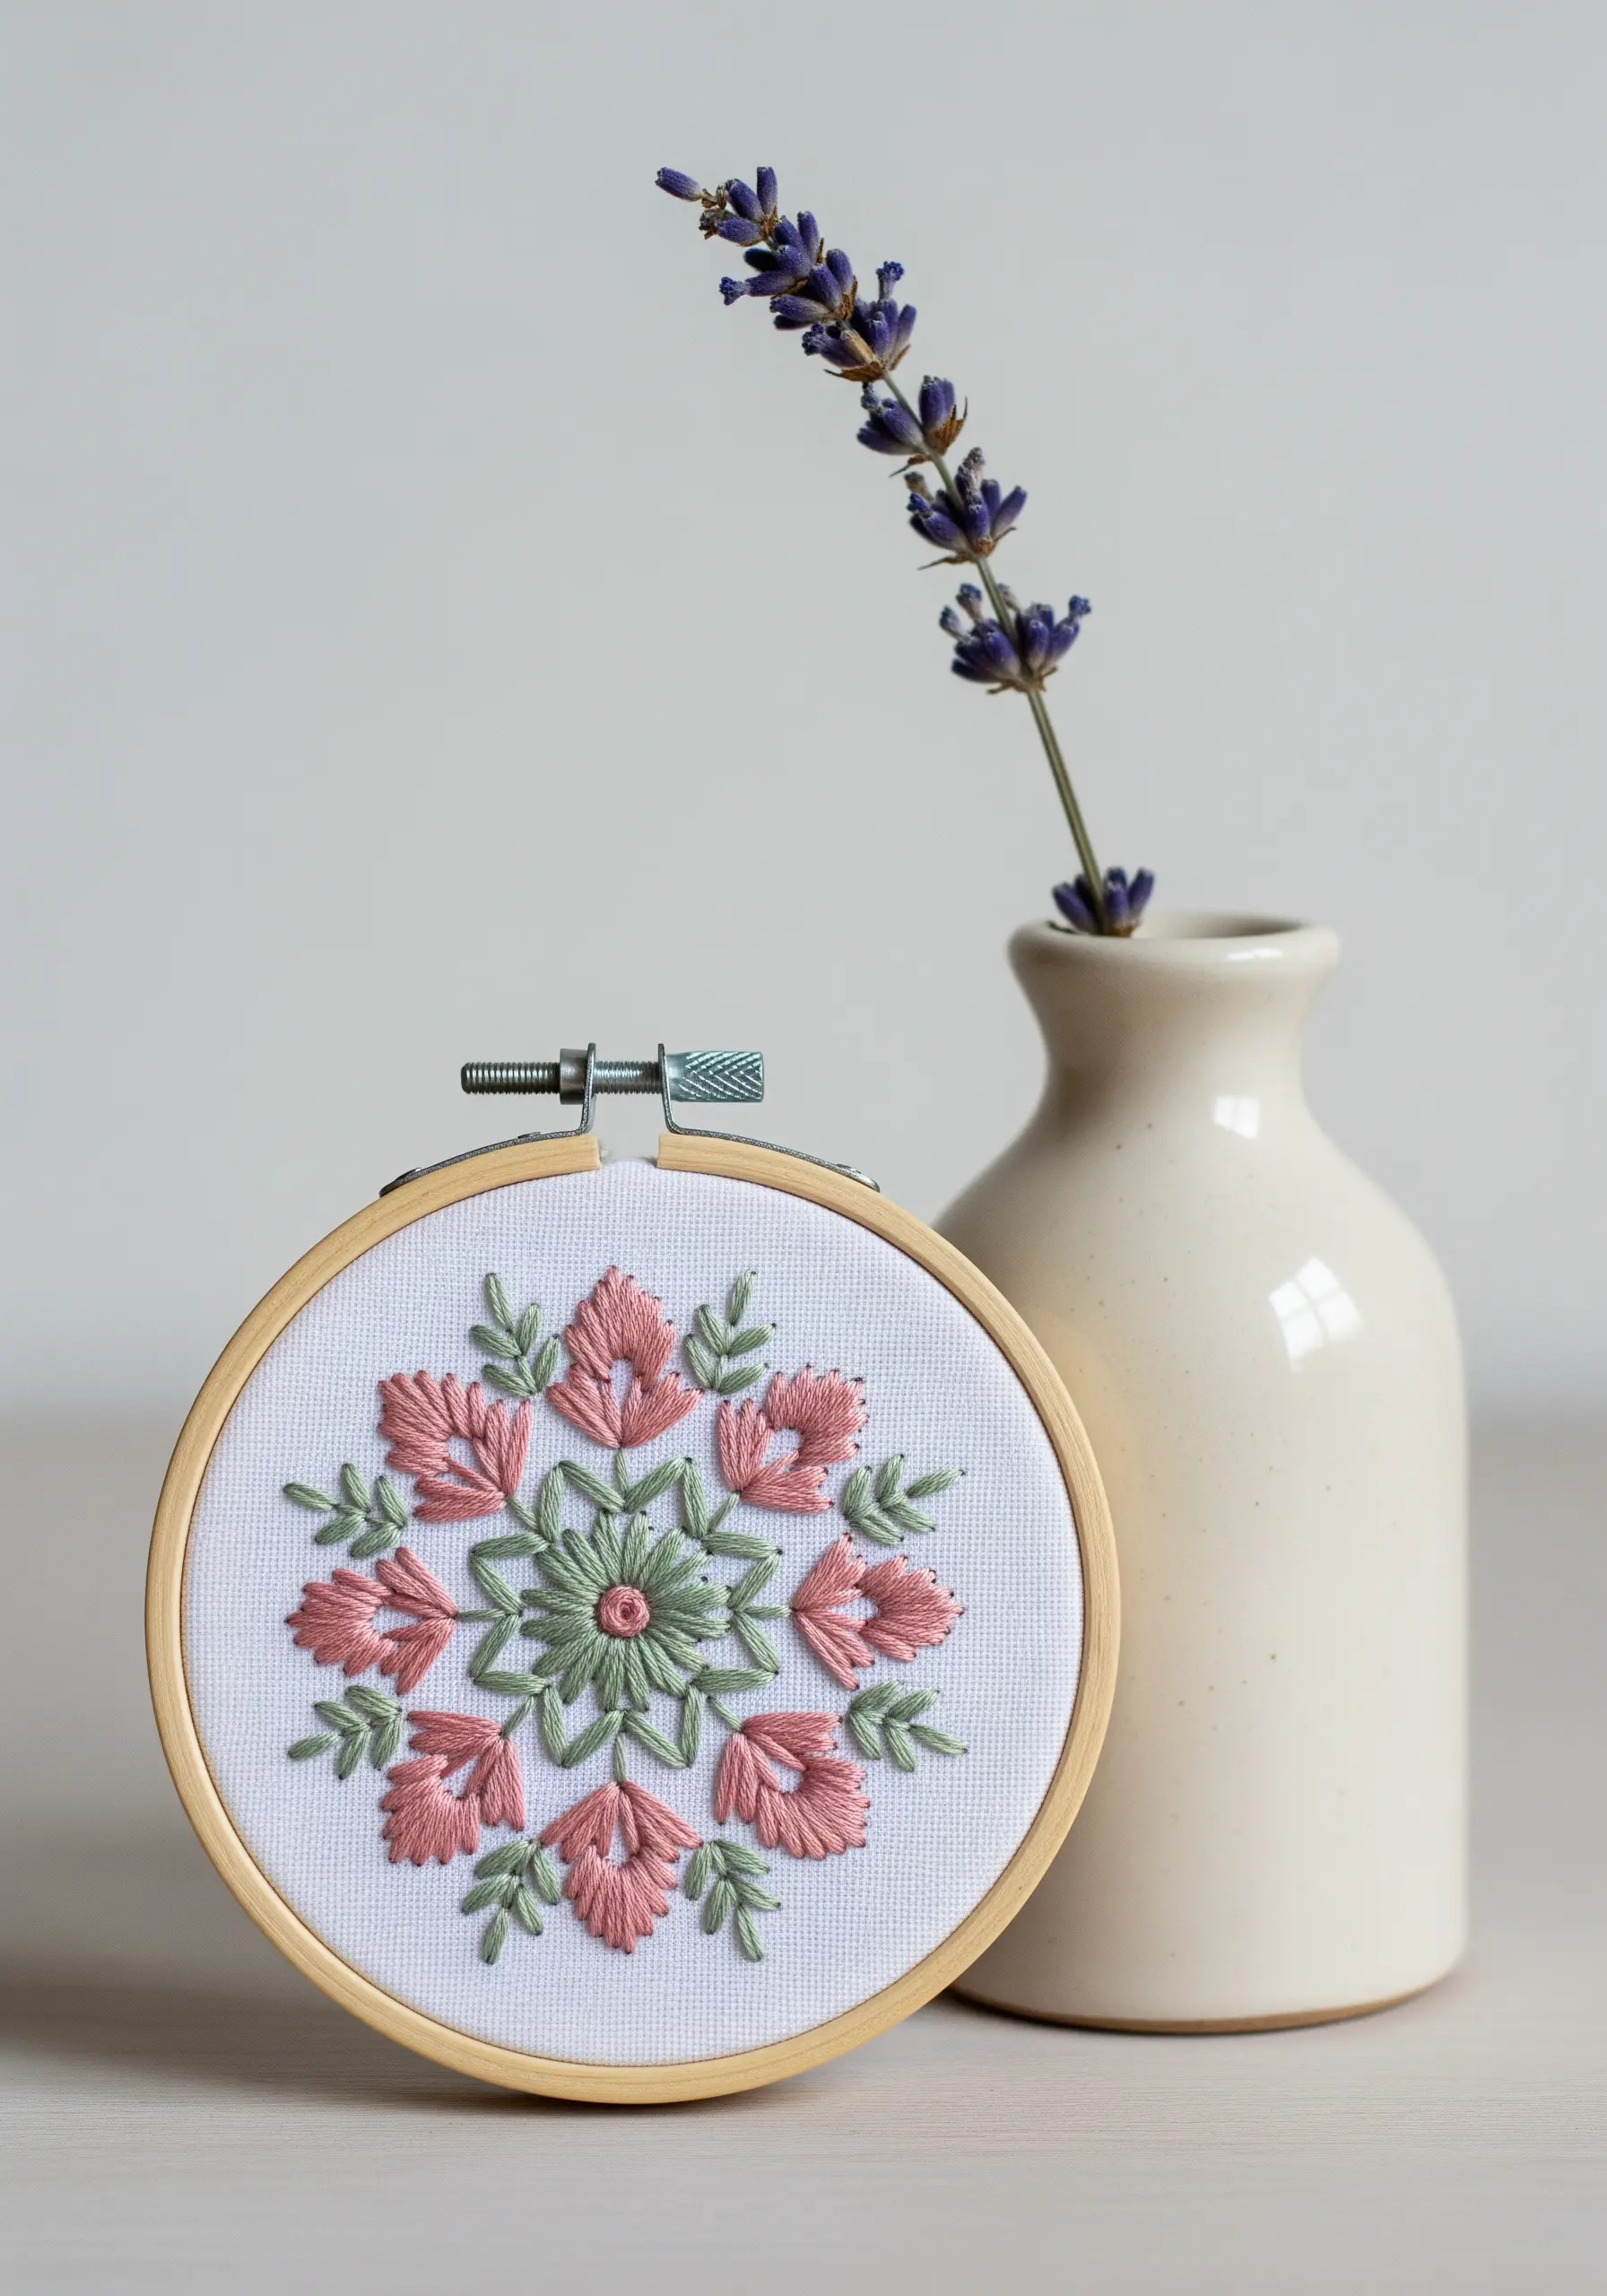
To give your floral motifs a gentle, curved dimension, angle your satin stitches slightly.
Instead of stitching straight across the petal shape, work from the outer edge inward toward the center, following the natural curve of the petal.
This subtle shift in stitch direction tricks the eye into seeing volume and softness.
For the delicate leaves, switch to a simple fishbone stitch using fewer strands—this creates a central vein and a more organic texture, contrasting beautifully with the smooth petals.
3. Master Geometric Tension with Lattice Work

This intricate, lace-like effect is built with a foundation of long, straight stitches, followed by tiny couching stitches to secure each intersection.
Maintain a firm, even tension on your initial grid of threads; if they are too loose, the pattern will sag.
Using a single color of thread places all the emphasis on the geometric form, turning a simple stitch into a complex, captivating pattern.
This technique is a beautiful meditation on precision and control.
4. Weave a Tapestry of Knots and Texture
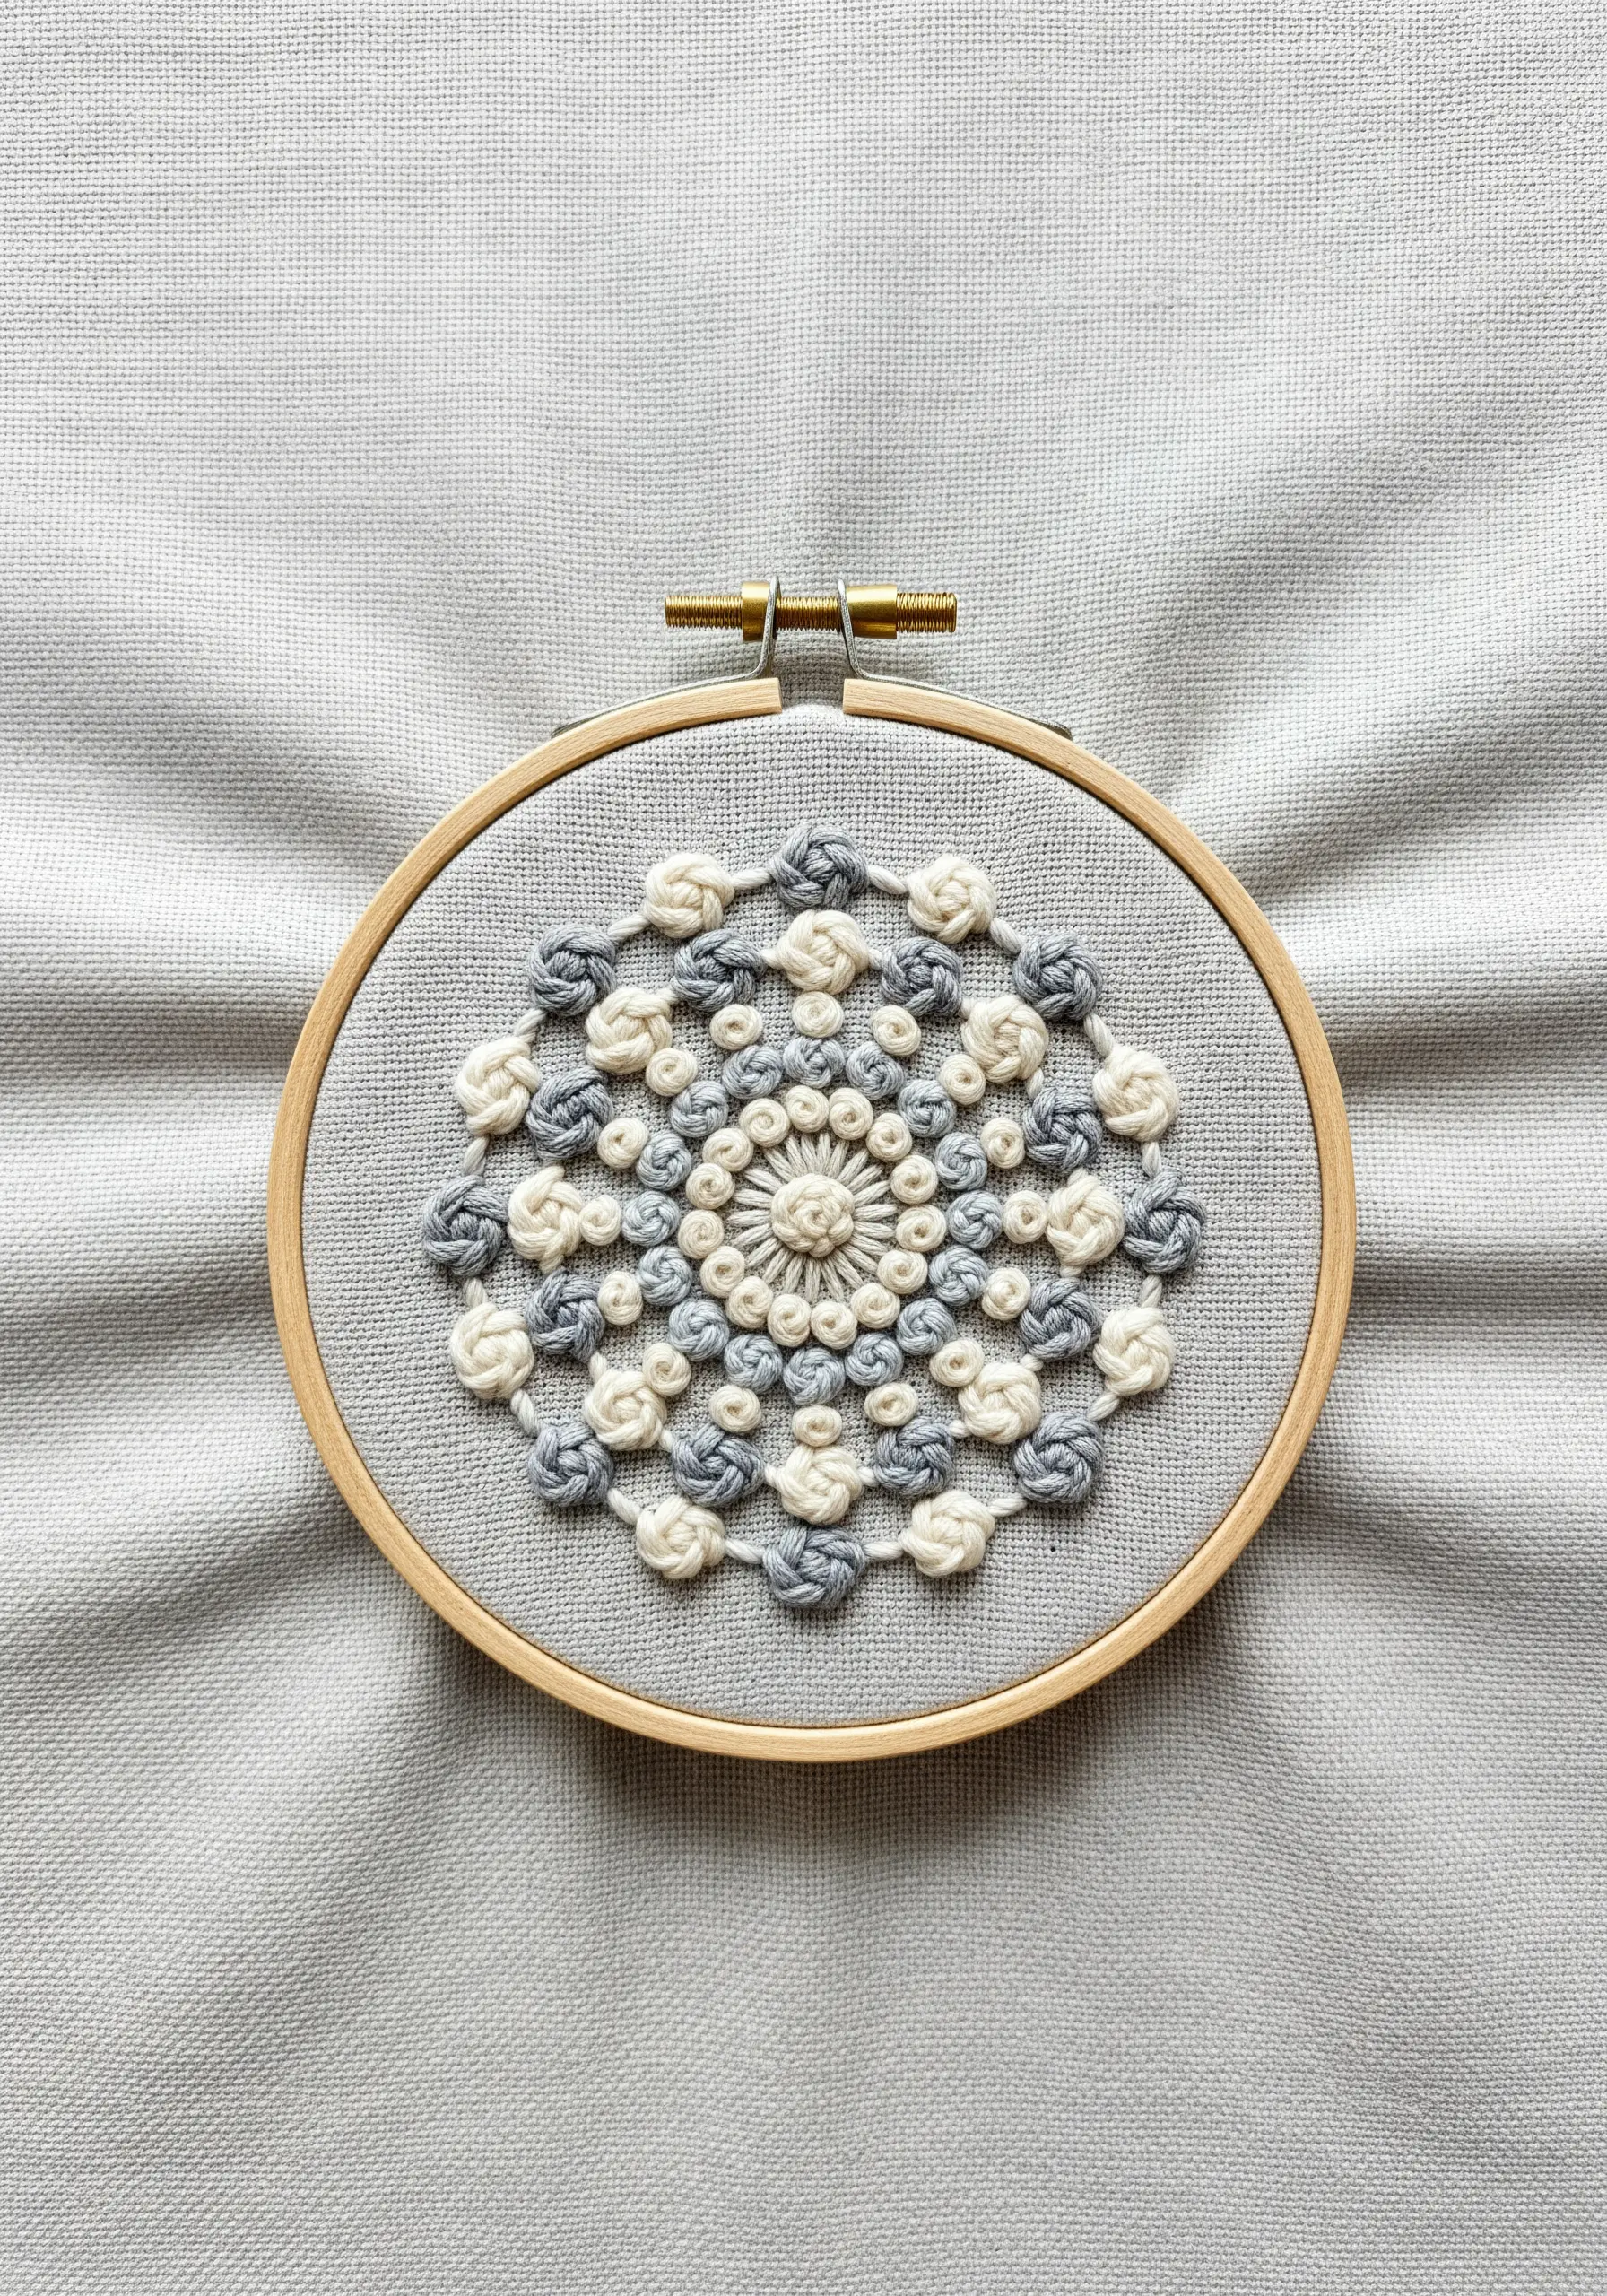
Combine French knots, colonial knots, and bullion knots to build a mandala with deep, touchable texture.
Vary the number of wraps for your bullion knots to create different lengths, mimicking the look of woven petals or beads.
Cluster your knots tightly in some areas and space them out in others to create a rhythm of density and sparseness.
Using a thicker thread, like pearl cotton, will enhance the sculptural quality and make each knot more pronounced.
5. Define Shapes with Negative Space
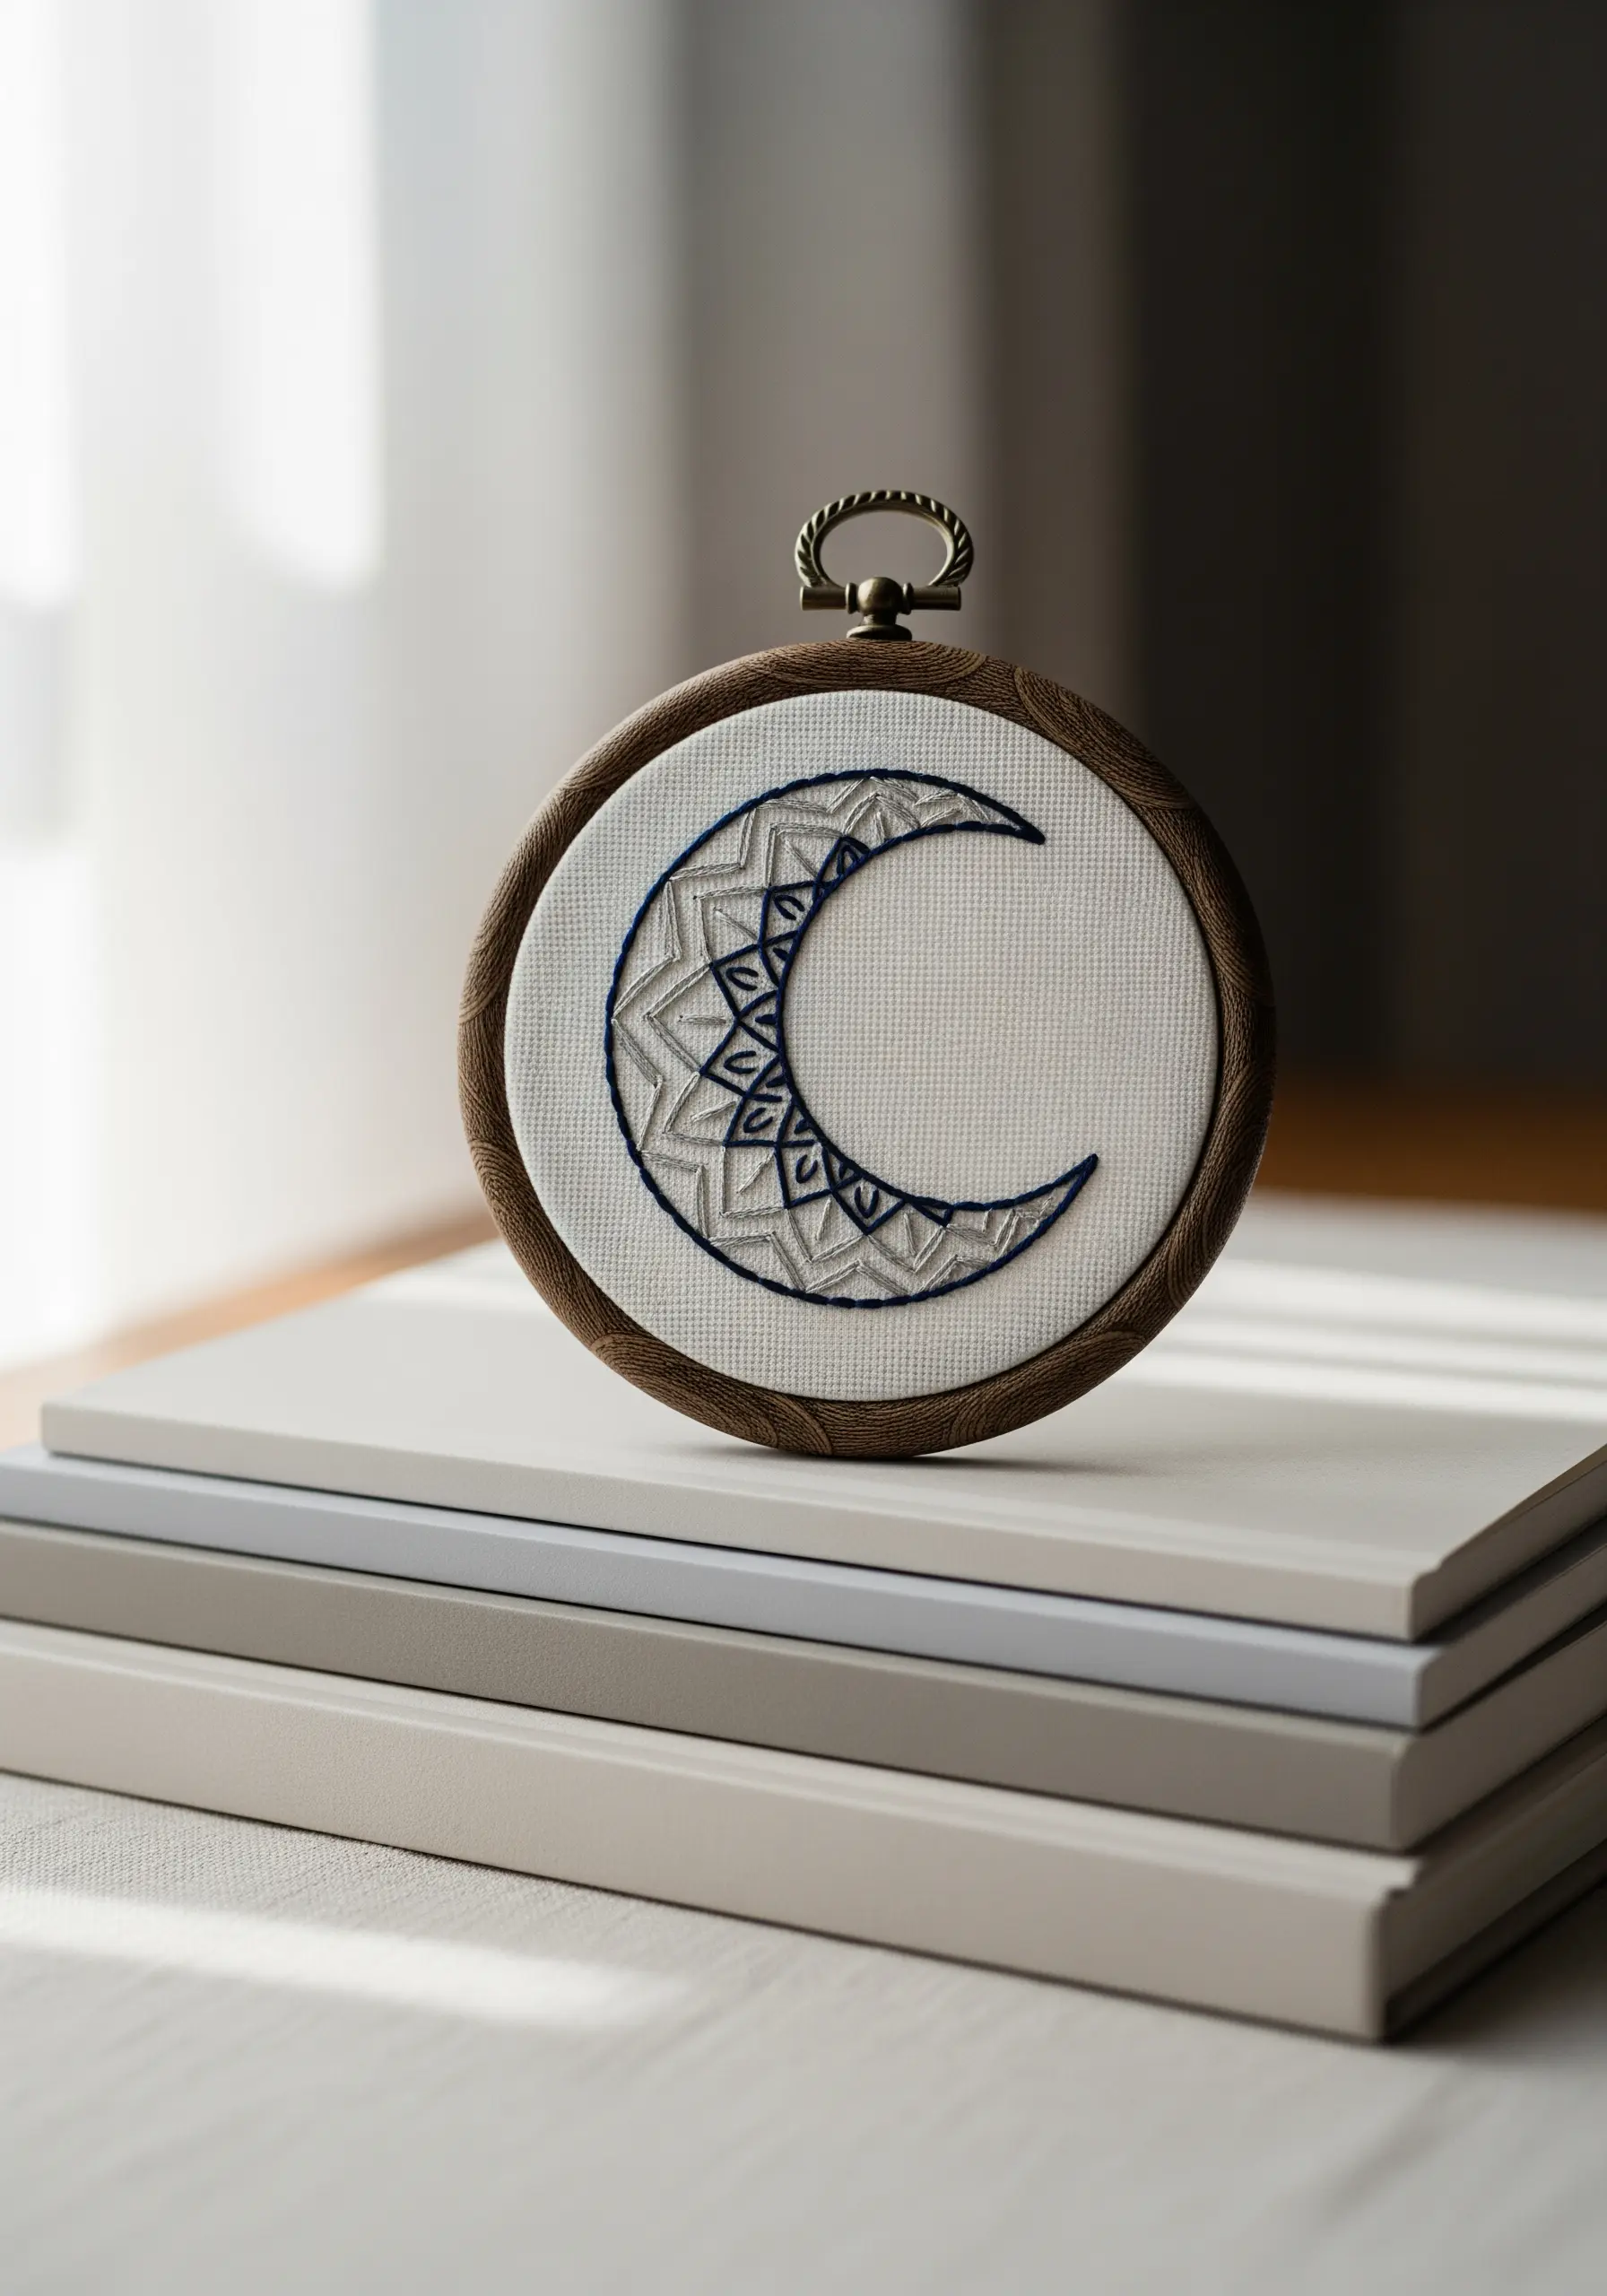
Let the unstitched fabric become an integral part of your design.
First, establish a crisp, clean outline of your primary shape—in this case, a crescent moon—using a whipped backstitch for a smooth, solid line.
Then, fill the interior with a delicate geometric pattern using a finer thread weight, which draws the eye inward while emphasizing the bold outer shape.
This play between filled and empty space creates a sophisticated, modern aesthetic that feels both intricate and uncluttered.
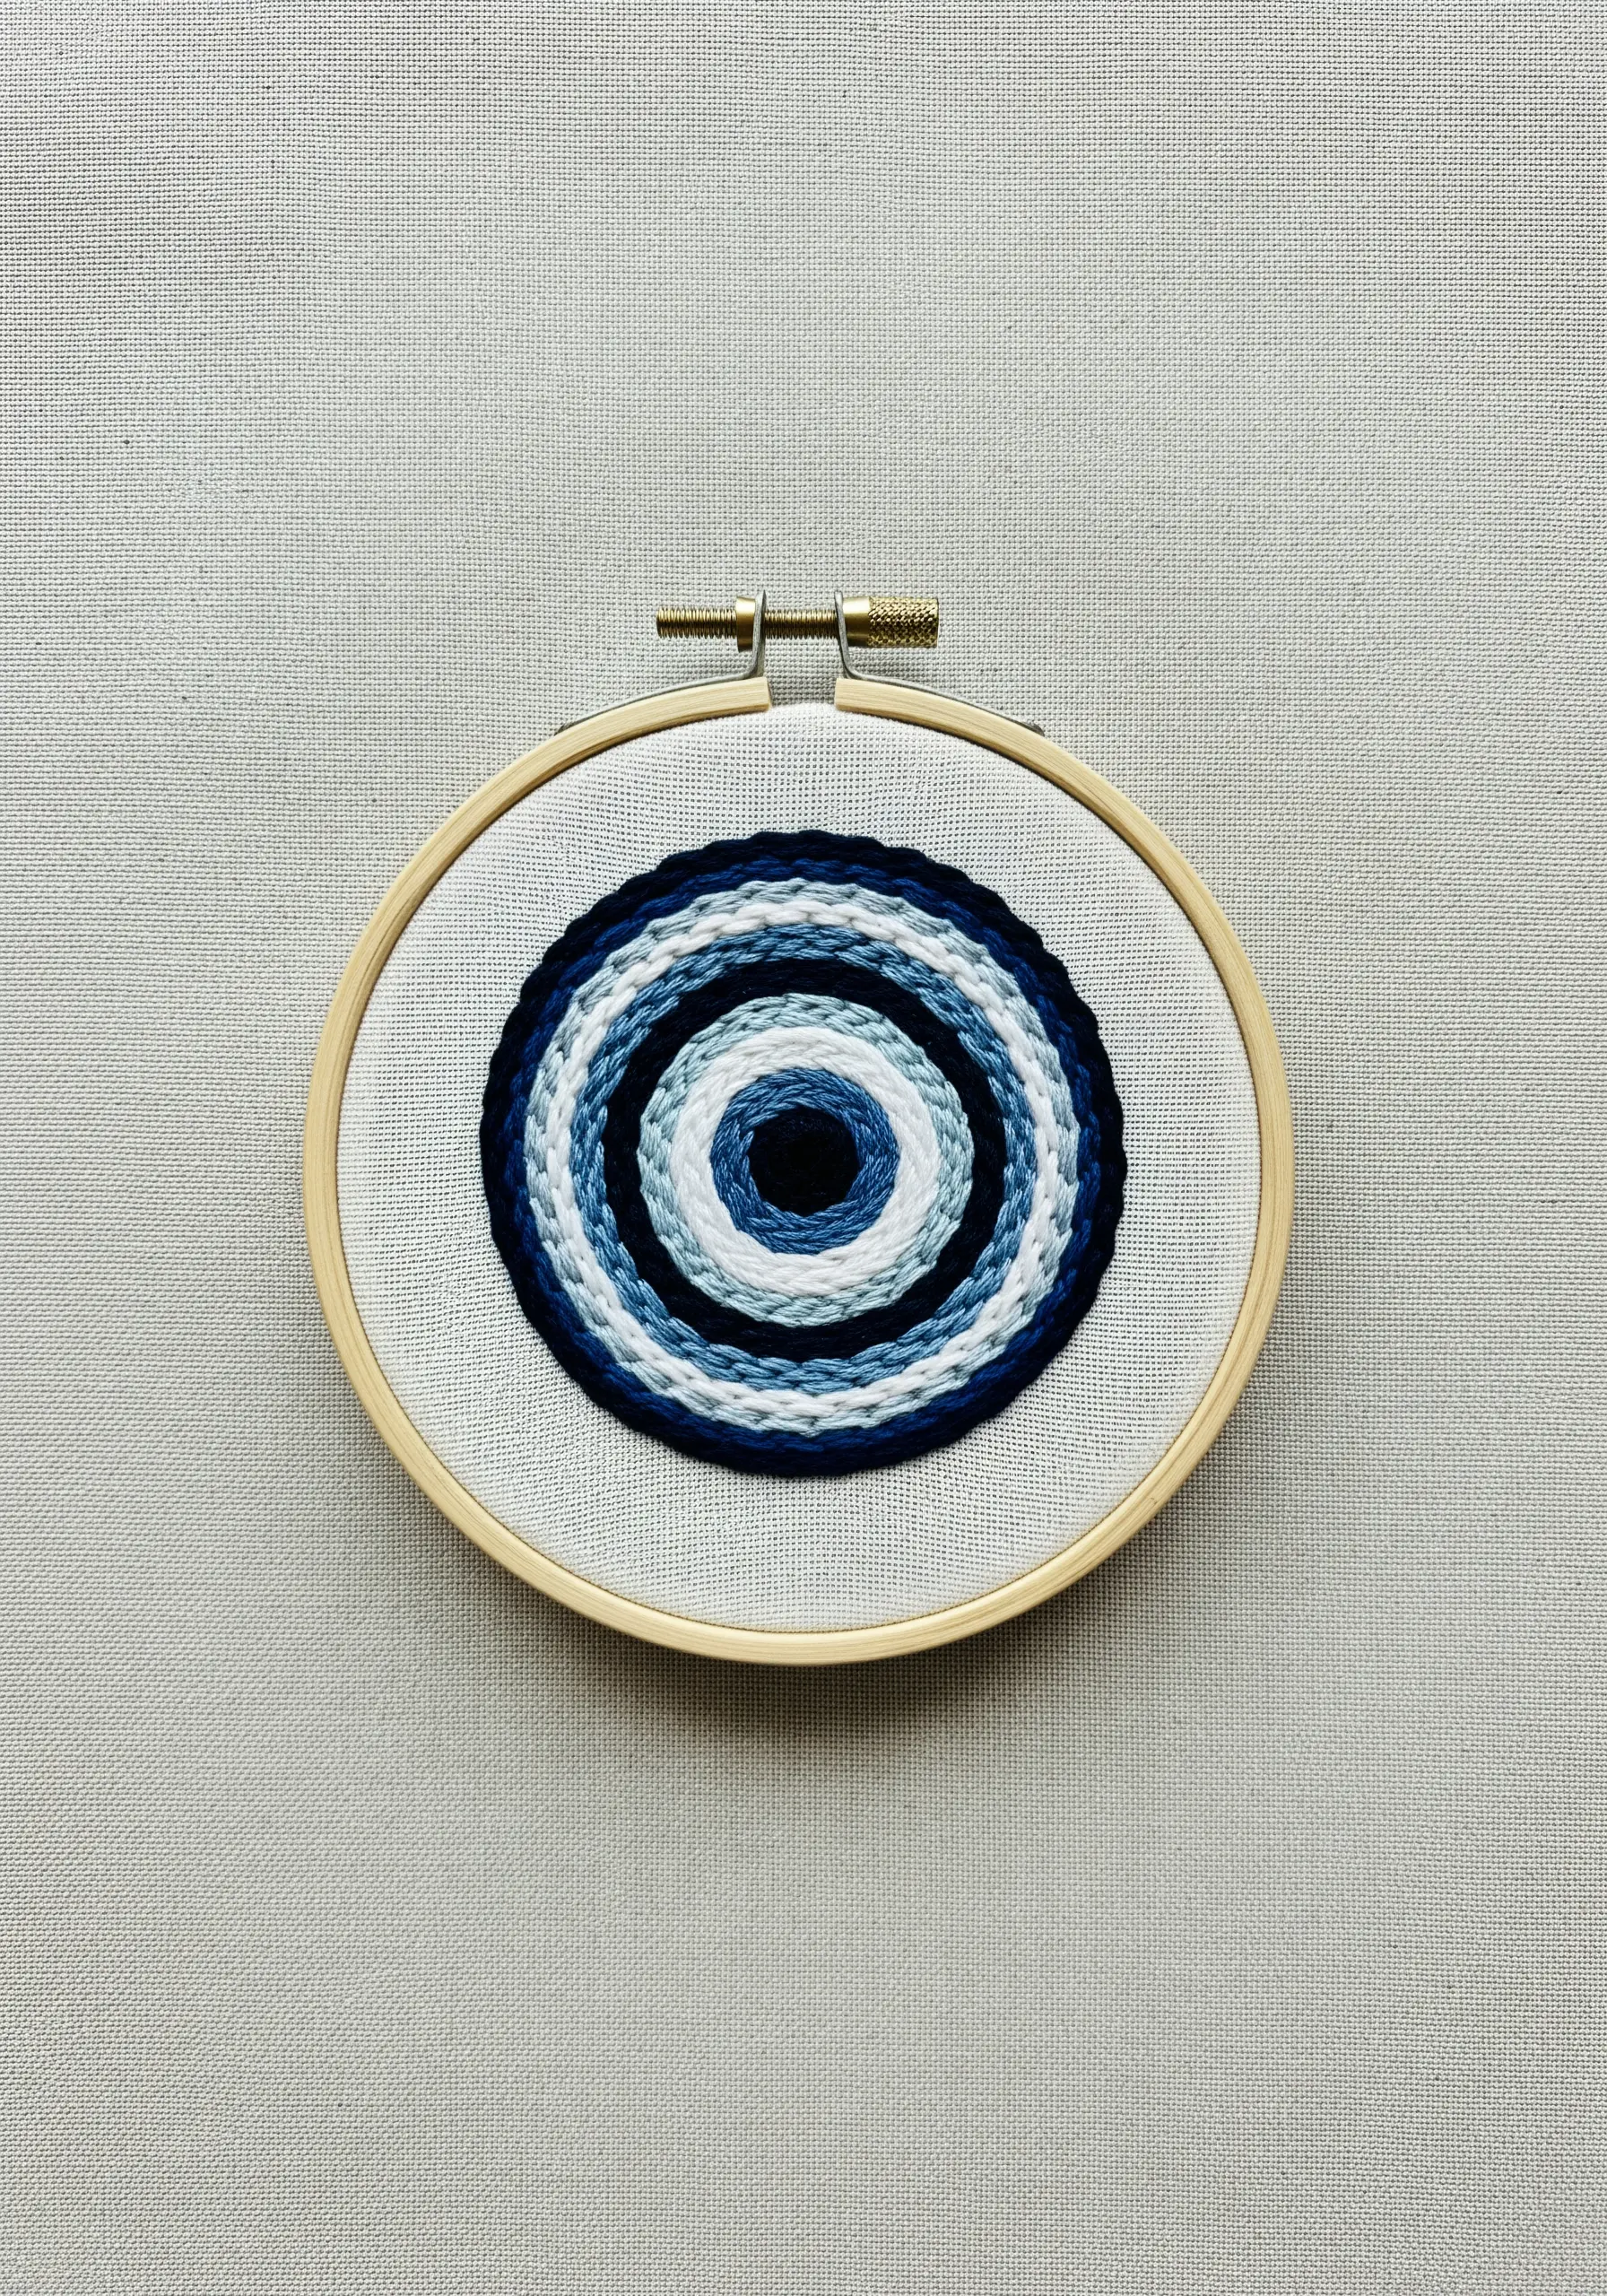
6. Build a Dense Woven Wheel Centerpiece
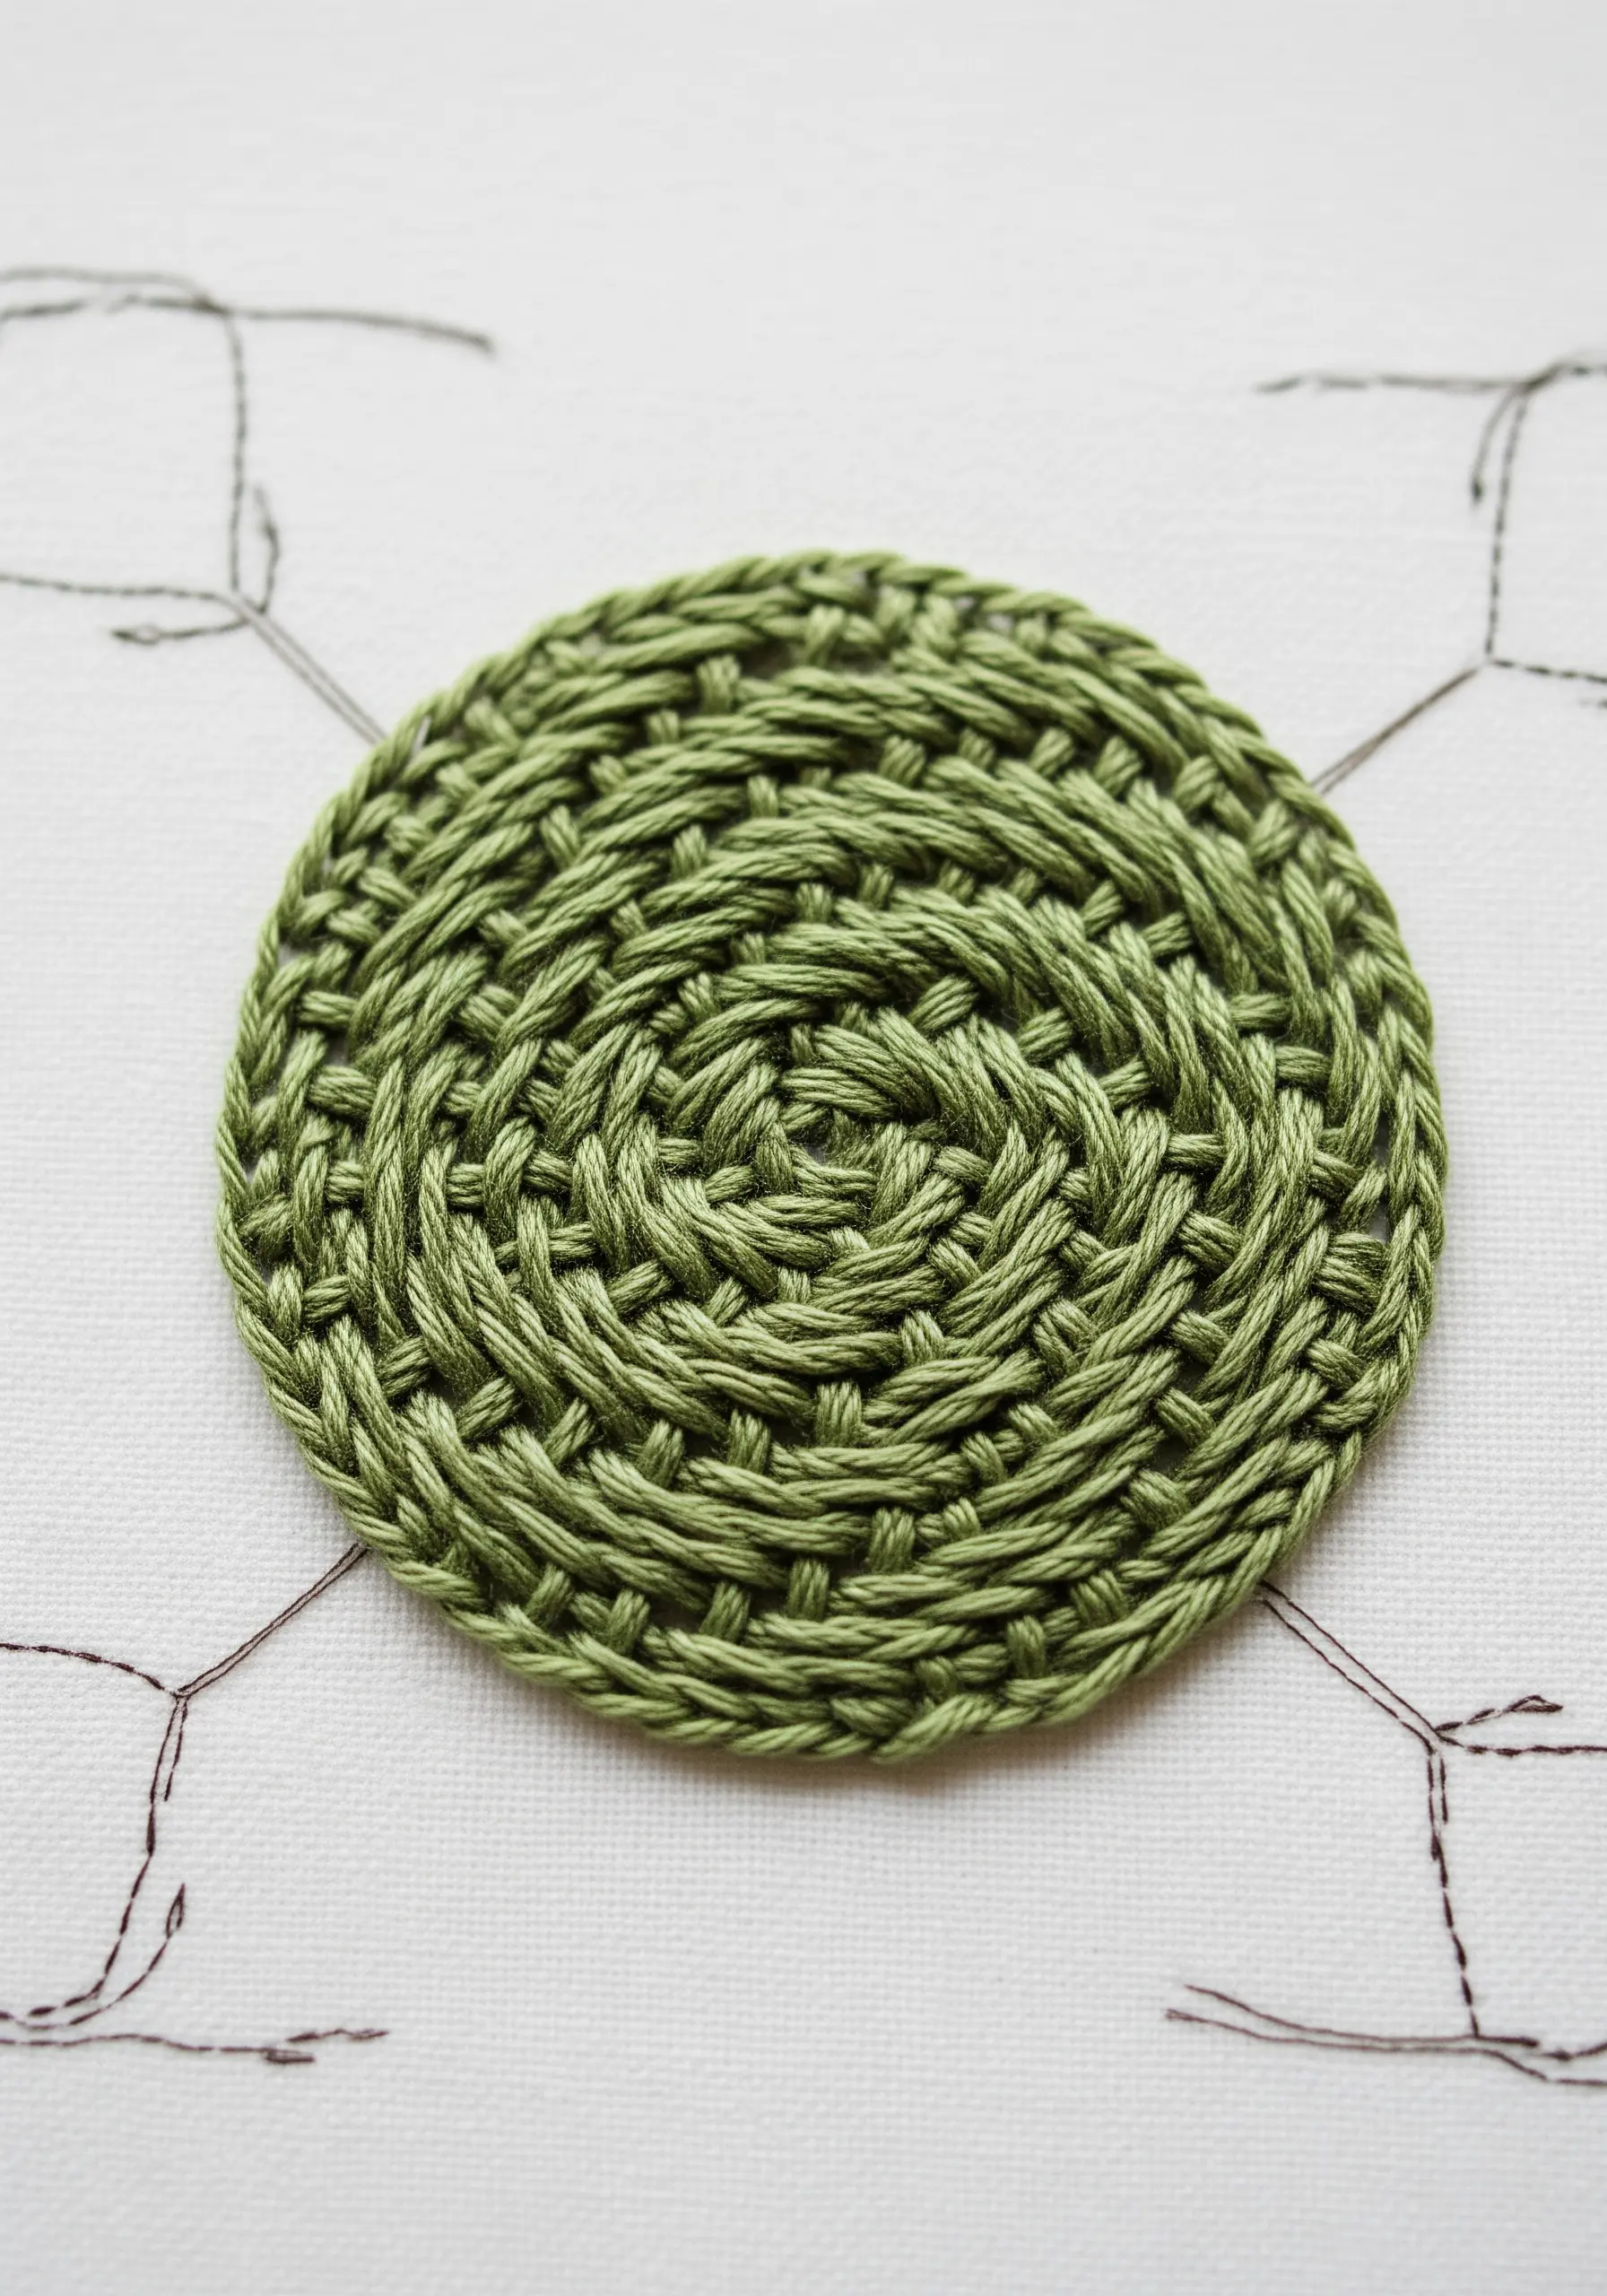
Transform the simple woven wheel stitch into a solid, medallion-like focal point.
Start with a base of an odd number of straight stitches, like spokes on a wheel, all meeting in the center.
Then, using a blunt tapestry needle, weave your working thread over and under these spokes without piercing the fabric.
Pull each woven row taut against the last to create a dense, basket-like texture with no fabric showing through.
7. Adapt String Art with Linear Precision
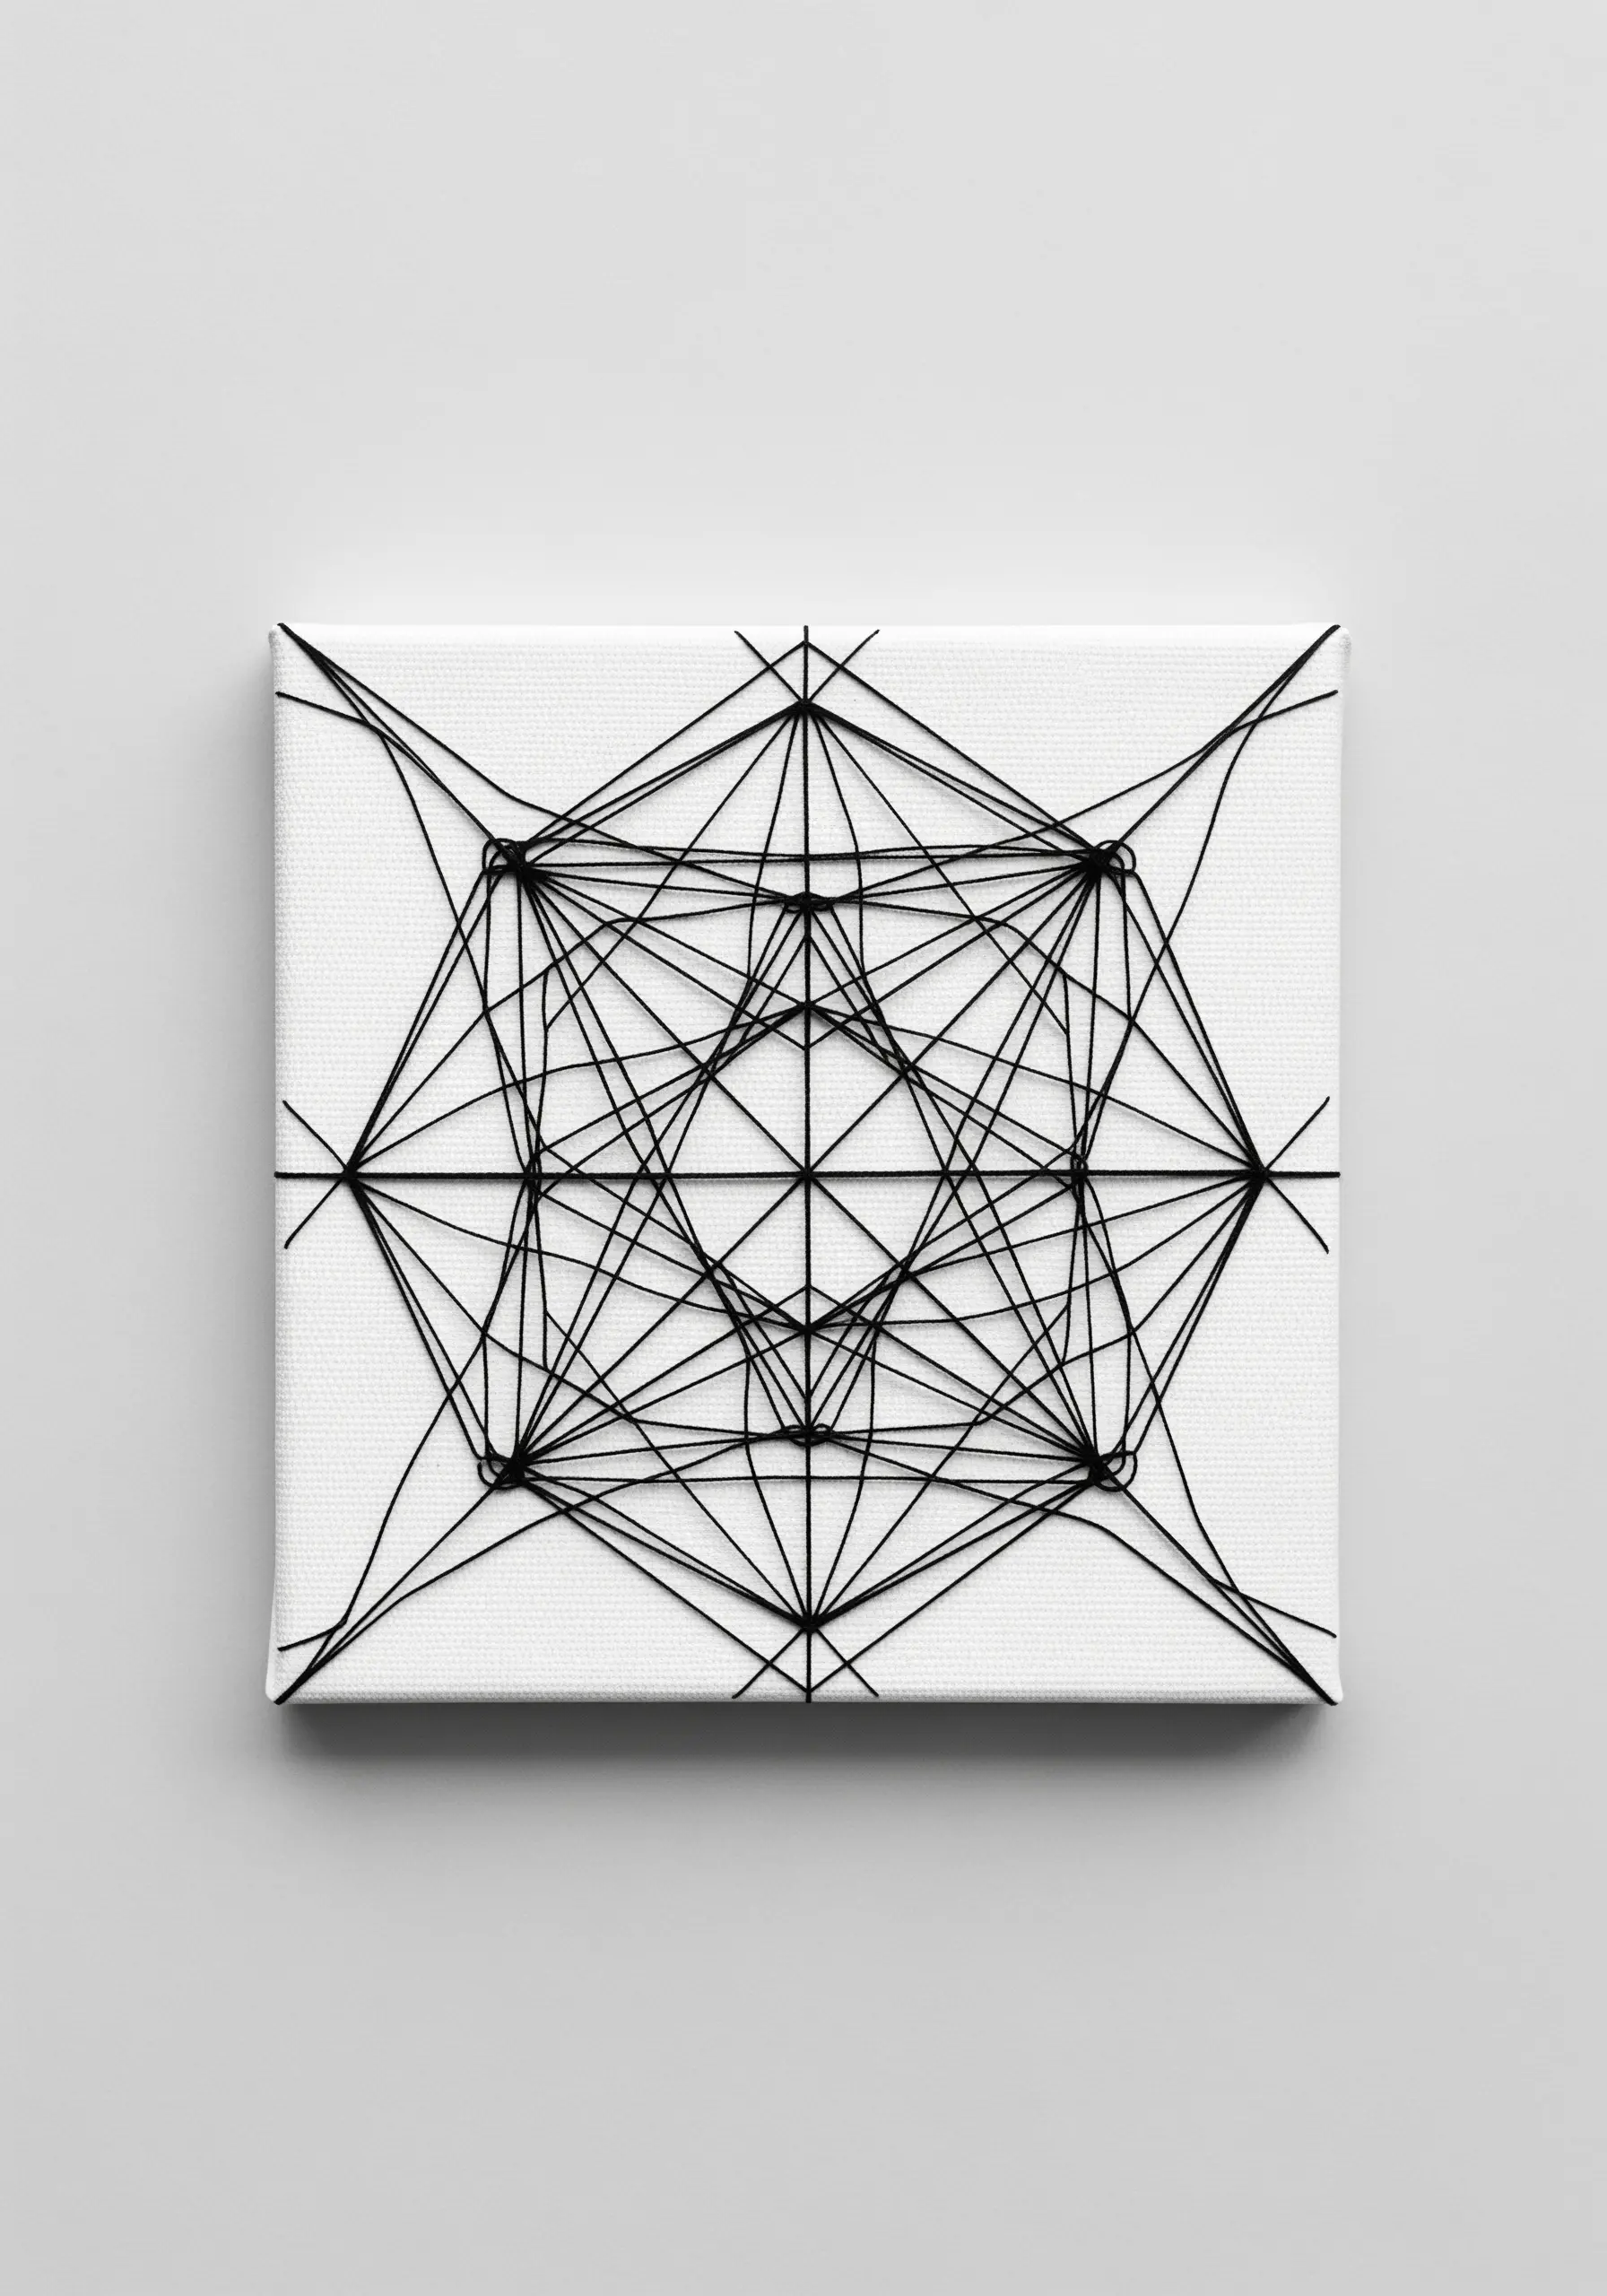
Translate the sharp geometry of string art to fabric by using long, taut straight stitches.
To achieve those incredibly straight lines without sagging, work on a stretched canvas or a very tightly hooped, stiff fabric.
Use a couching stitch if you need to secure extra-long threads across the surface, ensuring they remain perfectly linear.
This modern thread art approach focuses purely on line and tension, creating a dramatic, architectural effect with minimal stitching.
8. Paint with Thread Using Variegated Floss
Achieve beautiful, flowing color transitions without changing your thread.
Use a variegated or space-dyed floss, which has multiple colors along a single strand, and work in long, continuous lines of couching or satin stitch.
Allow the thread’s natural color changes to dictate the pattern, creating an organic, watercolor-like effect.
This is an intuitive way to add complex color play to your mandala, letting the thread do the work for you.
9. Contrast Solid Fills with Airy Openwork
Create visual intrigue by pairing dense stitching with delicate, open patterns.
Fill the center of your mandala with smooth, tightly packed satin stitches in concentric rings for a solid, vibrant core.
For the outer border, use open fly stitches or drawn thread techniques to create a lacy, almost transparent edge.
This contrast between solid and void makes the dense areas appear richer and the open areas more delicate.
10. Capture Nature with Directional Satin Stitch
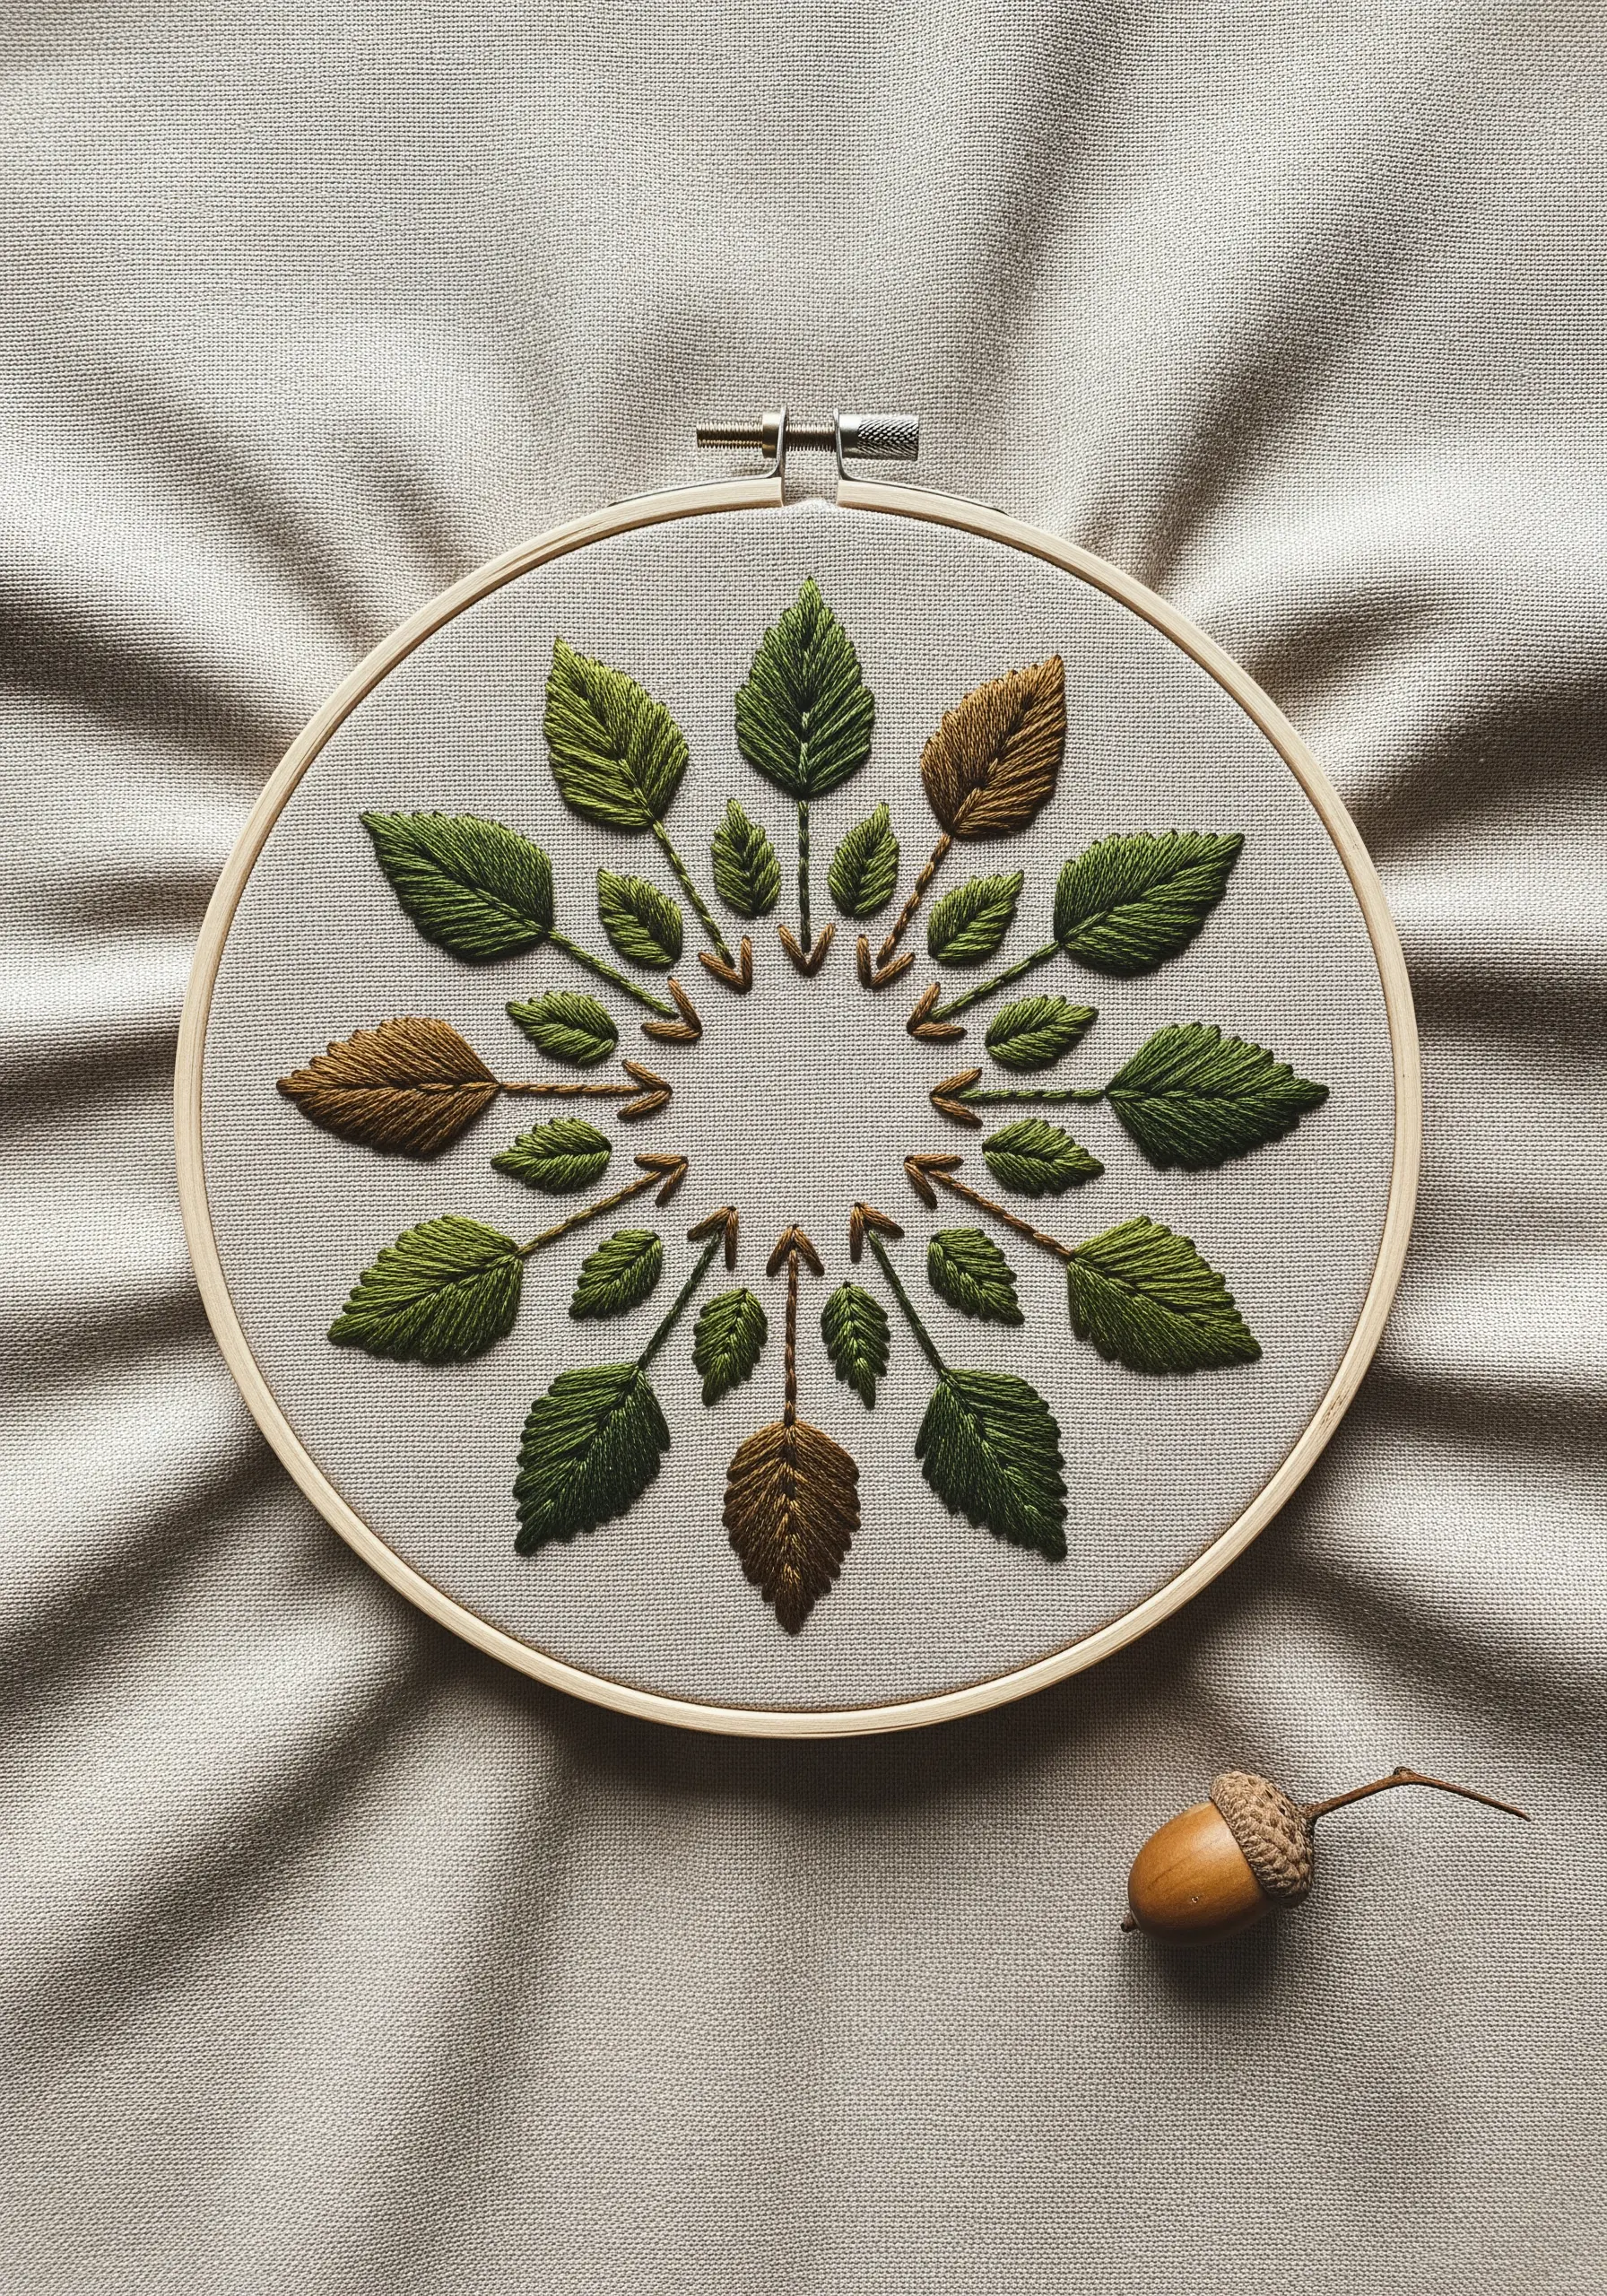
Bring your embroidered leaves to life by carefully considering your stitch direction.
Instead of filling each leaf with horizontal or vertical stitches, angle them to mimic the natural growth of veins, starting from a central line and sweeping outwards.
This technique, known as directional satin stitch, creates a subtle illusion of movement and realism.
Arranging them in a circle transforms them into leaf mandala-inspired embroidery projects that feel both organized and organic.
11. Make a Statement with High-Contrast Metallics
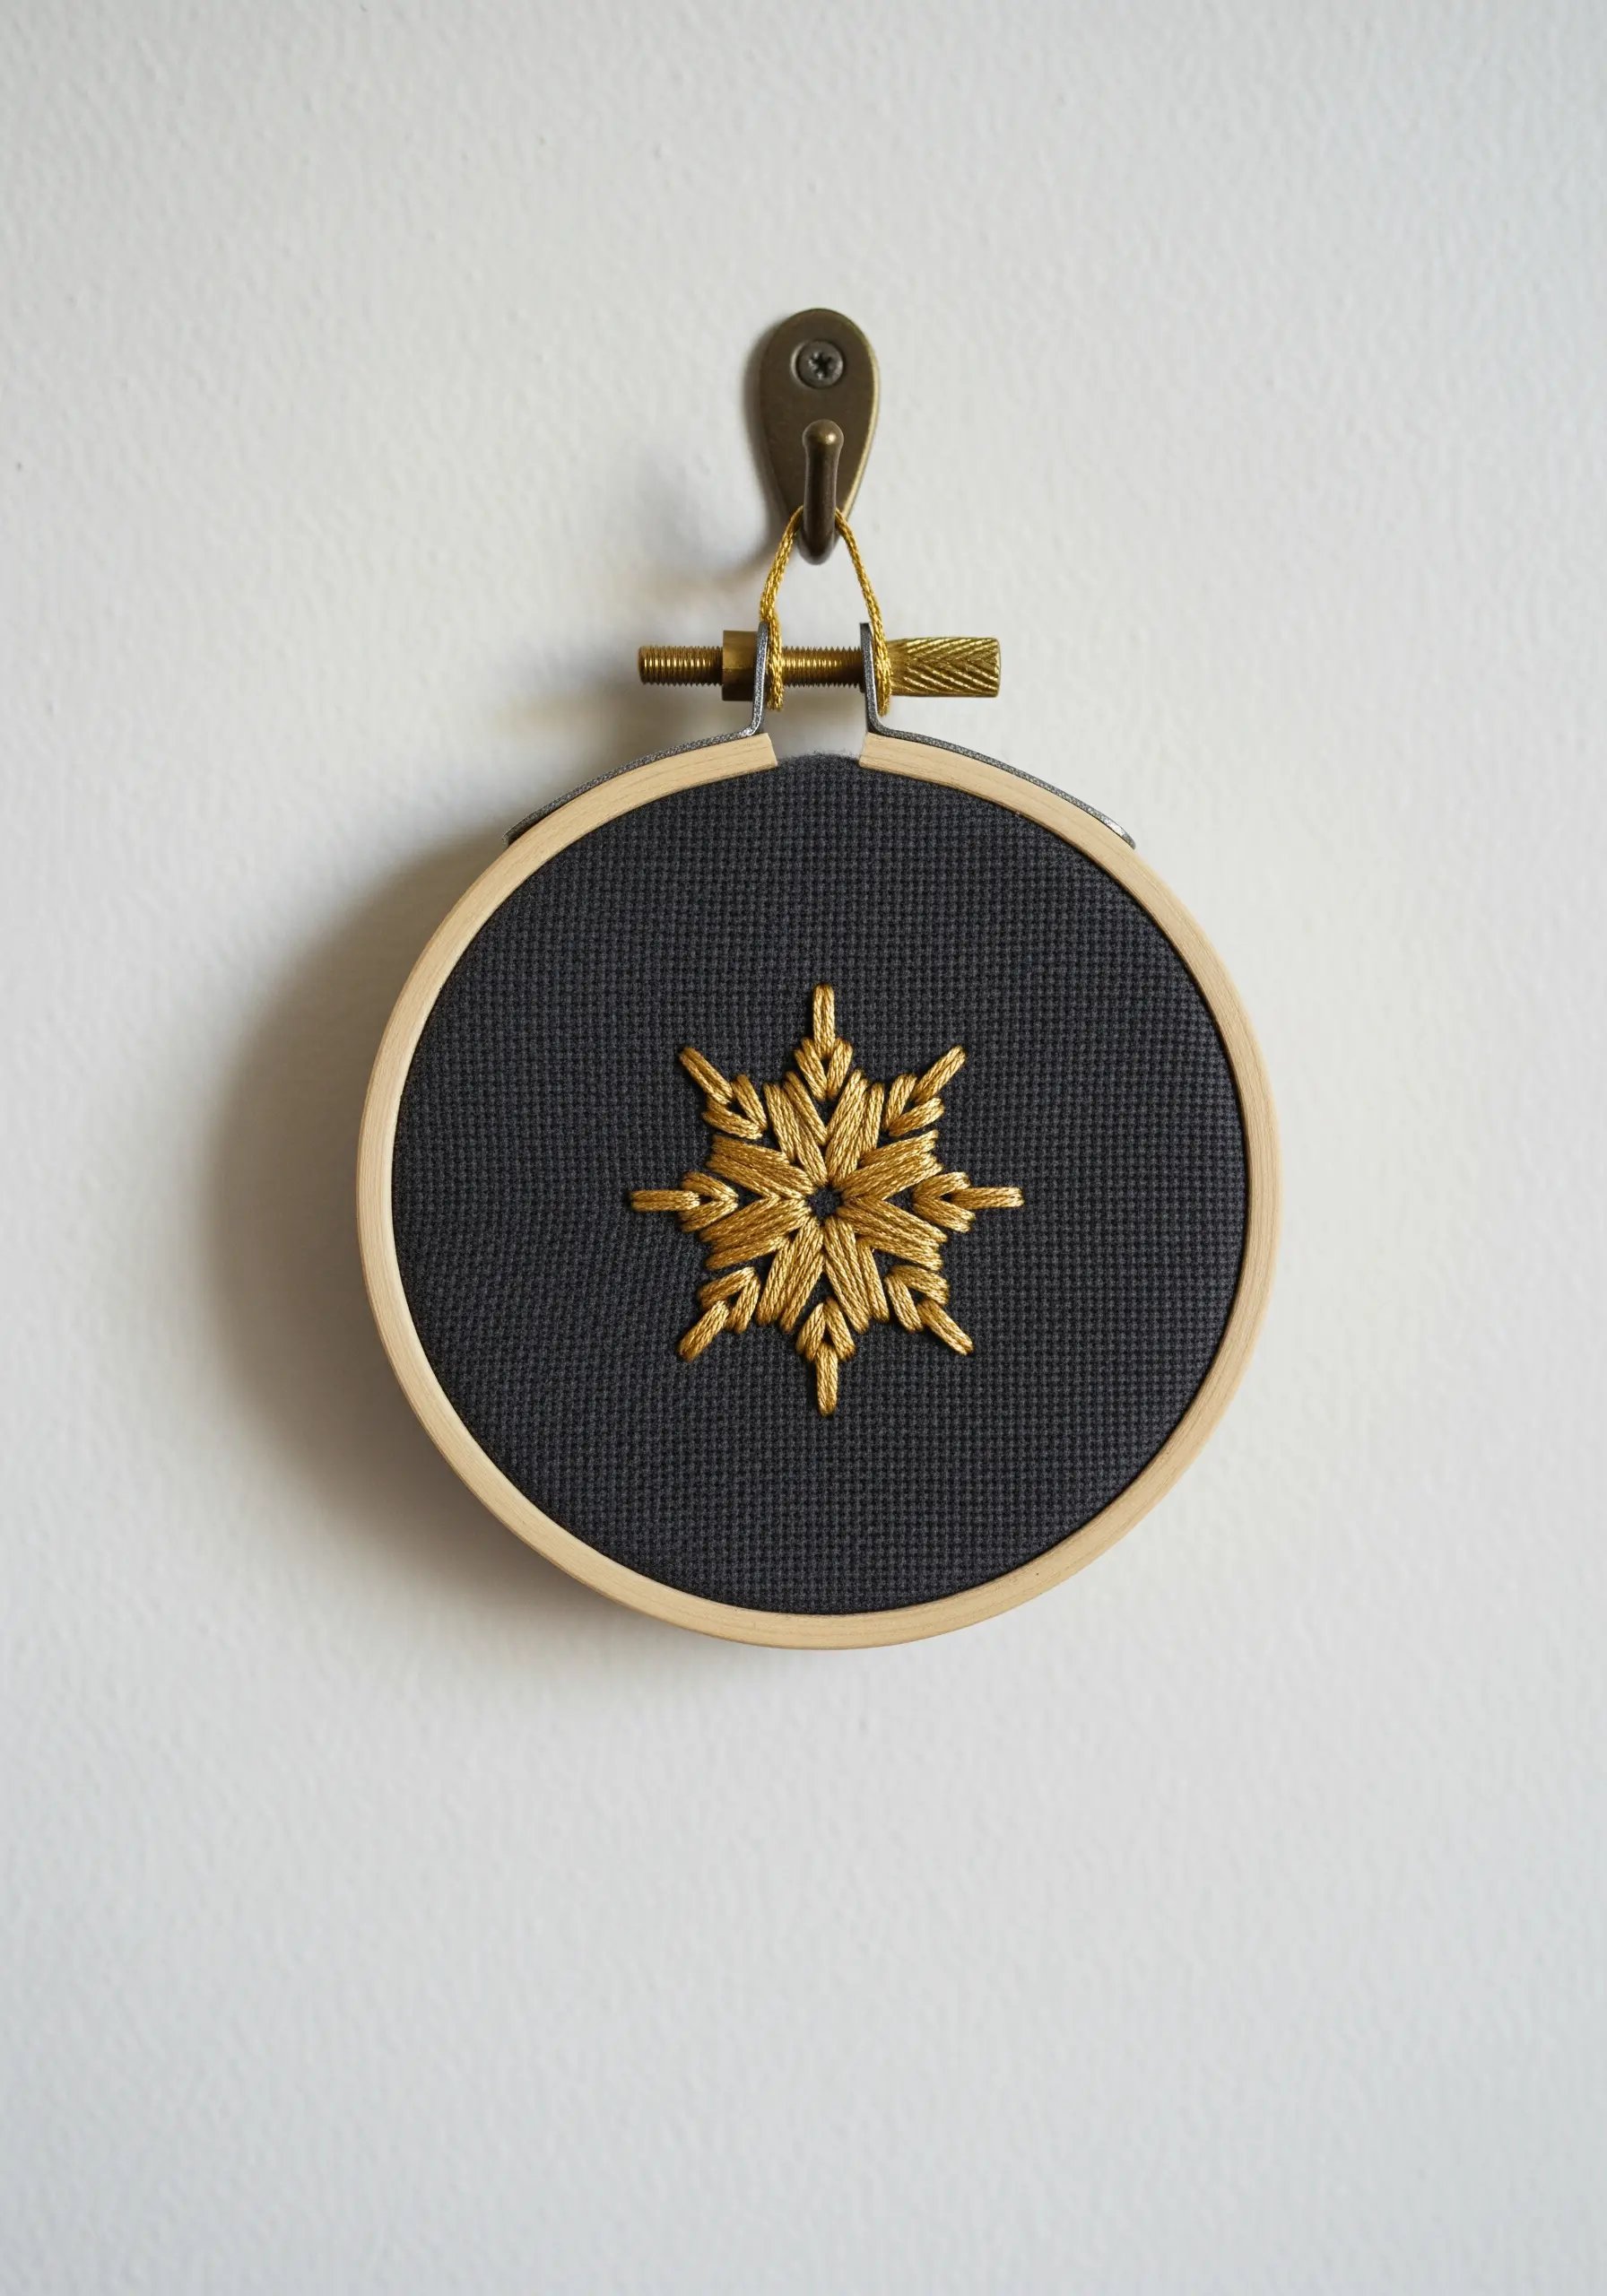
Elevate a simple motif by stitching with metallic thread on a dark, matte fabric like black cotton or charcoal grey linen.
Metallic floss can be challenging, so use shorter lengths of thread (no more than 12 inches) to prevent fraying and tangling.
A thread conditioner like beeswax can also make it smoother to work with.
The dramatic contrast allows the luxury metallic thread to catch the light, turning a small snowflake into a piece of jewelry for your wall.
12. Find Your Rhythm with a Chain Stitch Spiral

The chain stitch is perfect for creating continuous, textured lines, making it ideal for a meditative spiral pattern.
Focus on keeping each chain link the exact same size to ensure your spiral expands evenly and looks perfectly uniform.
Mark your circular guidelines with a water-soluble pen before you begin, but then allow the repetitive motion of the stitch to become your focus.
The result is a design that embodies calm and continuity.
13. Create Delicate Dimension with Layered Stitches
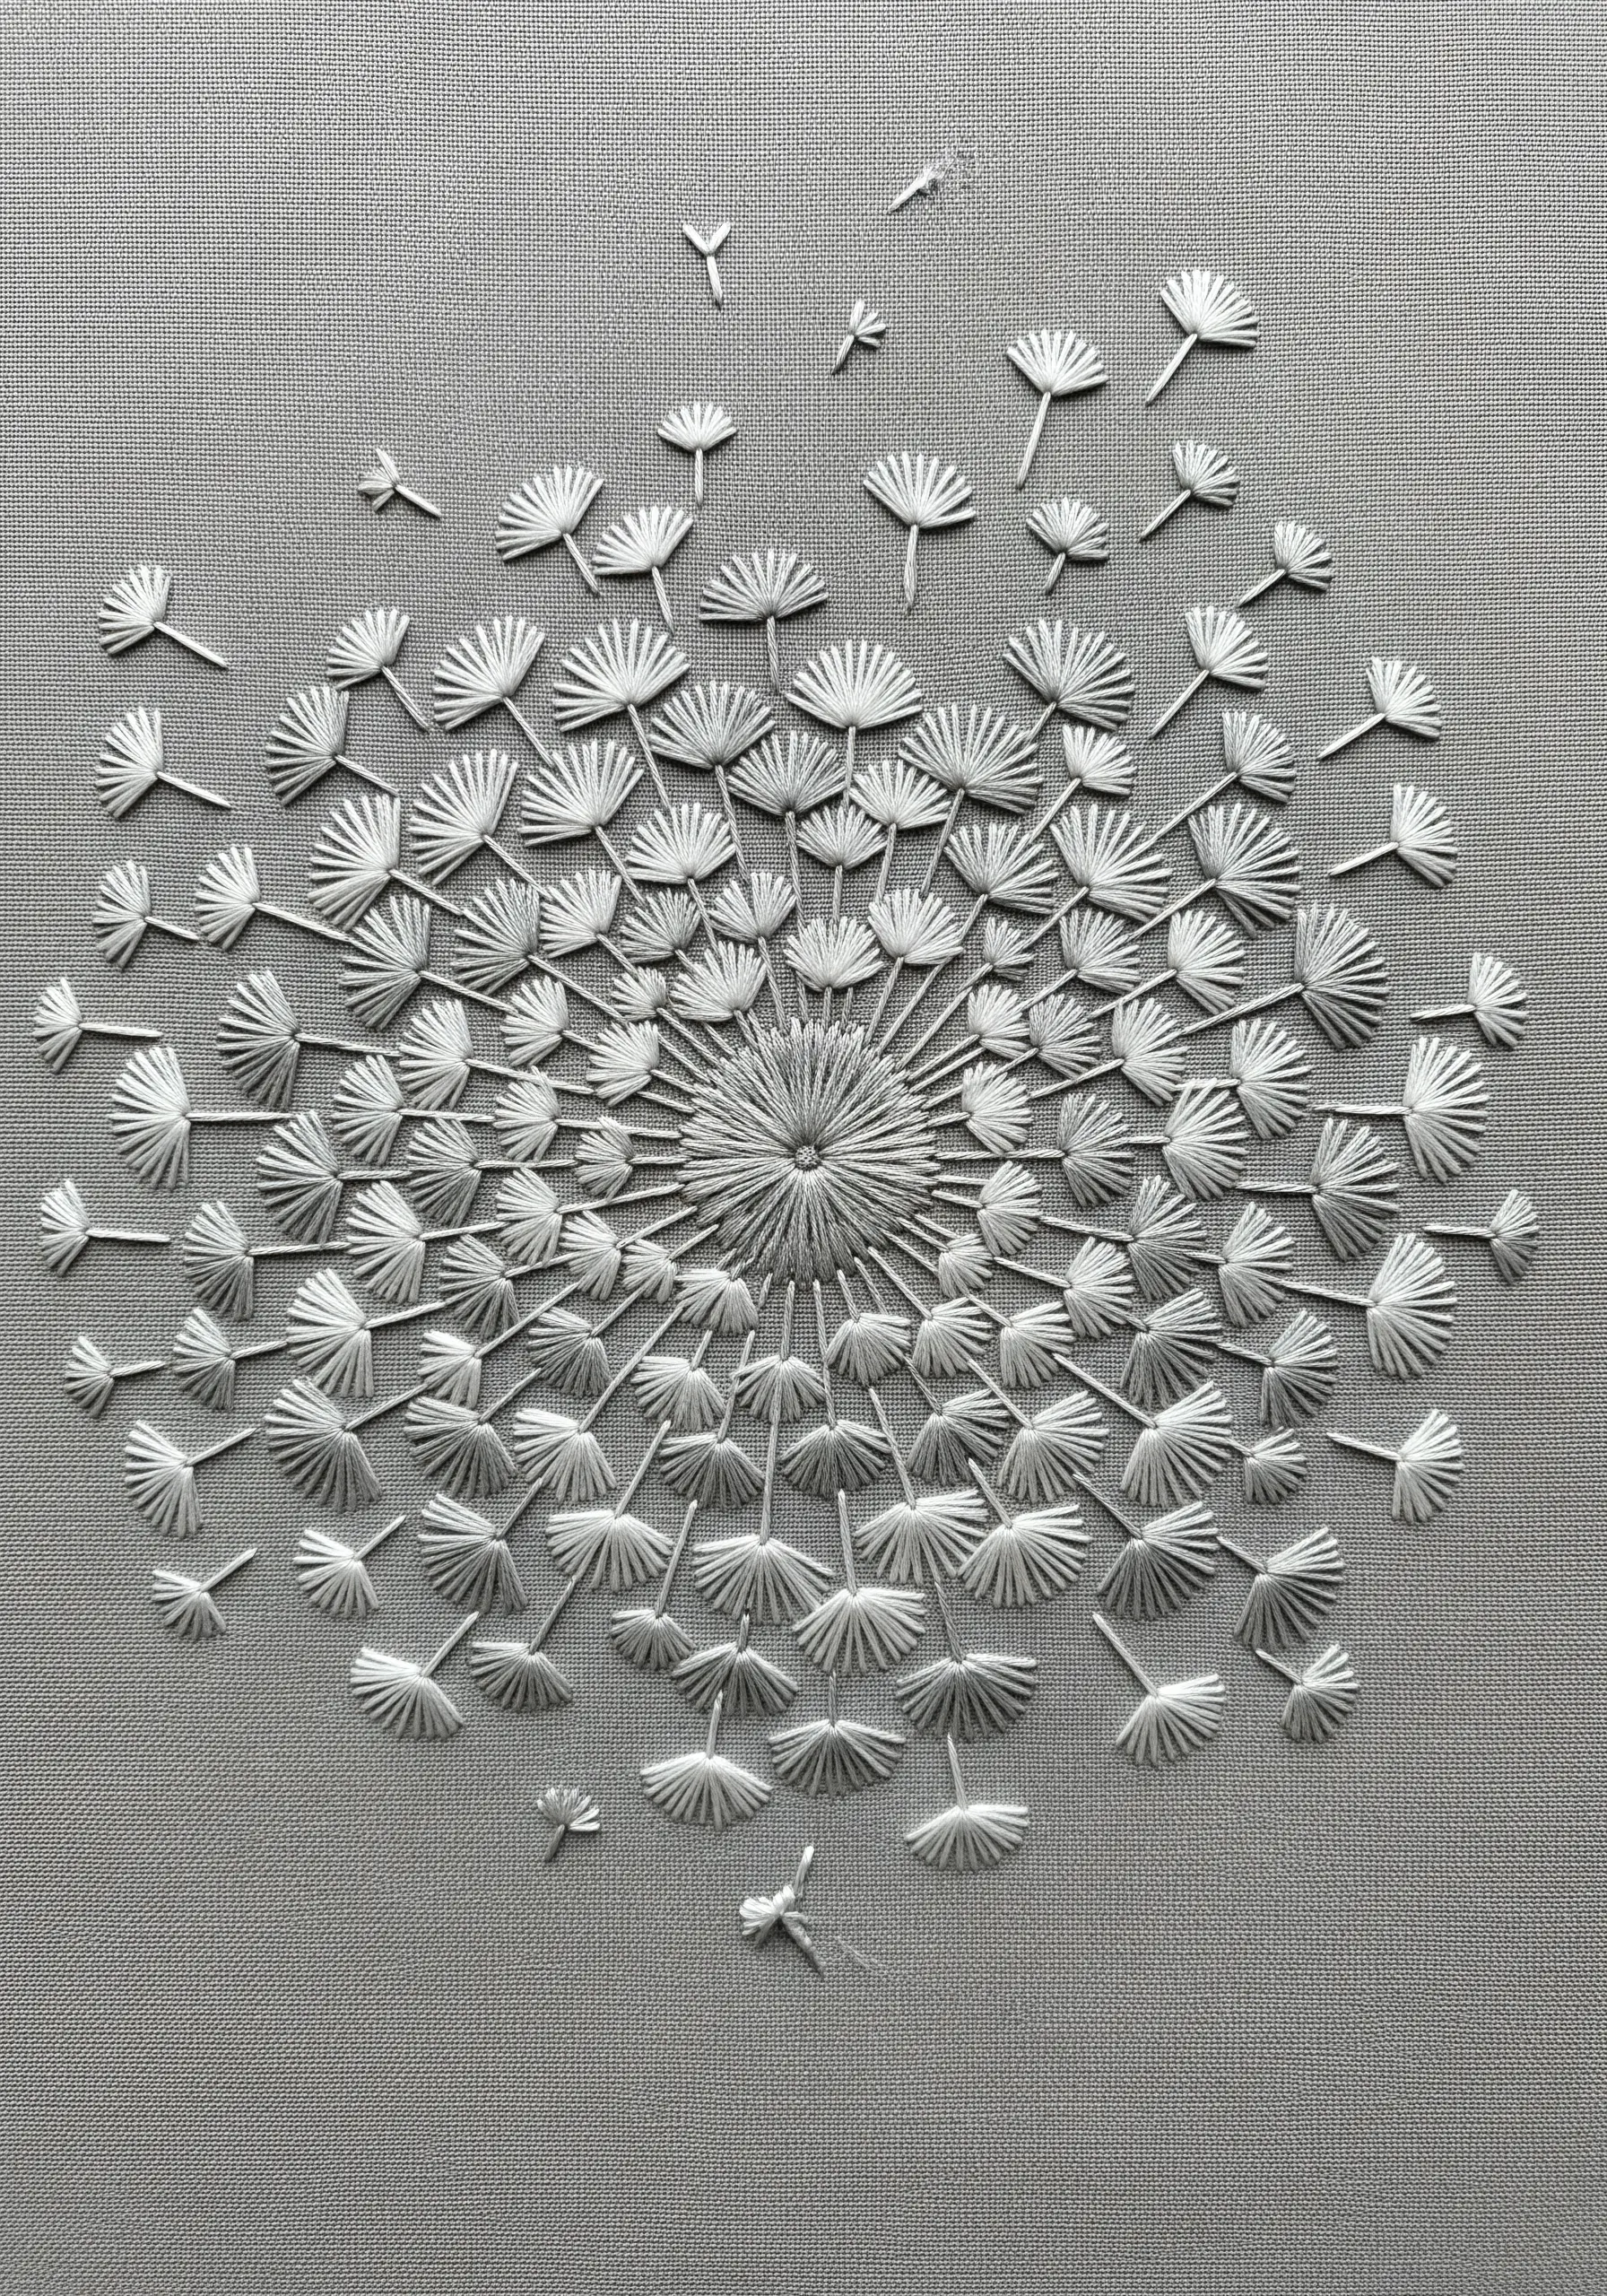
Build this intricate dandelion-style mandala by layering simple stitches.
Create each tiny seed head with a fan of small, straight stitches or a series of detached chain stitches arranged in a semi-circle.
Connect them to the center with a single straight stitch for the stem.
By varying the size and density of these clusters, you can create a beautiful illusion of depth and movement, as if the seeds are floating away.
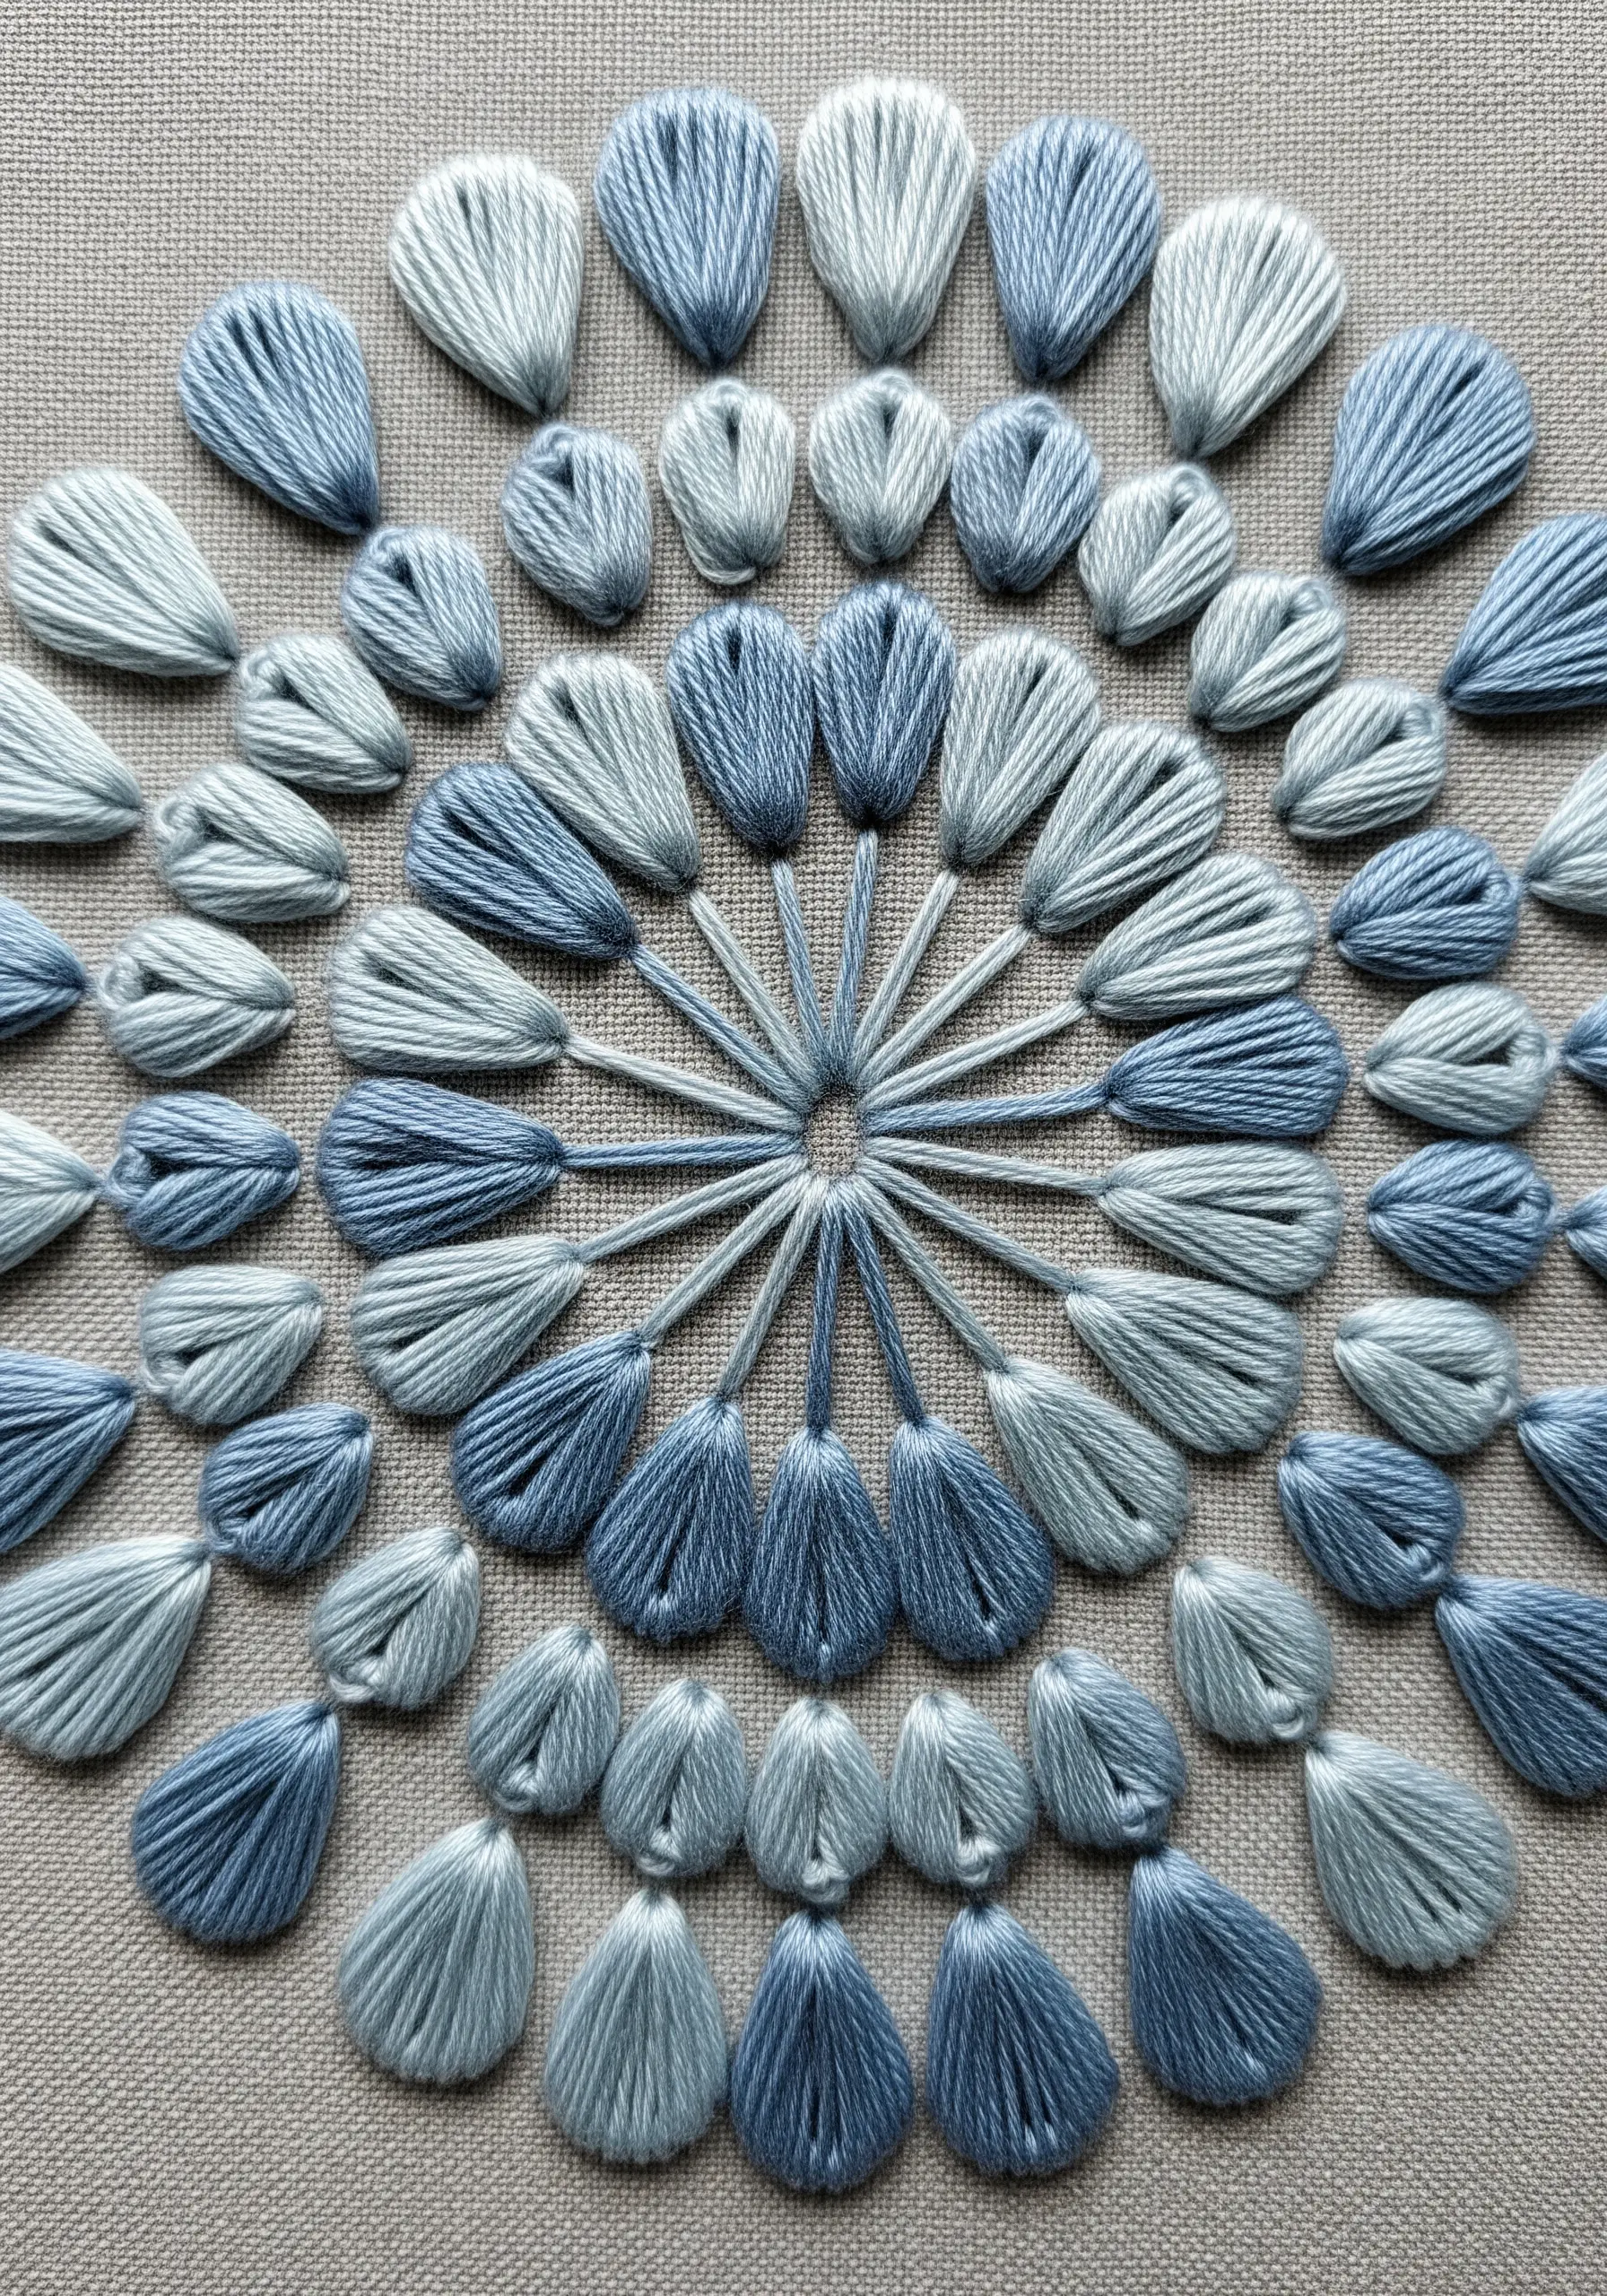
14. Blend Colors for a Frosty Effect
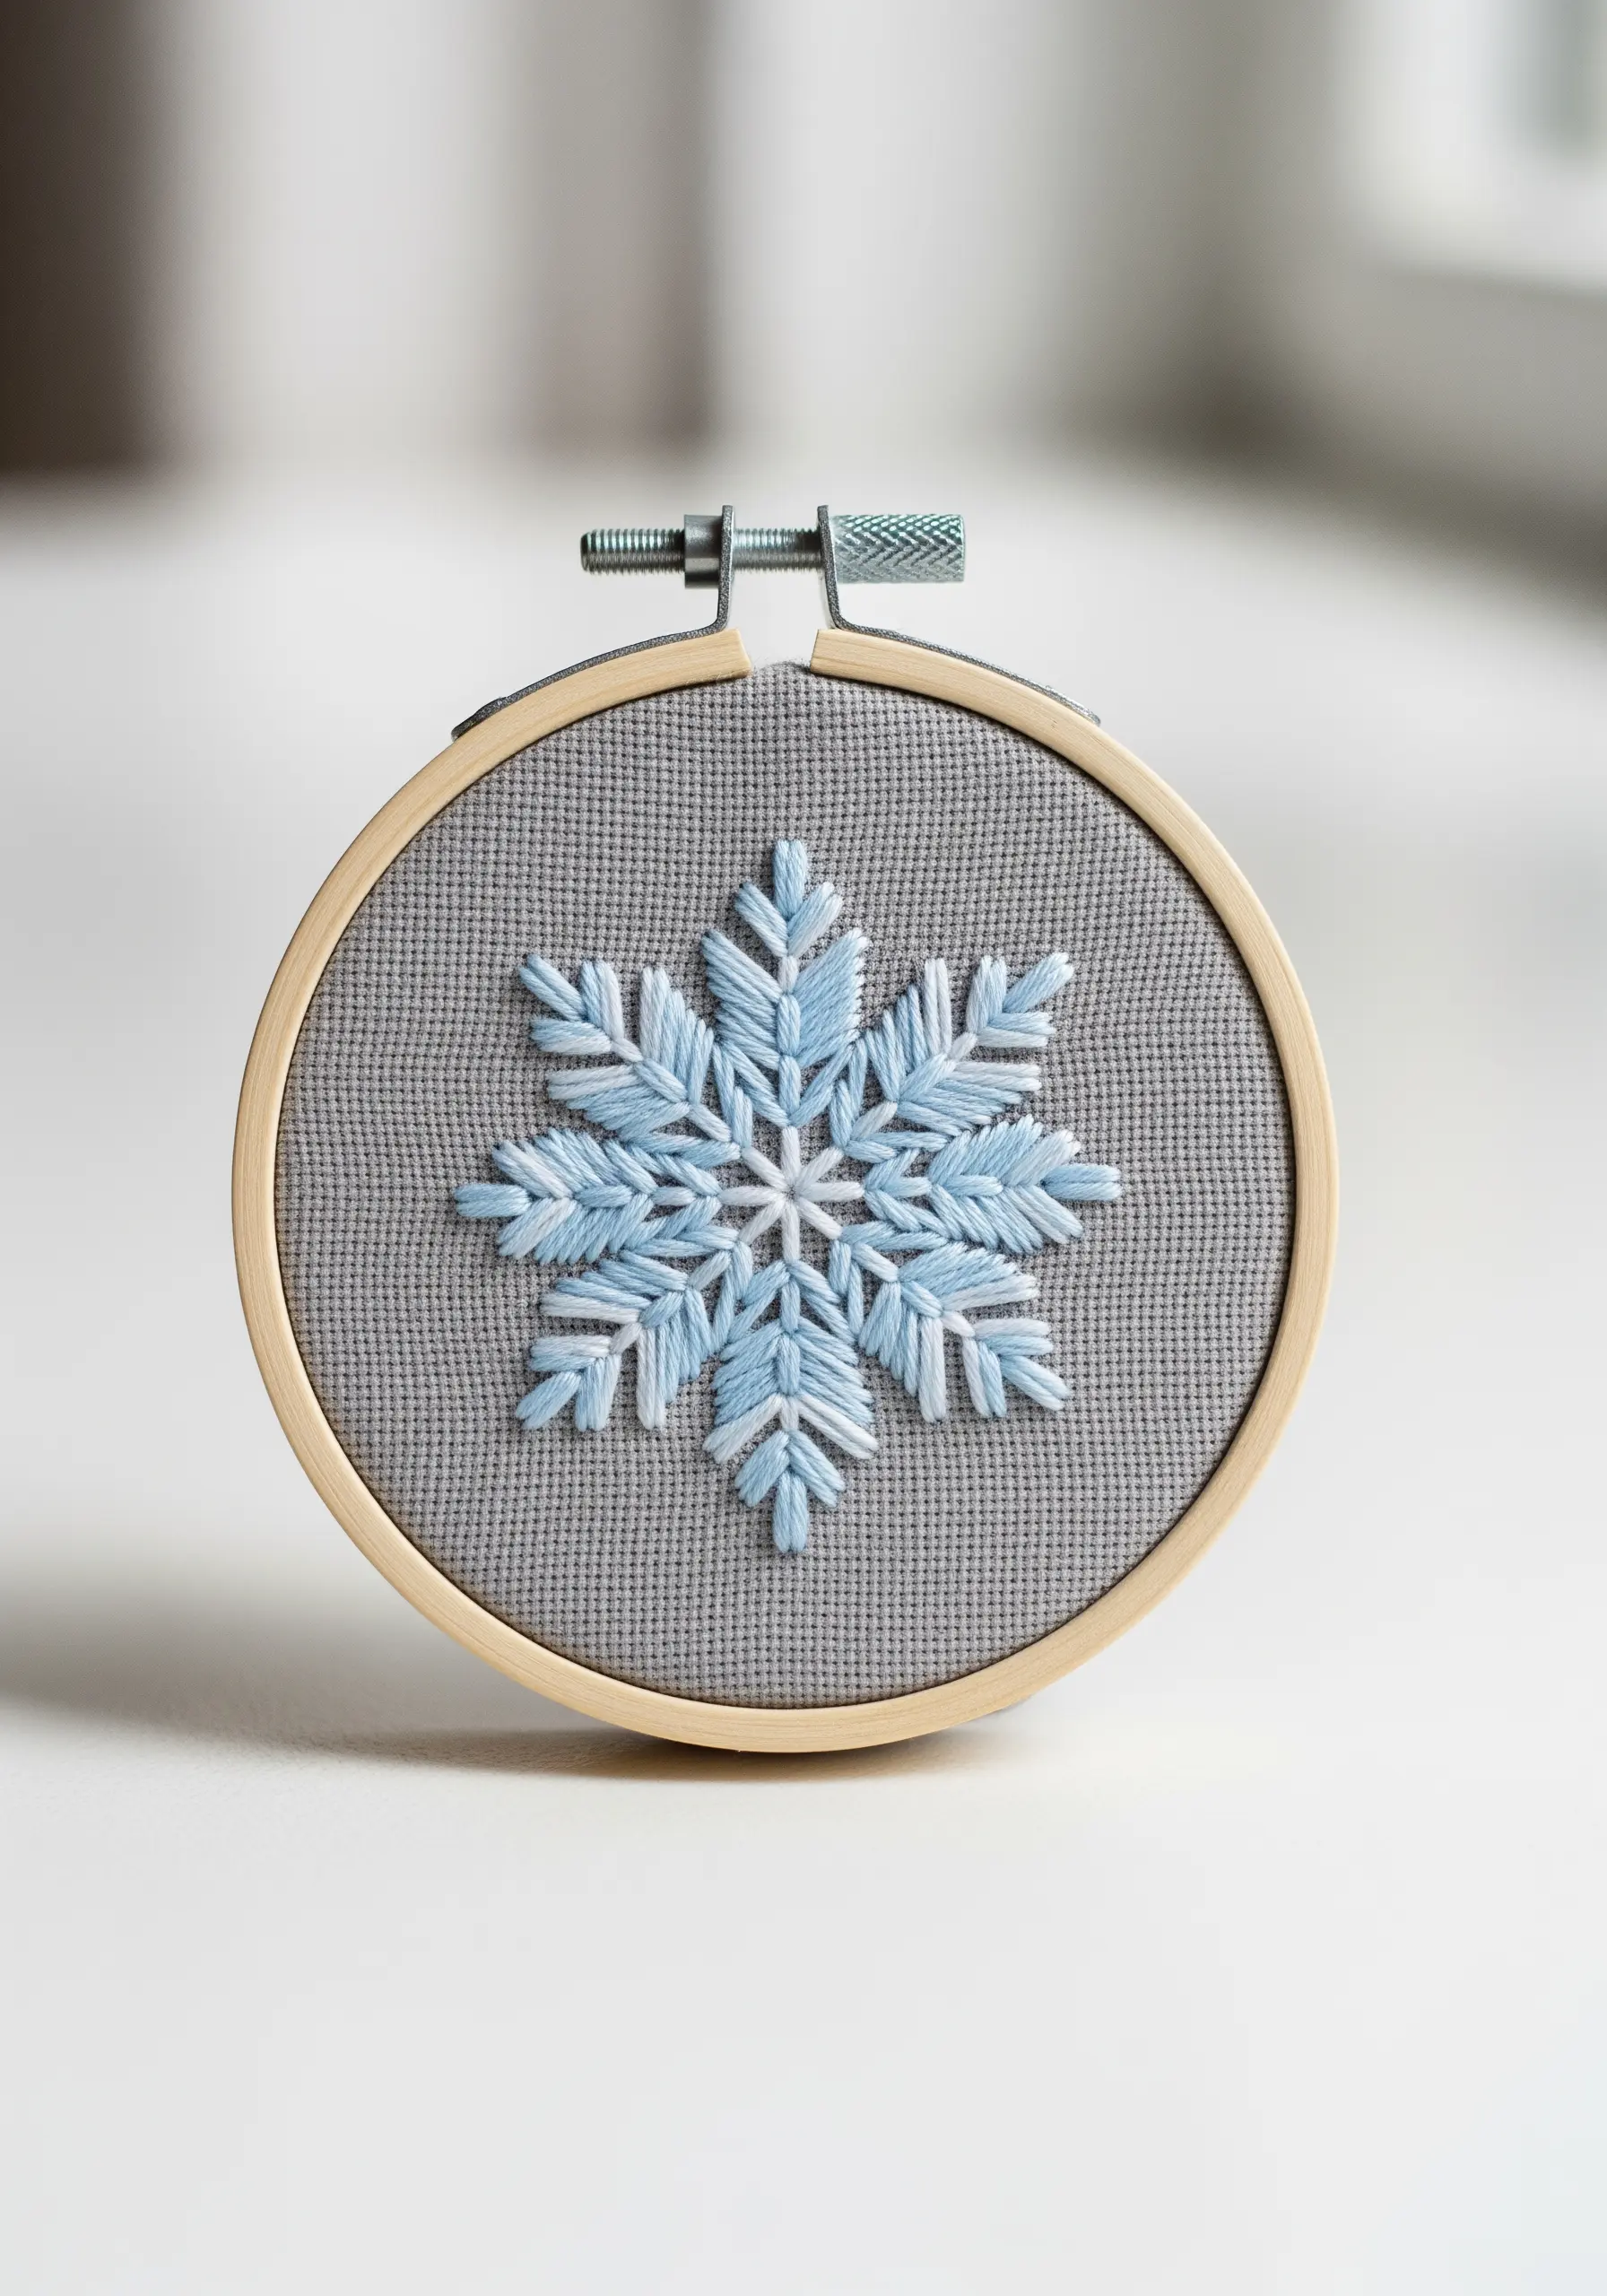
Achieve a subtle, frosted look by blending two or more shades within each segment of your design.
Use the long and short stitch, alternating between a light blue and a crisp white thread.
This technique creates a soft gradient that feels more natural and dimensional than solid blocks of color.
It’s a simple way to add painterly sophistication to a geometric snowflake pattern.
15. Elevate Outlines with Whipped Stitches
For lines that need to be both delicate and defined, use a whipped backstitch or whipped chain stitch.
First, create your base line of stitches, and then wrap a second thread around them without piercing the fabric.
This technique adds thickness and smoothness, turning a basic outline into a raised, cord-like feature.
It’s one of the best simple line art embroidery ideas for making your work look exceptionally clean and professional.
16. Intensify Spirals with a Heavy Chain Stitch

To give your spiral mandala more presence and texture, use a heavy chain stitch or a whipped chain stitch.
The heavy version involves stitching through the previous link in a slightly different way to create a braided, more substantial line.
Alternatively, whipping a standard chain stitch with a contrasting or matching color adds roundness and definition.
Both techniques prevent a simple spiral from looking flat, giving it a pleasing, rope-like appearance.
17. Sculpt 3D Pebbles with Padding
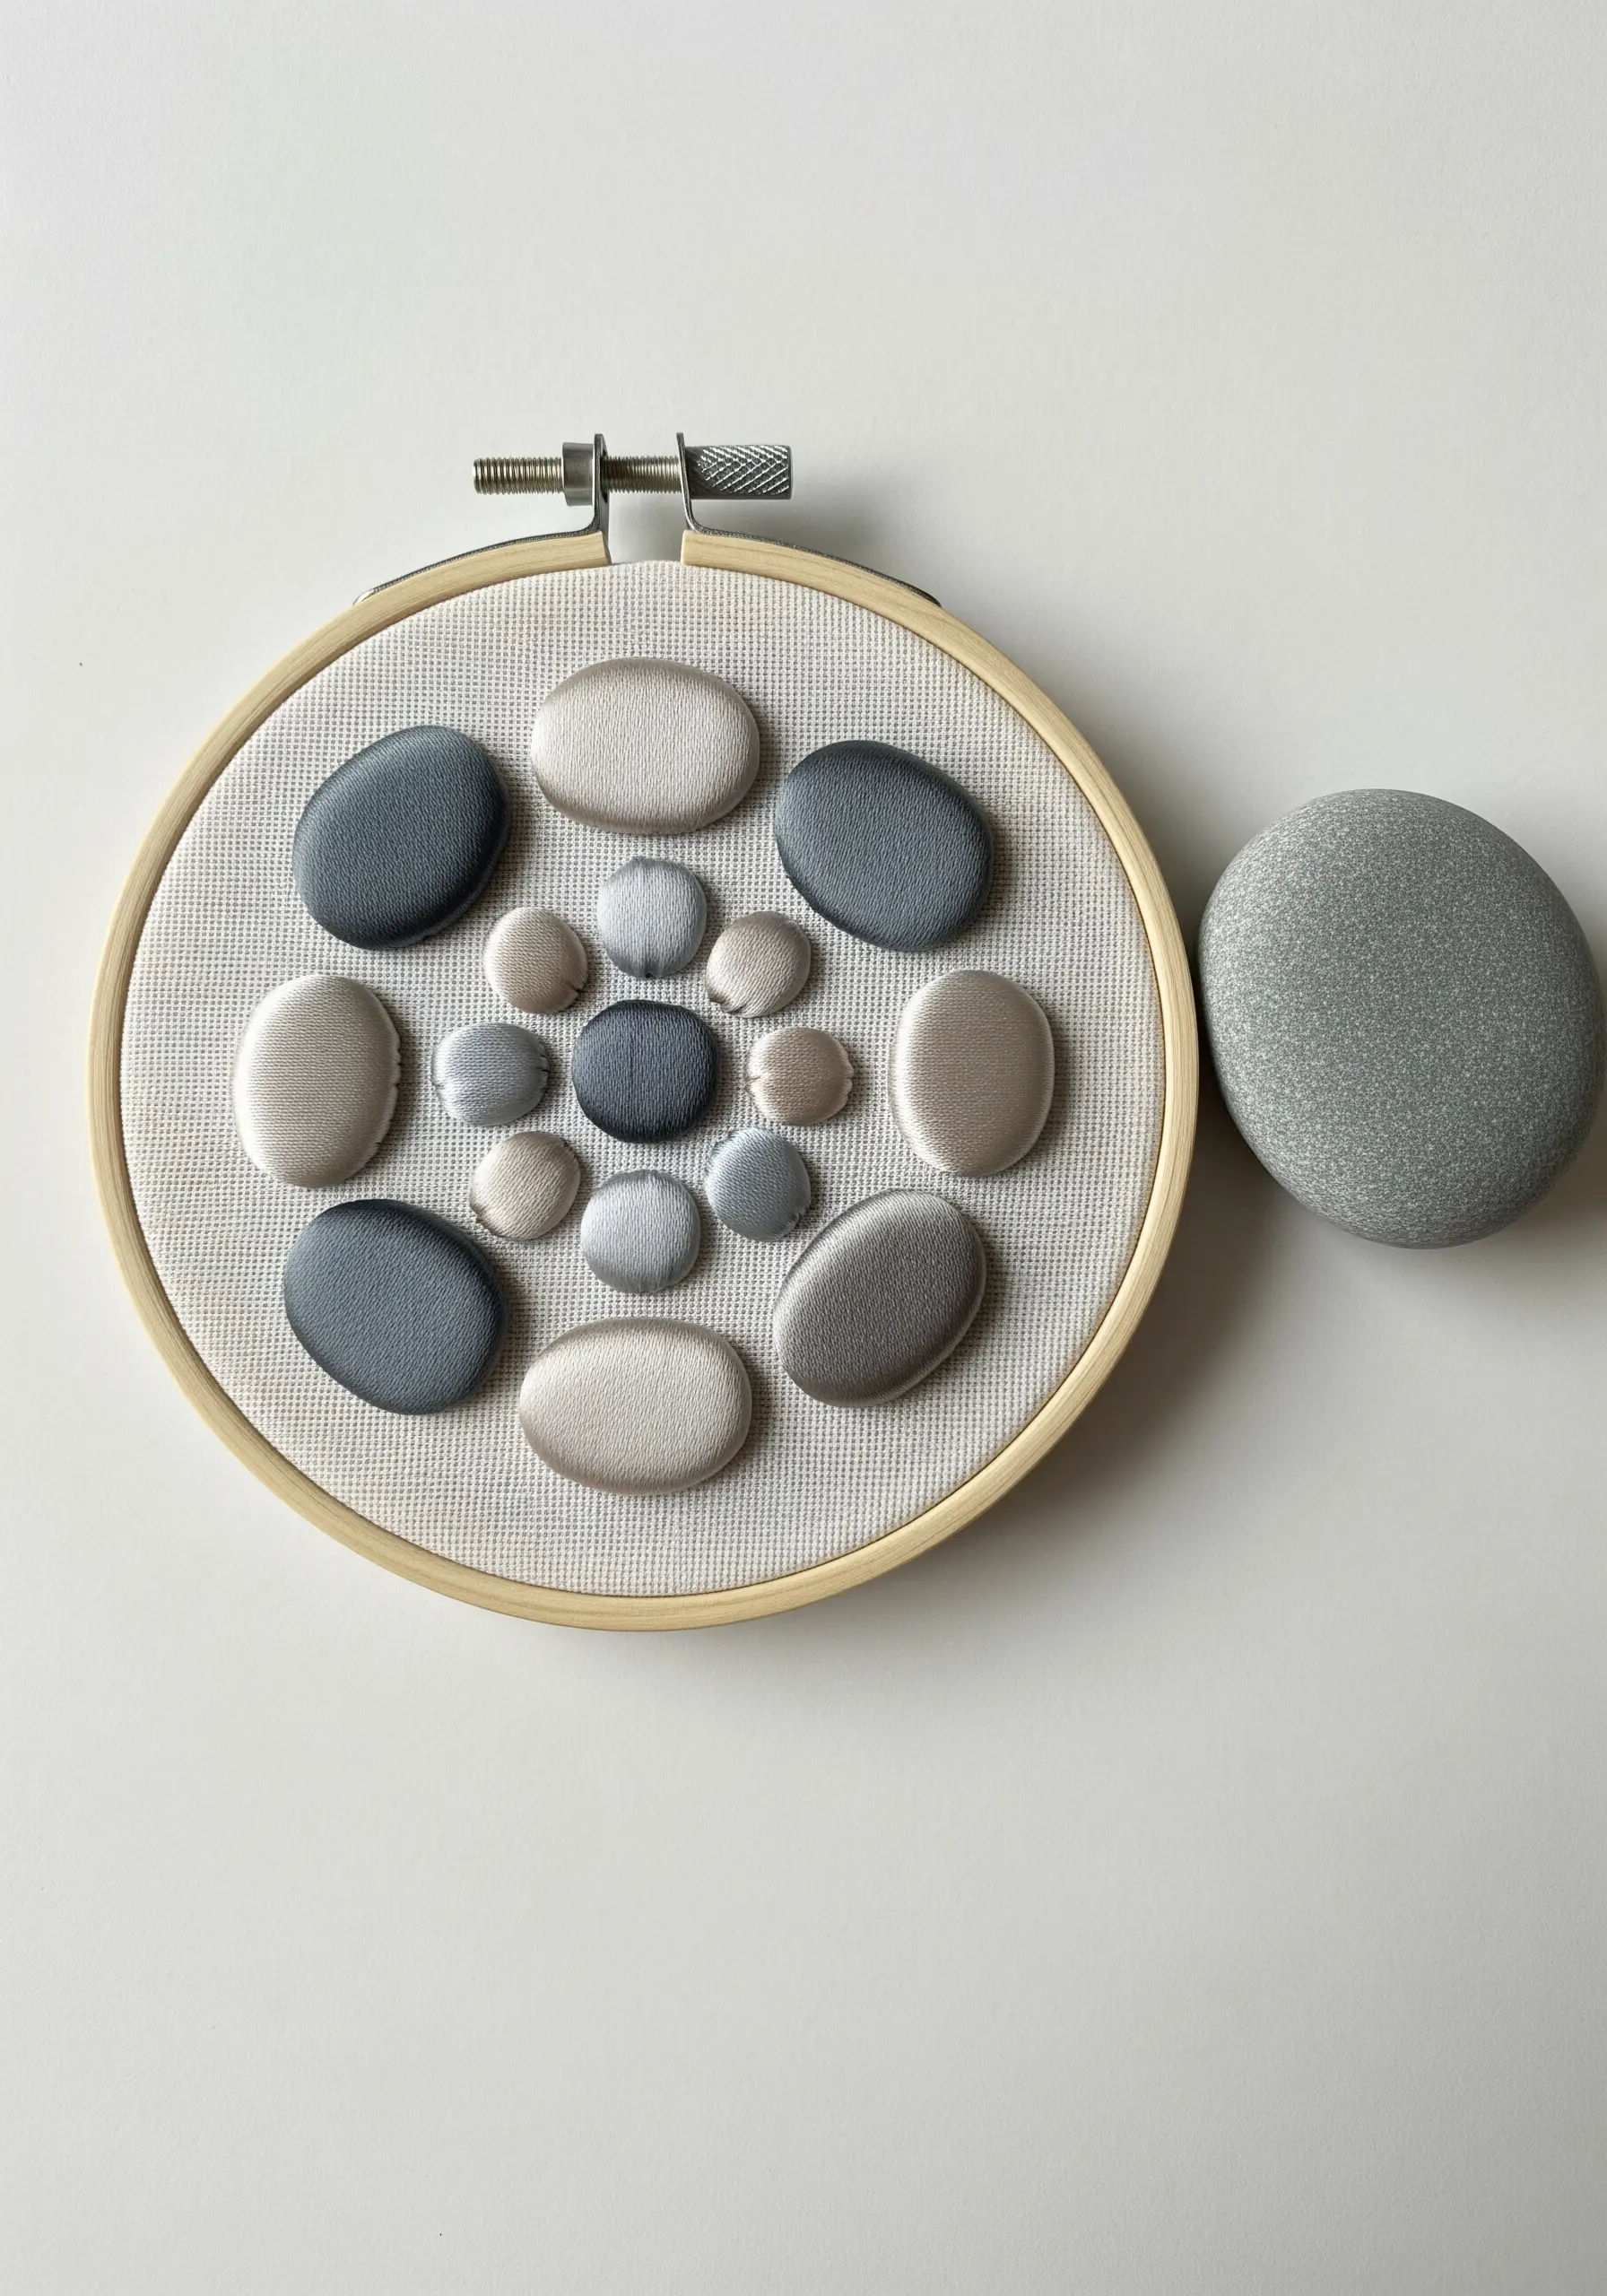
Create these smooth, raised stone shapes using padded satin stitch.
First, fill the shape of each ‘pebble’ with a base layer of small seed stitches or felt cut to size.
Then, cover this padding with your final satin stitches, working perpendicular to the direction of the base stitches.
The padding underneath raises the surface, giving your embroidery a smooth, three-dimensional form that invites touch.
18. Embrace Asymmetry with a Corner Mandala
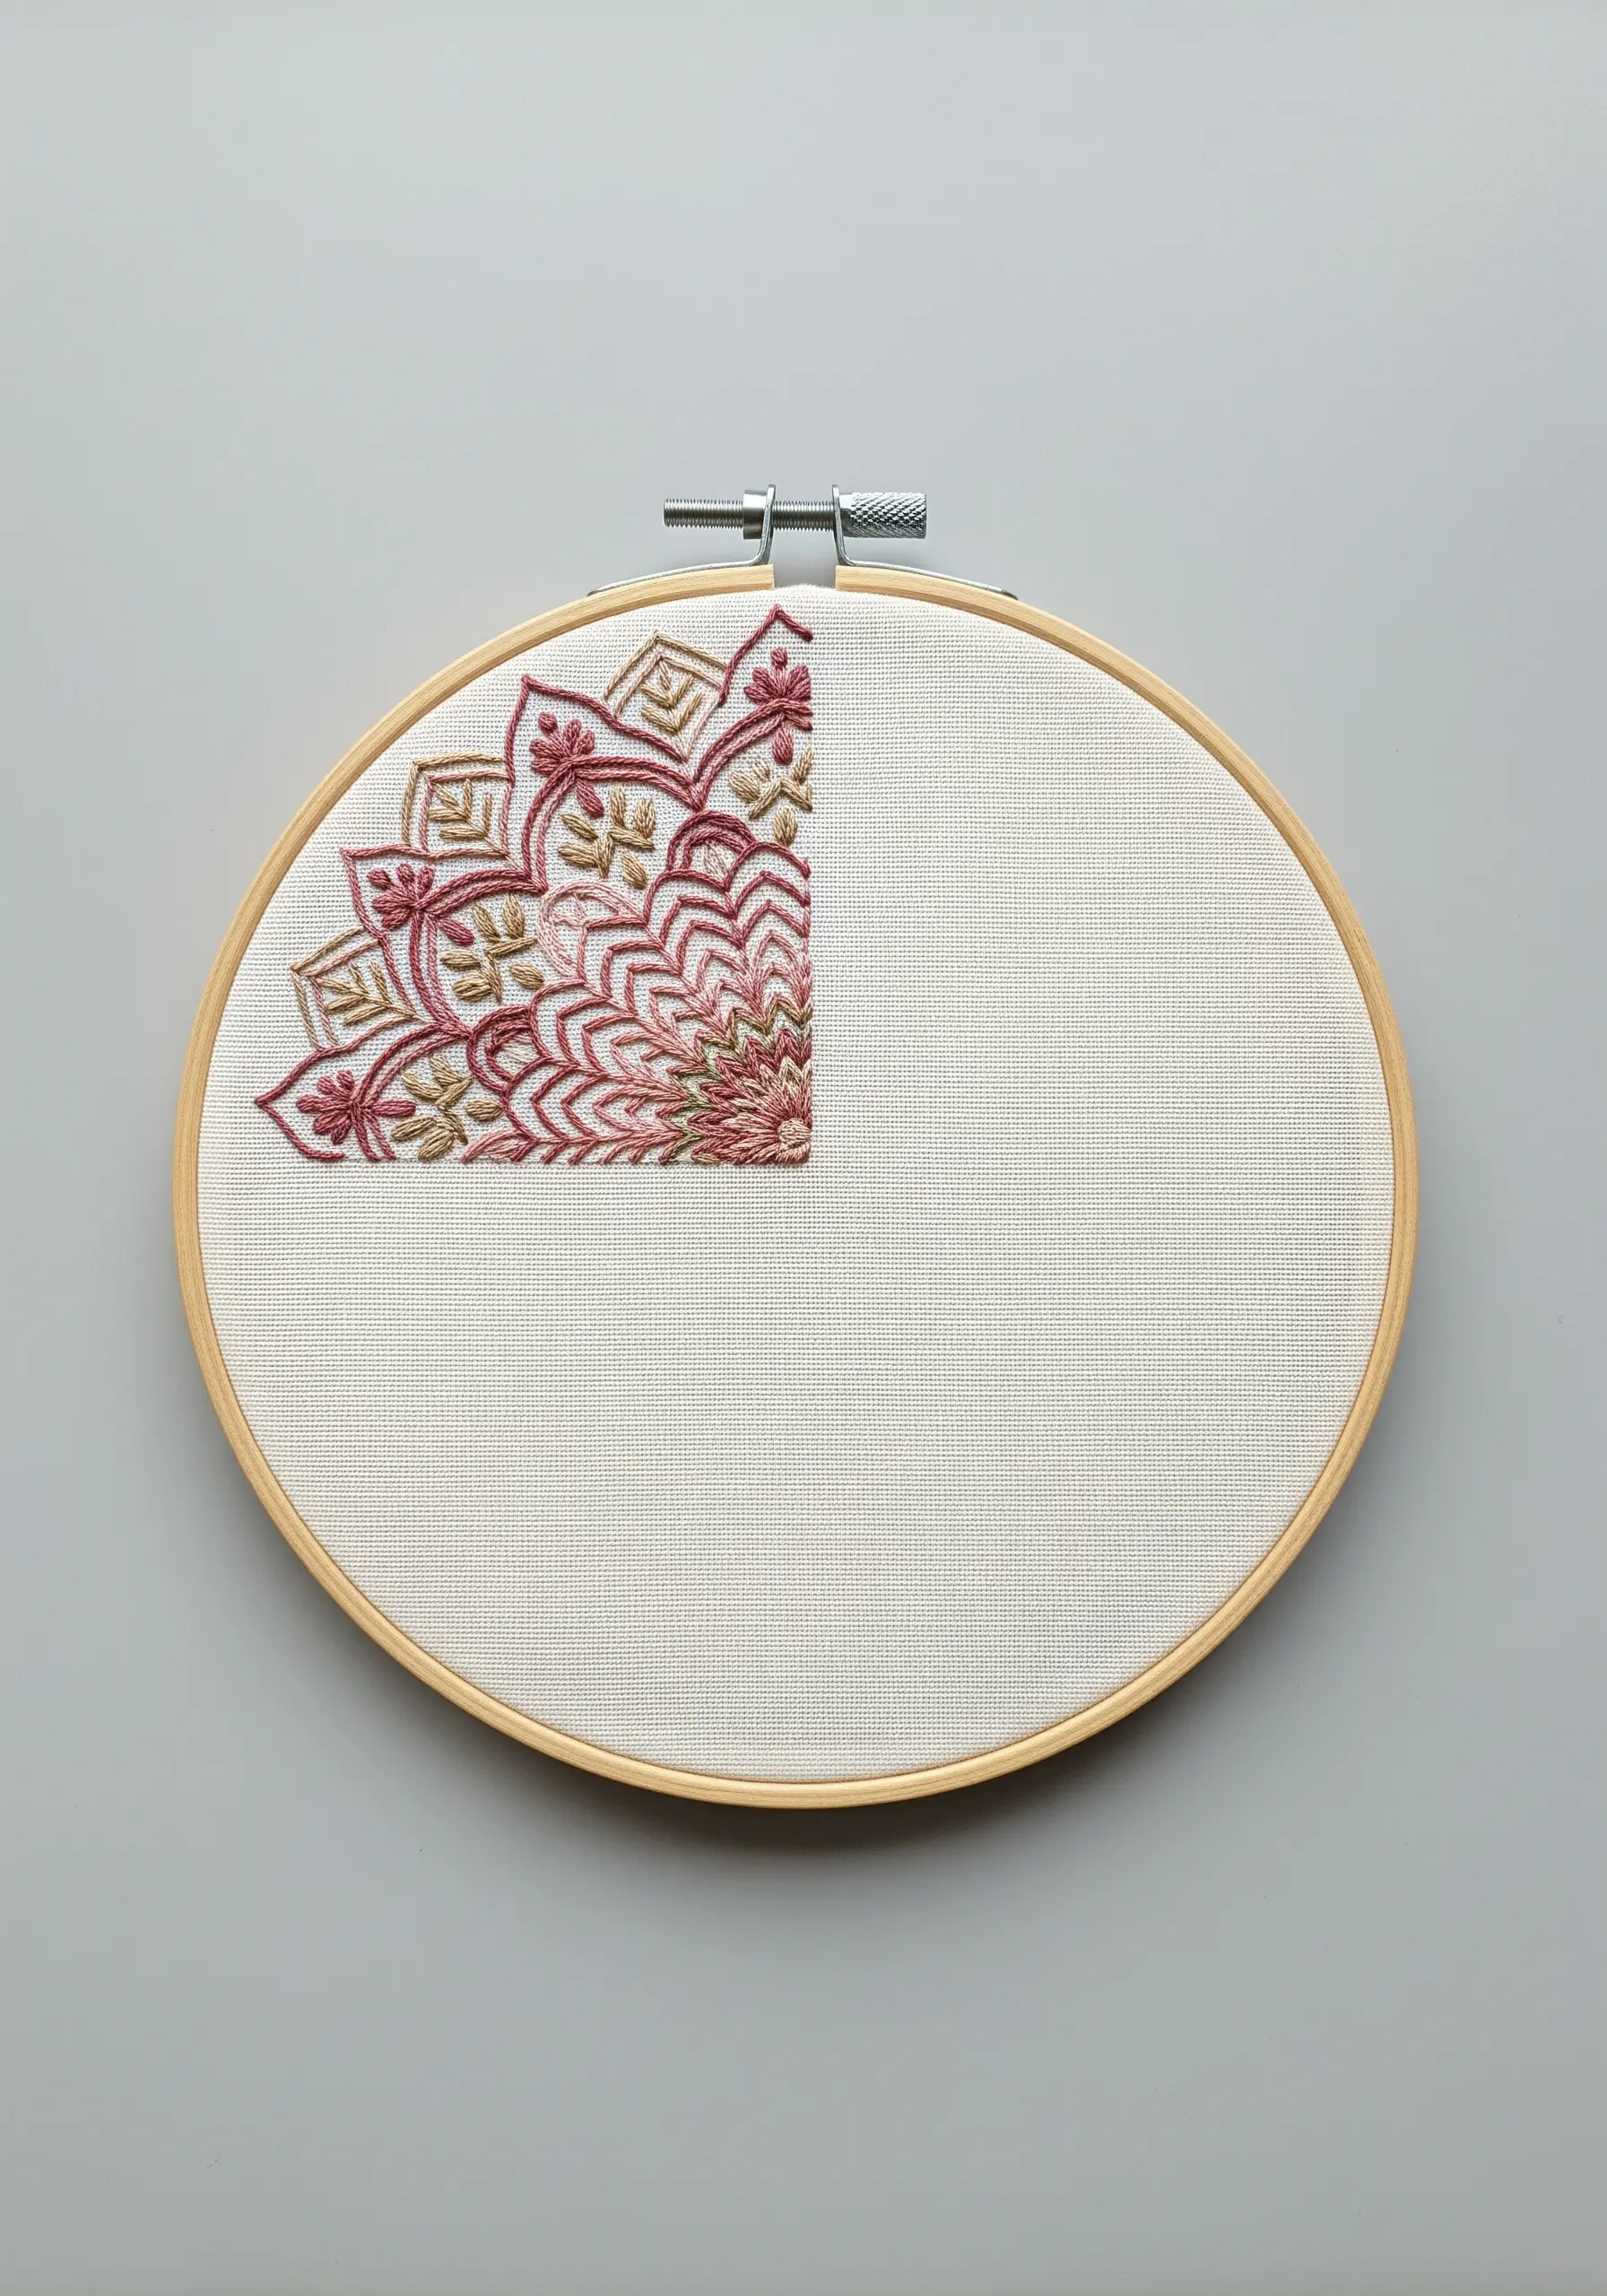
Challenge the traditional centered mandala by placing your design in a single quadrant of the hoop.
This asymmetrical composition creates a powerful focal point and makes excellent use of negative space, allowing the unstitched fabric to balance the detailed embroidery.
It feels modern, dynamic, and less formal than a fully symmetrical piece.
This approach works beautifully for highlighting particularly intricate stitch combinations without overwhelming the entire hoop.
19. Achieve a High-Tech Look with Metallic Lines

For a mandala that feels sharp, modern, and almost digital, use a fine metallic thread on a dark, high-contrast background.
The key here is precision—use a ruler and a fabric marker to create a perfectly symmetrical guide for your straight stitches.
A single strand of a fine metallic thread, like Kreinik #4 Braid, will give you crisp, shimmering lines that look like they were etched onto the fabric.
This is a great technique for dramatic dark thread embroidery designs with a futuristic edge.
20. Create a Crocheted Edge with Buttonhole Stitch

Mimic the look of delicate crochet by using the buttonhole stitch as an edging.
Work your buttonhole stitches closely together around the inner and outer perimeters of your shapes.
This creates a firm, raised border that stands out from the fabric.
When working concentric circles, this technique adds a beautiful scalloped texture and a handmade, heirloom quality to your design.
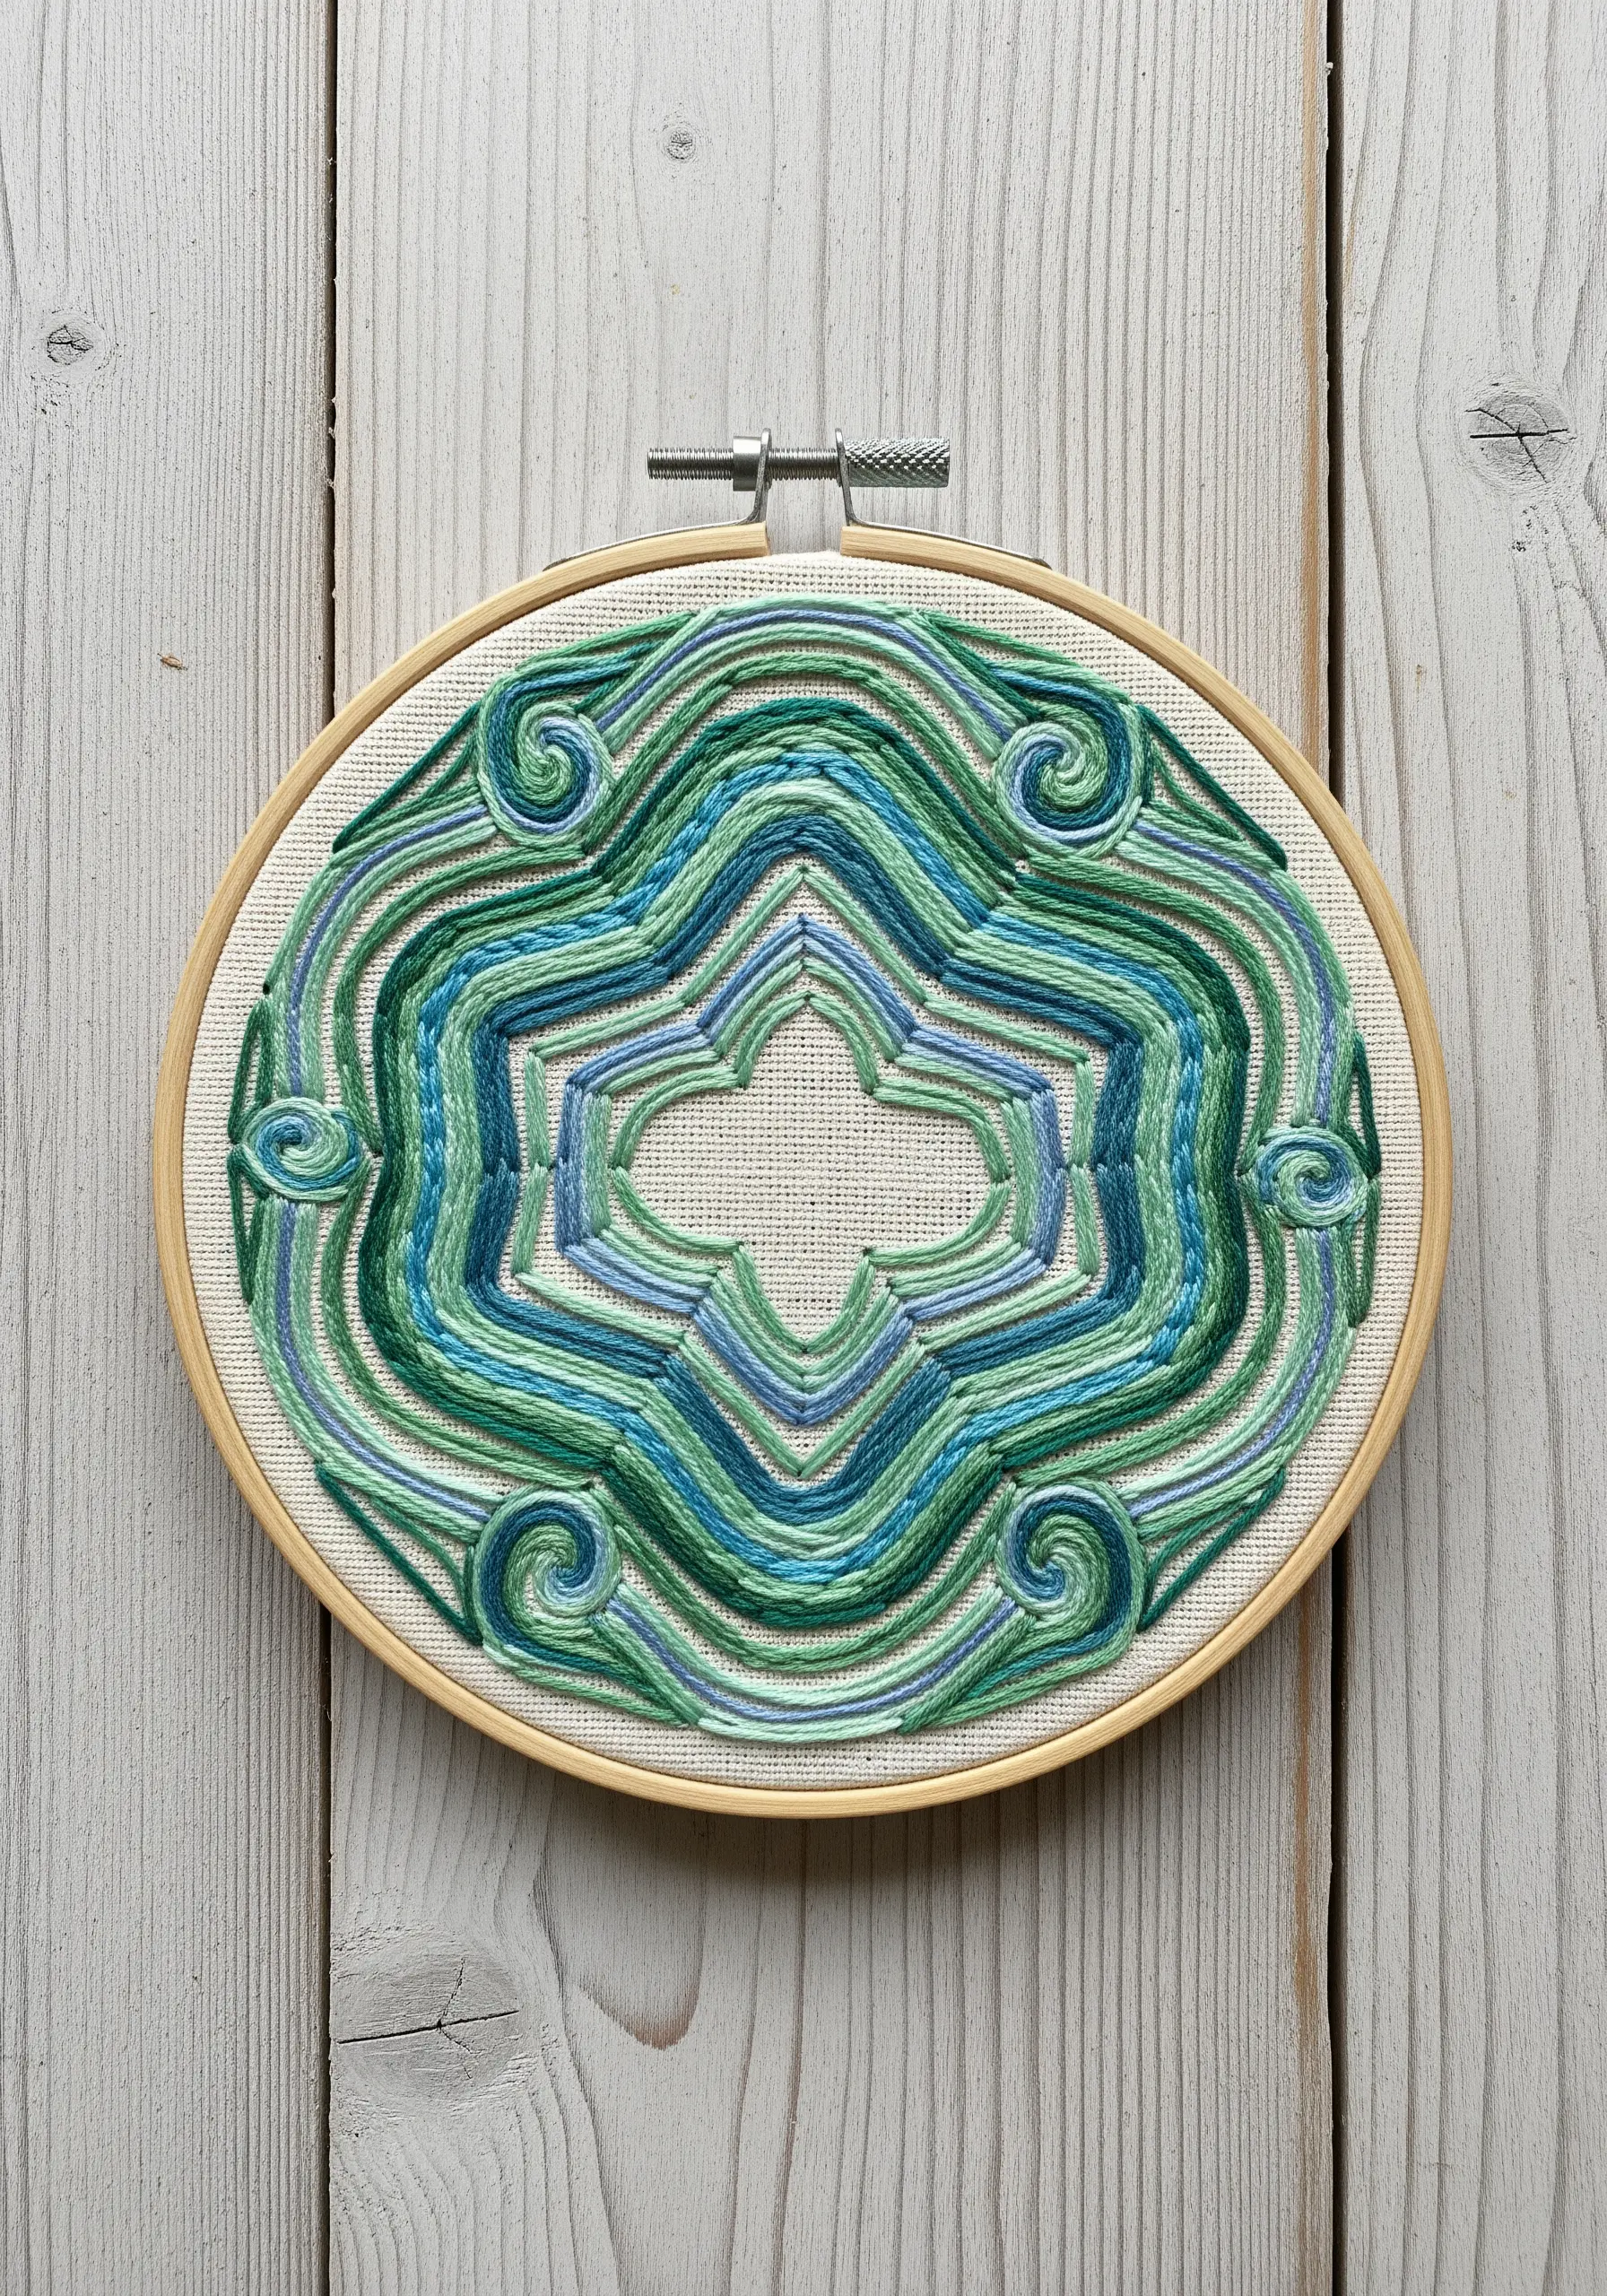
21. Layer Colors for Geometric Depth

Create the illusion of layered, transparent shapes by carefully planning your color placement.
In this string-art-inspired mandala, a base of grey thread is overlaid with a vibrant yellow thread in a contrasting pattern.
Where the two colors intersect, the eye perceives a third, deeper layer.
This technique allows you to build visual complexity and depth using only two colors and simple straight stitches.
22. Form Soft Petals with Detached Chain Stitches
Fill your mandala with soft, teardrop-shaped petals using detached chain stitch, also known as lazy daisy stitch.
To create a fuller, more dimensional look, layer these stitches by working a smaller one inside a larger one with a slightly different shade.
Varying the size of the loops and the tightness of the anchoring stitch will change the shape from a round petal to a pointed one.
This stitch is perfect for creating soft texture that fills space quickly.
23. Create Bold Circles with Couching
For perfectly smooth, bold concentric circles, use the couching technique.
Lay down a thick cord or several strands of embroidery floss along your design line, and then use a second, finer thread to tack it down with small, evenly spaced stitches.
This method gives you complete control over the curve and placement of your lines, creating a result that is much cleaner and more uniform than a standard line stitch.
It’s ideal for creating graphic, color-blocked designs.
24. Combine Fabric Appliqué with Stitching

Introduce a new texture and dimension by creating a mandala from cut fabric shapes.
Cut your leaf shapes from thin felt or non-fraying cotton and arrange them in a radial pattern, securing them with fabric glue or a few tacking stitches.
You can then add embroidered details like veins on top or use a decorative blanket stitch around the edges.
This layered fabric collage embroidery approach is fast, bold, and visually striking.
25. Give Simple Lines Definition with Whipped Backstitch

Elevate a simple line-based mandala by turning your backstitches into a raised, rope-like cord.
After stitching your basic wheel-spoke pattern with a simple backstitch, take a new thread and whip it around each stitch without going through the fabric.
This adds dimension, covers any minor inconsistencies in your backstitching, and creates a beautifully smooth, defined line.
It’s a simple extra step that yields a much more professional finish.
26. Design a Gradient with Knot Density
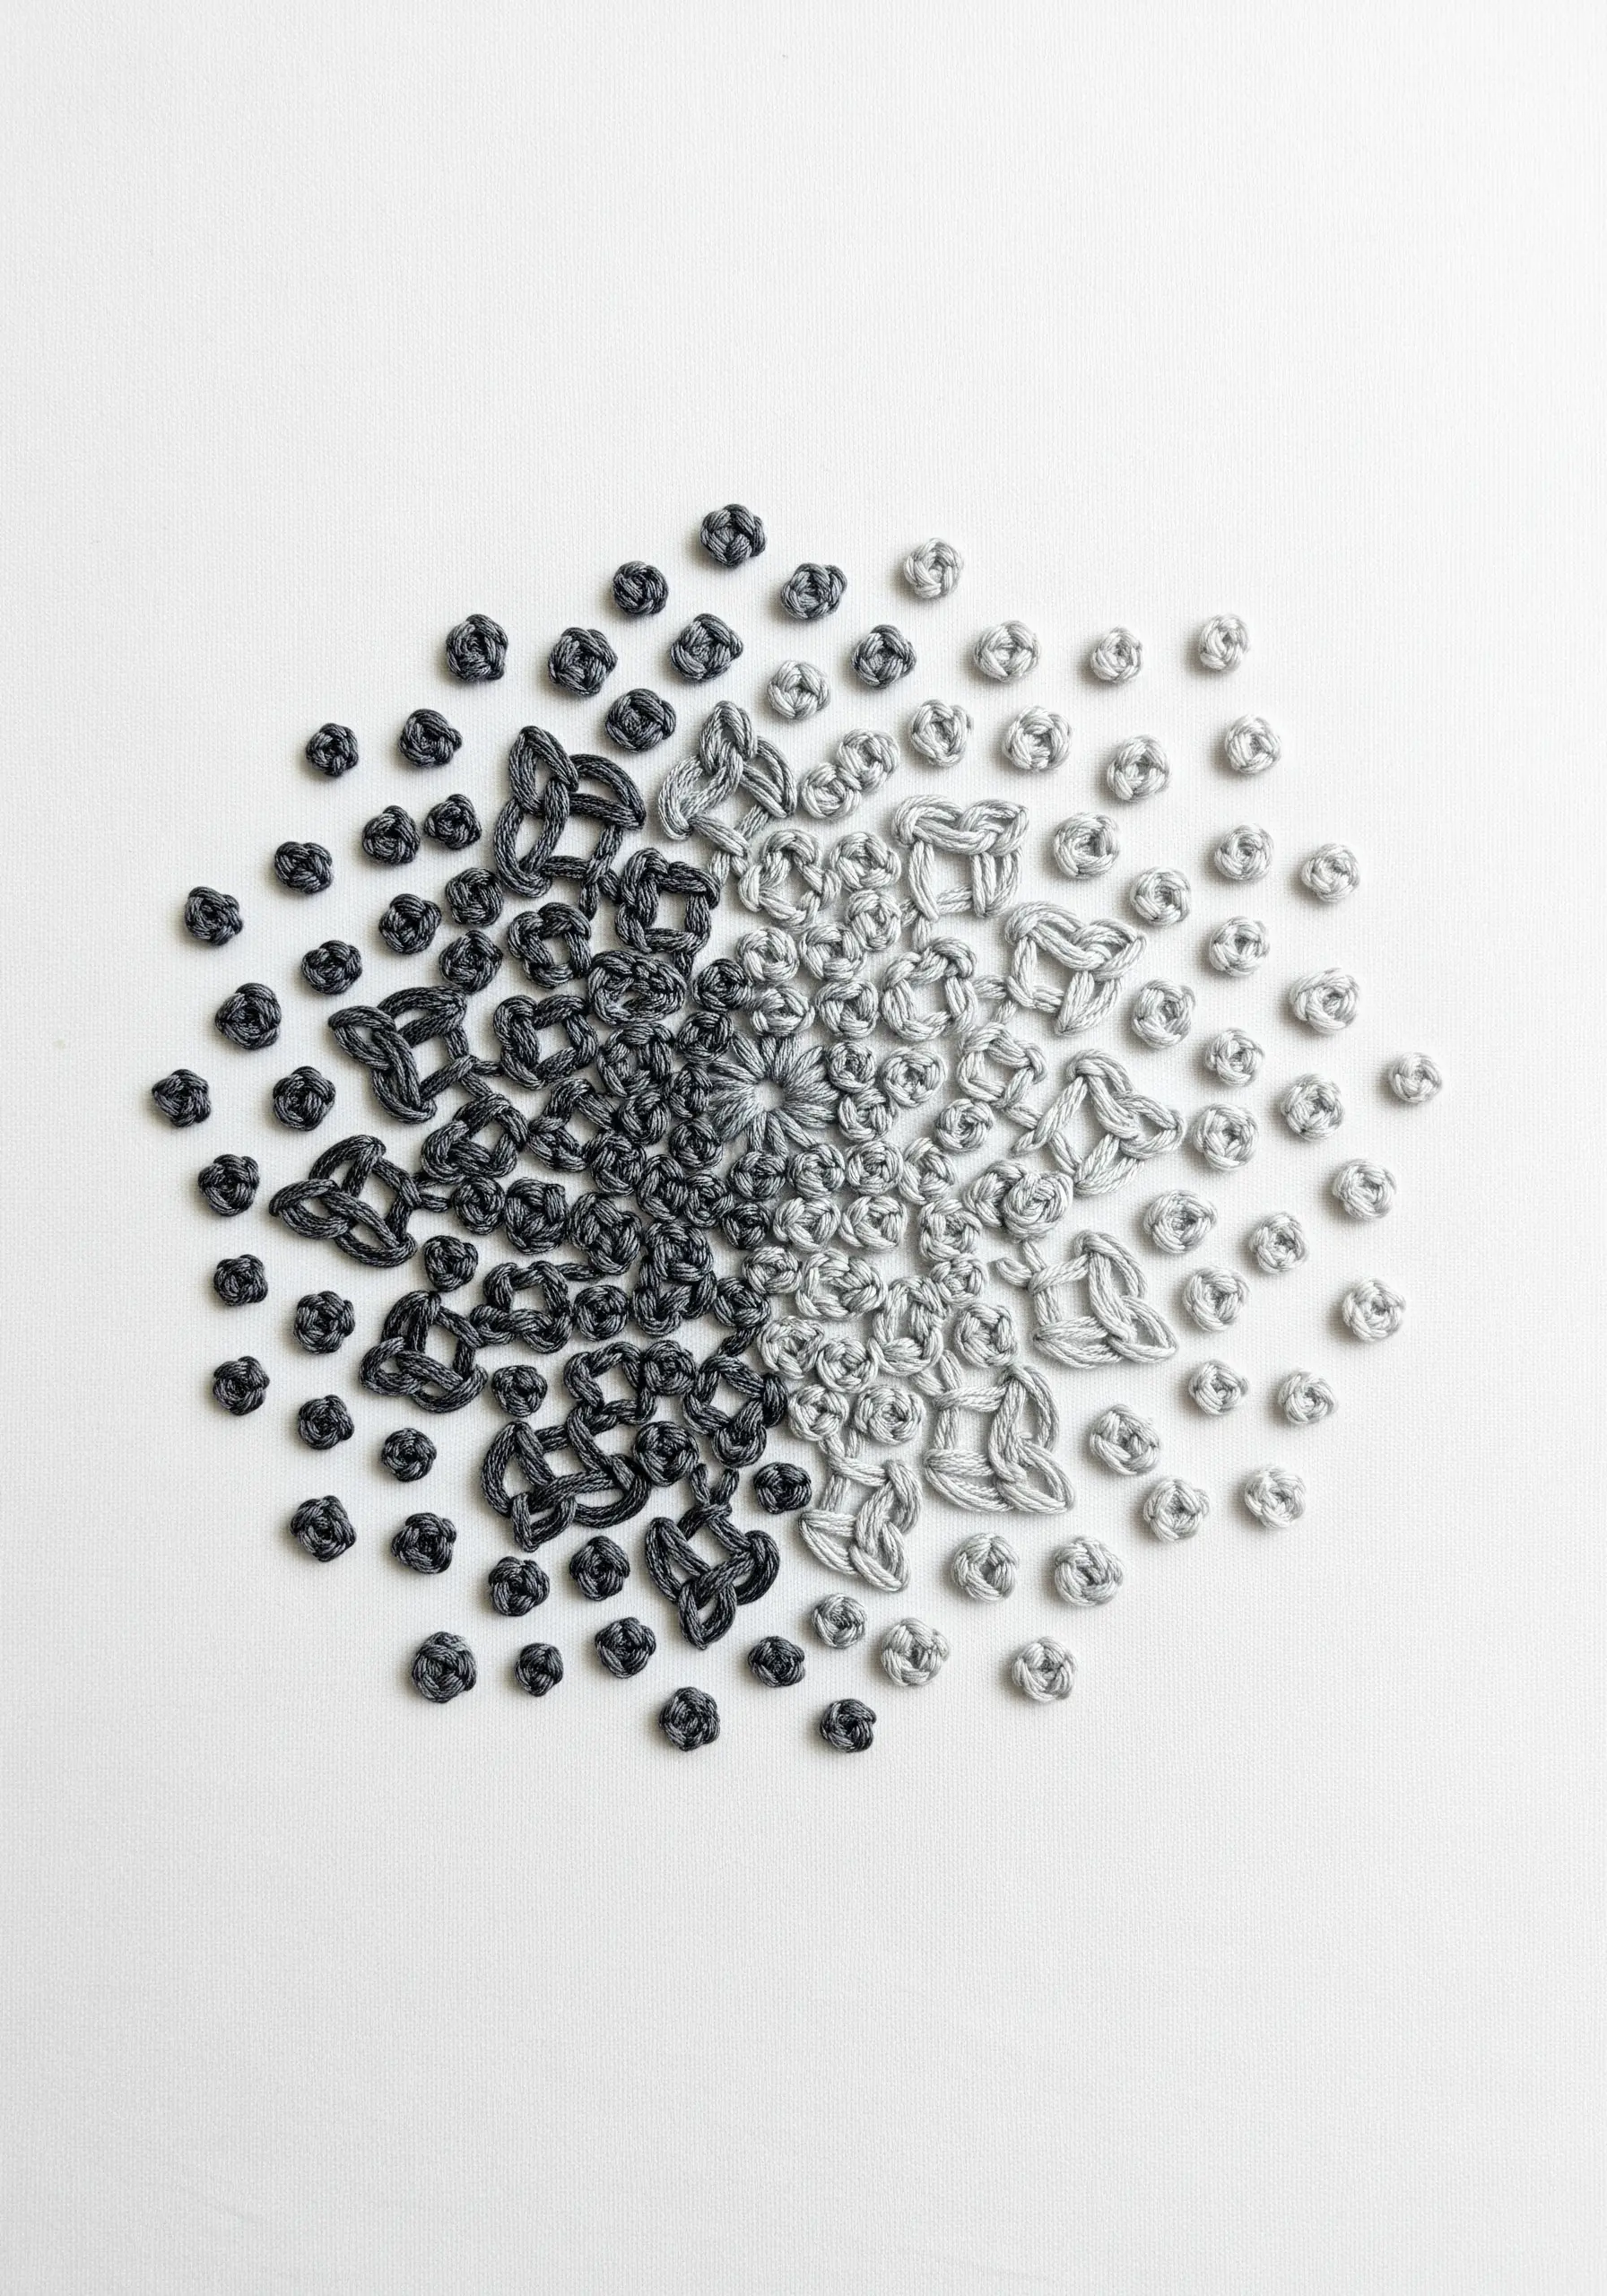
Create a stunning gradient effect using only texture and spacing, not color changes.
Start by packing various knots—like French knots, colonial knots, and woven knots—very tightly in one area of your mandala.
As you move outward, gradually increase the space between each knot until they are scattered sparsely at the edge.
This transition from dense to sparse creates a powerful sense of fading or dissolving, all while maintaining a single color palette.
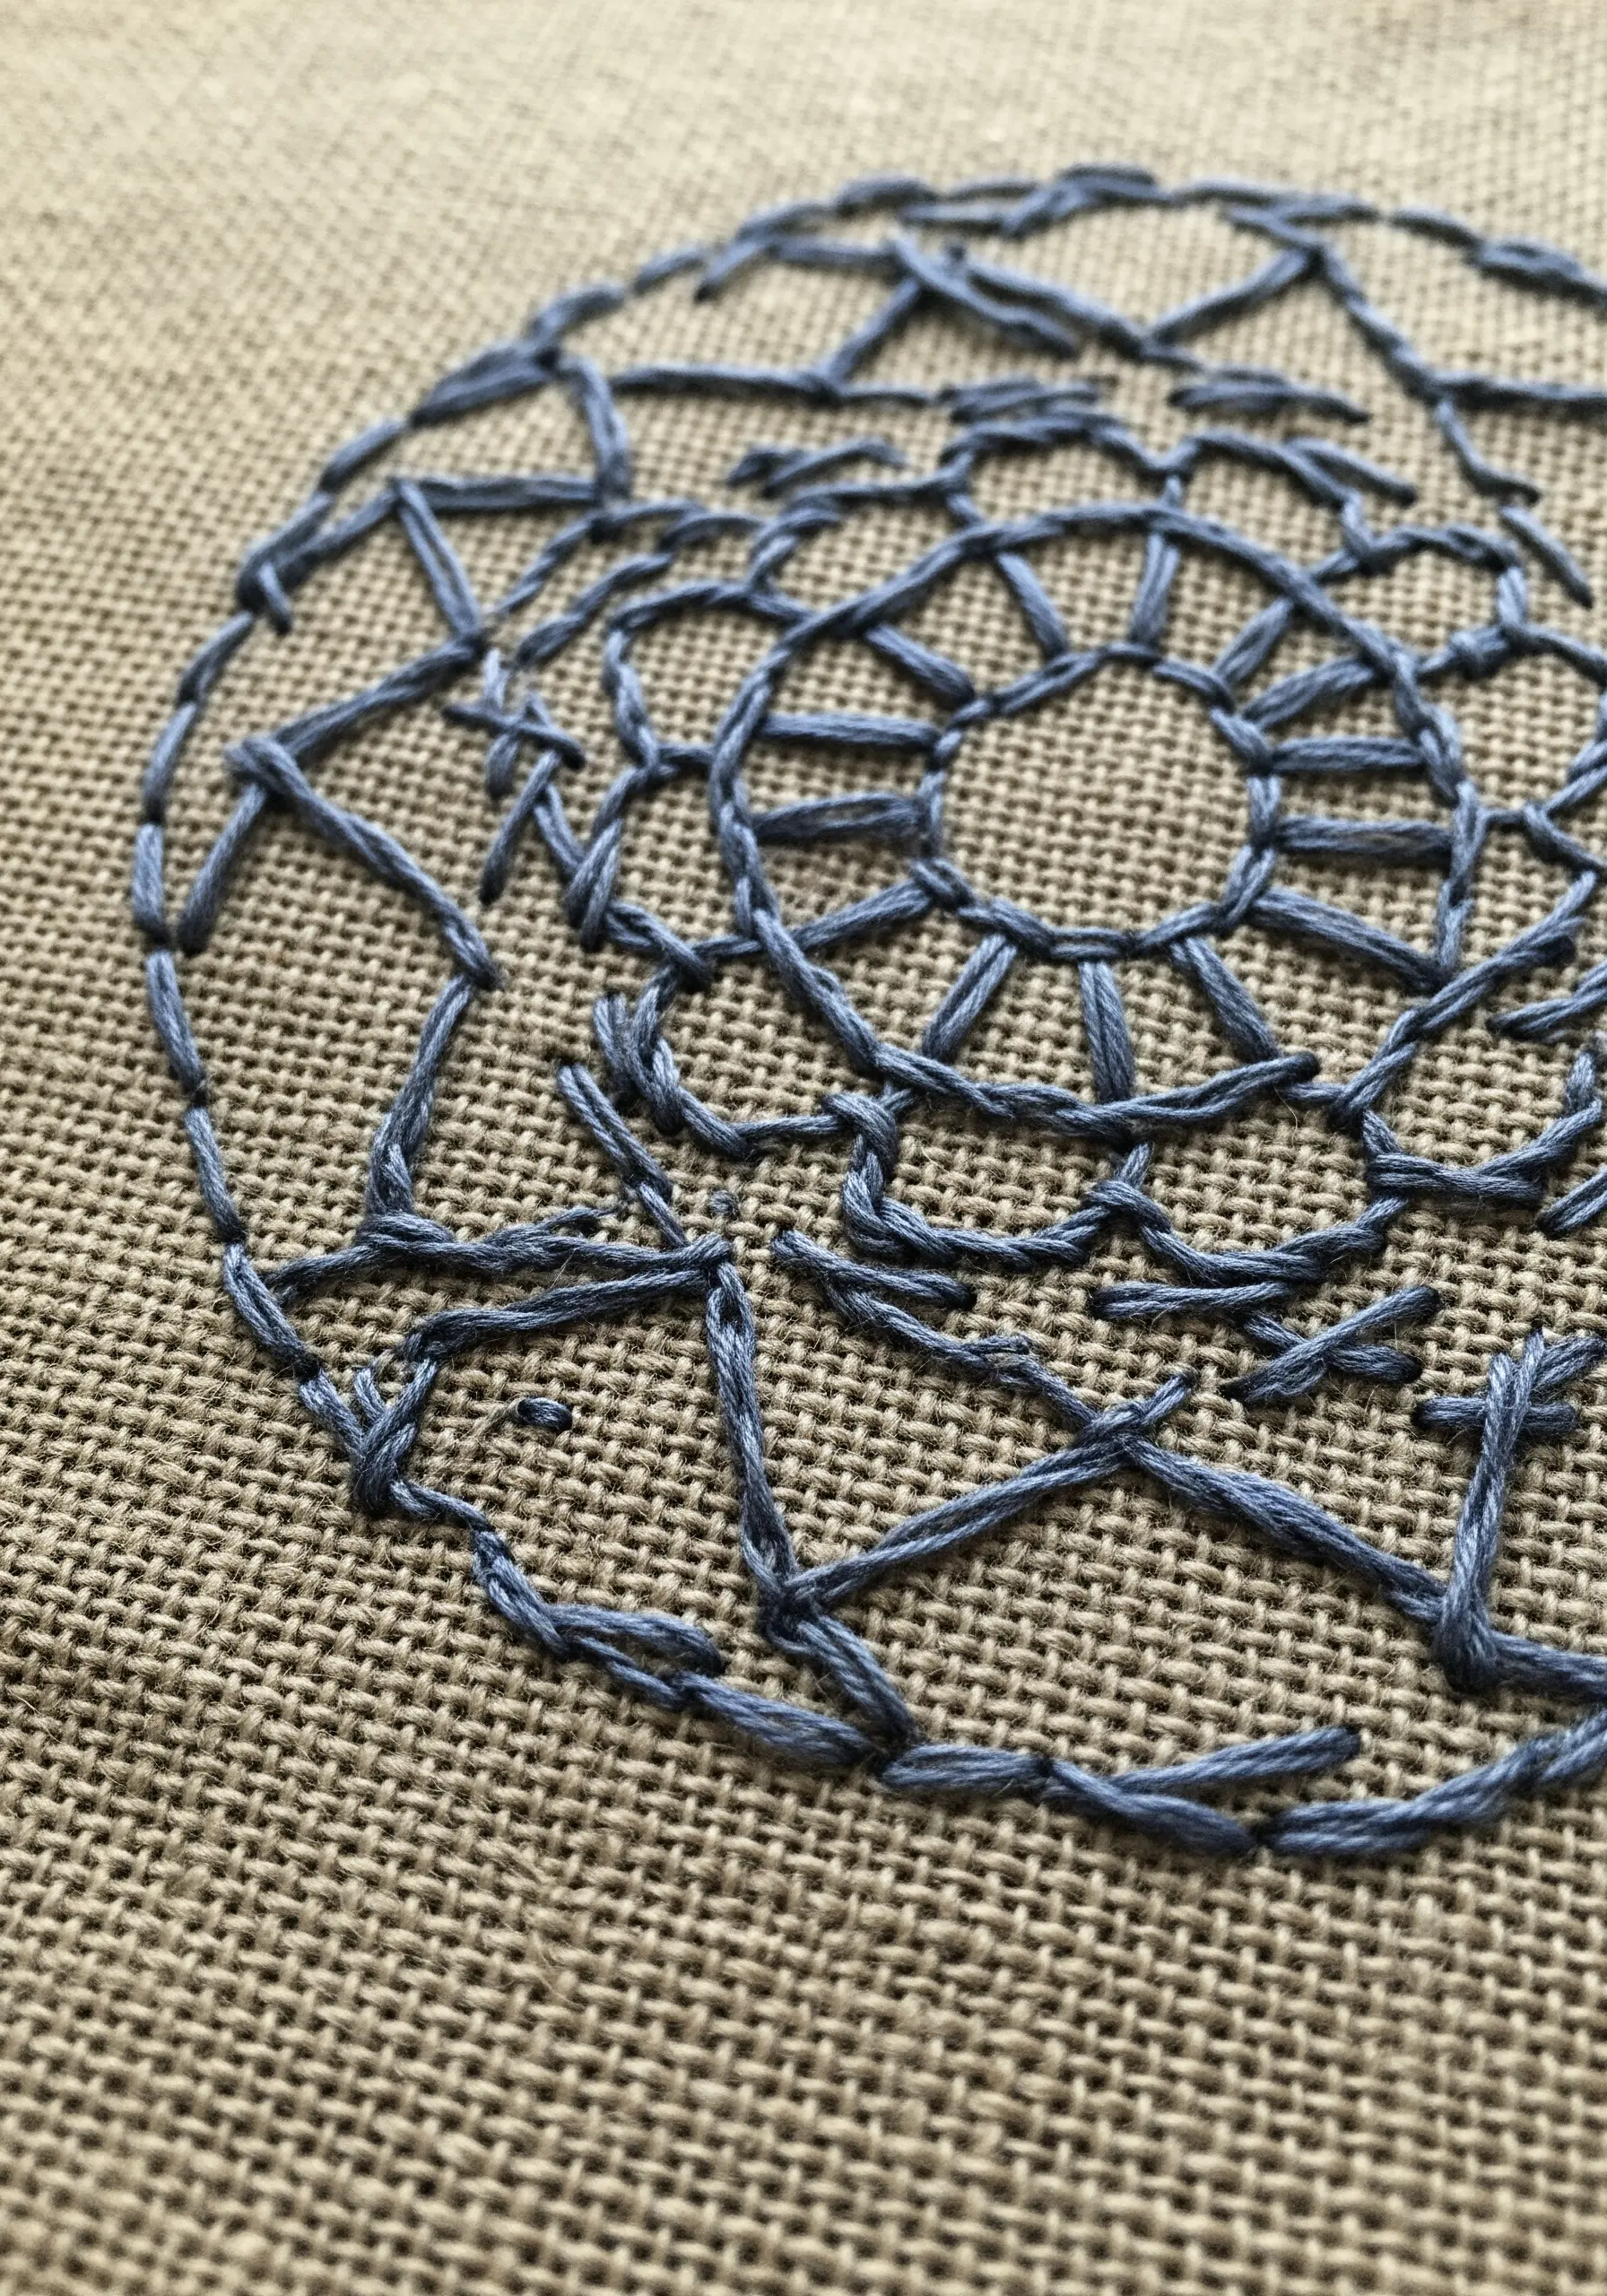
27. Interlock Rings with a Woven Spider Web Stitch

Create these beautiful, interlocking woven rings using a variation of the woven spider web stitch.
For each ring, create a circular base of spokes and then weave your thread through them, alternating colors to create stripes.
By planning the placement of your spokes so the rings overlap, you can create a design that looks like an intricate Celtic knot.
The three-dimensional quality of the weave makes the design pop off the fabric.
28. Achieve Delicate Detail with Fishbone Stitch

The fishbone stitch is your best choice for creating realistic leaves and ferns with a defined central spine.
Each stitch crosses over the center line, creating a beautifully textured and slightly raised midrib automatically.
For the delicate fronds of a fern, keep your stitches small and angled sharply.
The precision required for this stitch is a meditative practice in itself, resulting in a breathtakingly intricate design.
29. Walk a Meditative Path with a Labyrinth

Stitch a labyrinth as a form of active meditation, focusing on the continuous, flowing line.
Use a stem stitch or a split stitch to navigate the tight curves, as these stitches are excellent for creating smooth, consistent lines that don’t appear jagged on bends.
Choose a variegated thread to add subtle color shifts along the path, enhancing the sense of journey and movement.
The goal is not just the final piece, but the calming process of following the path with your needle.
30. Define Geometric Shapes with a Split-Stitch Base
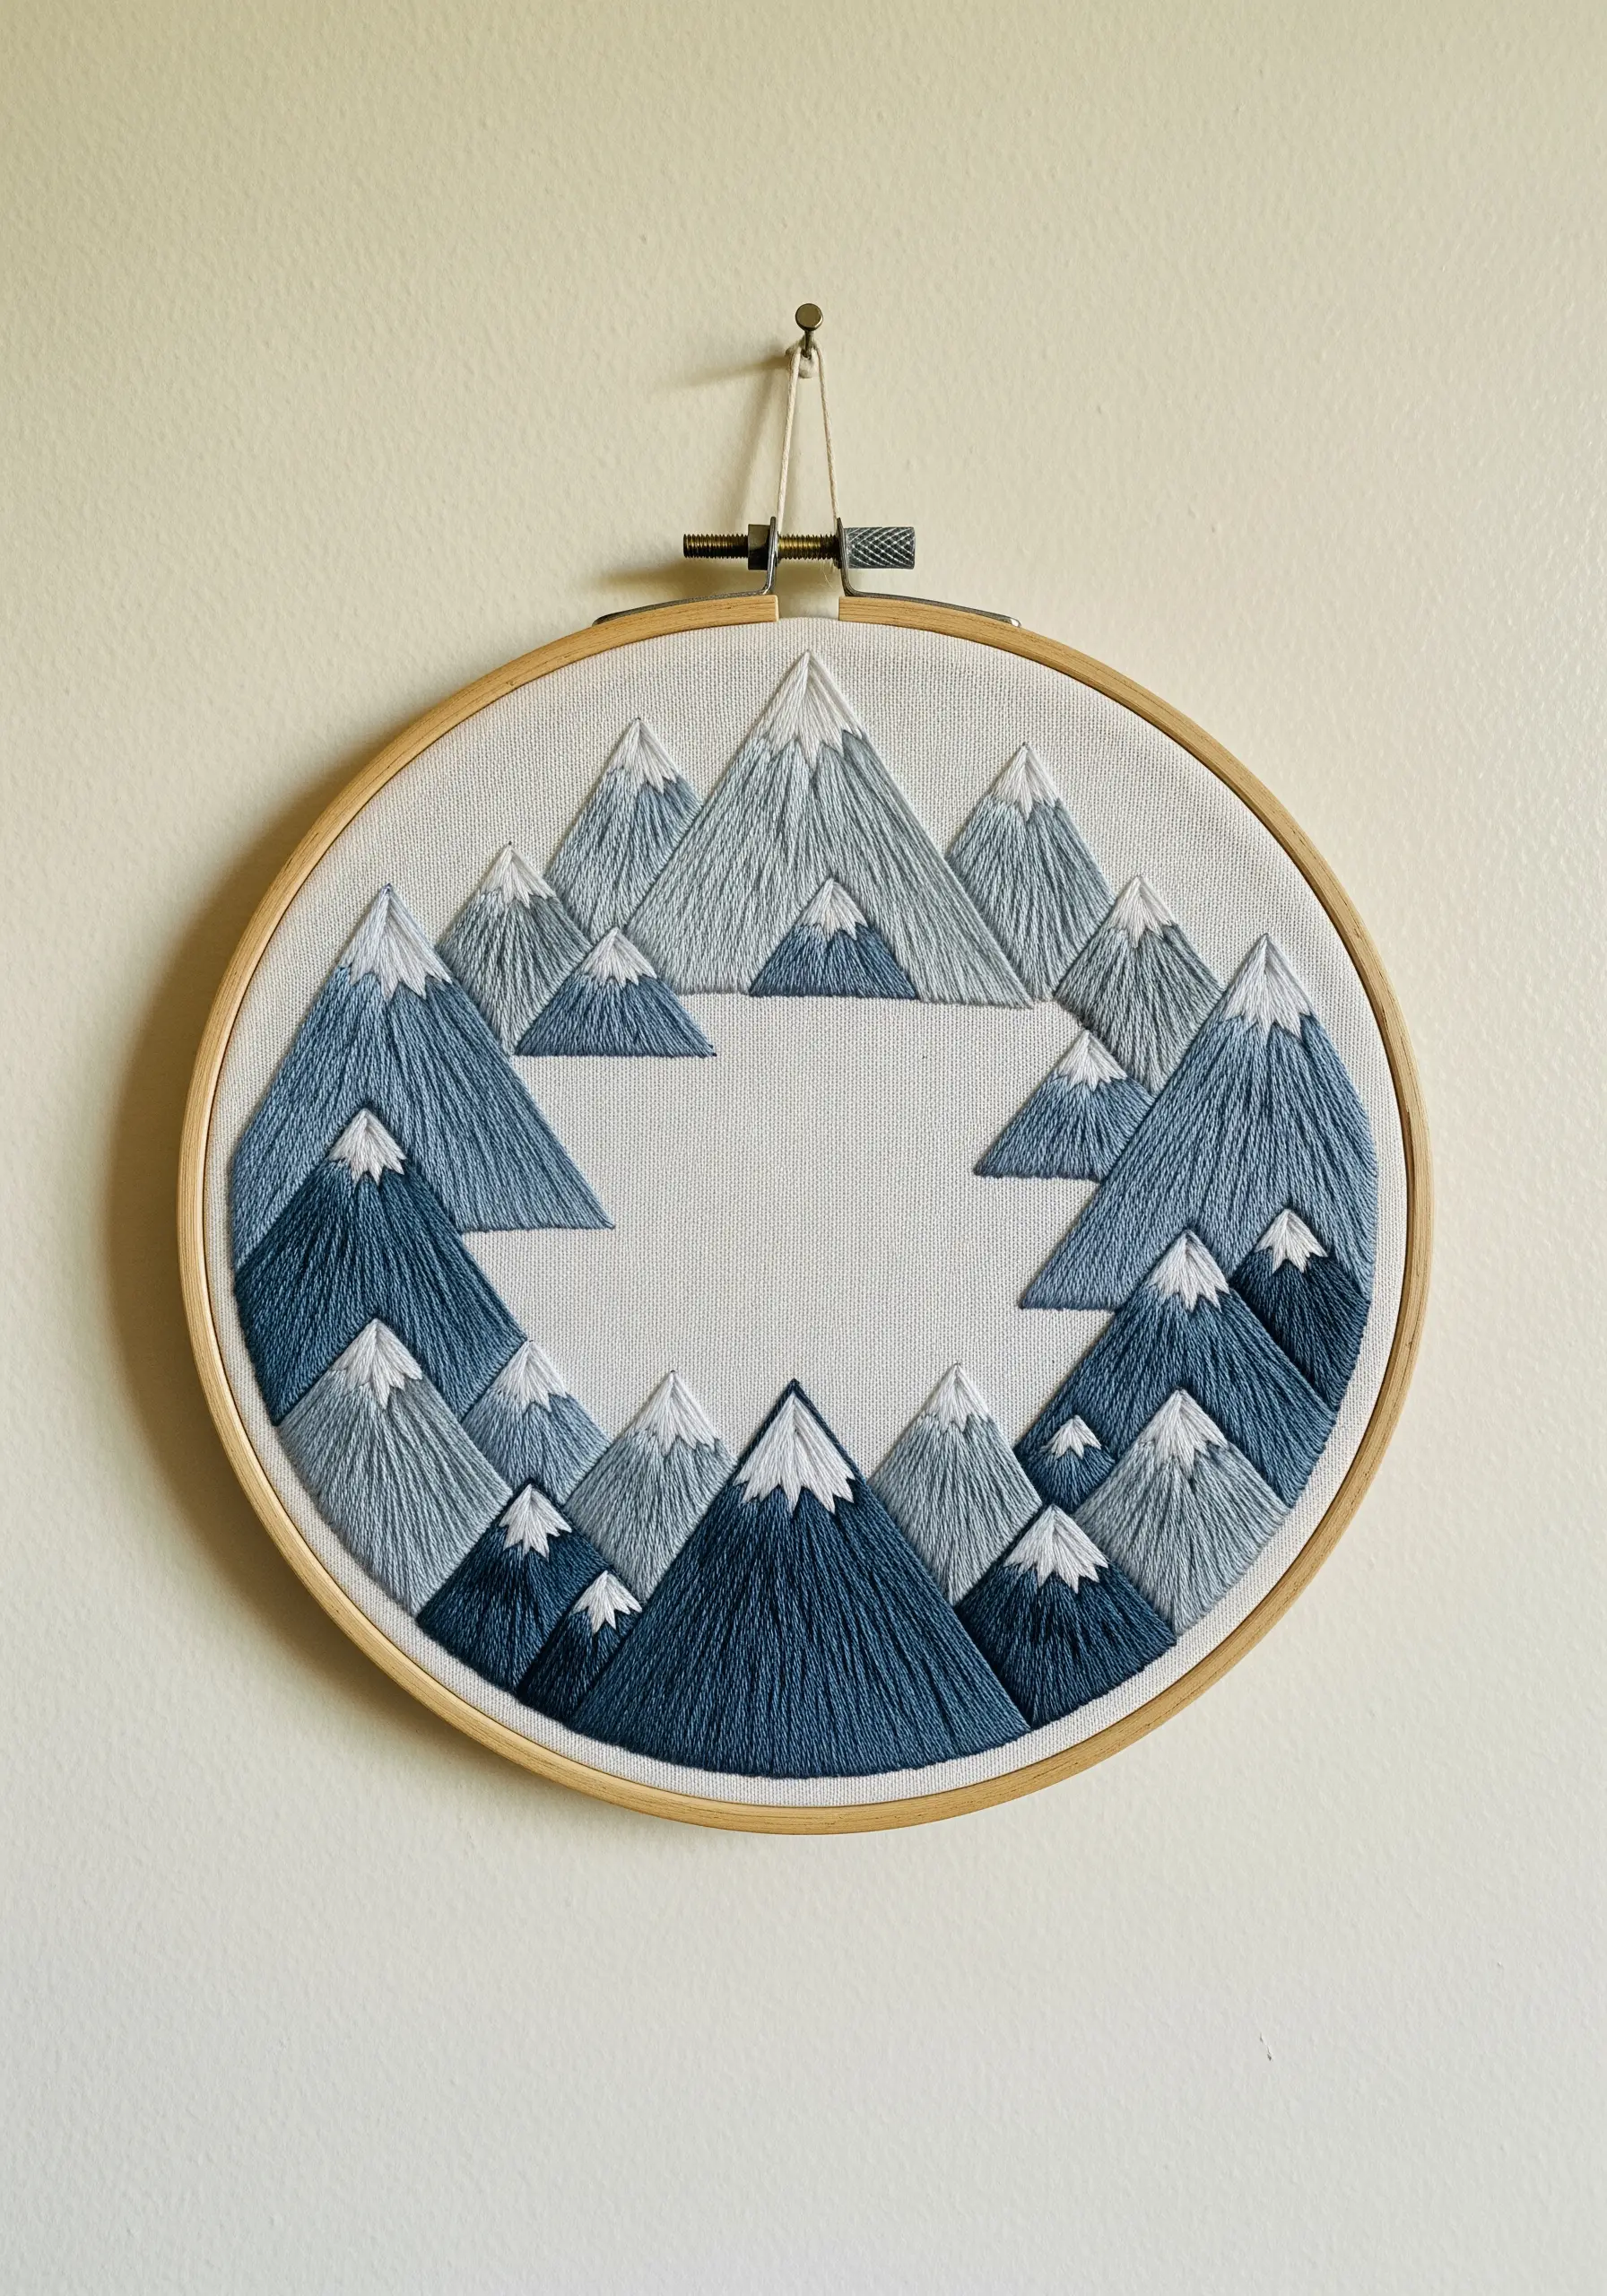
To achieve the sharp, clean edges essential for this mountain mandala, give your satin stitch a perfect foundation.
First, outline each triangular mountain shape with a precise split stitch.
Then, fill the shape with your satin stitches, making sure each stitch goes just over the split-stitch outline.
This technique creates a slightly raised, perfectly defined edge that prevents the satin stitch from looking uneven, resulting in a crisp, professional finish.
31. Incorporate Fabric Texture into Your Design
When working on a fabric with a prominent weave, like burlap or linen, let that texture become part of your art.
Use open, airy stitches like running stitch, seed stitch, or widely spaced cross stitches that allow the fabric to show through.
This creates a rustic, earthy feel that complements the natural material.
The interplay between the smooth thread and the rough texture of the fabric adds a layer of depth to even the simplest mandala pattern.
32. Stitch a 3D Illusion with Color Value

Create this stunning tumbling blocks or honeycomb illusion using only three shades of one color: a light, a medium, and a dark tone.
The secret is to assign each tone to a specific side of the hexagon and keep the satin stitch direction consistent for each face (e.g., light tones on top, medium on the right, dark on the left).
This manipulation of light and shadow tricks the eye into seeing a three-dimensional geometric structure on a flat surface.
33. Create a Celestial Scene on a Night Sky Canvas

Use dark blue or black fabric as your canvas to stitch a simple yet evocative celestial mandala.
For the central sun, use a tightly packed woven wheel stitch with a golden or yellow thread to give it texture and dimension.
Scatter a constellation of stars around it using a mix of single French knots and small, fluffy bullion knots for variety.
The high-contrast colors and varied textures make these moon and stars embroidery ideas feel truly magical.


