

When you combine fabric collage with embroidery, you’re not just adding color—you are building layers of texture, story, and personality right onto your canvas. It’s a way to think like a painter, using fabric for broad strokes of color and thread for the fine, defining details.
Forget the idea that appliqué has to be perfectly neat or flawlessly executed. The modern approach celebrates raw edges, contrasting textures, and the simple beauty of a well-chosen fabric scrap. It’s about letting the materials guide you, creating pieces that feel both intentional and intuitively crafted.
In these patterns, you’ll see how a few simple stitches can anchor a design, how layering sheer fabrics can create a watercolor effect, and how a touch of 3D texture can bring a flat surface to life. Let’s explore how you can use these techniques to make your work more expressive, personal, and beautiful.
1. Layer Frayed Fabrics for a Soft-Focus Background
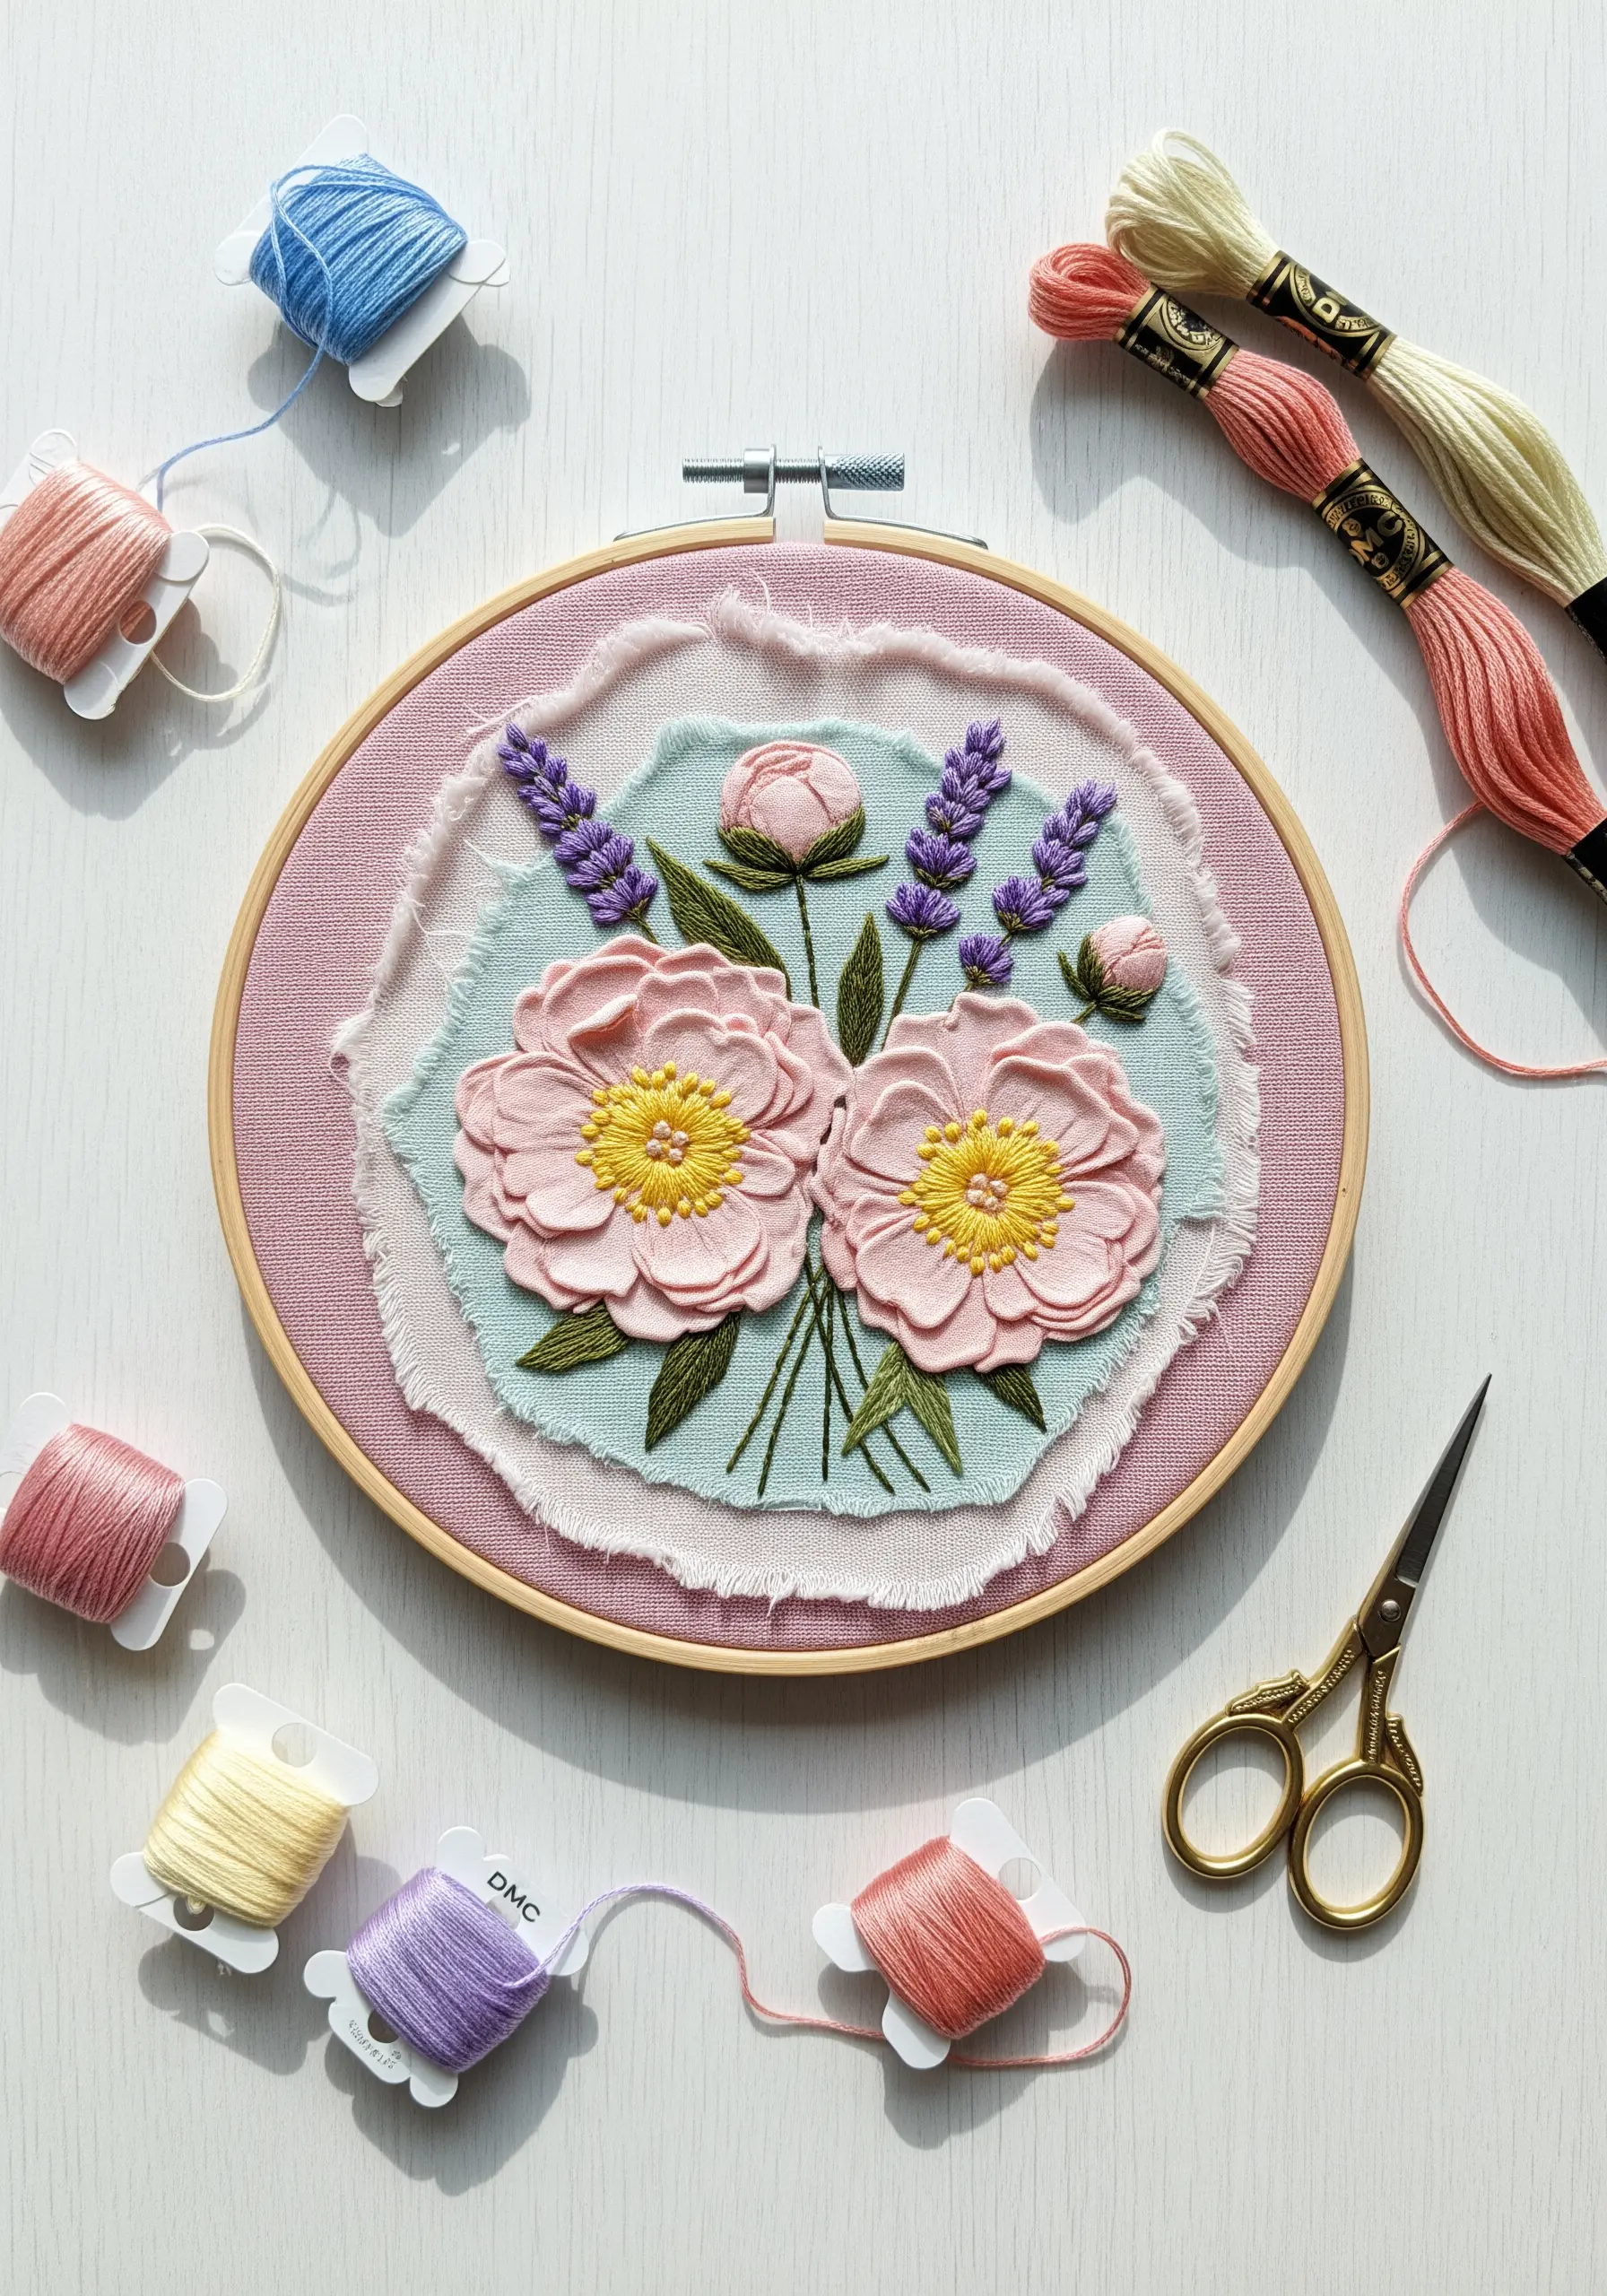
Create depth behind your central motif by layering two or three pieces of coordinating pastel fabric, each with a hand-frayed edge.
This technique adds a soft, cloud-like texture that makes your primary stitches, like these satin-stitched flowers, appear more dimensional and defined.
Secure the fabric layers with a few hidden tacking stitches before you begin your main embroidery, ensuring they don’t shift.
The contrast between the smooth petals and the raw, textural background creates immediate visual interest without complicating the design.
2. Combine Felt Appliqué with Minimalist Stitching

Use wool-blend felt to create crisp, graphic shapes for landscape elements like these soft-toned mountains.
Instead of dense stitching, add subtle detail with minimal accents—a scattering of seed stitches for a starry sky, or a simple backstitch for snow-capped peaks.
This approach balances the boldness of the collage shapes with the delicacy of hand embroidery, resulting in a clean, modern aesthetic.
Anchor the felt pieces with a running stitch in a matching thread color for a nearly invisible finish that lets the colors and shapes lead the design.
3. Build Tactile Dimension with Woven Stitches and Beads

Transform a simple fabric moon into a textured celestial body by incorporating woven wheel stitches to suggest craters.
Use a contrasting, thicker thread, like a cream wool or cotton perle, to make the woven texture stand out against the pastel fabric appliqué.
Integrate metallic seed beads around the craters and for the surrounding stars to add a subtle glint that catches the light.
This mixed-media approach turns a flat collage into a rich, tactile piece you can’t help but want to touch.
4. Stitch on Sheer Tulle for a Stained-Glass Effect
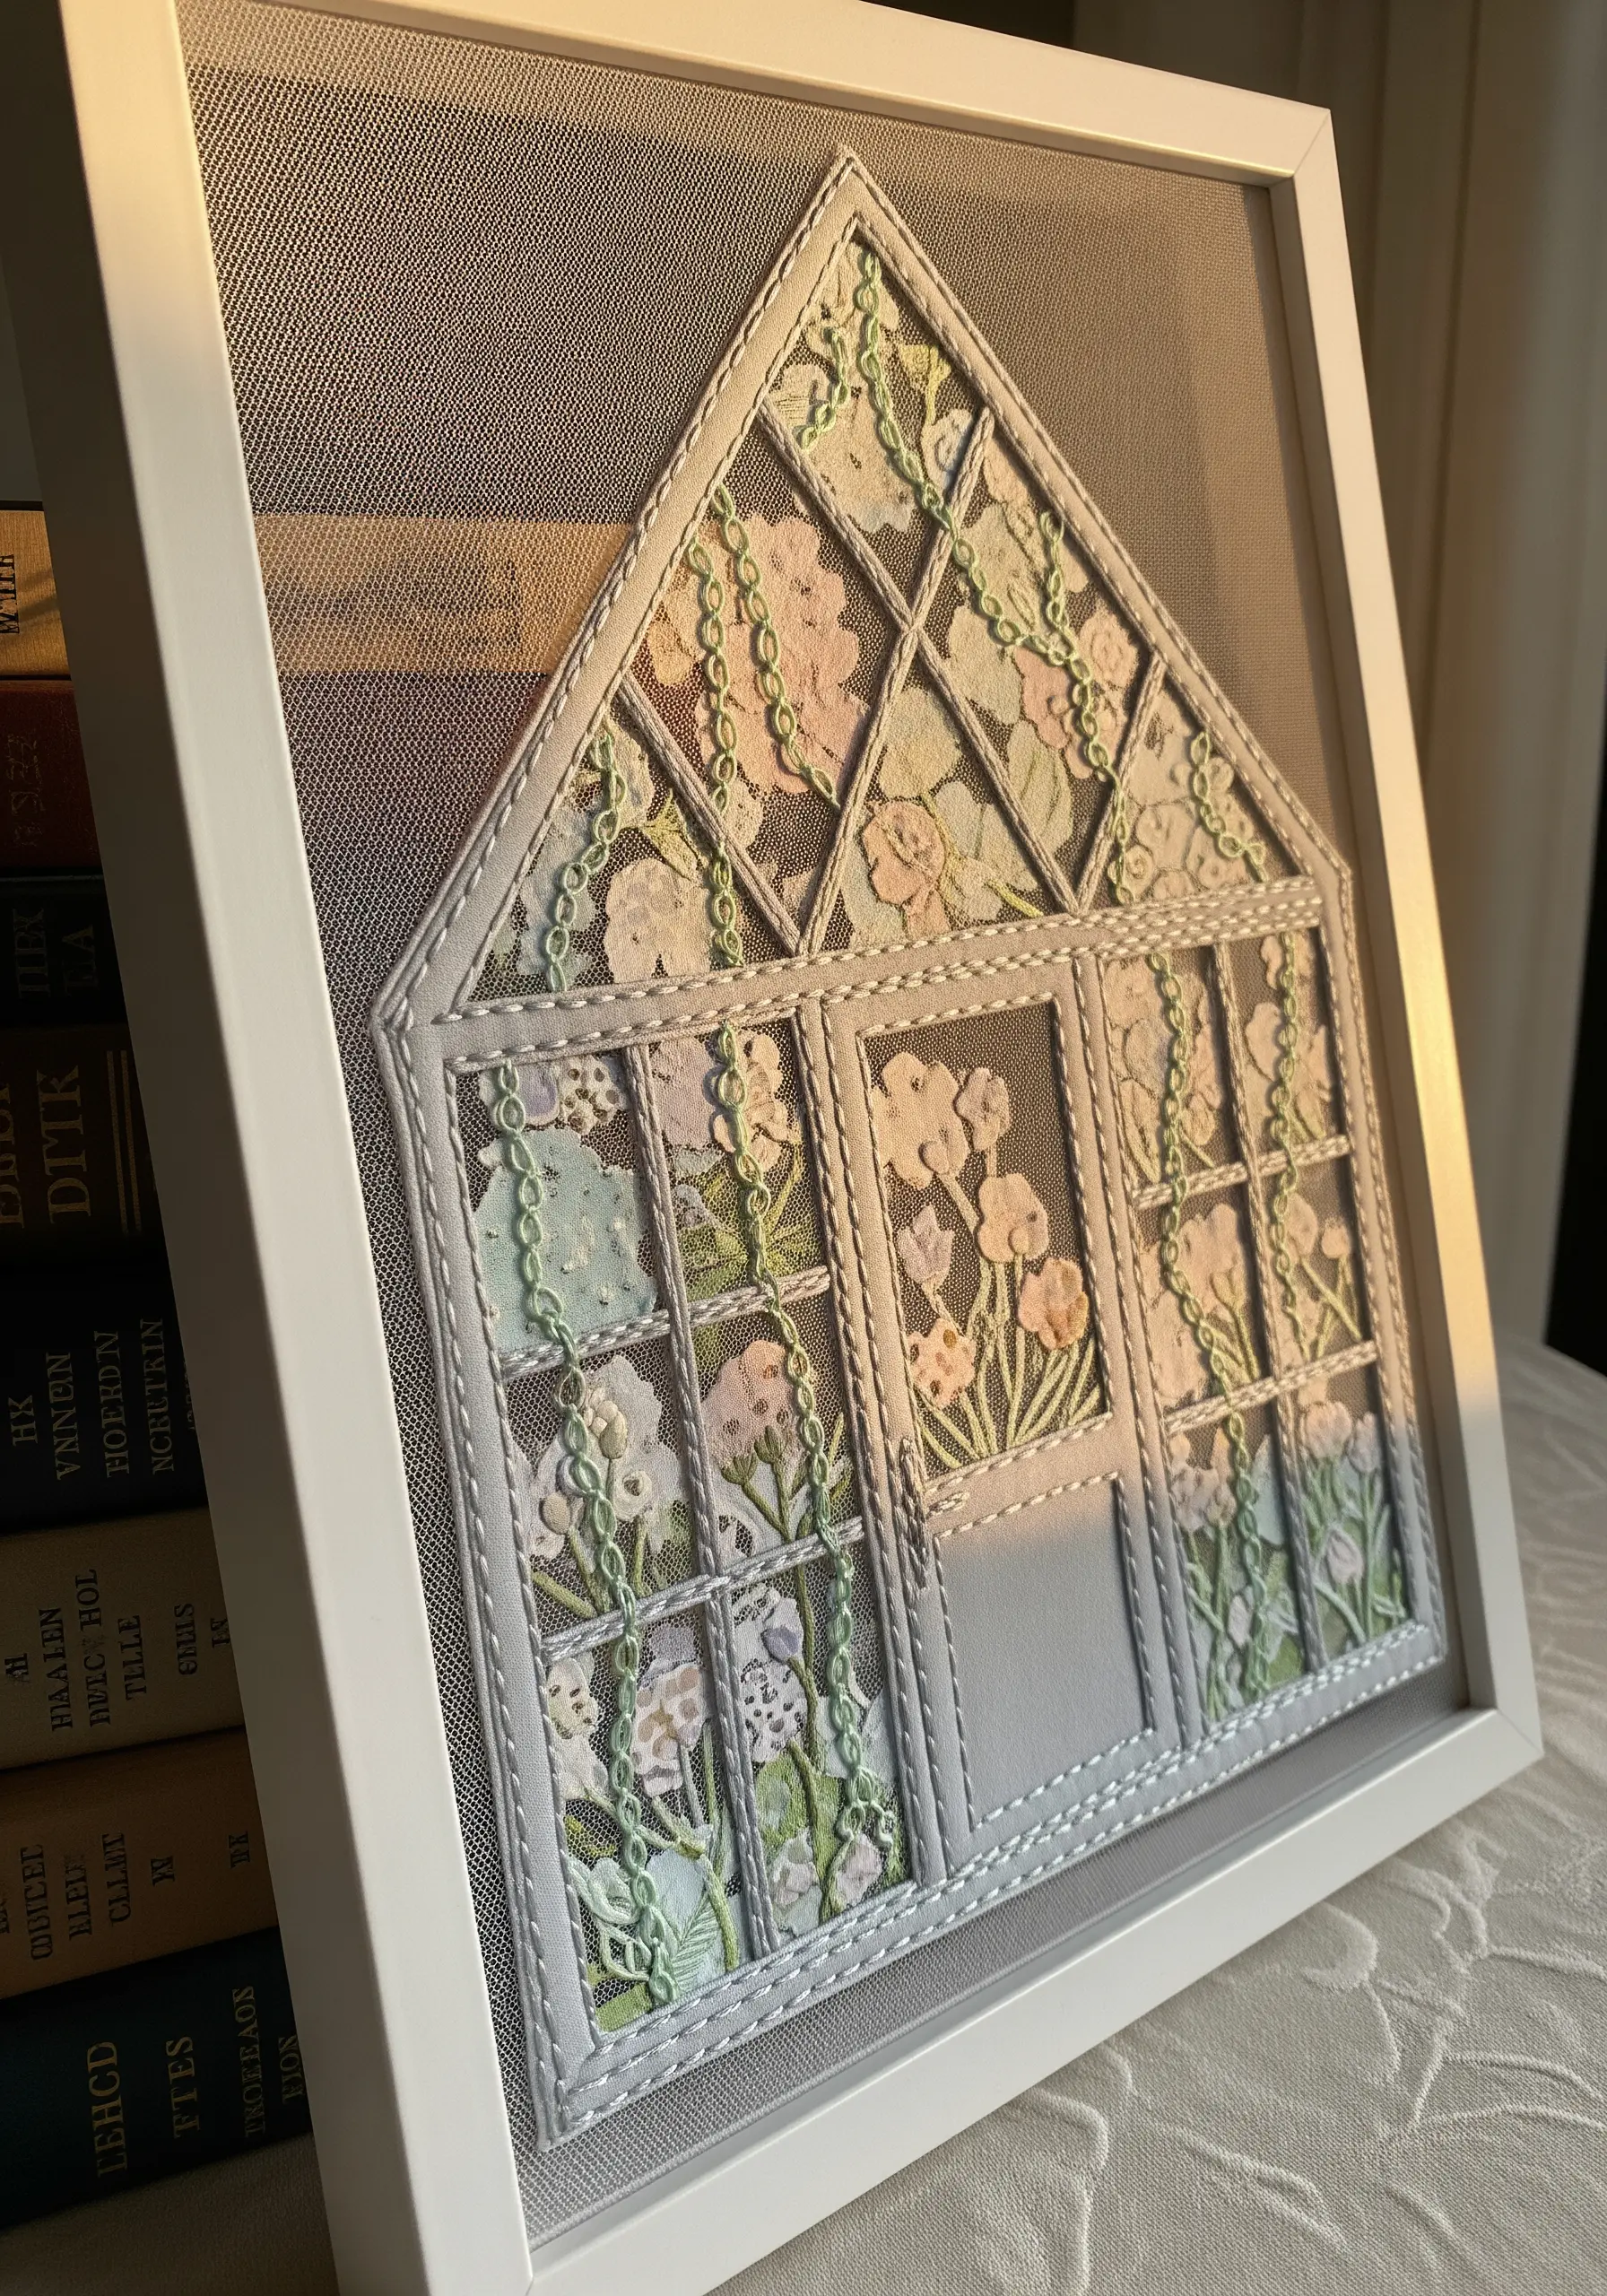
Create a delicate, ethereal look by using tulle or organza as your primary fabric, stretched within a frame.
Appliqué your design elements—like the floral details of this greenhouse—onto the sheer background, allowing light to pass through.
Use a fine backstitch to outline the main structure, which gives the piece stability and definition against the transparent base.
This technique makes your embroidery feel weightless and transforms it into a light-catching piece of art, perfect for hanging in a window.
5. Add Rhythmic Lines to Abstract Fabric Shapes
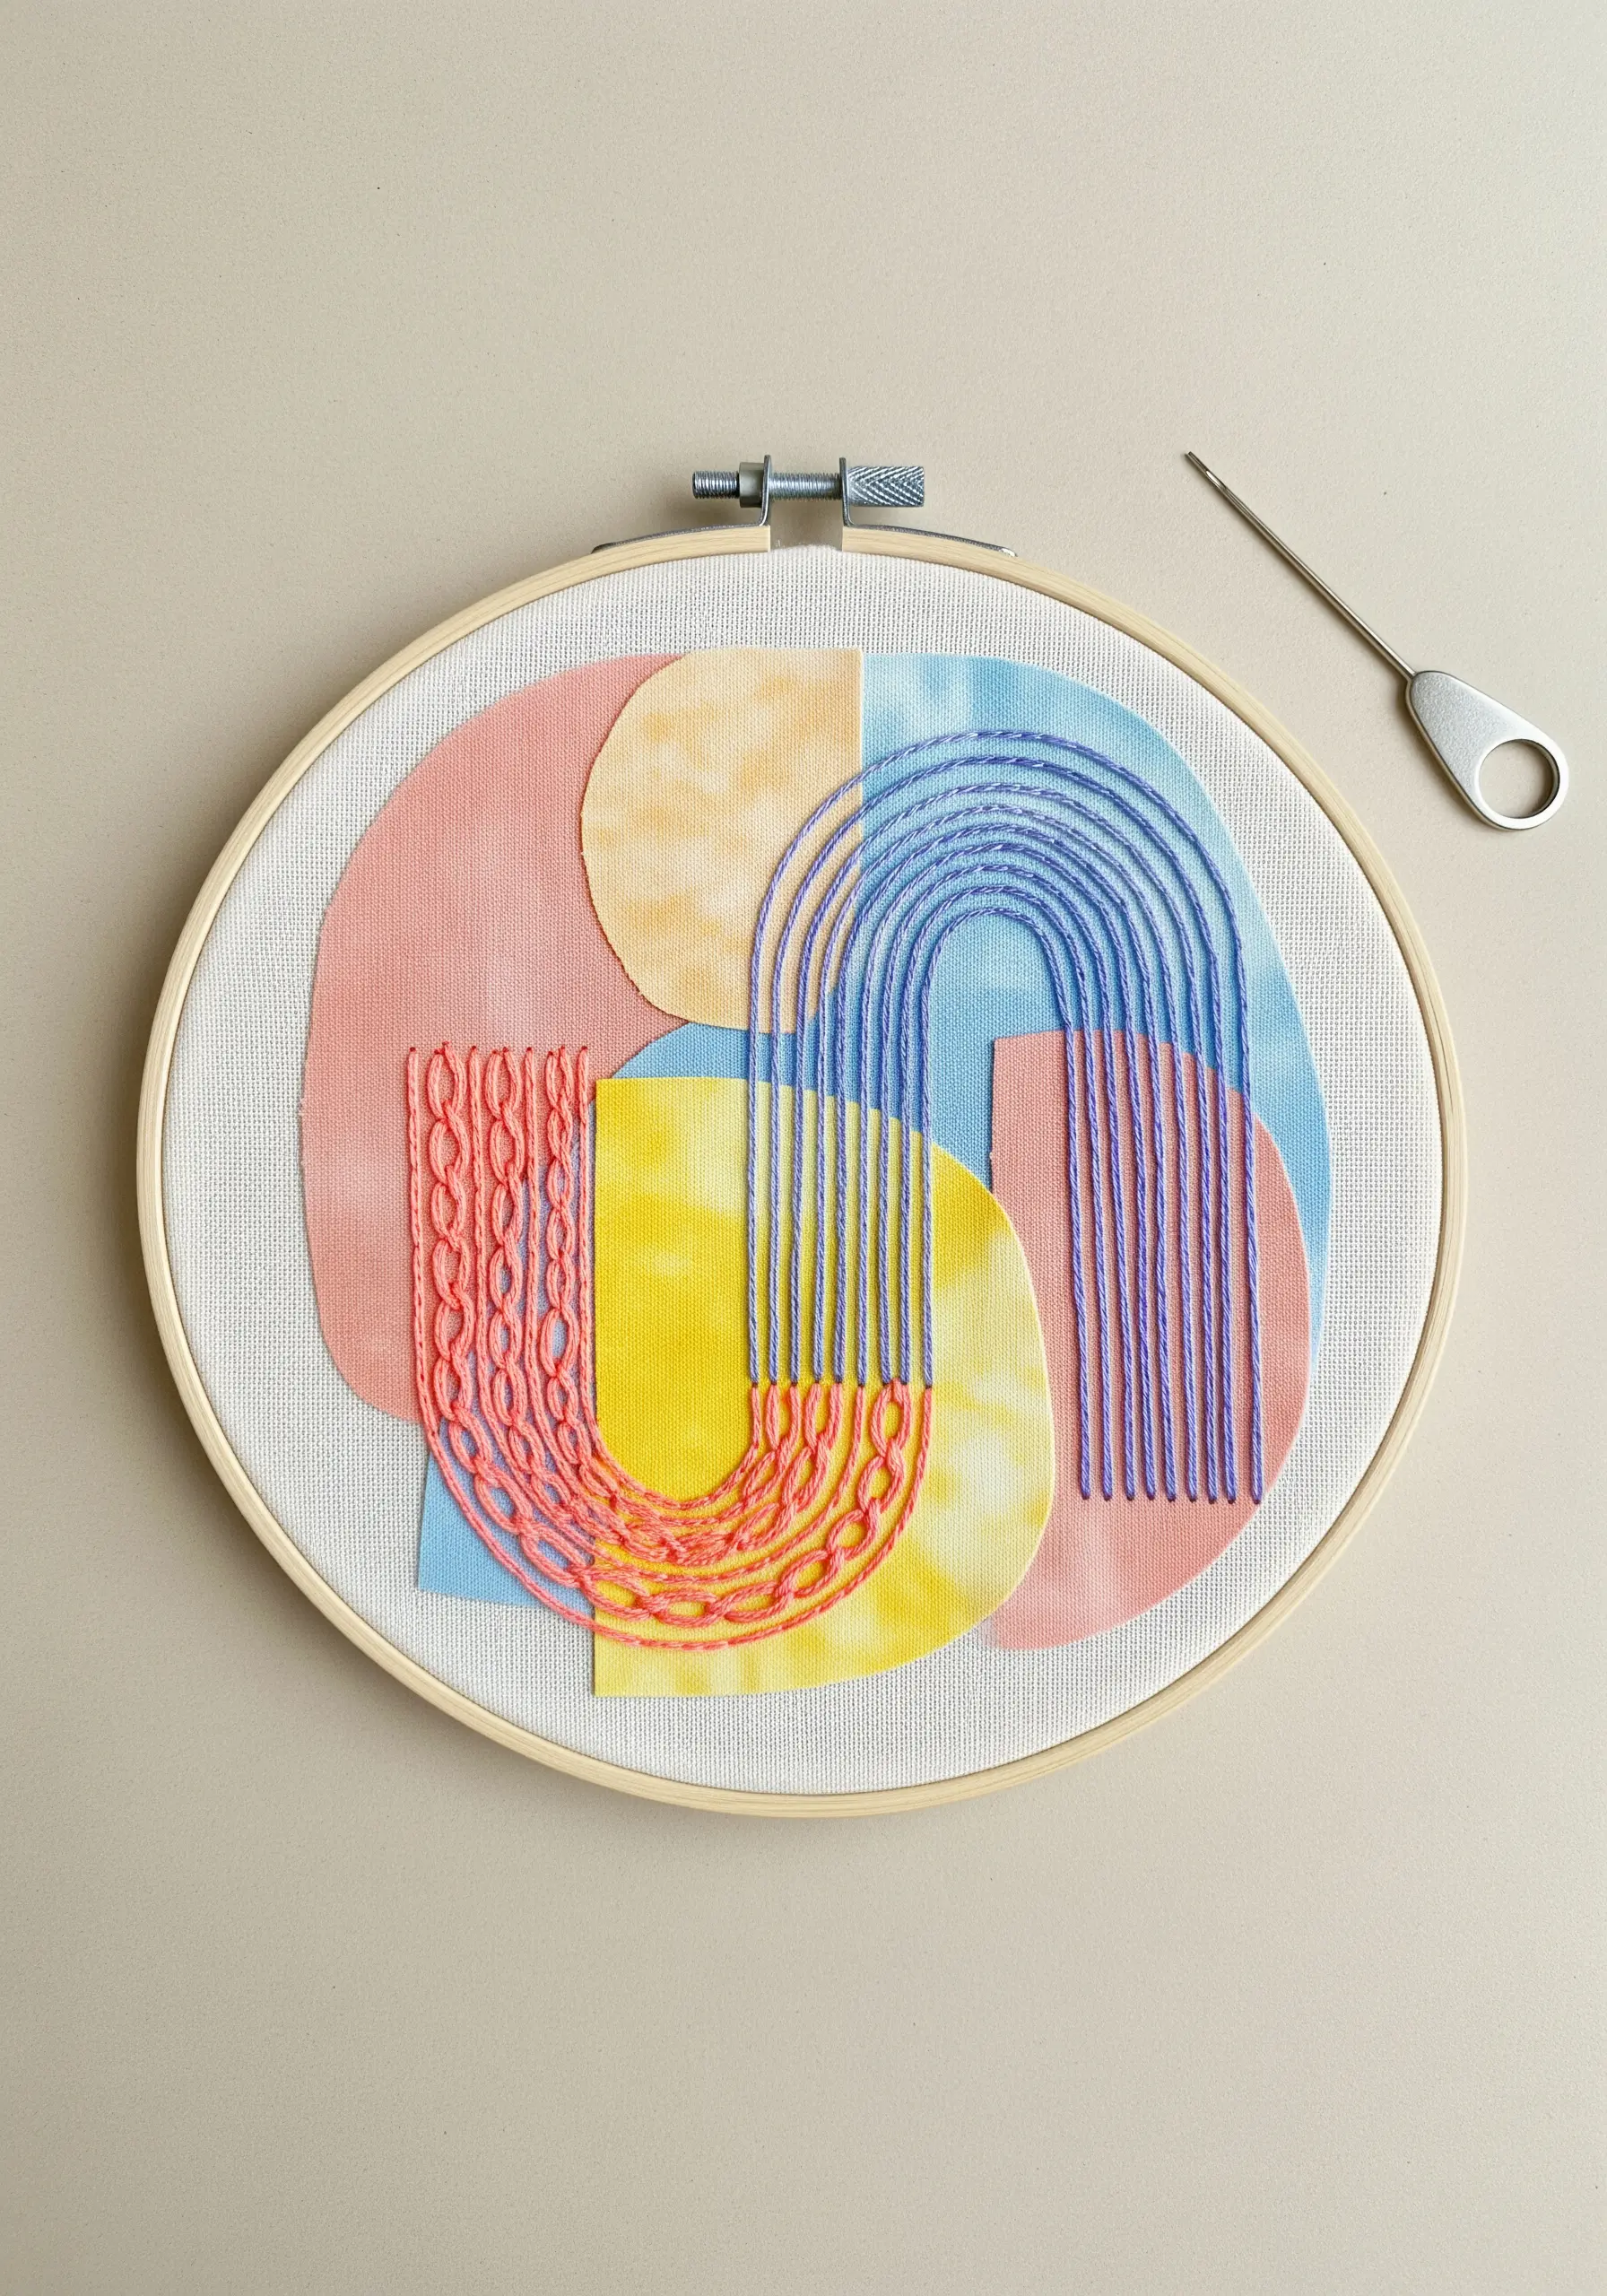
Begin by collaging abstract shapes cut from hand-dyed or patterned fabrics to create a dynamic, painterly base.
Then, impose order and rhythm by adding structured stitch patterns, such as parallel lines of chain stitch or long straight stitches.
This juxtaposition of freeform color and disciplined stitching creates a compelling visual tension that feels both spontaneous and intentional.
These abstract thread embroidery projects turn simple stitches into powerful design elements that guide the eye across the composition.
6. Layer Translucent Fabrics for a Watercolor Look

Mimic the soft blending of watercolor paints by layering strips of sheer fabrics like chiffon, organza, or even cheesecloth.
Allow the edges to remain raw and overlap them slightly to create subtle color shifts where the fabrics meet, perfect for skies and water.
Anchor the layers with a simple, utilitarian running stitch using a neutral thread to suggest waves or wind without distracting from the color.
This method builds beautiful, atmospheric coastal-inspired fabric collage embroidery scenes with minimal effort and maximum impact.
7. Add Thread-Painted Detail to Felt Appliqué

Start with a clean, simple felt appliqué as the base for an animal motif, like this sleeping fox.
Instead of leaving the felt plain, use it as a canvas for thread painting. A few directional long-and-short stitches create the impression of fur.
This technique gives you the best of both worlds: the crisp edges of felt and the soft, dimensional texture of embroidery floss.
Focus the textural stitching on one area, like the tail, to create a focal point and add sophisticated detail to an otherwise simple design.
8. Use Floral Fabric as Your Fill
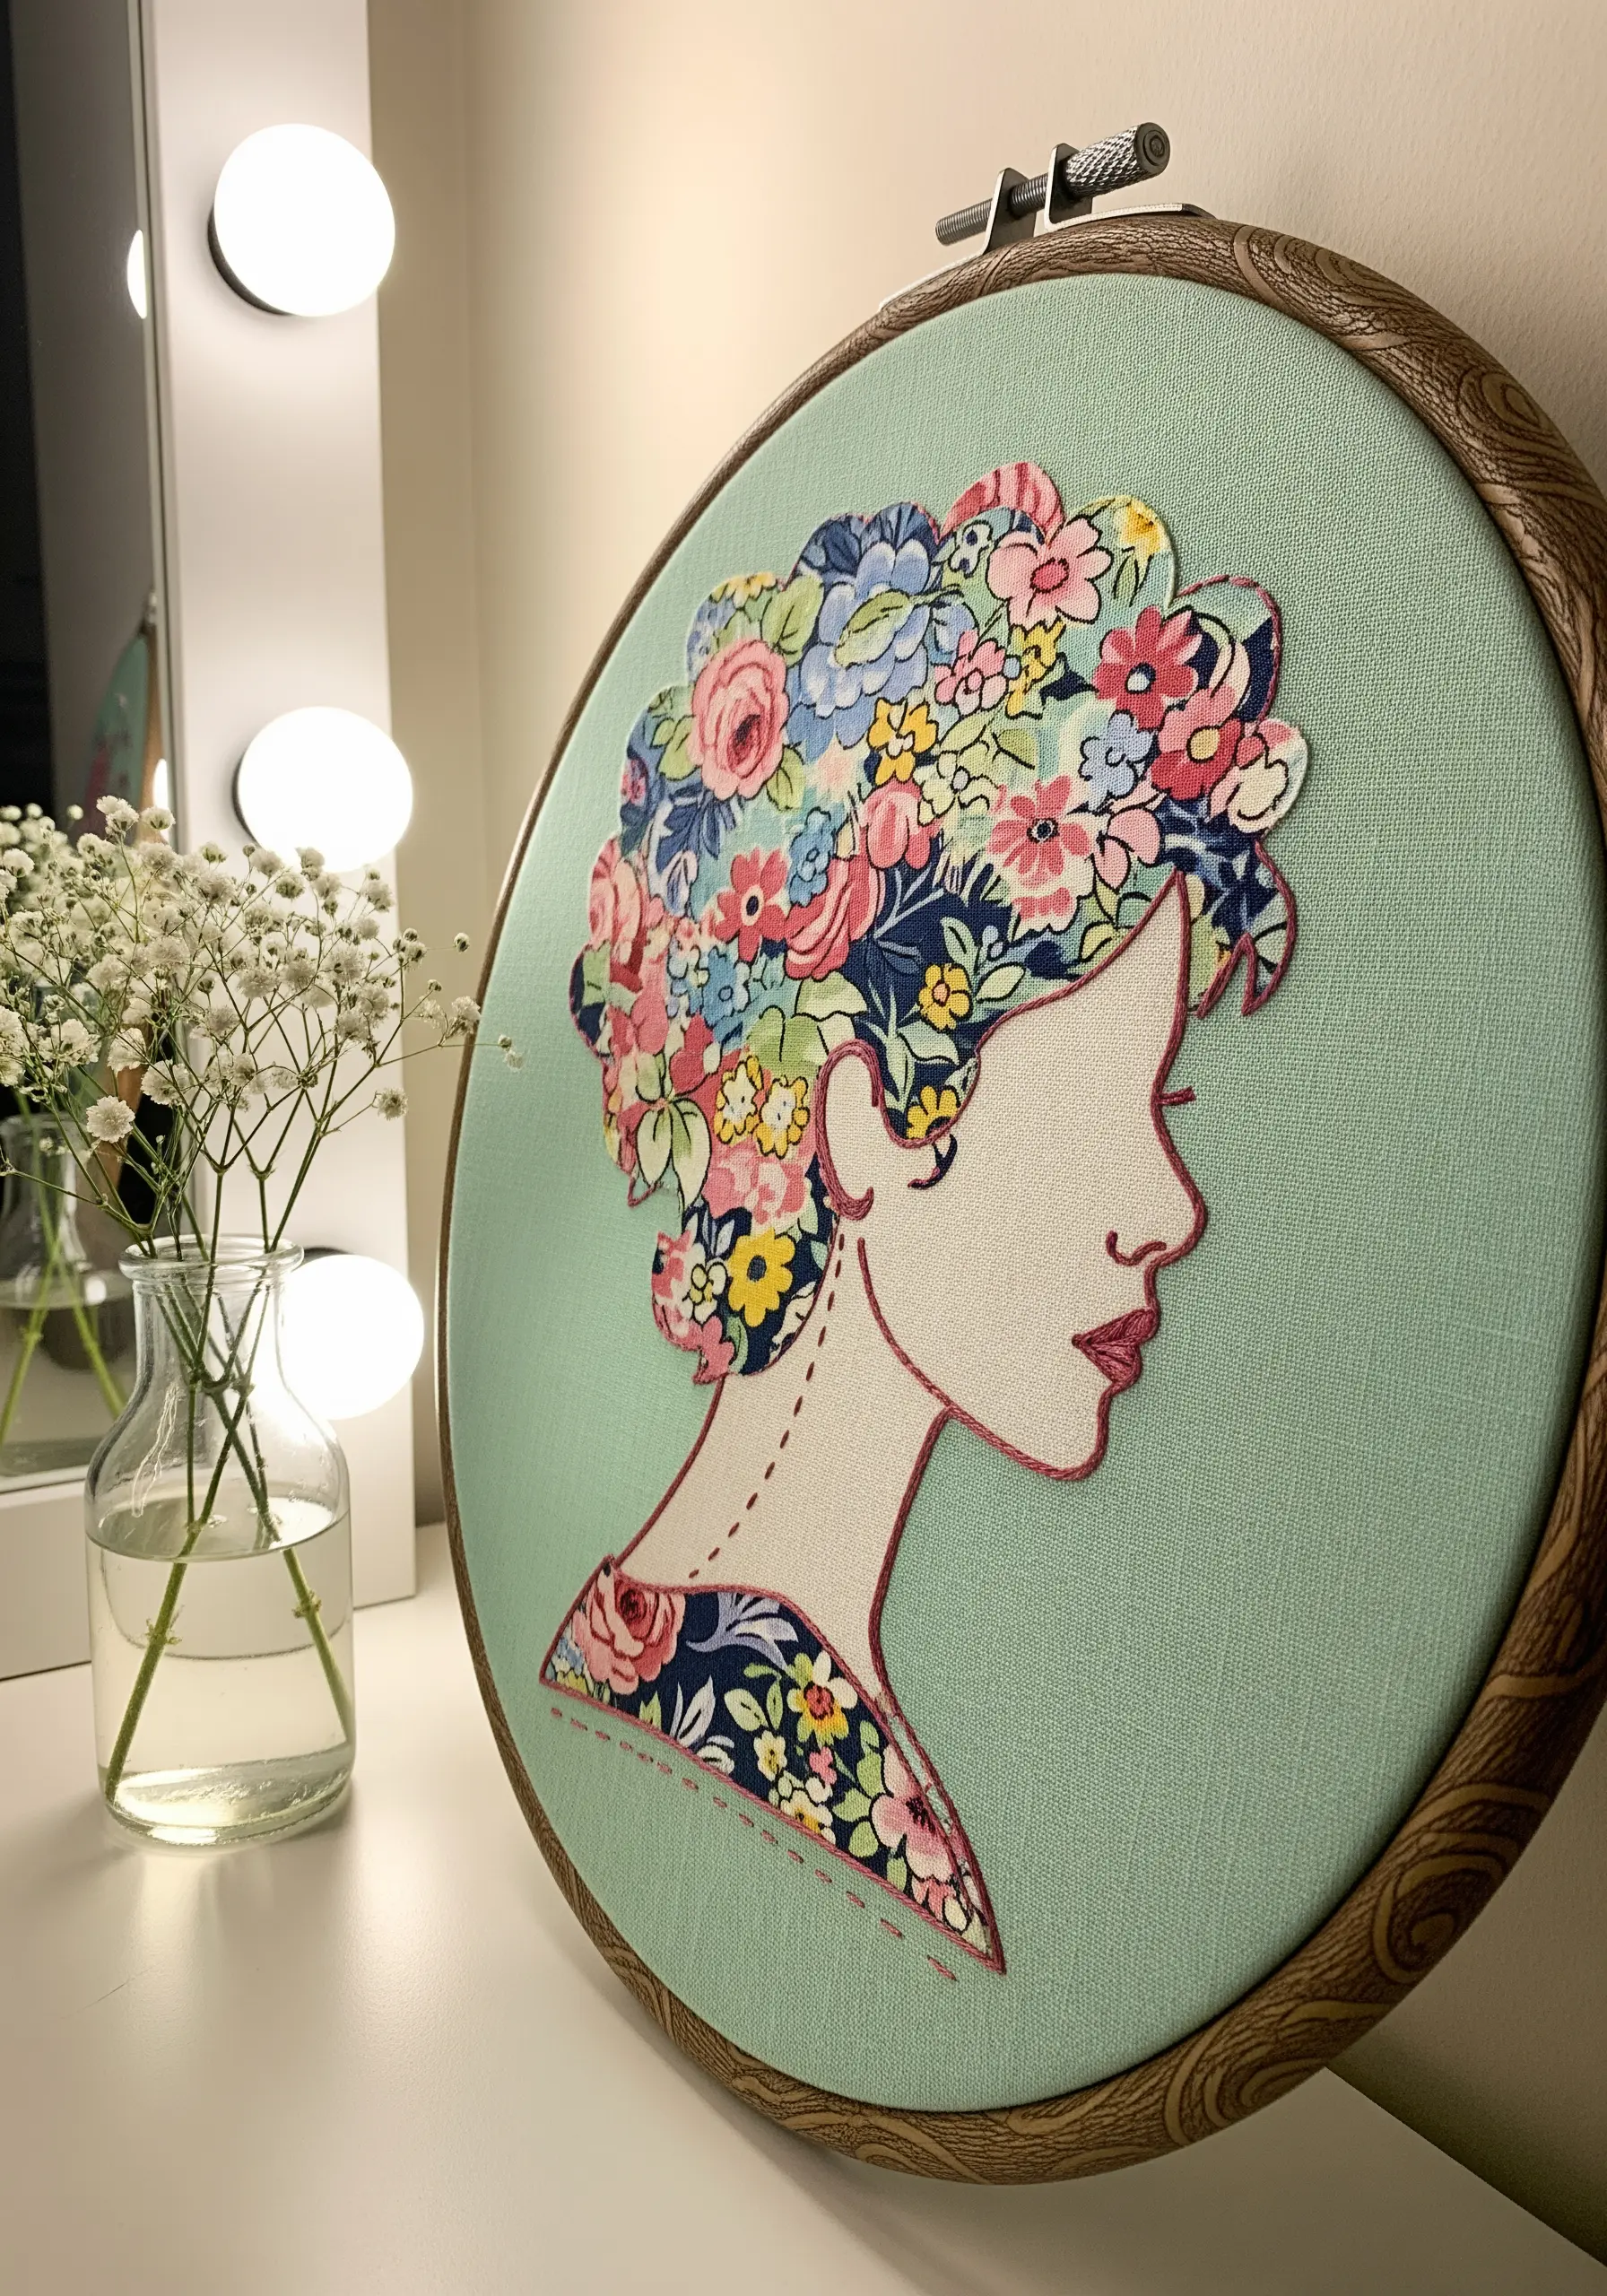
Let a vibrant, patterned fabric do the heavy lifting in your design. Trace a silhouette onto a busy floral print and carefully cut it out.
Appliqué the shape onto a solid-colored background fabric. The contrast makes the silhouette pop.
Secure the edges and add definition with a simple running stitch or backstitch just inside the fabric’s border.
This method allows you to create a visually complex and colorful piece with very little stitching, making it perfect for a quick yet impactful project.
9. Sculpt 3D Details with Bullion Knots

To create the realistic filling for these felt macarons, use a row of tightly packed bullion knots.
The key is to use a milliner’s needle, which has a uniform shaft, making it easier to wrap the thread and pull it through cleanly.
Vary the number of wraps around the needle to adjust the length of each knot, creating a slightly uneven, organic texture that mimics piped cream.
This advanced stitch adds impressive dimension and a professional touch to your felt appliqué projects.
10. Couch Thick Yarn for Bold, Graphic Lines

For large-scale pieces, create impactful lines by couching thick yarn or cotton rope onto your fabric base.
To do this, lay the yarn along your design line and use a standard embroidery floss in a matching or contrasting color to tack it down with small, perpendicular stitches.
This technique is faster than satin stitching and adds a prominent, sculptural element to abstract or geometric designs.
It’s an ideal way to translate small hoop art concepts into large-scale embroidery tapestries that command attention.
11. Construct Dimensional Florals with Stumpwork

To achieve hyper-realistic, 3D florals, explore the technique of stumpwork. This involves creating separate, wired petals that are then attached to the main fabric.
Stitch over a fabric-covered wire outline with buttonhole stitches, then cut out the petal and gently shape it by hand.
Arrange and attach the individual petals to build your flower, allowing them to lift away from the background for a lifelike effect.
While intricate, these 3D floral embroidery techniques create breathtaking depth that standard stitches cannot replicate.
12. Layer Organza for Ethereal Wings

Add a touch of magic to motifs like butterflies or fairies by incorporating a layer of sheer silk organza.
First, stitch your main design on a base fabric, or use a pre-printed fabric panel as your guide.
Then, lay a piece of organza over a section, like the wings, and secure it with a delicate running stitch along the outline.
Carefully trim the excess organza close to the stitching. This creates a transparent, layered effect that suggests movement and fragility.
13. Combine Watercolor Painting with Metallic Stitches
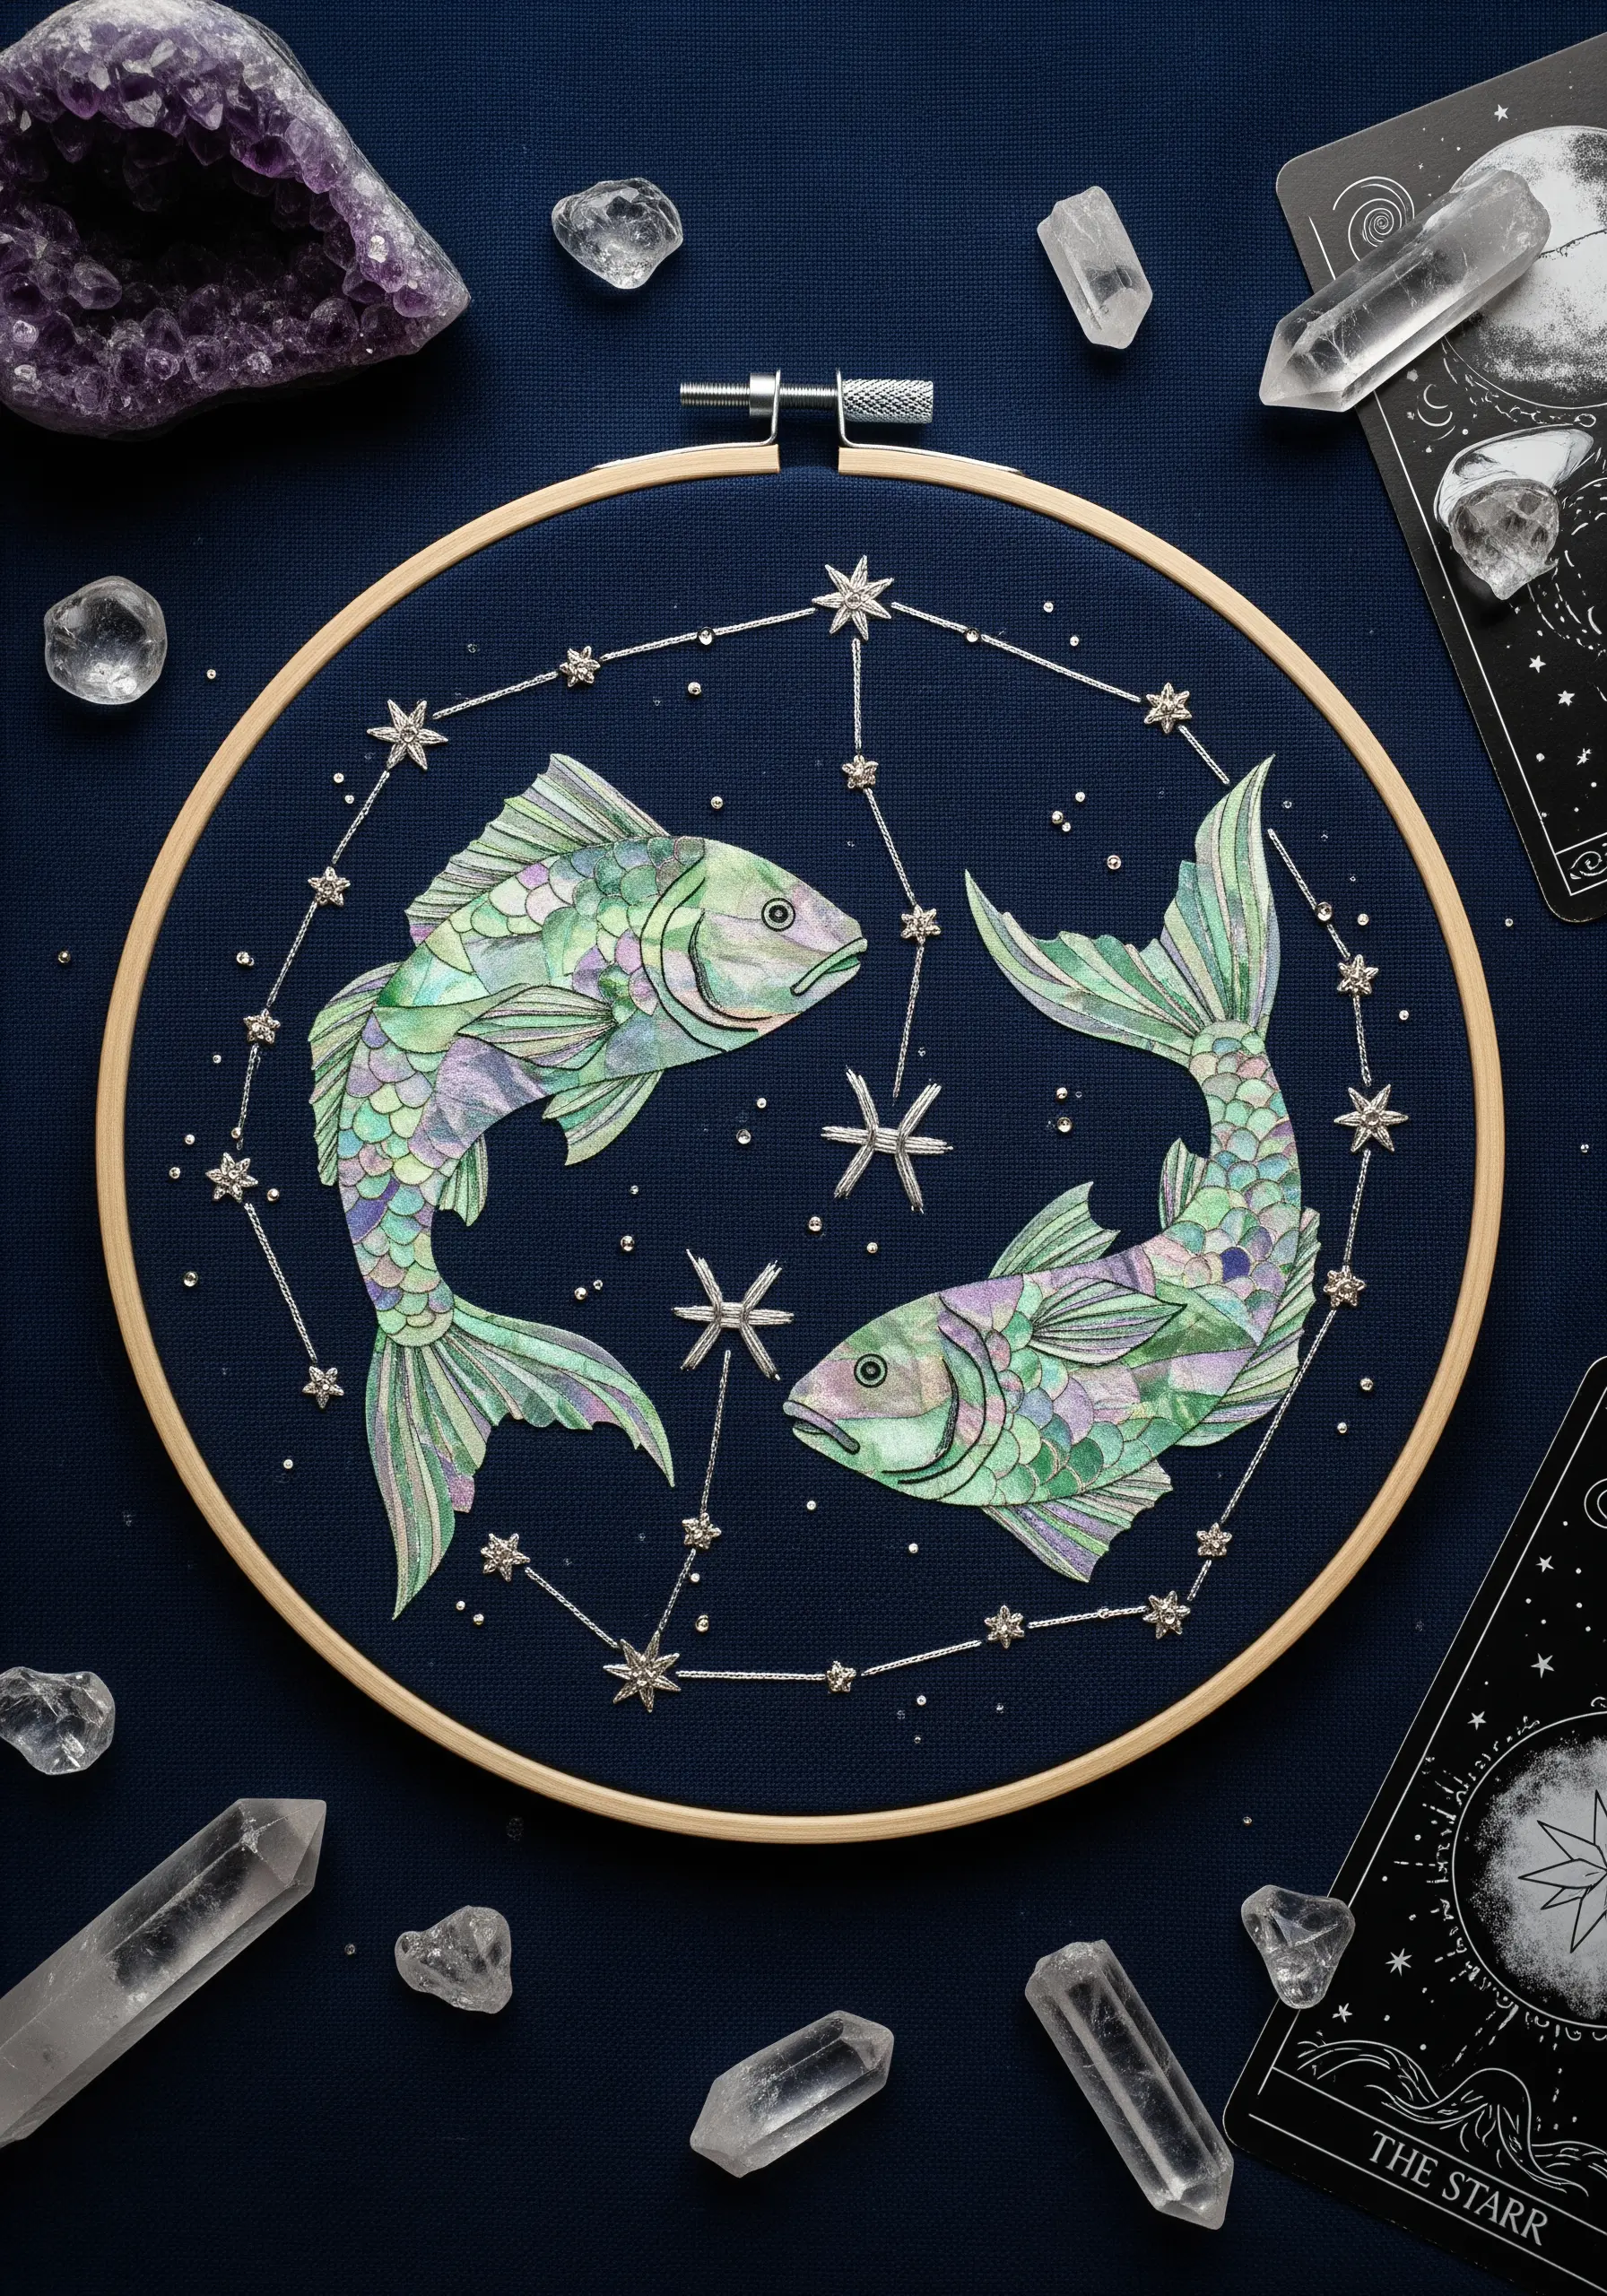
Elevate your fabric collage by painting your appliqué pieces with watercolor before you stitch them.
Use a fabric medium mixed with your paints to ensure they are permanent and won’t bleed. Let the pieces dry completely before cutting them out.
Once appliquéd, enhance the painted details with strategic embroidery. Use a silver metallic thread to outline scales or create celestial constellations.
This mixed-media approach allows for soft color gradients that are difficult to achieve with thread alone, creating a truly artistic finish.
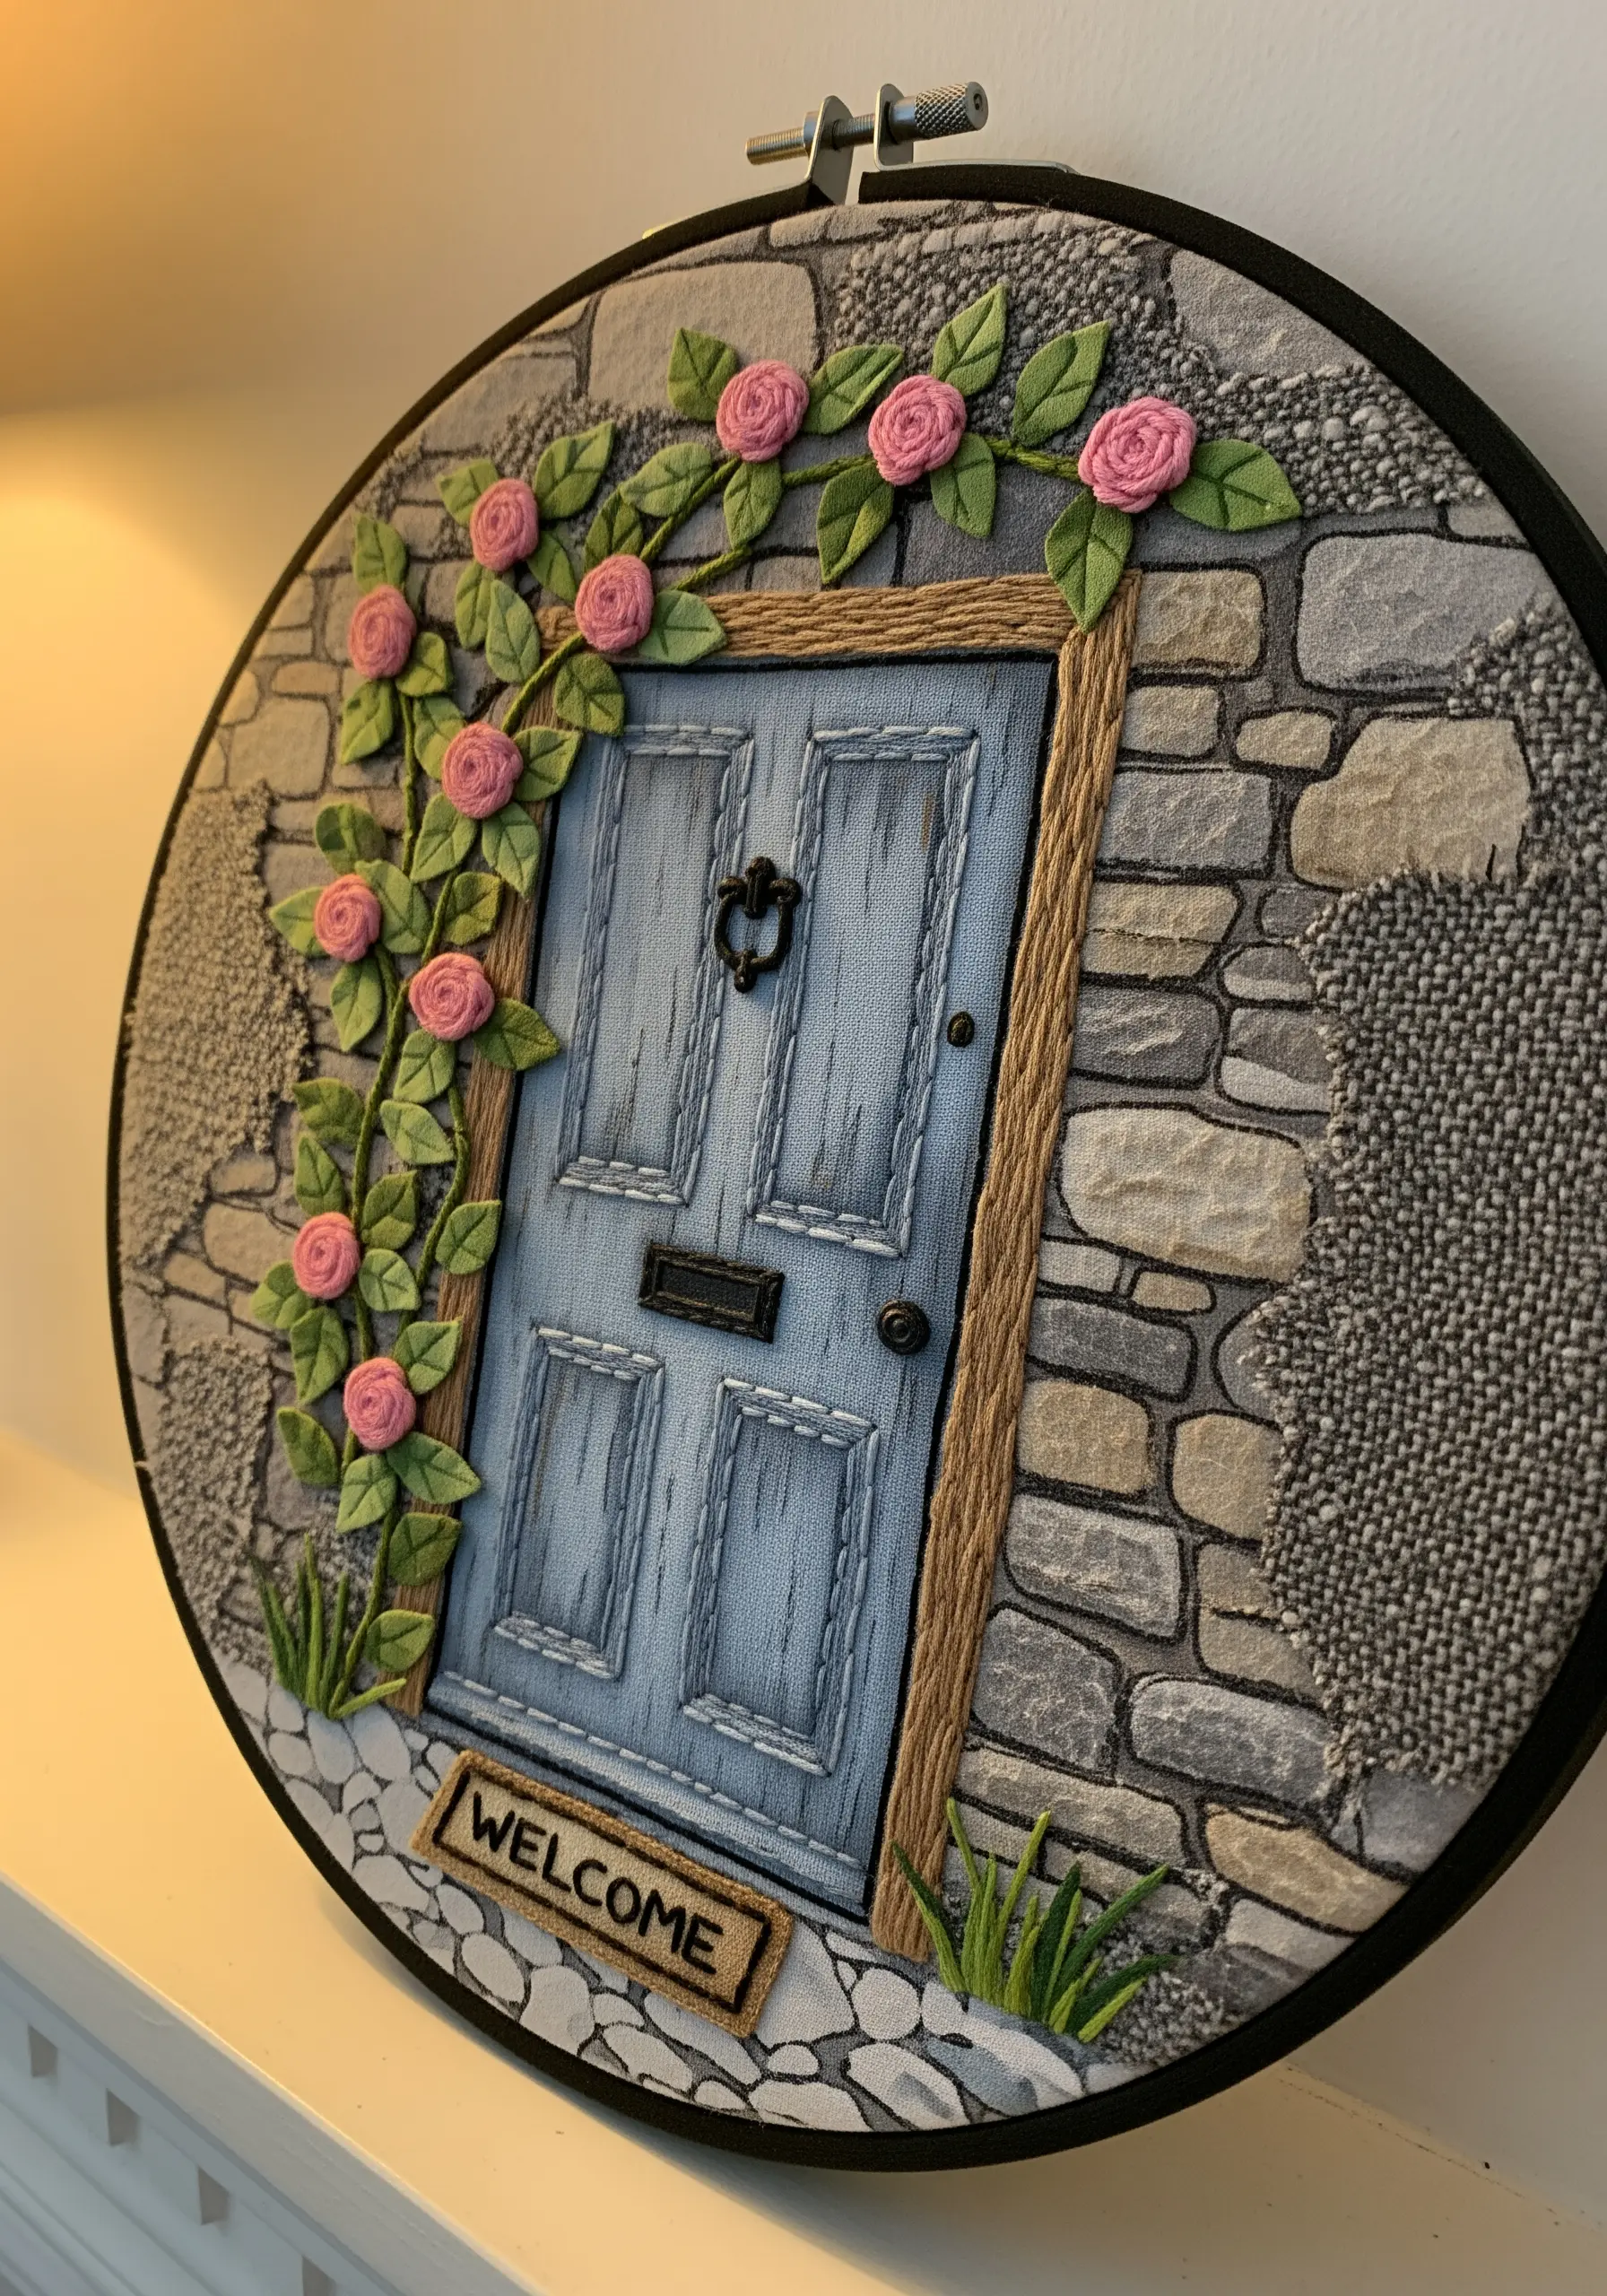
14. Create a Scene with Patterned Fabric Scraps

Design a charming townscape by treating your fabric scraps like paper in a collage. Assign different patterns to roofs, walls, and doors.
Secure each piece with an iron-on adhesive like Heat’n Bond Lite, which holds them in place for easy stitching.
Then, add architectural details with a simple backstitch for windowpanes and outlines. This stitch provides a clean, illustrative quality.
Finish with textural French knots for bushes, which adds a soft, dimensional contrast to the flat fabric pieces.
15. Build a 3D Succulent with Layered Felt
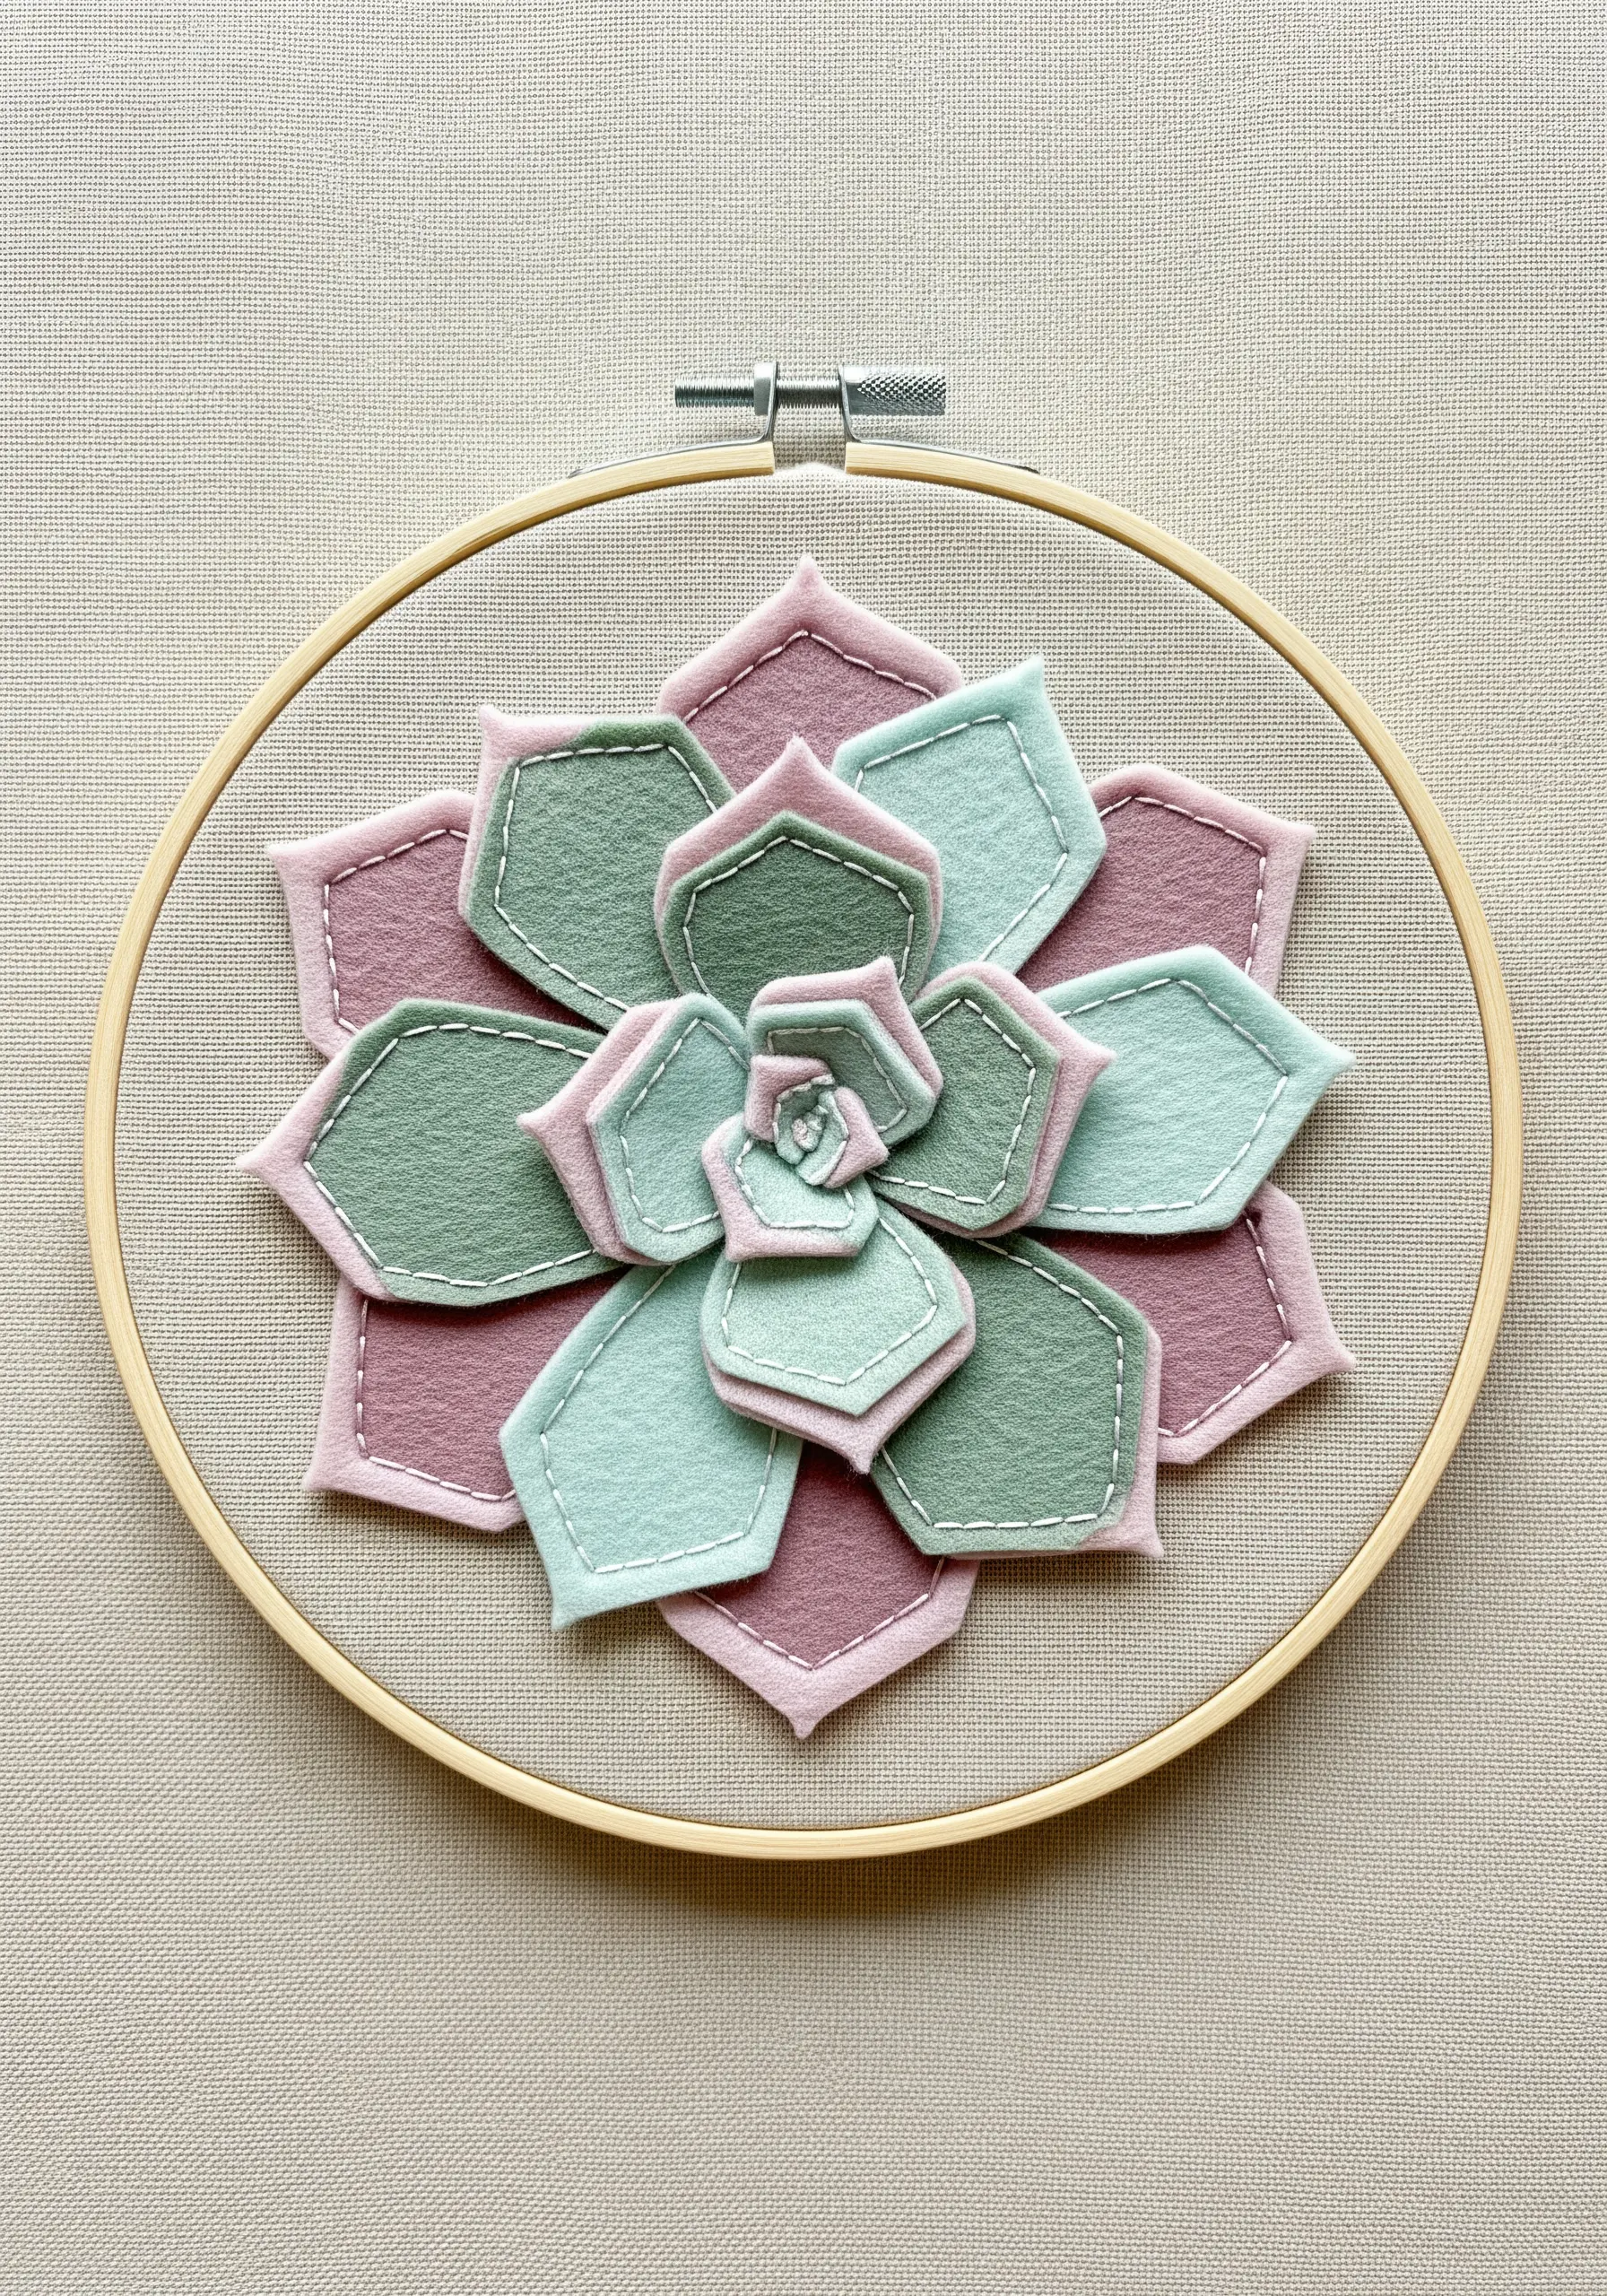
Create a sculptural felt succulent by layering individually cut ‘leaves’ in a concentric pattern, starting with the largest on the bottom.
Use two complementary colors, like dusty rose and sage green, to add depth and visual interest.
A single running stitch down the center of each leaf not only secures it but also mimics the plant’s natural veining.
This method is incredibly effective for creating botanical forms that have a clean, graphic, and highly dimensional presence.
16. Define Appliqué with a Whipped Backstitch Outline

Make your fabric appliqué shapes truly stand out by outlining them with a whipped backstitch.
First, secure your fabric piece with a standard backstitch around the edge in a primary color (like gold).
Then, take a second, contrasting thread (like white) and ‘whip’ it around the backstitches without piercing the fabric, creating a smooth, rope-like border.
This technique adds a polished, raised edge that gives your collage a clean and professional finish.
17. Weave a Basket for Textural Contrast
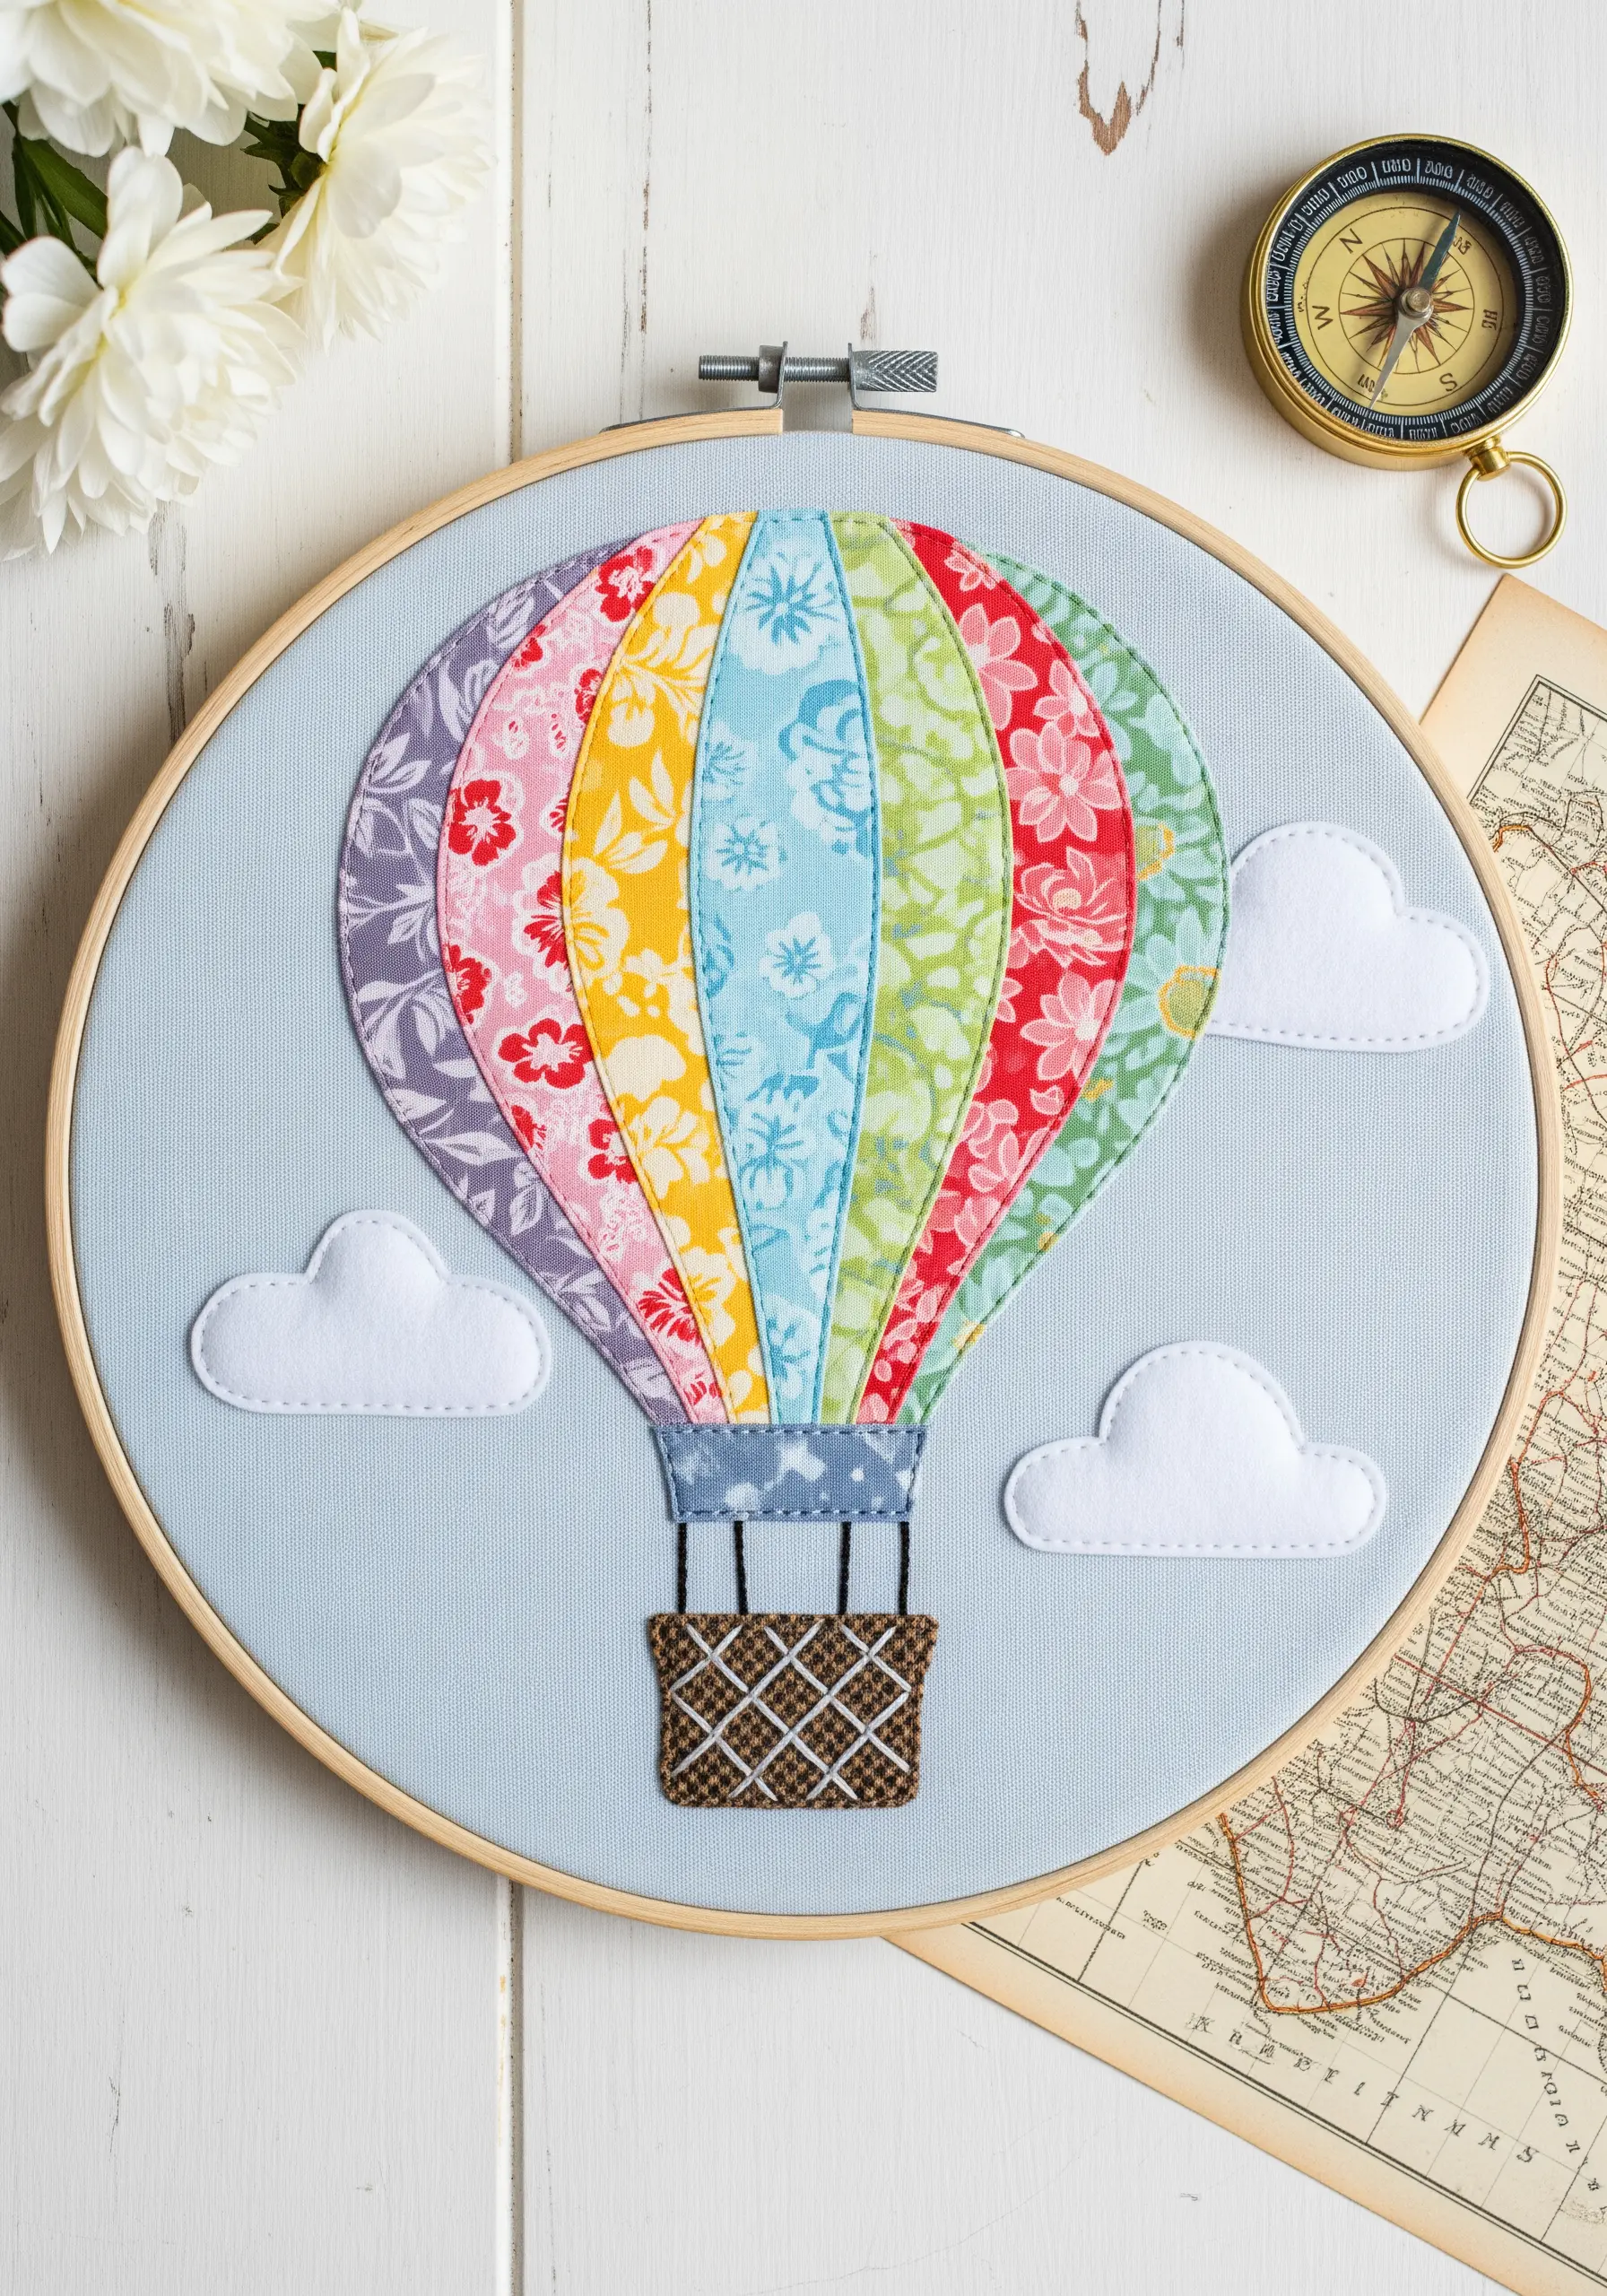
Add an unexpected element of texture by incorporating a woven stitch into your collage.
For the hot air balloon’s basket, create a grid of long straight stitches as your ‘warp’ threads.
Then, use a tapestry needle to weave another thread over and under the warp threads, creating a realistic basket-weave pattern.
This small detail provides a satisfying textural contrast to the smooth cotton fabric of the balloon panels.
18. Sculpt a Coral Reef with High-Texture Stitches

To build a vibrant, tactile underwater scene, rely on a dense clustering of high-dimension stitches.
Use bullion knots for tube-like structures, French knots for pebbly textures, and cast-on stitches for anemone tentacles.
Work with variegated and multi-tonal threads to give your coral natural-looking color variations with every stitch.
These dense, sculptural ocean-inspired hoop embroidery ideas transform the fabric surface into a rich, three-dimensional ecosystem.
19. Blend Colors with Directional Thread Painting

Achieve a smooth, painterly blend of colors by using the long-and-short stitch, also known as thread painting.
Pay close attention to the direction of your stitches. They should follow the natural contours of your subject, like the feathers on a hummingbird’s wing or the curve of a petal.
To create an iridescent effect, blend jewel-toned threads—like turquoise, purple, and green—side-by-side.
This technique is meticulous but unmatched for creating realistic gradients and capturing the subtle play of light on a surface.
20. Mix Patterned Fabric with Textured Stitches

Create a modern, quilted effect by combining patterned fabric appliqué with fully stitched shapes.
Cut hexagons from various printed cottons and arrange them in a honeycomb pattern. Secure them with an iron-on adhesive.
Fill the empty spaces with other hexagons filled entirely with textural stitches, like French knots or seed stitch, using a solid-colored thread.
This interplay between flat pattern and raised texture results in a dynamic, visually engaging composition.
21. Achieve a Silken Finish with Satin Stitch Appliqué

Elevate simple leaf shapes by covering them completely with a dense, smooth satin stitch.
First, lightly tack down your fabric appliqué pieces. Then, using two or three strands of floss, lay parallel stitches across the shape, keeping them close together for full coverage.
The key to a perfect sheen is maintaining a consistent angle with your stitches across each leaf.
This technique gives the ginkgo leaves a luminous, silky quality that contrasts beautifully against the matte background fabric.
22. Create Impressionistic Texture with Fabric Confetti

Build a stunning, mosaic-like texture by using tiny, irregular scraps of fabric as ‘confetti’.
Apply a fusible webbing to the back of your fabrics before cutting them into small pieces. This allows you to arrange them on your background and iron them in place.
Focus on creating a gradient of color and light, placing lighter ‘confetti’ where the sun would hit to create a sense of radiance.
This is a wonderfully painterly technique for depicting dappled light in a forest or the texture of a field of flowers.
23. Emulate a Geode with Layered Textiles and Beads
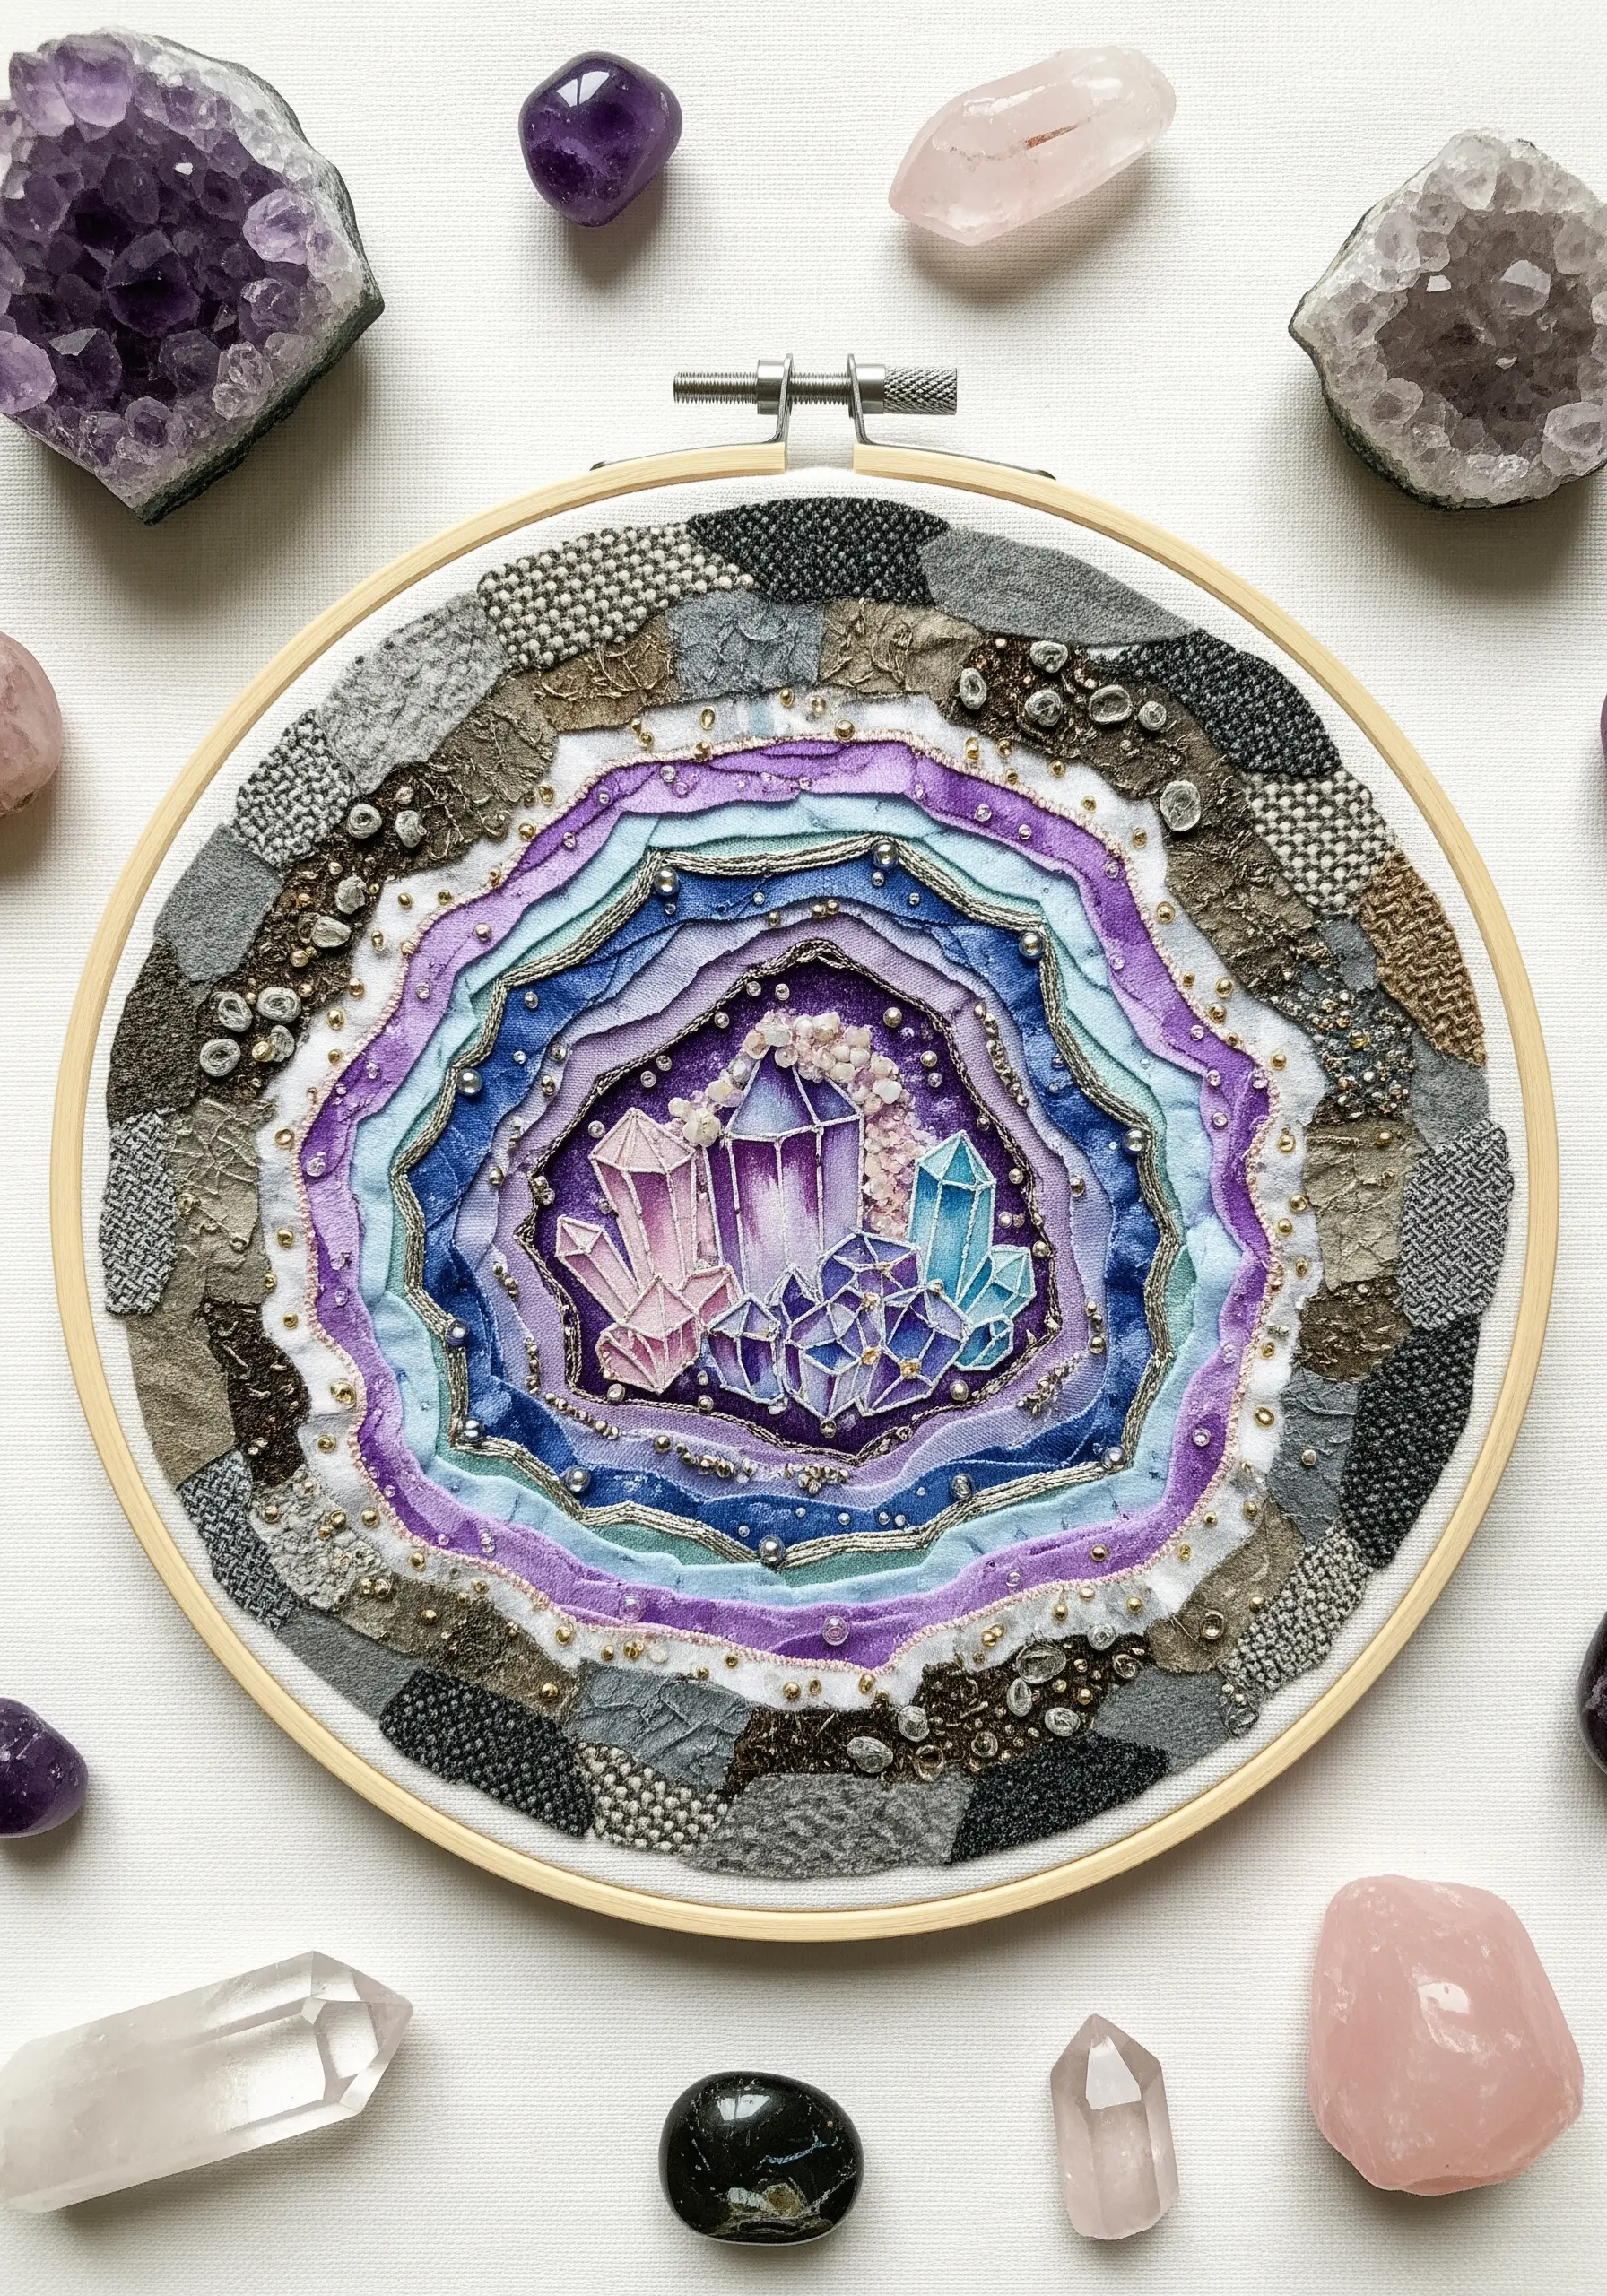
Construct a geode effect by layering concentric rings of fabric with varying textures, from smooth cotton to coarse tweed.
Leave the inner edges of each fabric ring raw and slightly frayed to mimic the organic growth of crystal formations.
Create the sparkling center by filling it with a dense cluster of French knots using metallic thread, and then accent with seed beads and genuine crystal chips.
This is one of the most effective ways to create depth in your embroidery using natural textures and a touch of glamour.
24. Suggest Texture with Directional Straight Stitches
You don’t need complex stitches to create the illusion of texture. Use simple straight stitches to suggest wood grain on a door or lines on stone.
For the door, use a slightly darker shade of thread than the fabric and stitch long, irregular vertical lines to mimic wood planks.
For the stone wall, appliqué textured fabric pieces and add short, directional stitches to enhance the look of rough-hewn stone.
This subtle addition of stitched lines over fabric collage brings the entire scene to life with minimal effort.
25. Design a Garden with Blocks of Color and Texture
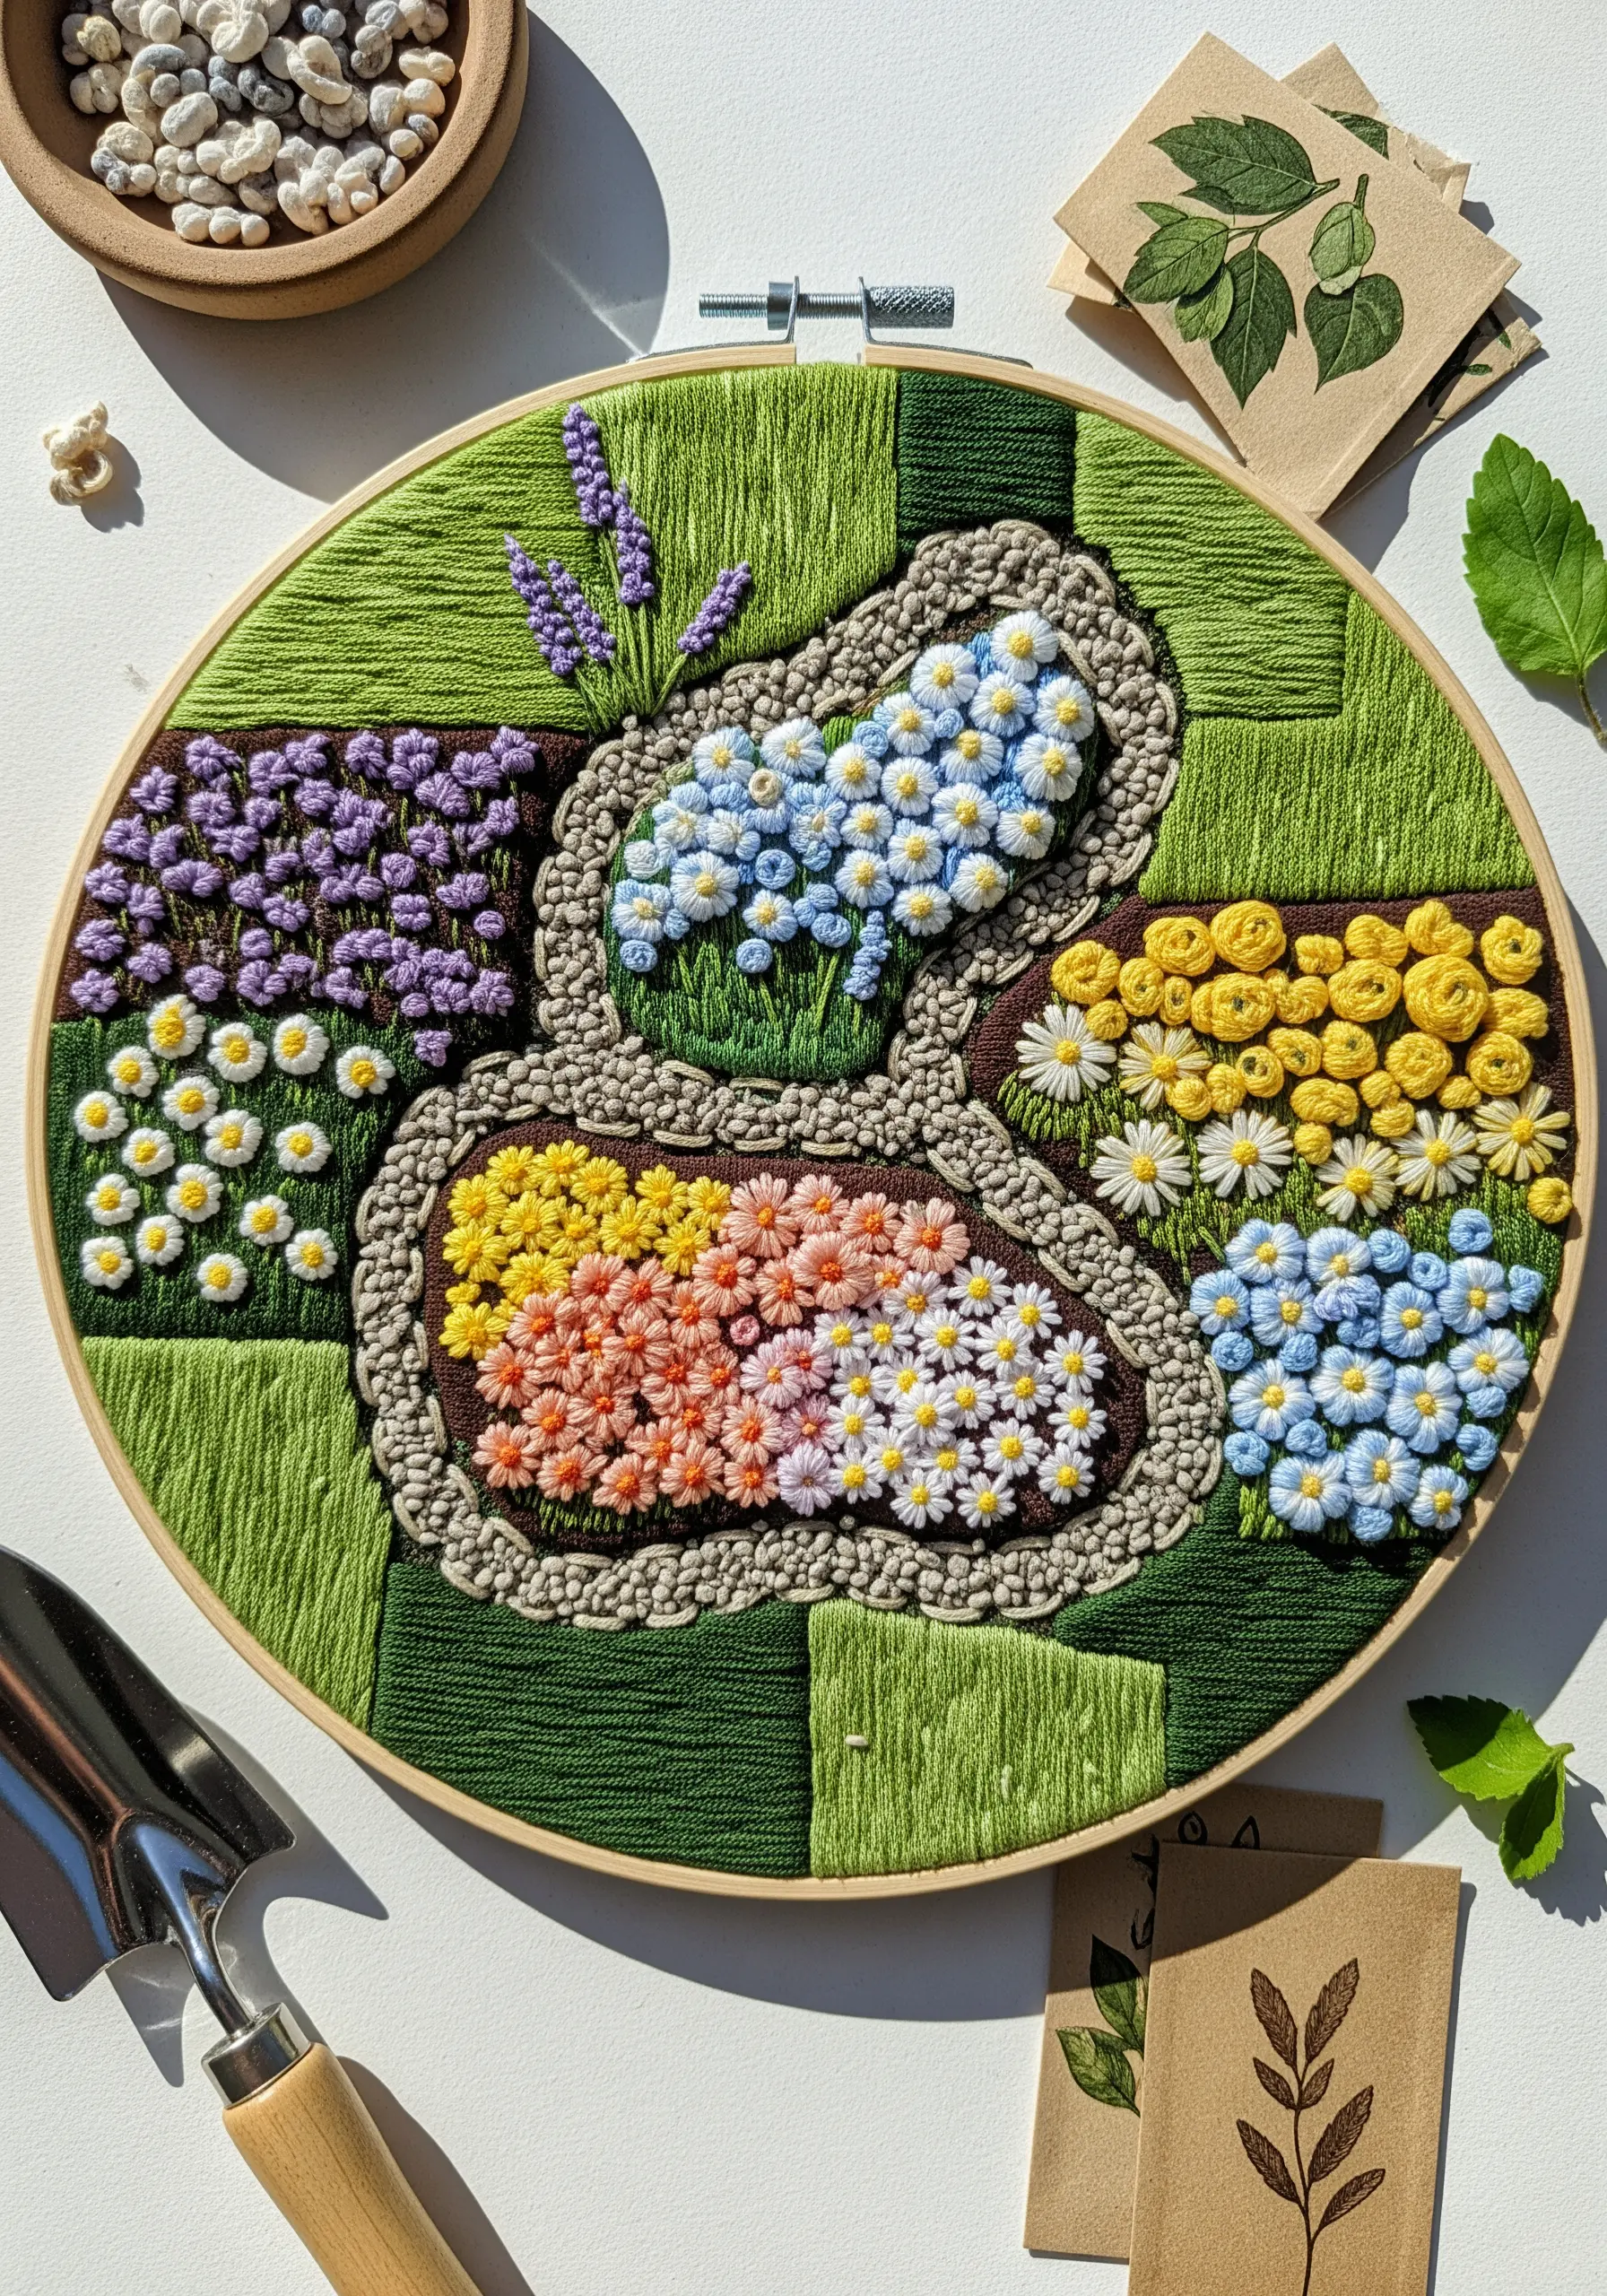
Lay out a formal garden design by mapping out ‘beds’ and filling them with dense, textural stitches.
Use a block of satin stitch for the lawn areas, ensuring your stitches all lie in the same direction for a neat finish.
For the flower beds, pack them with colorful French knots, lazy daisies, and woven wheel roses to create a lush, abundant look.
Outline the beds with a heavier, contrasting stitch like a couched chain stitch to give the entire composition clear definition and structure.
26. Add Movement with Trailing Ribbons and Trims

Bring your embroidery out of the hoop by adding dynamic, flowing elements.
After completing the main appliquéd body of the jellyfish, attach various lengths of ribbon, lace, rickrack, and yarn to the bottom edge.
Choose a cohesive pastel color palette but vary the textures and widths of the trims to create visual interest.
This turns a static hoop art piece into a kinetic wall hanging that gently moves and sways, adding a whimsical touch to your decor.
27. Isolate Textural Studies on a Neutral Background

For a conceptual and artistic piece, treat your hoop like a specimen board. Appliqué small, irregular fabric swatches onto a neutral felt background.
Within each swatch, experiment with a different textural stitch or color combination. This one uses dense clusters of French knots.
This approach allows you to practice different techniques in a low-pressure way while creating a beautiful, modern art piece.
The raw, frayed edges of the swatches add to the piece’s charm, highlighting the tactile nature of the threads.
28. Use Pinking Shears for a Decorative Edge

For a charming, decorative finish on your appliqué pieces, cut them out with pinking shears instead of regular scissors.
The zigzag edge adds a subtle, playful detail and also helps to minimize fraying on woven cotton fabrics.
This technique is especially effective for whimsical subjects like cake layers or clothing details in an illustrative piece.
Secure the shape with a simple running stitch just inside the decorative edge to make it a deliberate design feature.
29. Tell a Story with Stitched Pathways

Transform a simple fabric collage map into a personal narrative by adding a stitched journey line.
Use a bold, contrasting color like red and a simple running stitch or backstitch to create a dotted line that connects meaningful locations.
You can even add tiny icons, like a stitched ‘X’ or a small heart, to mark special spots.
This simple addition turns a decorative piece into a meaningful keepsake, making it one of those travel-inspired embroidery hoops that tell a story.
30. Create a Cohesive Gallery Wall with Mini Hoops
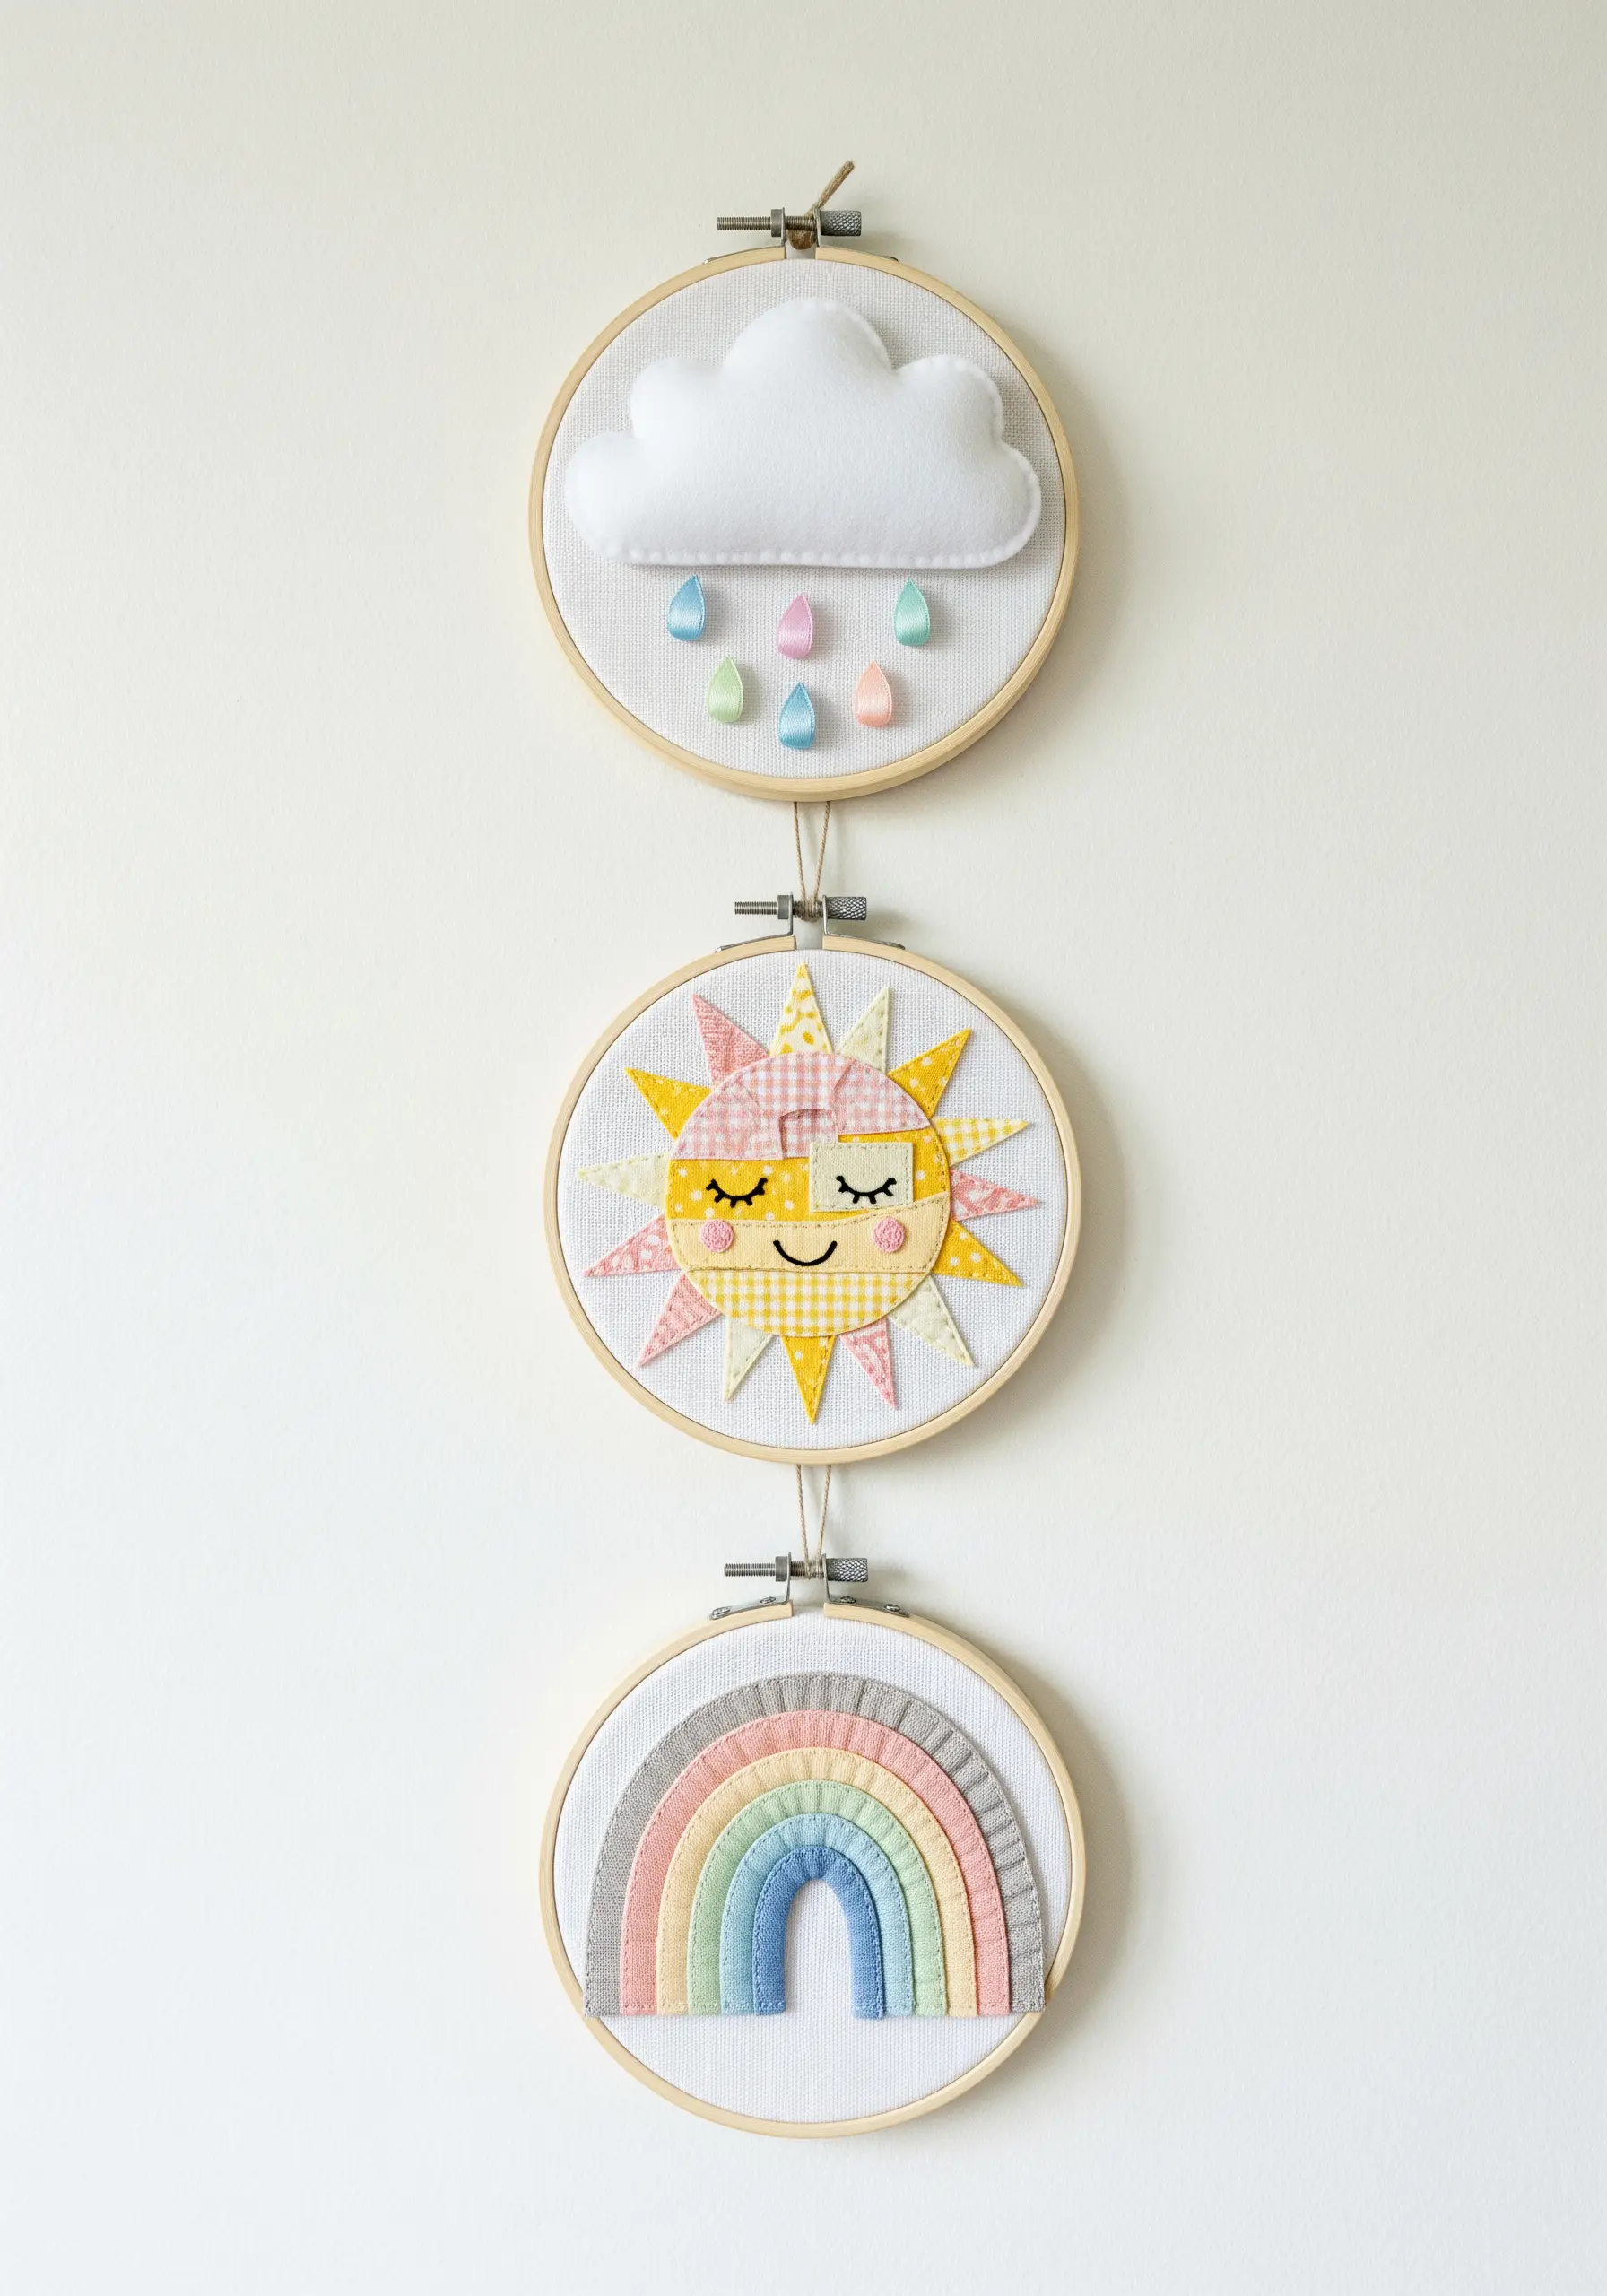
Design a set of smaller, related pieces to create a cohesive wall display. A theme like ‘weather’ works perfectly.
Use a consistent palette of pastel felt and patterned fabrics across all hoops to ensure they feel connected.
Keep the embellishments simple and balanced—a few bead ‘raindrops’ on one, a simple stitched face on another.
These circle frame minimal embroidery compositions are perfect for filling a small space with a dose of handmade charm.


