

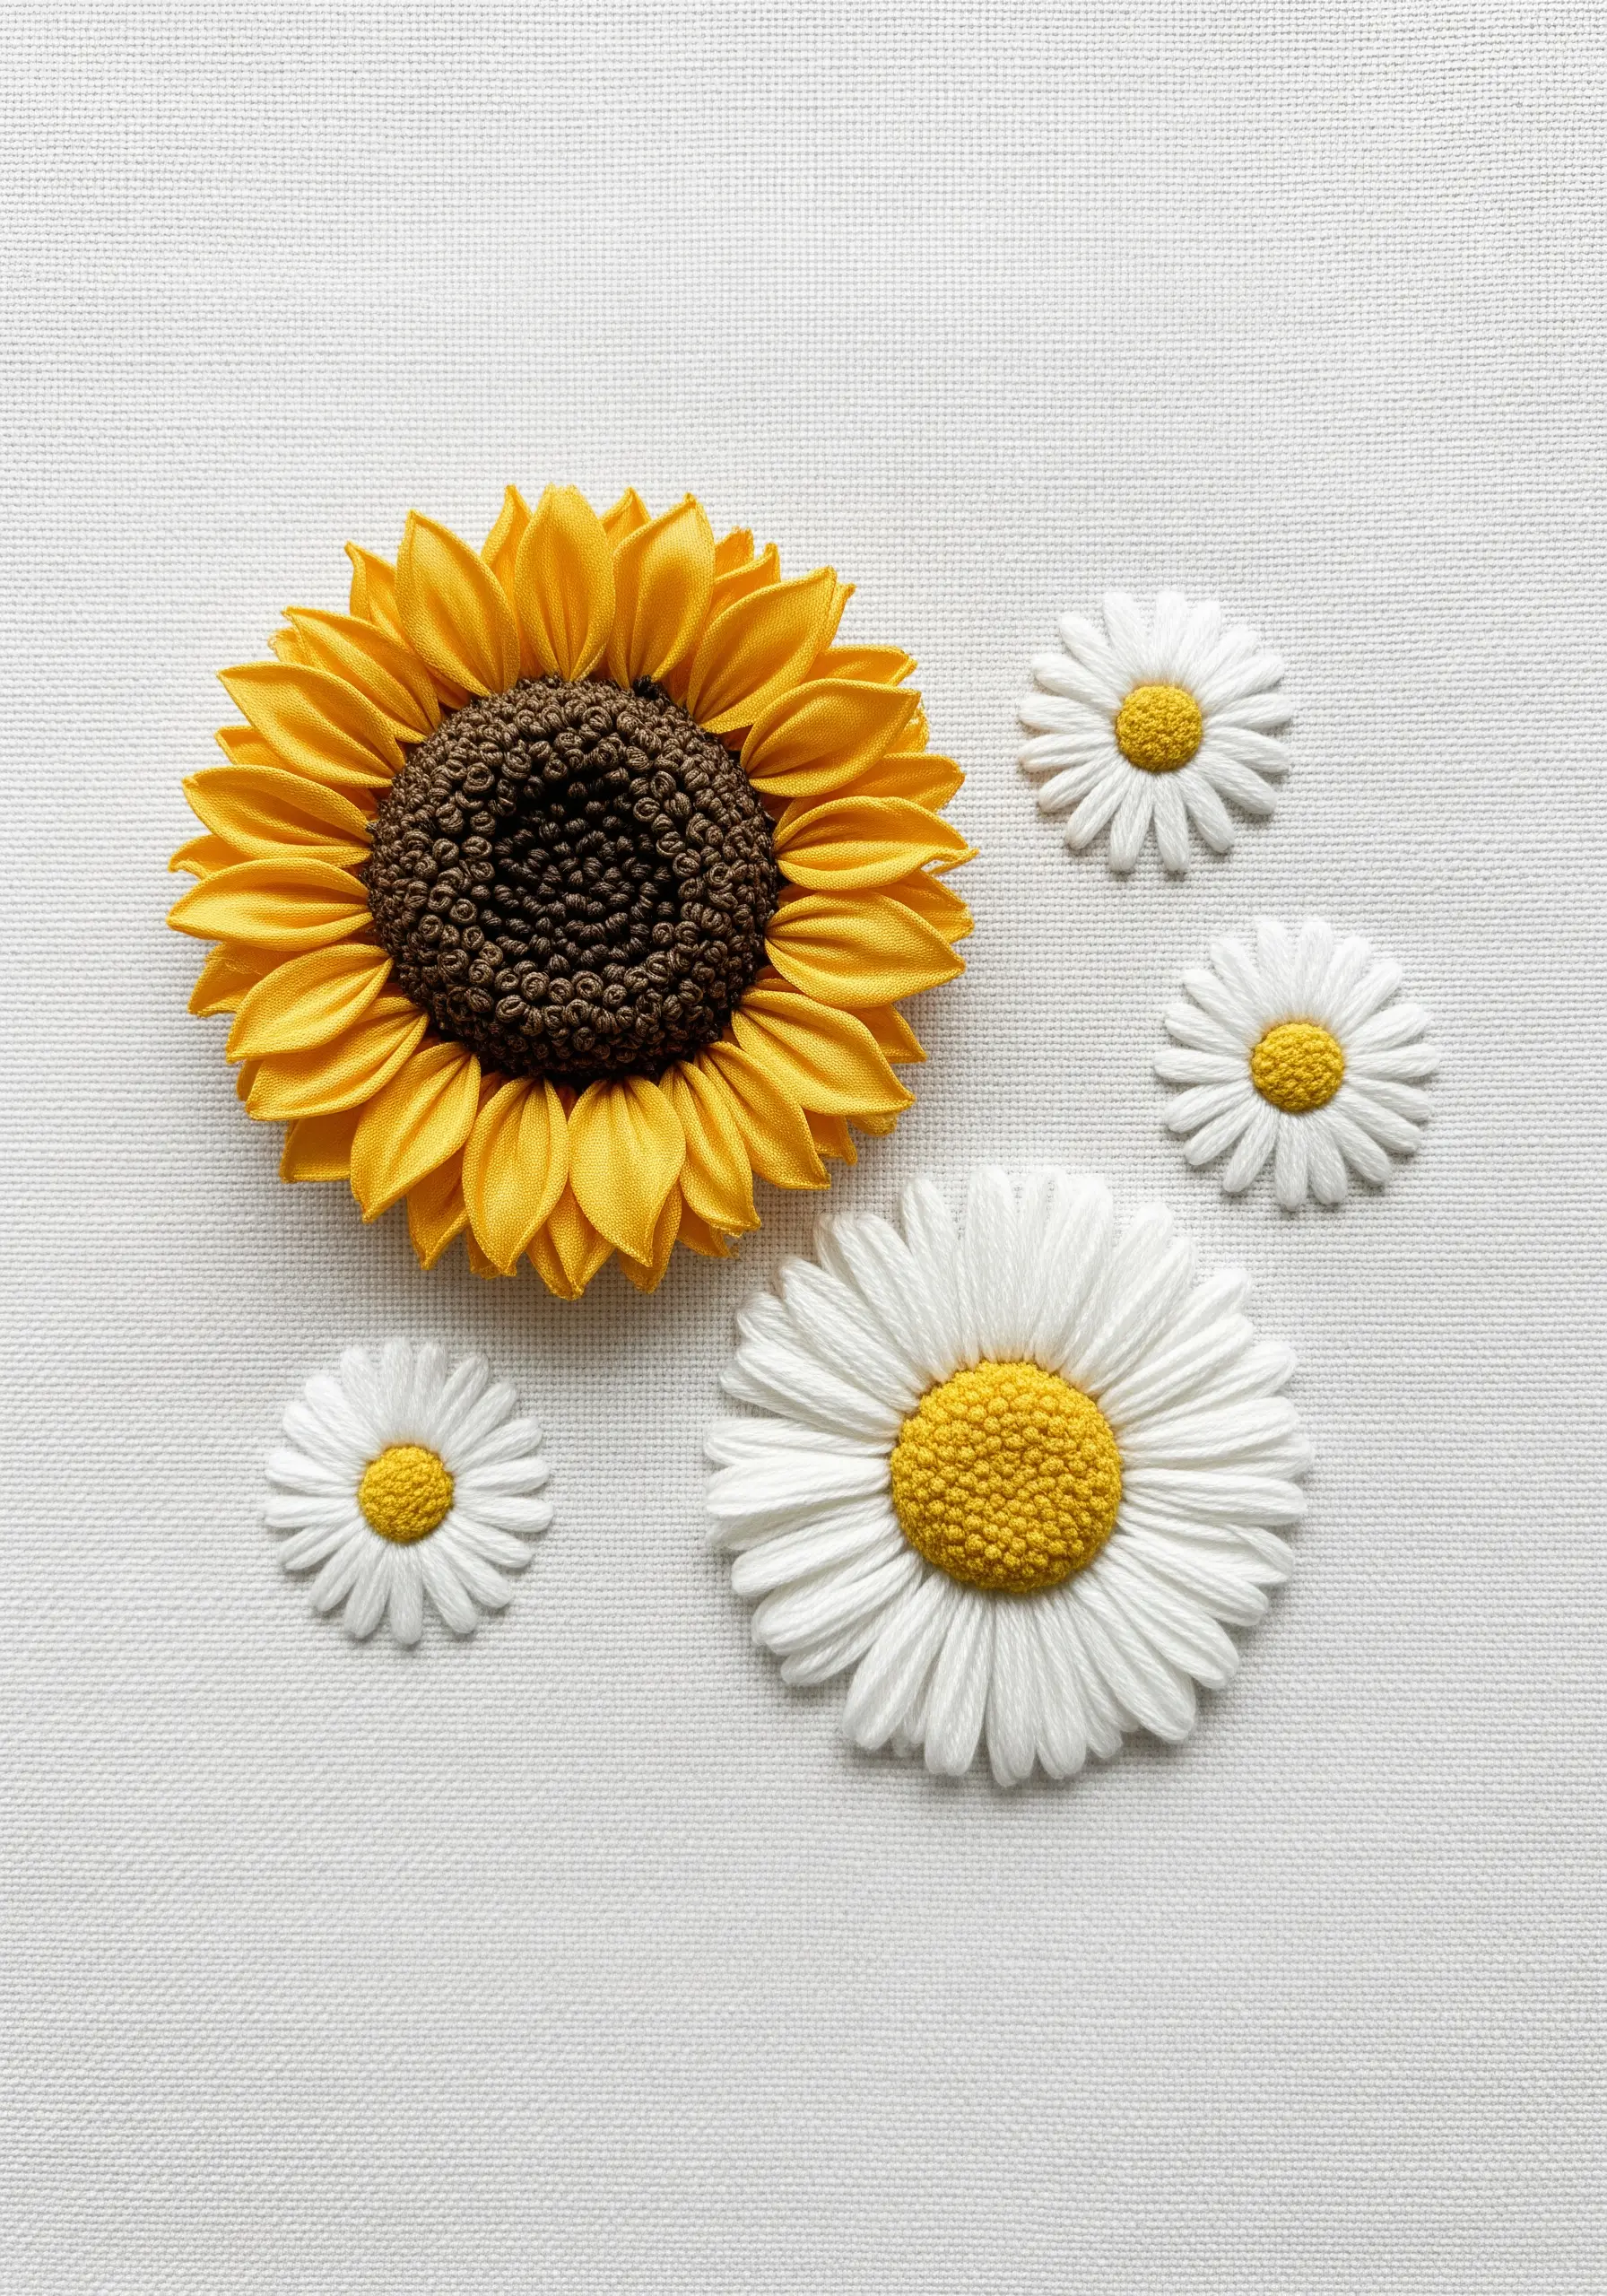
You’ve mastered the basic stitches, and now you’re ready for the element that transforms your work from craft to art: color. Creating a smooth, believable gradient is the key to giving your embroidery breathtaking depth and realism, but it can feel intimidating.
This is where the sunflower-to-daisy transition comes in. Think of it not just as two different flowers, but as a complete spectrum of light. You have the fiery, saturated heart of the sunflower, its bright golden tips, and the slow fade into the pale, creamy hues that finally resolve into the pure white of a daisy petal.
Here, you’ll find techniques that guide you through this beautiful color journey. We’ll explore how to blend threads like paint, how to use stitch direction to create form, and how to combine these two iconic flowers into compositions that feel both classic and completely new. It’s time to stitch with the confidence of a painter.
1. Master the Photorealistic Petal Gradient
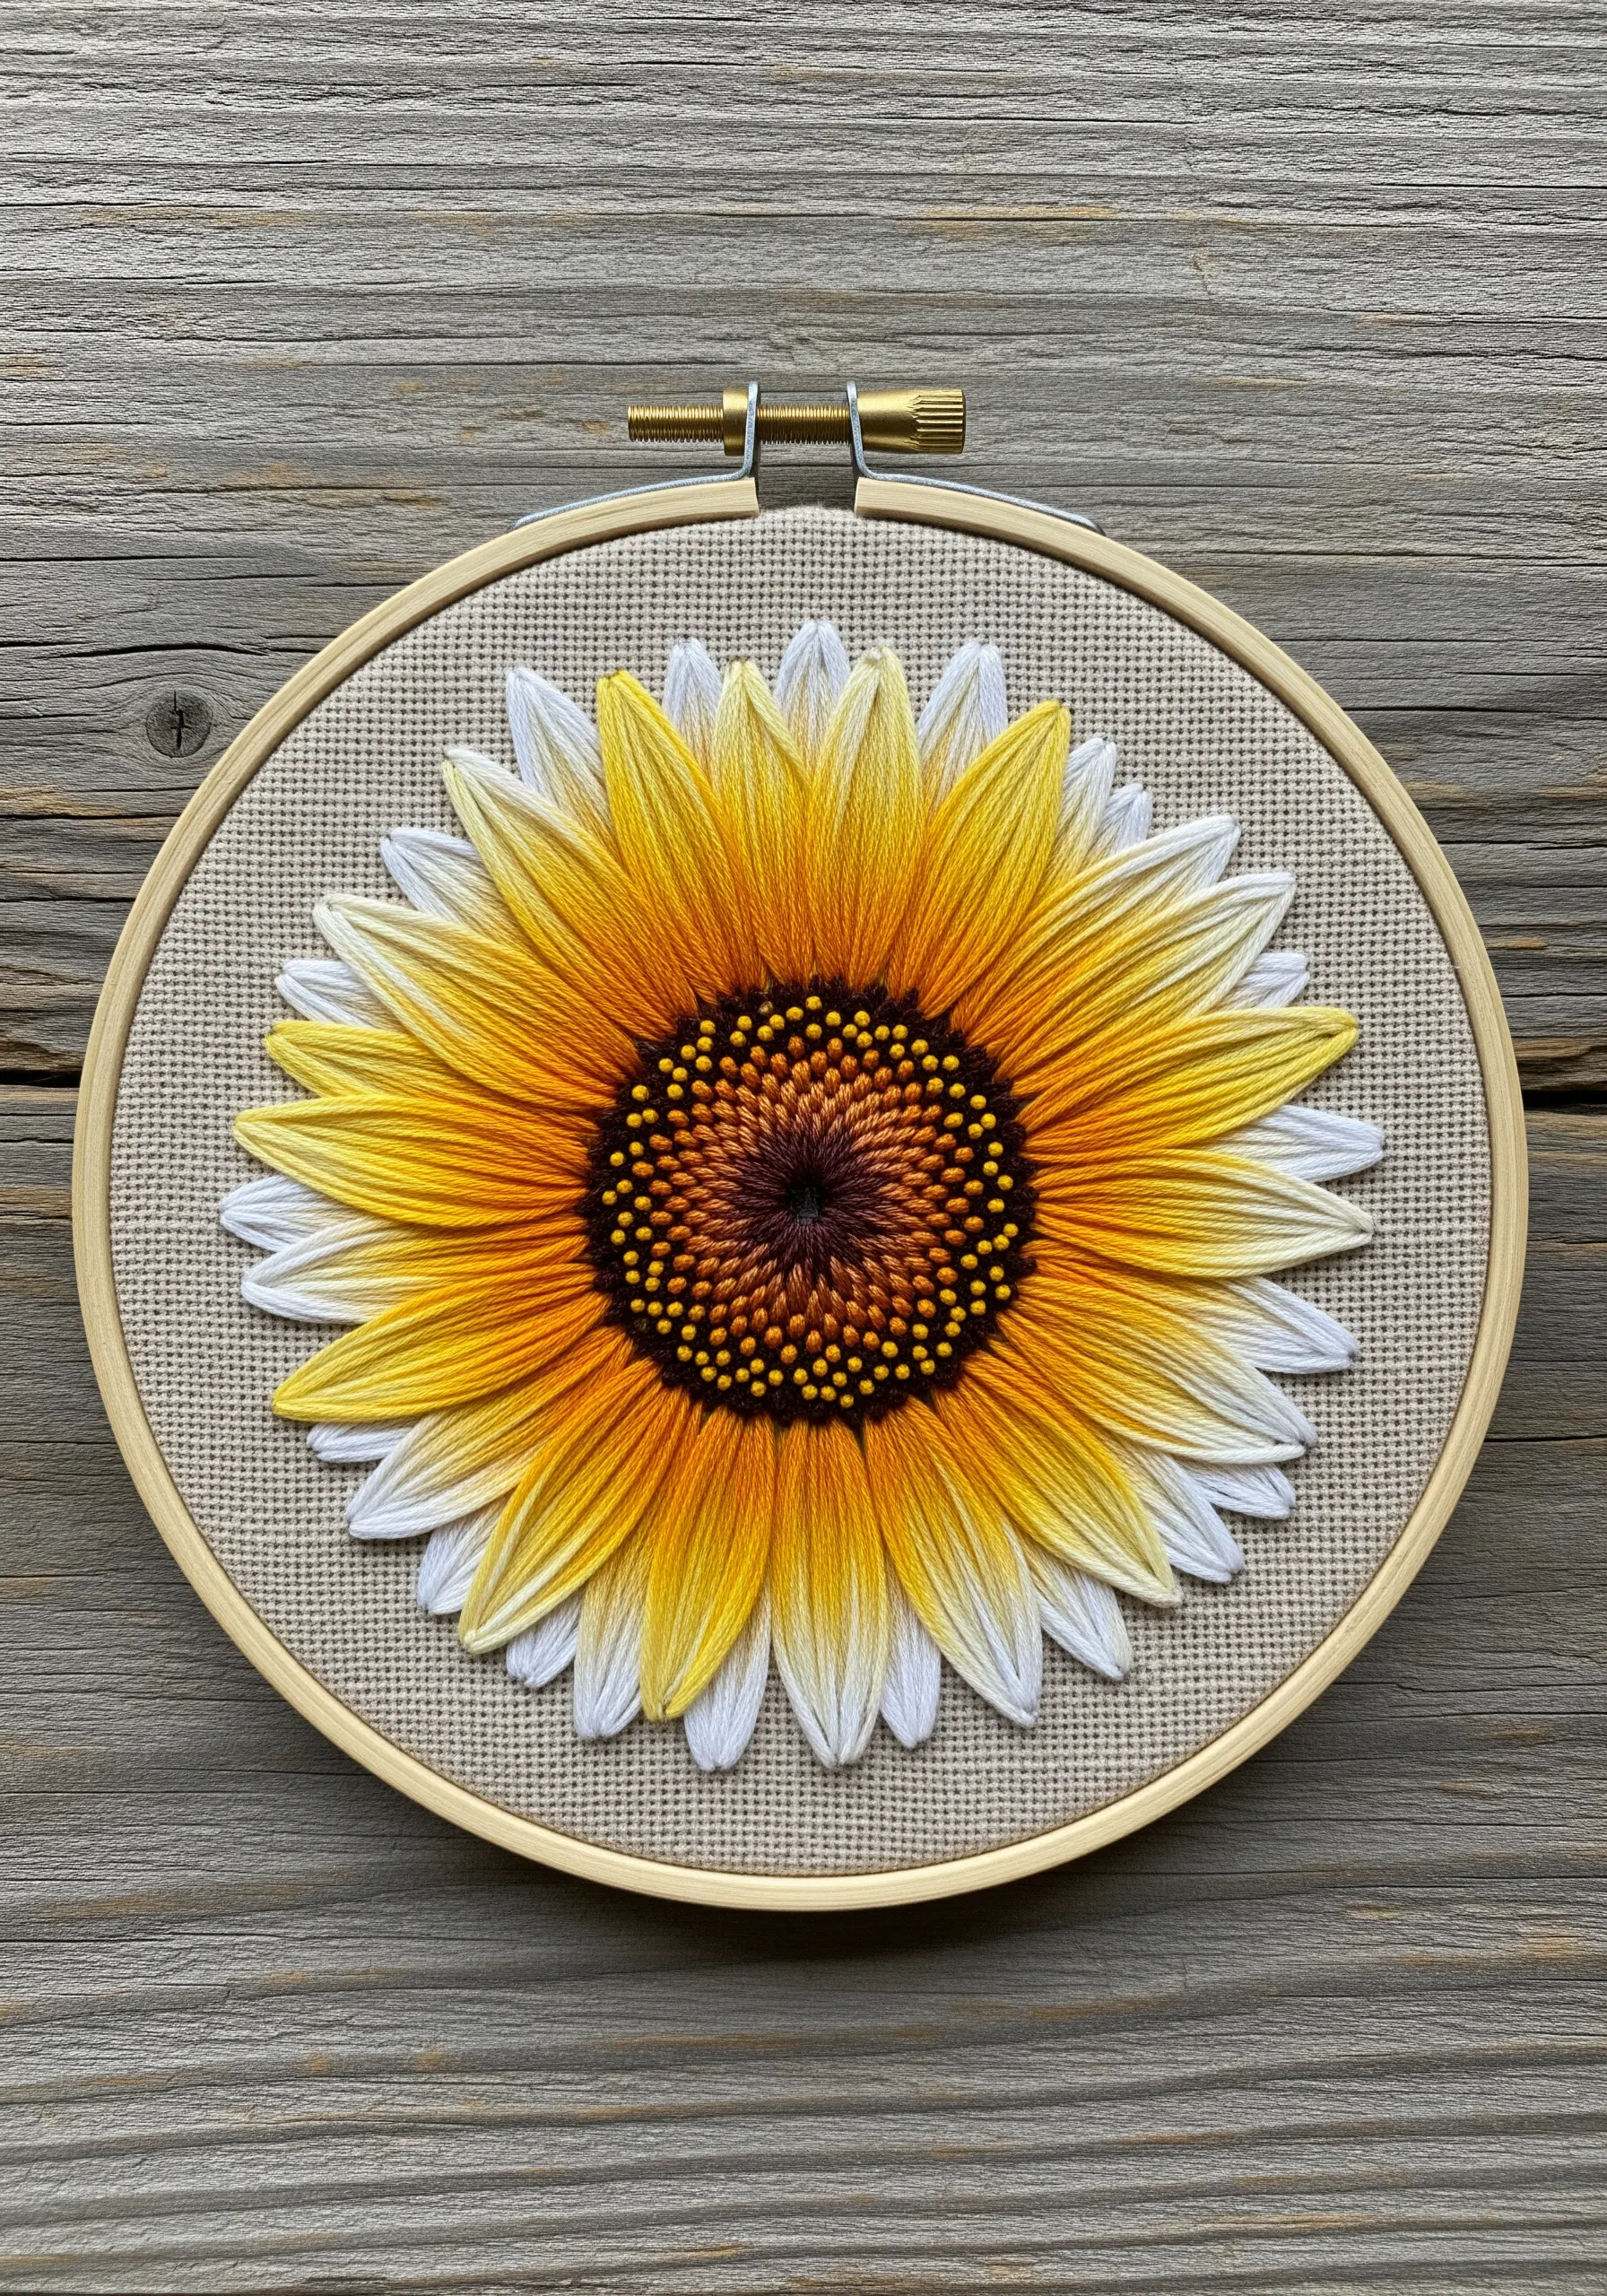
To achieve this level of realism, you’ll rely on the long-and-short stitch, using at least five to seven shades ranging from deep orange to gold, yellow, and finally, pure white.
Begin stitching at the tip of each petal with your lightest color (white), working your way toward the center with progressively darker shades.
This method mimics how light naturally hits a flower, creating convincing depth and form.
For the smoothest possible transitions, use only a single strand of six-strand embroidery floss—it allows the colors to blend seamlessly, almost like paint.
2. Create a Meadow with Contrasting Textures

Combine bold sunflower petals with the softer, slightly raised forms of daisies to build a field with visual interest.
Use three or four strands of floss for the sunflowers’ satin-stitched petals to give them prominence and a slight sheen.
In contrast, use only two strands for the daisies, which keeps them feeling more delicate and further back in the composition.
This intentional variation in thread weight is a simple way to create hierarchy and a dynamic, balanced scene without adding complex stitches.
3. Design a Wreath with Intentional Color Flow
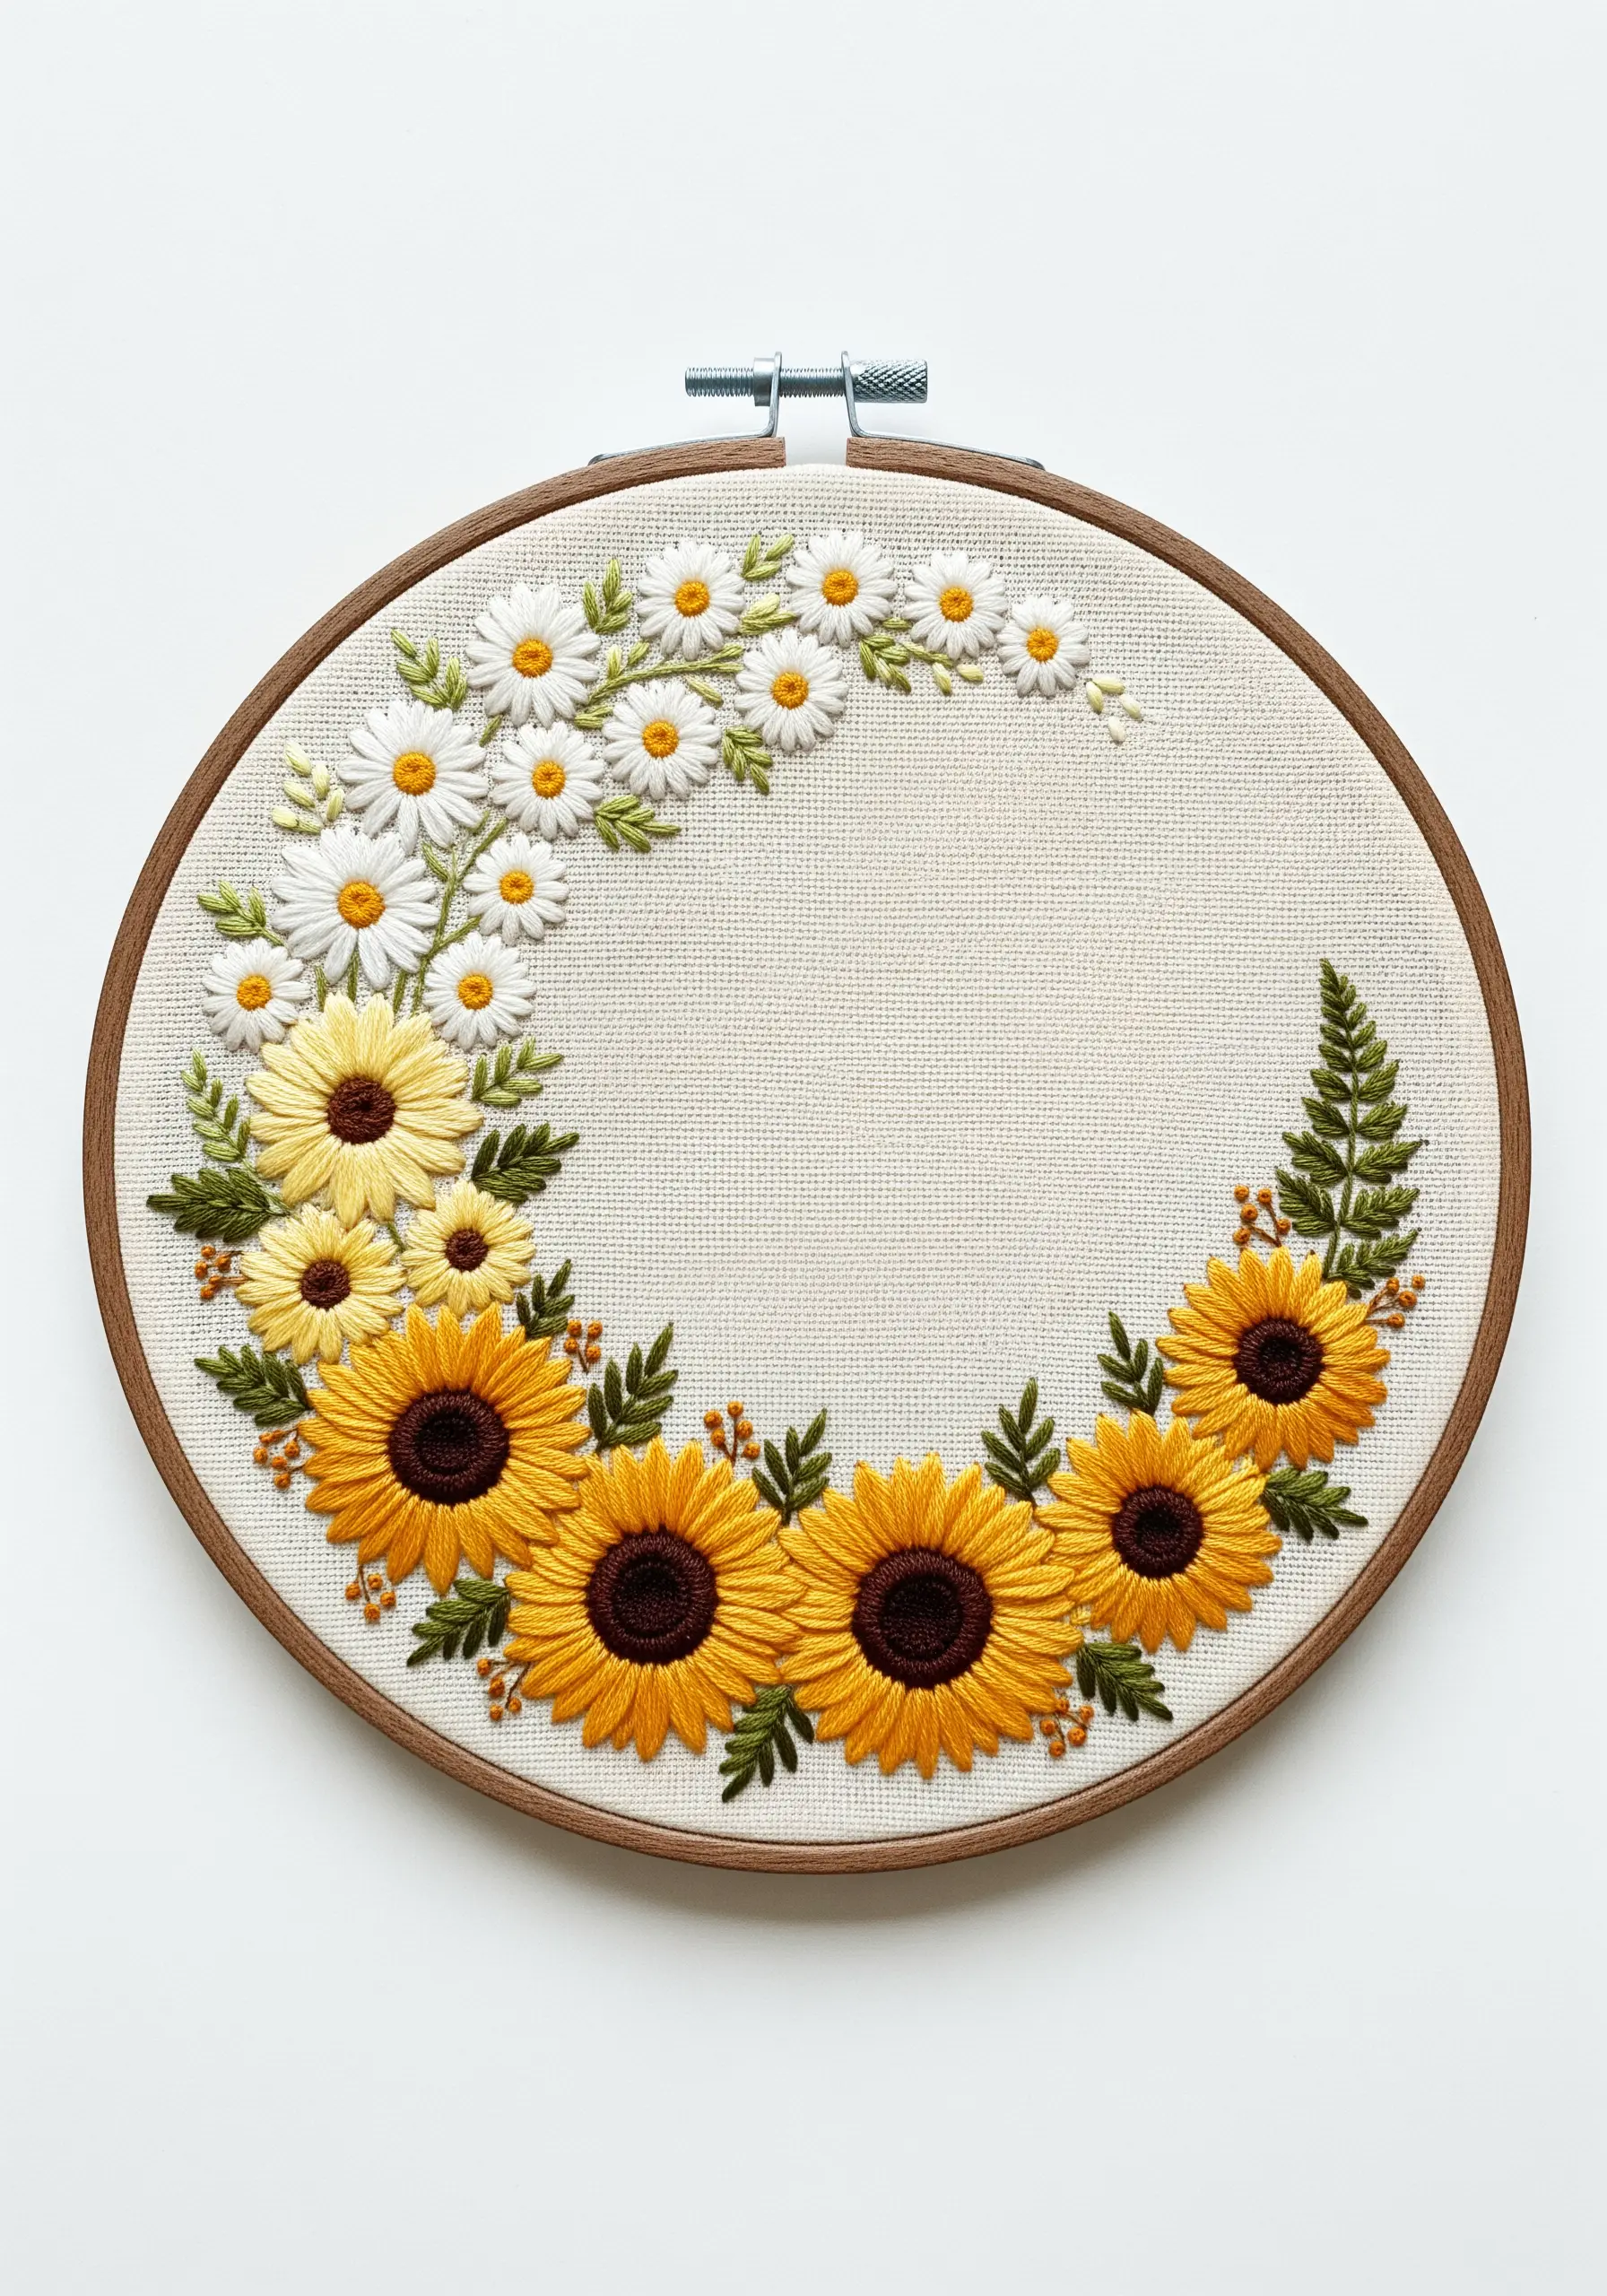
Arrange your wreath to tell a story of transformation, moving from pure white daisies into pale yellow hybrids, and finally into rich, golden sunflowers.
This gradual color shift creates a beautiful visual narrative that guides the viewer’s eye around the hoop.
To maintain a cohesive look, ensure the stitch direction on all the petals follows the curve of the wreath.
This subtle detail unifies the different flower types and gives the entire piece a professional, polished finish.
4. Arrange a Cascading Floral Bouquet
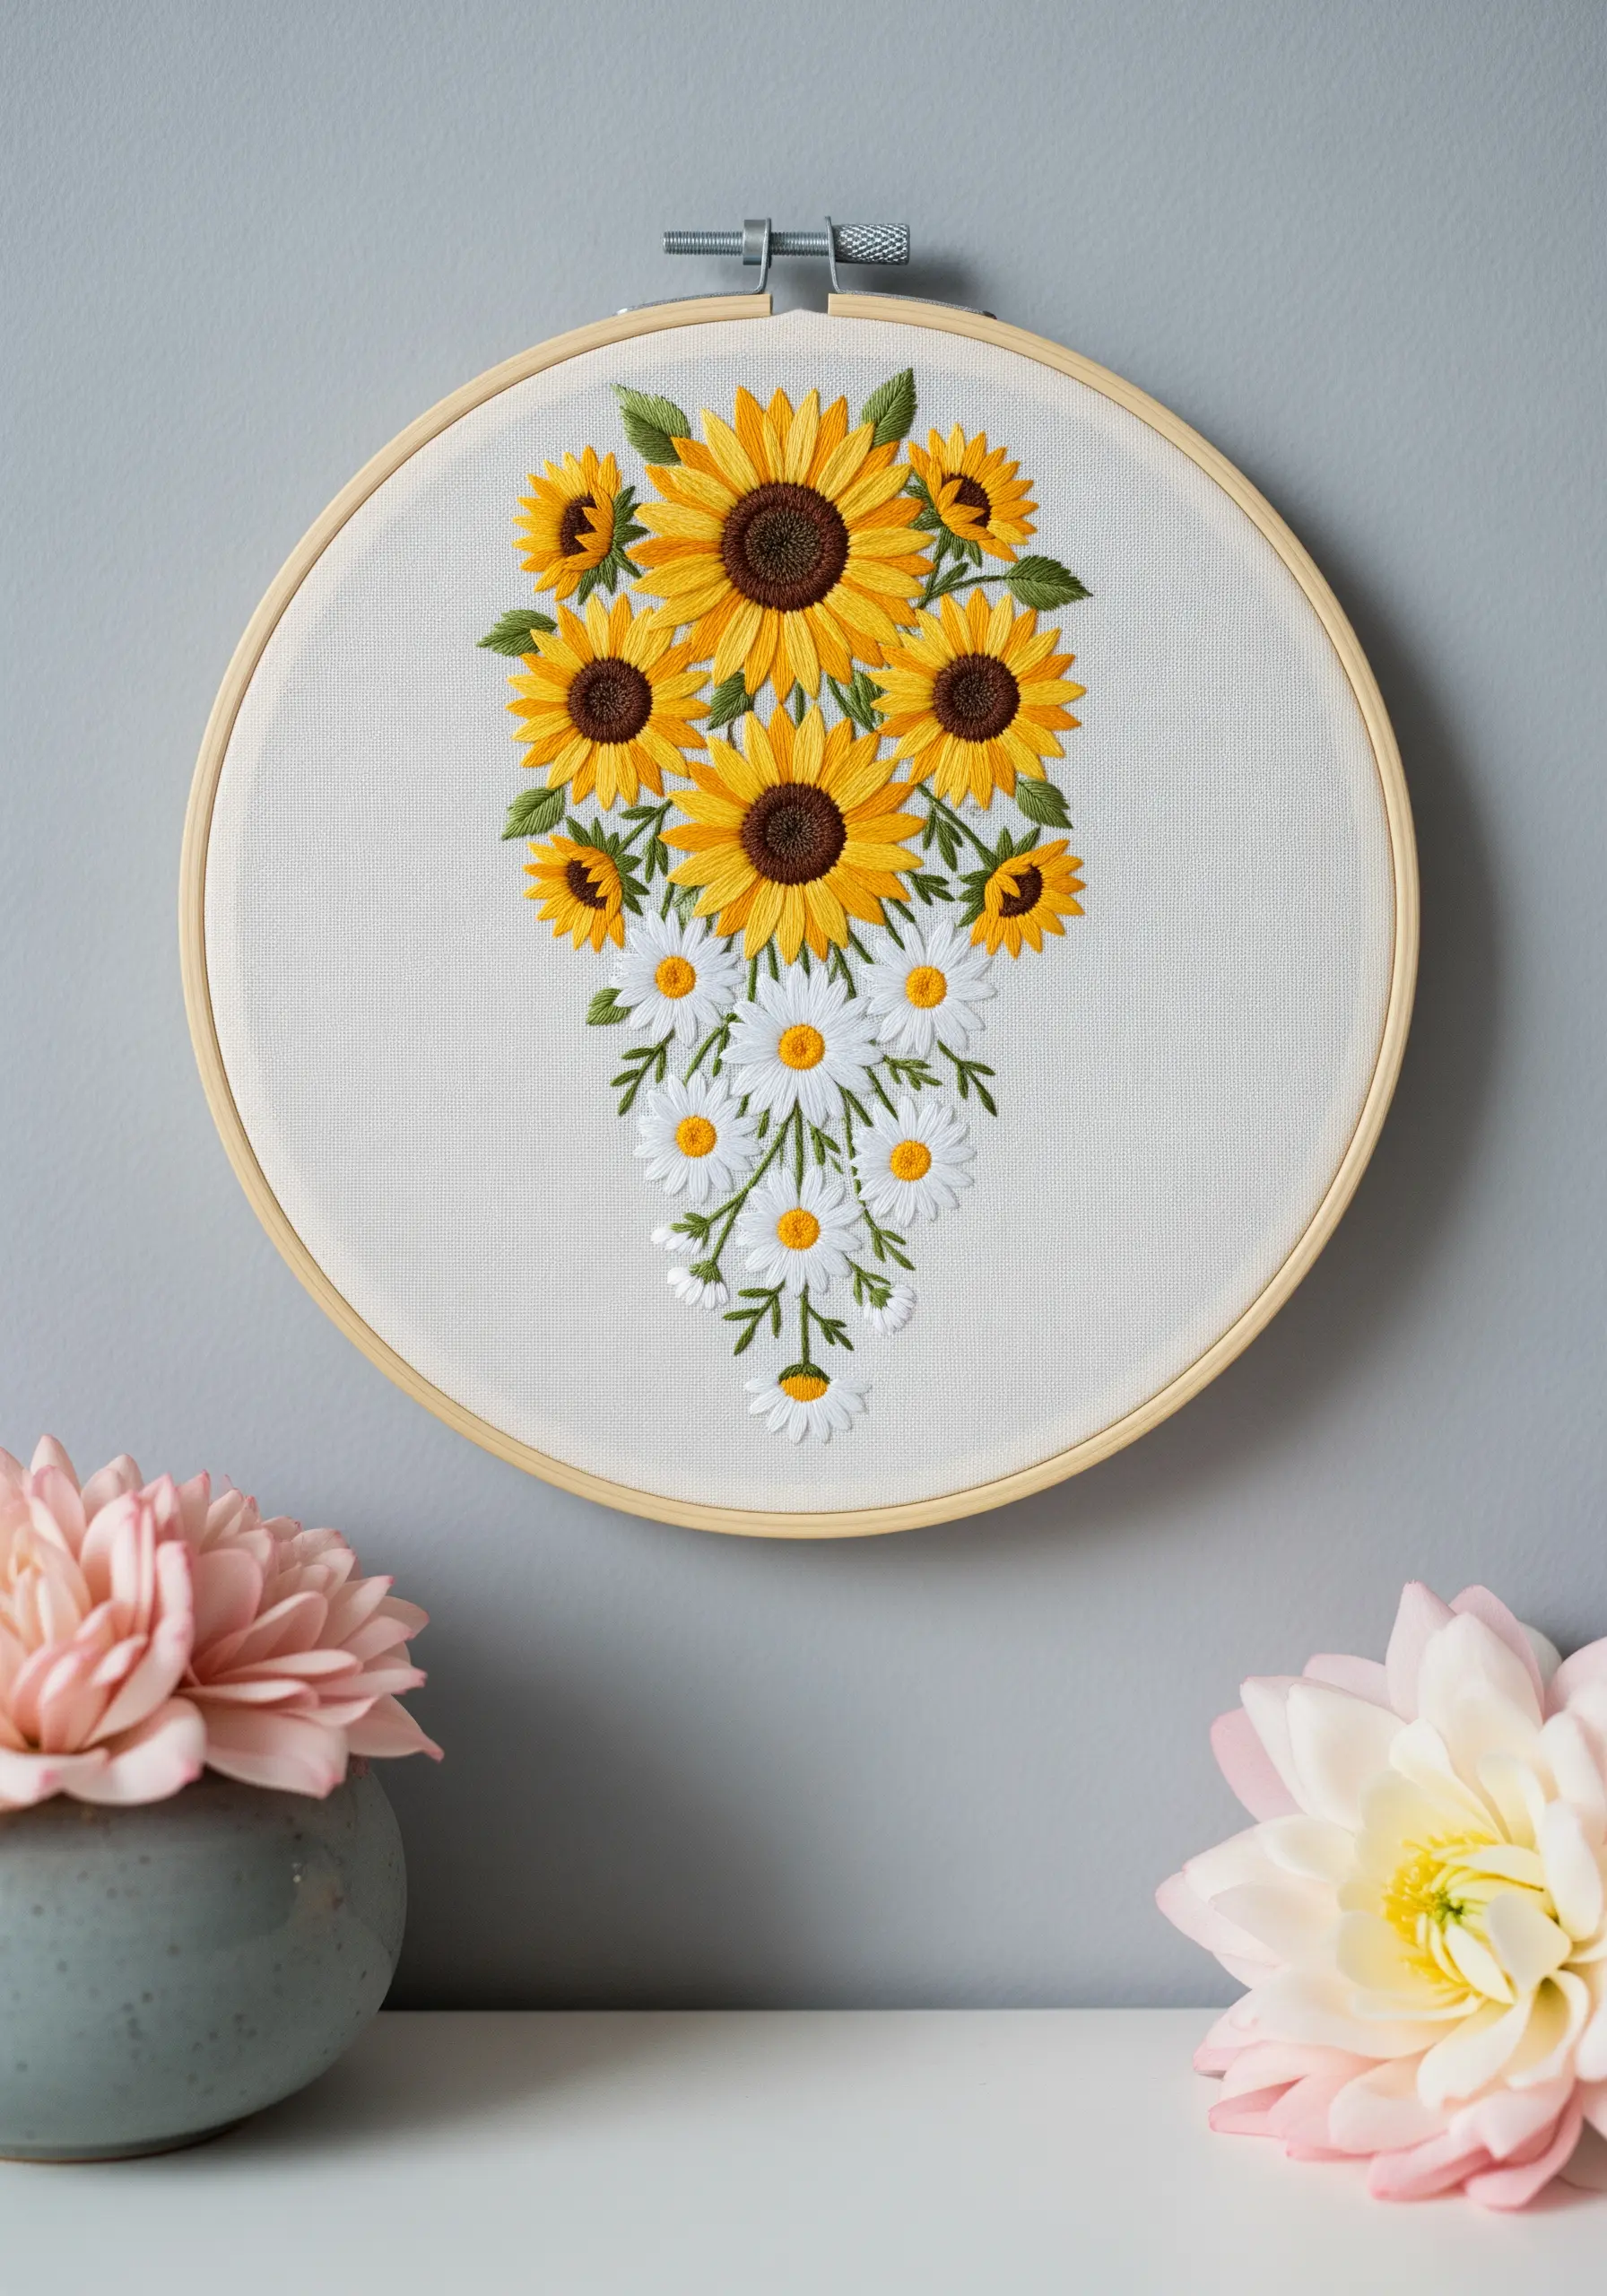
You can create a sense of natural gravity and movement by structuring your composition vertically.
Place the larger, visually heavier sunflowers at the top of the arrangement, allowing the smaller, lighter daisies to trail downwards as if spilling out of a vase.
This classic compositional technique draws the eye through the entire piece, creating a graceful and balanced flow.
Vary the length of the daisy stems to enhance the feeling of organic, spontaneous movement.
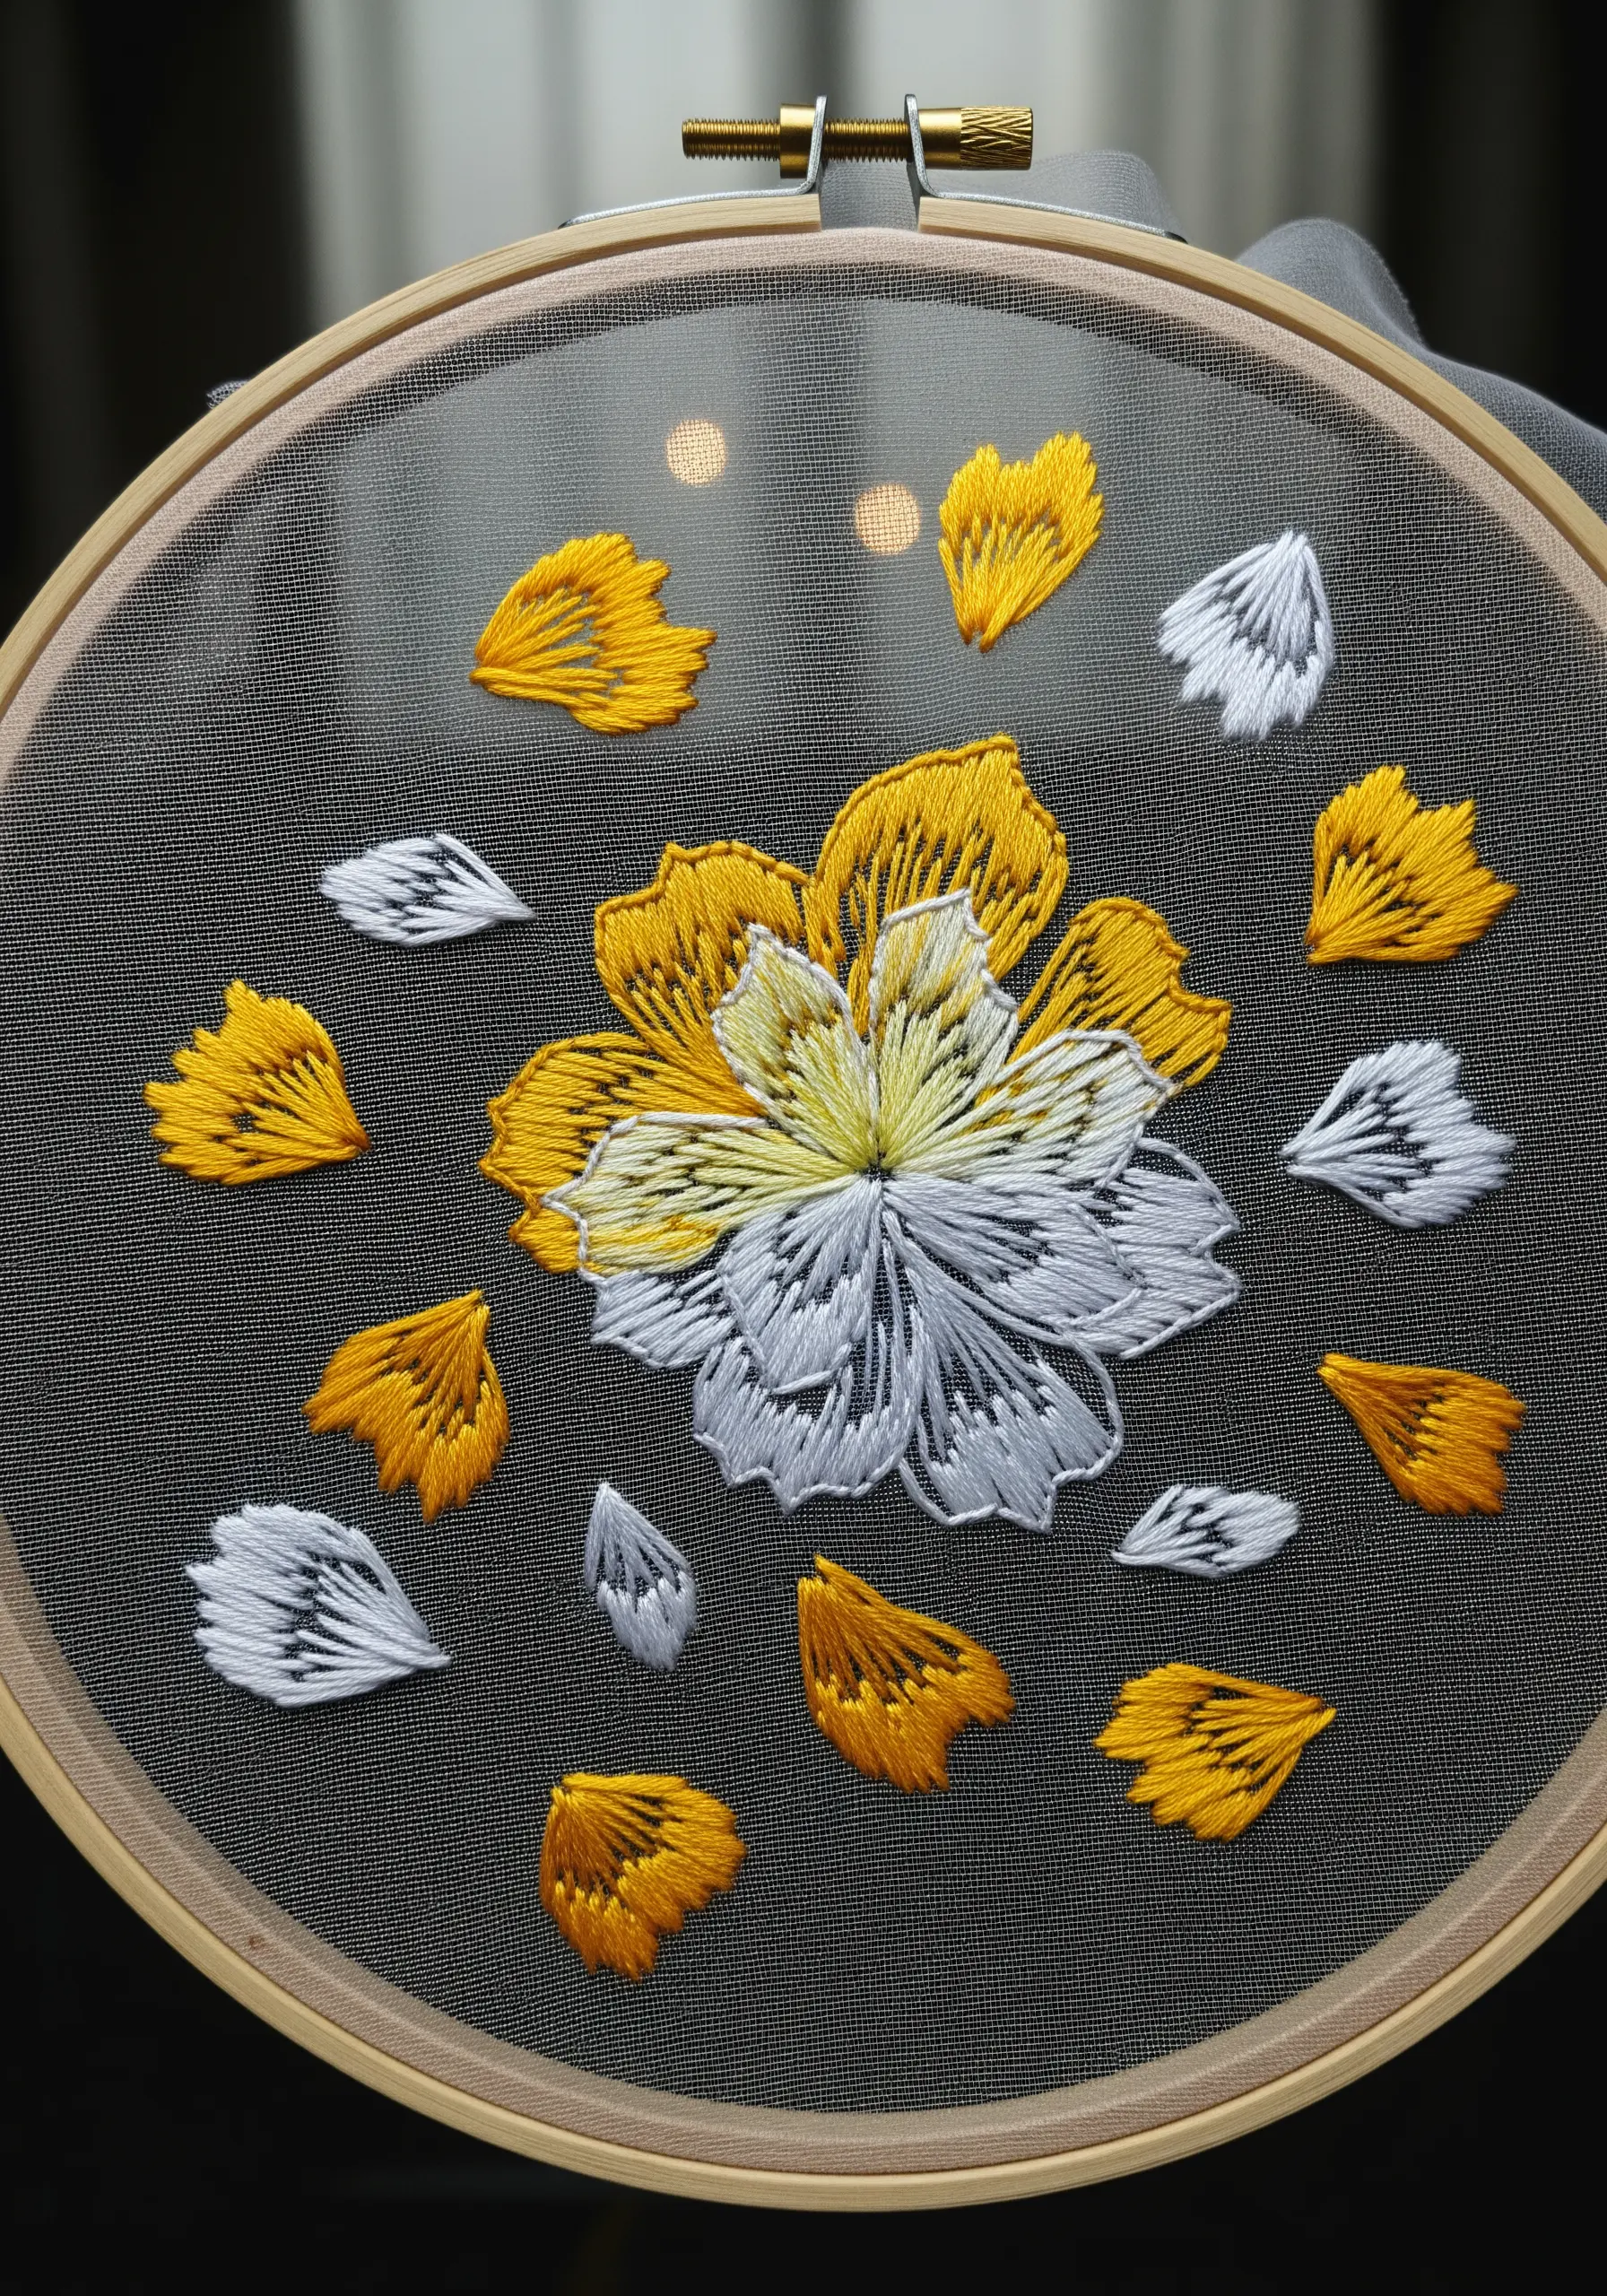
5. Deconstruct Petals to Perfect Your Blending

Instead of tackling a full flower, isolate individual petals to practice your gradient color blending without pressure.
Create several petal shapes on your fabric and experiment with different stitch combinations and color transitions in each one.
This focused exercise allows you to see exactly how different shades interact and helps you build the muscle memory needed for smooth, confident stitching on larger projects.
Try adding tiny French knots directly onto a blended petal to see how texture interacts with color.
6. Embellish Denim with a Radiant Floral Arc

When embroidering on a heavy fabric like denim, always use a stick-on, wash-away stabilizer to prevent the fabric from puckering and to give you a clear pattern to follow.
Choose high-contrast threads—bright whites and vibrant yellows will pop dramatically against the blue denim.
An arc-shaped composition is perfectly suited for the yoke of a jacket, creating a flattering and wearable piece of art that feels both custom and timeless.
7. Stitch a Hybrid Bloom to Merge Two Identities
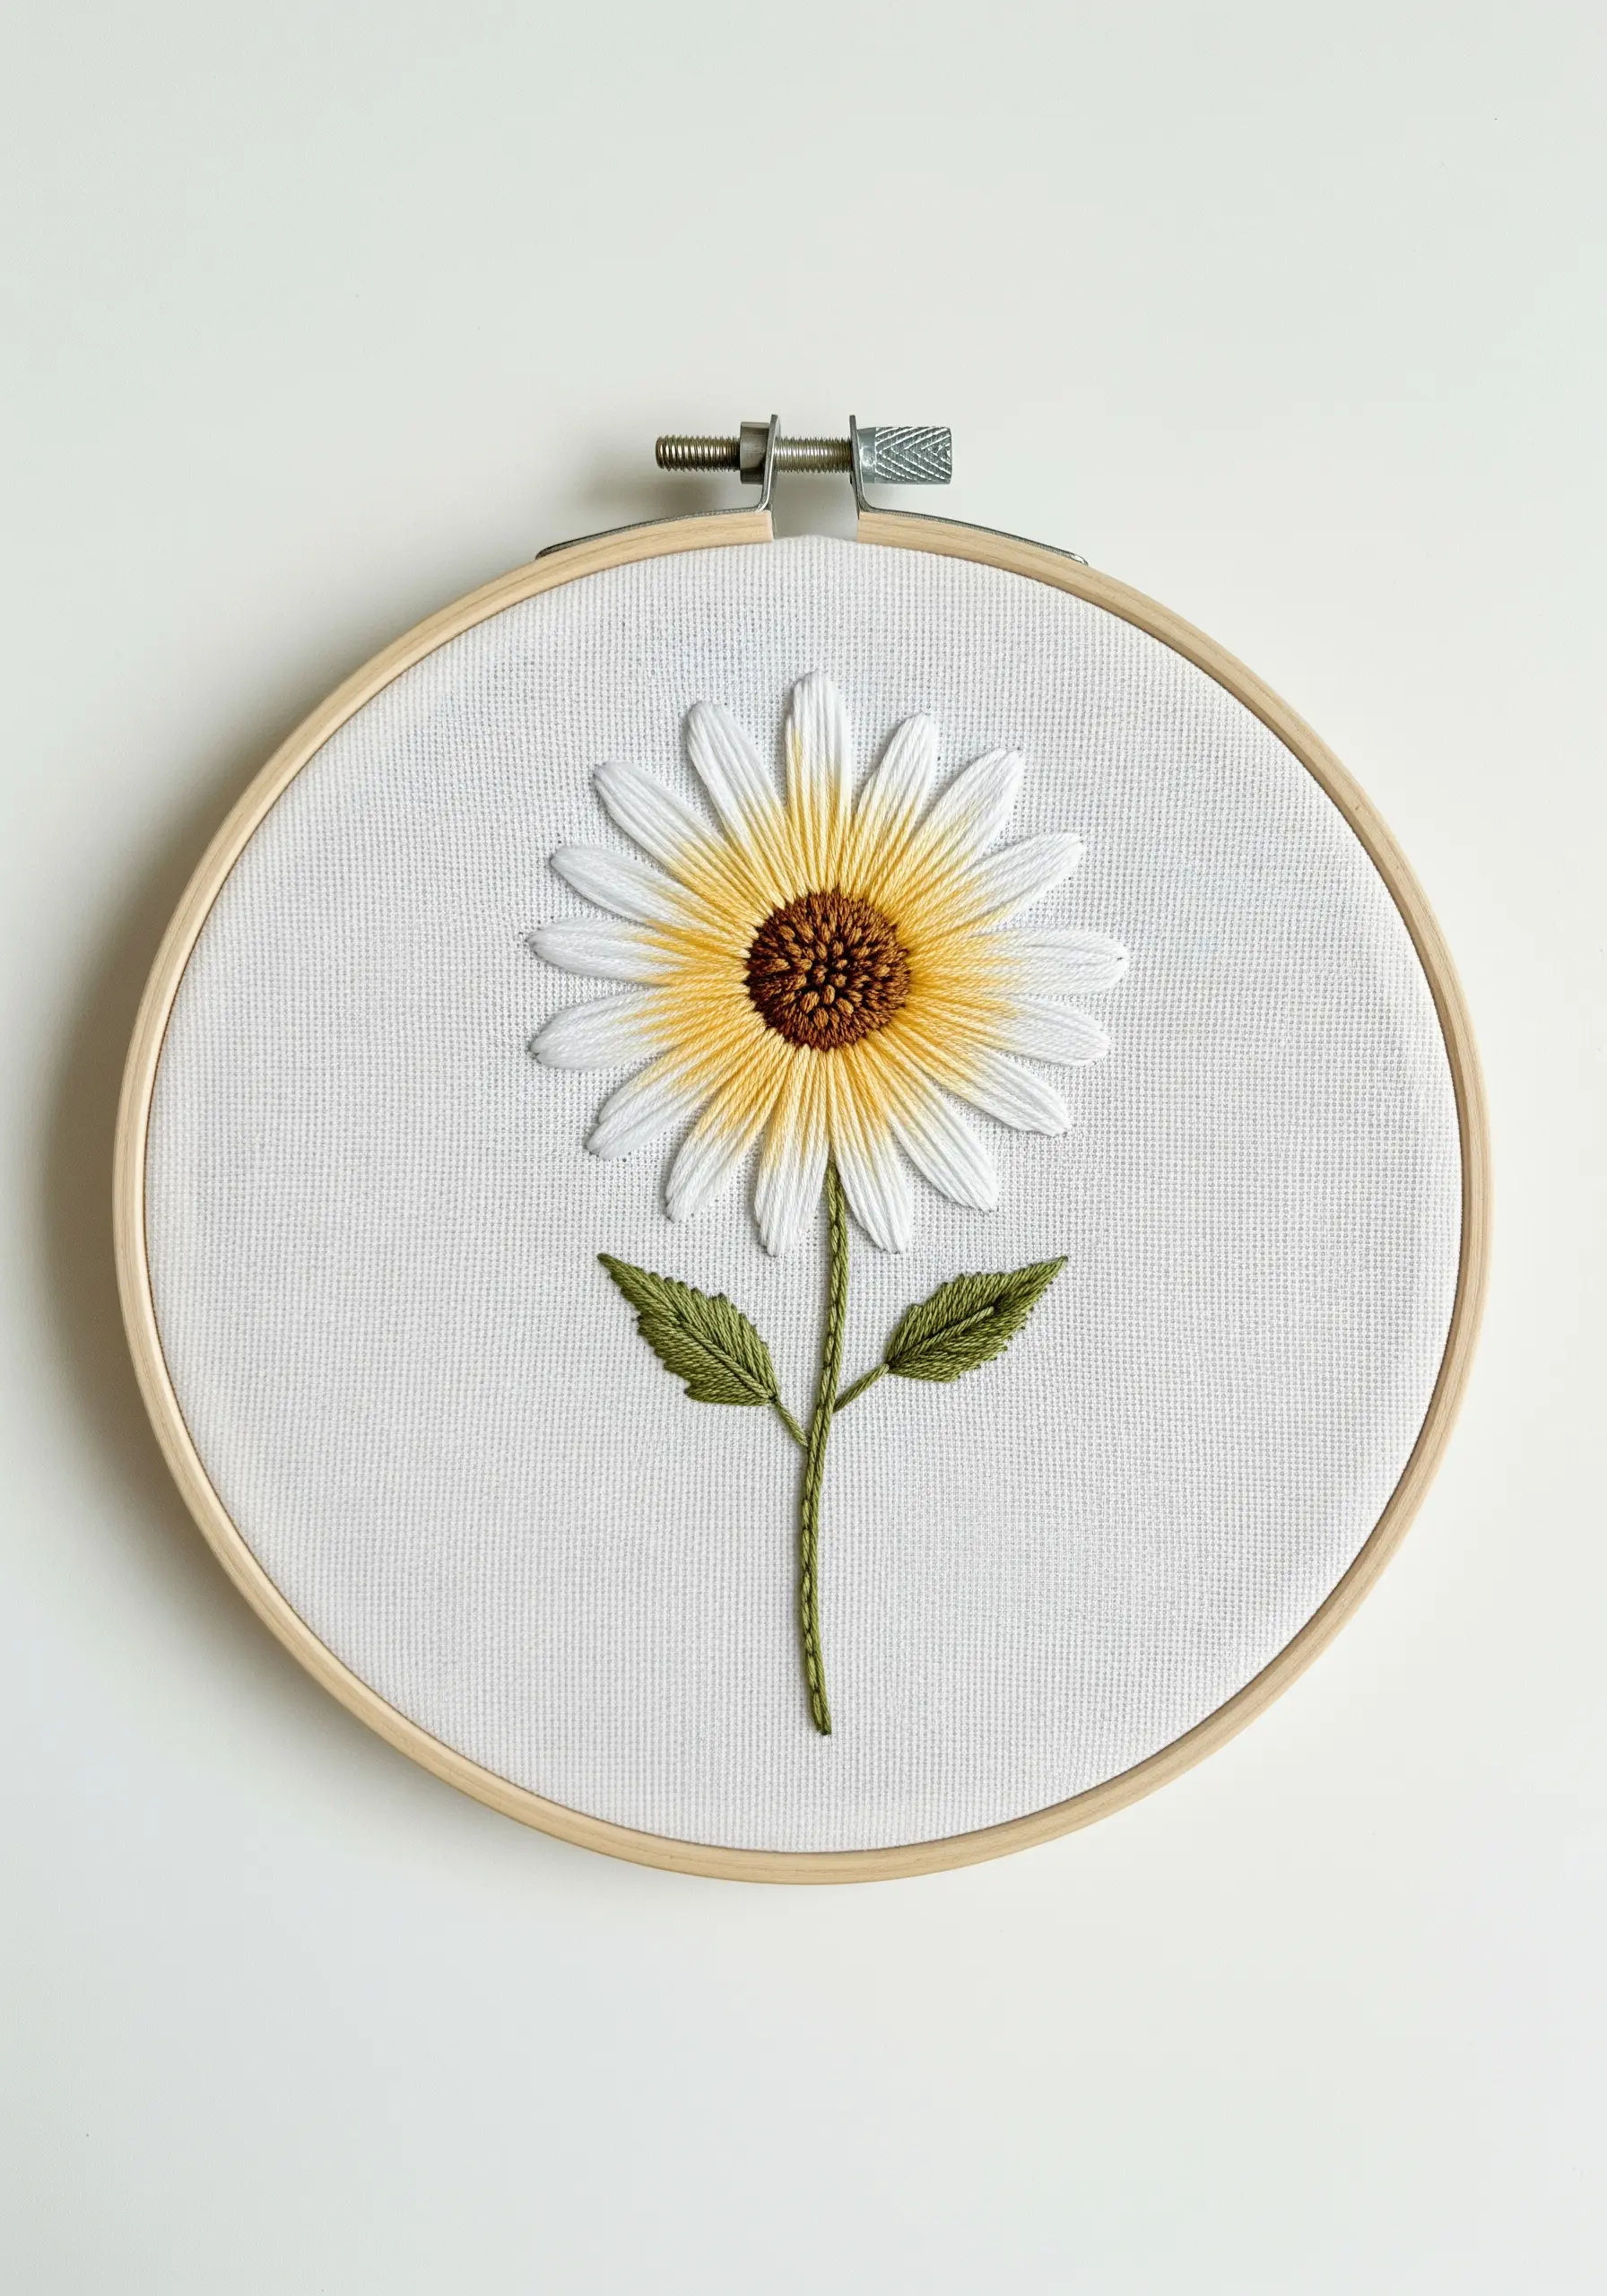
Create a stunning conceptual flower by combining the physical traits of a daisy and the color palette of a sunflower.
Use a classic long-and-short stitch to fill the daisy’s clean, white petals with a subtle yellow gradient that radiates from the center.
This surprising fusion of two familiar flowers creates an intriguing and artistic design that immediately captures attention and showcases your skill in color theory.
8. Fuse Sculptural Fiber Art with Delicate Stitches
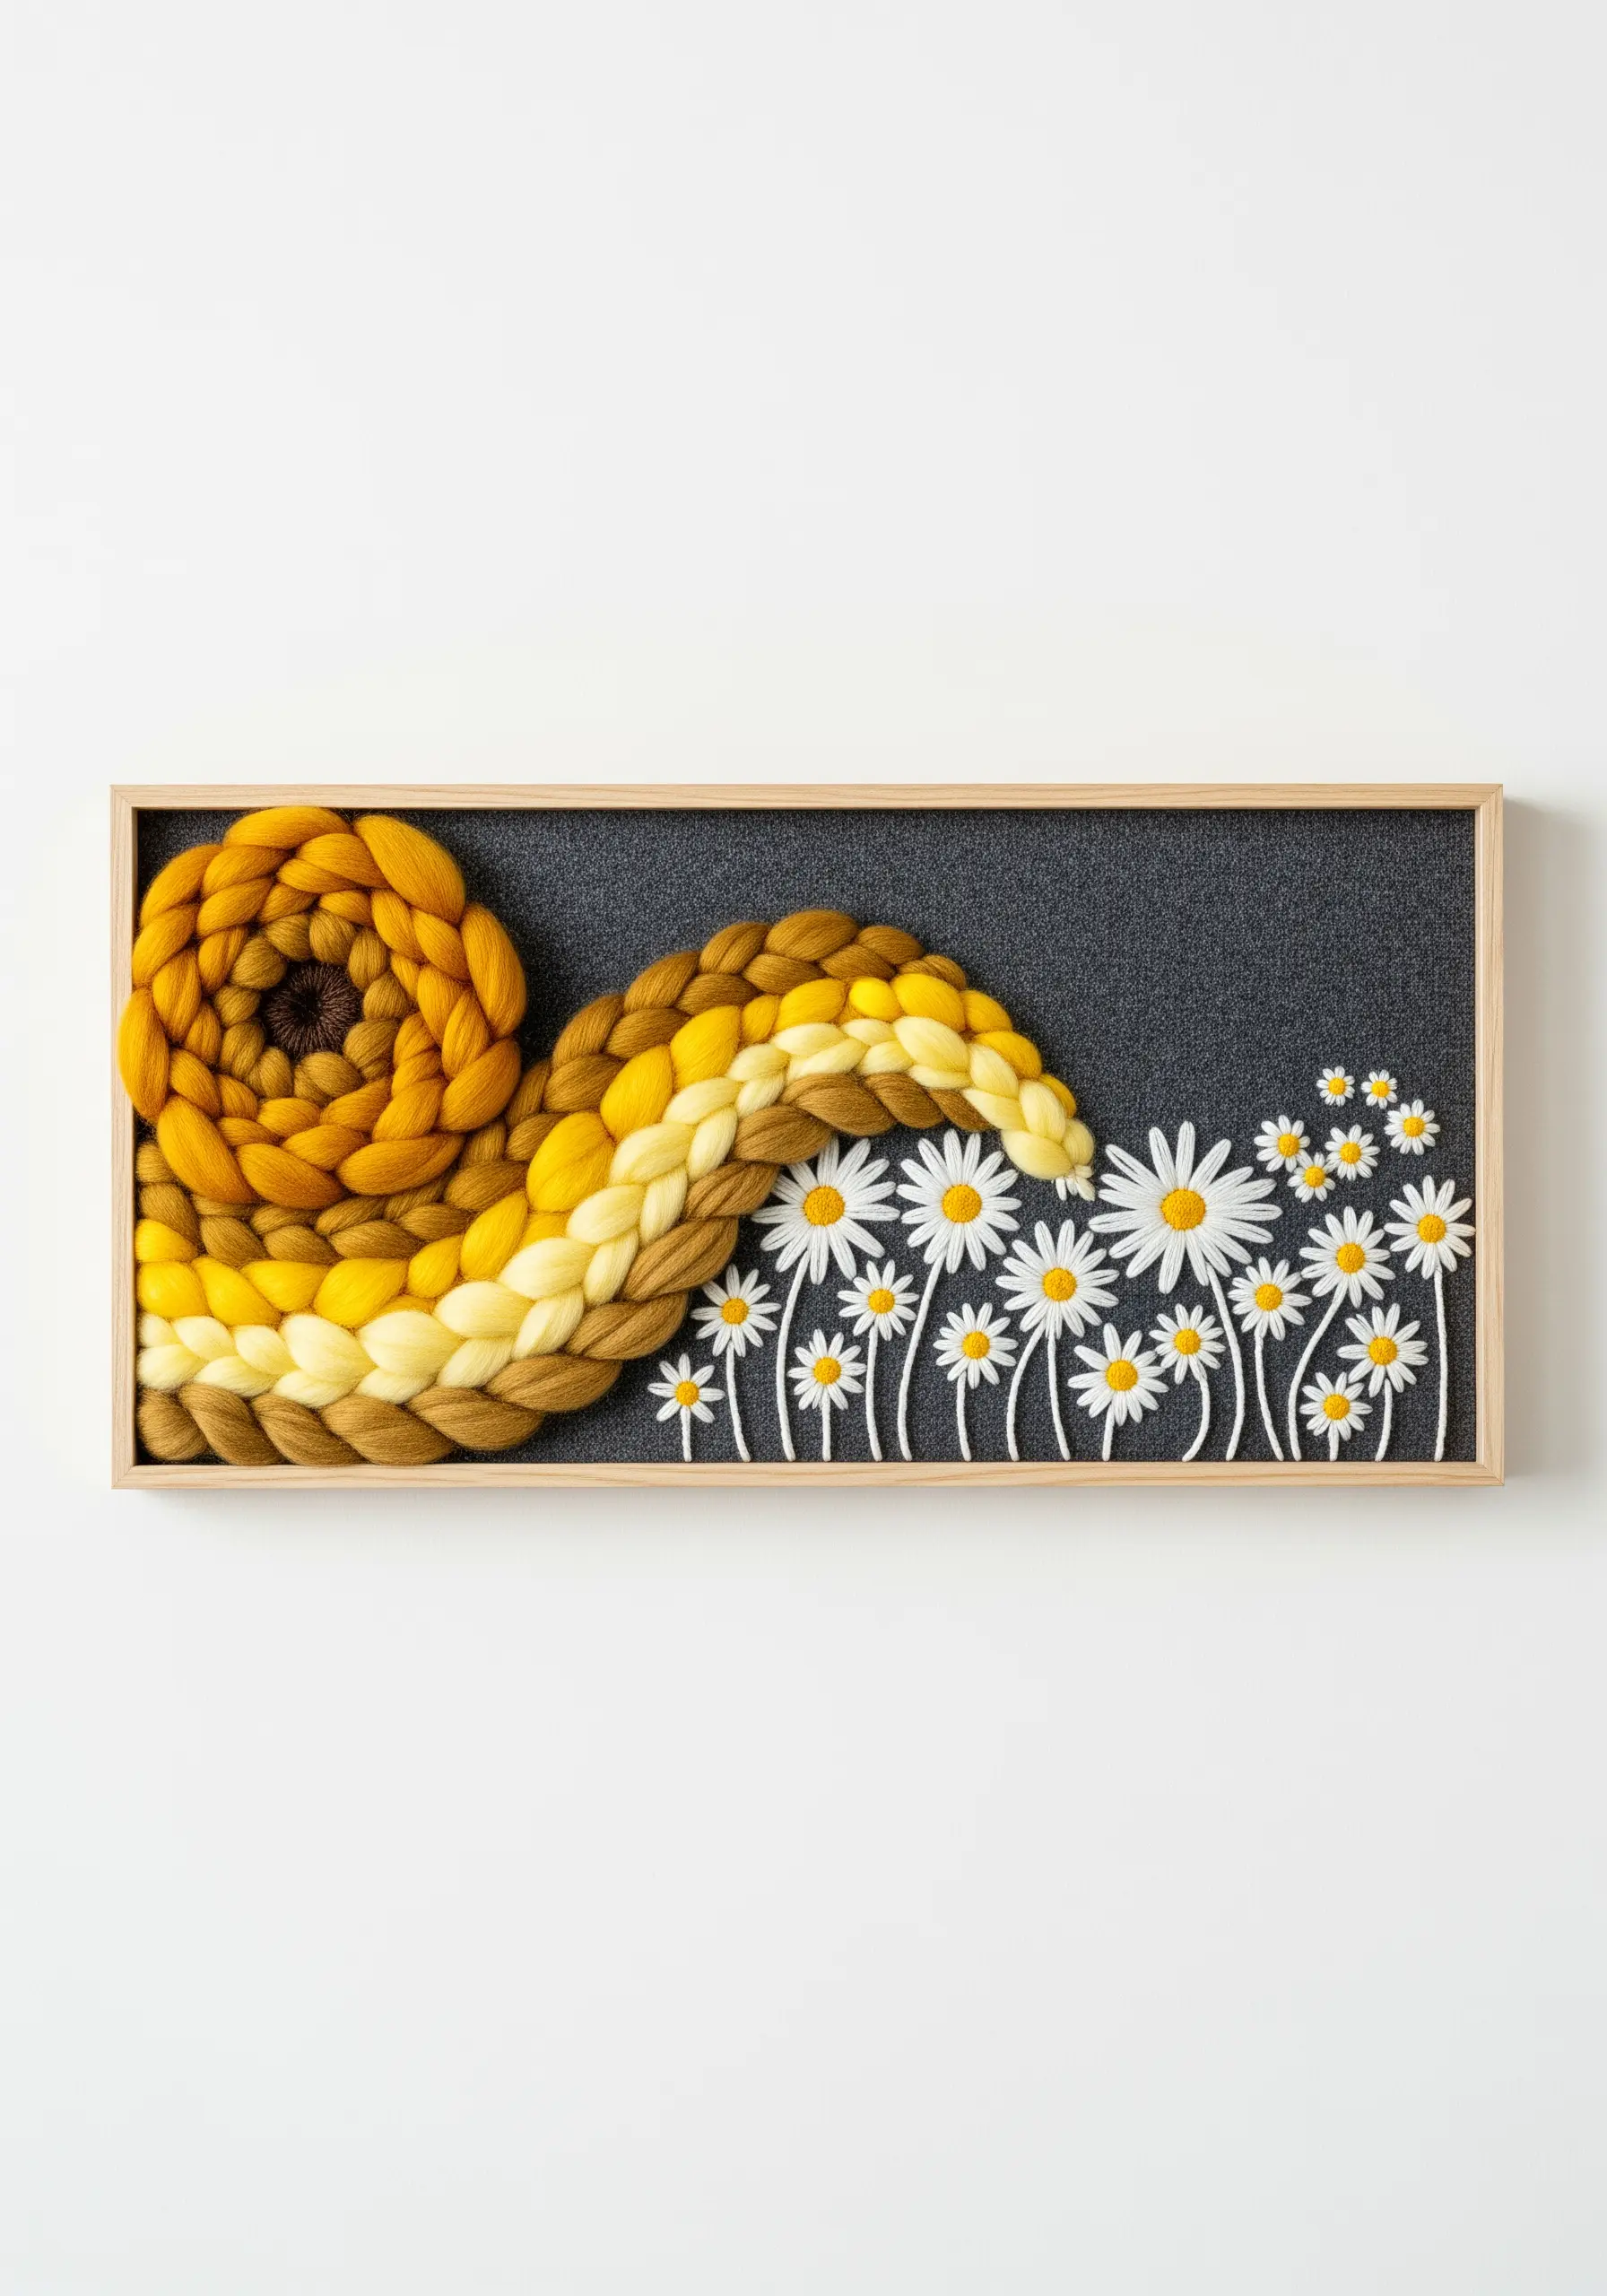
Introduce a dramatic textural contrast by pairing thick, sculptural yarn with finely detailed embroidery.
Create a bold, sweeping shape with chunky woven yarn, then stitch delicate daisies appearing to grow in its shadow.
The difference in scale and texture—from the soft, thick wool to the precise, flat stitches—creates a powerful tactile art piece with undeniable presence.
Mount your finished work on a fabric-covered canvas frame for a clean, gallery-ready display.
9. Tell a Story with a Connected Diptych
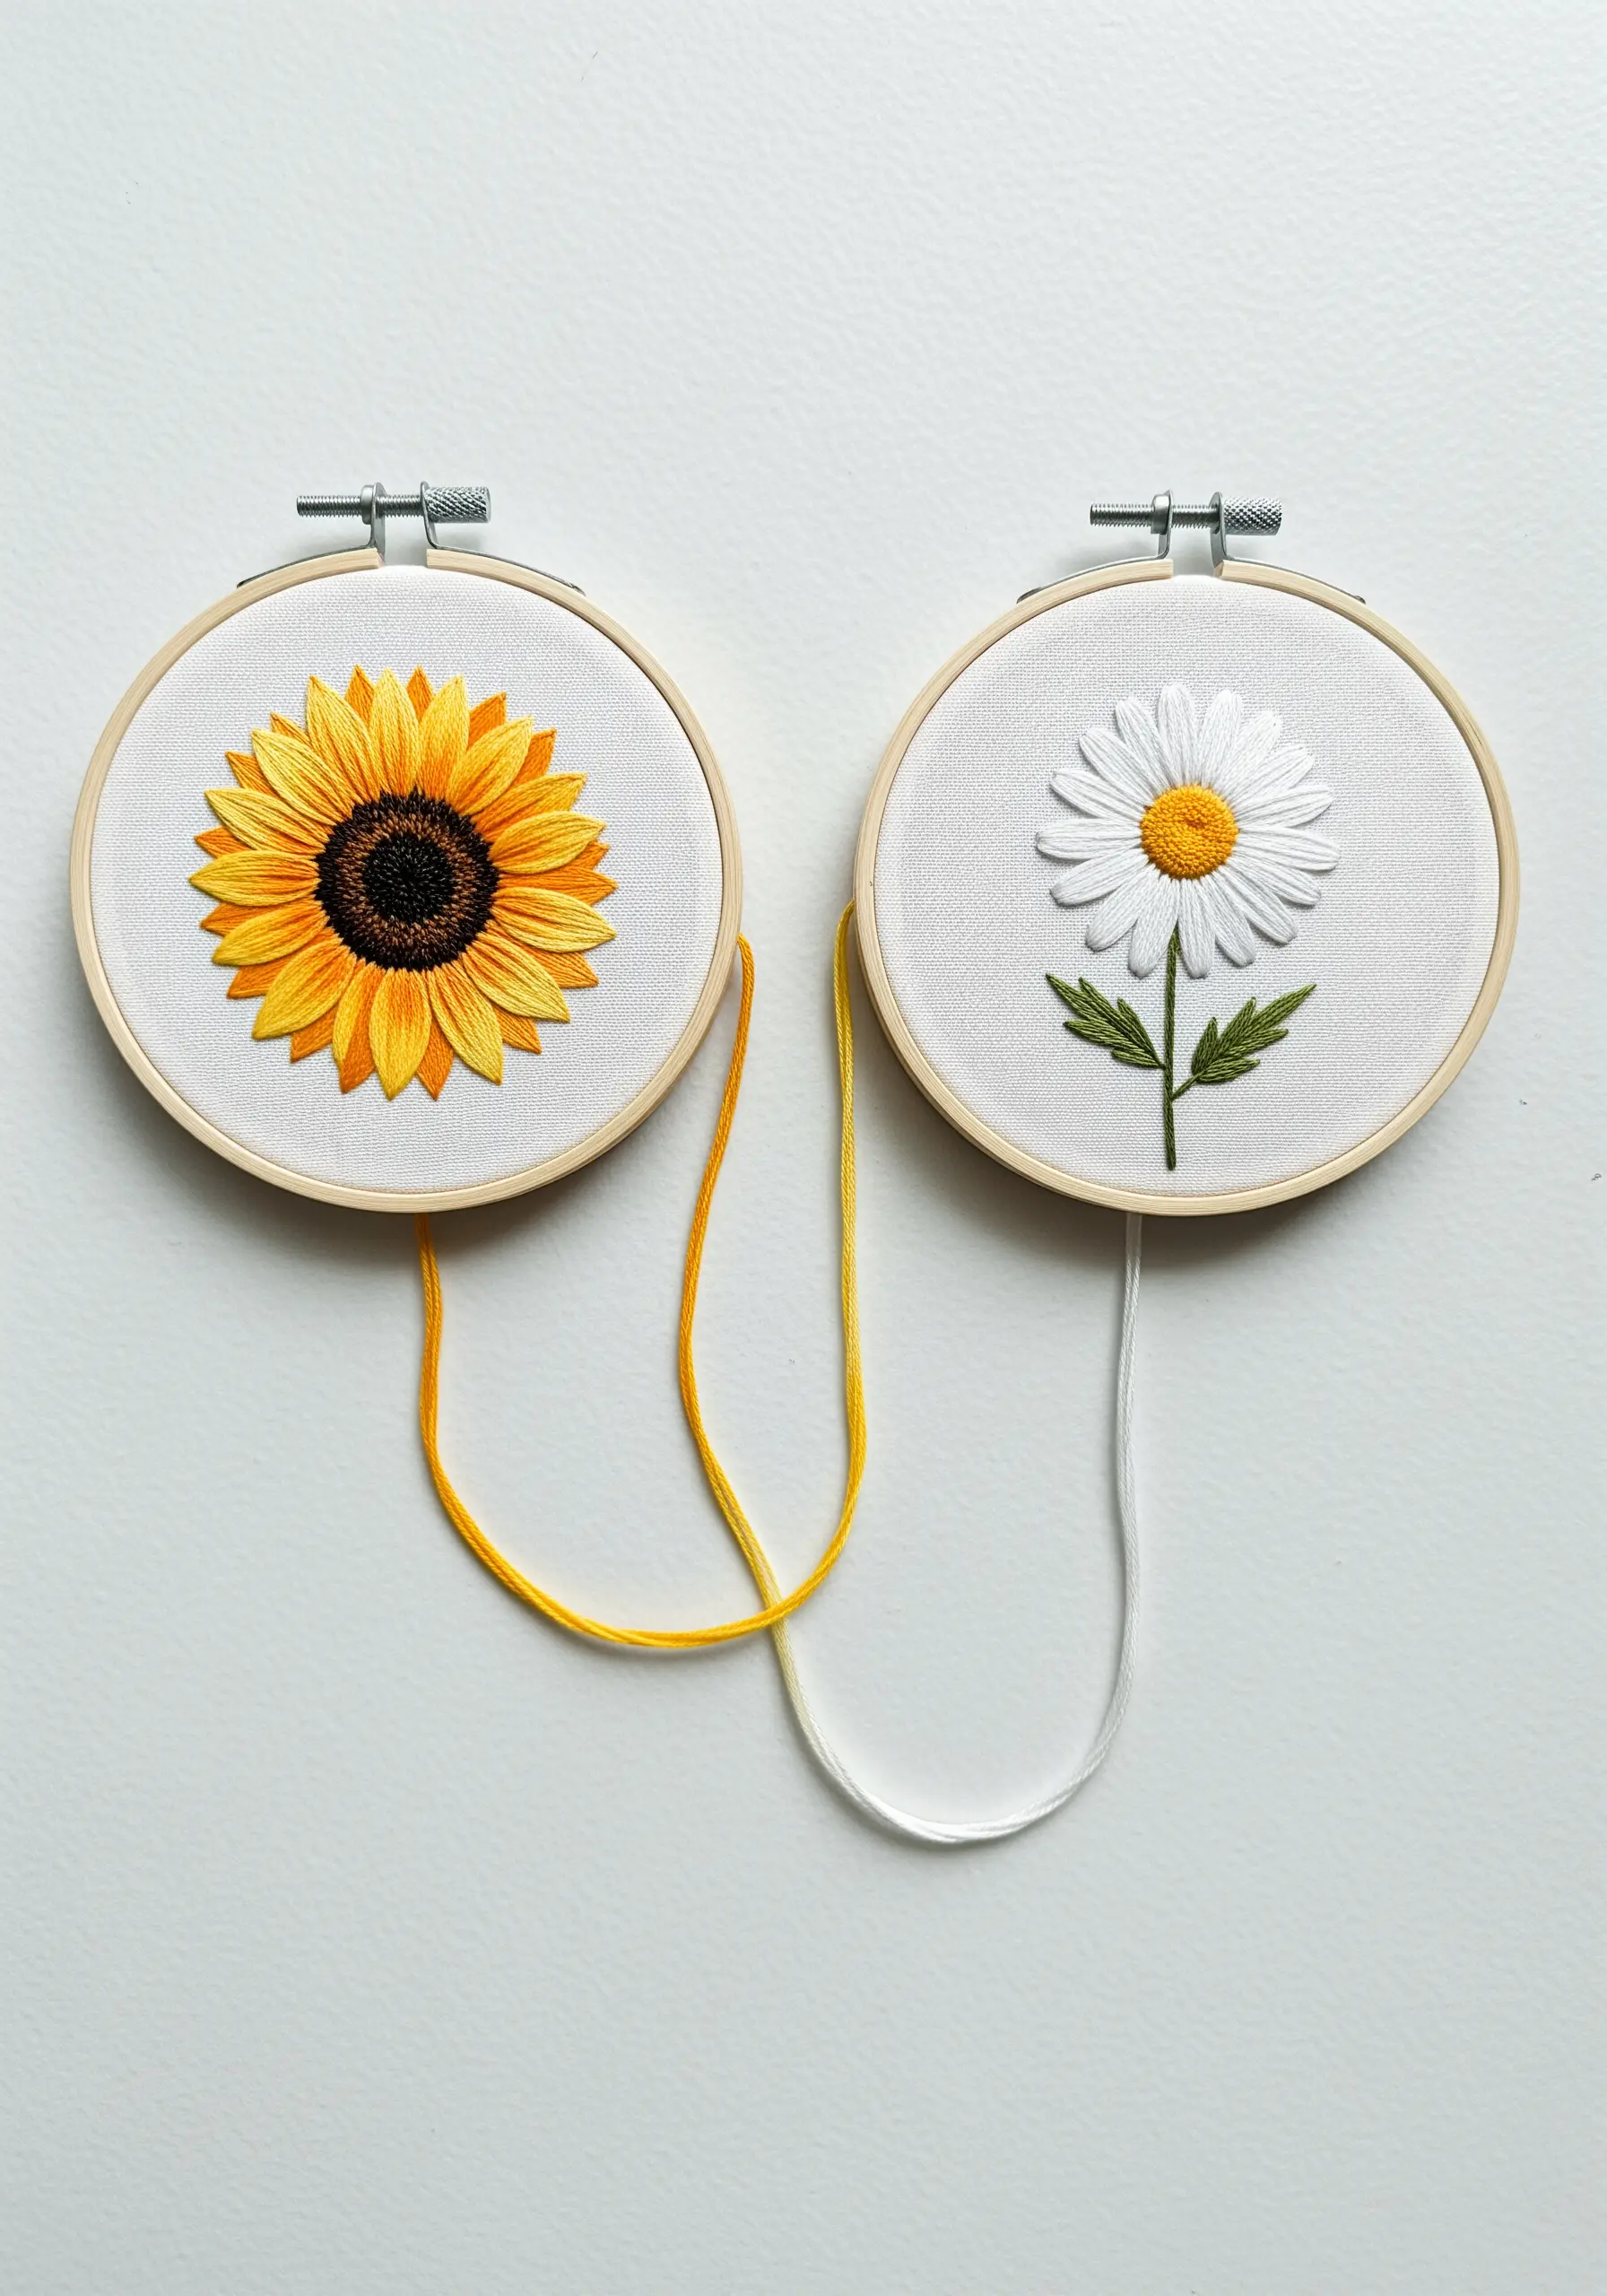
Expand your composition beyond a single hoop by creating a diptych.
Stitch a detailed sunflower in one small hoop and a simple daisy in another, then display them side-by-side.
By leaving a trailing thread from each piece and allowing them to connect, you create a physical and symbolic link between the two subjects.
This is an elegant way to explore themes of contrast, harmony, and connection.
10. Adorn a Journal with an Asymmetrical Corner Spray
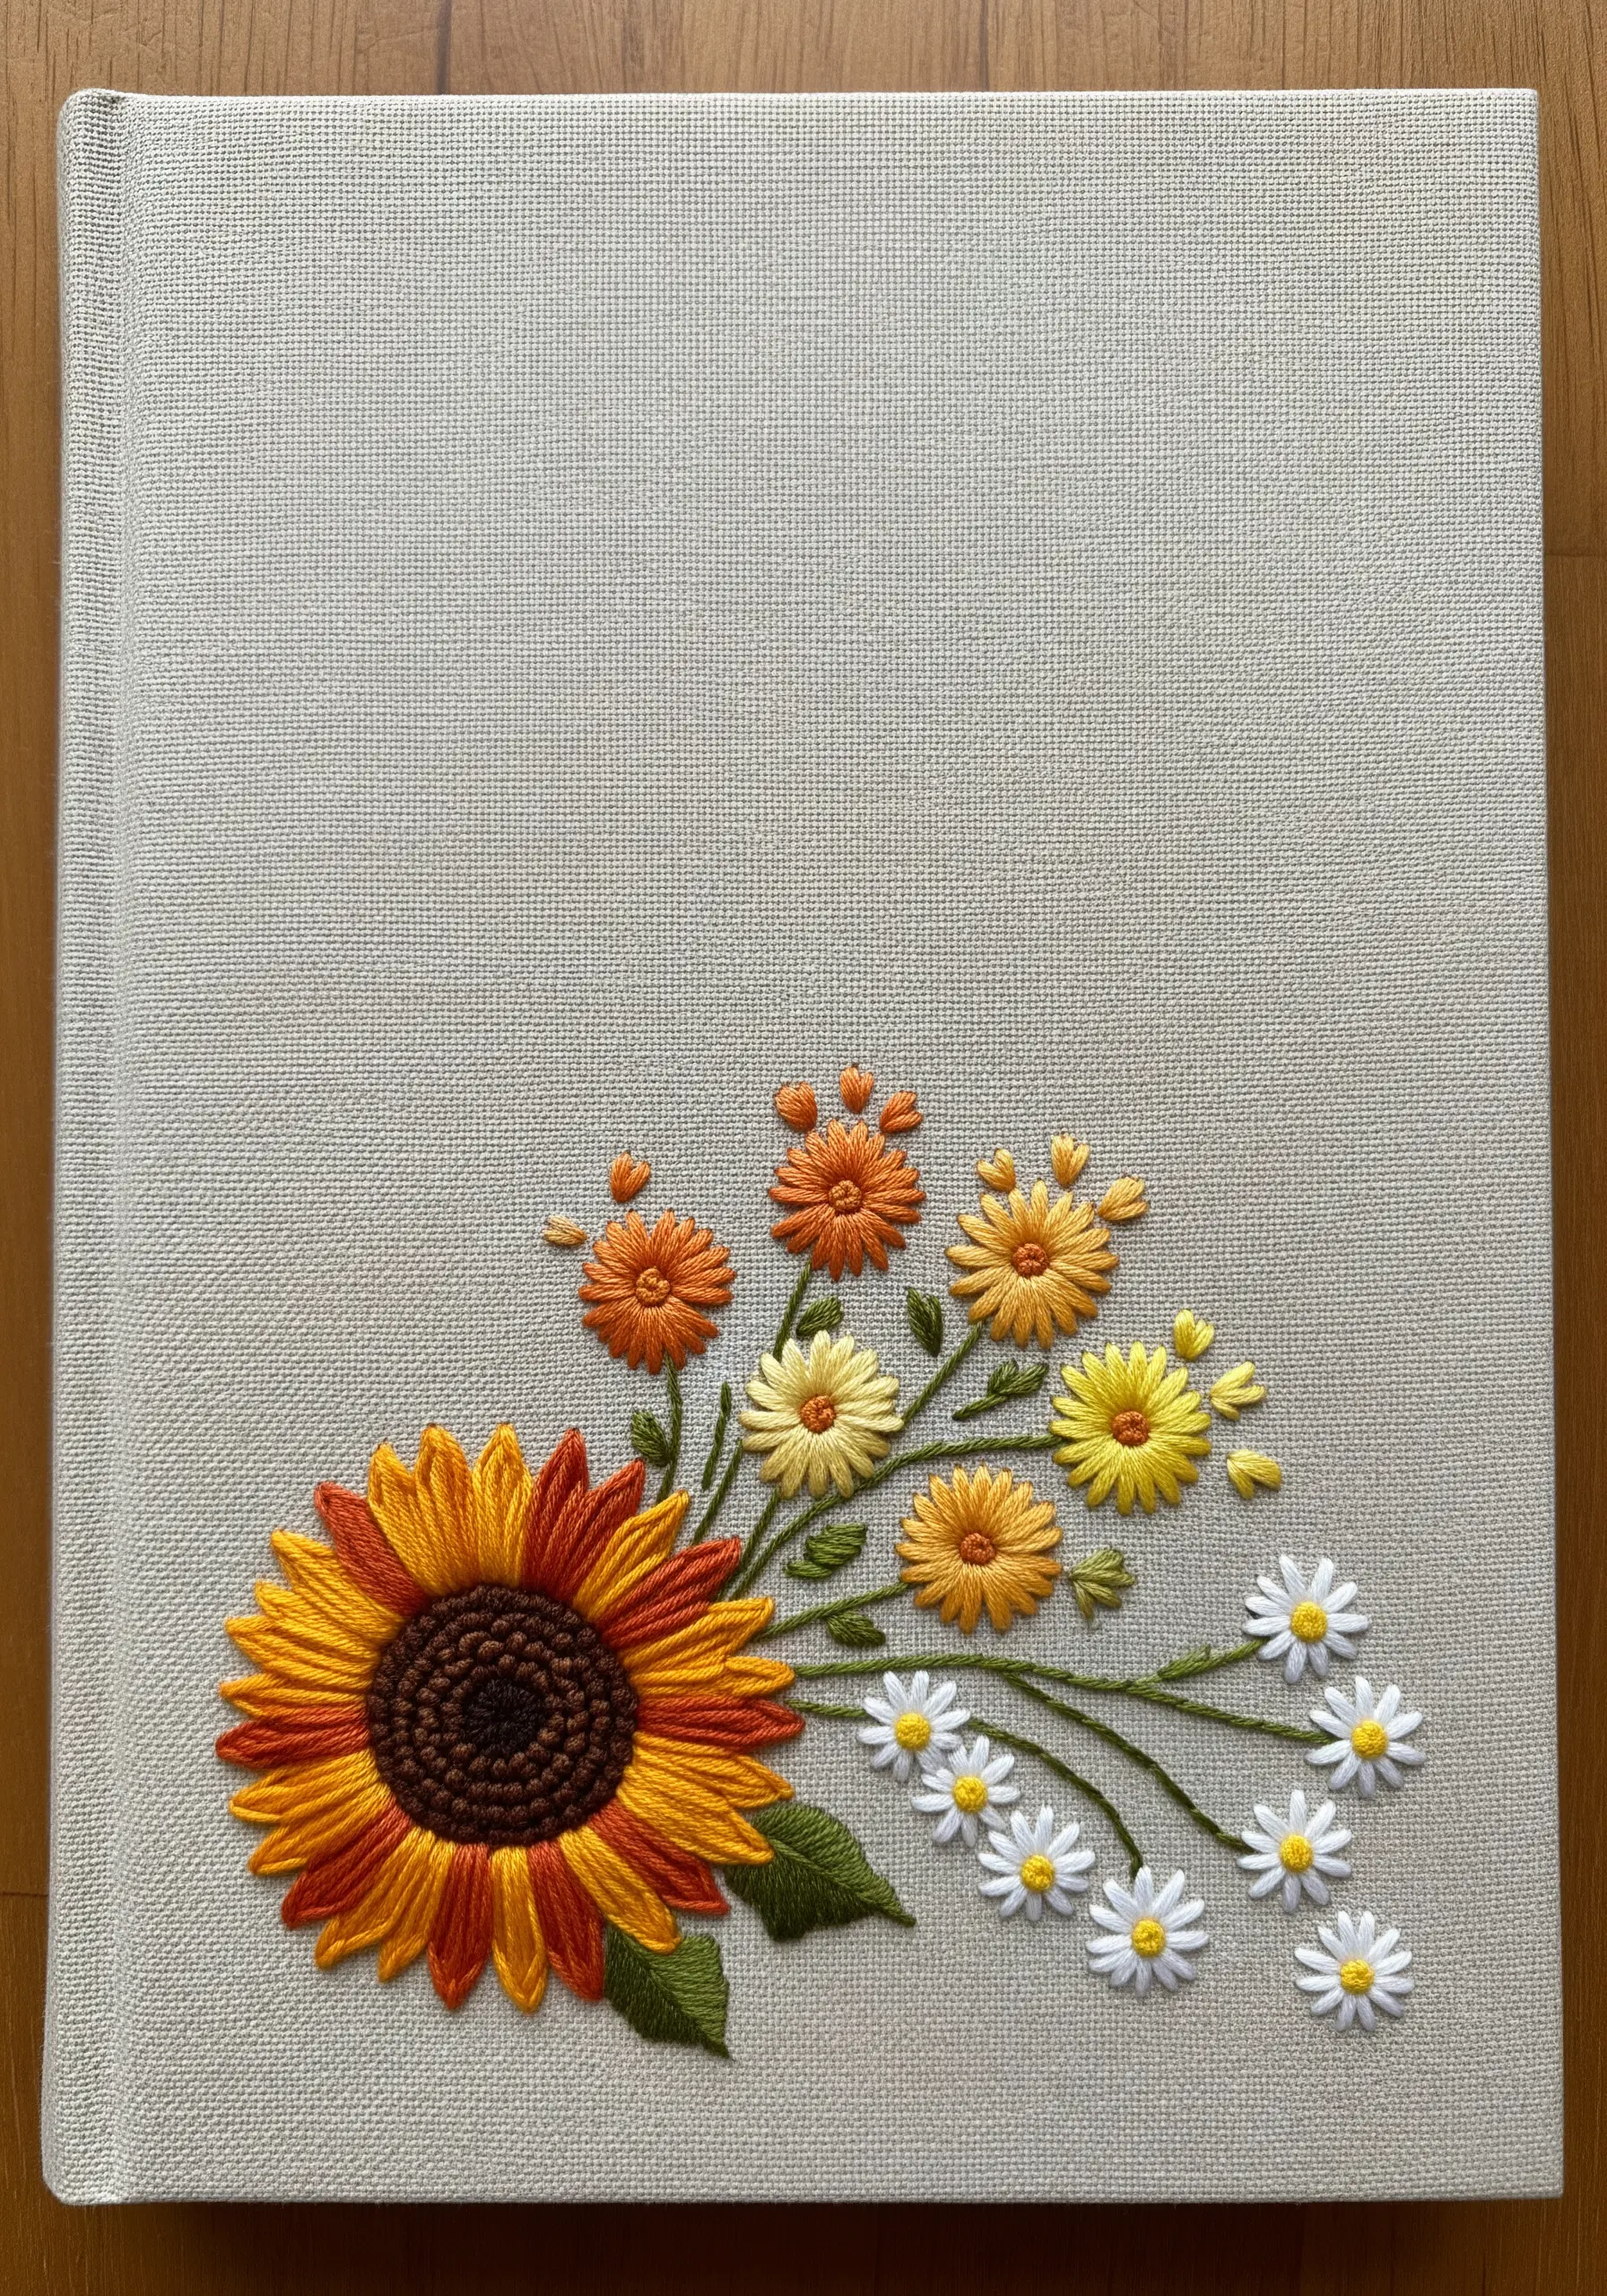
An asymmetrical floral spray is a perfect embellishment for a journal cover, as it adds a beautiful handmade detail without overwhelming the surface.
Position the largest flower—the sunflower—in the corner and allow the smaller daisies and leaves to branch out organically.
This creates a natural sense of movement and leaves plenty of negative space.
If stitching on a ready-made journal, use a strong fabric glue and a piece of felt on the inside cover to secure and protect your stitches.
11. Capture the Glow of Golden Hour in Thread
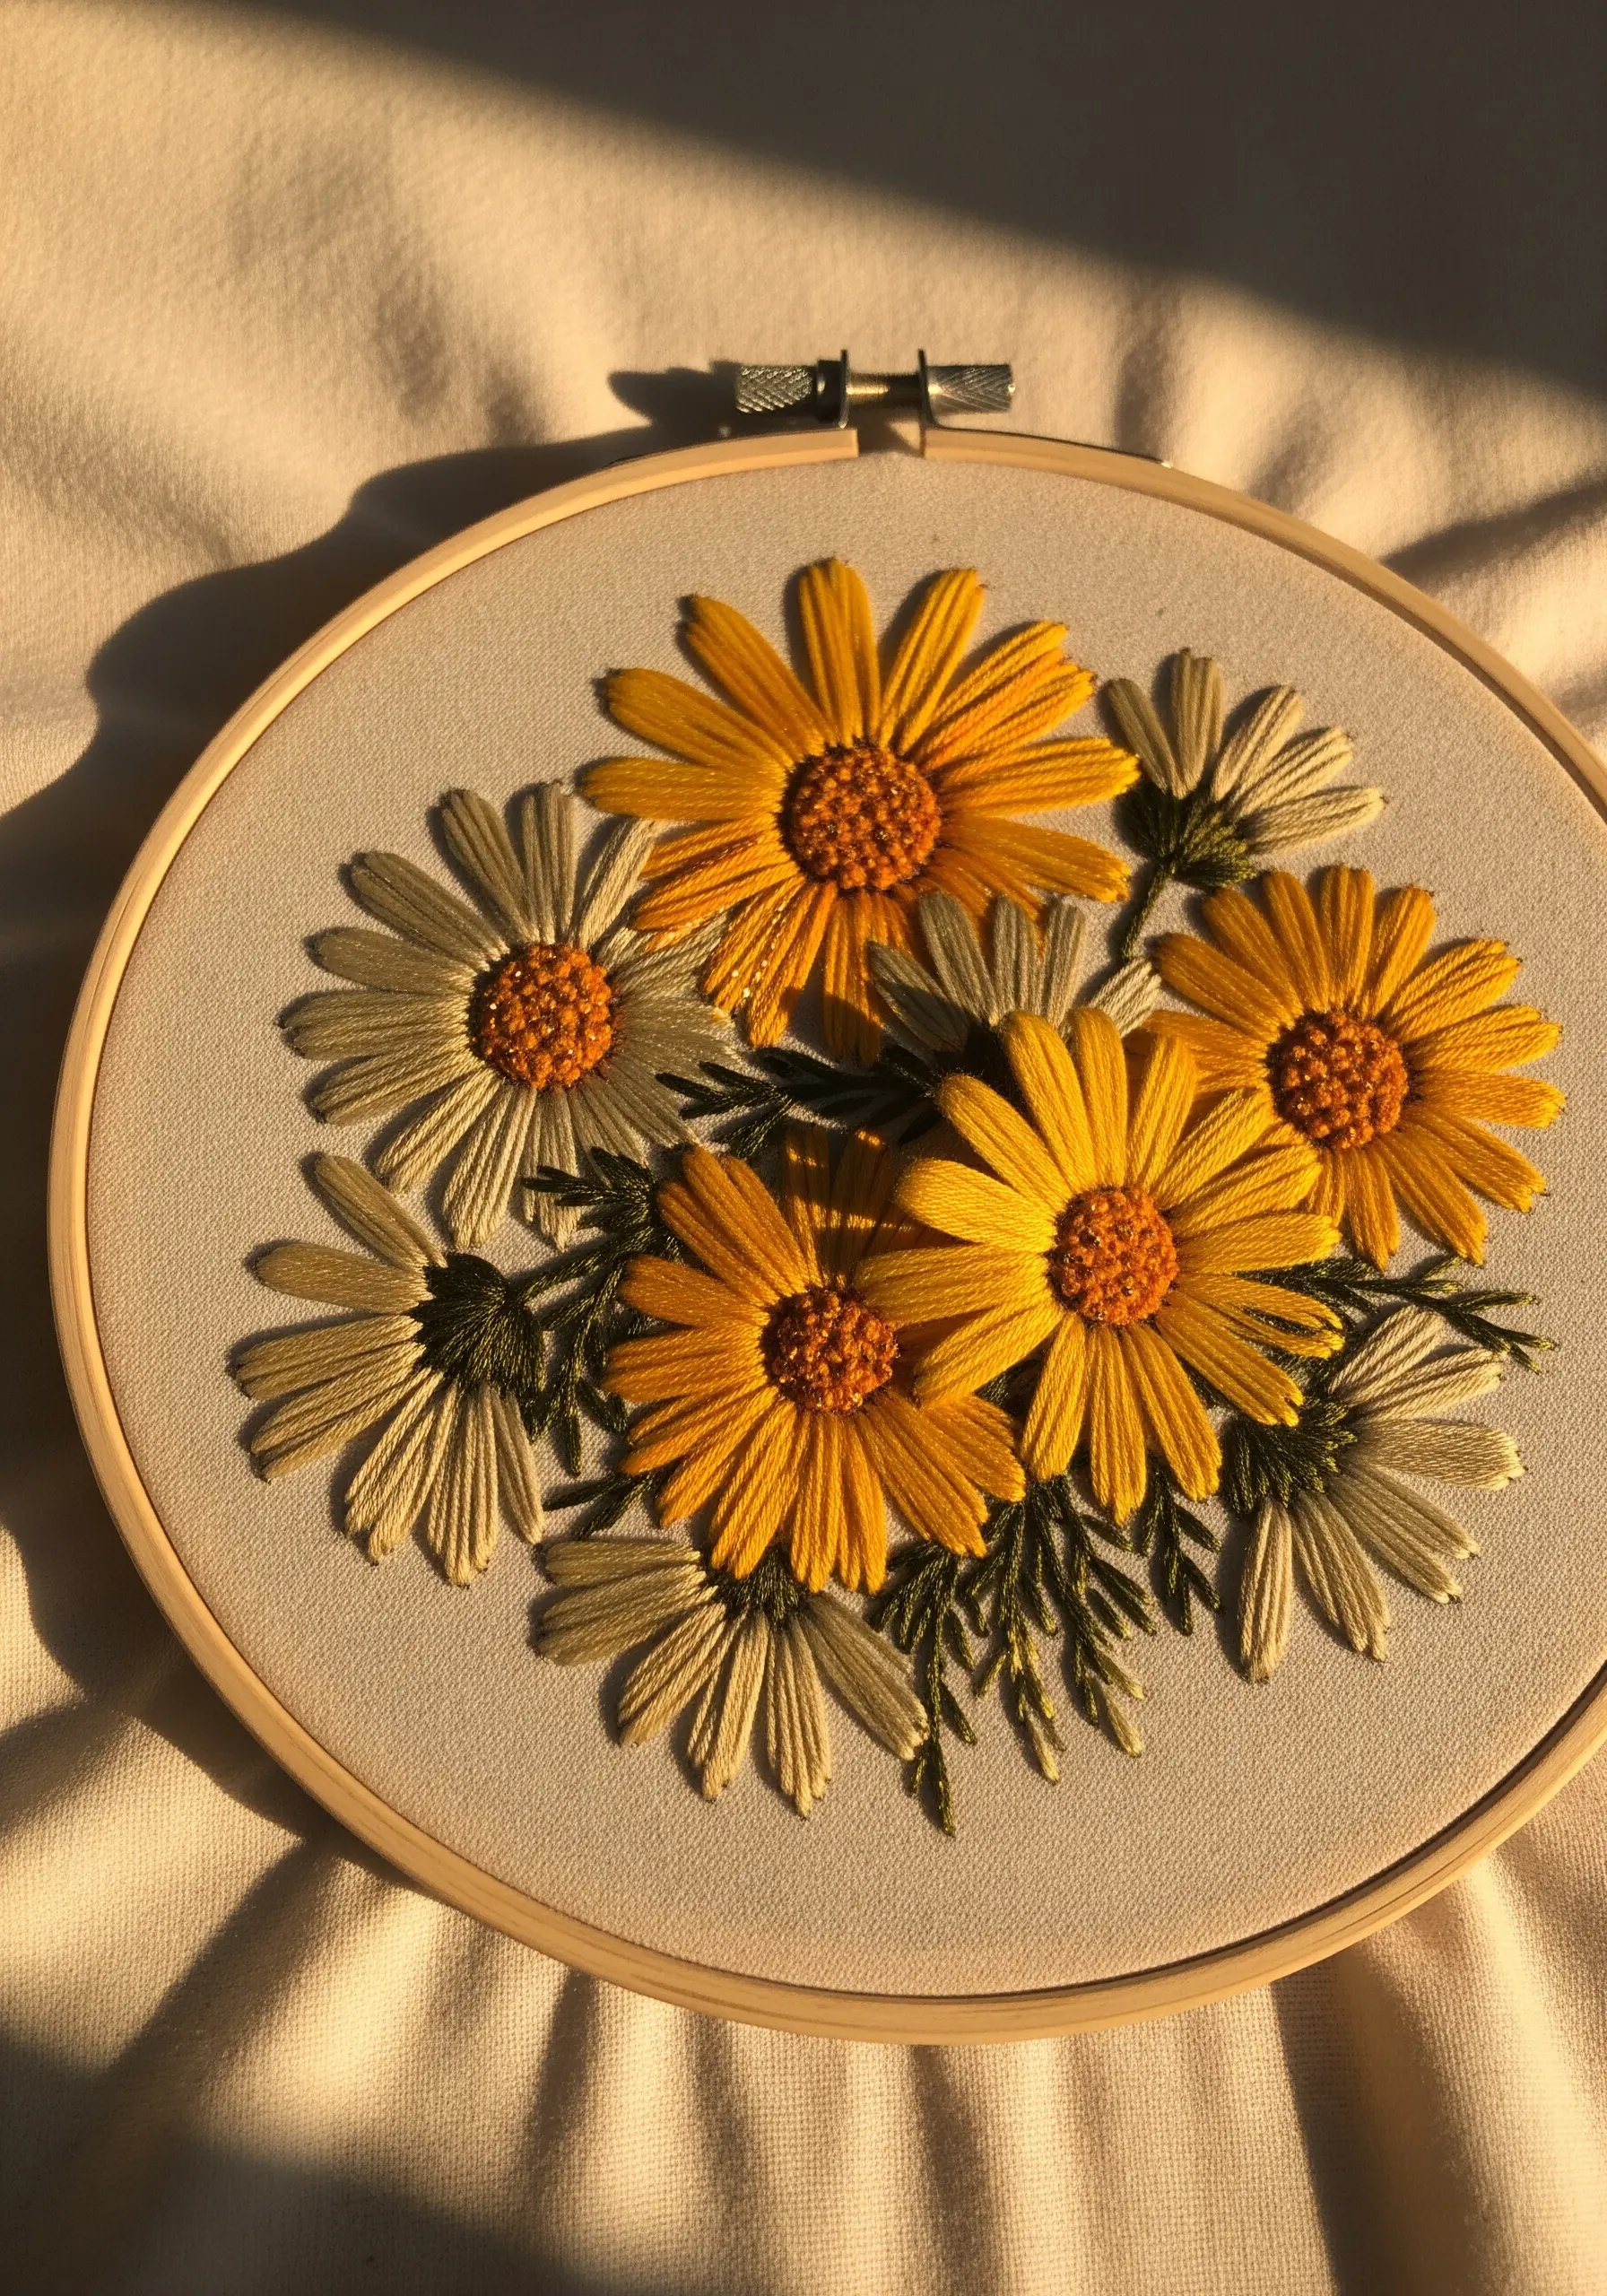
Evoke the specific mood of late-afternoon sunlight by curating a warm, muted color palette.
Swap out bright, clear yellows for softer shades of mustard, ochre, and marigold. For the daisies, choose a creamy off-white instead of a stark white.
This subtle shift in color temperature instantly creates a feeling of warmth and nostalgia.
The long, directional satin stitches will catch the light beautifully, enhancing the sun-kissed effect.
12. Frame a Geometric Mandala with Floral Logic
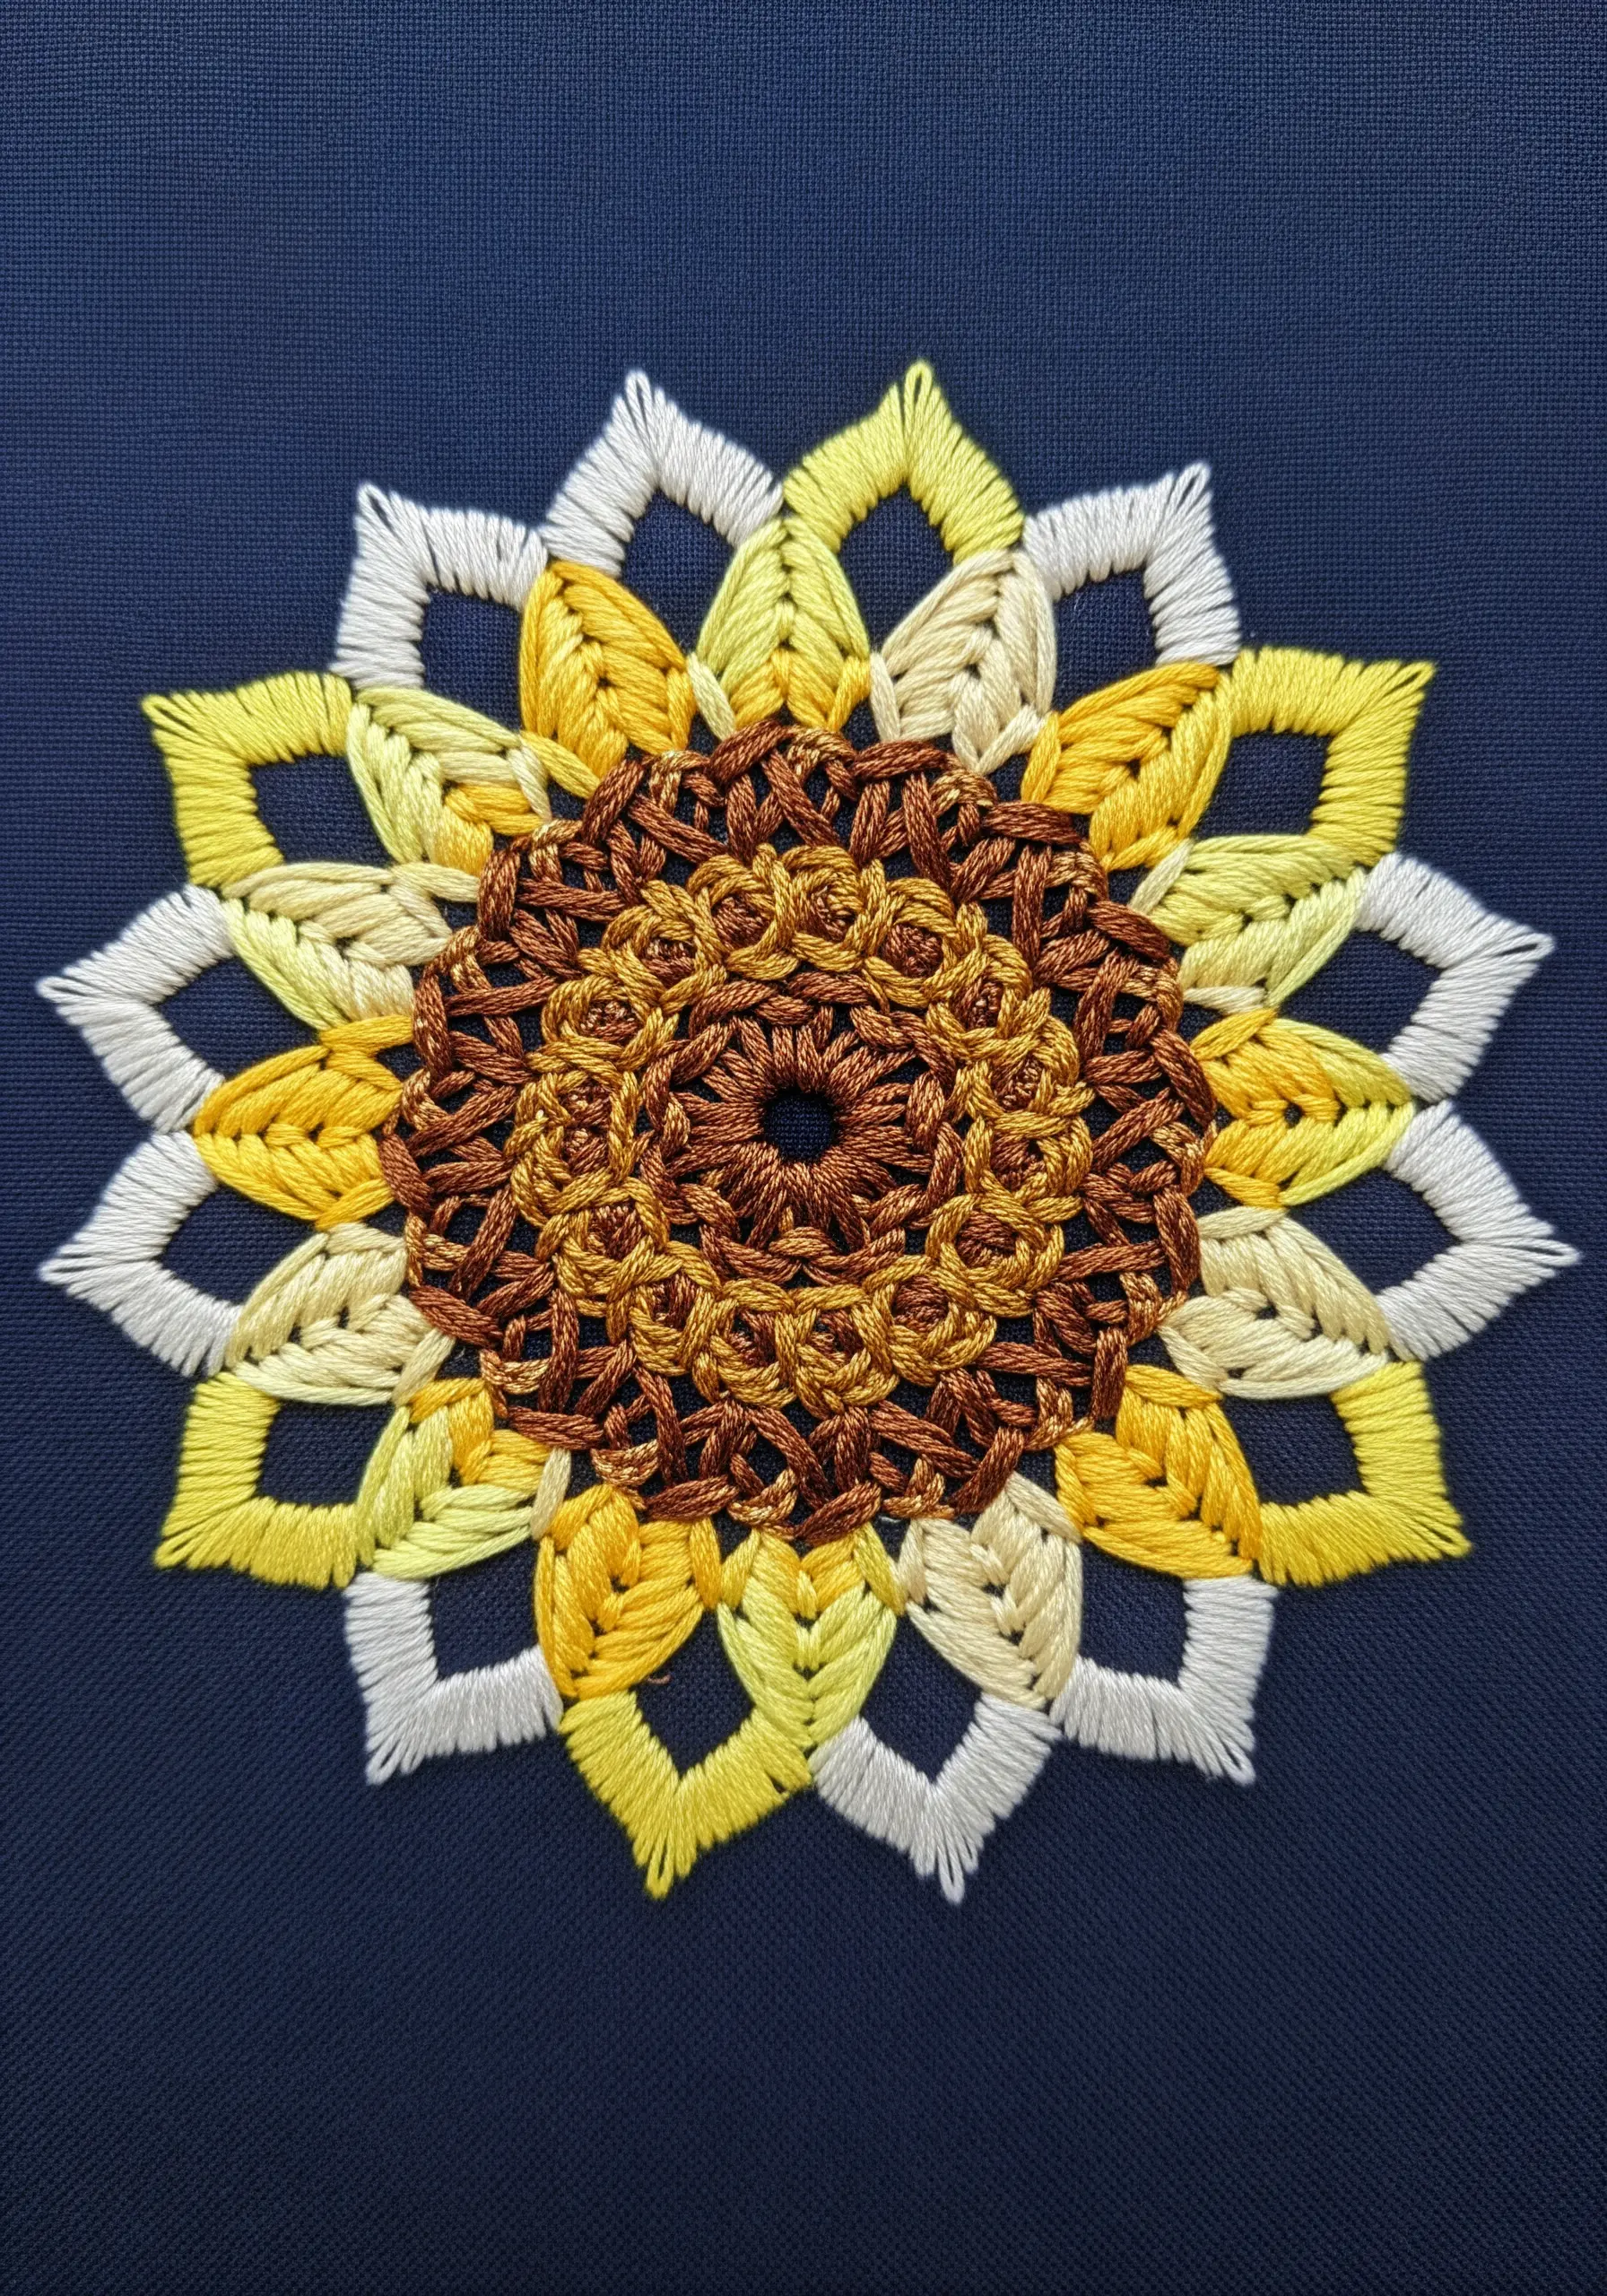
Translate the organic form of a sunflower into a structured, geometric pattern.
Use detached chain stitches to create open, airy ‘petals’ arranged in a symmetrical, circular pattern.
This technique blends the natural inspiration of a flower with the meditative precision of mandala art, resulting in a design that feels both modern and timeless.
The negative space within the stitches is just as important as the thread itself, contributing to the design’s delicate, lace-like quality.
13. Add Elegance to Home Décor with a Climbing Vine
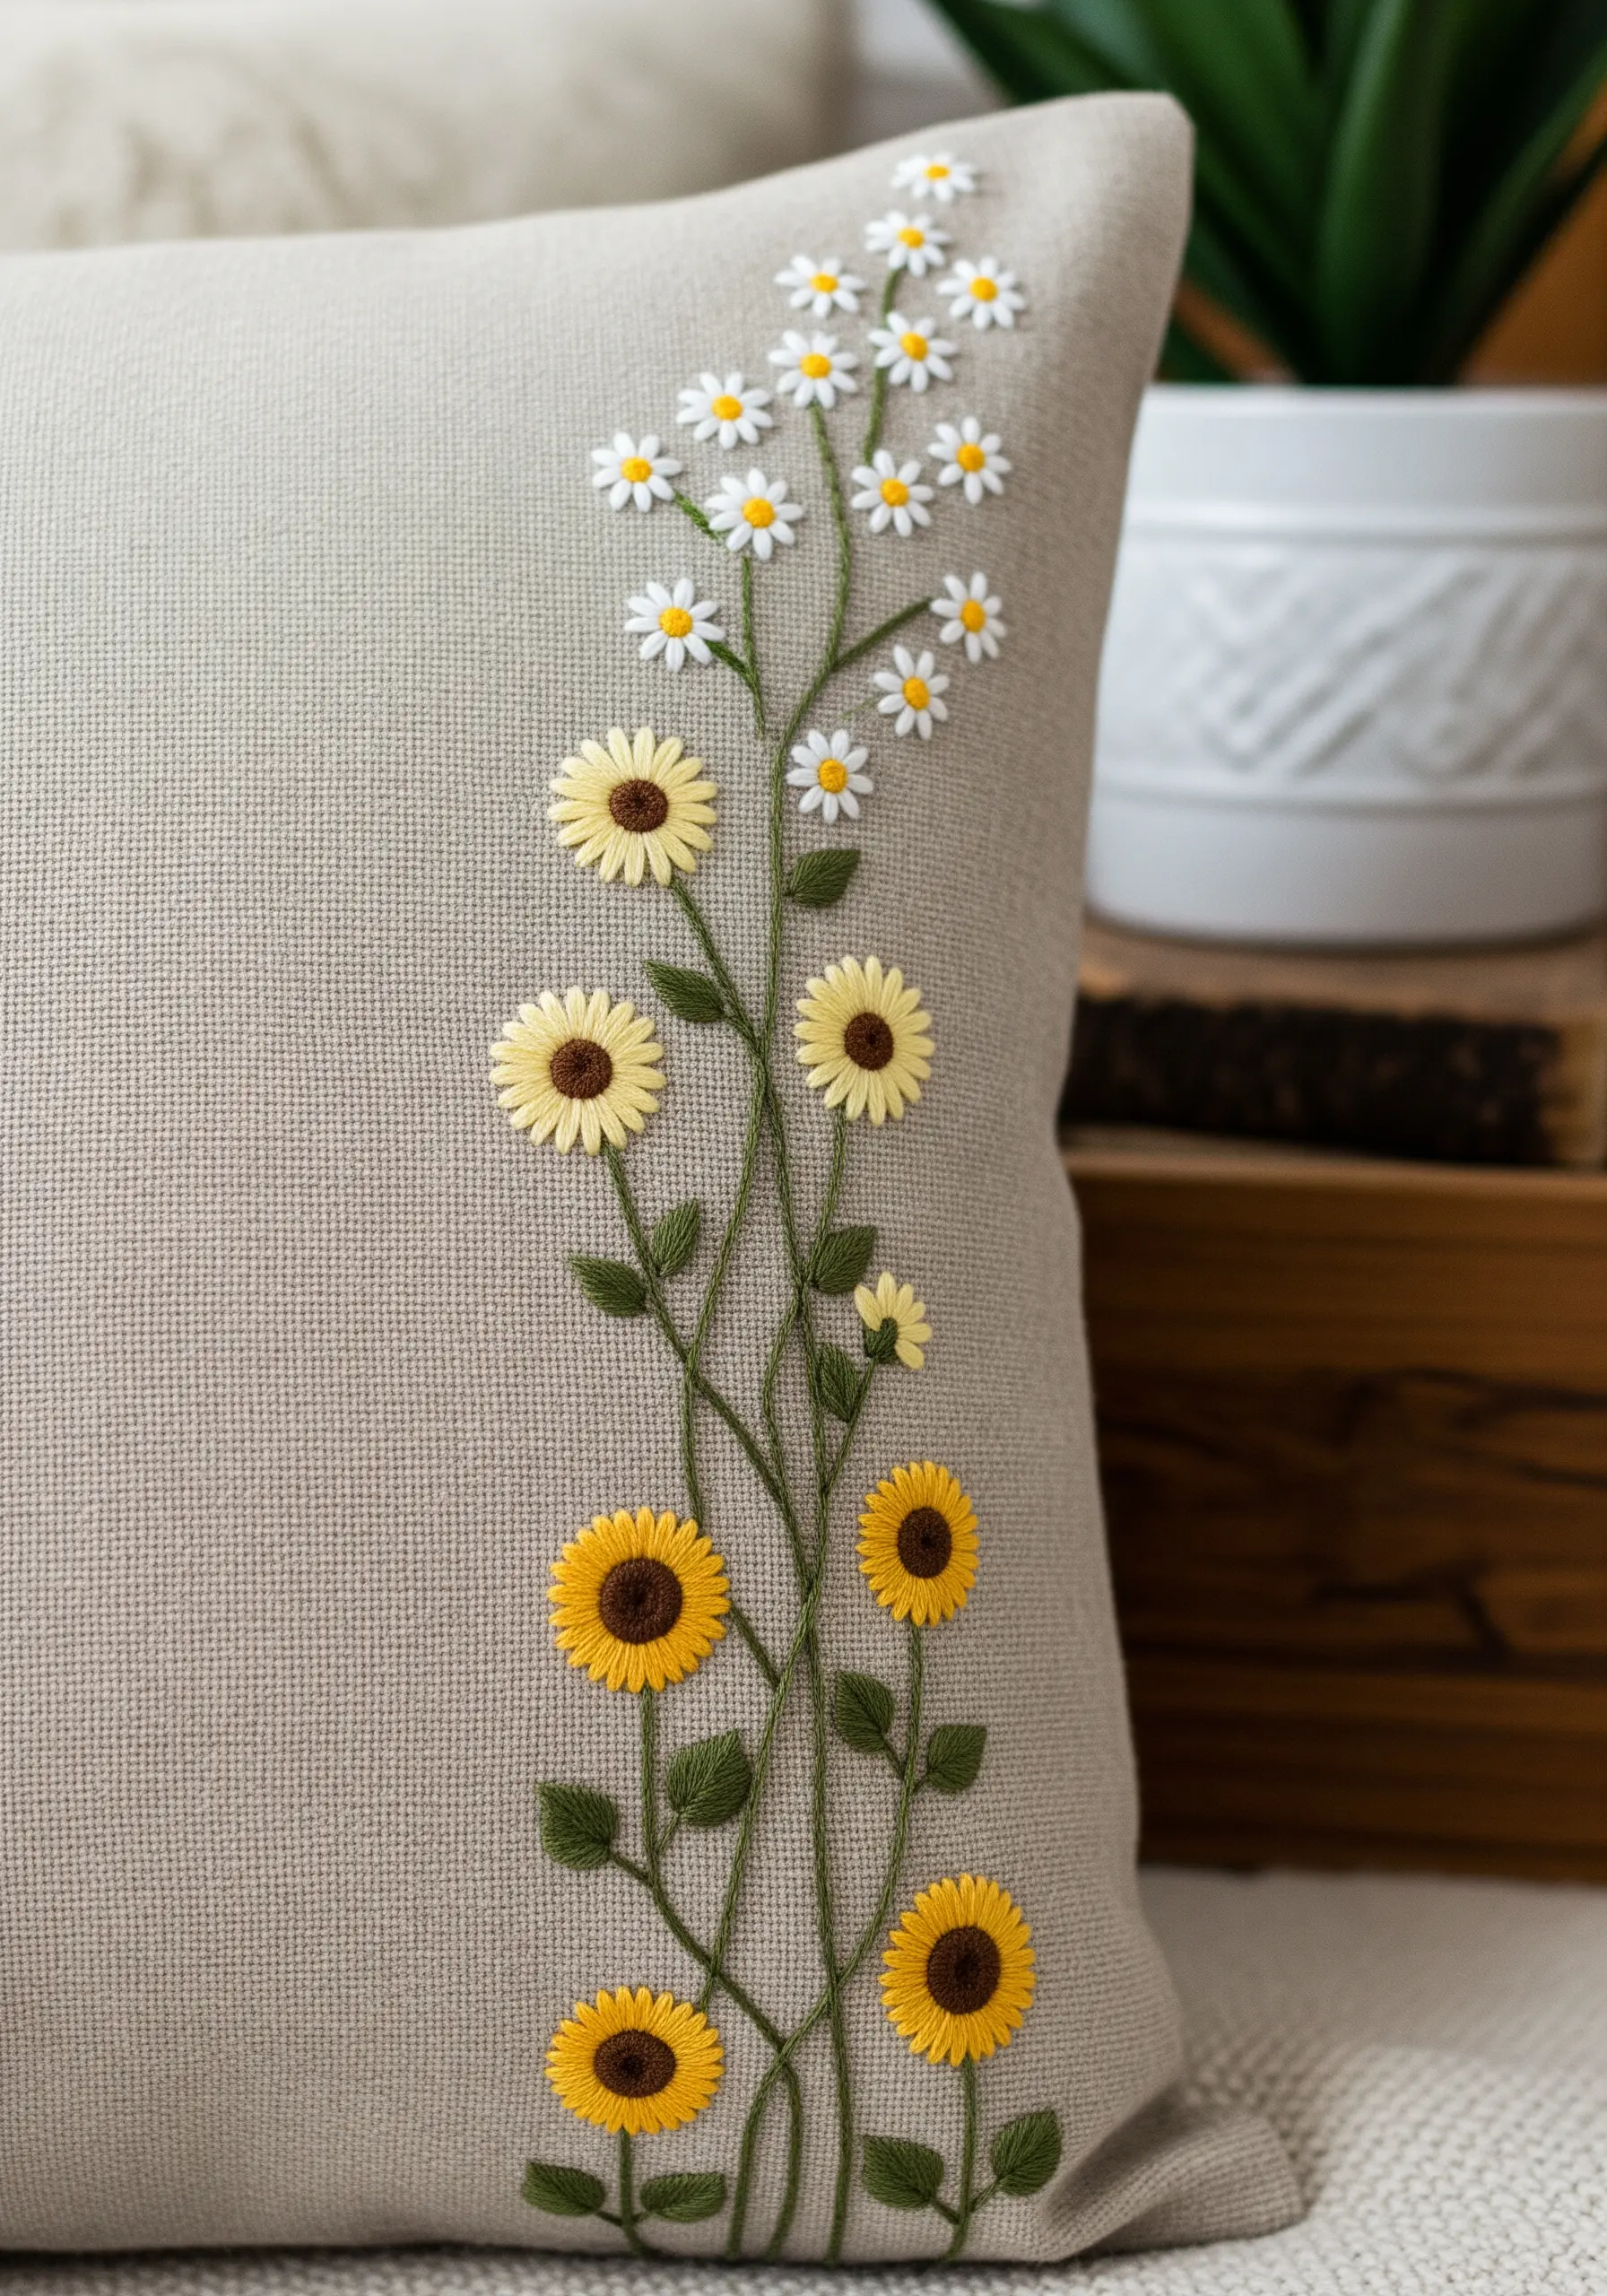
A delicate, meandering vine is a sophisticated way to add a touch of custom embroidery to home textiles like pillow covers or curtains.
Use a simple stem stitch or backstitch for the vine to create a clean, flowing line.
Alternate small, satin-stitched sunflowers with even smaller daisies to create a pleasing rhythm as the vine climbs.
This restrained approach to embellishment adds a high-end, bespoke feel to your neutral sofa or bedding.
14. Explore Duality with a Split Composition
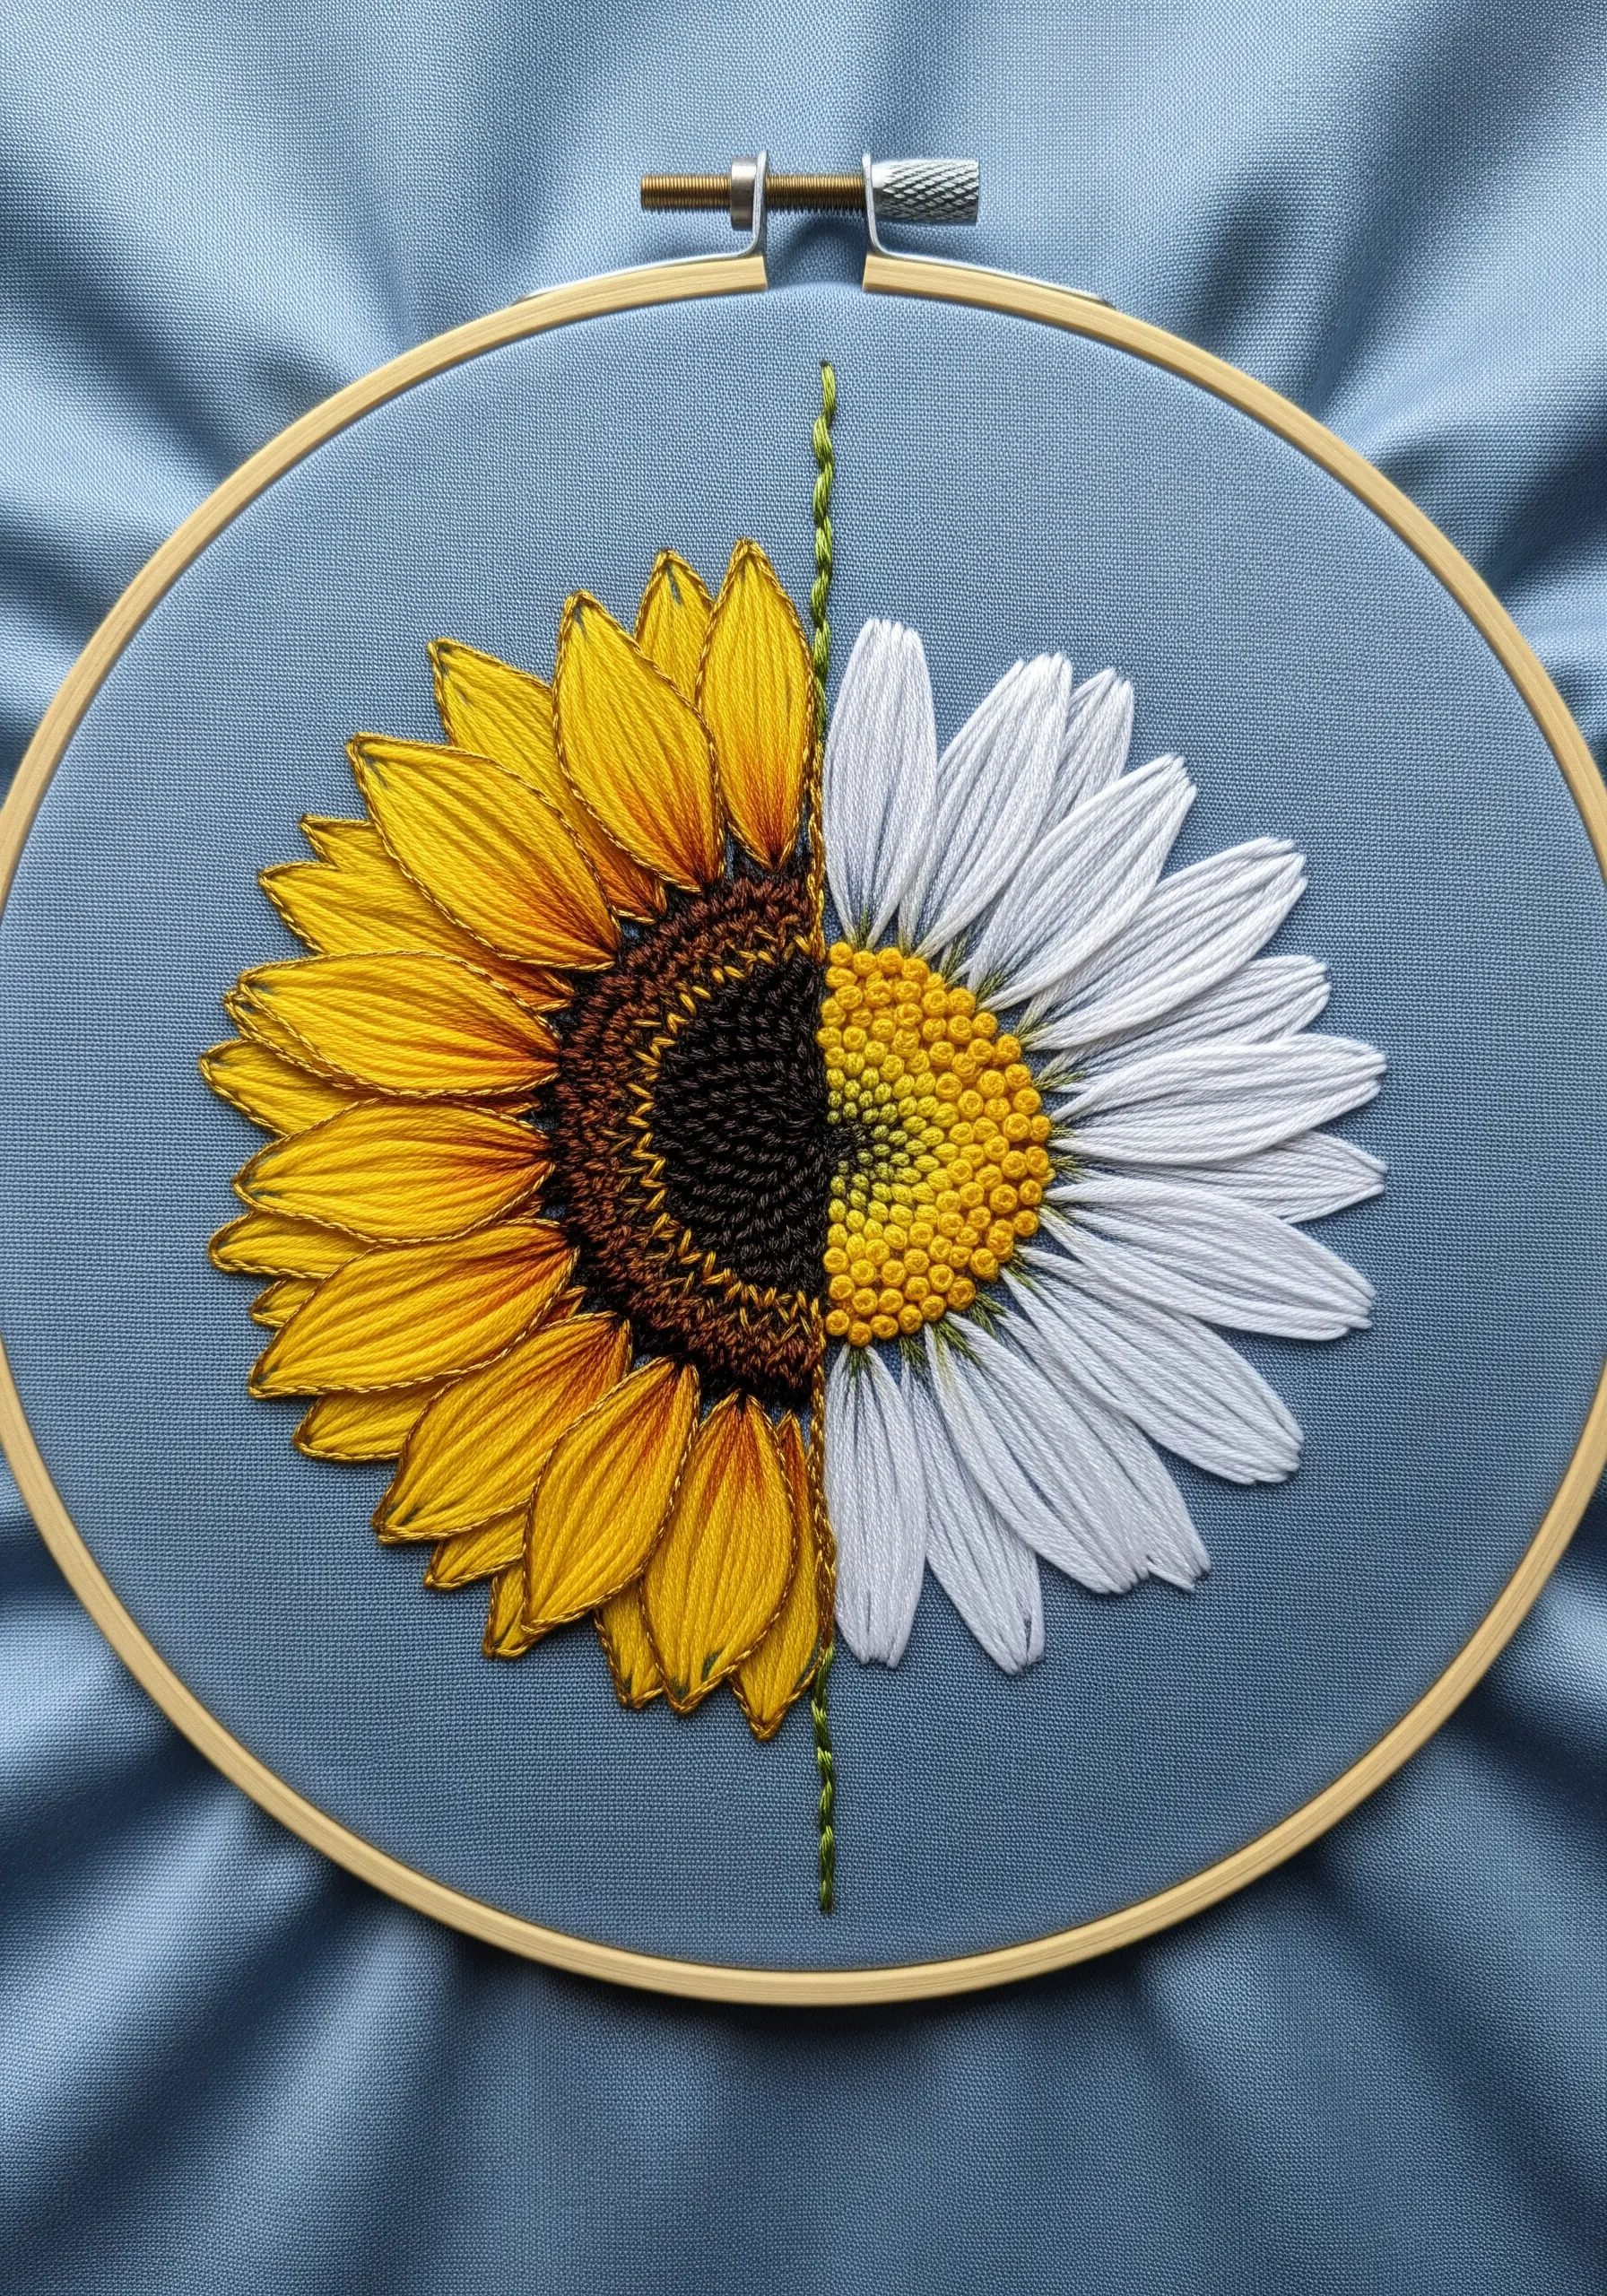
This design is a powerful exercise in precision and balance.
To create a convincing split portrait, you must meticulously plan your stitch directions so that the petals on both the sunflower and daisy halves mirror each other perfectly.
A cleanly stitched central dividing line is crucial—use a single strand of thread in a contrasting color and a sharp backstitch to make it crisp.
This technique turns two simple flowers into a bold, graphic statement about contrast and unity.
15. Weave Celestial Symbolism into Your Stitching
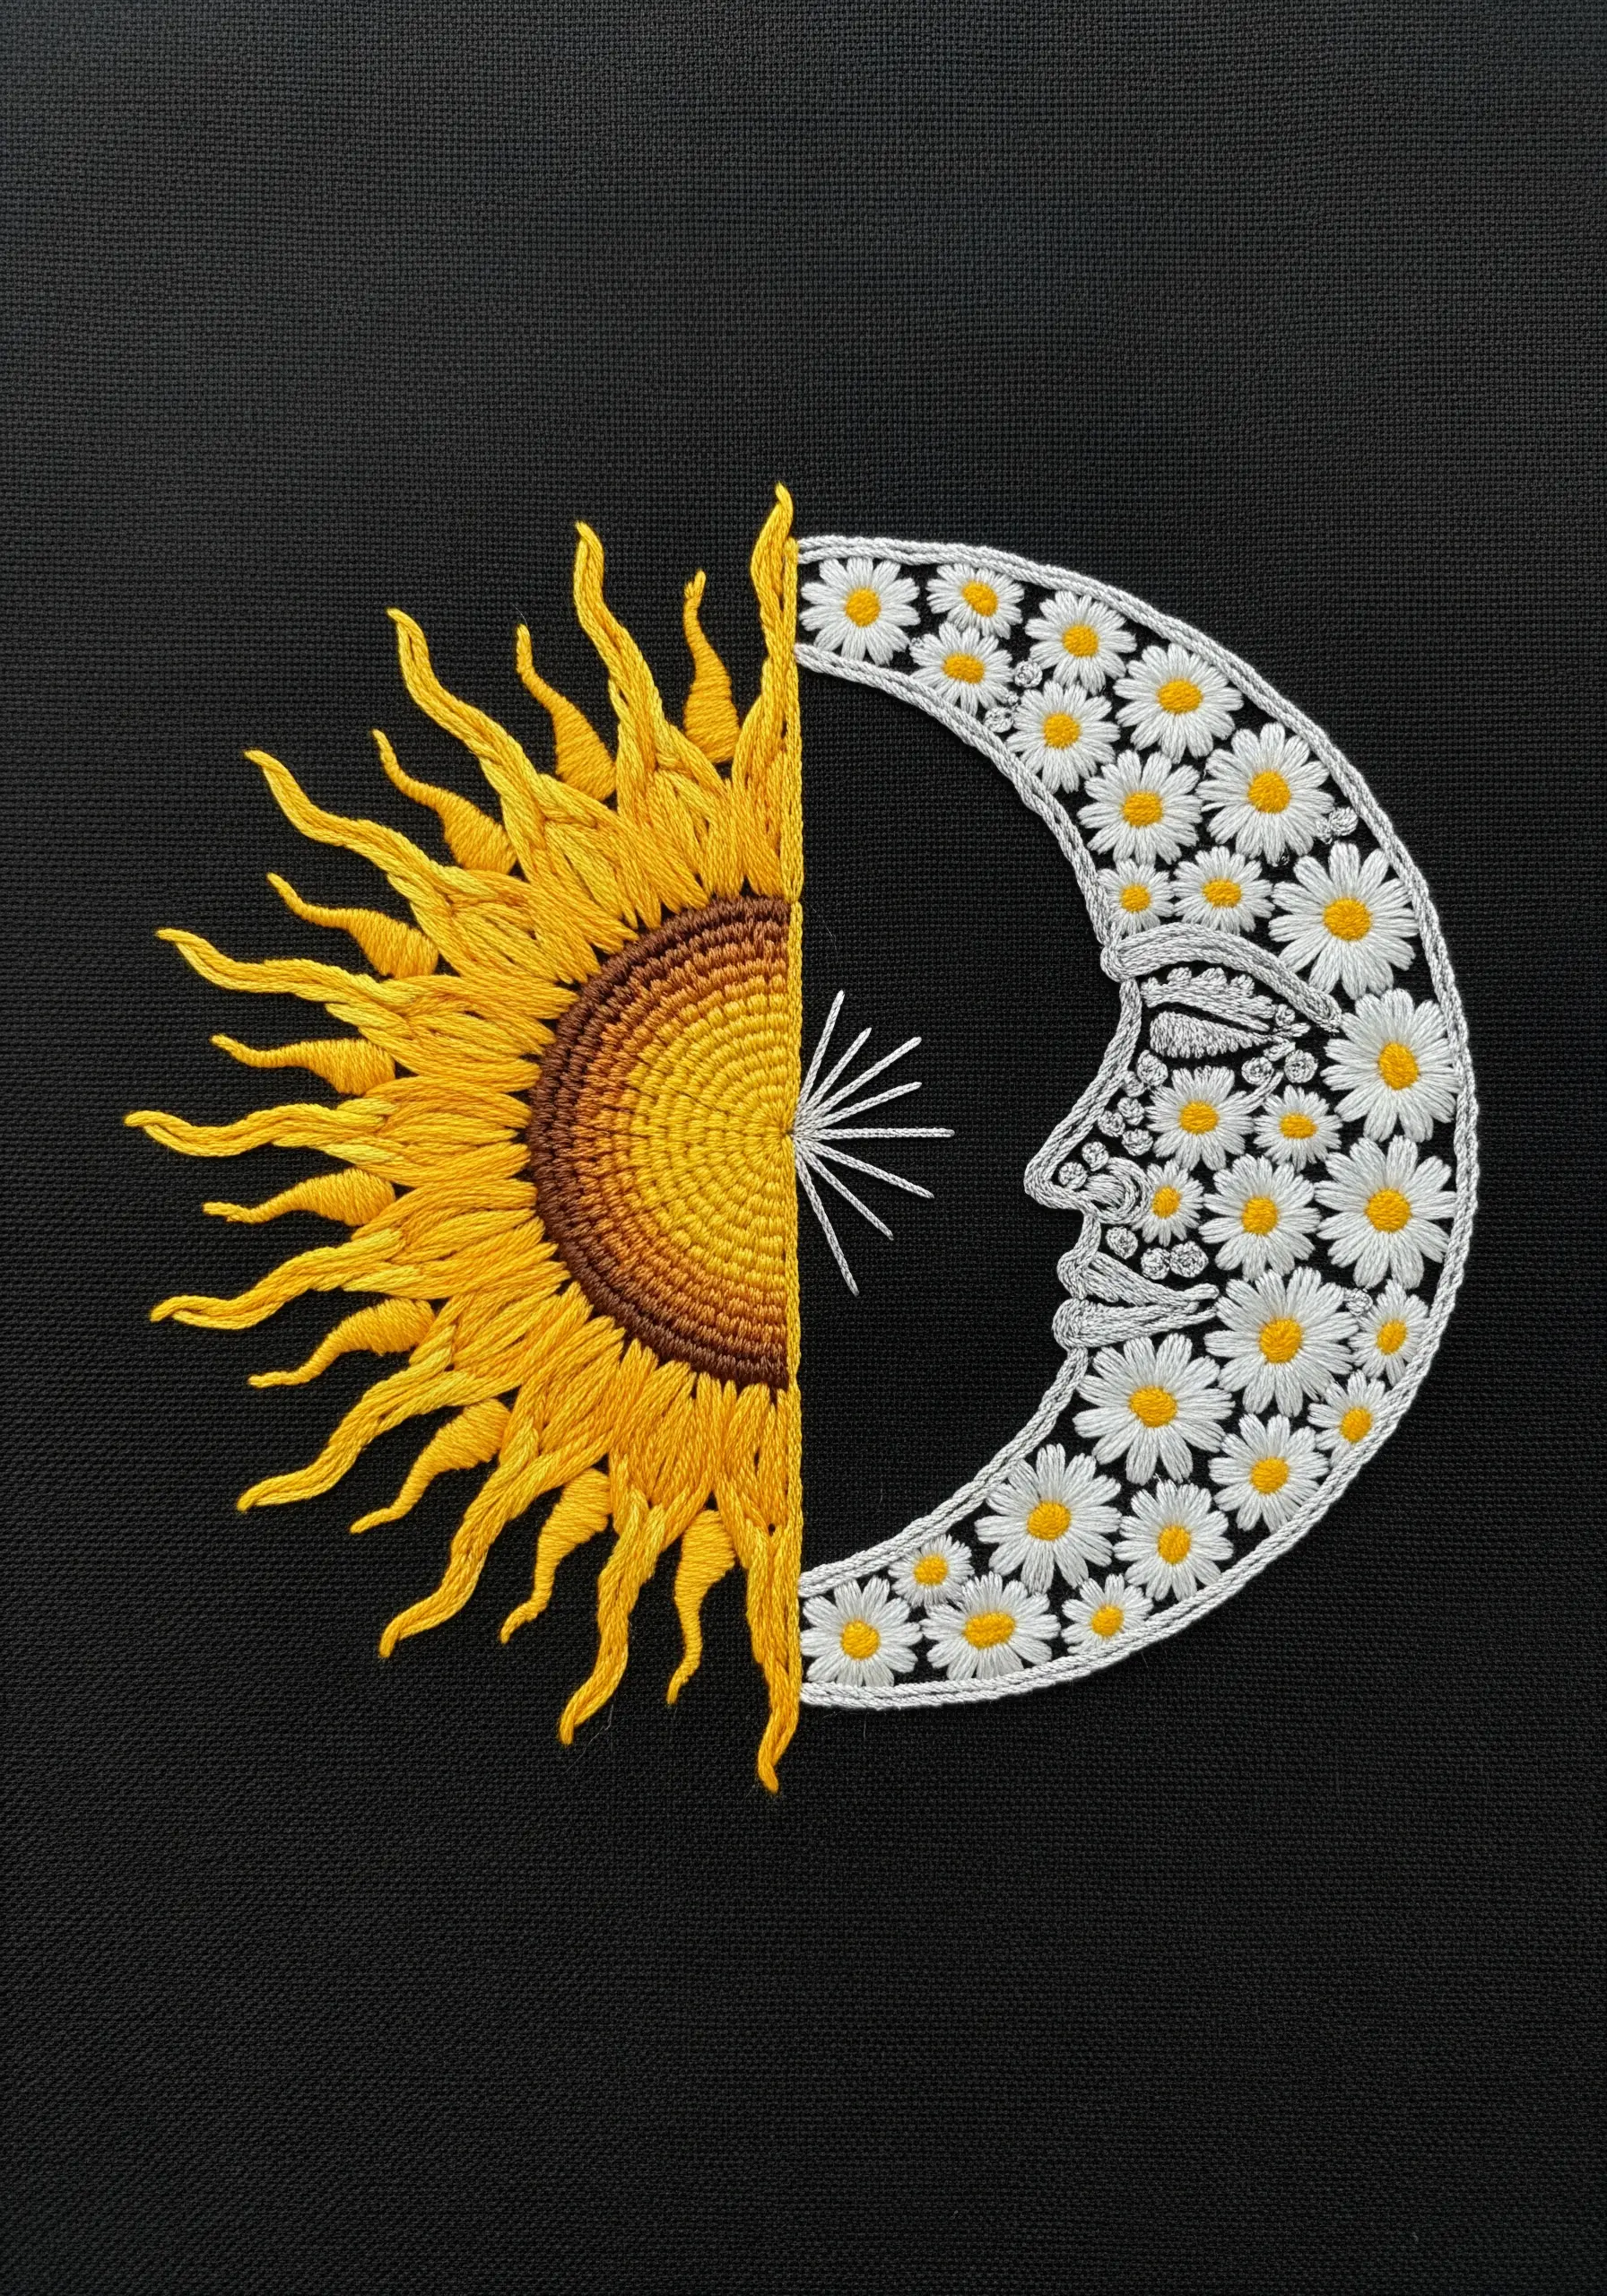
Use floral motifs to represent grander, symbolic ideas like the sun and moon.
The radiant, layered petals of a sunflower naturally evoke the energy of the sun, while a crescent moon filled with cool, white daisies suggests the quiet glow of night.
Stitching on black fabric is key here, as it makes the colors feel luminous and enhances the cosmic theme.
Add a few scattered straight stitches or star stitches in metallic silver thread to complete the celestial scene.
16. Design a Panoramic Meadow on a Tote Bag
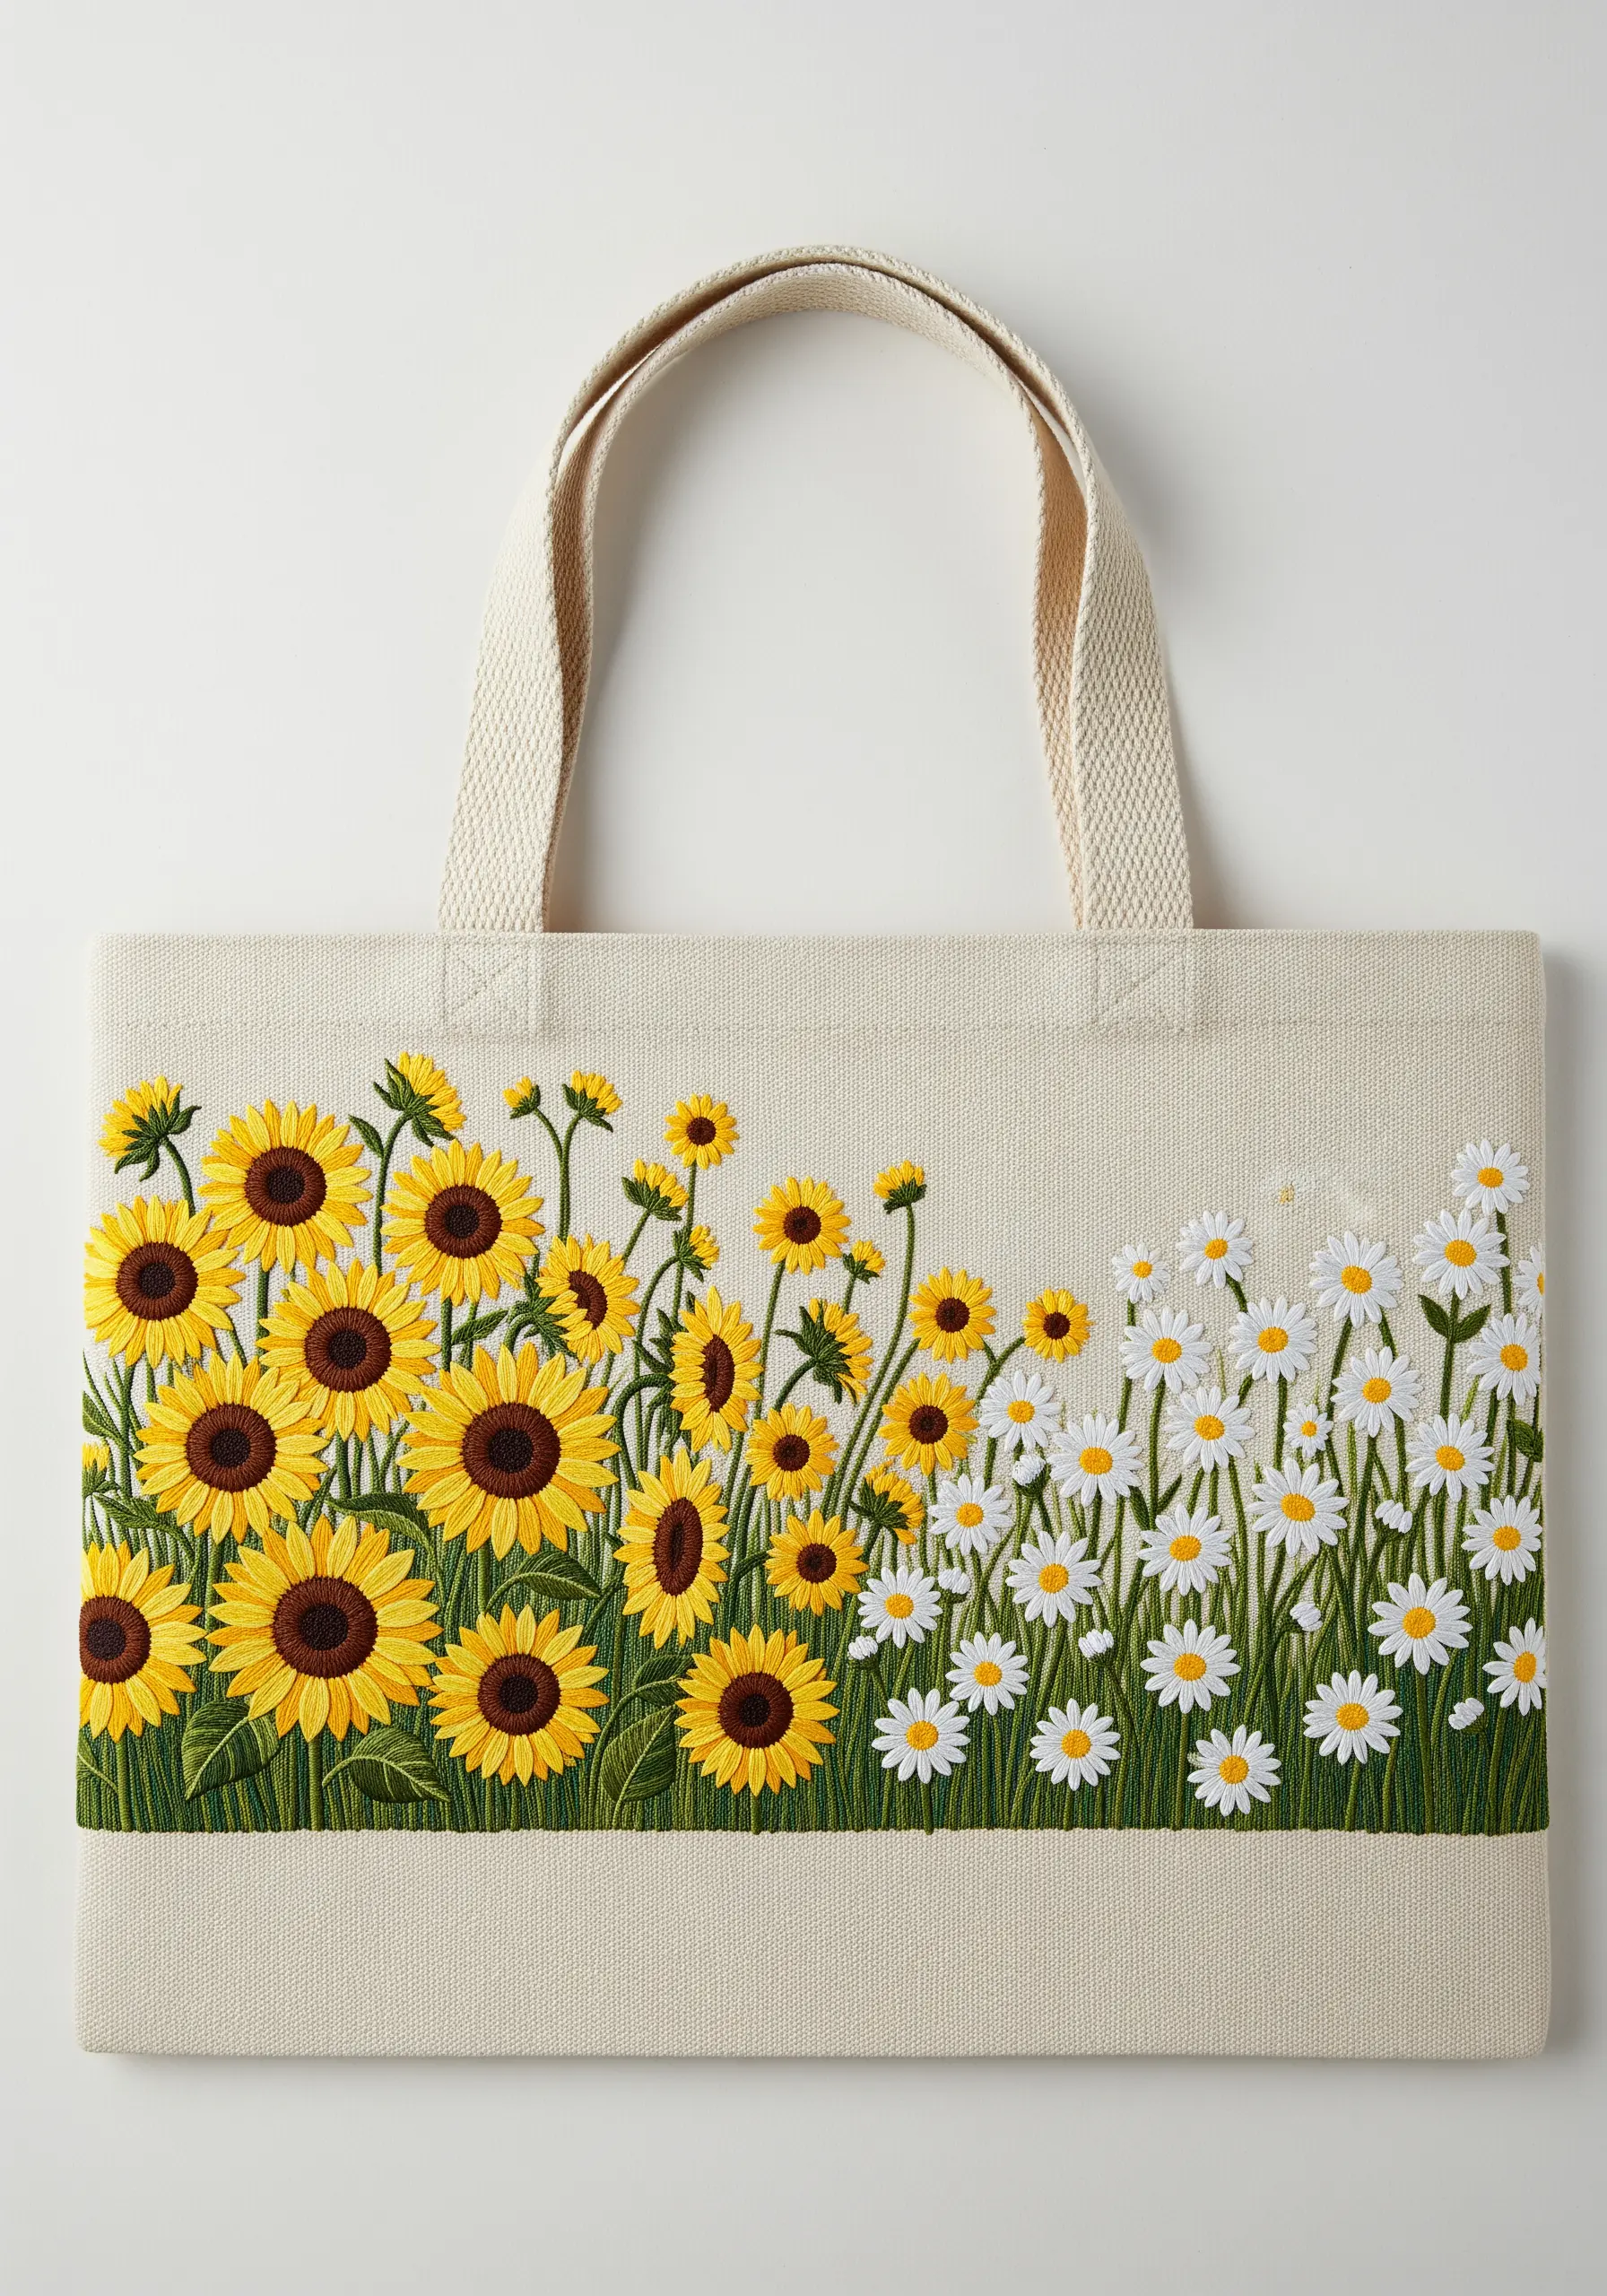
Take advantage of a tote bag’s wide surface to create a panoramic landscape that tells a story of transition.
Start with a dense cluster of sunflowers on one side, gradually thinning them out and introducing daisies until the other side is a sparse field of white.
This careful arrangement creates a beautiful sense of depth and perspective.
Always use a medium-weight stabilizer inside the bag to prevent stretching and support the stitches, ensuring your artwork lasts.
You can transform plain tote bags into garden-inspired artwork with this one technique.
17. Create an Emotional Focus with a Single Contrast

You can create a powerful narrative with just two elements: one large, complex subject and one small, simple one.
Here, the slightly drooping, highly detailed sunflower commands attention, while the small, bright daisy beside it offers a point of contrast and emotional focus.
This compositional choice invites the viewer to create a story about their relationship—a technique that adds immense depth to a simple floral piece.
18. Apply a Floral Palette to an Abstract Form
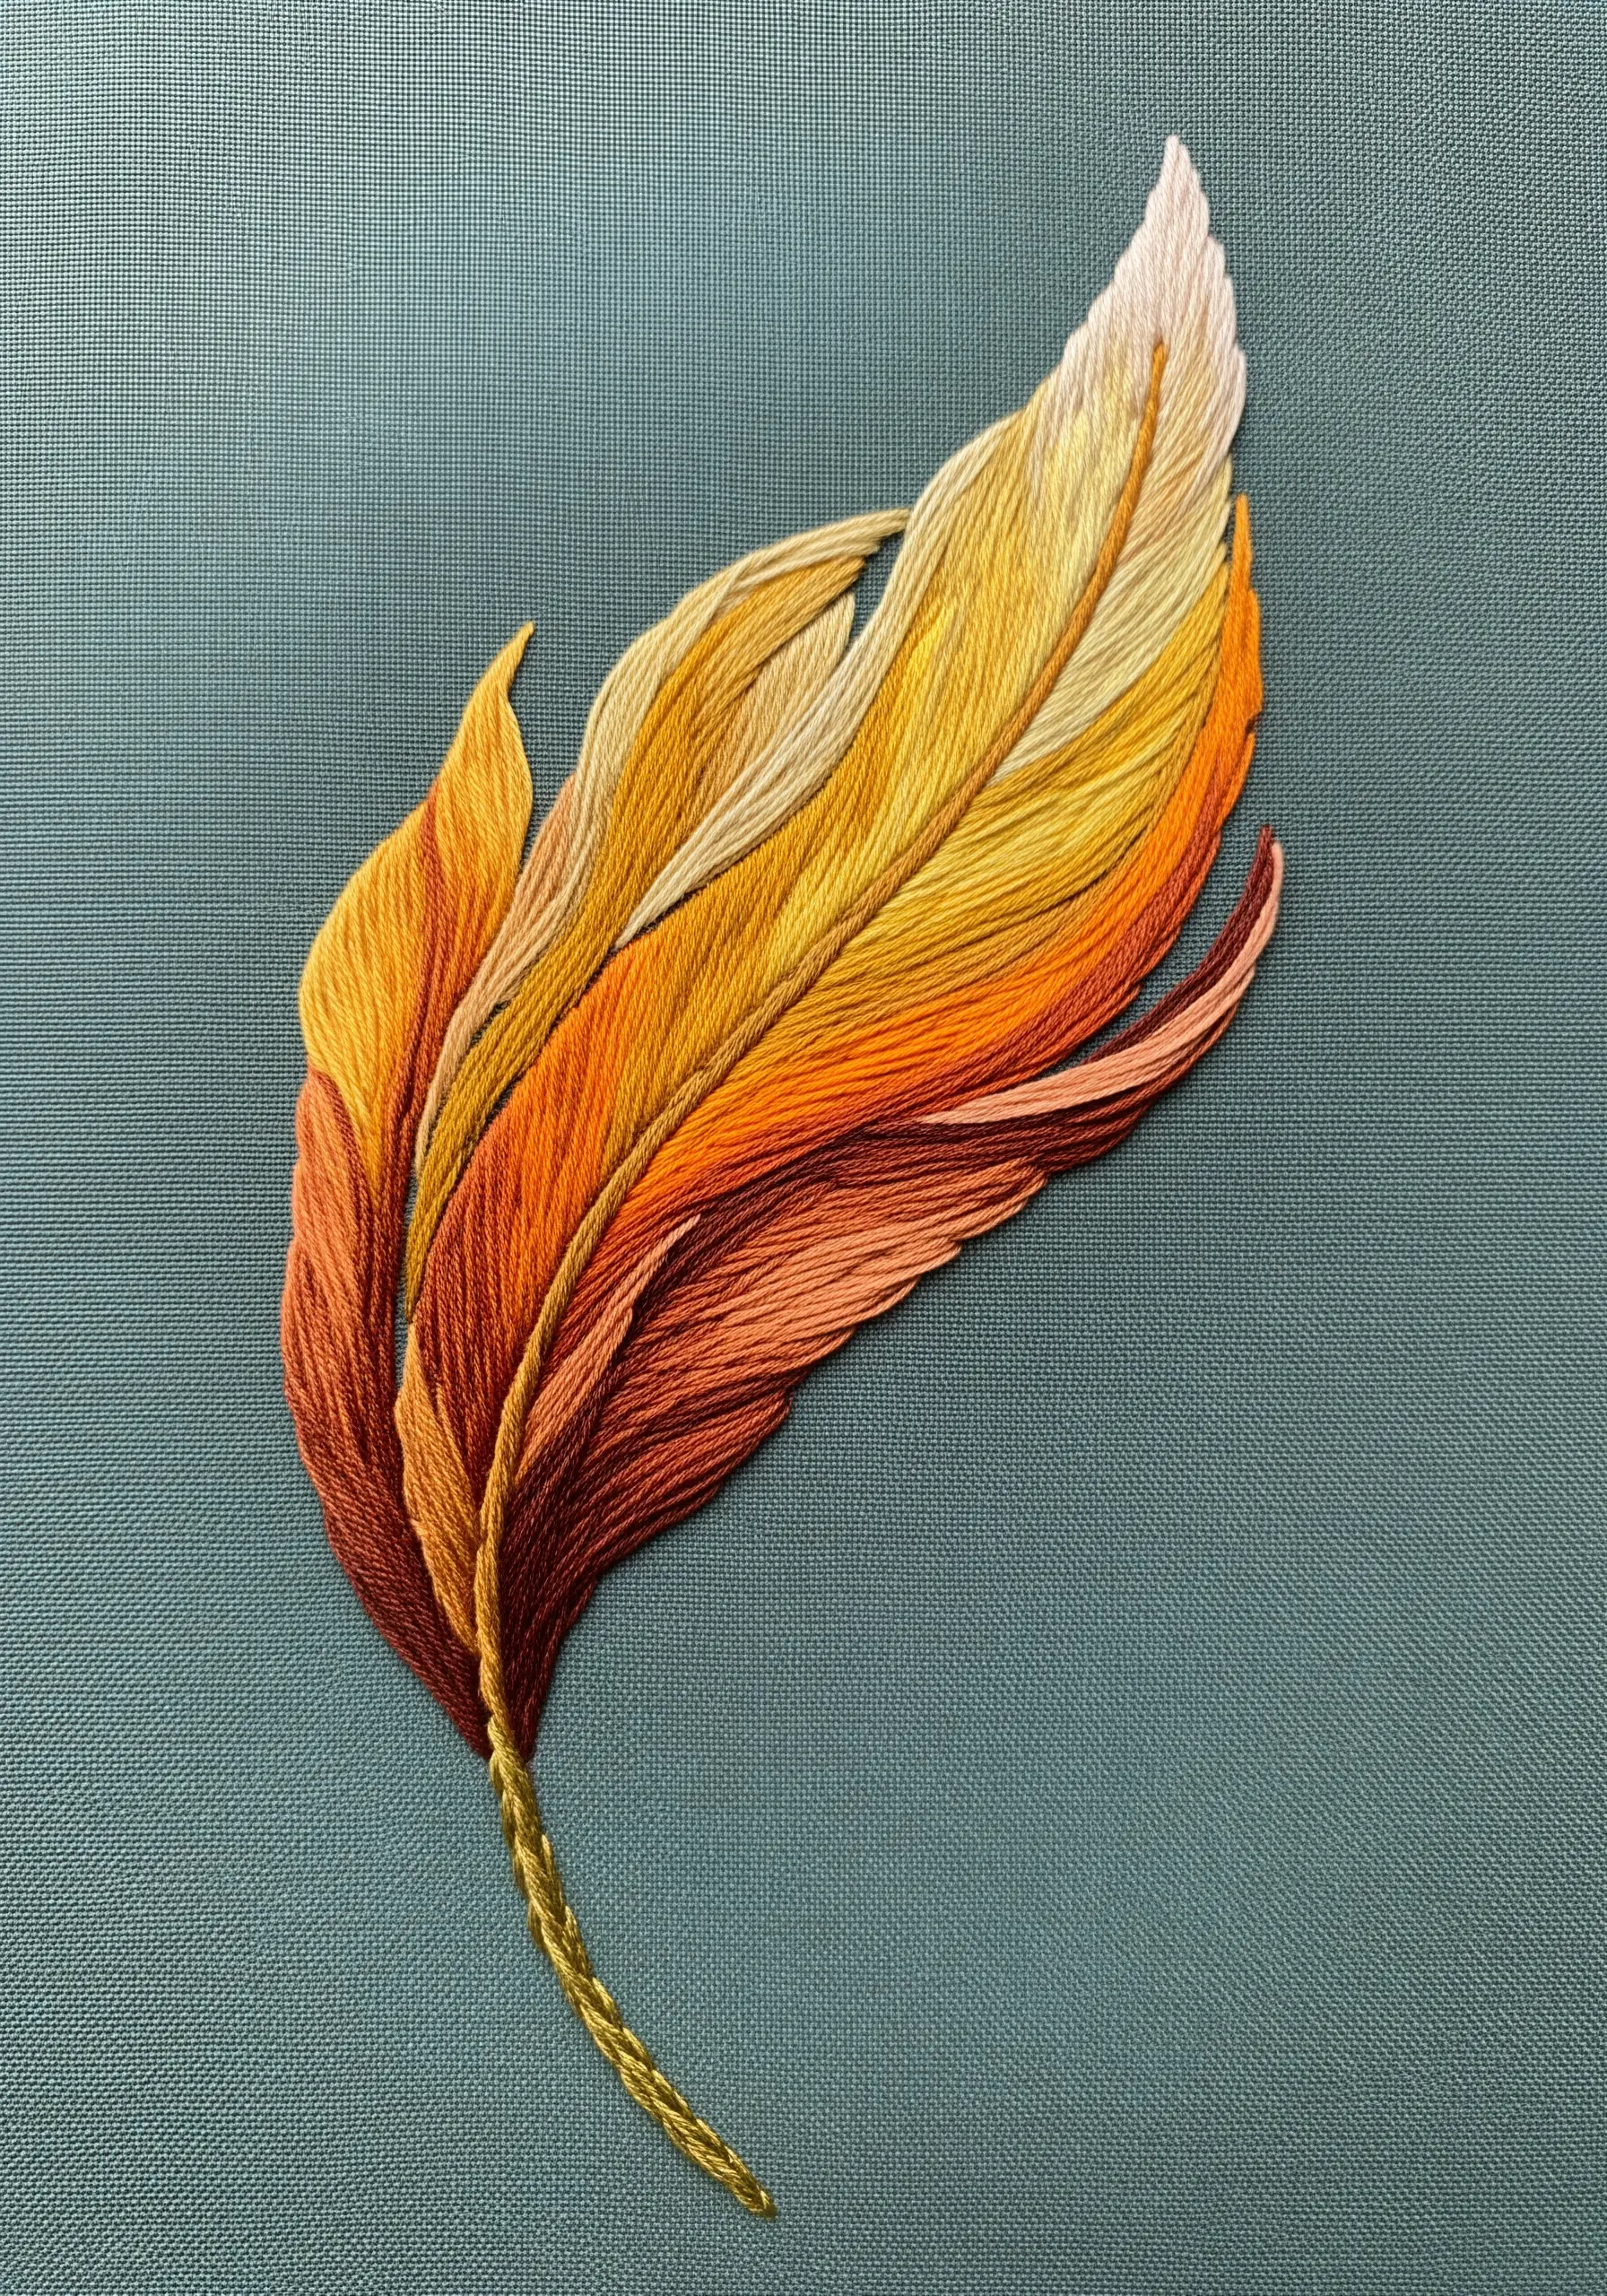
Challenge yourself to move beyond literal representations and apply the sunflower-to-daisy color palette to an entirely different shape, like a feather.
Use long-and-short stitch to blend fiery oranges, bright golds, soft yellows, and creamy whites along the feather’s barbs.
This exercise proves that a strong color story can unify any design, allowing you to create abstract thread embroidery ideas inspired by nature that feel cohesive and deeply artistic.
19. Define an Edge with a Minimalist Floral Border

When embellishing functional items like tea towels or table linens, a simple, repeating border adds a touch of handmade elegance without sacrificing usability.
Alternate simplified sunflowers and daisies along the hem, using clean satin stitches for the petals and single French knots for the centers.
This restrained approach feels polished and intentional, turning an everyday object into a small piece of art.
20. Fill the Frame with a Textural Abstract Meadow
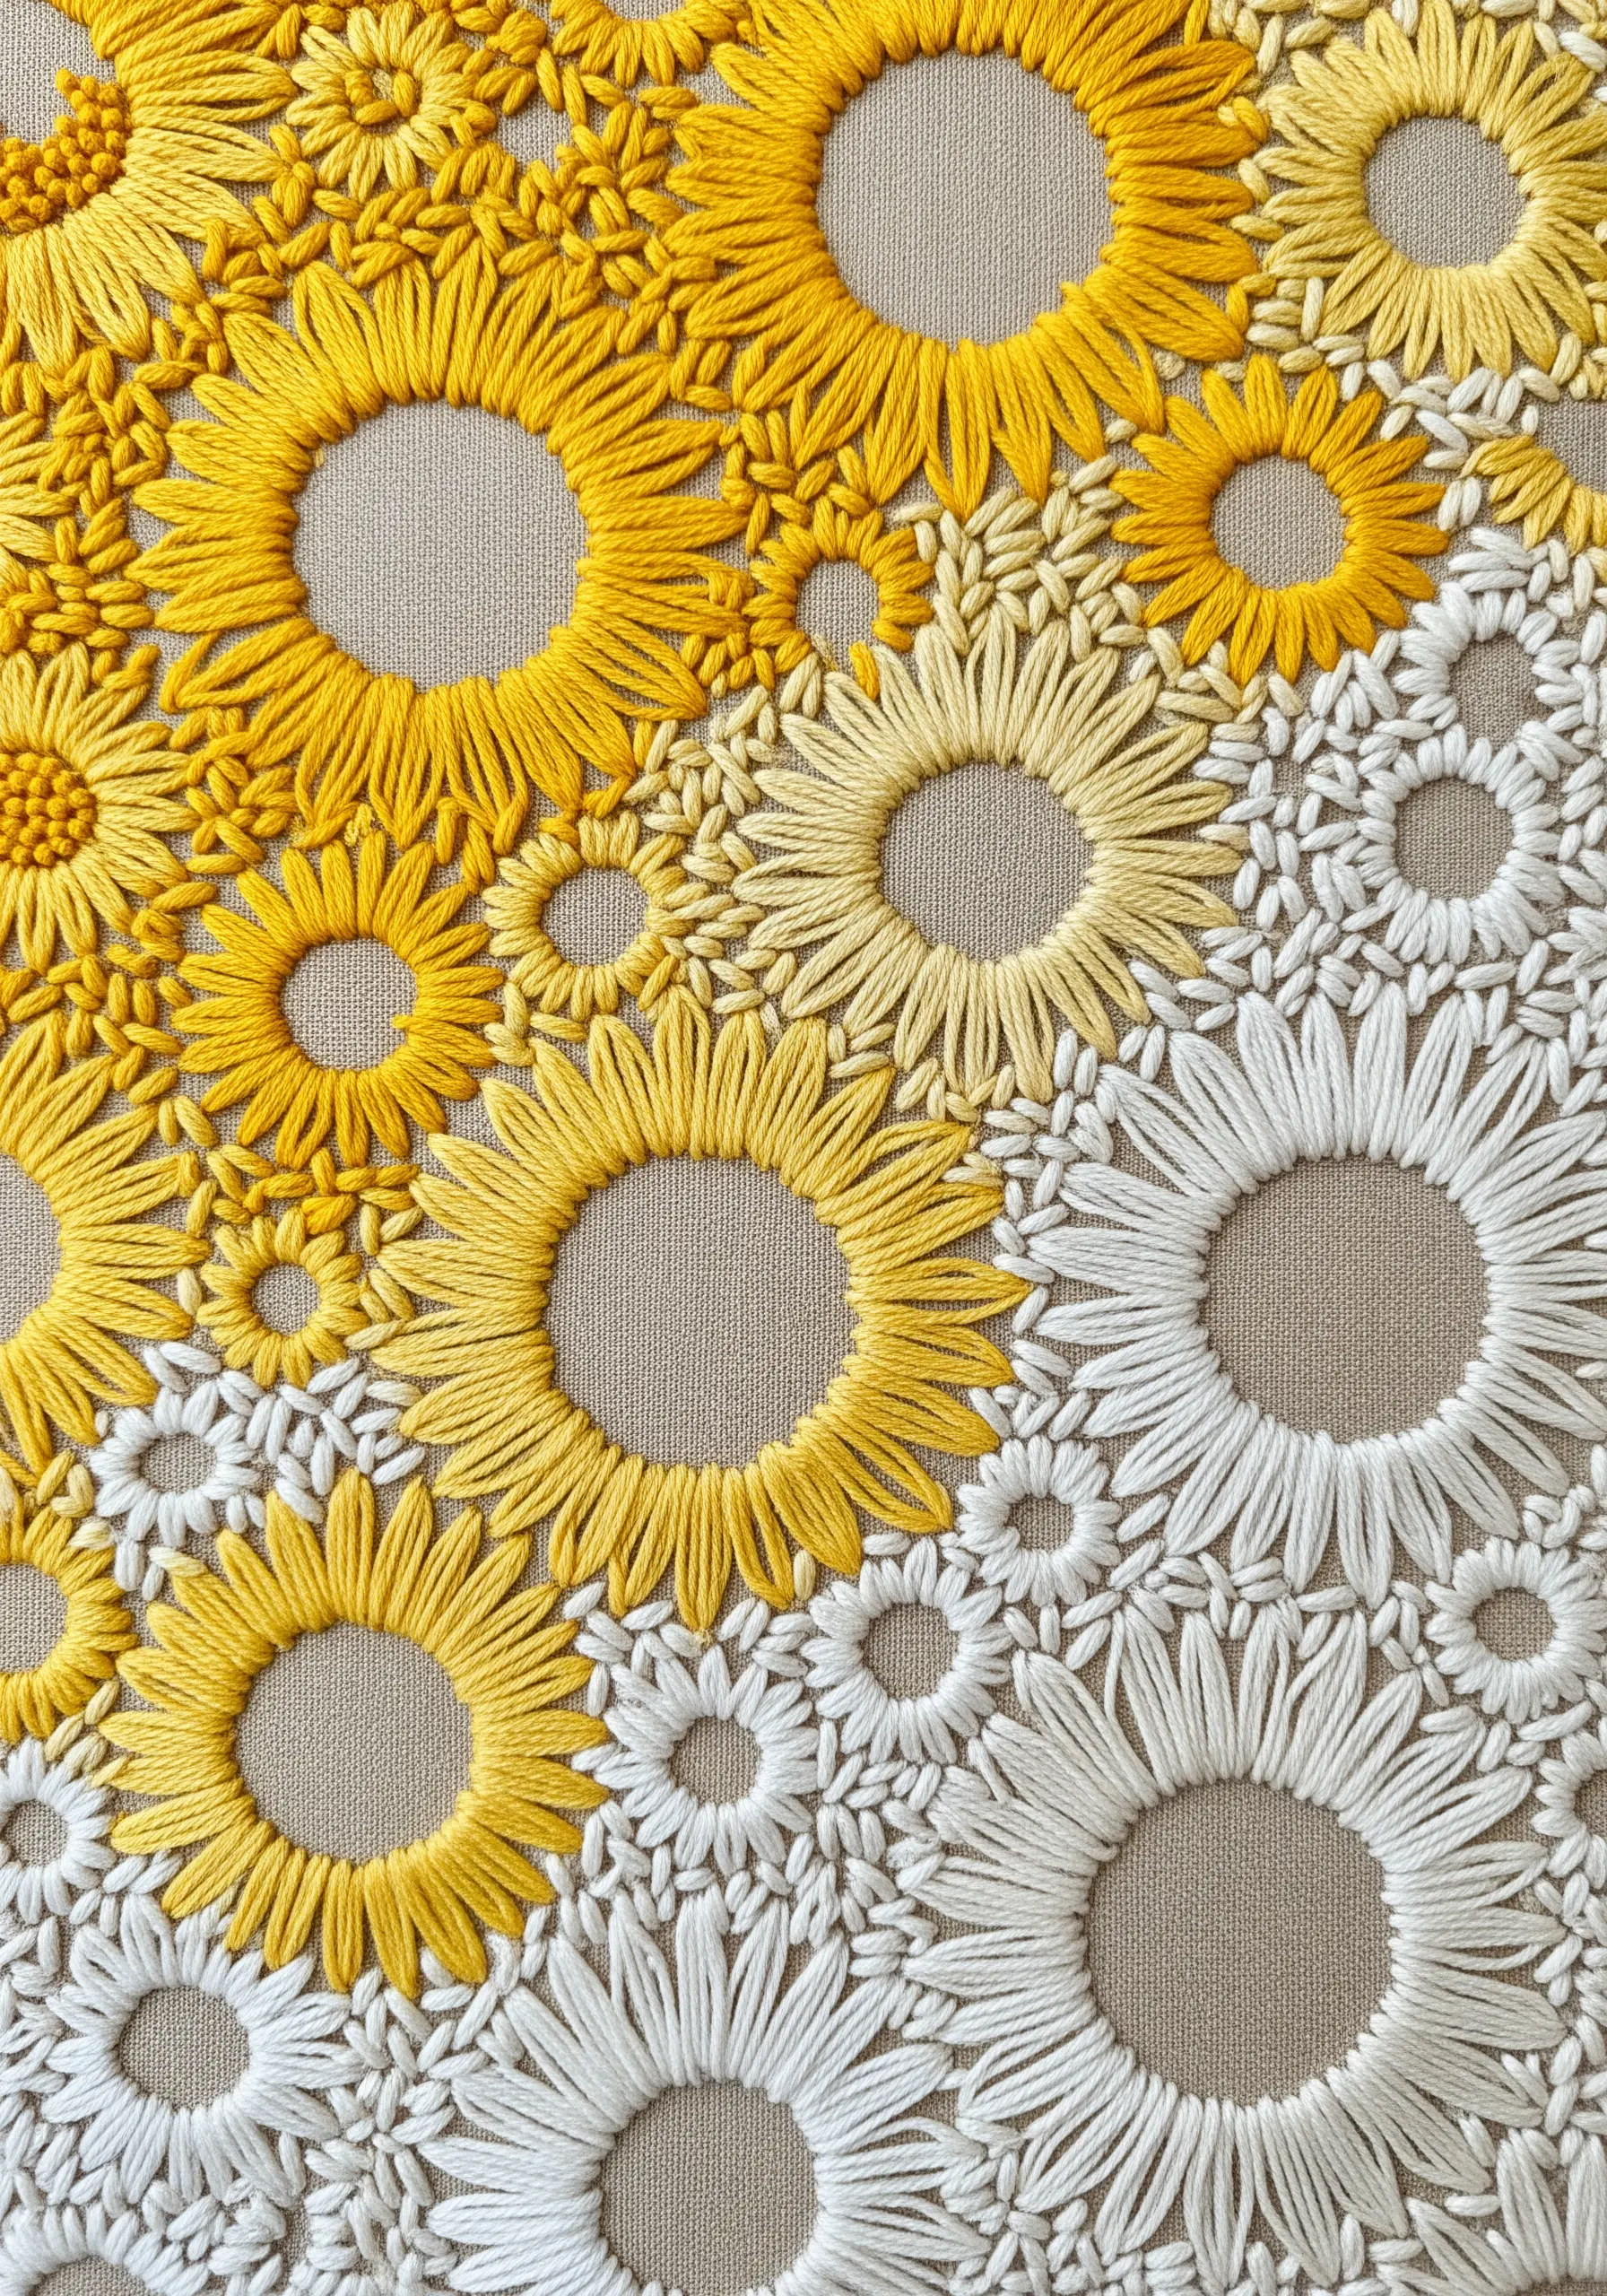
Instead of focusing on a single motif, fill your entire hoop with overlapping, simplified floral shapes to create a rich, textural surface.
Vary the size of your lazy daisy stitches and straight stitches, and cluster different colors together to create waves of yellow, white, and gold.
This technique is a joyful exploration of color and density, resulting in a piece that is more about tactile sensation than botanical accuracy.
21. Introduce a Surrealist Twist with Drip Effects

Elevate a classic daisy motif into a piece of modern, conceptual art by adding an unexpected ‘melting’ effect.
After stitching your daisies with traditional satin stitch, add the drips using long, single straight stitches that end in a small, teardrop-shaped satin stitch ‘droplet’.
This surrealist detail is playful and thought-provoking, transforming a simple floral pattern into a memorable statement.
22. Translate Your Color Palette into a 3D Form
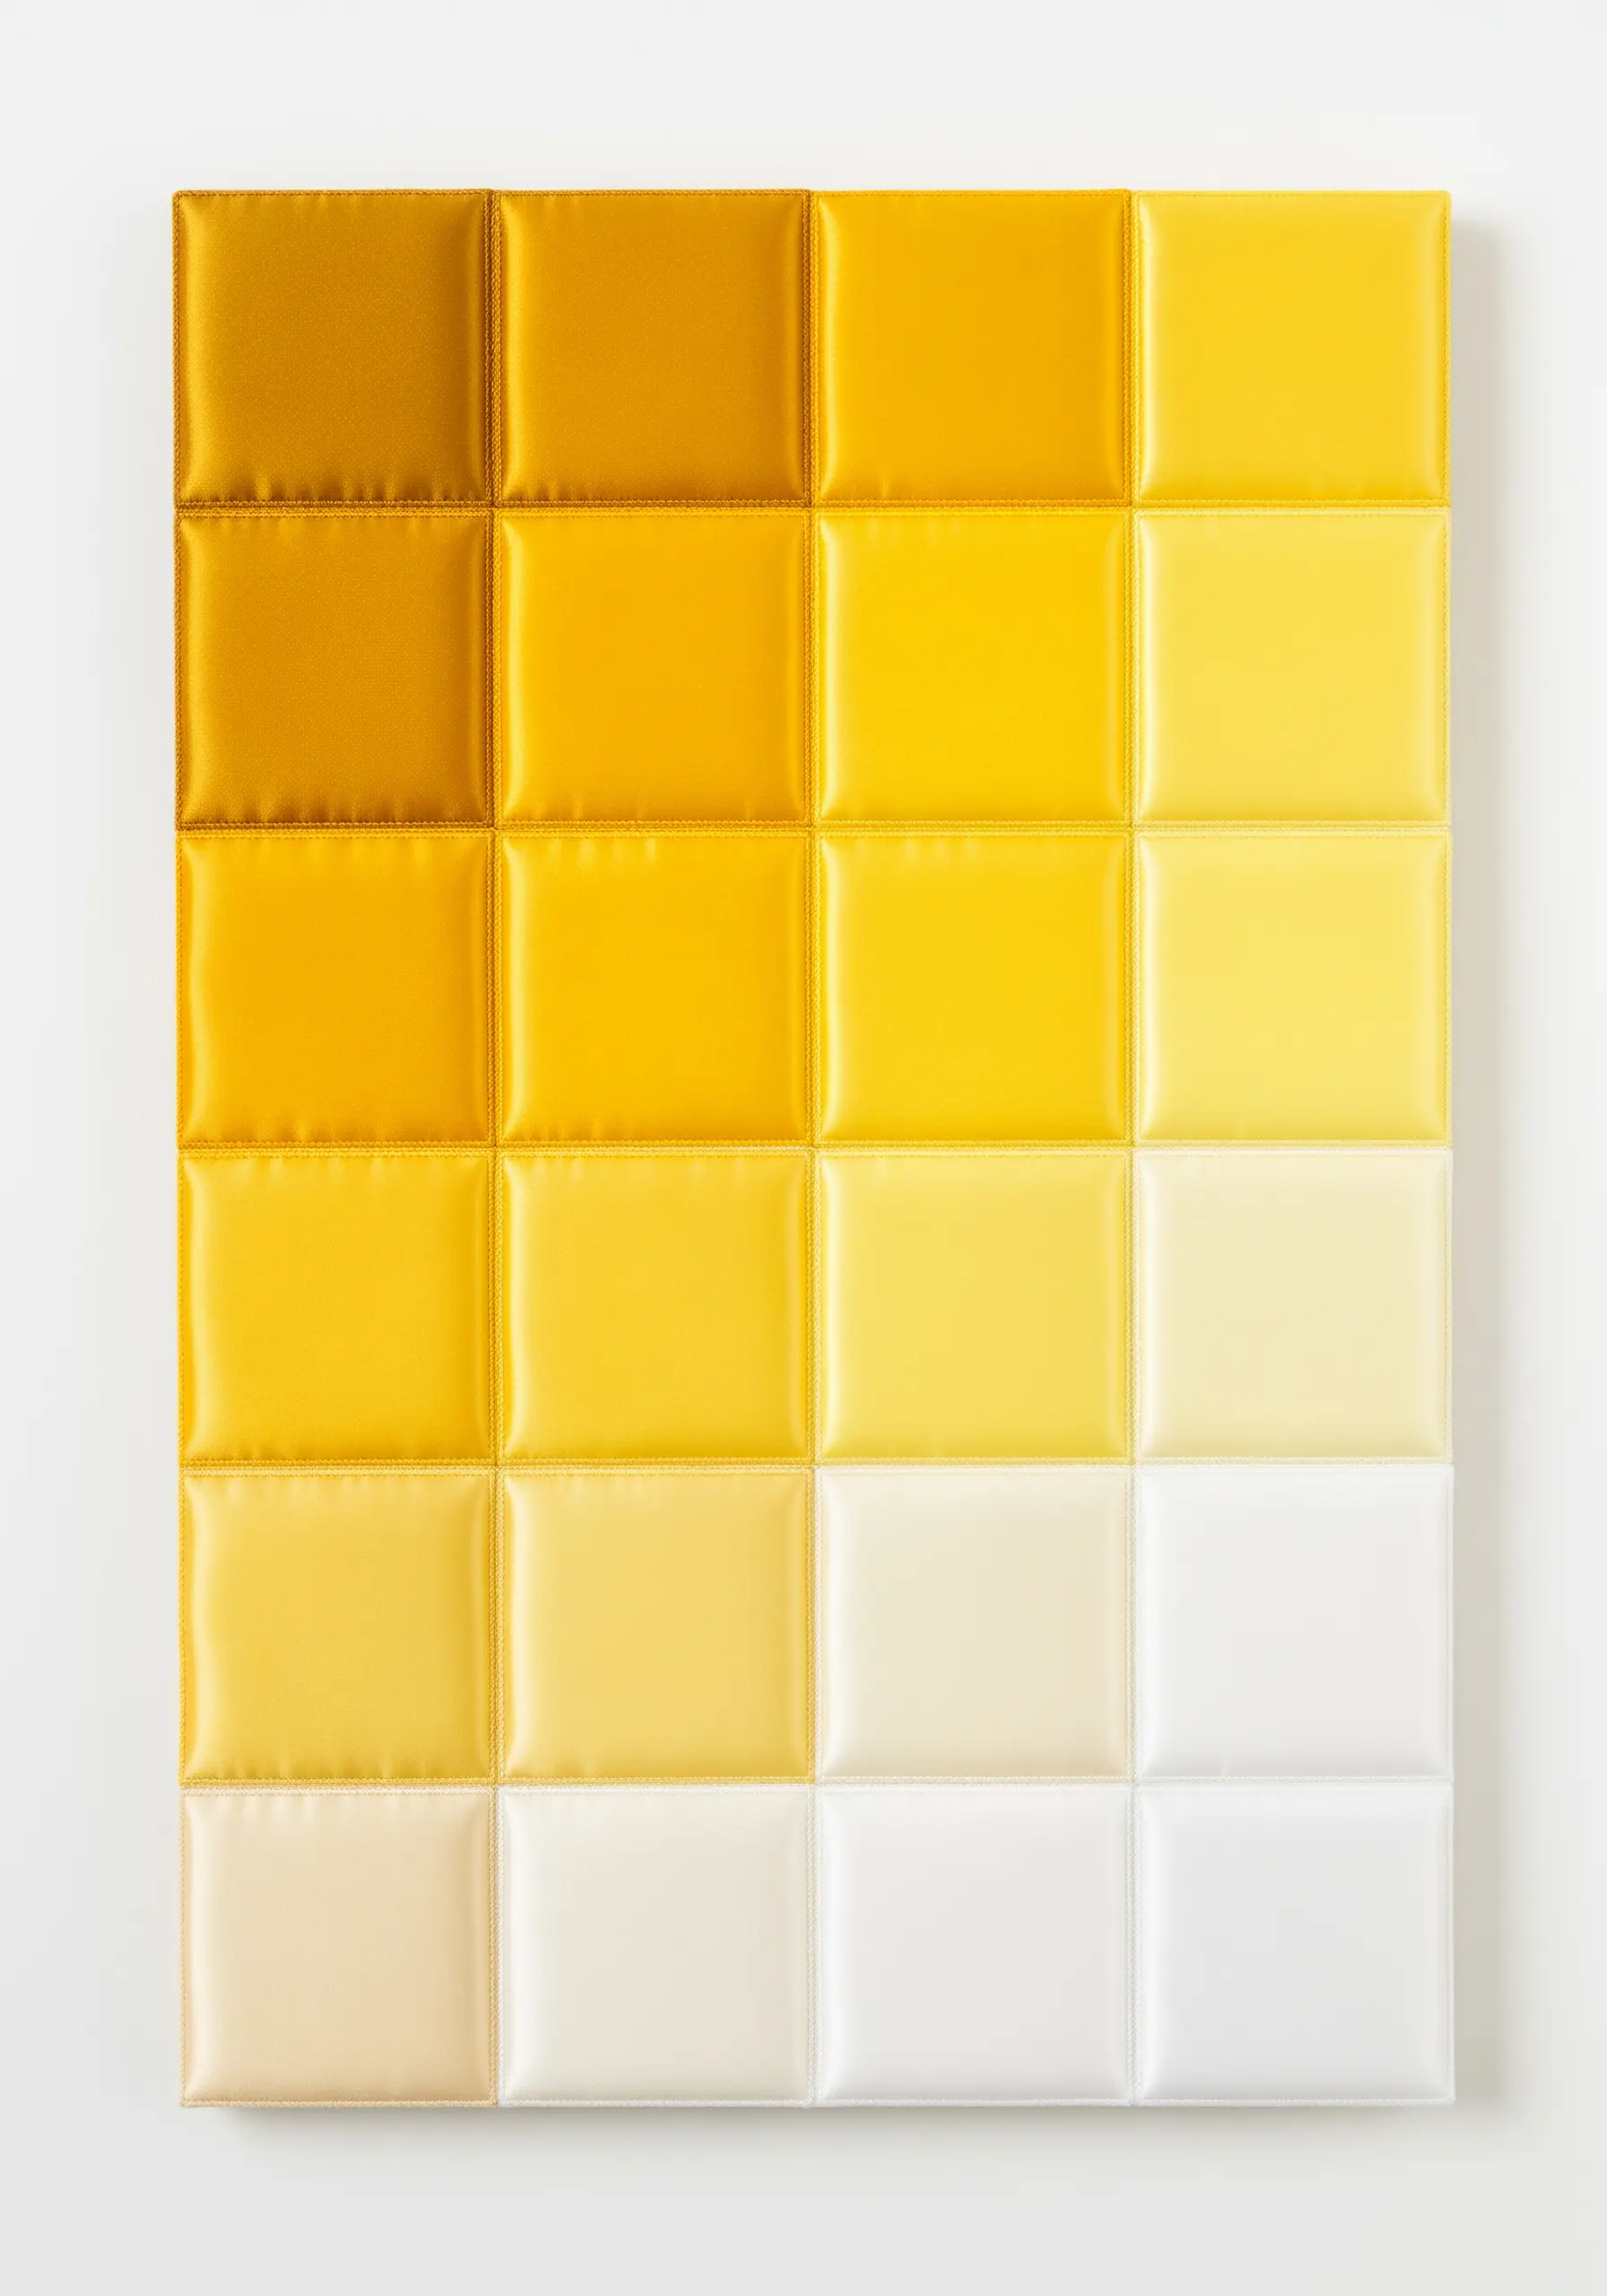
Explore your color gradient in a completely new way by combining embroidery with quilting techniques.
Create small, lightly padded squares of fabric, each wrapped in a different shade from your palette, from deep gold to pale cream.
Stitching them together in a grid creates a tactile color chart that has sculptural depth and visual weight.
This is a sophisticated way to study color relationships beyond the hoop.
23. Create Motion with a Deconstructed Bloom
Give your floral embroidery a dynamic, energetic feel by ‘exploding’ the flower on the fabric.
Stitch a central bloom, then scatter individual petals around it as if they are flying away.
Using a sheer fabric like organza or tulle enhances this illusion of movement and weightlessness.
You will need to use a water-soluble stabilizer on top of the sheer fabric to provide support while you stitch, which you can then rinse away to reveal the floating effect.
24. Finish Your Hoop with a Woven Tassel
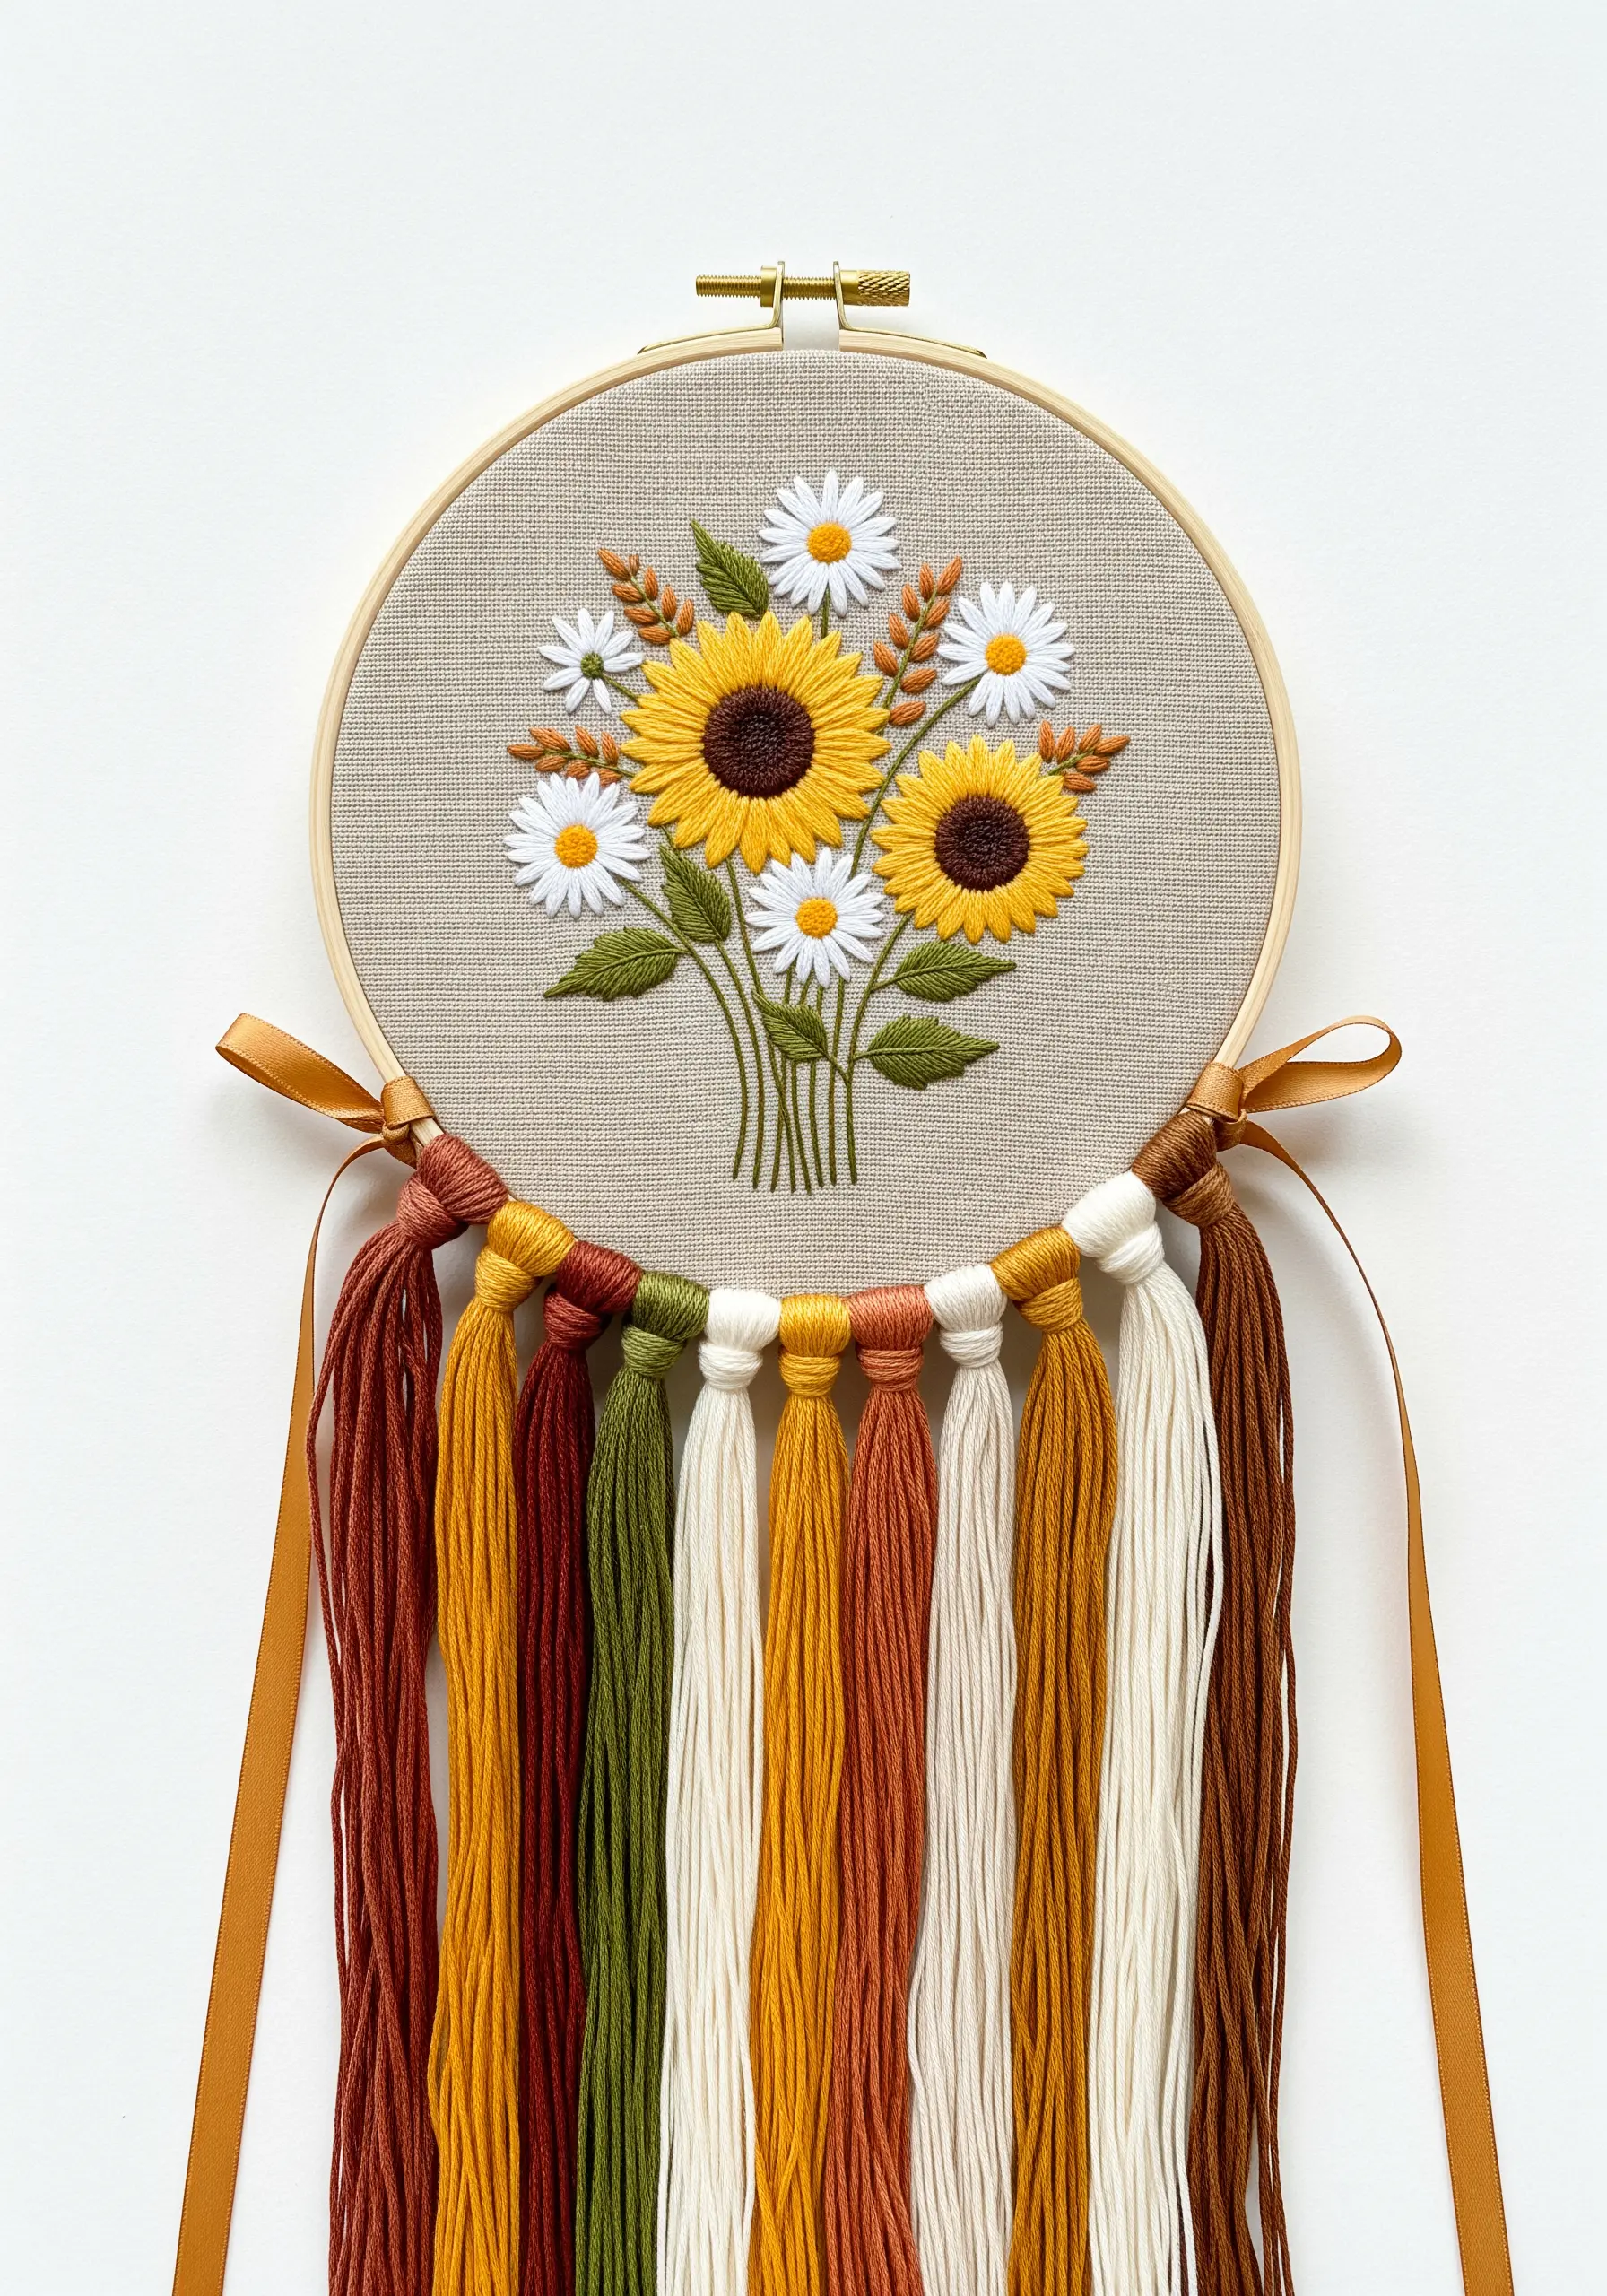
Transform your finished hoop art into a more substantial wall hanging by adding a decorative tassel tail.
Using full skeins of embroidery floss in your project’s color palette, attach them to the bottom of the hoop with Lark’s Head knots.
Varying the colors and textures of the floss adds richness and dimension.
This finishing touch gives your piece a polished, bohemian feel and makes it ready to hang as a statement decoration.
25. Invent an Imaginary Botanical Hybrid
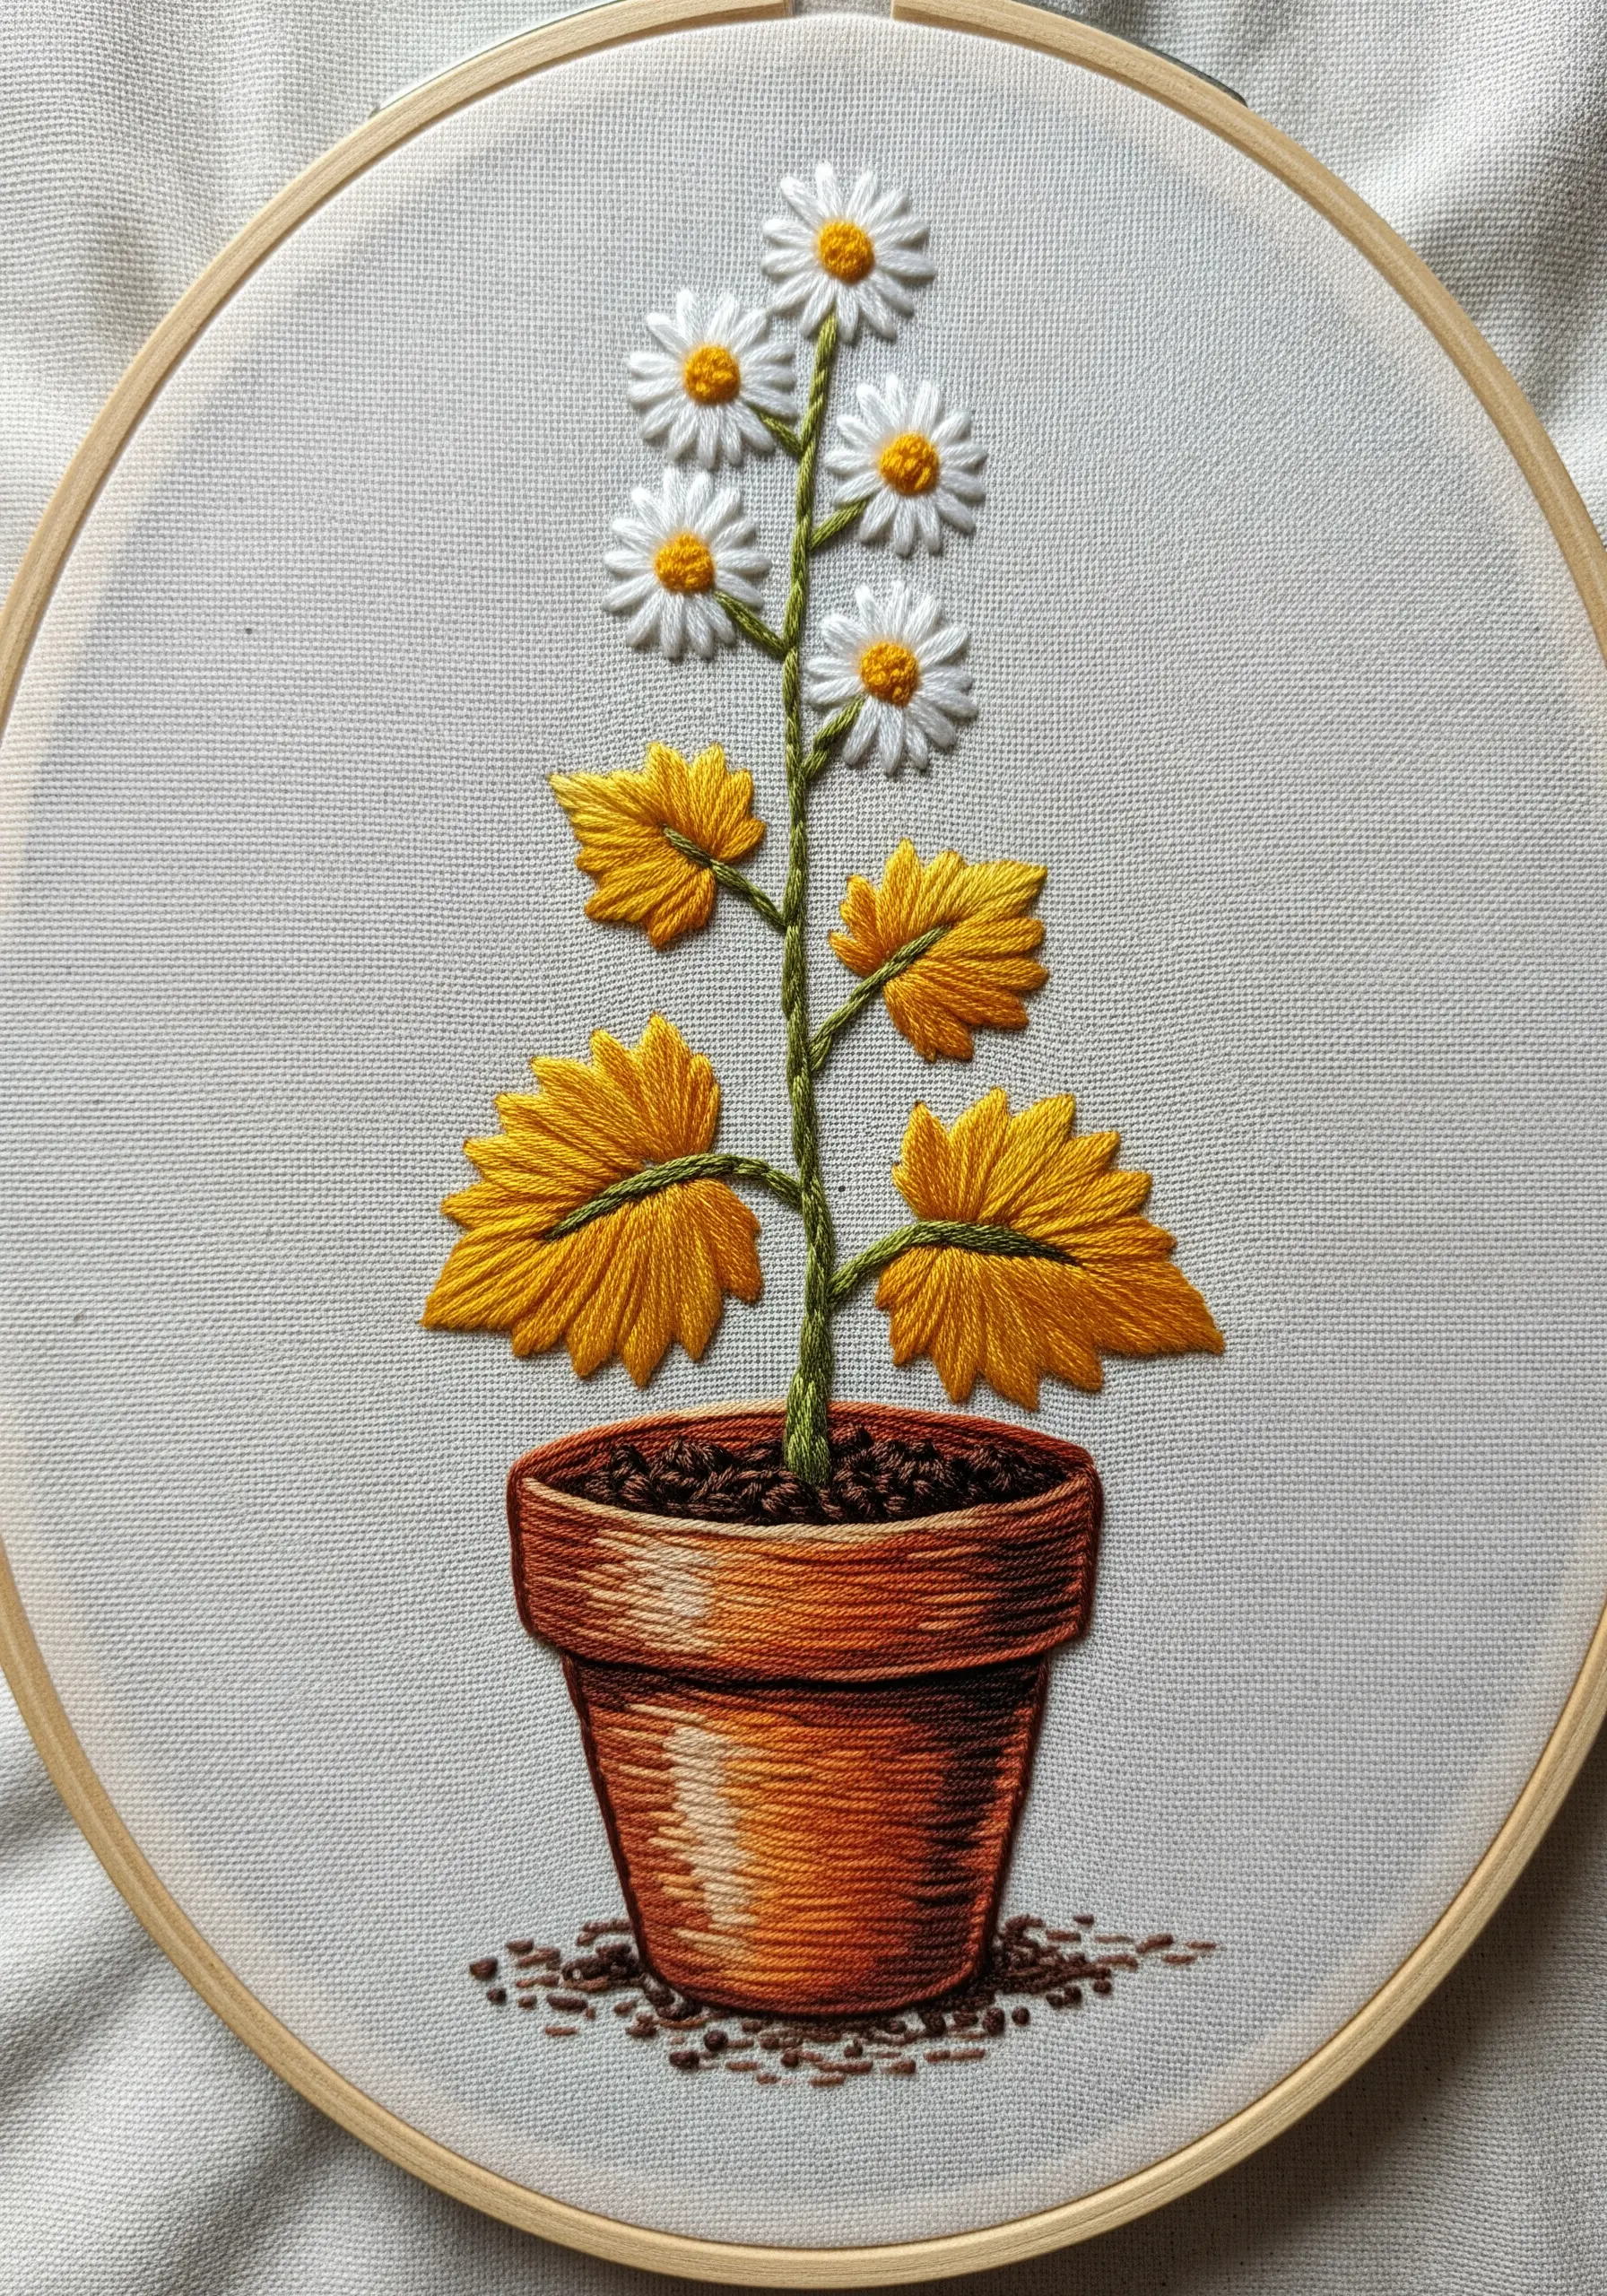
Let your imagination guide you by designing a plant that doesn’t exist in nature.
This piece uses the distinct shape and color of sunflower petals as leaves along a central stem, which is then topped by a cluster of classic white daisies.
This whimsical approach frees you from the constraints of realism and allows you to create unique, story-filled botanicals that are entirely your own.
26. Build Dimension with Silk Ribbon Embroidery
For petals that literally lift off the fabric, switch from cotton floss to silk ribbon.
The width of the ribbon allows you to create plush, three-dimensional petals with just a few simple stitches, like the ribbon stitch or Japanese ribbon stitch.
The natural luster of silk also adds a luxurious sheen that creates beautiful highlights.
Use this technique for a focal flower to give your composition a dramatic, textural anchor point.
27. Create a Sampler as a Technical Study
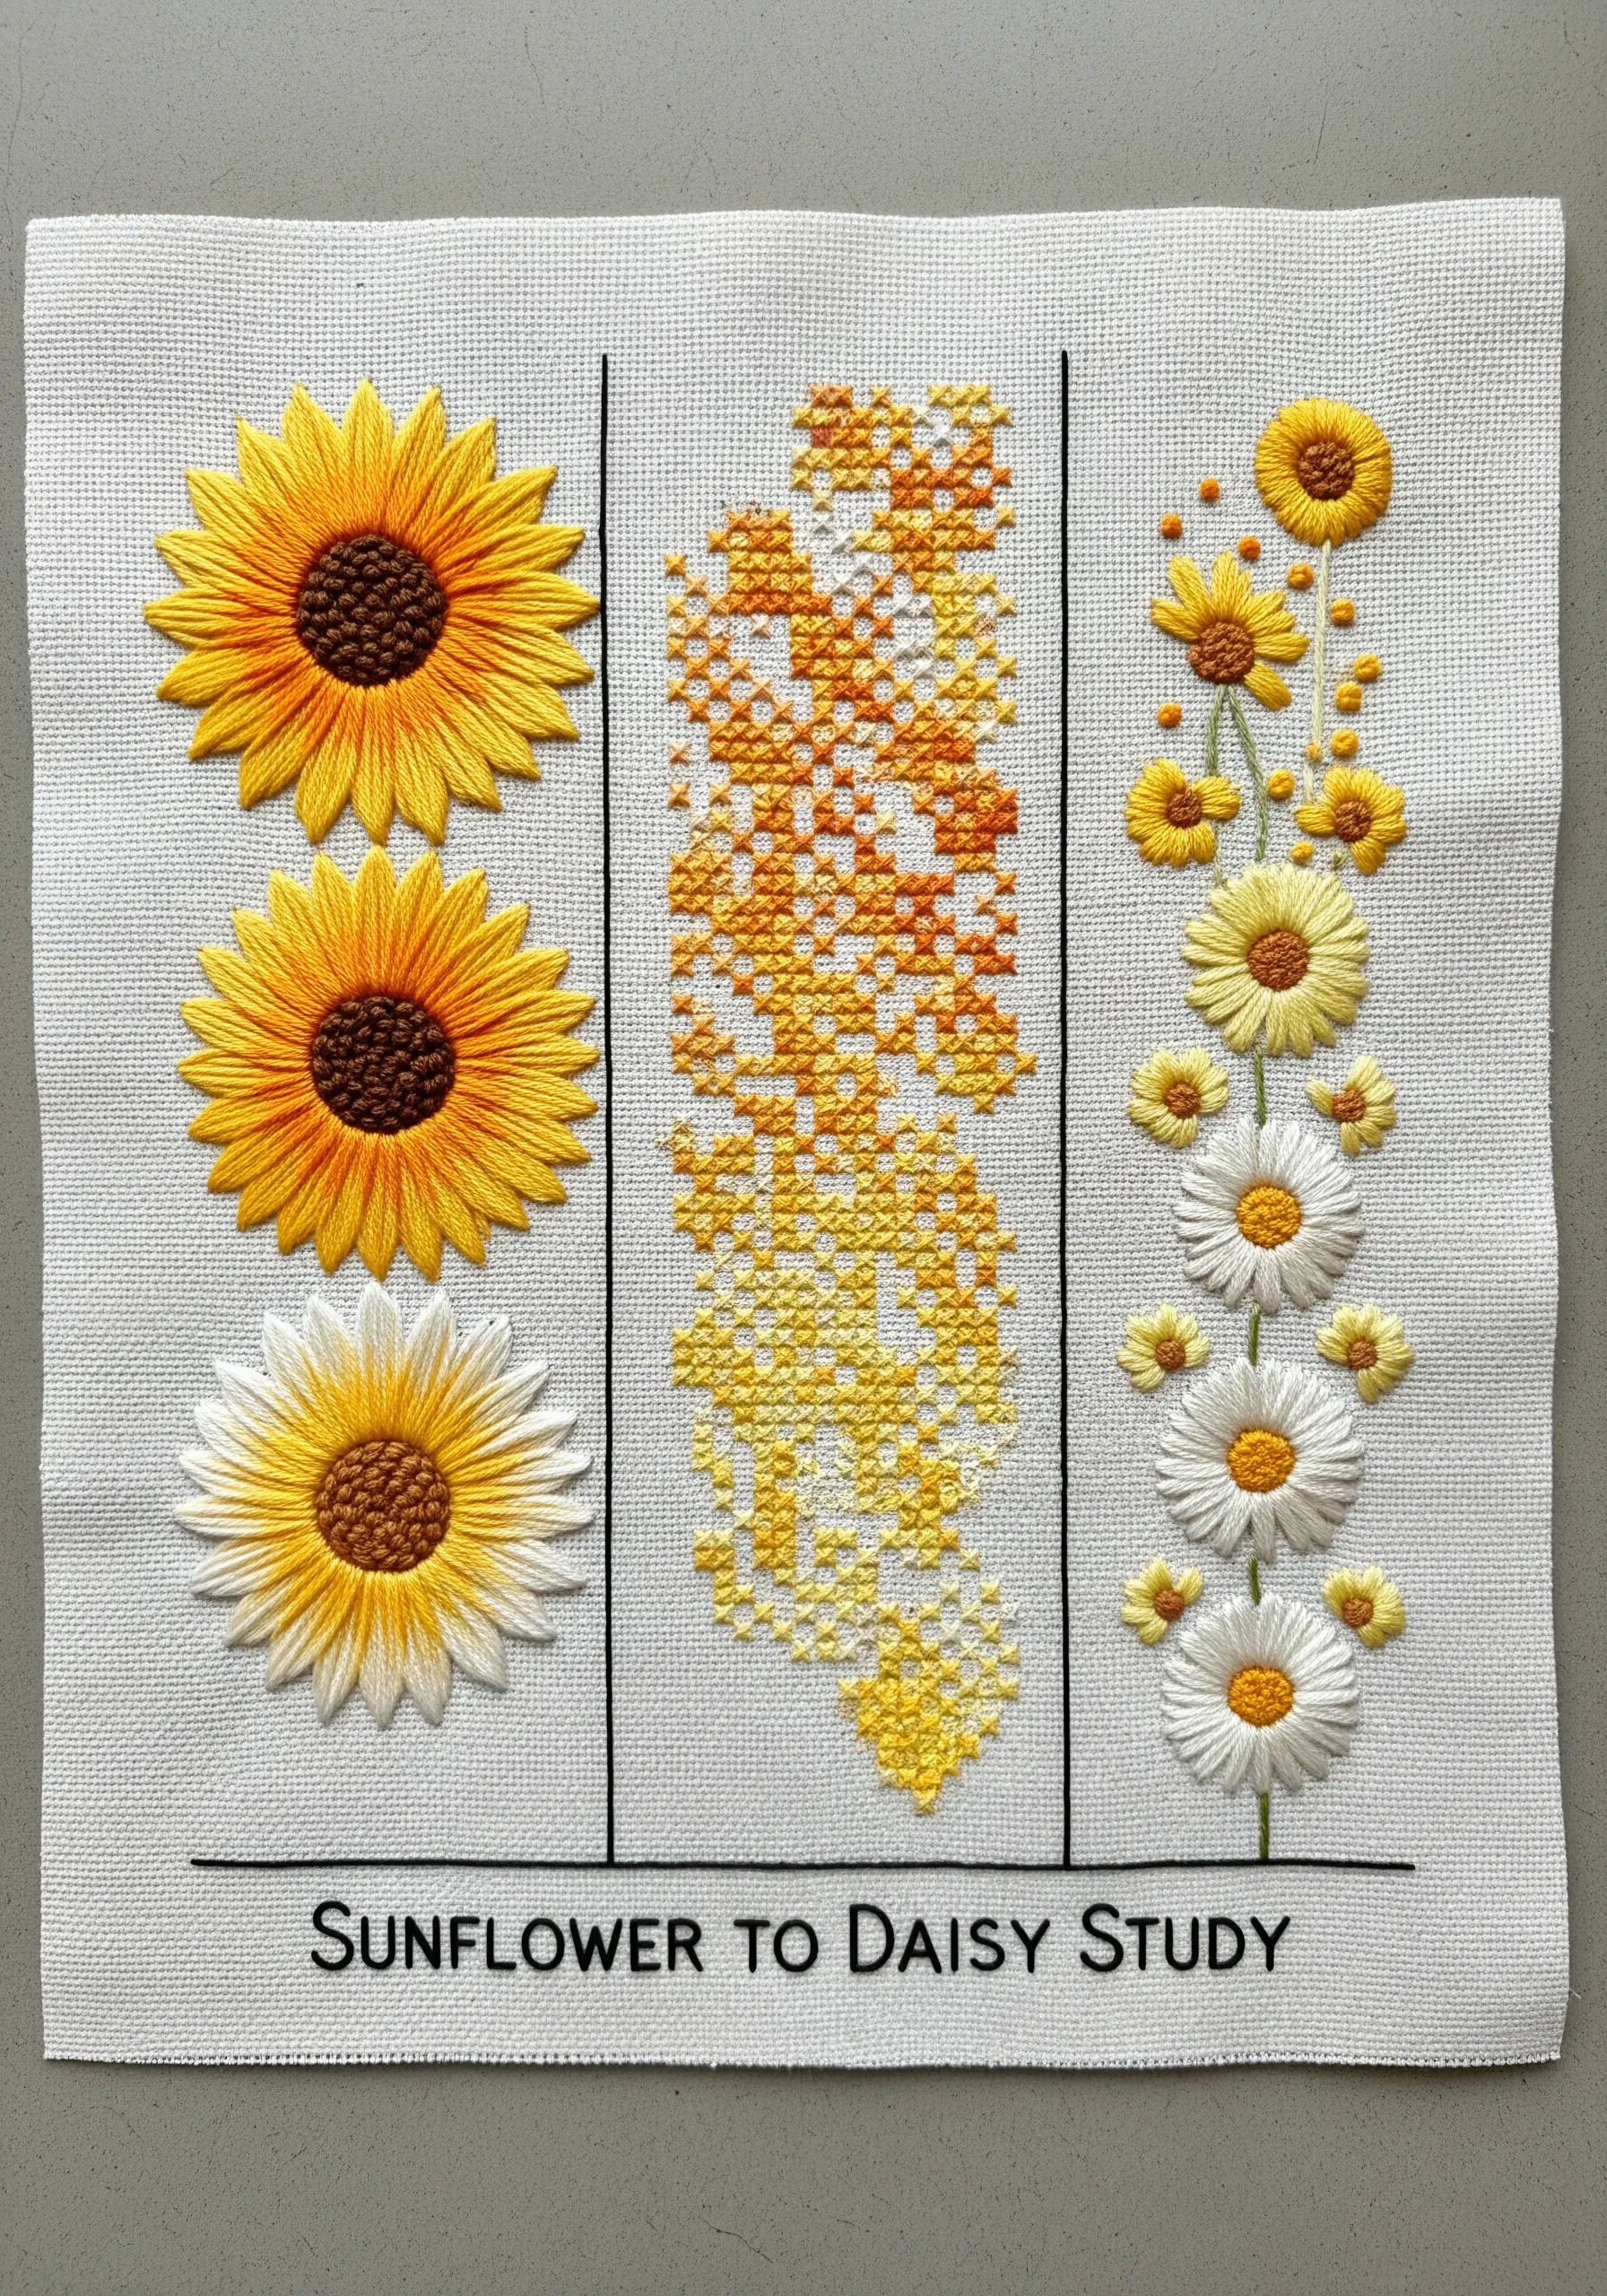
Dedicate a single piece of fabric to exploring the sunflower-to-daisy theme through various techniques.
You can document your thread-painting progress, experiment with a cross-stitch interpretation of a gradient, or chart the evolution of one flower into another along a single stem.
This approach not only refines your skills but also results in a beautiful and informative reference piece you can look back on for future projects.


