

A hoodie is more than just comfortable—it’s a canvas waiting for your personal signature. Forget fleeting trends for a moment and think about what makes an embroidered piece truly stand out: the texture, the placement, the story your stitches tell.
Here, you won’t find generic advice. Instead, I want to show you the specific techniques that elevate a simple design into something memorable. We’ll explore how to add dimension with padded satin stitches, create realistic fur with careful color blending, and use minimalist line art to make a sophisticated statement.
This is your chance to turn a wardrobe staple into a piece of wearable art that is uniquely, confidently you. Let’s begin.
1. Master the Full-Back Koi Canvas

A large back piece demands stability, so start by applying a heavy-duty cut-away stabilizer to the inside of your hoodie.
Create the fish scales using a scallop stitch or overlapping rows of short satin stitches, changing thread color every few rows to achieve a natural gradient.
For the water, use a variegated blue thread with a long, flowing stem stitch to mimic the movement of waves without adding bulk.
This combination of dense fill stitches for the koi and lighter stitches for the water creates a dynamic visual hierarchy that makes the central motif pop.
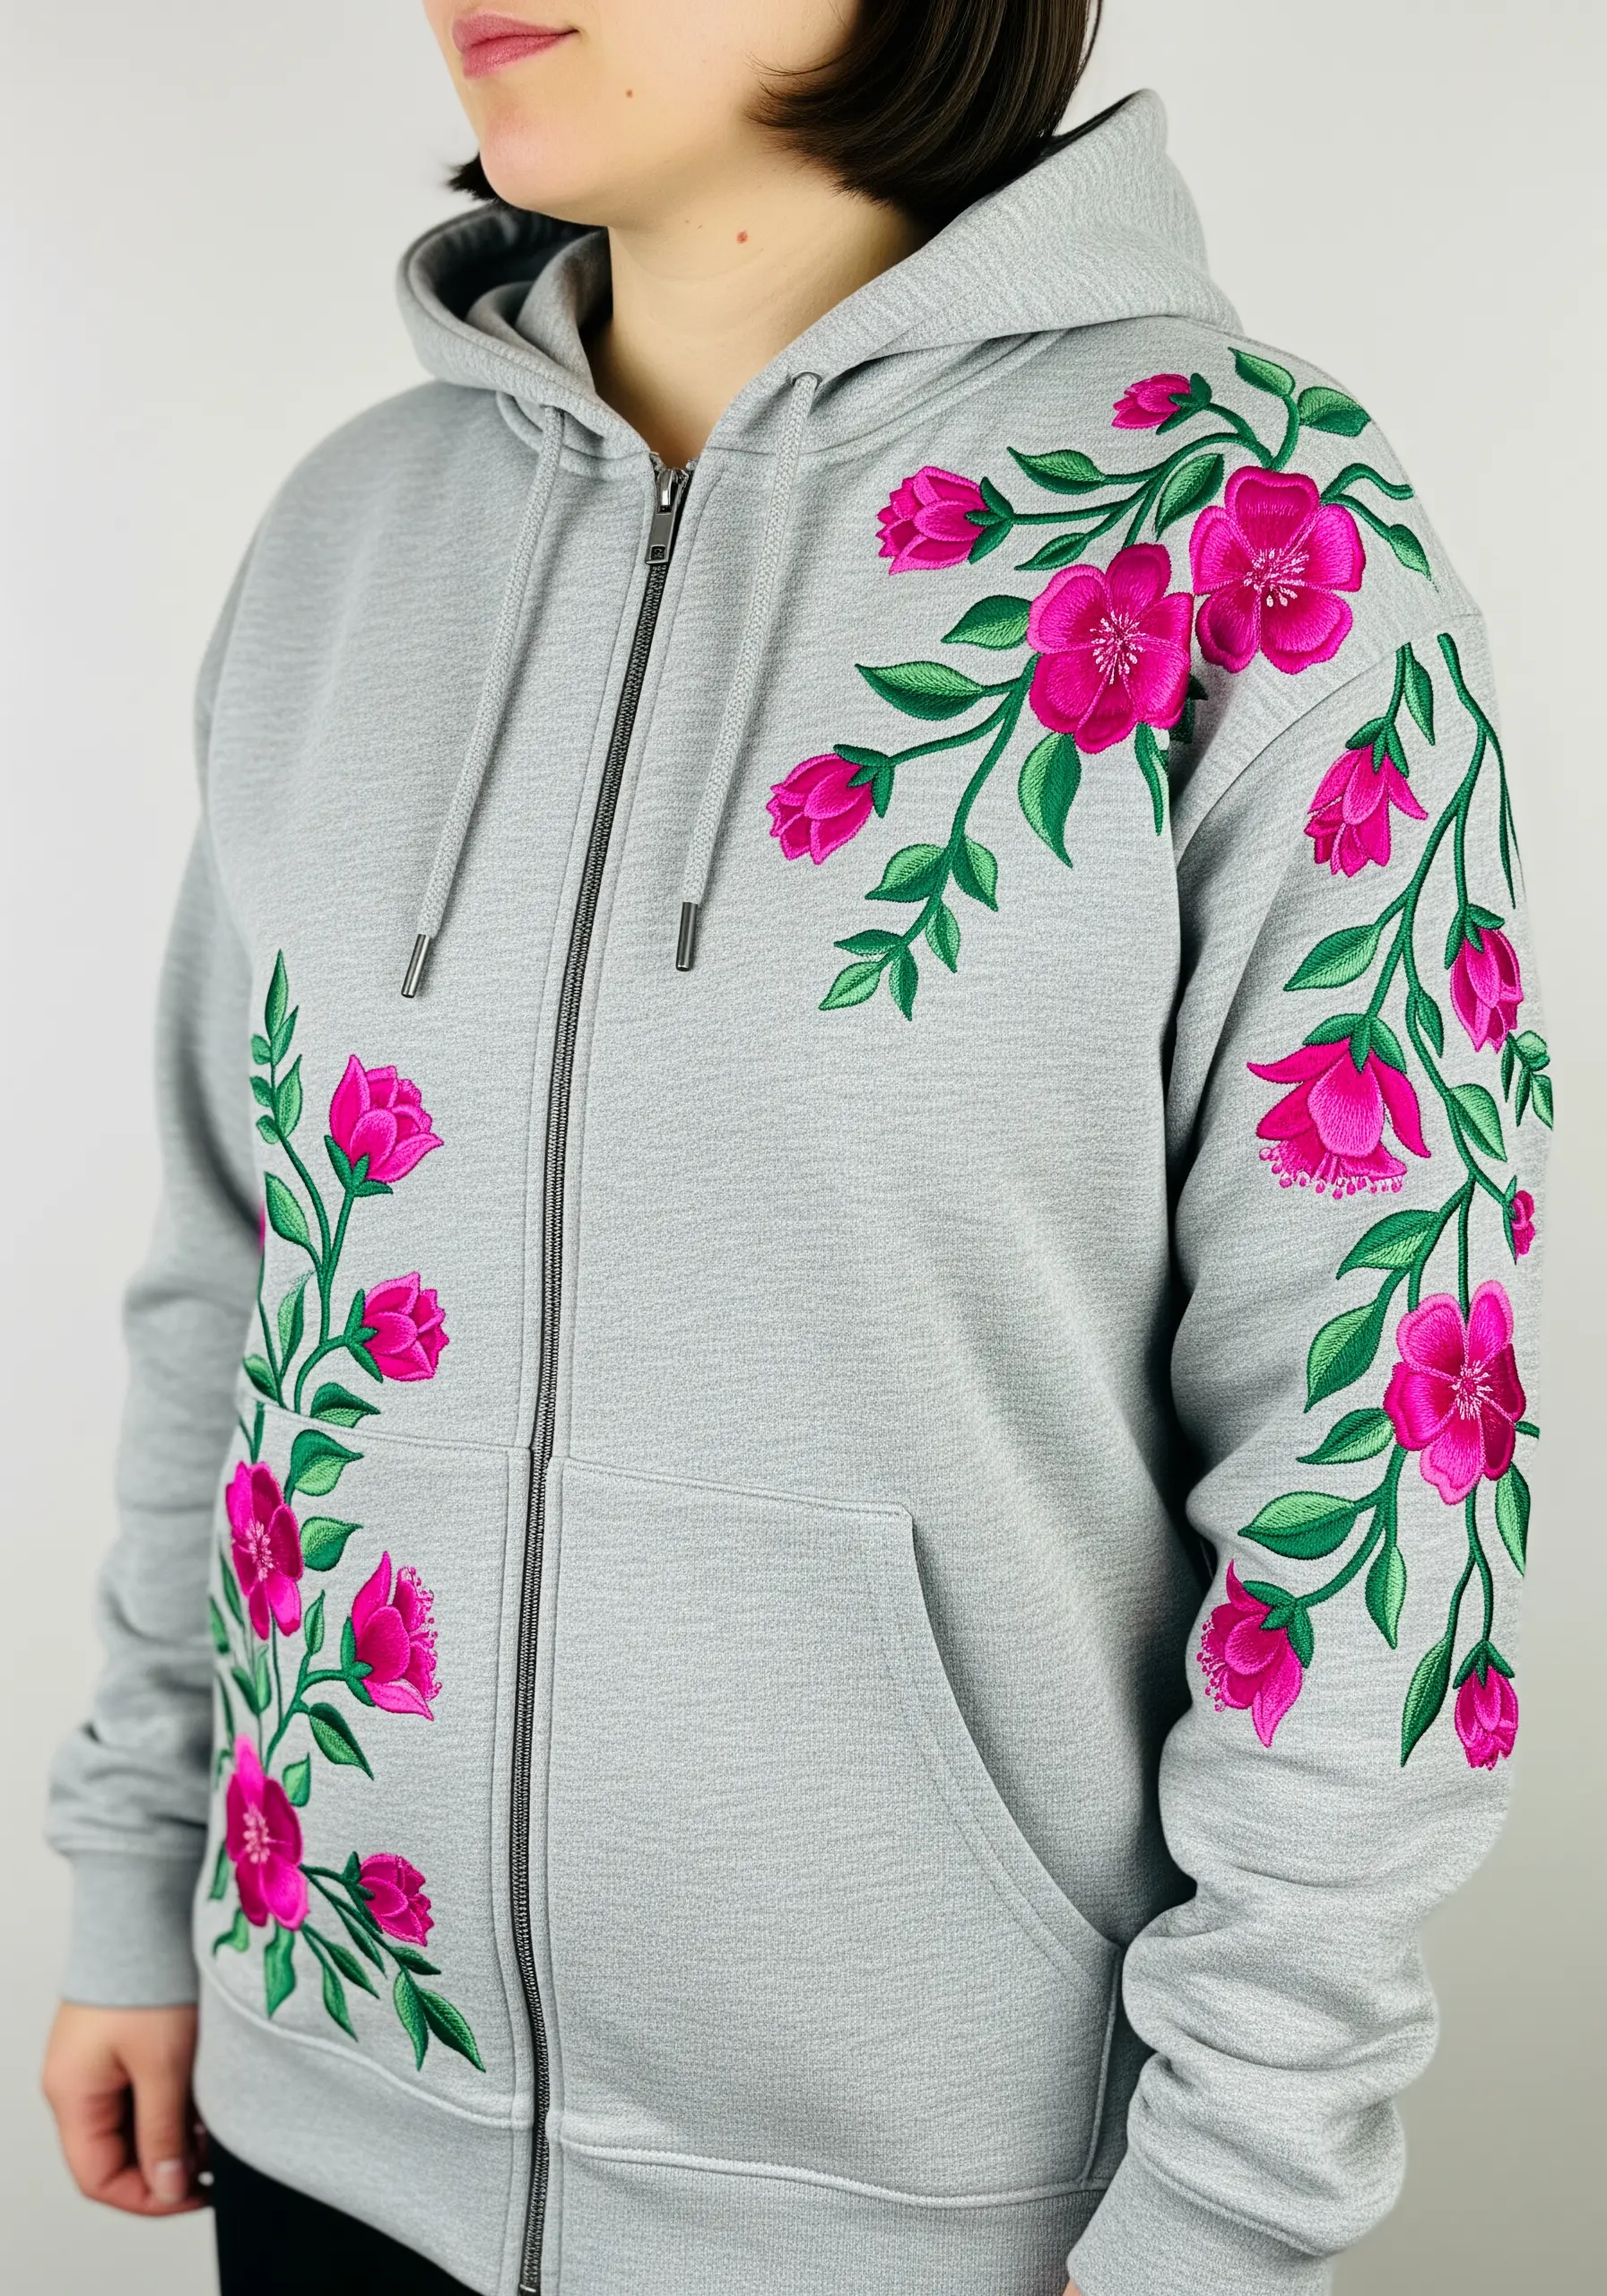
2. Scatter Delicate Lavender and Bees

Achieve the texture of lavender buds by clustering French knots or colonial knots close together at the top of each stalk, using two or three shades of purple for depth.
Use a simple straight stitch for the stems and leaves, keeping them light and airy to contrast with the denser floral heads.
For the bees, create the body with a small, padded satin stitch in yellow and black, and use a single detached chain stitch with a sheer or light grey thread for the wings to give them a translucent feel.
Distribute these tiny botanical motifs across the chest and hood for a playful, asymmetrical look.
3. Elevate Your Hoodie with Minimal Line Art
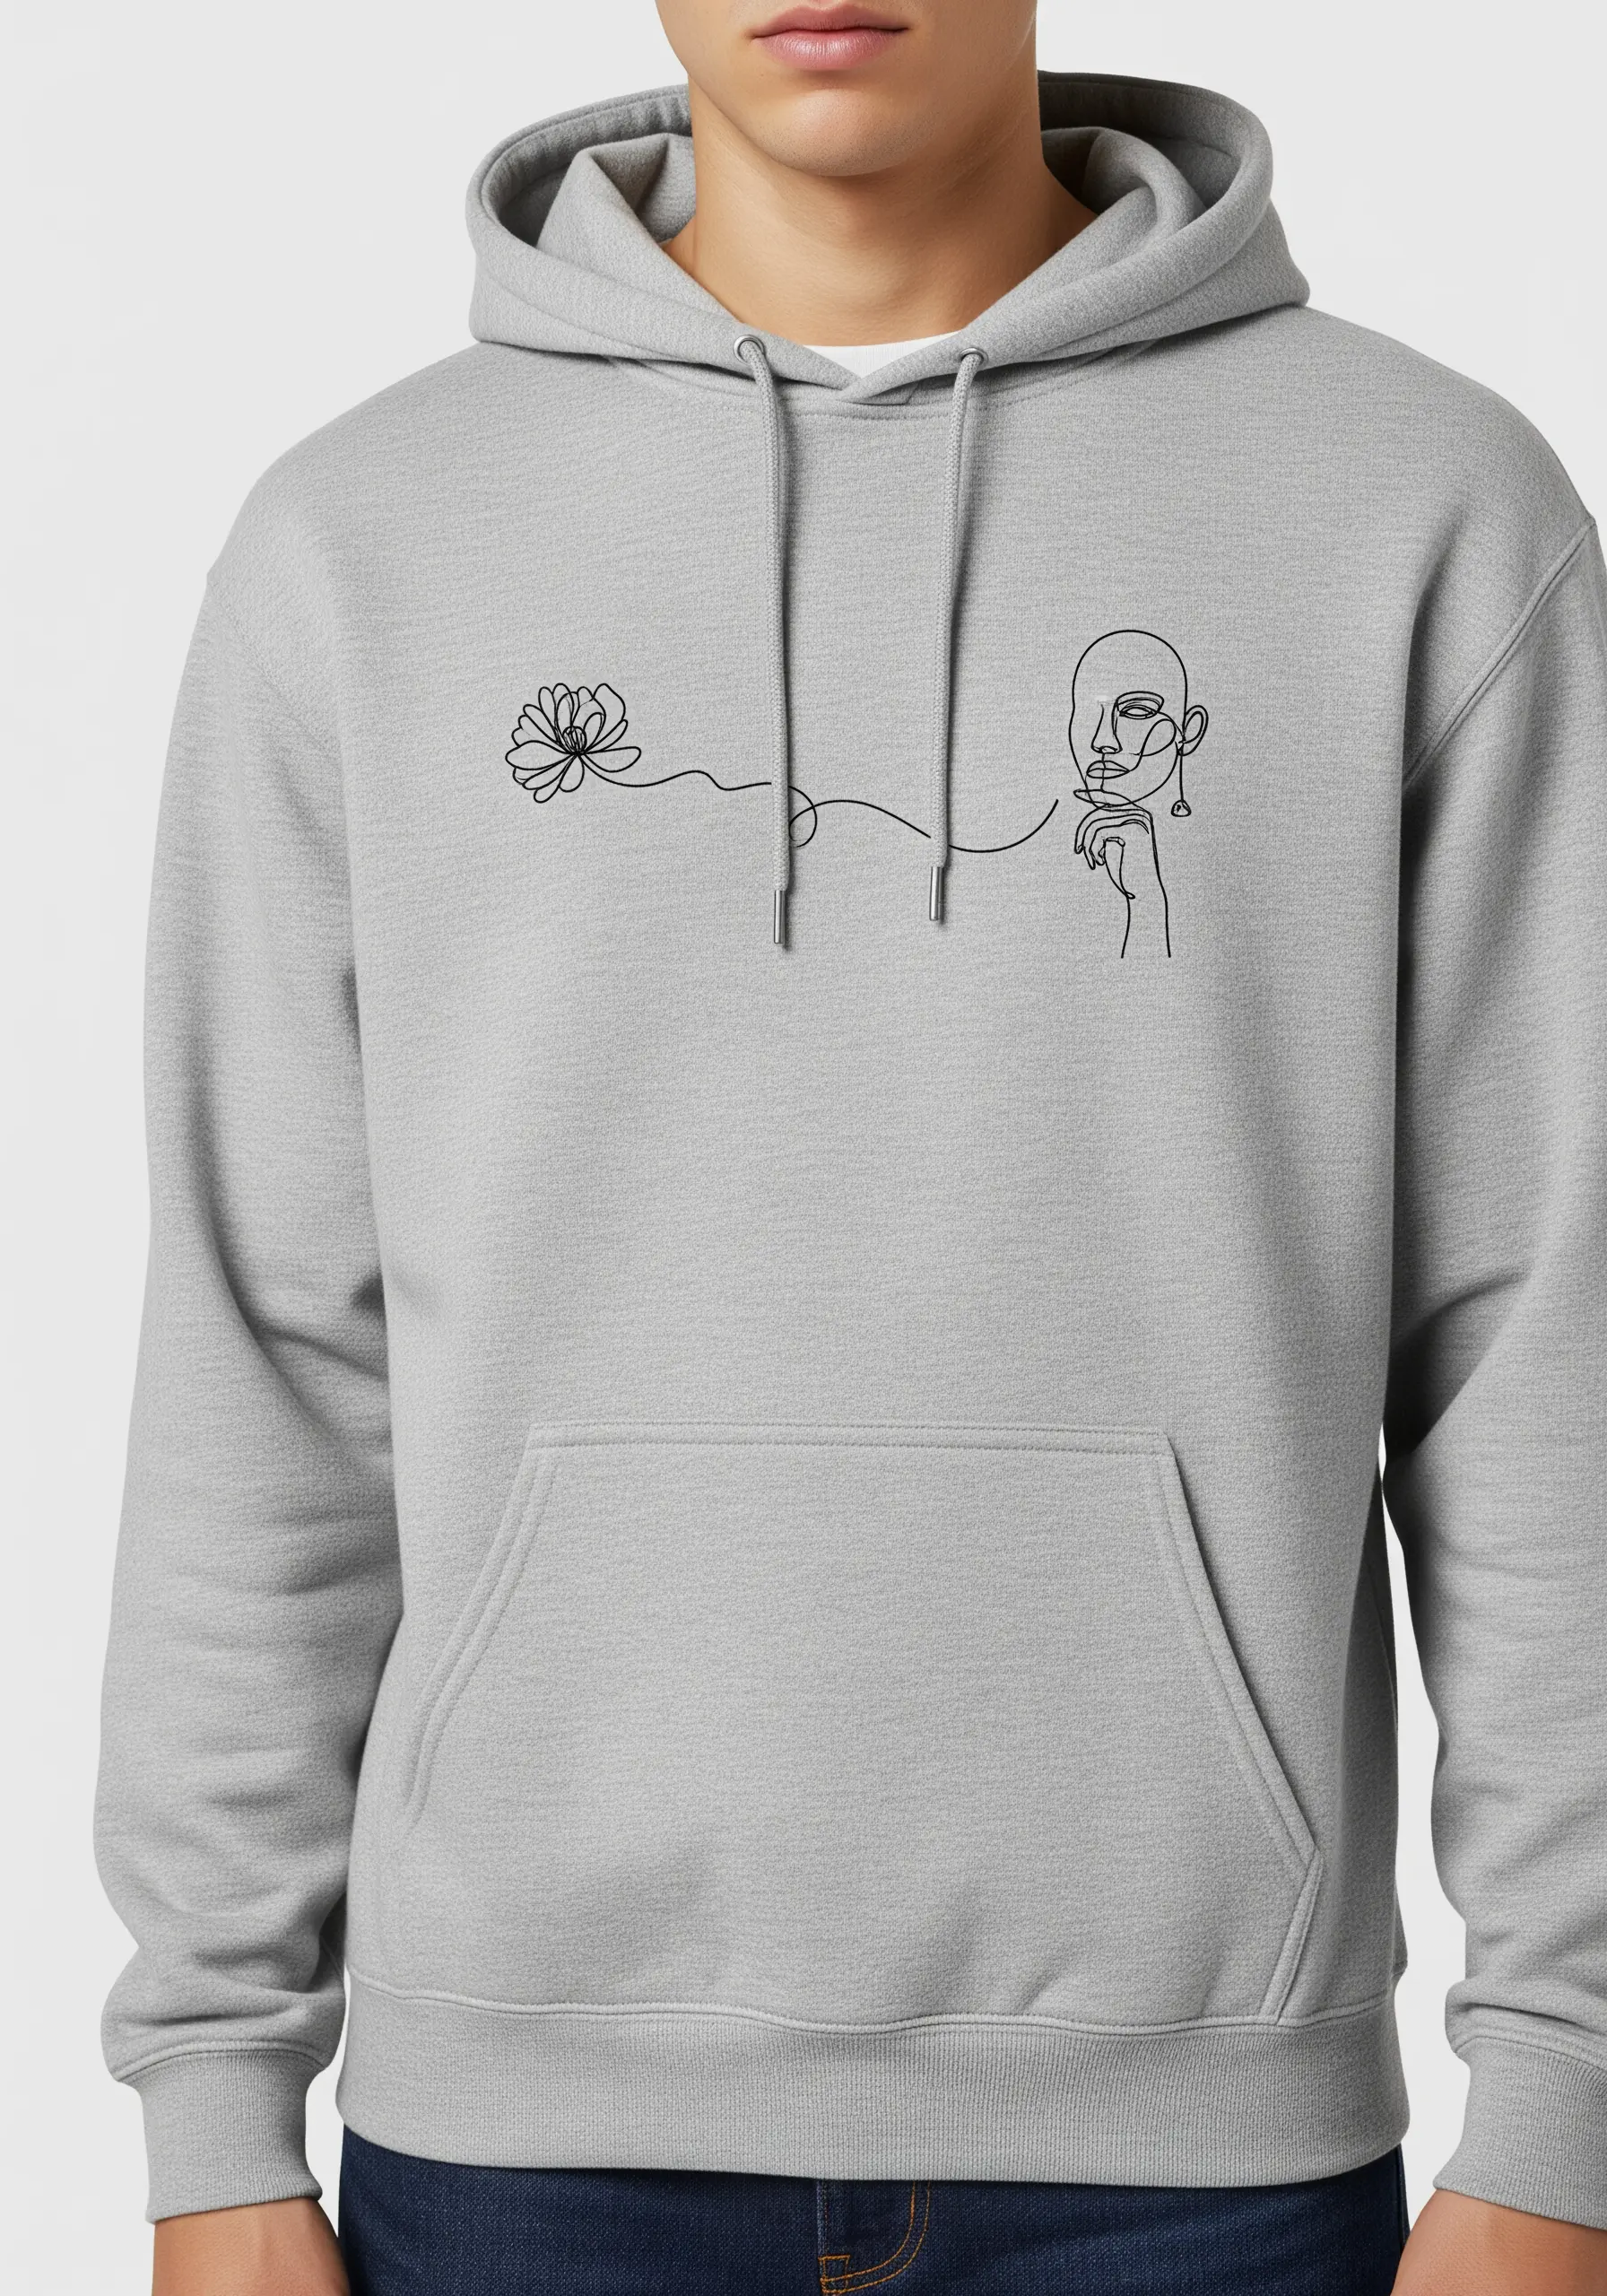
The key to successful line art is a perfectly even, consistent stitch.
Trace your design with a water-soluble pen, then use a two-strand backstitch or stem stitch for a clean, uninterrupted line that mimics ink on paper.
Pay close attention to your thread tension; pulling too tight will cause the stretchy hoodie fabric to pucker, disrupting the fluid motion of the design.
Using a lightweight stabilizer is non-negotiable here—it prevents the fabric from stretching as you stitch, ensuring your lines remain crisp and true.
4. Stitch a Vibrant Retro Sunset
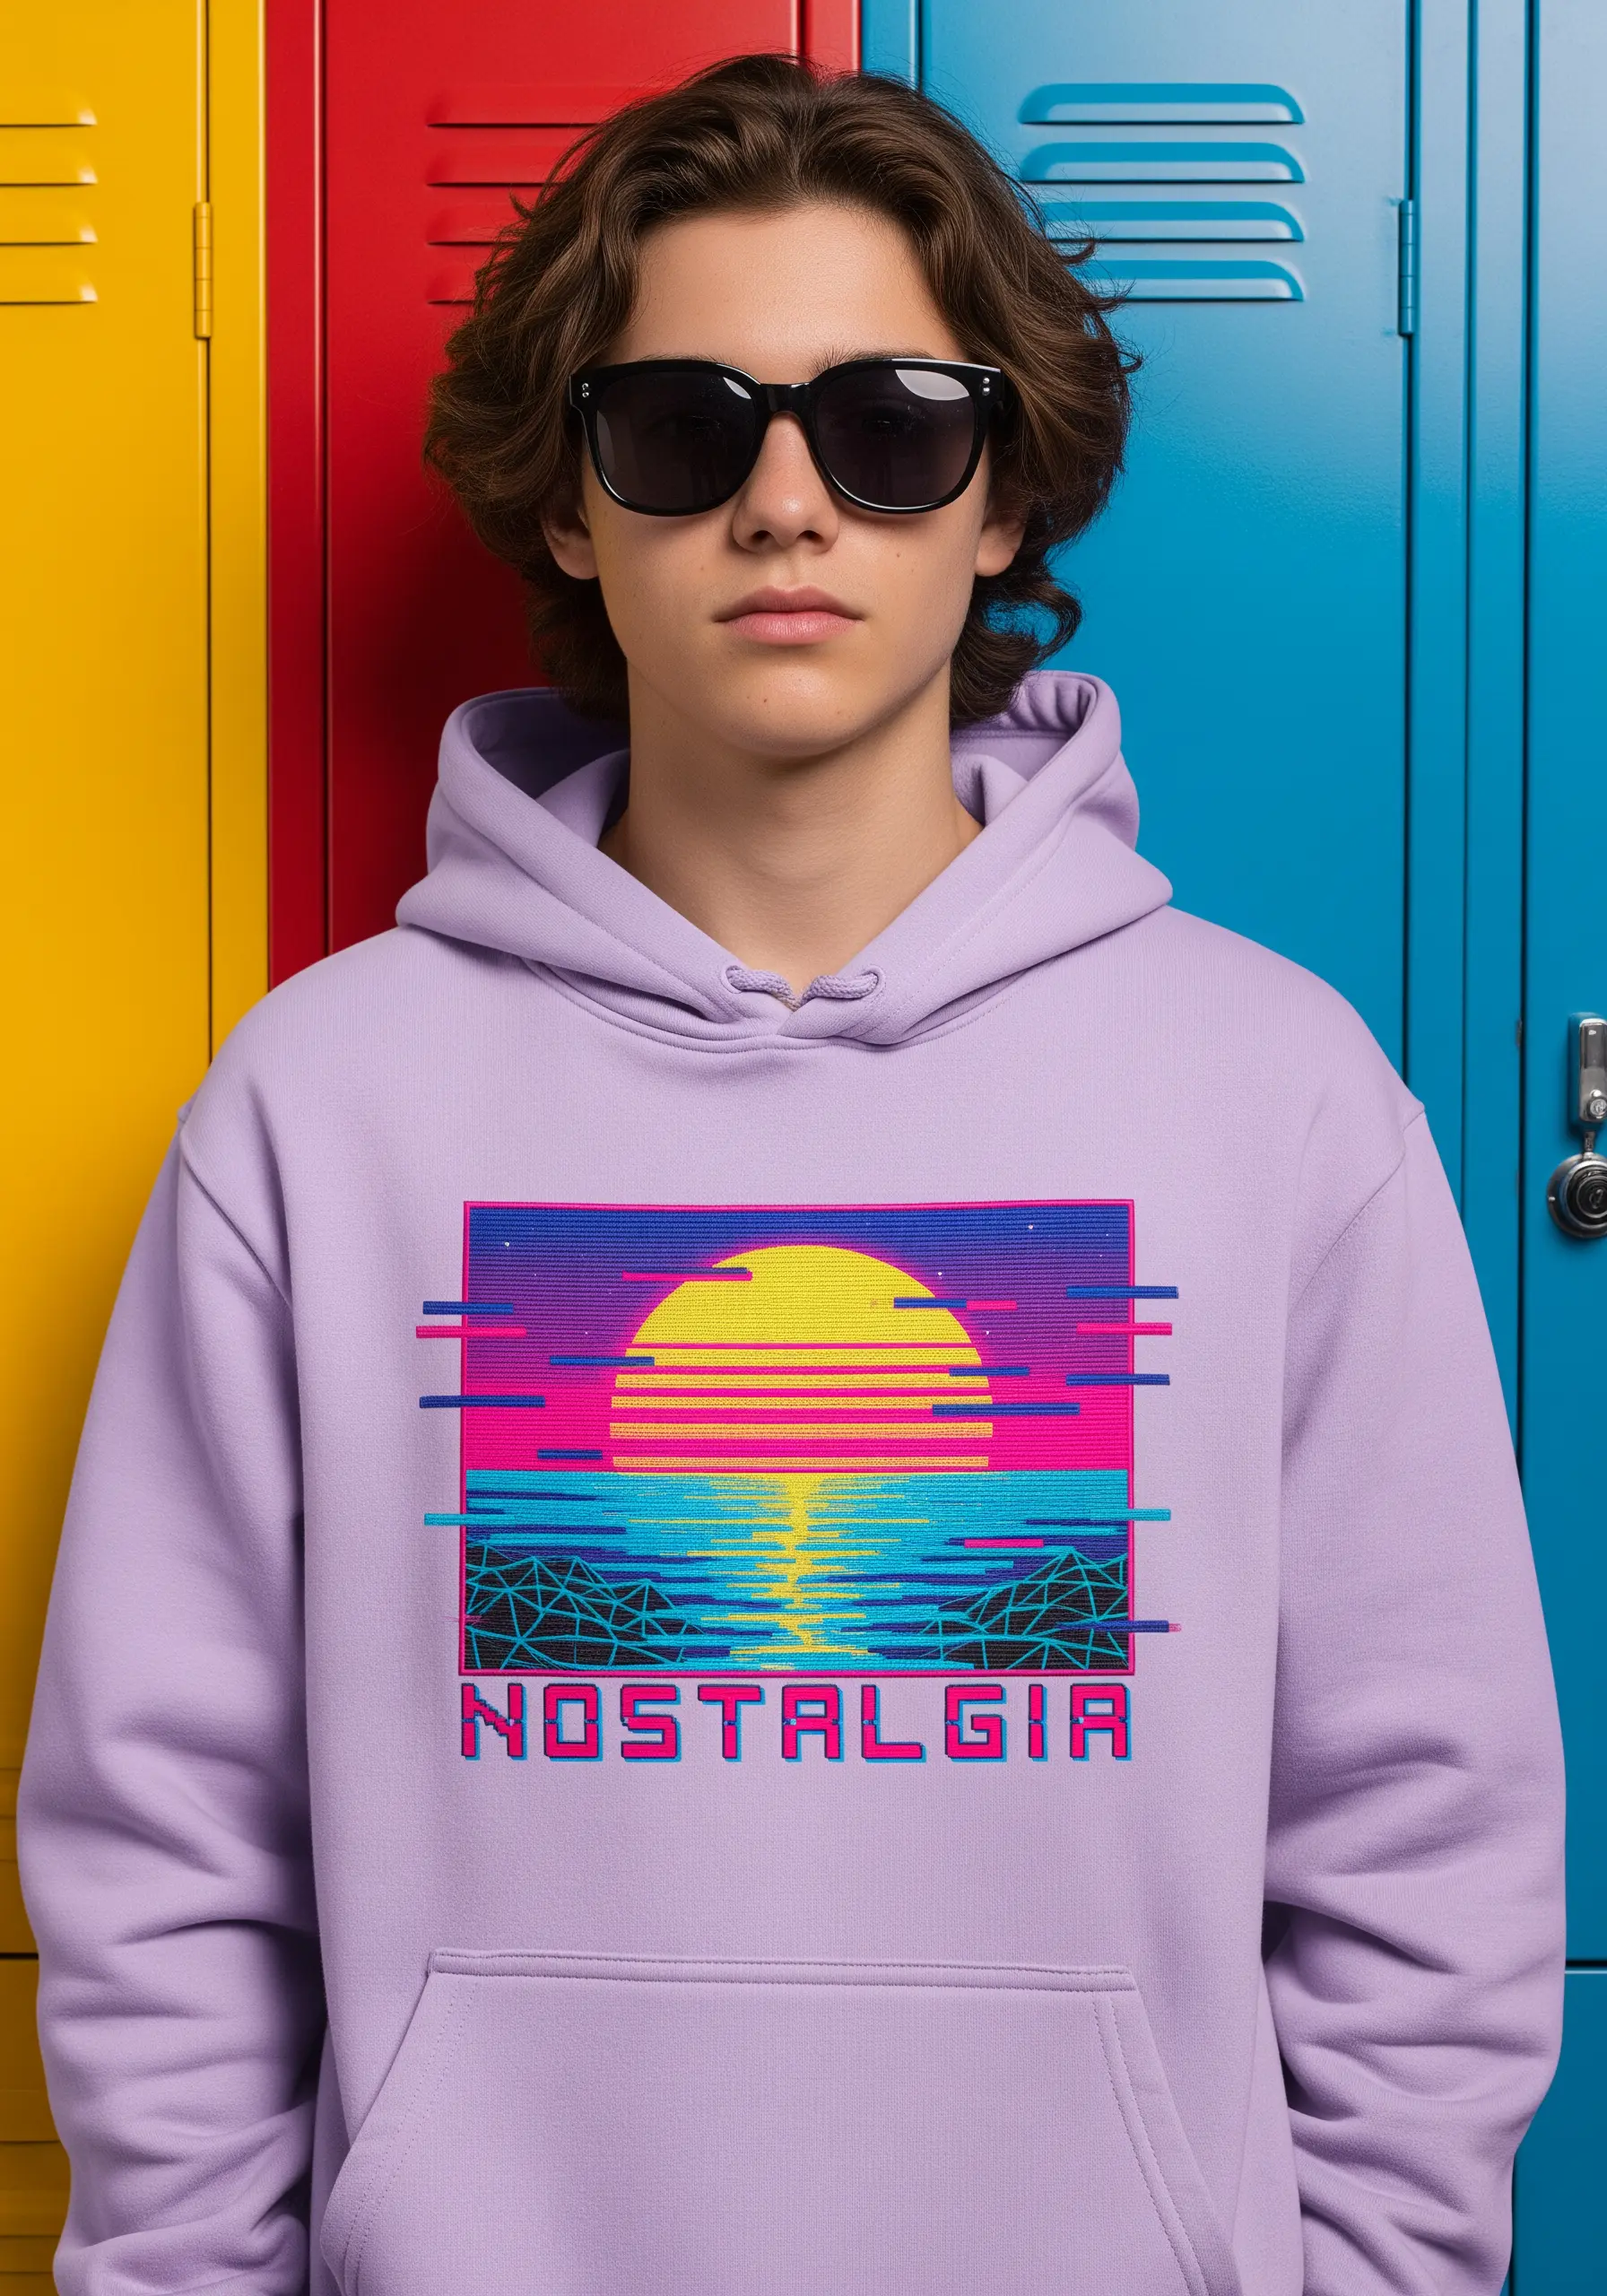
Create this sharp, graphic look using dense satin stitch fills and a bold color palette.
To keep your horizontal lines perfectly straight, stitch guide-lines with a single strand of floss first, then fill in the sections with satin stitch, ensuring each stitch lays flat against the next.
For the sun, stitch from the center outwards in a semi-circle to maintain a smooth curve.
The contrast between the hot pinks and cool blues is what gives this design its nostalgic, vaporwave energy, so choose high-saturation threads that won’t fade.
5. Chart the Stars on a Celestial Map
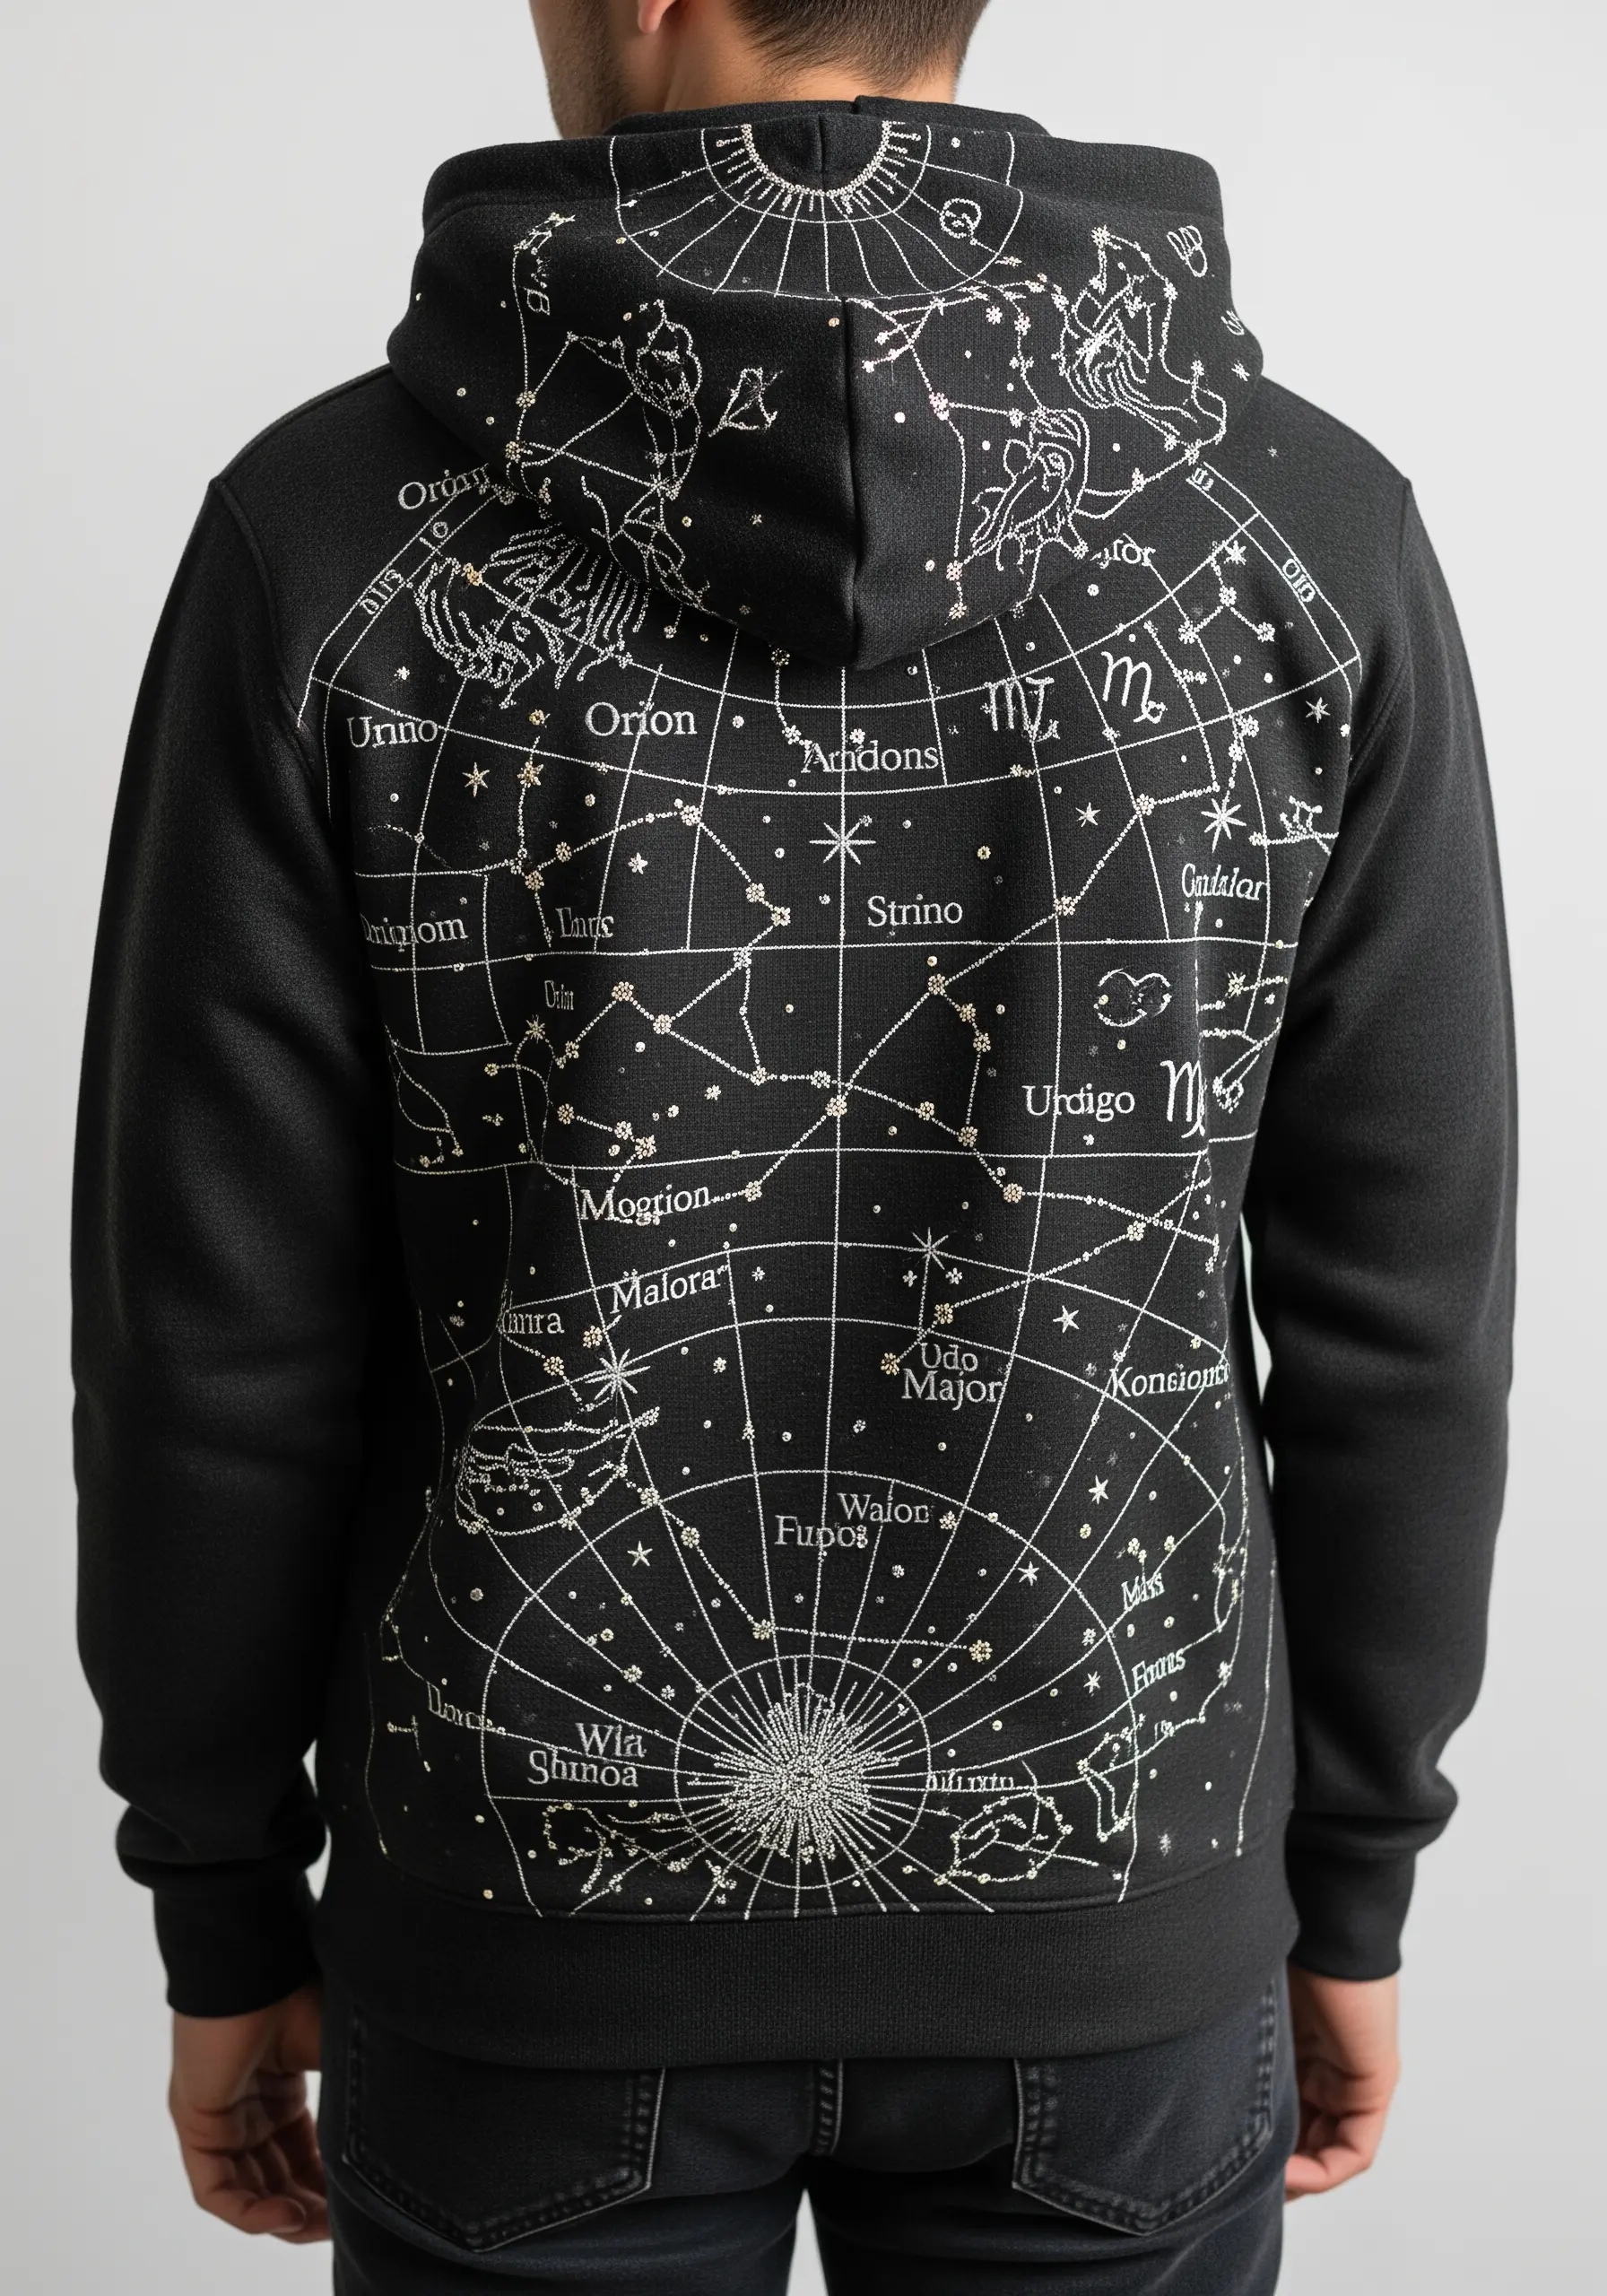
Turn the back of your hoodie into a celestial masterpiece by using a silver metallic or glow-in-the-dark thread against a dark fabric.
Use a simple backstitch for the constellation lines to keep them delicate and precise.
For the stars, vary your stitches: use tiny single seed stitches for distant stars and French knots in different sizes for brighter ones to create a sense of depth and scale.
The sunburst at the bottom can be created with radiating straight stitches, layered to build a dense, shimmering texture.
6. Create Uplifting Padded Typography

Make your text stand out by using a padded satin stitch technique.
First, fill the shape of each letter with a base layer of running stitches or a smaller satin stitch, then cover it with your final satin stitch perpendicular to the base layer.
This simple step adds a raised, three-dimensional effect that gives the letters a professional, high-quality finish.
Choose a warm, analogous color scheme (yellows, peaches, oranges) to visually reinforce the sunny message and create a soft, harmonious gradient.
7. Build Fierce Texture with a Wolf Portrait
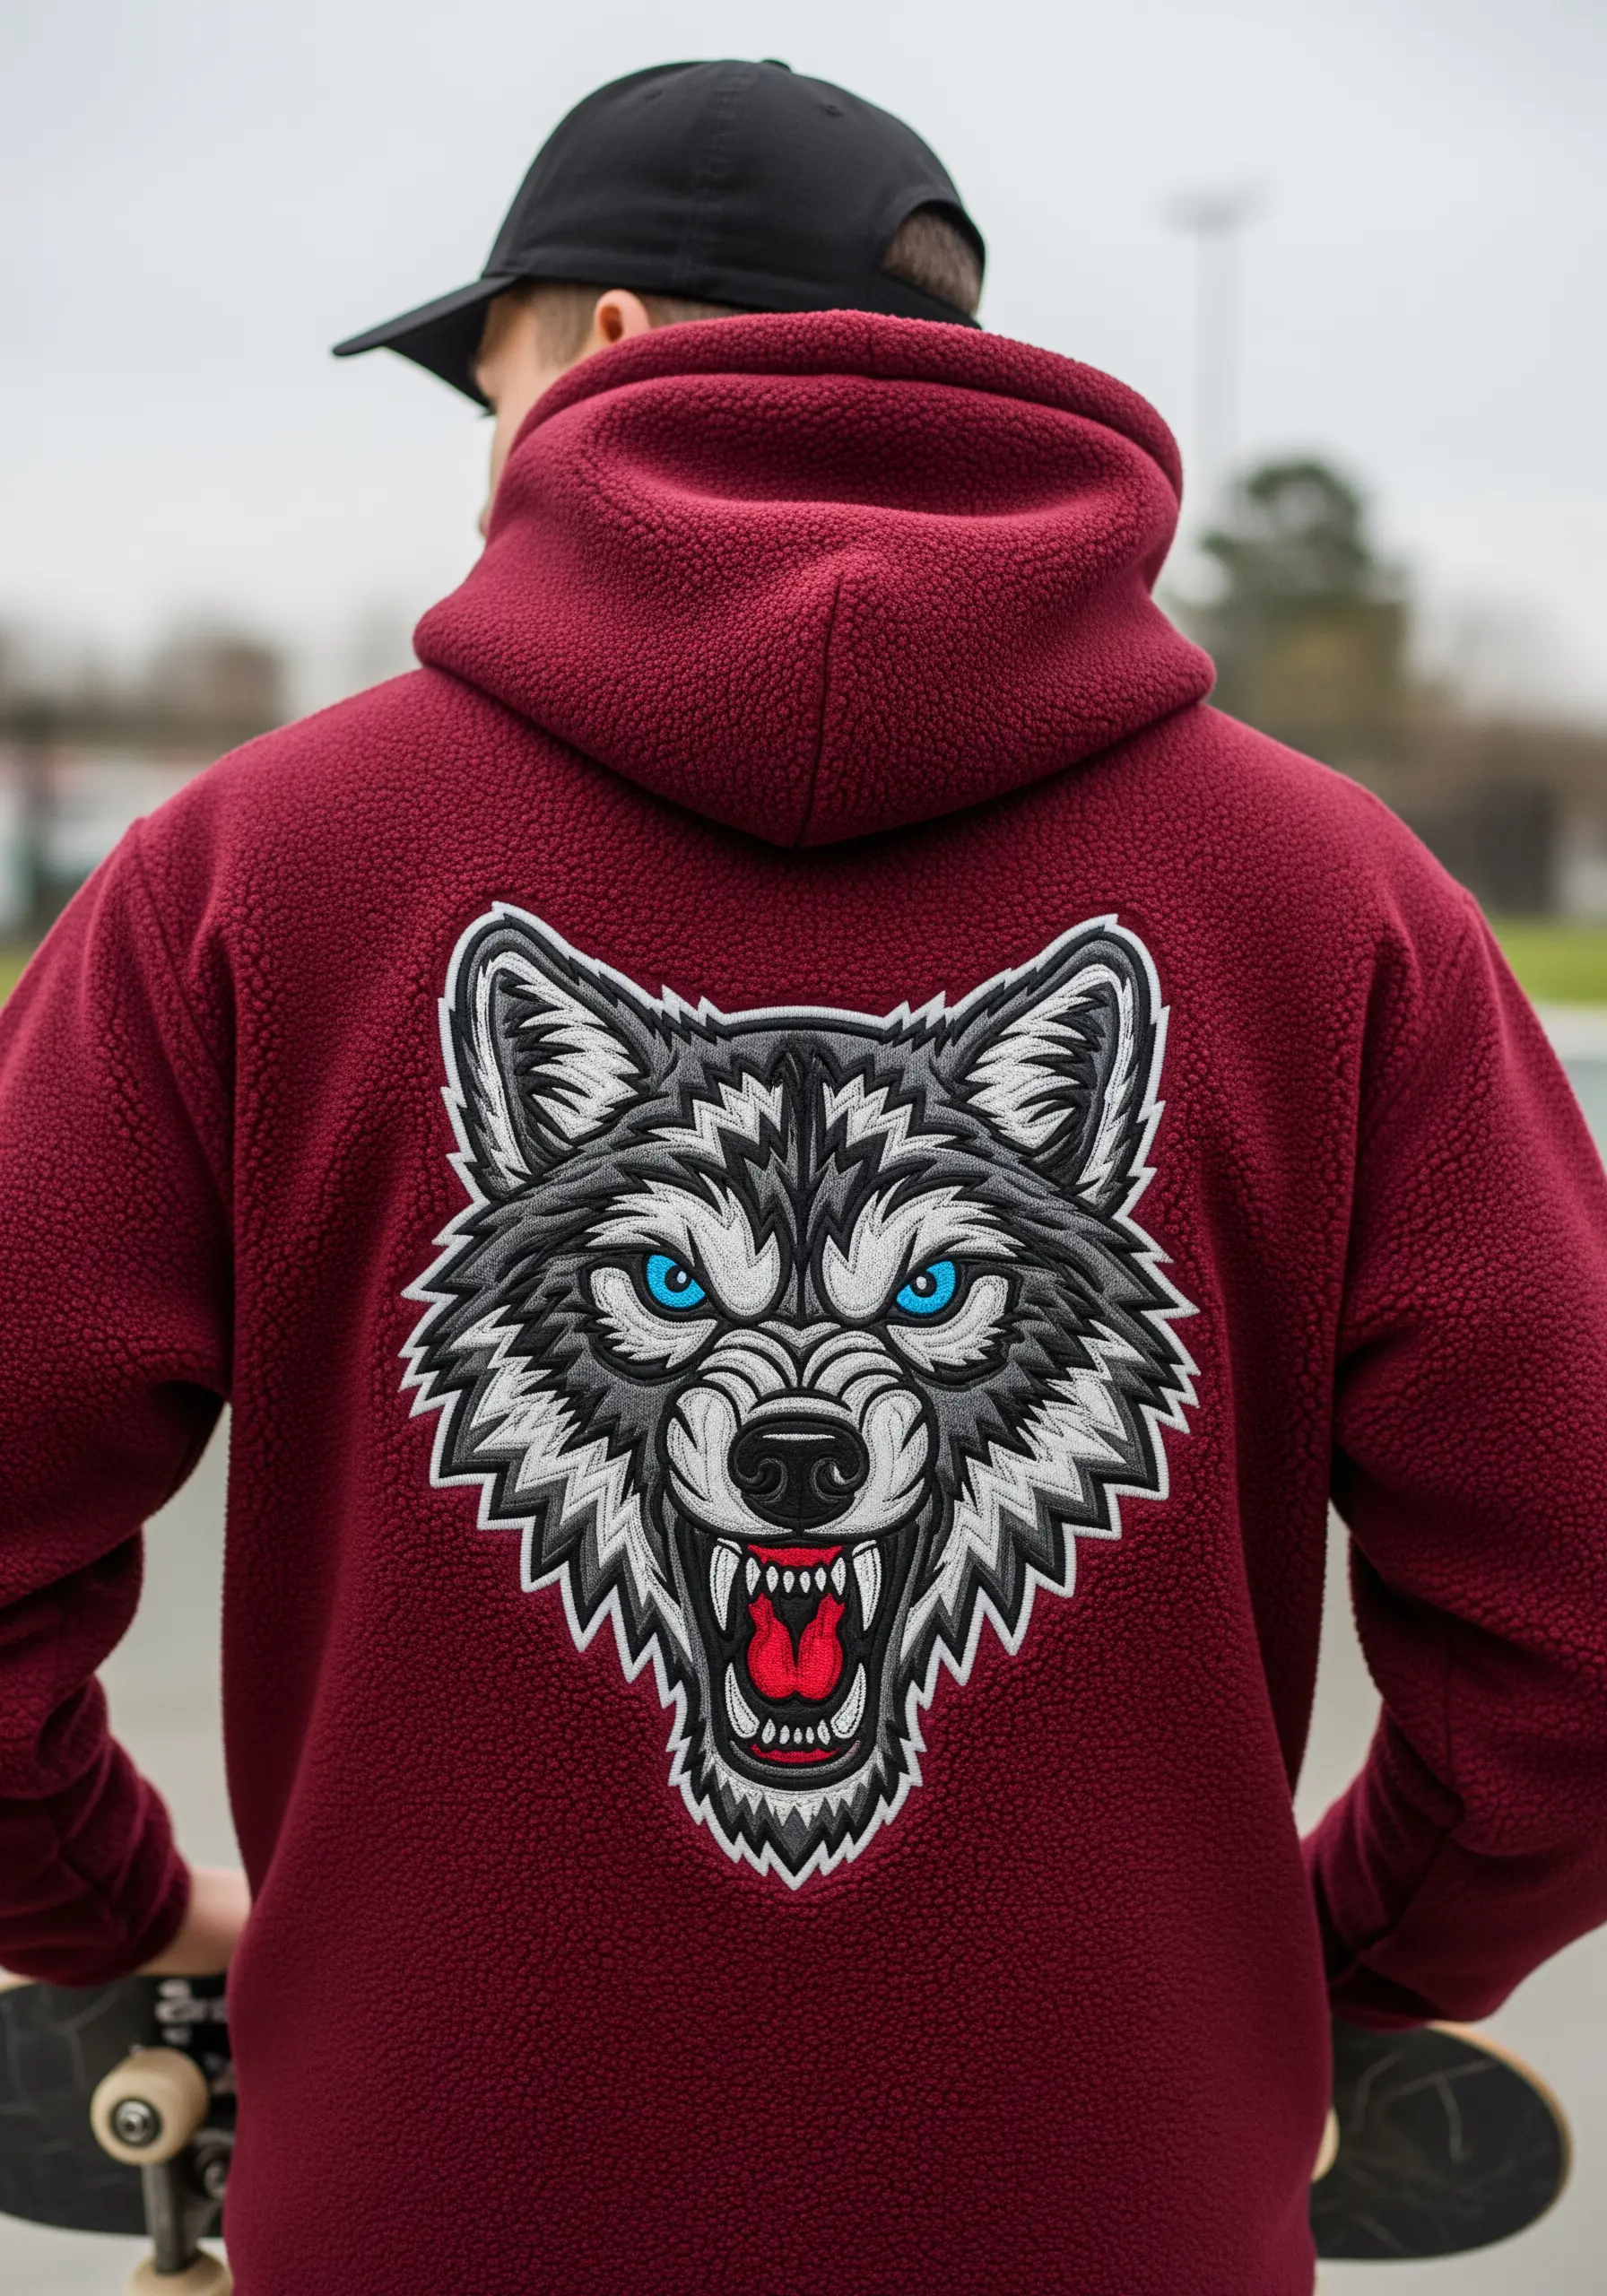
To achieve the realistic fur texture, you must master the long-and-short stitch.
Work in small sections, blending shades of grey, black, and white to create depth and shadow. Always direct your stitches in the natural direction of fur growth for a more lifelike appearance.
Use a sharp, contrasting color like electric blue for the eyes and add a single white stitch as a highlight to bring them to life.
Outlining the entire design with a thick, black satin stitch border contains the intricate detail and gives it a clean, patch-like finish, especially on a textured fabric like sherpa fleece.
8. Design a Curving Sleeve Serpent
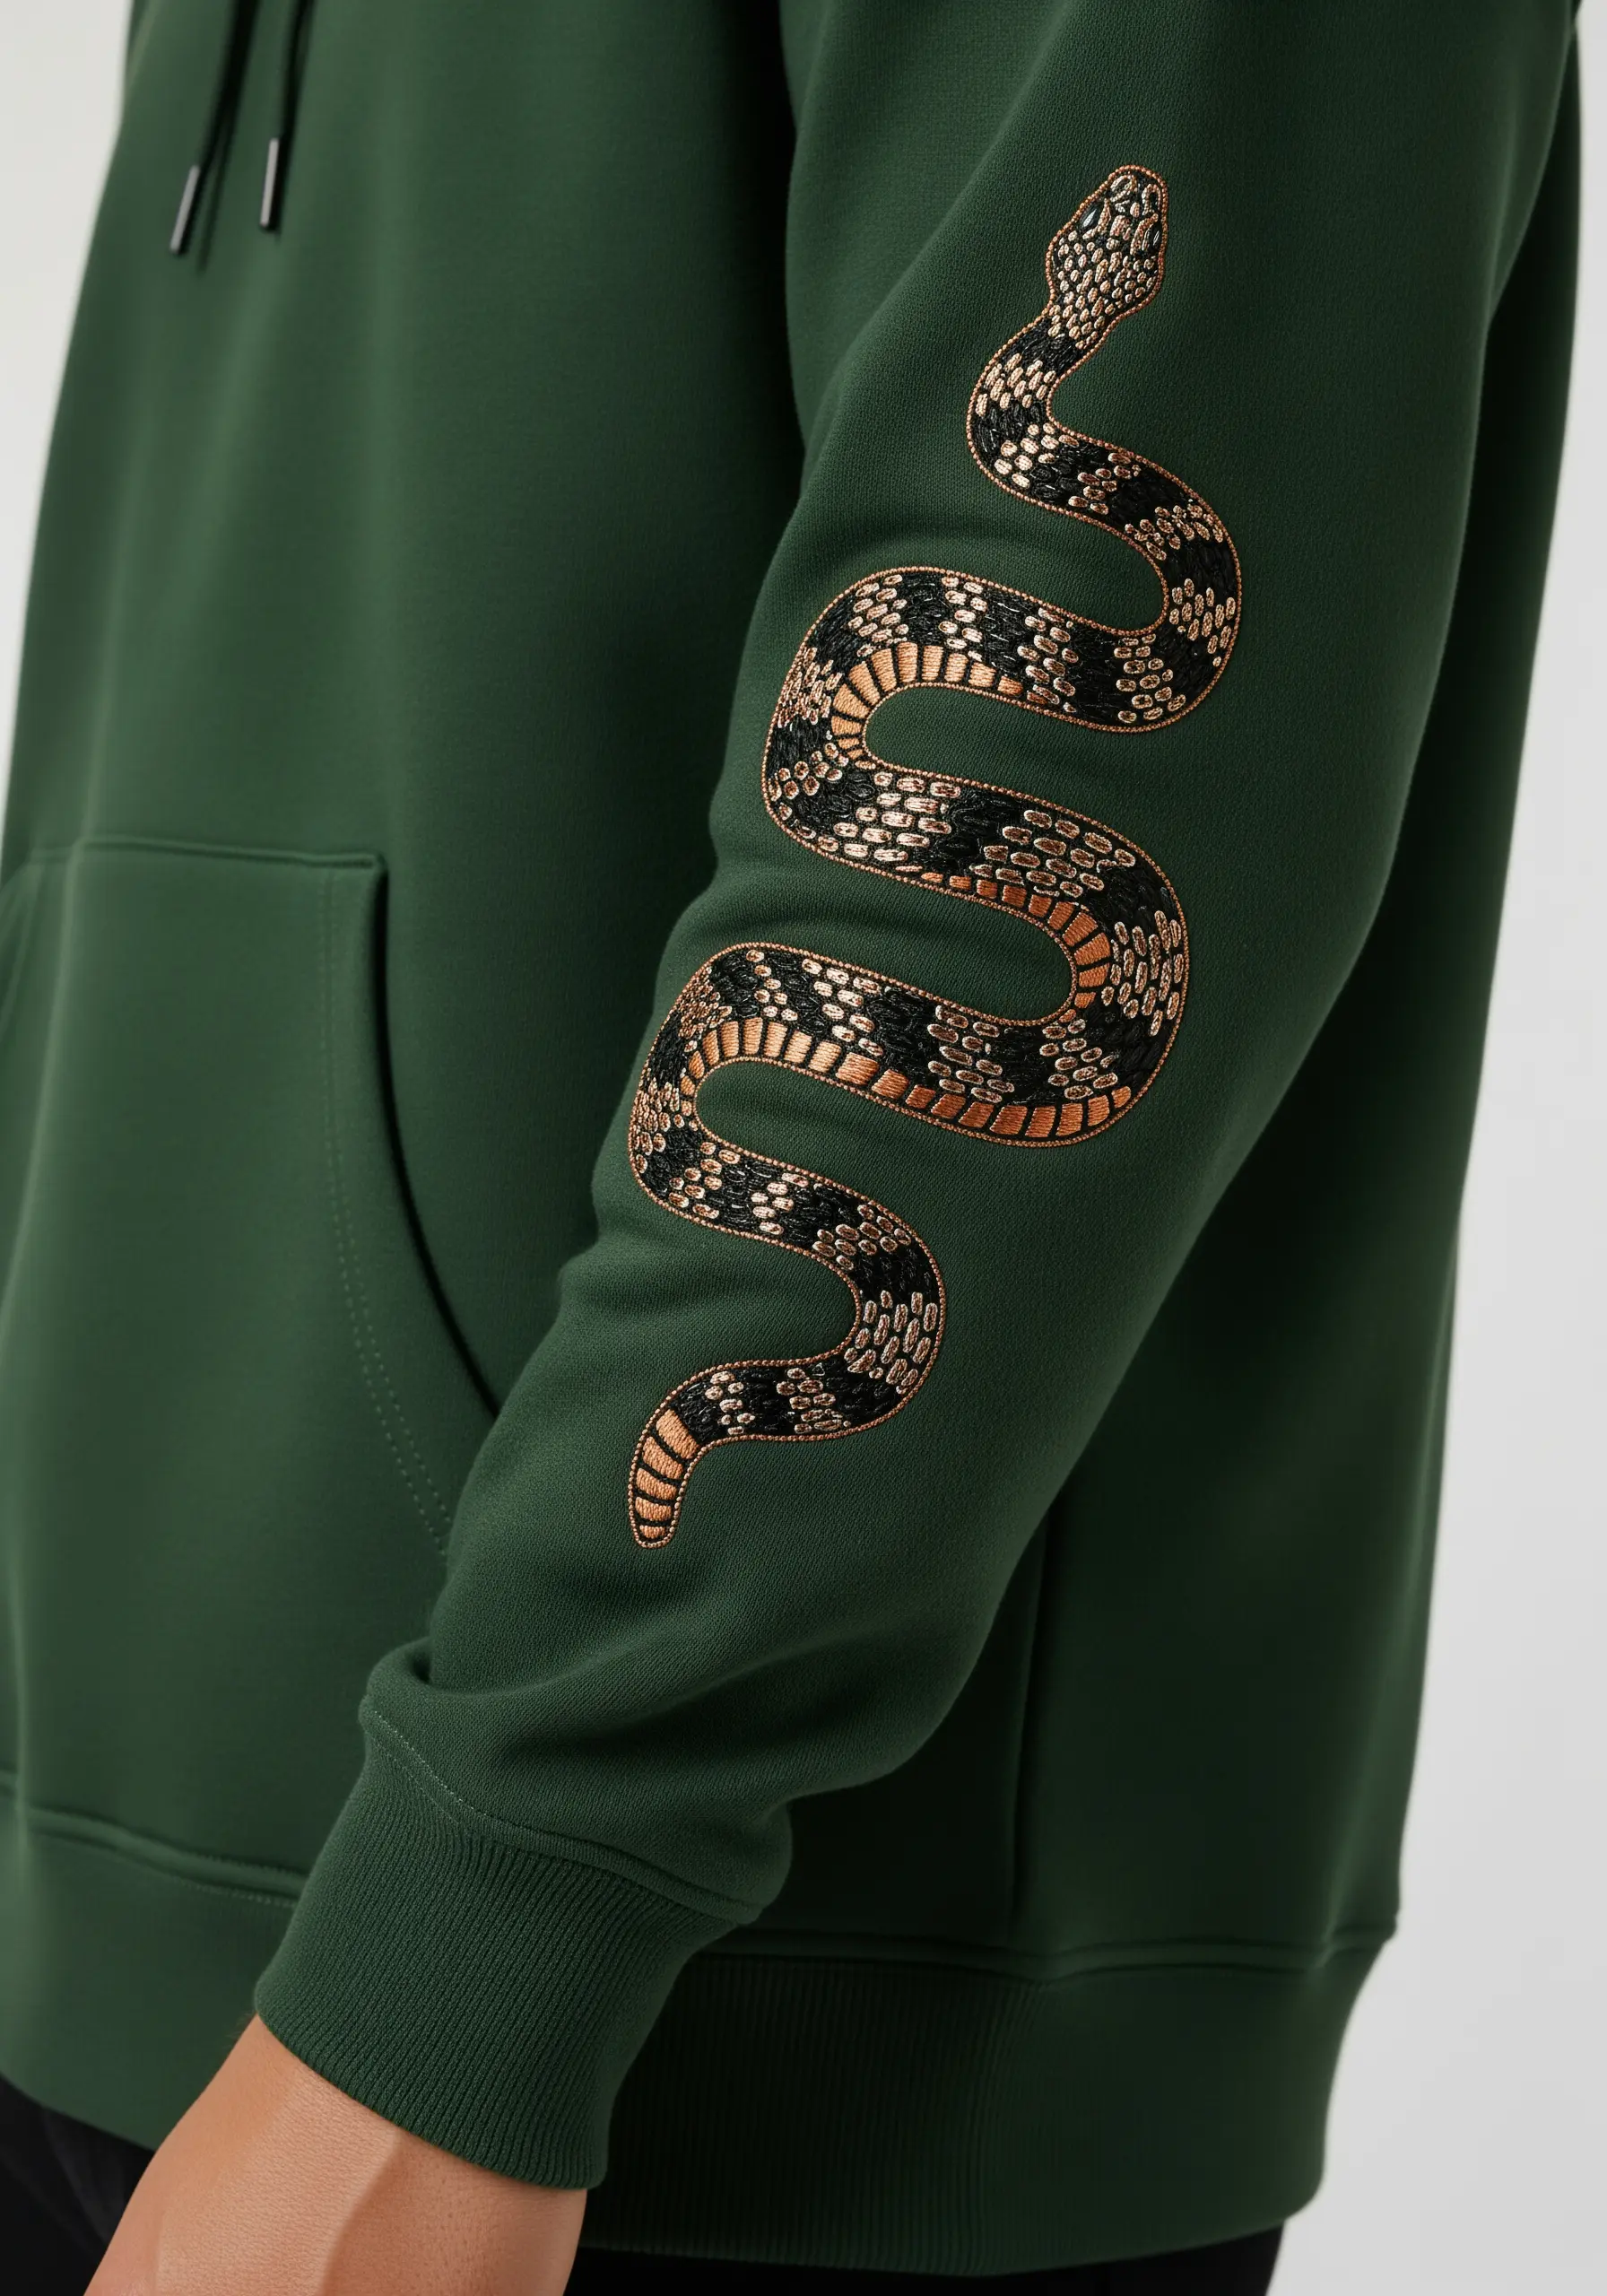
When embroidering on a sleeve, the composition should flow with the natural curve of the arm.
Sketch your design directly onto the sleeve, or print it on a water-soluble stabilizer, ensuring it wraps organically from the cuff towards the elbow.
To create the shimmering scales, alternate between a metallic gold thread and a matte black thread using short, dense satin stitches.
For an even more luxurious effect, try couching a thick metallic cord for the snake’s spine, which adds a raised, textural element that catches the light.
9. Stitch Expressive, Glossy Anime Eyes
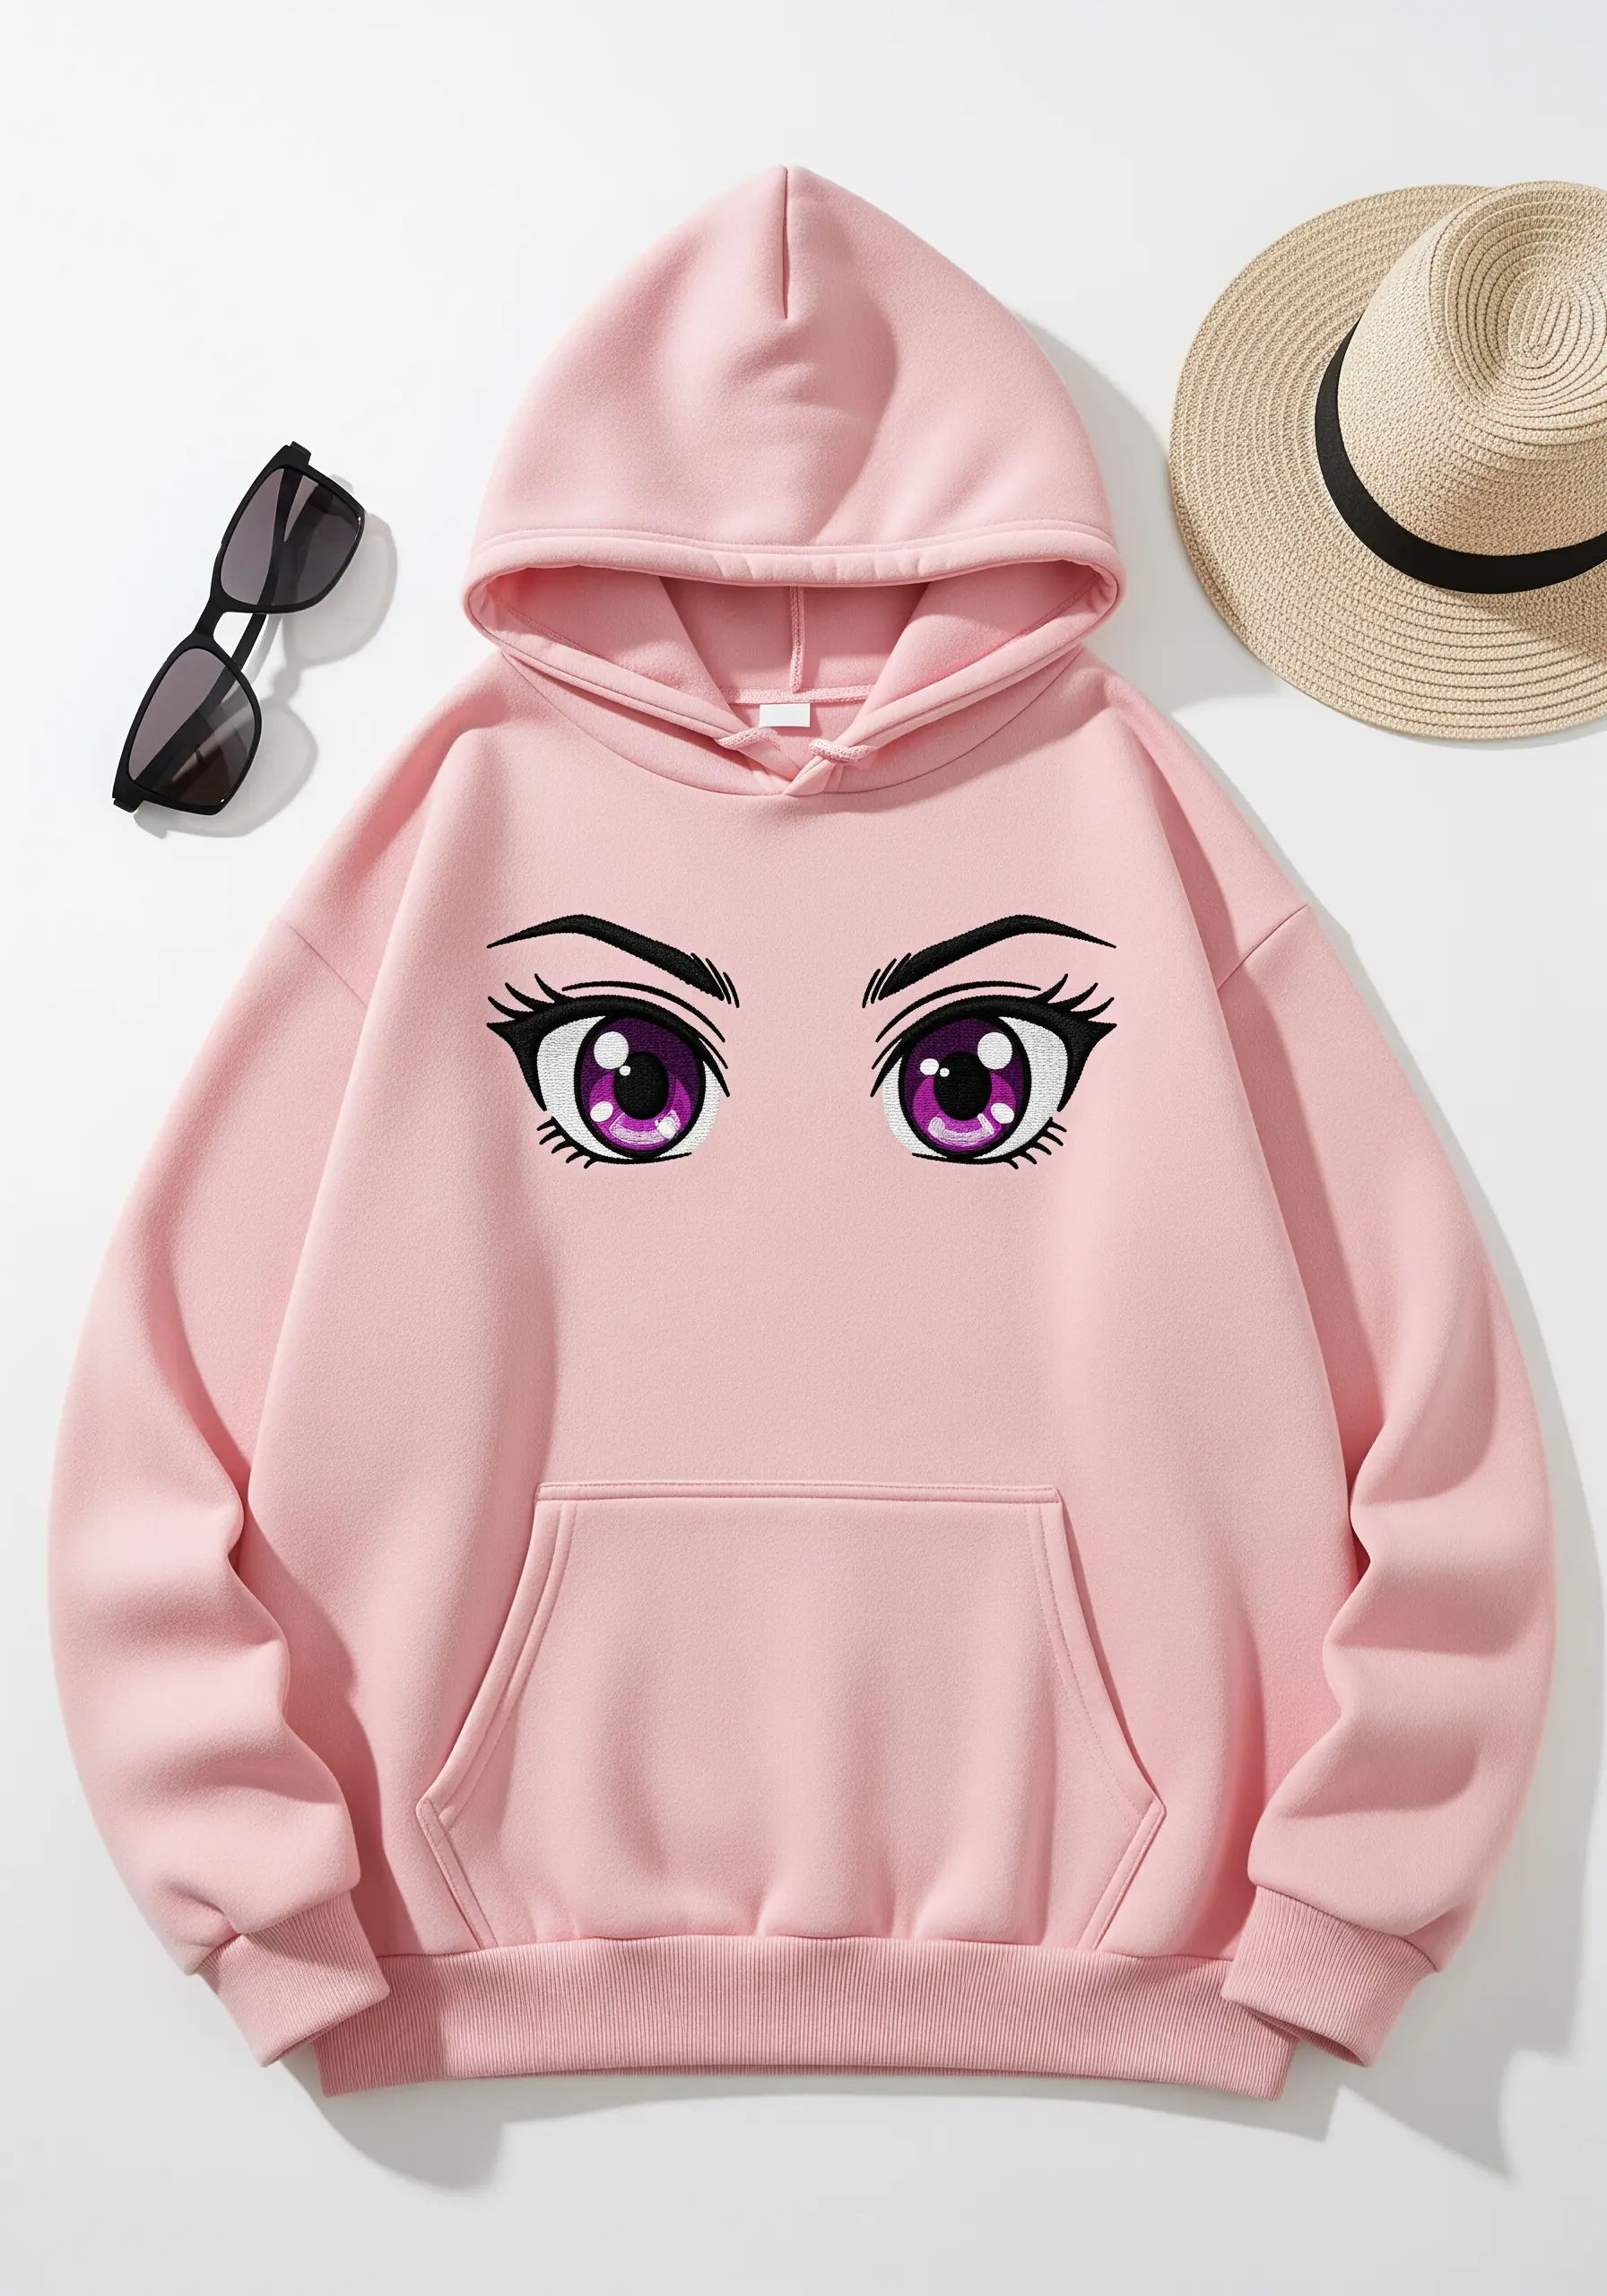
The key to capturing the classic anime eye style is a flawless satin stitch and strategic highlights.
Fill the iris with a gradient of purple threads to create depth, ensuring your stitches are tight and uniform for a smooth, glossy finish.
Define the eyes with a crisp, thin backstitch outline in black. The most crucial detail is the reflection: add two or three small, bright white satin stitches in the upper corner of each pupil to mimic light and bring the expression to life.
10. Add Subtle Cityscape Silhouettes
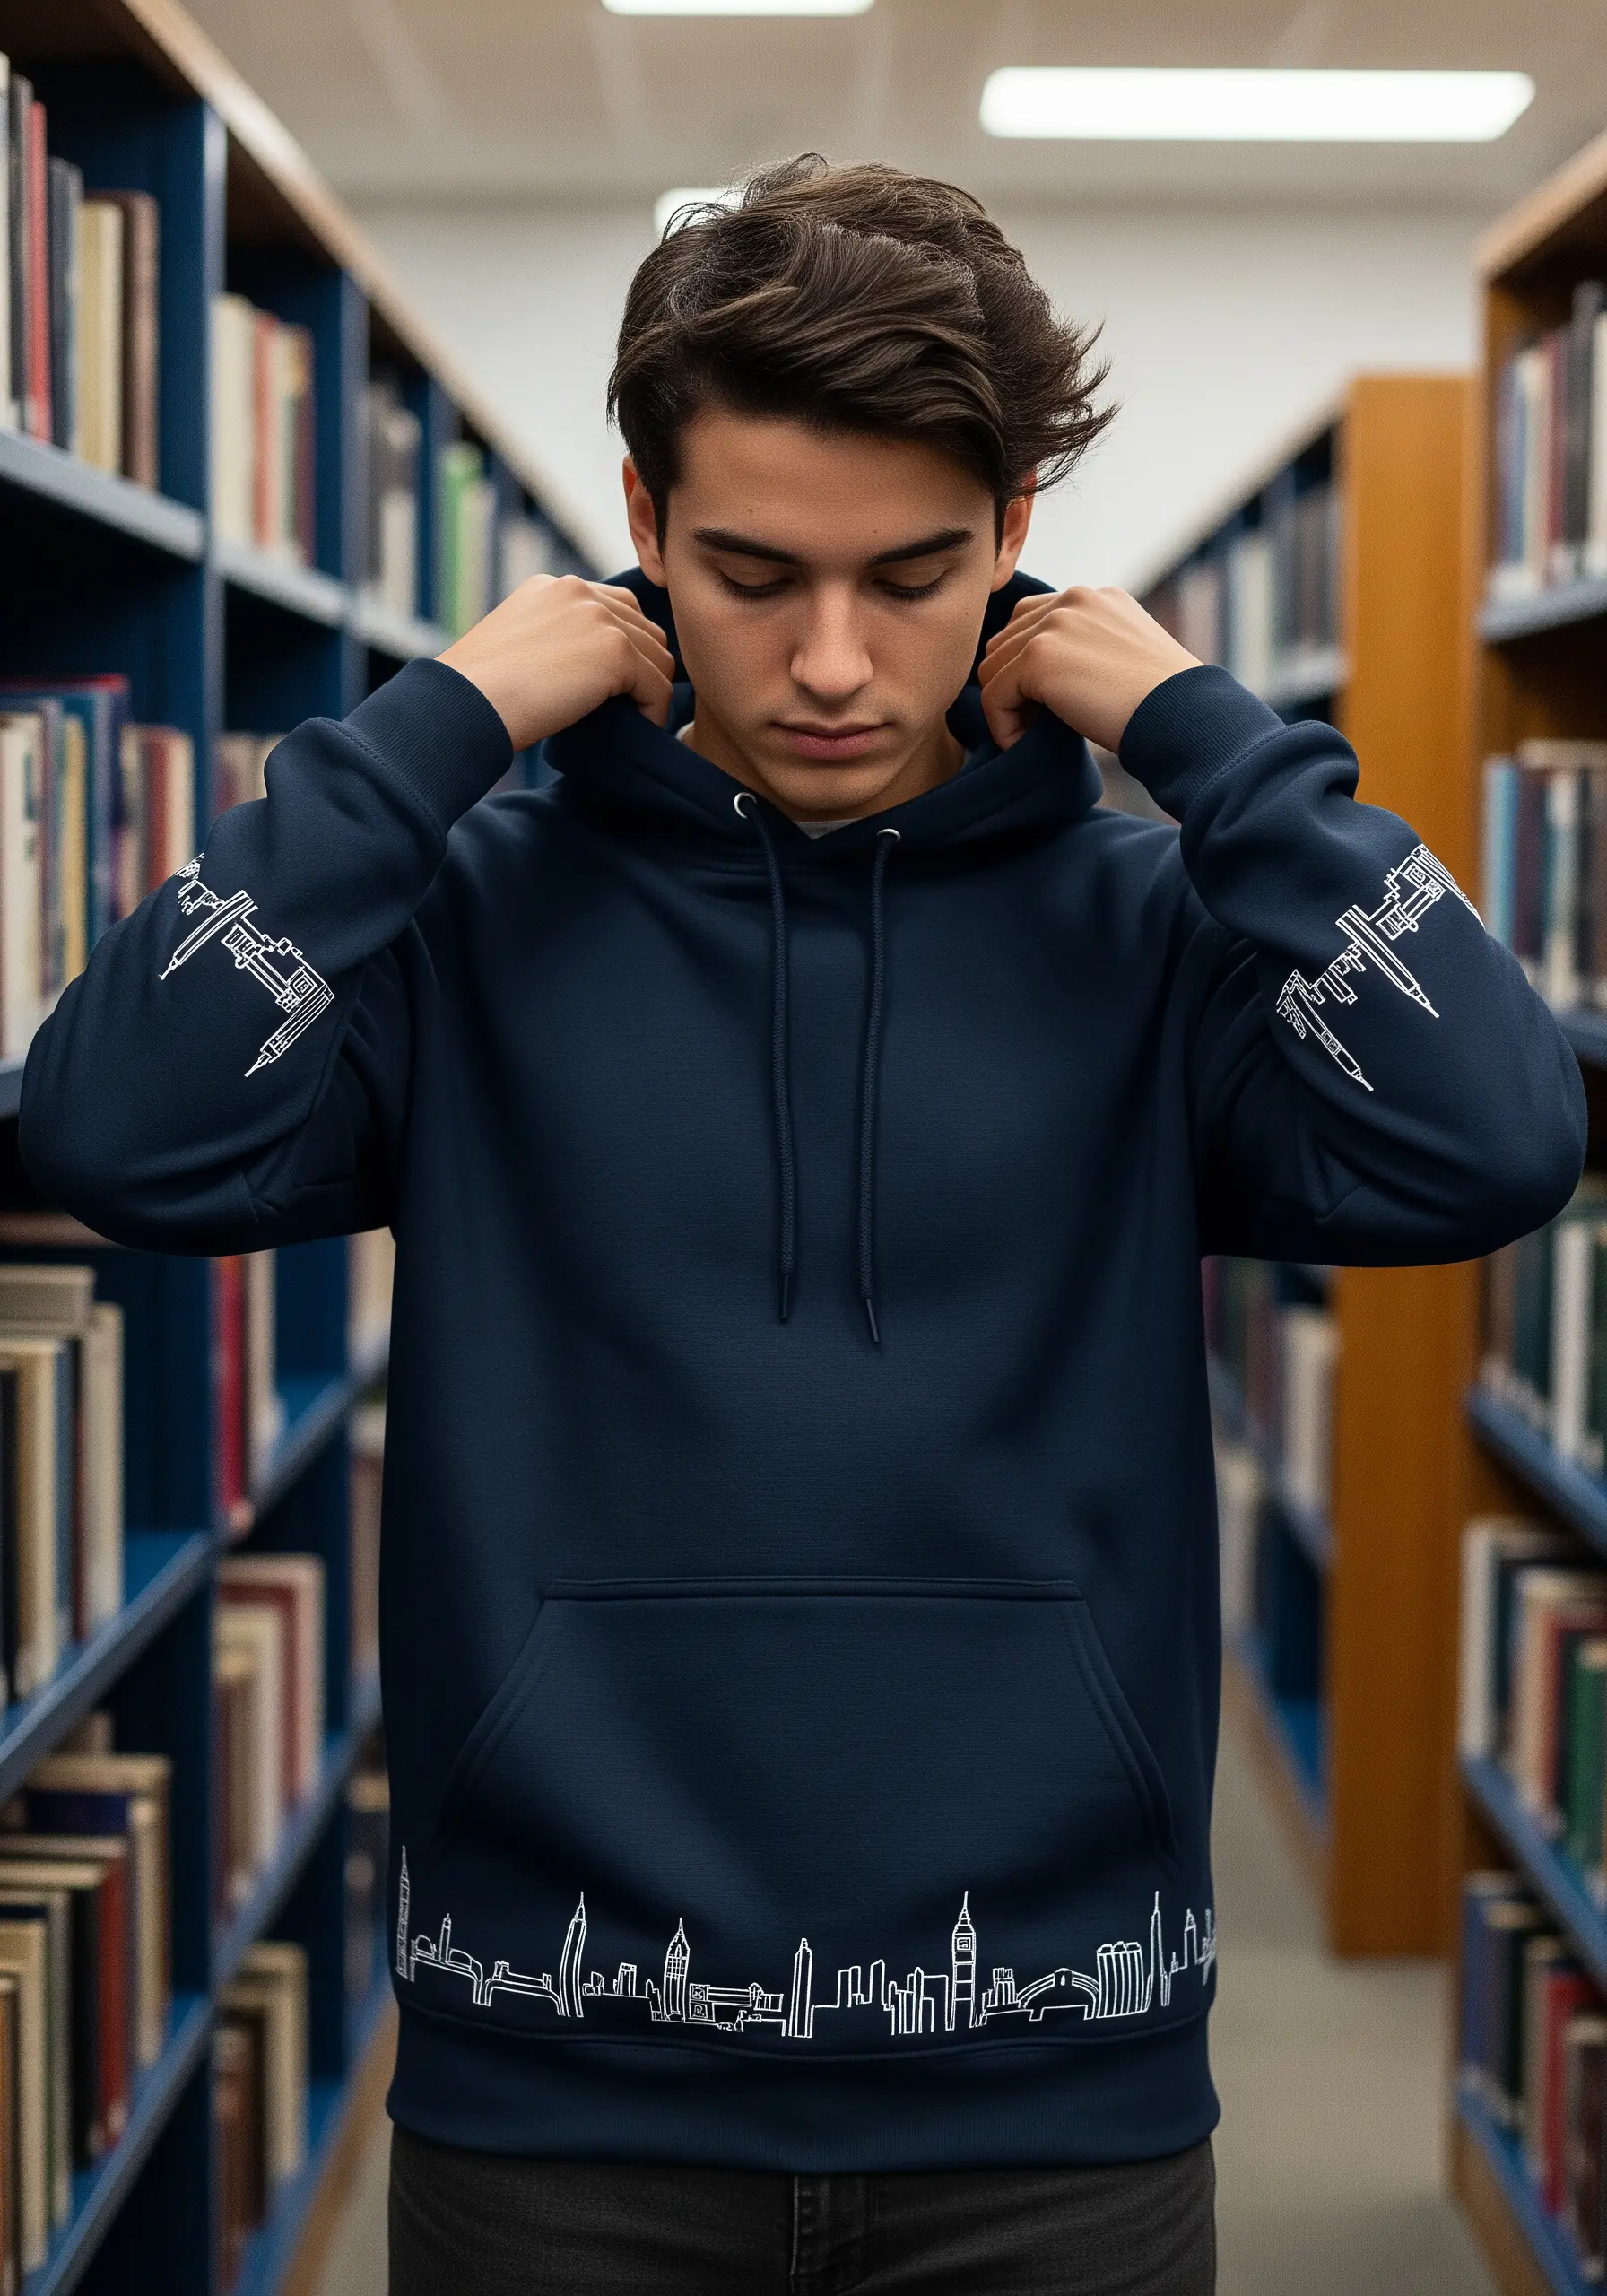
For an understated yet cool design, focus on minimalist outlines placed in unexpected spots like the cuffs and hemline.
Use a fine, two-strand backstitch to create a clean, continuous silhouette of your favorite city’s skyline.
Choose a thread color that contrasts subtly with your hoodie—like white on navy or grey on black—for a sophisticated, tone-on-tone effect.
This technique turns simple garment edges into a personal statement without overwhelming the entire piece.
11. Achieve Realistic Butterfly Wings
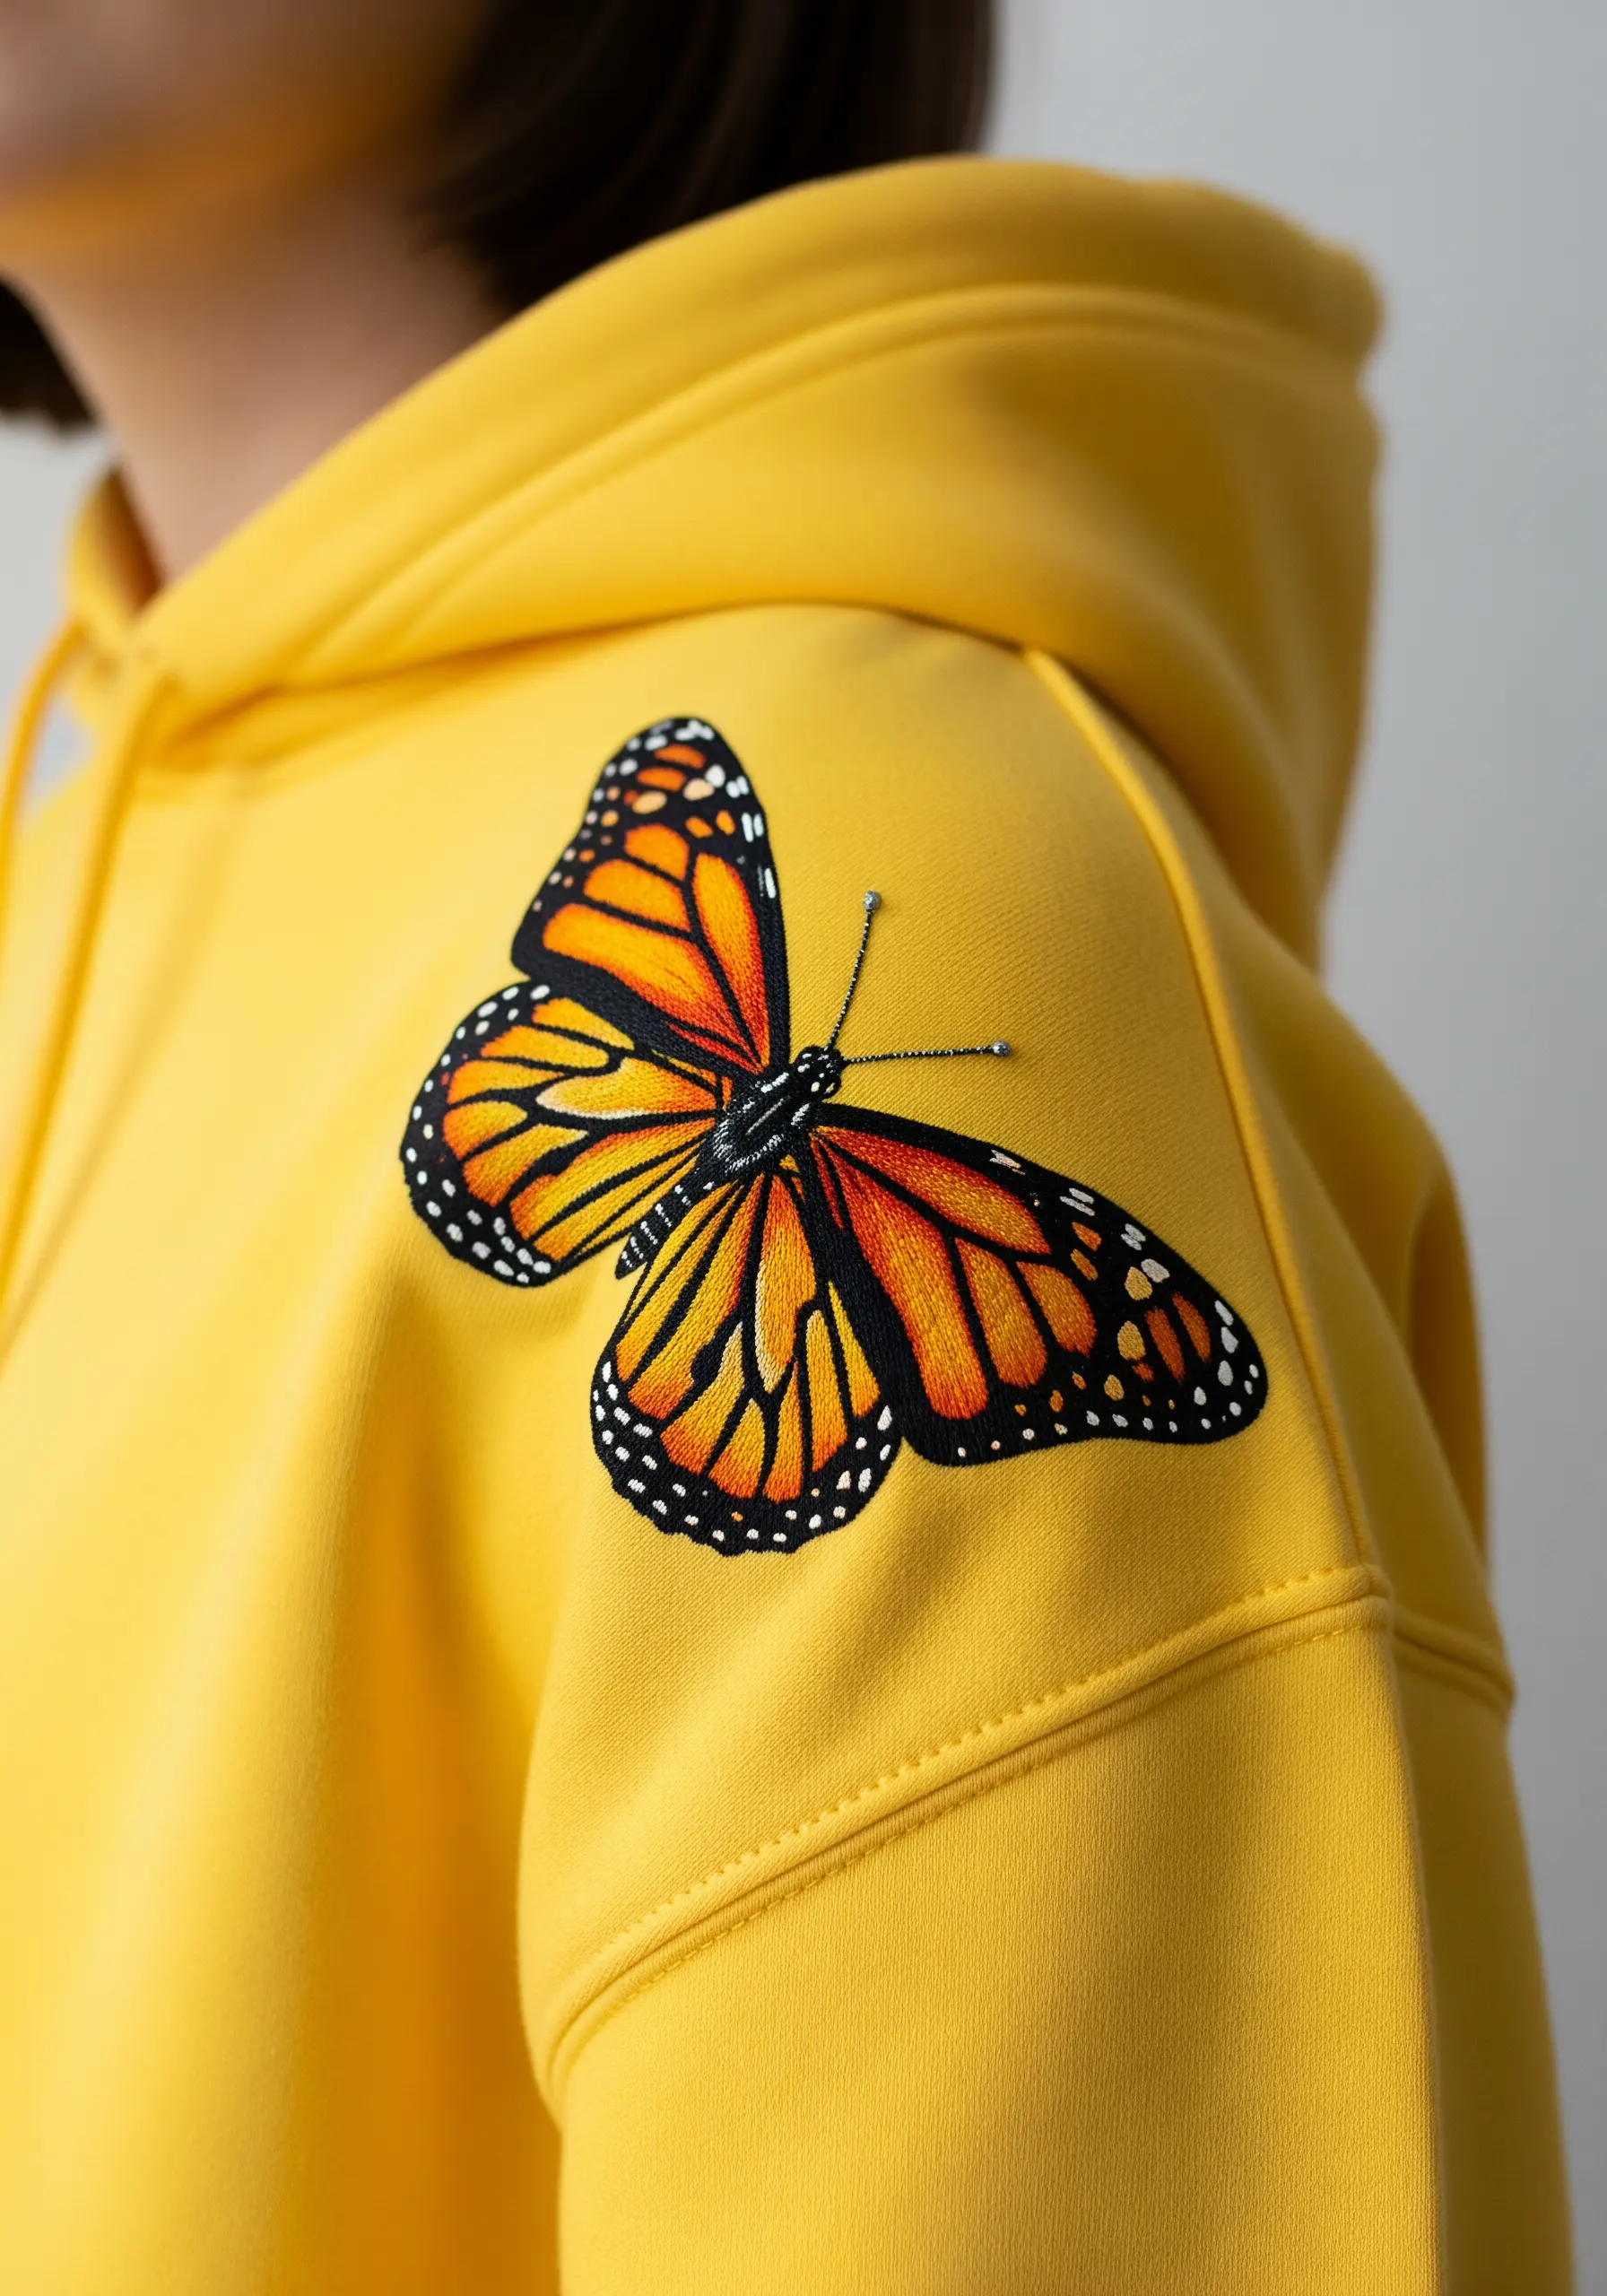
Bring a monarch butterfly to life with careful color blending using the long-and-short stitch, also known as thread painting.
Transition smoothly from yellow to light orange to deep orange within the wing panels to create a realistic, sun-kissed gradient.
Use a crisp black split stitch for the delicate veins and a bold satin stitch for the outer edges to create a sharp, defined frame.
A few well-placed French knots in white complete the iconic wing pattern, making the design instantly recognizable.
12. Curate a Punk-Inspired Patch Collection

Create a custom, layered look by designing and stitching your own embroidered patches.
Stitch your motifs—like smiley faces and skulls—onto separate pieces of sturdy felt or canvas. Once finished, trim the fabric, leaving a small border.
To attach them, use a simple whip stitch around the edges for a classic DIY feel. This method allows you to combine multiple small designs without the hassle of re-hooping your hoodie for each one.
13. Add Kintsugi-Style Golden Accents
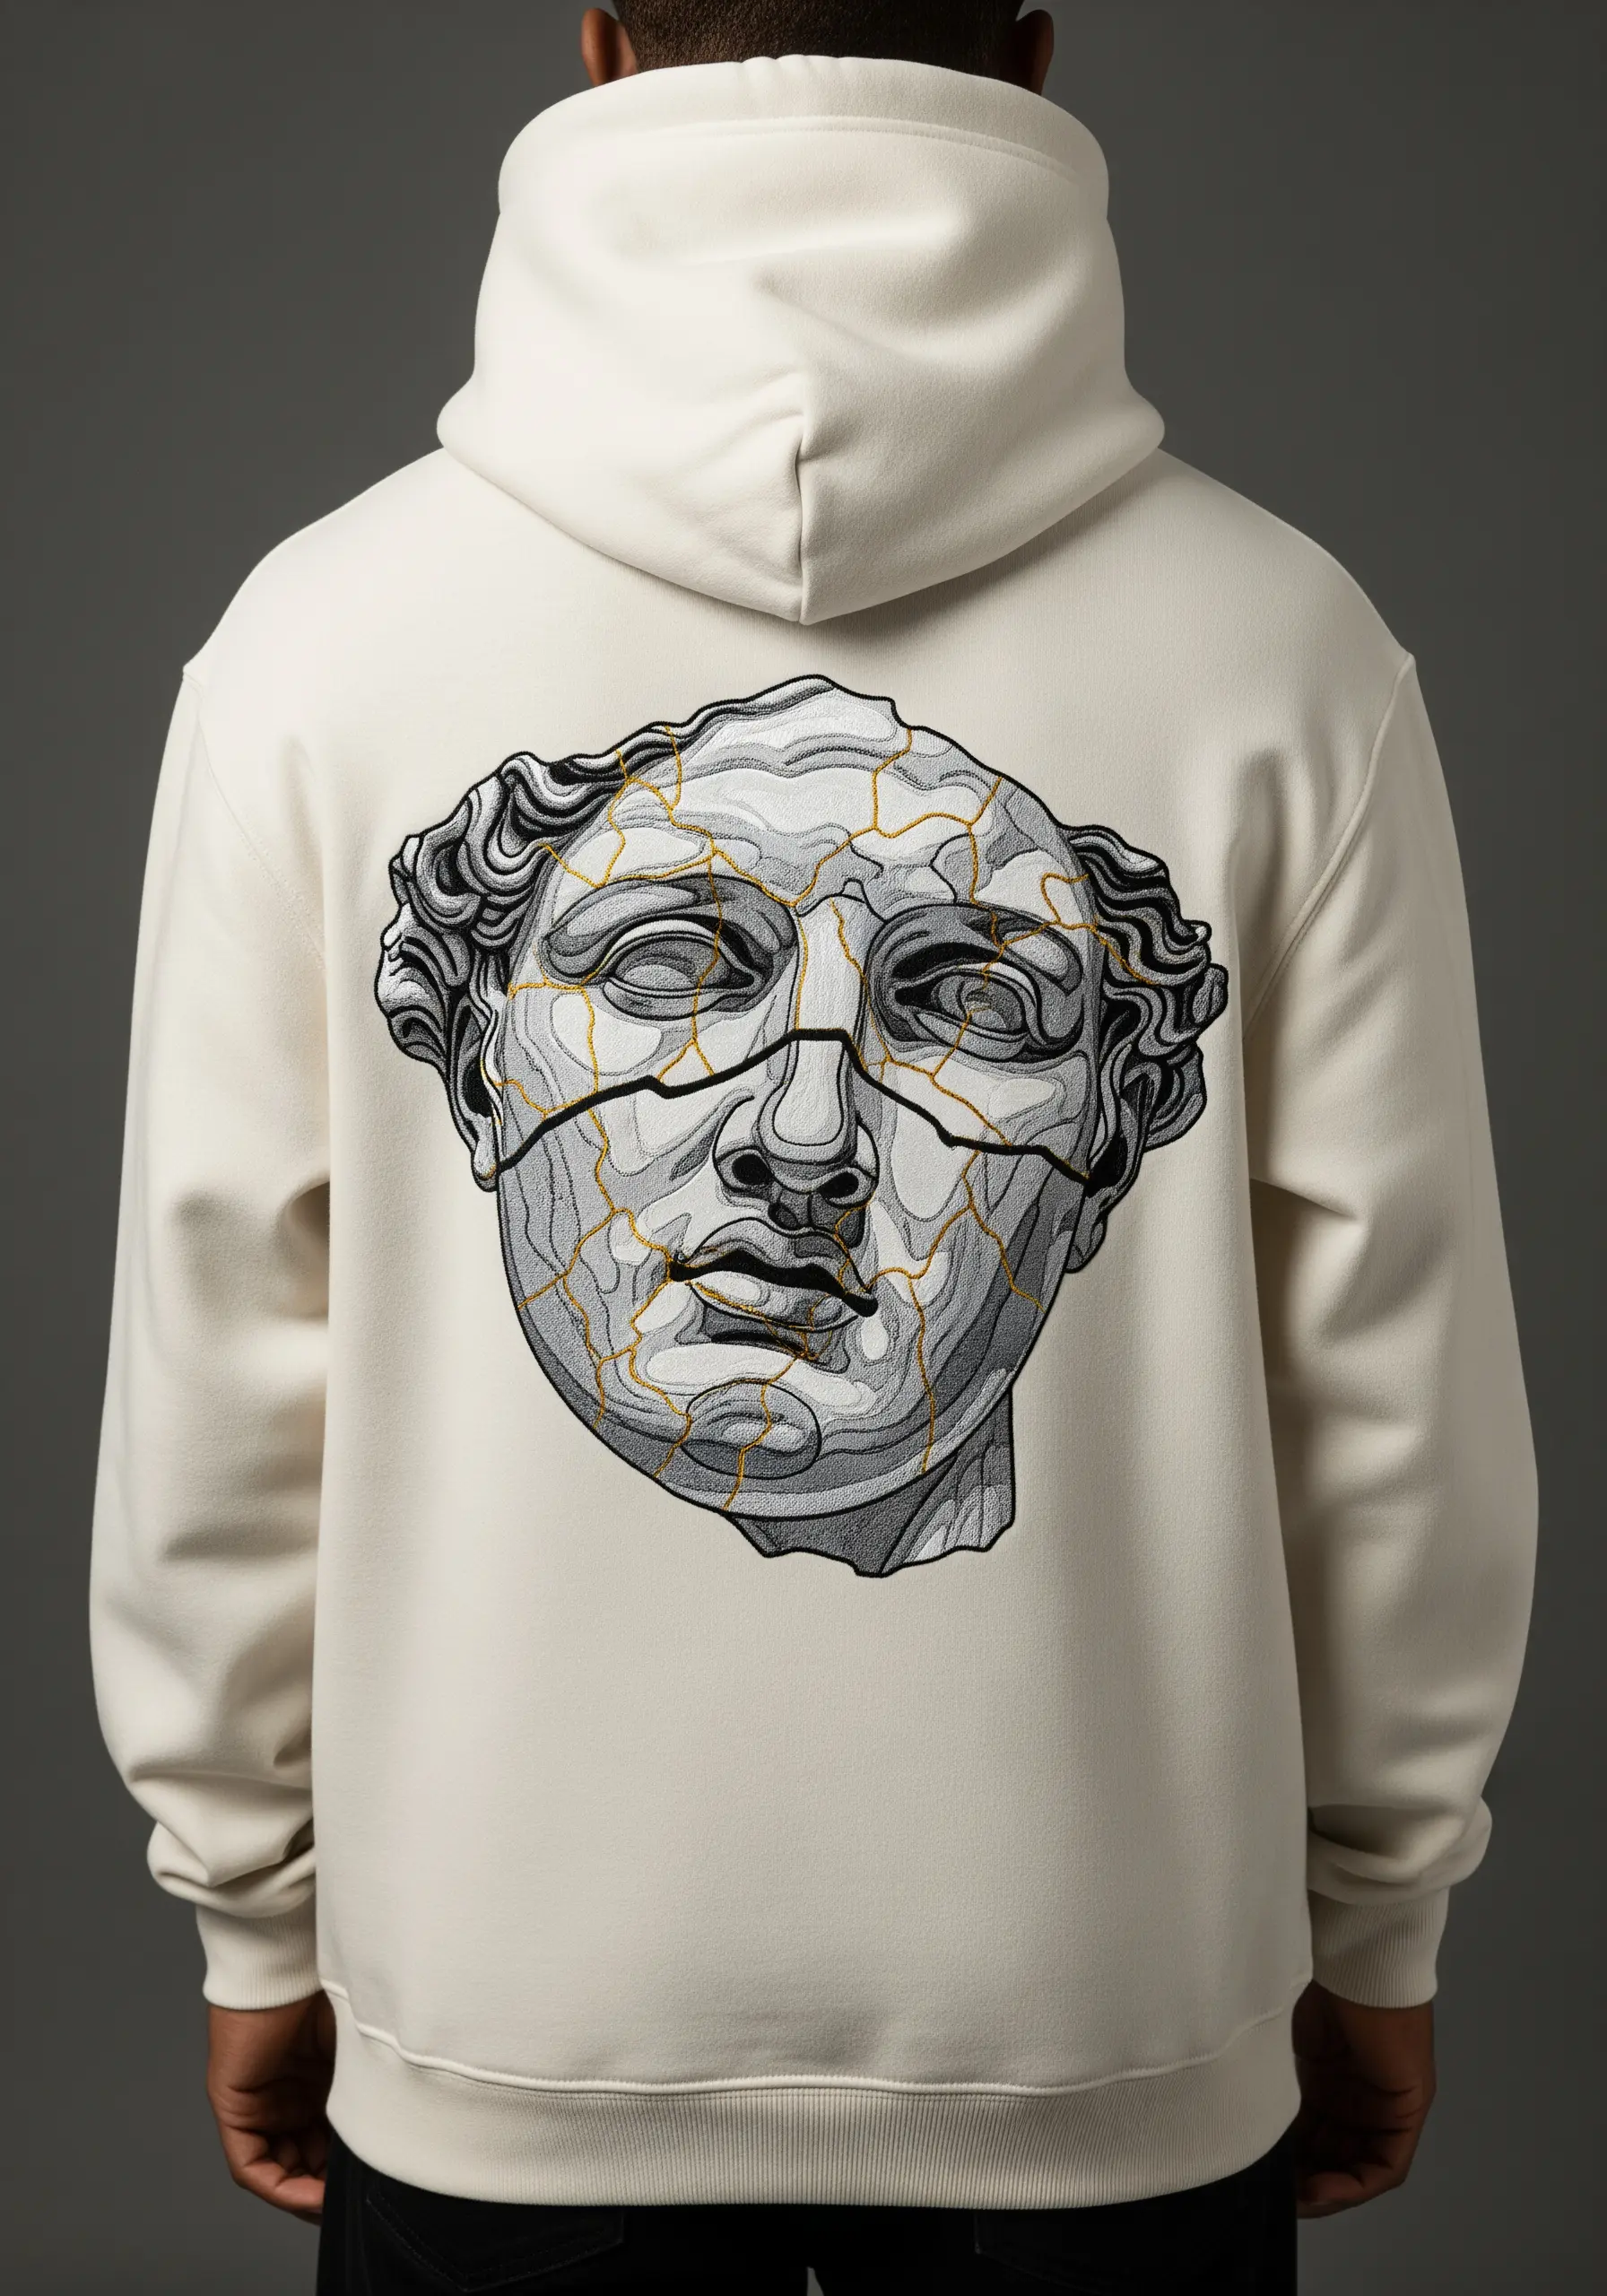
This design beautifully combines classical art with the Japanese art of kintsugi, where broken pottery is repaired with gold.
First, create the statue’s form using shades of grey and white thread, focusing on long-and-short stitch to create smooth, sculptural contours.
Then, stitch over the top with a glistening gold metallic thread to represent the cracks. Use a thin couching stitch or a meticulous backstitch to ensure the metallic thread lies flat and follows sharp, clean lines, making the repair a celebrated feature of the design.
14. Frame Your Face with Dragon Wings
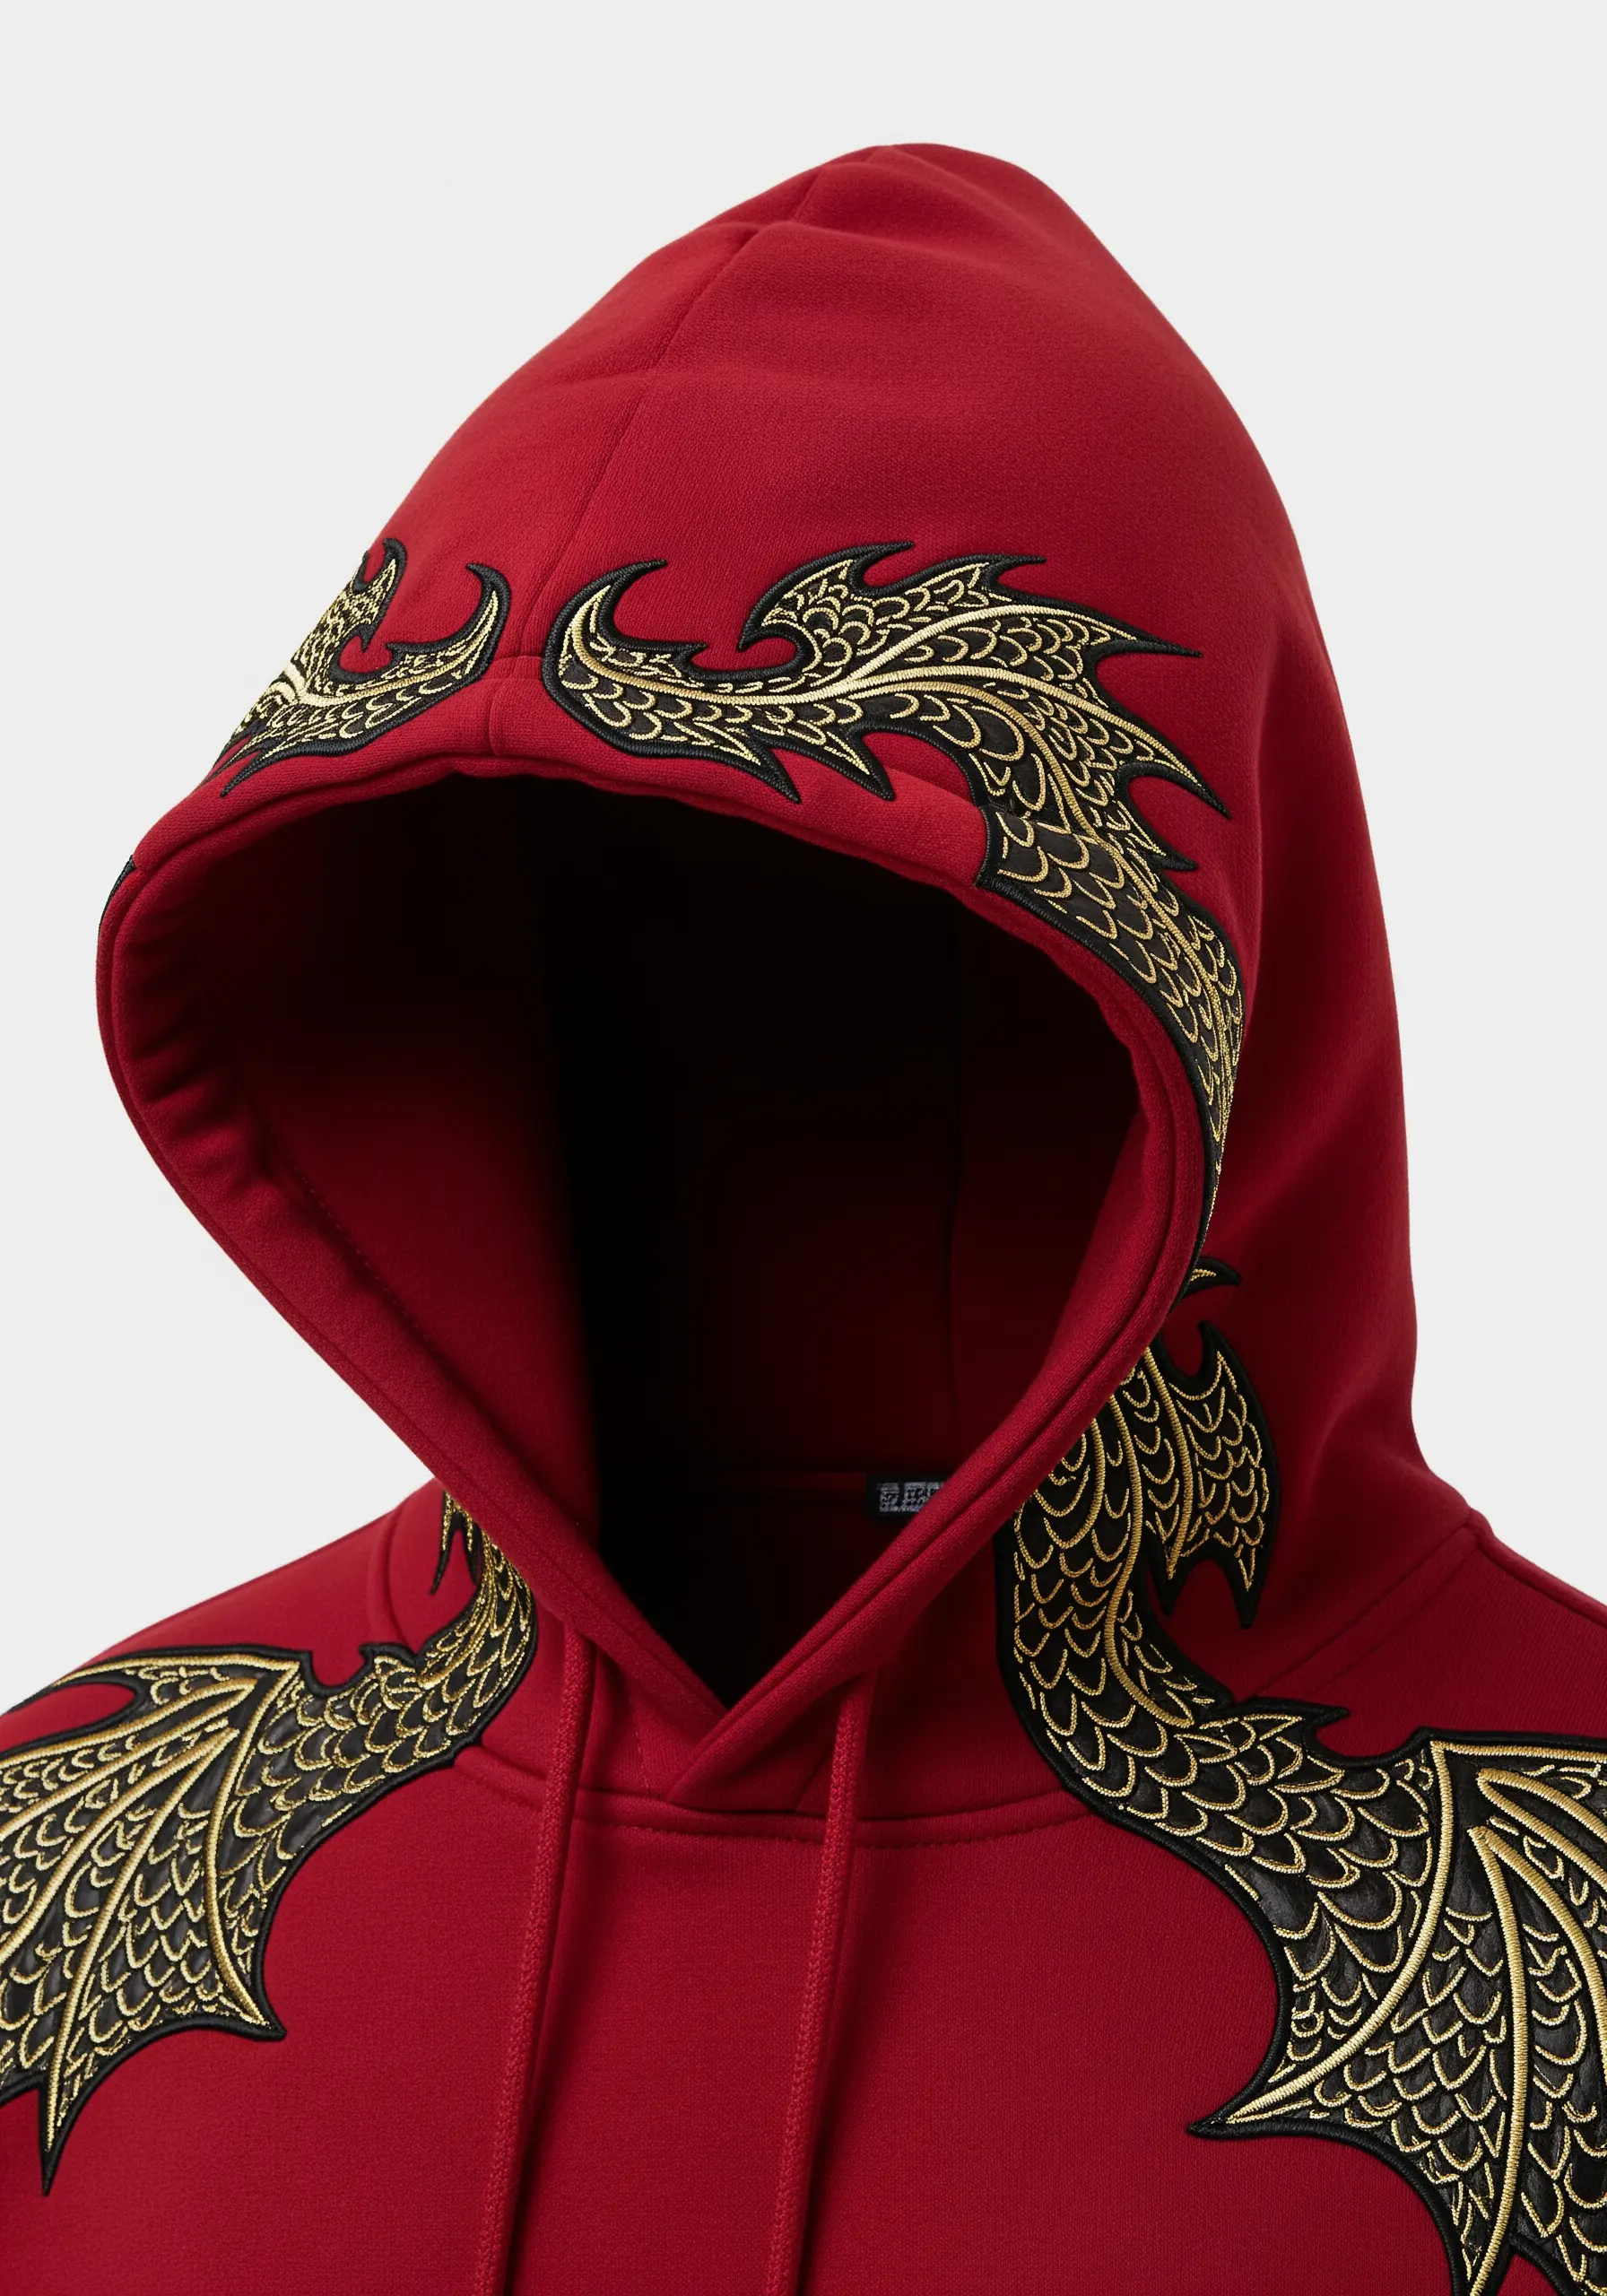
Symmetrical designs on a hood create a powerful framing effect. To ensure perfect alignment, fold the hood in half and press a center crease, then use that line as your guide for placing the two halves of your design.
Use a dense, lustrous satin stitch for the golden scales to make them catch the light.
For the black wing structure, use a whipped backstitch to create a raised, cord-like outline that adds definition and separates the design from the fabric.
15. Master the Hand-Drawn Doodle Aesthetic
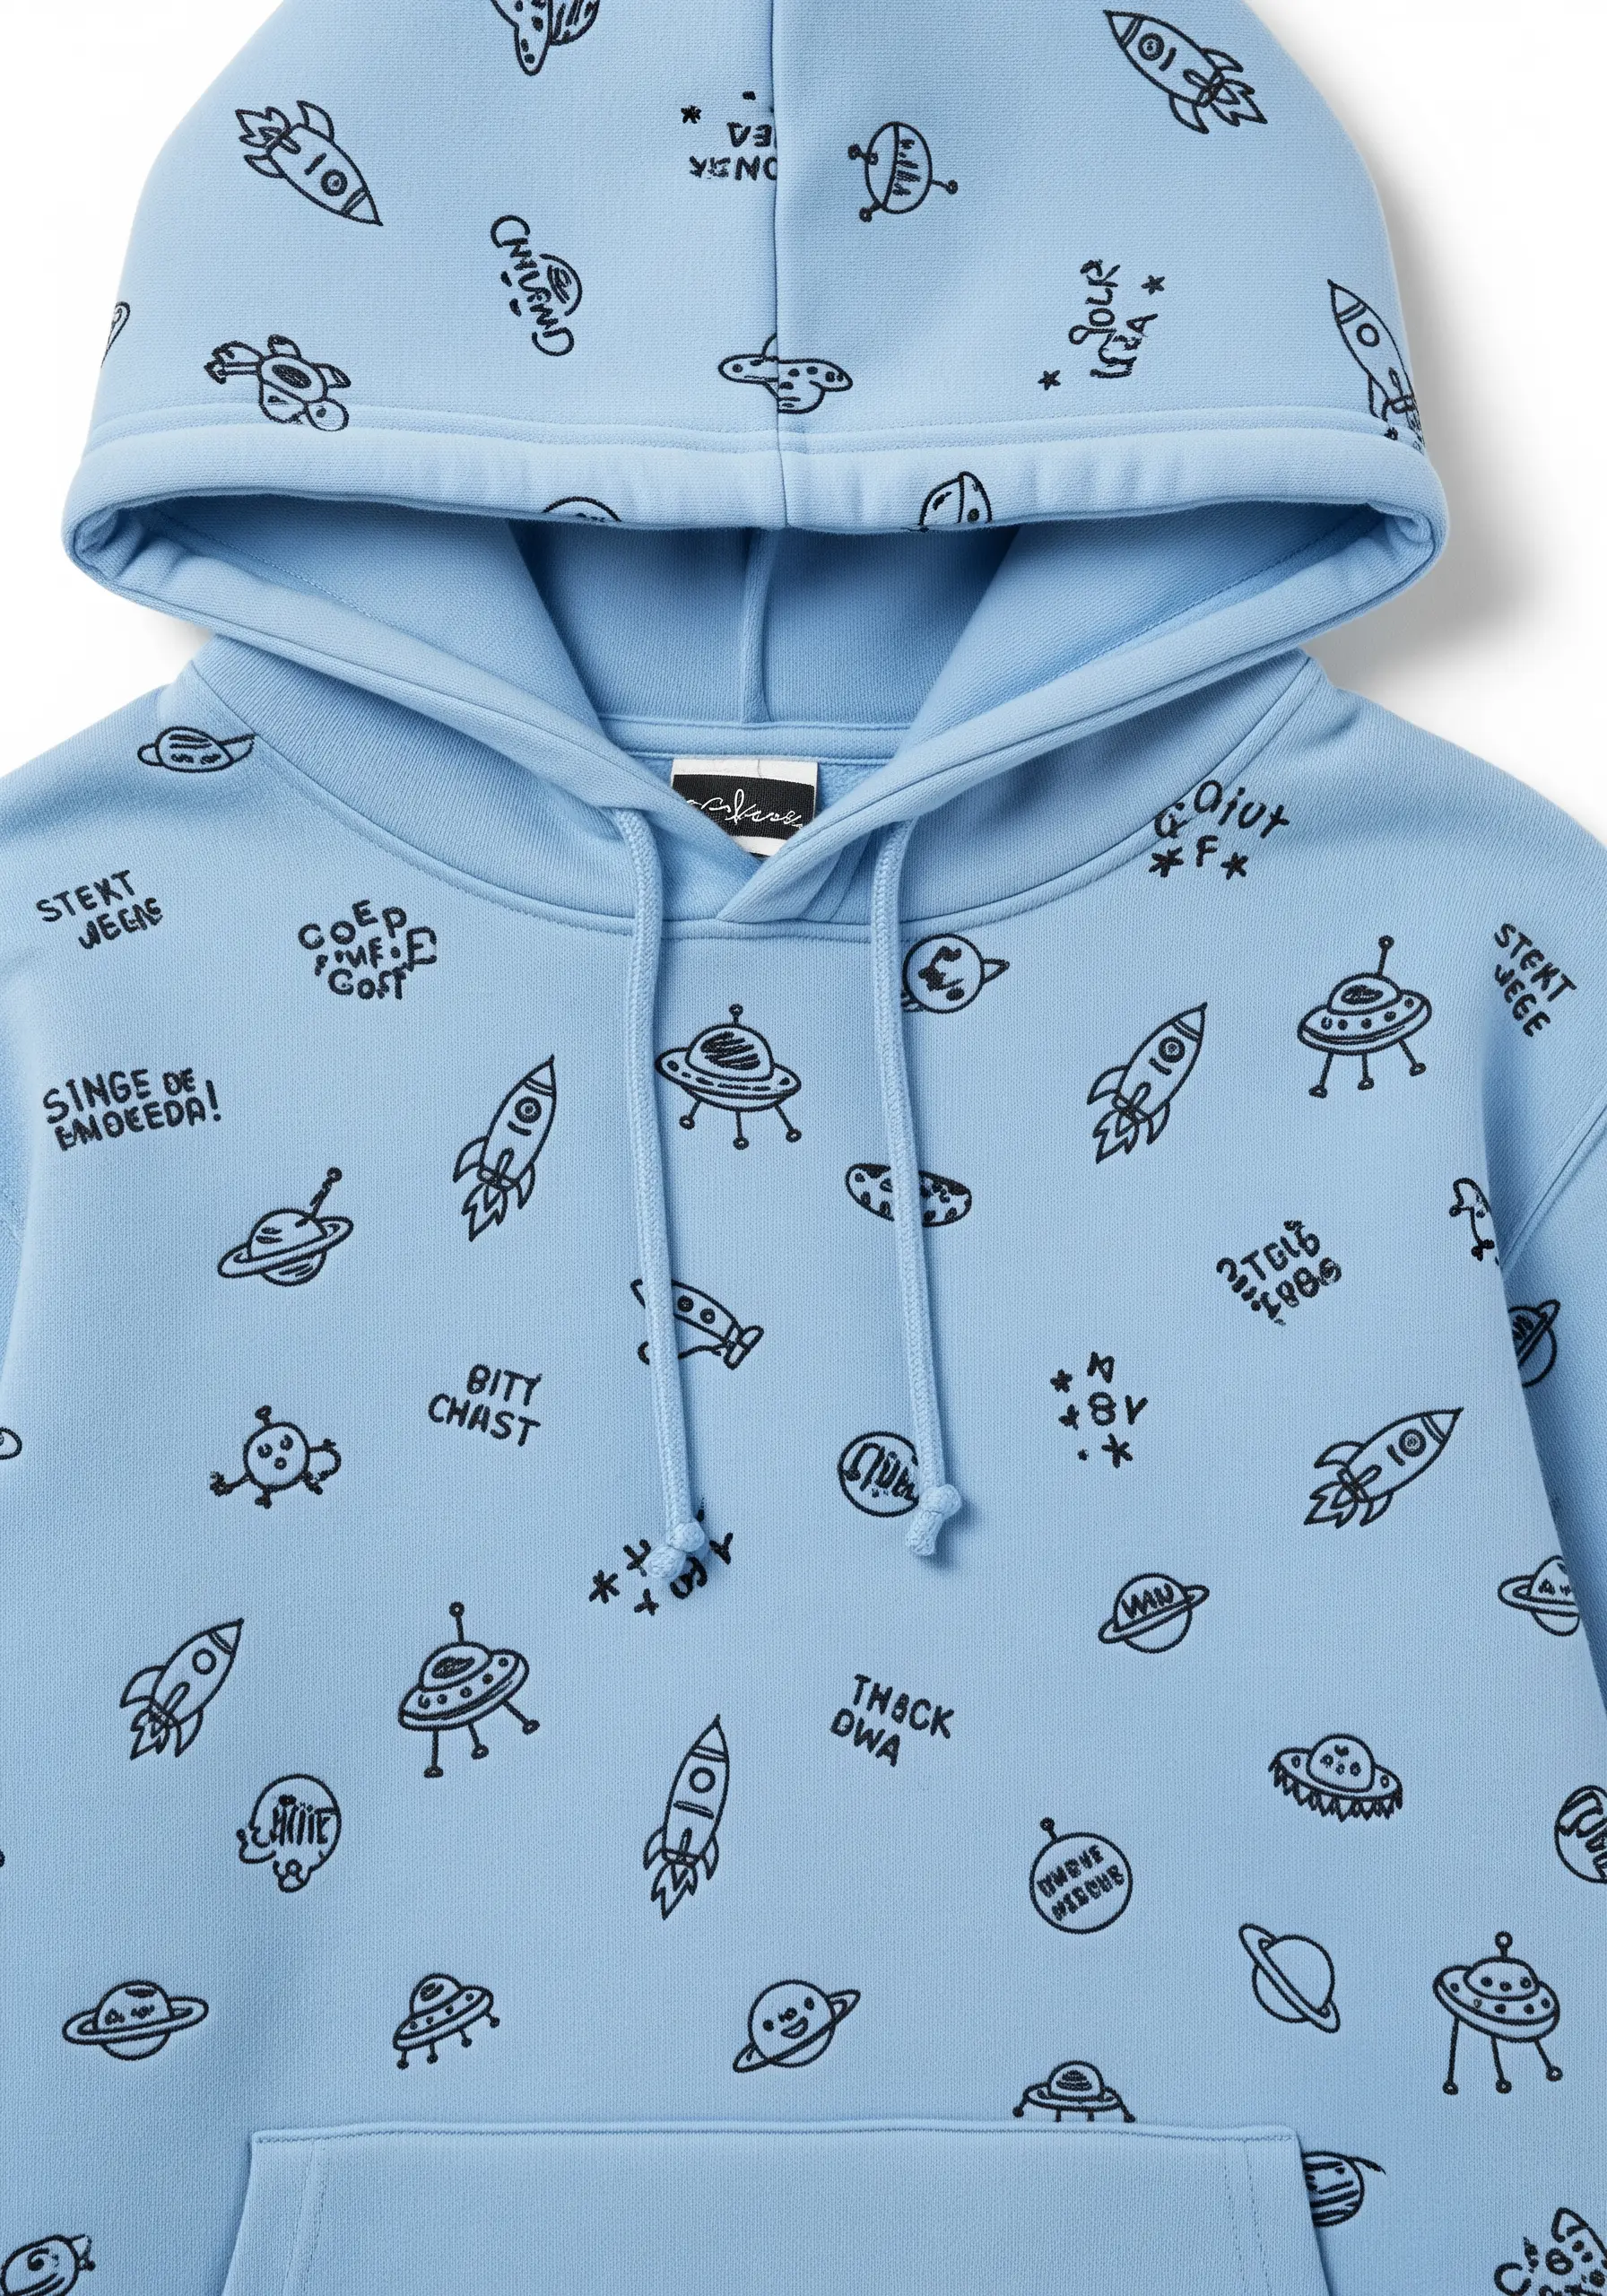
To capture the spontaneous energy of sketchbook doodles, stitch with a single strand of black floss.
Use a simple backstitch or stem stitch, intentionally varying your stitch length slightly to enhance the hand-drawn, imperfect feel.
Don’t overthink the placement; a scattered, random pattern of planets, rockets, and stars looks more authentic than a perfectly structured layout.
This style is about embracing charming imperfections to create a piece that feels personal and unique.
16. Illuminate Your Design with Neon Thread

Create a high-tech, futuristic look by using neon or UV-reactive thread on a dark hoodie.
Use a simple backstitch for the circuit pathways to keep the lines clean and sharp. For the nodes or connection points, use small, tightly packed satin stitch circles or French knots to add a pop of texture.
The extreme contrast between the bright thread and the black fabric is what makes this design so visually striking, especially in low light.
17. Stitch Nostalgia with a Cassette Tape
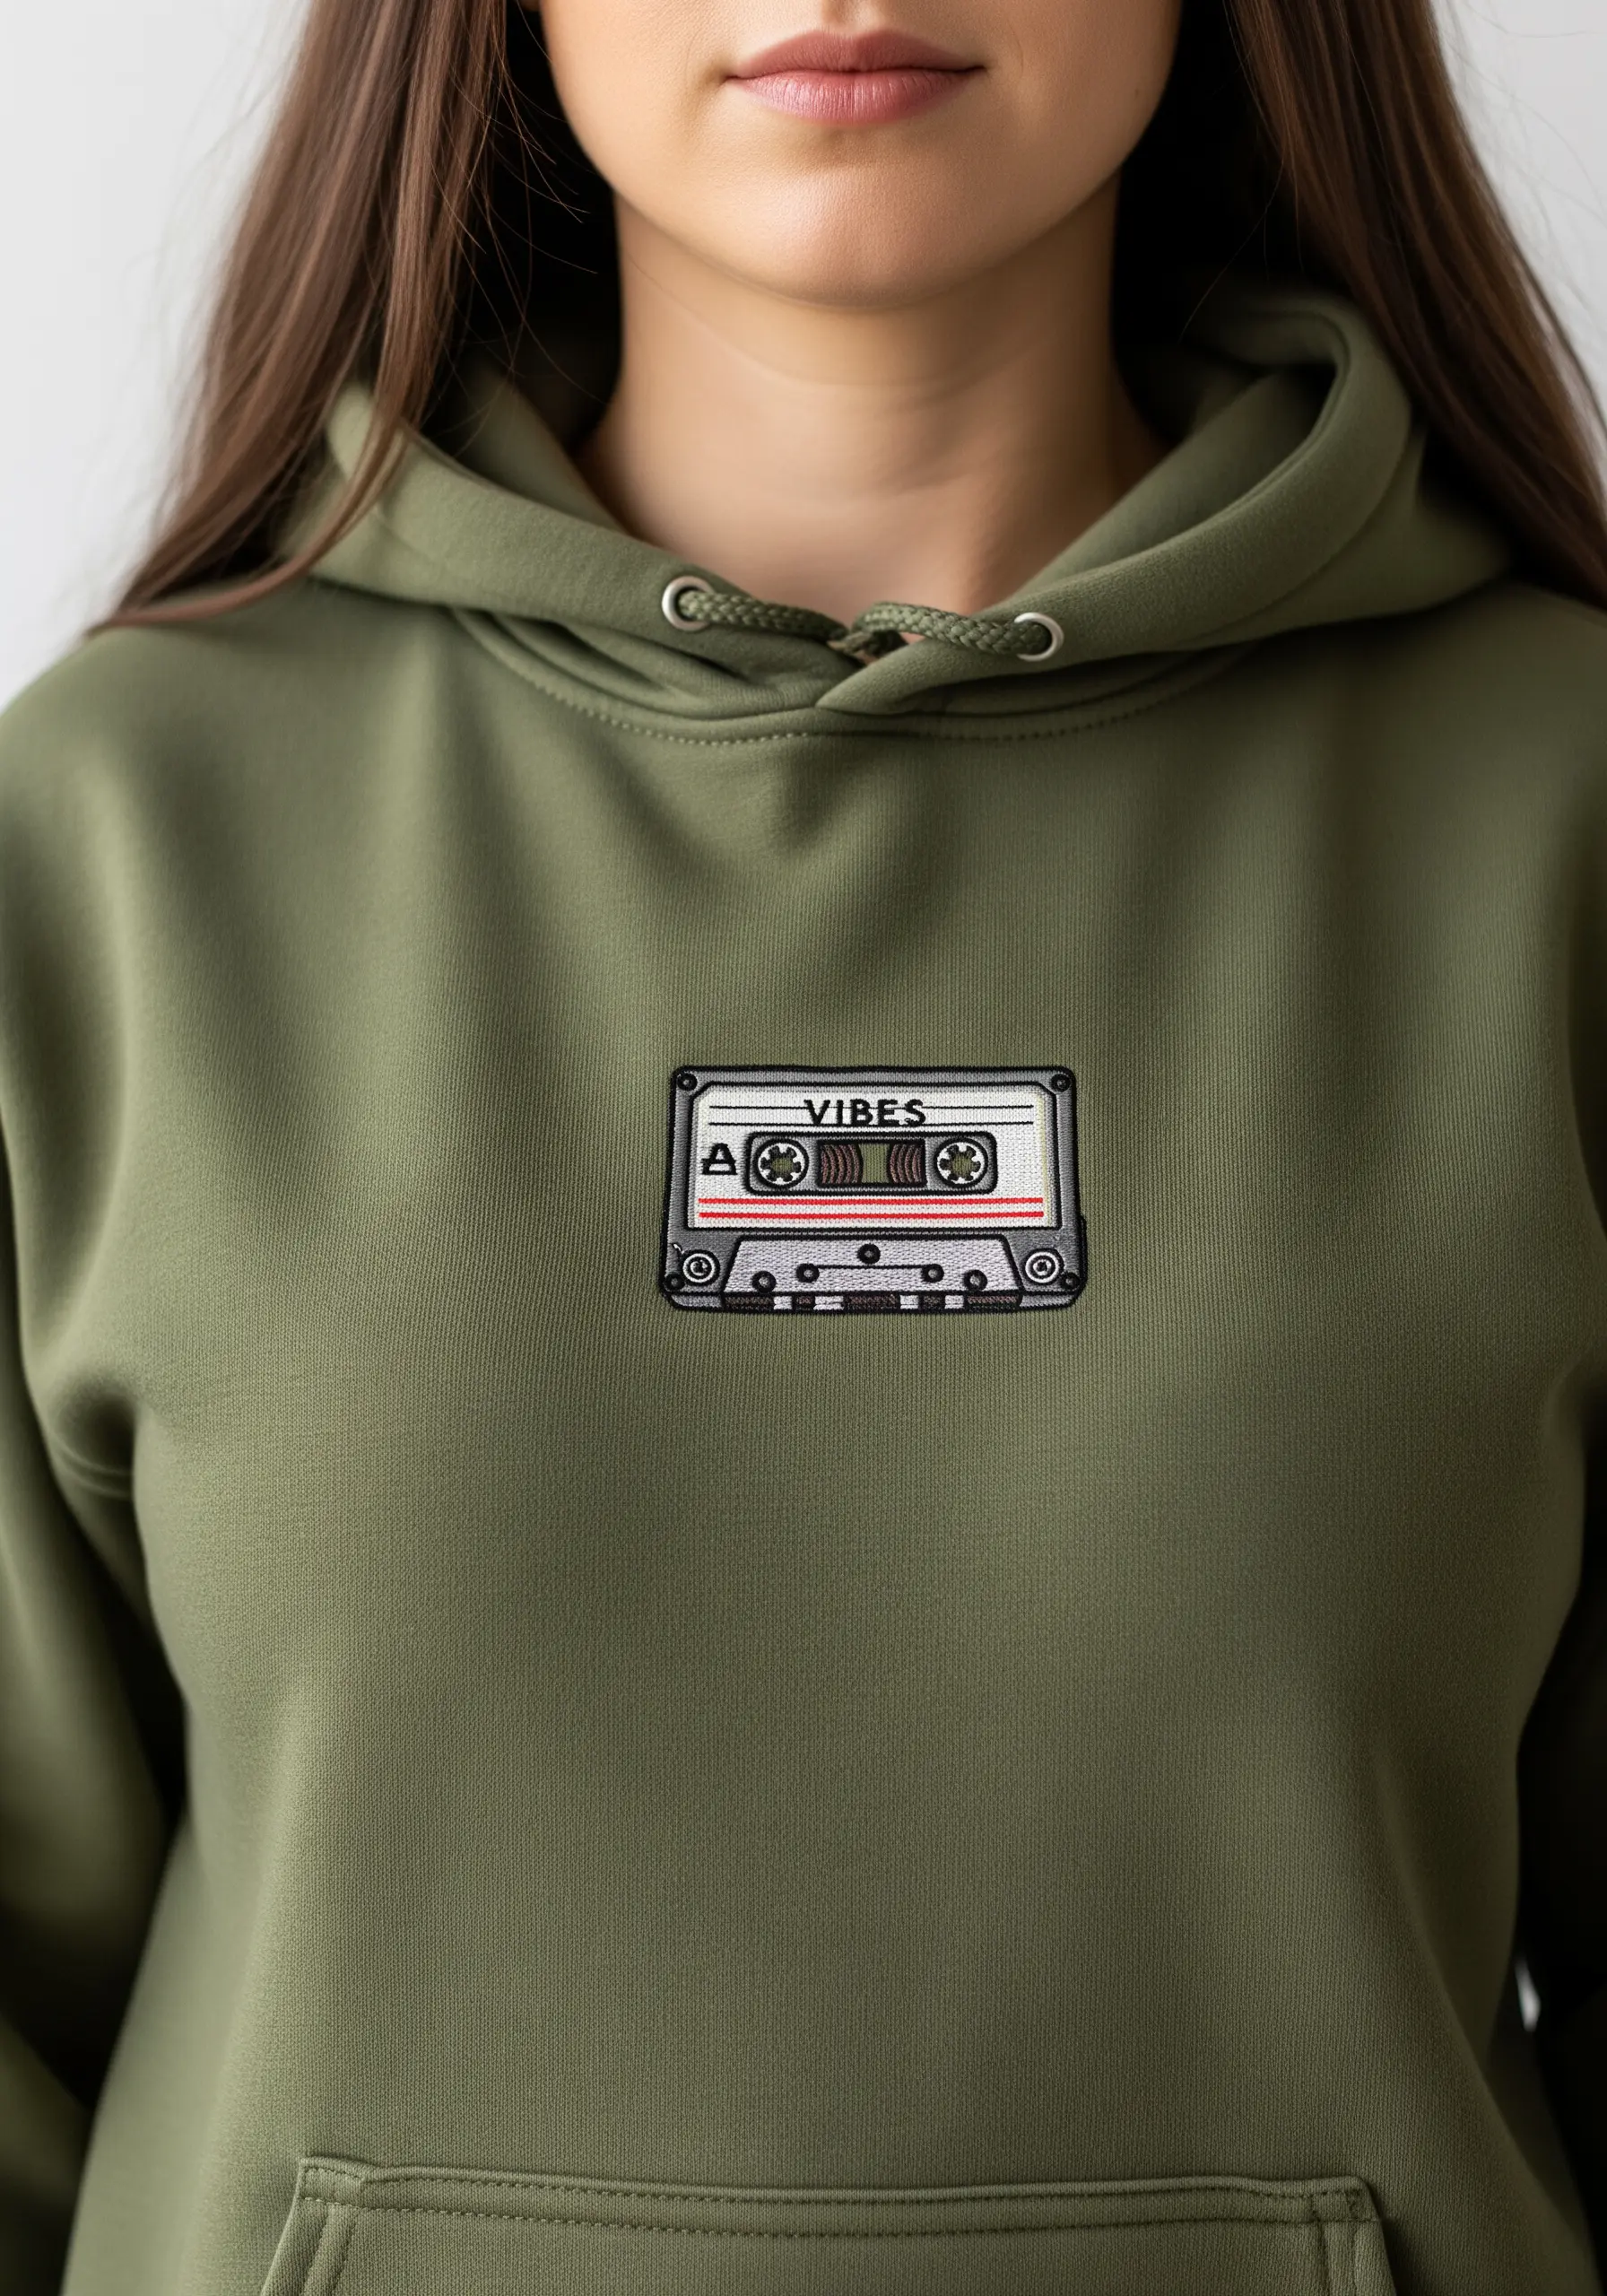
For small, detailed designs, precision is everything. Use a single strand of floss and a fine needle to execute the tiny details like the text and tape spools.
Use a vertical satin stitch for the main body of the cassette and a fine backstitch for all outlines and lettering.
To create the illusion of tape wound on the spools, use concentric circles of stem stitch. This technique creates a subtle texture that mimics the real thing.
18. Make Lettering Pop on a Tie-Dye Background

Stitching on a busy, multi-colored background like tie-dye presents a challenge: how do you make your design readable?
Choose a thread color that isn’t prominent in the dye pattern. Here, a light lavender with a subtle sheen stands out against the pastel swirl.
To give the lettering extra definition, outline it with a darker, contrasting color using a fine backstitch. This simple trick acts as a border, separating the word from the background and ensuring it remains the focal point.
19. Create Fiery Wings with Thread Painting

The magic of a phoenix is its fiery essence, which you can capture by blending a palette of red, orange, and yellow threads.
Use long-and-short stitch to seamlessly transition between colors, creating a gradient that looks like glowing embers.
For the long tail feathers, keep your stitches flowing in the direction of the feather’s growth. Add highlights with a bright yellow or even a touch of gold metallic thread to create the illusion of heat and light.
20. Illustrate a World with Textural Stitches

Turn a simple hoodie into a fantasy map by assigning different stitches to different geographical features.
Use a dense satin stitch to create the sharp, snow-capped peaks of the mountains. For the forests and grasslands, scatter French knots and seed stitches in various shades of green to build a rich, varied texture.
Outline the continents with a bold chain stitch and use a simple running stitch for the rivers, letting the texture tell the story of the landscape.
21. Design an Asymmetrical Floral Zip-Up
A zip-up hoodie offers a unique canvas. Create a dynamic, asymmetrical design where floral vines appear to grow across the zipper from one side to the other.
Use a vibrant satin stitch for the flower petals to make them pop against the neutral grey fabric.
To ensure the design feels balanced, place a larger cluster of flowers on one shoulder and a smaller, trailing vine along the opposite pocket. This creates a sense of movement and visual interest that guides the eye across the garment.
22. Recreate a Digital Glitch Effect with Thread
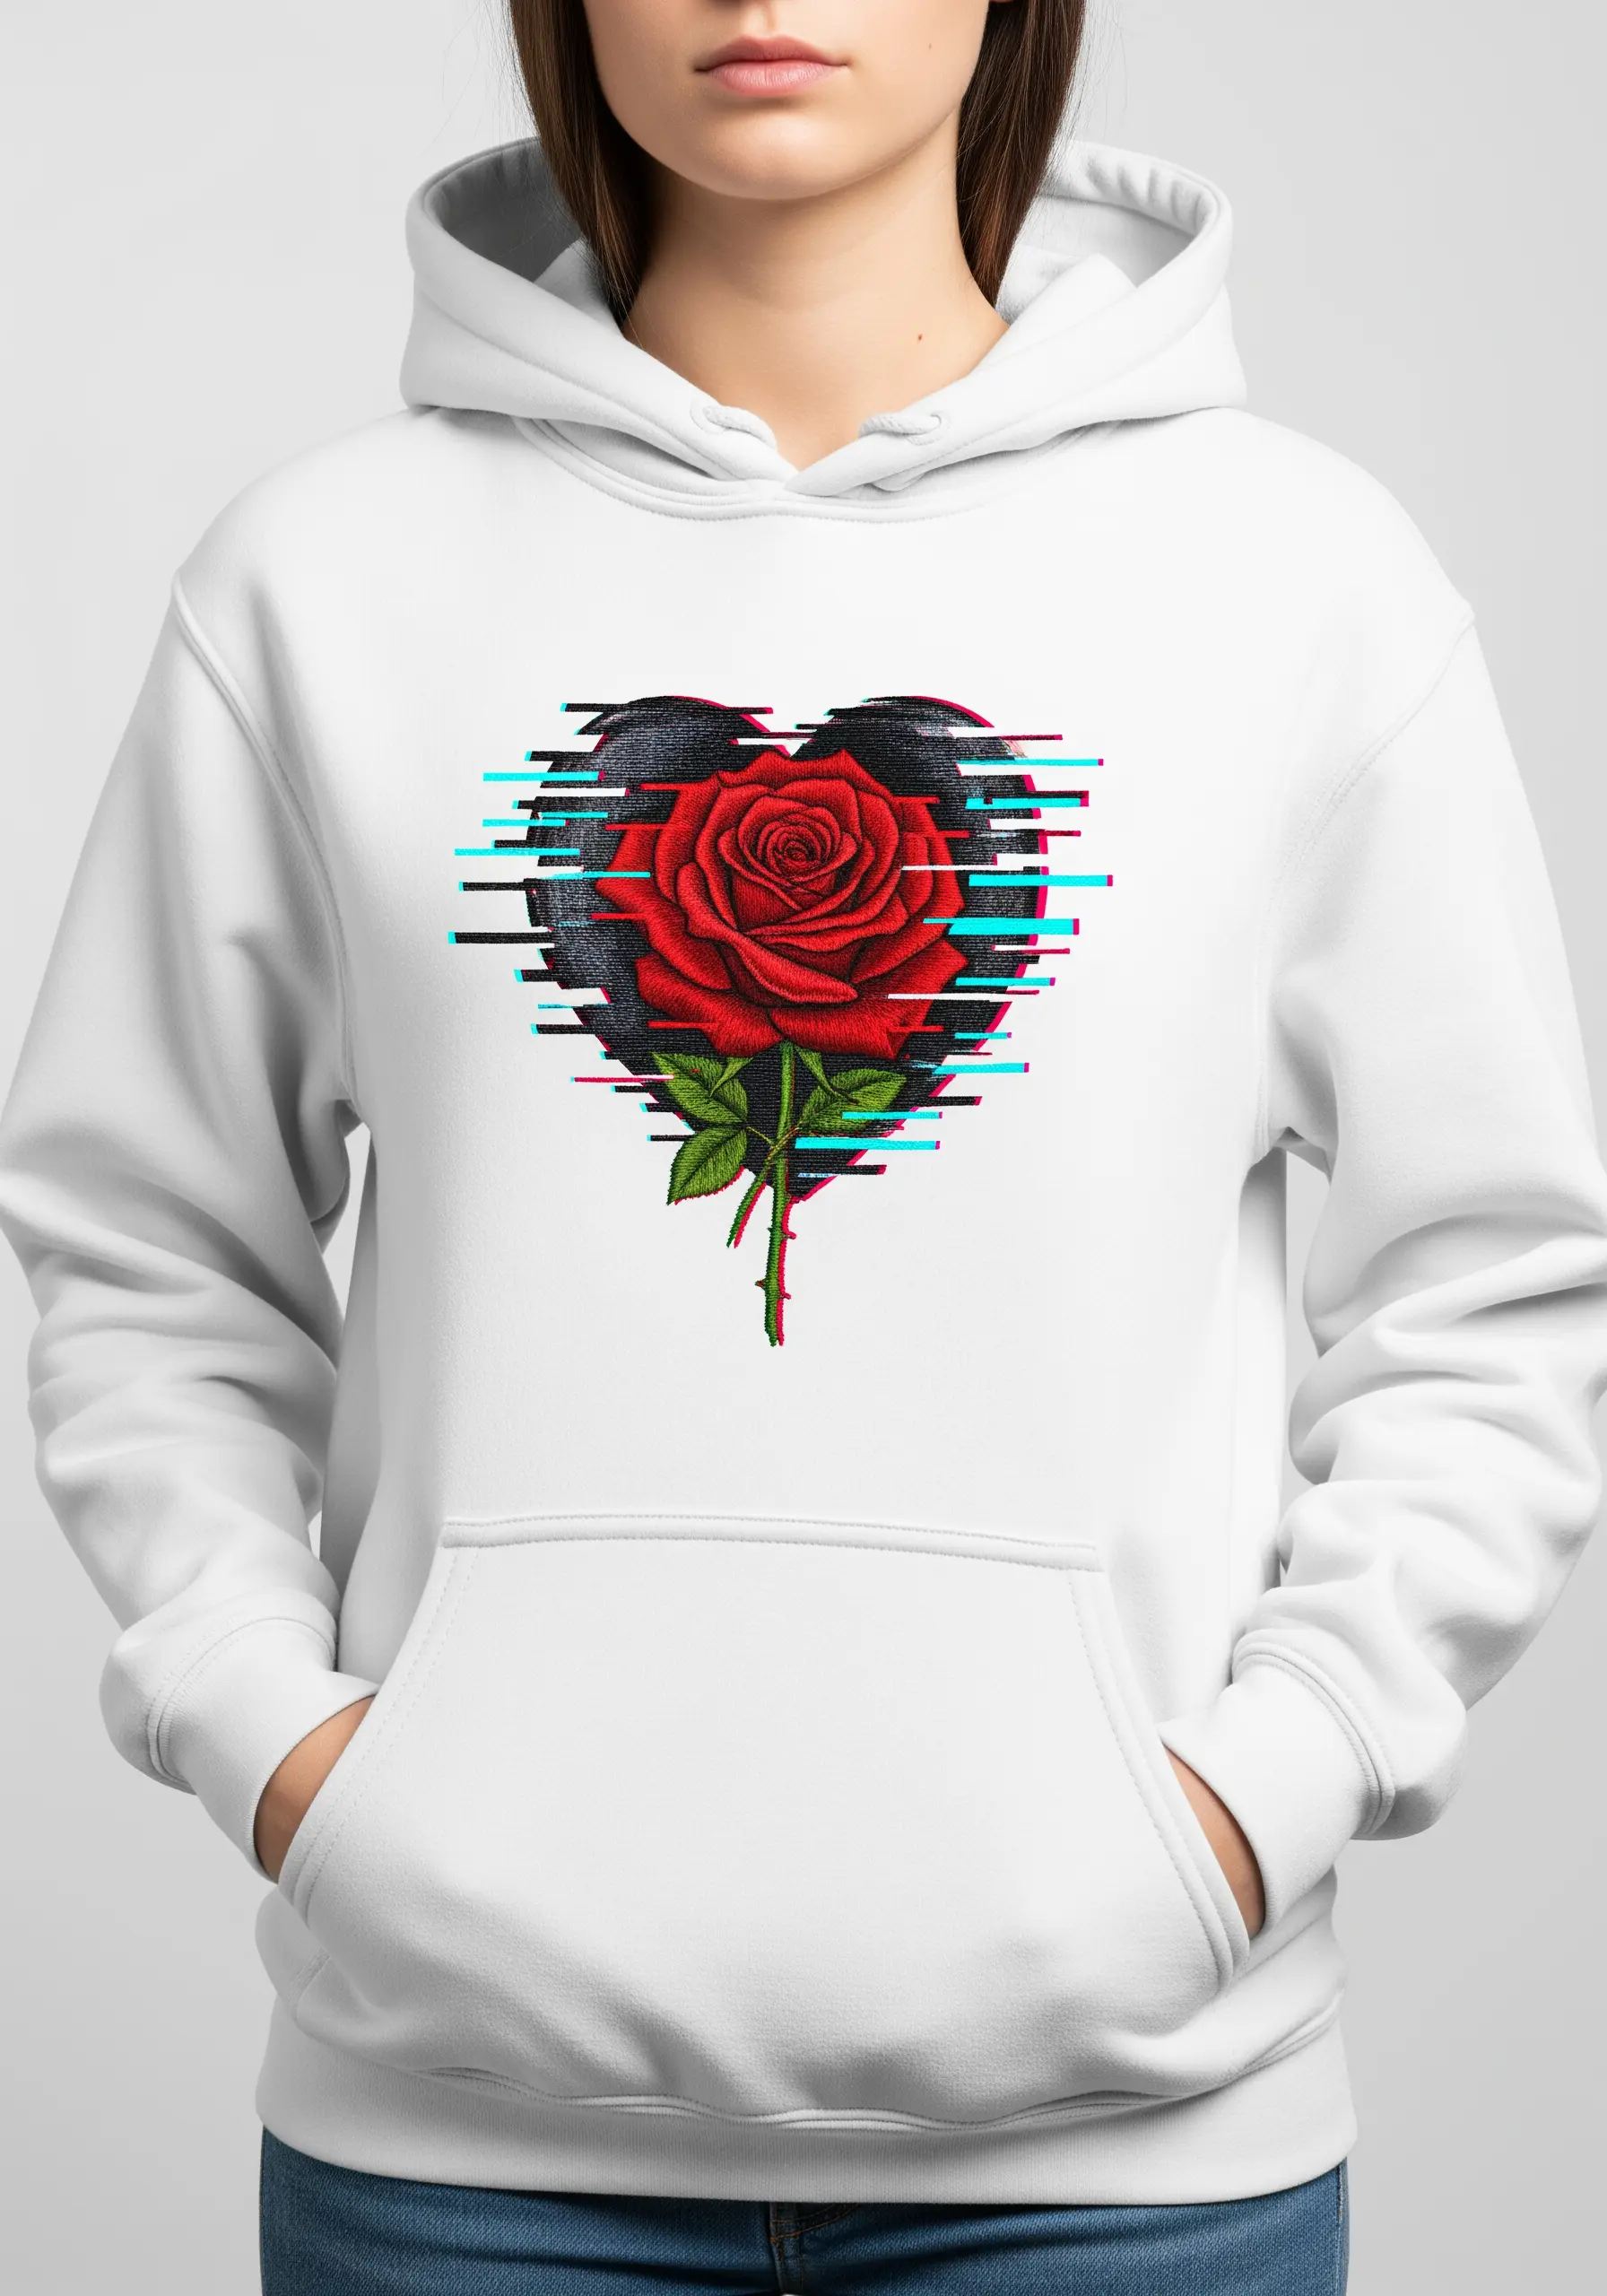
Capture a modern, tech-inspired vibe by stitching a digital glitch effect.
First, embroider your central motif—the heart and rose—using traditional satin stitch and thread painting techniques for a realistic look.
Then, add the glitch effect by stitching thin, horizontal bars of satin stitch in bright cyan, magenta, and black that intentionally misalign with the central image.
This contrast between the classic embroidered rose and the jarring digital distortion creates a powerful and trendy aesthetic.
23. Fill Shapes with Geometric Patterns
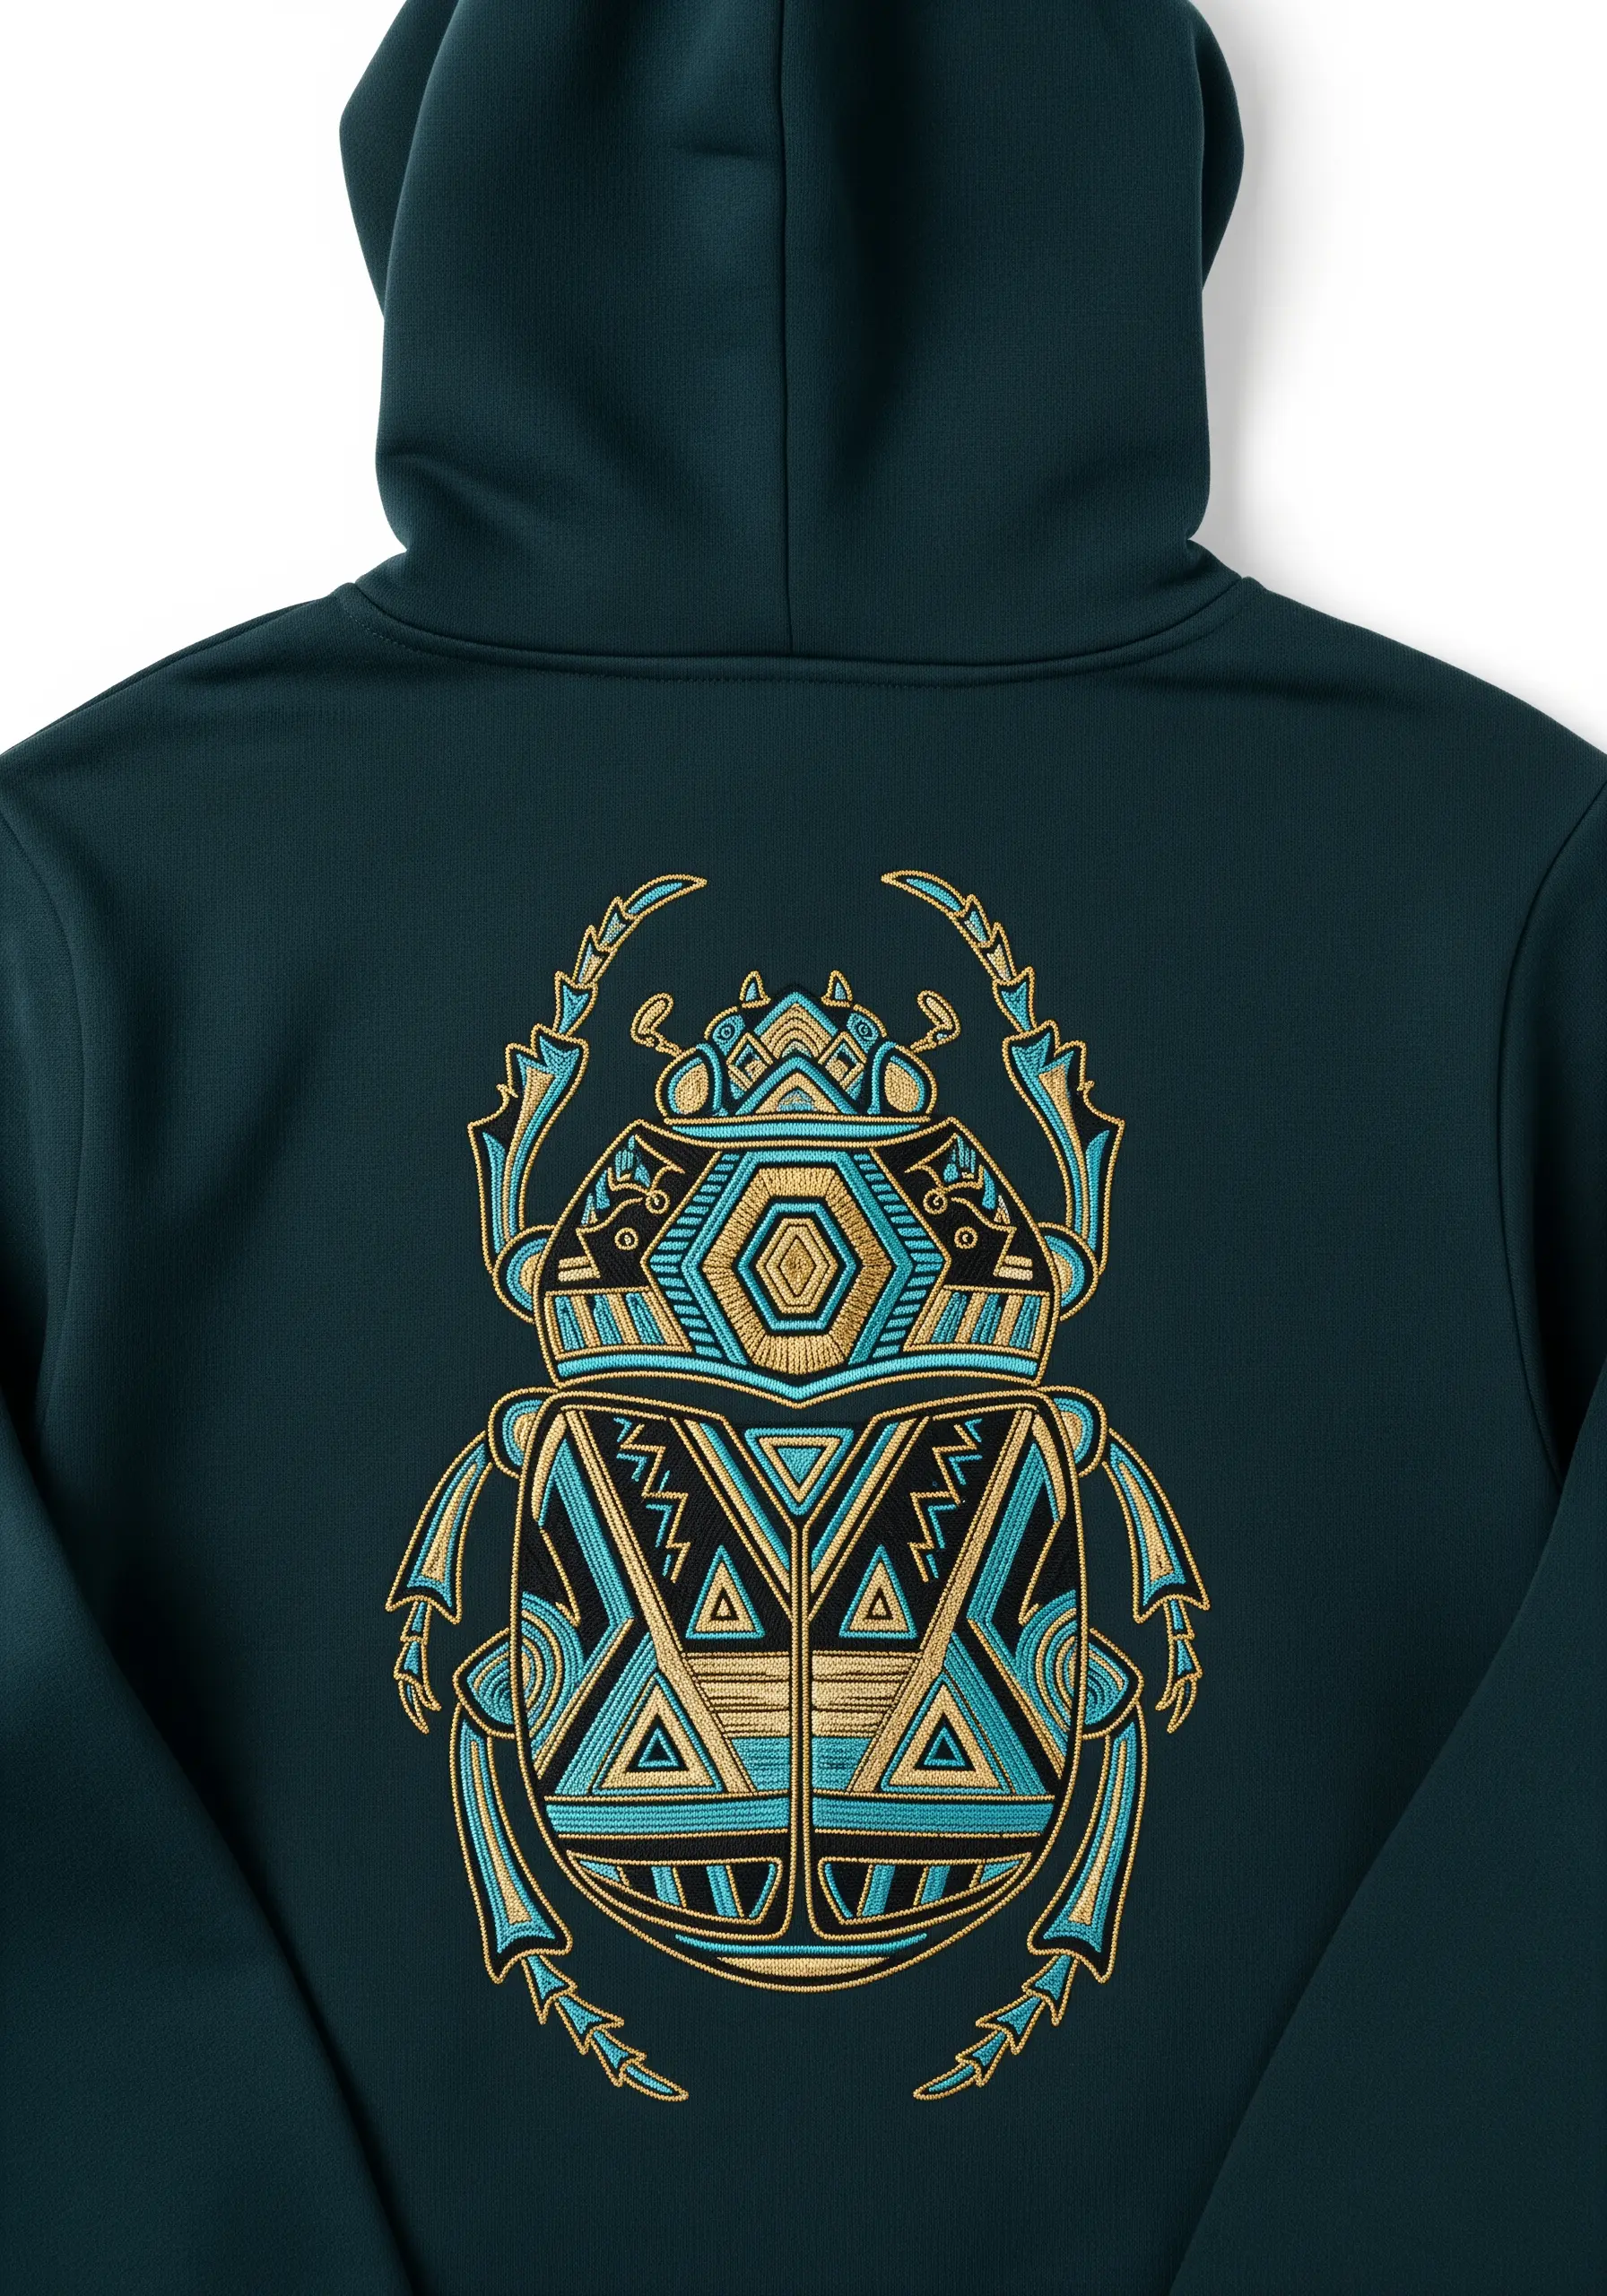
Elevate a simple silhouette by filling it with intricate geometric patterns instead of a solid color.
Within each section of the beetle’s shell, use different fill stitches—like brick stitch, long-and-short stitch, or even a simple cross stitch—to create visual texture and variety.
Use a high-contrast palette of gold, turquoise, and black to emphasize the clean lines and sharp angles of the design. A bold, black outline using a whipped backstitch will frame the entire piece and make the internal patterns stand out.
24. Define Seams with a Bold Accent Stitch
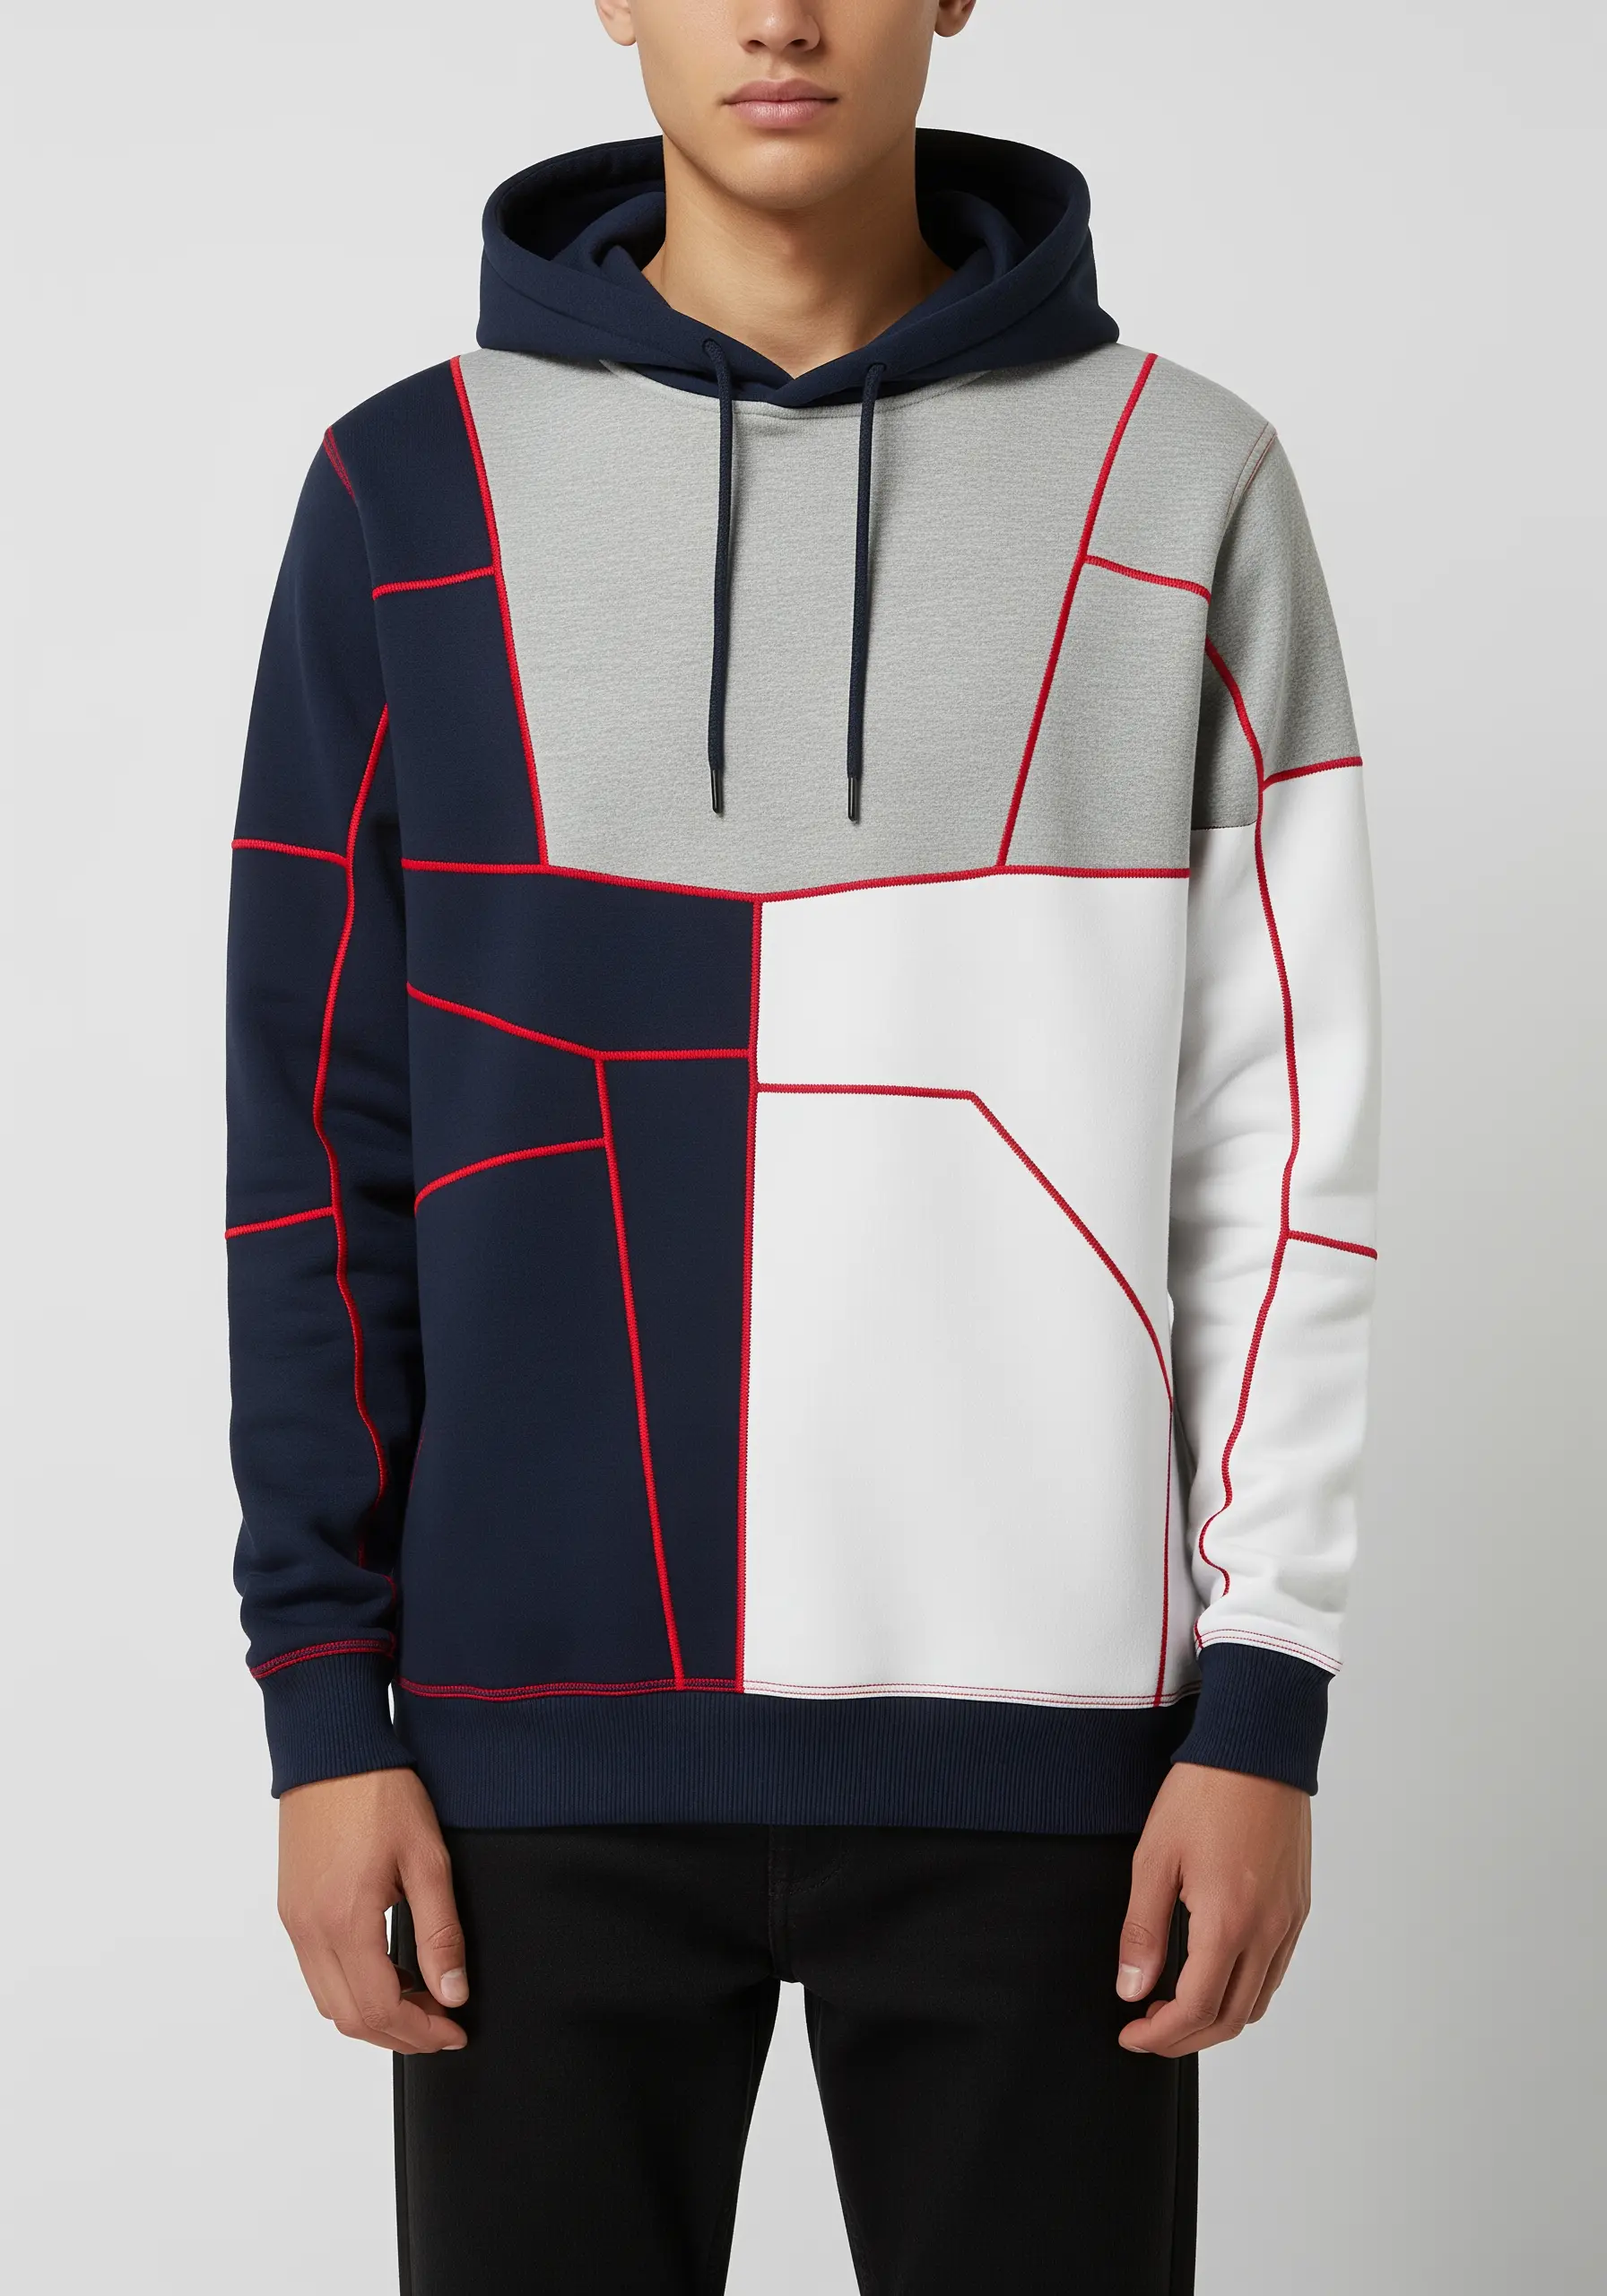
This is less about adding a motif and more about celebrating the construction of the garment itself.
Use a thick, bright red thread and a highly visible stitch, like a chain stitch or a blanket stitch, to trace the existing seam lines of your color-blocked hoodie.
This technique, known as decorative topstitching, transforms functional seams into a key design element, creating a modern, architectural look that is both minimalist and impactful.
25. Combine Appliqué and Embroidery for 3D Fun

Create a whimsical, three-dimensional design by combining fabric appliqué with embroidery.
Cut the main shapes, like the mushroom cap and house base, from felt or cotton fabric. Secure them to the hoodie with an adhesive stabilizer, then stitch them down with a neat blanket stitch around the edges.
Add all the details—the door, windows, and polka dots—with embroidery on top. For the smoke, couch a piece of thick white yarn in a swirling pattern to give it a soft, fluffy texture that literally pops off the fabric.
26. Craft an Ornate Gothic Monogram
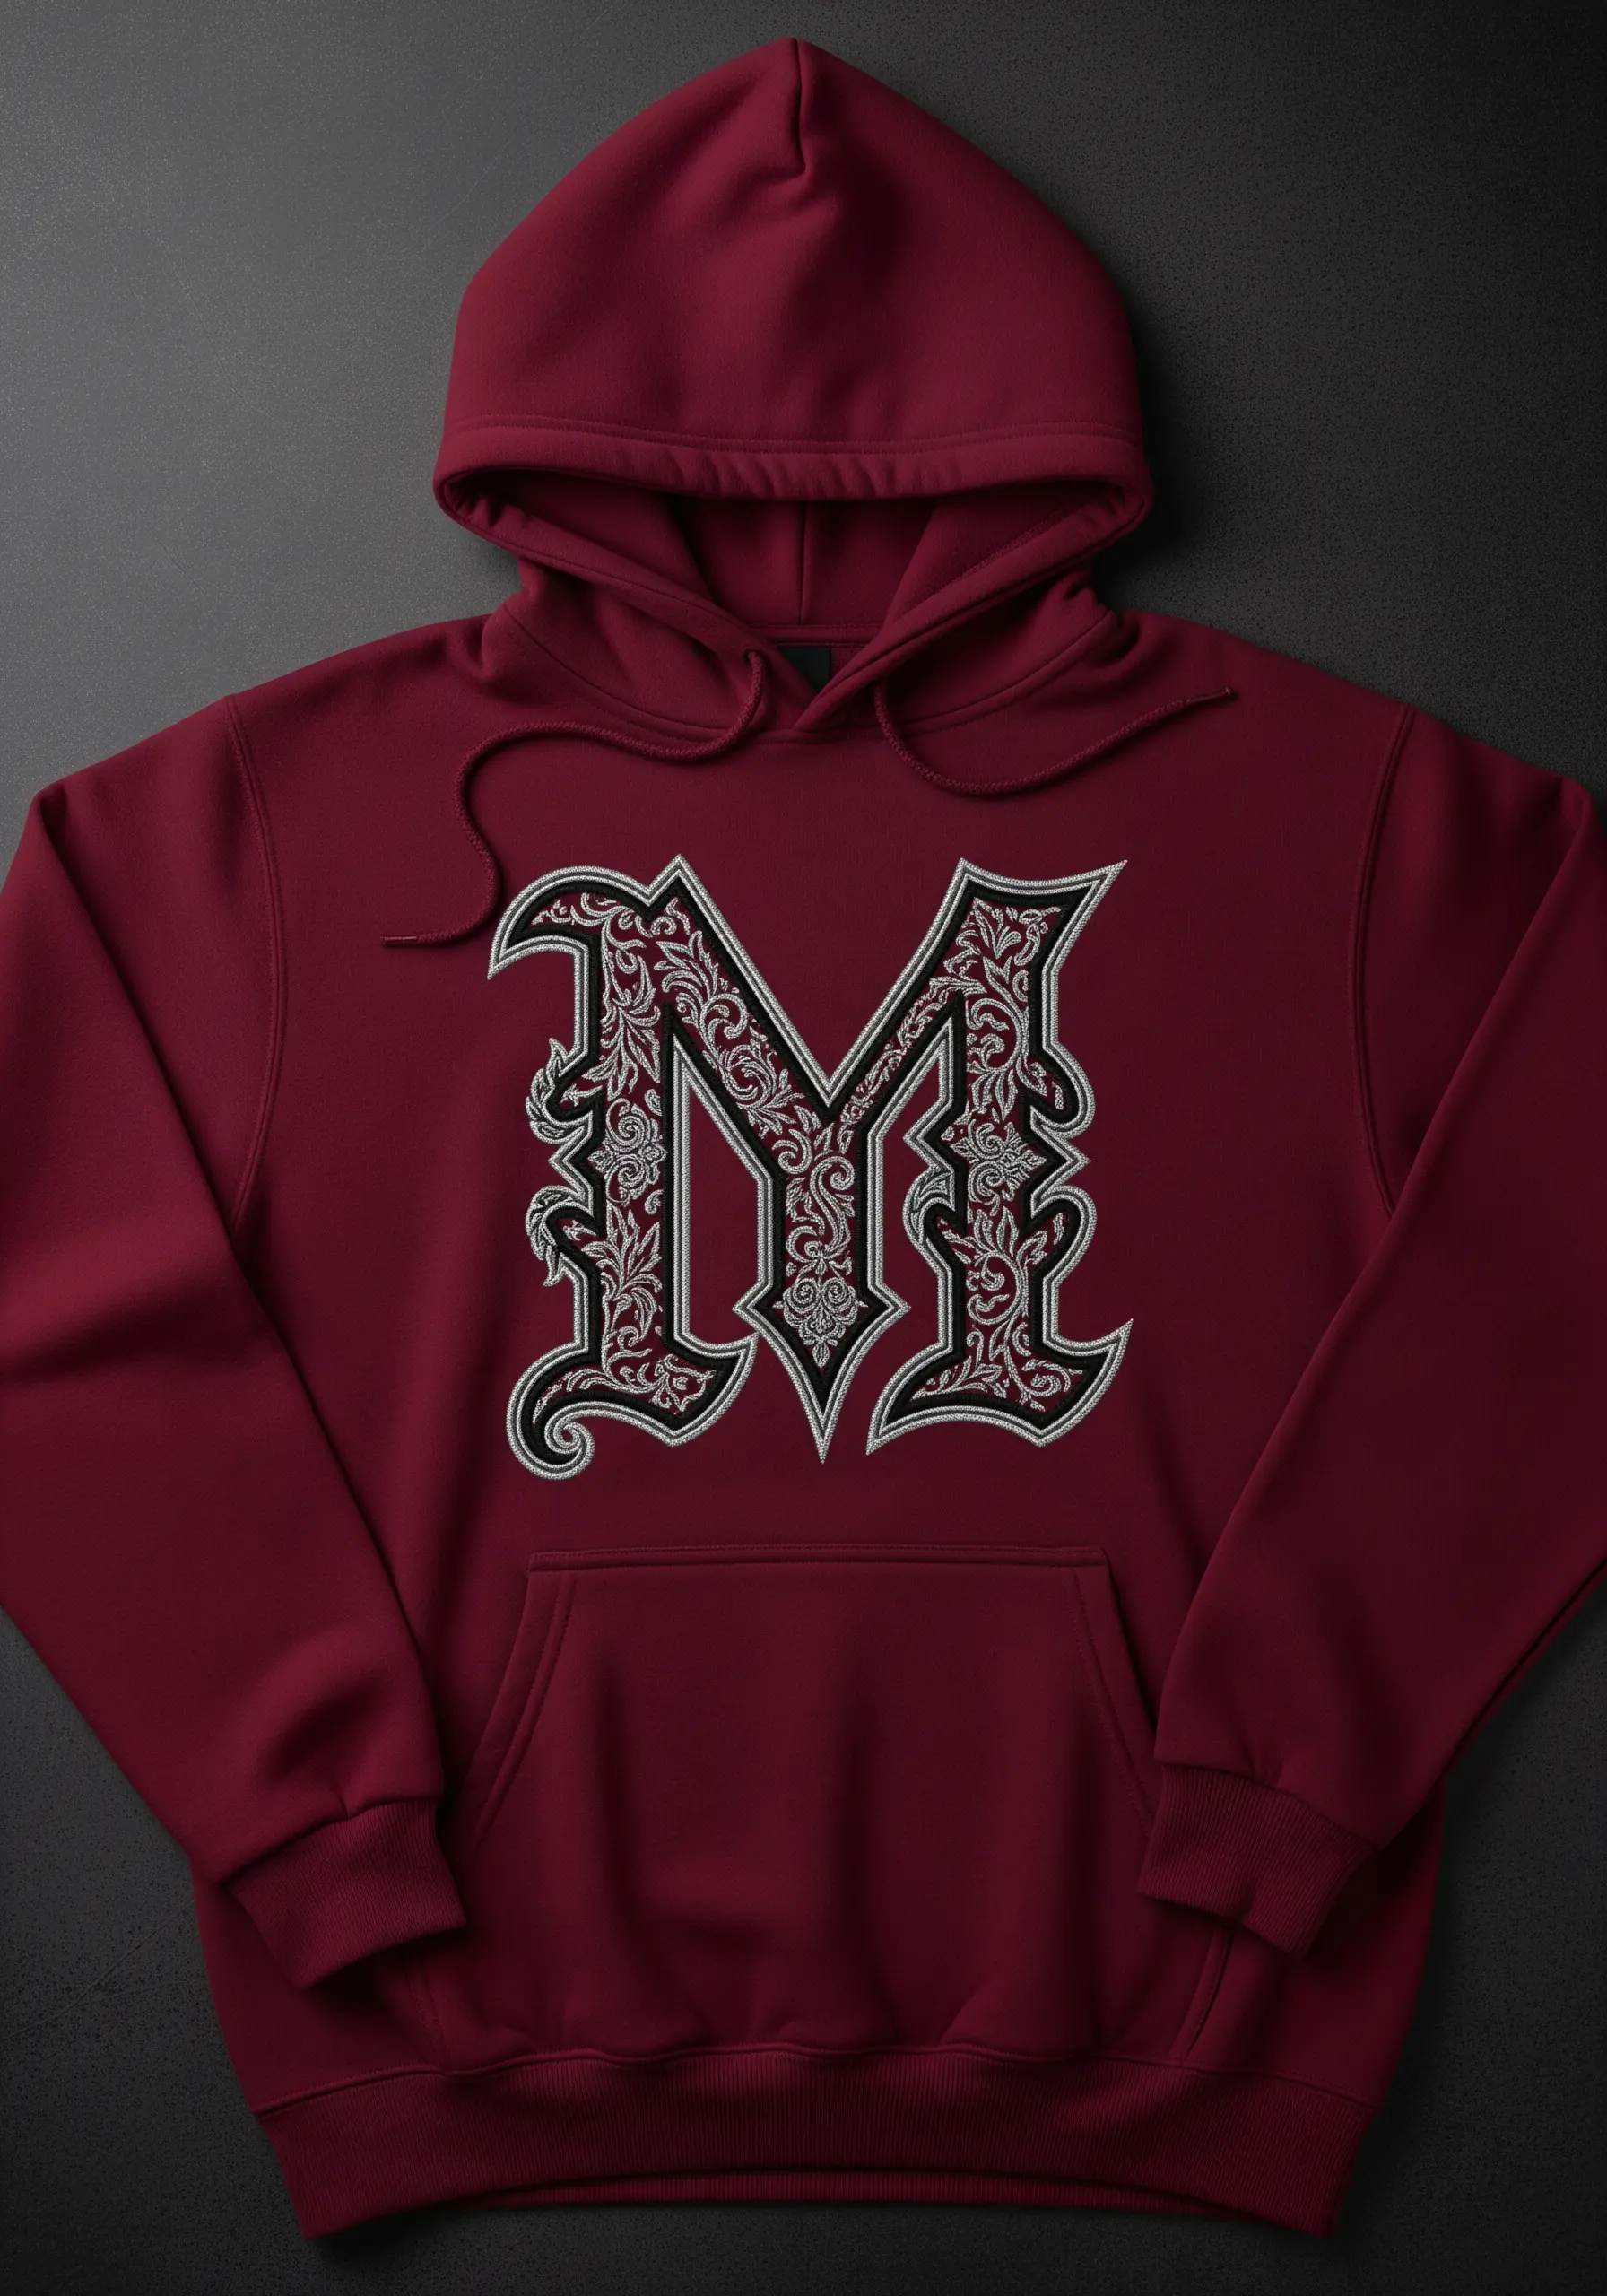
To create a monogram that feels both classic and edgy, focus on contrasting textures and line weights.
Use a padded satin stitch for the main black letterform to give it a bold, raised profile. This makes it the undeniable focal point.
For the intricate filigree details inside and around the letter, switch to a very fine, single-strand backstitch in white or silver. This contrast between the heavy main letter and the delicate interior scrollwork creates a stunning sense of depth and sophistication.
27. Stitch with Reflective Thread for a Surprise Effect
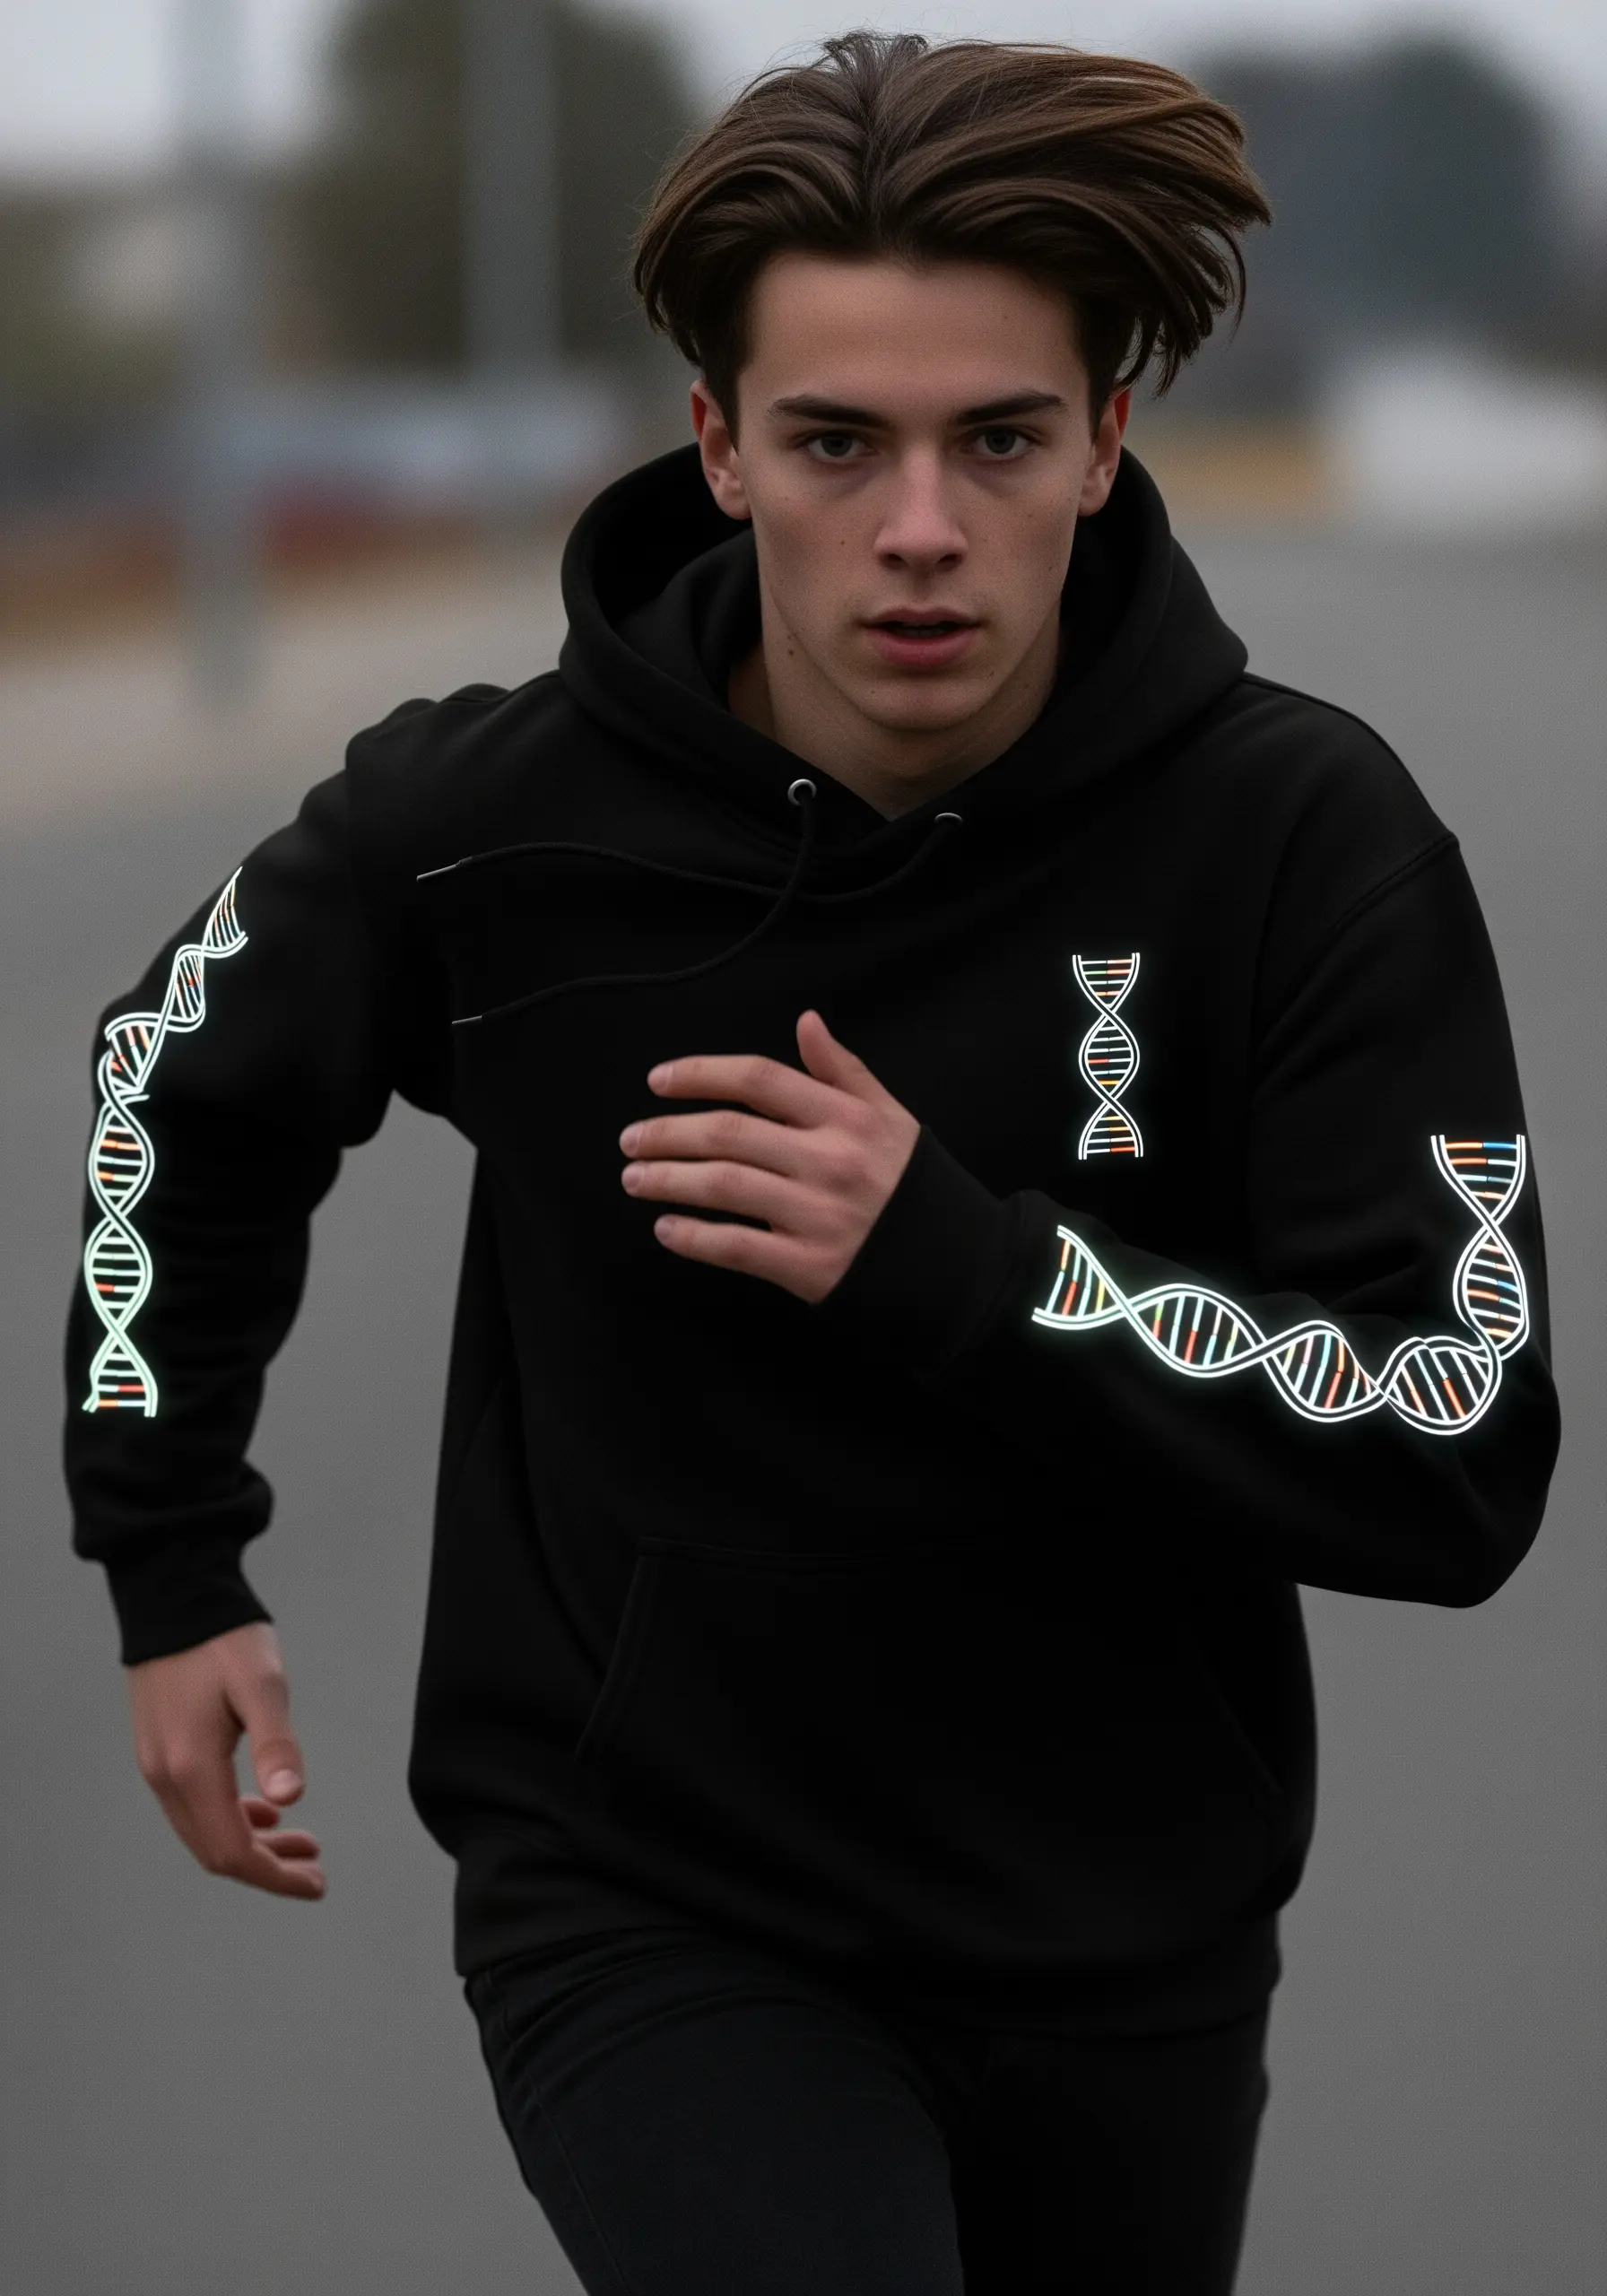
For a design that transforms in different lighting, use a reflective or iridescent thread.
This type of thread can be slippery, so use shorter stitch lengths and a needle with a larger eye to prevent fraying. A simple satin stitch or a clean backstitch is often best, as it allows the thread’s unique properties to take center stage.
Stitched on the sleeves, this DNA design will catch light as you move, creating a subtle but dynamic effect that’s sure to get noticed.
28. Capture Miniature Florals in Tiny Spaces
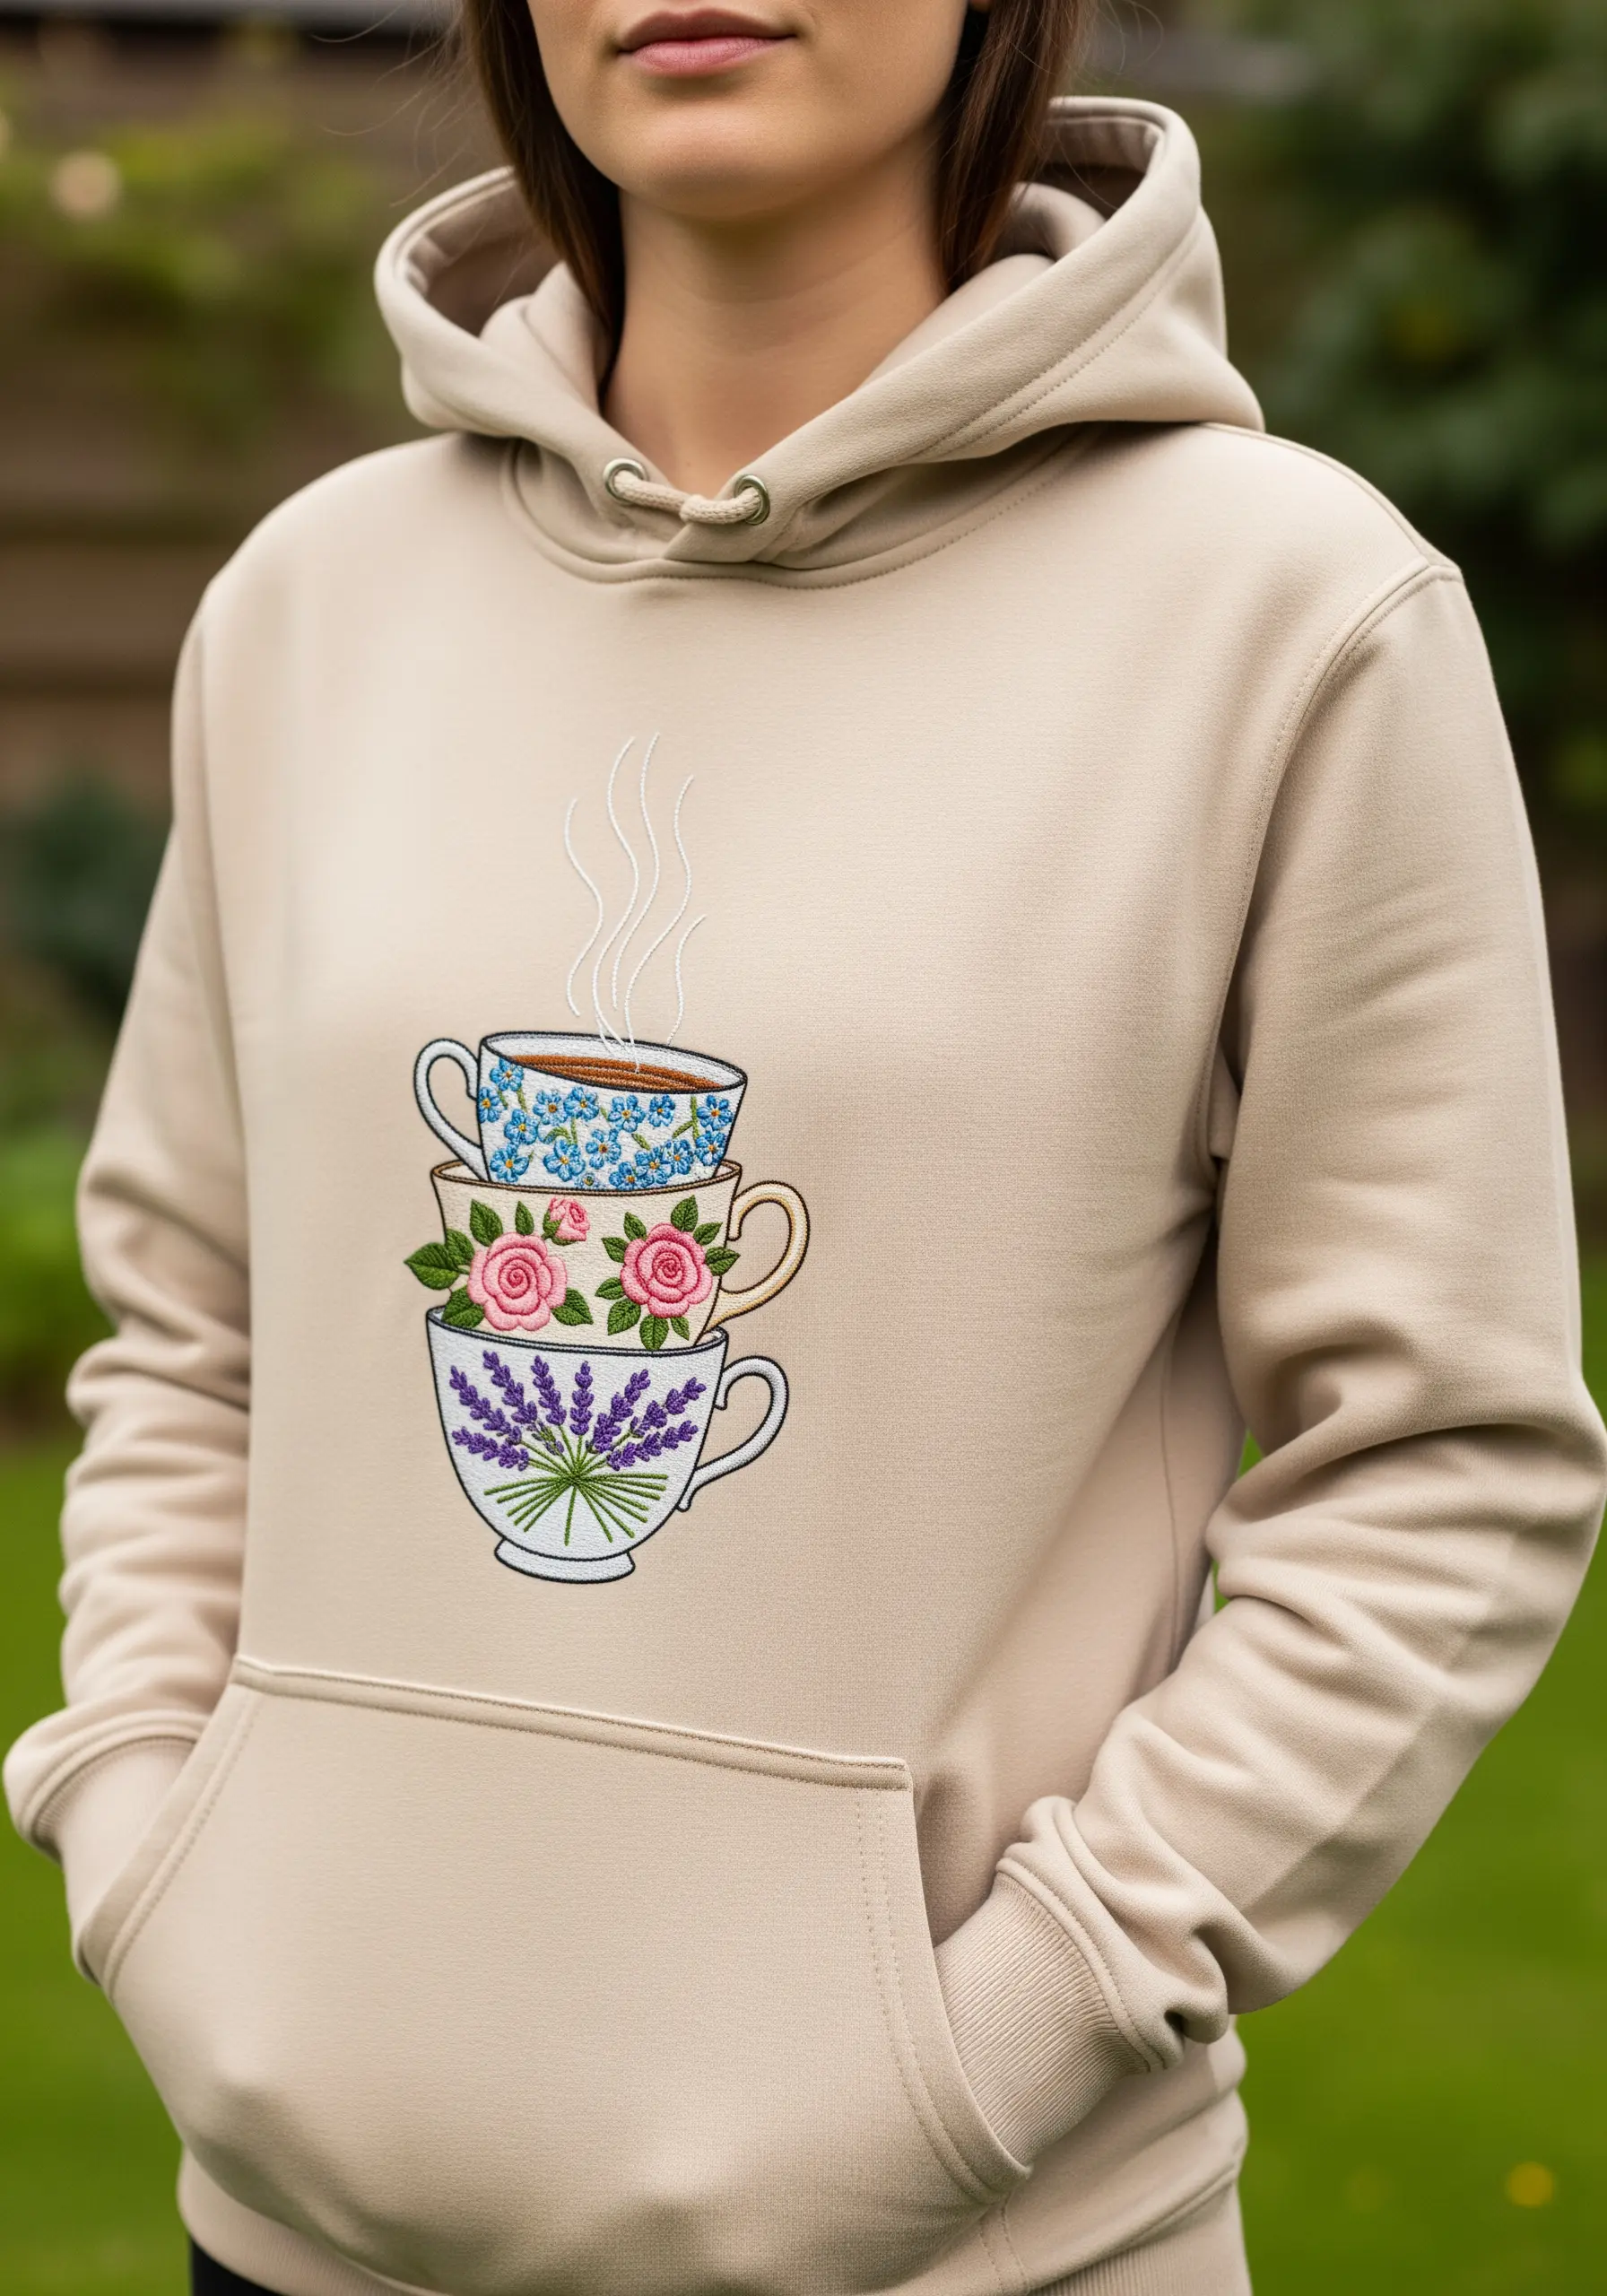
The charm of this design lies in the tiny, detailed patterns on each teacup.
To achieve this, use a single strand of floss and a variety of micro-stitches. Use lazy daisy stitches for small flowers, tiny French knots for buds, and single straight stitches for leaves.
Work with a magnifying lamp if you have one to ensure your stitches are neat and precise. The challenge is to suggest a complex pattern without overcrowding the small space.
29. Create Radiating Energy with Padded Rays

Give your sun design a bold, sculptural quality by padding the rays.
Before stitching the final layer, fill each ray with a base of seed stitches. Then, cover this padding with long satin stitches that radiate from the center outwards.
Using a gradient of three or four colors—from yellow to orange to red—enhances the feeling of warmth and movement.
This technique creates a high-relief effect that makes the design feel dynamic and alive.
30. Stitch a Pop-Art Snack Patch

Embrace a playful, pop-art aesthetic by turning an everyday object into a bold embroidered patch.
Use a limited, high-contrast color palette—bright red, yellow, and a solid black outline—to mimic the look of a cartoon or sticker.
The key is a thick, perfectly executed satin stitch outline. This defines the shape and gives it that clean, graphic edge. A dense satin stitch fill for the colors ensures a solid, vibrant finish.
31. Achieve Precision with a Barcode Design
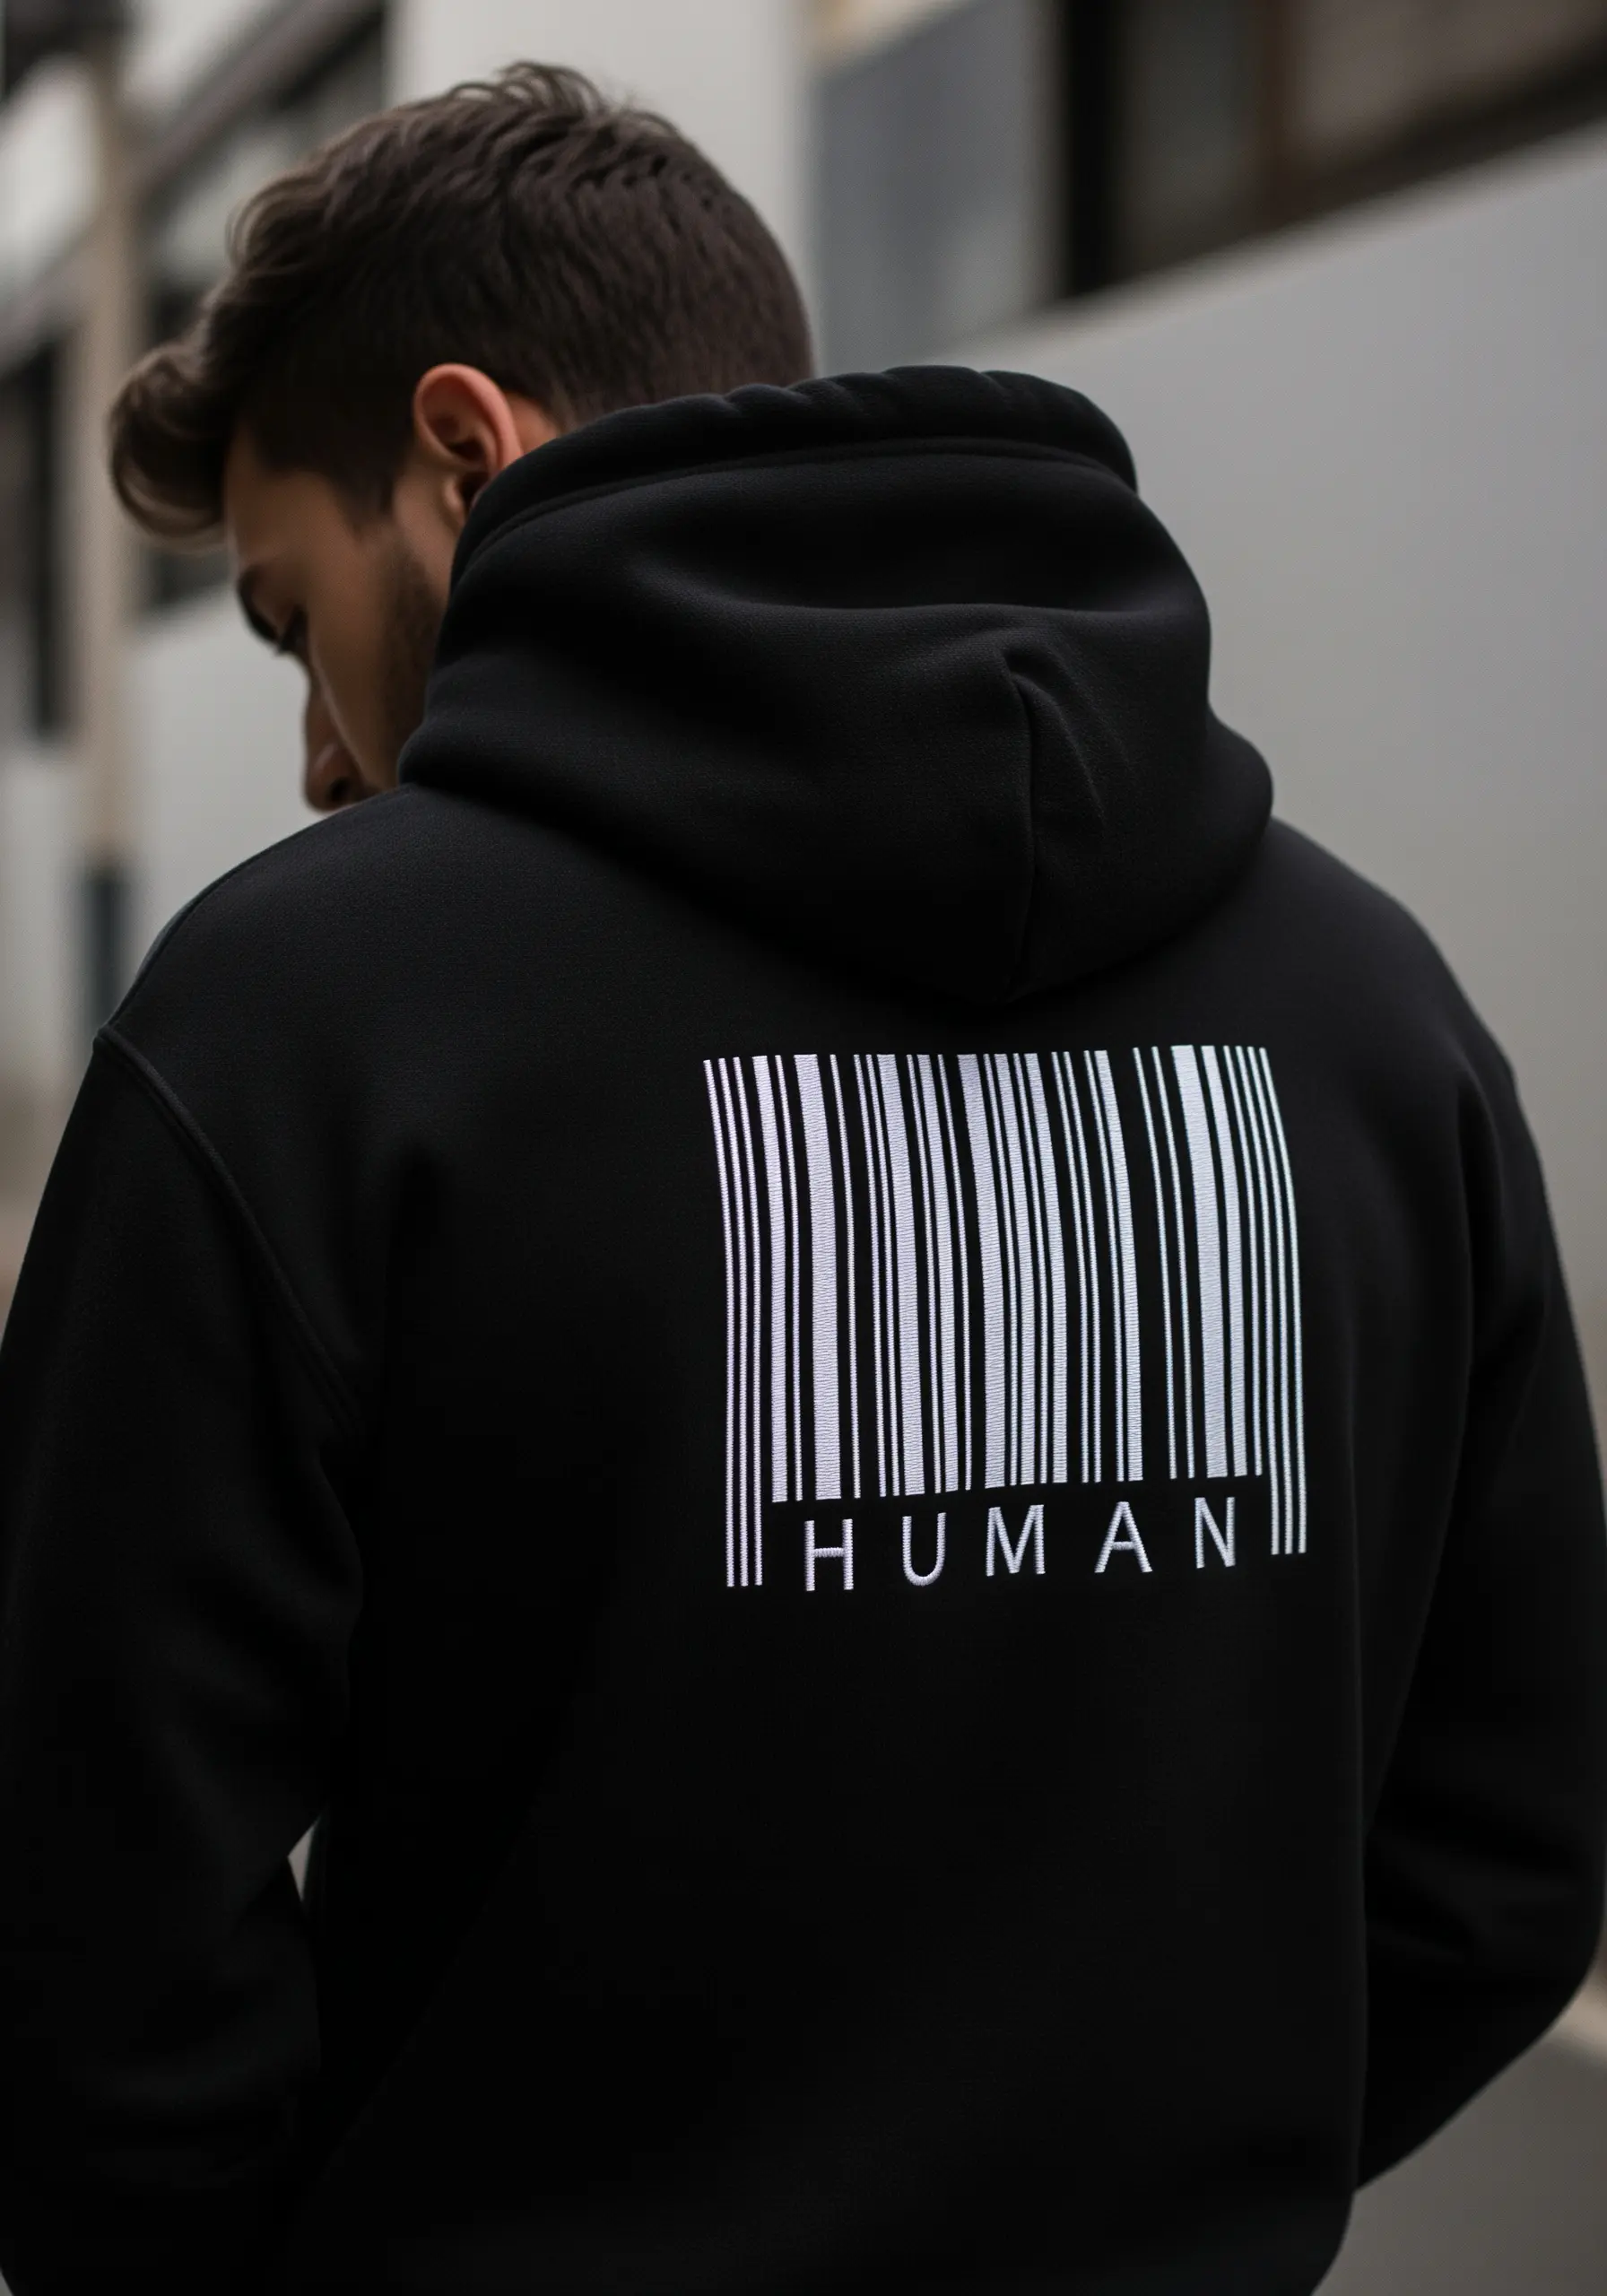
A barcode design is a testament to precision stitching. The goal is perfectly straight, parallel lines with consistent spacing.
Use a tear-away stabilizer and draw your lines with a ruler and a fine-tipped, air-erasable marker to ensure accuracy.
Stitch each bar with a vertical satin stitch, making sure the thread lies completely flat. Using a slightly glossy rayon or polyester thread will give the design a subtle sheen that mimics the look of a printed label, adding to the realism.
32. Paint a Realistic Portrait with Thread

Creating a realistic animal portrait is all about understanding how light and shadow create form.
Before you even start stitching, study your source image and map out the light, mid, and dark tones. Use a palette of at least five shades of brown and black.
With the long-and-short stitch, blend these colors to sculpt the bear’s features, paying close attention to the direction of your stitches to mimic fur growth. The eyes are the soul of the piece; use a tiny satin stitch with a white catchlight to bring the portrait to life.
33. Create a Playful All-Over Cherry Pattern

For an all-over pattern, consistency is key. Create a small stencil on cardstock or use a dissolvable sticker template to ensure each cherry motif is the same size and shape.
Use a simple satin stitch for the cherries, adding a small white straight stitch on one side to act as a highlight, giving the fruit a glossy, 3D look.
A simple stem stitch for the green stems and a lazy daisy stitch for the leaves keeps the design light and playful. Stagger the placement of the motifs for a more organic, scattered effect.
34. Build a Miniature World in a Terrarium
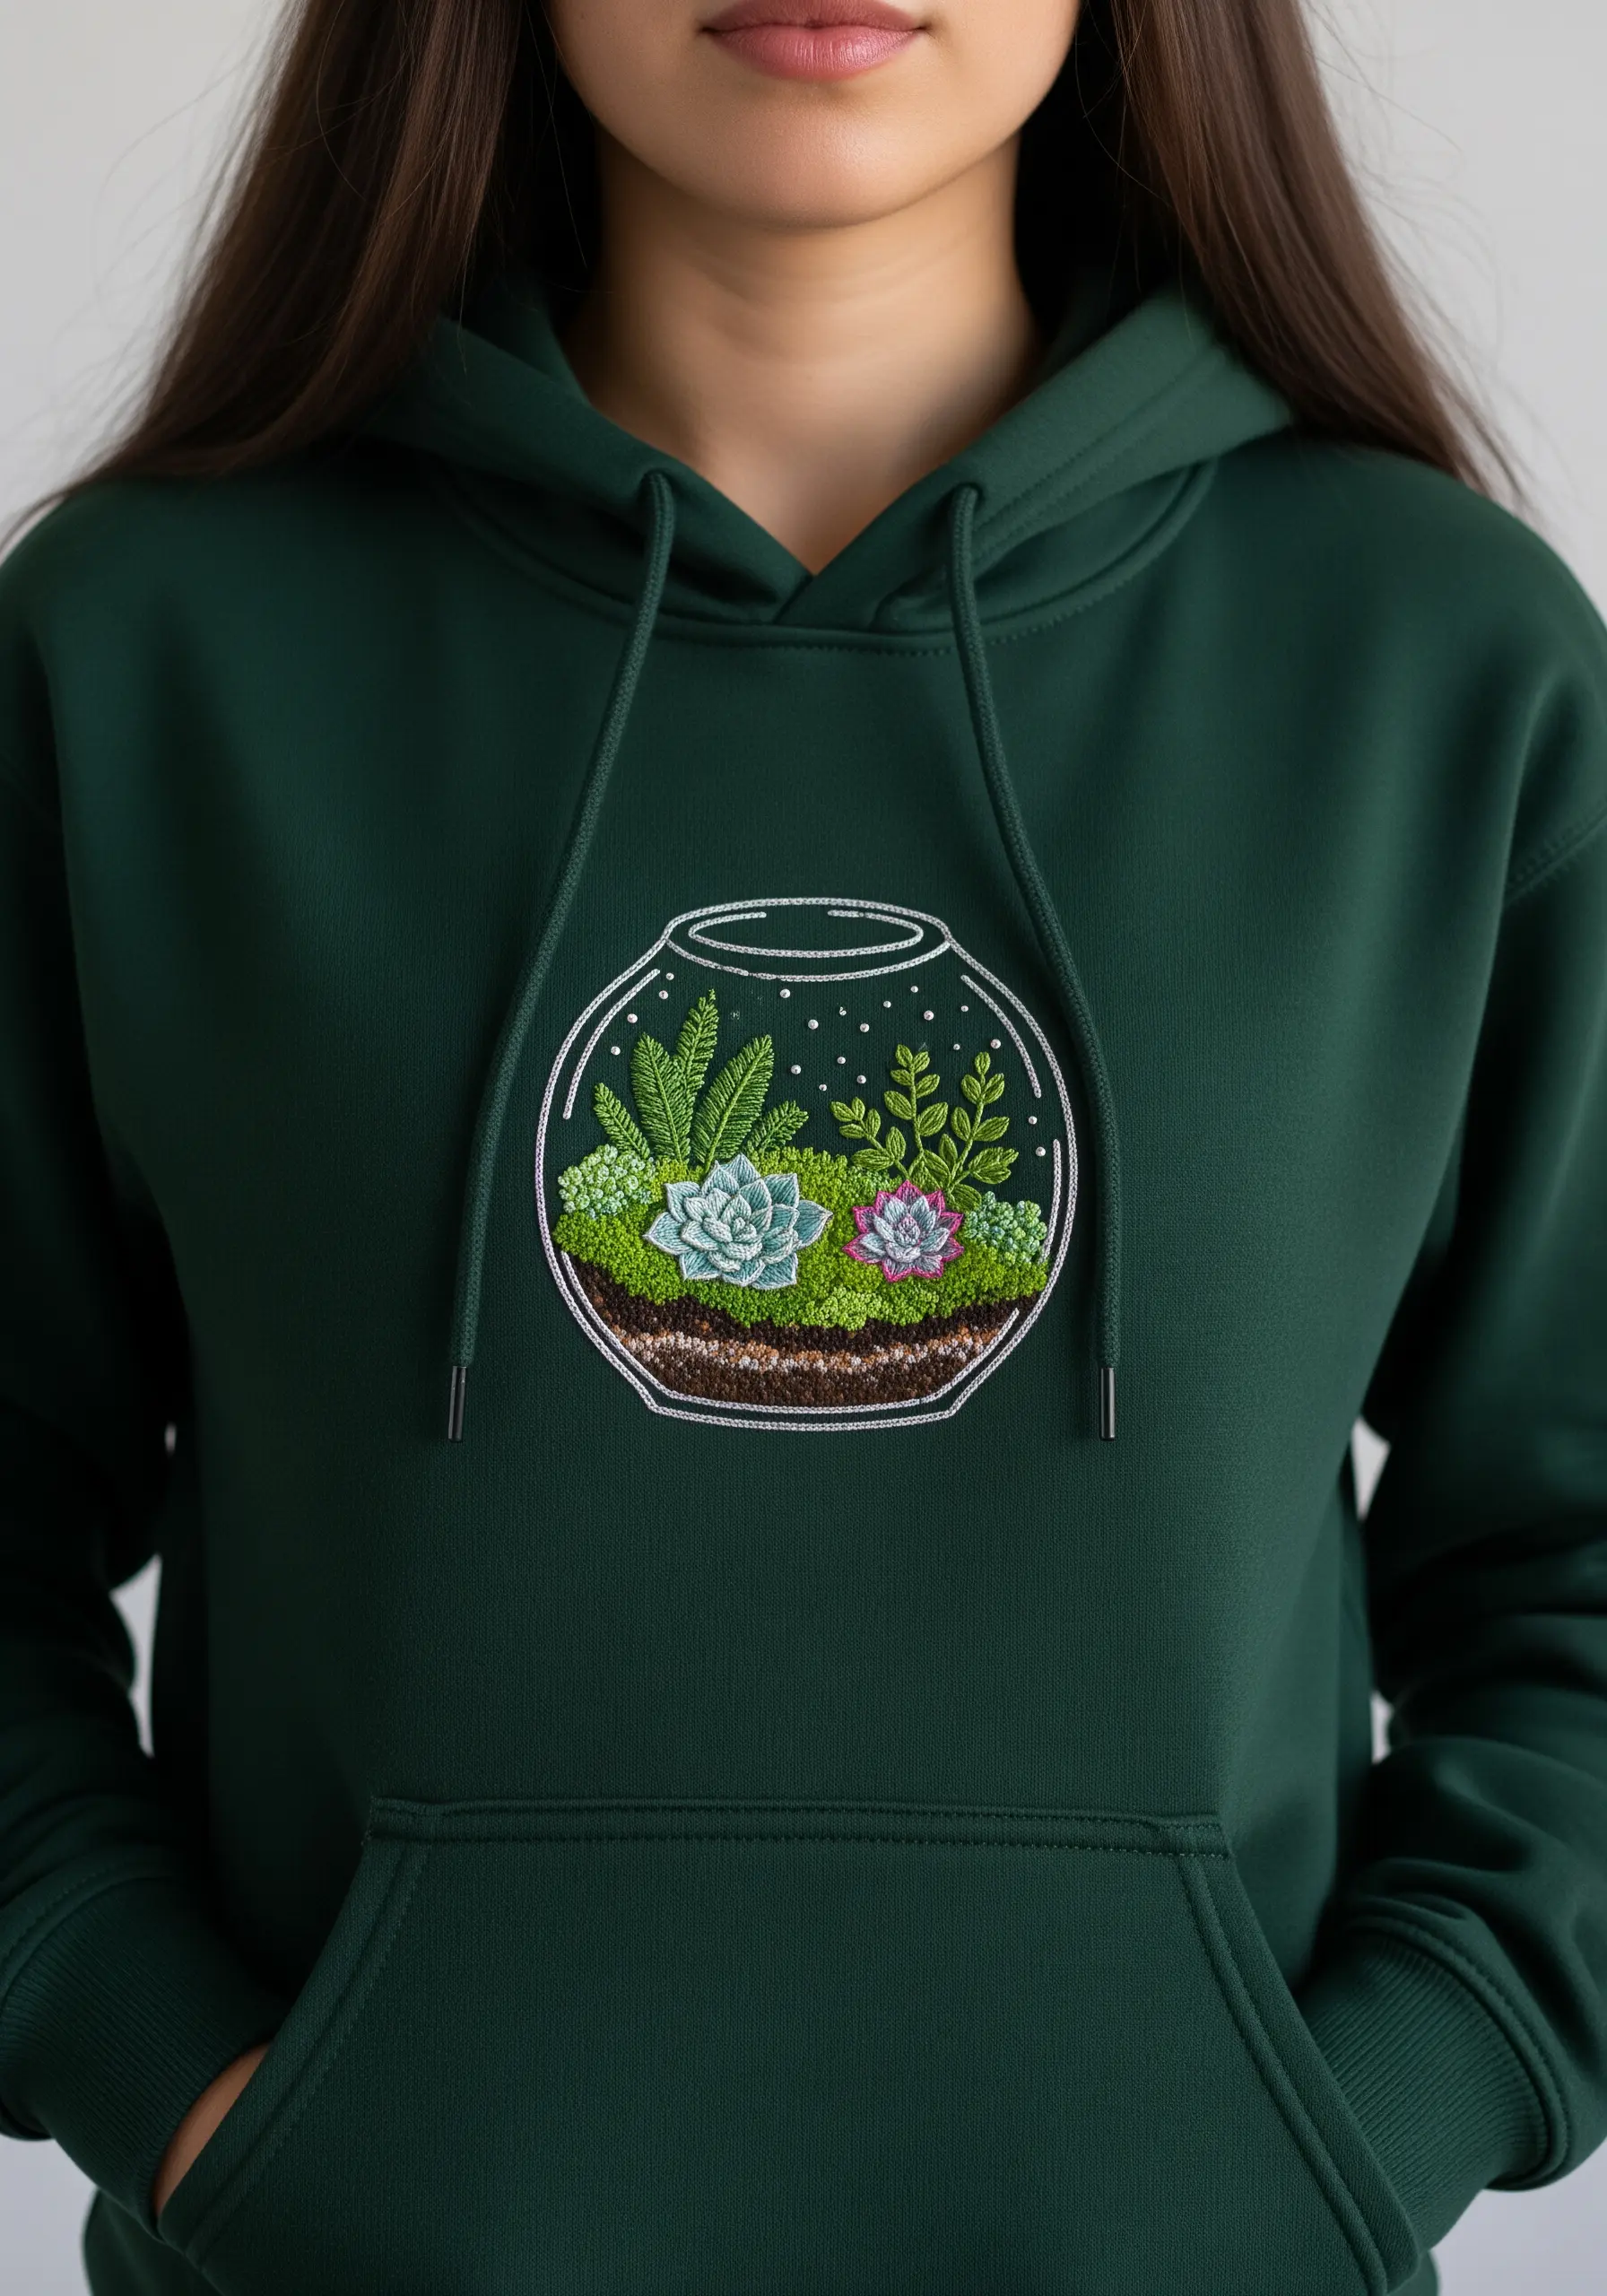
This design is a wonderful exercise in using different stitches to create a variety of natural textures in a small space.
Use French knots and seed stitches in brown tones for the soil and gravel layers. For the succulents and ferns, combine lazy daisy stitches, fishbone stitch, and woven wheel stitches to create different leaf shapes and textures.
Outline the glass bowl with a fine, silver-grey split stitch to give it a delicate, reflective edge that contains your miniature garden.
35. Visualize Sound with a Rainbow Waveform
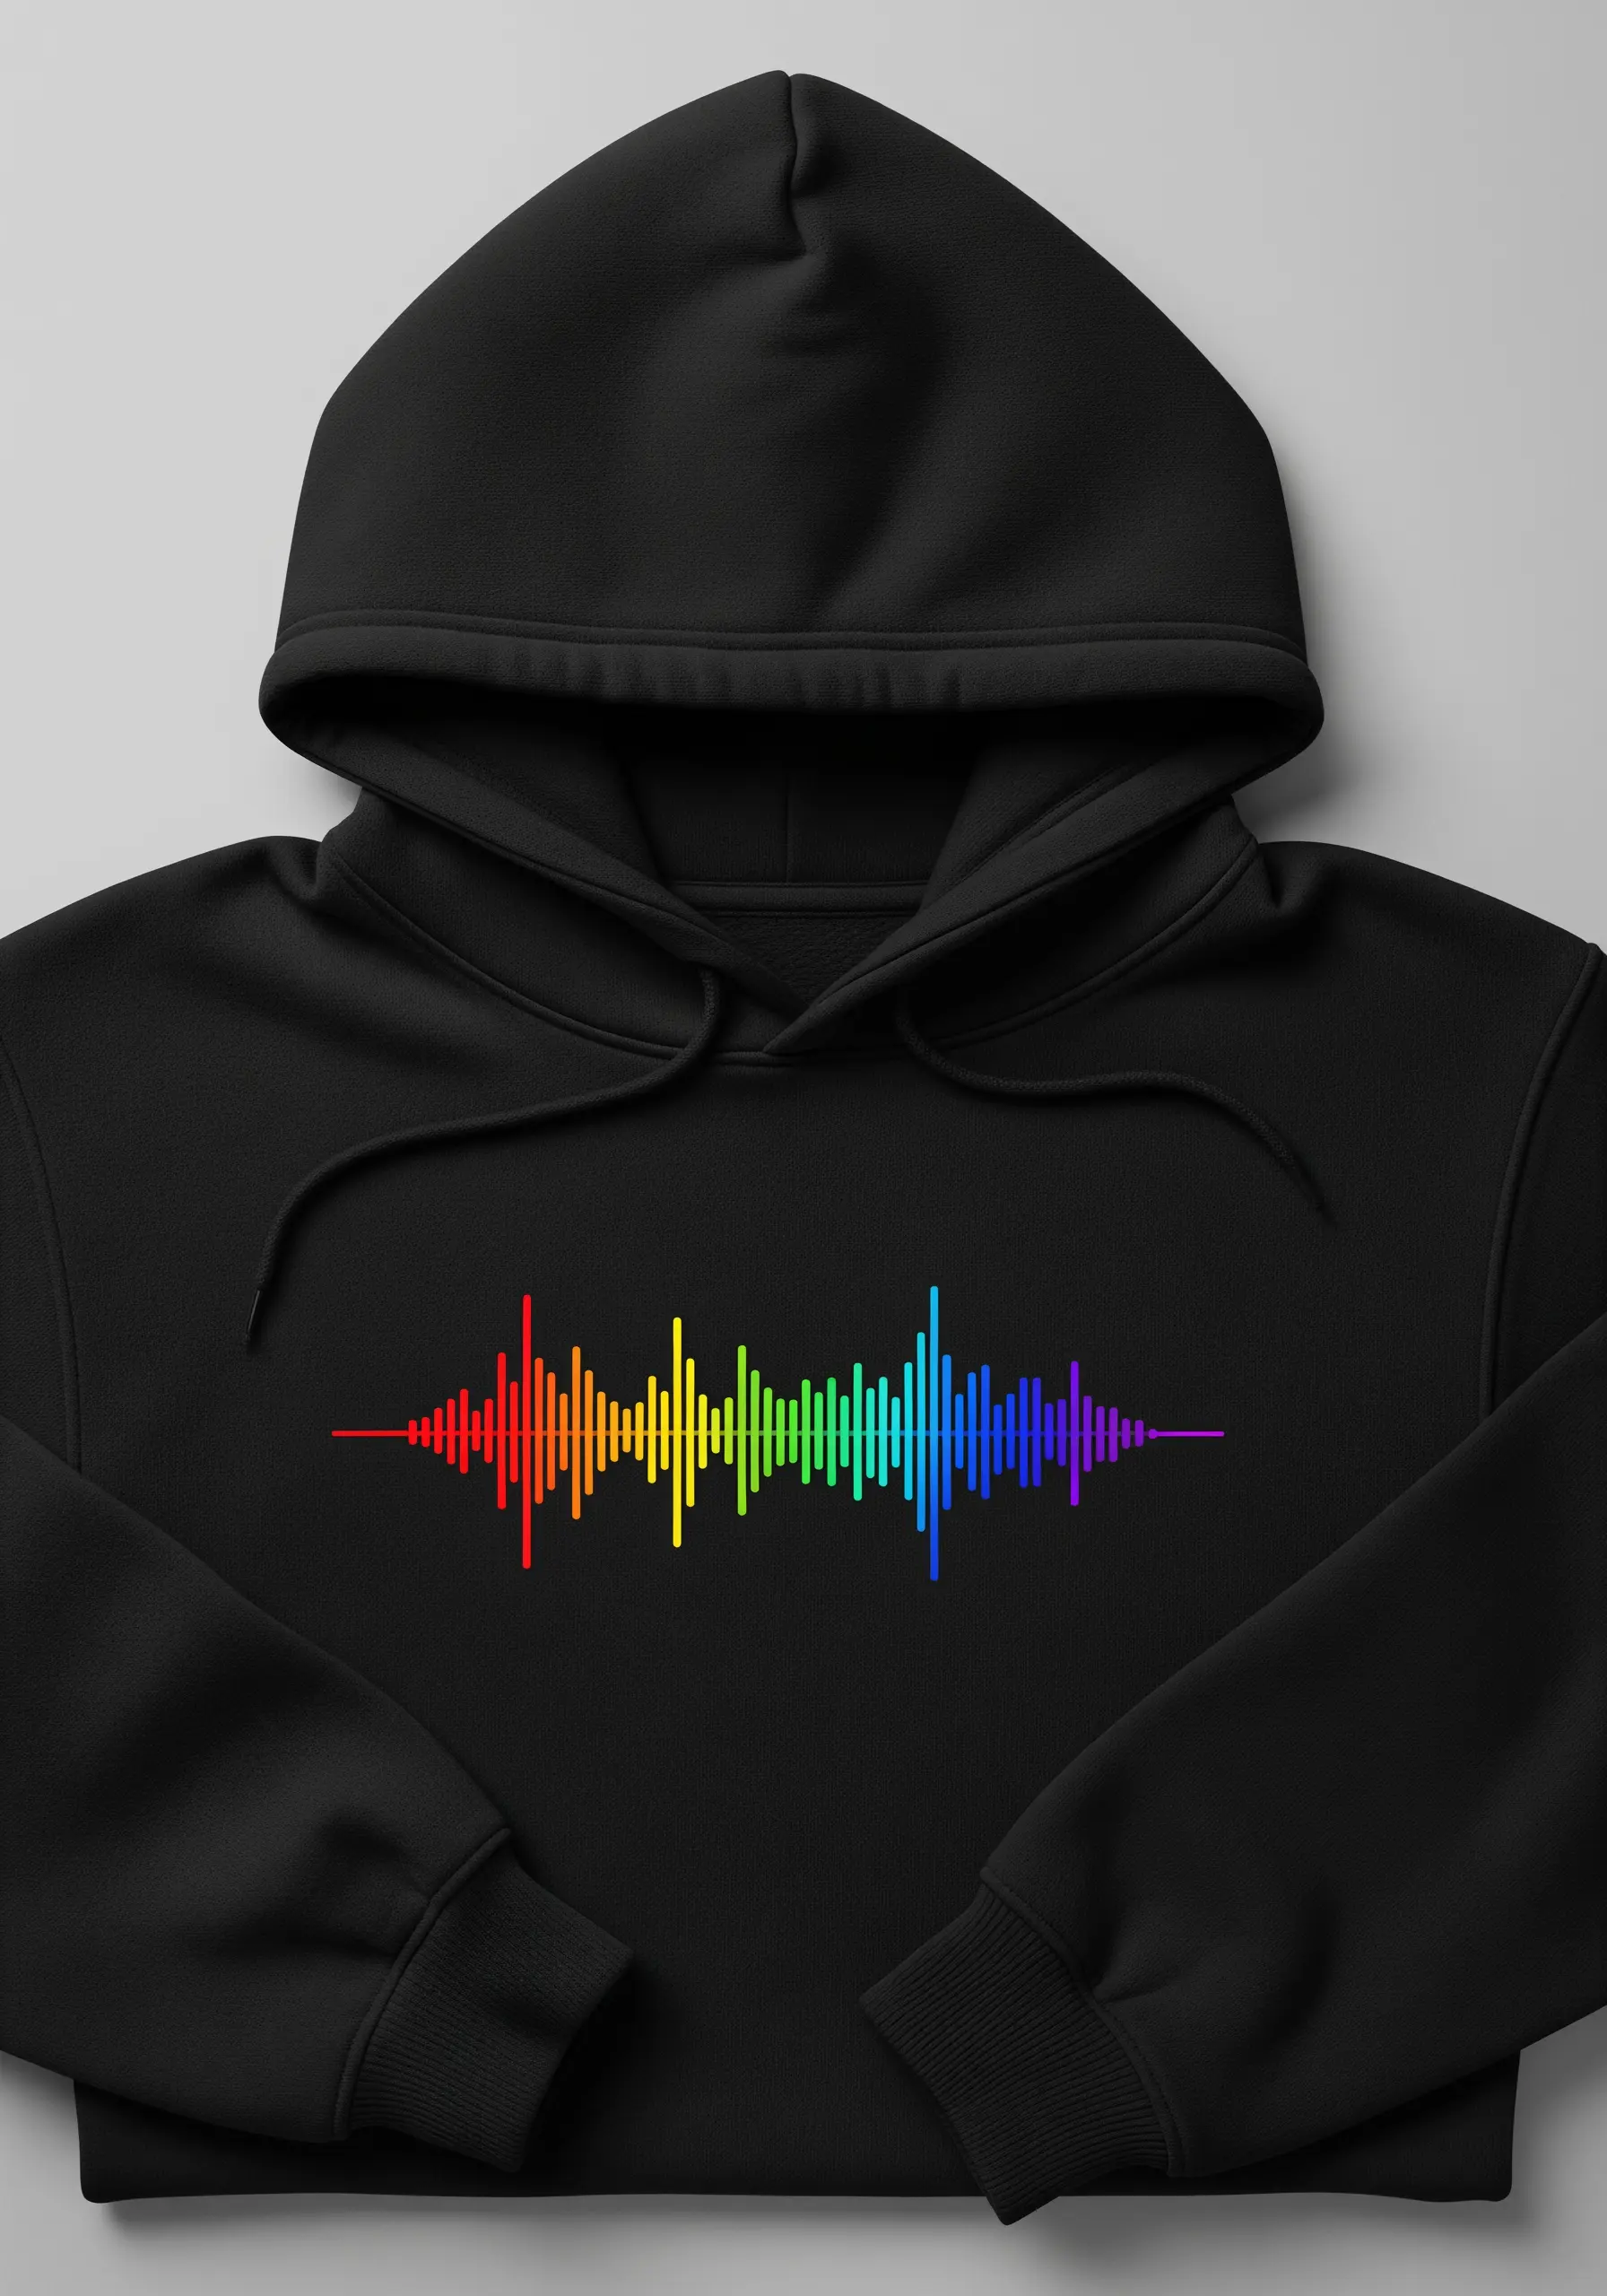
Transform a soundwave into a vibrant piece of art by assigning a color to each section of the audio spectrum.
Use a vertical satin stitch for each bar of the waveform, which allows for clean color changes between sections.
To achieve a smooth gradient, choose threads that are close in value and hue, like moving from red to orange to yellow. The high contrast of the full rainbow against the black hoodie makes this a visually electric design that celebrates sound and color.


