
You already know how to follow a pattern, how to make a stitch. But I suspect you’re ready for the next step—to move beyond imitation and begin creating pieces that feel truly and uniquely yours, perfectly at home in your space.
The difference between good embroidery and breathtaking embroidery often lies in the smallest, most intentional details. It’s in the choice to use one strand of thread instead of two, the direction you lay your stitches to create texture, or the way you combine simple techniques to create something with extraordinary depth.
Think of these ideas not as a set of rules, but as a collection of techniques and new ways of seeing. Apply them to your own work. The goal is to craft objects that don’t just decorate your home, but feel like a natural extension of your own creative spirit.
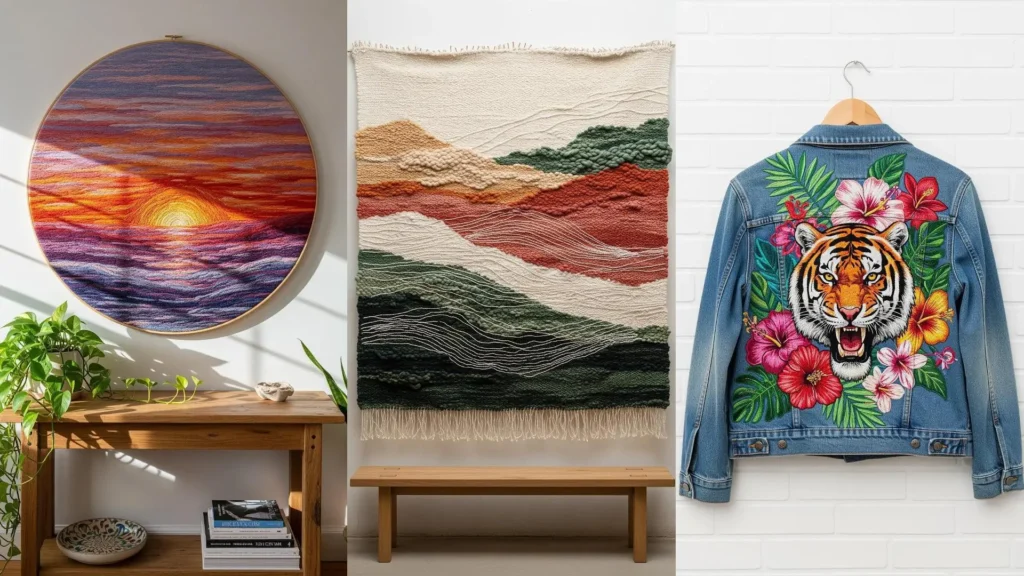
1. Thread Painting a Luminous Seascape

To create a painterly sunset, focus on blending colors using the long-and-short stitch with single strands of floss.
Vary the direction of your stitches to mimic the texture of clouds and the movement of water, which adds realism and visual flow.
For the sun’s bright reflection on the water, use a lighter, slightly reflective thread like a silk or satin floss, and keep your stitches tightly packed and horizontal.
This technique transforms your hoop into a canvas, creating depth and luminosity that a simple satin stitch cannot achieve.
2. Integrating Chunky Knits for Sculptural Texture

Instead of traditional embroidery, add bold, graphic dimension to a pillow using chunky yarn.
Create thick, braided or knitted cords using finger-knitting or a knitting mill, which produces a consistent, rope-like texture.
Attach these cords to a sturdy fabric base, like cotton canvas, using a strong couching stitch with a matching embroidery floss. This keeps the chunky yarn secure without flattening its loft.
This method allows you to add cozy mixed-fiber projects to your repertoire, creating tactile art that invites touch.
3. Crafting a Botanical Fabric Planter Cover

To give your embroidered leaves a crisp, professional finish, outline each one with a split backstitch before filling it in.
Use long-and-short stitch with two or three shades of green per leaf to create subtle gradients that mimic natural light and shadow.
This adds incredible realism without complicating the process.
Choose a durable, medium-weight fabric like cotton canvas or linen blend, as it provides enough stability for dense stitching and holds its shape well when formed into a pot cover.
This is a perfect project to practice your leaf embroidery stitches on a functional object.
4. Achieving Photorealism with Thread Painting

For hyper-realistic results, work exclusively with a single strand of embroidery floss. This allows for the finest control over color blending and detail.
Create the bee’s fuzzy texture by using short, directional satin stitches that mimic the natural growth of its hair.
For the delicate, transparent wings, outline them with a fine split stitch and then fill with sparse, open straight stitches using a light grey or off-white thread.
This meticulous technique elevates your work from craft to fine art, making for stunning realistic animal insect embroidery patterns.
5. Illuminating Stitches on a Lampshade

To create an embroidered lampshade, always stitch your design on a flat piece of fabric *before* it’s attached to the lampshade rings.
Use a simple backstitch for the constellation lines and small star stitches or French knots for the stars. This keeps the design clean and graphic.
The magic is in the thread choice: select a bright white, silver, or glow-in-the-dark thread that will catch the light and truly shine when the lamp is turned on.
This project turns simple stitches into an interactive piece of decor, perfect for minimal sky & moon designs.
6. Ornate Beadwork for Luxurious Textiles

Elevate a velvet table runner by combining metallic thread with bead embroidery for a truly opulent finish.
First, lay down the primary lines of your design using a couching stitch to secure a thick metallic cord. This creates a defined and raised framework.
Fill in the motifs with seed beads, small pearls, and sequins, using a strong beading needle and thread. Apply them in dense clusters to create texture and catch the light.
Always use a stabilizer on the back of velvet to prevent the fabric from puckering under the weight of the beadwork.
7. Abstract Appliqué and Couching on Felt

Explore modern composition by creating functional art coasters from felt.
Cut organic shapes from contrasting felt colors and attach them to a square base using a simple running stitch for a clean, graphic look.
For the raised linear details, use couching: lay down a thicker yarn or cord and tack it in place with a thinner, contrasting embroidery floss. This adds a beautiful 3D element.
Finish the coaster’s edge with a blanket stitch for a durable and polished look, turning simple abstract fabric collage embroidery ideas into everyday objects.
8. Minimalist Line Art on Functional Canvas

To make a line art design impactful on a canvas bin, use a thick thread that stands out. Six strands of standard floss or a #5 pearl cotton in a dark color works perfectly.
A stem stitch or a whipped backstitch will give you a smooth, solid line that mimics the quality of an ink drawing.
Before you begin, place a tear-away stabilizer on the inside of the bin. This prevents the fabric from pulling and distorting as you stitch, ensuring your lines remain crisp.
This technique is ideal for turning everyday objects into chic accessories with minimalist line art embroidery patterns.
9. Upholstery Embroidery for Statement Furniture

When embroidering for furniture, you must work on the upholstery-grade fabric *before* it’s attached to the piece.
Choose durable threads like tapestry wool or #8 pearl cotton that can withstand daily wear and tear. These thicker threads also fill large areas more quickly.
Use a long-and-short stitch for the large poppy petals to achieve beautiful, seamless color blending that looks painterly and professional.
Iron a heavy-duty interfacing onto the back of your finished embroidery to protect the stitches from the inside and add extra stability, turning a simple stool into beautiful embroidery accent furniture.
10. Crafting Embellished Tassels and Tie-Backs

Create luxurious curtain tie-backs by focusing on layering different textile techniques.
The main decorative knot is formed from thick, twisted cords. You can make these yourself by twisting multiple strands of embroidery floss or silk thread together.
The embellished globes are created by wrapping a wooden bead or form with thread, then adding surface details with goldwork couching or simple seed stitches.
The key to a professional finish is the contrast in textures—the smooth silk, the twisted cord, and the metallic shine—which creates a sophisticated and functional object.
11. Weaving and Stitching for Landscape Tapestries

Create extraordinary depth in a wall hanging by combining weaving with embroidery.
First, weave an abstract landscape background using yarns of varying thicknesses and textures, like chunky wool roving and smooth cotton.
Once the weaving is complete, add fine, linear details directly onto its surface with embroidery. A simple running stitch in a thin, contrasting thread can represent contour lines, wind, or water.
This layering technique turns a simple woven piece into one of the most stunning fiber art installations for your home.
12. Capturing Animal Fur with Directional Stitching

The secret to realistic embroidered fur is mastering directional stitching. Before you begin, lightly draw guide-lines on your fabric to map the way the animal’s fur grows.
Using a single strand of floss, fill the areas with long-and-short stitches that follow these directional lines, seamlessly blending colors from dark to light to create depth.
For crisp details like whiskers, use a single, taut straight stitch with a stiff thread. This precision is what brings an animal portrait to life.
You can create incredible art with fox & deer embroidery patterns using this technique.
13. Modern Quilting as Graphic Textile Art

In modern quilting, the stitches that hold the layers together are a key design element, not just a utility.
After piecing your top, use a contrasting thread color for the quilting stage to make your stitch lines a visible, graphic element.
You can use a sewing machine with a walking foot to achieve clean, straight lines that echo the geometric shapes, or hand-quilt with a simple running stitch for a softer, handmade feel.
This approach treats the entire surface as a canvas where the stitches are as important as the fabric pieces themselves.
14. A Serene Stitched Mobile for a Nursery

Construct a gentle nursery mobile by combining simple felt shapes with textured thread elements.
For the leaves, cut shapes from high-quality wool felt and add veins with a contrasting backstitch. This adds detail without bulk.
The textured spheres can be created using the Japanese art of Temari, wrapping a base ball with thread in geometric patterns, or by simply wrapping yarn around a styrofoam ball.
Assembling these handmade elements on a simple brass hoop with wooden beads results in beautiful embroidered nursery decor with a calm, natural aesthetic.
15. Celestial Embroidery on a Book Cover

Personalize a cloth-bound journal by stitching directly onto the cover. Use a sharp, strong needle to pierce the material cleanly.
For a shimmering celestial design, choose metallic threads. To create a textured crescent moon, try a dense laid-work filling instead of a simple satin stitch.
Outline stars with a split stitch before filling them to ensure their points are sharp and defined.
A sprinkle of tiny French knots or seed beads adds a final touch of stardust, making this an easy way to customize backpacks, journals, and fabric covers.
16. Large-Scale Embroidery on a Folding Screen

For a project of this magnitude, you must embroider the design on the fabric panels before they are stretched and mounted into the screen’s frame.
Choose a sheer yet stable fabric like linen scrim, which allows light to pass through while providing a solid ground for stitching.
A simple backstitch with a dark, high-contrast thread is all that’s needed to create this elegant, illustrative effect.
The result is a functional room divider and one of those framed embroidery patterns that look like they belong in a gallery.
17. Dimensional Felt and Beadwork Napkin Rings

Create these charming napkin rings by embroidering your mushroom motifs on felt first, then cutting them out and assembling them.
Use a padded satin stitch for the stem to give it a rounded shape, and use tiny French knots or white seed beads for the spots on the cap for a delightful 3D texture.
Once the mushroom is complete, appliqué it onto a simple felt band that forms the ring. A blanket stitch around the edges gives a clean and durable finish.
These are perfect for anyone who loves realistic mushroom forest floor embroidery projects.
18. Crafting a No-Wilt Felt Flower Wreath

This vibrant wreath relies on felt construction, but small embroidered details are what will set it apart.
After cutting and layering your felt petals to form the flowers, add a cluster of French knots in a contrasting color at the center of each to mimic stamens.
For the leaves, a simple backstitch down the middle creates a convincing vein and adds a touch of handcrafted texture.
These subtle additions elevate the project from a simple craft to a more refined piece of cottagecore floral embroidery.
19. Stumpwork and Goldwork for 3D Jewelry

Create sculptural jewelry using stumpwork, a 17th-century technique that creates raised, three-dimensional embroidery.
The beetle’s wings are stitched on a separate piece of fabric over a wire frame. Once complete, they are cut out and attached to the body, allowing them to be shaped.
The body is given its domed shape by using padded satin stitch over layers of felt. Combining this with goldwork threads results in a stunning, wearable piece of art.
This technique fundamentally changes the relationship between thread and surface, turning embroidery into sculpture.
20. A Statement Back Panel for a Denim Jacket
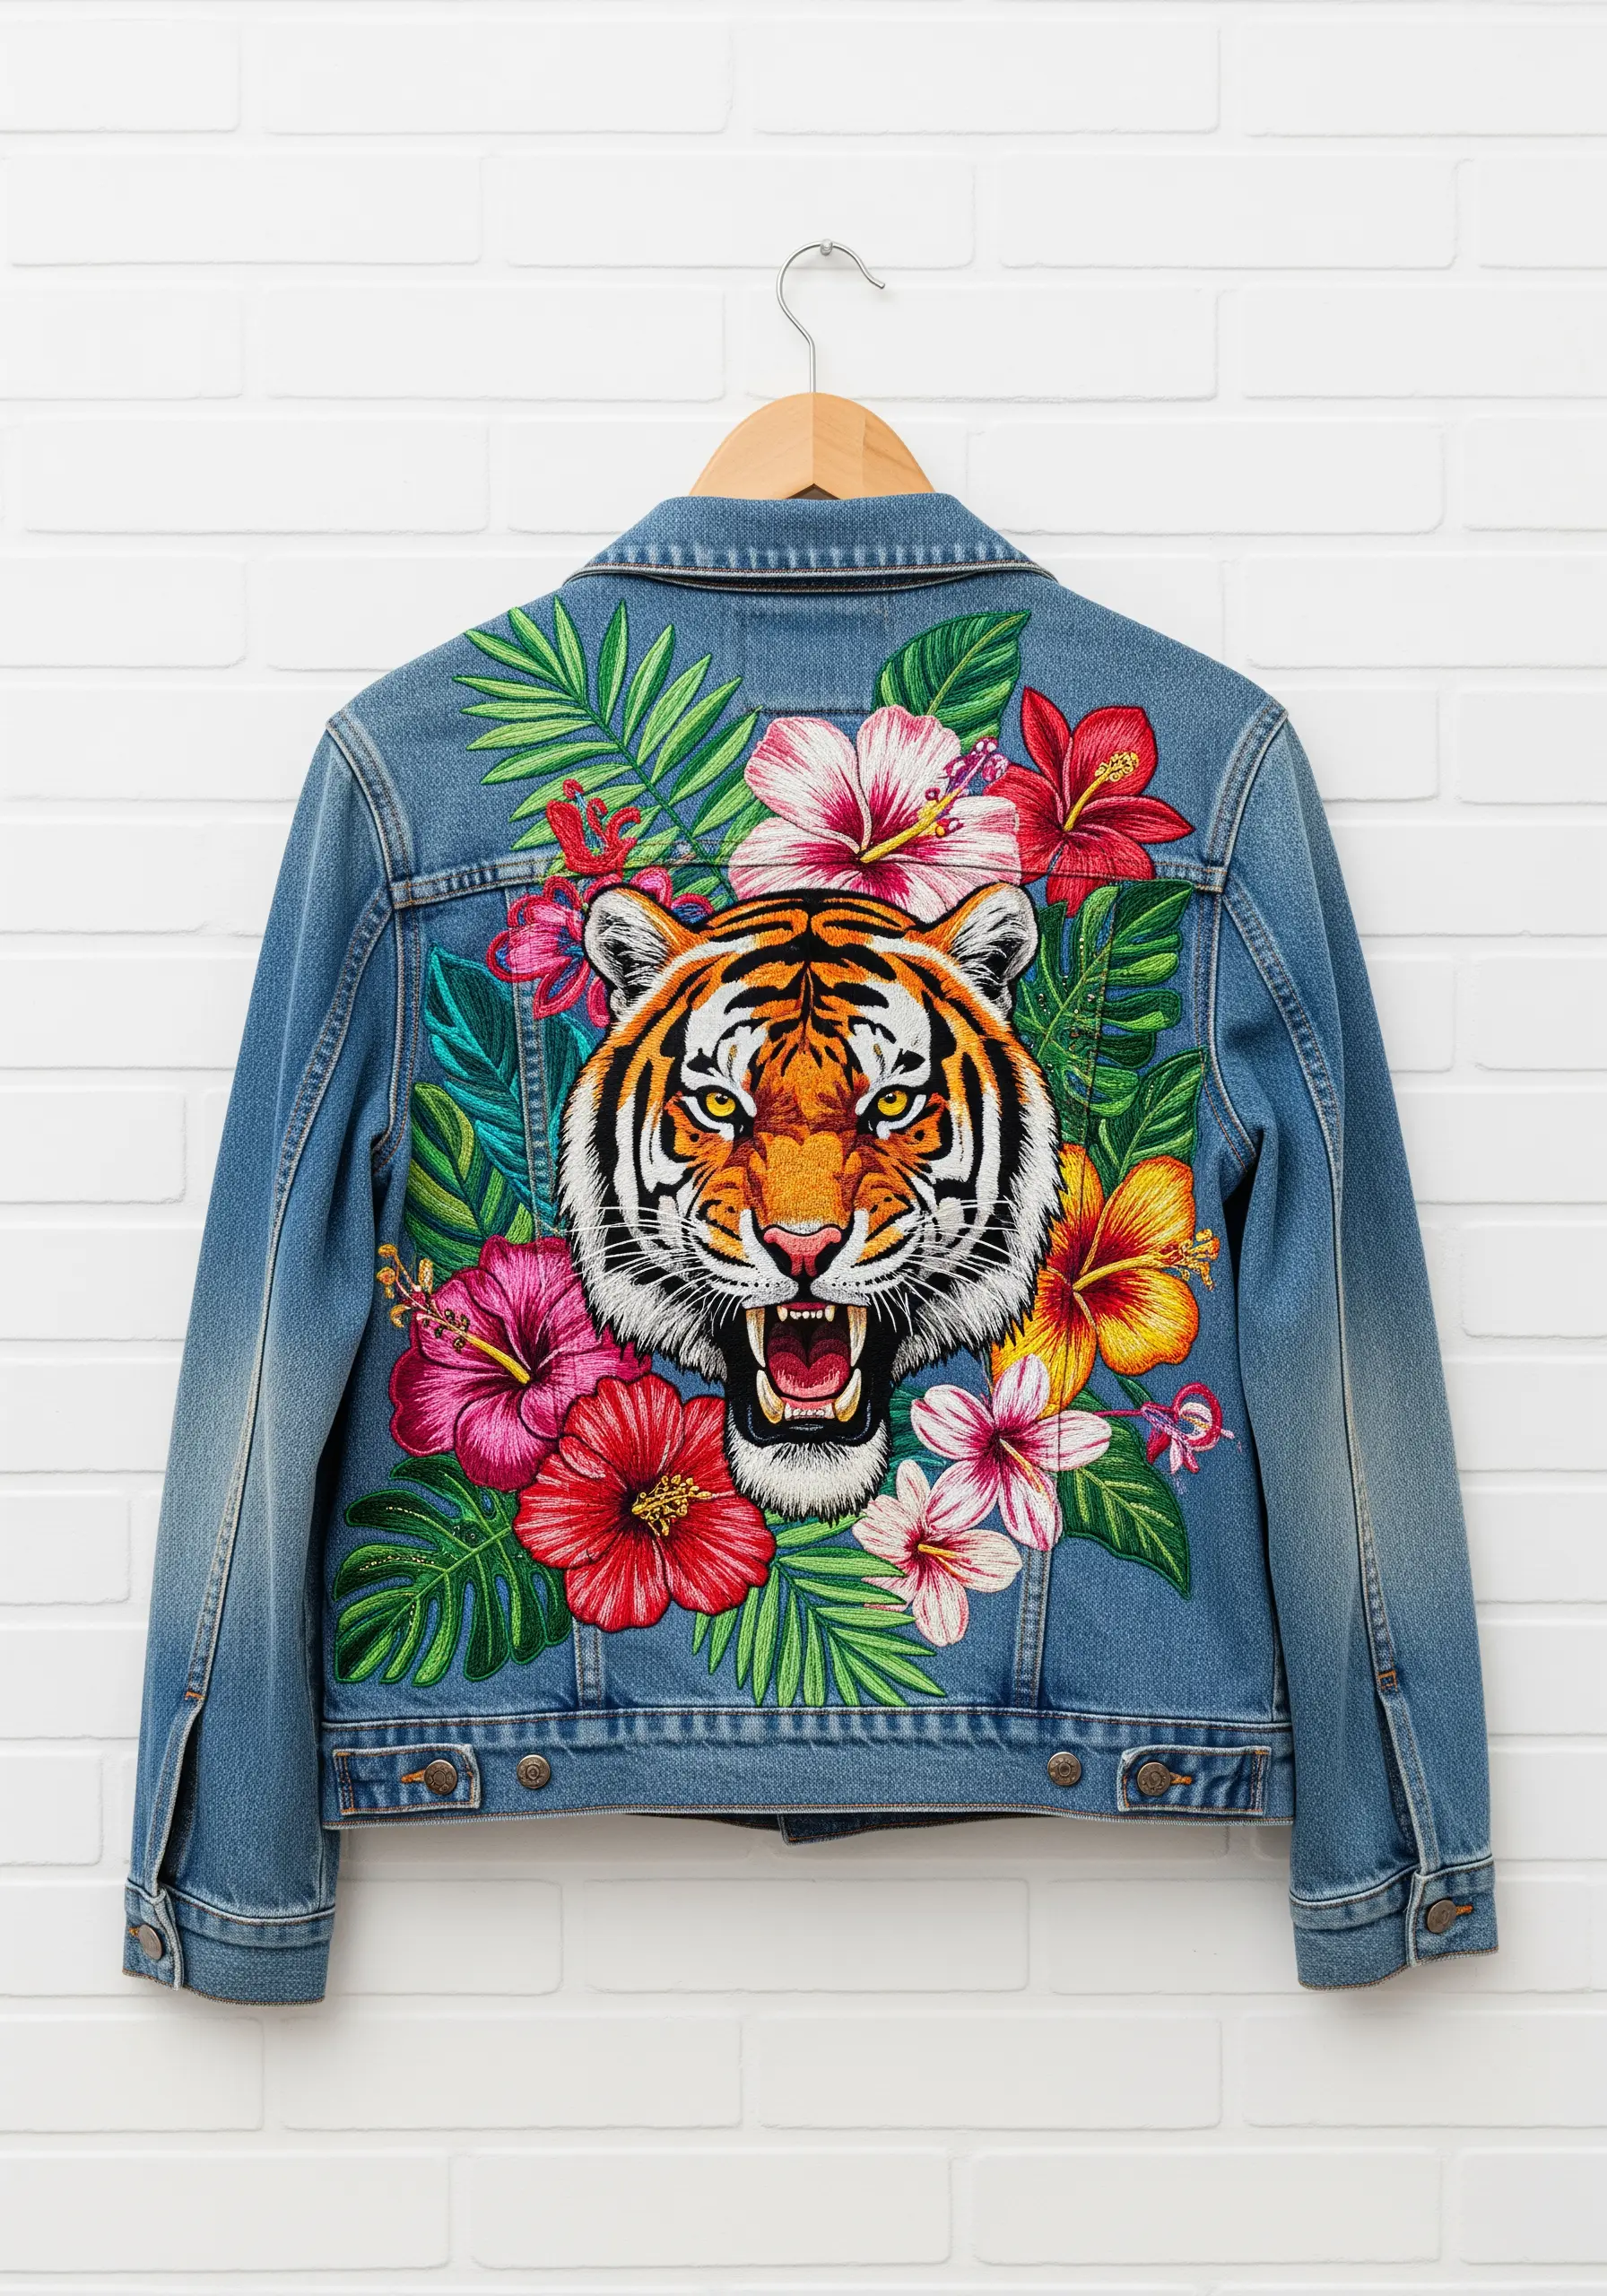
To successfully embroider on heavy denim, always use a heavy-duty cut-away stabilizer on the inside. This prevents the dense stitching from warping the fabric.
Use a sharp denim needle in your hoop, which is designed to pierce thick fabrics without shredding the thread.
For a design with this much color and detail, the long-and-short stitch is your best friend. It allows for beautiful, painterly blending in the tiger’s fur and flower petals.
This is the ultimate way to create wearable art with vintage-inspired denim jacket embroidery motifs.
21. A Functional Embroidered Hoop Clock

Combine your stitching with a practical purpose by turning a finished hoop into a clock.
Embroider your motifs around the edge of the fabric, carefully planning their placement to mark the hours. Simple, delicate florals work beautifully for this.
Once your embroidery is complete and stretched taut in the hoop, purchase a simple clock mechanism online. You’ll make a small hole in the center of the fabric to install it.
This project is a brilliant way to display tiny embroidered accents in a functional, unexpected way.


