

Have you ever finished a piece and felt that something was missing? That your stitches, however neat, didn’t quite capture the life and feeling you had envisioned? It’s a common feeling—the gap between what your hands can do and what your heart wants to express.
The secret to closing that gap often lies not in learning more complex stitches, but in embracing texture. Moving beyond flat embroidery floss to the world of yarn, wool, and roving opens up a new dimension in your work. It’s about building surfaces you can not only see but feel—the soft plush of moss, the rough bark of a tree, the fluid weight of a wave.
These ideas are an invitation to think like a sculptor as much as a stitcher. Let nature guide your choice of materials and techniques. Whether you’re weaving, knotting, or punching, you’re translating the tactile world into fiber. You can do this, and the results will feel more personal and alive than anything you’ve made before.
1. Weave a Gradient Sky with Topographical Texture
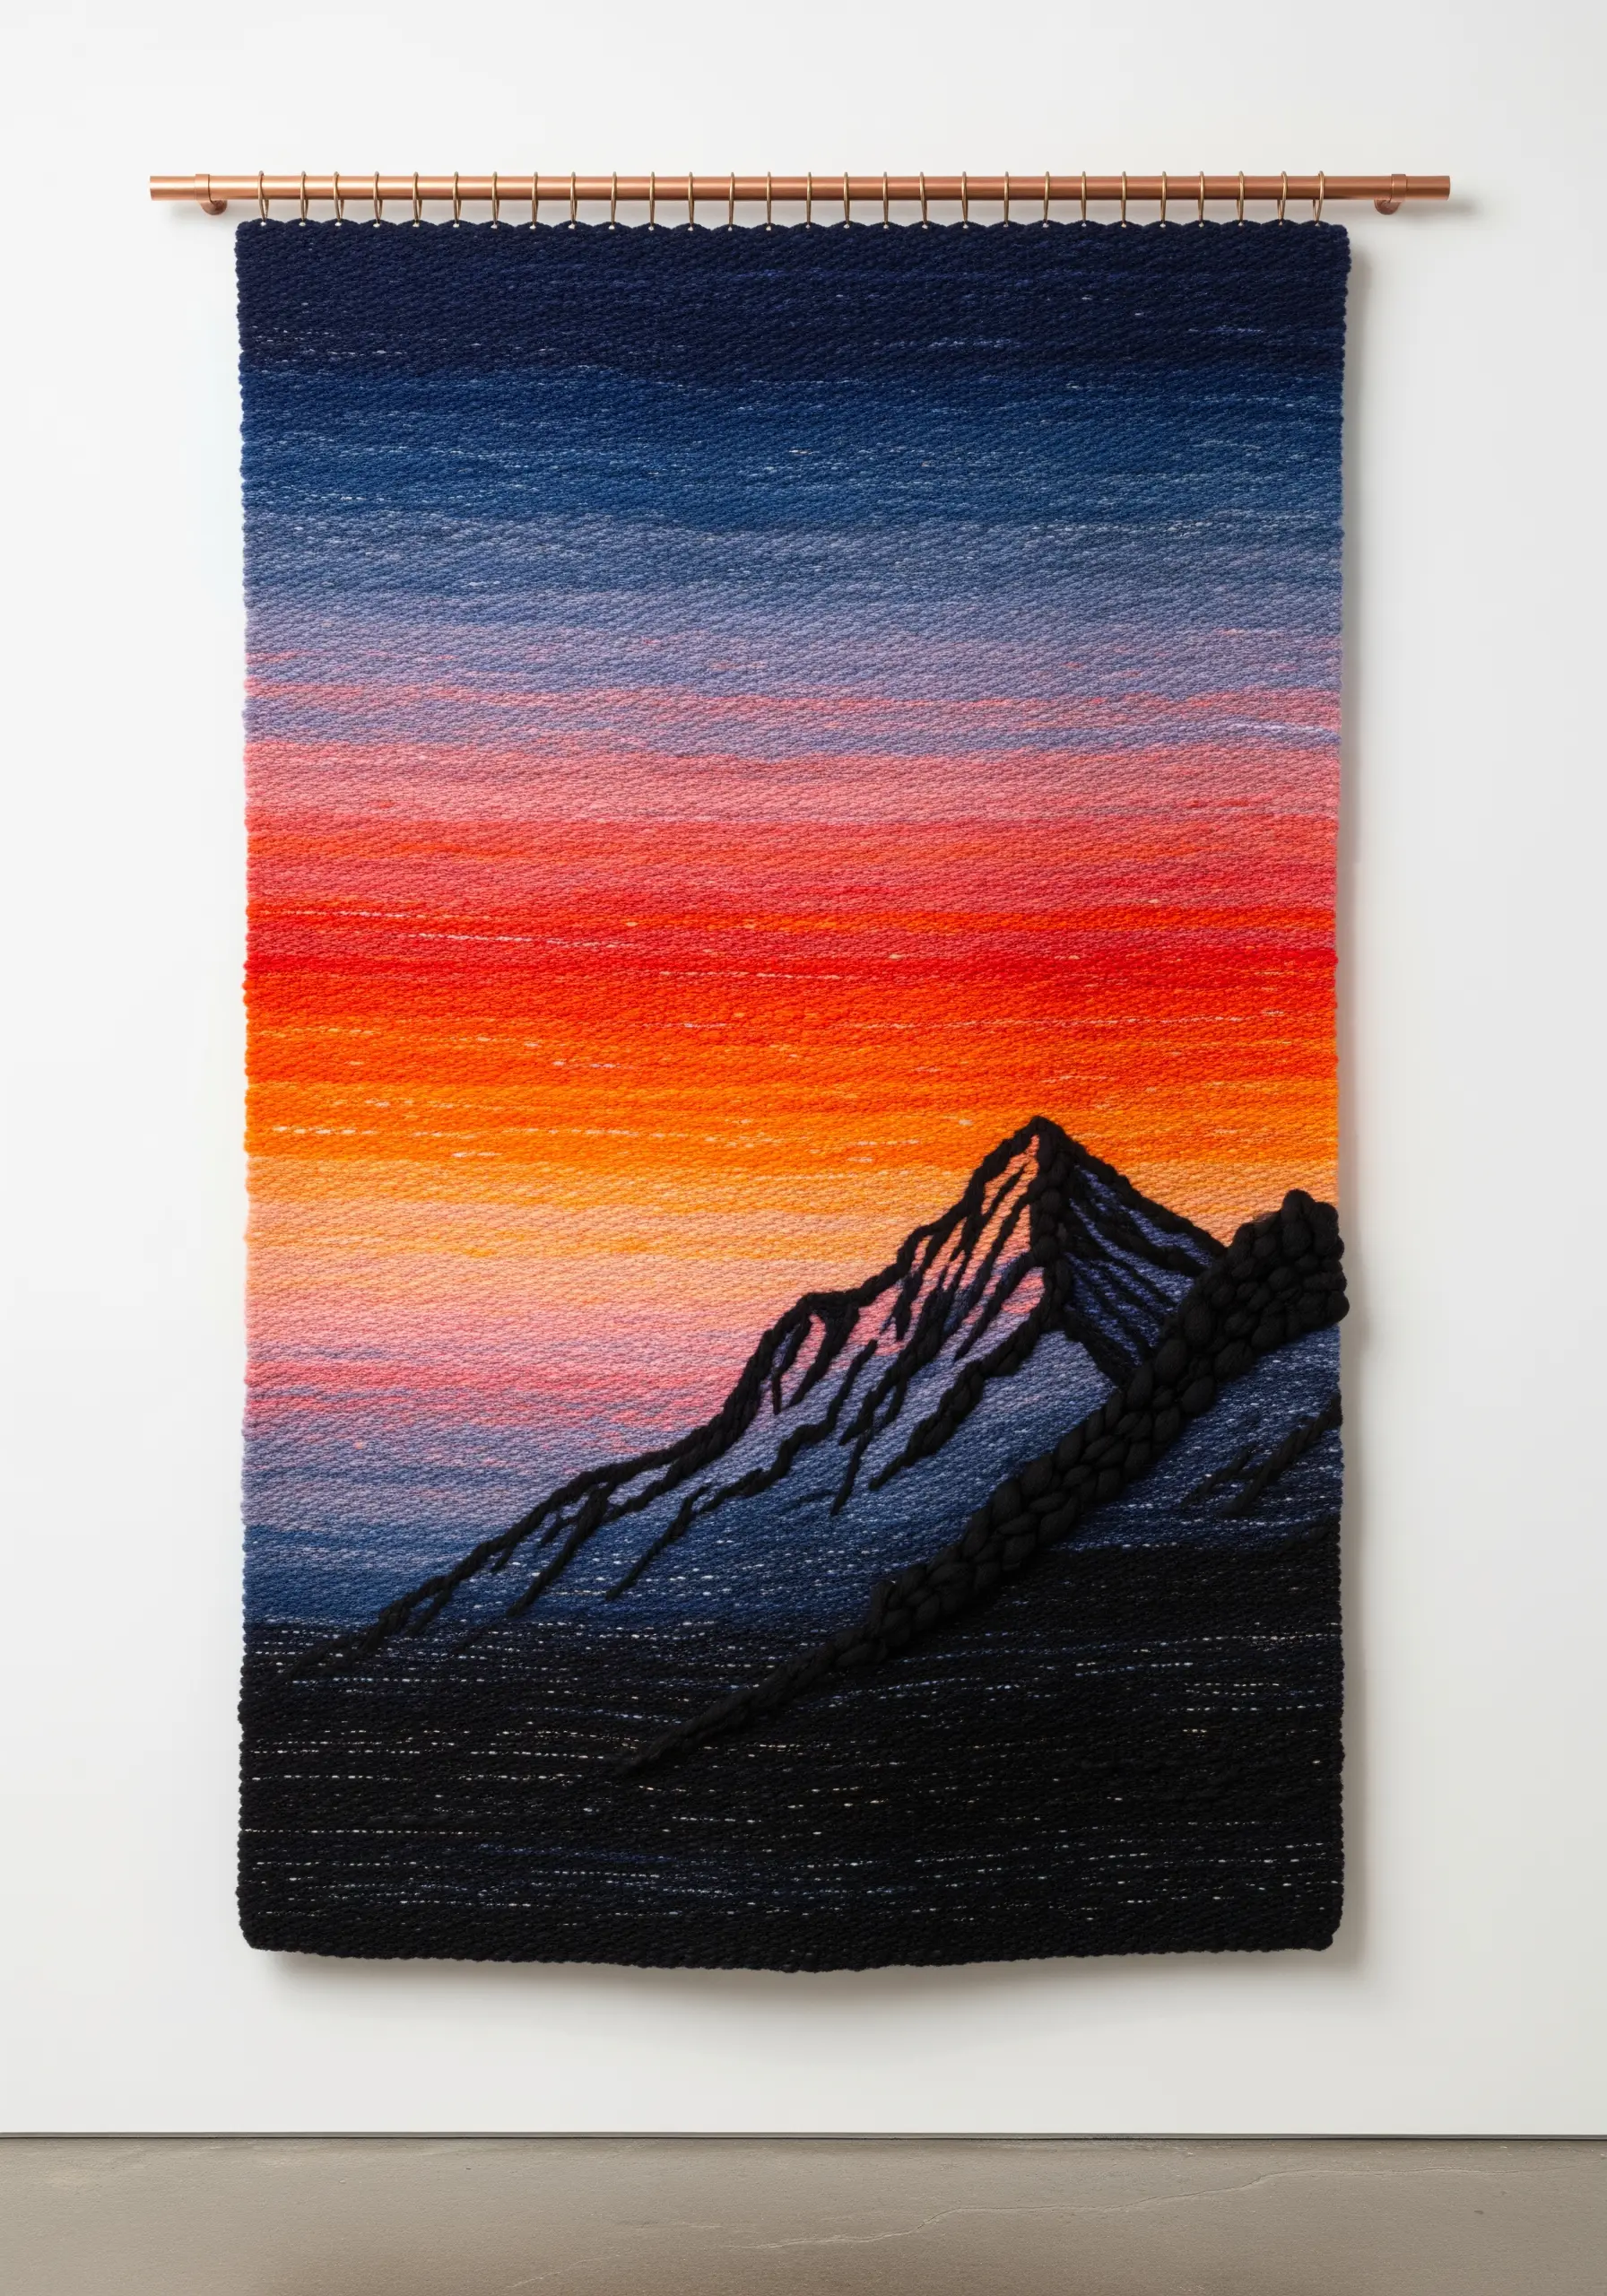
To create a smooth, atmospheric sunset, blend several shades of yarn using a simple tabby weave, allowing colors to transition organically.
For the mountain, switch to a thicker, chunkier black yarn and use soumak braids or raised knots.
This contrast between the flat, soft sky and the raised, rugged mountain creates immediate visual depth and a powerful focal point.
The technique makes the landscape feel both expansive and tactile.
2. Sculpt Dynamic Movement with Macrame Knots
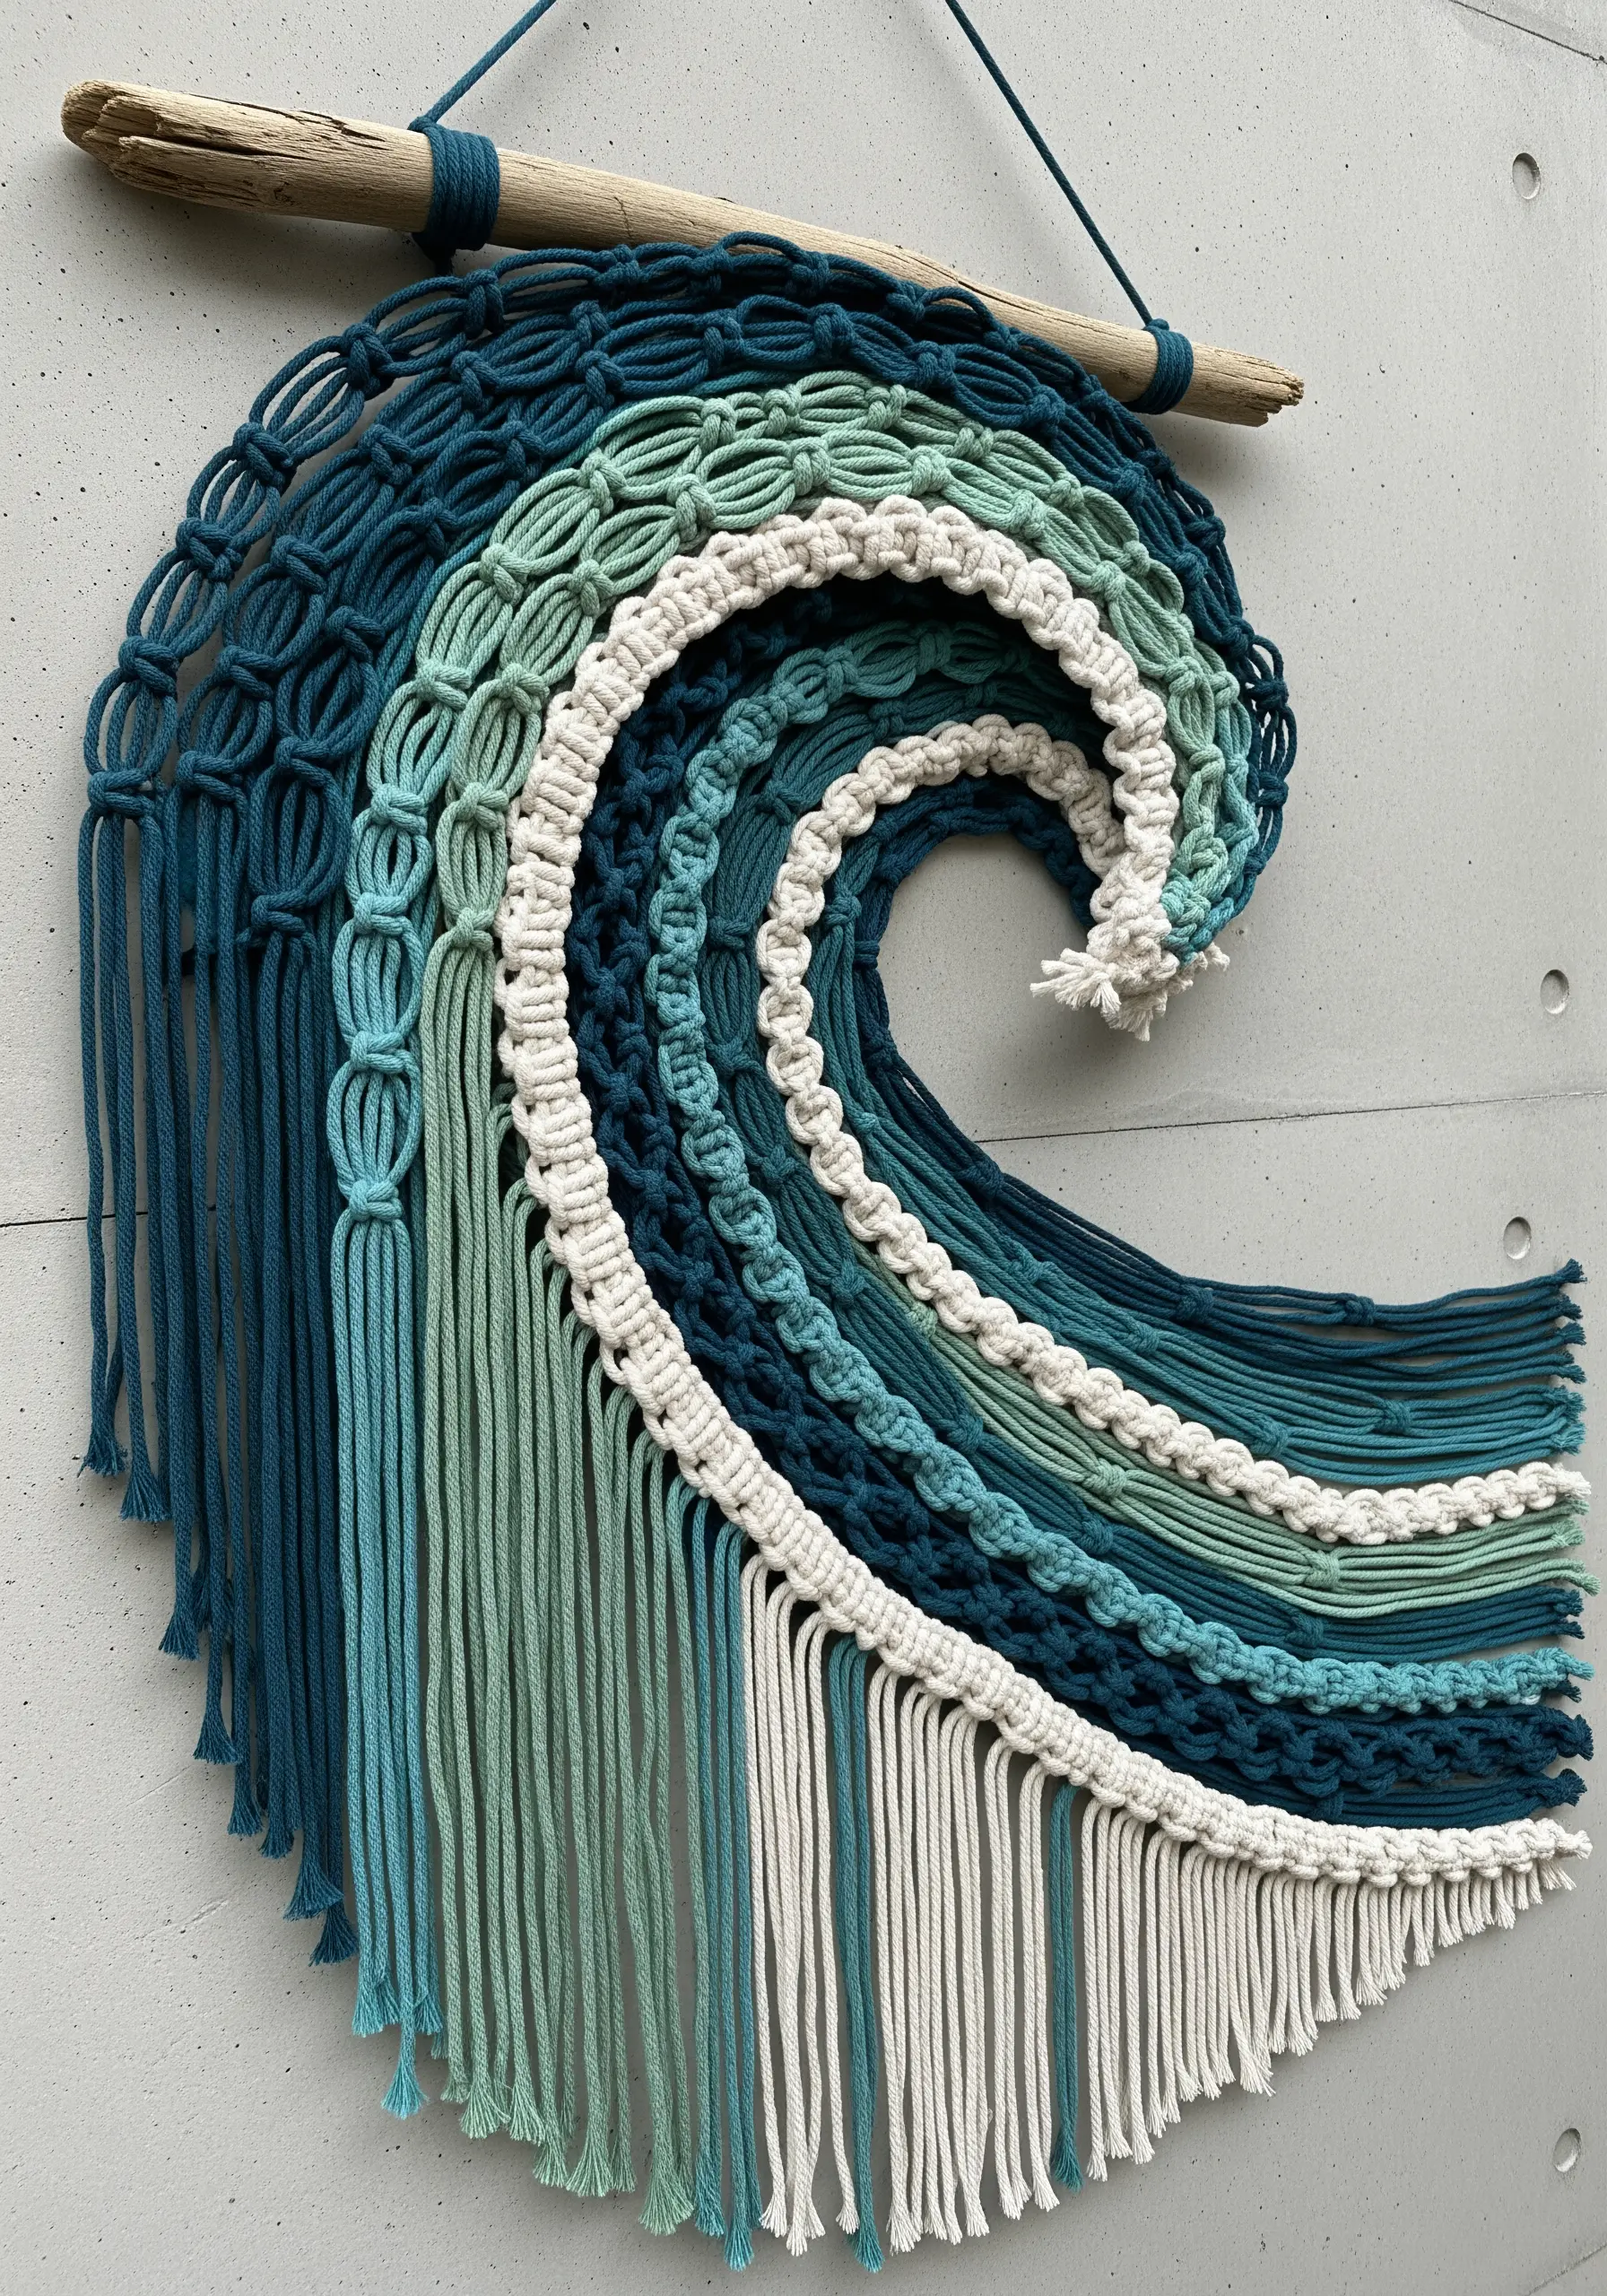
Capture the energy of a wave by varying your knotting techniques and cord colors in deliberate sections.
Use tight, repeating square knots for the dense, powerful parts of the wave, and looser, more open knots for the spray.
Arrange your colors in distinct bands to define the layers of water, from deep teal to foamy white.
The final shape is achieved by trimming the fringe at a curve, reinforcing the sense of motion.
3. Build a Forest Floor with Punch Needle Loops
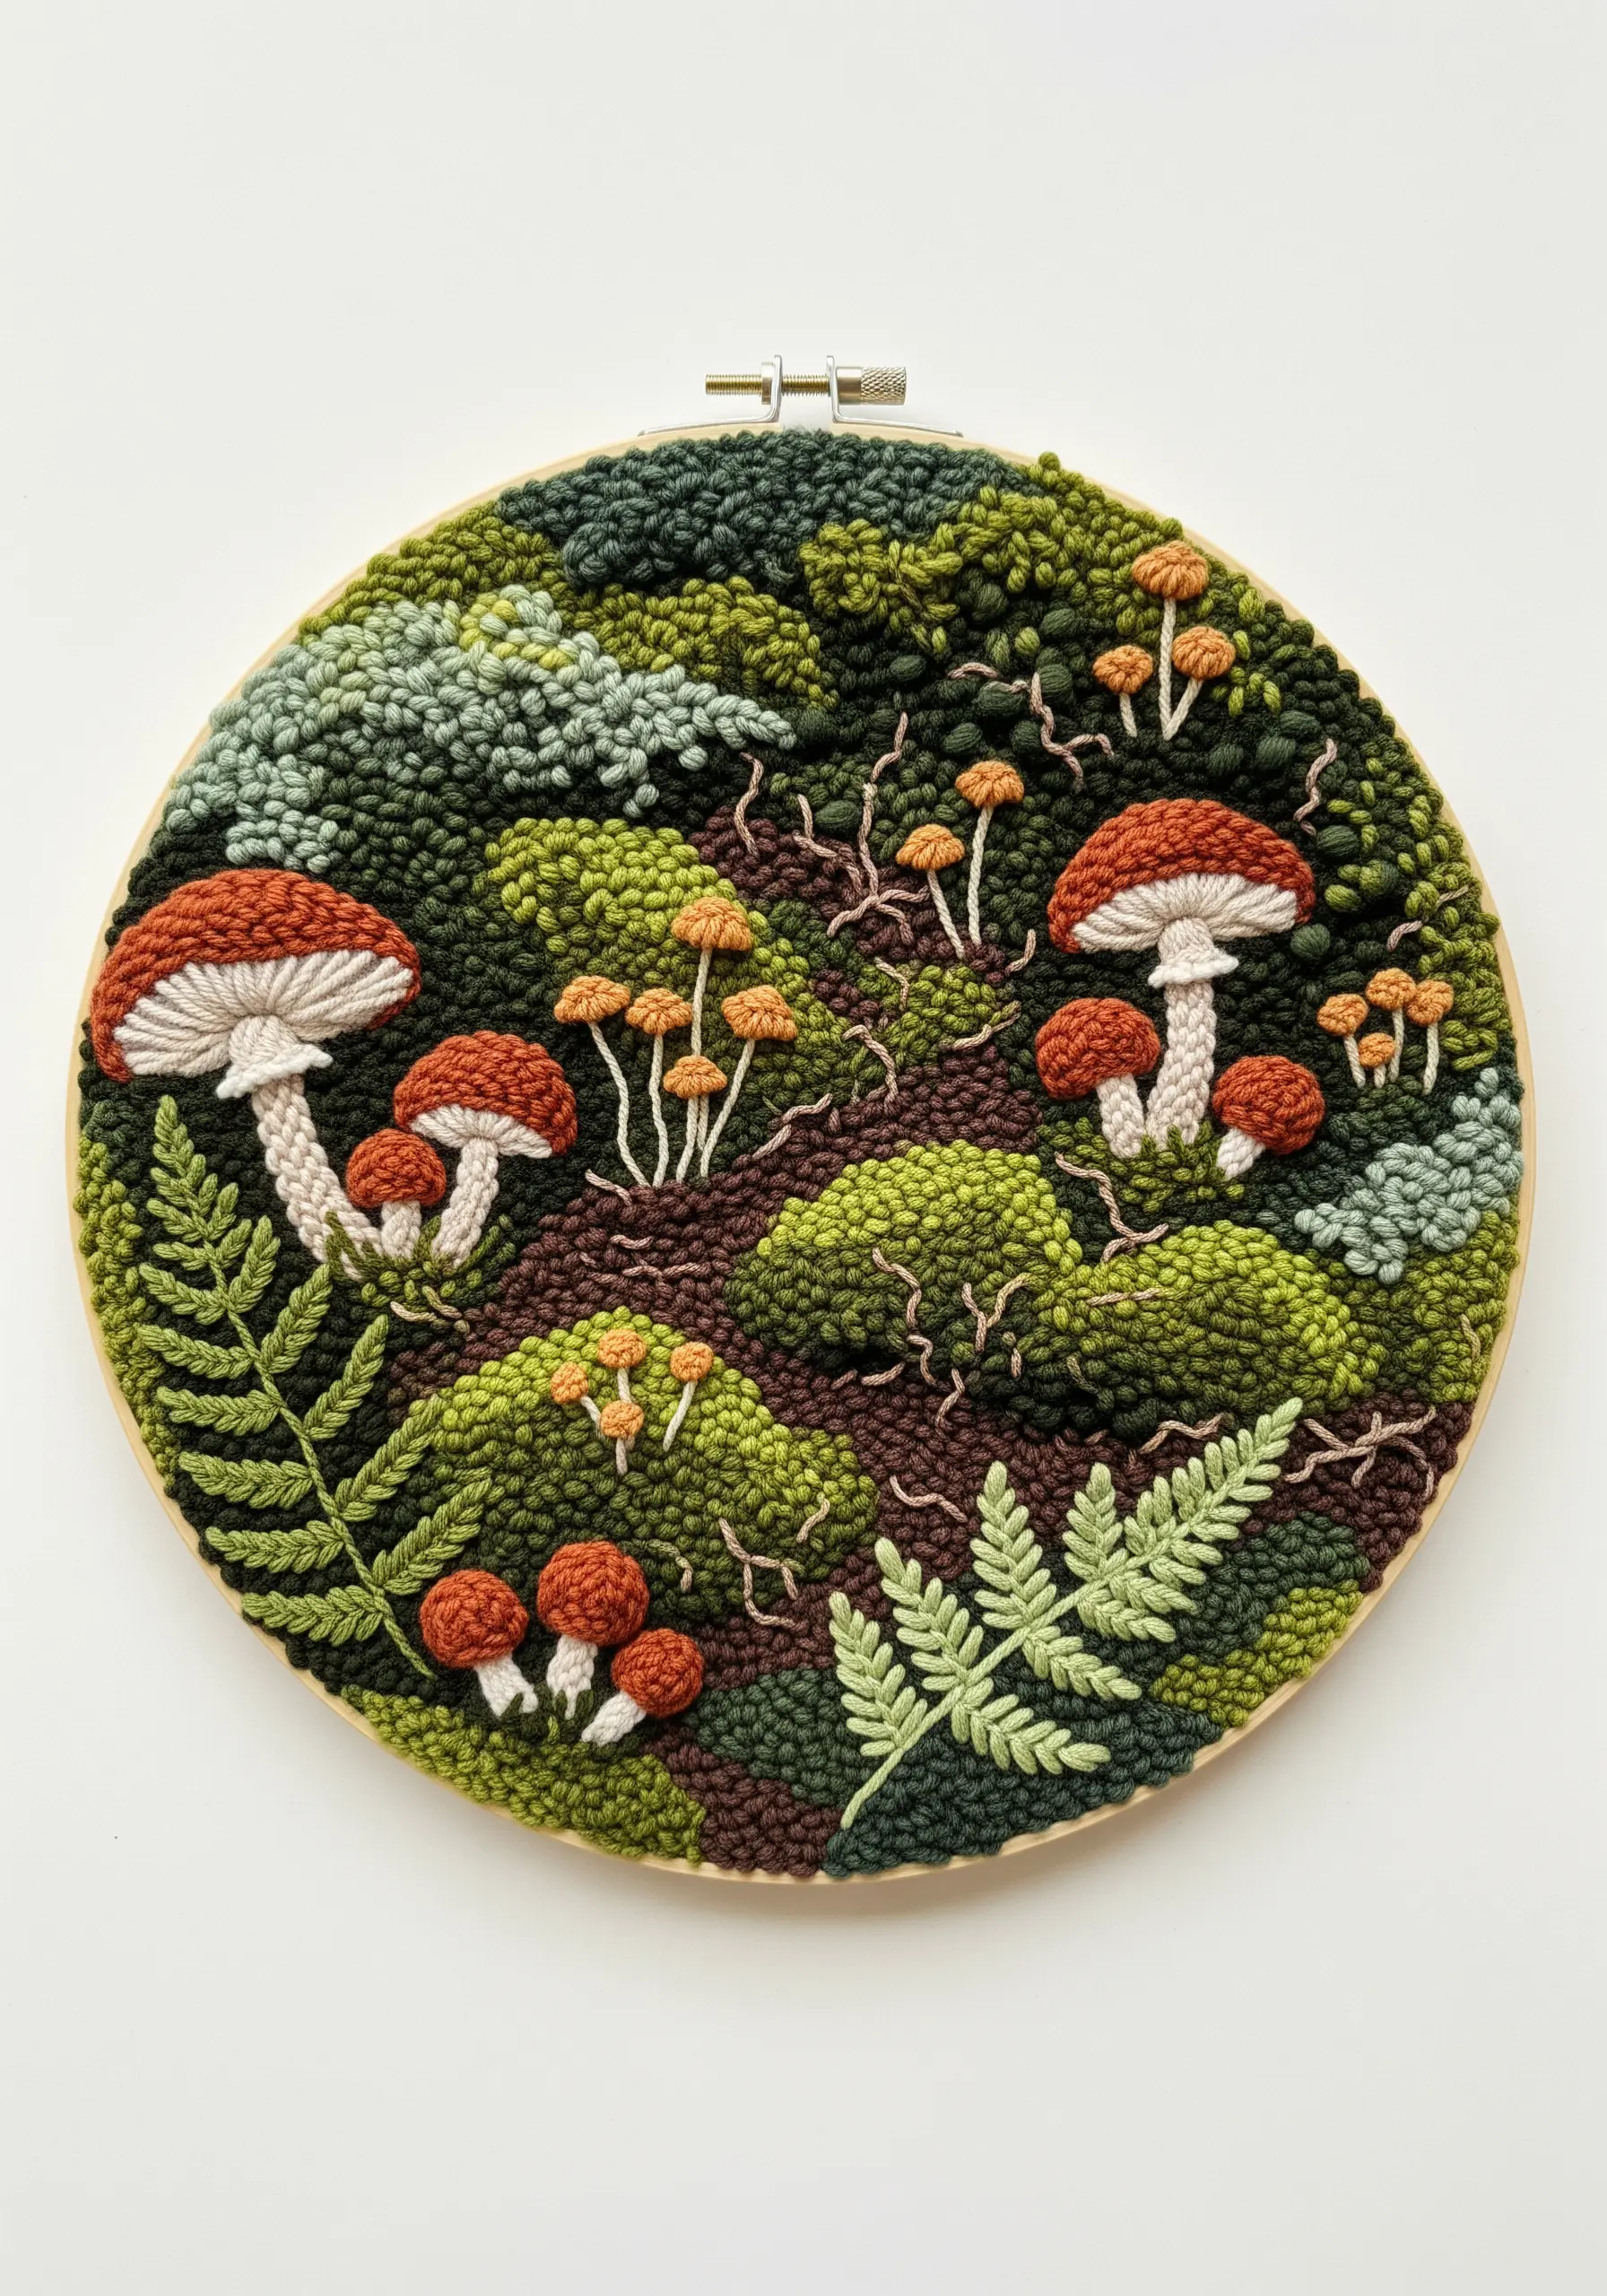
Mimic the rich, varied texture of a forest floor by adjusting your punch needle’s loop height.
Use shorter, tighter loops for packed earth and pathways, and longer, plusher loops for patches of soft moss.
Introduce different shades of green and brown yarn randomly within a single mossy patch for a more natural, variegated look.
For delicate details, add realistic mushroom caps using satin stitch or tiny French knots with finer embroidery floss.
4. A Minimalist Birch Triptych Using Wrapped Yarn

Create this clean, graphic look by tightly wrapping thick white yarn vertically around a canvas or board.
Secure the yarn periodically on the back to maintain tension.
Once the trunks are formed, use a single strand of black embroidery floss to add the characteristic bark lines and thin branches with a simple backstitch.
Grouping three panels together as a triptych elevates this simple technique into a sophisticated piece of minimalist embroidery wall art.
5. Paint an Impressionistic Meadow with Yarn Loops
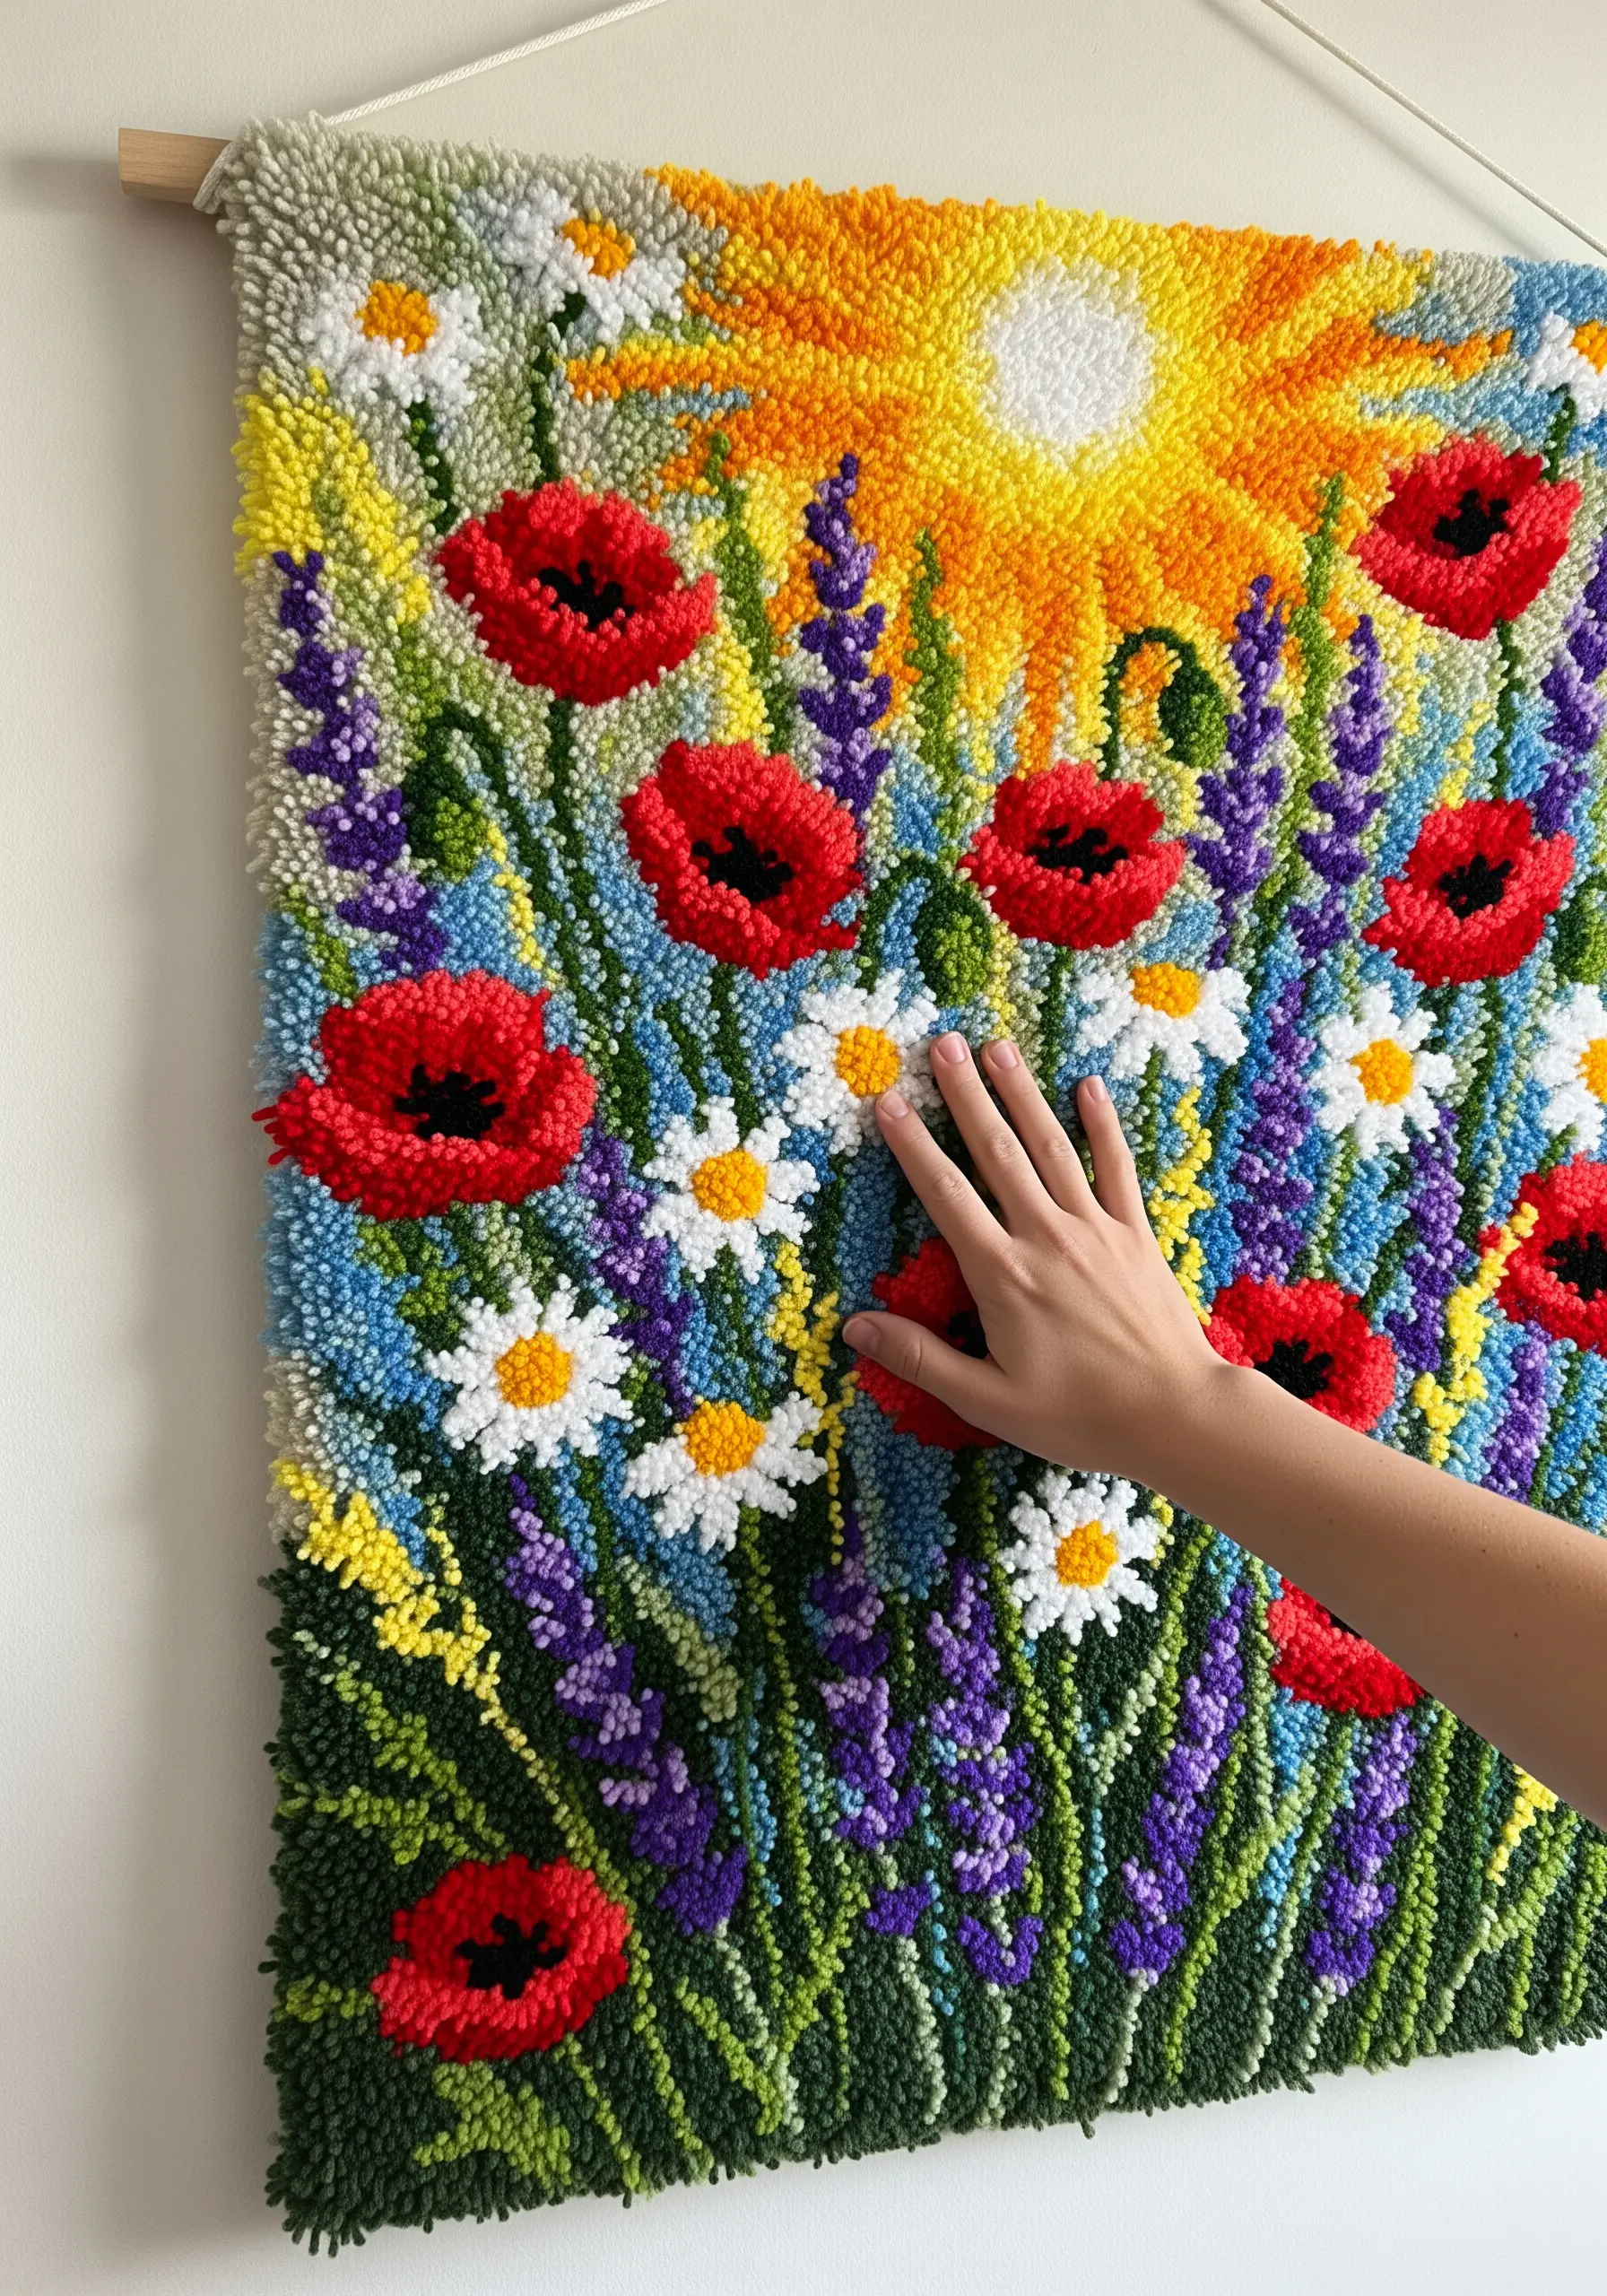
Approach this project like a painting, using your punch needle to place dabs of color.
Create a blended, impressionistic background with short, dense loops of various greens and blues.
Then, add the flowers by punching individual loops or small clusters of vibrant colors like red, yellow, and white.
This pointillist technique allows you to build a complex, cottagecore floral scene that is rich with texture and color from a distance.
6. Capture the Aurora Borealis in Woven Fibers

To achieve the ethereal glow of the Northern Lights, use variegated yarns in shades of green, purple, and teal.
As you weave, allow the colors to blend naturally instead of forcing sharp lines.
Introduce fine, fuzzy mohair or silk-blend yarns to create a soft-focus haze.
You can add tiny French knots or seed beads with a metallic thread to represent distant stars, enhancing the celestial magic of these texture-rich thread art ideas.
7. Combine Weaving and Macrame for a Desert Landscape
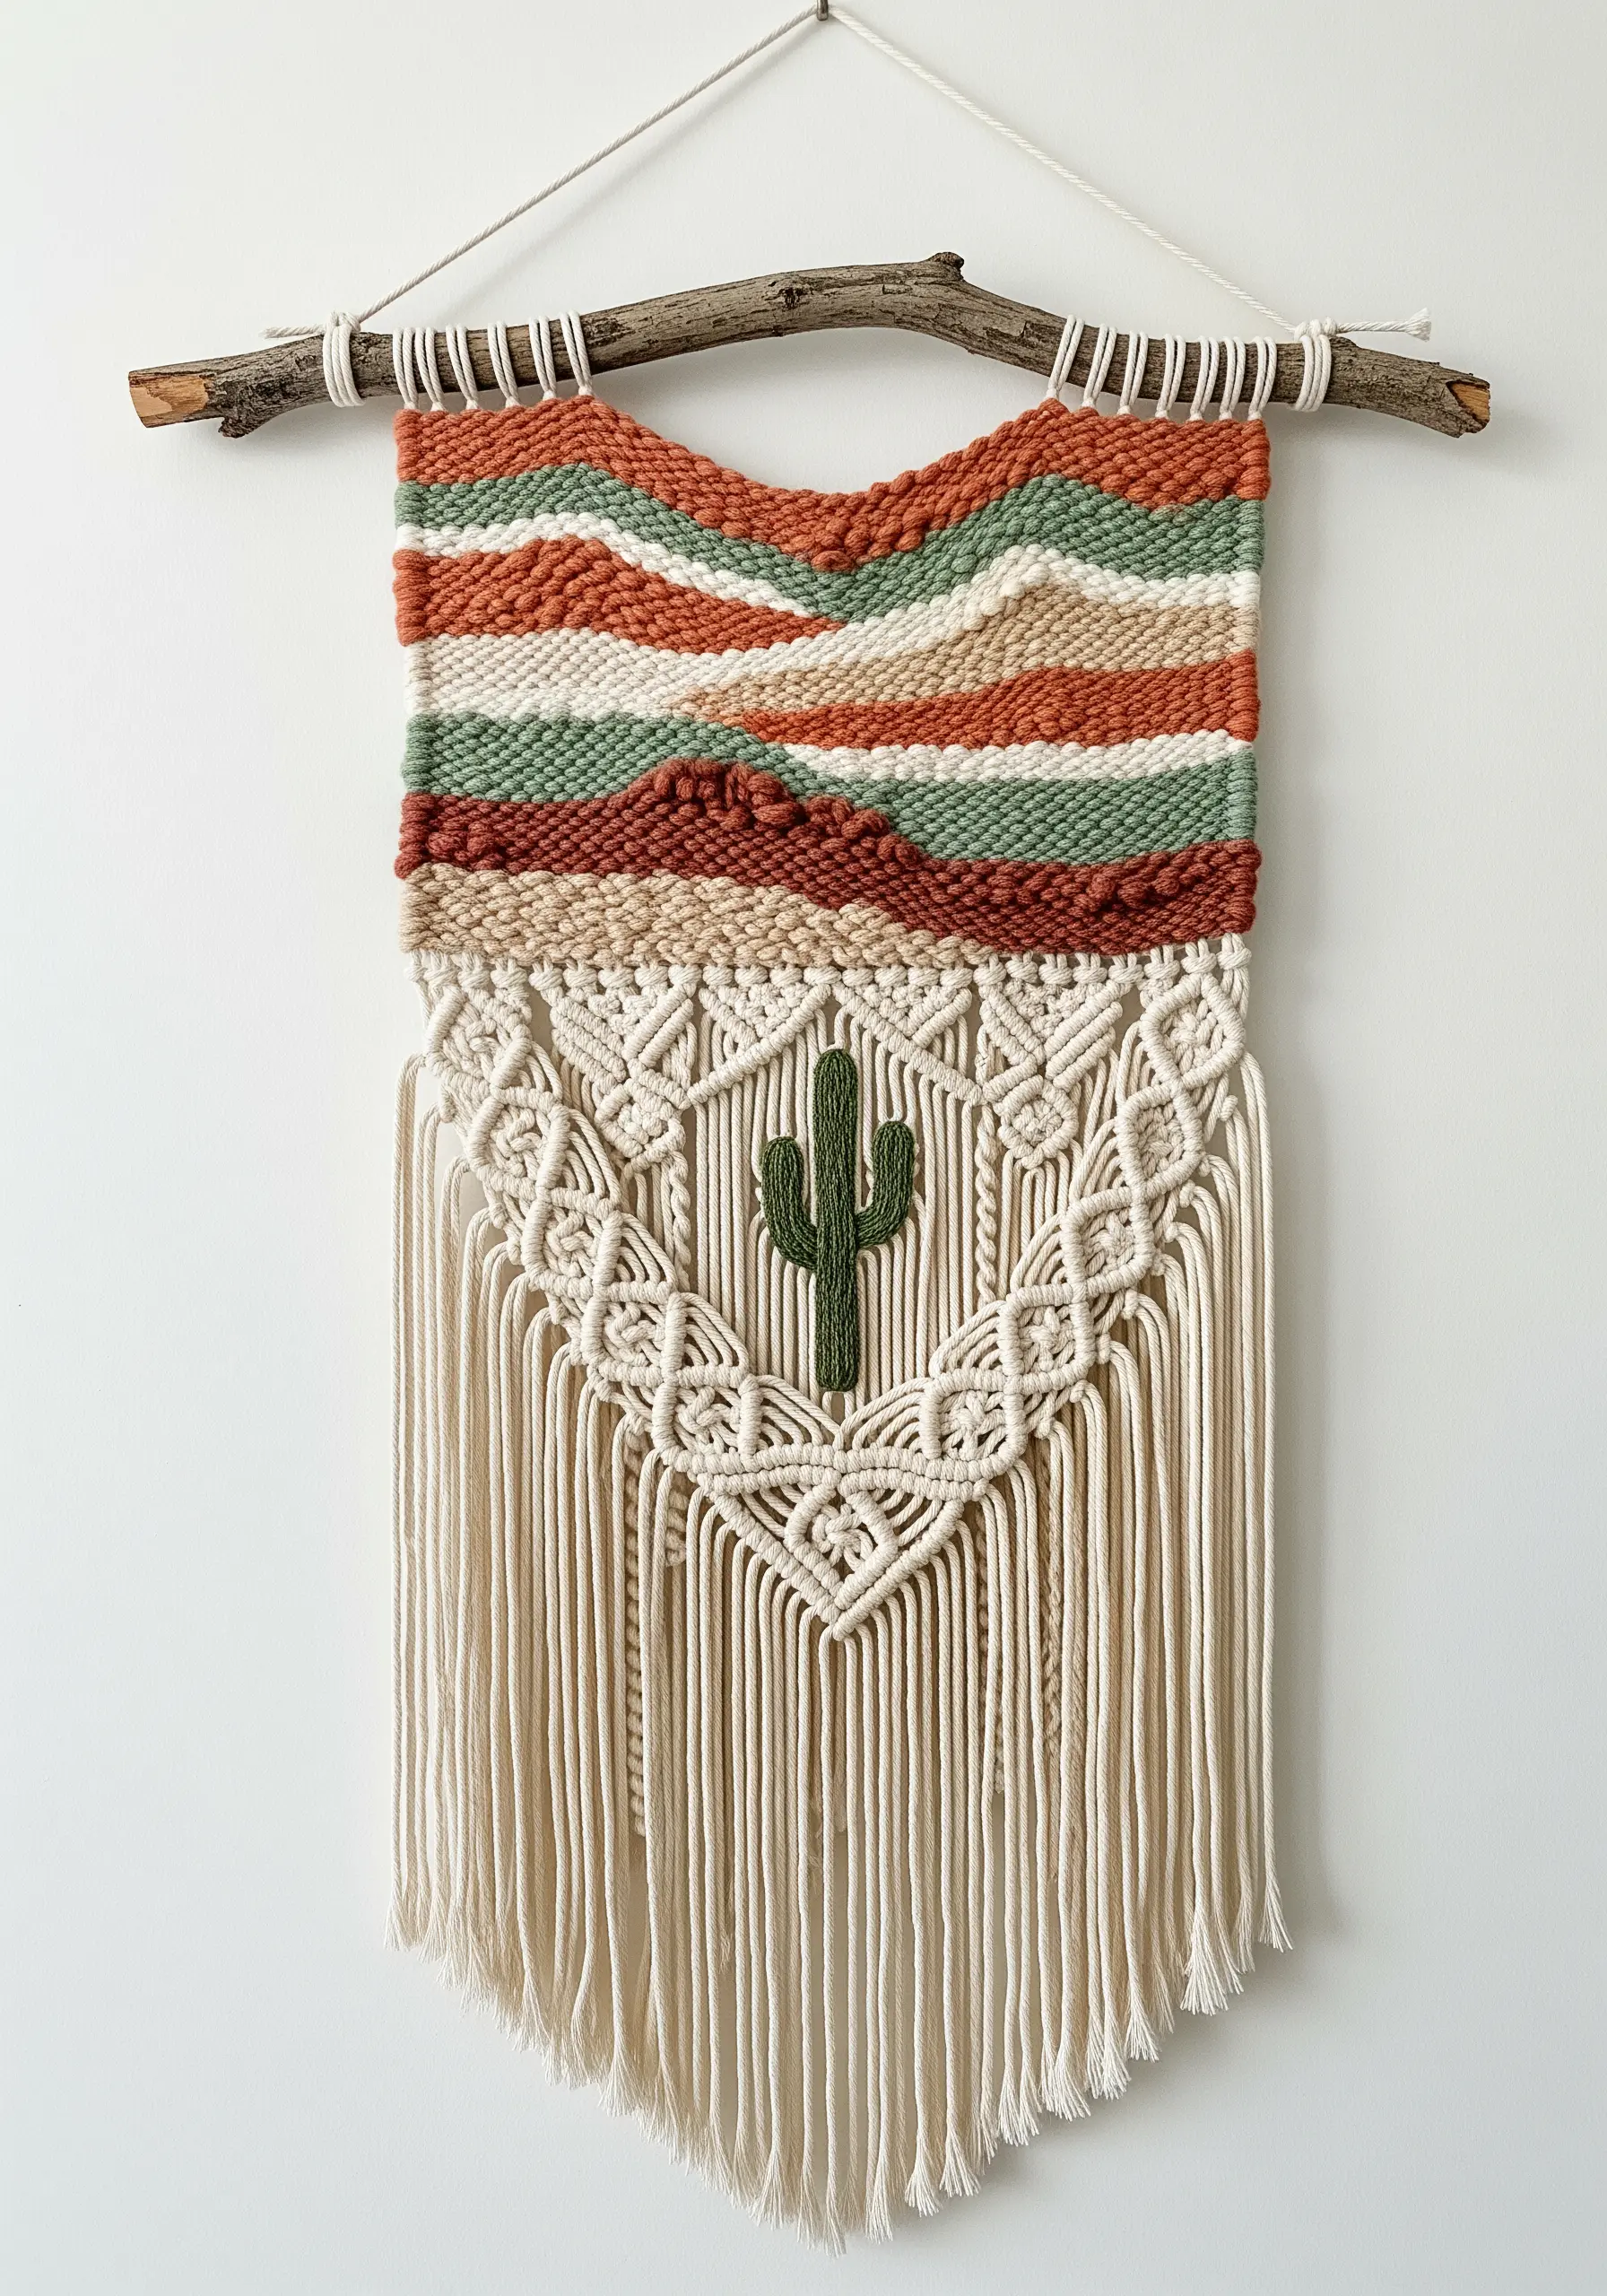
Create a piece with distinct zones of texture by combining two fiber techniques.
Weave the top portion to represent rolling hills, using a simple tabby weave with earthy-toned yarns.
For the bottom half, create a structured macrame pattern with natural cotton cord, leaving a negative space in the center.
Finally, appliqué a small, neatly stitched cactus into the center of the macrame, uniting the two styles with a single, clear motif.
8. Sculpt a Coral Reef with Freeform Crochet
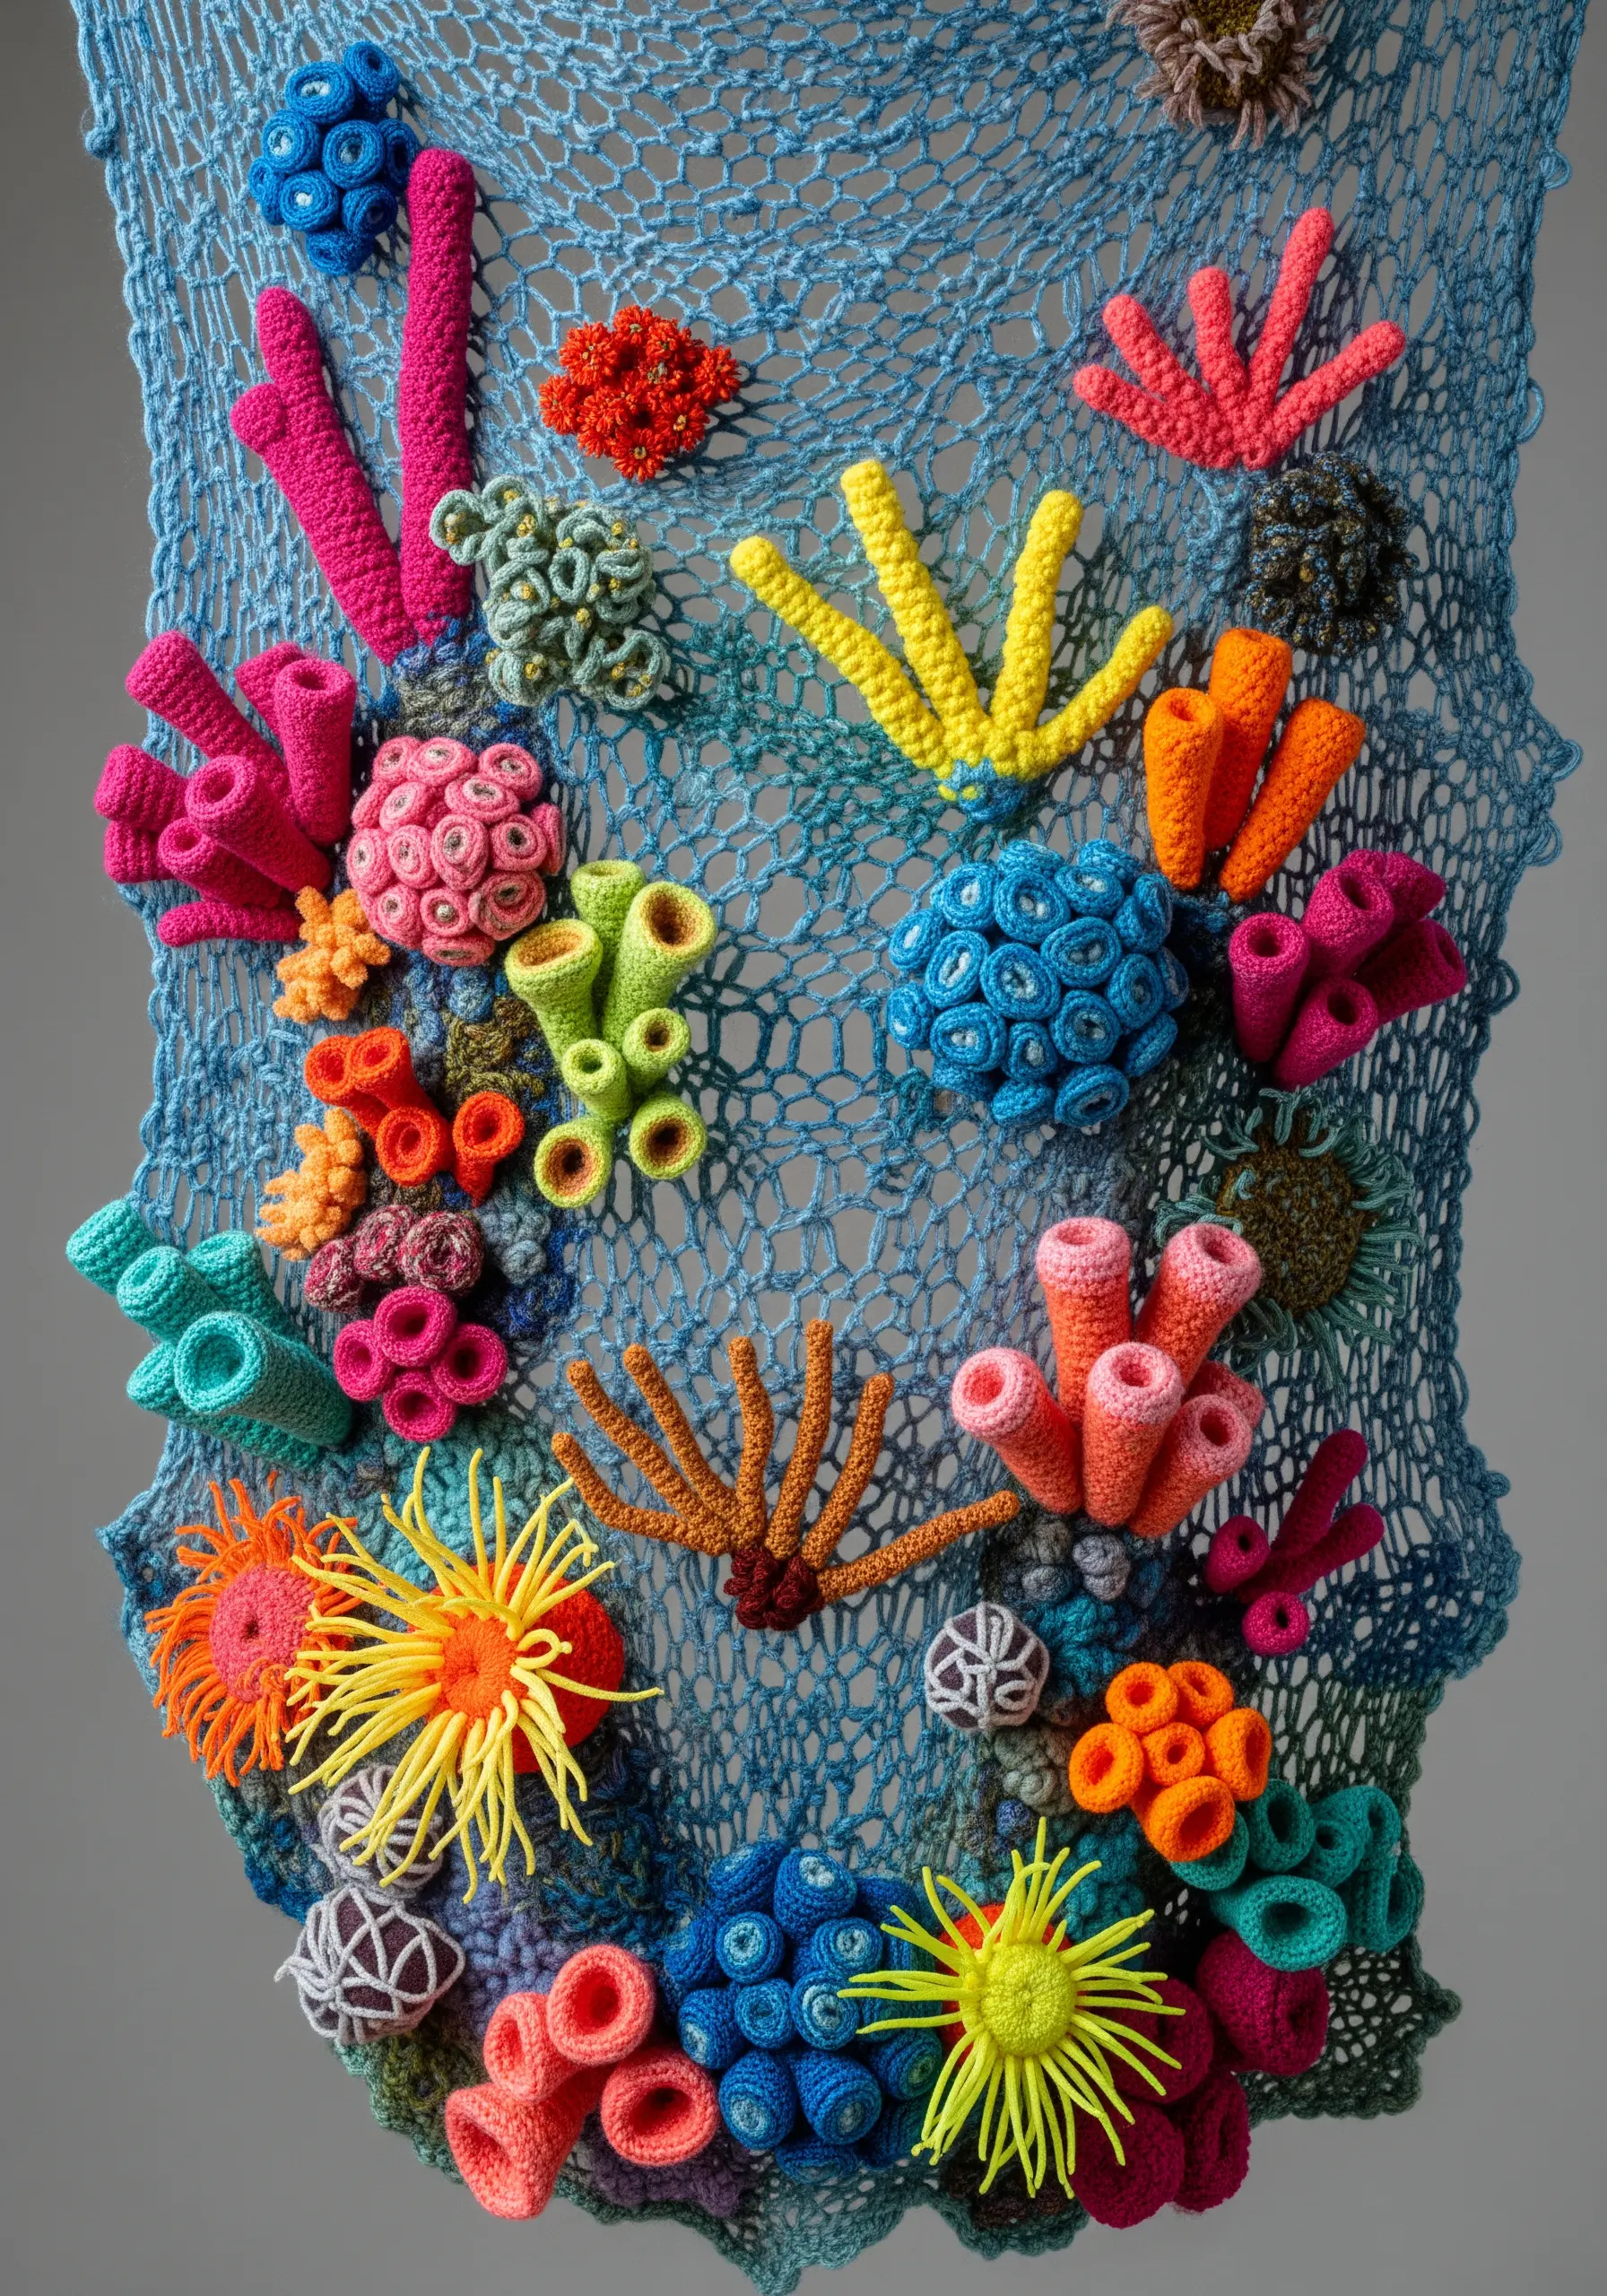
Move beyond flat patterns and embrace organic, sculptural forms with freeform crochet.
Use hyperbolic crochet—a simple technique of increasing stitches in every row—to create the natural ruffles and spirals of coral and sea anemones.
Combine different yarn weights and textures, from smooth cotton to fuzzy chenille, to build a diverse and tactile reef.
These individual pieces can then be arranged into larger fiber art installations.
9. Stitch the Night Sky with Beads and Thread
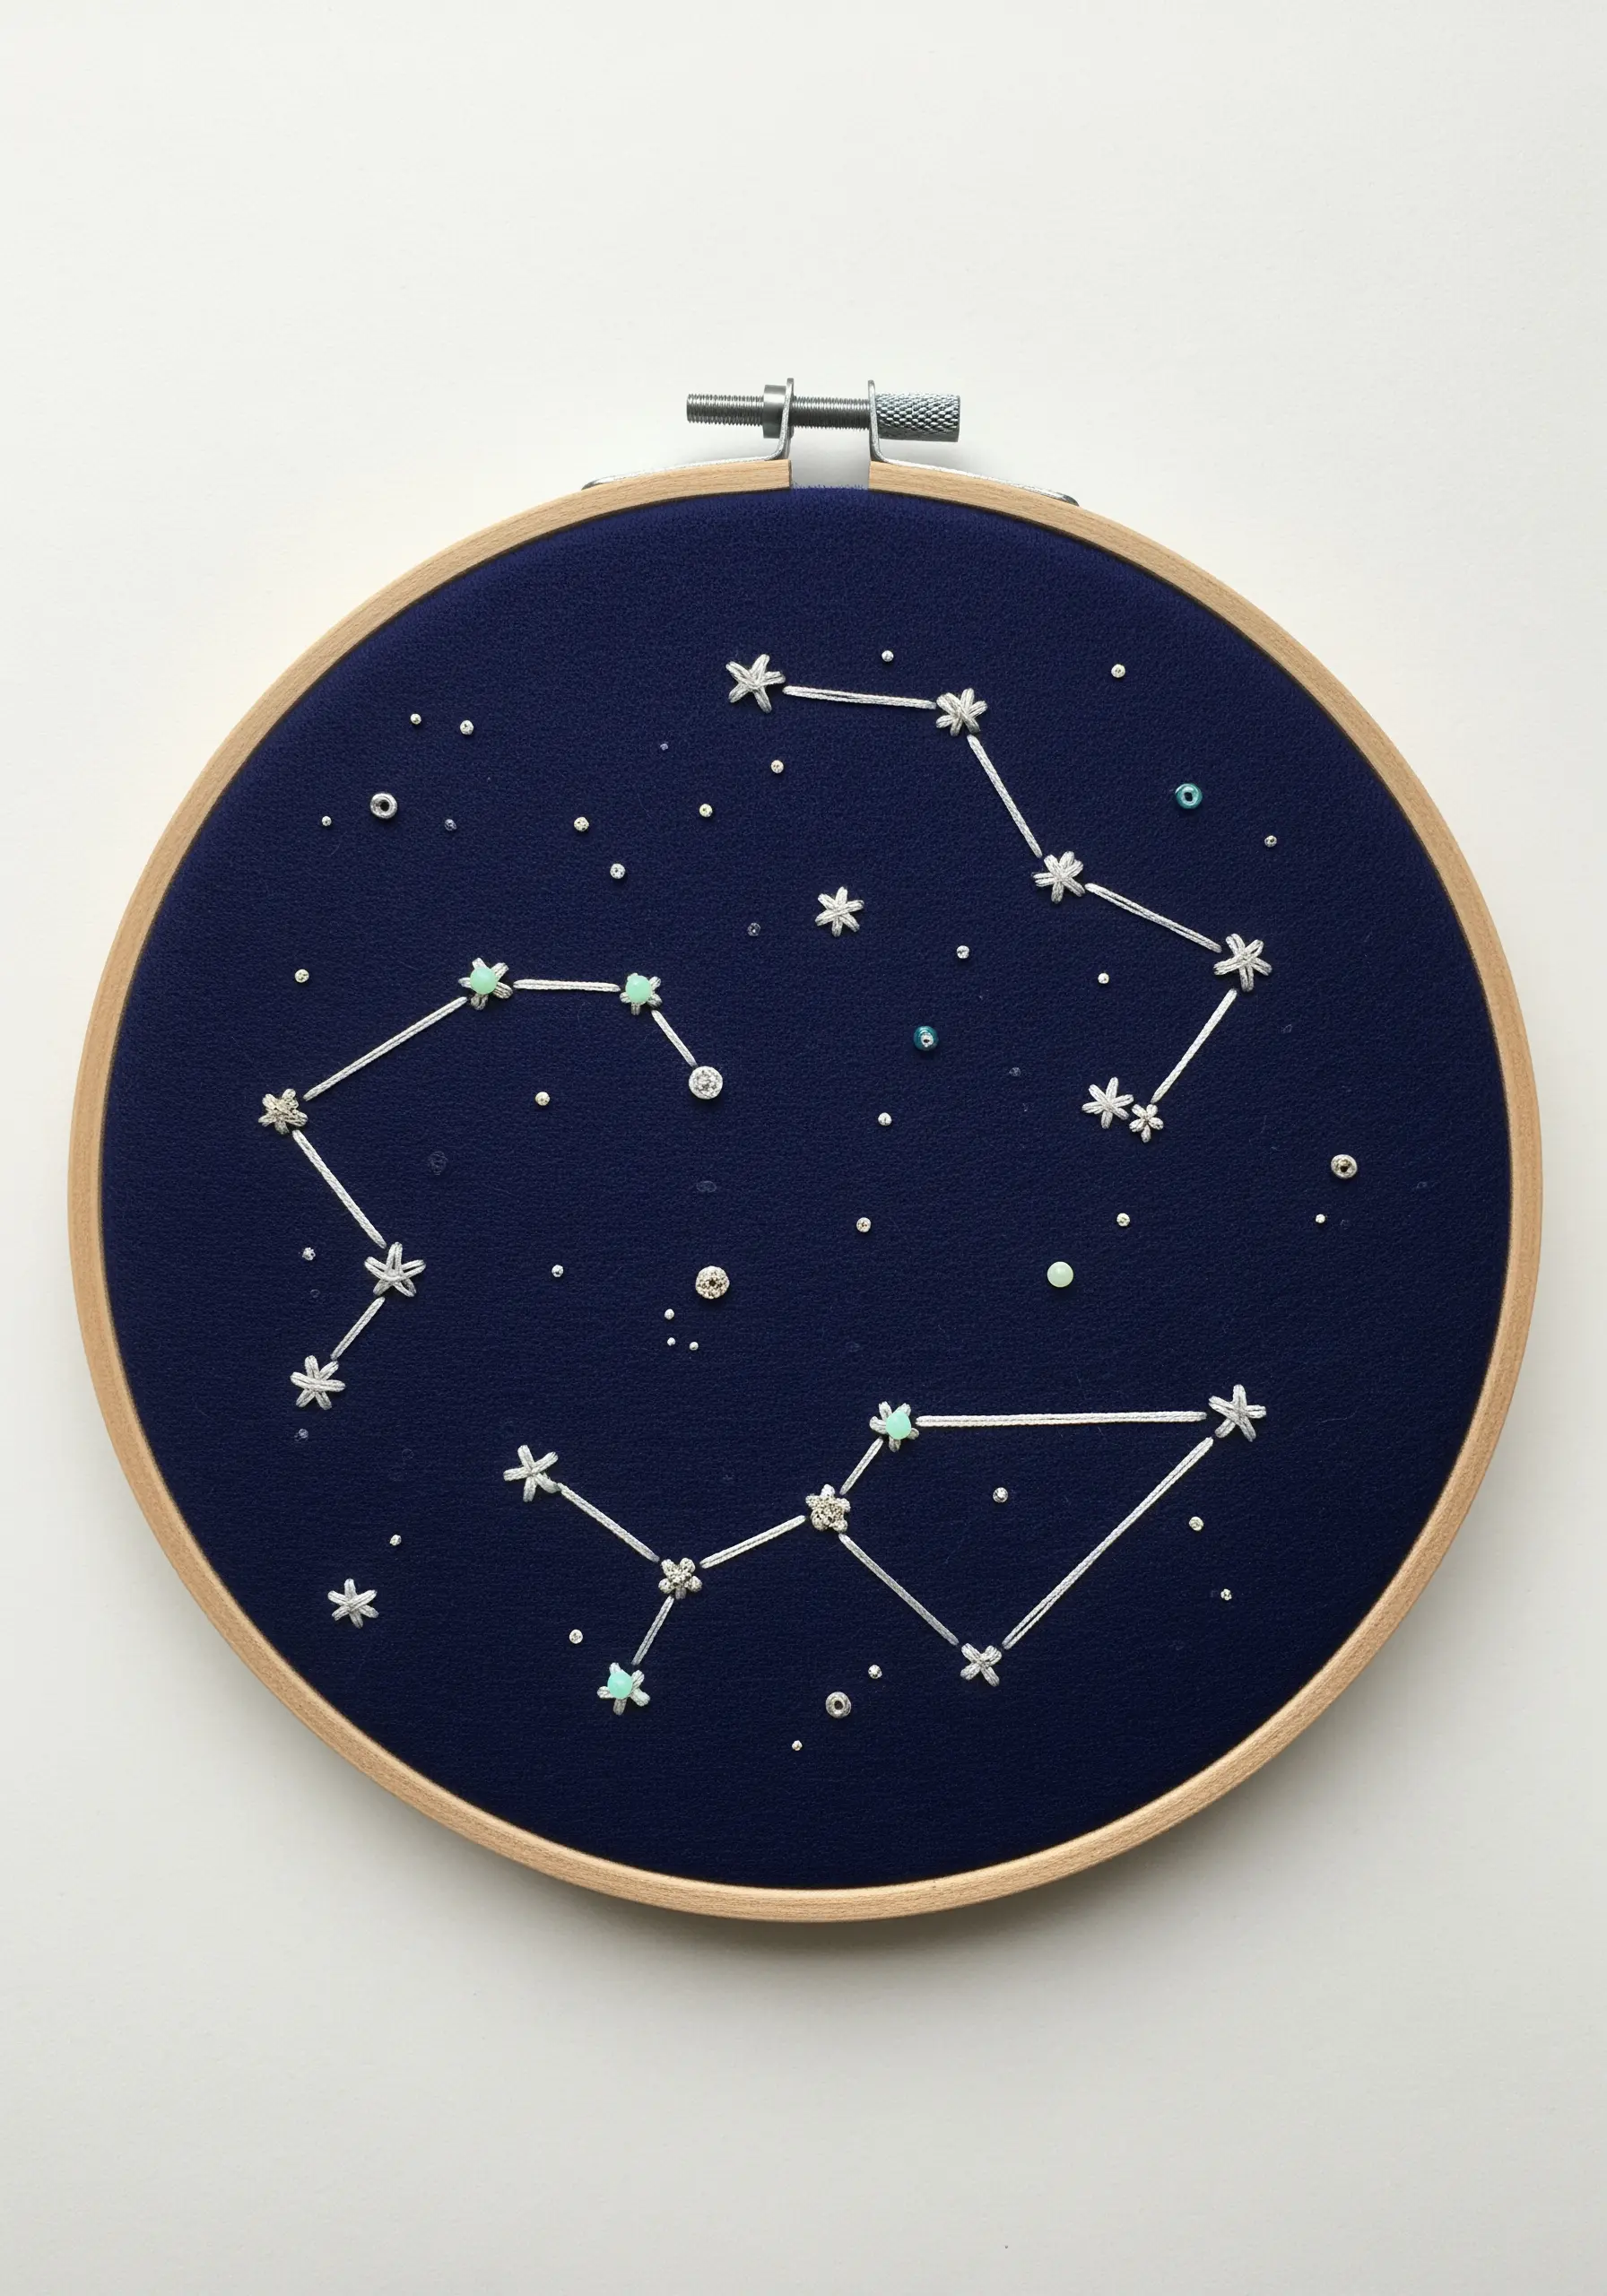
On a dark navy or black fabric, map out your favorite constellations.
Use a single strand of metallic silver thread and a simple backstitch to draw the connecting lines.
At each point where a star should be, secure a single, tiny seed bead or a small, neat French knot.
This subtle addition of beads catches the light, making your minimal sky moon designs shimmer with a delicate, celestial sparkle.
10. Create a Felted Stone Mobile for Natural Serenity
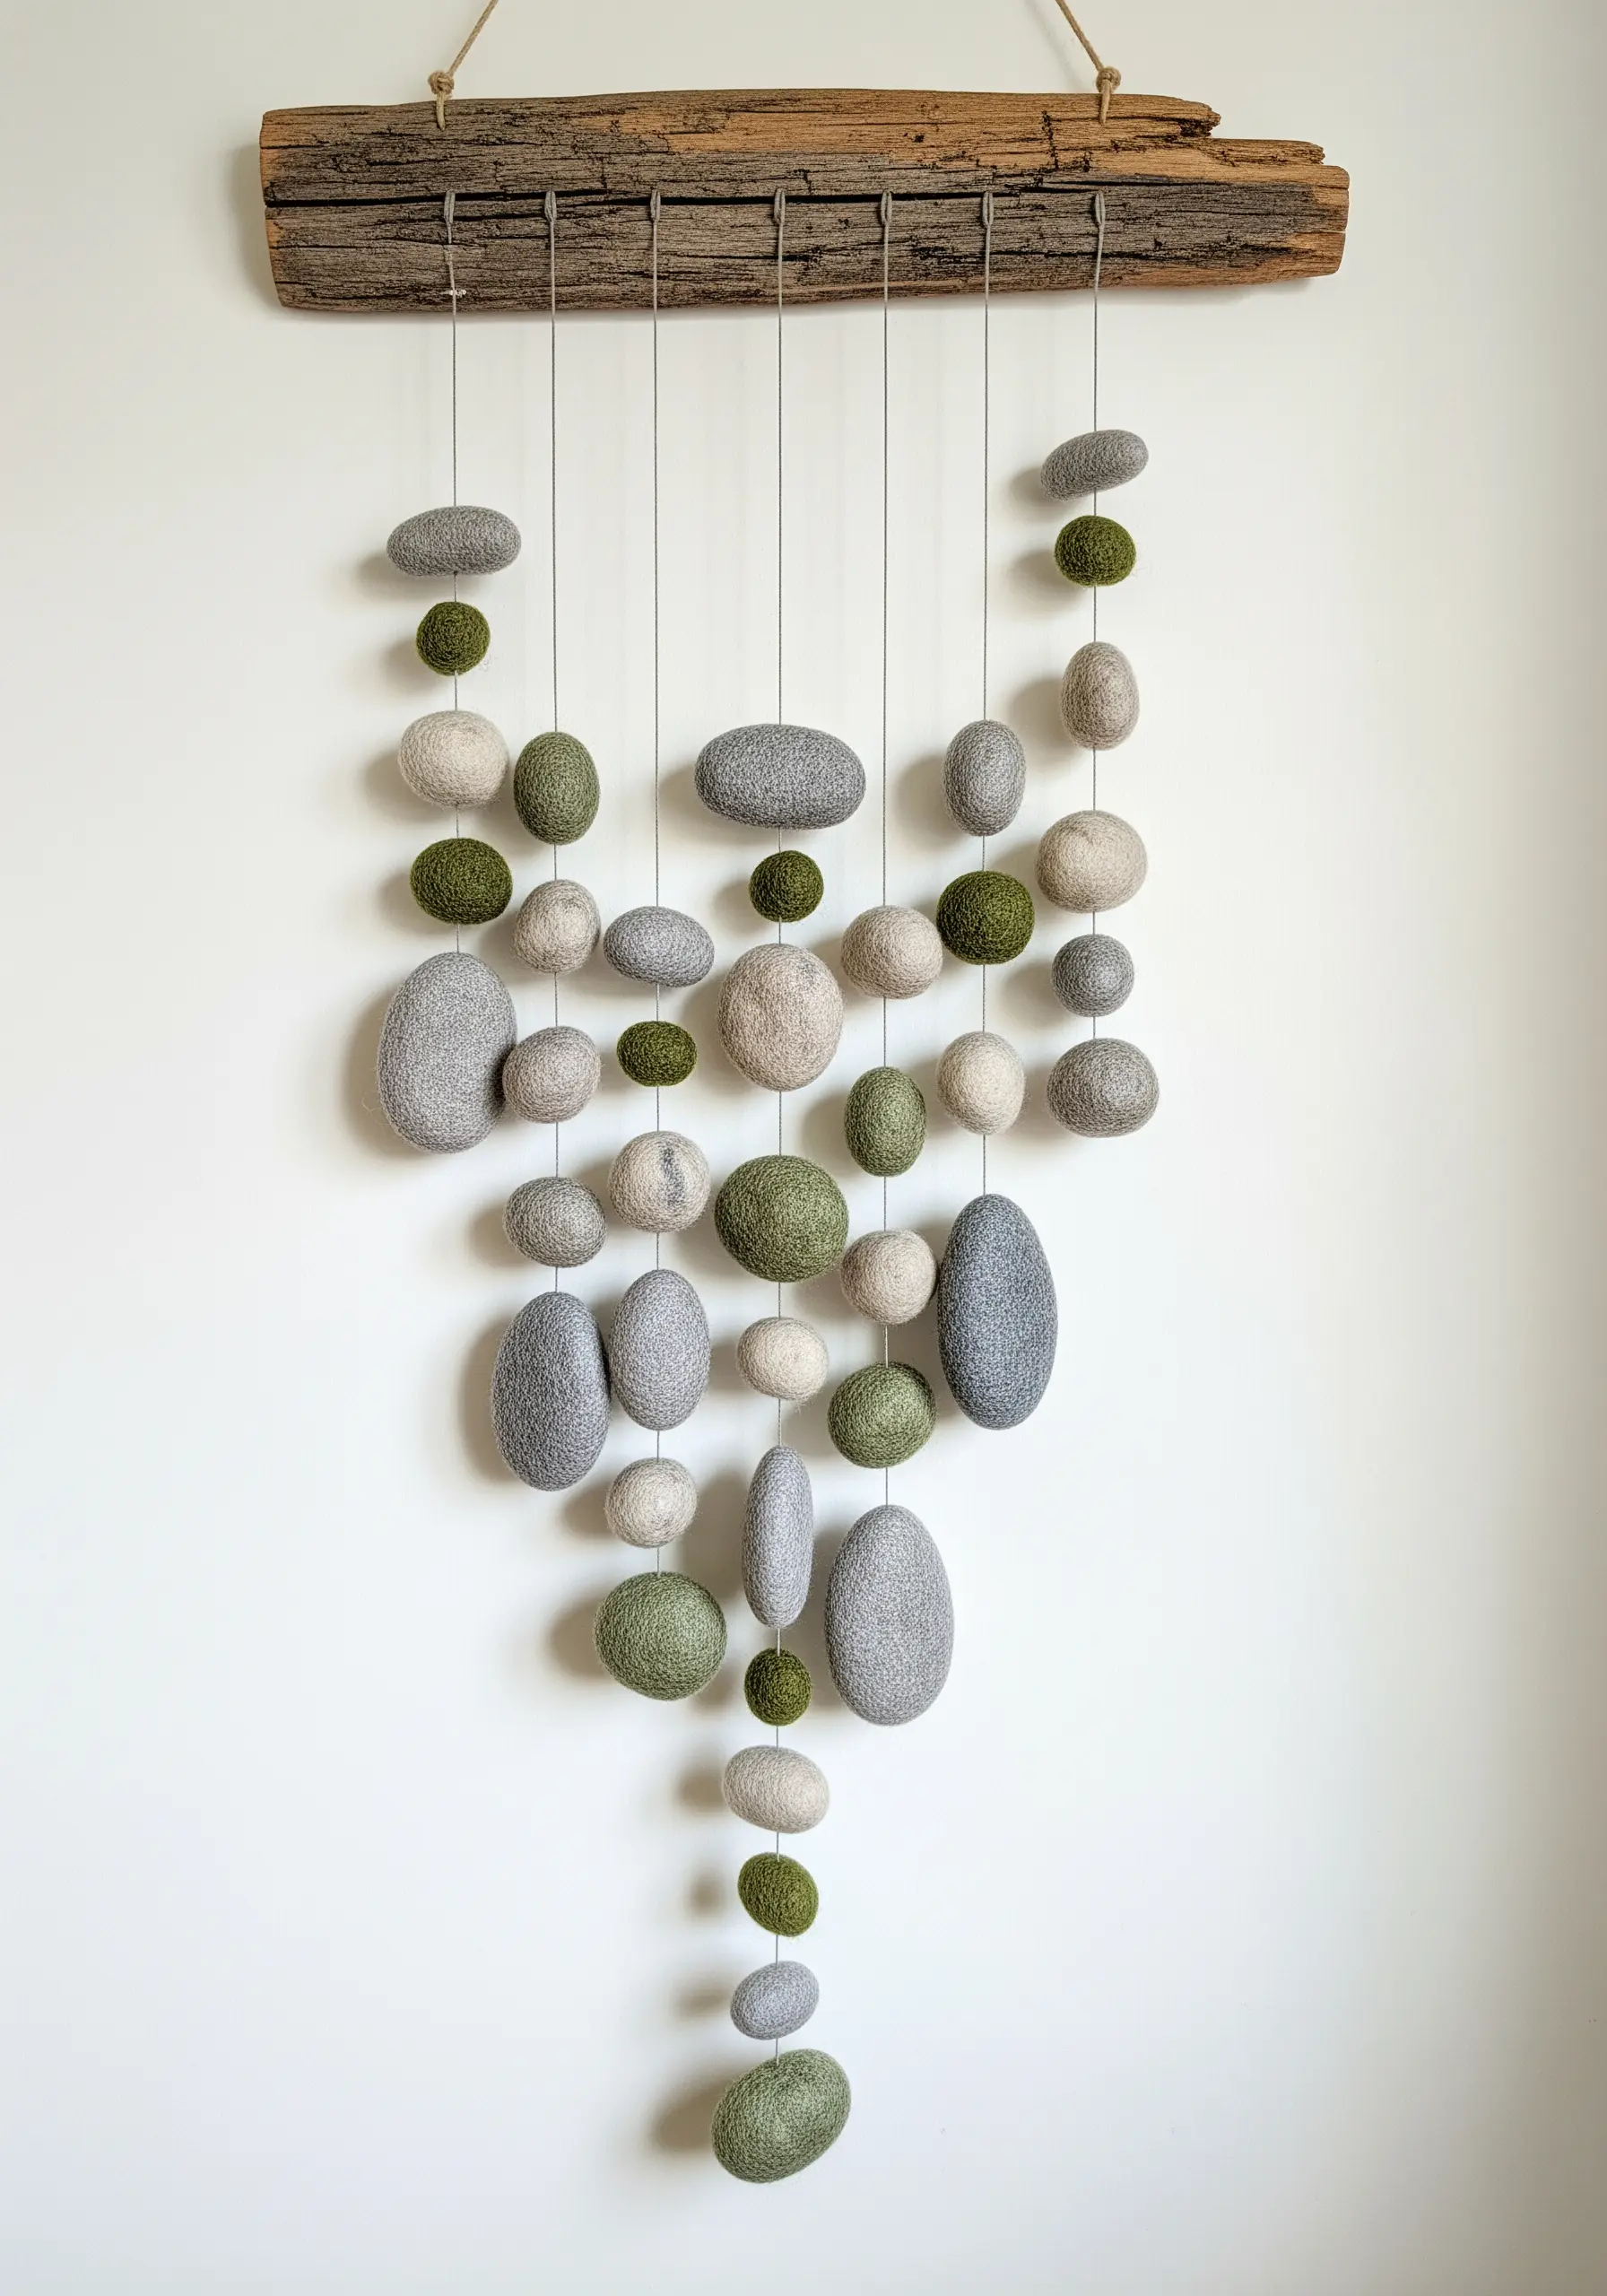
Use needle felting to craft soft, lightweight ‘stones’ from wool roving in earthy tones.
To achieve a realistic, variegated look, layer small tufts of different colored wool before you begin felting.
Felt each shape firmly until it is dense and smooth to the touch.
String your finished stones at varying lengths from a piece of weathered driftwood to create balanced, handmade embroidery touches that make every room feel natural.
11. A Dimensional Honeycomb with Appliquéd Details
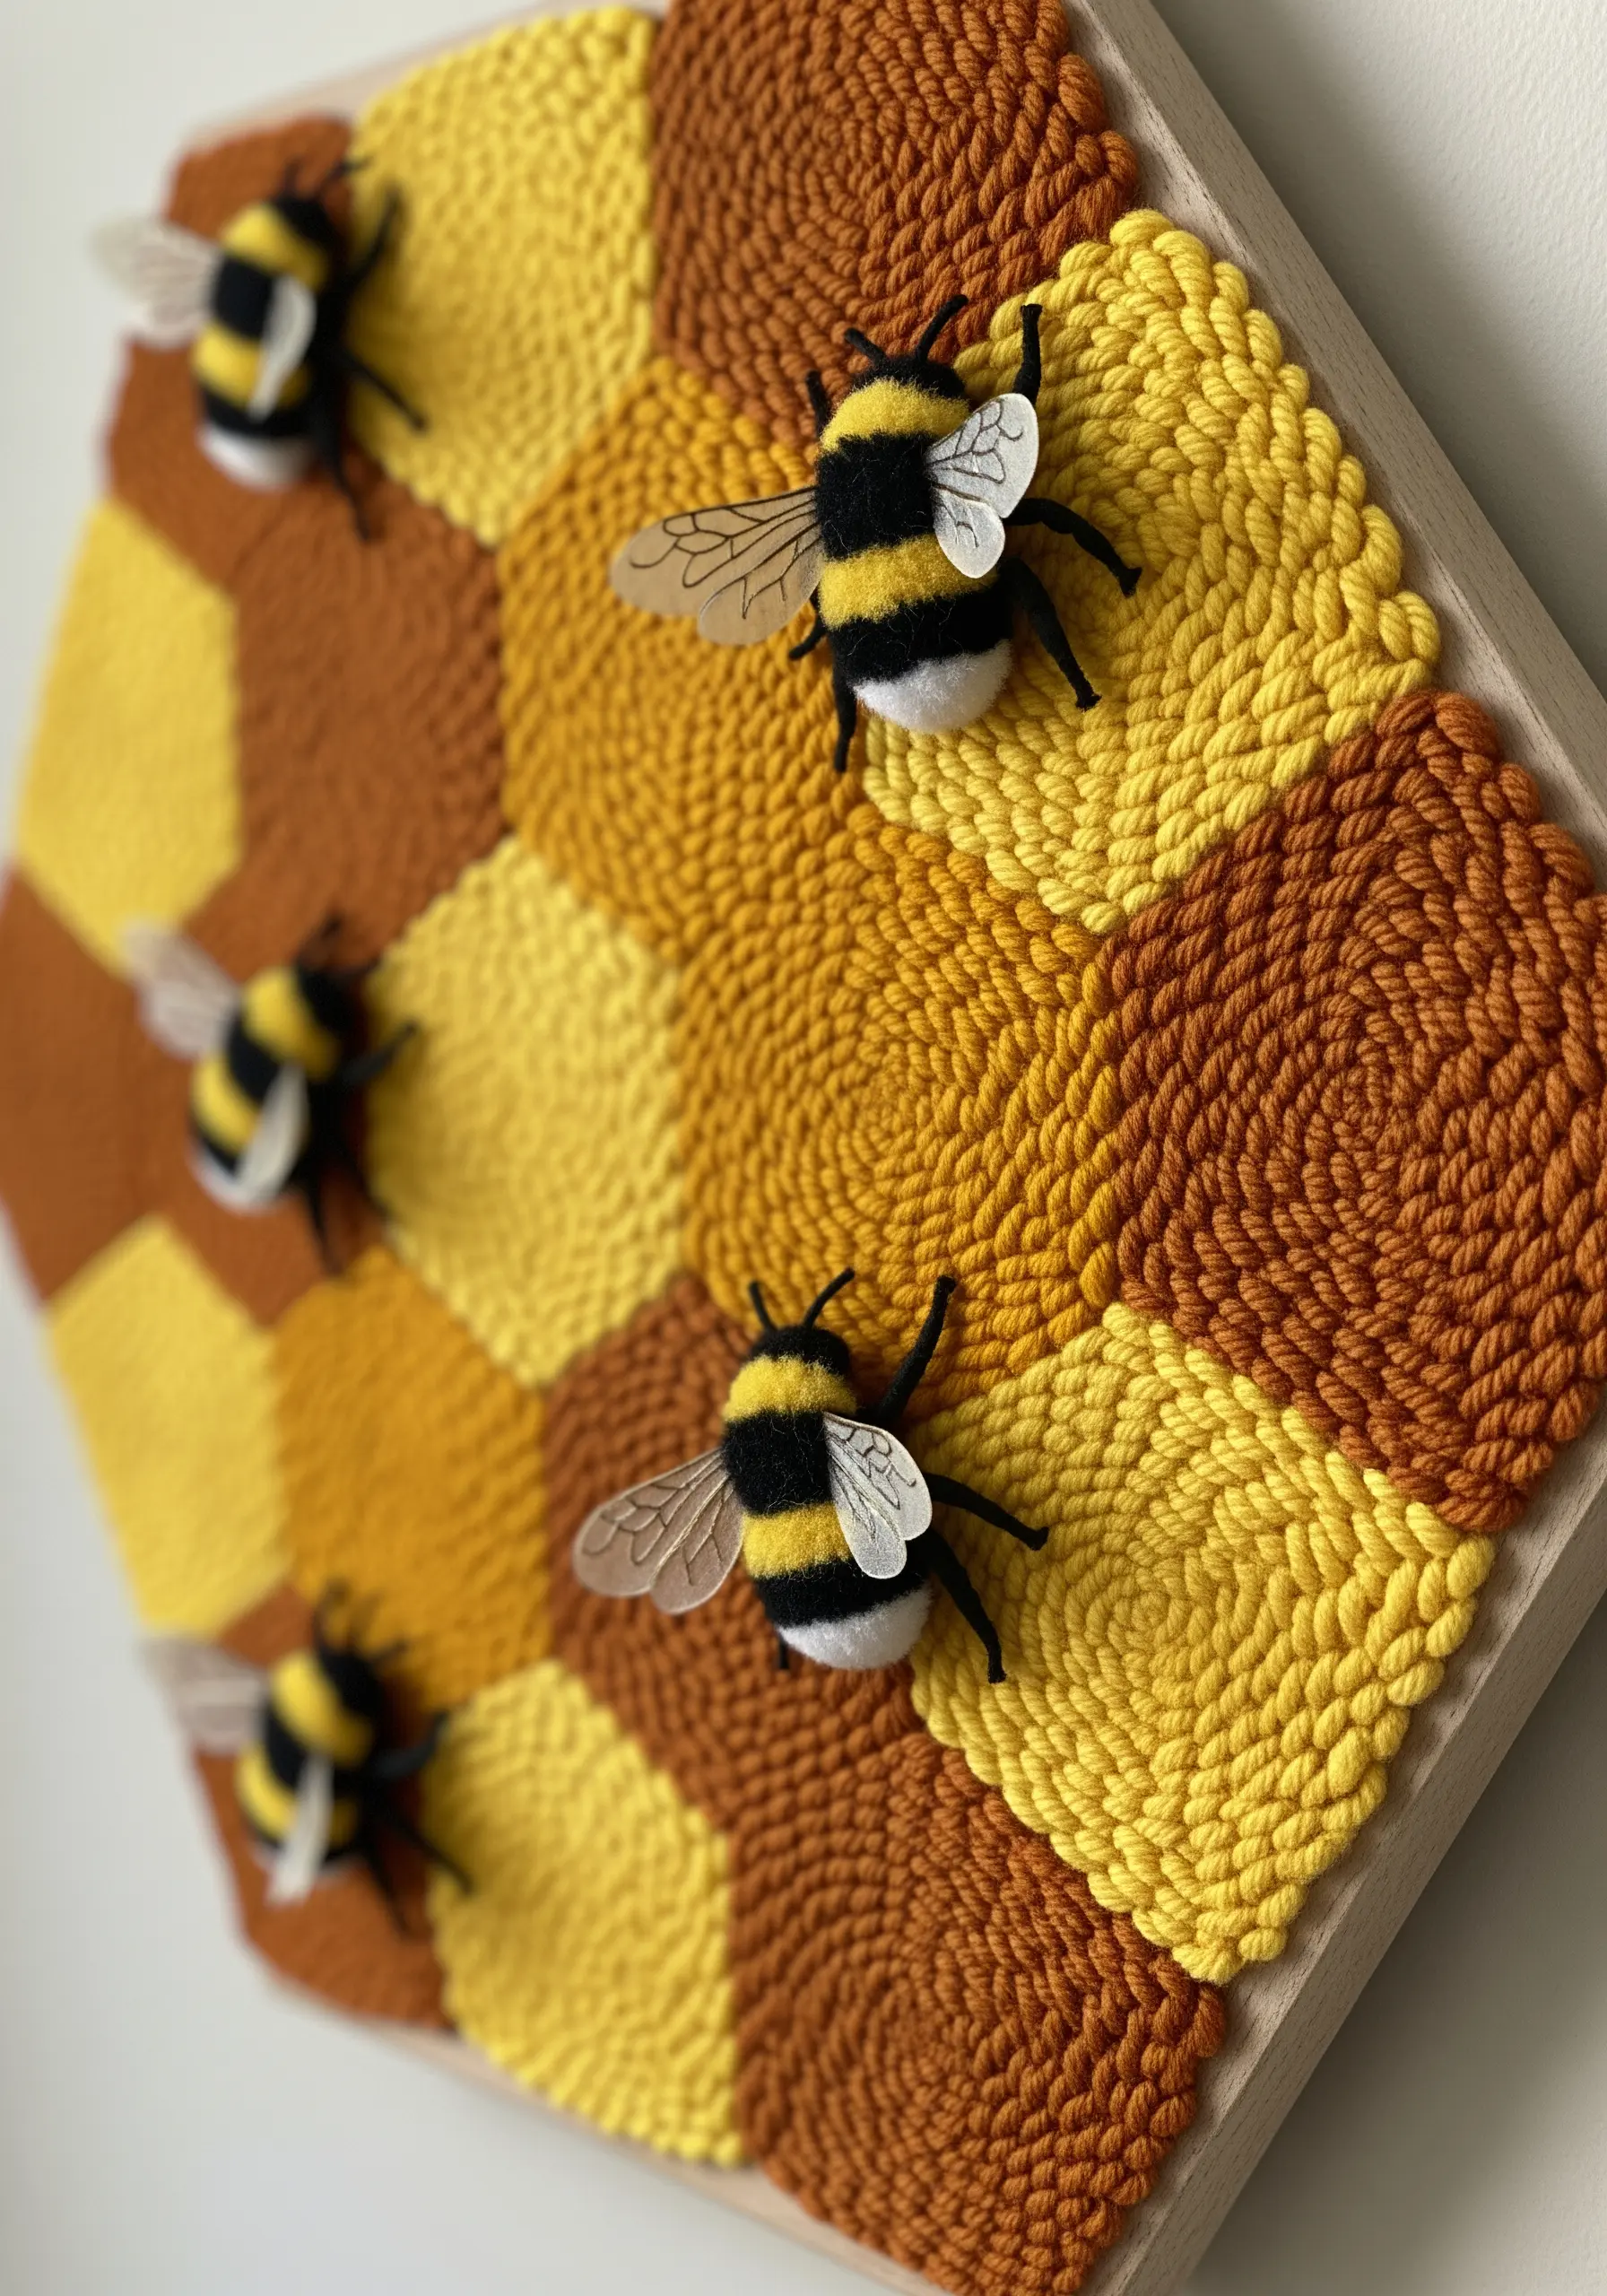
Start by creating a geometric honeycomb pattern with punch needle, using clean blocks of color.
To bring the piece to life, add three-dimensional bees crafted from felted wool pom-poms.
For the wings, use a sheer material like vellum or organza for a delicate, translucent effect.
This mix of flat texture and 3D appliqué creates a playful, interactive piece that elevates simple realistic animal insect embroidery patterns.
12. Weave a Meditative Mandala on a Circular Loom
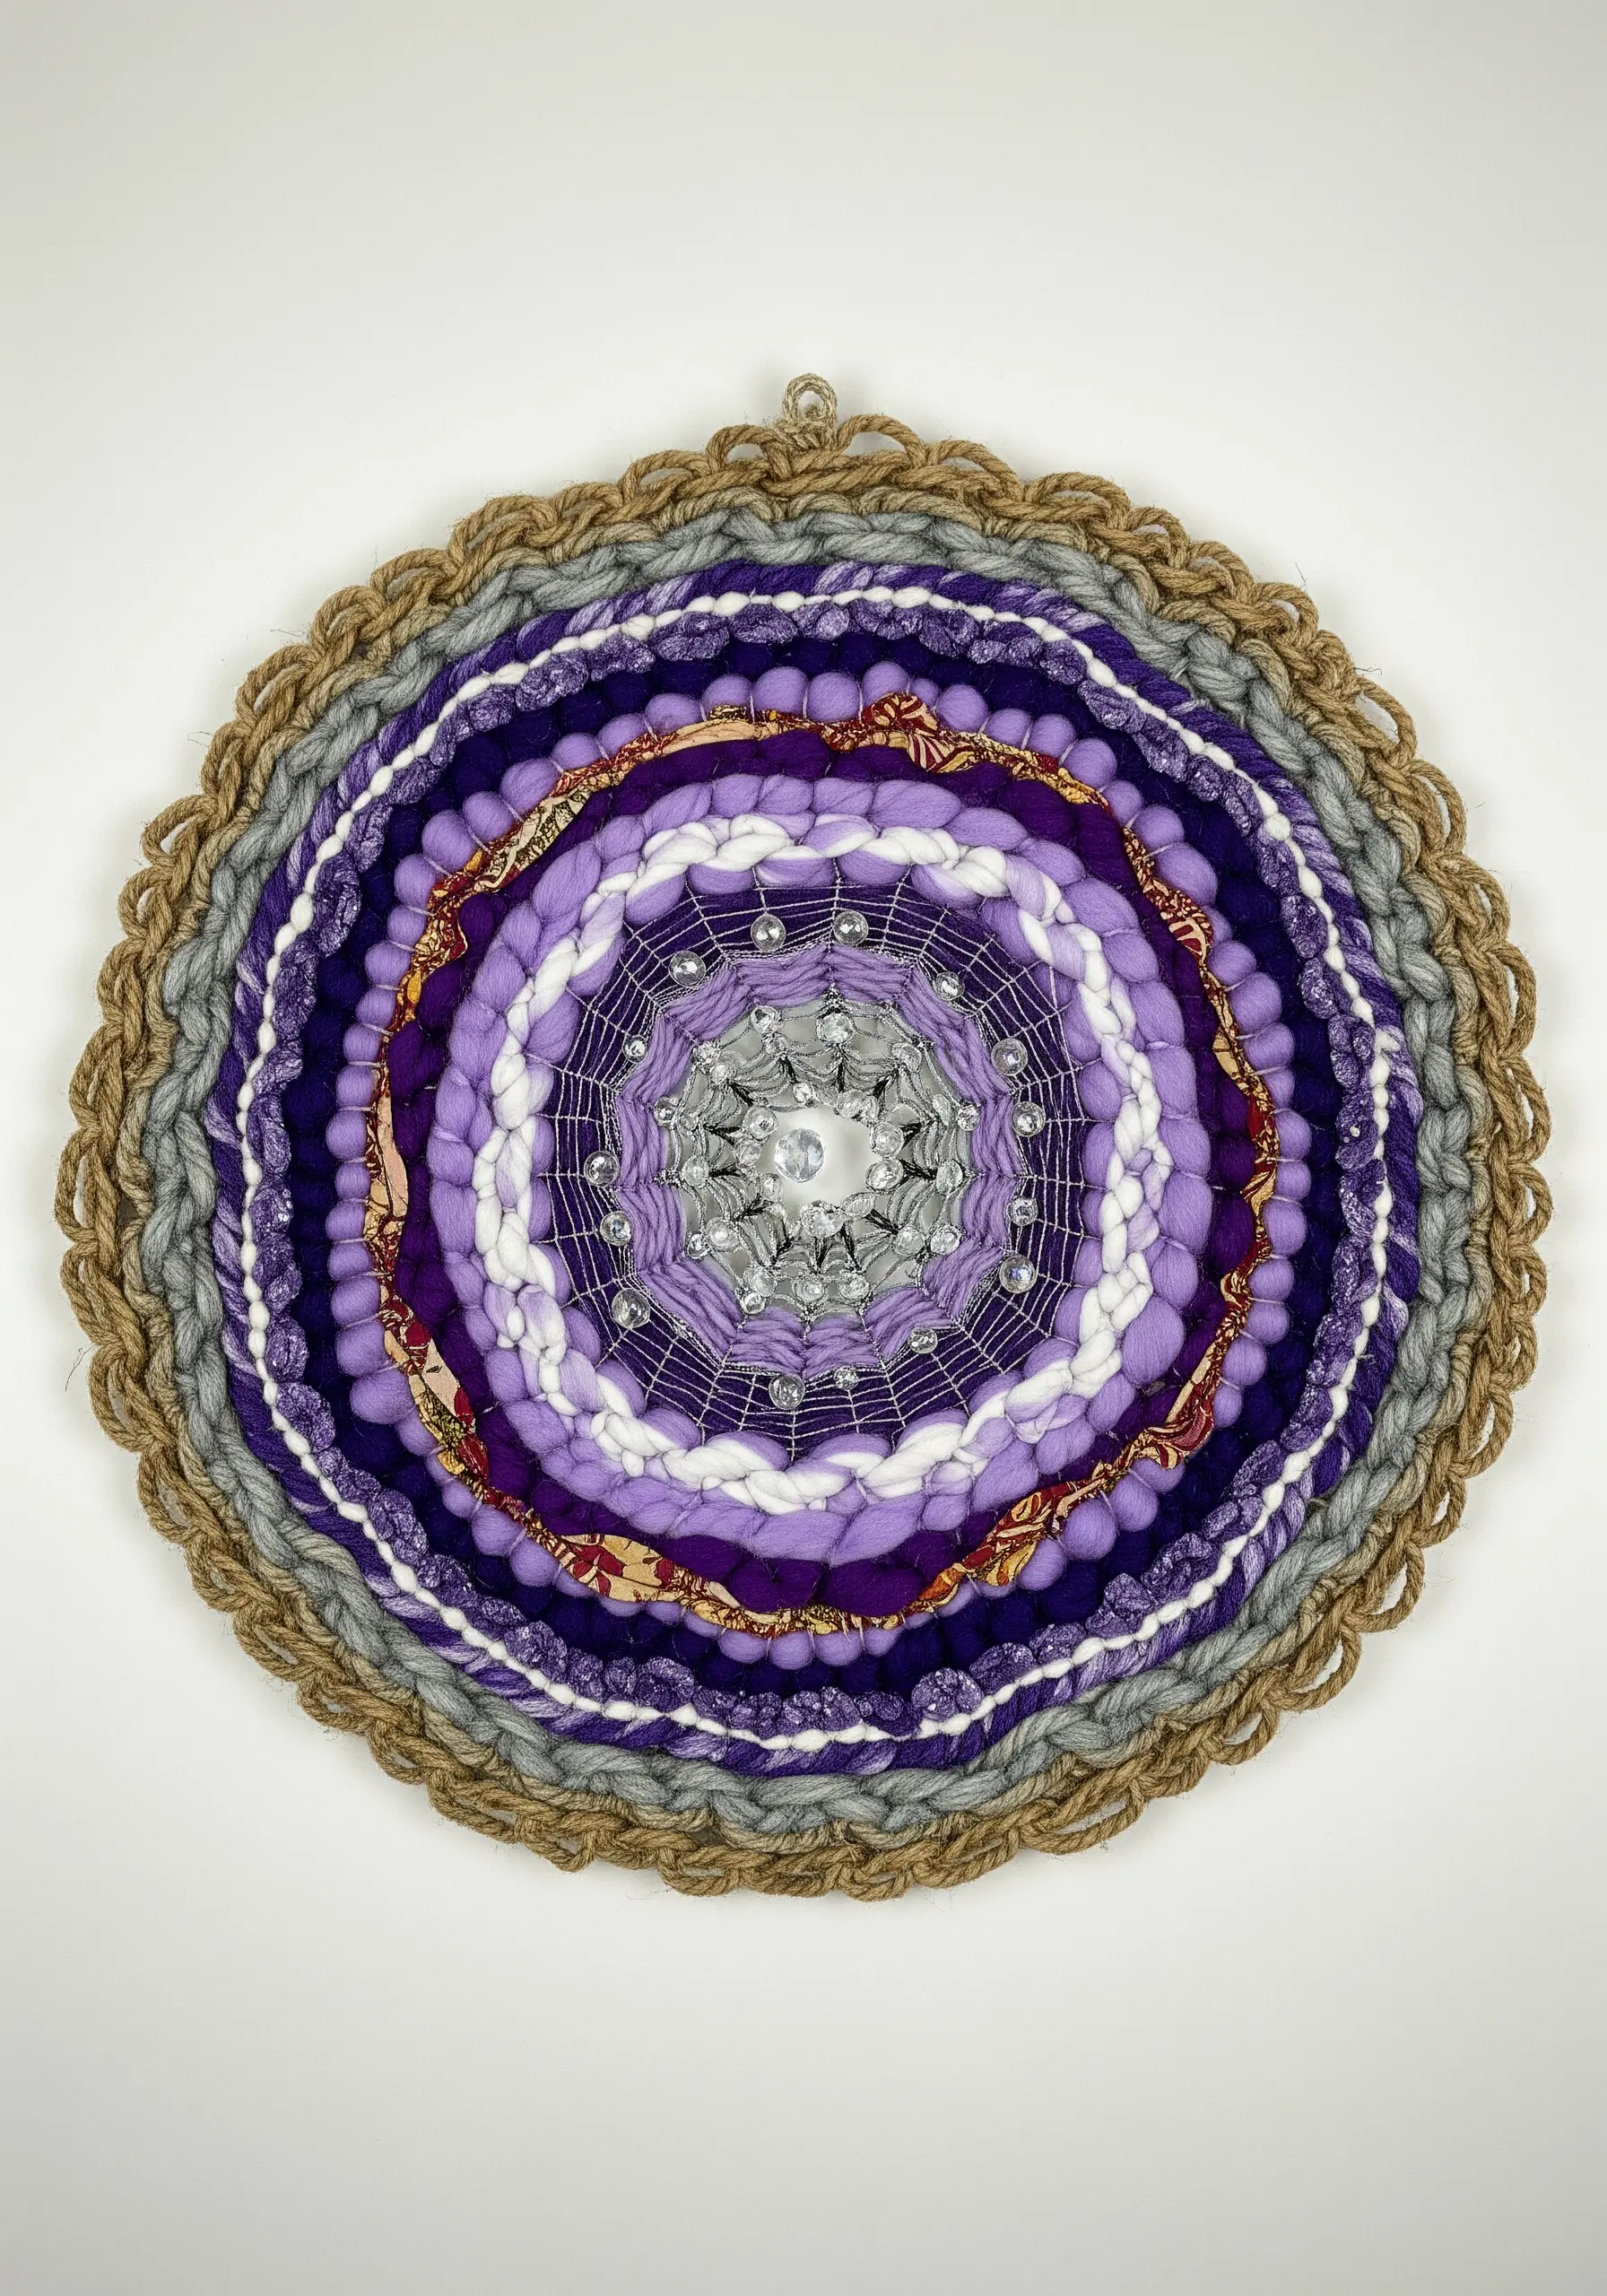
Use an embroidery hoop or a dedicated circular loom as your base for a woven mandala.
Create visual rhythm by dedicating each concentric circle to a different material: chunky wool roving, then thin cotton, then strips of fabric.
For a radiant focal point, weave metallic thread or small beads directly into the warp threads near the center.
The process itself feels as calming as the finished design.
13. Frame a Focal Point with Radiant Macrame
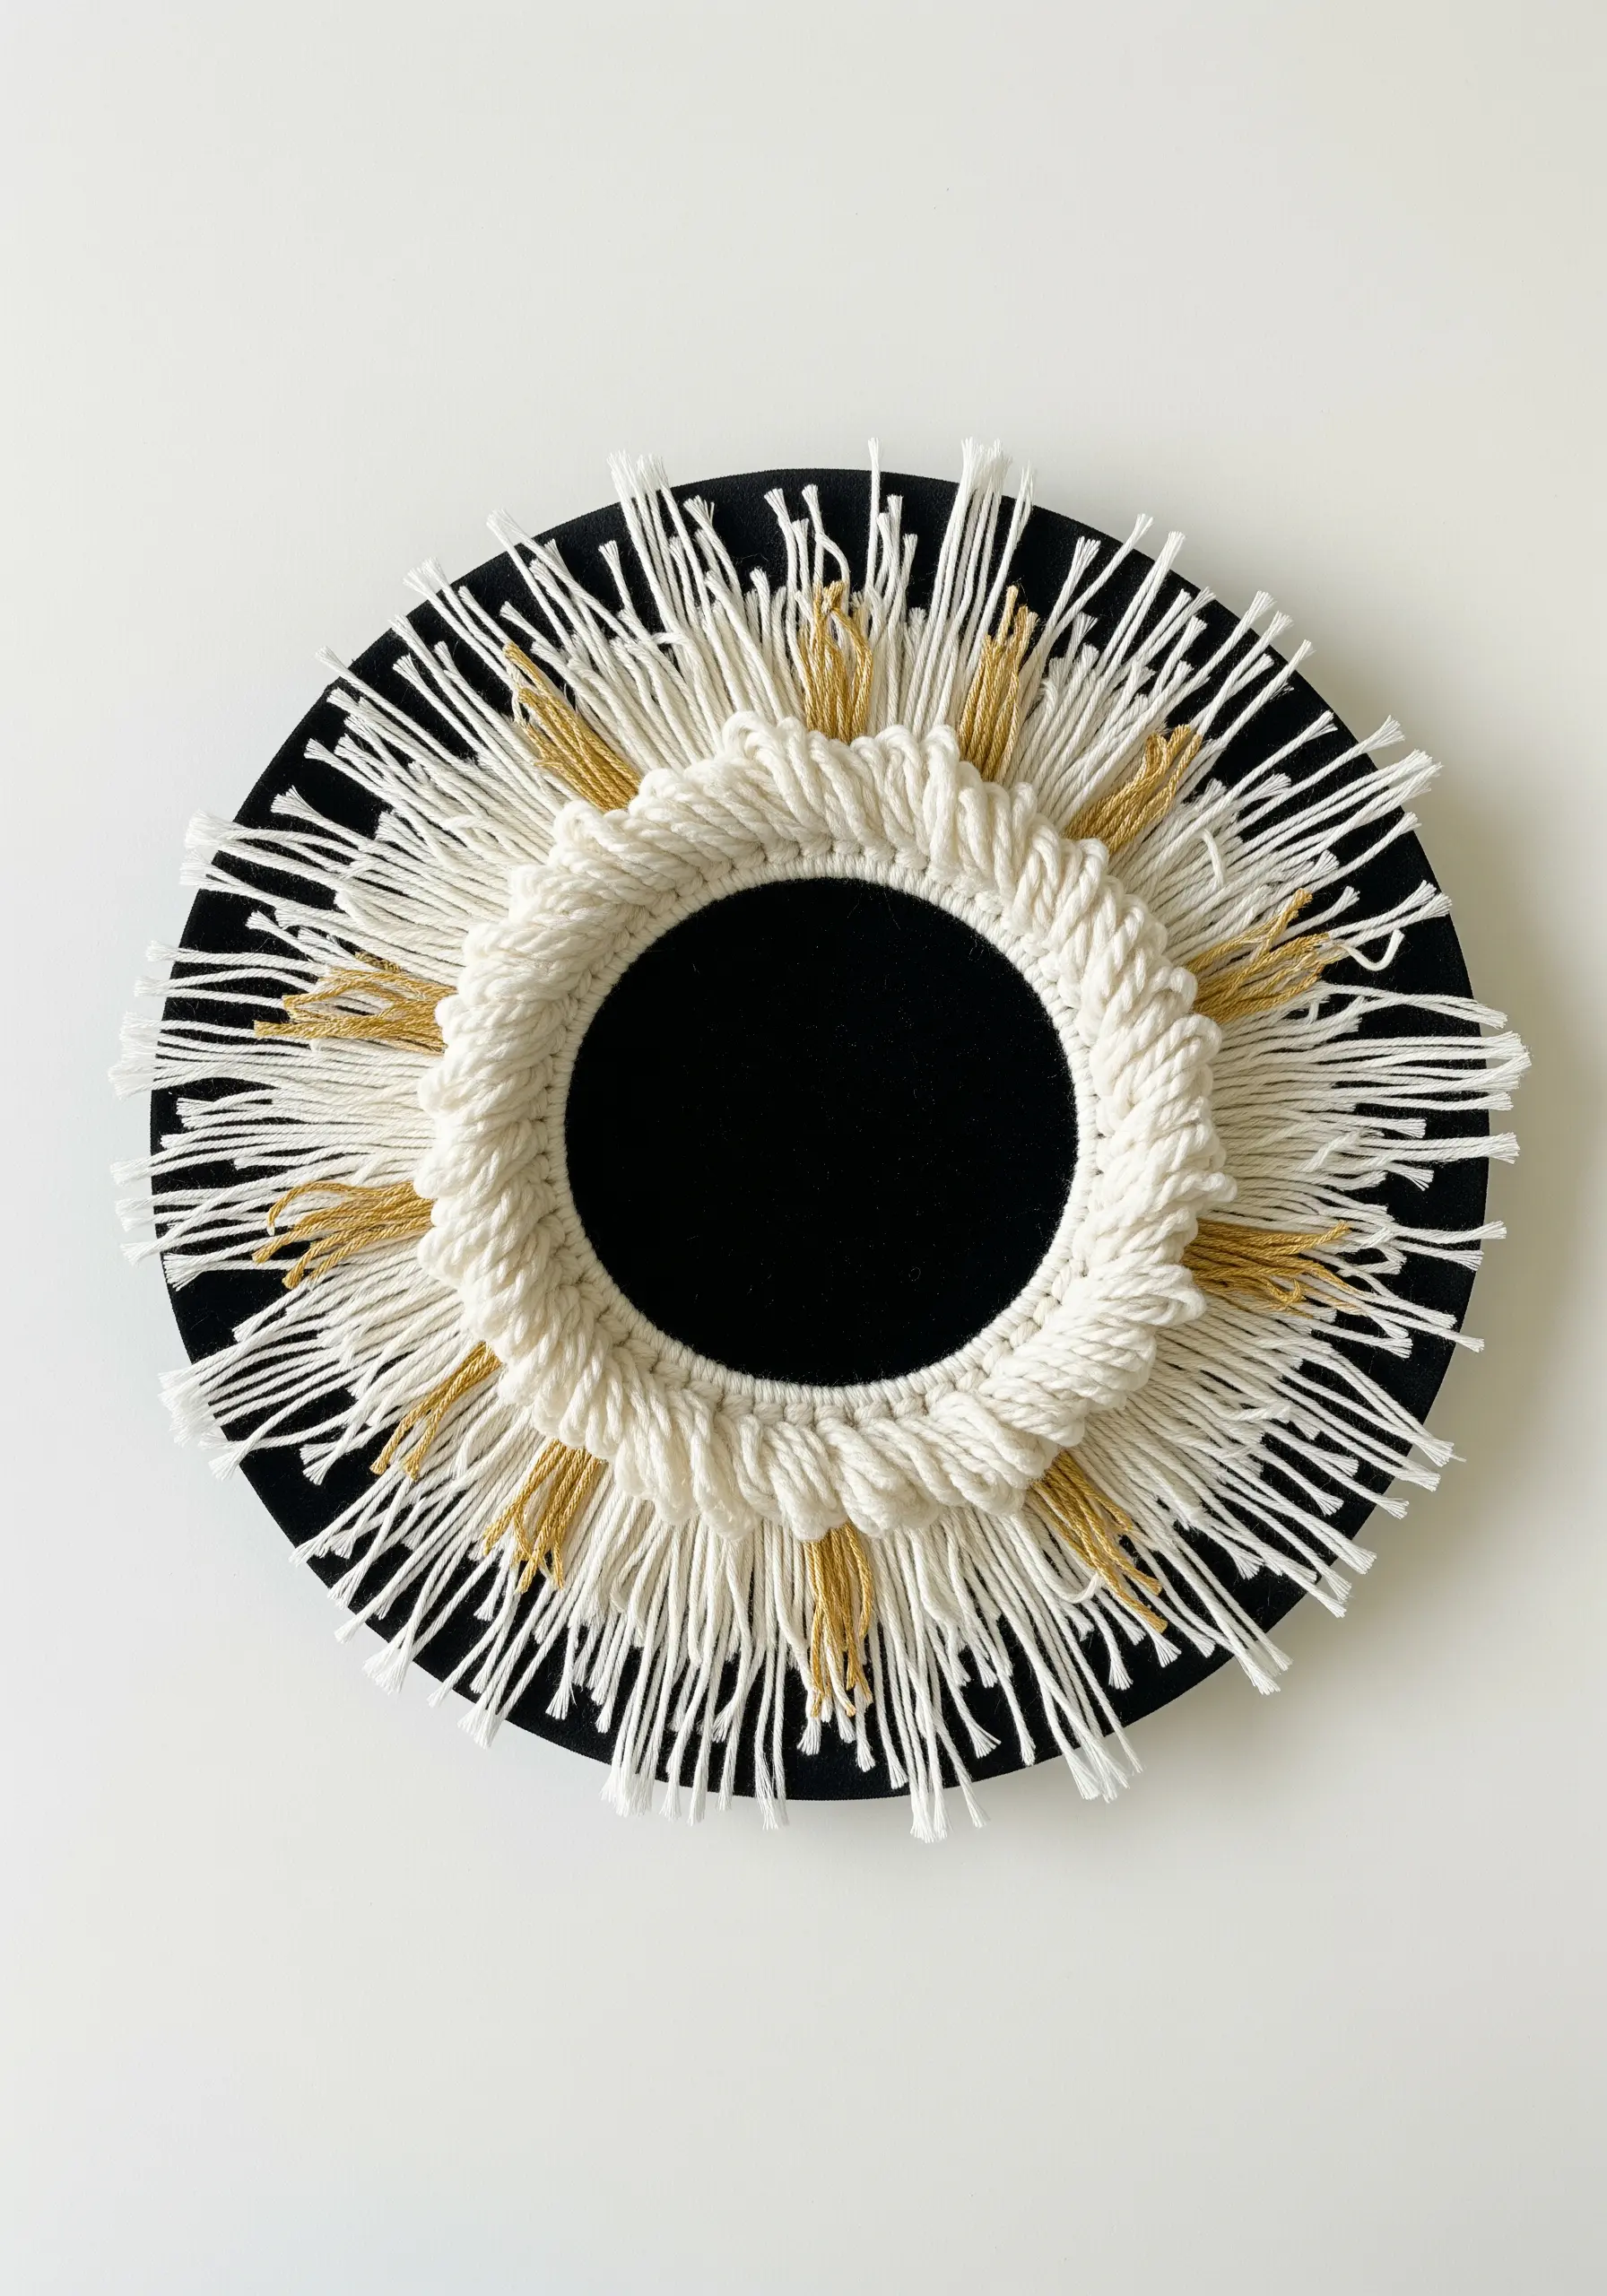
Transform a simple circular mirror or painted wooden disk into a statement piece.
Attach your cords to the central ring using Lark’s Head knots, then create a solid inner border with a series of tight Clove Hitch knots.
Let the remaining cords hang loose and trim them evenly to create a sunburst effect.
Adding wraps of a contrasting color, like gold, draws the eye and adds a polished finish to these playful yarn wall art crafts.
14. A Tactile Sampler of Earth-Toned Weaving
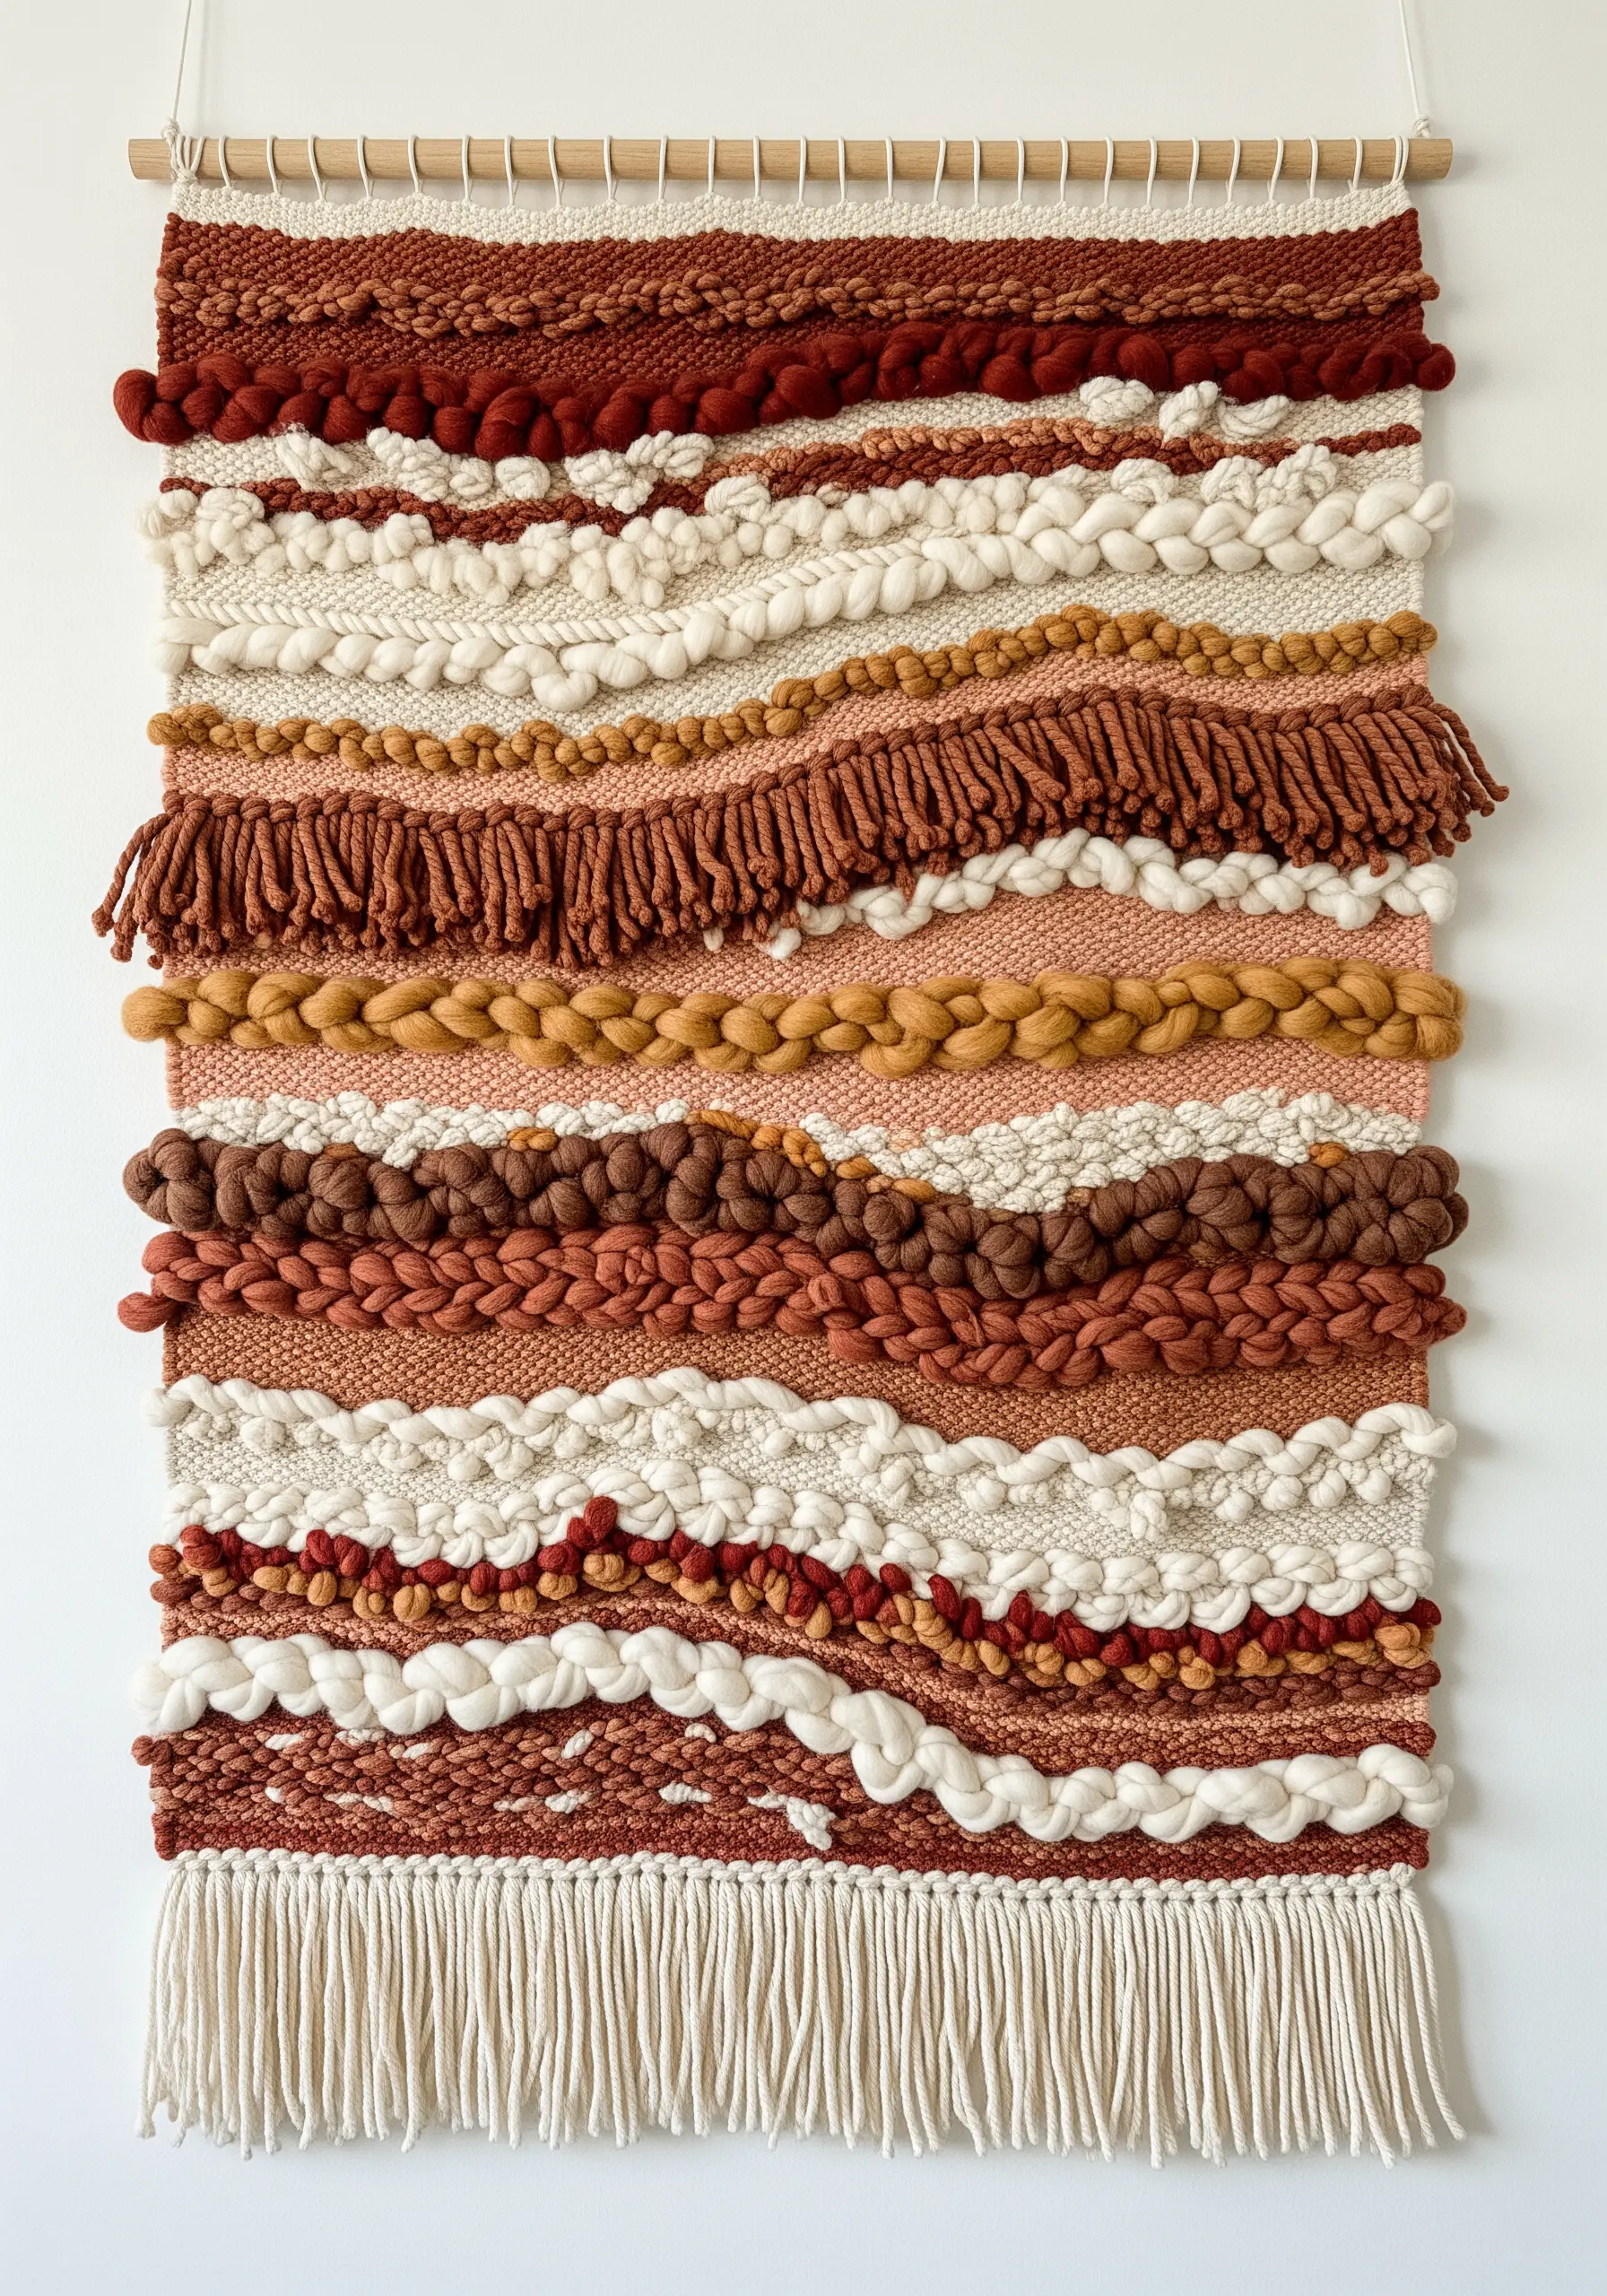
Design a wall hanging that celebrates texture by dedicating each horizontal band to a different technique.
Alternate between a smooth tabby weave, chunky soumak braids, fluffy rya knots, and sections of thick, unspun wool roving.
By sticking to a cohesive, earthy color palette, you ensure the varied textures feel harmonious and intentional, not chaotic.
This approach results in dynamic, high-texture fabric collage embroidery projects that invite touch.
15. Build a Lush Wall of Macrame Foliage
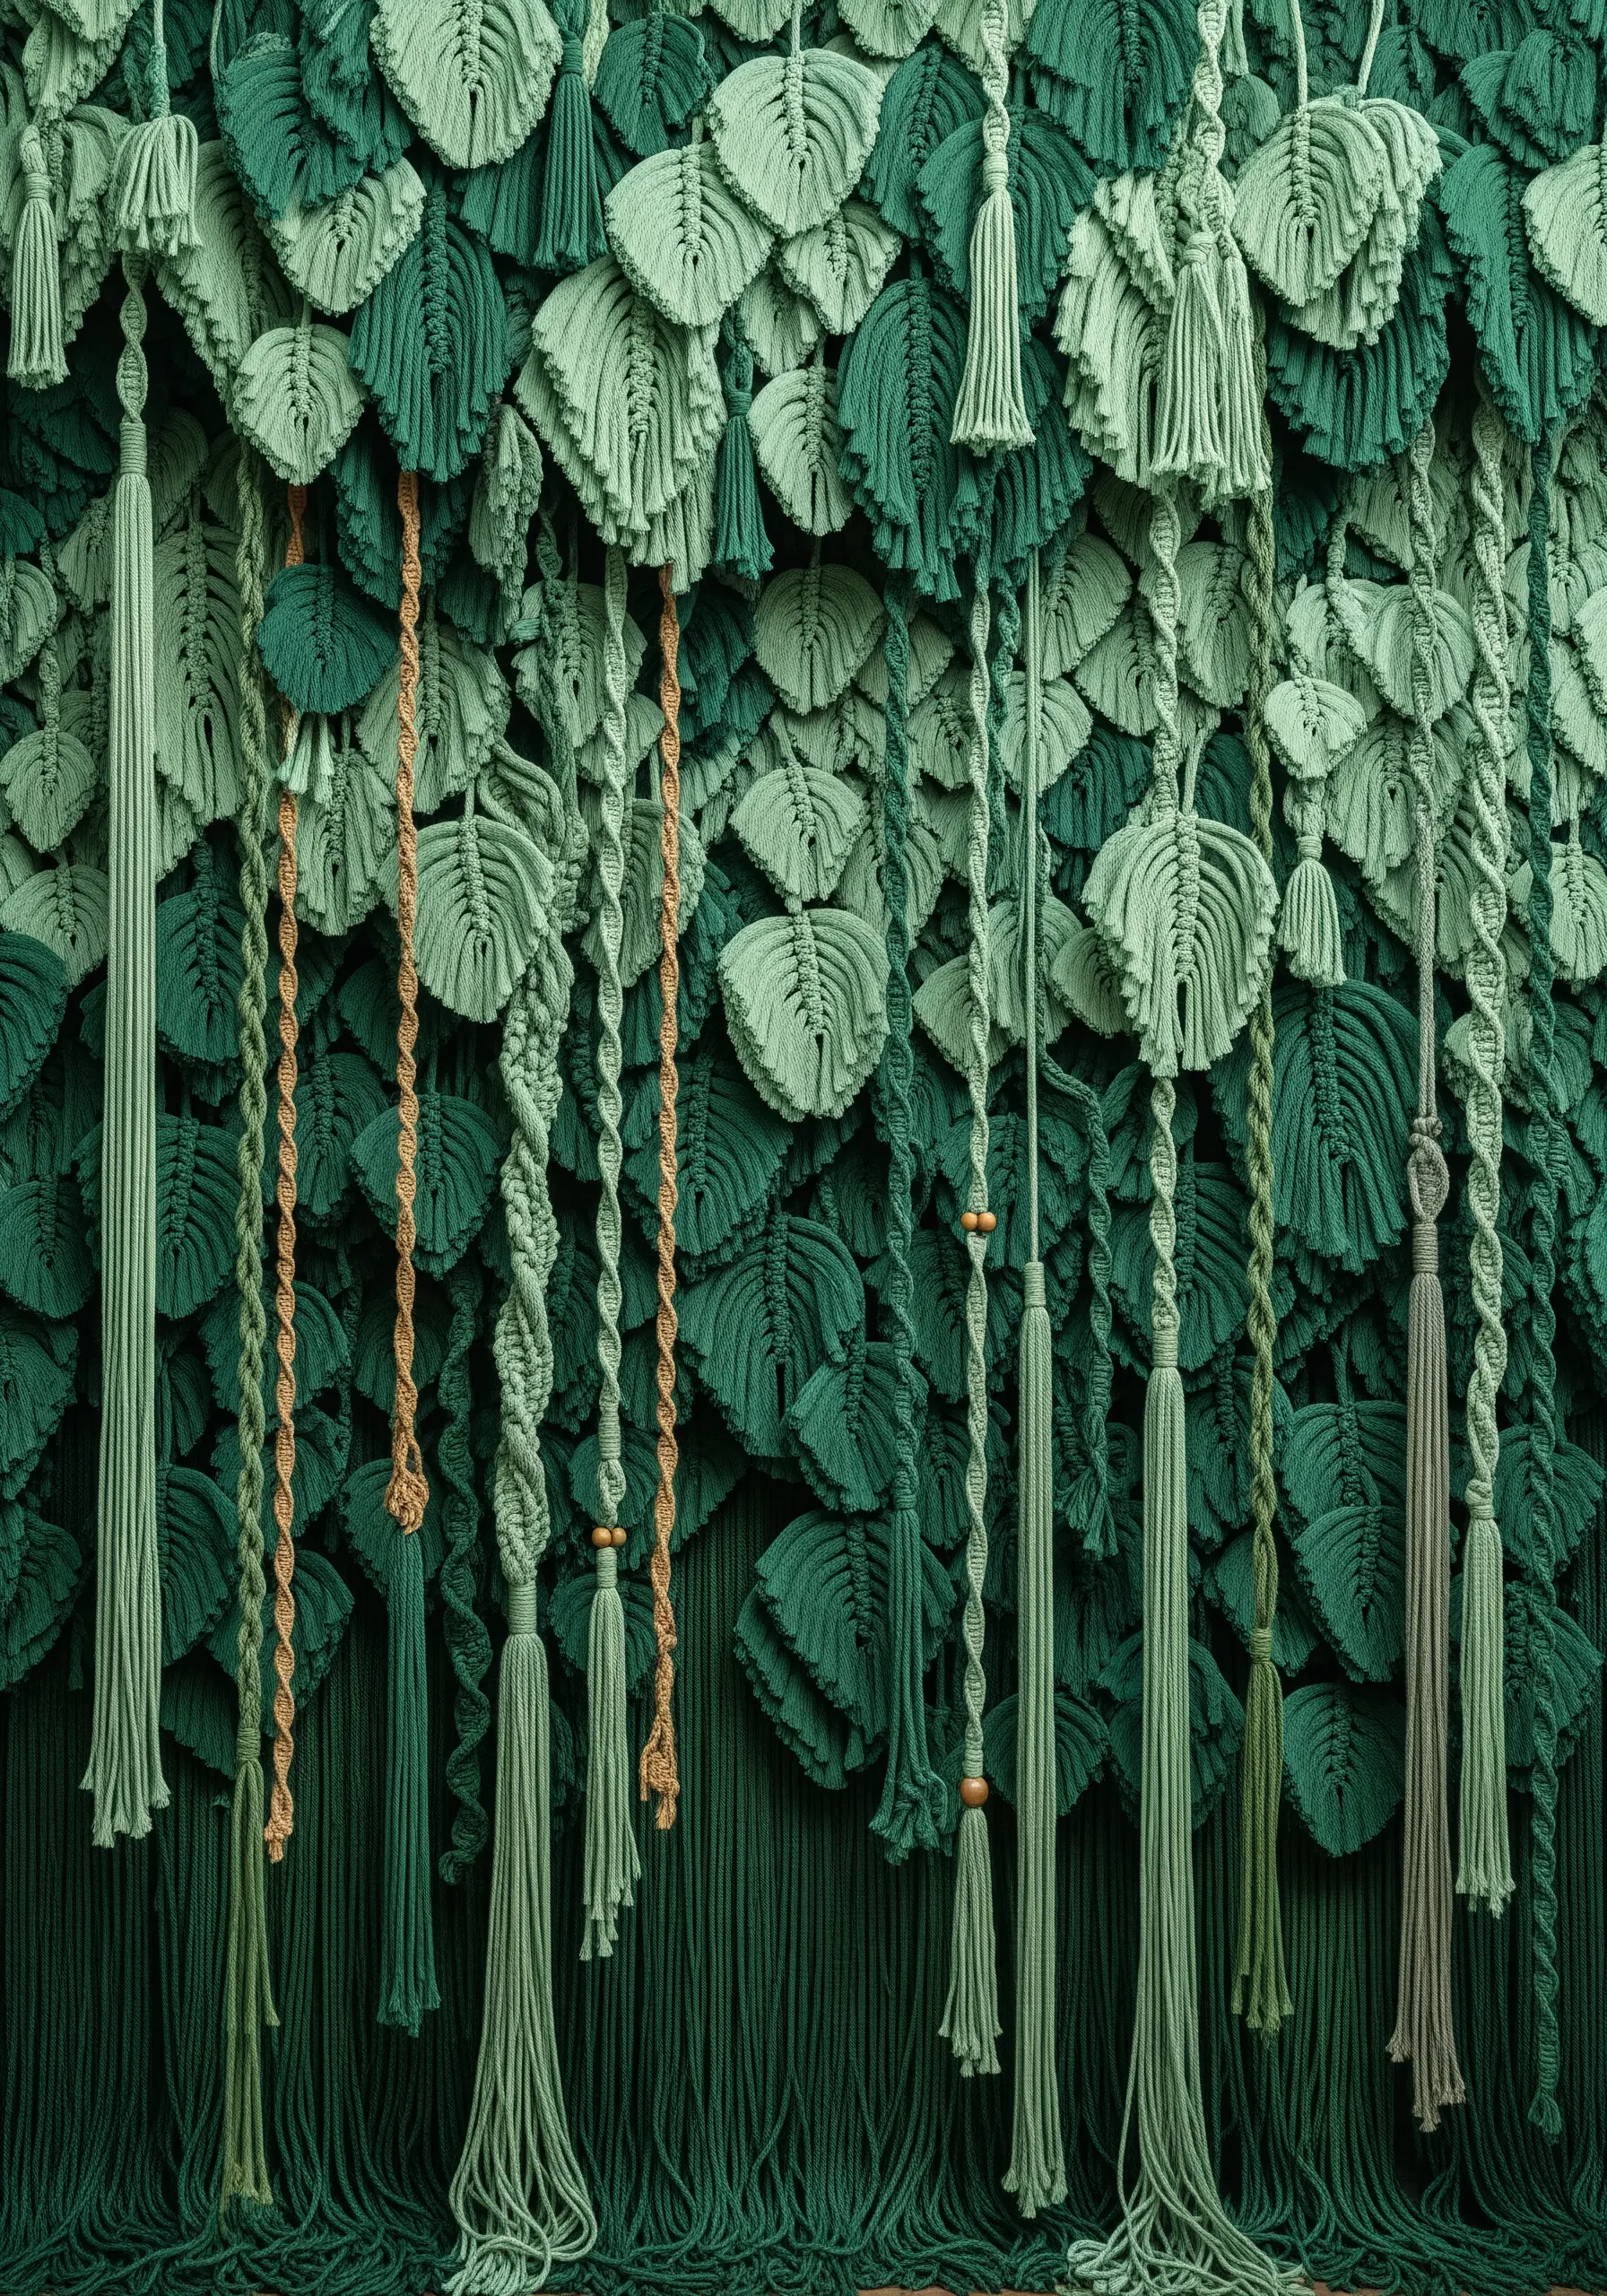
Master a single macrame leaf knot (often a variation of the double half-hitch) to create an entire wall of cascading greenery.
Use several shades of green cord and arrange the leaves to create a natural, ombré effect from top to bottom.
For crisp, well-defined leaf shapes, lightly coat the finished leaves with a fabric stiffener and trim the edges sharply once dry.
This technique is perfect for trying out the rare leaf patterns you’ve probably never tried.
16. A Hybrid Butterfly Wing Fusing Macrame and Punch Needle
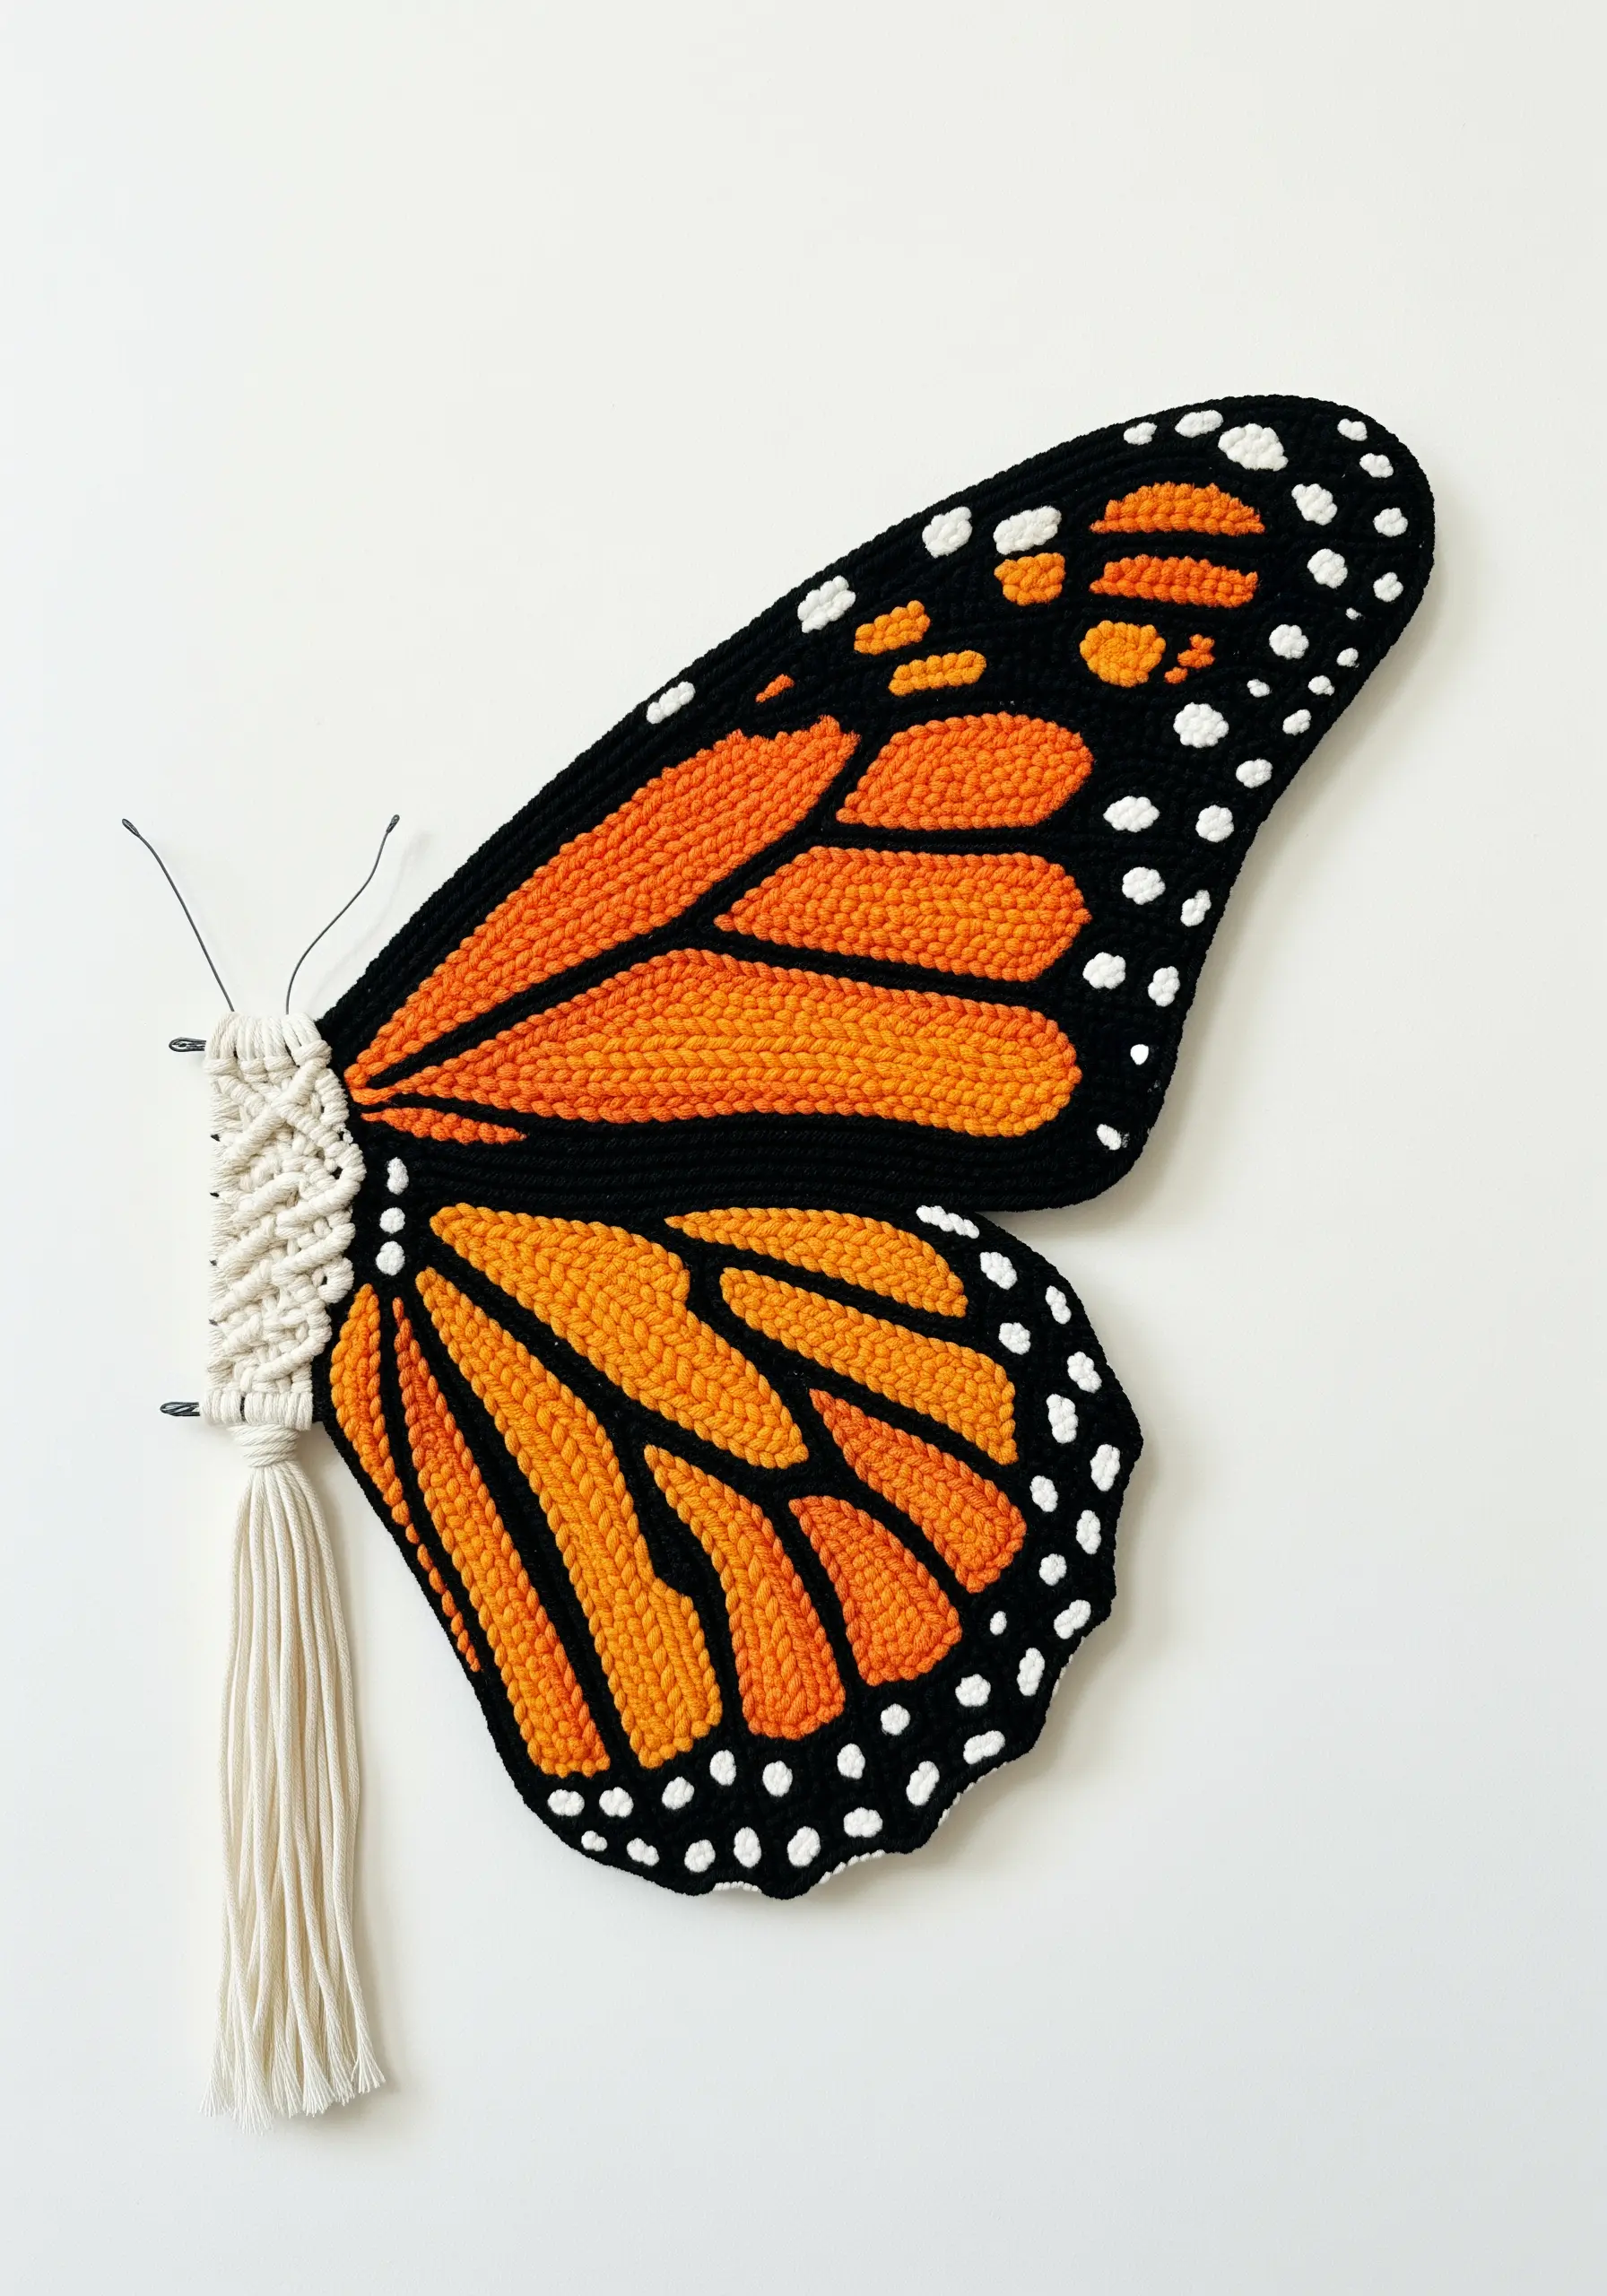
This is one of the most inventive mixed-fiber creations inspired by nature, combining two distinct textures for one stunning result.
Create the butterfly’s body and the structural veins of the wing with structured macrame knots.
Then, use a punch needle on a separate piece of fabric to fill in the colorful orange and black cells of the wing.
Finally, cut out the punch needle portion and stitch it onto the macrame frame for a piece that is both soft and sculptural.
17. Icy Elegance with Beaded Macrame
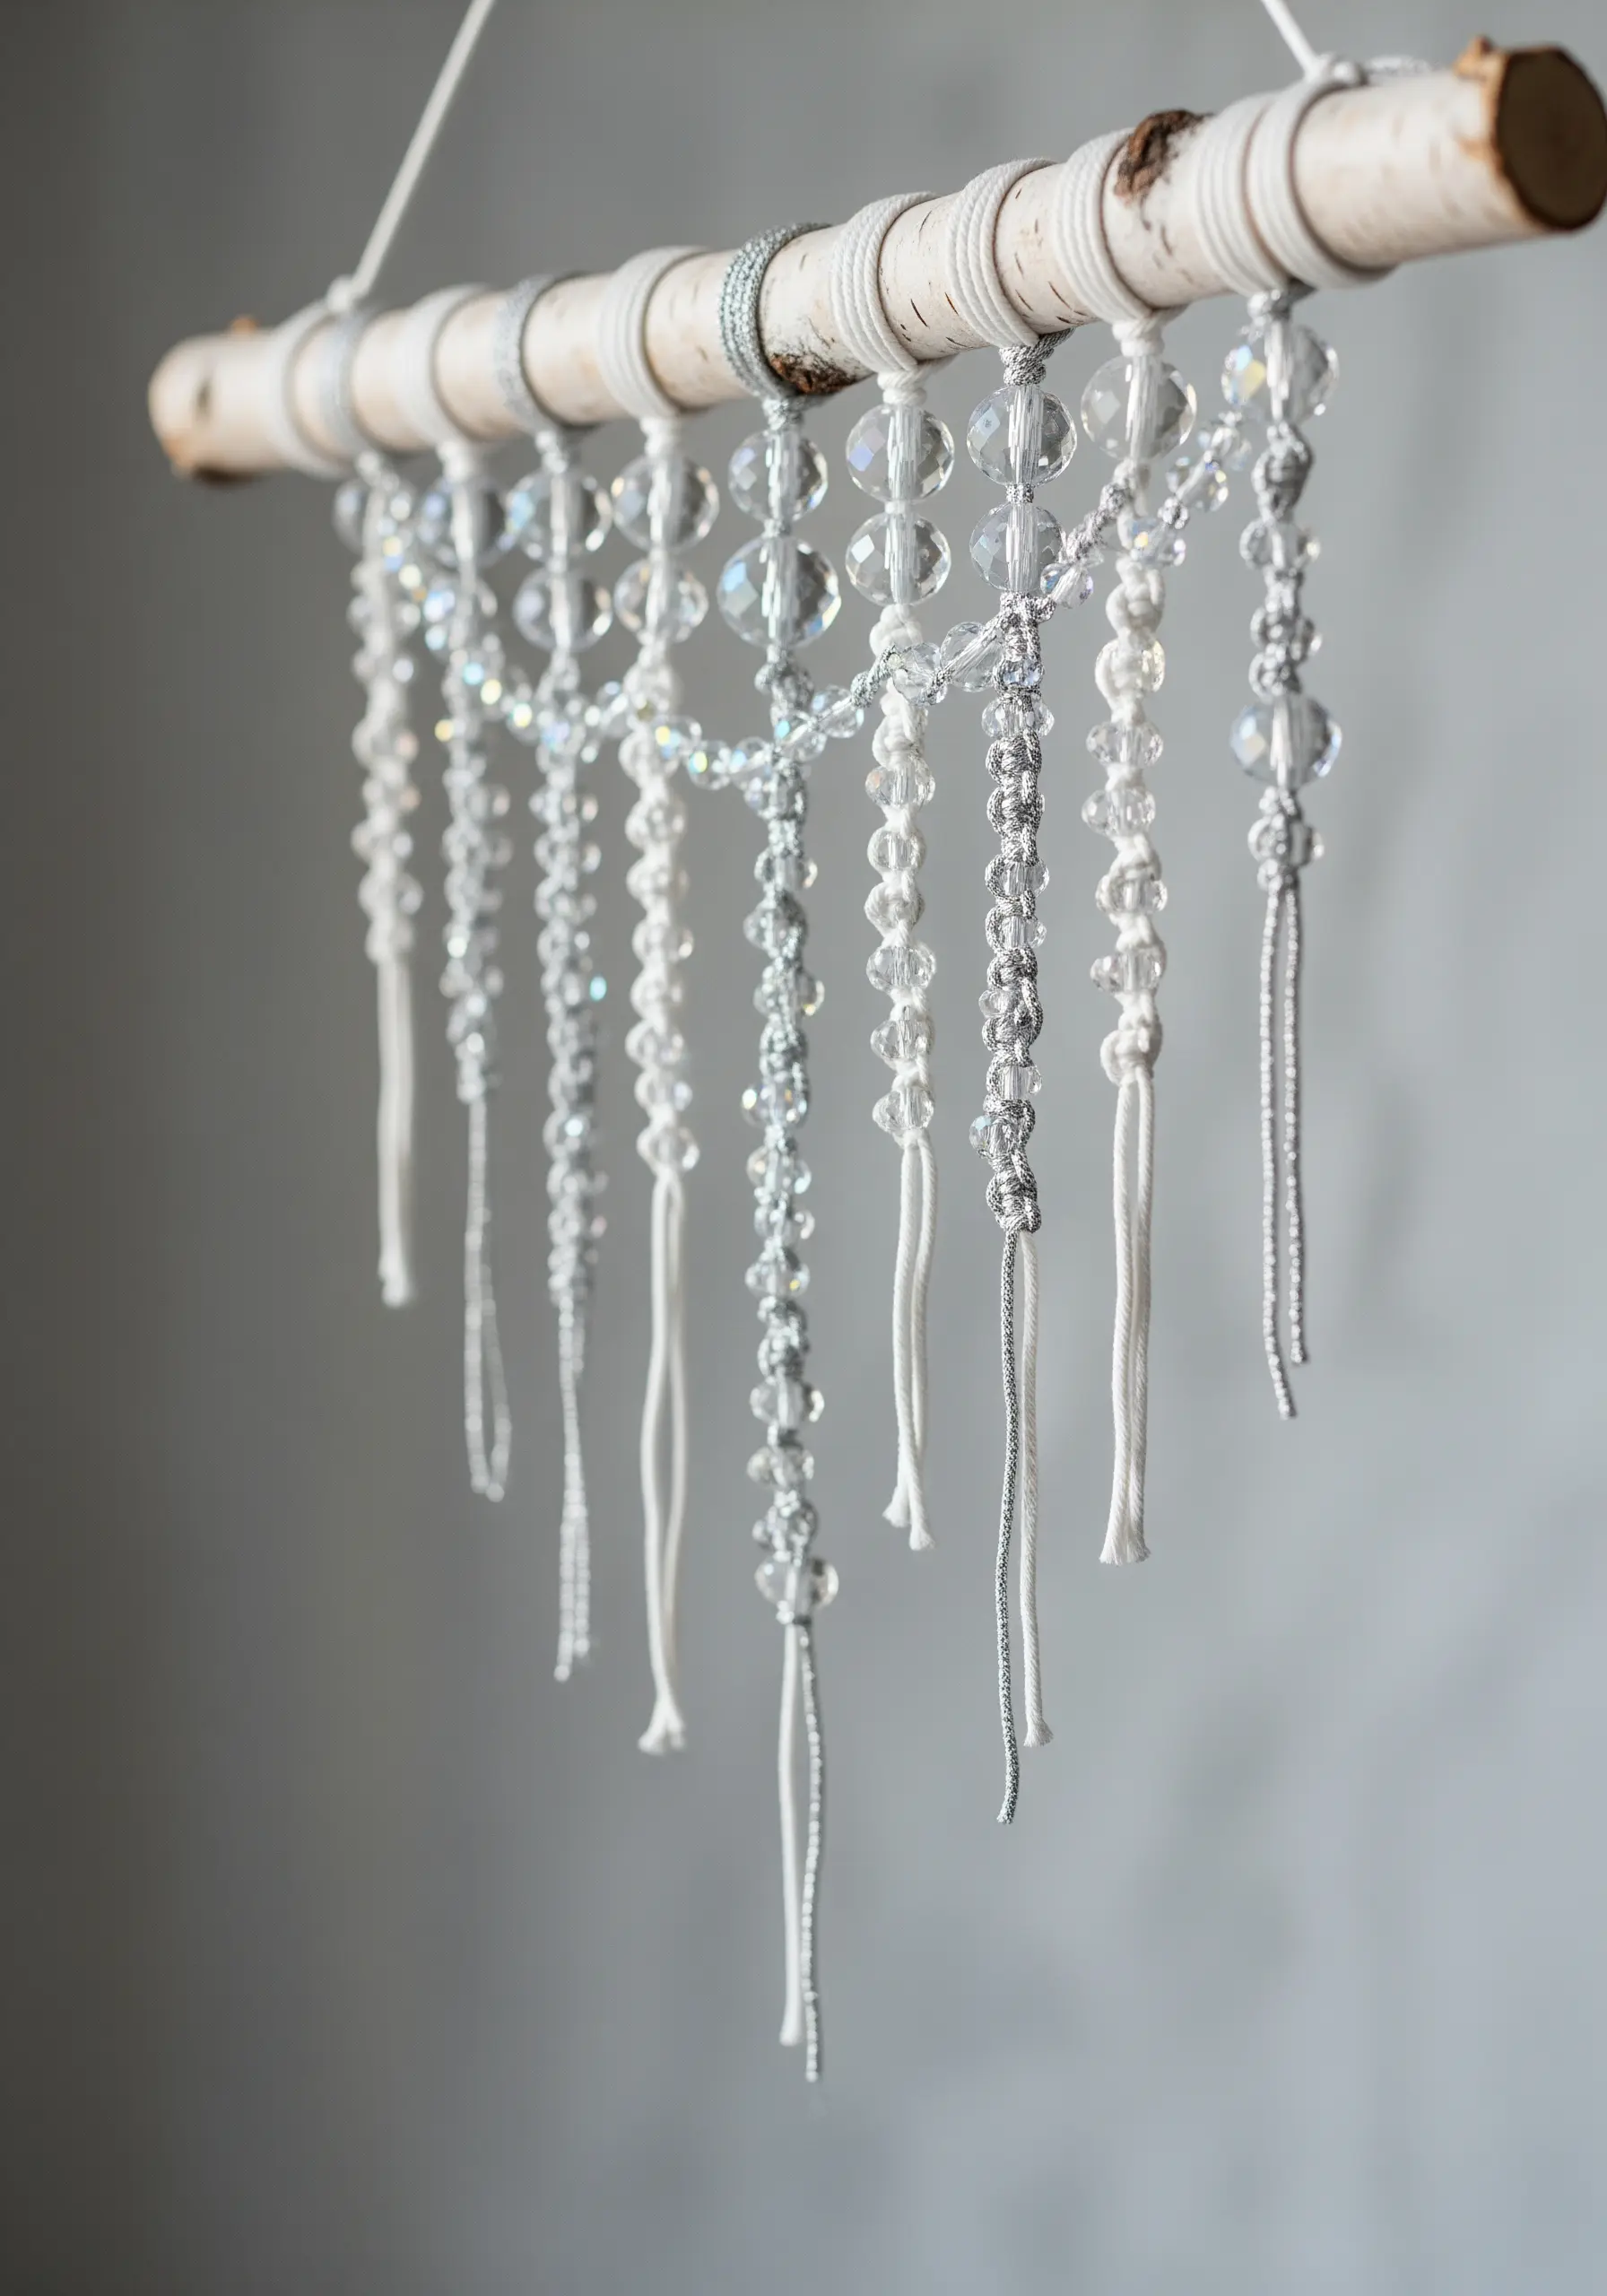
Elevate a simple macrame hanging by incorporating beads for a touch of light and refinement.
Before you begin knotting, string clear or silver-lined glass beads onto your cords.
Secure them within square knots or let them hang freely on un-knotted sections.
Combining a metallic silver cord with plain white enhances the frosted, wintery feel, making it one of those minimal festive motifs that make holiday gifts look elegant.
18. Create Depth in a Punch Needle Sunflower Field
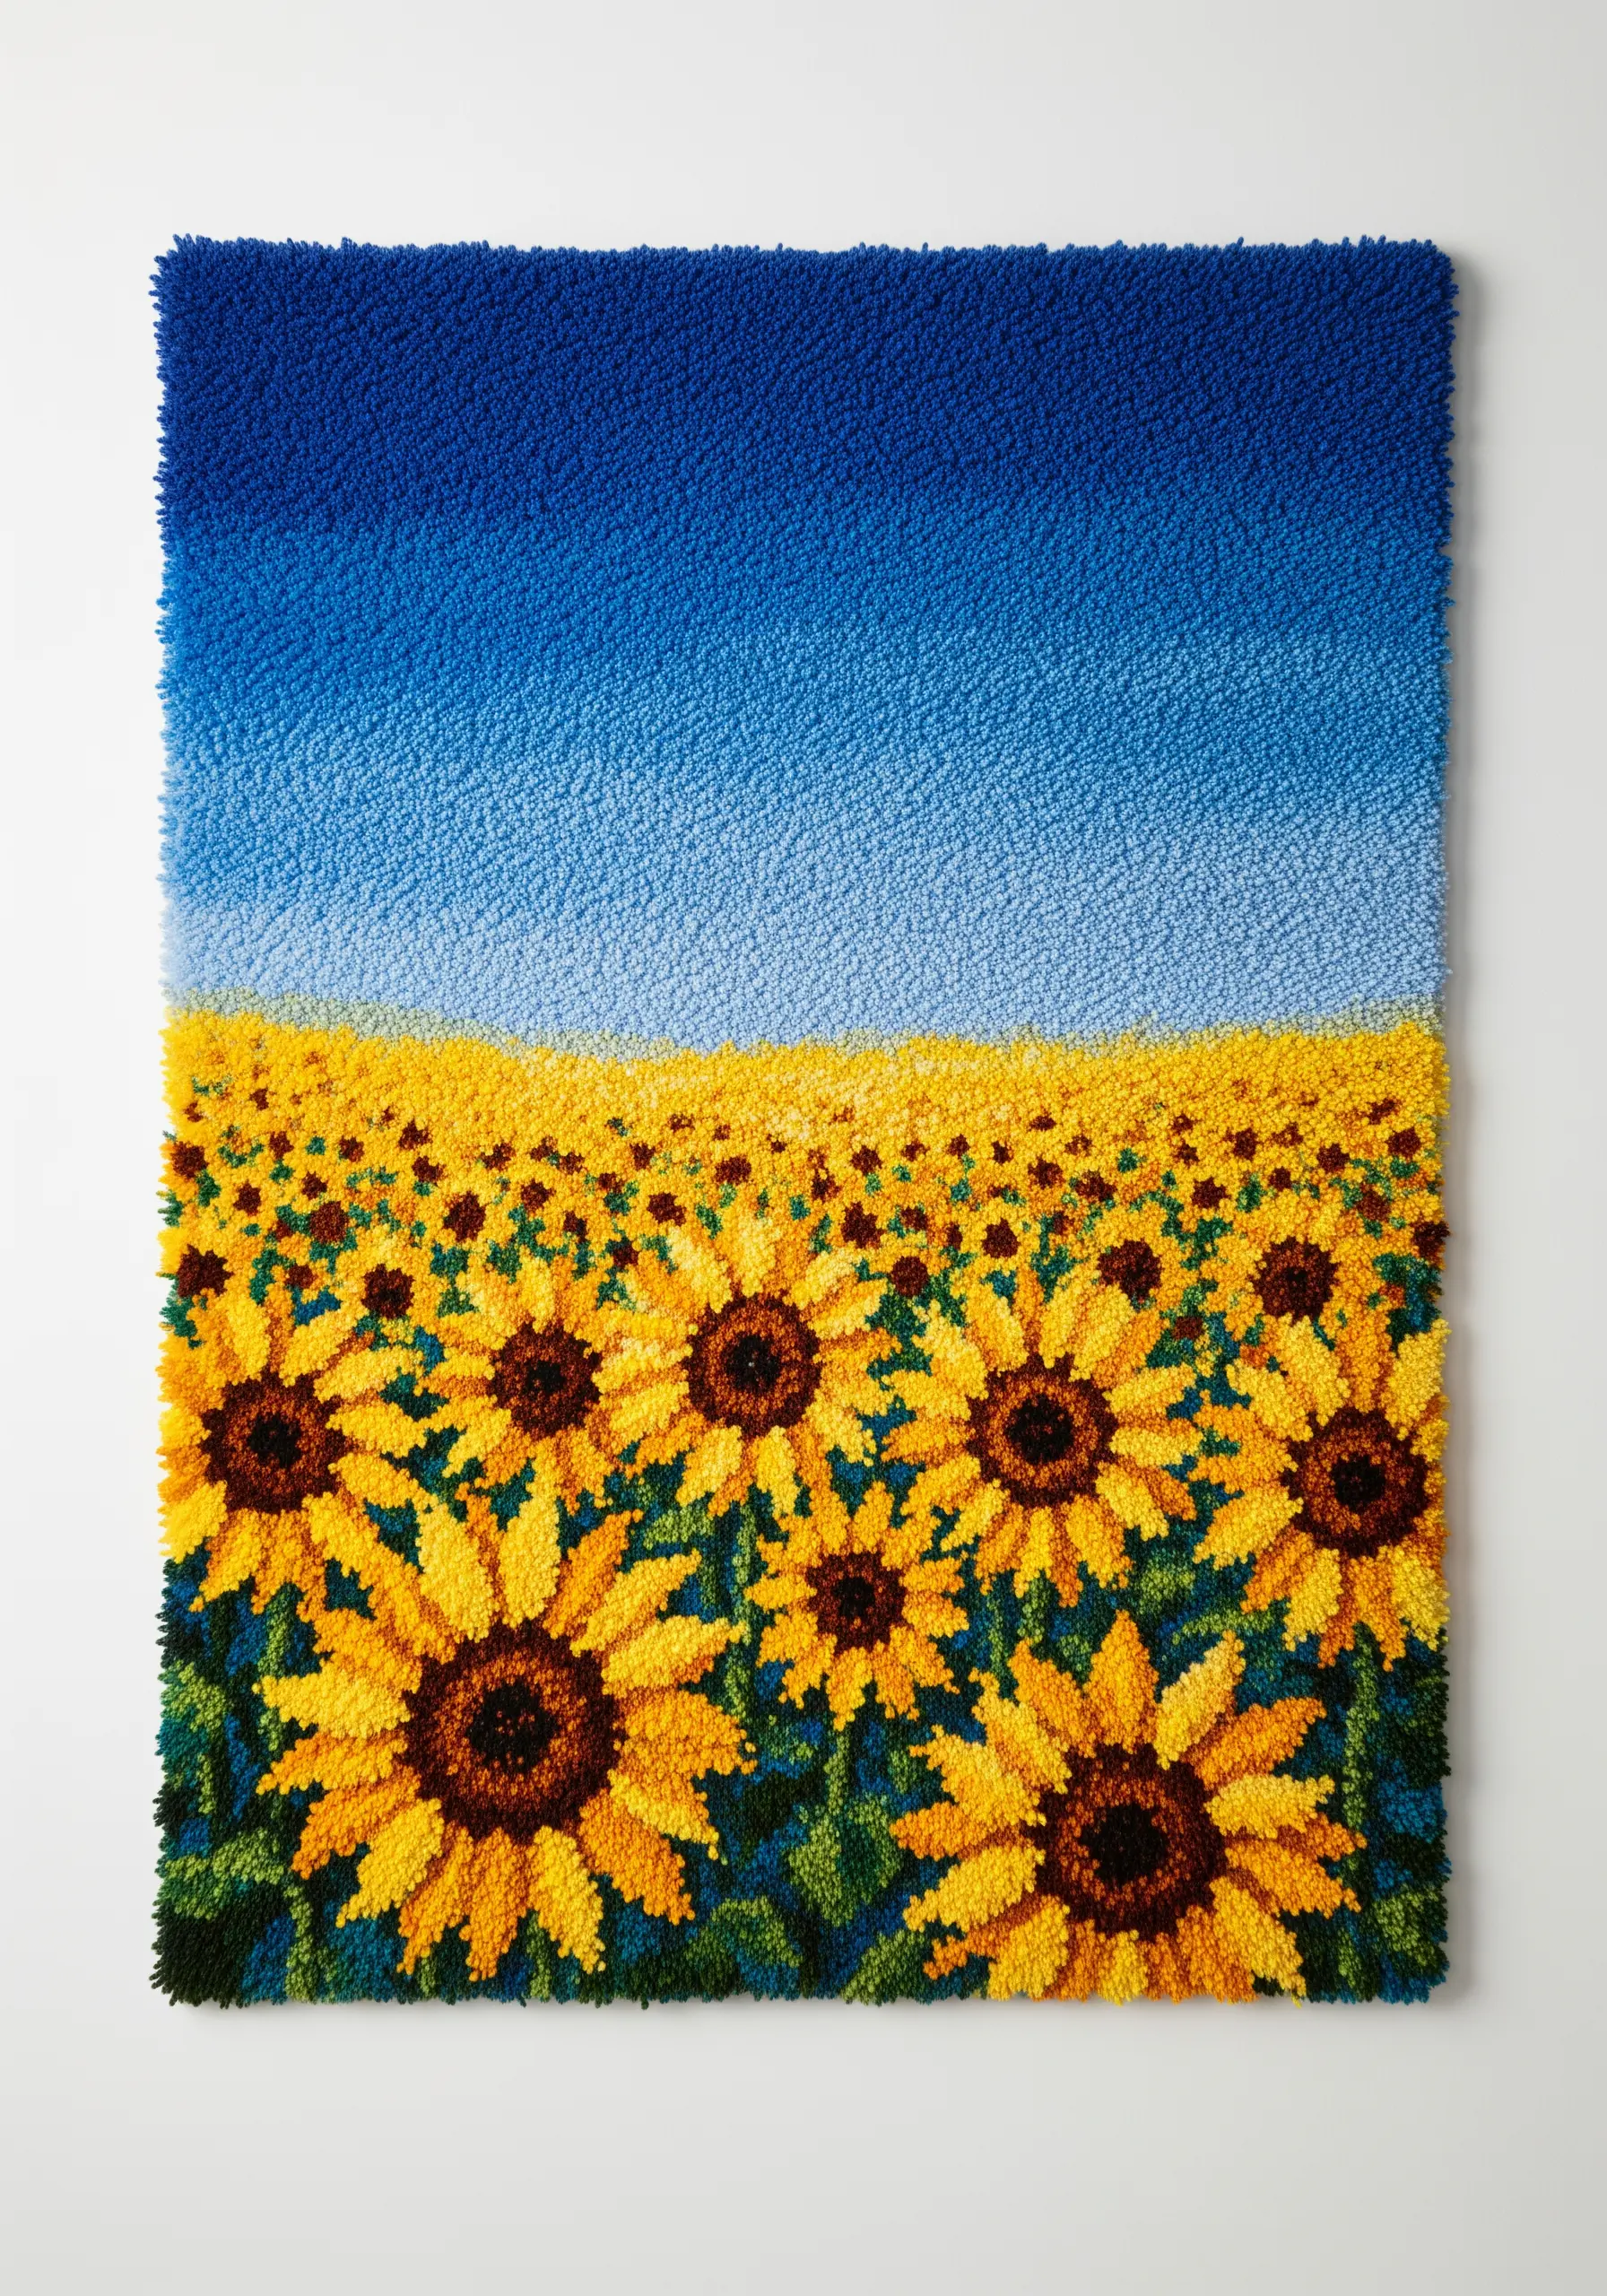
To give your landscape a sense of perspective, vary the texture and detail from front to back.
Use the longest, most defined loops for the sunflowers in the foreground, with distinct colors for petals and centers.
For the flowers in the distance, switch to shorter loops and more muted, blended colors to suggest they are farther away.
This simple trick transforms a flat panel into a deep, expansive field.
19. Lifelike Forest Fungi with Stumpwork Embroidery
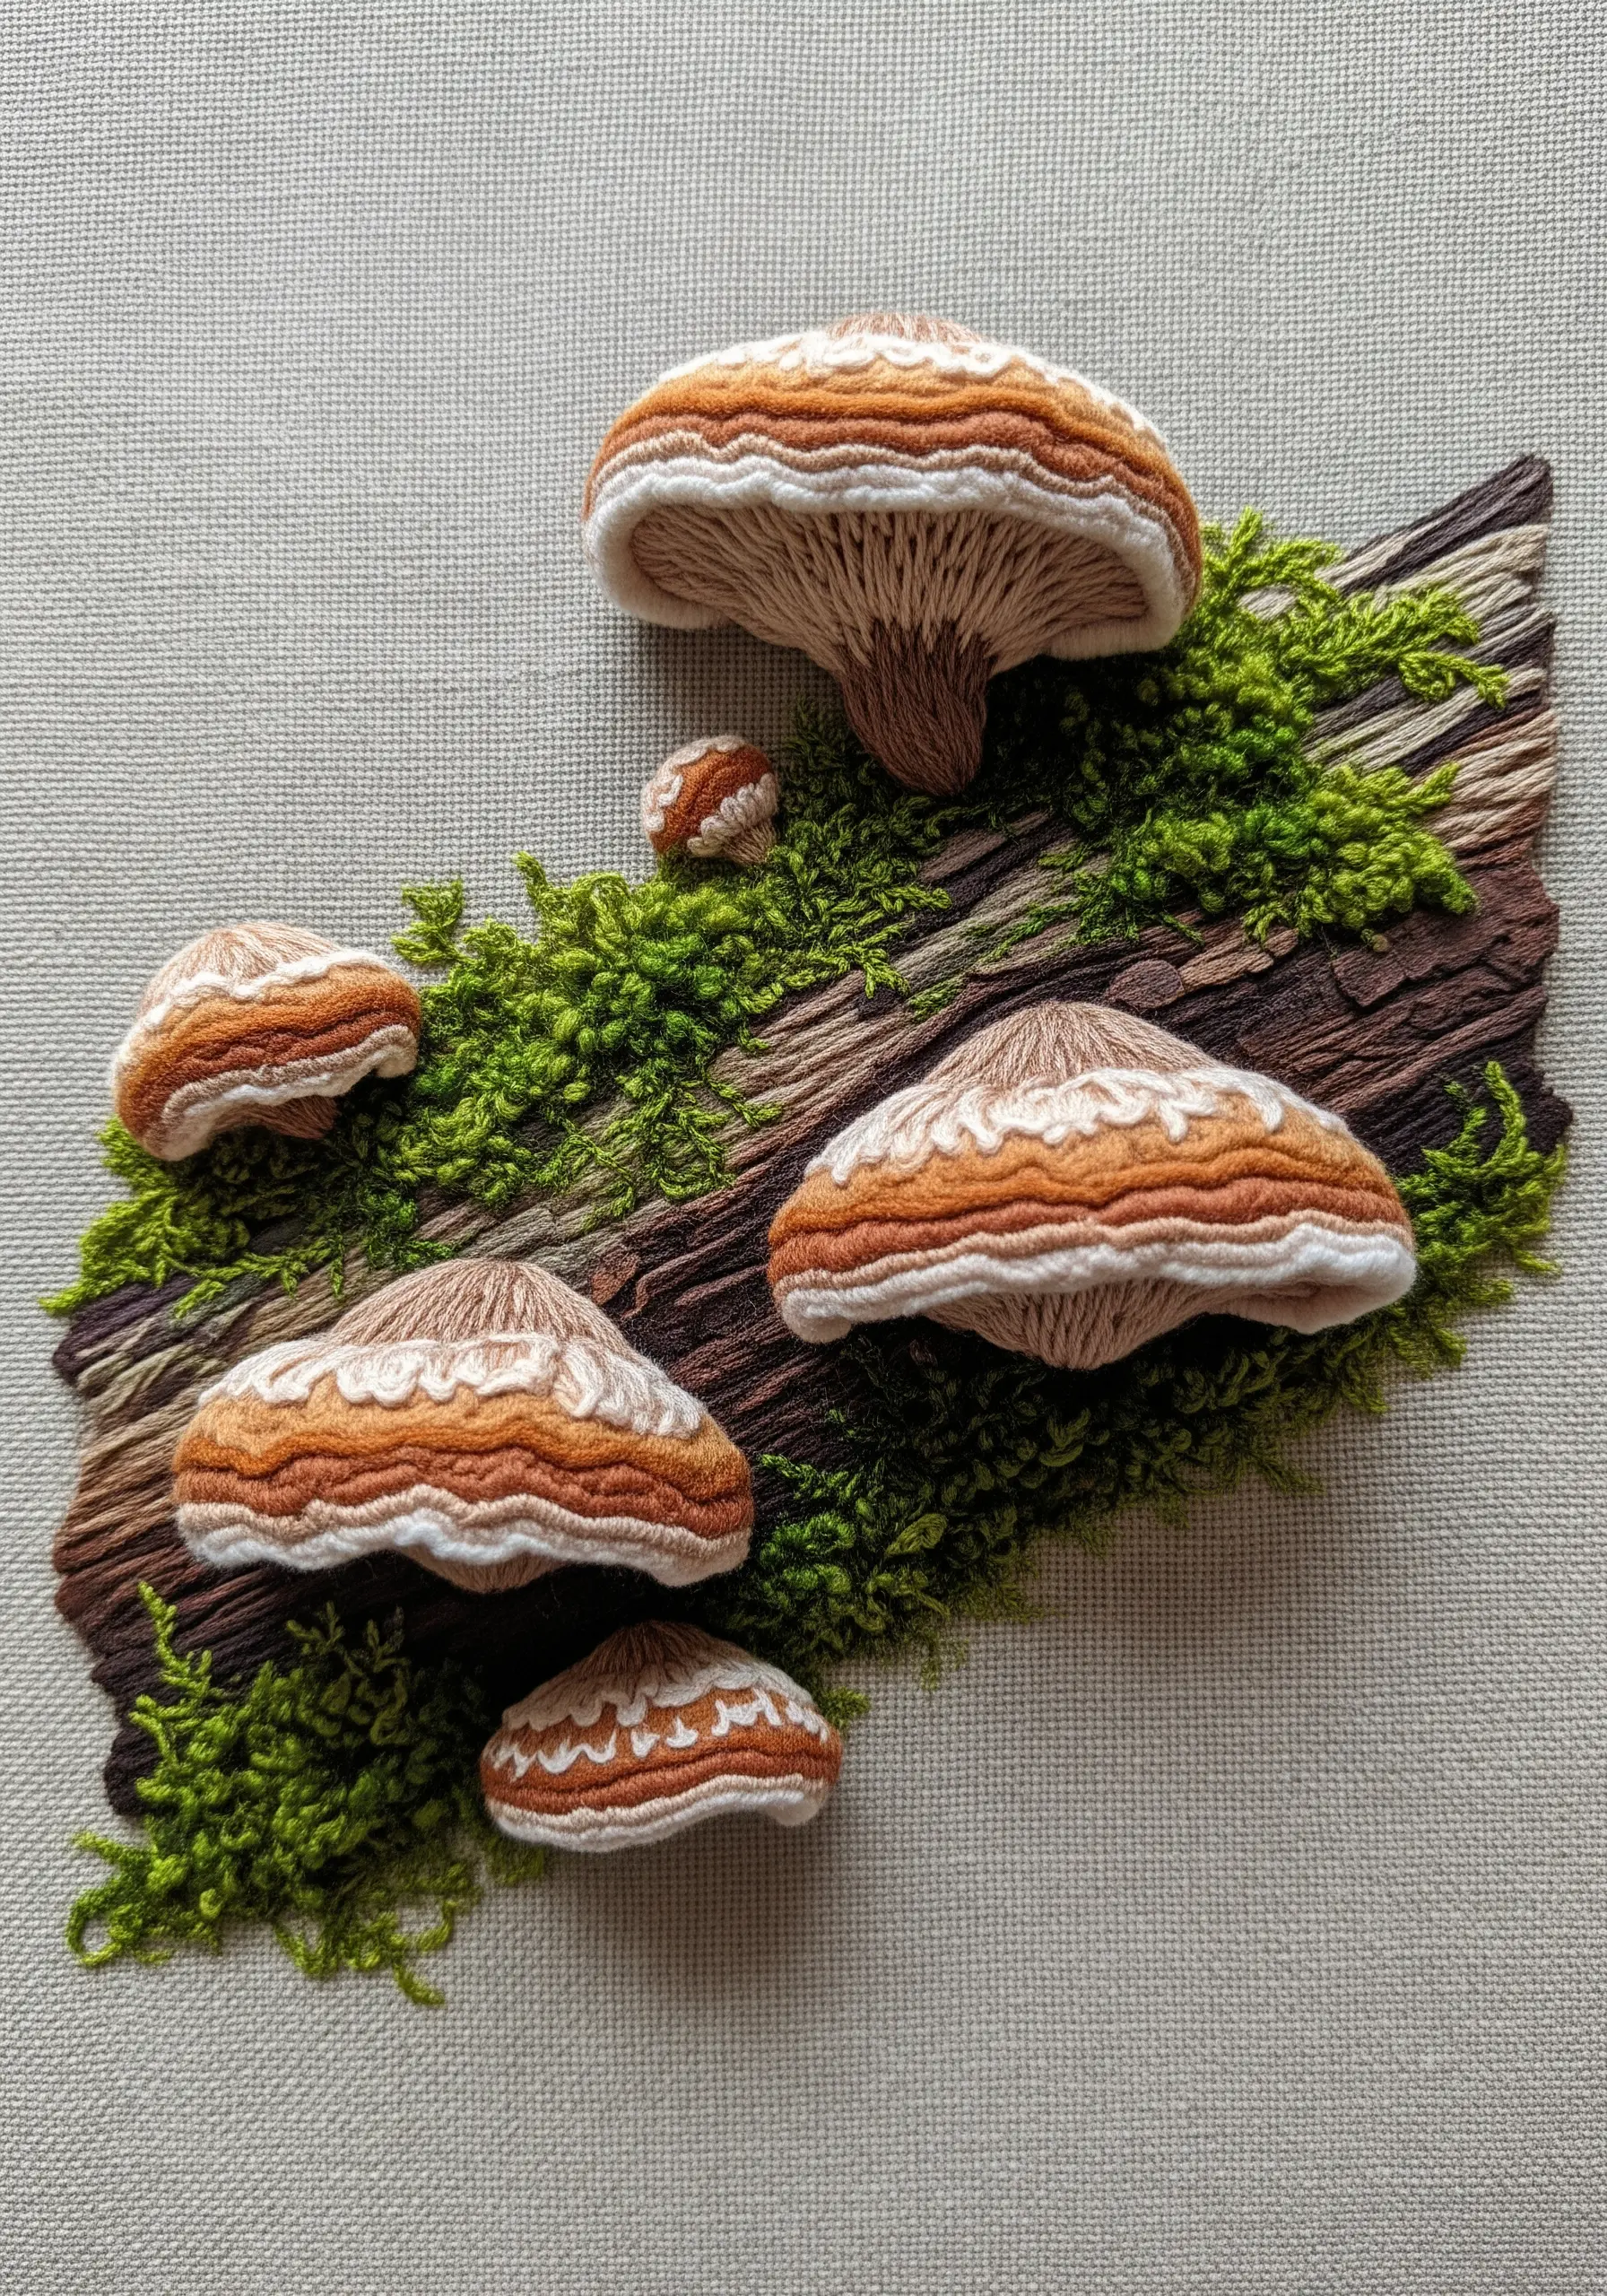
Bring your embroidery into the third dimension using stumpwork techniques.
Create the mushroom caps as separate, wired elements by padding felt with buttonhole stitches, then attach them to your background fabric.
For the fuzzy moss, use the turkey work stitch: create loops of yarn, then snip them open and trim them to create a dense, velvety texture that looks incredibly realistic.
20. The Iridescent Peacock: A Study in Thread Painting
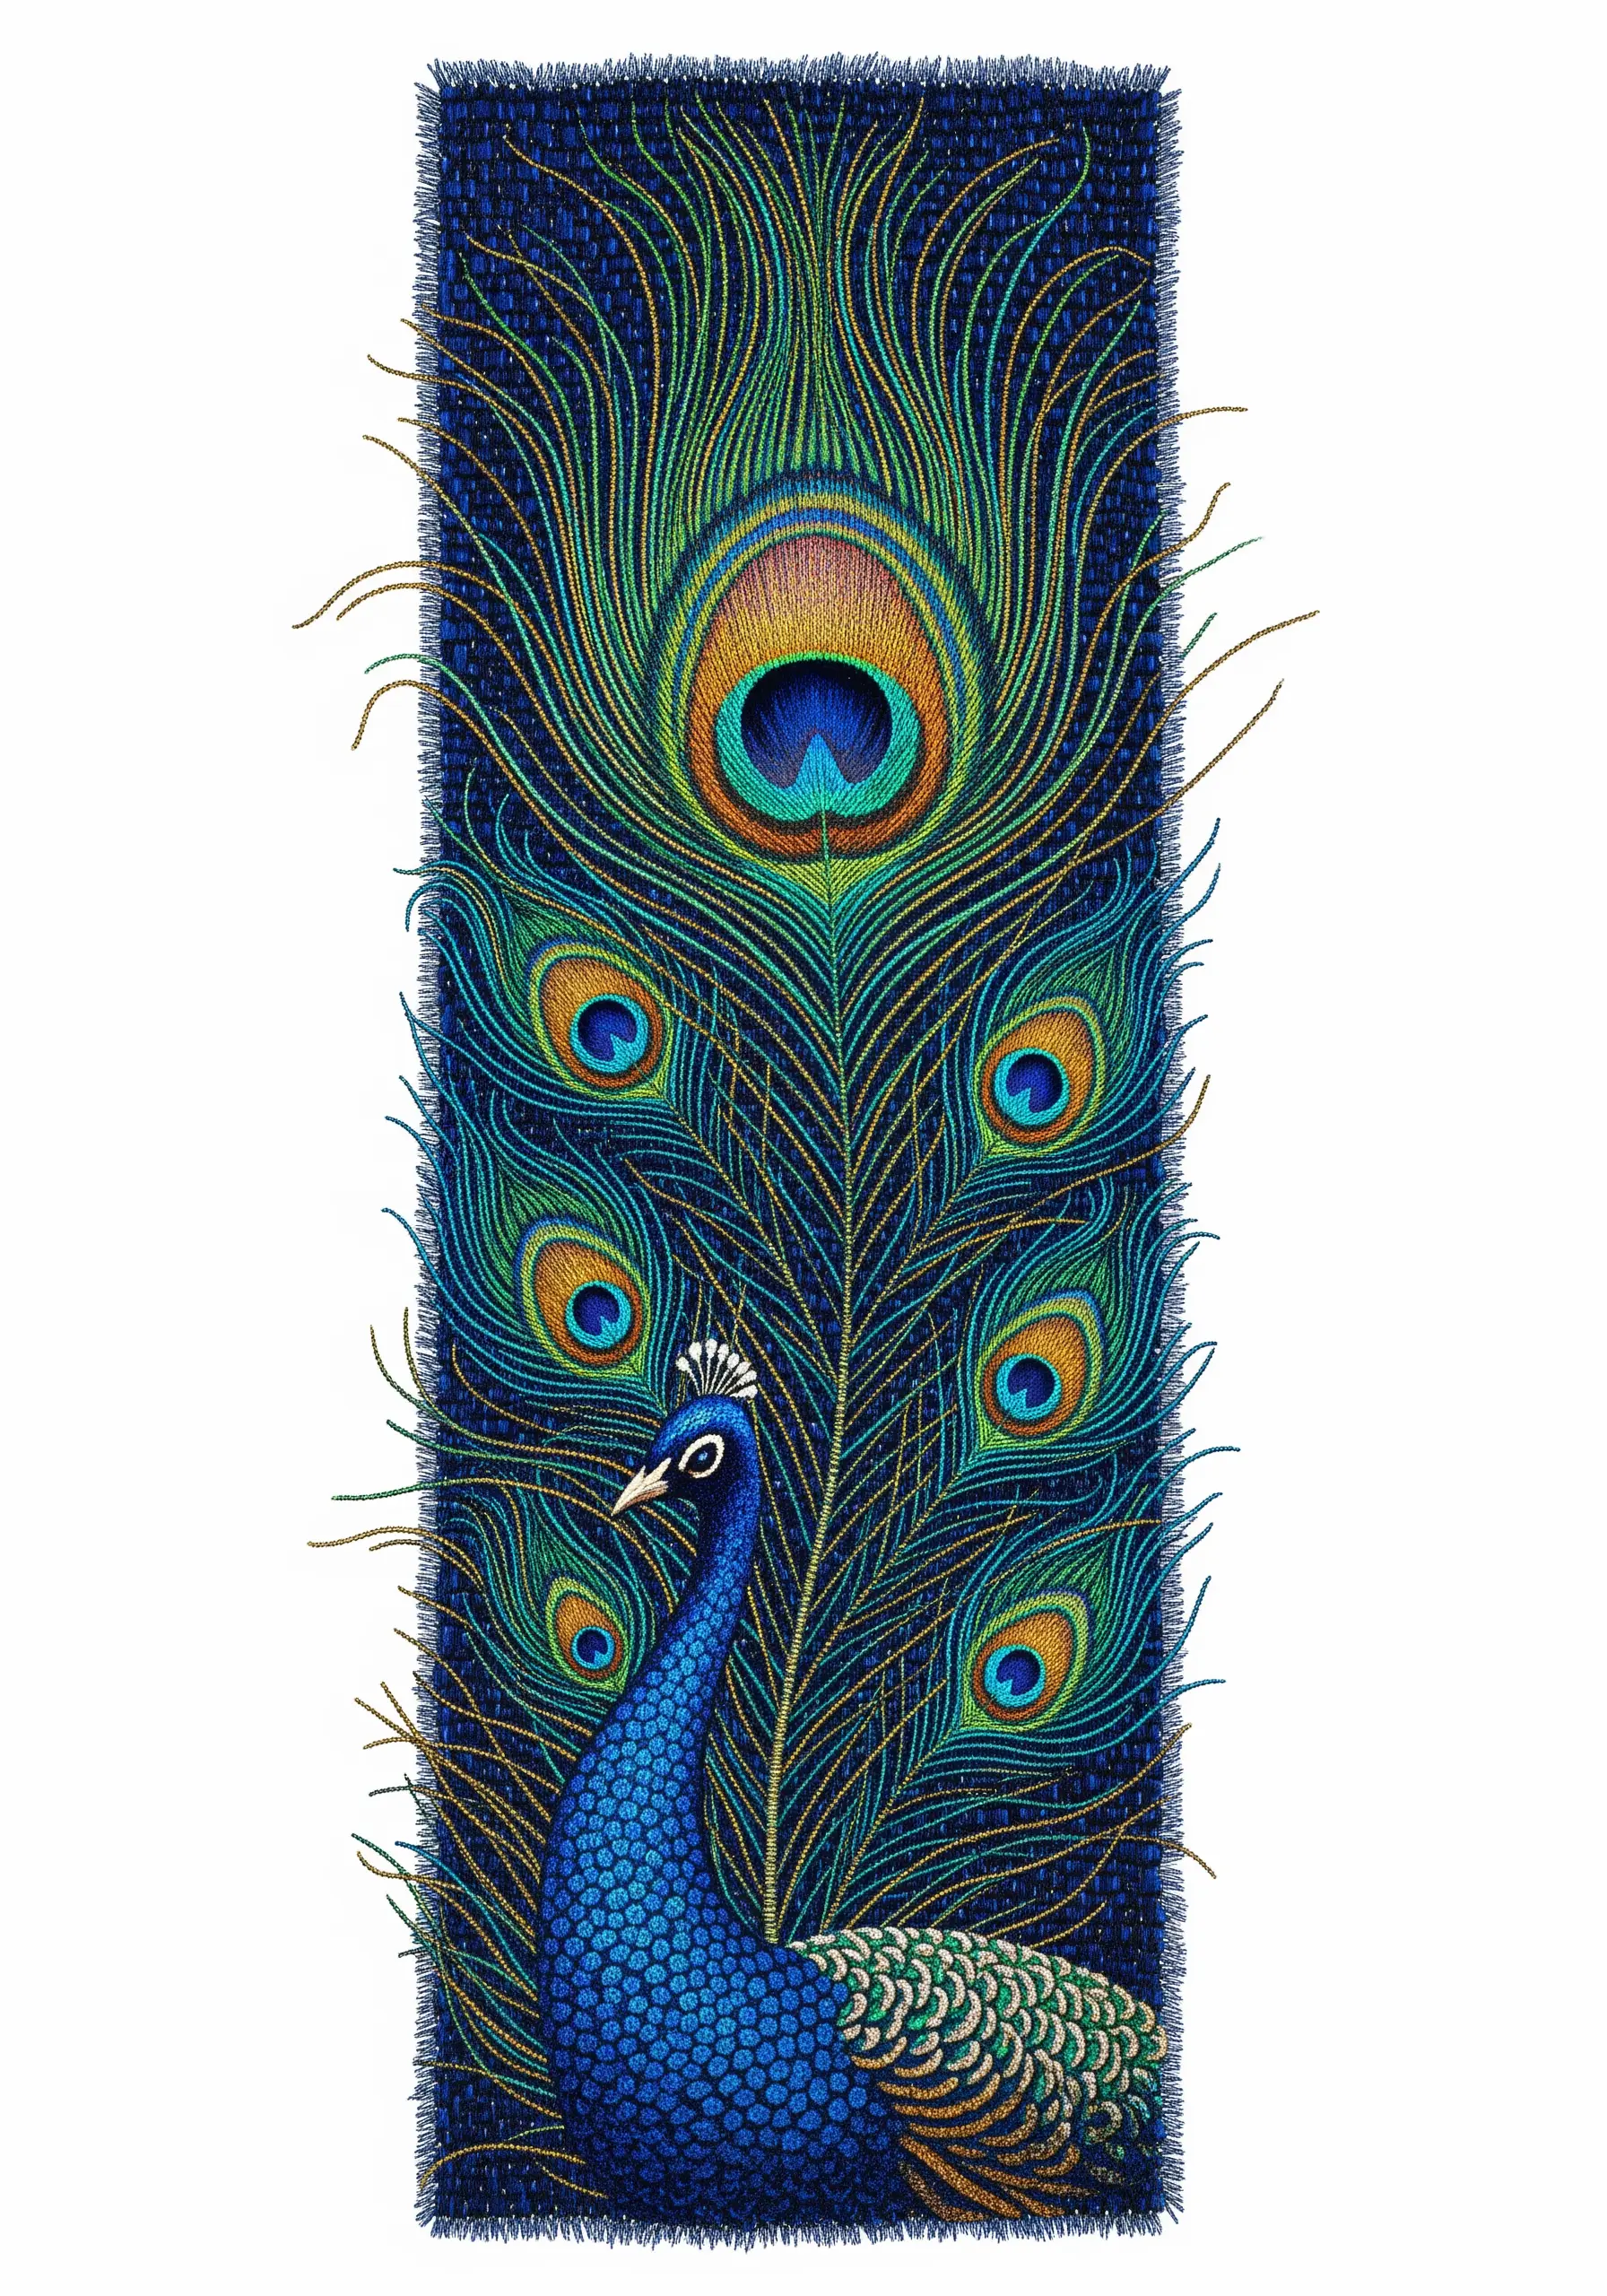
The key to capturing the peacock’s shimmer is careful color blending with the long-and-short stitch.
Use at least four or five shades of blue, green, and turquoise, blending them seamlessly to create a gradient effect.
To add that signature iridescence, incorporate one strand of fine metallic gold or blue thread alongside your regular floss.
This subtle addition will catch the light and bring the feather to life.
21. Capture Forest Majesty with Vertical Stitches

To convey the immense height and rough texture of ancient trees, fill the trunks with dense, vertical straight stitches.
Use several shades of brown, grey, and rust floss, laying the stitches parallel to one another to guide the eye upward.
For the misty background, use fewer strands of thread in lighter colors and add sparse French knots to create atmospheric depth and a sense of scale.
22. Ethereal Botanicals by Stitching on Tulle
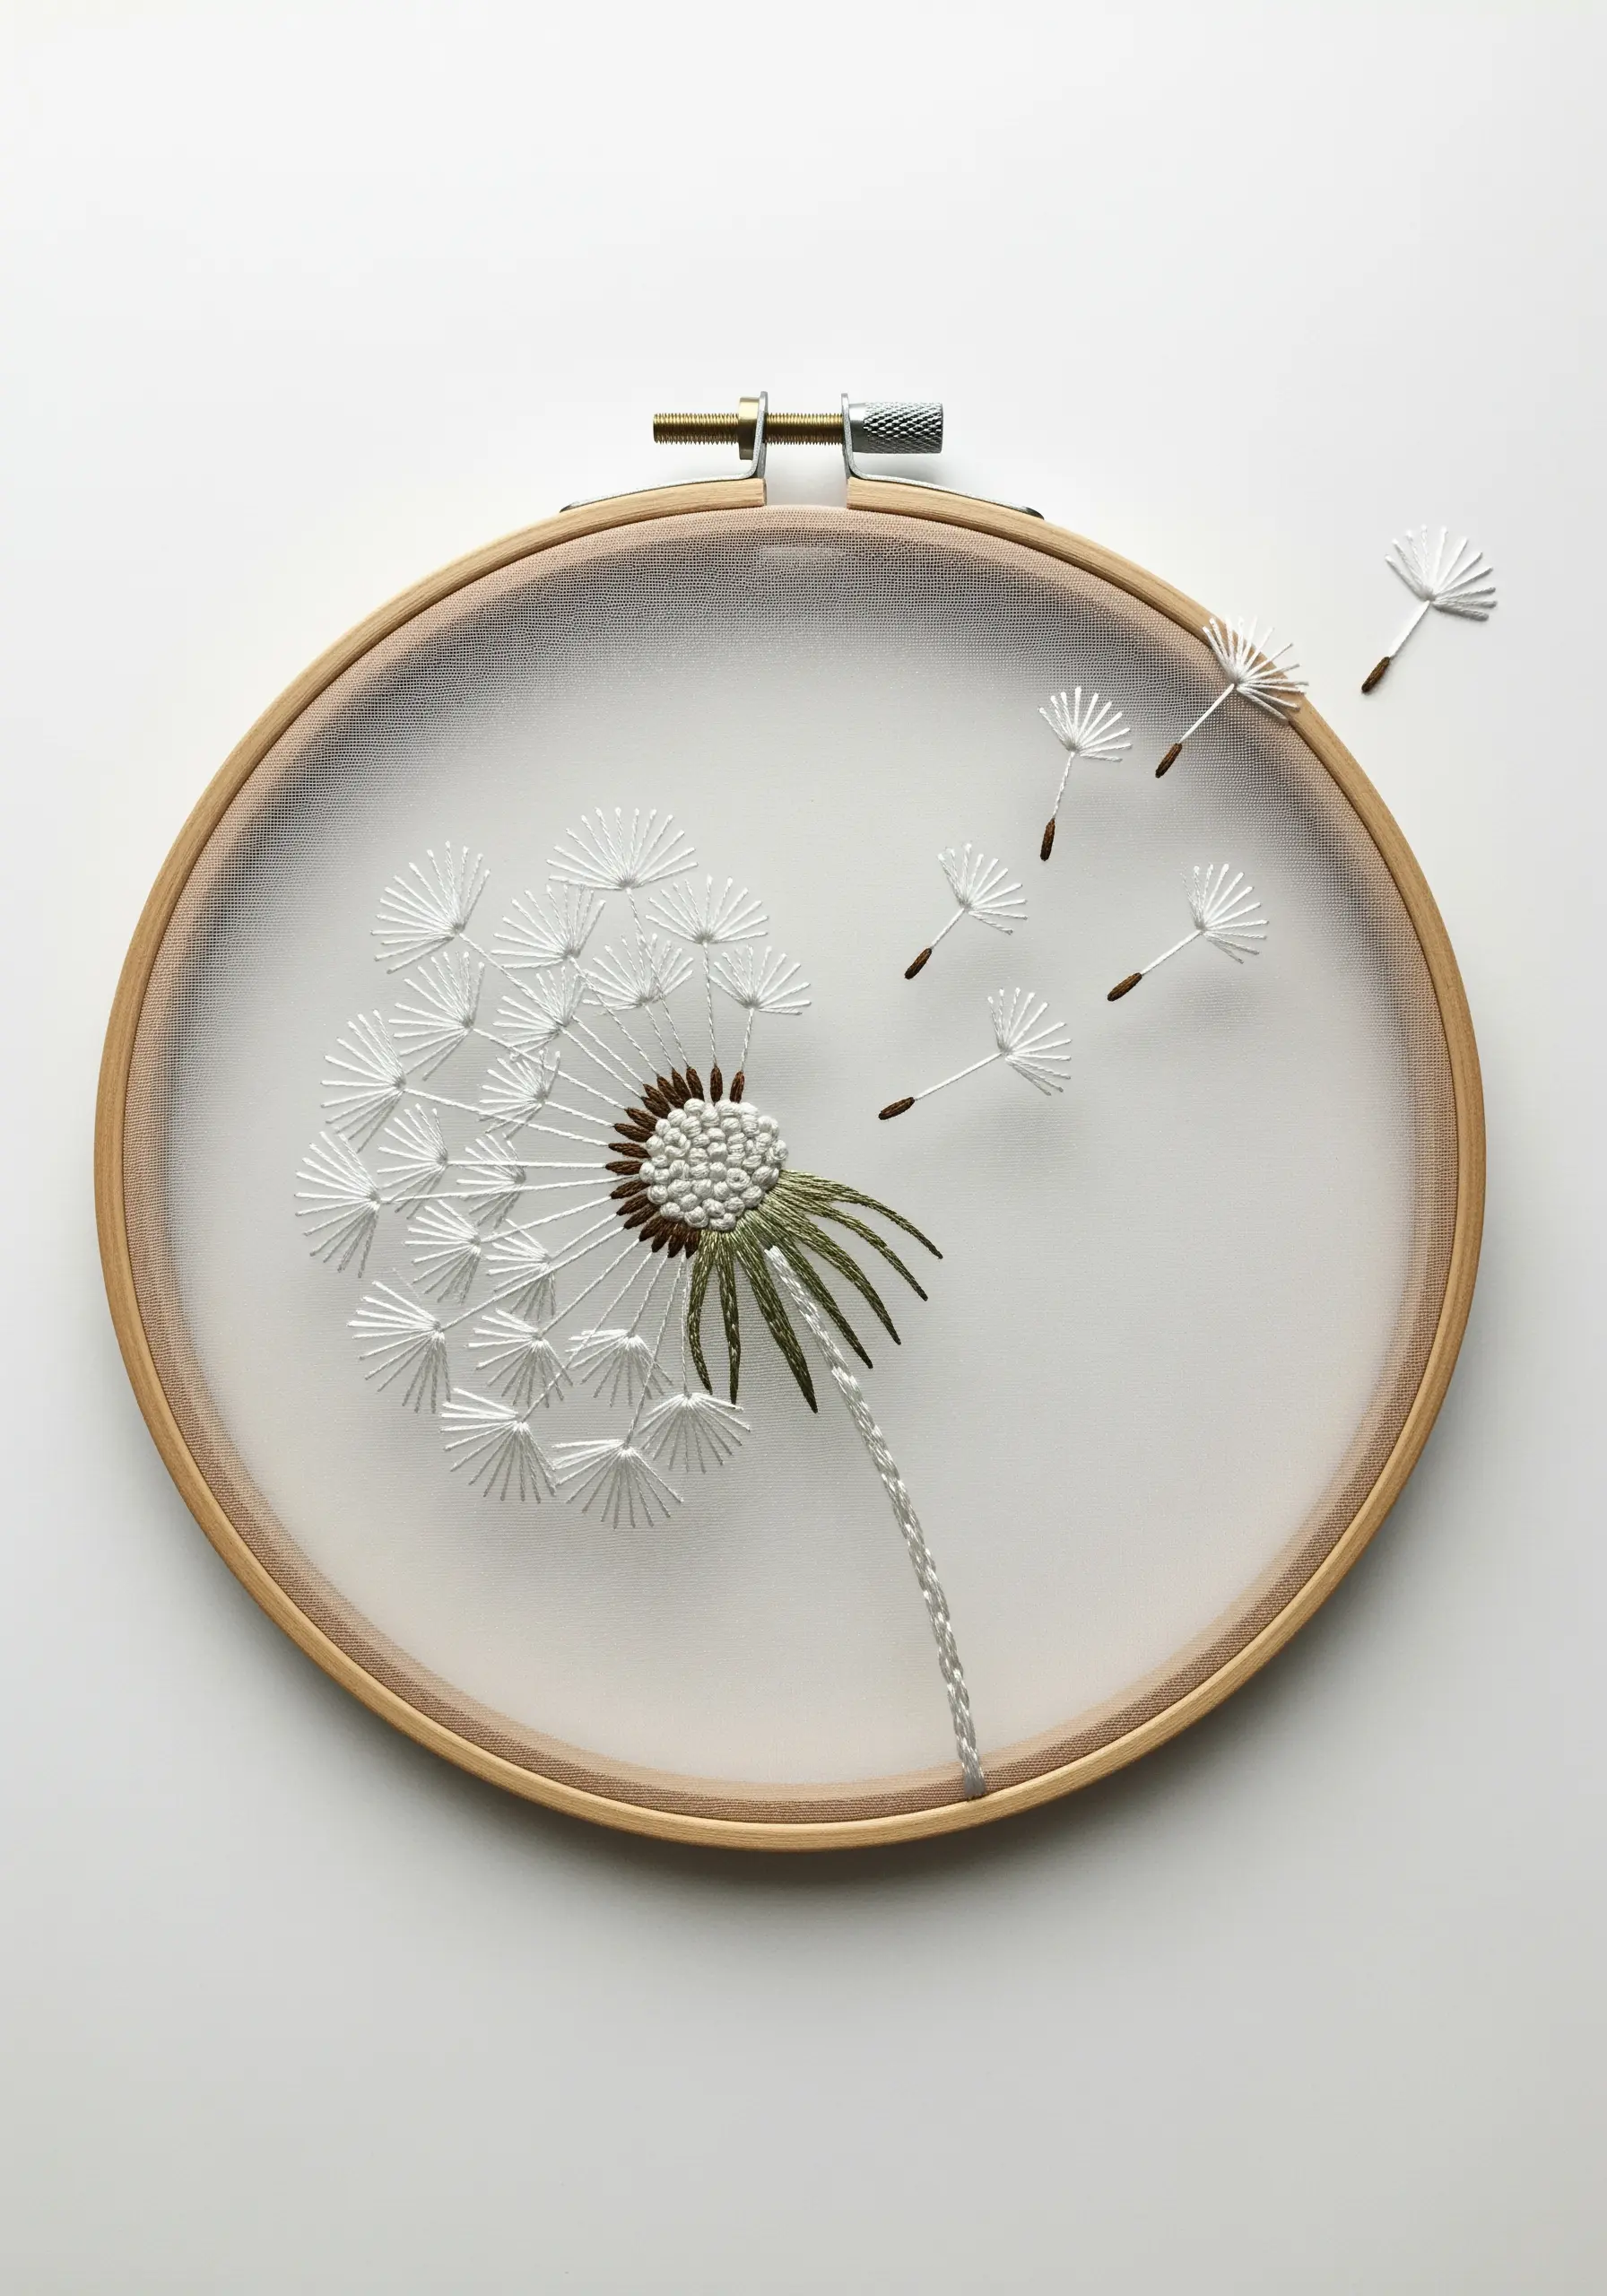
Embroidering on sheer fabric like tulle or organza creates a magical ‘floating’ effect, as if the stitches are suspended in air.
To prevent the delicate fabric from puckering, use a water-soluble stabilizer on the back while you stitch, then dissolve it away once you’re finished.
For the dandelion seeds, use single detached chain stitches to create a sense of weightless movement, perfecting these botanical line art embroidery patterns.
23. A Tactile Ocean Floor with 3D Embellishments

Begin by creating a flat background with punch needle, using wavy blocks of color for water and sand.
Then, bring your scene to life by adding separate, three-dimensional crocheted elements.
Craft starfish, kelp, and anemones and stitch them securely onto the punch needle base.
For jellyfish, let long strands of yarn hang loose to mimic flowing tentacles, perfect for coastal theme tiny embroidery art.
24. Geometric Precision with Macrame Snowflakes

The beauty of a macrame snowflake lies in its perfect symmetry.
This design is built on repeating patterns of simple knots, like the double half-hitch and the square knot, to form its geometric arms.
The key to a crisp, professional finish is maintaining a consistent, firm tension throughout your work.
A light mist of fabric stiffener will help the final piece hold its intricate shape flawlessly.
25. Capture Autumnal Gradients with Long-and-Short Stitch
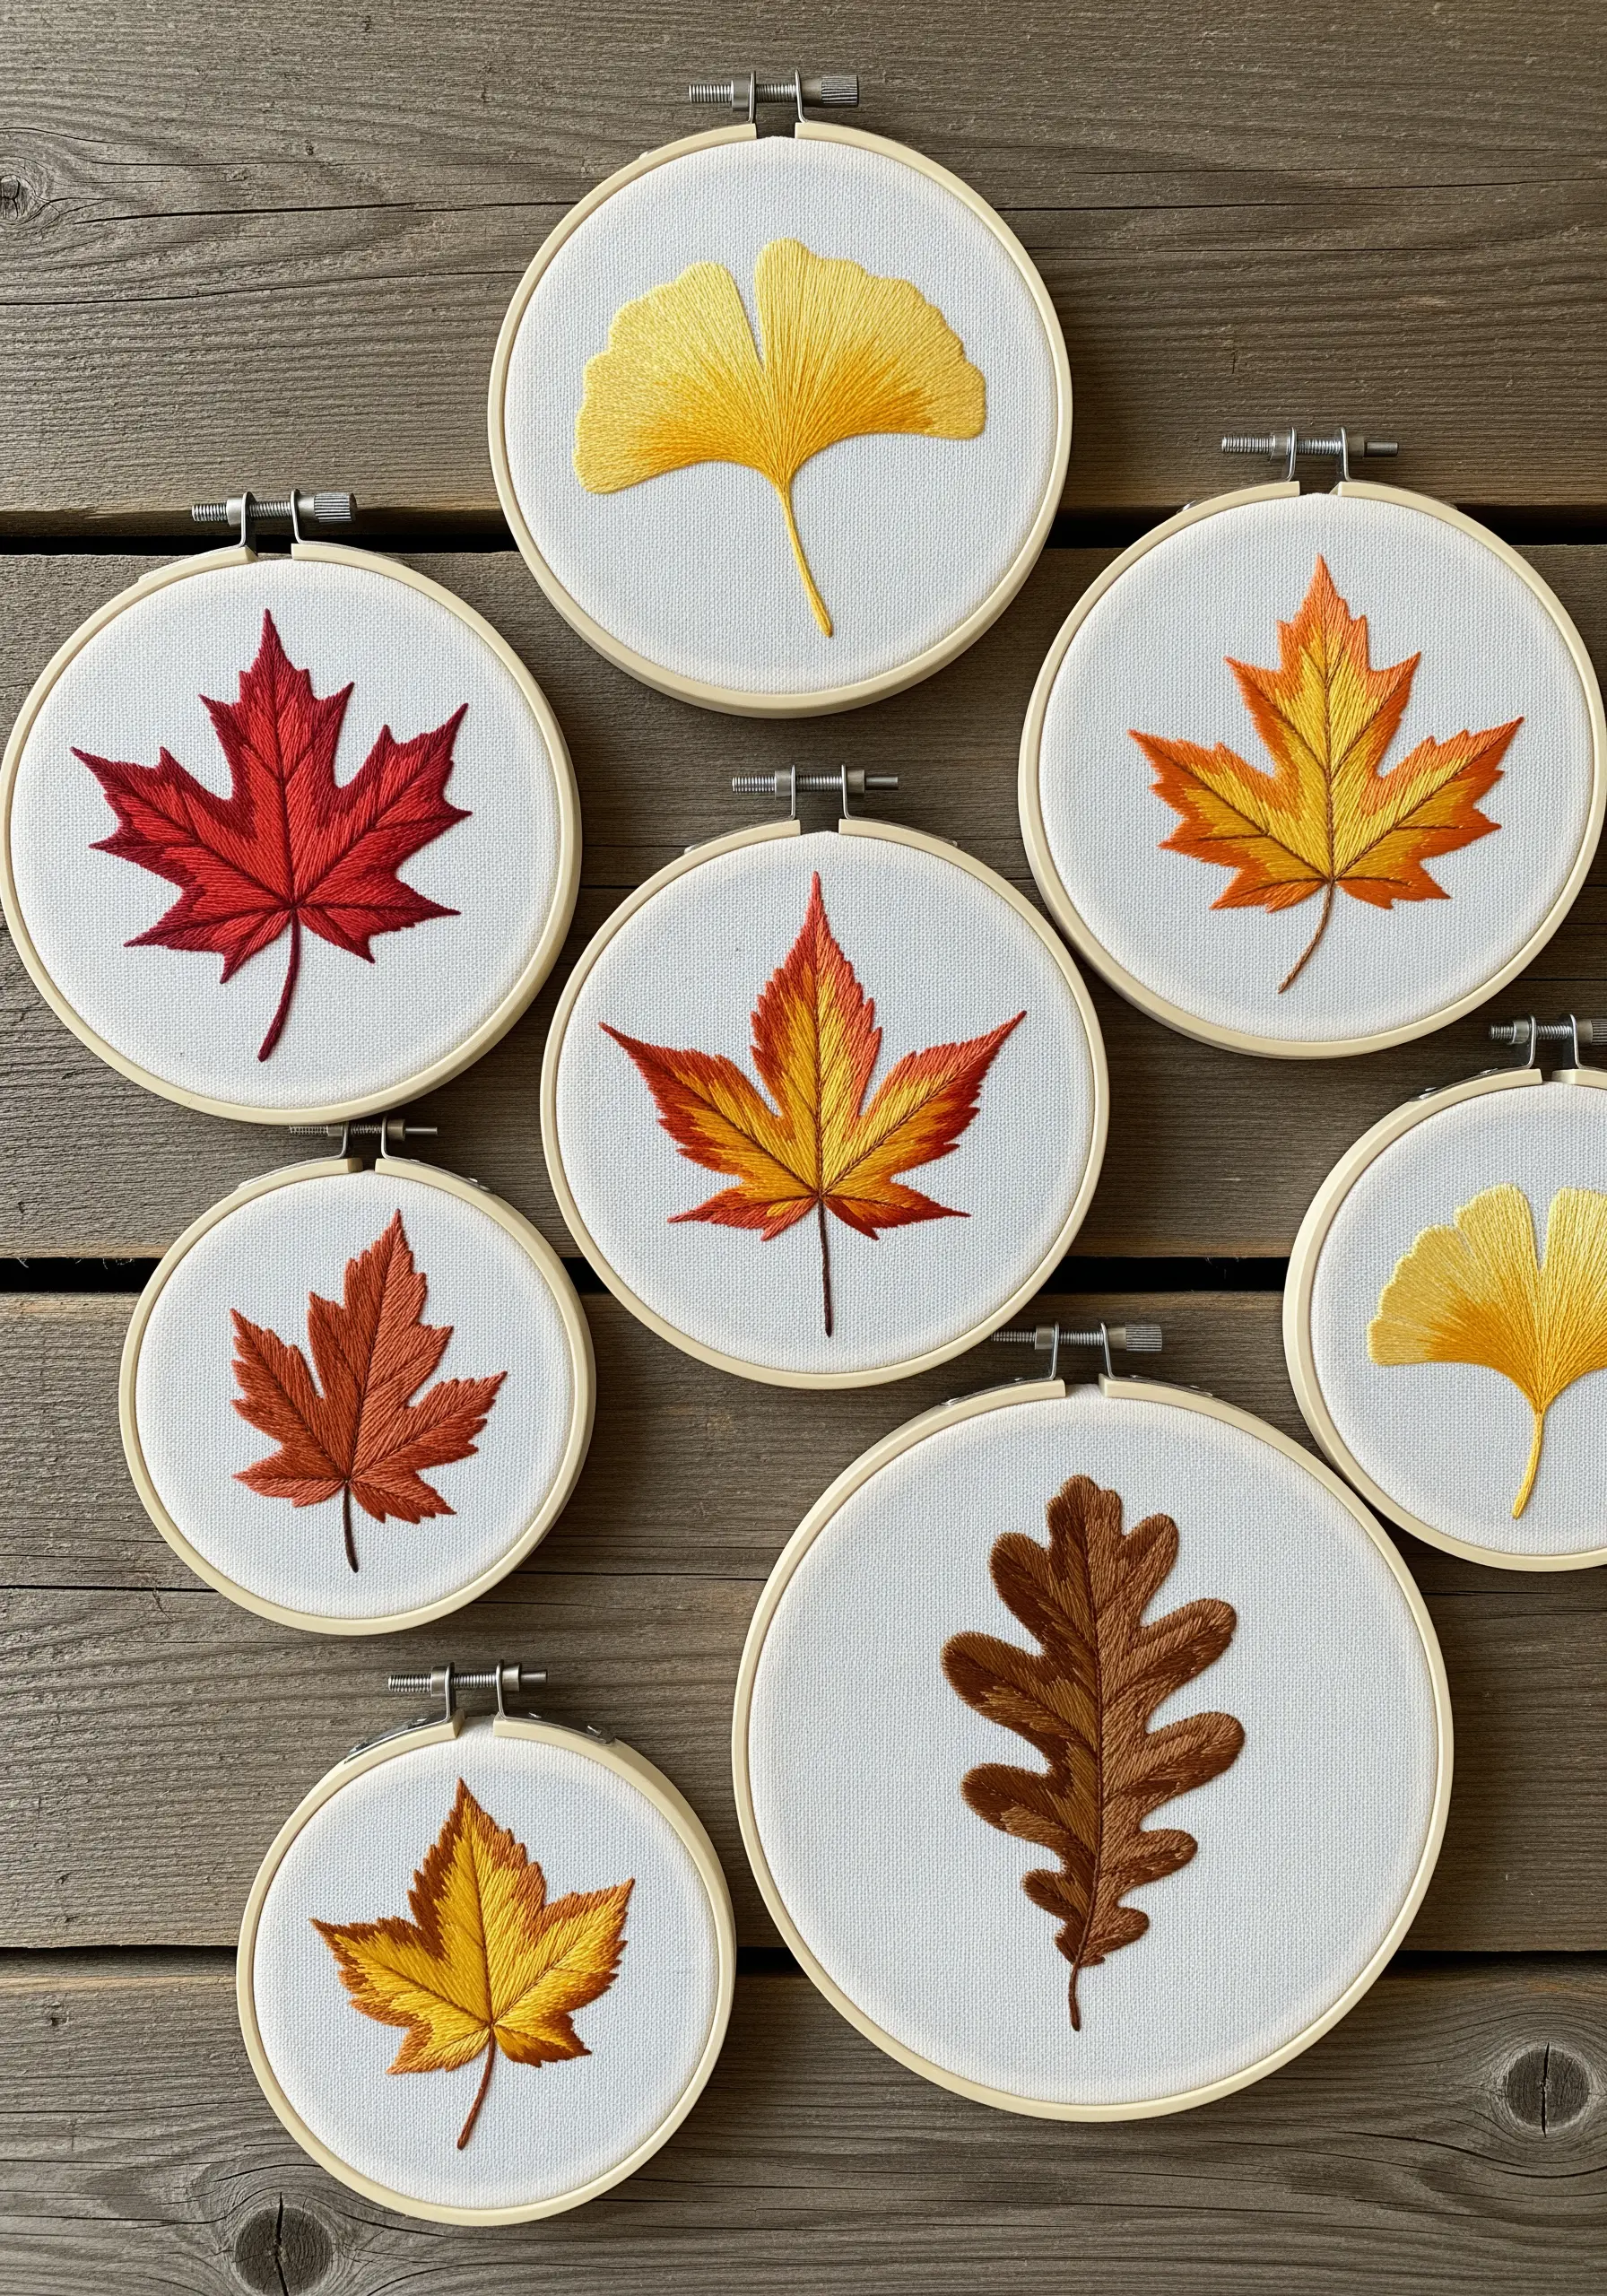
The long-and-short stitch is the ideal choice for creating the smooth color transitions found in autumn leaves.
Work in rows, staggering your stitch lengths and gradually introducing new shades of red, orange, and yellow.
To add a final layer of realism, use a single strand of dark brown thread to add the leaf’s veins with a simple backstitch over your filled sections.
These are beautiful hand-embroidery leaf patterns to master.
26. A Minimalist Waterfall from Wool Roving
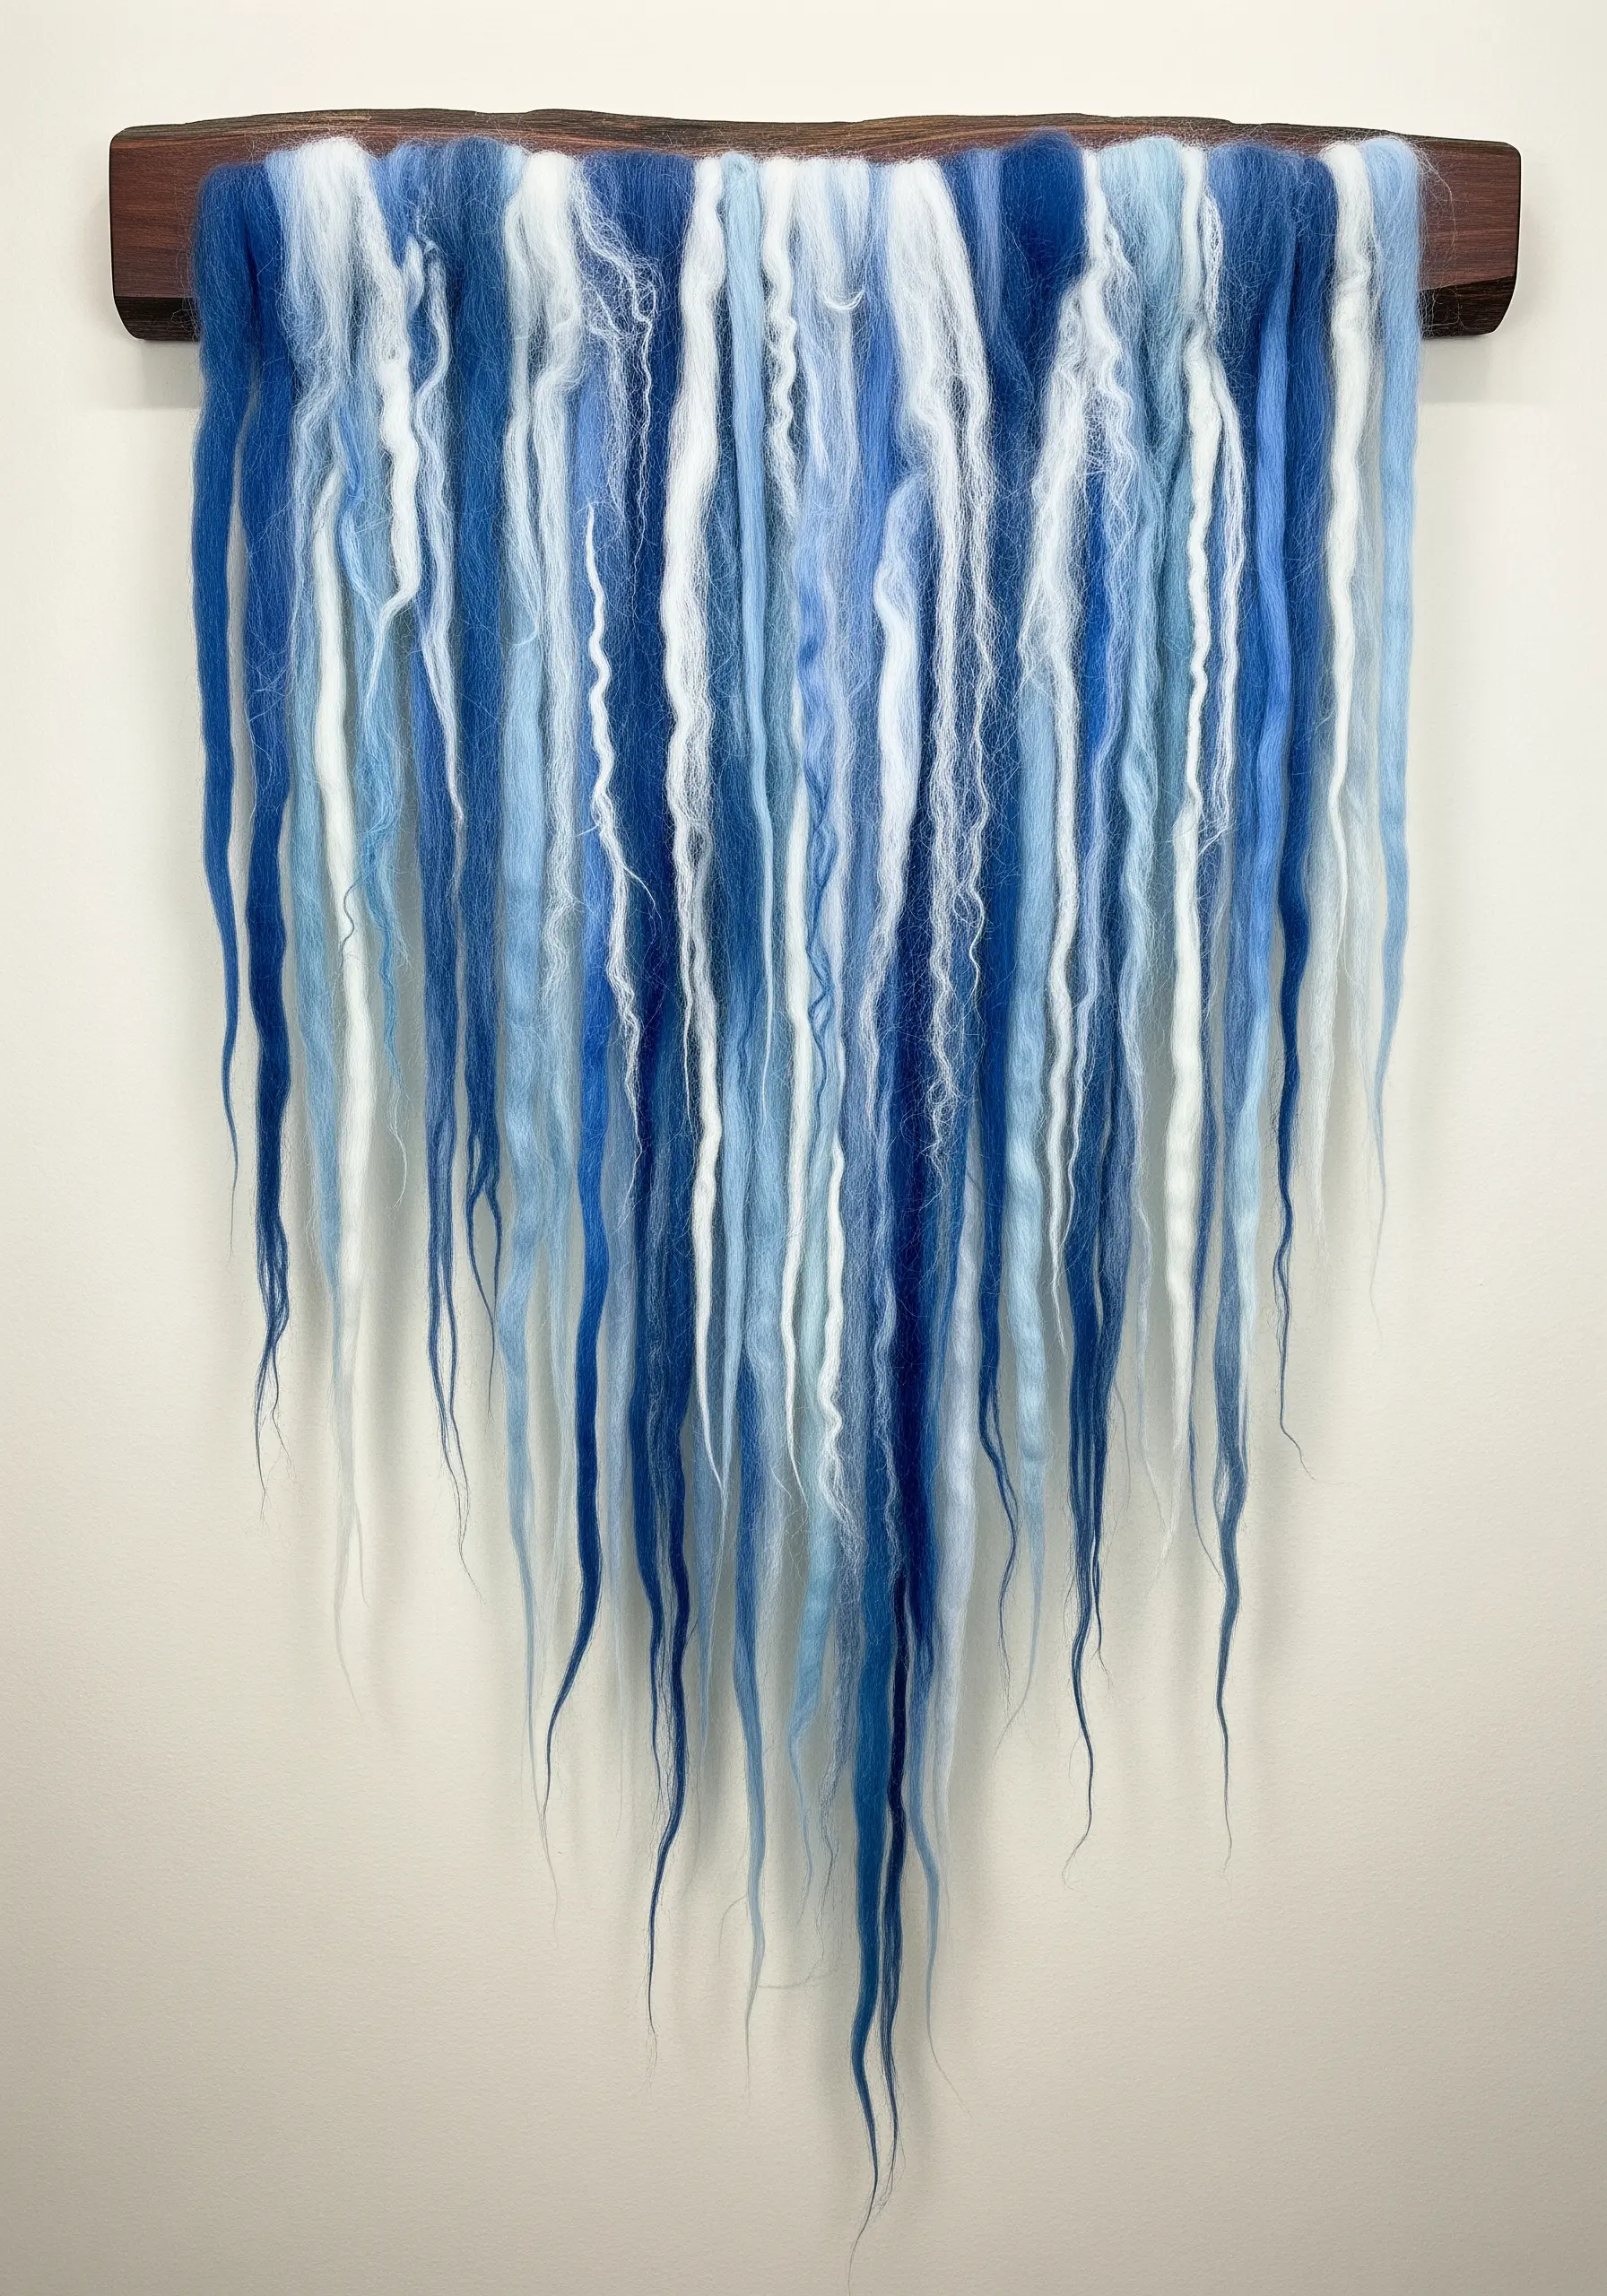
For a piece that is both soft and dramatic, work with unspun wool roving.
There’s no complex technique here; the beauty is in the material itself.
Gently separate strands of white and blue roving and simply drape them over a wooden dowel.
Avoid over-handling the wool to maintain its delicate, airy texture.
The result is an organic, minimalist interpretation of falling water.
27. Weave with Contrasting Sheens and Textures
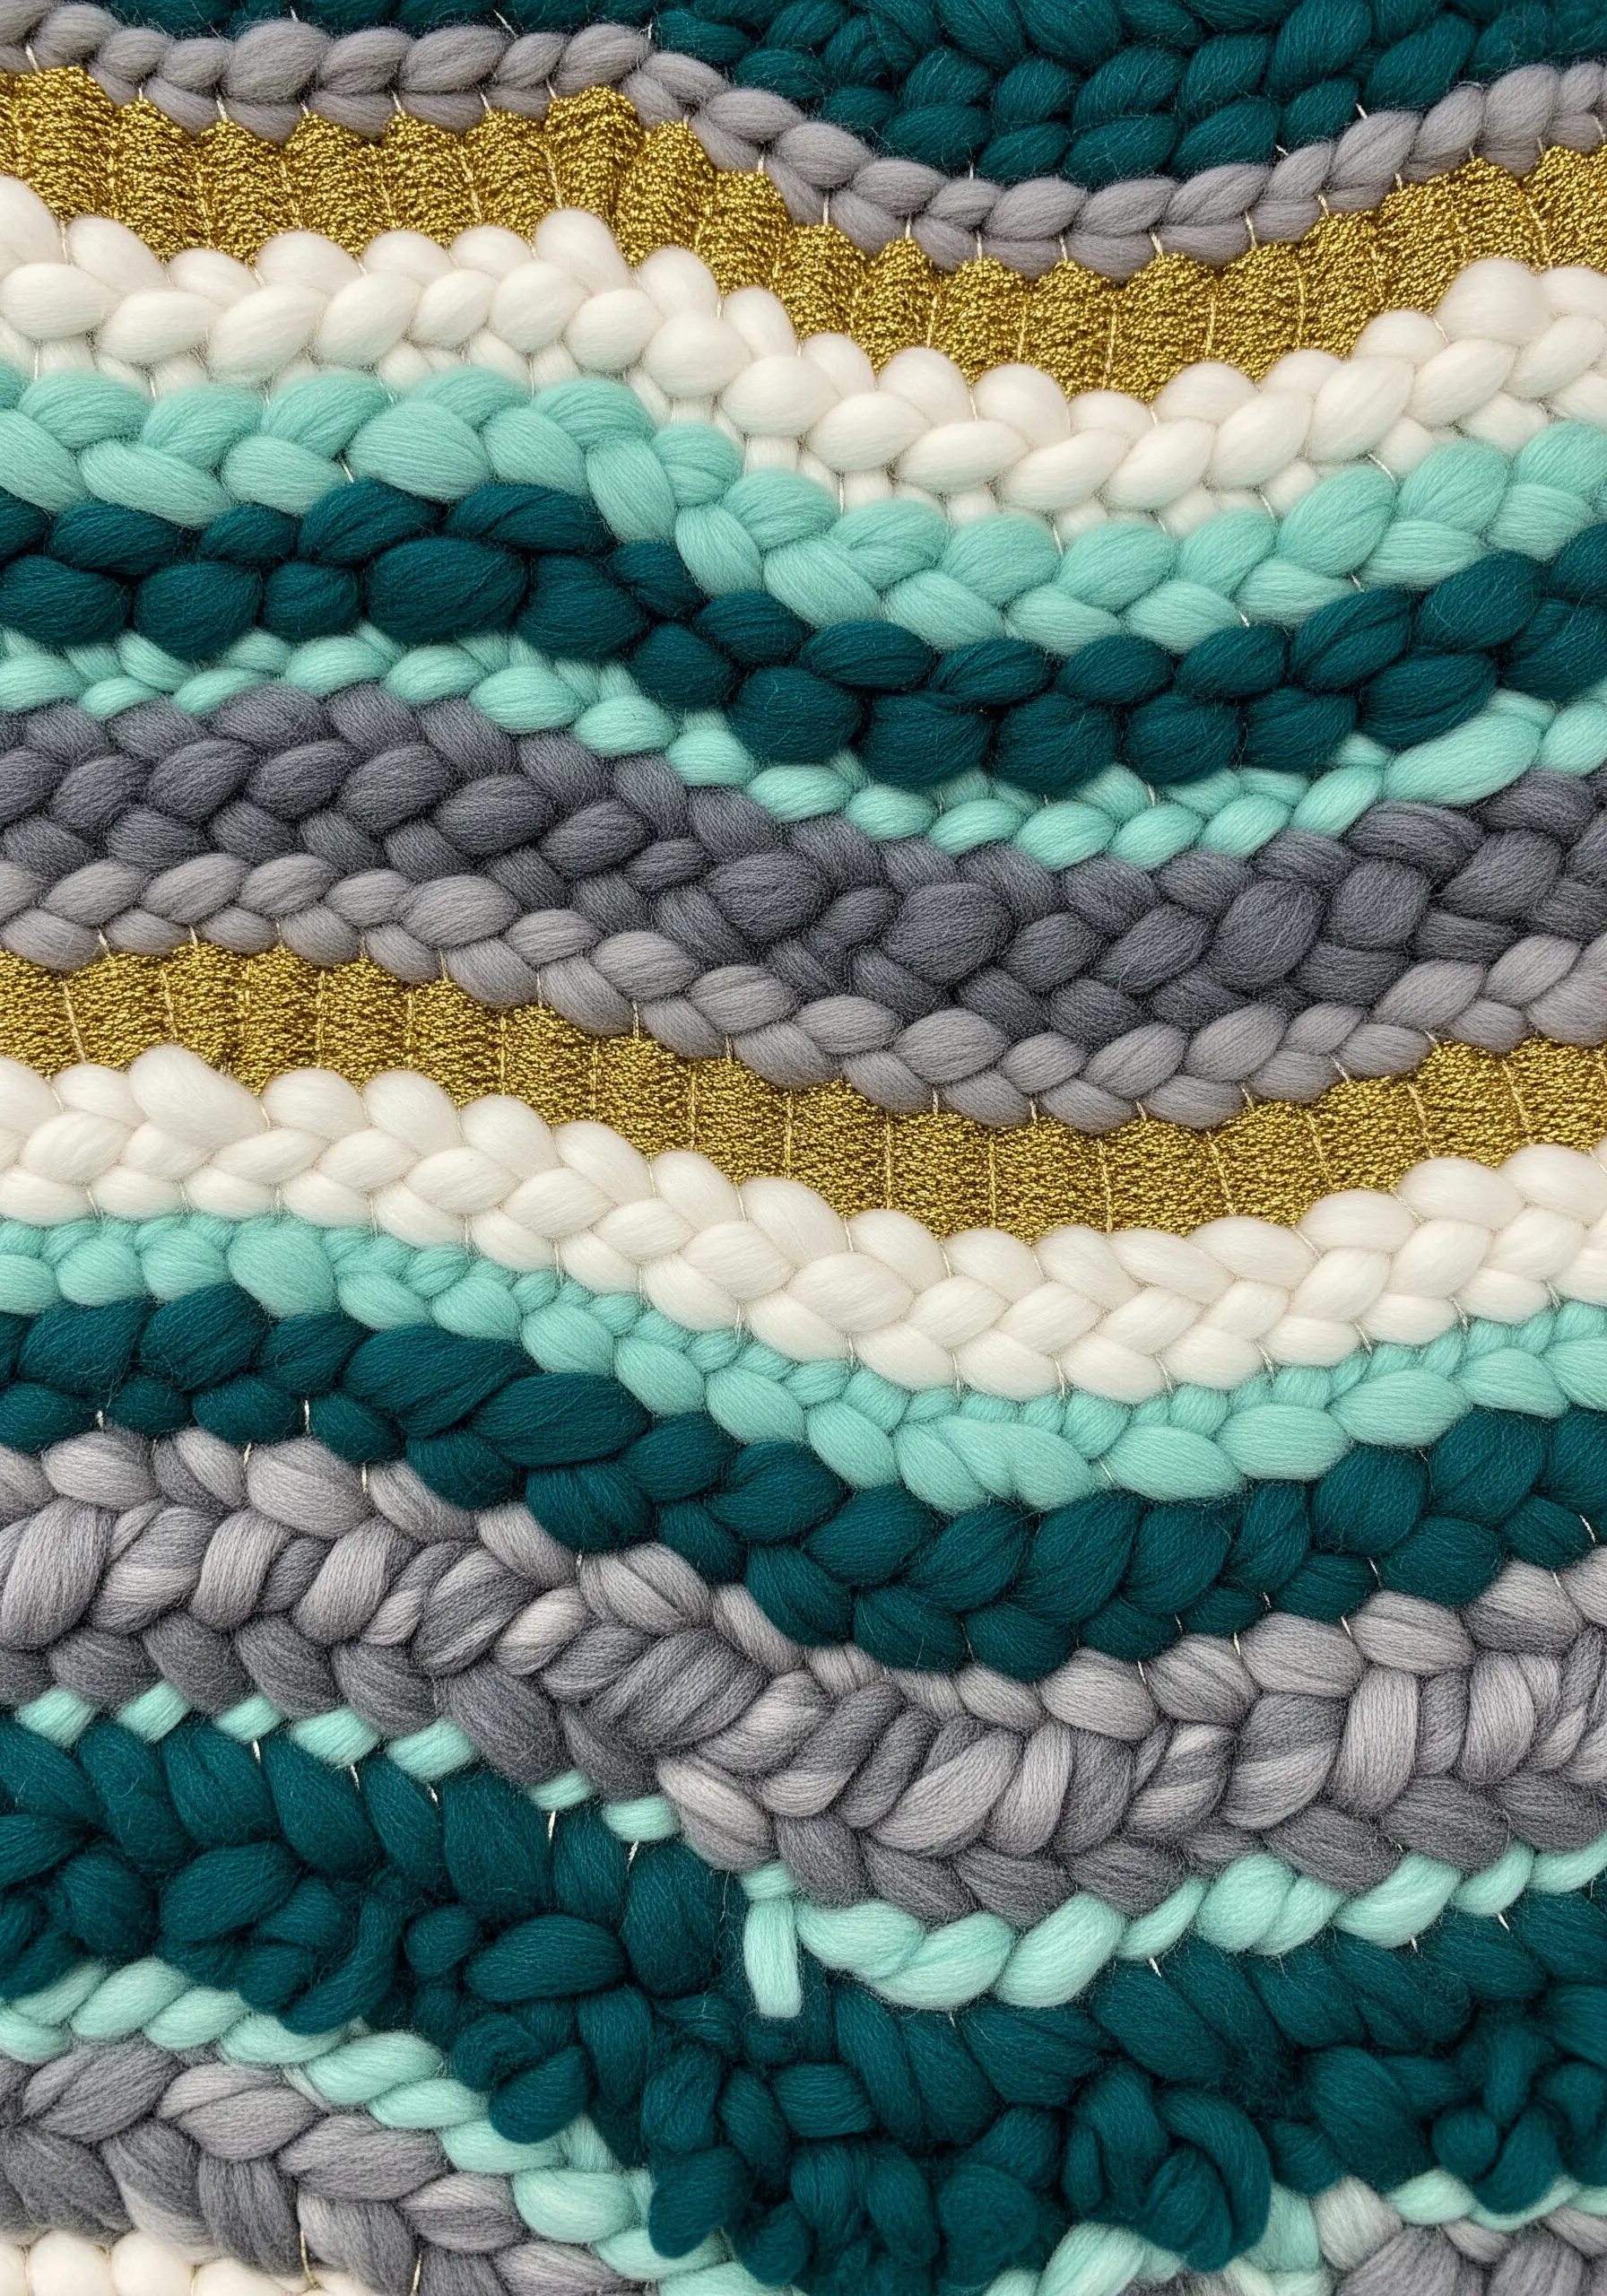
Elevate a simple woven design by introducing a single, contrasting material.
Here, a thin band of shimmering metallic gold thread is placed between chunky, matte wool braids.
This simple juxtaposition of thick versus thin and shiny versus matte creates immediate visual interest and a touch of unexpected luxury.
It proves that even a small detail can make a piece feel more dynamic and intentional.


