

Think of your hallway not as a passageway, but as a gallery. This is a space that craves texture, dimension, and a personal touch—qualities that fiber art delivers with warmth and sophistication. It’s time to move your beautiful stitching beyond the hoop and onto the wall in a way that feels intentional and truly transformative.
The skills you already possess—an understanding of tension, a feel for color, and the patience to build something beautiful thread by thread—are the exact same skills needed for these larger projects. Whether you are knotting, weaving, or coiling, you are simply applying your love of fiber to a different scale.
Let these ideas encourage you to see yarn not just as something to stitch with, but as a medium to sculpt, paint, and build with. You have the ability to create art that softens a room, tells a story, and turns a simple wall into a testament to the quiet, powerful beauty of handmade work.
1. The Organic Anchor: Macrame on Driftwood

Begin your piece by securing cords to a found object, like driftwood, using a simple lark’s head knot.
This grounds your design in a natural, irregular form, creating an immediate contrast with the structured symmetry of your knotting.
Focus on maintaining even tension in your square knots to ensure the geometric patterns remain crisp and defined.
The dialogue between the organic wood and the disciplined knots is what gives handmade pieces that bring natural beauty into your home their unique power.
2. Woven Gradients: Painting with Yarn

Achieve a seamless color transition by weaving with multiple strands of different colored yarn held together, gradually phasing colors in and out.
This technique, often called “color blending” or “hatching” in tapestry weaving, creates a soft, painterly ombré effect that a single strand cannot replicate.
Vary the density of your weave by alternating between a tight plain weave and a looser soumak weave to add subtle textural shifts within the color fields.
This control over color and texture allows you to create large-scale embroidery tapestries that become the focal point of any home.
3. Tension as Line: The Art of Precision Stringing
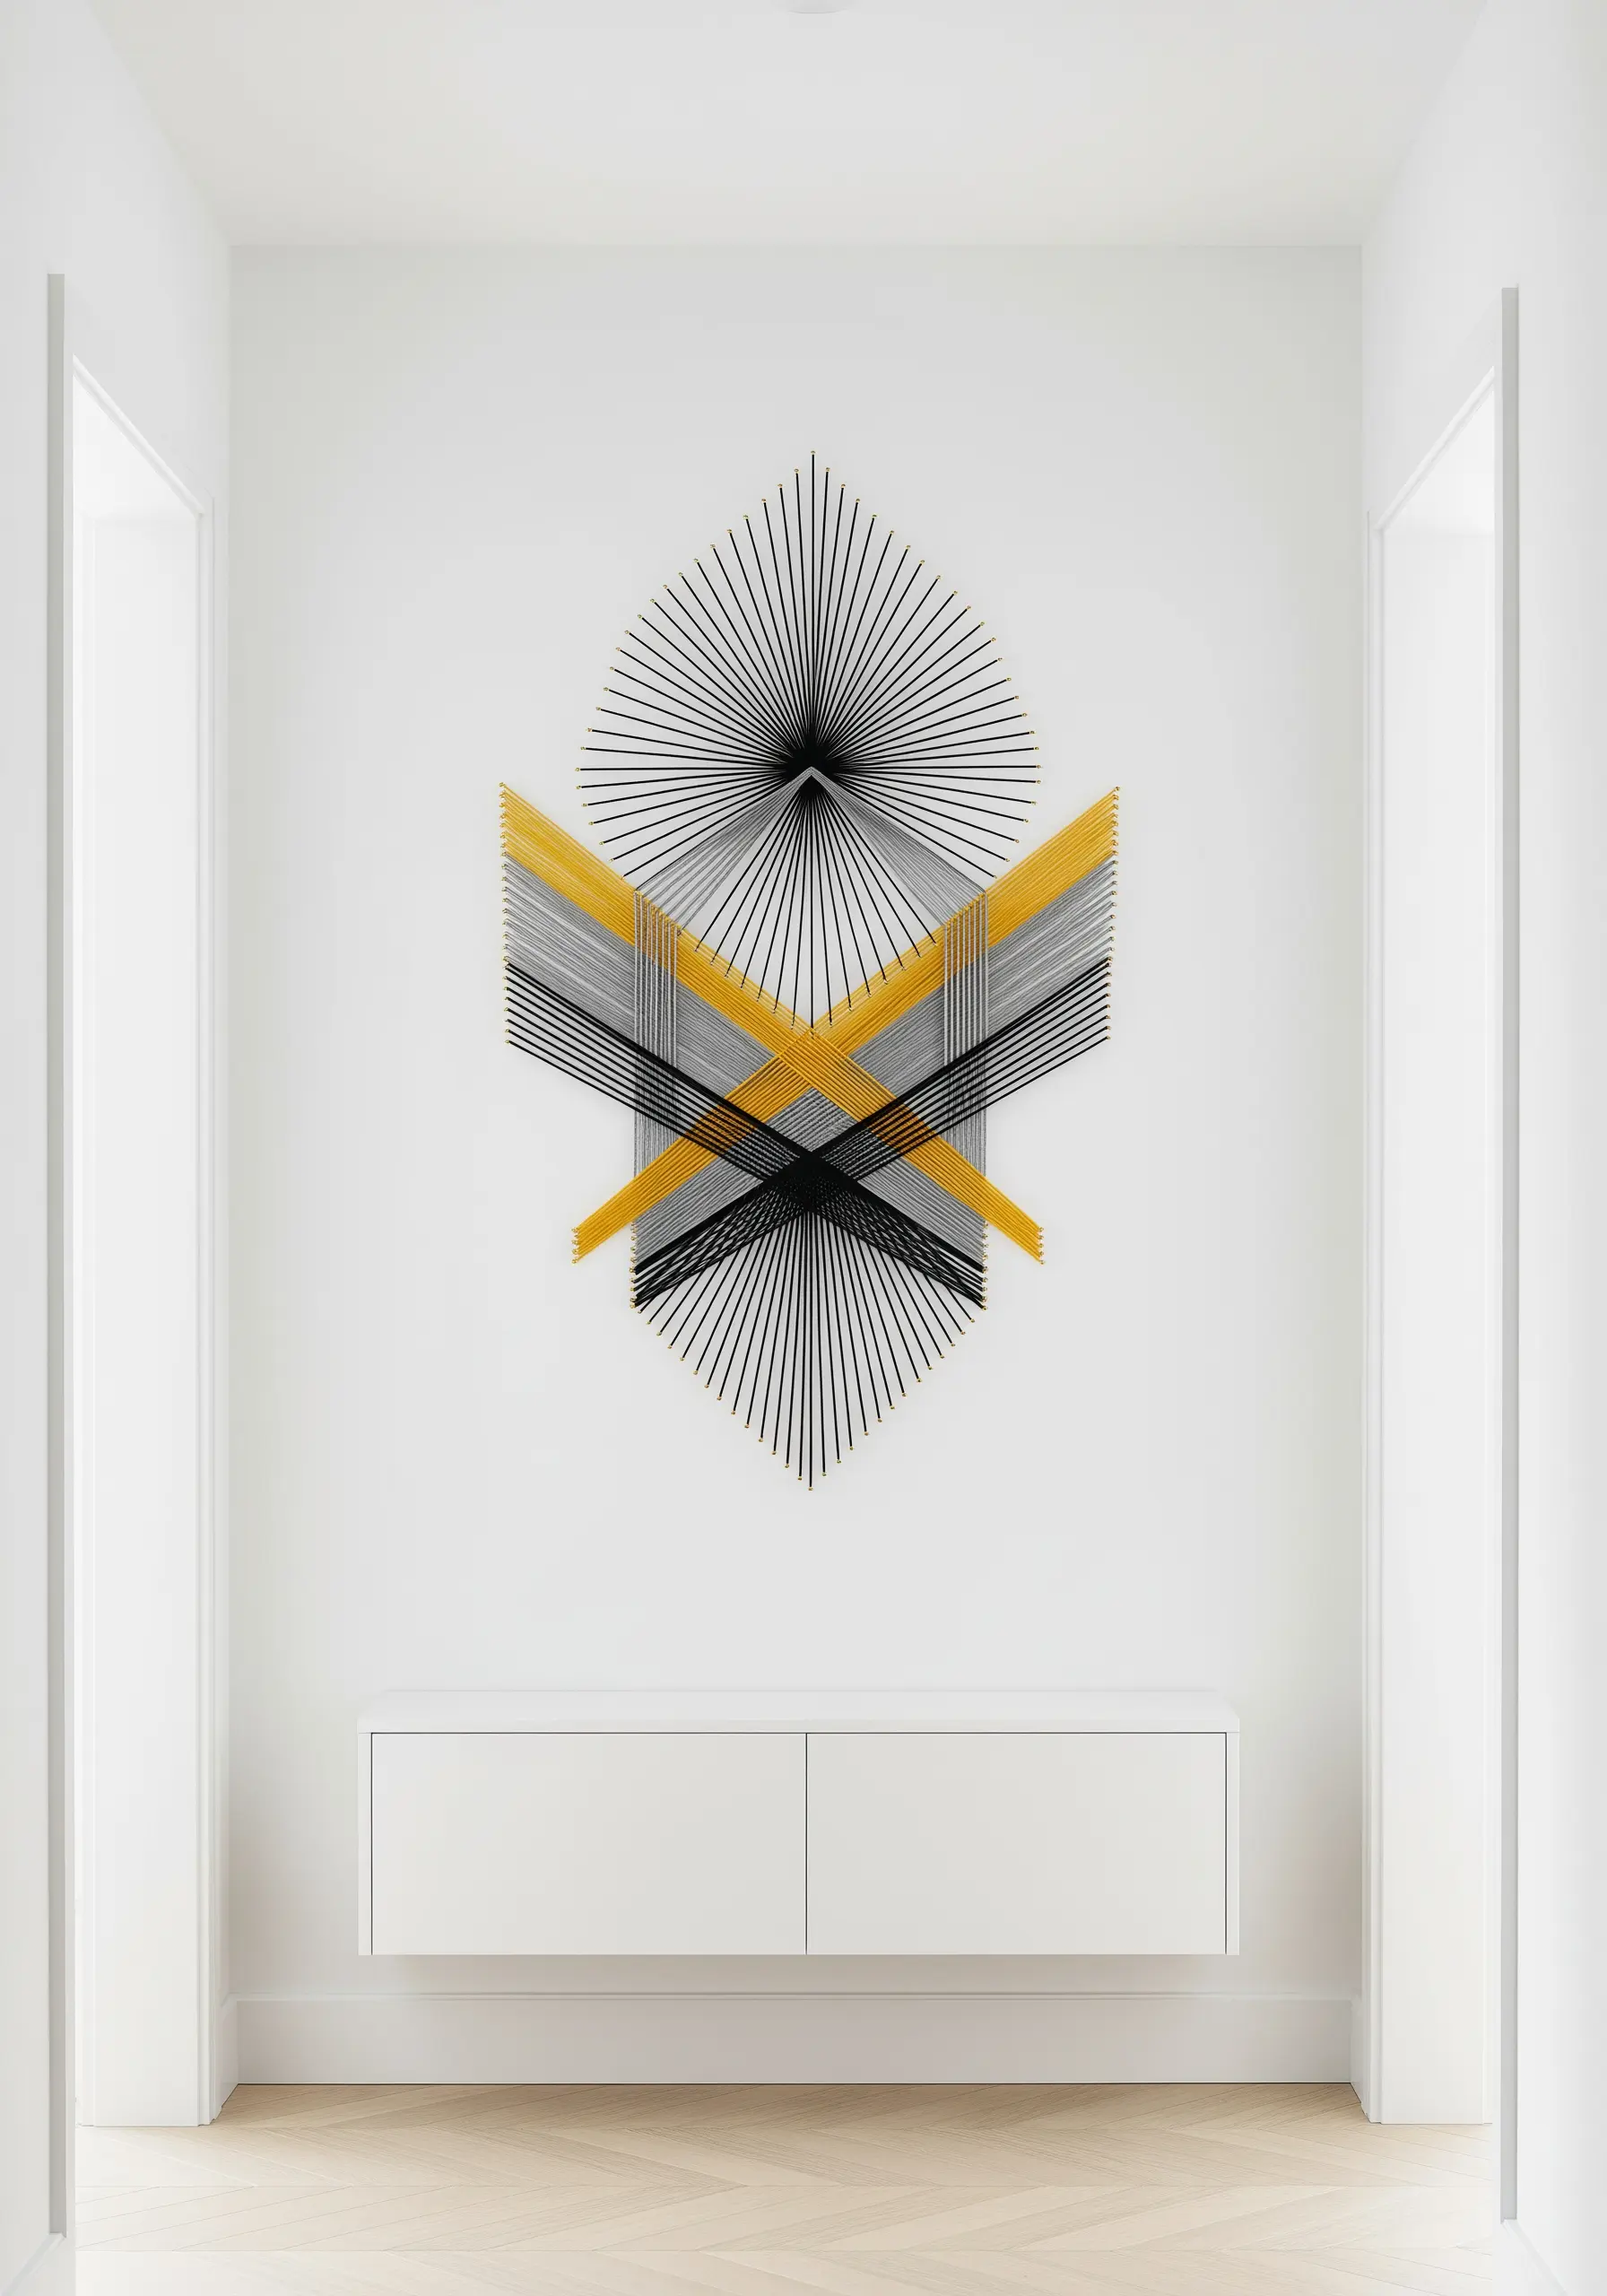
Create dynamic geometric forms by stretching thread between precisely placed anchor points, like small nails or pins, on a board.
The visual magic comes from layering colors and changing the stringing sequence to create illusions of curves and depth from straight lines.
Use a high-contrast thread, like black against white, and introduce a metallic or accent color to guide the eye and define the primary shapes.
This technique transforms simple thread into abstract optical illusion stitches that trick the eye.
4. The Sculptural Drape: Celebrating Yarn’s Inherent Weight

Move beyond function and treat a chunky knit piece as a sculptural object.
Instead of a flat hang, drape it over a branch or decorative hook to emphasize the weight, texture, and deep shadows created by the oversized stitches.
This approach requires no complex technique—only an appreciation for the material itself.
The simplicity of the display allows the texture of the merino wool or thick roving to become the central artistic statement, perfect for cozy neutral decor ideas.
5. The Rhythmic Landscape: A Punch Needle Triptych
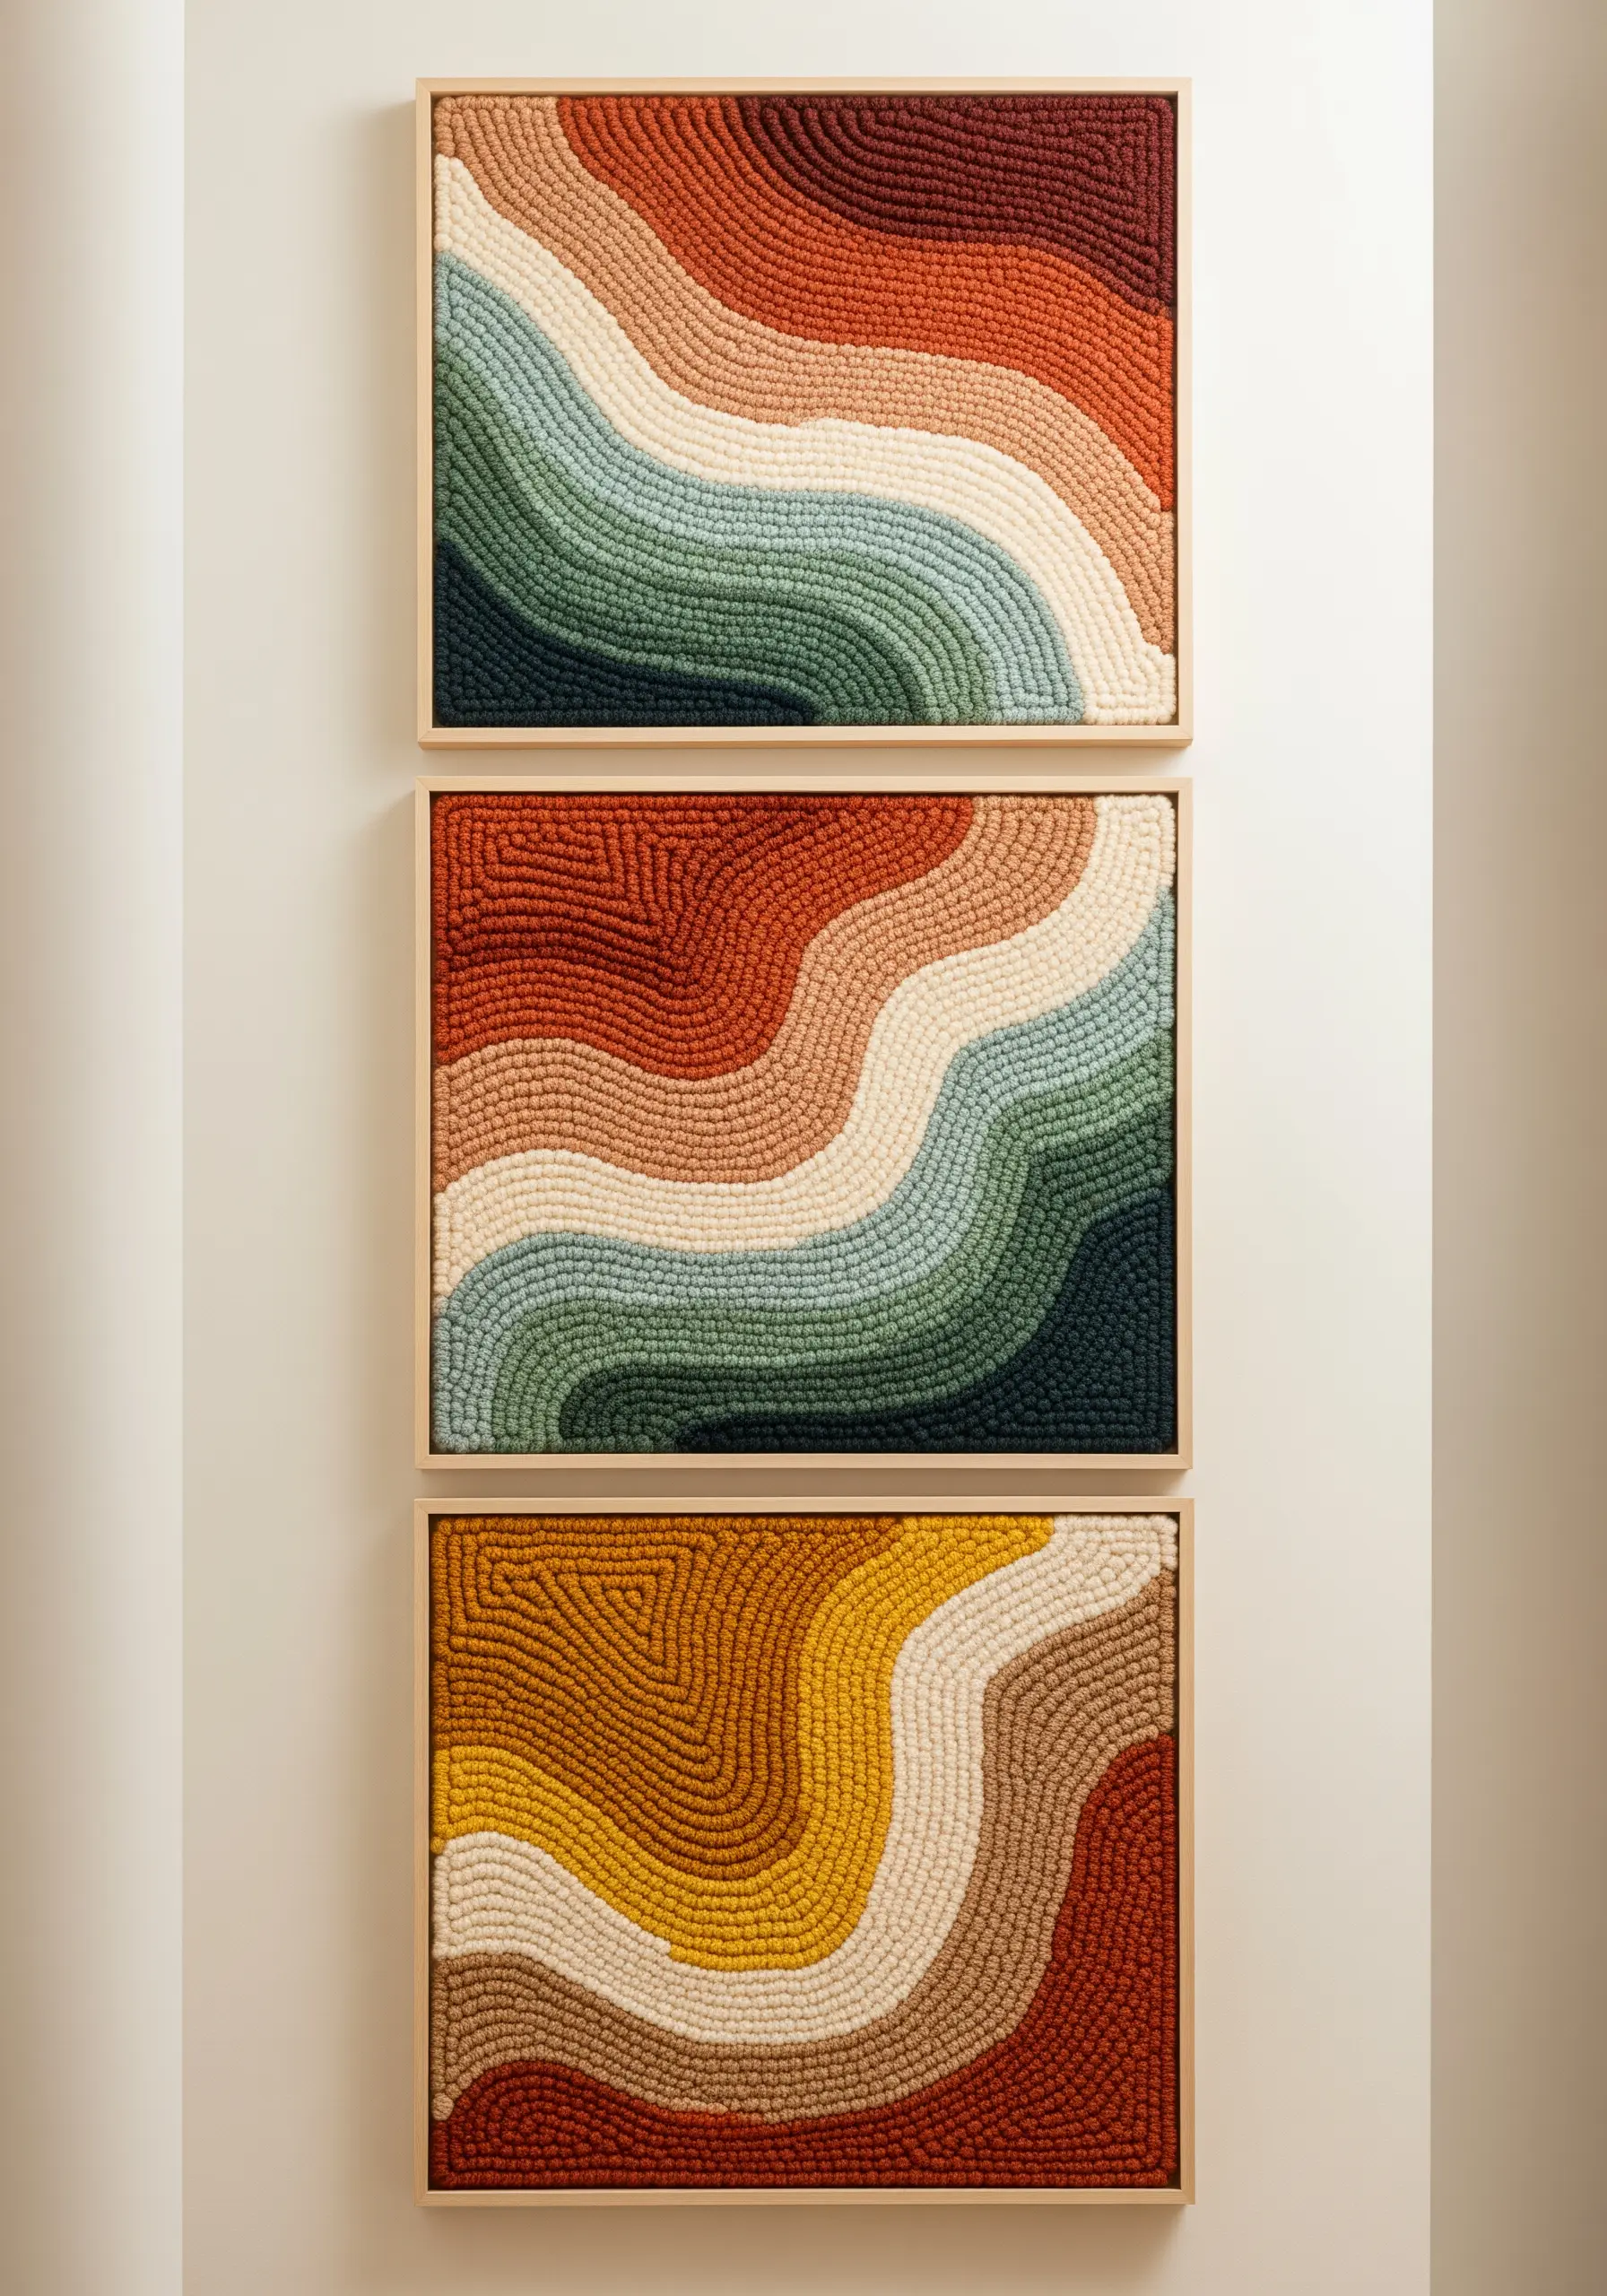
Tell a larger story by creating a triptych—three individual panels that work together as a single piece of art.
Maintain a consistent loop height with your punch needle for a uniform, plush texture that reads like a rich textile painting.
Guide the direction of your stitches to mimic the flow of natural landscapes, creating sweeping curves that continue from one frame to the next.
This method turns simple shapes into organic shape embroidery patterns for neutral minimal walls.
6. Tufted Color Fields: Bold Graphic Formations

Use a tufting gun or a dense punch needle technique to create large, uninterrupted blocks of plush color.
The key to this style is the crisp definition between shapes, so map out your design clearly on the backing fabric before you begin.
Embrace curved and interlocking forms, as the uniform, rug-like texture gives these simple shapes a powerful graphic and tactile presence.
This is one of the most effective DIY wall art embroidery projects that everyone will ask about.
7. Cascading Color: The Dip-Dyed Fiber Chandelier

Construct a three-dimensional sculpture by suspending yarn from concentric rings or hoops of varying sizes.
Create a stunning gradient by dip-dyeing bundles of yarn before attaching them, allowing the color to travel up the fibers for a soft, watercolor-like transition.
Vary the lengths of the yarn strategically to create a sense of movement and draw the eye downward through the cascading form.
This transforms simple yarn into one of the most playful yarn wall art crafts to refresh your living space.
8. The Woven Mandala: A Universe of Texture

Use a circular loom or a metal ring as your warp frame to build a woven mandala.
The power of this form lies in mixing materials: combine chunky wool roving for soft, cloud-like sections, tightly wrapped cords for defined lines, and fine threads for delicate details.
Leave some warp threads exposed near the outer edge to integrate the frame into the design and create a radial burst of energy.
Such mixed-fiber art designs inspired by abstract patterns offer endless creative possibilities.
9. A Grid of Intent: The Power of Pattern Repetition

Design a series of small, individual weavings that share a common color palette and geometric language.
Arranging them in a precise grid transforms them from simple crafts into a sophisticated, large-scale installation.
Play with variations on a theme—invert colors, mirror patterns, or alter the scale of a motif across the different panels to create rhythm and visual interest.
This approach elevates simple embroidery patterns that make statement wall art.
10. The Wrapped Arc: Sculpting with Solid Color

Create clean, sculptural forms by using thick cotton rope or even foam pipe insulation as a structural base.
Wrap the base tightly and evenly with yarn, ensuring no gaps are visible, to achieve solid, uninterrupted blocks of color.
Secure the ends of the yarn discreetly on the back of the piece with a fabric glue or by stitching them down.
This technique allows you to build bold, graphic DIY yarn wall art pieces perfect for small apartments without needing a loom.
11. A Dialogue of Textures: Contrasting Knots and Roving

Create a compelling visual dialogue by combining two distinct fiber techniques in a single piece.
Juxtapose a section of structured, geometric macrame knots with a freeform woven area using soft, unspun wool roving.
The upper macrame section provides a sturdy, predictable foundation, while the lower roving section adds organic softness and unpredictable volume.
This interplay is key to creating ways to create depth in your embroidery using natural textures.
12. Vertical Rhythm: The Composed Tassel Garland

Elevate the simple garland by focusing on composition and rhythm.
Instead of random placement, create a deliberate pattern of tassels, pom-poms, and beads that repeats or evolves as it moves down the string.
Incorporate accents like wooden or metallic beads to add weight and a touch of refinement, breaking up the softness of the yarn.
These mini DIY decor hacks that look professional but cost almost nothing can fill a narrow vertical space with charm.
13. Coiled Abstraction: Drawing with Sculptural Rope

Create a textured canvas by coiling and stitching thick rope onto a backing fabric, arranging the coils into dense, organic shapes.
Once the background is established, use thinner, brightly colored ropes to ‘draw’ abstract lines over the top, securing them with discreet stitches.
This layered, painterly approach to fiber art allows for incredible freedom of expression and results in a piece with significant depth and texture.
This is a great example of abstract fabric collage embroidery ideas that feel like modern paintings.
14. Earthly Weave: Integrating Natural Elements
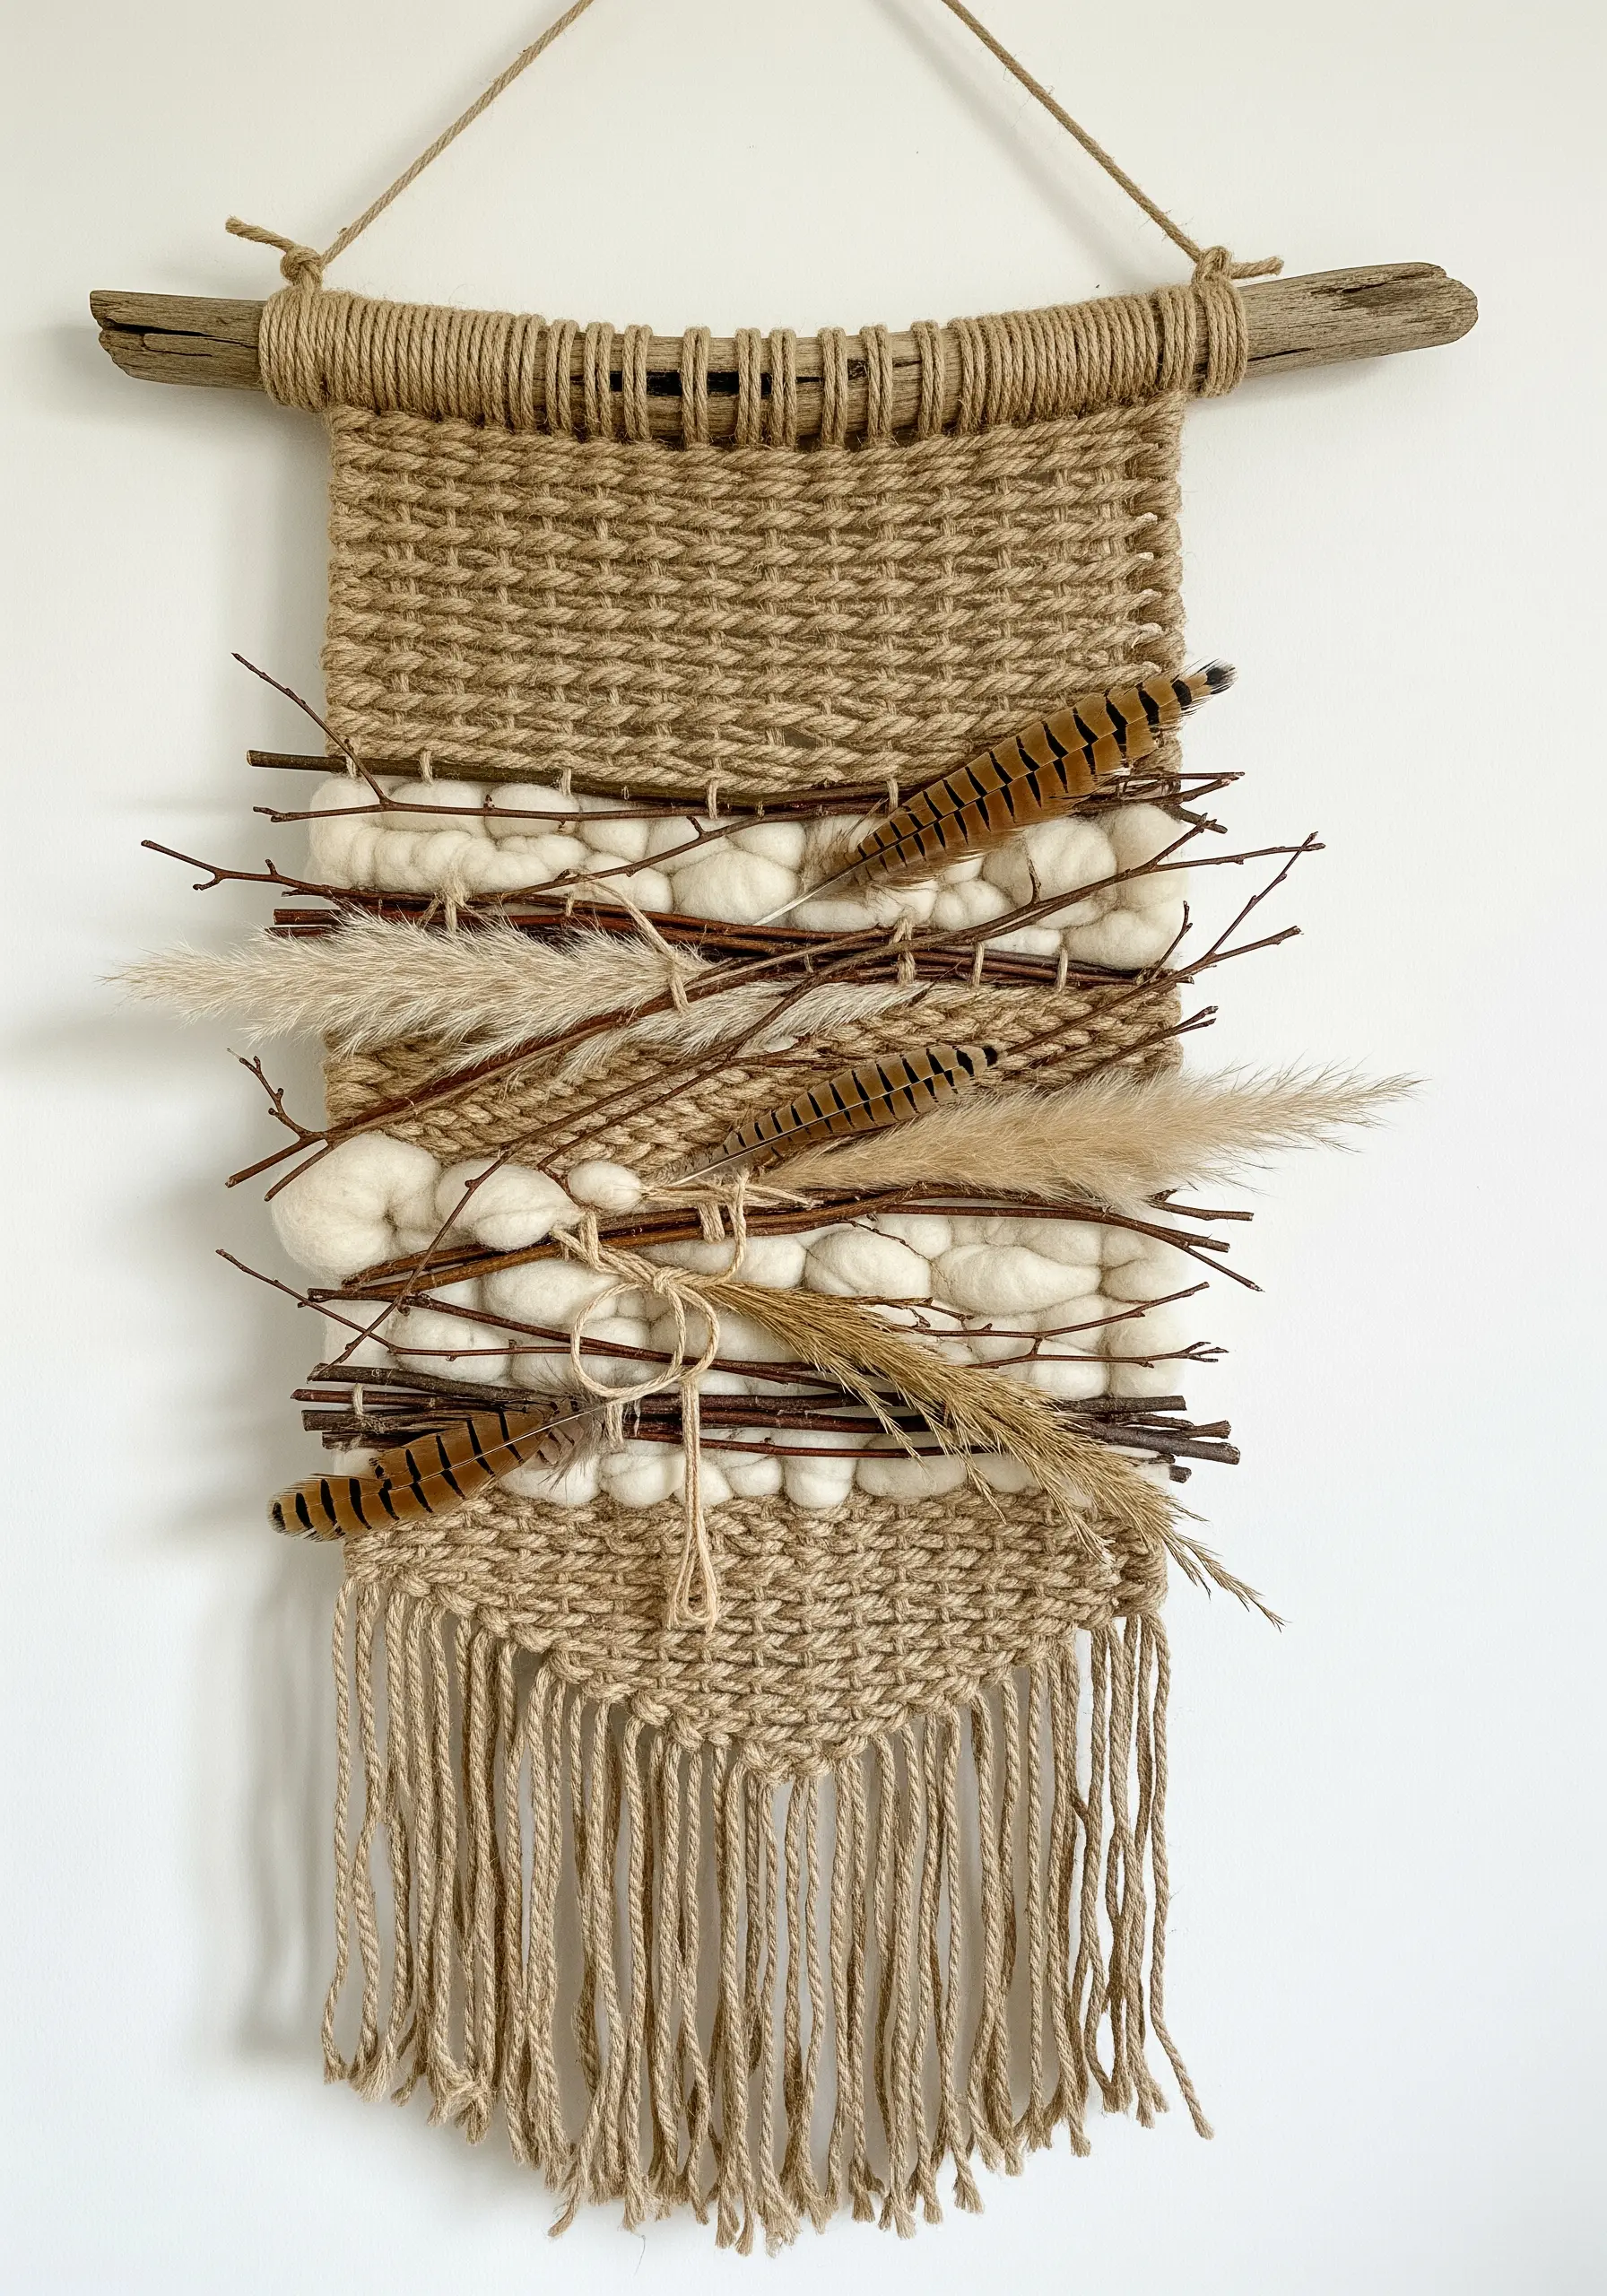
Bring the outside in by weaving found natural objects directly into your tapestry.
Use sturdy, natural fibers like jute or hemp for the main weave to complement the rustic materials.
Incorporate elements like twigs, dried grasses, or feathers as part of the weft, allowing them to sit within the woven structure.
This technique is perfect for embroidery projects inspired by textures you’d find on a nature walk, creating an authentic connection to the outdoors.
15. Celestial Cartography: Stitching the Stars
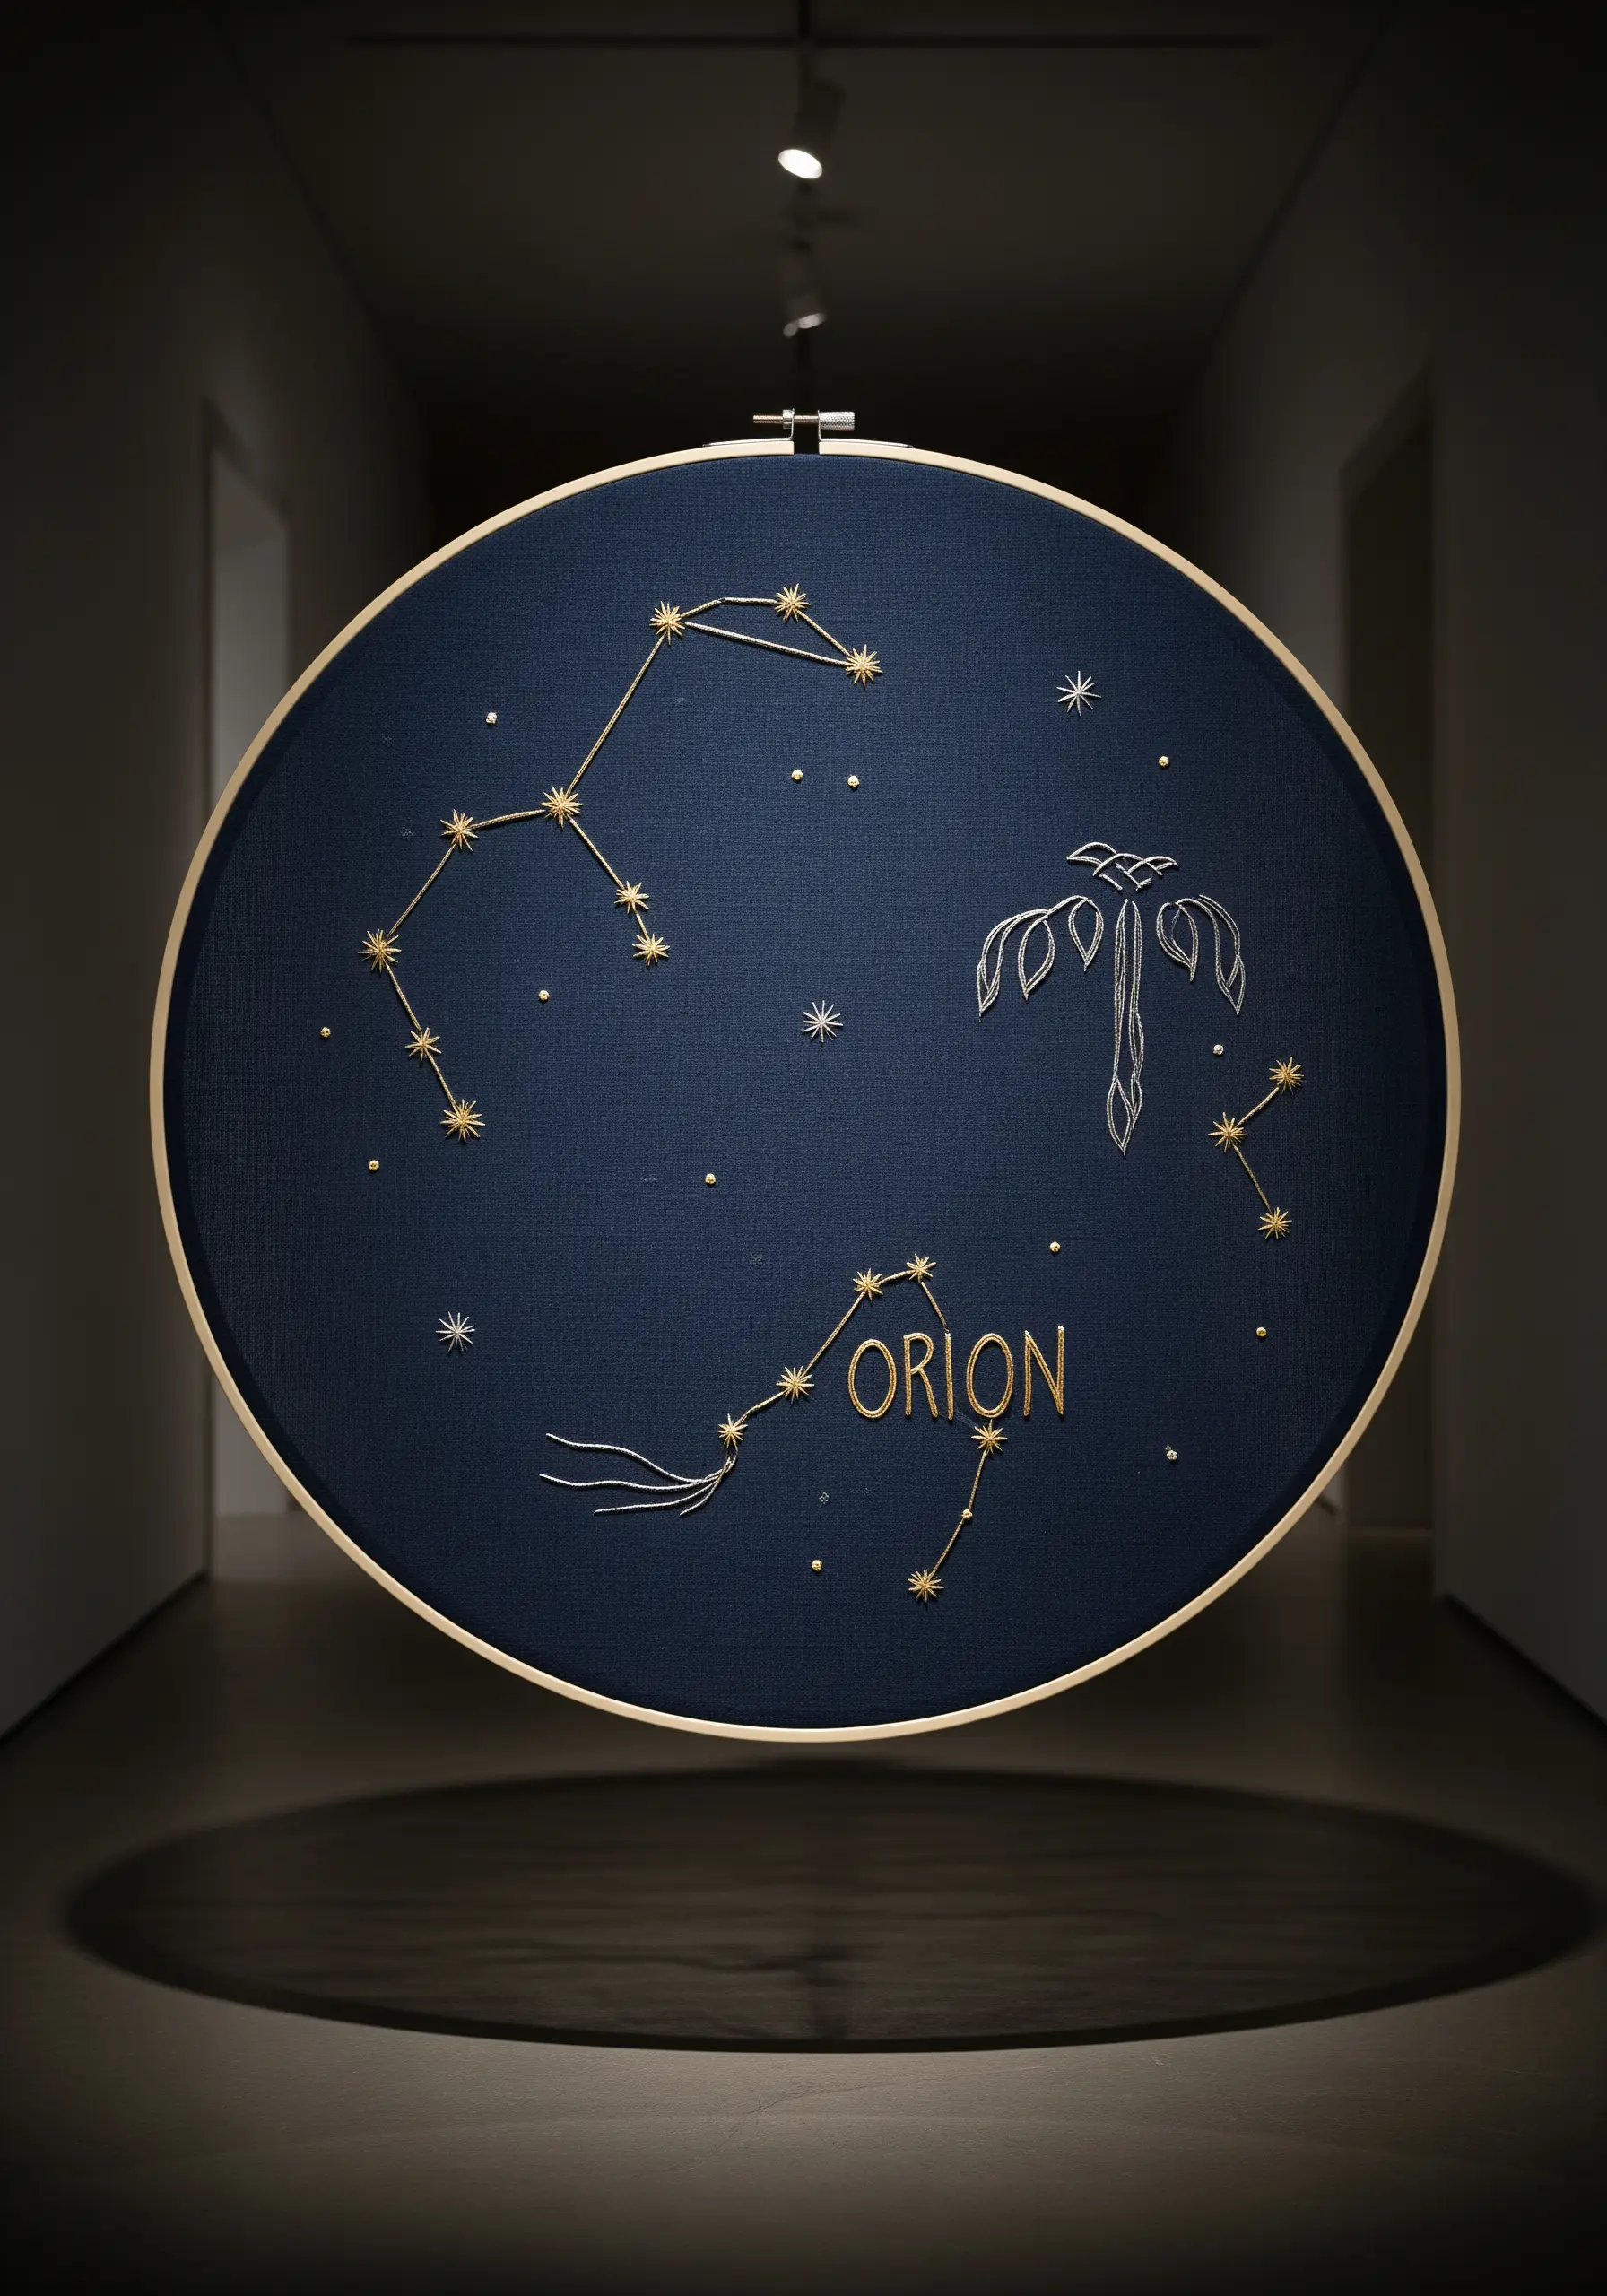
Use a large, oversized embroidery hoop to frame your piece, turning it into a significant focal point.
Choose a dark, tightly woven fabric like navy linen or black cotton canvas to serve as your night sky.
Stitch your constellations using a high-sheen metallic or silk thread; the contrast against the dark background will make the lines pop with reflected light.
Vary your stitches—use tiny seed stitches for distant stars and smooth satin stitches for bolder ones, creating tiny night sky embroidery designs with depth.
16. Felted Atmospheres: Painting with Wool Fibers

Explore needle felting as a way to create soft, ethereal landscapes without a single stitch.
Work on a base of pre-felt or thick wool fabric, layering thin wisps of colored wool roving and using a felting needle to blend them together.
To create the effect of atmospheric perspective, use darker, more saturated colors in the foreground and progressively lighter, cooler tones for distant layers.
This process feels less like stitching and more like painting, allowing for beautifully neutral color gradient embroidery ideas.
17. The Sculptural Knot: Line, Shadow, and Form

Create a high-impact, minimalist statement piece by focusing on a single, complex knot rendered in oversized rope.
Use a thick, braided cotton rope that holds its shape well, allowing the lines of the knot to be the primary focus.
The beauty of this approach lies in the interplay between the positive space of the rope and the negative space of the wall, as well as the soft shadows the form creates.
These fiber art installations that are perfect for small apartments add drama without clutter.
18. The Indigo Horizon: Dyeing the Finished Weave

Instead of weaving with pre-dyed yarn, try dyeing the entire woven panel after it comes off the loom.
This technique, known as dip-dyeing, creates a beautiful, organic bleed where the color wicks up the fibers, resulting in a softer, less precise edge than weaving with colored yarn.
The contrast between the structured grid of the weave and the free-flowing nature of the dye line is what makes the piece so visually compelling.
It’s an excellent way to create DIY calm cozy wall hangings you can stitch this weekend.
19. Deconstructed Weaving: The Elegance of Raw Edges

Challenge traditional tapestry forms by combining a section of tightly woven geometric patterns with a long, deconstructed fringe.
Instead of cutting the warp threads short, leave them long and incorporate braids, knots, and un-spun sections to create textural interest.
This ‘deconstructed’ approach celebrates the raw materials and the process of weaving, resulting in stunning fiber art installations that transform any room instantly.
20. The Rya Knot Wreath: A Burst of Tactile Energy

Build an incredibly lush, tactile surface by covering a wreath frame with hundreds of individual rya knots or by using a latch hook tool.
The technique involves looping short pieces of yarn around a mesh or fabric base, creating a dense, shaggy pile.
By using a single, vibrant color, you draw all the attention to the explosive texture, turning a simple circular form into a captivating piece of fiber art.
These yarn wall art creations inspired by nature you’ll love often mimic moss or other natural textures.


