

The hemline of a garment is more than just an edge; it’s an opportunity. It’s a quiet space waiting for a story, a line of color, a touch of texture that transforms the ordinary into something deeply personal and beautifully crafted.
Before you begin your next stitch, I want you to think about rhythm and weight. Consider how a dense cluster of French knots on a denim jacket creates a different feeling than the delicate float of a single line on sheer silk. It is in these choices—the thread you select, the space you leave empty, the way a design flows with the fabric—that true artistry is found.
Here, you will find more than just patterns; you will discover techniques that give your work a boutique-designed finish. These are concepts to help you stitch with intention, turning every cuff, collar, and hem into a small masterpiece of your own making.
1. Add Dimension with a Fruiting Vine Border
Create a dynamic, cottage-garden feel by varying the texture of each element along your skirt’s hemline.
For the strawberries, use a padded satin stitch—a base of small straight stitches—to give them a plump, three-dimensional form before covering them in red thread.
Stitch the leaves using a fishbone stitch to create that lovely central vein, and use a lighter green for the veins to add realistic detail.
Scatter tiny white lazy daisy stitches with yellow French knot centers for the blossoms, placing them at different heights to mimic natural growth.
This layering of textures ensures the design feels alive and avoids a flat, stamped-on appearance.
2. Contrast Dense and Airy Stitches on Denim
When embroidering on a heavy fabric like denim, play with stitch density to create visual interest.
For the goldenrod flowers, use tightly packed French knots with a full six strands of floss to build up a rich, bumpy texture that stands out against the twill.
In contrast, form the Queen Anne’s lace with delicate, open lazy daisy stitches in white, using only two or three strands.
This high-contrast approach—dense versus delicate—makes the entire composition pop, giving each flower its own distinct personality.
Always use a sharp, strong needle and a tear-away stabilizer on the inside of the jacket to prevent the fabric from puckering under the tension of dense stitches.
3. Integrate Embroidery into a Scalloped Hem

For a truly bespoke finish, make the embroidery part of the garment’s structure by creating a scalloped edge.
First, stitch your floral design, then trace a gentle scalloped line that follows the contours of the flowers.
Reinforce this line with a very tight, narrow satin stitch or a hand-worked buttonhole stitch—this is crucial to prevent fraying.
Once the edge is secured, carefully trim away the excess fabric right up to the stitched line.
This technique works best on stable, non-stretch fabrics and creates an incomparably elegant, couture-level detail, especially with monochrome floral embroidery ideas.
4. Stitch Delicate Botanicals on Ribbed Cuffs

Embroidering on knitwear requires a gentle touch to avoid distorting the fabric’s stretch.
Choose a fine-gauge knit sweater and apply a lightweight, wash-away stabilizer to the area before you begin stitching.
Use stitches that work with the fabric, not against it: fishbone stitch for the ferns allows for subtle movement, while small, carefully placed satin stitches create the petals without puckering.
Keep your tension loose and consistent.
Finish with delicate French knots or seed beads, which add texture without pulling on the ribbed structure, perfect for tiny secret embroidery ideas to hide inside cuffs.
5. Create Cascading Wisteria on Sheer Fabric

Achieve a dreamy, ethereal effect by stitching a cascading wisteria vine onto a sheer or semi-sheer fabric like chiffon or organza.
Use a water-soluble stabilizer to provide support during stitching, then dissolve it away to leave the embroidery floating on the transparent material.
Create the blossoms with a mix of French knots and short straight stitches in a gradient of purples and lavenders for depth.
For the vines, a delicate whipped backstitch adds dimension without overwhelming the fine fabric.
This technique gives the illusion of painted florals, allowing the color of the underlying garment or your skin to show through.
6. Frame a Shirt Hem with Graphic Ginkgo Leaves

Combine modern geometry with organic forms for a sharp, contemporary look.
Use the natural curve of a shirt-tail hem as a frame for mirrored ginkgo leaf motifs.
Stitch the leaves with a satin stitch, ensuring each stitch lays parallel to the others for a smooth, fan-like sheen.
Define the design with crisp, straight lines stitched in a contrasting color using a simple backstitch.
The combination of a limited, bold color palette—like teal and mustard—and the clean lines makes this design feel architectural and intentional.
7. Build Rich Texture on Heavy Wool Coats
Transform a classic wool coat with a border that celebrates texture and depth.
On thick fabric, you can use heavier threads, like pearl cotton or multiple strands of floss, to make your stitches stand out.
For the thistle heads, combine a satin stitch base with turkey work loops that you can trim for a fuzzy, realistic texture.
Use densely packed French knots for the heather, varying the shades of pink and lavender to create a field-like effect.
This is one of those aesthetic embroidery ideas to turn your old clothes into art, making a functional garment a true statement piece.
8. Imply Movement with Floating Dandelion Seeds
Embroidering on tulle or organza offers a unique opportunity to play with transparency and light.
Stitch a border of dandelion clocks and their drifting seeds using a single strand of black thread for a delicate, graphic effect.
Use simple straight stitches for the seeds and stems, radiating from a central point for the seed head.
The magic happens when the fabric moves; the sheer layers create a 3D effect as the stitched seeds appear to float and separate.
Finish the hem with a fine, scalloped satin stitch to contain the design and add a polished edge.
9. Stitch a Dense Wildflower Meadow on Chambray
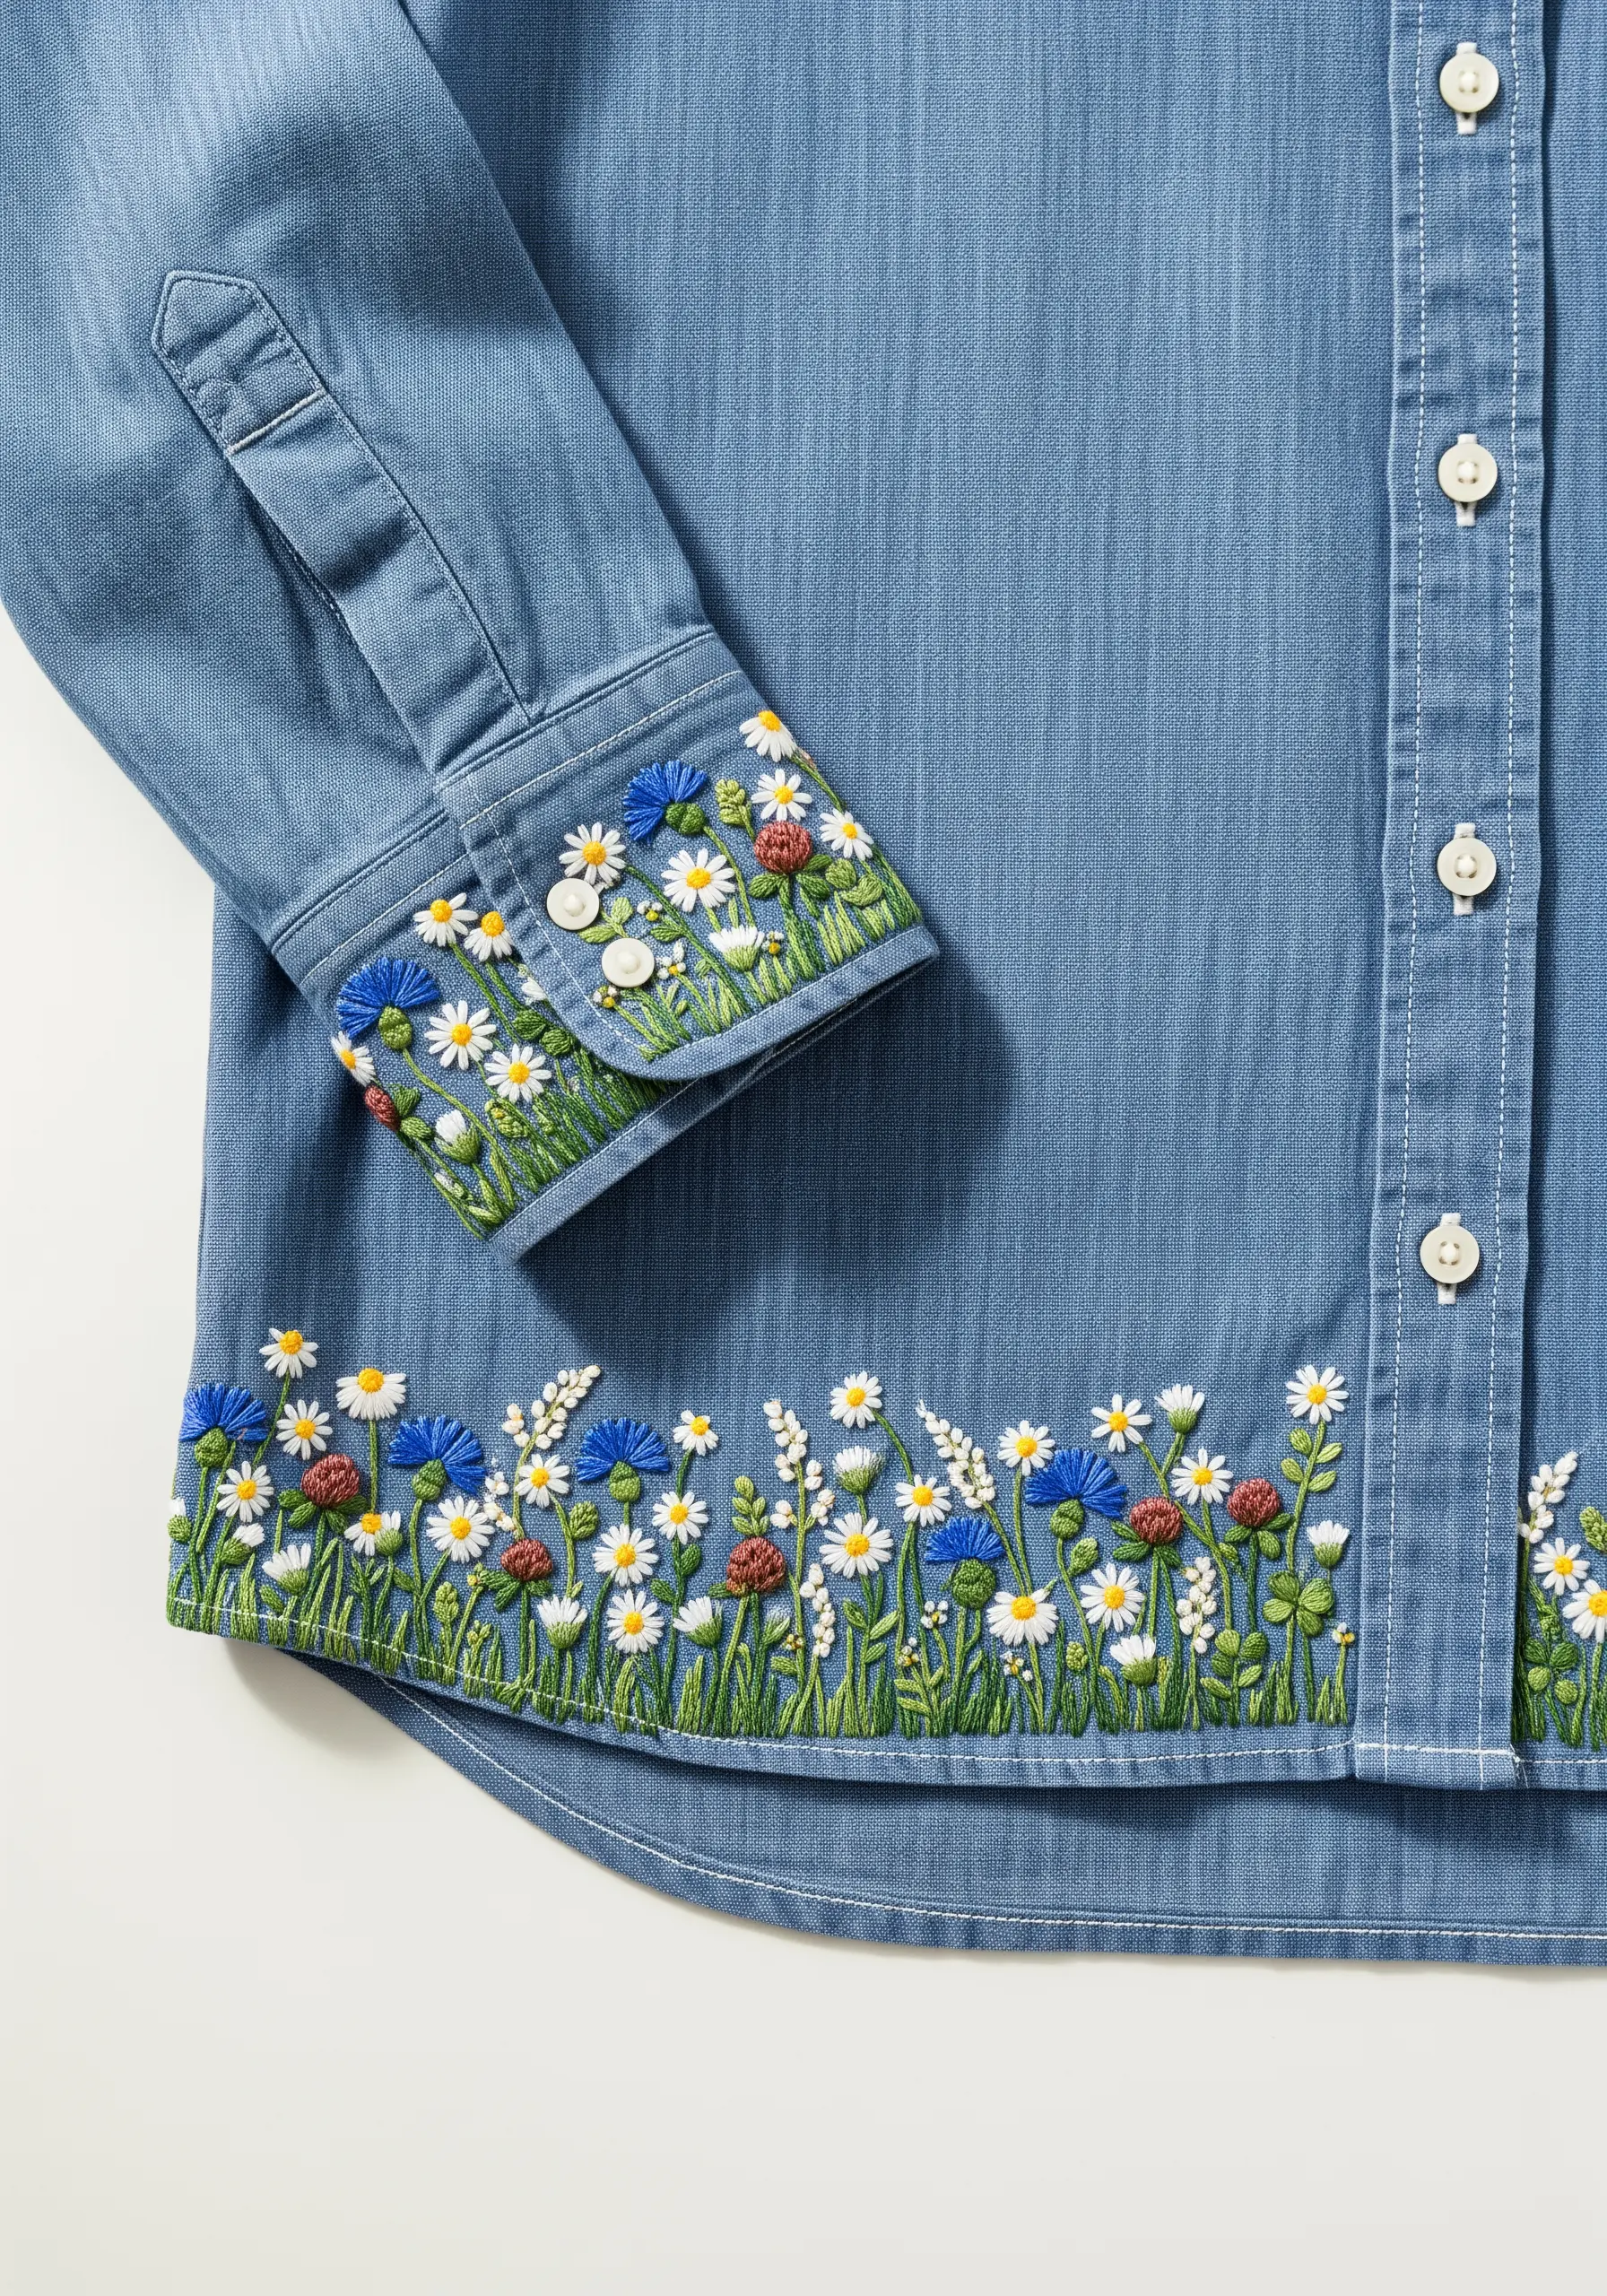
Capture the joyful chaos of a wildflower field by layering different flower types and heights along a hemline and cuff.
On a sturdy fabric like chambray, you can pack your stitches tightly without fear of puckering.
Combine simple lazy daisy stitches for daisies, satin-stitched cornflowers, and French knots for clover.
Use vertical straight stitches in various shades of green to create a dense bed of grass and stems, which grounds the design and makes the colorful blooms pop.
Overlap the flowers slightly to enhance the feeling of depth and abundance, as if you’re looking into a real meadow.
10. Capture Art Nouveau Elegance on Velvet
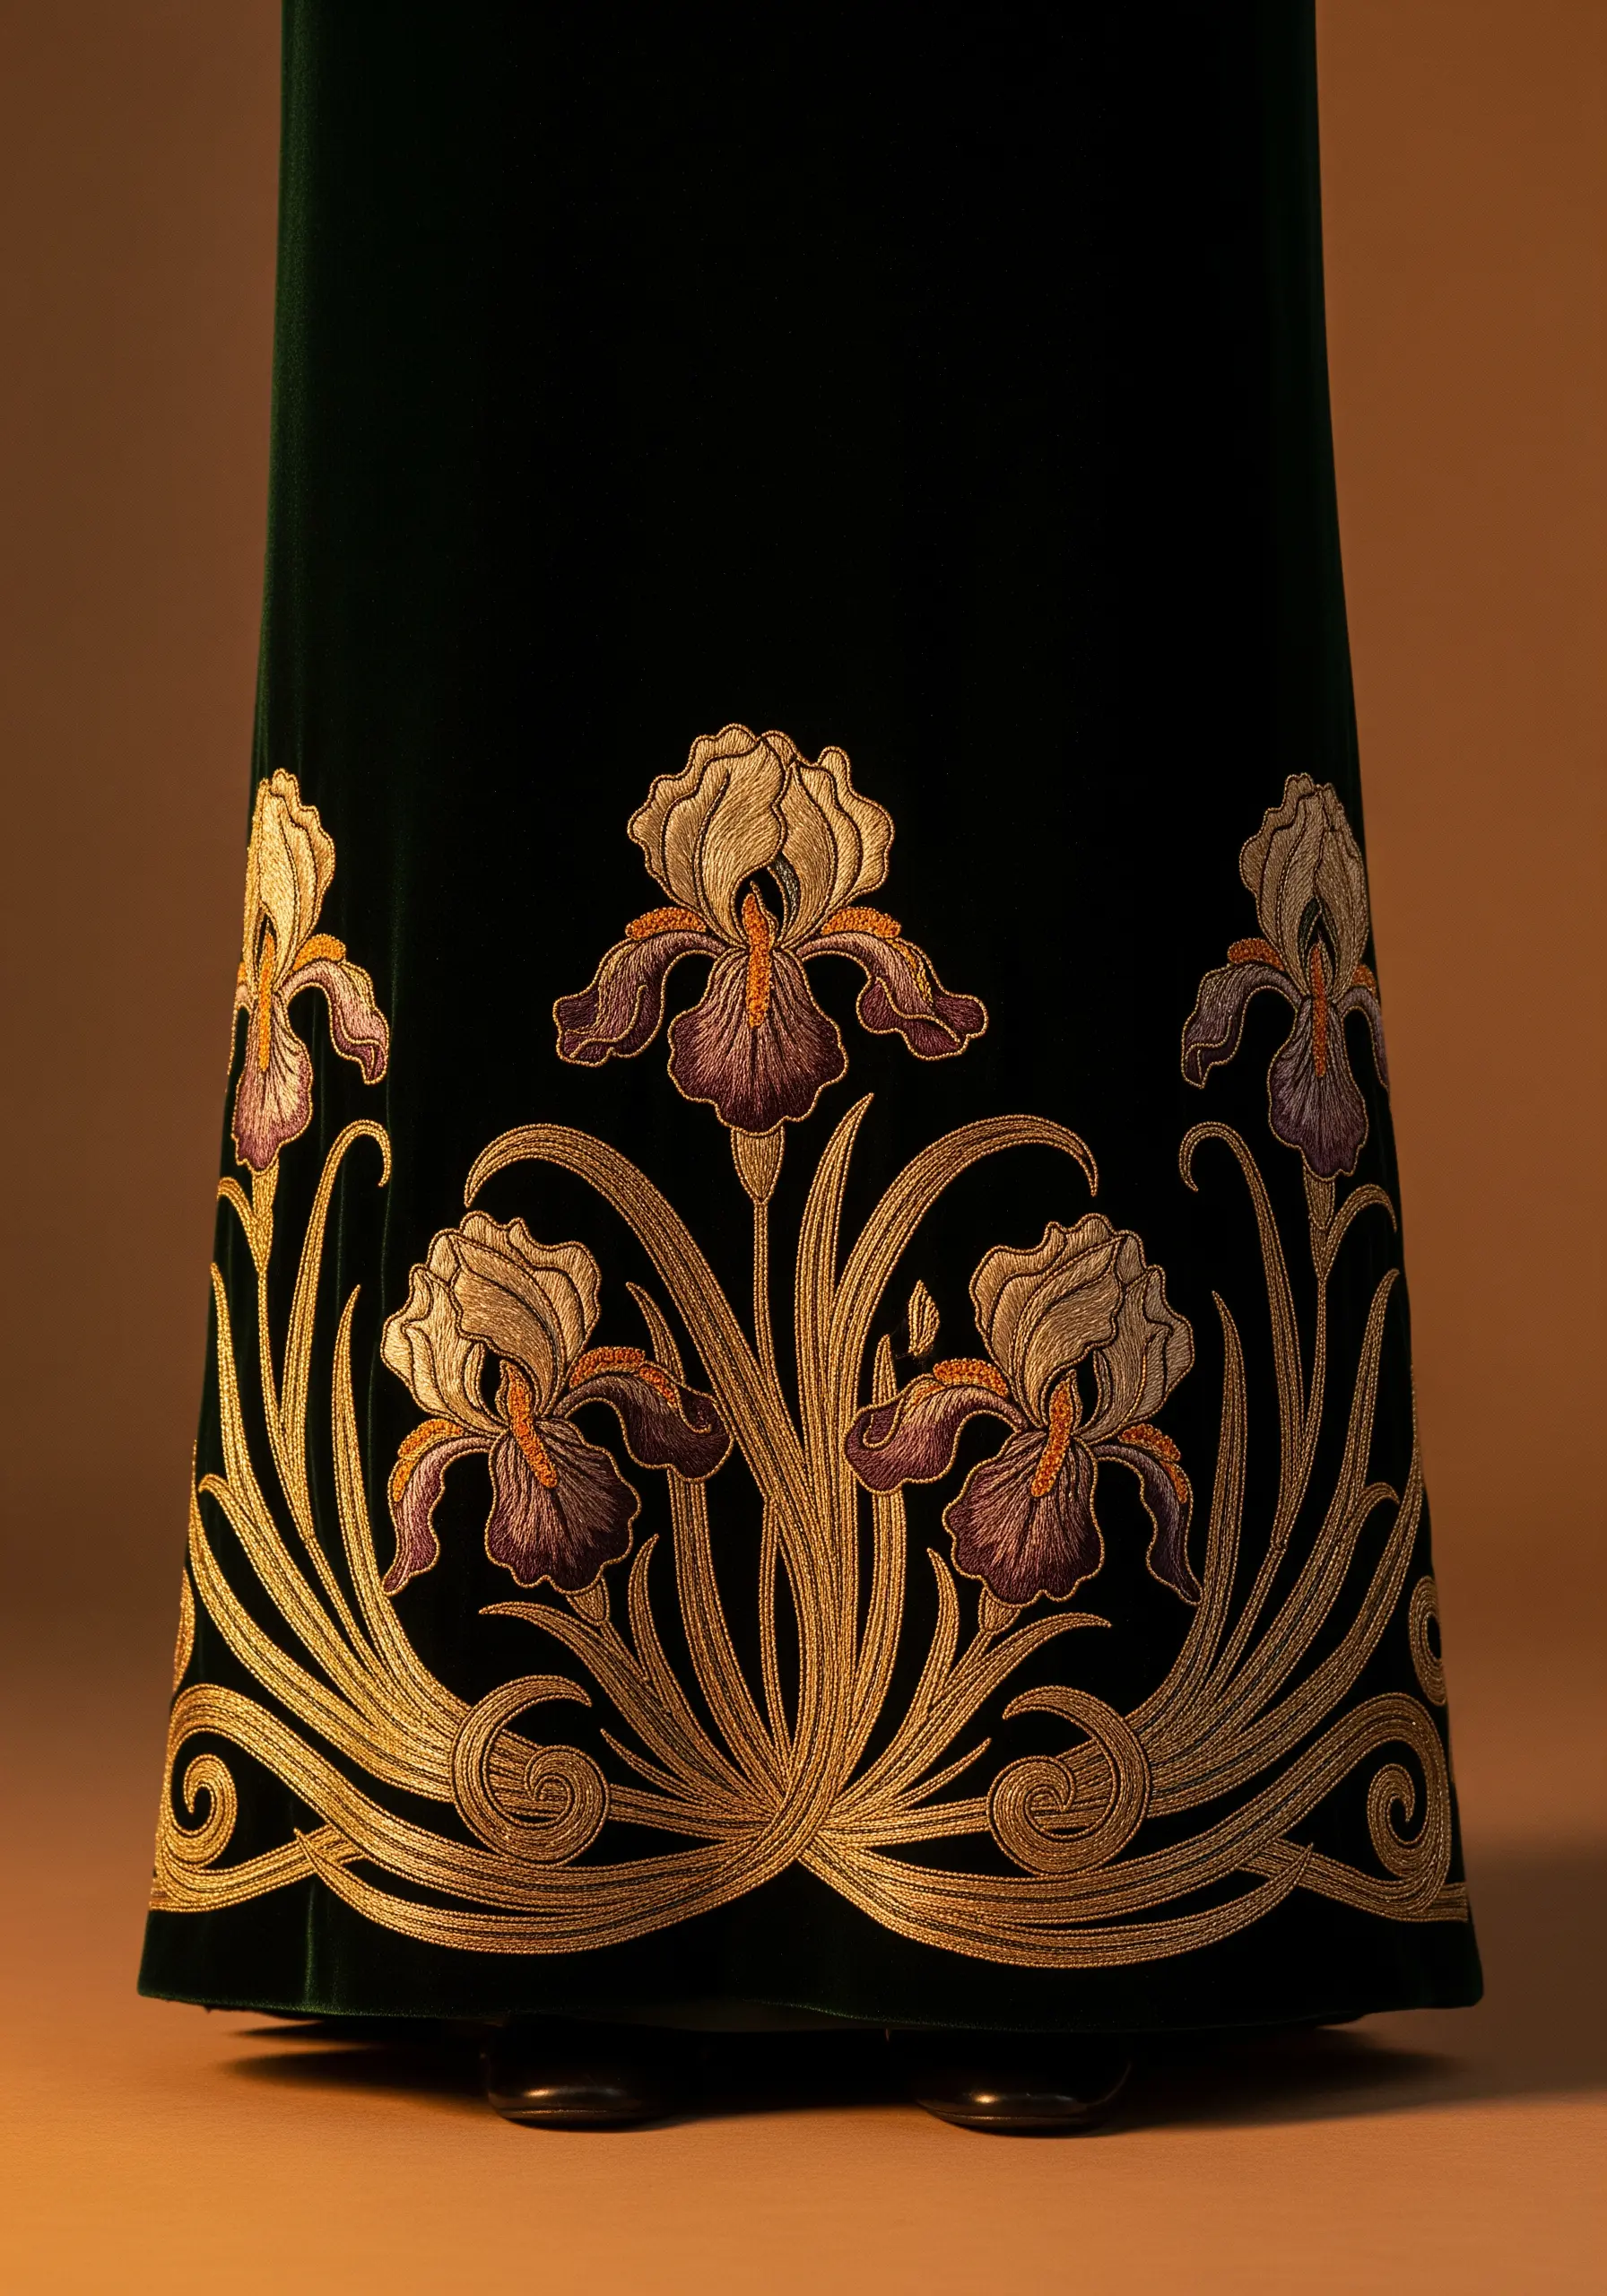
Velvet’s deep pile and luxurious sheen provide the perfect canvas for an opulent, Art Nouveau-inspired border.
Choose a design with flowing, organic lines, like these irises. Use metallic or silk threads to catch the light beautifully against the matte texture of the velvet.
A combination of long-and-short stitch for the petals allows for smooth color blending, while a fine whipped backstitch creates the elegant, sweeping golden stems.
Always use a stabilizer and stitch in the direction of the velvet’s pile for the cleanest result.
11. Apply Minimalist Line Art to Trouser Cuffs

Prove that embroidery can be modern and understated with a clean, single-line botanical design.
Choose a simple, recognizable leaf shape like the Monstera and stitch it using a basic backstitch or stem stitch with just two strands of floss.
The key to this look is precision—ensure your stitch length is consistent and your curves are smooth.
Placing the design on a rolled cuff adds a casual, thoughtfully considered detail that elevates simple trousers into a designer piece.
This technique is perfect for anyone who loves delicate line art embroidery ideas.
12. Create a Whimsical Autumnal Border
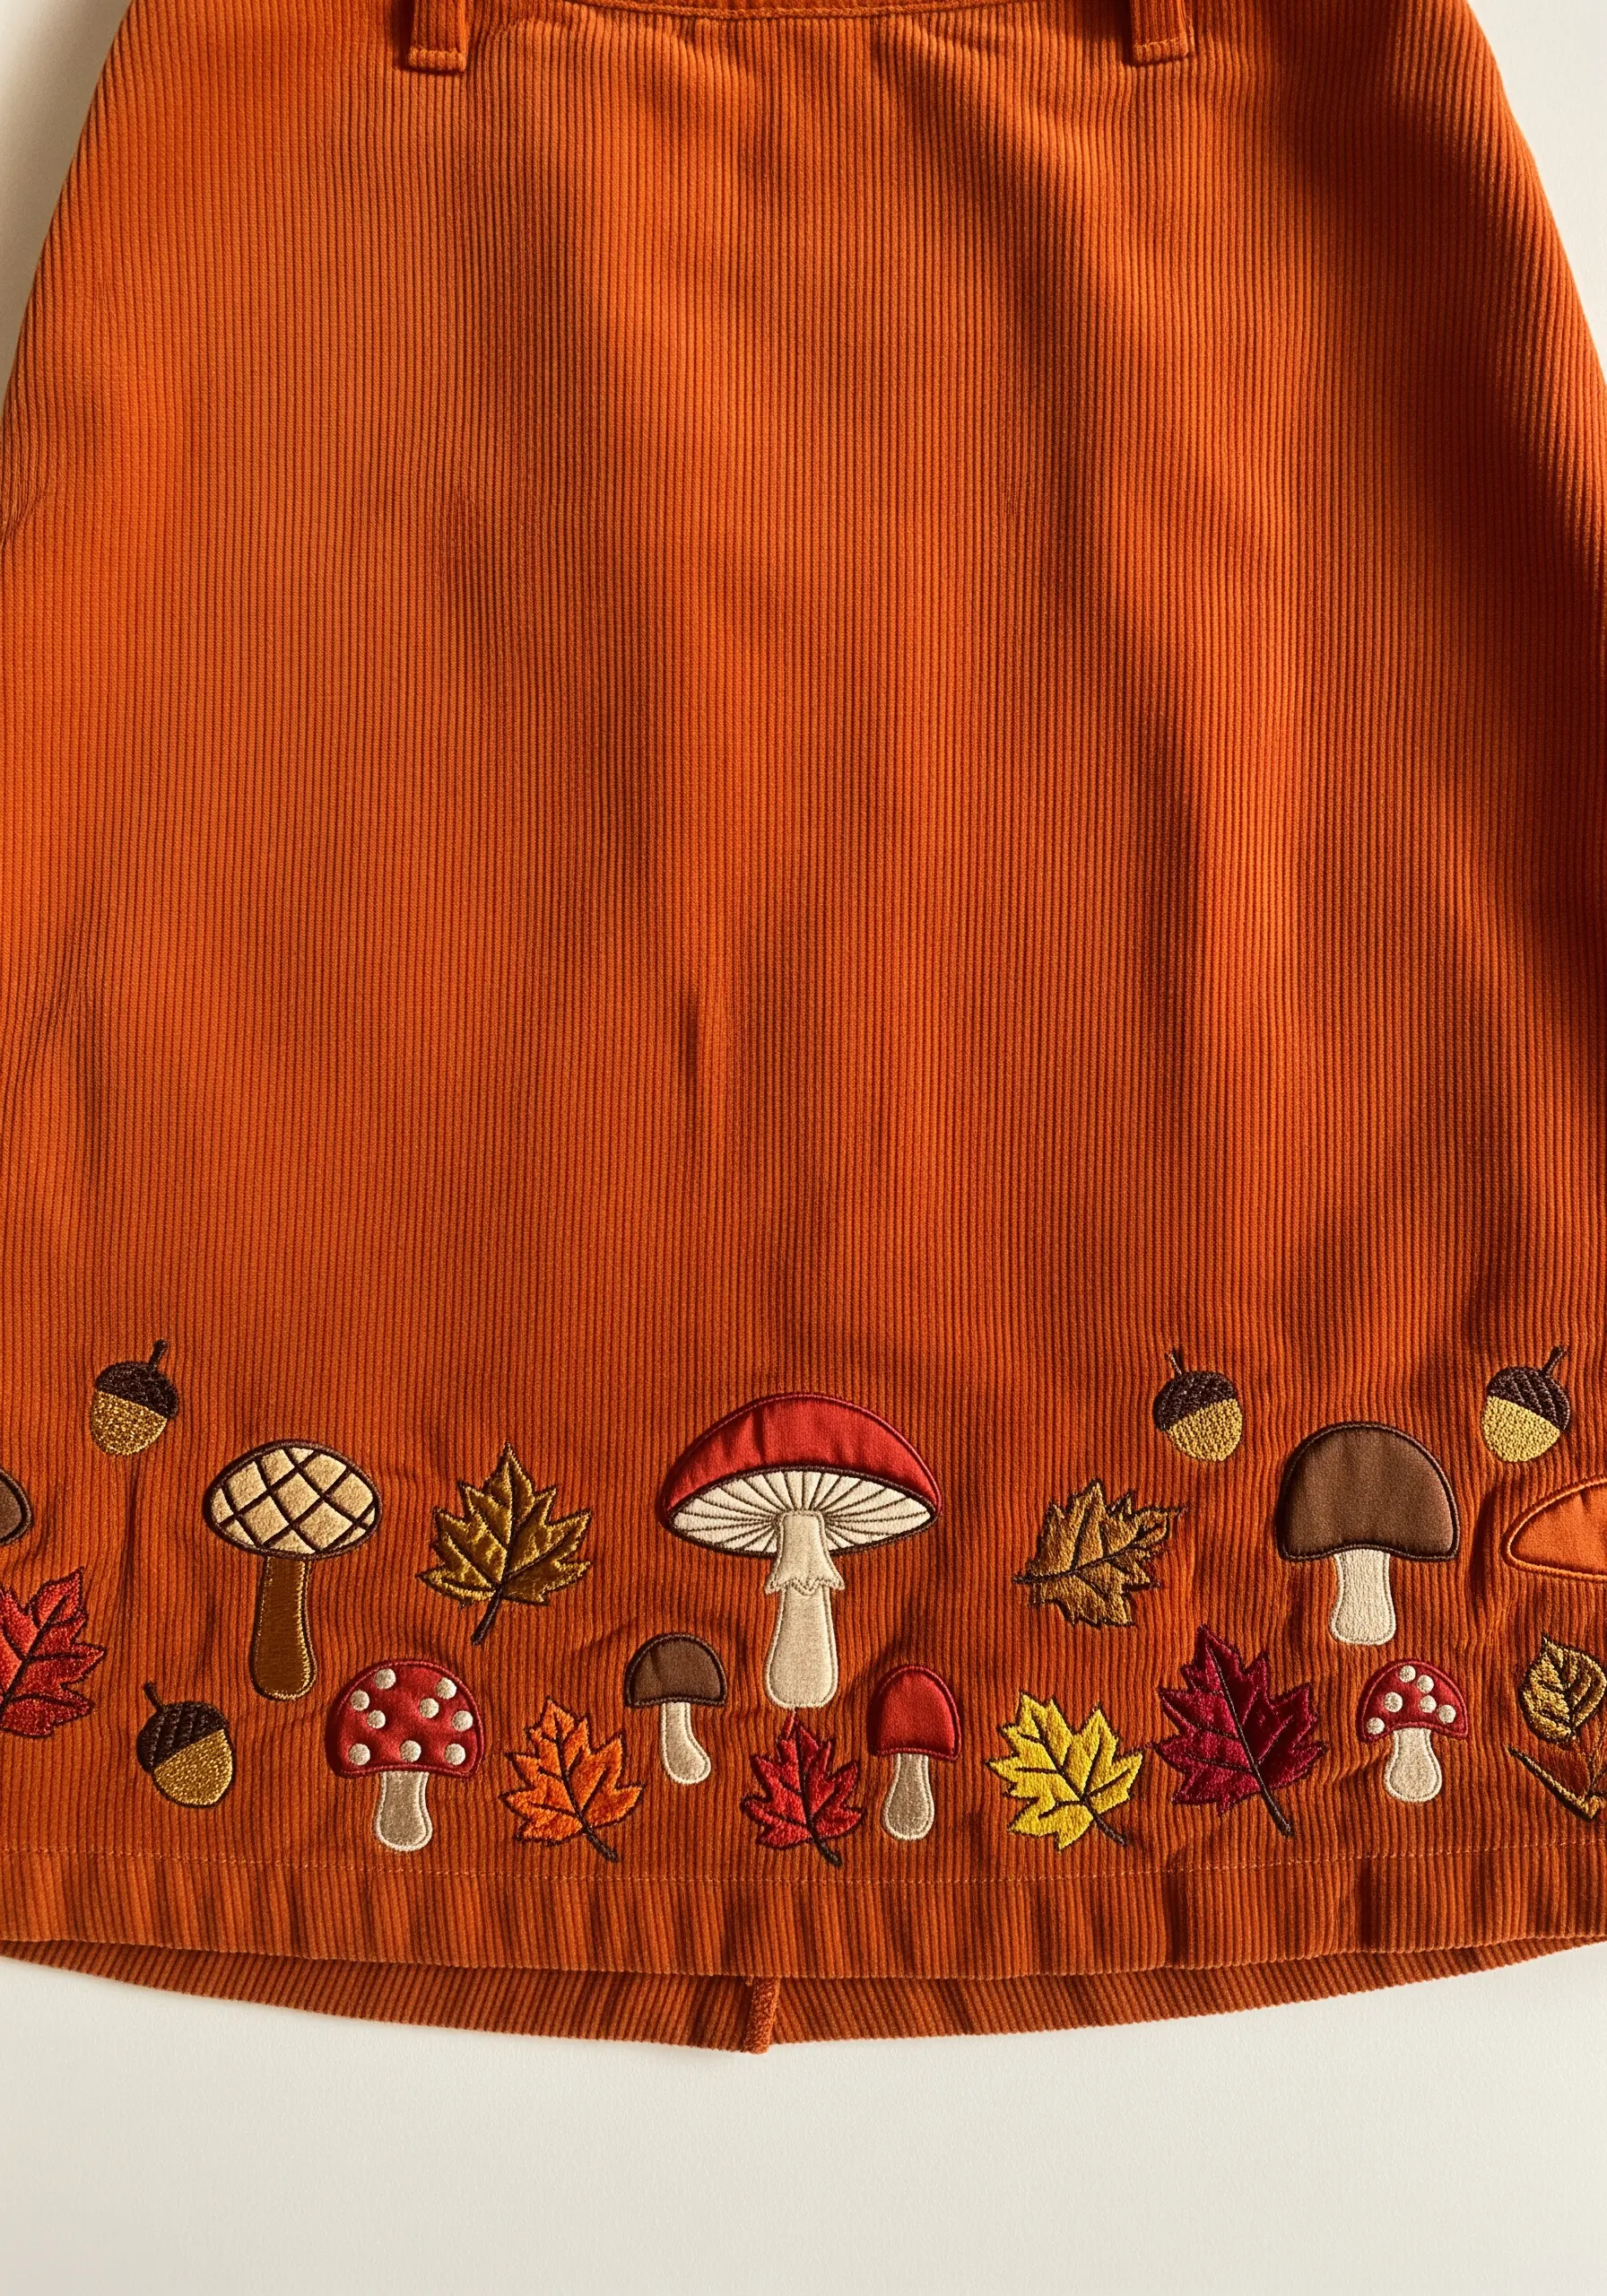
Embrace a playful, illustrative style by turning your hemline into a forest floor scene.
On a textured fabric like corduroy, use a classic satin stitch to create solid, appliqué-like shapes.
Outline each motif with a darker shade using a single backstitch line—this adds definition and a charming, cartoonish quality that makes the design pop.
Vary the shapes and colors of the leaves and mushrooms to create a rhythmic, engaging pattern.
This approach works beautifully for seasonal themes and adds a storybook feel to everyday apparel.
13. Let a Design Flow Asymmetrically

Break away from traditional, symmetrical borders by letting a design crawl organically across the fabric.
A cherry blossom branch is perfect for this, as it naturally grows in an irregular, elegant way.
Start the design on one side of a sleeve or hem and allow it to taper off delicately.
Use long-and-short stitch for the petals to create a soft, painted effect, blending shades of pink and white.
Tiny brown straight stitches form the branches, and a few well-placed French knots can suggest buds. This asymmetry feels more natural and sophisticated.
14. Achieve Sophistication with a Tonal Palette

Create an incredibly chic, high-end look by using threads that are only a few shades different from your base fabric.
This tone-on-tone technique focuses on texture and light rather than color contrast.
For the ivy leaves on this trench coat, use a satin stitch, varying the direction of your stitches in different sections of each leaf.
This subtle shift in stitch direction will catch the light differently, creating depth and definition without needing multiple colors.
It’s a quiet statement, perfect for classic garments where you want detail that whispers rather than shouts.
15. Use Bold Color Blocking for a Tropical Feel

Channel a vibrant, sun-drenched aesthetic by using bold, blocked colors and high-contrast combinations.
For these hibiscus flowers and palm leaves, fill large areas with smooth satin stitch.
To keep your satin stitches flat and even on a design this large, break up the shape into smaller sections (a technique called split satin stitch).
Don’t be afraid to use unexpected colors, like bright turquoise in the leaves, to create a stylized, energetic look.
This approach transforms a simple top into a wearable piece of pop art, perfect for tropical flower embroidery ideas.
16. Tell a Story with a Desert Landscape Border

Go beyond simple floral repeats and create a narrative scene along your hemline.
Stitch a desert landscape complete with Saguaro and prickly pear cacti, using different stitches to represent different textures.
Use a vertical satin stitch for the ribs of the Saguaro, and a base of seed stitches for the prickly pear pads to give them a bumpy texture before adding tiny straight stitches for spines.
Create a ground layer with rows of running stitches in earthy tones to anchor the scene.
This approach turns a simple skirt into a unique piece of wearable art with a strong sense of place, reminiscent of rustic woodland cottage themes but with a desert twist.
17. Integrate Beading for Subtle Sparkle and Texture
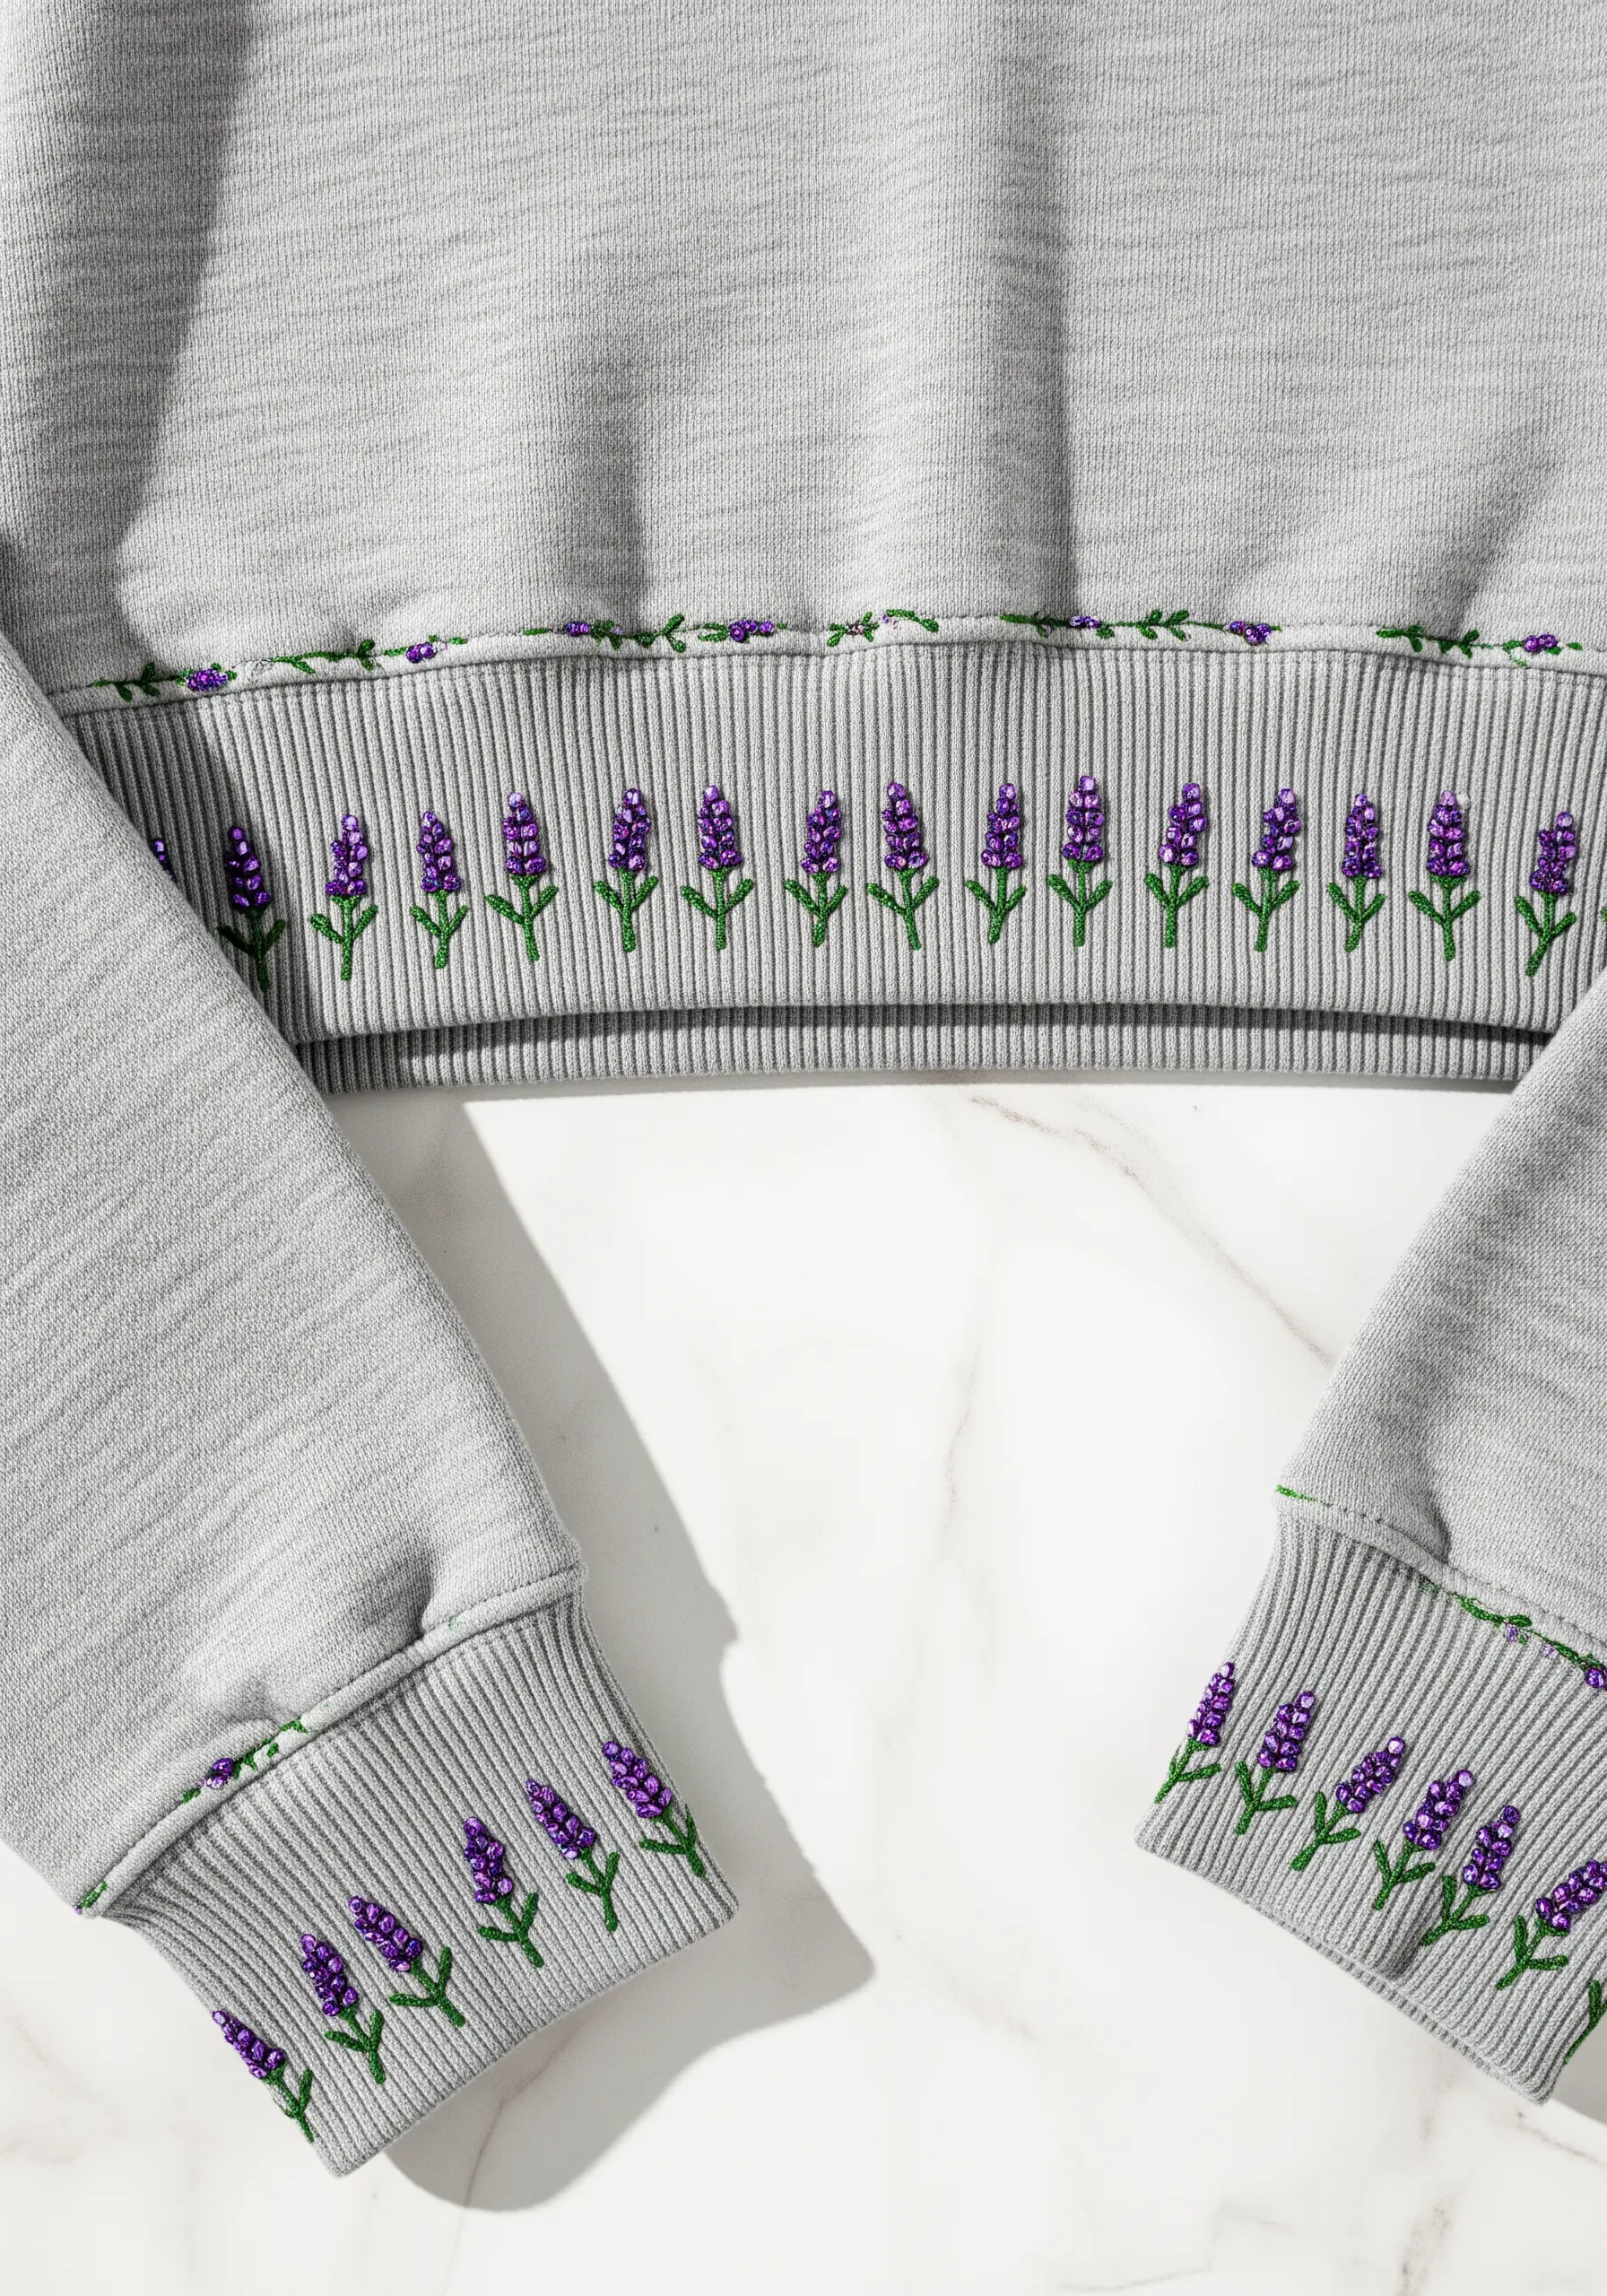
Elevate a simple design by incorporating tiny seed beads into your embroidery.
On this lavender border, the purple flowers are stitched with satin stitch, but the centers are accented with carefully placed beads.
This adds a hint of light-catching sparkle and a raised texture that floss alone cannot achieve.
To apply beads, bring your needle up through the fabric, thread on a bead, and go back down right next to where you came up. Use a thread that matches the bead for an invisible finish.
This technique is perfect for adding a touch of luxury to ribbed cuffs and hems.
18. Build a Hyper-Realistic Forest Floor Scene

Create breathtaking depth and realism by layering multiple textures and advanced stitches.
For the ferns, use a classic fishbone or fly stitch. For the moss, build up layers of French knots in various shades of green and brown.
Create fallen logs with long, horizontal satin stitches and add dimension with couching—laying down thicker yarn and tacking it in place with smaller stitches.
The key is layering: stitch the elements in the background first (like the logs and soil), then add the moss and ferns on top.
This meticulous technique results in a stunning, tactile scene that invites closer inspection and showcases your skill with fern foliage stitch variations.
19. Master the Art of Skeleton Leaves on Sheer Sleeves

For an exceptionally delicate and technical look, embroider skeleton leaves onto a sheer fabric.
First, outline the leaf shape with a fine backstitch or split stitch using a silvery or metallic thread.
Then, painstakingly fill the interior with a web of interconnected straight stitches or a very fine couched thread to mimic the intricate vein structure.
This requires immense precision and works best with a fine needle, a single strand of thread, and a high-quality water-soluble stabilizer for support.
The final effect is one of ghostly, suspended beauty, perfect for cuffs and sleeves where you want to showcase complex linework.
20. Adapt Your Design to Fabric Movement
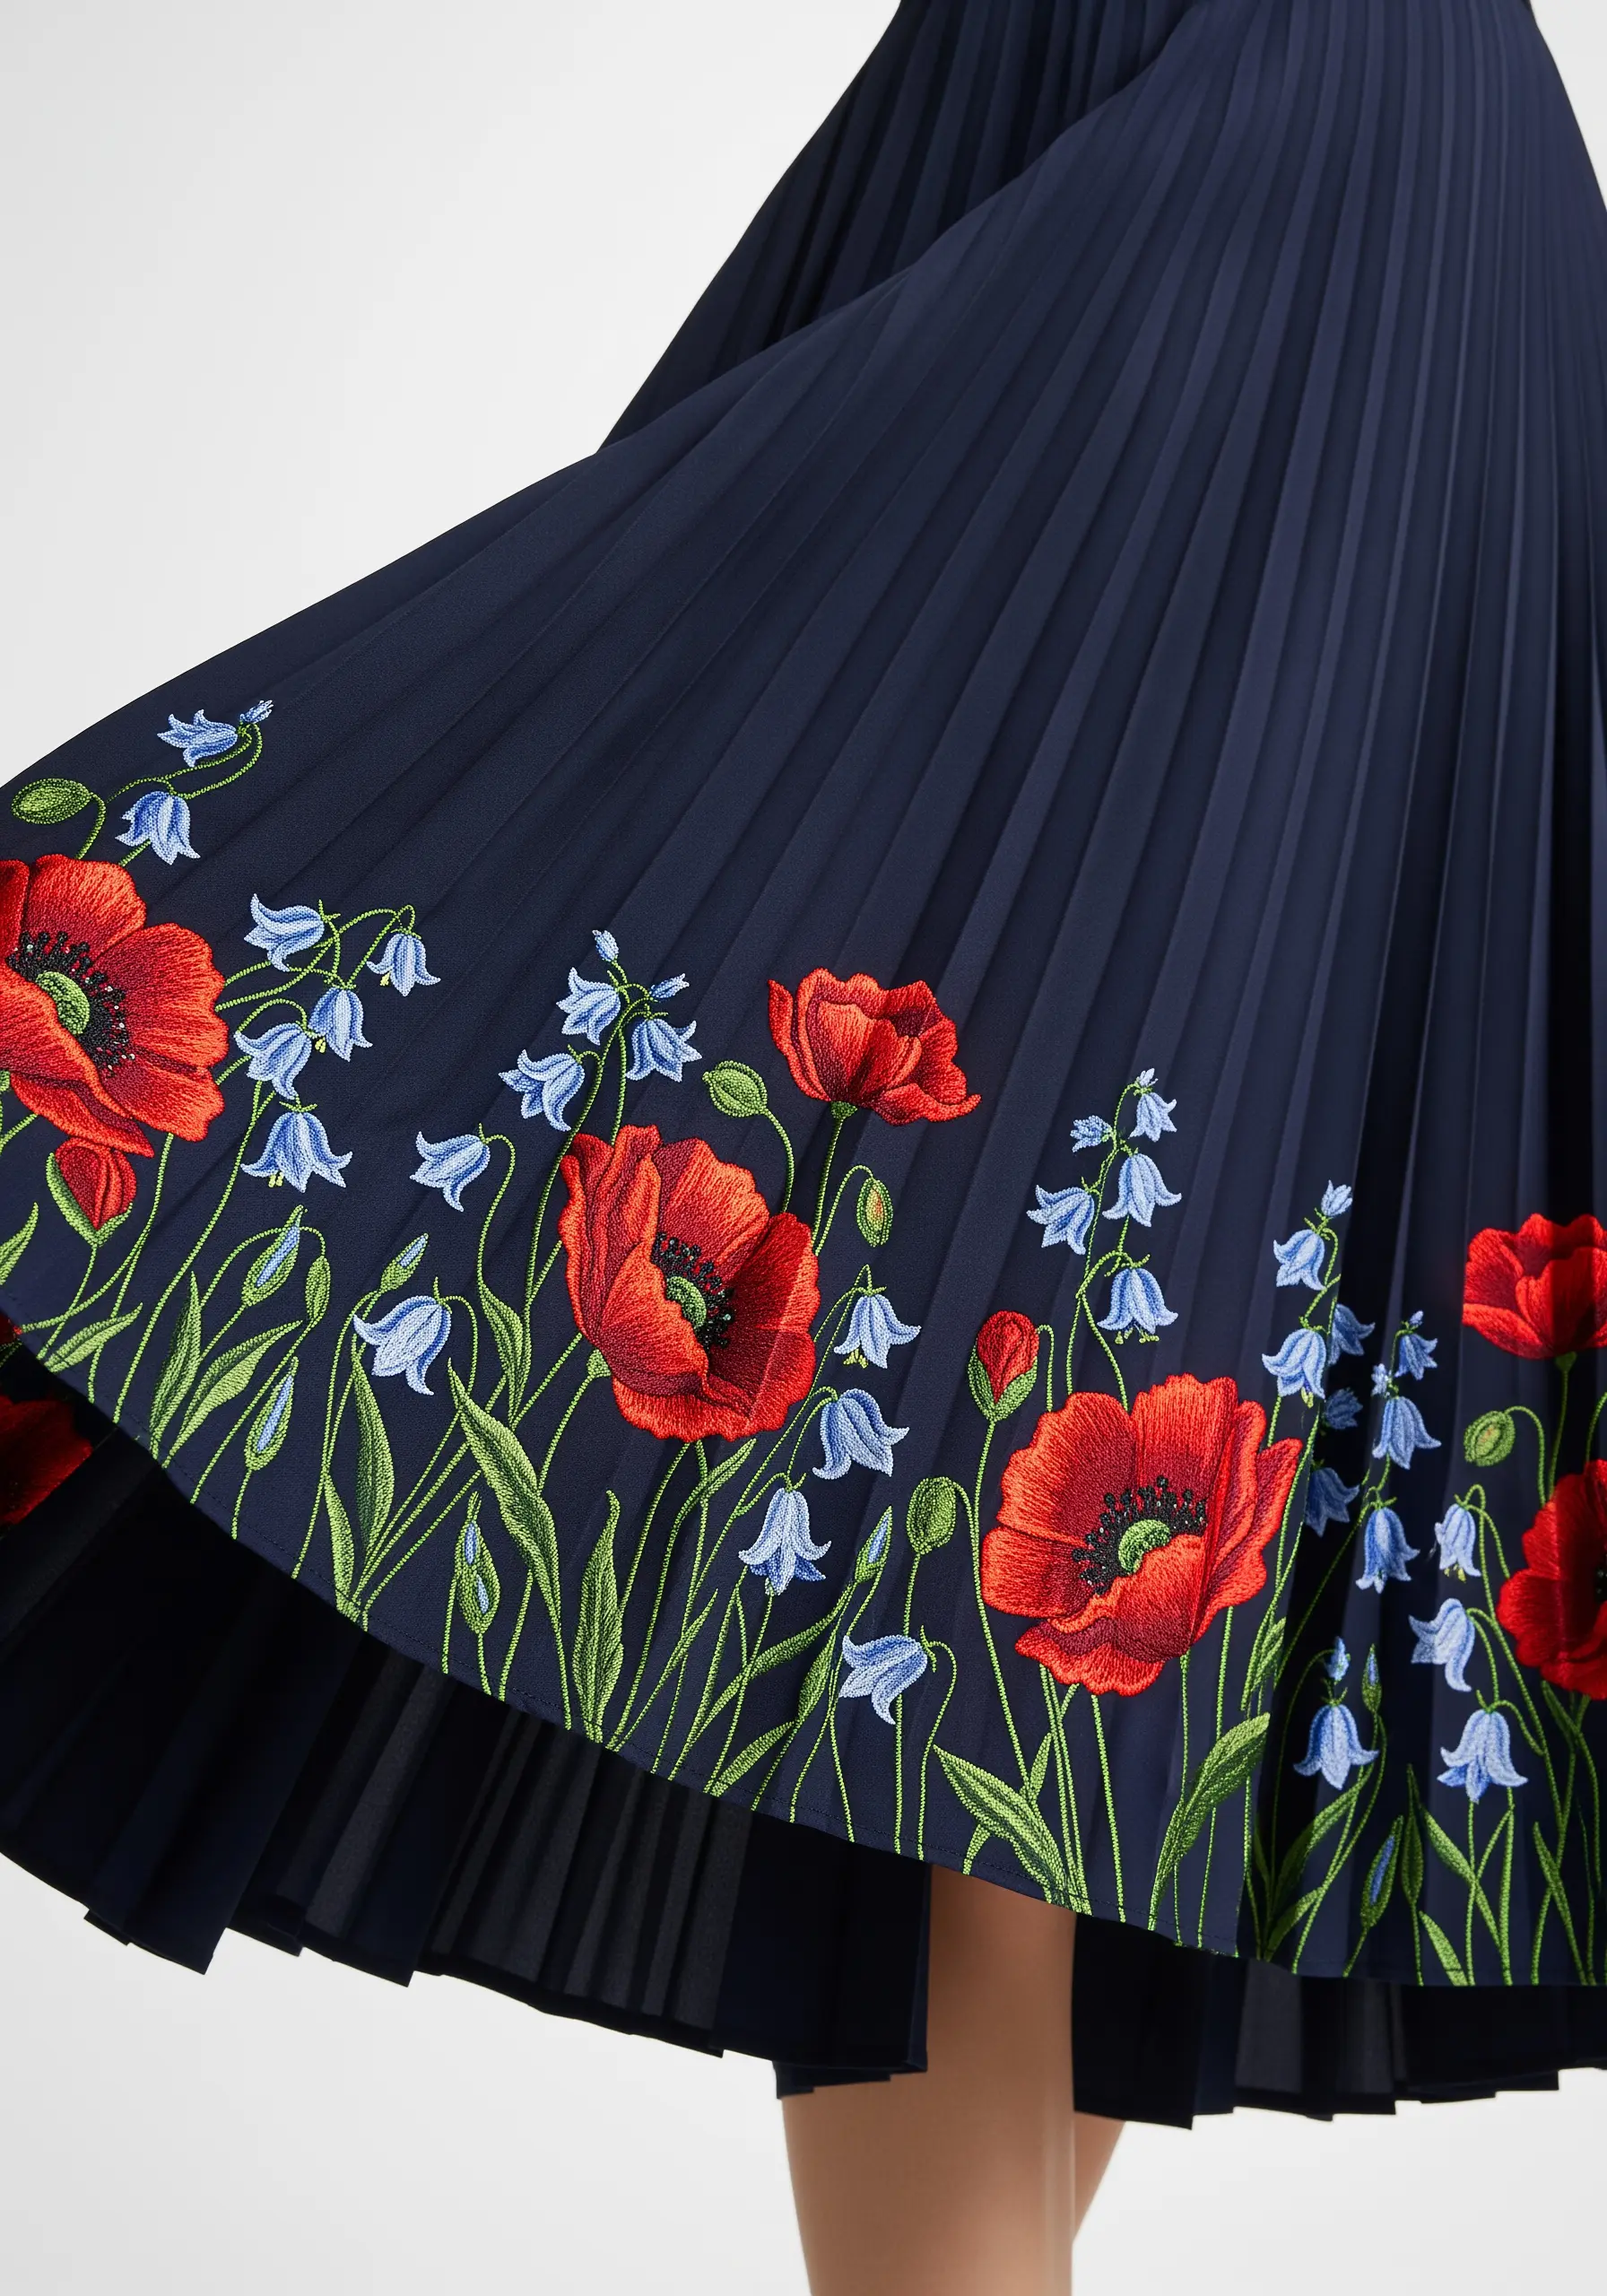
When embroidering on pleated fabric, consider how the design will look both when still and in motion.
Place larger motifs, like the poppy heads, on the outer faces of the pleats so they remain the focal point.
Allow more delicate elements, like the stems and bluebells, to fall into the recessed parts of the pleats. This creates a wonderful sense of discovery as the skirt moves and the full design is revealed.
Use a smooth long-and-short stitch for filling the petals to ensure the embroidery remains flexible and doesn’t stiffen the fabric’s drape.
This is a form of contemporary thread painting that interacts with the garment’s form.
21. Use Negative Space in a Corner Accent

A hemline border doesn’t always have to be a continuous line. A strategically placed corner accent can be just as impactful.
On this crisp white fabric, a delicate spray of eucalyptus is positioned to draw the eye to the corner.
Use a muted, soft palette and combine stitch types: satin stitch for the leaves and tiny French knots for the seed pods.
The negative space around the motif is just as important as the stitching itself, giving the design room to breathe and emphasizing its delicate nature.
This minimalist approach is perfect when you want to add a custom touch without overwhelming the garment.
22. Create a Framed Cuff Masterpiece

Turn your sleeve cuffs into framed pieces of art by containing your floral design within a clean, stitched border.
Use a simple backstitch to create a geometric frame, then fill the space with a more intricate motif like these water lilies.
This contrast between the linear frame and the organic flowers creates a beautiful tension and makes the design feel deliberate and complete.
Fill the petals with long-and-short stitch for a smooth gradient, and use a contrasting color for the outlines to make them stand out, similar to these beautiful peacock lotus inspired table linen embroidery patterns.
23. Blend Colors for an Autumnal Gradient

Capture the beauty of changing seasons by using thread painting techniques on your cuffs.
For these autumn leaves, use a long-and-short stitch and blend multiple shades of red, orange, and yellow within a single leaf.
Start with your lightest color, then bring in the next shade, angling your stitches to blend seamlessly into the first layer.
Use a single strand of a darker color to stitch the veins over the top, which adds realism and definition.
This technique elevates a simple leaf motif into a miniature work of art, celebrating the subtle color shifts found in nature.
24. Create a Breezy, Under-the-Sea Border

Move beyond traditional florals and stitch a whimsical underwater scene on a lightweight summer garment.
On a fine fabric like cotton voile, use delicate stitches that won’t weigh it down.
Create seaweed with whipped backstitch or coral stitch for a wavy, textured line. Use detached chain stitches (lazy daisies) for fan coral and French knots for tiny shells or seafoam.
Add a few real seed pearls or tiny shell beads, stitched securely, for a final touch of seaside magic.
This playful theme is perfect for beachwear or a child’s dress.
25. Achieve Dramatic Contrast with White on Black

Make a bold, graphic statement by embroidering bright white calla lilies against a stark black fabric.
To make the white truly opaque and prevent the dark background from showing through, use a full six strands of floss and lay down a base of white split stitches before covering it with a final layer of smooth satin stitch.
Incorporate subtle shading with a very light grey or pale yellow just inside the flower’s curl to create dimension and stop it from looking flat.
This high-contrast approach is inherently dramatic and sophisticated, perfect for evening wear.
26. Frame a Cardigan with Climbing Passion Flowers

Use the button placket of a cardigan as a natural trellis for a climbing floral vine.
On a textured knit, you’ll need a stabilizer to support complex stitches. For the passion flower’s intricate center, layer straight stitches, French knots, and woven picot stitches to build up the unique structure.
Use a simple stem stitch for the winding vines and fishbone stitch for the leaves.
This symmetrical placement frames the garment beautifully and turns a simple knit into a stunning, botanical statement piece, using 3D floral embroidery techniques for the flower centers.
27. Enhance a Patterned Fabric with Outlined Florals
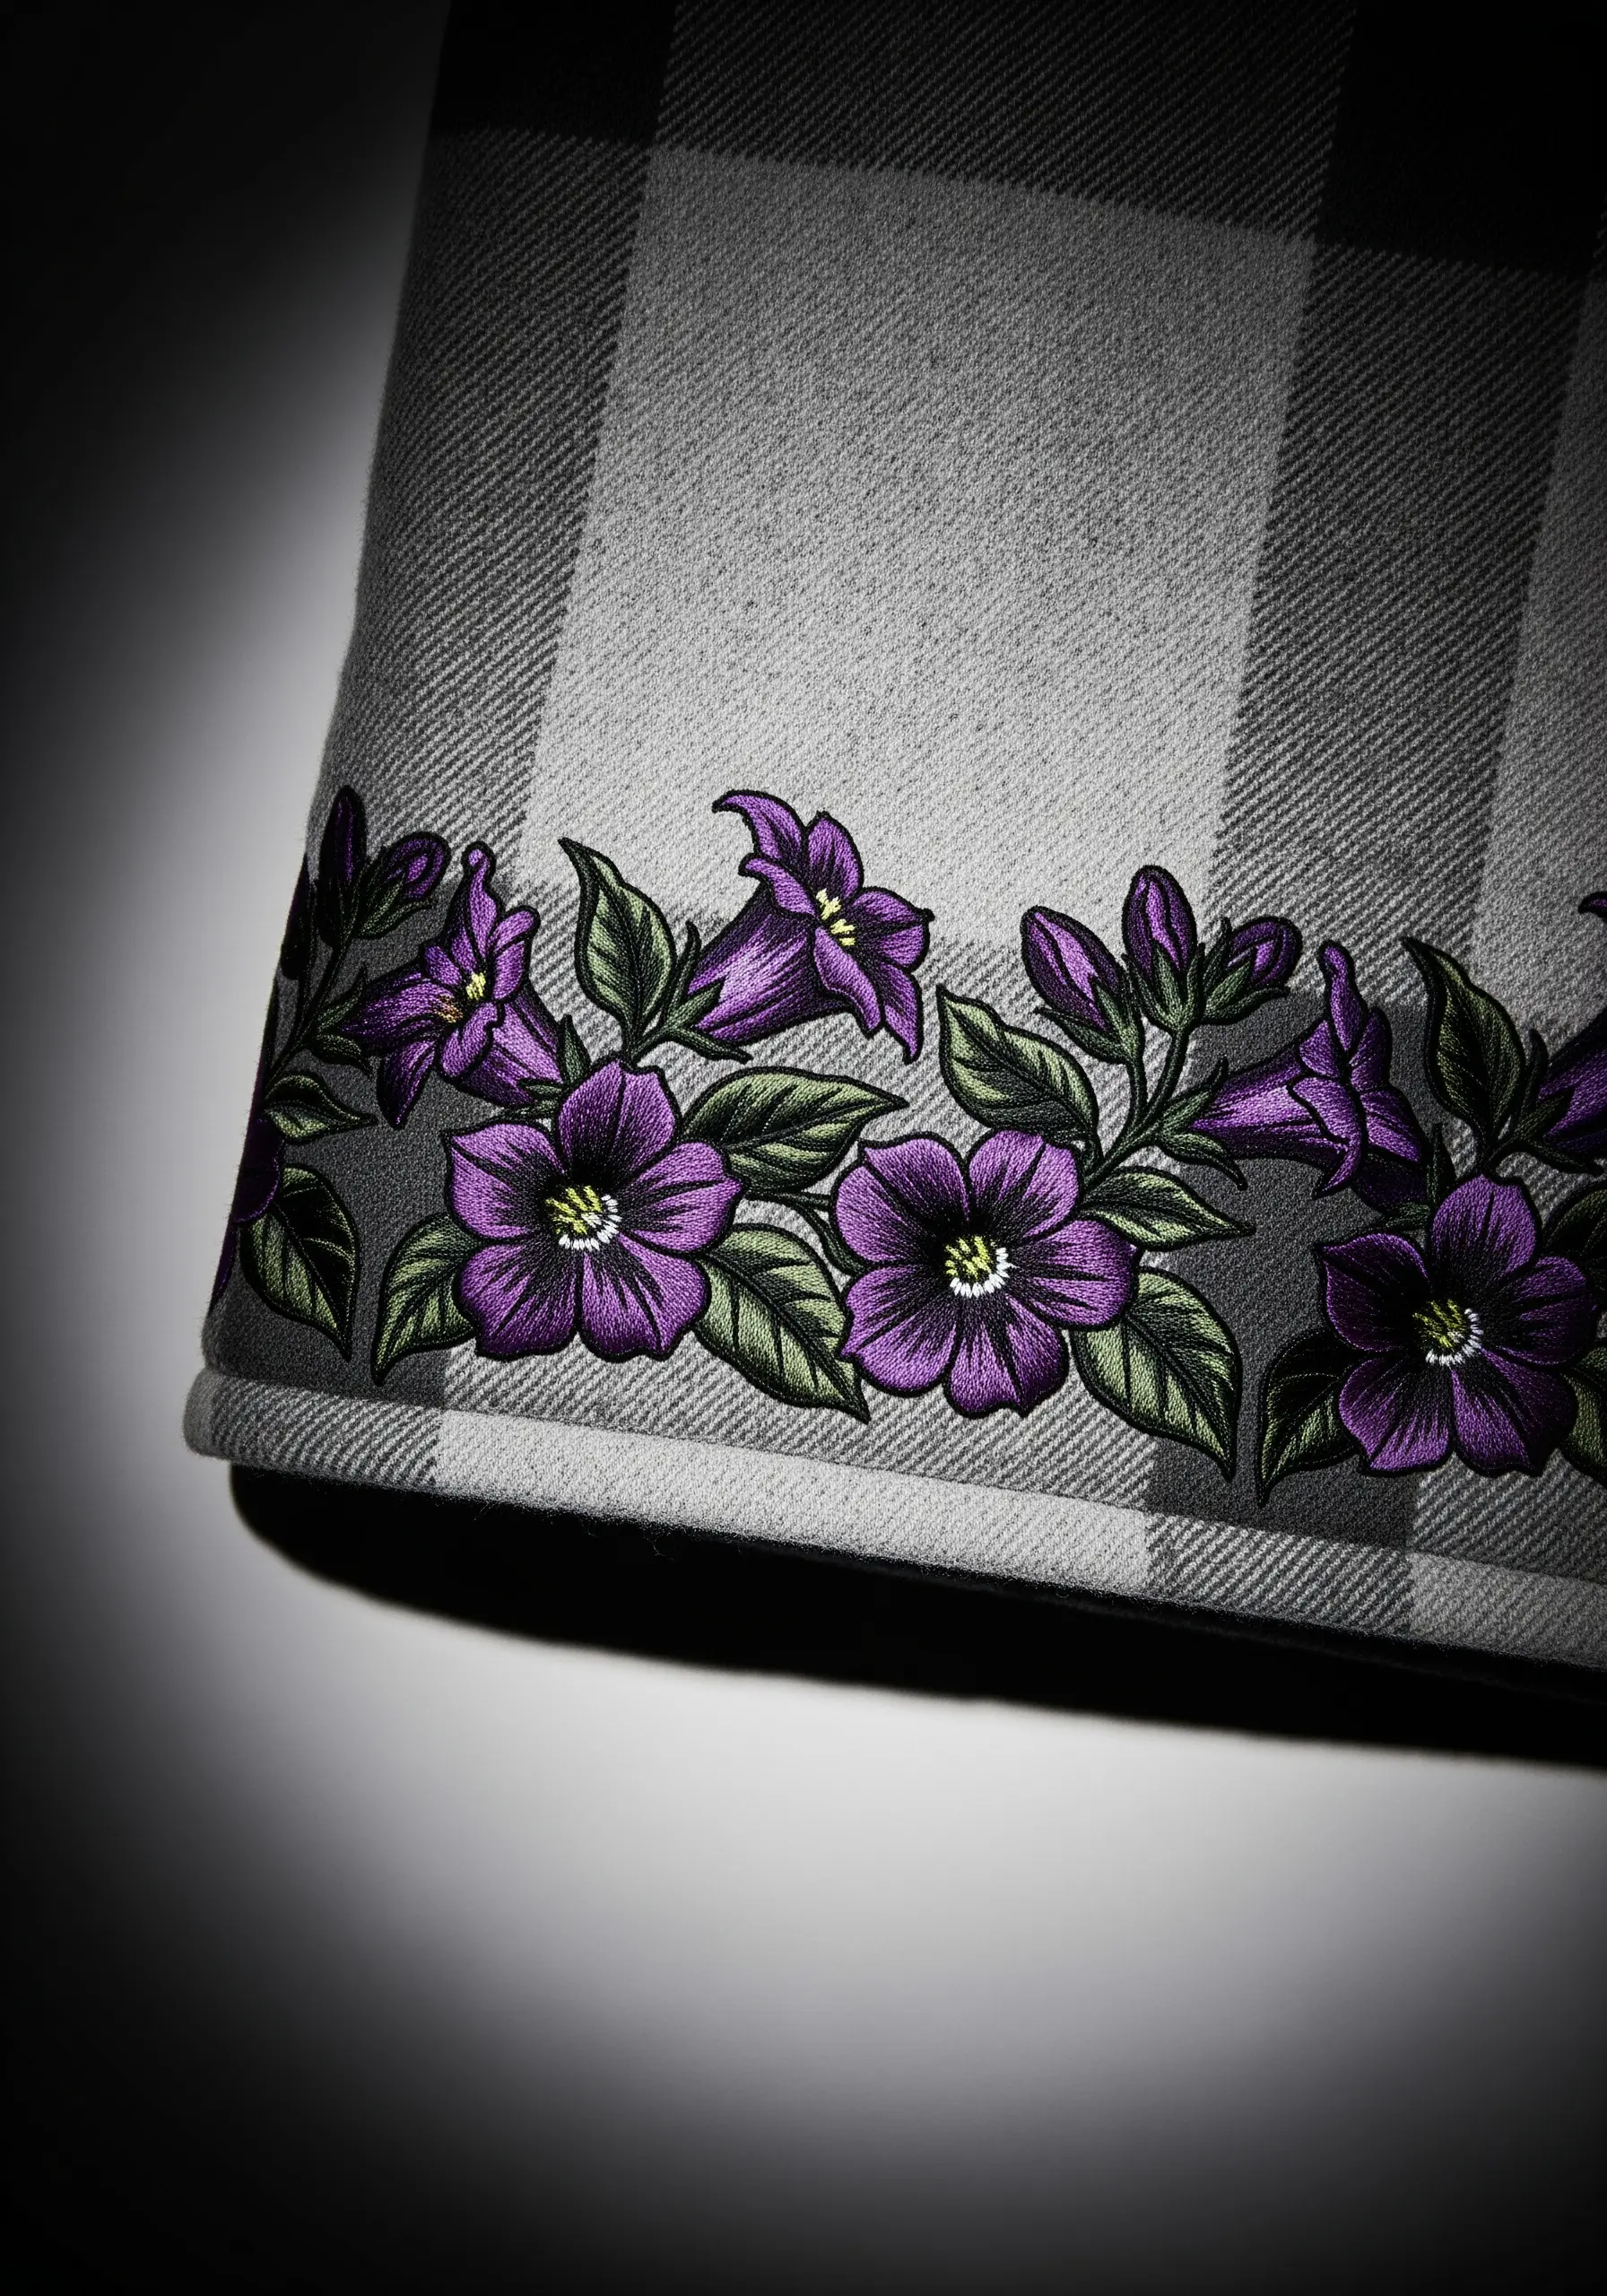
Instead of stitching on a plain background, choose a subtly patterned fabric like this plaid flannel and make it part of your design.
To ensure your embroidery stands out against the pattern, use a bold, dark outline around each shape, almost like a comic book illustration.
Fill the shapes with solid, vibrant satin stitch in a color that contrasts with the fabric’s background tones.
This technique of outlining creates a crisp, defined border that feels integrated with the fabric yet distinct enough to be the focal point.


