

Before you pack your bags for that next sunny escape, think of your beach towel and summer hat not just as accessories, but as blank canvases waiting for a personal touch.
Transforming these everyday items with embroidery is more than just decoration; it’s about embedding your own artistry into the fabric of your vacation memories. It’s a way to carry a piece of handcrafted beauty with you, turning a simple object into a conversation starter and a treasured keepsake.
Here, you’ll find techniques designed to work with the unique textures of terrycloth and woven straw. From achieving smooth gradients on plush towels to creating dimensional florals on a sun hat, each idea is a practical lesson in elevating your stitching with intention and modern style.
1. Render a Bird of Paradise with Gradient Thread Painting
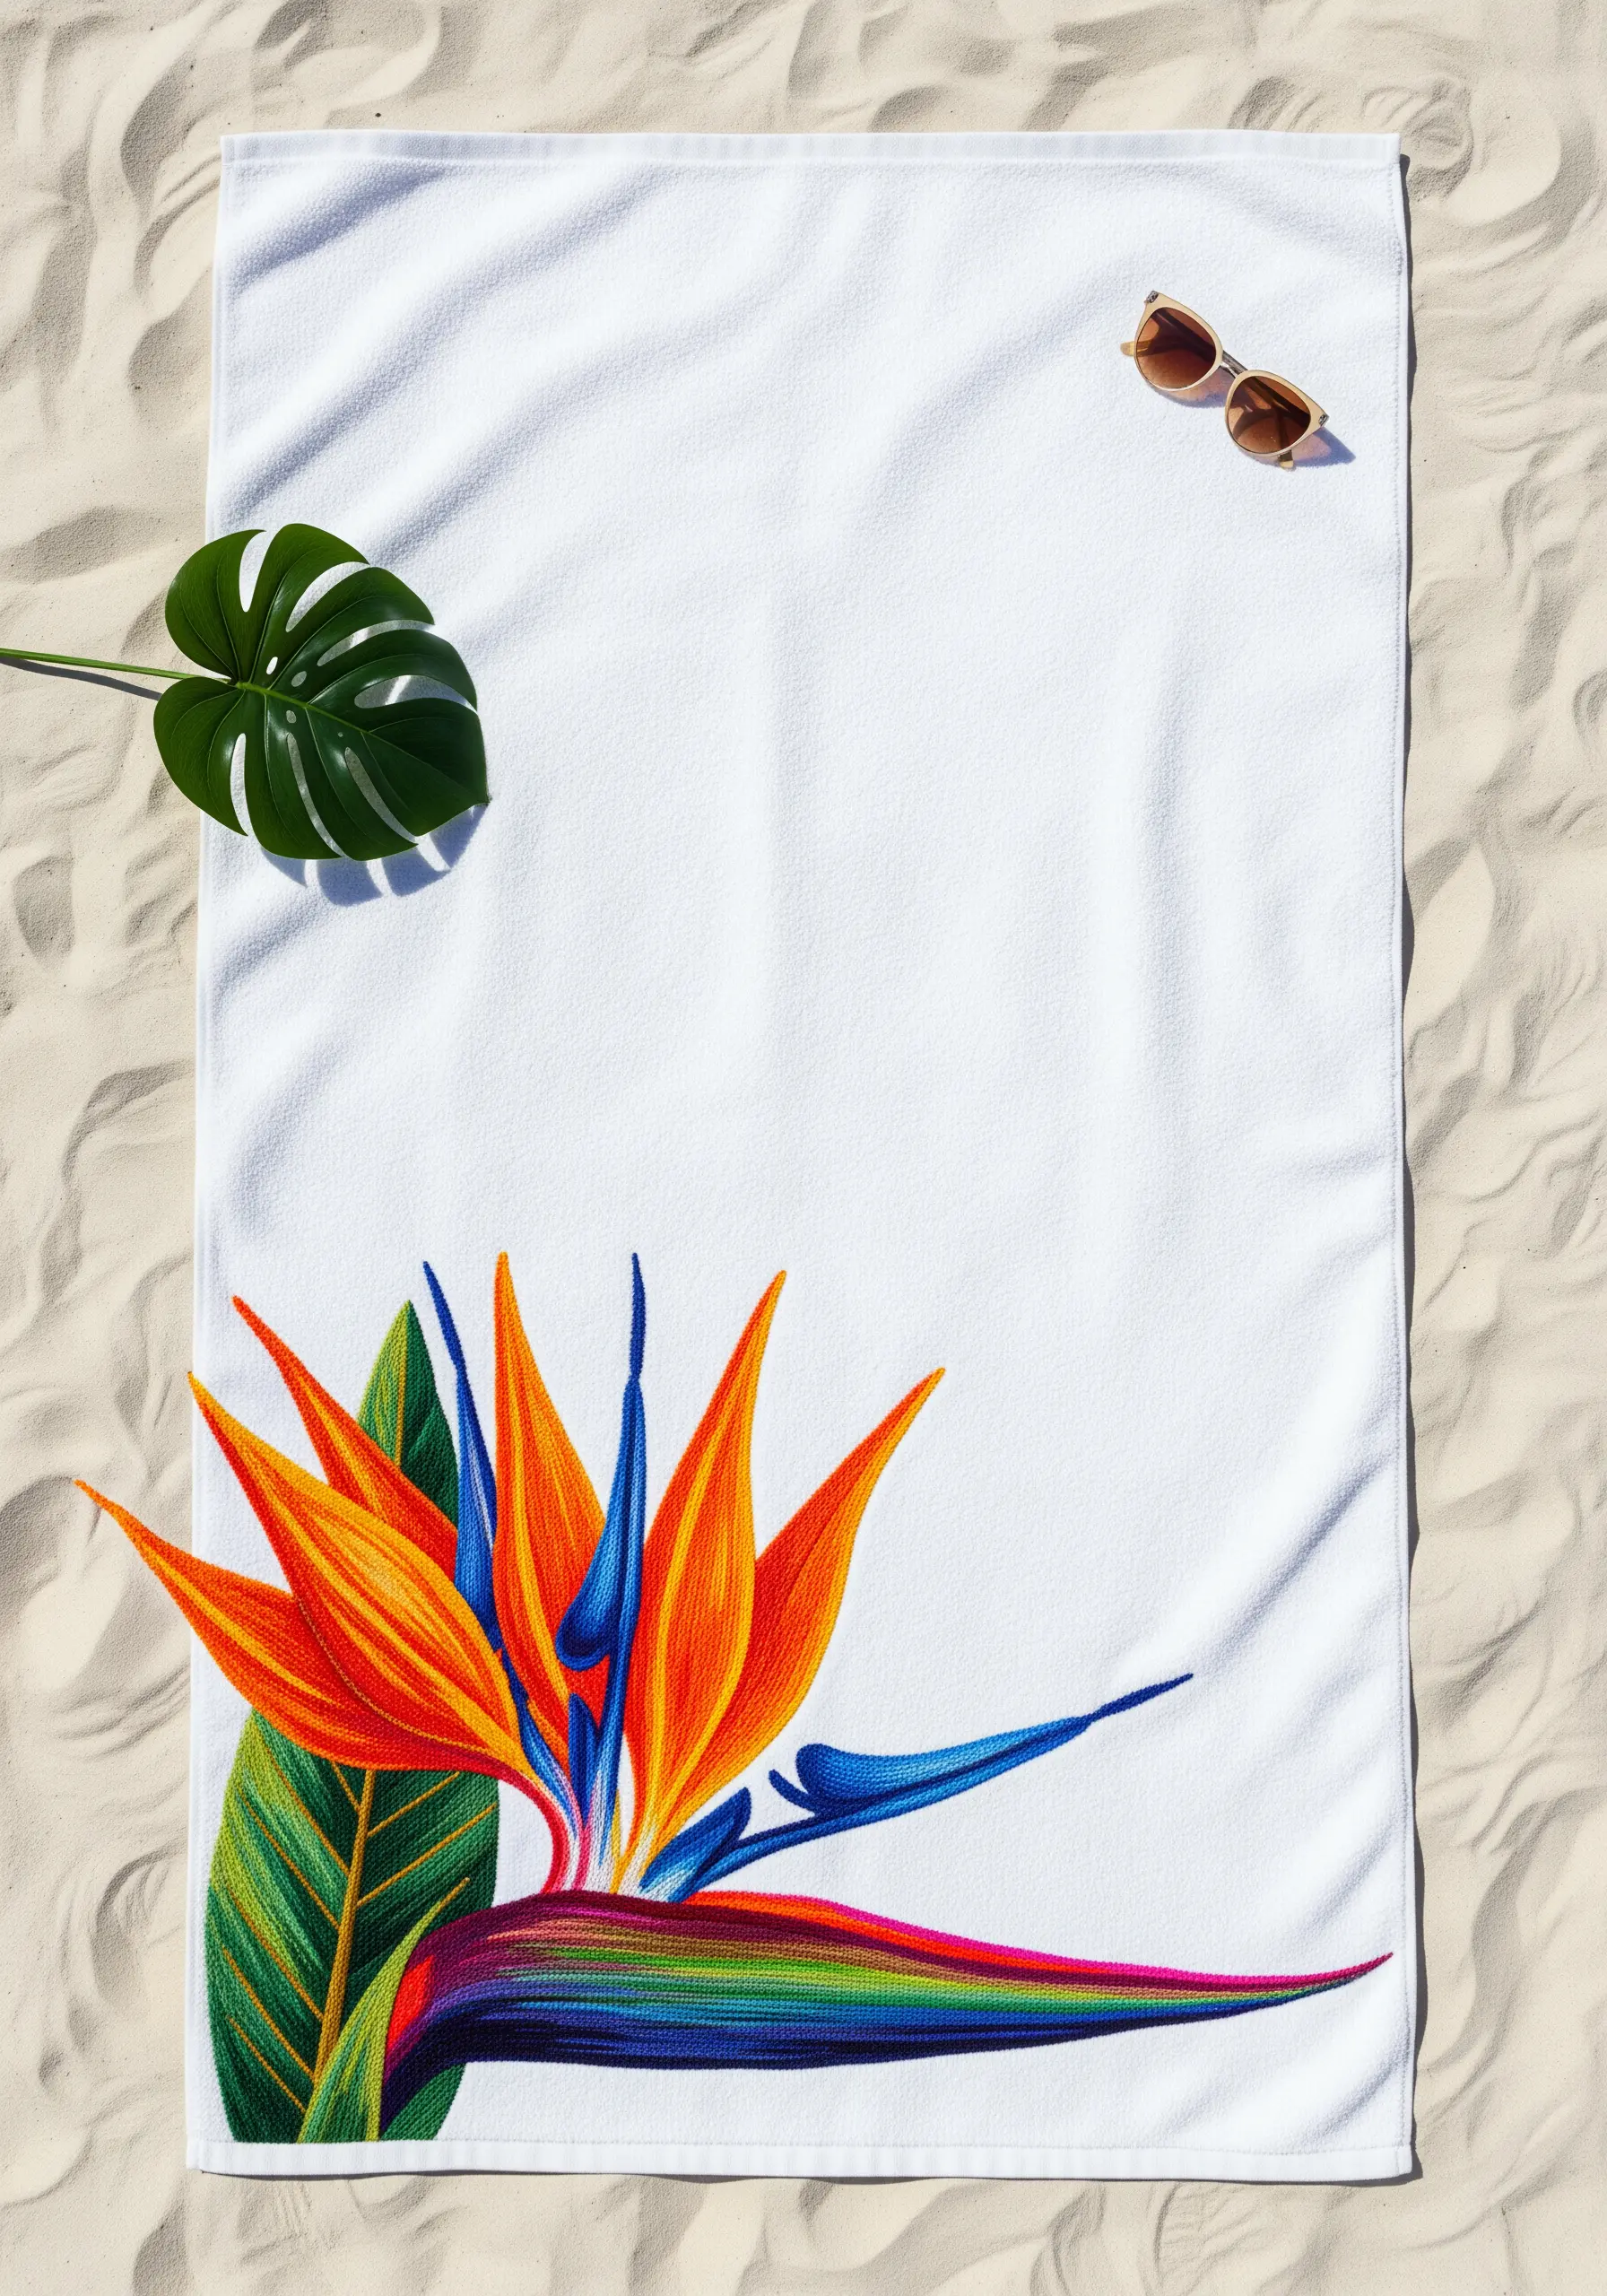
To embroider on a plush terrycloth towel, first apply a water-soluble stabilizer over your design area.
This creates a smooth surface, preventing your stitches from sinking into the fabric’s loops and ensuring a clean finish.
Use a long-and-short stitch to blend the vibrant oranges, blues, and purples seamlessly.
Vary your stitch direction to follow the natural curve of each petal, which gives the flower its dynamic, sculptural quality.
For the sharpest points, use a single strand of floss and a sharp needle to pierce the fabric with precision.
2. Create a Delicate Floral Vine on Woven Straw
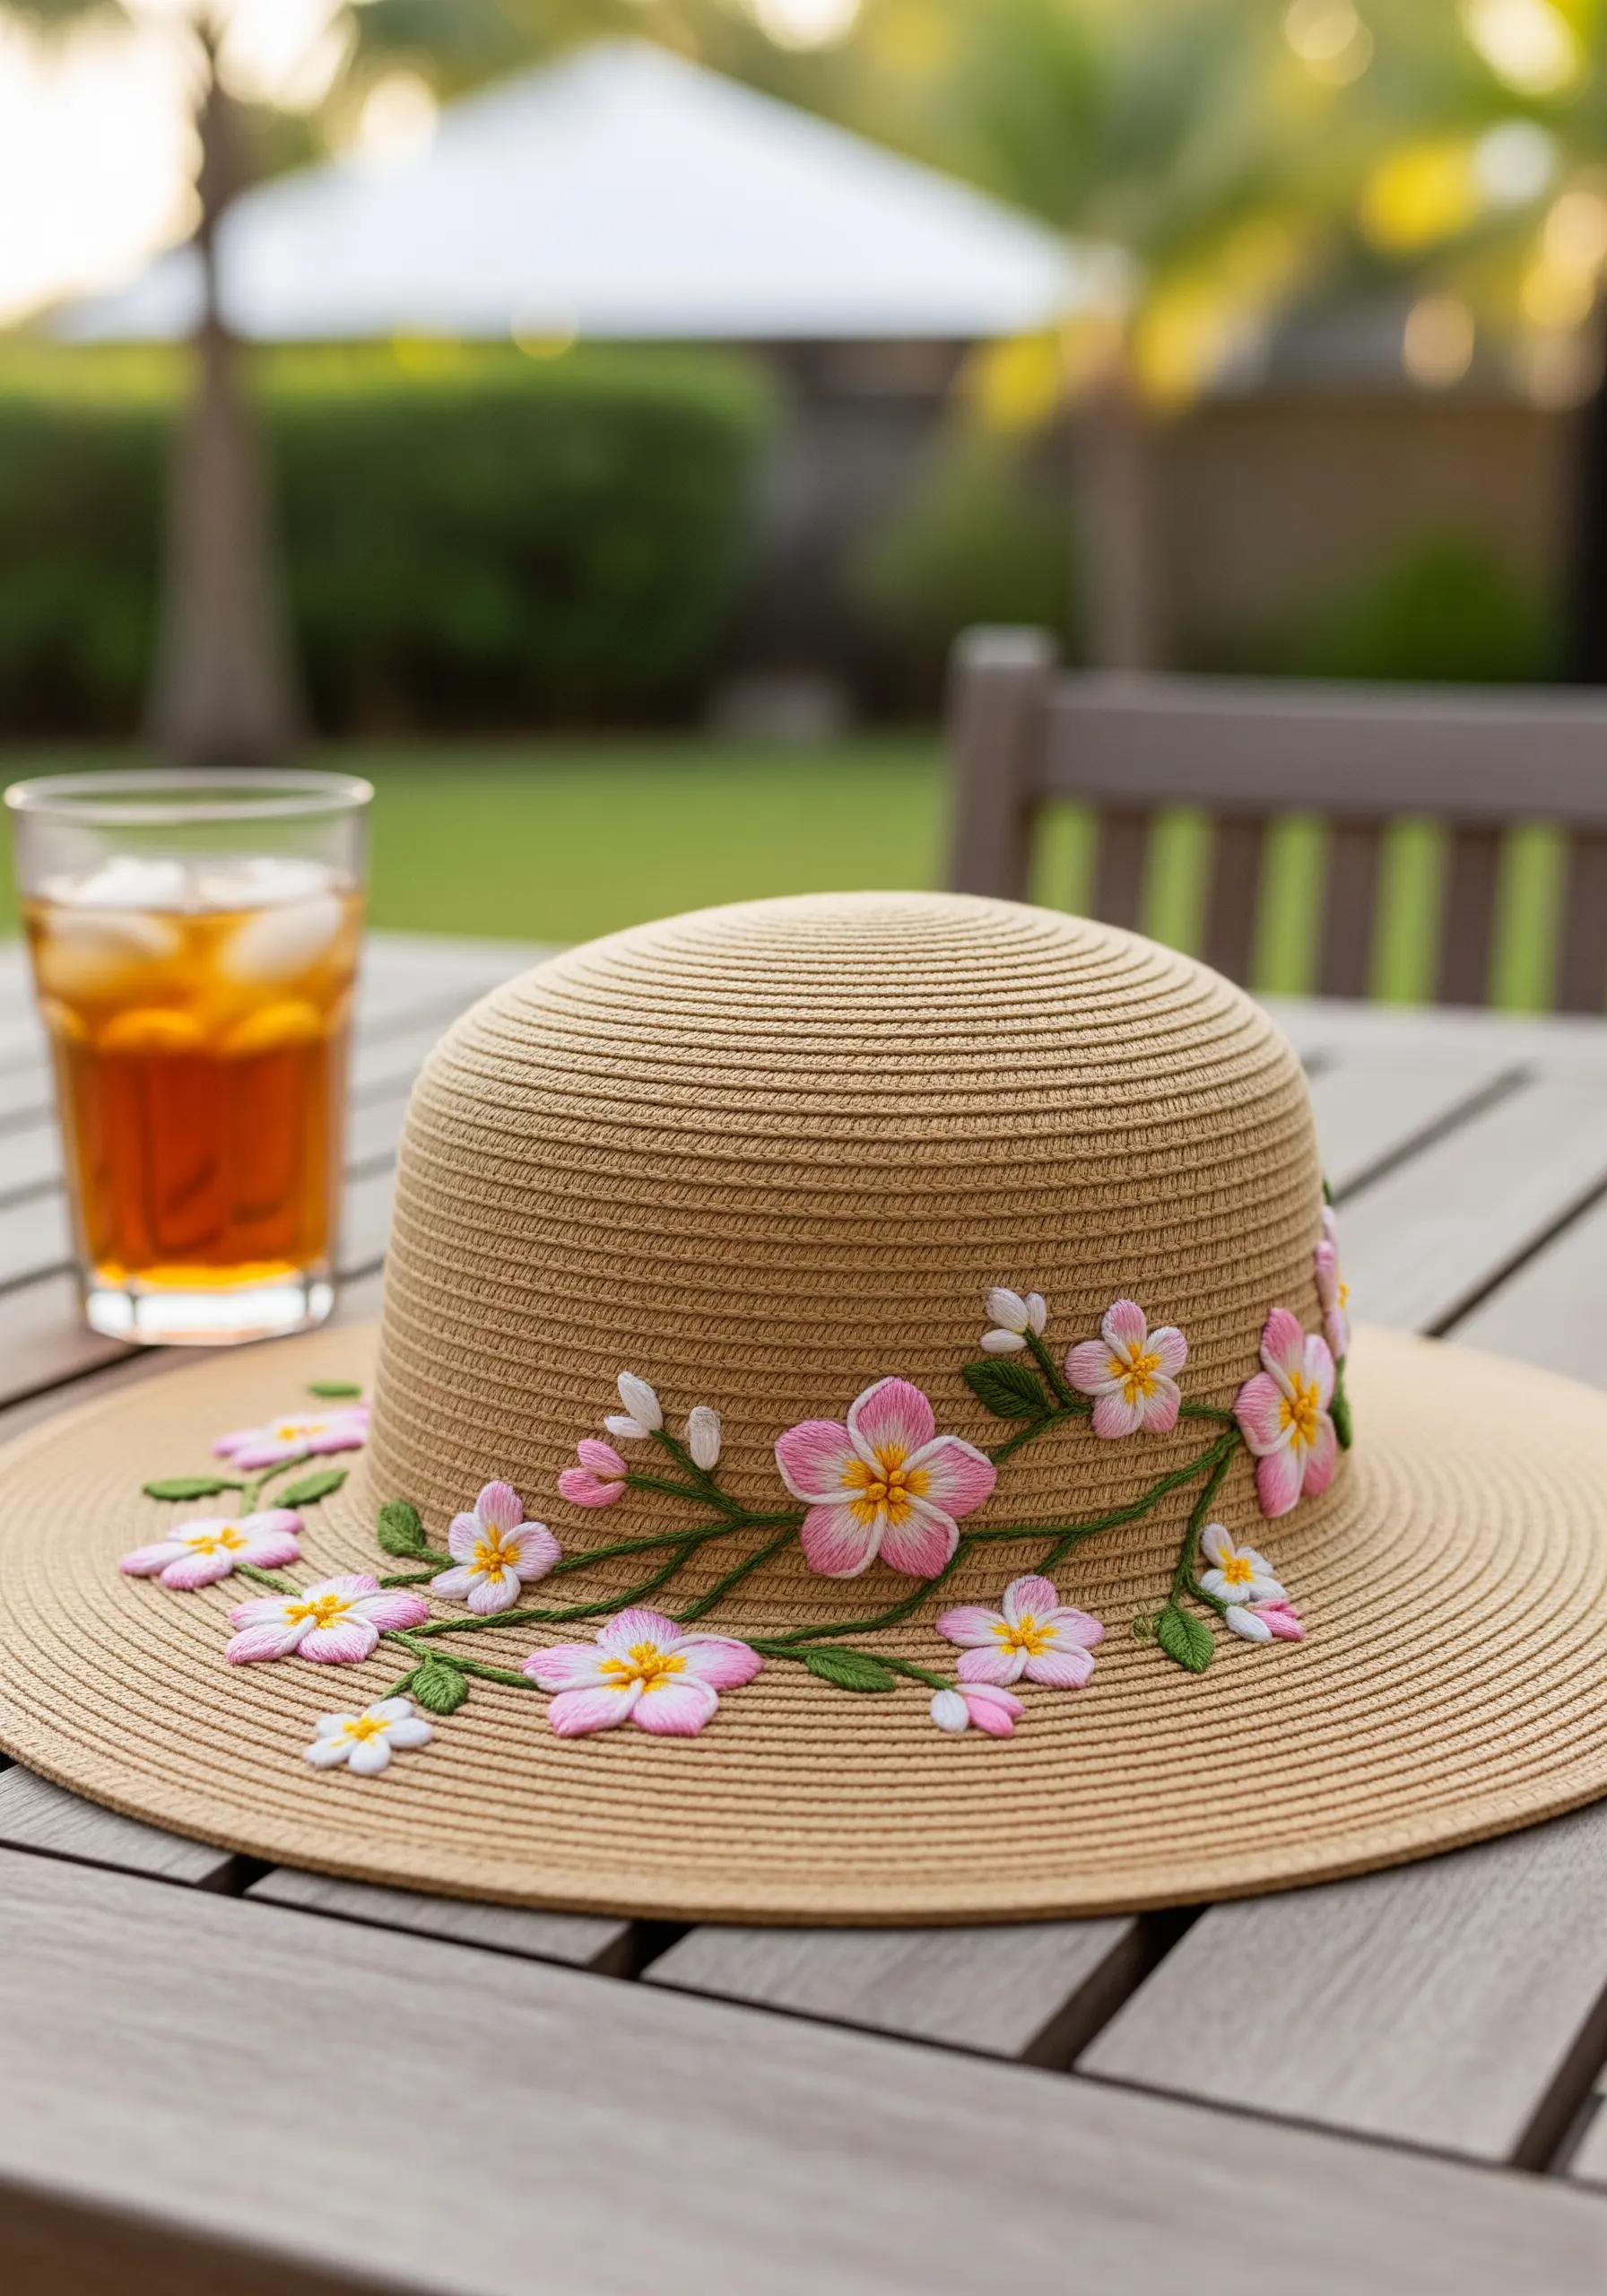
When stitching on a straw hat, you need to anchor your threads securely on the underside to prevent unraveling.
Form the petals using a detached chain stitch (lazy daisy) with three to four strands of floss for a raised, dimensional effect.
Use a single, contrasting yellow French knot for each flower’s center to add a focal point of texture.
Connect the blossoms with a flowing stem line using a simple backstitch, occasionally adding small leaf stitches for a more organic feel.
3. Achieve Bold Contrast with a Statement Hibiscus
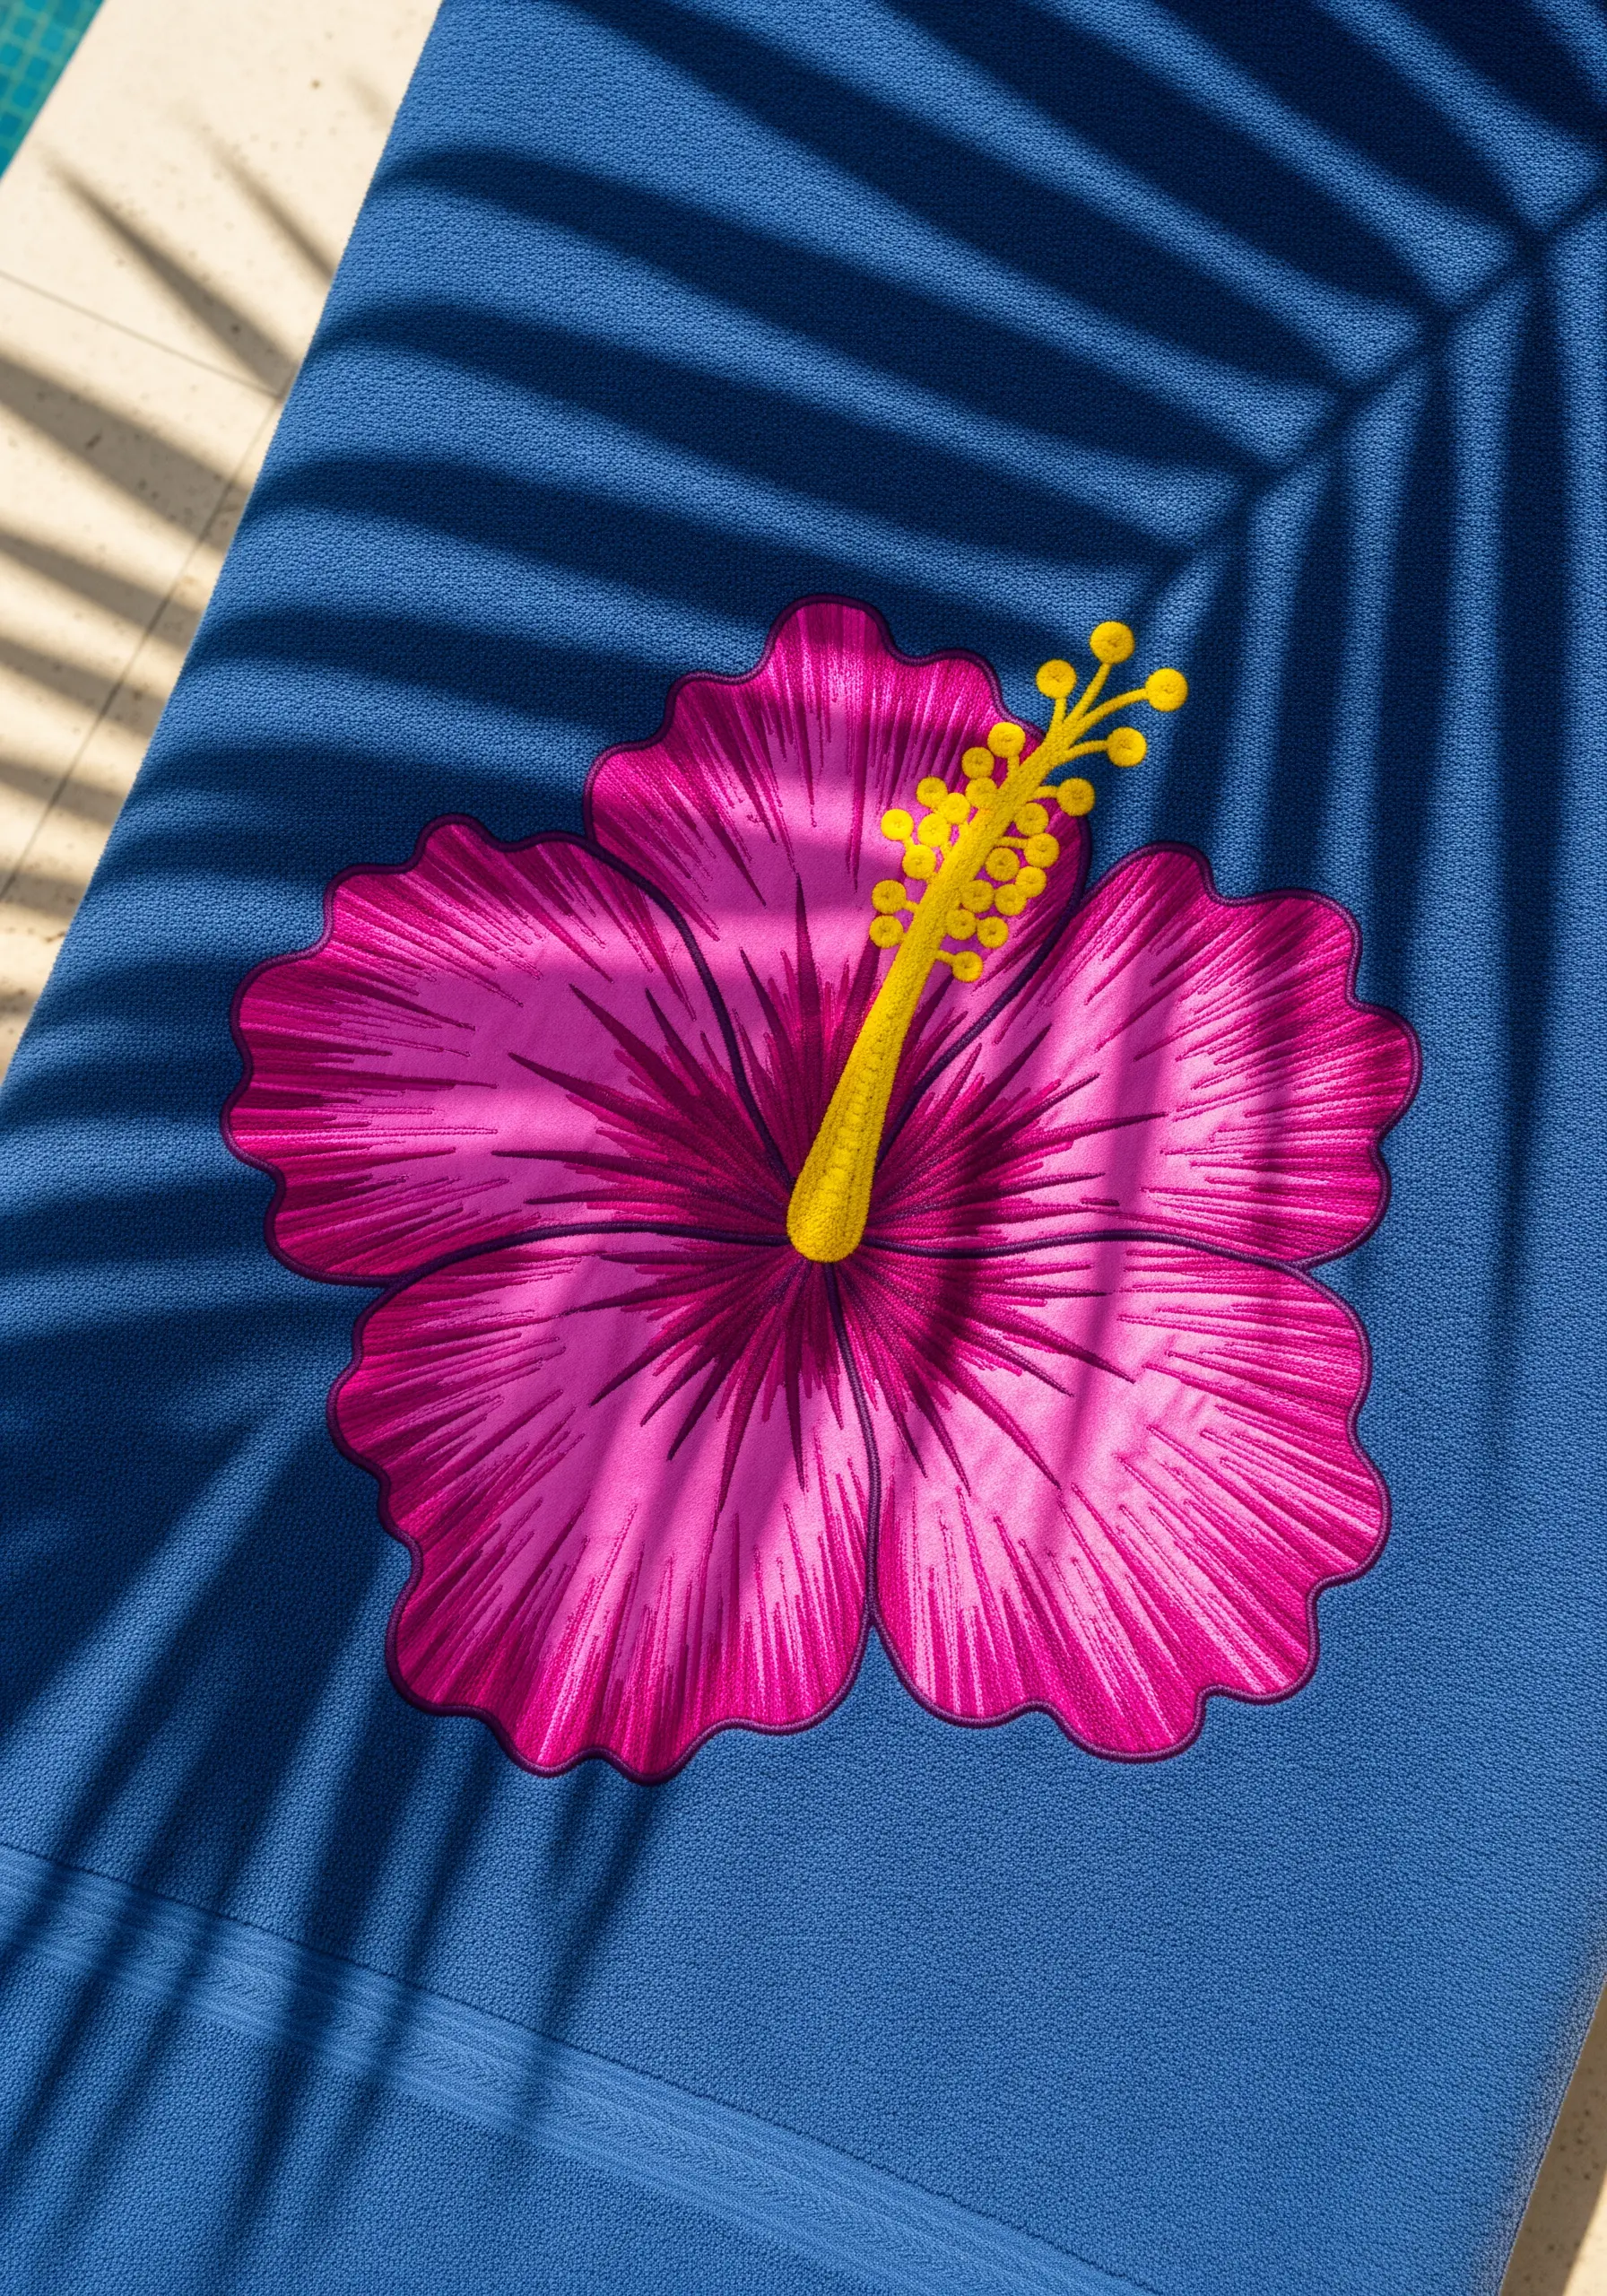
Make a single hibiscus flower the hero of your design by choosing a towel color that creates high contrast, like this vibrant magenta on deep blue.
Use directional satin stitch for the petals, angling your stitches from the center outwards to mimic the flower’s natural growth lines.
To create subtle highlights and shadows, blend two or three shades of the same color family using the long-and-short stitch technique.
Construct the stamen with a column of tightly packed French knots in a contrasting yellow, making it stand out with texture and color.
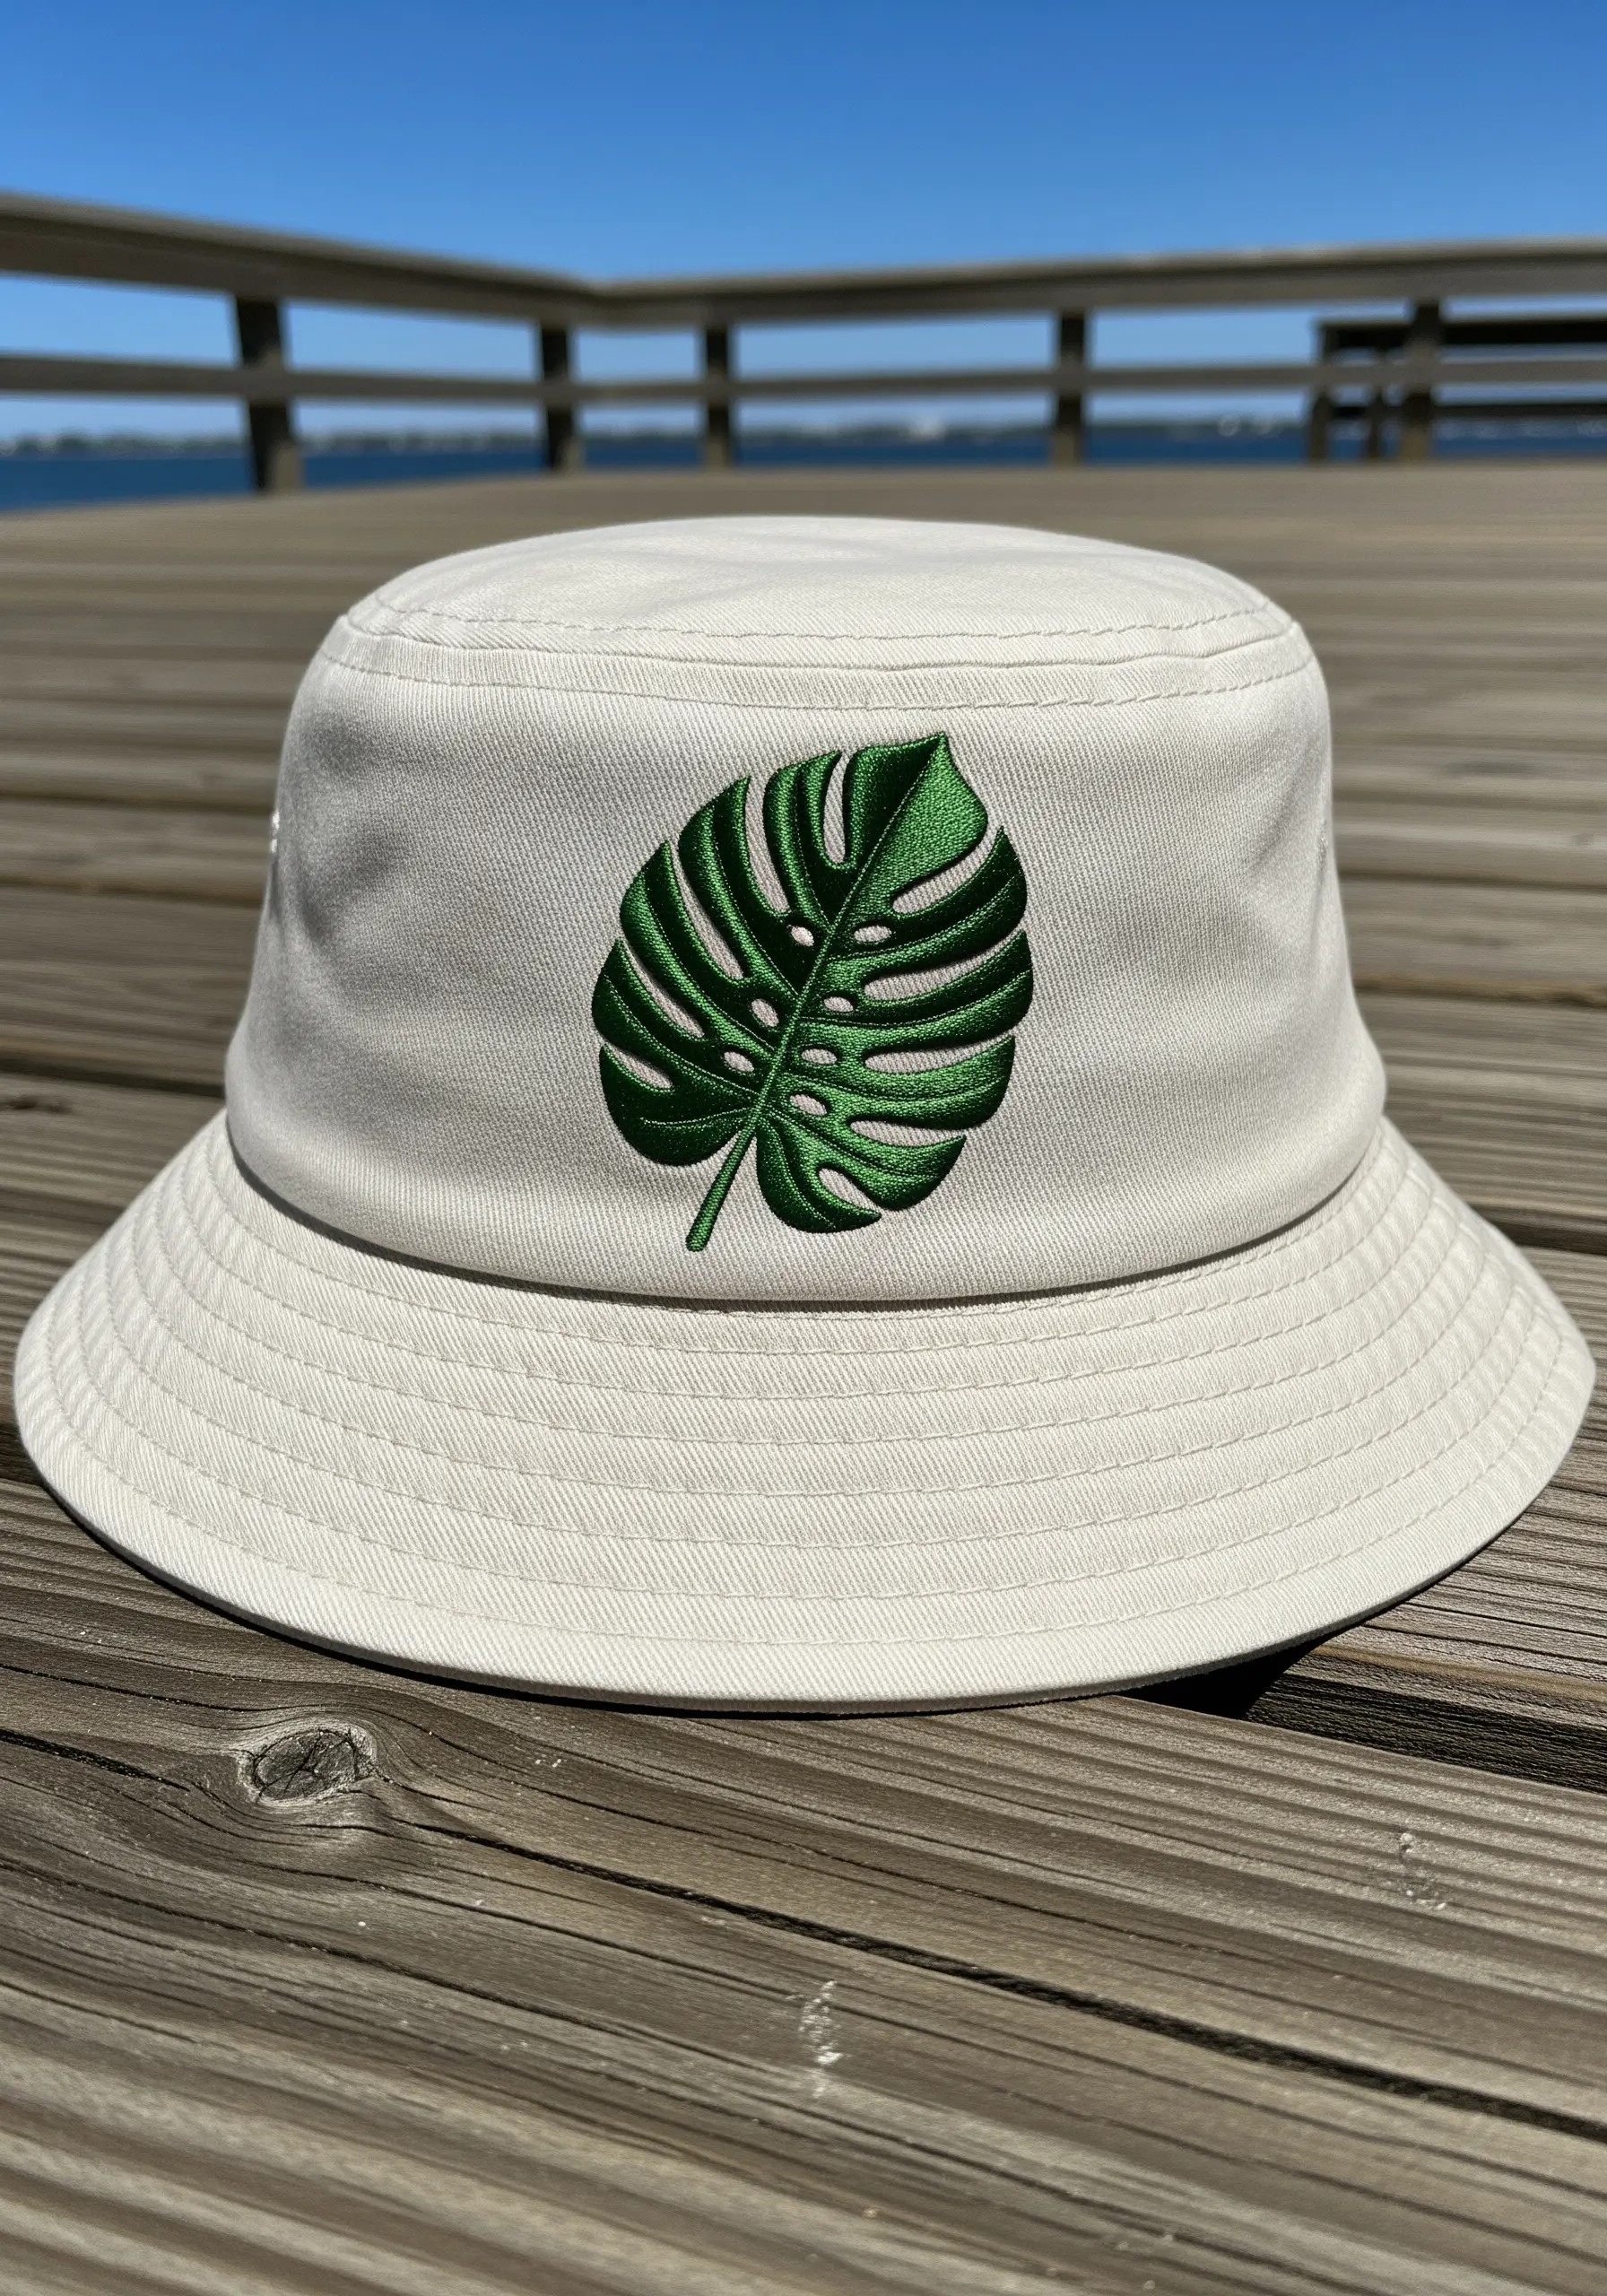
4. Compose a Lush Foliage Cascade on a Hat Brim
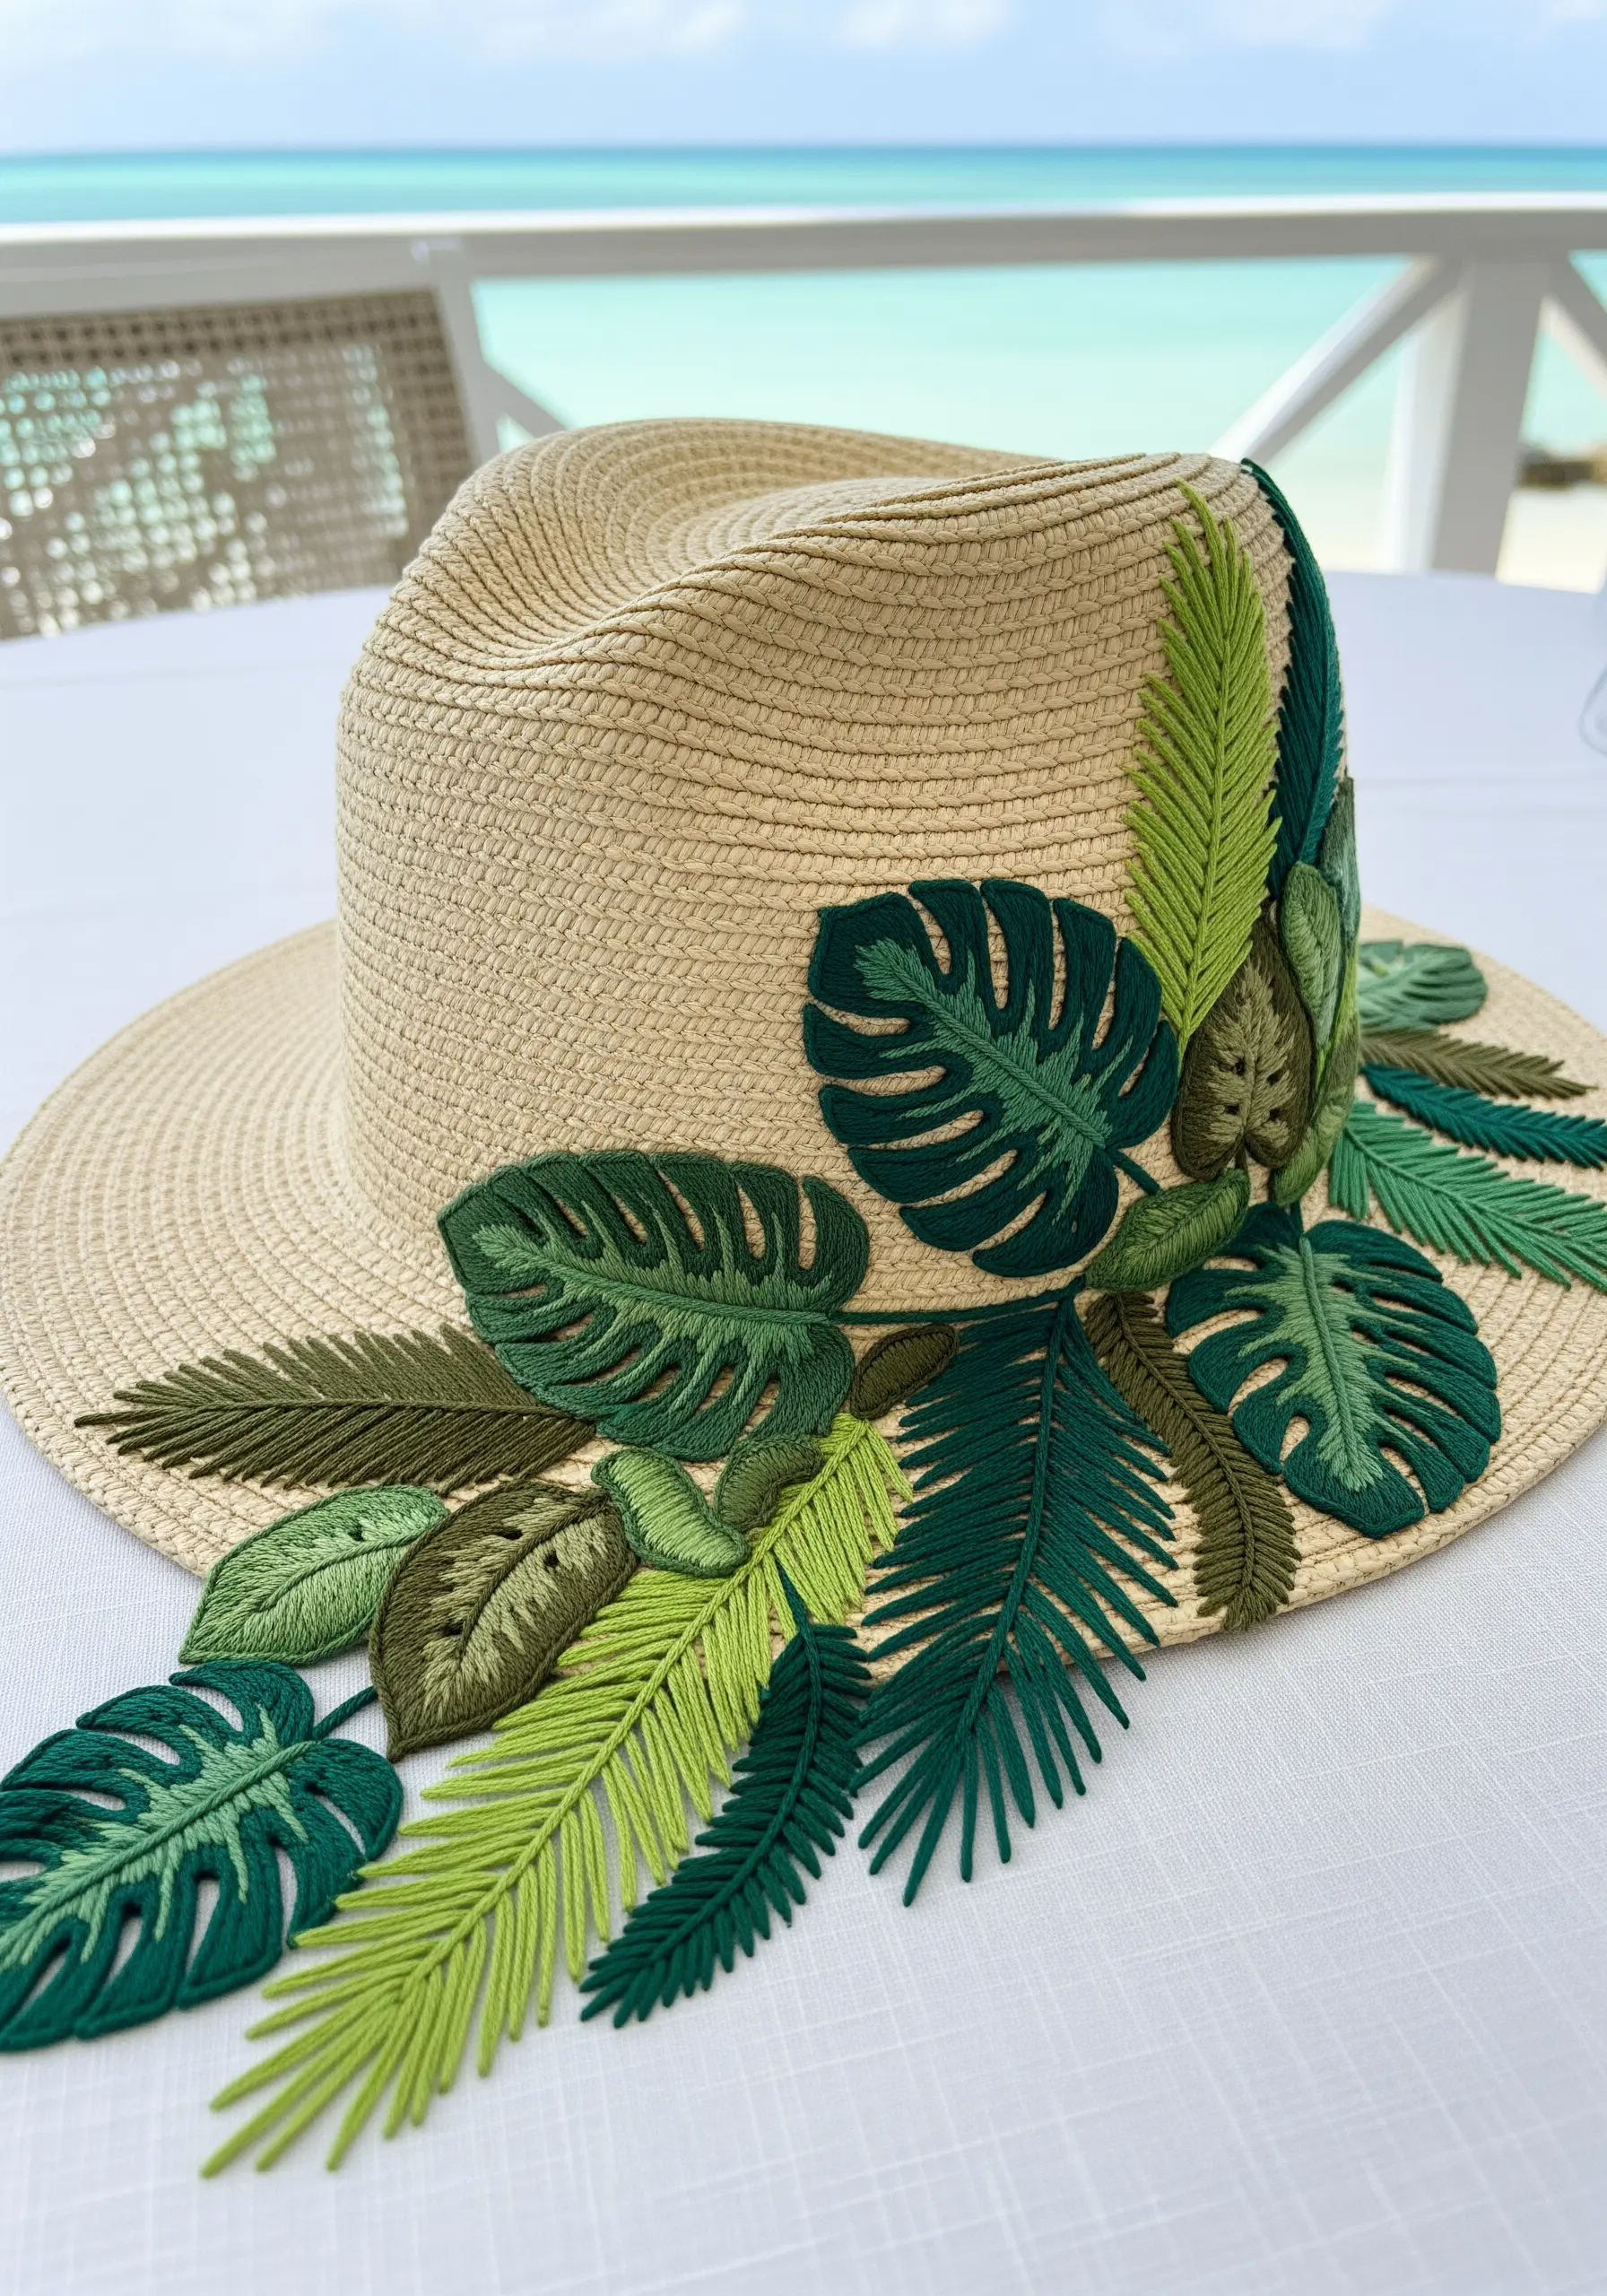
Create a sophisticated, monochromatic look by using various shades of green to embroider different types of tropical leaves.
Use fishbone stitch for the solid leaves to create a defined central vein and a smooth, filled appearance.
For the palm fronds, use long, straight stitches fanning out from a central stem to achieve a light, feathery texture.
Arrange the leaves so they appear to grow organically from the hatband and spill over the brim, adding movement and elegance to your design.
Explore different hand-embroidery leaf patterns to add variety and realism.
5. Design a Symmetrical Passion Flower Mandala
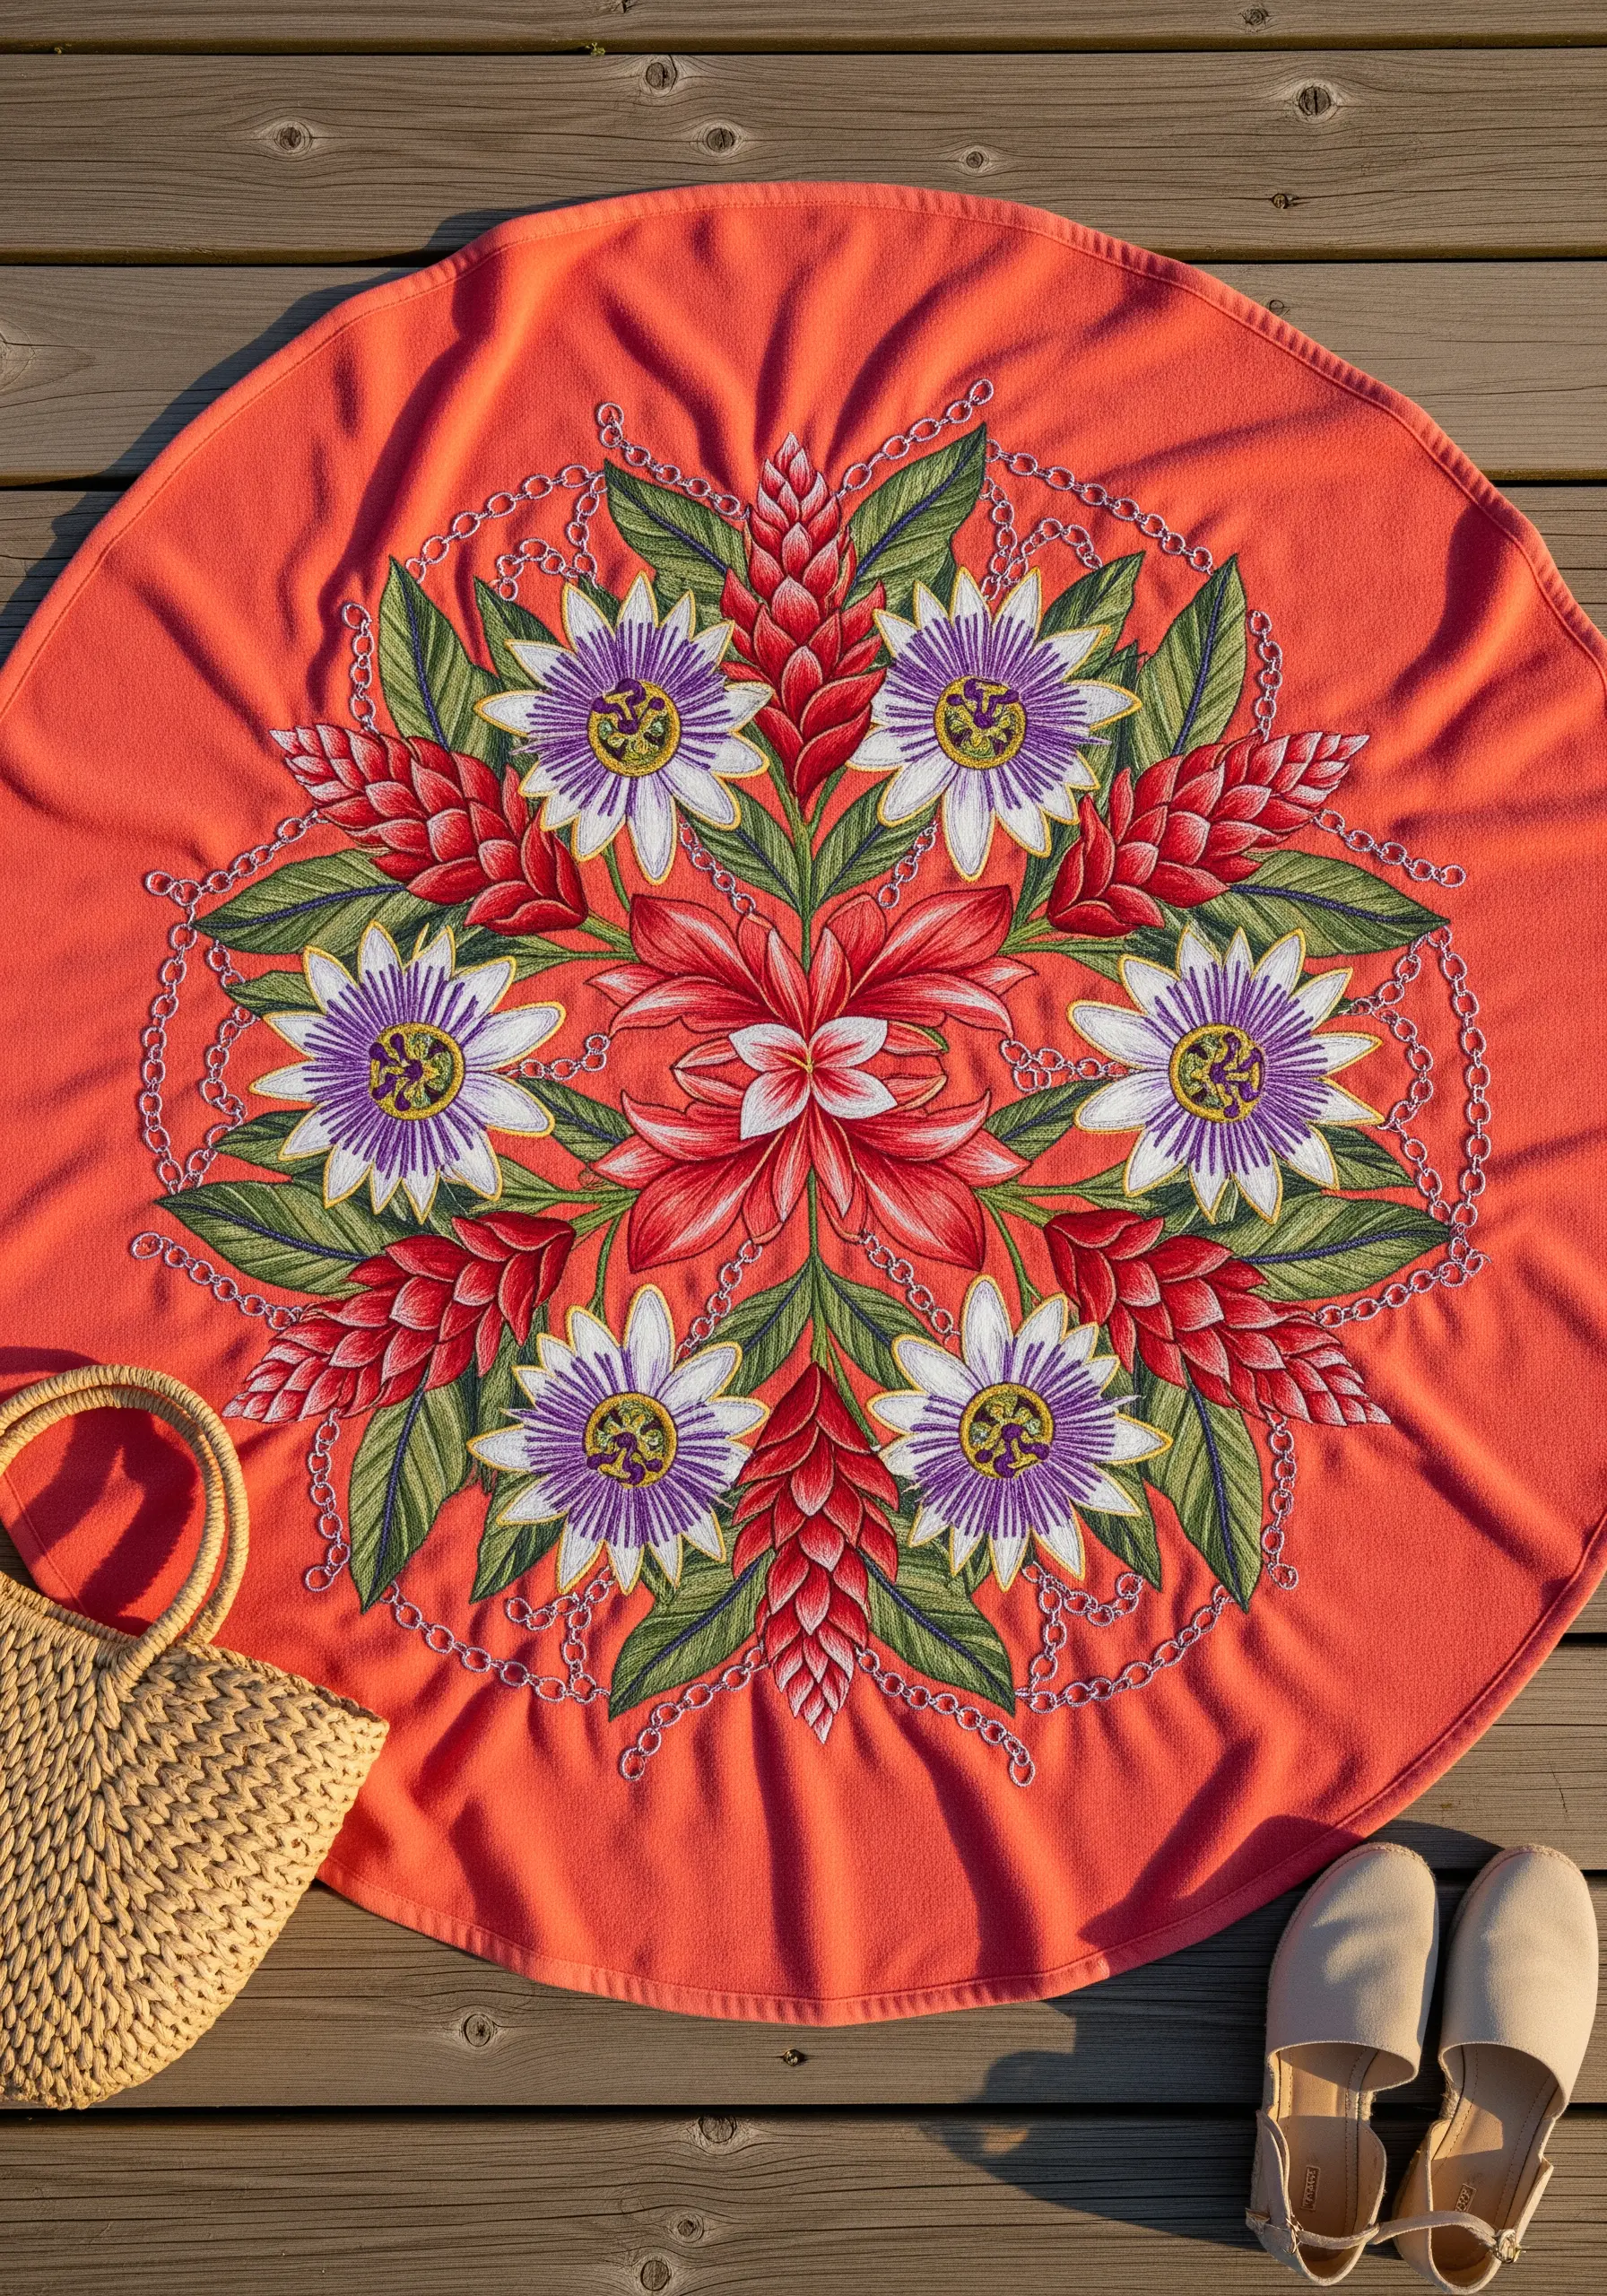
For a complex, symmetrical design on a round towel, lightly trace your pattern with a water-soluble marker before you begin.
Start stitching from the center and work your way outwards to ensure the design remains balanced and even.
Combine satin stitch for the bold petals with delicate French knots for the textured centers of the passion flowers.
Use a fine chain stitch for the decorative circular elements, which adds a delicate, jewelry-like quality to the overall composition of your embroidered mandala.
6. Stitch a Playful Repeating Ginger Flower Pattern
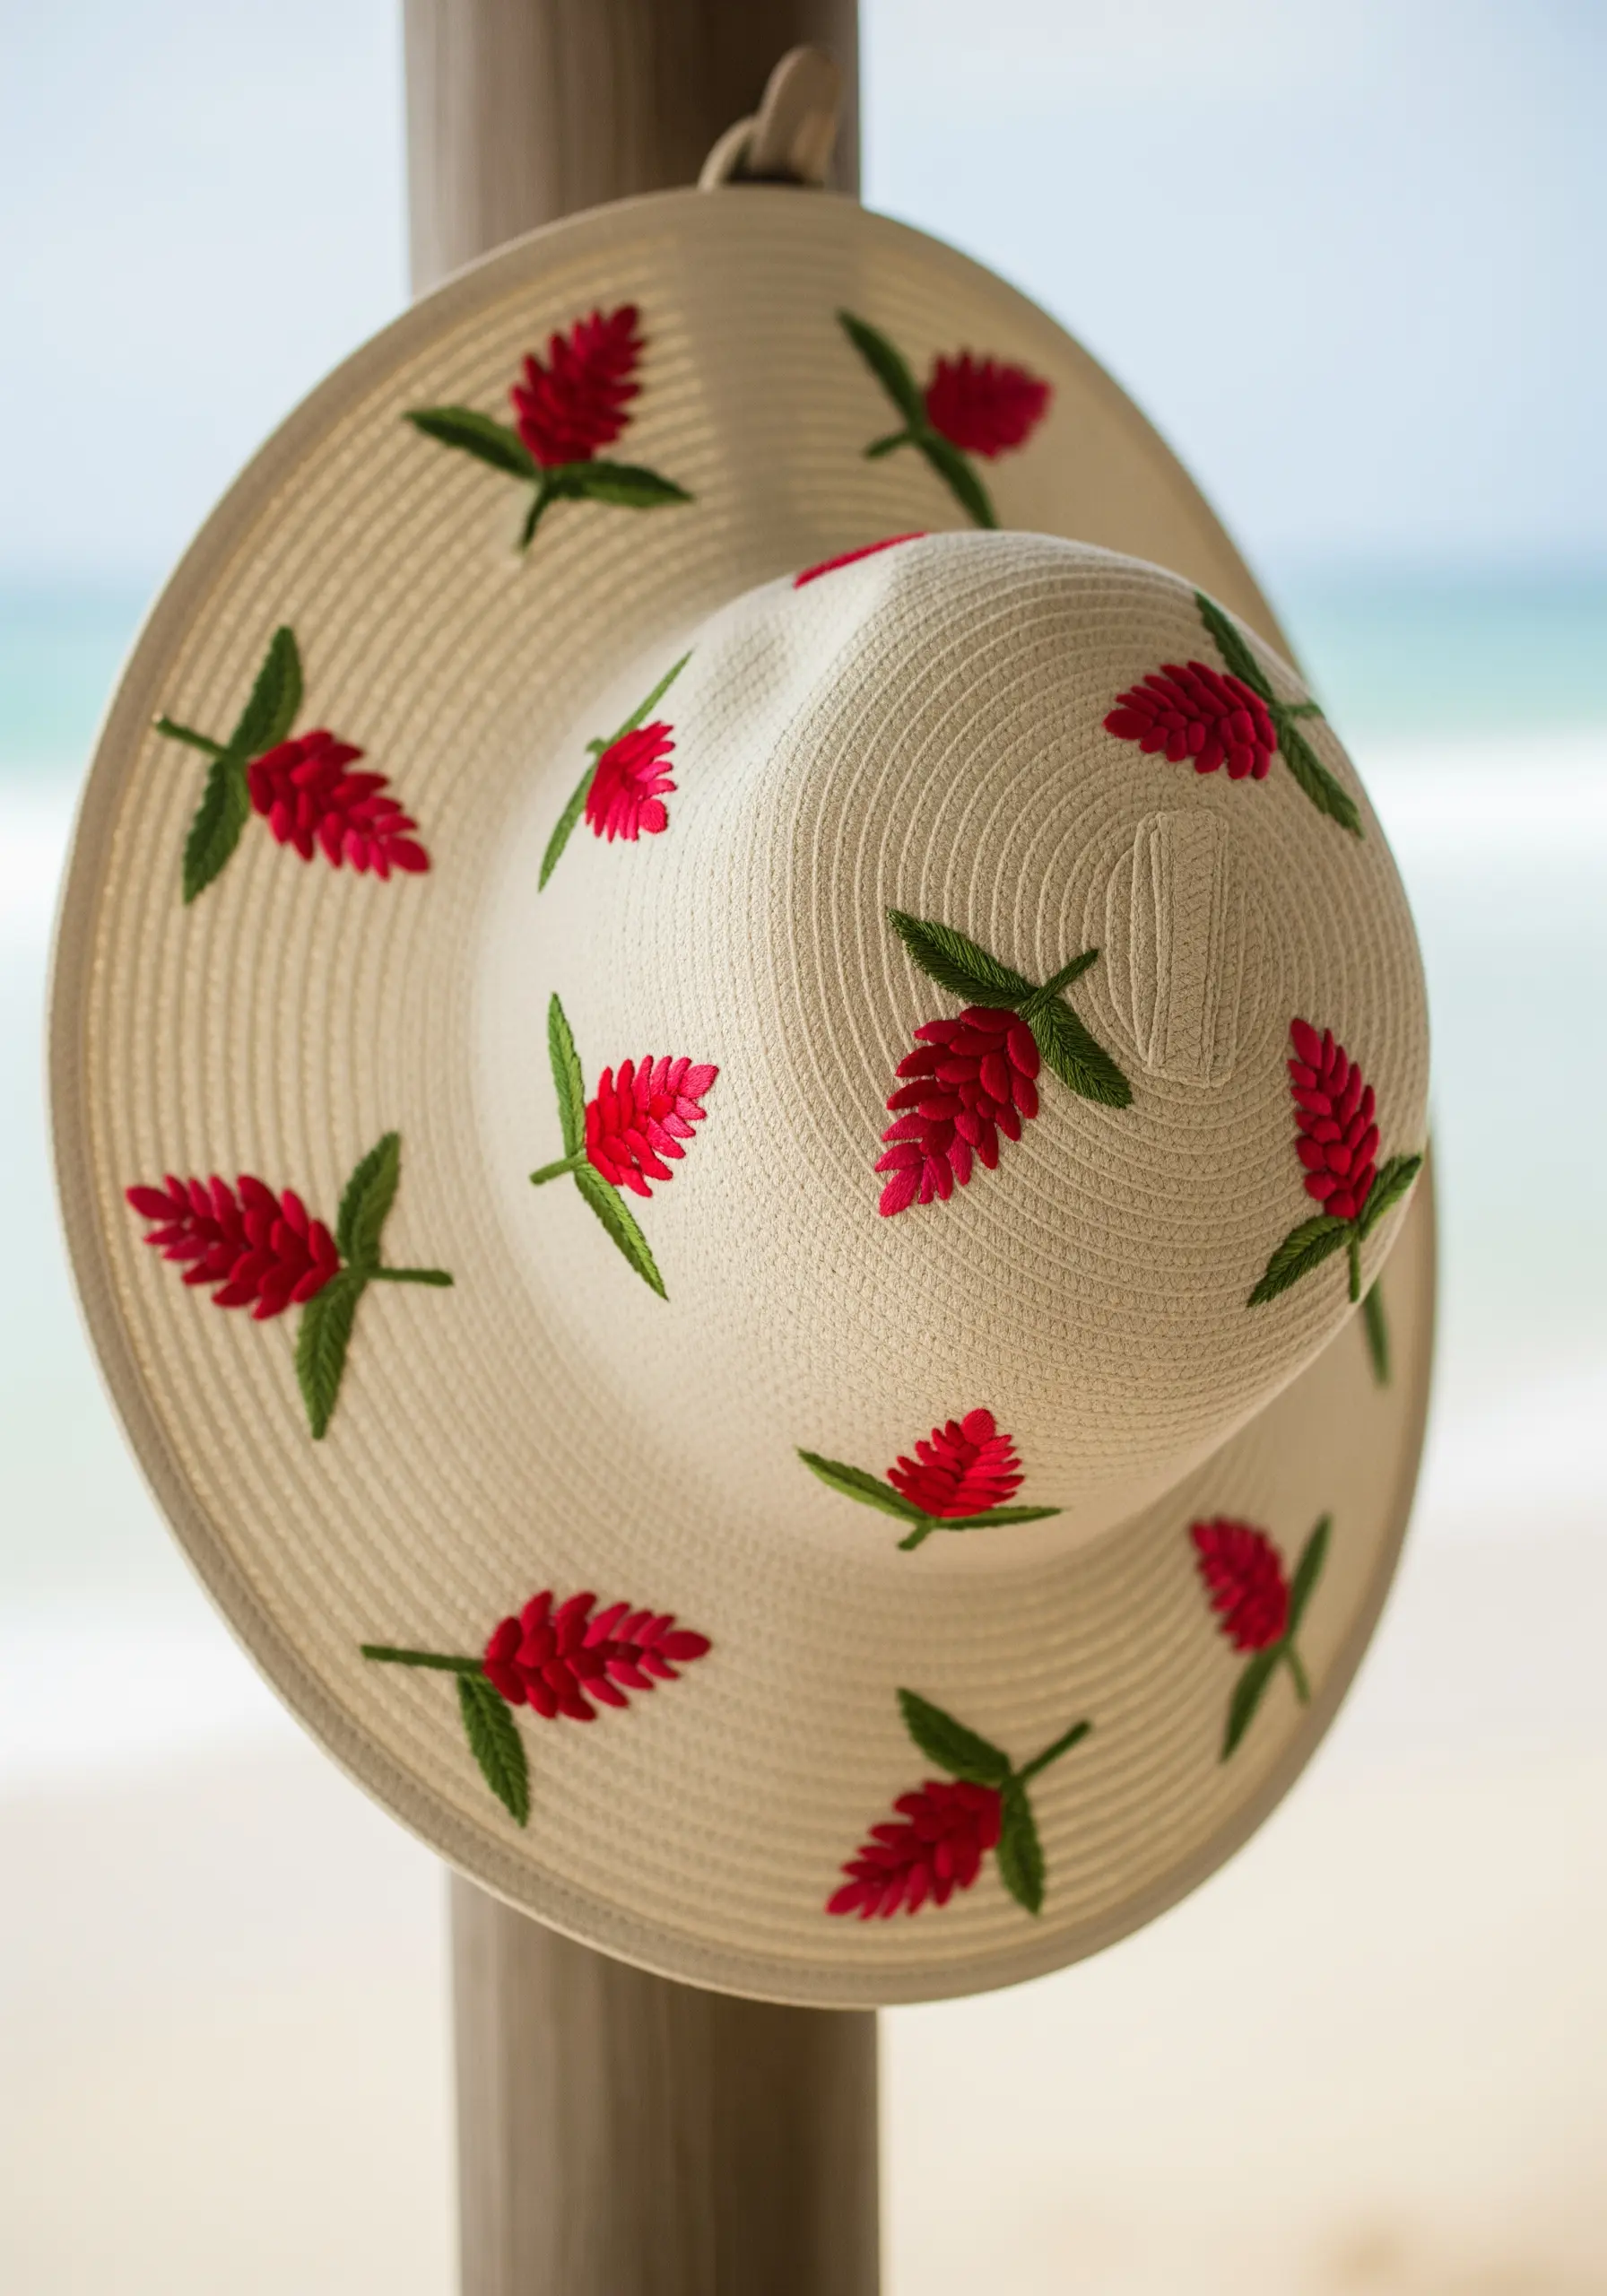
To create a uniform pattern on a hat, make a small stencil of your motif on cardstock to guide your placement.
For the textured petals of the ginger flower, use a series of overlapping satin stitches or tightly packed French knots in a vibrant red.
Keep the leaves simple with a few straight stitches or a small fishbone stitch to avoid overpowering the floral elements.
The negative space is just as important as the motifs; ensure your spacing is consistent for a professional, polished look.
7. Embellish with Elegant Phalaenopsis Orchids
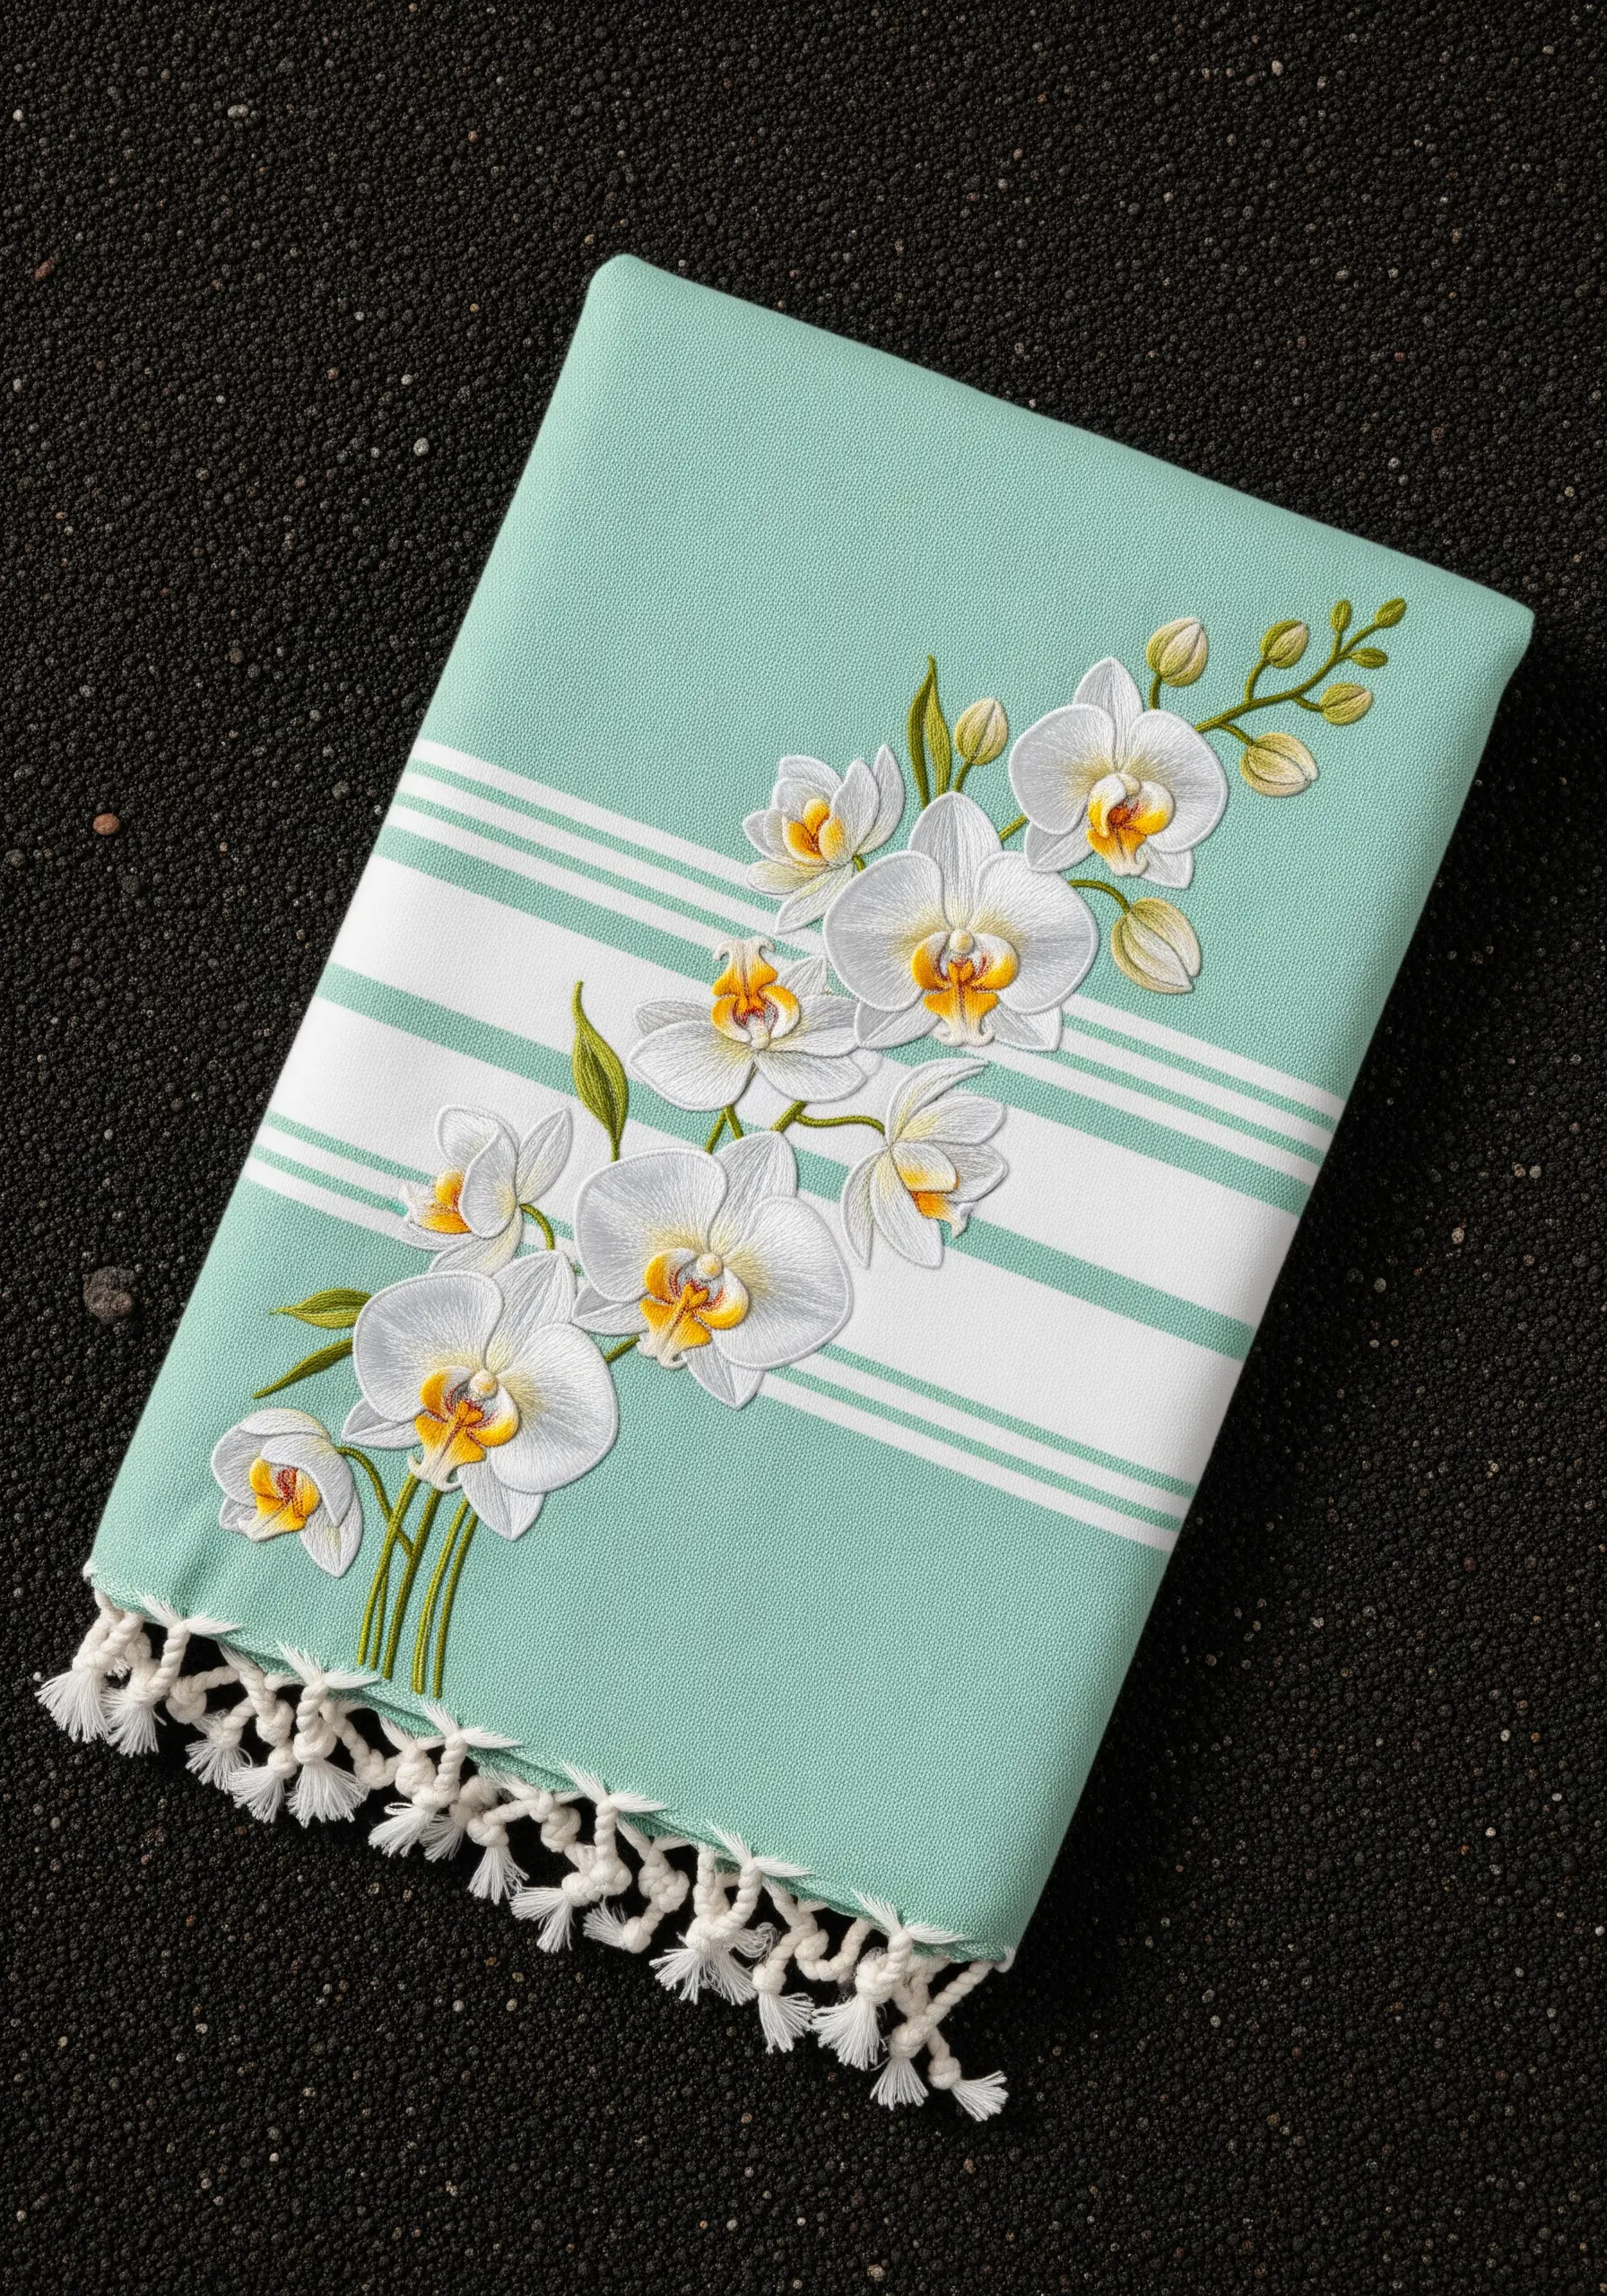
Capture the delicate nature of orchids by using a long-and-short stitch with fine, two-ply thread for the white petals.
Introduce a single strand of pale grey or soft lilac to stitch subtle shadows where the petals overlap, creating realistic depth.
The key to the orchid’s realism is the detailed center; use bright yellow and orange satin stitches to form the intricate labellum.
Connect the blossoms with a gracefully curved stem rendered in a whipped backstitch for a smooth, raised line.
8. Frame a Hatband with Bold Banana Leaves
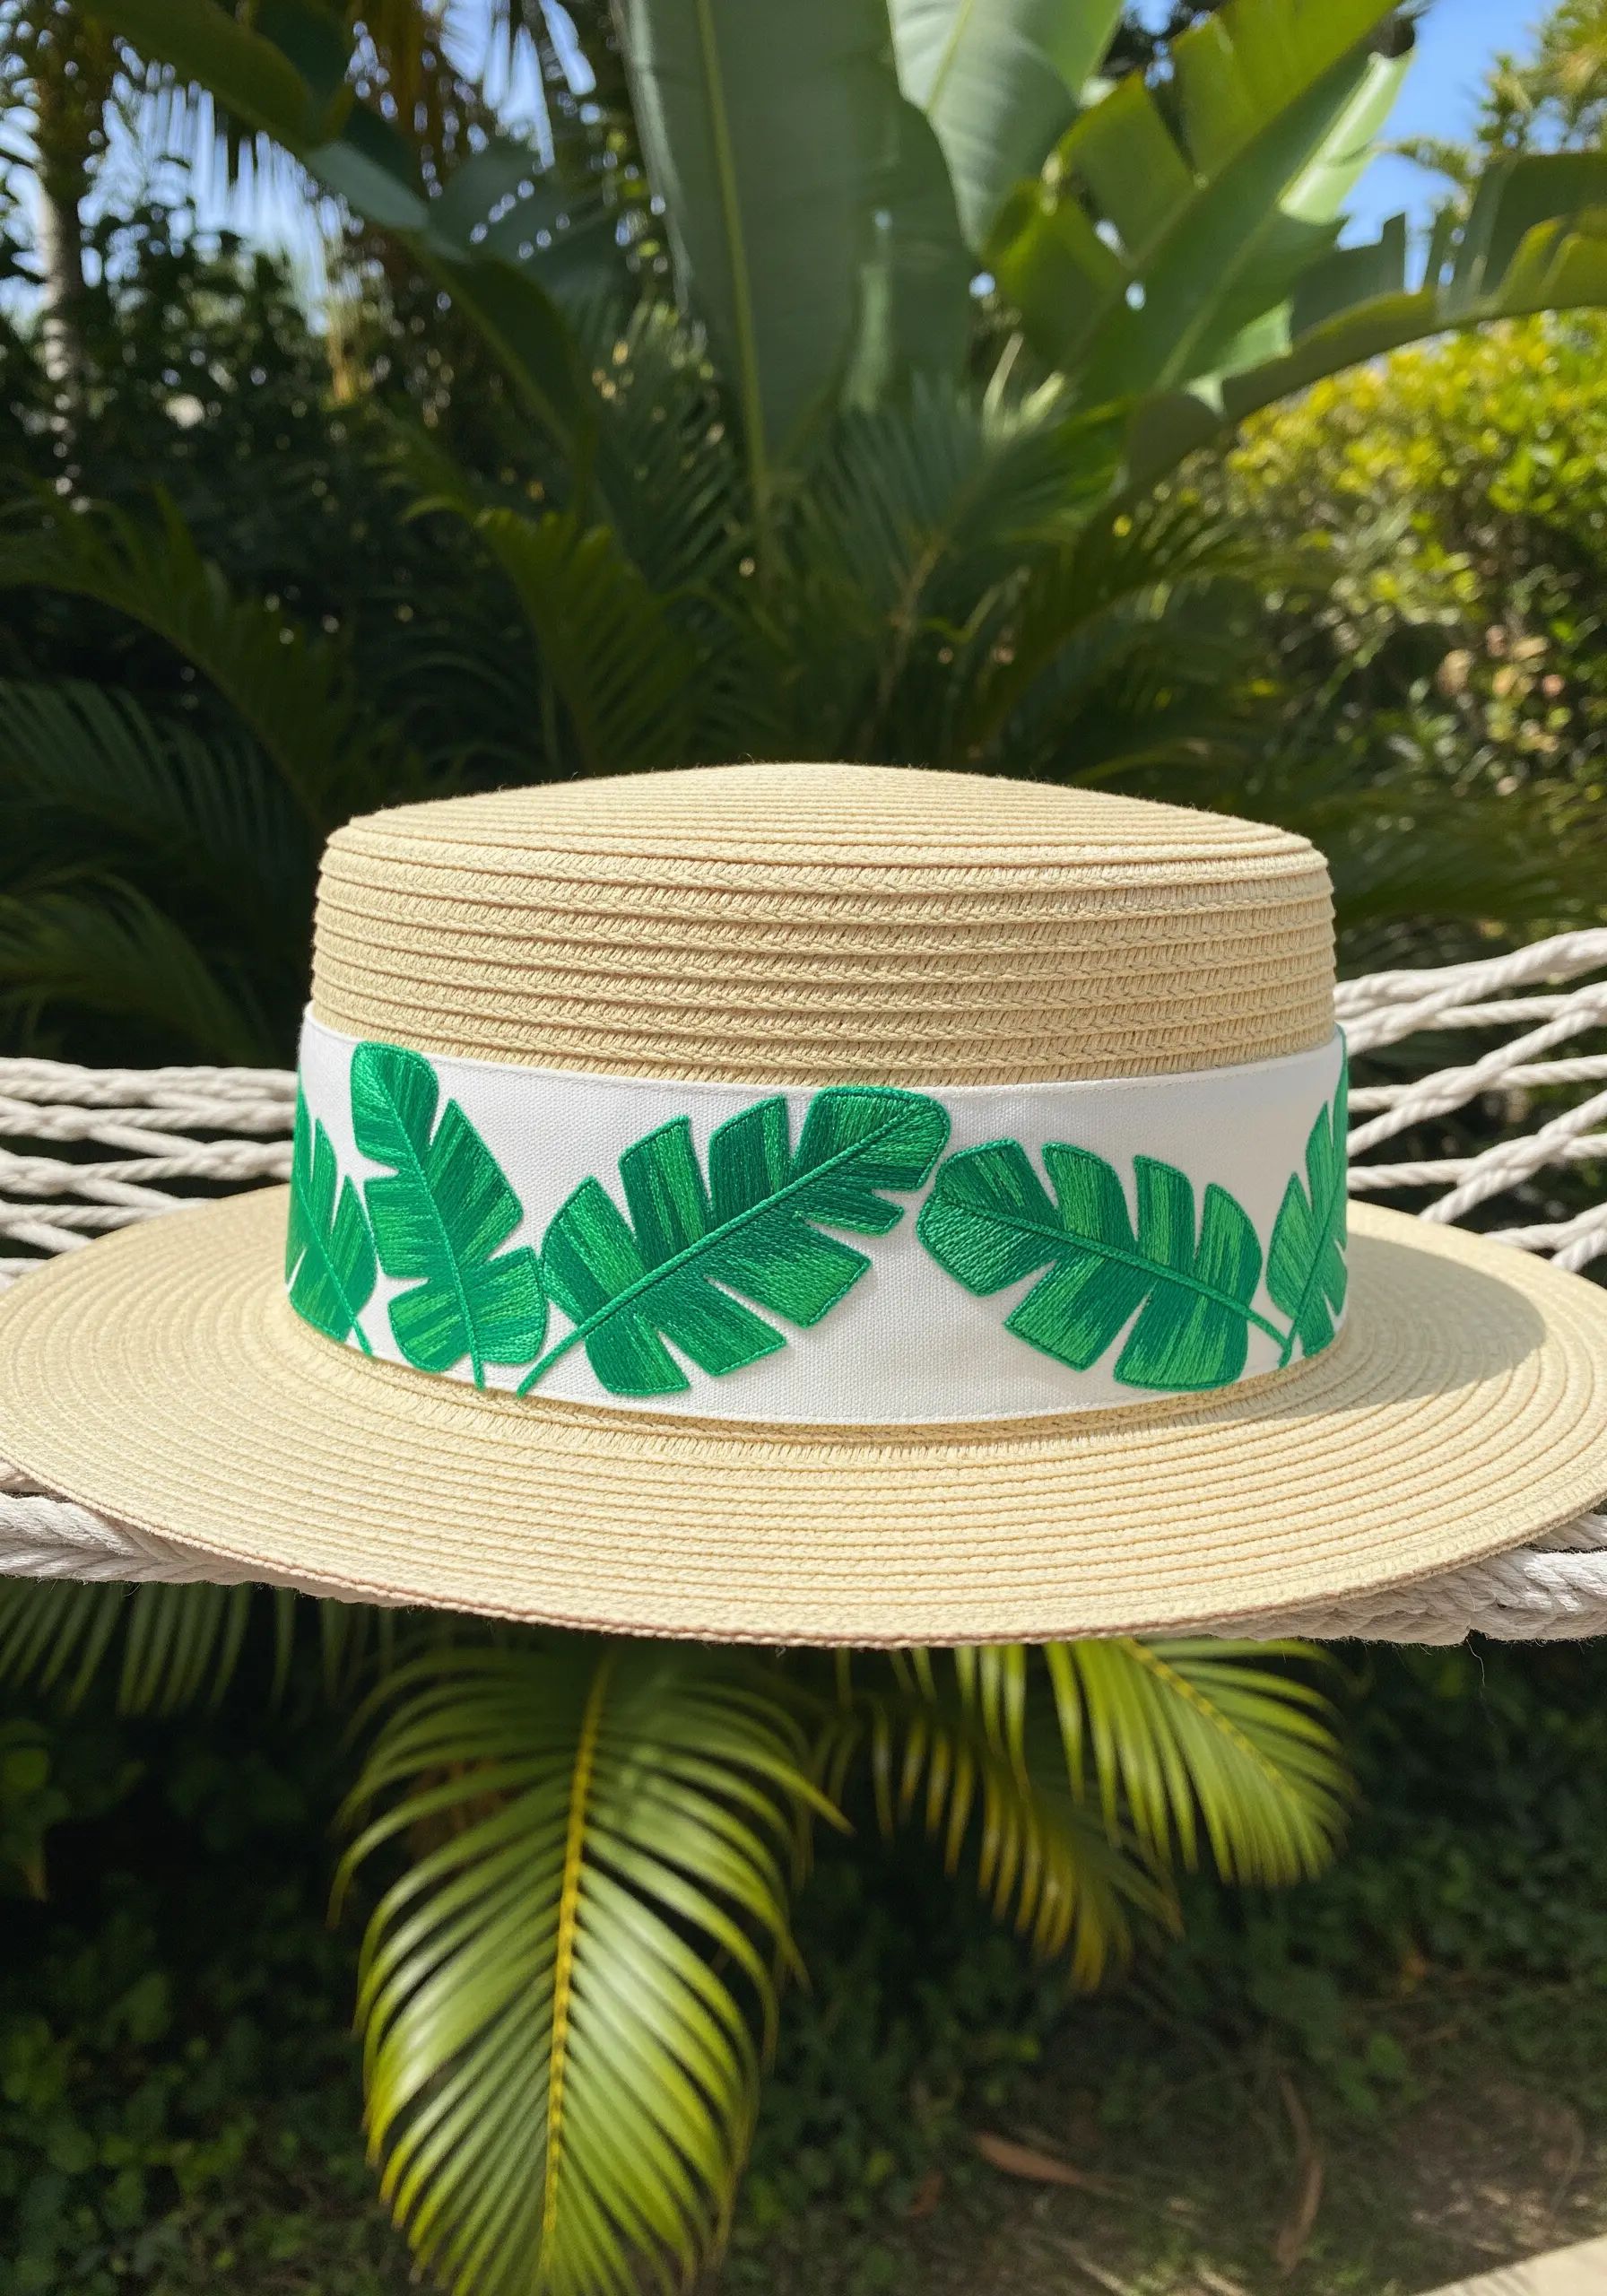
For a clean, modern aesthetic, stitch bold leaf motifs directly onto a contrasting fabric hatband before attaching it to the hat.
Use a split stitch to outline each leaf first; this creates a raised, sharp edge that contains your subsequent fill stitches.
Fill the leaves with a dense satin stitch, ensuring your stitches are parallel and lie flat for a smooth, graphic finish.
Stitch the central vein in a slightly darker shade of green using a stem stitch to add a subtle layer of dimension.
9. Compose a Rich Botanical Corner Bouquet

To create a visually dense arrangement, layer different leaf shapes and floral elements, starting with the largest leaves in the background.
Incorporate a variety of green tones to differentiate between monstera, fern, and palm leaves, giving the composition depth.
Make the central blue orchid the focal point by using the most vibrant color and the most detailed stitching, drawing the eye inward.
Add delicate, swirling tendrils using a stem stitch with a single strand of thread to fill empty spaces and add a sense of movement.
10. Illustrate a Scene with a Toucan and Heliconia
When embroidering a bird, pay close attention to the direction of your stitches to mimic the texture of feathers.
Use short, overlapping satin stitches for the body and long, parallel stitches for the wing and tail feathers.
Capture the toucan’s iconic beak by using blocks of vibrant, rainbow-colored satin stitch, keeping the edges between colors crisp and clean.
These colorful tropical bird embroidery stitches will make any plain accessory come alive.
Ground the scene by placing the bird on a simple branch, stitched with a variegated brown thread for natural texture.
11. Create a Graphic Pineapple with Textured Details
Outline the entire pineapple shape with a split stitch to establish a clean boundary for your fill stitches.
Fill the body with a golden yellow satin stitch, then overlay a grid pattern in a slightly darker gold or light brown using a simple backstitch.
This layering technique creates the classic pineapple texture without complex stitches.
For the crown, use a fishbone stitch in multiple shades of green to give the leaves dimension and a sense of movement.
12. Stitch a Luminous Gardenia on a Dark Canvas
To make white thread pop against a black hat, use a high-quality, bright white floss and increase your strand count to four or five.
Create depth in the petals by blending shades of white, cream, and very pale grey with a long-and-short stitch.
Place the darkest shades where petals overlap or recede to create the illusion of shadow and form.
This monochrome floral embroidery style is perfect for creating a dramatic, high-contrast effect.
13. Add a Playful Hibiscus Border to Stripes
When stitching over a striped pattern, choose a simple, bold motif that won’t get lost in the background design.
Use a vibrant color like red that contrasts strongly with both the white and blue stripes, ensuring your work stands out.
Keep the hibiscus shape simple, using satin stitch for the petals and a cluster of French knots for the center.
Align the flowers along the bottom edge of the towel to create a cheerful, modern border that complements the classic nautical stripes.
14. Achieve Minimalist Elegance with a Single Calla Lily
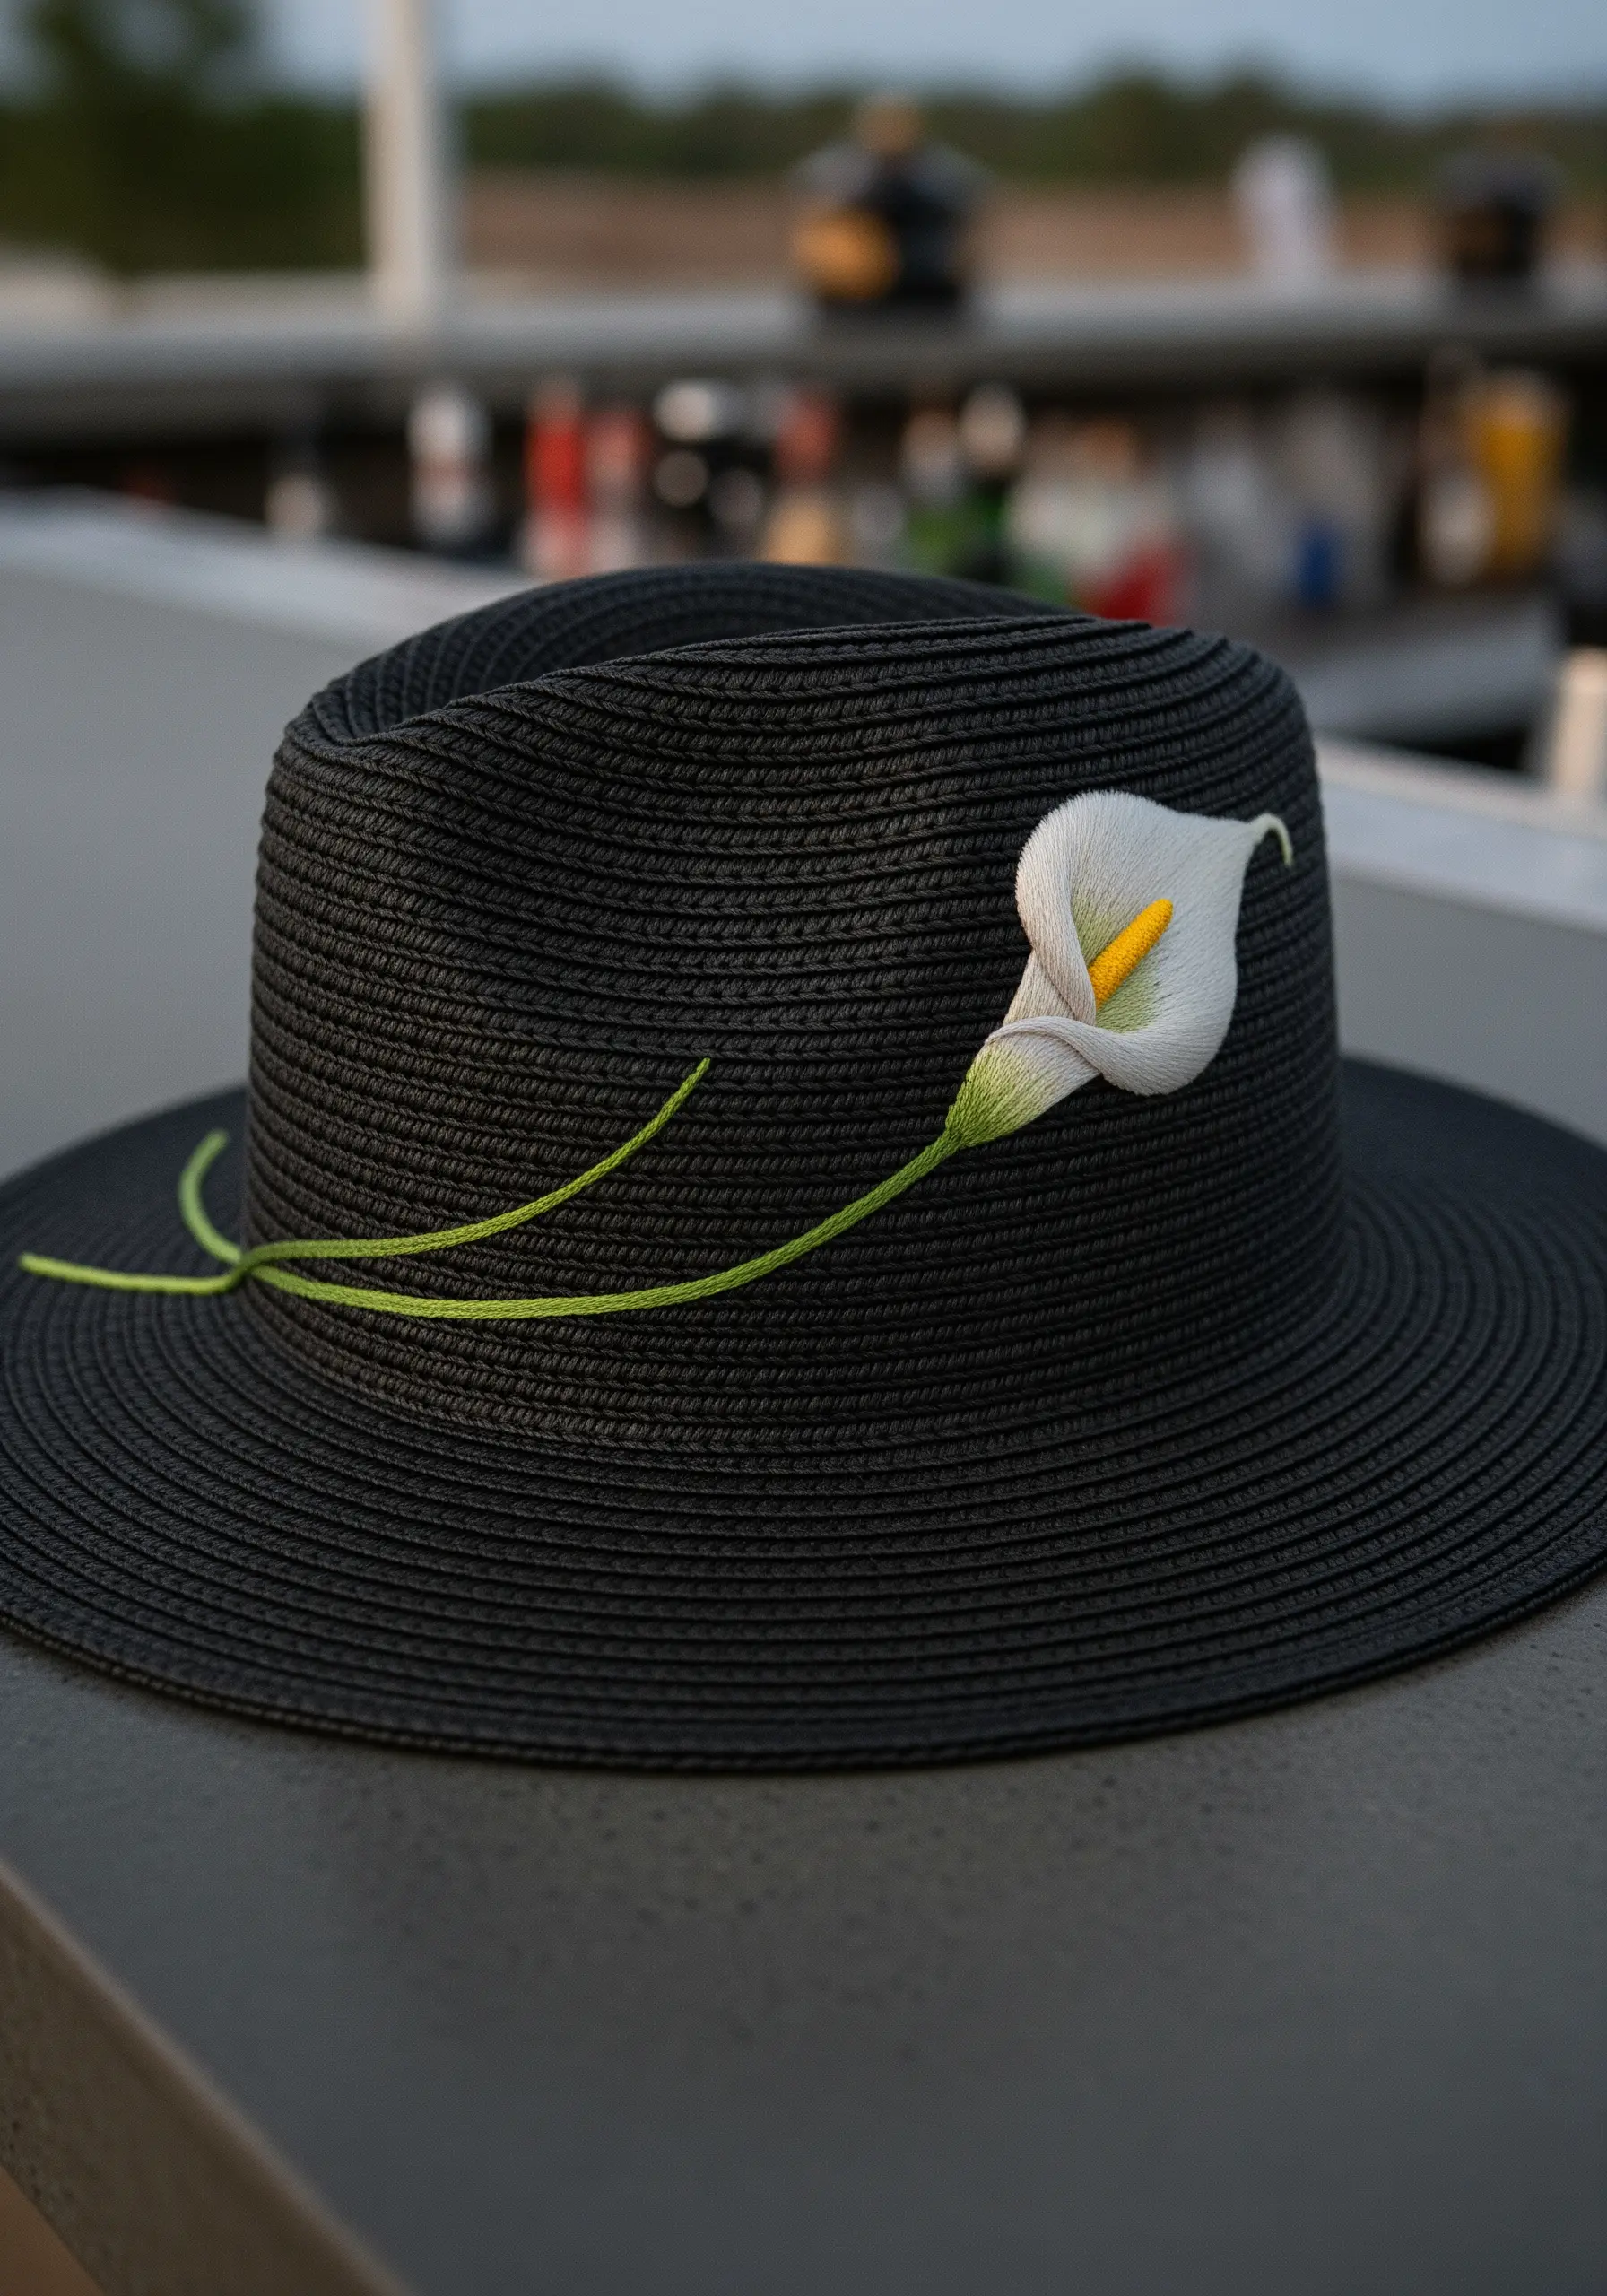
For a design this refined, the focus is on form and line, not complex fills.
Create the lily’s spathe with a padded satin stitch; first lay down a series of straight stitches as a base, then cover them with satin stitches perpendicular to the base.
This gives the flower a raised, three-dimensional quality.
Use a single, flowing line of stem stitch for the stalk, allowing it to curve naturally around the hat’s crown for an effortlessly elegant look.
15. Create a Dainty All-Over Clover Pattern

To achieve this scattered pattern, stitch each four-leaf clover motif with four individual satin stitches, angled toward a central point.
Use a variegated green-and-white thread to give each clover subtle color variation without changing your floss.
This adds visual interest and a hand-dyed feel to the overall design.
Ensure the motifs are randomly oriented and spaced to create a natural, meadow-like effect across the fabric.
16. Craft a Colorful Tropical Fruit Hatband
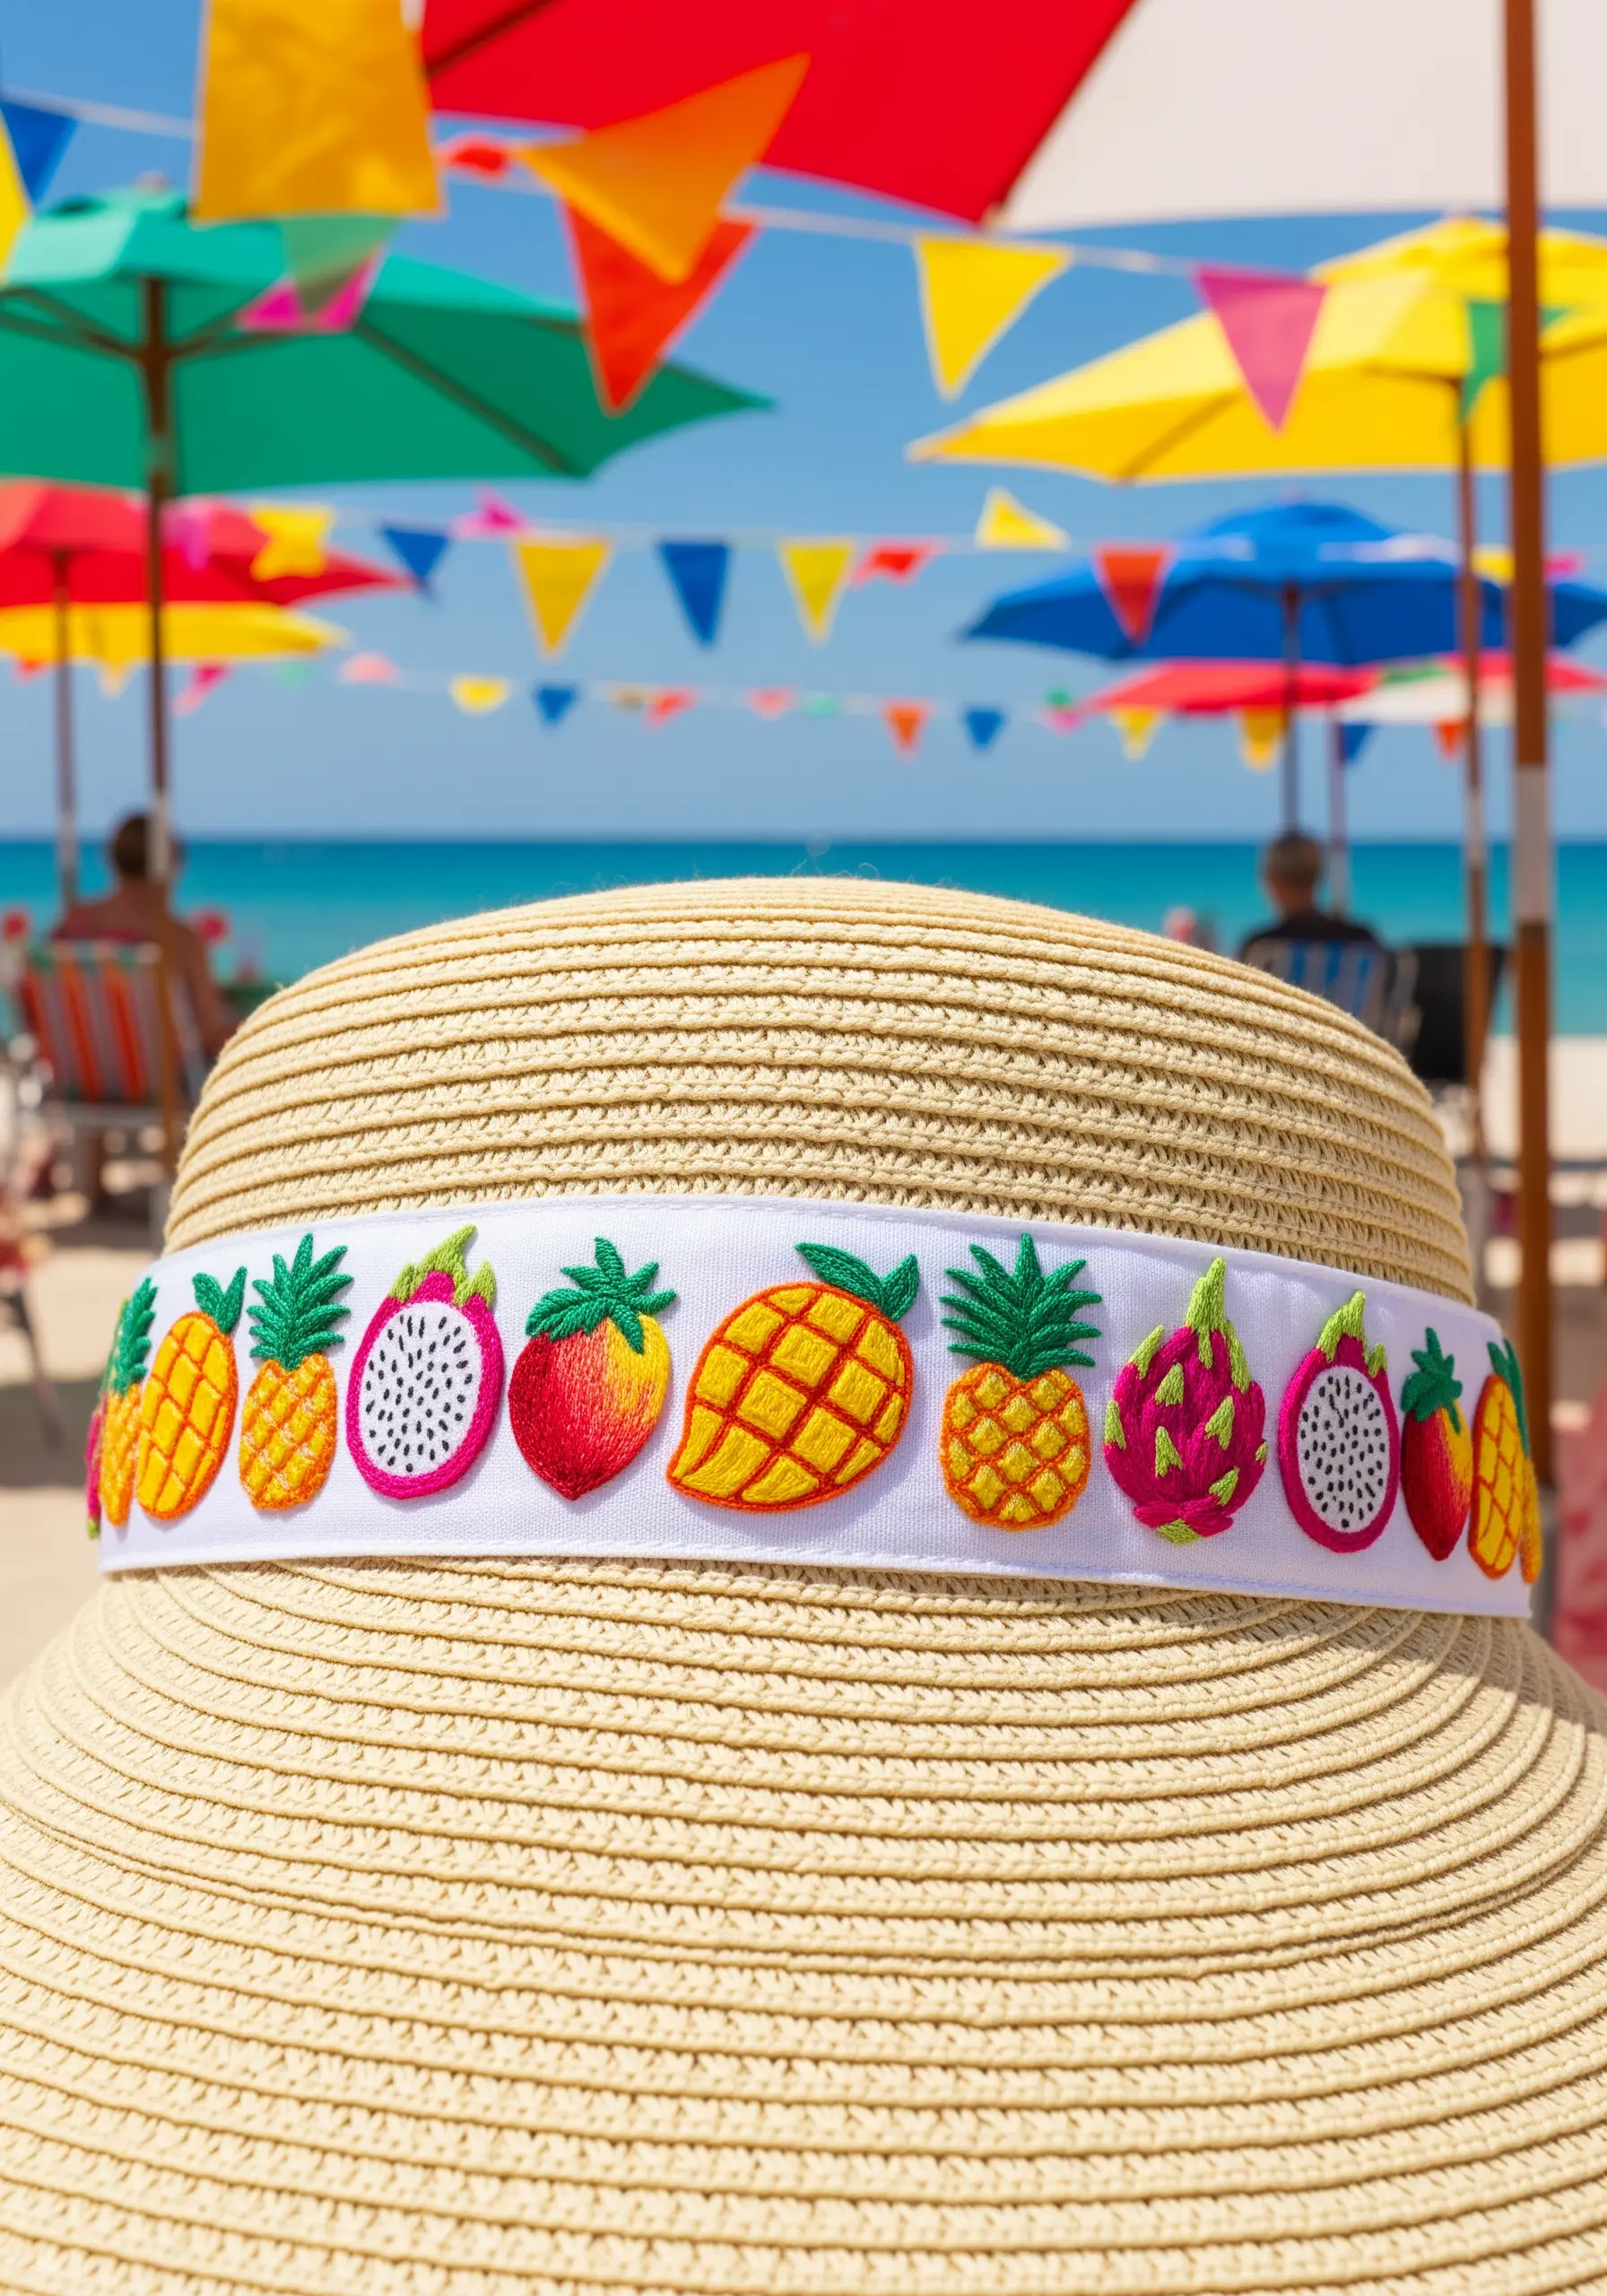
Embroider your fruit motifs onto a separate strip of fabric, like felt or heavy cotton, to create dimensional patches.
Use satin stitch for smooth fills on the pineapple and strawberry, and add tiny black seed stitches or French knots for detail on the dragon fruit.
Outline each fruit with a darker shade using a backstitch to give them a crisp, cartoon-like definition.
Once complete, trim the patches and stitch them onto the hatband for a playful, layered effect.
17. Detail a King Protea on Waffle-Weave Fabric
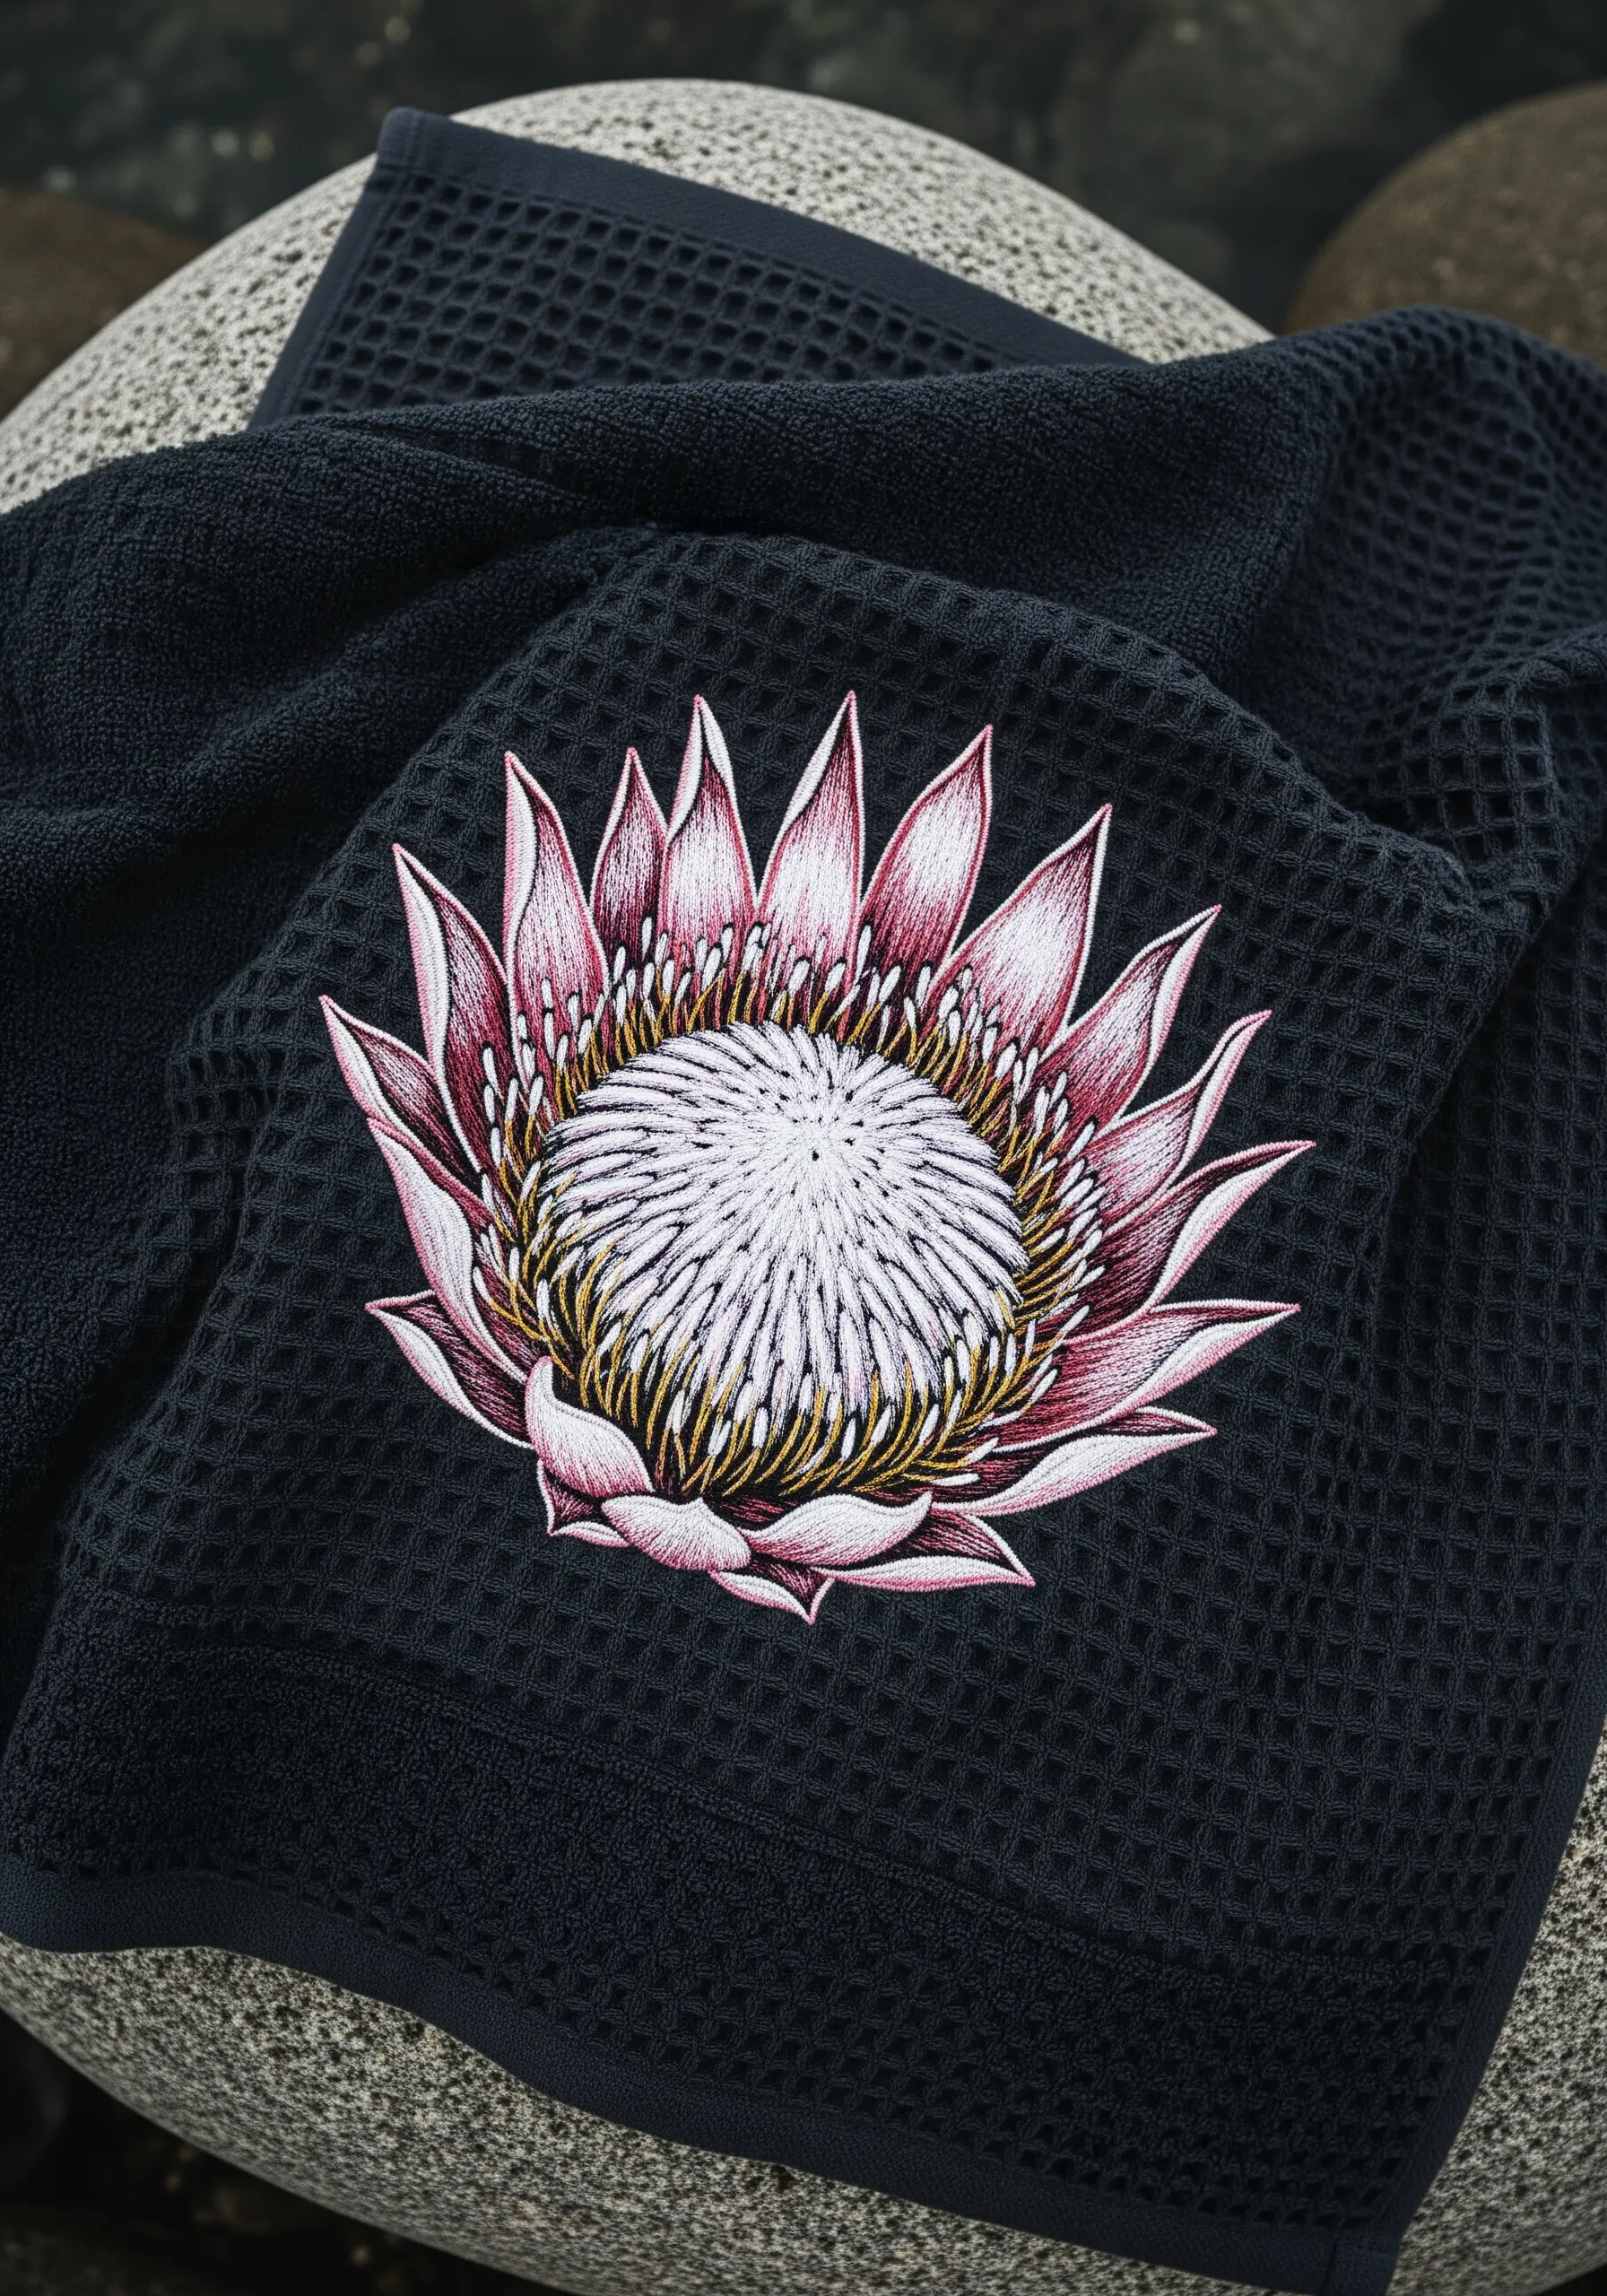
The grid of a waffle-weave towel can be challenging; use a stabilizer on the back to prevent distortion as you stitch.
For the intricate center of the protea, use a dense field of straight stitches or French knots in white and pale grey.
Create the pointed bracts (petals) with long-and-short stitch, blending from pale pink at the base to a deep rose at the tips.
A fine backstitch outline in a dark thread will define each bract and make the entire flower pop against the dark fabric.
18. Blend Ocean Waves with Floating Blossoms

Create the stylized ocean waves by layering rows of chain stitch in varying shades of blue and white.
This technique builds texture and mimics the appearance of sea foam and rolling water.
Scatter small, brightly colored flowers across the top of the waves using clusters of French knots and lazy daisy stitches.
This unexpected combination of elements creates a whimsical, imaginative scene that merges the sea with a floral garden.
19. Stitch a Cascading Bougainvillea Vine
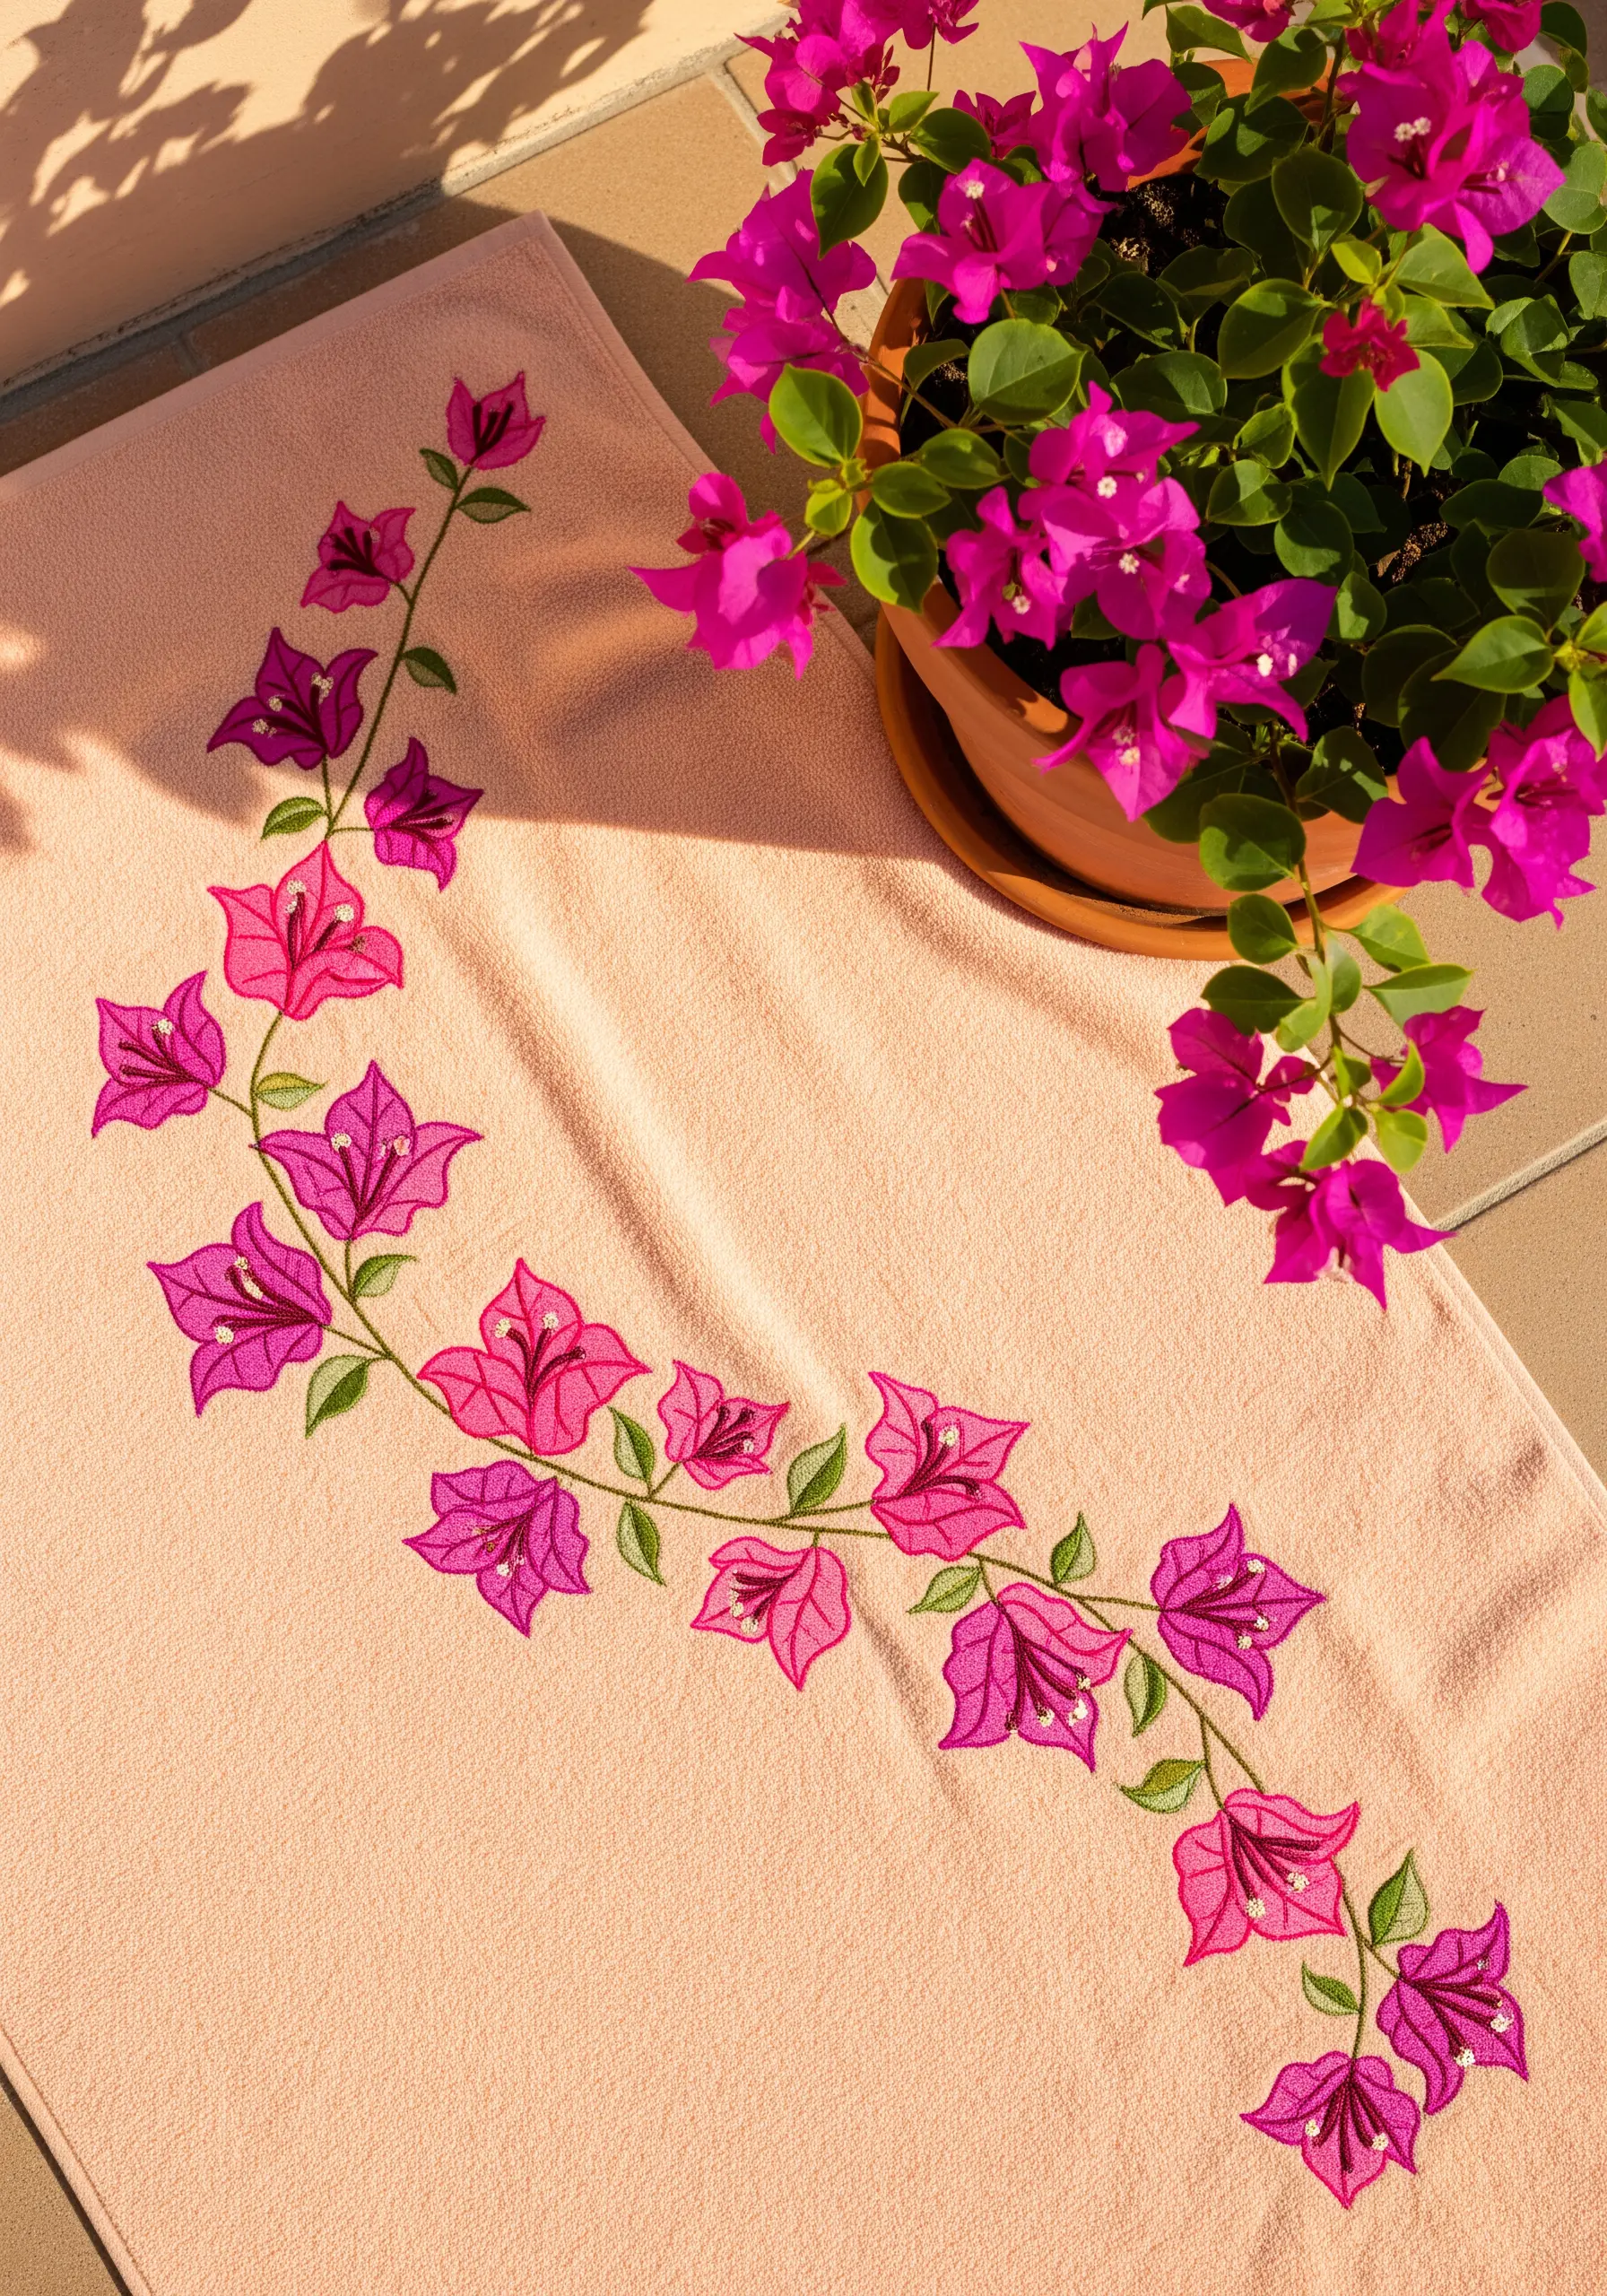
Capture the papery texture of bougainvillea bracts by using an open satin stitch, allowing a little of the fabric to show through.
Vary the shades of pink and magenta throughout the vine to give it a natural, sun-dappled look.
Use a whipped backstitch for the connecting brown vine to create a smooth, raised line that grounds the floating blossoms.
Add a tiny, single seed stitch in a contrasting color at the center of each blossom cluster to represent the true flower.
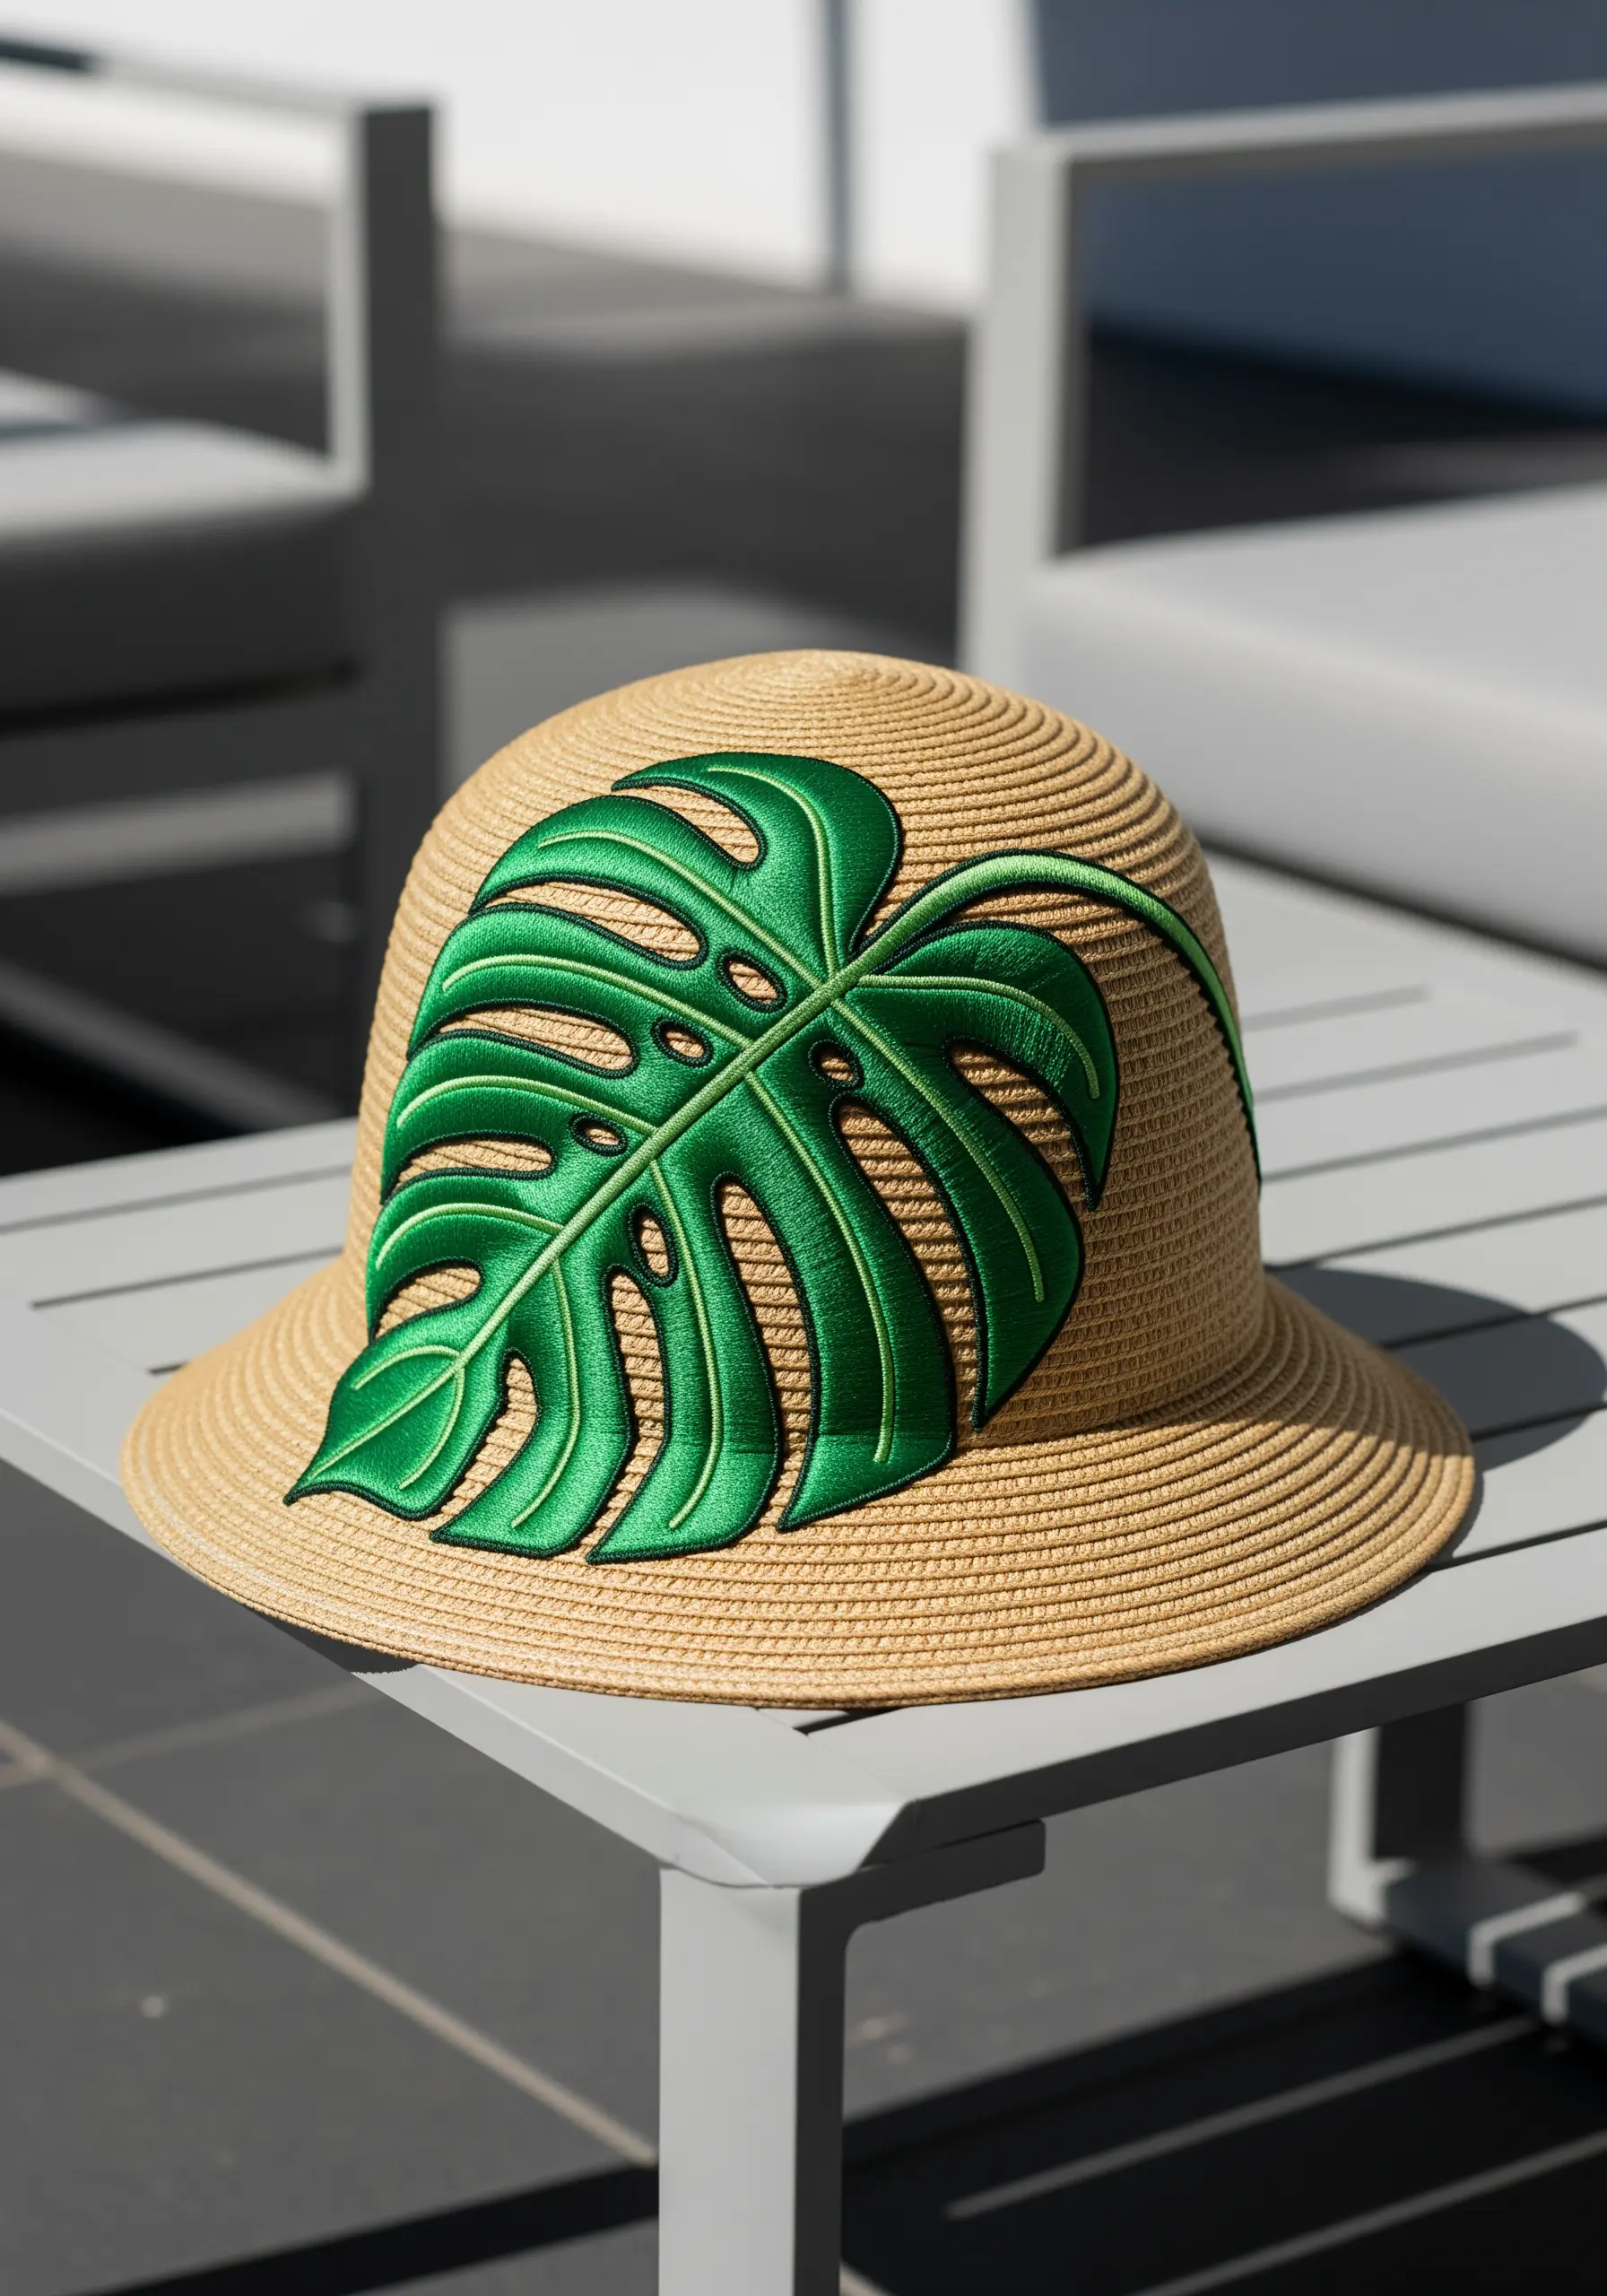
20. Highlight a Single, Bold Monstera Leaf
To make a single leaf a statement piece, focus on perfecting its form and texture.
Use a split stitch to create a clean, sharp outline of the entire leaf, including the characteristic fenestrations (holes).
Fill the sections with directional satin stitch, angling your stitches toward the central vein for a realistic finish.
Stitch the veins in a lighter green using a simple backstitch to add definition and guide the eye across the leaf’s surface.
This technique is a great way to practice tropical leaf and flower combination patterns.
21. Frame a Space with a Tropical Floral Wreath
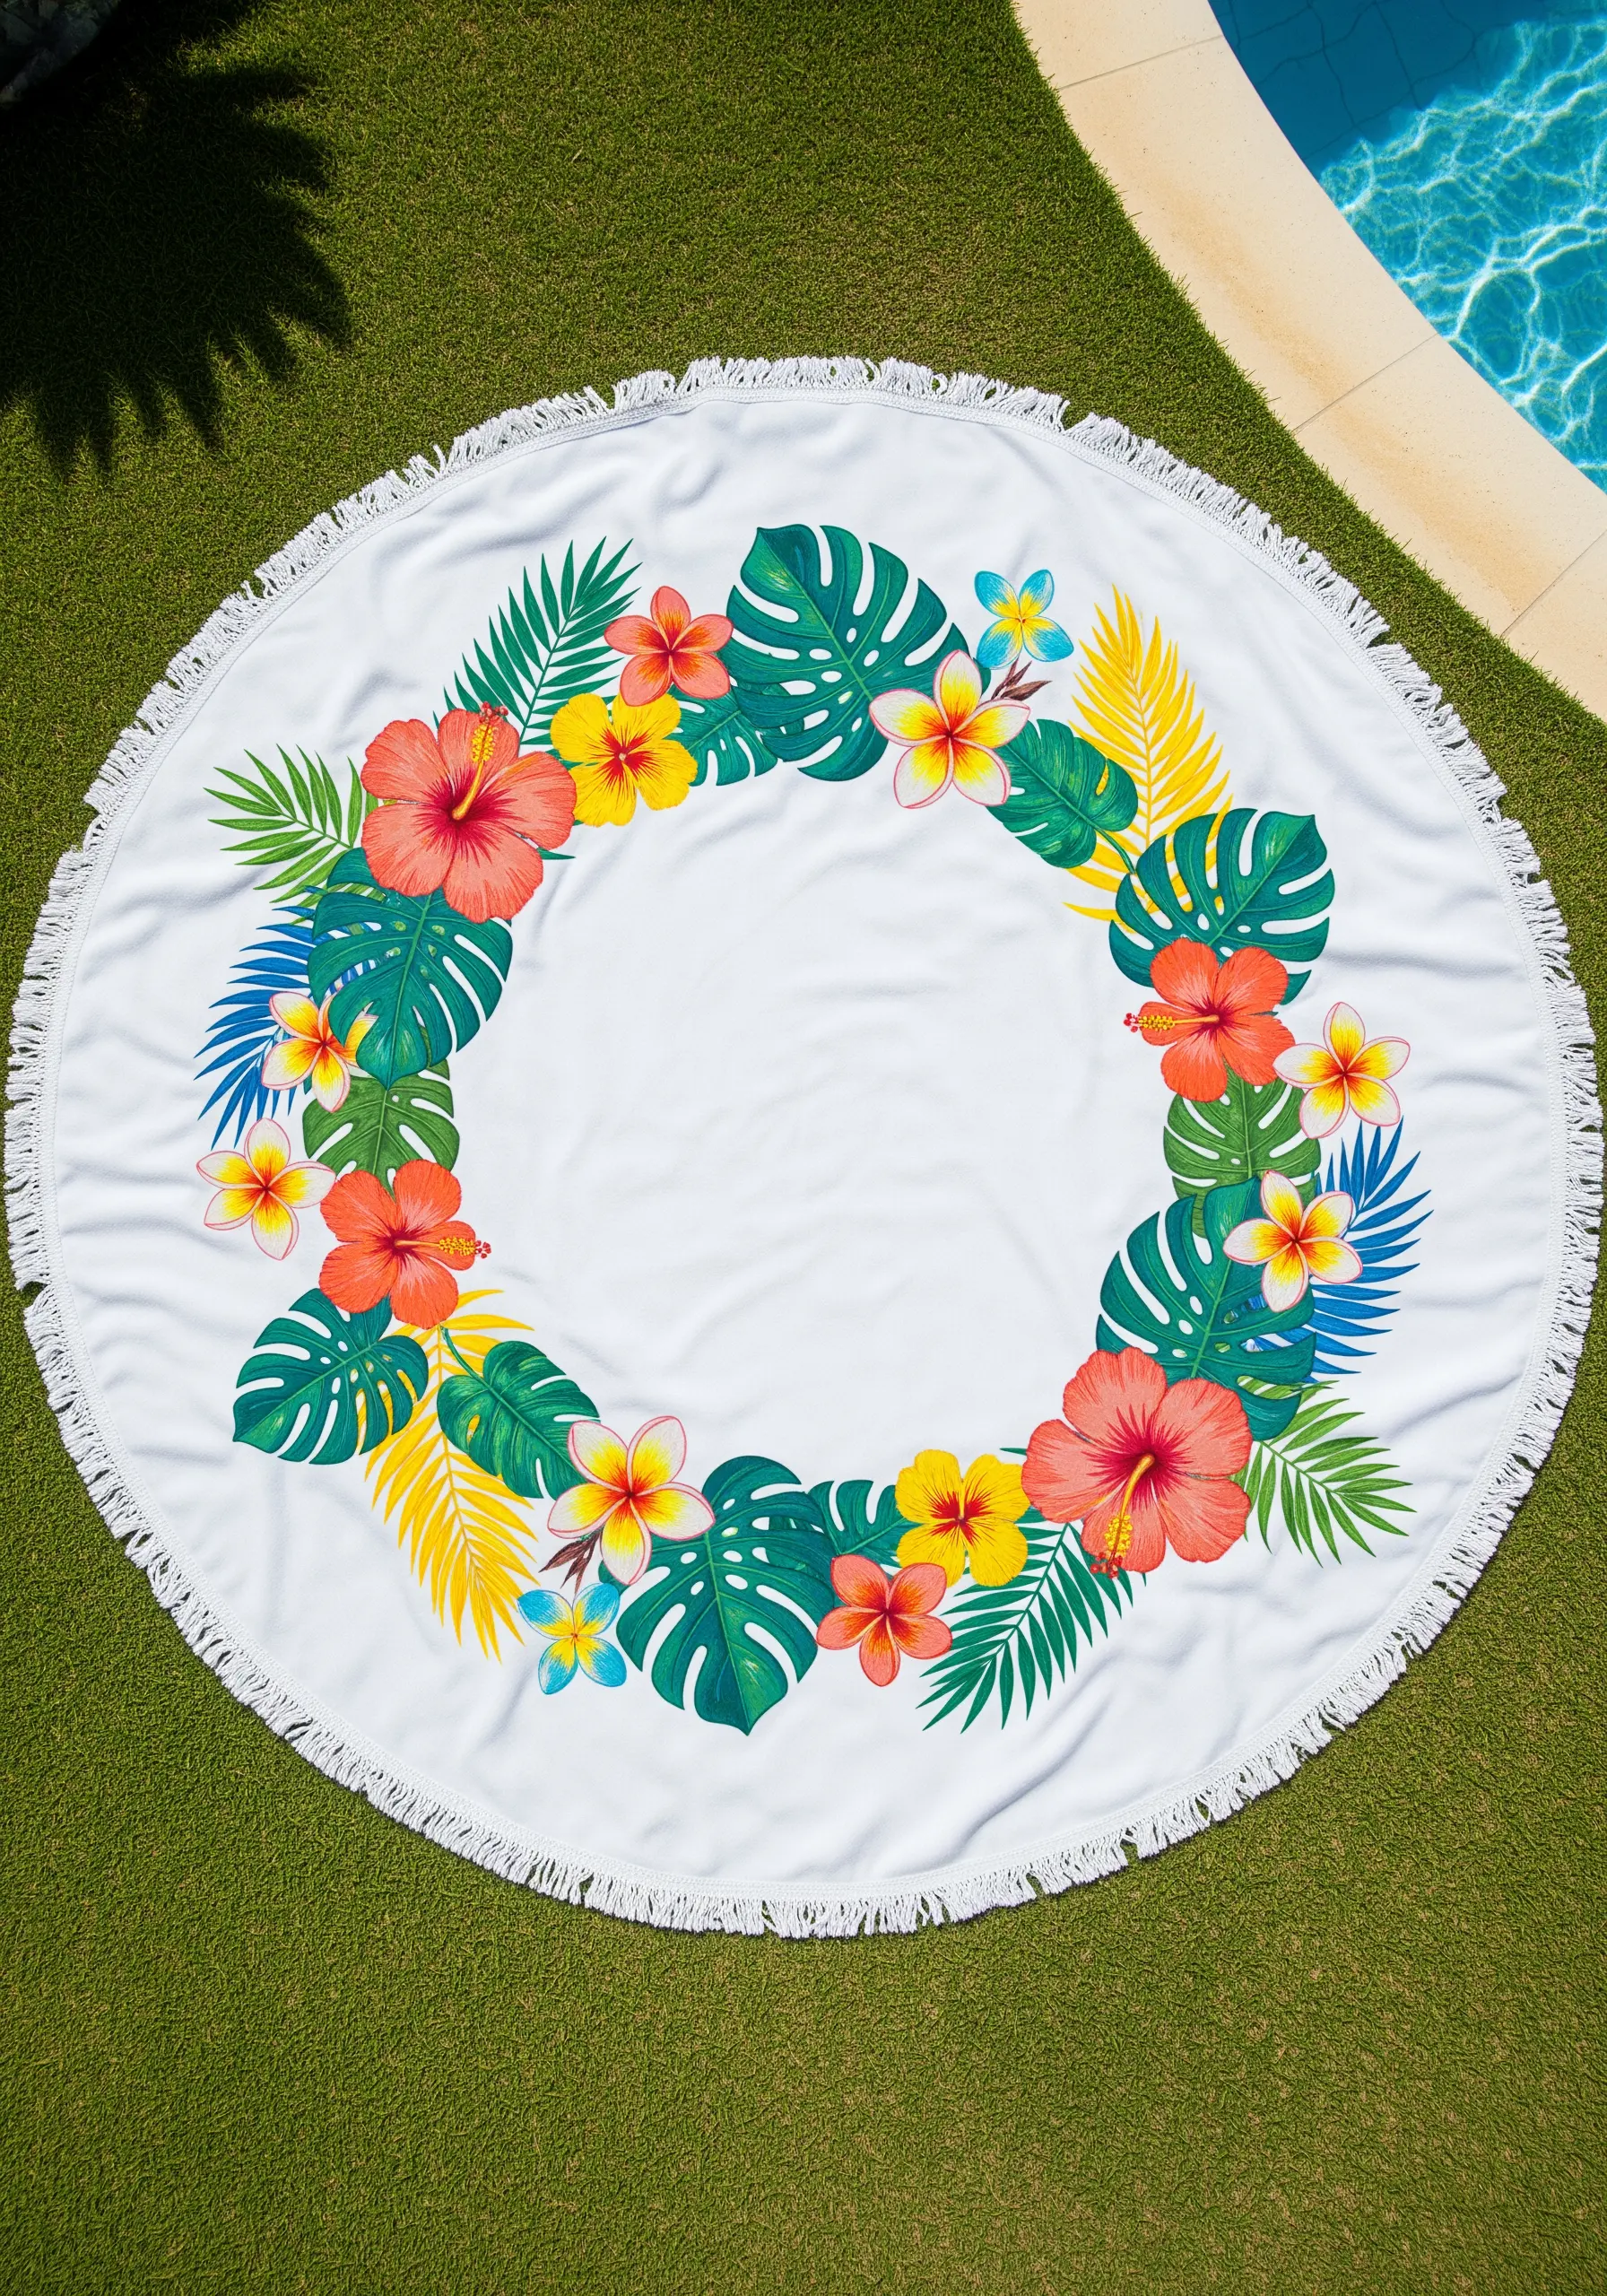
Design a wreath that leaves the center of your round towel open, creating a functional and beautiful frame.
Combine large-scale hibiscus flowers and monstera leaves with smaller plumeria and filler foliage for visual balance.
Use bold, contrasting colors like coral, yellow, and turquoise to create a vibrant, energetic composition that feels celebratory.
Ensure your motifs are evenly distributed around the circle for a harmonious design that draws the eye around the entire perimeter.
22. Experiment with Neon and Glow-in-the-Dark Threads
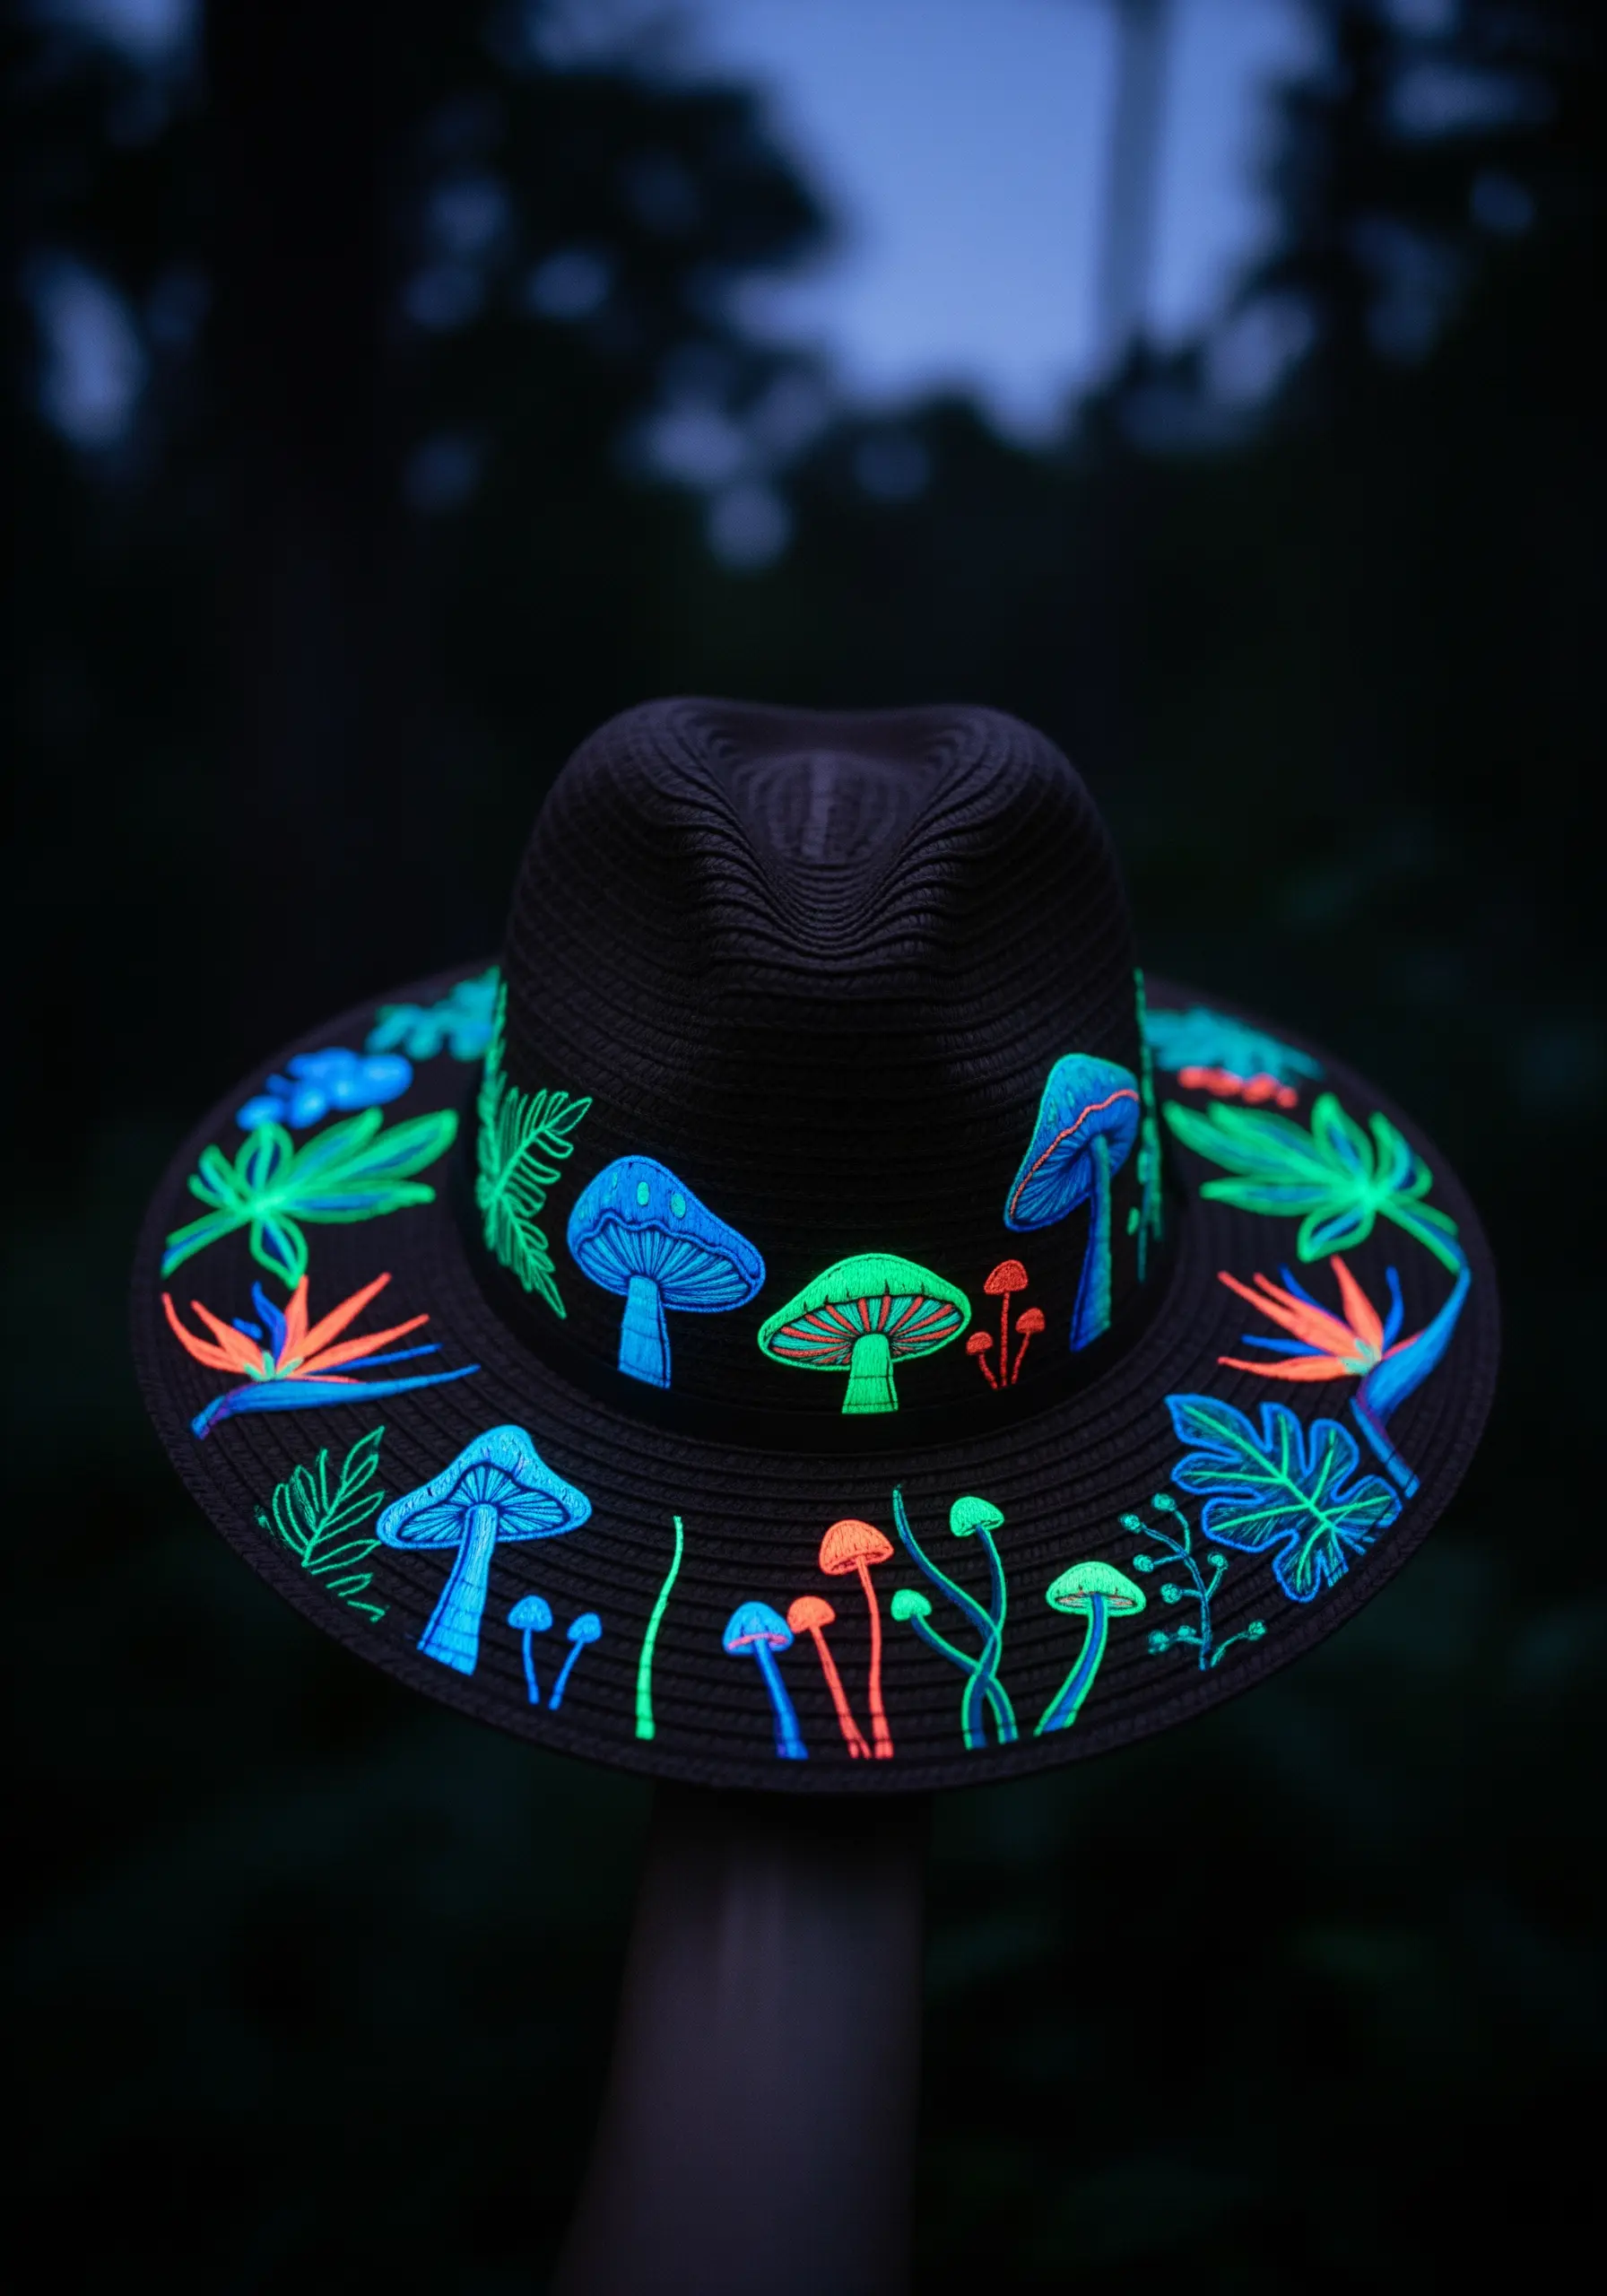
Transform a simple hat into a statement piece by using specialty threads that react to light.
Outline your mushroom and leaf motifs with neon or UV-reactive floss, using a simple backstitch or stem stitch for clean lines.
Choose a dark-colored hat to maximize the glowing effect of the threads in low light or under a blacklight.
This technique turns your embroidery into a dynamic piece of art that changes depending on the environment.
23. Create a Full Beach Scene with Varied Textures
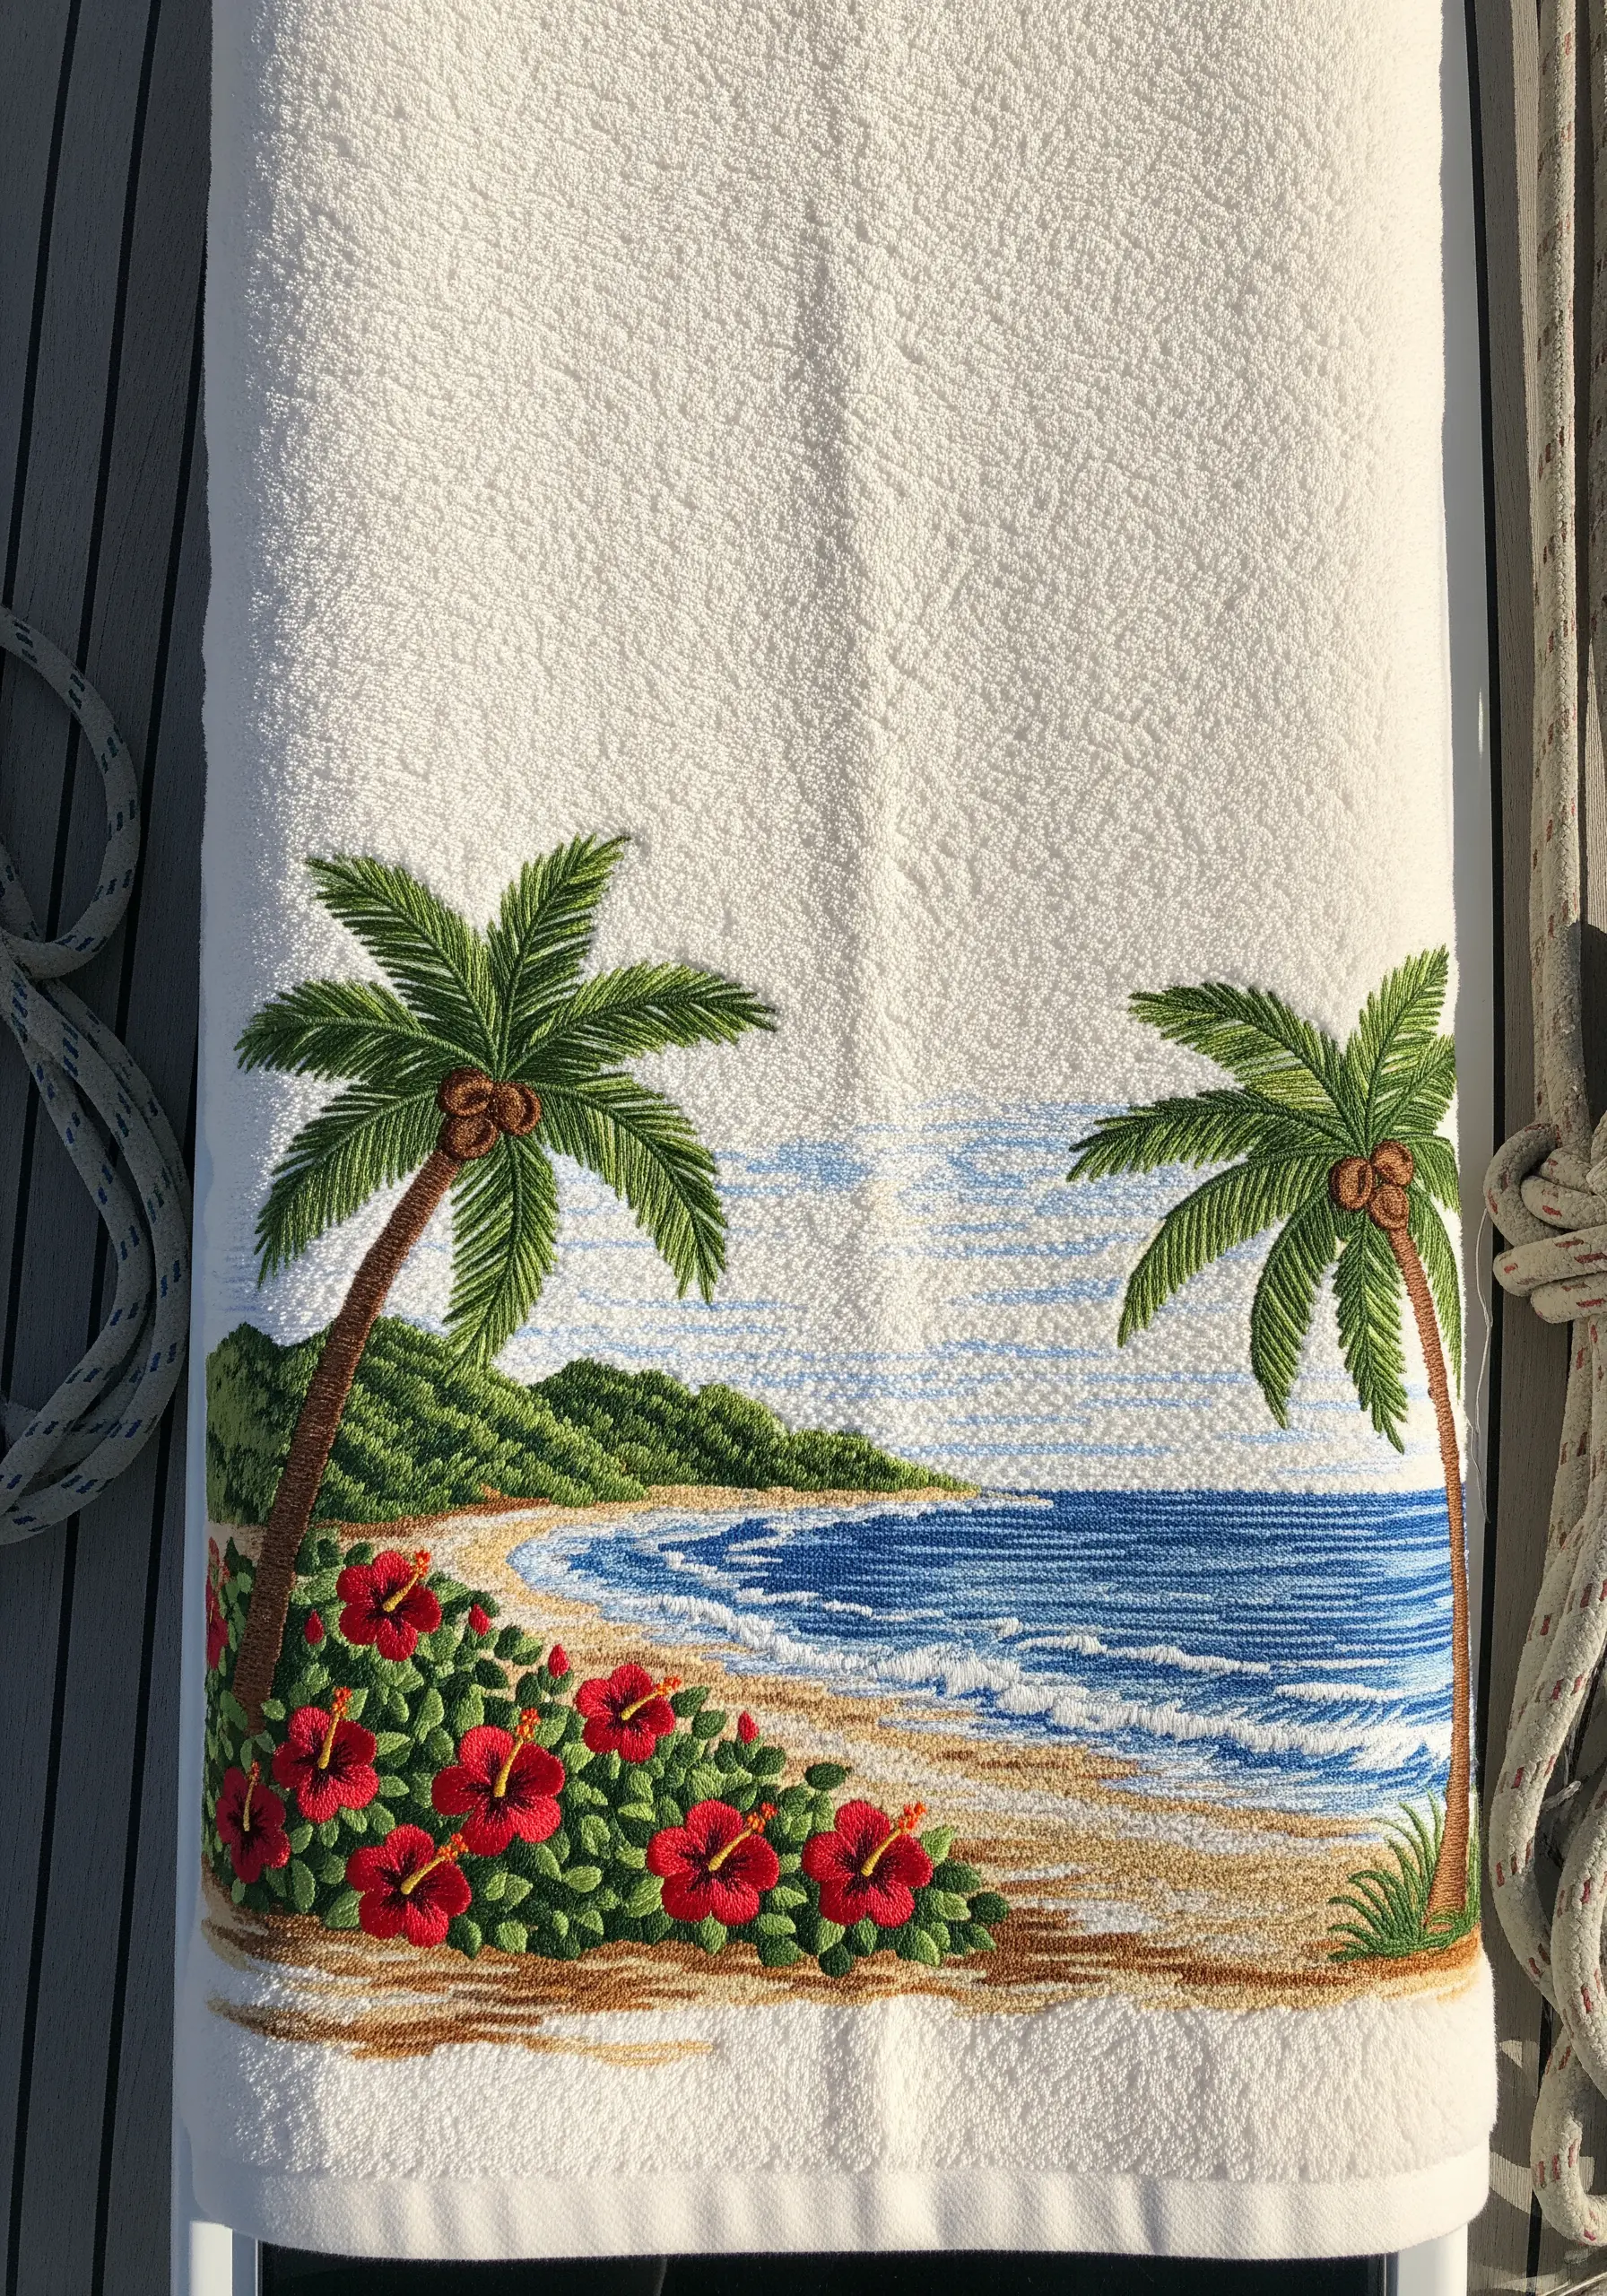
Build a landscape by stitching in layers, starting with the sky and working your way to the foreground.
Use sparse, horizontal straight stitches in light blue and white for a hazy sky and shimmering water effect.
For the sand, use a field of randomly placed seed stitches in various beige and gold tones to create a granular texture.
Bring the foreground into sharp focus with detailed satin-stitched hibiscus and fishbone-stitched palm fronds.
24. Add a Delicate Mimosa Garland to a Hat Brim

To capture the fluffy texture of mimosa flowers, use a cluster of small, delicate French knots for each bloom.
Use a bright, cheerful yellow thread to contrast beautifully against a dark teal or navy blue hat.
Connect the floral clusters with a fine, trailing vine using a single strand of green thread in a simple backstitch.
Arrange the garland asymmetrically around the brim for a more natural and effortless look.
25. Craft a Serene Water Lily on a Terrycloth Surface
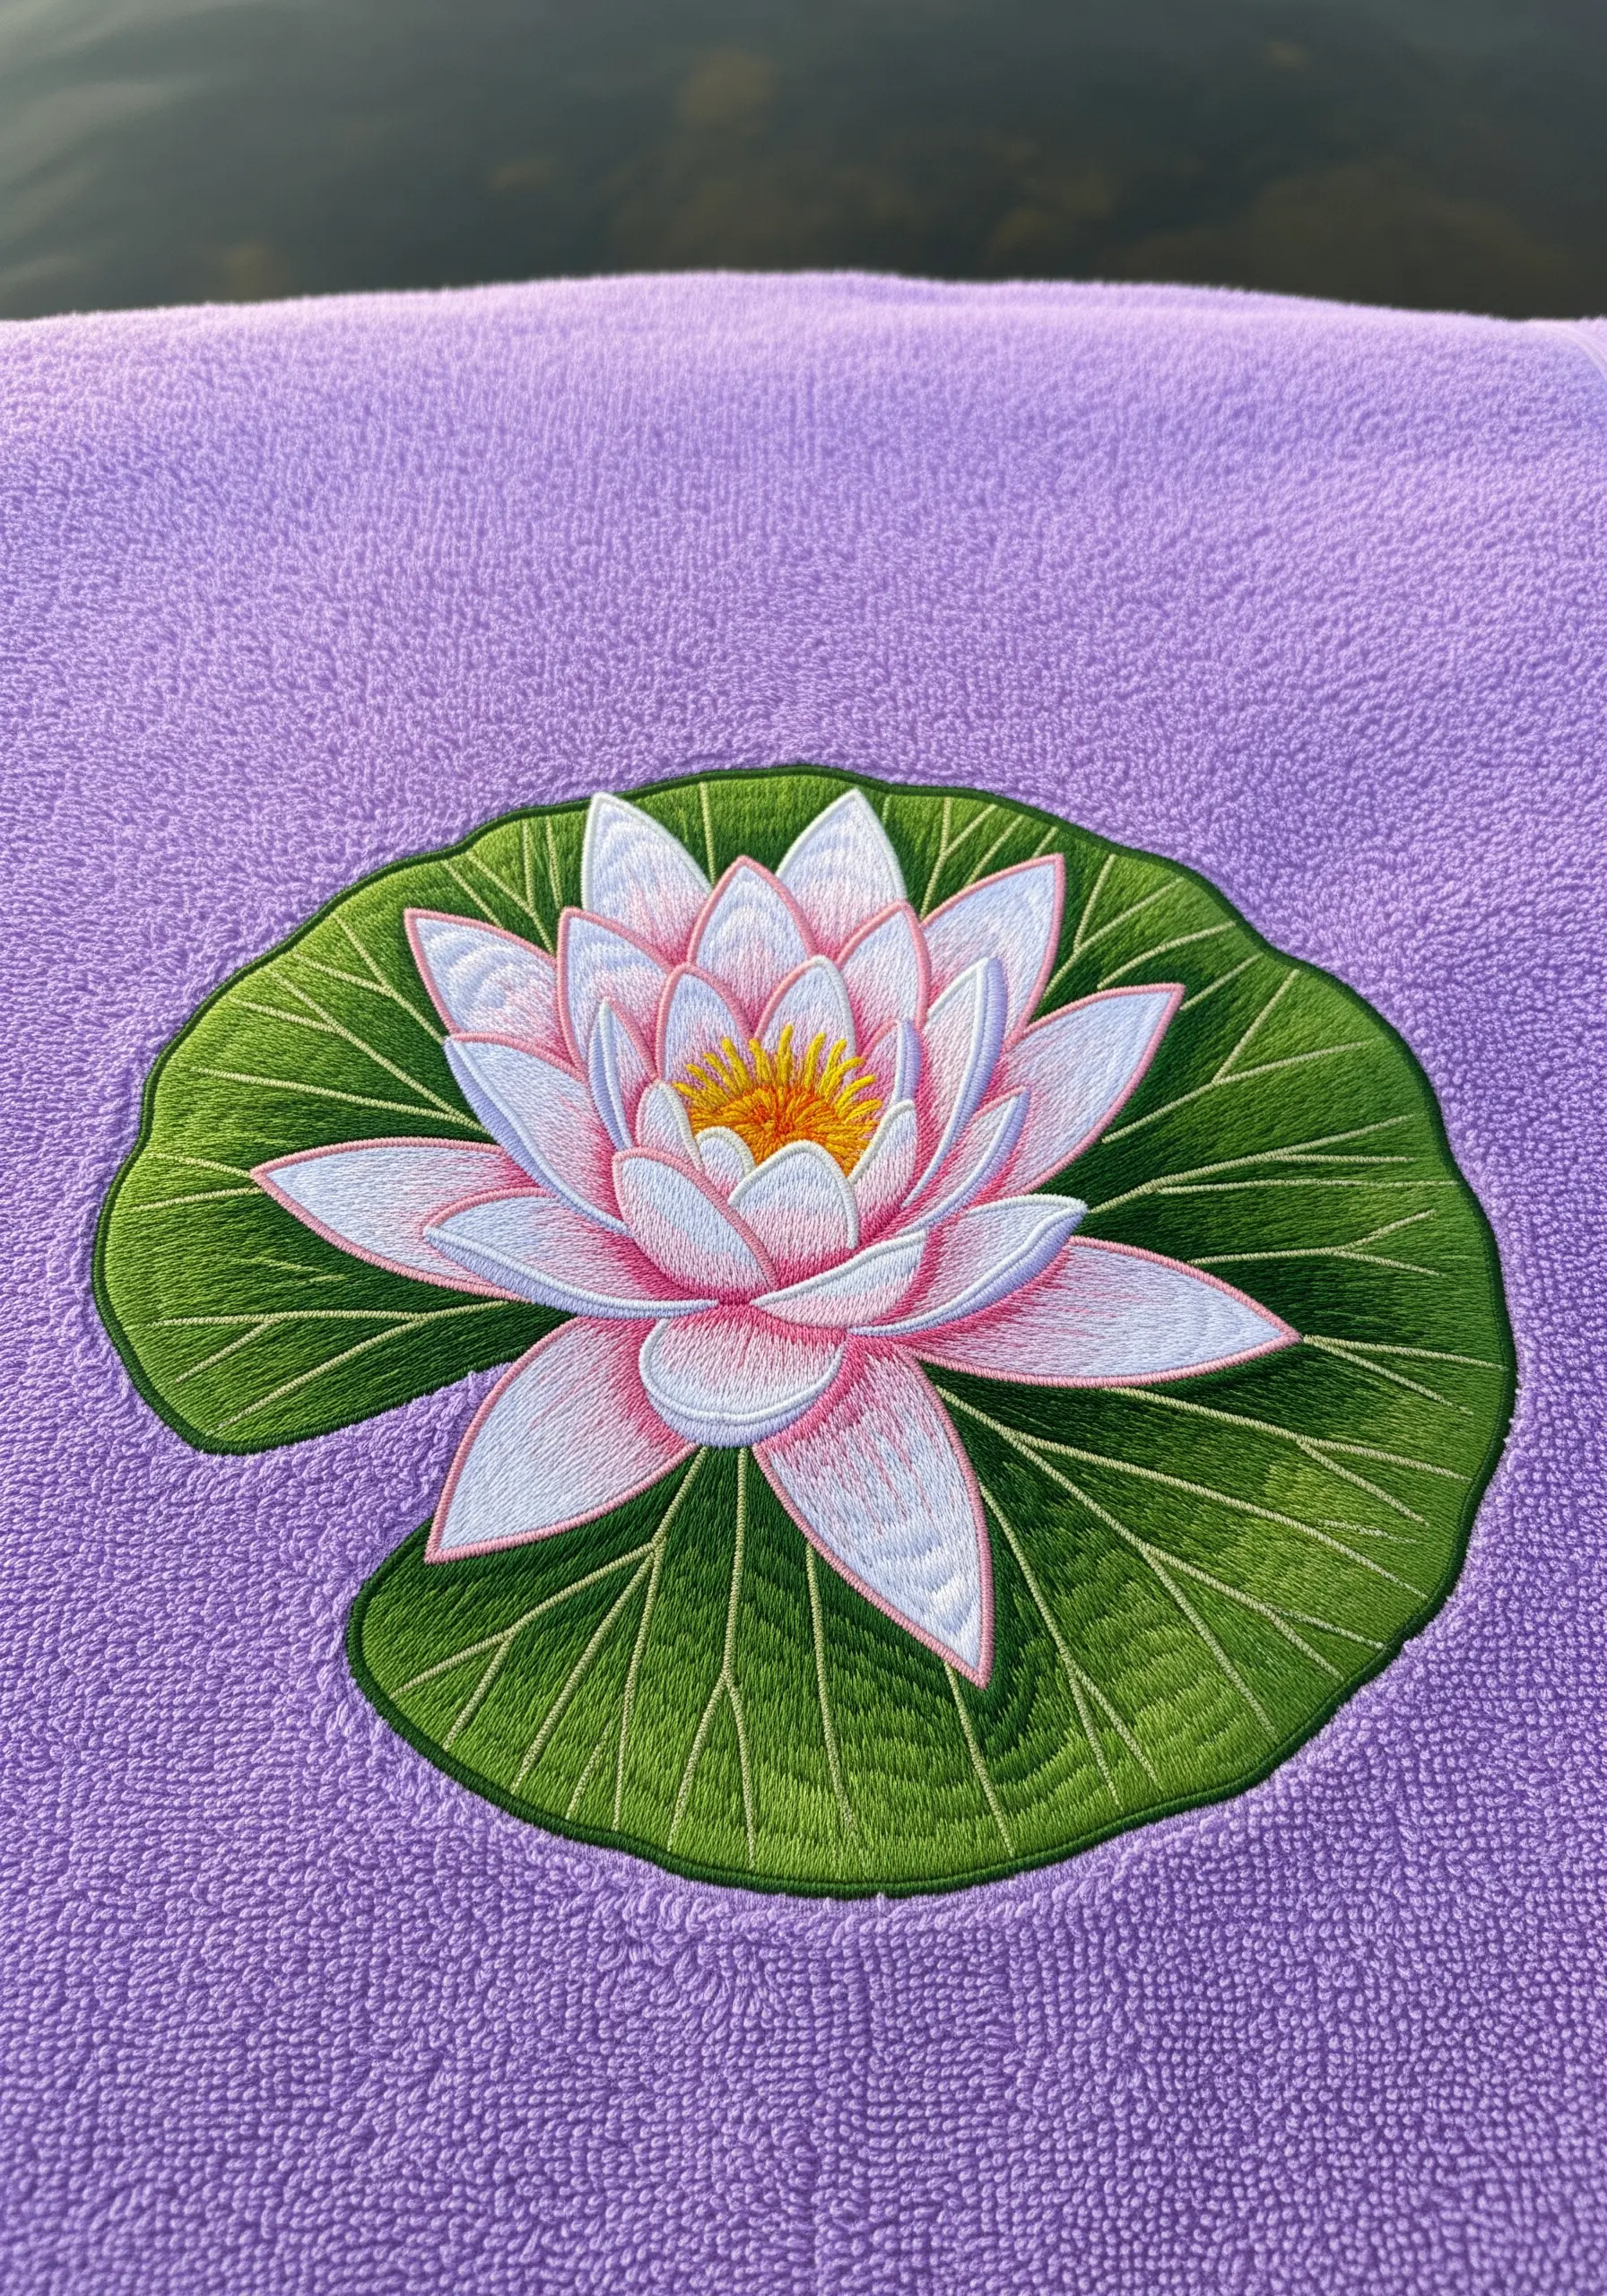
To prevent the plush loops of a towel from distorting your design, use a water-soluble topping stabilizer.
For the lily pad, use a fishbone stitch, angling the stitches from the center vein outwards to create a smooth, realistic surface.
Build the lily’s petals in layers, using a long-and-short stitch to blend from soft pink at the tips to pure white at the base.
A cluster of yellow and orange French knots creates the textured center, adding a final touch of realism.
26. Apply a Bold Appliqué-Style Monstera Leaf
For a clean, graphic look that stands out on a textured straw hat, stitch your leaf as a separate patch first.
Embroider the monstera leaf onto a piece of felt or non-woven interfacing using a dense satin stitch.
Outline the entire shape and the inner veins with a thick, contrasting border using a satin stitch or chain stitch.
Carefully cut out the finished patch and securely stitch it onto the hat for a bold, appliqué effect that has dimension and presence.
27. Recreate a Banksia’s Fiery Texture with French Knots

Capture the unique, spiky texture of a banksia flower by using a dense field of French knots and long straight stitches.
Use variegated orange and yellow thread for the French knots to create the flower’s cone, giving it natural color variation.
For the protruding styles, use long, single straight stitches in a contrasting rust or orange, finished with a tiny knot or dot at the tip.
The high contrast against a black towel makes every textural detail stand out dramatically.
28. Capture a Hummingbird in Motion
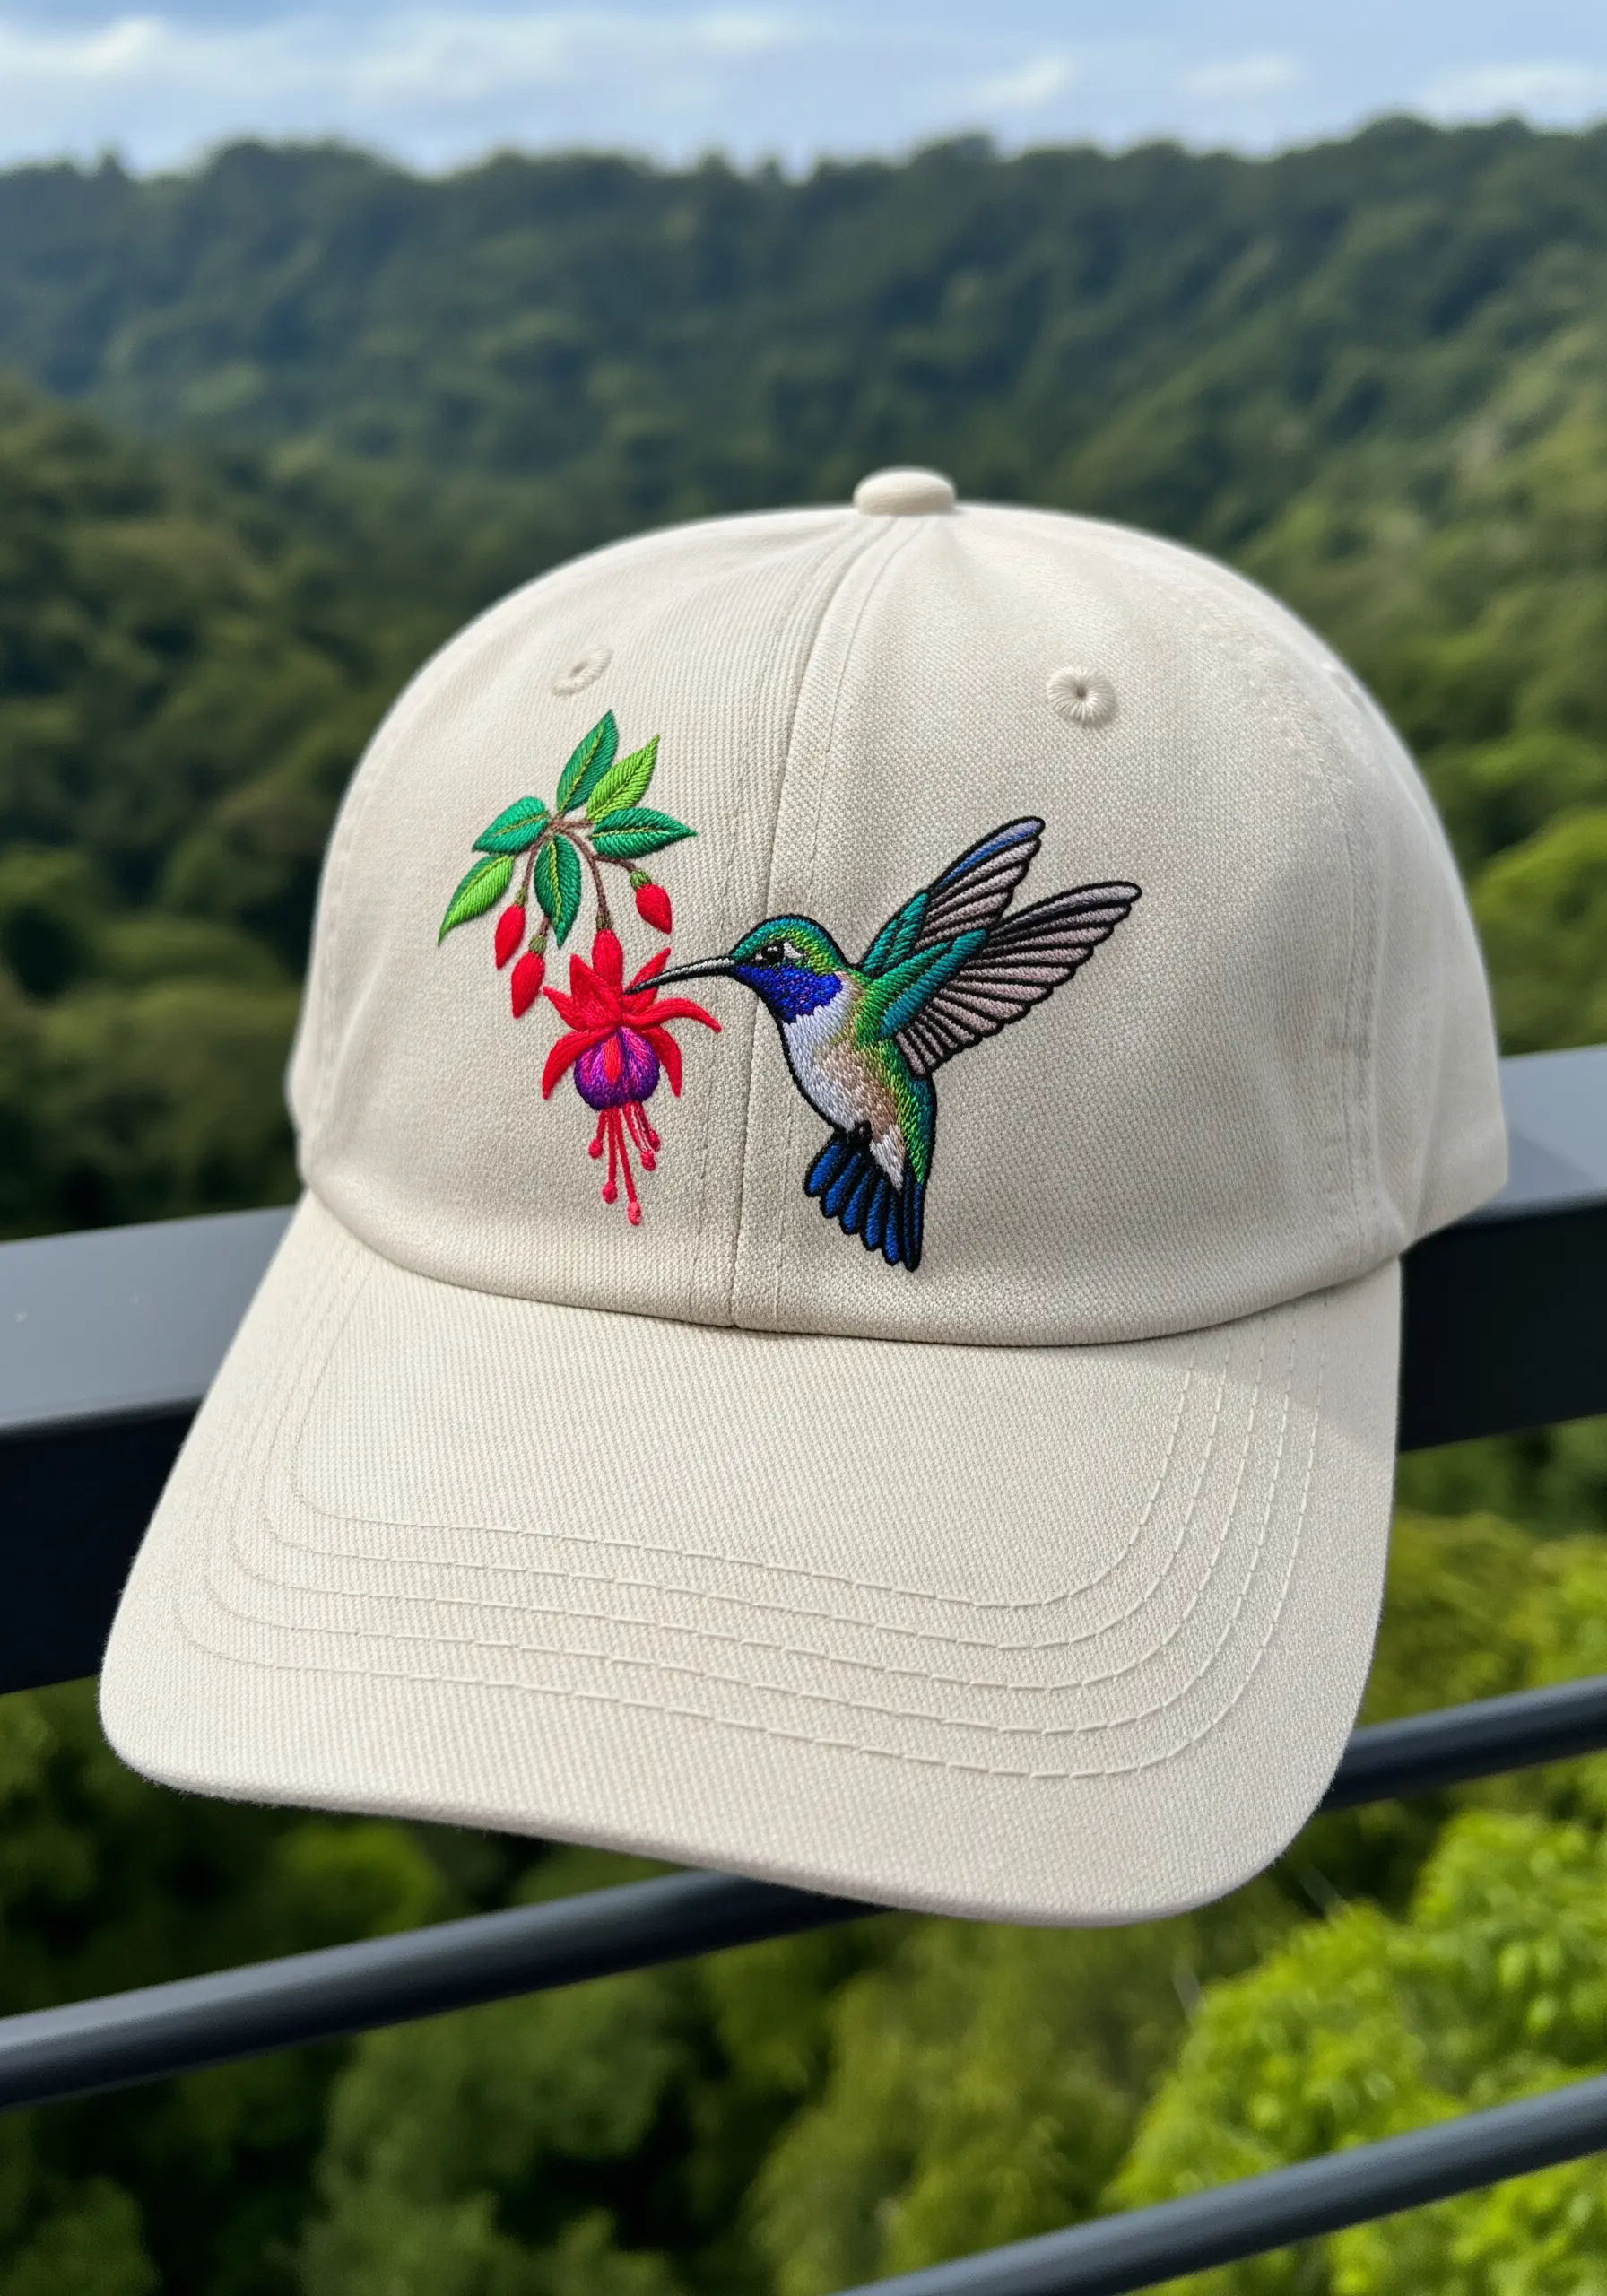
For the hummingbird’s iridescent feathers, use a thread painting technique with single strands of metallic or silk floss.
Lay stitches in shades of blue, green, and turquoise side-by-side to mimic the way light hits the feathers.
For the wings, use an open fill of grey straight stitches to create the illusion of rapid movement.
These tiny hummingbird embroidery ideas are perfect for adding a touch of magic to small accessories like a baseball cap.


