

I know you’re looking for more than just another pattern. You’re searching for that specific technique, that subtle shift in approach that will make your embroidery feel less like a hobby and more like an art form—polished, intentional, and uniquely yours.
The difference between an adequate piece and an exquisite one often lies in the smallest details: the direction of a stitch, the choice to use two strands of thread instead of three, or the courage to combine textures in a new way. These are the adjustments that don’t require expensive new tools, only a fresh perspective.
Consider these projects less as a set of instructions and more as a series of invitations. An invitation to thread paint a sunset onto your favorite jacket, to feel the meditative rhythm of Sashiko mending, or to see how a simple backstitch can become a piece of modern, graphic art. This is your chance to stitch with confidence and create something that truly resonates.
1. Mastering Leaf Veins with Directional Satin Stitch
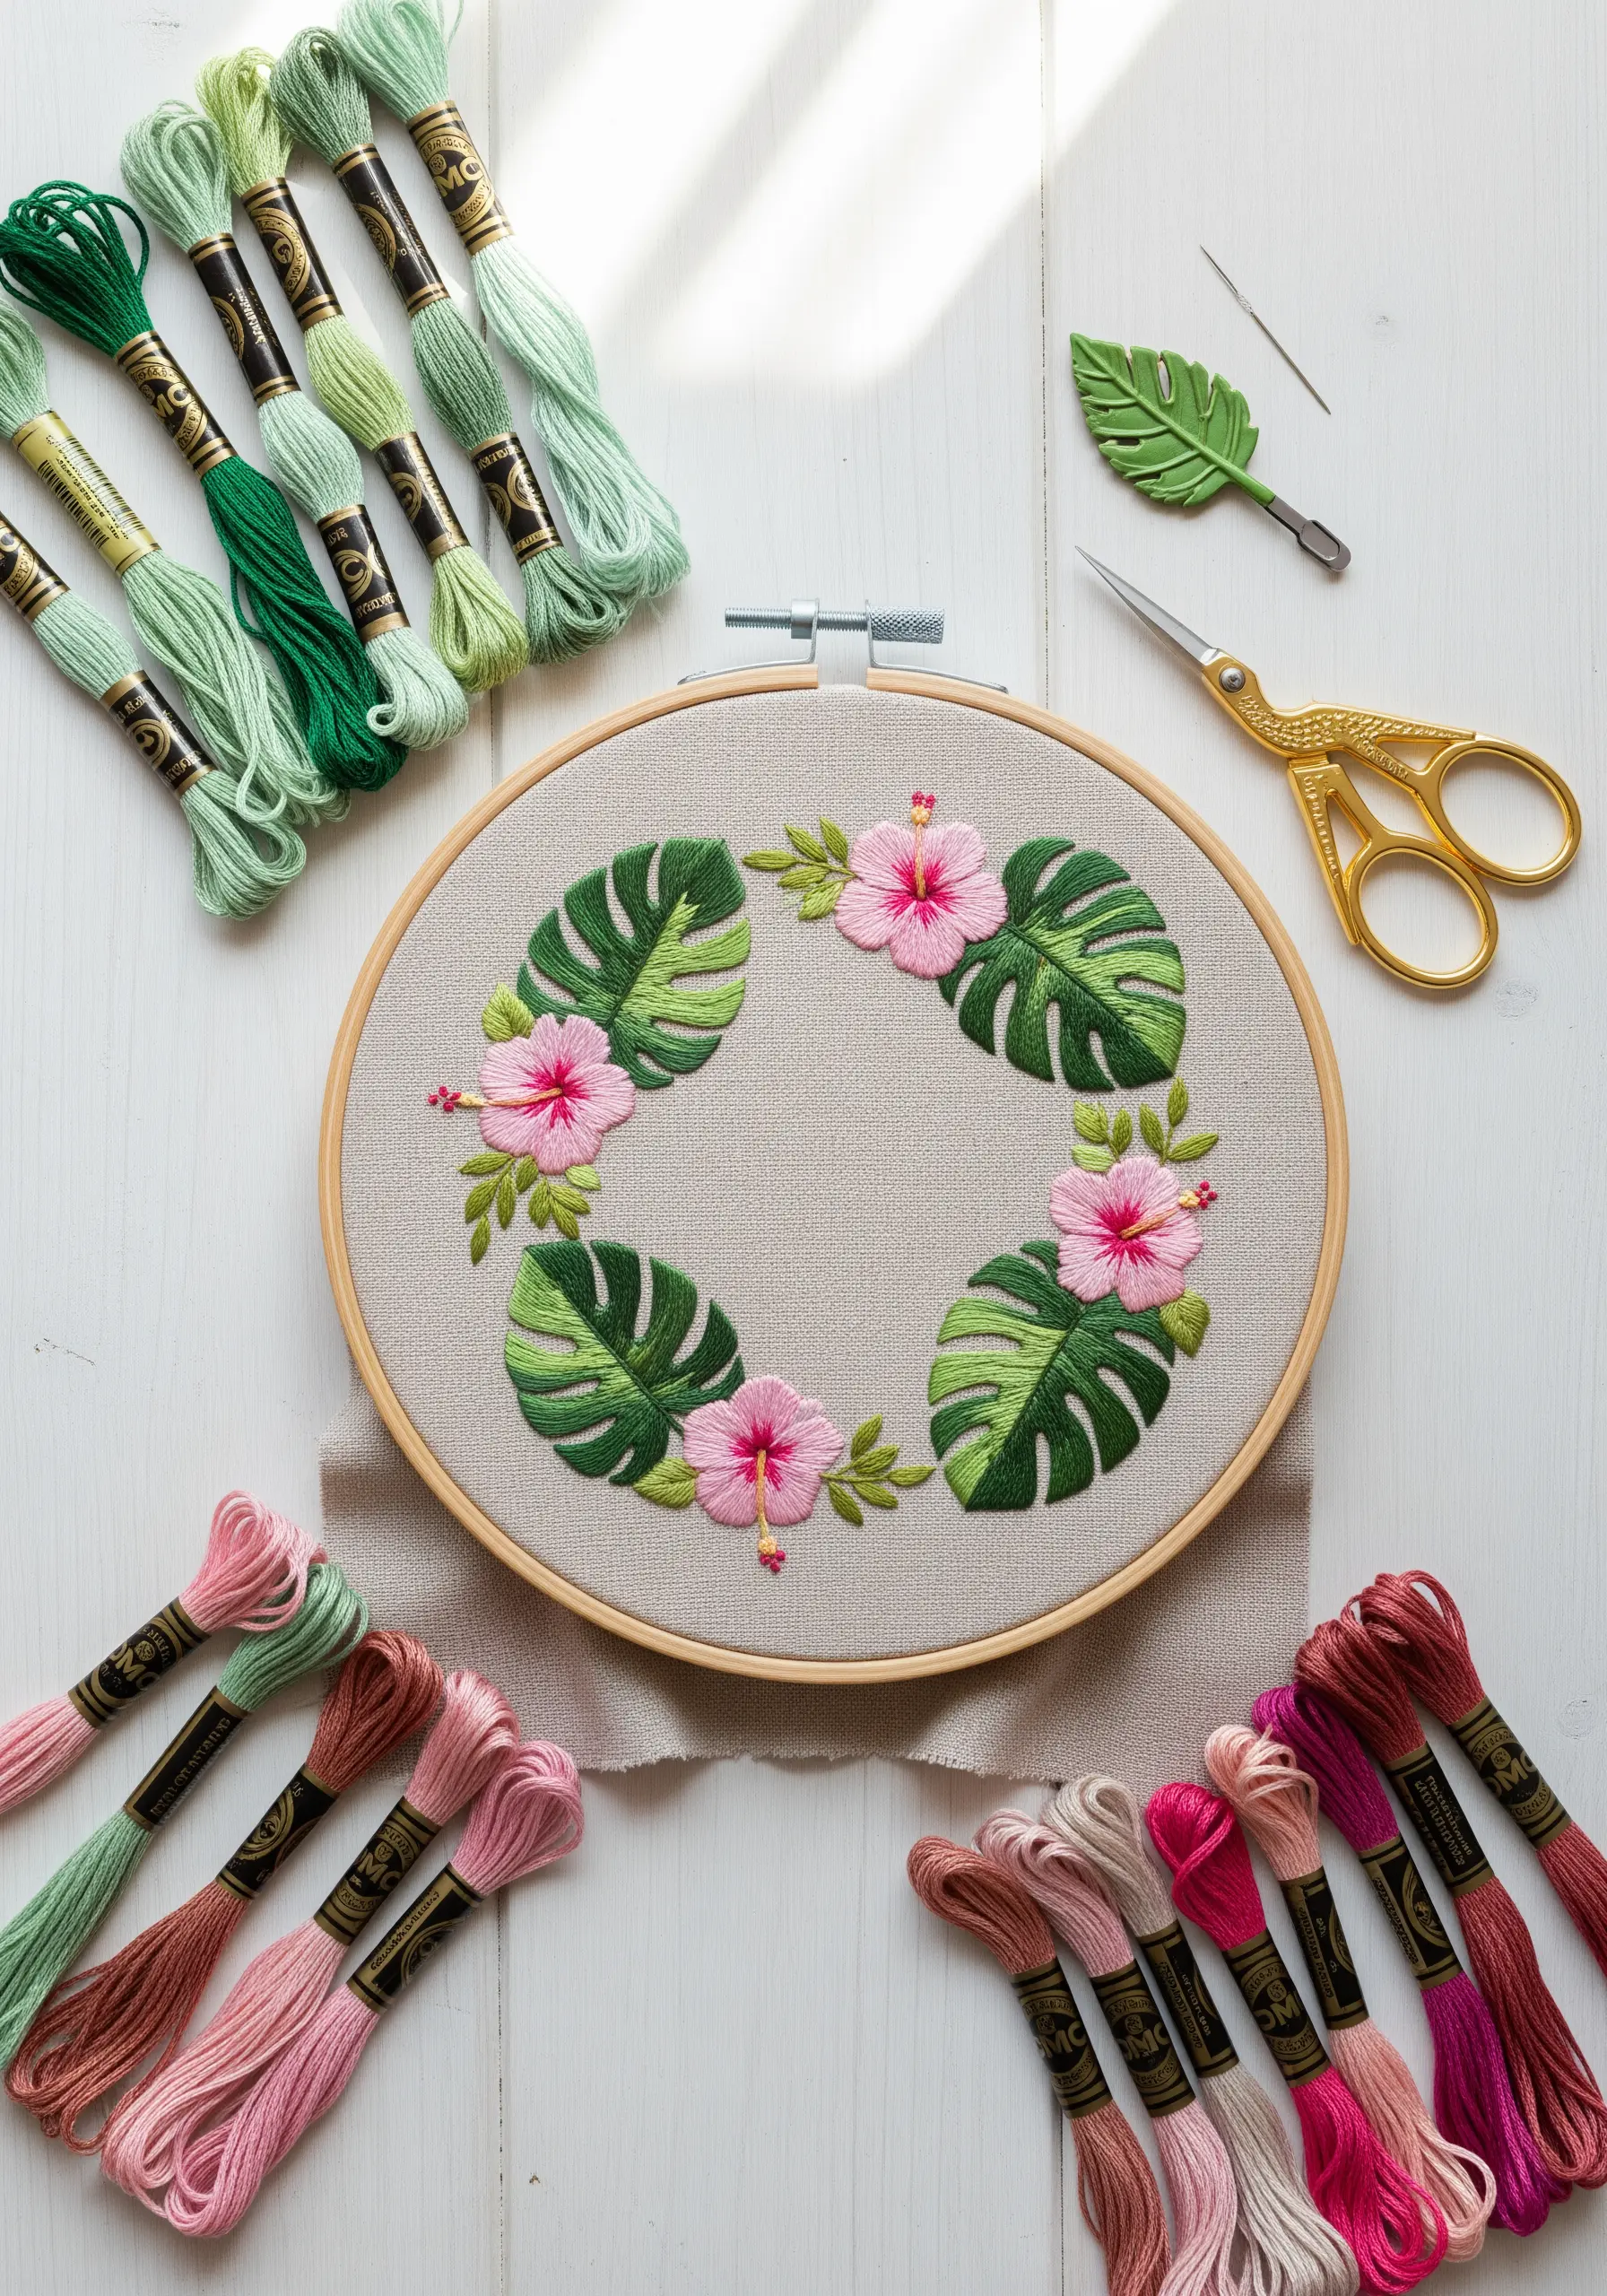
Create dynamic, realistic leaves by adjusting the angle of your satin stitch to mimic natural veins, eliminating the need for harsh outlines.
Use a single strand of a slightly lighter green for the central vein line; this simple highlight adds instant depth.
For the hibiscus flowers, blend two shades of pink with a long-and-short stitch to give the petals a soft gradient, and finish the center with textured French knots.
This method of letting your stitch direction define form is one of the fastest ways to make your tropical leaf & flower combination patterns look more professional.
2. Creating Celestial Drama on Dark Fabric
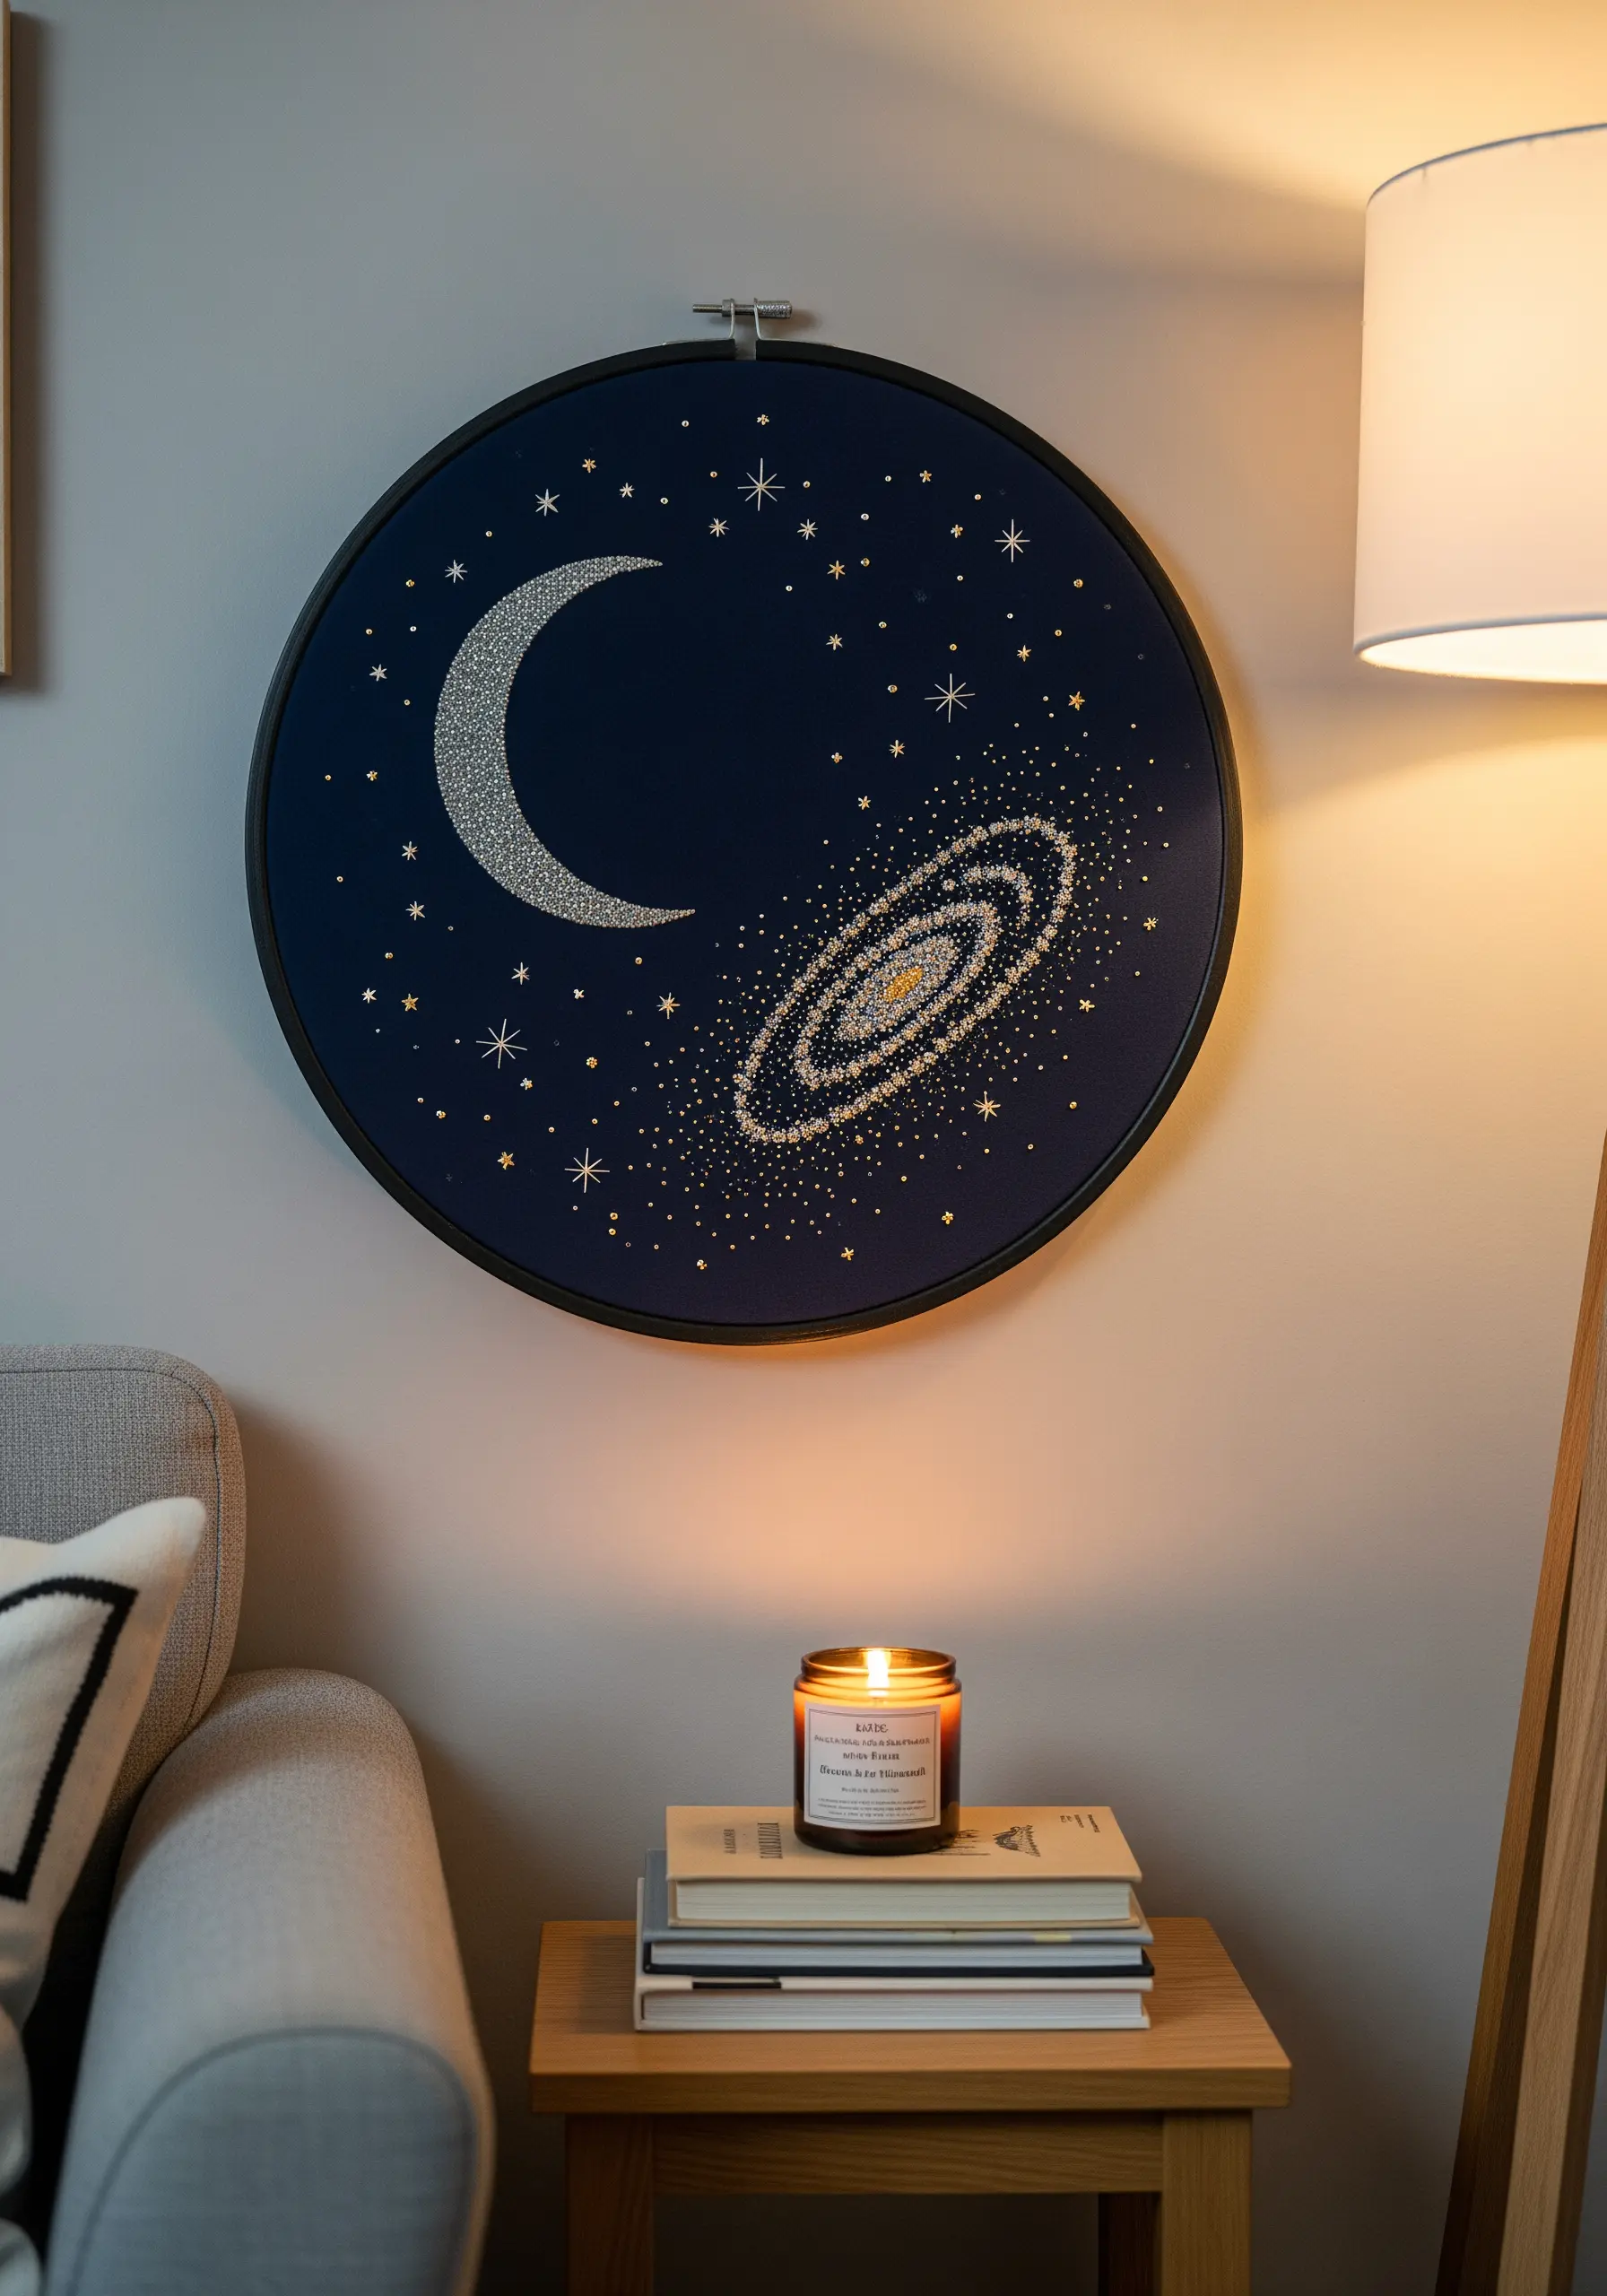
Let dark fabric be the foundation for a high-contrast masterpiece, making metallic and silver threads appear infinitely brighter.
Before you begin, apply a lightweight stabilizer to the back of your fabric to prevent puckering from the dense stitching.
For the moon, use a silver metallic thread in a dense satin stitch, ensuring each stitch lies flat and parallel for maximum shine.
Create a dynamic galaxy by varying the size of your French knots—use one strand for distant stars and three for those that are closer, mixing gold and silver for a richer shimmer.
This technique is perfect for night garden embroidery ideas using dark fabric & metallic threads for dramatic contrast.
3. Thread Painting a Landscape on Denim
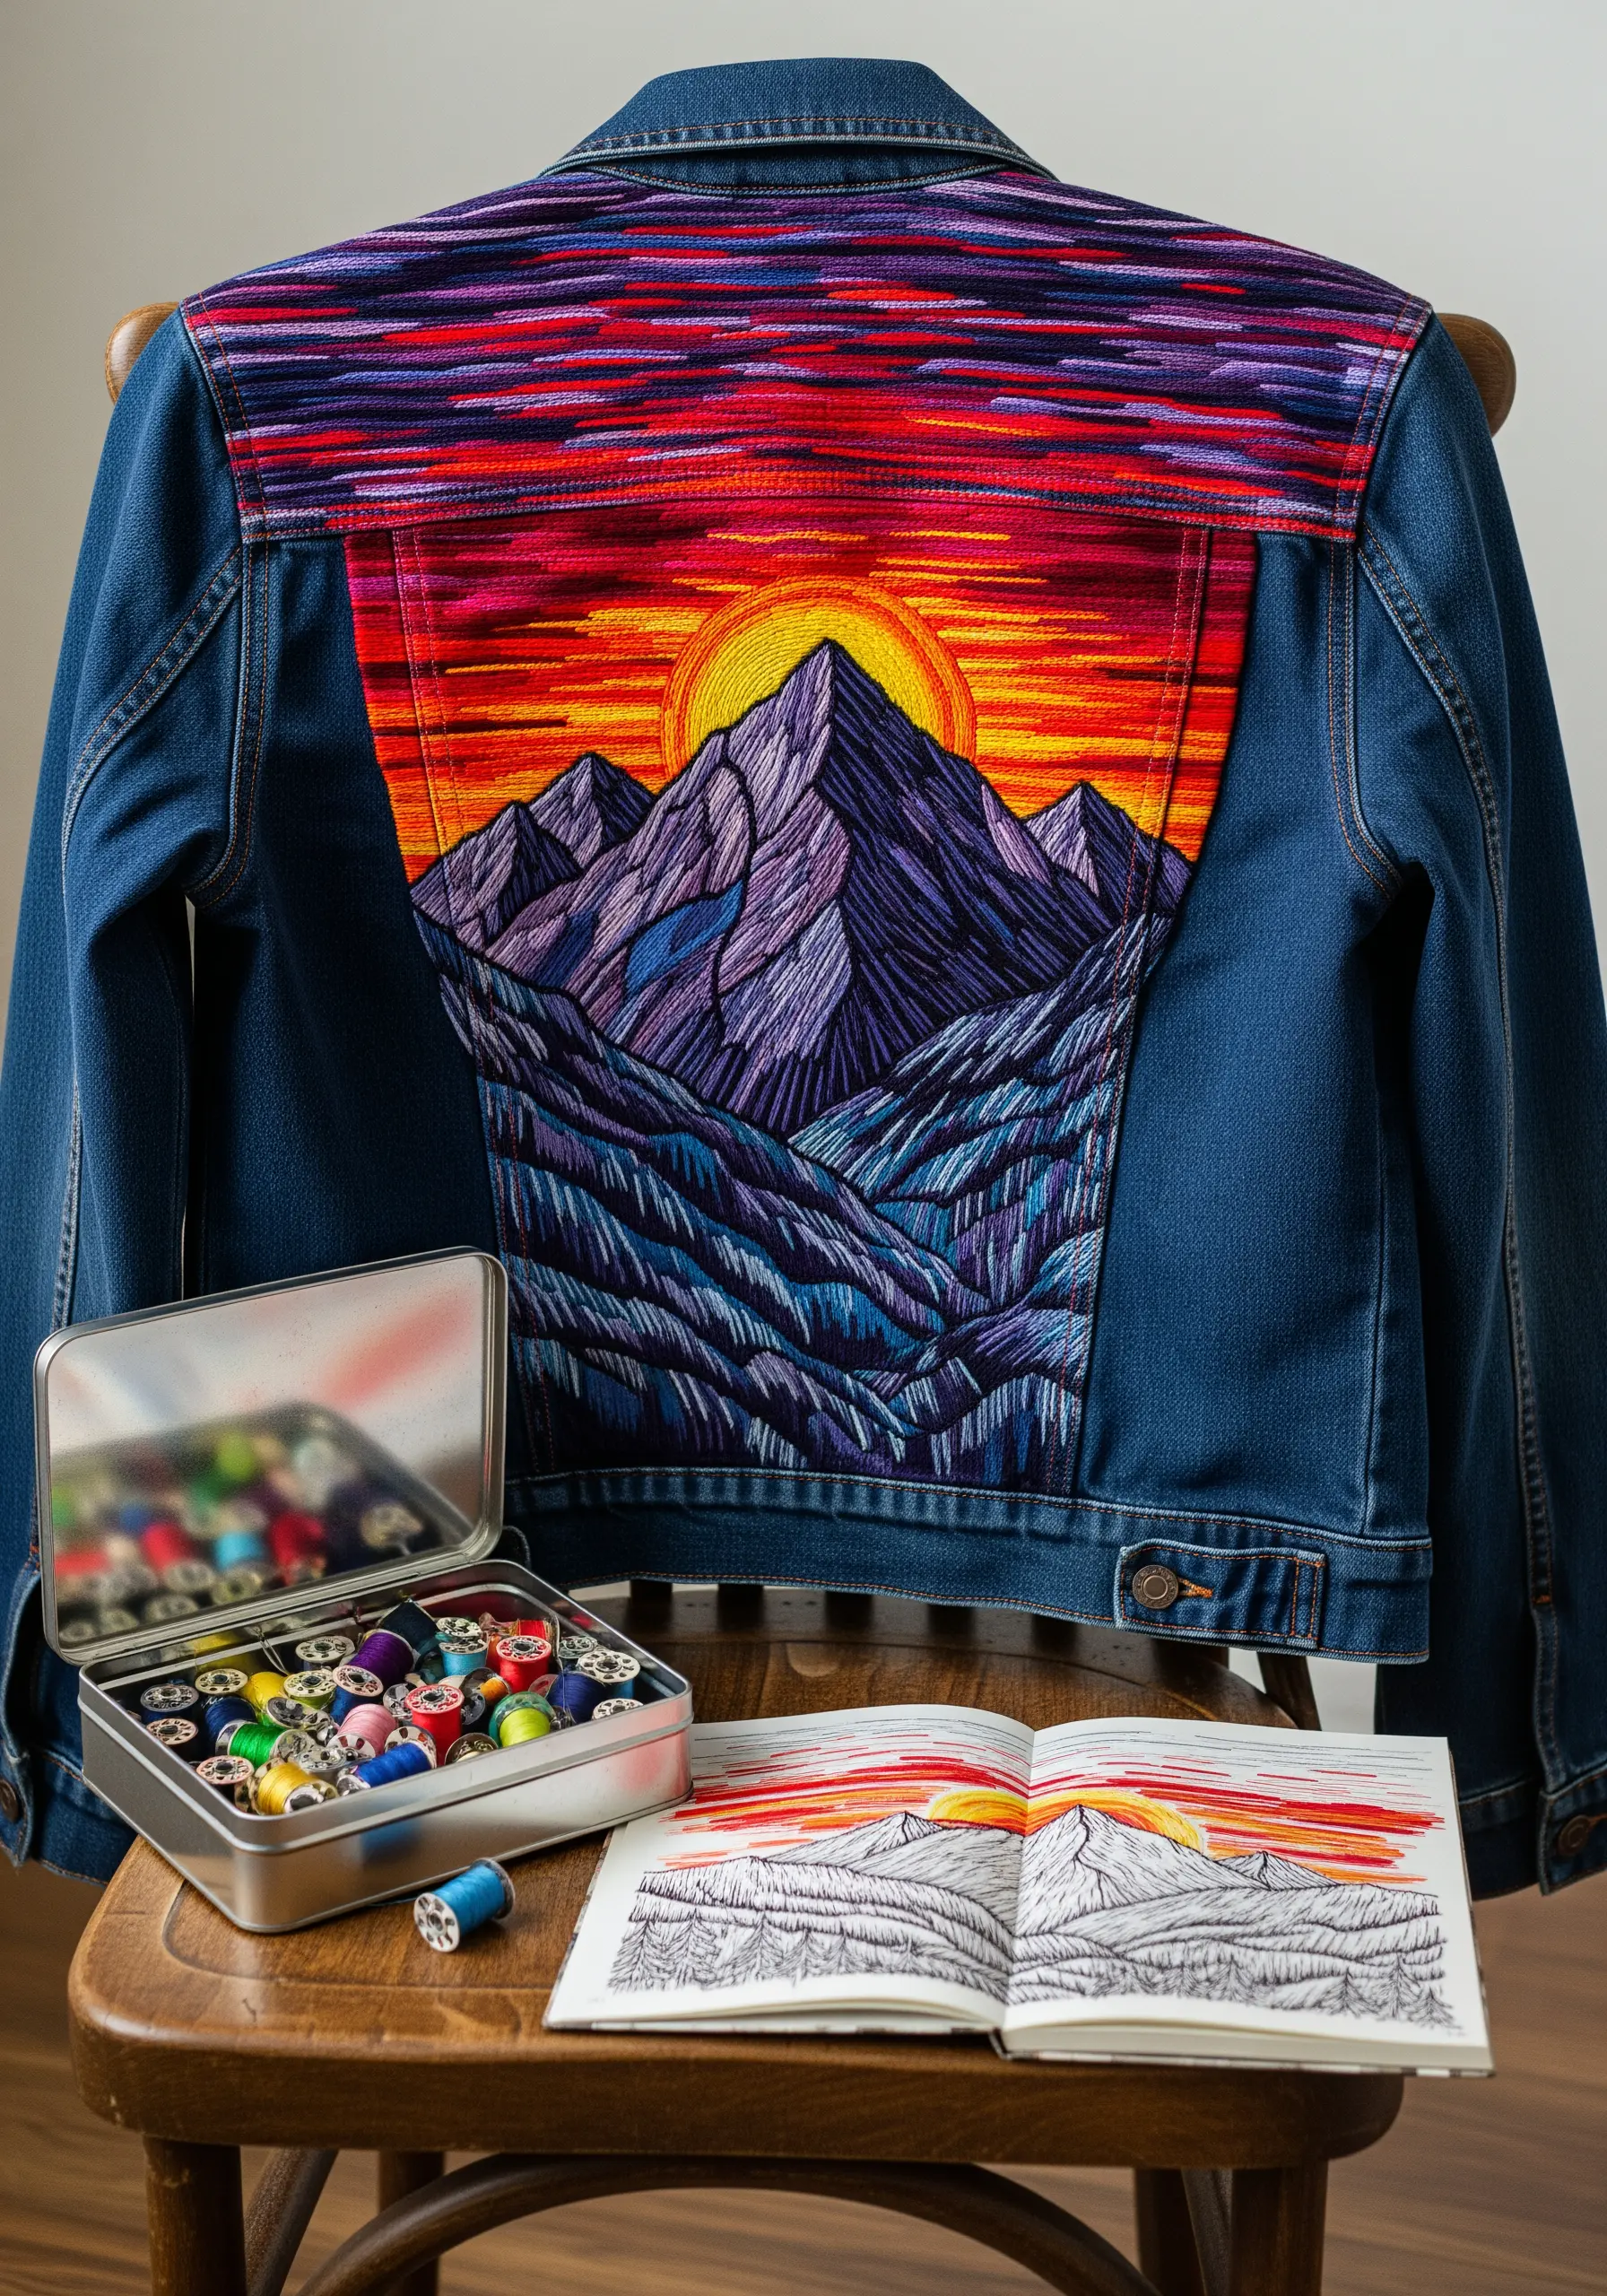
Transform a denim jacket into wearable art by treating the back panel as a canvas for thread painting.
Always use a heavy-duty needle and a cut-away stabilizer on the inside of the jacket to support the weight of the stitches and prevent distortion.
Map out your design in color blocks, then use long-and-short stitch to blend the sunset hues seamlessly from yellow to deep red.
For the mountains, switch to shorter, more angular stitches to create a rocky texture, varying the direction to define the peaks and shadows.
These mountain landscape thread painting techniques turn a simple garment into a masterpiece.
4. Adding Delicate Botanicals to Journal Covers
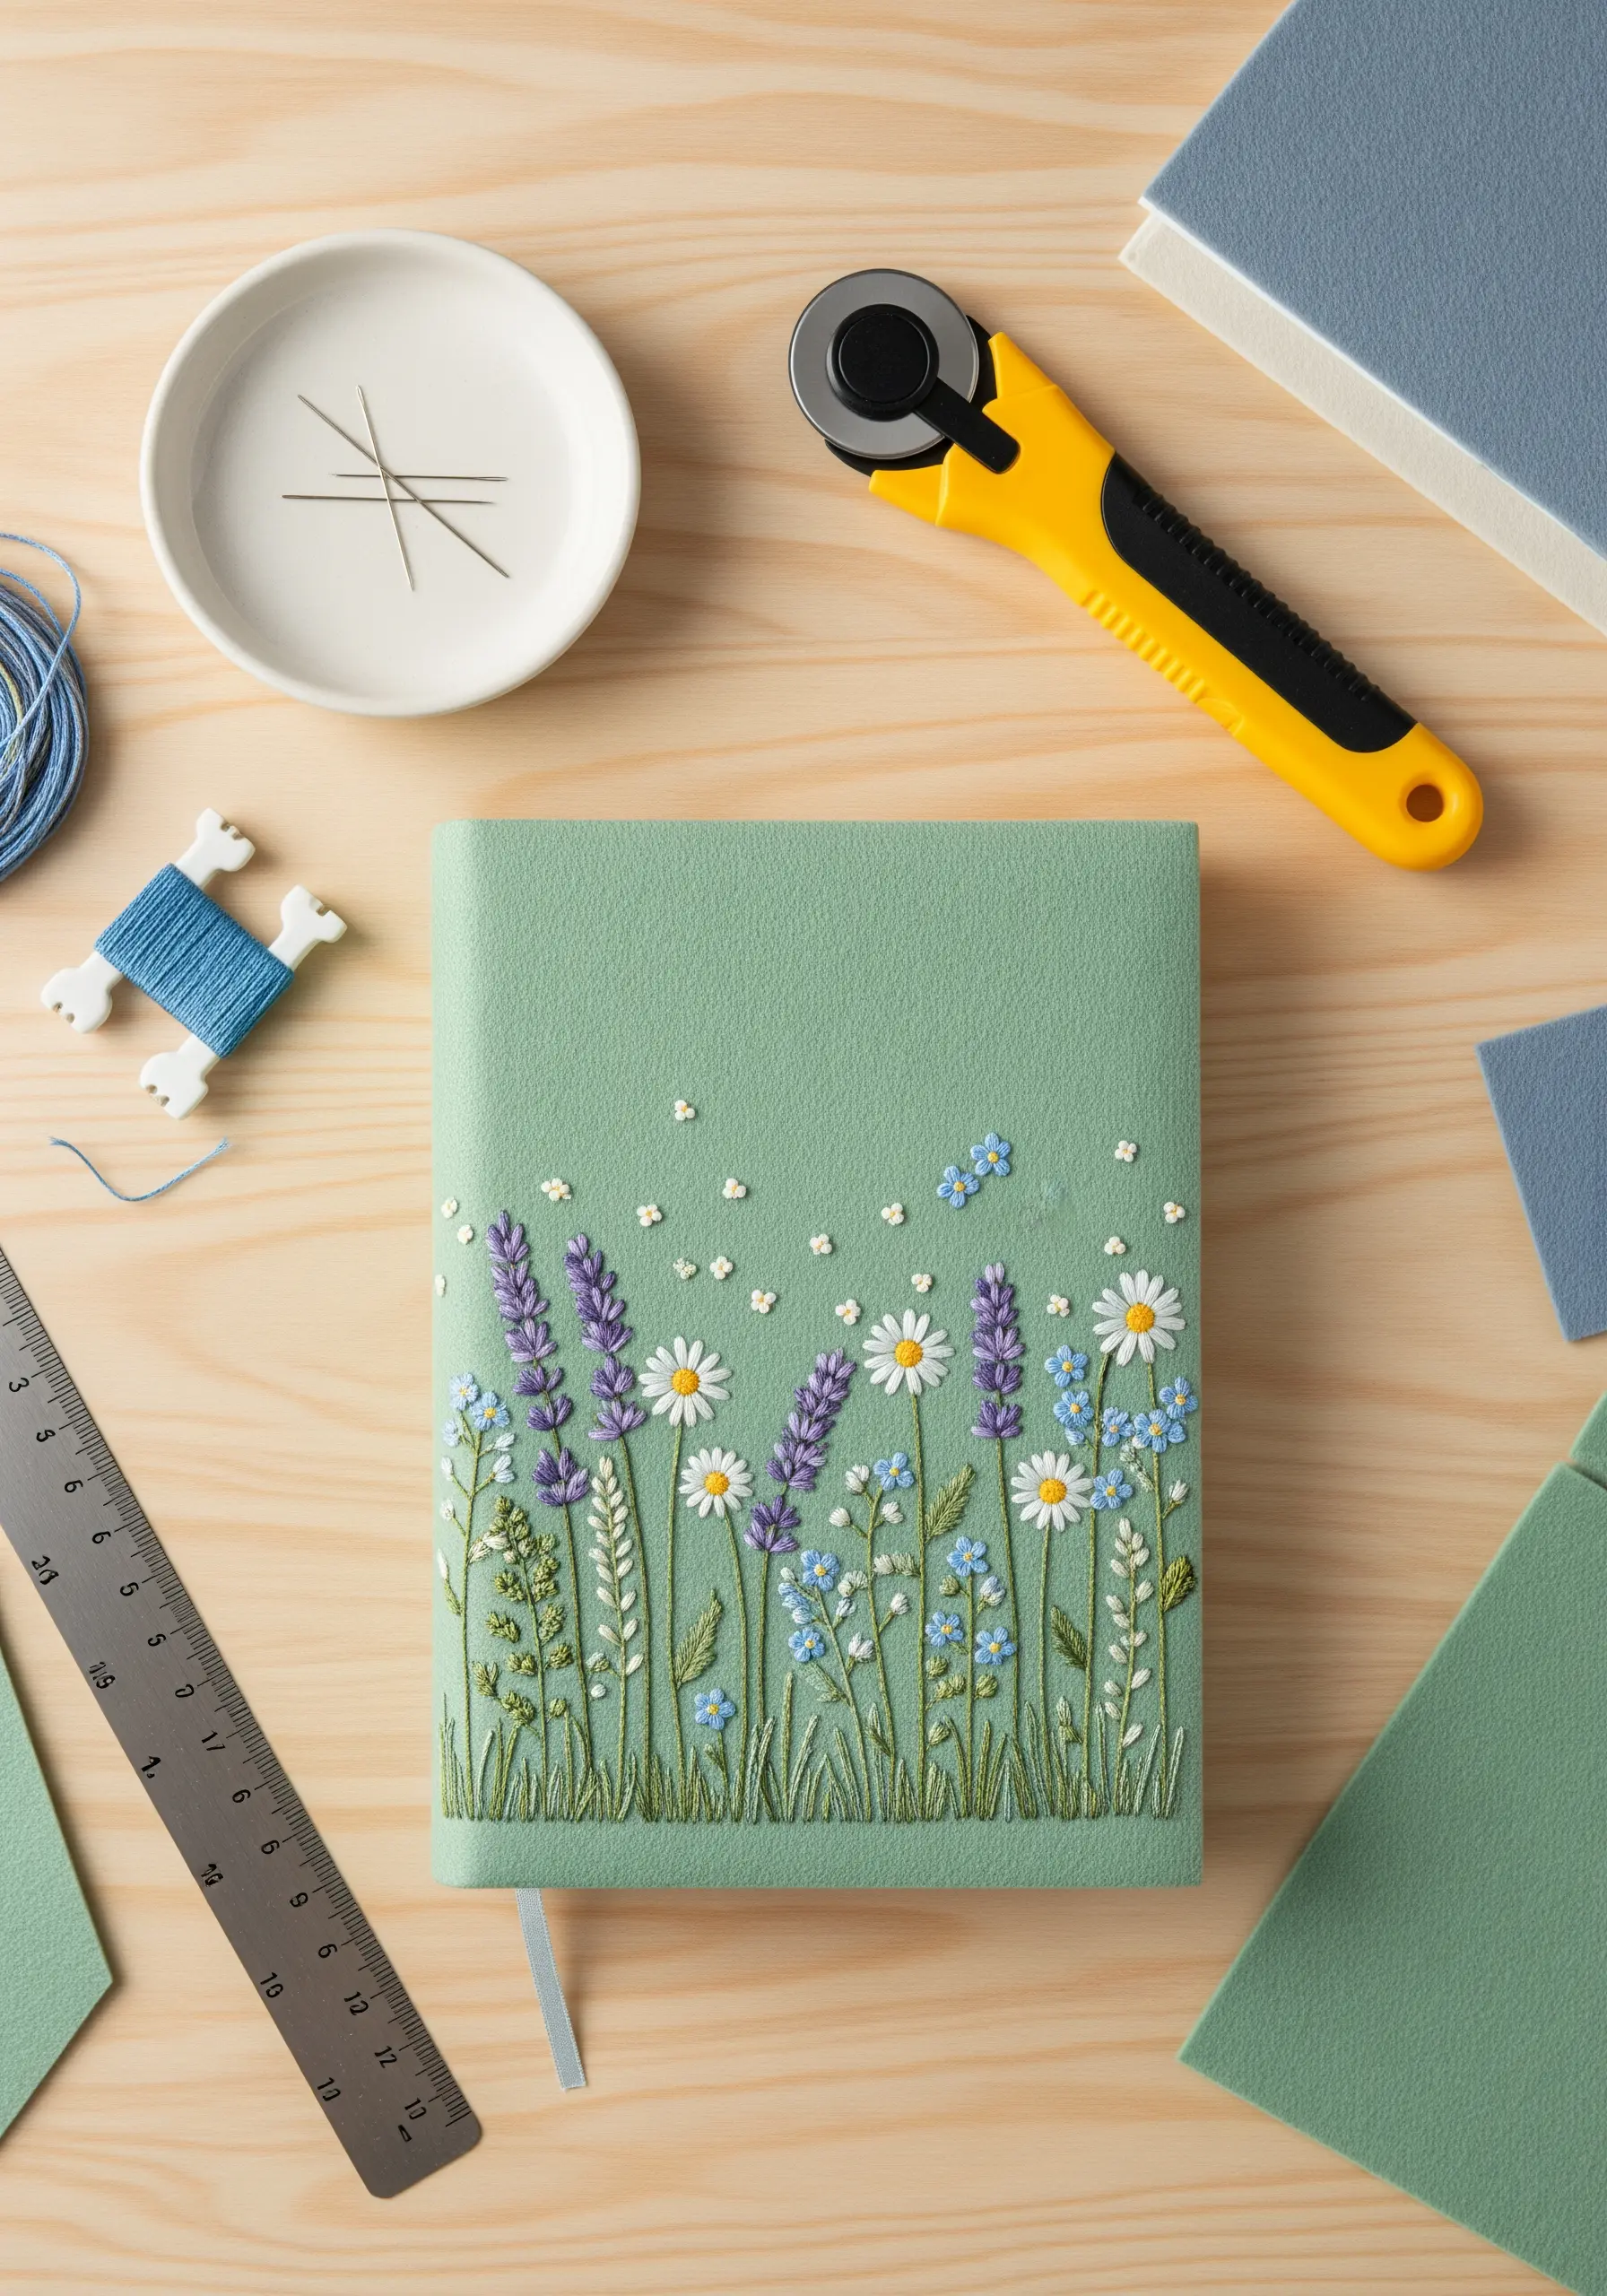
Embroidering on unconventional surfaces like a journal cover adds a deeply personal and tactile quality to everyday objects.
If the material is thick, use a sharp, sturdy needle and consider pre-punching your stitch holes with a fine awl to ensure clean entry points.
For the lavender, detached chain stitches create perfect buds, while a simple stem stitch gives the stalks a graceful curve.
The daisies come to life with classic lazy daisy petals and dense French knot centers, proving that even simple stitches can create rich texture.
These delicate lavender stitch ideas are perfect for small, meaningful projects.
5. Transferring Detailed Motifs onto Canvas Footwear
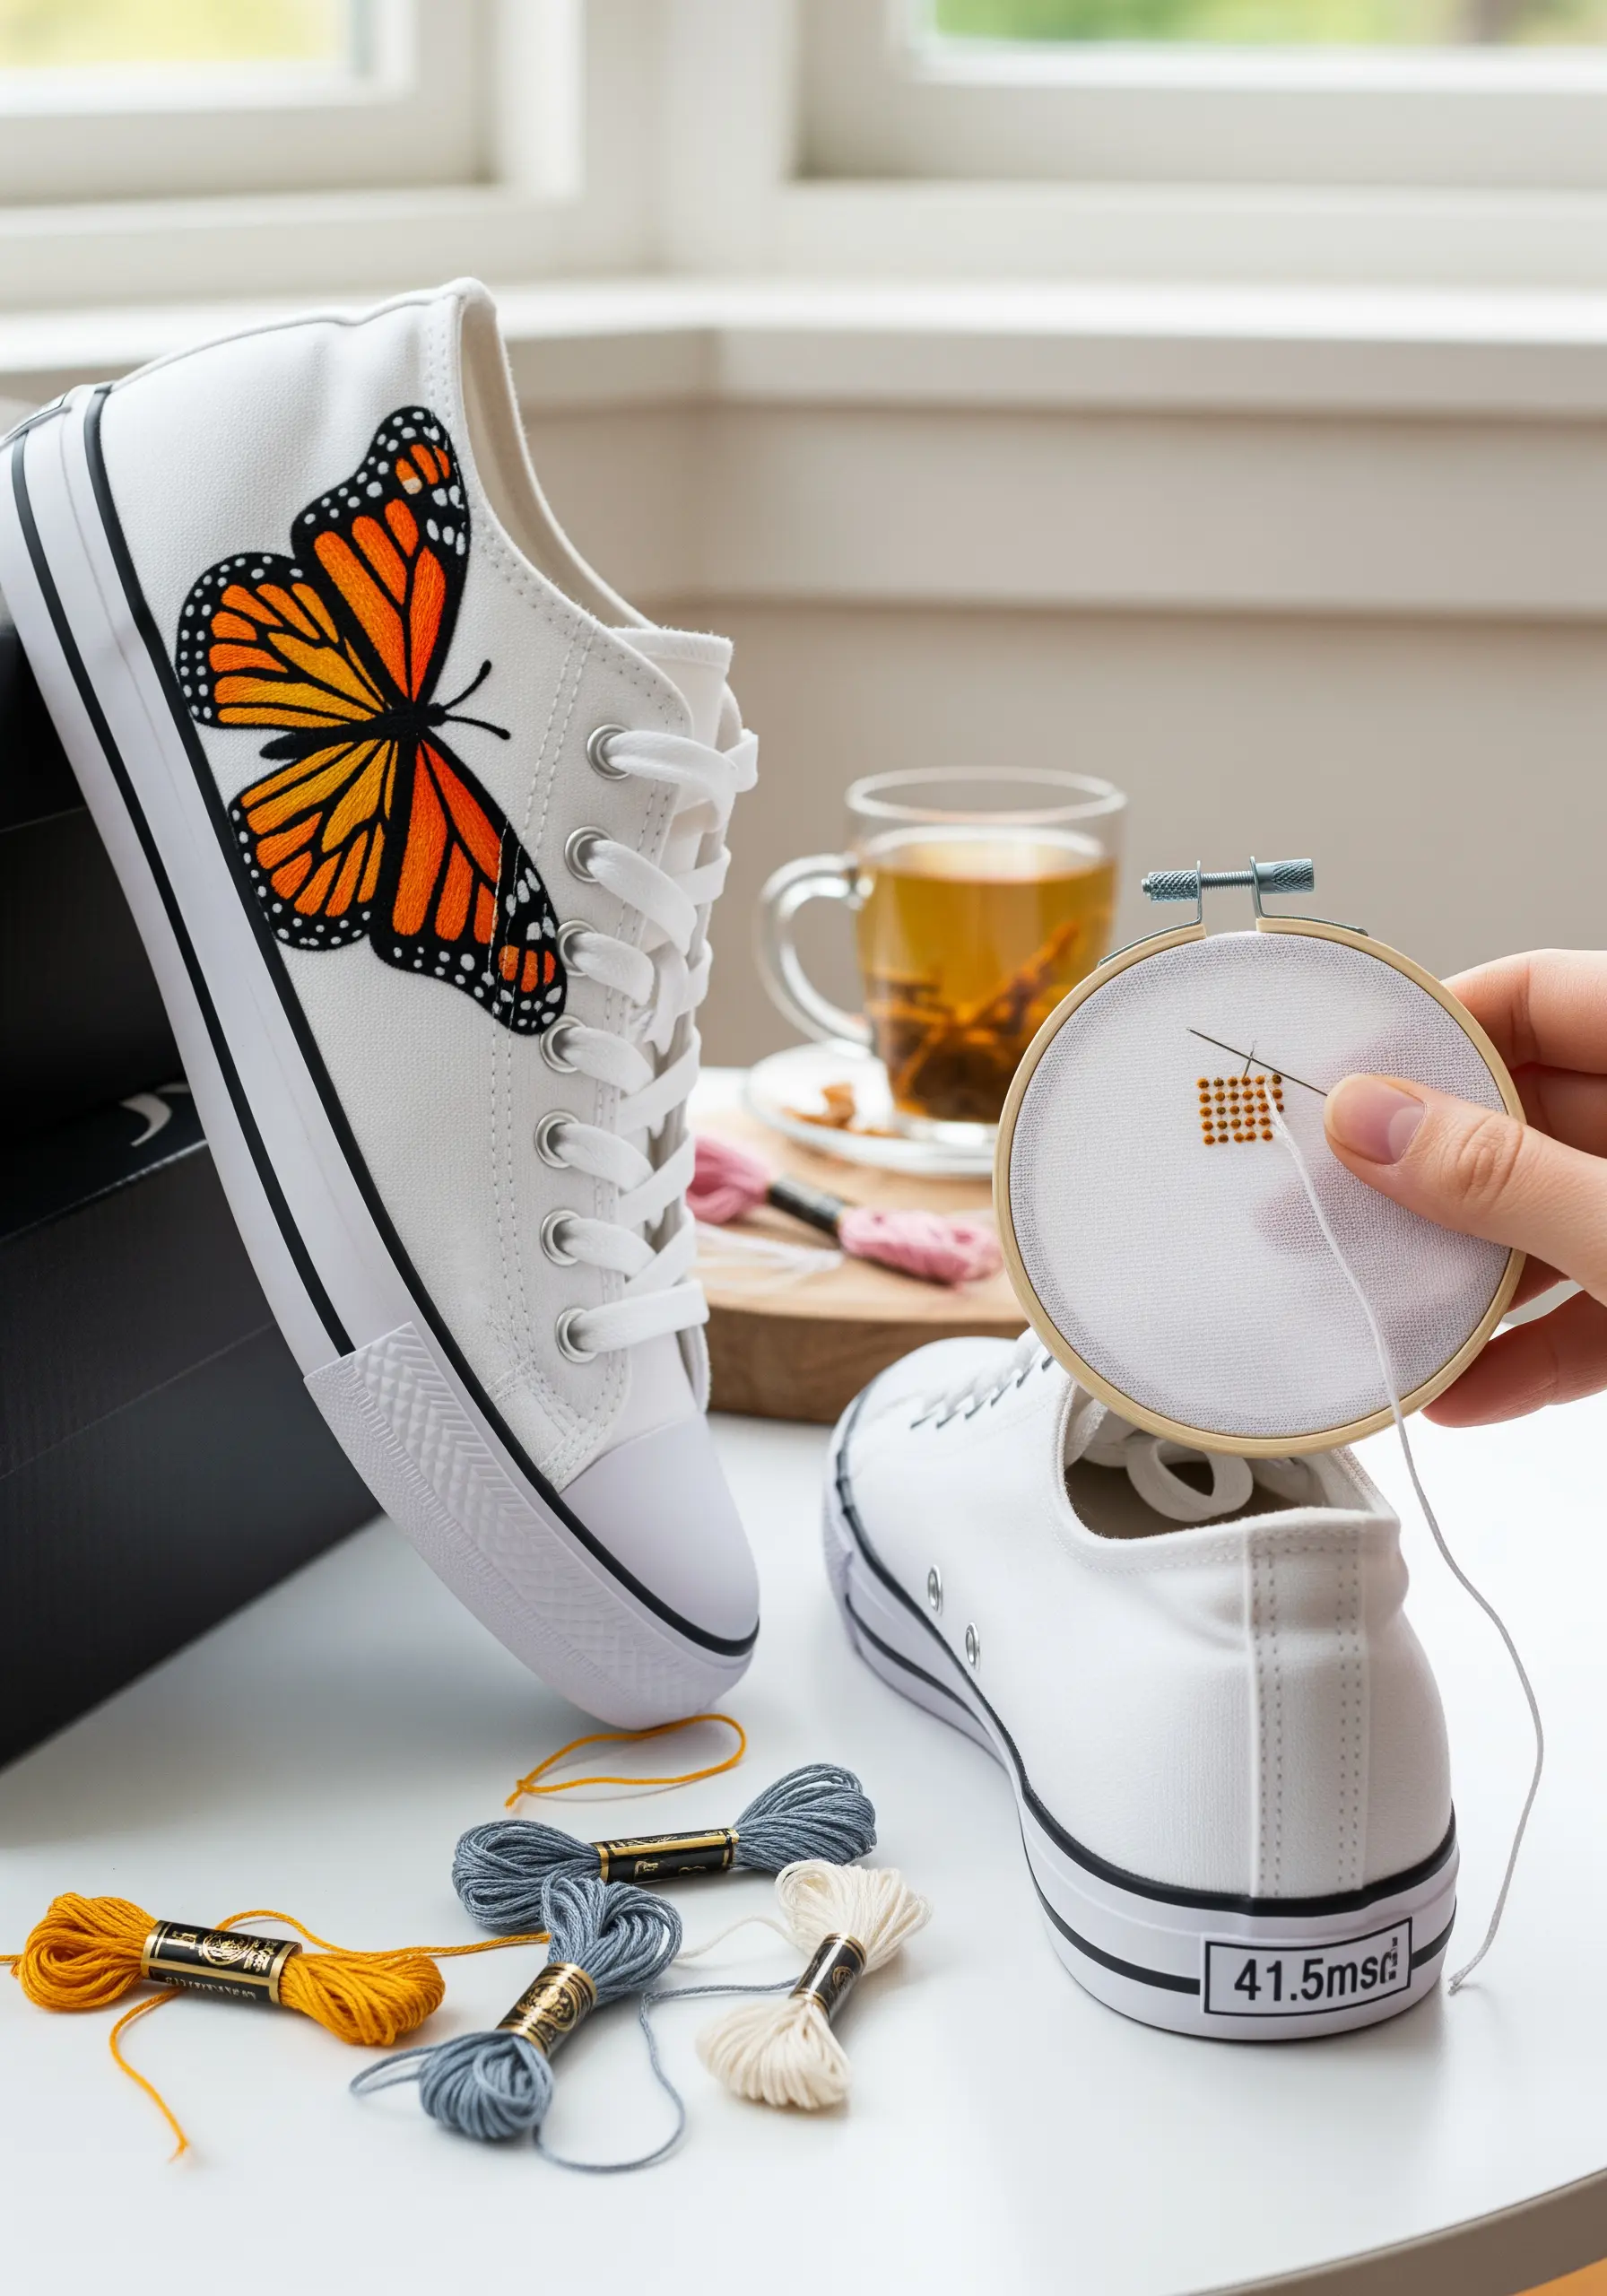
To embroider a complex, symmetrical design like a butterfly onto shoes, a water-soluble stabilizer is your most essential tool.
Simply trace your pattern onto the stabilizer, stick it to the canvas, and stitch directly through it—it provides a perfect guide and dissolves away with water, leaving only your crisp stitching.
Use a tight, neat satin stitch for the vibrant wing colors, keeping the stitches parallel to create a smooth, glossy finish.
Finally, outline each color section with a single strand of black thread using a backstitch to create sharp definition and make the colors pop.
Explore more butterfly garden embroidery ideas to personalize your accessories.
6. Minimalist Herbal Motifs for Elegant Table Linens
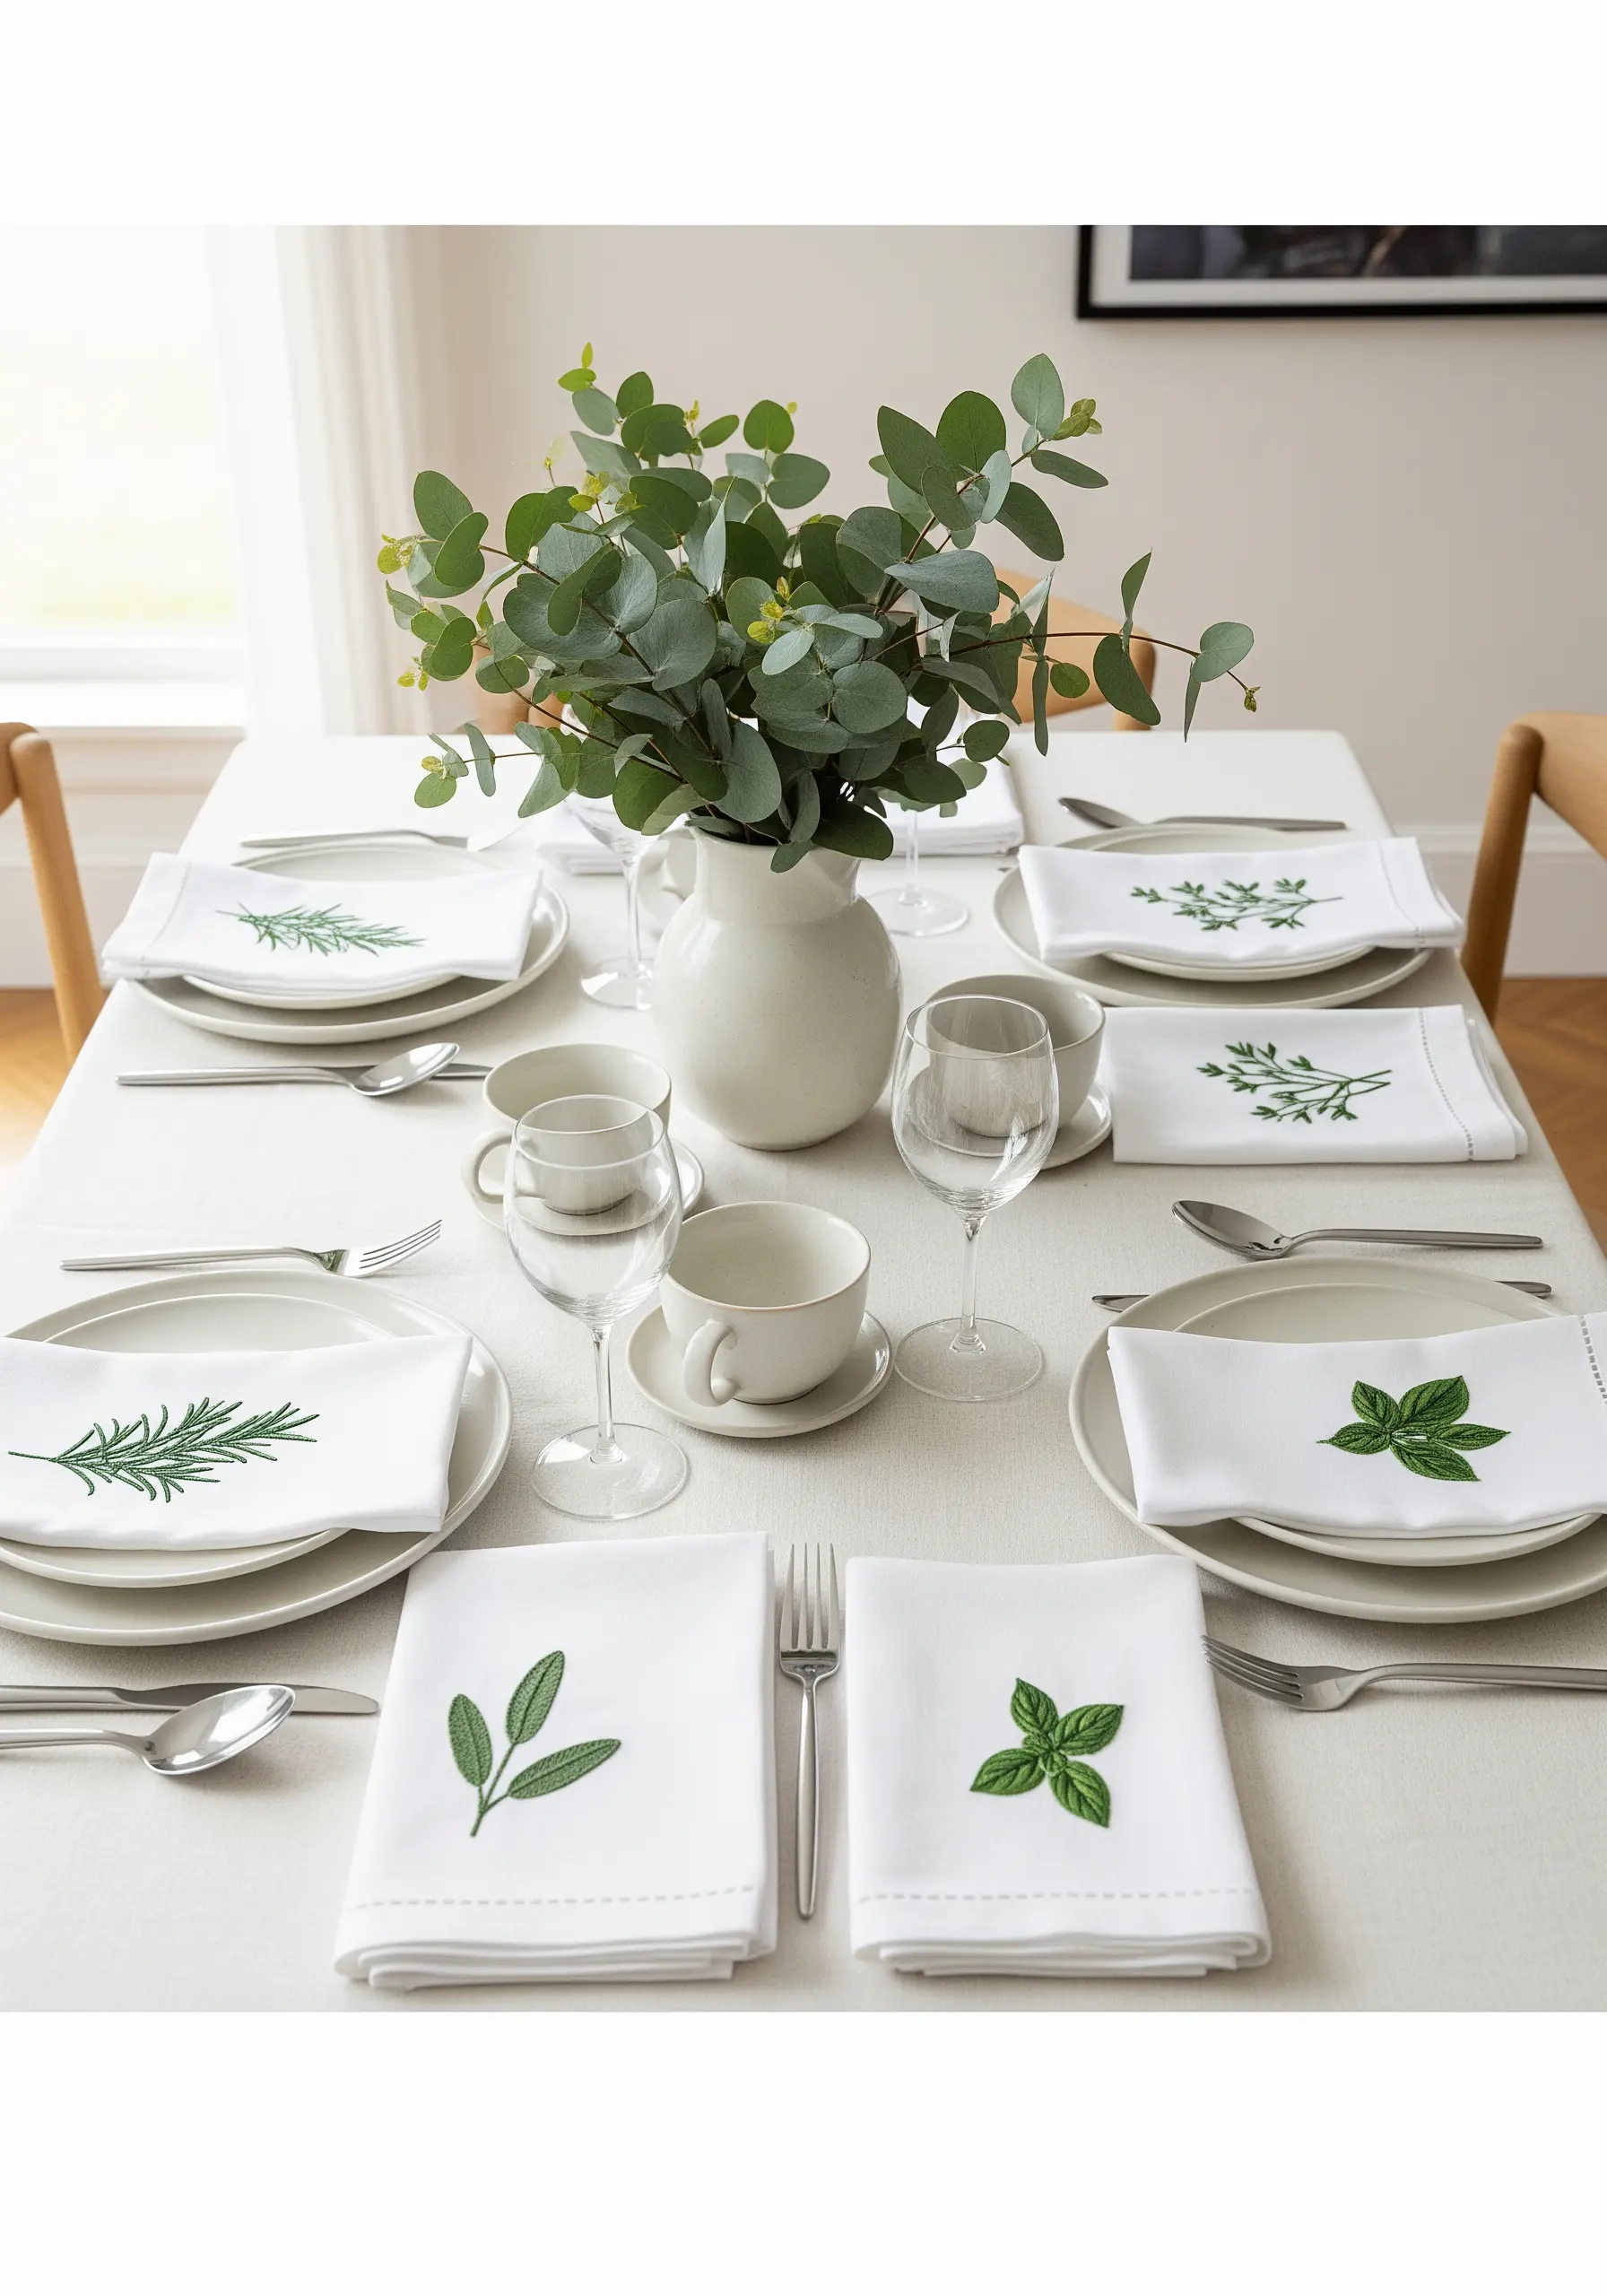
Instantly elevate a simple dining set with the understated elegance of single botanical motifs on linen napkins.
Choose a high-quality linen or cotton-linen blend; the fabric’s natural texture provides a beautiful canvas.
Use just two or three shades of green per herb, employing fishbone stitch for the basil leaves and a delicate stem stitch for rosemary needles.
This creates subtle dimension without adding unnecessary complexity, proving that even minimalist embroidery ideas can feel luxurious.
7. Layering Texture and Color in Geometric Embroidery
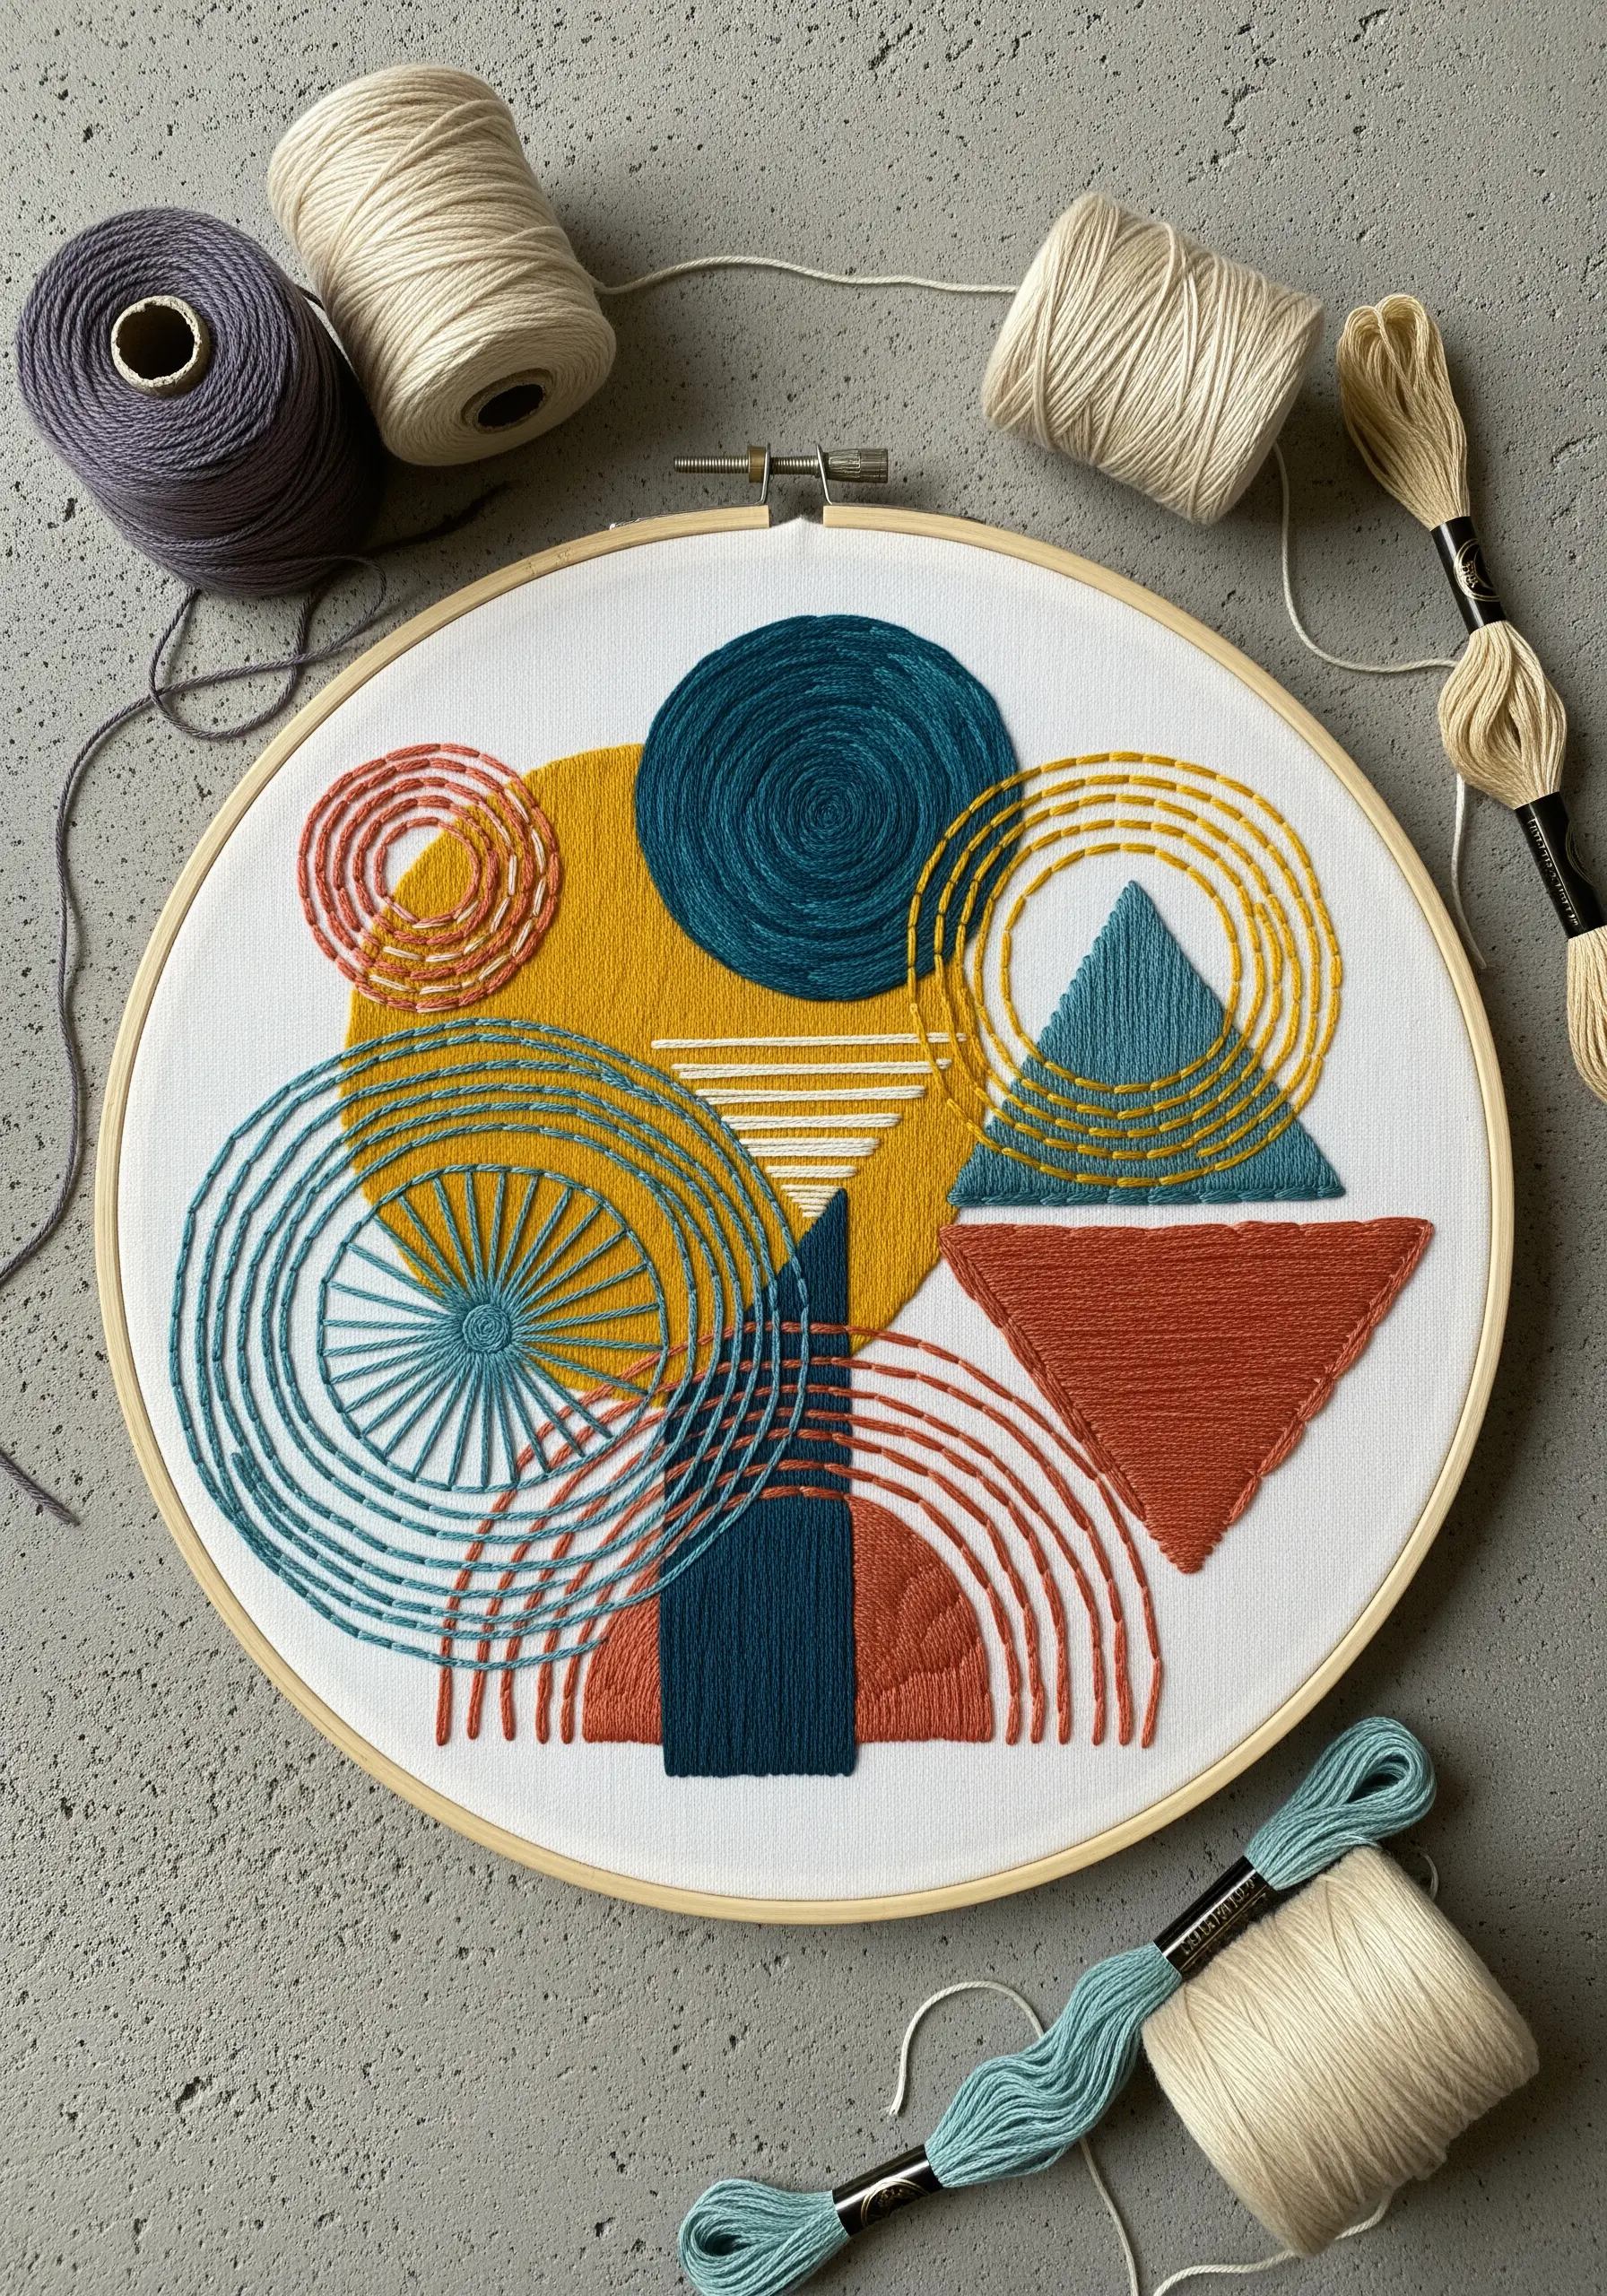
Create a dynamic abstract piece by focusing on the interplay of stitch textures, not just colors.
Lay down a foundation of solid shapes with a dense, smooth satin stitch to create a flat, bold color block.
Then, overlay those shapes with raised, linear stitches like whipped backstitch or chain stitch for the concentric circles—this adds a tactile, cord-like quality.
This intentional contrast between flat and raised textures is what gives modern geometric thread art ideas their sophisticated, multi-dimensional feel.
8. Capturing Realism in Pet Portraits with Thread Painting
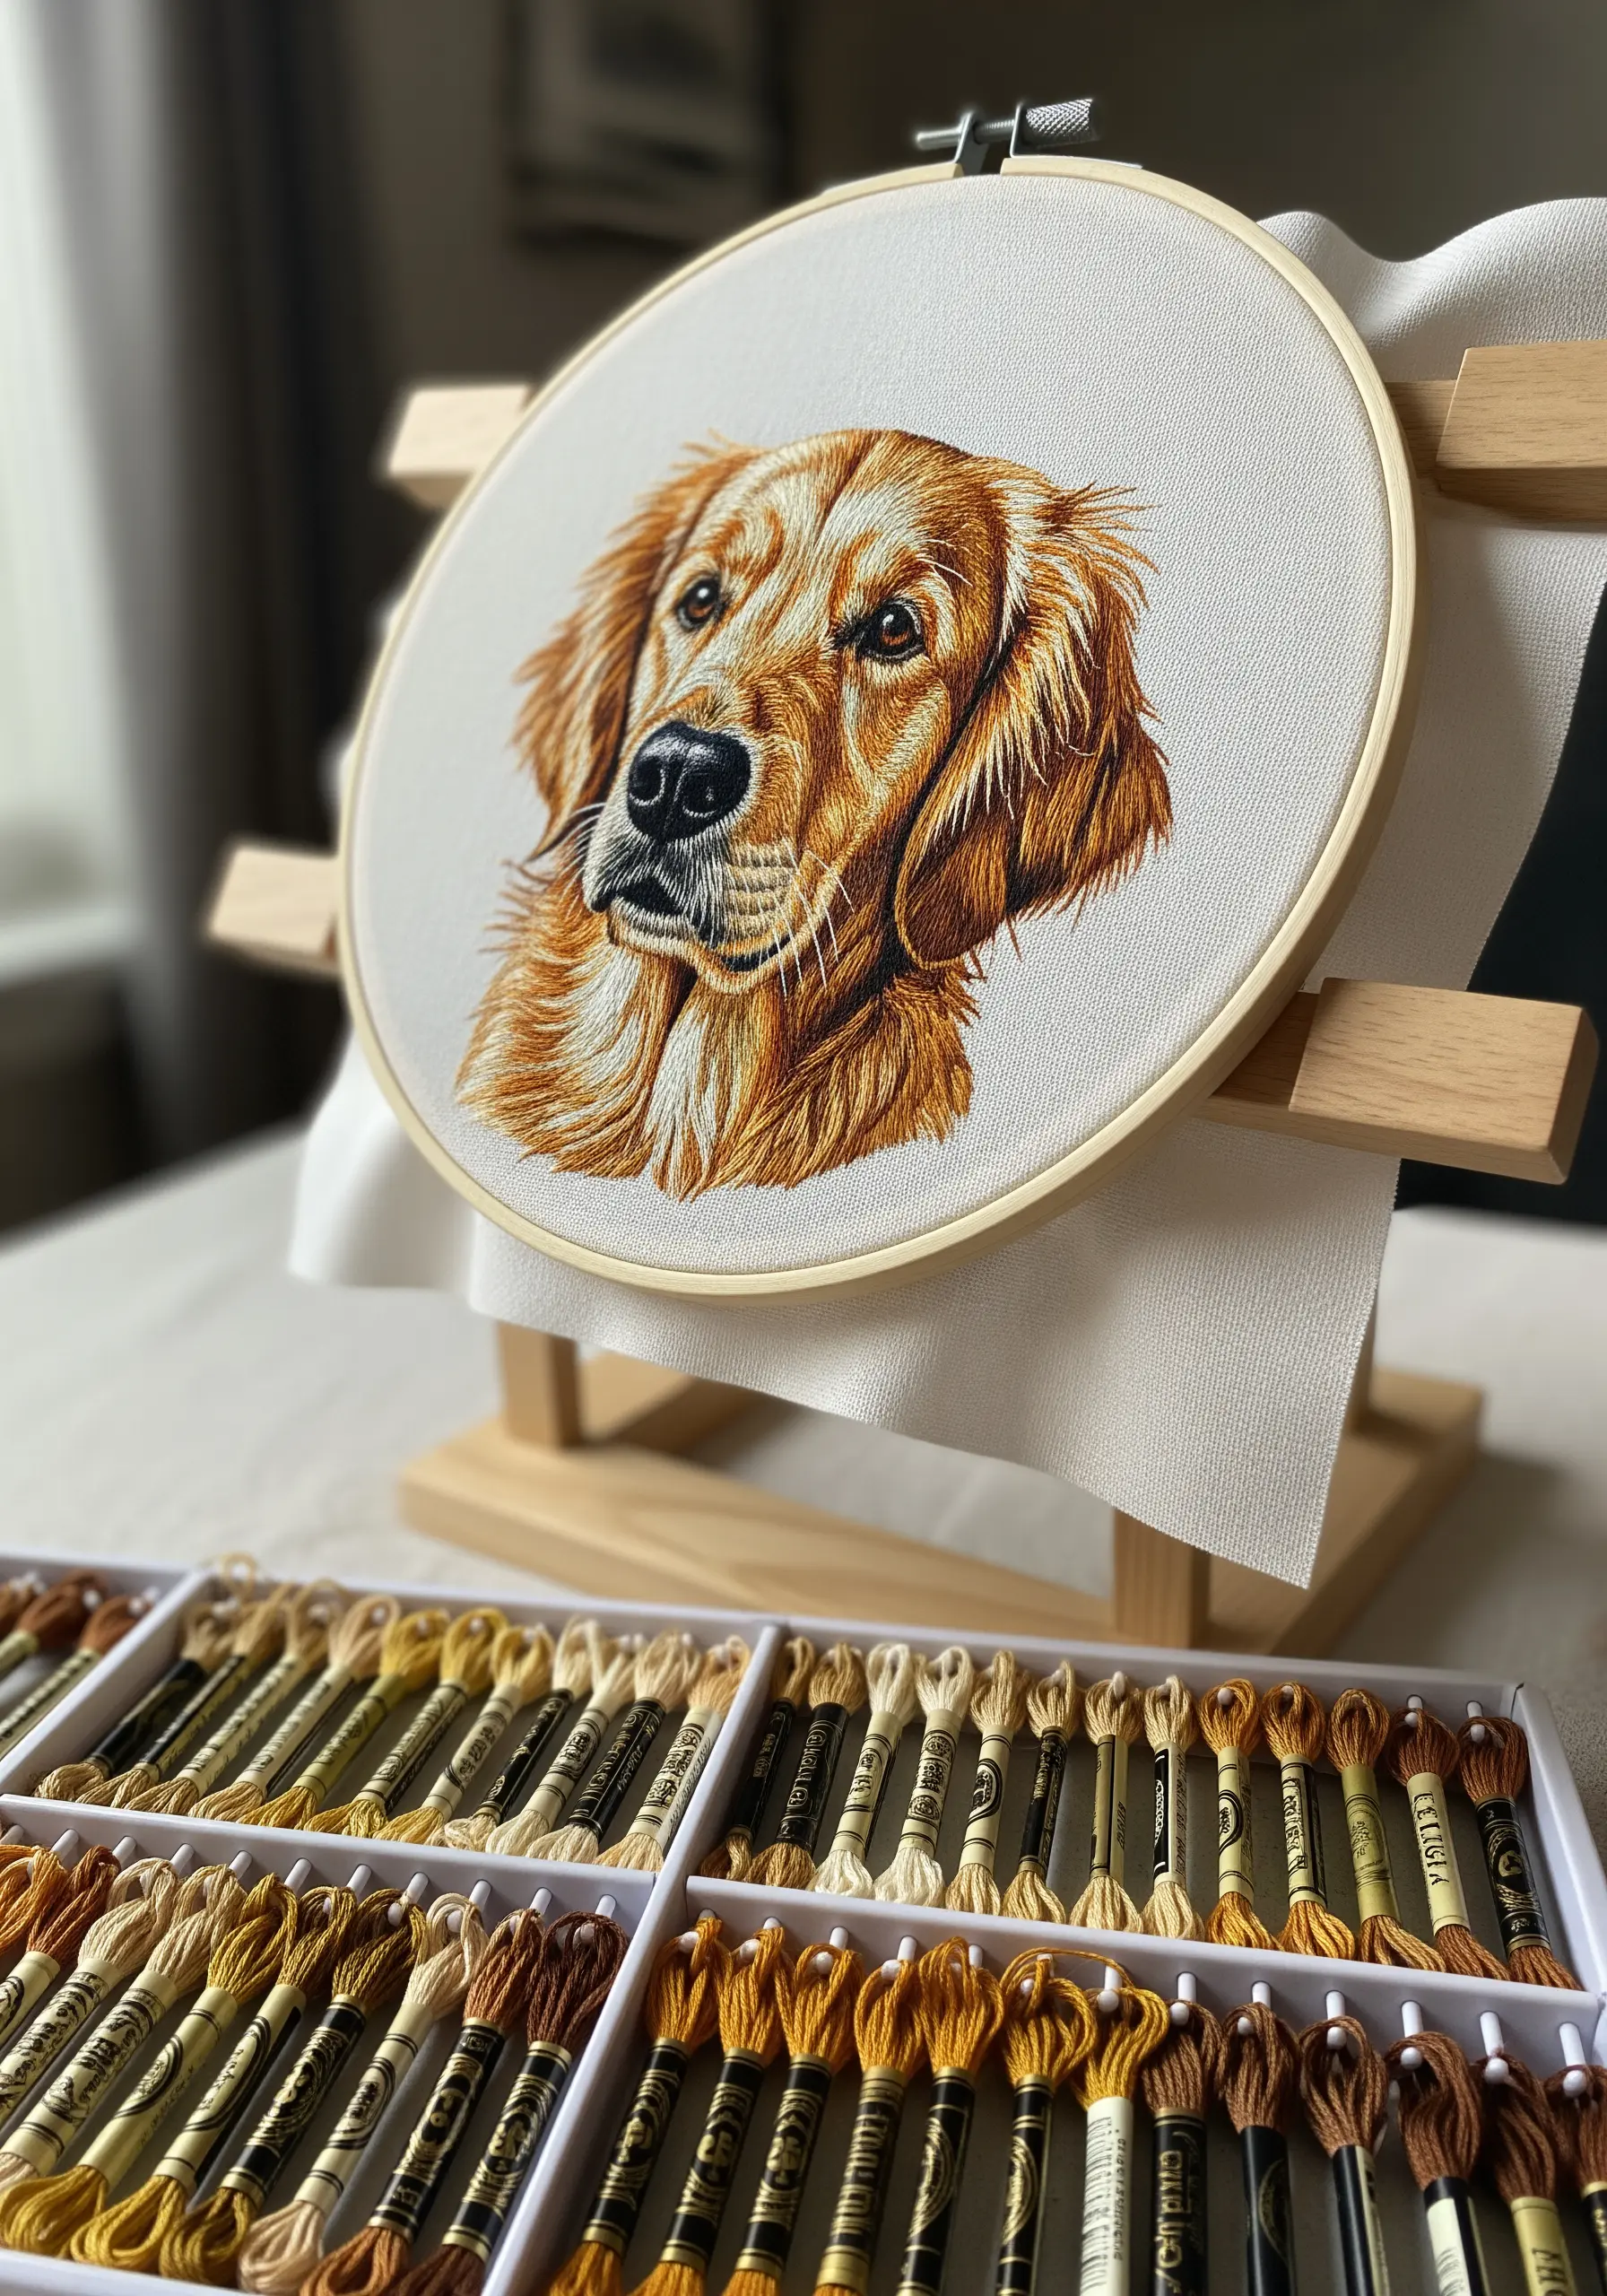
The key to a lifelike pet portrait is not in complex stitches, but in subtle, patient color blending.
Work exclusively with a single strand of floss to achieve the smoothest gradients, allowing you to build up color and depth gradually.
Pay close attention to the direction of fur growth, and angle your long-and-short stitches to mimic its natural flow and texture.
Use tiny, precise seed stitches to add catchlights to the eyes—this final detail is what truly brings your portrait to life.
Try these delicate pet line-art embroidery ideas for a meaningful keepsake.
9. Achieving Sharp Line Art on Apparel

When embroidering on a structured, curved surface like a cap, a traditional hoop won’t work, but precision is still achievable.
Use a sticky, self-adhesive stabilizer on the front panel; it will hold your fabric taut and your pattern in place without warping the cap’s shape.
A simple backstitch using three strands of floss creates a bold, clean line that is perfect for graphic designs.
This approach to minimalist line art nature embroidery ensures a professional finish on even the trickiest items.
10. Crafting Polished, Custom Iron-On Patches
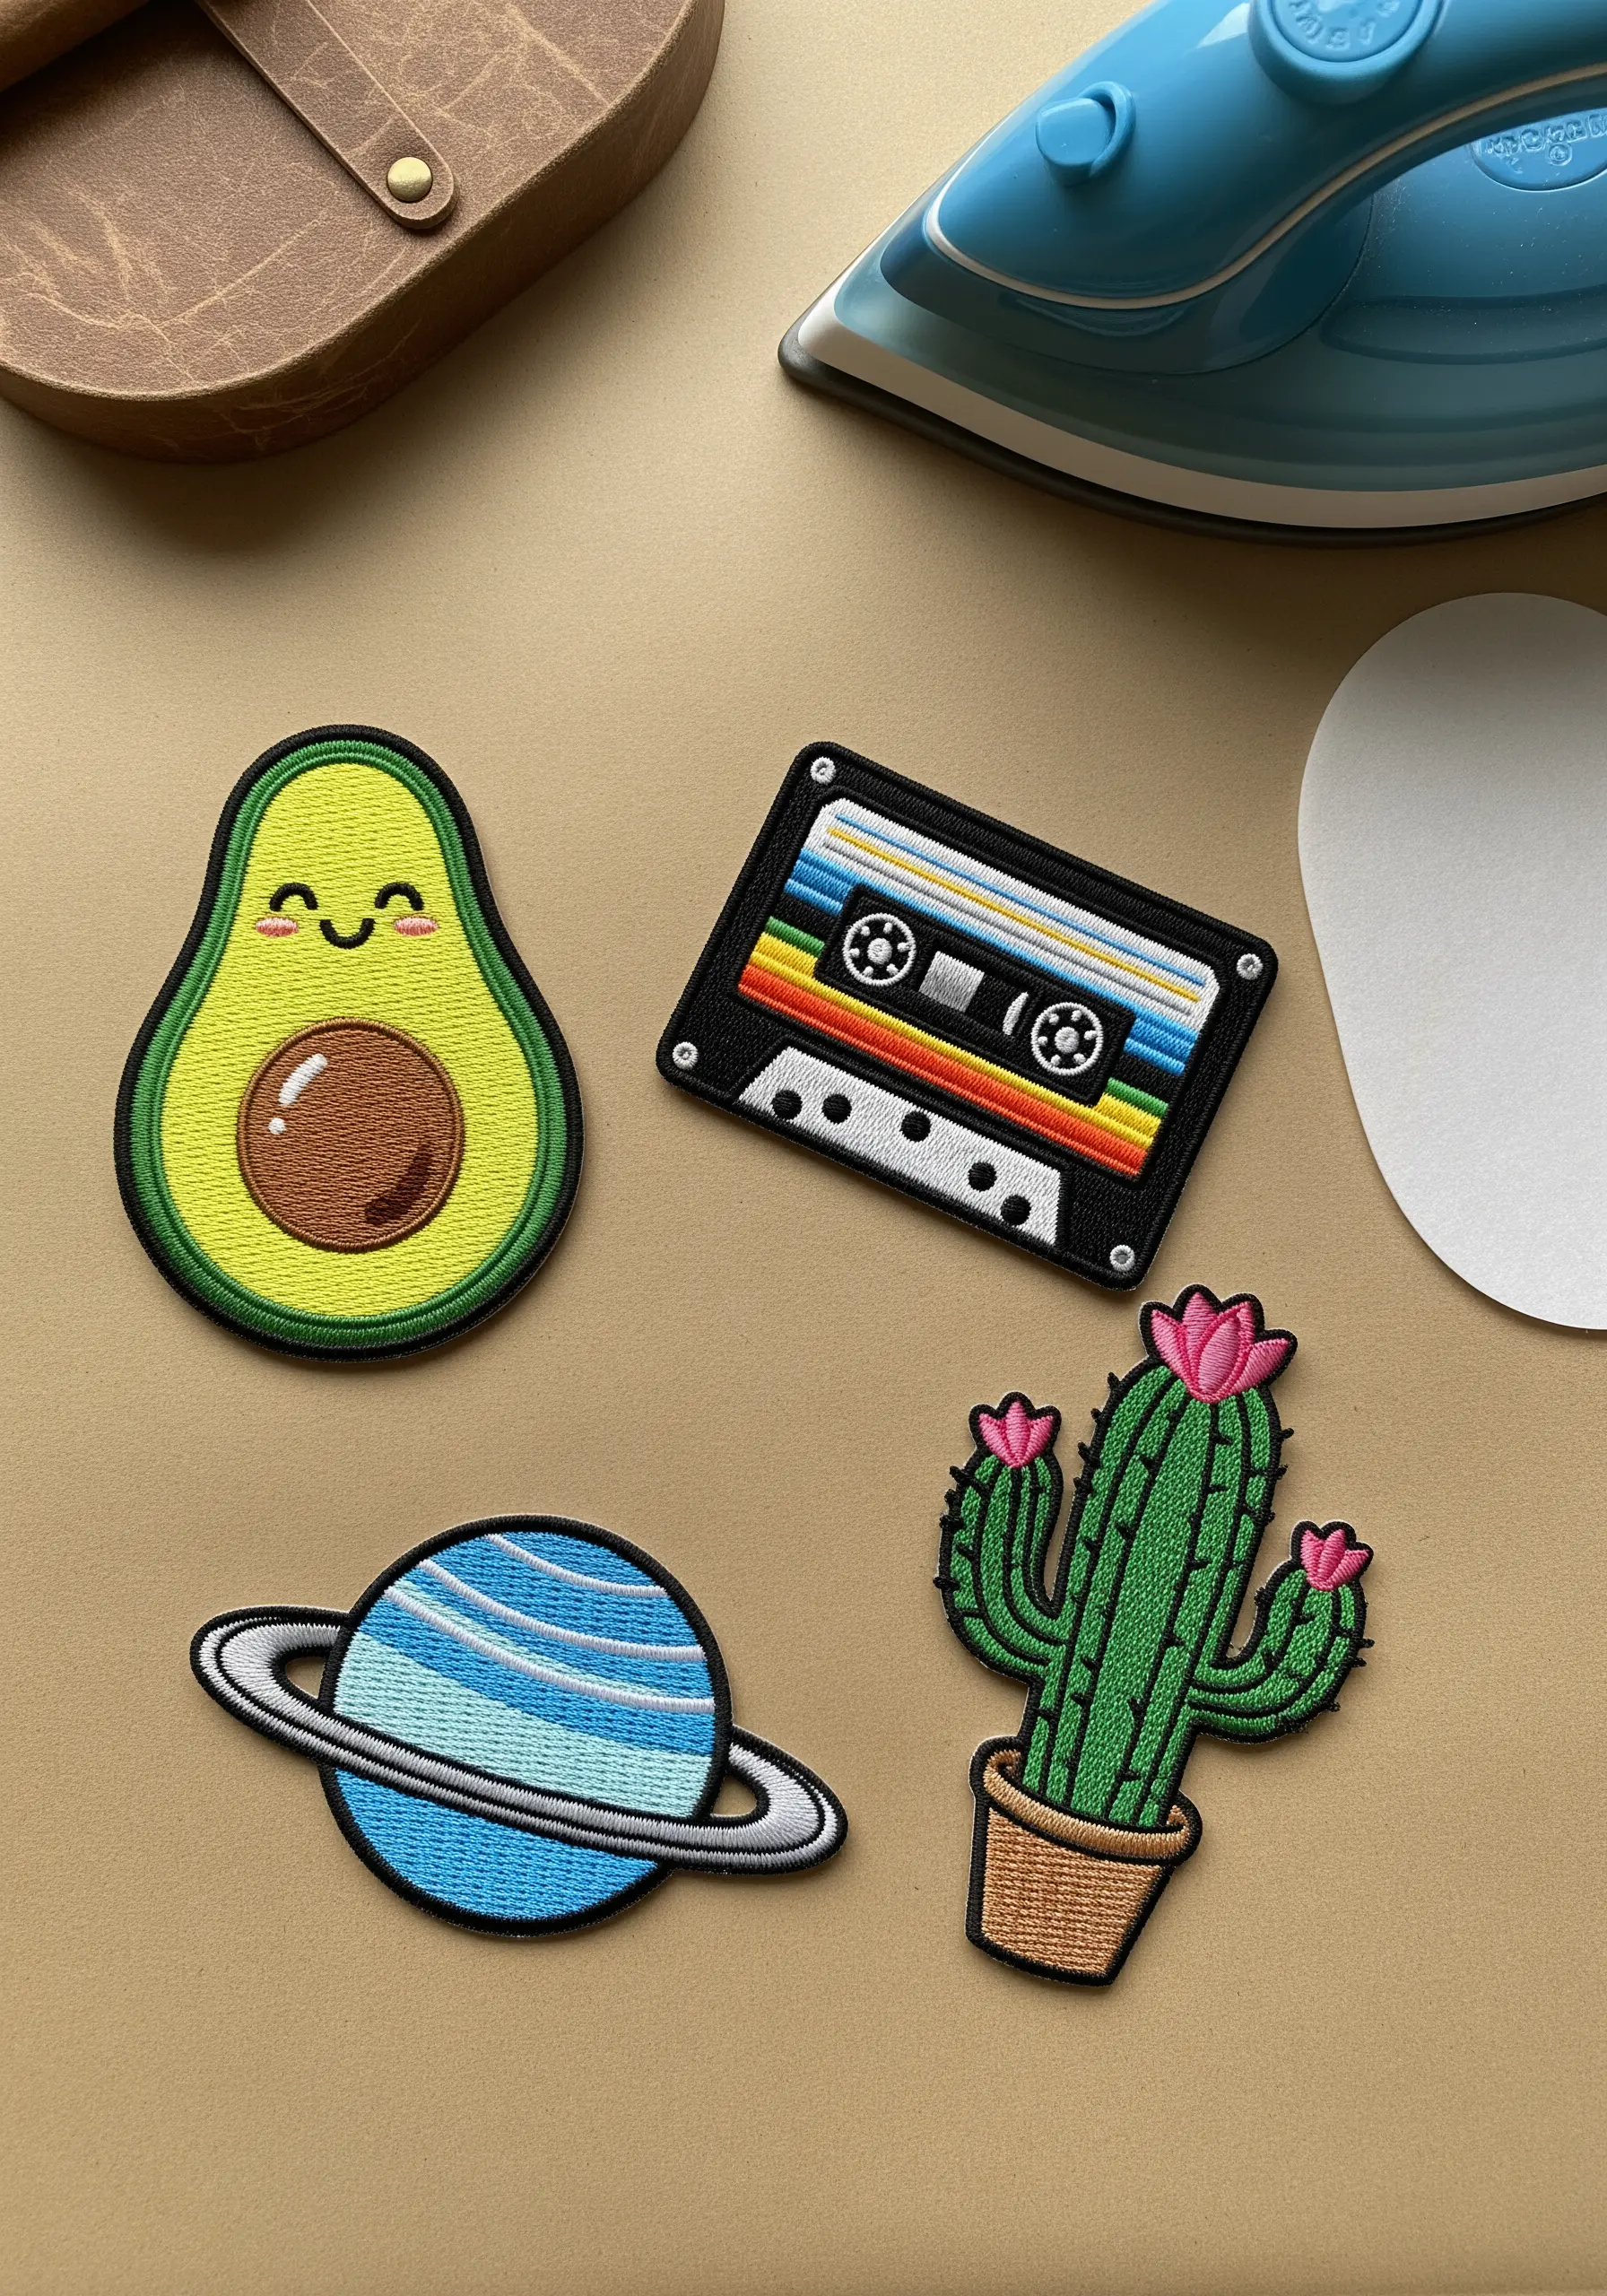
To create your own professional-looking patches, start by embroidering your design on a sturdy, non-stretch fabric like felt or heavy canvas.
Fill the entire design with dense satin stitch for a solid, uniform appearance and vibrant color saturation.
Once stitching is complete, apply an iron-on adhesive sheet to the back before you cut out the final shape.
This method not only makes application easy but also secures your stitches and prevents the edges from fraying, allowing you to try out all sorts of botanical patch ideas to repair clothes.
11. Modernizing Traditional Blackwork for Home Décor
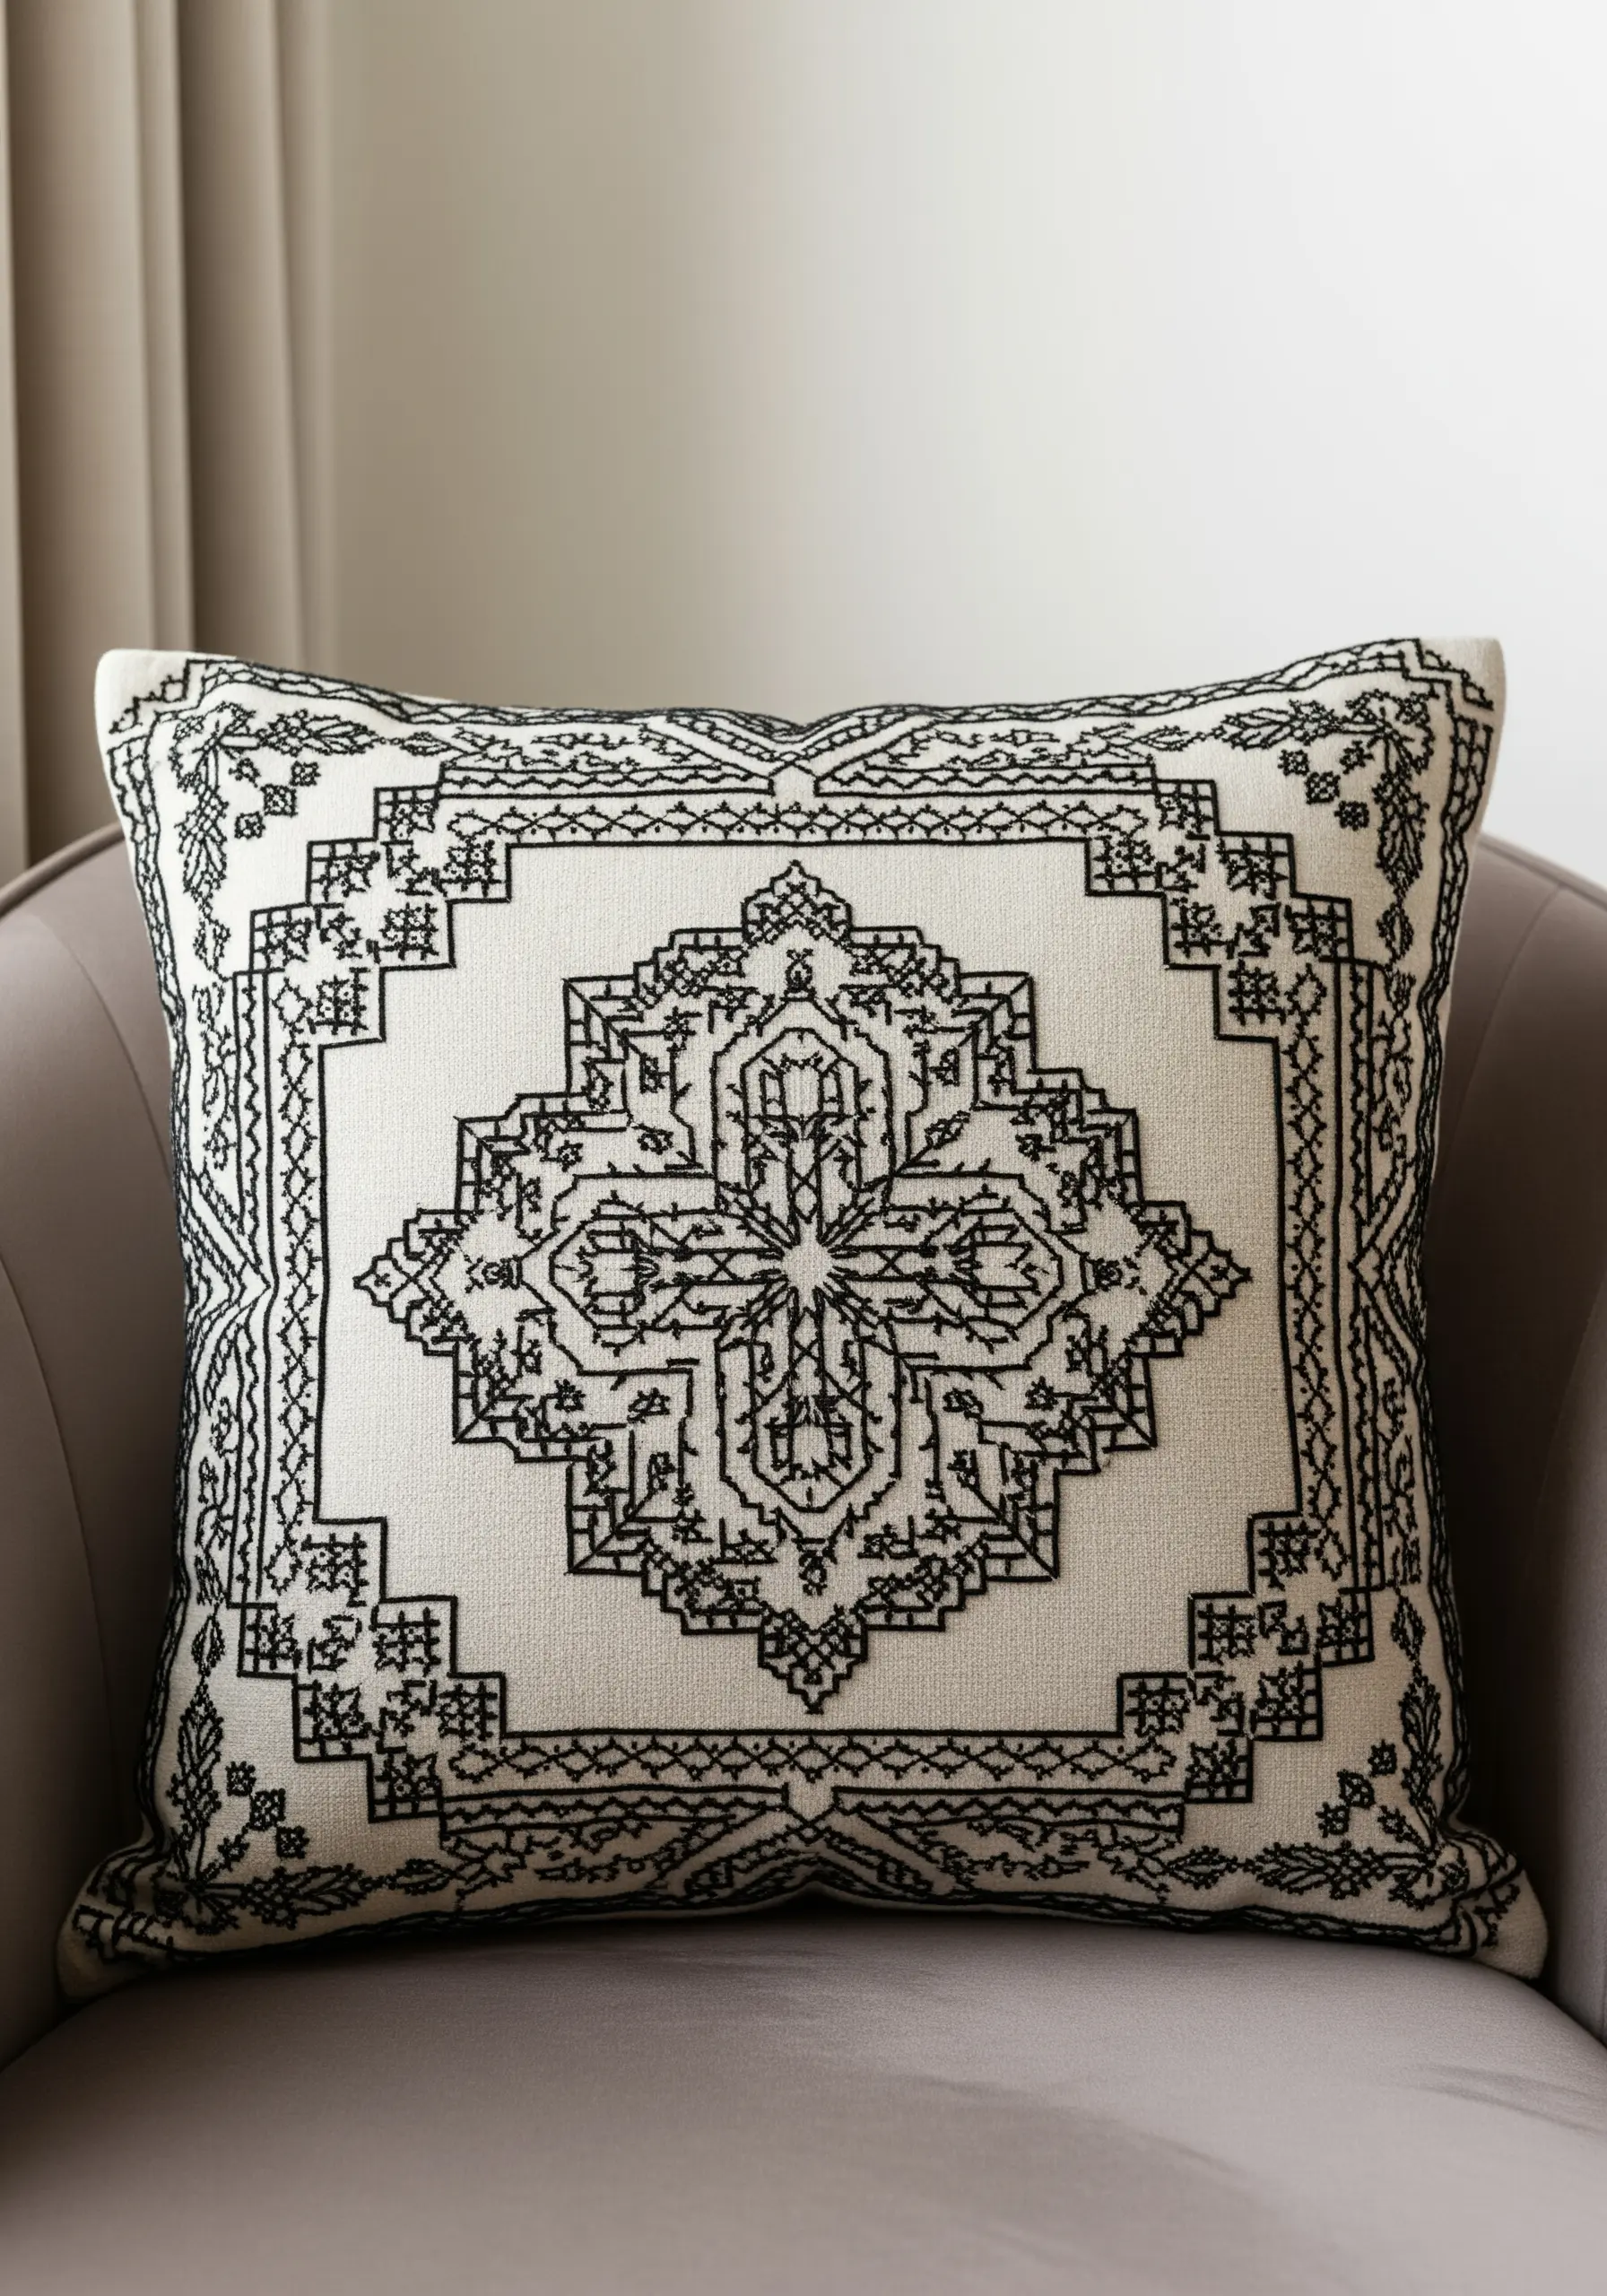
Blackwork, a historical technique using geometric patterns of backstitch, finds a bold new voice in modern home décor.
The entire effect relies on consistency—keep your stitch length and tension uniform to create a clean, graphic texture.
Choose a high-contrast combination like black thread on off-white linen to allow the intricate, repeating patterns to stand out.
This technique turns a simple cushion into a sophisticated statement piece, perfect for hand-stitched cushion borders that feel both historic and contemporary.
12. Embroidering on Sheer Organza for an Ethereal Effect
Stitching on a transparent fabric like organza creates a stunning illusion of floating motifs.
Because the back of your work is visible, your stitches must be exceptionally neat. Secure your threads by weaving the tails under existing stitches rather than tying knots.
Use a fine, sharp needle and lightweight thread to avoid snagging the delicate material.
Opt for open fill stitches like fishbone or spaced-out satin stitch; they add color without overwhelming the fabric’s airy quality, perfect for projects using sheer fabrics for dreamy effects.
13. Combining Stitch and Bead for Celestial Accents
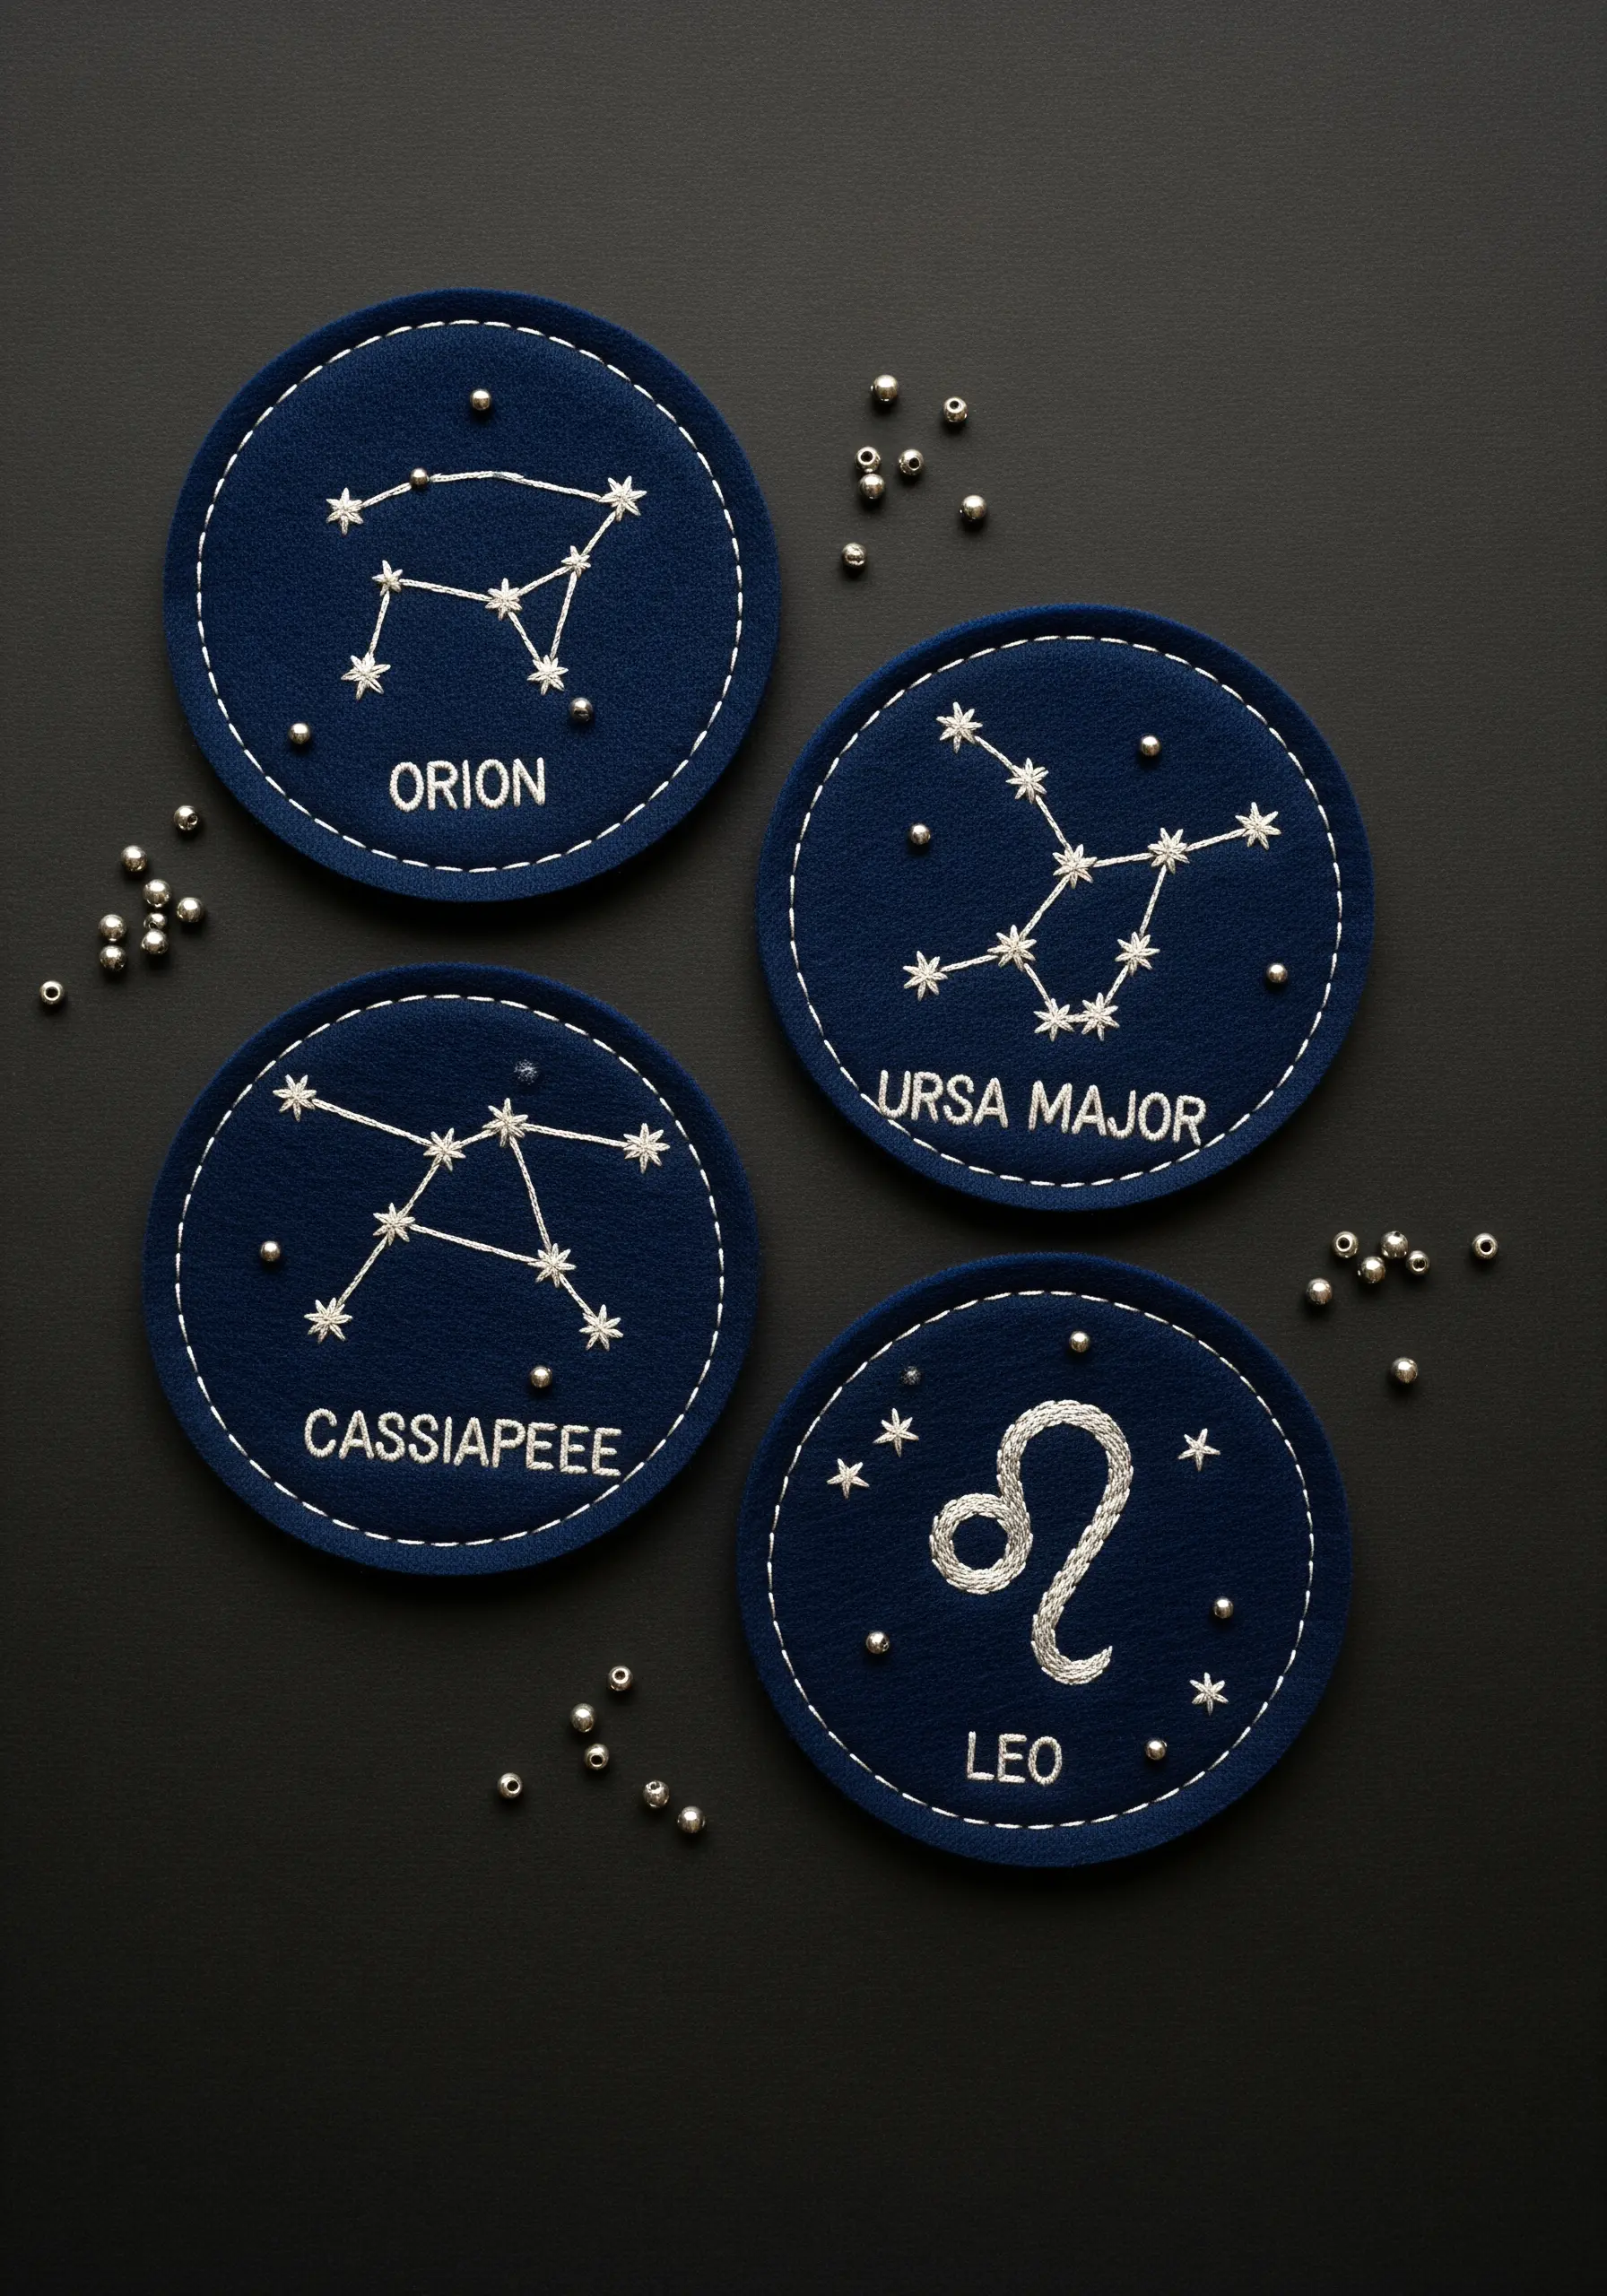
Introduce a new layer of texture and light to your work by strategically adding beads.
On these felt coasters, first embroider the constellation lines with a simple backstitch using a silver metallic thread.
Then, to represent the stars, secure tiny silver seed beads at key points, using a single, small stitch for each one.
This interplay of reflective thread and dimensional beads creates a sophisticated finish, a great example of combining embroidery, beads & fiber art.
14. Crafting Soft, Embroidered Sculptures for a Nursery
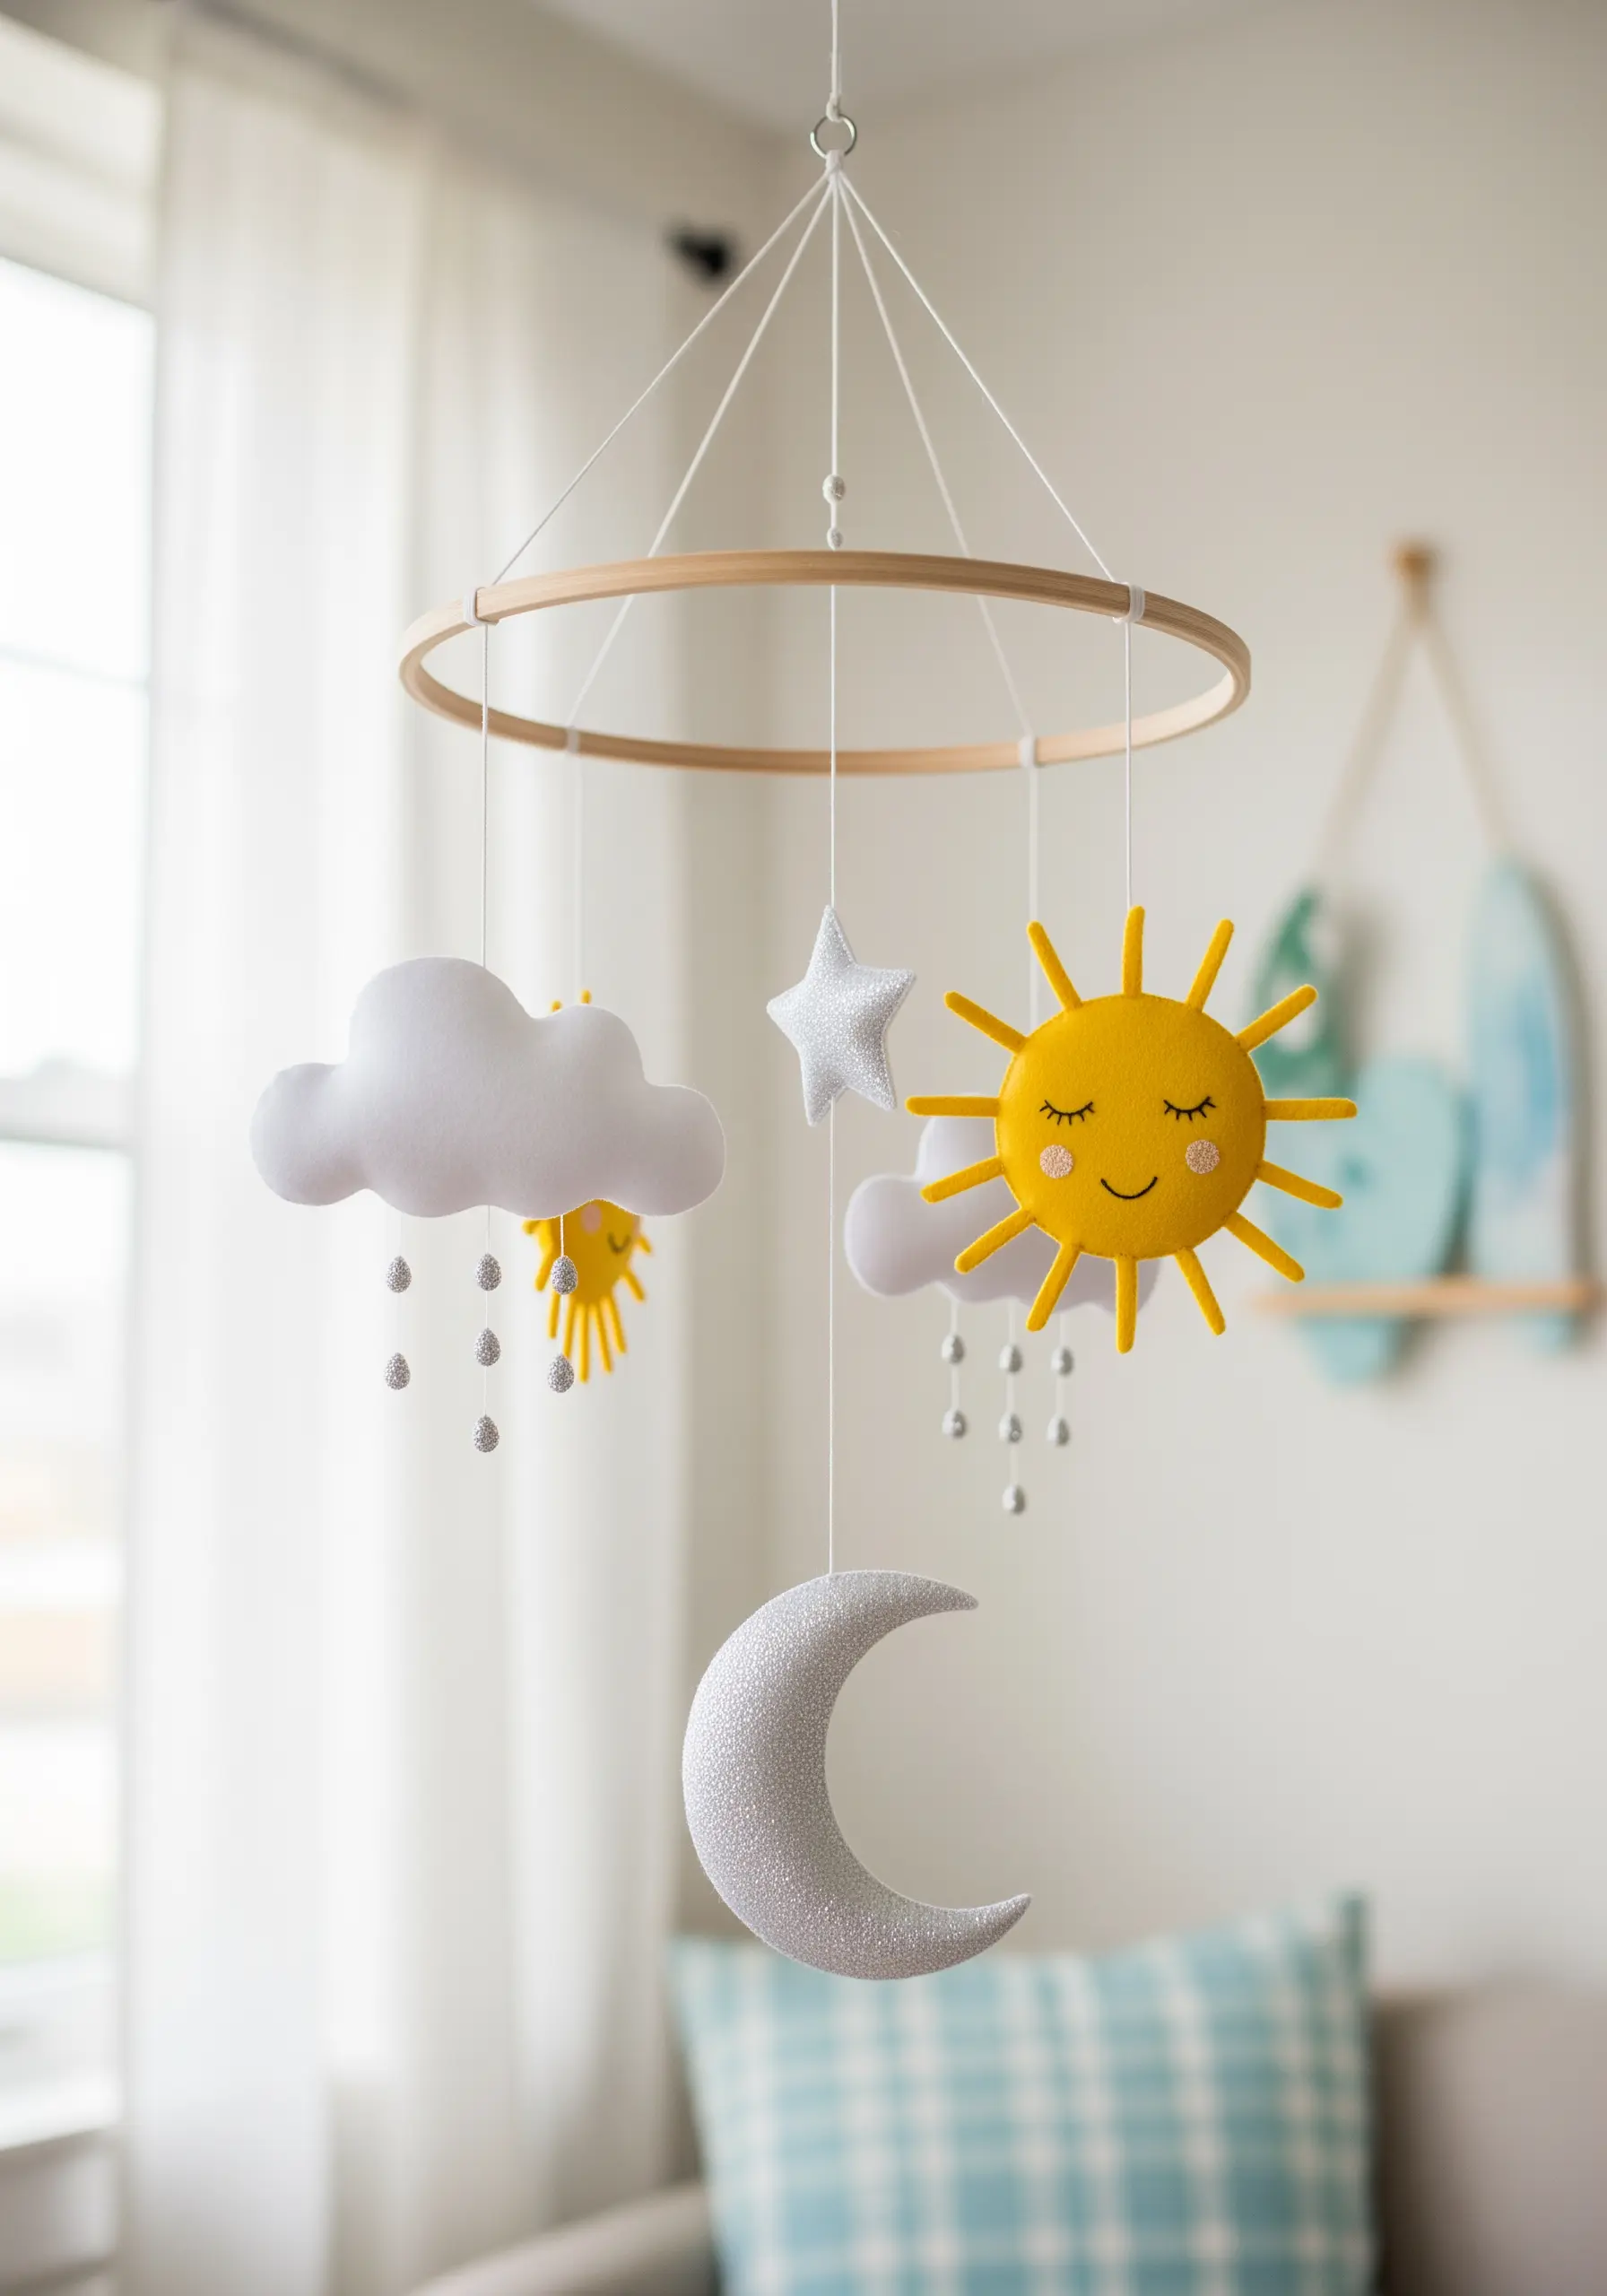
Bring your embroidery into the third dimension by creating soft felt sculptures for a nursery mobile.
Cut two identical pieces of felt for each shape, and add simple embroidered details—like a backstitched smile or French knot eyes—to the top piece first.
Join the two pieces with a decorative blanket stitch around the edge, leaving a small gap to add stuffing before stitching it closed.
The blanket stitch provides a clean, handcrafted finish perfect for adorable forest animal embroidery ideas.
15. Exploring Stumpwork for 3D Nature Scenes
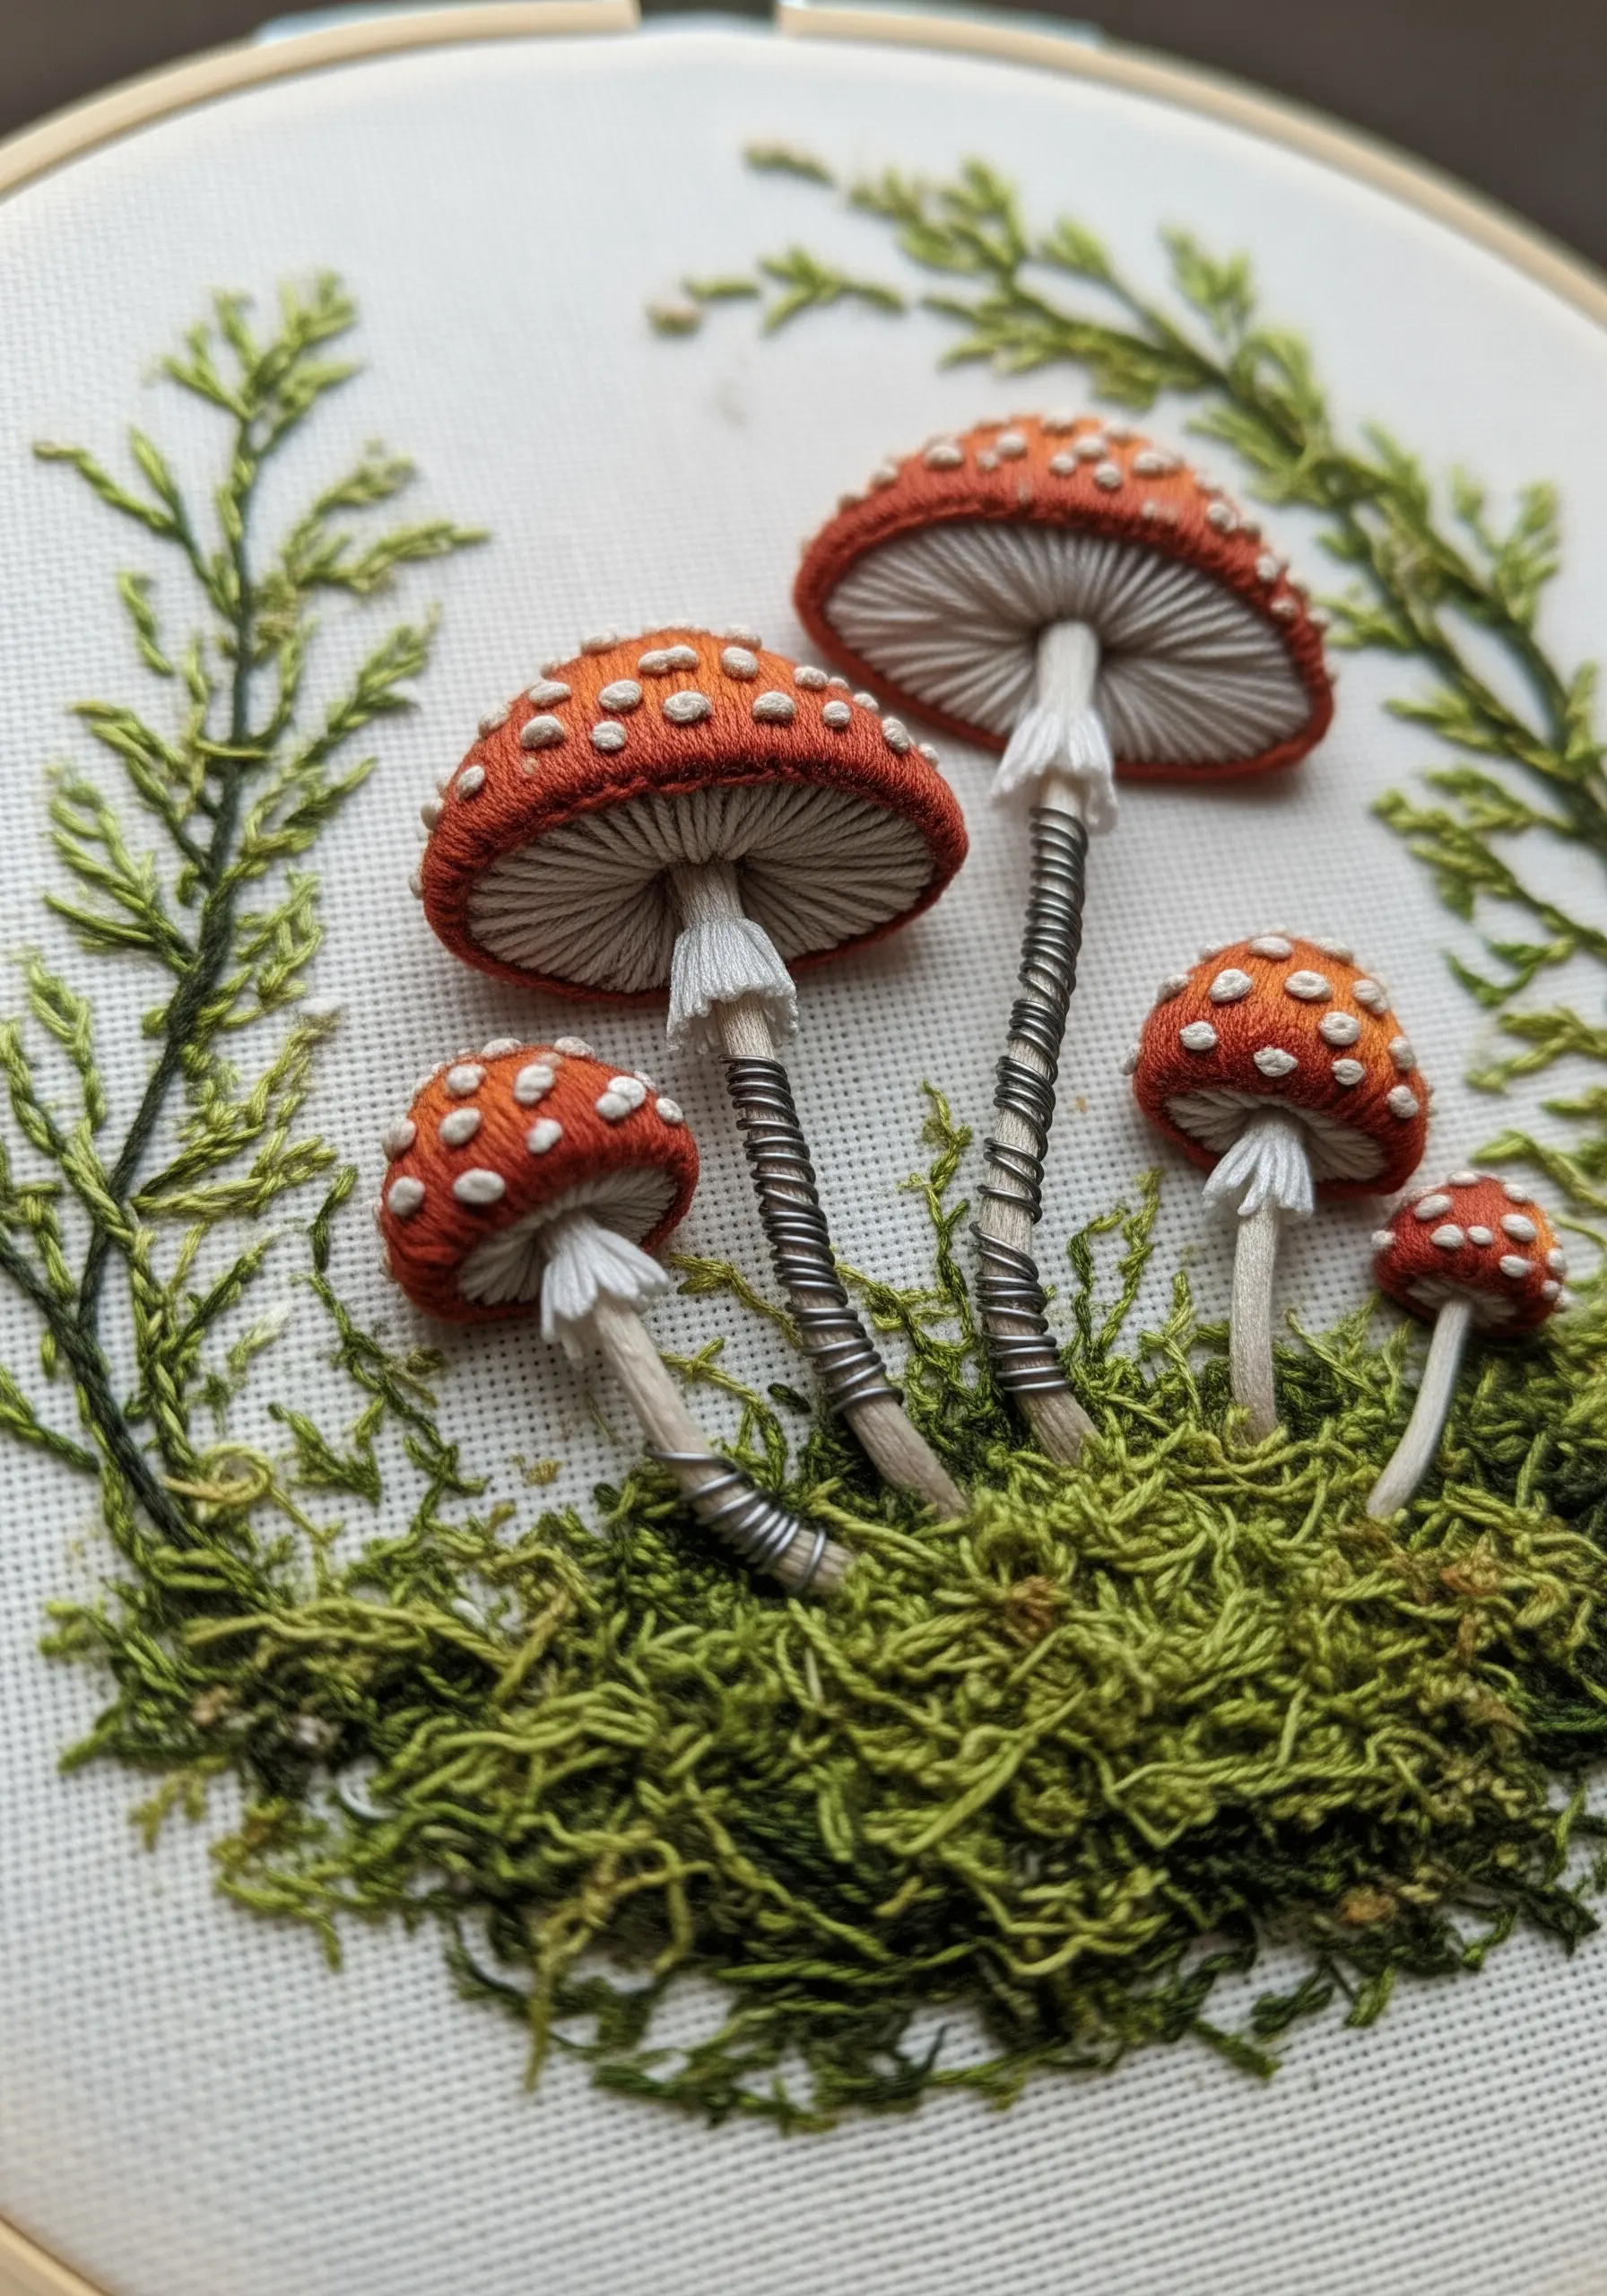
Stumpwork is a dimensional embroidery technique that allows elements of your design to lift off the fabric surface.
To create the mushroom caps, build a padded base with layers of felt, then cover it completely with satin stitch.
For the stems, wrap thread tightly around a piece of flexible wire, which allows you to bend them into a natural position.
A dense field of French knots in varied greens makes for a perfect mossy ground, resulting in embroidery ideas inspired by tree bark and leaves that feel incredibly lifelike.
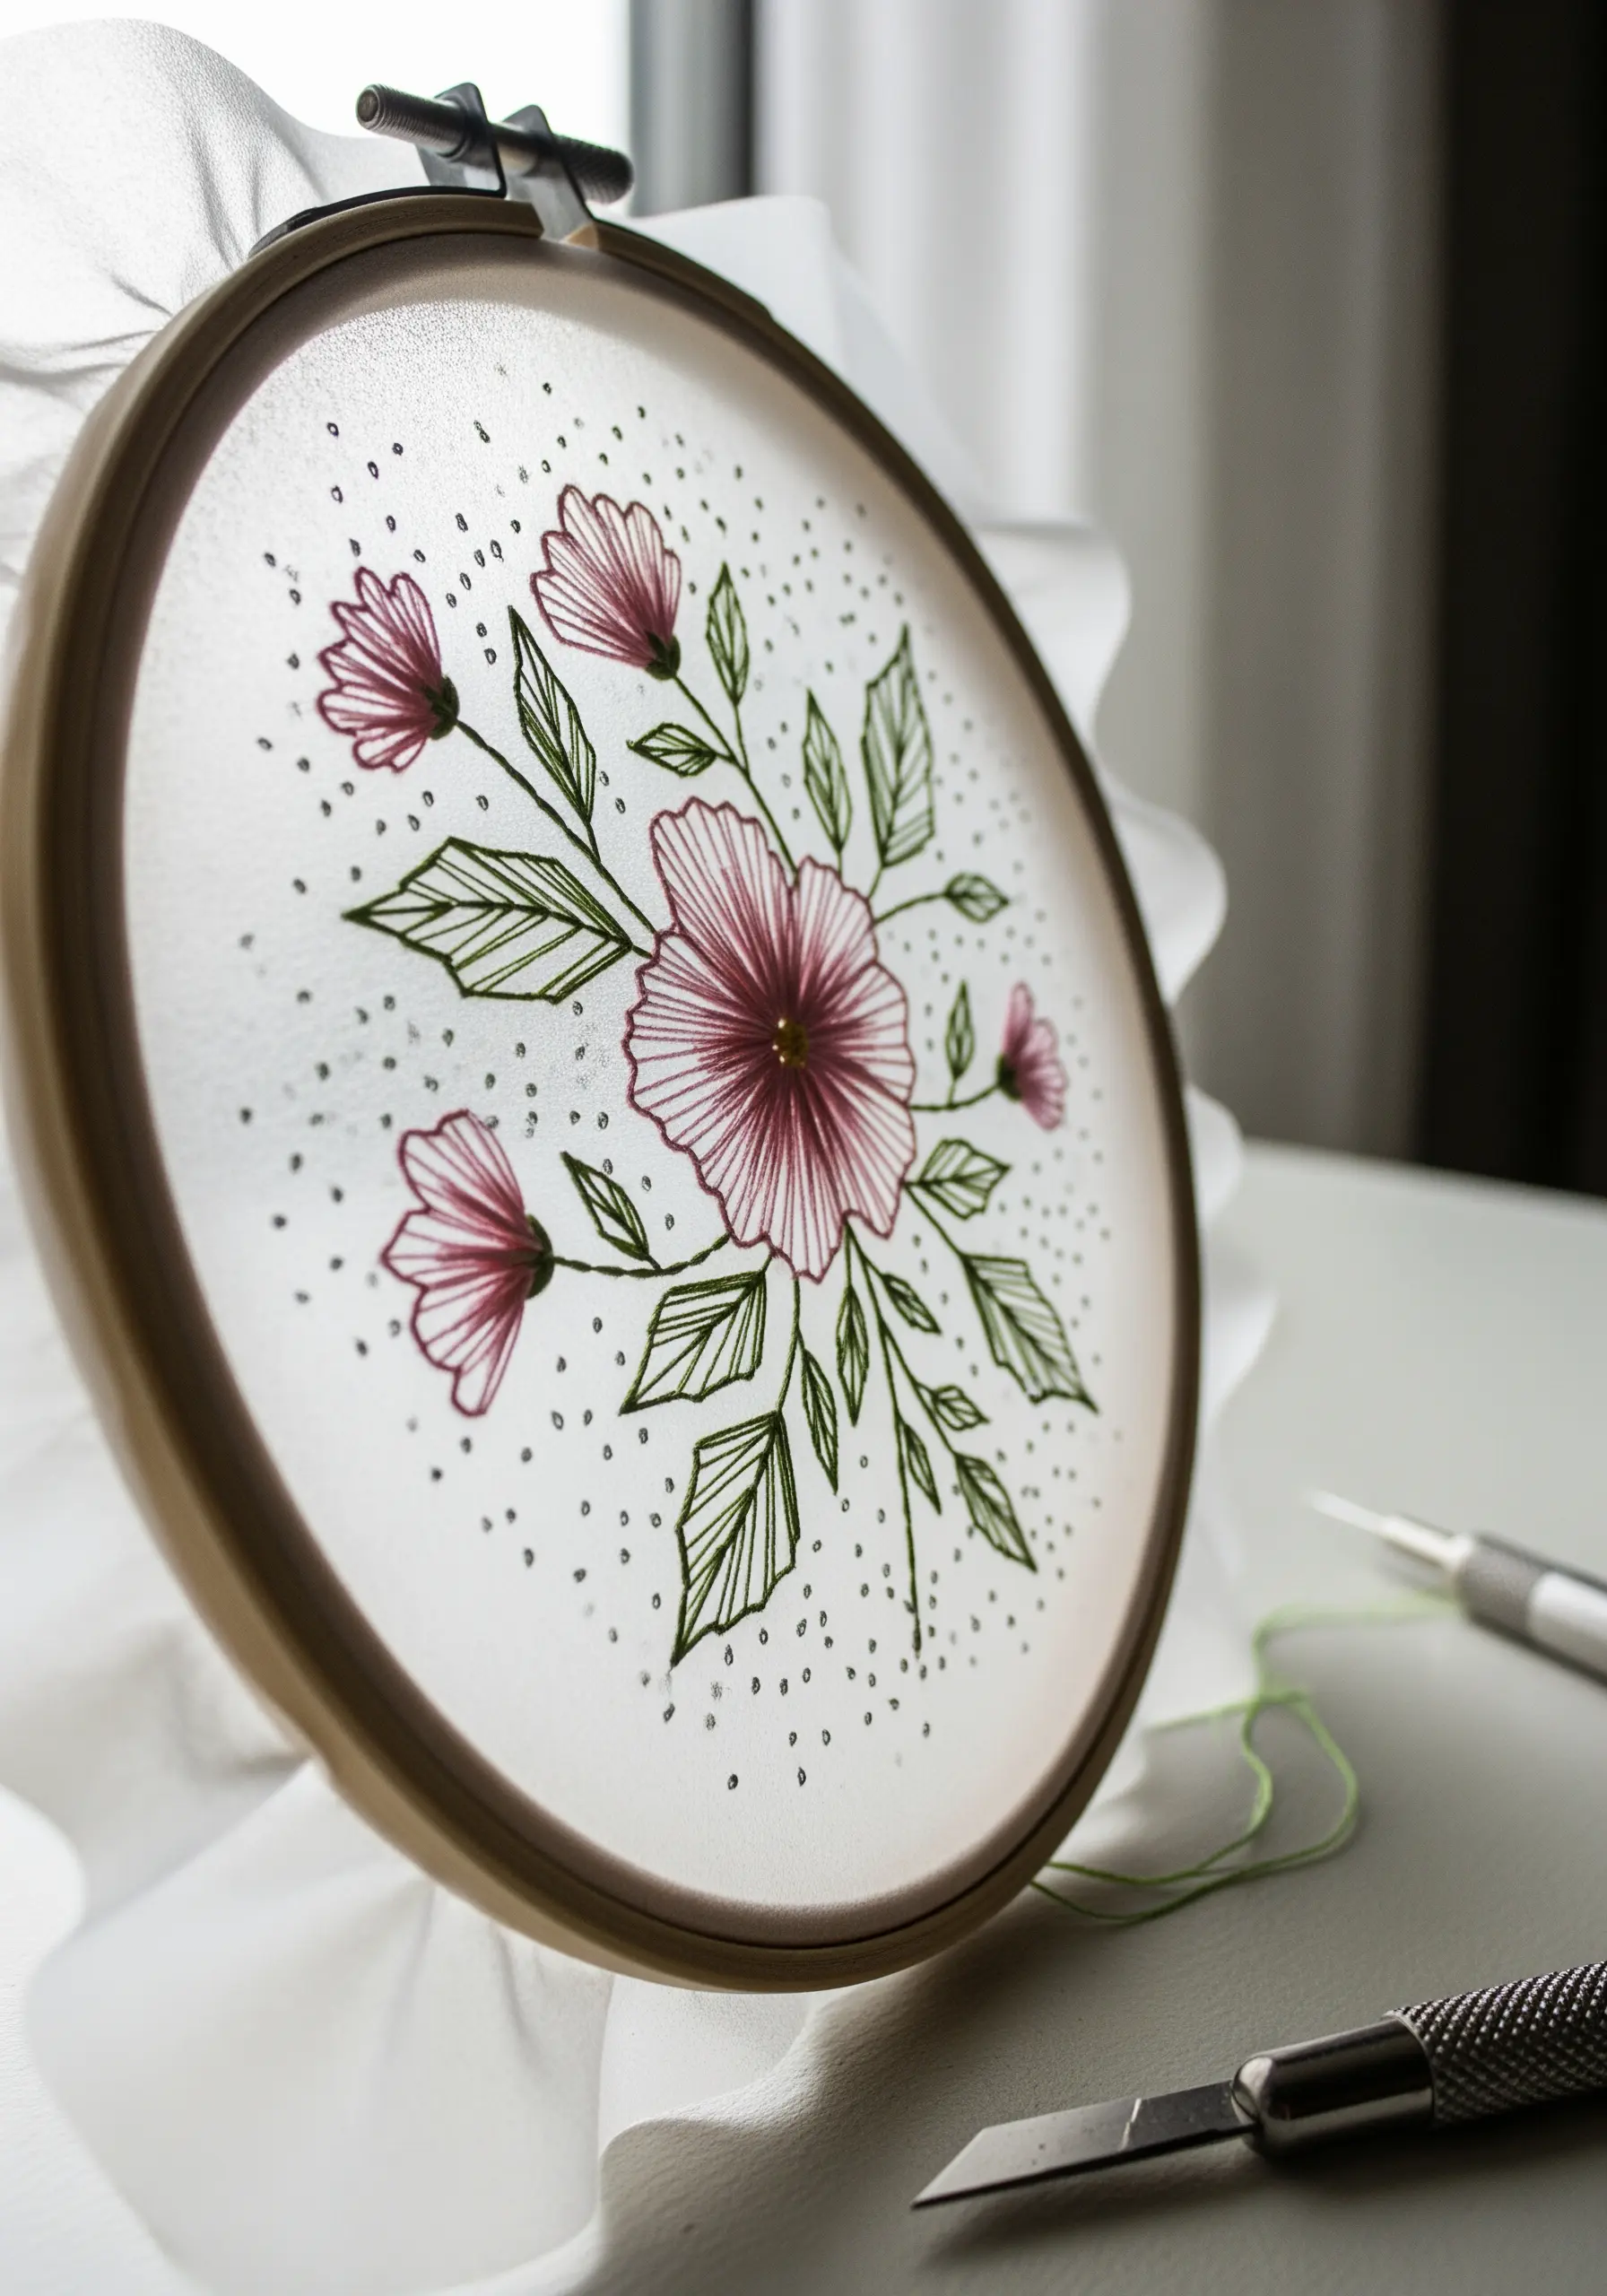
16. The Polished Elegance of Minimalist Line Art
A stunning piece doesn’t always require complex stitches; sometimes, a strong design and a clean line are all you need.
For a delicate floral wreath like this, a simple backstitch or stem stitch provides a crisp, continuous outline.
The secret to a polished look is consistency in your stitch length and tension, which creates smooth, graceful curves.
Use just two or three strands from a standard six-strand floss for a refined line that feels intentional and modern.
This project is one of many minimalist embroidery designs inspired by nature that values simplicity.
17. Visible Mending as a Thoughtful Design Statement
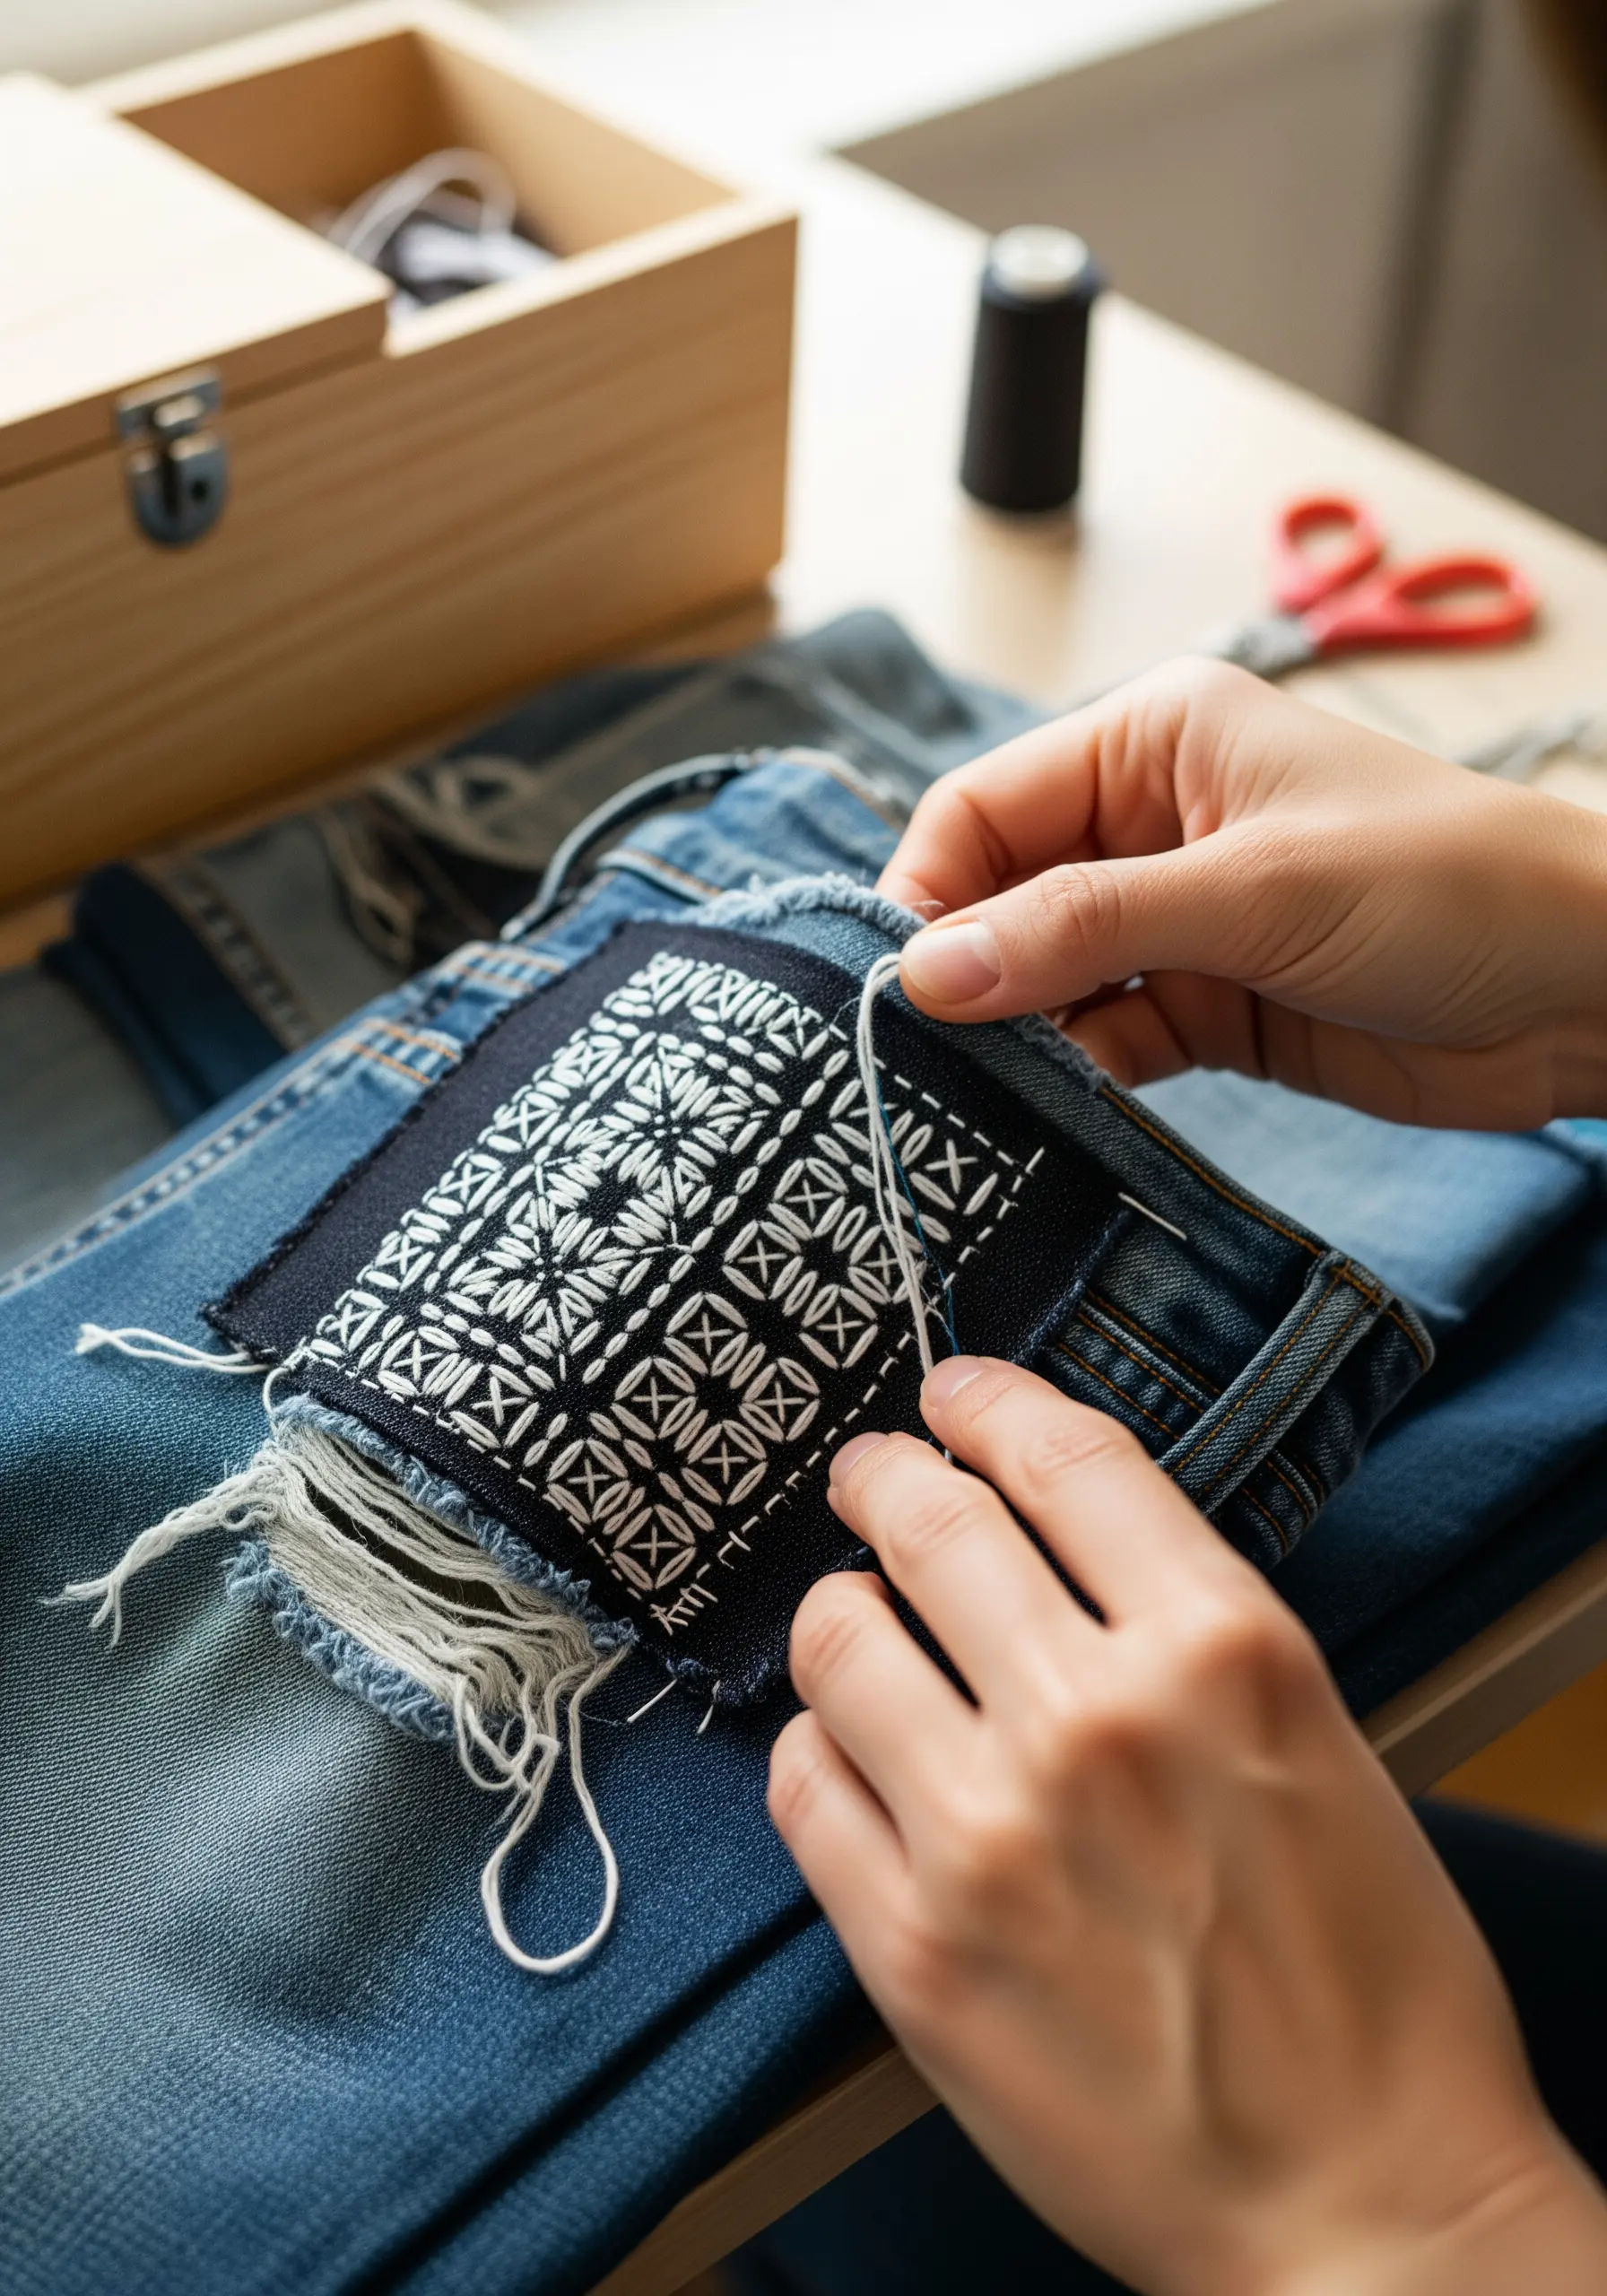
Instead of hiding a tear, celebrate it with the Japanese-inspired art of visible mending.
This Sashiko-style technique uses a simple, strong running stitch and a contrasting thread to create beautiful geometric patterns over a patch.
The beauty is in the meditative rhythm of the stitching and the clean, graphic result.
It’s a sustainable practice that honors a garment’s history and allows you to reuse old clothes in artistic ways.
18. Creating Statement Art with Large-Scale Embroidery

To tackle a large-scale project like a world map, careful preparation is key.
Transfer your design onto a large piece of heavy canvas using a projector for accuracy or by piecing together carbon paper transfers.
Use a simple backstitch for the outlines to maintain a clean, graphic aesthetic that won’t overwhelm the space.
You can then personalize it over time, turning it into a living piece of art that documents your travels and stories.
These large-scale embroidery tapestries are true conversation starters.
19. Fine-Scale Florals for Functional Art Pieces
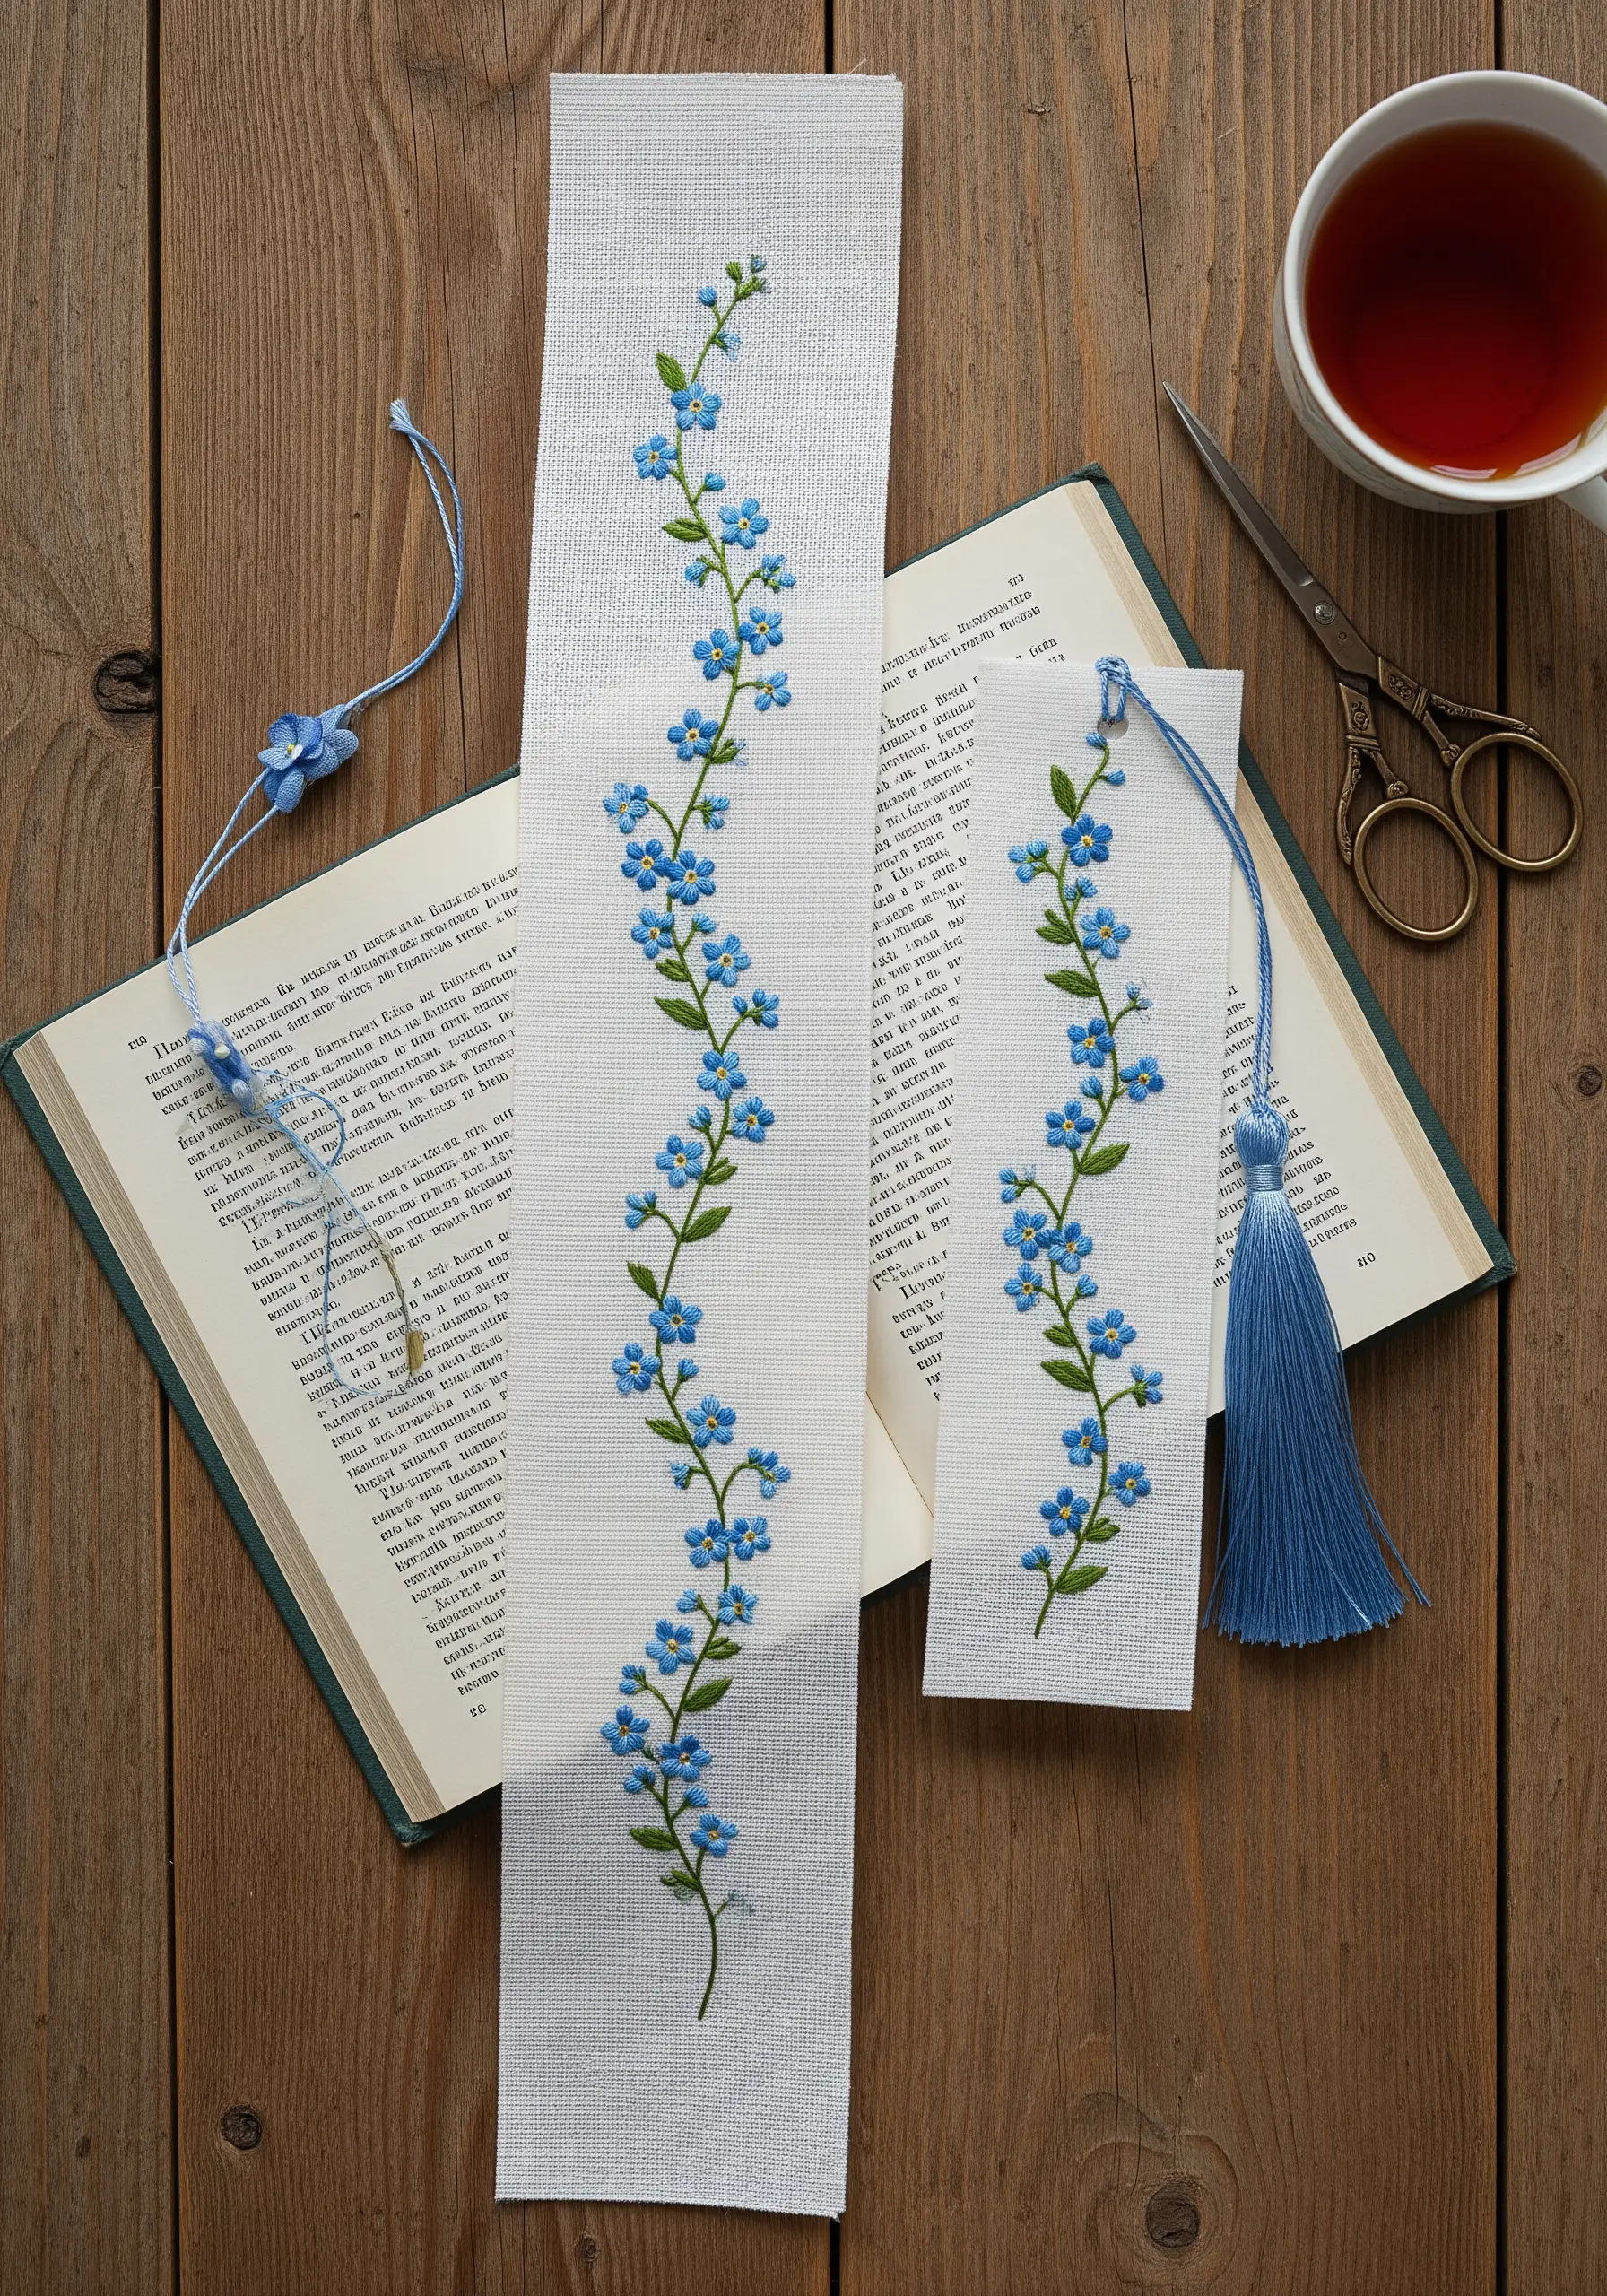
When working on a small, narrow item like a bookmark, your choice of fabric is crucial for achieving fine detail.
Select a fabric with a high thread count, like evenweave or linen, which provides a stable grid for precise, tiny stitches.
For delicate forget-me-not blossoms, use a single strand of floss to create lazy daisy stitches, with a single French knot in the center.
These DIY cozy embroidery bookmarks are a perfect way to practice precision on a small scale.
20. Customizing a Lampshade for a Warm, Artistic Glow
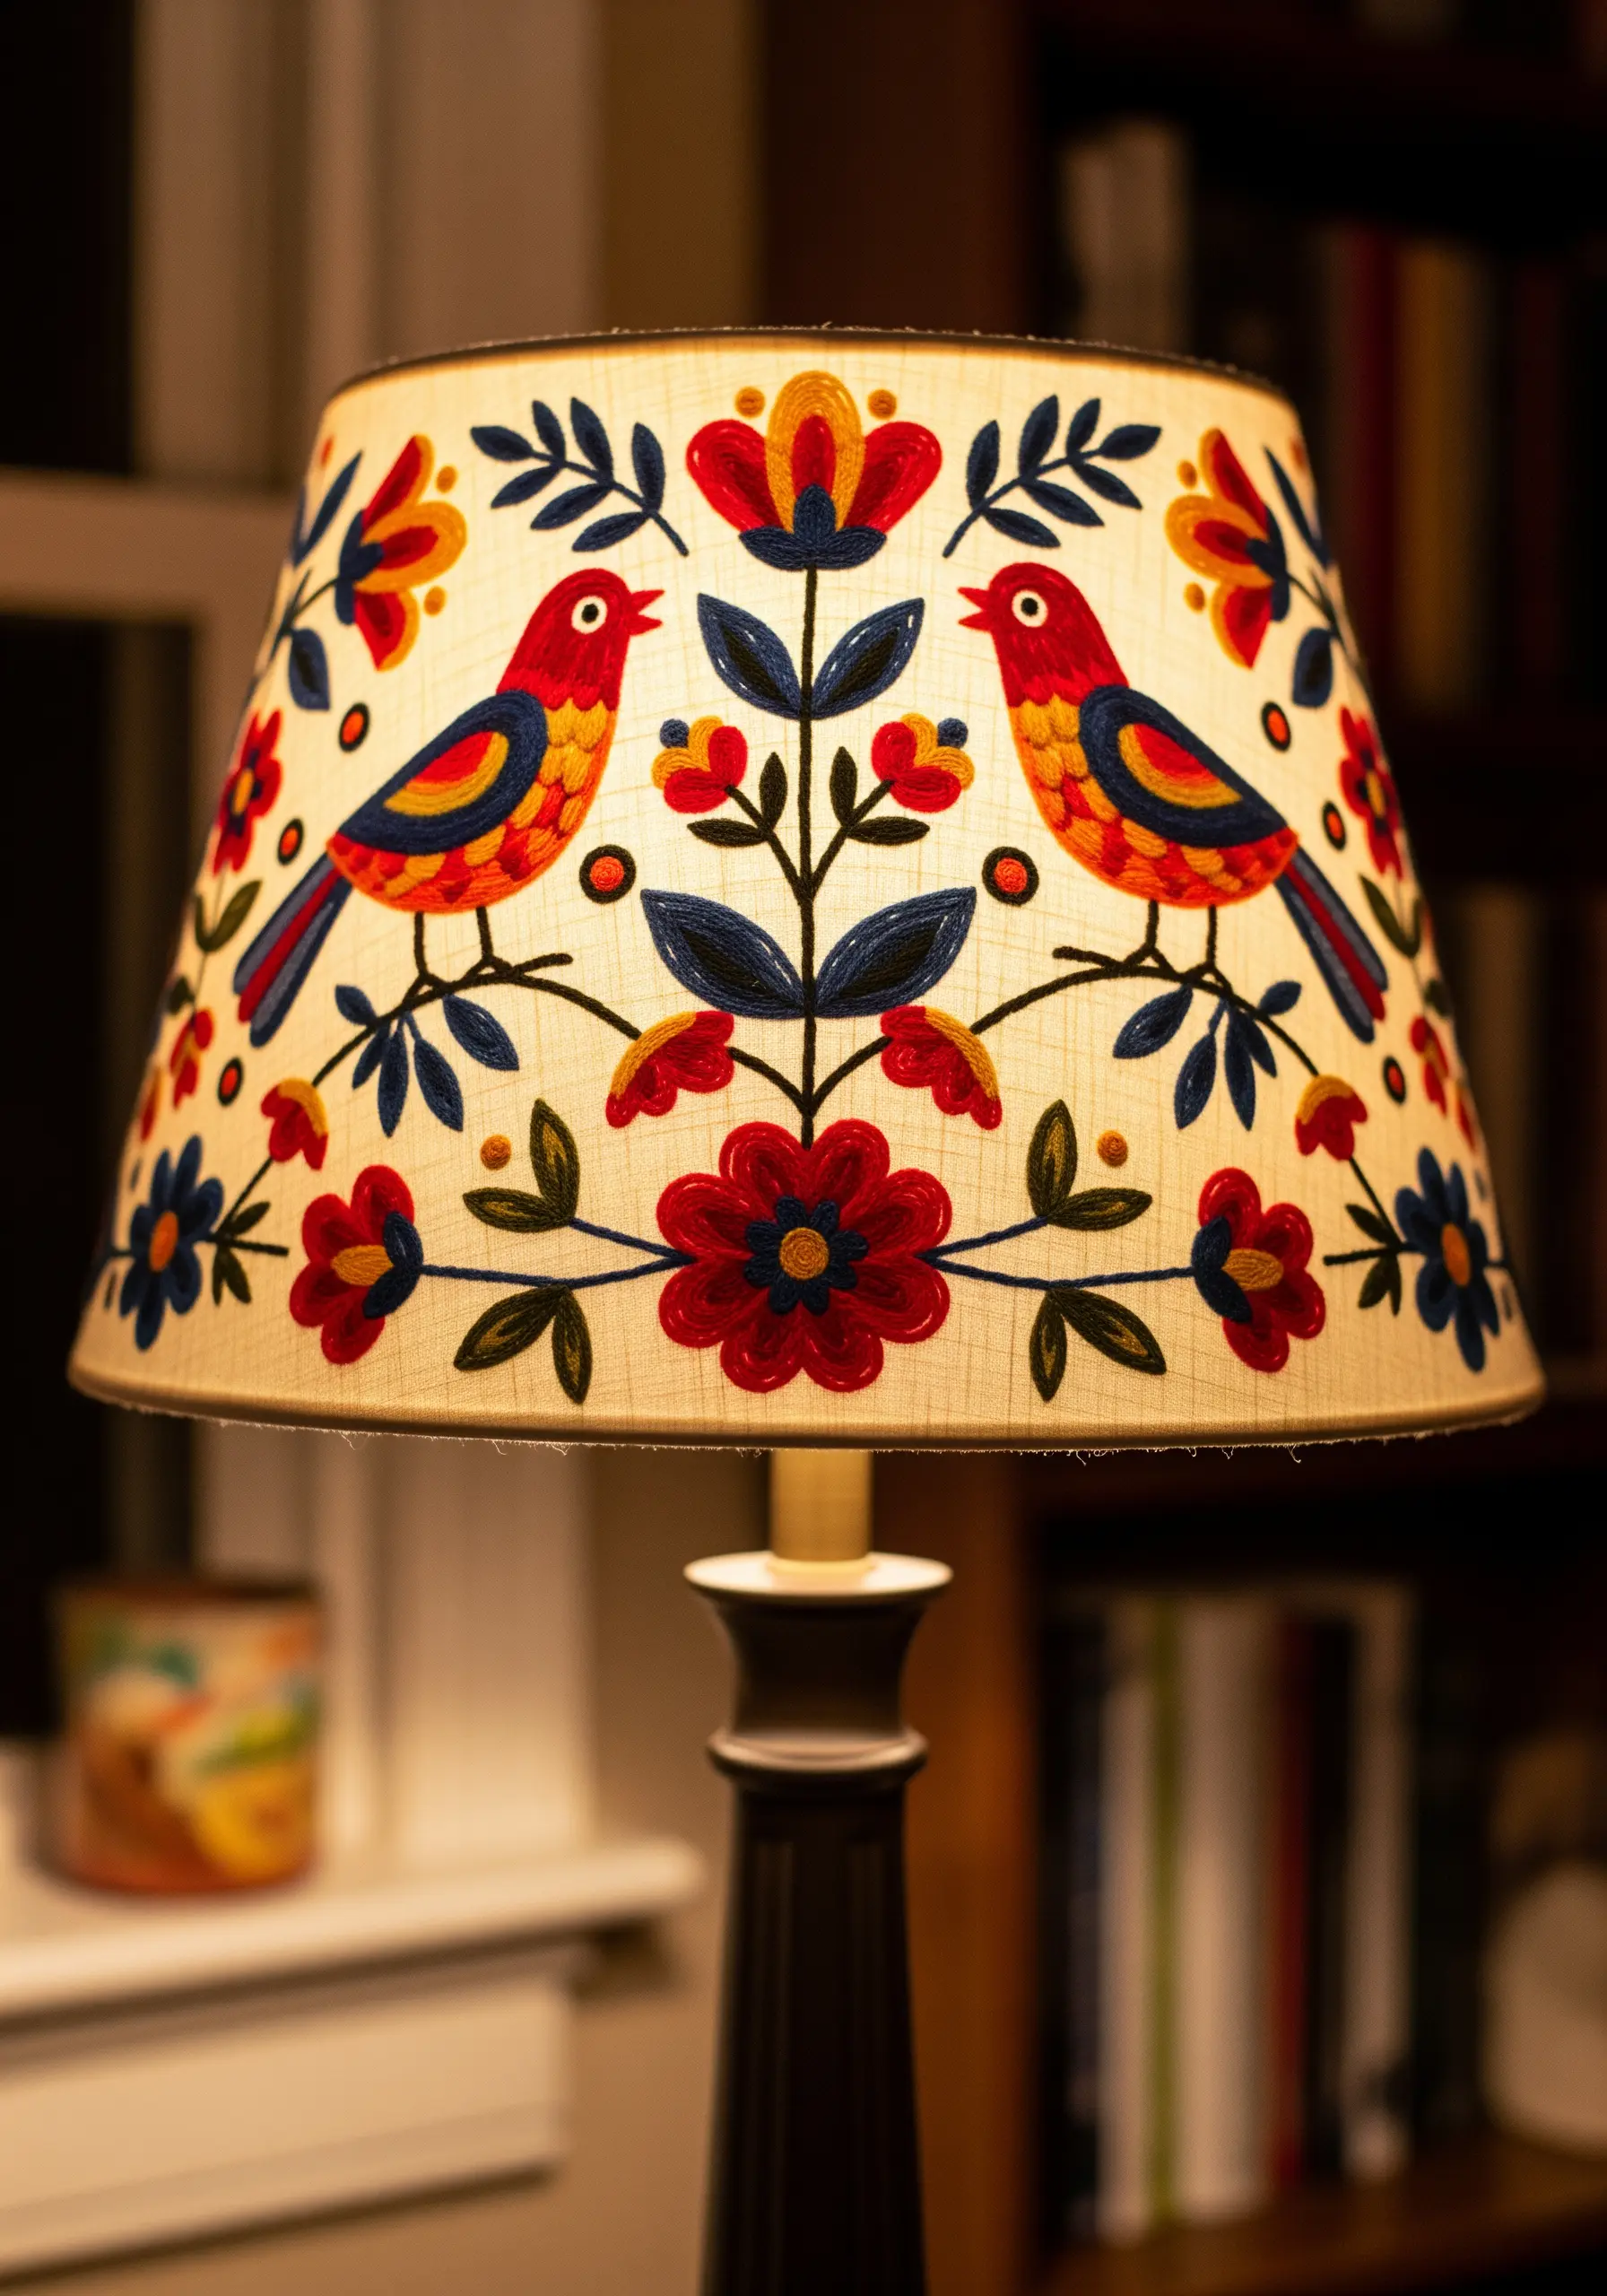
Transform a plain fabric lampshade into a unique piece of functional art.
Since you can’t use a hoop, you’ll need to stitch carefully by hand, holding the shade steady as you work.
Lightly trace your design onto the fabric and use bold fill stitches, like satin stitch or fishbone stitch, with a vibrant, high-contrast thread palette.
When the lamp is turned on, the light will illuminate the threads from behind, creating a stunning, warm glow that makes the design come alive and helps to refresh your apartment decor without buying new furniture.
21. Exploring Luxe Texture with Goldwork and Beading
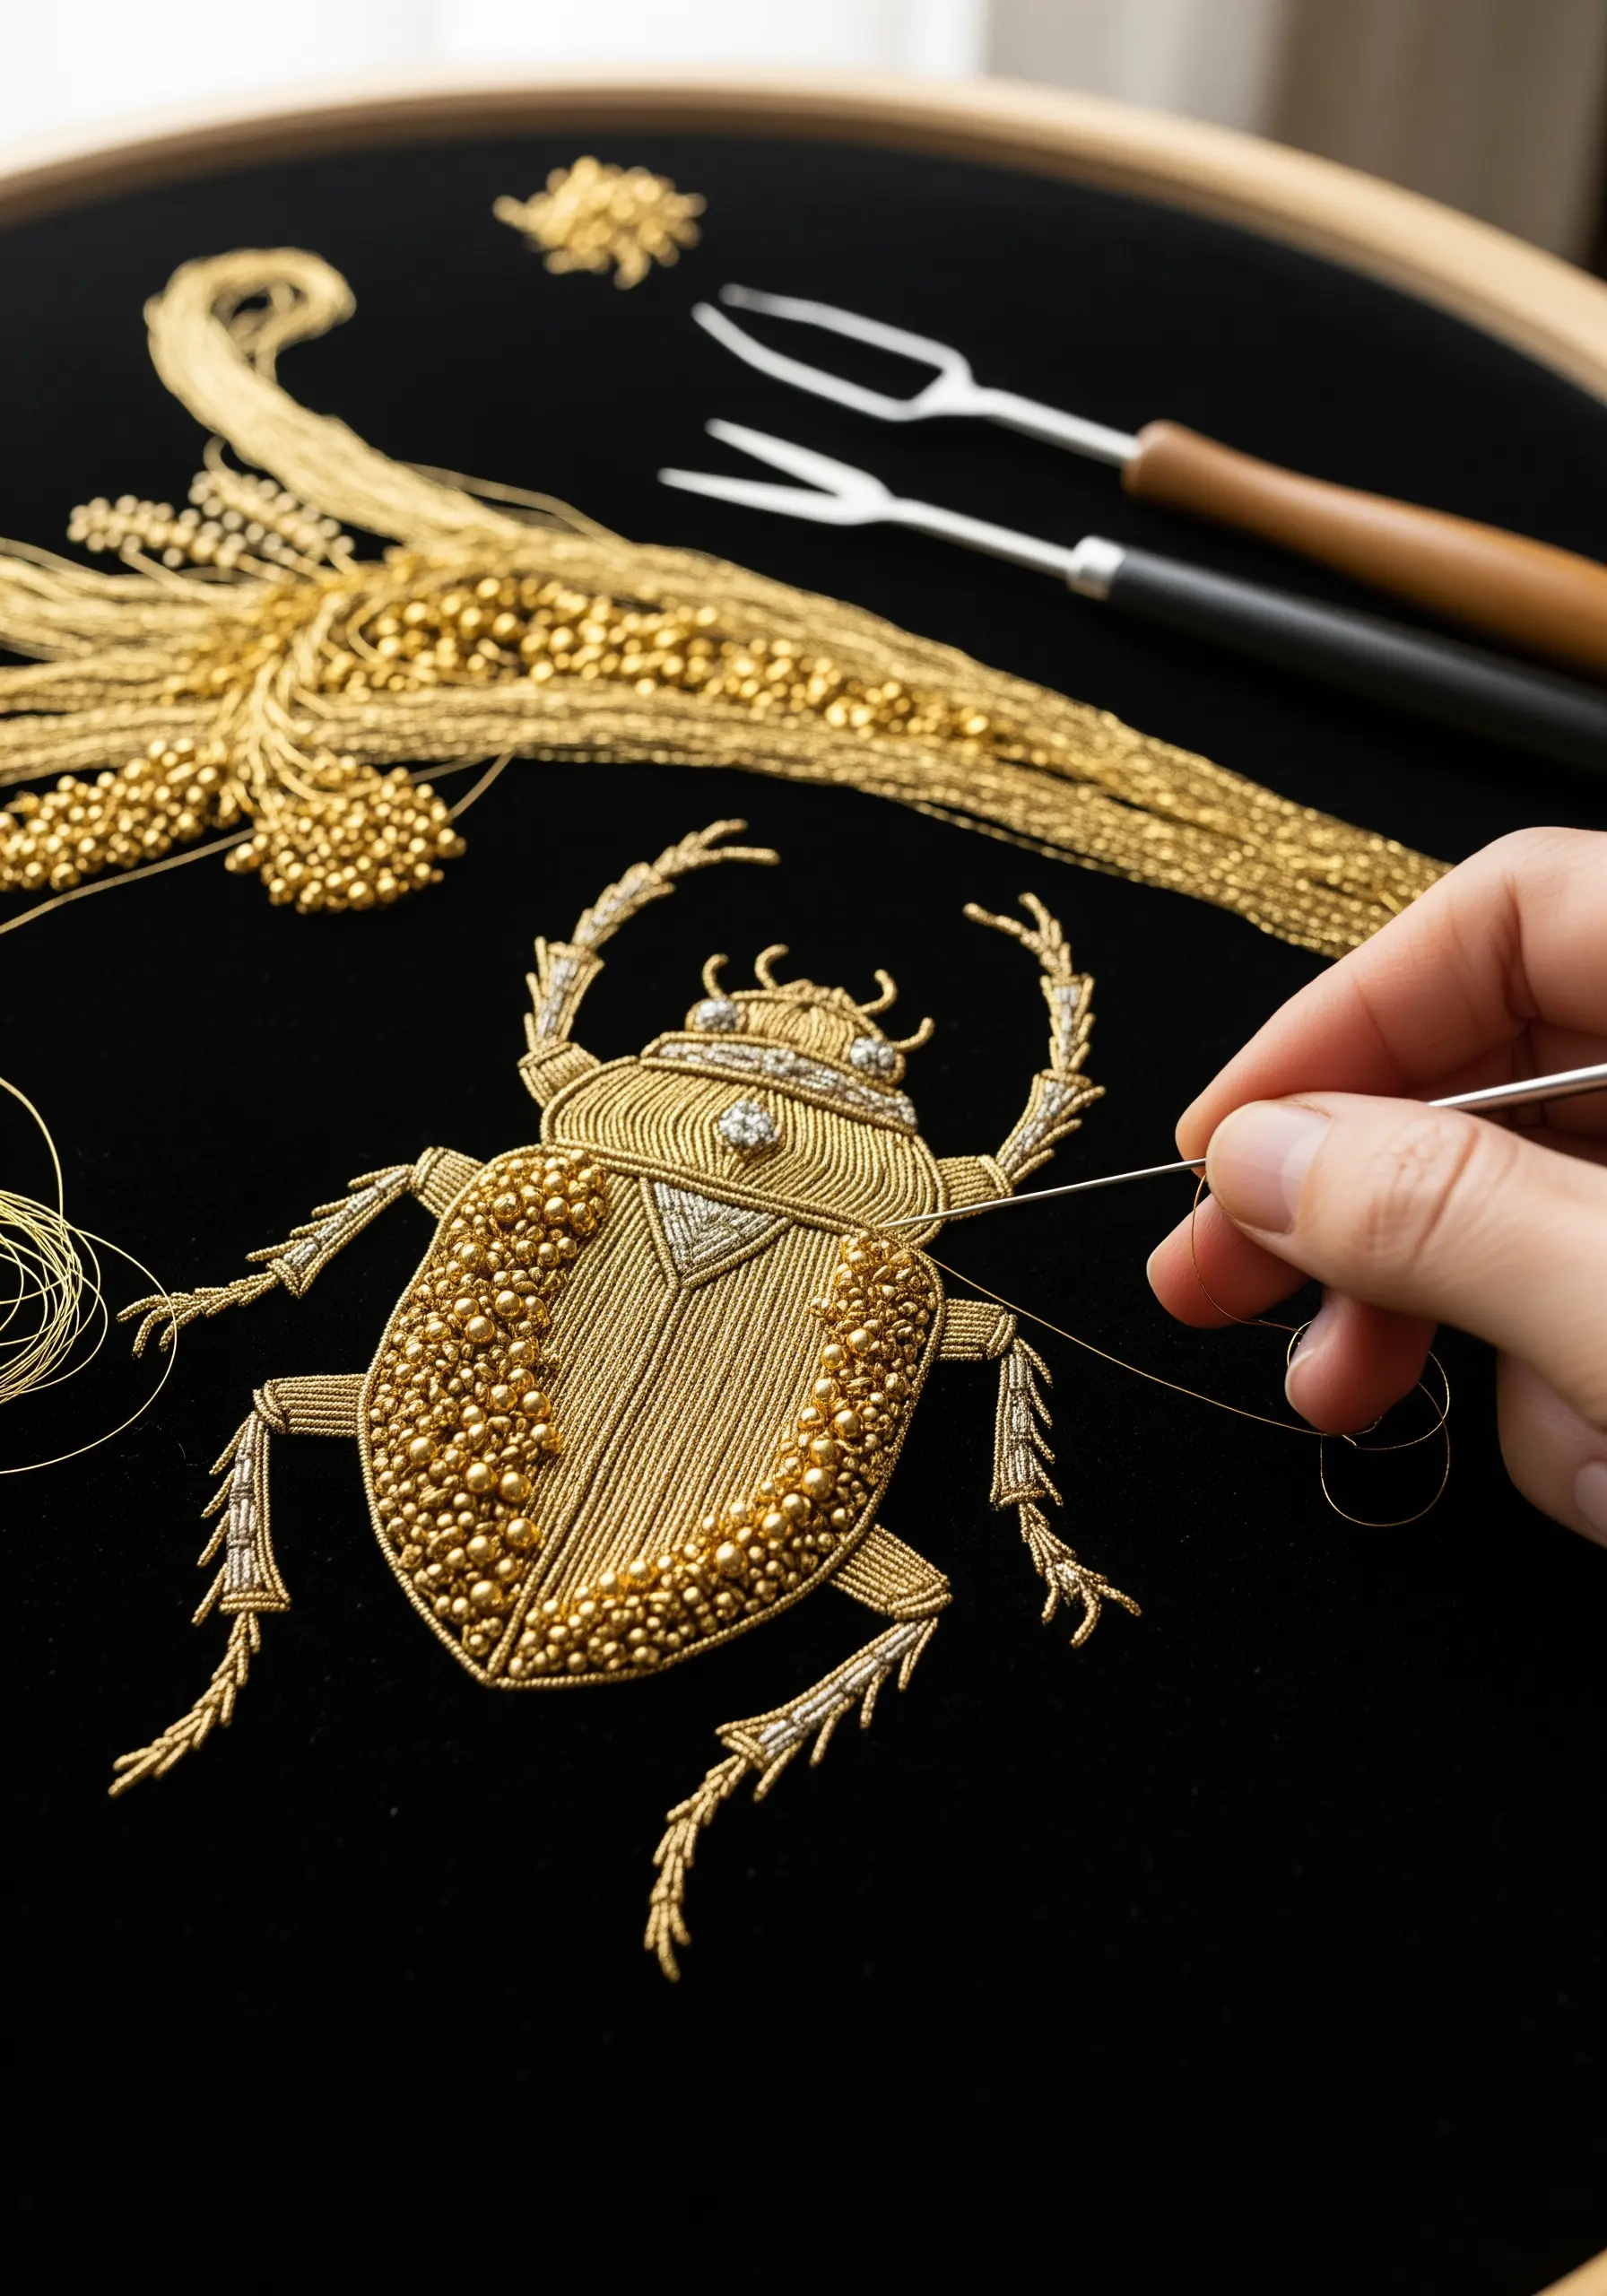
Goldwork is the art of embroidering with metal threads, creating an opulent, raised effect that catches the light beautifully.
Combine these specialty threads with beadwork for an even more dramatic and tactile result.
Outline your design using a metallic passing thread, then fill sections with tightly packed seed beads for a rich, caviar-like texture.
The contrast between the linear shine of the threads and the clustered sparkle of beads elevates your work into a piece of textile jewelry, perfect for gold thread luxury wall art projects.
22. Achieving Smooth Color Gradients in Lettering
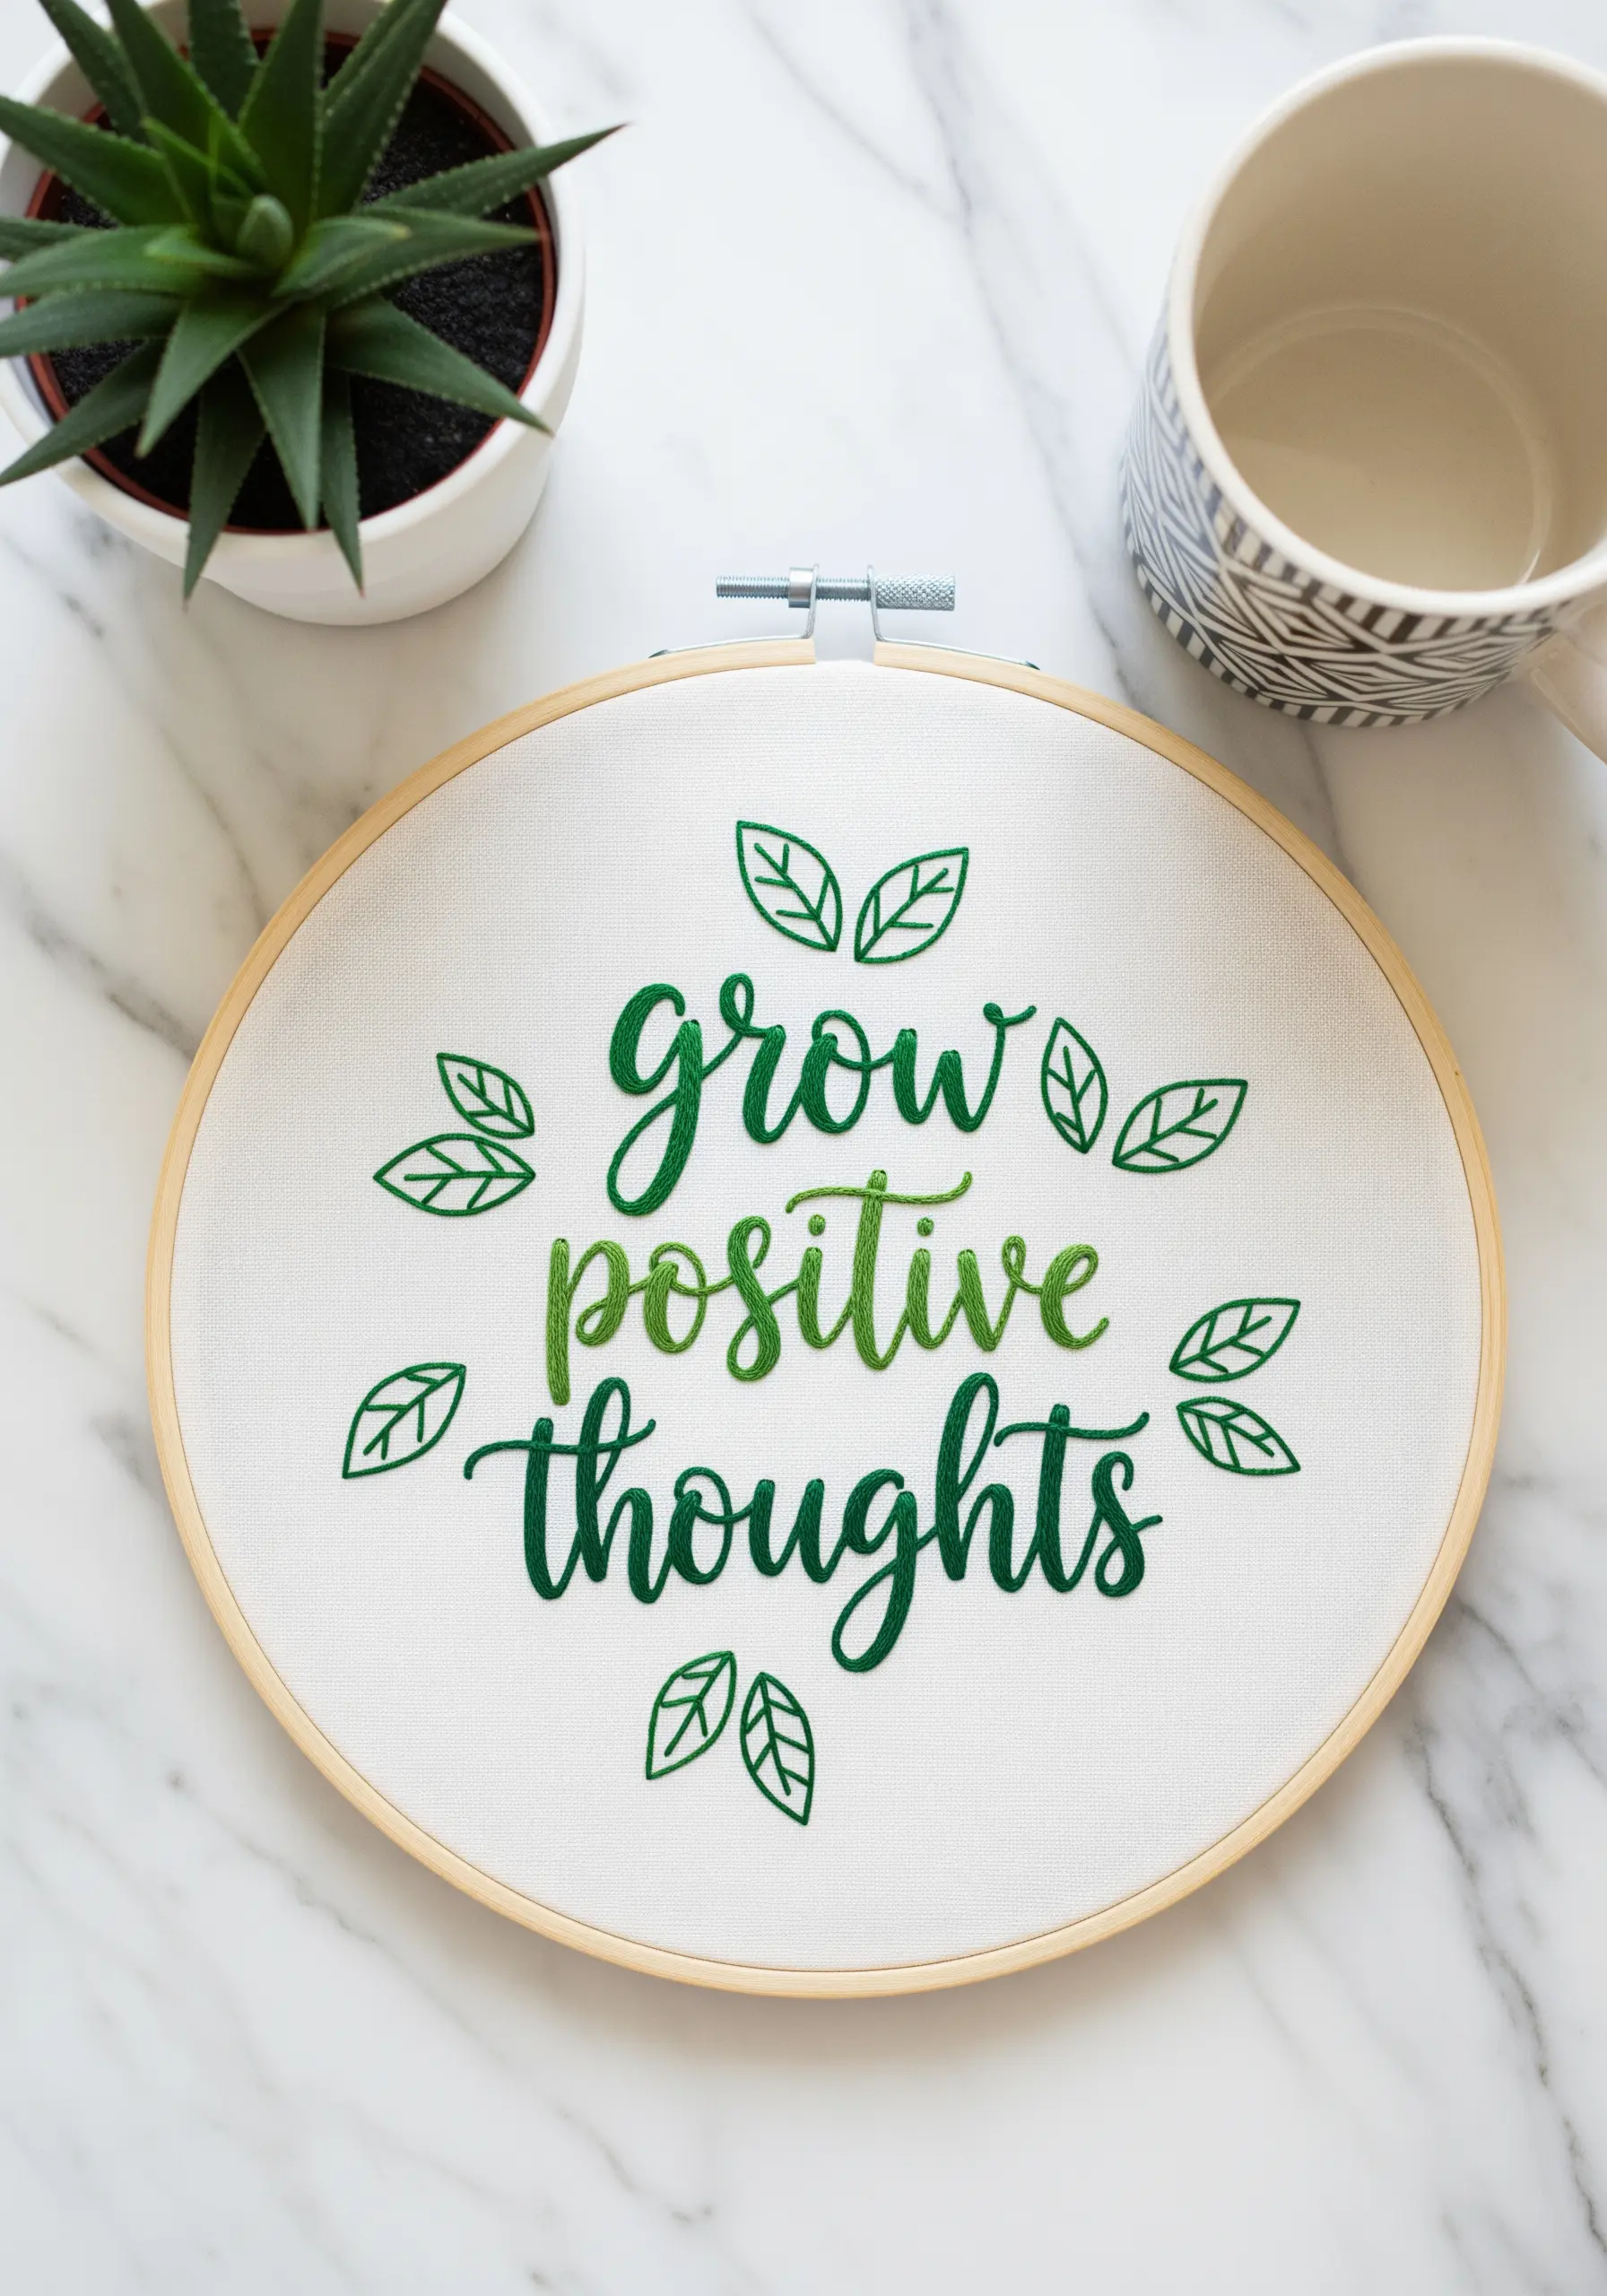
Create a seamless ombré effect in your embroidered text by blending threads at the strand level.
For the transition zone, use two strands of floss in your needle—one of the first color and one of the second.
Work this blended section between solid blocks of each color, using a smooth satin stitch to allow the shades to melt into one another.
This technique gives your lettering a professional, polished gradient that looks far more sophisticated than simple color blocking, making your inspirational quote embroidery hoops stand out.
23. Adding Garden Charm to Kitchen Linens
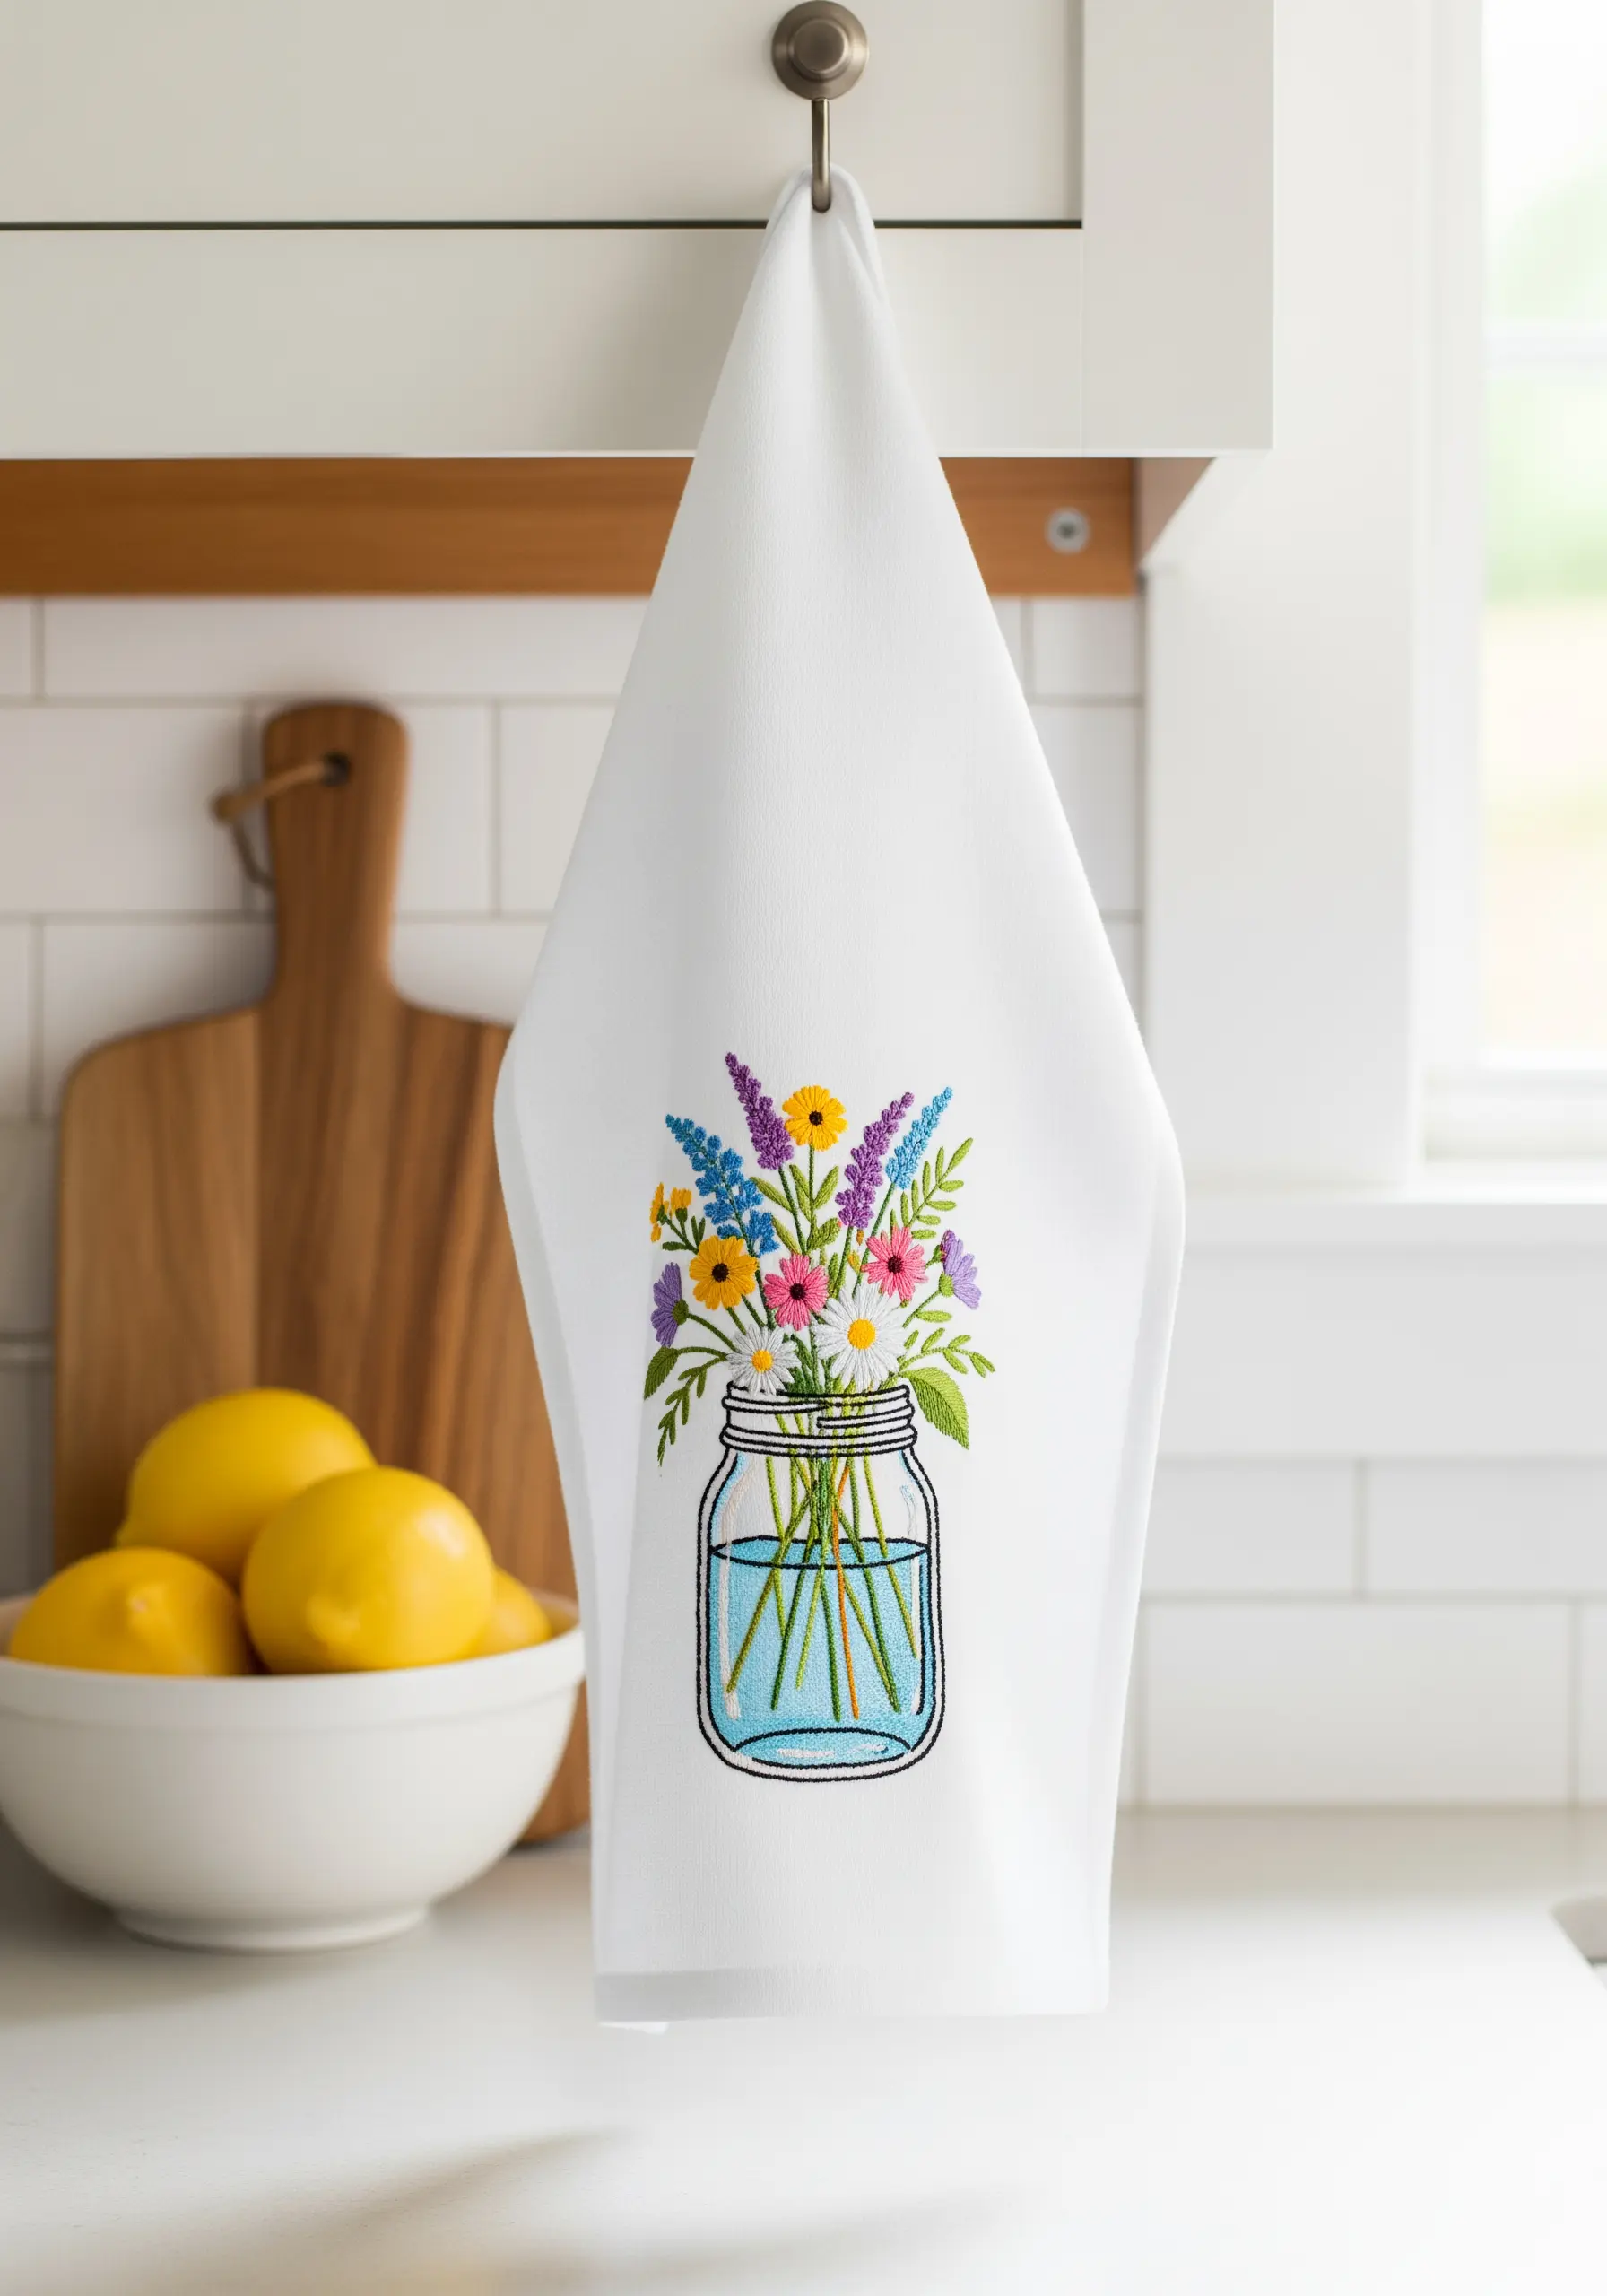
Embellish a simple cotton tea towel with a vibrant wildflower bouquet to bring a touch of lasting beauty to your kitchen.
To ensure your work is durable enough for use and washing, secure the thread tails meticulously on the back by weaving them under existing stitches.
Using a tear-away stabilizer during stitching will prevent the fabric from puckering and keep your stitches even.
A mix of simple stitches—lazy daisy, French knots, and stem stitch—gives each flower its own unique texture and personality, turning your hoop into a miniature meadow from one of these wildflower thread palettes.
24. Creating Dimensional Florals for Wearable Art

For embellishments on items that see a lot of wear, like a sun hat, durability is just as important as beauty.
Create your flowers as separate, sturdy patches on a felt base first.
Use dimensional stitches like the woven wheel for roses or layered detached chain stitches for hibiscus petals to give them a 3D quality.
This allows you to perfect your stitching on a flat, stable surface before securely sewing the finished motifs onto the challenging curve of the hat. This is perfect for tropical flower designs for turning beach towels and summer hats into custom pieces.
25. Personalized Stitched Paper Gift Tags
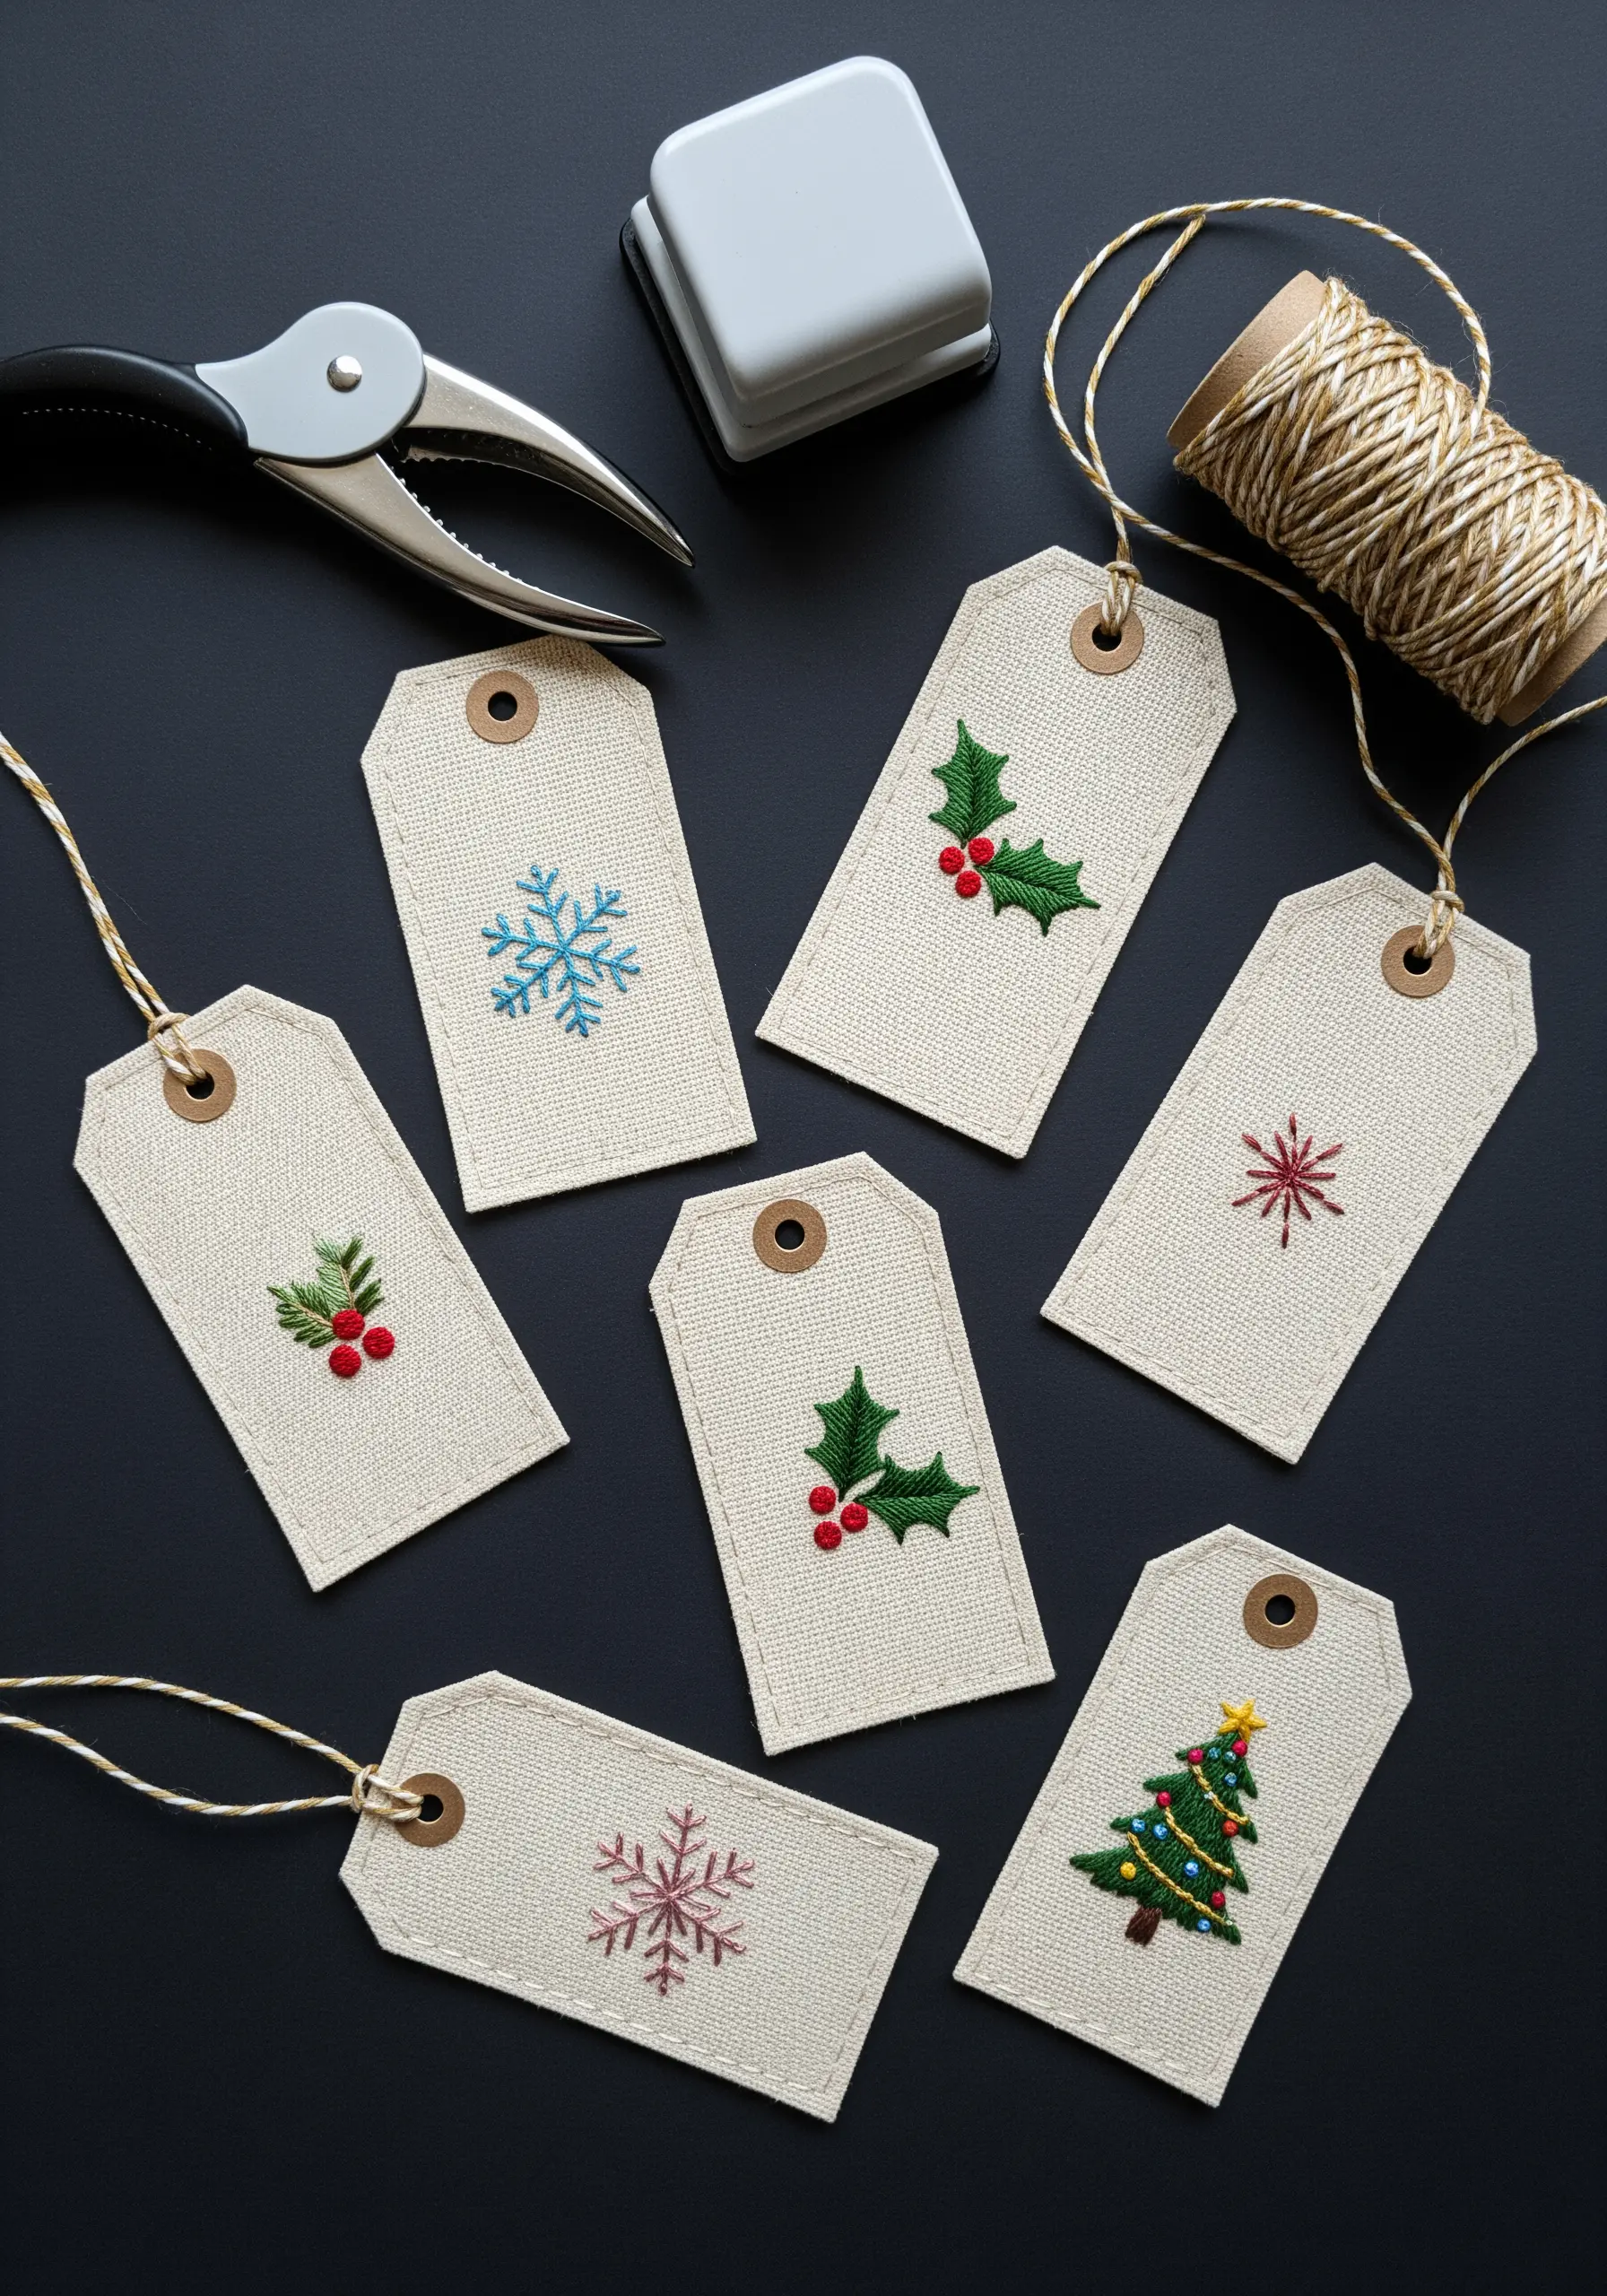
Embroidery isn’t limited to fabric; stitching on heavy cardstock or paper can add a wonderfully unexpected, handmade touch.
The trick is to pre-pierce your stitching holes along the design lines with a needle or awl to prevent the paper from tearing.
Use just one or two strands of floss and simple stitches like the backstitch or small satin stitches.
This technique transforms a simple gift tag into a keepsake ornament, perfect for DIY embroidered mixed-media cards.
26. Faux Macrame with a Couching Technique

You can achieve the bold, textural aesthetic of macrame on fabric without tying a single knot.
This technique is called couching: you lay down a thick cord or yarn onto the fabric surface in your desired pattern.
Then, you use a thinner, matching thread to secure the cord with small, discreet stitches placed at regular intervals.
It’s a fast and effective way to add high-impact texture to table runners and wall hangings, especially for boho-chic table linen embroidery patterns.
27. Blending Watercolor with Minimalist Stitching
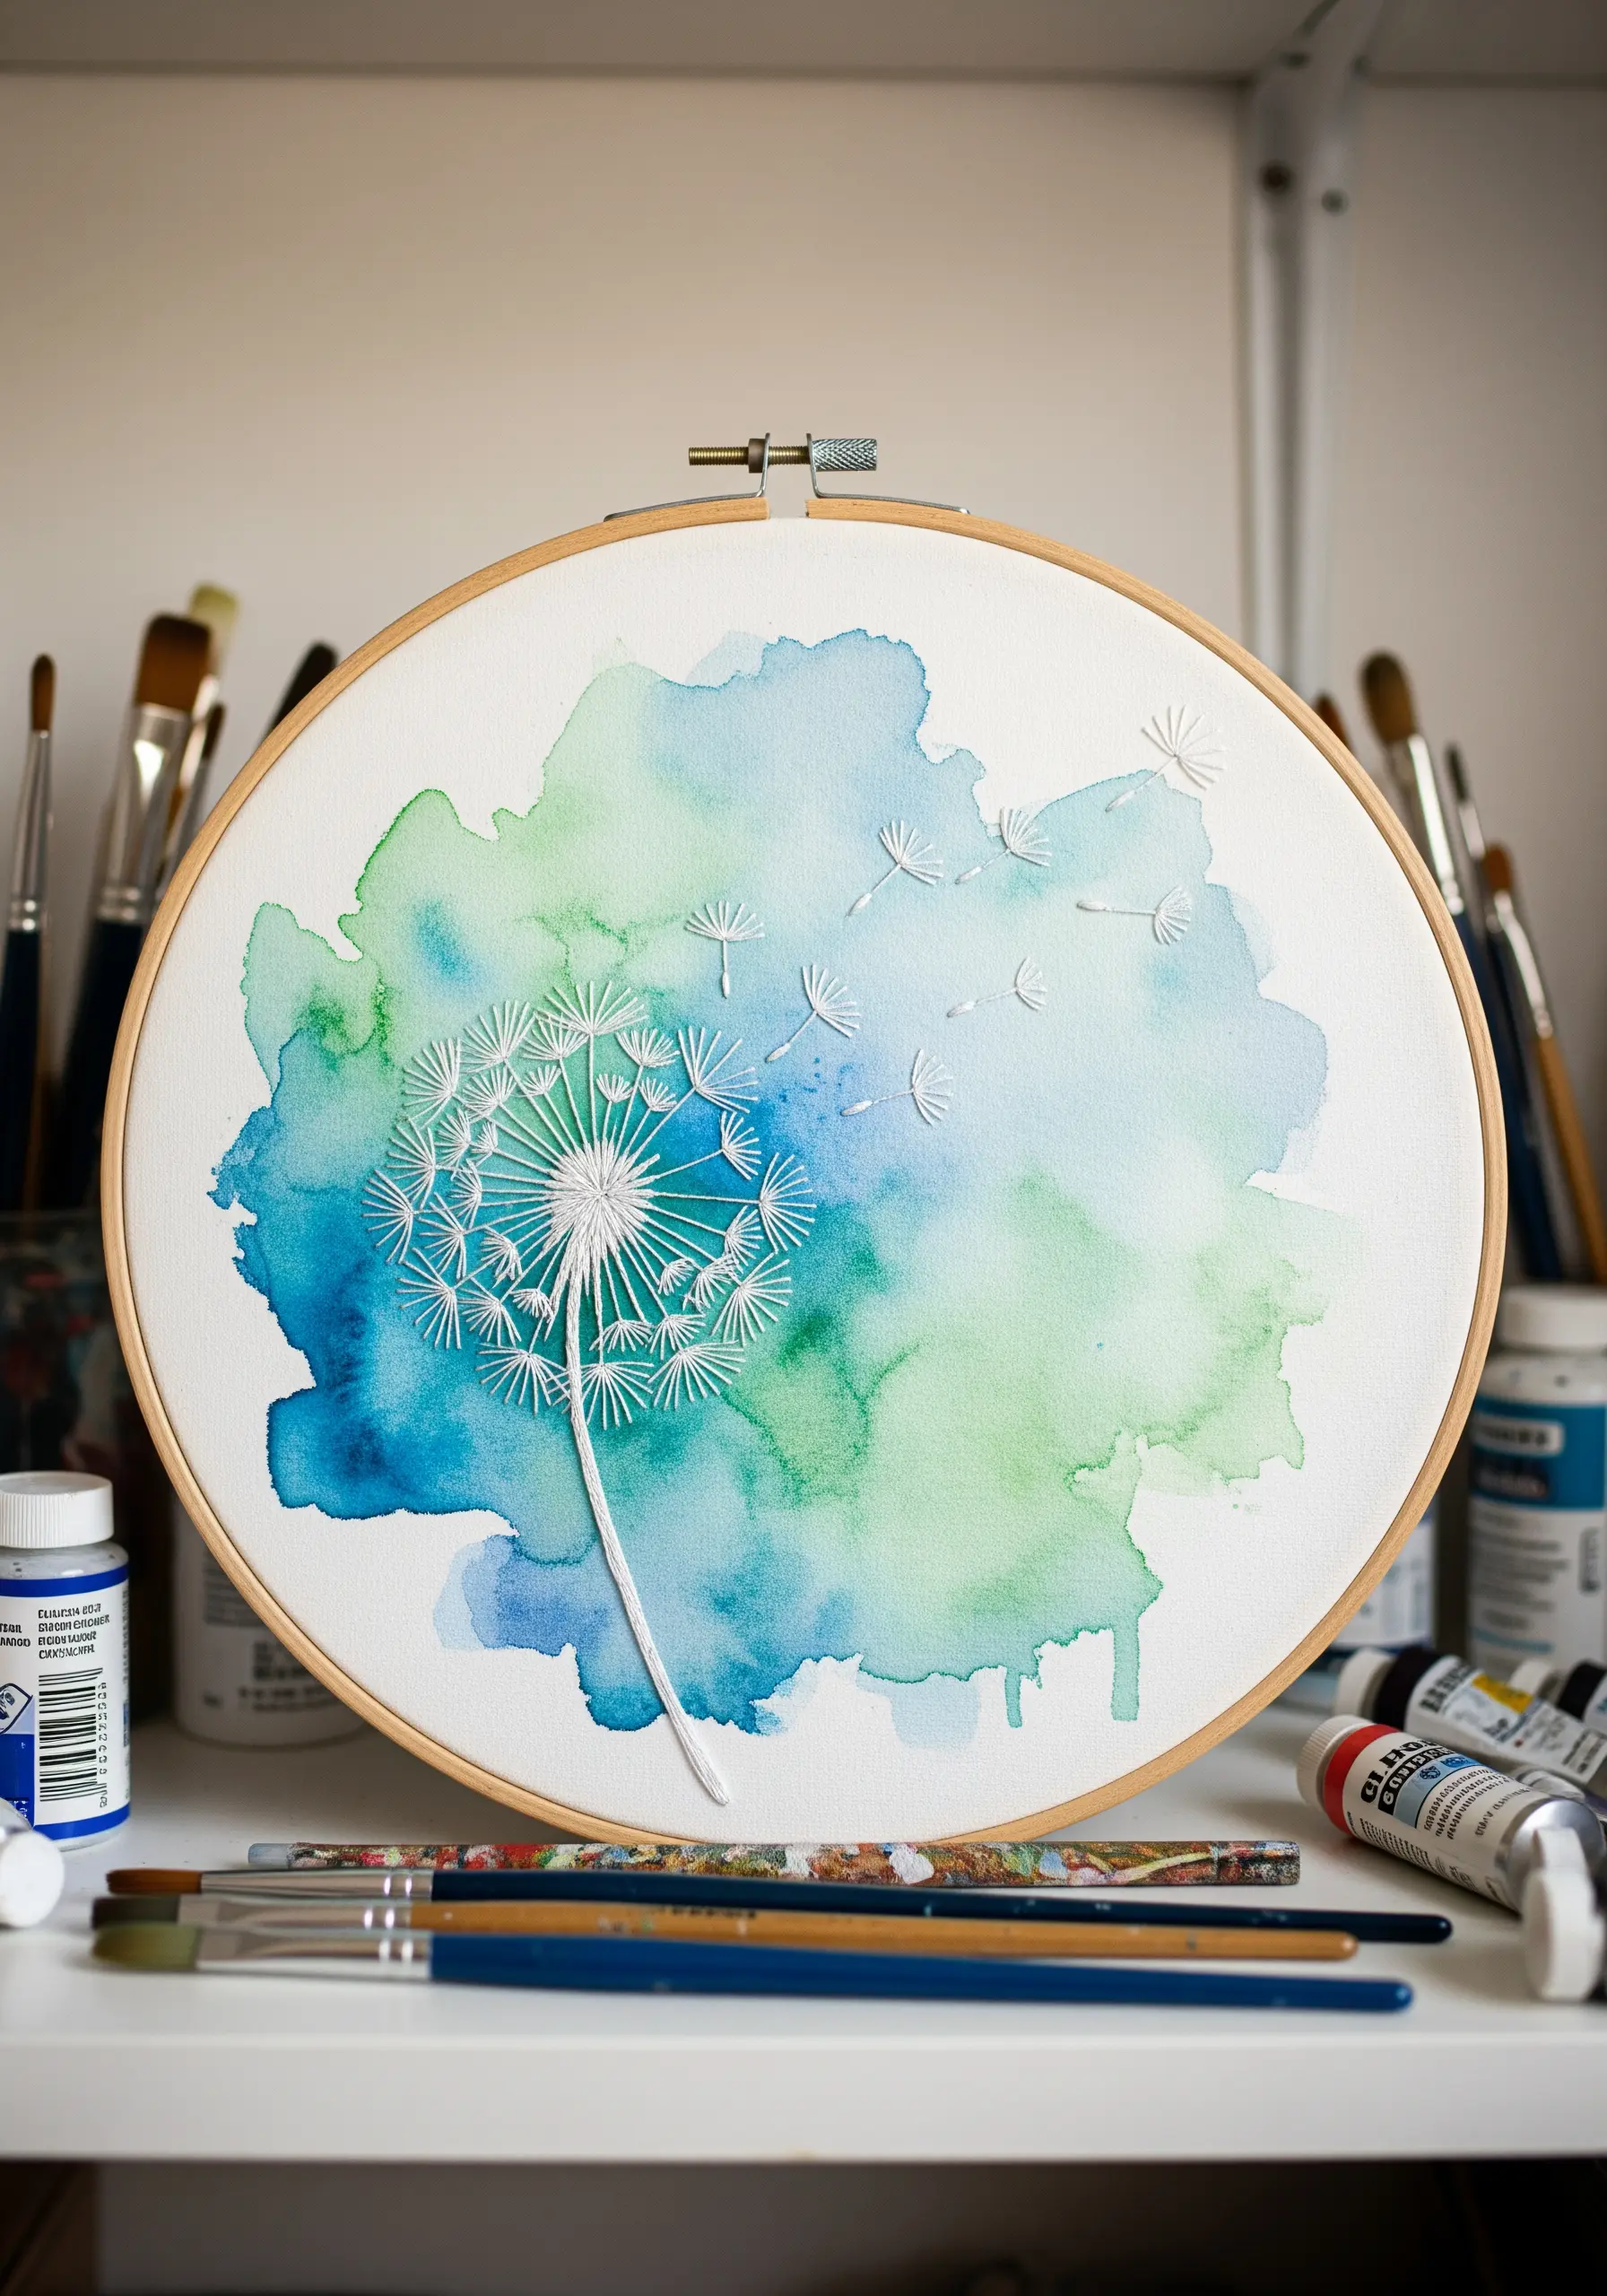
Create a stunning mixed-media piece by combining the soft, diffuse nature of watercolor with the sharp precision of embroidery.
Begin by painting a color wash directly onto your fabric and allowing it to dry completely before stretching it in your hoop.
Then, use a high-contrast thread—like this bright white against blue and green—to stitch your design over the painted background.
The interplay between the fluid background and the crisp, linear stitches creates a beautiful and artistic effect when you combine embroidery and mixed media.
28. Embroidering on Plush Velvet for a Luxe Finish
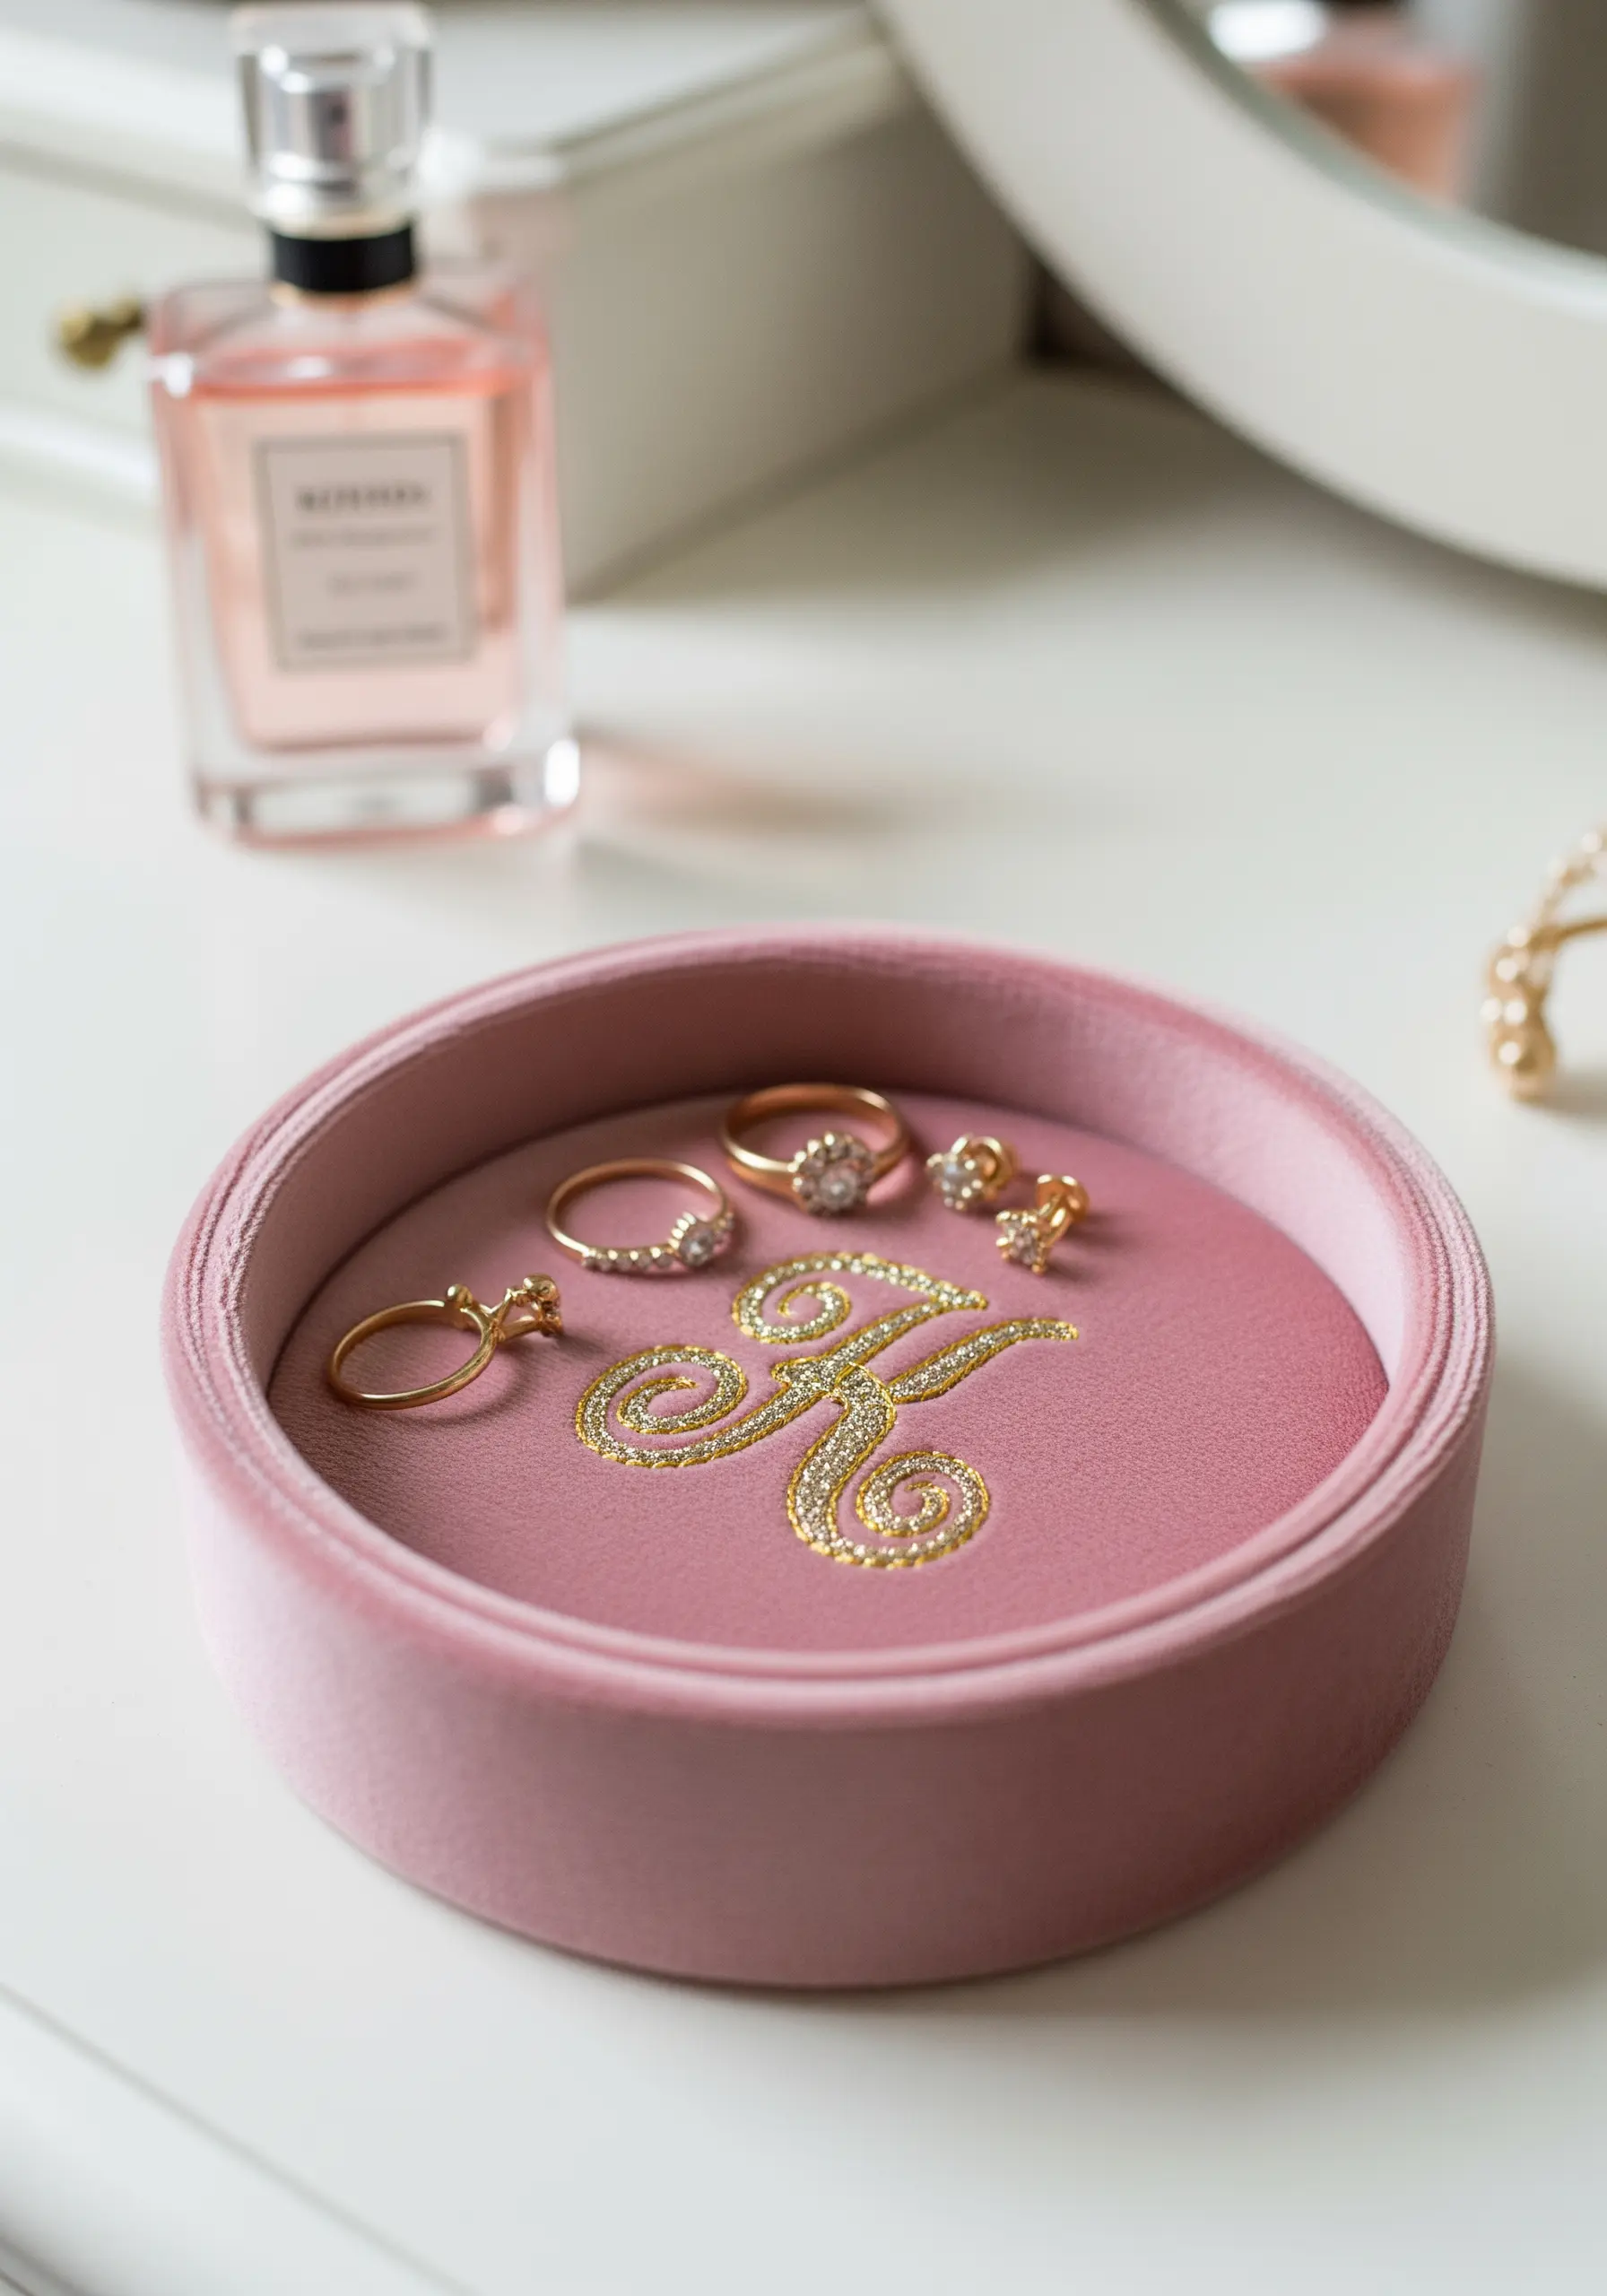
Stitching on velvet requires special handling to protect its delicate pile, but the luxurious result is well worth it.
Place a fluffy towel or a dedicated velvet board under your hoop to prevent the fabric from being crushed.
Use a water-soluble stabilizer on top of the velvet; this provides a smooth surface for your pattern and prevents your stitches from sinking into the plush pile.
A sharp needle and open stitches are best for creating elegant, high-end minimal monogram styles.
29. Creating a Functional, Heirloom Cross-Stitch Calendar
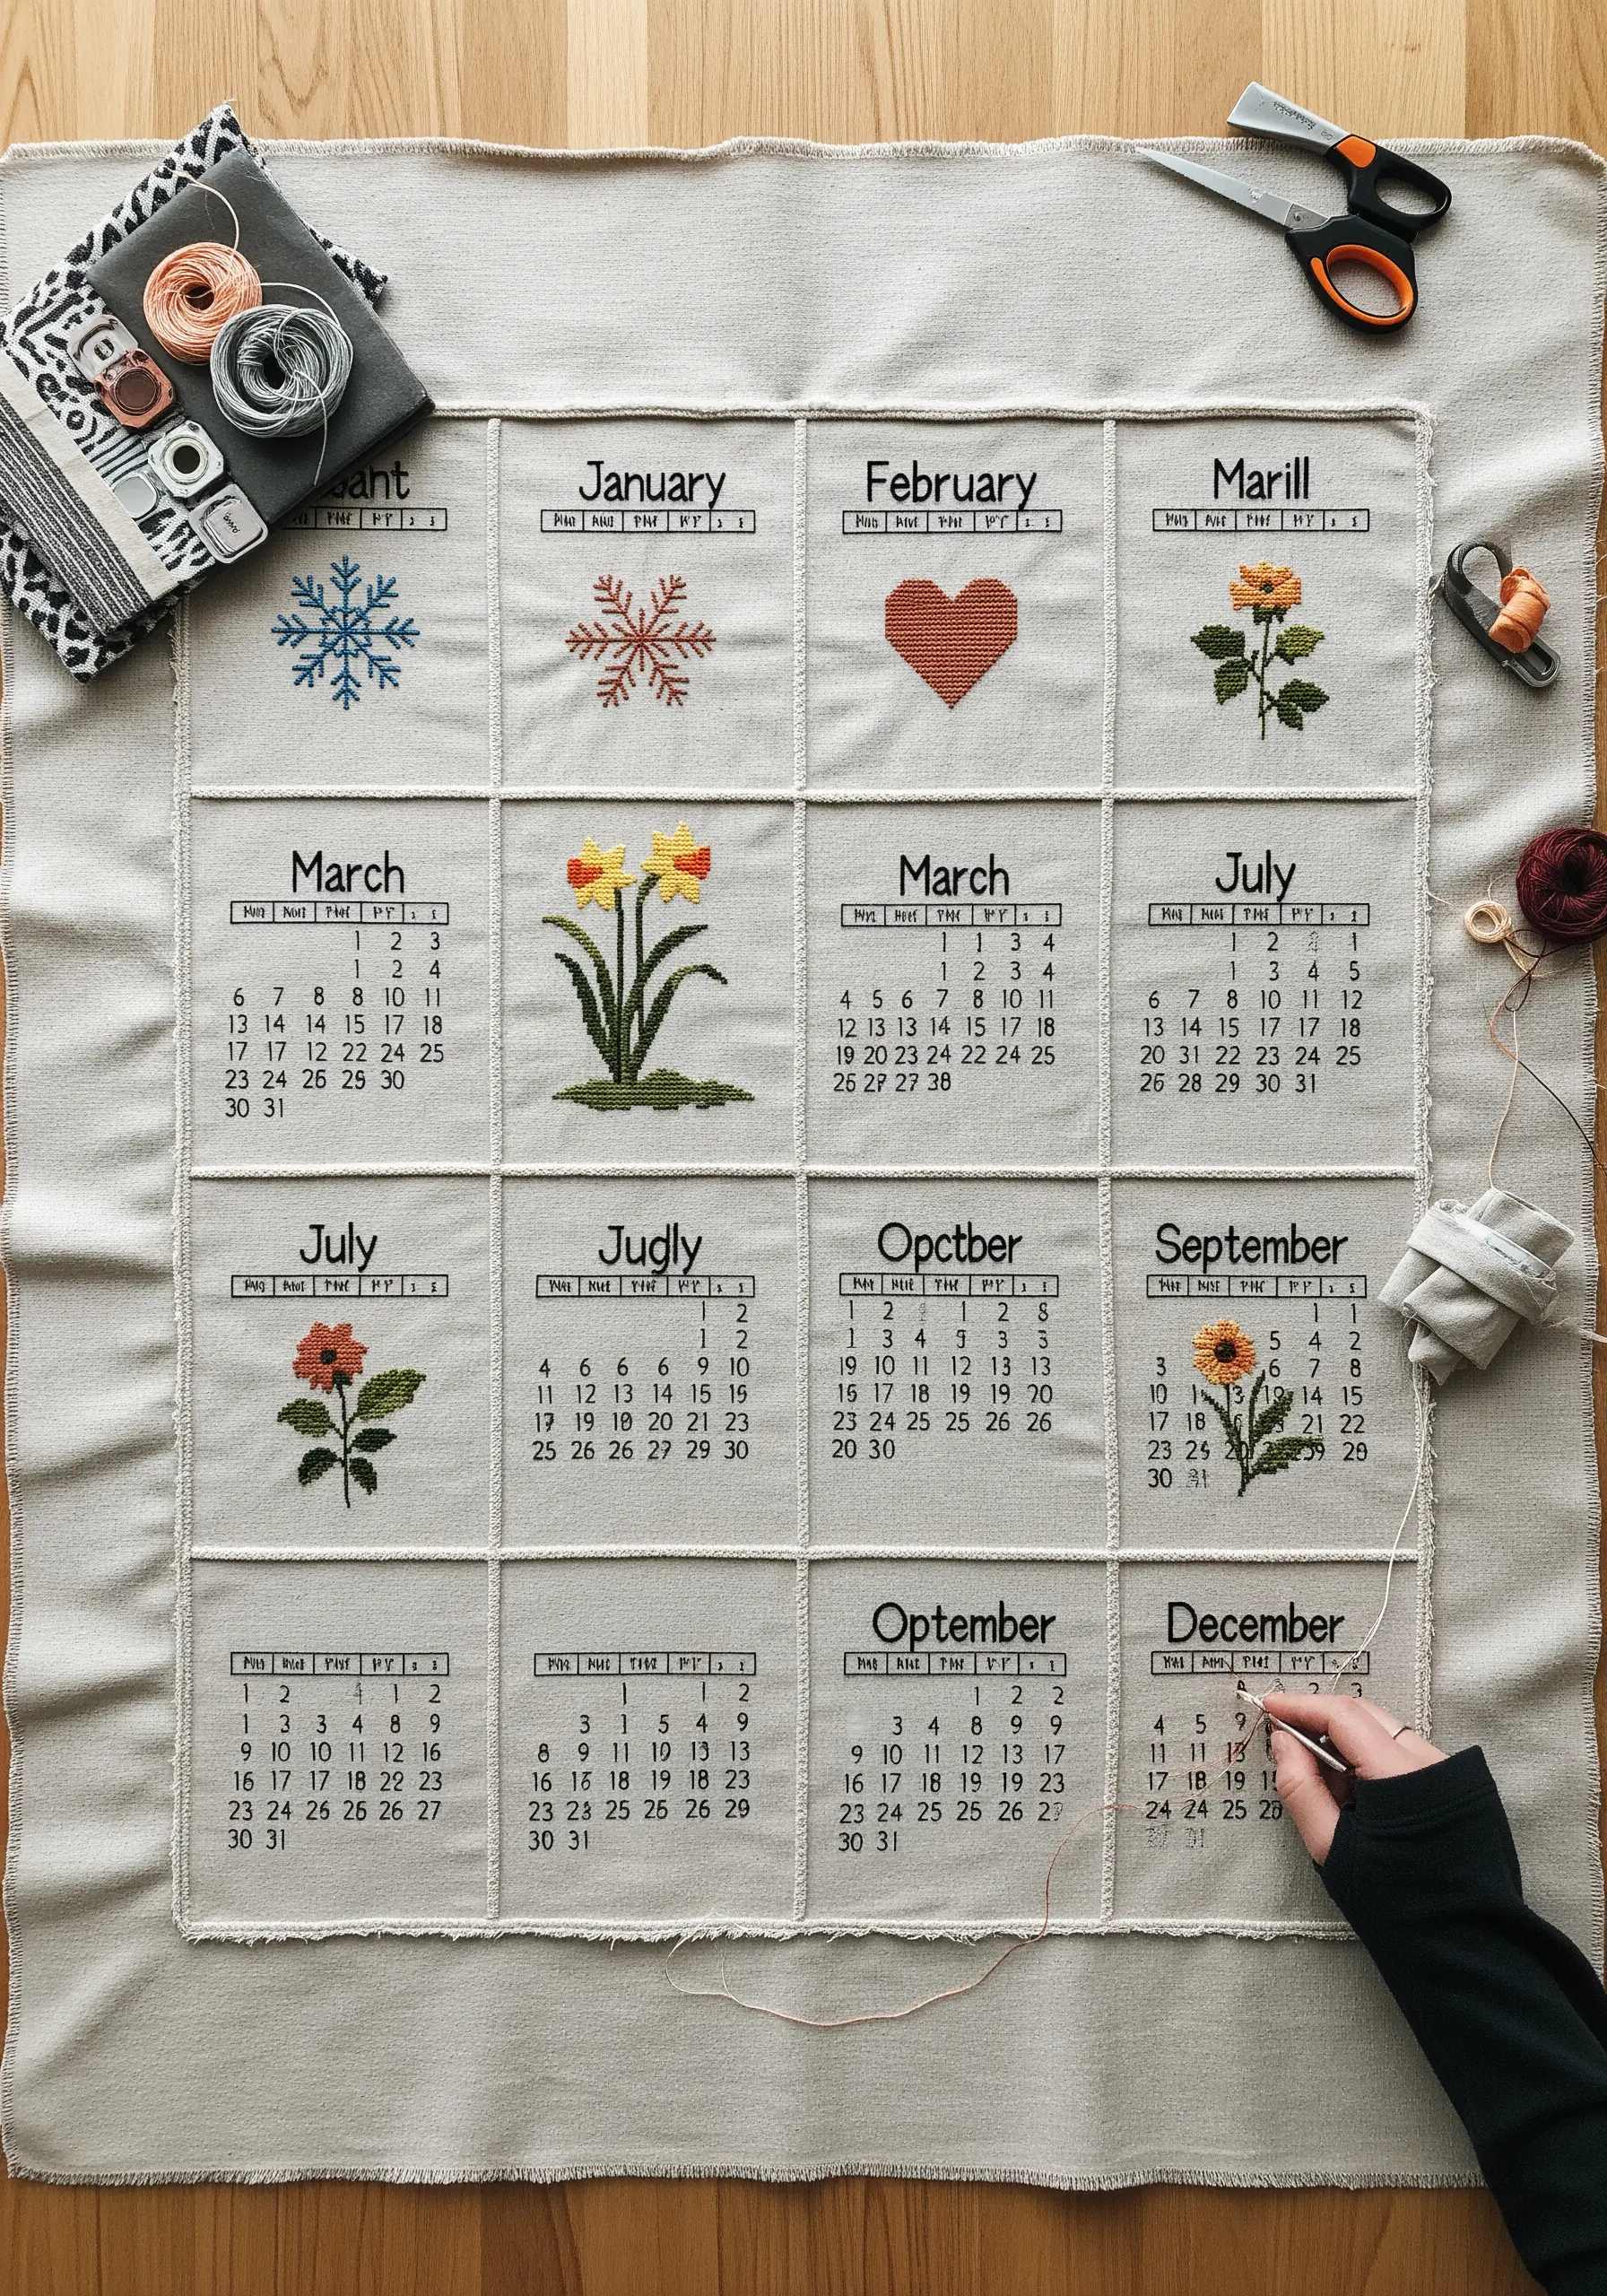
This project beautifully marries the timeless tradition of cross-stitch with everyday utility.
Cross-stitch is worked on a grid-like fabric (Aida or evenweave), which ensures every ‘X’ is perfectly uniform and square.
Choose simple, seasonal motifs to represent each month, creating a piece that is both a calendar and a celebration of the year’s passing.
This is more than just decor; it’s a functional heirloom that can be displayed for years to come, much like other festive season embroidery wall hangings.
30. Visible Mending with a Dense Beading Patch
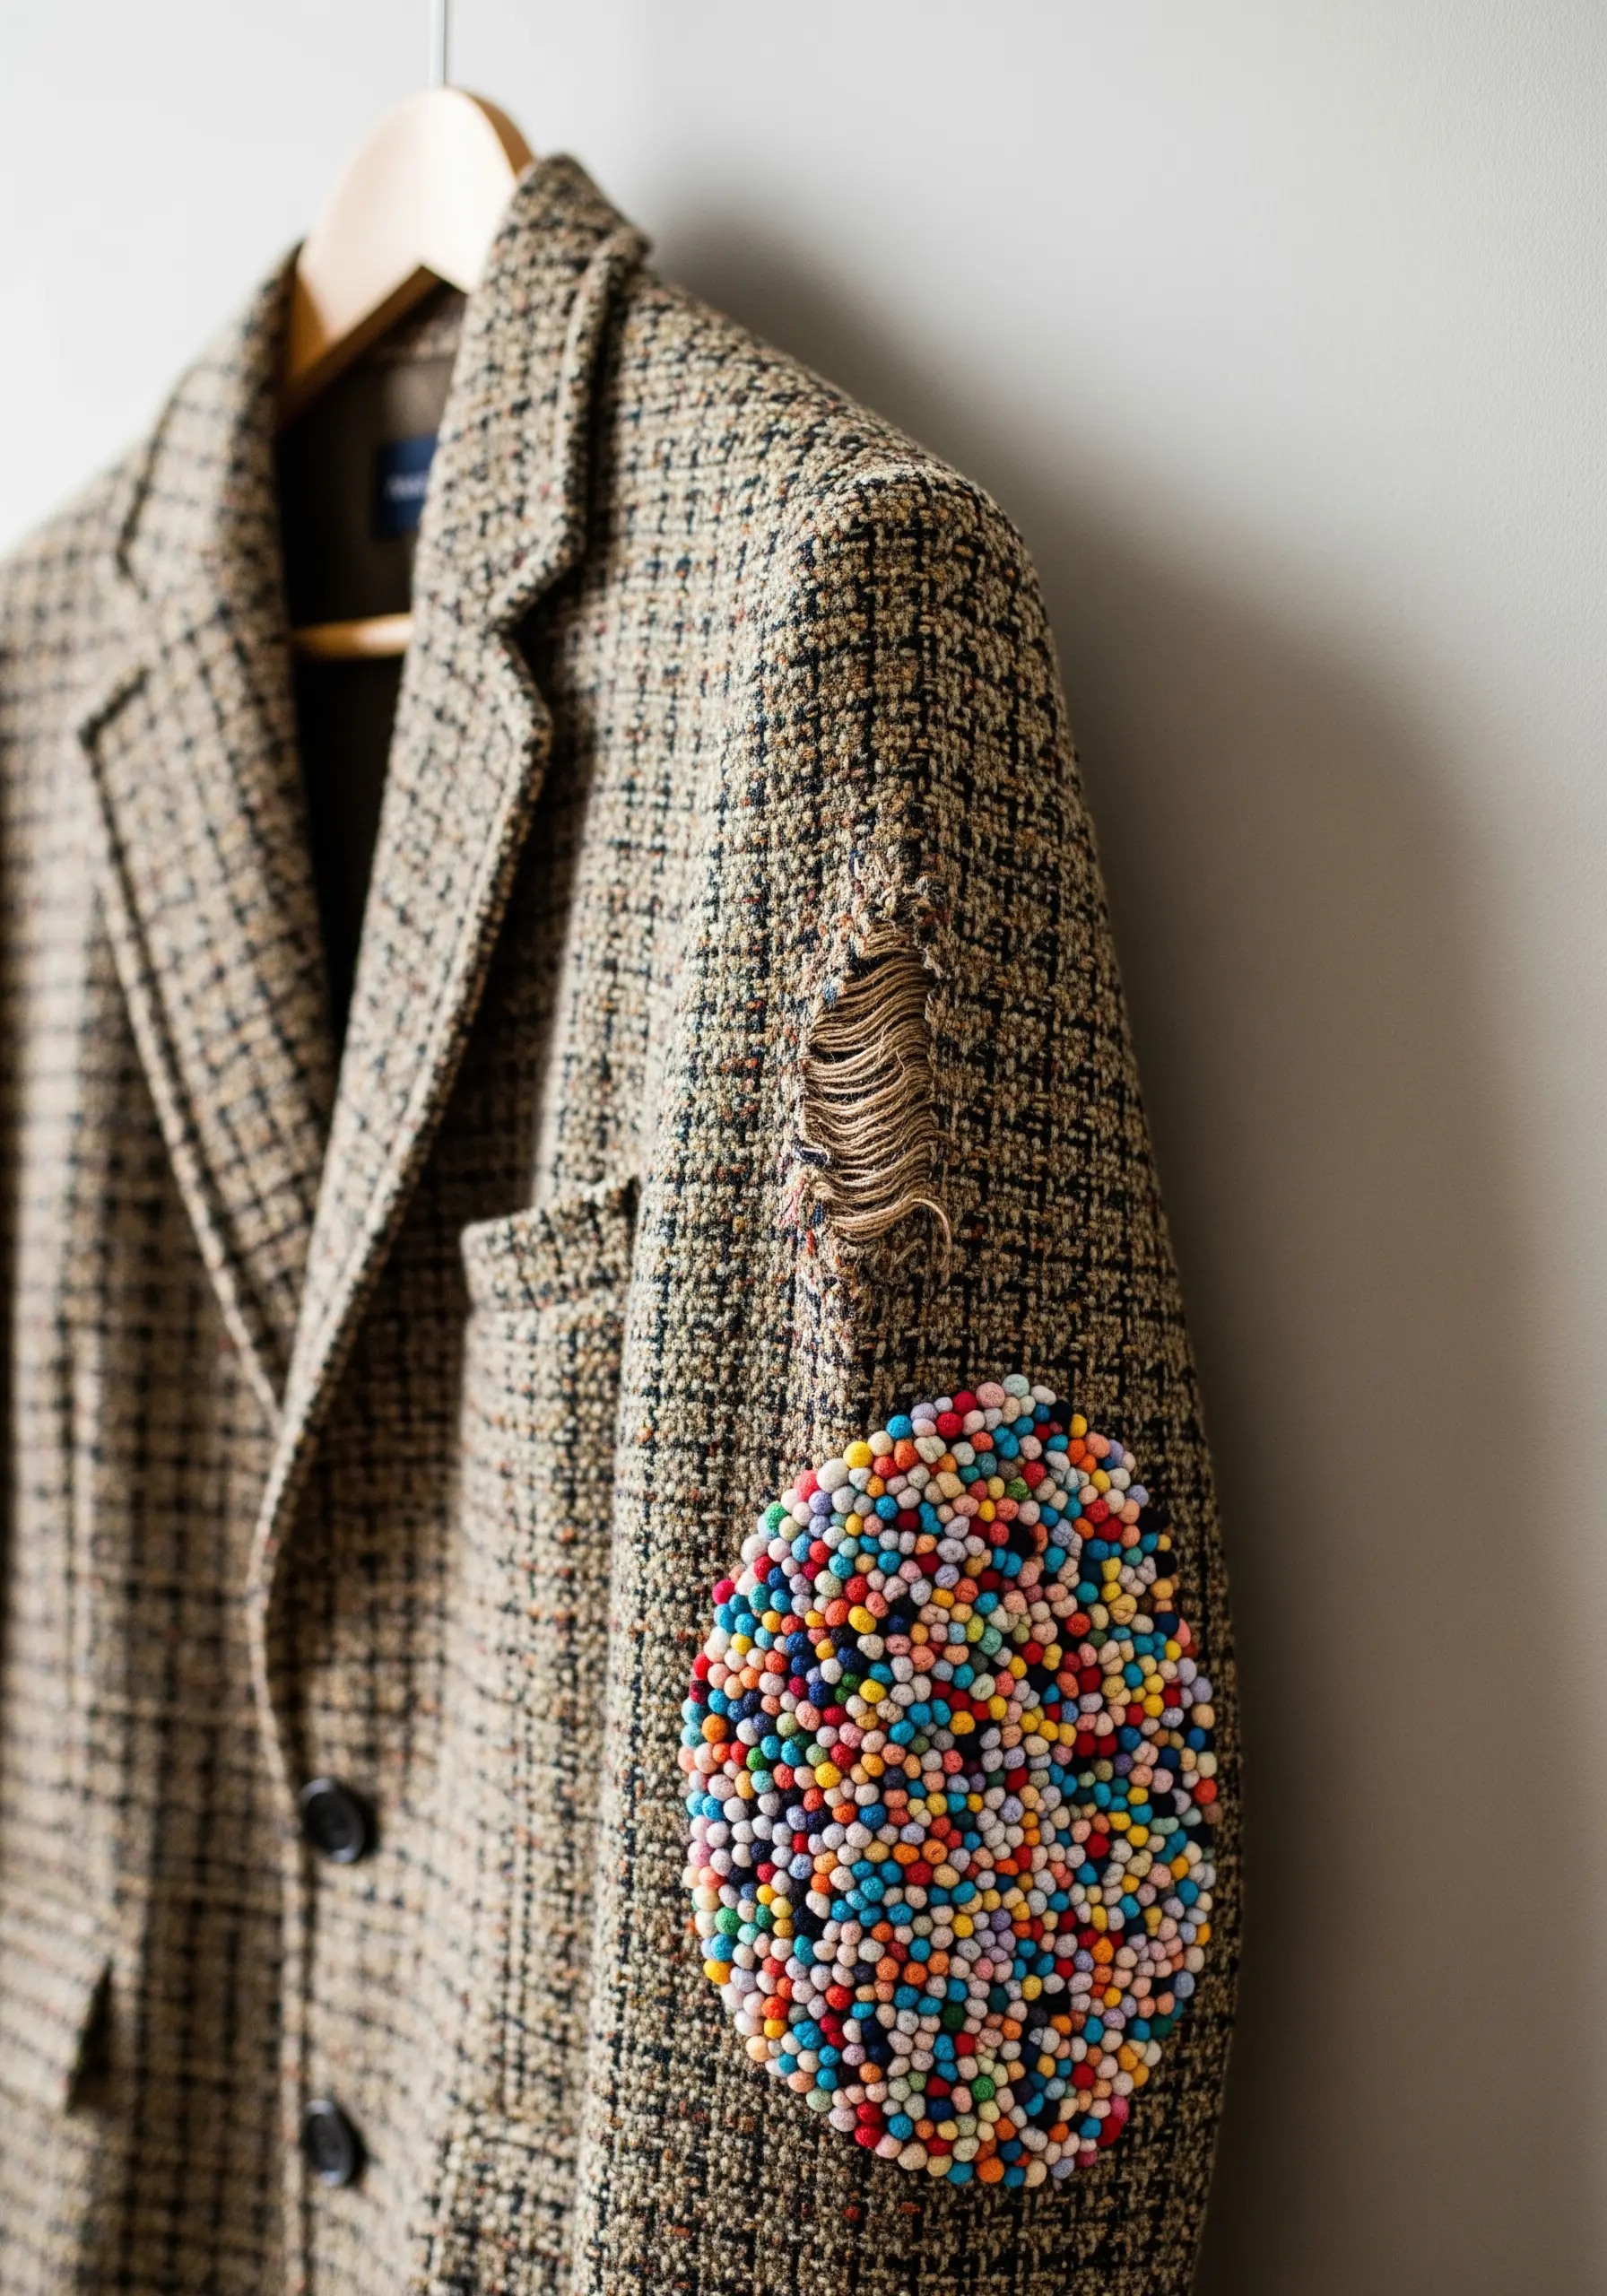
Elevate the concept of visible mending by moving beyond thread and repairing with texture and sparkle.
Create a durable patch by stitching dense, colorful seed beads onto a sturdy felt base, securing each bead with a strong beading thread.
When the patch is complete, stitch it securely over the damaged area of the garment.
The result is a vibrant, tactile, and completely unique repair that transforms a flaw into a stunning focal point—one of the best easy DIY art pieces that turn trash into treasure.


