
A floral wreath is more than a circle of stitches; it’s a study in balance, texture, and restraint. Before you begin your next piece, I want you to reconsider the hoop not just as a frame, but as an integral part of your composition. How can negative space give your flowers room to breathe? How can a single, well-placed French knot command more attention than a dozen crowded stitches?
In the ideas that follow, we’ll move beyond simply filling a shape. You’ll learn how to direct the eye with the angle of a satin stitch, create depth with thread weight, and build palettes that feel both personal and polished. These are not just patterns, but principles you can apply to any design, transforming your work from handmade craft to intentional art.
Trust your eye. Your ability to create something beautiful is already there. My role is simply to offer the techniques that will give your creative instincts clarity and confidence. Let’s begin.
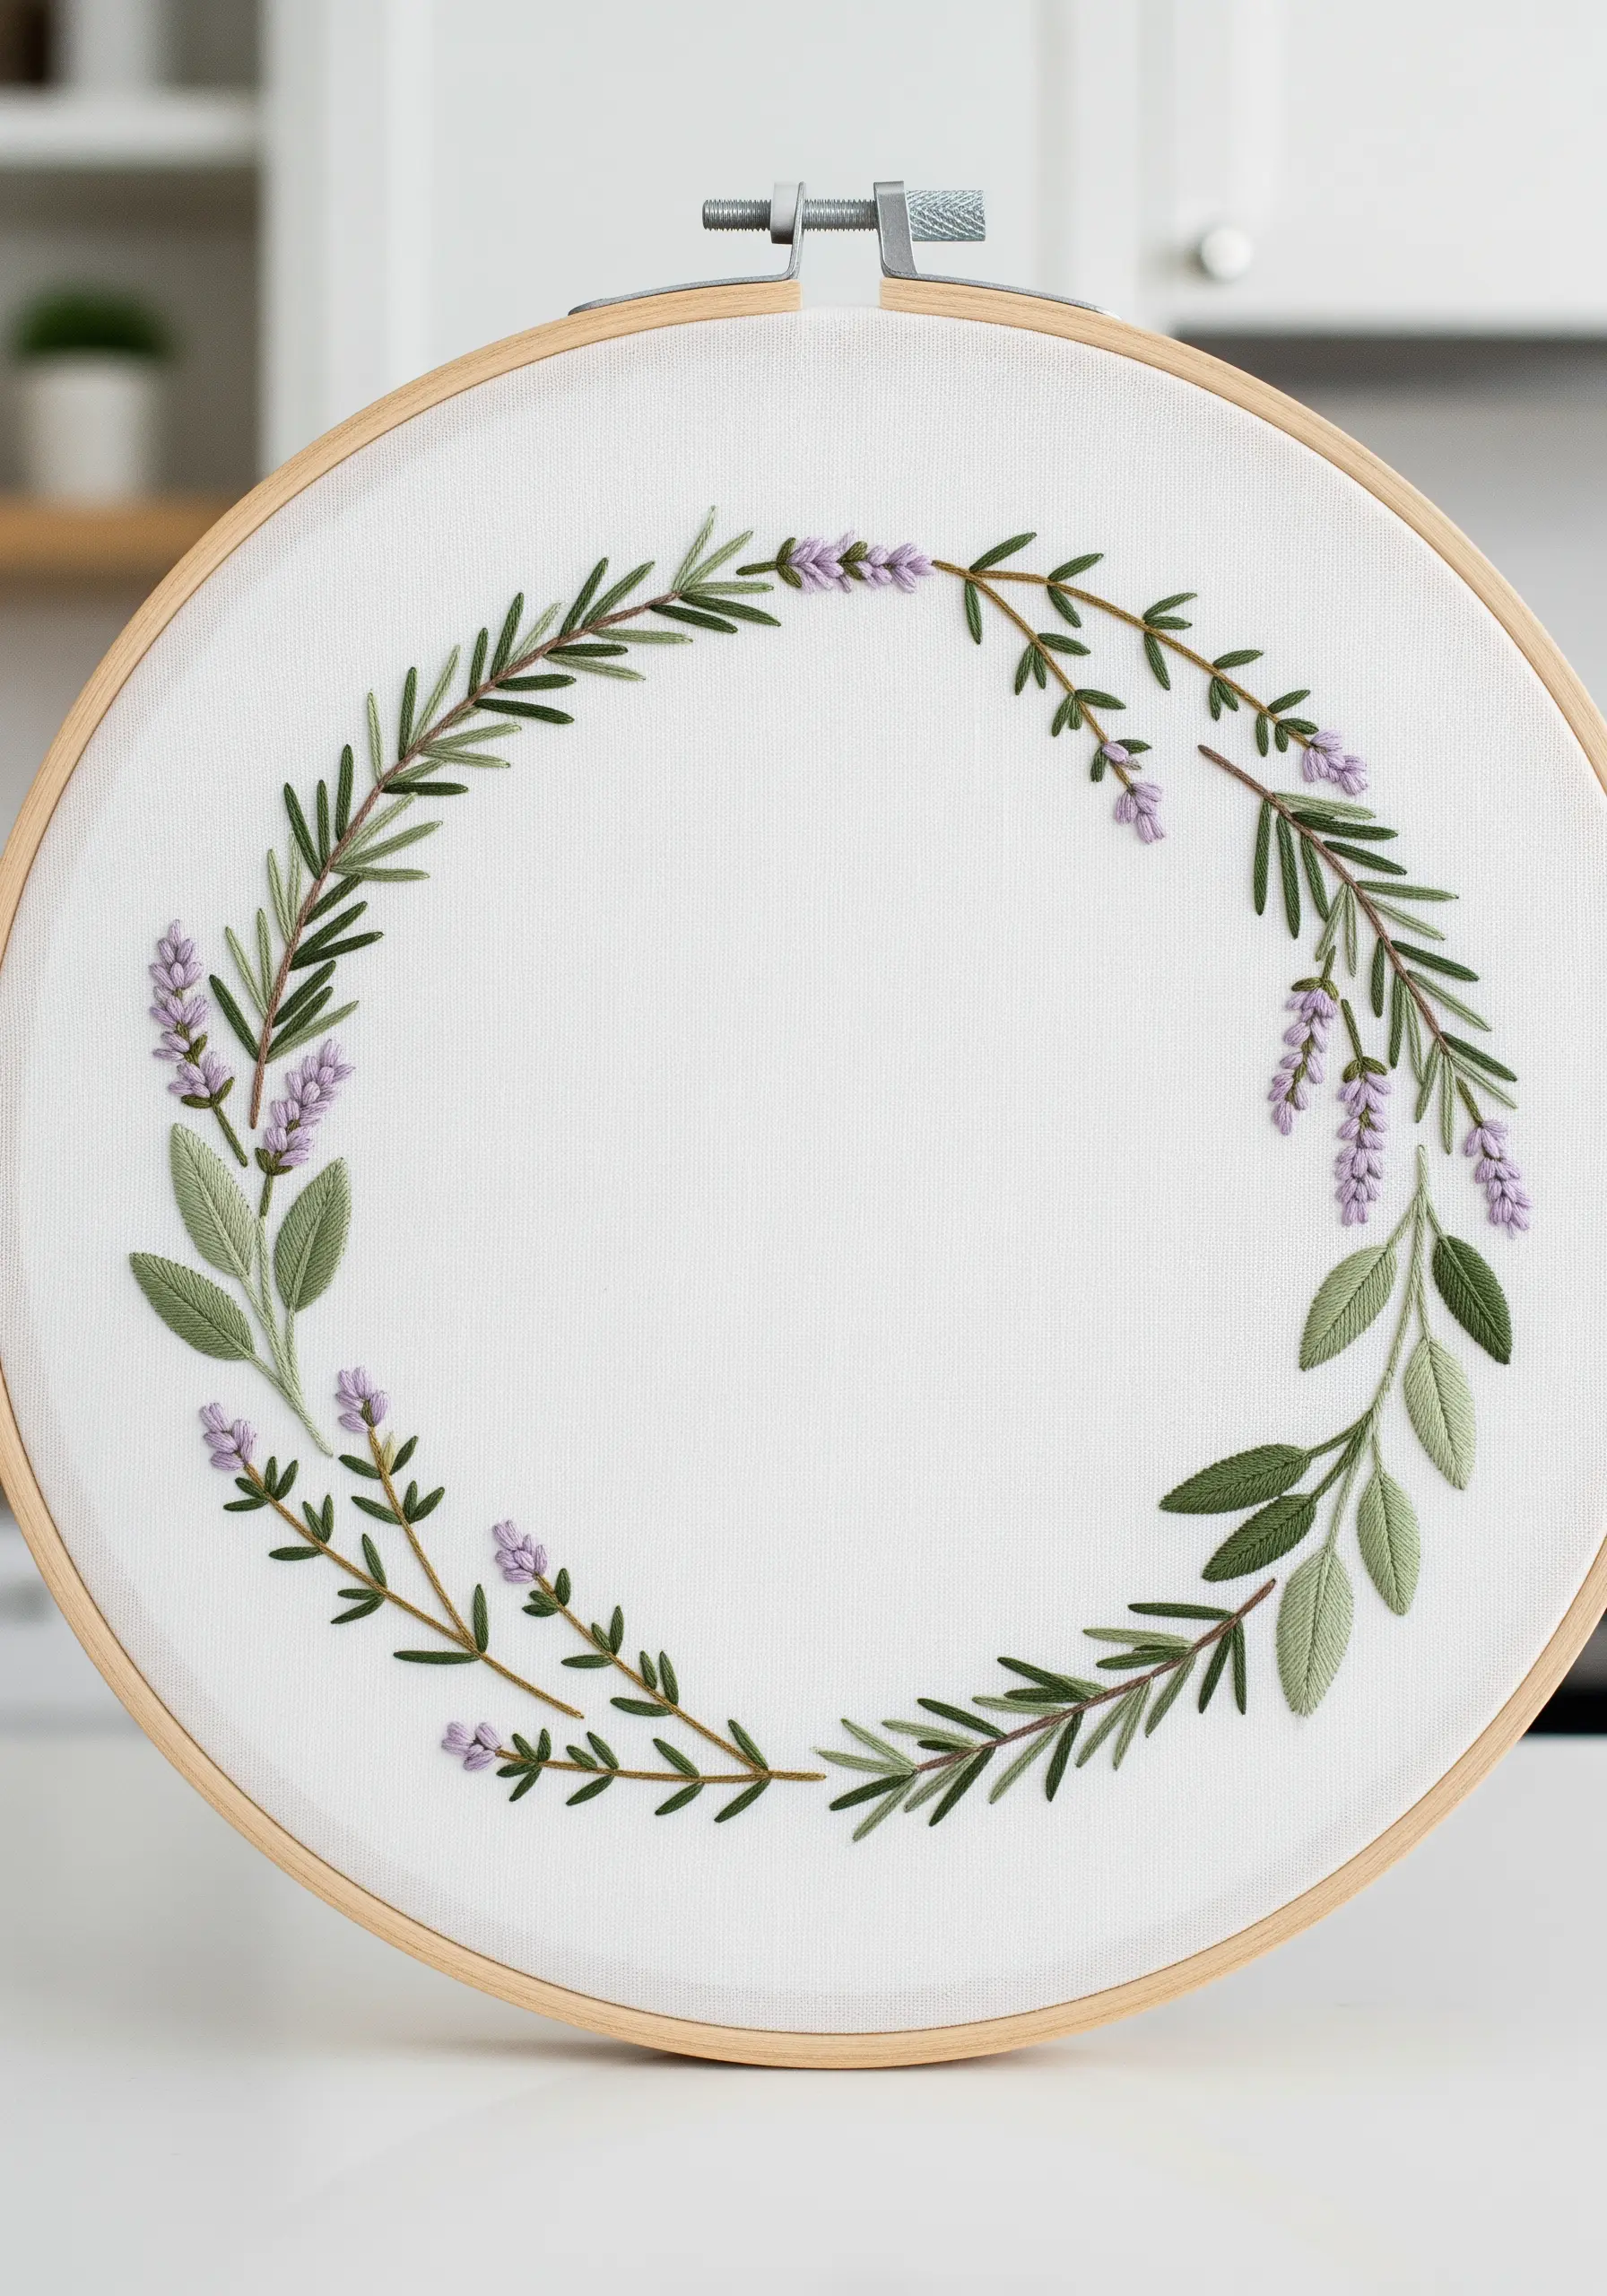
1. Composing with Contrasting Textures
Create immediate visual interest by pairing smooth satin stitches with dimensional knots.
For the daisy petals, use a classic satin stitch with two strands of floss for a flat, polished sheen that reflects light evenly.
Contrast this by working the lavender blossoms in bullion knots or stacked French knots, giving them a raised, realistic texture that creates subtle shadows.
The tiny yellow filler flowers are perfect for simple French knots, adding another layer of texture without overwhelming the composition.
This intentional textural play is what makes a simple wreath feel dynamic and professionally finished.
2. Mastering Elegance with Negative Space
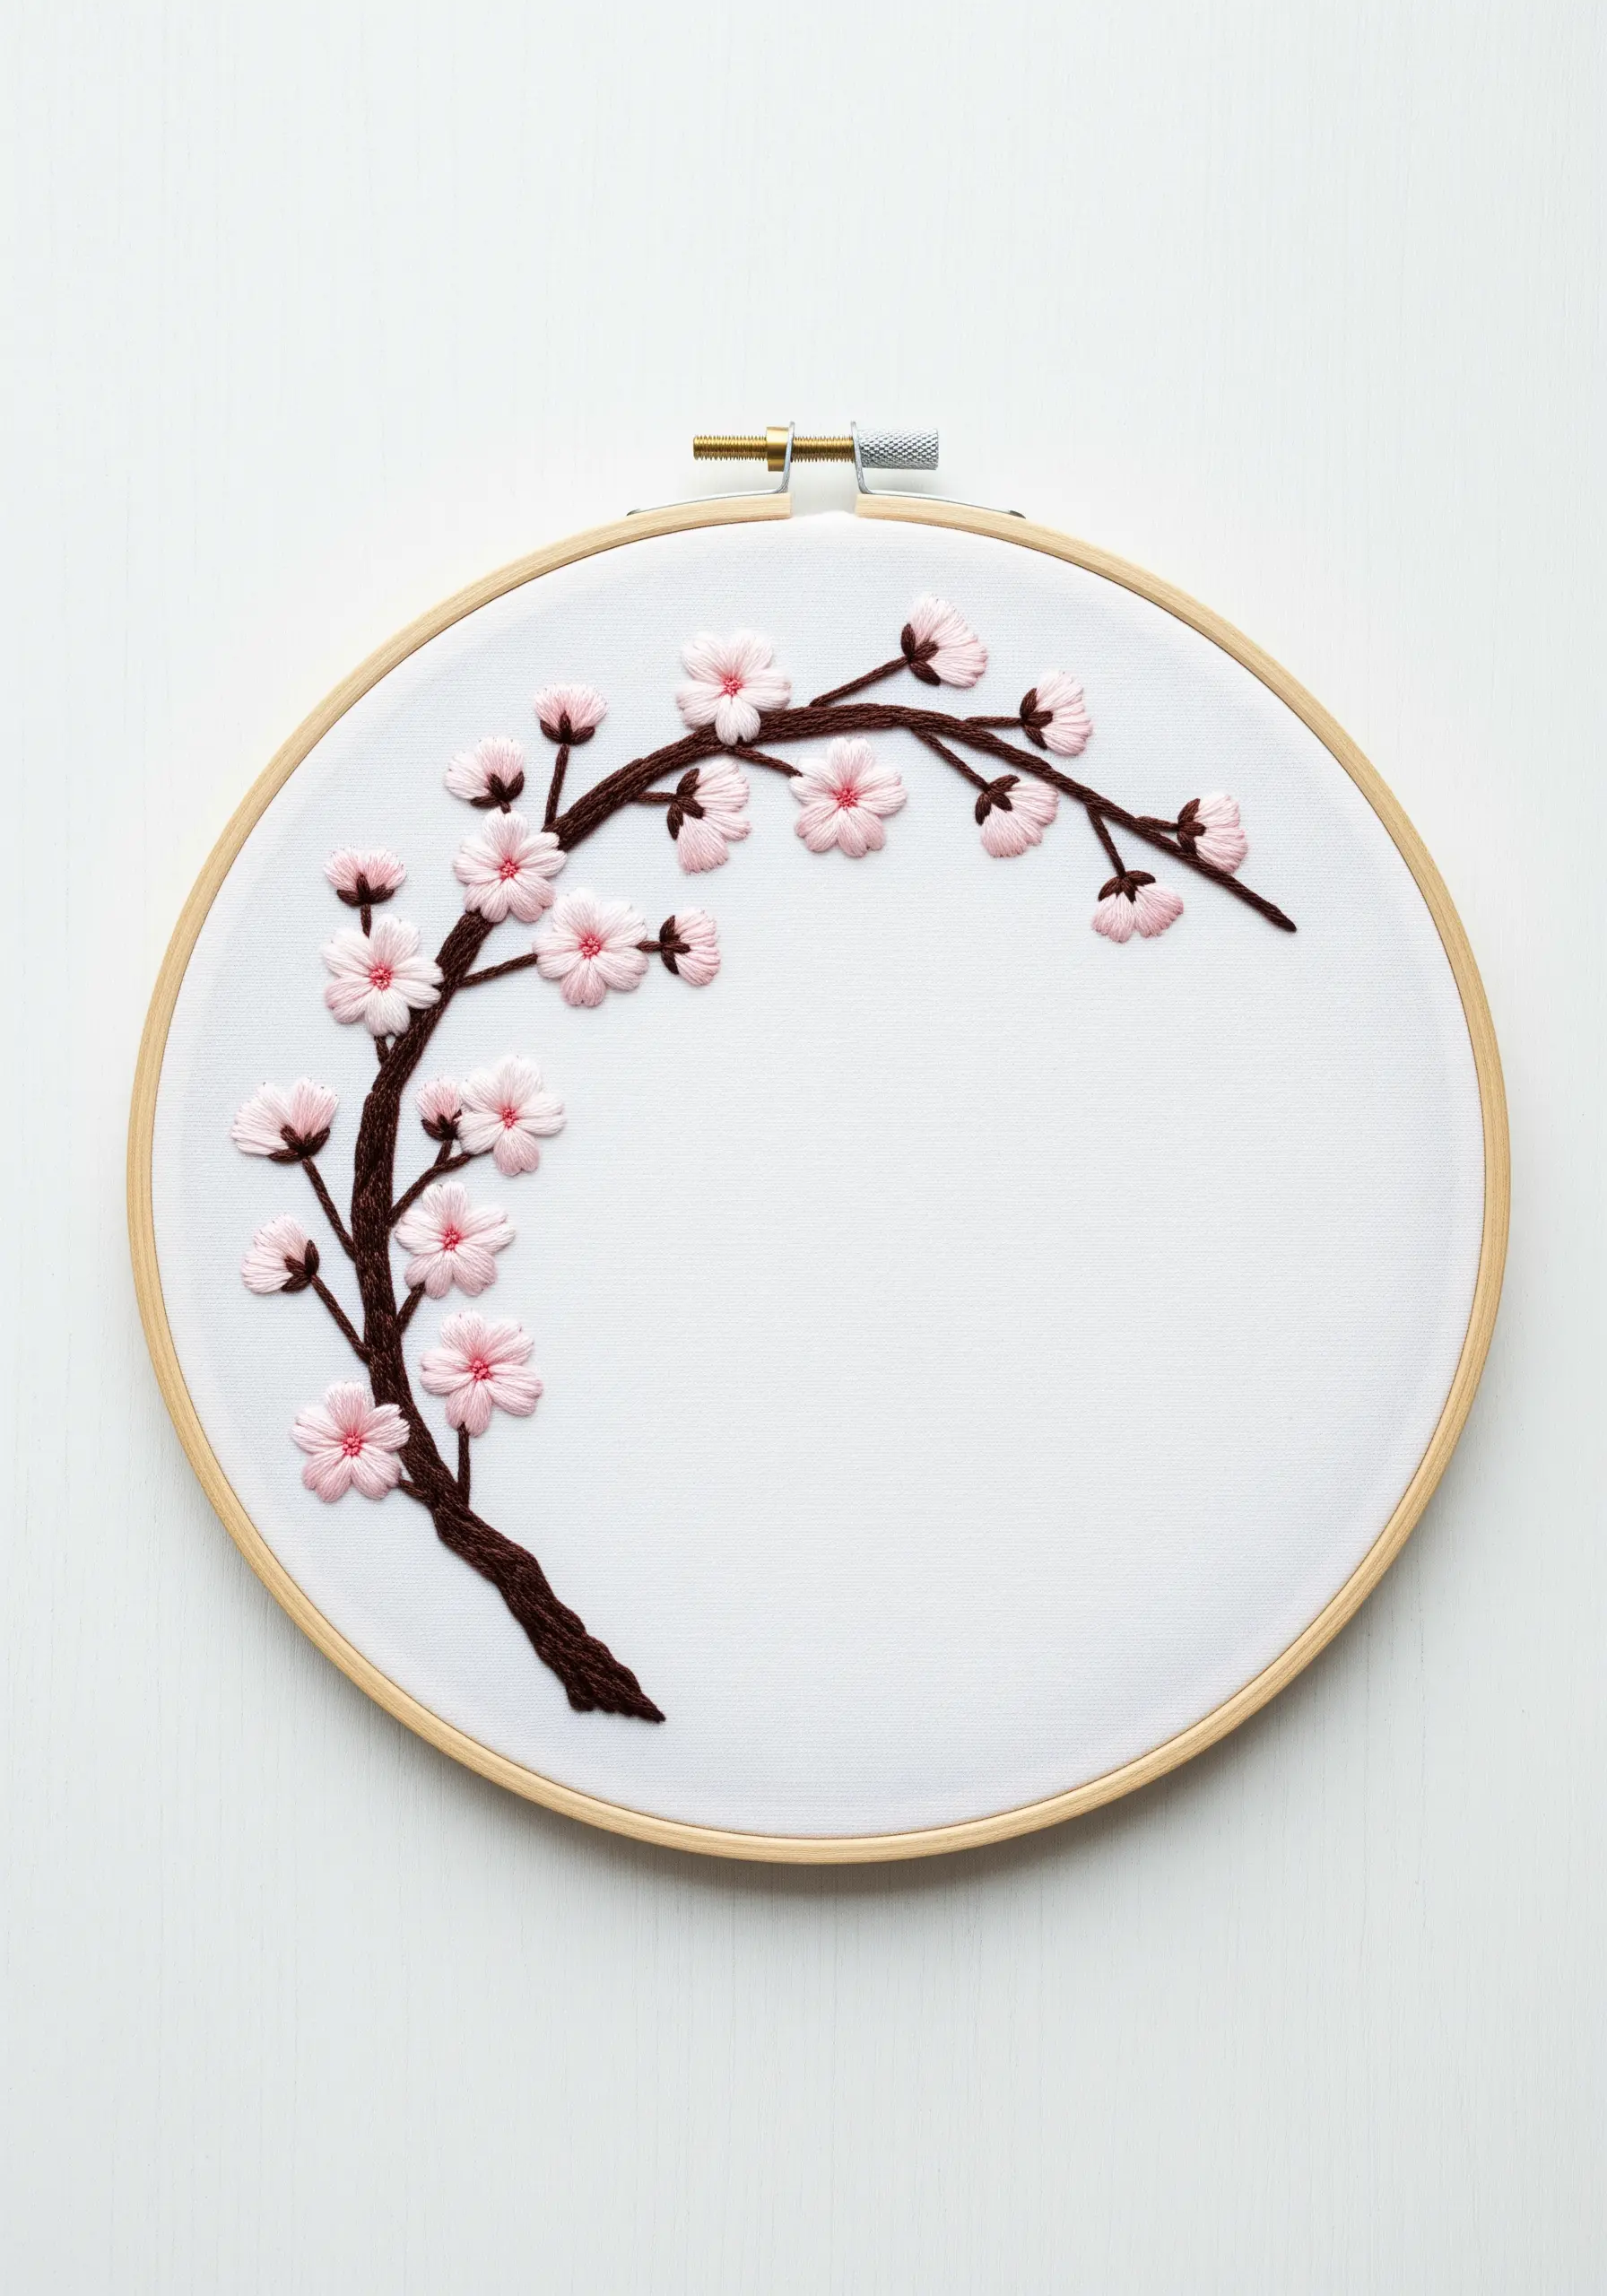
A sparse design often carries more impact than a dense one.
Use the unstitched fabric as a key element of your composition, allowing the delicate cherry blossoms to feel light and airy.
Create texture on the branches by using a whipped backstitch or couching a thicker thread onto the surface—this adds dimension without adding clutter.
For the petals, use a detached chain stitch or a few simple straight stitches, letting their placement define the flower’s shape.
This minimalist approach ensures the viewer’s eye is drawn to the quality of your stitching, not the quantity.
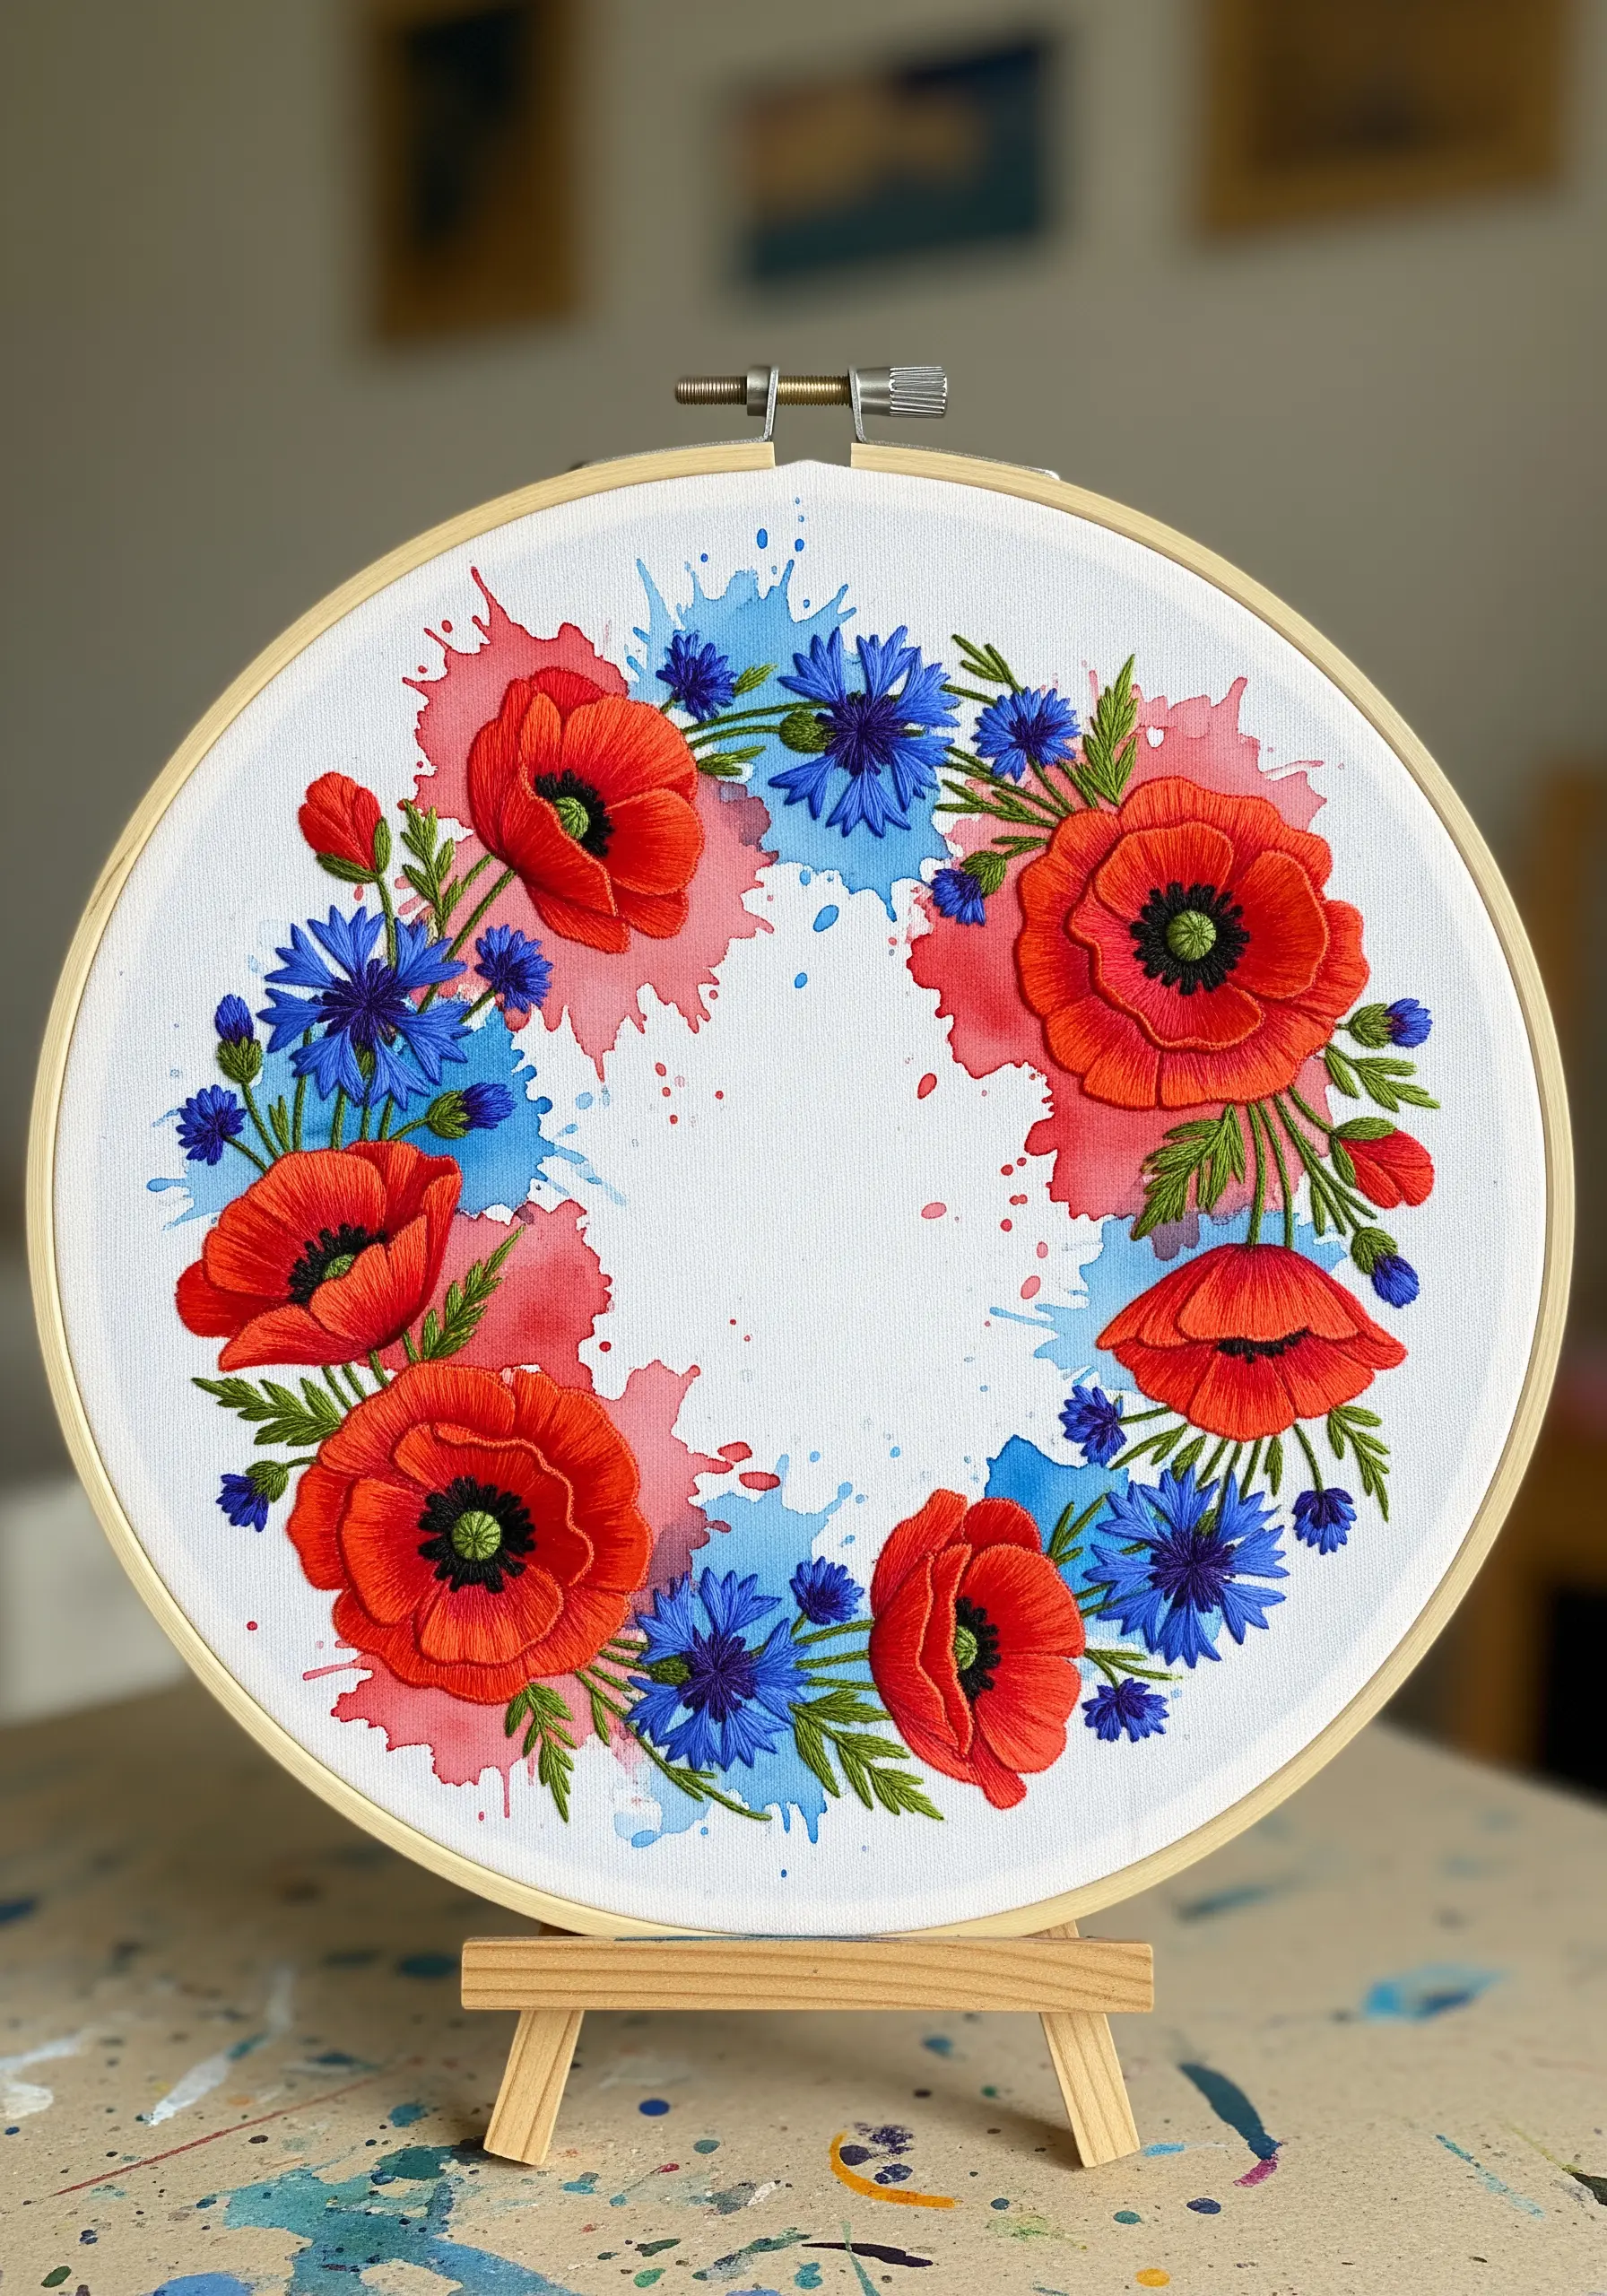
3. Achieving Harmony with a Primary Palette
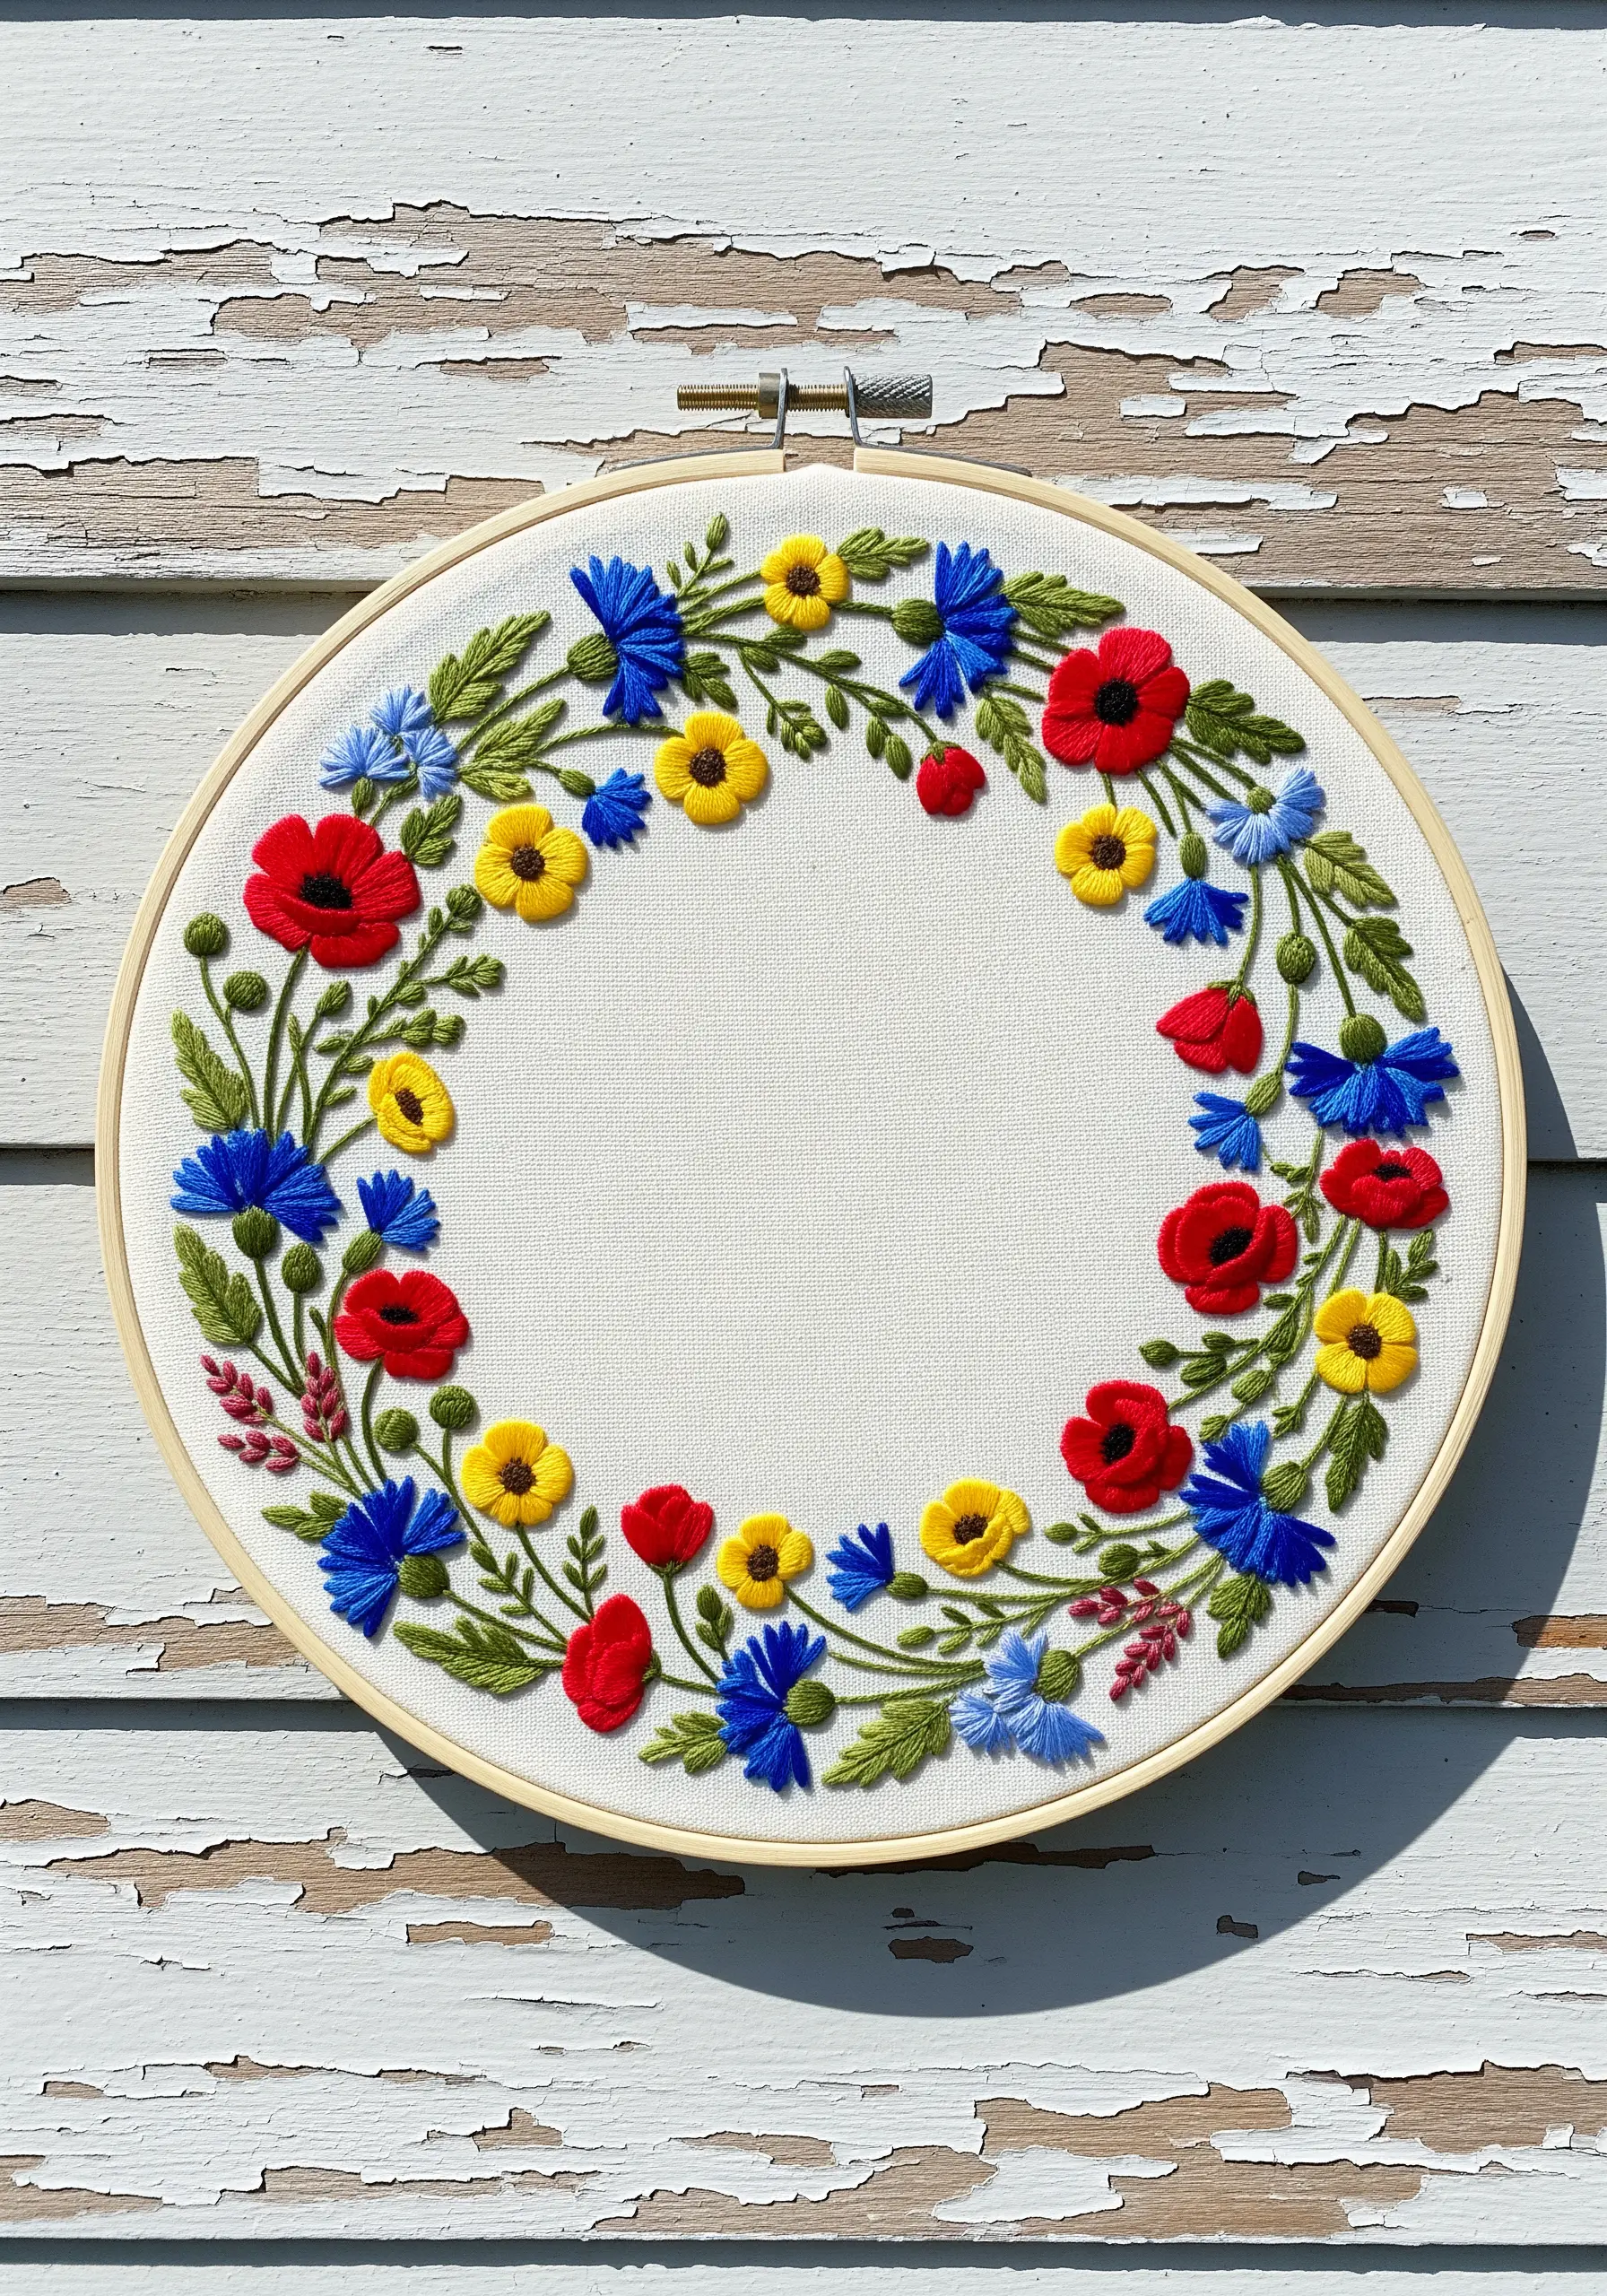
A bold, primary-inspired color scheme feels confident and cheerful, making it perfect for market pieces.
To prevent the colors from looking flat, focus on stitch direction.
Angle the satin stitches on the red poppy petals outward from the center to mimic natural growth and create a sense of movement.
For the blue cornflowers, use long, straight stitches that radiate from a central point, giving them a spiky, wild texture.
This directional stitching animates the simple color palette, turning a classic design into something vibrant and alive.
4. Simulating 3D Florals with Stumpwork Techniques
To achieve this highly dimensional look without using paper, explore the world of stumpwork.
Create wired petal slips by outlining a petal shape on a spare piece of fabric with backstitch, couching a fine wire over the outline, and then filling it with long-and-short stitch.
Once complete, you can cut the petal out and attach it to your main design, shaping it for a realistic, three-dimensional effect.
Alternatively, you can integrate other materials by exploring mixed media crafts combining embroidery, paper, and paint.
This technique transforms your hoop from a flat canvas into a small-scale textile sculpture.
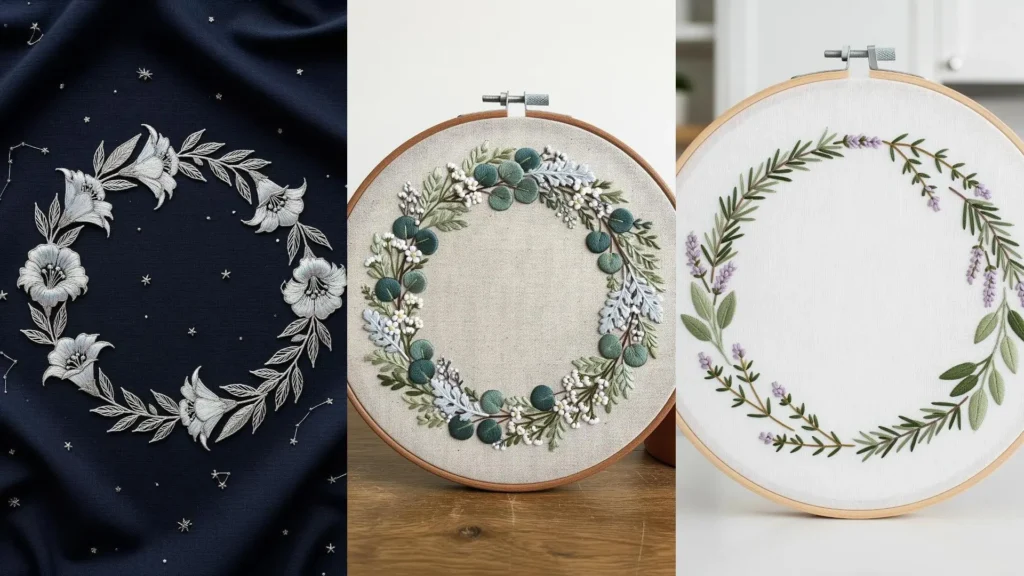
5. Layering Foliage for Depth and Realism

A wreath made entirely of foliage can be just as stunning as one full of flowers, provided you create depth.
Vary the type of green, using cooler, blue-toned greens alongside warmer, yellow-toned ones to create a natural, layered look.
Stitch the eucalyptus leaves in a fishbone stitch to get that central vein texture, and overlap them slightly to suggest density.
Incorporate sprays of lighter leaves using a fly stitch, and scatter tiny white French knots throughout to act as highlights, breaking up the green and adding delicacy.
These are the tone-on-tone embroidery techniques that create subtle, high-end neutral finishes.
6. Creating Volume and Sheen with Silk Ribbon
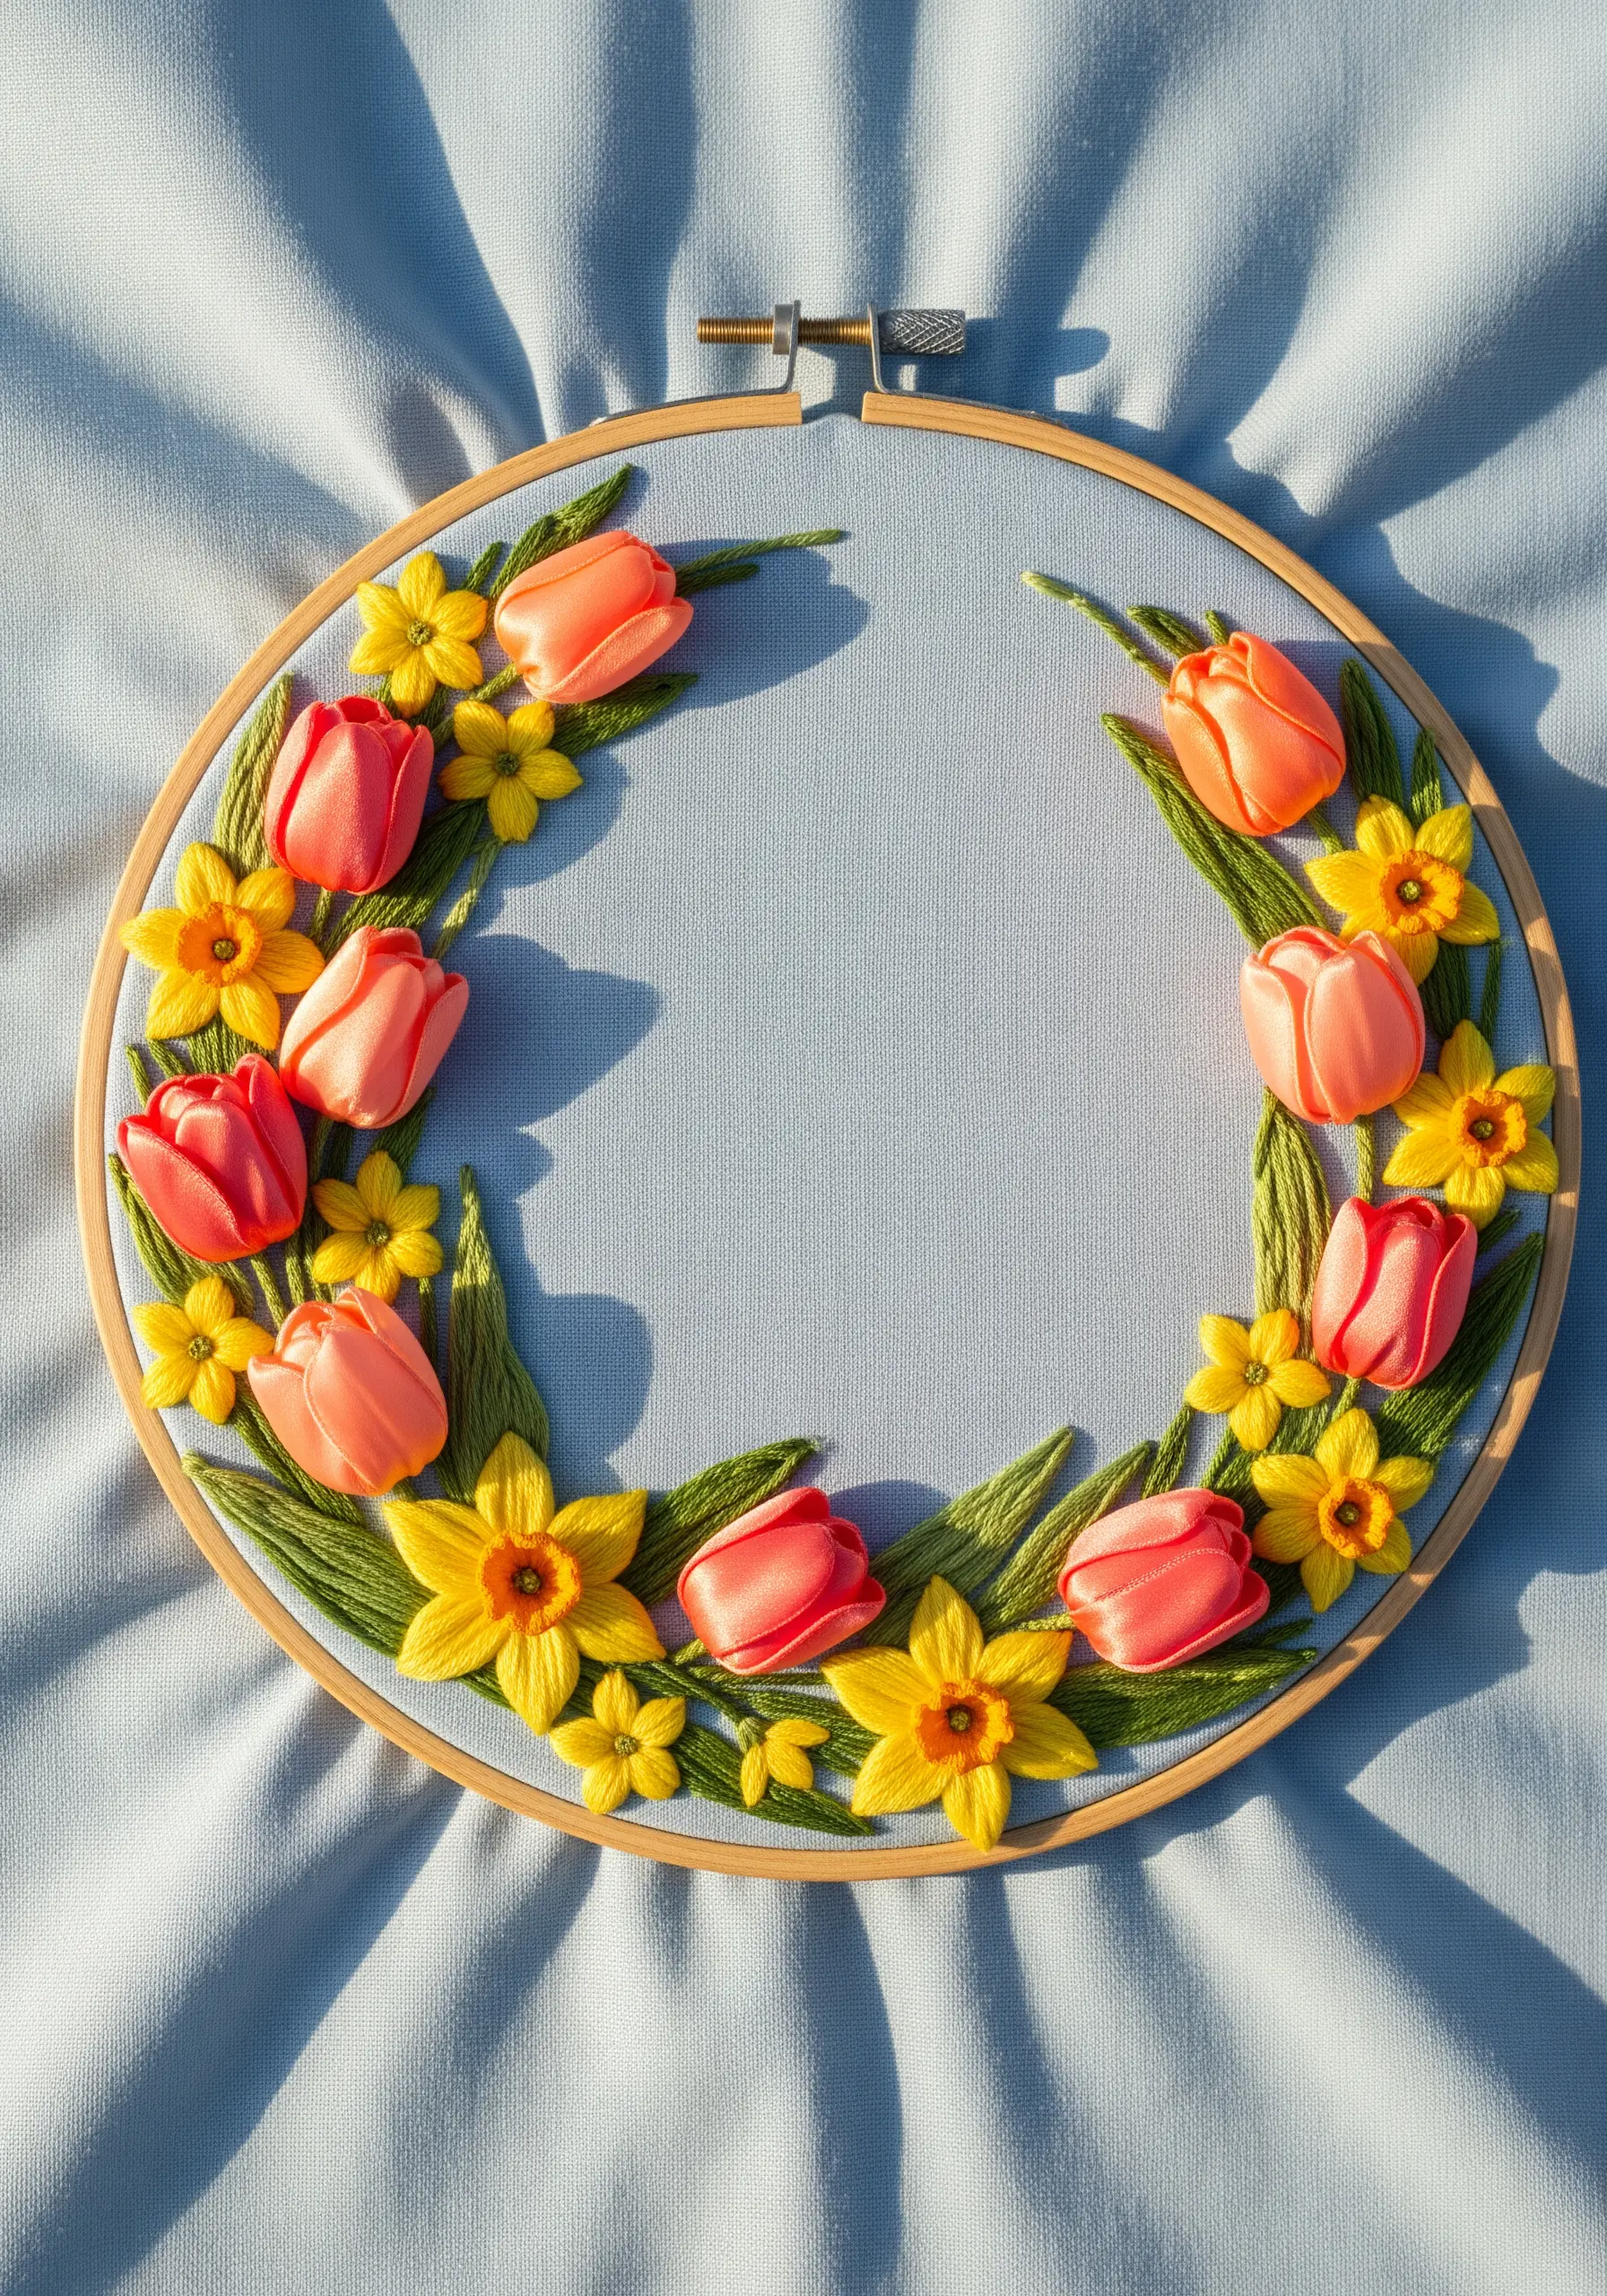
For flowers that need a plush, voluminous presence, switch from floss to silk ribbon.
The tulips are formed with a single folded ribbon stitch, where the width of the ribbon creates the petal’s body and a small securing stitch at the tip gives it shape.
Daffodils can be made using looped ribbon stitches for the petals and a gathered stitch or French knot for the central cup.
The ribbon’s natural sheen catches the light beautifully, offering a luxe finish that standard thread can’t replicate.
7. The Delicate Power of Clustered French Knots
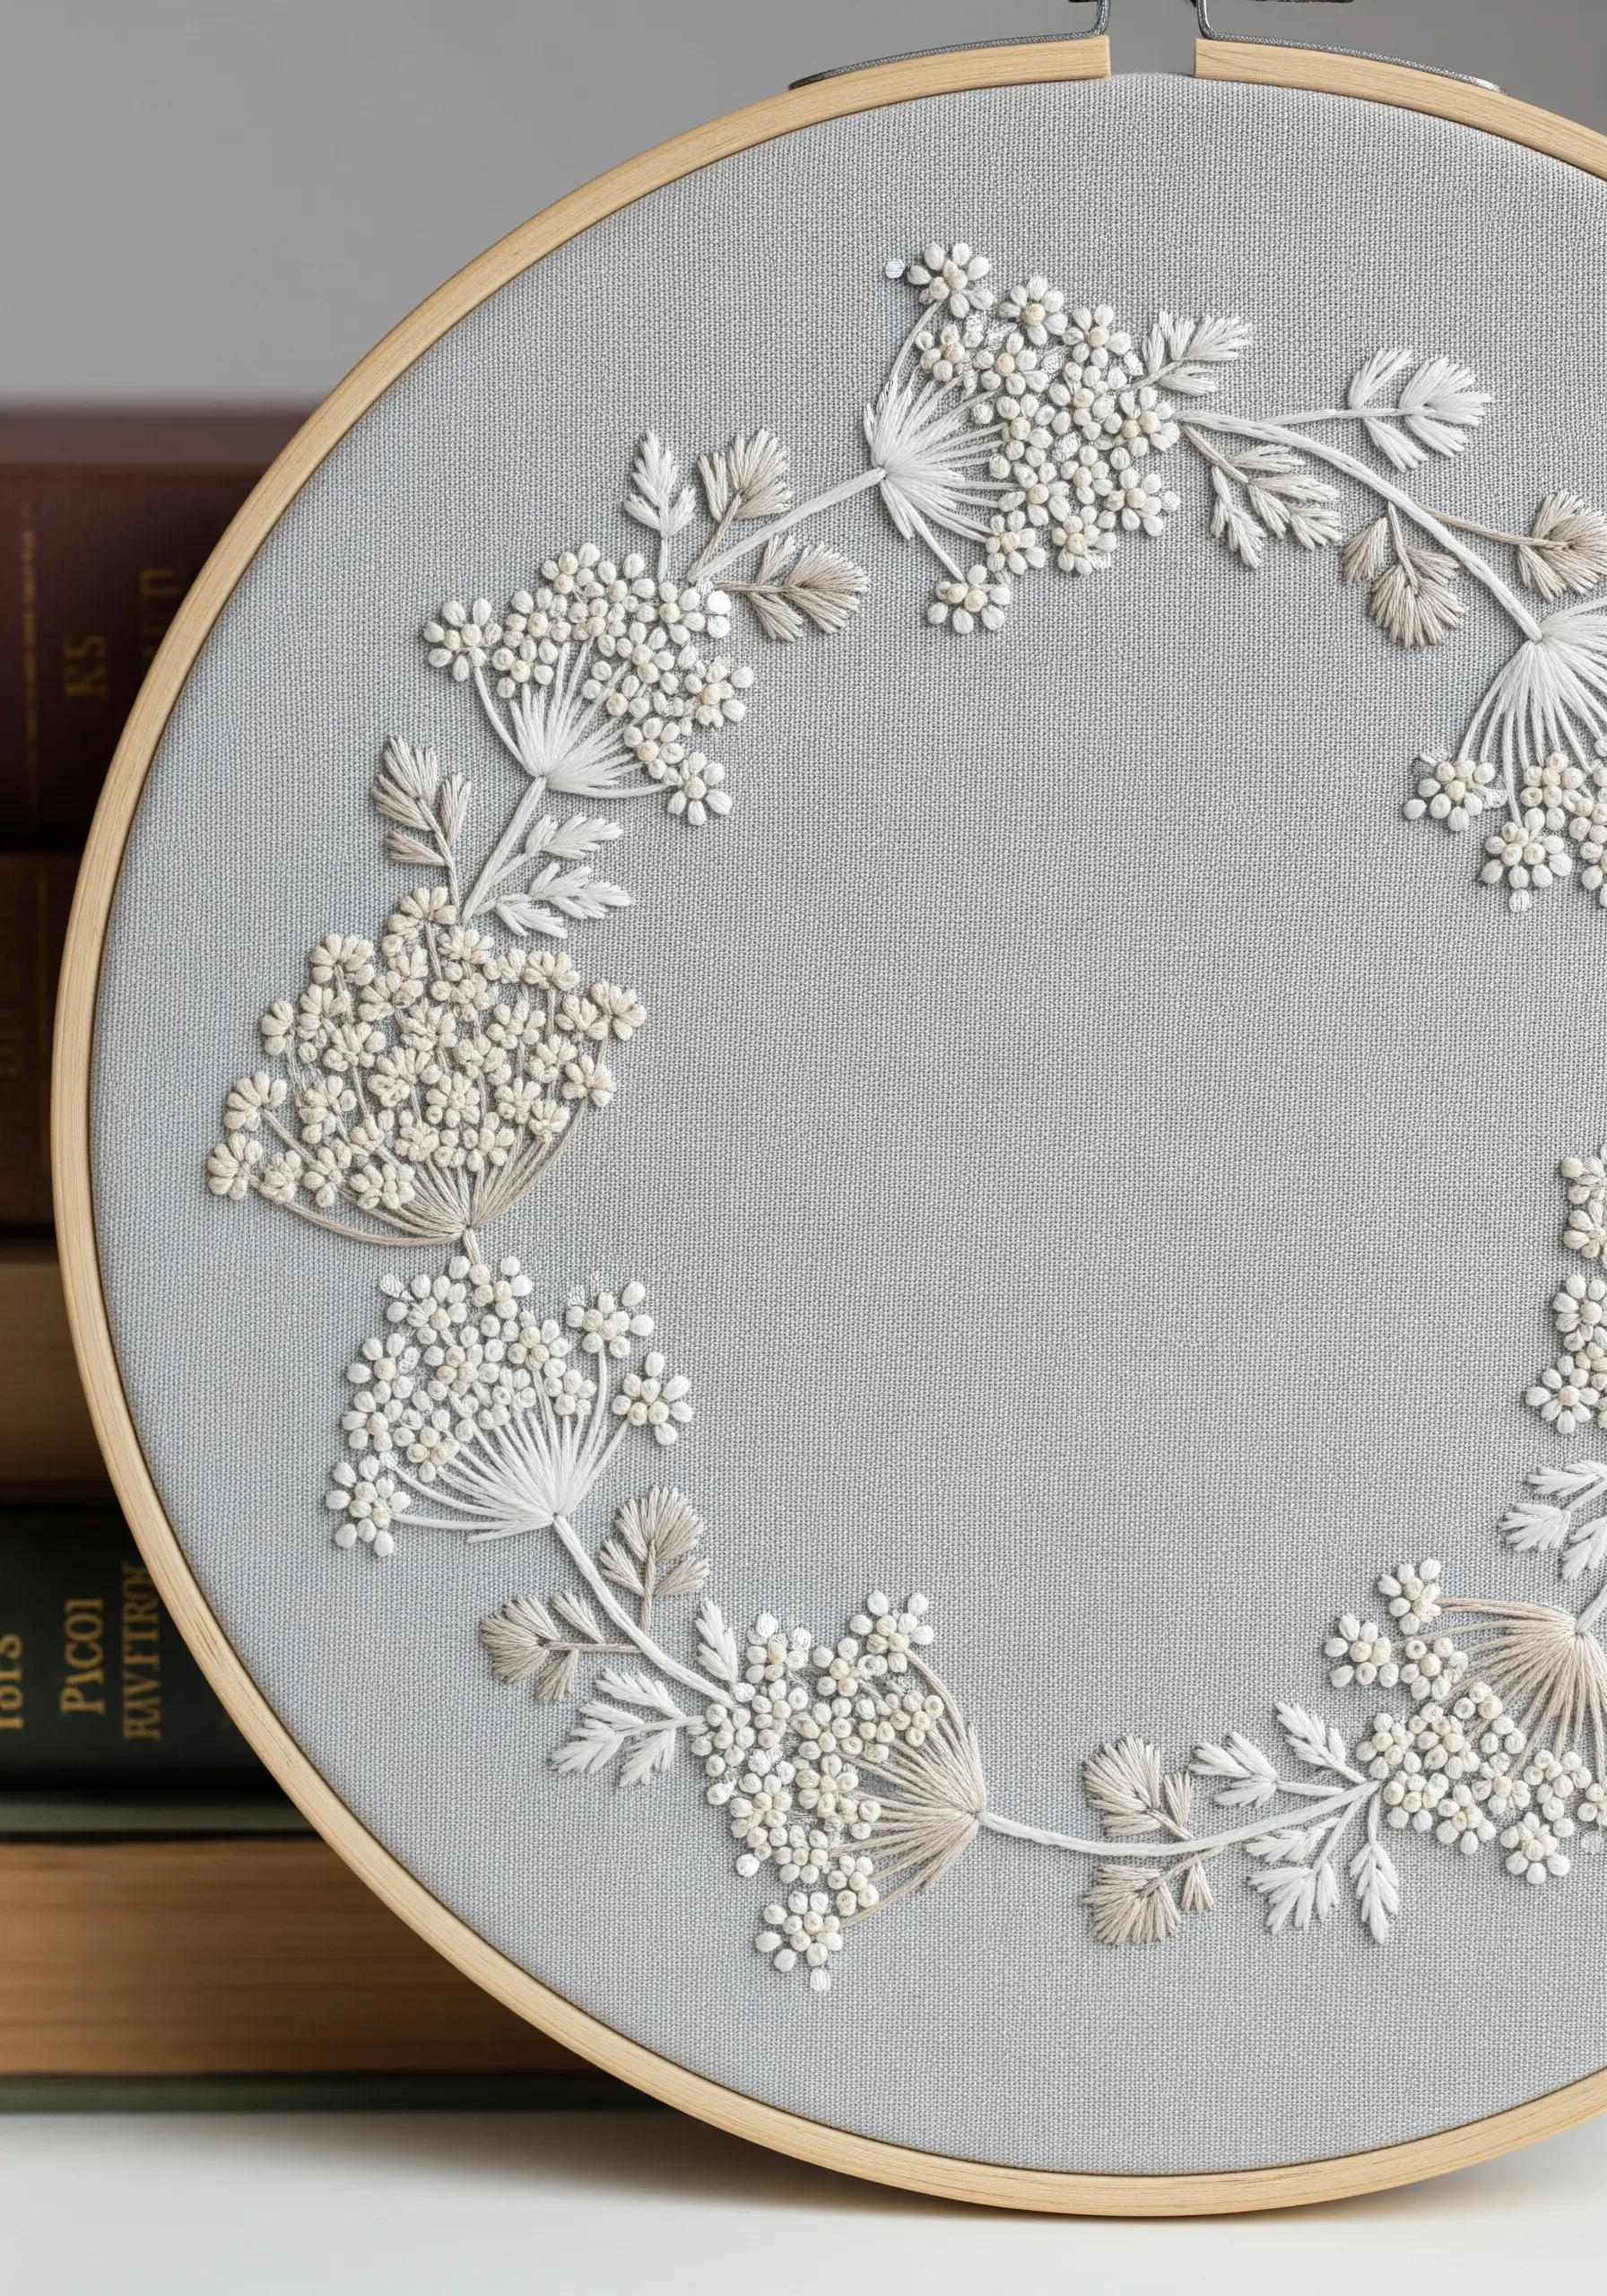
To recreate the airy feel of Queen Anne’s lace, focus entirely on the French knot.
Create the flower heads by clustering dozens of white French knots together, varying the number of wraps around the needle (once or twice) to create slight differences in size and texture.
Use a single strand of a slightly darker, ecru-colored thread for the delicate stems and leaves, worked in a simple straight or split stitch.
The result is one of the most elegant monochrome thread embroidery ideas, proving that a single stitch executed with intention can be incredibly powerful.
8. Weaving Bold, Sculptural Blossoms
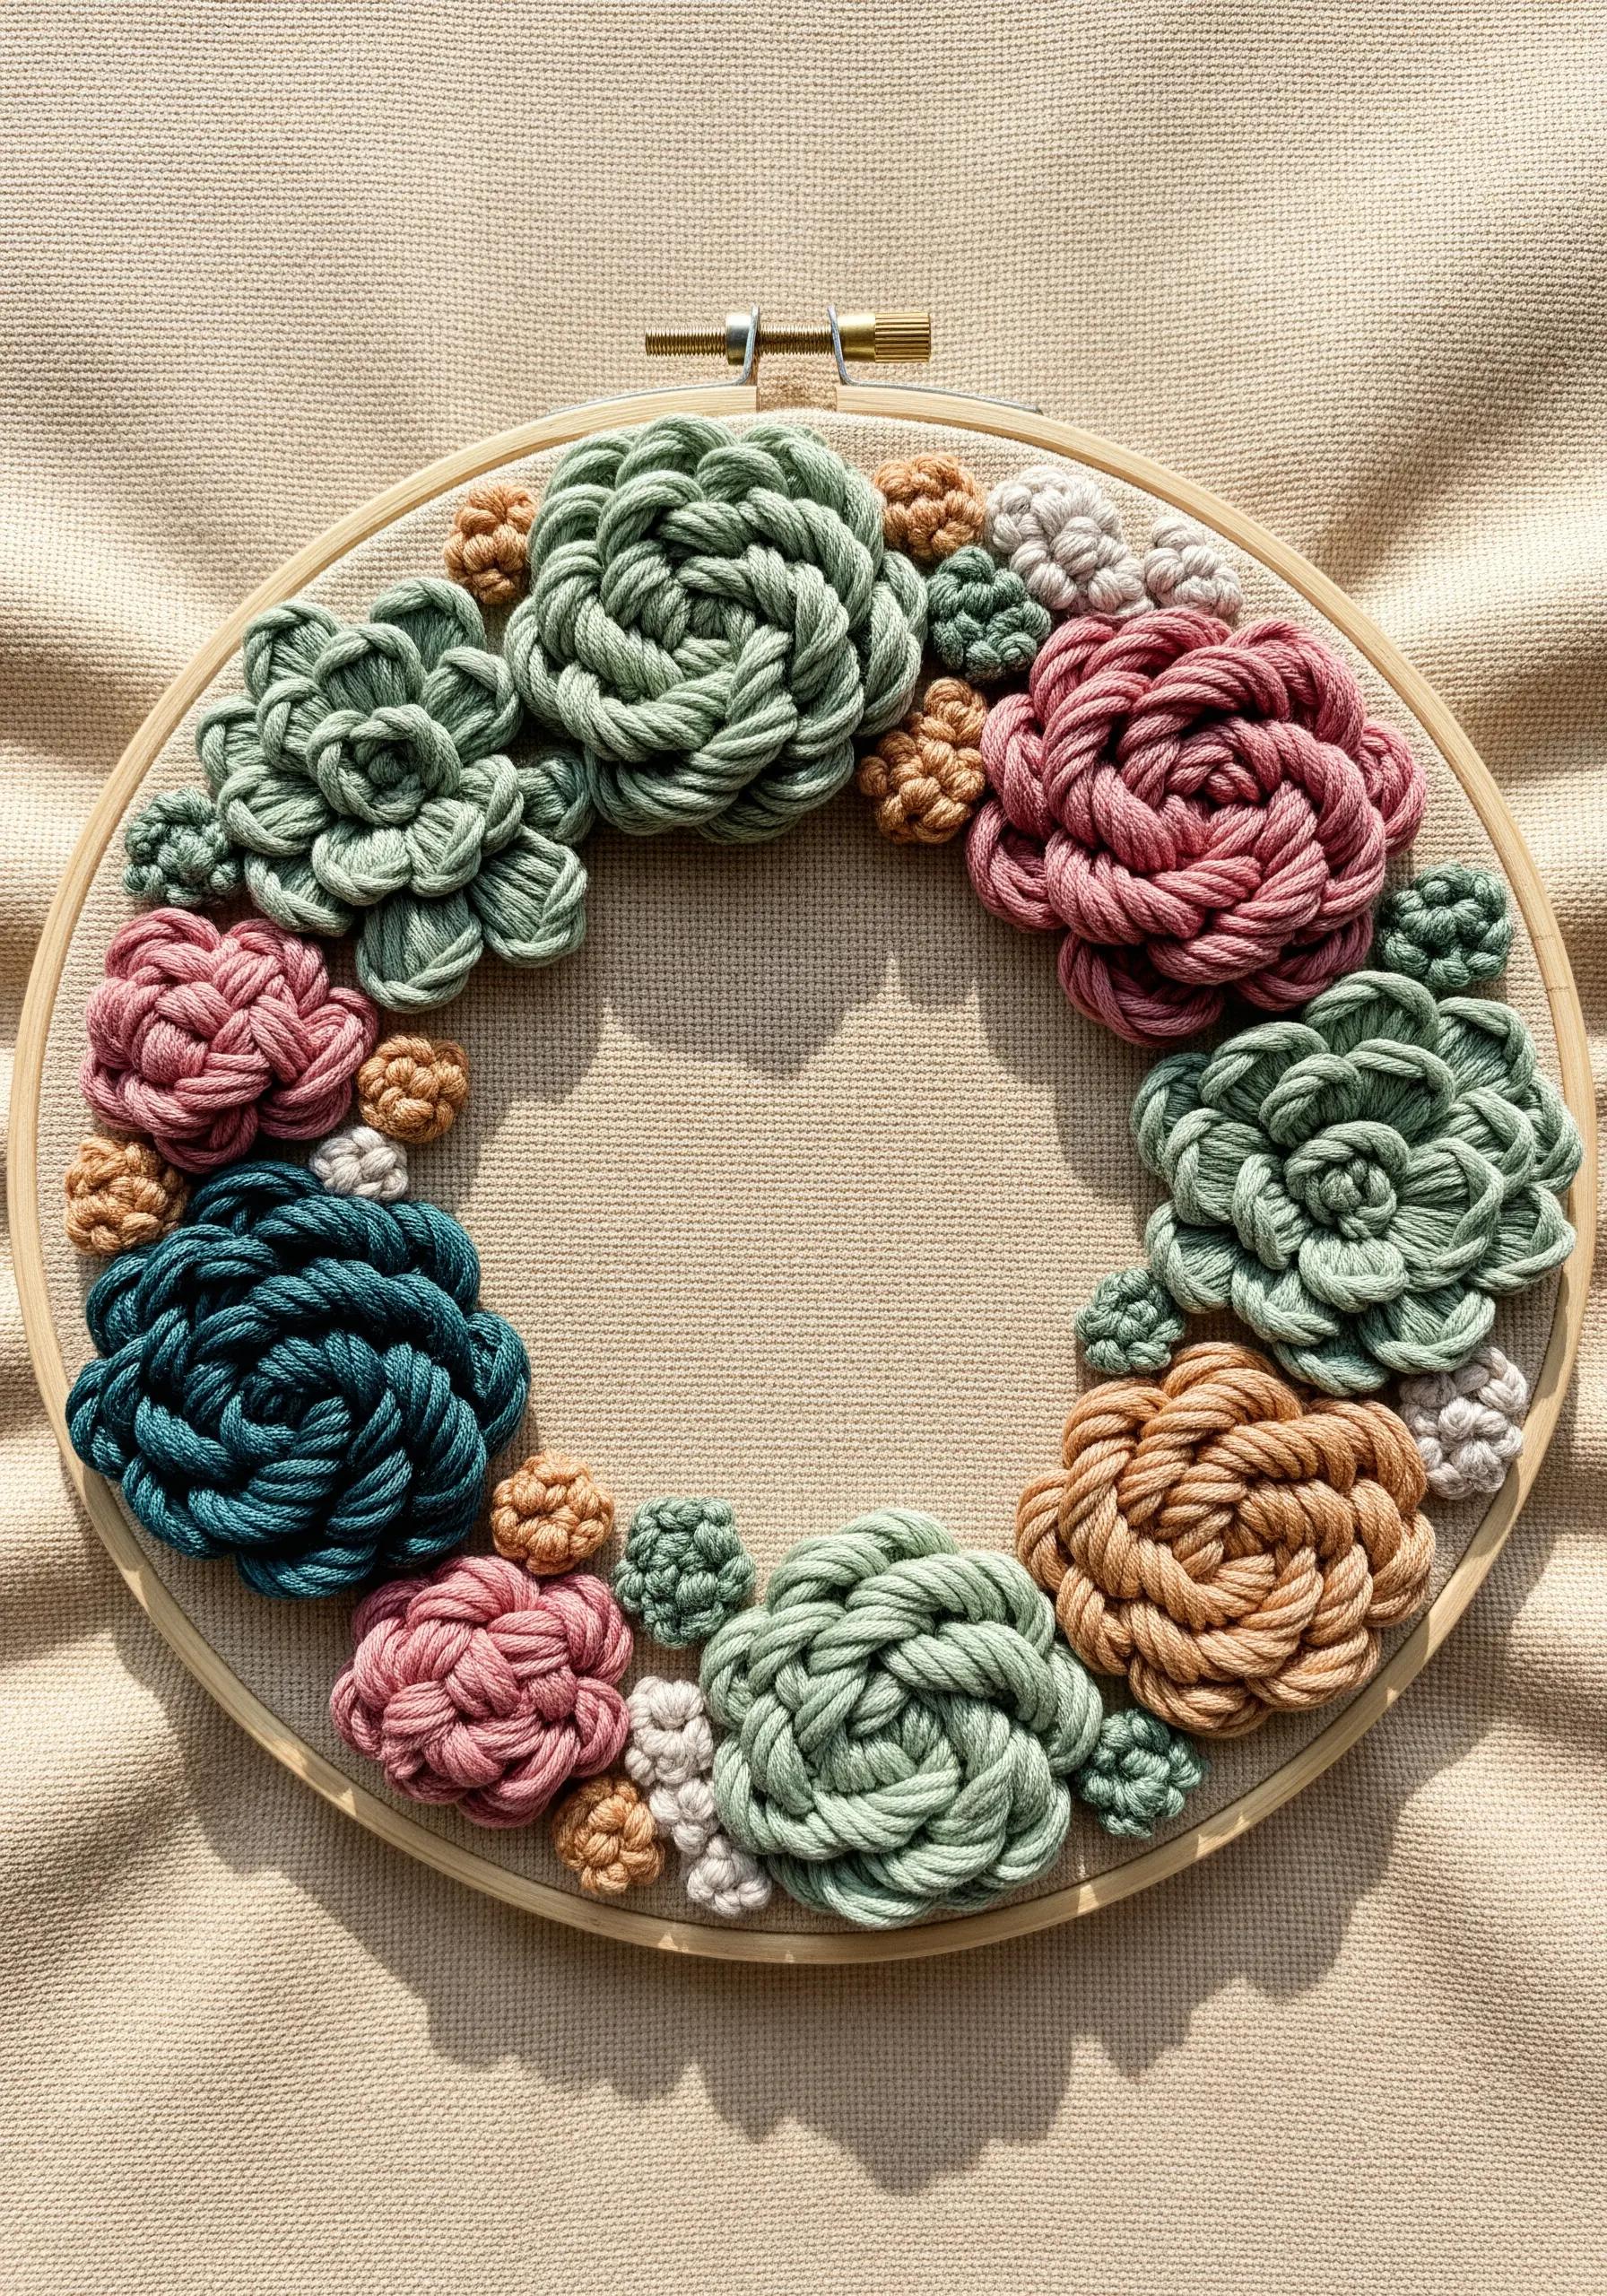
For maximum texture that you can truly feel, the woven wheel stitch is your best friend.
Start with a star of straight stitches (an odd number is crucial, like 5 or 7), then weave your thread over and under each spoke until the shape is filled.
To create a multi-toned effect, simply switch colors partway through the weaving process.
This stitch works beautifully with thicker threads like pearl cotton or even fine yarn, allowing you to create a highly sculptural, plush wreath in a fraction of the time.
9. Building a Woodland Narrative with Detail
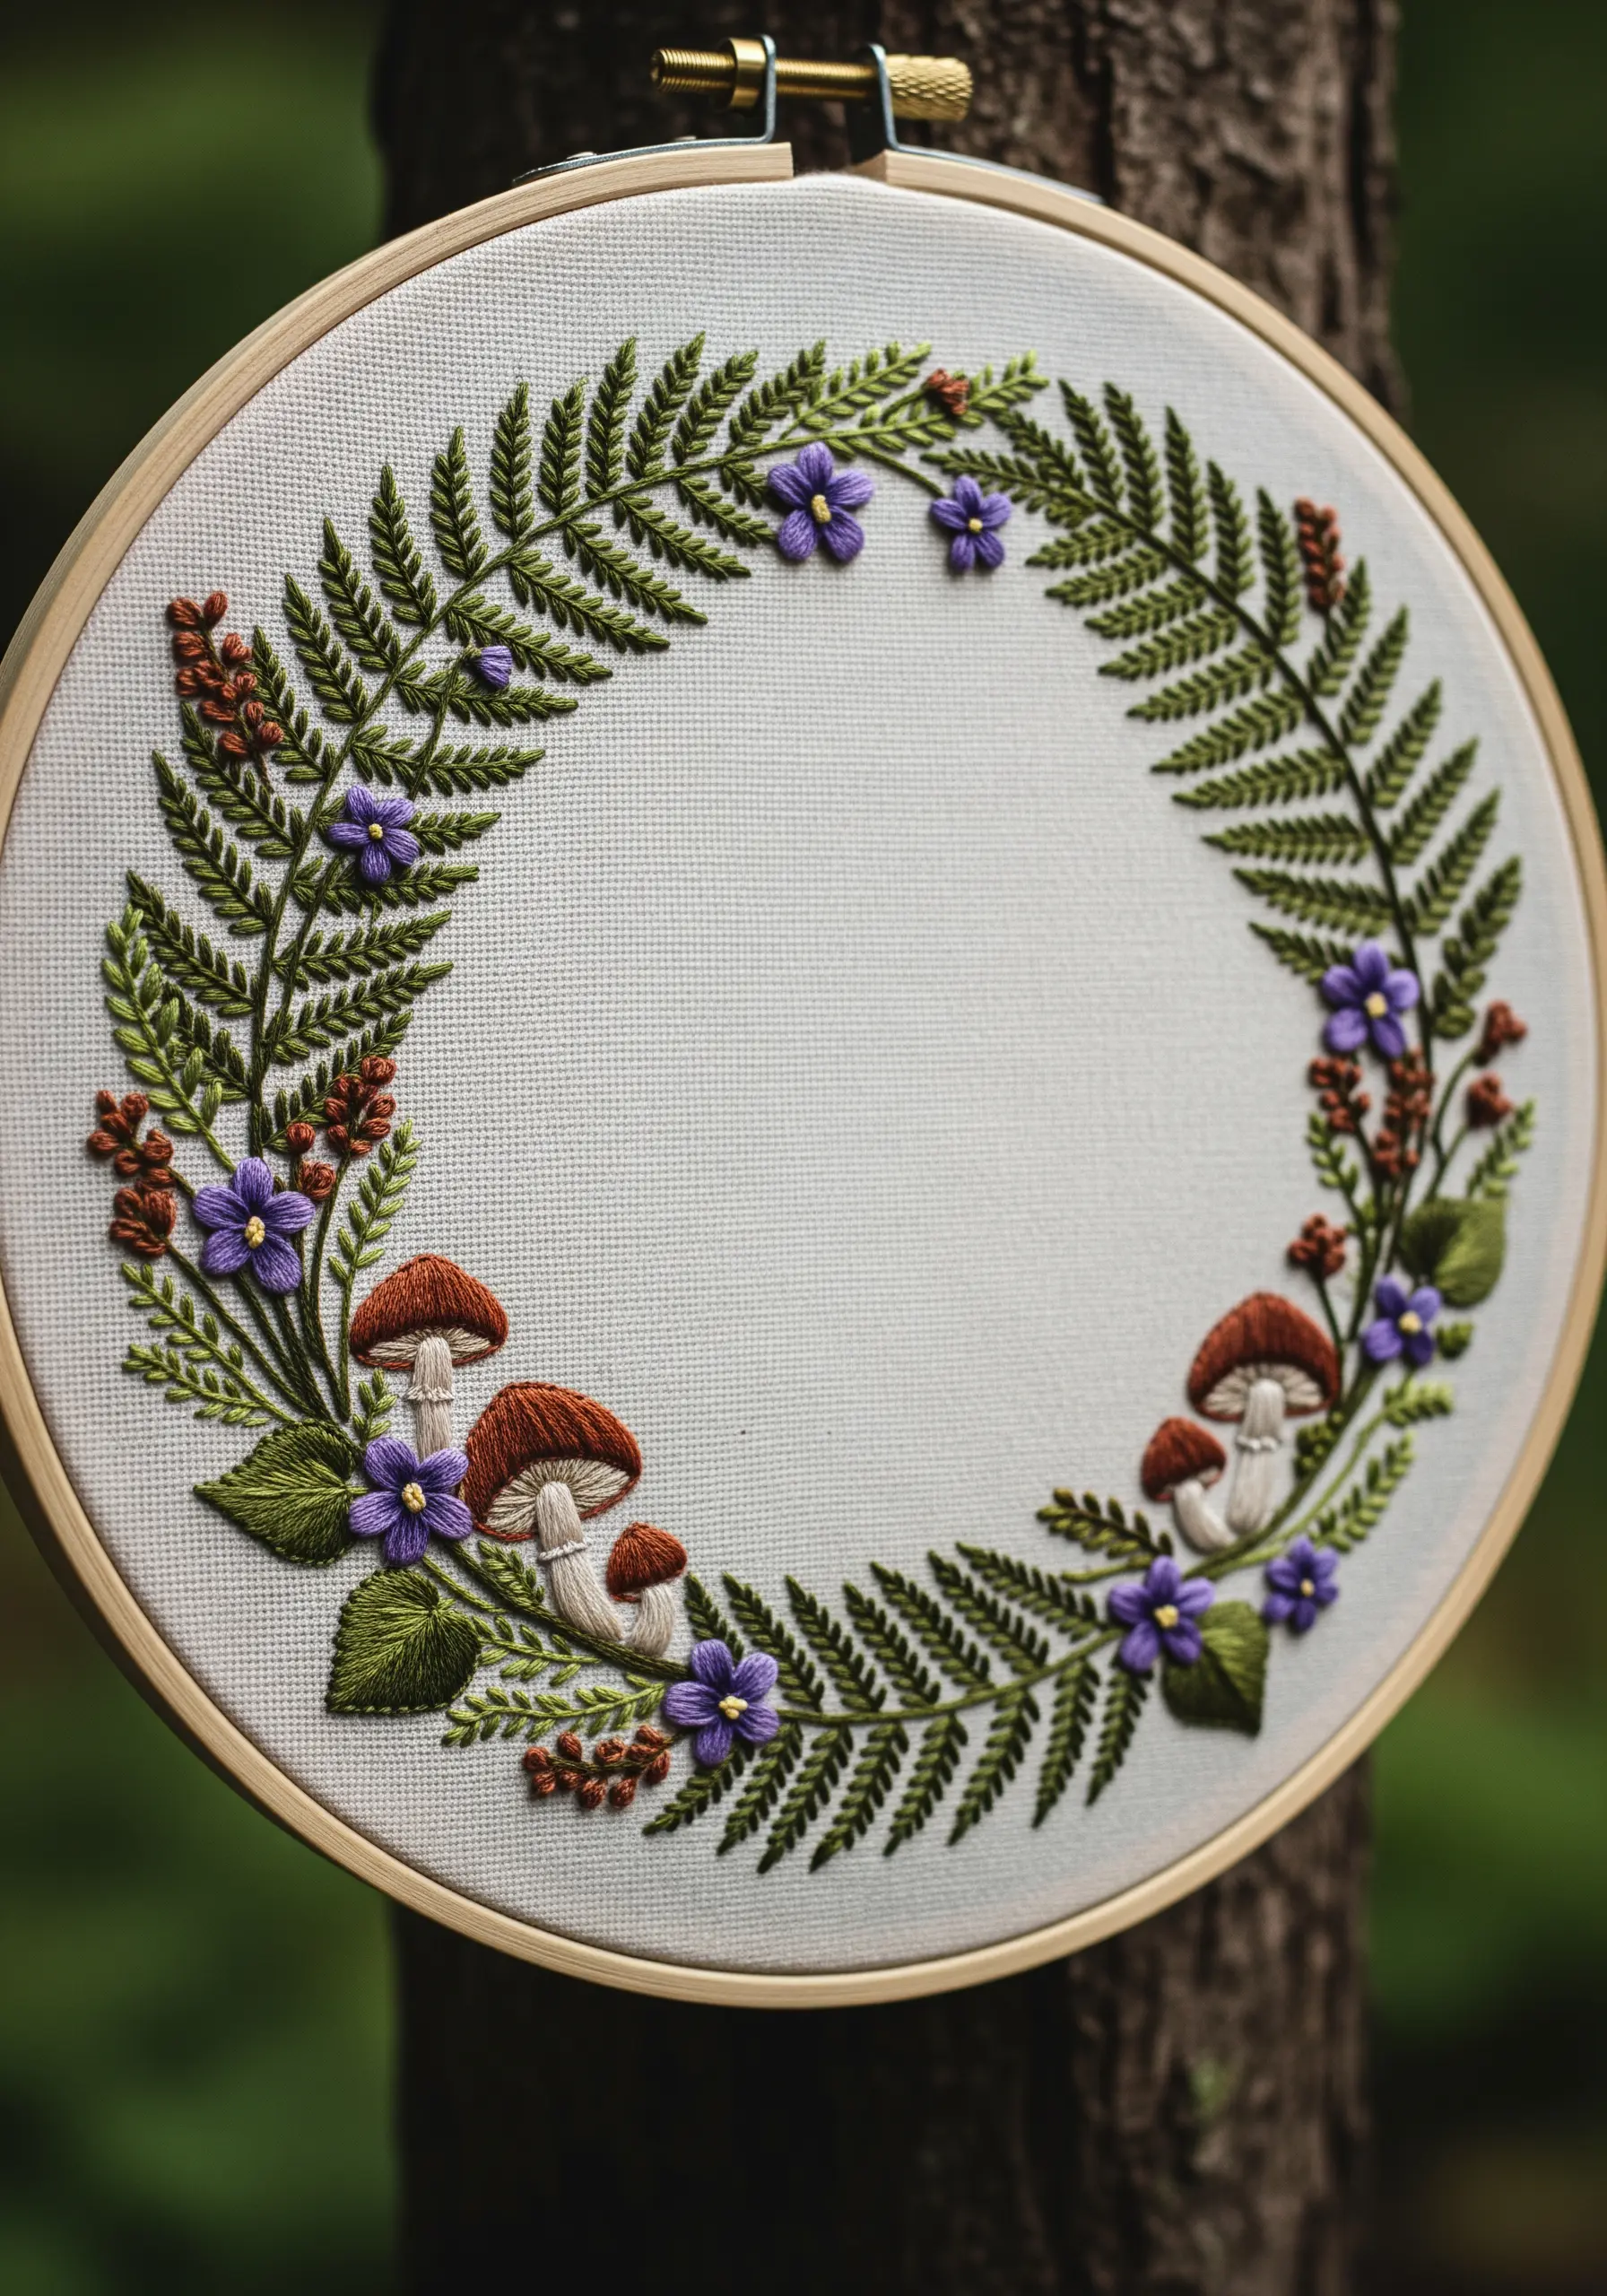
A successful themed wreath tells a small story through its elements.
Render the fern fronds with fishbone stitch to achieve a perfect, herringbone-like texture that looks incredibly realistic.
For the mushroom caps, use long-and-short stitch with two shades of brown to create a smooth, rounded gradient, and add fine straight stitches underneath for the gills.
These detailed, earthy texture embroidery patterns are what elevate a piece from a collection of motifs to a cohesive woodland scene.
10. Extending Your Design Beyond the Fabric
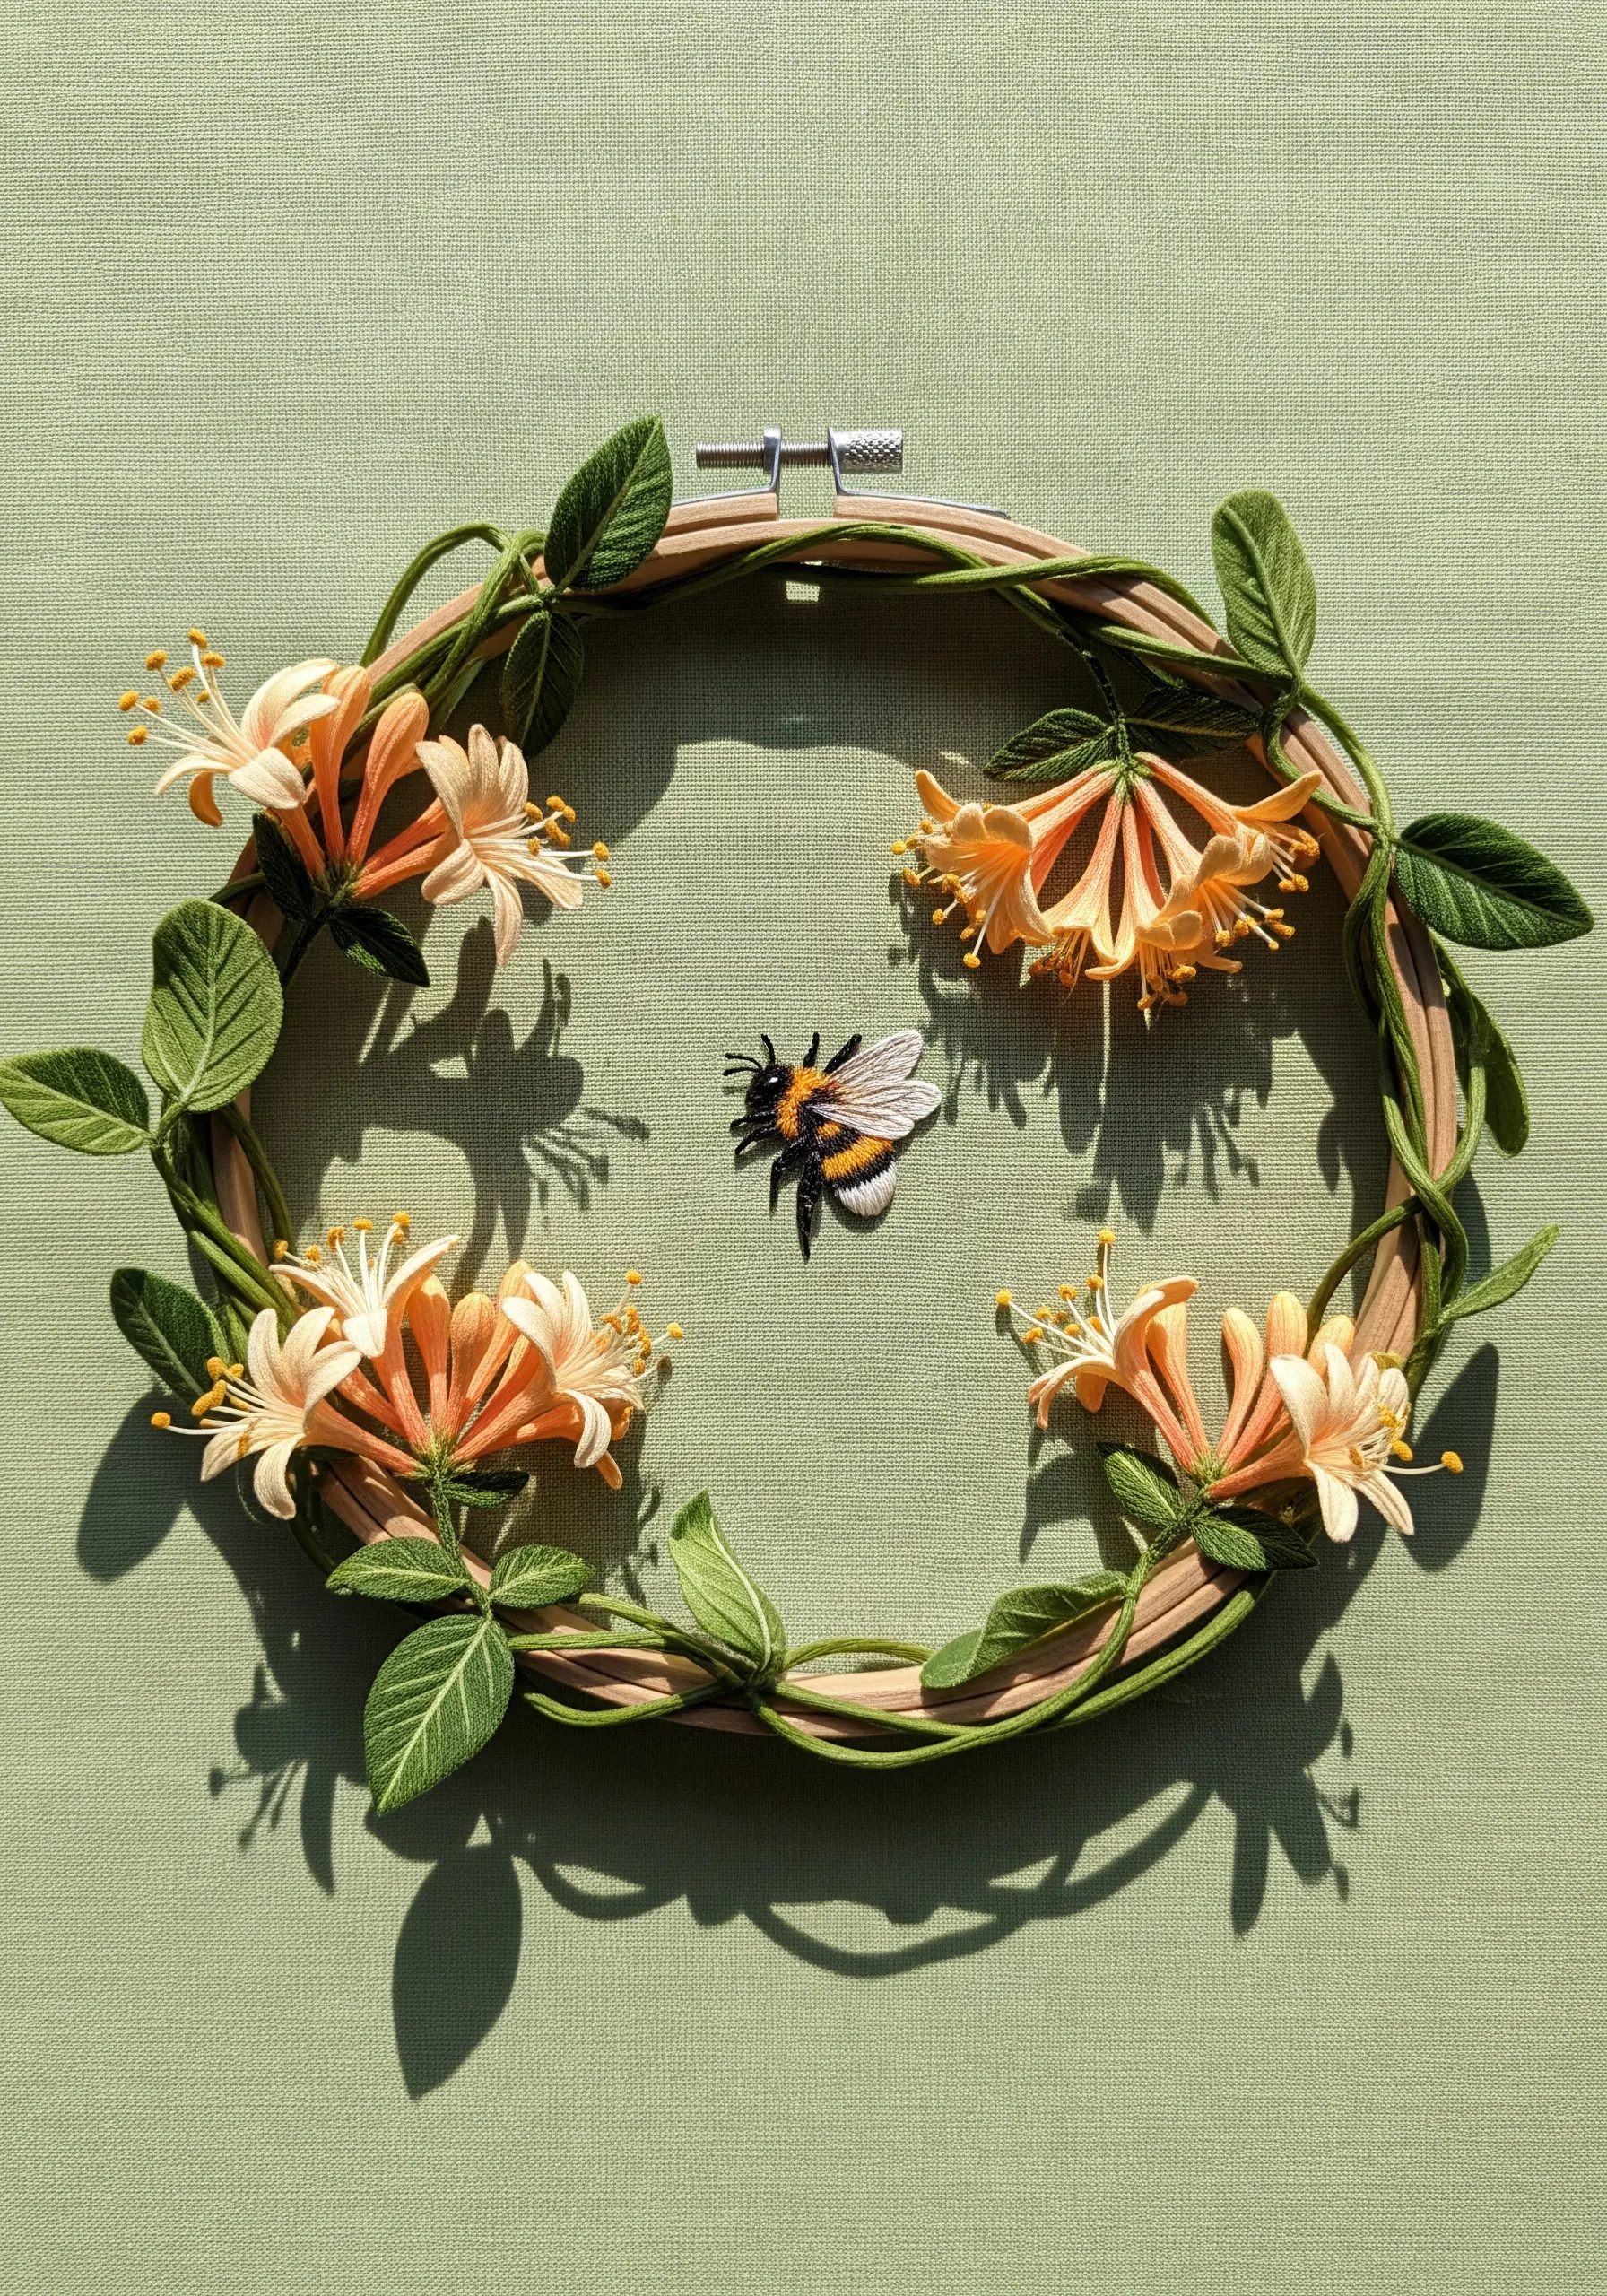
Challenge the conventional hoop boundary by integrating the frame itself into your design.
Before you begin stitching, wrap the inner hoop with green floss or fabric strips to create a vined base.
Stitch your floral elements directly onto the fabric as usual, but allow some leaves and stems to be stitched over the wrapped hoop, blurring the line between the art and its frame.
For the bee, try a stumpwork slip—embroider it on a separate piece of fabric, cut it out, and attach it with a few tacking stitches for a raised, 3D effect.
11. Achieving Painterly Realism with Thread Painting
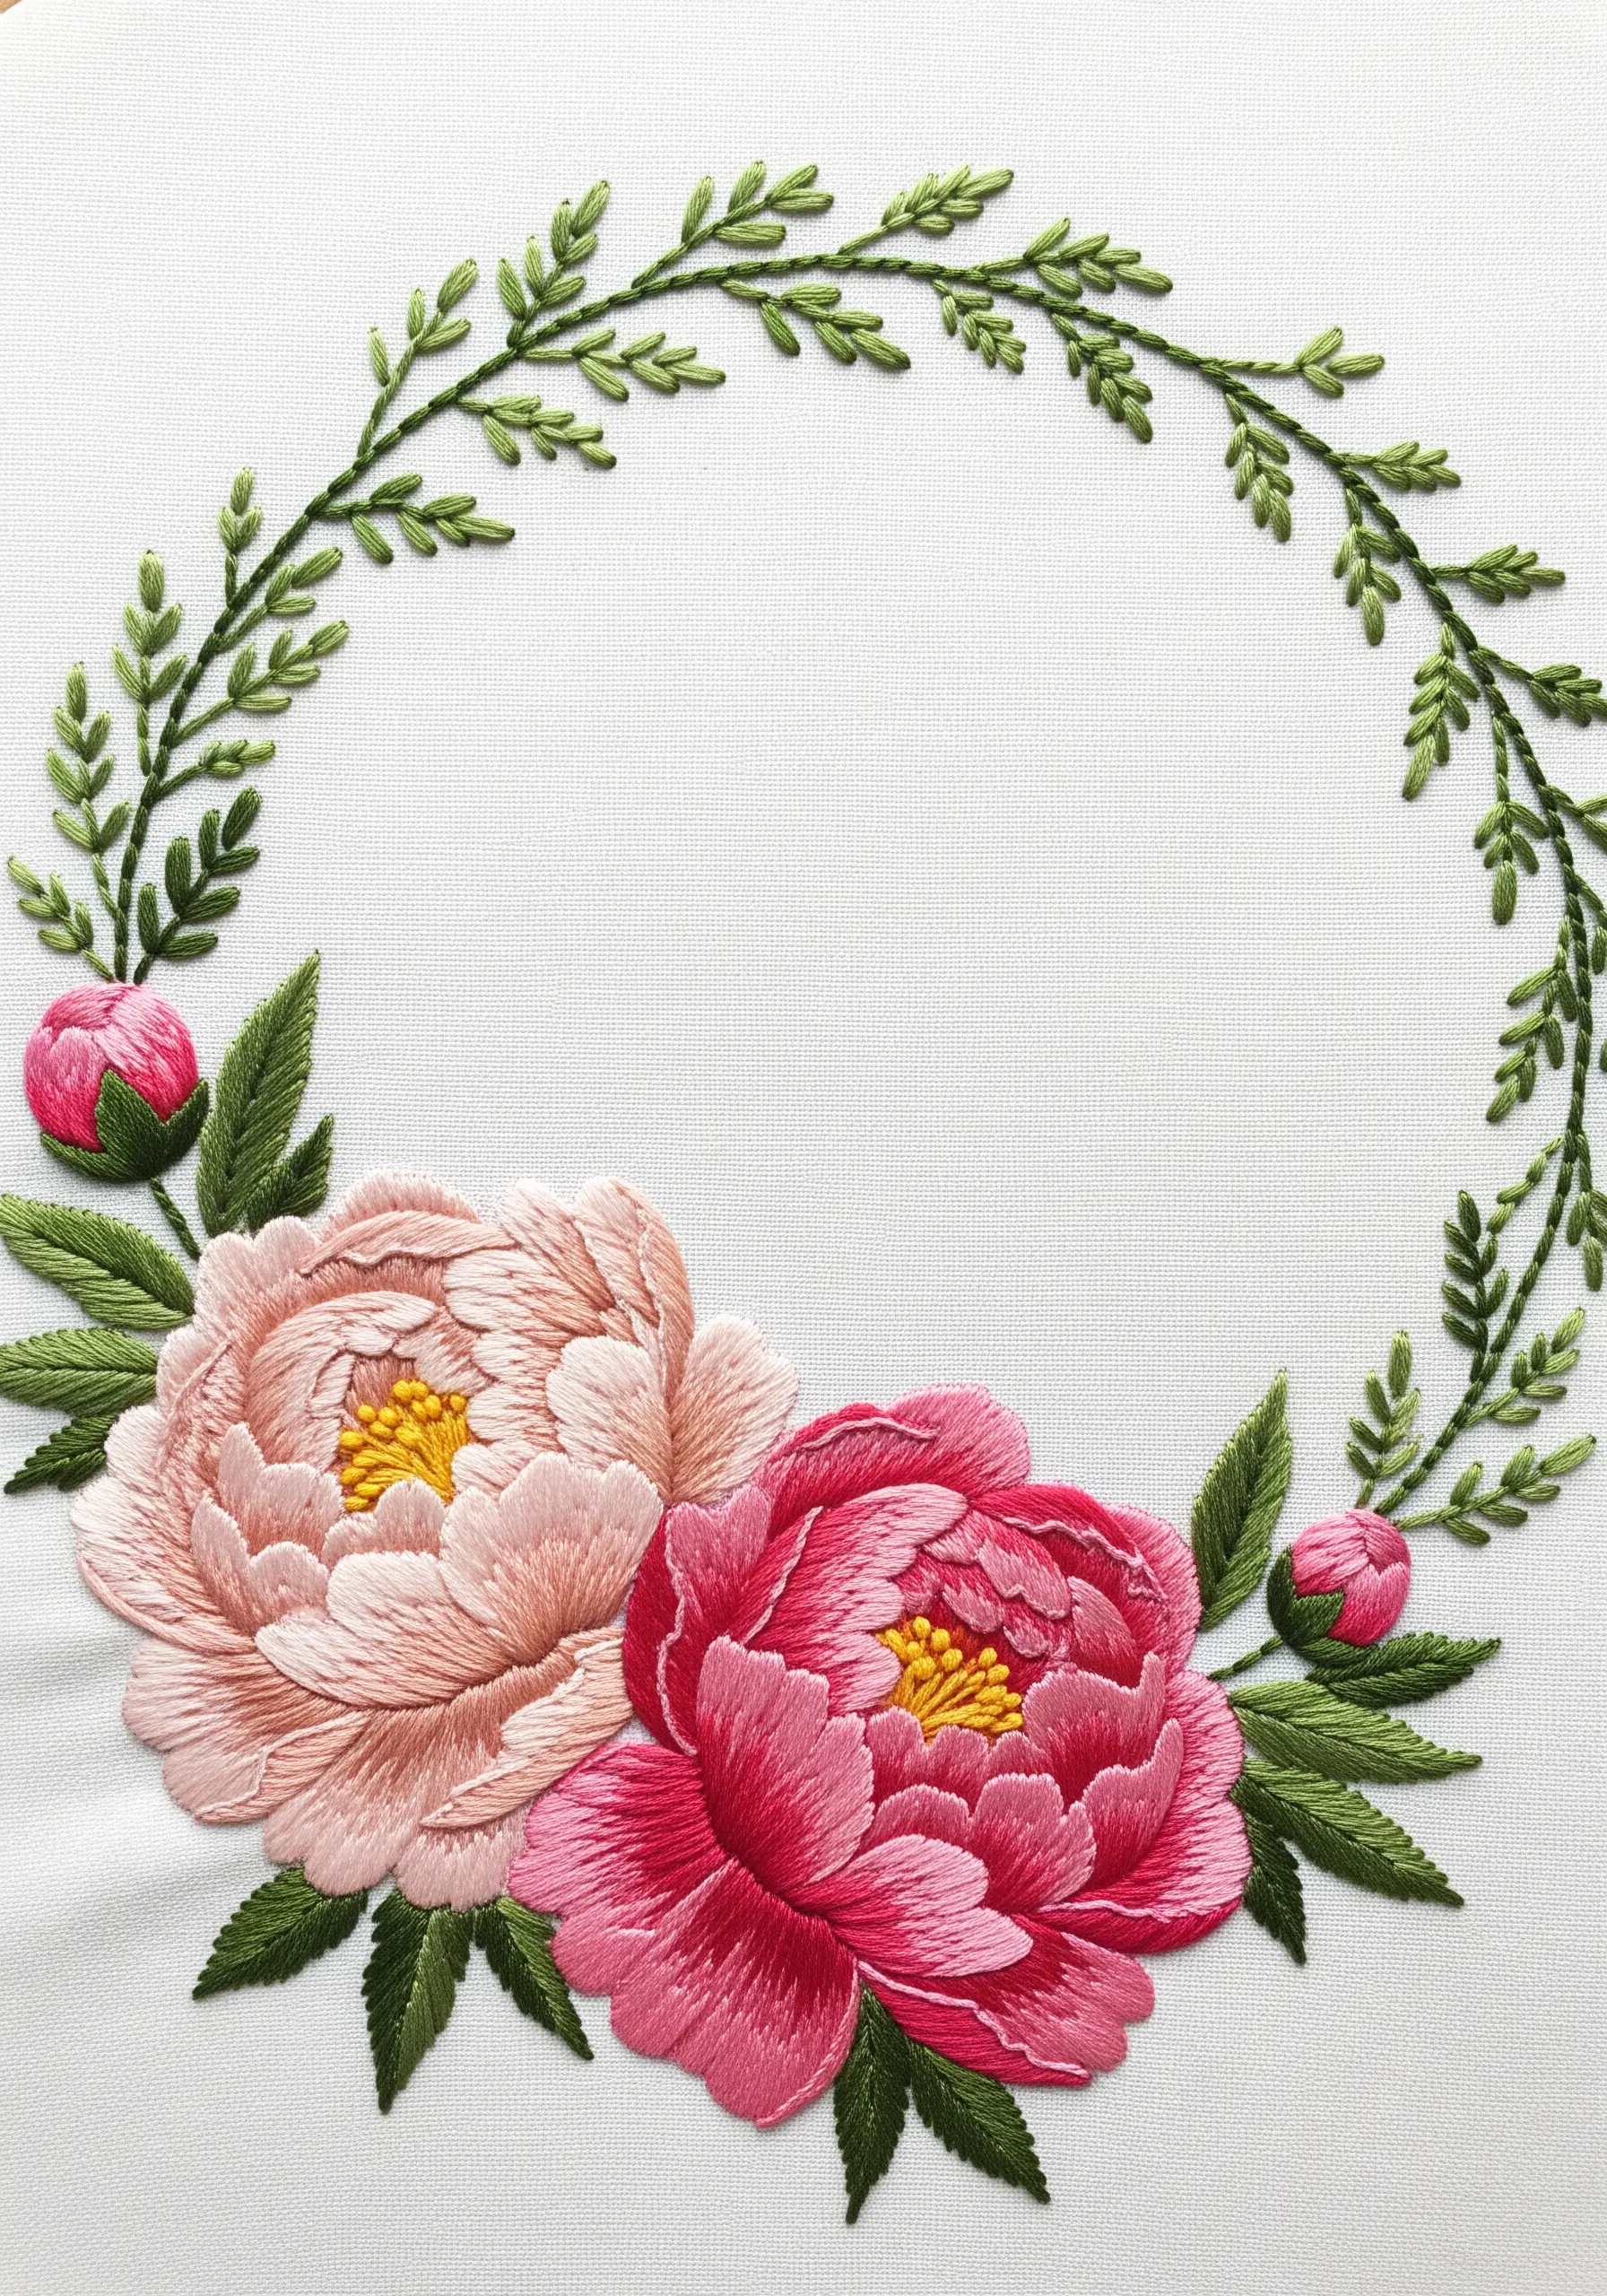
For florals that look almost real, you must master the long-and-short stitch.
Work in concentric rows, starting from the outer edge of the petal and moving inward.
The key is to bring your needle up through the middle of the stitches in the previous row, splitting the thread to create a seamless color blend.
Use a single strand of floss for the most delicate gradients, and don’t be afraid to use three or four shades of pink per petal to achieve that soft, painterly depth.
These are the foundational floral thread painting techniques that create hyper-realistic results.
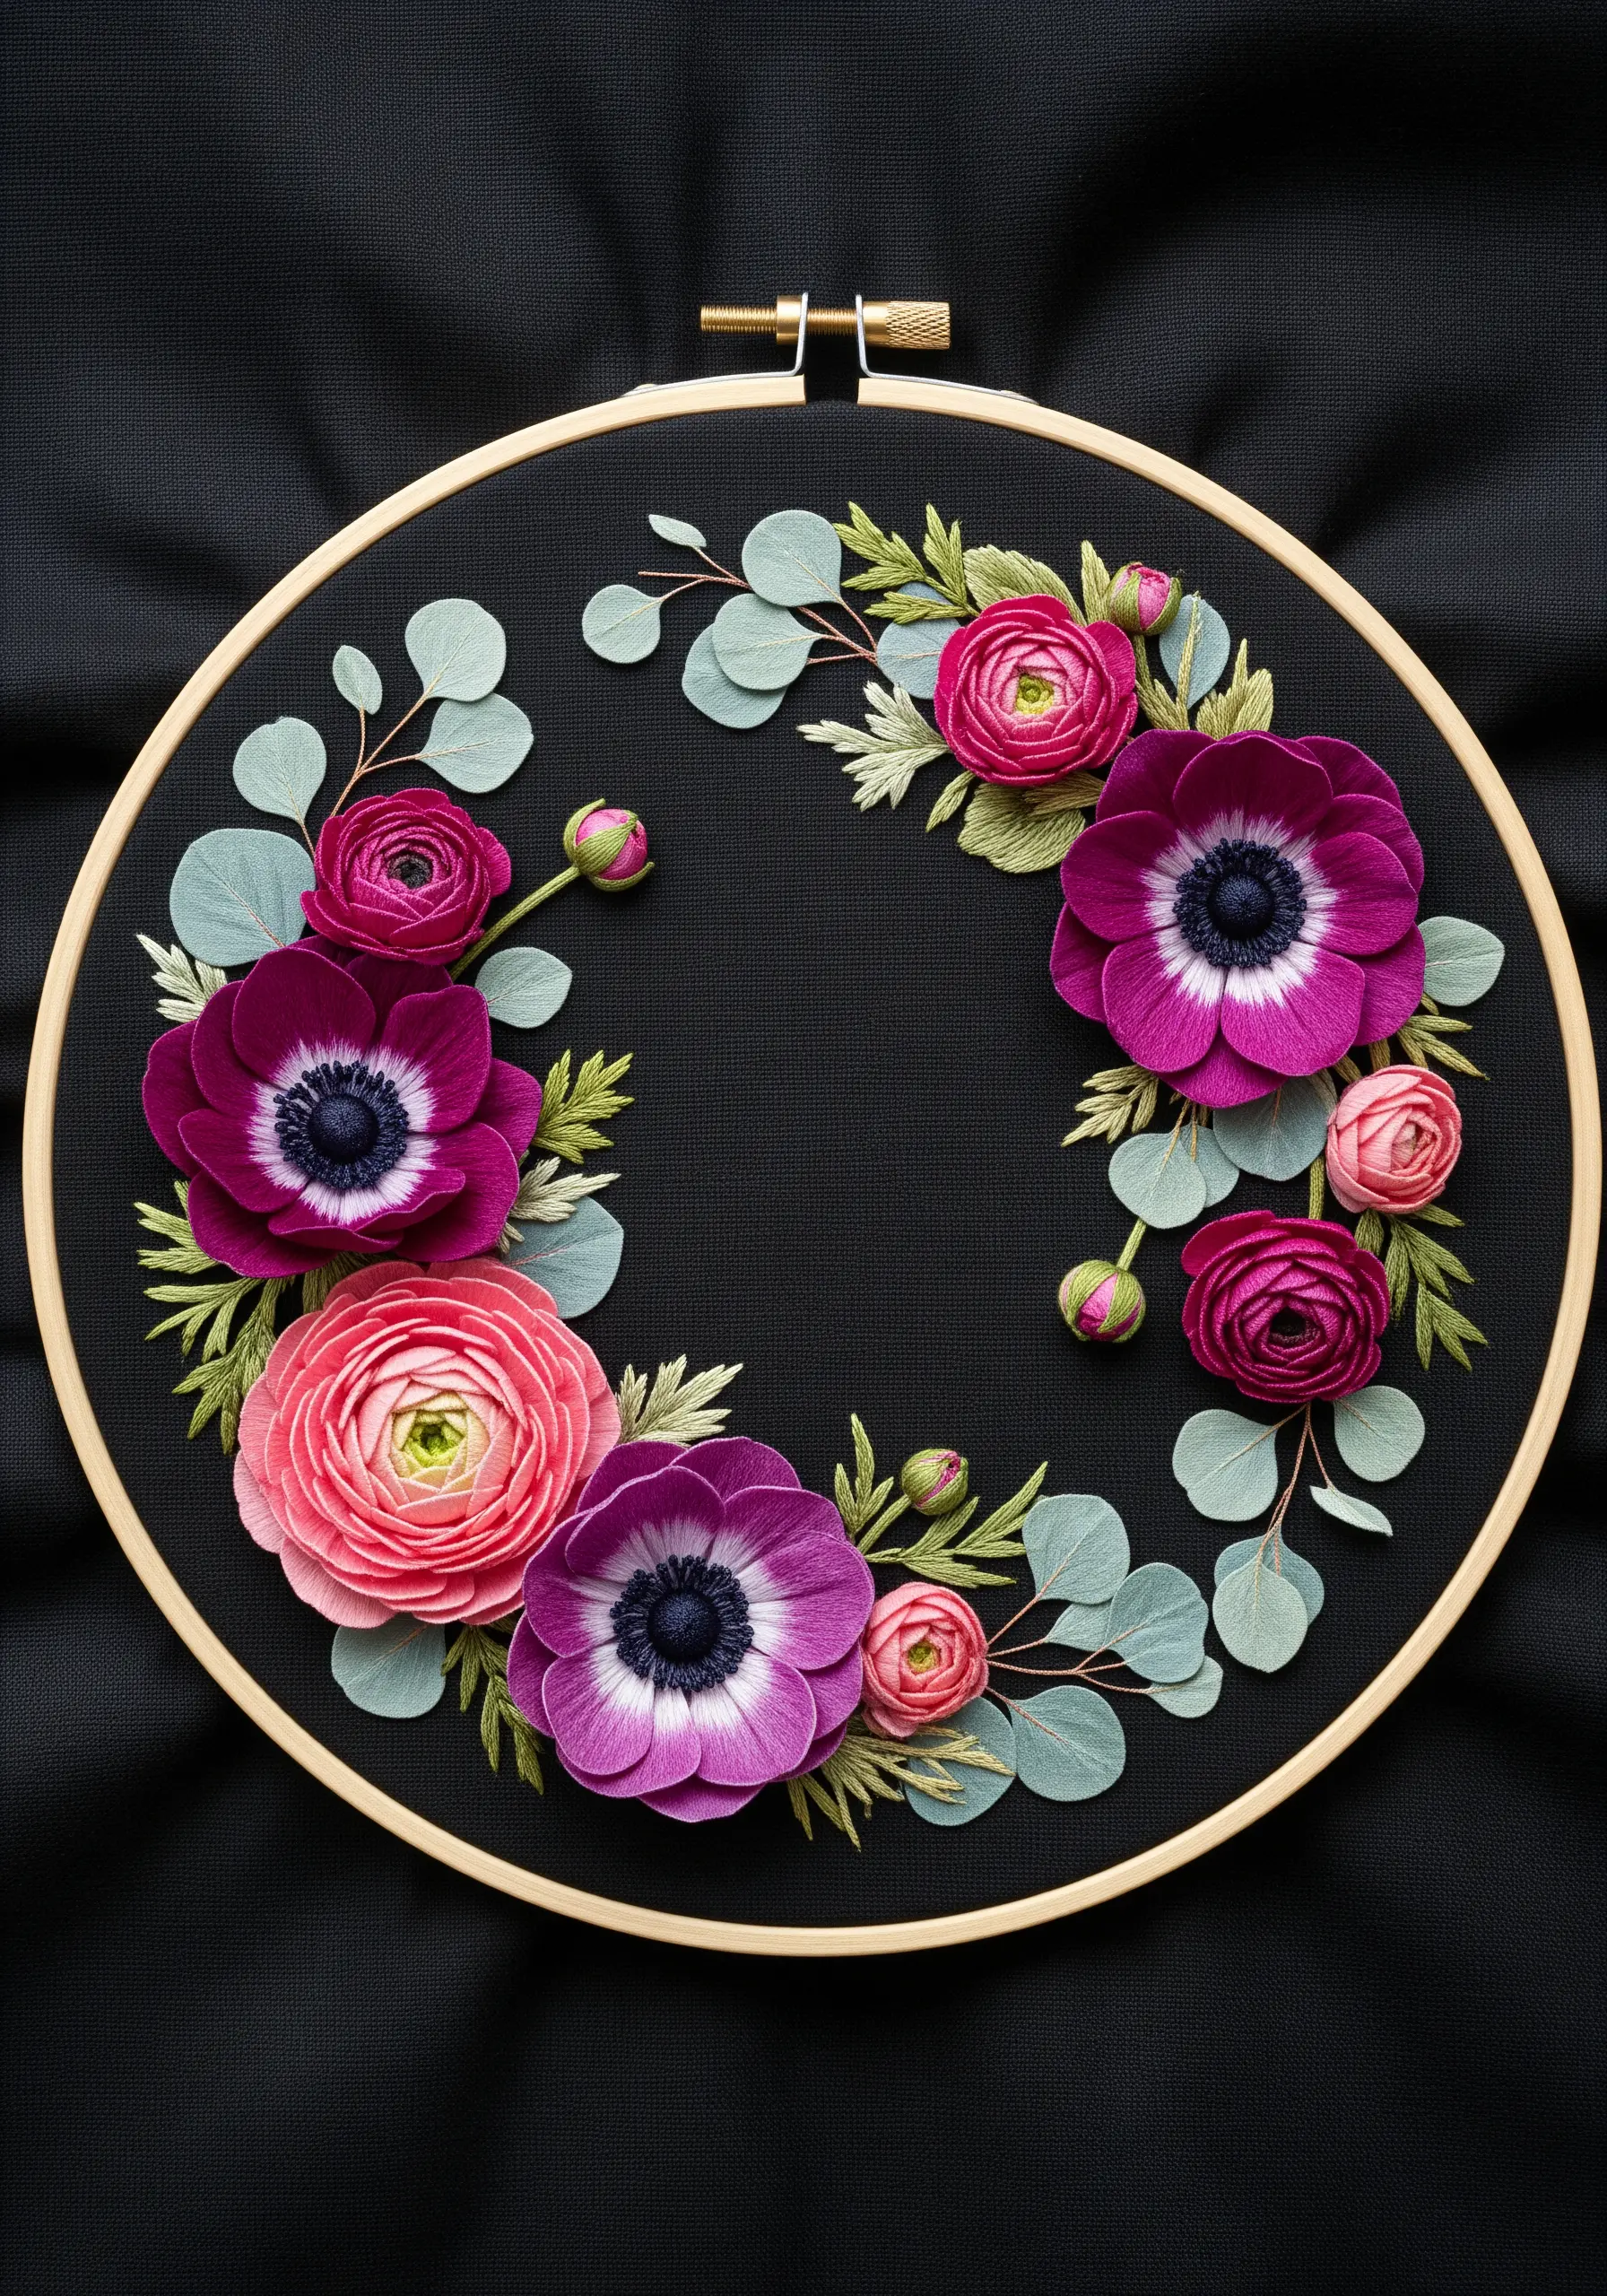
12. Creating Moody Florals on Dark Fabric
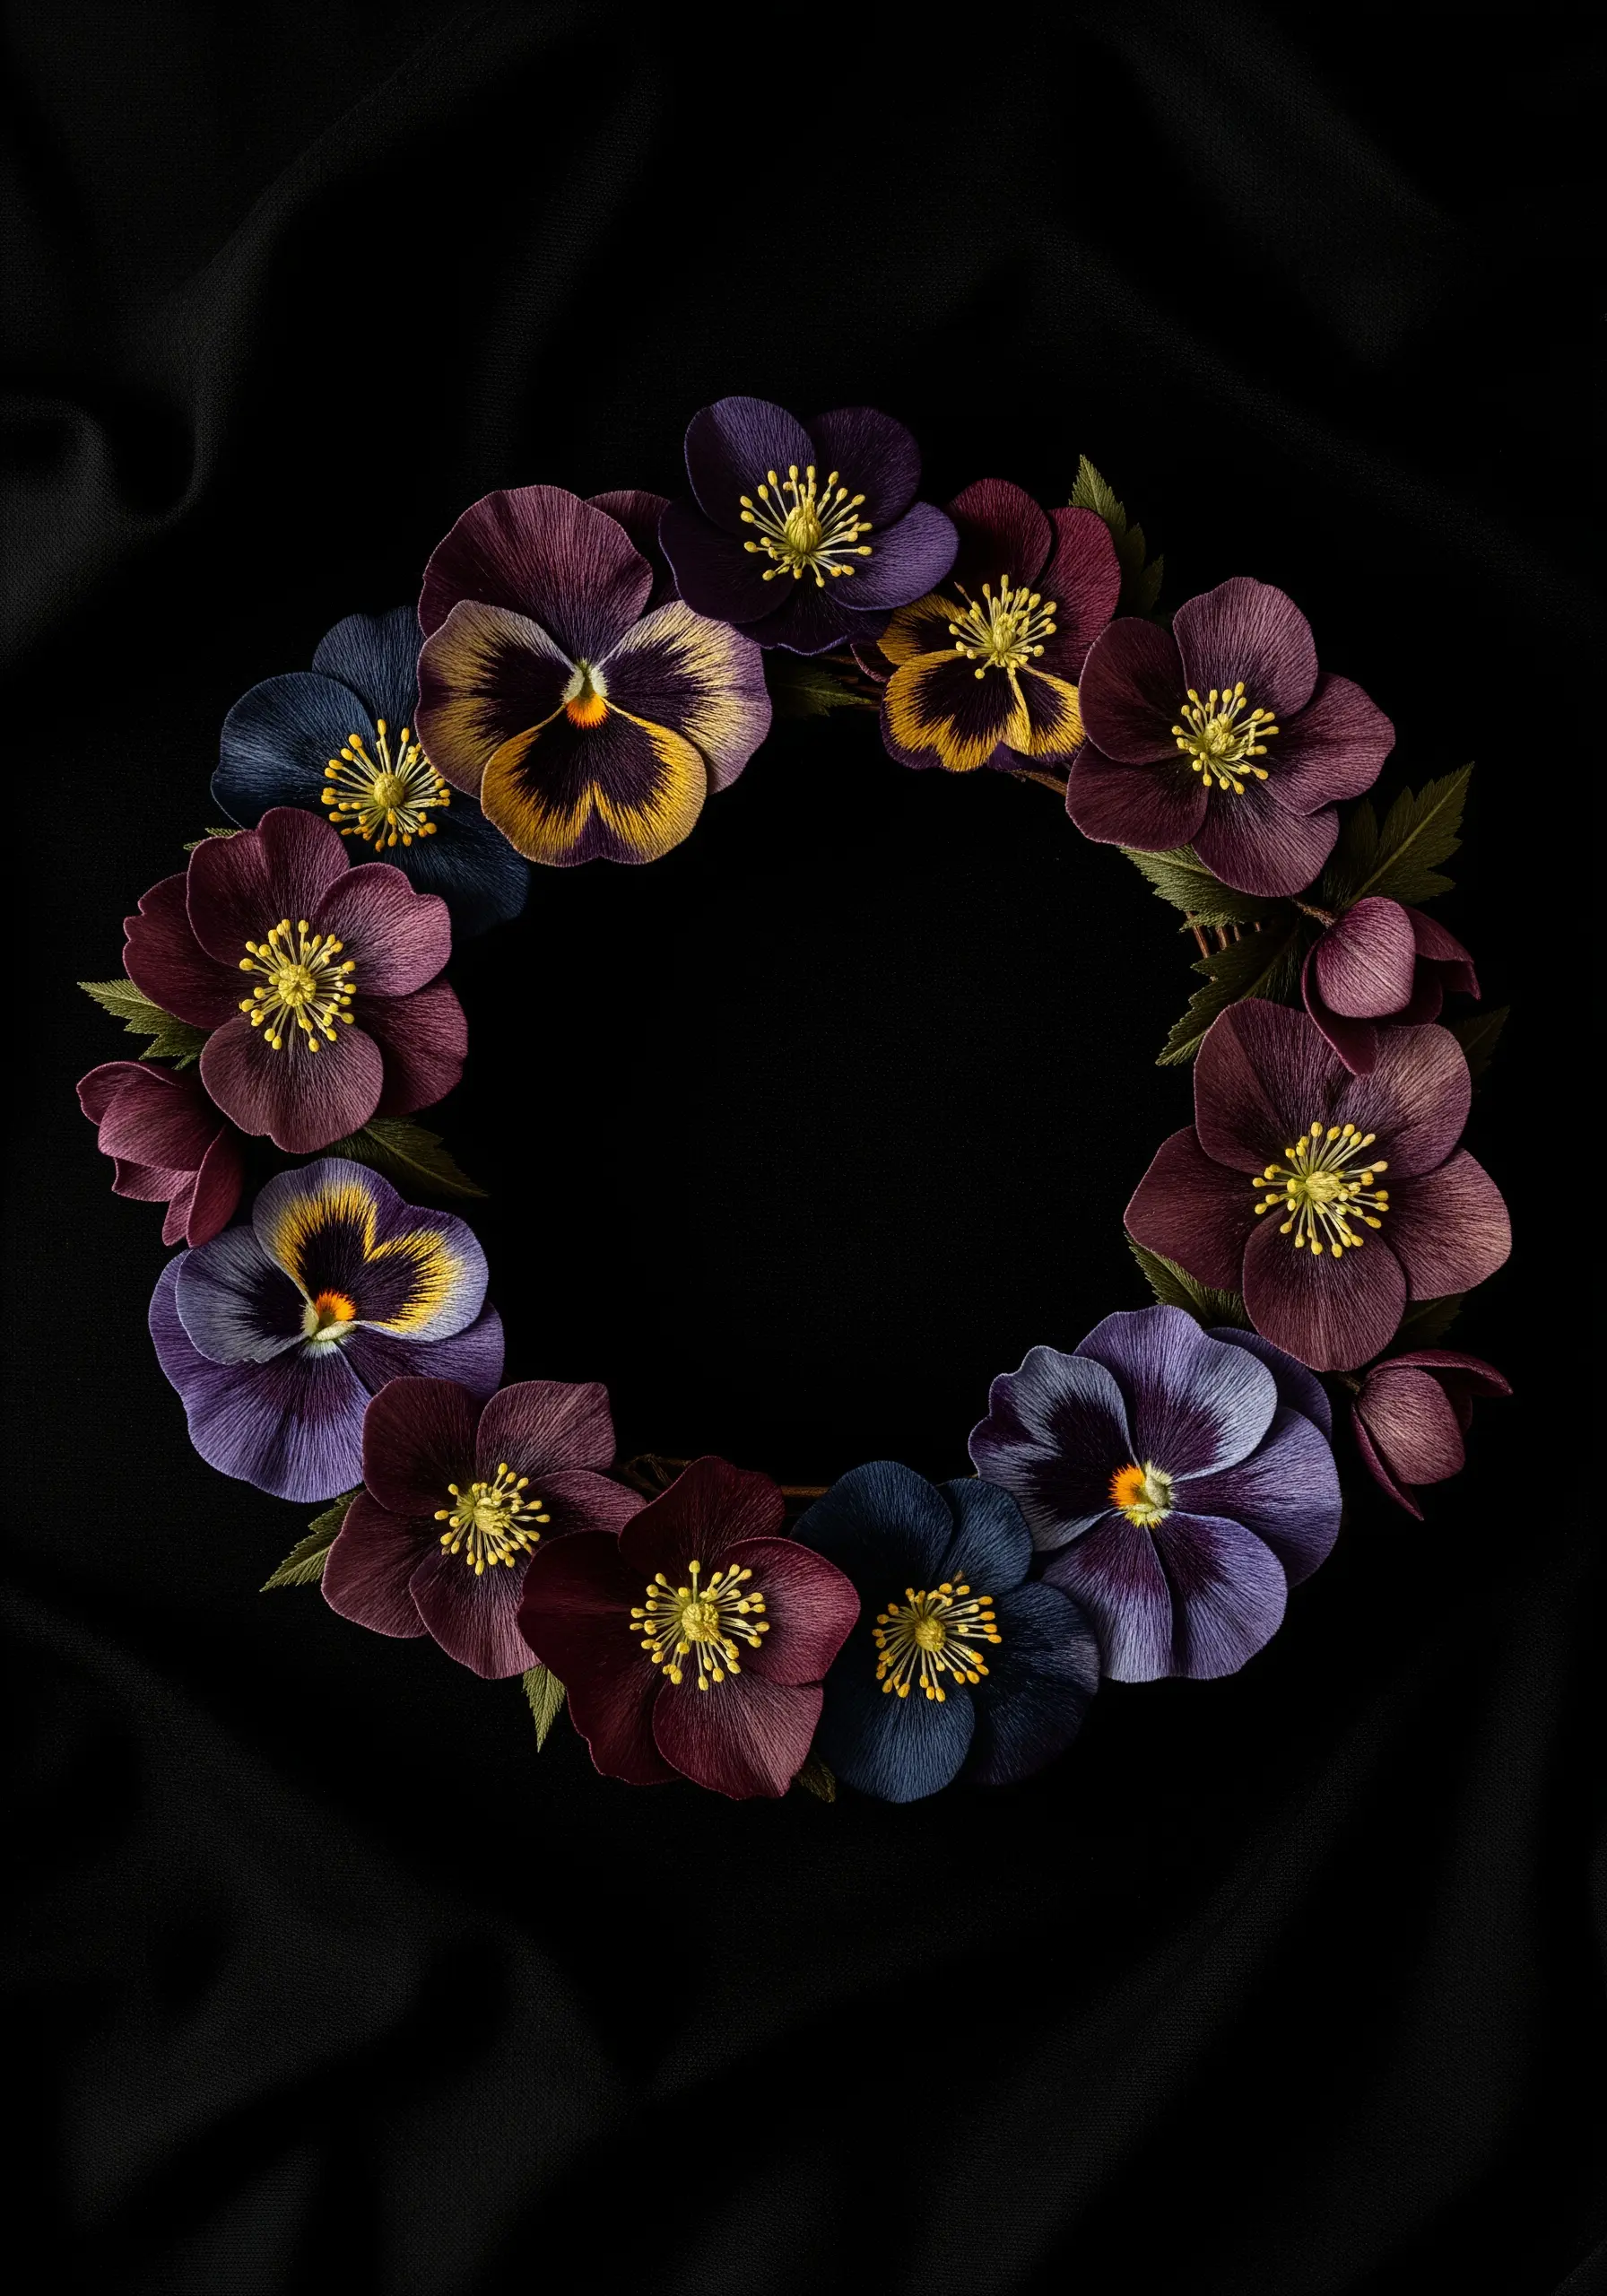
Stitching on black or dark navy fabric instantly adds drama and makes your colors appear more luminous.
Choose threads with a slight sheen, like satin or silk floss, as they will catch the light and pop against the dark background.
For the pansies, blend deep purples, blues, and maroons with a surprising highlight of yellow at the center to draw the eye.
A dense cluster of bright yellow French knots for the stamens creates a focal point and prevents the dark florals from receding into the fabric.
This approach is perfect for night garden embroidery ideas where drama and contrast are key.
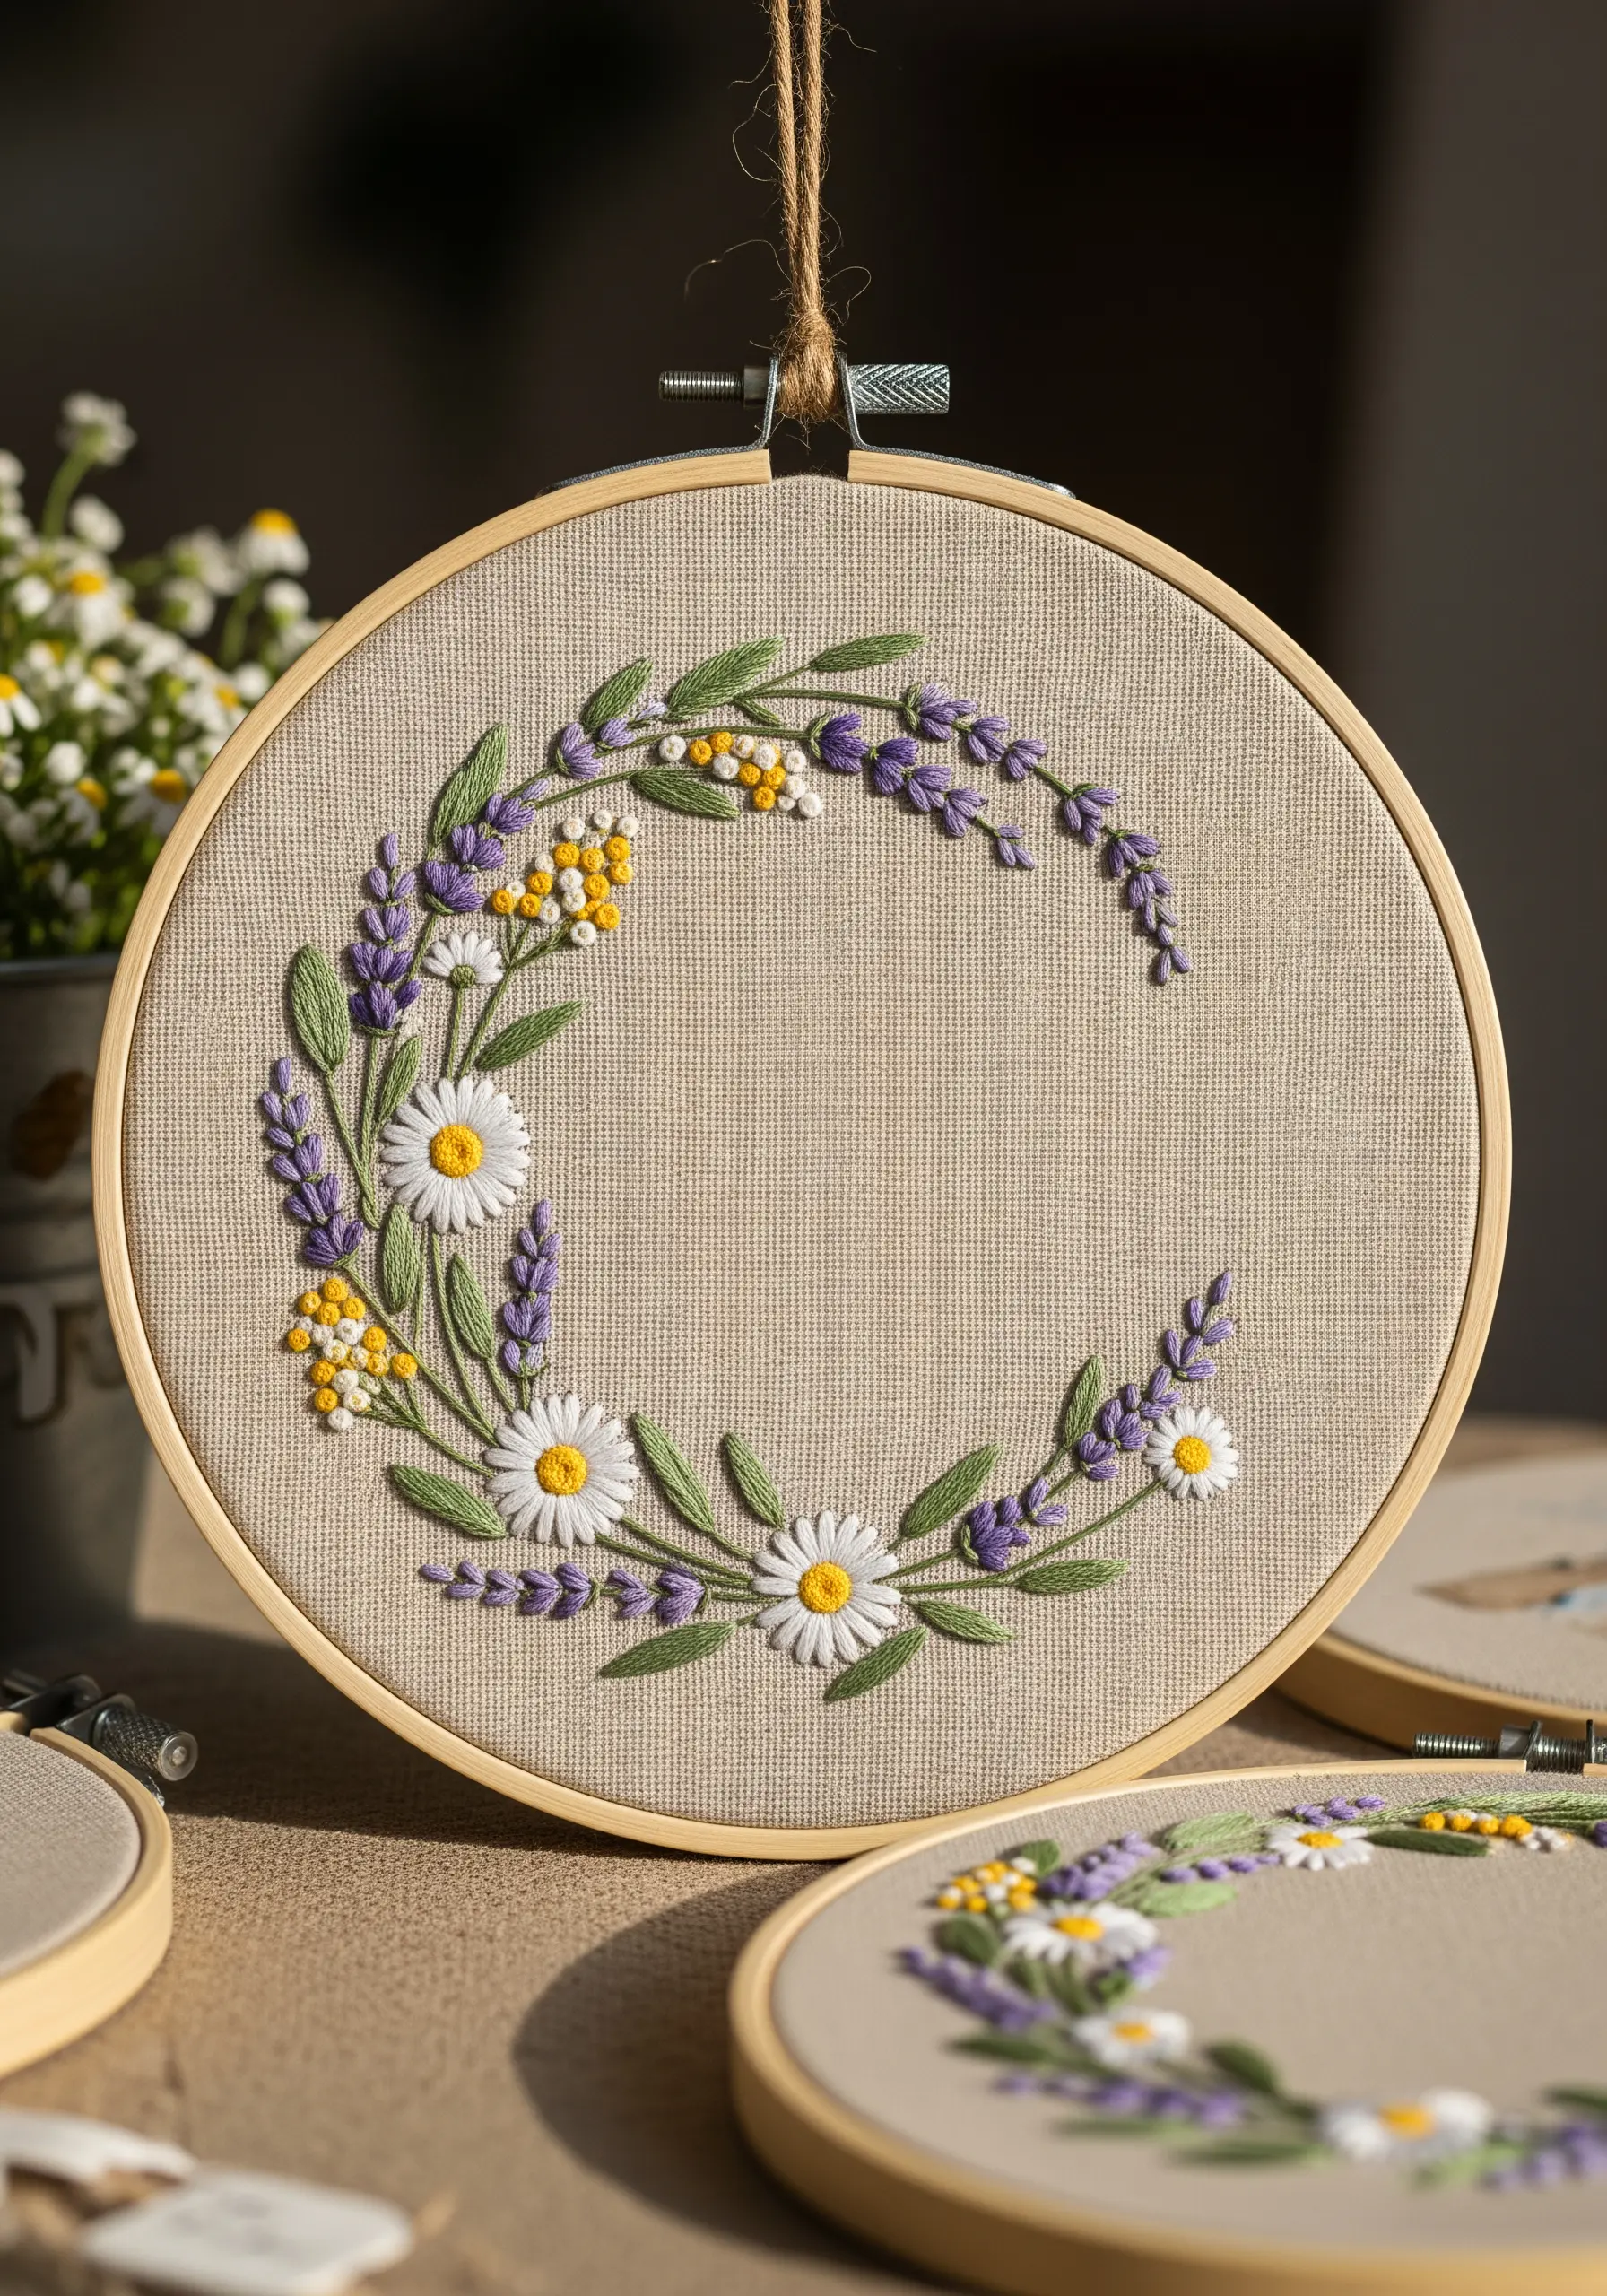
13. The Understated Beauty of an Herbal Wreath
Embrace minimalism by focusing on the distinct shapes of culinary herbs.
For rosemary, a simple stem stitch for the branch and tiny, angled straight stitches for the needles is all you need.
Recreate sage leaves with a satin stitch, ensuring your stitches follow the direction of the central vein for realism.
Use small, stacked lazy daisy stitches or French knots for the lavender sprigs, keeping the design open and breathable.
This clean, organic style is perfect for minimalist embroidery ideas that feel both modern and timeless.
14. Designing with Asymmetrical, Cascading Forms
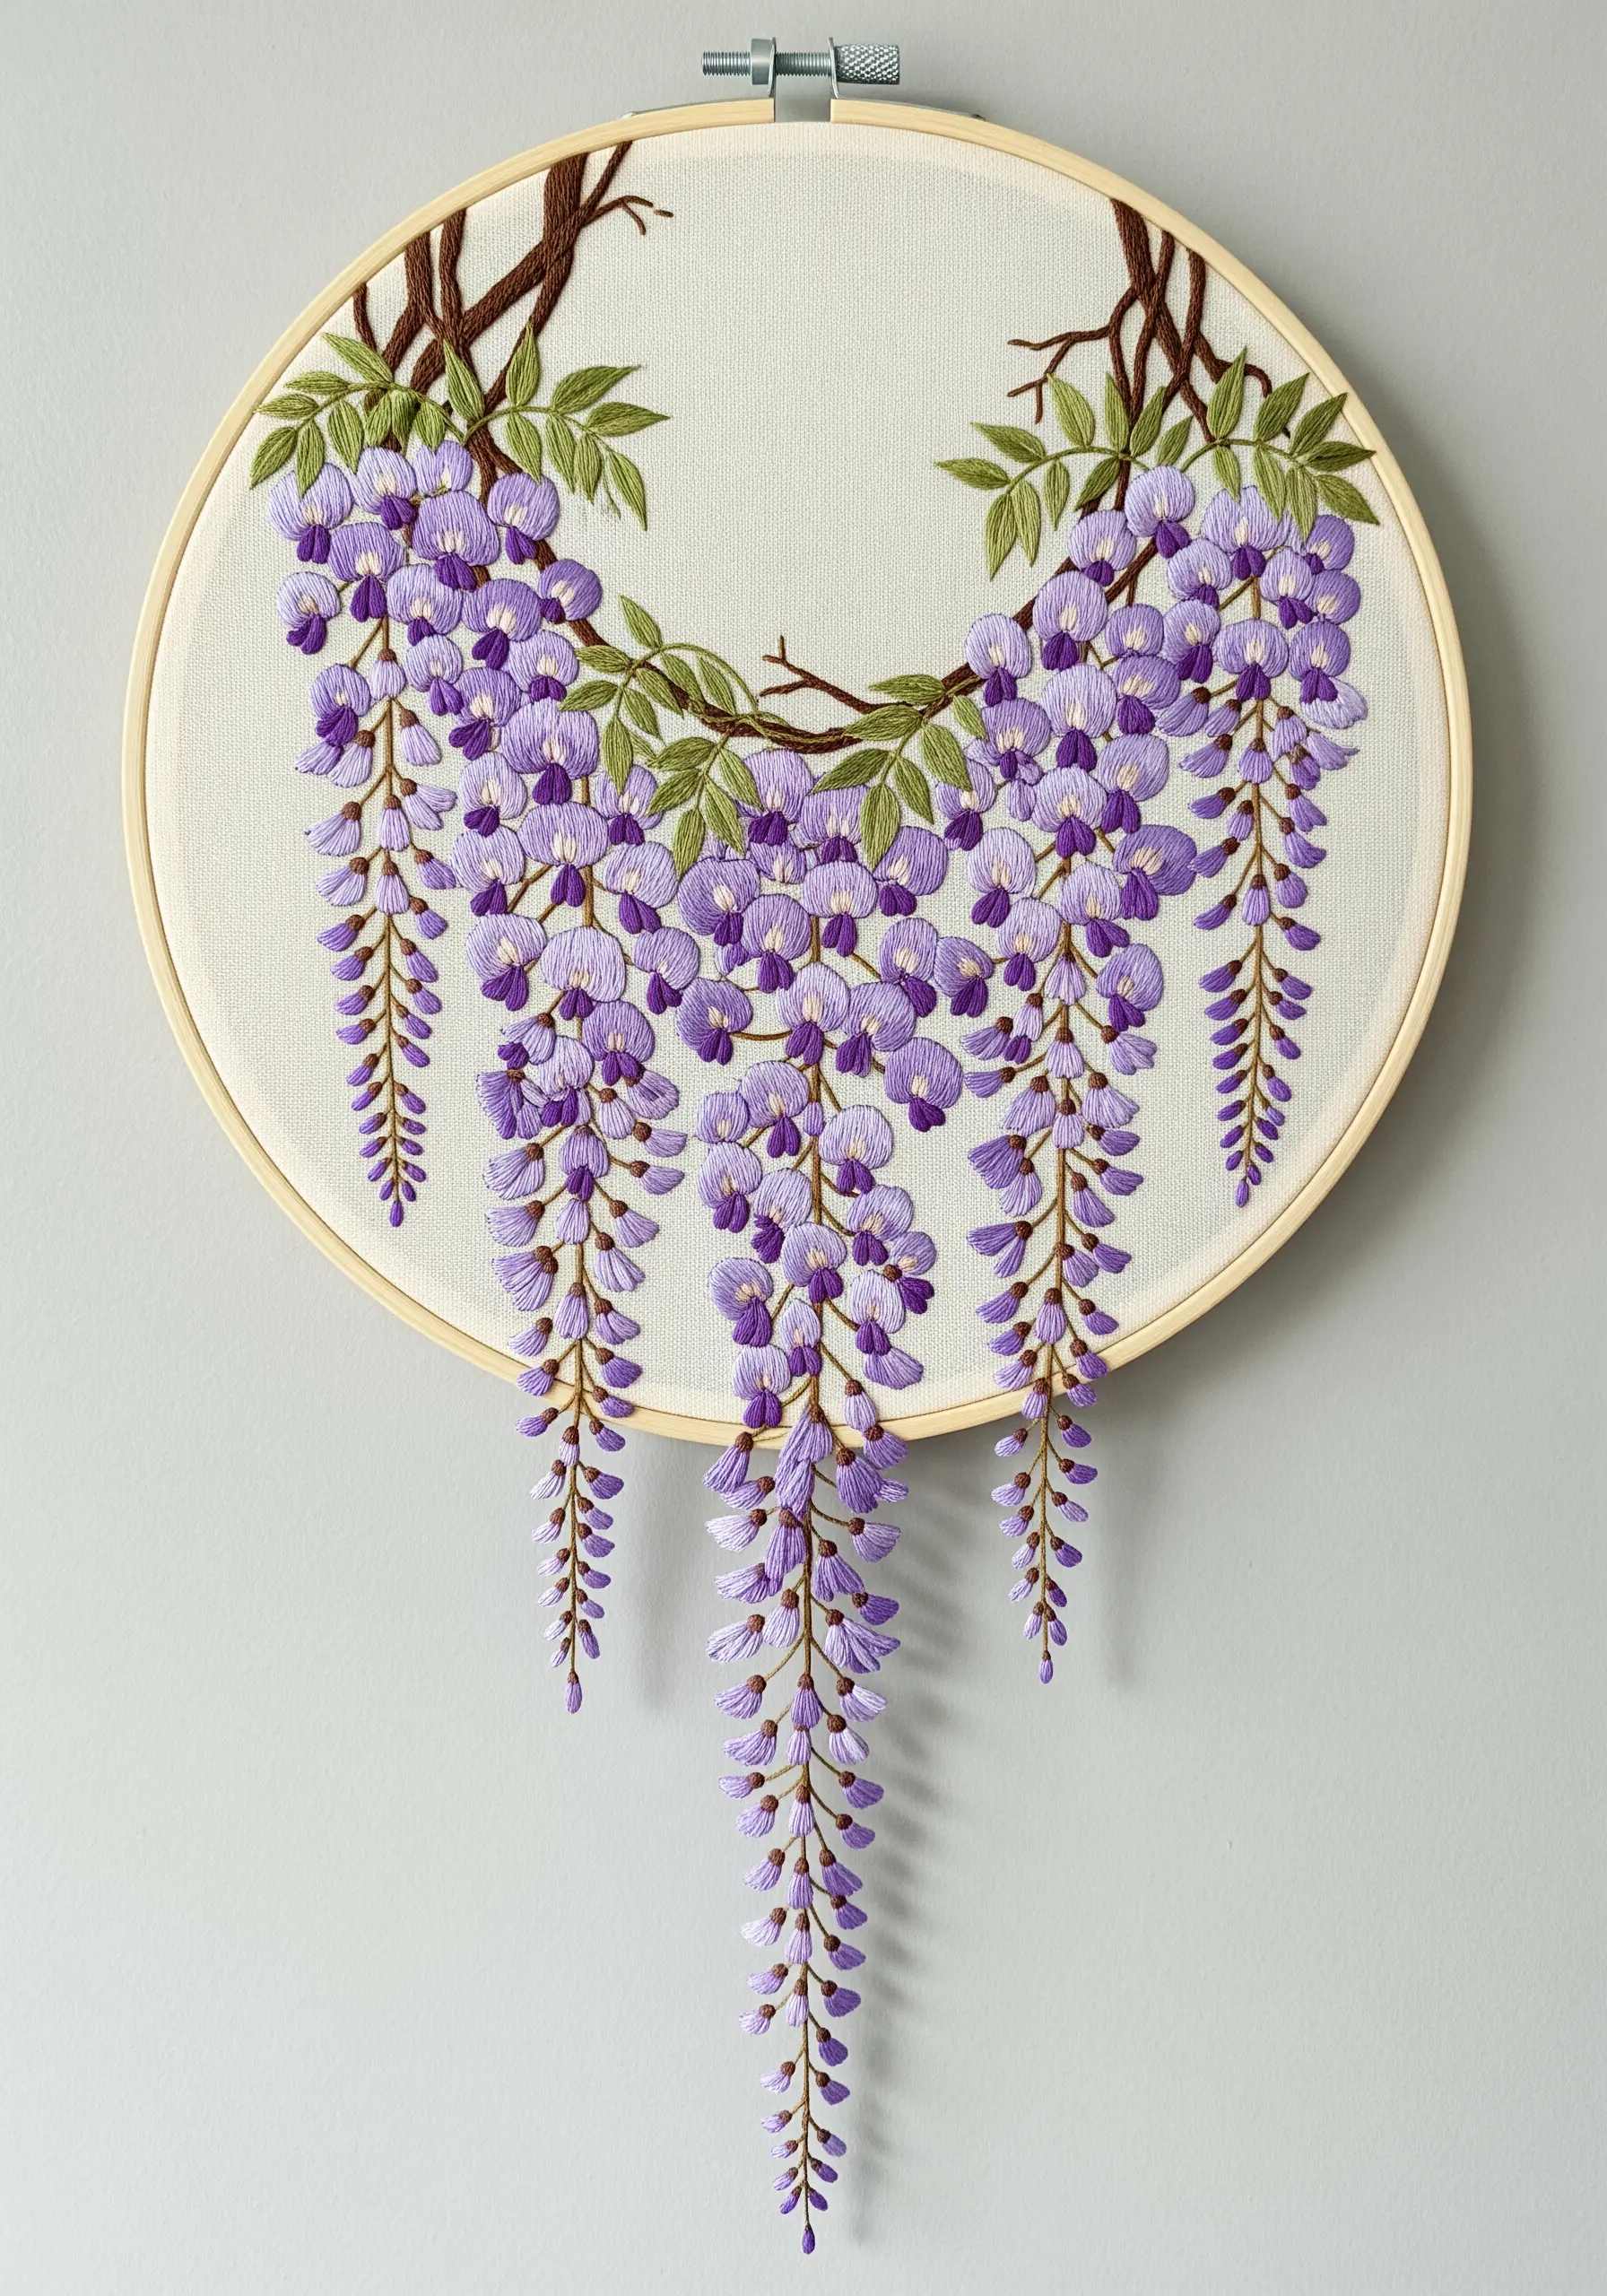
Move away from the perfect circle and let your design flow naturally.
A cascading wisteria arrangement creates a beautiful sense of gravity and movement, drawing the eye downward.
To create the full blossoms, use a padded satin stitch. First, lay down a base of horizontal seed stitches, then cover them with vertical satin stitches. This gives each petal a plump, 3D quality.
Arrange the blossoms in dense clusters at the top, becoming sparser as they descend, to mimic how they grow in nature.
15. Building Dimension with Padded Satin Stitch
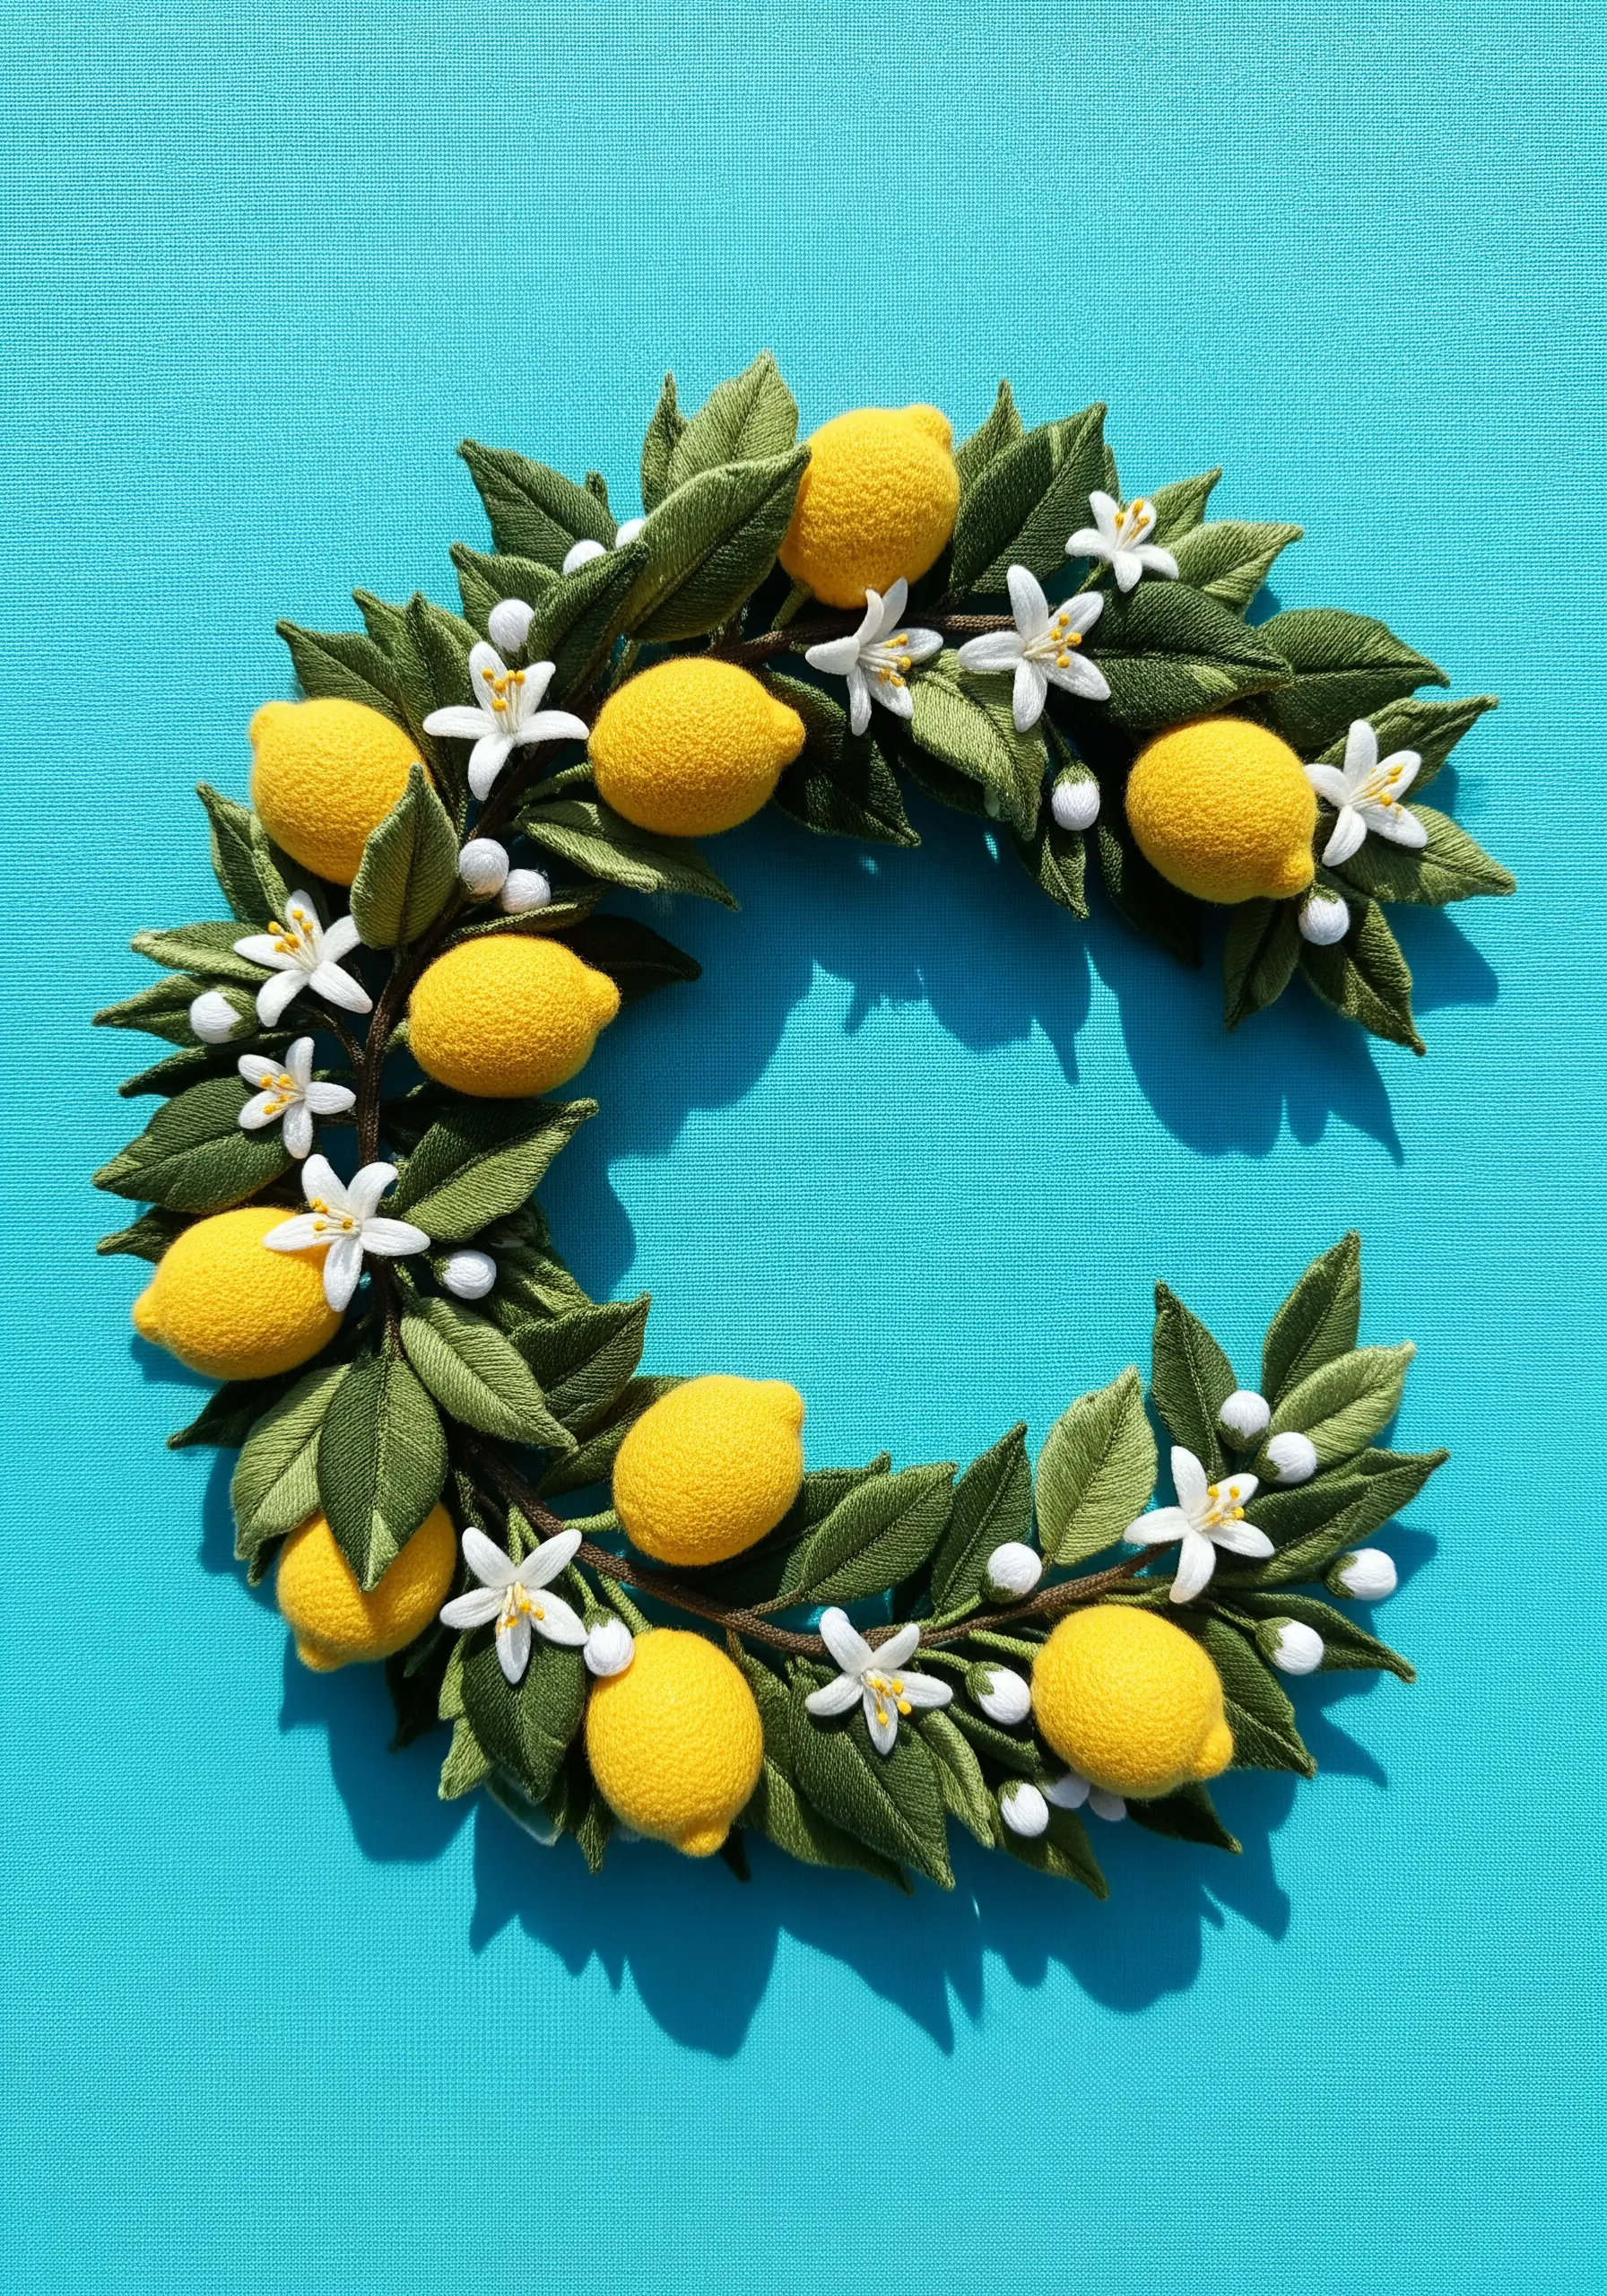
To make round elements like fruits feel truly three-dimensional, you need to give them some loft.
Before you stitch the final layer, create a padded base by filling the lemon shape with small, random stitches (seed stitches) or a layer of felt cut to size.
Then, work your satin stitch over this padding using six-strand floss. The underlying bulk will raise the surface, allowing it to catch light and cast shadows like a real object.
This technique instantly adds a professional, sculptural quality to your work.
16. Capturing Fleeting Moments with Dynamic Stitches
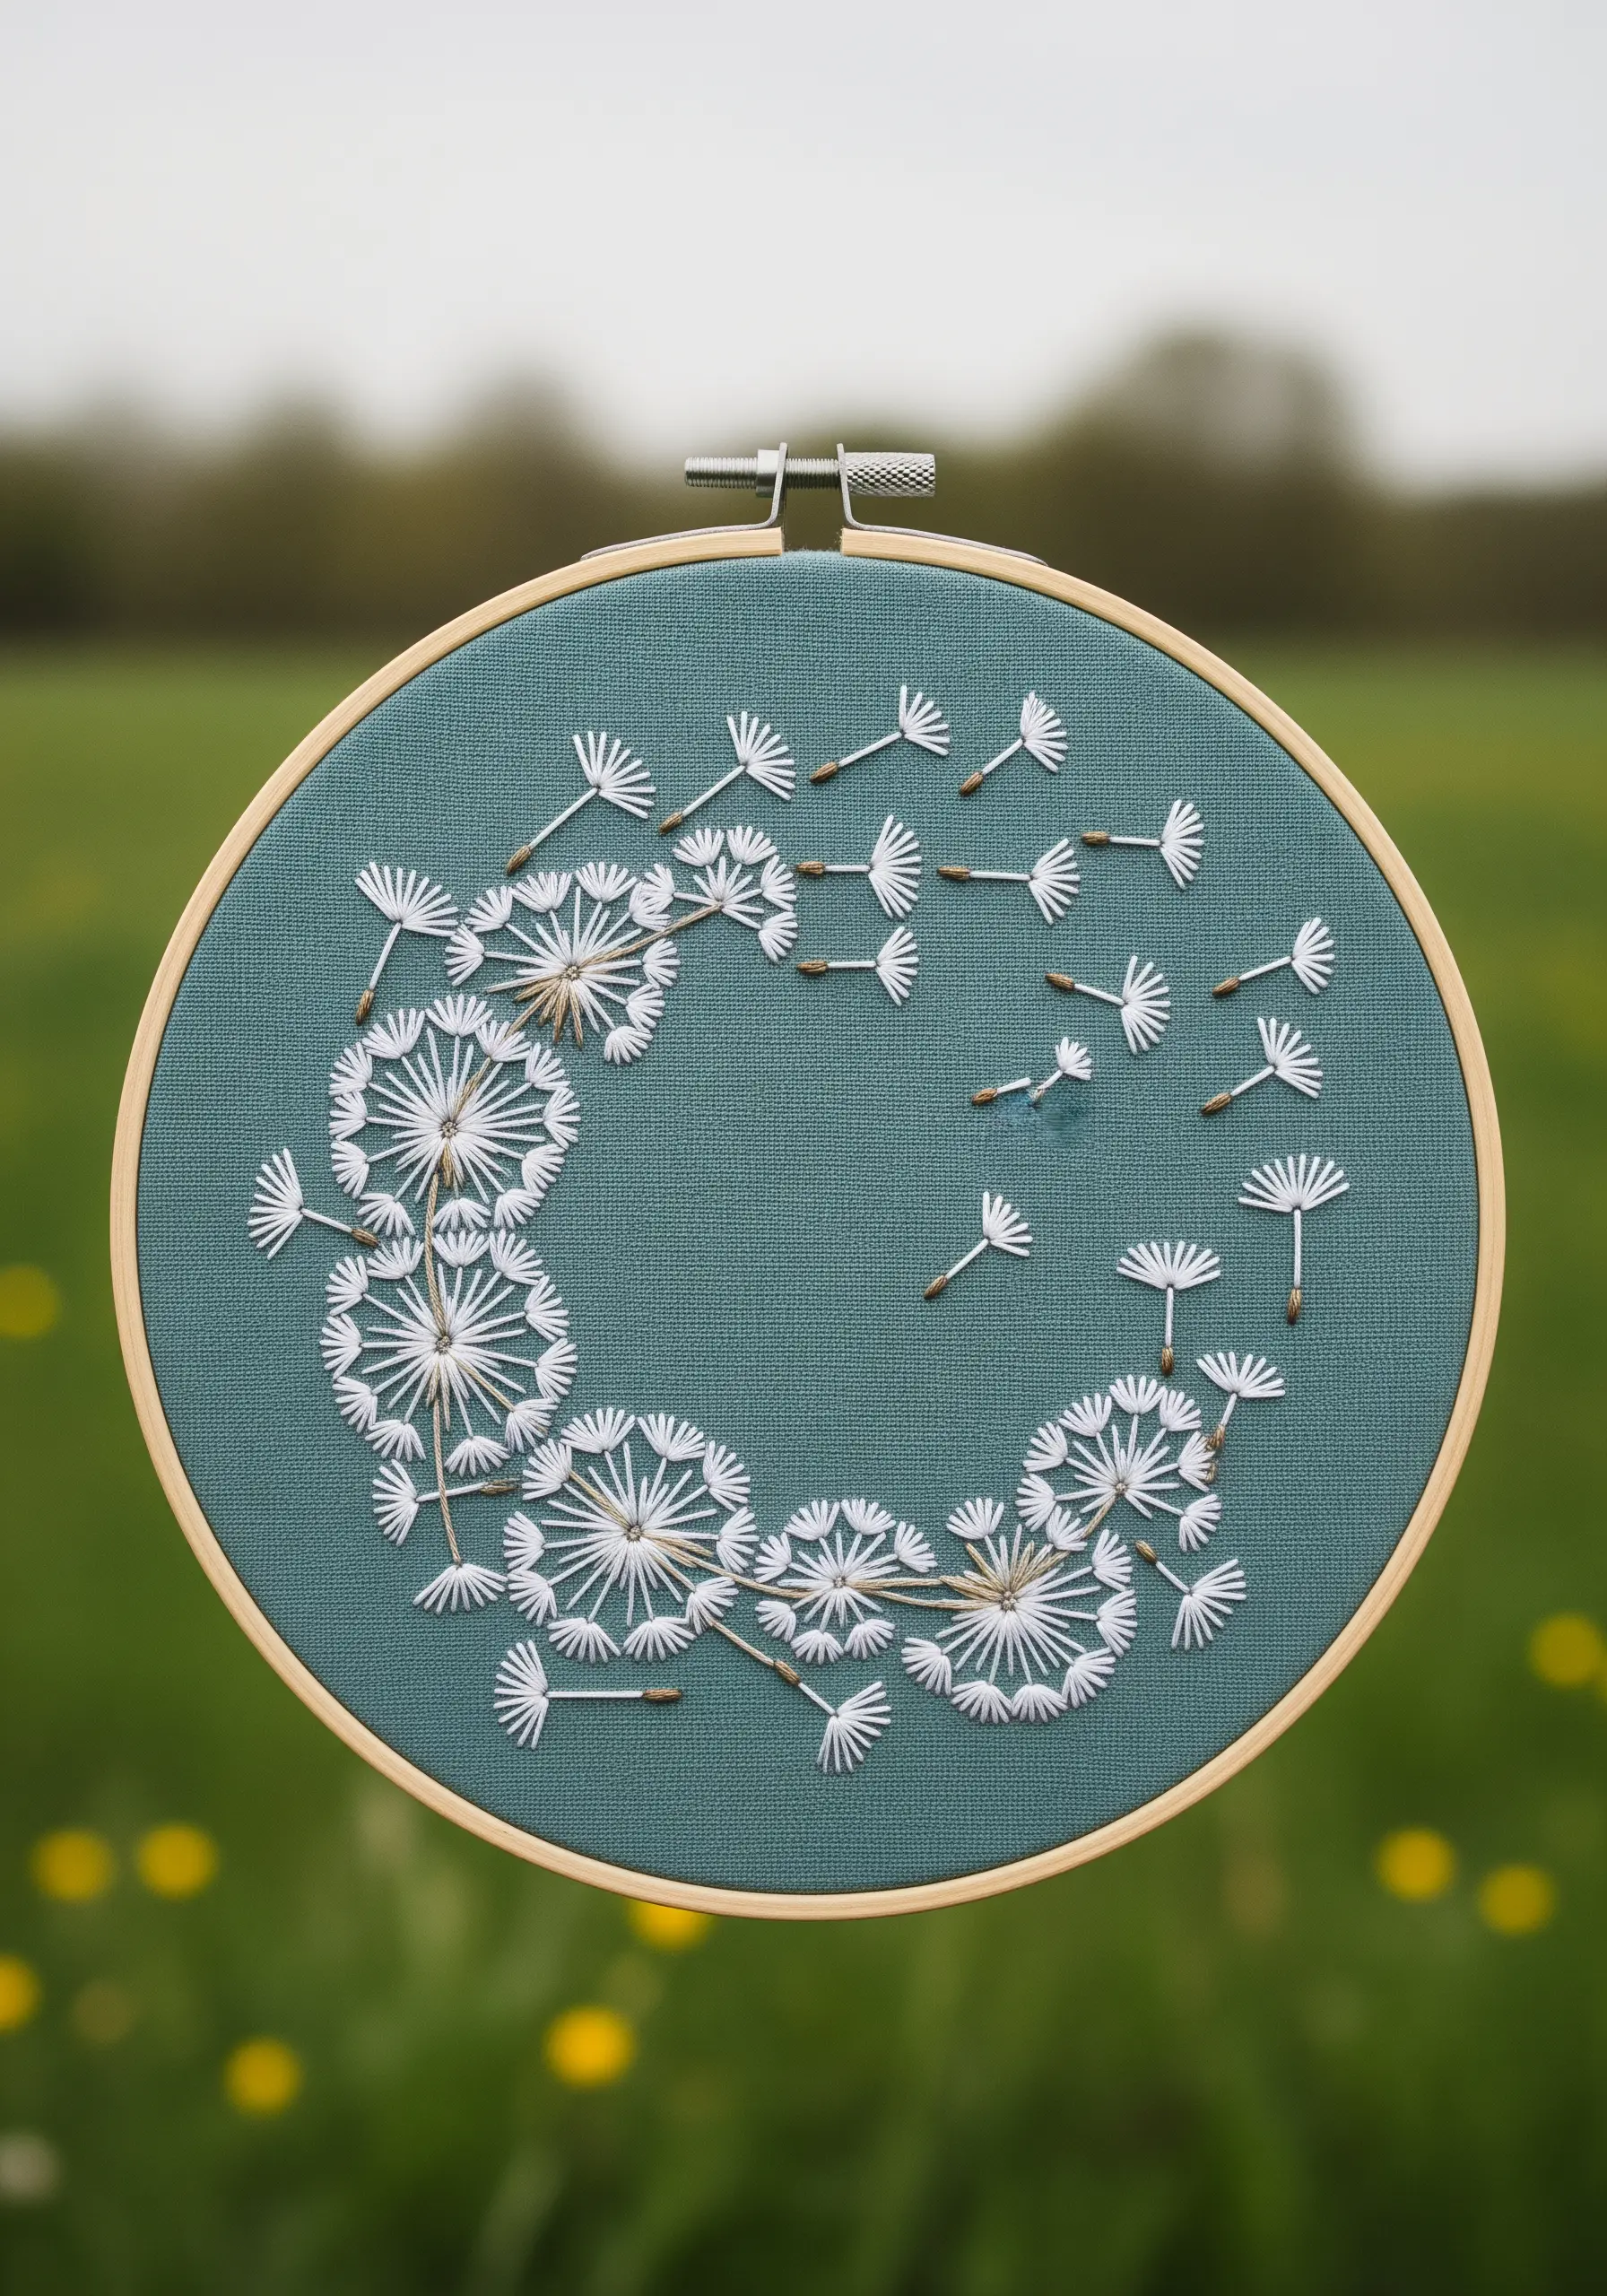
This design is a masterclass in suggesting movement and airiness.
The dandelion heads are created with radiating straight stitches, packed tightly for the full heads and sparsely for the ones that have begun to disperse.
The real magic is in the floating seeds. Use a single, delicate straight stitch for the stem and a tiny V-shape or three small straight stitches for the pappus.
Vary the angle and spacing of these floating seeds to create a convincing illusion of them being carried on the wind. This technique transforms your hoop into a narrative moment.
17. Framing a View with a Hollow-Center Wreath
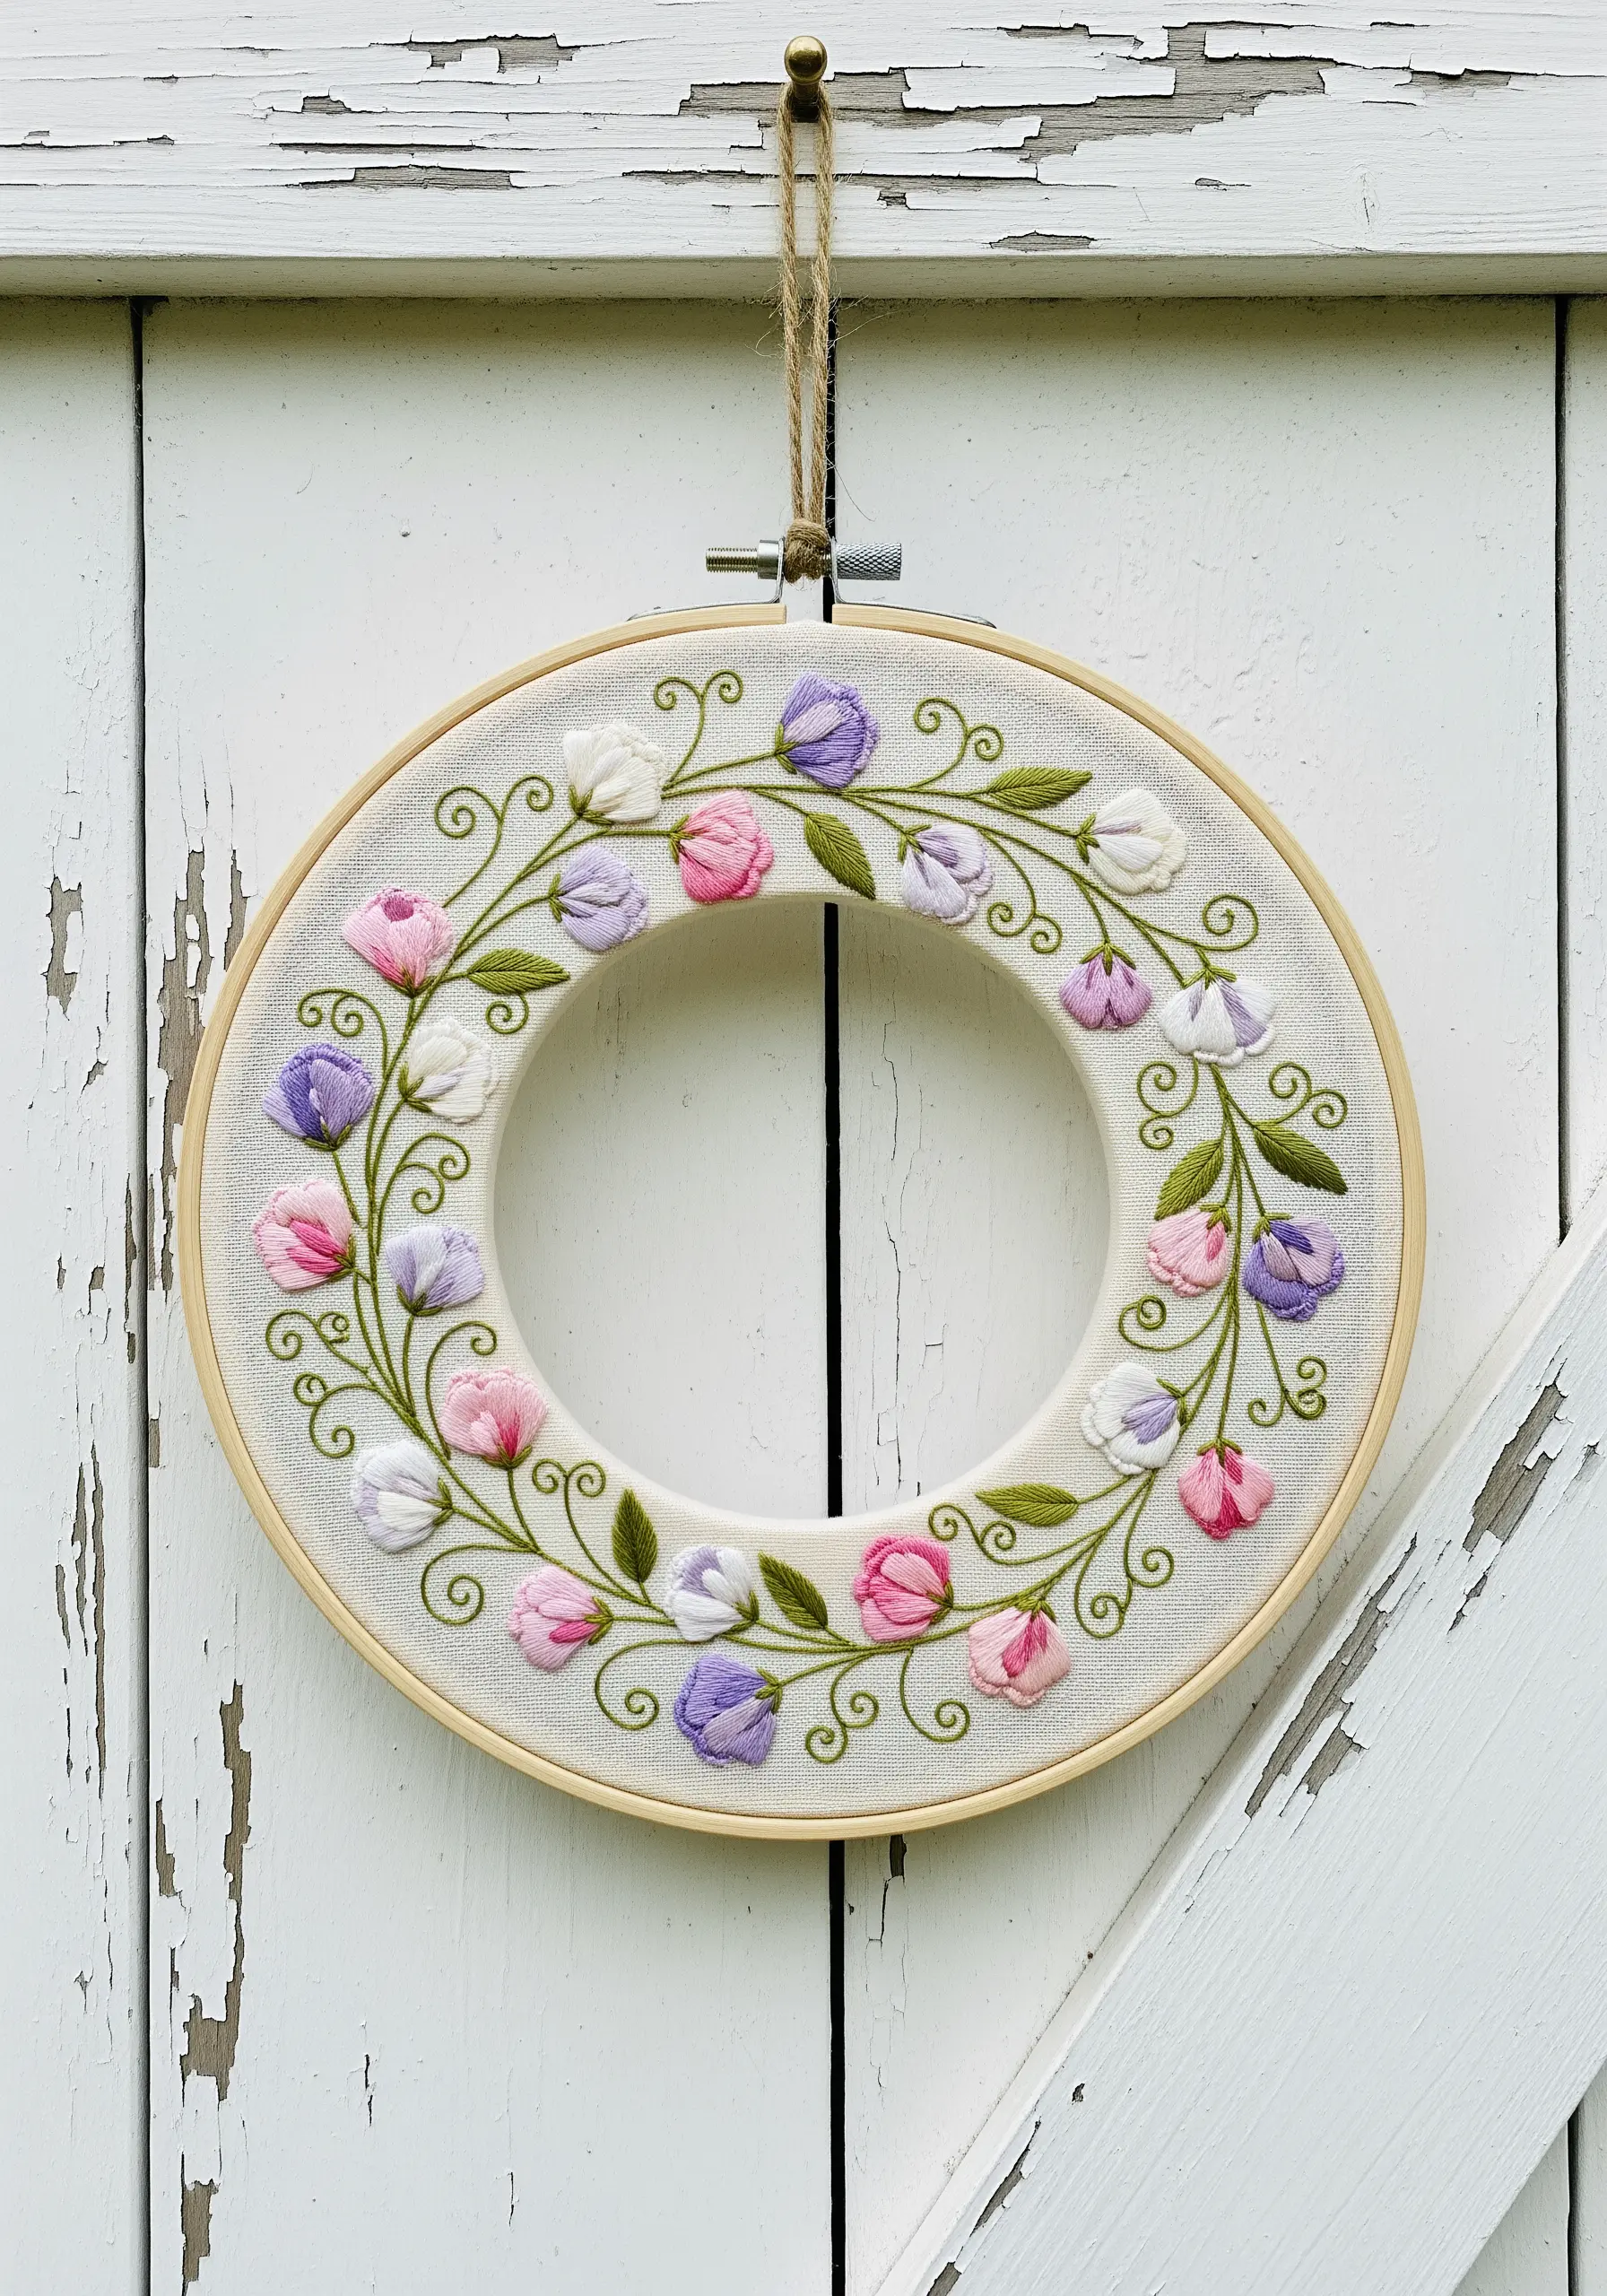
Turn your hoop into a window by cutting away the central fabric.
To achieve this, complete your embroidery as usual. Then, apply a fray-prevention glue to the fabric just inside your stitch line on the back of the hoop.
Once it’s dry, carefully trim the center fabric away with small, sharp scissors. The glue ensures your stitches and fabric remain secure.
For the sweet pea blossoms, a well-placed bullion knot creates that perfect, plump shape with a single stitch.
This finishing technique offers a unique, professional look that stands out at markets.
18. Creating Graphic Impact with Tropical Foliage

The bold shapes of tropical plants are perfect for creating high-impact designs.
For the iconic splits in the monstera leaves, outline the entire leaf shape with a split stitch, then fill with satin stitch, leaving the split areas unstitched.
This negative space within the leaf is far more effective than trying to stitch around a cut-out shape.
Pair the deep green leaves with vibrant hibiscus flowers, worked in long-and-short stitch to blend hot pinks and oranges for a fiery, energetic contrast.
This is one of those tropical leaf embroidery designs that feels vibrant and alive.
19. Weaving Harvest Textures Together
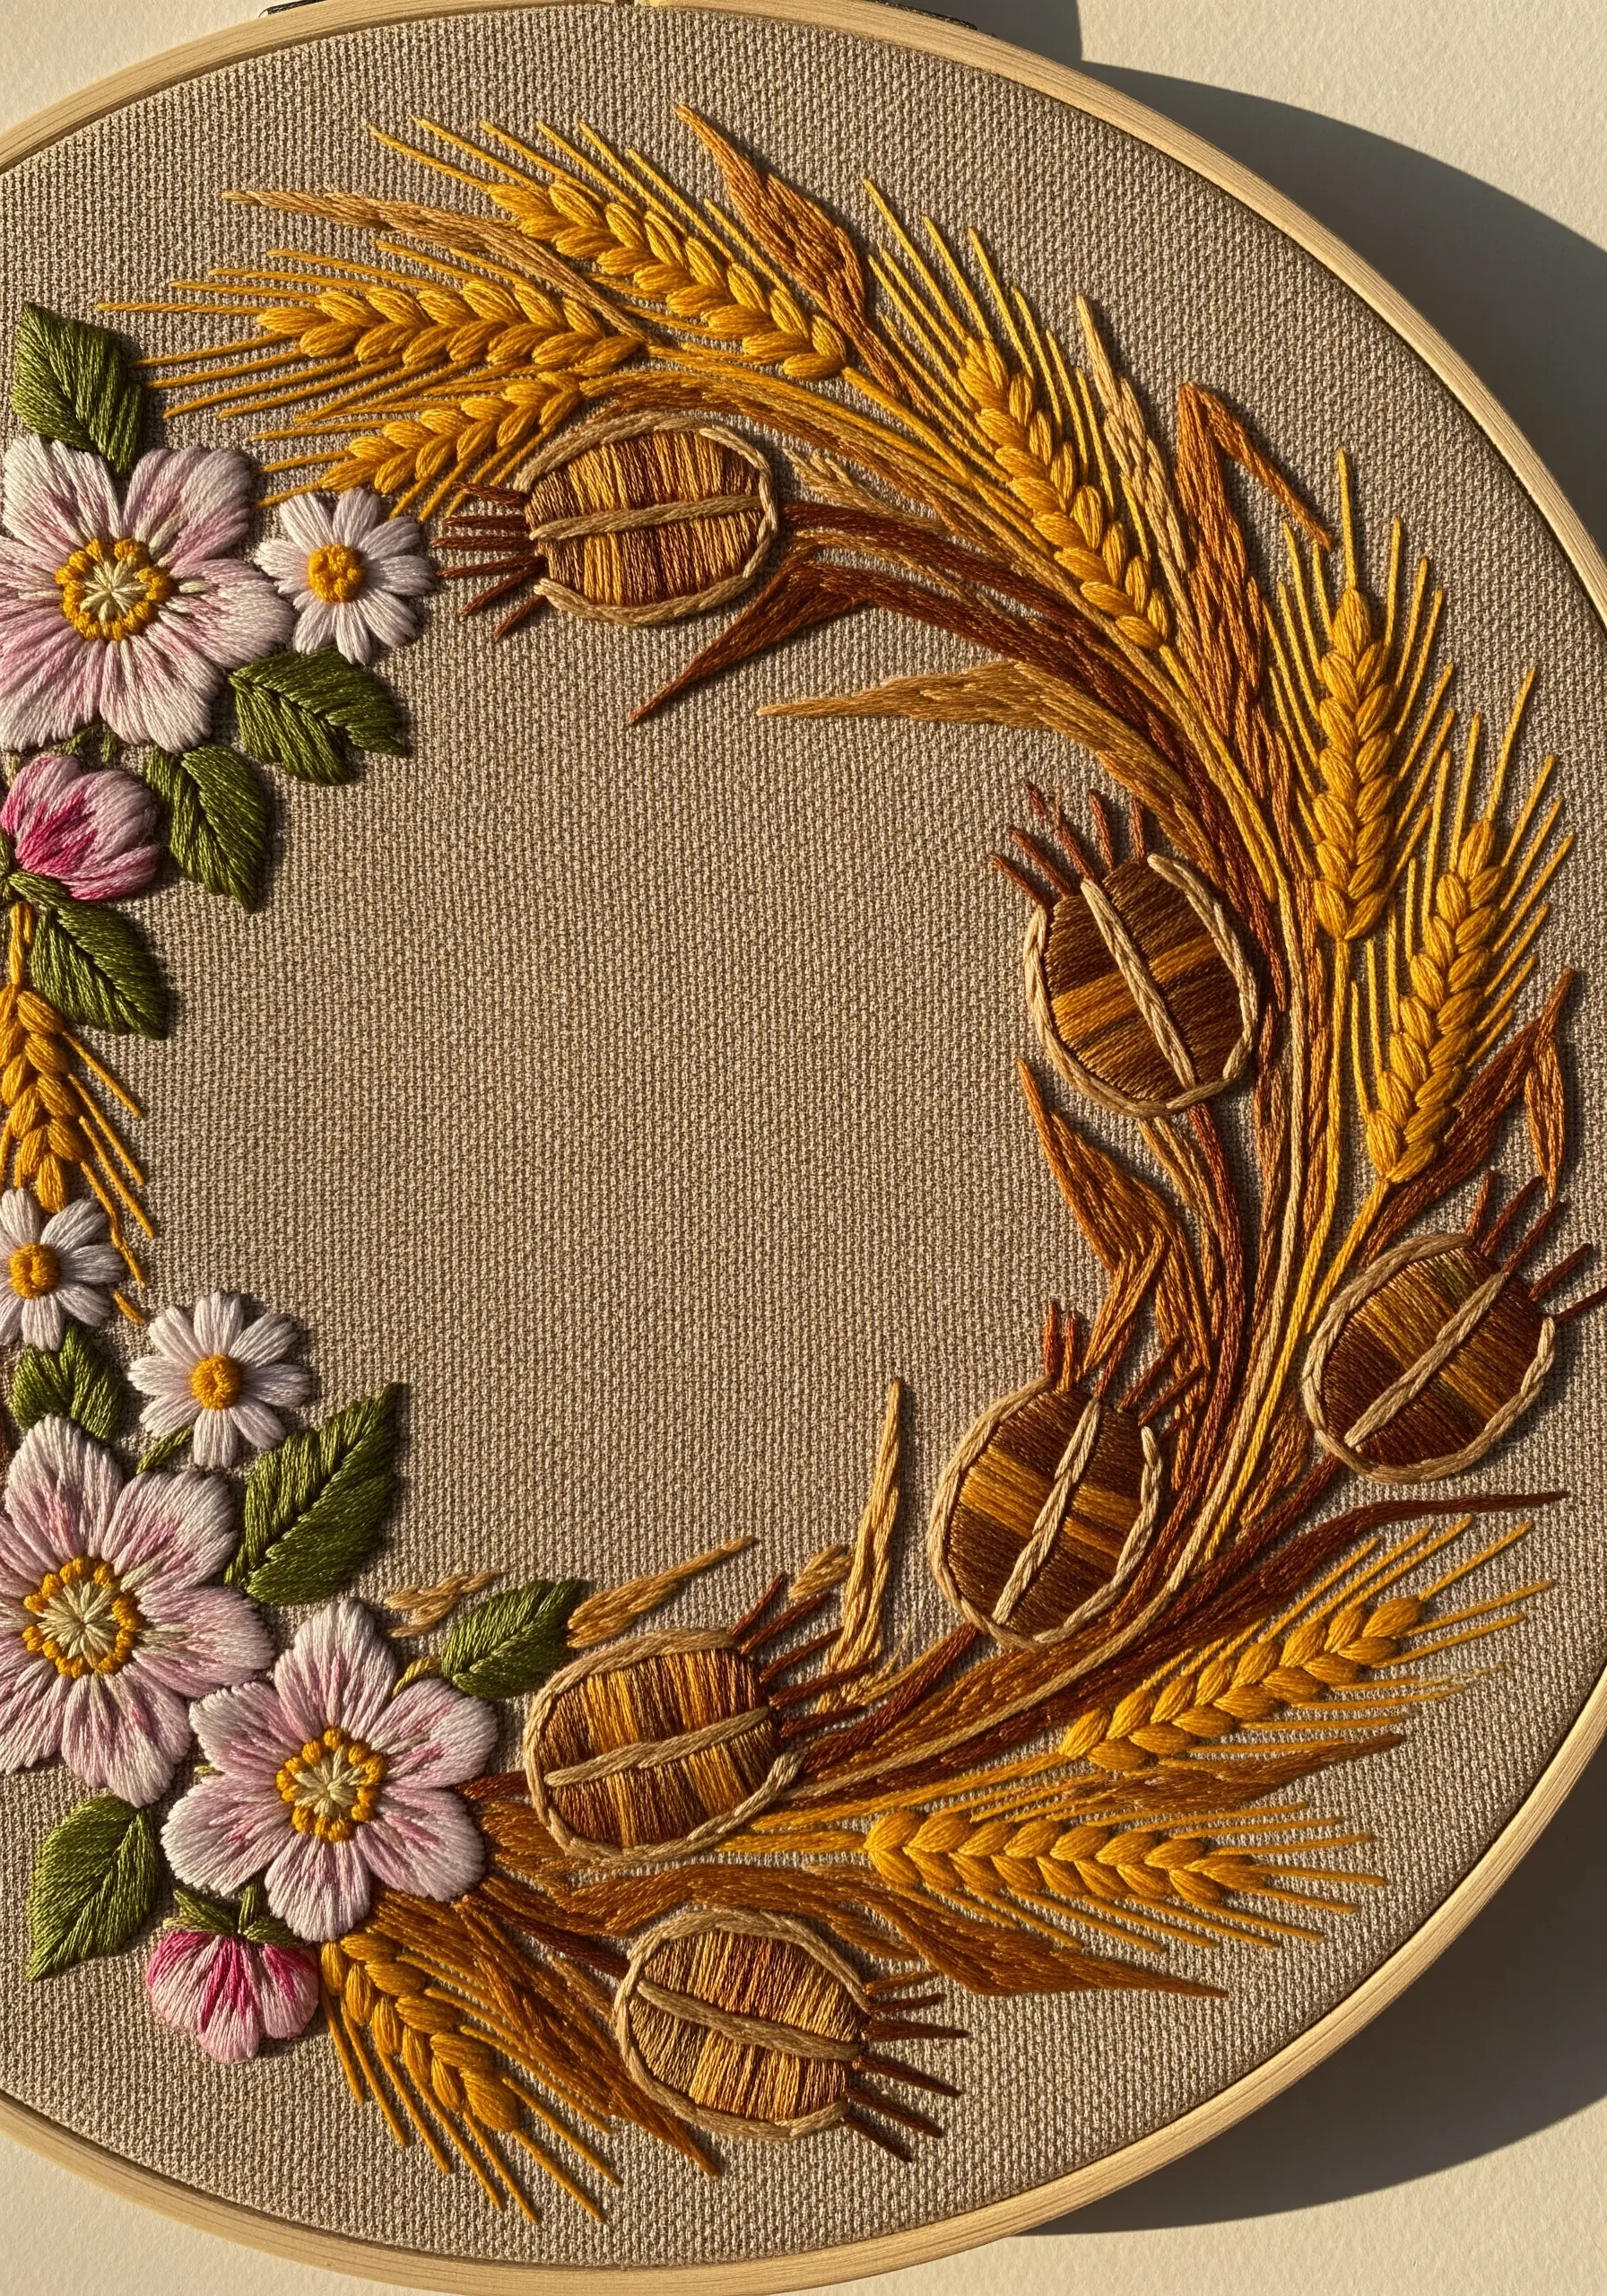
A successful harvest theme is all about celebrating texture.
Create the wheat stalks using a fishbone stitch or a series of detached chain stitches stacked along a central stem. This gives them a plaited, graphic look.
For the rounded seed pods, use a padded satin stitch and add detail with contrasting straight stitches or couched thread to suggest segments.
By combining these different textural stitches, your design will feel rustic, abundant, and rich with detail, perfectly capturing the feeling of autumn.
20. Adding a Touch of Magic with Metallic Threads
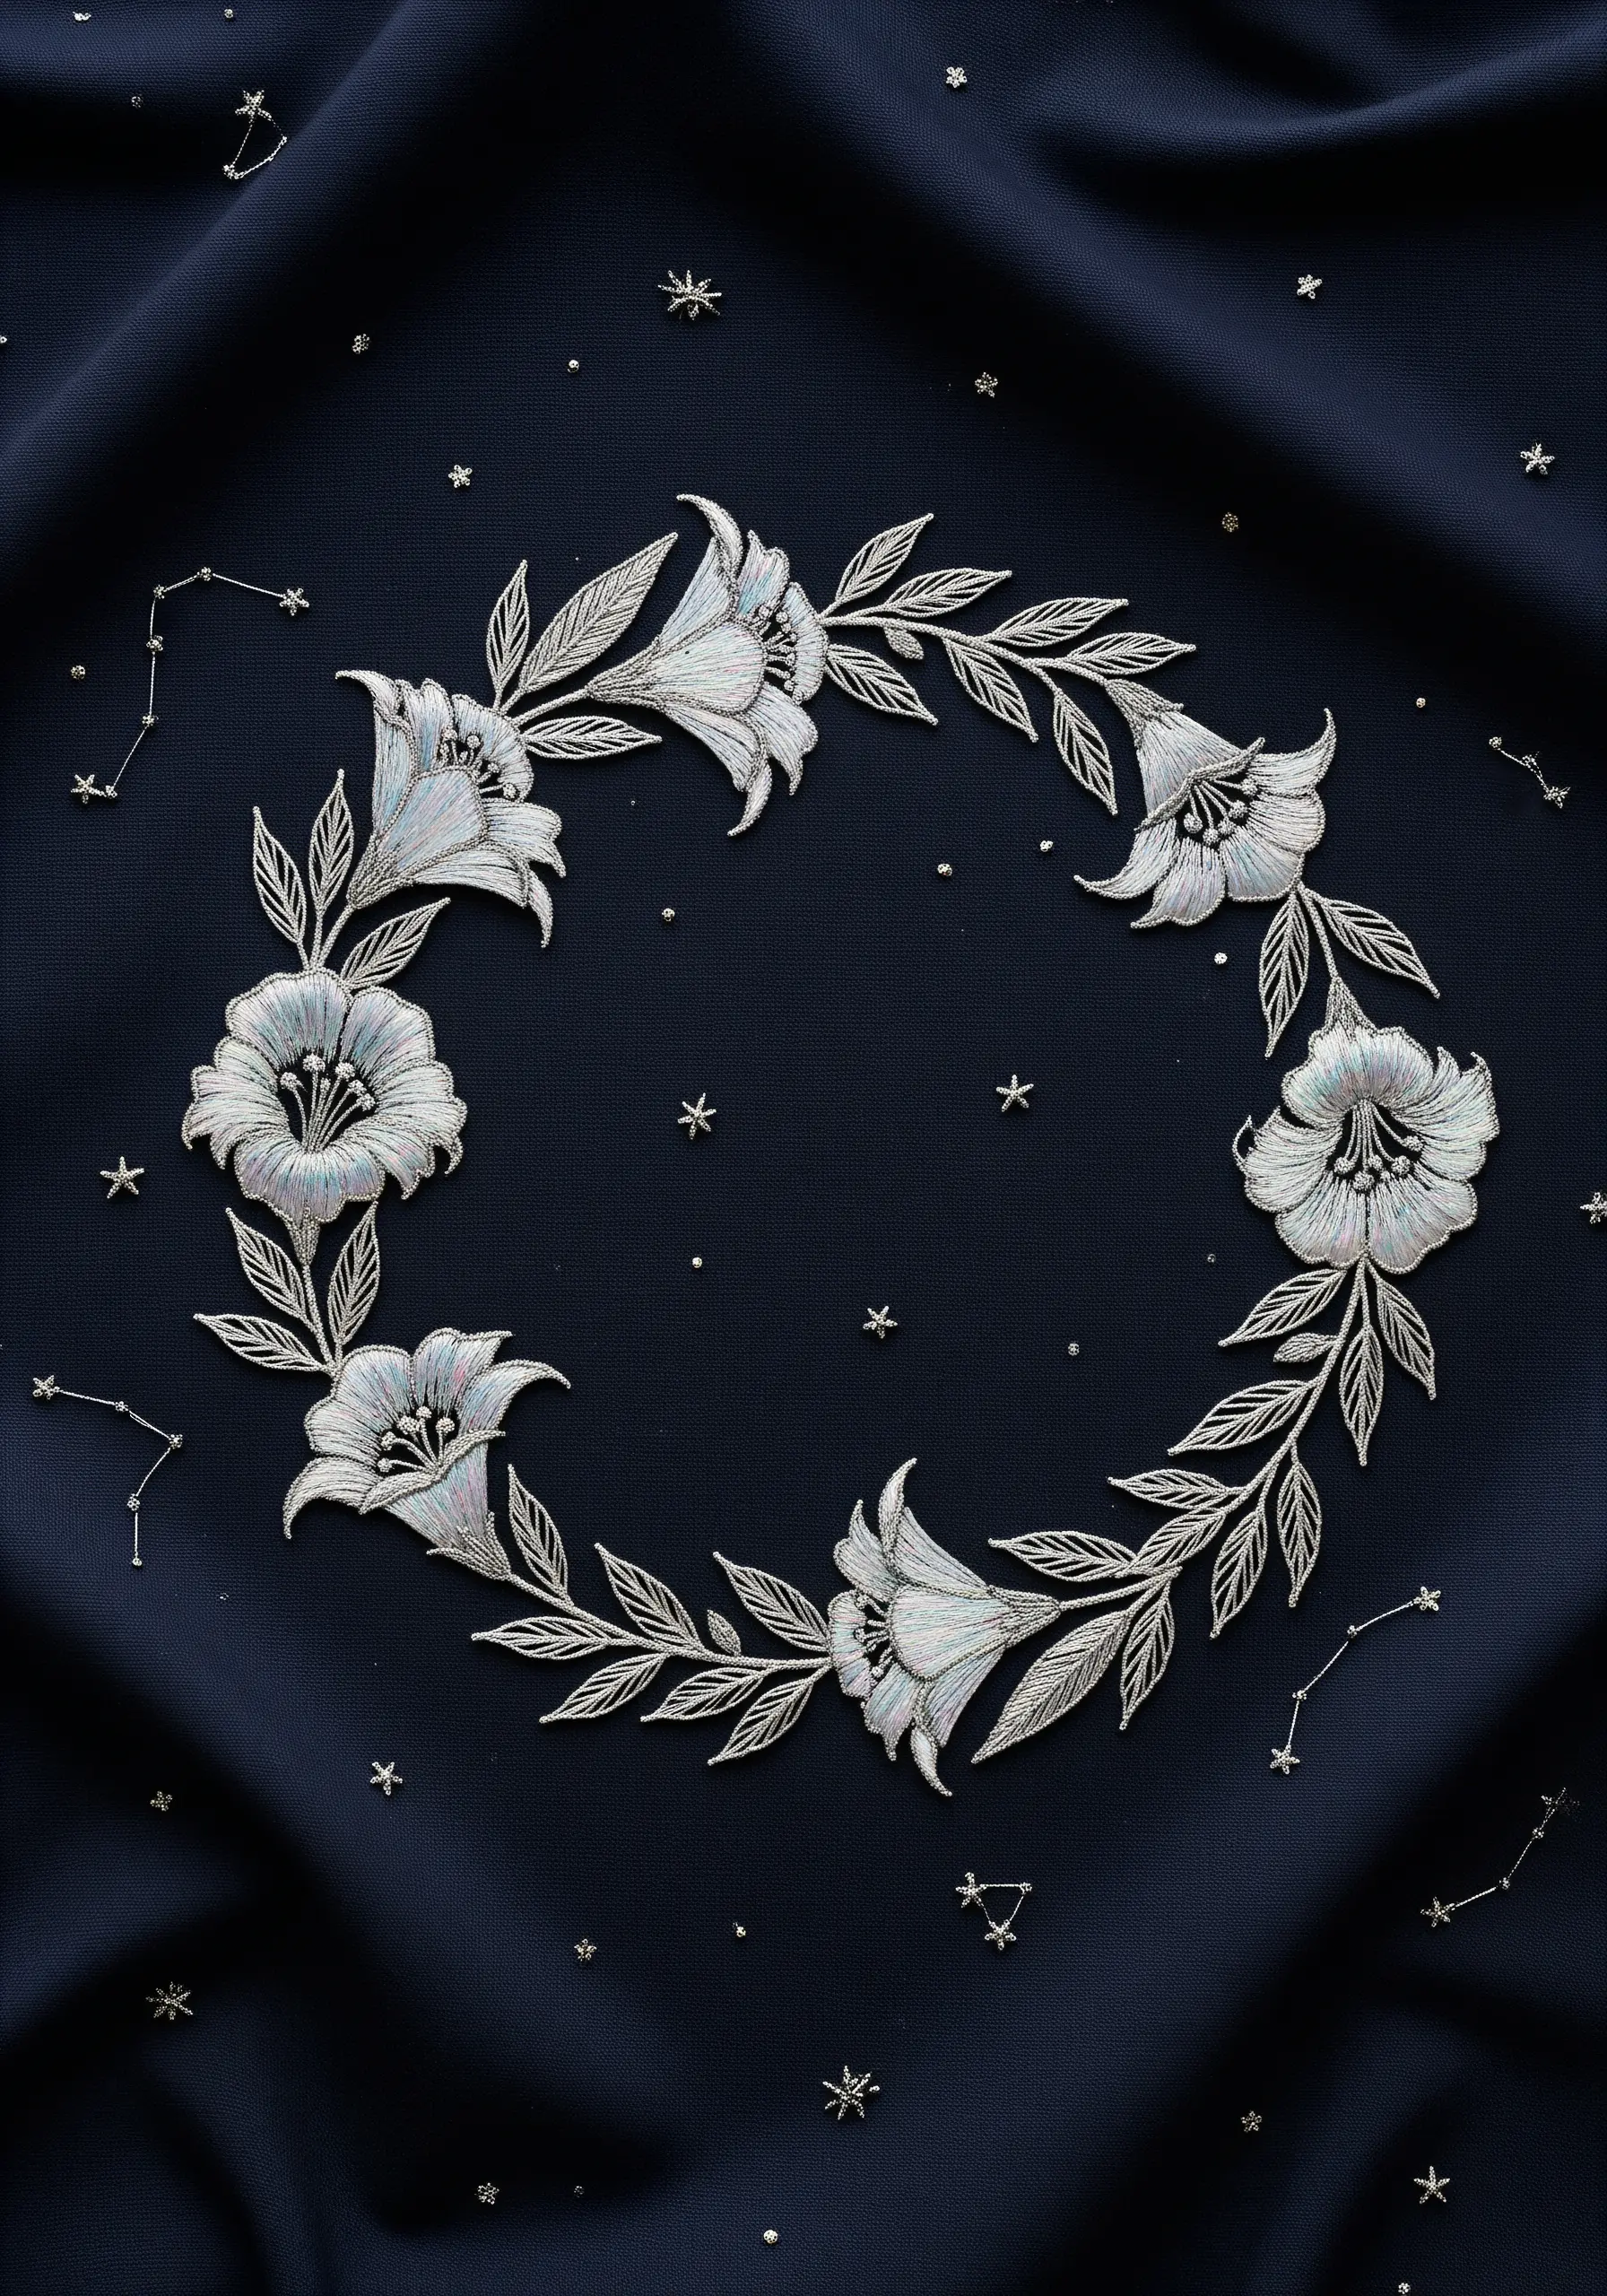
Elevate a simple floral design into something ethereal by incorporating metallic floss.
Use a silver or pearlescent metallic thread for the outlines of the lilies and leaves. To make it easier to work with, use short lengths of thread and a thread conditioner to prevent tangling.
Fill the petals with a blend of white, light gray, and a single strand of holographic thread to create a subtle, otherworldly shimmer.
Scatter tiny silver stars (using straight stitches) or French knots in the background to complete the celestial theme. These celestial micro embroidery ideas truly transform a piece.
21. Blending Stitch and Paint for a Watercolor Effect
Combine the softness of watercolor with the sharp definition of embroidery for a truly unique piece.
Lightly sketch your design onto the fabric, then use fabric-safe watercolors or watered-down acrylics to paint loose washes of color in the background.
Let the fabric dry completely before stretching it in the hoop. Then, add your embroidery over the painted areas.
Use stitches not to fill the entire shape, but to add detail, outlines, and texture, allowing the soft painted colors to show through.
There are many mixed media techniques to explore, and this is one of the most accessible and beautiful.


