

Have you ever finished a piece of botanical embroidery and felt something was missing? You filled the leaf perfectly, the outline is clean, but it still feels… flat. The secret to transforming that leaf from a simple shape into a living, breathing element lies in its veins.
These details are not just lines; they are the architecture of the leaf. They give it structure, texture, and a story. Stitching them with intention is what separates good embroidery from truly breathtaking textile art. It’s the subtle shift that adds depth, catches the light, and pulls the viewer closer.
In this collection, you won’t just find stitches. You’ll find new ways of seeing. You’ll learn how to use thread, texture, and color to mimic nature’s own artistry—from the delicate skeleton of a decaying leaf to the sculptural presence of a succulent. It’s time to give your embroidery the stunning depth it deserves.
1. Create a Mottled Texture with French Knots
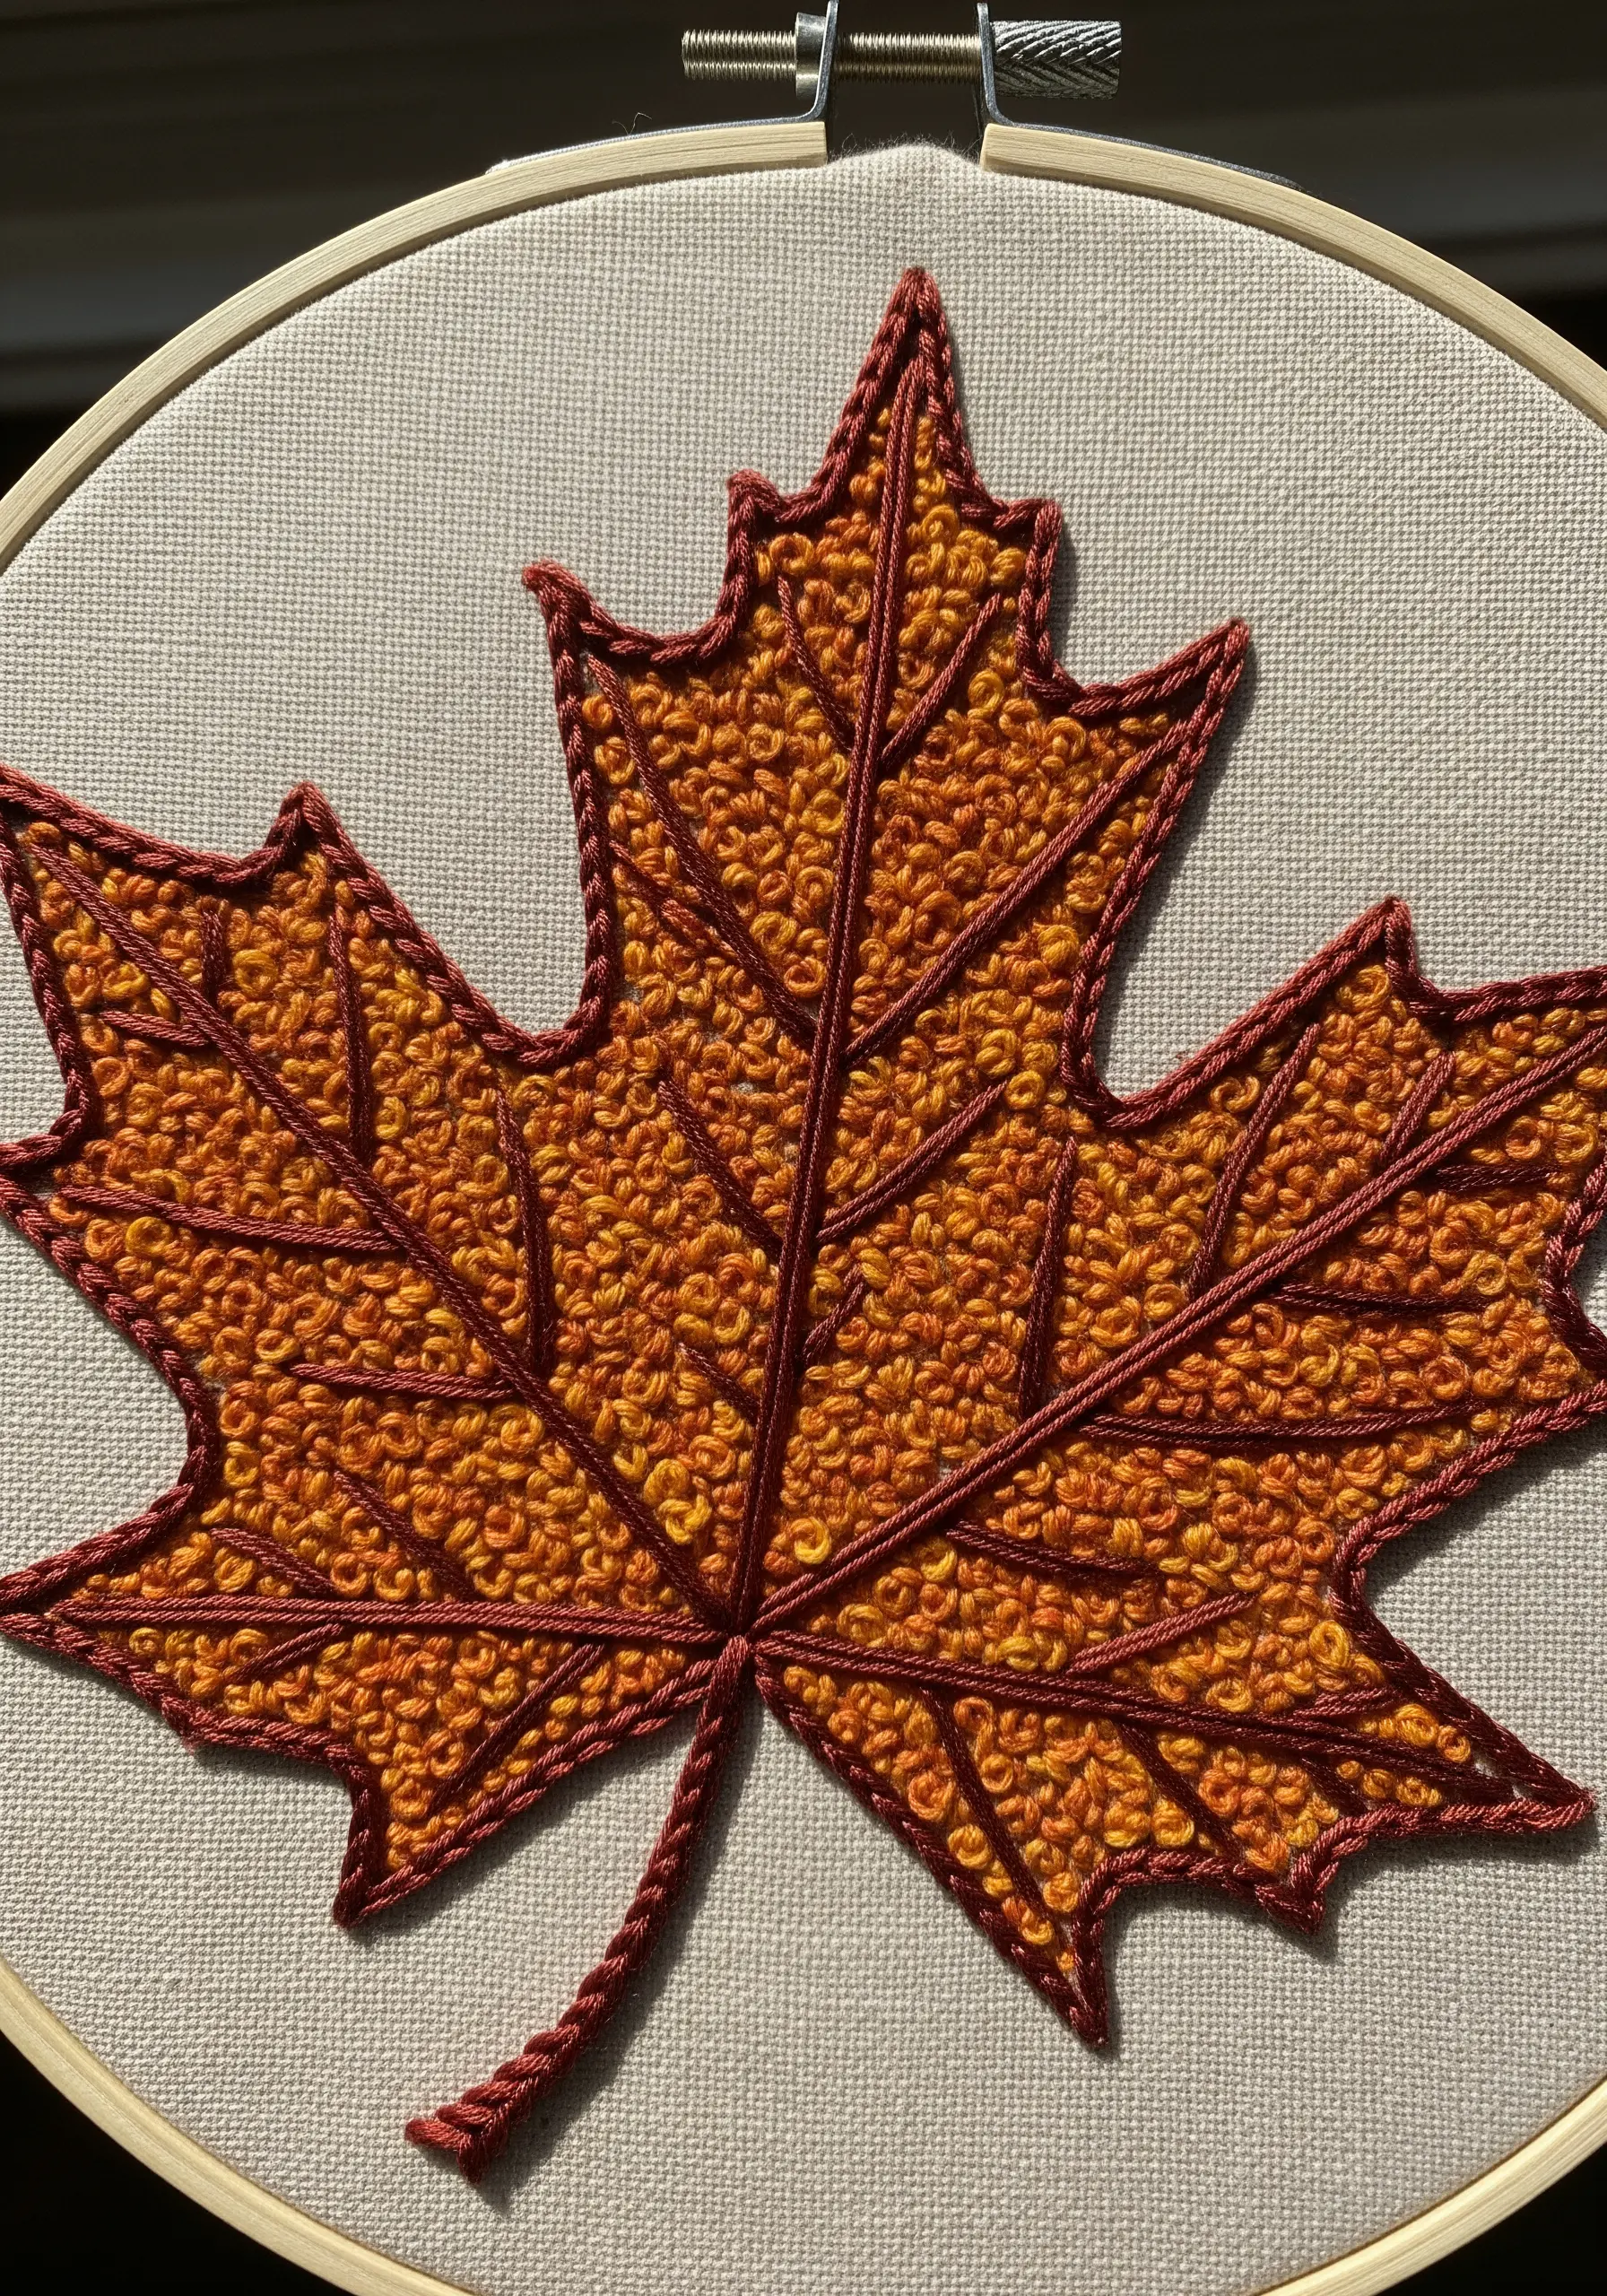
Instead of a flat fill, create a rich, tactile surface using French knots in two or three closely related autumnal shades.
Randomly mix the colors to mimic the natural, imperfect variegation of a turning leaf.
For the veins, use a heavier thread like all six strands of floss or a Perle cotton, and apply it over the knots using a couching stitch for a raised, structural line that defines the shape.
2. Imply Veins with Topstitching on Faux Leather
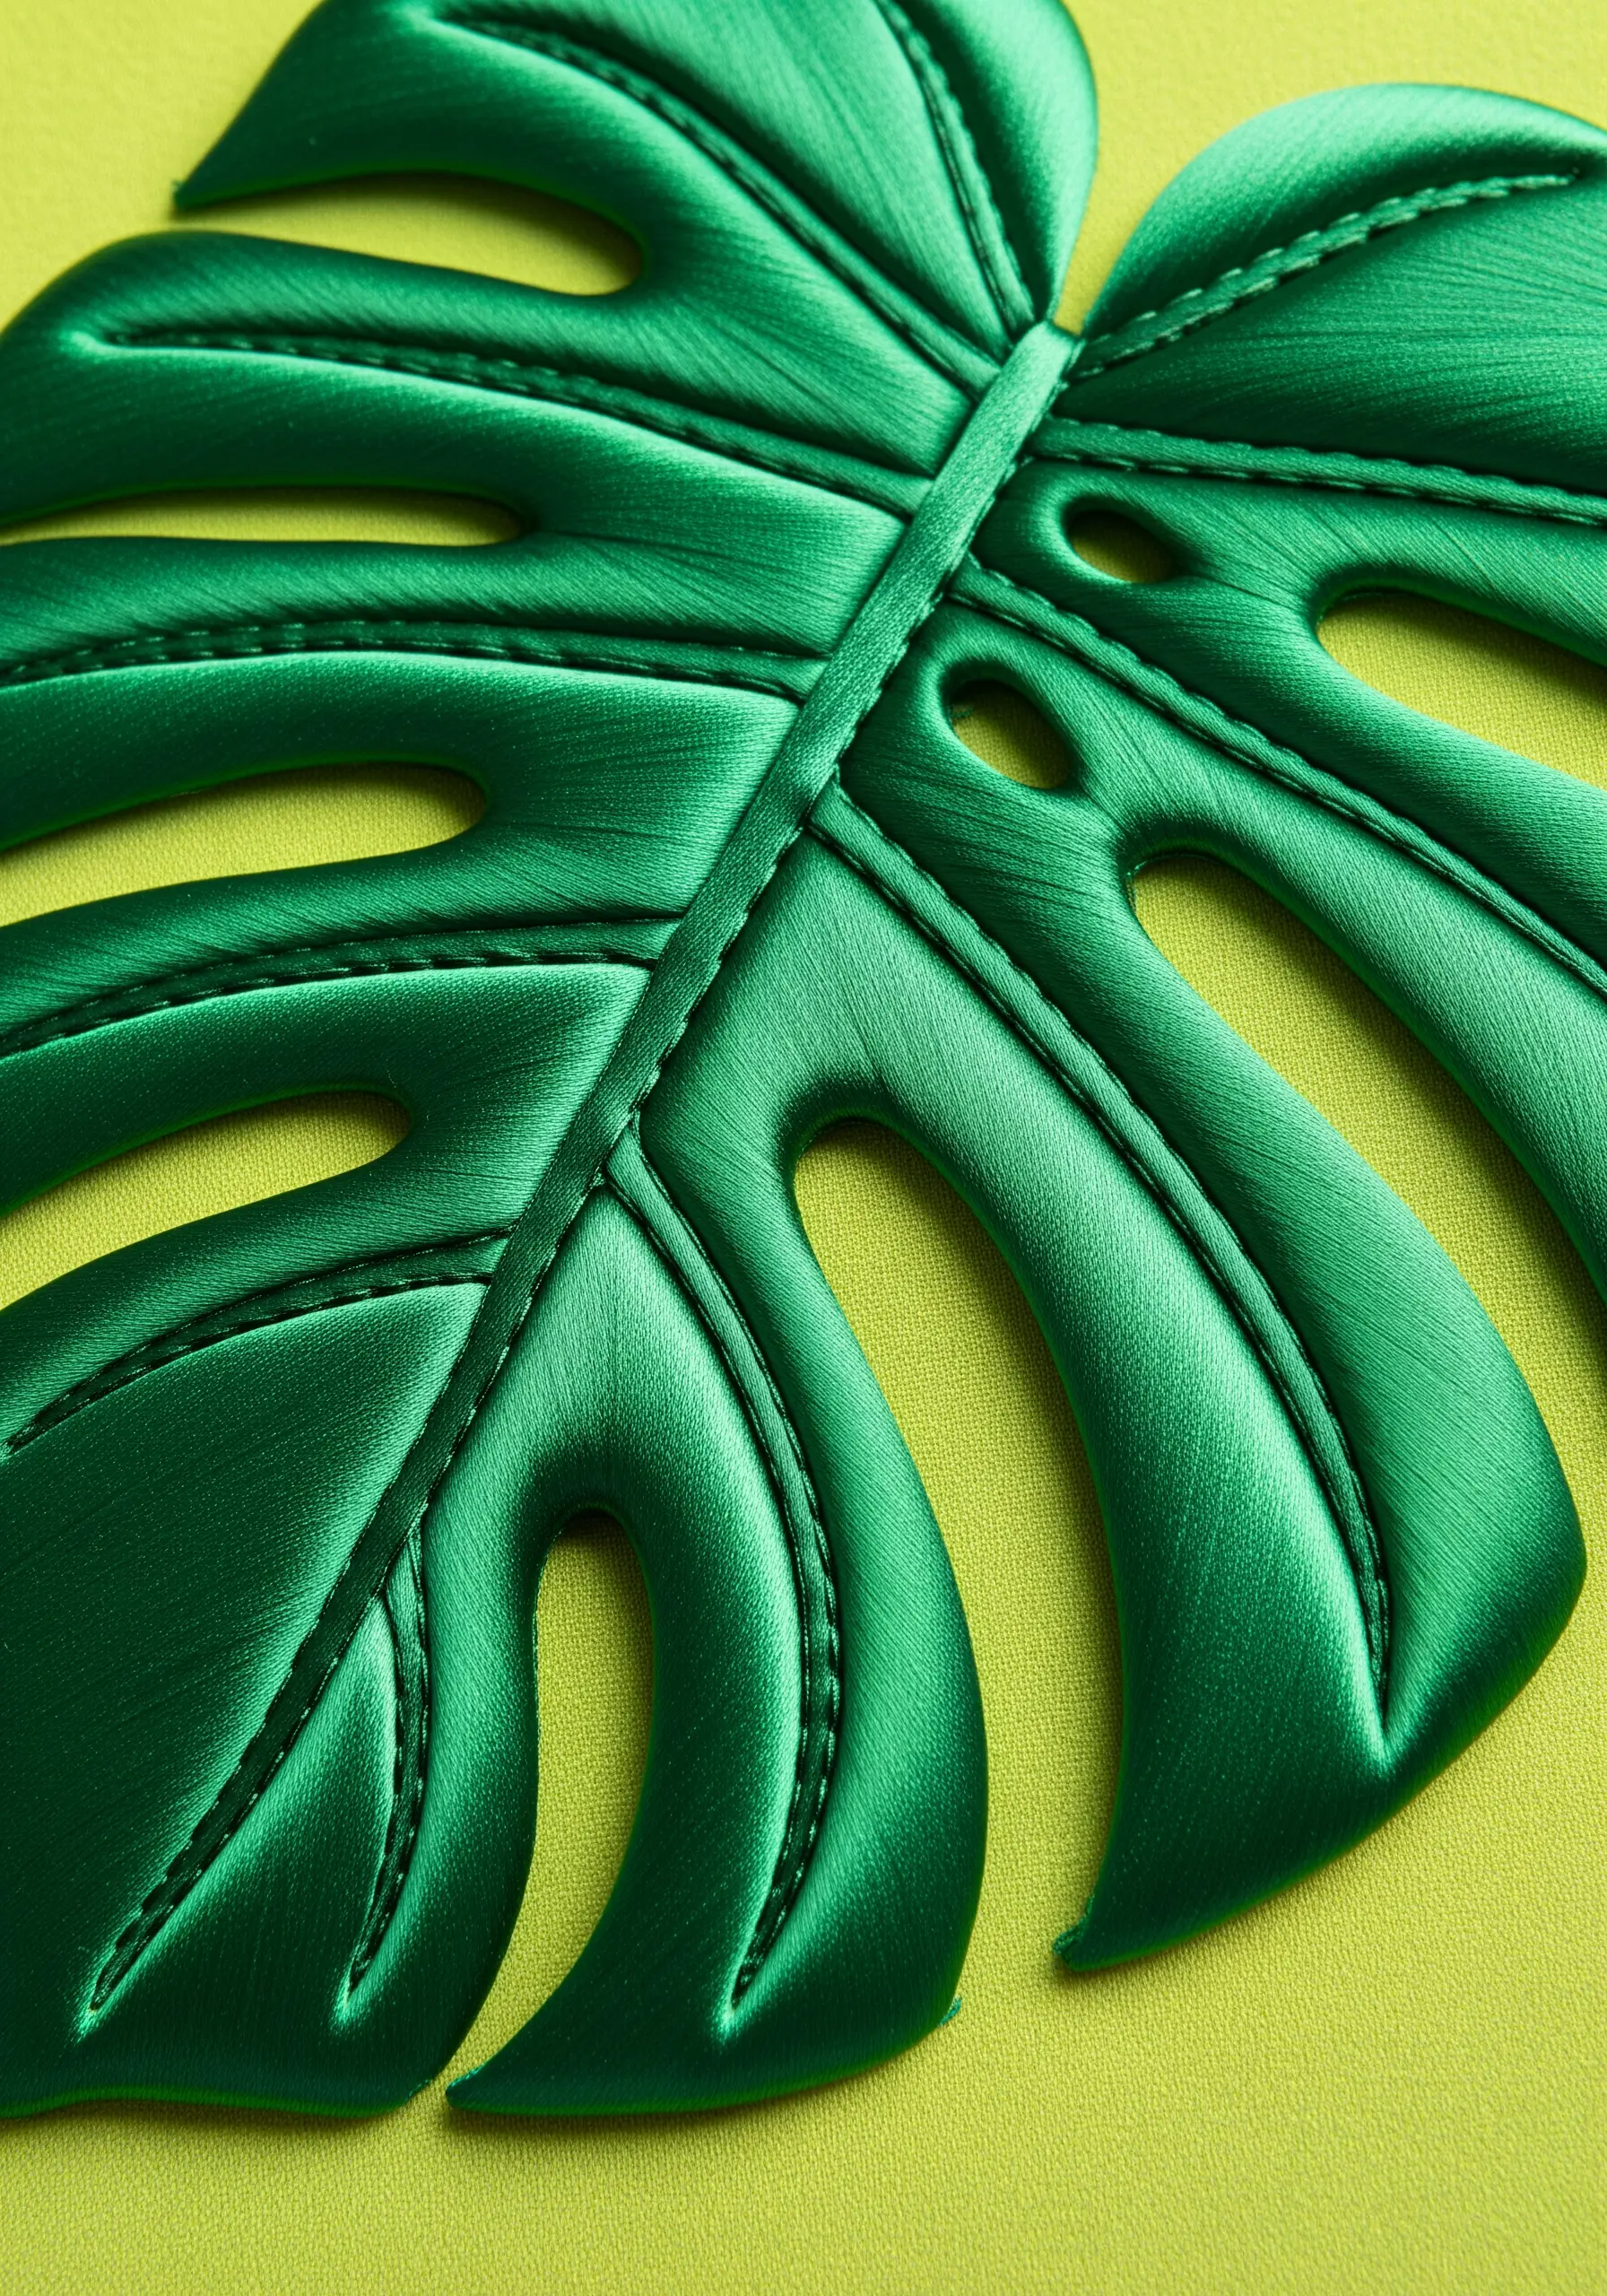
Take your botanical art off the fabric and onto alternative materials like faux leather or vinyl.
Use a sewing machine to topstitch the vein pattern directly onto the material.
The indented line creates a subtle, sculptural effect that is both modern and minimalist.
A walking foot on your machine will prevent the material from slipping and ensure clean, even lines.
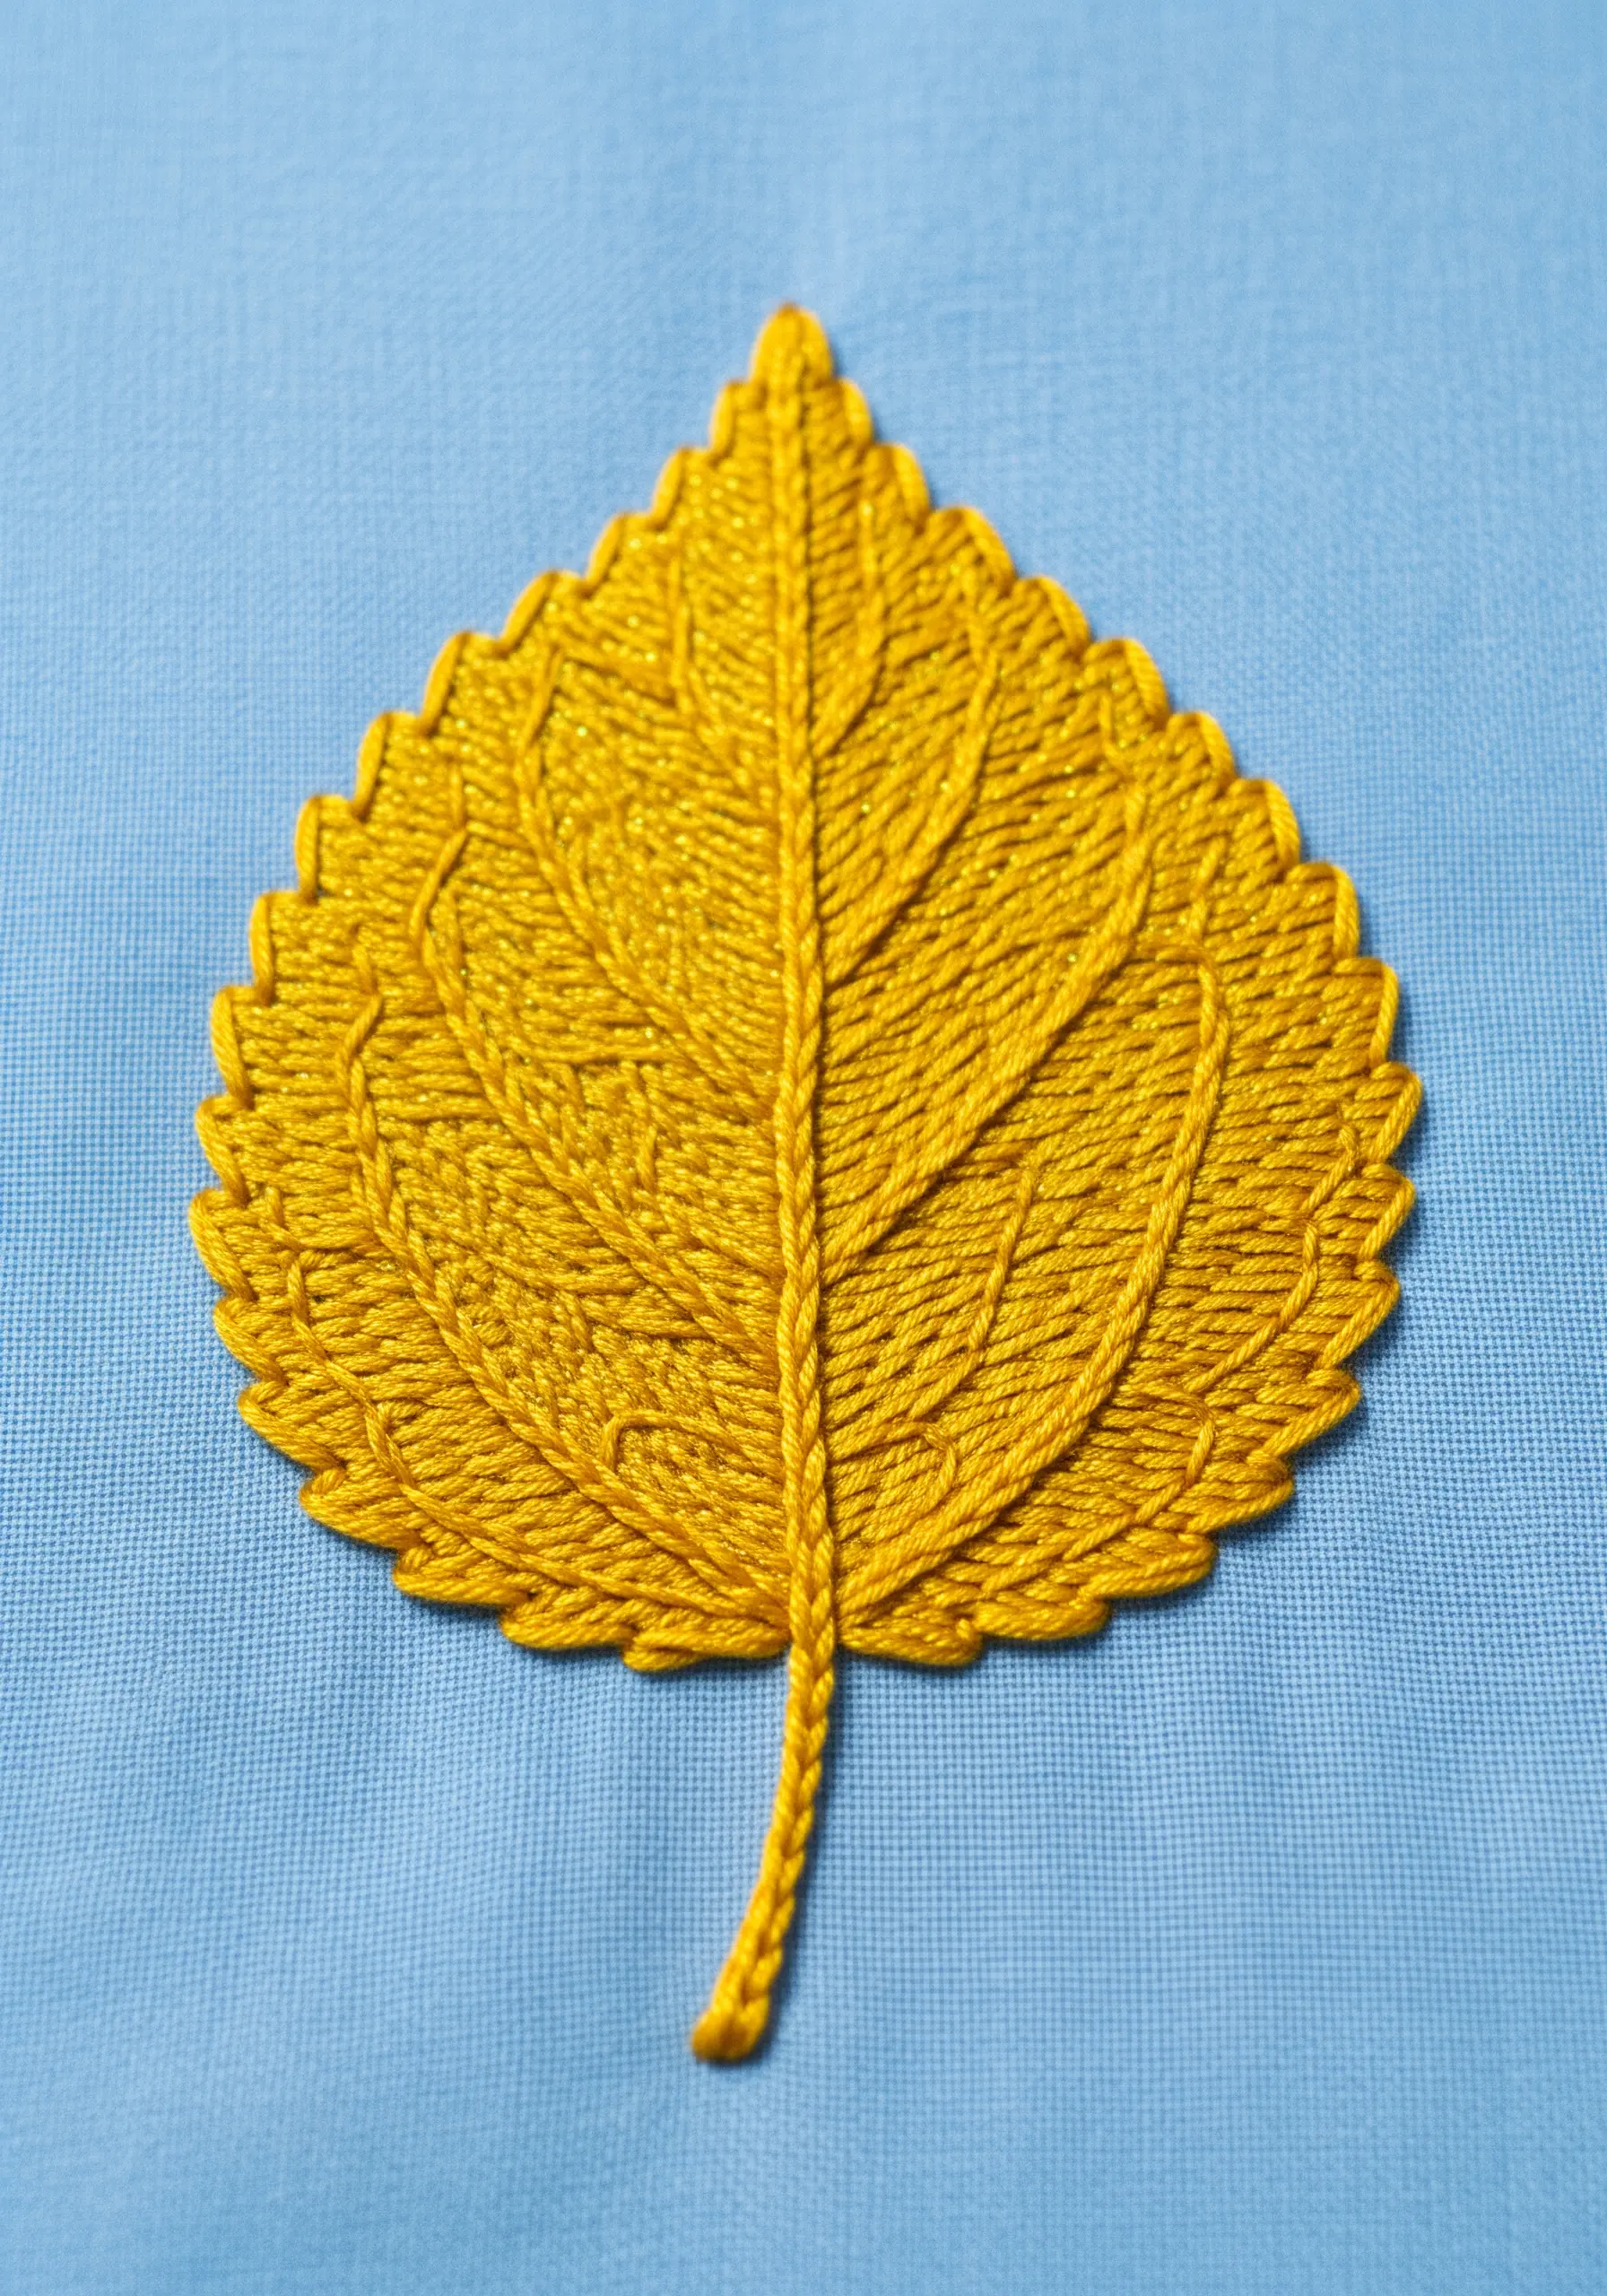
3. Define Form with Radiating Metallic Stitches
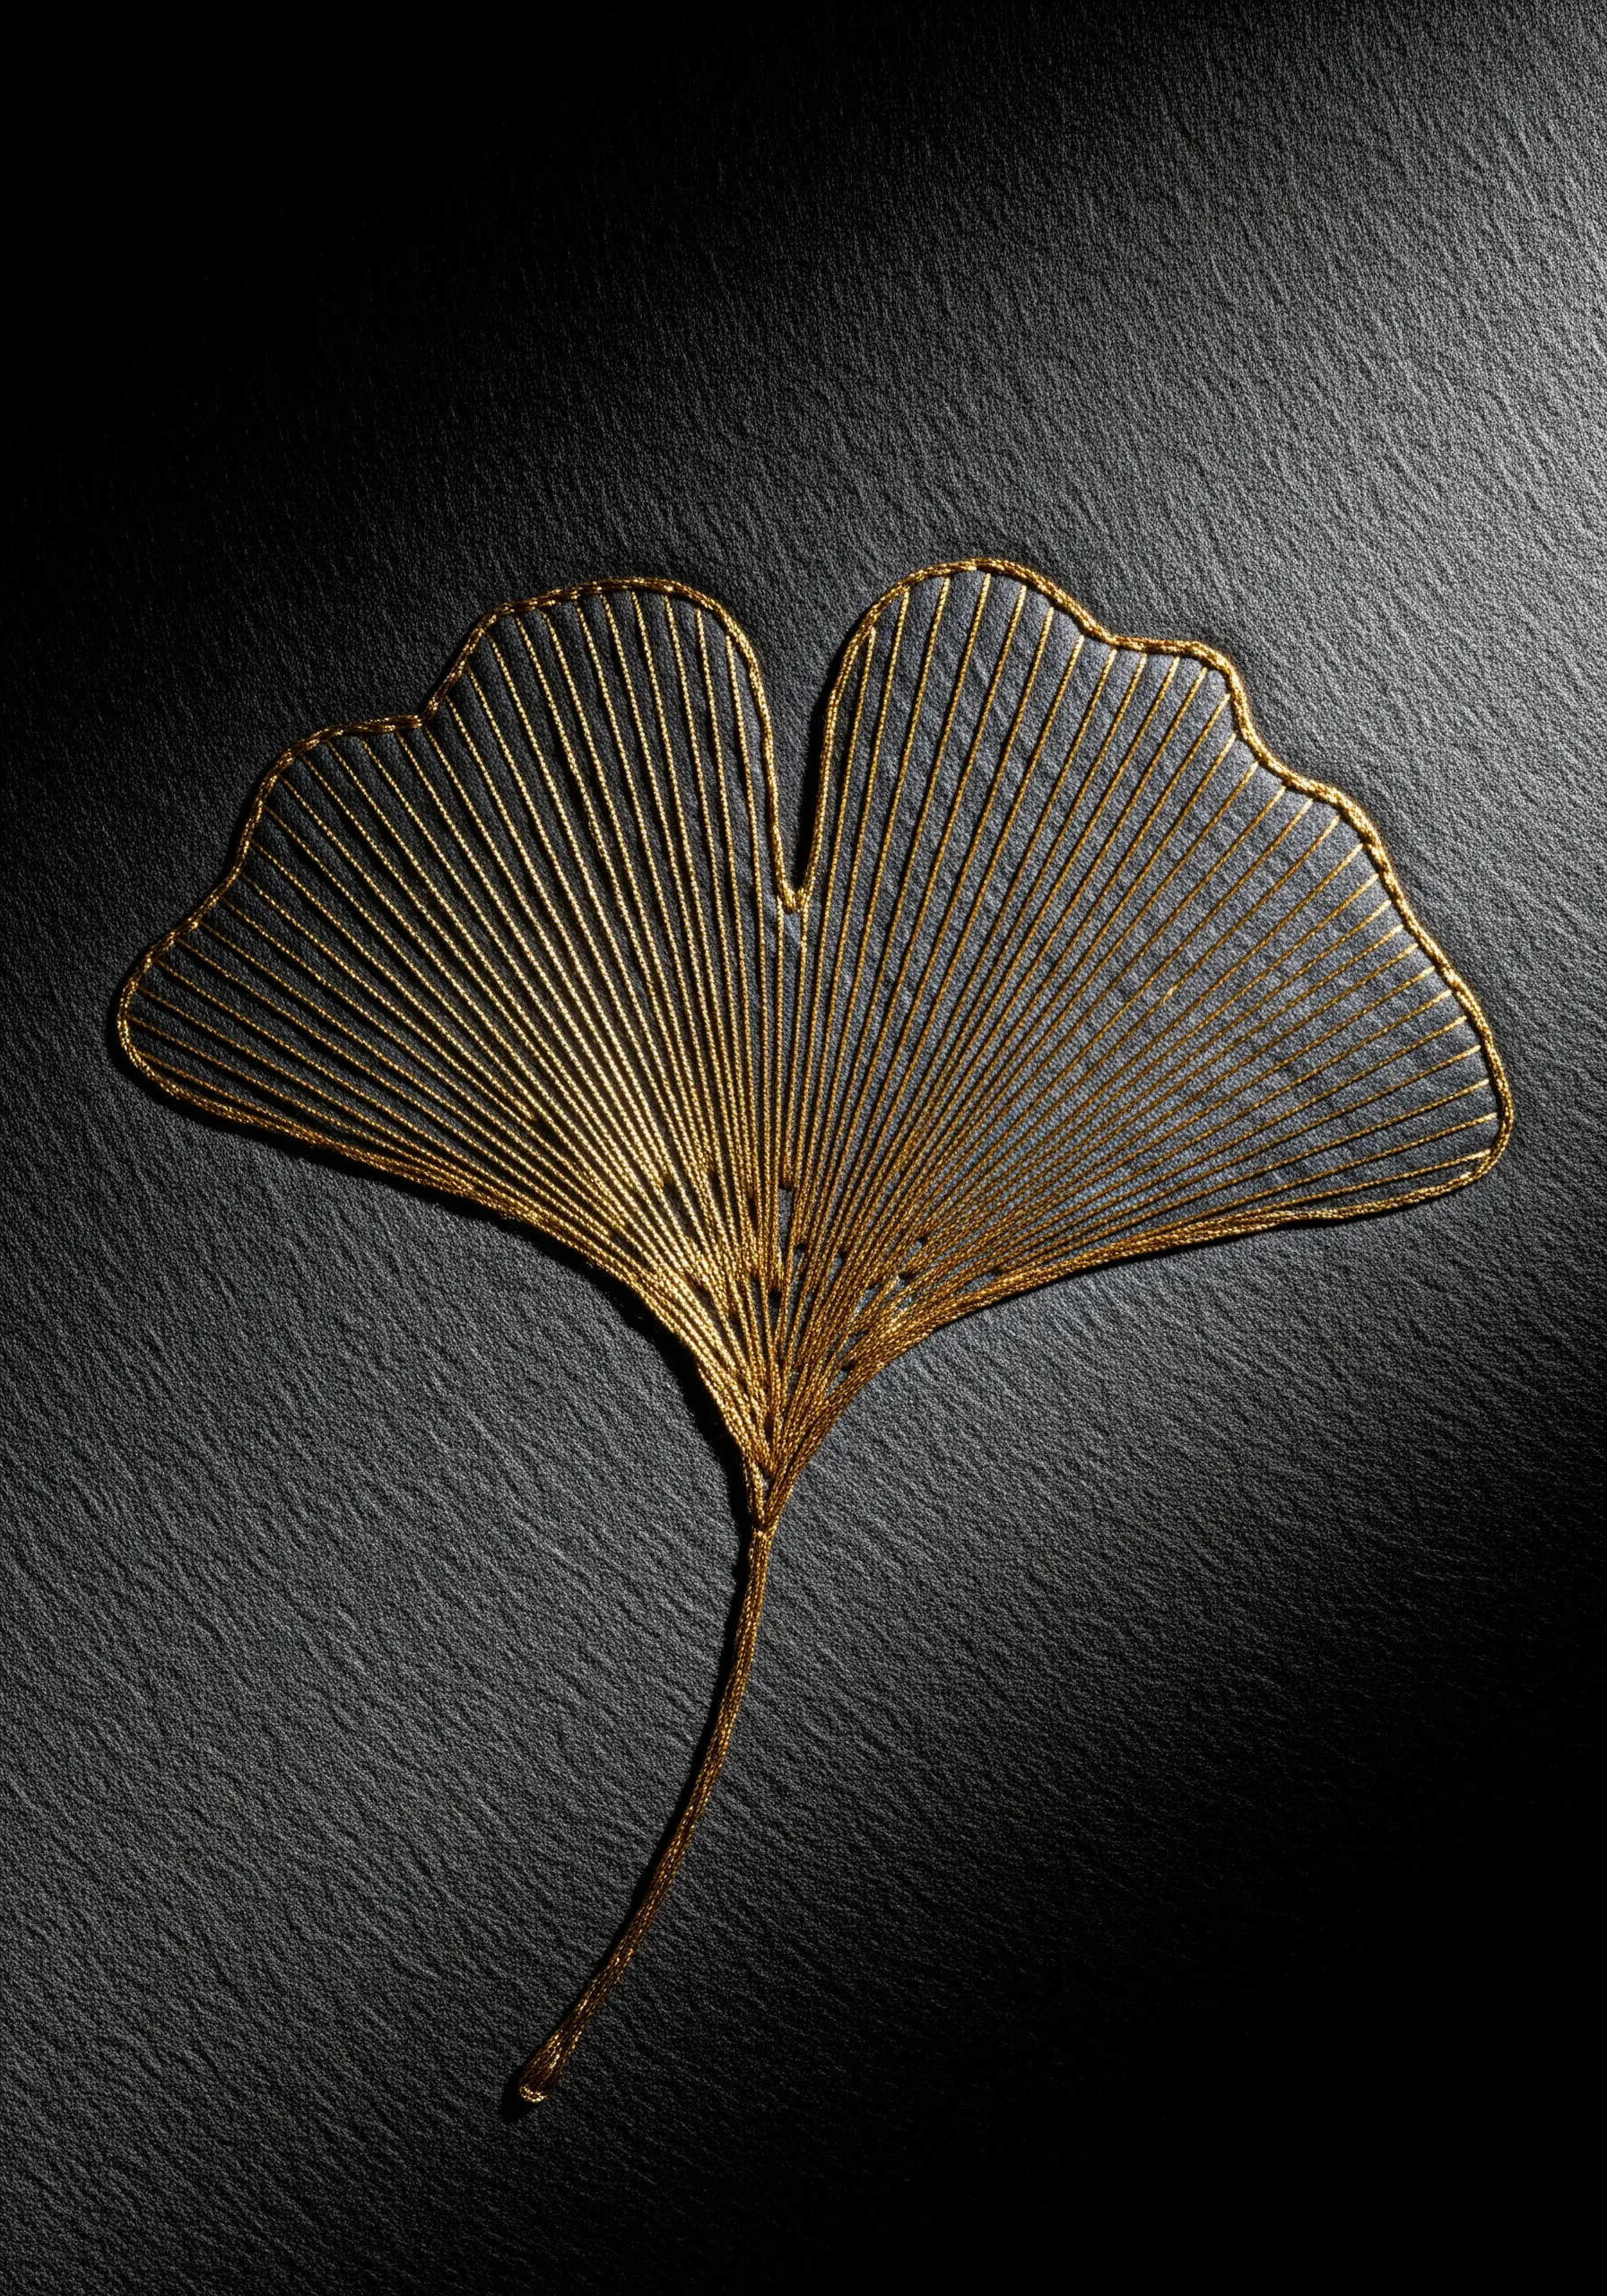
For fan-shaped leaves like the ginkgo, let negative space do the work.
Use a single strand of metallic thread to create long, radiating straight stitches from the stem to the outer edge.
The tension and precision of these lines are key, as they alone define the leaf’s delicate structure.
Stitching on a dark, textured background makes the metallic thread glow, enhancing the dramatic contrast.
4. Build Dimension with Directional Satin Stitch
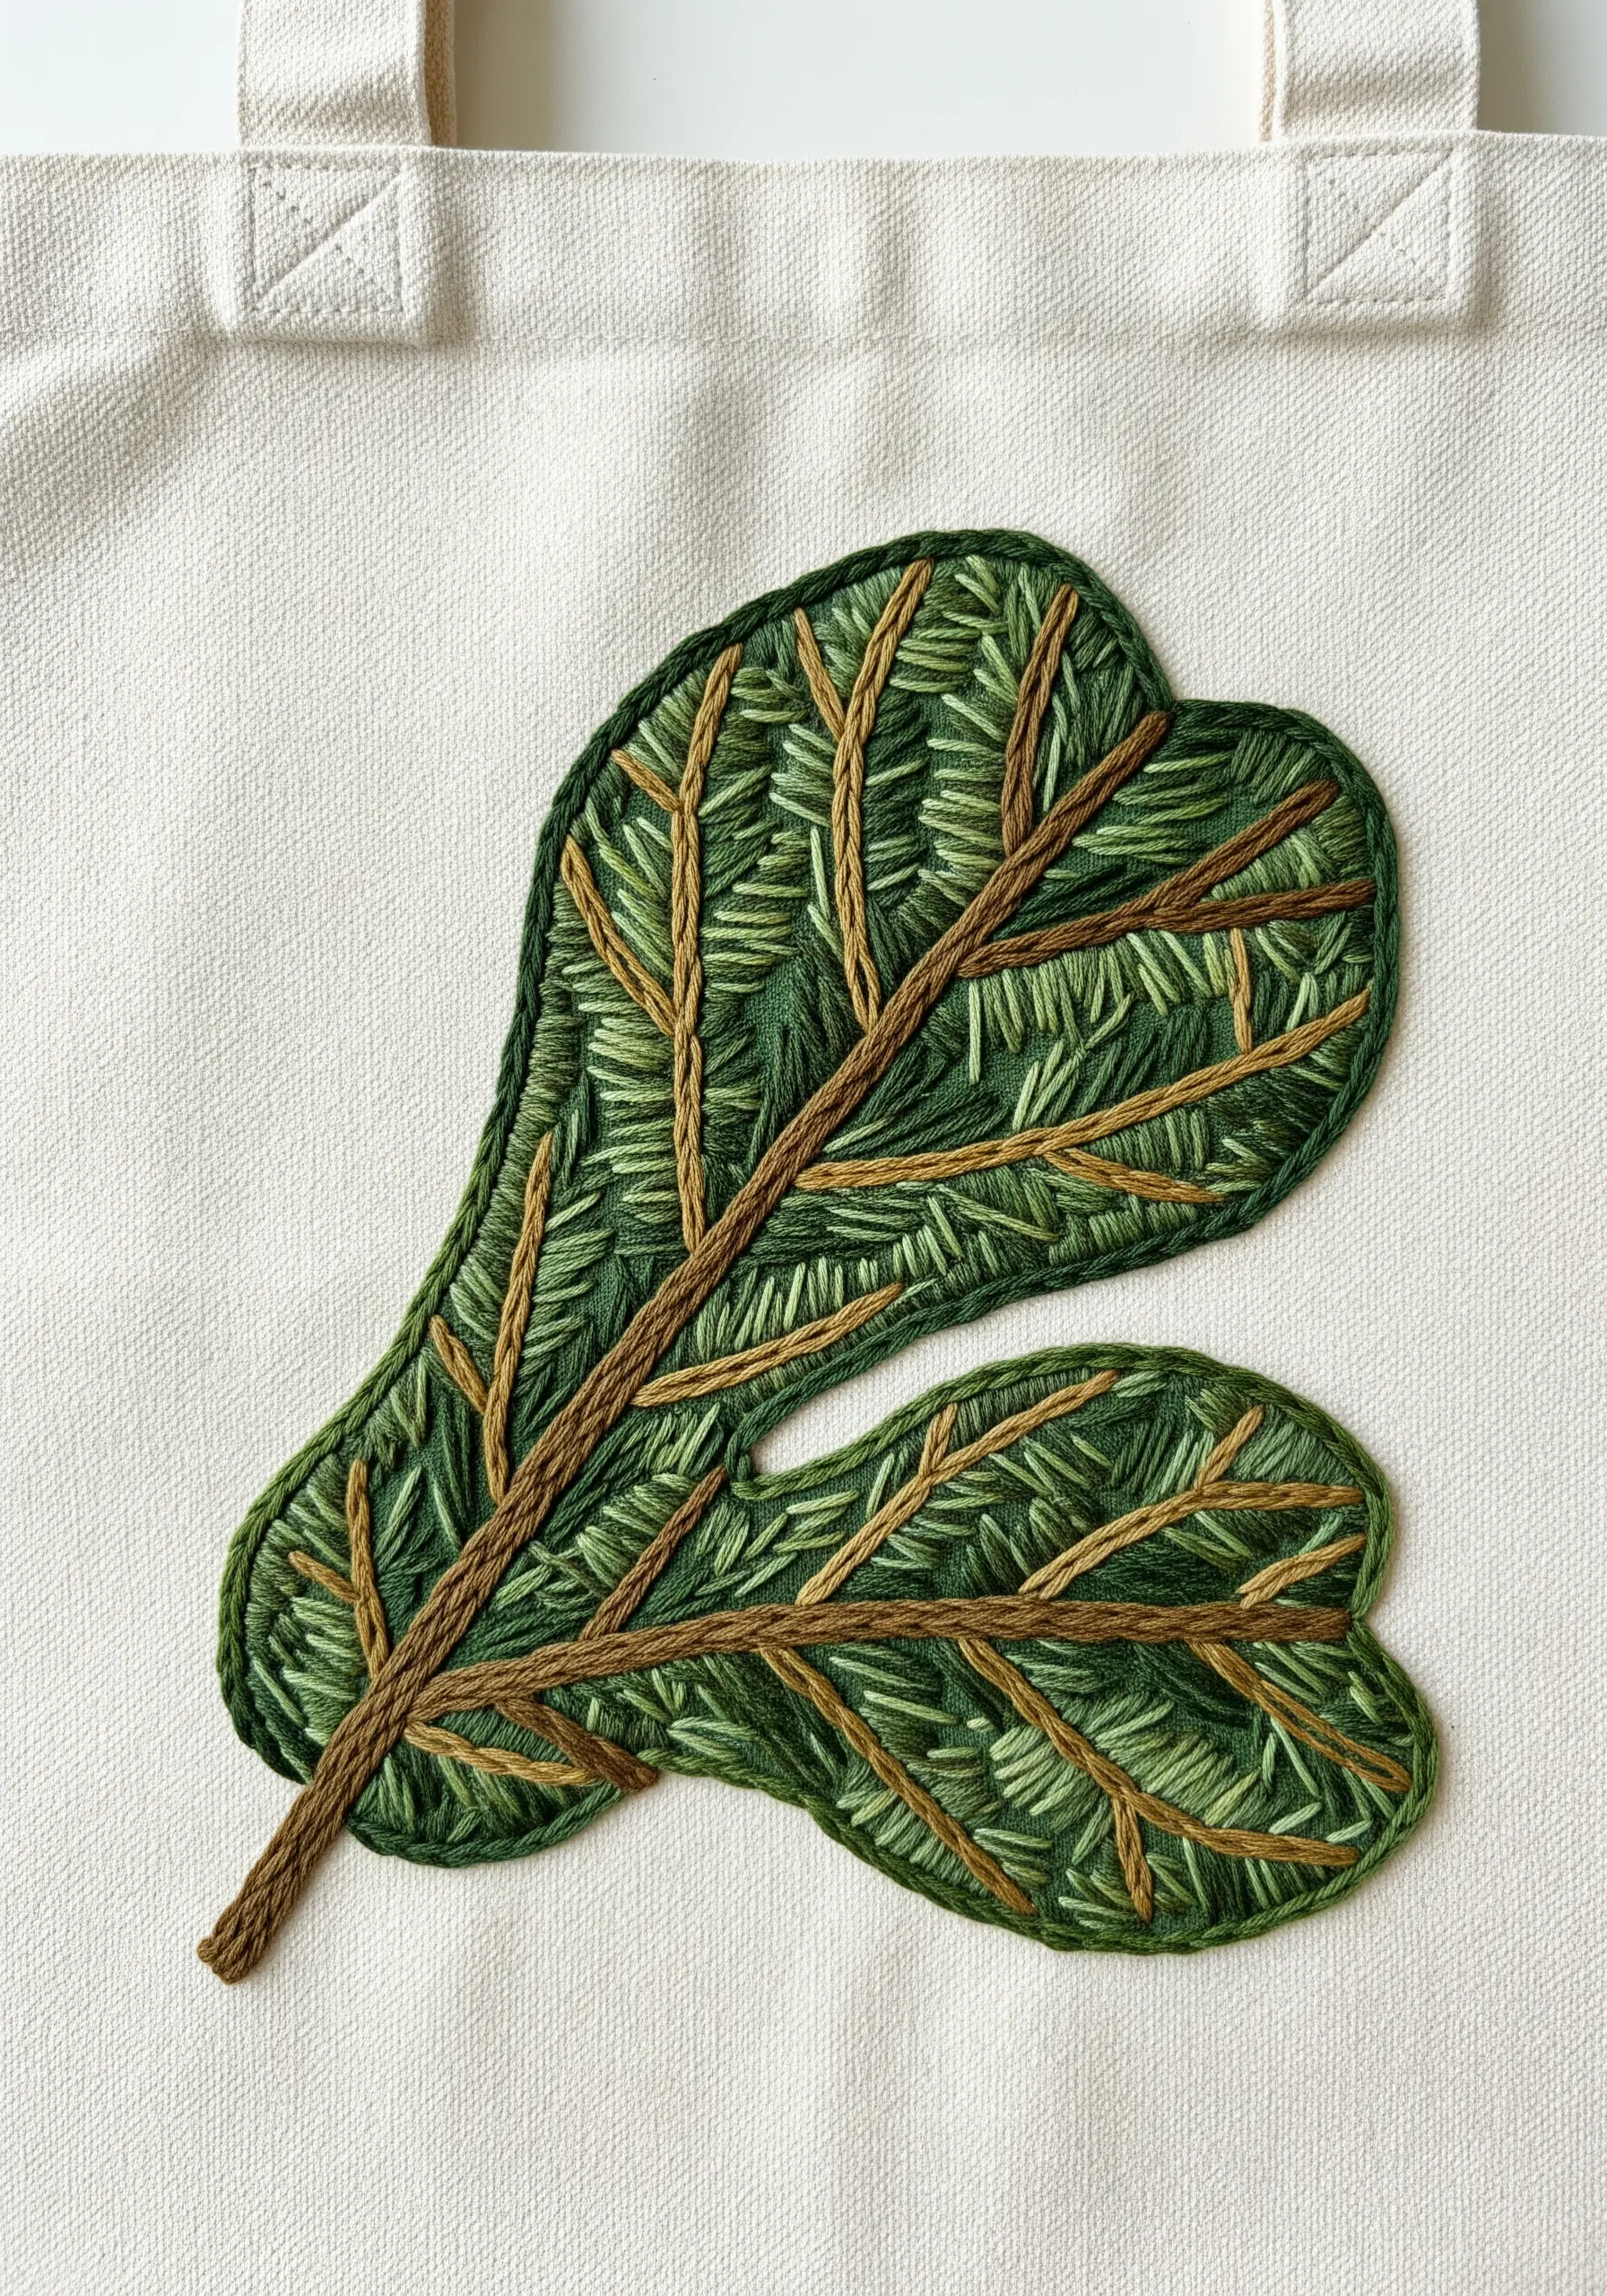
Avoid a flat, uniform look by breaking the leaf into smaller sections guided by the veins.
Fill each section with satin stitch, but change the angle of your stitches for each distinct area.
This simple shift in direction causes the thread to catch the light differently, creating a dynamic, faceted surface that implies movement and depth.
This method is perfect for embellishing everyday items, turning them into unique tote bag embroidery designs.
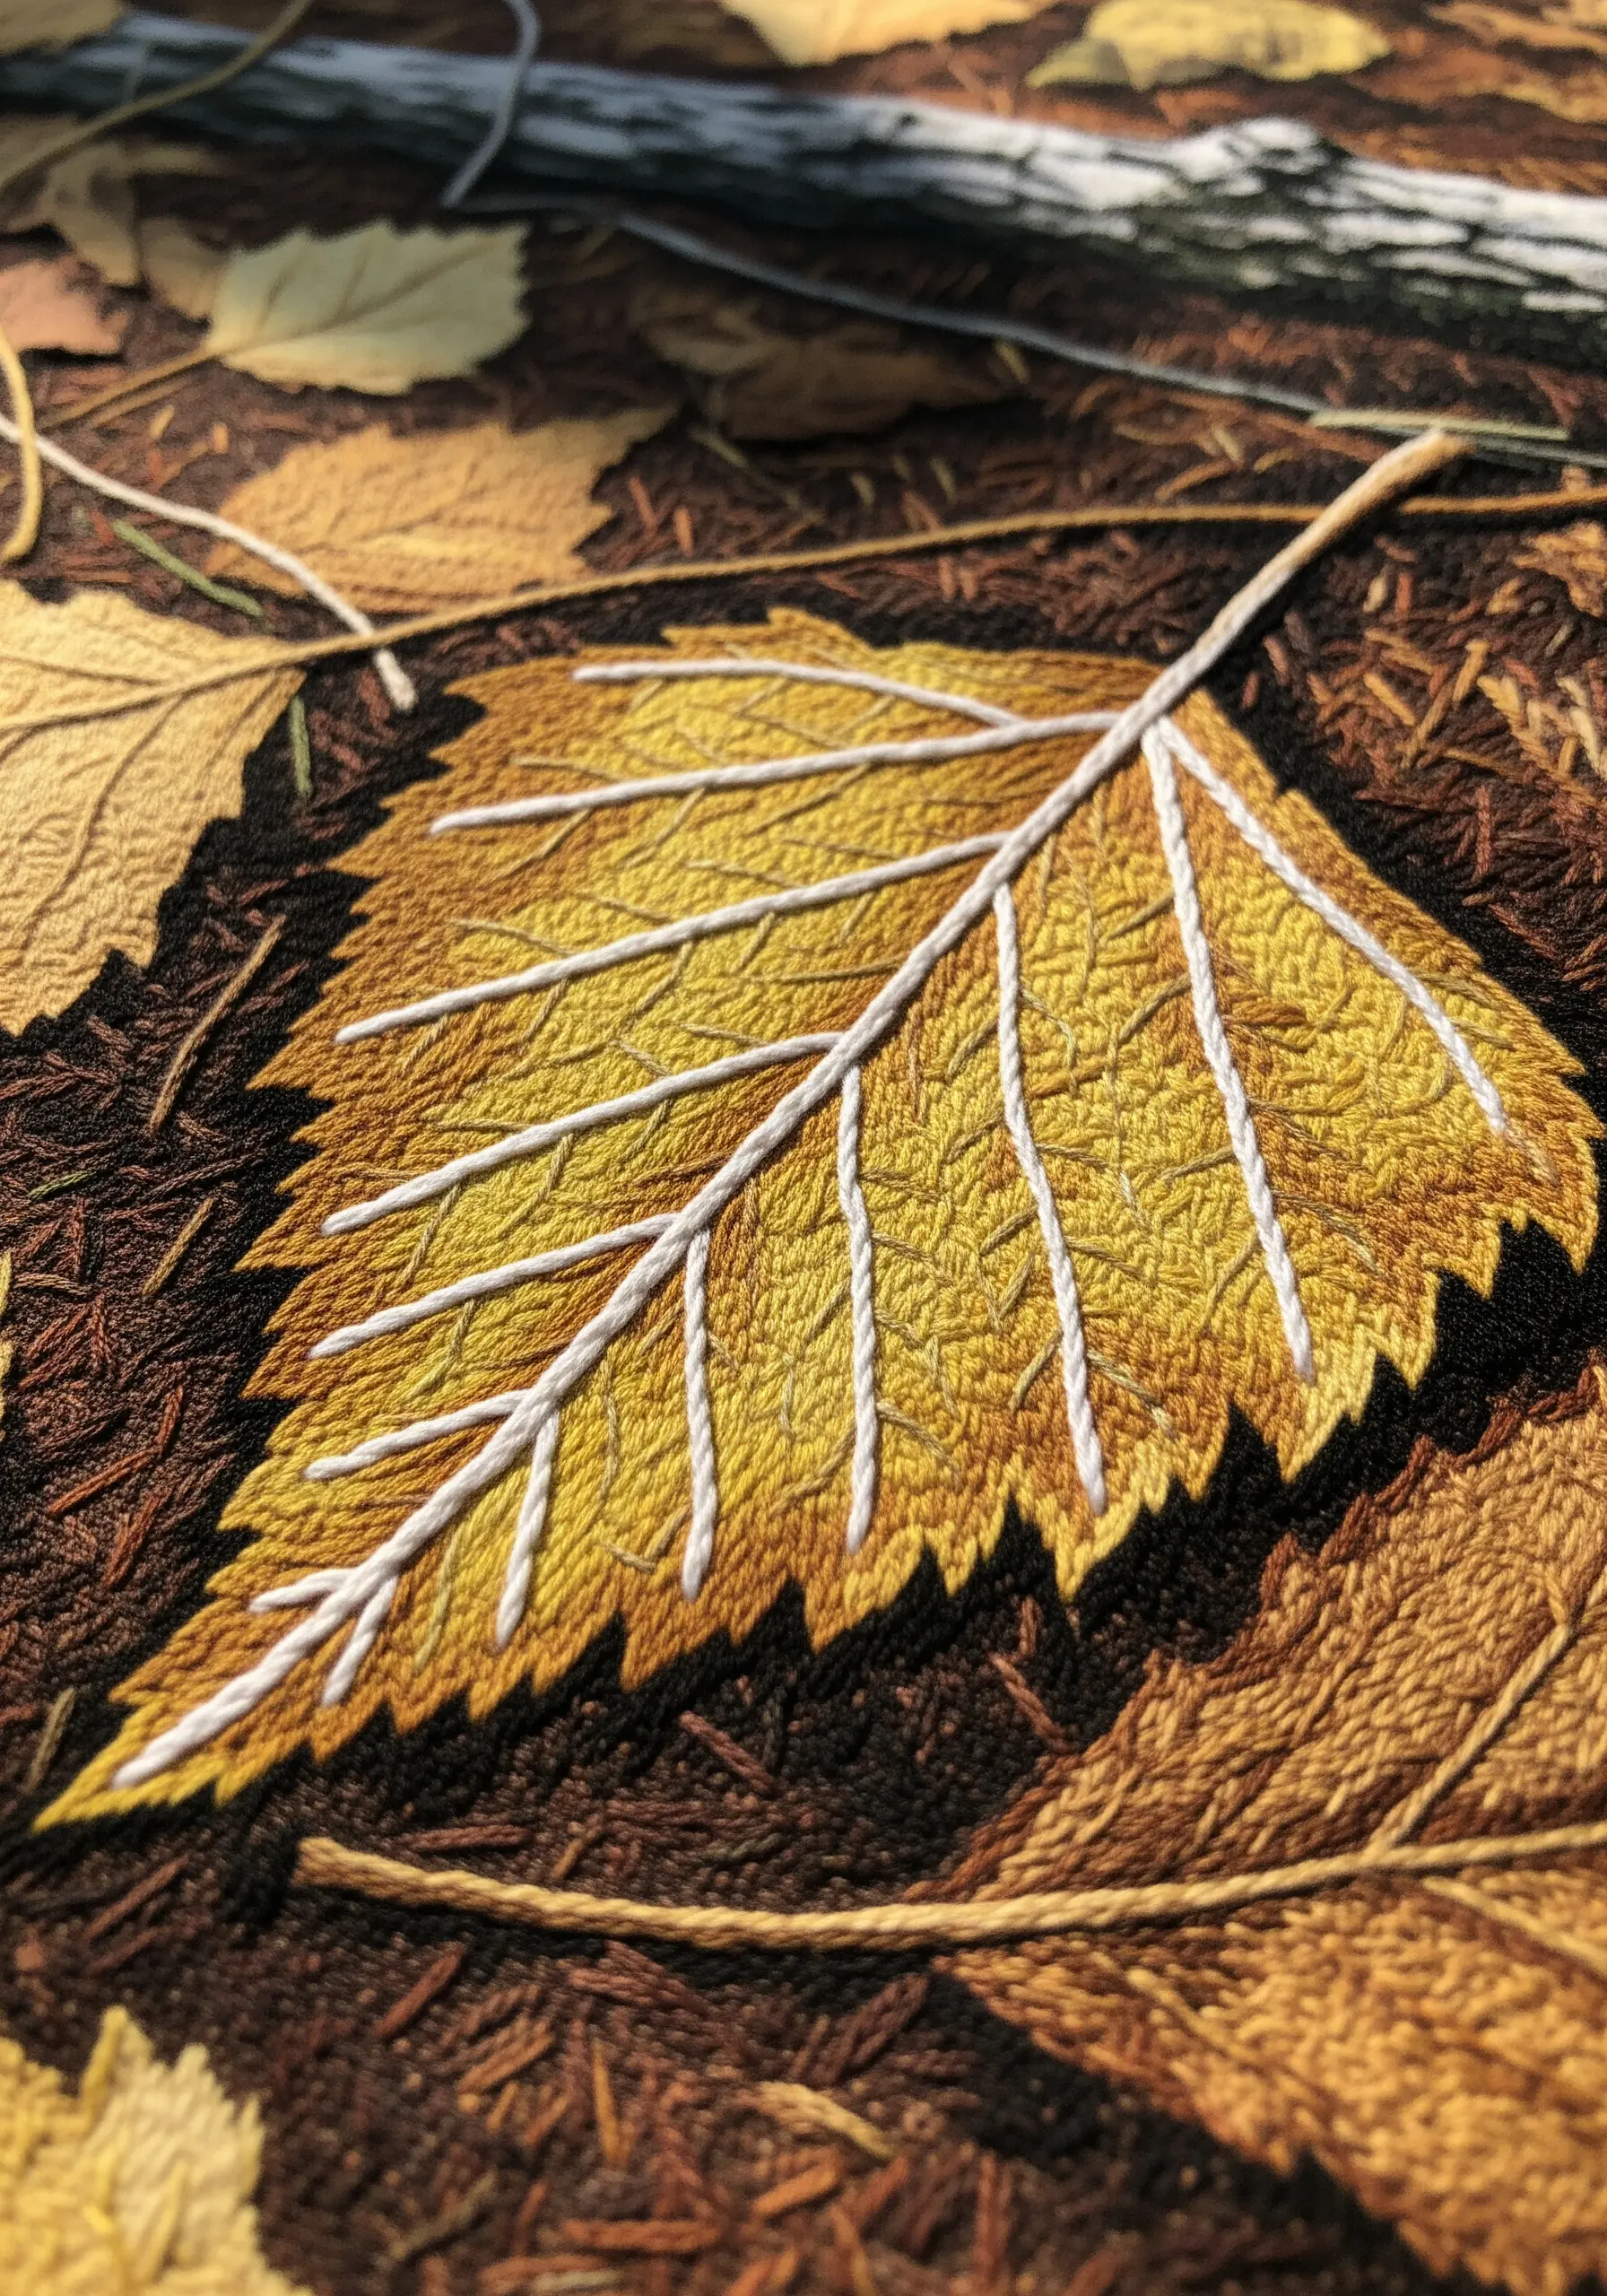
5. Capture Delicate Anatomy with a Single Thread
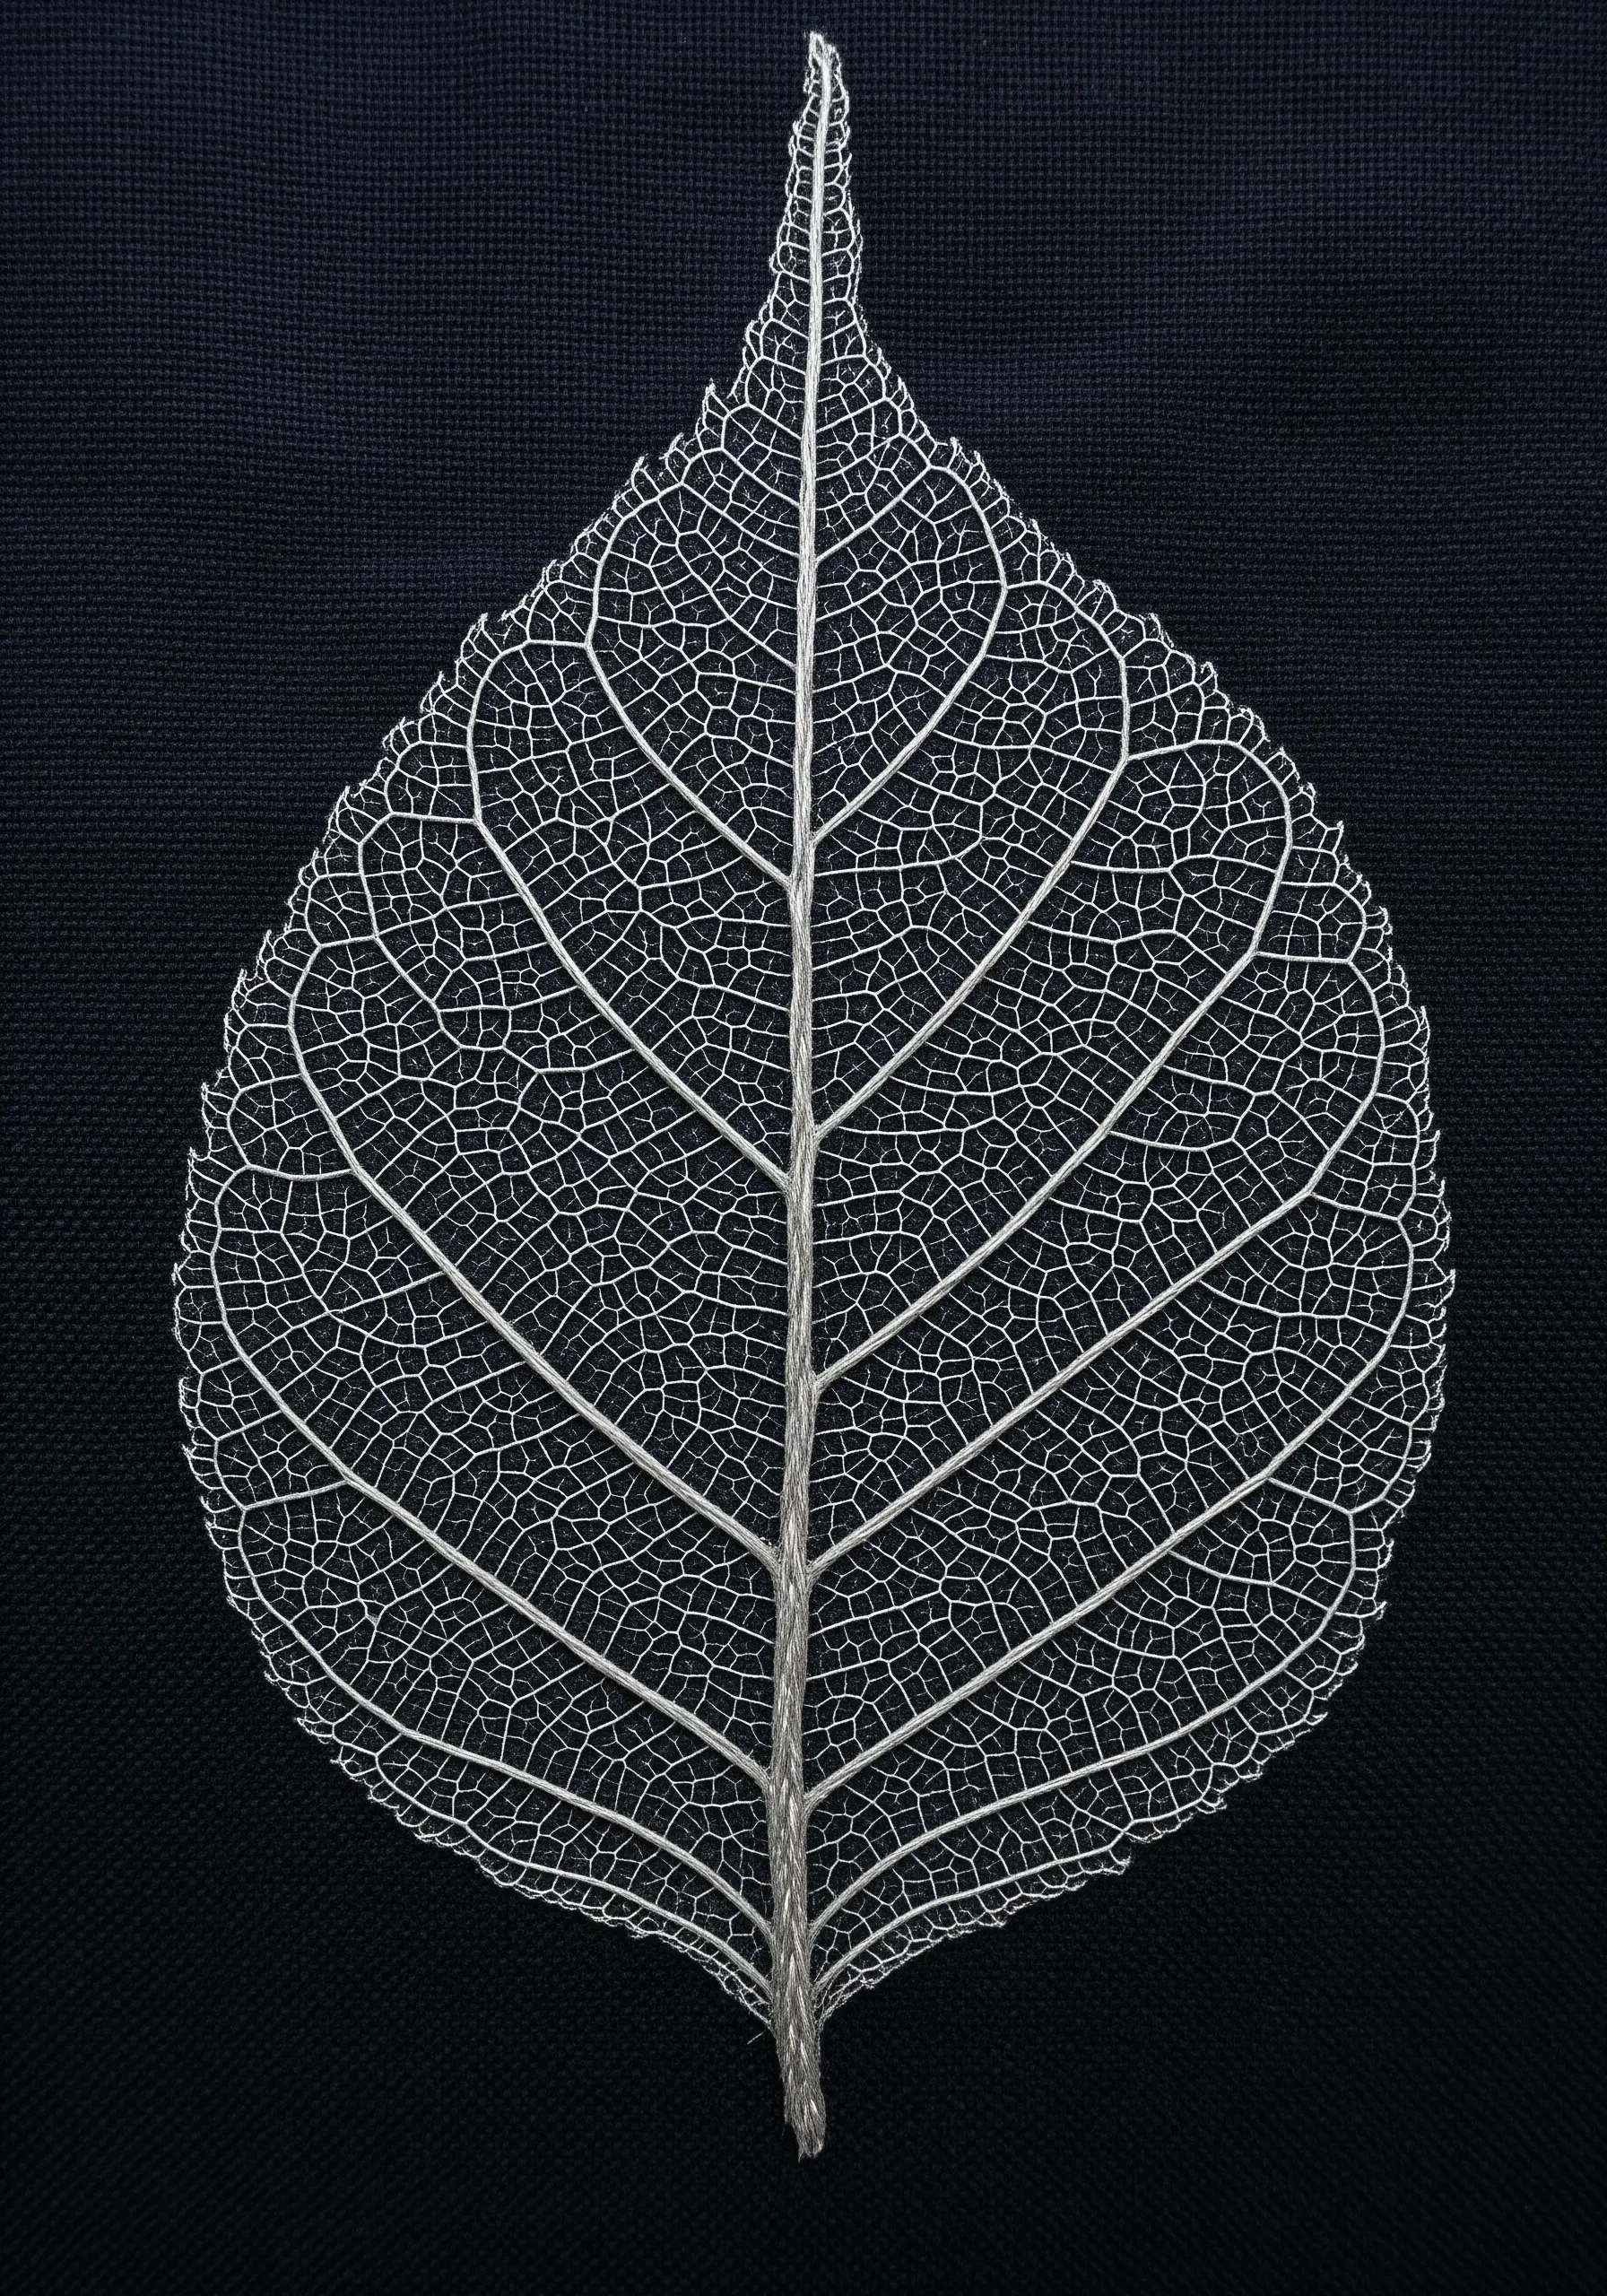
Recreate the intricate, lace-like structure of a skeleton leaf by using a single, fine strand of white or silver thread on a dark ground.
Use backstitch for the main veins and tiny, precise straight stitches for the web-like capillaries.
Embrace the organic imperfection; the goal is not perfect symmetry but a believable, natural complexity that showcases your control over linework.
6. Use Fishbone Stitch for Symmetrical Leaflets
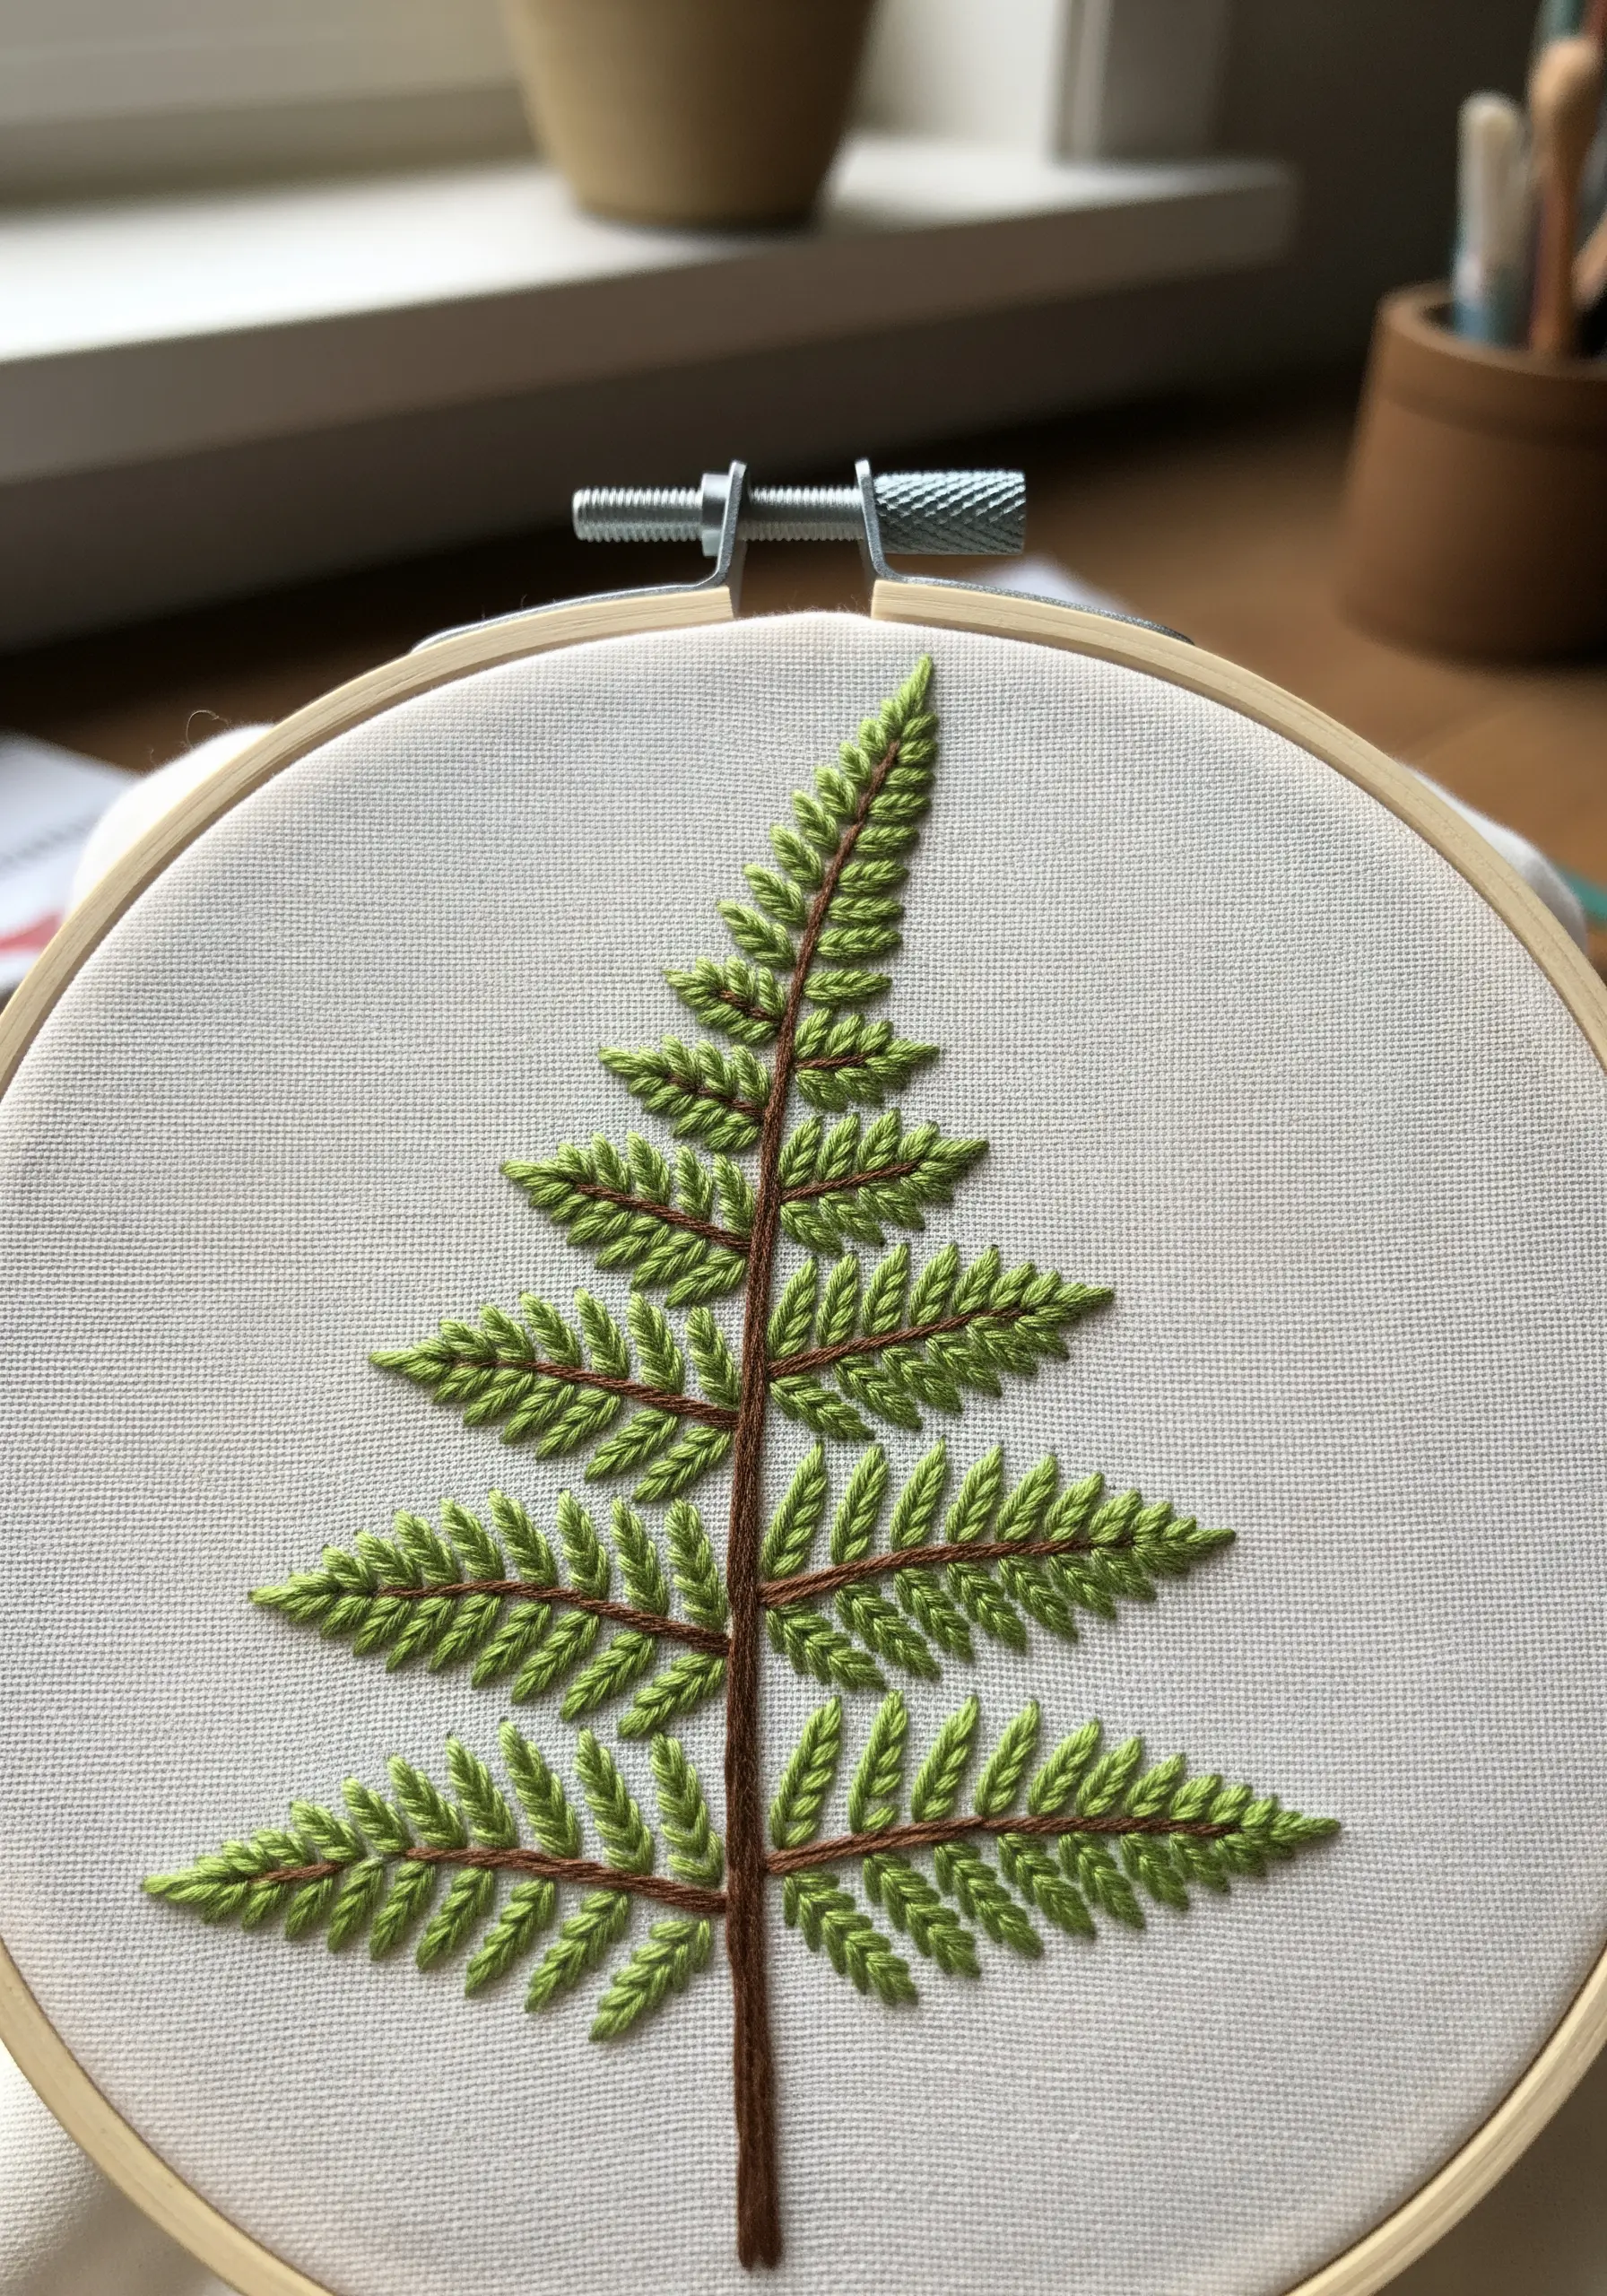
The fishbone stitch is your most efficient tool for creating small, symmetrical leaves like fern fronds.
Each stitch crosses over the central guideline, creating a beautiful braided effect down the middle that serves as the vein.
This single stitch simultaneously fills the shape and forms its central vein, making it perfect for clean, elegant botanical work.
7. Suggest Texture with Sculptural Bullion Knots
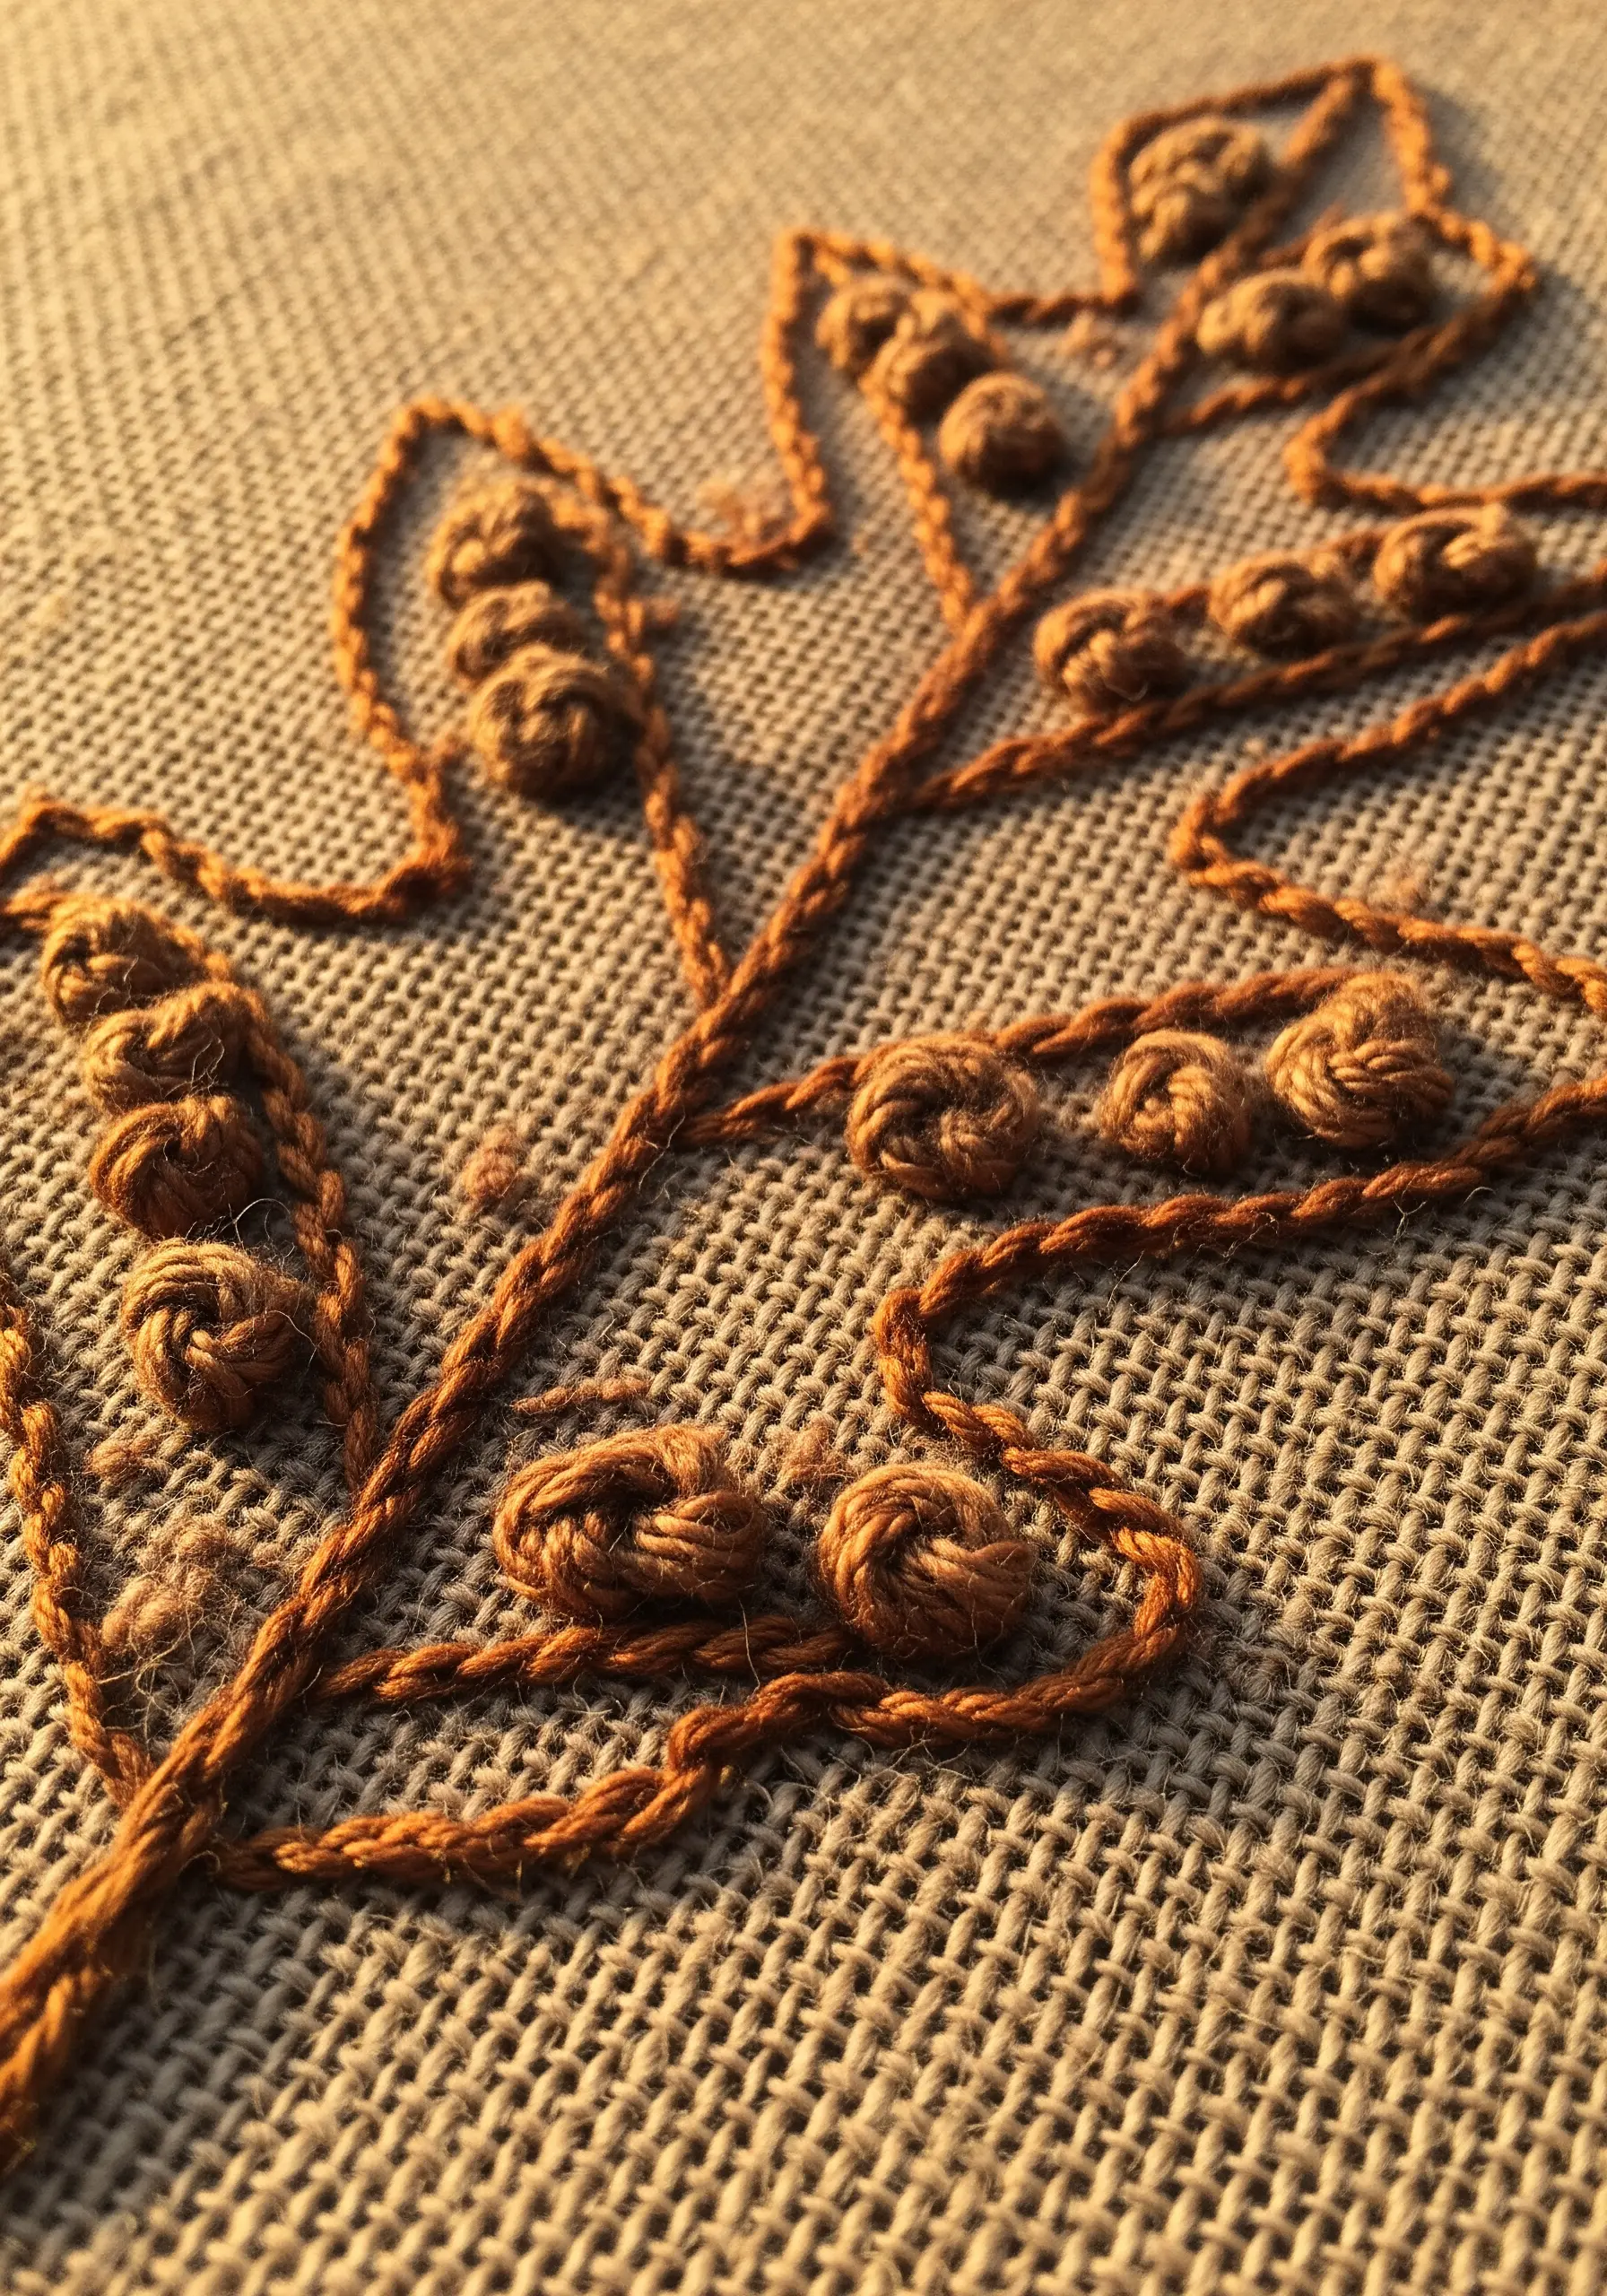
You don’t always need to fill a shape to give it life.
Outline your leaf and then place dimensional bullion knots along the vein lines.
This minimalist approach creates a tactile, acorn-like effect that feels rustic and organic.
It works exceptionally well on coarse fabrics like burlap or heavy linen, which enhances the overall natural aesthetic.
8. Create Graphic Patterns with Color-Blocked Satin Stitch
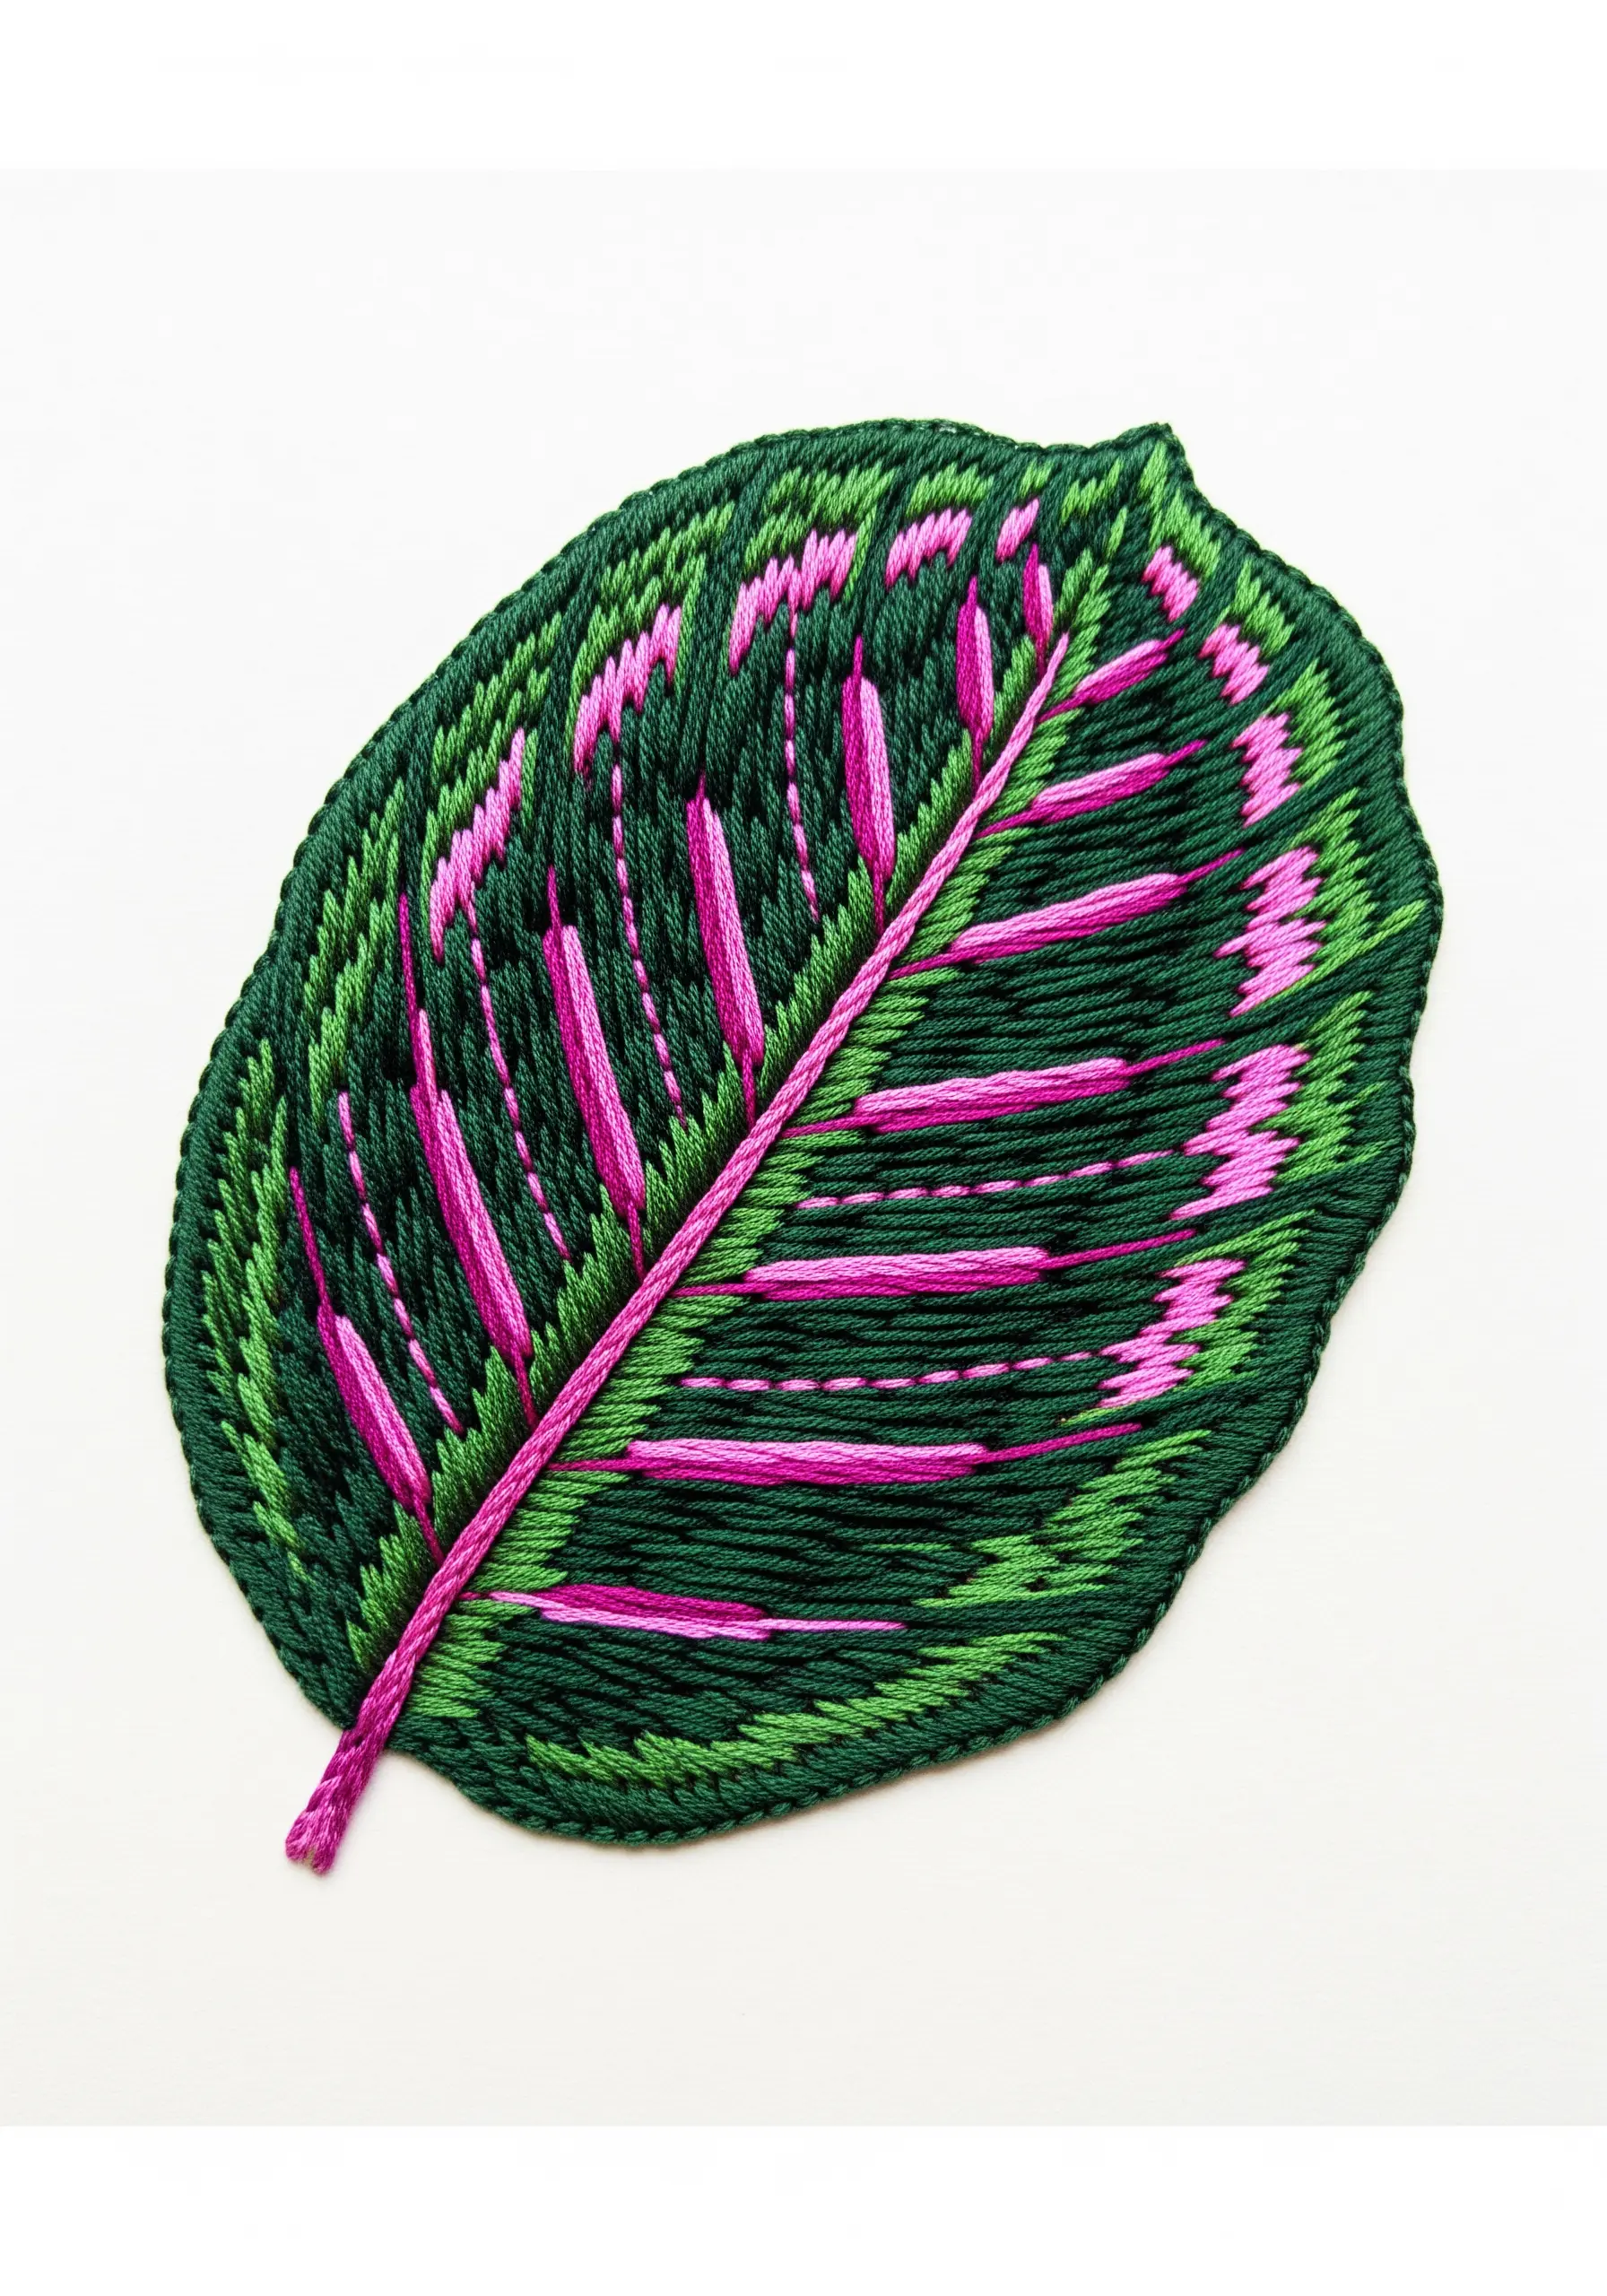
For leaves with bold, natural patterns like the Calathea, use satin stitch to create sharp, graphic shapes.
Keep your stitches parallel and tightly packed to ensure clean divisions between the contrasting colors.
The central vein acts as a natural divider, making the bright colors pop and turning the leaf into a piece of modern, color-blocking embroidery.
9. Mimic Soft Textures with Whipped Backstitch
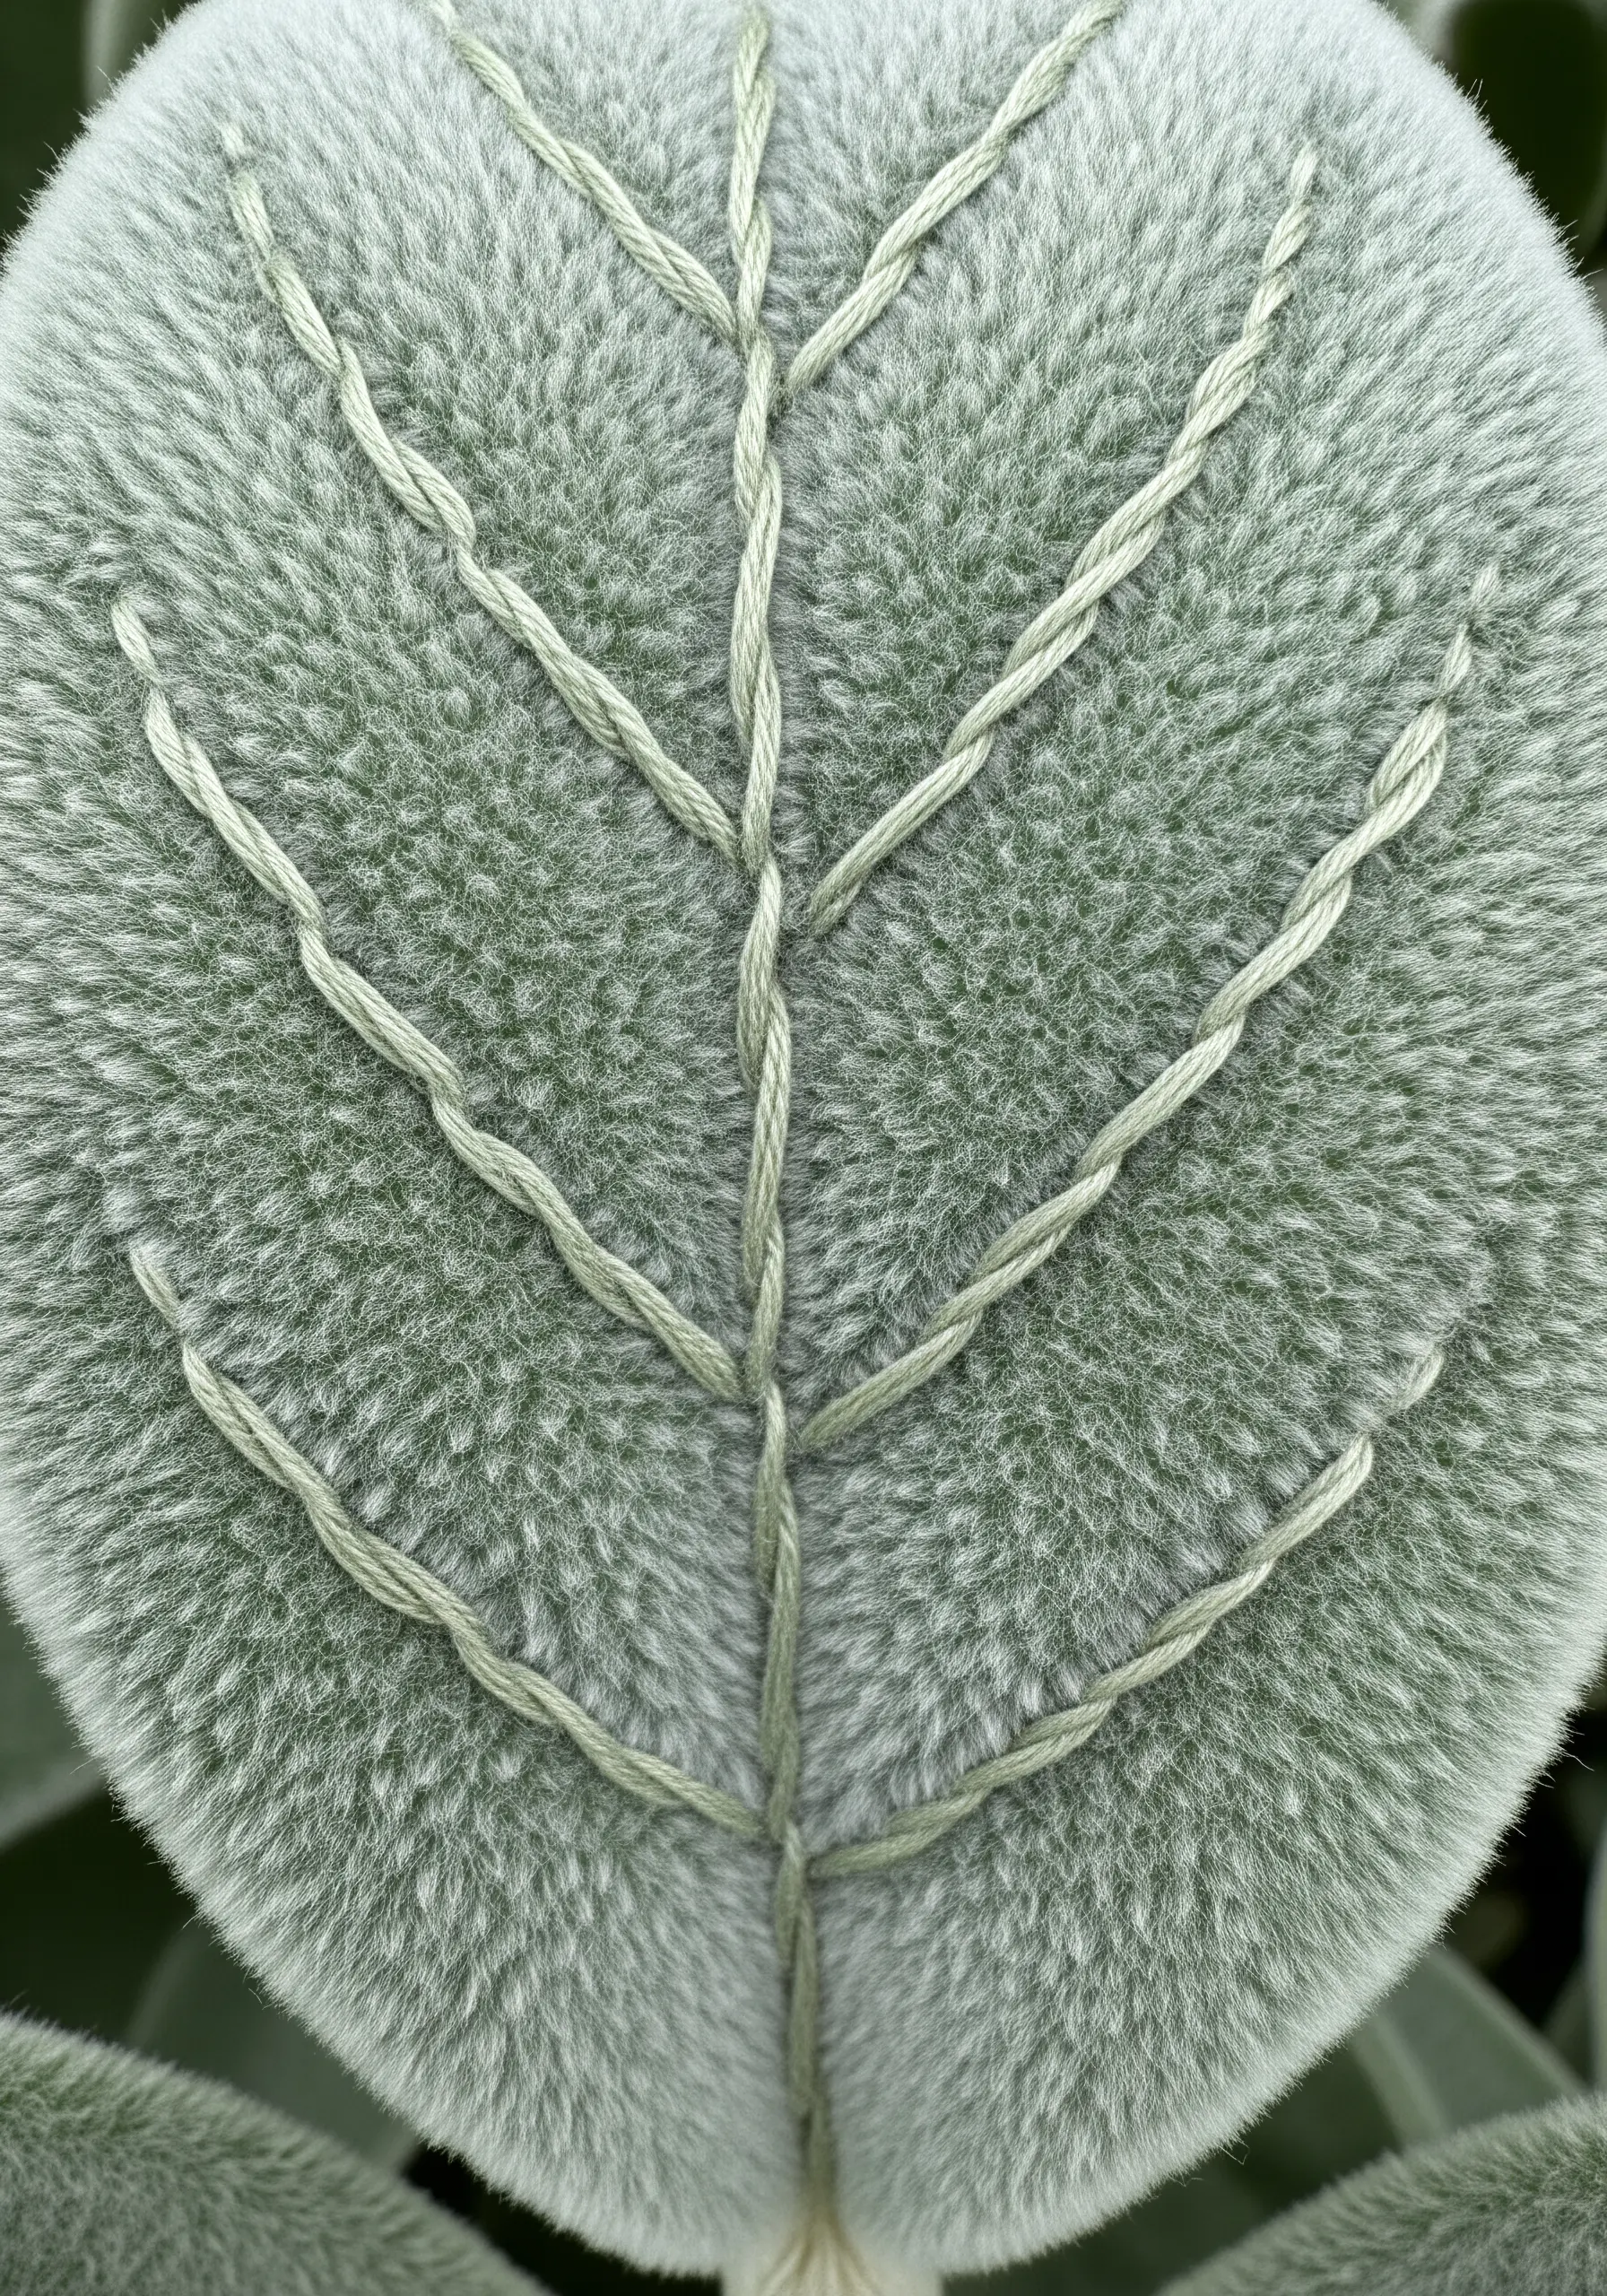
To recreate the soft, fuzzy texture of a lamb’s ear leaf, first establish your veins with a simple backstitch.
Then, whip that stitch with a lighter-colored, fuzzy thread—a single strand of merino wool or a thin chenille works perfectly.
This technique adds a raised, soft line that doesn’t just look like a velvety leaf vein, it feels like one too.
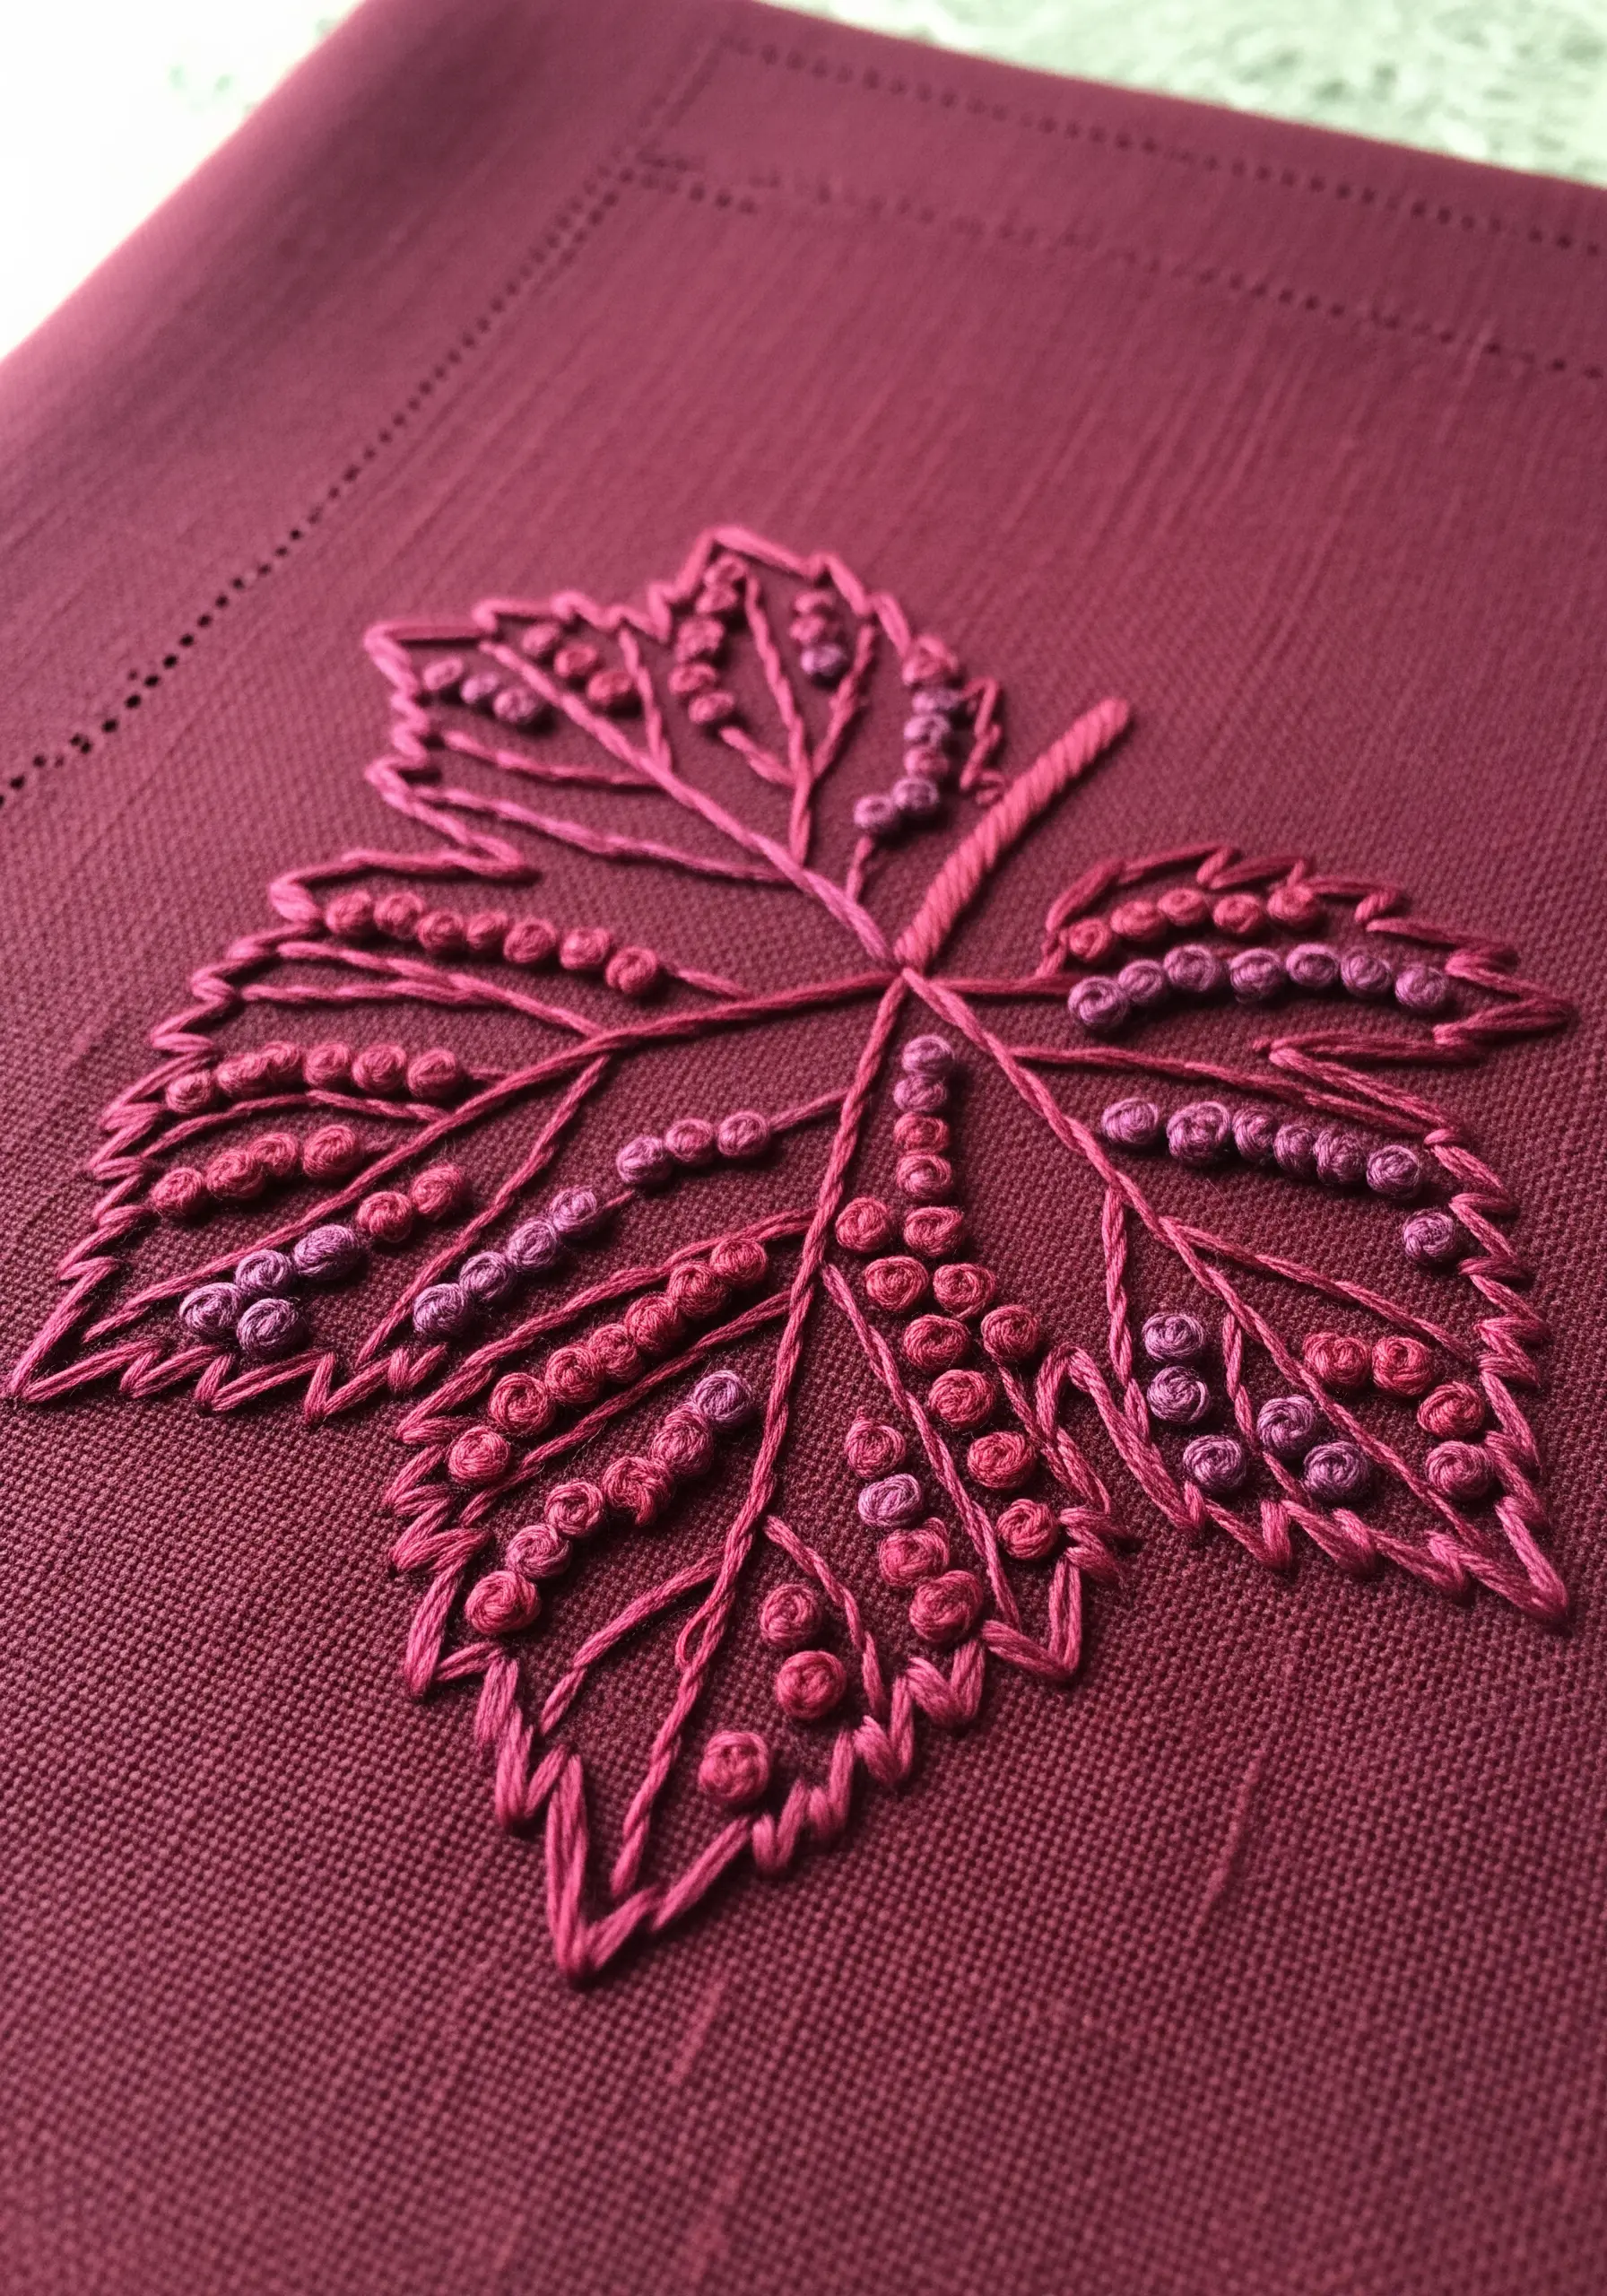
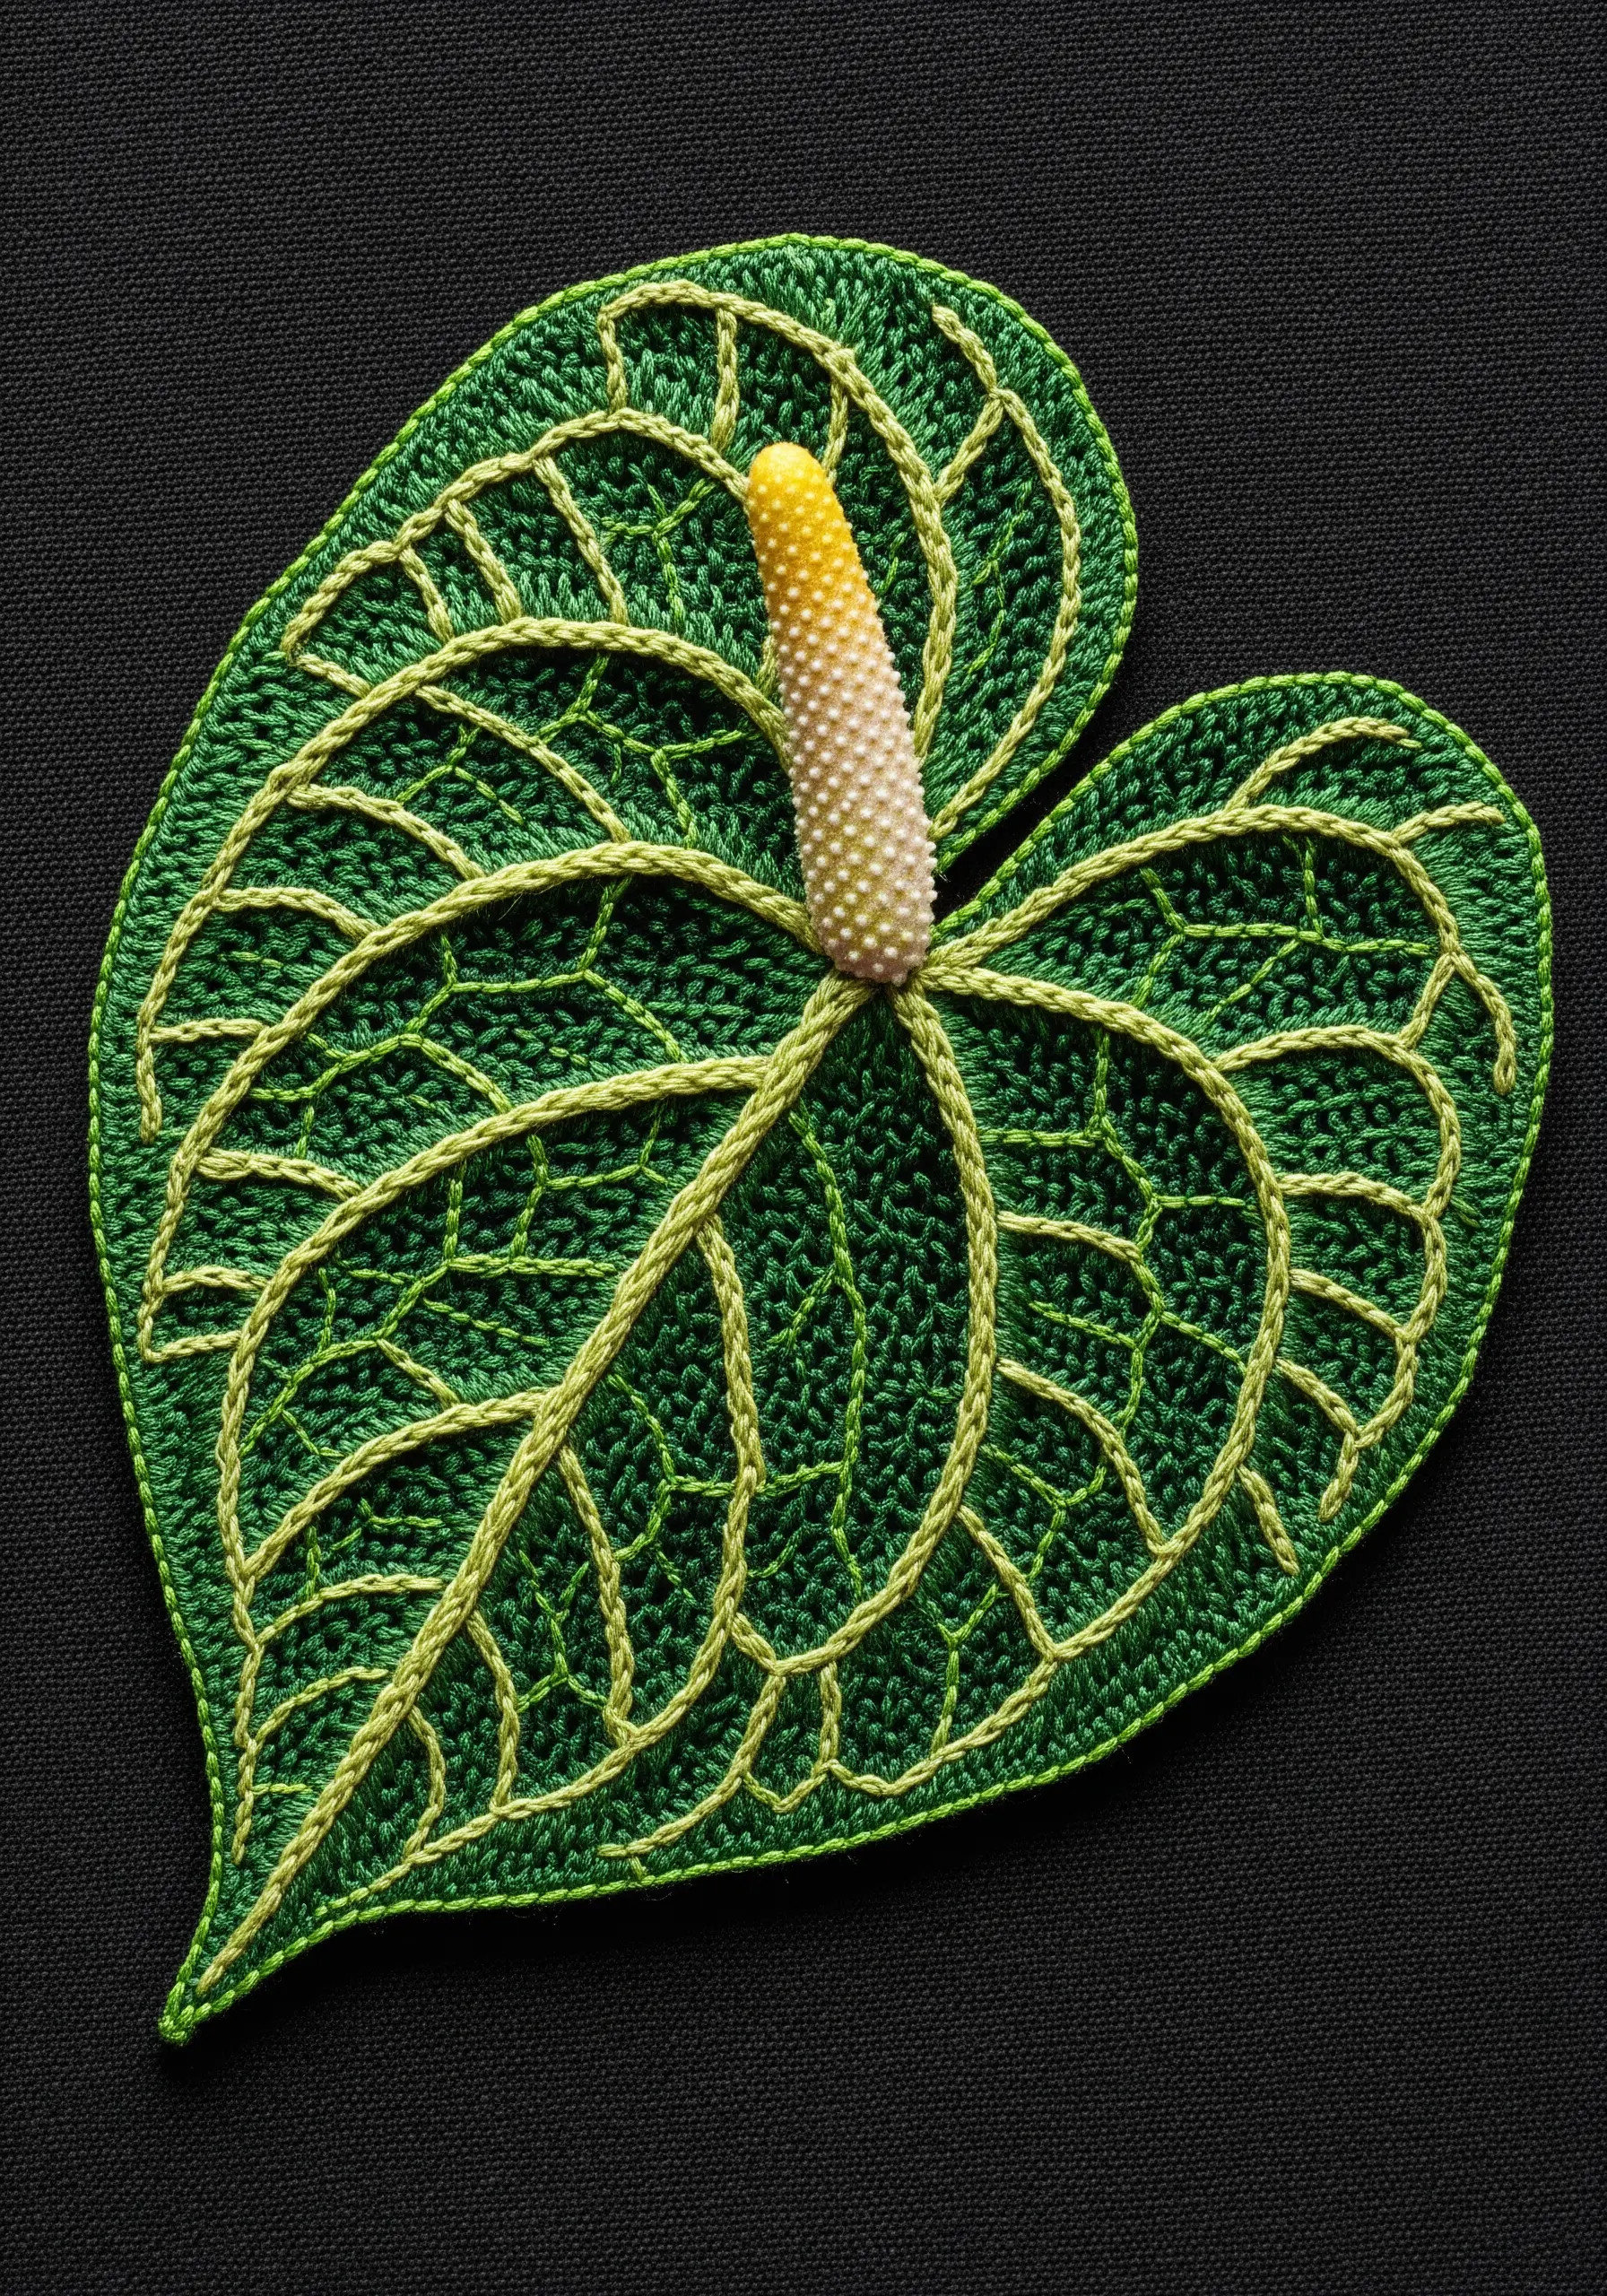
10. Elevate Veins with Couching and Beading
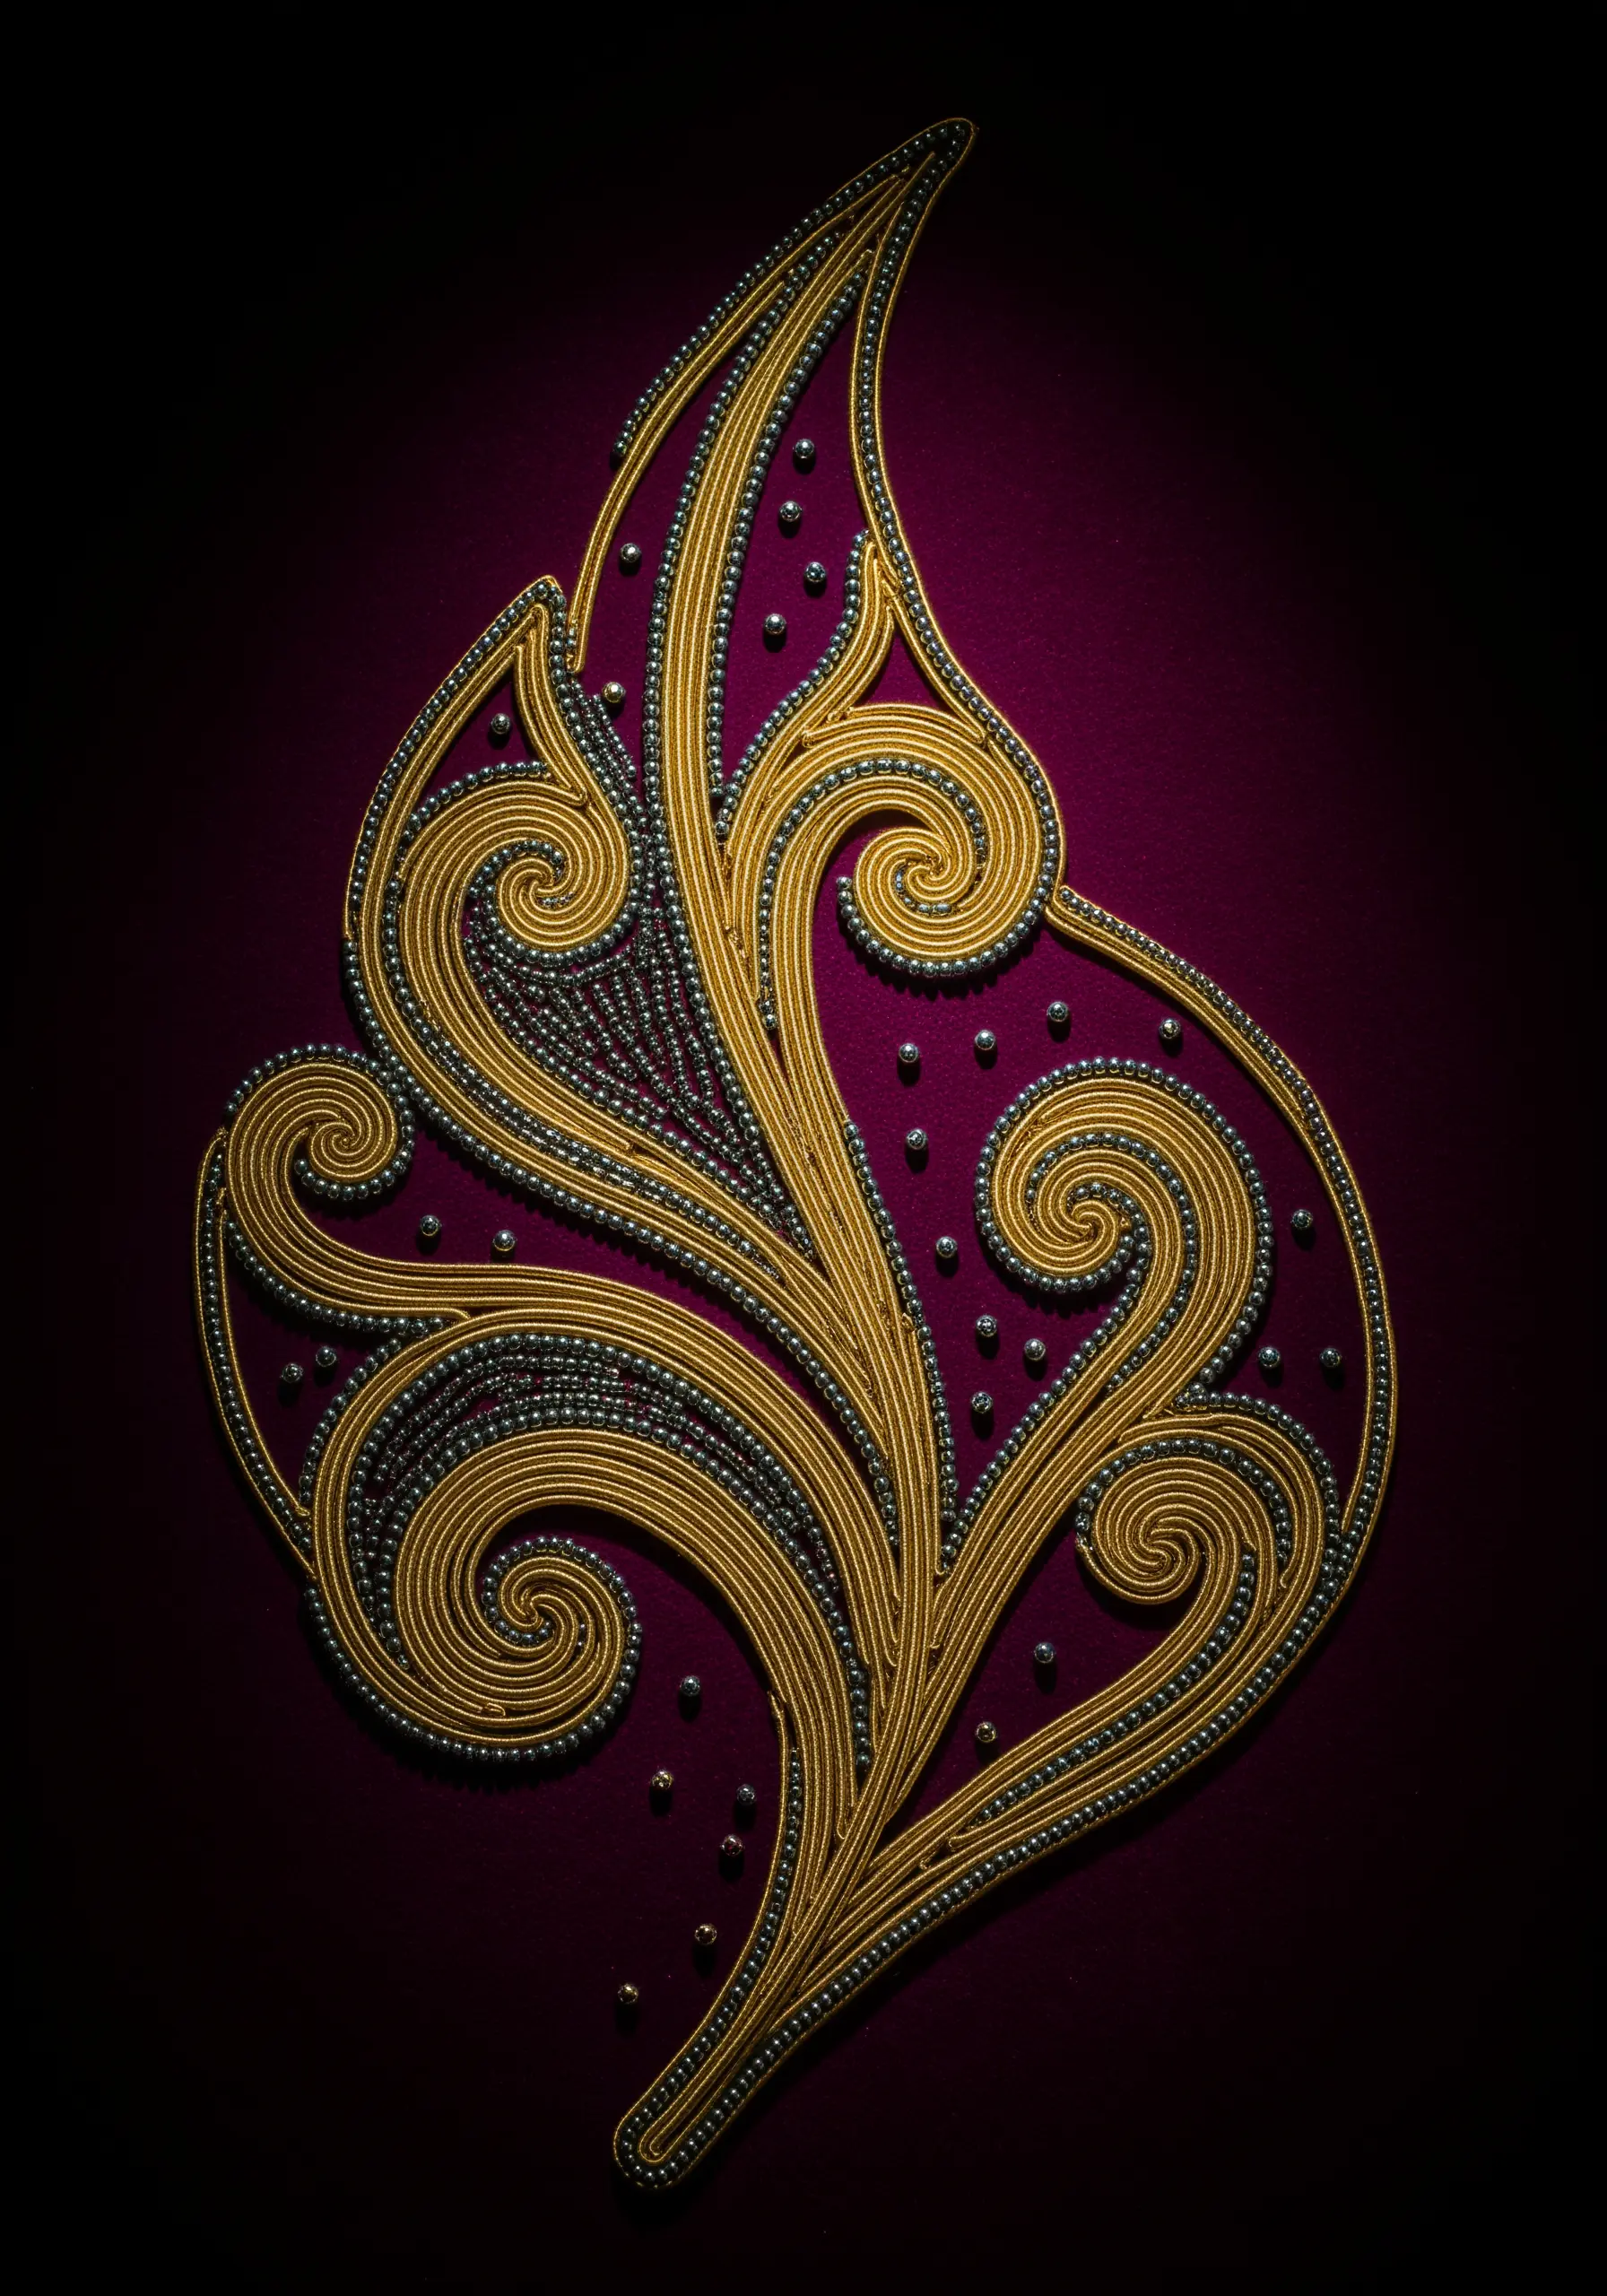
Transform your leaf veins into delicate, jewelry-like elements for a truly luxurious finish.
Lay down a metallic cord for the main veins and couch it in place with a fine, matching thread.
Then, amplify the elegance by outlining these couched lines with tiny, glimmering seed beads.
This combination of materials creates unparalleled texture and is ideal for statement gold thread luxury wall art.
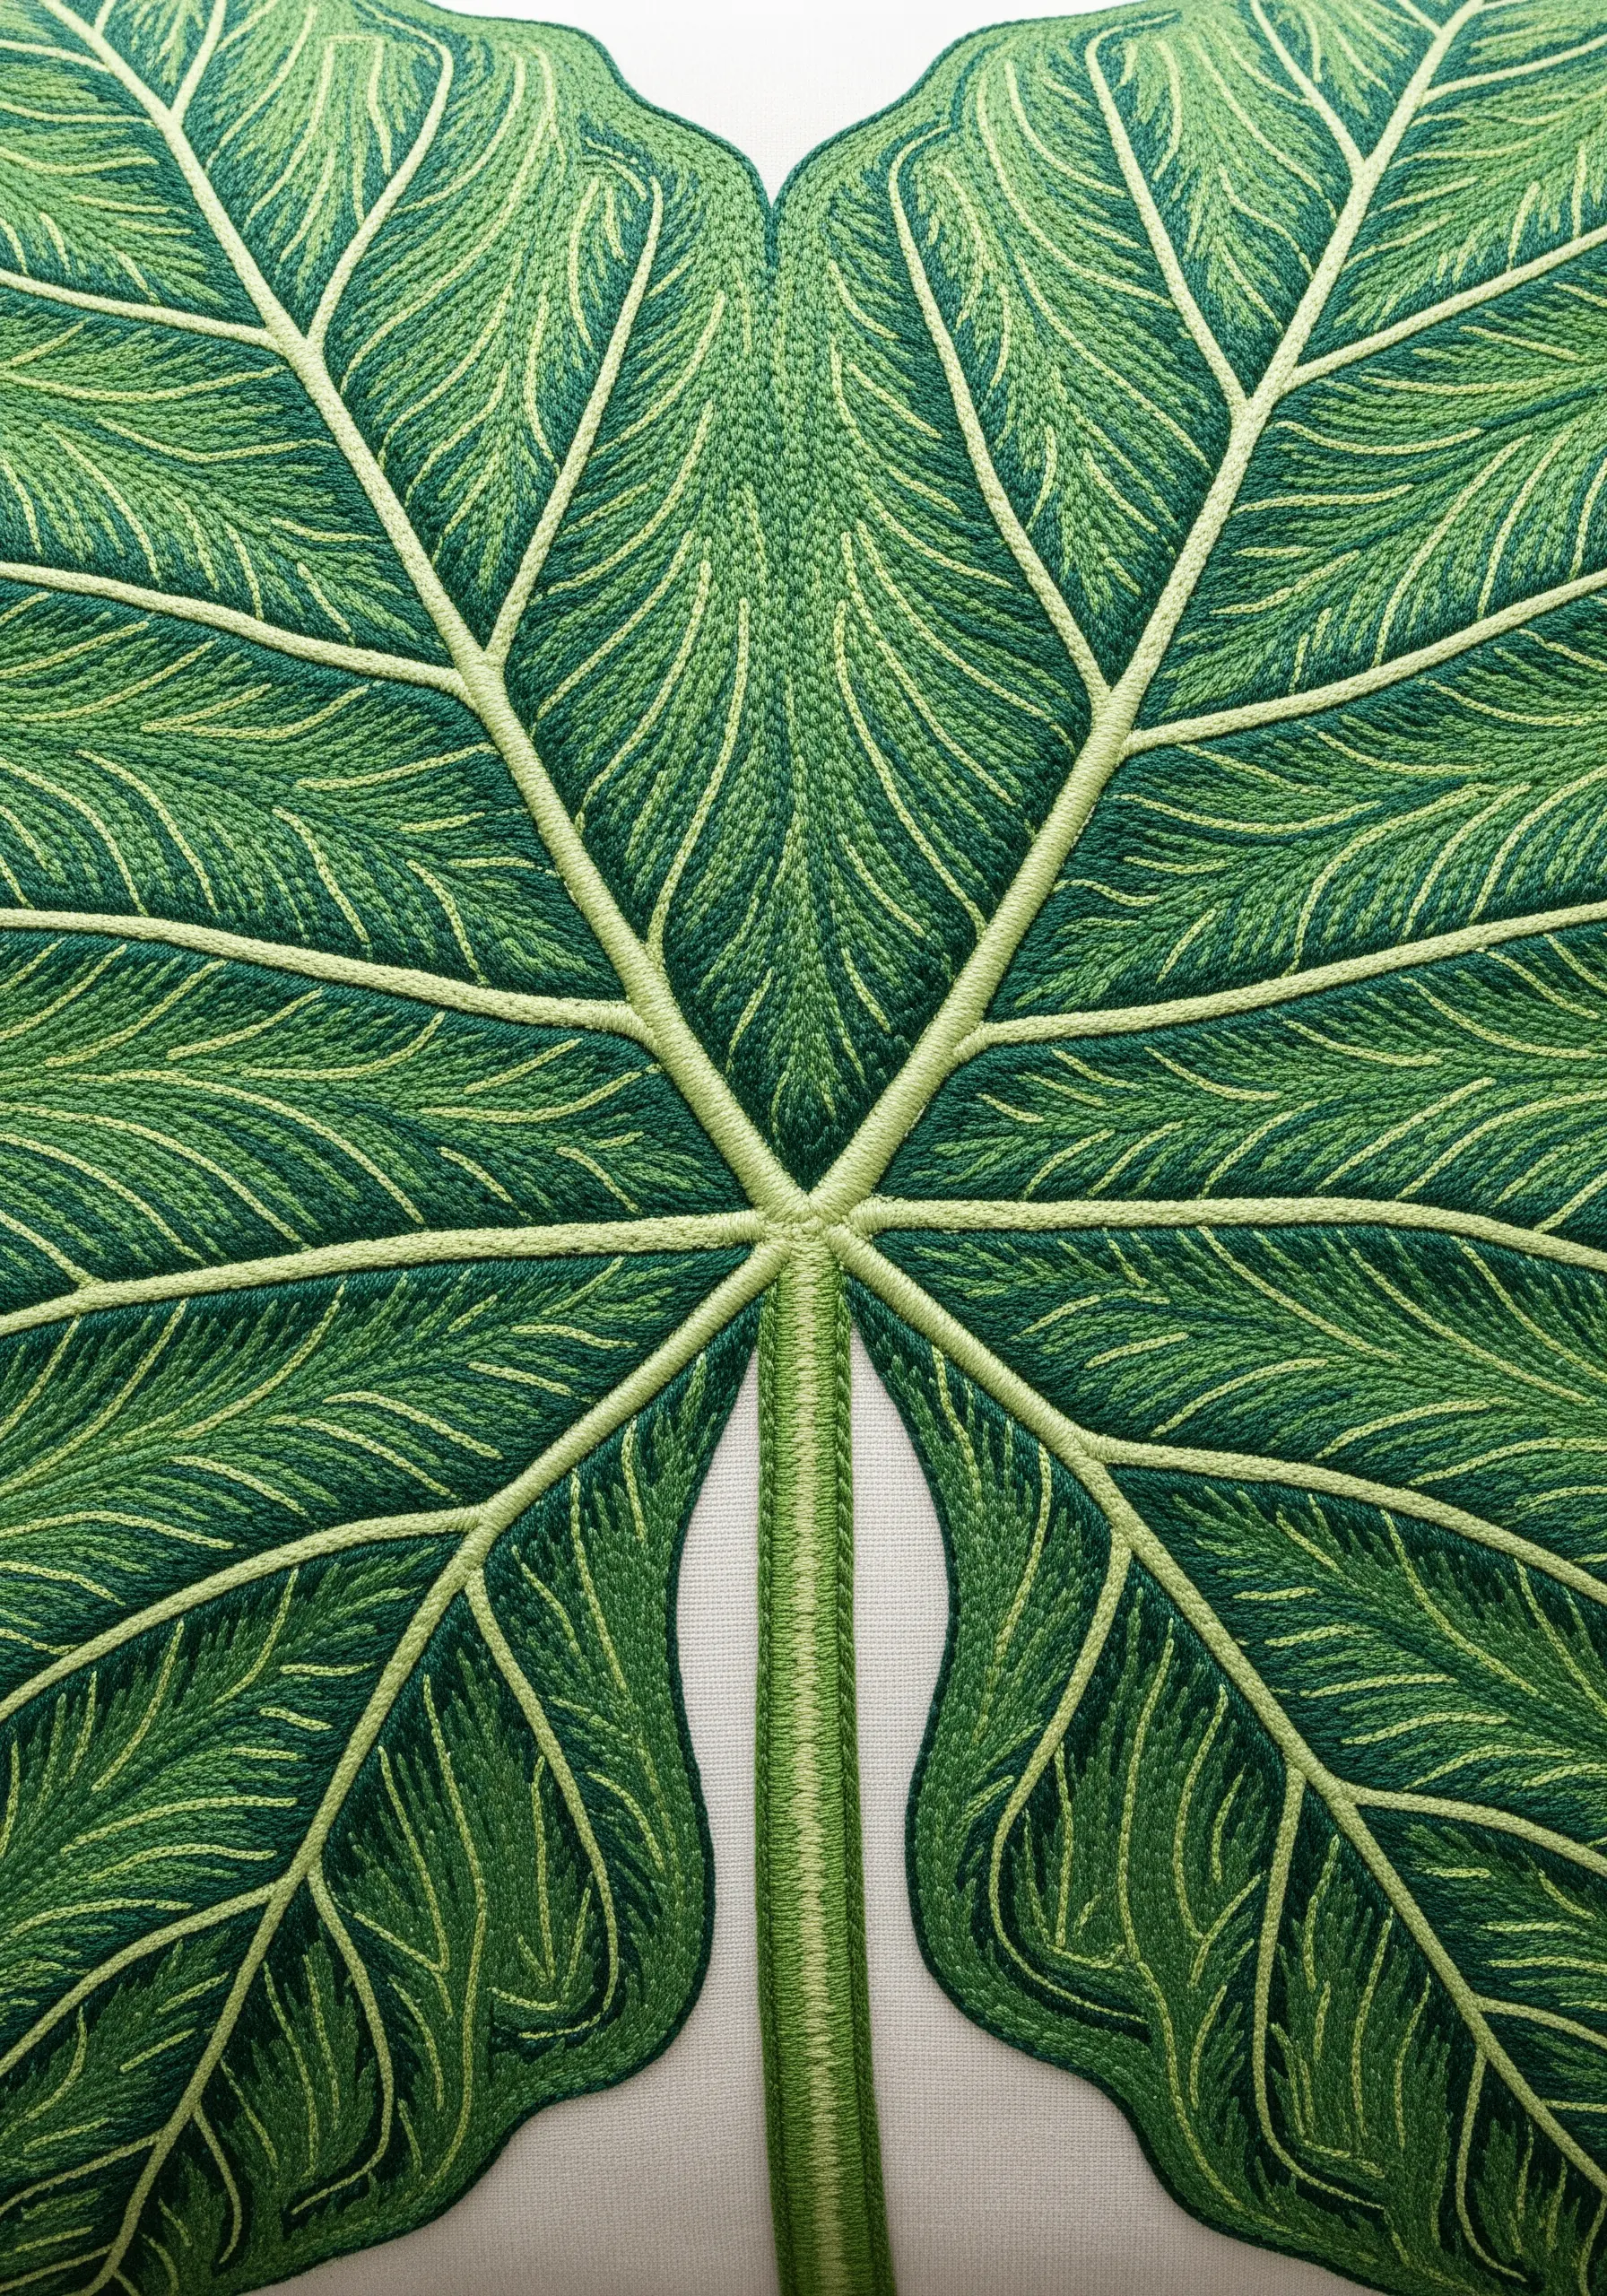
11. Add Realism with Finely Stitched Vein Overlays
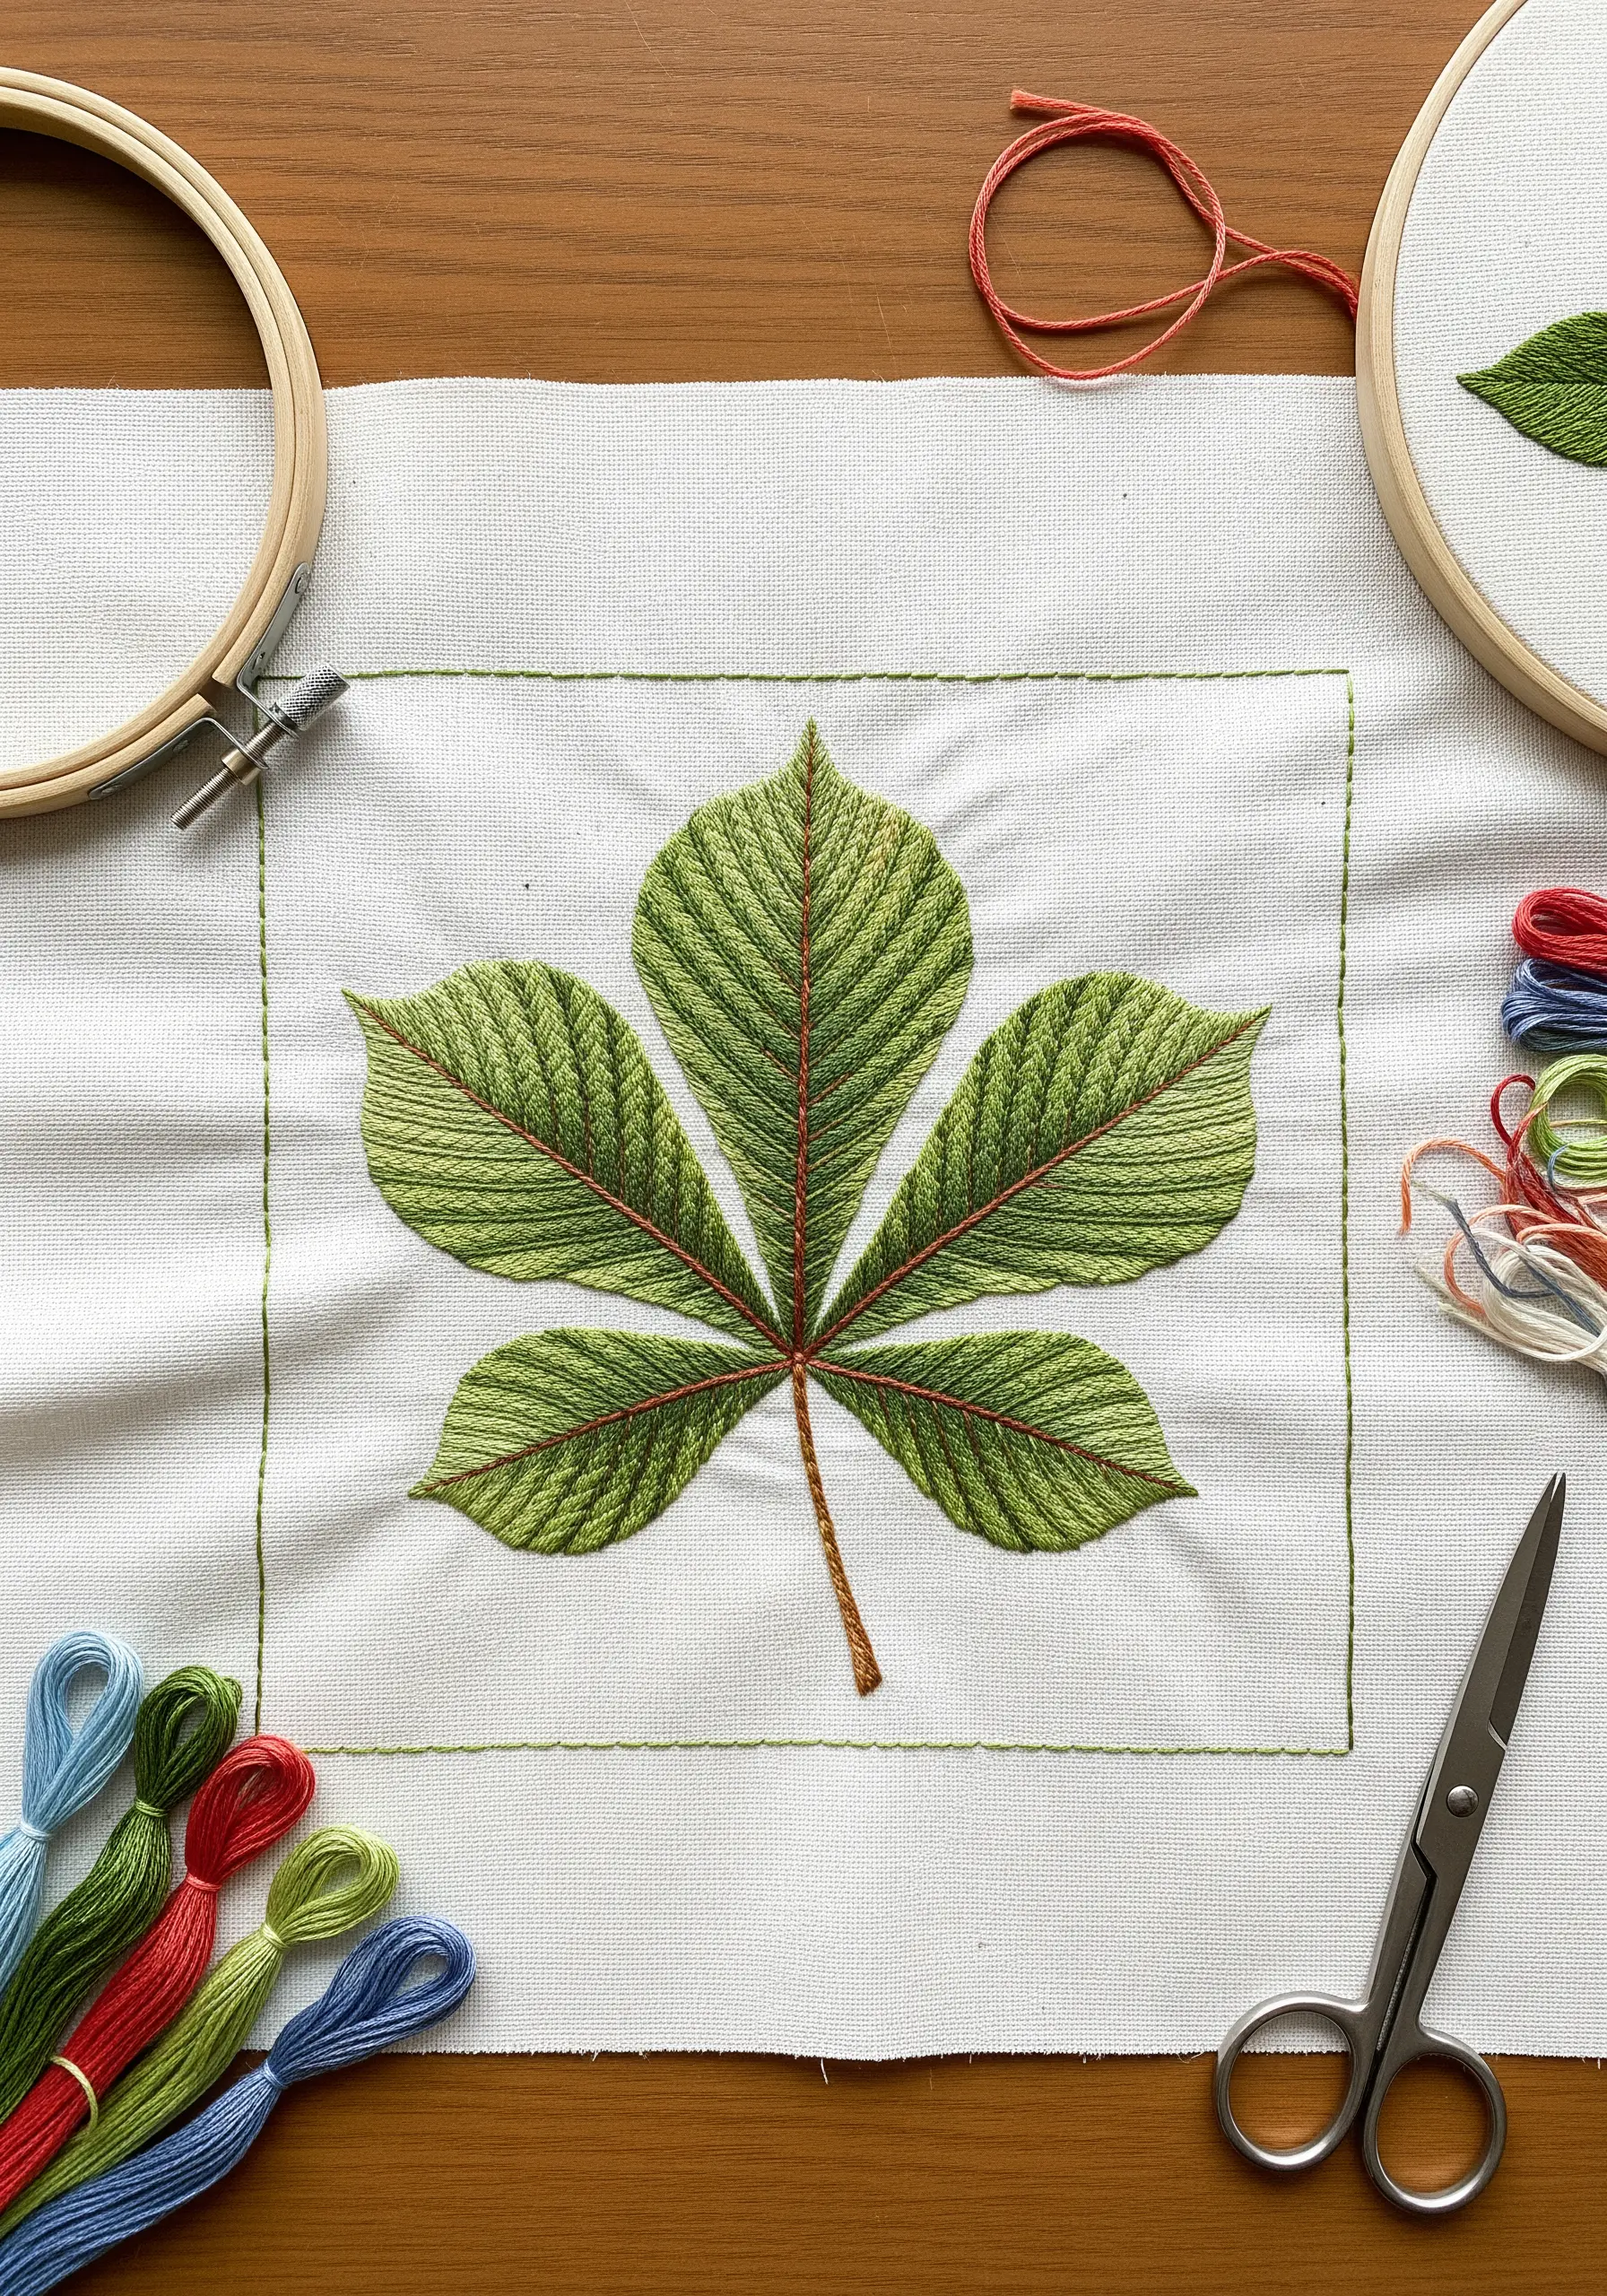
For a highly realistic, thread-painted effect, focus on layering.
First, complete the entire leaf fill using a single strand and long-and-short stitch to blend your greens.
Once the base is complete, stitch the veins directly on top using a slightly contrasting shade and a simple backstitch.
This subtle addition of veins over the blended colors gives the leaf incredible depth and a true-to-life quality.
12. Use Padded Satin Stitch for Sculptural Veins
To make your leaf veins dramatically pop from the fabric, give them a padded foundation.
First, stitch the vein lines with several parallel rows of backstitch or chain stitch to build up a raised area.
Then, cover this padding with a smooth satin stitch using a high-sheen thread, like rayon or silk.
The result is a glossy, raised vein that is beautifully sculptural and tactile.
13. Expose Veins with Reverse Appliqué
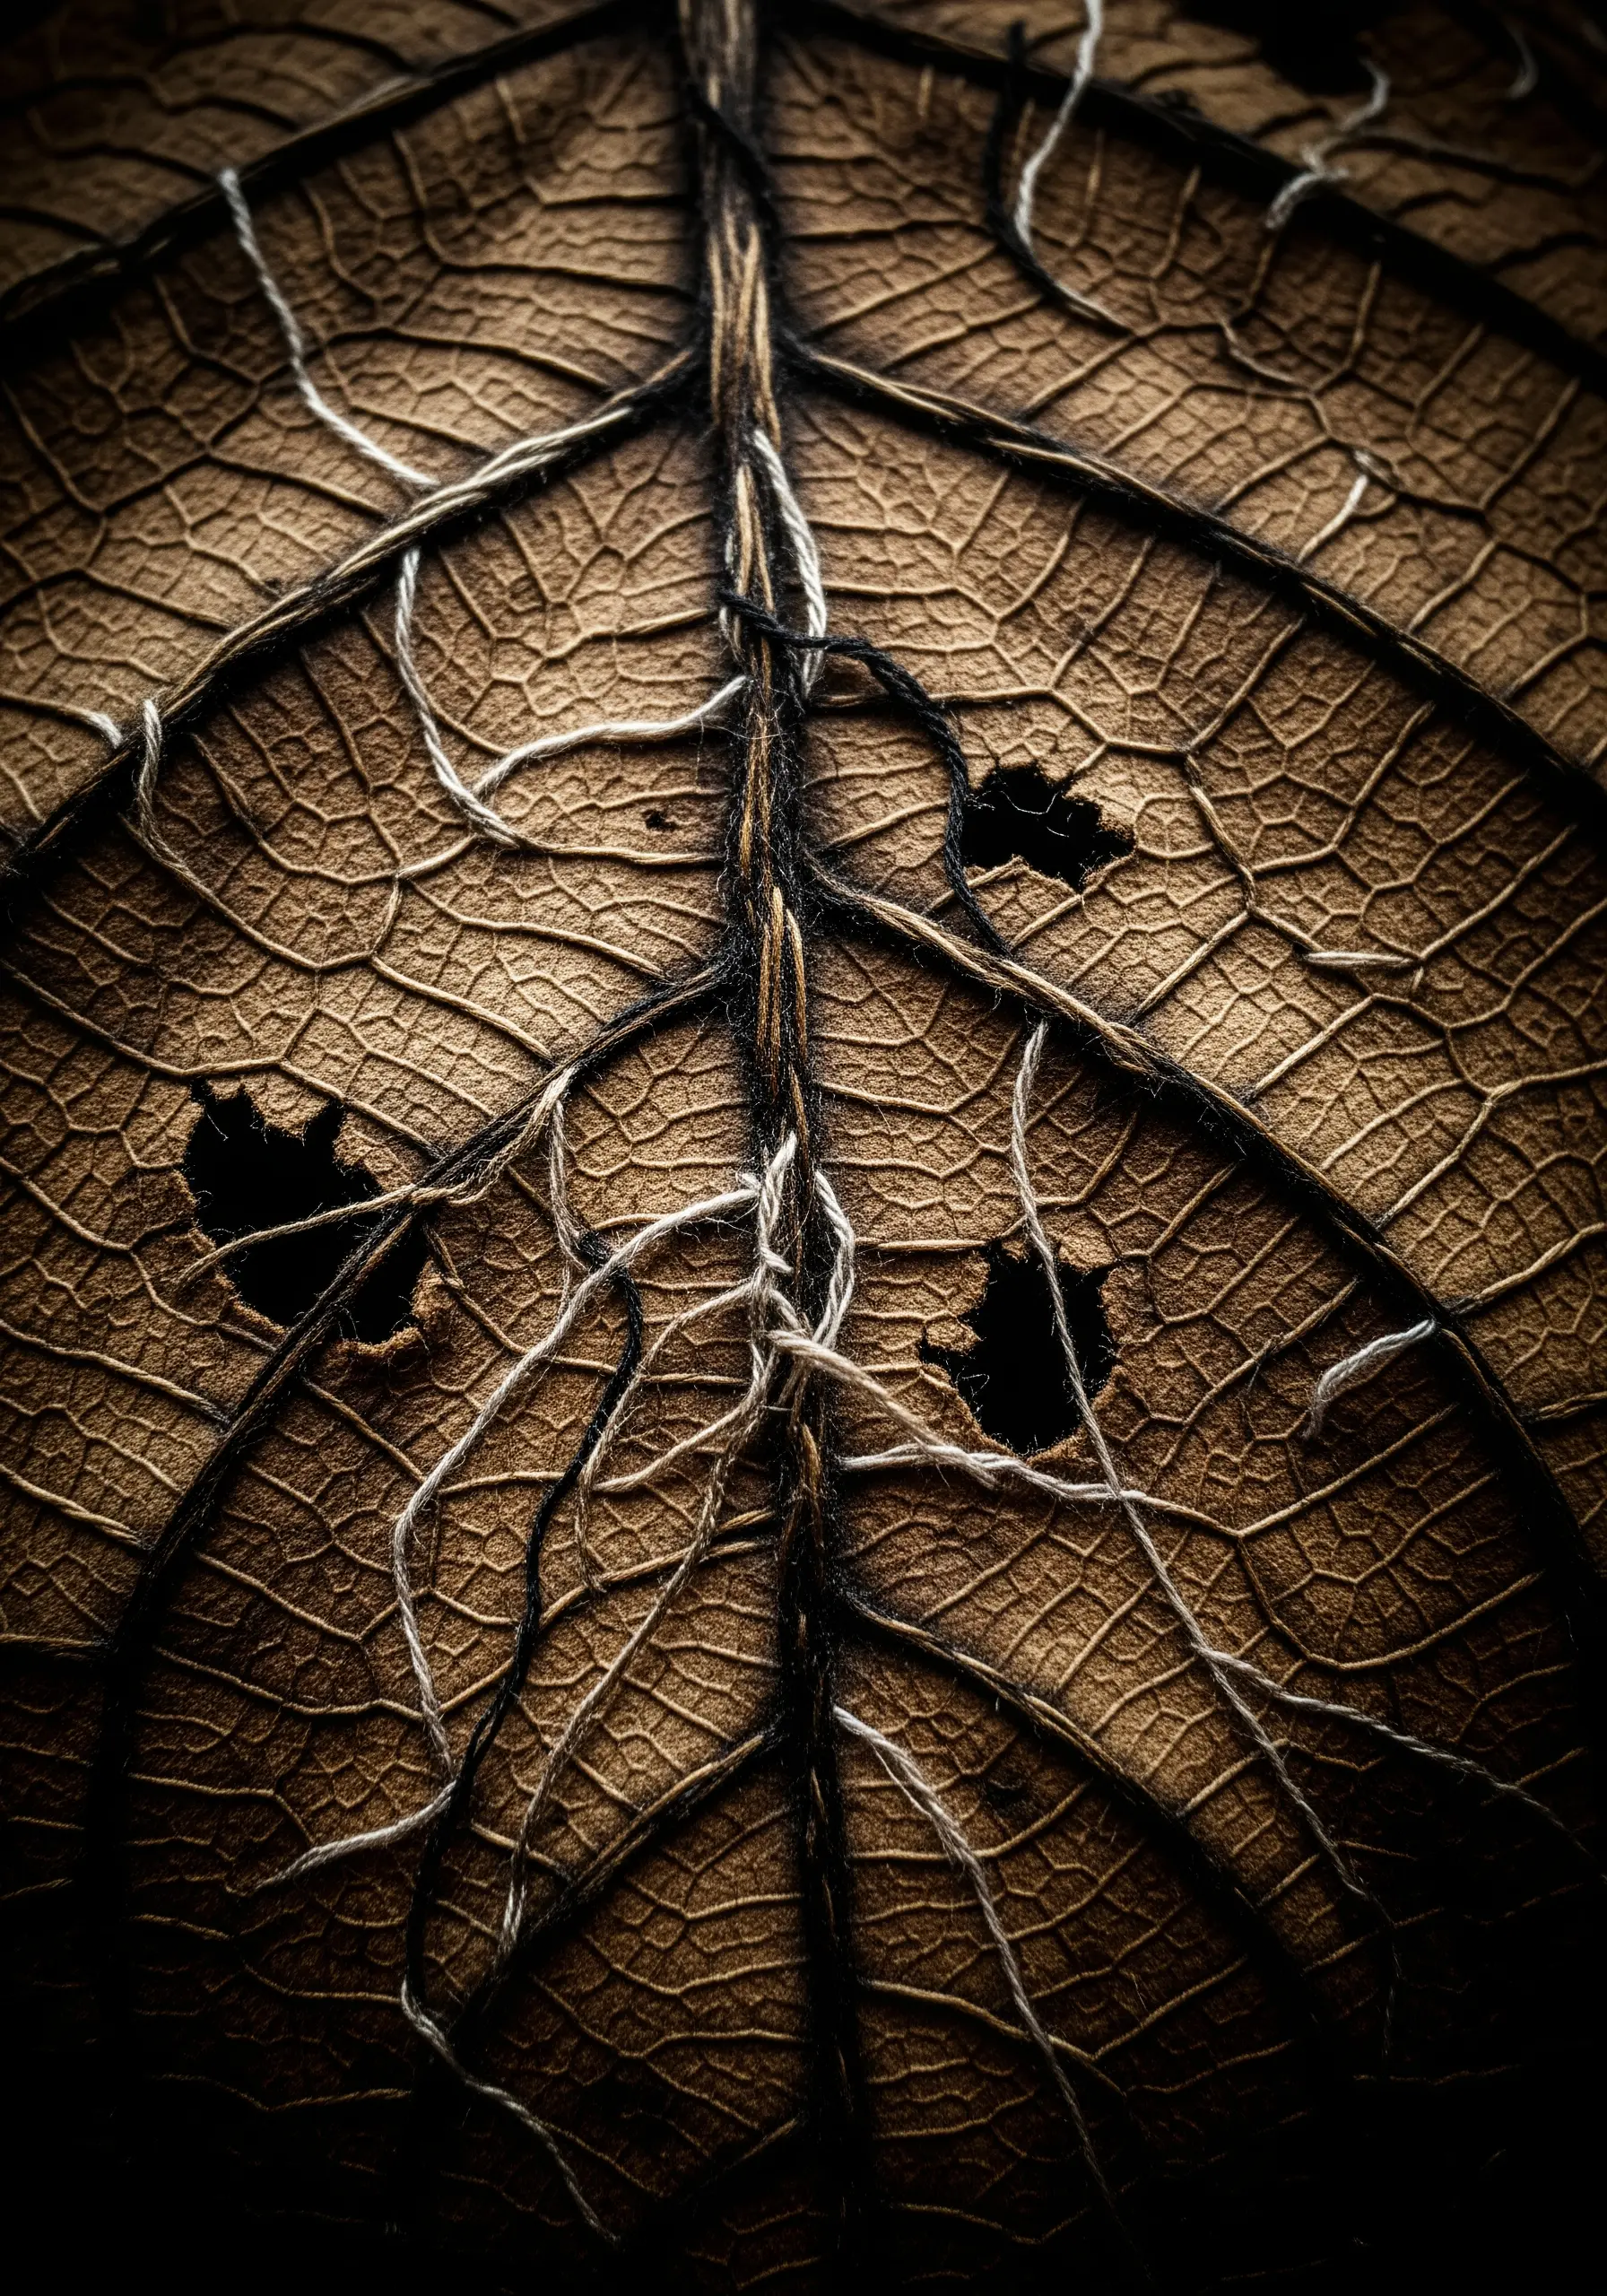
Create the delicate look of a decaying leaf by cutting away sections of your fabric.
First, stitch the main vein structure onto your top fabric, then layer a darker, contrasting fabric underneath.
Carefully snip away small sections of the top layer between the stitched veins to reveal the dark fabric below.
This reverse appliqué technique adds profound depth and a compelling narrative to your piece.
14. Weave a Celestial Story into Your Leaves
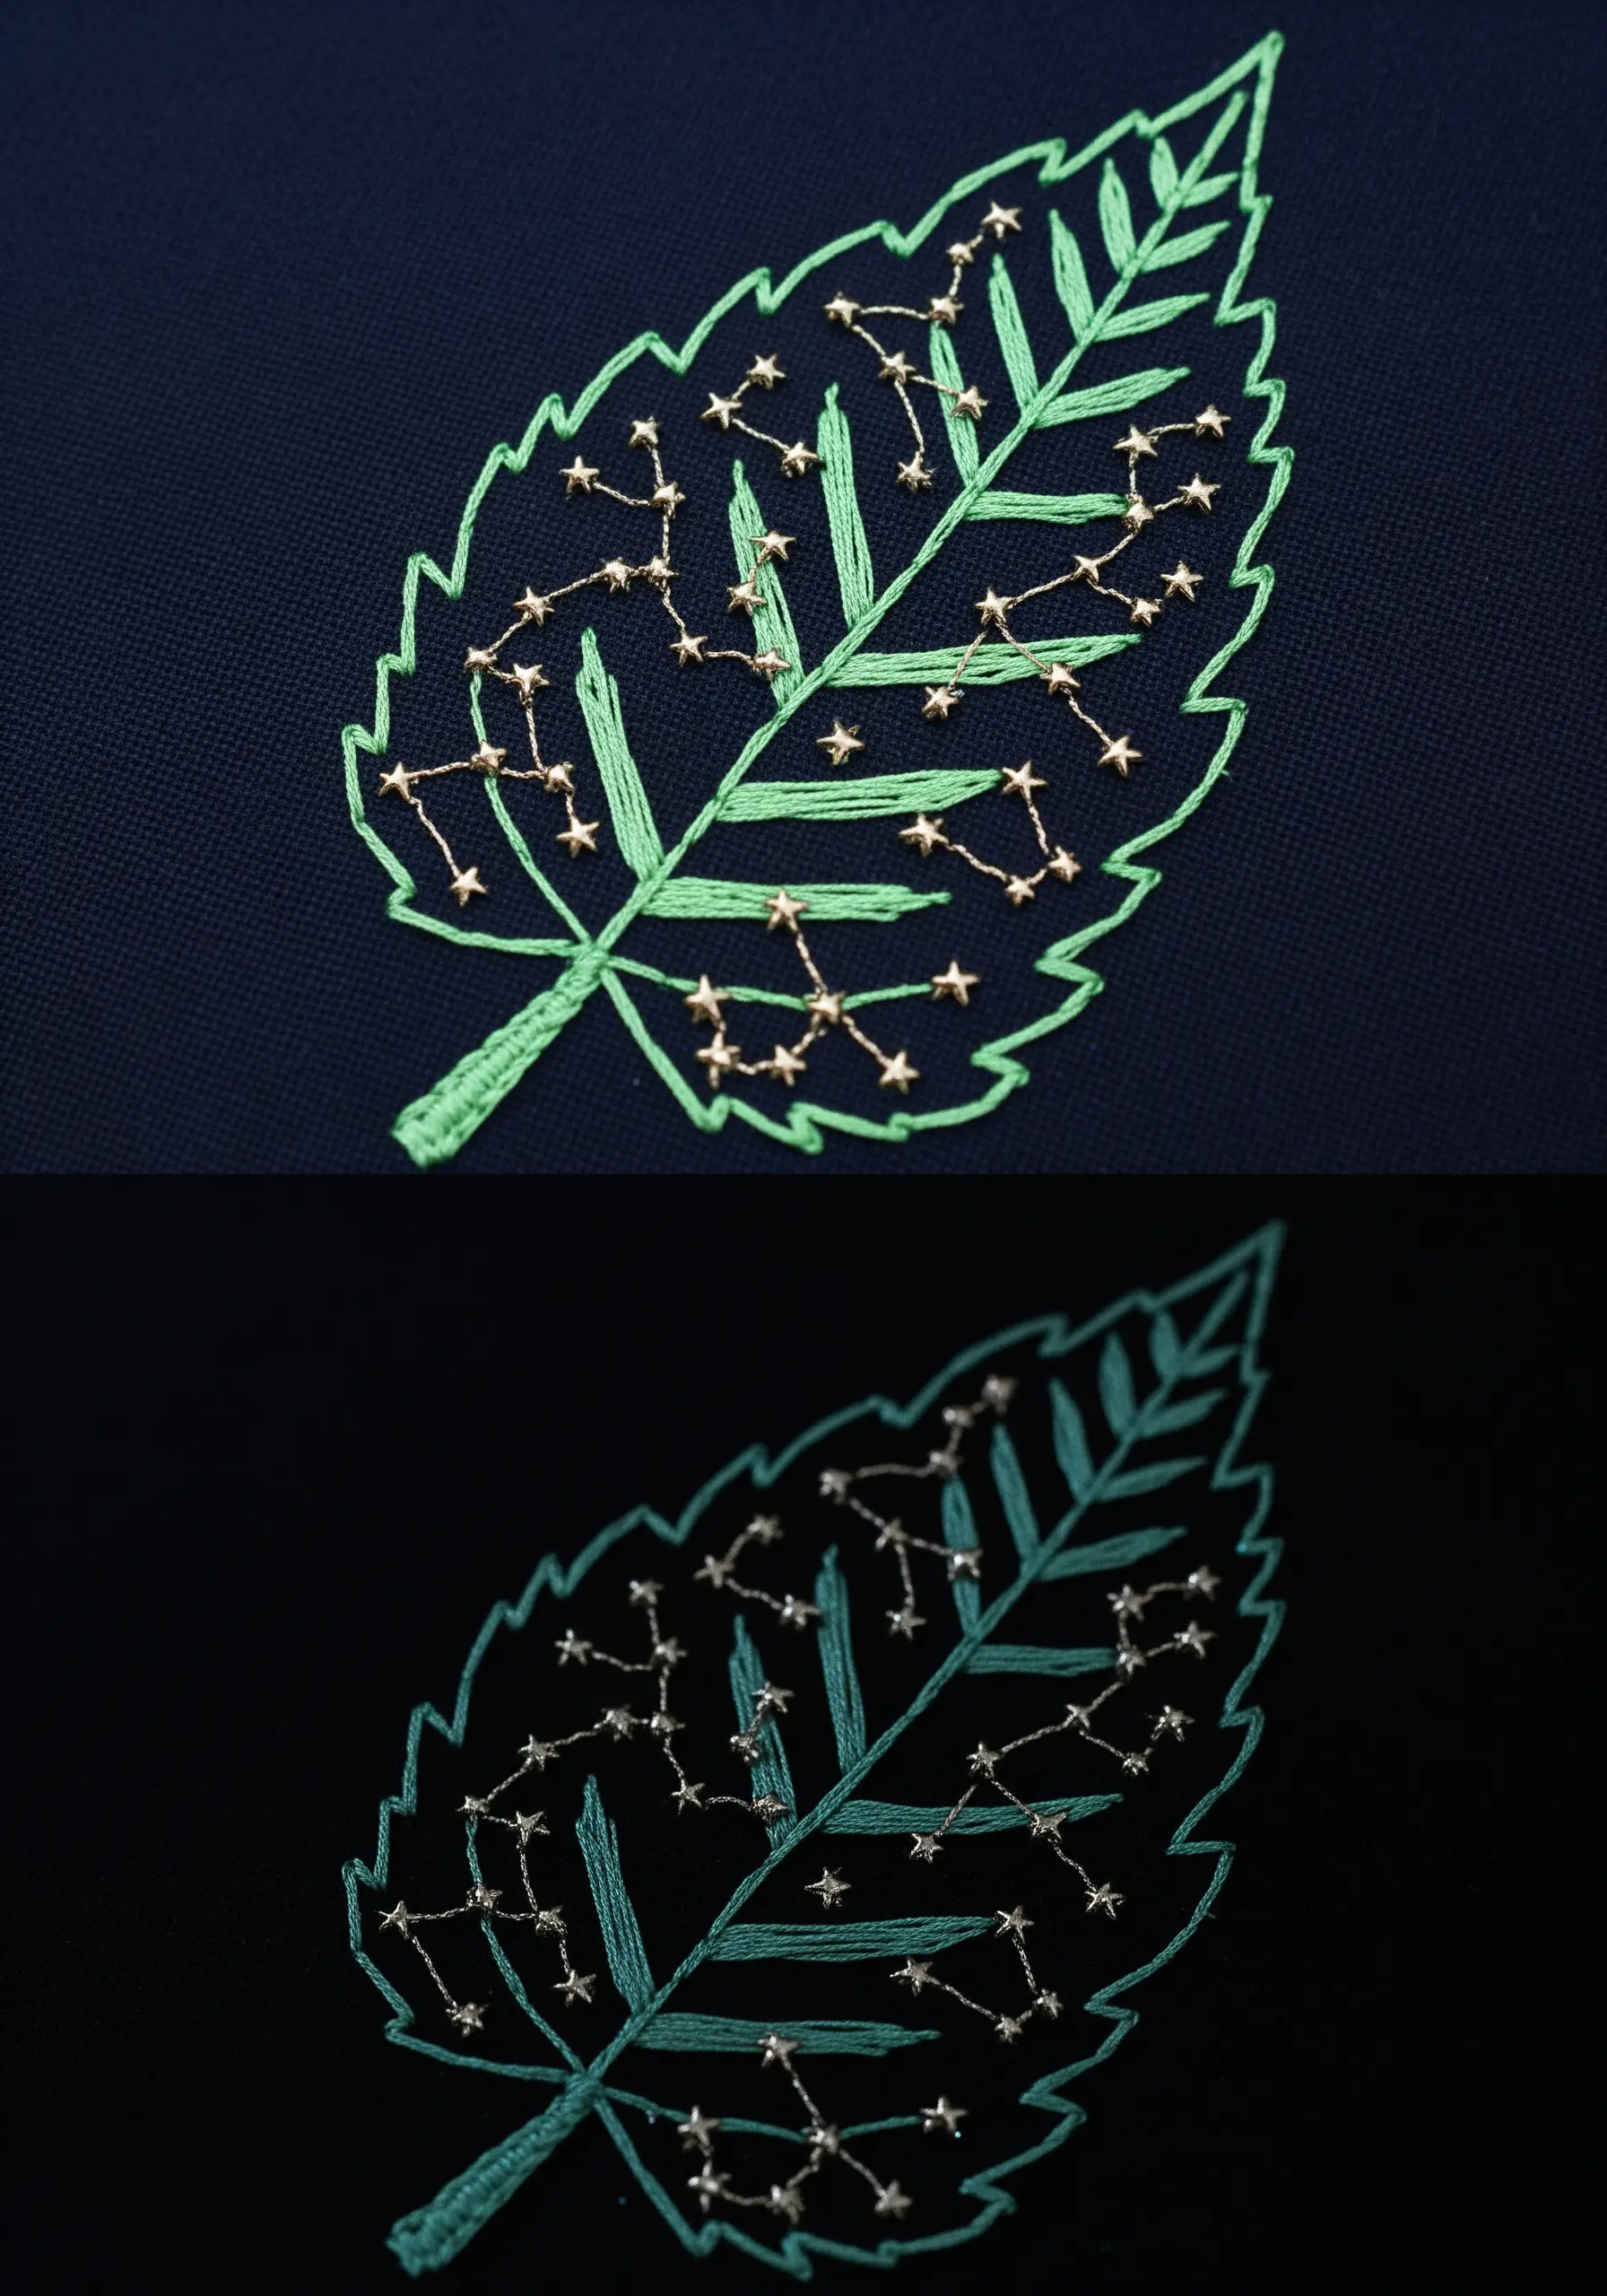
Reimagine leaf veins as celestial maps for a touch of magical realism.
Use a simple backstitch for the main veins, then add constellations within the leaf sections using tiny star-shaped beads or metallic French knots.
Connect them with a single strand of glow-in-the-dark or metallic thread to transform a botanical element into a piece of whimsical, dreamy nature-inspired art.
15. Suggest Veins with Minimalist Geometric Lines
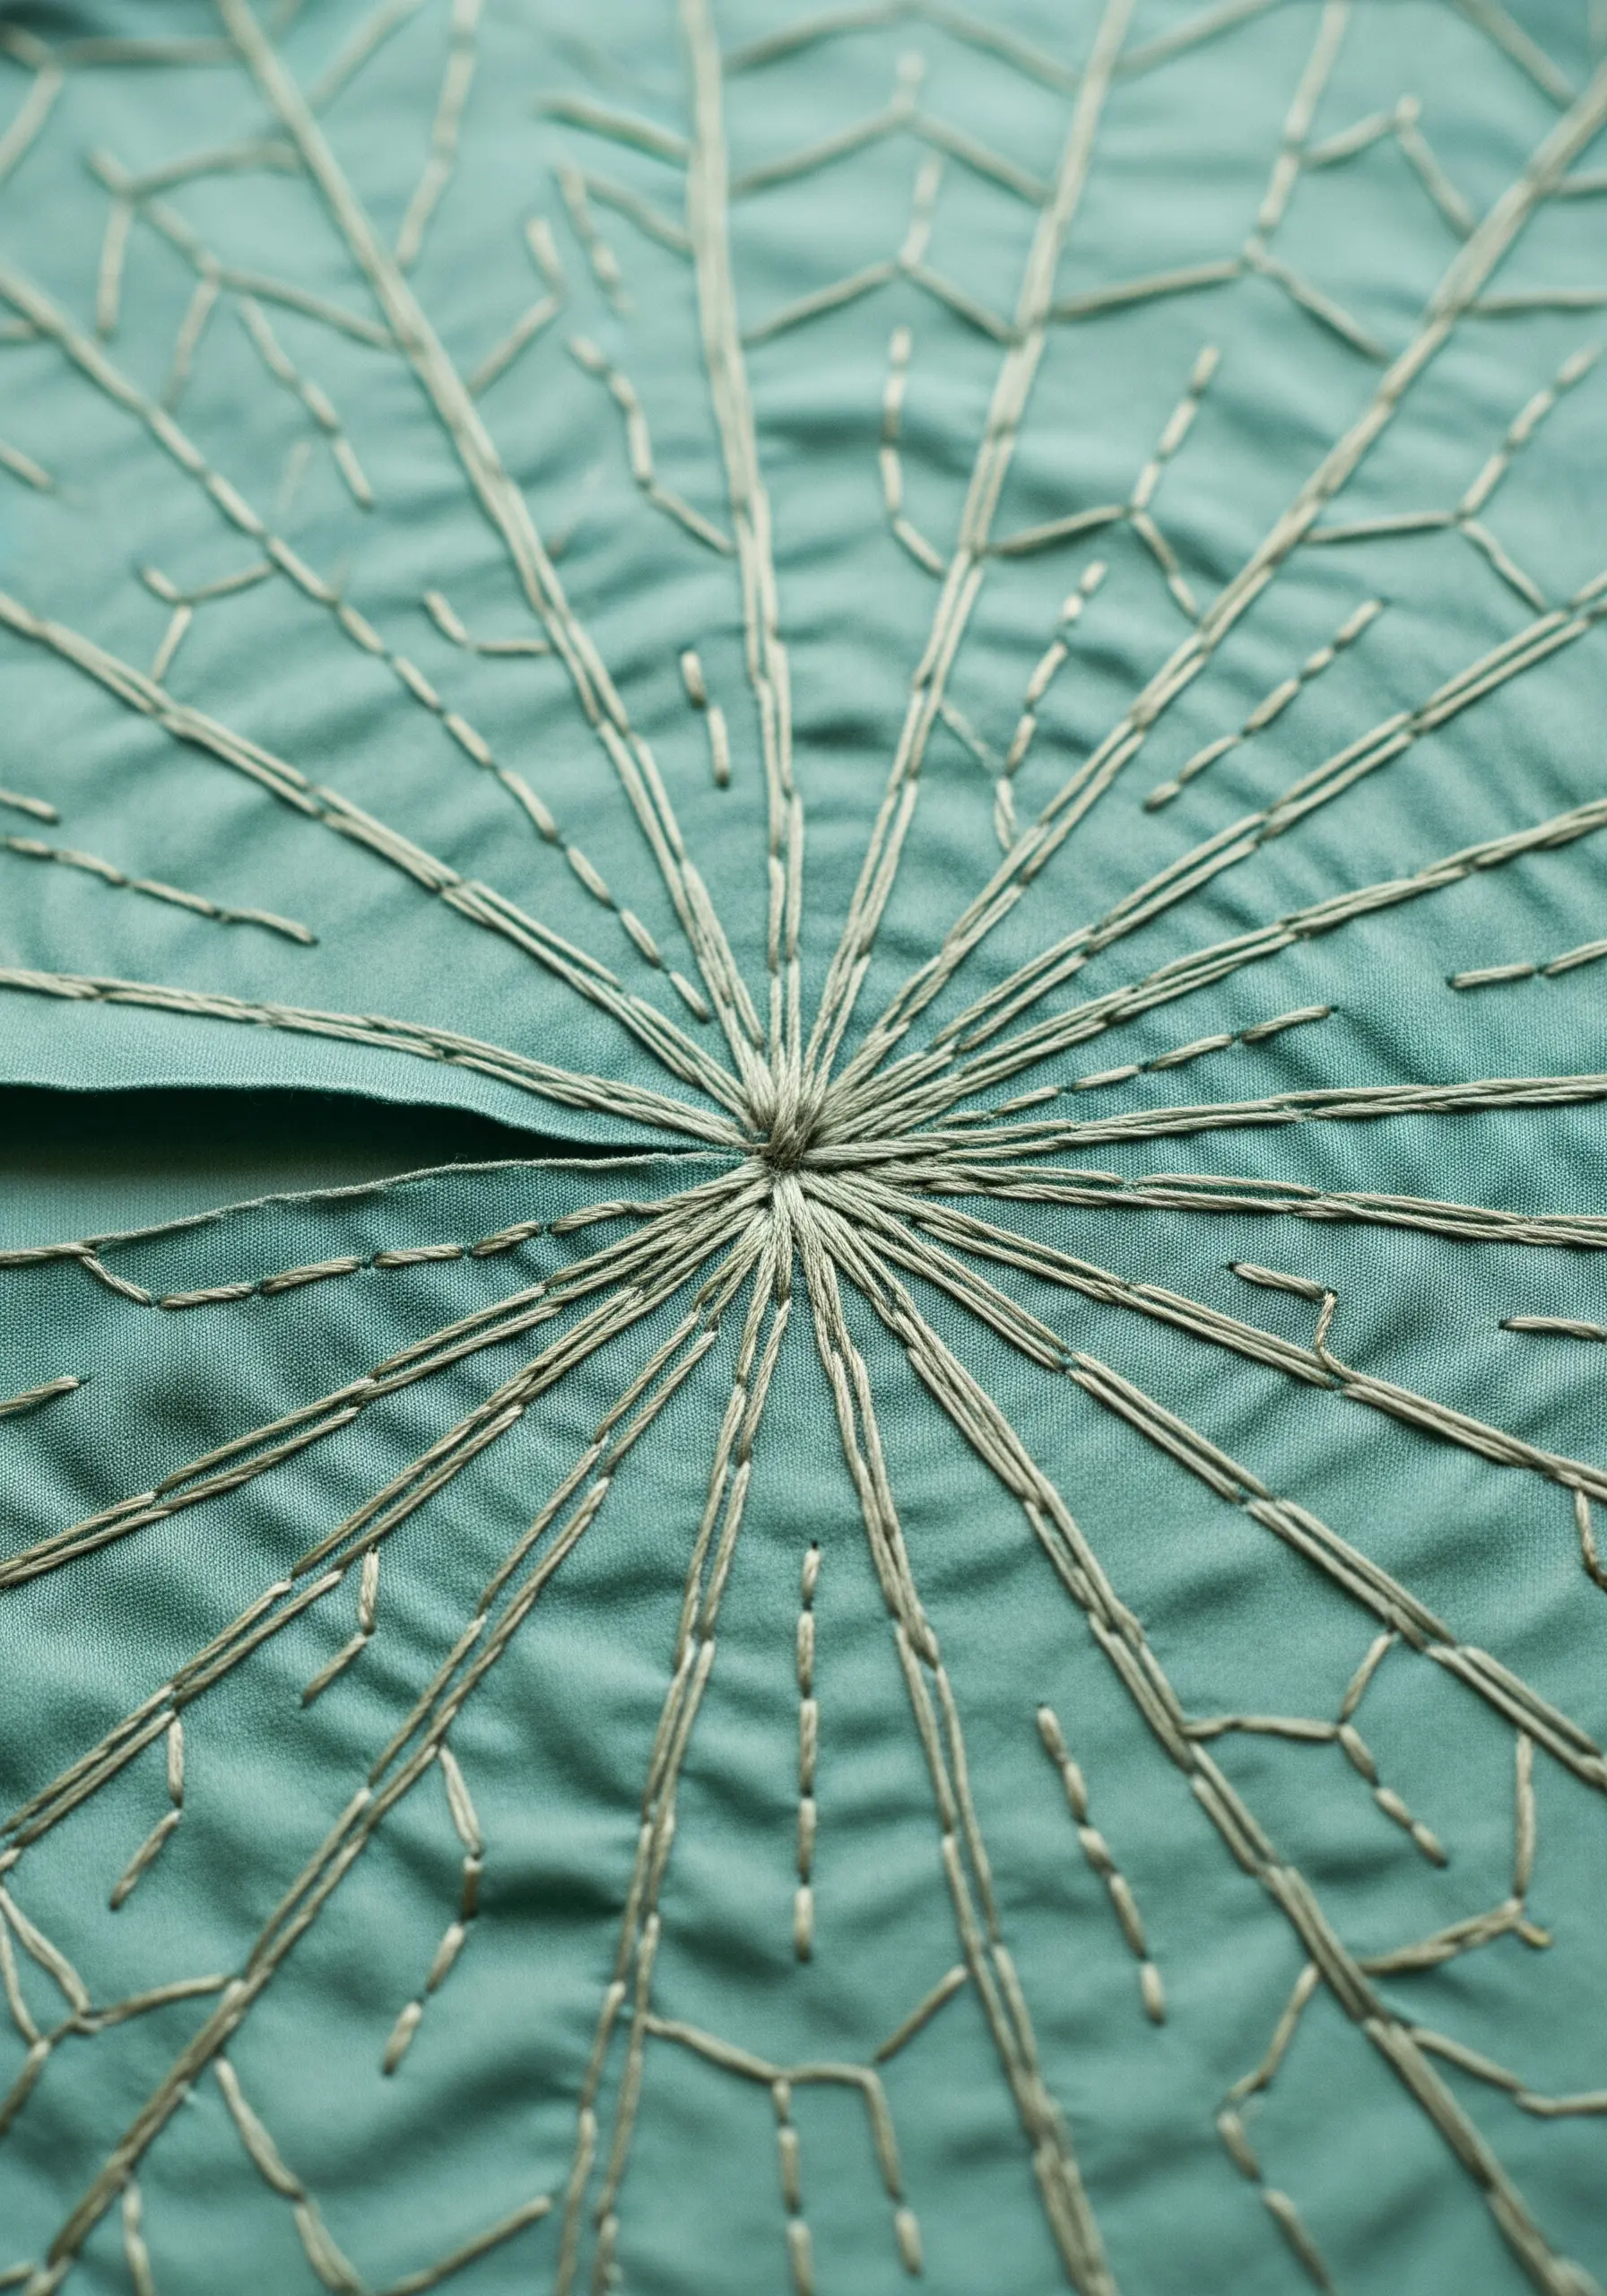
You don’t always need to stitch a full leaf shape to evoke its presence.
Imply the structure with a network of long, radiating straight stitches that map out the vein pattern.
This abstract approach focuses purely on the geometry of the leaf, creating a fast, modern look that is perfect for geometric embroidered wall decor and other home accents.
16. Create Ethereal Veins on Sheer Organza
Stitching on a sheer fabric like organza creates a breathtaking, floating effect.
Use a single strand of thread to backstitch the delicate vein structure of a leaf.
When held to the light, the leaf appears suspended in air, delicate and weightless.
For best results, stabilize the organza in the hoop with a layer of water-soluble stabilizer, which you’ll wash away after stitching.
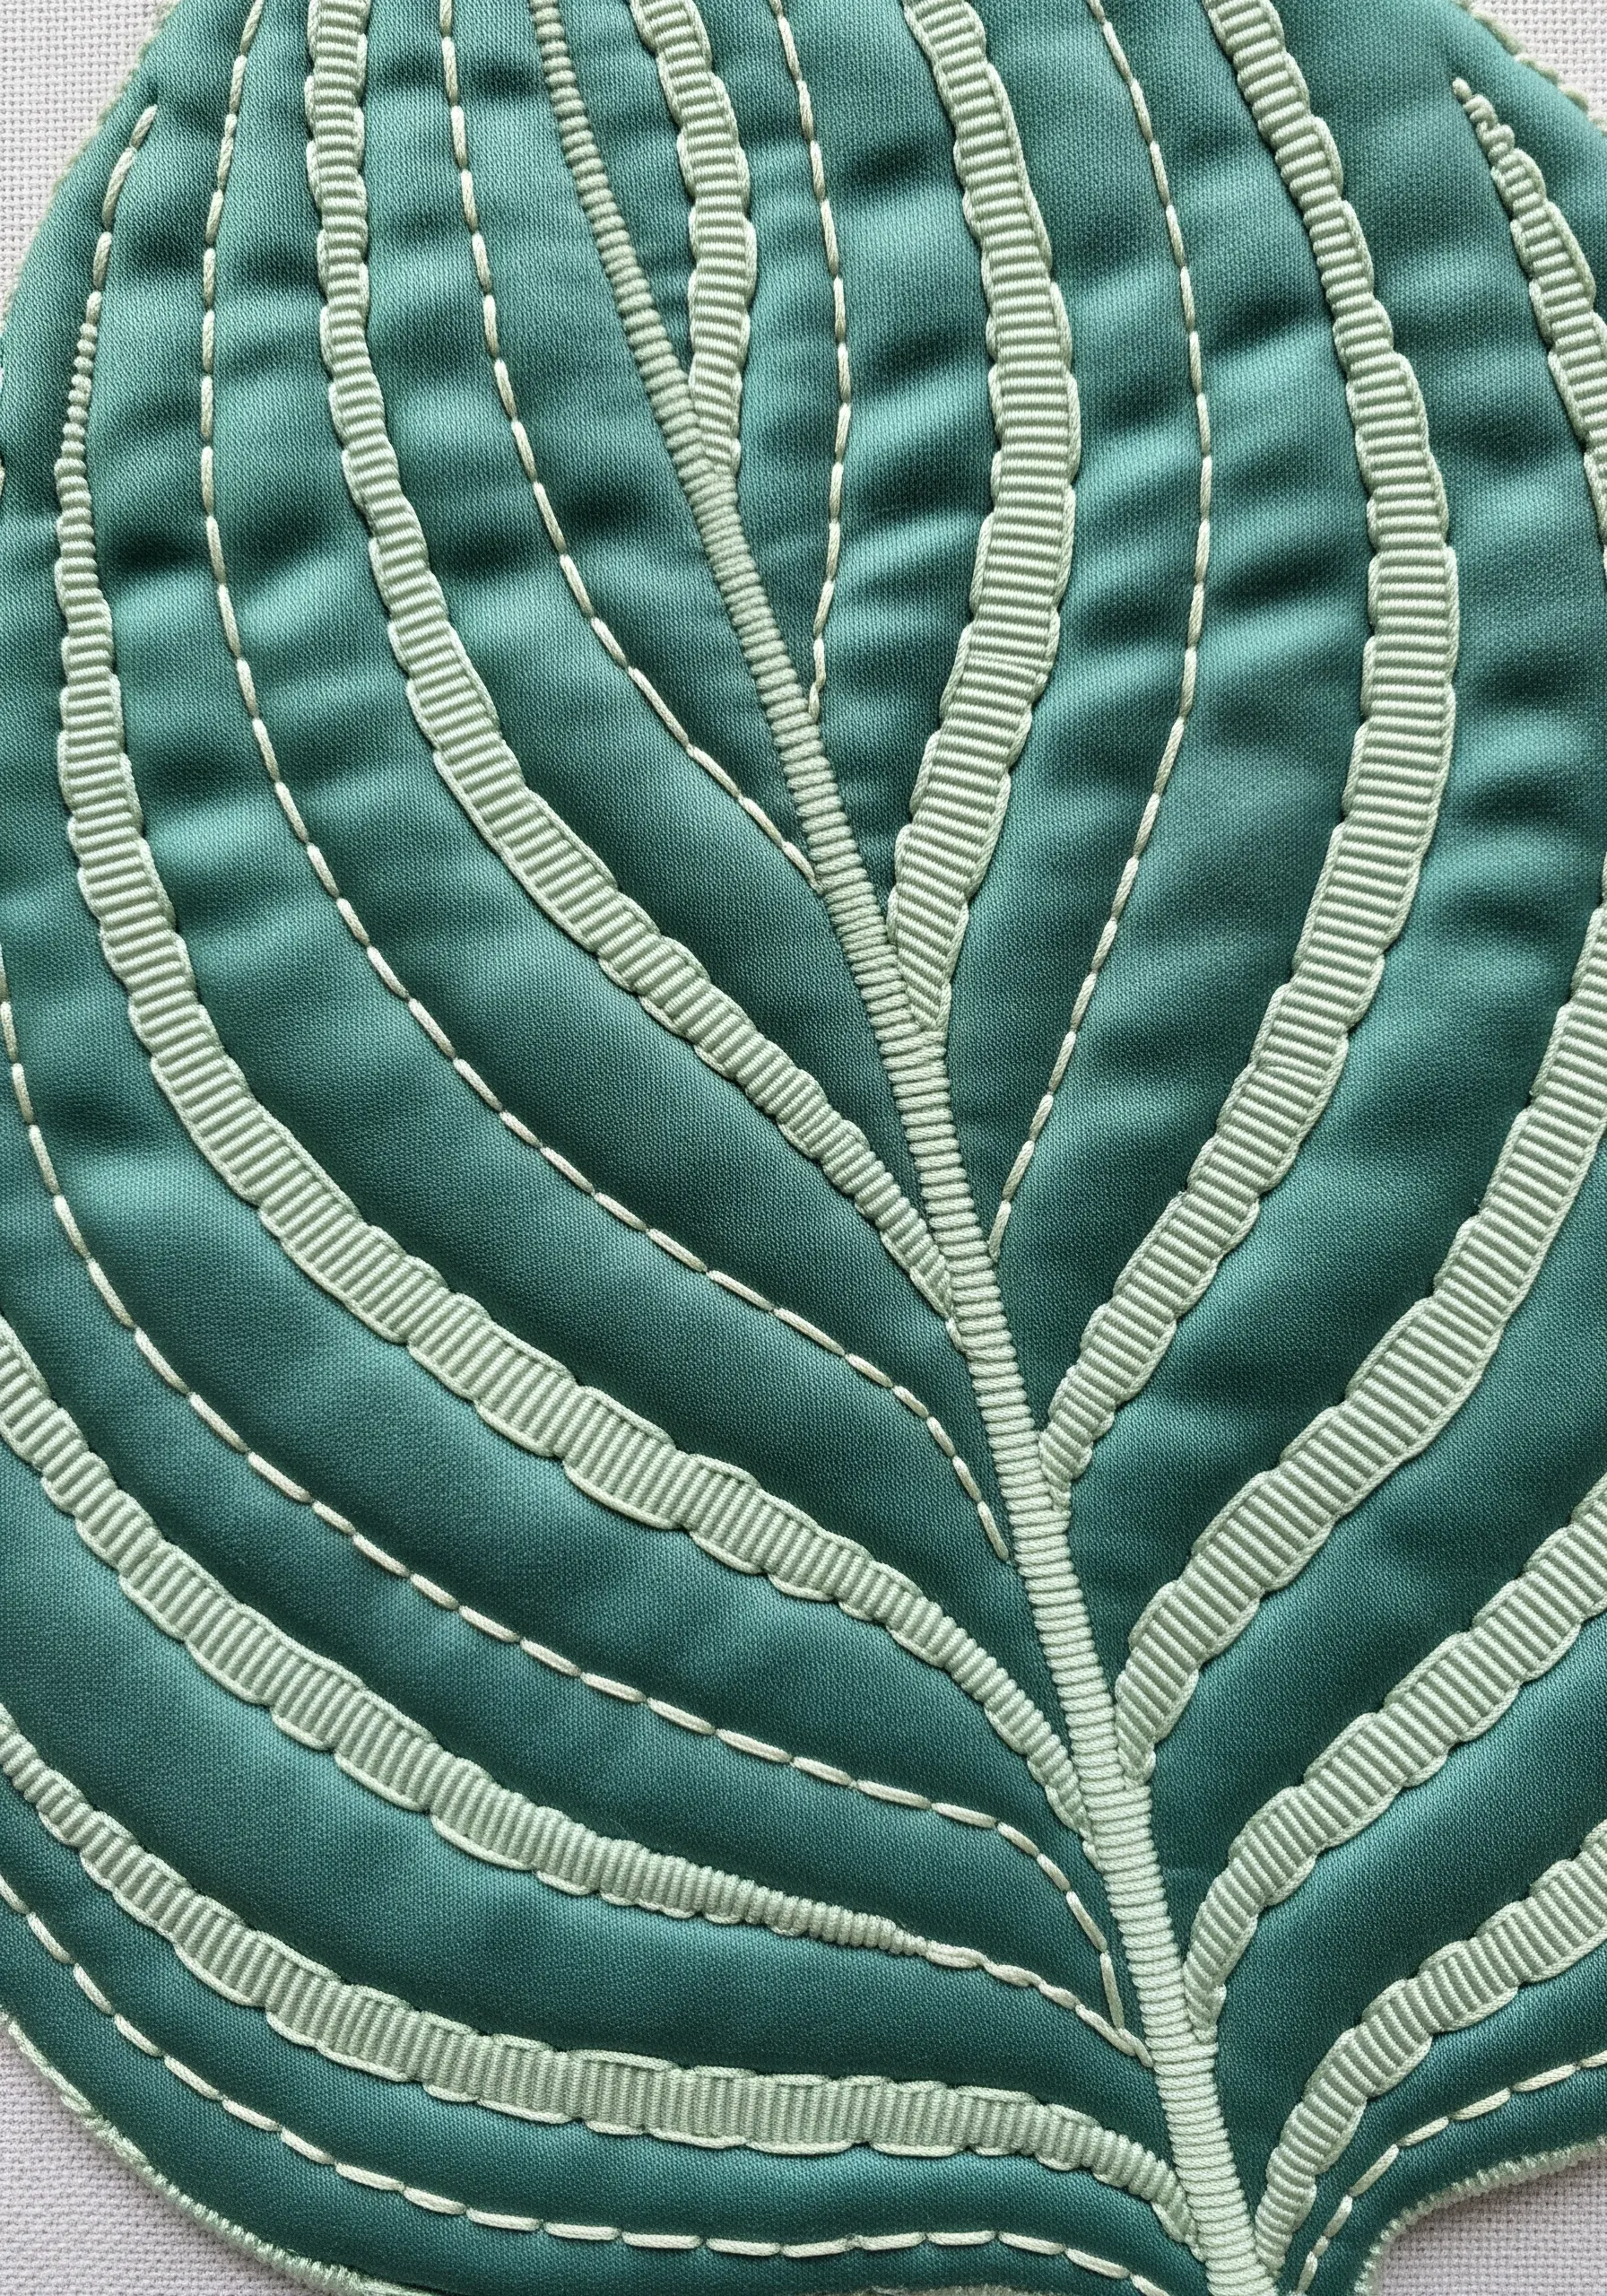
17. Define Veins with a Bold, Couched Thread
After filling your leaf, make the veins a distinct and powerful design element.
Lay down a thick, contrasting thread—like a white cotton perle—along the vein lines.
Then, use a single strand of the leaf’s fill color to tack it down with tiny, almost invisible couching stitches.
This creates a clean, graphic line that stands out beautifully without overpowering the delicate fill.
18. Add Definition to Crocheted Leaves with Surface Stitches
Elevate your crochet or knit projects by adding sharp, embroidered details.
Use a contrasting yarn and a blunt tapestry needle to add simple straight stitch or backstitch veins to a crocheted leaf.
Stitching directly onto the surface adds a layer of refinement and detail that makes your fiber art look more polished and intentional.
19. Blend Veins Subtly with Long and Short Stitch
For a photorealistic look, integrate the veins directly into your fill stitch rather than adding them on top.
As you work your long and short stitch, seamlessly switch to a slightly lighter thread color along the vein lines.
This creates soft, subtle veins that appear to be part of the leaf’s tissue, delivering a truly masterful and realistic effect.
20. Define a Vein with a Line of Contrasting Knots
Forgo traditional lines and instead define your central vein with pure texture.
Fill the entire leaf with tightly packed French knots in your main color.
Then, create the vein by stitching a single, clean line of knots in a slightly different shade or tone.
This pointillist technique creates a wonderfully tactile and visually integrated effect, perfect for stitching natural textures.
21. Layer Stitches for a Light-Reflecting Sheen
To mimic the way light reflects off a glossy leaf, create textural shifts with your stitches.
Fill the main leaf sections with a flat satin stitch.
Then, add the primary veins over the top using a more dimensional stitch, like a chain stitch or a heavy stem stitch, in the exact same color.
The change in stitch structure alone creates a subtle ridge that catches the light differently, adding depth without changing color.
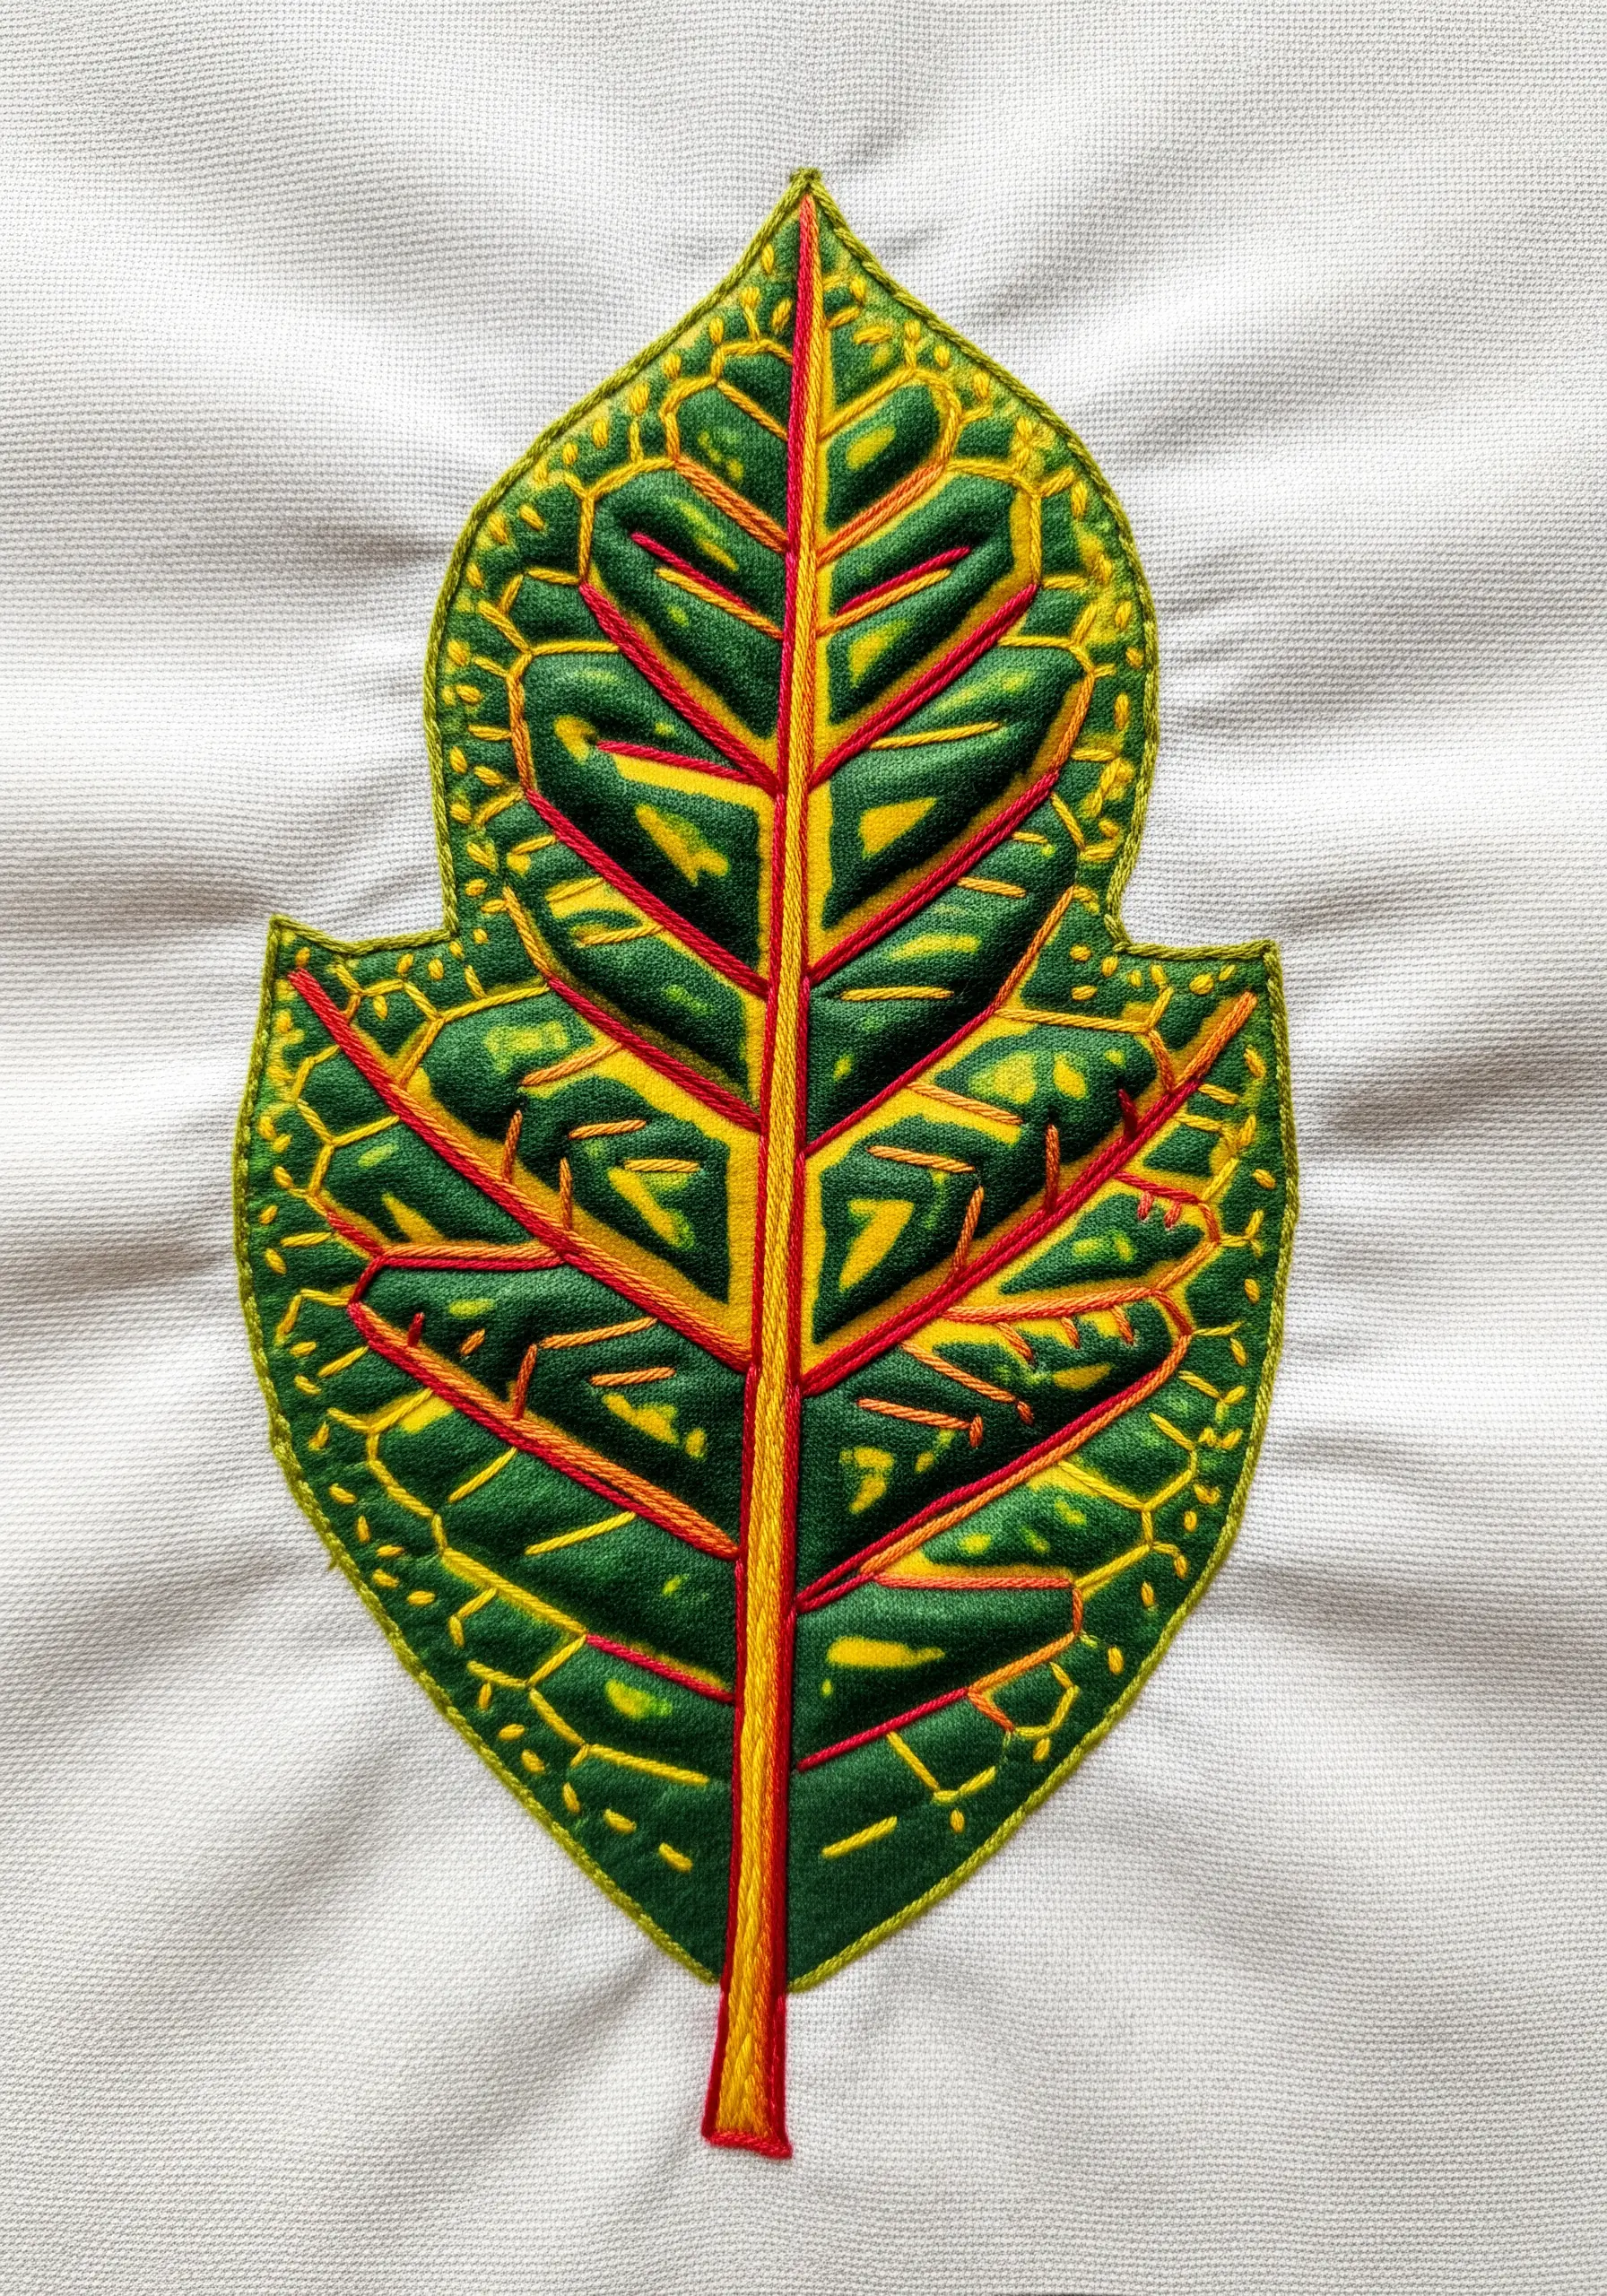
22. Weave Colors Together for Natural Variegation
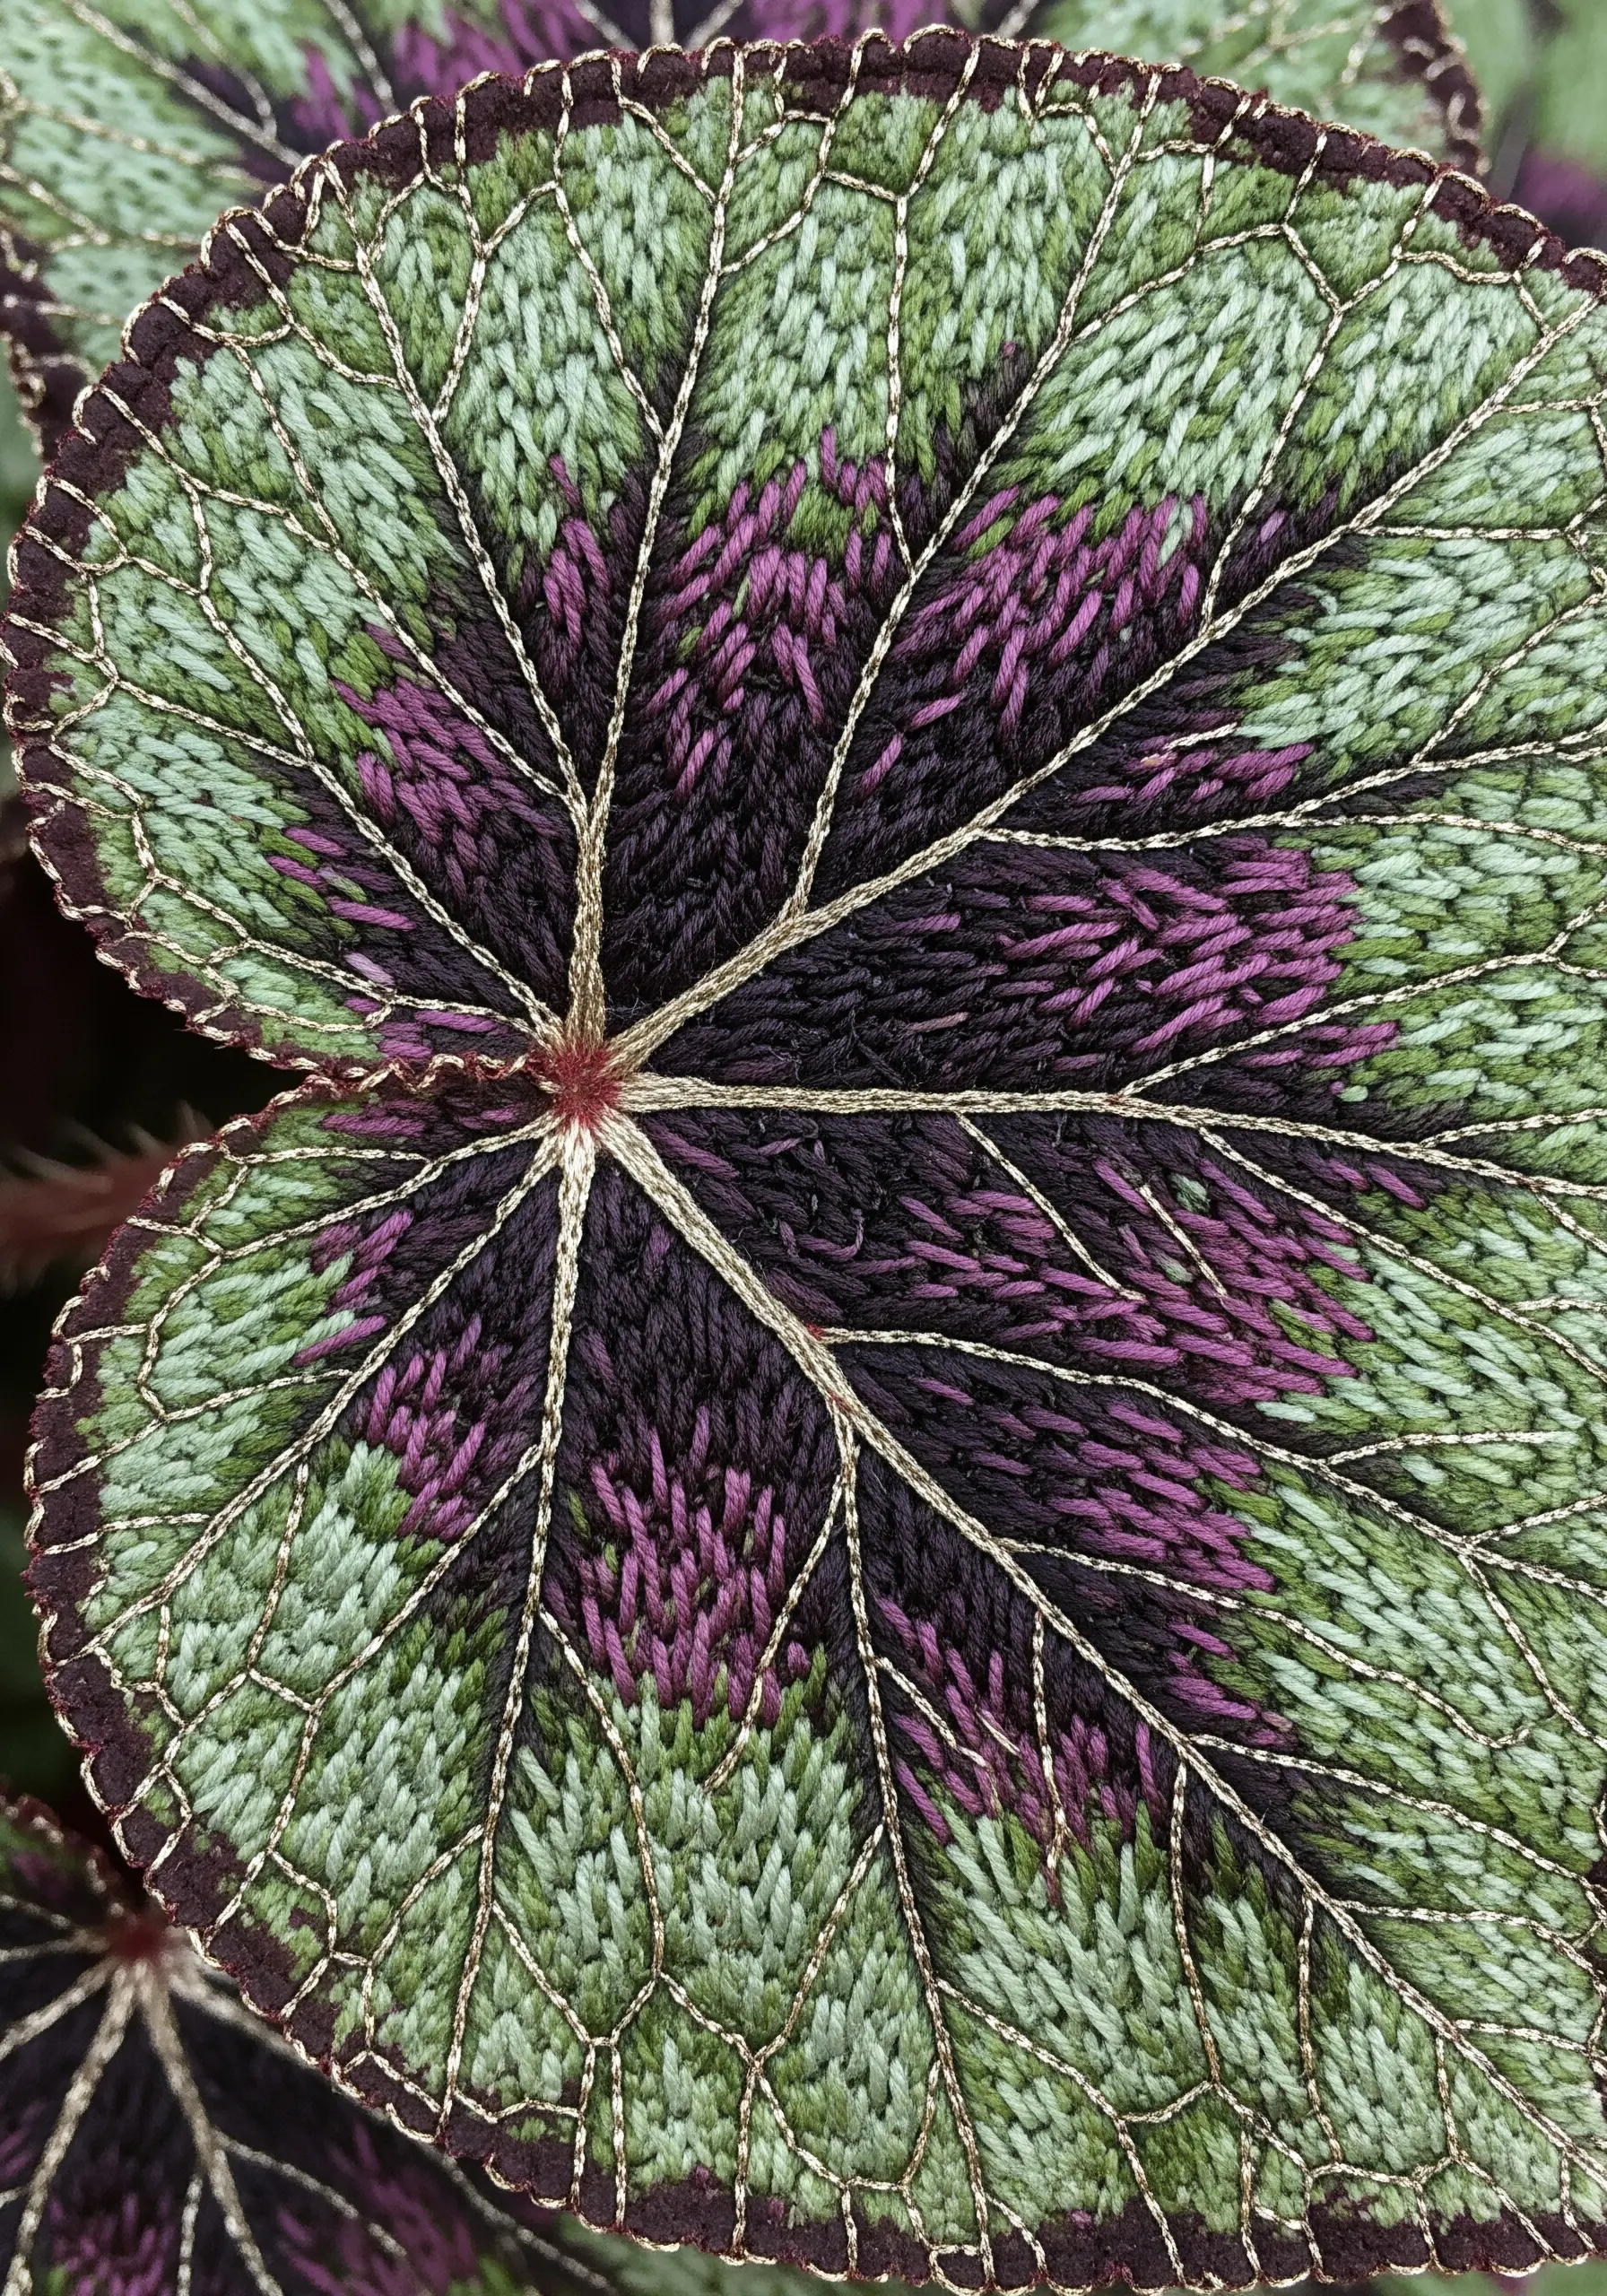
Capture the complex, painted patterns of a Begonia or Caladium by weaving your stitches.
Instead of blending colors smoothly with long and short stitch, create distinct blocks of color that interlock like a puzzle.
Finally, define the main veins with a thin, couched metallic thread to add a touch of elegant structure to the organic patterns.
23. Create Pine Needles with Radiating Straight Stitches
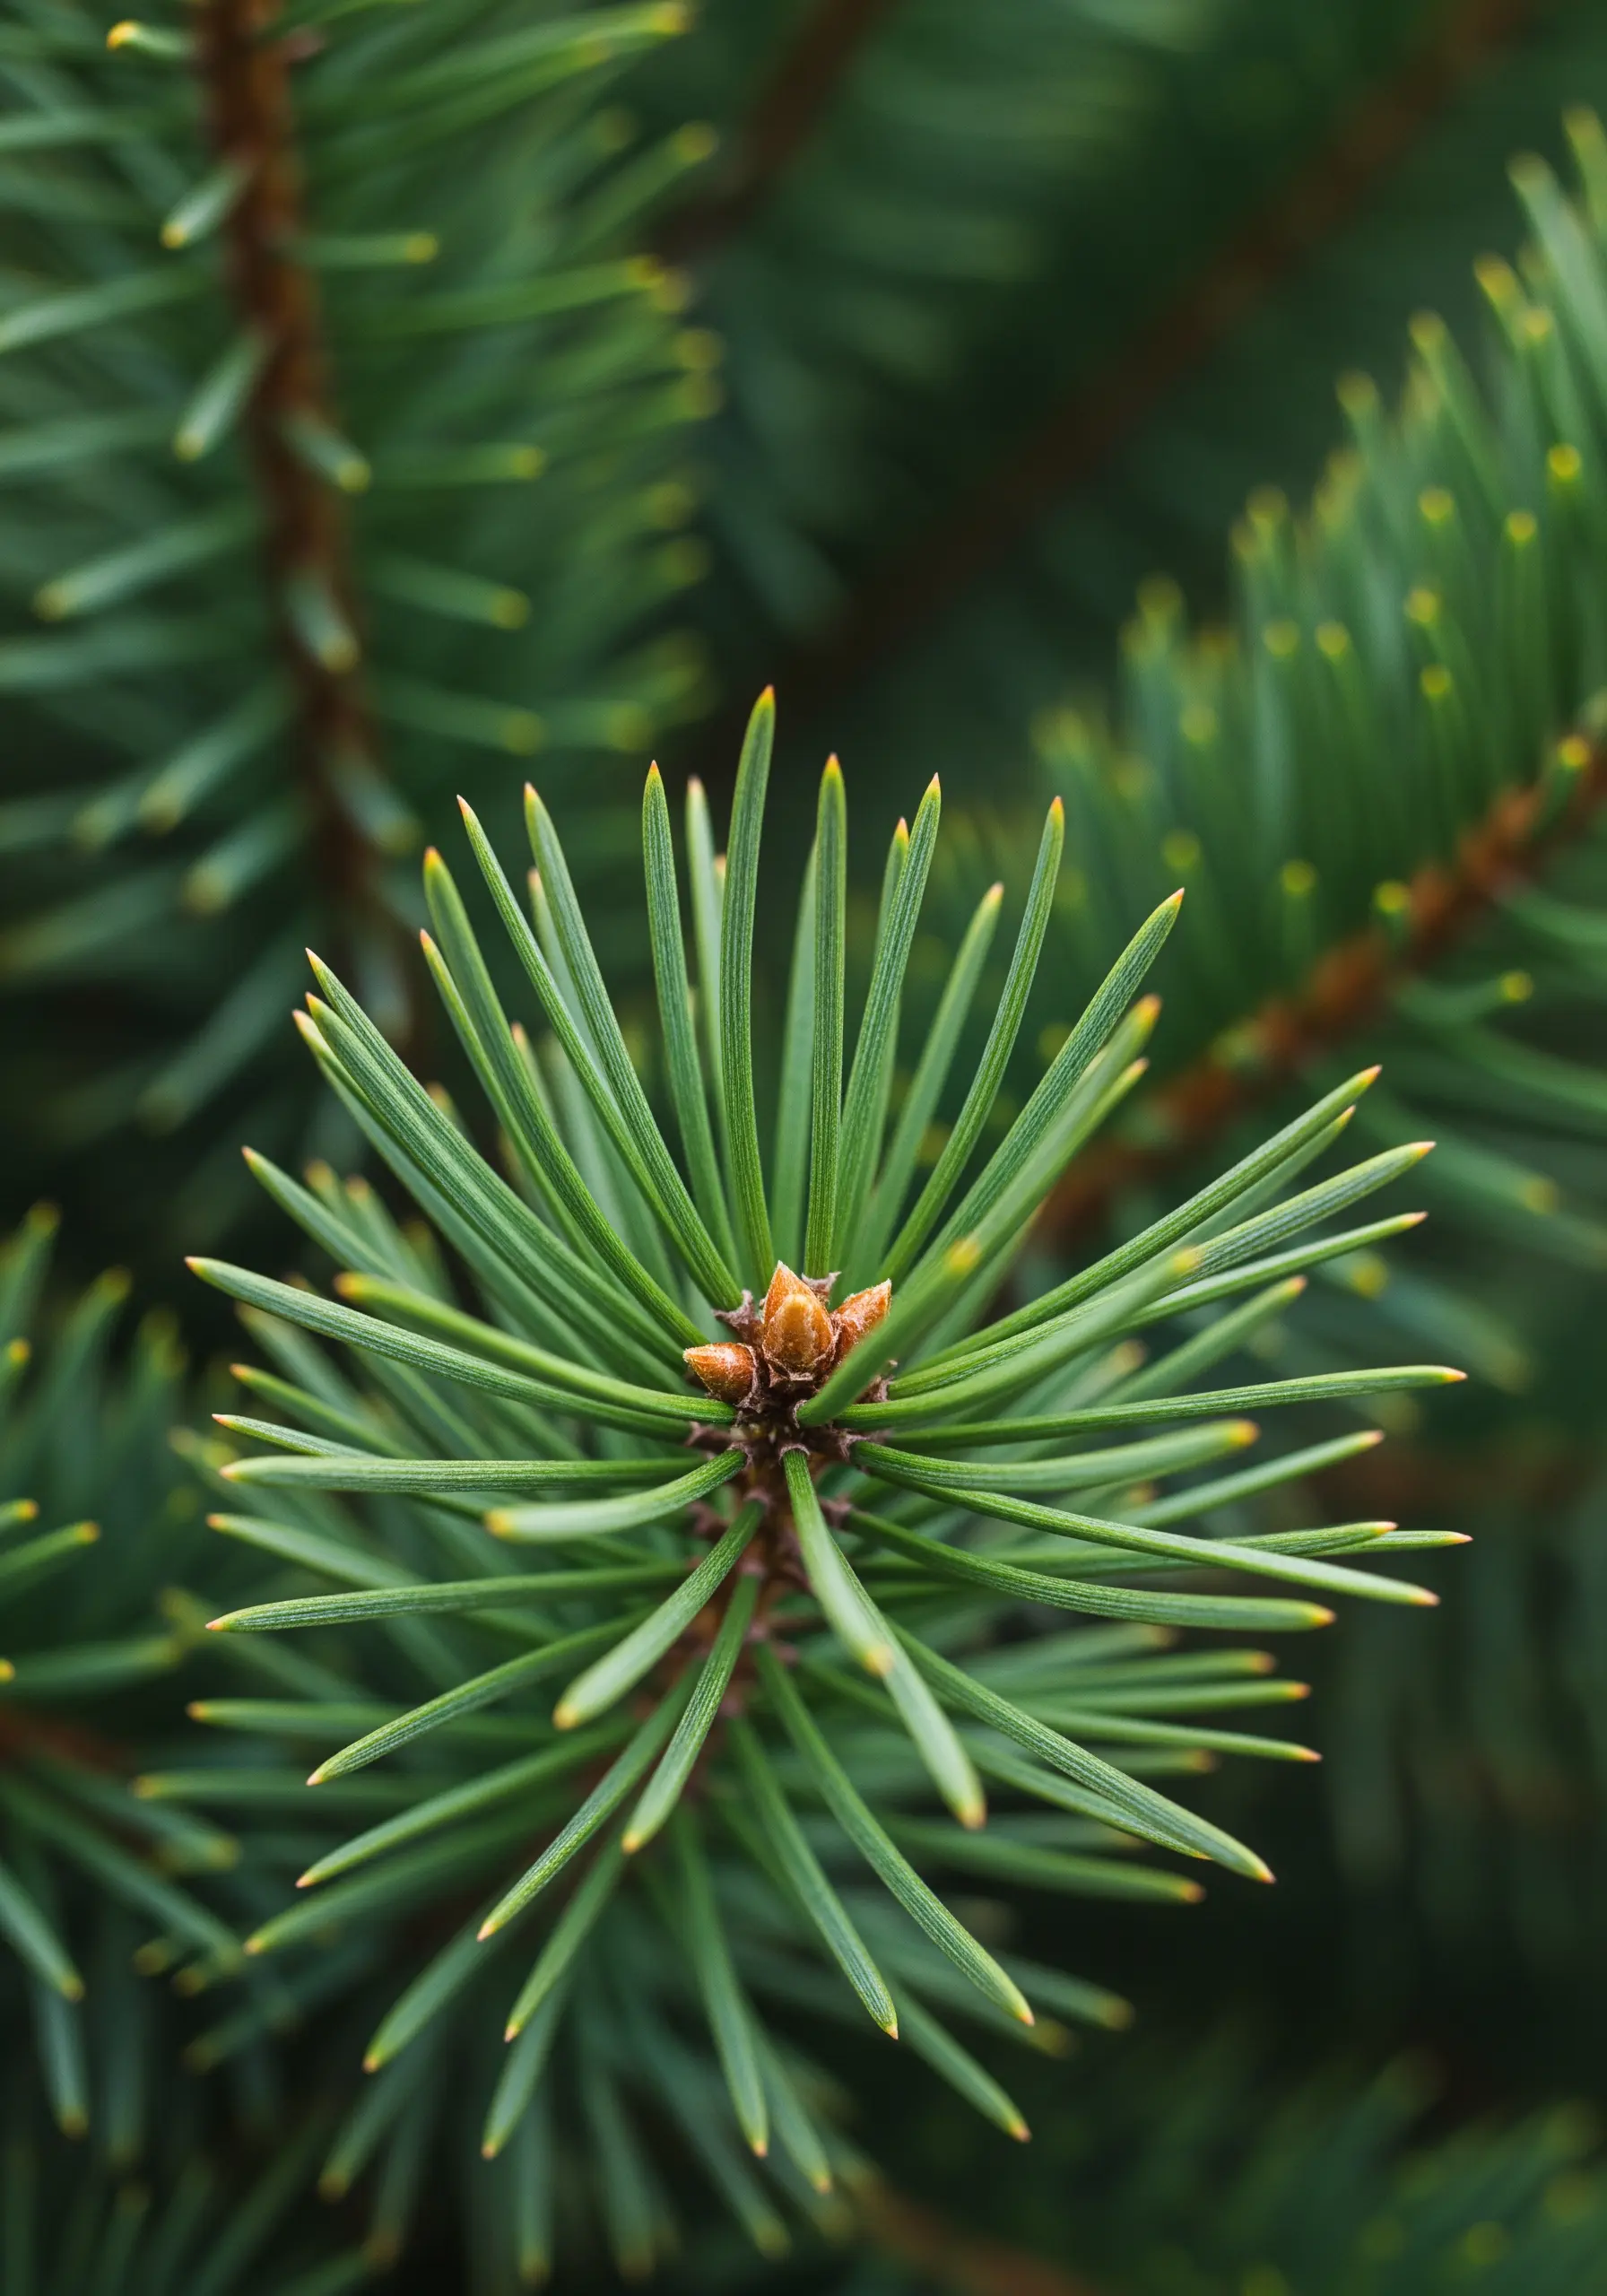
While not a traditional leaf, pine needles offer a unique textural opportunity.
Create them by stitching clusters of straight stitches that radiate from a central point.
Use a slightly thicker thread, like cotton perle, to give them body and dimension.
Vary the length and angle of each stitch slightly to create a more natural, less rigid appearance that feels full of life.
24. Blend Autumnal Hues with Thread Painting
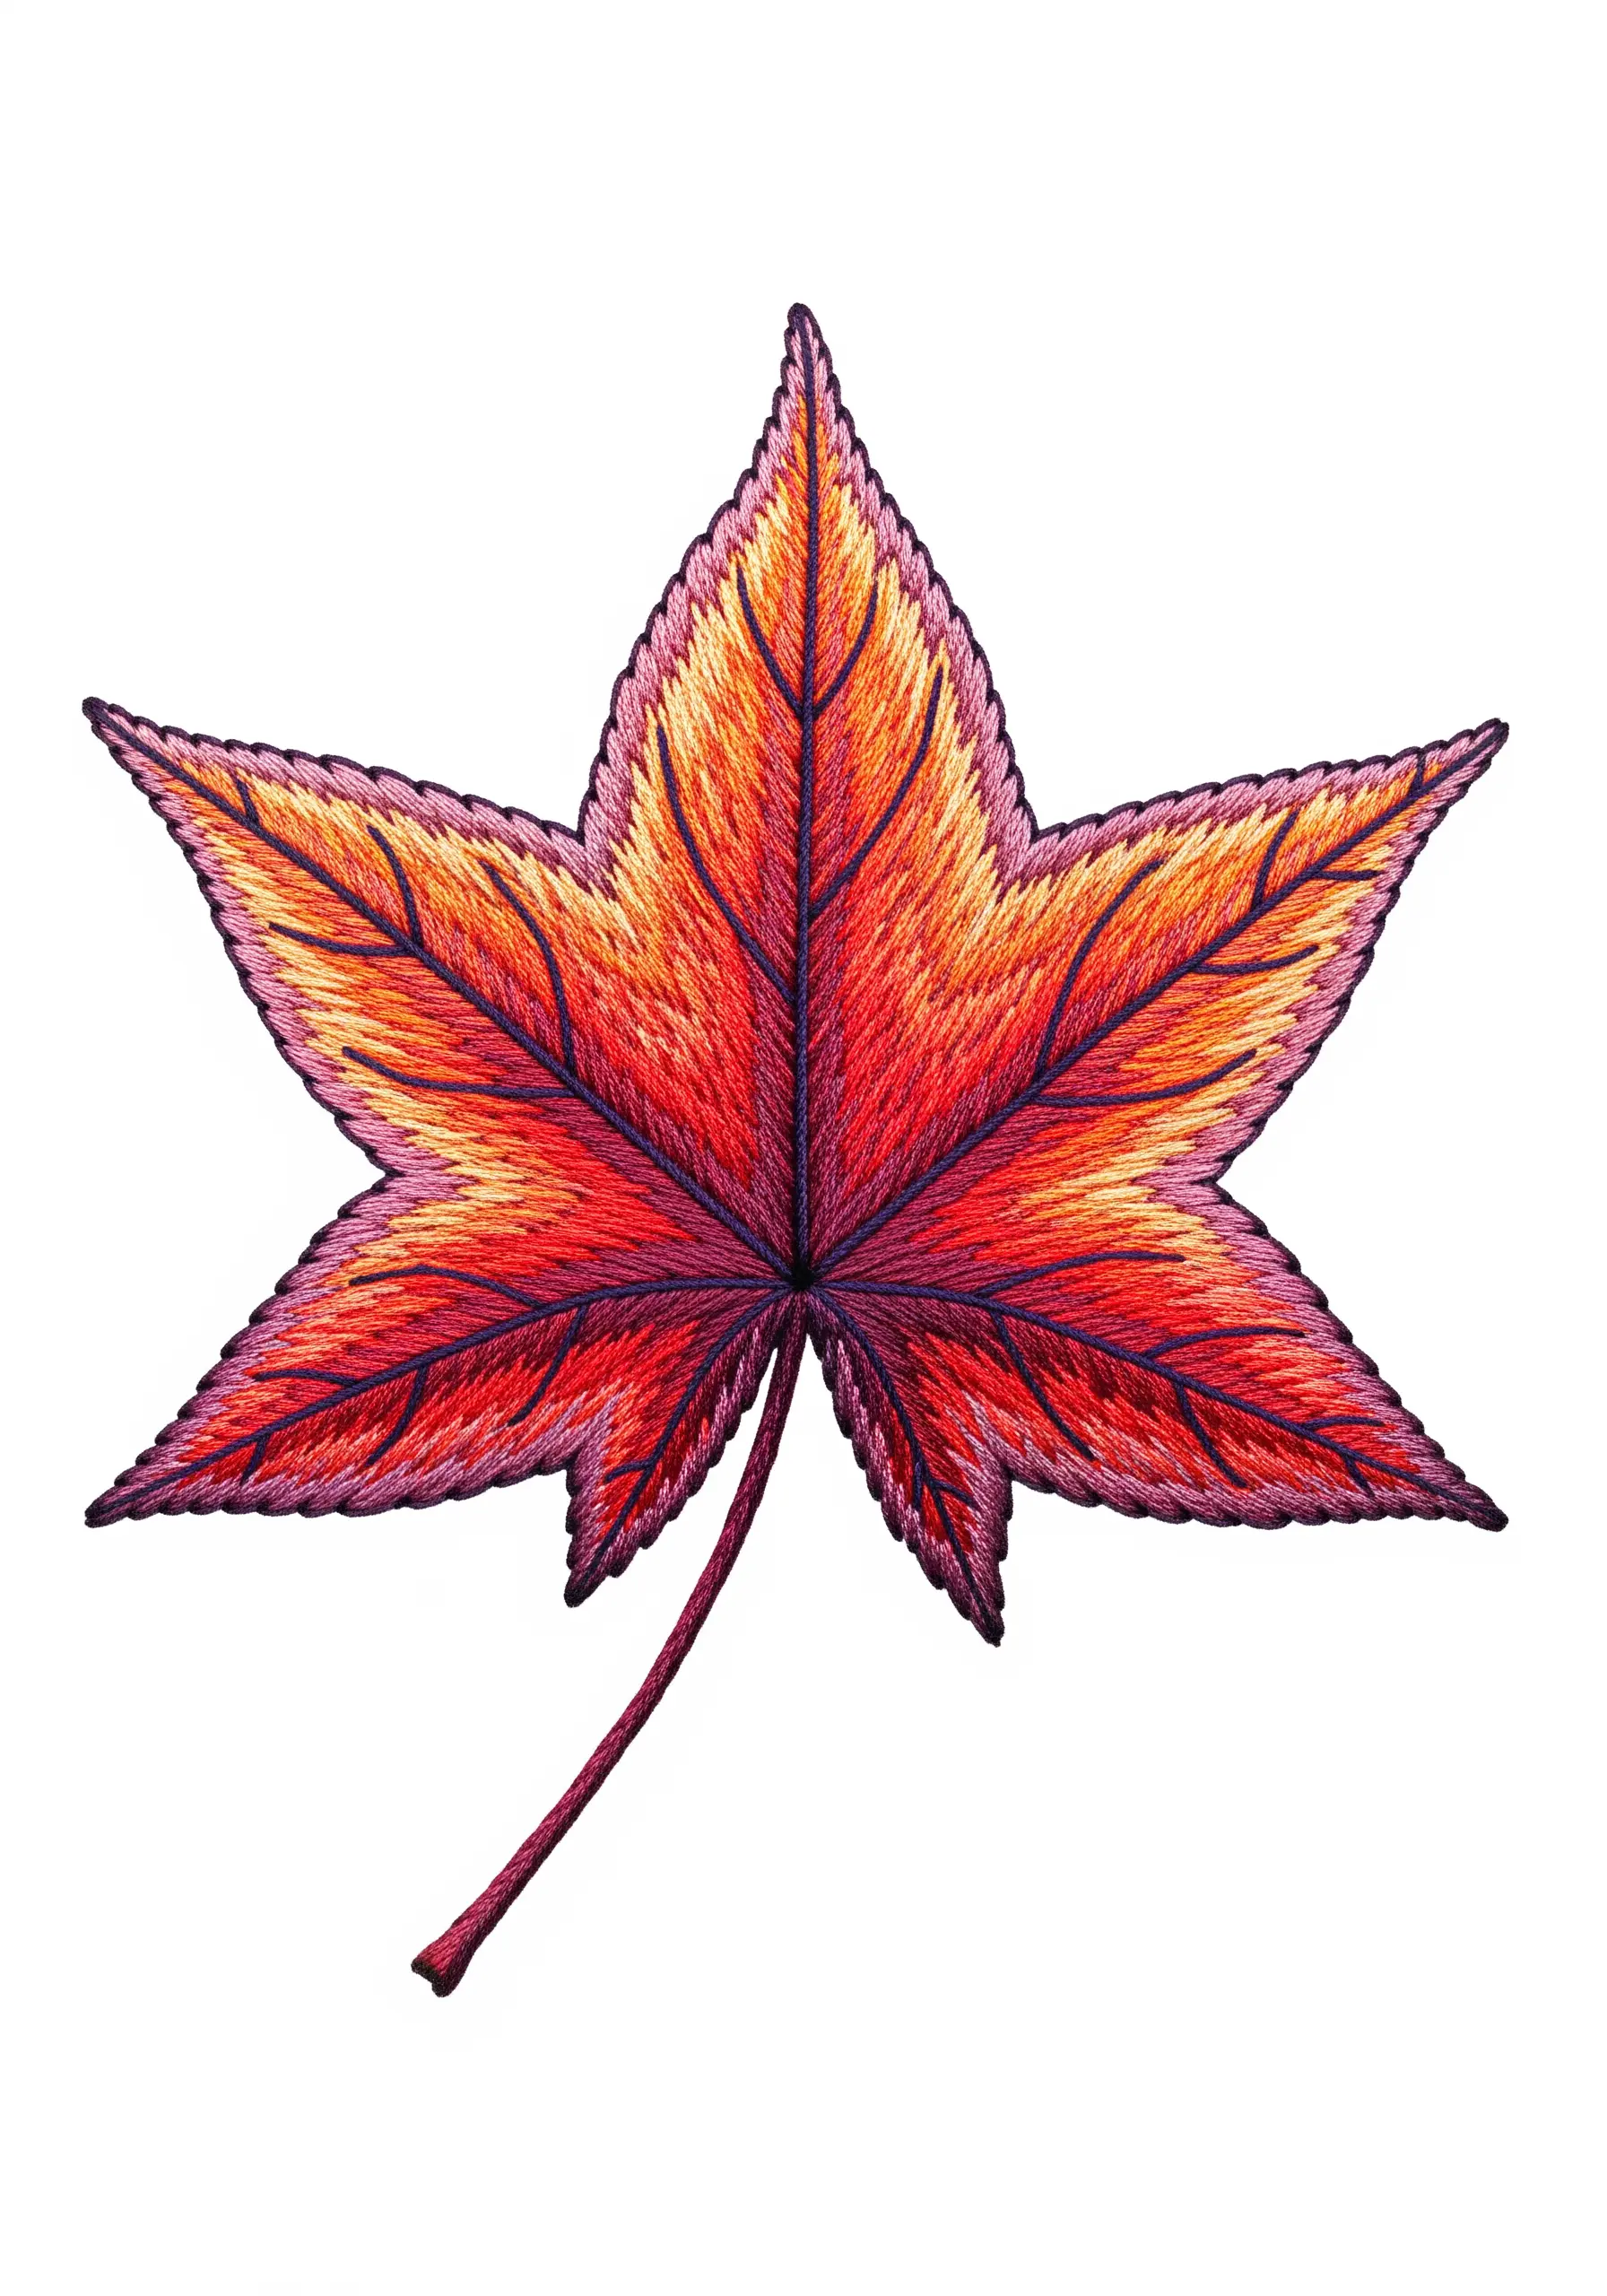
The magic of an autumn maple leaf is its seamless gradient of color.
Achieve this using the long and short stitch with three or four colors, transitioning smoothly from red to orange to yellow.
Once the blend is complete, stitch the dark veins on top using a simple backstitch.
This layering technique ensures the veins look sharp and defined against the soft, painterly background.
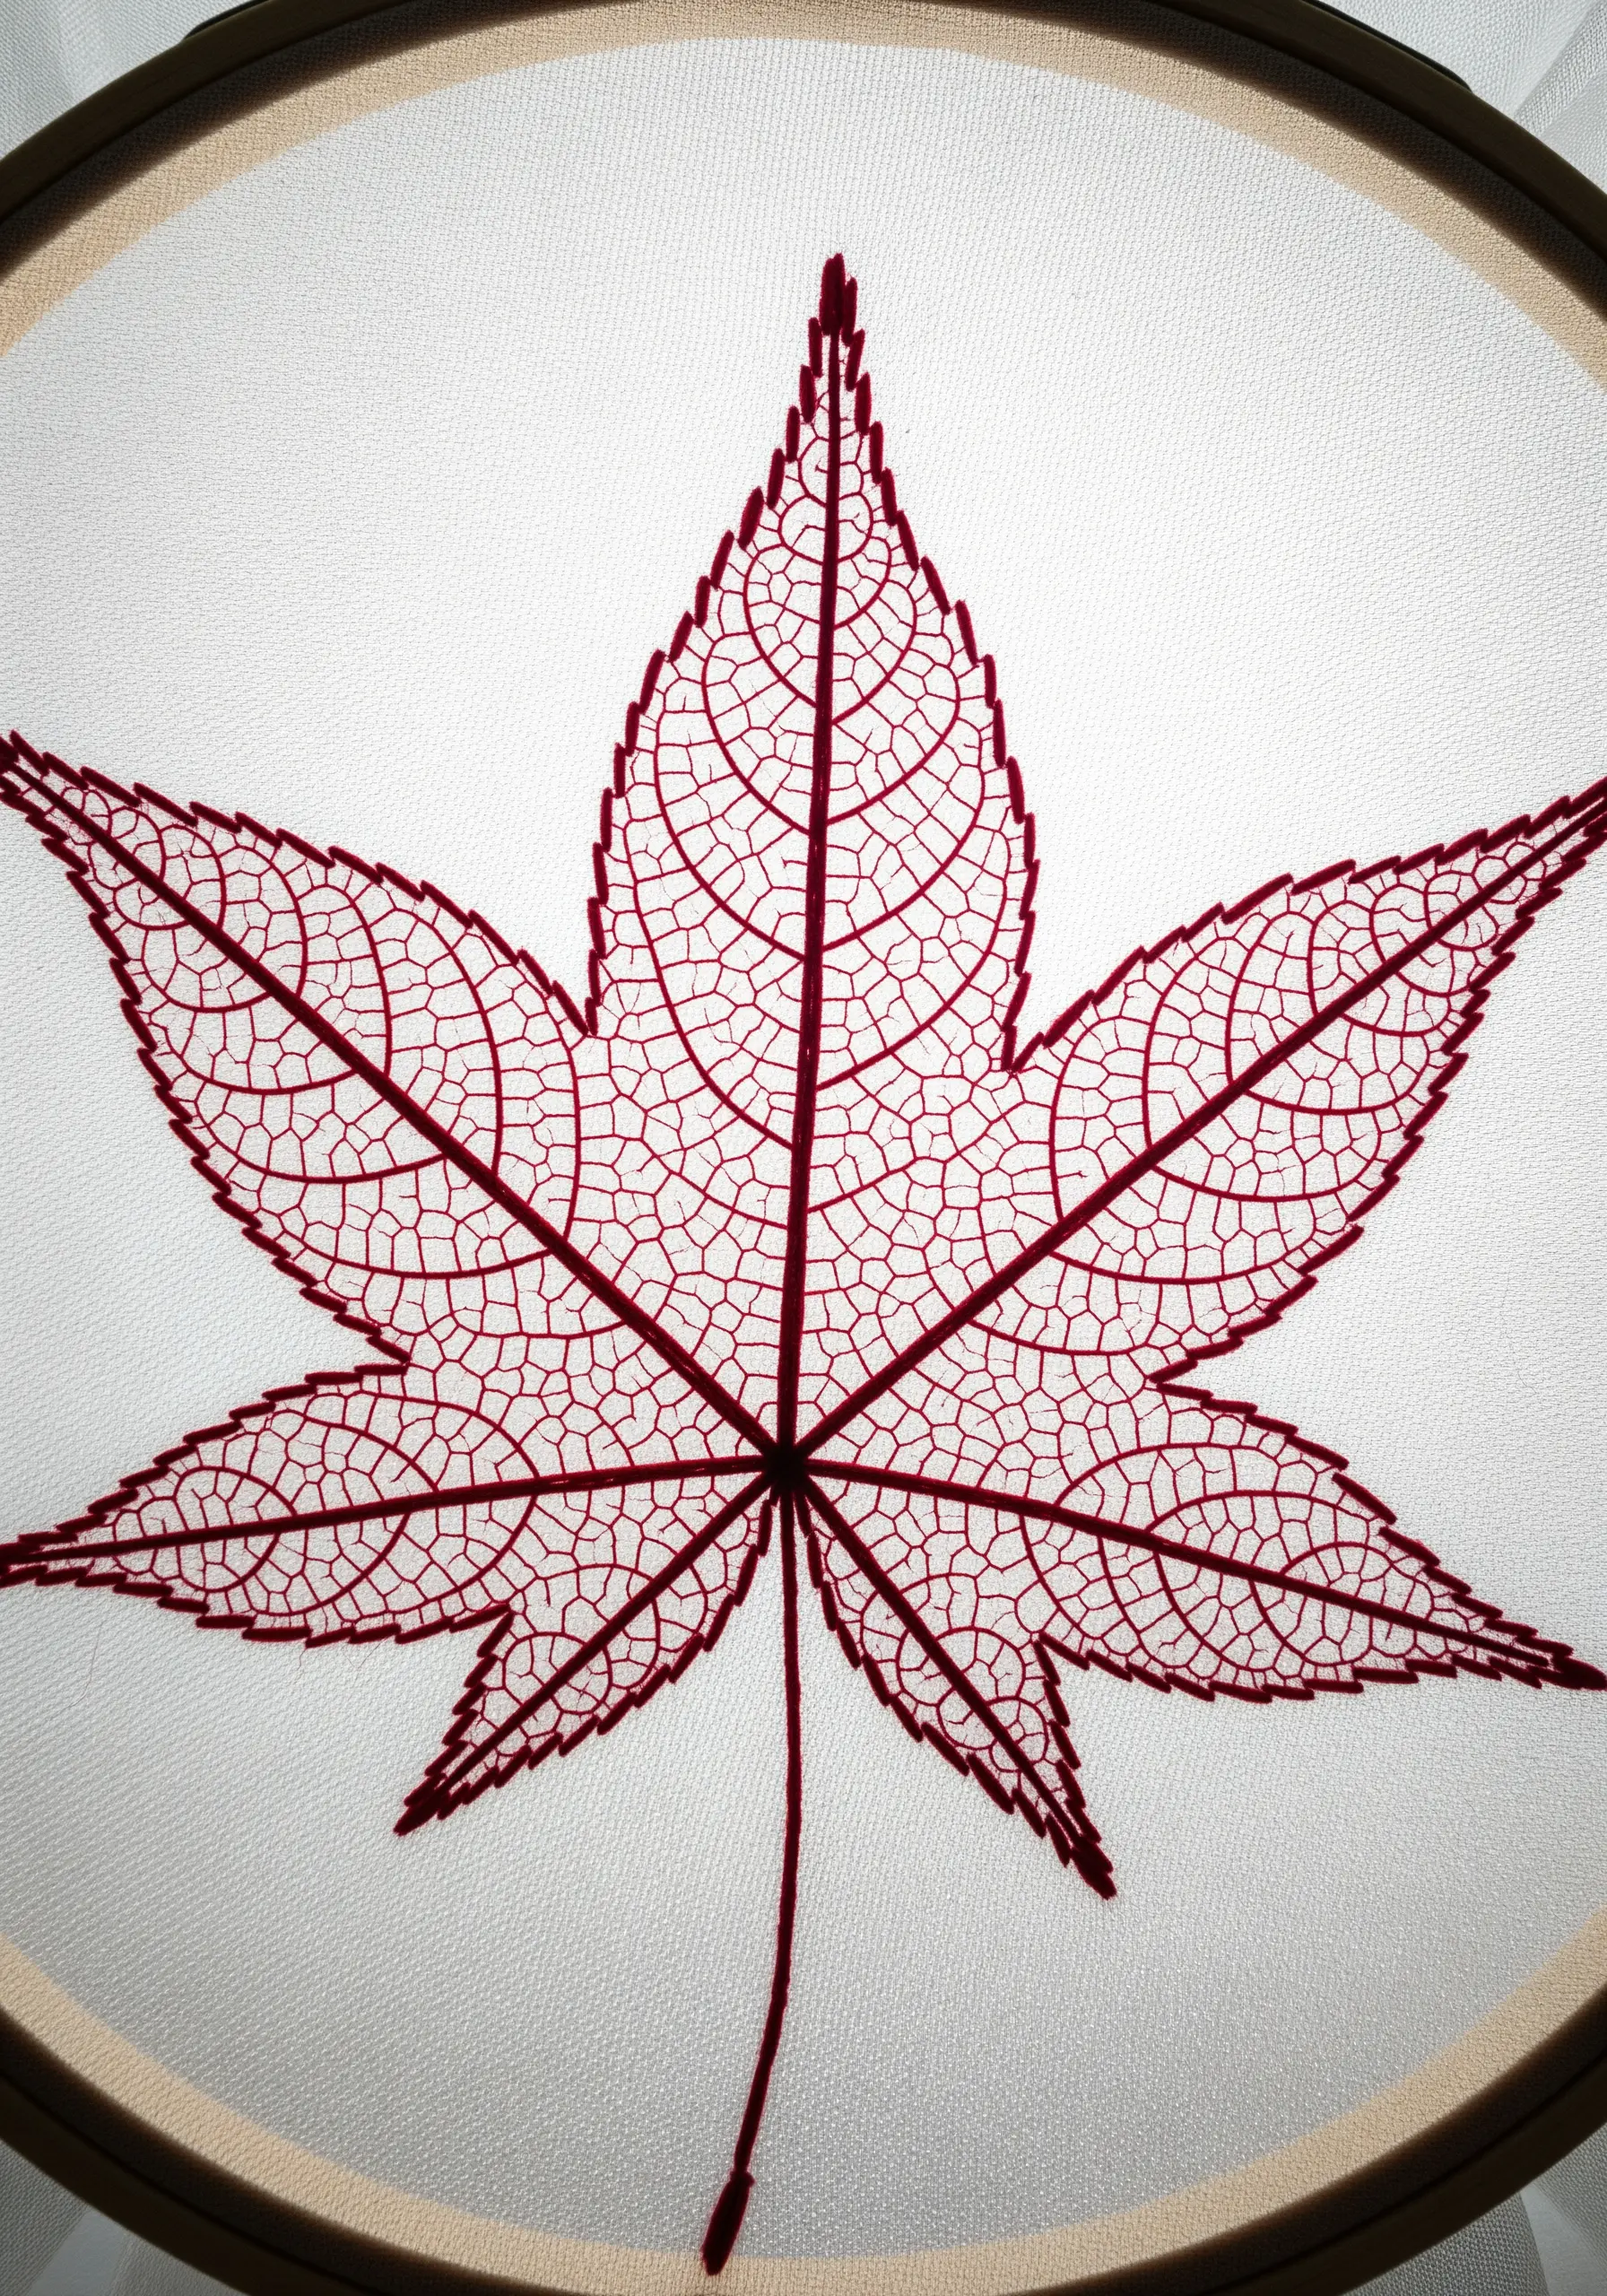
25. Etch Fine Veins with a Single-Thread Backstitch
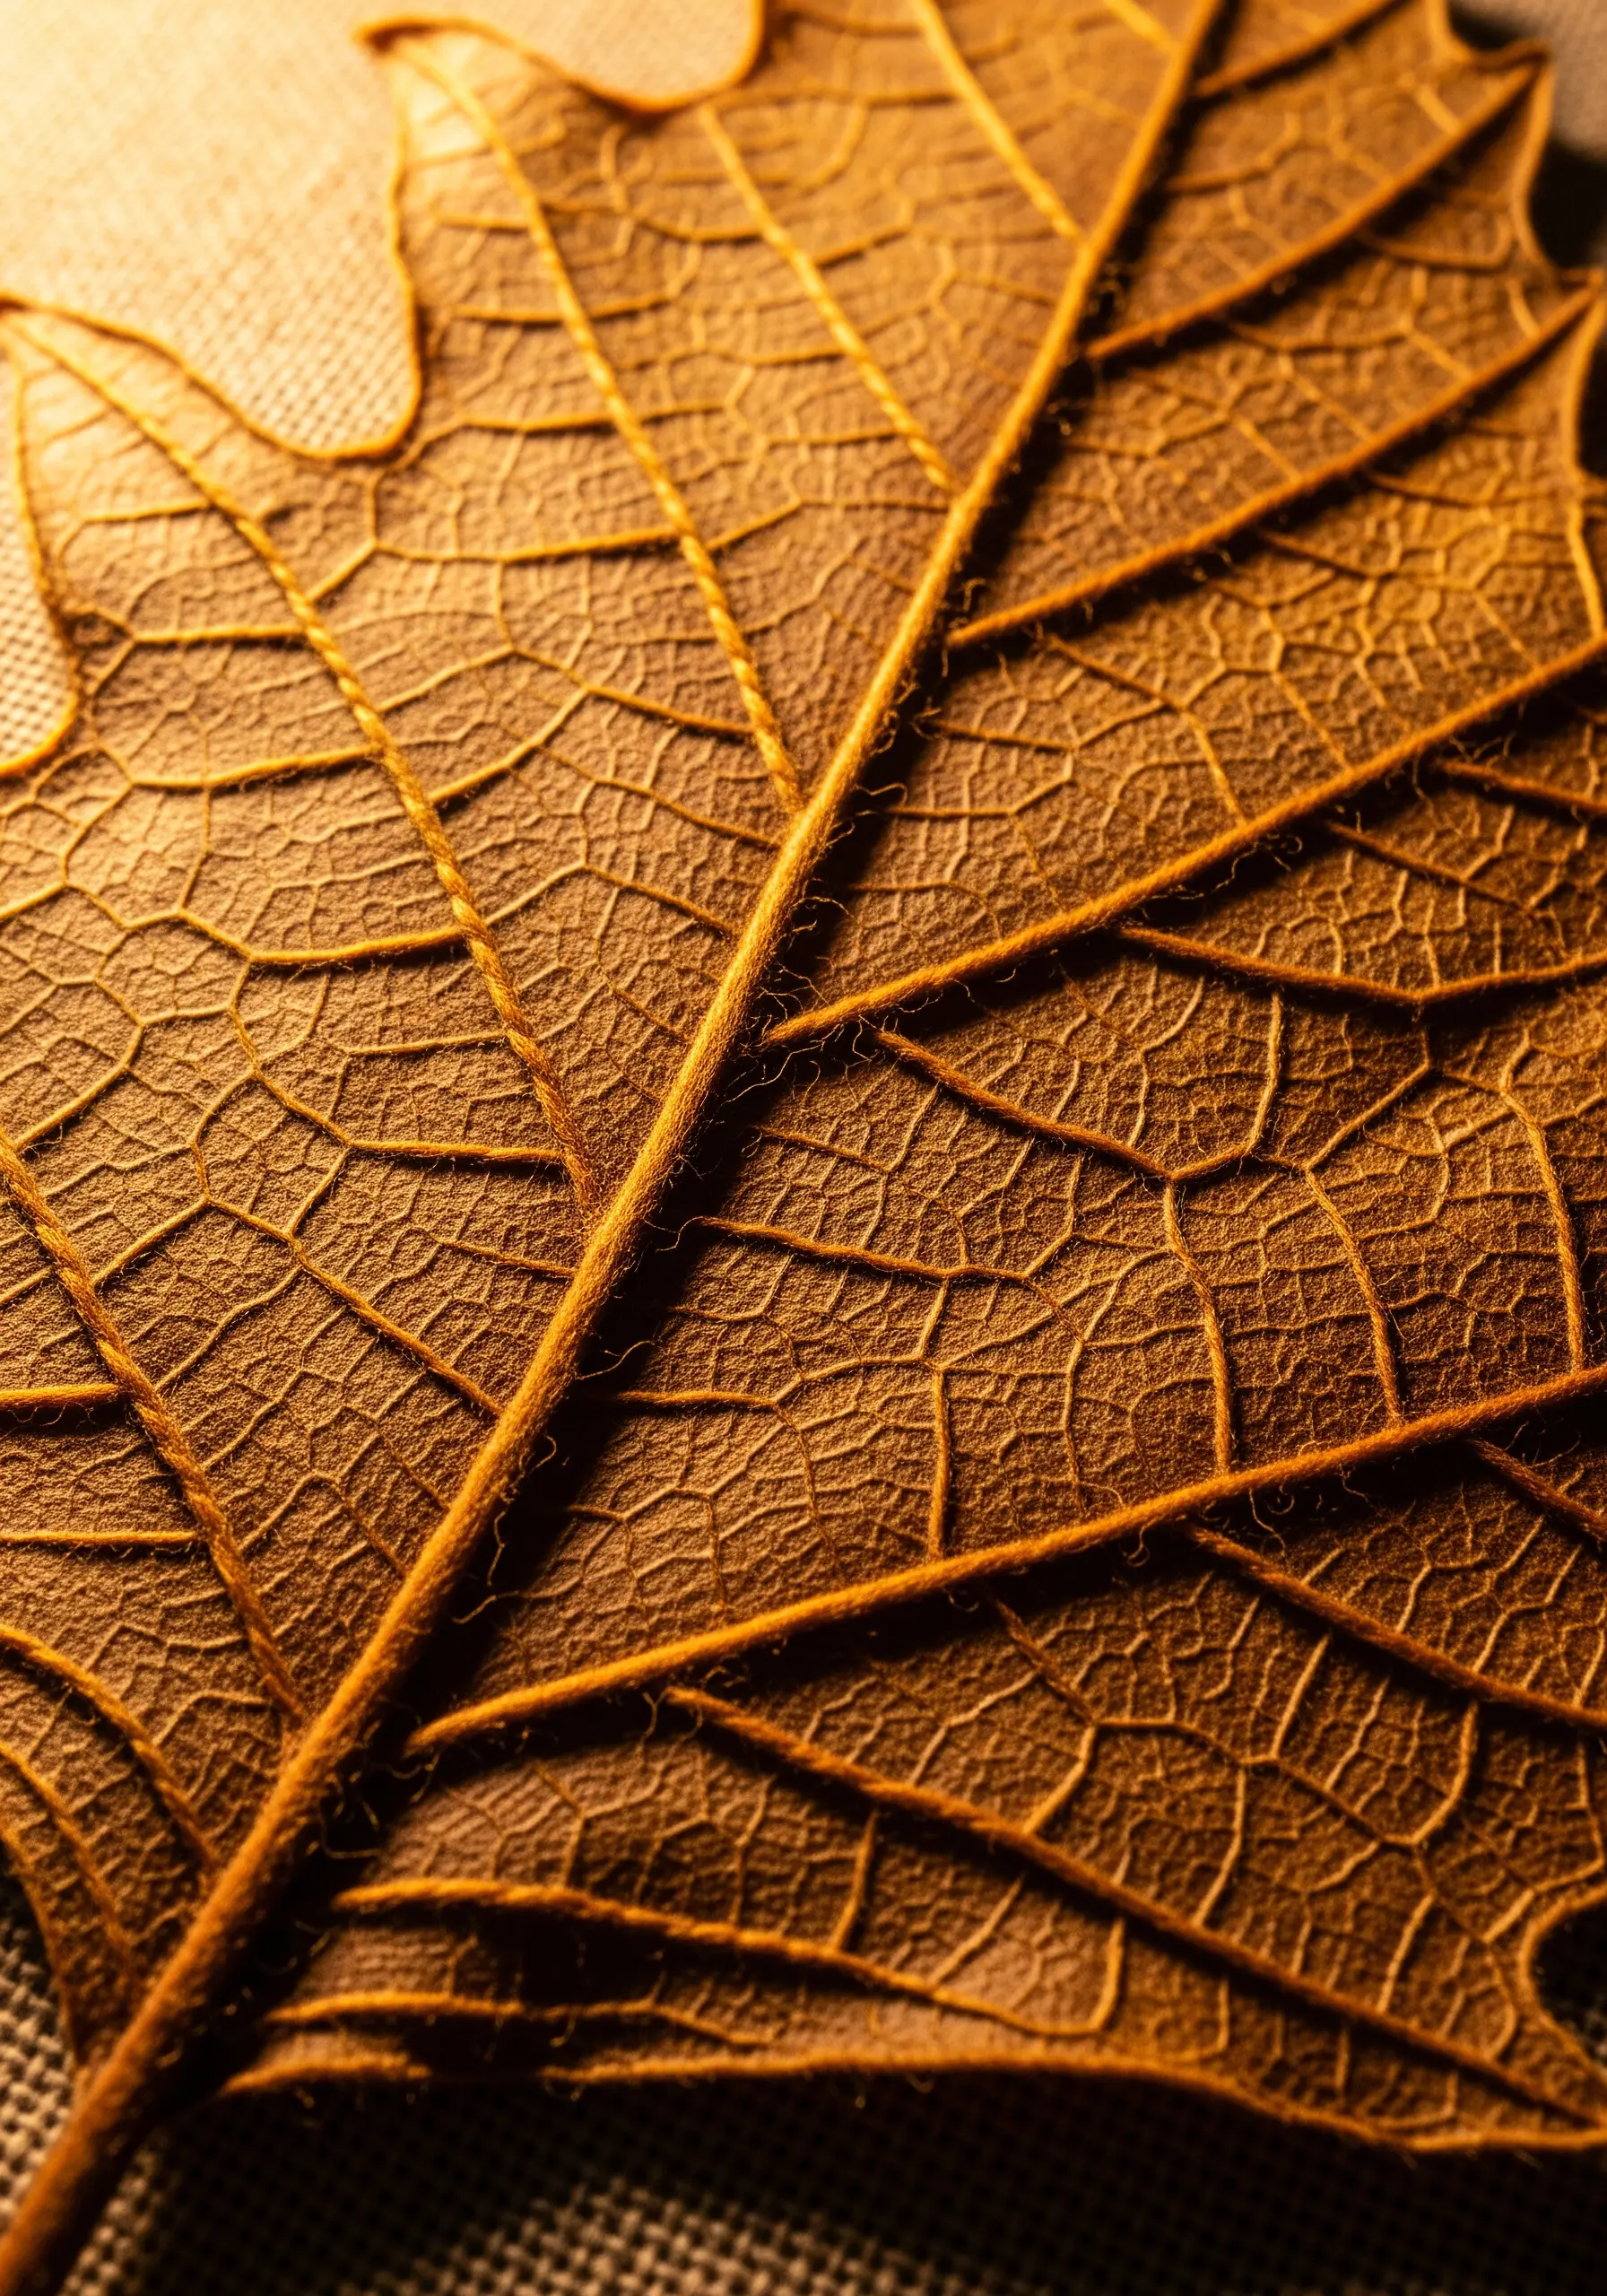
For the intricate, web-like veins of a dried leaf, subtlety is your greatest tool.
Use just a single strand of thread and a tiny backstitch to create the delicate network.
Working on a textured, neutral fabric like linen will enhance the organic, fragile feel.
The goal isn’t to create bold lines, but a delicate pattern that seems etched into the surface of the fabric itself.
26. Form Bold Veins with Applied Silk Ribbon
For a dramatic, dimensional effect, incorporate mixed media by using thin ribbon for your veins.
Lay a satin or silk ribbon along the vein line and secure it with small, hidden tacking stitches on each side.
The ribbon’s width and lustrous sheen create a bold, raised element that contrasts beautifully with a matte thread fill, adding instant luxury.
27. Define Veins with Negative Space
Instead of stitching veins, create them with the absence of stitches.
First, draw your leaf and its main veins as guidelines.
Then, fill the sections *between* the veins with a highly textural stitch like French knots or bullion knots.
By stopping the knots just short of your guidelines, you create channels of un-stitched fabric that read as delicate, recessed veins.
28. Suggest Form with Padded Satin Stitch Gradients
The “leaves” of a succulent are thick, fleshy, and dimensional.
Recreate this plumpness using padded satin stitch.
First, create a foundation of split stitches within each petal shape, making it thickest at the base.
Then, cover this padding with satin stitch, using a subtle gradient of color from the center outwards to mimic how light hits the curved surface.
29. Create a Bold Network with Couched Yarn
For a graphic, high-texture look that is both fast and impactful, use a thin yarn for your vein structure.
Lay the yarn on your fabric and use a contrasting, finer embroidery floss to couch it down with small tacking stitches.
The contrast between the thick, soft yarn and the delicate fill stitch is visually striking and wonderfully modern.
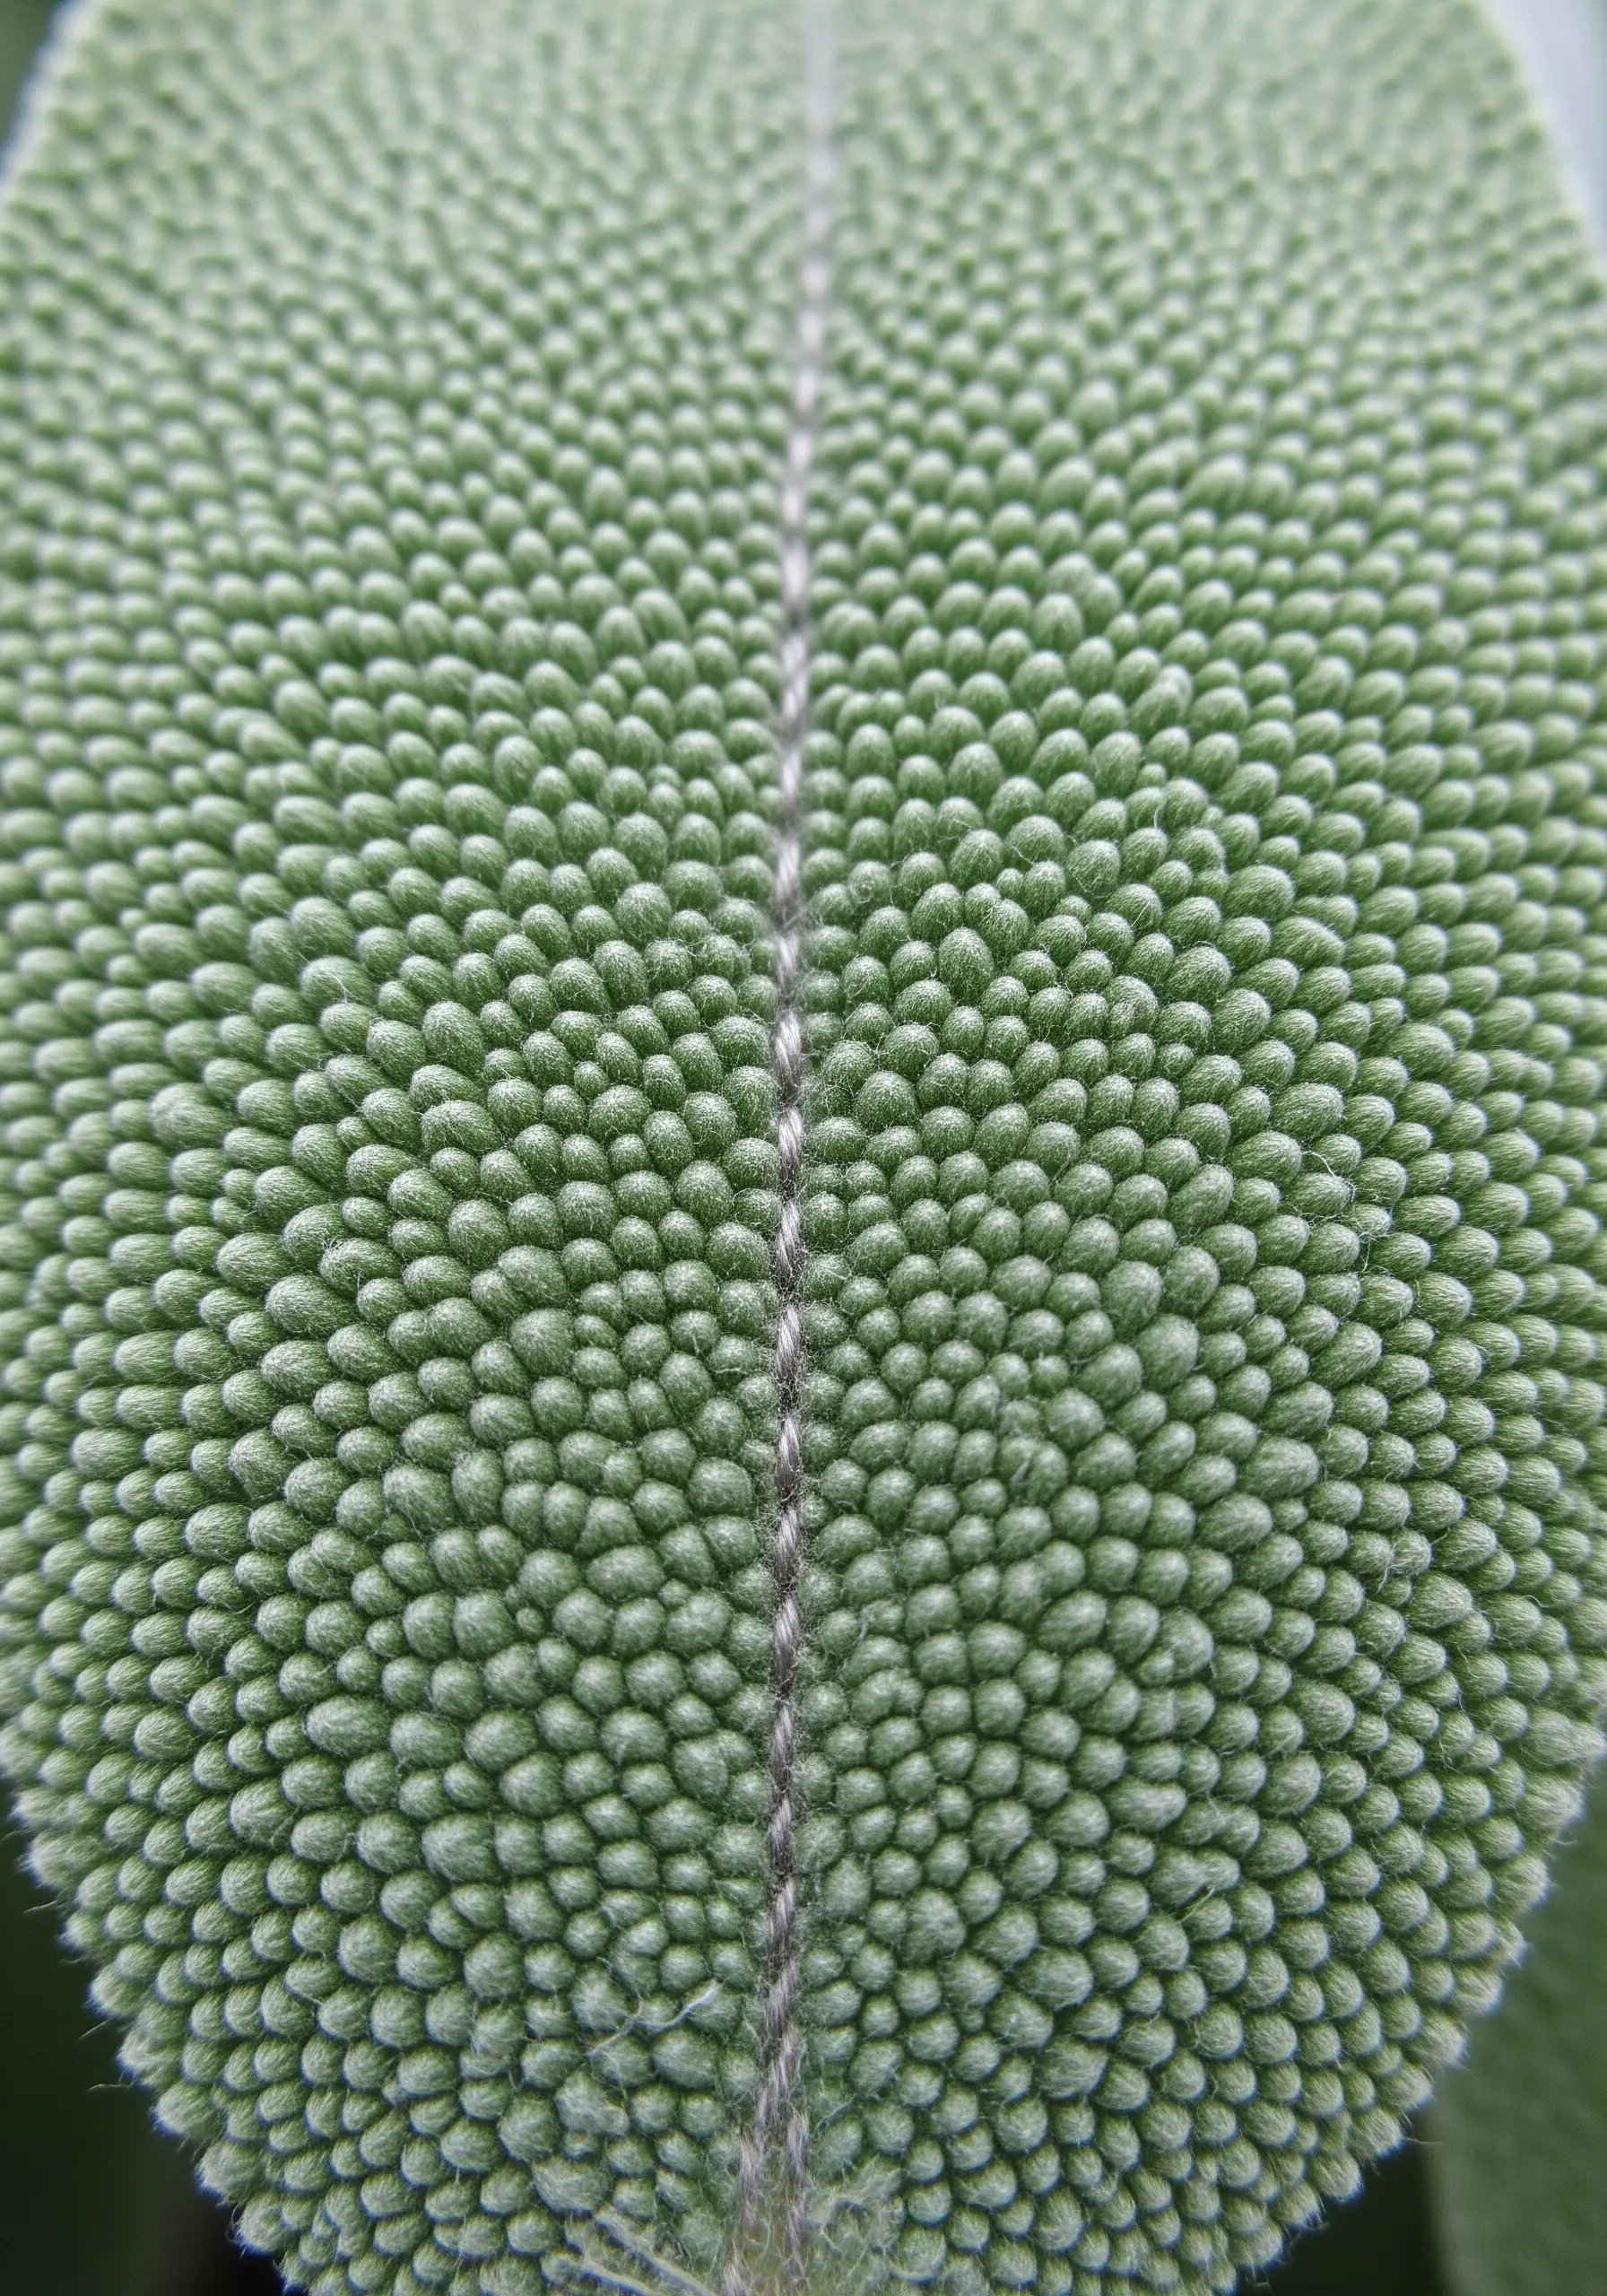
30. Imply Translucency with Sparse Seed Stitch
To capture the ethereal effect of light passing through a leaf, choose your fill stitch wisely.
Use a sparse fill, like the seed stitch, on a lightweight, light-colored fabric.
The tiny, scattered stitches allow the fabric to show through, creating a sense of airiness and translucency.
Add main veins with a simple backstitch to provide structure without sacrificing the delicate feel.


