

Embroidery is more than a craft; it’s a quiet practice of turning simple lines of thread into something beautiful and intentional. If you’ve ever felt that your stitches could be more refined or your designs more personal, you’re in the right place.
You don’t need dozens of complex stitches or expensive materials to elevate your work. Often, the most significant improvements come from small, thoughtful adjustments: changing the number of threads you use, altering the direction of a stitch, or choosing a fabric that enhances your design.
These minimalist botanical ideas are designed to help you focus on those very details. Each one is a gentle invitation to slow down, observe the quiet beauty of nature, and translate it into stitches that feel both calm and confident. Let’s begin.
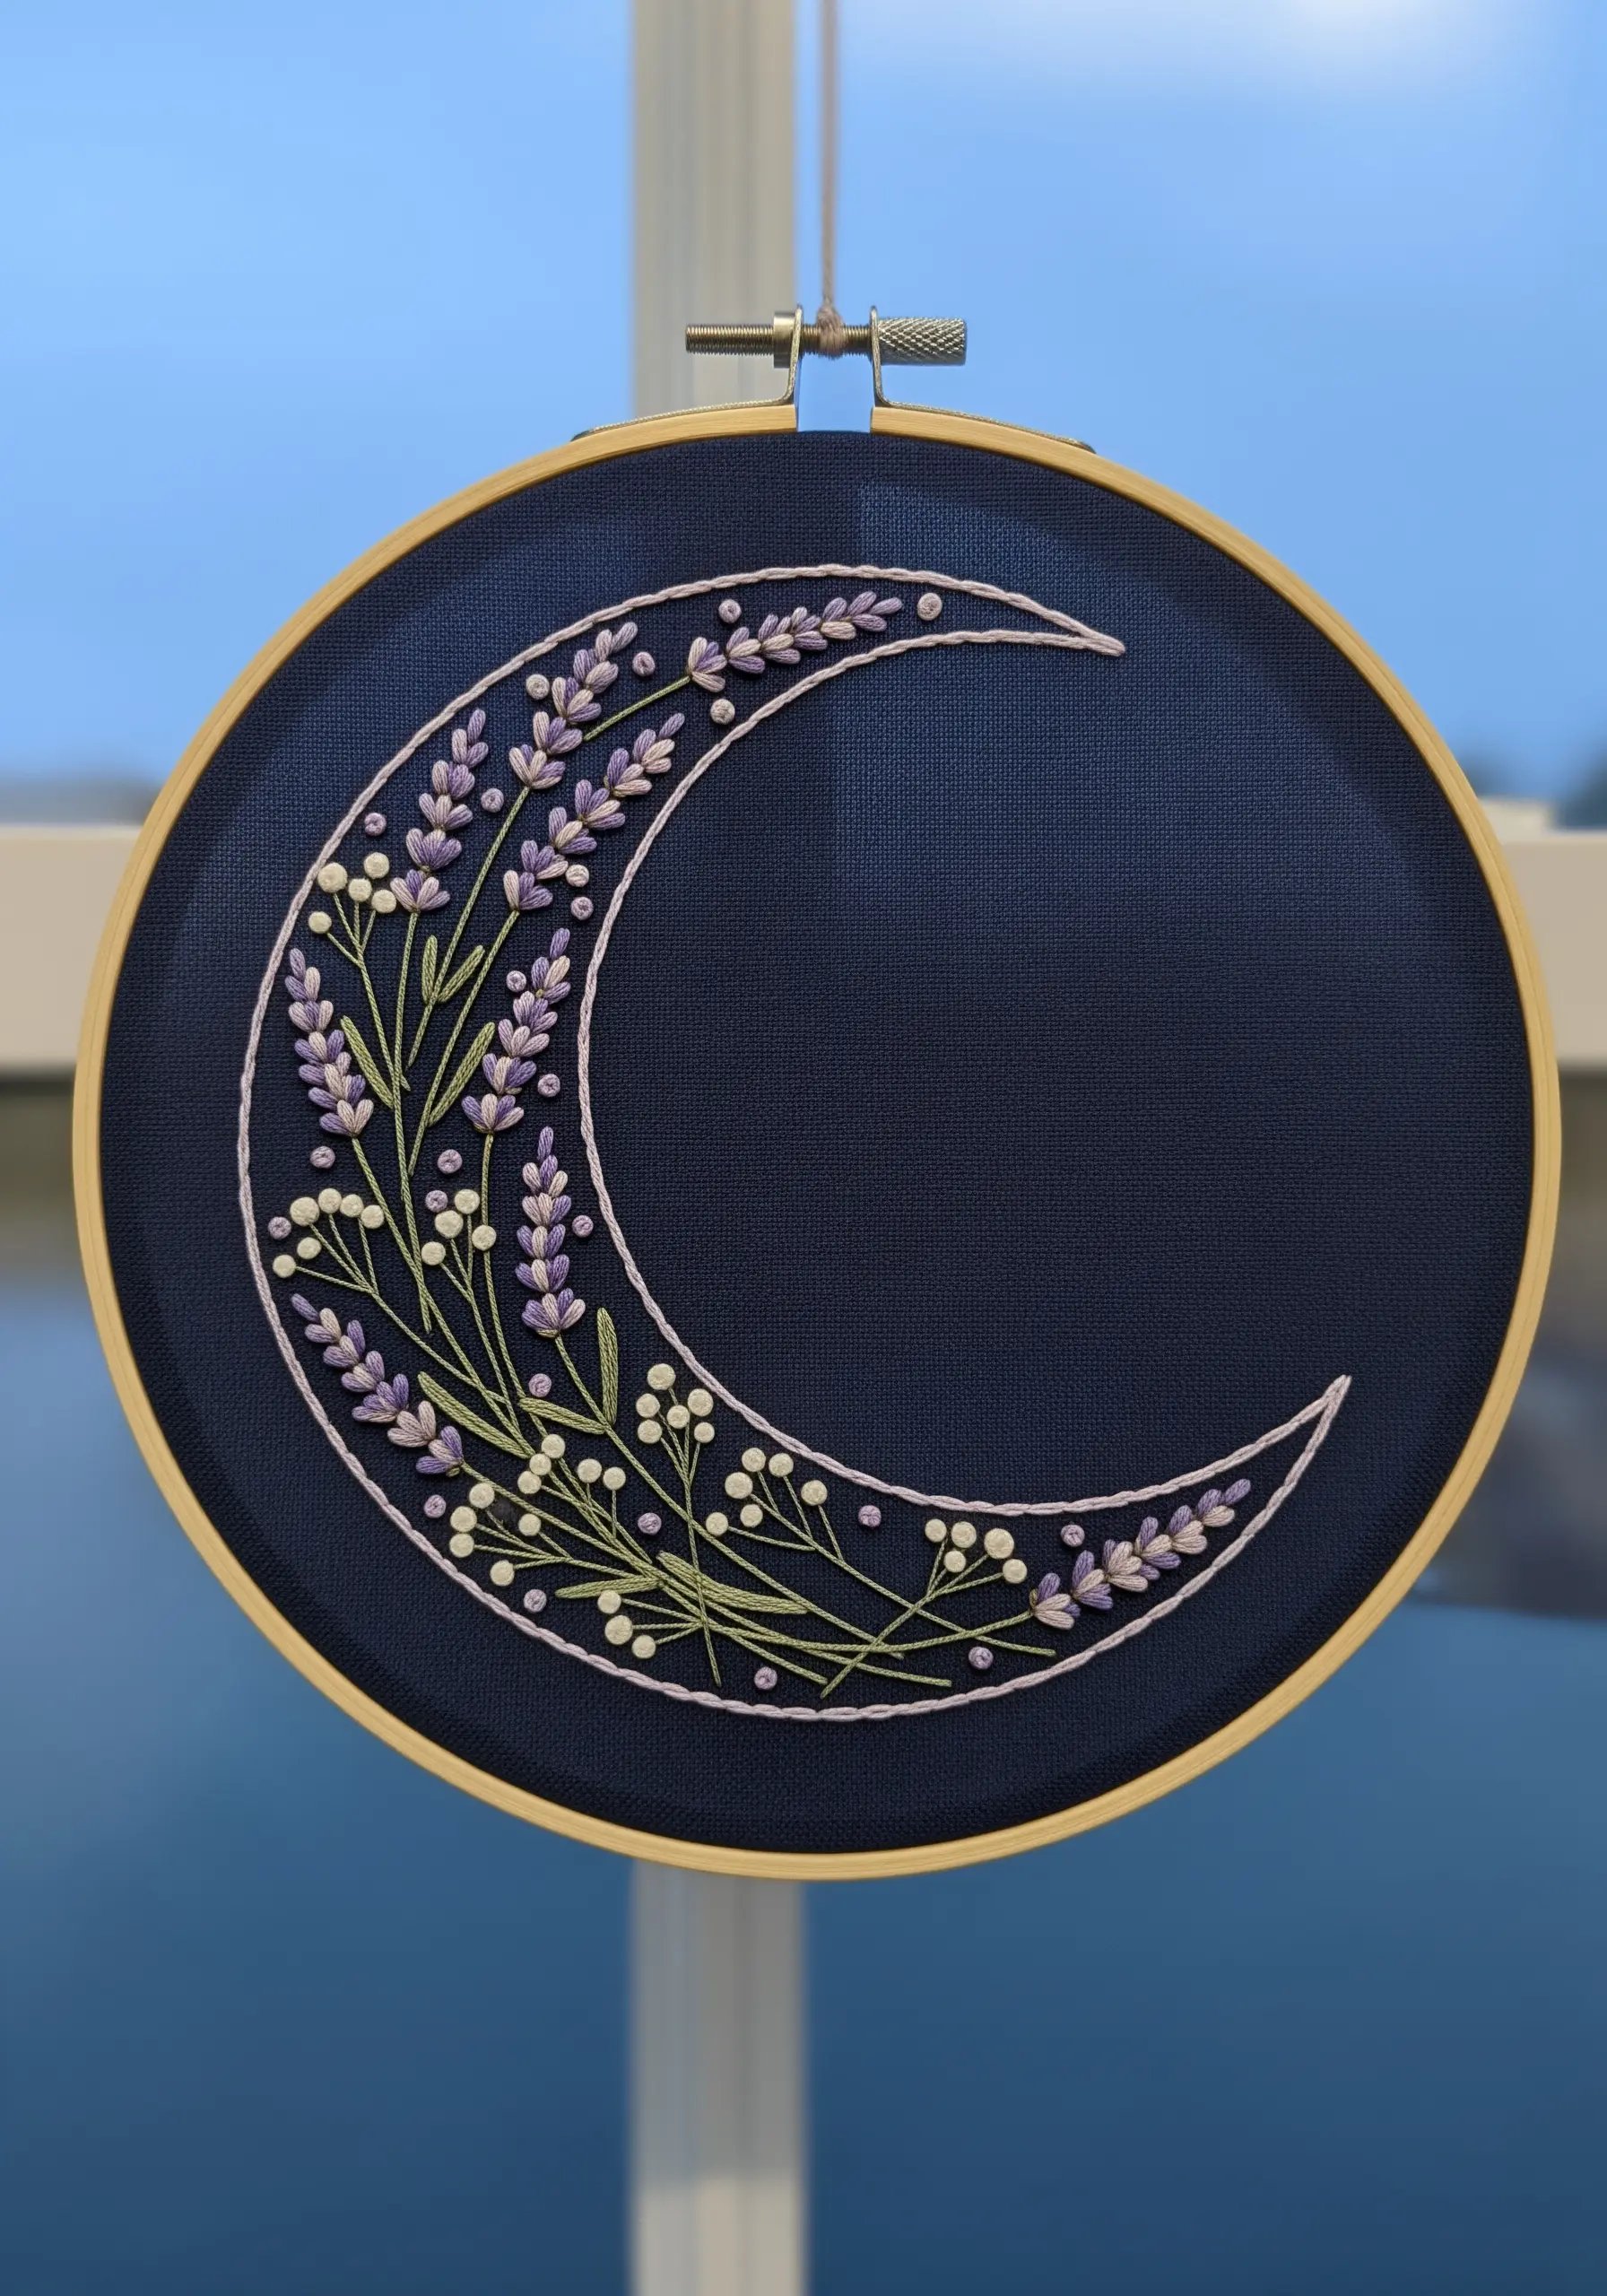
1. Render Lavender with Tactile French Knots
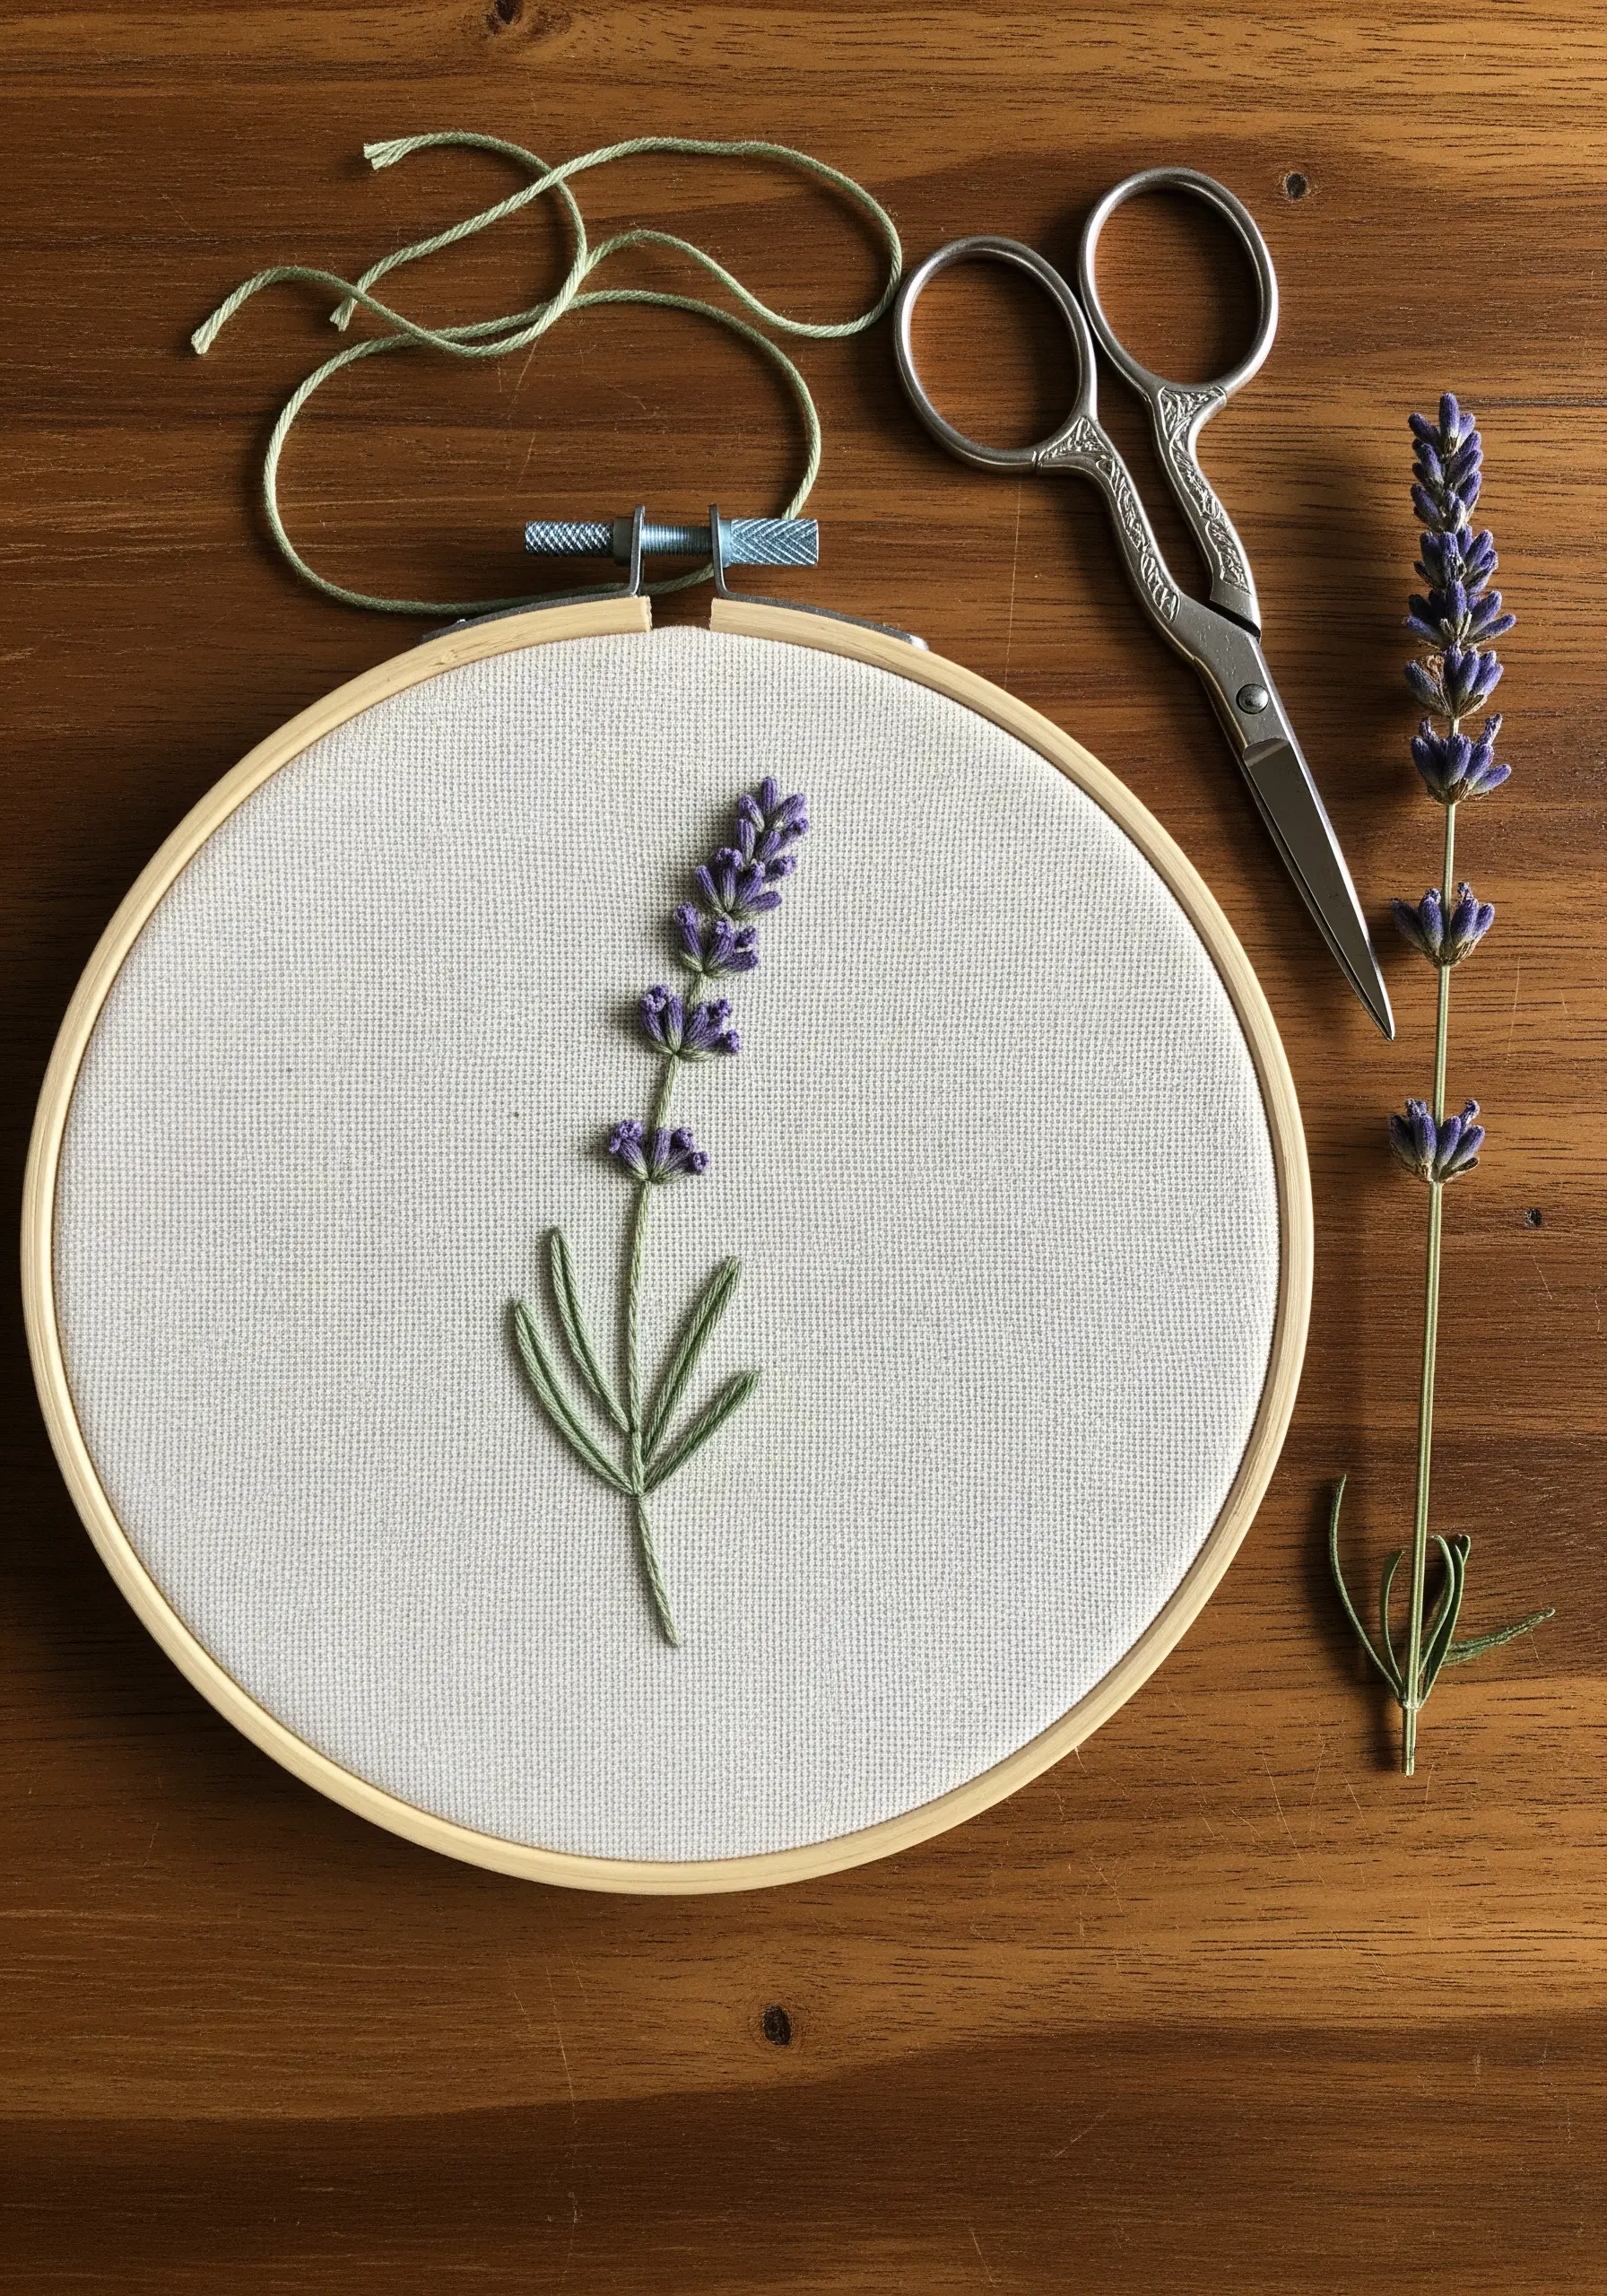
Create a realistic lavender sprig by focusing on texture, not complexity.
Use two or three strands of purple floss to make tight French knots for the flower buds, clustering them closely at the top and spacing them out as you move down the stem.
For the stem and leaves, switch to a simple stem stitch using two strands of green thread.
This combination of a textured stitch (knots) and a line stitch (stem) creates a balanced, three-dimensional effect that feels both delicate and true to life.
The technique elevates a simple motif into a piece of calm, sensory art.
2. Create Movement with Directional Satin Stitch
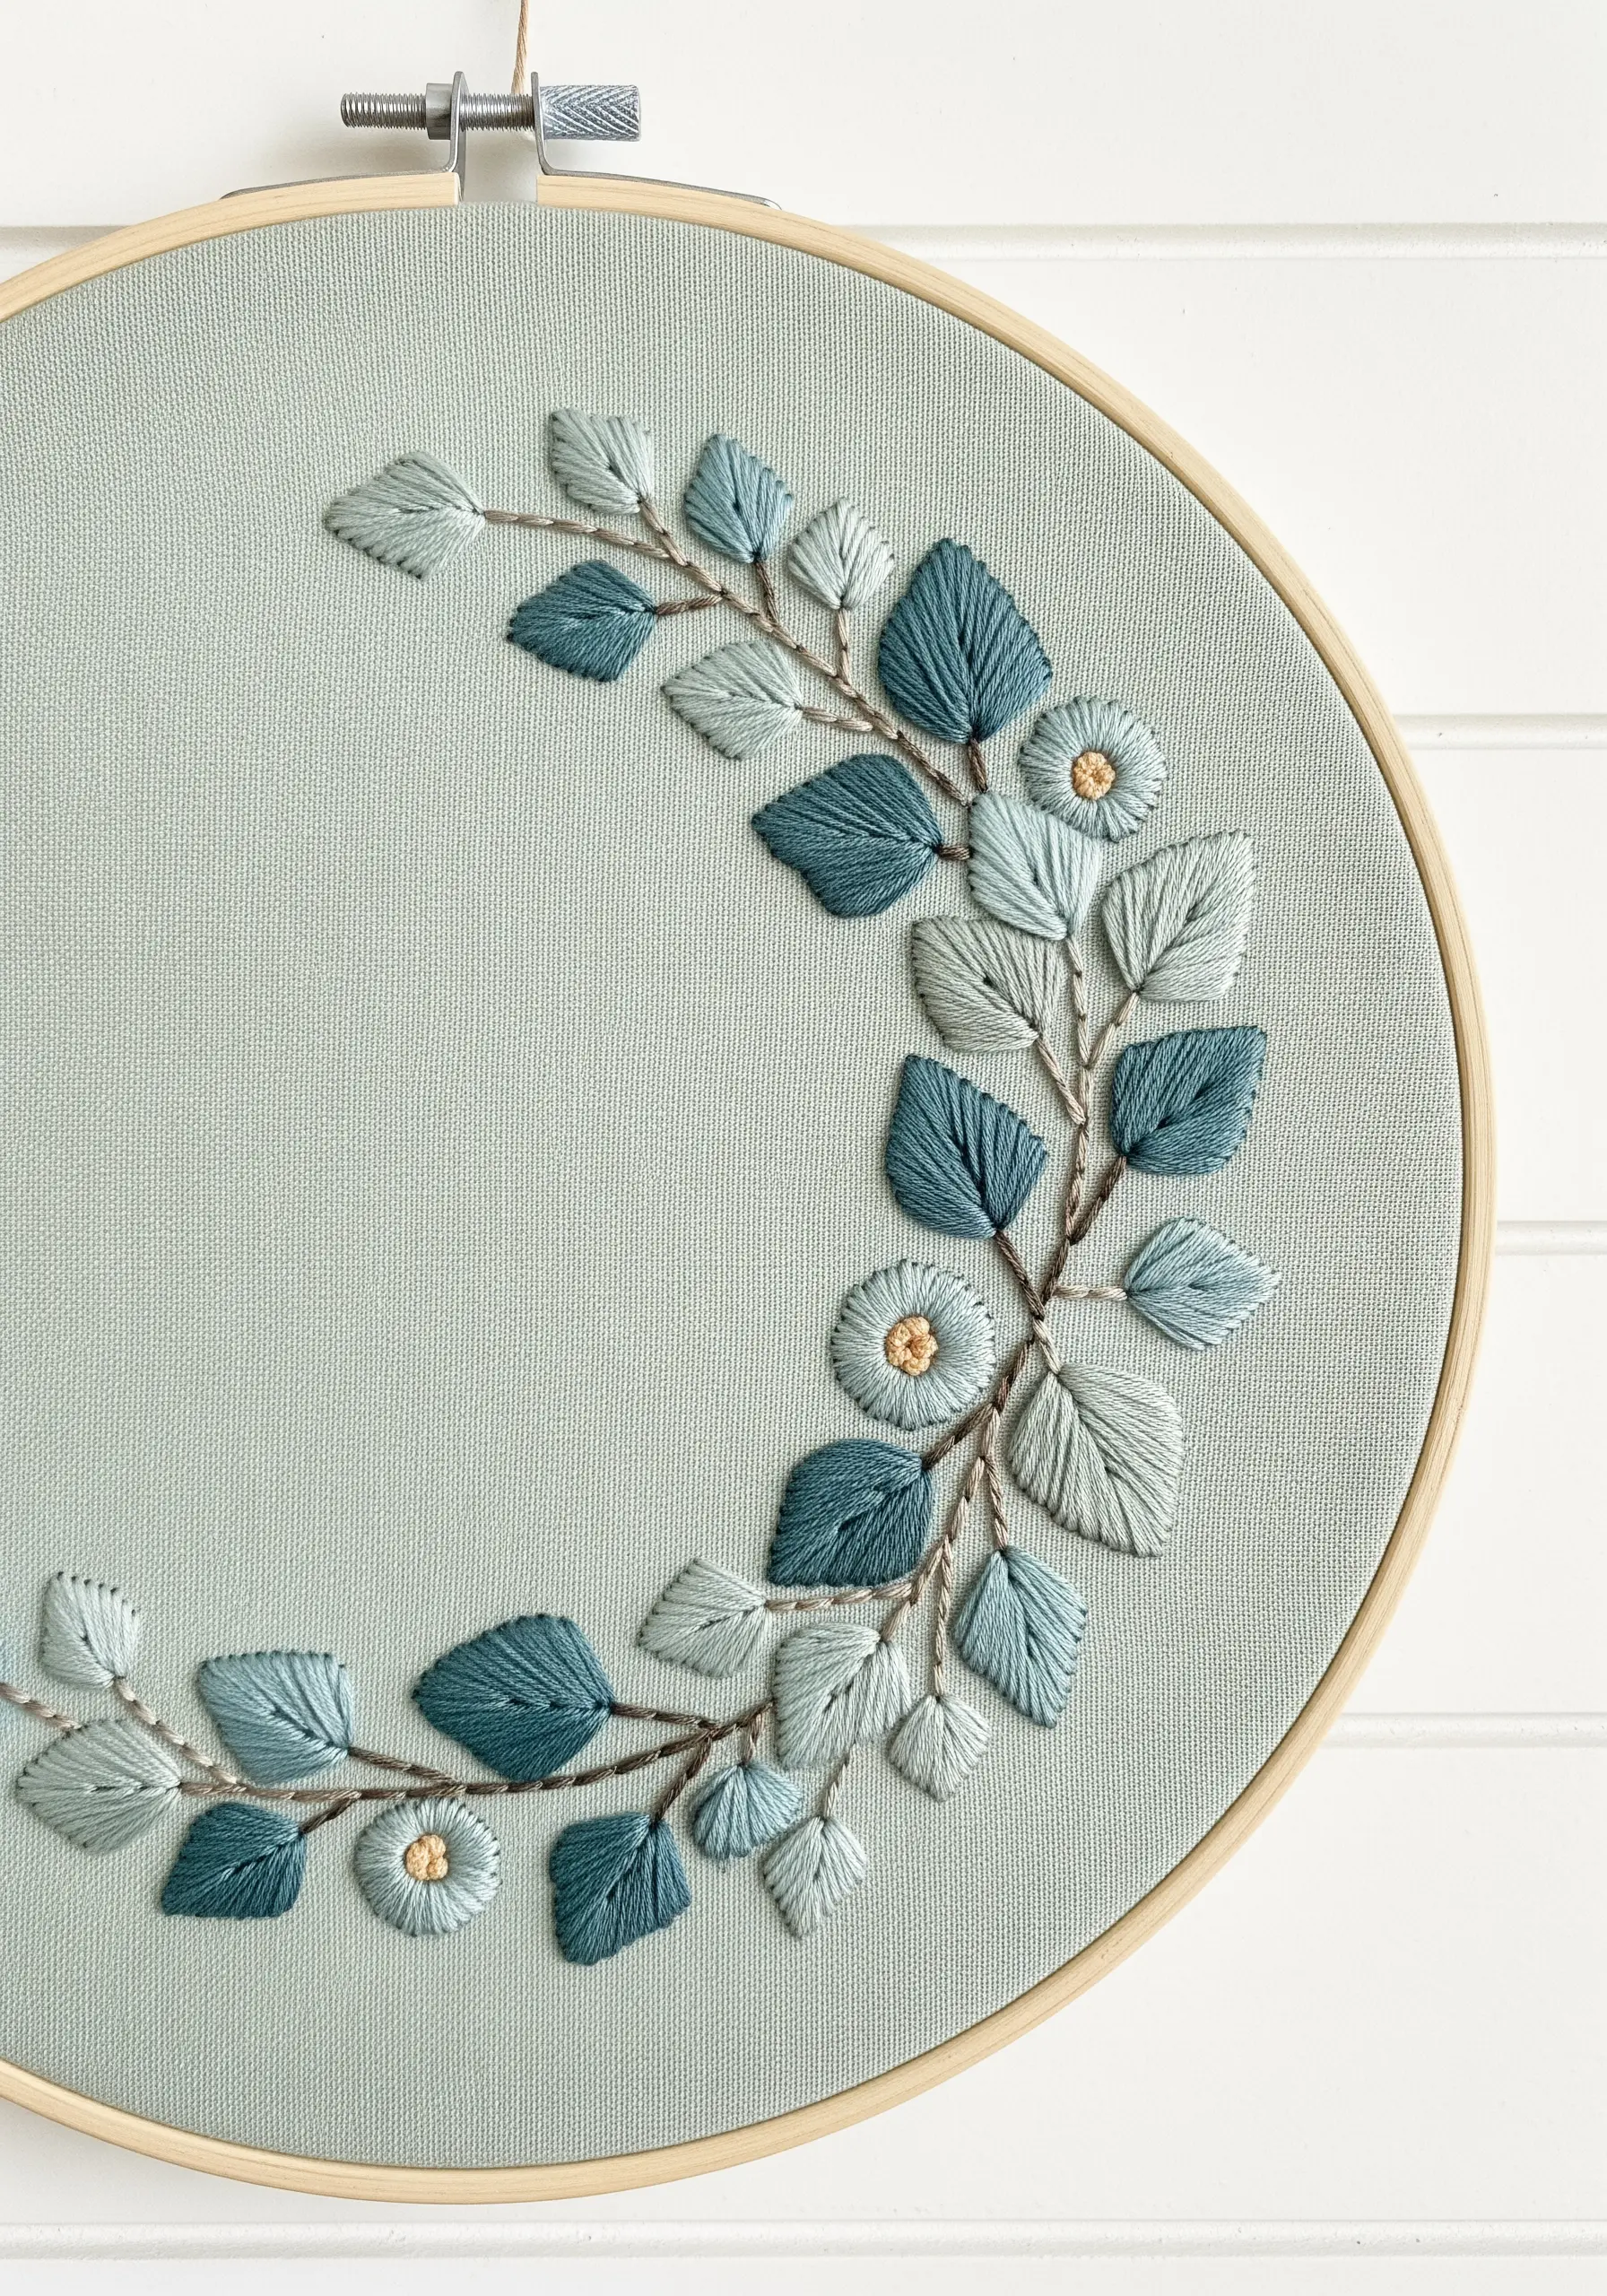
Elevate a simple floral wreath by controlling the direction of your satin stitches.
Instead of filling each leaf with uniform vertical or horizontal stitches, angle them to follow the natural curve of the leaf, pointing away from the stem.
This small adjustment makes the thread catch the light differently, creating the illusion of shadow and movement.
Use a cohesive, muted color palette—like these dusty blues and sages—to ensure the design feels harmonious rather than busy.
This thoughtful approach to stitch direction is what separates beginner work from polished textile art.
3. Master the Bold Simplicity of Line Art
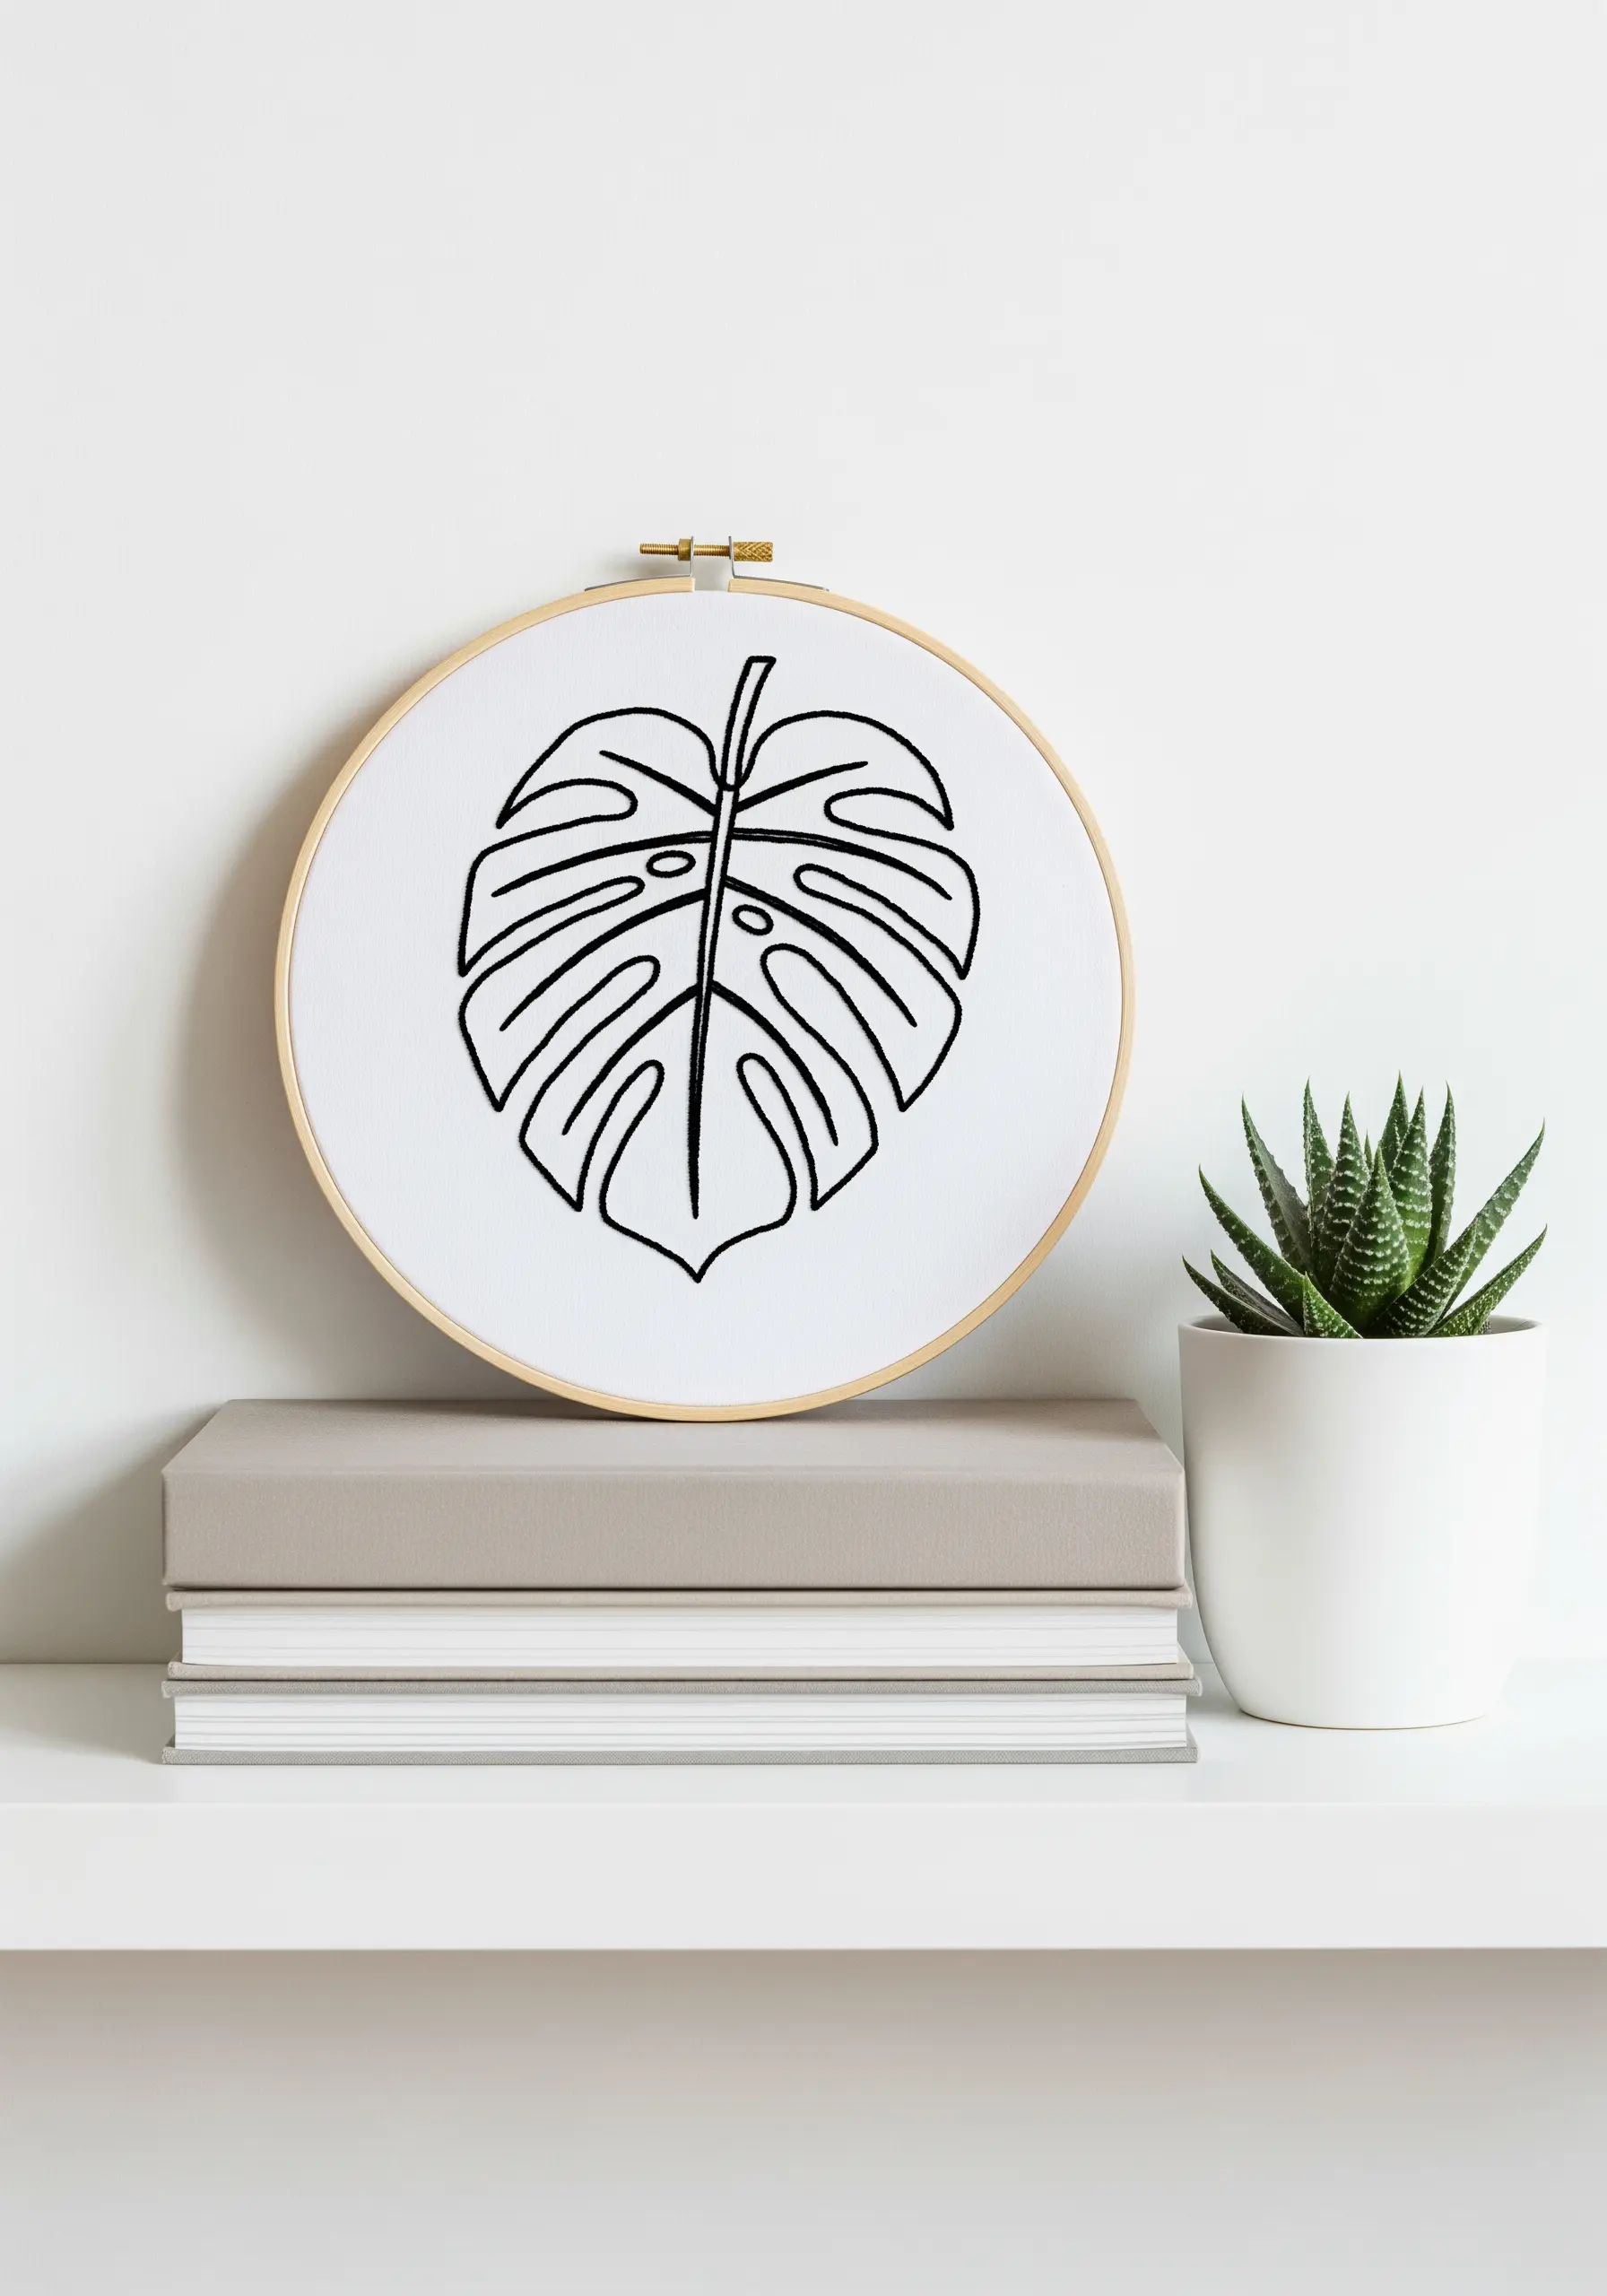
Capture the iconic shape of a Monstera leaf using only a single, clean line.
For a bold, graphic look, use all six strands of black embroidery floss with a backstitch or stem stitch.
To keep your lines crisp and prevent fabric puckering, especially on a plain-weave cotton, use a peel-and-stick stabilizer on the back of your fabric before you begin stitching.
This technique reinforces the fabric, allowing for perfectly smooth curves and sharp corners that define these minimalist line art nature embroidery pieces.
4. Define Shape with Fan-Like Satin Stitches
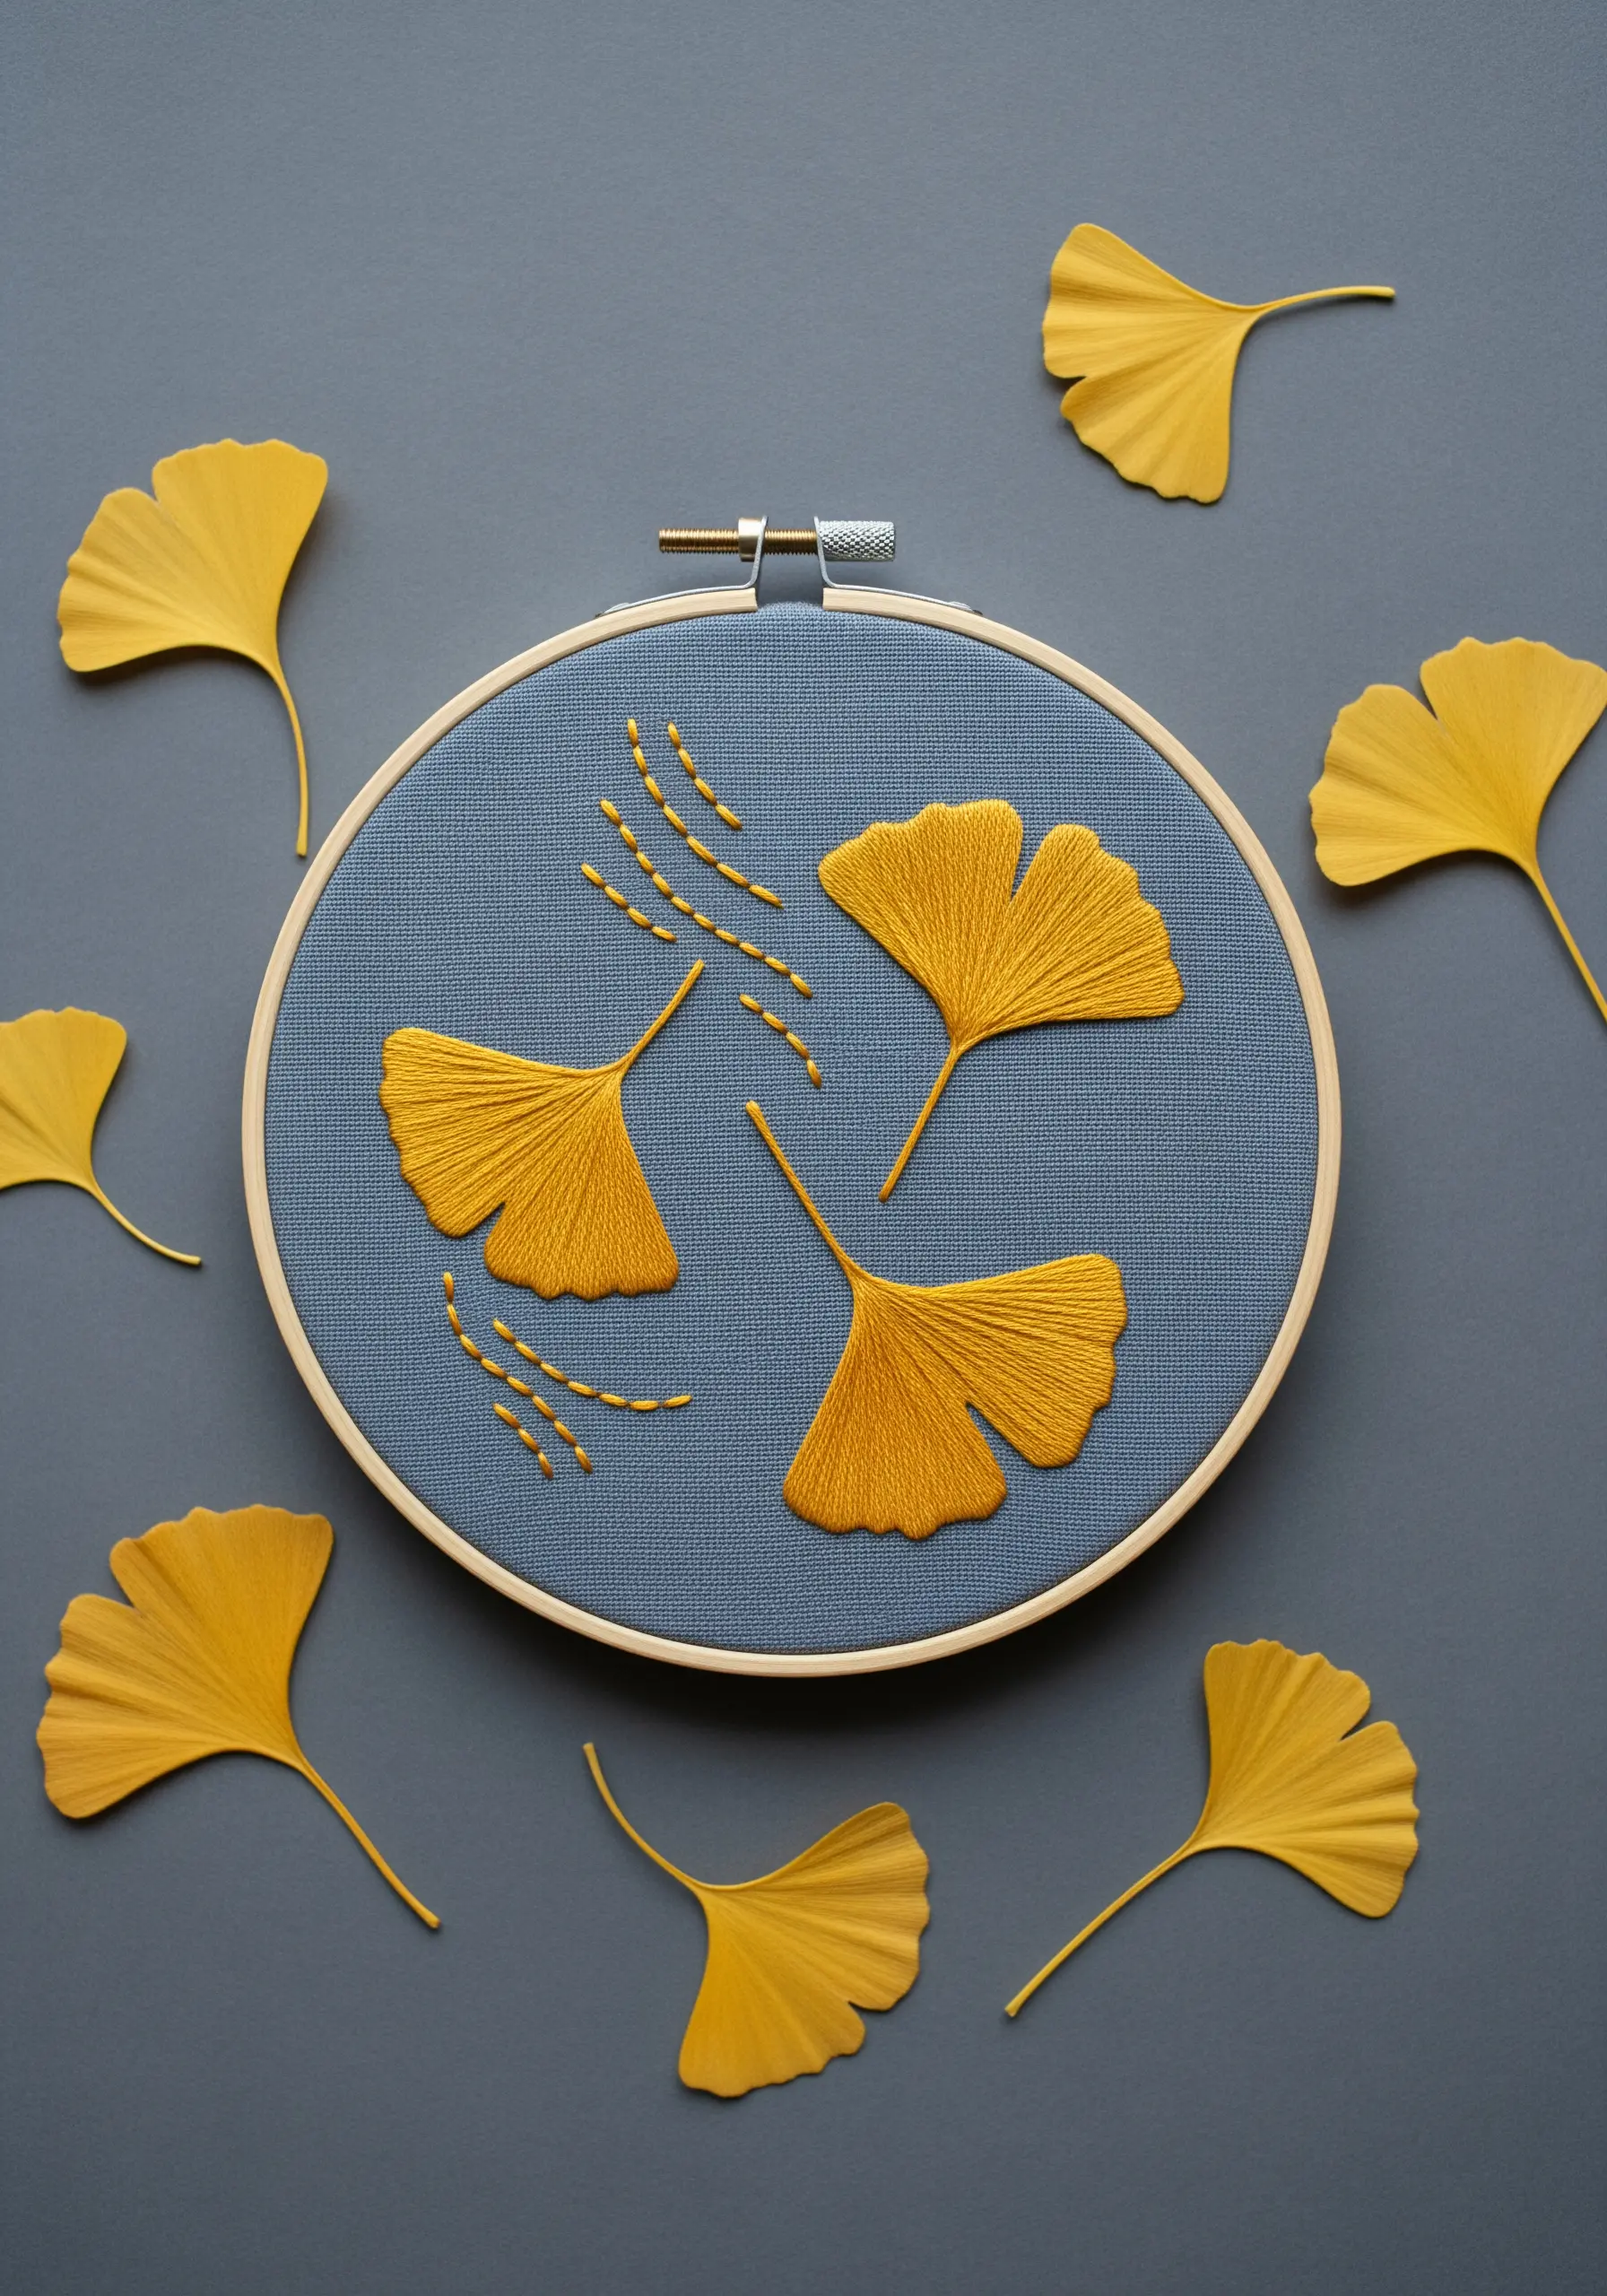
For a unique shape like a ginkgo leaf, the direction of your satin stitch is everything.
Start your stitches at the base of the leaf and fan them out towards the wavy top edge.
This technique naturally mimics the plant’s growth pattern and creates a beautiful, radiant effect.
To add a touch of movement, scatter a few tiny seed stitches nearby, as if the leaves are drifting in a gentle breeze.
The contrast between the solid, smooth leaves and the delicate, scattered stitches creates a balanced and thoughtful composition.
5. Build Realistic Ferns with Layered Stitches
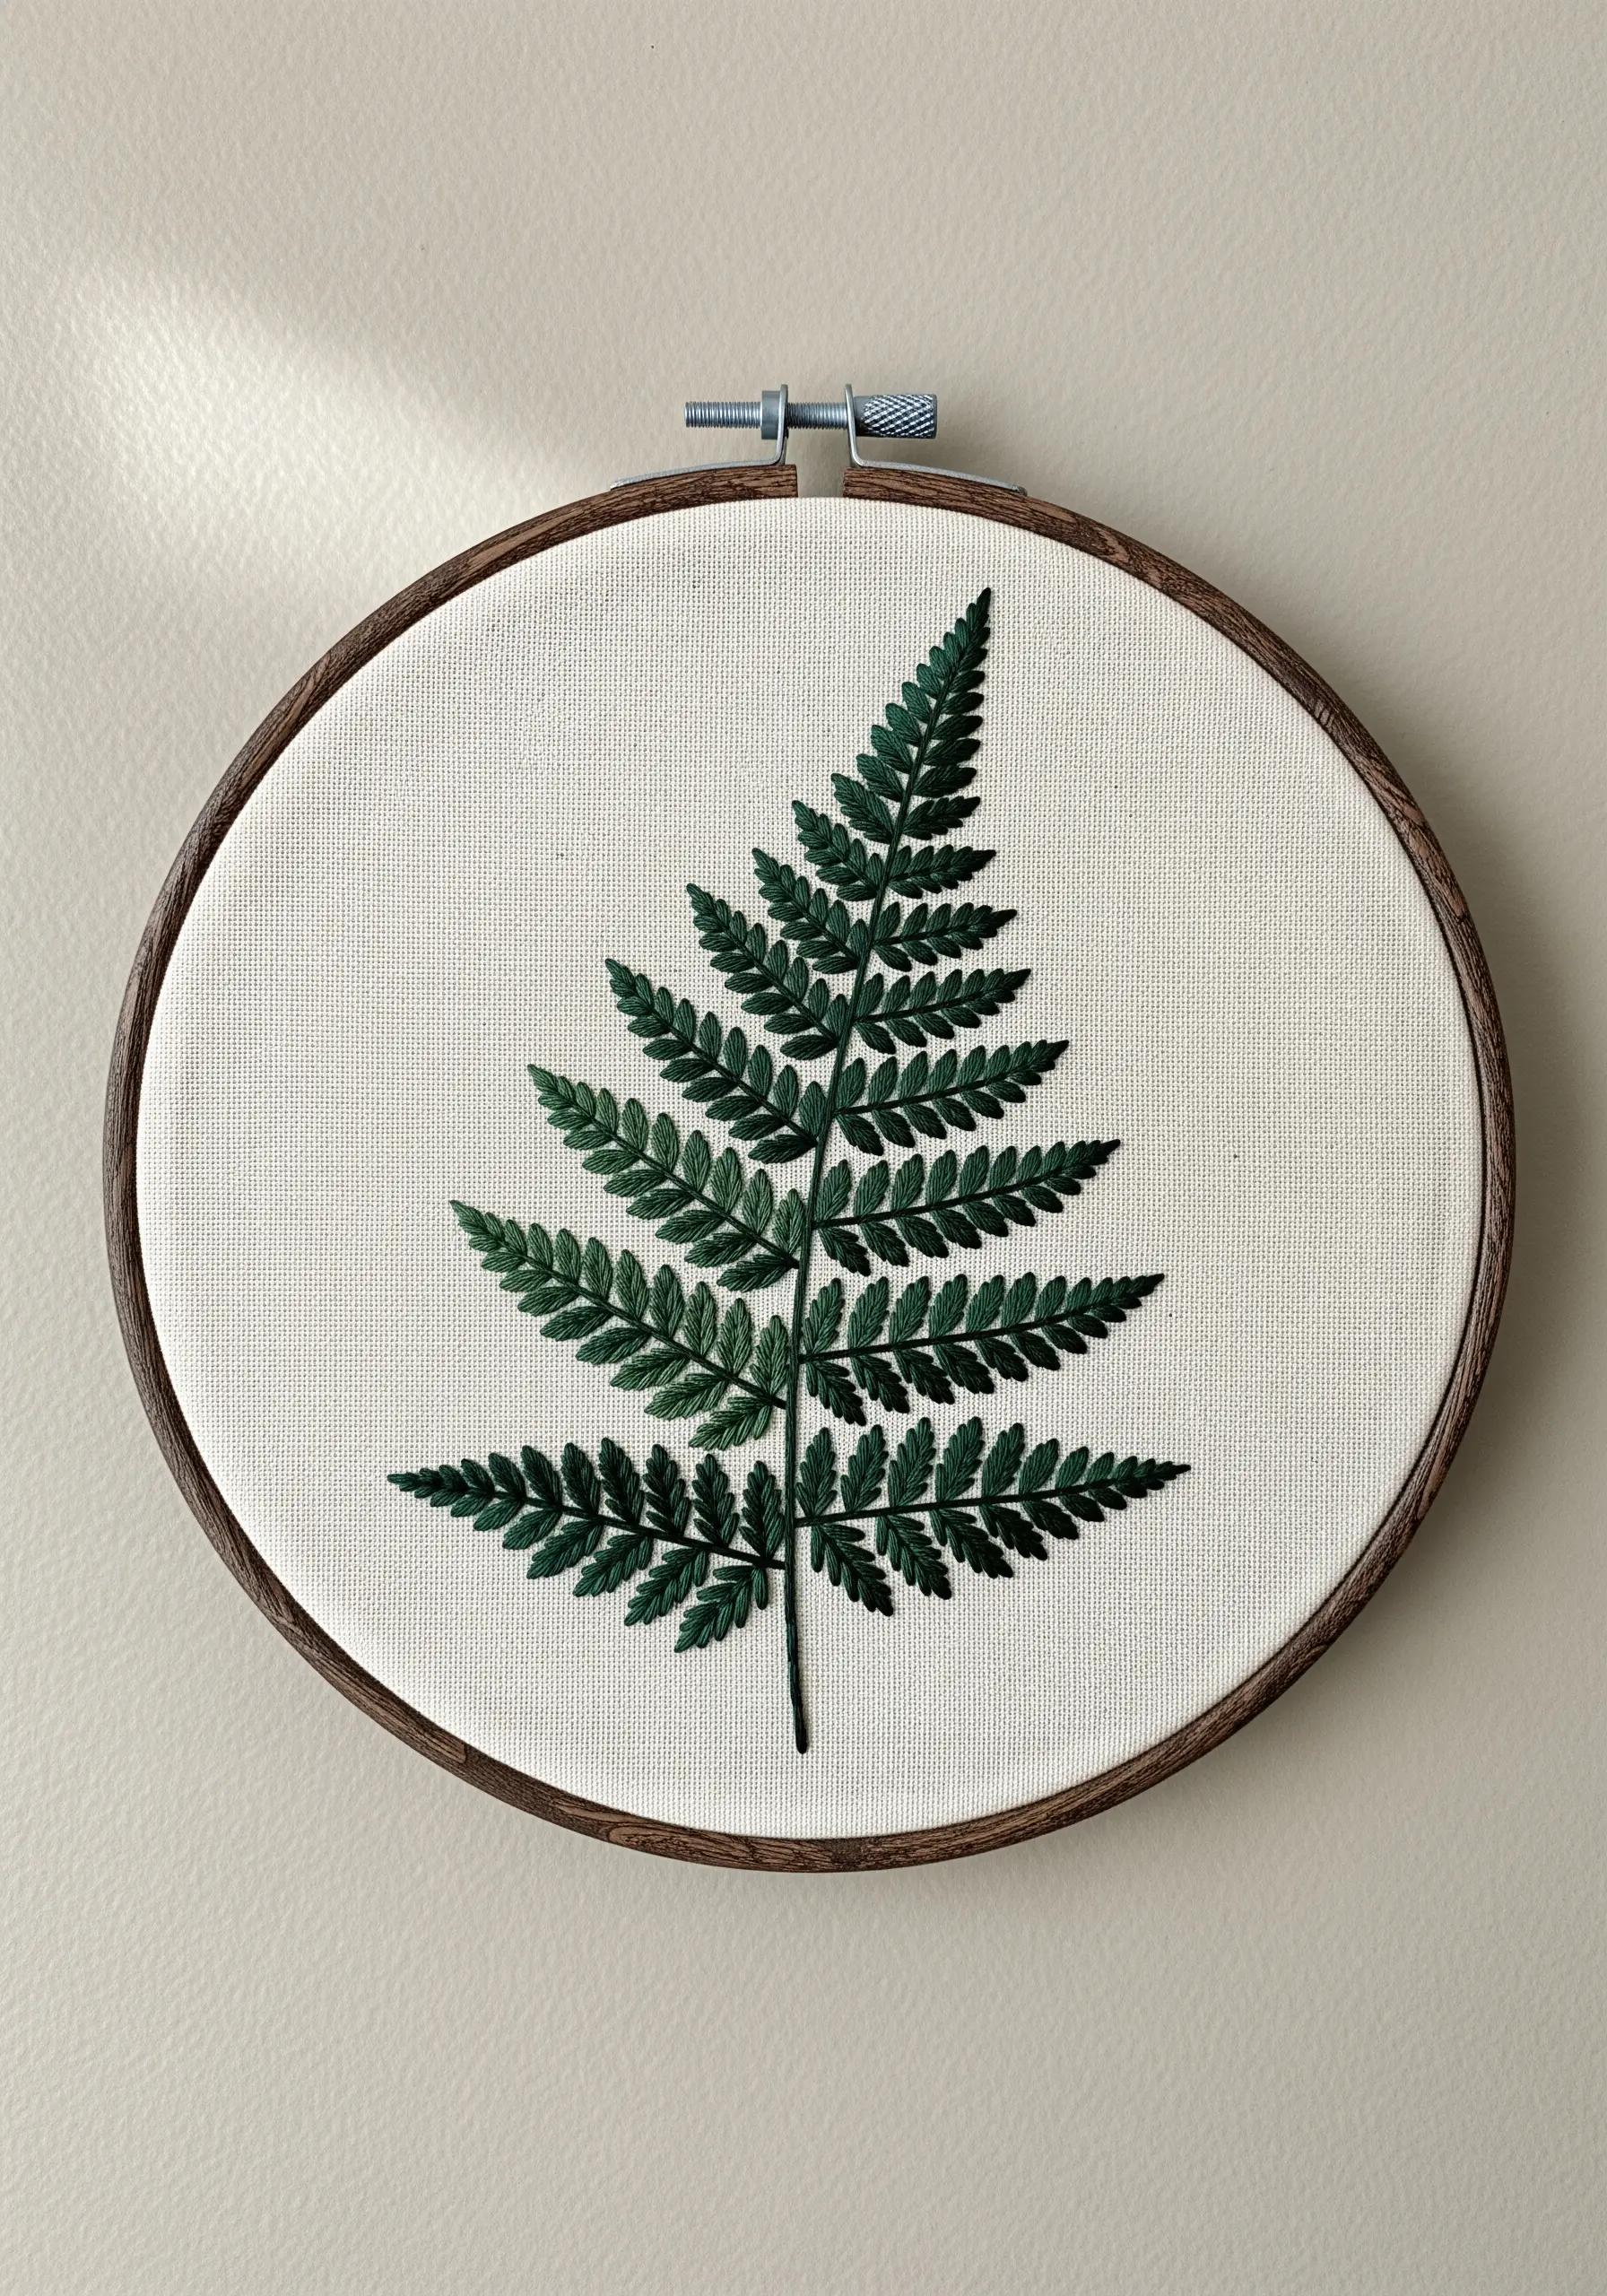
To embroider a fern that looks lush and realistic, build its form with small, layered stitches.
First, create the central stem with a simple stem stitch.
Then, work the individual fronds using a fishbone stitch or small, angled straight stitches on either side of a central line.
For added depth, use two closely related shades of dark green and alternate them randomly.
This subtle color variation breaks up the solid color, giving the fern a more natural, multi-tonal appearance that feels deeply organic.
6. Capture Ephemeral Motion with High-Contrast Thread
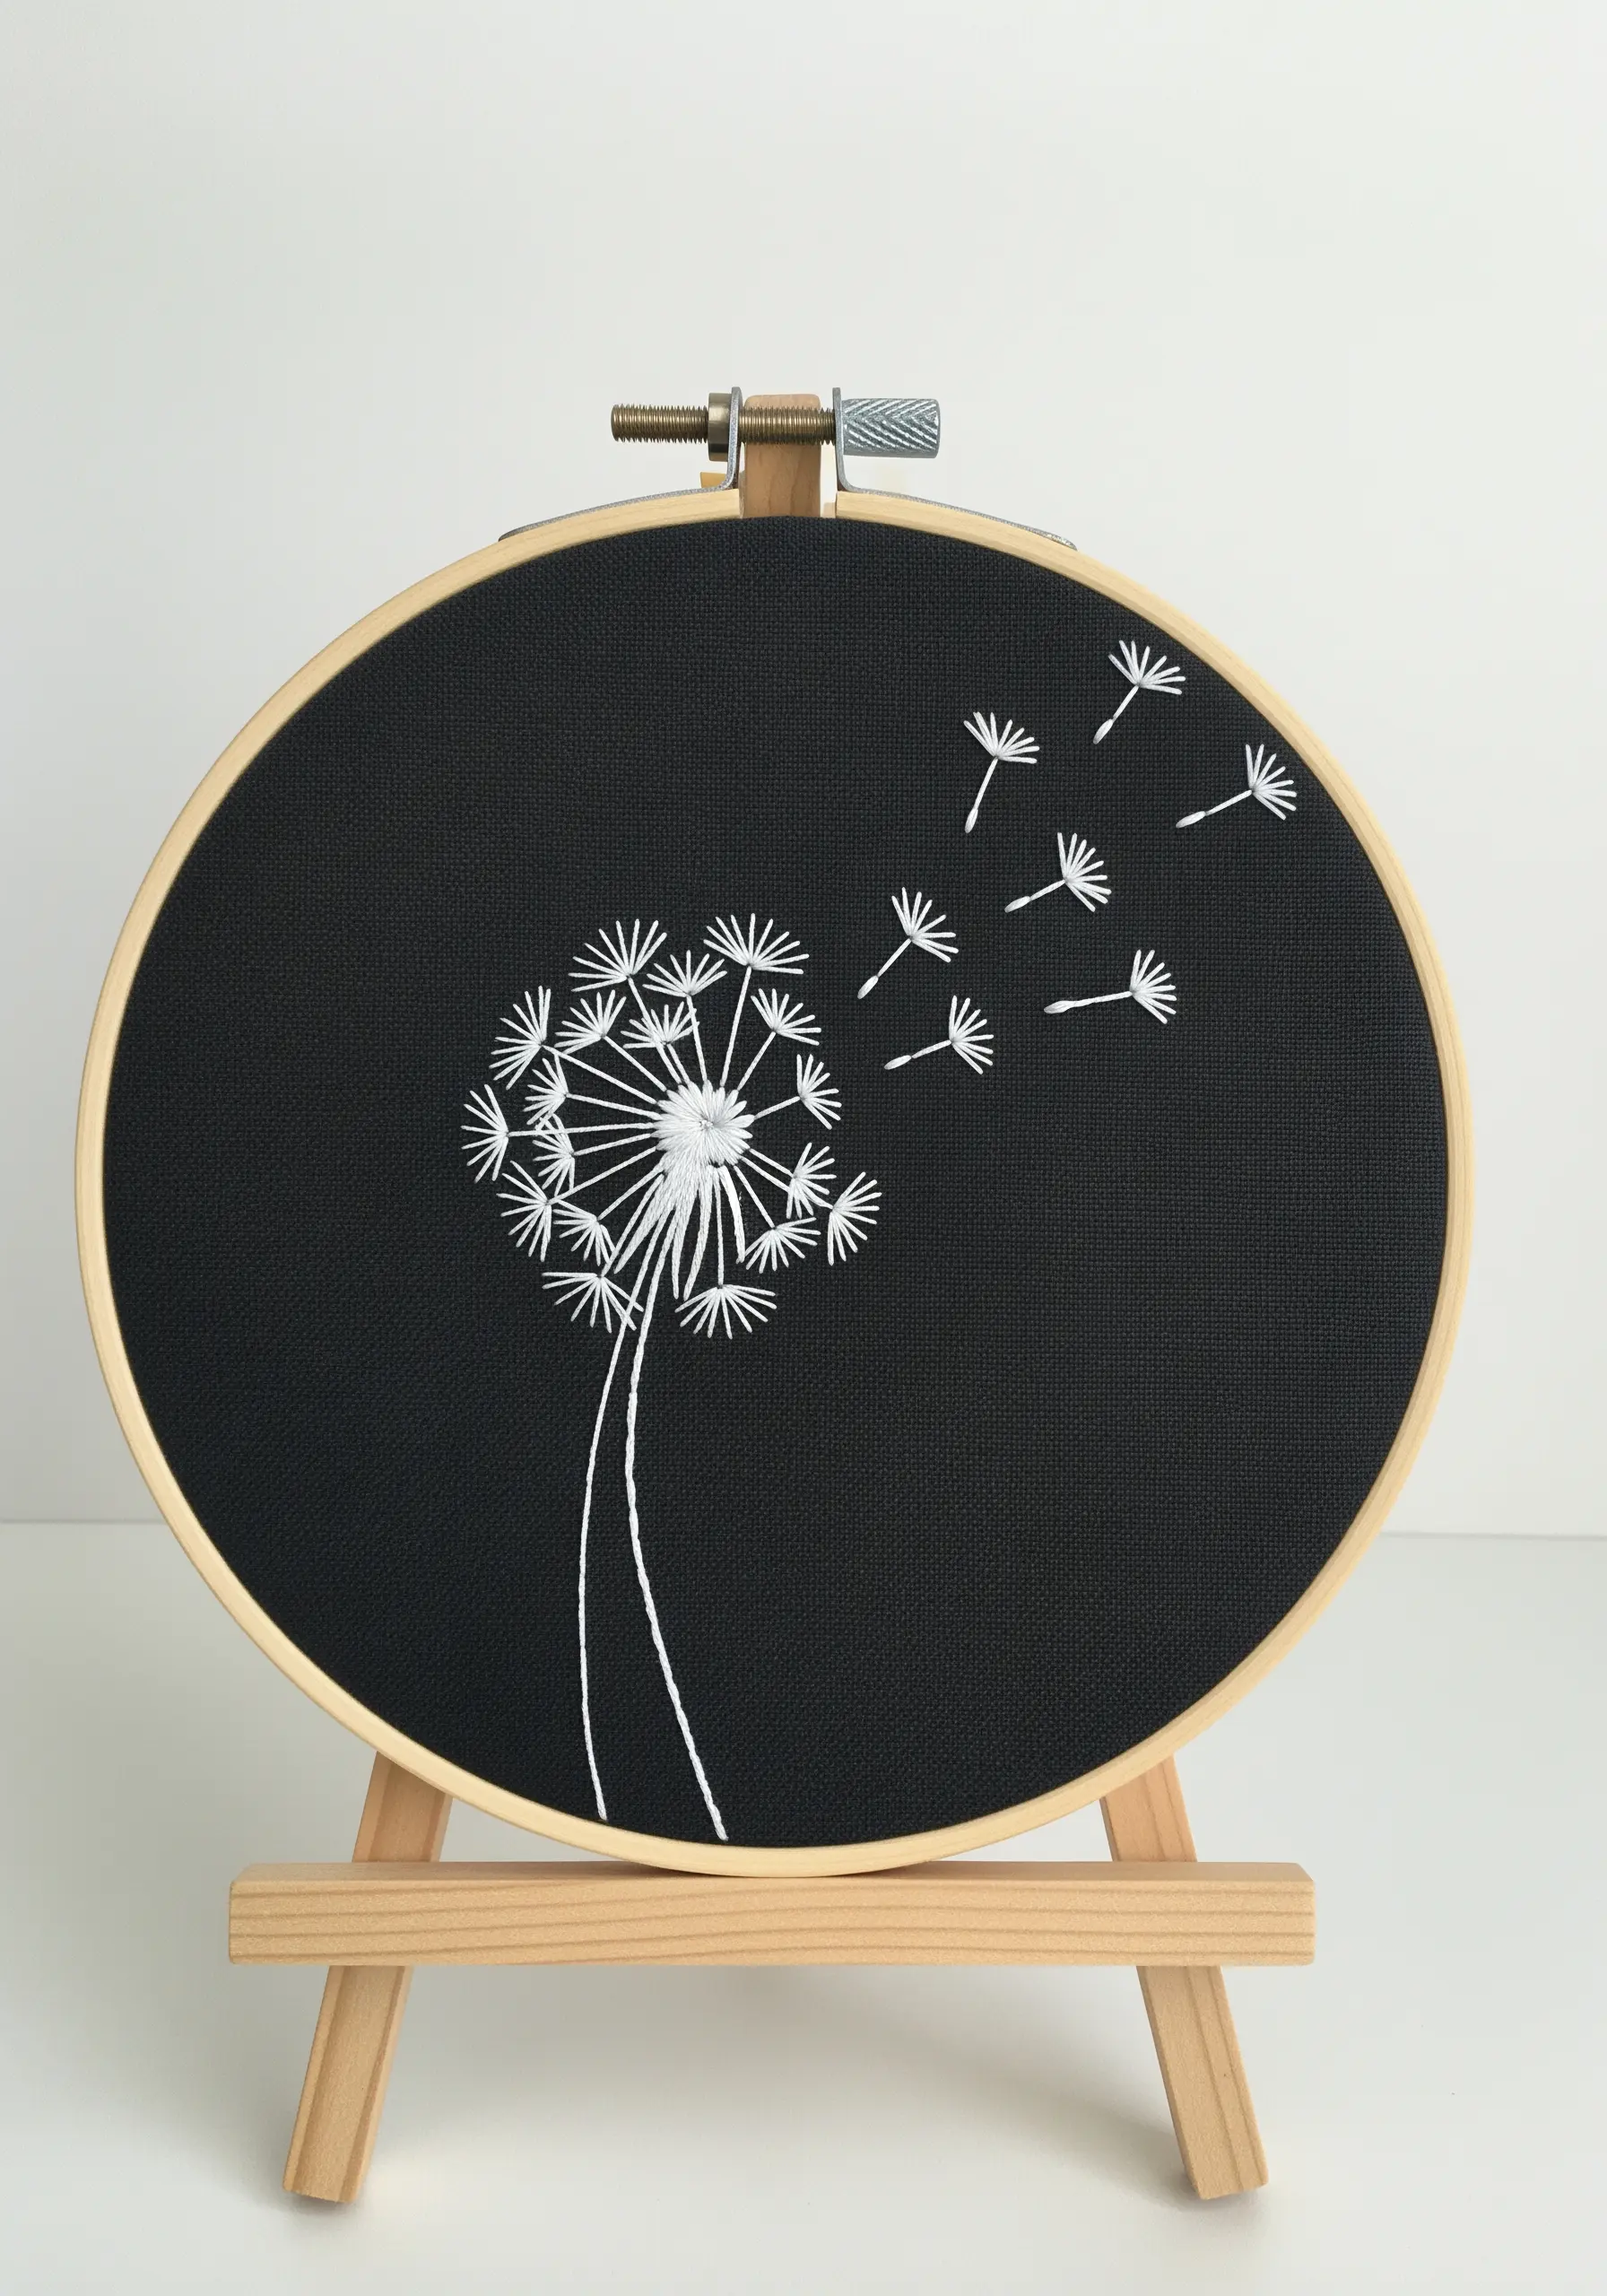
A simple dandelion design becomes instantly dramatic when stitched in bright white on black fabric.
Use a single strand of floss for the delicate seeds to emphasize their weightlessness.
A combination of detached chain stitches and straight stitches creates the floating seeds, while the main flower head can be built with layered straight stitches radiating from the center.
The negative space here is just as important as the stitches; it creates the feeling of open air and movement.
7. Use Fishbone Stitch for Natural Leaf Veins
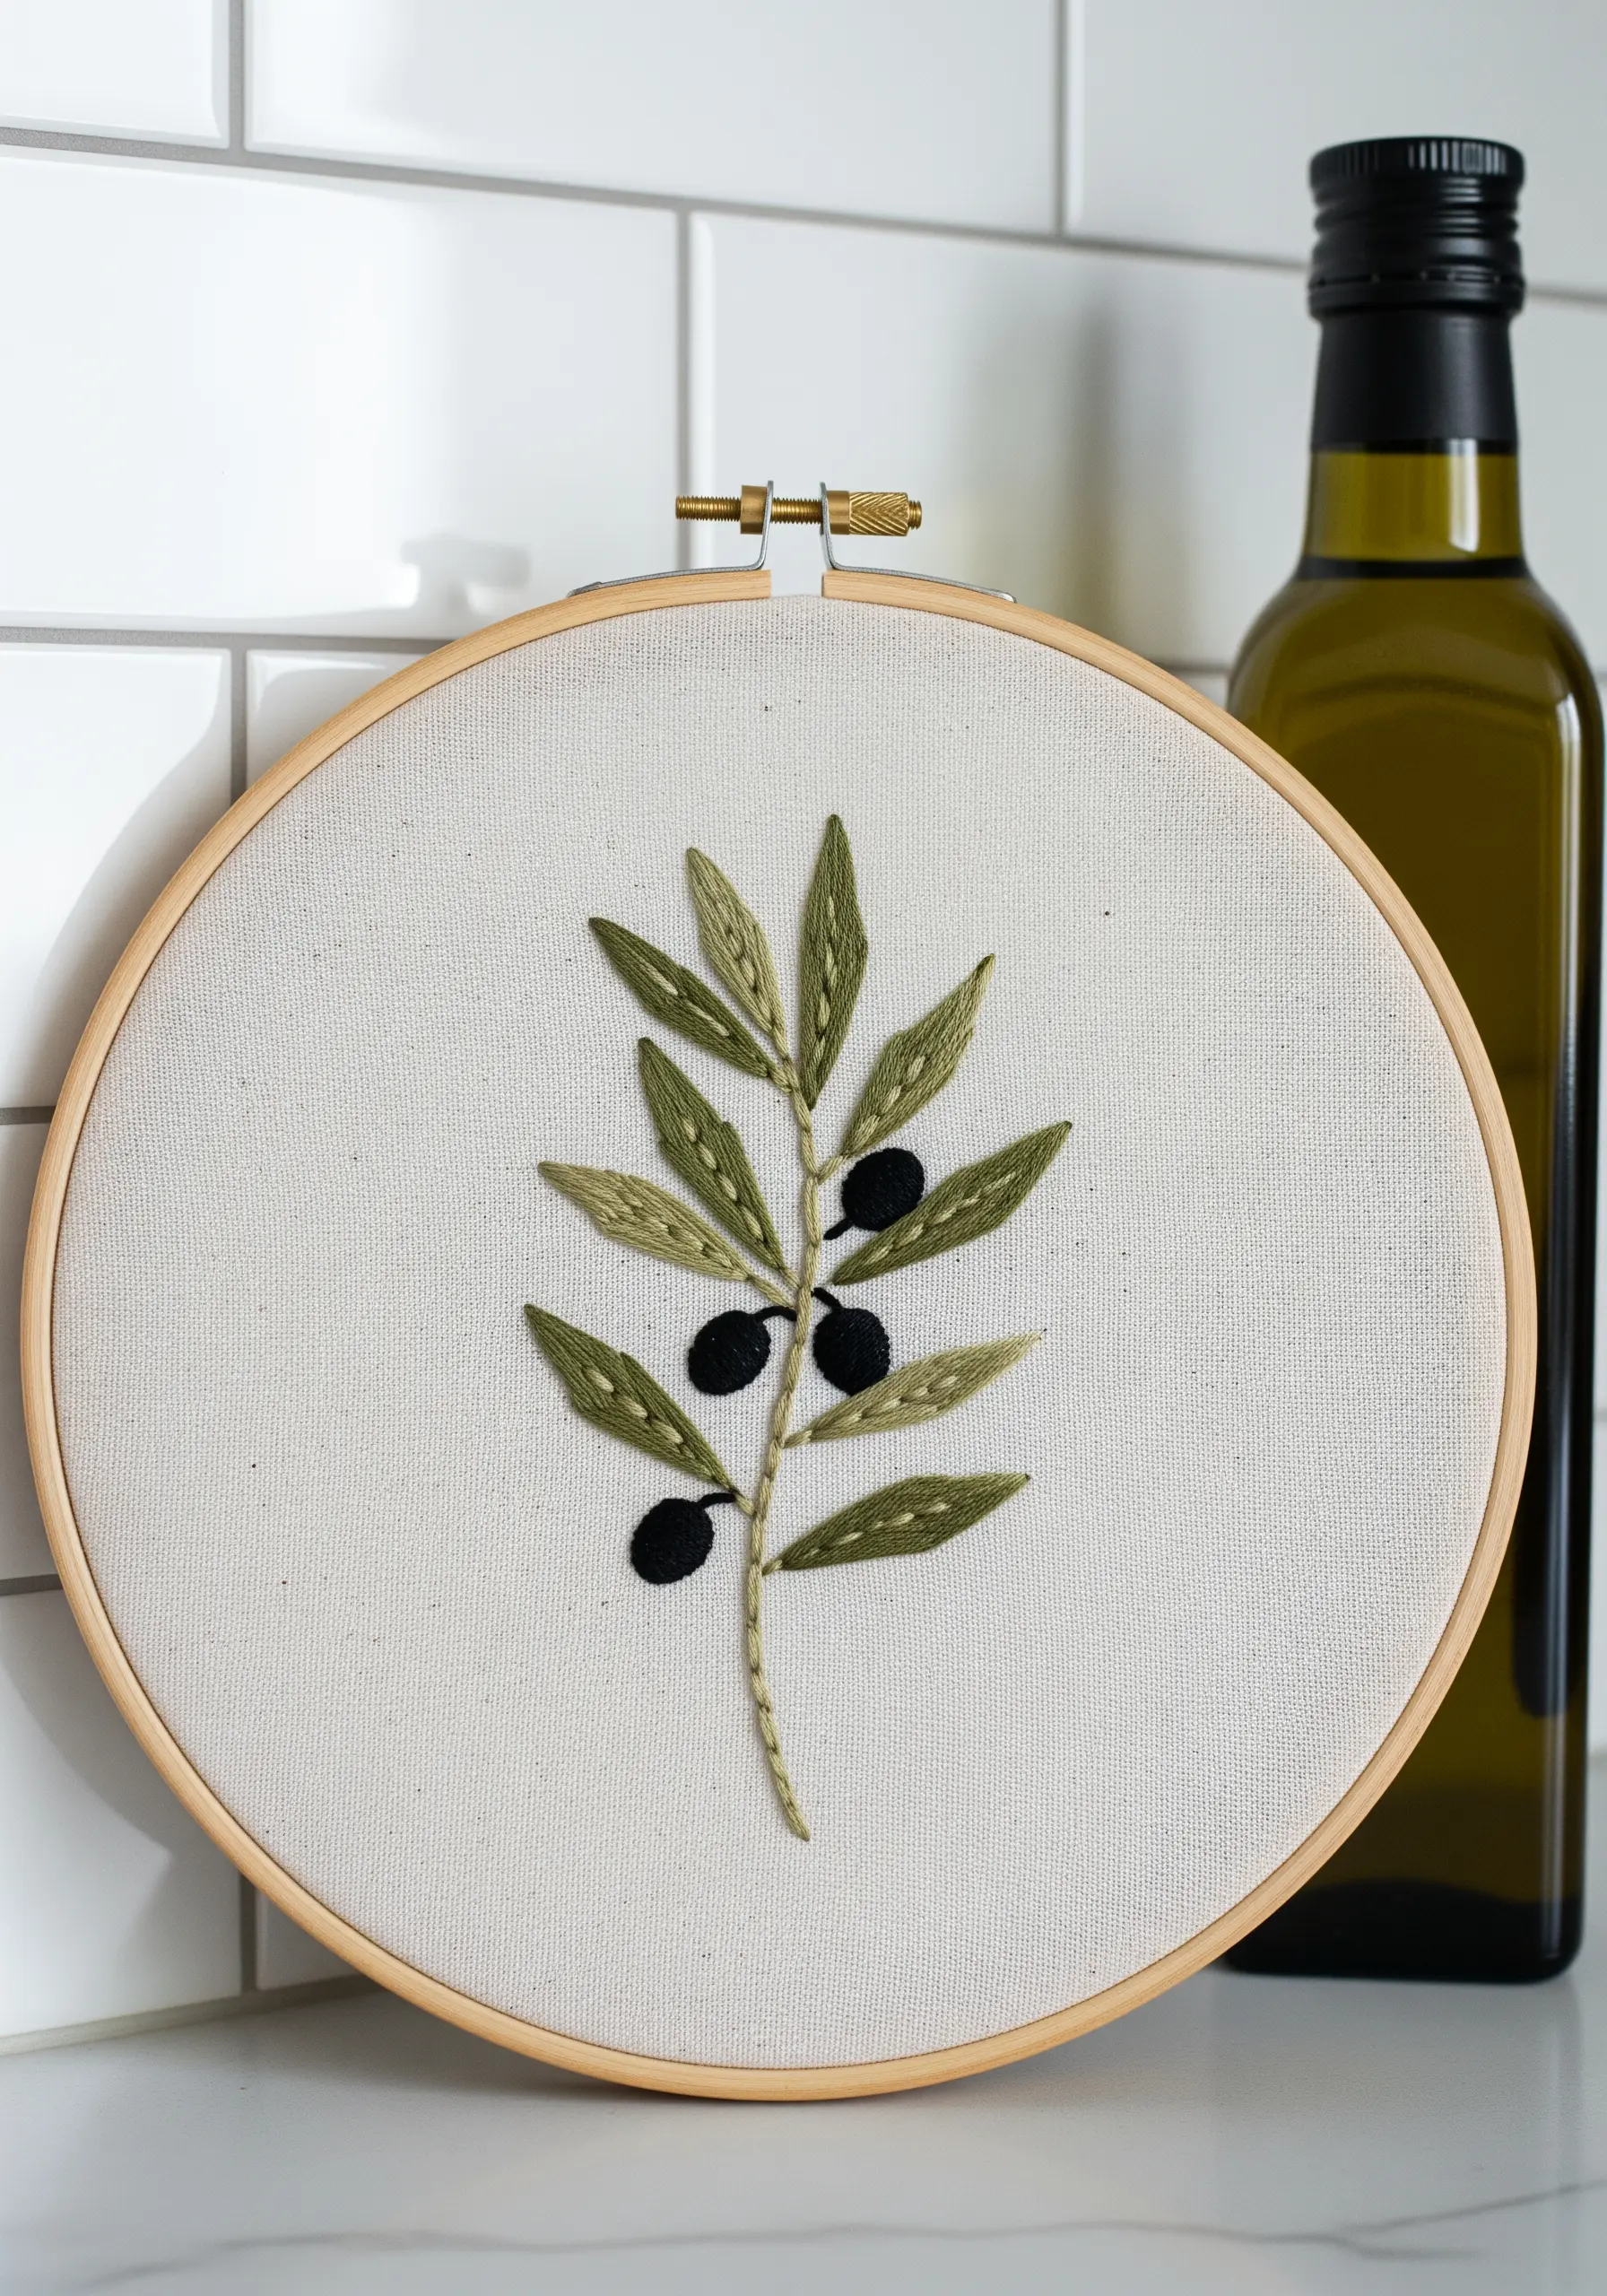
The fishbone stitch is the perfect choice for leaves like these, as it creates a central vein automatically.
Each stitch crosses over the center line, building a subtle, raised spine down the middle of the leaf without needing a separate outline.
Stitch the olives using a satin stitch in a contrasting dark color, or use French knots for a more rounded, three-dimensional look.
This efficient stitch choice gives the entire olive branch a clean, cohesive, and organic feel.
8. Compose a Meadow with Varied Stitch Textures
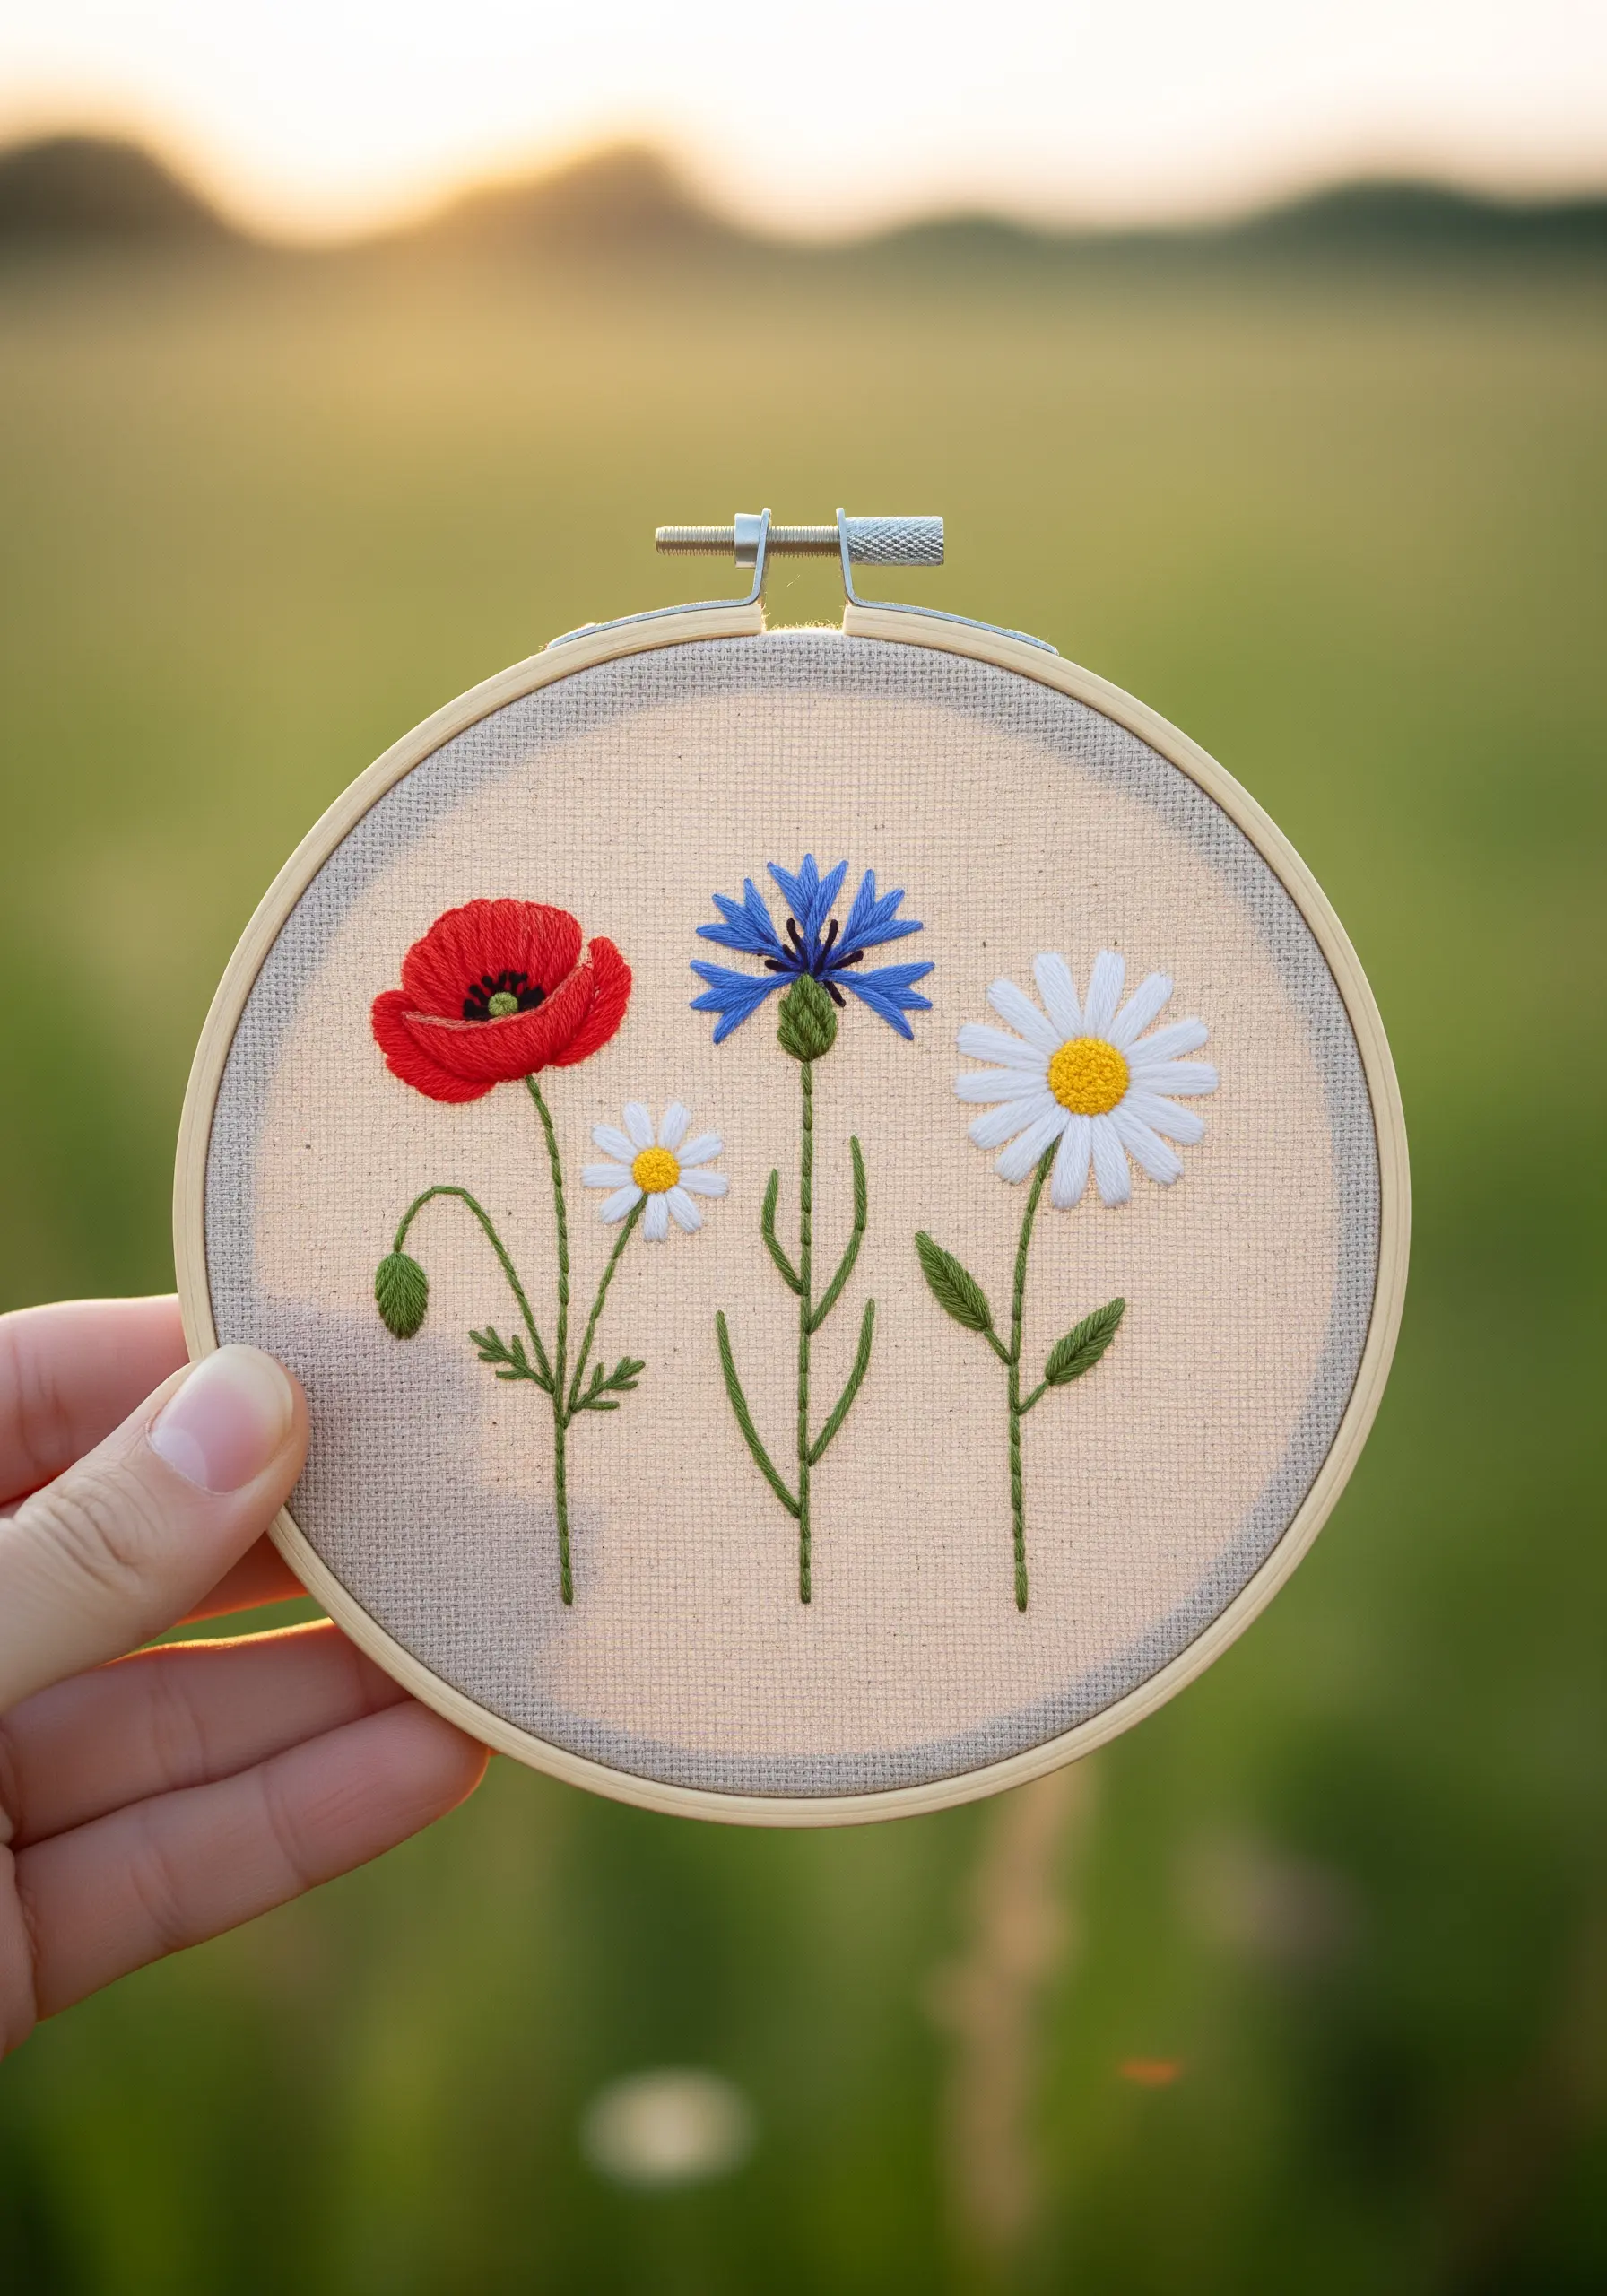
To create a vibrant wildflower scene, assign a unique stitch to each type of flower to reflect its natural texture.
Use a woven wheel stitch for the full, dense petals of the poppy, and lazy daisy stitches for the delicate petals of the daisies.
For the cornflower, use layered straight stitches fanning outward from a French knot center.
This approach transforms a simple floral arrangement into a tactile and visually interesting meadow, where each bloom has its own distinct personality.
9. Achieve Smooth Gradients with Long-and-Short Stitch
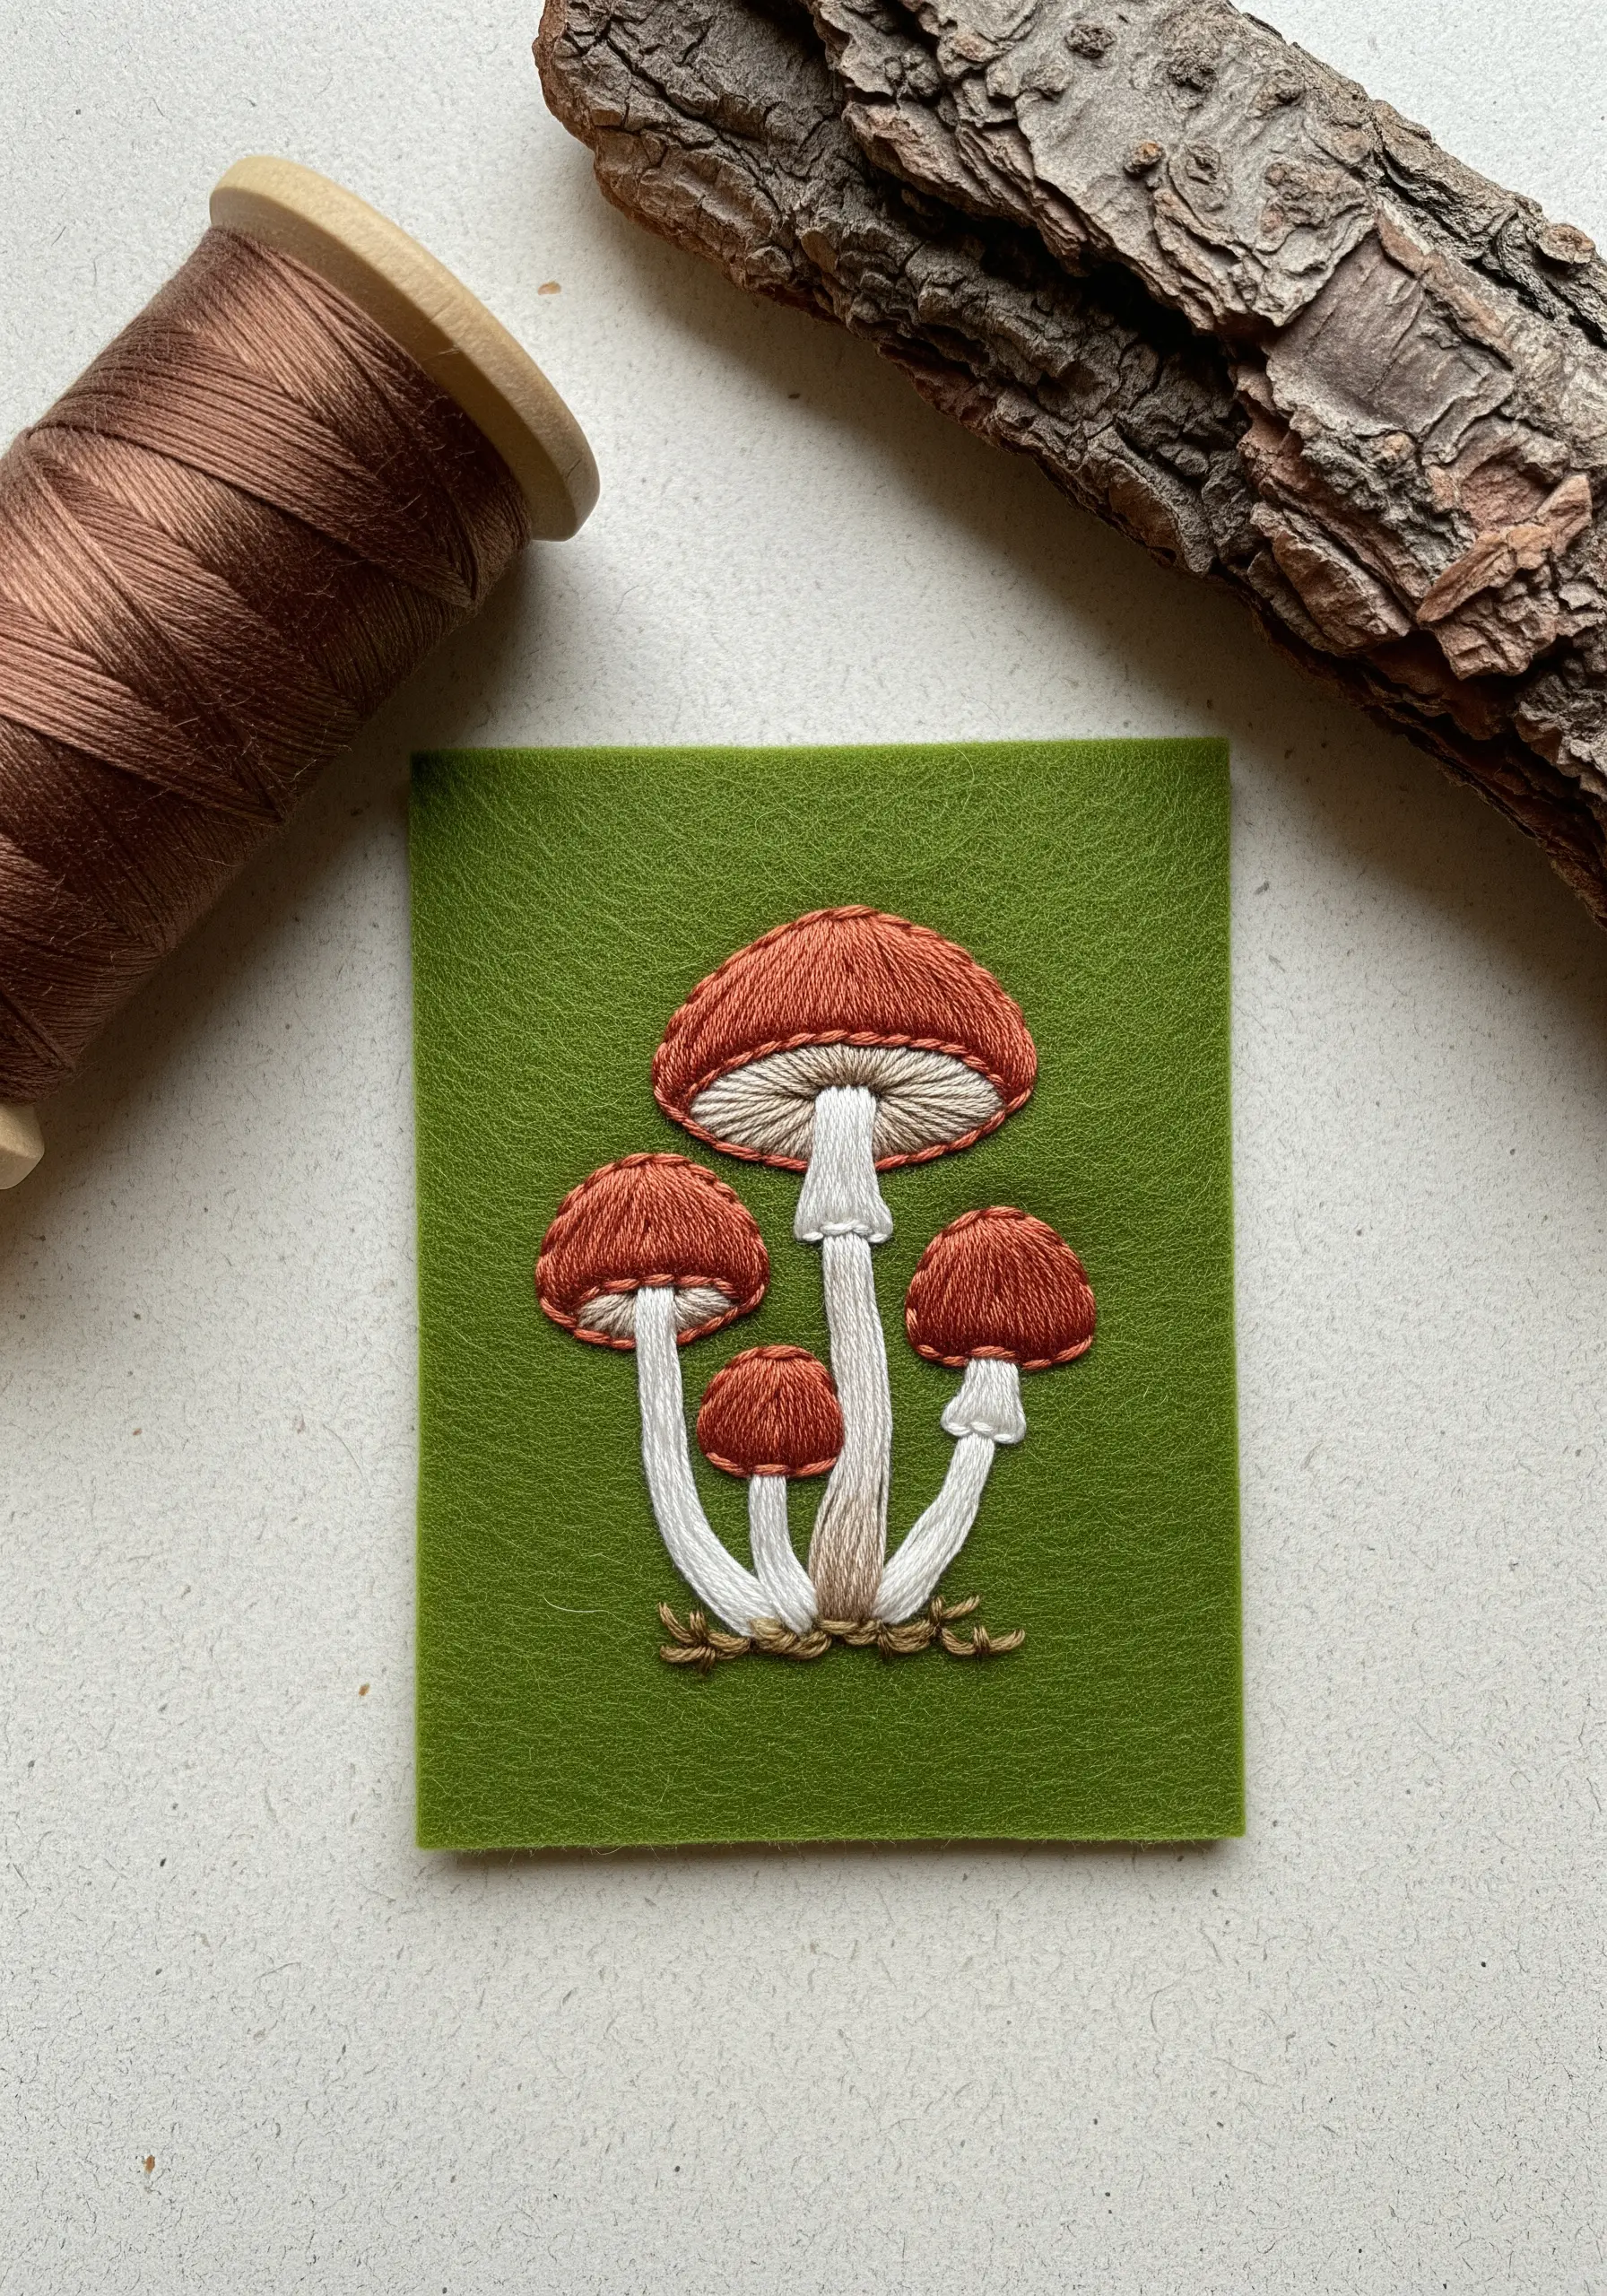
Bring mushrooms to life with subtle color blending, a technique known as thread painting.
Use a single strand of floss and the long-and-short stitch to fill the mushroom caps, blending shades of rust, beige, and white to create a soft, realistic gradient.
For the gills underneath, use vertical straight stitches in an off-white or light tan to create depth and shadow.
Stitching on a piece of felt, as shown here, is a great way to create a sturdy patch you can add to a jacket or bag.
This is a perfect project for exploring the quiet beauty of forest floor botanicals.
10. Create Fluffy Texture with Woven Wheel Roses
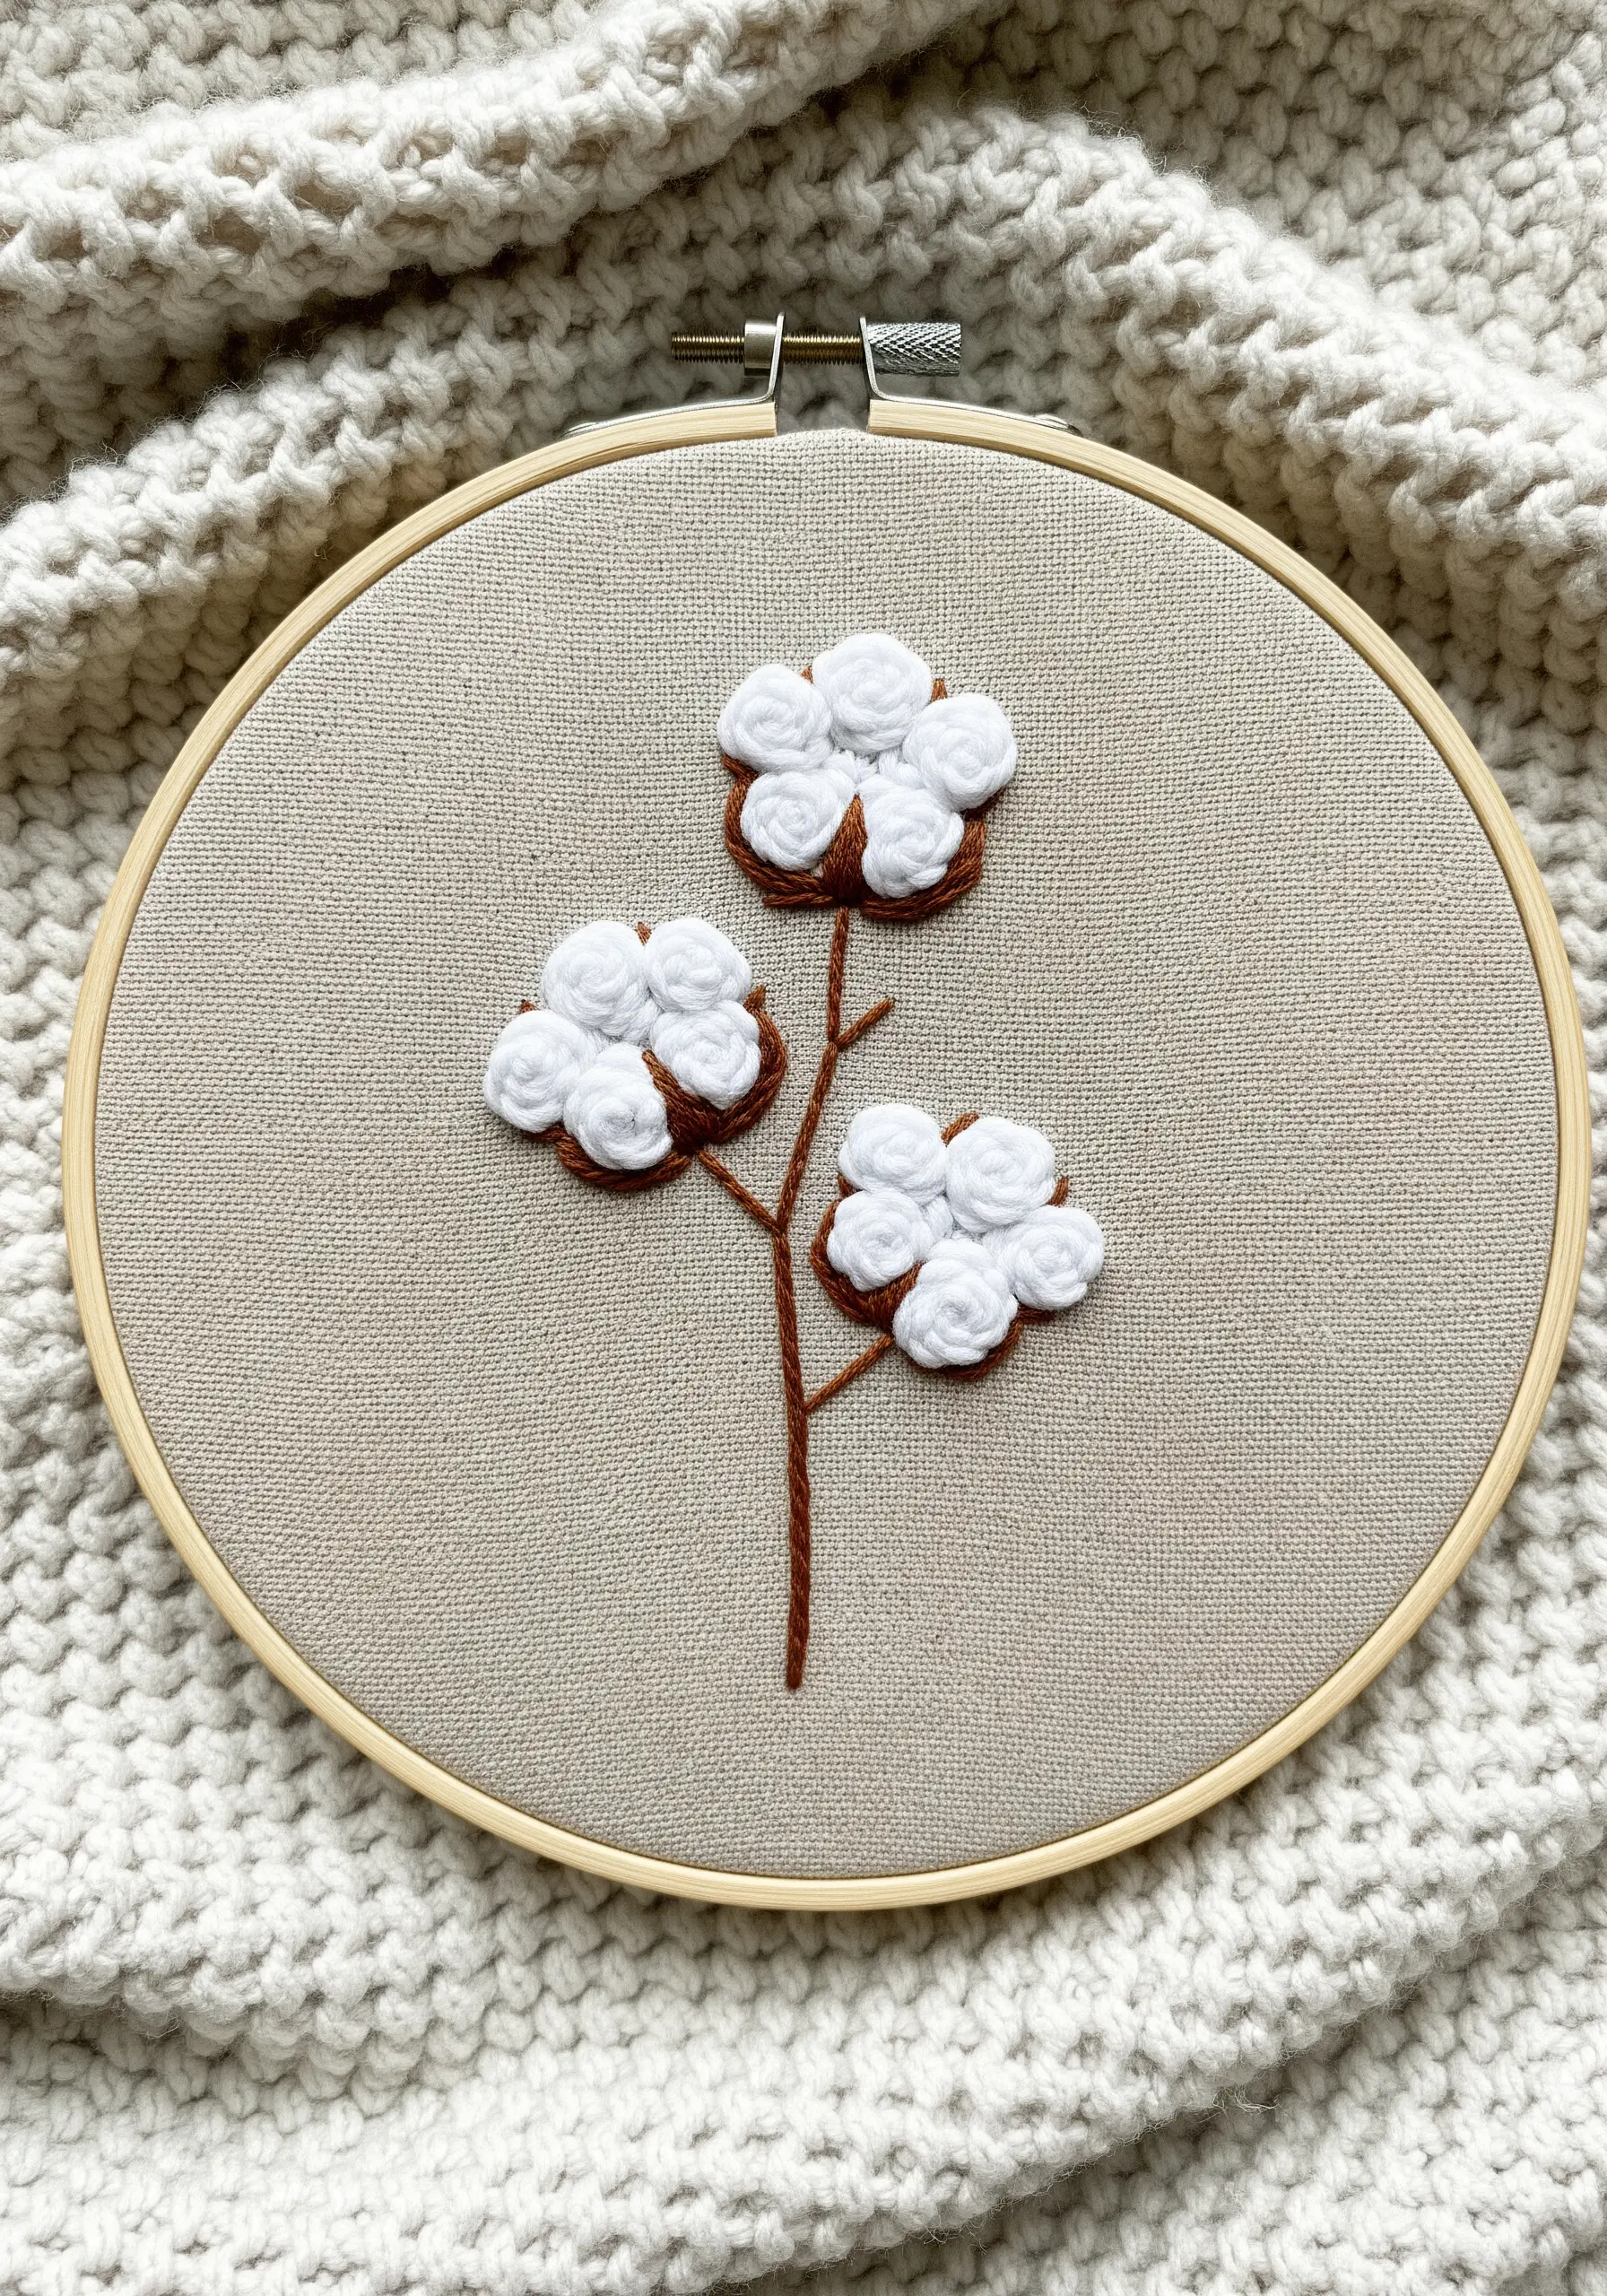
To capture the soft, fluffy texture of cotton bolls, the woven wheel stitch (or woven wheel rose) is your best tool.
Create a small star of five straight stitches as your base, then weave your thread over and under these spokes until the entire shape is filled.
Use a thicker floss, or all six strands, to create a plush, raised effect that stands out from the fabric.
Combine this with simple stem stitch branches for a design that balances bold texture with clean lines.
11. Emphasize Texture by Contrasting Thread and Fabric
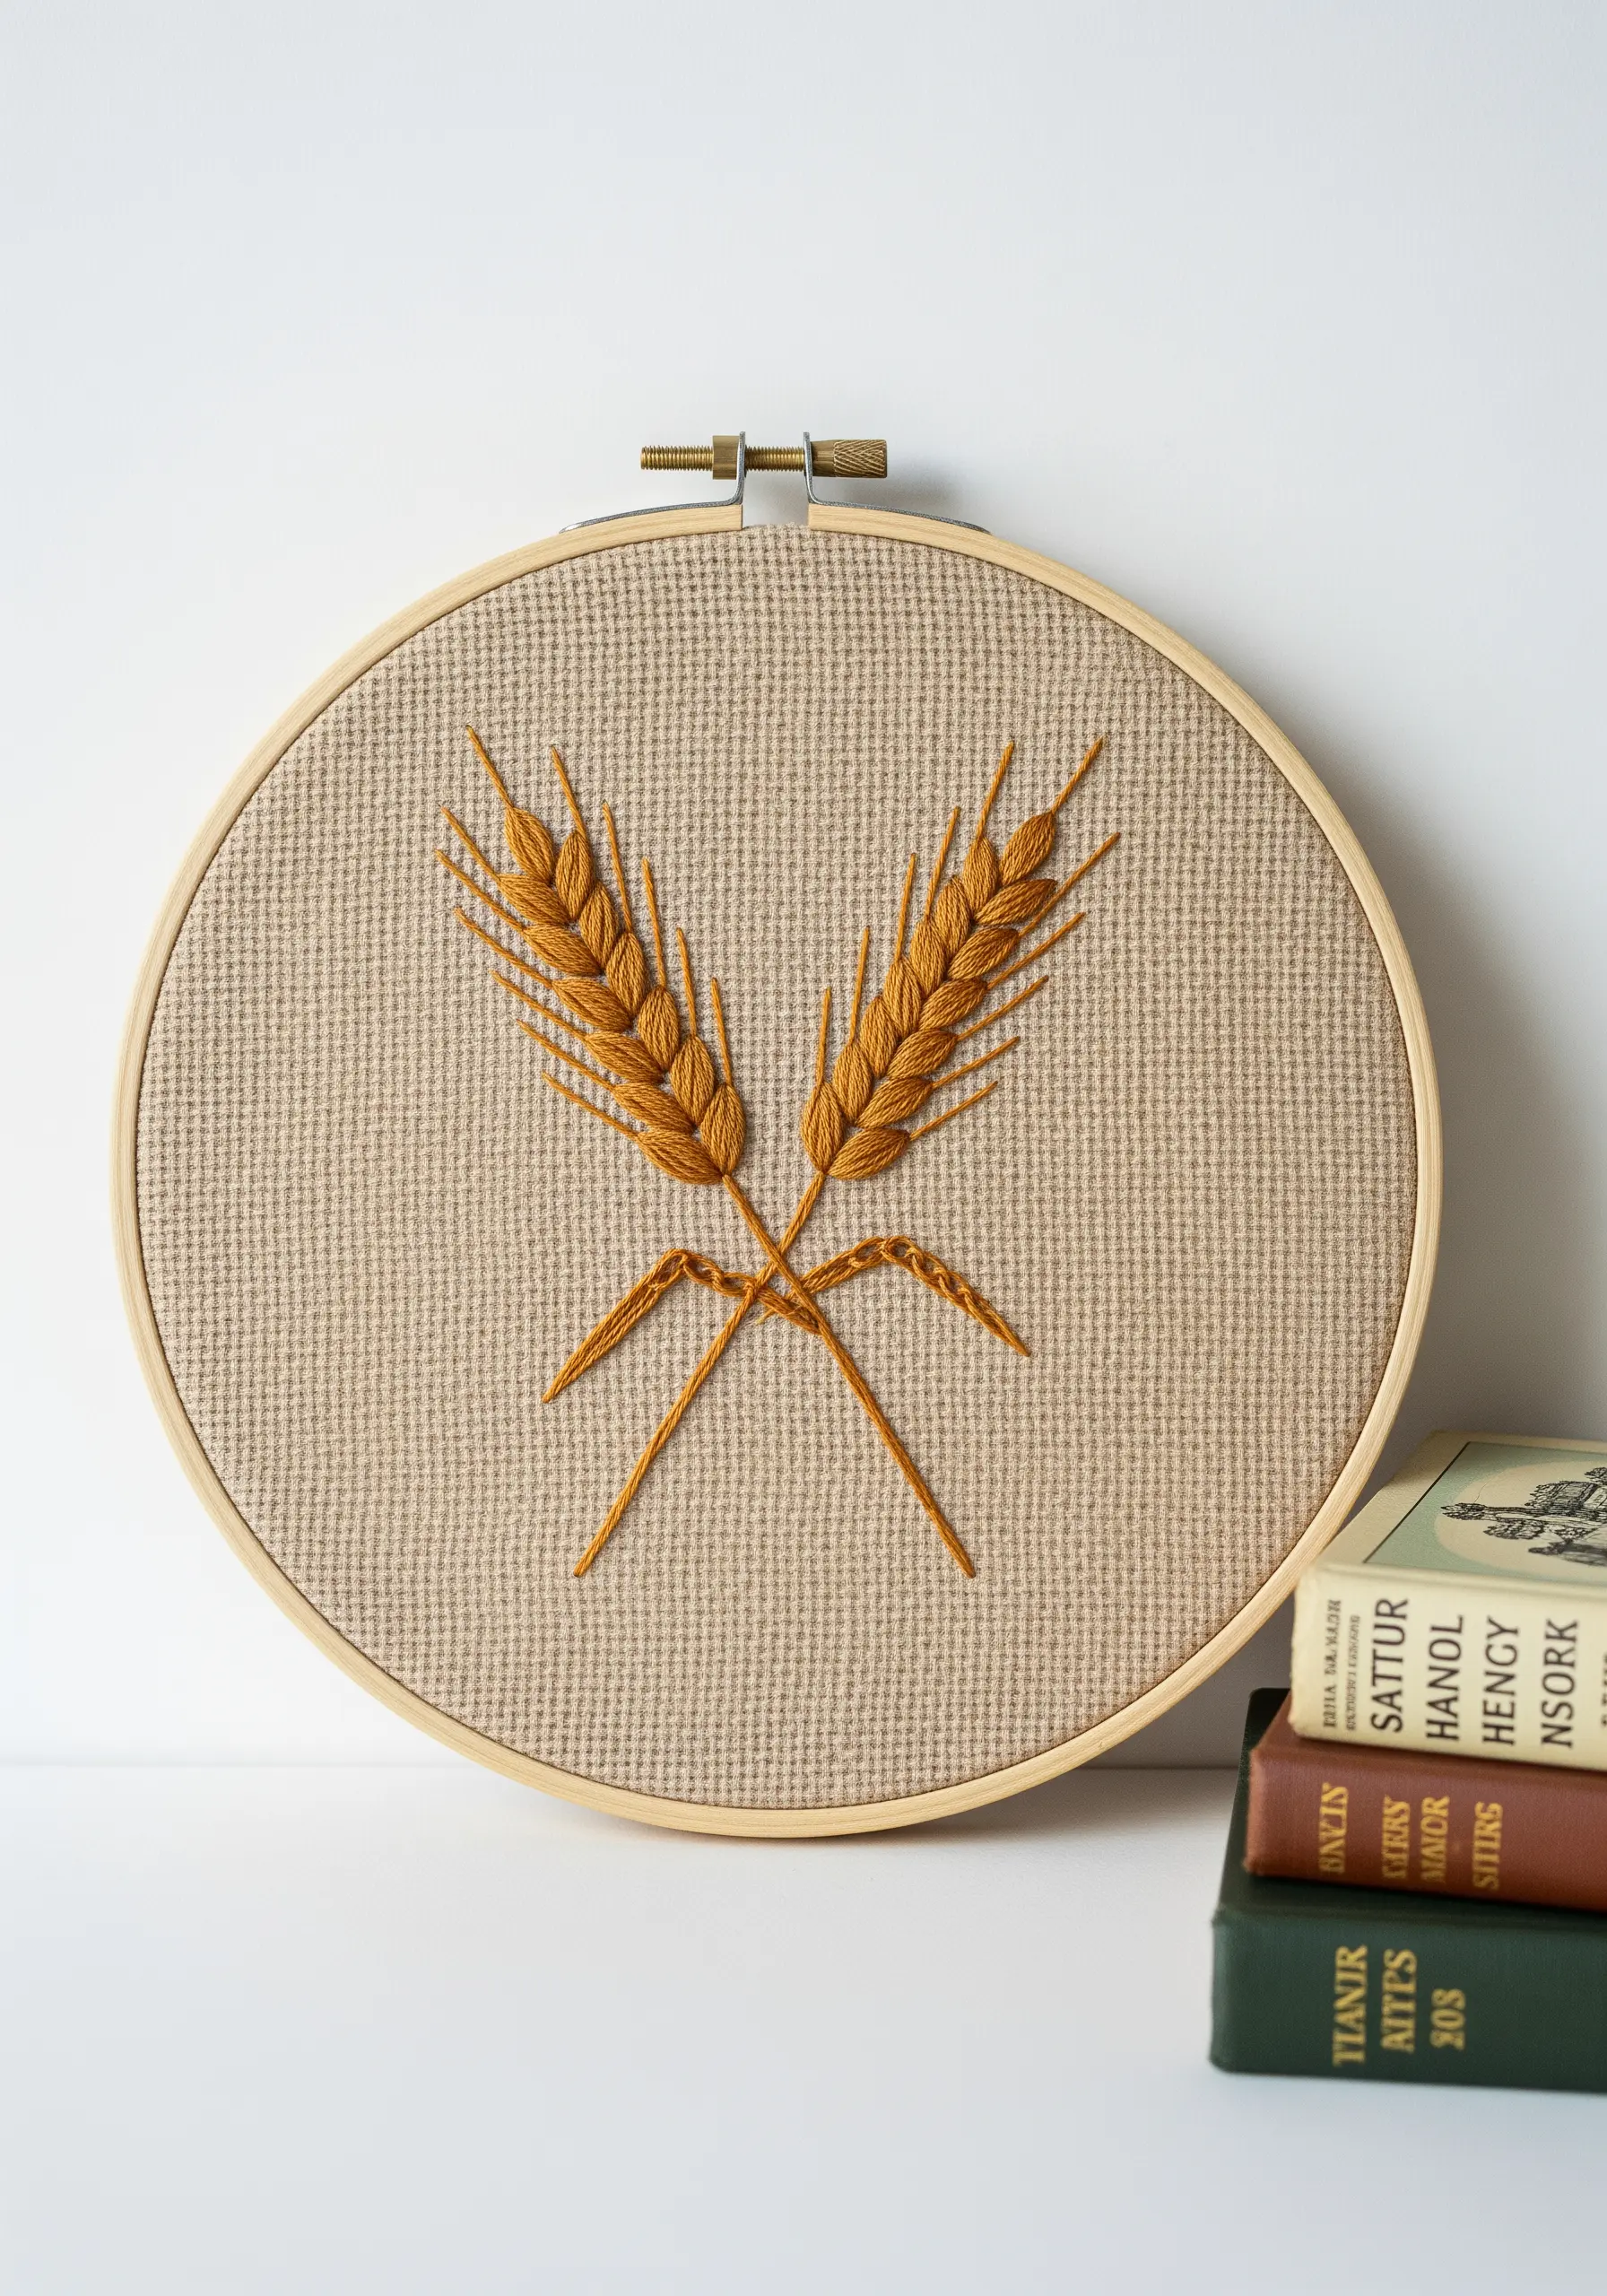
Make a simple design feel rich and intentional by choosing your fabric wisely.
Stitching a delicate wheat motif onto a rustic, loosely woven fabric like linen or burlap creates a beautiful textural contrast.
The smoothness of the floss stands out against the fabric’s natural grain.
Use a fly stitch or fishbone stitch for the wheat heads to give them dimension and a natural, chevron-like pattern.
This thoughtful pairing of materials is a key element of sophisticated, earthy embroidery.
12. Refine Your Outlines with a Whipped Backstitch
If you want your line art to look exceptionally smooth and solid, elevate your backstitch by whipping it.
First, complete your entire outline with a standard backstitch, keeping your stitches small and even.
Then, using the same thread, pass your needle under each backstitch without piercing the fabric.
This wraps the outline, covering the gaps between stitches and creating a seamless, cord-like line that looks incredibly polished and professional.
13. Add Depth to Line Art with Varied Thread Weights
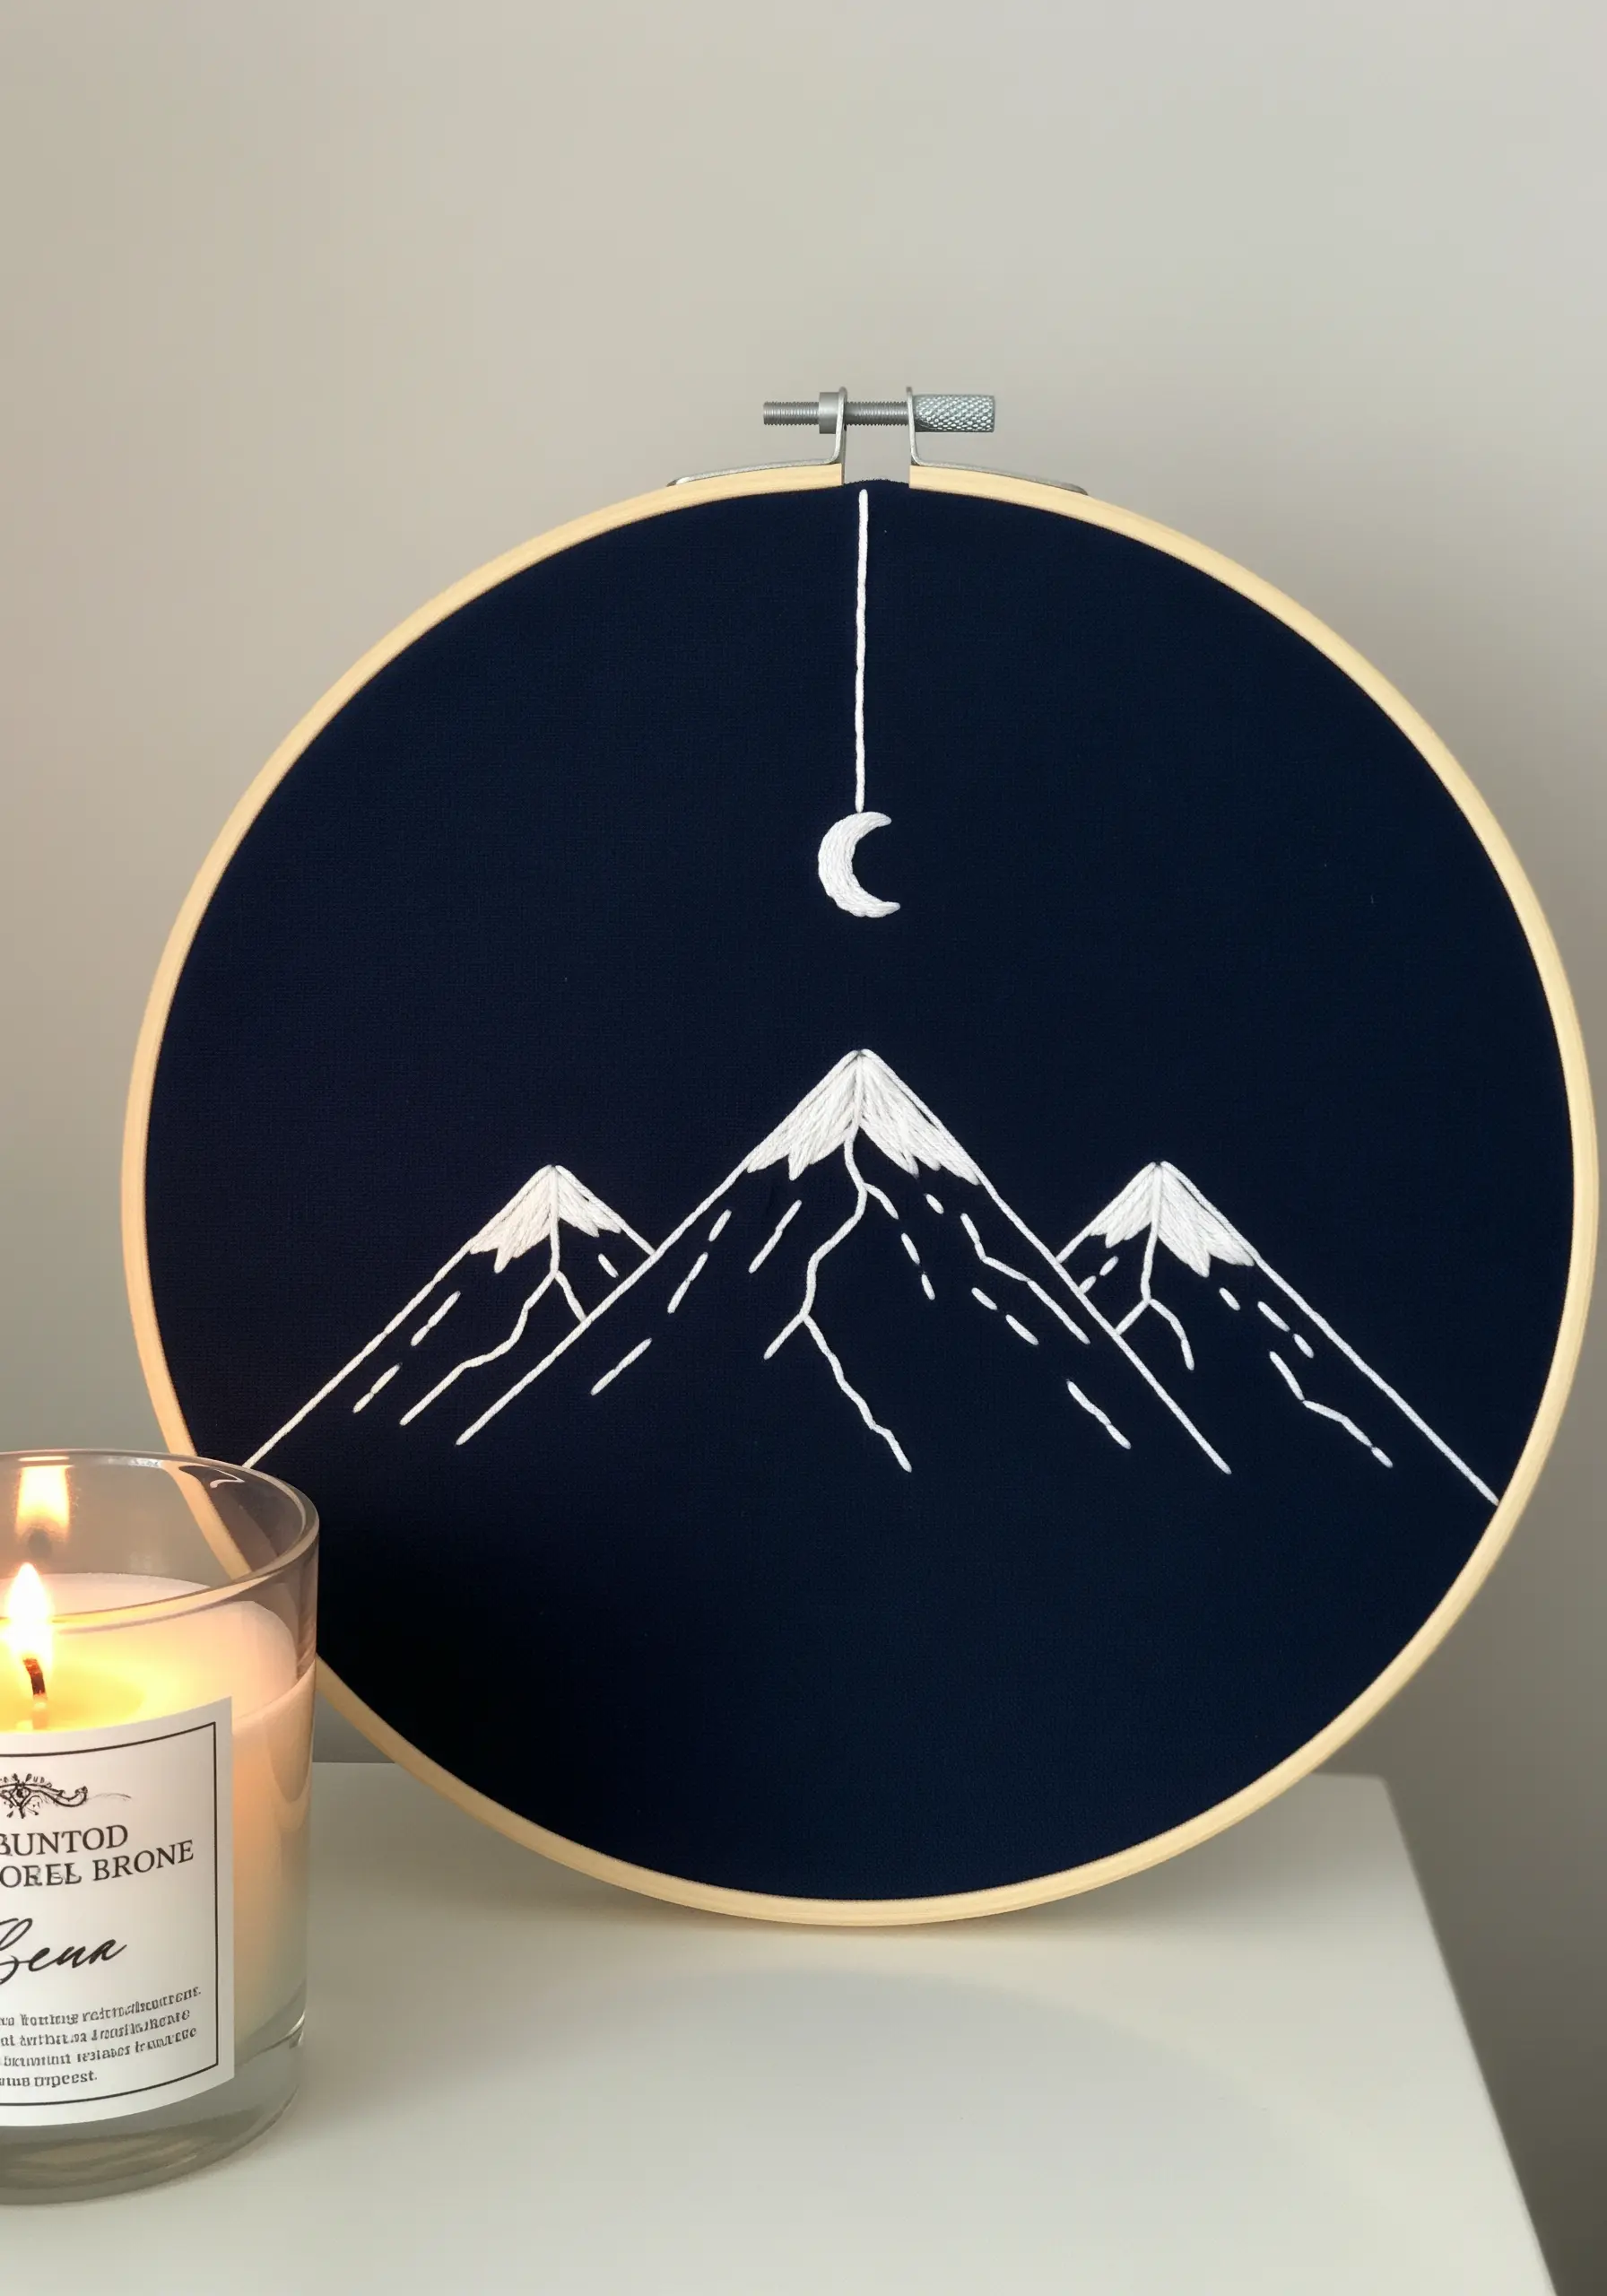
Create a sense of distance and detail in a minimalist landscape by simply changing the number of strands you use.
For the main mountain outlines, use three or four strands of white floss for a strong, clear line against the dark navy fabric.
For the delicate snow details on the peaks and the hanging moon, switch to a single strand.
This subtle shift in thread weight adds immediate depth and sophistication, making the composition feel more dynamic and intentional.
14. Capture Natural Form with Angled Straight Stitches
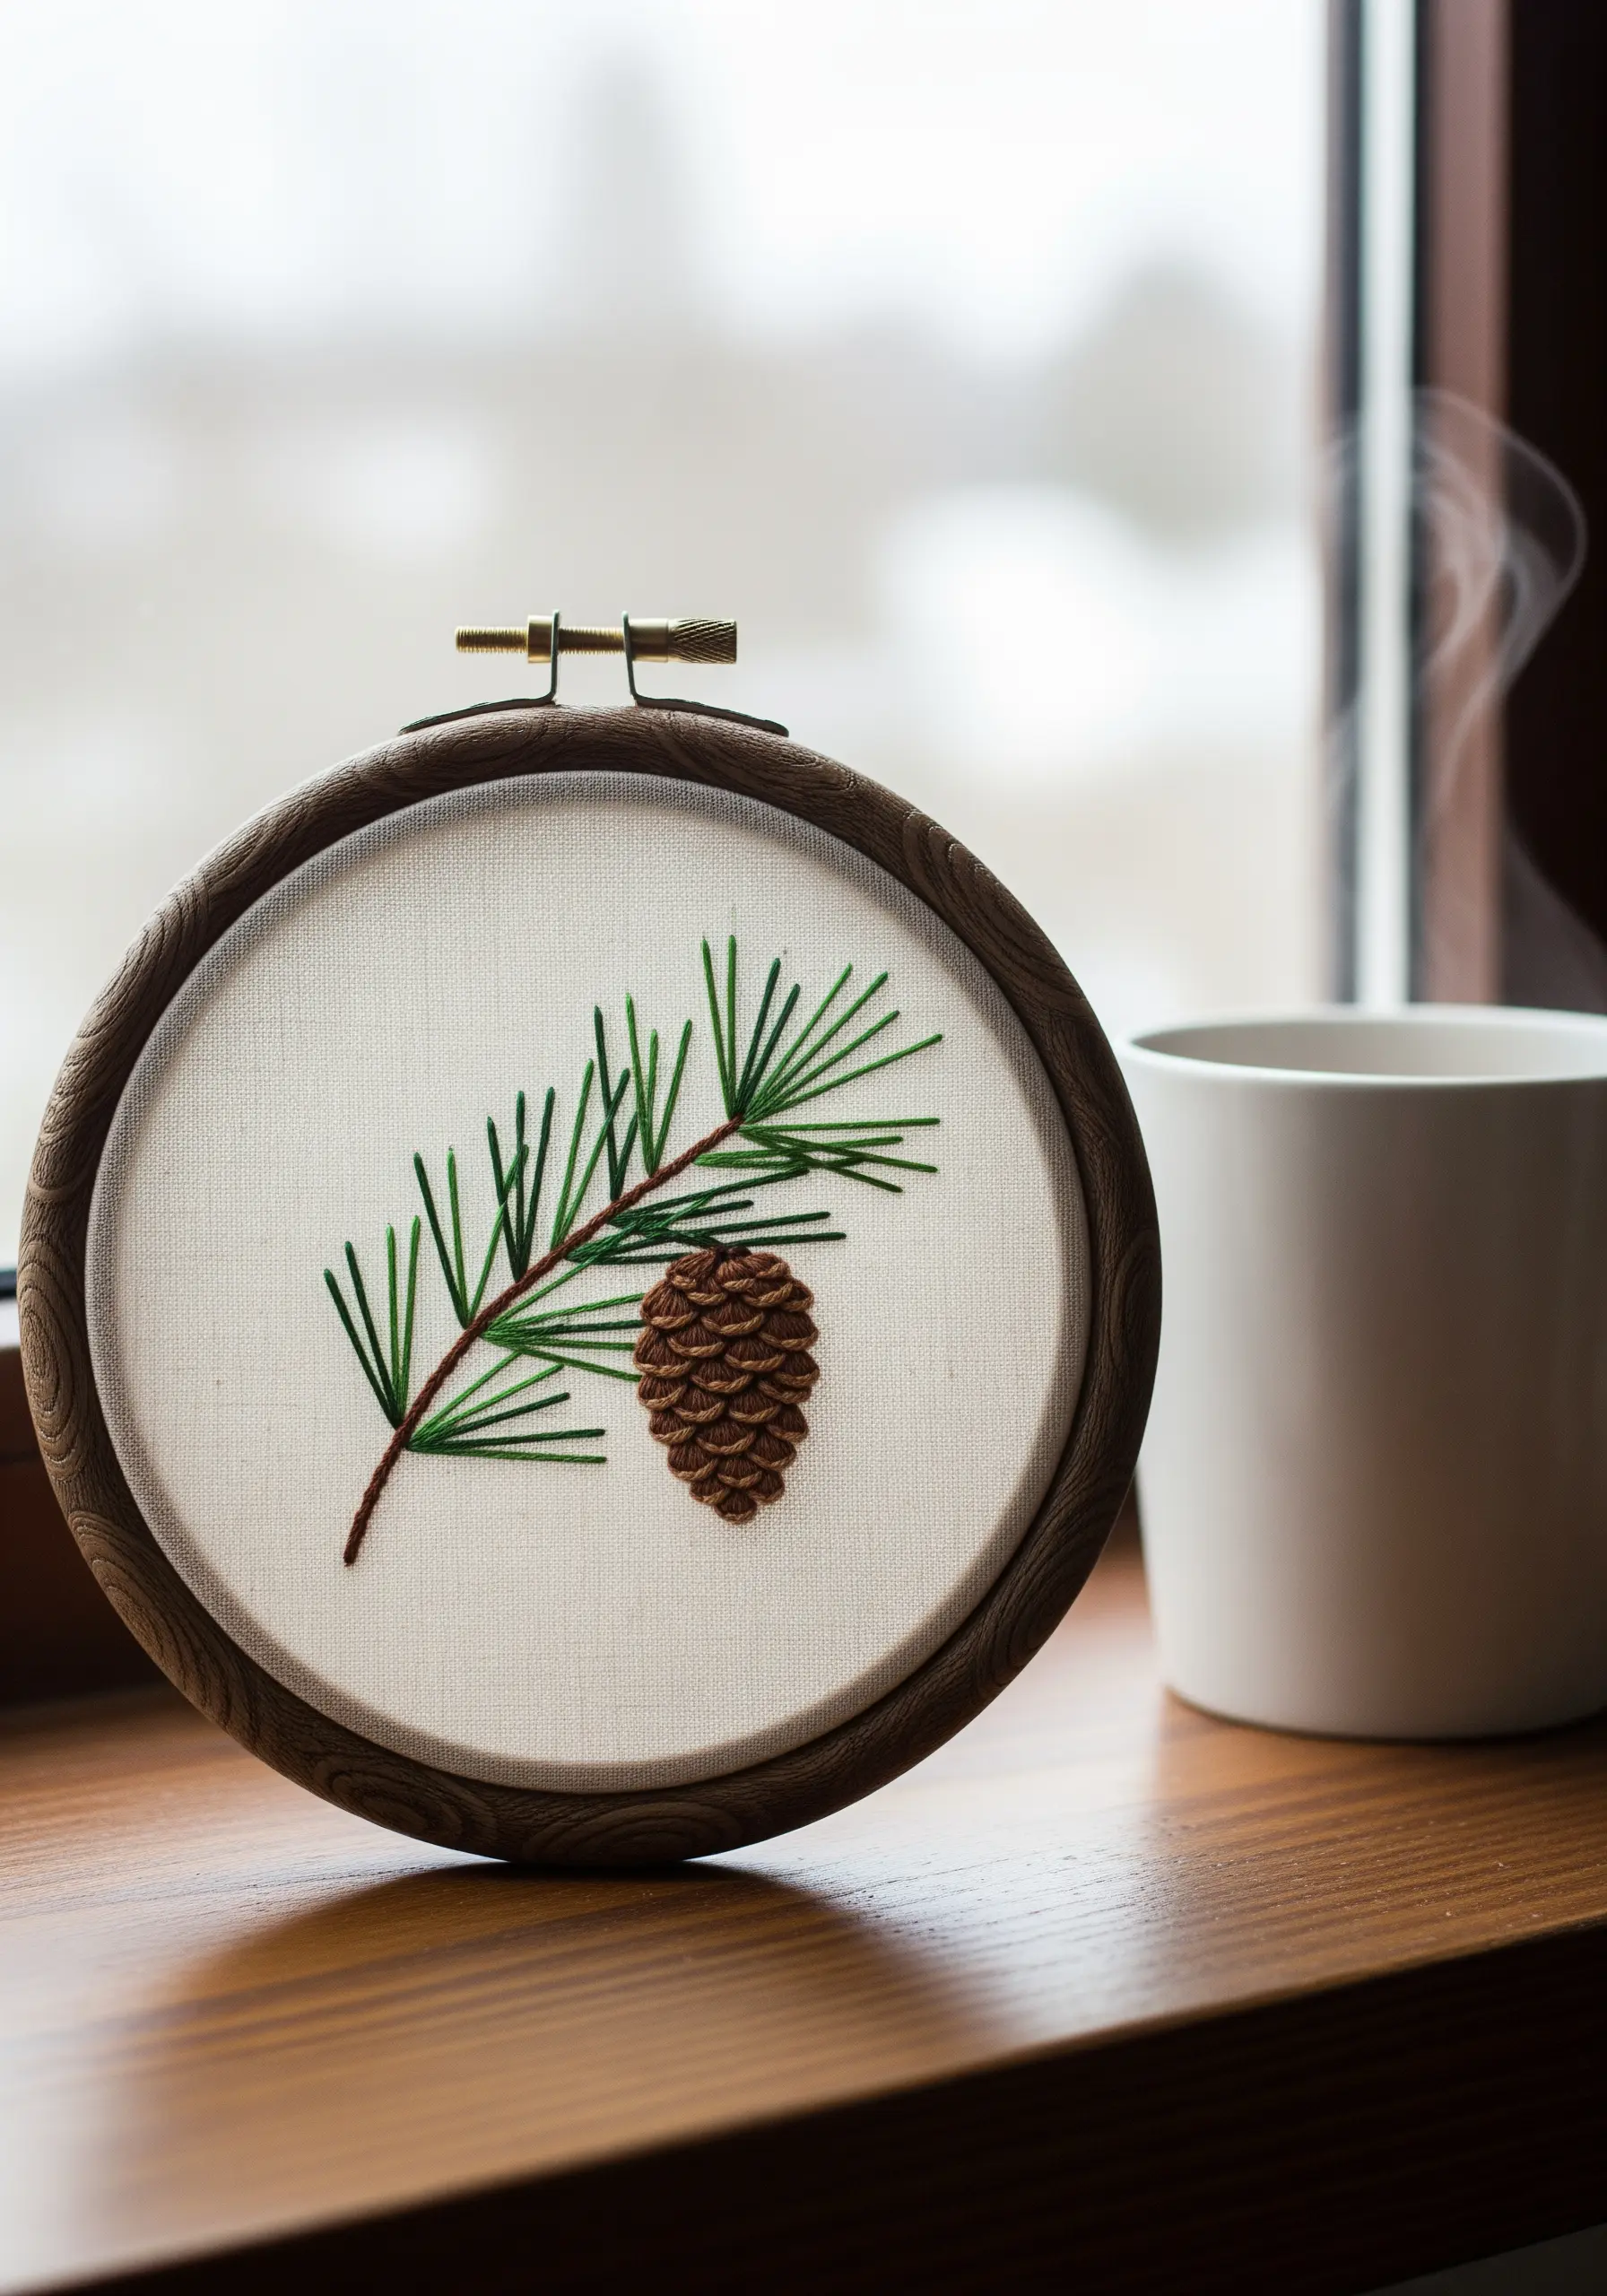
You don’t need complex stitches to create a realistic pine branch.
Simply use straight stitches for the needles, focusing on varying their length and angle to mimic the slight irregularity of nature.
For the pinecone, a series of overlapping satin stitches or tightly packed French knots in a rich brown will provide a lovely textural contrast to the sharp needles.
This design is a beautiful exercise in finding beauty in simplicity and paying attention to small details.
15. Sculpt Petals with Precise Thread Painting
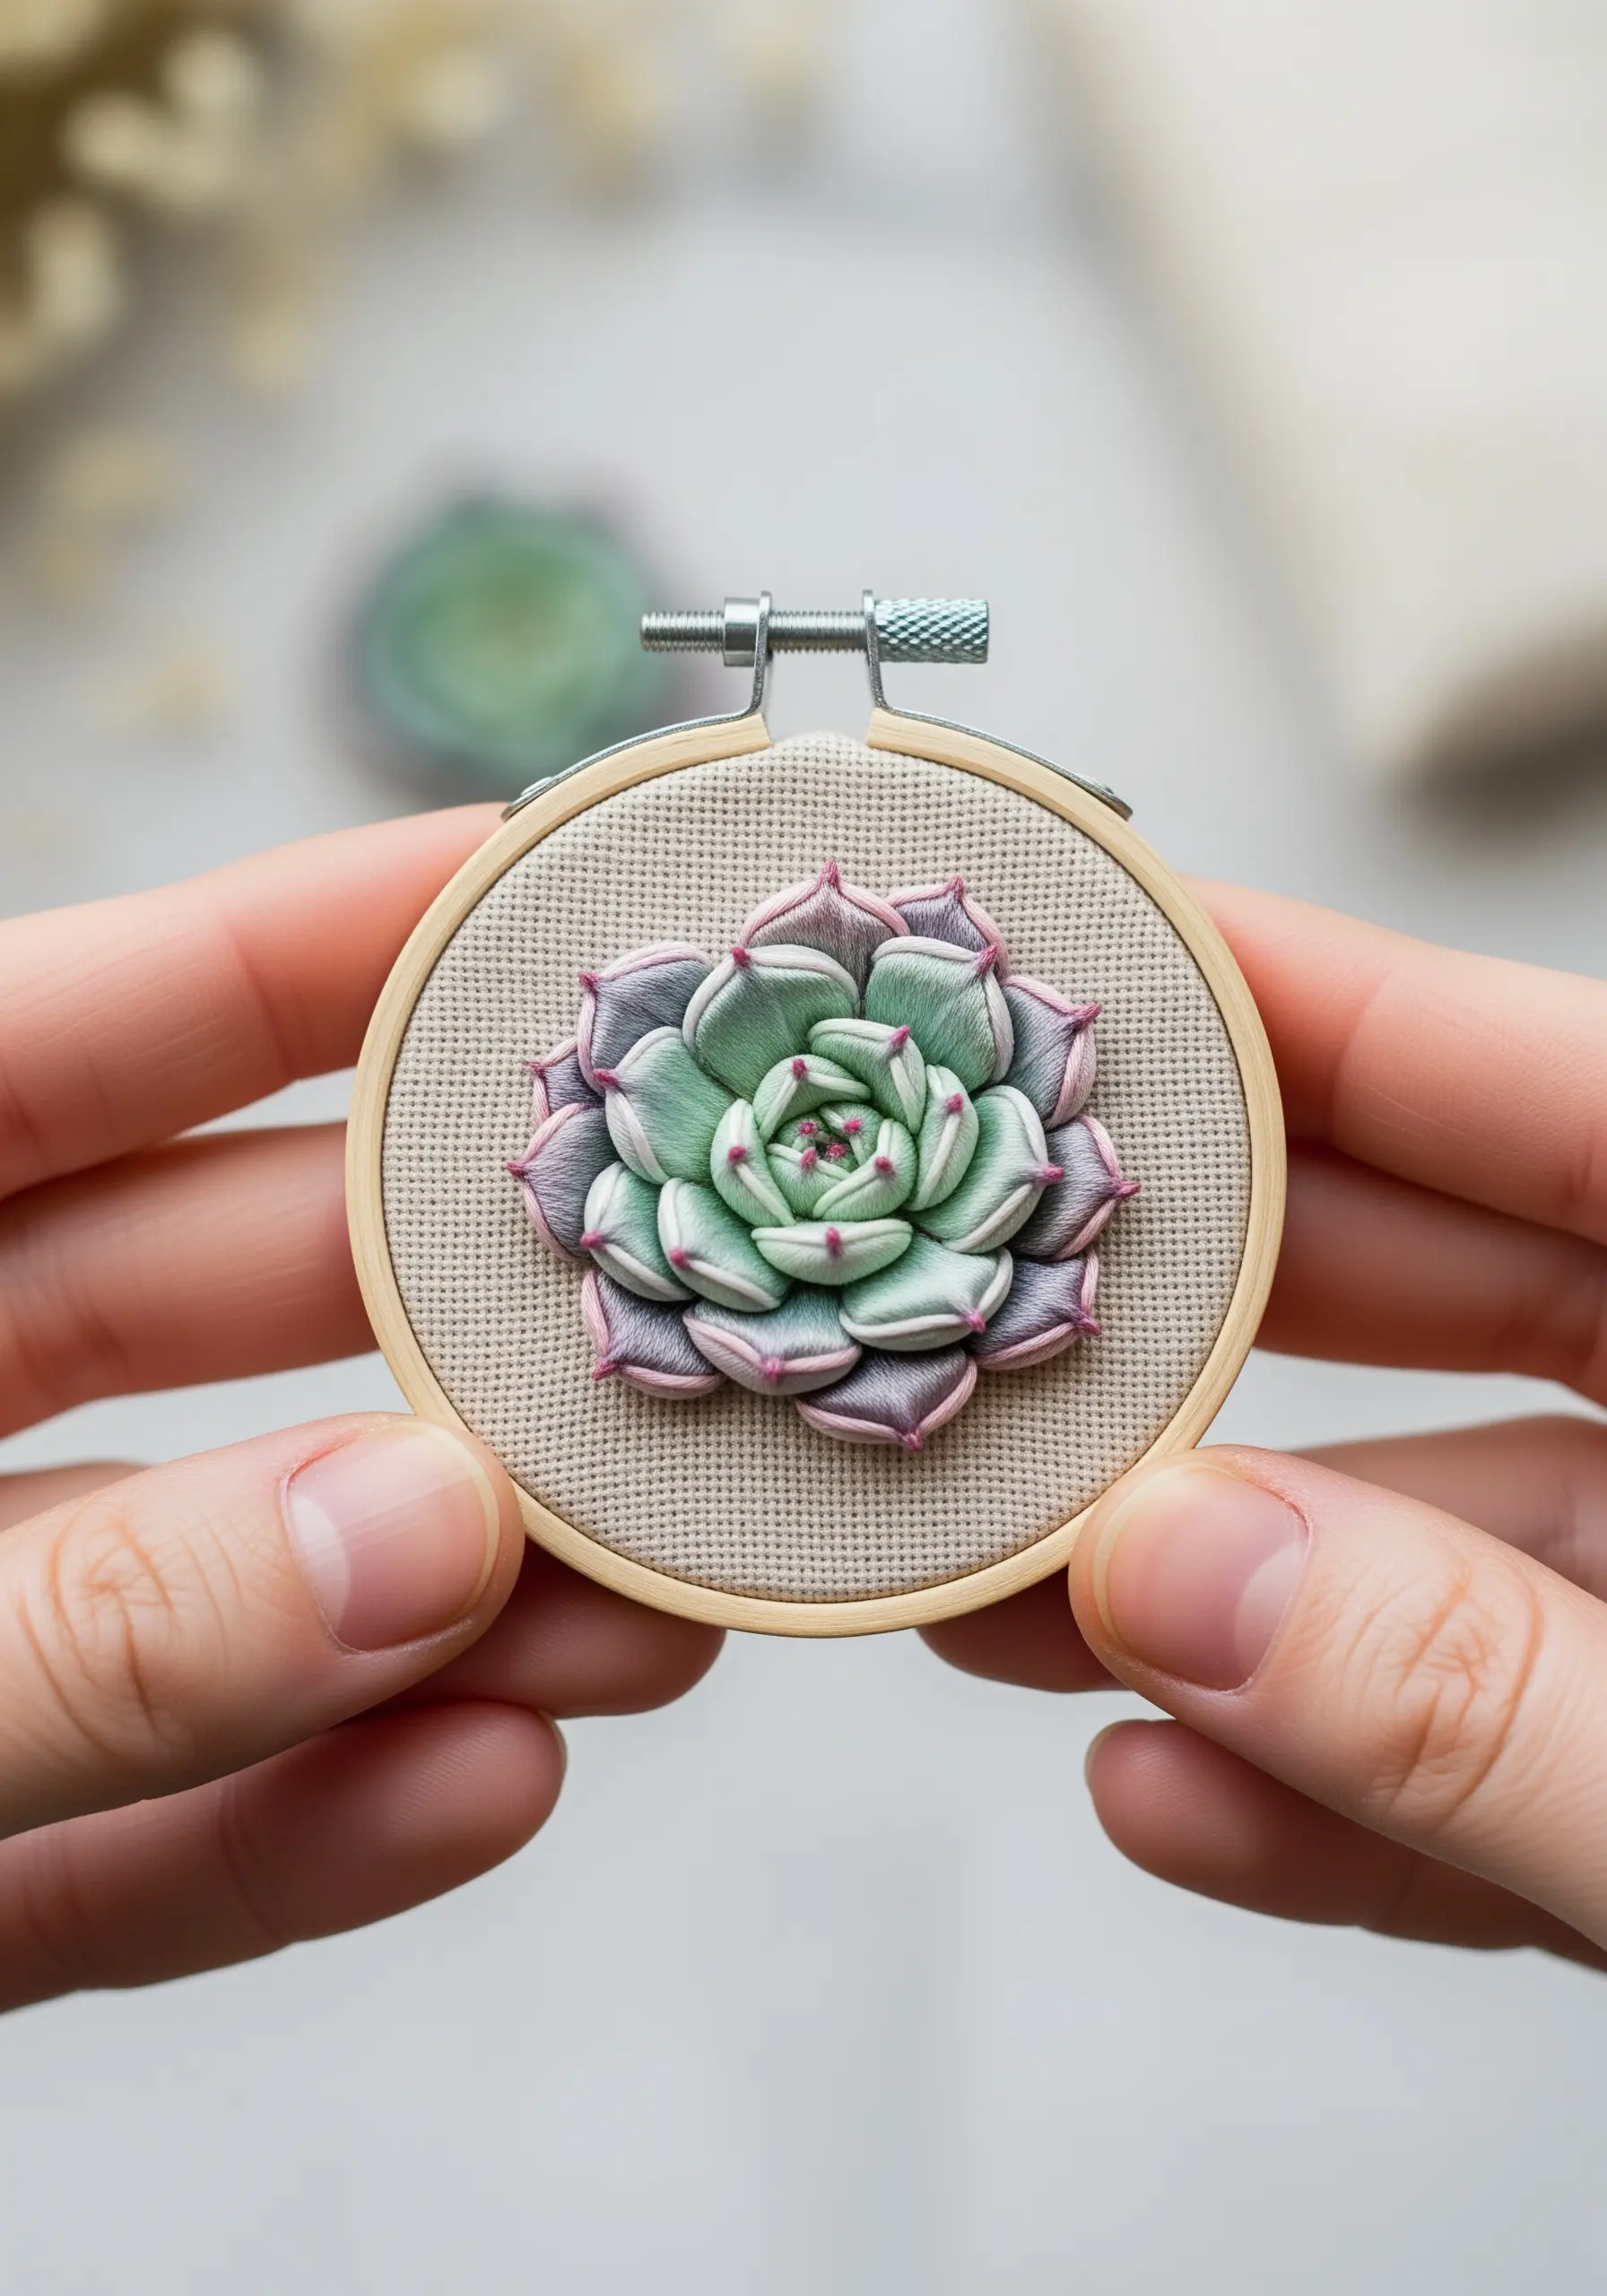
This miniature succulent is a masterclass in thread painting, but the principle is accessible to all.
Work one petal at a time, using a single strand of floss and long-and-short stitches.
Carefully place your colors to mimic the natural gradient of a succulent, with darker tones at the tips and base, and lighter greens toward the center.
The key is to make your stitches blend seamlessly into one another, creating a soft, painterly effect.
Start with a simple two-color leaf to practice this beautiful technique.
16. Convey Graceful Movement with Cascading Stitches
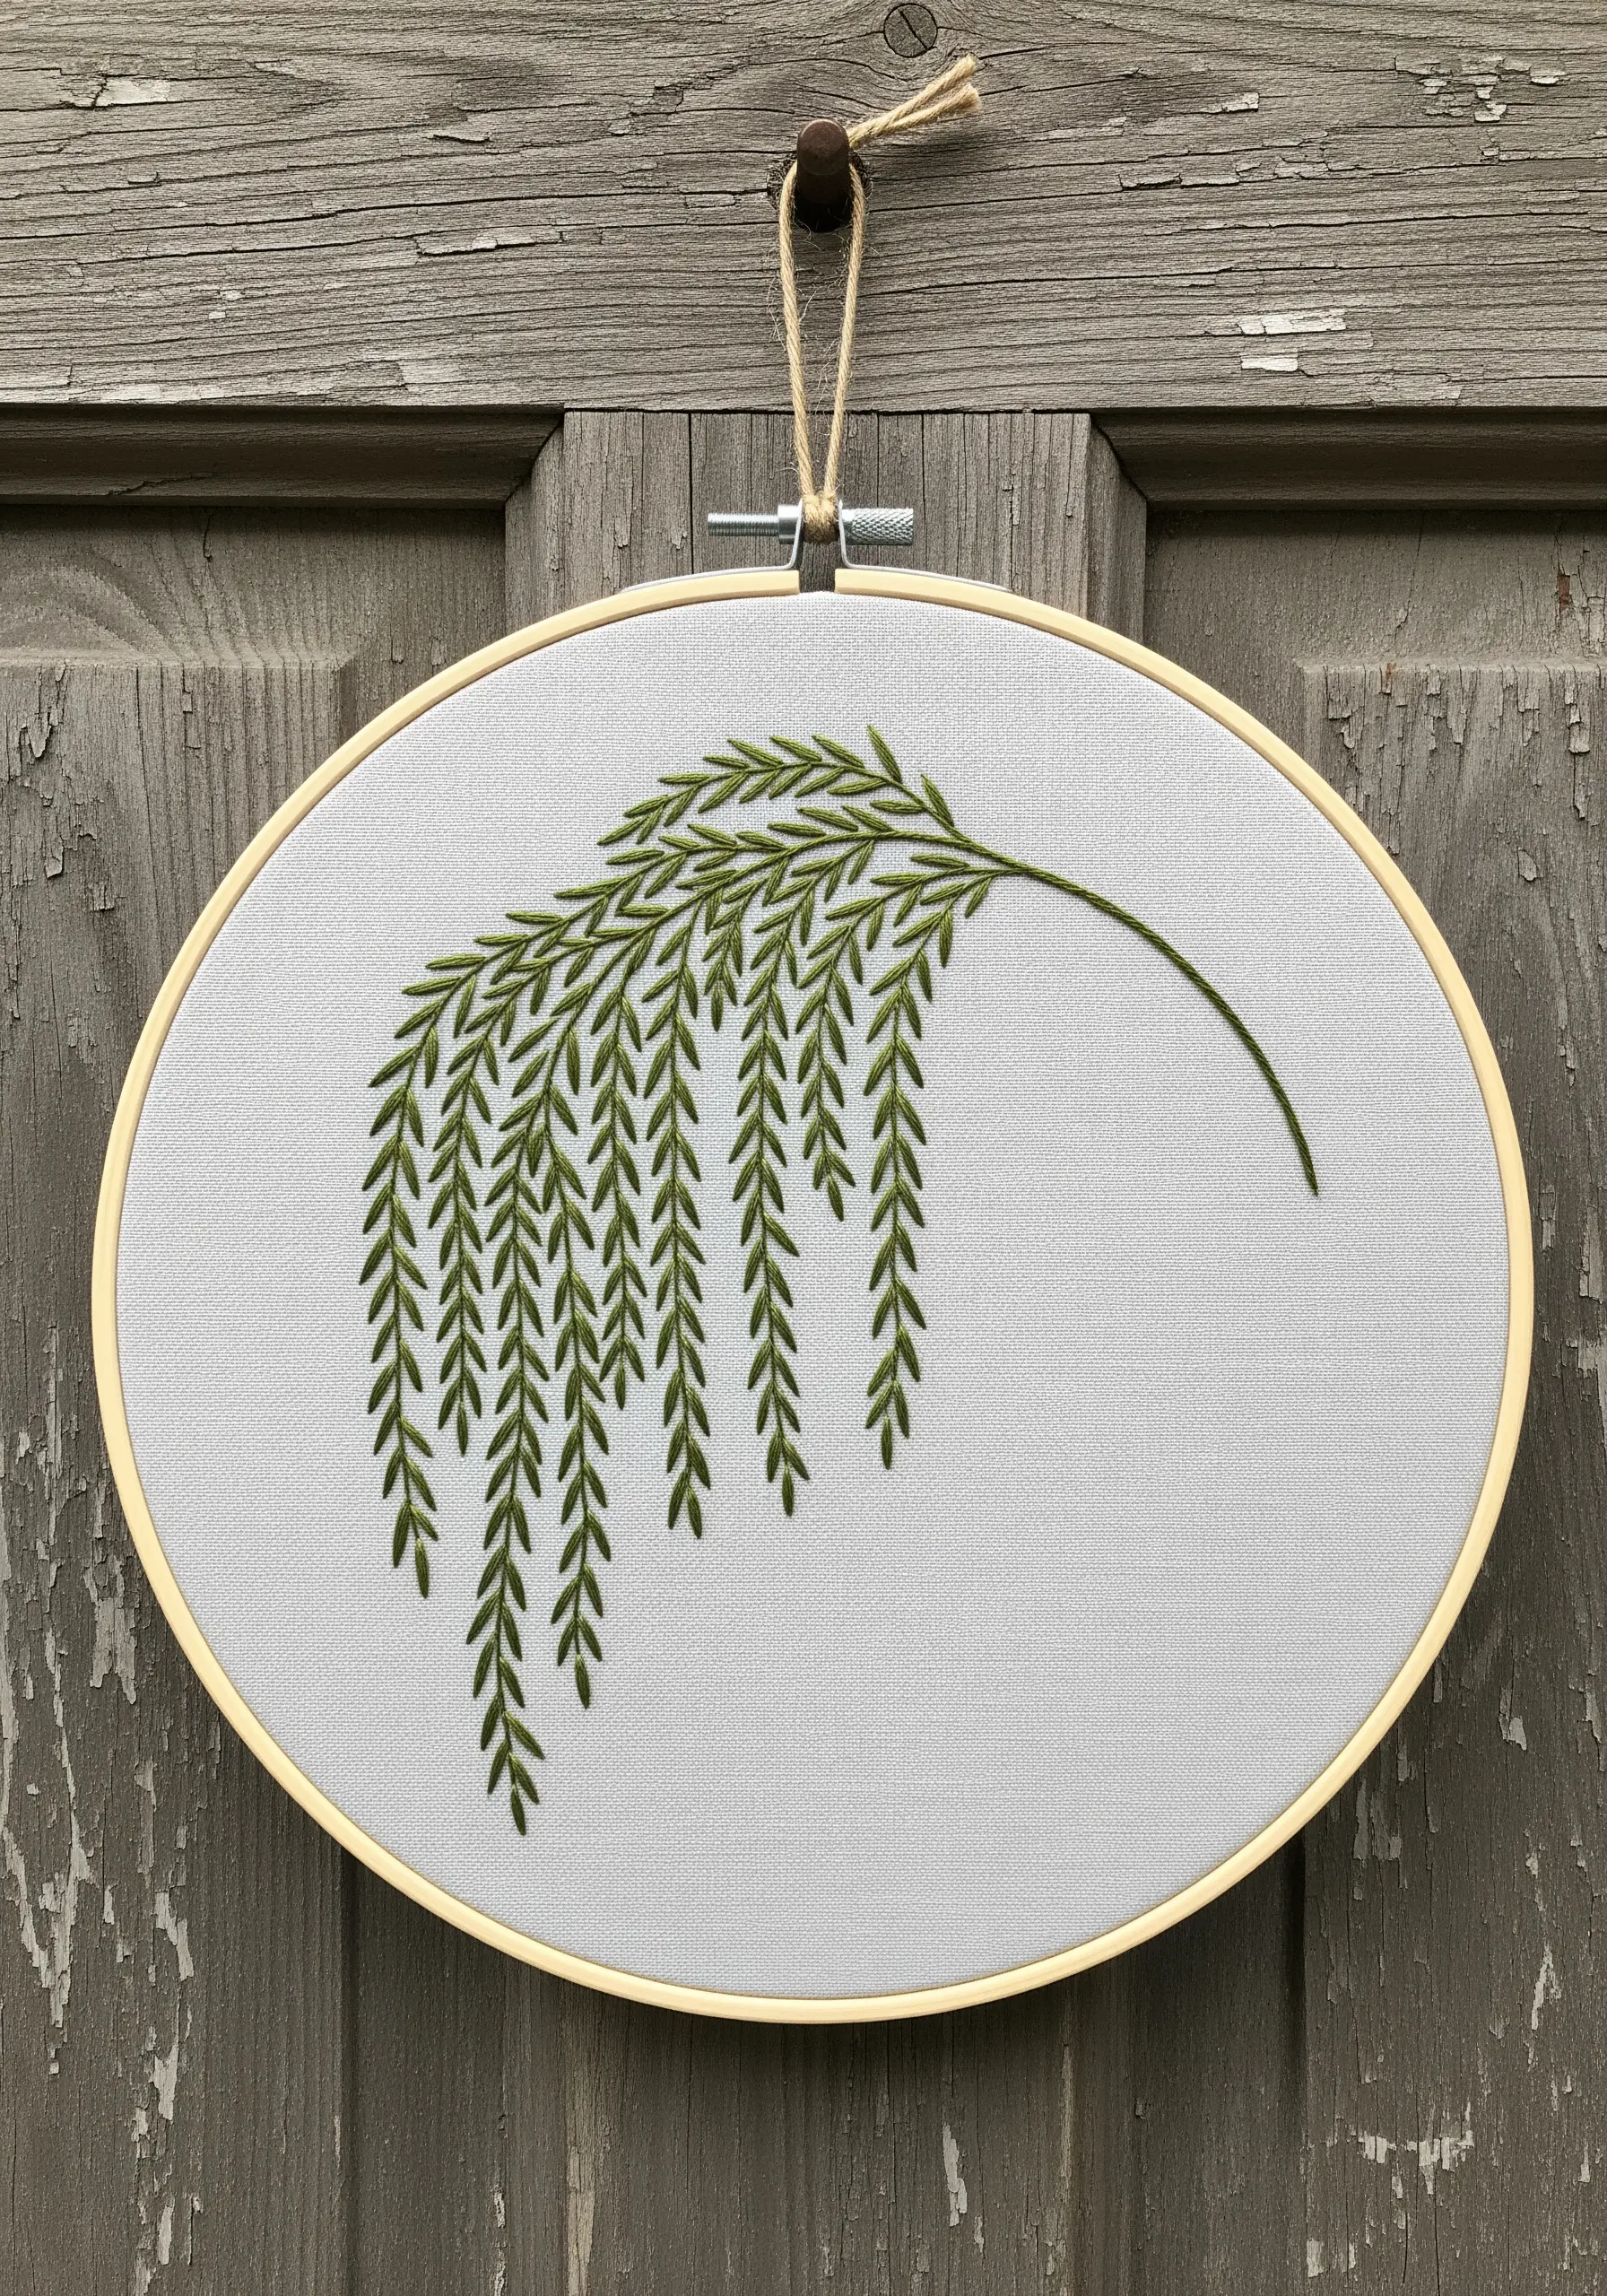
To capture the elegant droop of a weeping willow, let your stitches flow downwards.
After creating the main branch with a stem stitch, use long, delicate straight stitches or detached chain stitches for the hanging leaves.
Allow the threads to have a slight, natural curve rather than pulling them perfectly taut.
By placing this single, graceful branch in an oval hoop, you enhance the sense of length and gentle movement, creating a piece of truly calm and meditative art.
17. Add a Touch of Magic with Metallic Thread
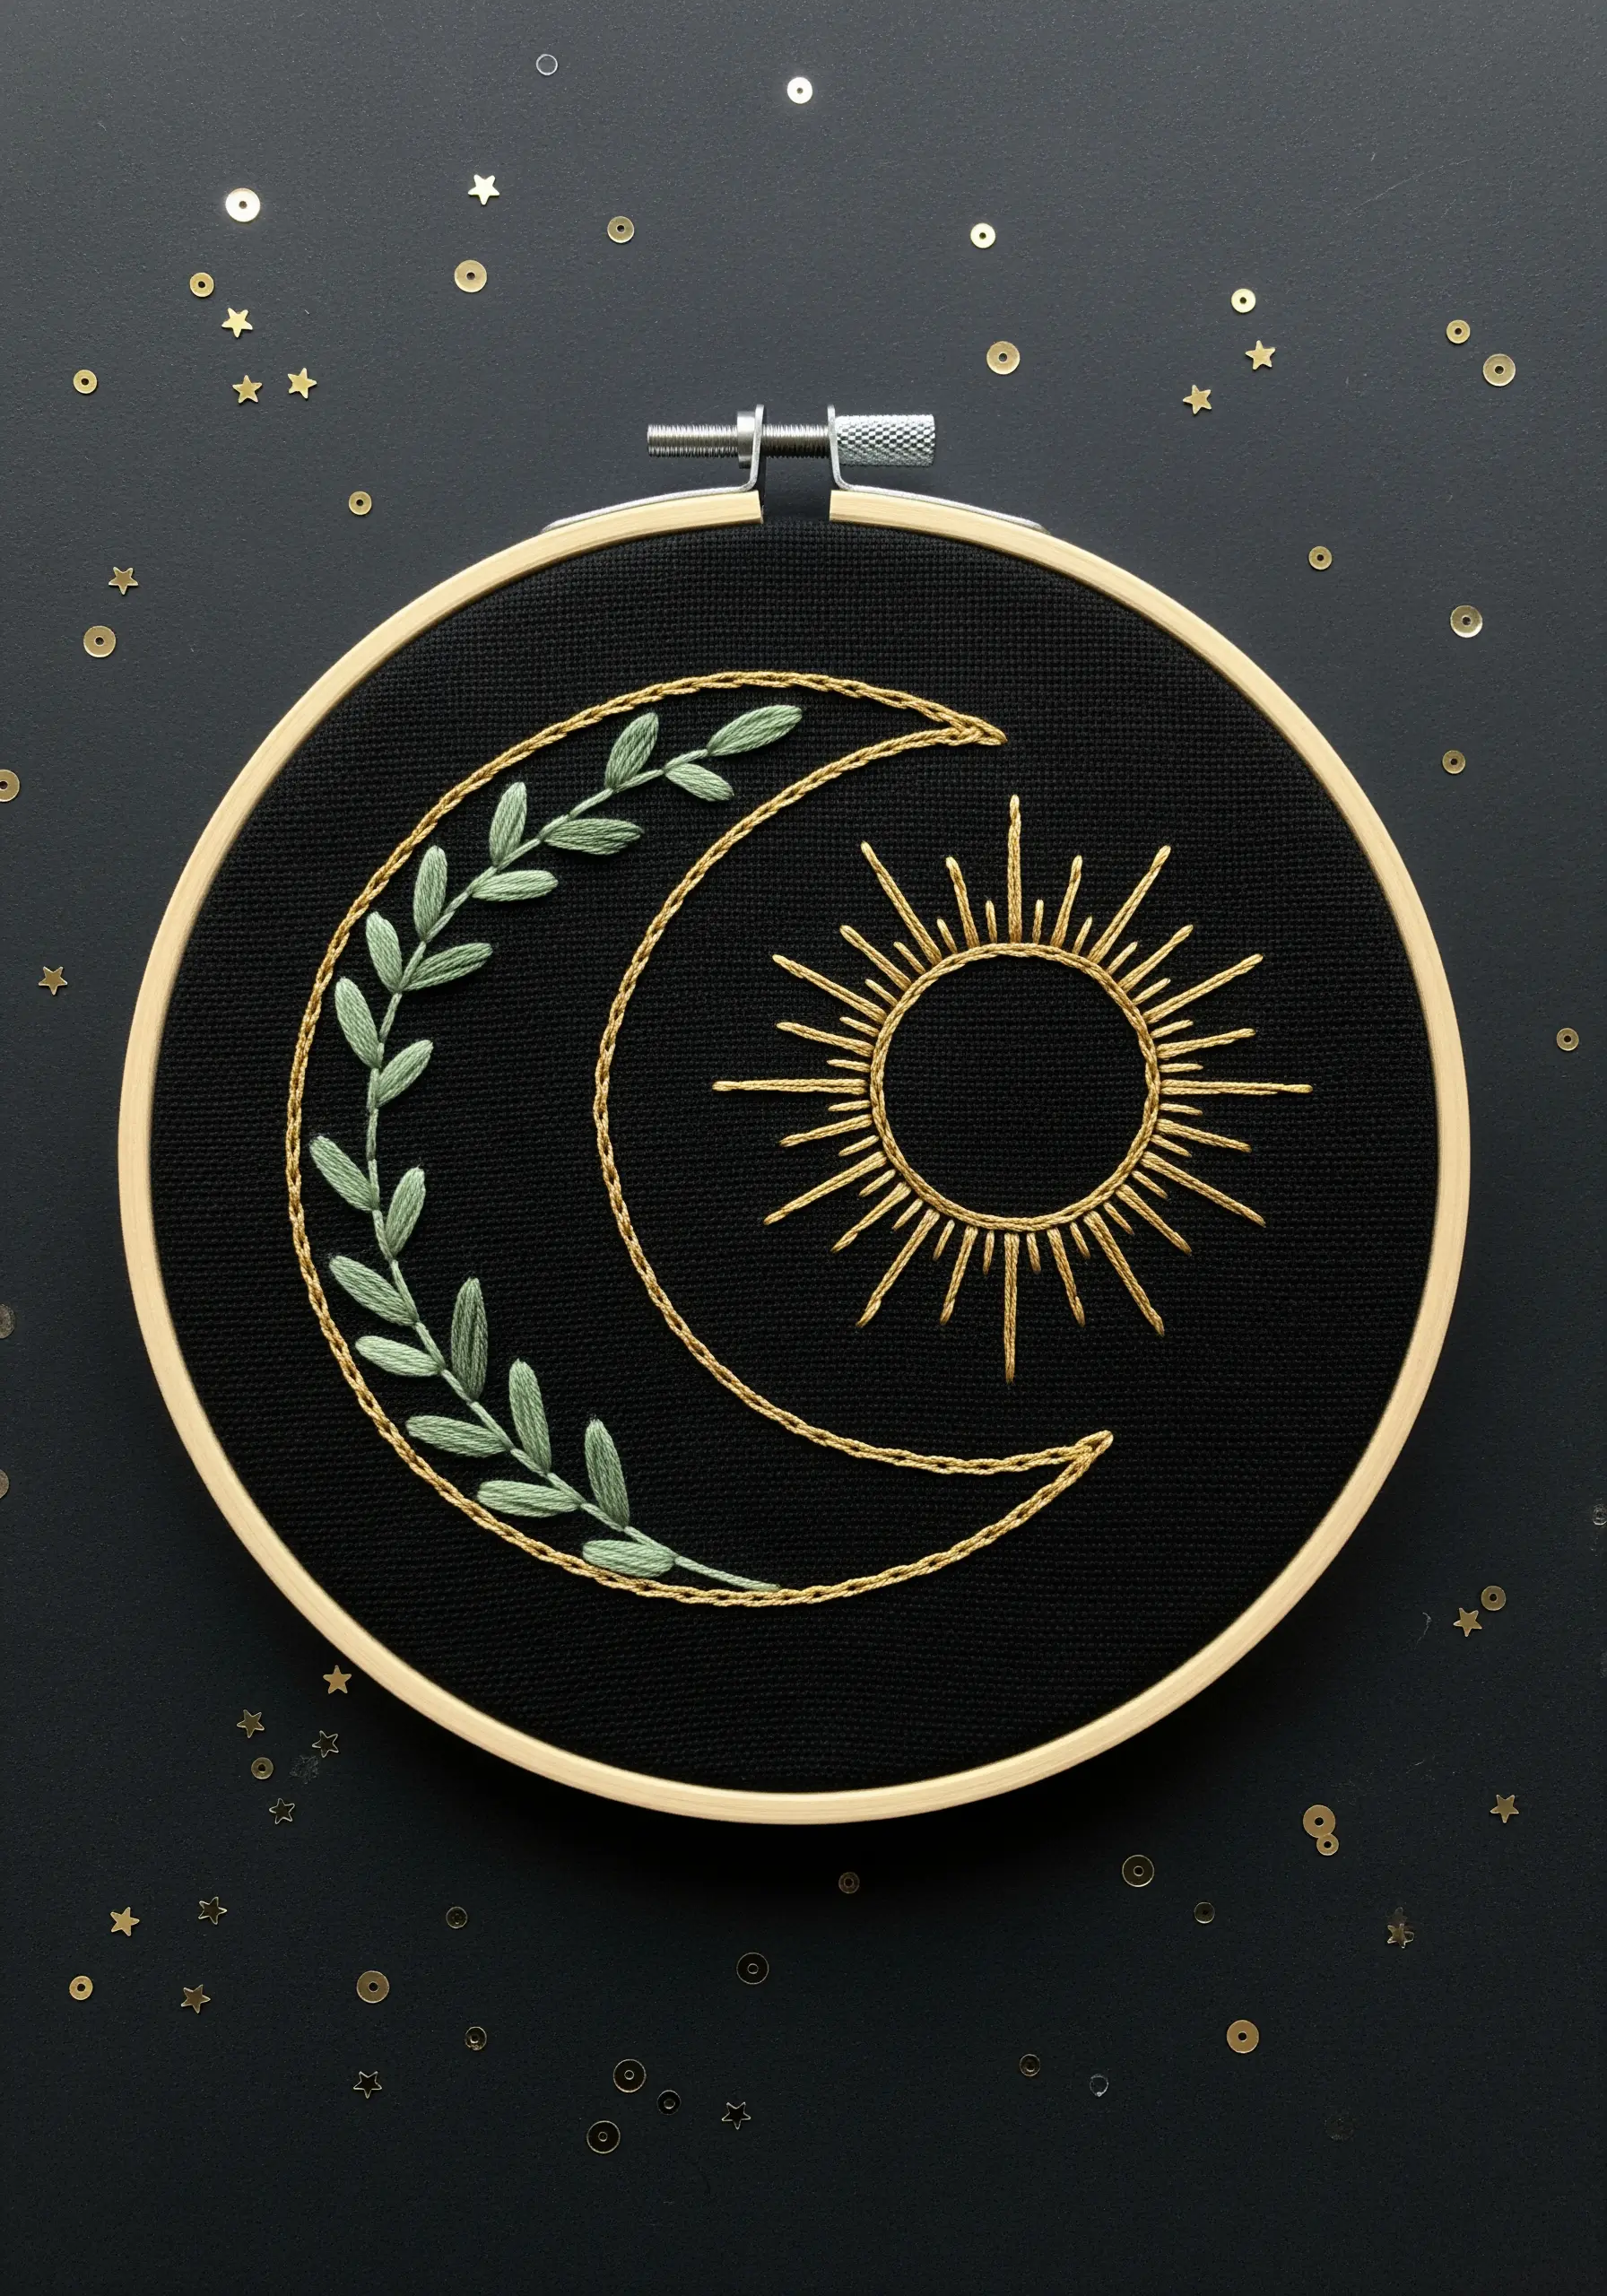
Elevate a celestial design by incorporating a metallic thread alongside your standard cotton floss.
Use a classic six-strand cotton for the botanical elements, like the leaves on the crescent moon, to give them a soft, matte finish.
Then, switch to a metallic gold or silver thread for the sun and the outline of the moon.
Metallic thread catches the light, adding a subtle, captivating shimmer that makes the entire piece feel more magical and special.
A thread conditioner can make metallic floss easier to work with.
18. Create a Field of Flowers with Simple Lazy Daisies
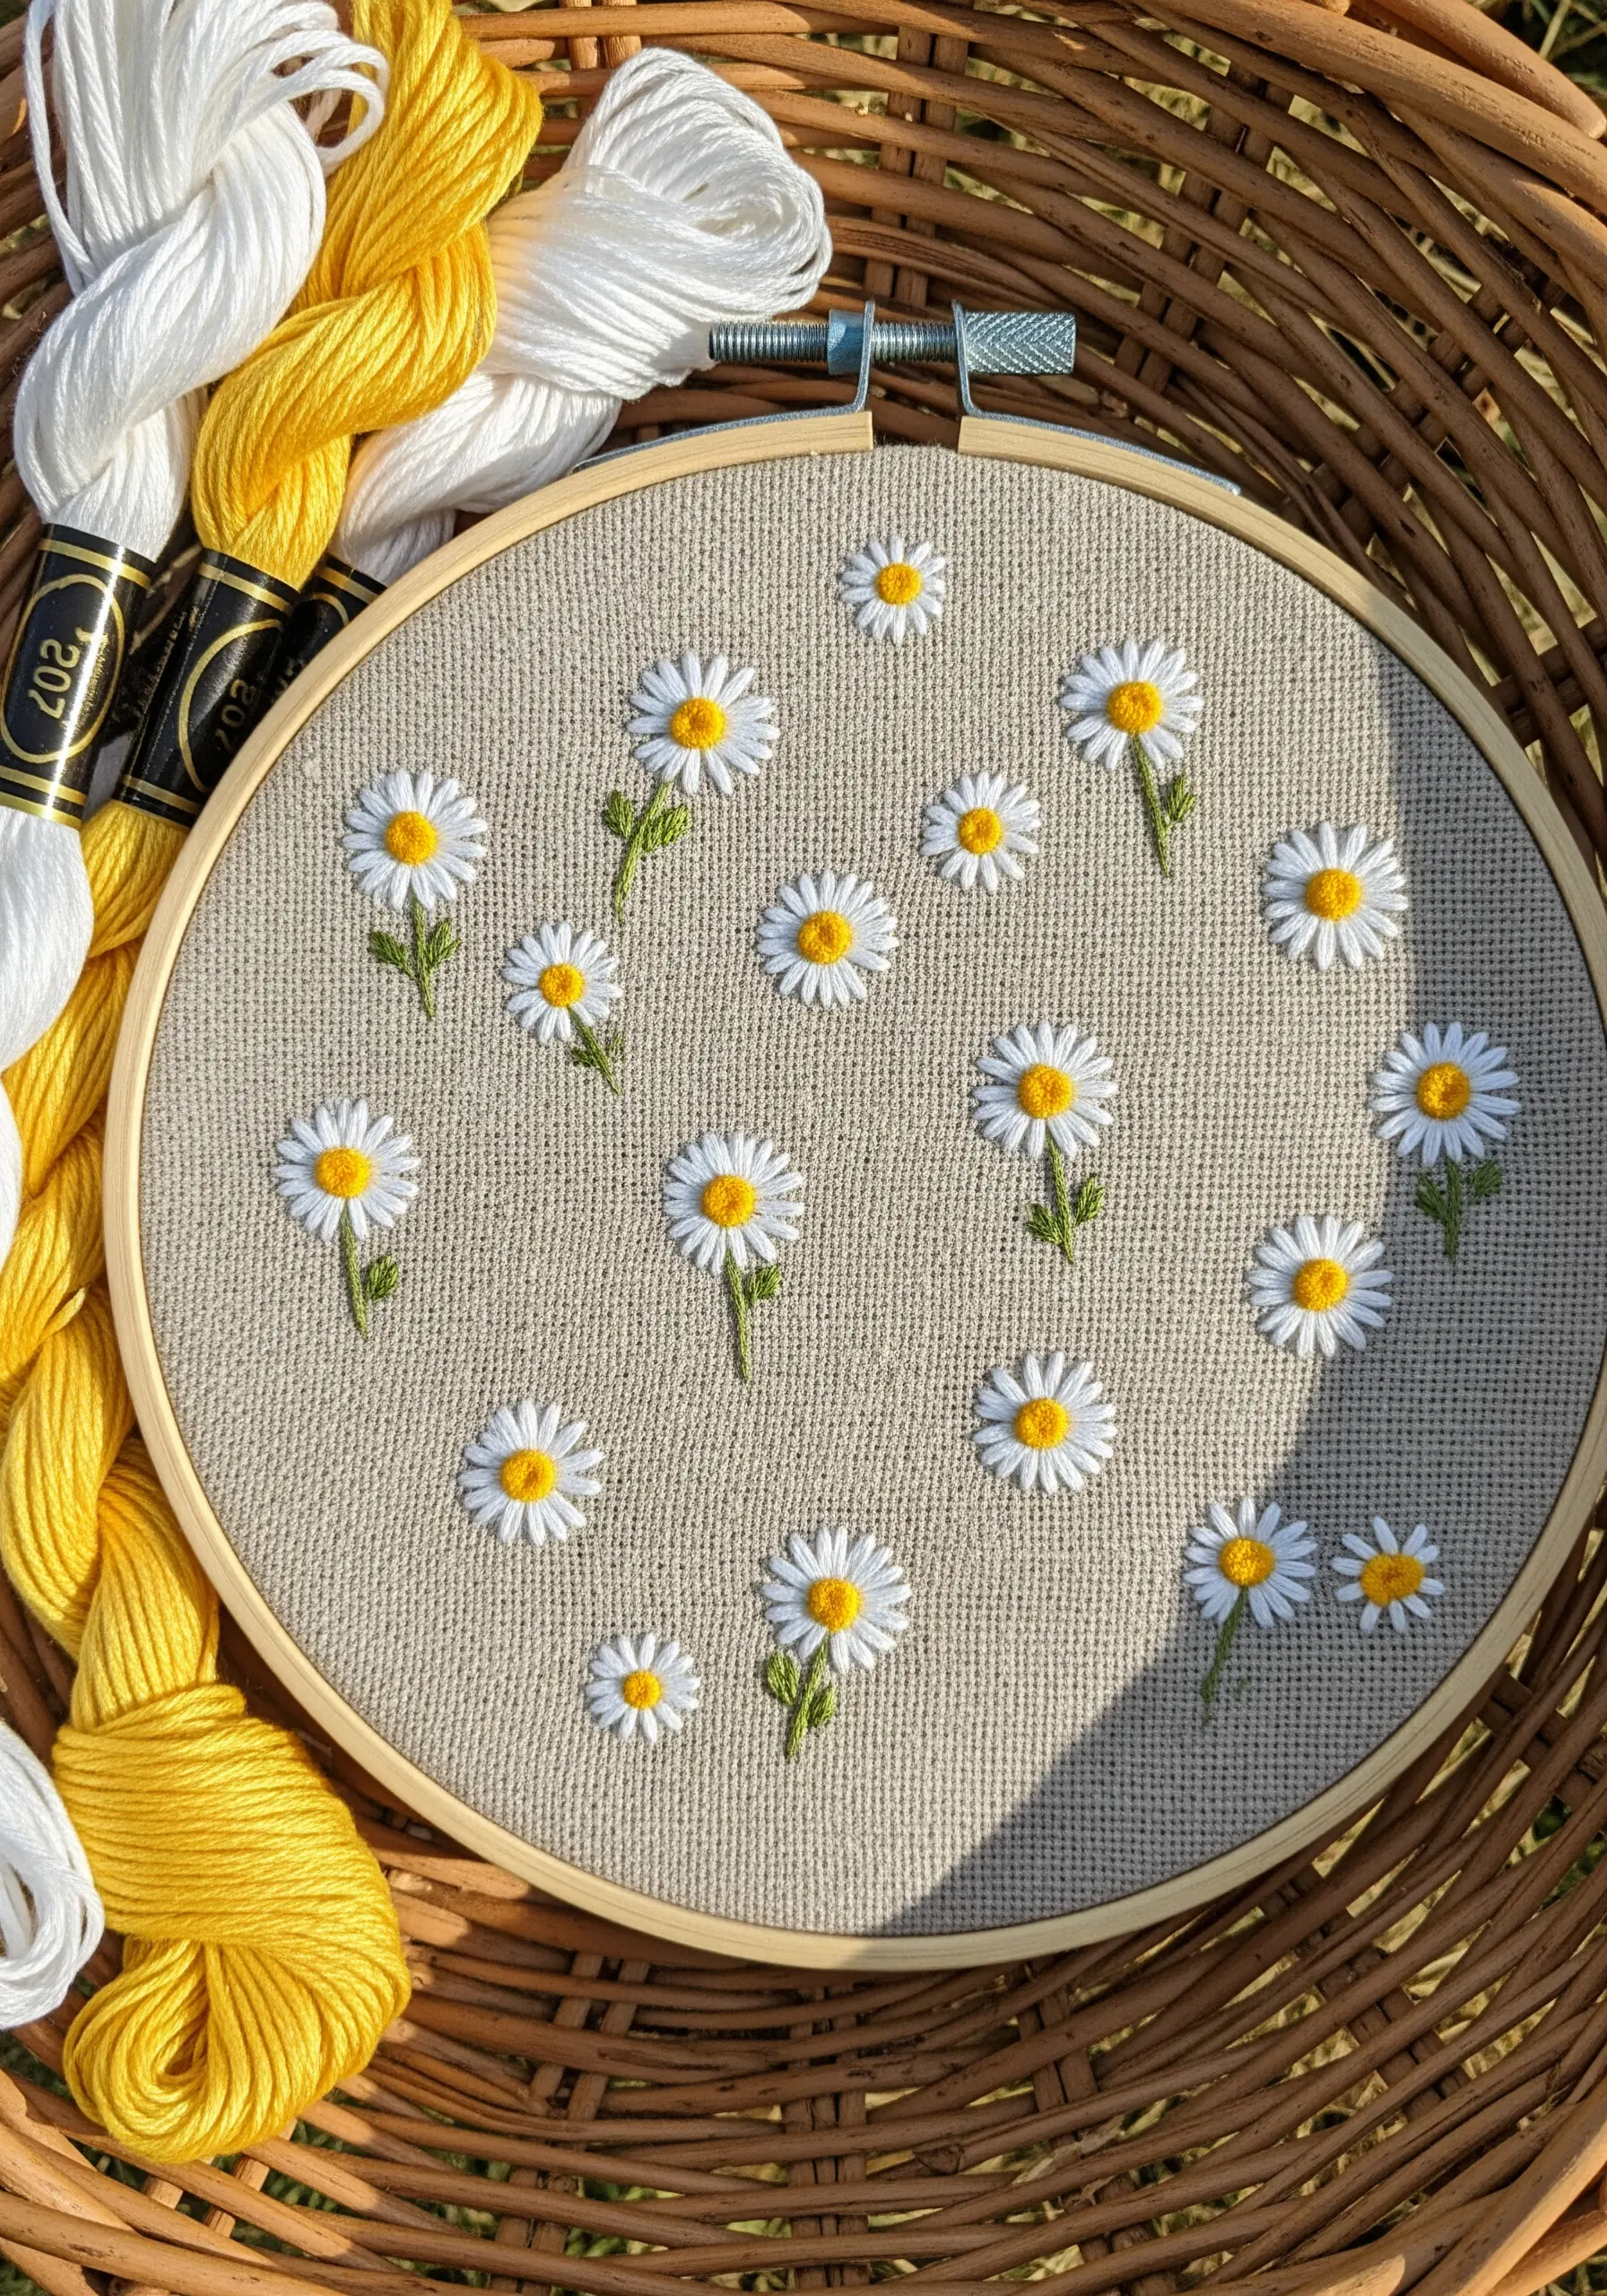
A field of daisies is easier to create than you think, and it’s a perfect way to practice the lazy daisy stitch.
Scatter the flowers randomly across your hoop to create a natural, meadow-like effect.
Vary the length and angle of the green stem stitches to give each flower a unique posture.
Using a neutral, textured fabric like linen provides a perfect rustic backdrop that makes the simple white and yellow flowers pop.
This is one of those delightful projects that brings pure joy.
19. Use a Two-Tone Palette for Graphic Impact

A simple outline becomes far more dynamic when you introduce a second color.
Stitch the main outline of the maple leaf in a bold color like red-orange using a backstitch.
Then, add the veins inside with a contrasting or complementary color, like this golden yellow, using simple straight stitches.
This technique adds visual interest and a sense of structure to the design without adding any complexity, proving that thoughtful color choices can be just as impactful as intricate stitches.
20. Define Forms with Directional Fill Stitches
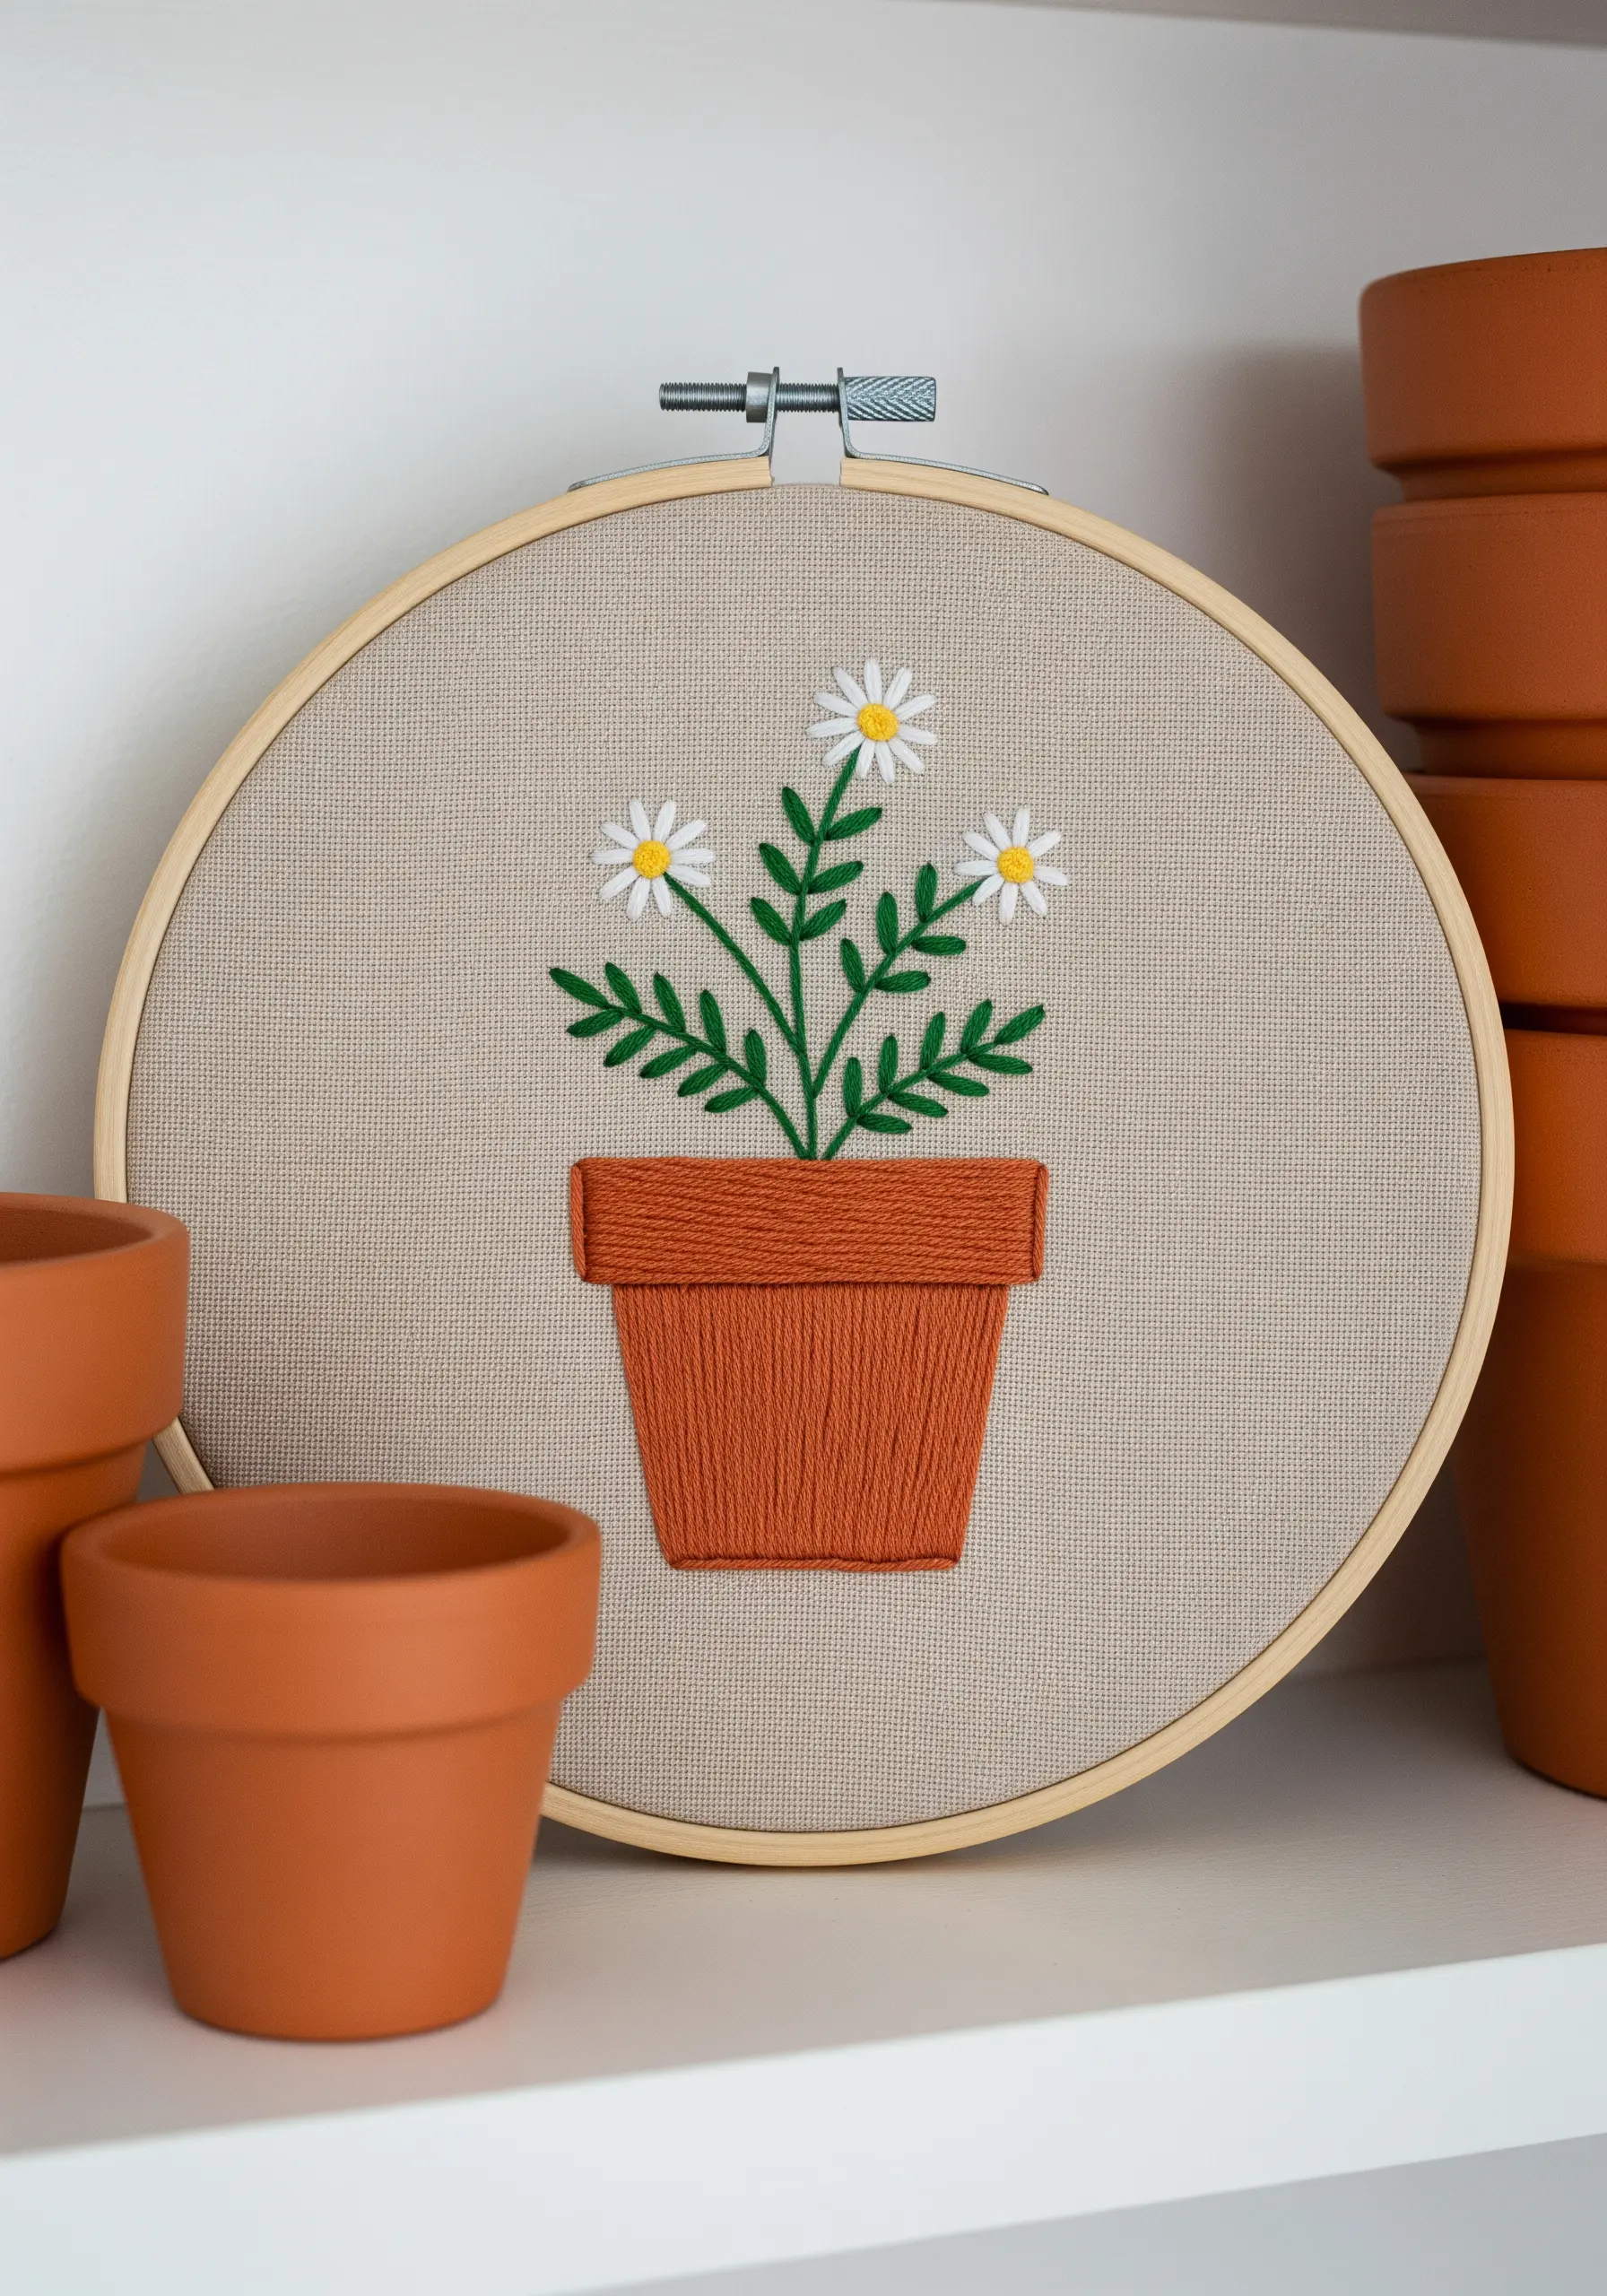
When filling solid shapes, the direction of your stitches can define the form.
For the terracotta pot, use long vertical satin stitches to suggest its tall, straight sides.
In contrast, fill the leaves with angled satin stitches or a fishbone stitch to give them a more organic shape and texture.
This intentional variation in stitch direction helps distinguish different elements within your design, making the final piece look more structured and polished.
21. Design Within a Shape for a Modern Composition
Instead of a traditional wreath, try arranging your botanicals within a defined shape, like this crescent moon.
This compositional constraint forces you to think creatively about placement and flow, resulting in a modern and elegant design.
Use a mix of small-scale stitches, such as French knots, lazy daisy stitches, and tiny straight stitches, to create a rich tapestry of texture.
The deep navy background makes the pastel lavenders and soft greens feel like they are glowing.
22. Master the Cheerful and Simple Lazy Daisy Stitch

The lazy daisy stitch is a beginner’s best friend, and it’s perfect for creating small, charming flowers like forget-me-nots.
Arrange five or six lazy daisy stitches in a circle to form the petals, then place a single yellow French knot in the center to complete the bloom.
Because the stitch is so quick and satisfying, you can easily create a full bouquet in an afternoon.
Pairing them with a simple split stitch for the stems creates a timeless and delicate design.
23. Create Pattern and Dimension with Vertical Lines
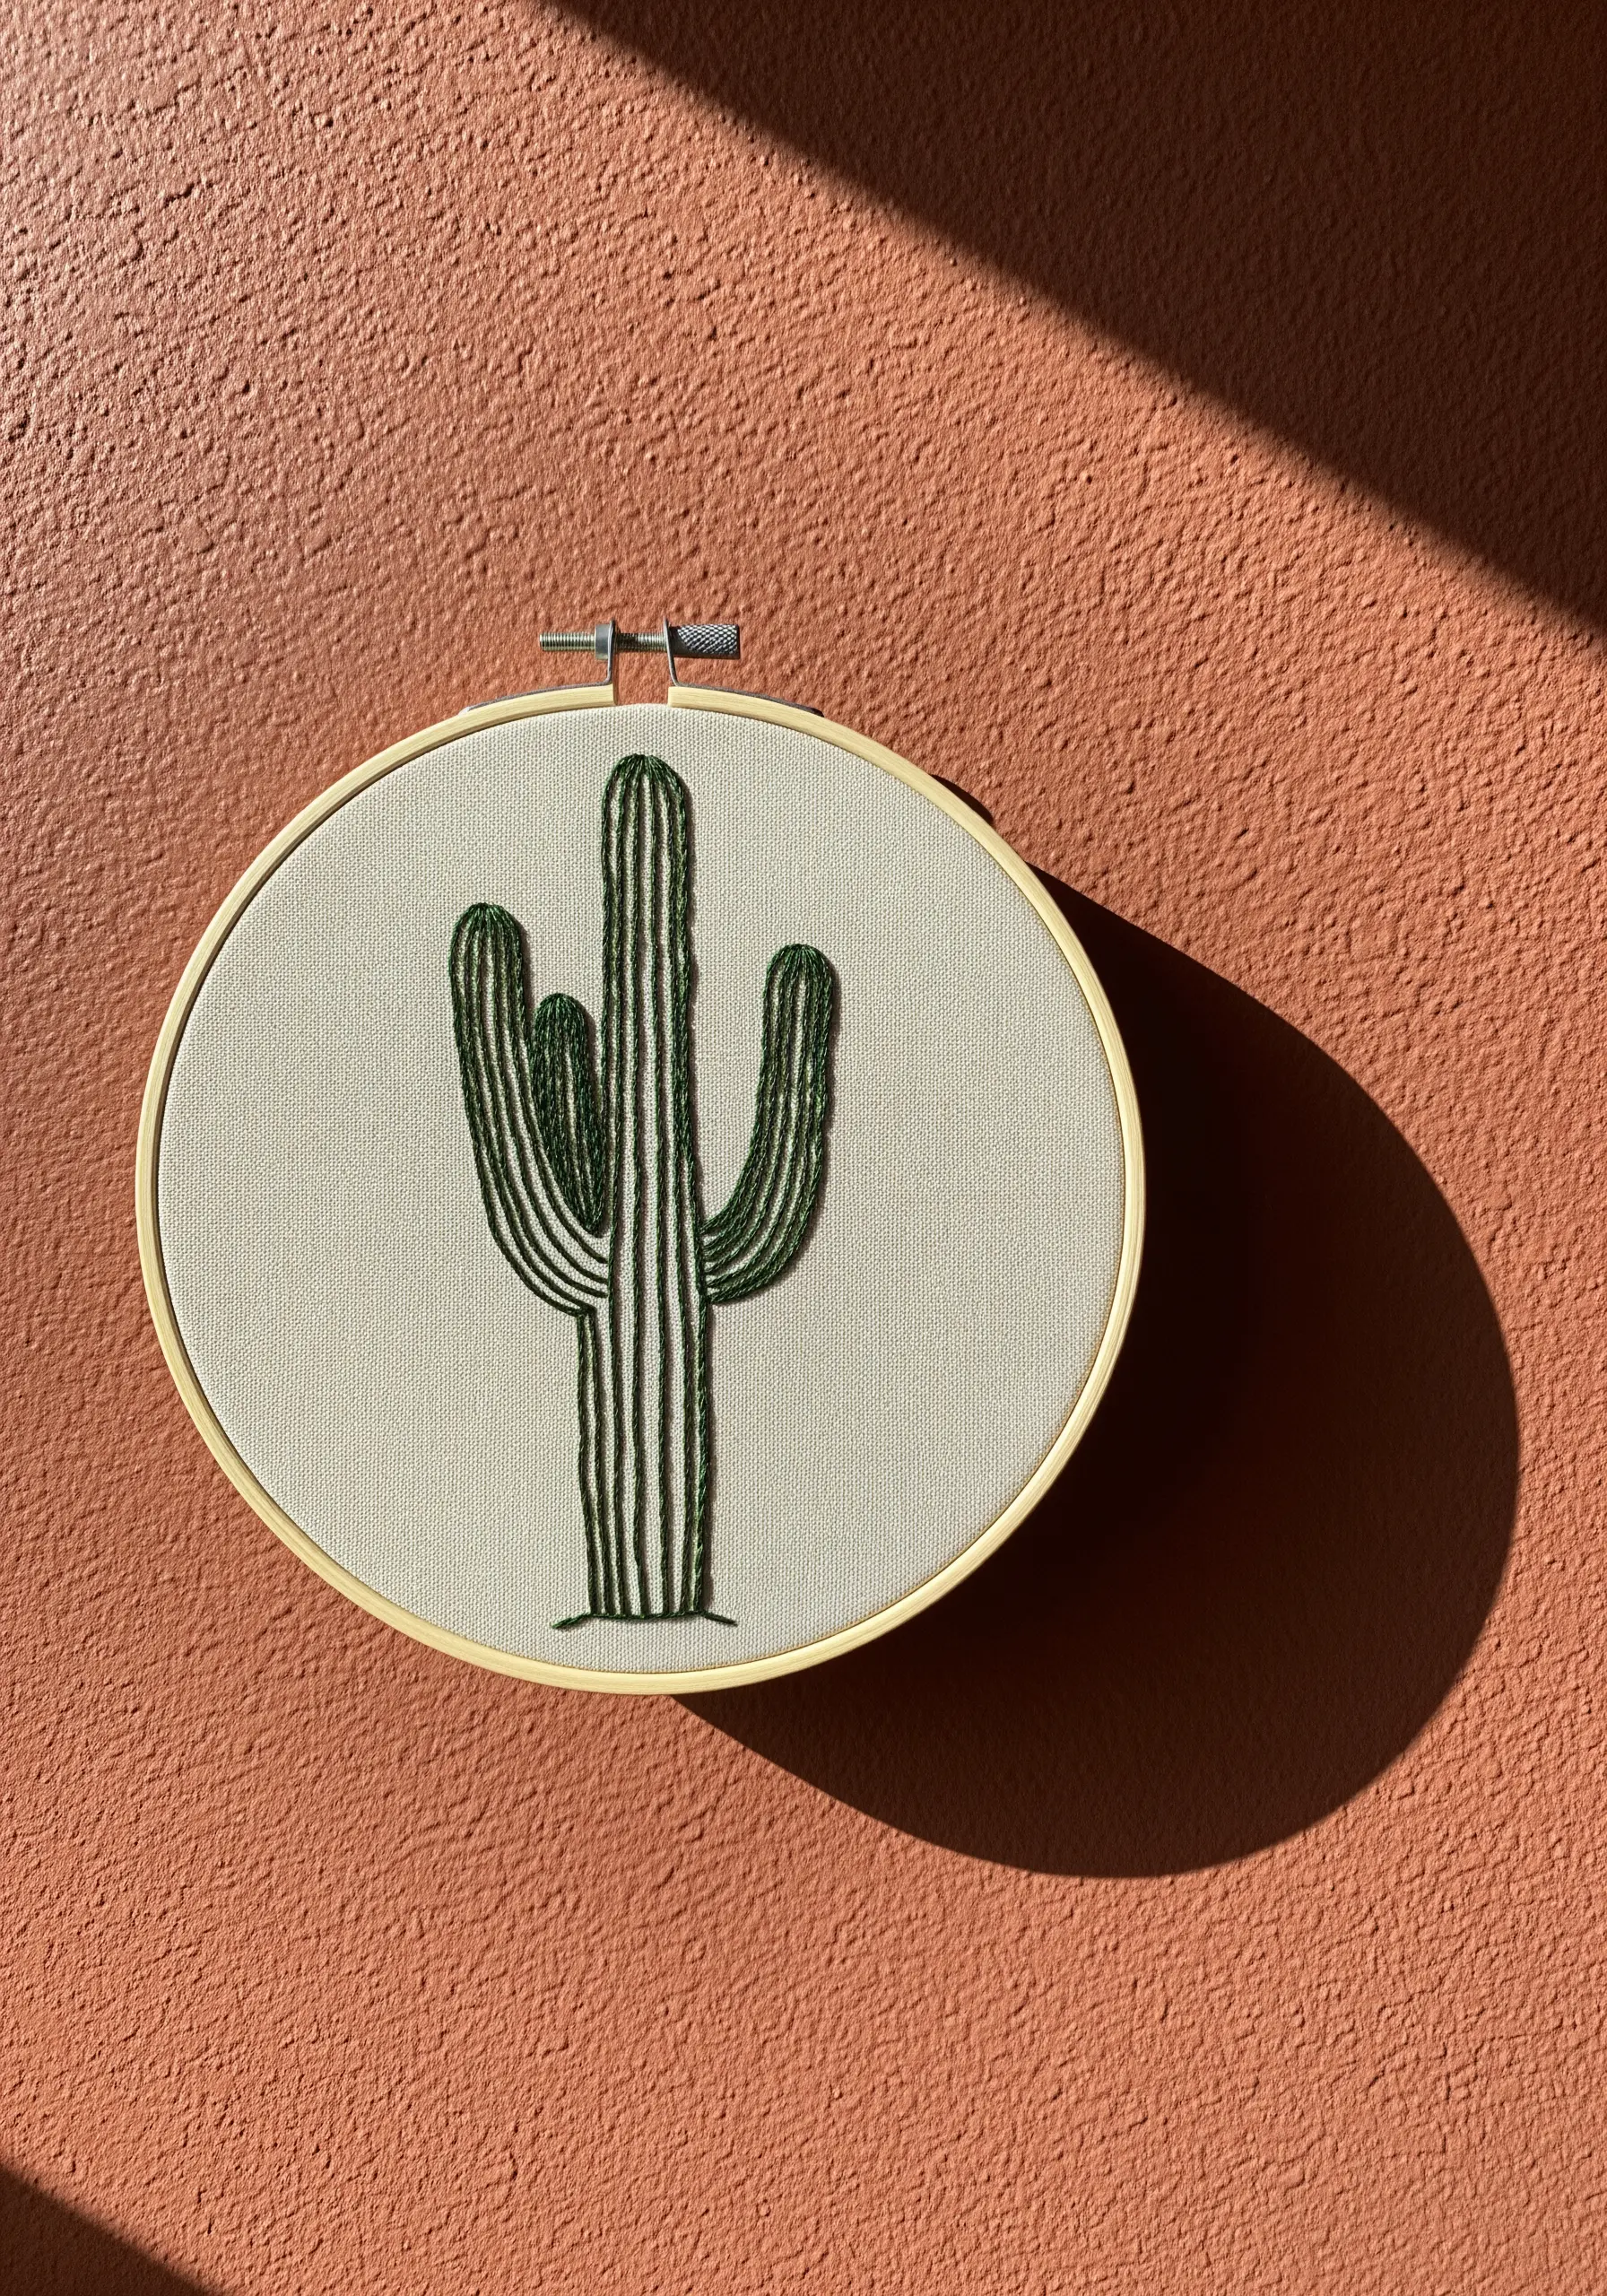
To capture the ribbed texture of a saguaro cactus, use vertical satin stitches and a smart color strategy.
Instead of filling the entire shape with one color, alternate between two or three shades of green to create distinct stripes.
To create the illusion of a rounded form, use darker shades on the outer edges and a lighter shade in the center.
This simple color placement trick adds instant dimension and realism to a flat design.
24. Combine Stitches for Complex Floral Textures

Recreate the unique texture of a Scottish thistle by combining several basic stitches.
For the spiky green base, use layered fly stitches or a series of V-shaped straight stitches to create that sharp, layered look.
The purple flower on top is made with long straight stitches fanning out from the base.
Finally, a tightly wrapped stem stitch (or Palestrina knot stitch) gives the stem a sturdy, rope-like texture.
This project shows how you can build complex-looking forms by layering small, simple stitches.
25. Stitch Delicate Details with a Single Thread
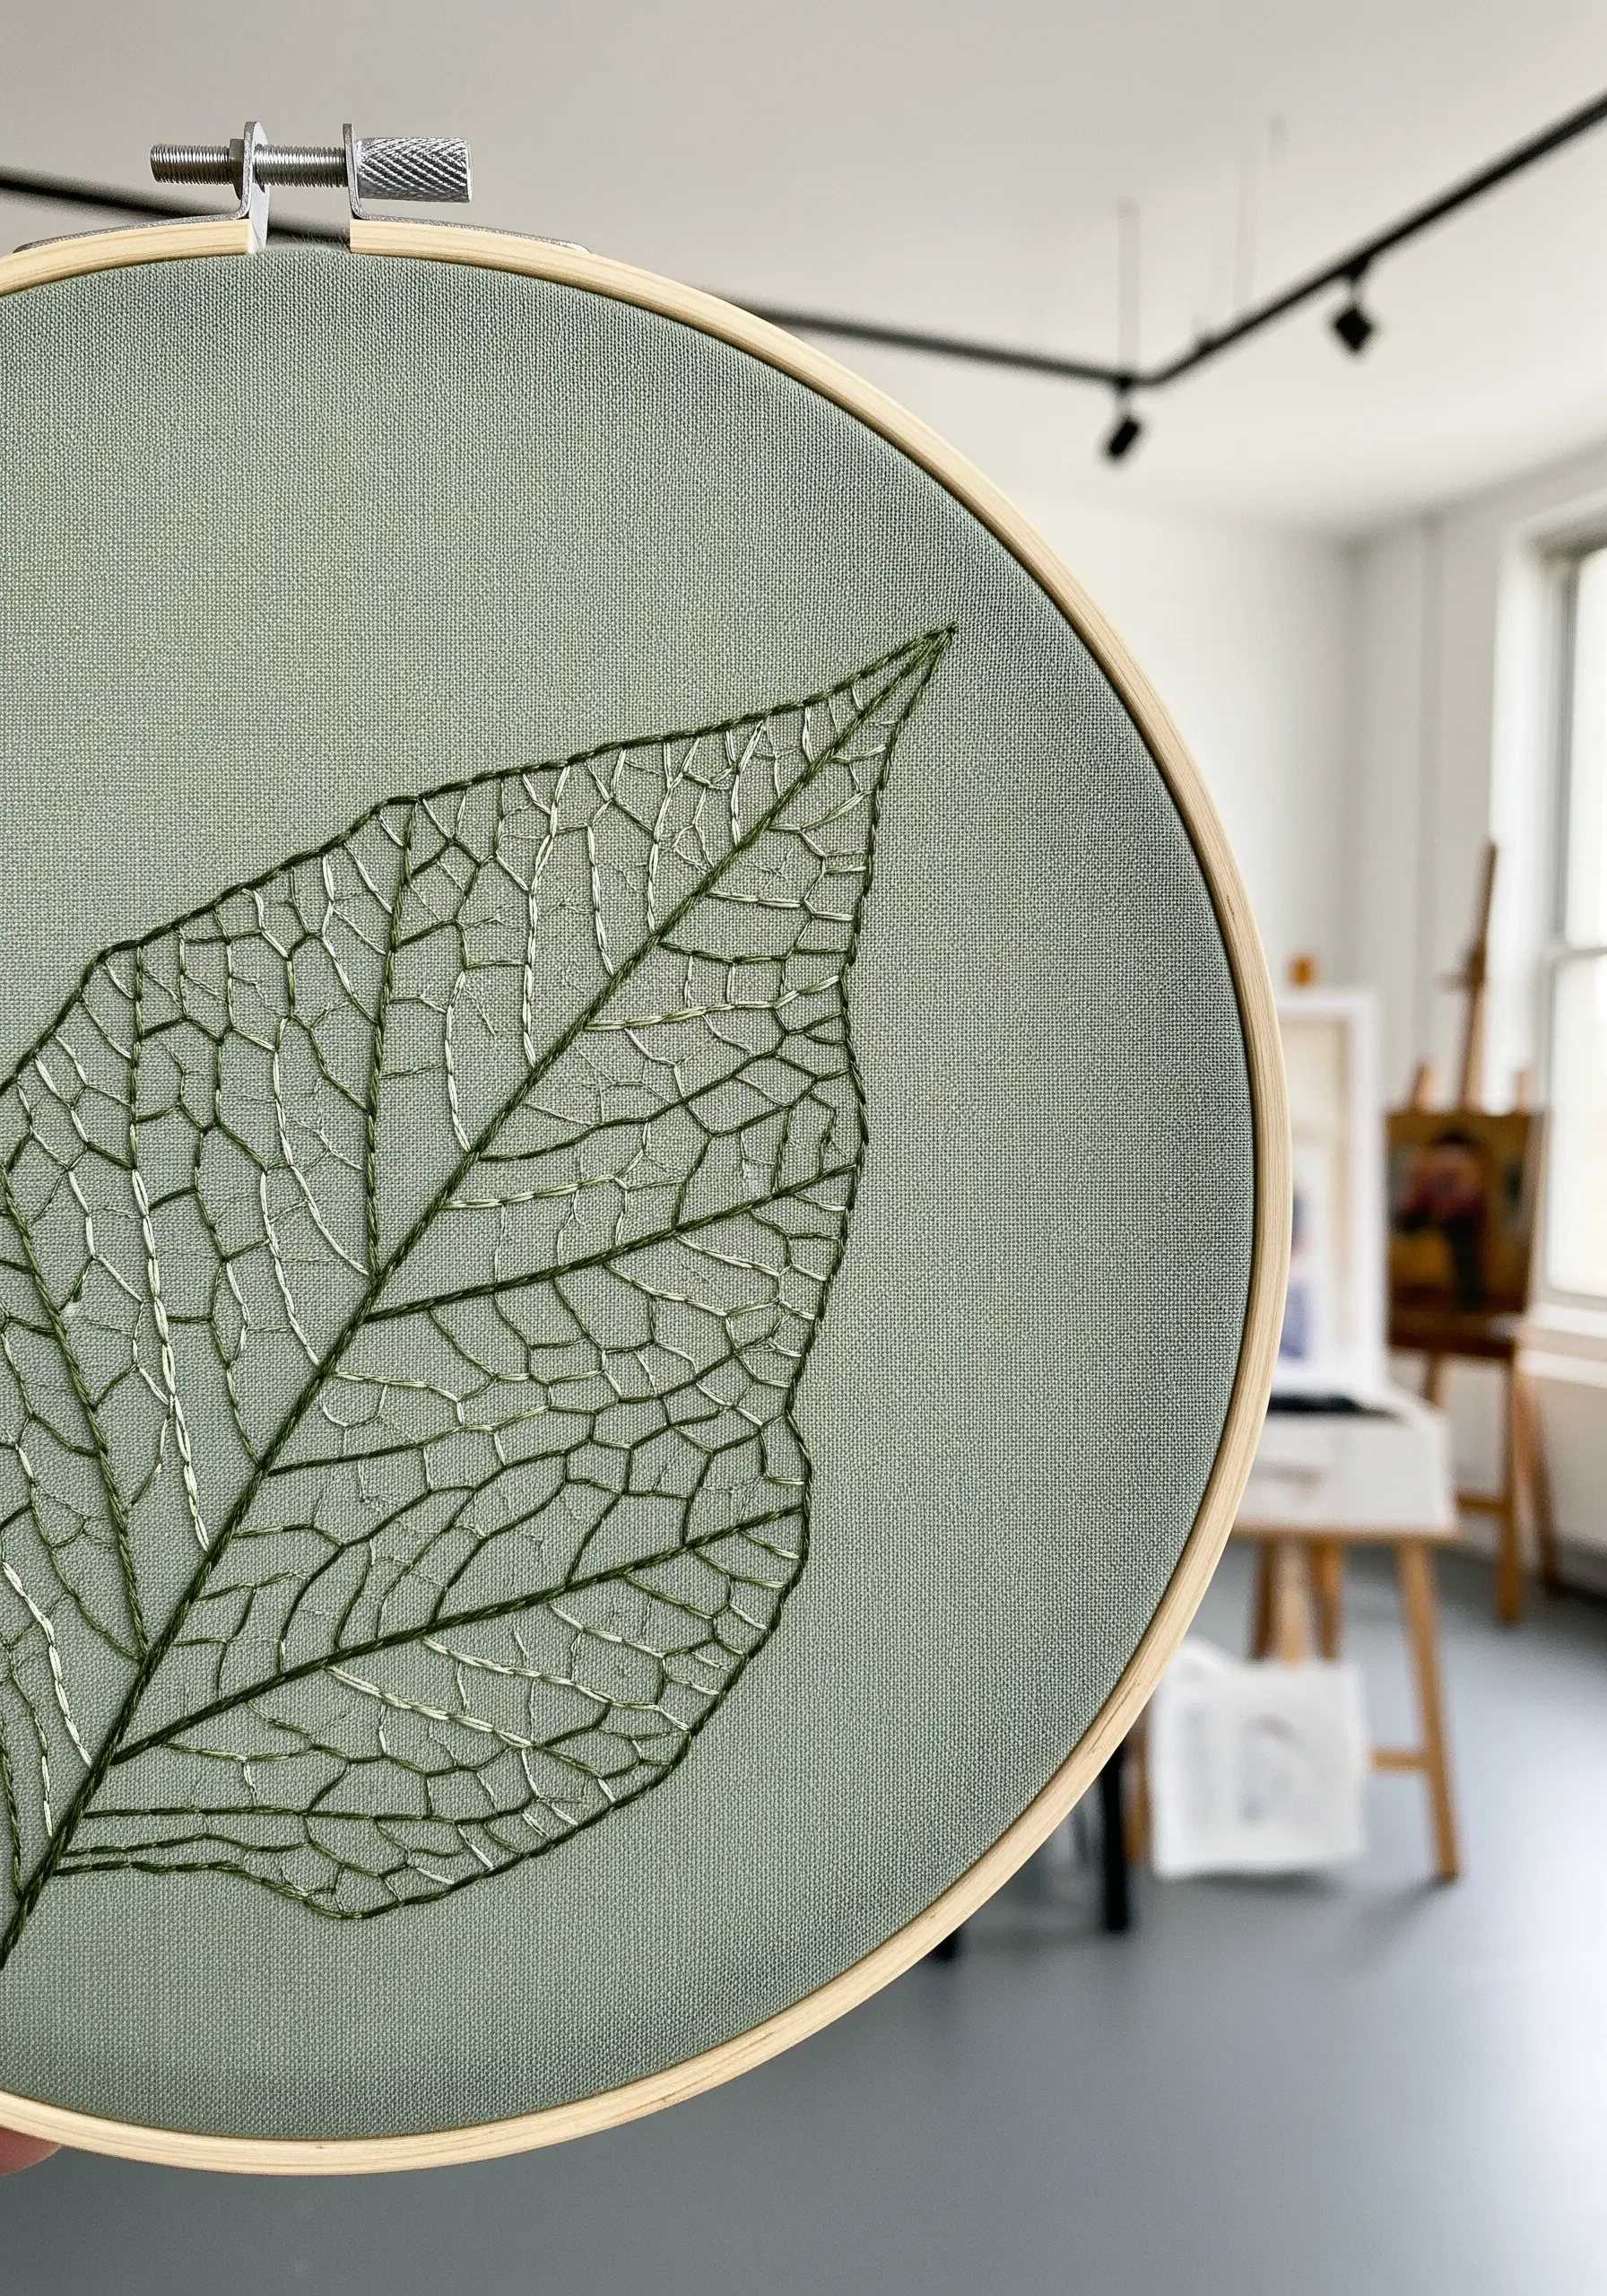
To capture the ethereal beauty of a leaf skeleton, simplicity is your most powerful tool.
Use only a single strand of embroidery floss. This allows you to create incredibly fine, delicate lines that won’t overwhelm the design.
Trace the primary veins with a simple backstitch, then fill in the intricate network of smaller veins with tiny, individual straight stitches.
Using a thread with a subtle sheen, like a silk or a light metallic, can enhance the fragile, almost magical quality of the piece.
26. Capture Herb Textures with Simple Line Stitches
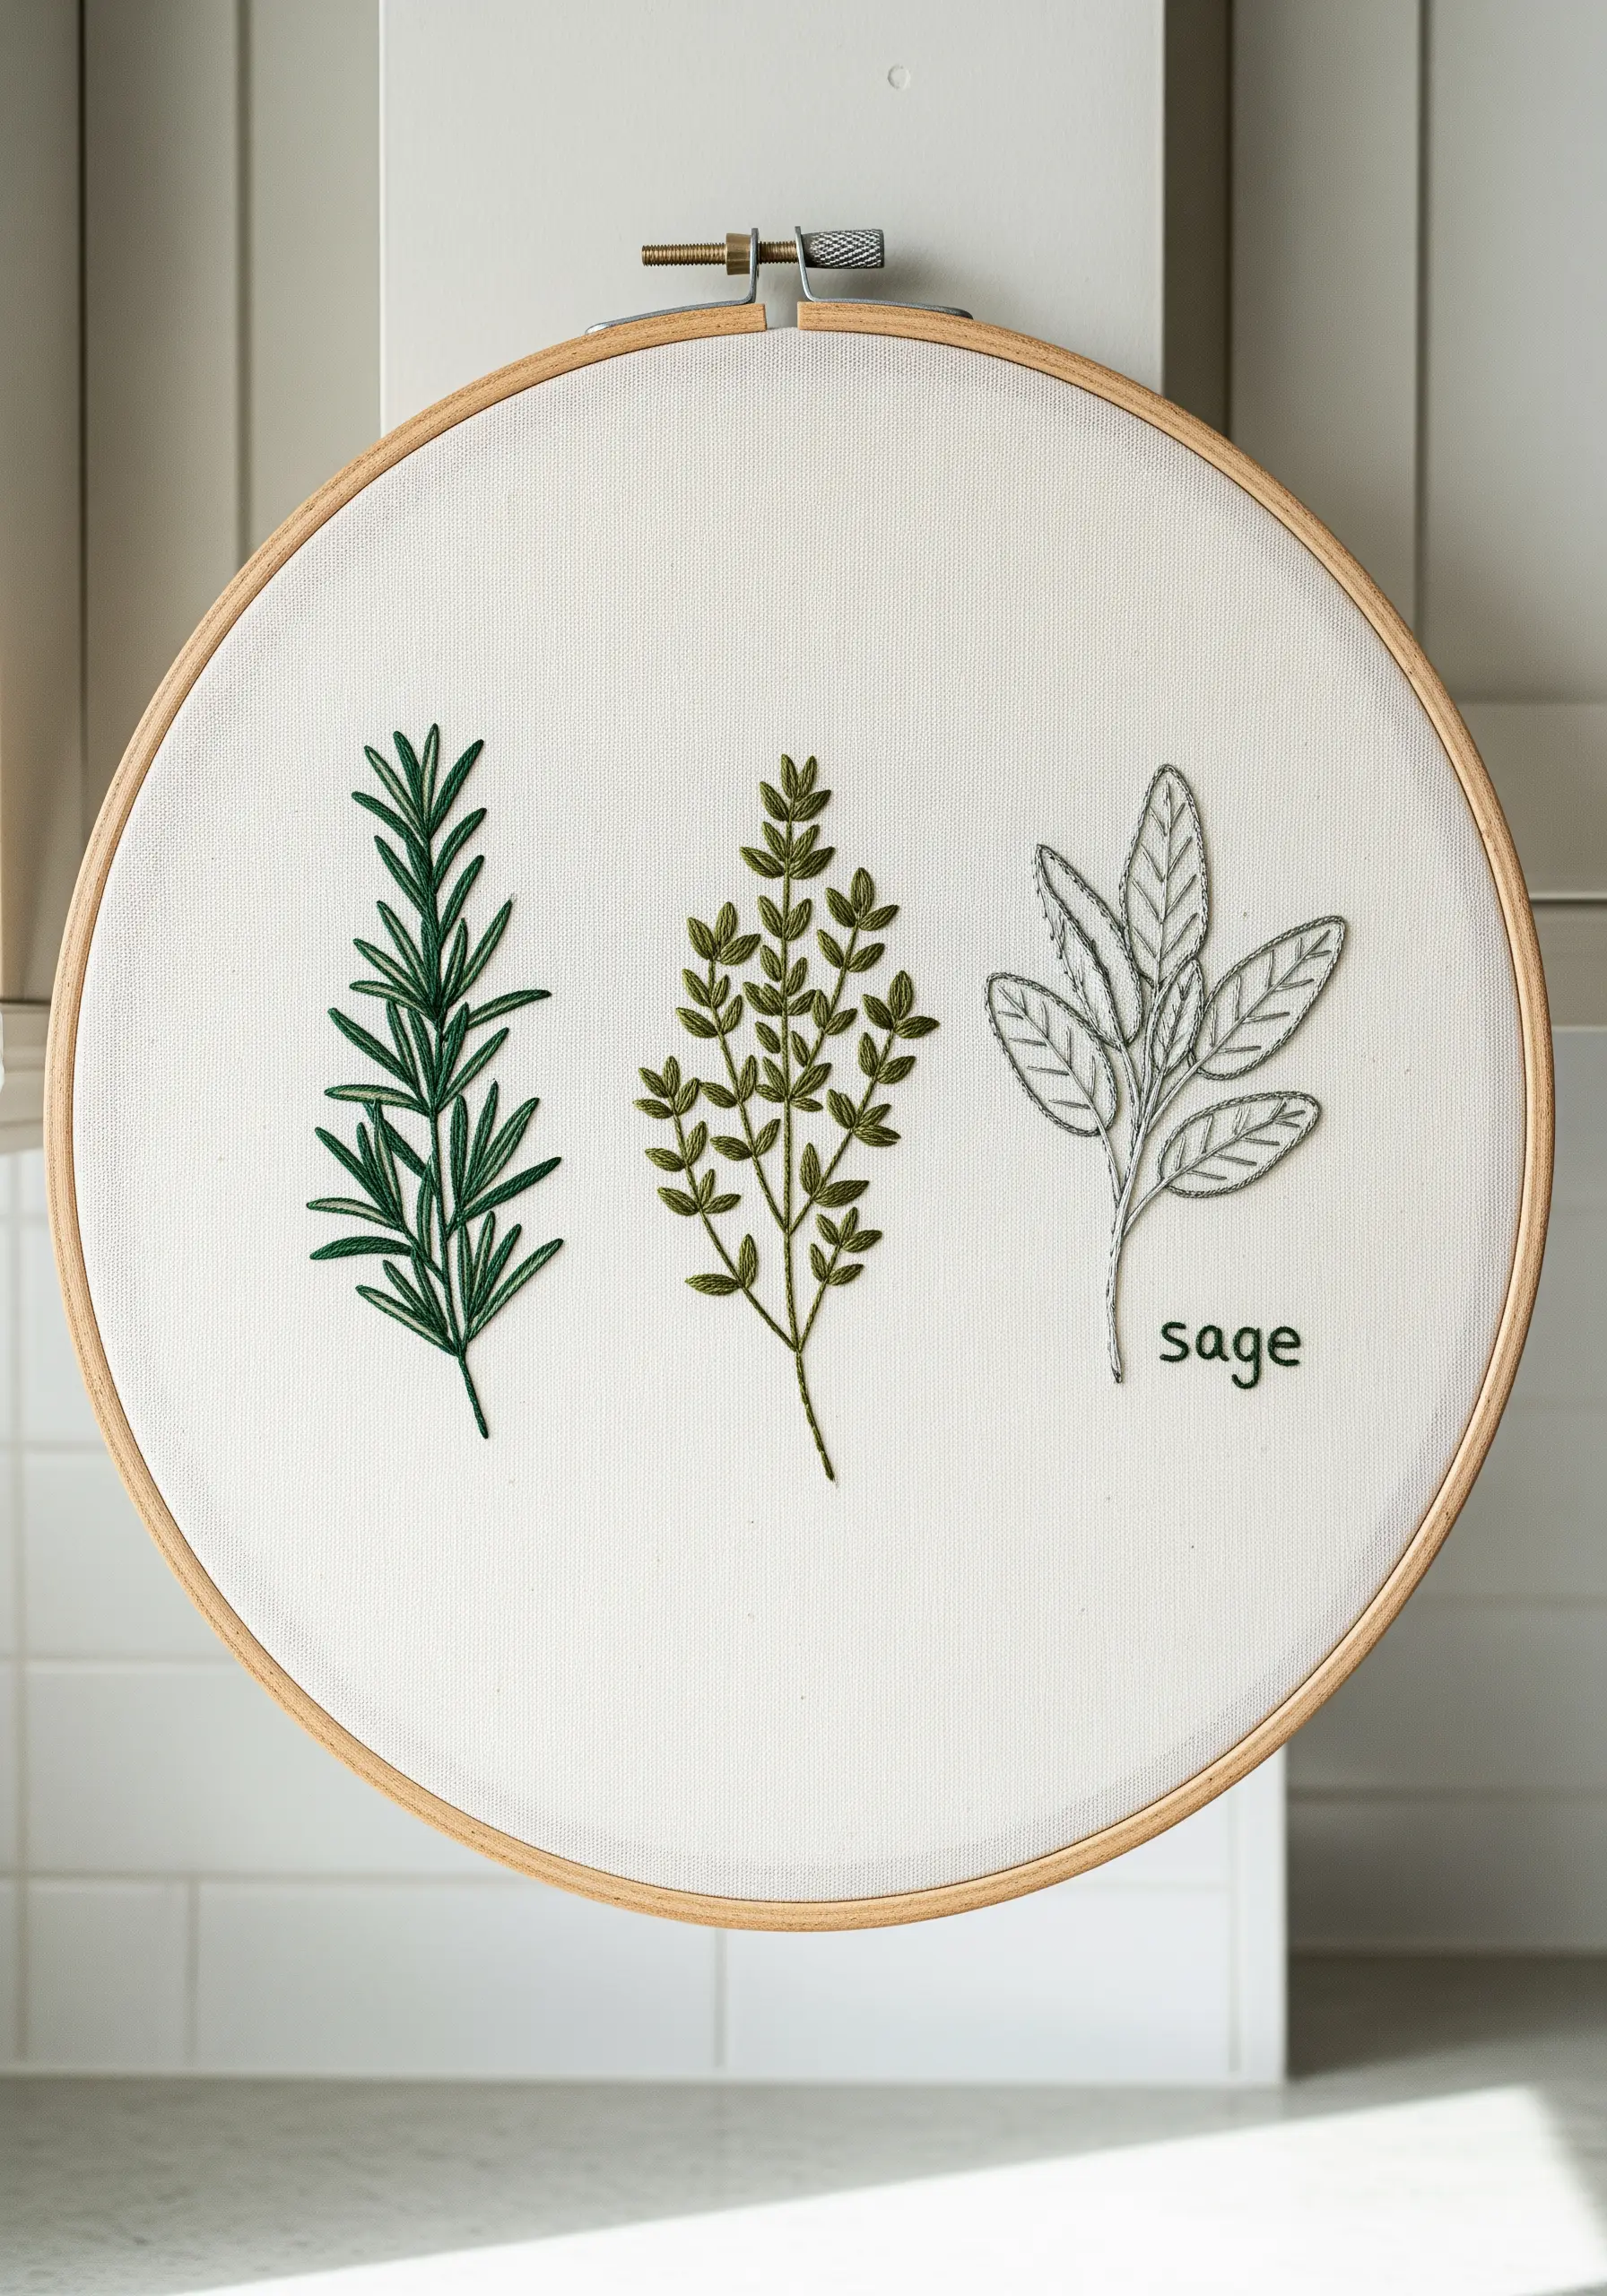
You can represent different herbs effectively just by changing your stitch choice and direction.
For rosemary, use short, angled straight stitches pointing upwards from a central stem.
For thyme, use tiny detached chain stitches (lazy daisies) for the round leaves.
For sage, outline the leaf shape with a backstitch and add a central vein. Using a silver-gray thread for sage instantly makes it recognizable.
Adding simple, hand-stitched typography gives your trio a clean, modern, and personalized finish.
27. Add Narrative with a Second Character

Transform a simple flower study into a charming scene by adding a second element, like a busy bee.
For the coneflower, use detached straight stitches for the petals to give them a light, open feel, and fill the center with dense French knots in orange and brown.
A simple satin-stitched bee and a dotted backstitch flight path add a sense of life, movement, and story to the composition.
This small addition makes the piece feel more dynamic and engaging.
28. Create Contrast with Outline and Fill

Play with positive and negative space by combining an outlined motif with a filled one.
Here, the large oak leaf is rendered in a simple backstitch, allowing the color of the fabric to show through.
This light, airy form is beautifully grounded by the small, solidly filled acorn next to it, which is stitched with a dense satin stitch.
This contrast in technique makes the overall design more visually interesting and balanced. The rich, earthy fabric color ties it all together perfectly.
29. Add Whimsy with Three-Dimensional Elements
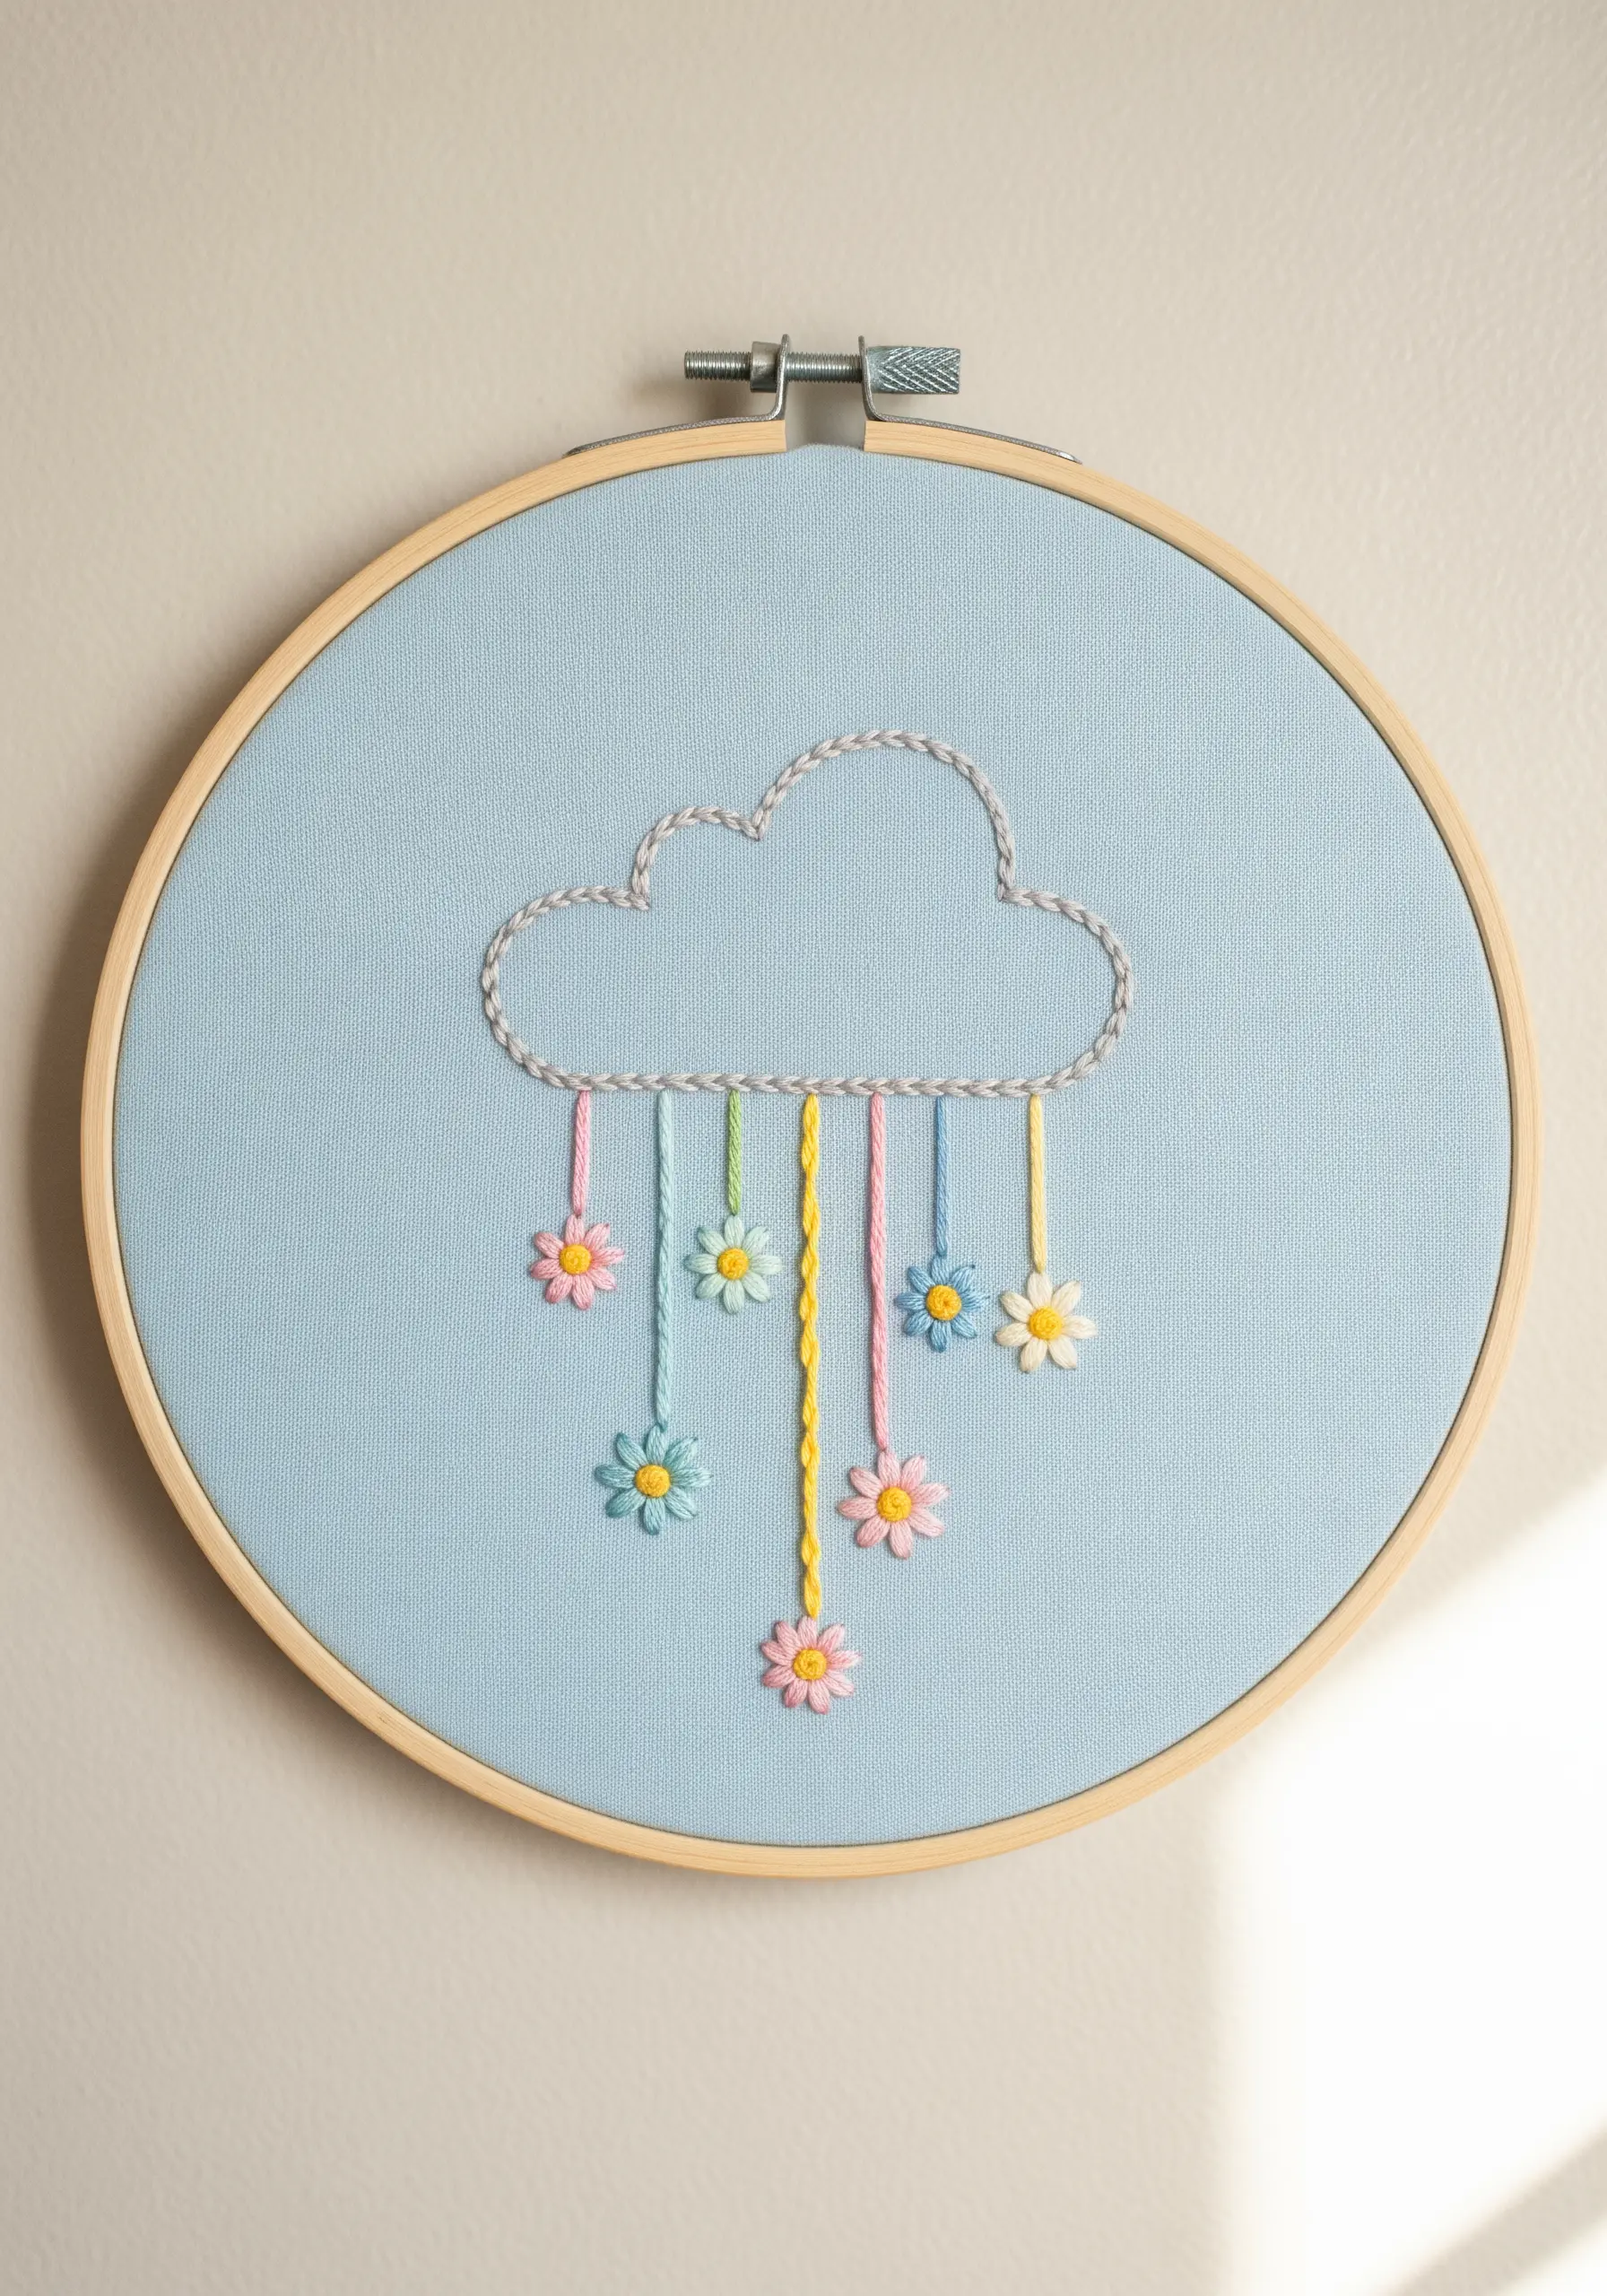
Bring a playful, three-dimensional element to your embroidery by letting some threads hang free.
Outline a simple cloud shape with a chain stitch or whipped backstitch for a puffy texture.
For the raindrops, stitch long, straight threads hanging down from the cloud. Instead of cutting them, secure each one at the bottom with a small, brightly colored lazy daisy flower.
This simple but clever technique adds a touch of interactive whimsy that is sure to make people smile.
30. Explore the Beauty of Monochrome Botanicals
You don’t always need a full spectrum of color to create a beautiful botanical piece.
Working with just one or two shades of brown or gray can result in an elegant, sketch-like design that highlights form and texture.
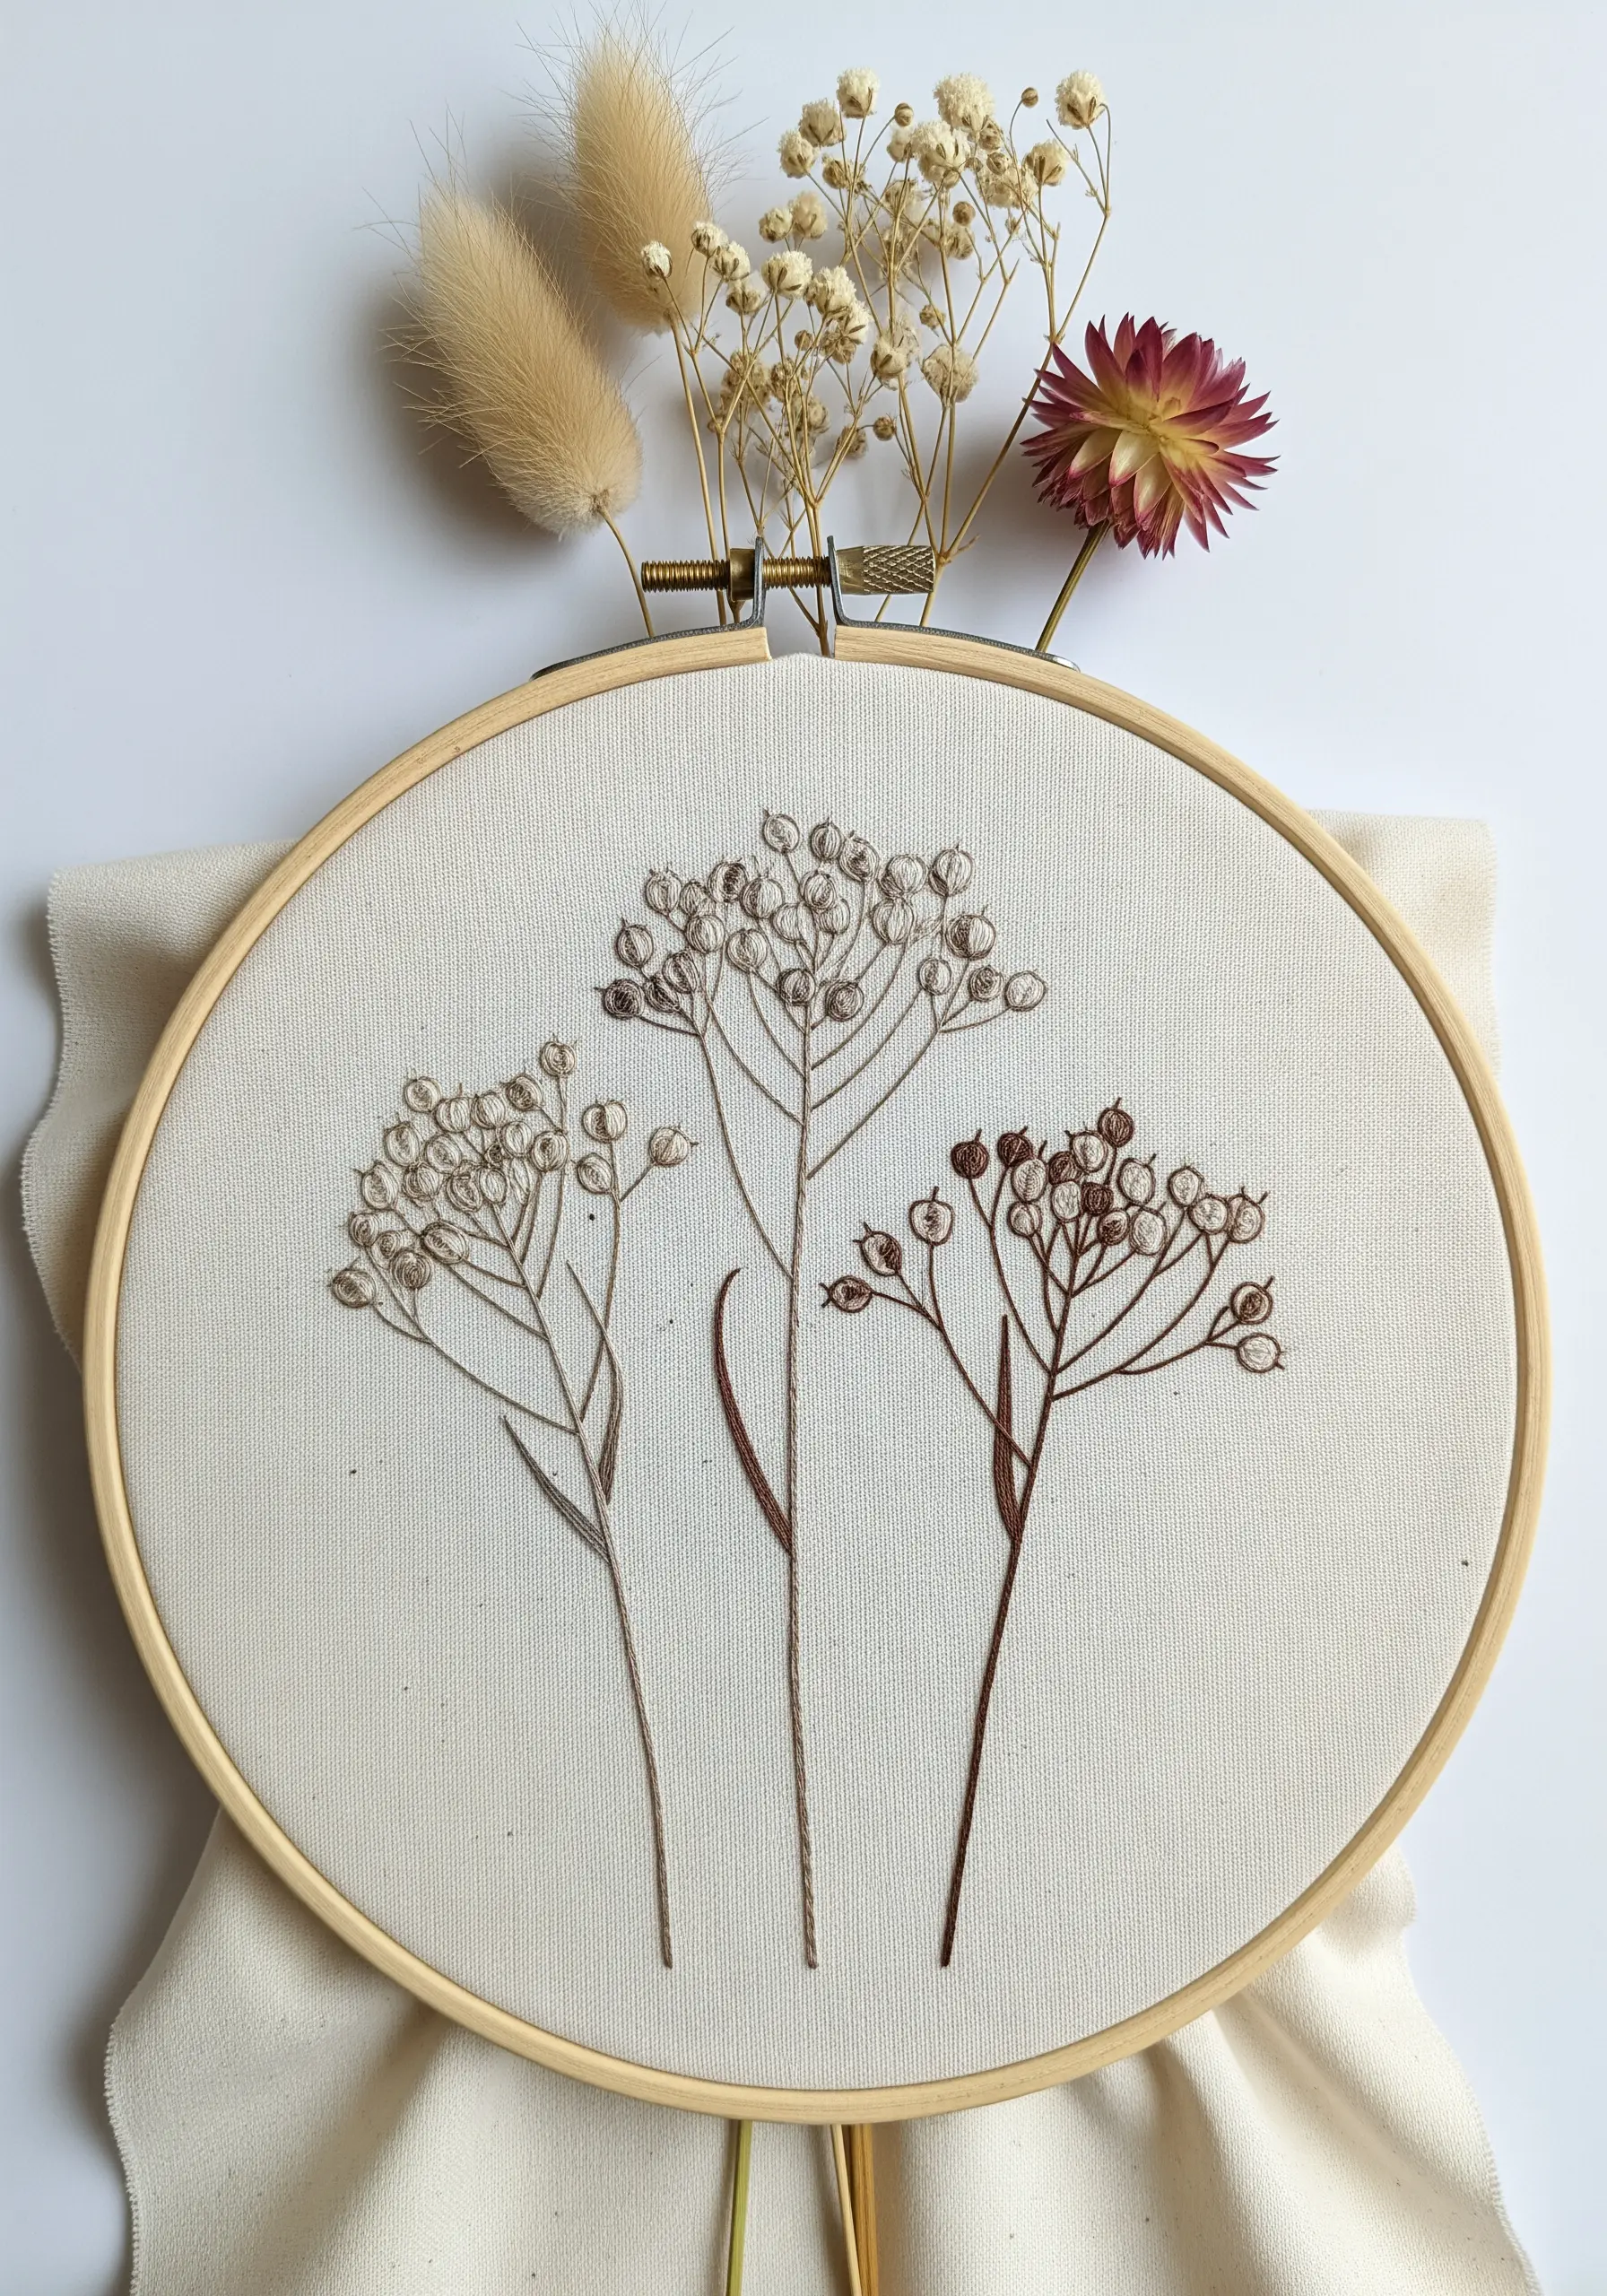
Use a single strand of floss and a combination of French knots, straight stitches, and stem stitches to create the delicate, skeletal forms of dried seed pods and winter branches.
This minimalist, monochrome approach feels both modern and timeless.
31. Weave a Story with Celestial Florals

Combine the magic of the cosmos with the beauty of nature by creating a floral constellation.
Use a fine metallic thread to stitch stars and dotted connecting lines, then weave in leafy vines using a soft green cotton floss.
The contrast between the sharp, glittering stars and the soft, organic leaves creates a wonderfully imaginative narrative.
Stitching on dark fabric is key here, as it allows both the metallic and the green threads to stand out dramatically.
32. Build Natural Texture by Layering Grasses
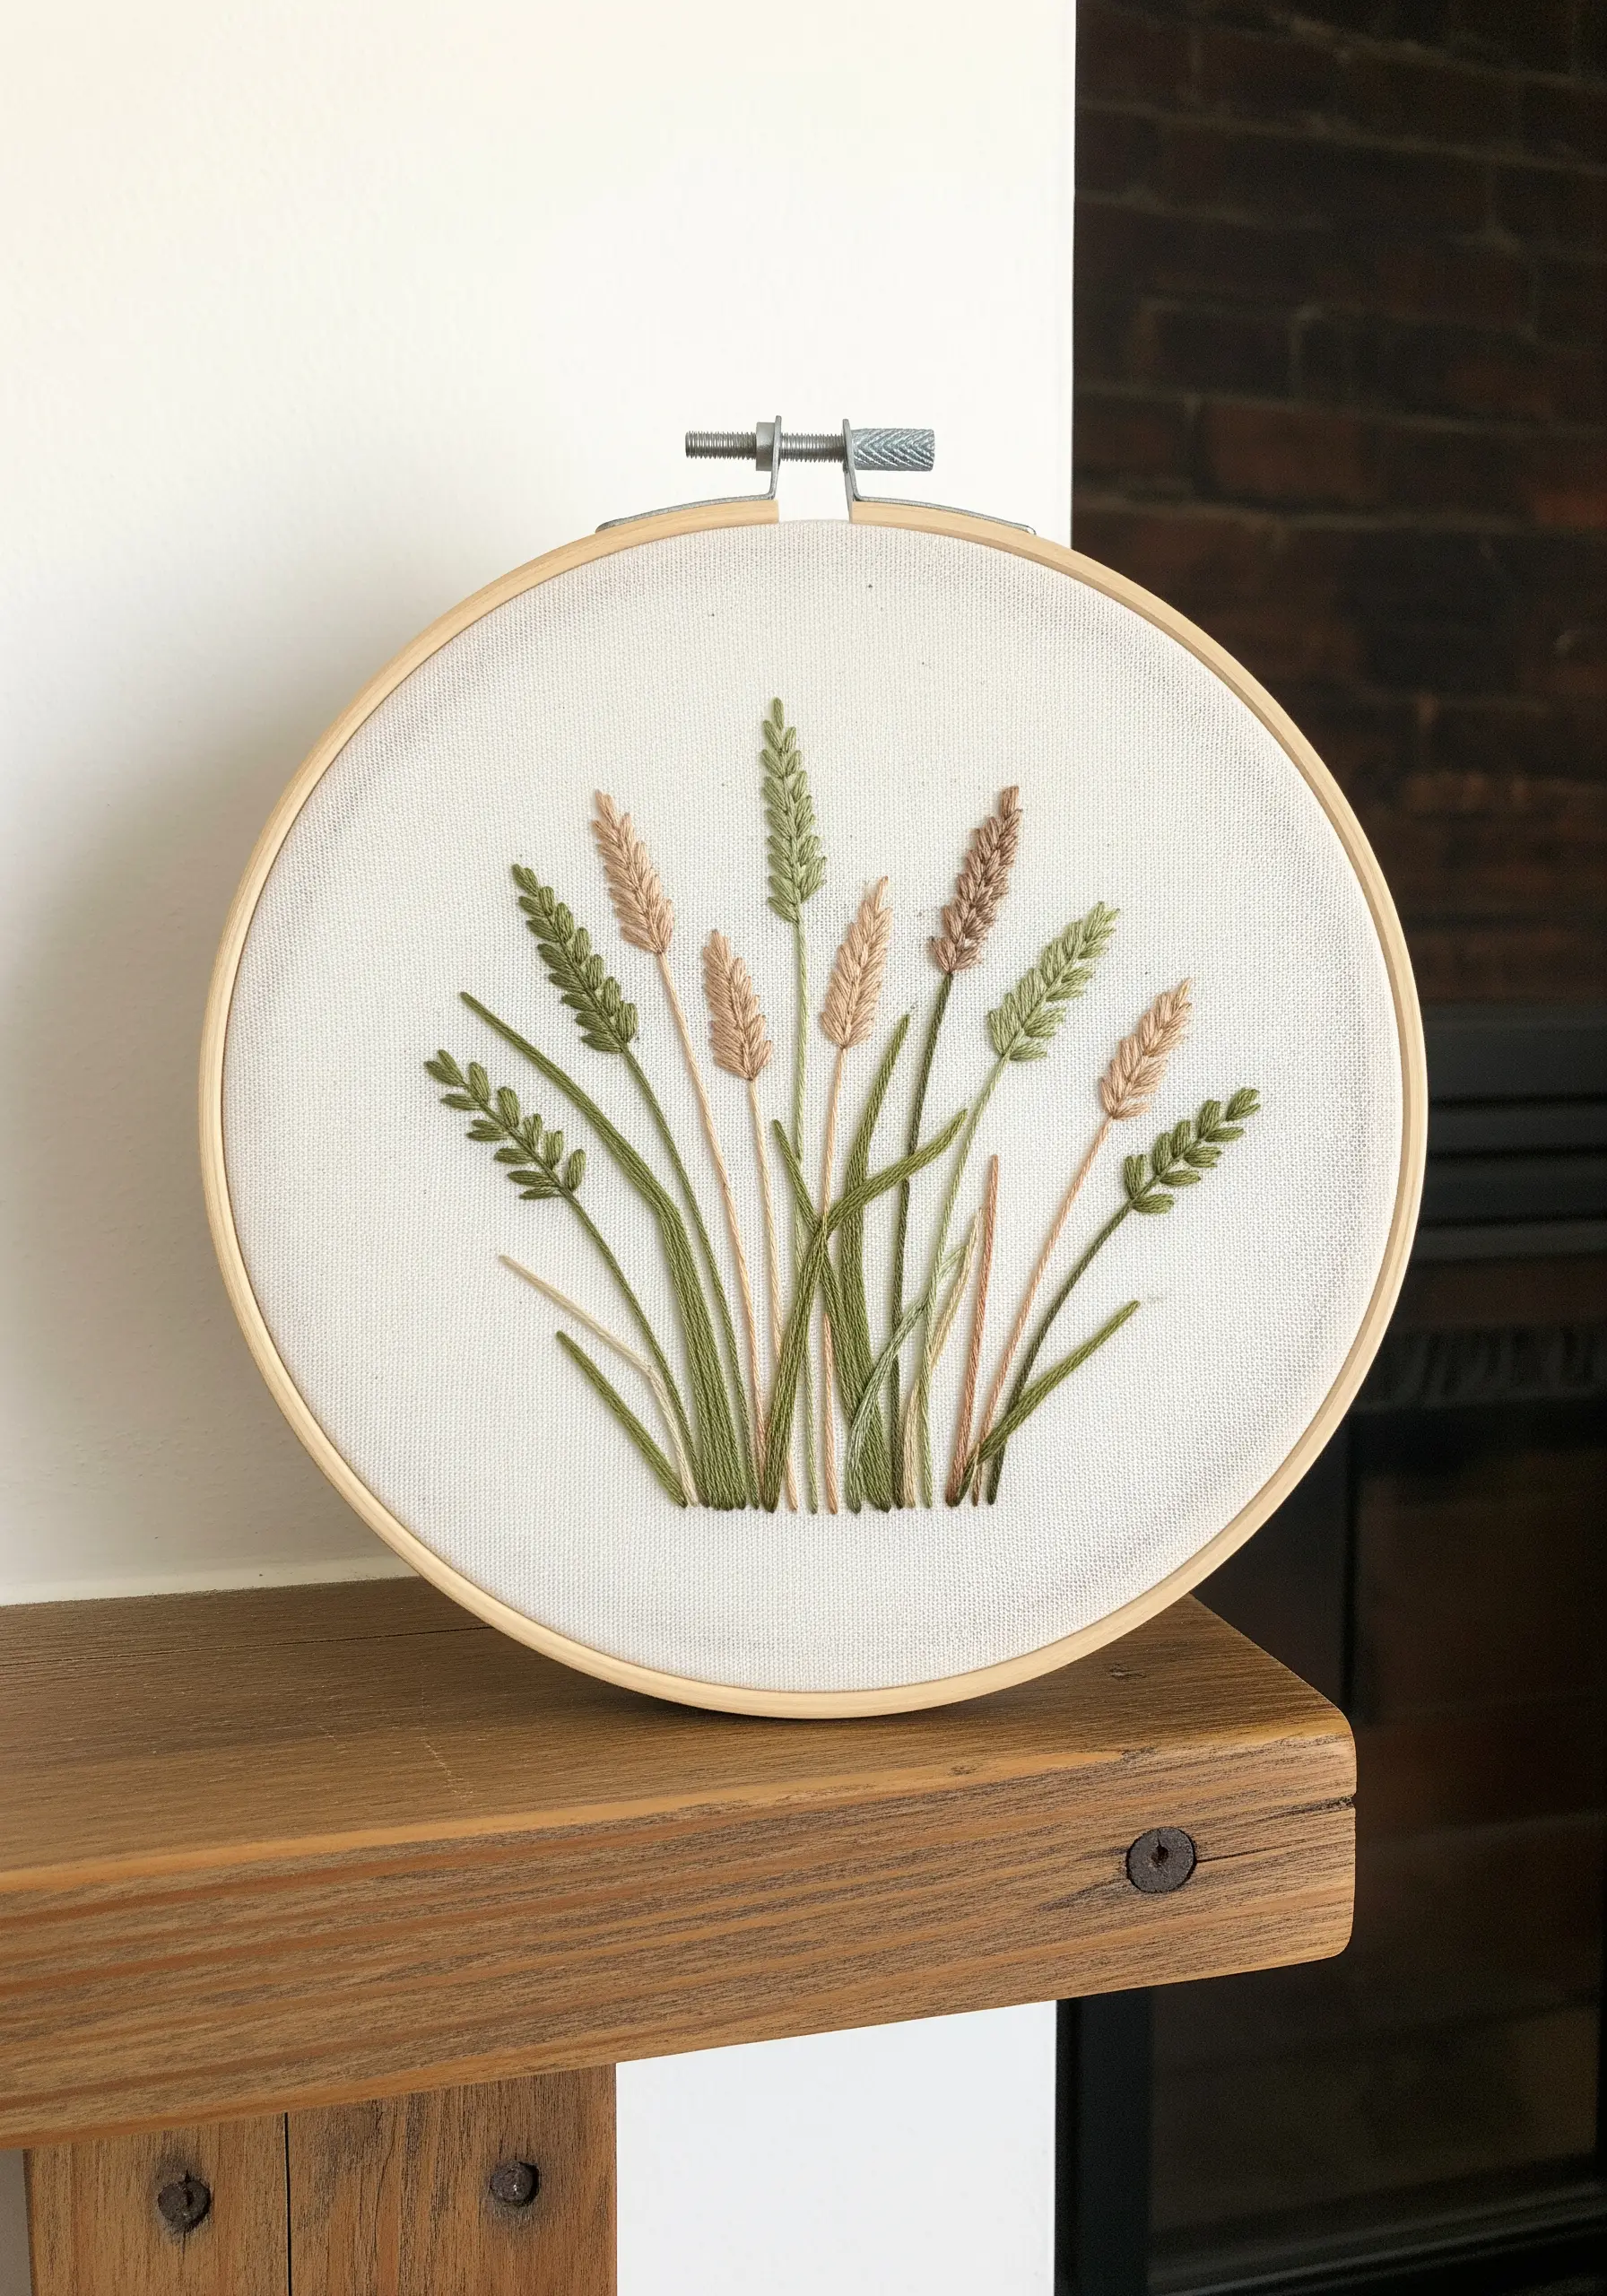
Create a realistic patch of wild grass by building up layers of simple stitches.
Start with the grasses in the background, then stitch the foreground elements over them to create a sense of depth.
Use a variety of stitches—like fishbone stitch, fly stitch, and straight stitches—in a mix of earthy greens, tans, and browns.
By varying the height, color, and stitch type of each blade and seed head, you can create a composition that feels lush, wild, and completely natural.
33. Use French Knots for a Pointillist Fill
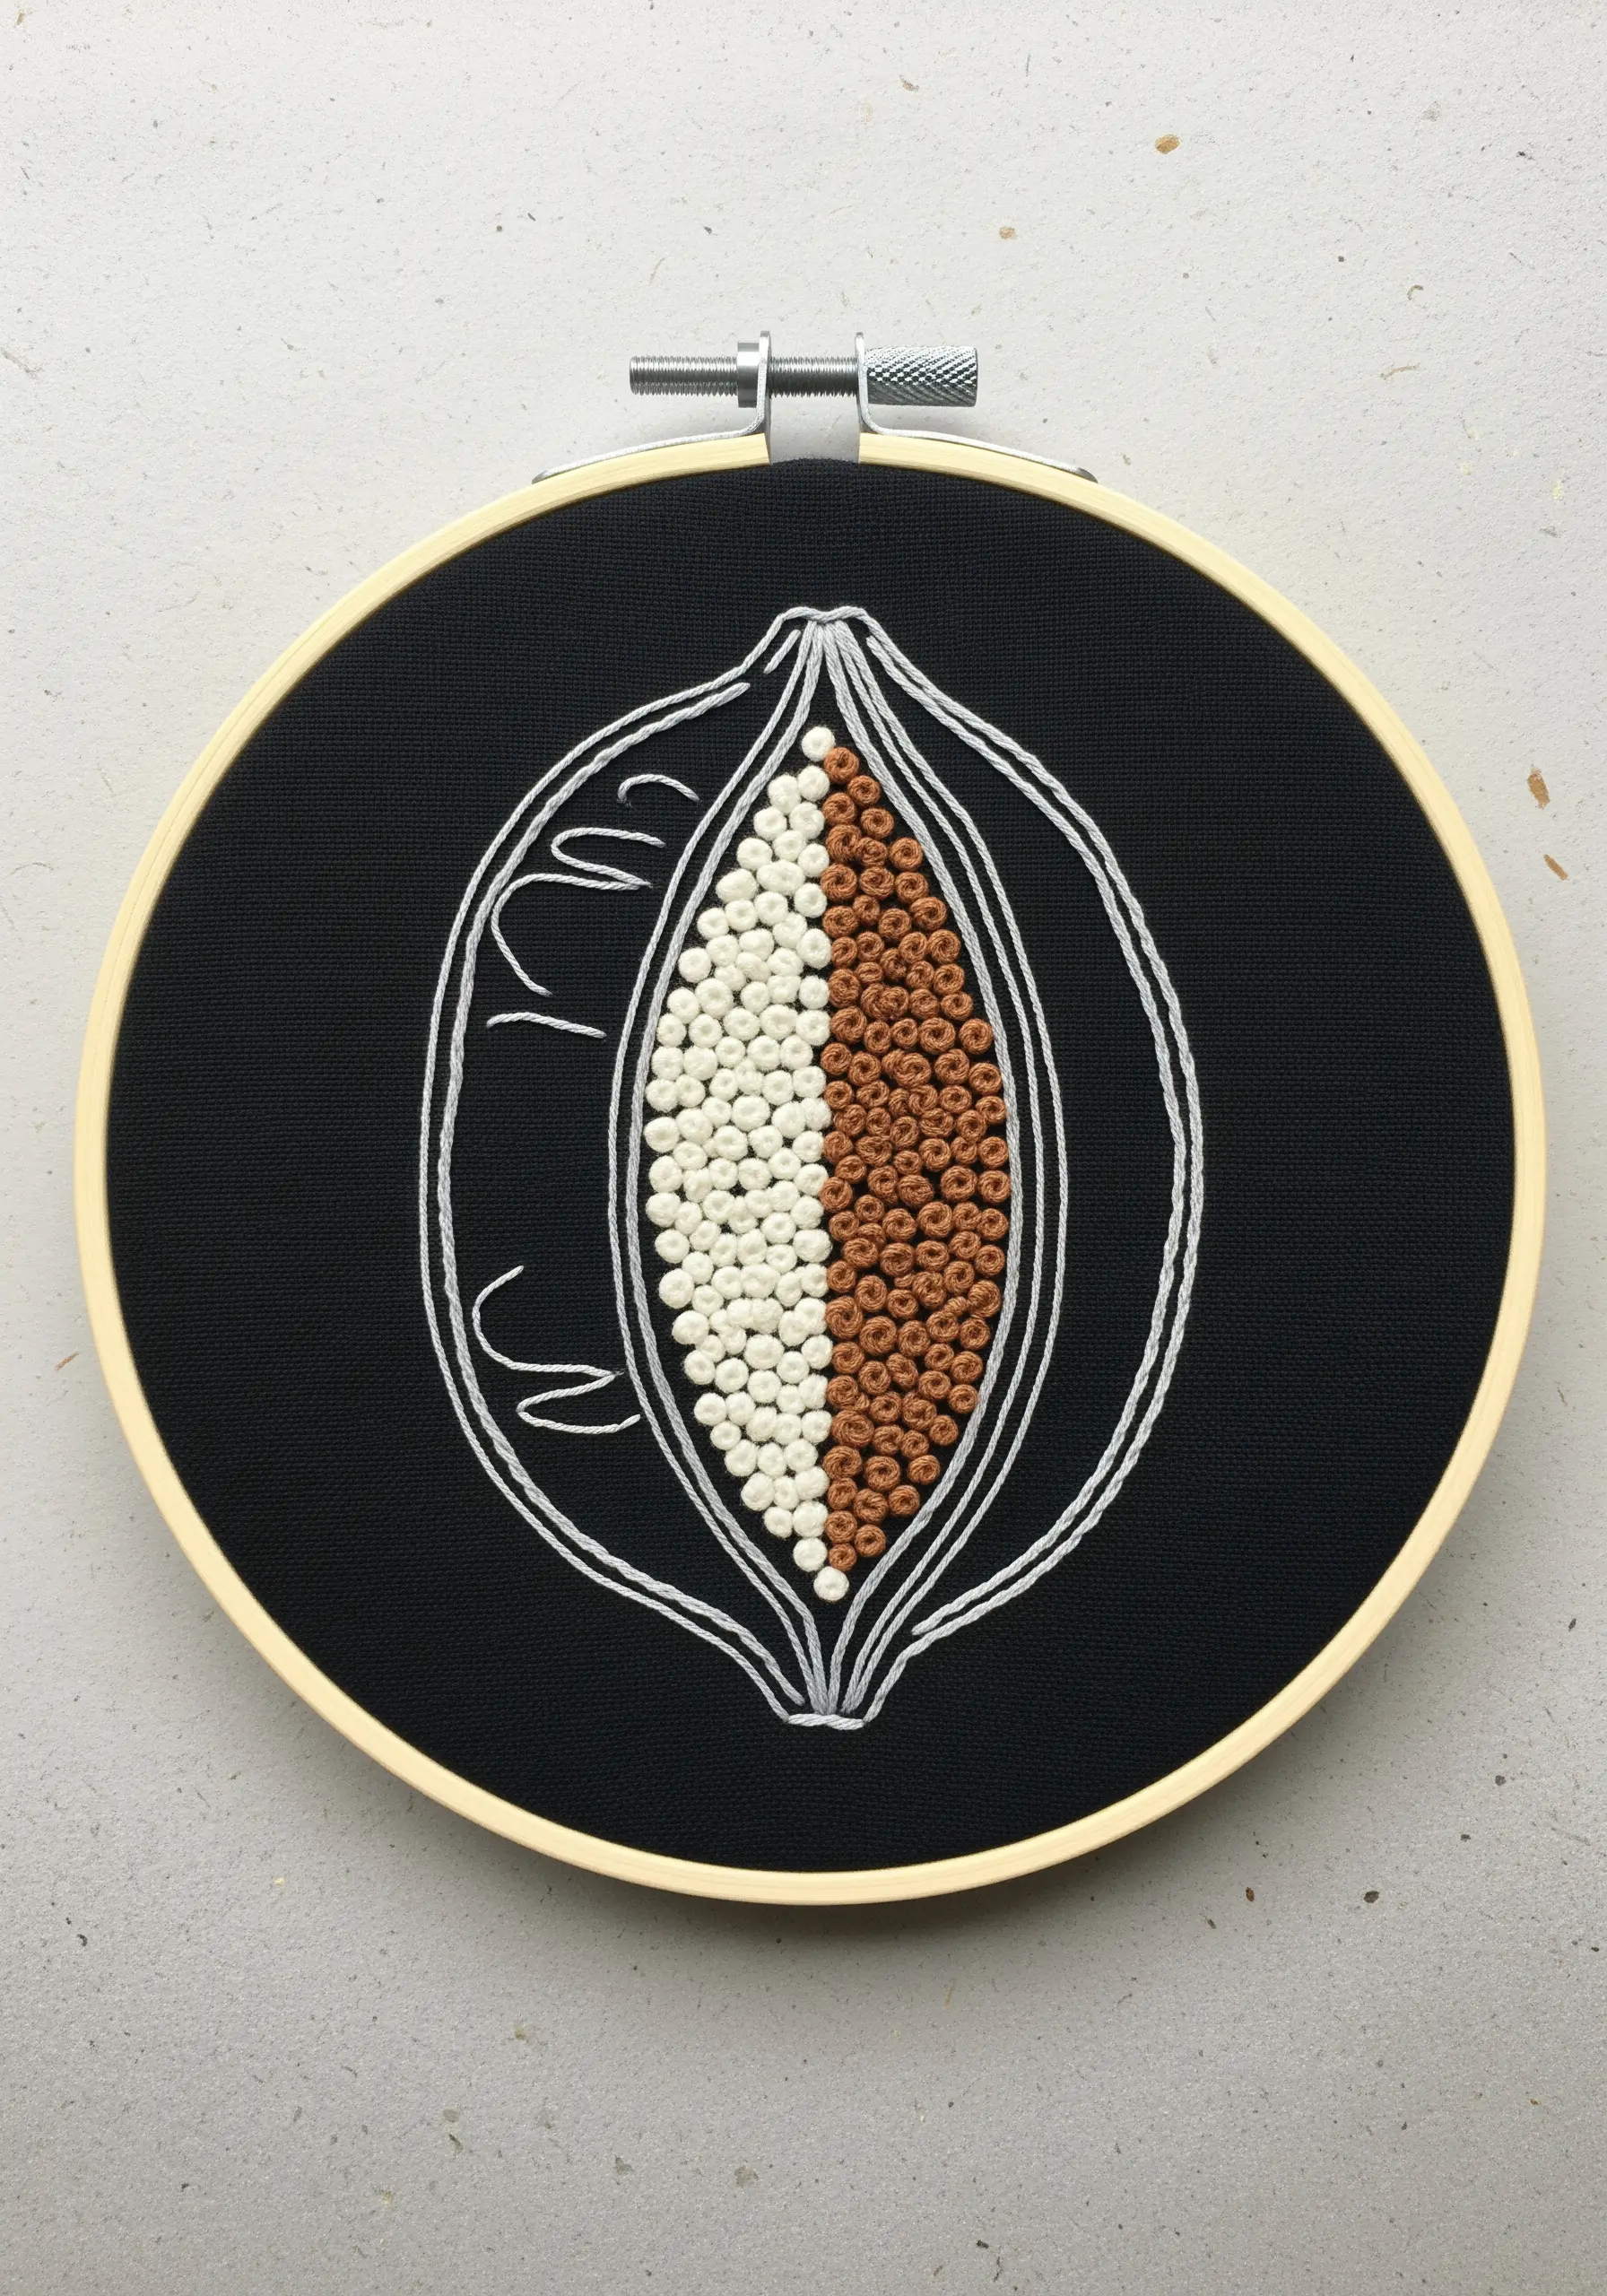
For a unique and highly textural fill, use French knots instead of satin stitch.
This technique, reminiscent of pointillism, is perfect for conveying granular or seeded textures, like the inside of this cacao pod.
By splitting the fill area into two colors, you create a striking visual contrast.
This is a meditative and satisfying process that turns a simple shape into a piece of compelling abstract art, proving that even the simplest stitch can be used in powerful ways.


