

Capturing your pet’s personality in thread is about more than just matching their fur color. It’s about translating their texture, the way light hits their coat, and the unique spirit in their eyes into stitches. Often, the difference between a good portrait and a great one lies in the subtle techniques that create depth and life.
Forget feeling overwhelmed by photorealism. Instead, I want you to focus on one or two key elements that define your pet. Is it their fluffy mane? Their sleek, shiny coat? Those expressive wrinkles? By mastering the specific stitches that replicate those textures, you can create a portrait that feels authentic and full of love.
This collection is designed to give you clear, practical ways to approach fur, feathers, and features. You’ll learn how to use stitch direction, color blending, and textural variety to build dimension, so you can move beyond flat outlines and stitch a keepsake that truly honors your best friend.
1. Master Directional Stitching for a Golden Glow
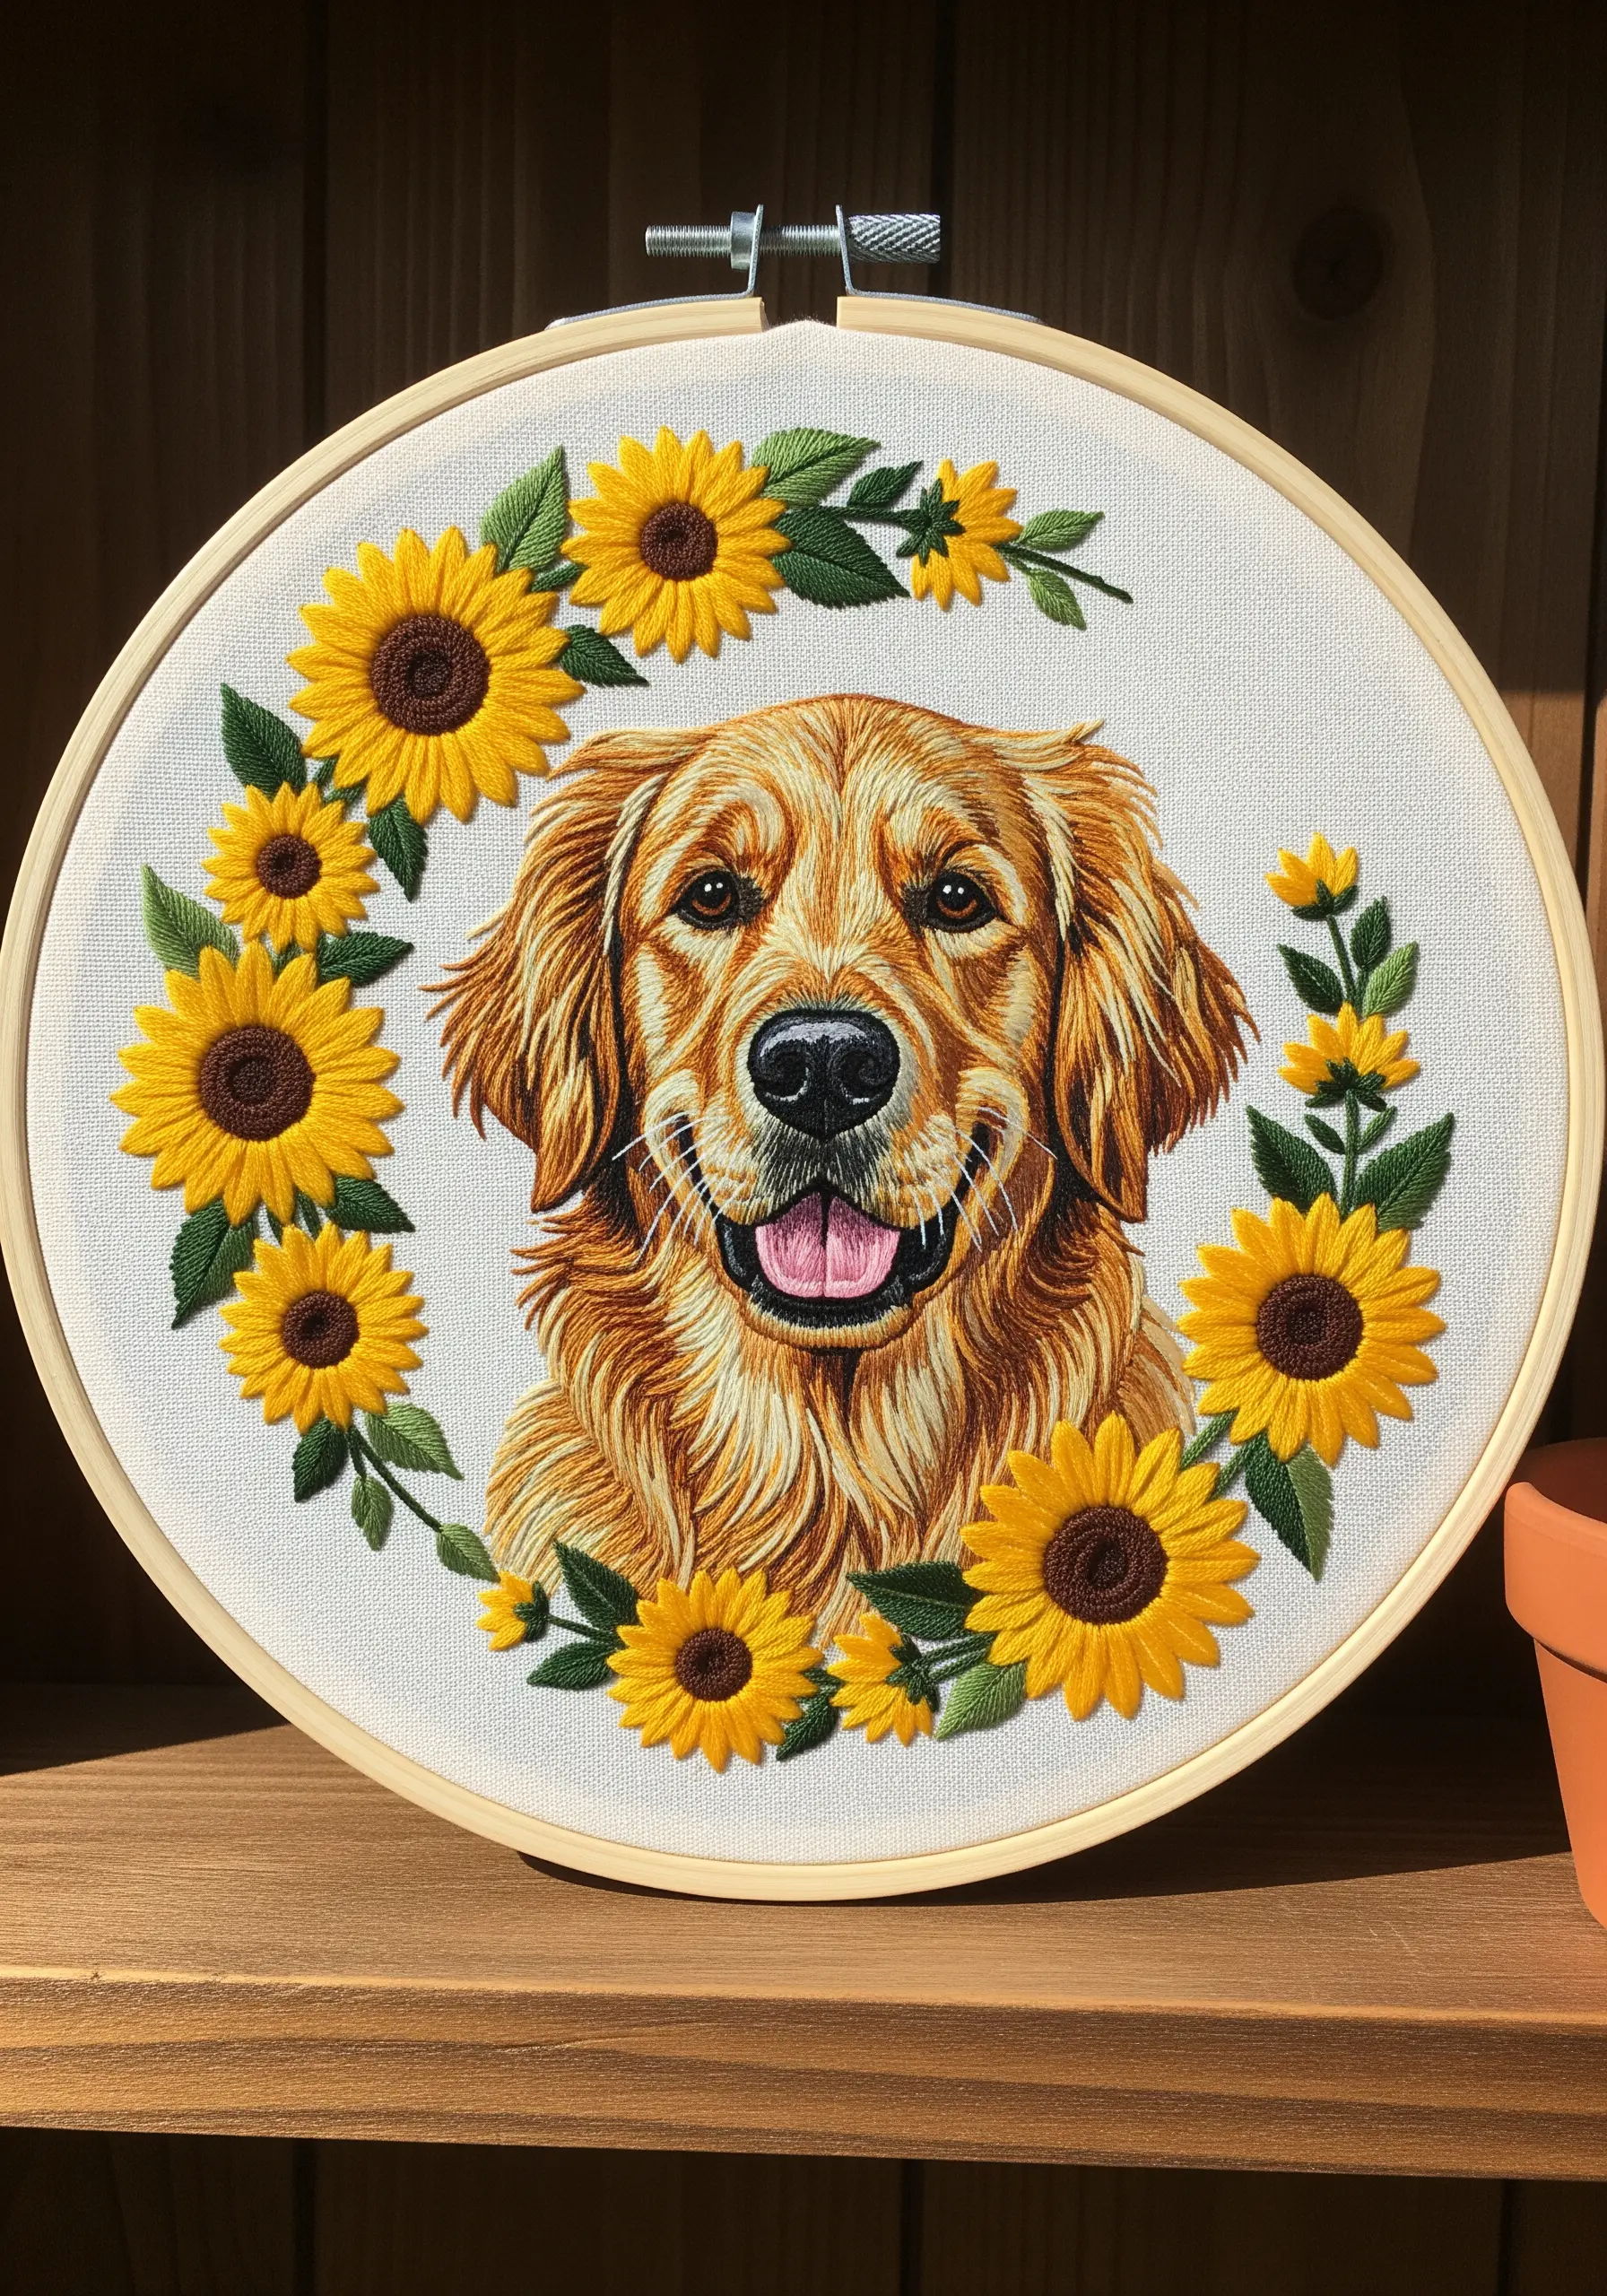
To capture the radiant coat of a golden retriever, treat your needle like a paintbrush, laying down stitches that follow the natural direction of the fur’s growth.
Use a long-and-short stitch, varying the length and angle slightly to mimic how light reflects off the fur, creating depth and movement.
Blend at least three shades of gold, ochre, and cream—using the darkest tones for shadows around the ears and mouth, and the lightest for highlights on the muzzle and brow.
This technique, known as thread painting, is what separates a flat portrait from one that feels alive and full of personality.
2. Use Subtle Gradients for Short, Sleek Fur
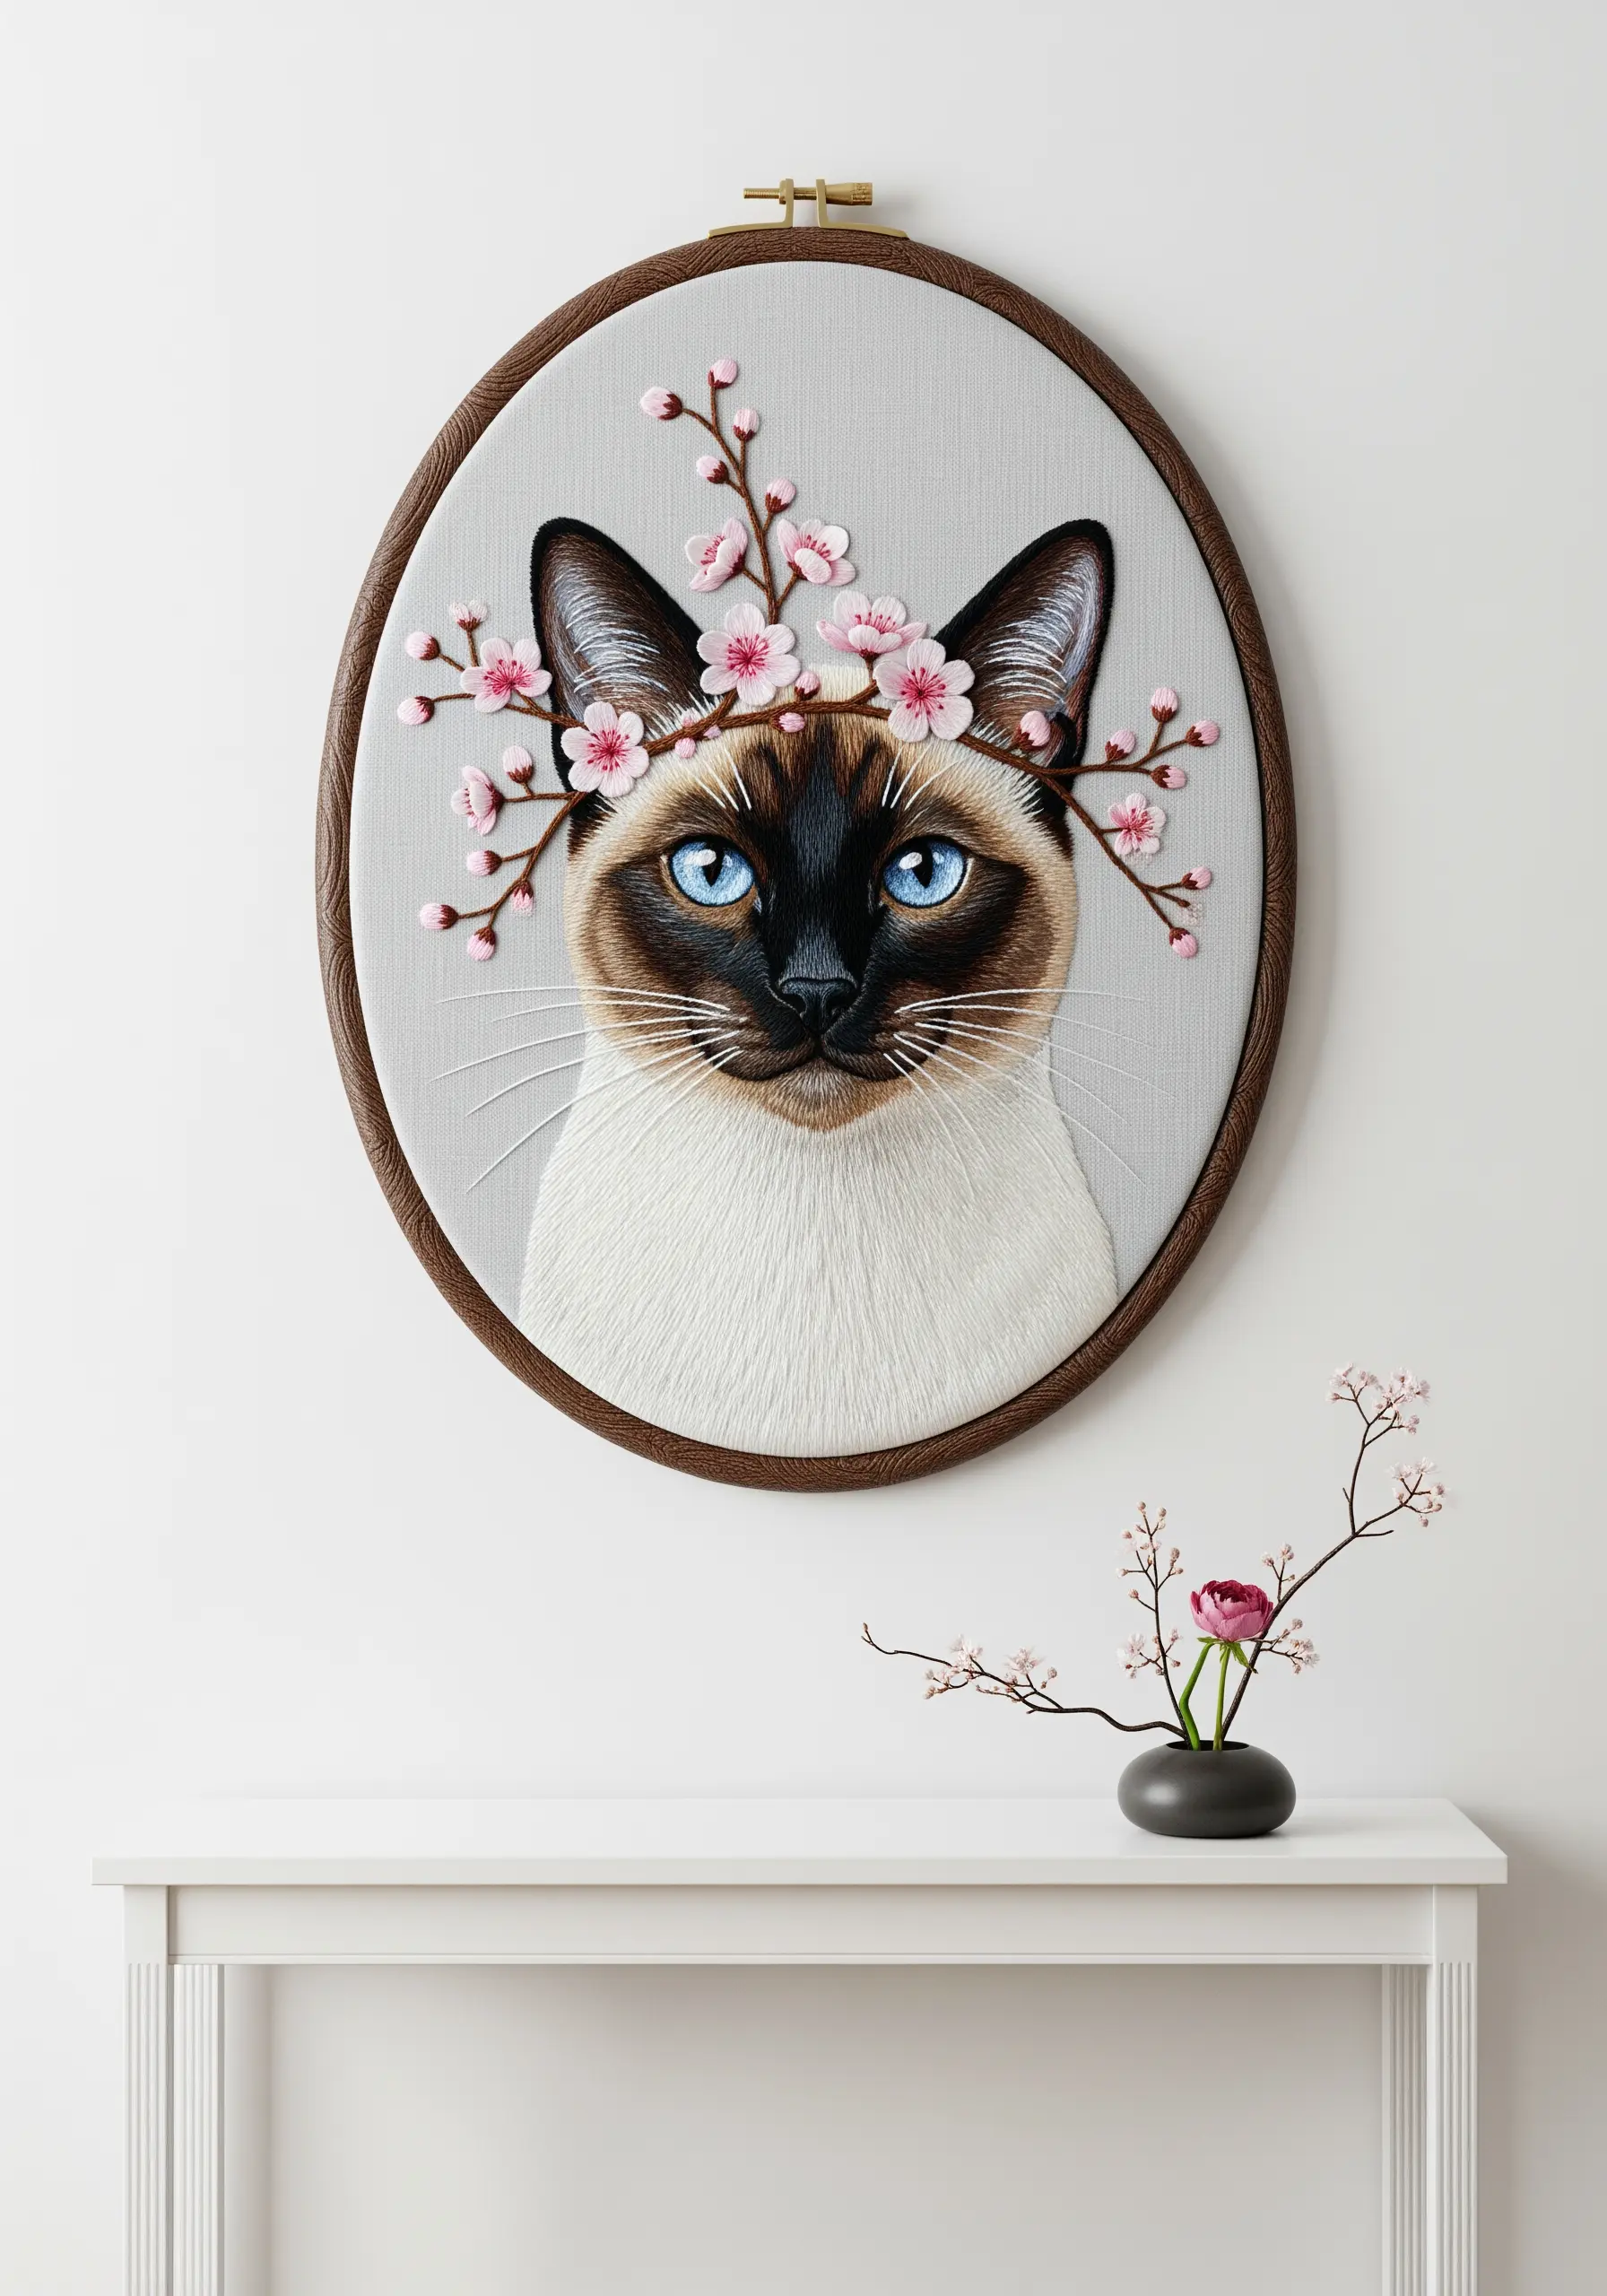
For short-haired breeds like Siamese cats, realism is achieved through subtle color shifts, not heavy texture.
Work with a single strand of floss for the smoothest possible gradient, using a soft grey for the body and transitioning into darker browns and blacks for the points.
Keep your stitches short and tightly packed to create a velvety surface that mimics the feel of their coat.
The key is restraint; let the precise color placement do the work, making the eyes the focal point of intensity.
3. Create Fluffy White Fur Without Flatness
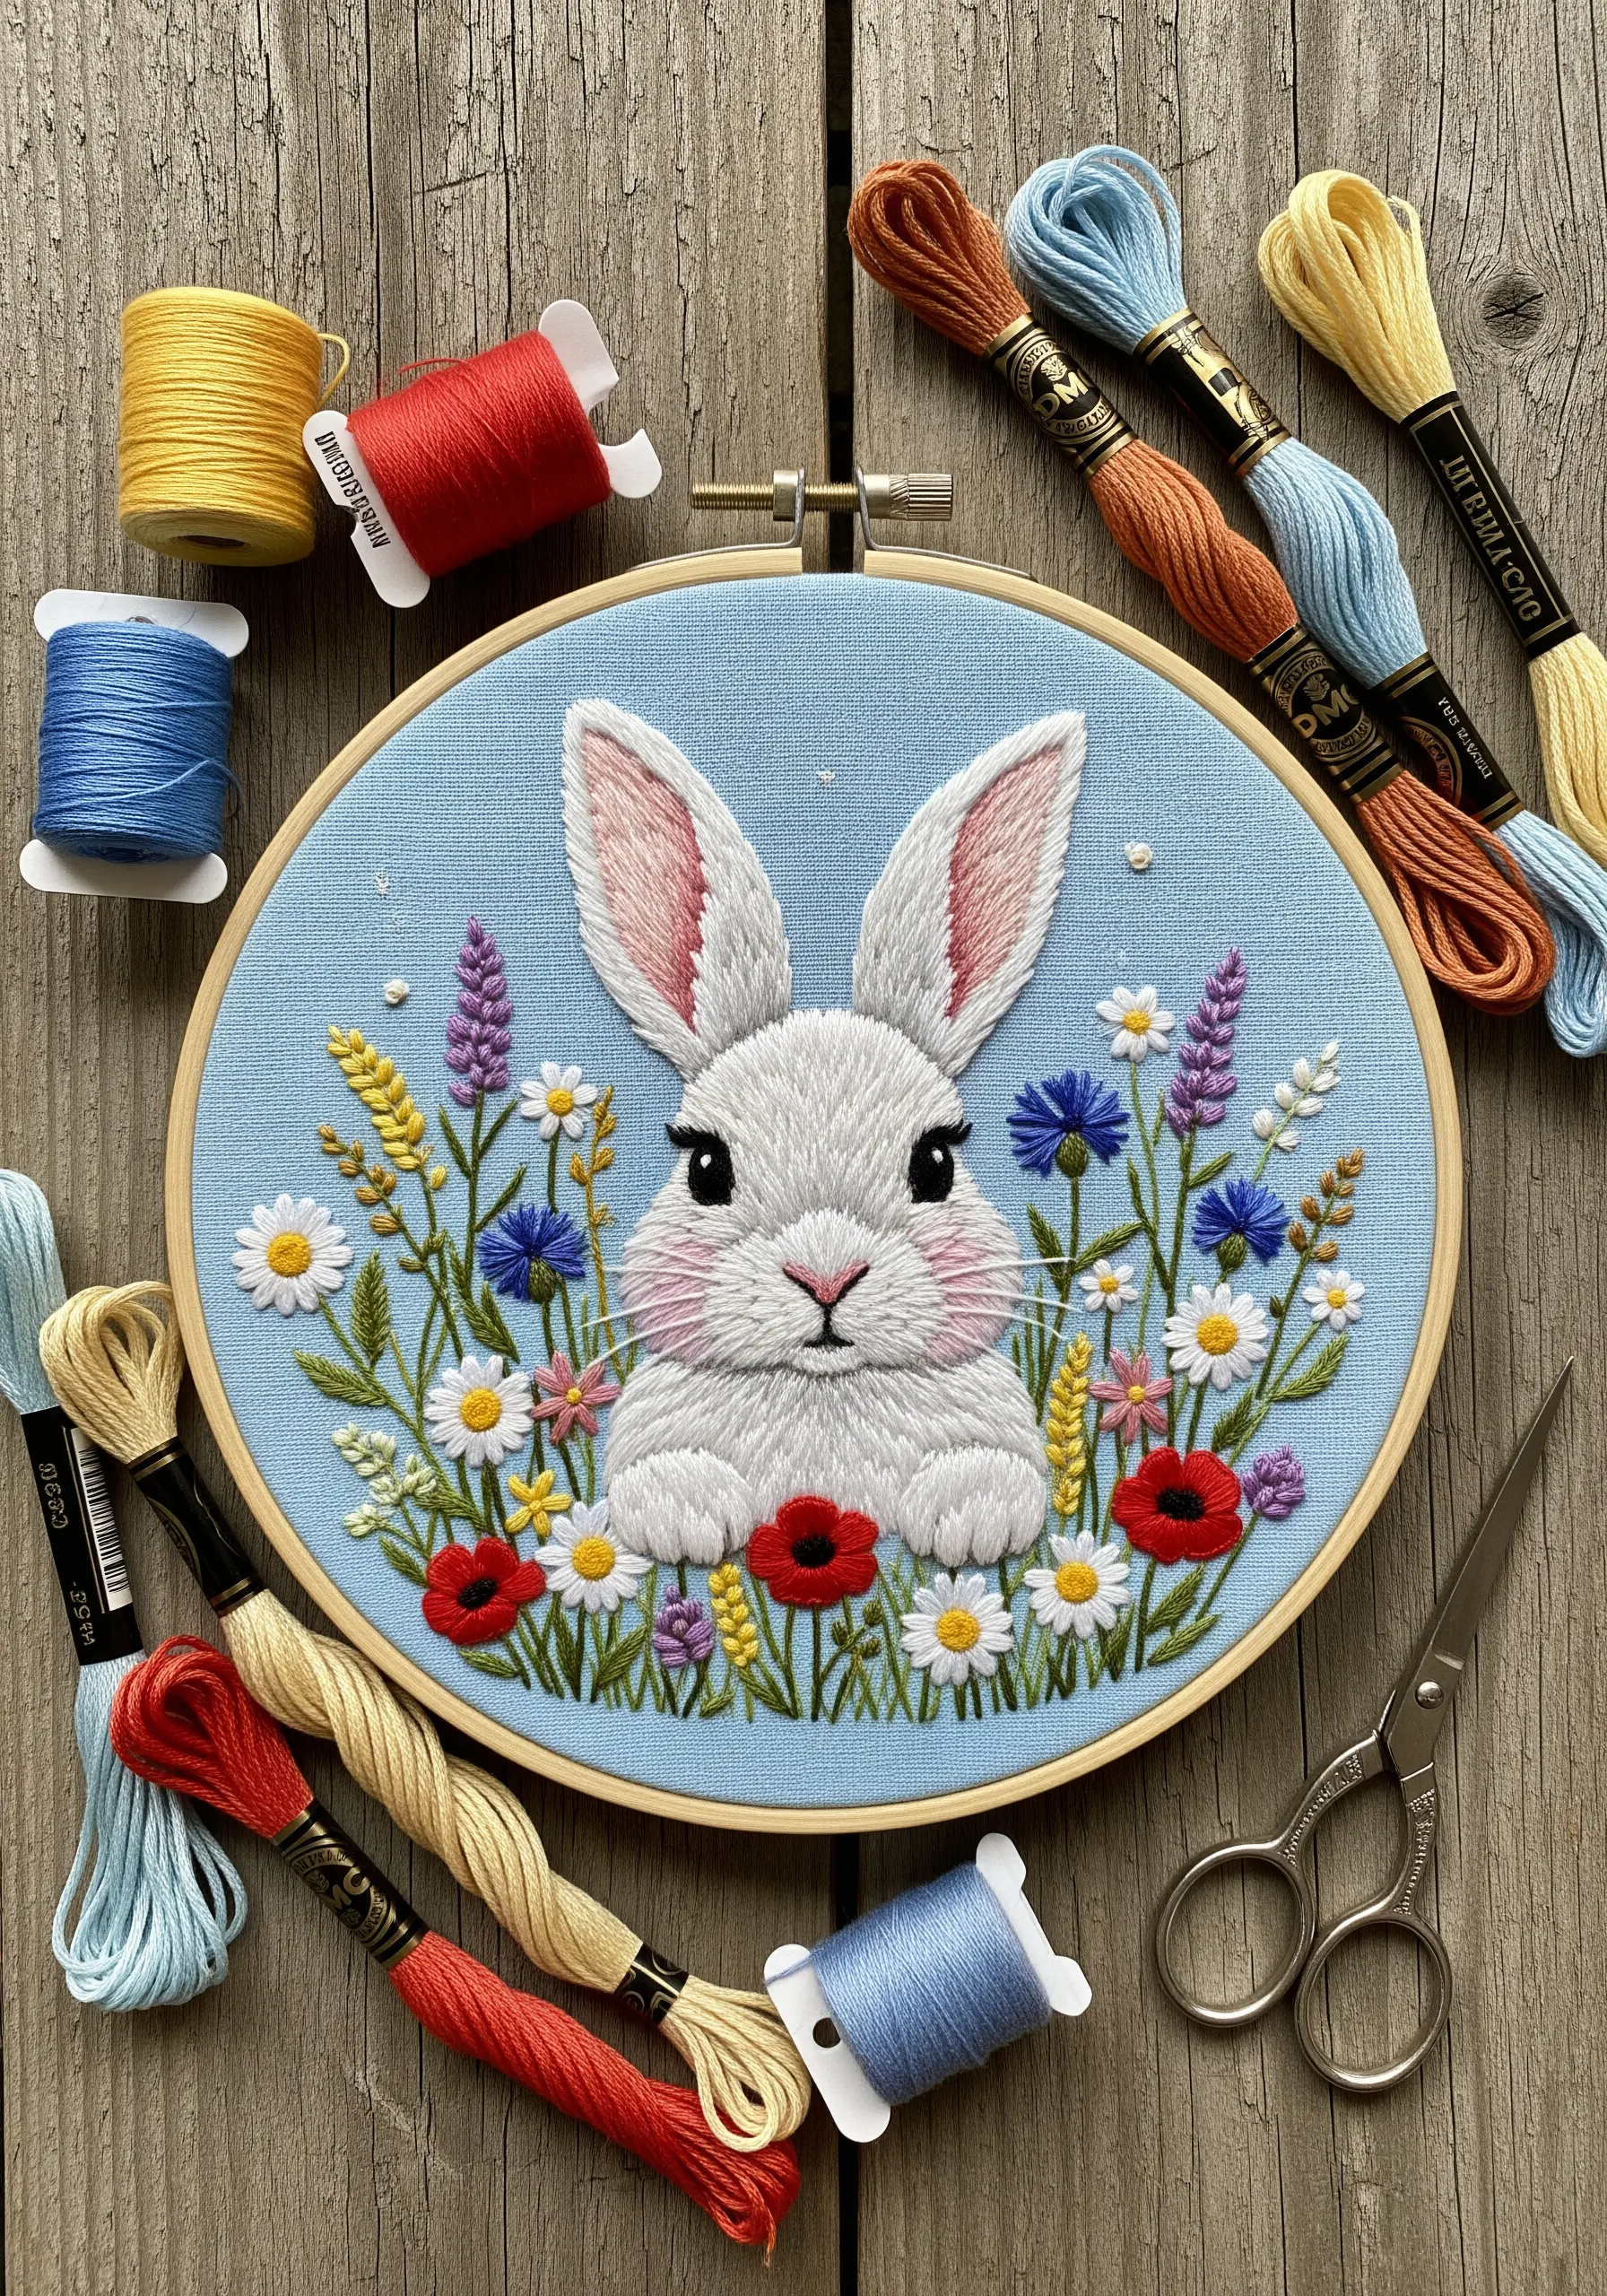
Stitching white fur is a challenge of light and shadow, not just color.
To prevent a white rabbit from looking flat, layer your stitches using shades of off-white, pale grey, and even a hint of light pink inside the ears.
Use split stitch in varying directions to create a soft, fluffy texture that catches the light from different angles.
Place the subtlest grey stitches where shadows would naturally fall—under the chin and around the cheeks—to sculpt the face and give it dimension.
4. Define Black Fur with Highlights, Not Just Black Thread
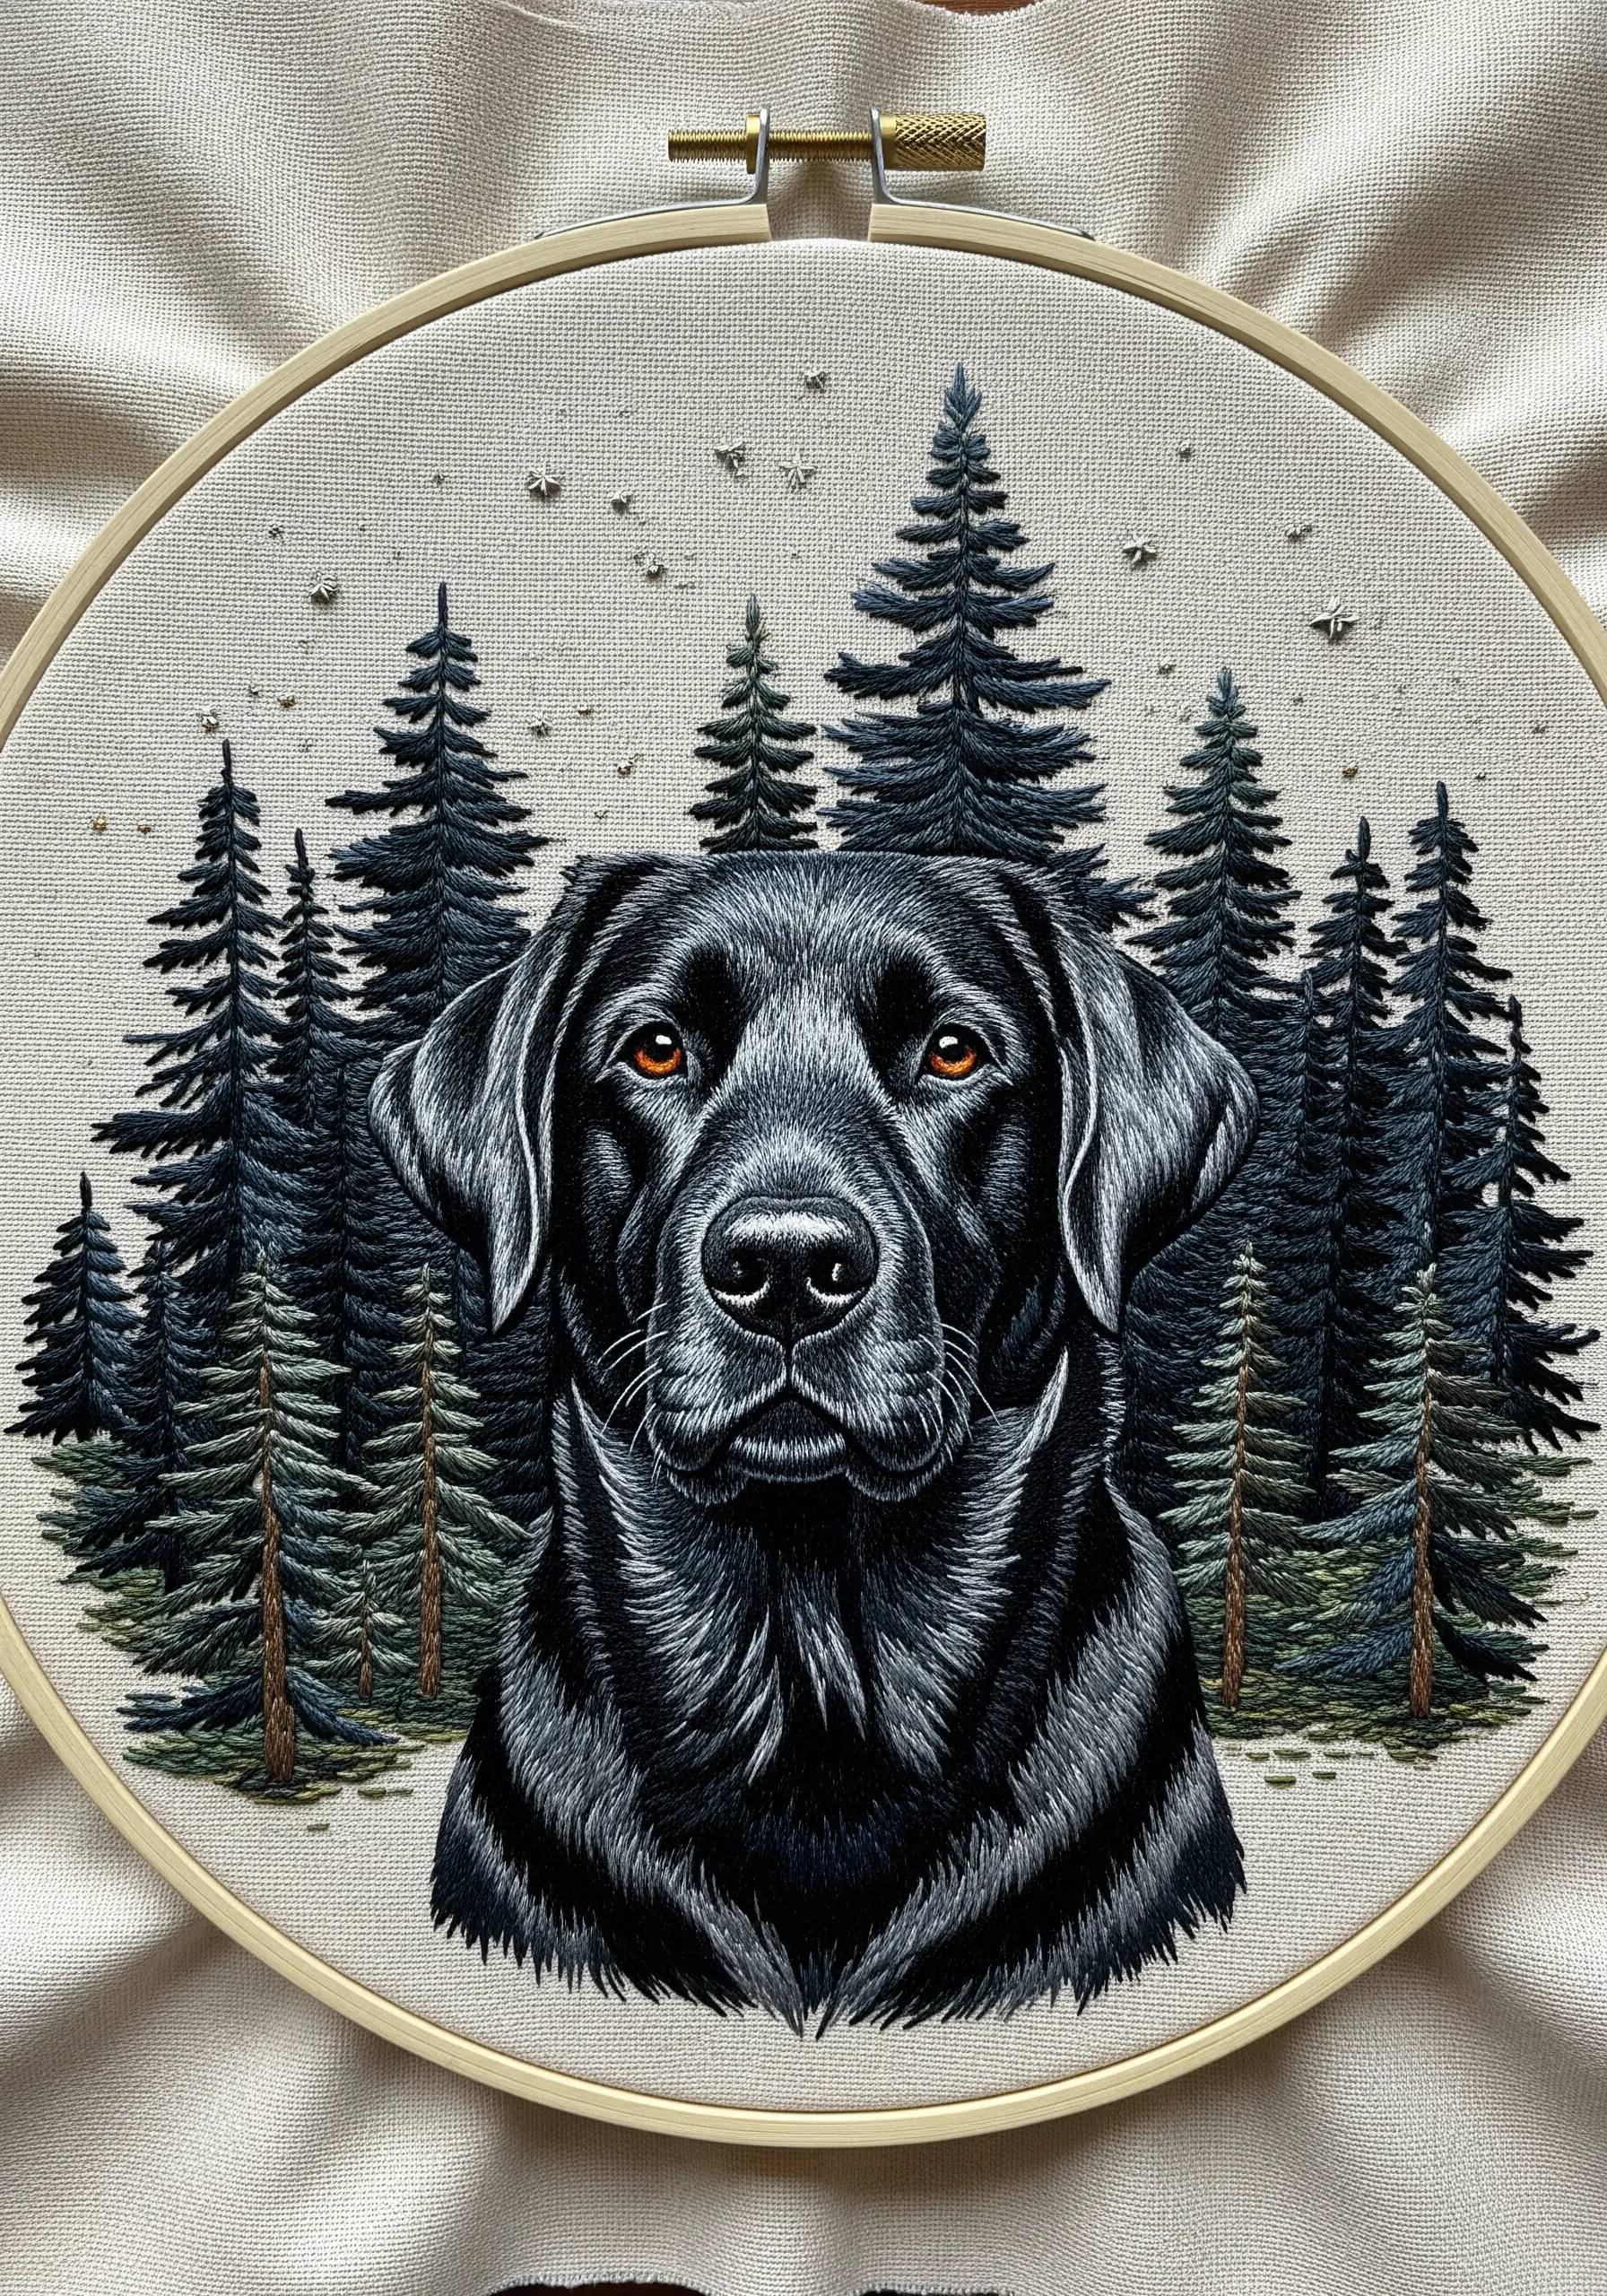
A common beginner mistake is filling a black coat with solid black thread, which erases all detail.
Instead, build the portrait using layers of charcoal grey, deep blue, and black to create dimension.
Use single strands of light grey or silver to stitch highlights along the brow, muzzle, and edges of the ears where light would hit.
This technique allows the form to emerge from the darkness, revealing the muscular structure and glossy texture of a black lab’s coat.
5. Capture Tabby Stripes with Blended Satin Stitch

The beauty of a tabby’s coat is in its stripes, which should blend softly rather than appear as hard lines.
Achieve this by using a slightly staggered satin stitch, allowing the colors of each stripe to feather into one another at the edges.
Work from light to dark, establishing the base color of the fur first, then layering the darker stripes on top, following the contours of the body.
This creates a natural, painterly effect that captures the true essence of their distinctive markings.
6. Stitch Facial Wrinkles with Contouring Stitches

For breeds like pugs, the wrinkles are an essential part of their expression and character.
Instead of just outlining them, create them with thread painting, using darker shades of brown and taupe inside the folds.
Follow the curve of each wrinkle with your stitches, keeping them short and dense. Add a very fine highlight of a lighter color along the top edge of the fold to make it look three-dimensional.
This transforms simple lines into the soft, expressive features that define the breed, making your portrait instantly recognizable.
7. Employ Bold Outlines for a Graphic Portrait Style
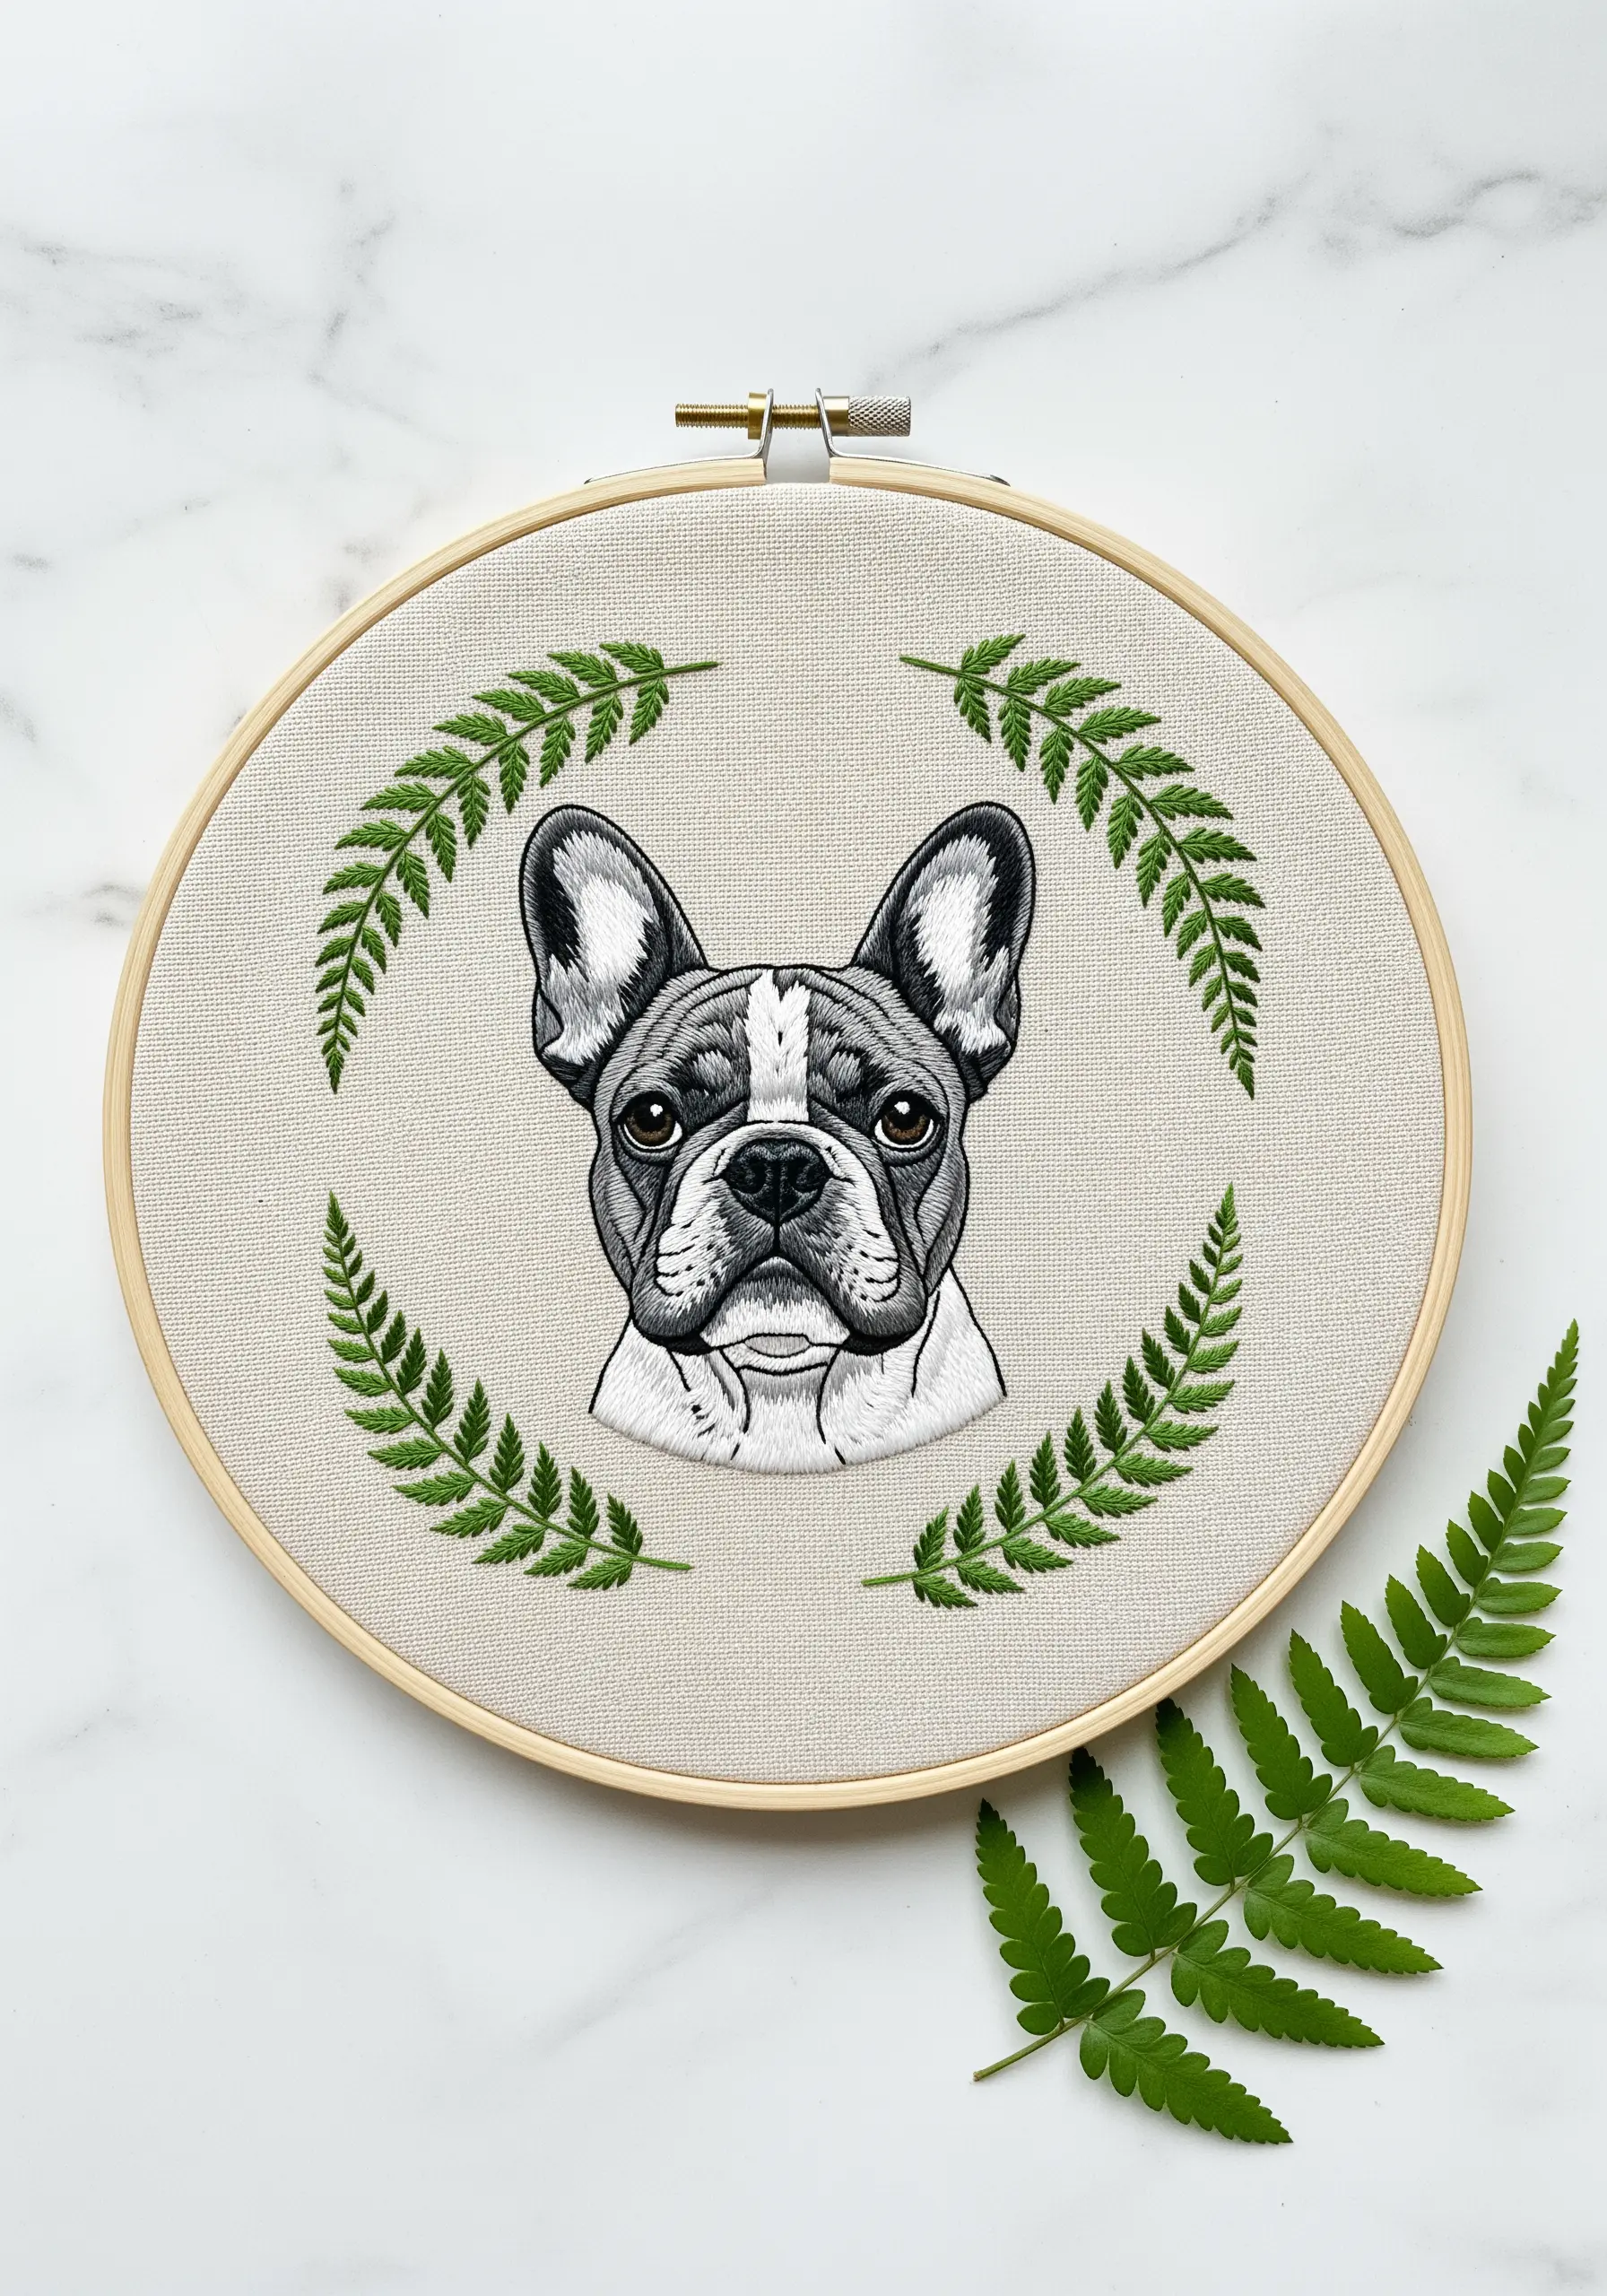
Sometimes, a stylized portrait makes a more powerful statement than photorealism.
To achieve this clean, graphic look for a French Bulldog, use a crisp backstitch or stem stitch for all the defining lines.
Fill the larger areas with a smooth, consistent satin stitch, focusing on clean edges and solid blocks of color.
This technique emphasizes the animal’s iconic shapes and features, resulting in a modern, illustrative piece that stands out.
8. Achieve Ultimate Fluff with Turkey Work Stitch

For exceptionally fluffy dogs like a Samoyed, traditional stitches won’t capture their cloud-like volume.
This is where you should use the Turkey work stitch—a technique that involves creating loops of thread and then snipping them to create a dense, plush pile.
Work in tight rows, trim the loops to the desired length, and then gently fluff the threads with your needle or a small brush to blend them.
This method produces an incredible 3D texture that you can’t help but want to touch.
9. Mimic Feather Texture with Layered Satin Stitches

Bird portraits require a different approach than fur; feathers are all about smooth surfaces and precise layers.
Use satin stitch for the larger, sleeker feathers, ensuring your stitches lie flat and parallel. For smaller, downy feathers, use shorter seed stitches.
To create the look of overlapping feathers, stitch the bottom layers first and then work your way up, slightly overlapping the start of each new row over the end of the last.
This layering technique is crucial for achieving the smooth, structured look of plumage and makes for beautiful, realistic foliage when applied to leaves, too.
10. Contrast Textures for Spines and Soft Fur
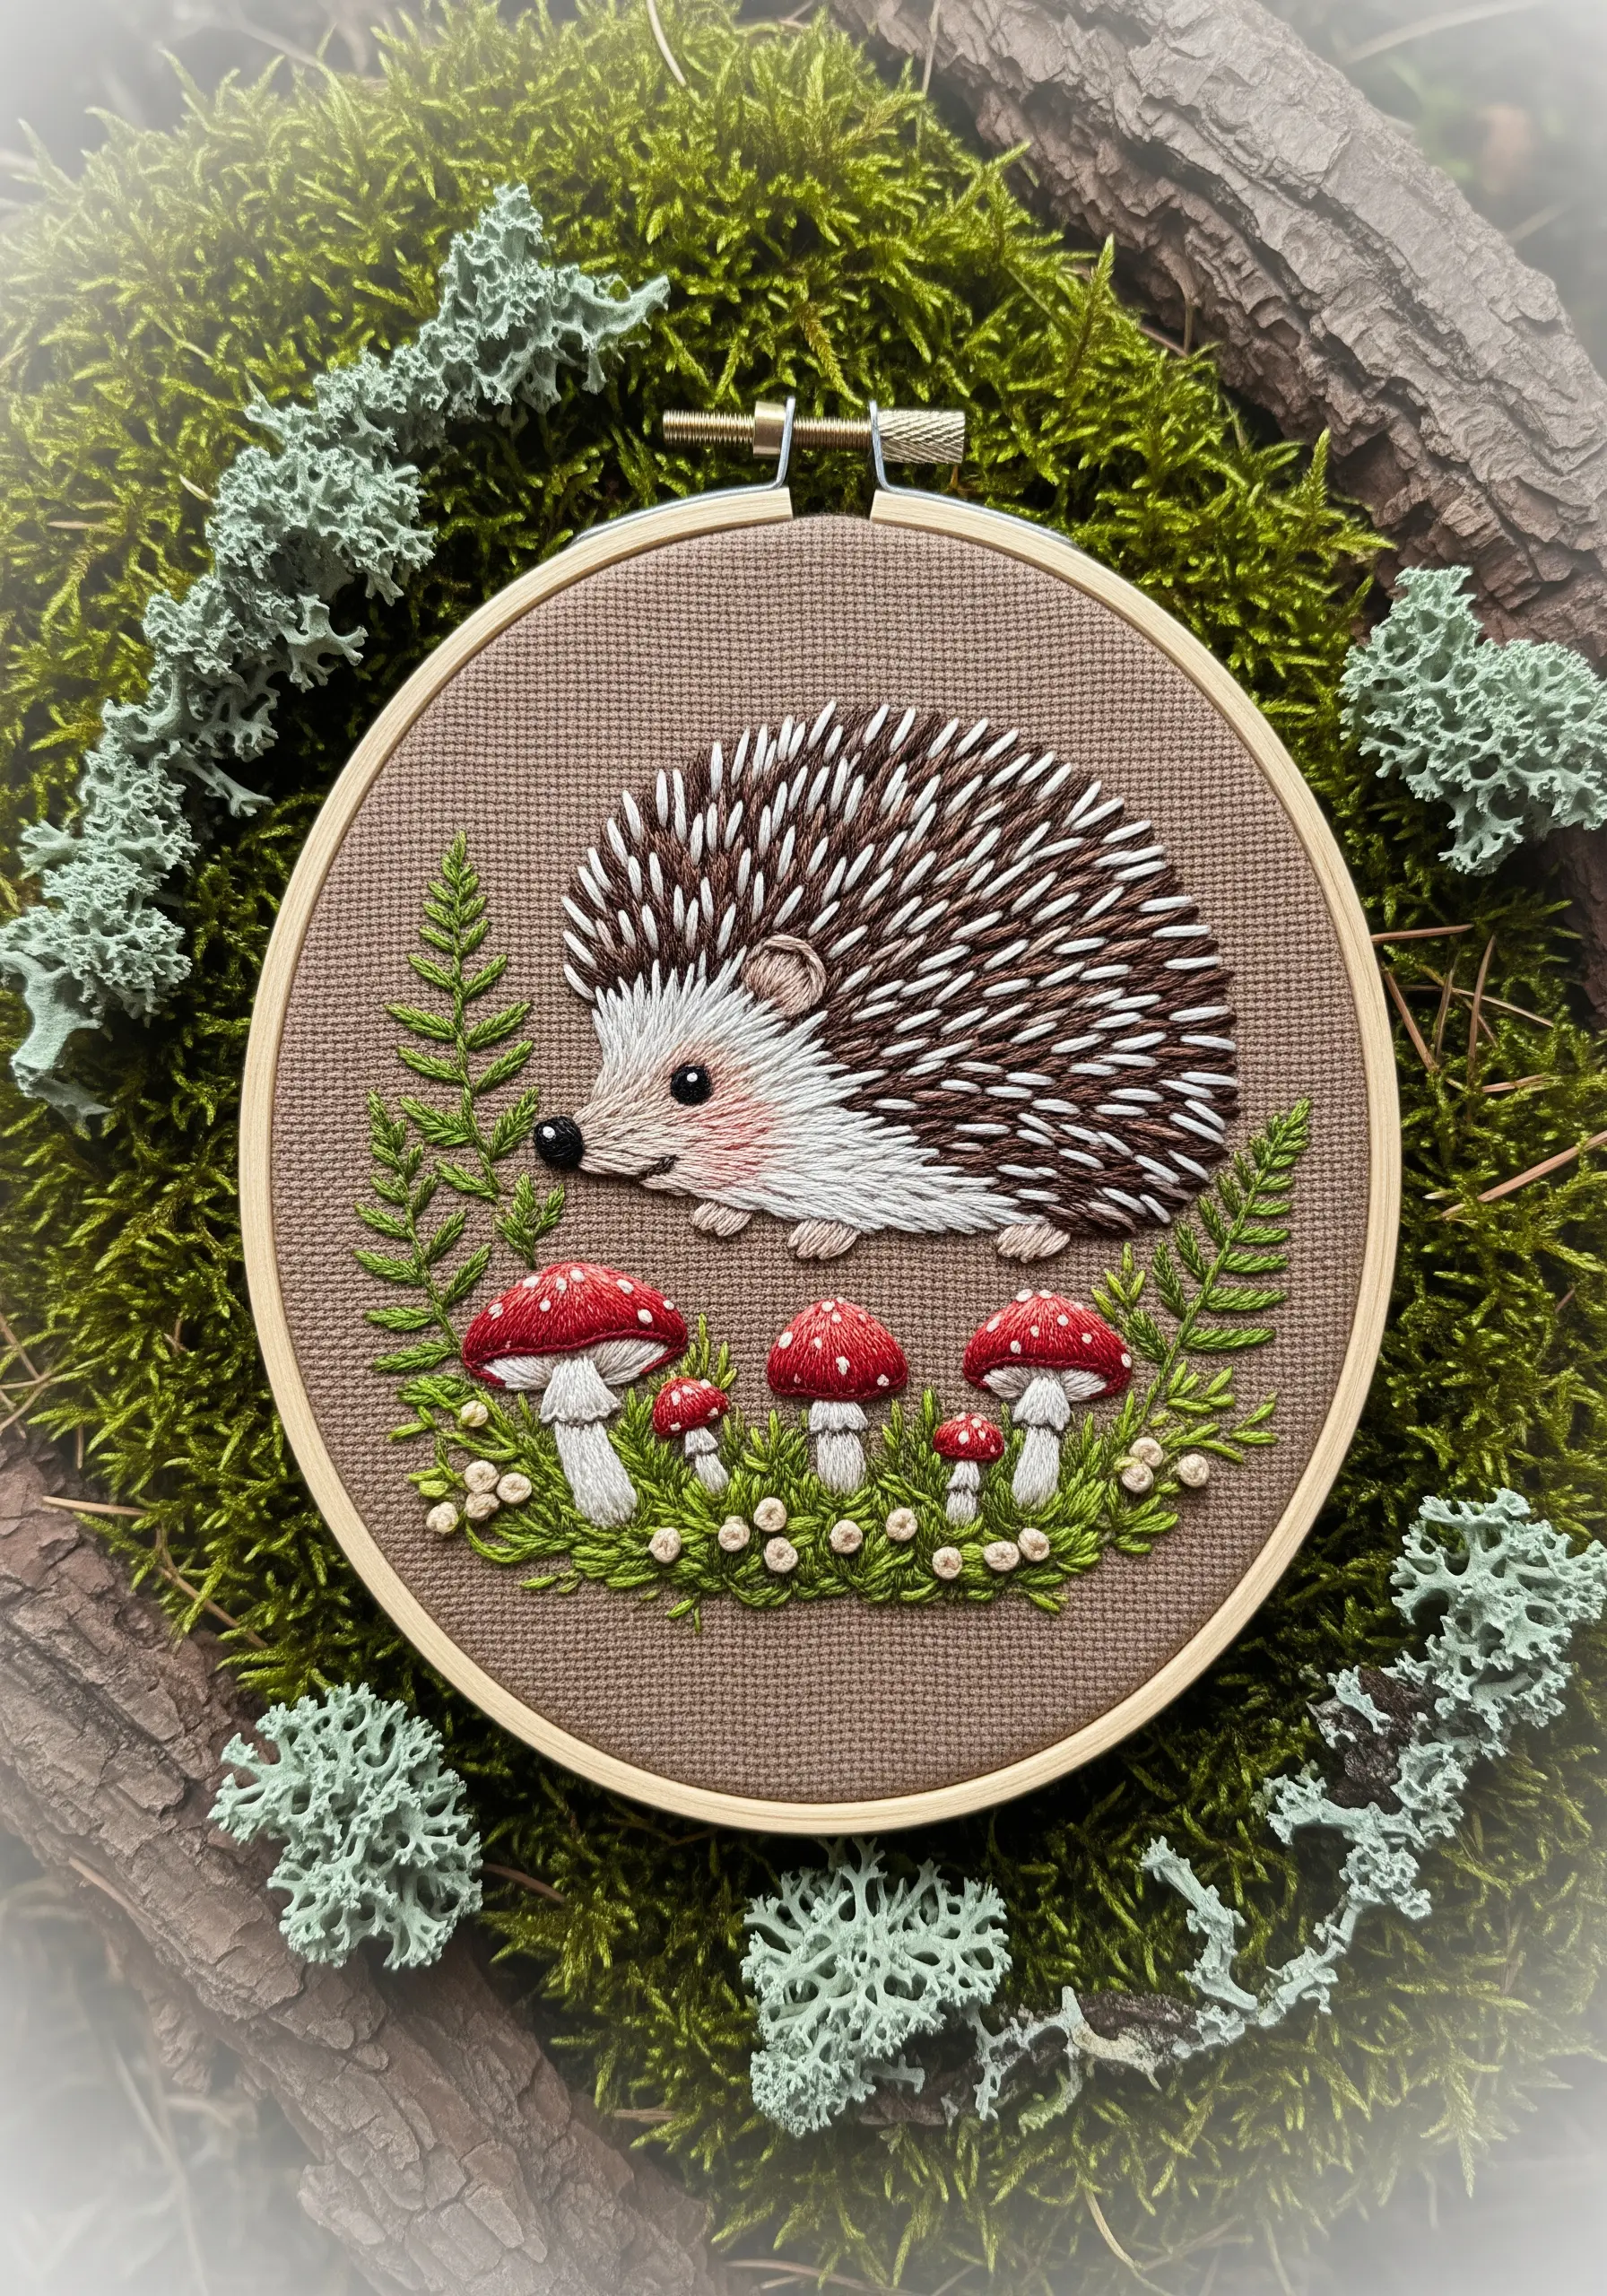
To capture a hedgehog’s unique form, you need to create a strong tactile contrast between its sharp spines and soft underbelly.
Use single, long straight stitches for the spines, layering colors like brown, black, and cream, and angling them outward from the body.
For the soft face and belly, switch to a dense, short split stitch or French knots worked in a pale, creamy color.
This dual-texture approach makes the portrait visually and texturally dynamic, highlighting the animal’s distinct characteristics.
11. Create a Glossy Coat with Thread Sheen

For dogs with short, glossy coats like a Dachshund, the key is to let the thread itself create the shine.
Use a high-quality satin or silk floss, which has a natural luster. Lay your satin stitches in uniform, parallel lines that follow the contour of the muscles.
Work with a single strand of a lighter, contrasting color to add a few deliberate highlights where light would reflect most strongly—along the brow and down the nose.
This minimalist approach to highlights on a smooth surface creates a convincing, high-shine effect.
12. Capture Majestic, Flowing Fur with Thread Painting
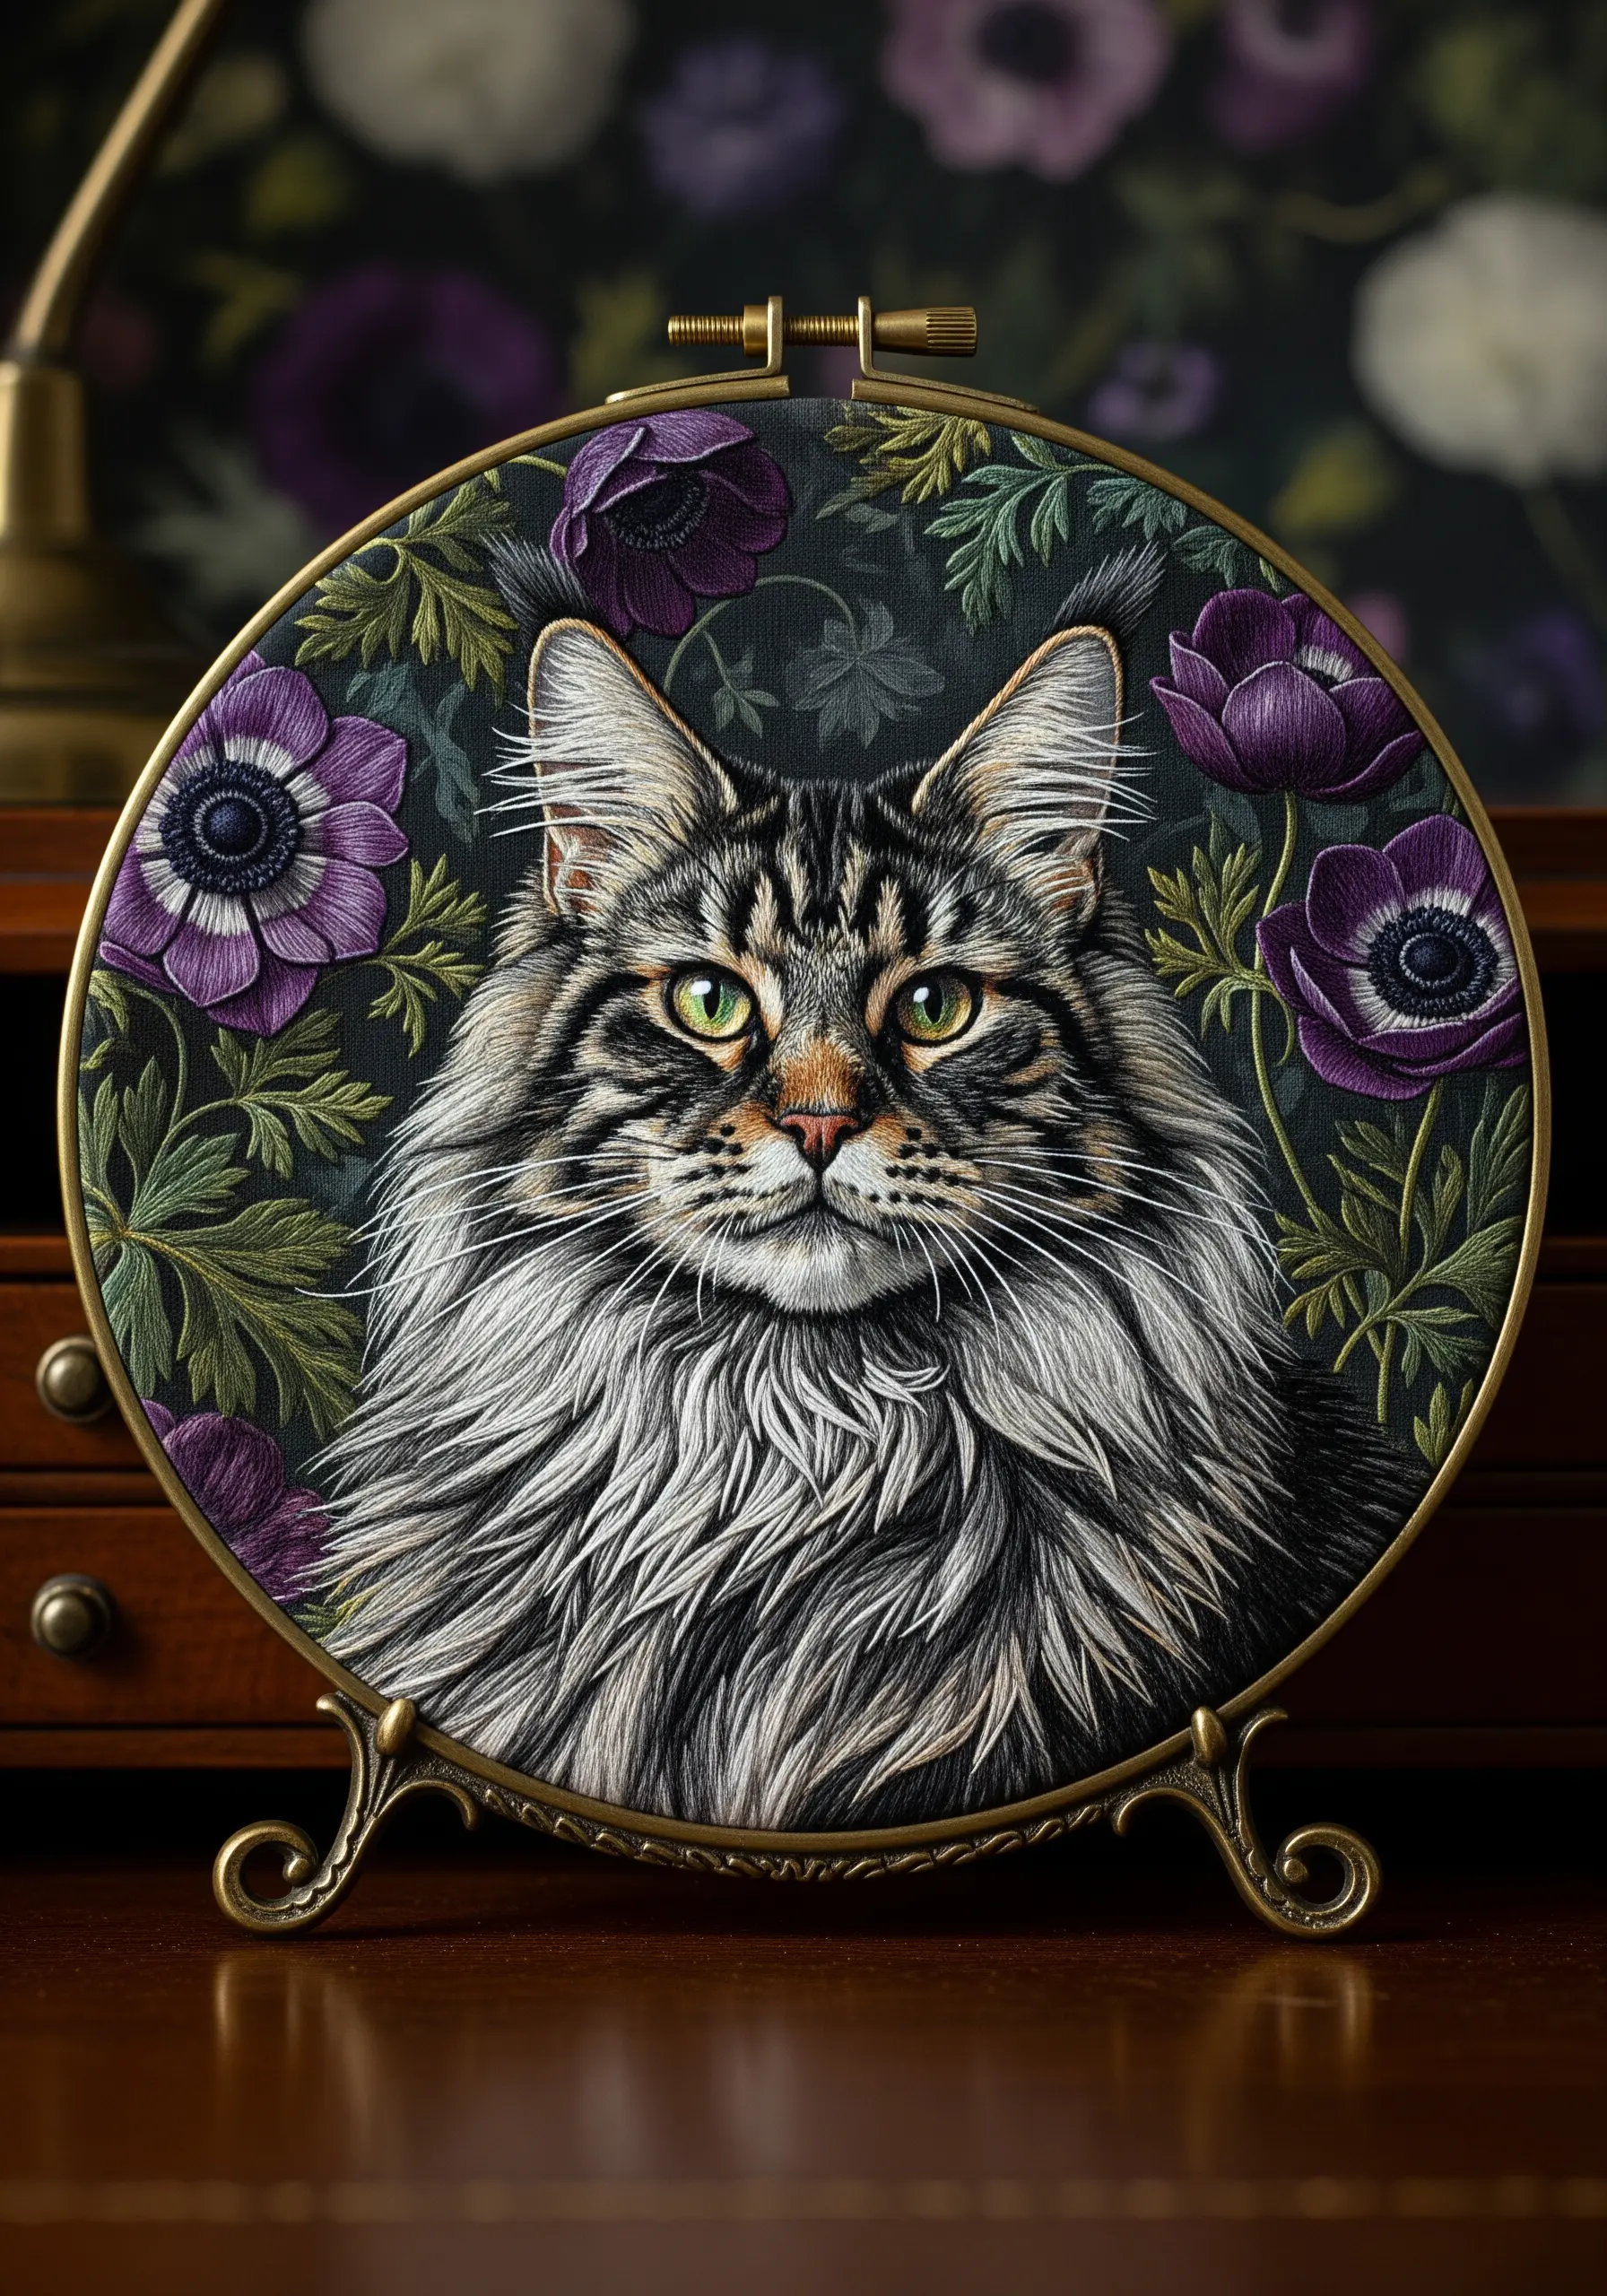
Long-haired breeds like Maine Coons are the perfect subject for mastering thread painting.
Build the fur in layers, starting with the shortest hairs around the nose and working your way out to the long, flowing mane. Use a wide palette of greys, whites, and blacks to create depth.
Your stitches should be long and slightly curved to mimic the weight and flow of the fur. Don’t be afraid to let some stitches overlap loosely to create a sense of untamed volume.
This technique elevates a simple stitching project into one of the modern thread portraits that look shockingly realistic and full of life.
13. Define Fur Patterns with Clean Color Blocking
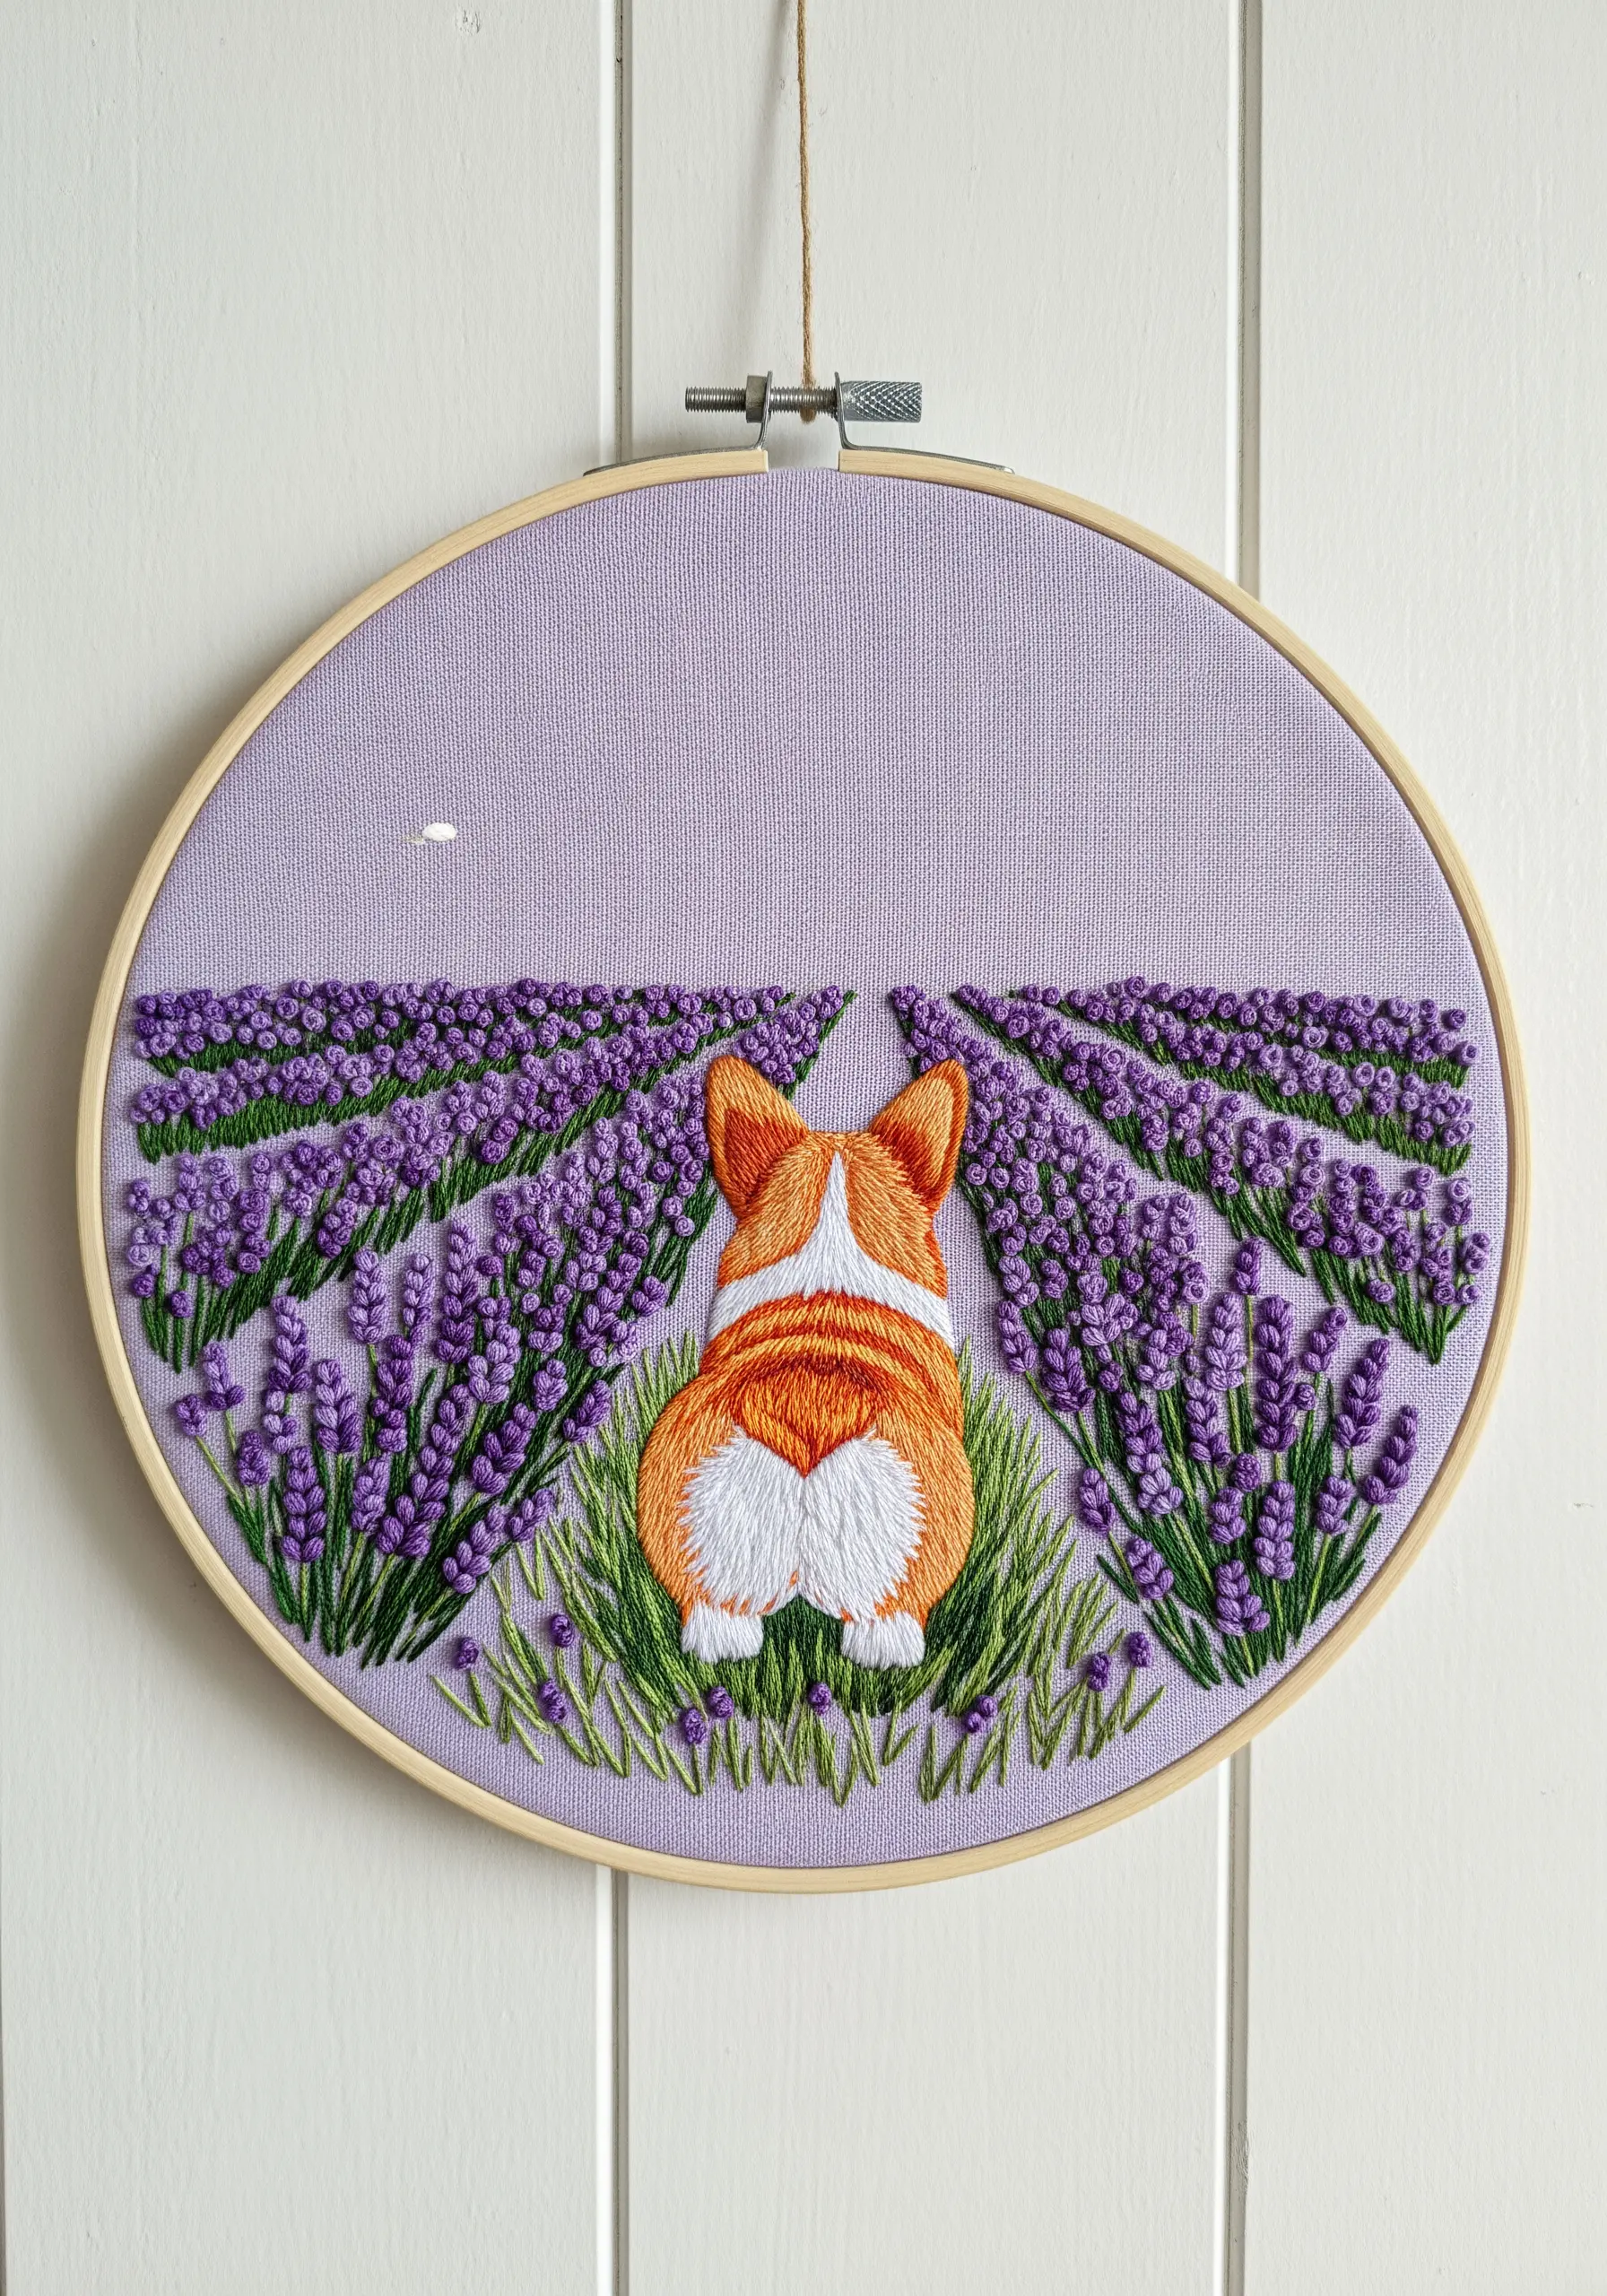
For pets with distinct patches of color, like a Corgi, the goal is to create clean divisions without harsh, unnatural lines.
Fill in each color block with directional satin stitch, ensuring all stitches within a patch flow in the same direction, following the fur growth.
Where two colors meet, use the long-and-short stitch to slightly interlock the threads. This creates a soft, dovetailed edge that looks natural and blended.
This method gives you the best of both worlds: the clean look of color blocking with the softness of a real coat.
14. Blend Multi-Toned Fur with Staggered Stitches
Pets like guinea pigs often have complex coats with multiple colors blending together softly.
To replicate this, use short, staggered seed stitches or split stitches, allowing you to place small ‘dots’ of color precisely where you need them.
Work in small sections, laying down stitches of different colors next to each other rather than trying to fill one large area at a time.
This methodical approach allows you to build up soft, gradual transitions between white, brown, and black, resulting in a perfectly blended, realistic coat.
15. Sculpt High-Contrast Fur with Directional Shading
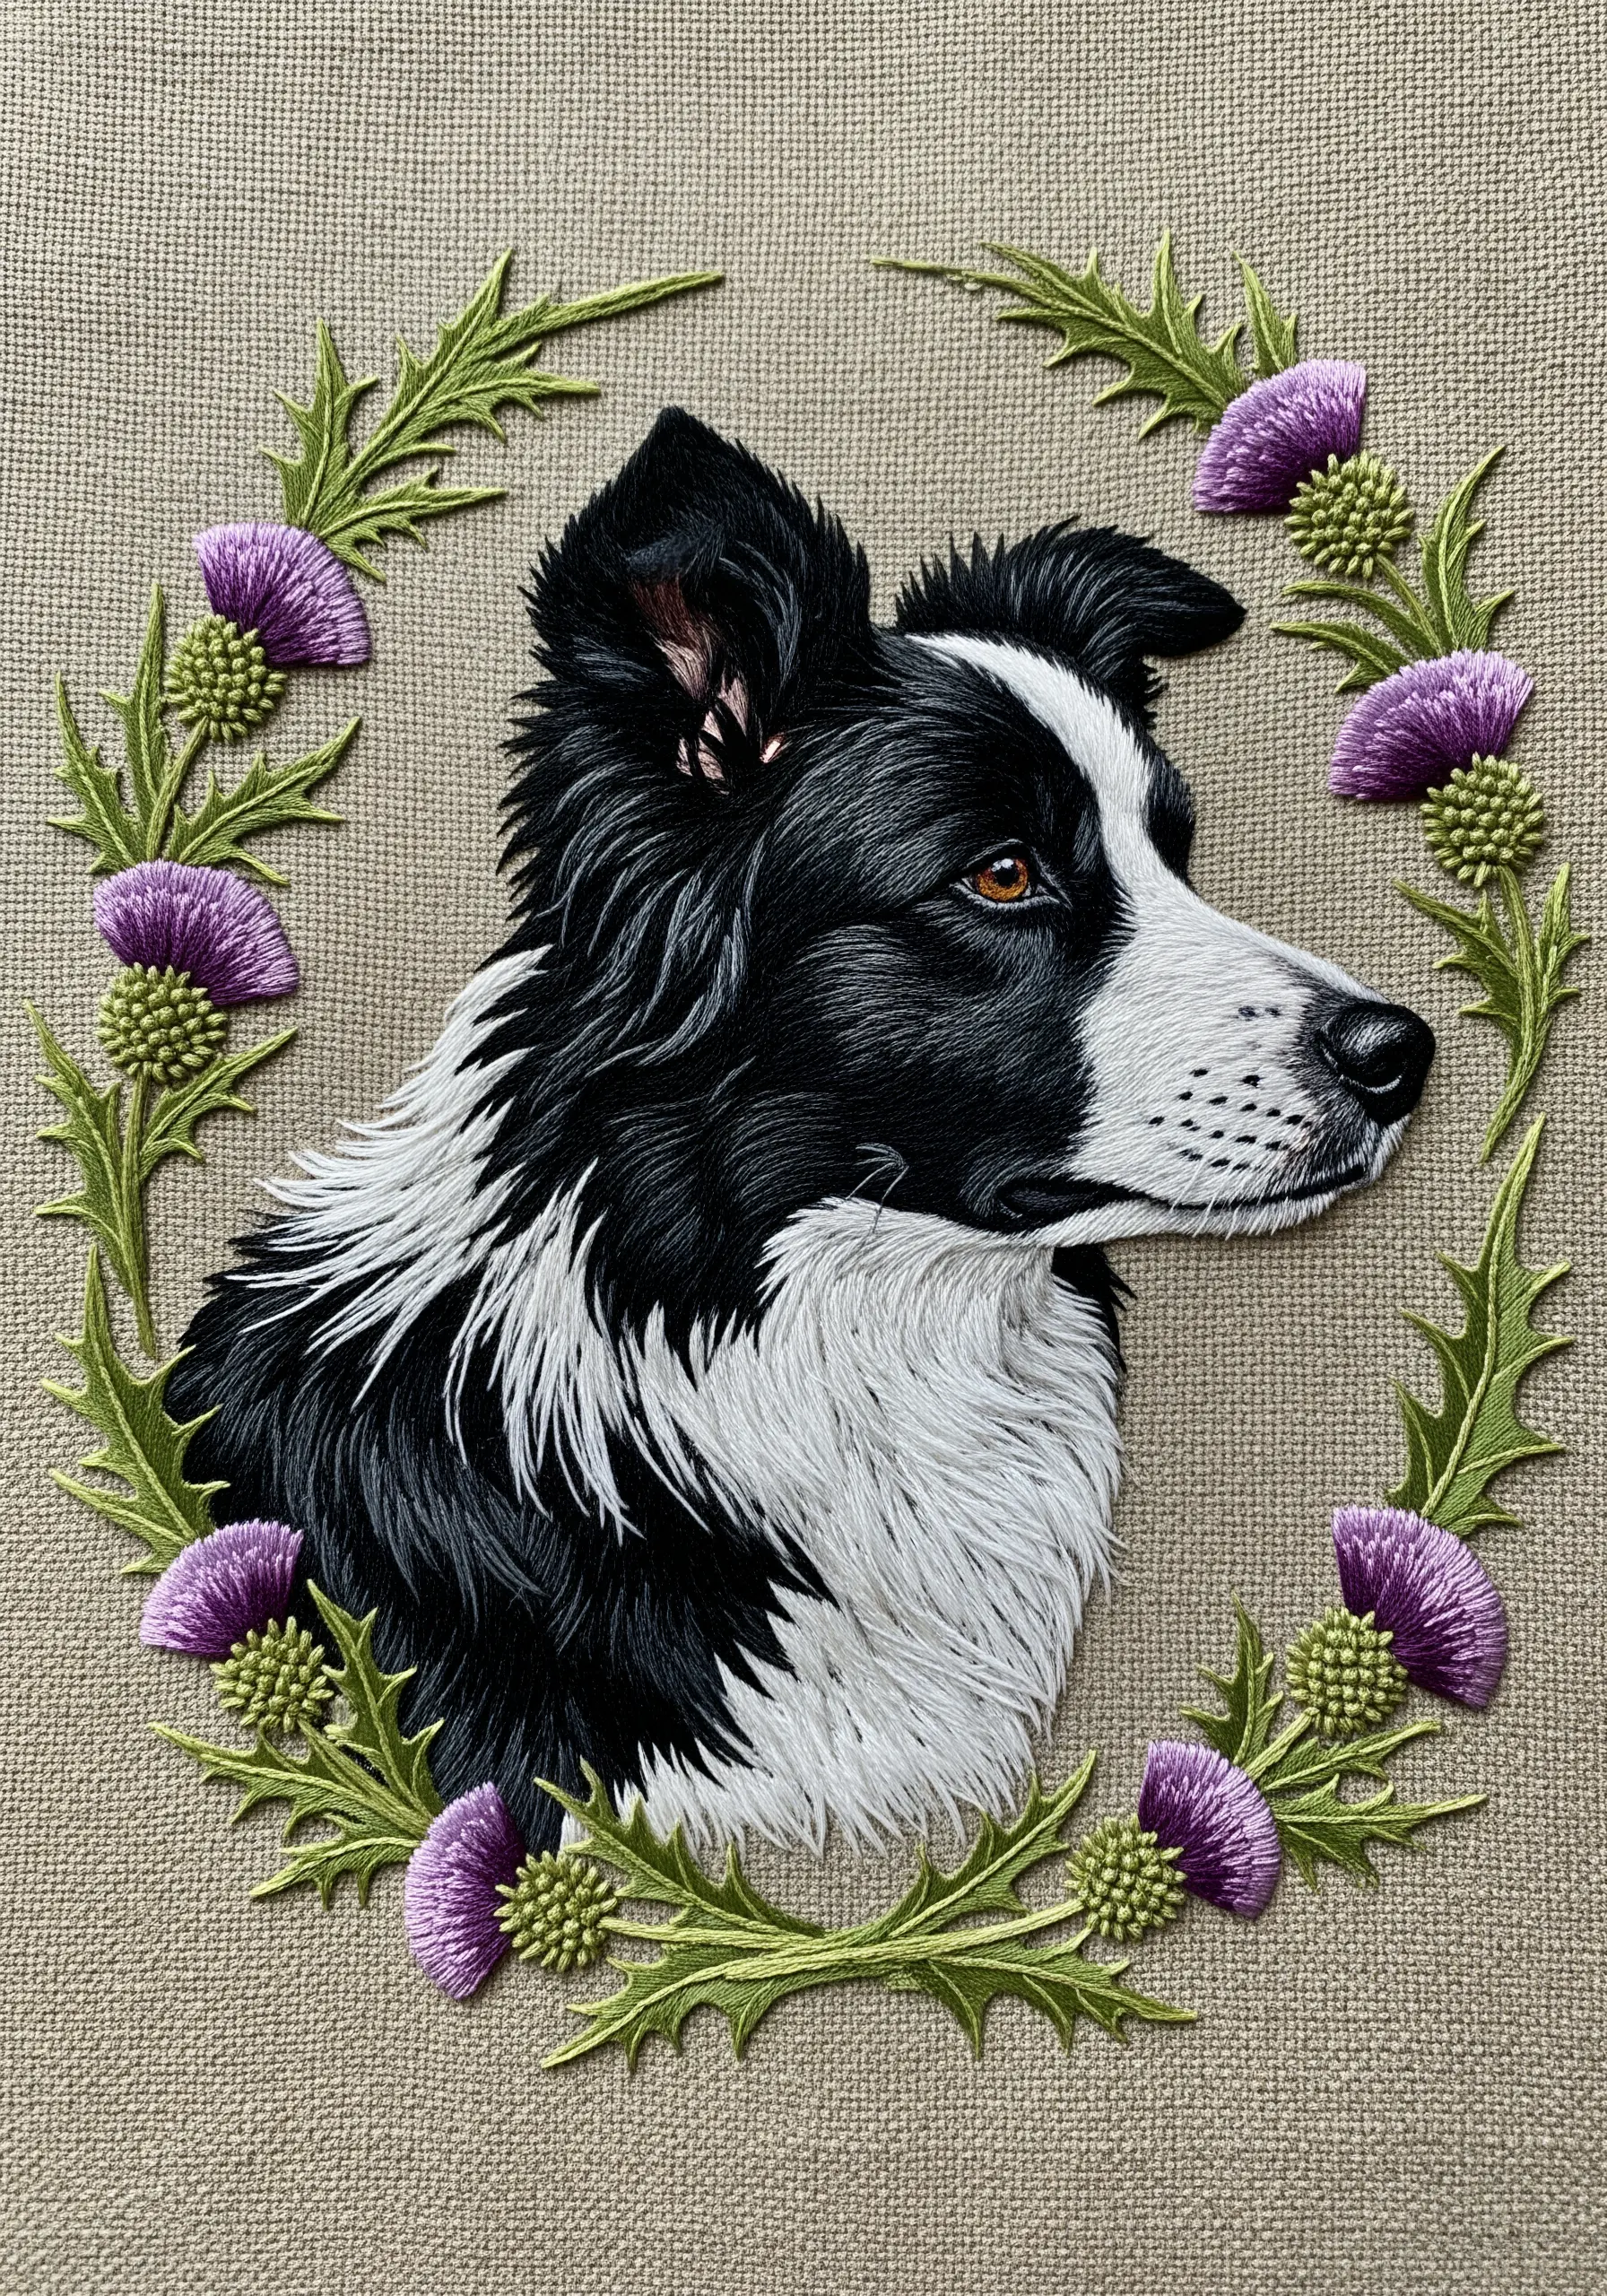
The challenge with black-and-white animals like Border Collies is to make both colors look equally detailed and dimensional.
For the white fur, use shades of off-white and very light grey to create shadows, especially in the thick ruff around the neck. Make sure your stitches follow the direction of the fur’s growth.
For the black areas, incorporate dark grey and even navy blue threads to define shape and add highlights, preventing it from looking like a flat void.
Balancing the detail in both the light and dark areas is what makes the final portrait feel cohesive and lifelike.
16. Combine Appliqué and Embroidery for Dynamic Compositions

Introduce a new layer of dimension by combining fabric appliqué with your embroidery.
For a celestial scene, cut the crescent moon shape from a piece of silver lamé or glittery fabric. Secure it to your base fabric with small, discreet stitches around the edge.
Then, embroider your pet directly onto the appliqué and the surrounding fabric, using satin stitch for the fur.
This mixed-media approach adds texture and a focal point that pops. You can explore other unexpected ways to use metallic thread to enhance the effect.
17. Create a Formal Portrait with a Shield Motif
Elevate your pet portrait by framing it within a classic embroidered element, like a shield or crest.
Lightly sketch the shield shape onto your fabric and outline it with a sharp stem stitch or chain stitch.
Fill the interior of the shield with a contrasting color using satin stitch, or create a gradient effect for a modern twist.
Stitch your pet’s portrait within the shield. This compositional device adds a sense of nobility and importance, turning a simple portrait into a treasured family crest.
18. Add Sculptural Details with 3D Stitches

Give your floral accents a lifelike, three-dimensional quality by incorporating raised stitches.
Use woven wheel stitches (or spider web roses) for the succulent rosettes, which creates a beautiful, raised petal effect.
For the trailing ‘string of pearls’ succulent, use French knots or bullion knots placed closely together.
These techniques create raised sculptural embroidery effects that lift off the fabric, providing a stunning textural contrast to the smooth, thread-painted fur of the pet.
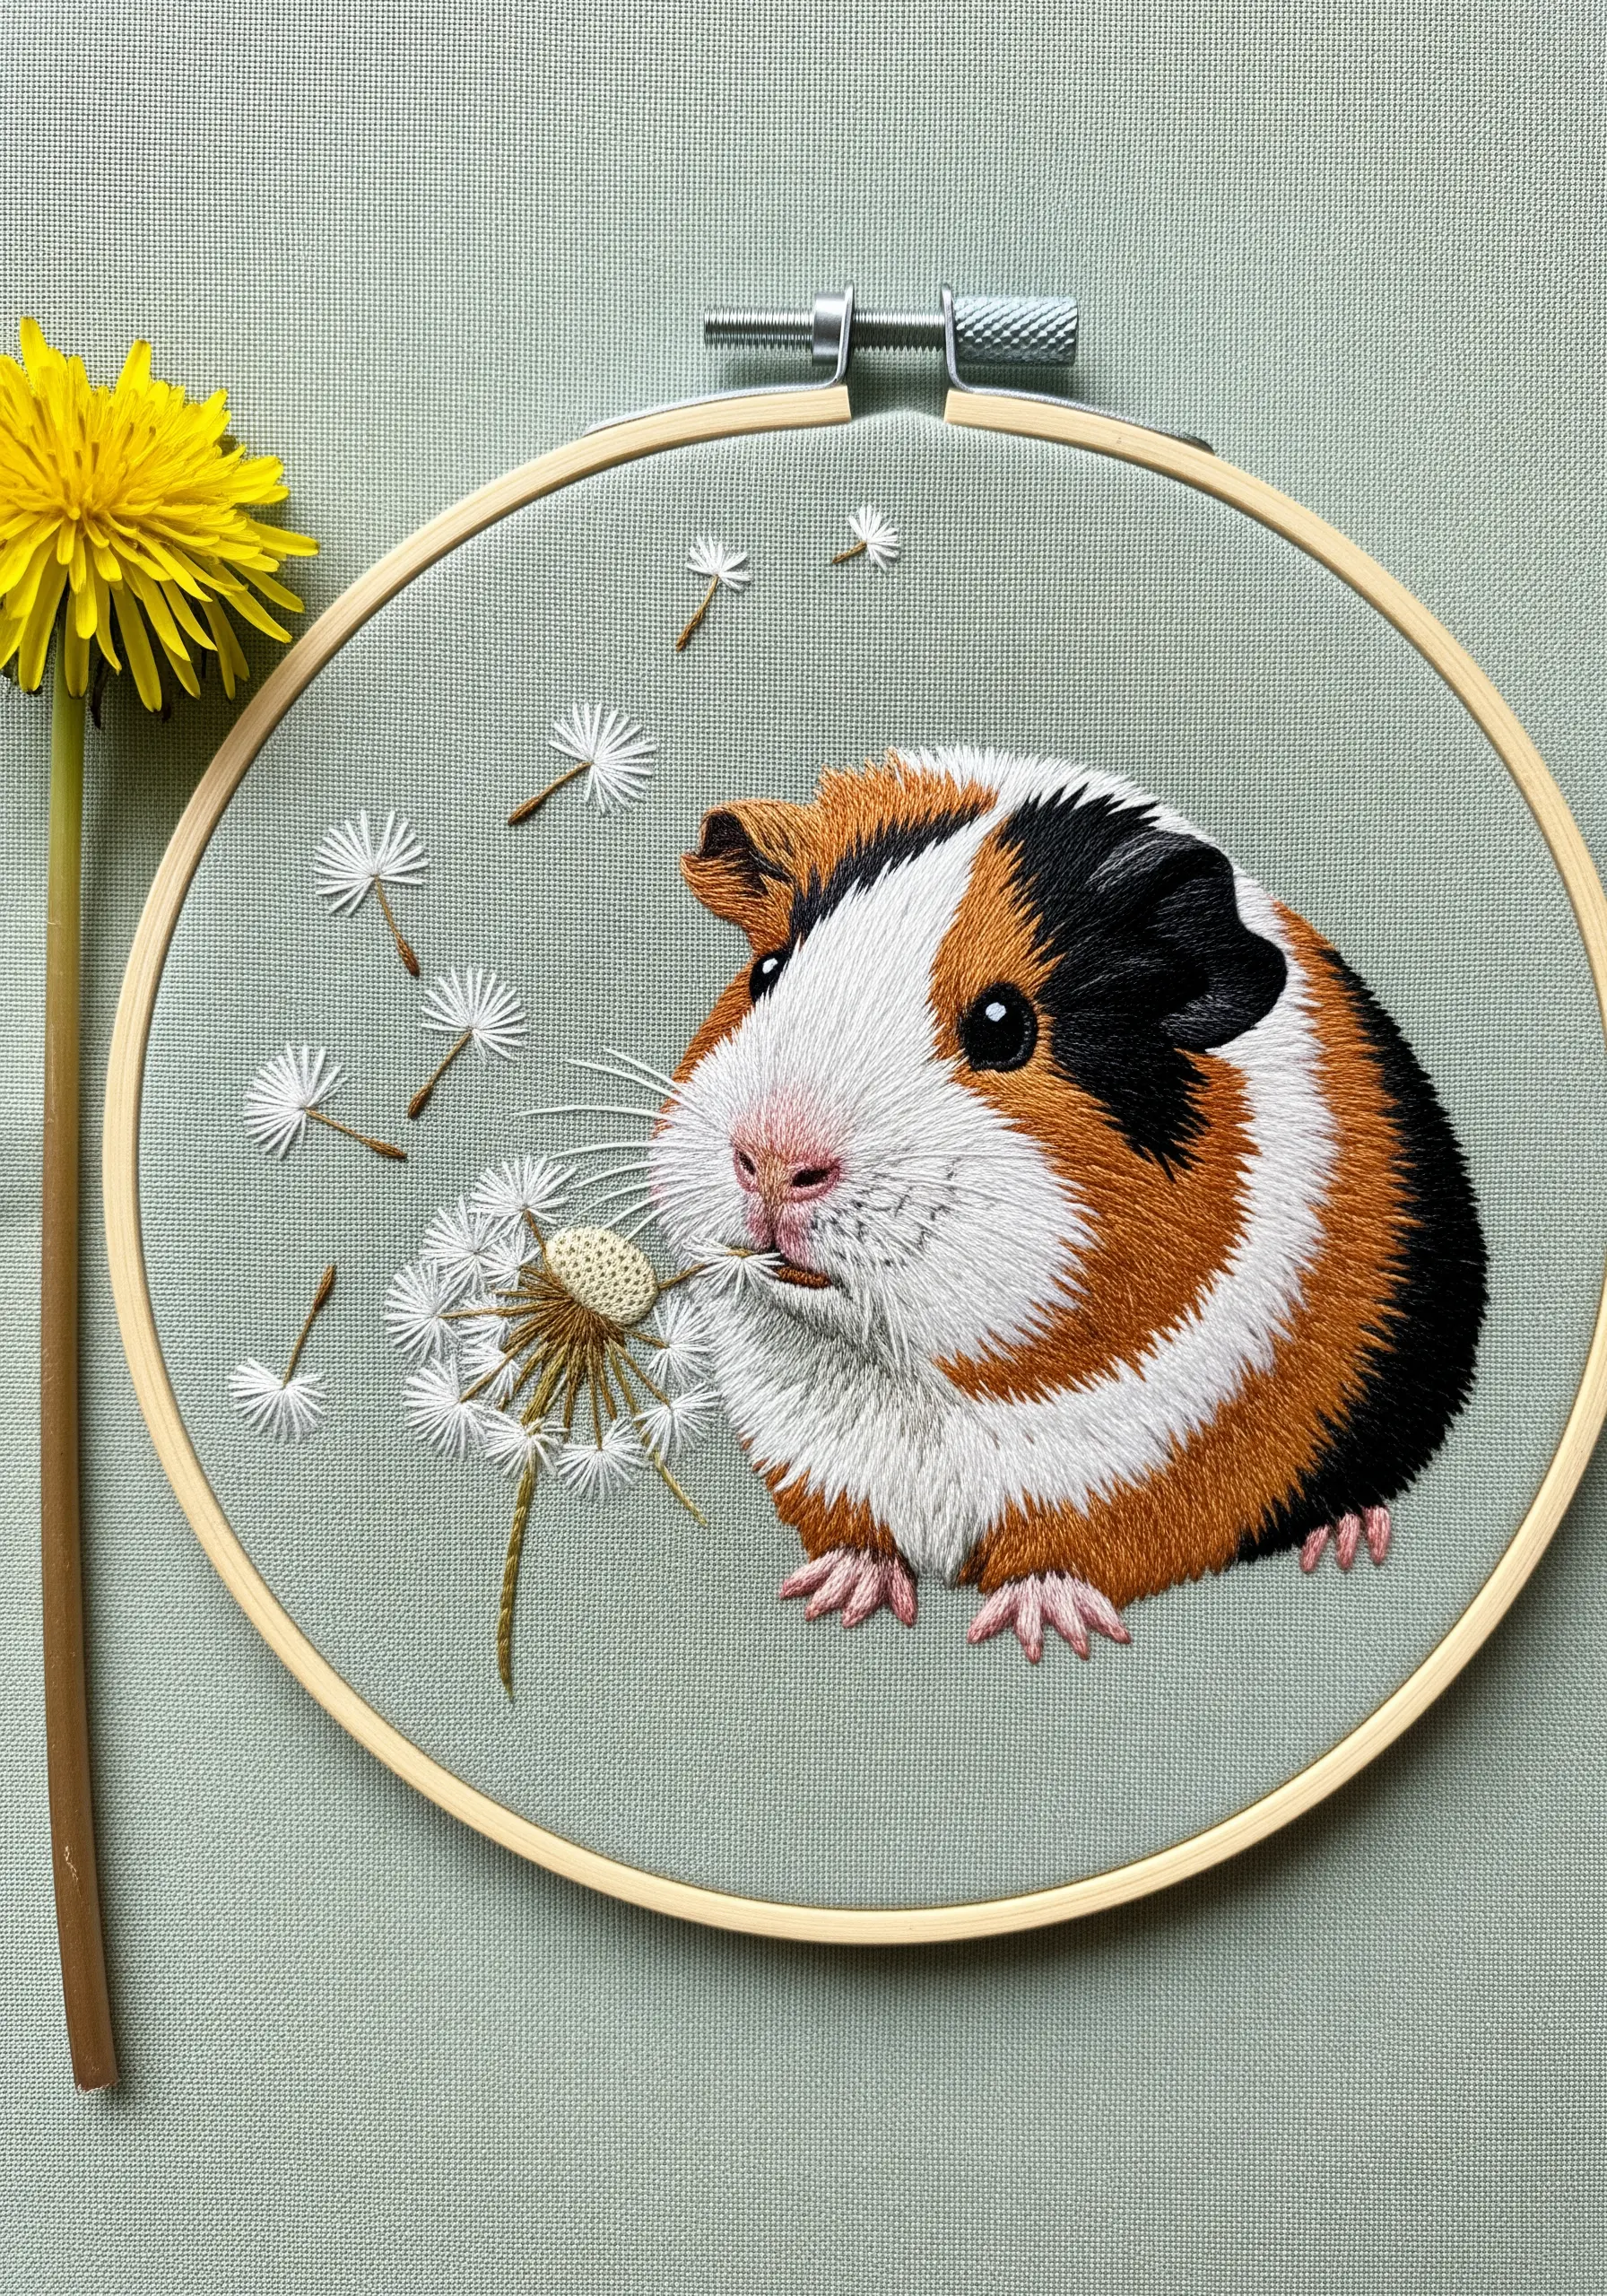
19. Use Color Temperature to Create Depth in Fur
To give your beagle’s coat a rich, lifelike quality, think about the temperature of your colors, not just the shades.
In the brown areas, blend warm, reddish-browns with cooler, darker browns for the shadows. This contrast makes the warmer tones appear closer and the cooler tones recede.
For the white sections, use a pure white for highlights but shade with a cool, pale grey to give it form.
This subtle use of color theory is a professional technique that adds incredible realism and depth to your work.
20. Embellish with Pearls for a Touch of Elegance
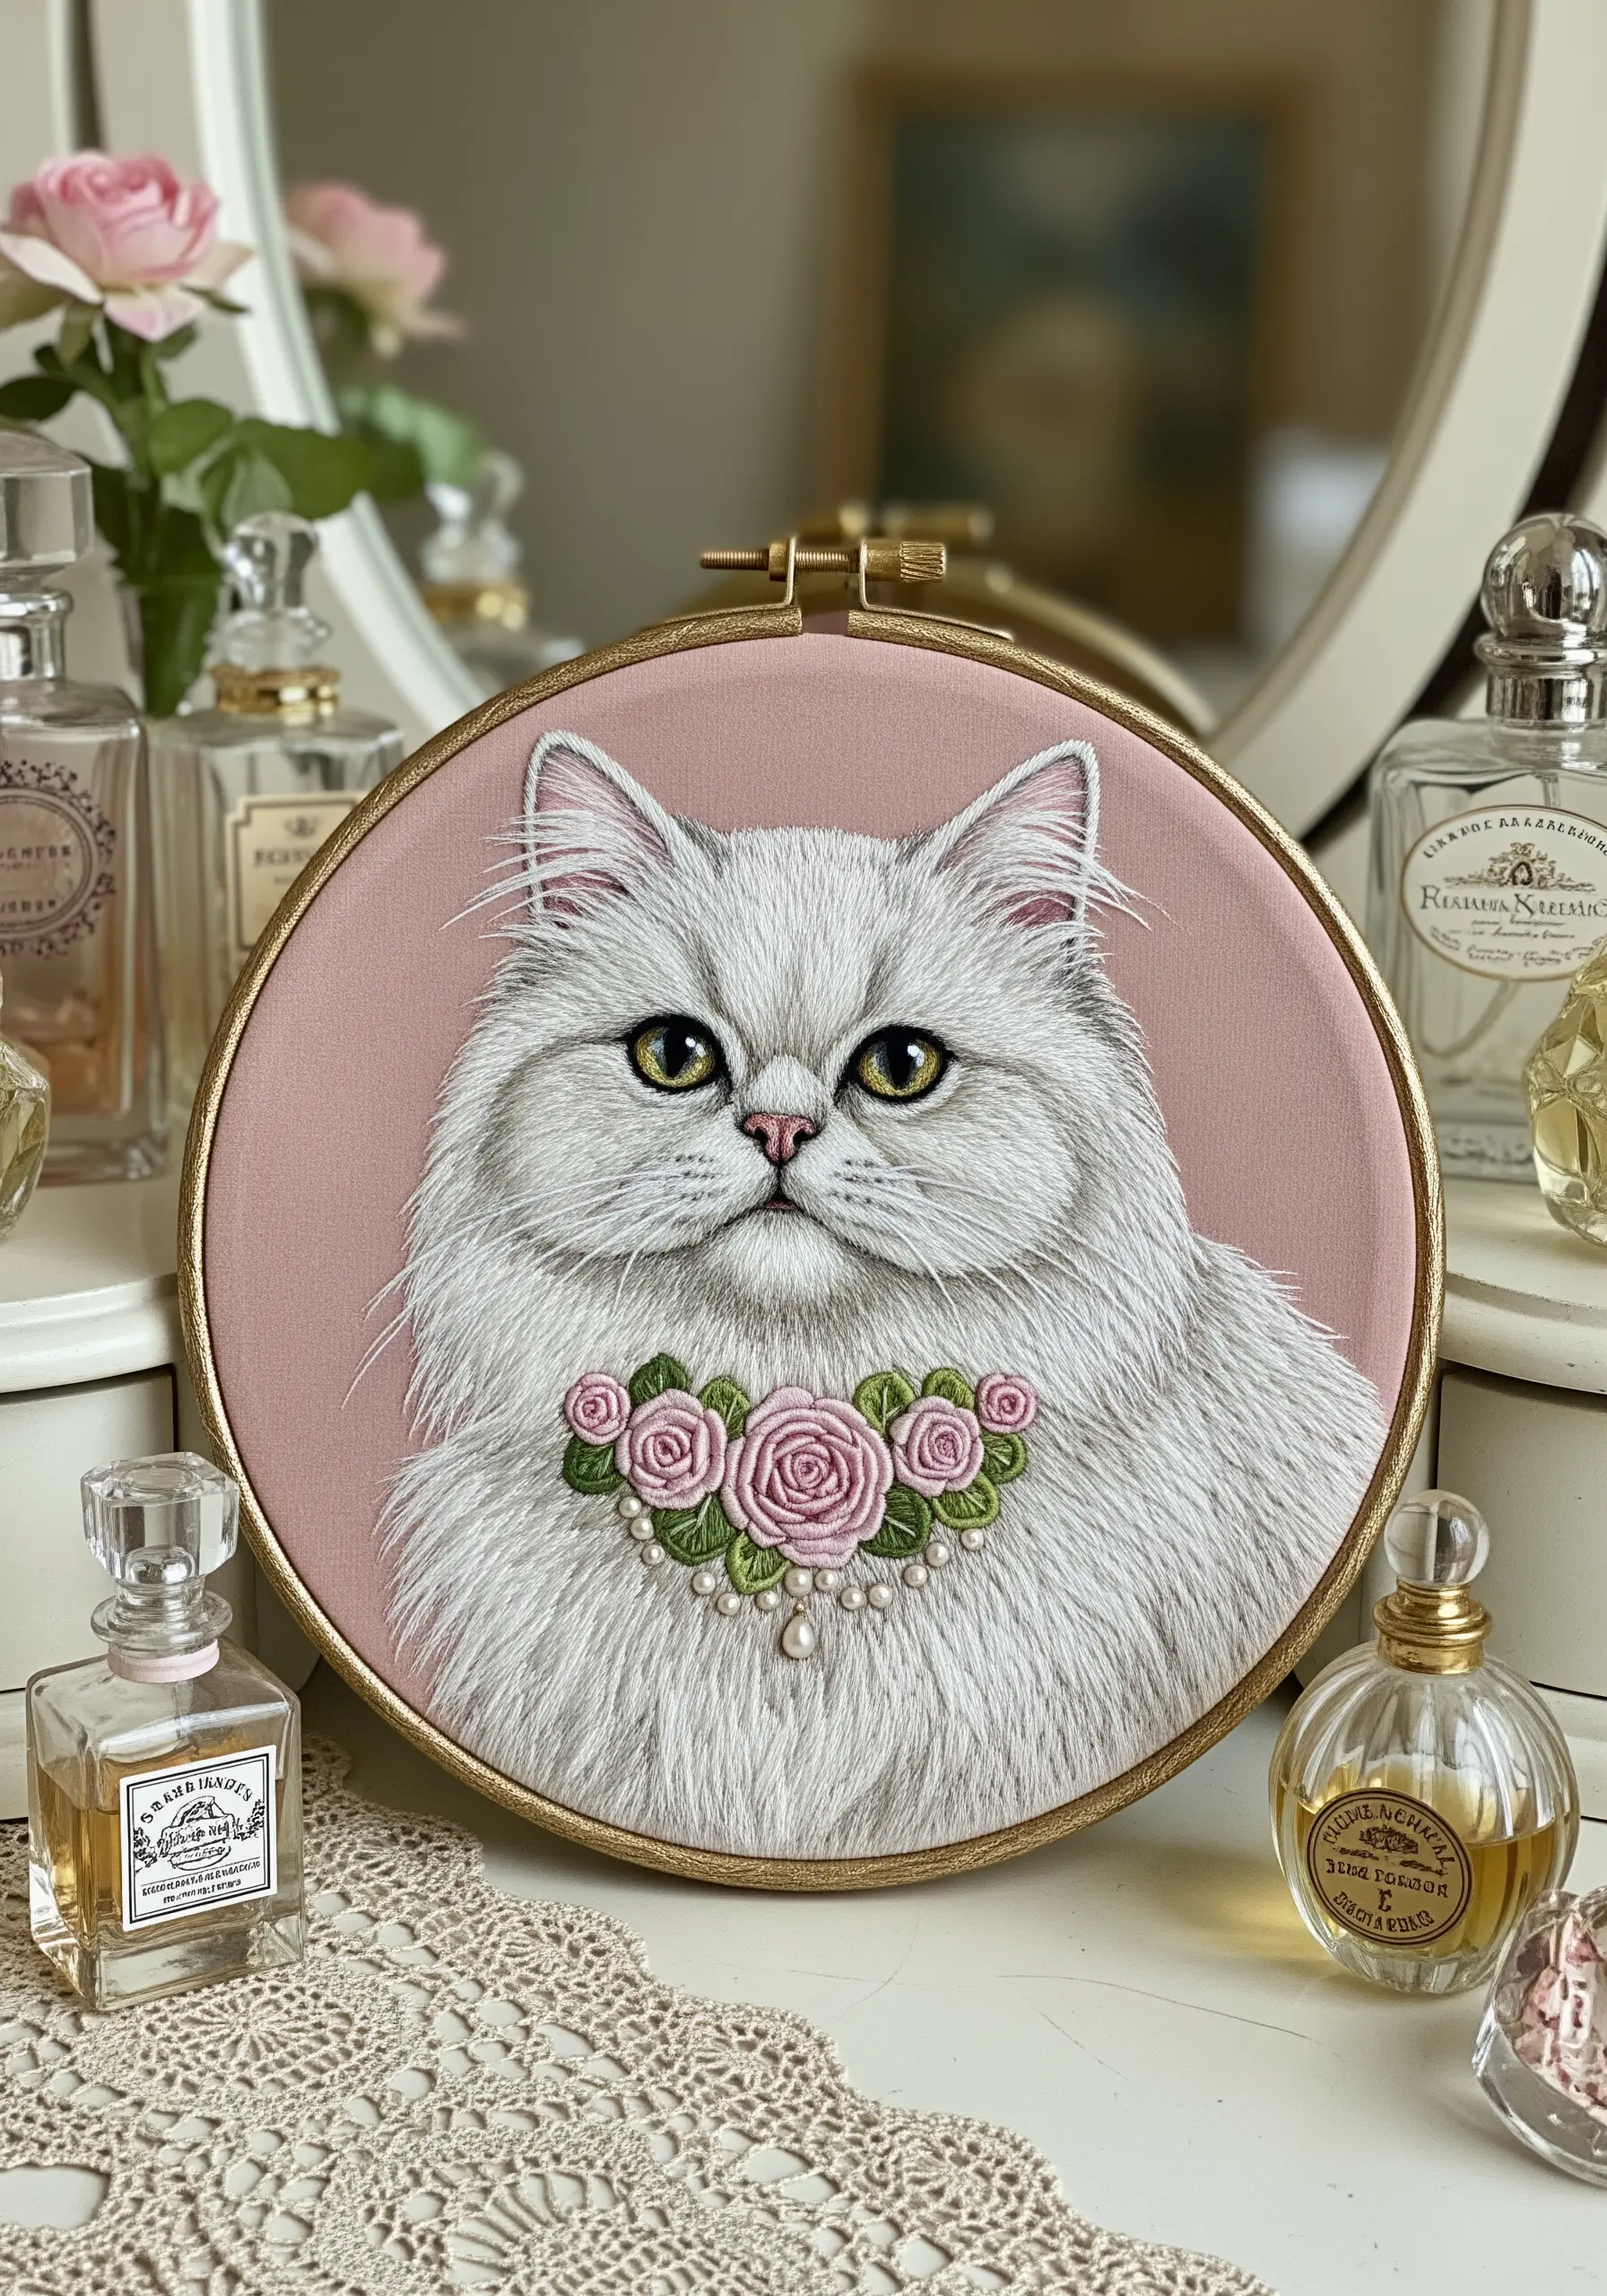
For a truly special portrait, especially of a regal-looking cat, incorporate delicate embellishments.
After embroidering a collar of woven wheel roses, carefully stitch tiny seed pearls between the flowers.
Use a single strand of thread that matches the pearls and pass through each pearl two or three times to ensure it’s secure.
This small addition introduces a different texture and light-reflecting quality, transforming the piece into a delicate, jewelry-like artwork.
21. Create Wiry Fur with Short, Staggered Stitches
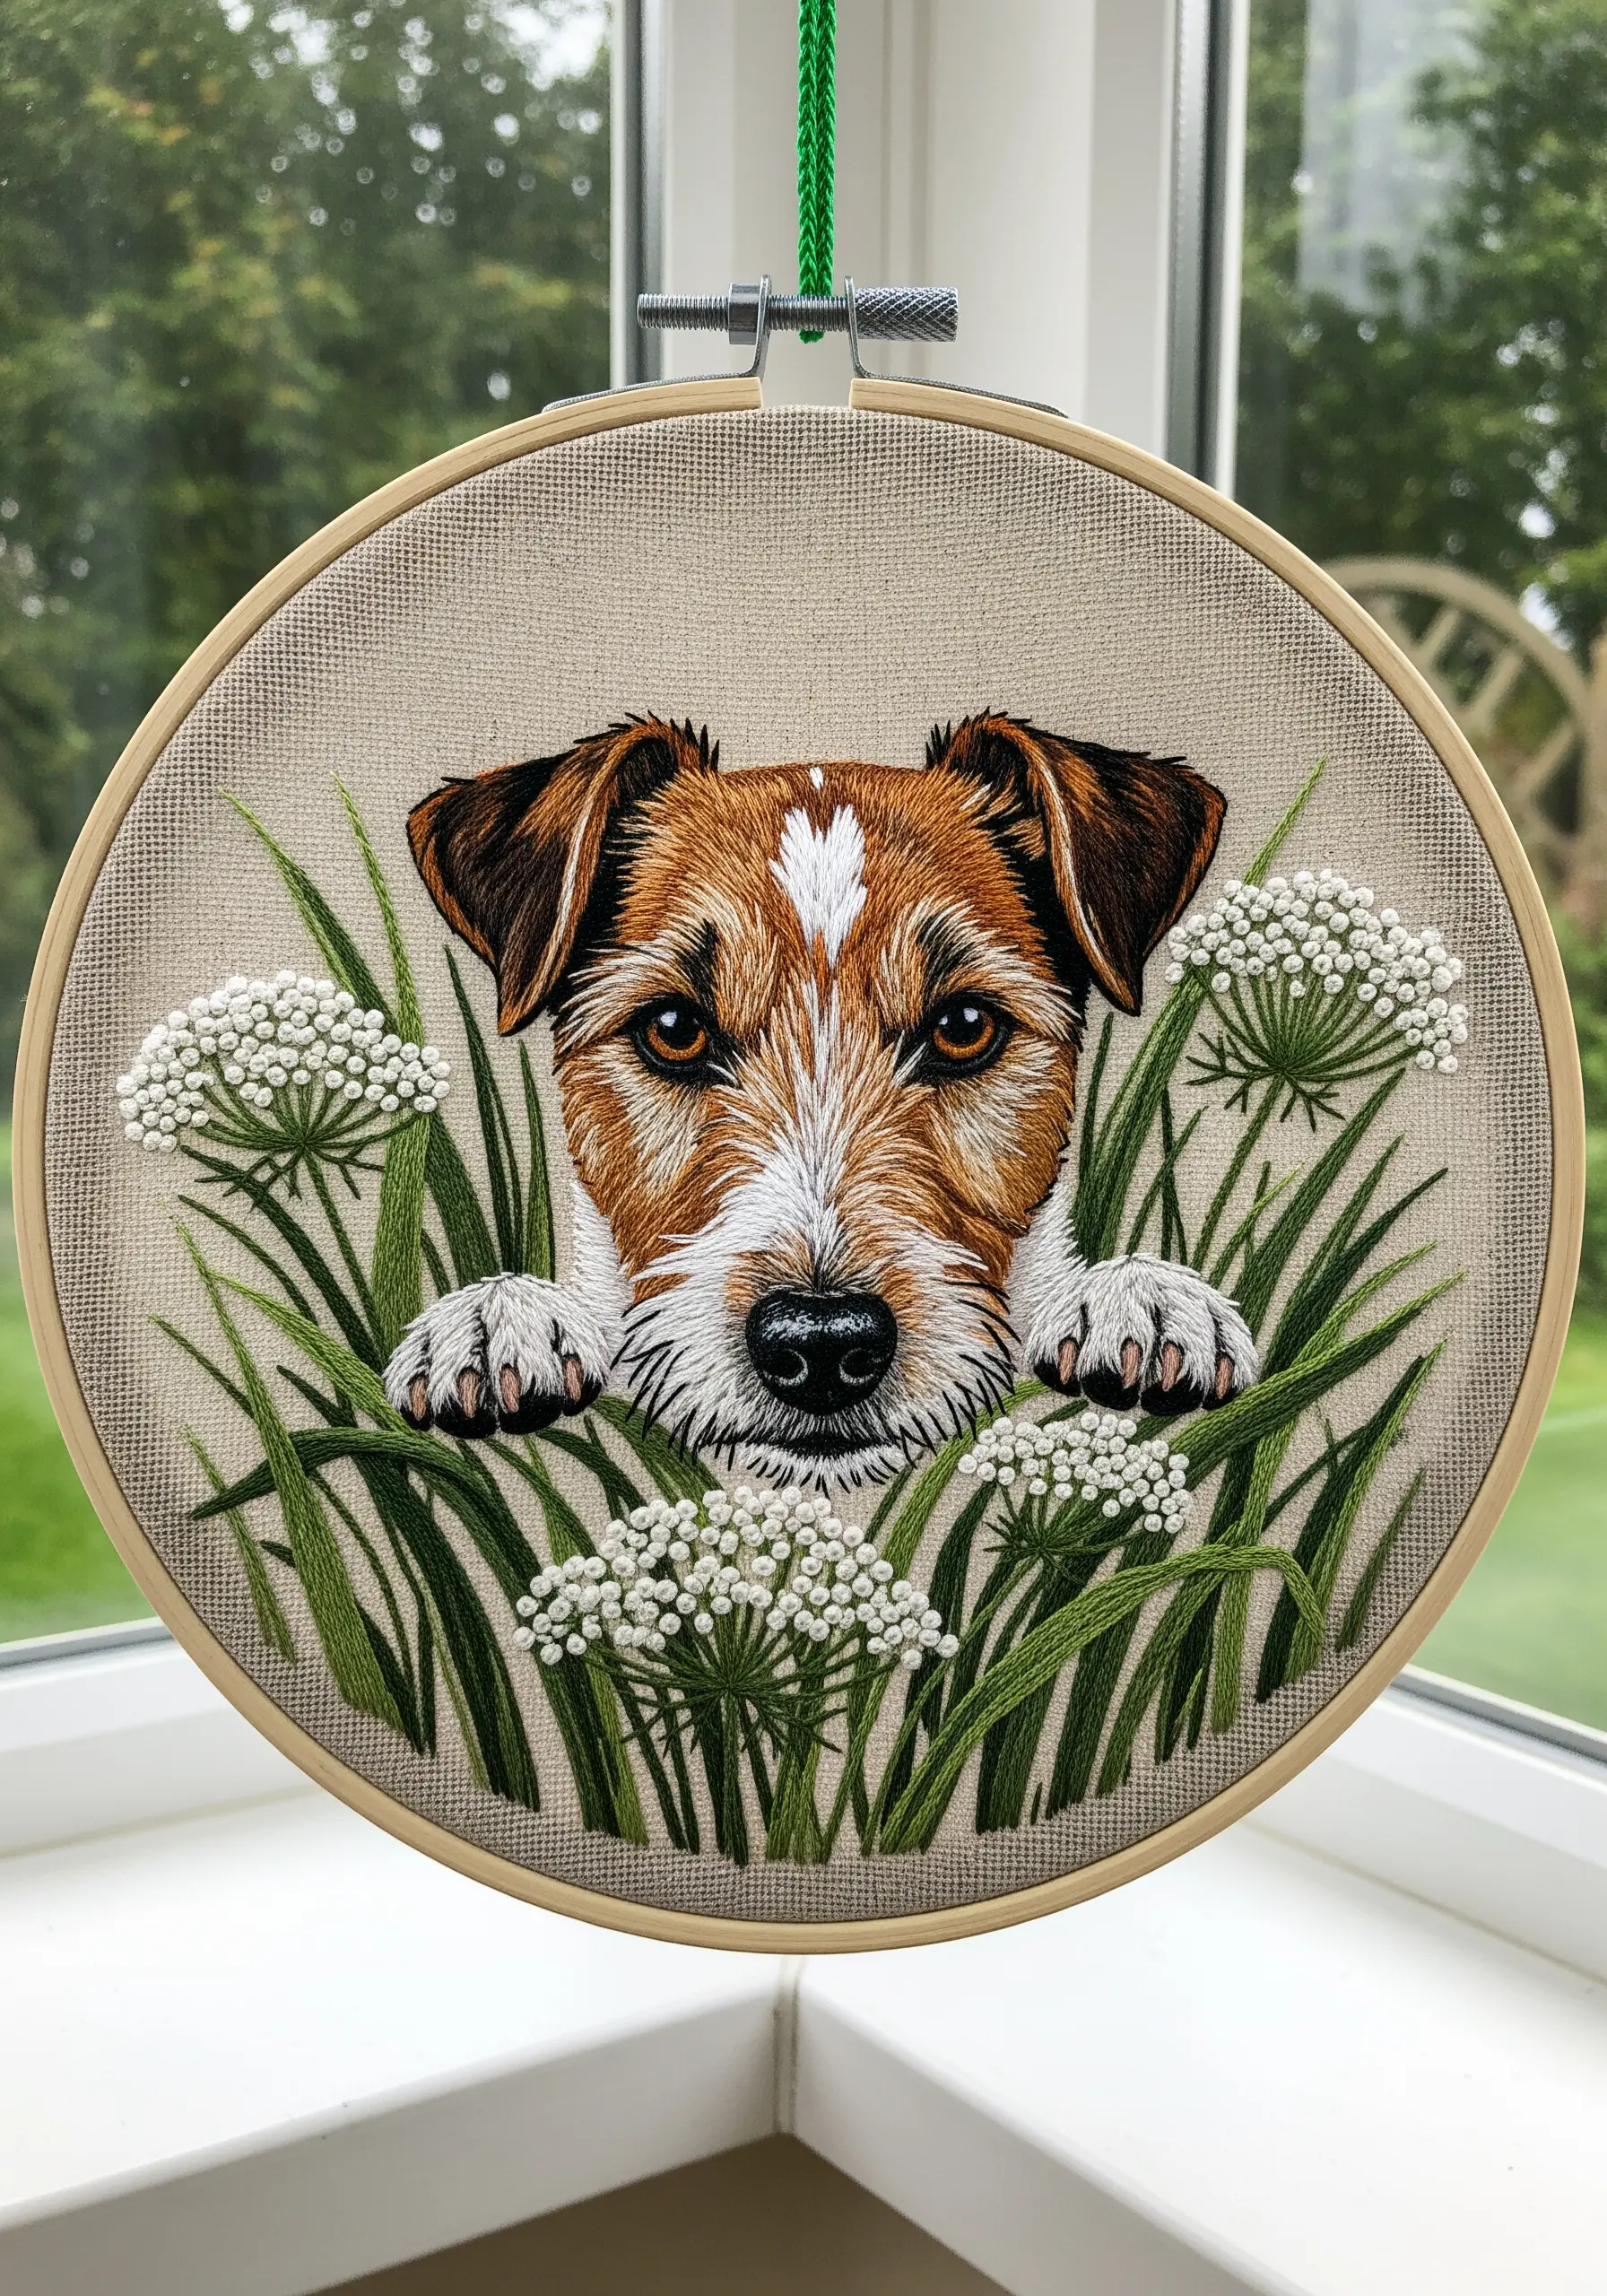
To capture the coarse, wiry texture of a terrier’s coat, you need to break the habit of smooth, uniform stitching.
Use short, straight stitches laid down in multiple, slightly chaotic directions. Deliberately leave tiny gaps between some stitches to enhance the scruffy look.
Layer multiple shades of brown, black, and white to mimic the multi-tonal nature of their fur.
This technique is liberating because it doesn’t rely on perfect precision; instead, its charm comes from its energetic and slightly uneven texture.
22. Replicate Skin Folds with Subtle Shading
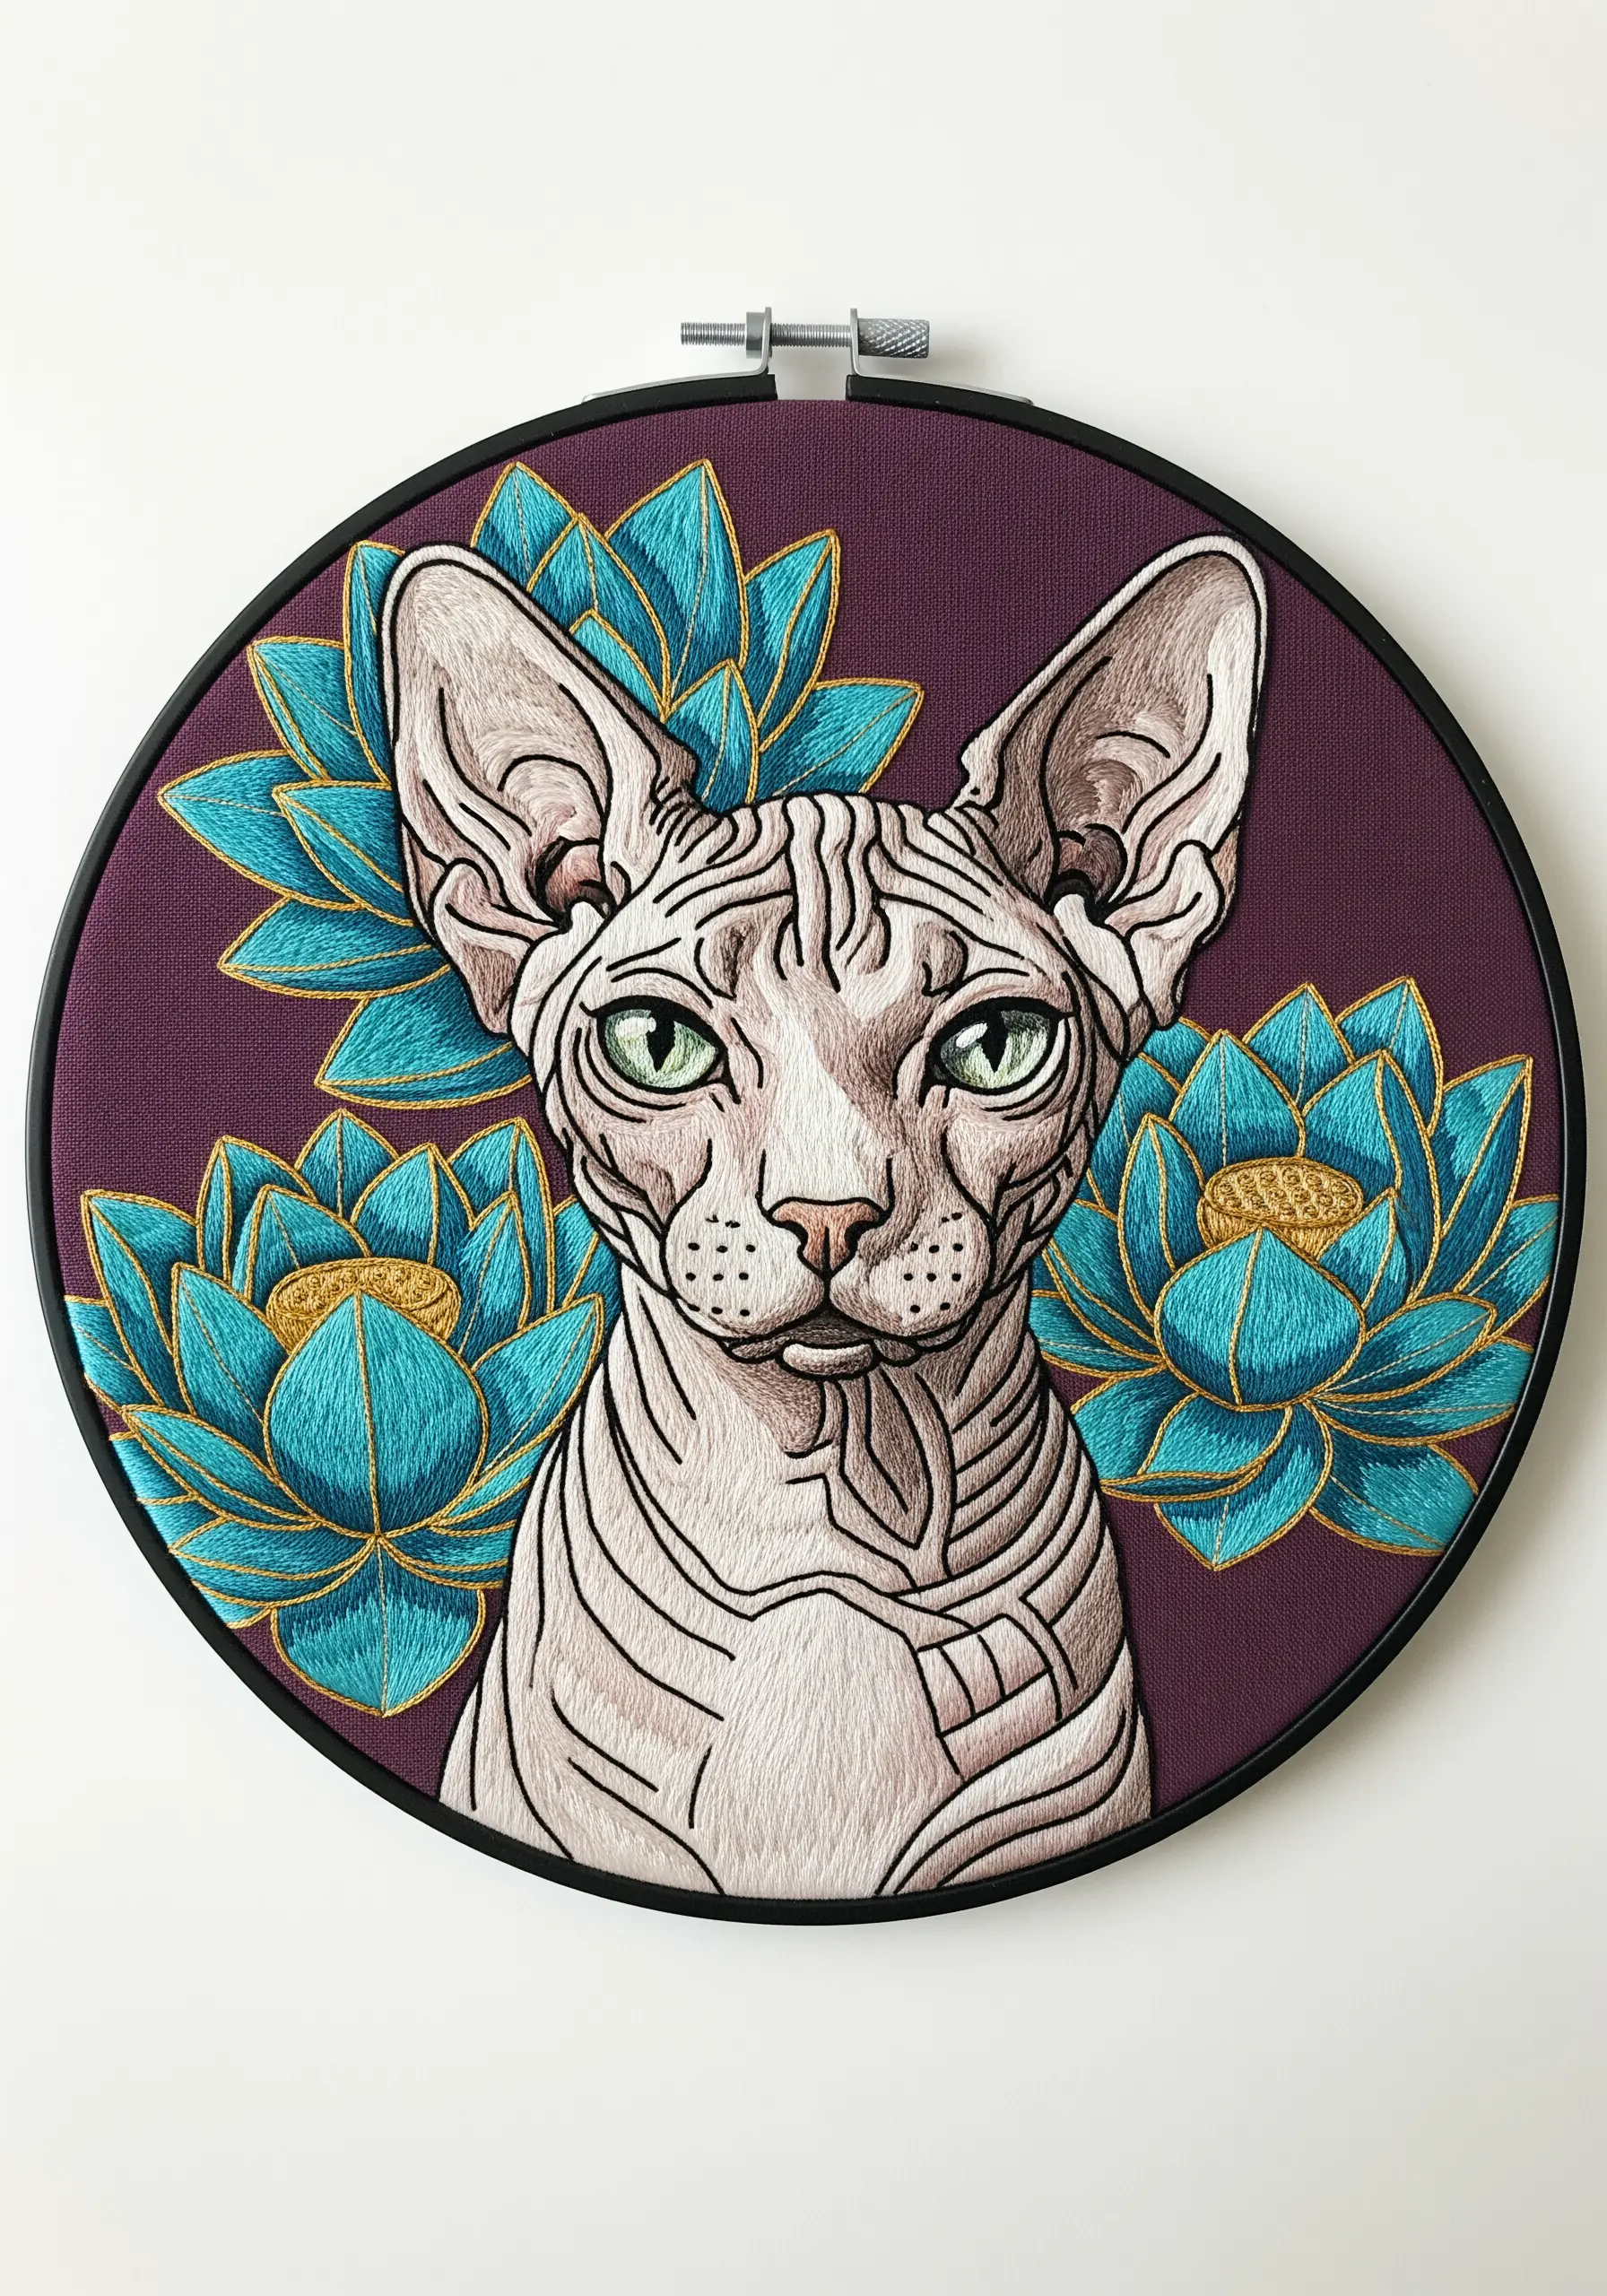
Stitching a hairless Sphynx cat is an exercise in subtlety and line work, focusing on skin rather than fur.
Use a single strand of floss in a few closely-related shades of beige and pink. Lay down short, smooth satin stitches that follow the contours and wrinkles of the skin.
The key is shading. Use the darkest shade inside the deepest wrinkles and the lightest shade on the most prominent surfaces.
This is where modern thread illusion techniques come into play, creating the illusion of soft, folded skin on a flat surface.
23. Convey Roundness and Volume on a Tiny Scale
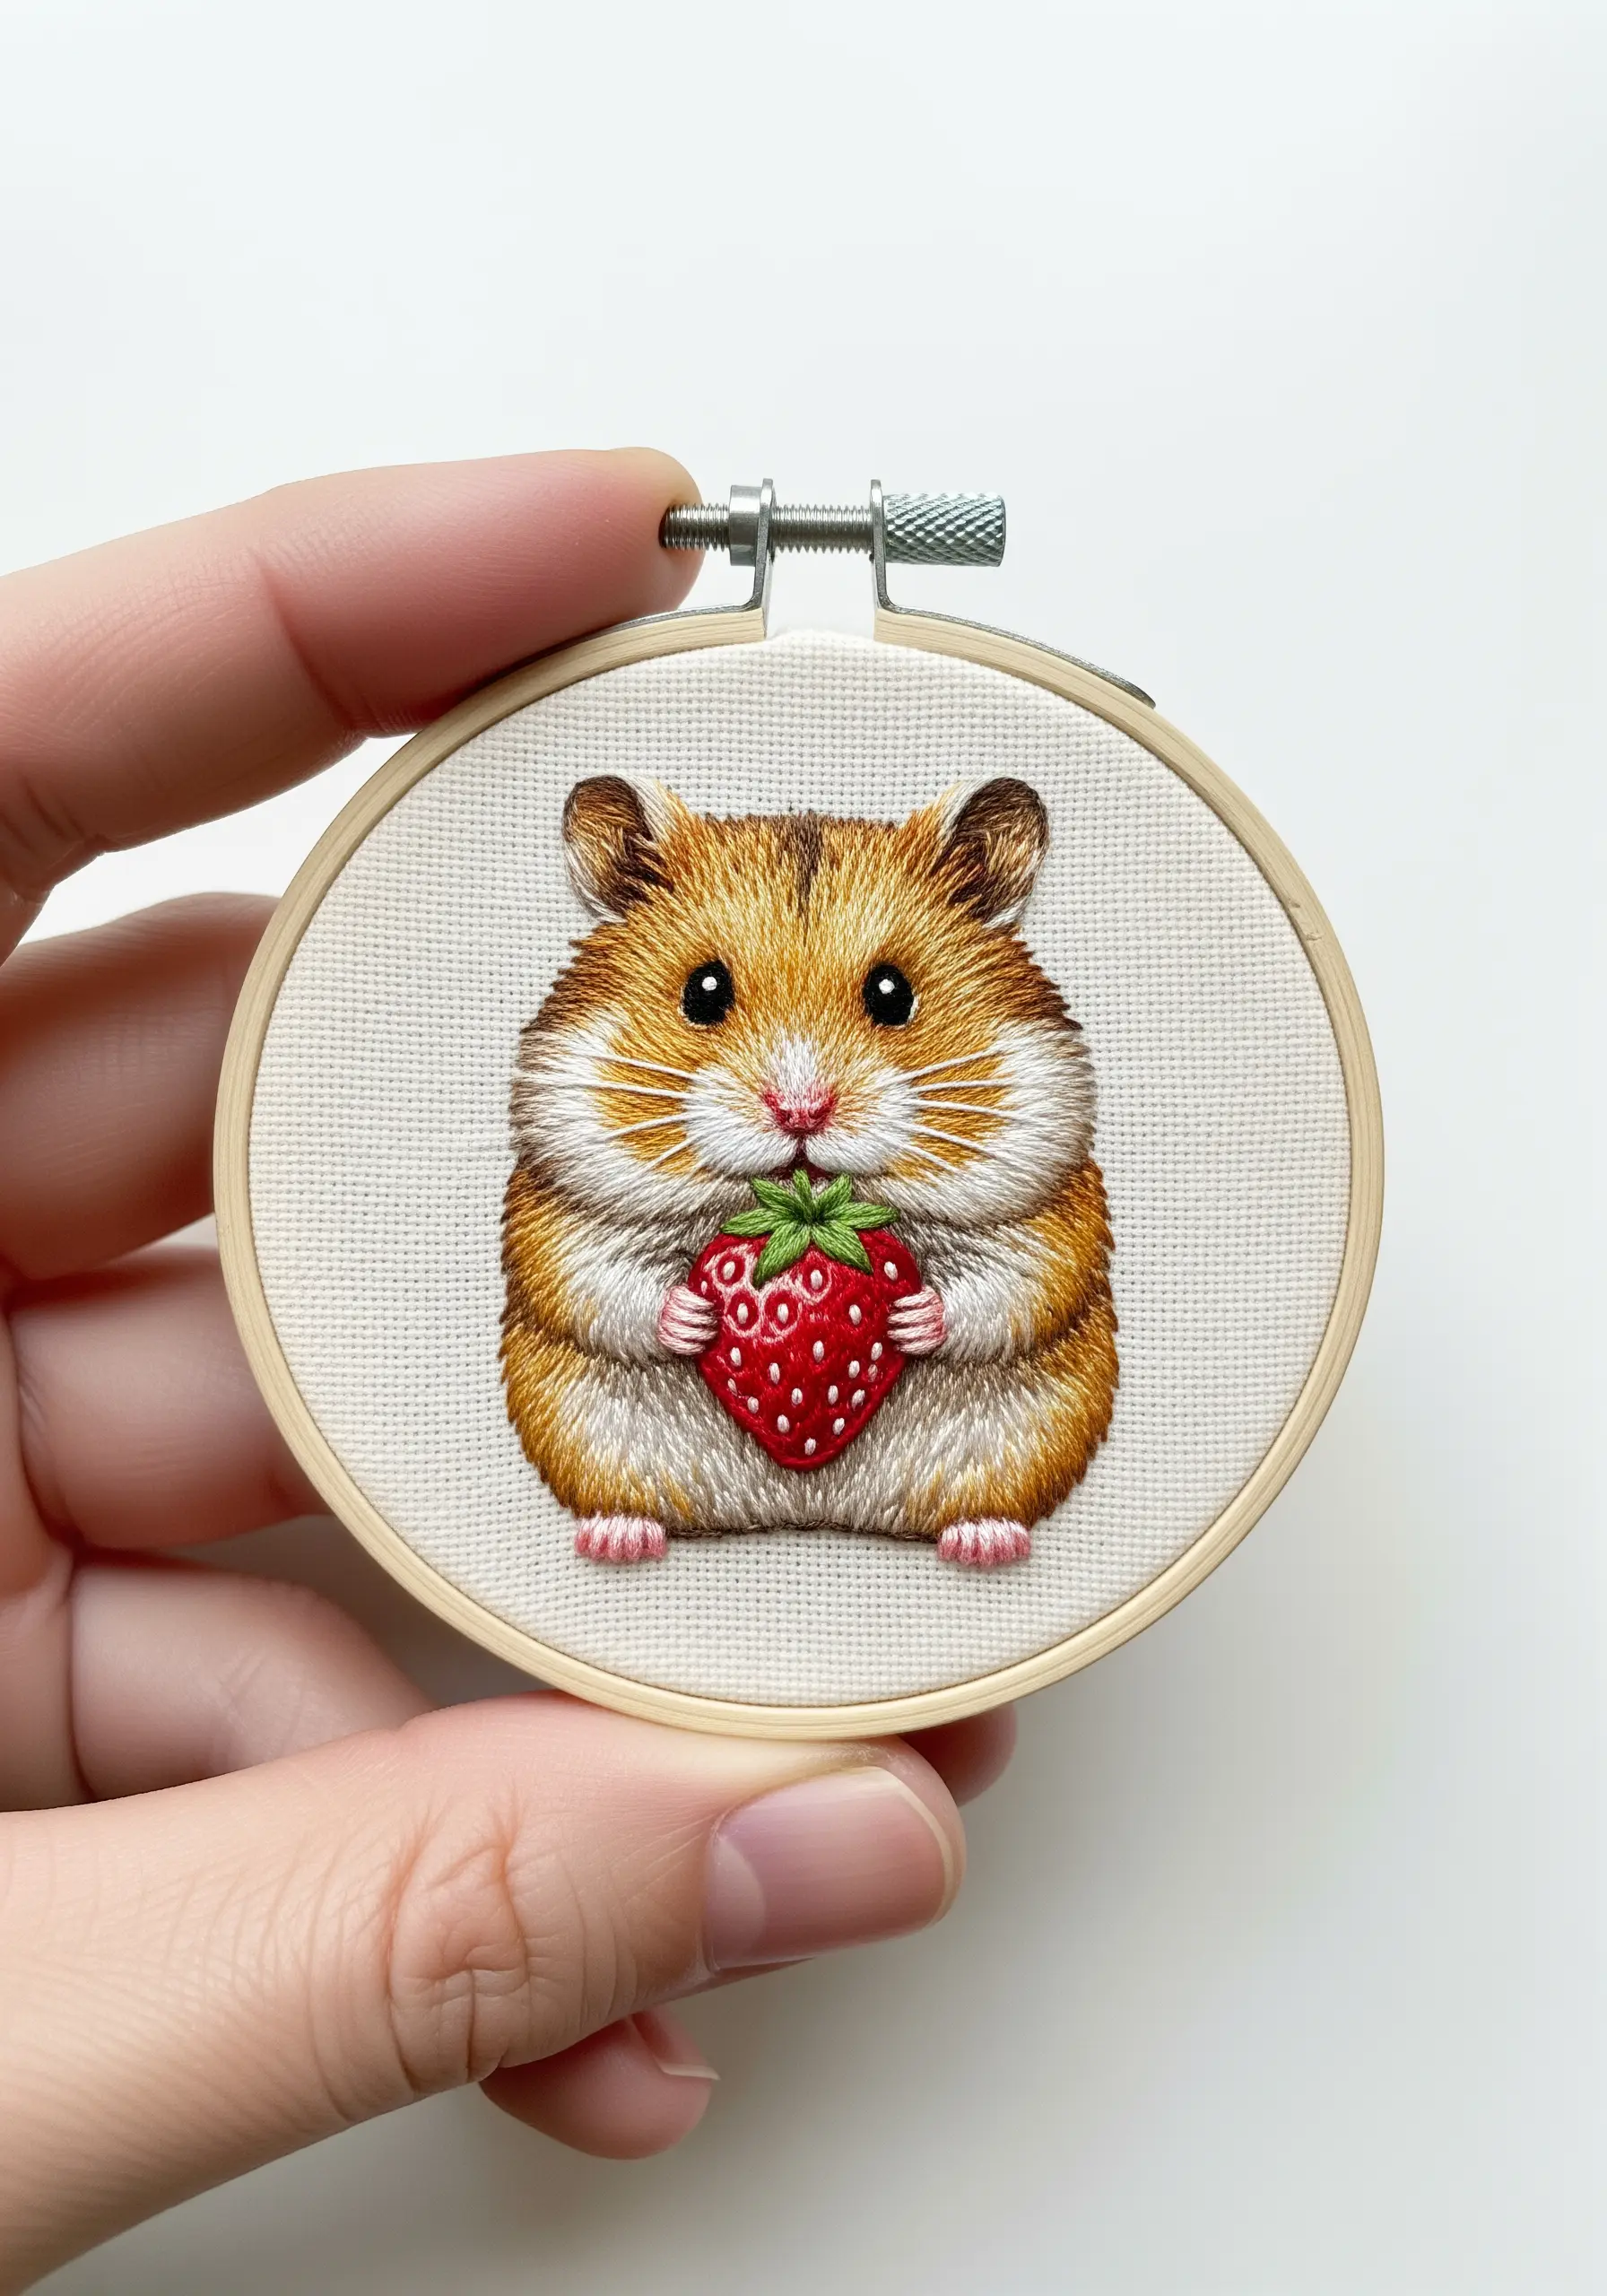
When embroidering a small creature like a hamster, every single stitch counts in creating its round, plump shape.
Work in curved rows of split stitch that wrap around the form of the body. Don’t stitch in straight lines.
Blend your colors—from dark brown on the back to a creamy white on the belly—in these same curved lines to enhance the illusion of volume.
A few tiny, isolated white stitches for whiskers and a single black French knot for the eye provide the finishing details that bring it to life.
24. Define a Thick Coat with Layered Color Blocks
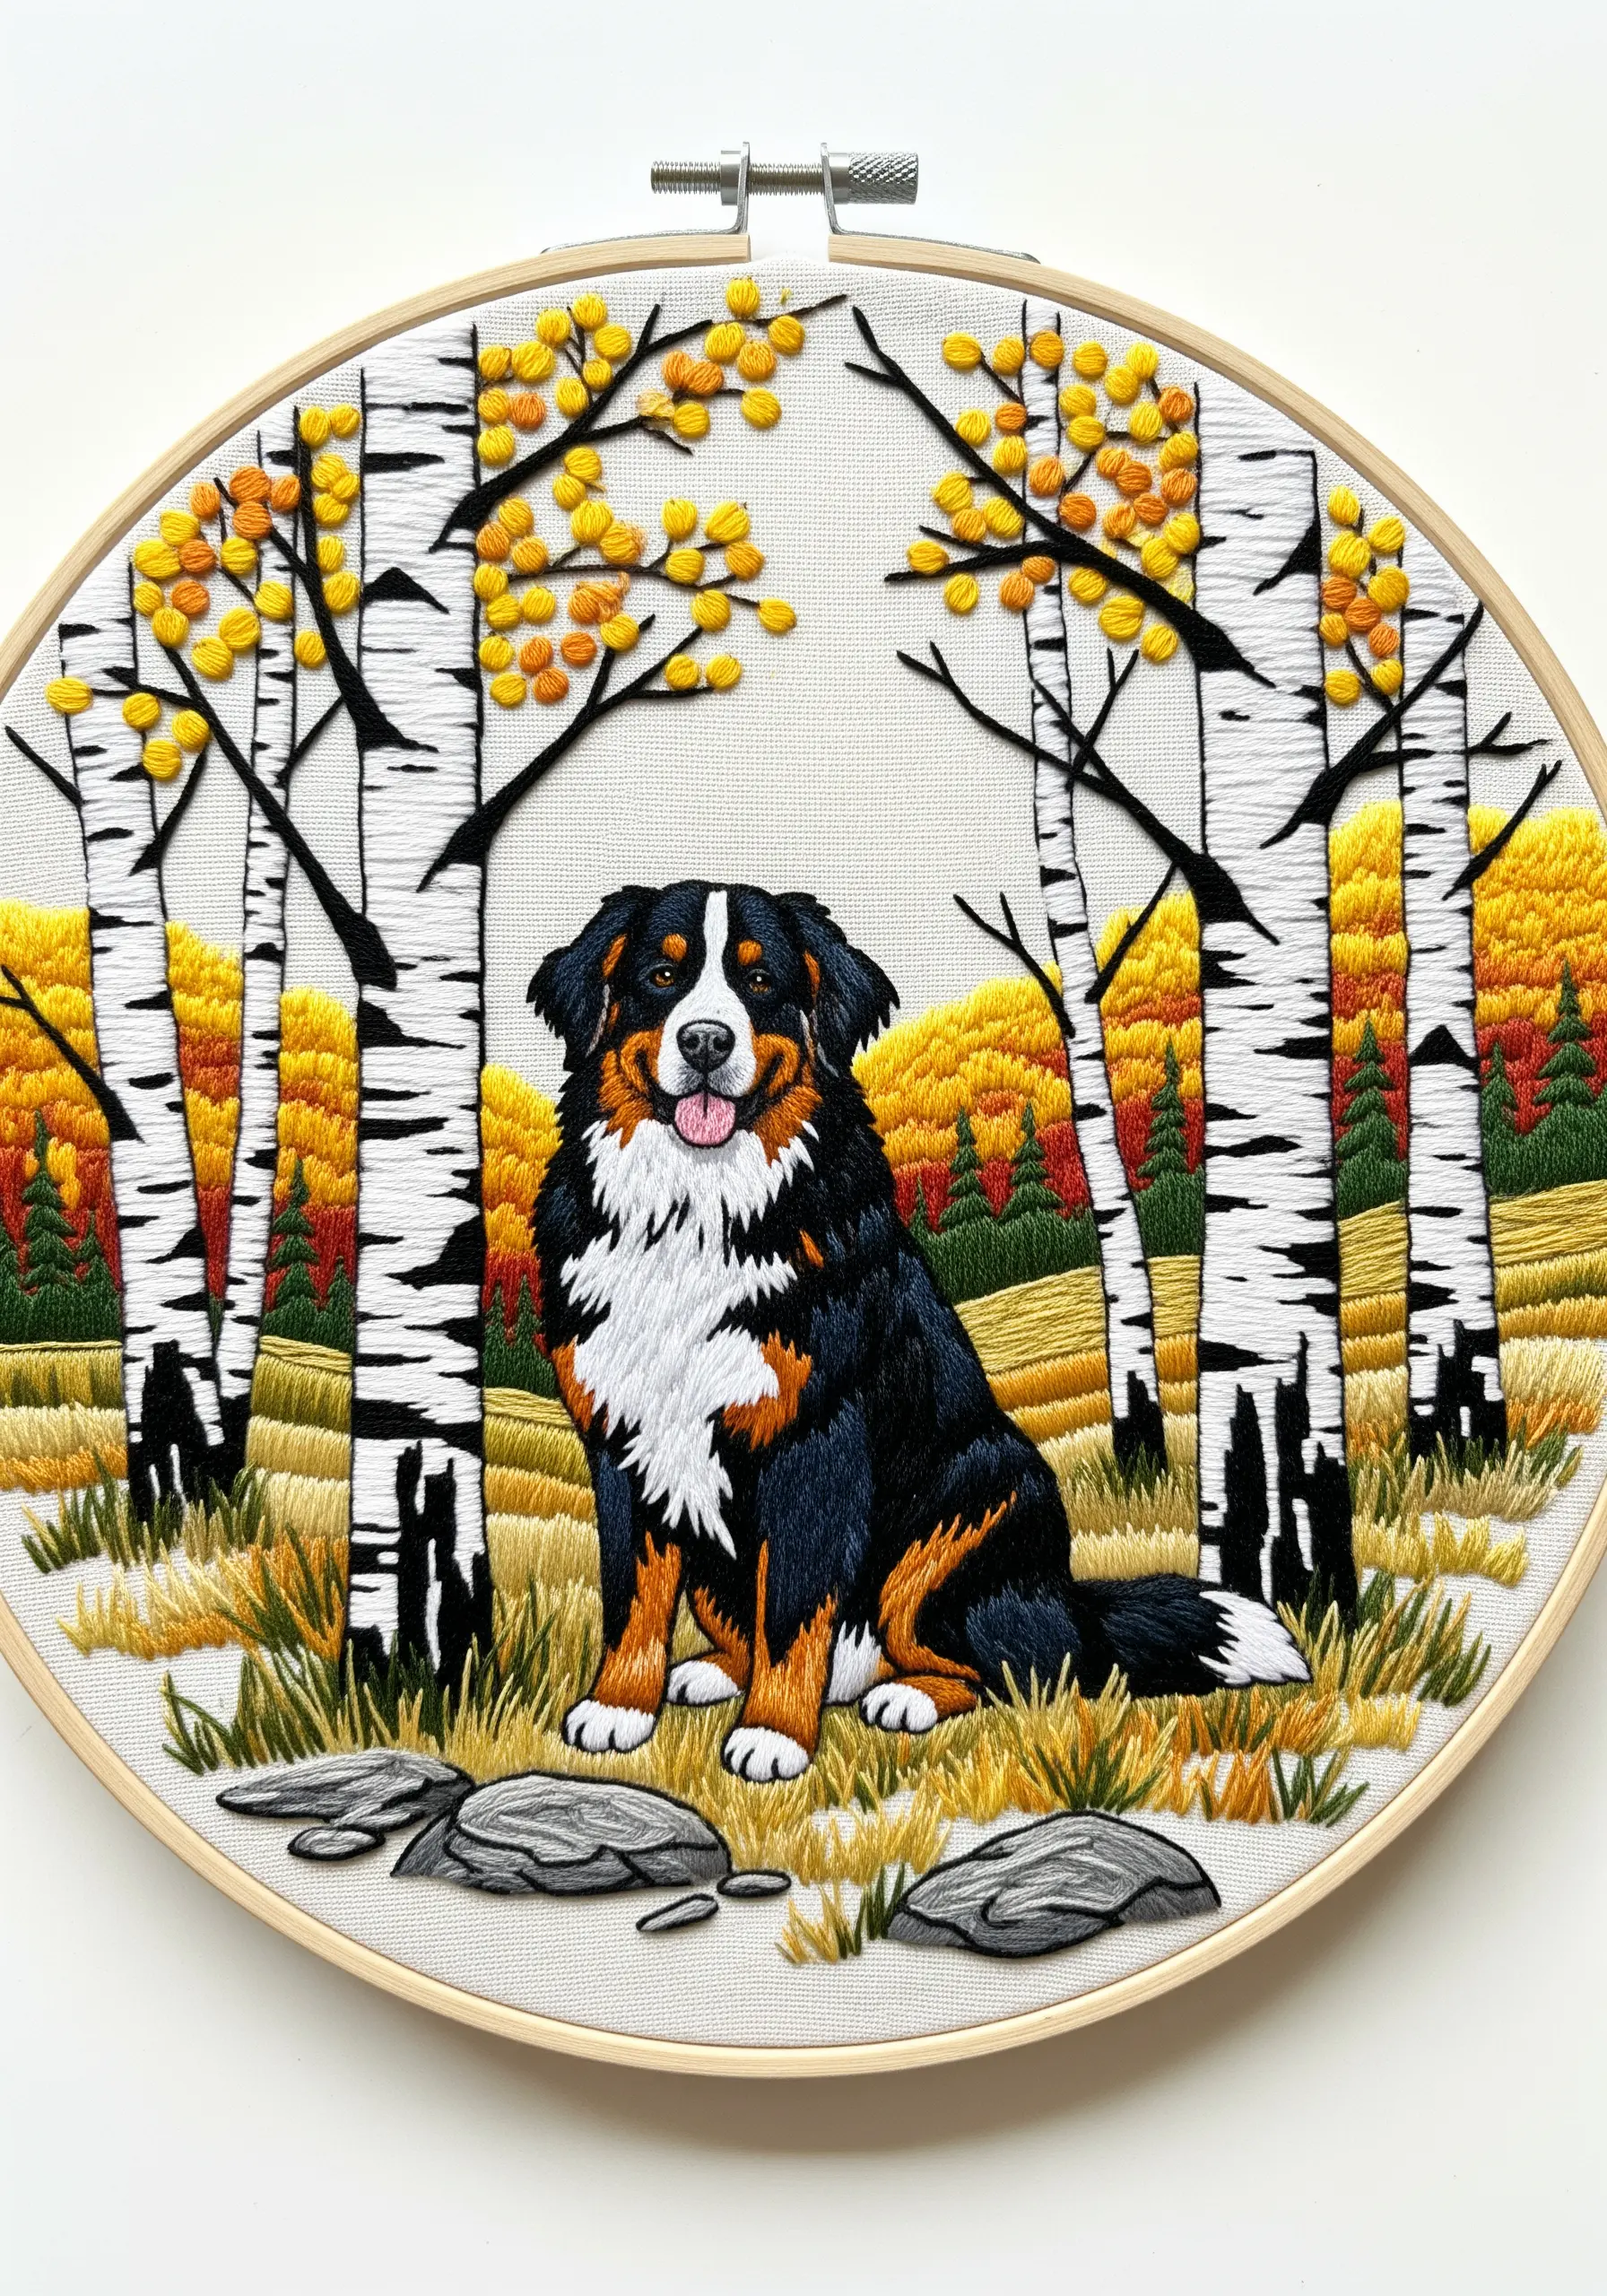
For a Bernese Mountain Dog, with its thick coat and distinct markings, you need to create texture within each block of color.
For the black sections, use long-and-short stitch with both black and dark grey threads to suggest density and shine.
In the white chest area, fill with a dense satin stitch, but add a few pale grey stitches near the edges to show how the black fur slightly overlaps it.
This layering of color and stitch type within defined areas makes the coat look impenetrably thick and luxurious.
25. Capture Iridescence with Careful Color Placement

The patterned feathers of a budgie offer a fantastic opportunity to play with color and create the illusion of iridescence.
Instead of one solid blue, use three or four shades—from turquoise to cobalt to navy—and place them in small, deliberate patches.
For the iconic black-and-white scalloped feathers on the head and wings, use small, U-shaped satin stitches, layering them precisely.
This meticulous color work is what creates the shimmering, multi-tonal effect that makes bird plumage so captivating.
26. Stitch a Luminous Aurora with Vertical Stitches
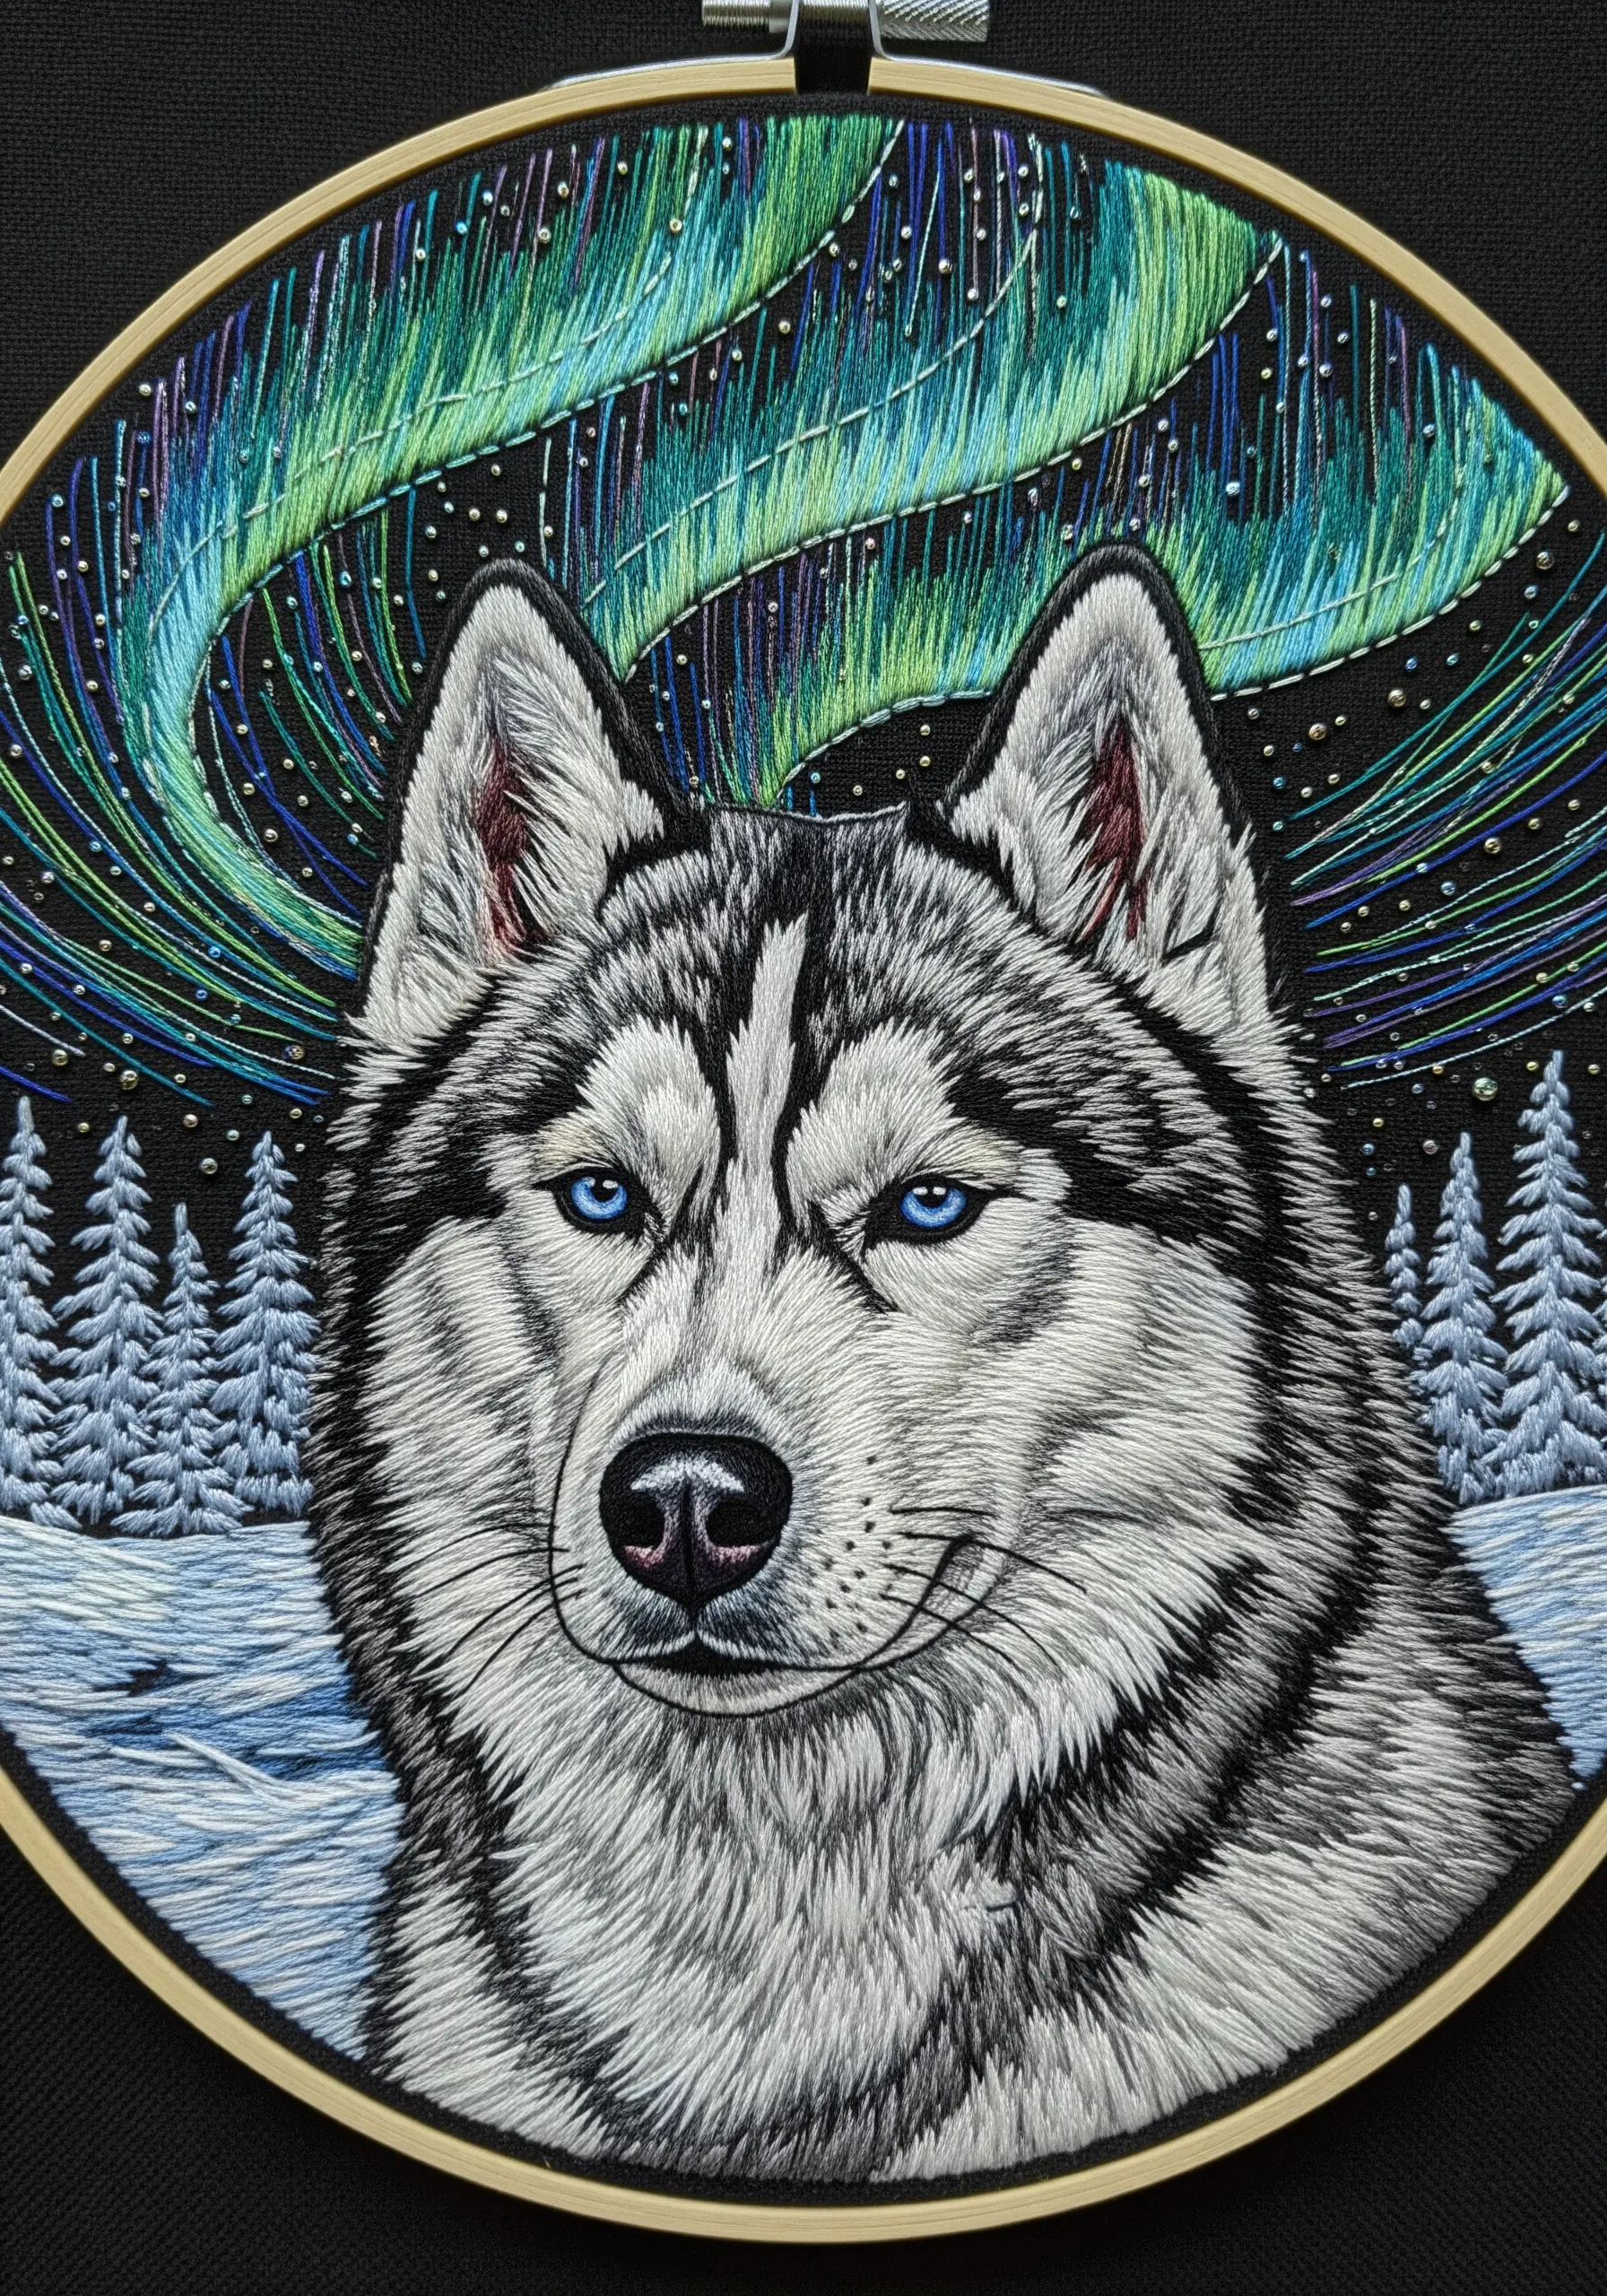
To create a dynamic, glowing aurora borealis effect in the background, think vertically.
Use long, straight stitches in various shades of green, blue, and yellow. Let the threads blend and overlap organically, varying the density to create brighter and darker areas.
Incorporate a single strand of metallic or iridescent thread throughout to catch the light and add a magical shimmer.
This technique provides a dramatic and atmospheric backdrop that makes the portrait of a husky feel right at home in its natural environment.
27. Turn Markings into a Canvas for Creativity
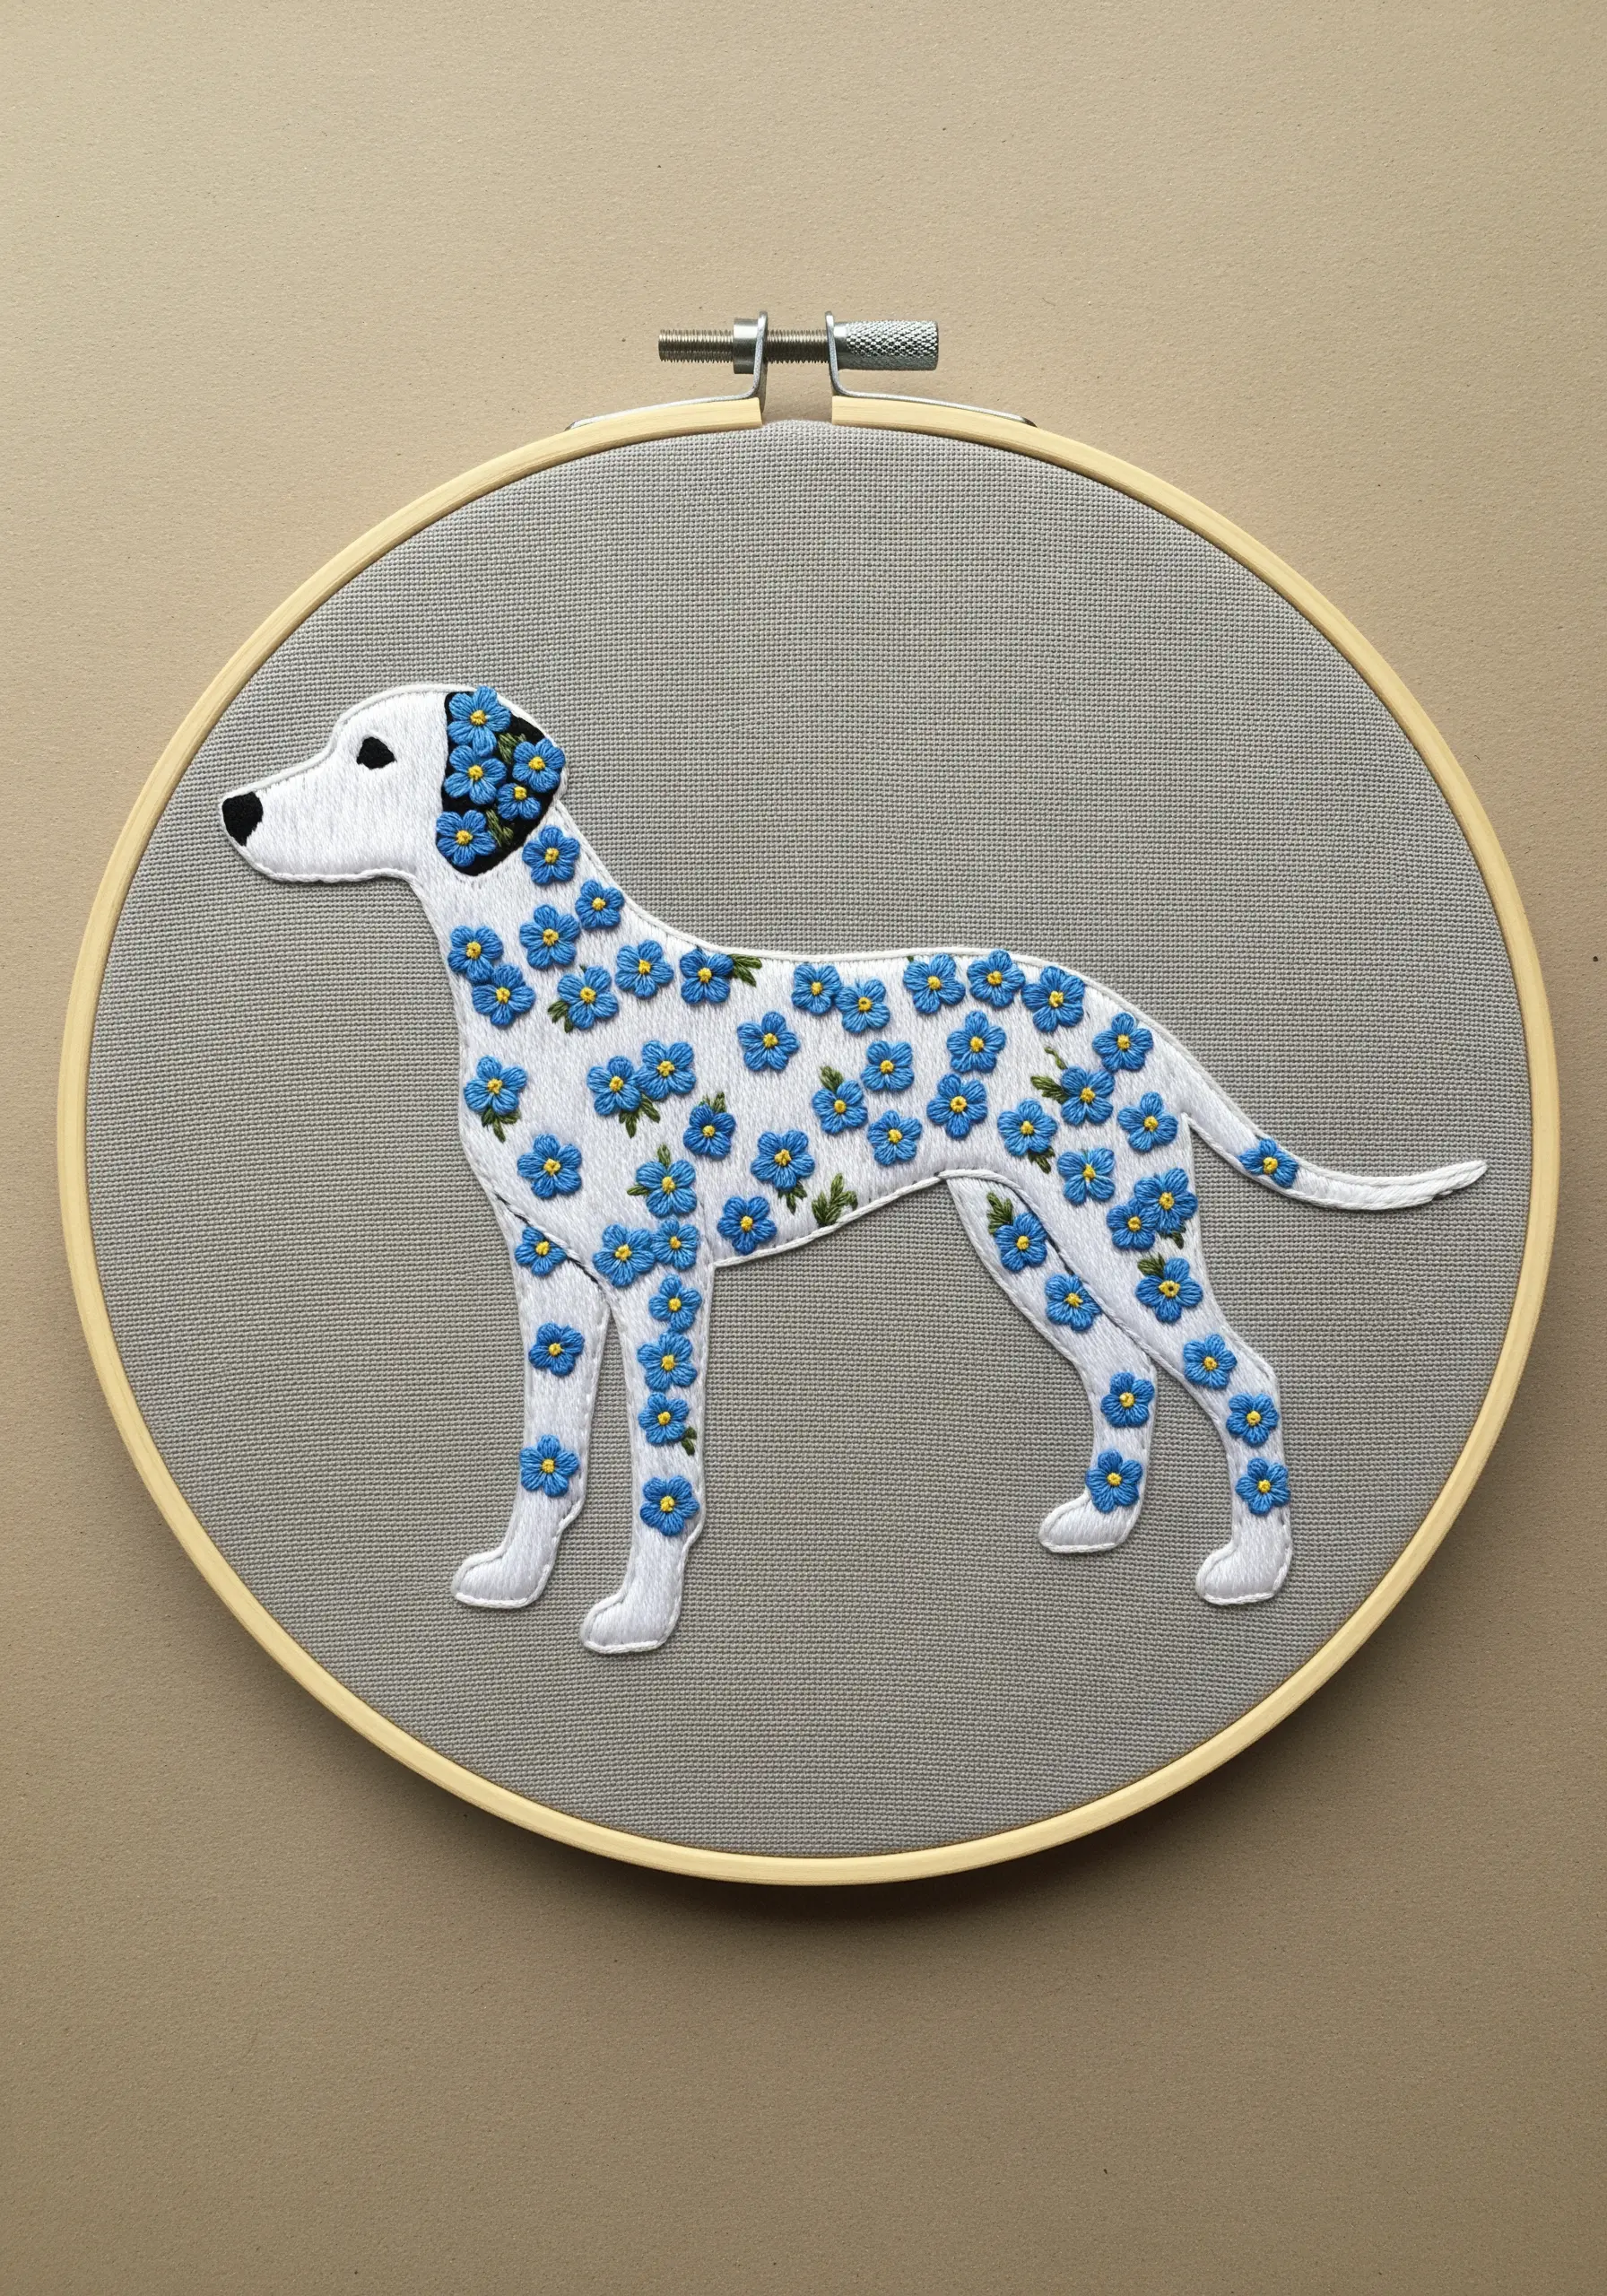
Reimagine a pet’s classic markings by transforming them into a miniature garden.
First, stitch the complete silhouette of the dog using an outline stitch and fill it with a flat white satin stitch.
Then, instead of stitching black spots, fill those areas with clusters of tiny French knots and lazy daisy stitches to create forget-me-not flowers.
Negative space embroidery techniques work well here, where the unstitched background becomes part of the design, making the floral spots the main focus.
28. Build a Fluffy Halo with Outward Stitches
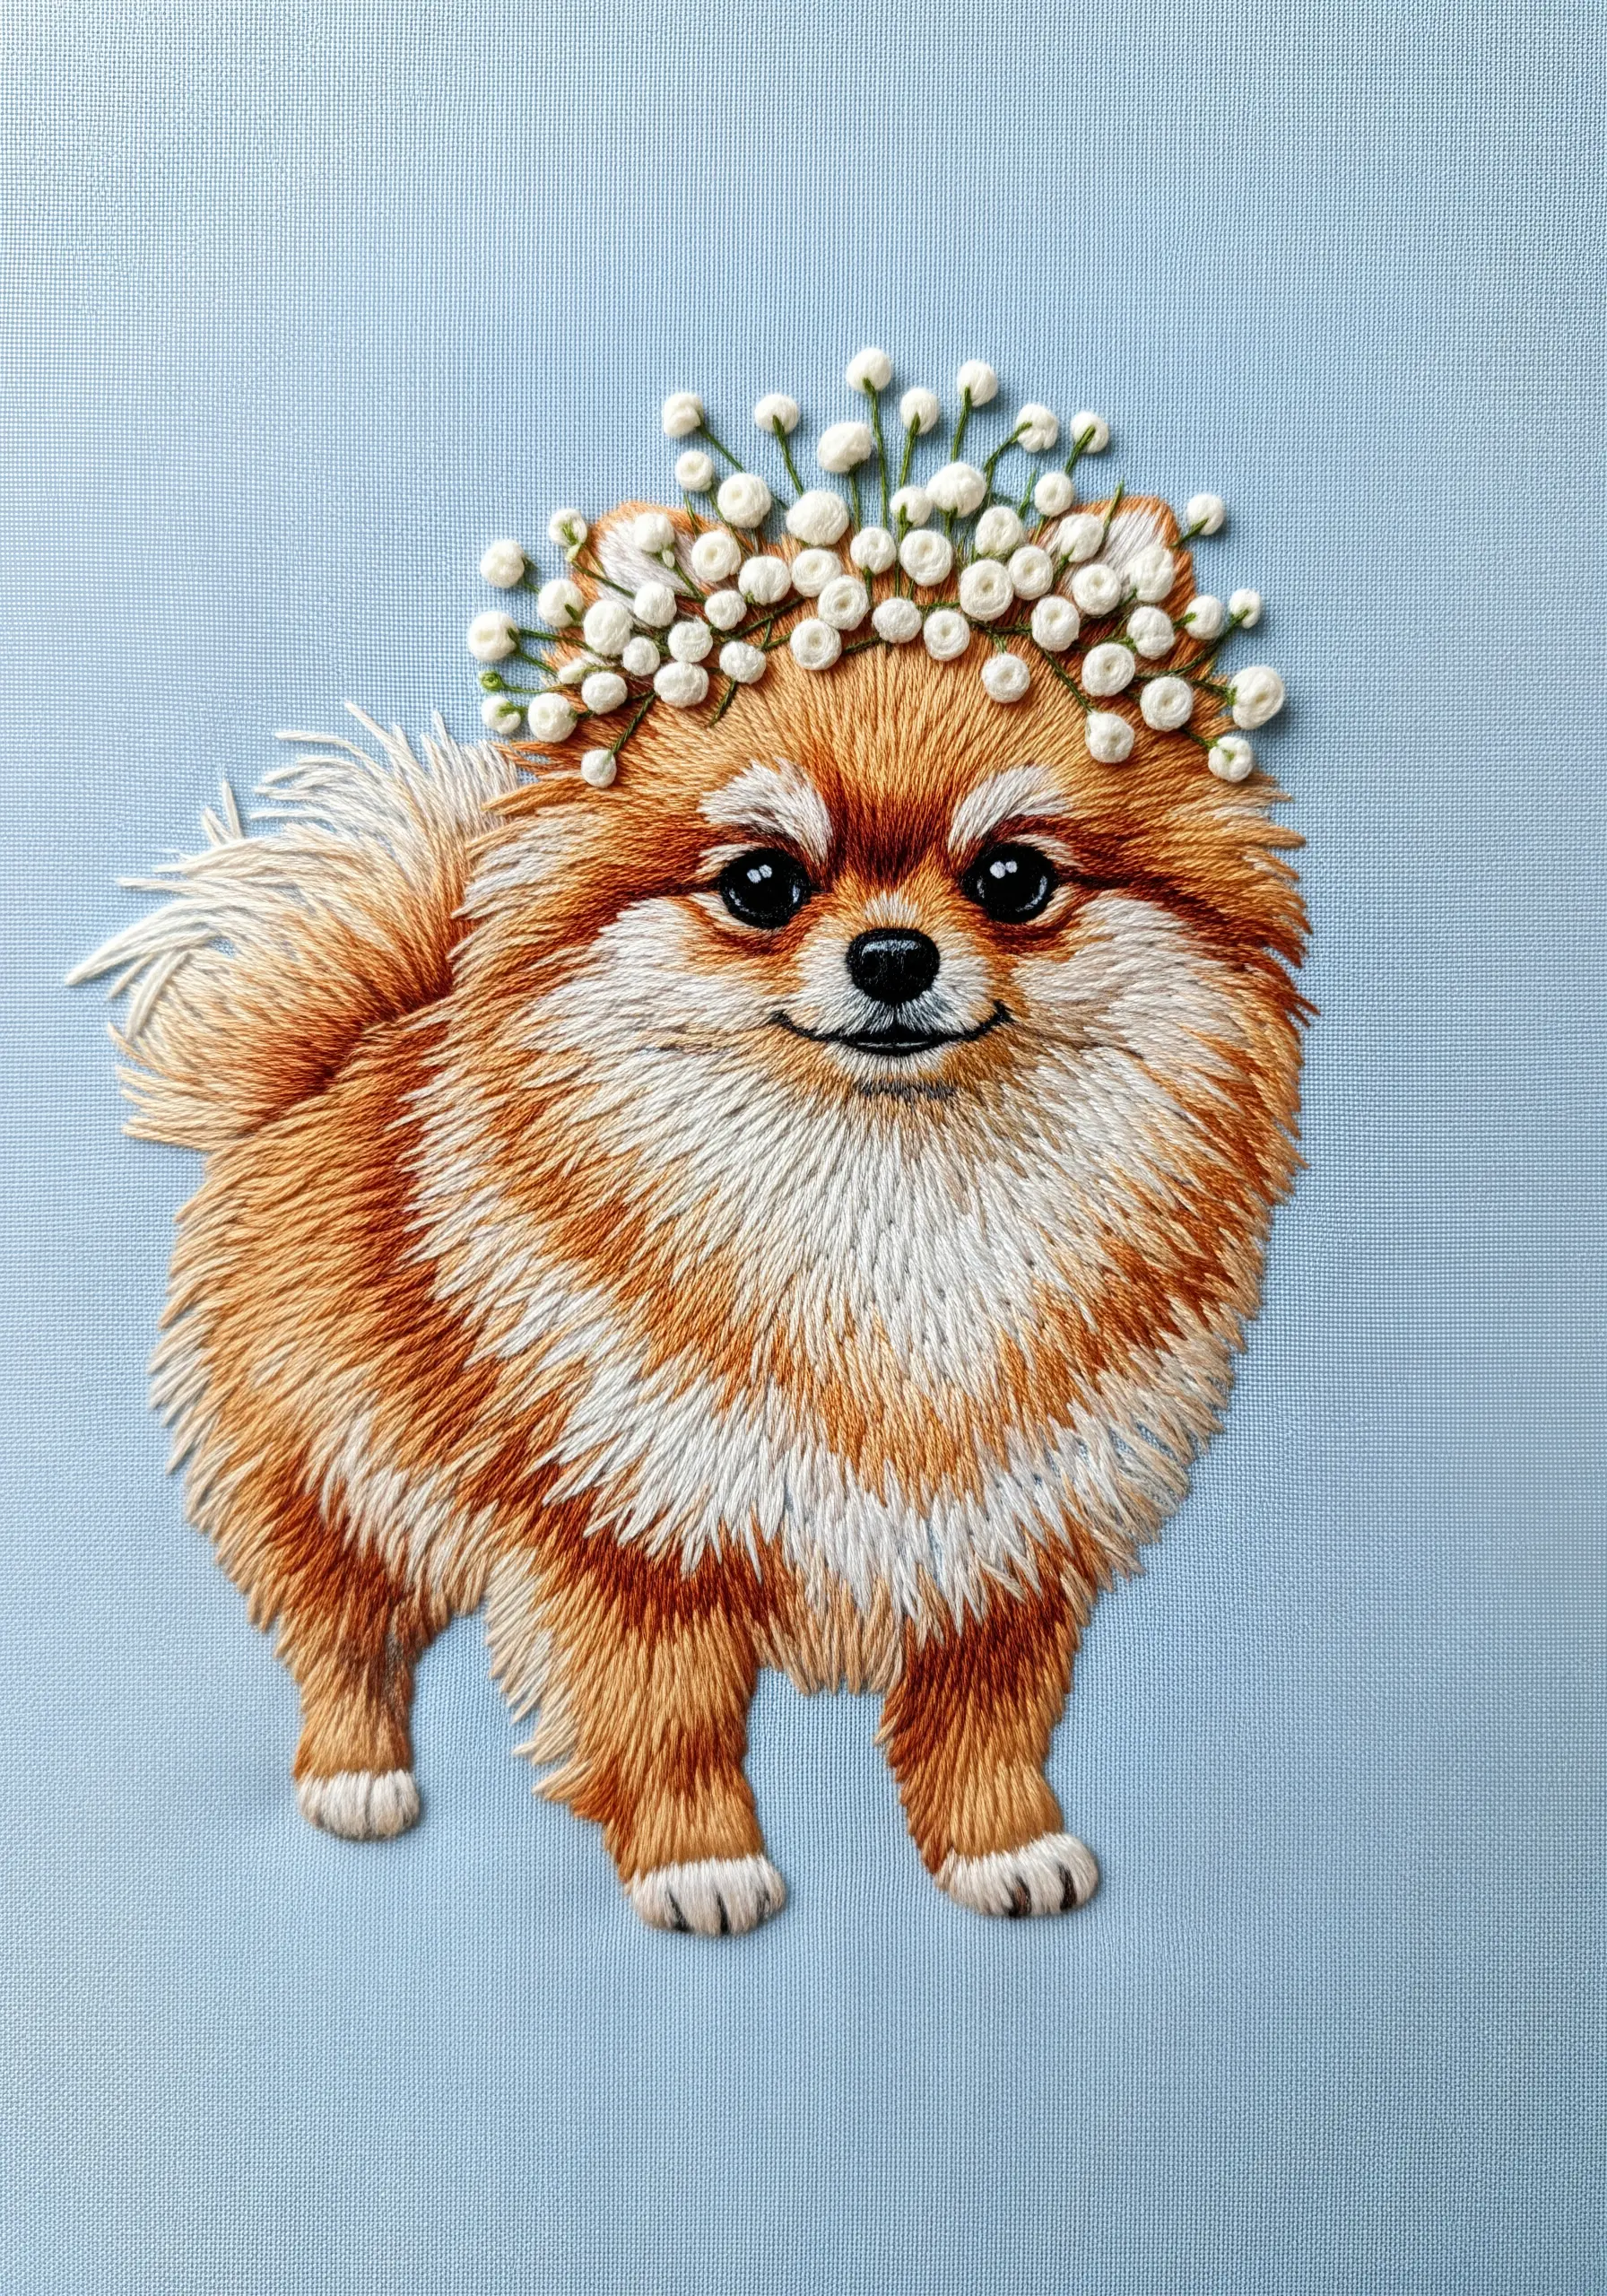
The key to a Pomeranian’s iconic look is the fluffy halo of fur that surrounds its face.
To achieve this, stitch the face first with short, dense stitches. Then, for the surrounding fur, work from the inside out, using long straight stitches that radiate away from the body.
Allow the ends of these stitches to be a little loose and uneven to enhance the fluffy, airy effect.
Layering multiple shades of orange, cream, and brown in this radiating pattern is what builds the signature puffball volume.
29. Create Shimmering Scales with Overlapping Stitches

To embroider the intricate pattern of goldfish scales, you need to create a texture that reflects light.
Use a fishbone stitch or overlapping satin stitches, worked in rows. Use a metallic or silky thread in shades of orange and gold to maximize the sheen.
For the translucent fins, switch to long, flowing straight stitches using a single strand of thread in multiple colors, like teal and white, letting them blend together softly.
Adding tiny, clear seed beads for bubbles introduces another texture and completes the underwater illusion.
30. Capture Ticking with Tiny Seed Stitches

For spotted or ticked coats like a German Shorthaired Pointer, the distribution of markings is key.
Fill the main body with a base of off-white thread using a short, smooth split stitch.
Then, go back over the white areas and add the ‘ticking’ using single, tiny seed stitches in dark brown. Scatter them randomly but densely, just as they appear in the real coat.
This two-step process gives you control over the pattern and creates a much more realistic texture than trying to stitch the spots as you go.
31. Define a Curled Tail with Spiral Stitching

A Shiba Inu’s curled tail is one of its most defining features, and it requires a specific stitch direction to look right.
When stitching the tail, work your stitches in a spiral pattern, starting from the base and curling around to the tip.
Use a darker shade on the underside of the curl and a lighter shade on the top to create a three-dimensional effect.
This simple change in stitch direction is a small detail that makes a huge difference in capturing the breed’s unique silhouette.
32. Create 3D Florals with Fabric Appliqué
For florals that truly stand off the canvas, turn to stumpwork or 3D appliqué techniques.
Embroider the white anemone petals separately on a spare piece of fabric that has been stabilized. Outline them with wire for structure, then fill with satin stitch.
Carefully cut out each completed petal and then stitch them onto your main portrait, arranging them in layers to form the full flower.
This advanced technique creates stunning, lifelike botanicals that provide a dramatic contrast to the flat embroidery of the pet.
33. Replicate Silky, Wavy Fur with Curved Stitches
The long, flowing ear fur of a Cavalier King Charles Spaniel requires a stitch that can mimic its silky, wavy texture.
Use long-and-short stitch, but instead of laying the stitches down straight, give each one a slight curve or ‘S’ shape.
Follow the natural wave of the fur, blending shades of chestnut, amber, and cream to capture the highlights and lowlights within each lock of hair.
It’s one of the best ways to stitch natural textures like a pro, turning simple thread into a cascade of silky, touchable waves.
34. Convey Elegance with Stylized Line Art

You can capture the essence and grace of a breed like a greyhound without stitching a single patch of fur.
Focus entirely on the animal’s elegant contours, using a single continuous line where possible with a whipped backstitch for a smooth, raised effect.
Add interior lines that suggest muscle and form rather than filling the shape completely. This minimalist approach is modern, sophisticated, and emphasizes the animal’s sleek silhouette.
The contrast between the clean line art and the textured French knots of the floral wreath creates a beautiful compositional balance.


