

You have the threads, the fabric, and the desire to create something beautiful for your home. But perhaps you feel that your stitches, however neat, aren’t quite capturing the organic, soulful feeling you’re aiming for. You want your work to feel less like a pattern followed and more like a piece of personal art.
The transformation you’re seeking doesn’t require complex new tools. It lies in the subtle choices you make before the first stitch—in choosing to use one less strand of thread for distant hills, in turning a simple straight stitch into a textured bark, or in letting negative space speak as loudly as your embroidered motifs.
These patterns and techniques are your invitation to stitch with greater intention. They are designed to help you see the relationship between texture, color, and form, empowering you to turn a simple neutral space into a haven of quiet, nature-inspired beauty, one thoughtful stitch at a time.
1. Master Atmospheric Depth in Hoop Art
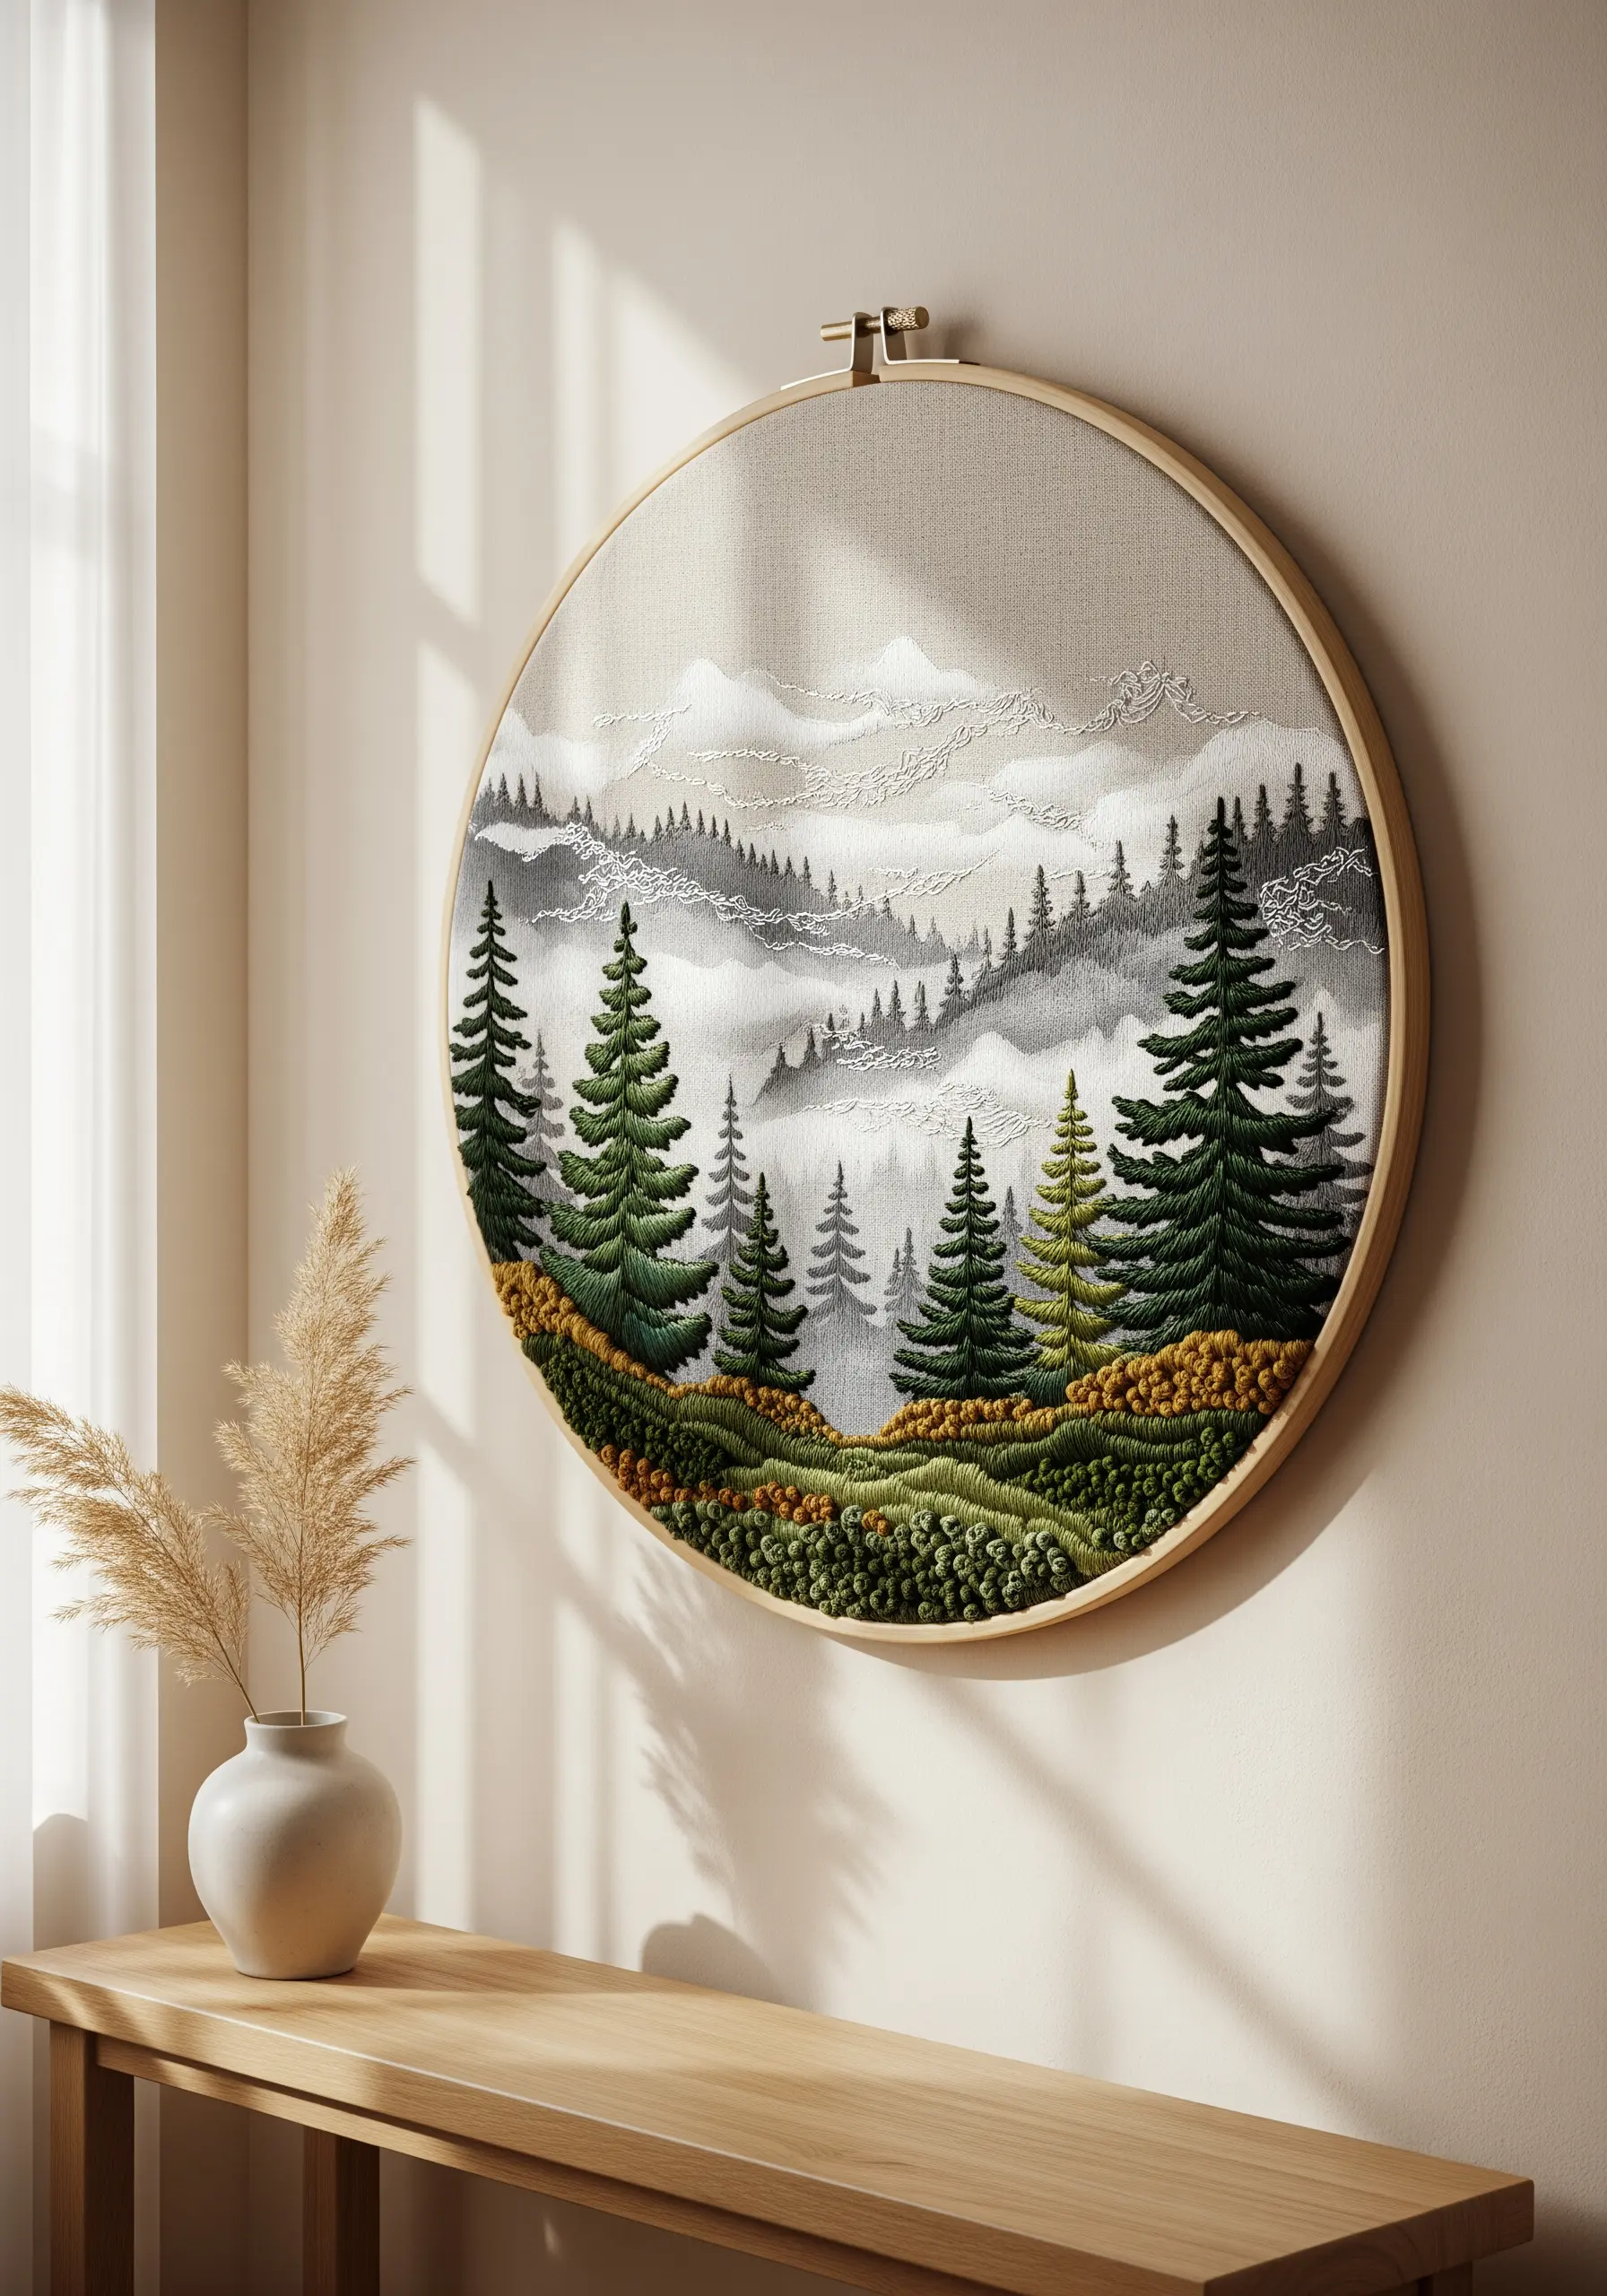
Create the illusion of a distant landscape by adjusting your thread weight and color temperature.
For the farthest mountains and mist, use a single strand of floss in cool grays and pale blues to make them recede visually.
As you move to the foreground, switch to two or three strands for the trees, using warmer, more saturated greens and ochres.
Finish the closest elements with dense French knots and bullion knots to add tactile texture that pulls them forward, enhancing the three-dimensional effect in oversized hoop wall displays.
2. Stitch a Wildflower Meadow with Dynamic Stems
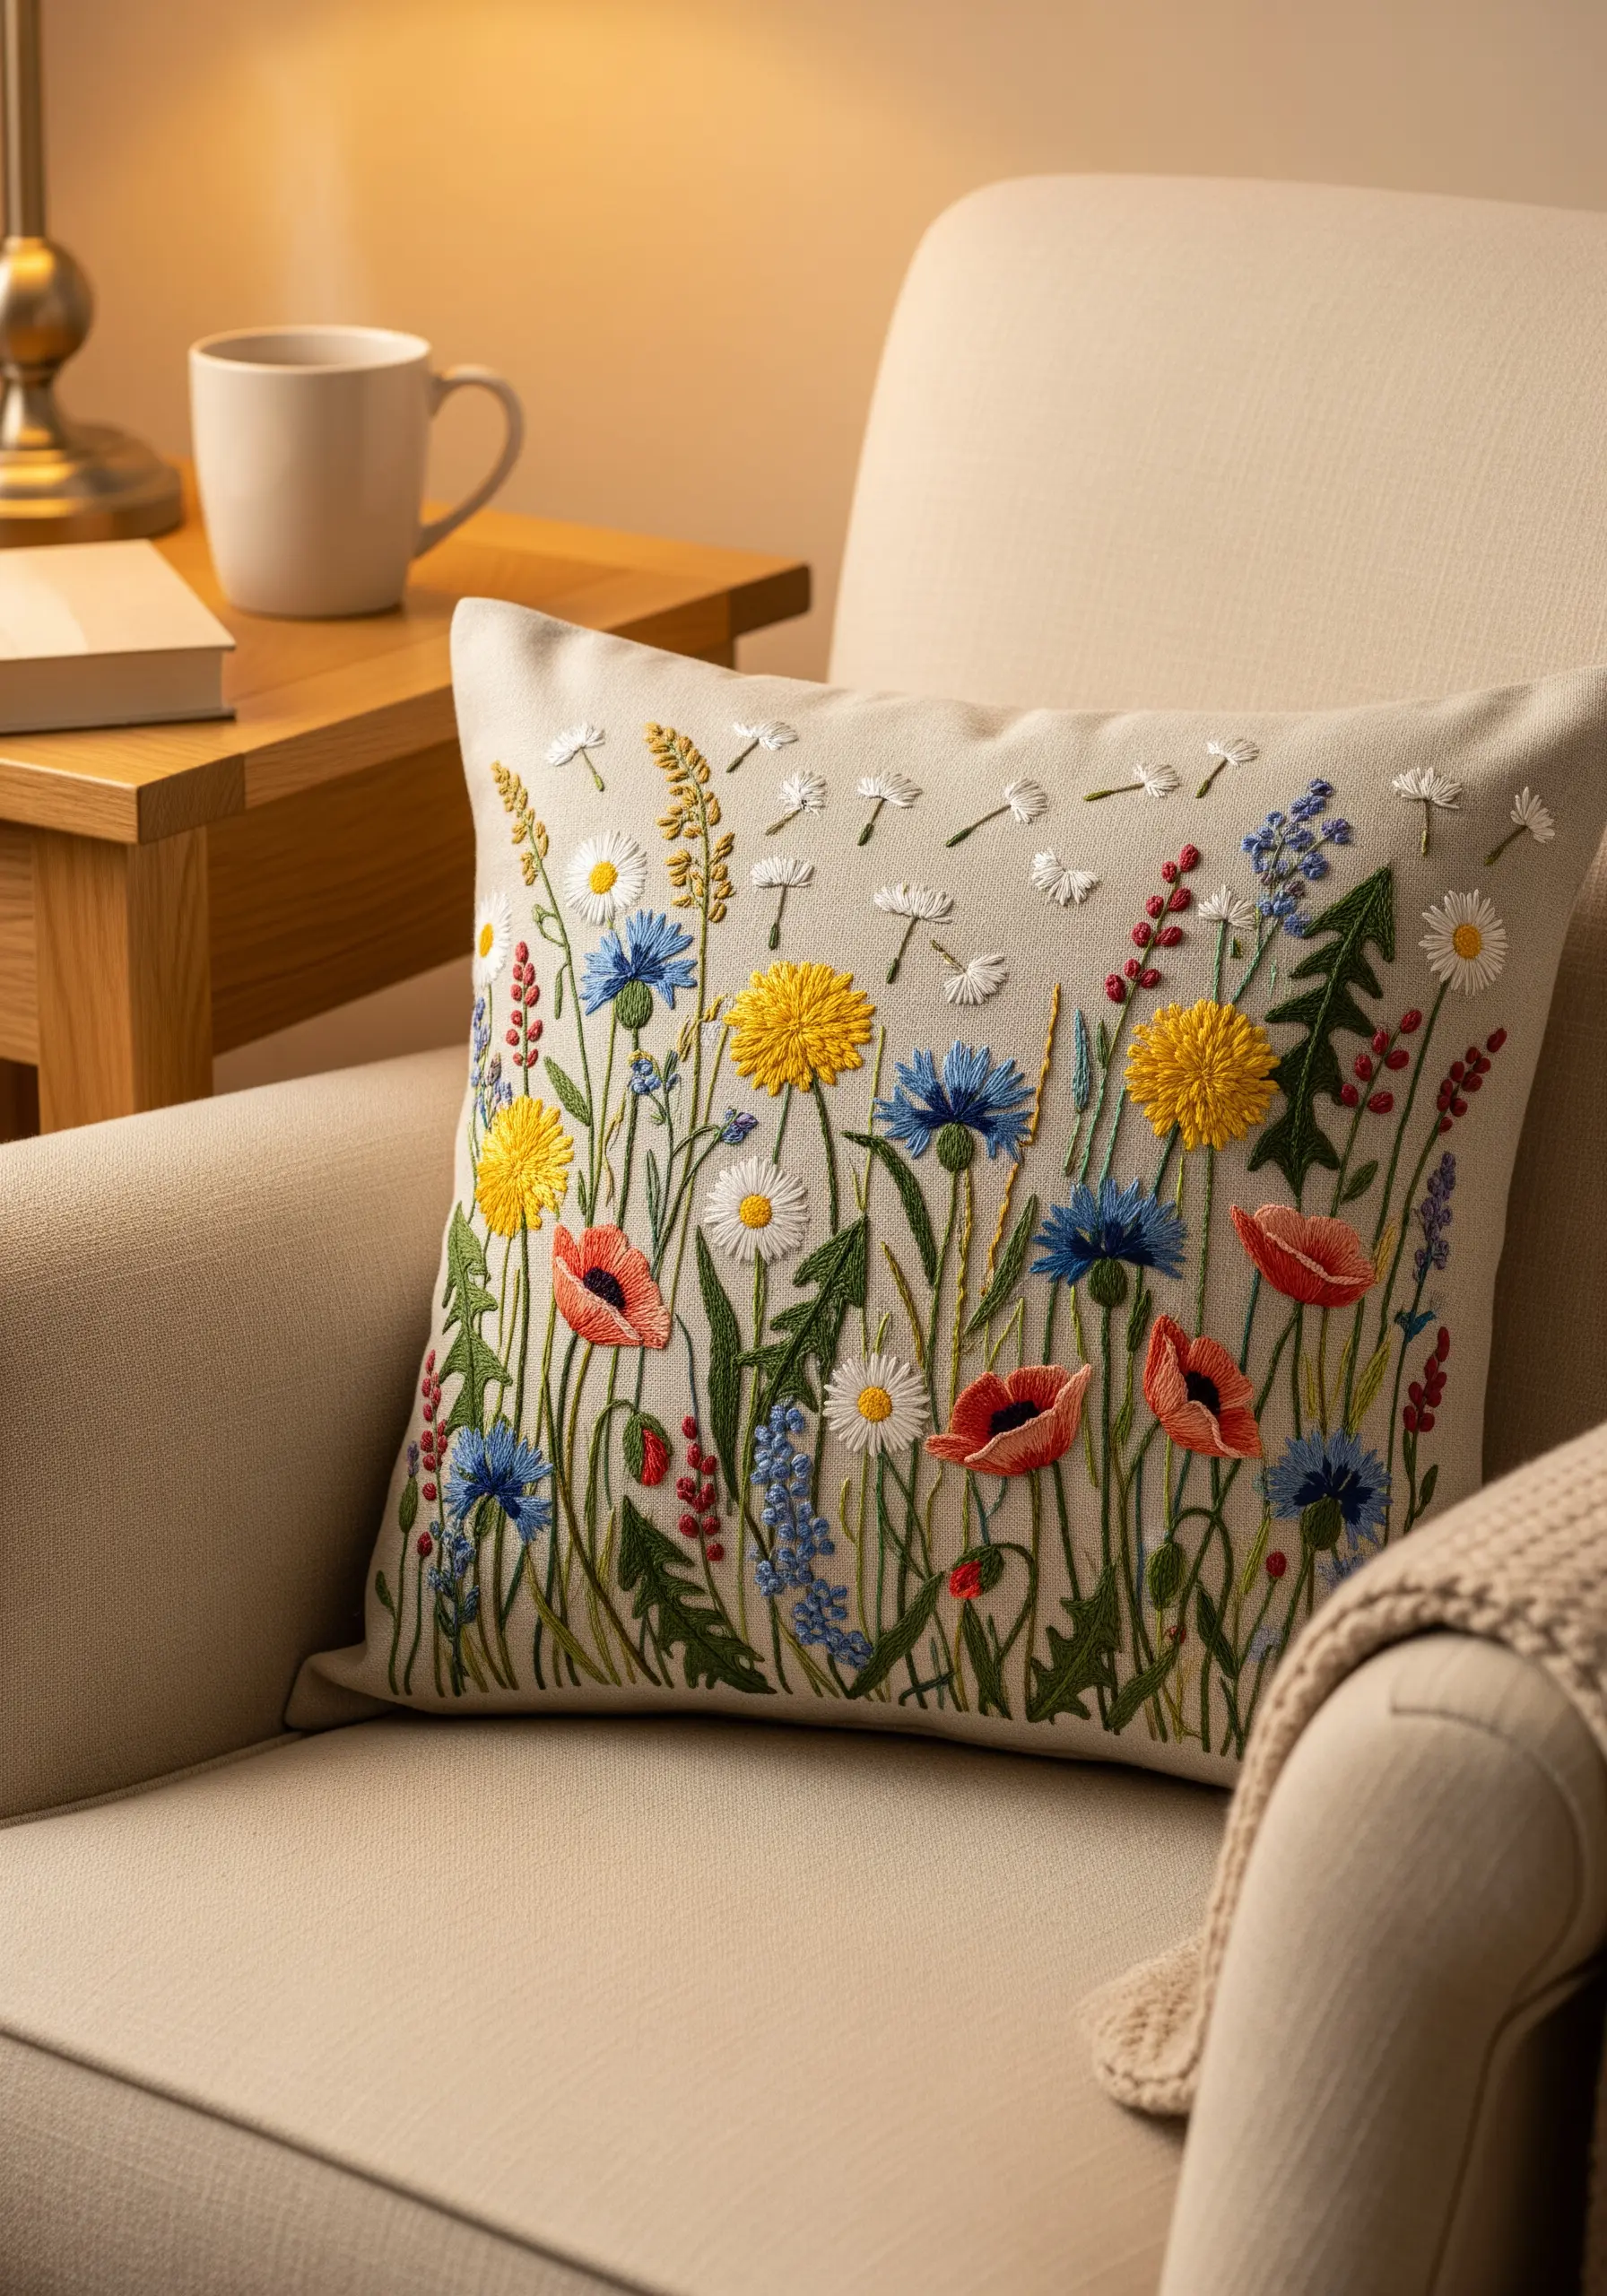
Transform a simple floral pattern into a lively meadow by varying the direction and height of your stems.
Instead of stitching every stem perfectly straight, use a slightly curved stem stitch and angle them differently to mimic natural, organic growth.
Intersperse delicate, detached chain stitches for dandelion seeds caught in a breeze, adding a sense of movement to your embroidery pillow ideas.
This simple adjustment breaks up uniformity and makes the entire composition feel more authentic and less static.
3. Create Bold Texture with Yarn Couching
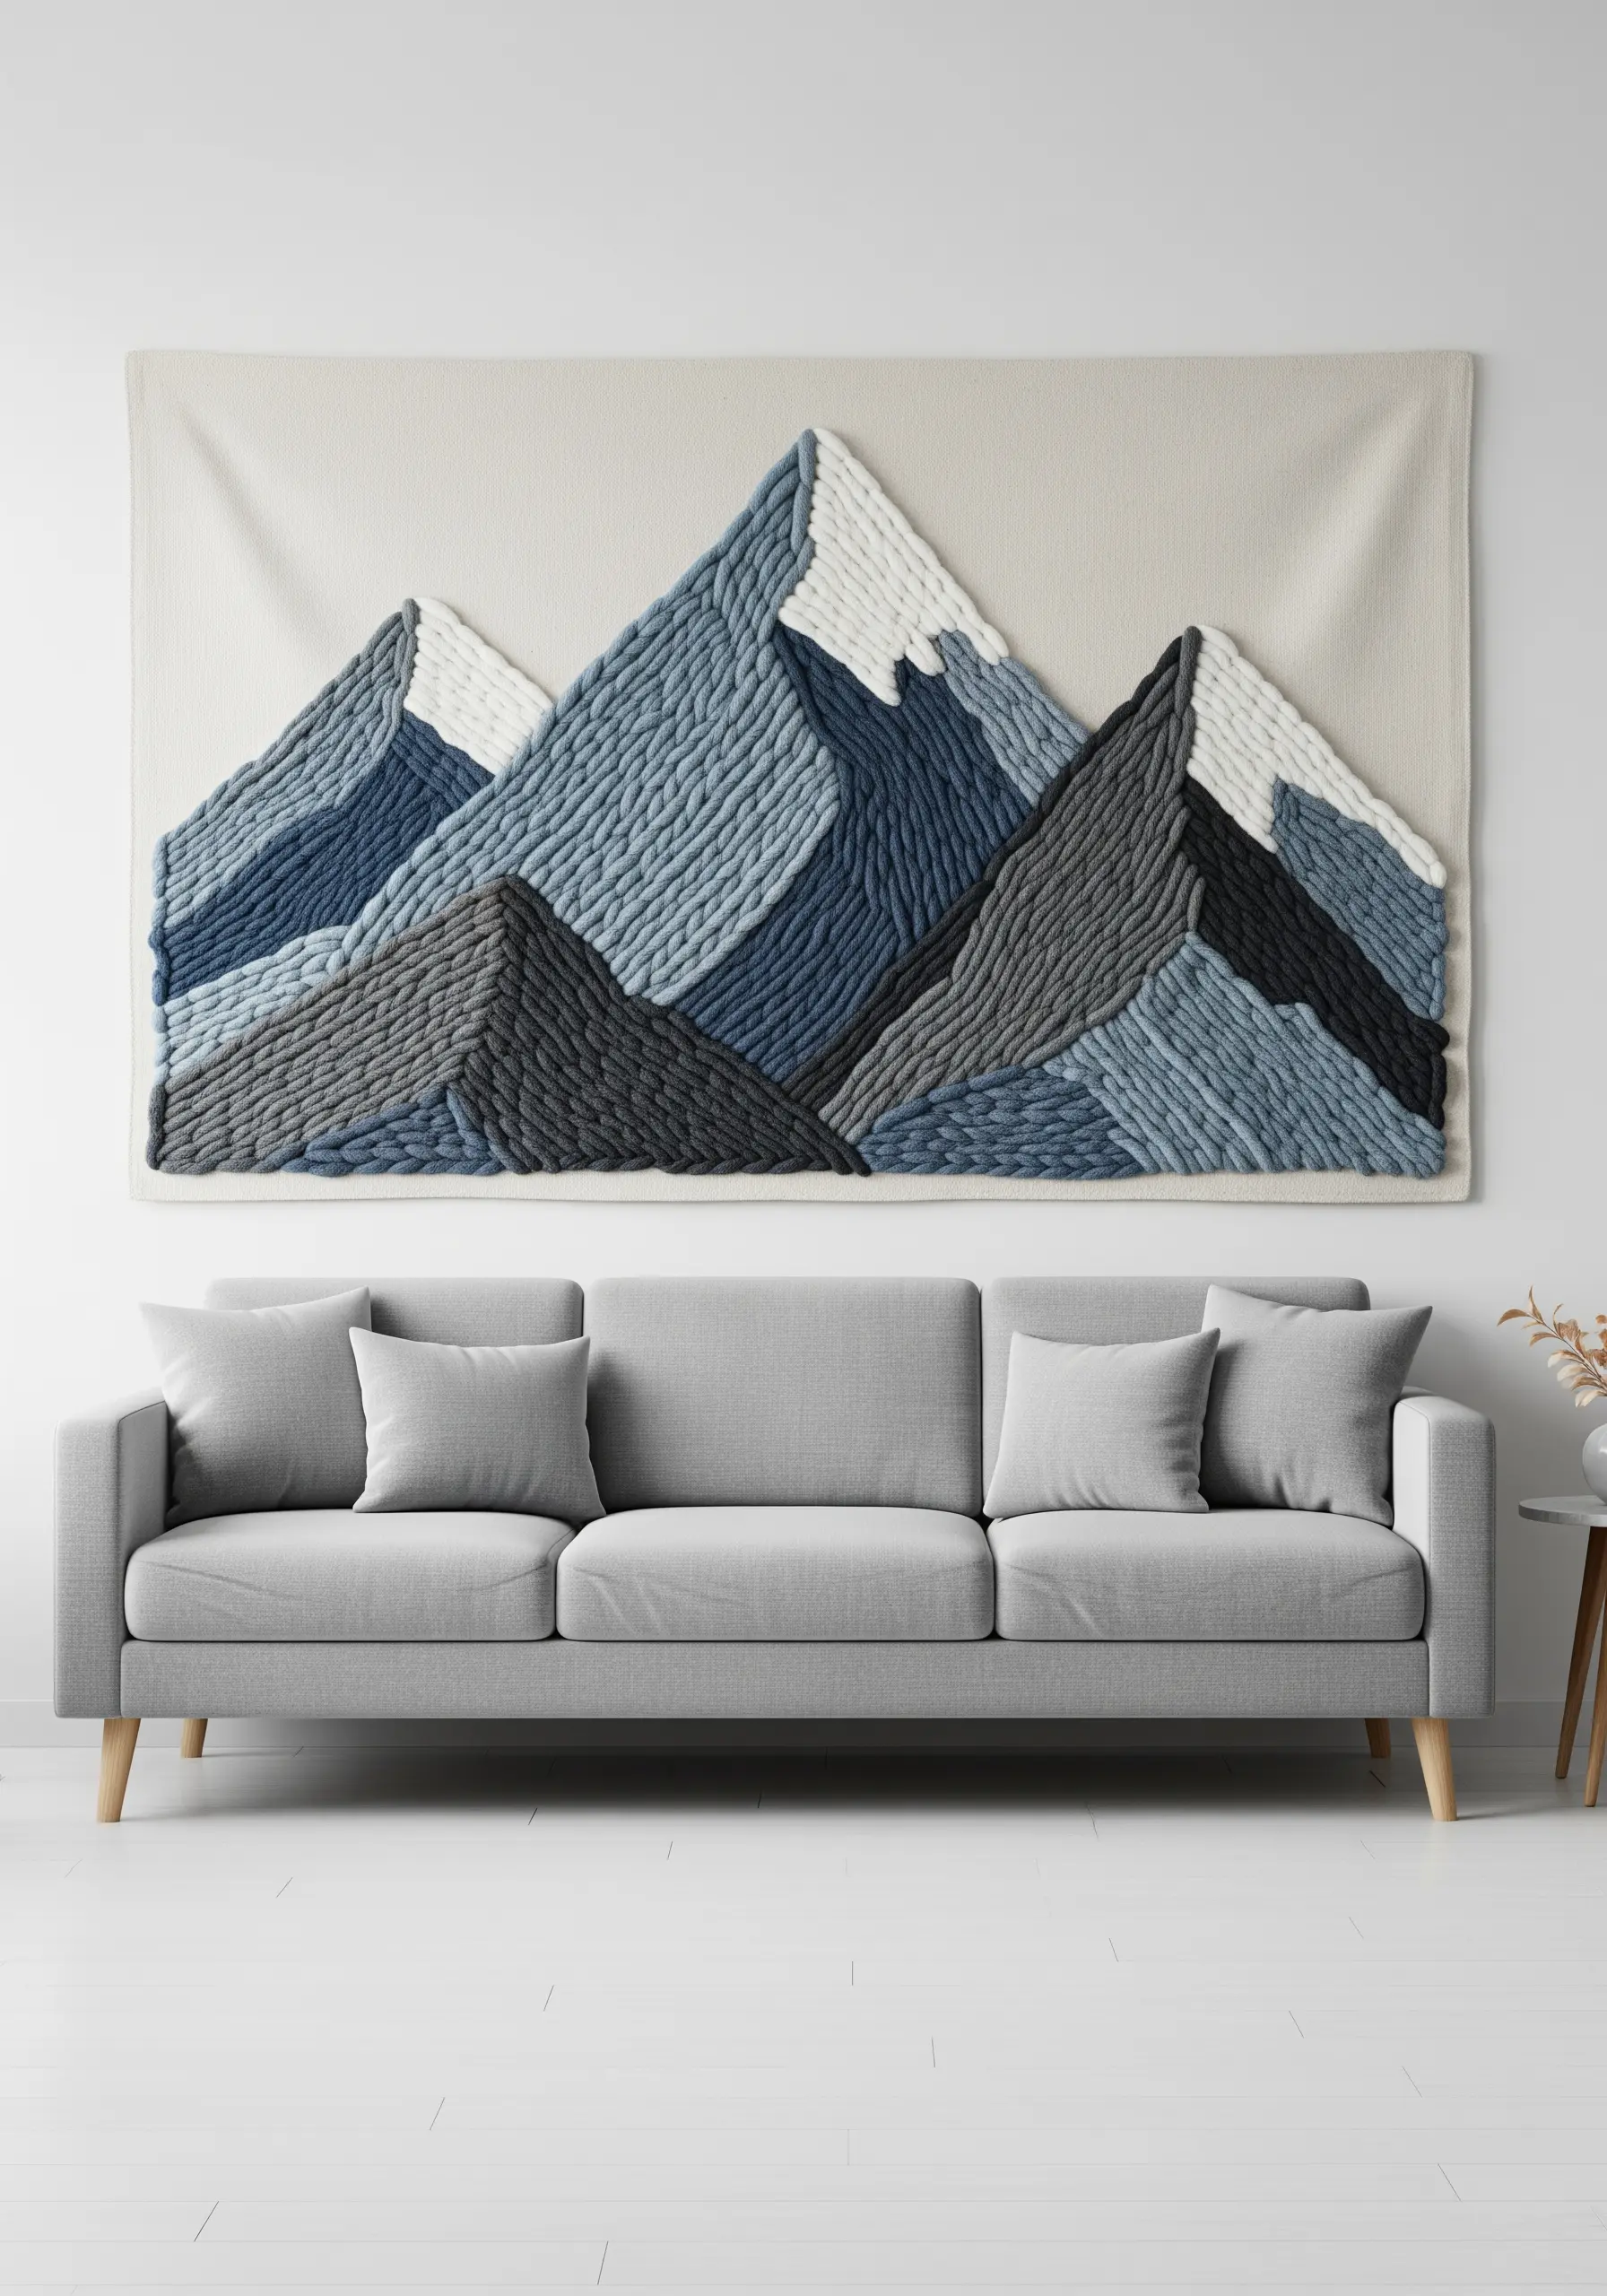
For large-scale pieces like wall hangings, achieve bold texture without endless stitching by using yarn.
Lay down thick wool or cotton yarn to form the main shapes of your mountains, then use a single strand of matching embroidery floss to tack it down with small, evenly spaced couching stitches.
This technique allows you to cover large areas quickly, building dramatic, tactile surfaces that define these powerful fiber art installations.
Change the direction of the yarn to represent different rock faces, creating geometric interest and depth.
4. Explore Botanical Silhouettes with Stitch Variation
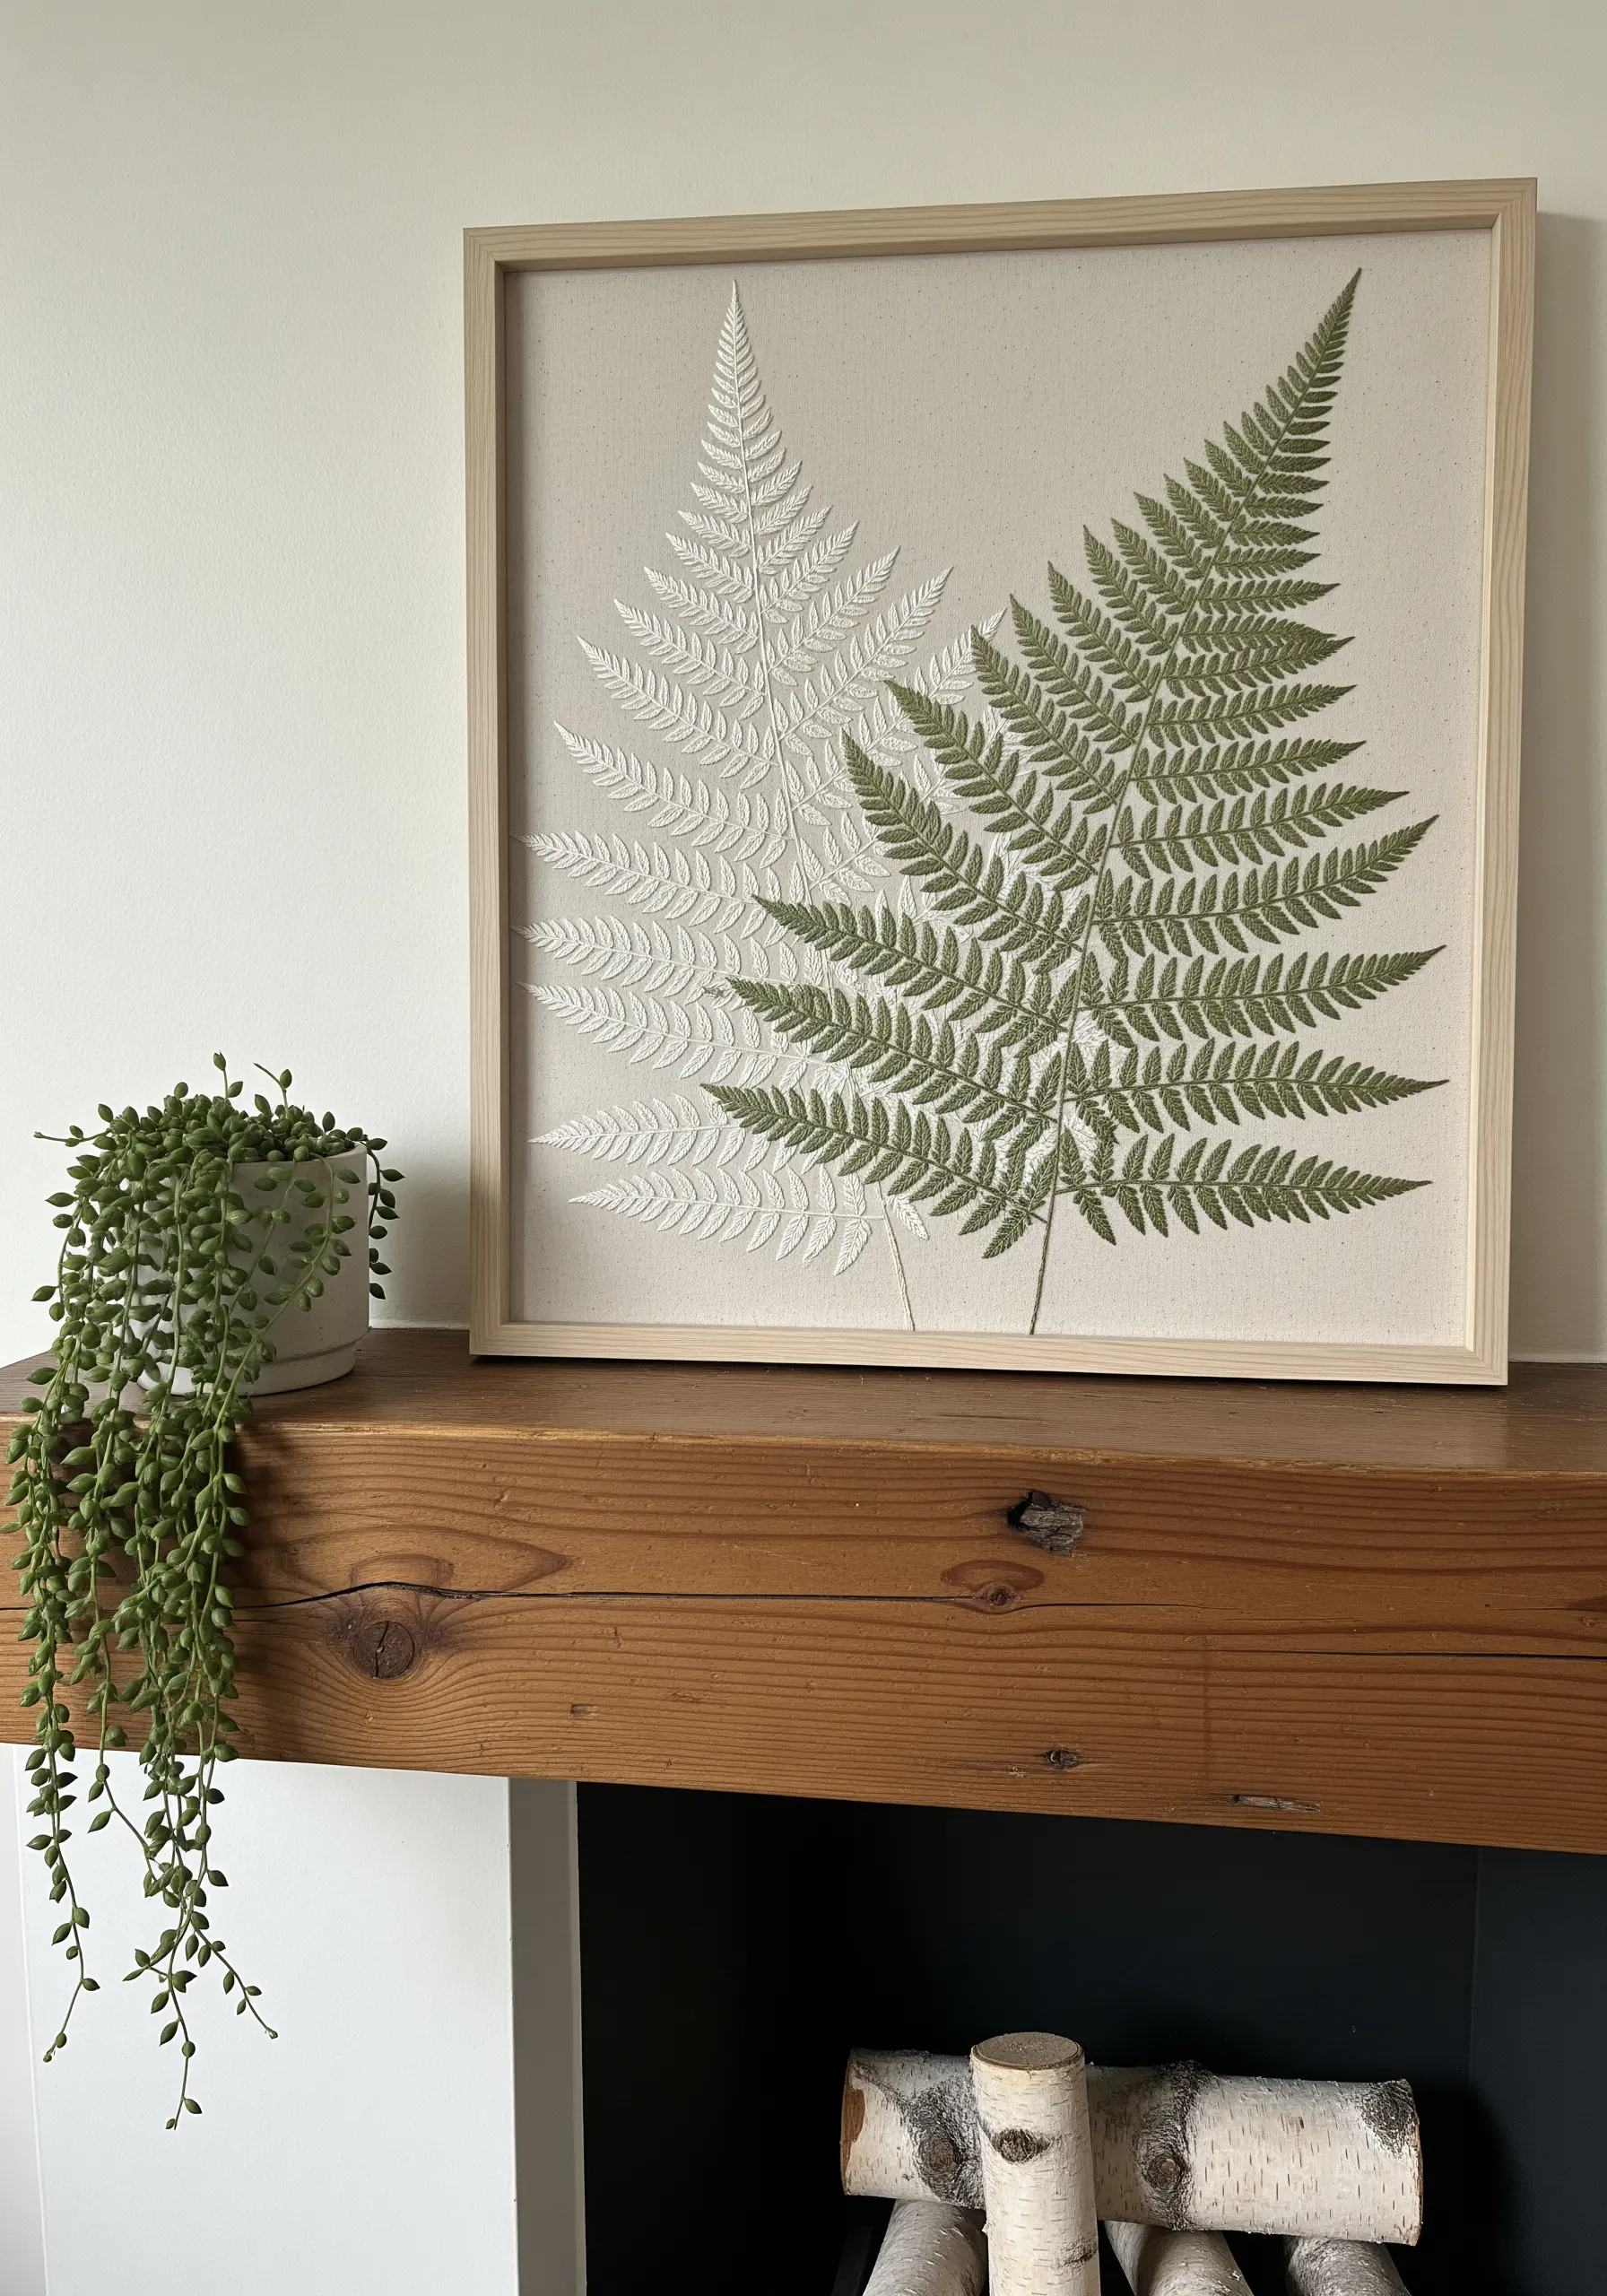
Instead of outlining and filling, use a single directional stitch to create the entire form of a leaf.
The fishbone stitch is perfect for this, as it creates a central vein and angled sides in one fluid motion.
For a delicate, ghost-like effect, use a white thread on a neutral fabric; for a bolder look, use a deep green.
This focus on a single, perfectly executed stitch elevates simple hand embroidery leaf patterns into refined botanical art.
5. Use Spiraled Stitches for Organic Fills

When filling circular or oval shapes, avoid the rigidity of satin stitch by working in a spiral.
Start at the center and use a continuous line of backstitch or stem stitch, spiraling outwards until the shape is filled.
This method creates a beautiful, subtle texture reminiscent of tree rings or water ripples, adding organic interest to minimalist designs.
Using variegated thread enhances the effect, creating effortless color shifts within your greige ivory embroidery art ideas.
6. Combine Appliqué with Dimensional Embroidery
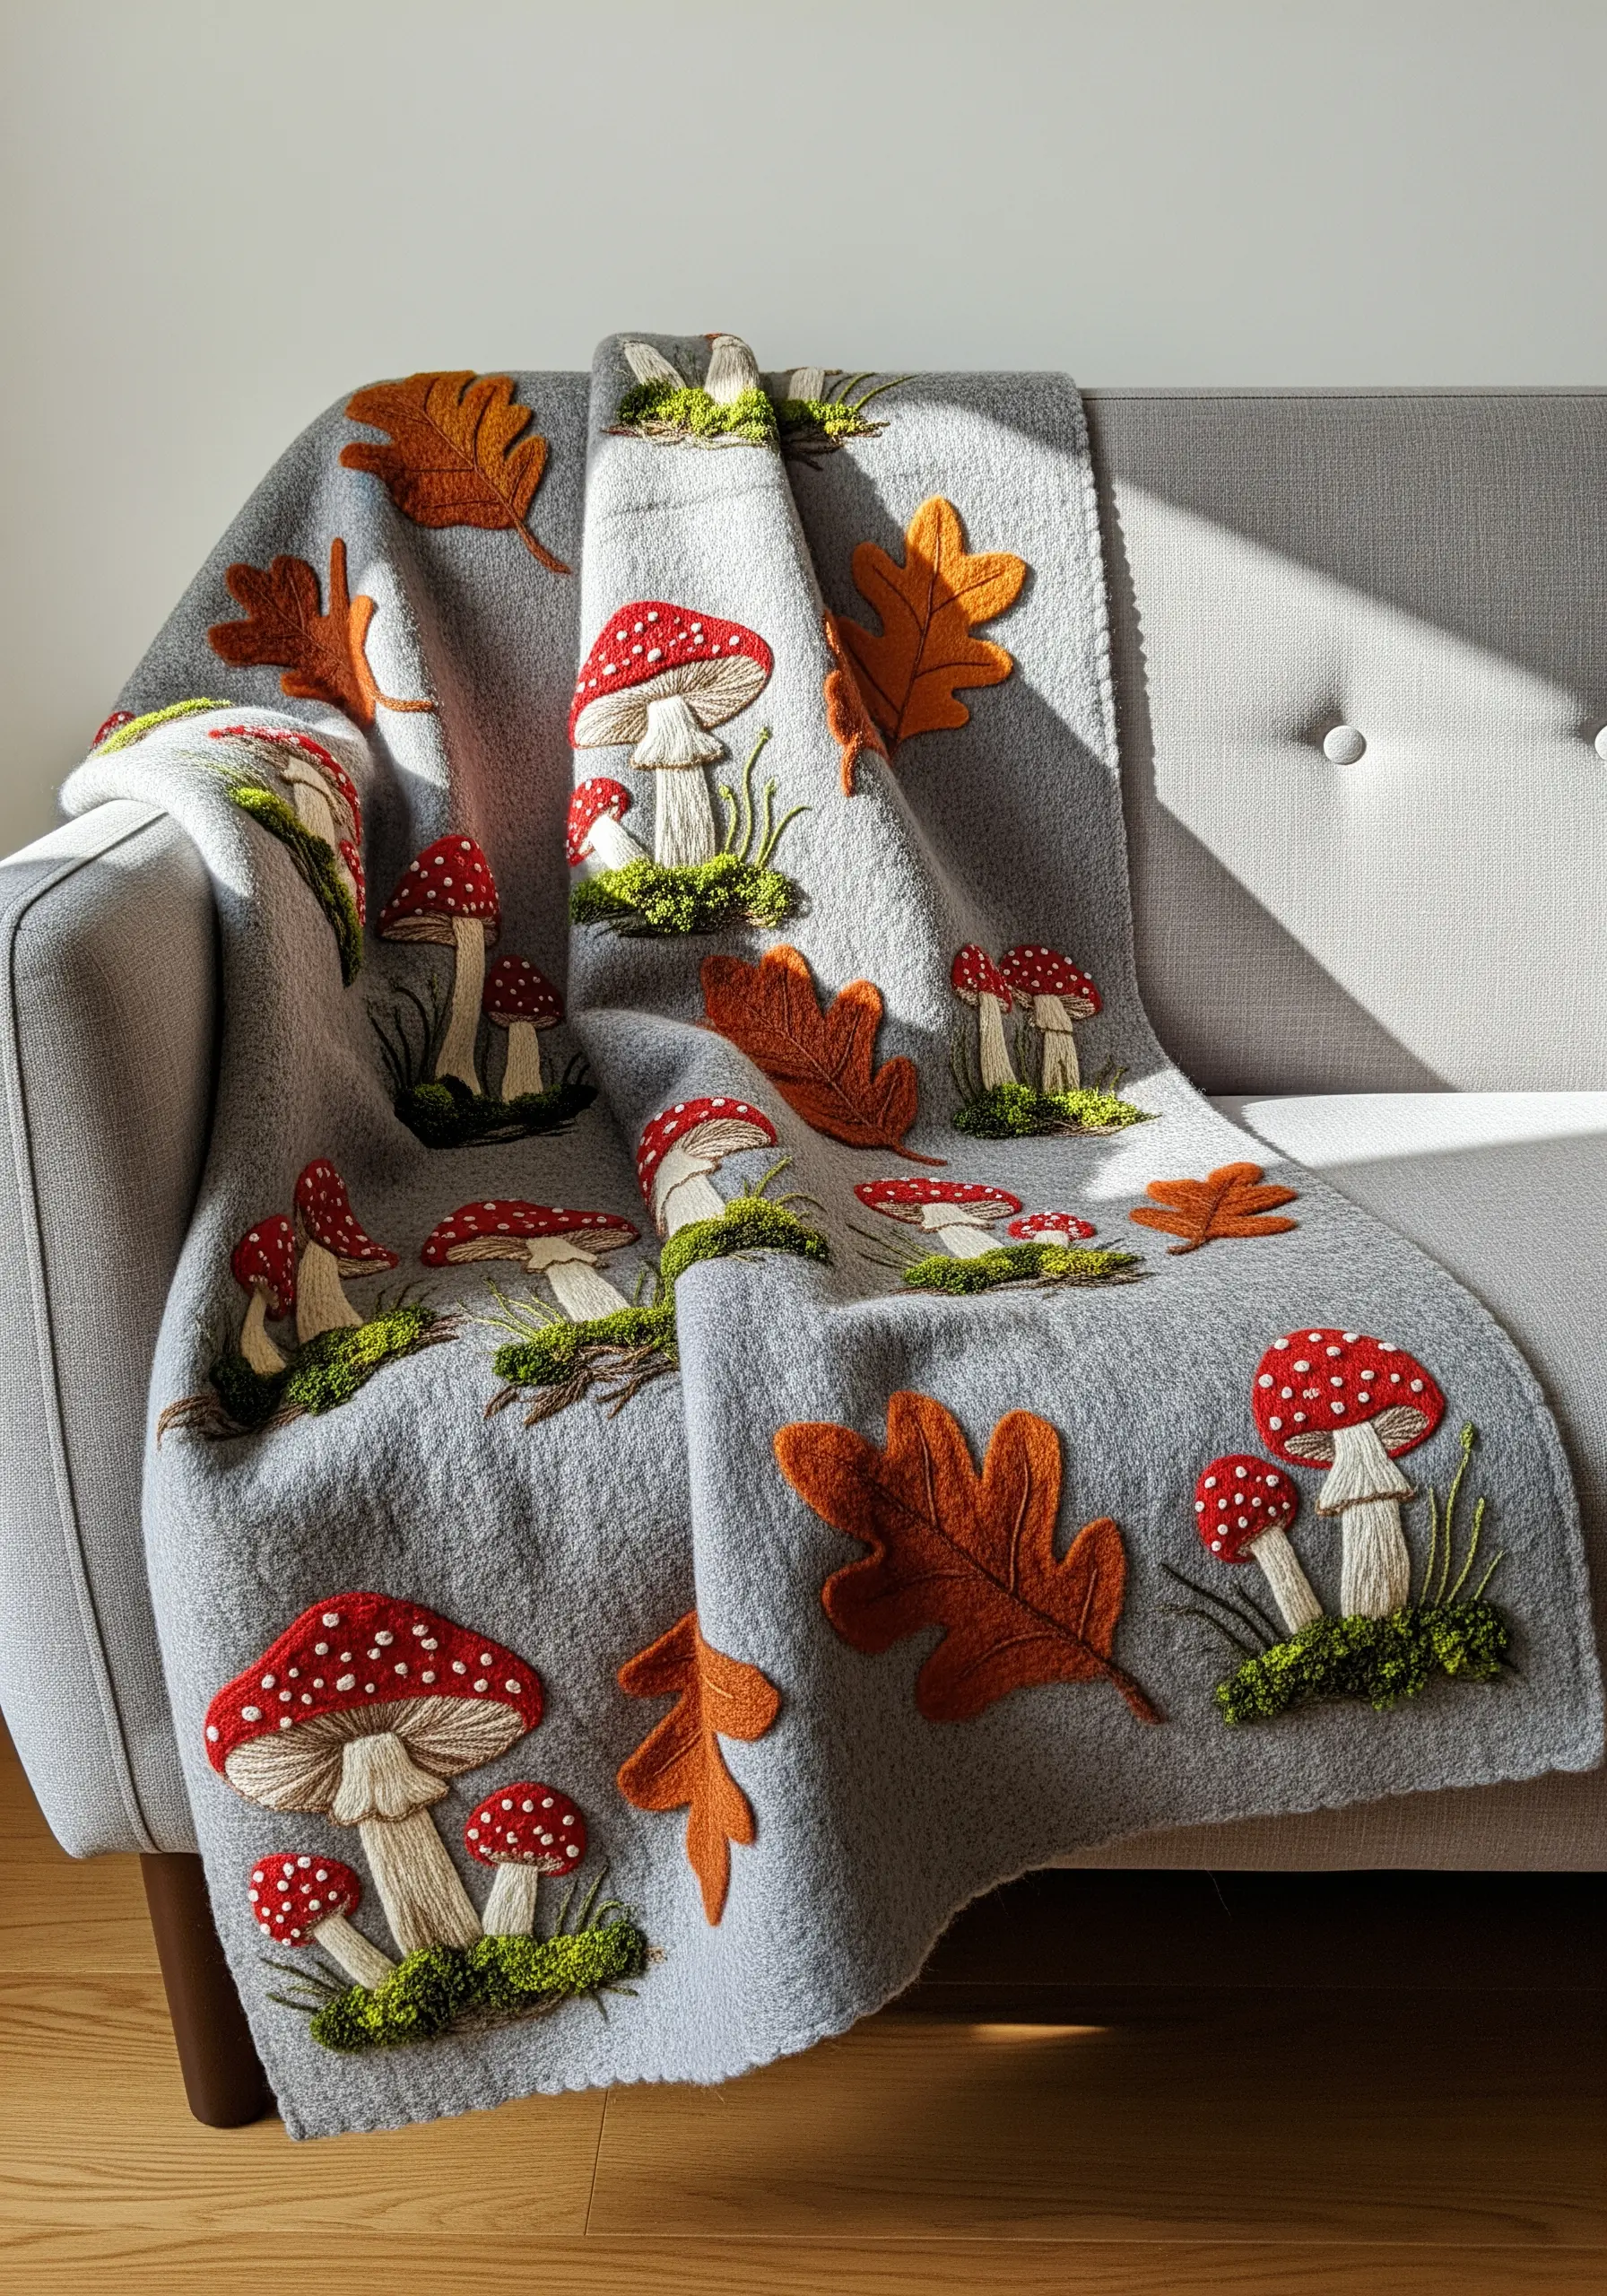
For motifs with large areas of solid color, use felt appliqué as a base to save time and add dimension.
Cut out the leaf shapes from felt and secure them with a simple whipstitch around the edges.
Then, build your embroidered details on top: use turkey work for fuzzy moss and French knots for mushroom spots.
This mixed-media approach makes cozy projects like embroidered throws and blankets more manageable and texturally rich.
7. Design a Cohesive Gallery with a Motif Series
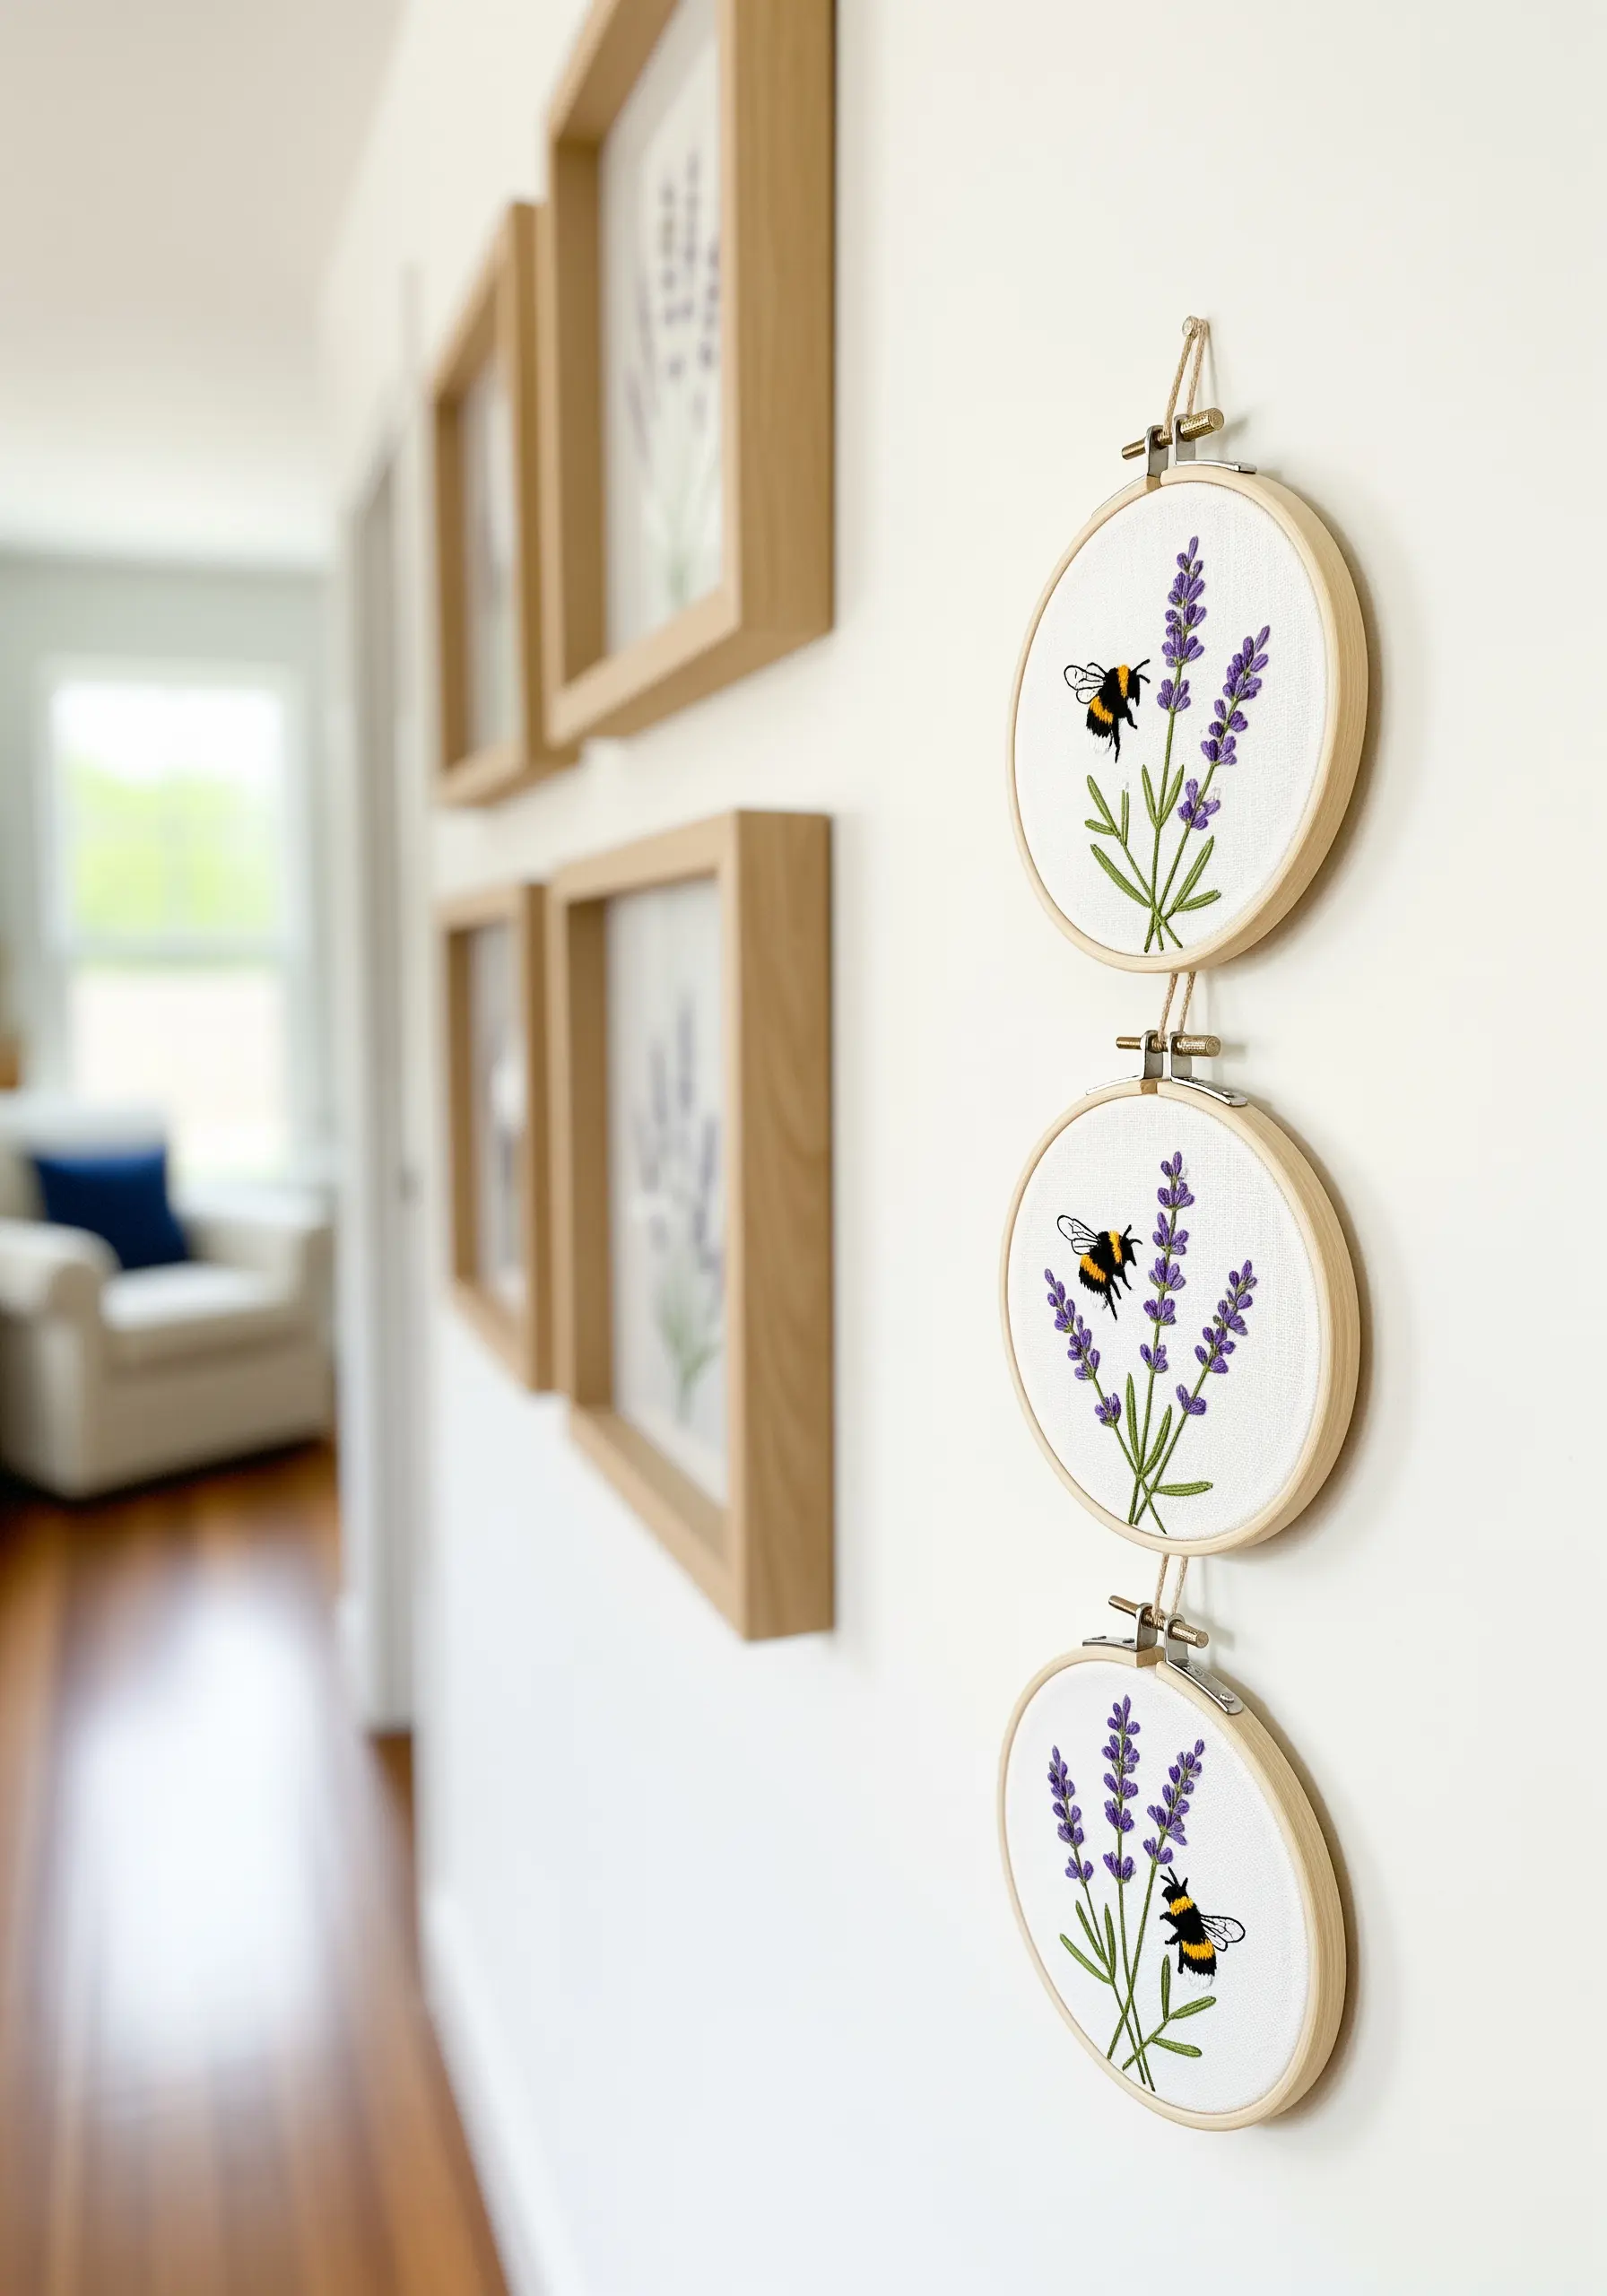
Elevate simple motifs by stitching them as a coordinated series in small hoops.
Choose a single theme, like lavender and bees, and use an identical color palette across three or more hoops.
Vary the composition in each—one bee, then two, a single stem, then a bunch—to create visual rhythm.
Hanging them together vertically or in a cluster transforms tiny embroidery ideas that make your walls come alive into a single, intentional piece of wall art.
8. Achieve Realism with Thread Painting on Dark Fabric
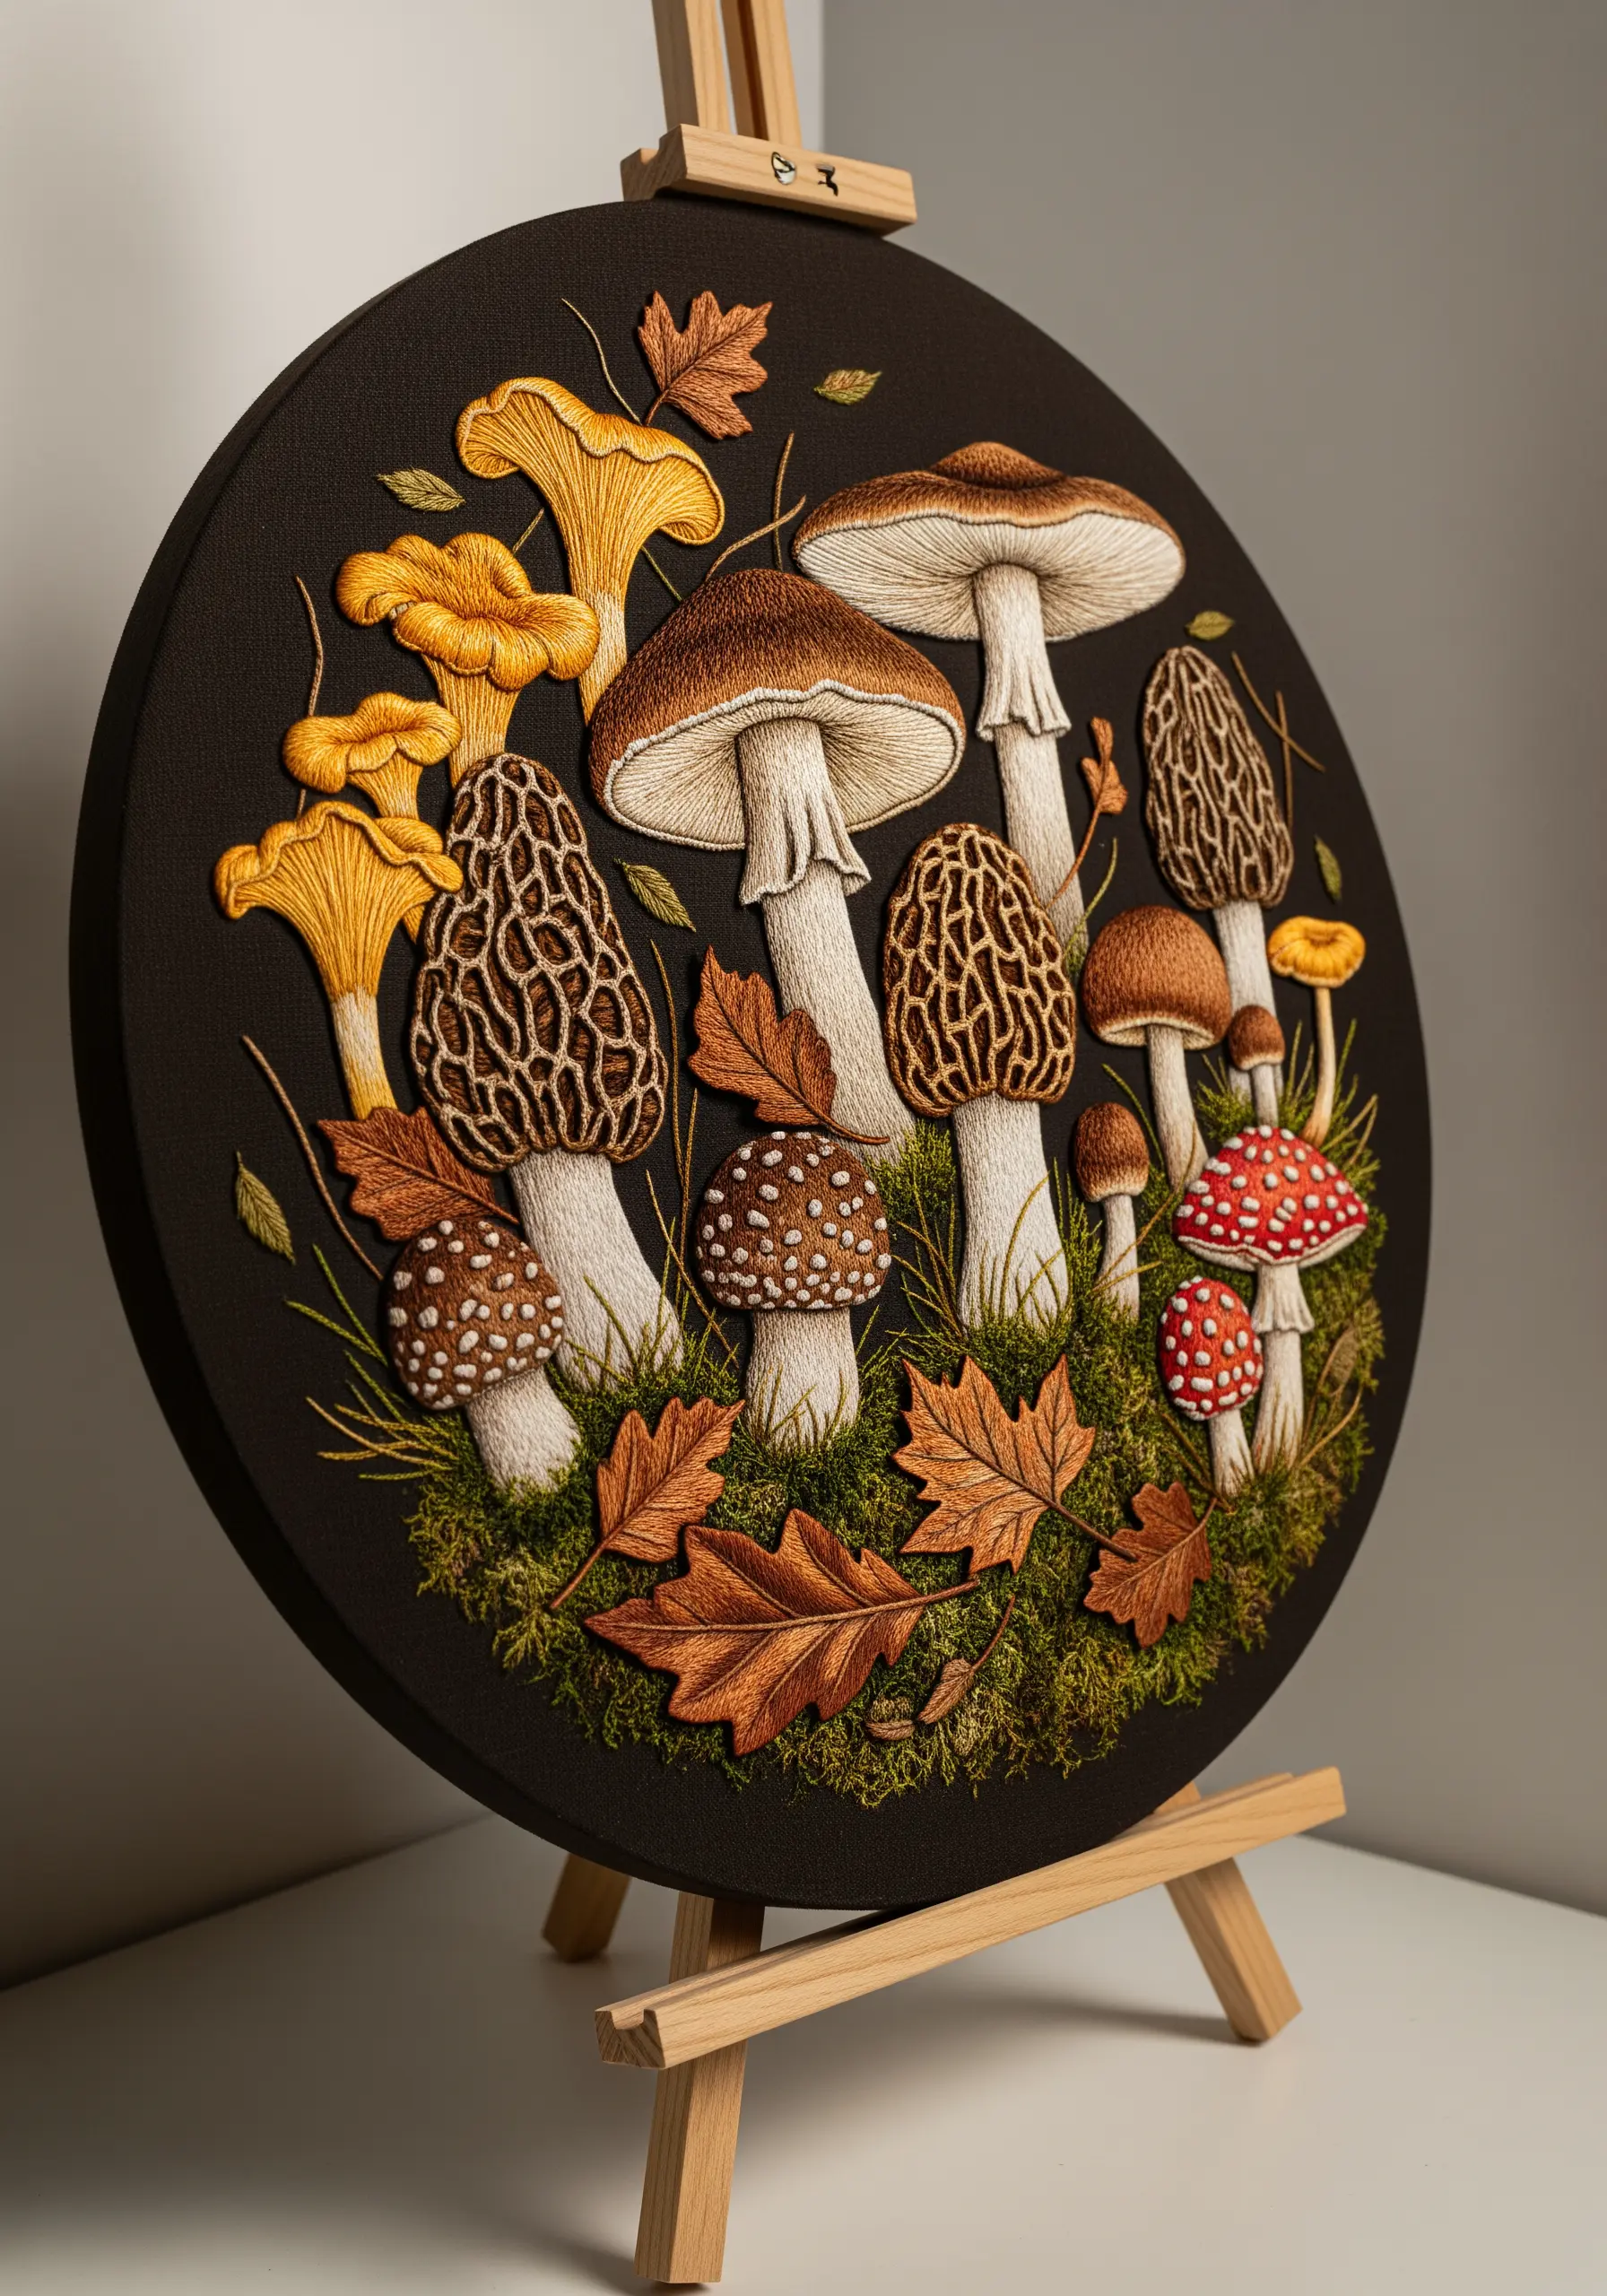
Make your subjects pop by stitching on black or dark-colored fabric, which absorbs light and intensifies your thread colors.
Use the long-and-short stitch to blend multiple shades seamlessly, creating the subtle gradients found in nature.
For the intricate caps of morel mushrooms, use a series of connected bullion knots or a raised stem stitch band to build up that distinctive, pitted texture.
This approach gives realistic mushroom forest floor embroidery projects a dramatic, gallery-quality finish.
9. Add Subtle Magic with Metallic Accents

Embellish a simple design with a touch of metallic thread to catch the light and add a hint of luxury.
For a constellation map, use a standard white or off-white floss for the lines and smaller stars, then stitch the most prominent stars with a single strand of gold or silver metallic thread.
This restrained use of sparkle keeps the design sophisticated and turns simple nature calm stitching projects into treasured heirlooms.
10. Craft Freestanding Embroidery with Soluble Stabilizer
Create delicate, freestanding elements like garland leaves by stitching directly onto a water-soluble stabilizer.
Hoop the stabilizer as you would fabric, stitch your design, and then rinse the finished piece in warm water.
The stabilizer dissolves completely, leaving only the thread structure behind.
This technique allows you to create intricate rare leaf patterns you’ve probably never tried that are impossible to cut out by hand.
11. Integrate Embroidery into Functional Home Décor
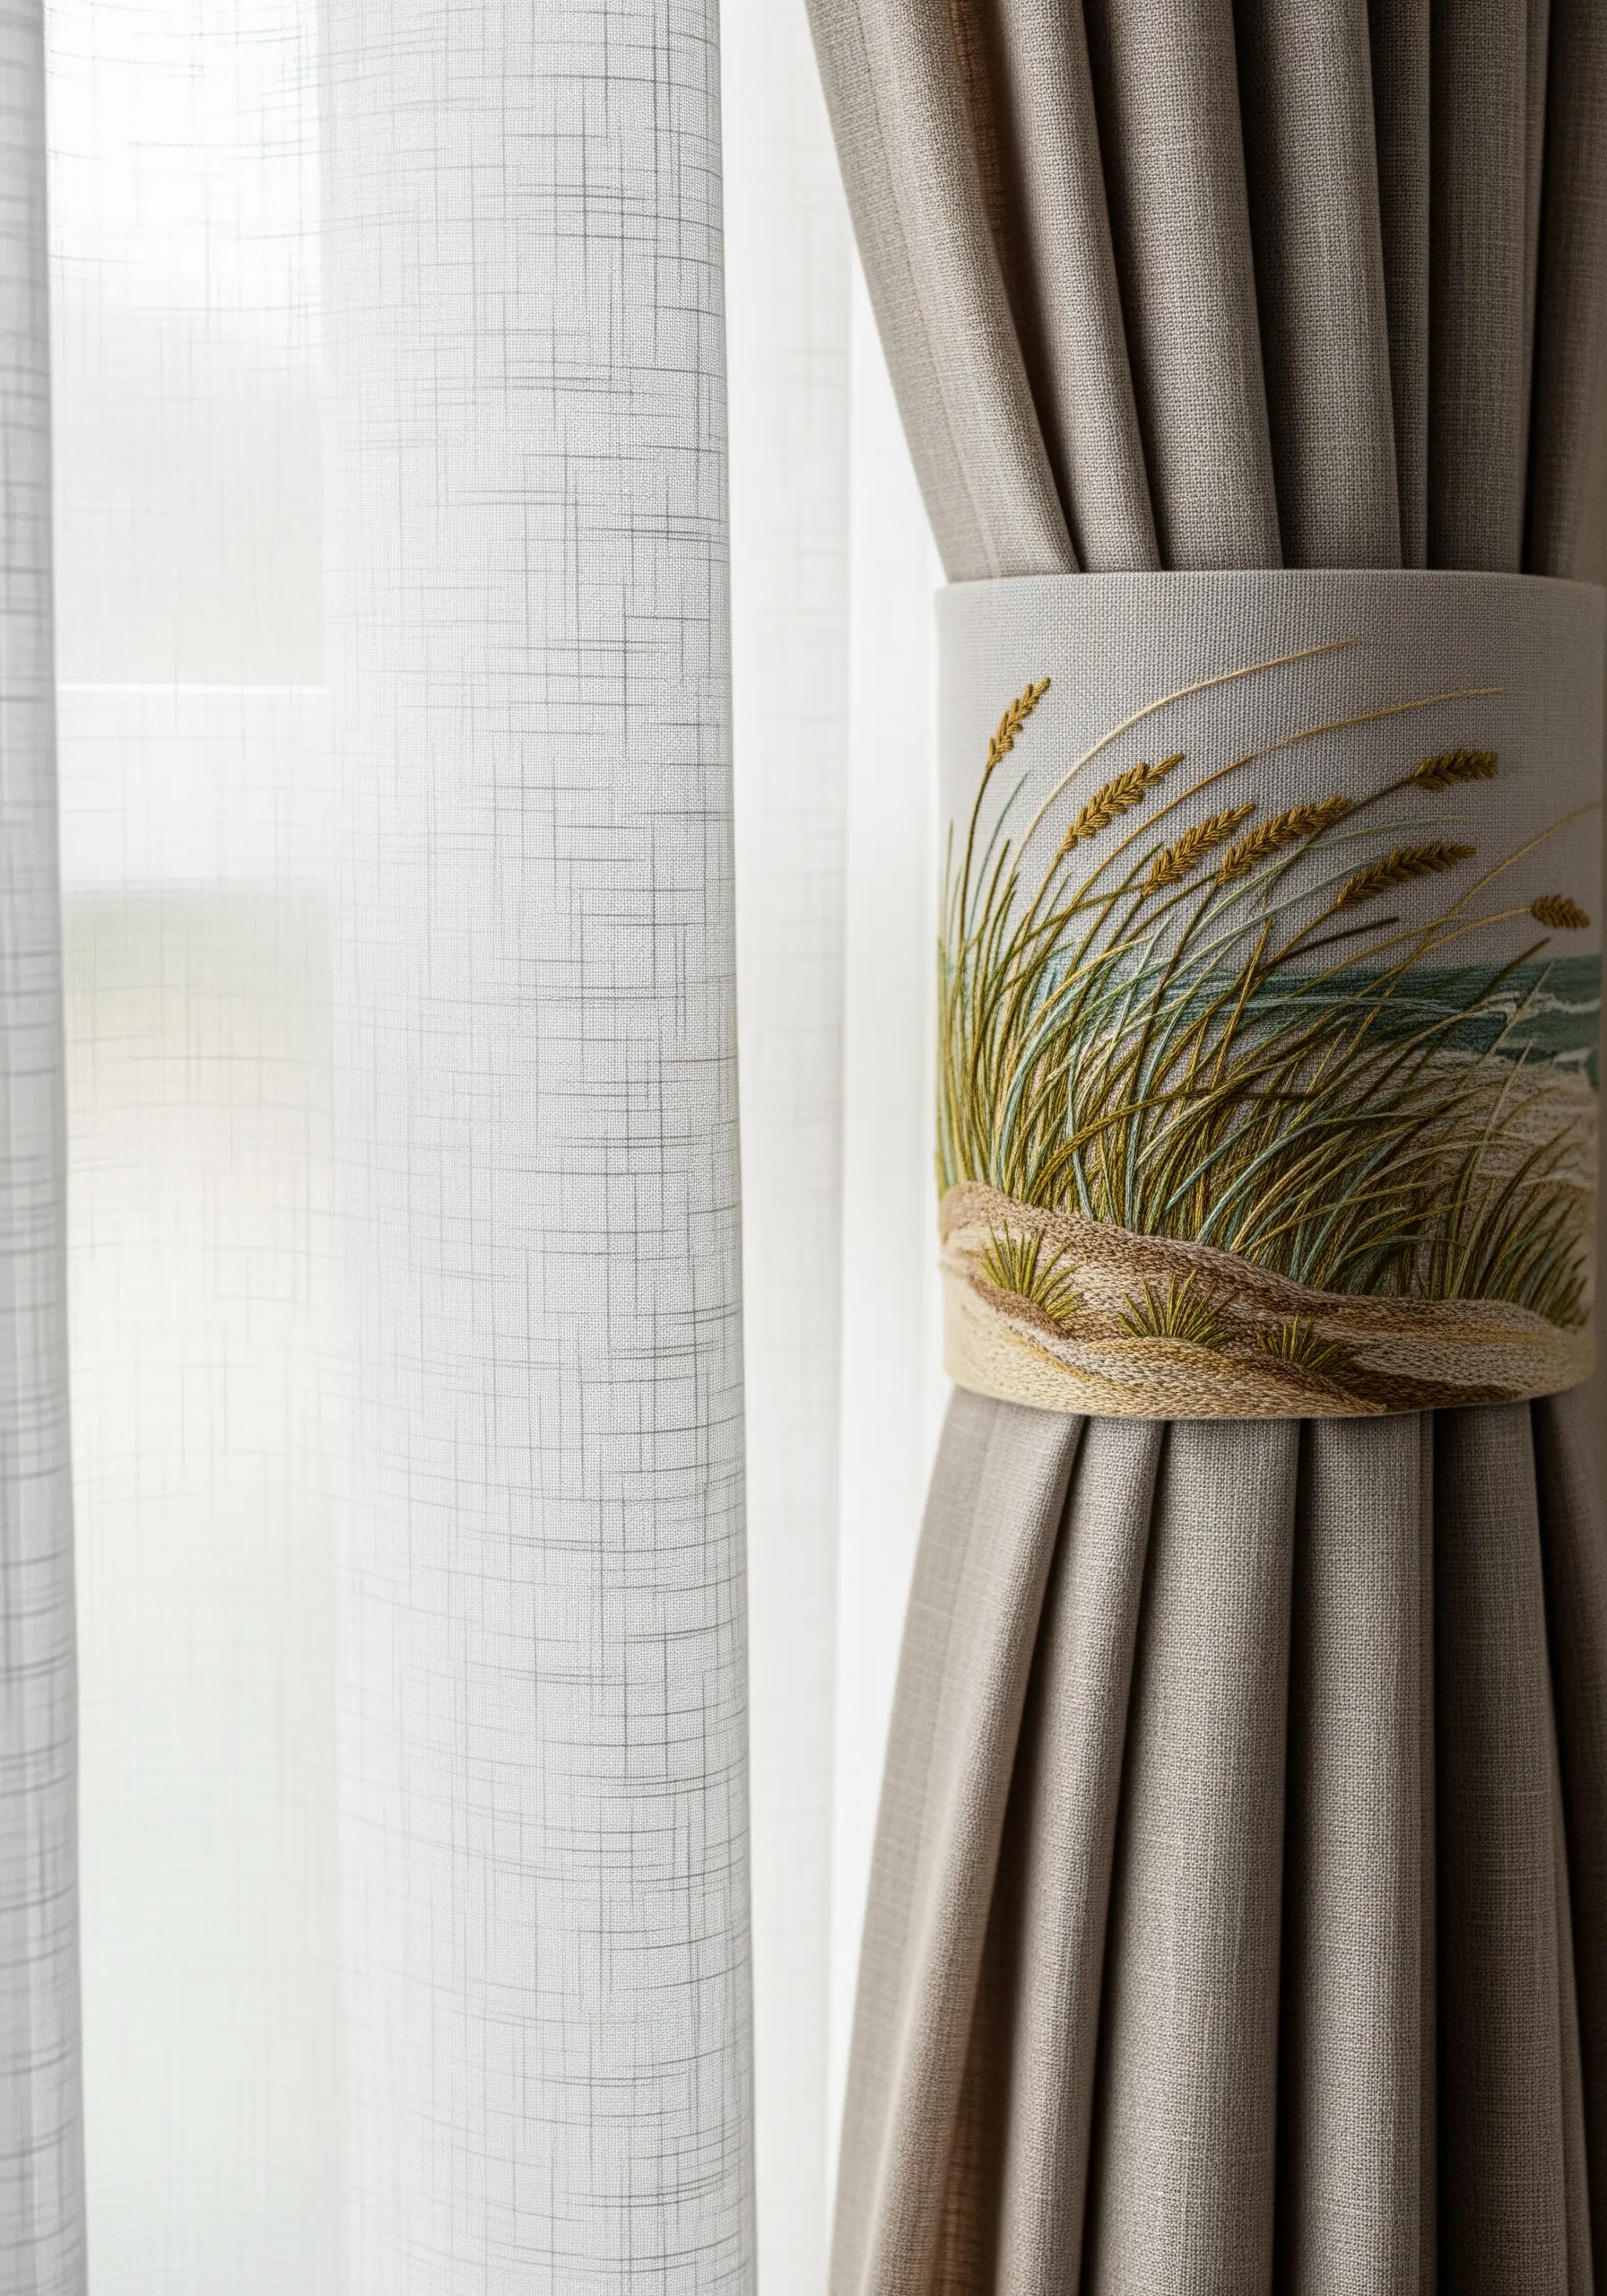
Apply your skills to everyday objects like curtain tie-backs to add a custom, handmade touch to your home.
Use long, layered straight stitches to depict dune grasses, varying the shades of green, beige, and gold to create depth.
Choose a sturdy, tightly woven linen or canvas that can withstand daily use.
These small, thoughtful applications of embroidery, like a coastal theme tiny embroidery art, make a space feel truly personal.
12. Scale Up a Single Motif for Statement Art
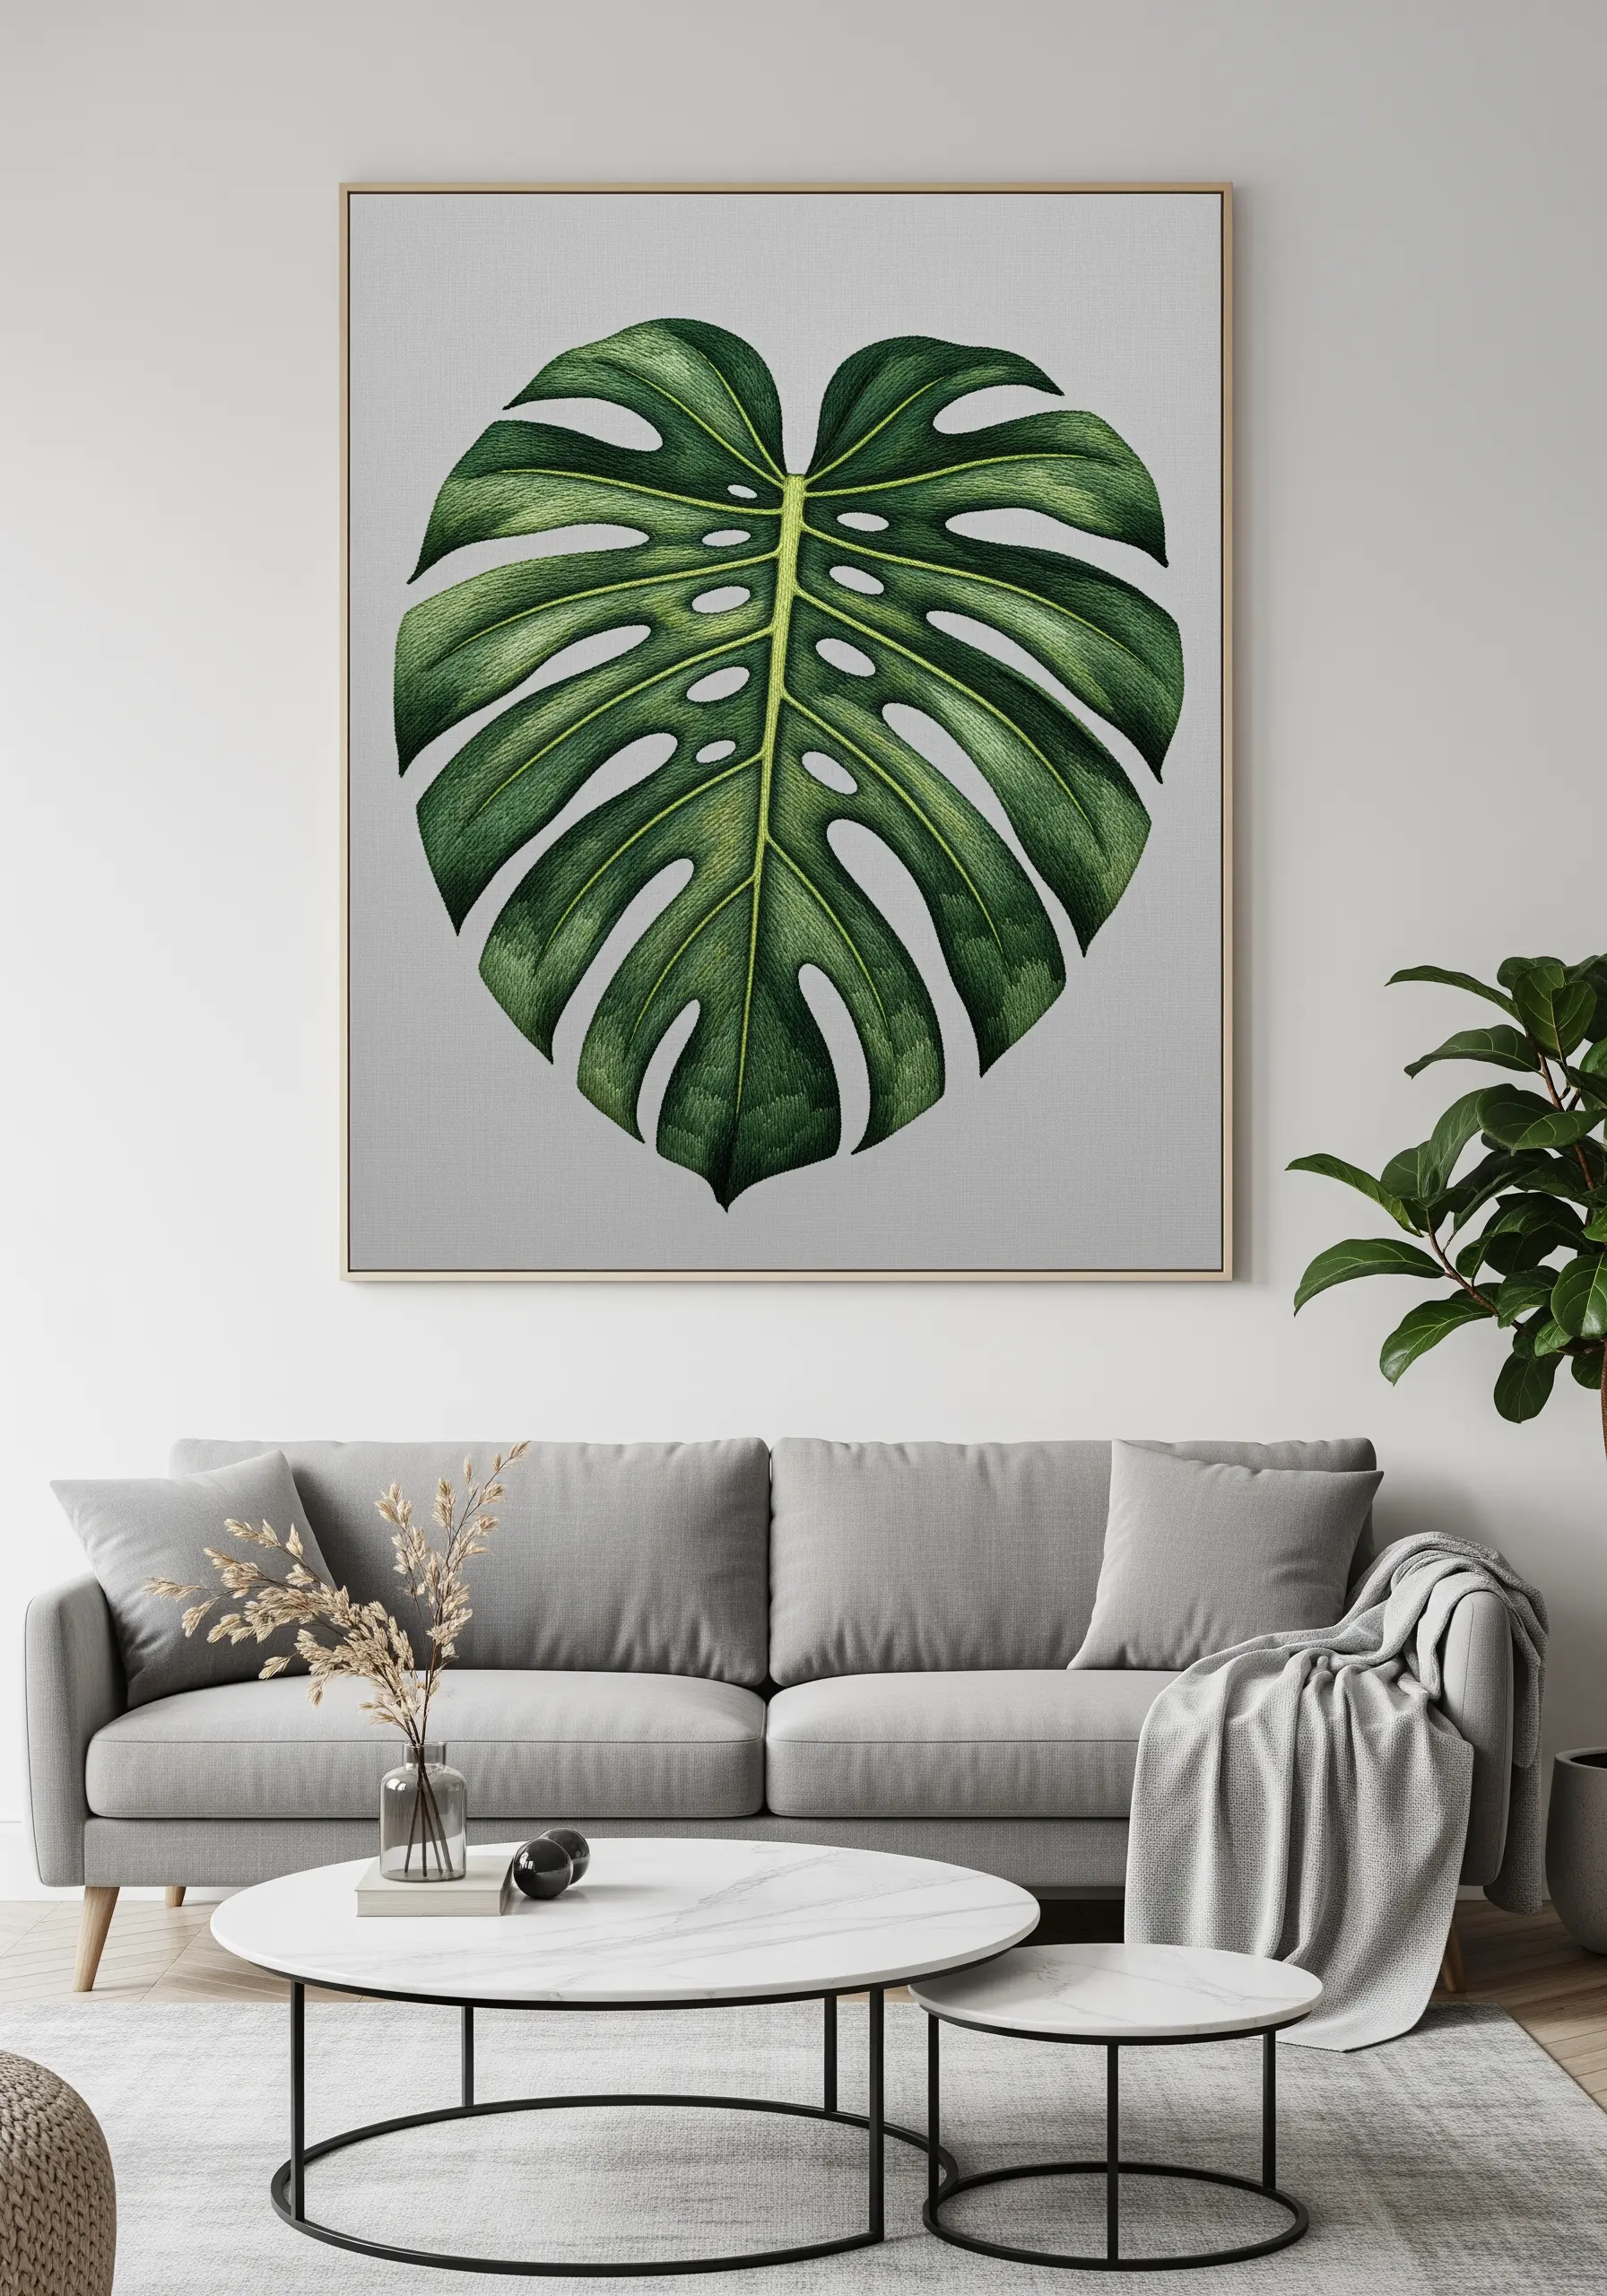
Instead of a collage of small elements, dedicate a large canvas to a single, beautifully rendered botanical subject.
A monstera leaf is an ideal subject for practicing thread painting, as its large surface allows for smooth color transitions.
Map out your light source and use at least four shades of green to embroider realistic shadows under leaves, giving the final piece stunning depth and realism.
Framing it simply allows the stitching itself to become the focal point.
13. Create Visual Interest with Appliqué and Line Work
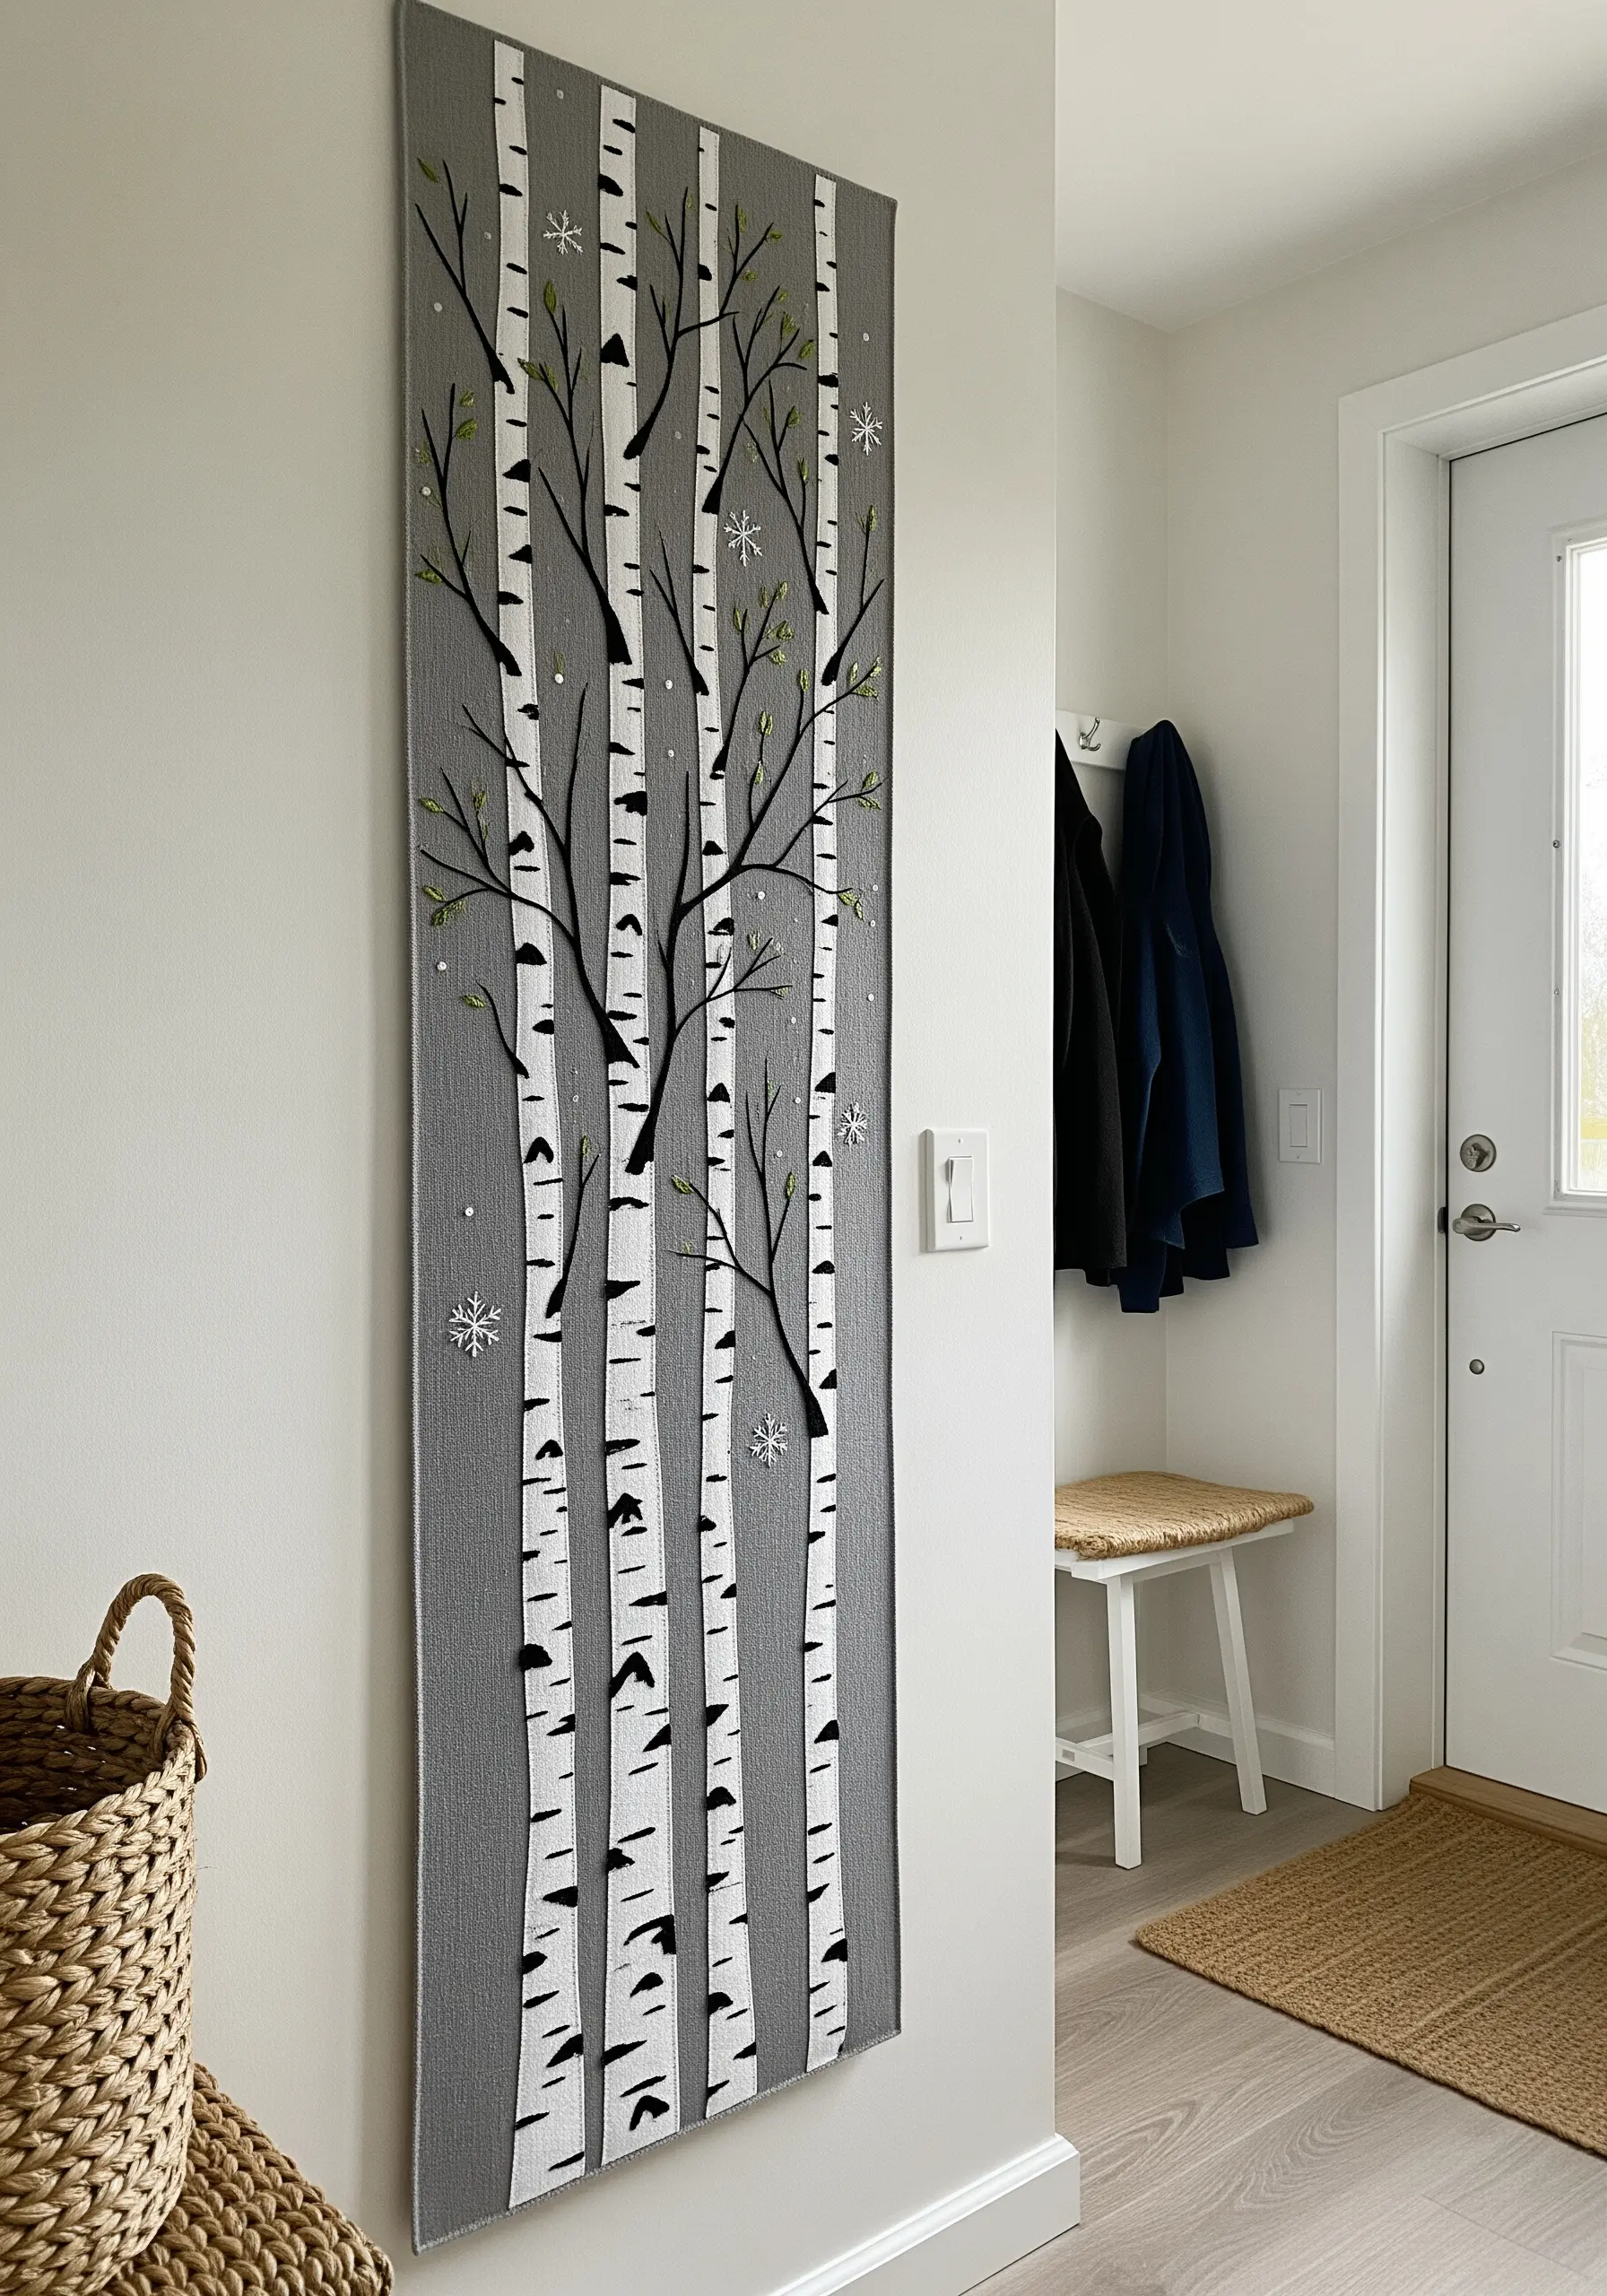
Combine fabric appliqué with stitched details for a graphic, modern take on a classic nature scene.
Cut the birch tree trunks from white fabric and apply them to a gray background for clean, sharp shapes.
Then, use a single strand of black floss to add the characteristic bark lines with short, horizontal straight stitches.
This technique is faster than filling with white thread and results in impactful minimalist embroidery wall art ideas.
14. Build Realistic Bark Texture with Whipped Stitches
Give tree trunks and branches a gnarled, realistic texture by using a whipped backstitch or stem stitch.
First, create your base lines with a standard backstitch using a medium brown thread.
Then, take a slightly lighter or darker shade and weave it over and under the base stitches without piercing the fabric.
This adds dimension and mimics the roughness of bark, elevating simple organic embroidery designs.
15. Capture Iridescence with Silk Thread and Stumpwork
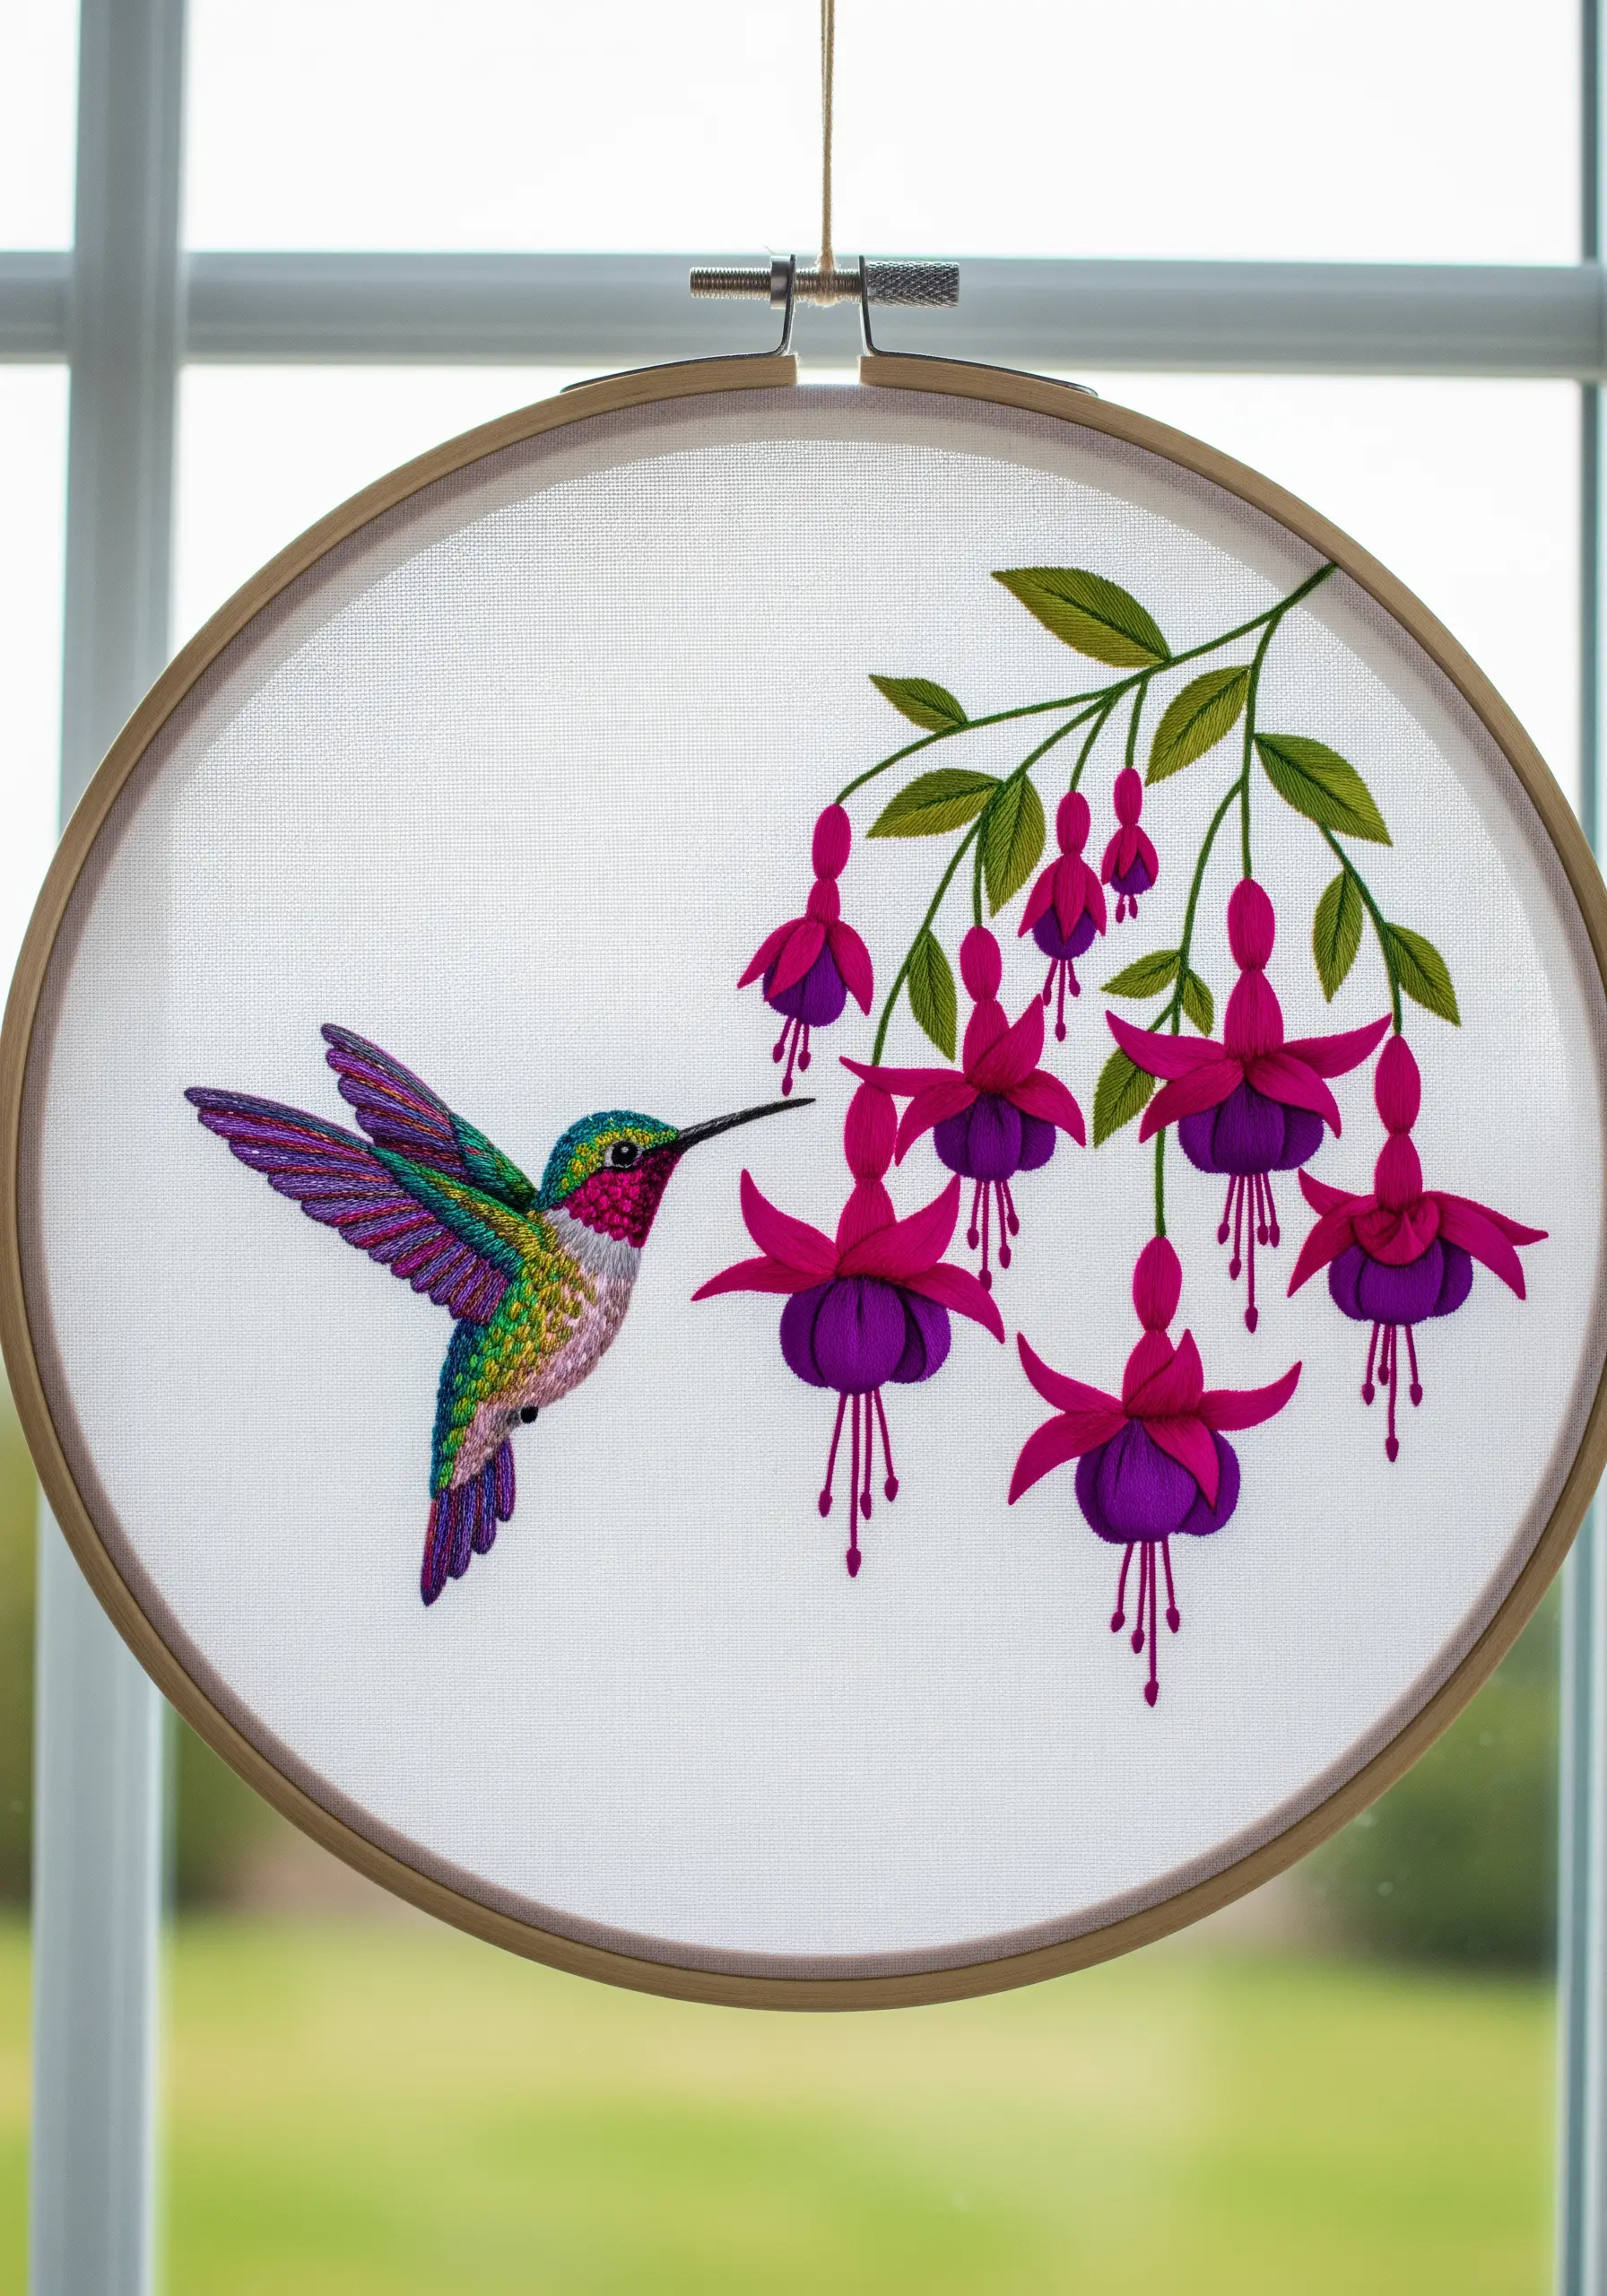
To replicate the shimmering colors of a hummingbird, swap standard cotton floss for silk or rayon threads.
Their natural luster catches the light beautifully, especially when using the long-and-short stitch to blend jewel tones.
For the fuchsia flowers, try a simple stumpwork technique: create wired petals on a separate piece of fabric using buttonhole stitch, cut them out, and attach them to your main piece for a breathtaking 3D effect on tiny hummingbird embroidery ideas.
16. Sculpt Succulents with Raised Stitches

Recreate the plump, layered look of succulents using dimensional stitches that rise off the fabric.
The cast-on stitch and woven picot stitch are perfect for building individual, petal-like leaves.
Work them in circles, layering stitches as you go, to form the classic rosette shape.
This focus on sculptural stitching is one of the best nature texture embroidery hacks for creating touchable, realistic plant life.
17. Paint a Landscape with Contoured Lines
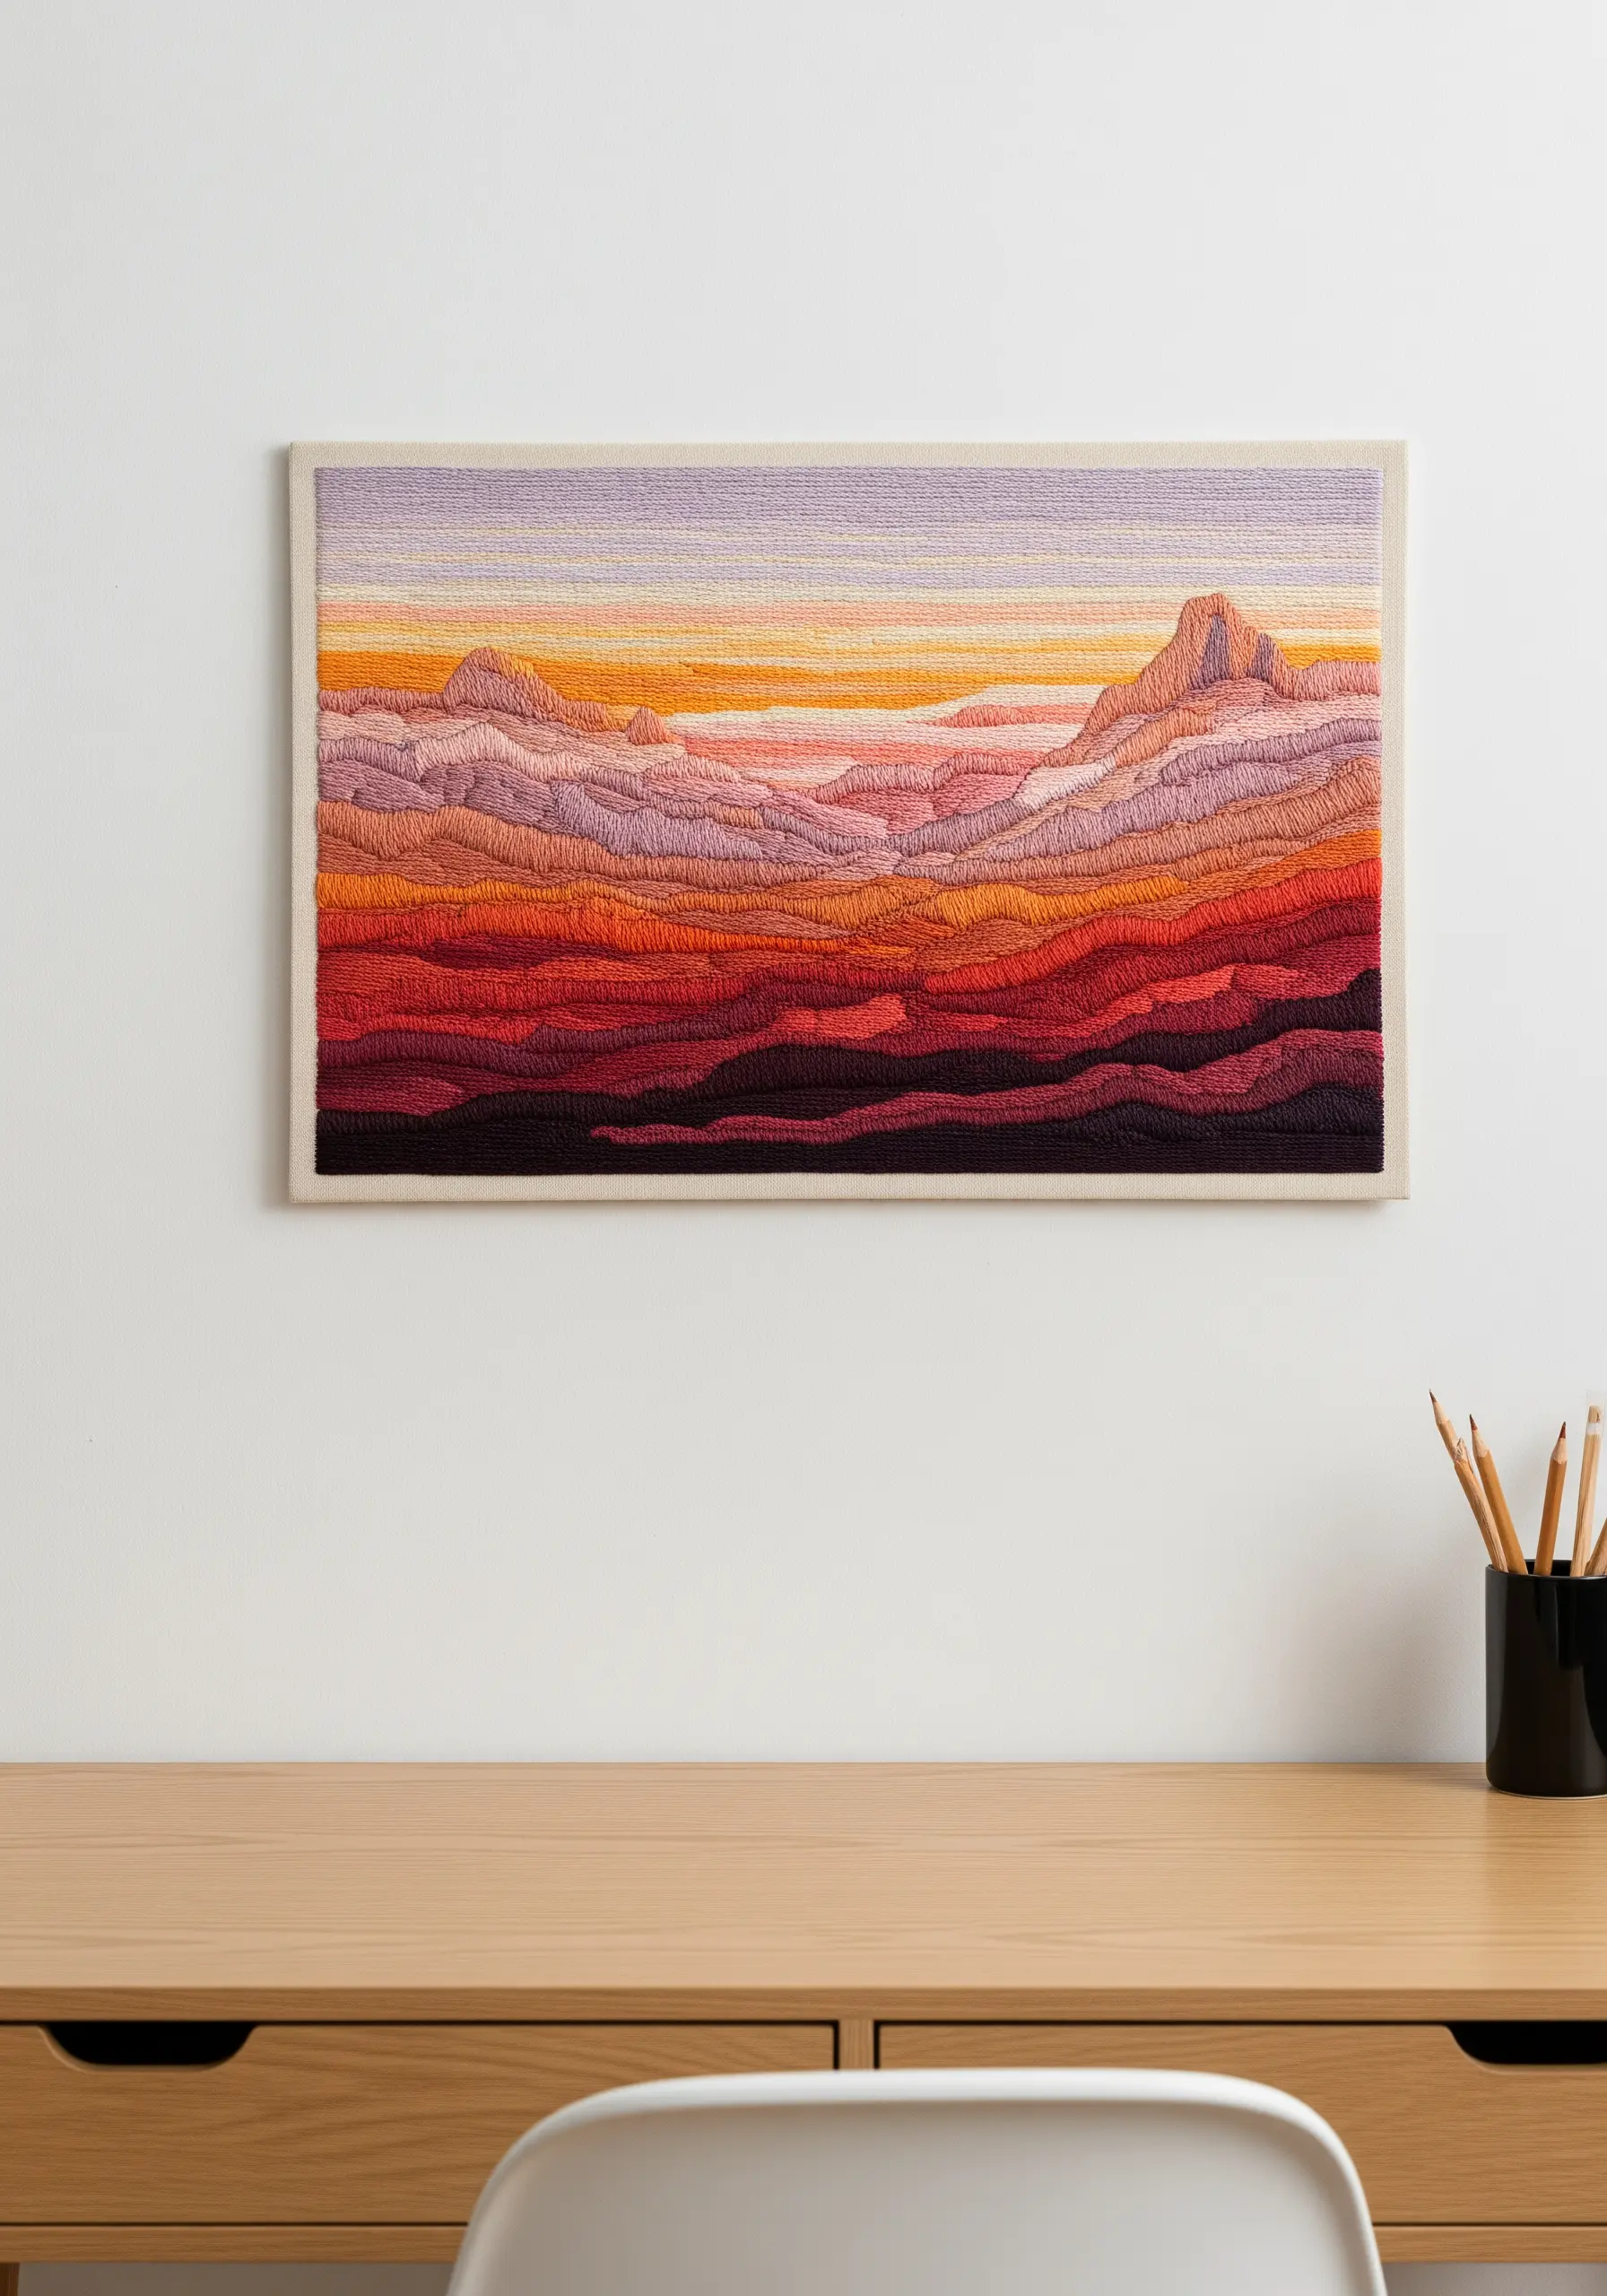
Instead of filling large color blocks with satin stitch, use lines of stem or split stitch that follow the contours of the landscape.
This approach creates a sense of form and movement, similar to the lines on a topographical map.
By methodically changing your thread color, you can build up stunning, painterly gradients that feel both graphic and organic.
It’s a meditative technique that makes texture-rich thread art ideas look like woven masterpieces.
18. Embroider on a Lampshade for an Ambient Glow
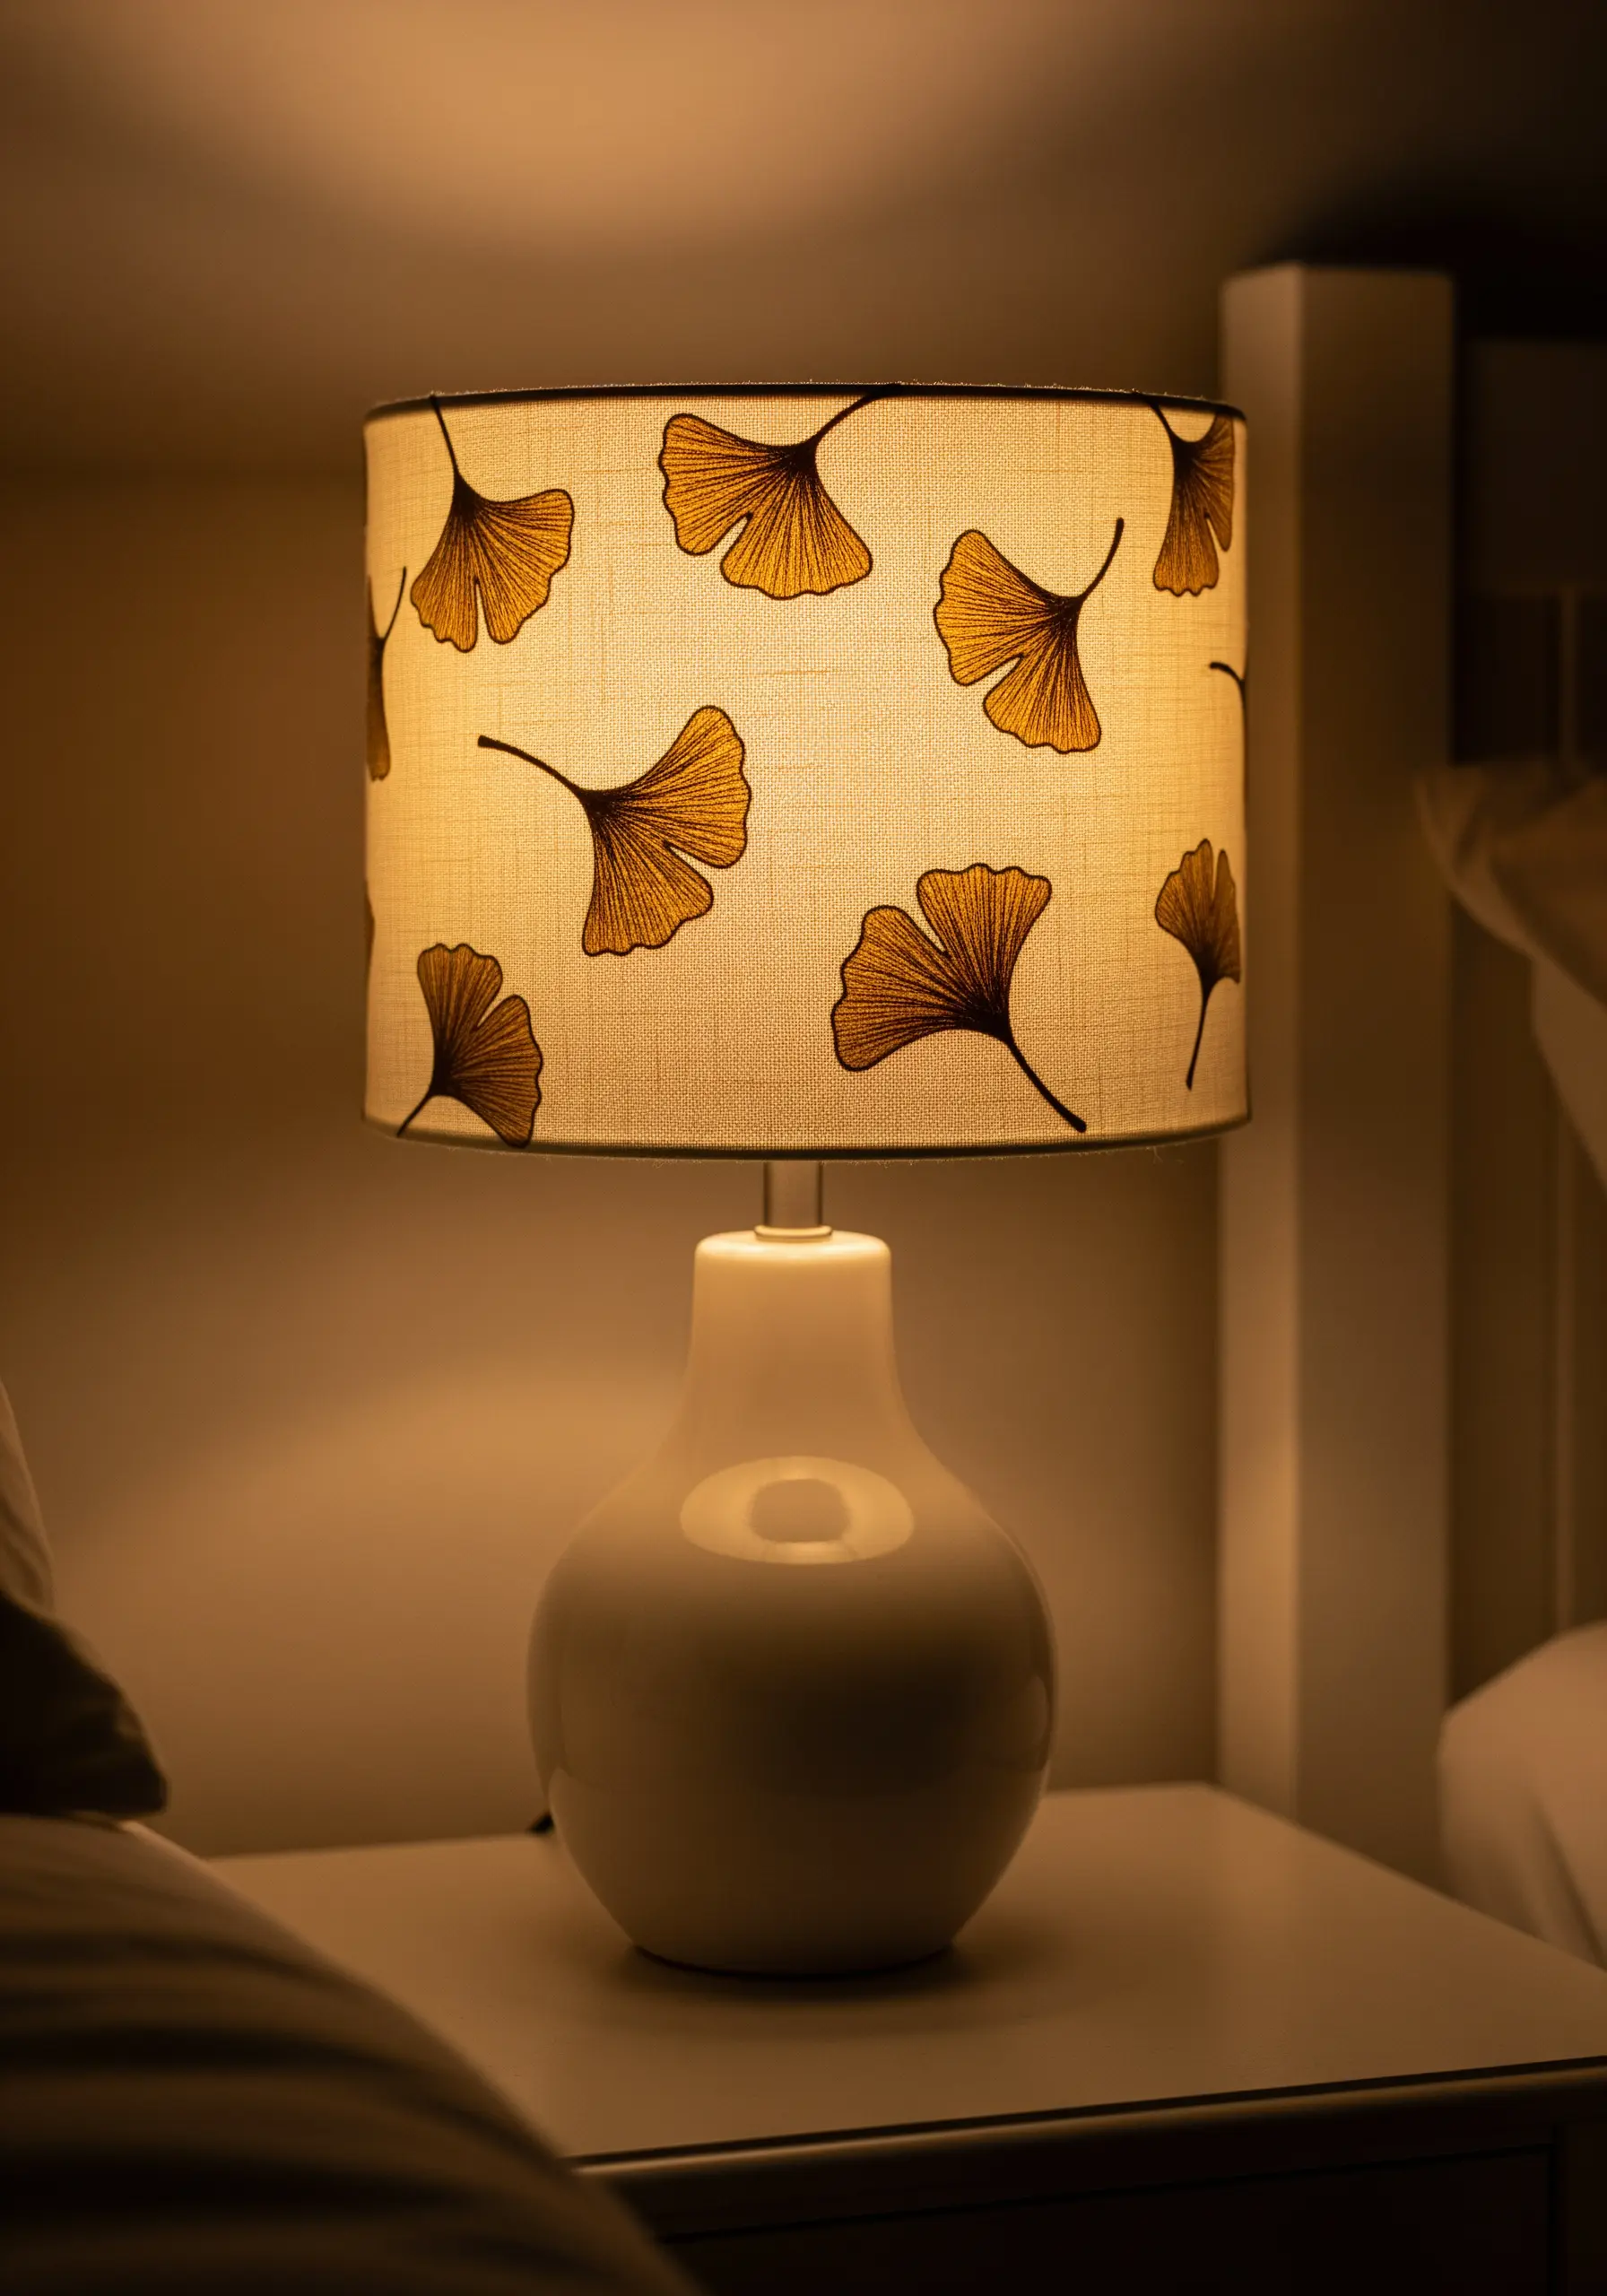
Transform a plain fabric lampshade into a piece of functional art that glows from within.
Choose a simple, graphic motif like ginkgo leaves and use a backstitch for the outlines and a sparse satin stitch for the fill.
When the lamp is on, the light will shine through the fabric, highlighting your stitches and creating a warm, cozy atmosphere.
This is one of the most rewarding simple embroidery designs that make your old linen look brand new.
19. Use Negative Space in Geometric Patterns
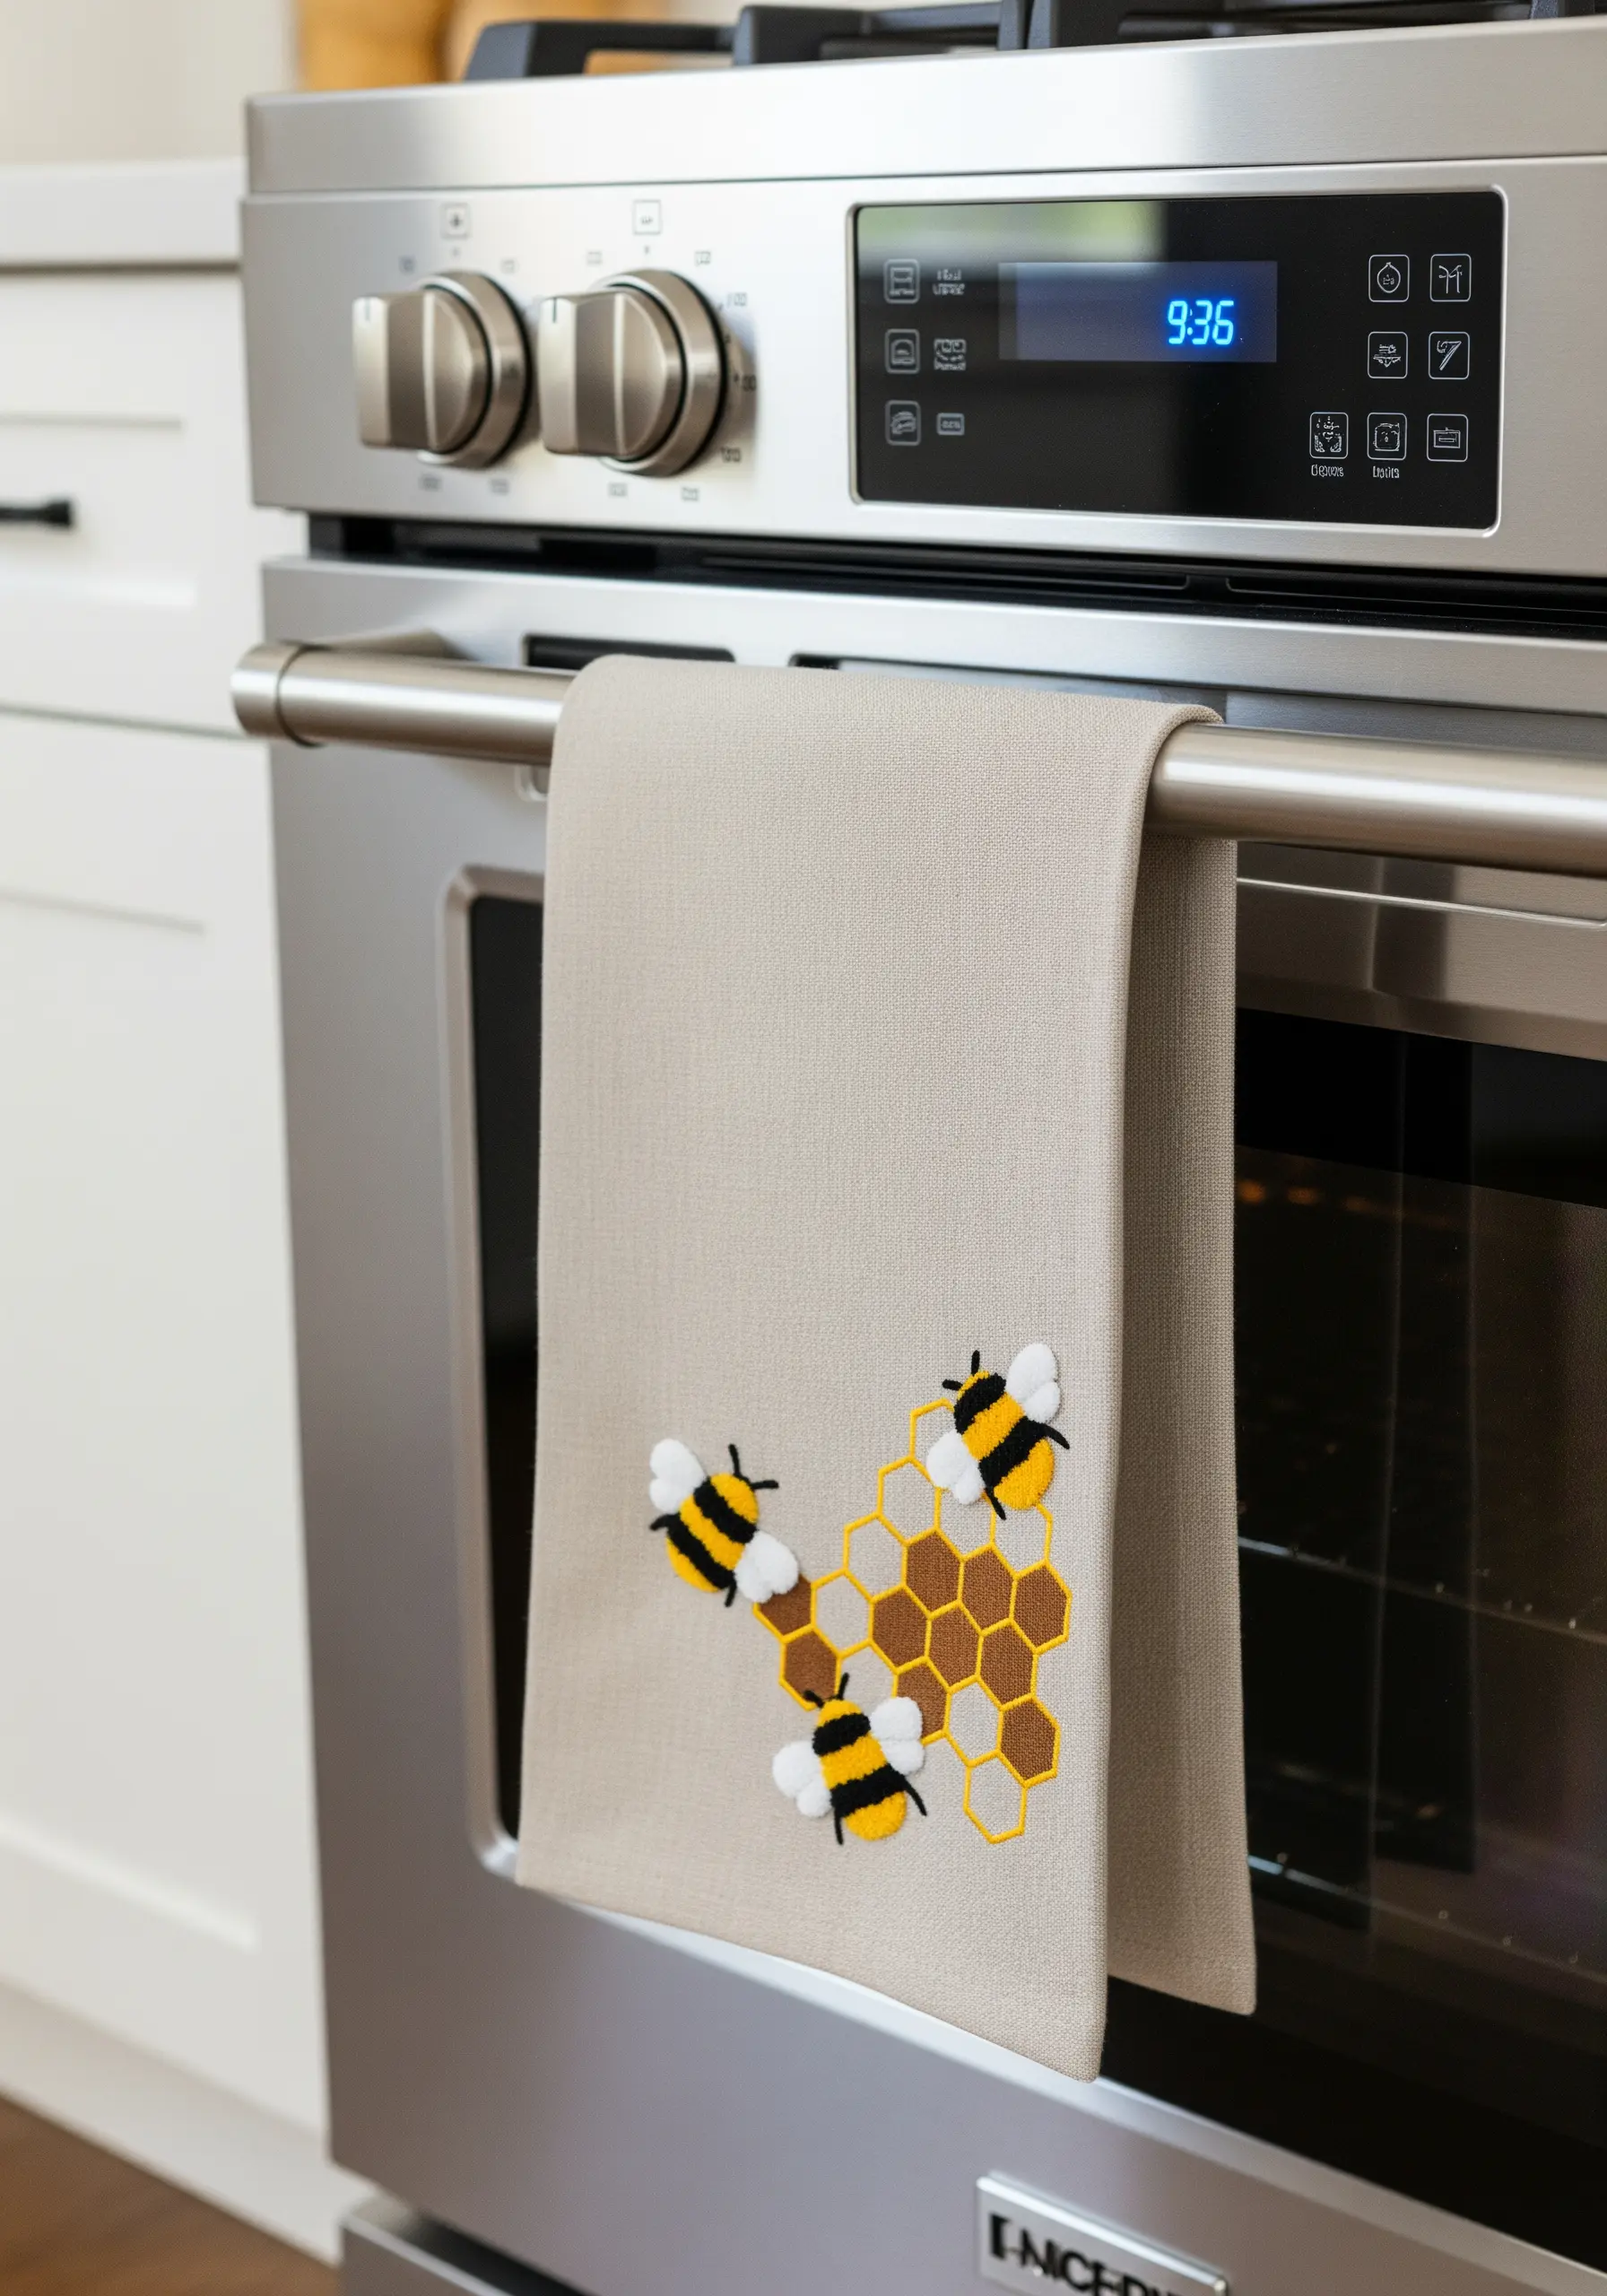
When stitching a pattern like a honeycomb, leaving some cells empty is just as important as filling others in.
Outline the entire geometric structure with a simple backstitch.
Then, selectively fill a few cells with satin stitch, leaving the others open.
This use of negative space makes the design feel lighter and more modern, and it draws the eye to your beautifully executed stitches in these easy small embroidery patterns.
20. Create an Underwater World with Mixed Media
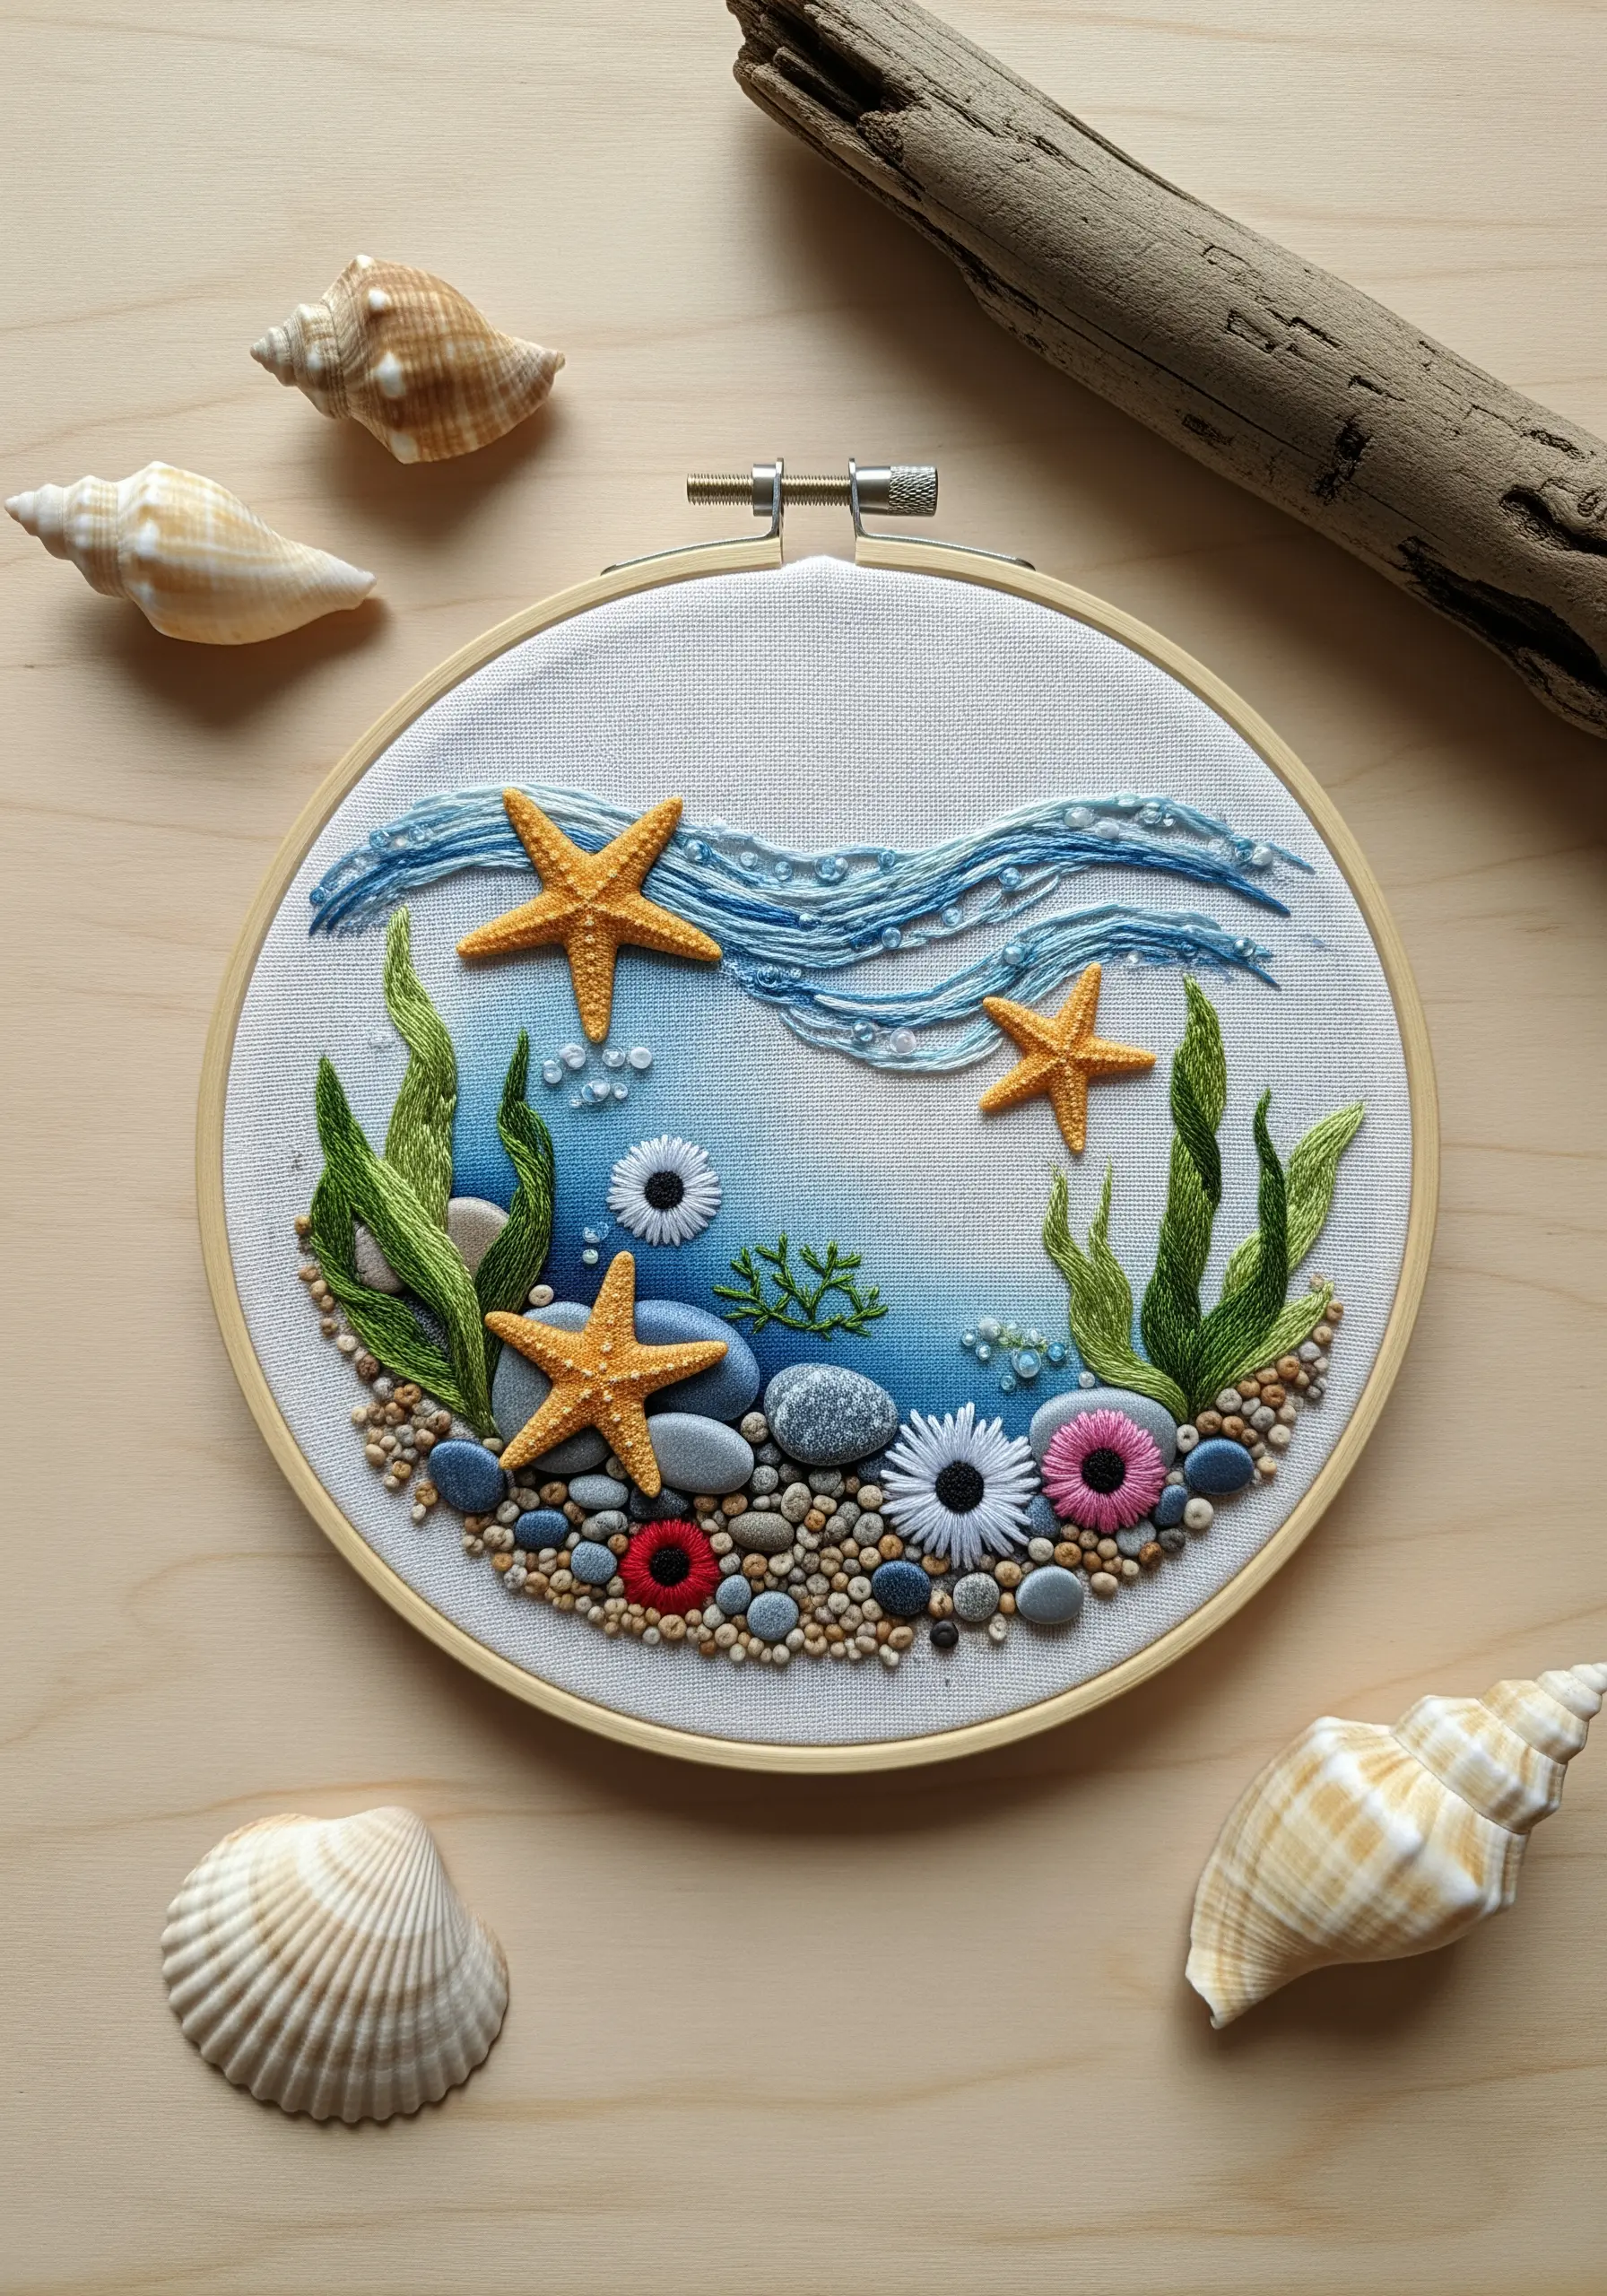
Go beyond thread by incorporating beads, pebbles, and ribbon to create a rich, multi-textured underwater scene.
Stitch on tiny seed beads to represent air bubbles, and couch fine silk ribbon to create waving seaweed.
You can even secure small, flat-backed pebbles with a few surrounding stitches.
These surprising elements are what make mixed media crafts with embroidery so captivating and fun to create.
21. Capture Weightlessness with Single-Strand Stitches
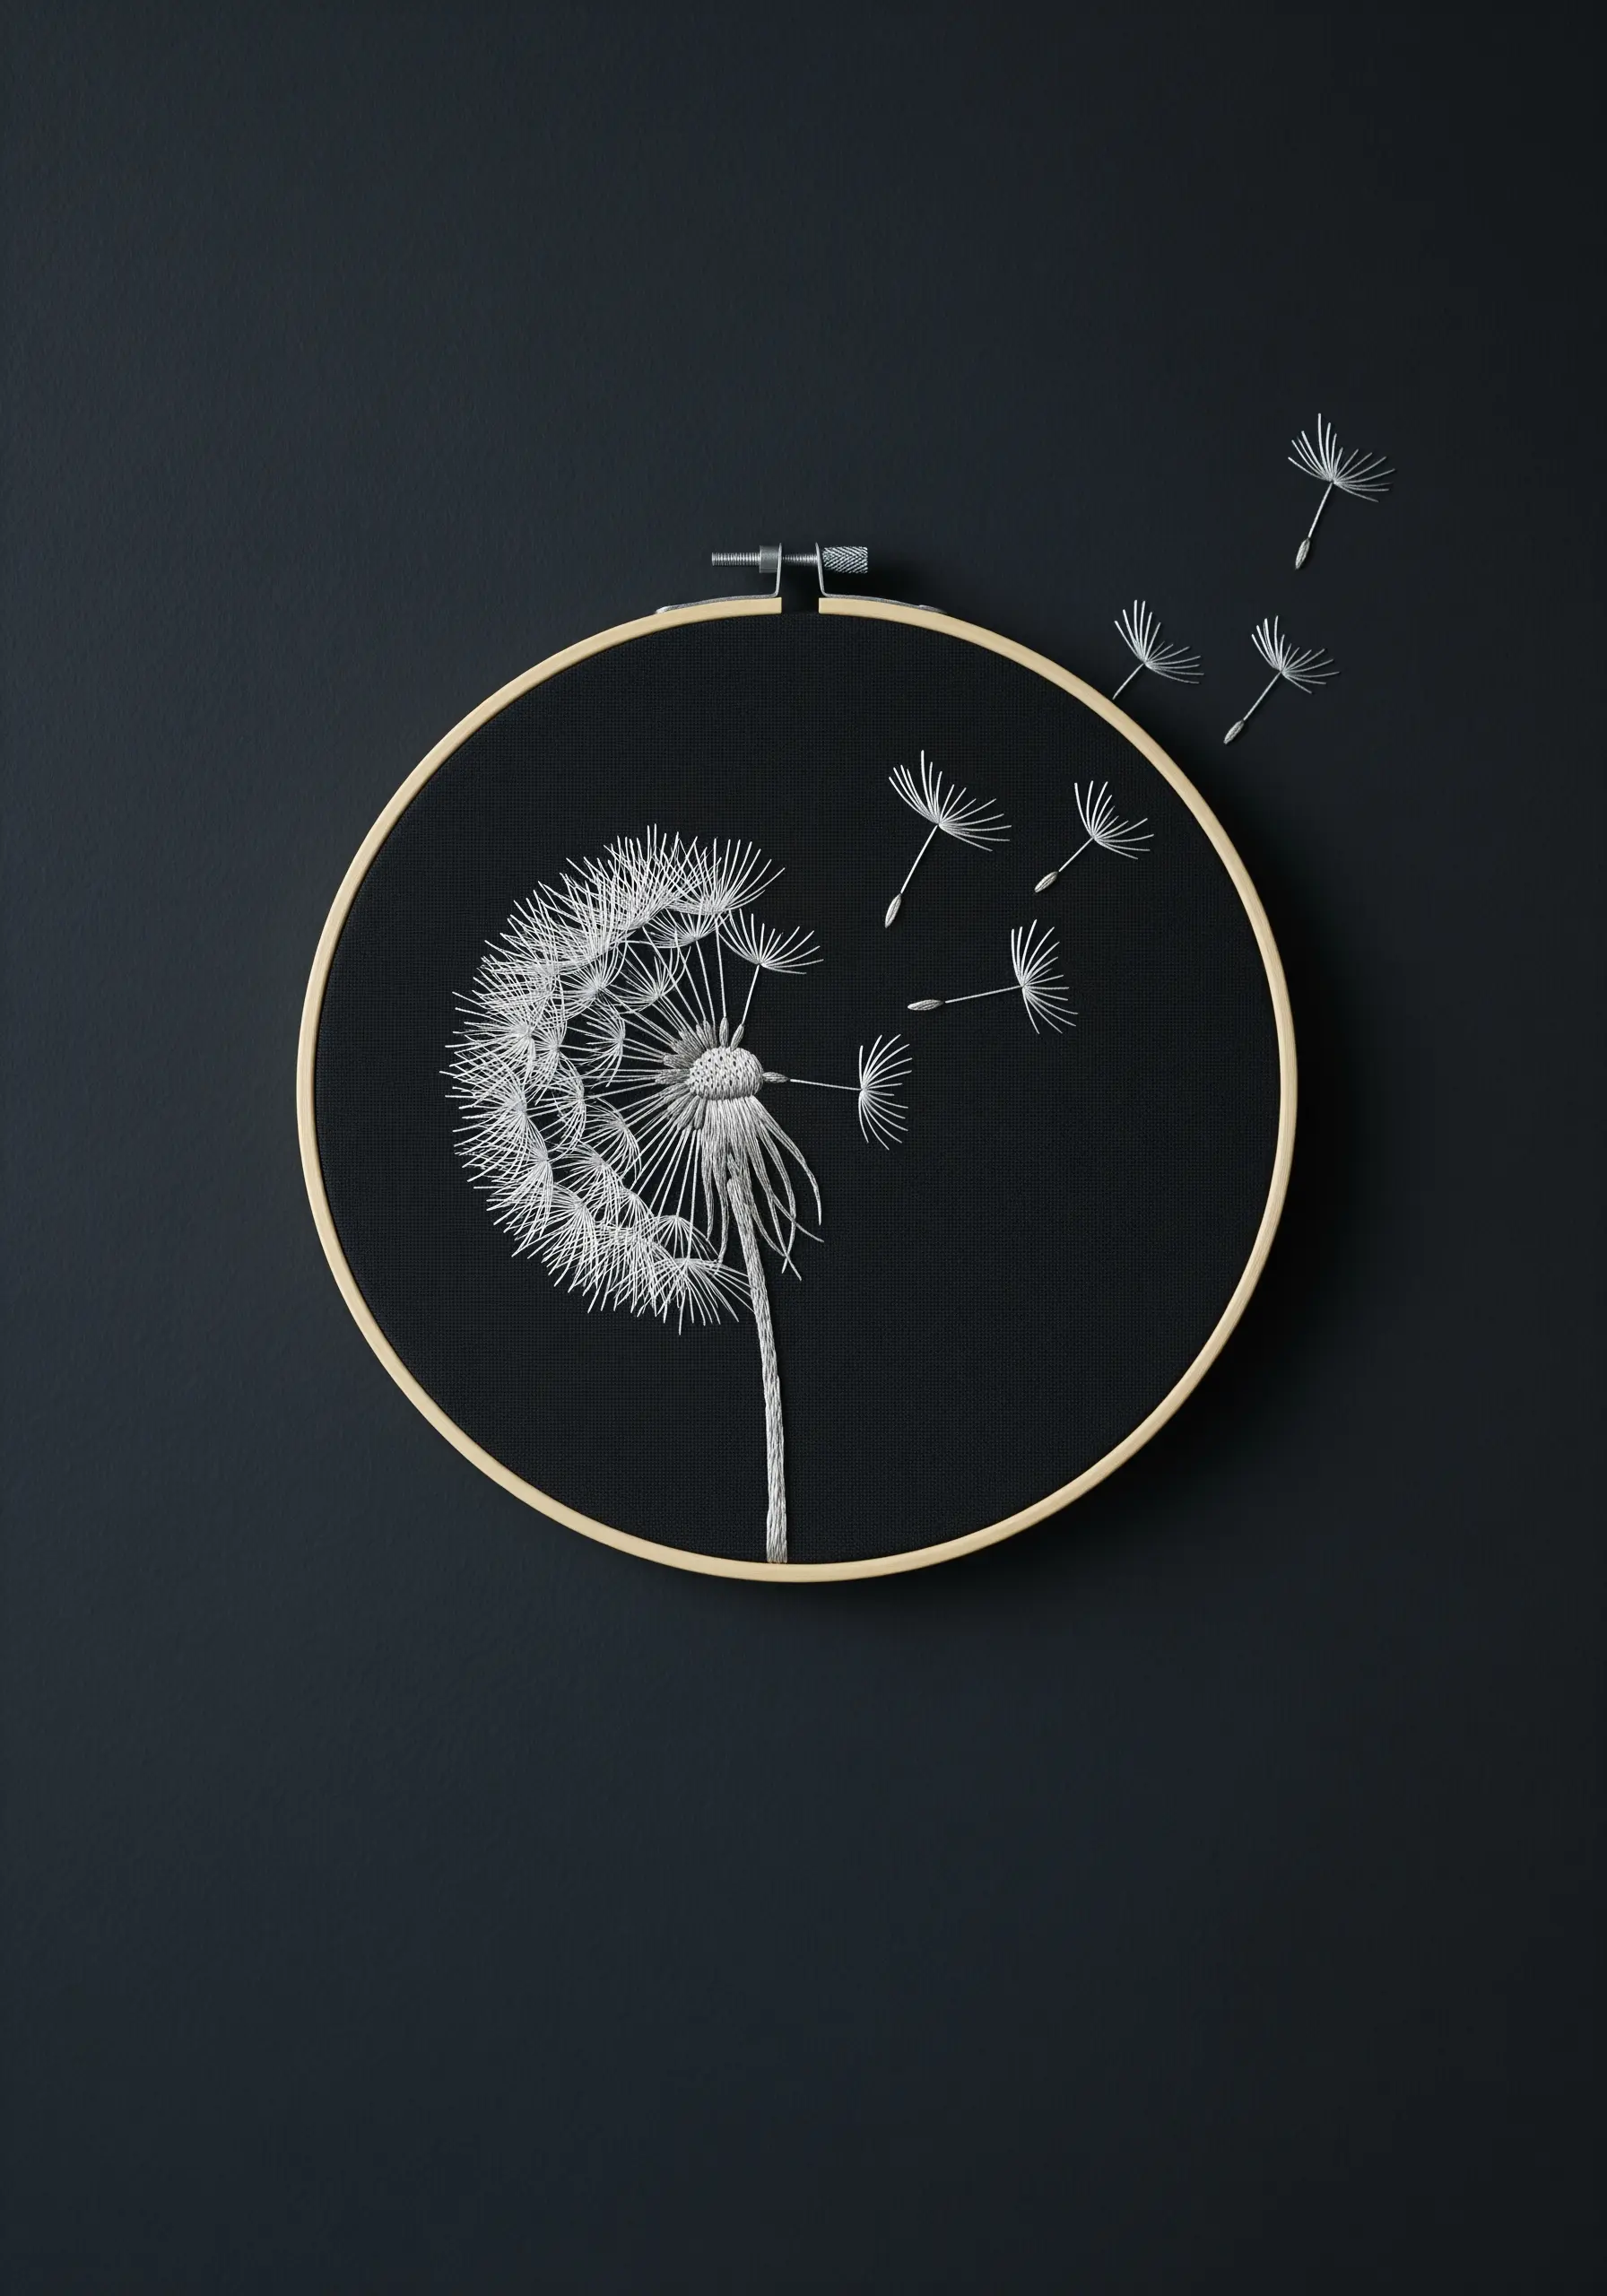
To embroider something as delicate as a dandelion, the key is to use the lightest touch possible.
Work the entire design with a single strand of floss on a dark, contrasting fabric.
Use long, delicate straight stitches for the flying seeds, ensuring they don’t pull the fabric.
This minimalist approach preserves the airy, ephemeral quality of the subject, making it perfect for minimal DIY embroidery projects.
22. Contrast Smooth and Textured Stitches for Tactile Appeal
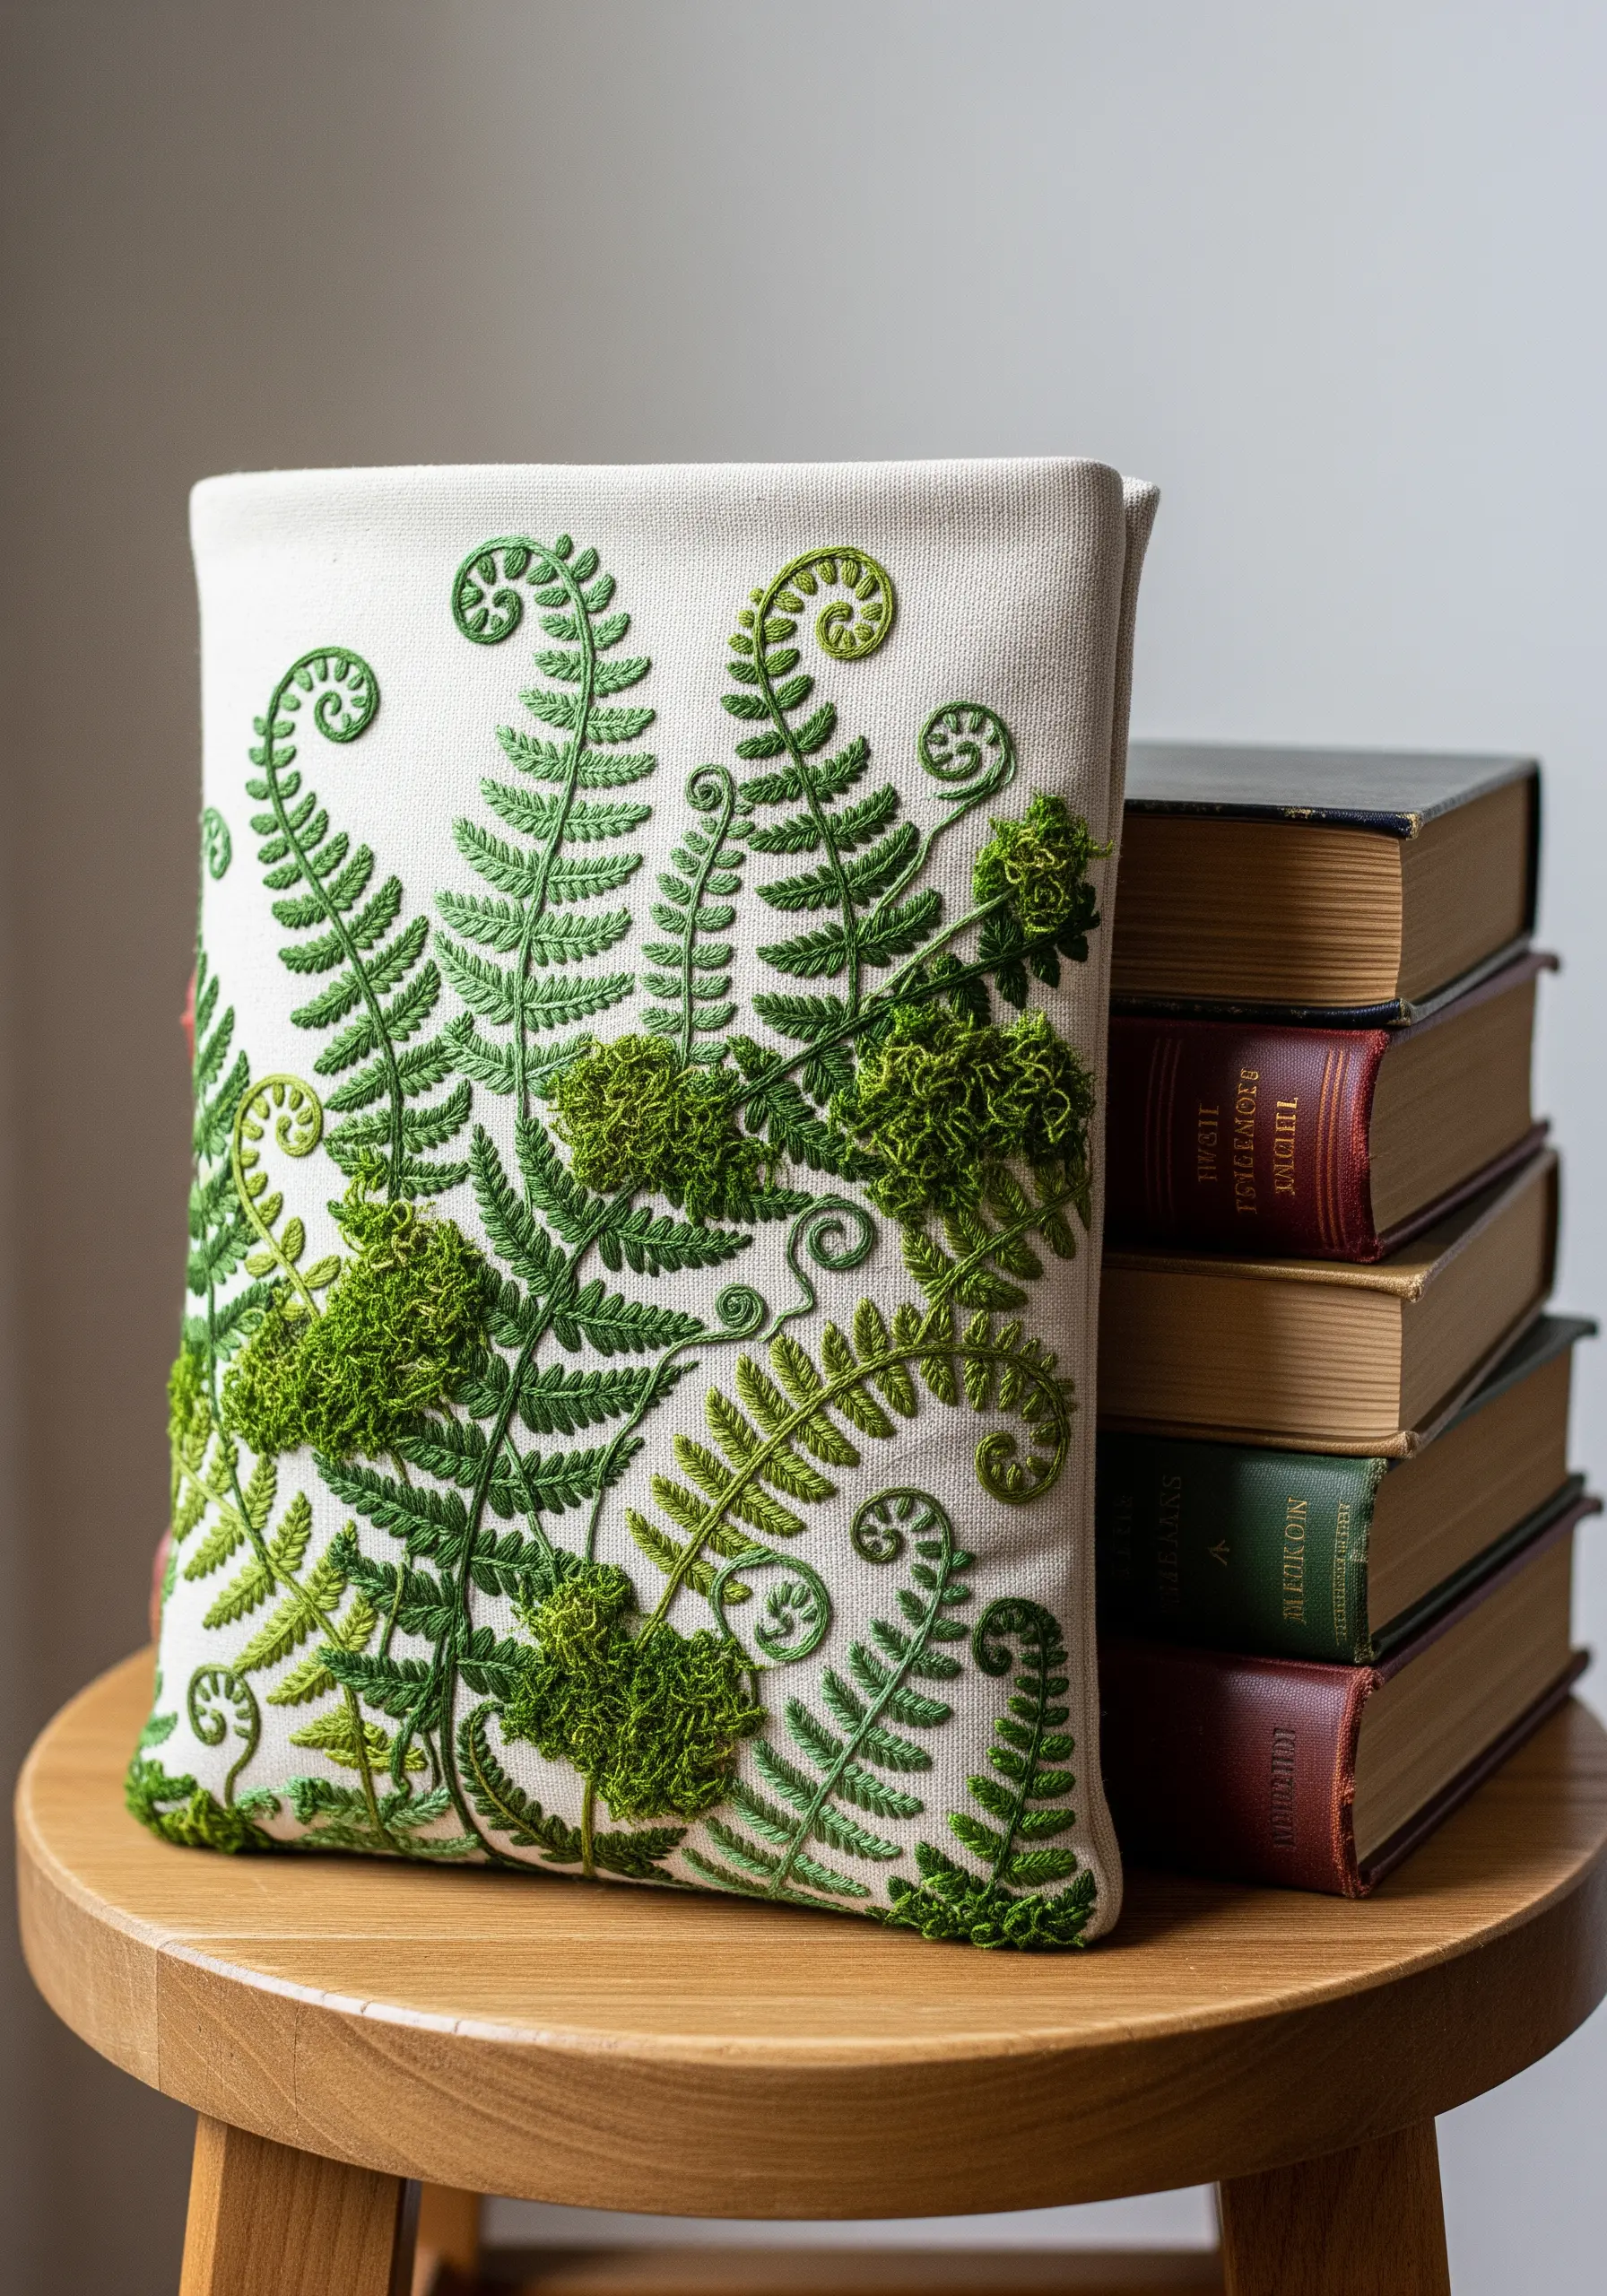
Create a design that invites touch by placing smooth and highly textured stitches side-by-side.
Render the main fern leaves with a sleek fishbone stitch, which lies flat against the fabric.
Then, add patches of moss at the base by filling the area with dense, bumpy French knots or fuzzy turkey work loops.
This textural contrast adds depth and realism to cottagecore floral patches and other botanical pieces.
23. Design an Elegant Border with Repetitive Motifs
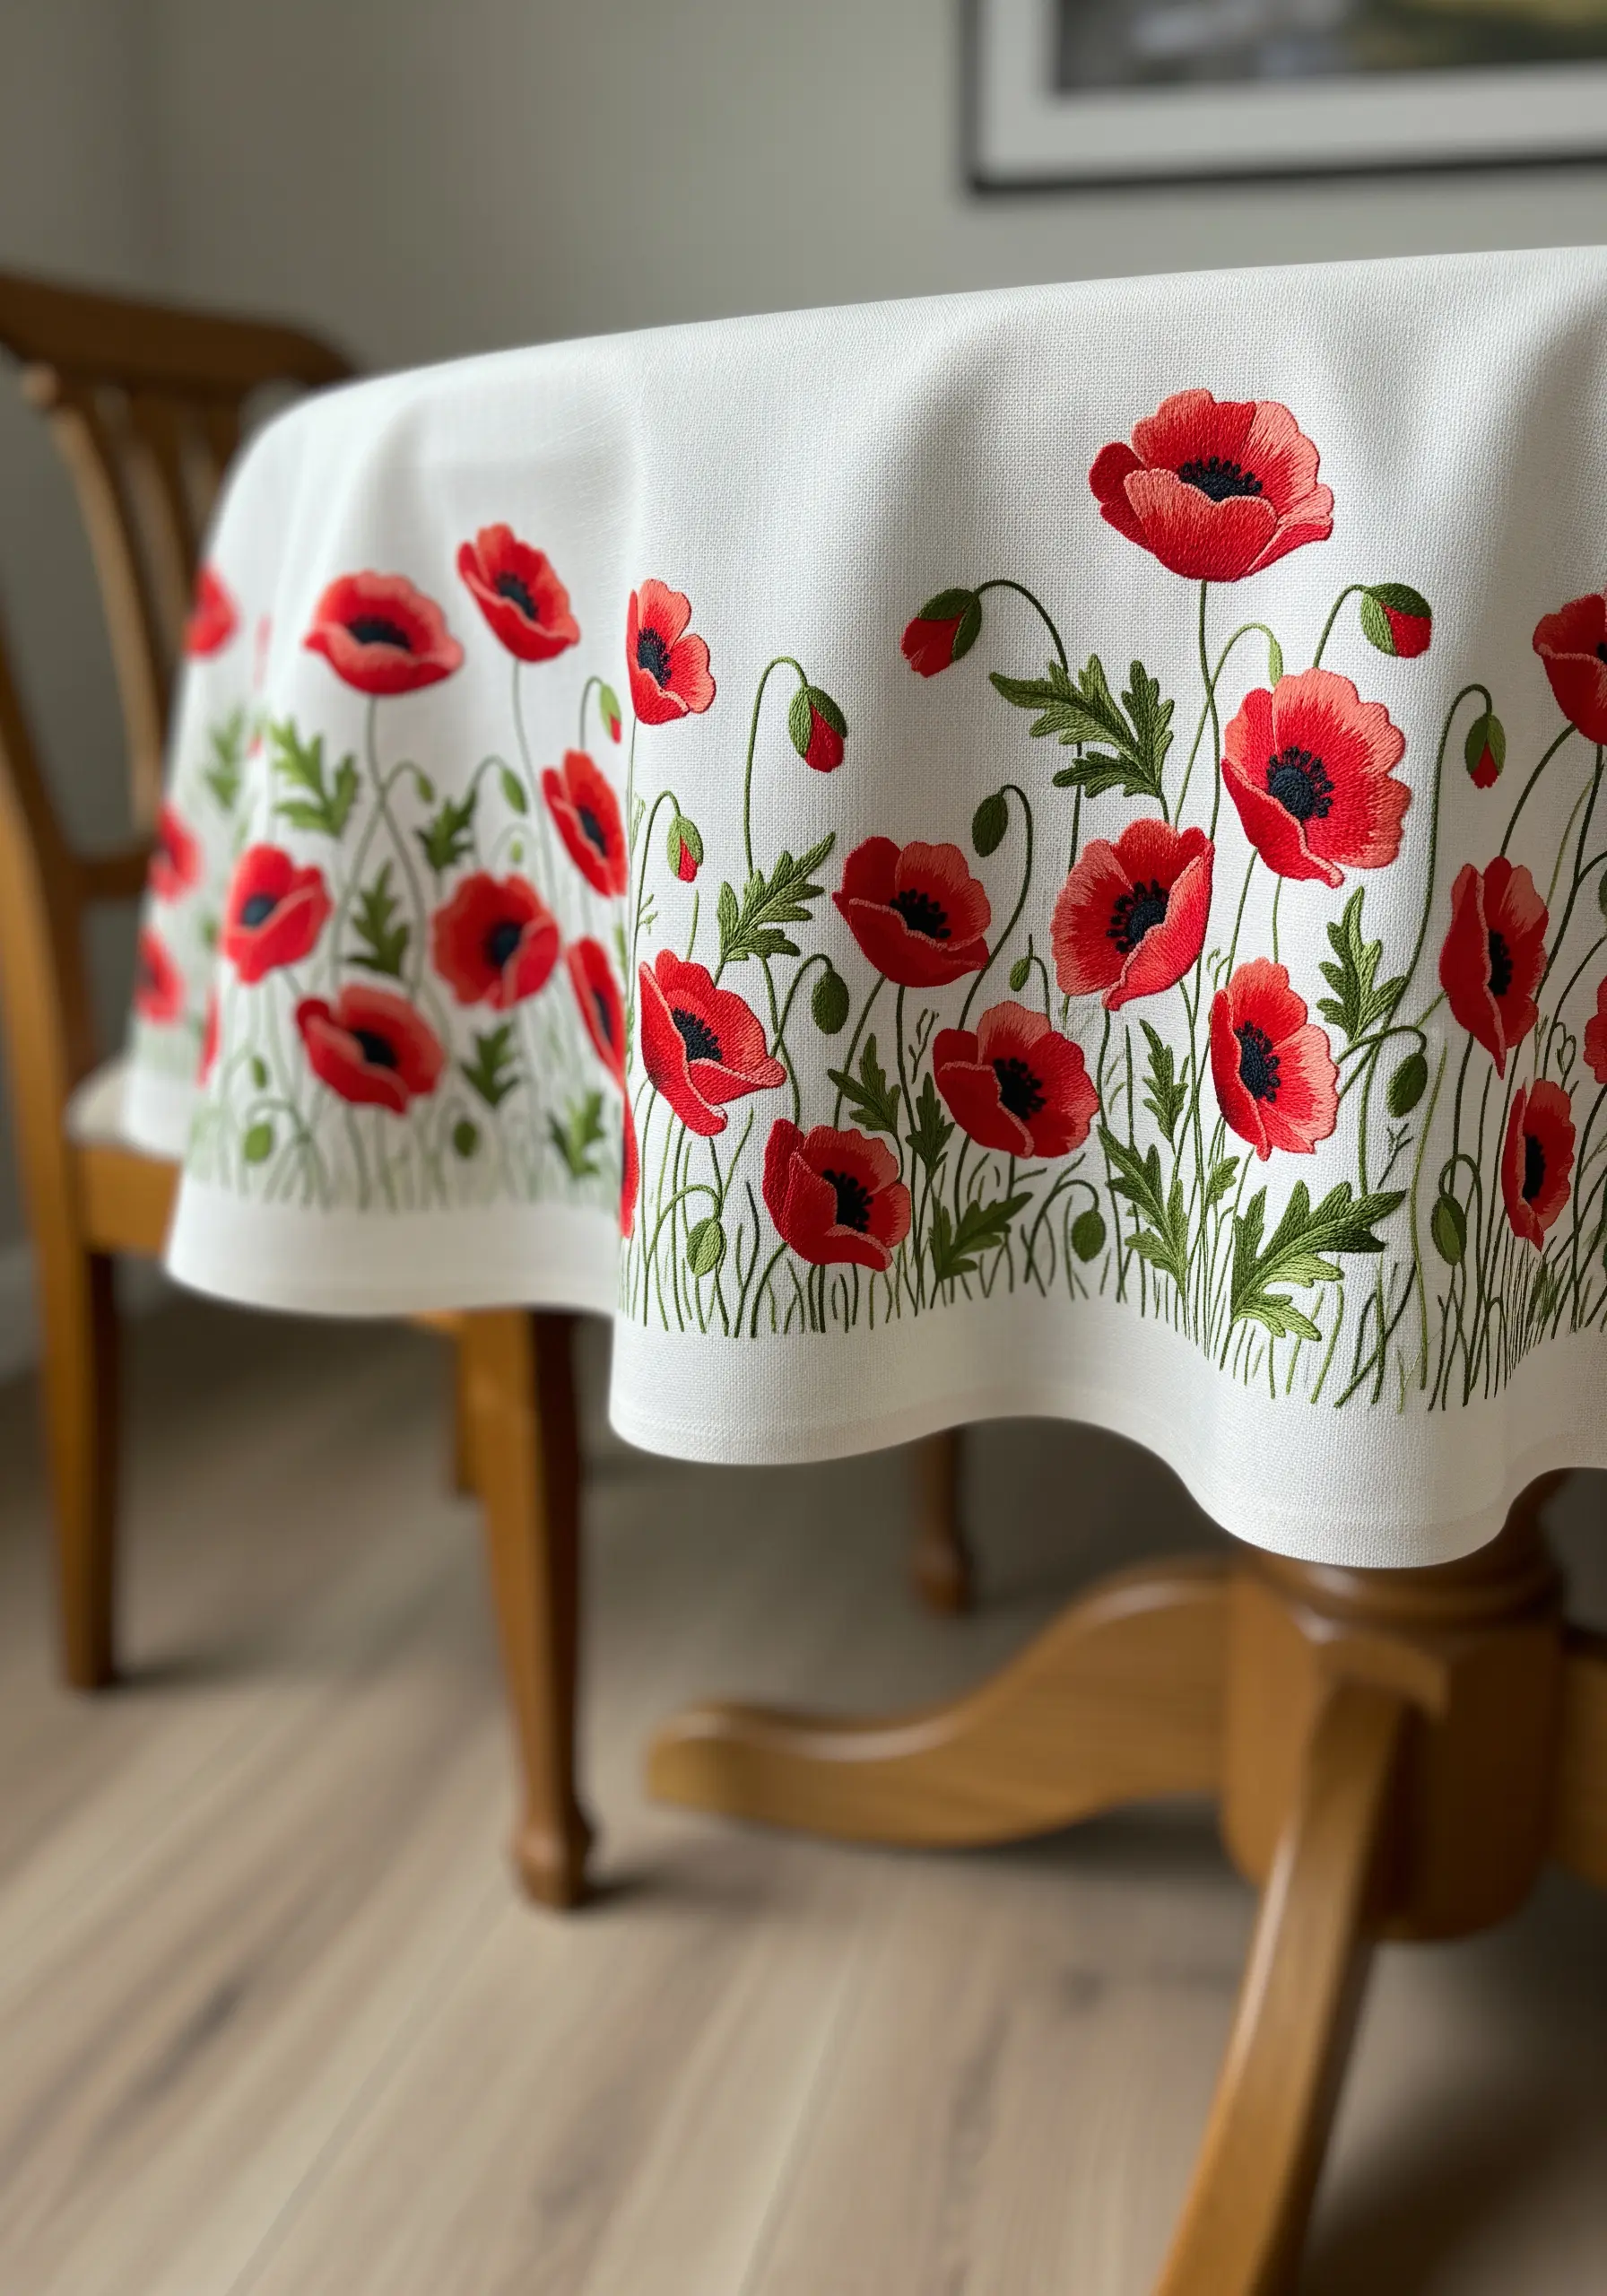
Elevate plain table linens by adding a continuous, repeating border of a single floral motif.
To ensure your design is balanced, create a simple paper template for the poppy shape and use it to mark your placement evenly around the cloth’s edge.
Use long-and-short stitch to shade the petals, giving each flower a soft, painterly look.
This technique turns everyday items into custom heirlooms using simple line art garden motifs.
24. Tell a Story Through Layered Composition
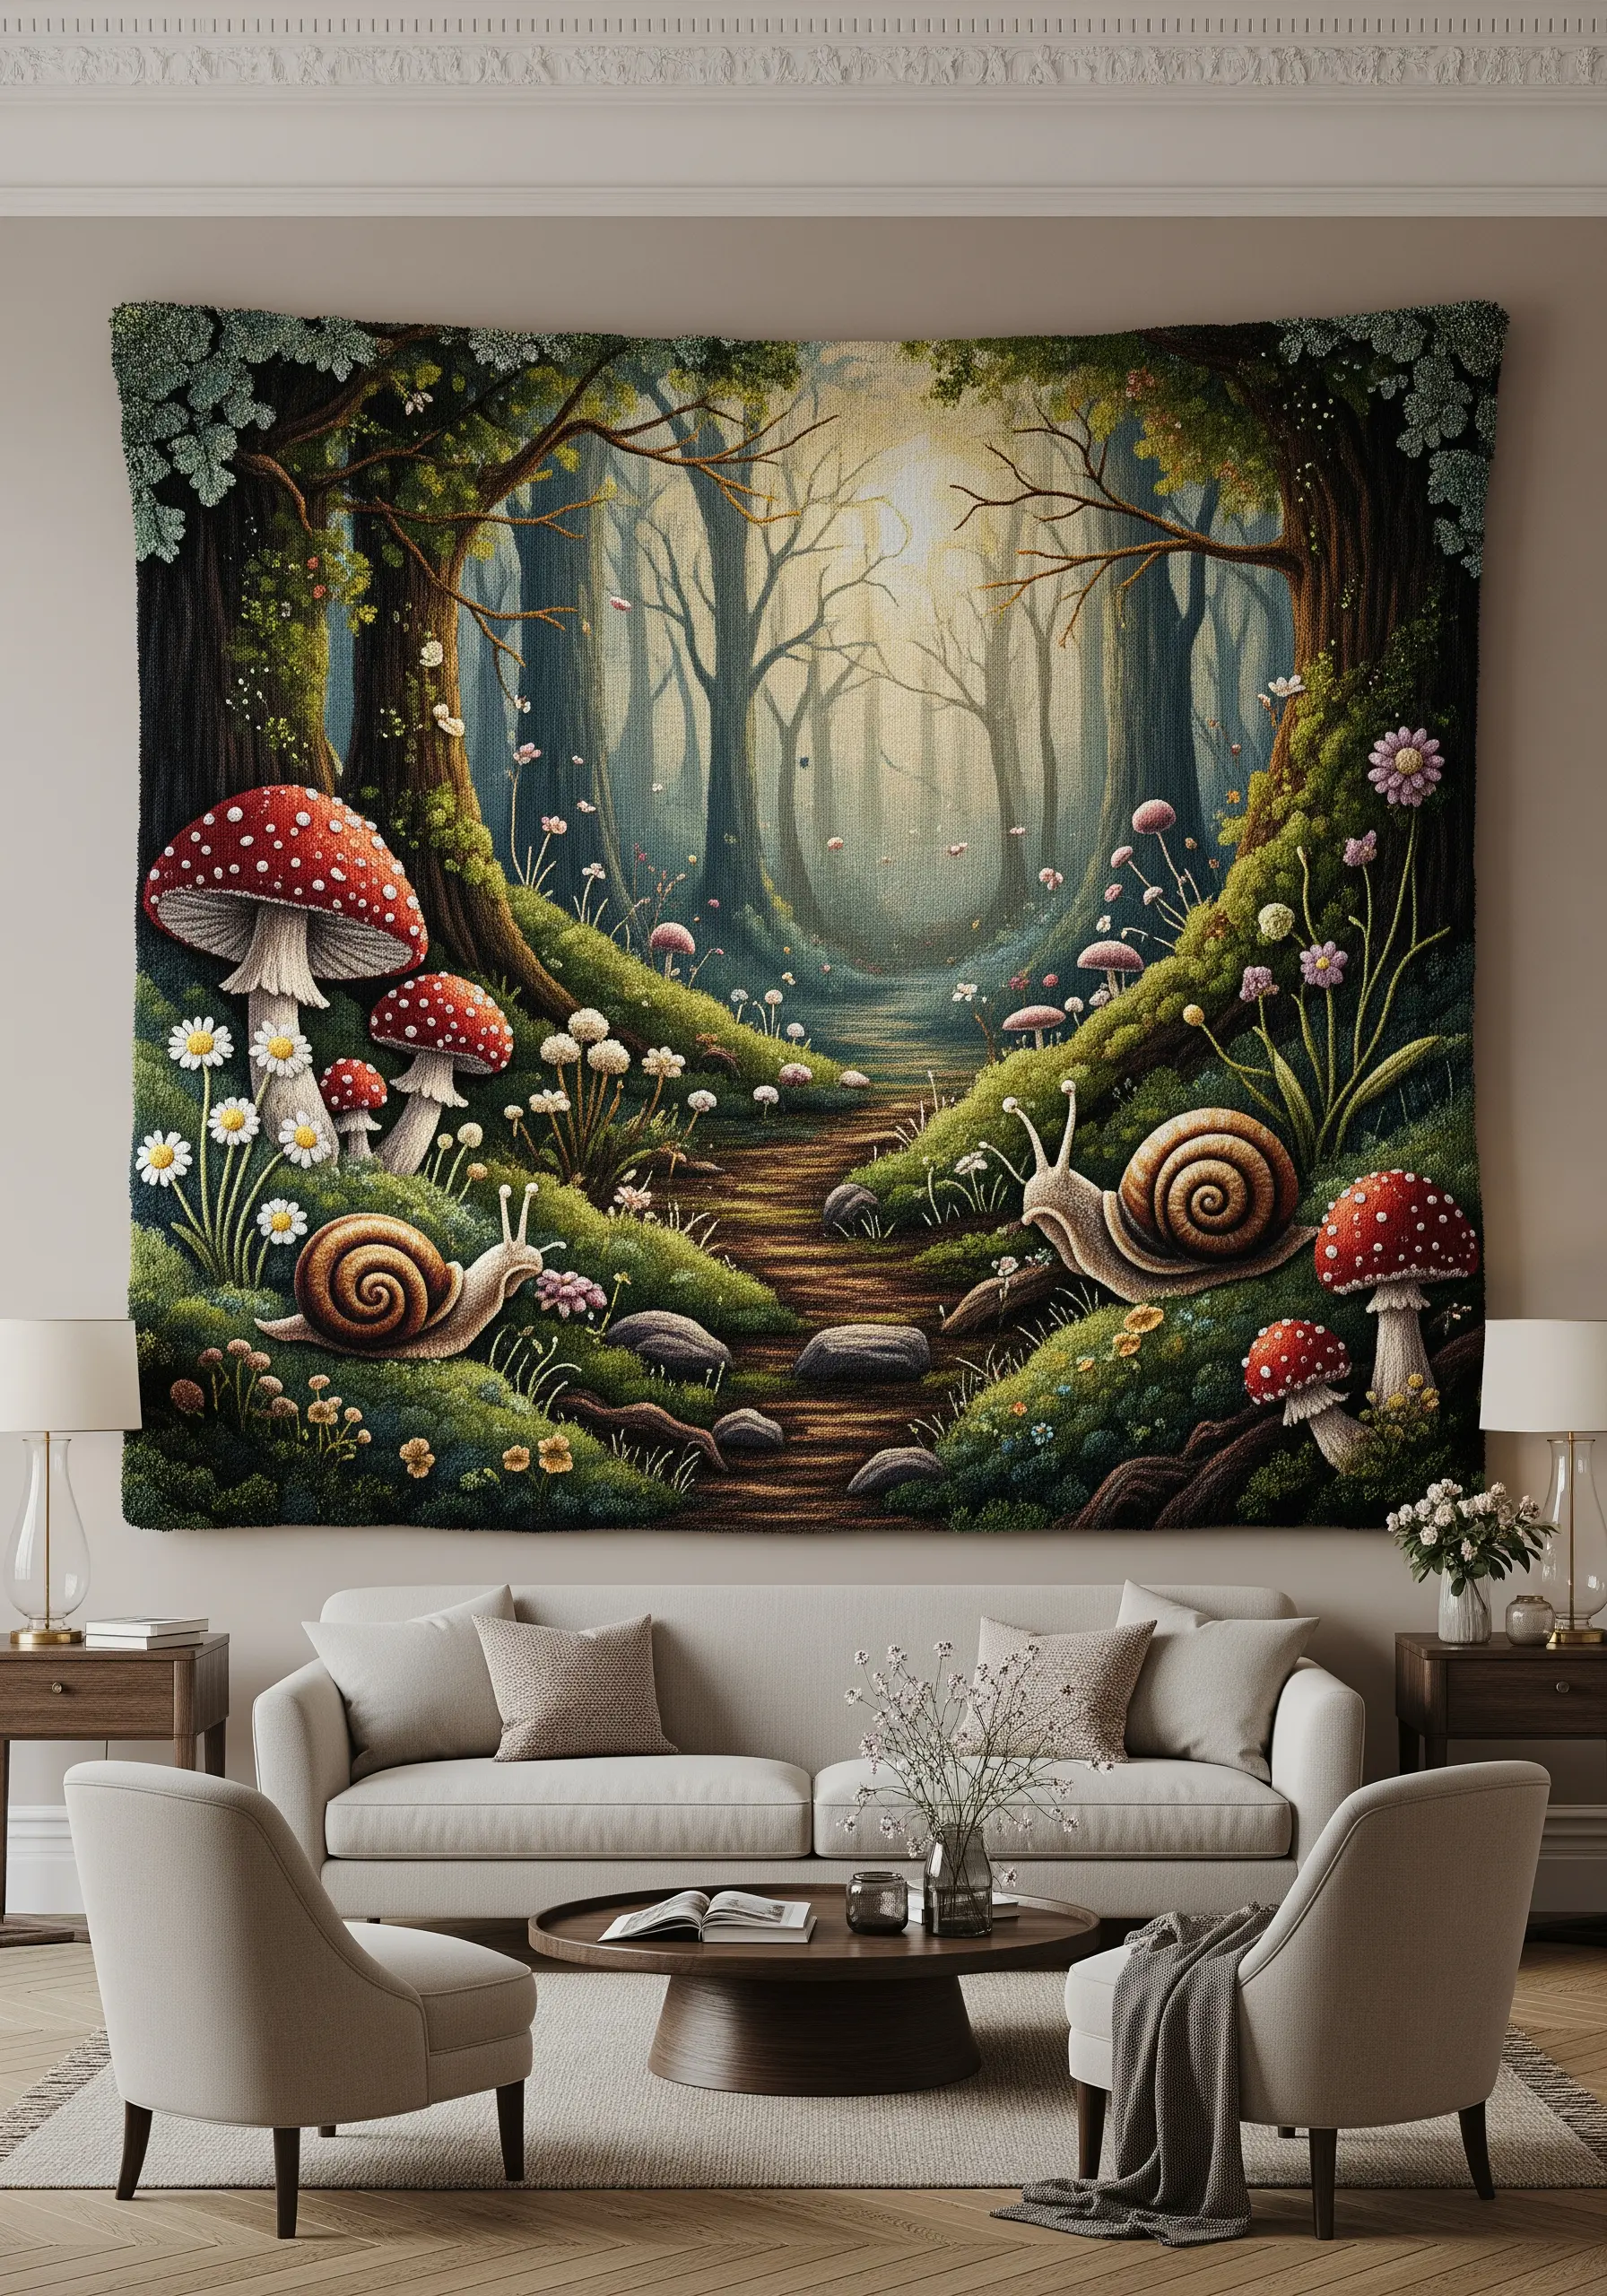
For a large-scale, narrative tapestry, think like a painter and build your scene in layers.
Establish your background first with simpler stitches and lighter colors to create atmospheric distance.
Work your way forward, adding more detail, richer color, and heavier texture—like bullion knots for snail shells and turkey work for moss—to the foreground elements.
This systematic approach makes even complex DIY framed embroidery art projects feel achievable and results in a cohesive, magical world.


