

Your canvas tote bag is more than just a utility item; it’s a blank surface waiting for a story. But it can be difficult to know how to transform it from a simple bag into a polished accessory that truly reflects your style. The secret isn’t in complex patterns or a hundred different colors.
Instead, it lies in the thoughtful combination of simple stitches to create texture, the deliberate choice of thread to create depth, and the precise execution that signals intention and care. It’s about making choices that elevate the final piece, turning your handwork into something that feels both personal and professional.
Here, you’ll find ideas that focus on technique over complexity. We will explore how changing the direction of a stitch or pairing a smooth texture with a raised one can completely transform your design. This is your guide to creating embroidery that not only looks beautiful but feels impeccably made.
1. Layered Botanicals with Satin and Daisy Stitch
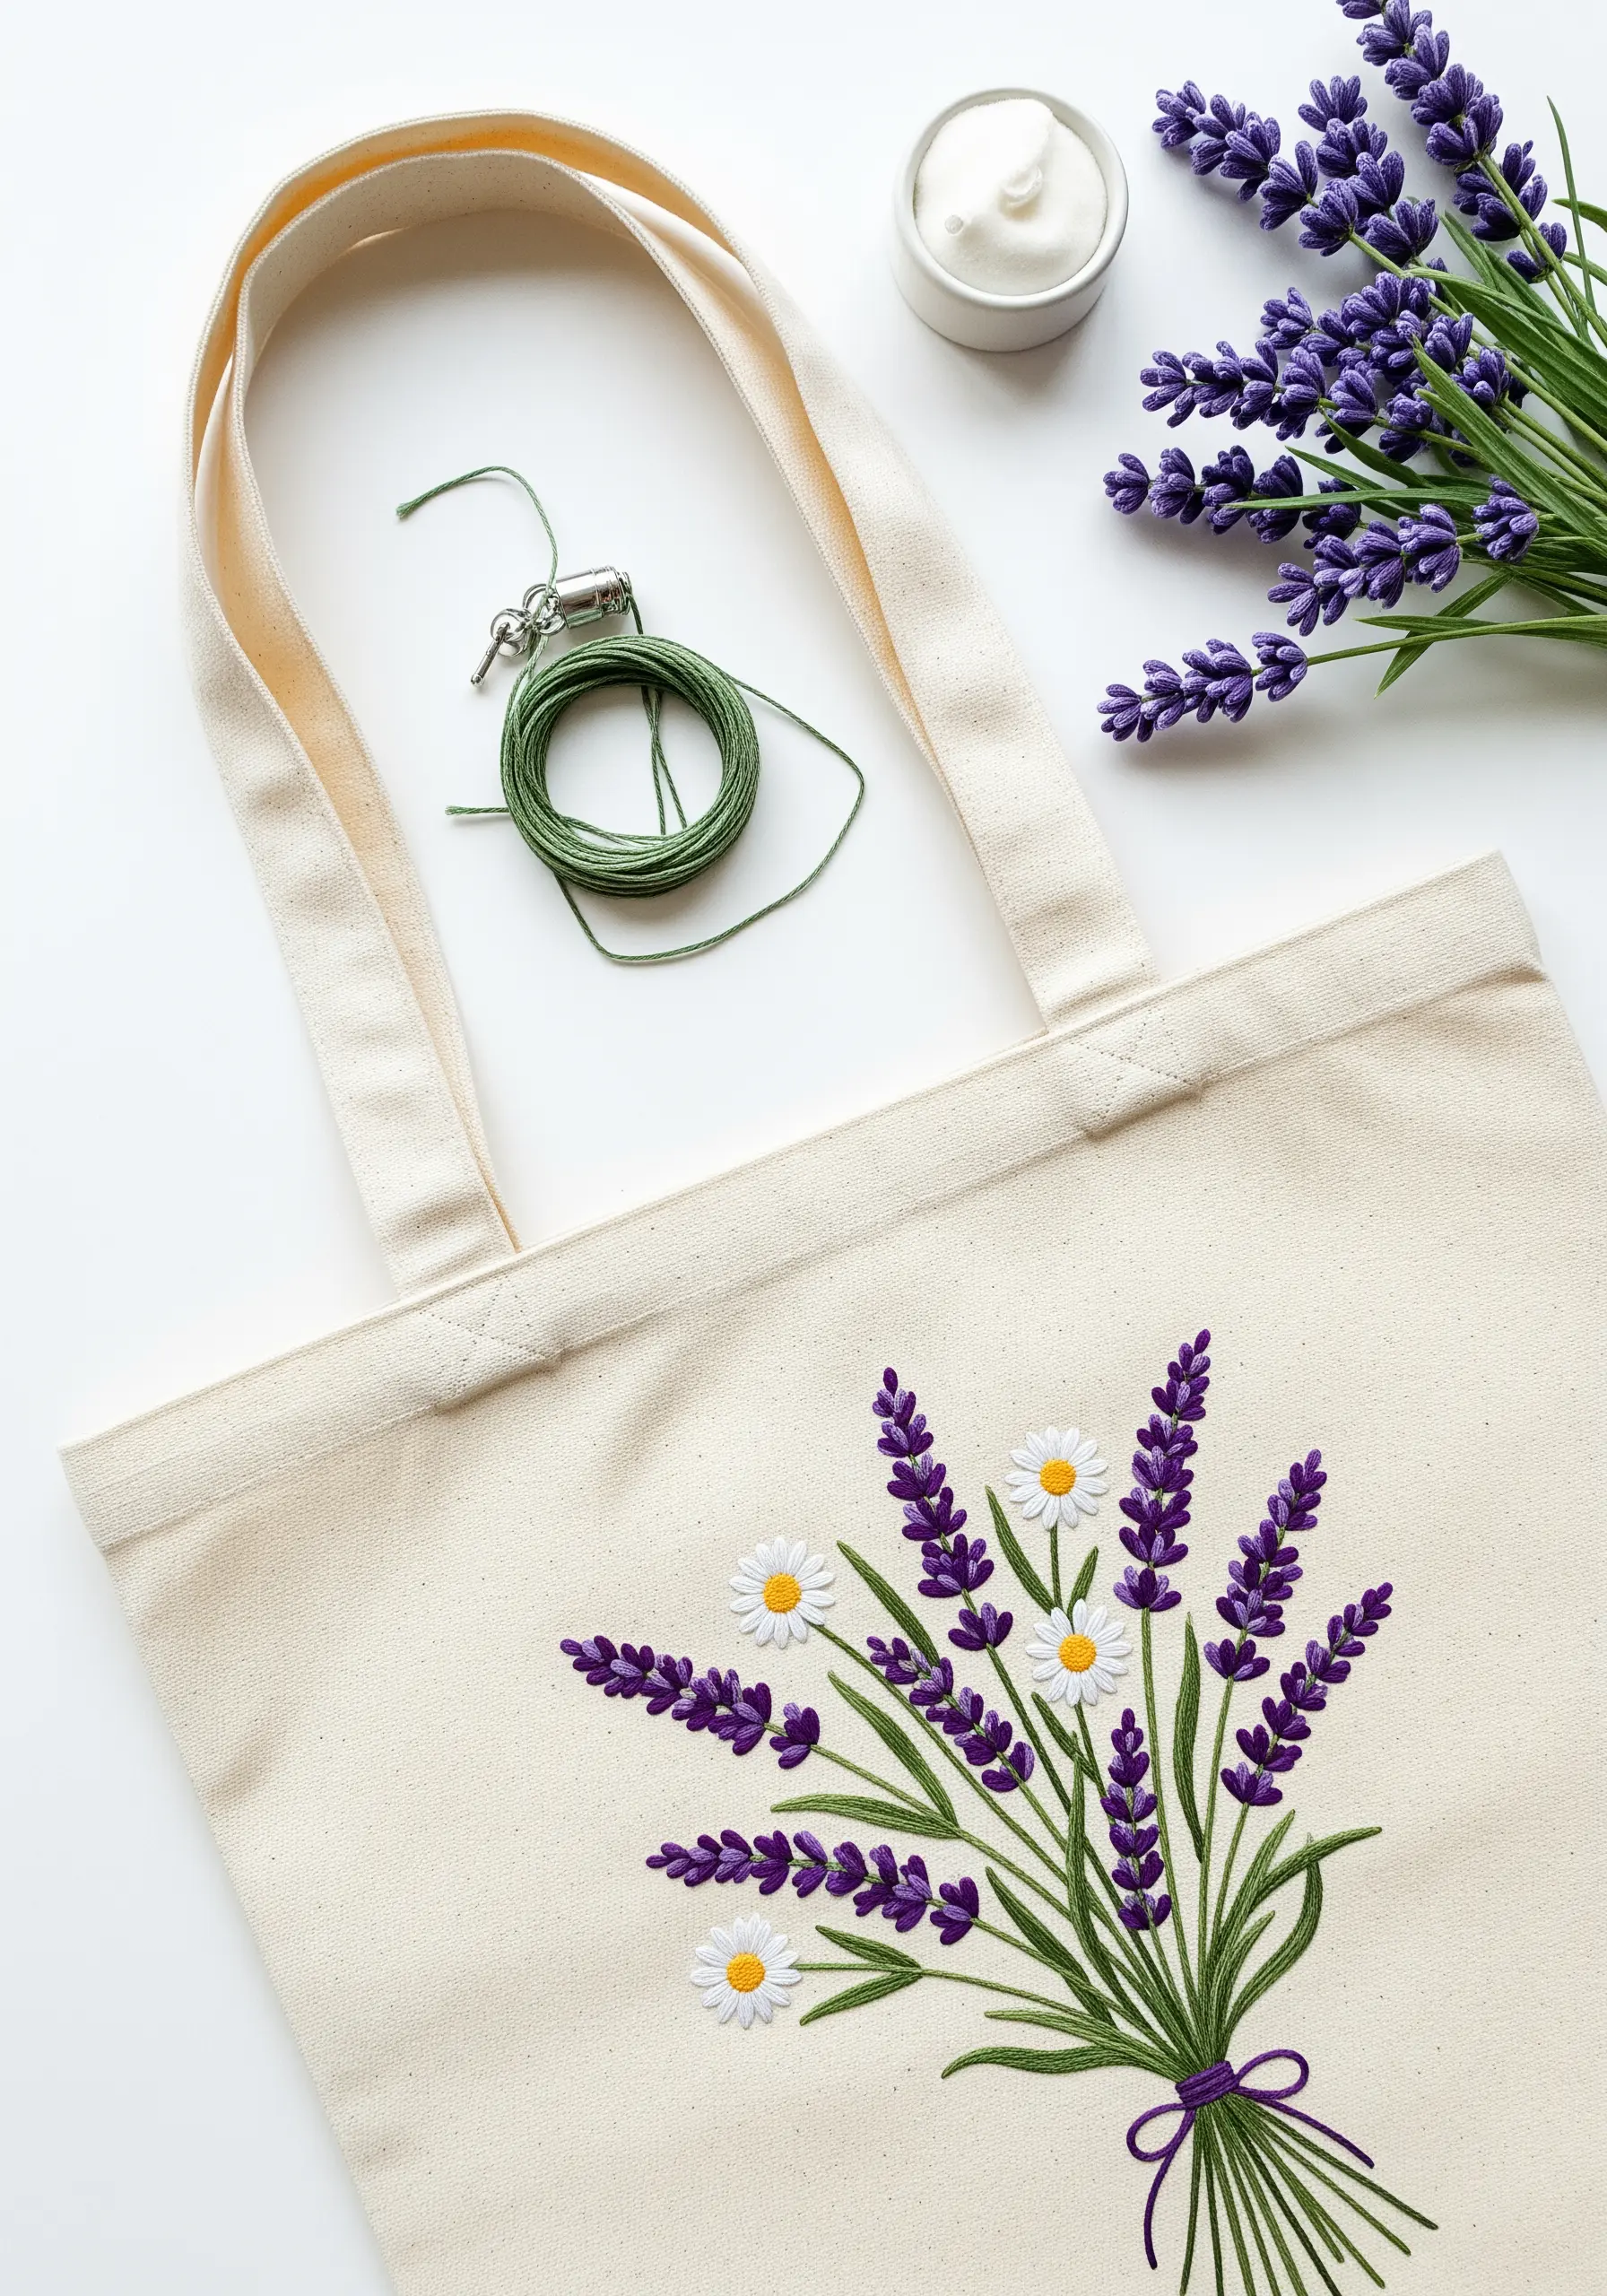
Create depth in your floral bouquets by combining two distinct stitch textures.
Use a dense, smooth satin stitch for the lavender buds, ensuring your stitches lie close together for a solid, plush effect.
For the daisies, switch to a light and airy lazy daisy stitch, pulling each loop just tight enough to form a petal without puckering the canvas.
Reserve a finer, single strand of thread for the stems, using a backstitch or stem stitch to keep the lines crisp and delicate, which makes the blossoms appear fuller.
This contrast between the heavy satin stitch and the open lazy daisy stitch is what gives the design a professional, dimensional quality.
2. High-Contrast Mandala with Whipped Outlines
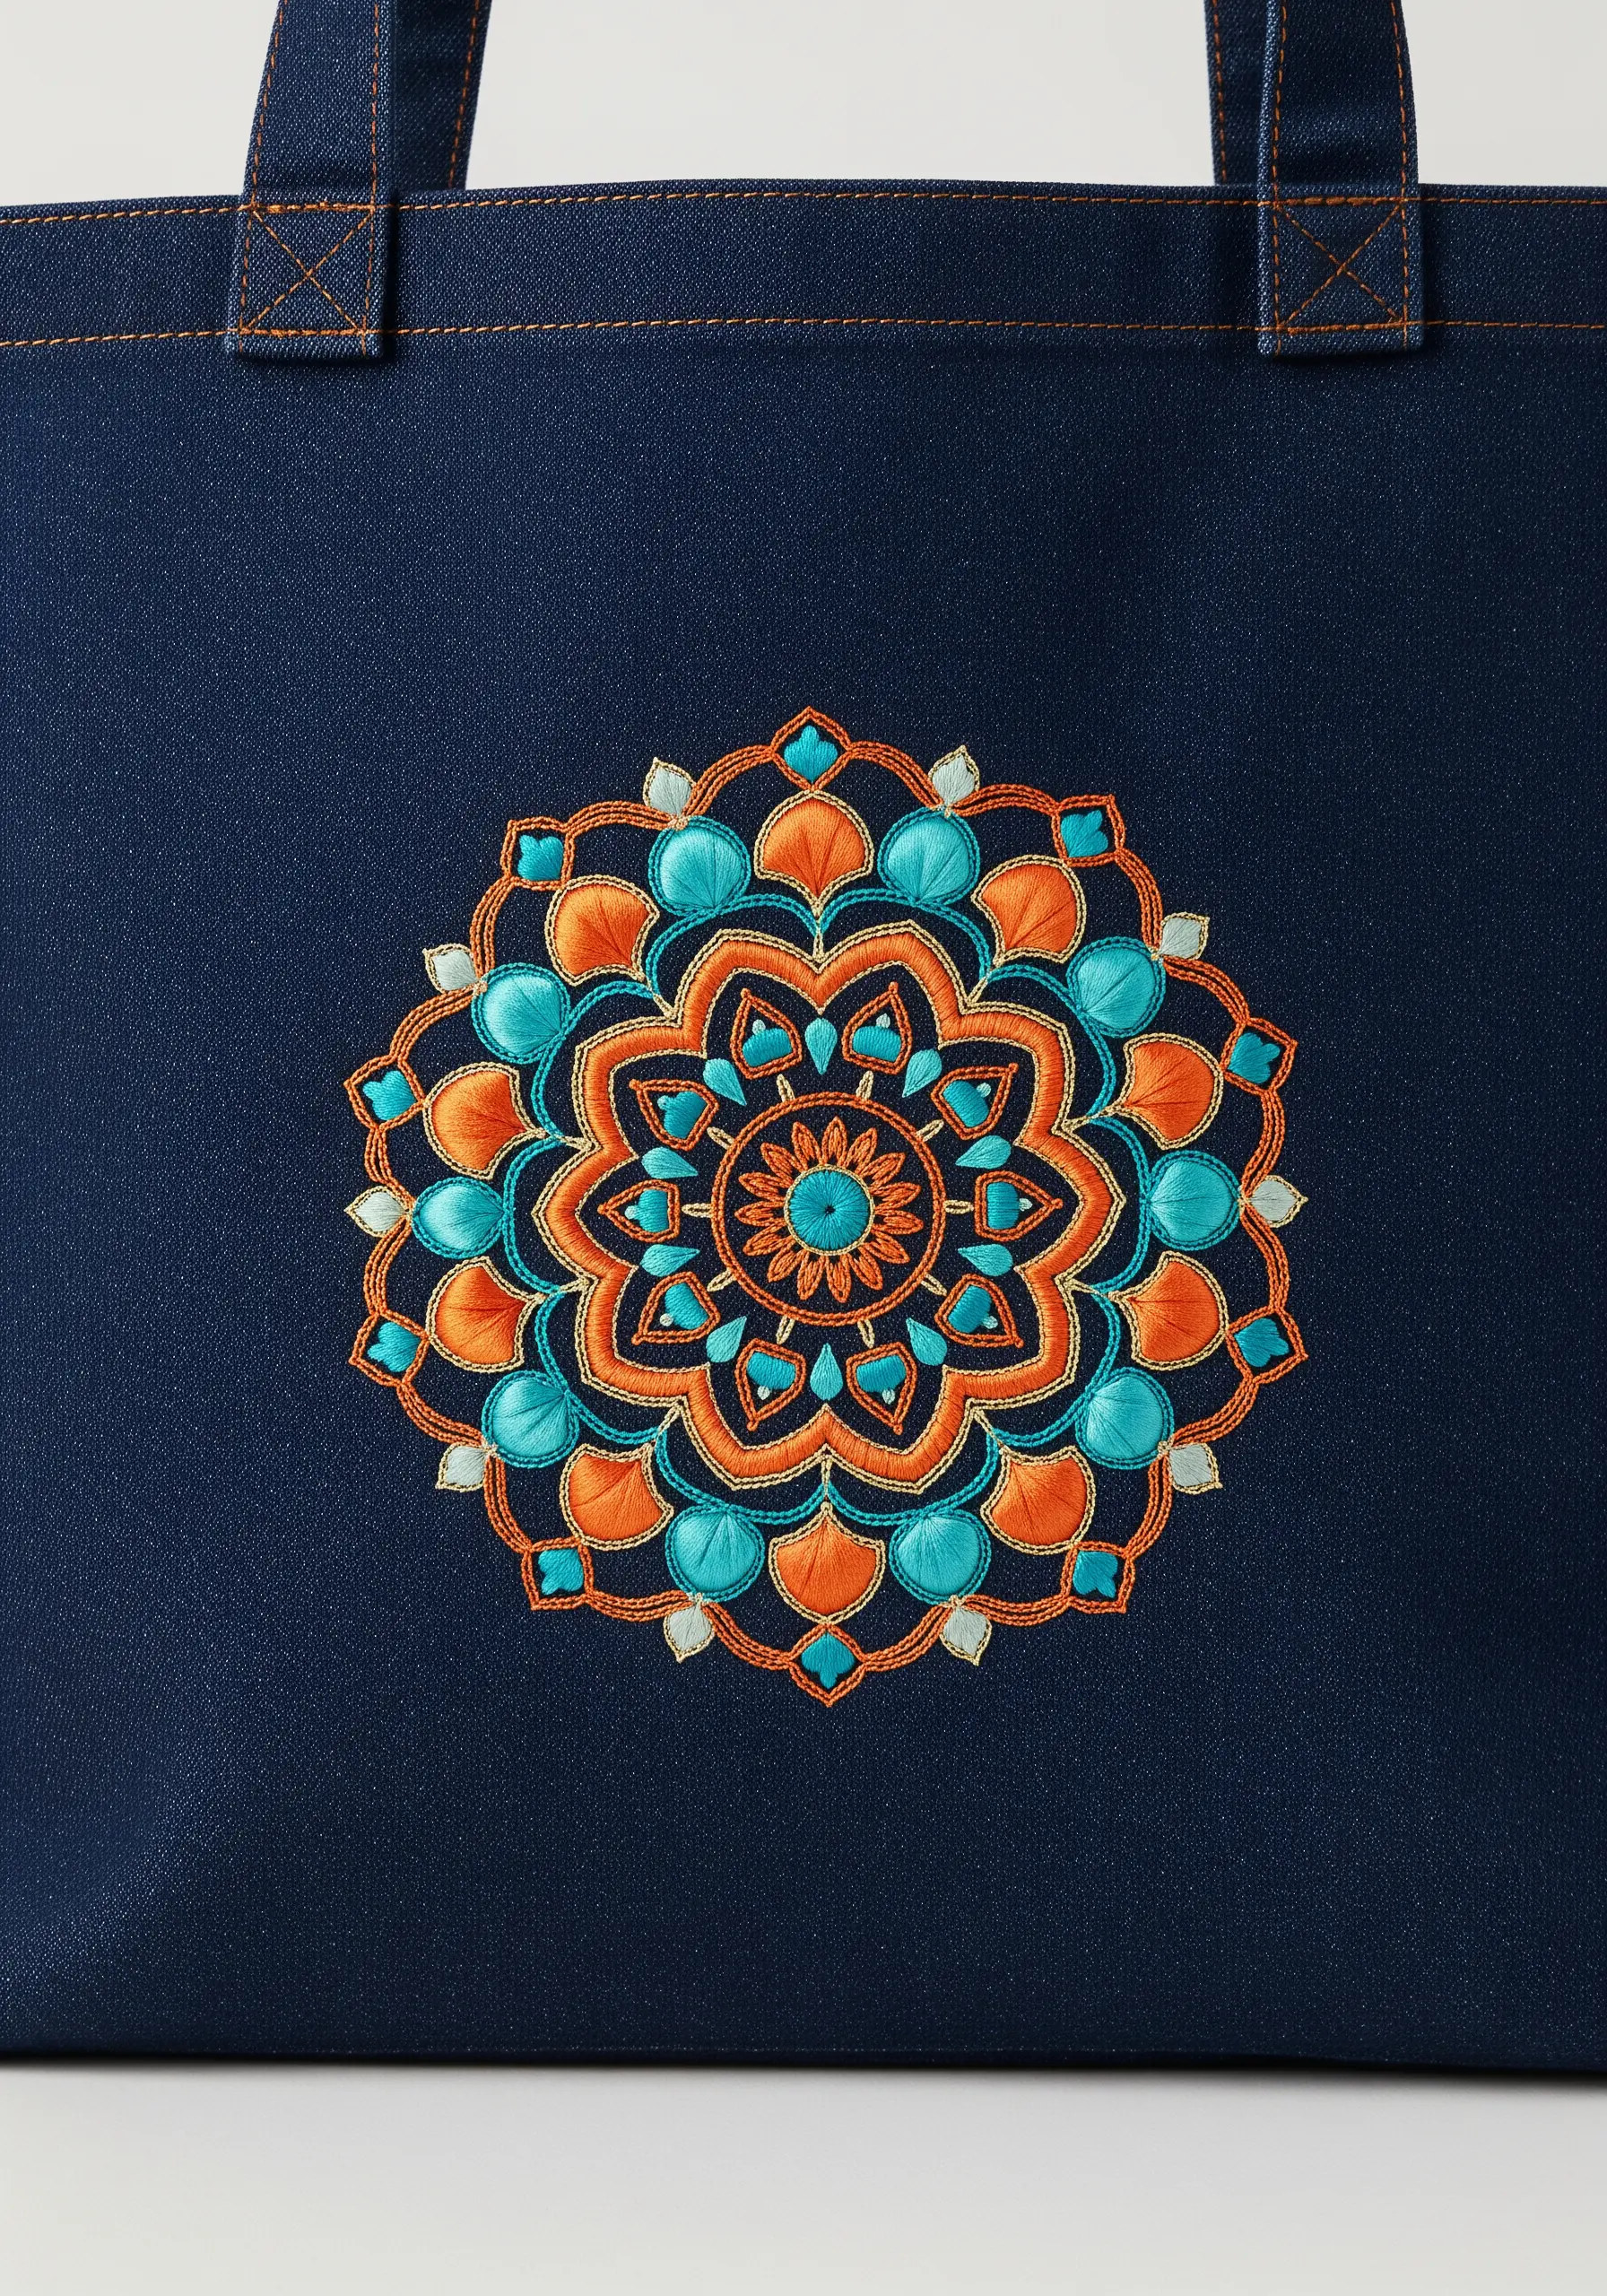
Make your geometric designs pop on dark fabric by focusing on clean edges and vibrant color choices.
Fill each segment of the mandala with a directional satin stitch, ensuring all stitches within a shape flow the same way for a smooth, light-reflective finish.
To achieve those razor-sharp outlines, first lay down a backstitch, then wrap it with a second thread—this is called a whipped backstitch.
This technique raises the outline slightly and covers any imperfections, giving it a bold, corded look that crisply separates the colors.
Choosing a complementary color palette, like this teal and orange, creates maximum visual impact against the dark denim.
3. The Elevated Single-Line Portrait

The elegance of a continuous line drawing relies entirely on the quality of your stitch.
Instead of a standard backstitch, which can look segmented on curves, use a whipped backstitch or a stem stitch for a fluid, uninterrupted line.
Opt for a slightly thicker thread, like a #8 perle cotton or all six strands of embroidery floss, to give the line presence and weight against the fabric.
Maintain consistent, even tension throughout the entire design to avoid any pulling or distortion of the minimalist portrait.
This technique transforms a simple drawing into a piece of sophisticated modern line art.
4. Geometric Daisies on Textured Corduroy
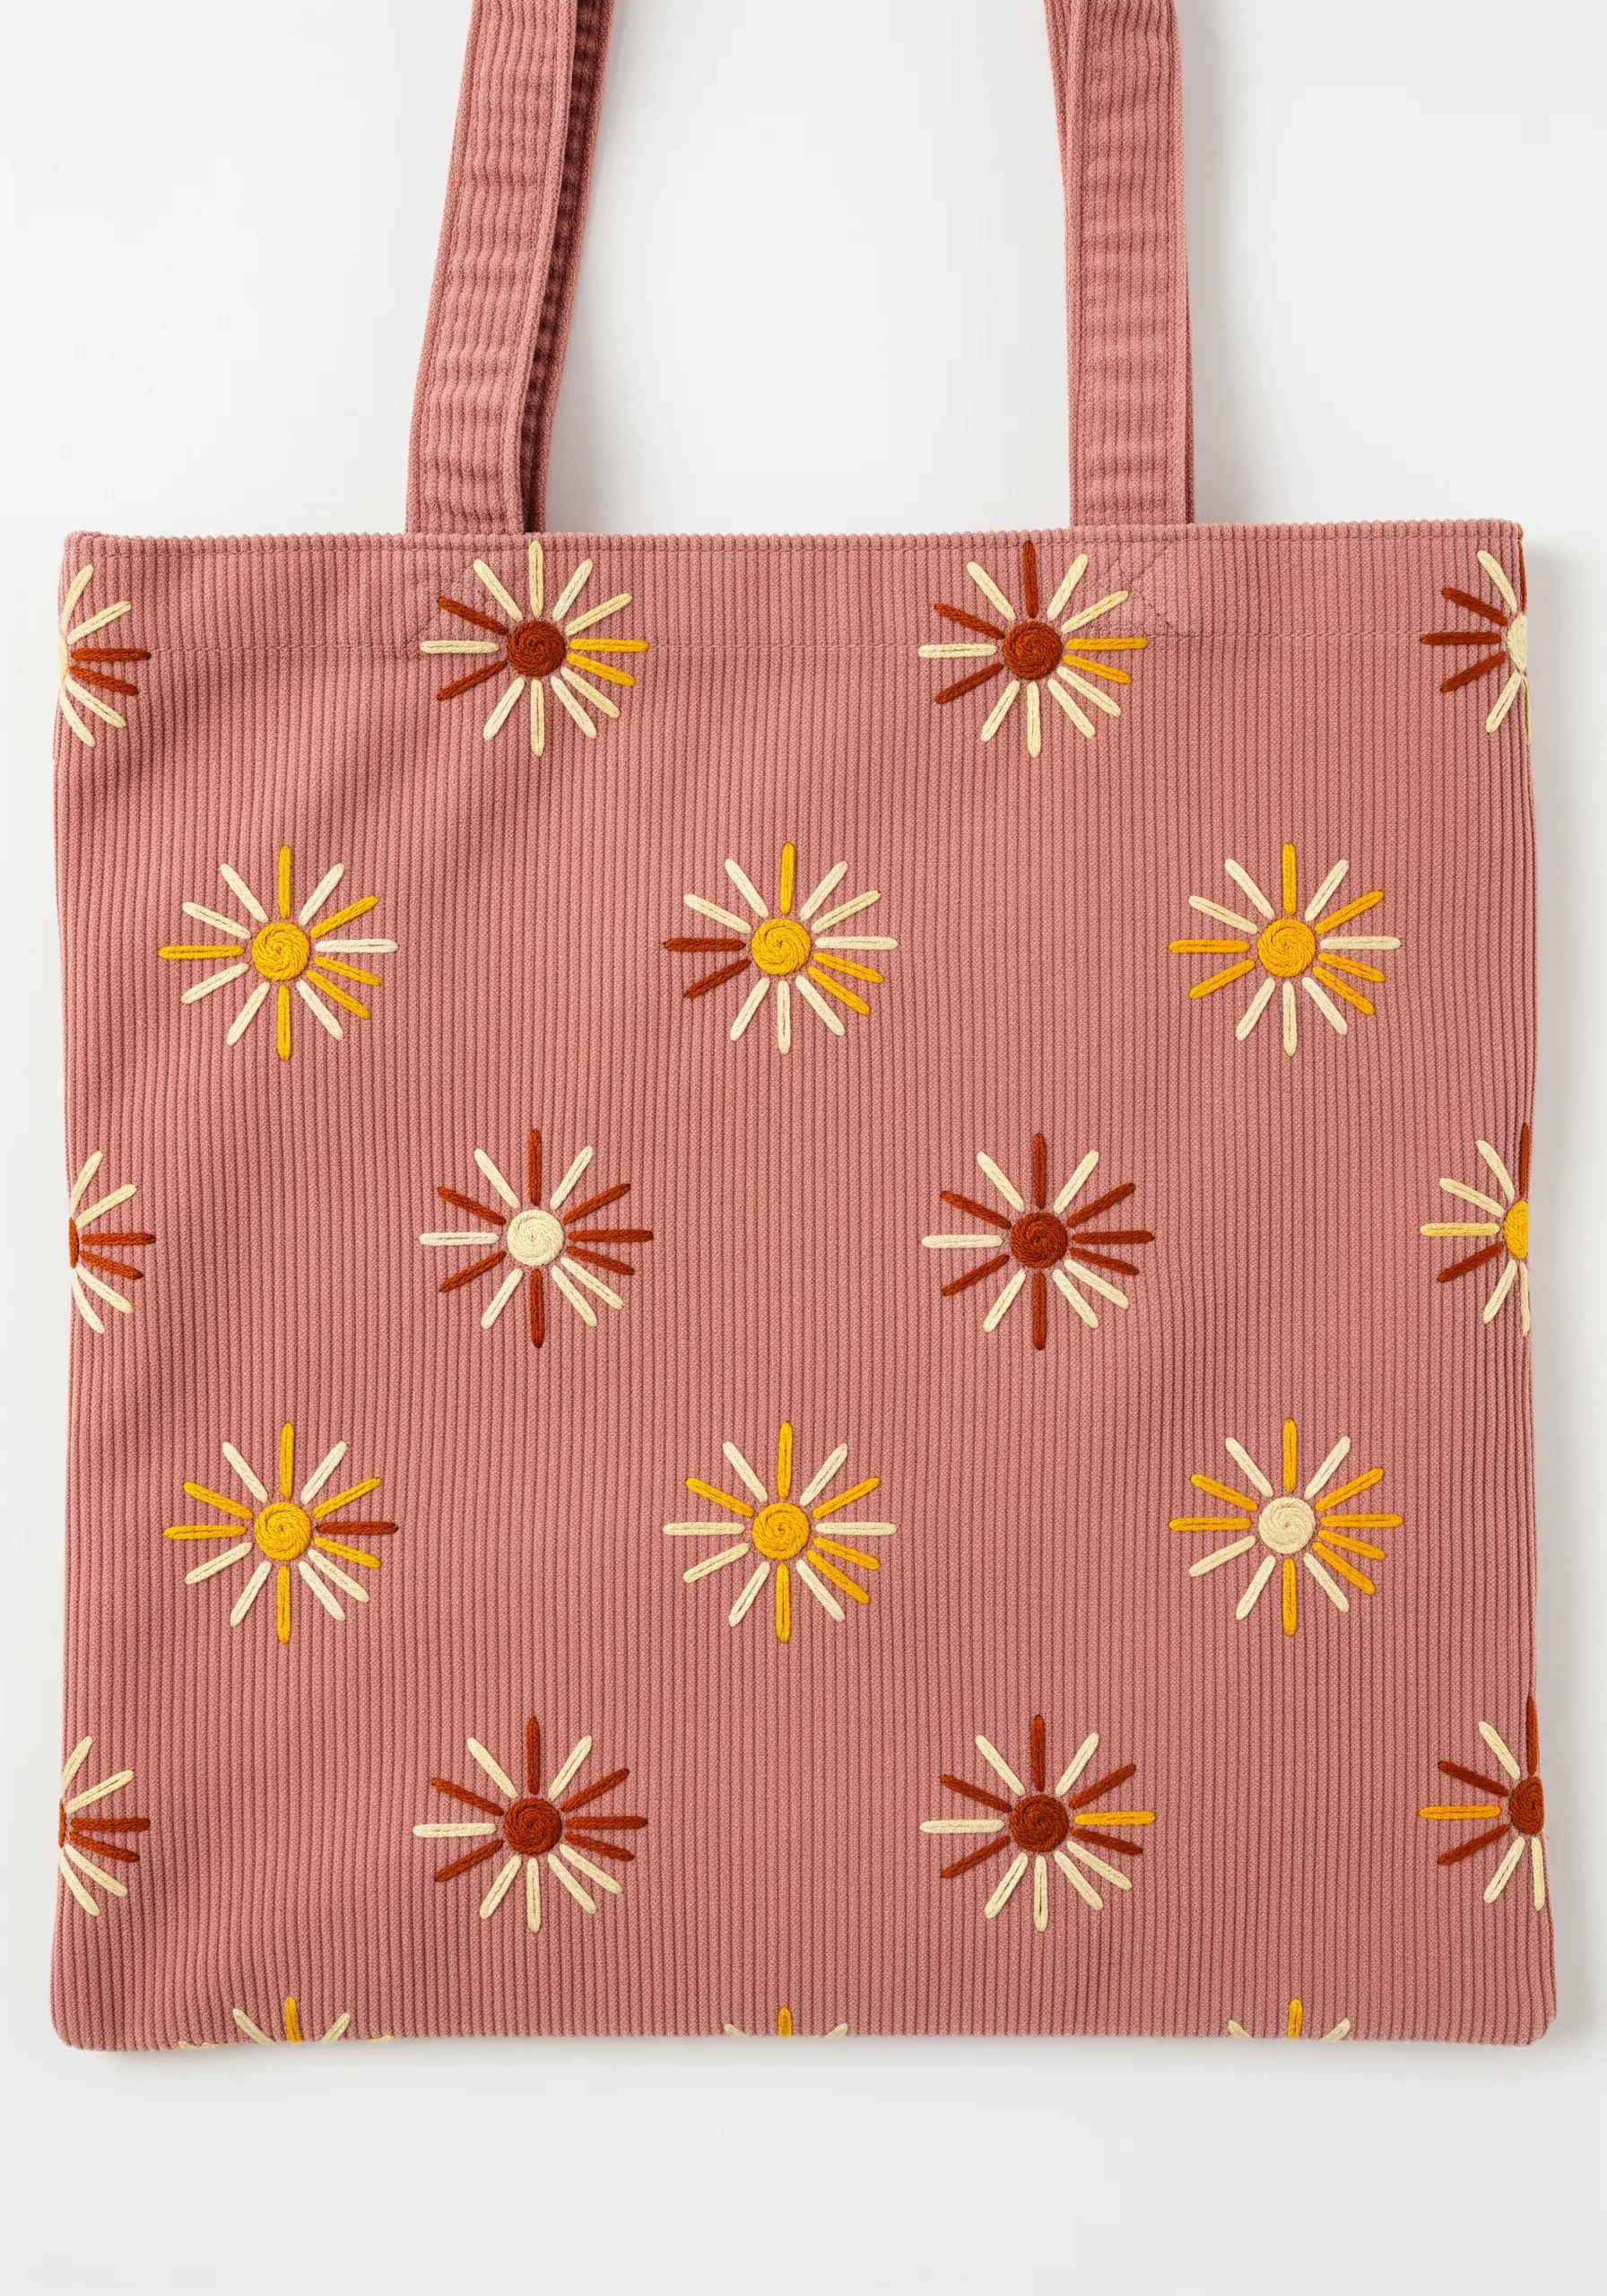
When embroidering on a textured fabric like corduroy, choose simple, bold stitches that won’t get lost in the fabric’s weave.
This scattered pattern uses basic straight stitches for the petals and a small satin-stitched circle for the center.
Vary the length and color of the straight stitches to create visual rhythm and prevent the pattern from feeling static.
By keeping the stitches uncomplicated, the design complements the corduroy’s linear texture instead of competing with it, resulting in a cohesive, retro-inspired look.
5. Monochrome Texture with Geometric Fills
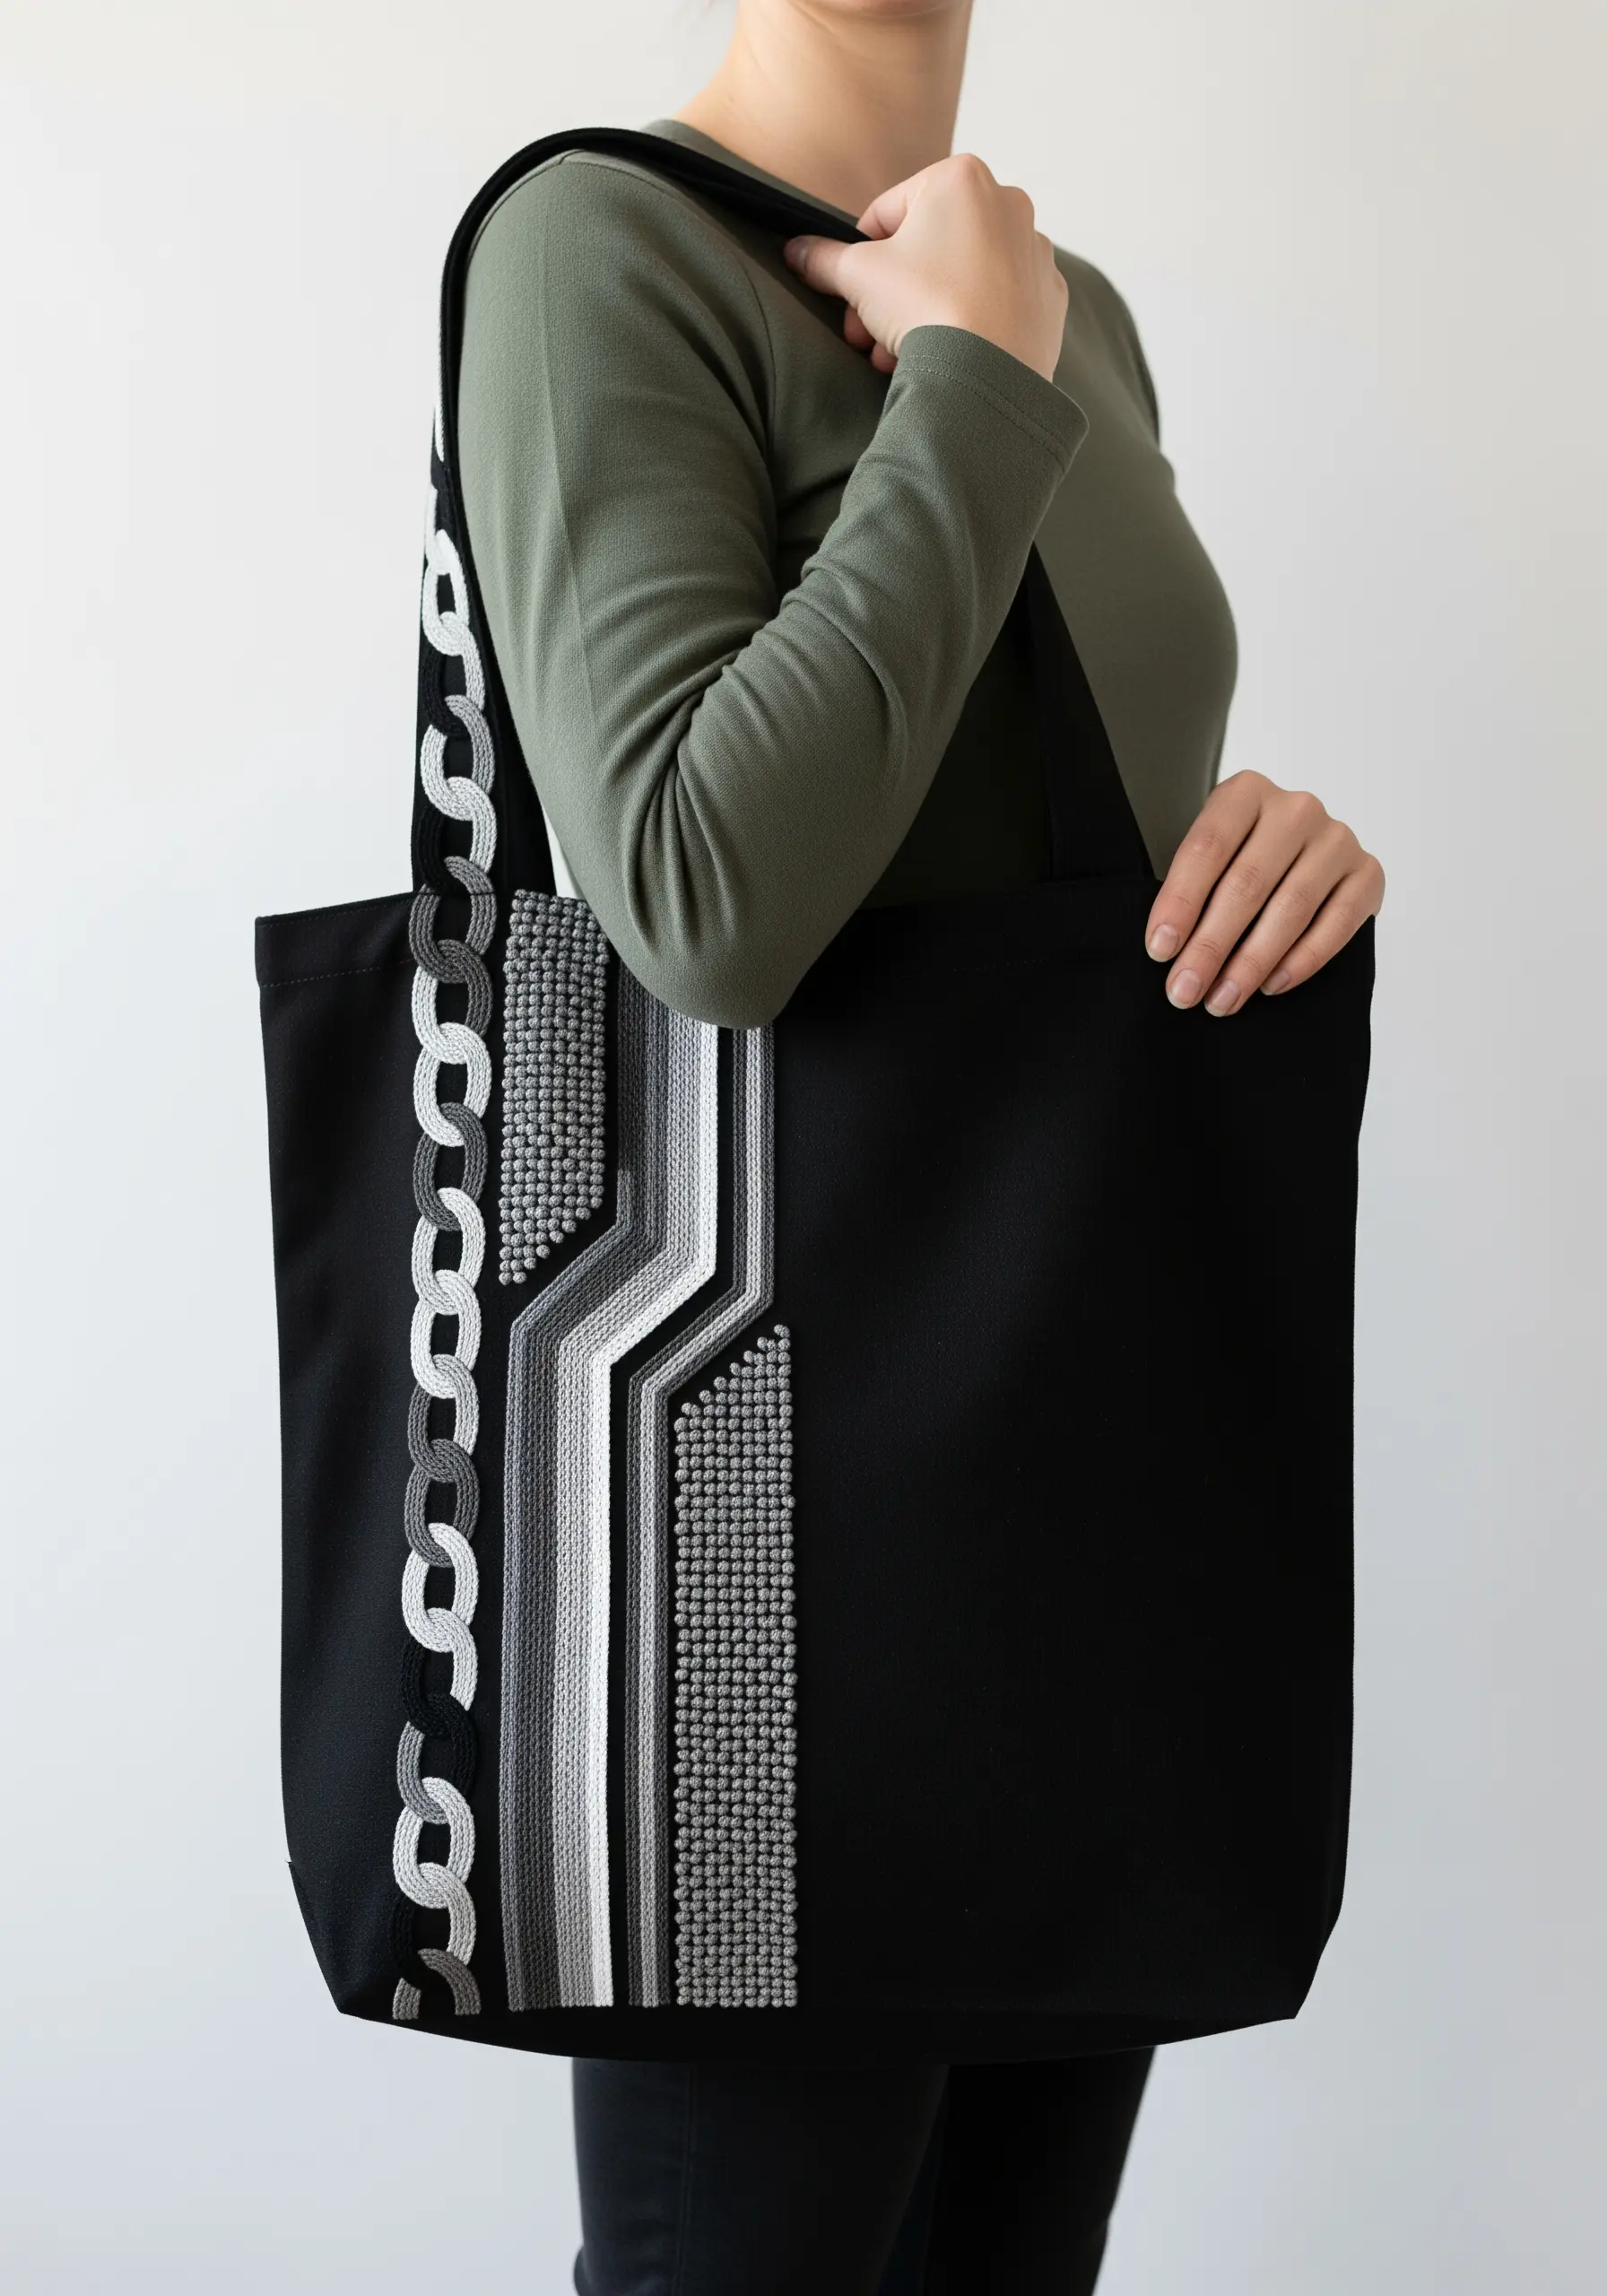
Create a visually complex design using a simple grayscale palette by focusing on texture, not color.
This design masterfully combines three different stitches to create distinct zones: dense French knots for a pebbled surface, smooth satin stitch for solid blocks, and an interlocking chain stitch for the graphic links.
The variation in light reflection and shadow across these different textures is what gives the piece its luxurious, high-end feel.
By confining this detailed work to a single panel on the bag, you create a strong focal point that feels intentional and chic.
6. Playful Landscapes with Motif Fillers
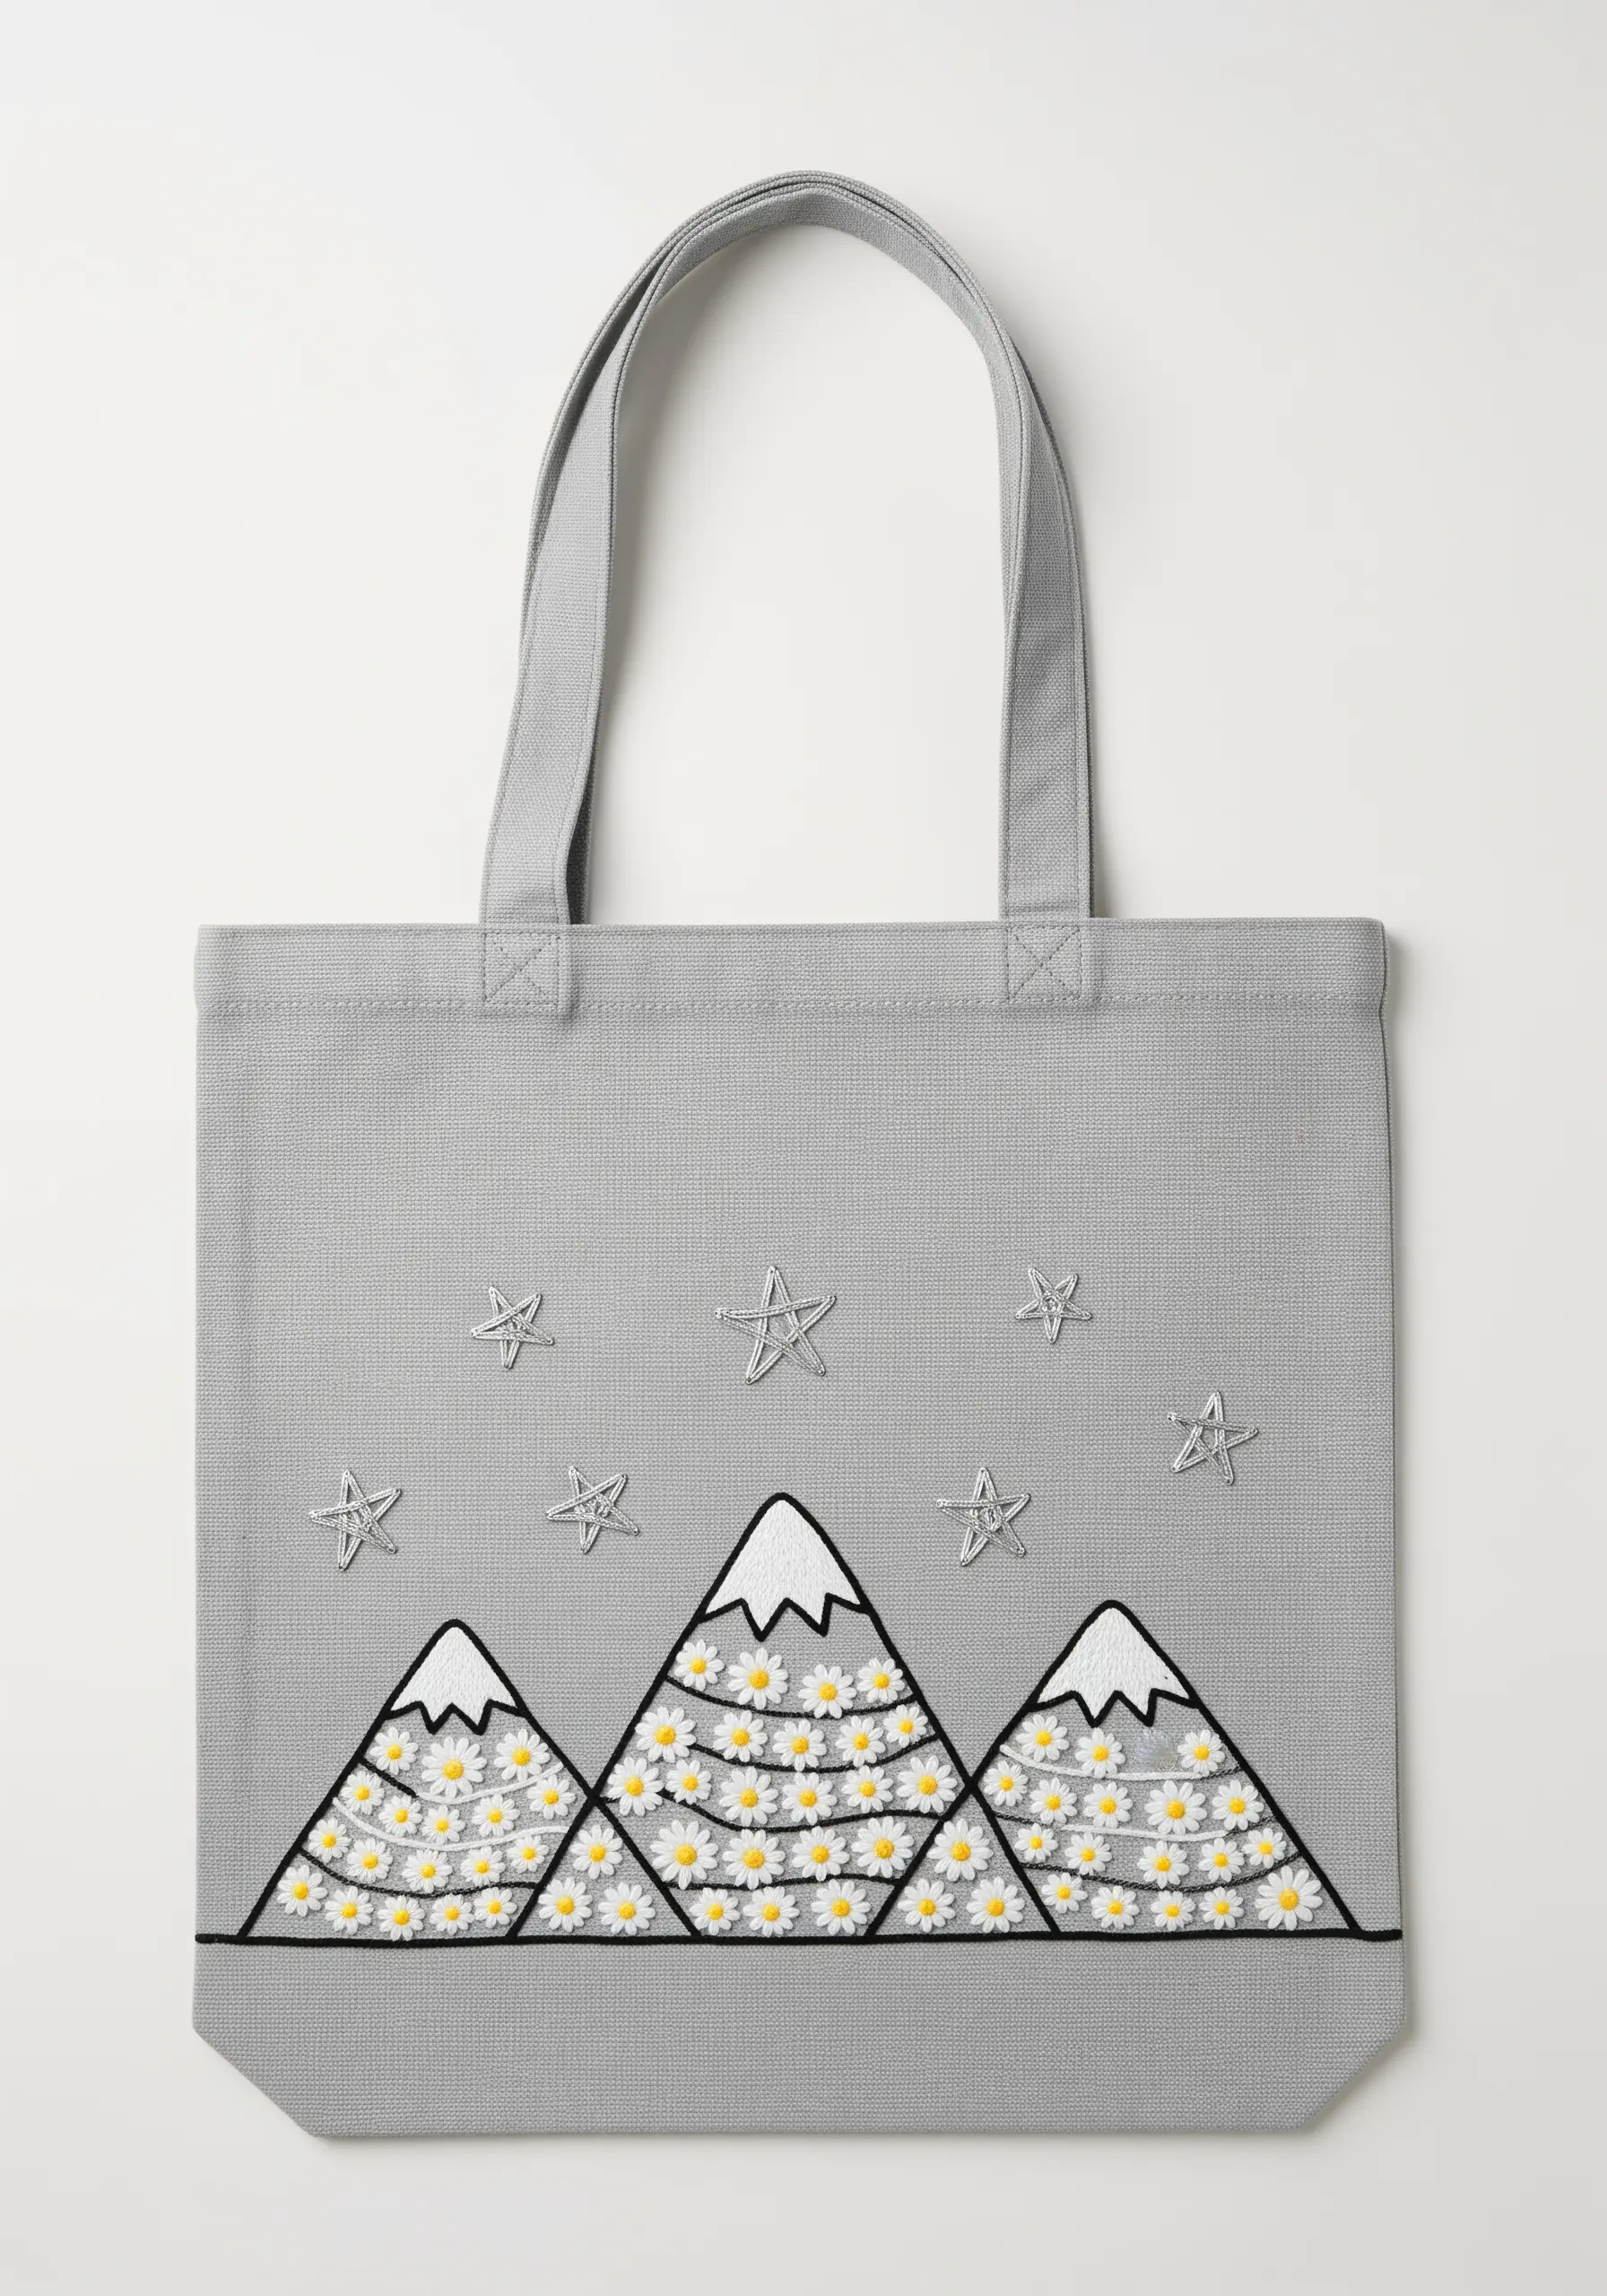
Turn a simple outline into a playful scene by using a tiny motif as a filler stitch.
First, create the bold mountain outlines using a thick satin stitch or by couching a heavier cord onto the fabric for a perfectly clean edge.
Instead of filling the shape with traditional stitches, scatter dozens of tiny lazy daisy flowers inside the lines.
This juxtaposition of a strong graphic outline with a delicate, detailed interior creates a whimsical and unexpected design that draws the eye in.
7. Controlled Gradients with Variegated Thread
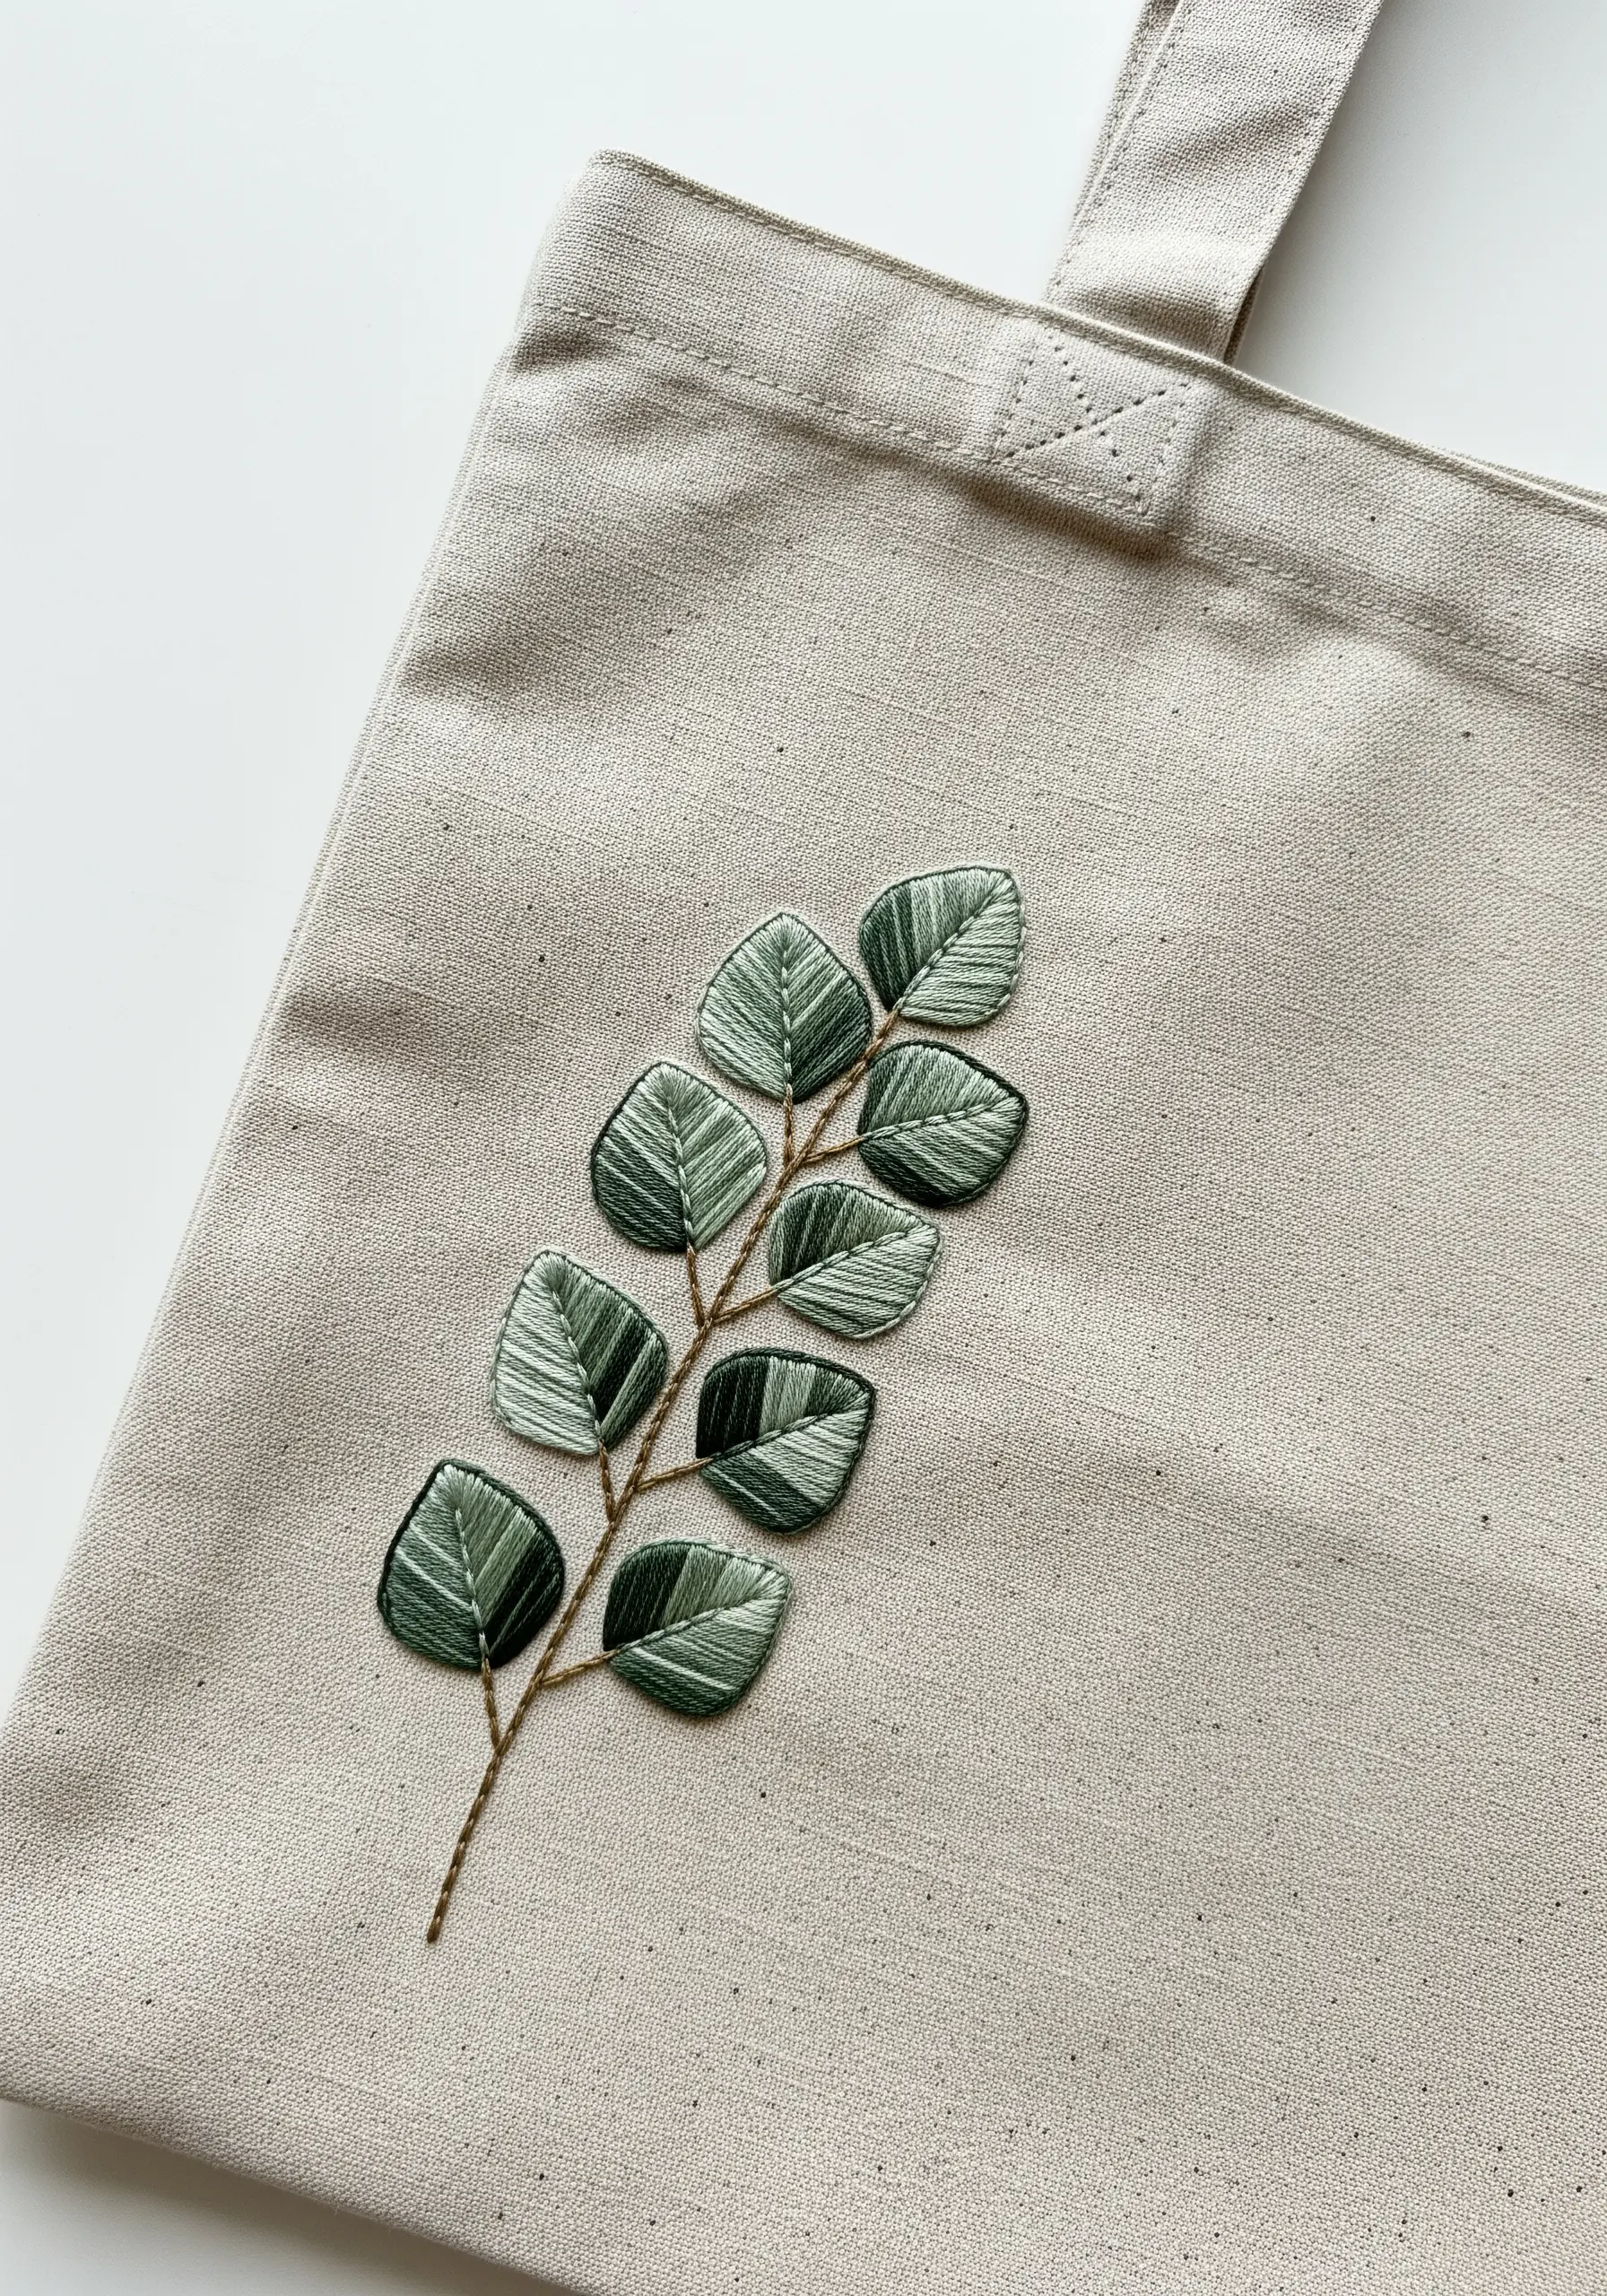
Let variegated thread do the color work for you, but maintain control for a polished look.
Instead of stitching randomly, use a fishbone stitch or a directional satin stitch for each leaf, working from the center vein outwards.
This technique allows you to intentionally place the thread’s color changes, creating a natural-looking gradient that flows across each leaf.
By keeping your stitch direction consistent within each leaf, you create a cohesive, shimmering effect that looks far more complex than it is to execute.
8. Lifelike Texture with Thread Painting
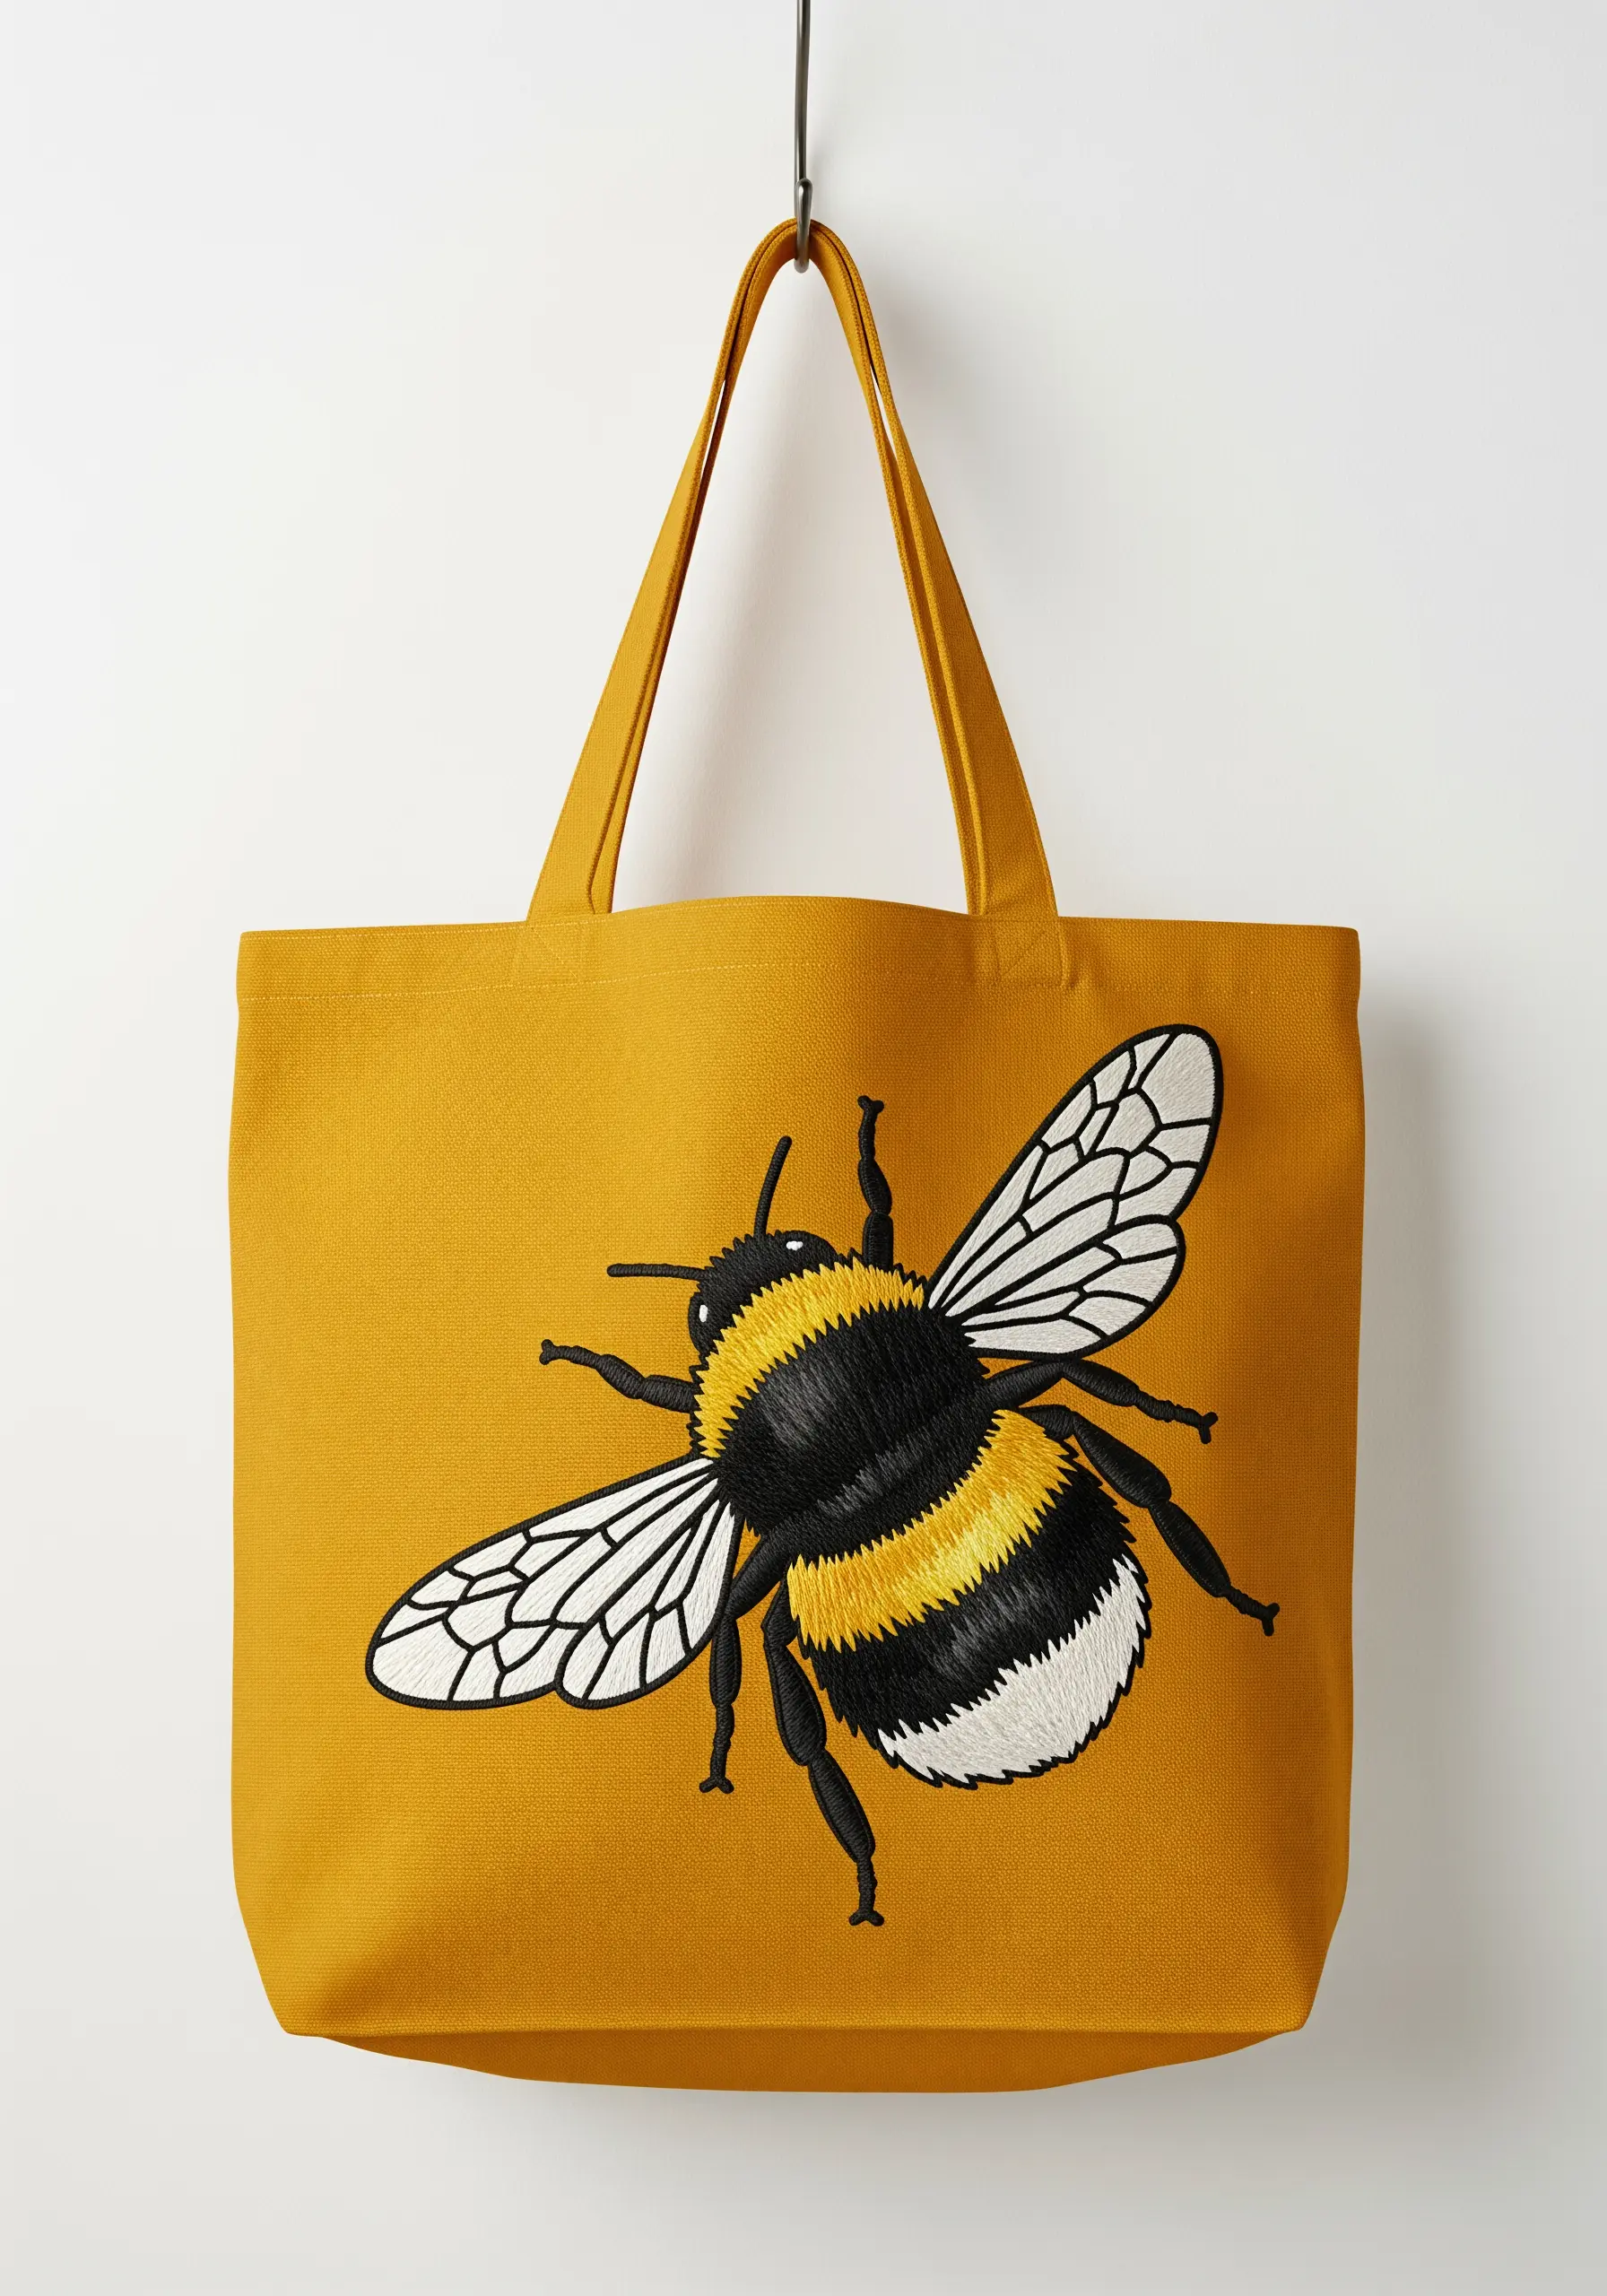
Achieve realism by using long-and-short stitch to blend colors seamlessly, creating a soft, fur-like texture.
For the bee’s fuzzy body, use two or three similar shades of yellow and black, overlapping your stitches to create a gentle gradient rather than hard stripes.
In contrast, use a single strand of white or light gray thread with a simple backstitch to create the delicate, transparent look of the wings.
This combination of soft, blended texture for the body and crisp line work for the wings is what makes the motif look so lifelike.
9. Art Deco Elegance with Metallic Thread
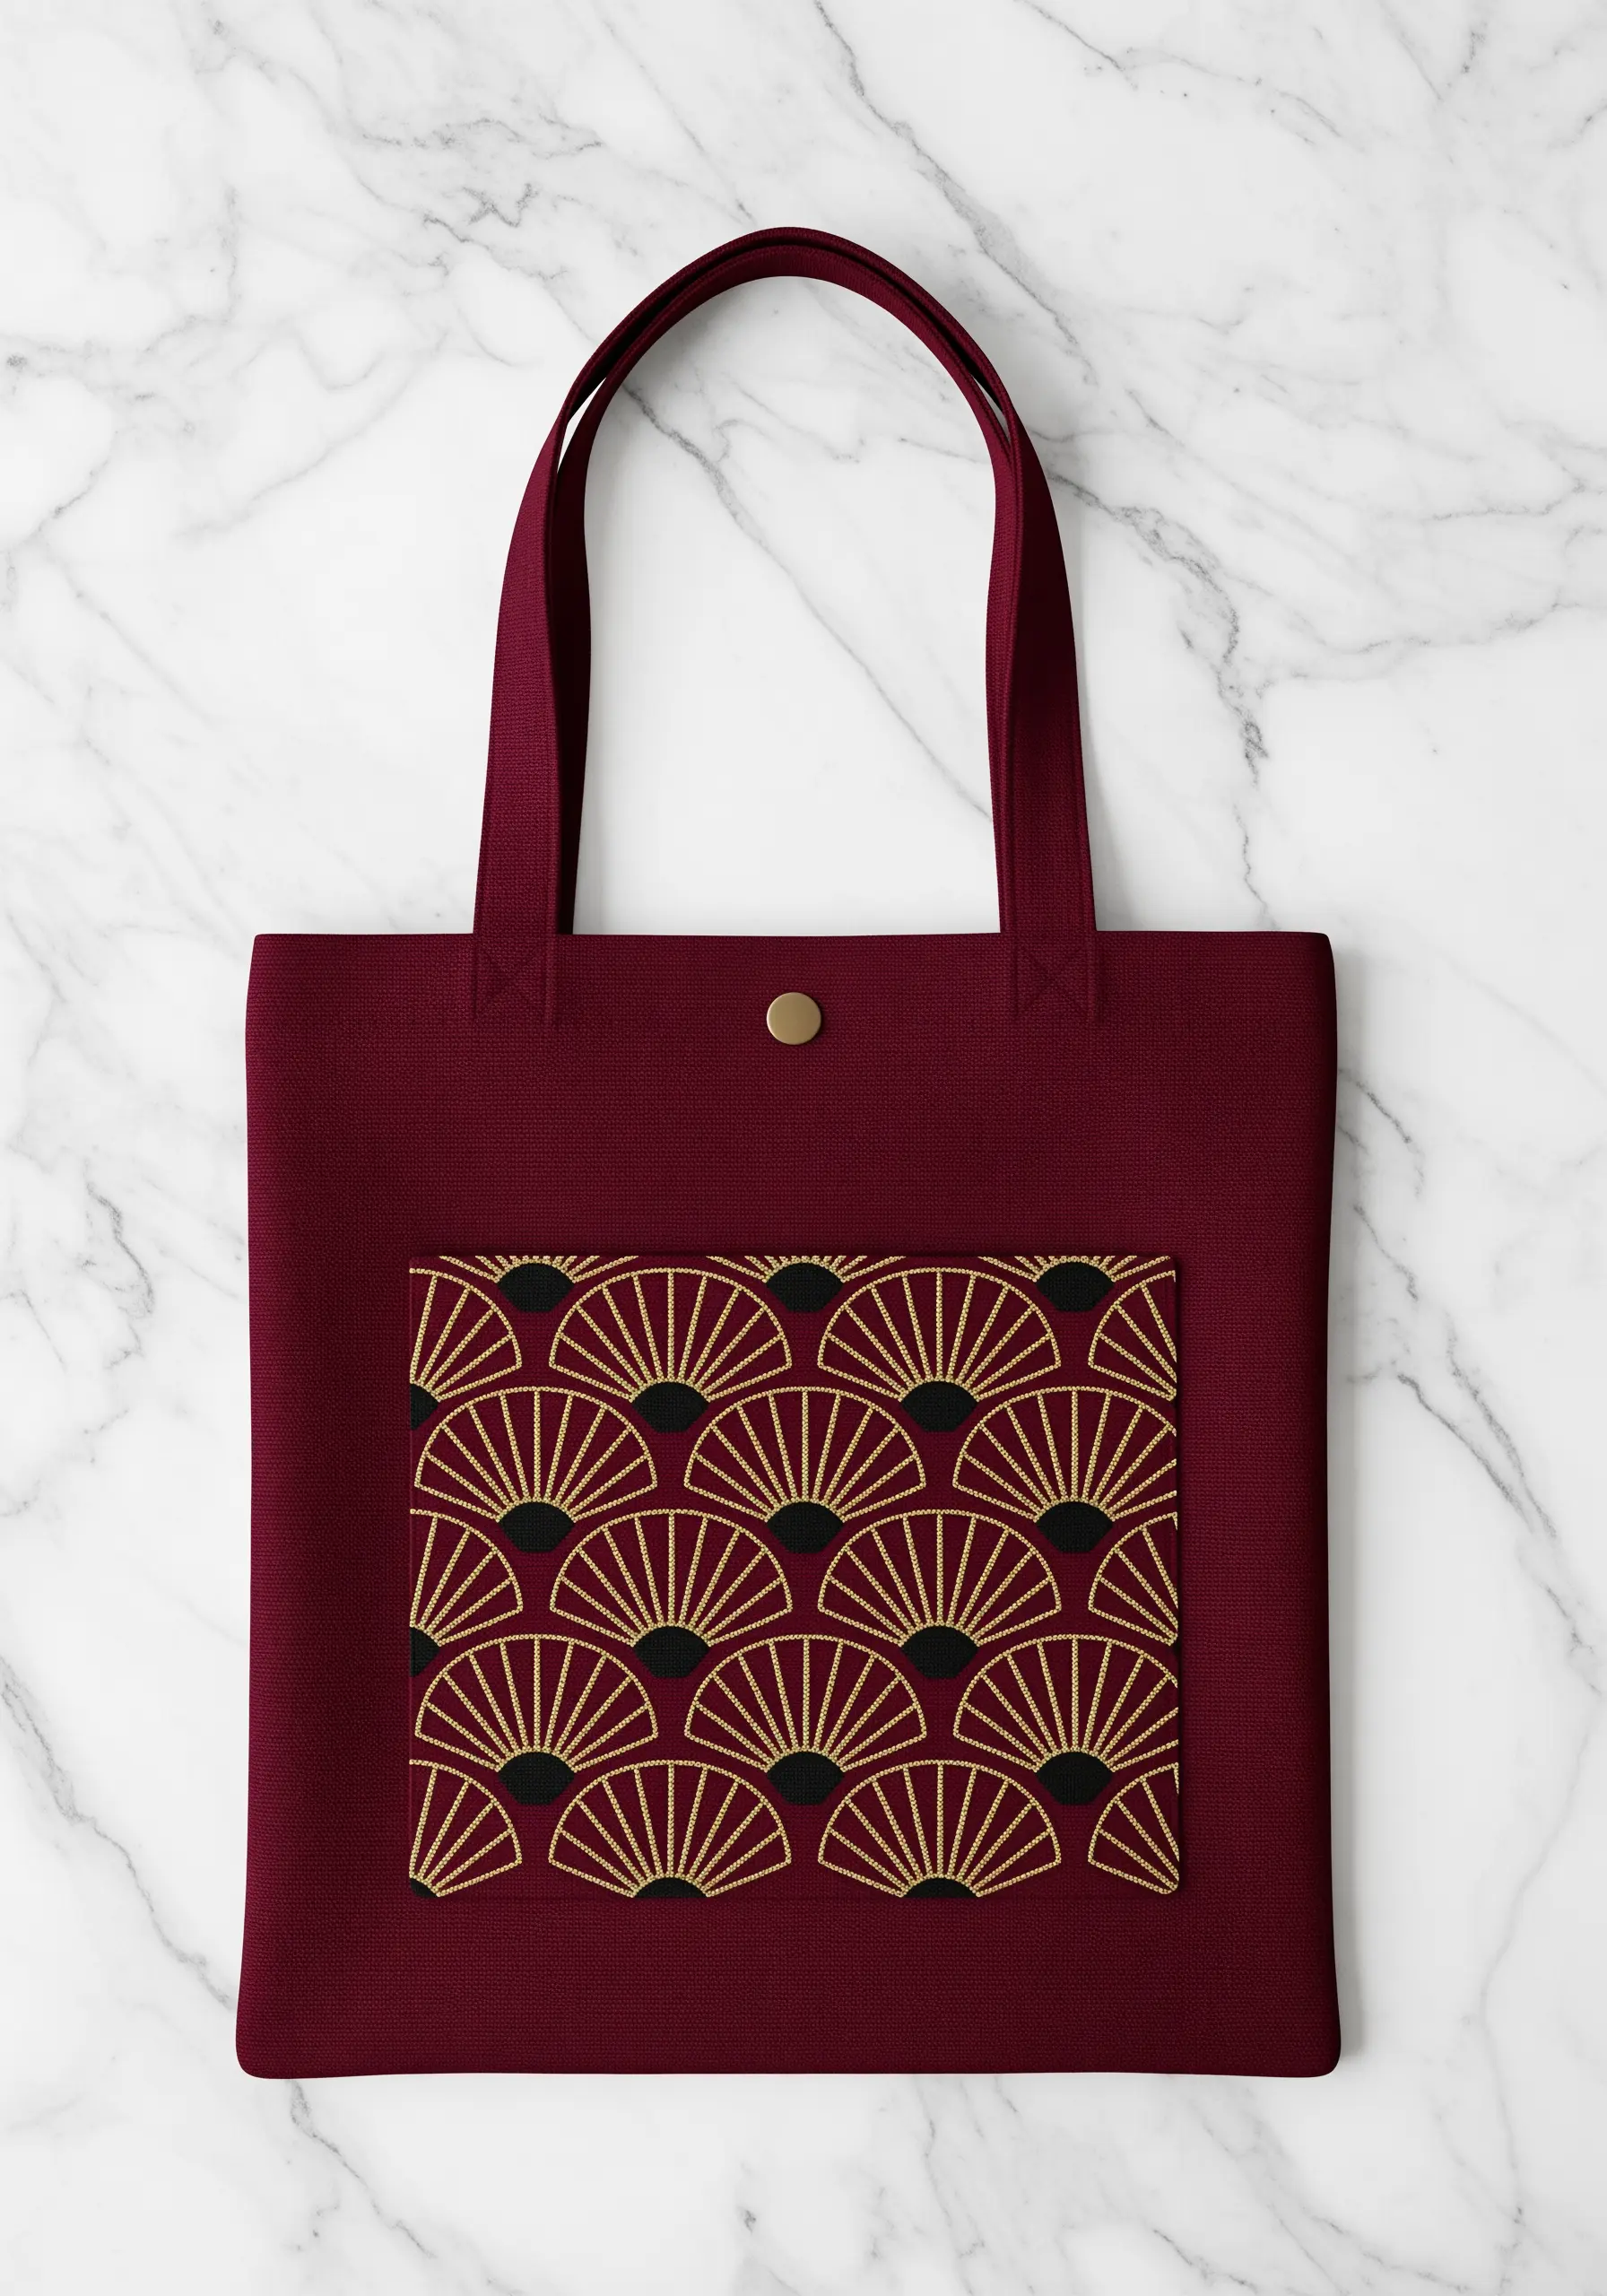
Capture the glamour of the Art Deco era by combining metallic thread with a dark, rich color palette.
Embroider the fan outlines using a fine gold metallic thread and a precise backstitch. To prevent fraying, use a shorter length of metallic thread than you normally would.
Fill the base of each fan with a solid black satin stitch to create a dramatic, high-contrast backdrop that makes the gold lines shine.
The success of this repeating pattern lies in perfect spacing and stitch consistency, so consider using a water-soluble stabilizer to draw your guidelines.
10. The Rainbow Stitch Sampler
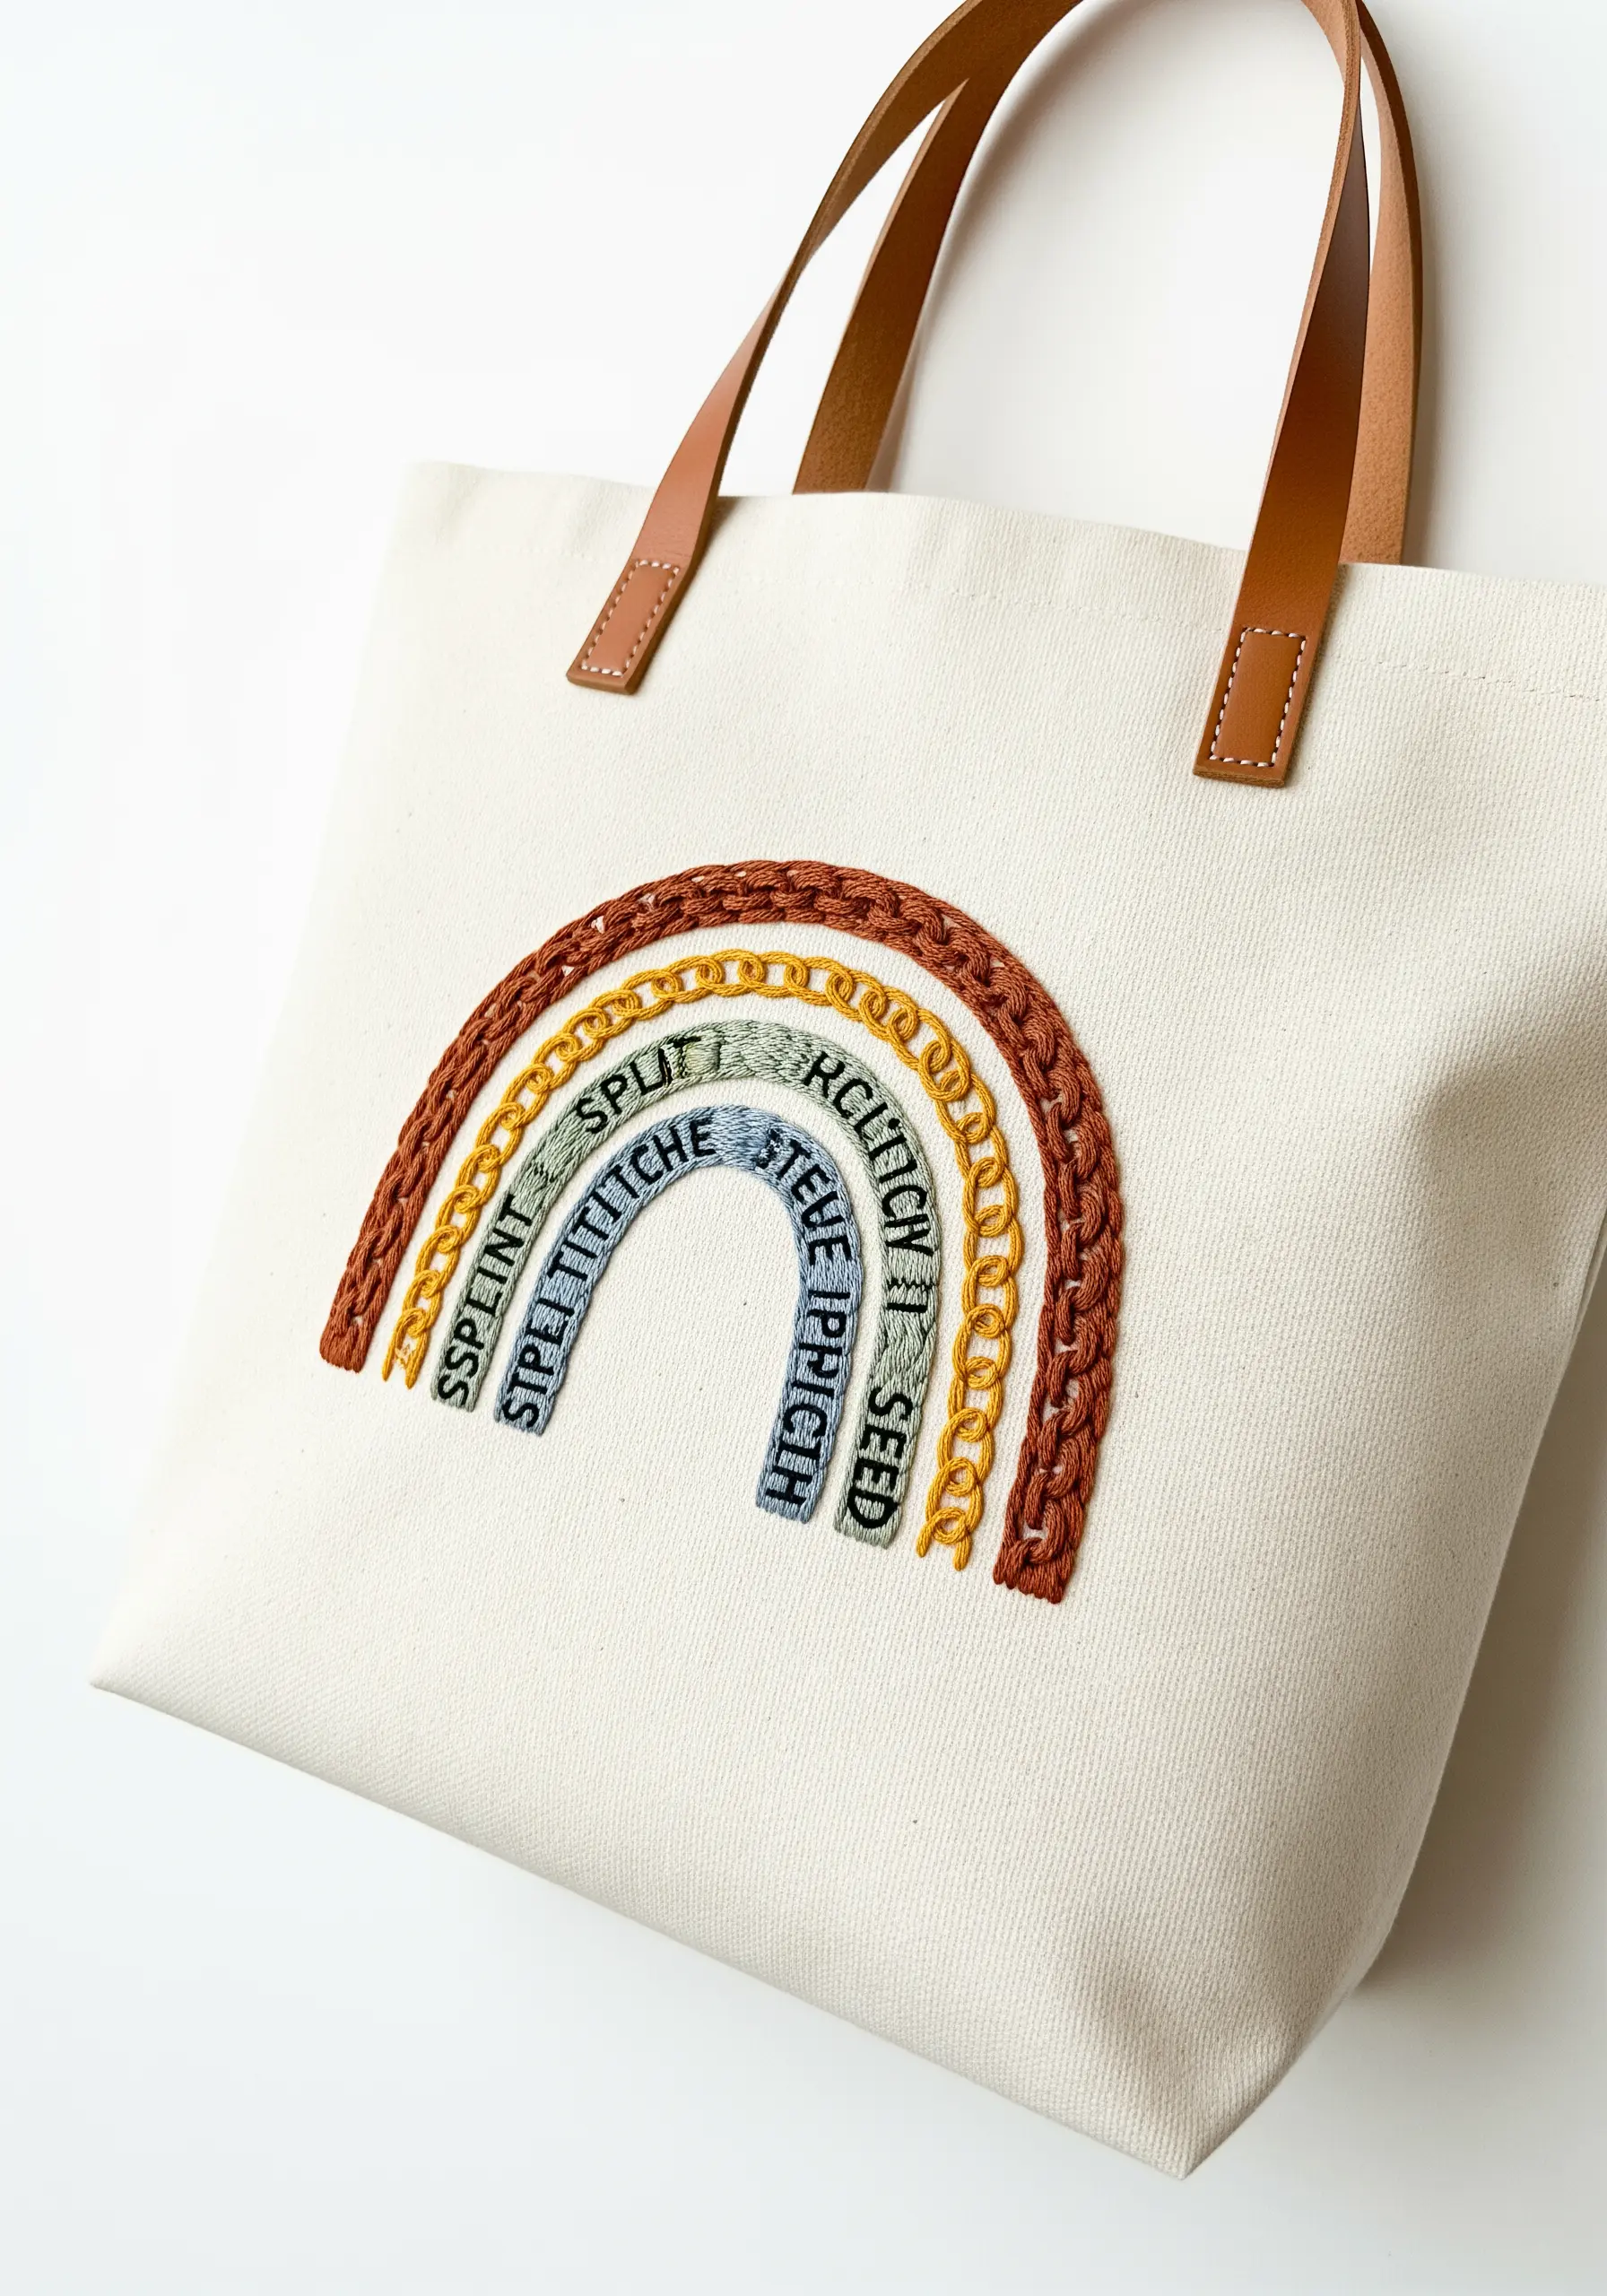
Turn a simple rainbow into a tactile masterpiece by assigning a different textural stitch to each color band.
This design cleverly uses a variety of stitches—like the braided-looking heavy chain stitch, pebbly seed stitch, and linear split stitch—to create a feast for the eyes and fingers.
By arranging them in a familiar shape, you create a cohesive design that doubles as a beautiful reference for your favorite stitches.
This is an excellent way to practice and showcase your skills on a functional item.
11. Creating the Appliqué Effect with Satin Stitch
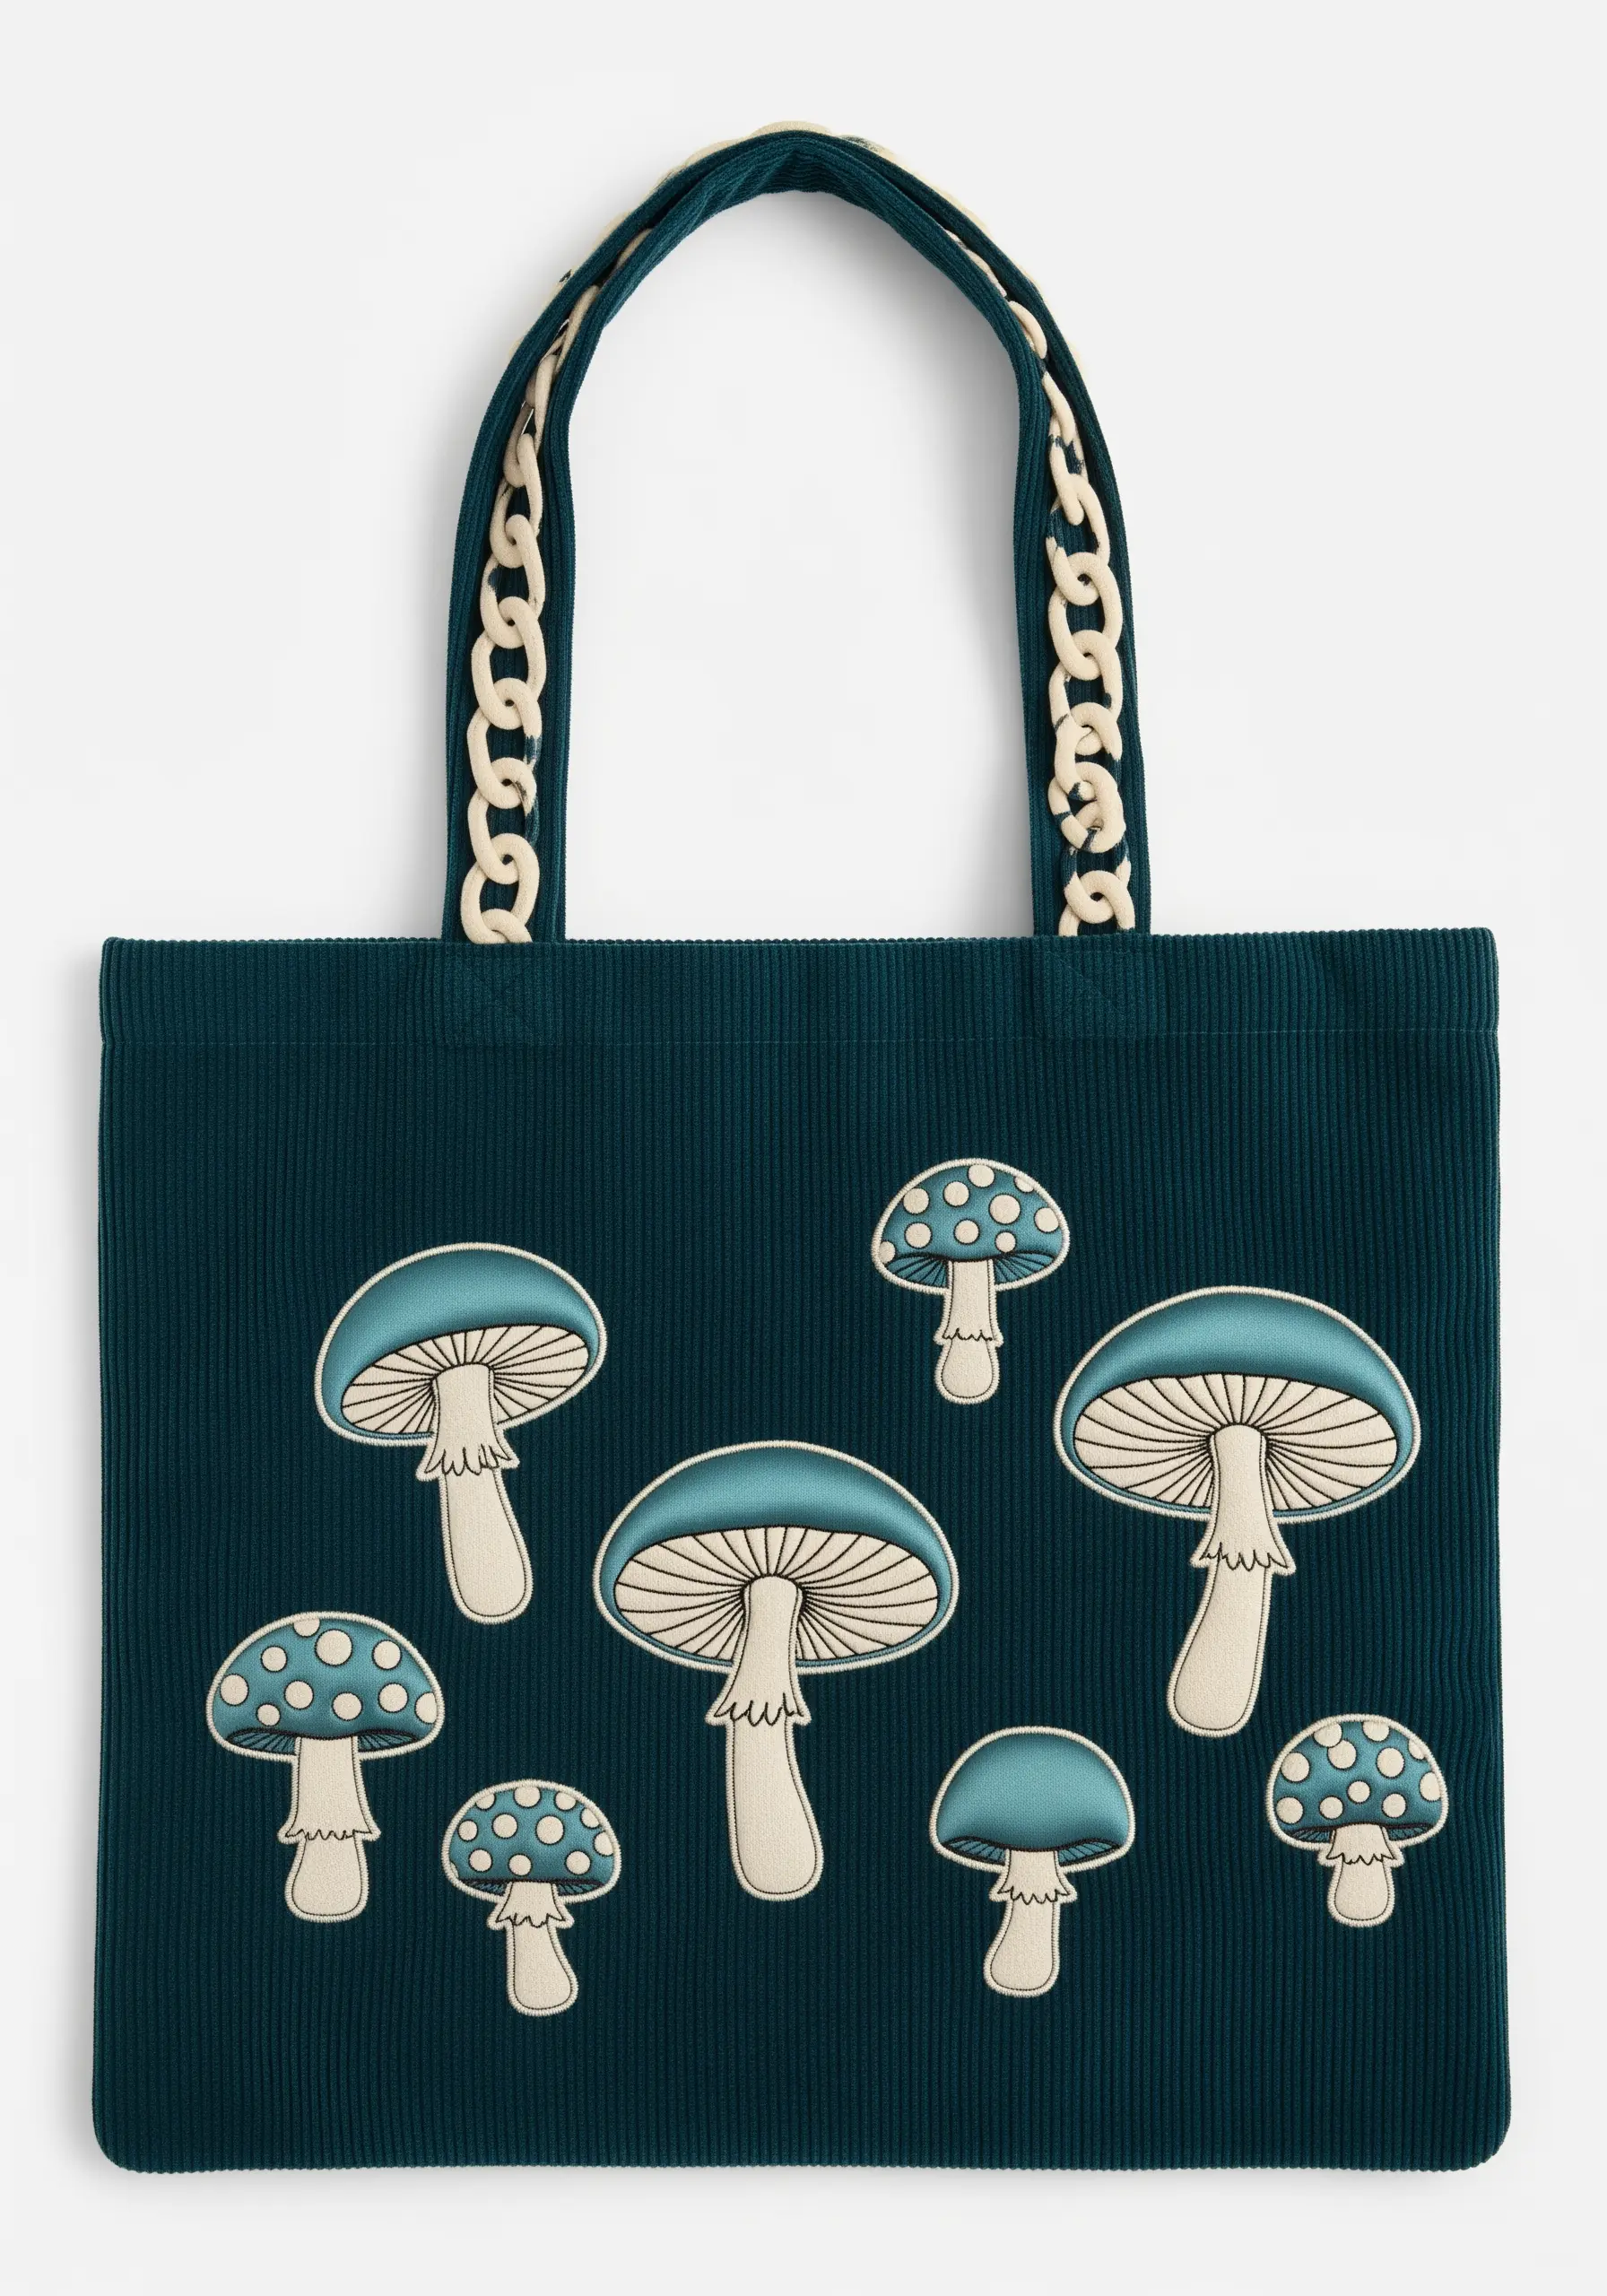
Give your motifs a raised, patch-like appearance without using any extra fabric.
The key is to create a thick, bold border around each shape using a dense satin stitch.
Work your satin stitches perpendicular to the edge of the design, pulling them tightly to create a raised, corded effect that cleanly defines the mushroom’s silhouette.
This technique makes the motifs stand out sharply against the background fabric, especially on a textured material like corduroy.
12. Bold Botanicals on Denim Canvas

Make a single leaf a statement piece by focusing on clean lines and dense fill.
Use a fishbone stitch to fill the leaf, starting from the center and angling your stitches outwards to create a natural, symmetrical texture.
Define the central vein and the outer edge with a raised stem stitch or a whipped backstitch in a slightly darker green.
This adds a subtle layer of dimension and structure, making the leaf look crisp and defined against the casual texture of the light-wash denim.
13. Modern Typography with Triple Backstitch

Create bold, graphic lettering with a surprisingly simple technique.
Instead of trying to fill the letters with a satin stitch, which can be tricky on curves, simply trace each line of the font three times with a basic backstitch.
Place each row of stitching directly next to the previous one, maintaining consistent stitch length throughout.
This method builds weight and color without bulk, resulting in clean, modern typography that feels both hand-stitched and impeccably designed.
Using a water-soluble stabilizer printed with your chosen font is crucial for achieving perfect spacing.
14. Creating Movement with Scattered Motifs
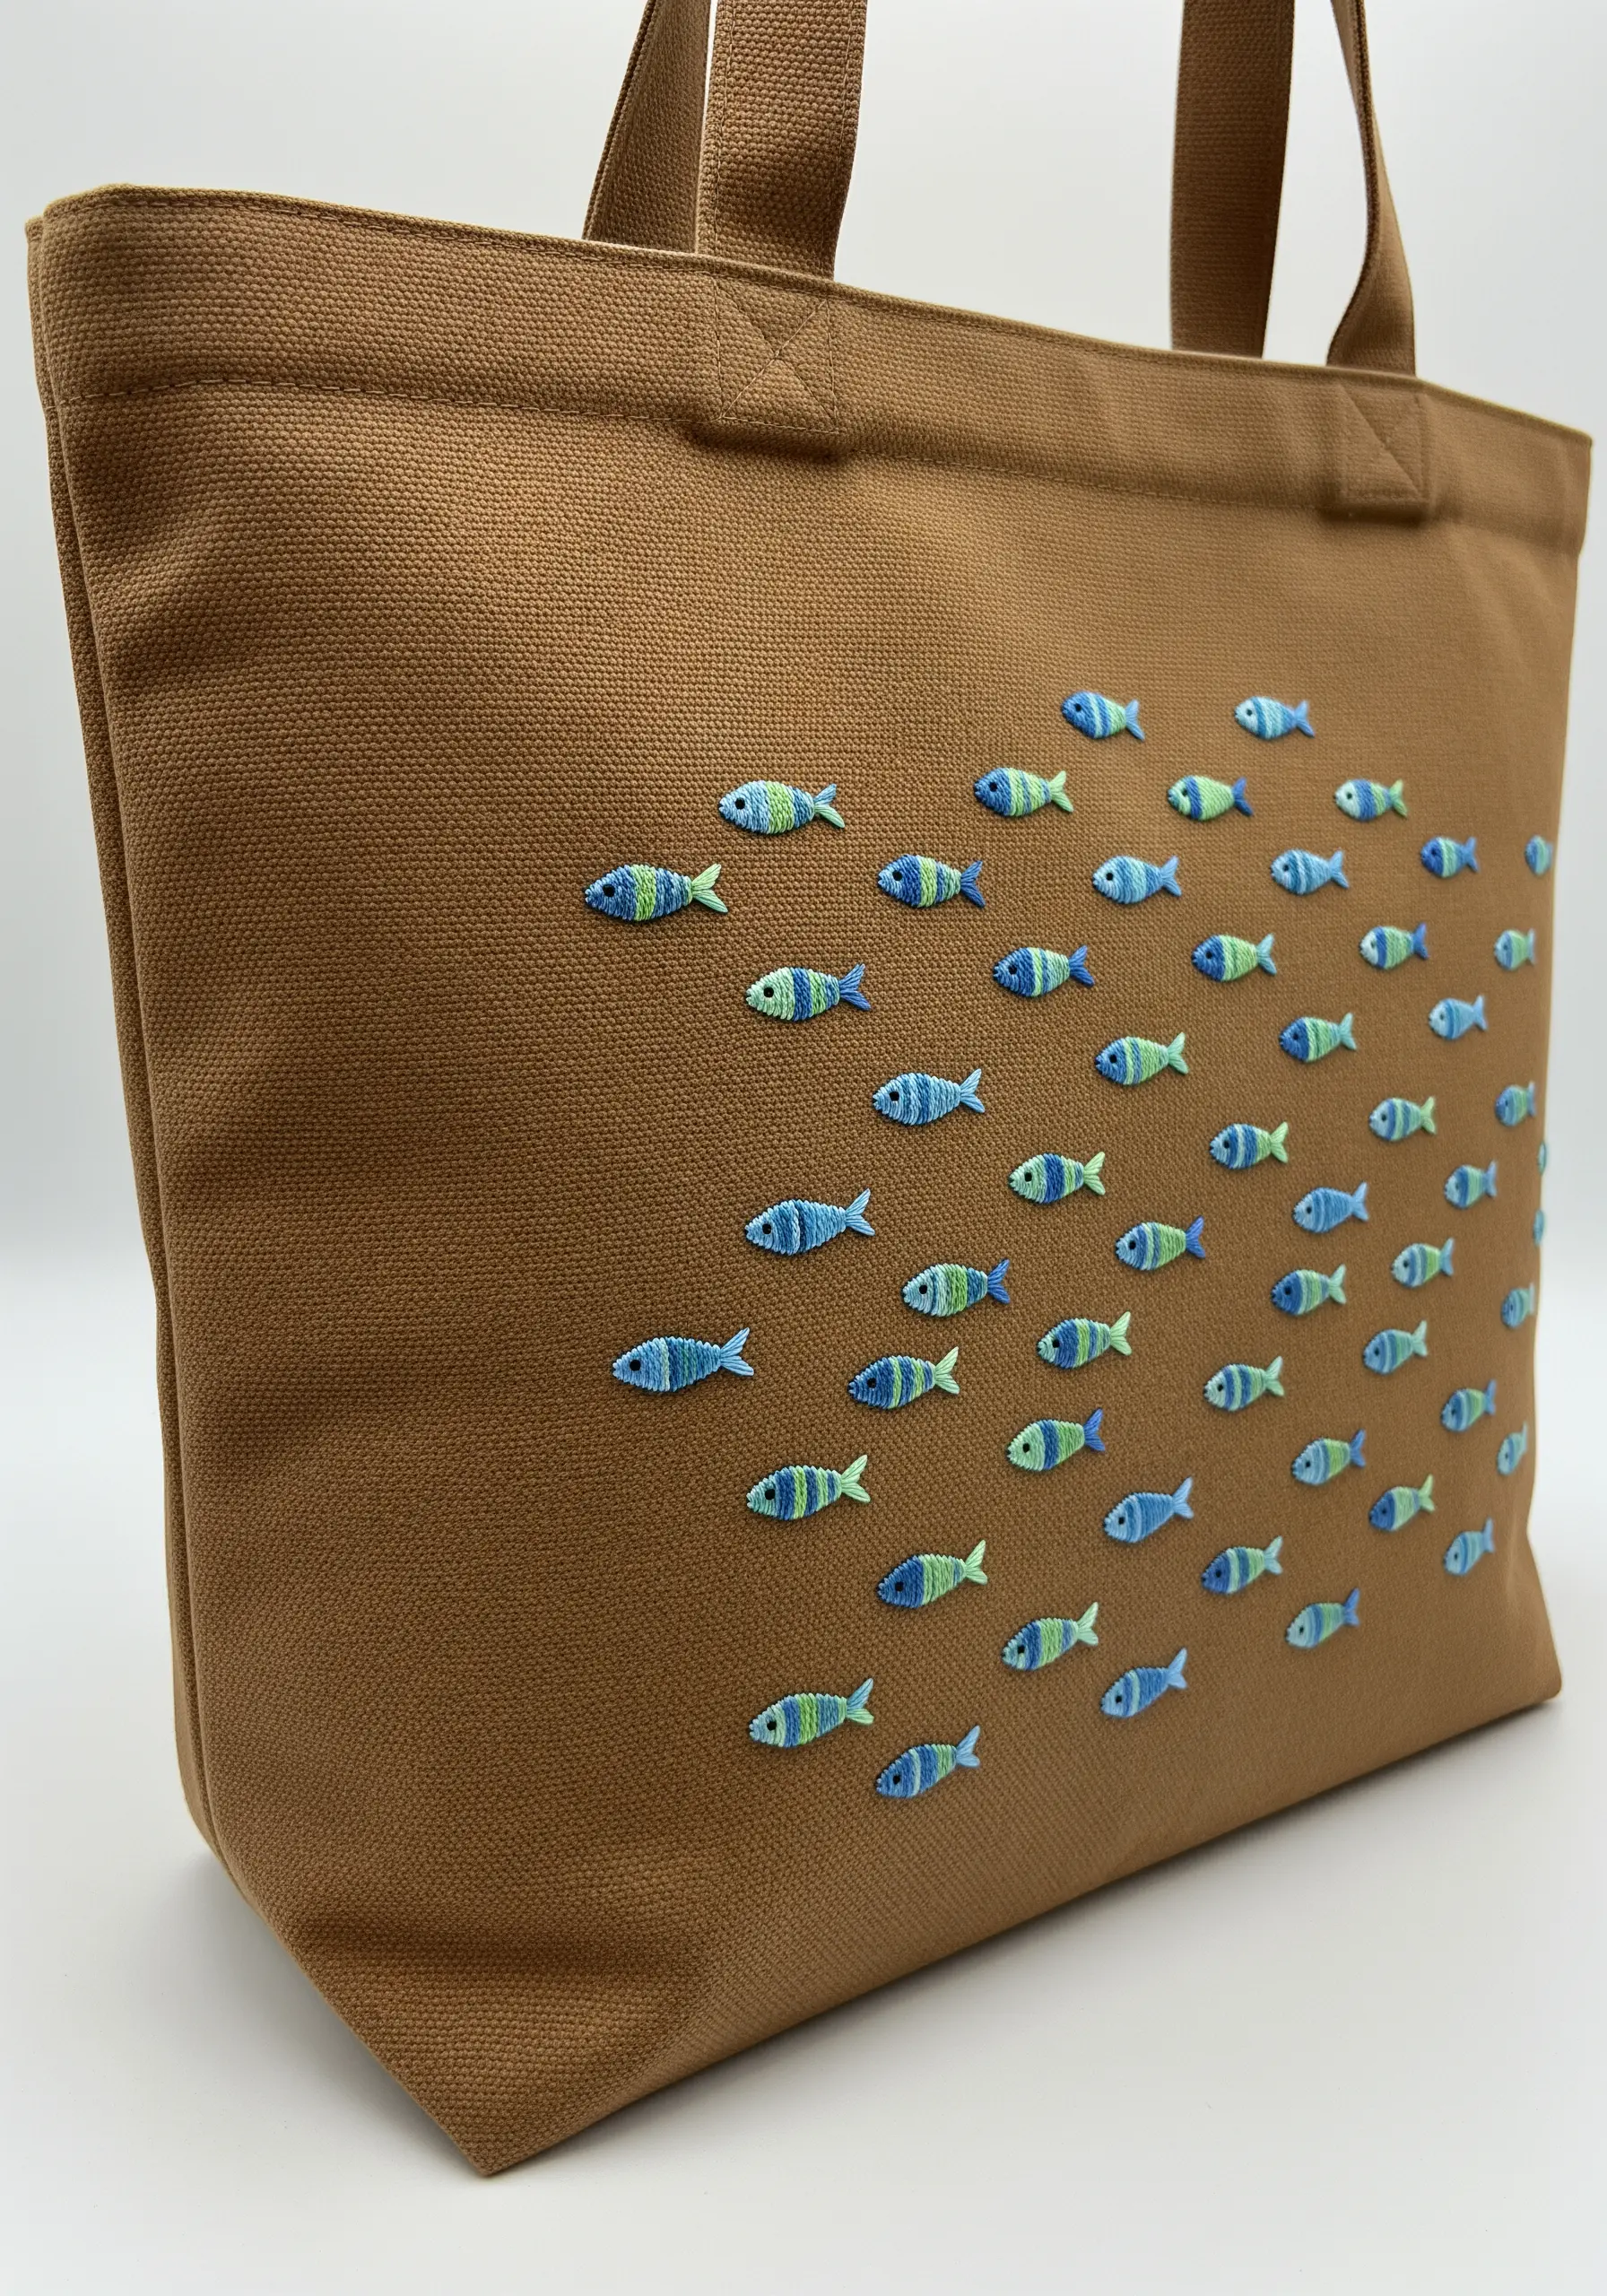
Evoke a sense of motion by carefully scattering small, simple motifs across the fabric.
Each fish can be stitched with just a few satin stitches or a single fishbone stitch using variegated thread to give each one unique coloring.
The key to the ‘schooling’ effect is the placement: start with a dense cluster of fish on one side and let them become more spaced out as they move across the tote.
Slightly varying the angle of each fish enhances the illusion of natural, fluid movement.
15. Delicate Texture with French Knot Clusters
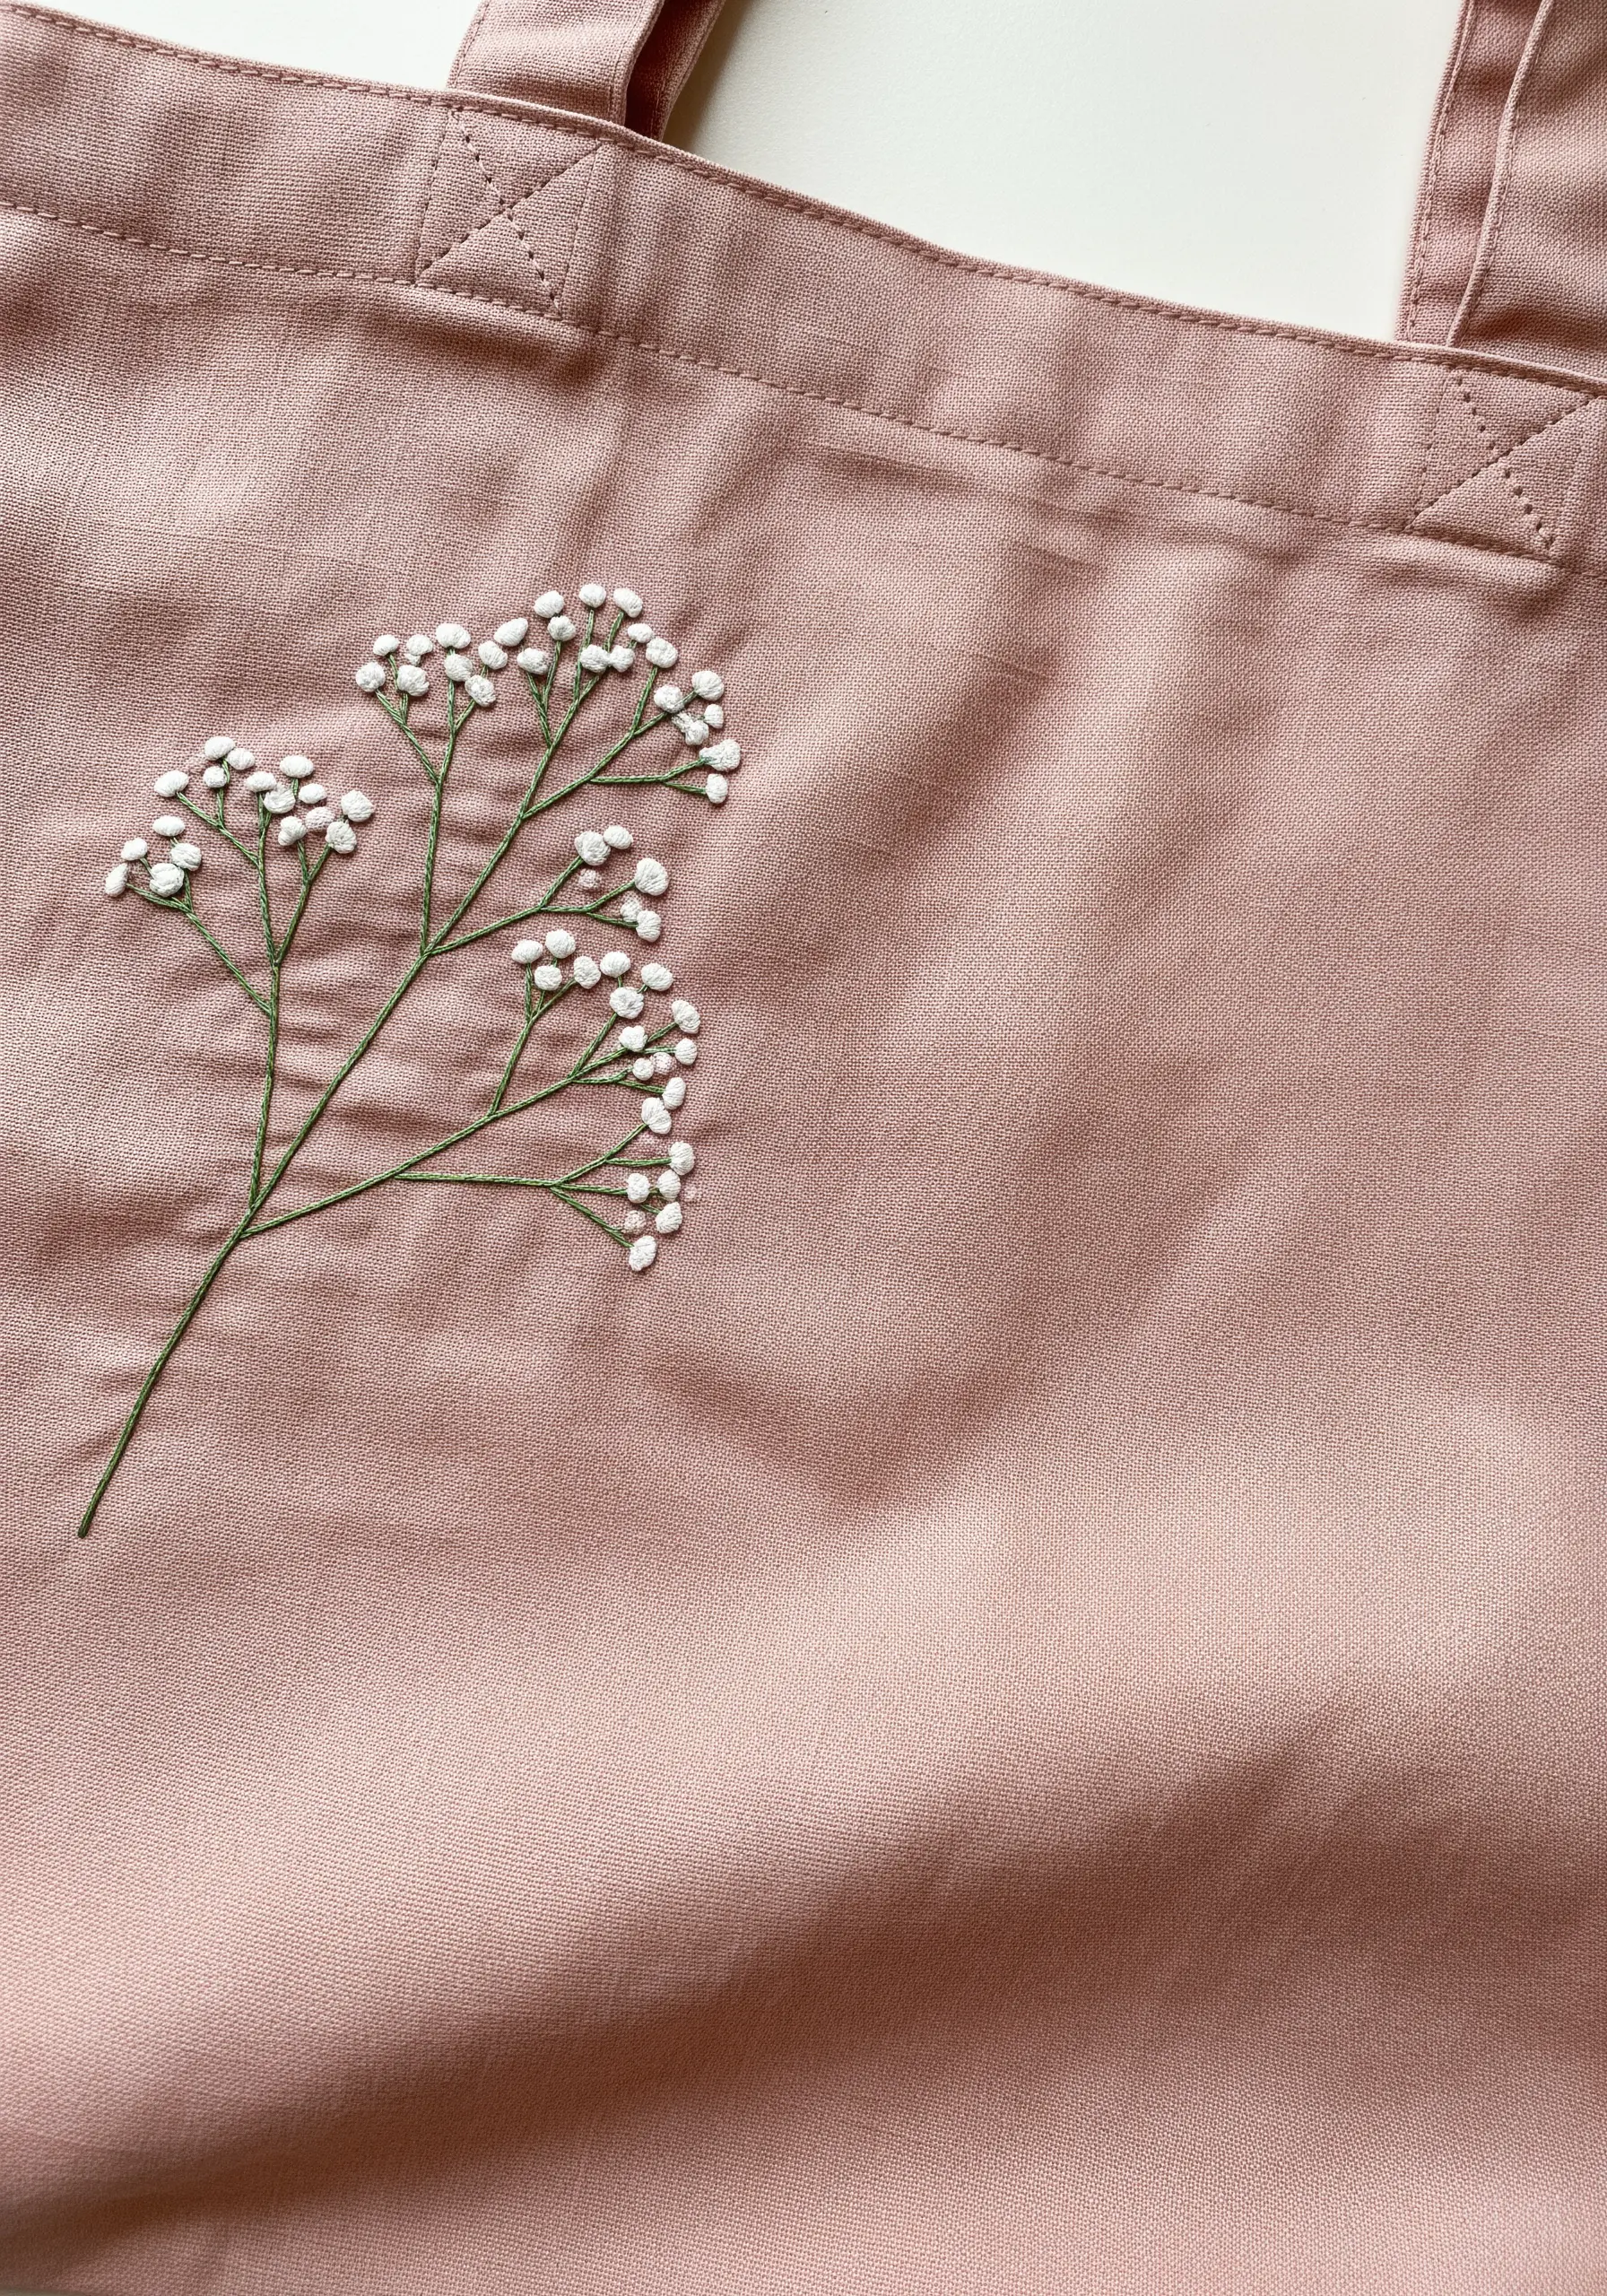
Capture the airy essence of Baby’s Breath by focusing on texture and negative space.
Use a very fine thread (one or two strands) for the delicate stems, stitching them with a simple stem stitch.
For the blossoms, create tight clusters of tiny French knots using a slightly thicker white or off-white thread.
By placing the knot clusters unevenly and leaving plenty of open space, you replicate the flower’s natural, cloud-like structure and prevent the design from feeling heavy.
16. Graphic Energy with a Spiraled Center
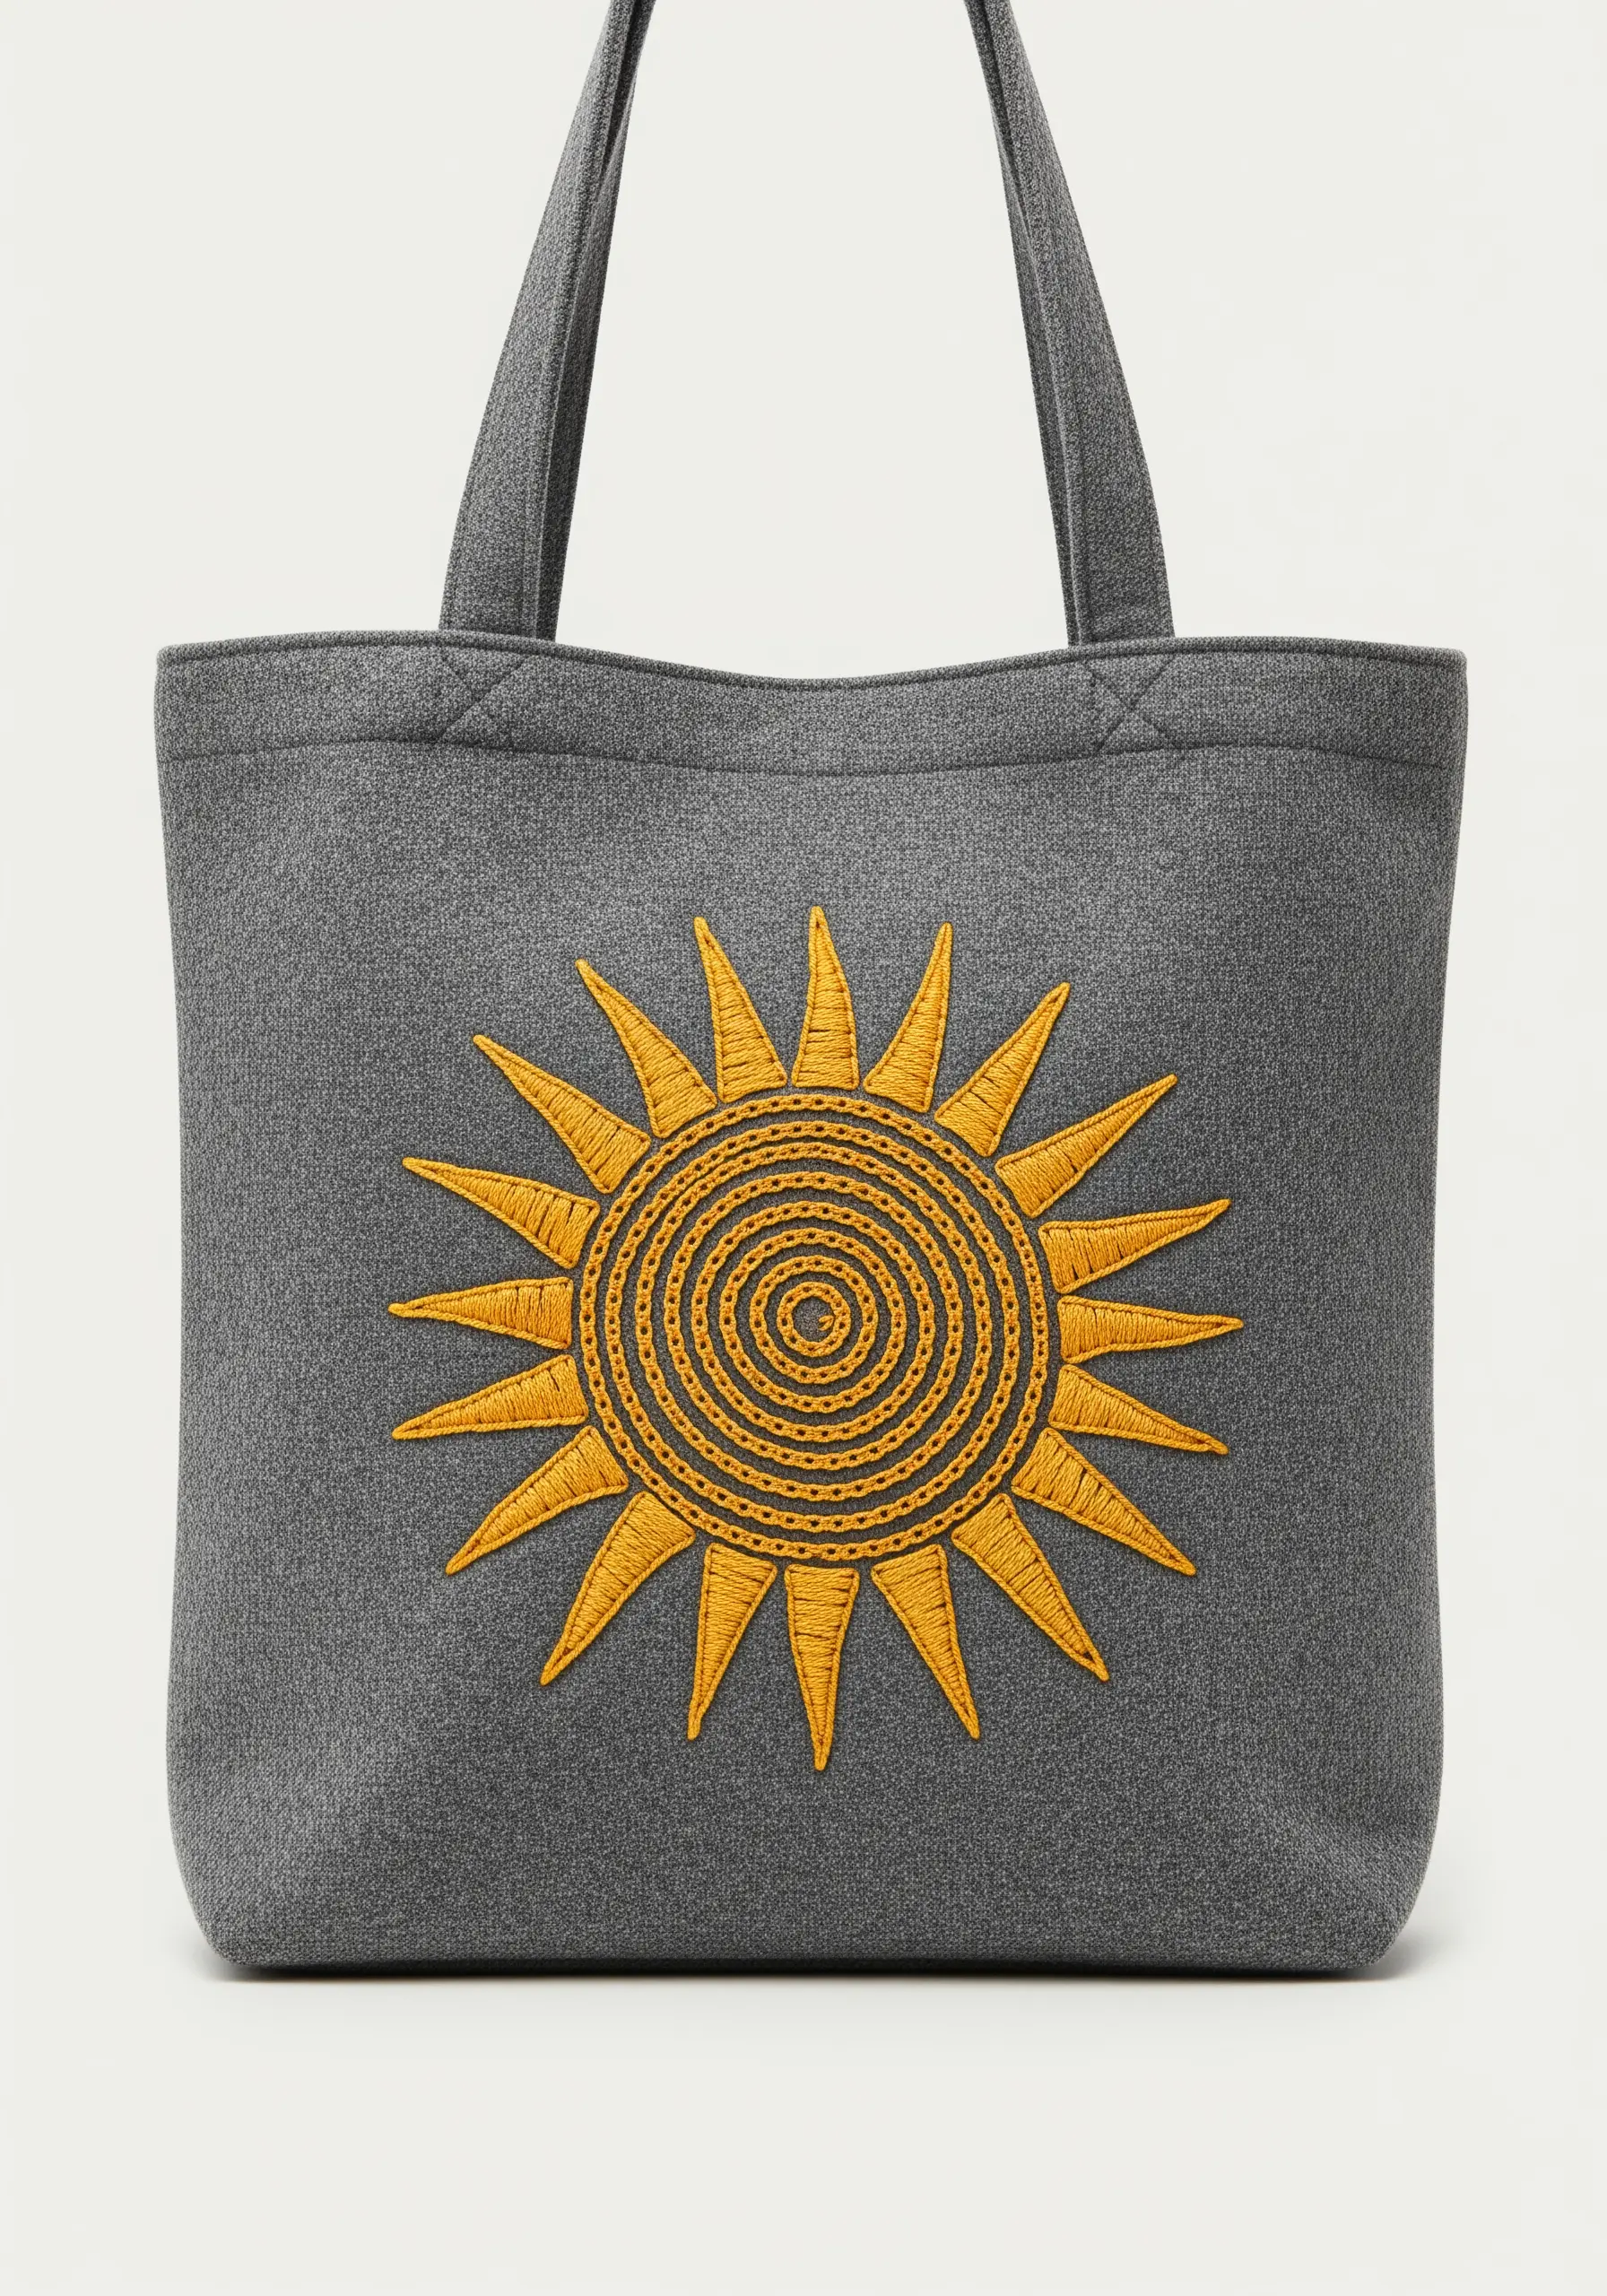
Inject dynamic energy into a simple sun motif by combining radial and spiral stitching.
Create the pointed rays with a classic satin stitch, ensuring each point is sharp and the stitches are smooth.
For the center, instead of a simple circle, use a whipped backstitch or stem stitch worked in a continuous spiral from the outside in.
This spiraling line draws the eye inward and creates a textural contrast with the straight, radiating lines of the sun’s rays, making the whole design more engaging.
17. Celestial Elegance with Star Stitches
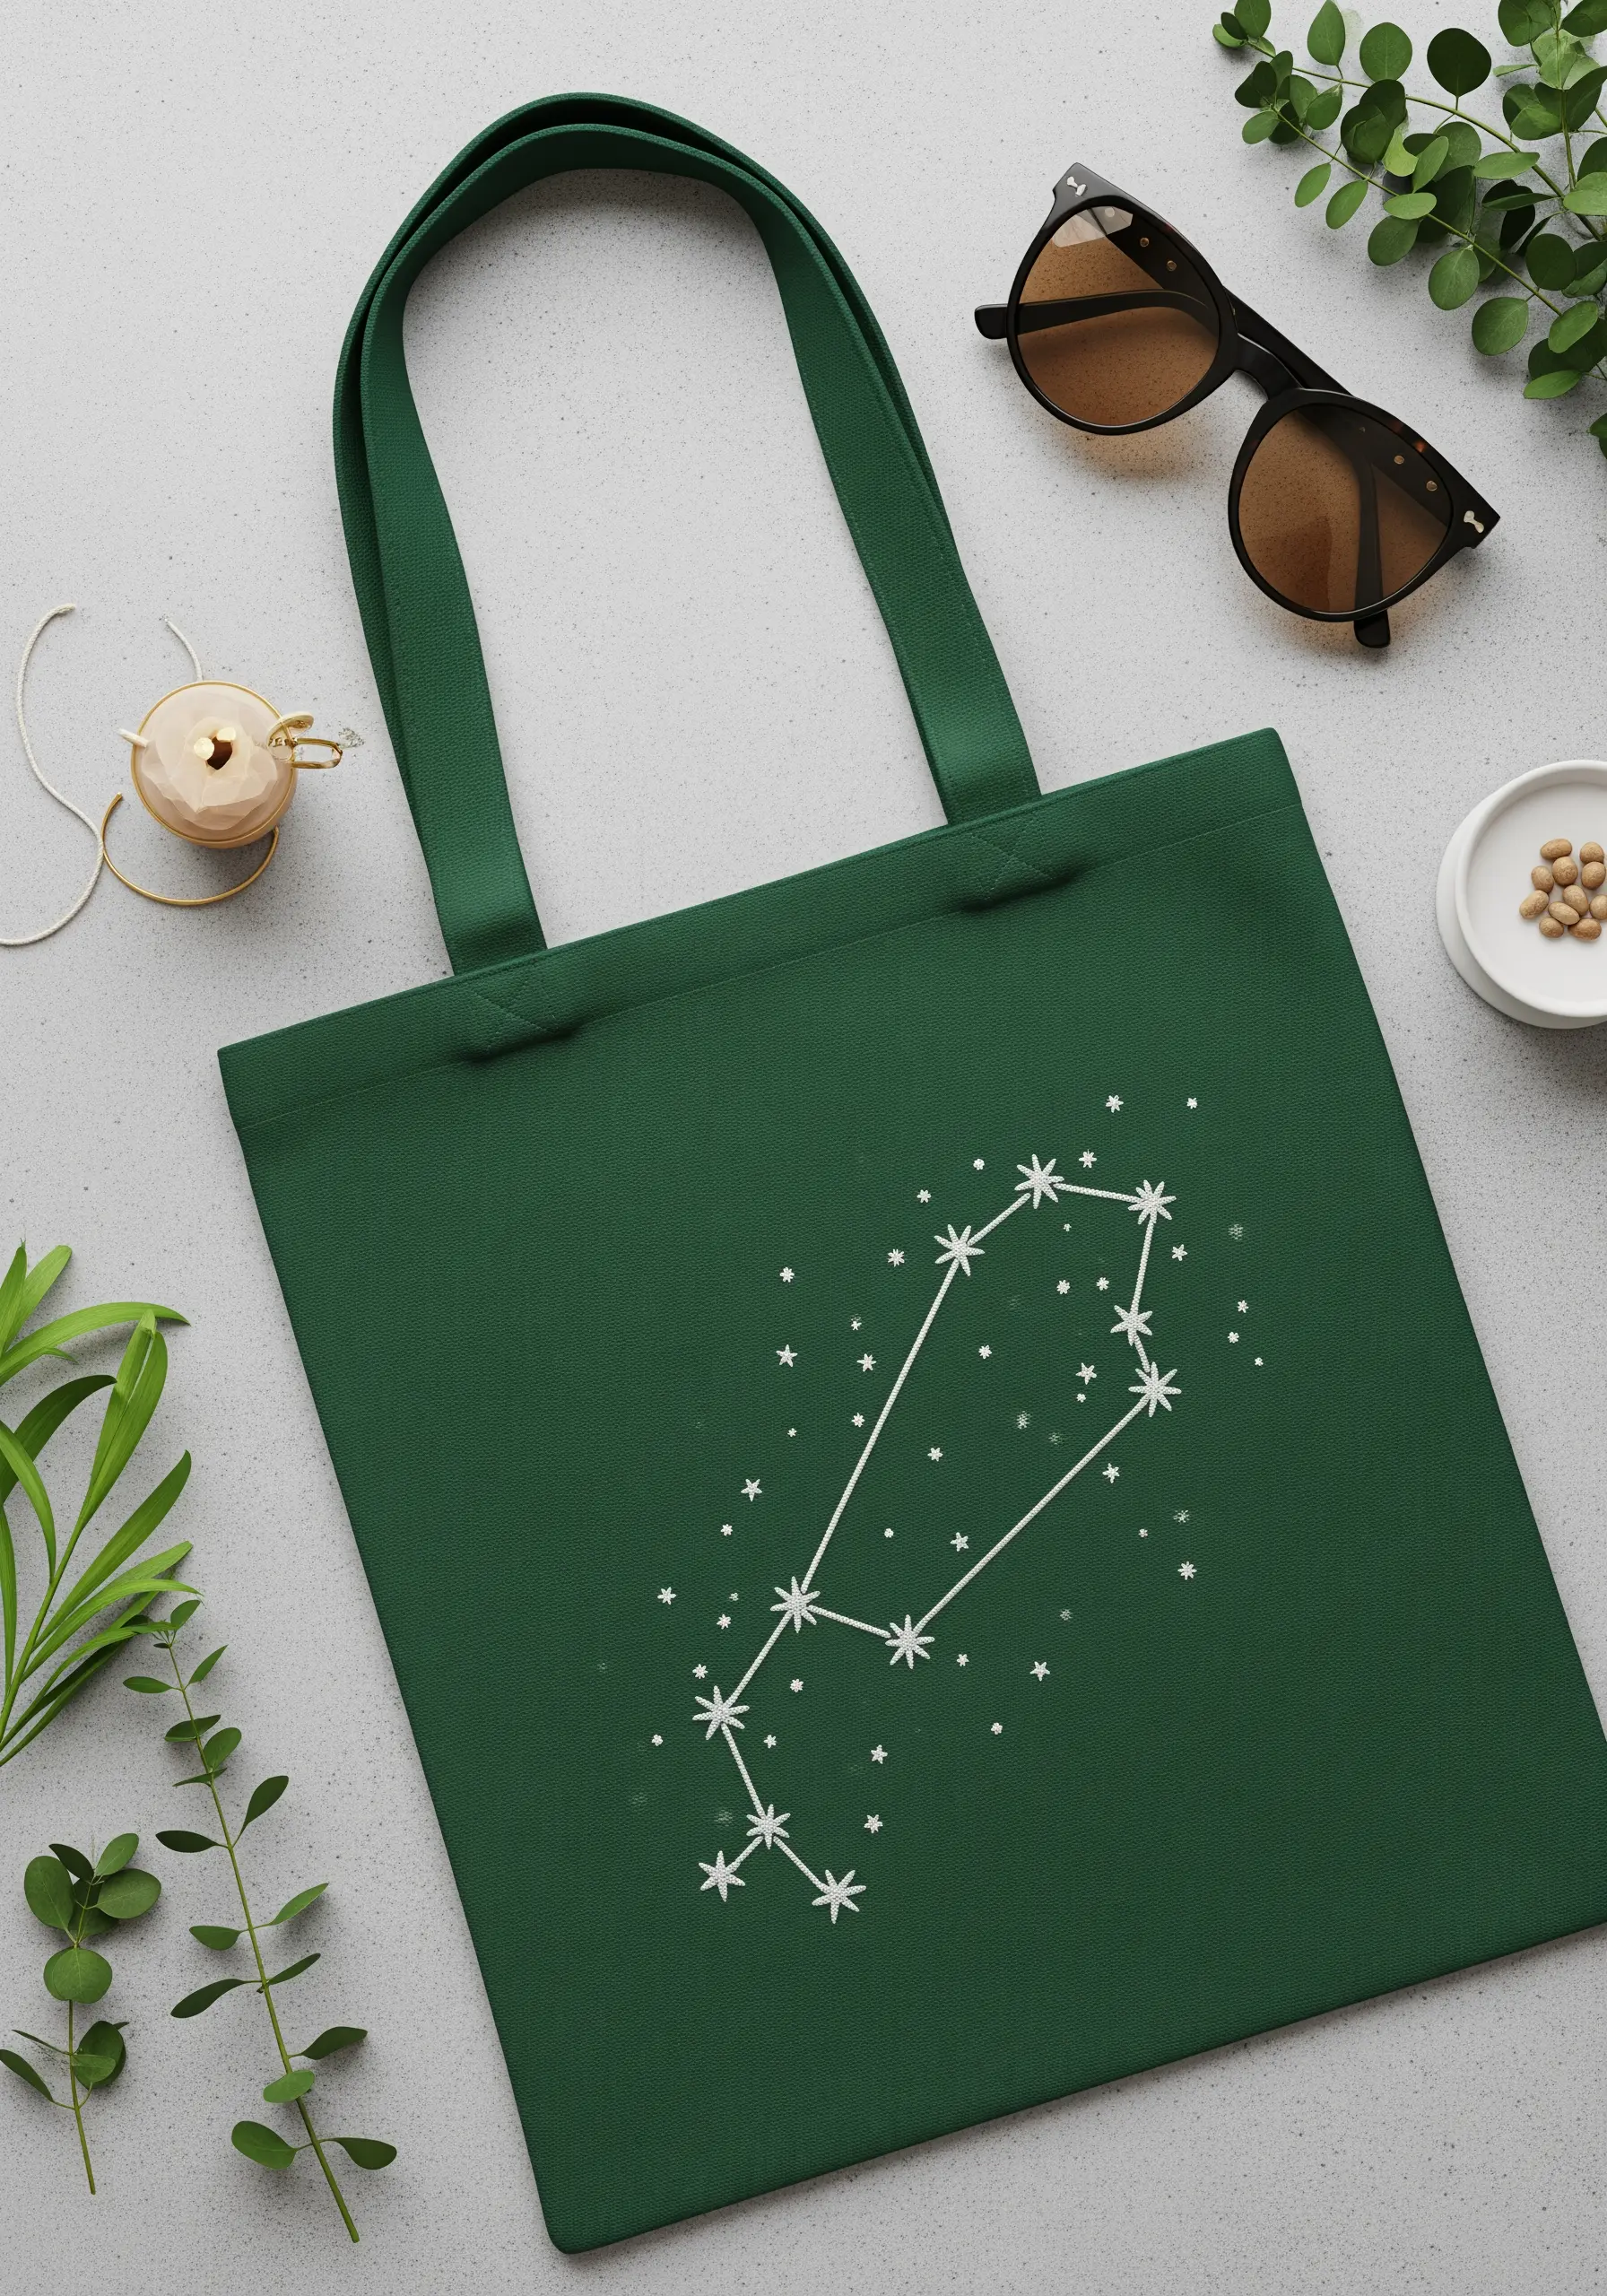
Elevate a simple constellation design by choosing the right stitch and thread.
Use a crisp backstitch for the connecting lines to ensure they are straight and clean.
For the stars, you can use simple French knots, but a small, four- or five-pointed star stitch (made of overlapping straight stitches) adds a more graphic, celestial touch.
Stitching with a white or silver metallic floss on a dark green or navy tote enhances the night-sky effect and gives the design a touch of modern magic.
18. Creating a Polished Folk Art Border
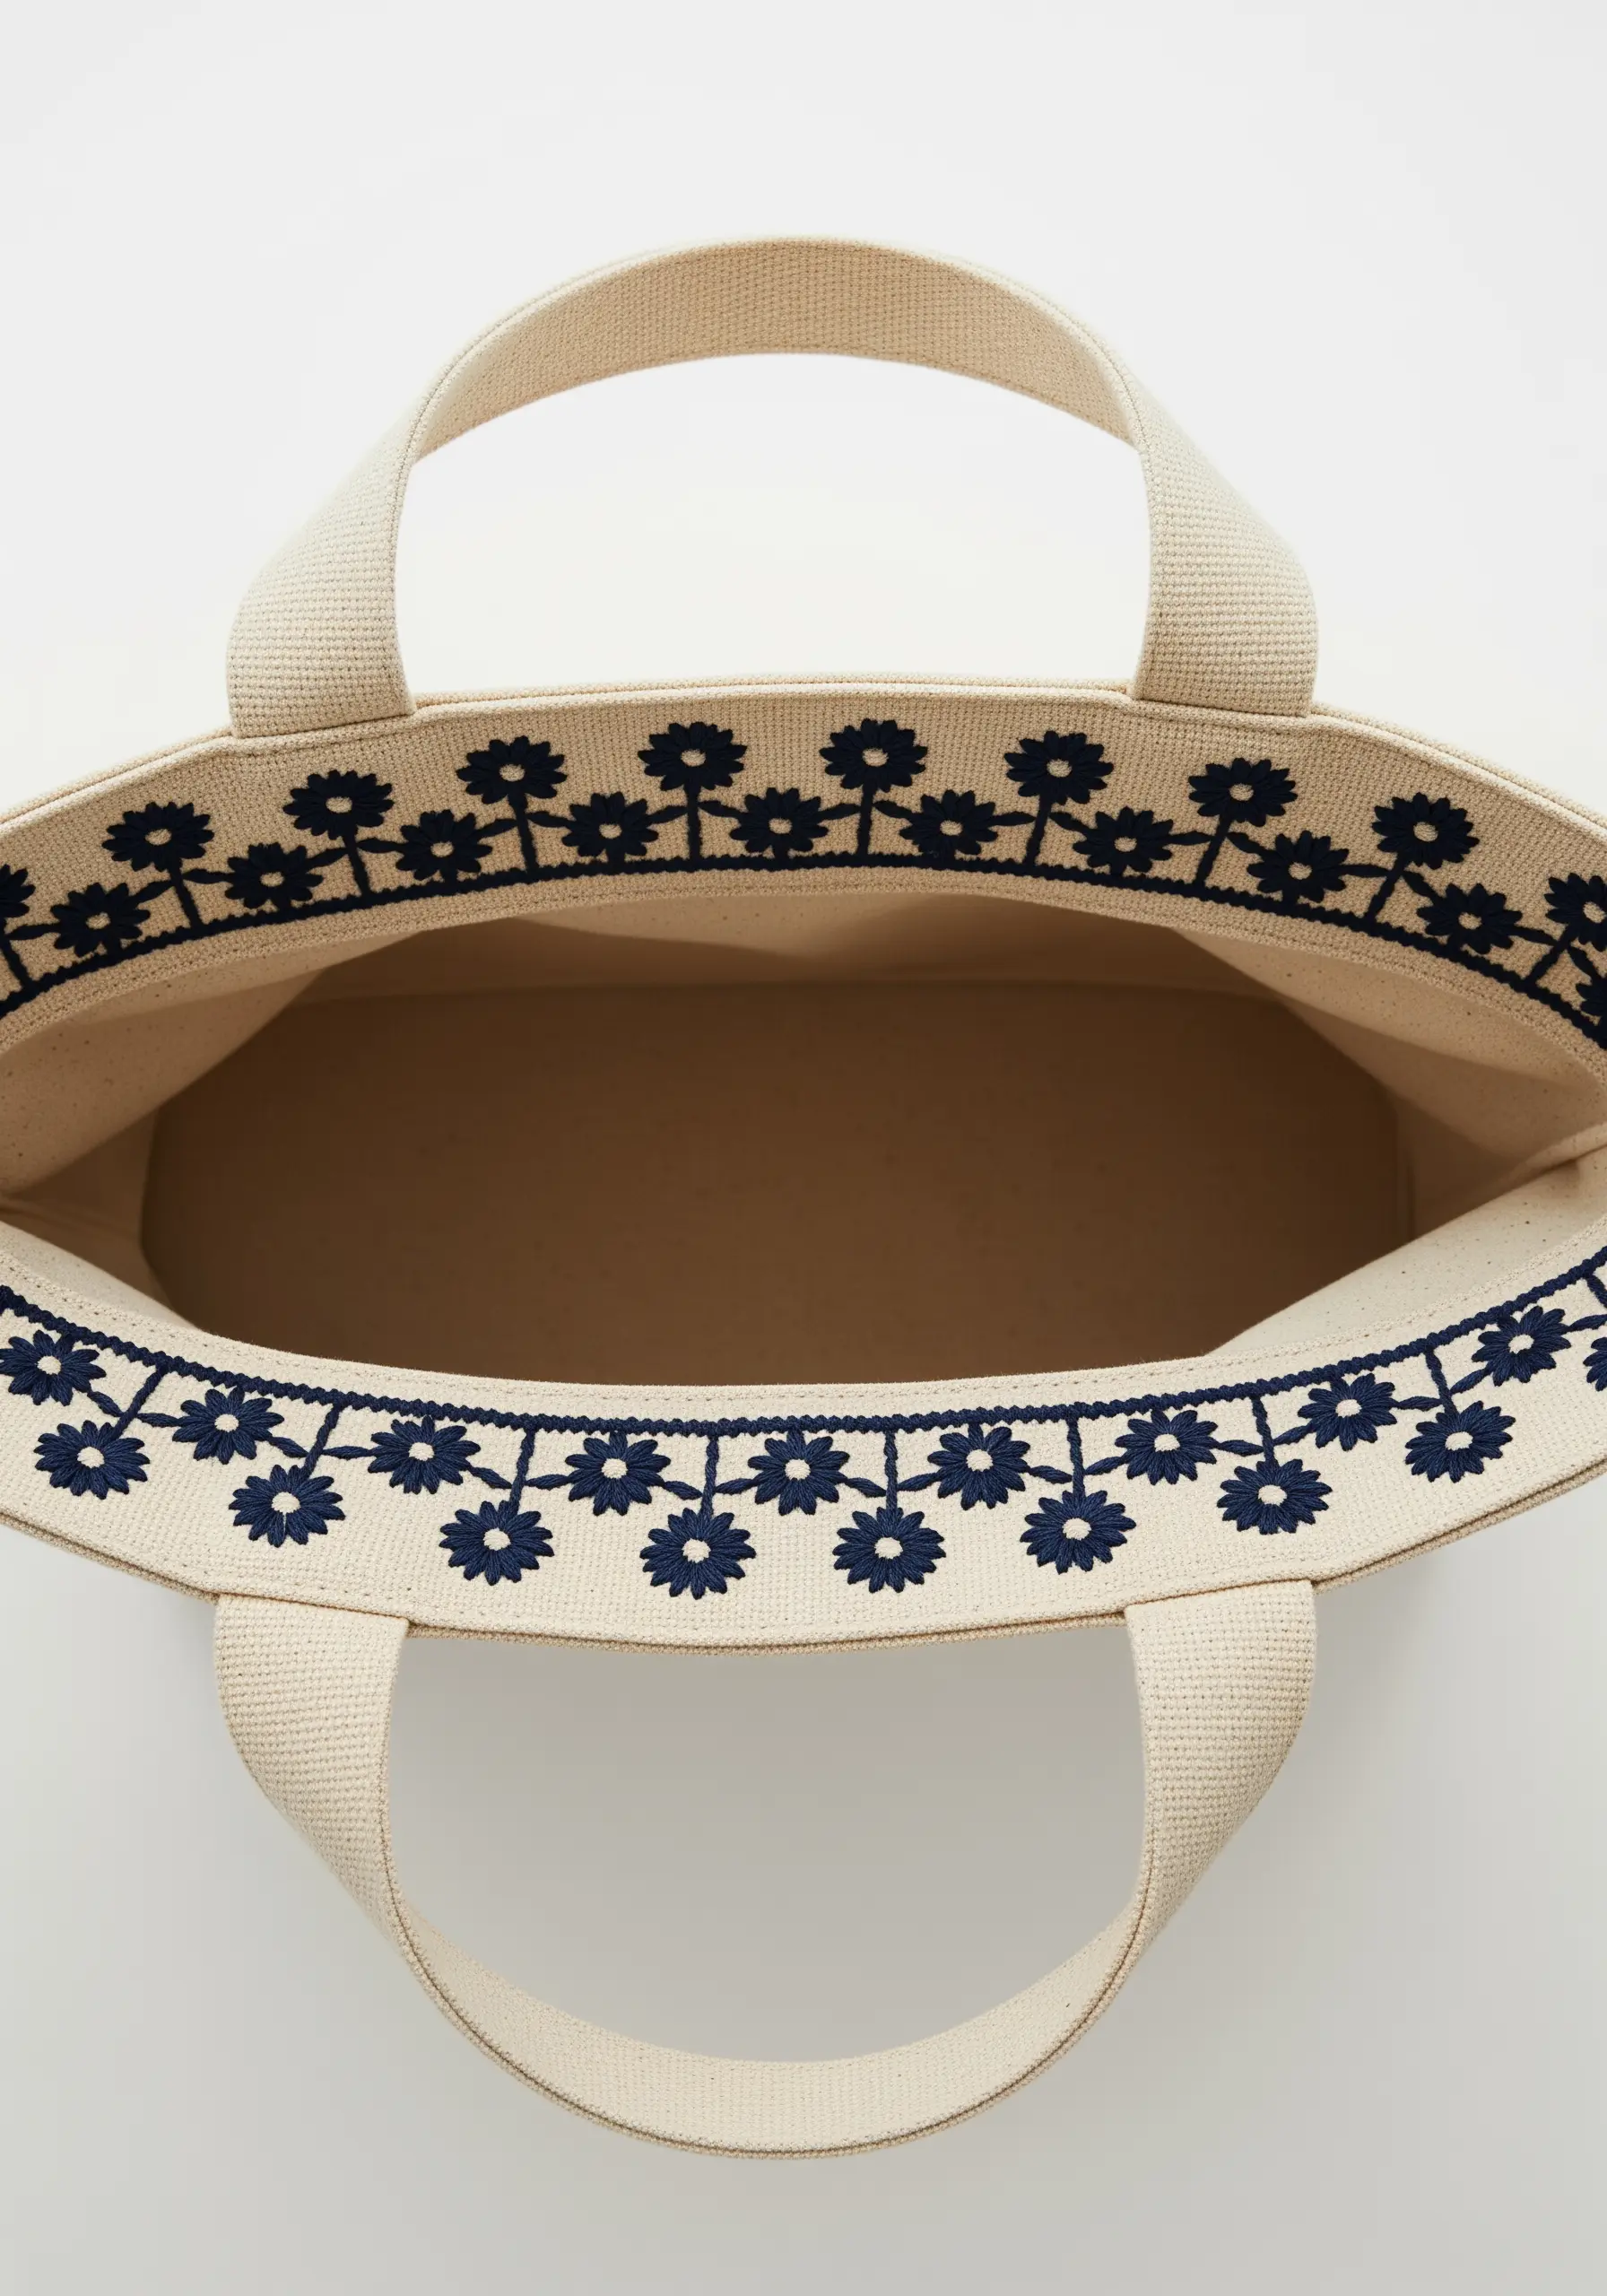
A repeating border adds a professional finish to any tote, and this folk art style is remarkably simple.
The pattern is composed of just two basic stitches: lazy daisy stitch for the flower petals and a single French knot for the center.
The key to a store-bought look is perfect repetition and spacing. Use a ruler and a removable fabric marker to map out the placement of each flower before you begin.
Stitching this border along the top opening of the tote gives it a beautifully finished, custom-made feel.
19. Achieving Painterly Realism in Florals
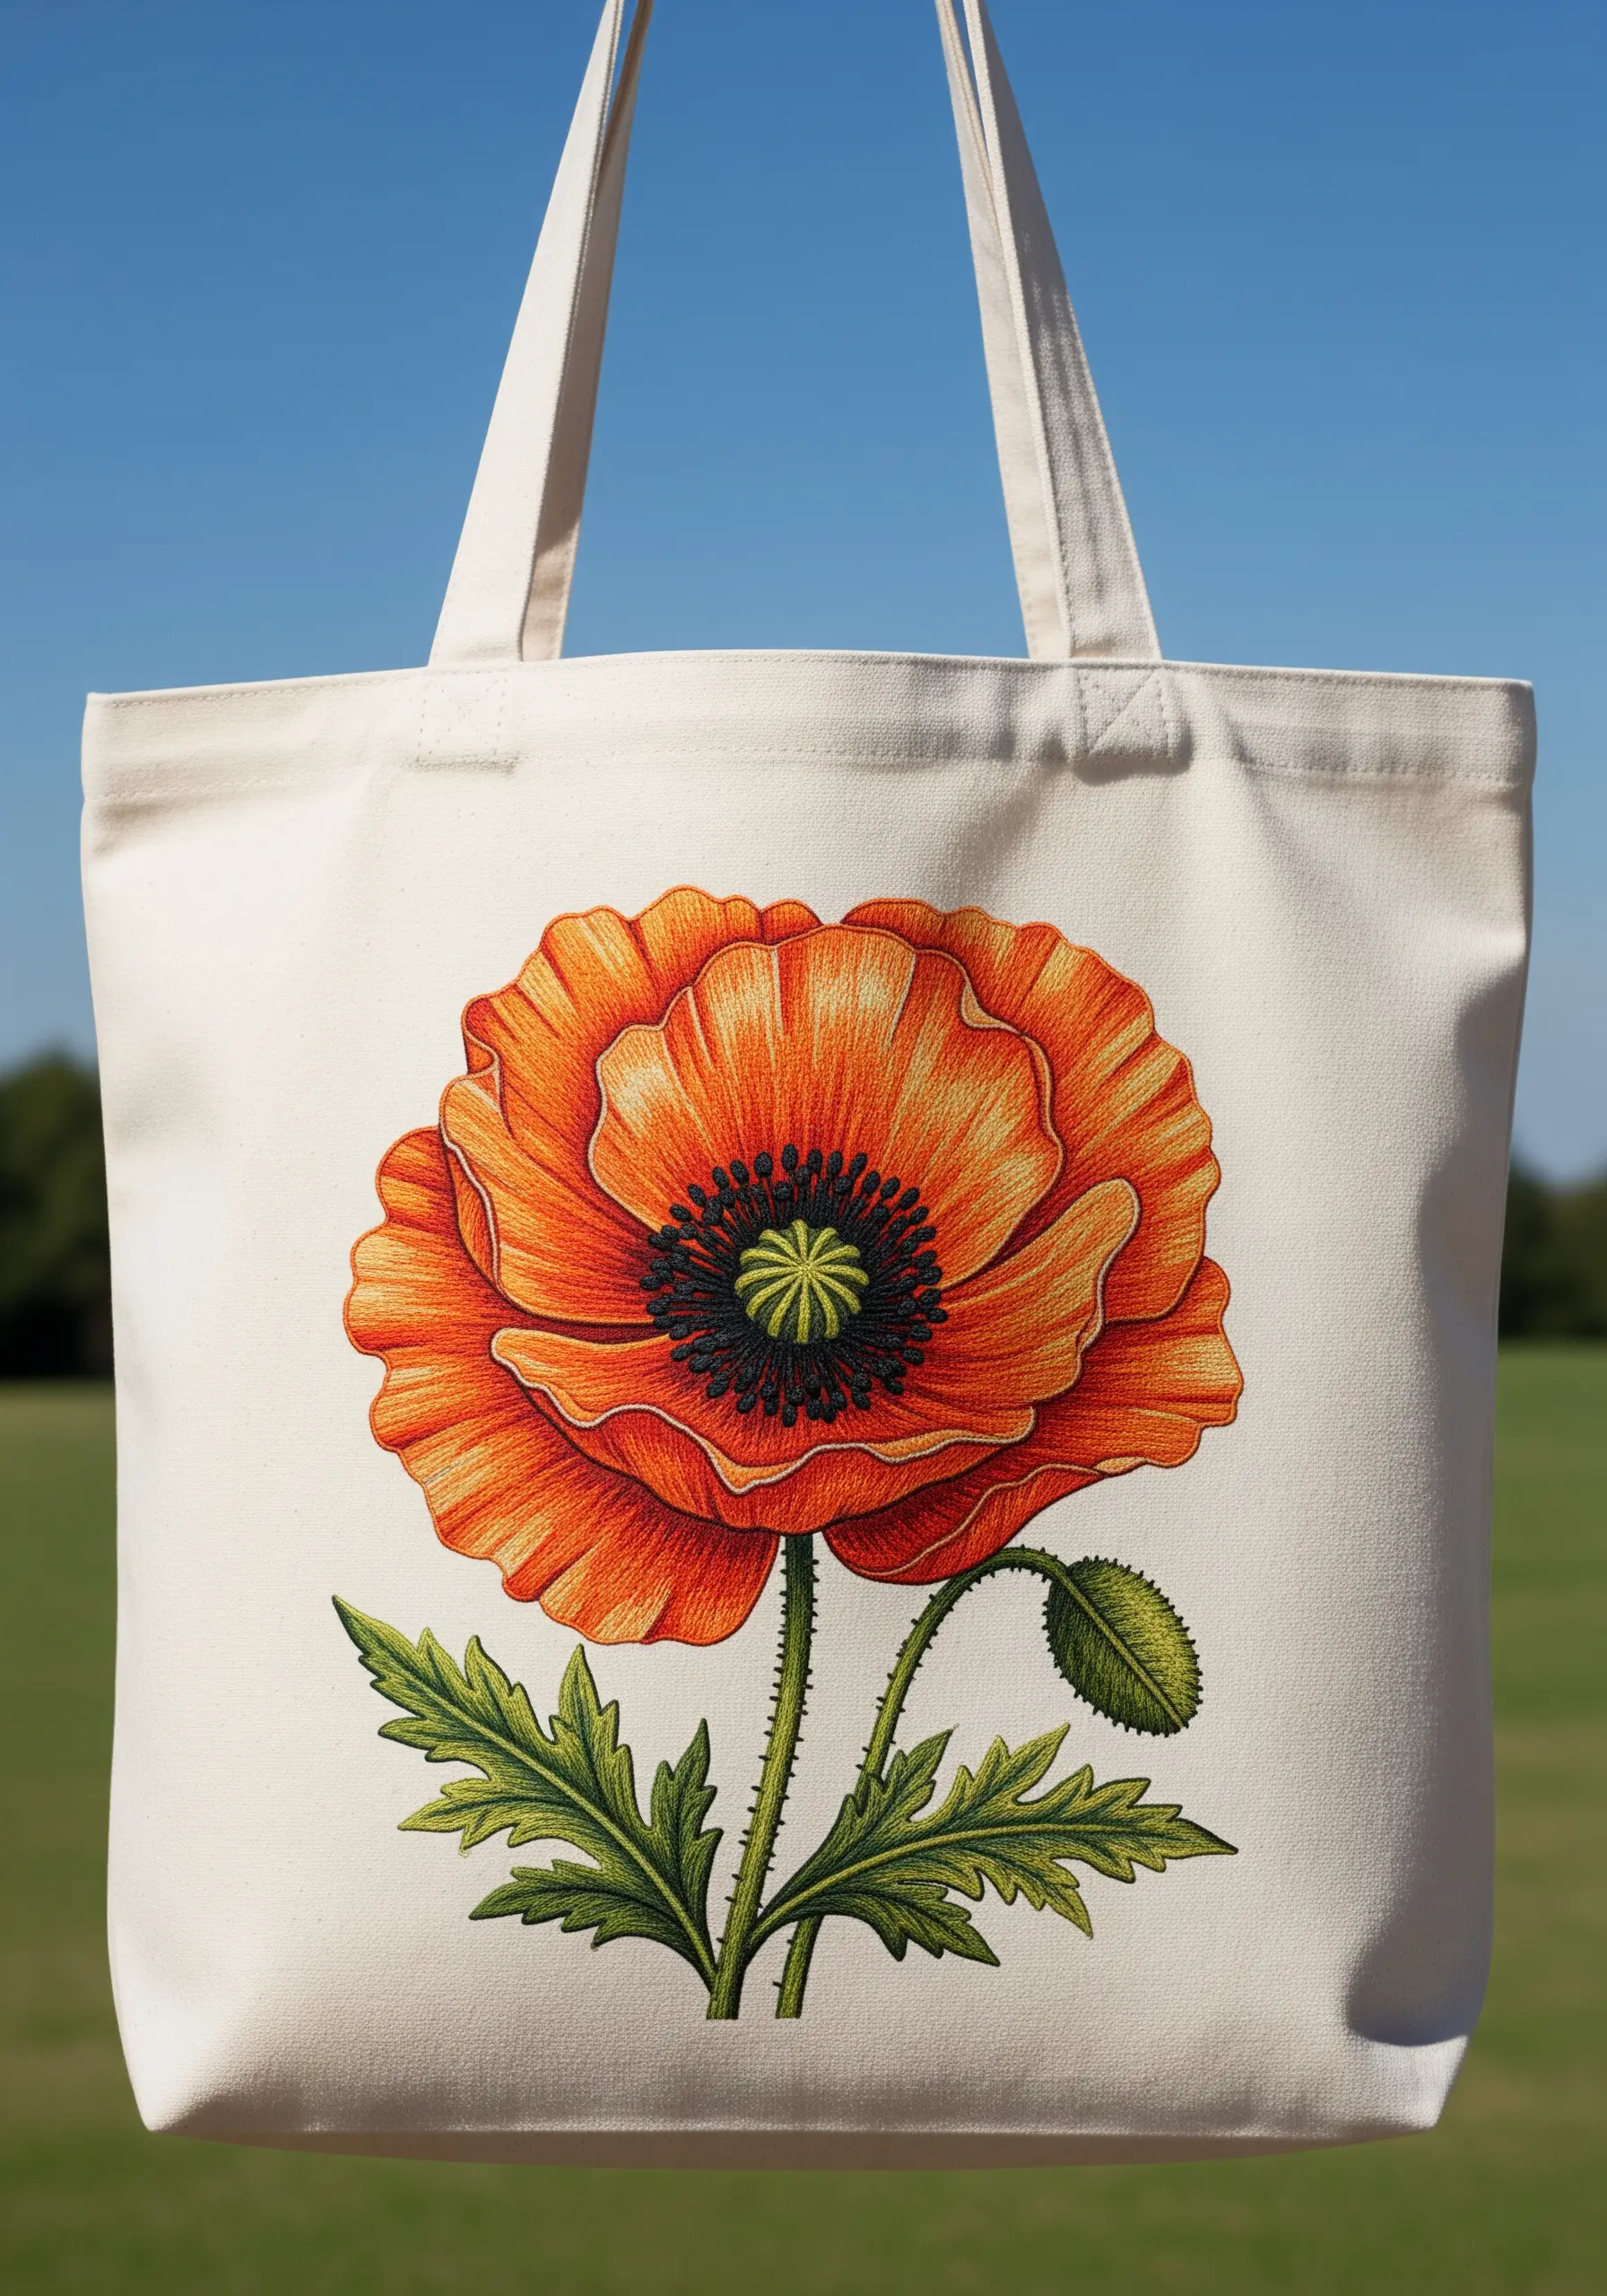
Transform a simple flower into a work of art using thread painting techniques.
This poppy’s realism comes from long-and-short stitch, which allows you to blend multiple shades of red and orange seamlessly, just like paint.
Start with the lightest color and work your way to the darkest, using angled stitches that follow the natural curve and folds of the petals.
A dense cluster of black and dark green French knots creates the textured center, providing a deep contrast that makes the bright petals truly glow.
This is how you achieve wild garden floral embroidery ideas that look like watercolor paintings.
20. Graphic Impact on a Denim Pocket
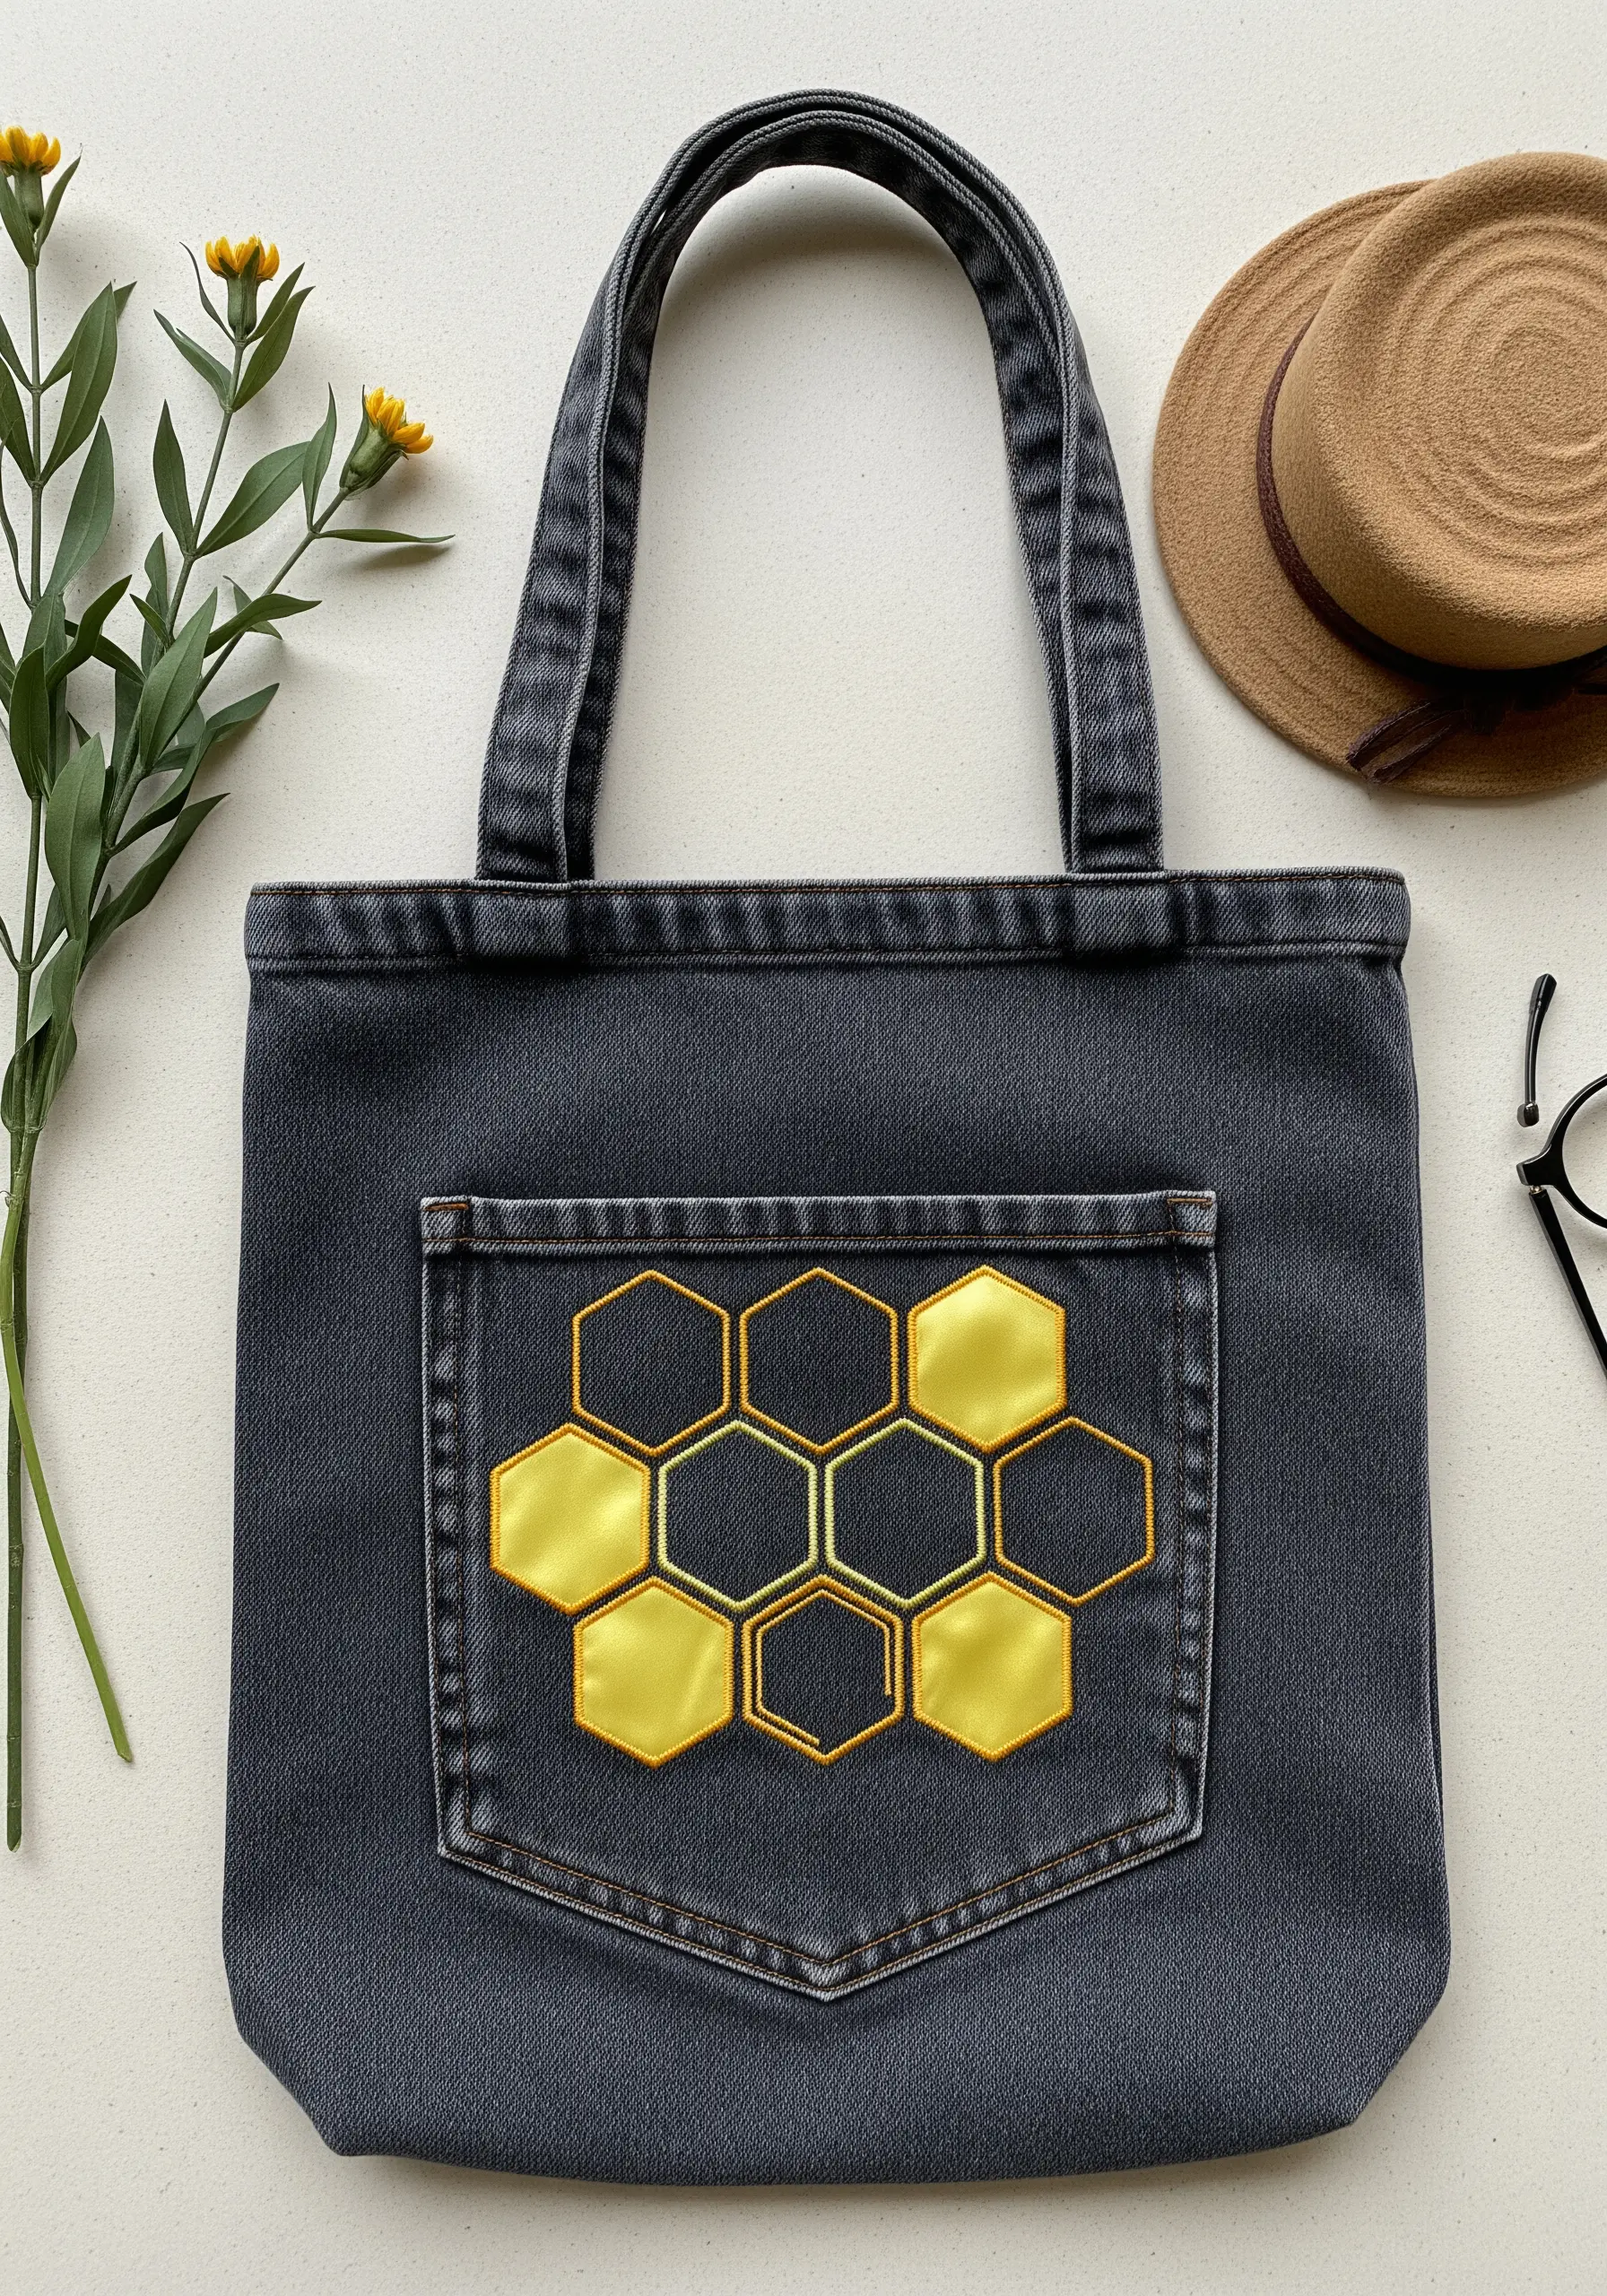
Use an existing feature, like a pocket, as a natural frame for your embroidery.
This honeycomb design plays with positive and negative space by combining filled-in shapes with simple outlines.
Use a perfectly smooth satin stitch for the filled hexagons, ensuring all your stitches lie in the same direction for a uniform sheen.
For the outlines, a clean backstitch provides a crisp, graphic counterpoint. This thoughtful composition turns a simple pocket into a bold design element.
21. Adding Playful Patterns to Simple Shapes
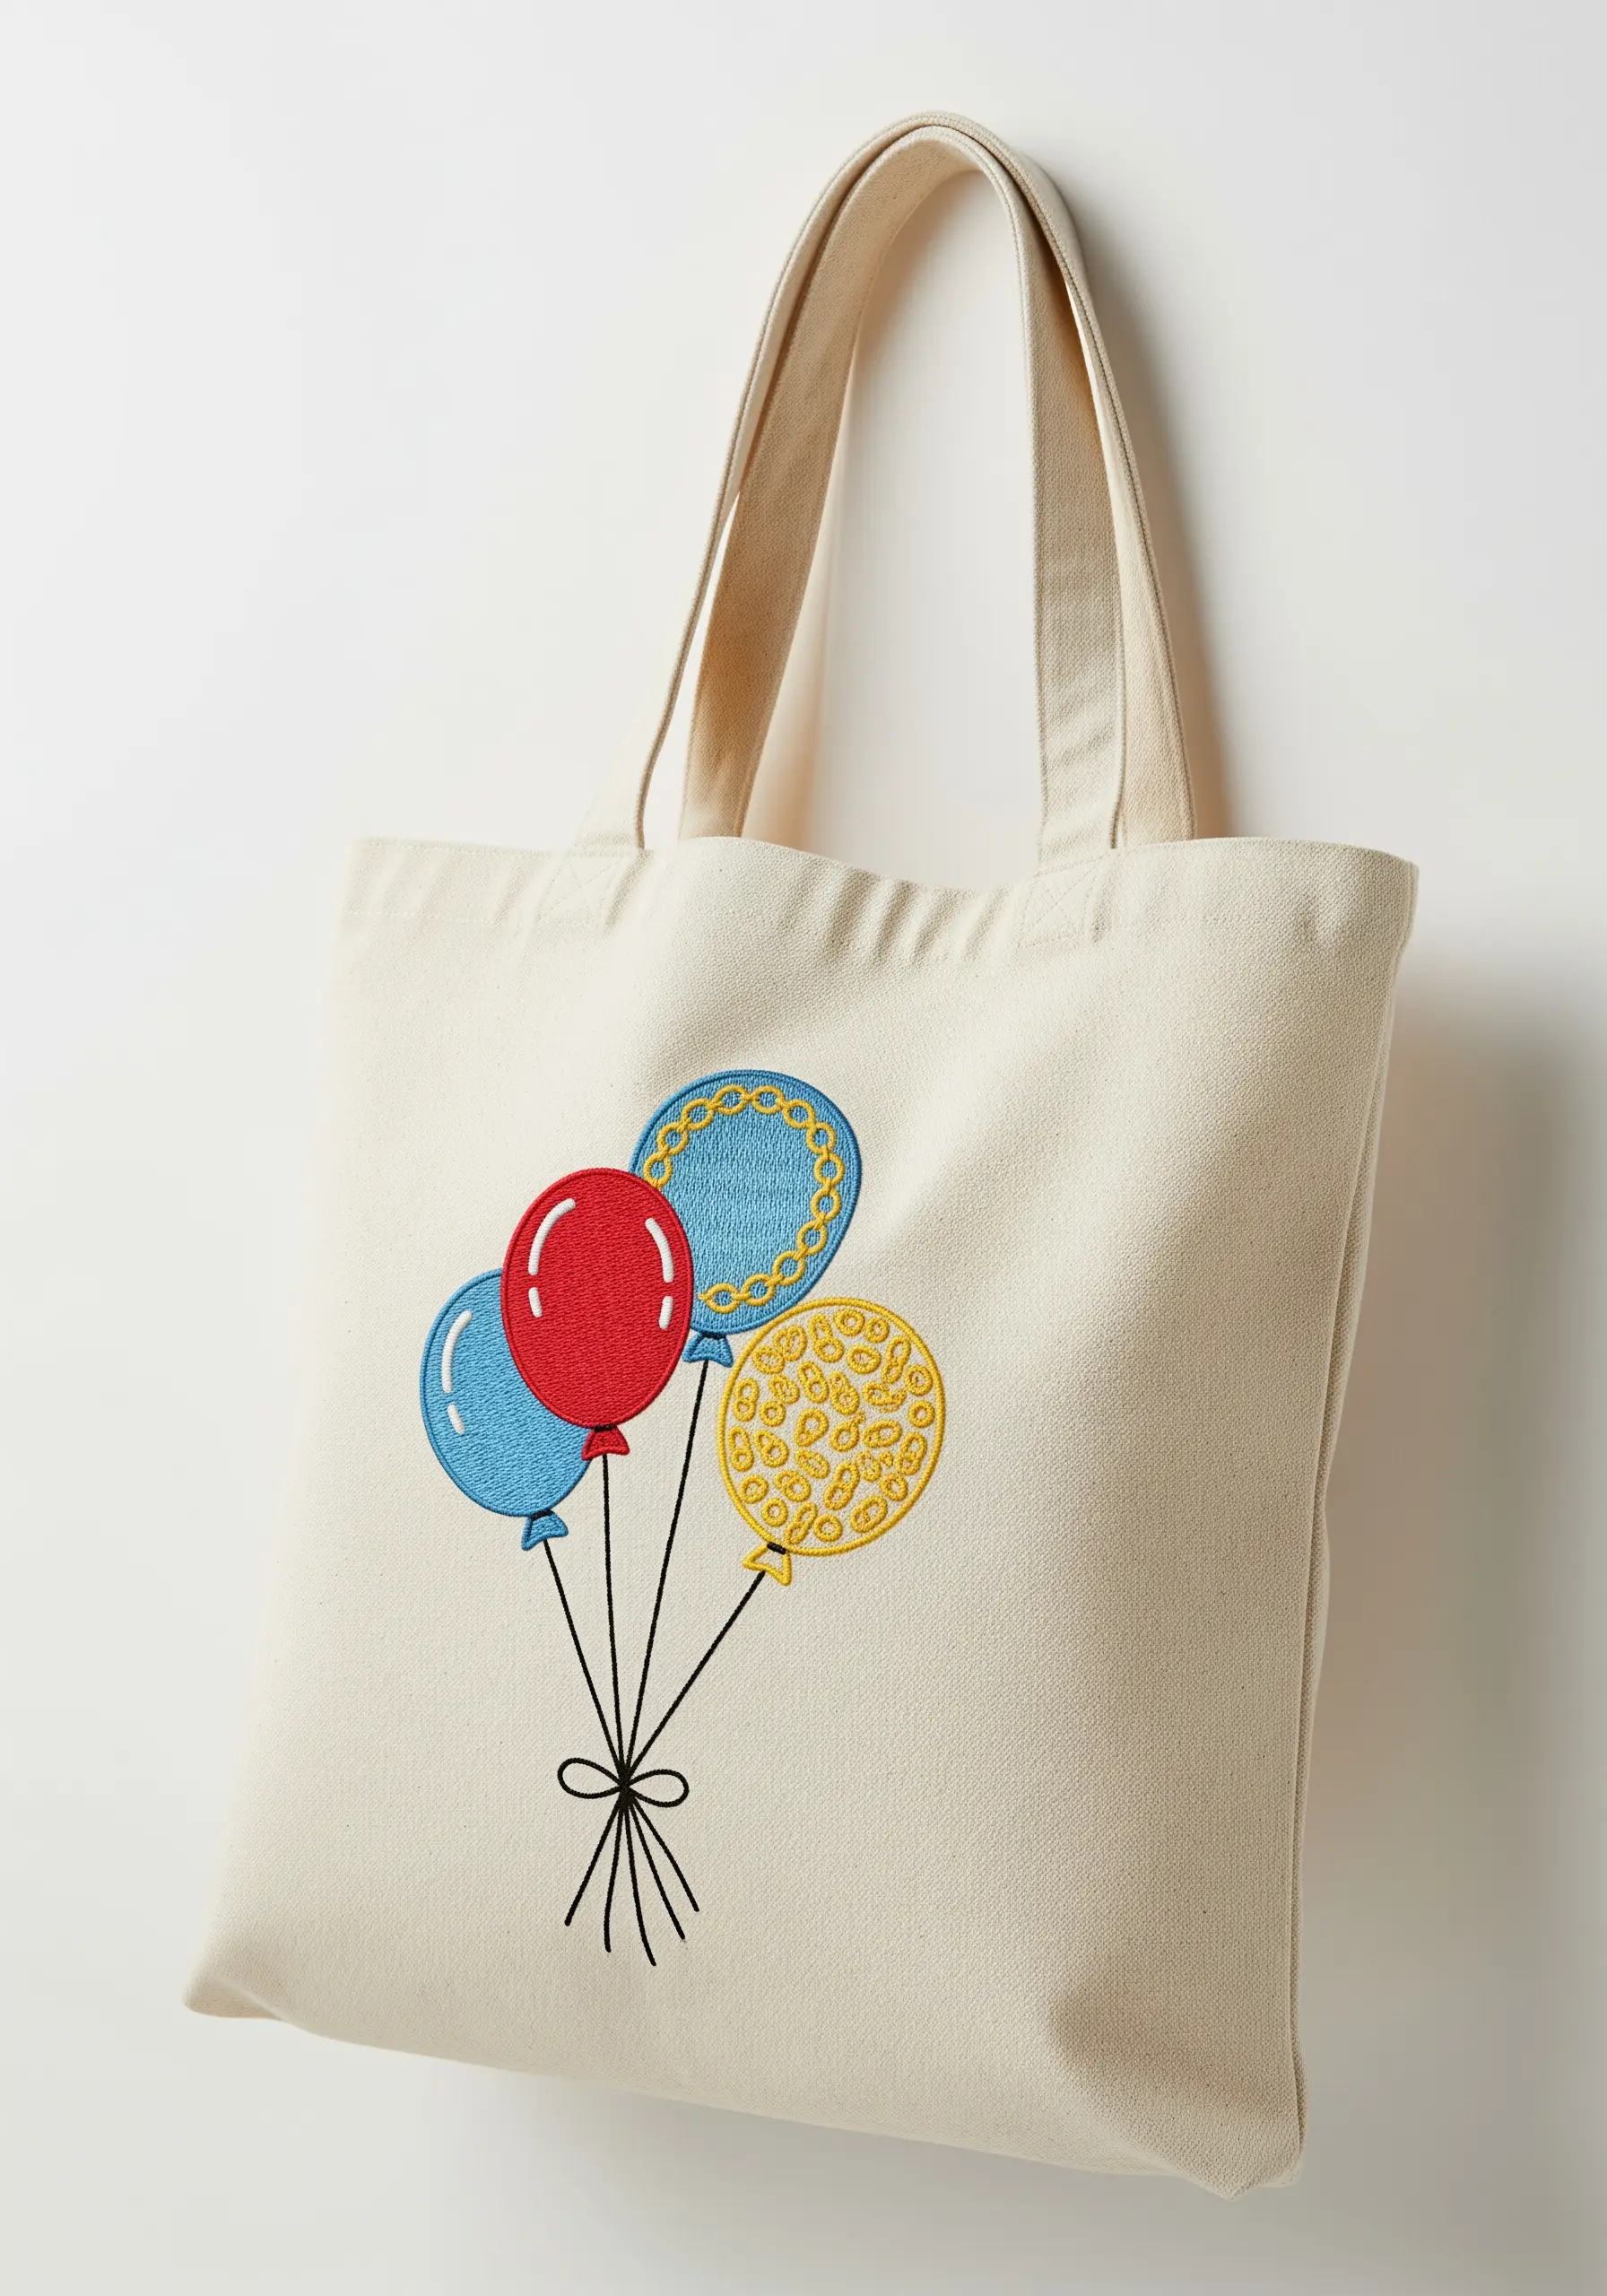
Elevate simple balloon shapes by turning them into mini canvases for textural patterns.
After filling each balloon with a smooth satin stitch, embellish the surface with contrasting details.
Try adding a border of chain stitch in a complementary color, scattering tiny seed stitches across the surface, or creating a pattern with French knots.
These small, thoughtful details add a layer of sophistication and fun, transforming a basic motif into a custom design.
22. Building Depth with Layered Scallop Stitches
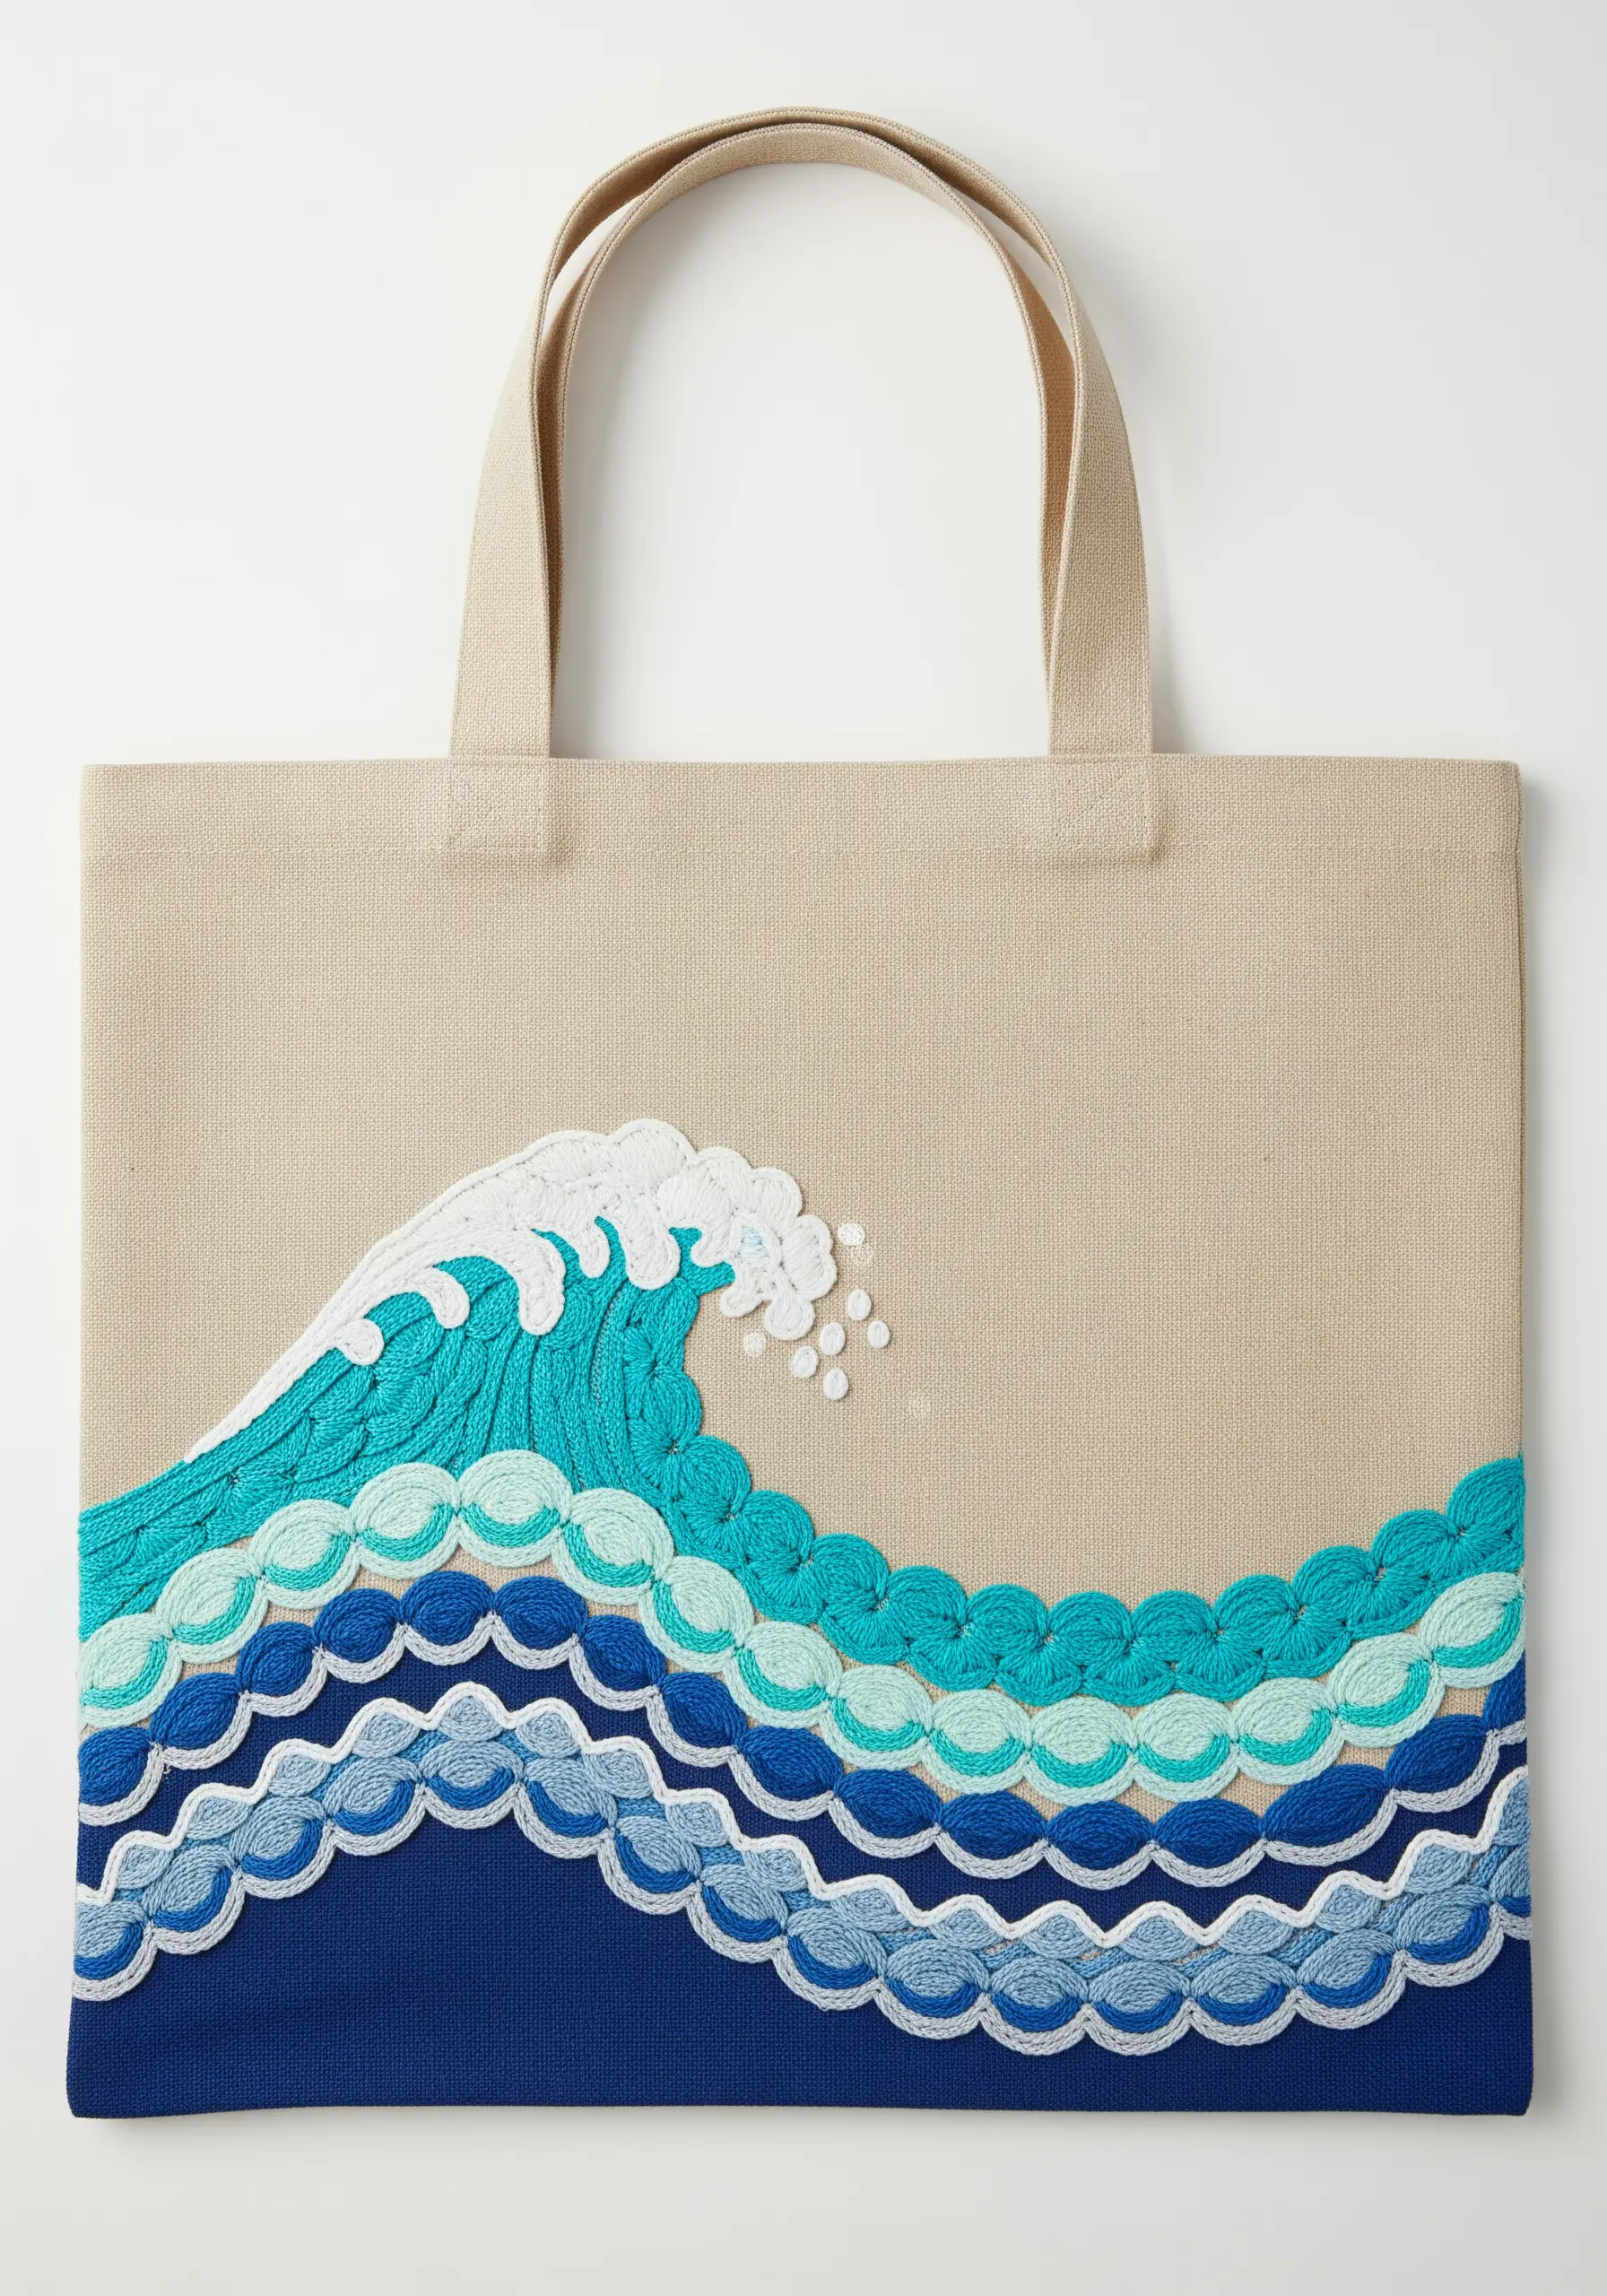
Create the illusion of rolling waves by layering rows of simple stitches in graduating shades of blue.
This design uses a closed buttonhole stitch or a simple satin stitch scallop to form each wave crest.
Start with the darkest blue at the bottom and work your way up, slightly overlapping each new, lighter-colored layer on top of the one below it.
Finish the top crest with a crisp white whipped backstitch to mimic sea foam. The layering is what creates the wonderful sense of depth and movement.
23. Capturing Cactus Texture with Varied Stitches
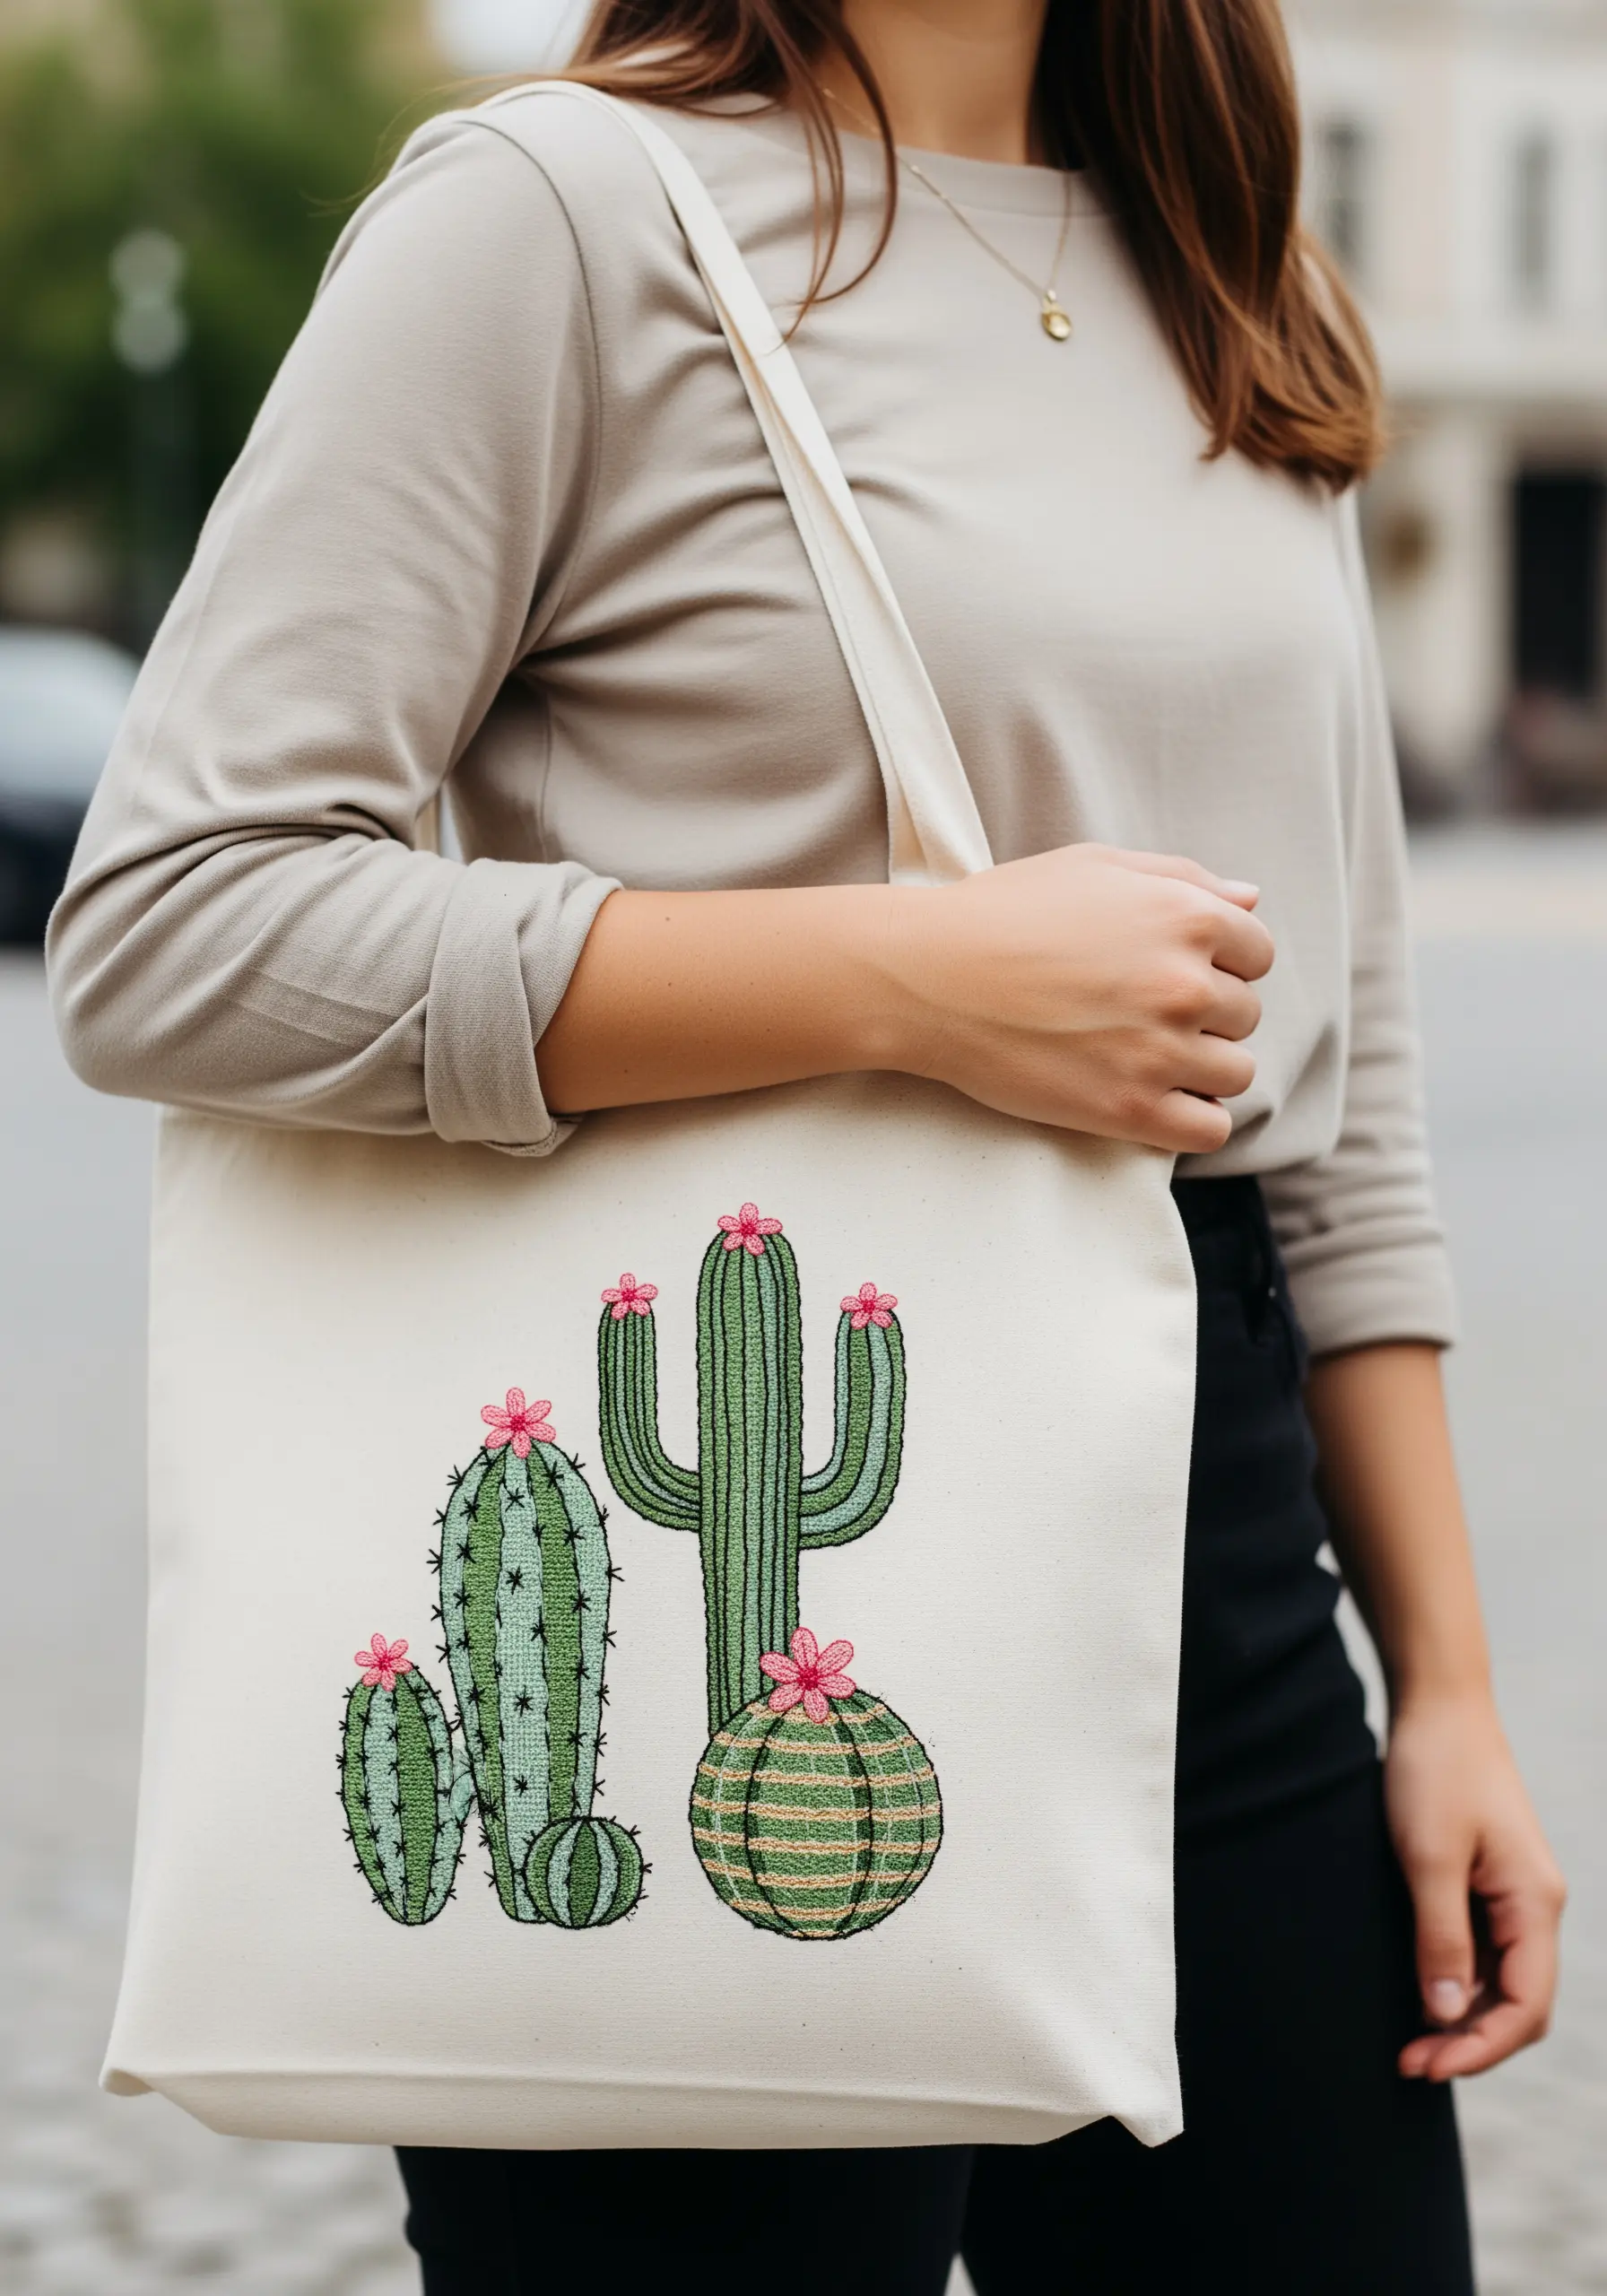
Mimic the unique textures of different cacti by assigning a specific stitch to each one.
Use vertical satin stitches or long straight stitches to create the ribbed texture of a saguaro cactus.
For a prickly pear, scatter tiny seed stitches or ‘v’ stitches across the surface to represent the spines.
A round barrel cactus can be created with satin stitches that curve around its form. This thoughtful use of texture makes each plant distinct and adds realistic character to the design.
24. Luxe Shimmer with a Seed Bead Fill

Combine beading and embroidery for a design that offers unparalleled shimmer and texture.
First, outline your crescent moon shape with a clean chain stitch or whipped backstitch using a silver metallic thread.
Fill the interior of the shape by sewing on silver seed beads one by one, packing them tightly together to create a dense, sparkling surface.
This technique, known as bead embroidery, creates a rich, tactile effect that catches the light beautifully and feels incredibly luxurious on the dark canvas.
25. Crafting 3D Clouds with Woven Wheels
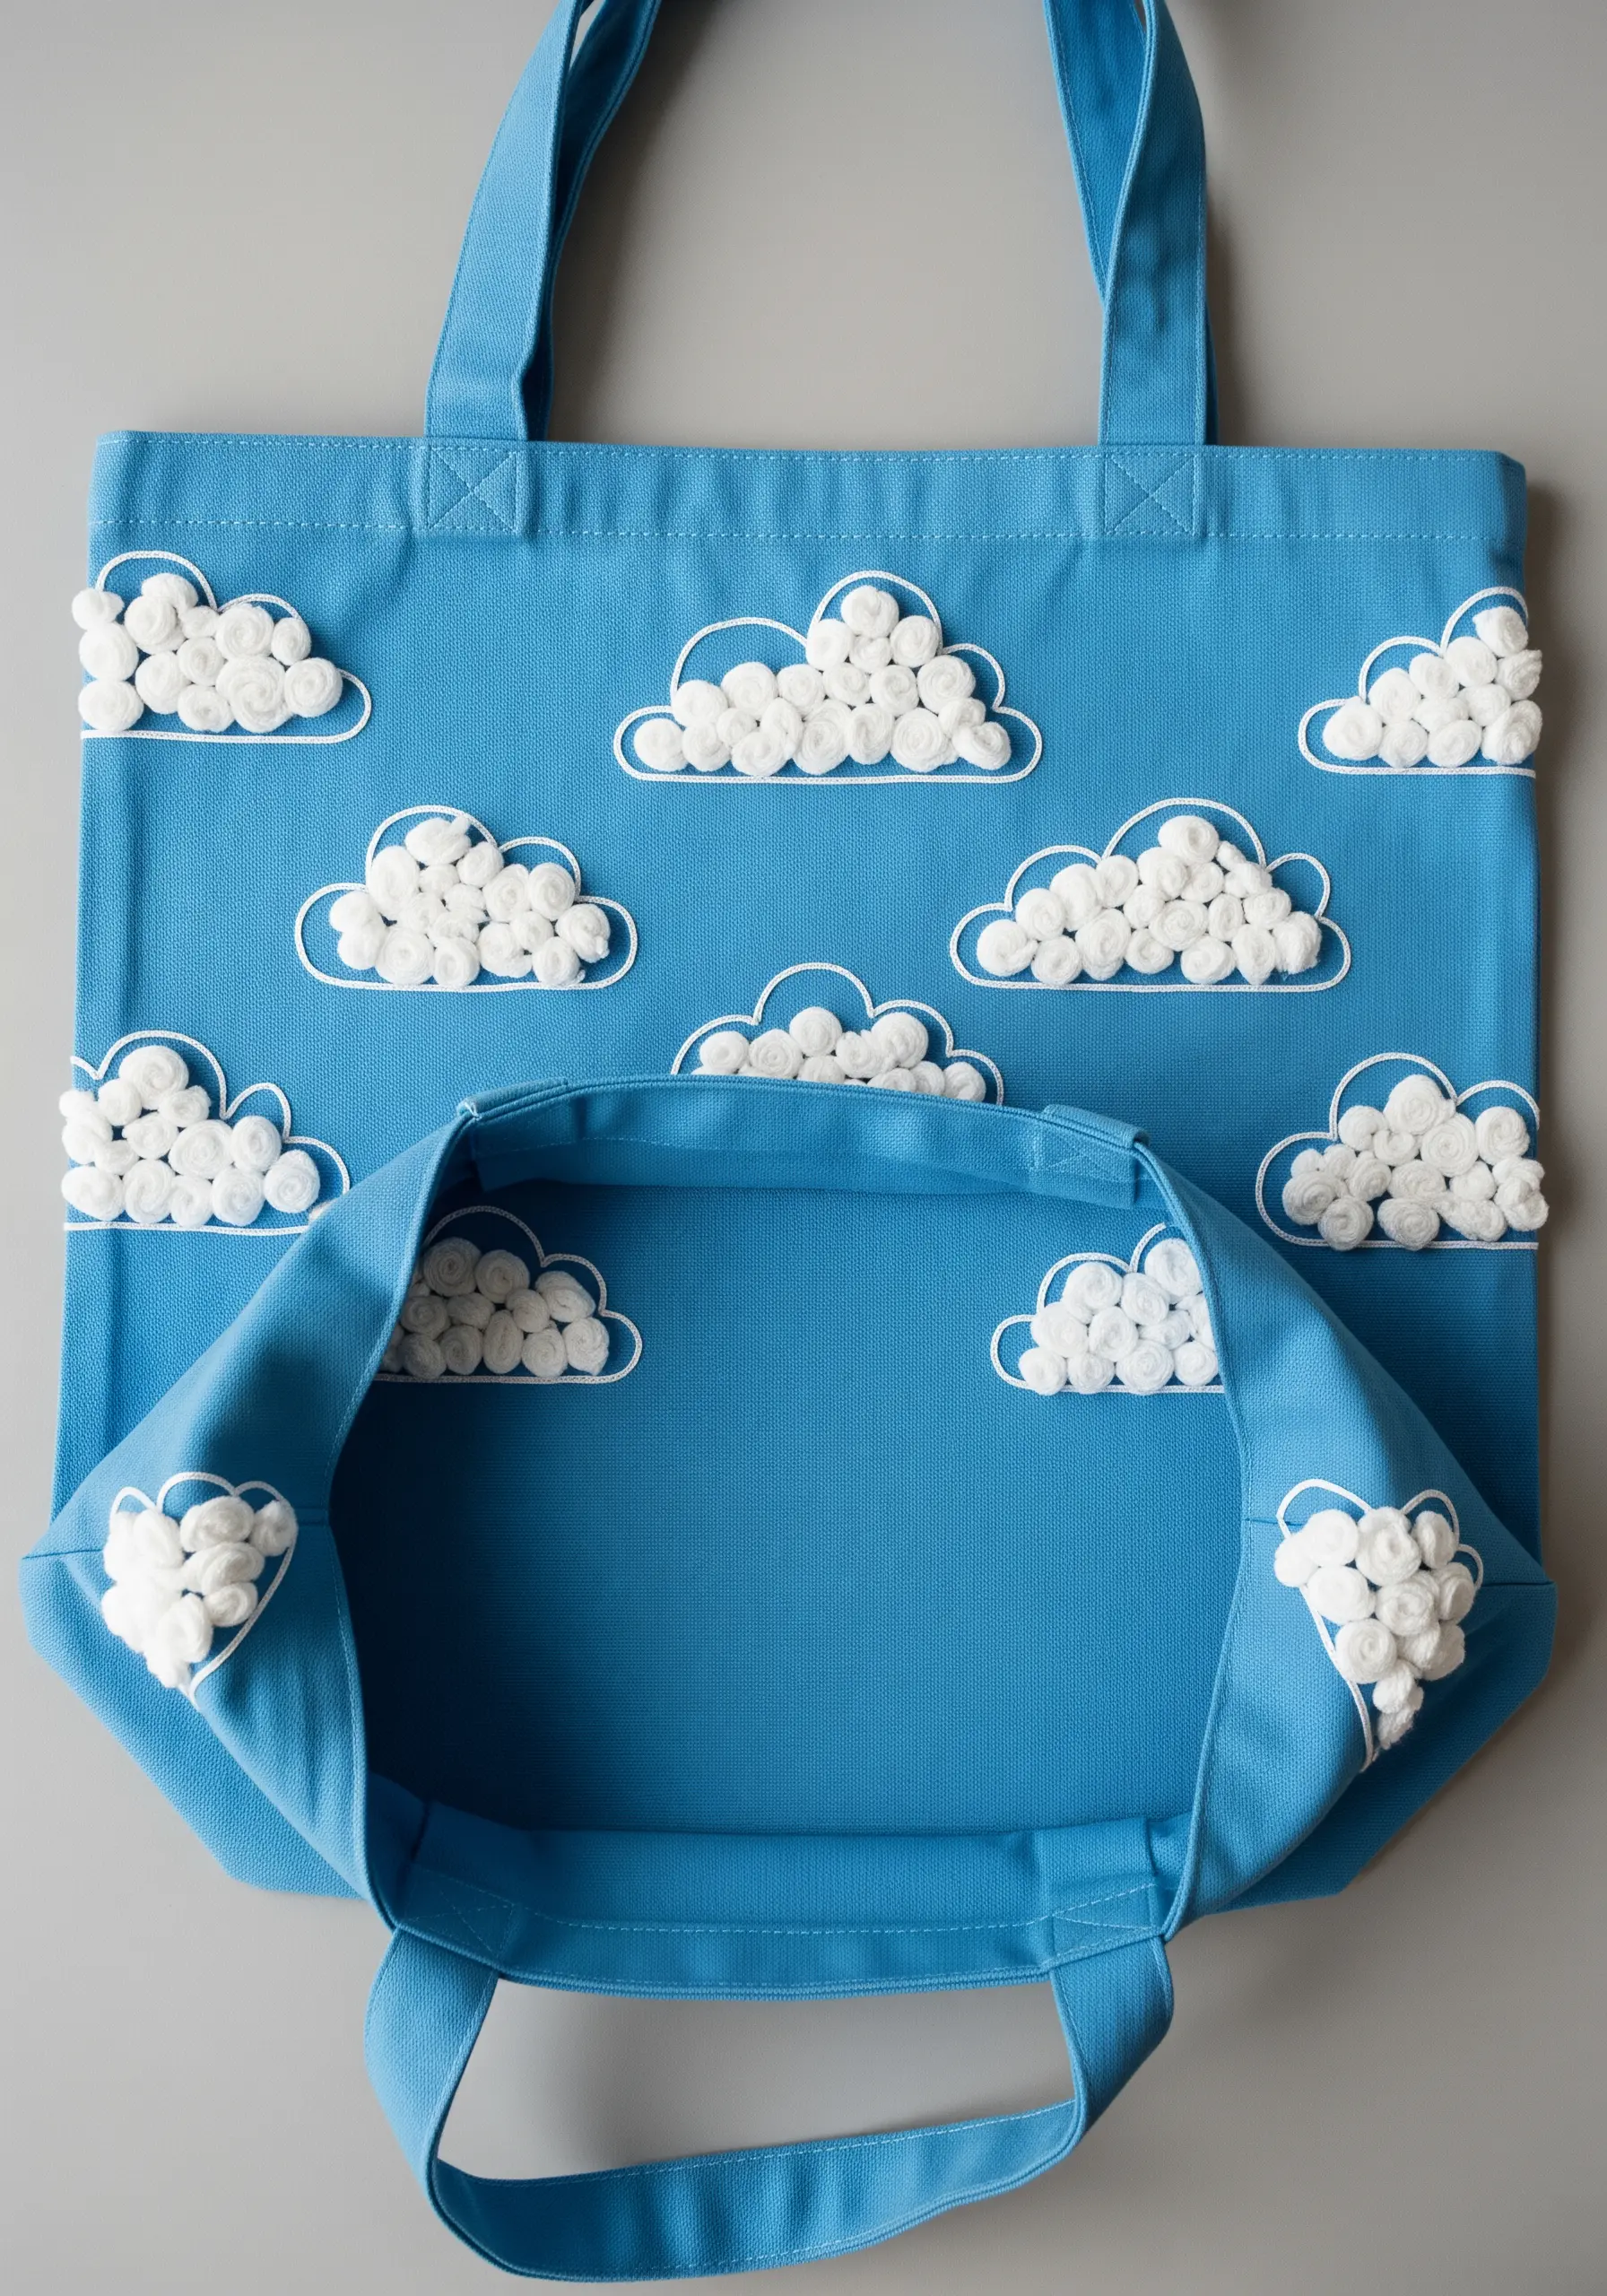
Achieve a fluffy, three-dimensional effect using a classic raised stitch.
The voluminous texture of these clouds is created with woven wheel stitches (also known as woven rose stitches).
Start with a star-shaped foundation of straight stitches and then weave your thread over and under the spokes until the shape is filled.
By packing these puffy stitches closely together within a simple backstitch outline, you create a delightful, cartoon-like cloud pattern that begs to be touched.
26. Graphic Detail with a Backstitch Lattice
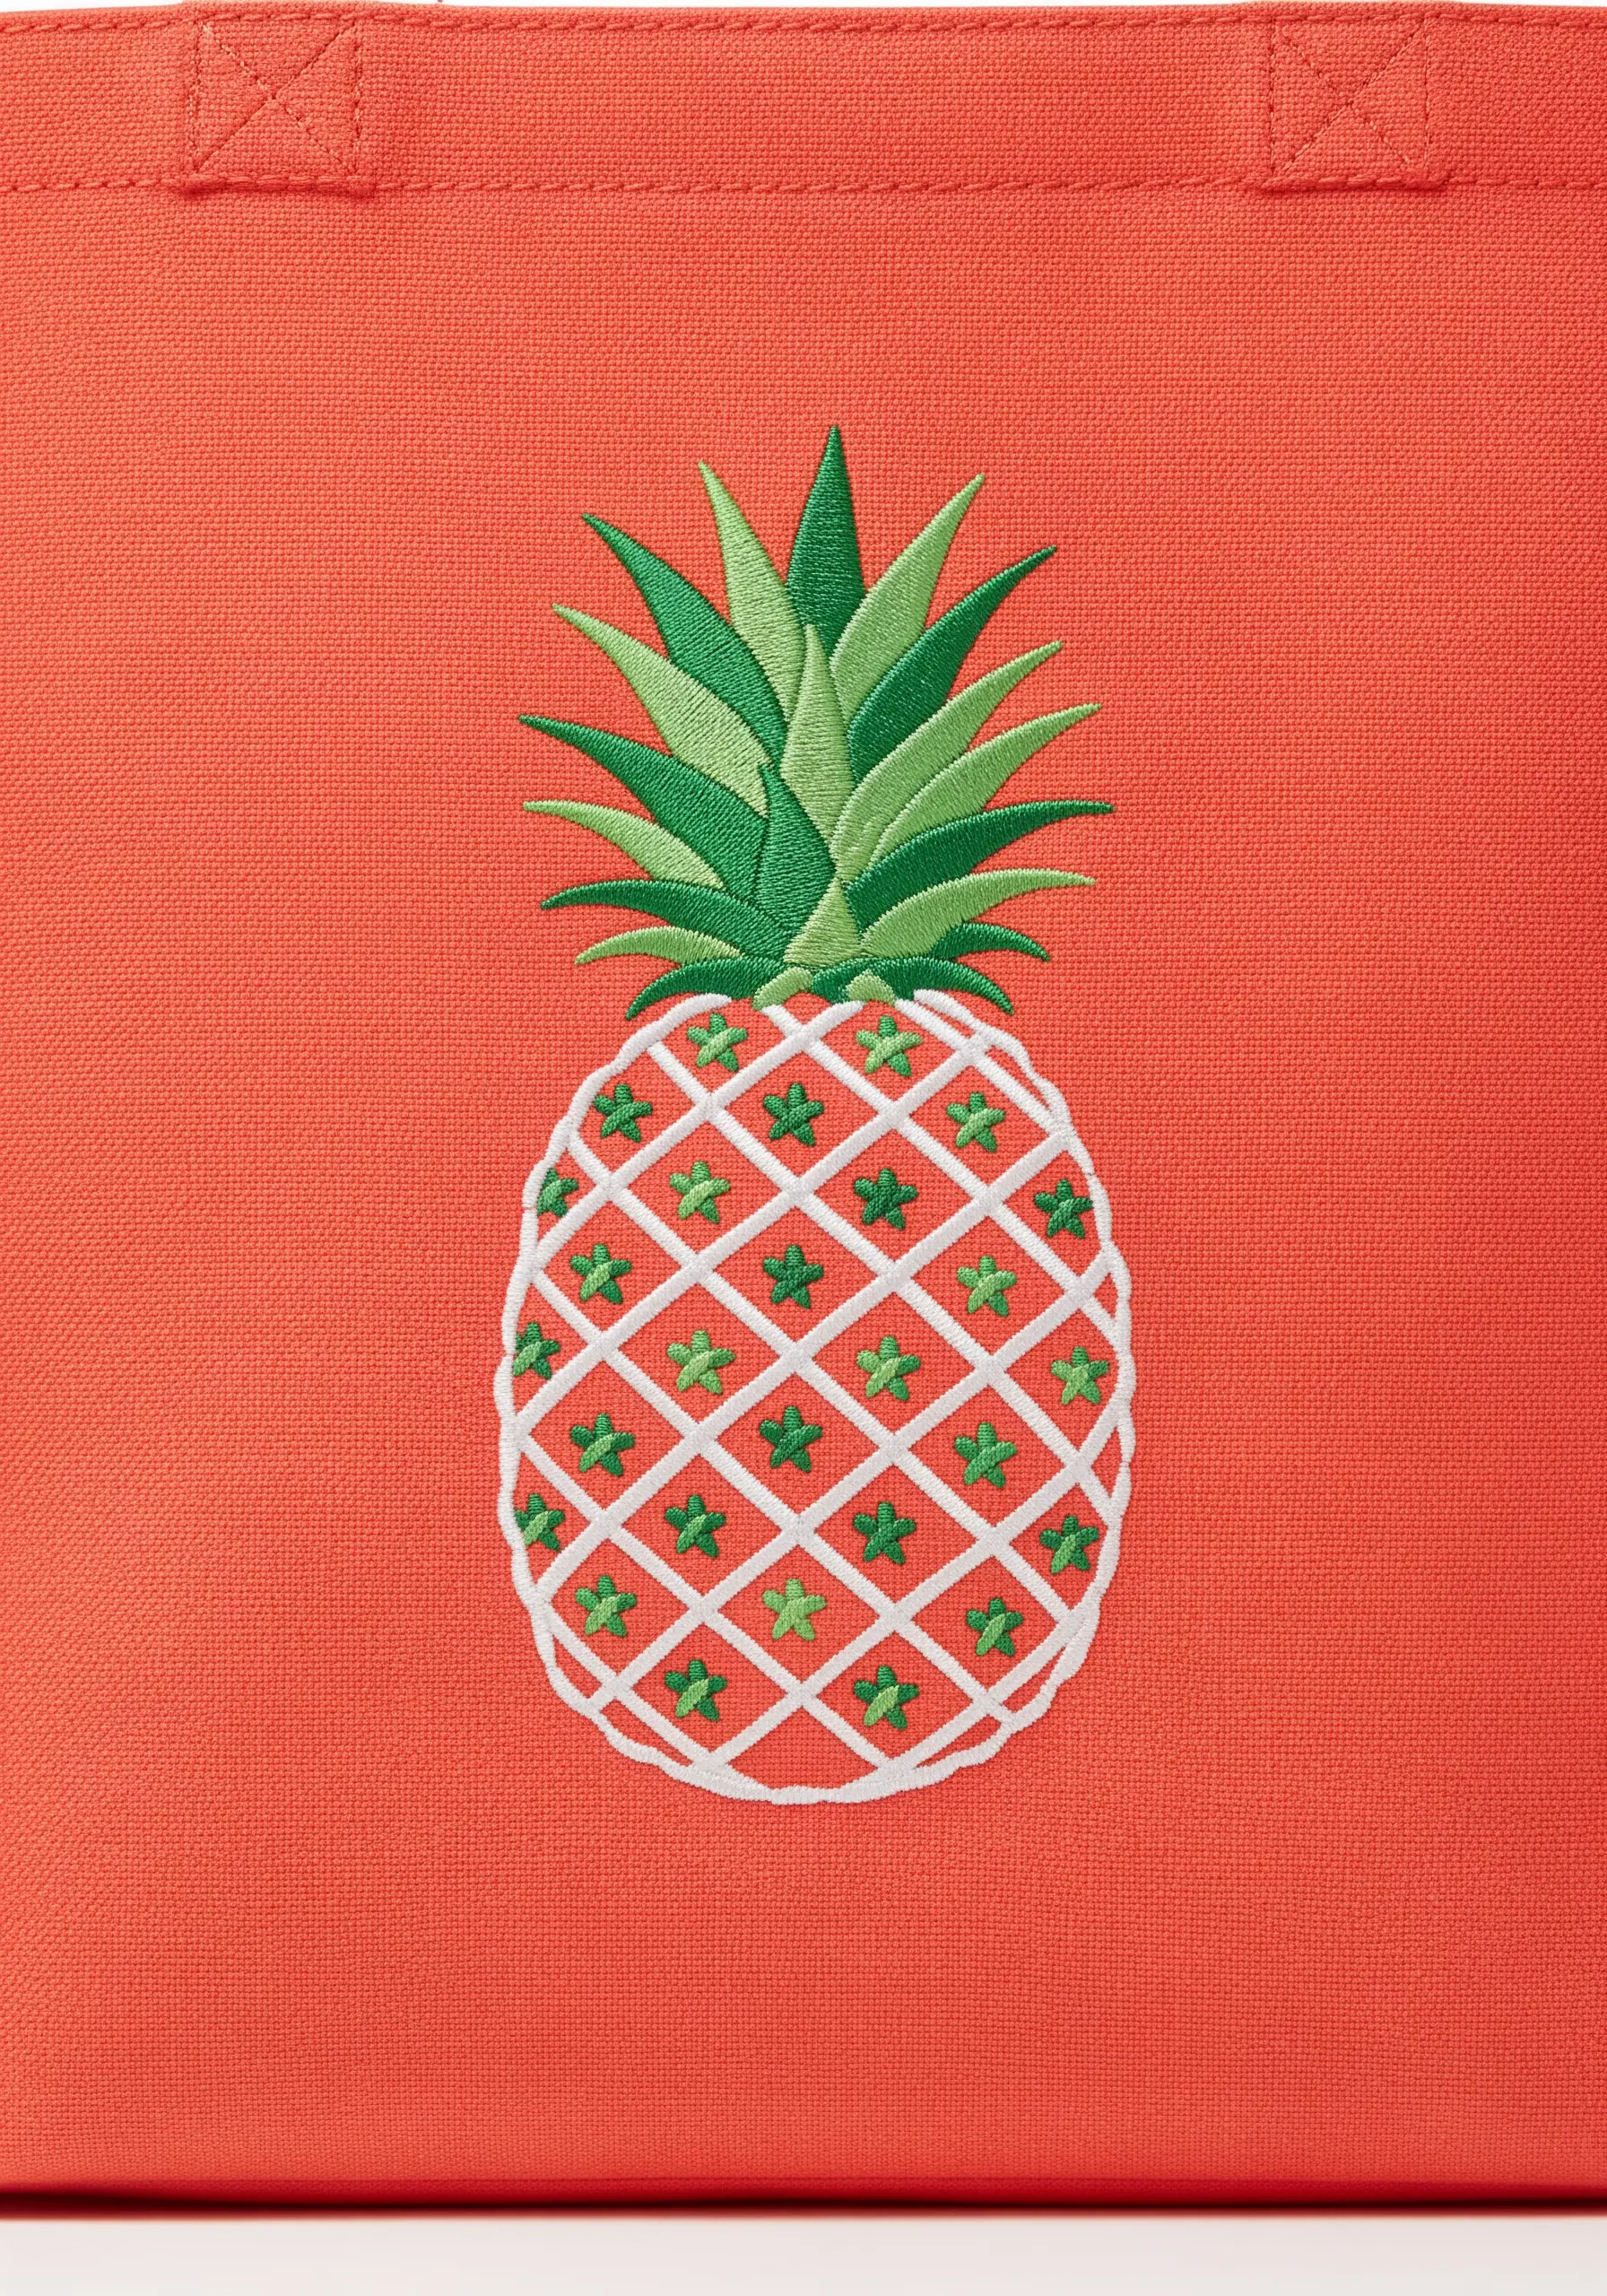
Create intricate-looking patterns with the simplest of stitches.
After filling the pineapple leaves with a directional satin stitch, create the body’s texture with a grid of clean backstitches.
This open lattice technique is faster than a full satin fill and adds a light, graphic quality to the design.
Anchor the design by adding a tiny decorative stitch, like a small star or a single French knot, at each intersection of the lattice lines for a final, polished detail.
27. Raised Stitches for Impact on Patterned Fabric
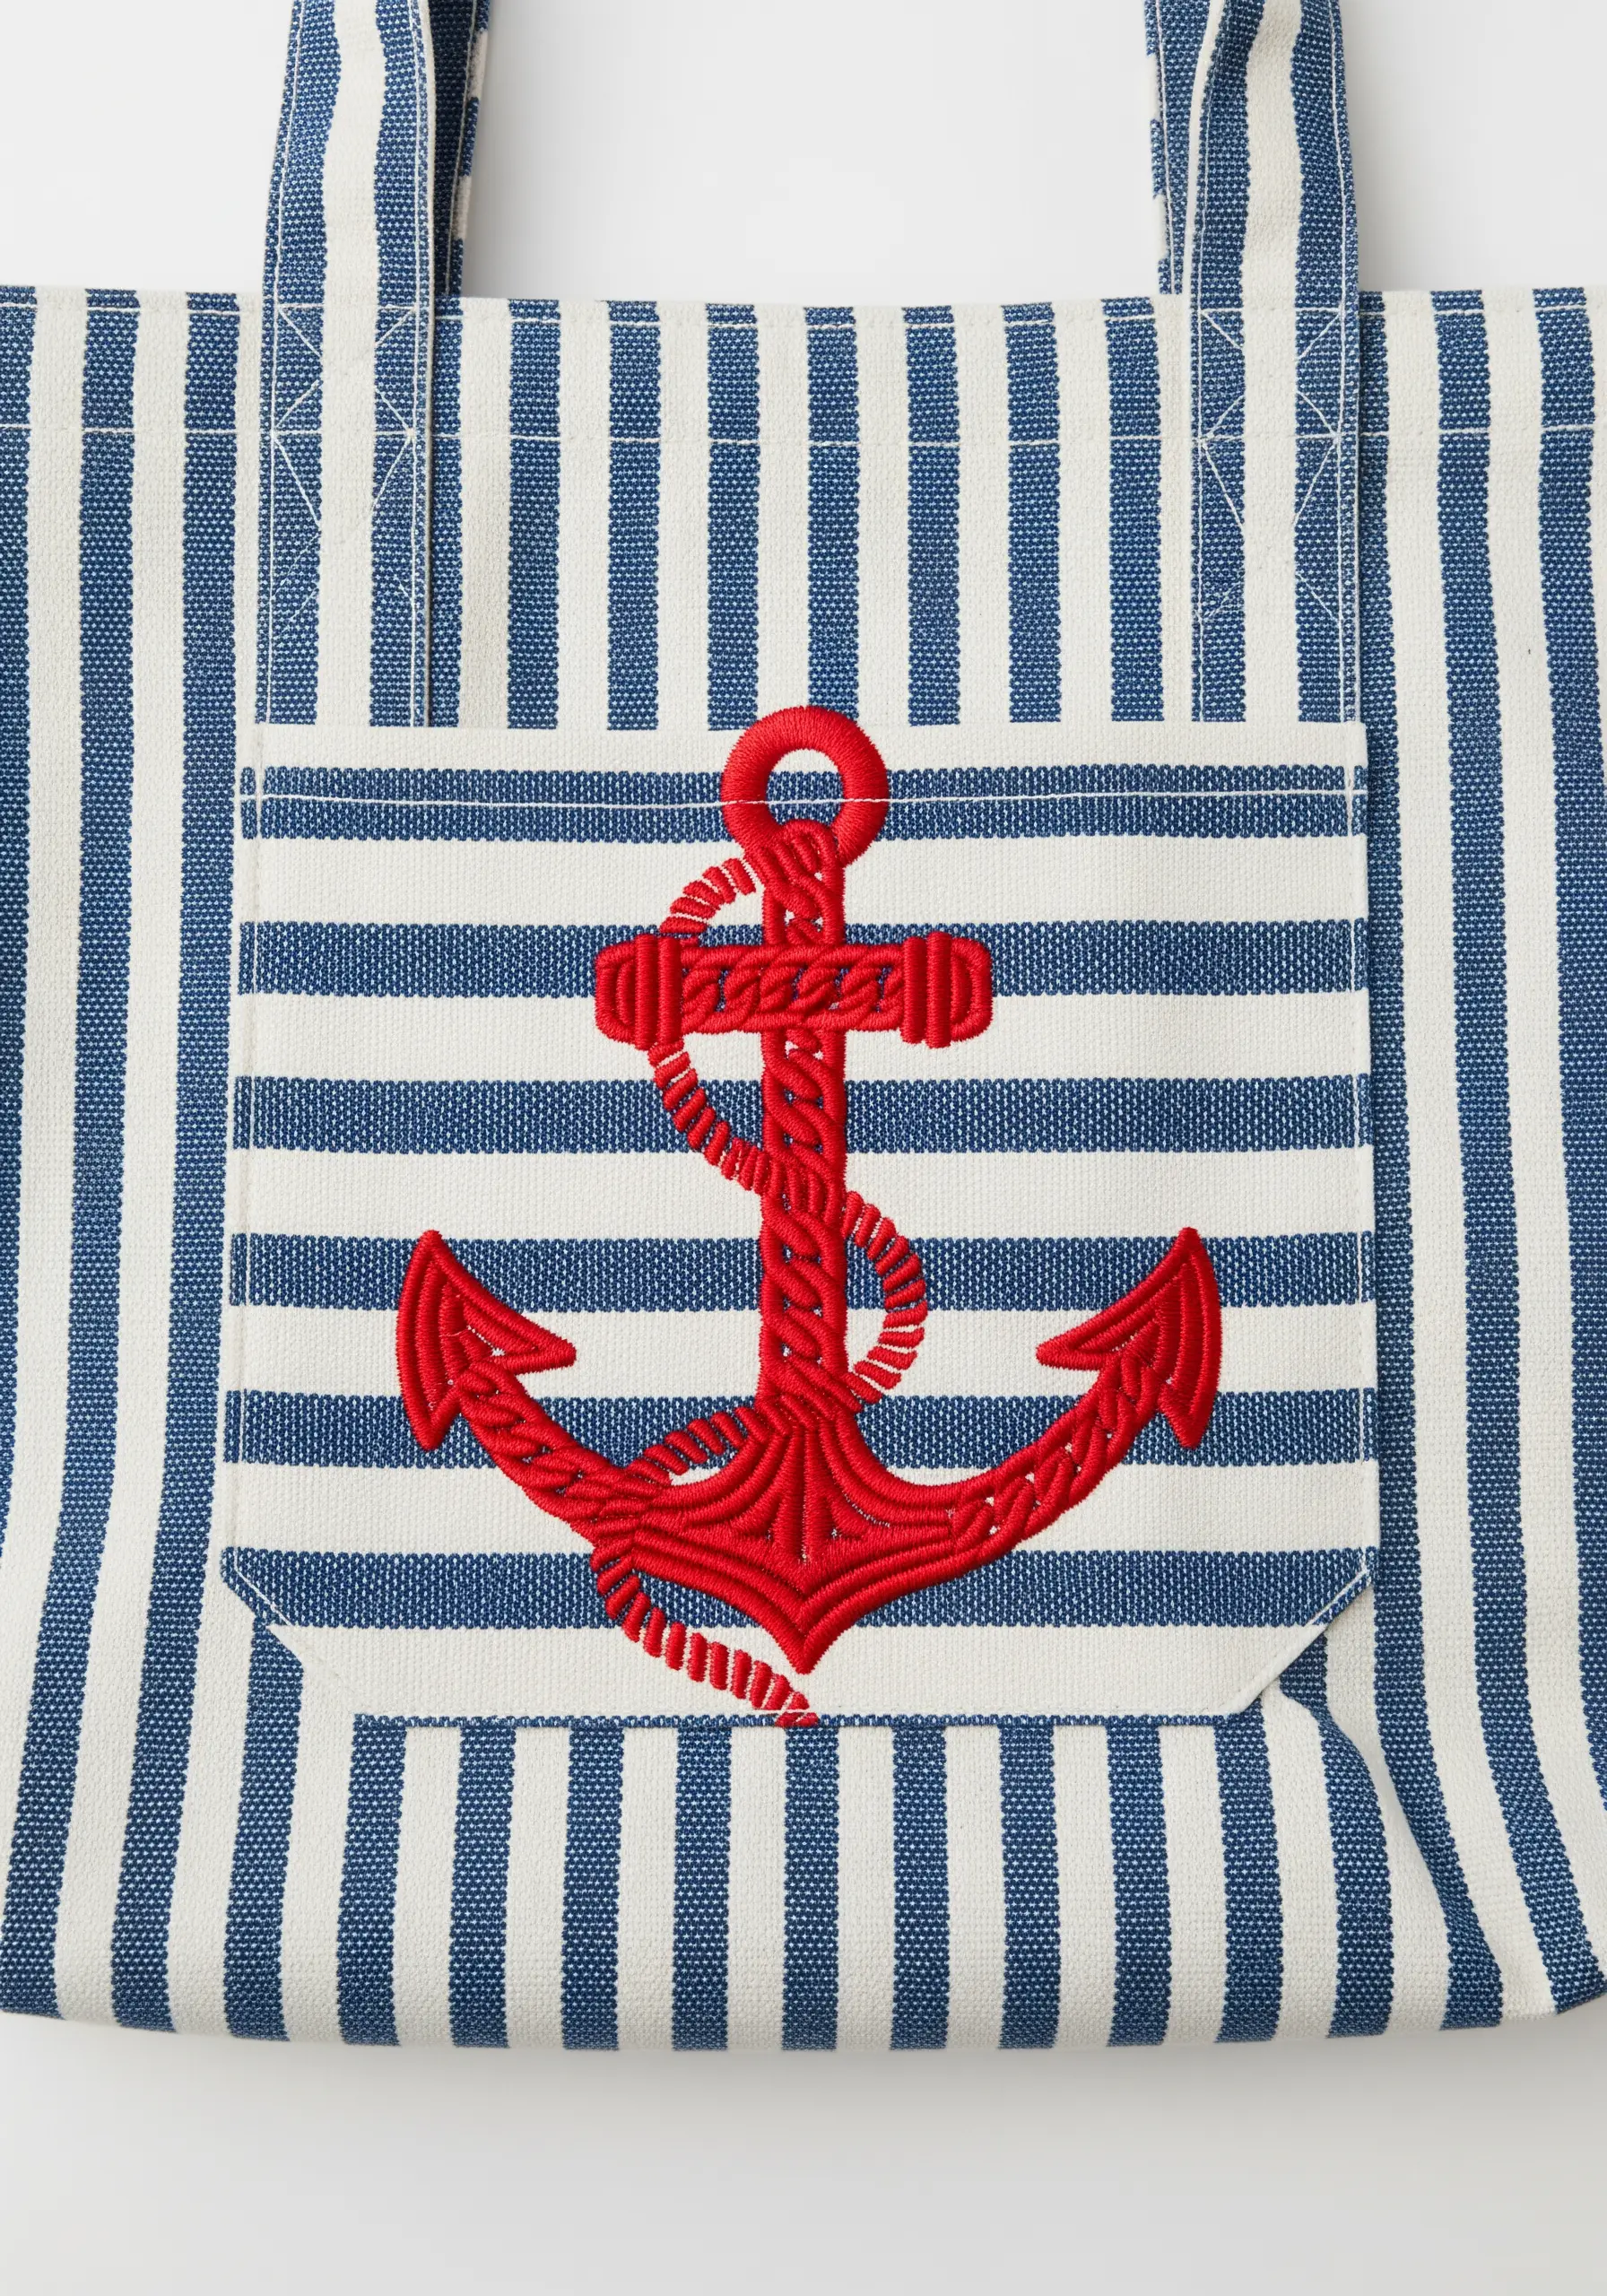
Make your design stand out against a busy background, like stripes, by giving it dimension.
A padded satin stitch is the perfect technique here. First, fill the anchor shape with a base layer of horizontal satin stitches or small running stitches.
Then, cover this padding with your final layer of vertical satin stitches. This raises the motif off the surface of the fabric, helping it to stand out boldly and not get lost in the pattern.
The raised texture creates its own shadow, ensuring the design remains the clear focal point.
28. Delicate Dimension with Layered Petals
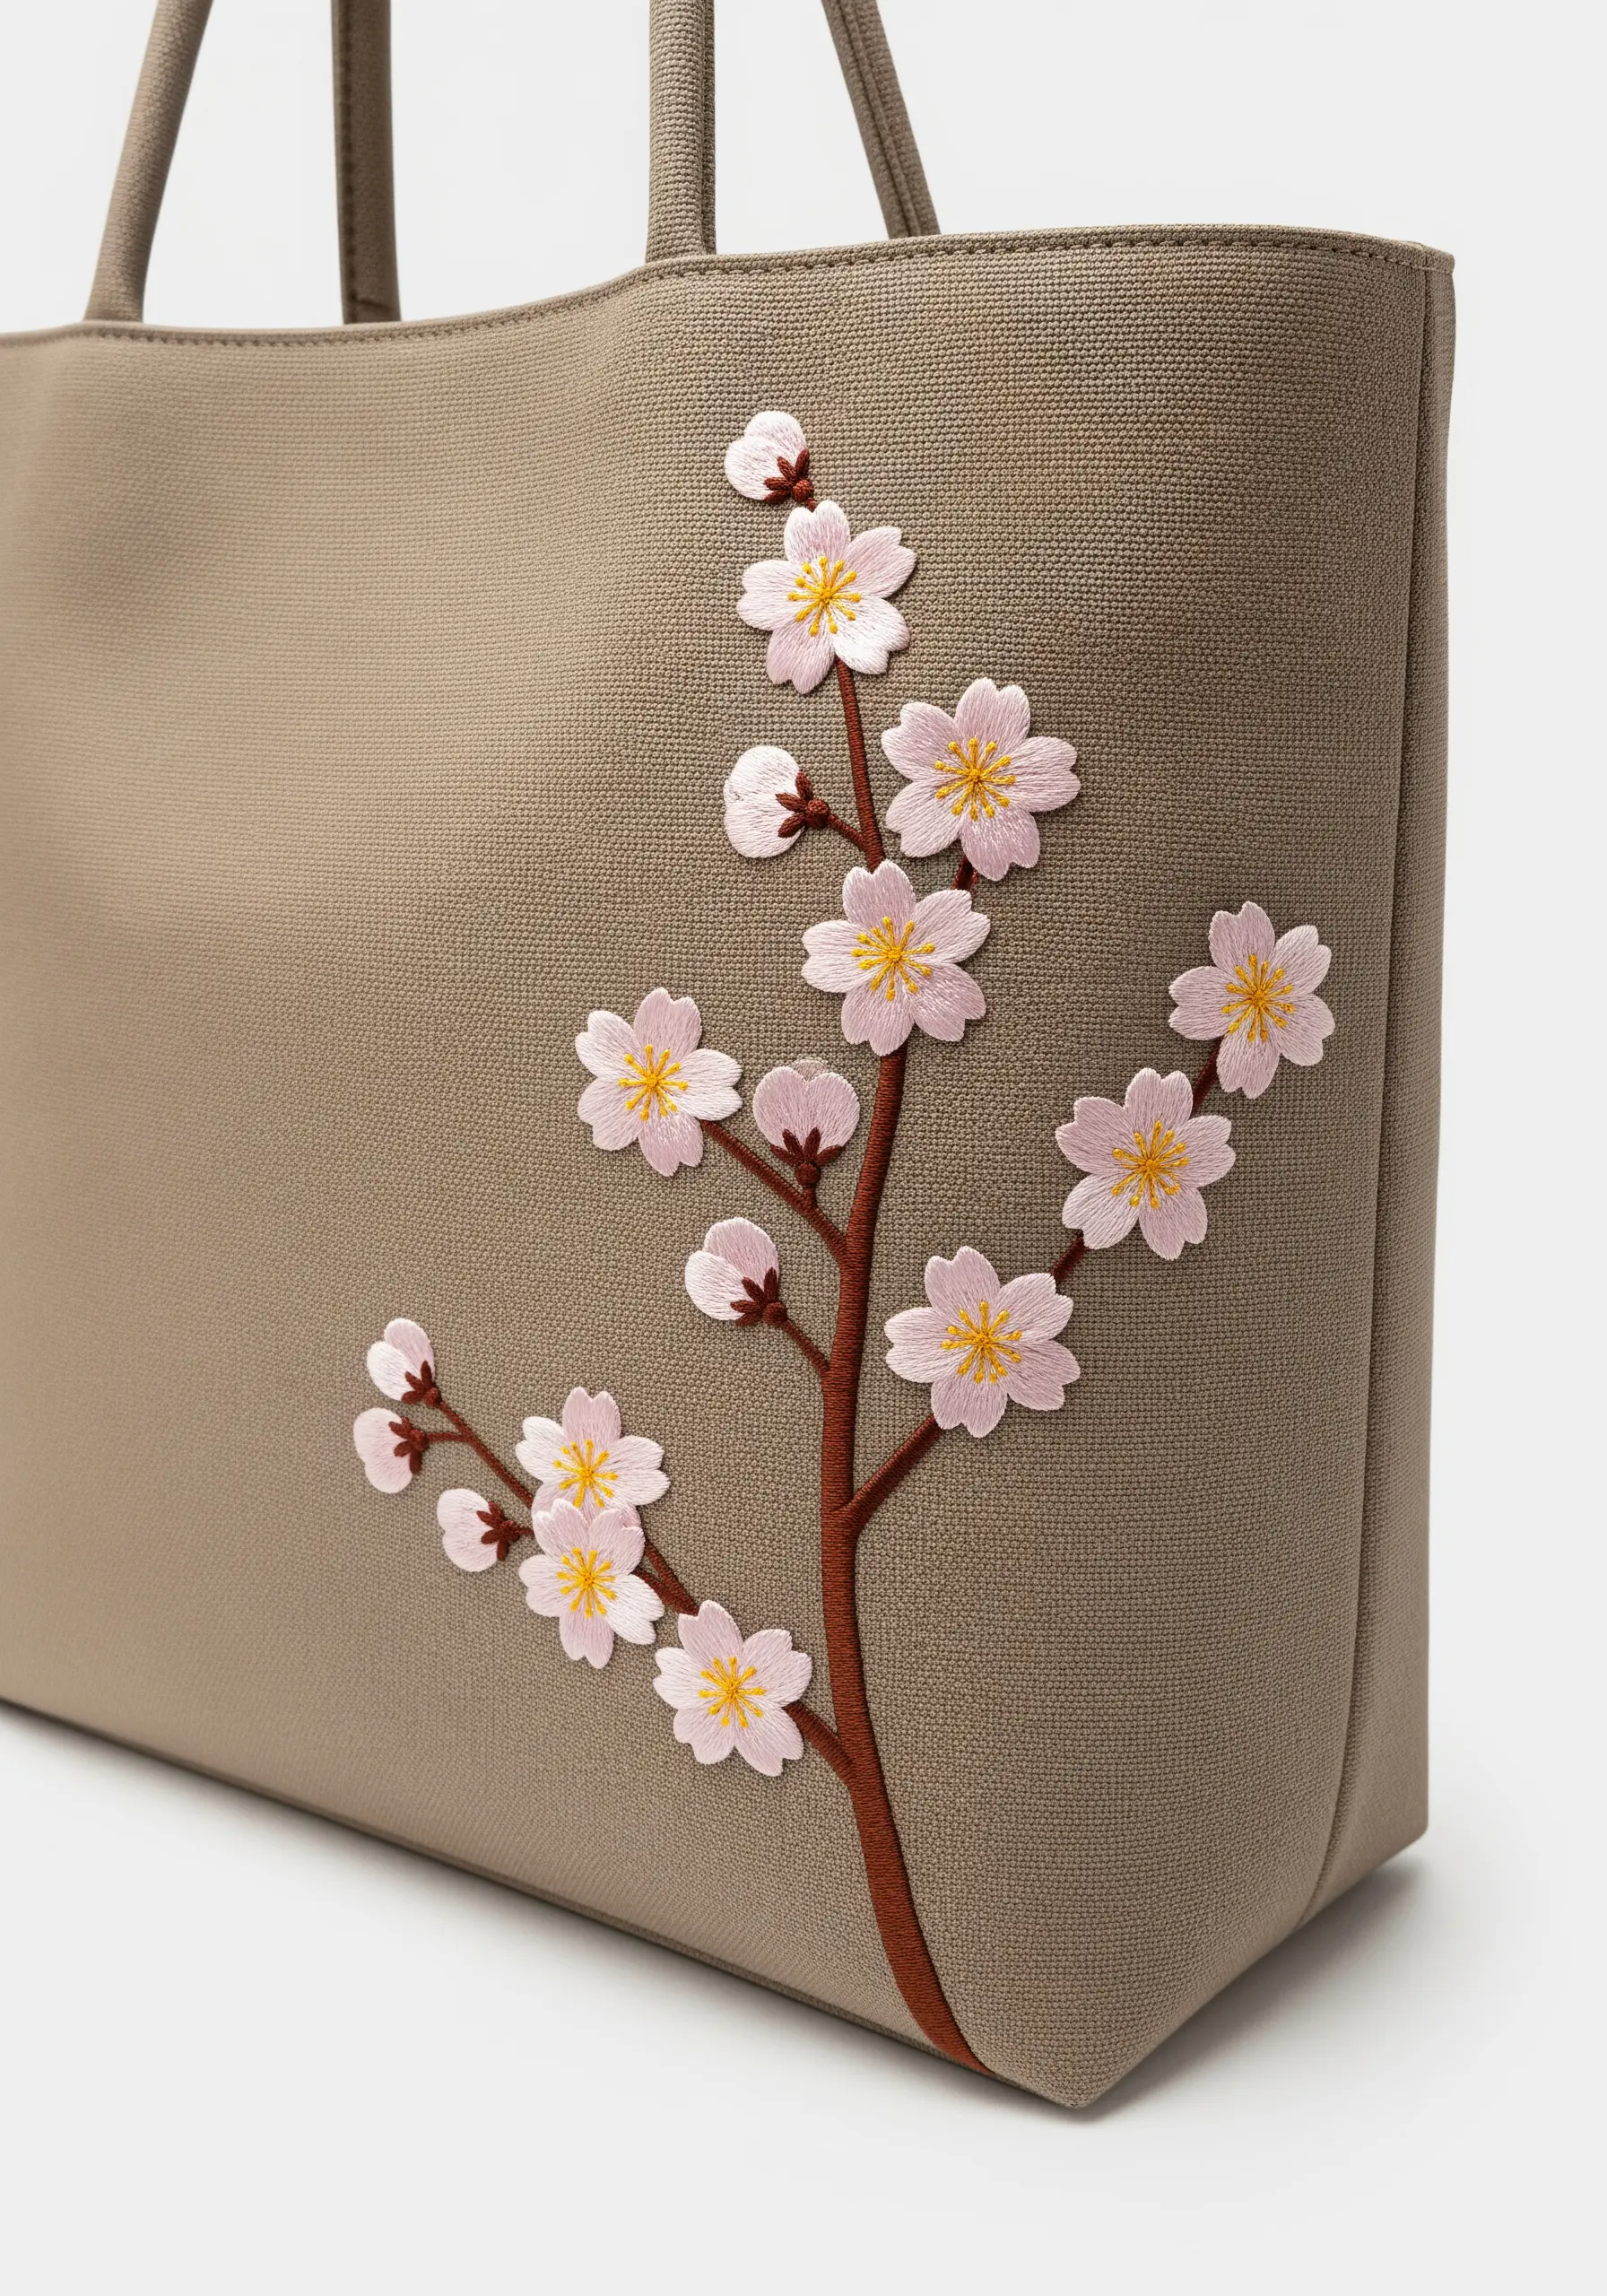
Create the delicate, layered look of cherry blossoms by stitching each petal individually.
Use a light satin stitch for each of the five petals, angling them toward the center but leaving a tiny unstitched gap between them.
This separation gives the illusion that the petals are distinct, overlapping layers. Add a cluster of three or four tiny yellow French knots to the center to complete the flower.
Applying this technique to an entire branch creates a beautiful, three-dimensional effect that captures the essence of cherry blossom embroidery projects.
29. Character and Charm in Simple Line Work
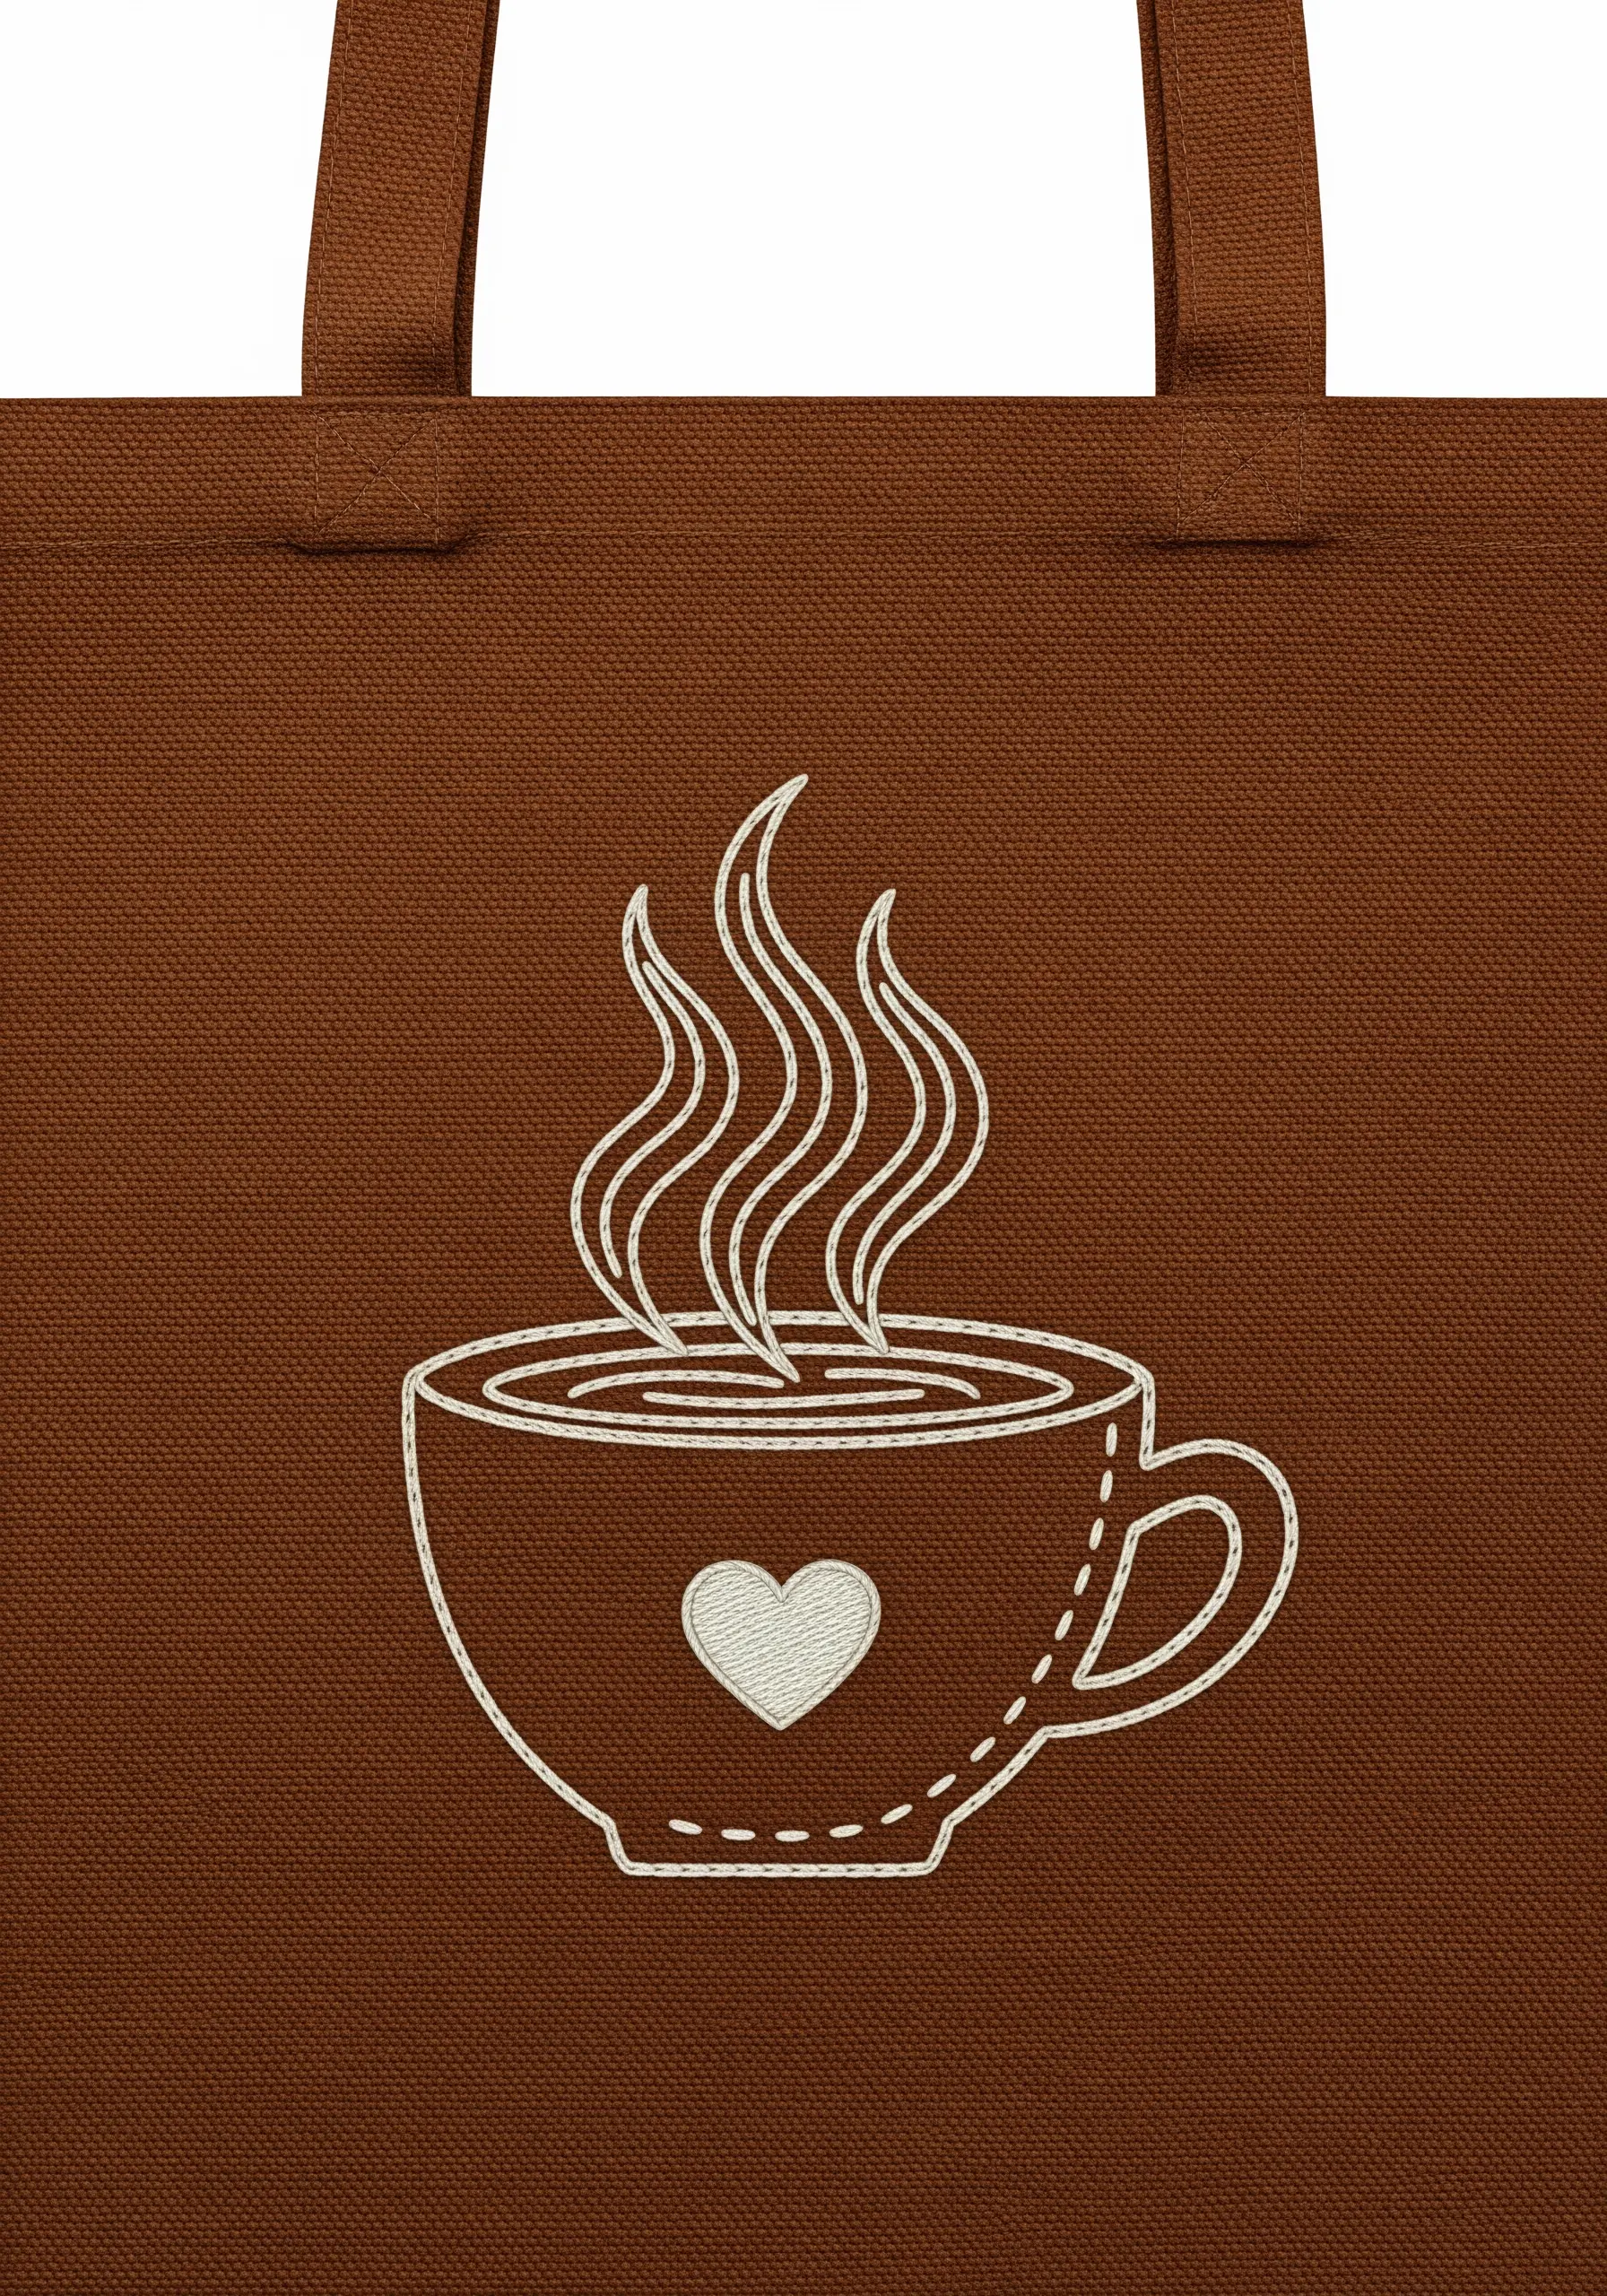
Infuse personality into a simple line drawing by varying your stitch types.
Use a clean, continuous whipped backstitch for the main outlines of the cup and the steam to keep them smooth.
Switch to a simple running stitch for the ‘stitching’ detail along the bottom of the cup—the visible gaps in the stitch add a charming, rustic quality.
A tiny, solid satin-stitched heart provides a sweet focal point and a textural contrast to the surrounding line work, proving that even the simplest motifs can tell a story.
These are the kind of details that elevate tote bag embroidery designs for coffee lovers.
30. Mimicking Fruit Texture with Satin Stitch
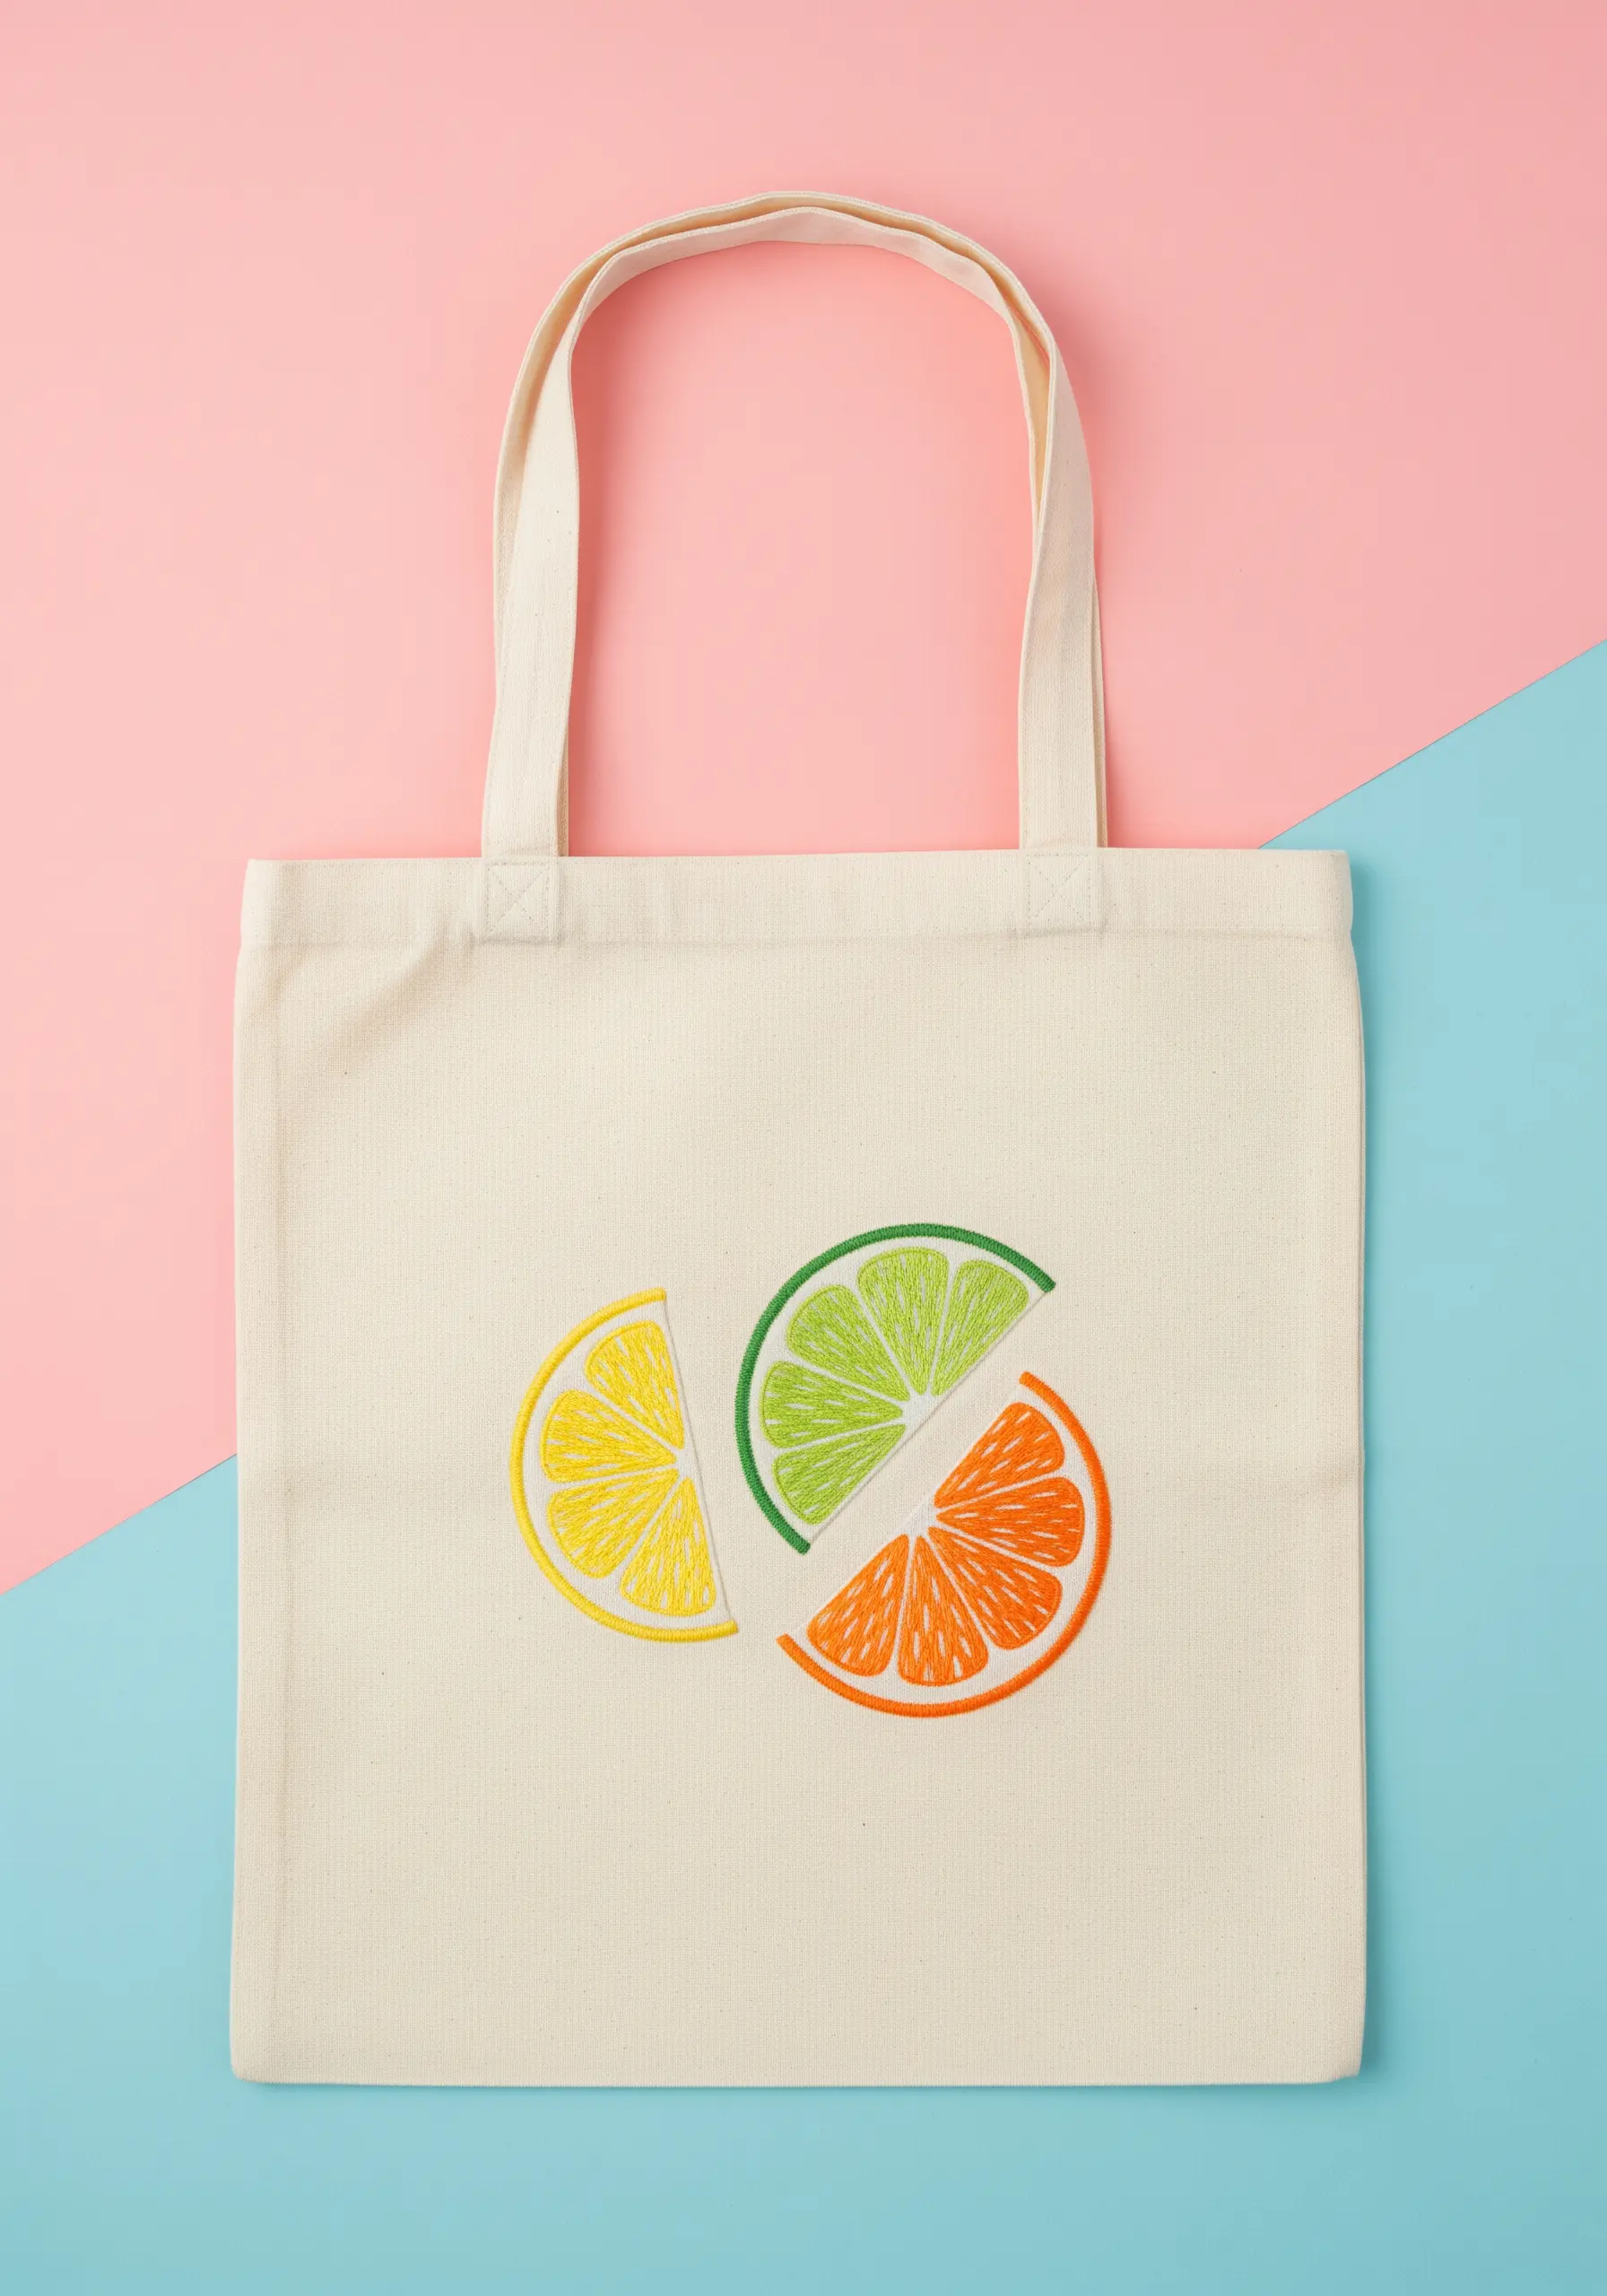
Use the direction of your satin stitches to replicate the natural texture of an object.
For these citrus slices, the satin stitches are not random; they are all angled precisely towards the center of each fruit segment.
This radial stitching perfectly mimics the look of citrus pulp, creating a realistic and visually satisfying effect.
Enclosing each segment and the entire slice with a clean split stitch outline provides the crisp definition needed to make the colors pop and the shapes recognizable.


