

Perhaps you’ve mastered the basic stitches and followed patterns dutifully, but now you find yourself pausing, hoop in hand, wondering how to make your work feel truly your own. How do you move from simply executing a design to breathing life and elegance into it? The cherry blossom, or sakura, is more than just a beautiful motif; it’s a perfect lesson in grace, balance, and intentionality.
This collection is designed to be your guide. We will move beyond just showing you what to stitch, and instead explore *why* certain techniques create a desired effect. You’ll learn how to use long-and-short stitch to give a petal a soft, painterly gradient, why a simple whipped backstitch can make a branch feel more dimensional, and how to use negative space to create a sense of movement on a piece of fabric.
Consider these projects as thoughtful starting points. Absorb the principles of shading, textural variety, and compositional flow. Then, take them and apply them to your own canvas—be it a denim jacket, a linen napkin, or a simple piece of hoop art. This is where you begin to develop your own artistic voice, stitching with confidence, clarity, and a quiet, refined elegance.
1. Architectural Blossom: The Statement Wall Hanging
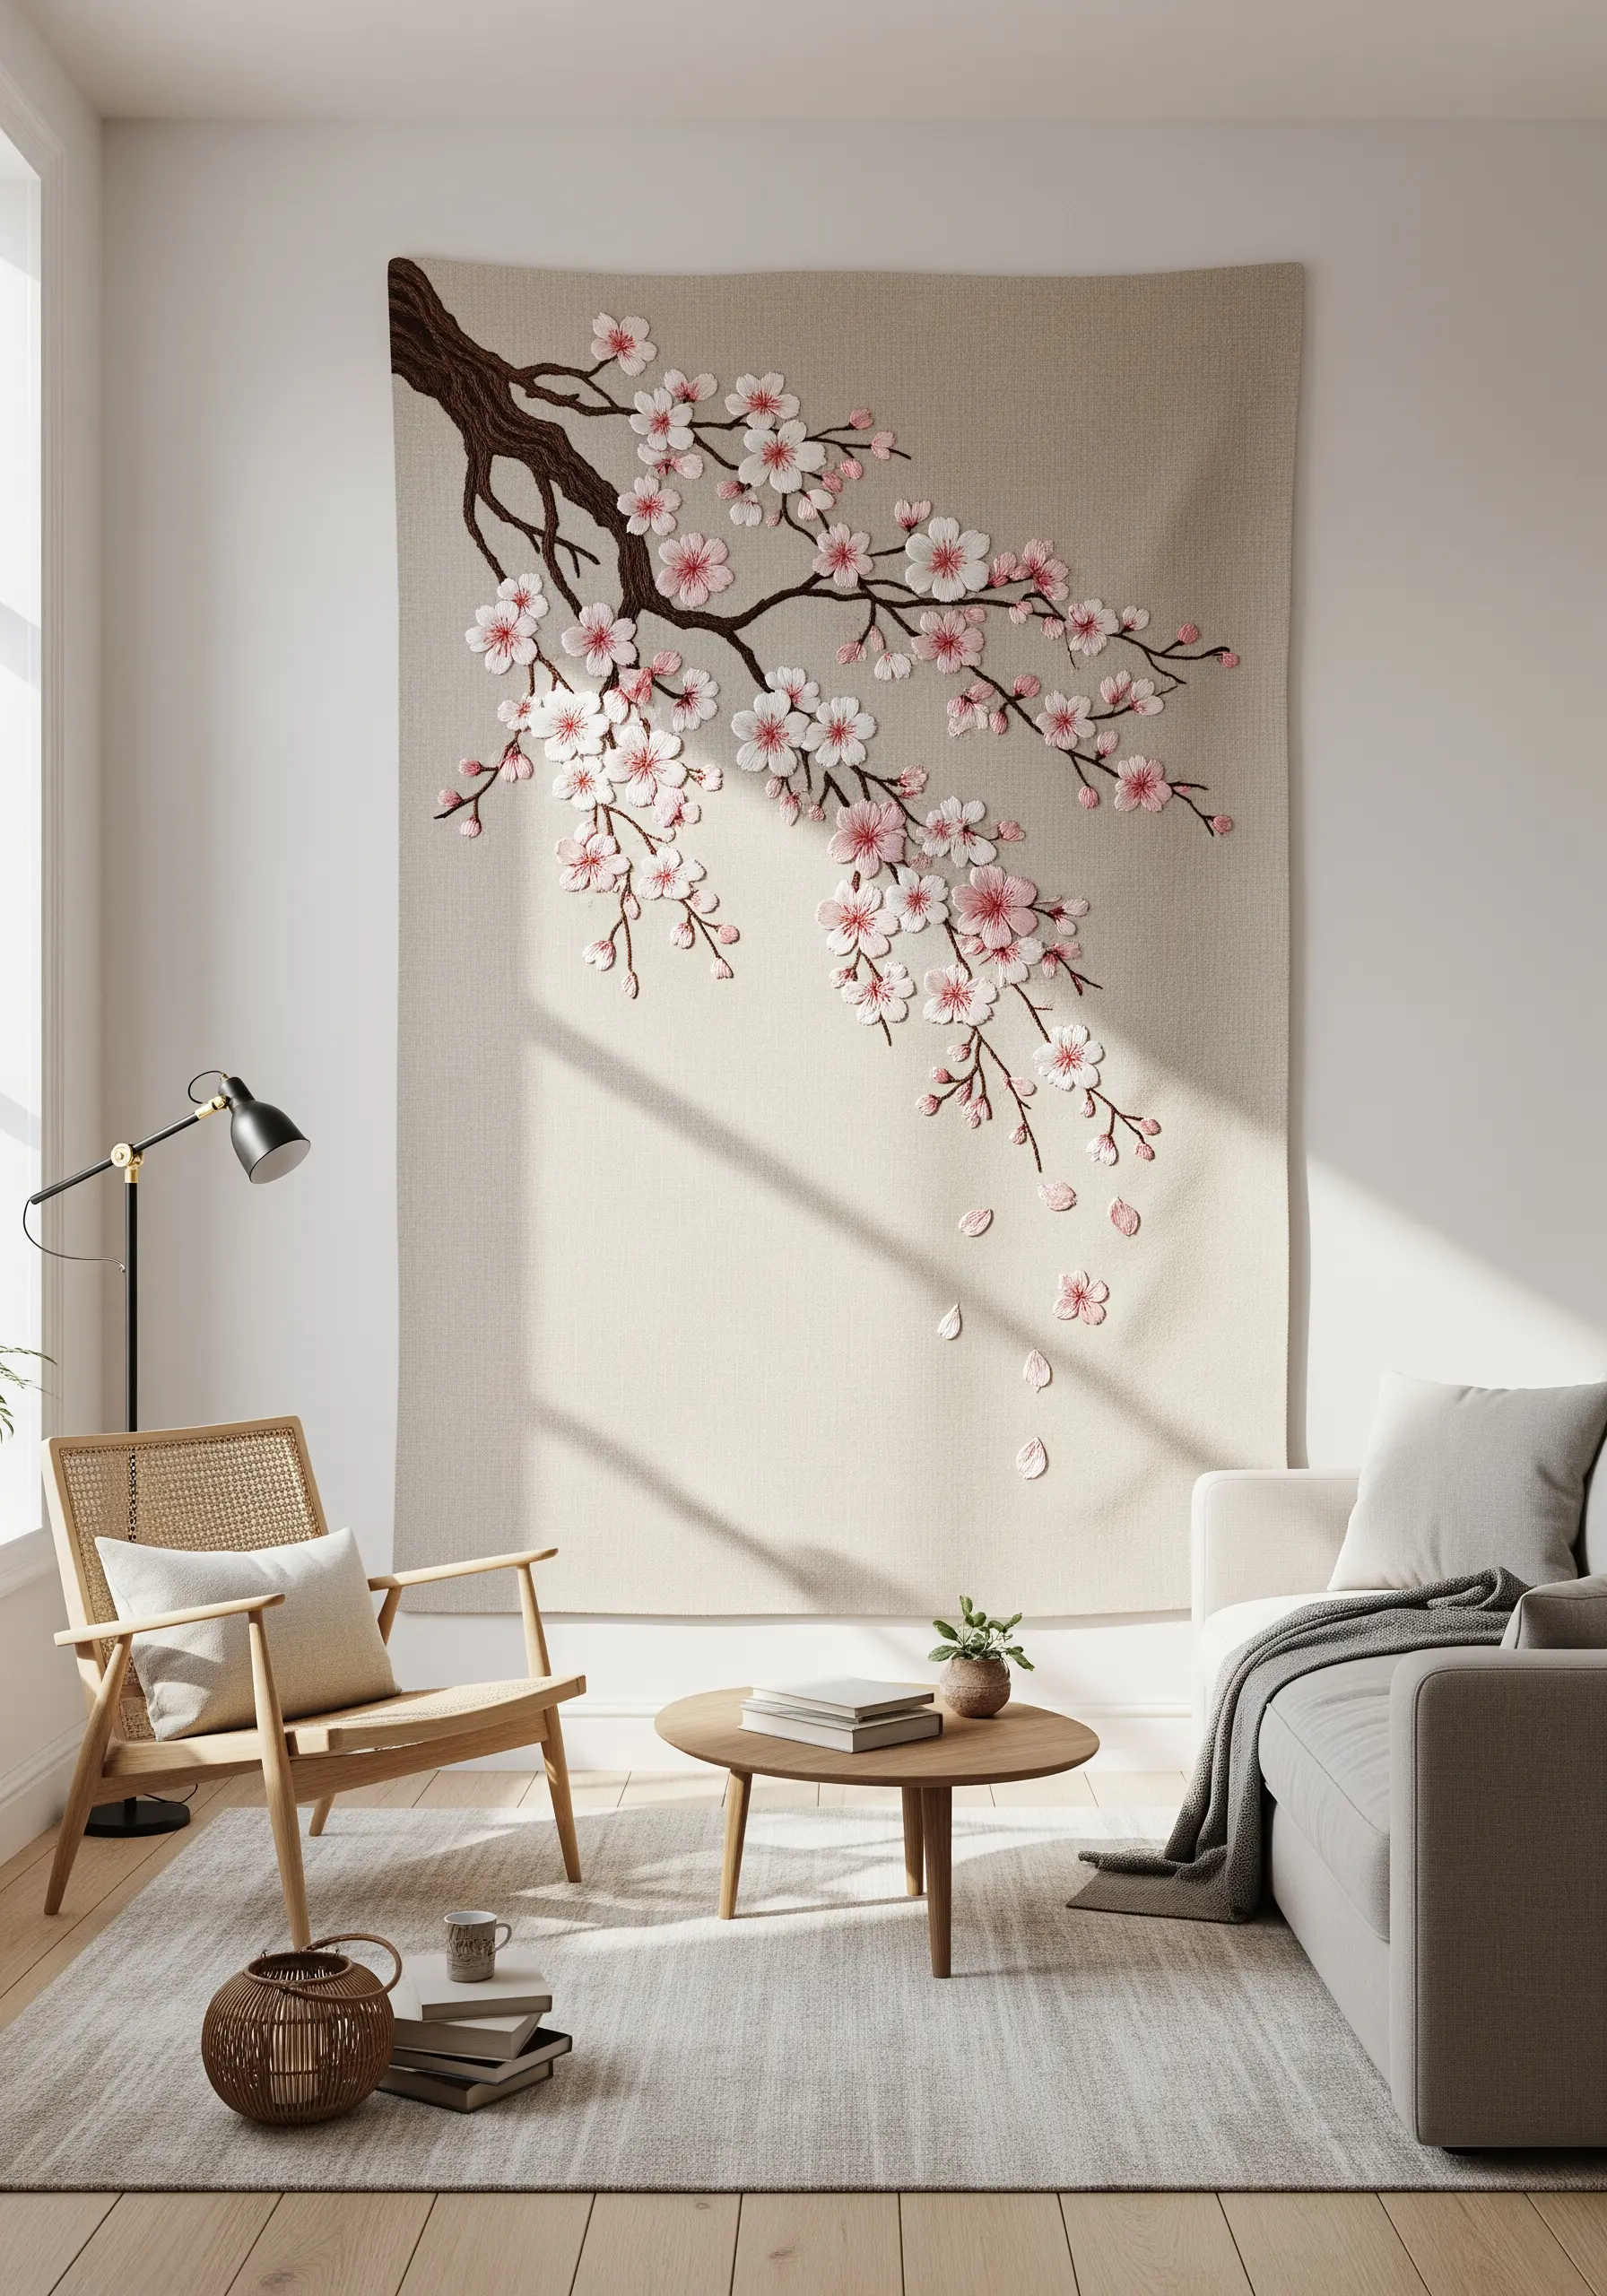
To translate a small motif into a large-scale artwork, you must think about visual weight and texture.
Use thicker threads like pearl cotton or tapestry wool for the main branches; this not only fills the space more efficiently but also creates a tangible, rustic texture that grounds the composition.
For the delicate blossoms, switch to single-strand floss. Create depth by making some petals three-dimensional using stumpwork techniques or detached chain stitches, allowing them to lift slightly from the fabric.
A heavyweight fabric like linen canvas is crucial to support the embroidery and prevent sagging, ensuring your piece hangs with architectural grace.
2. The Vivacious Denim Canvas: A Study in Saturation
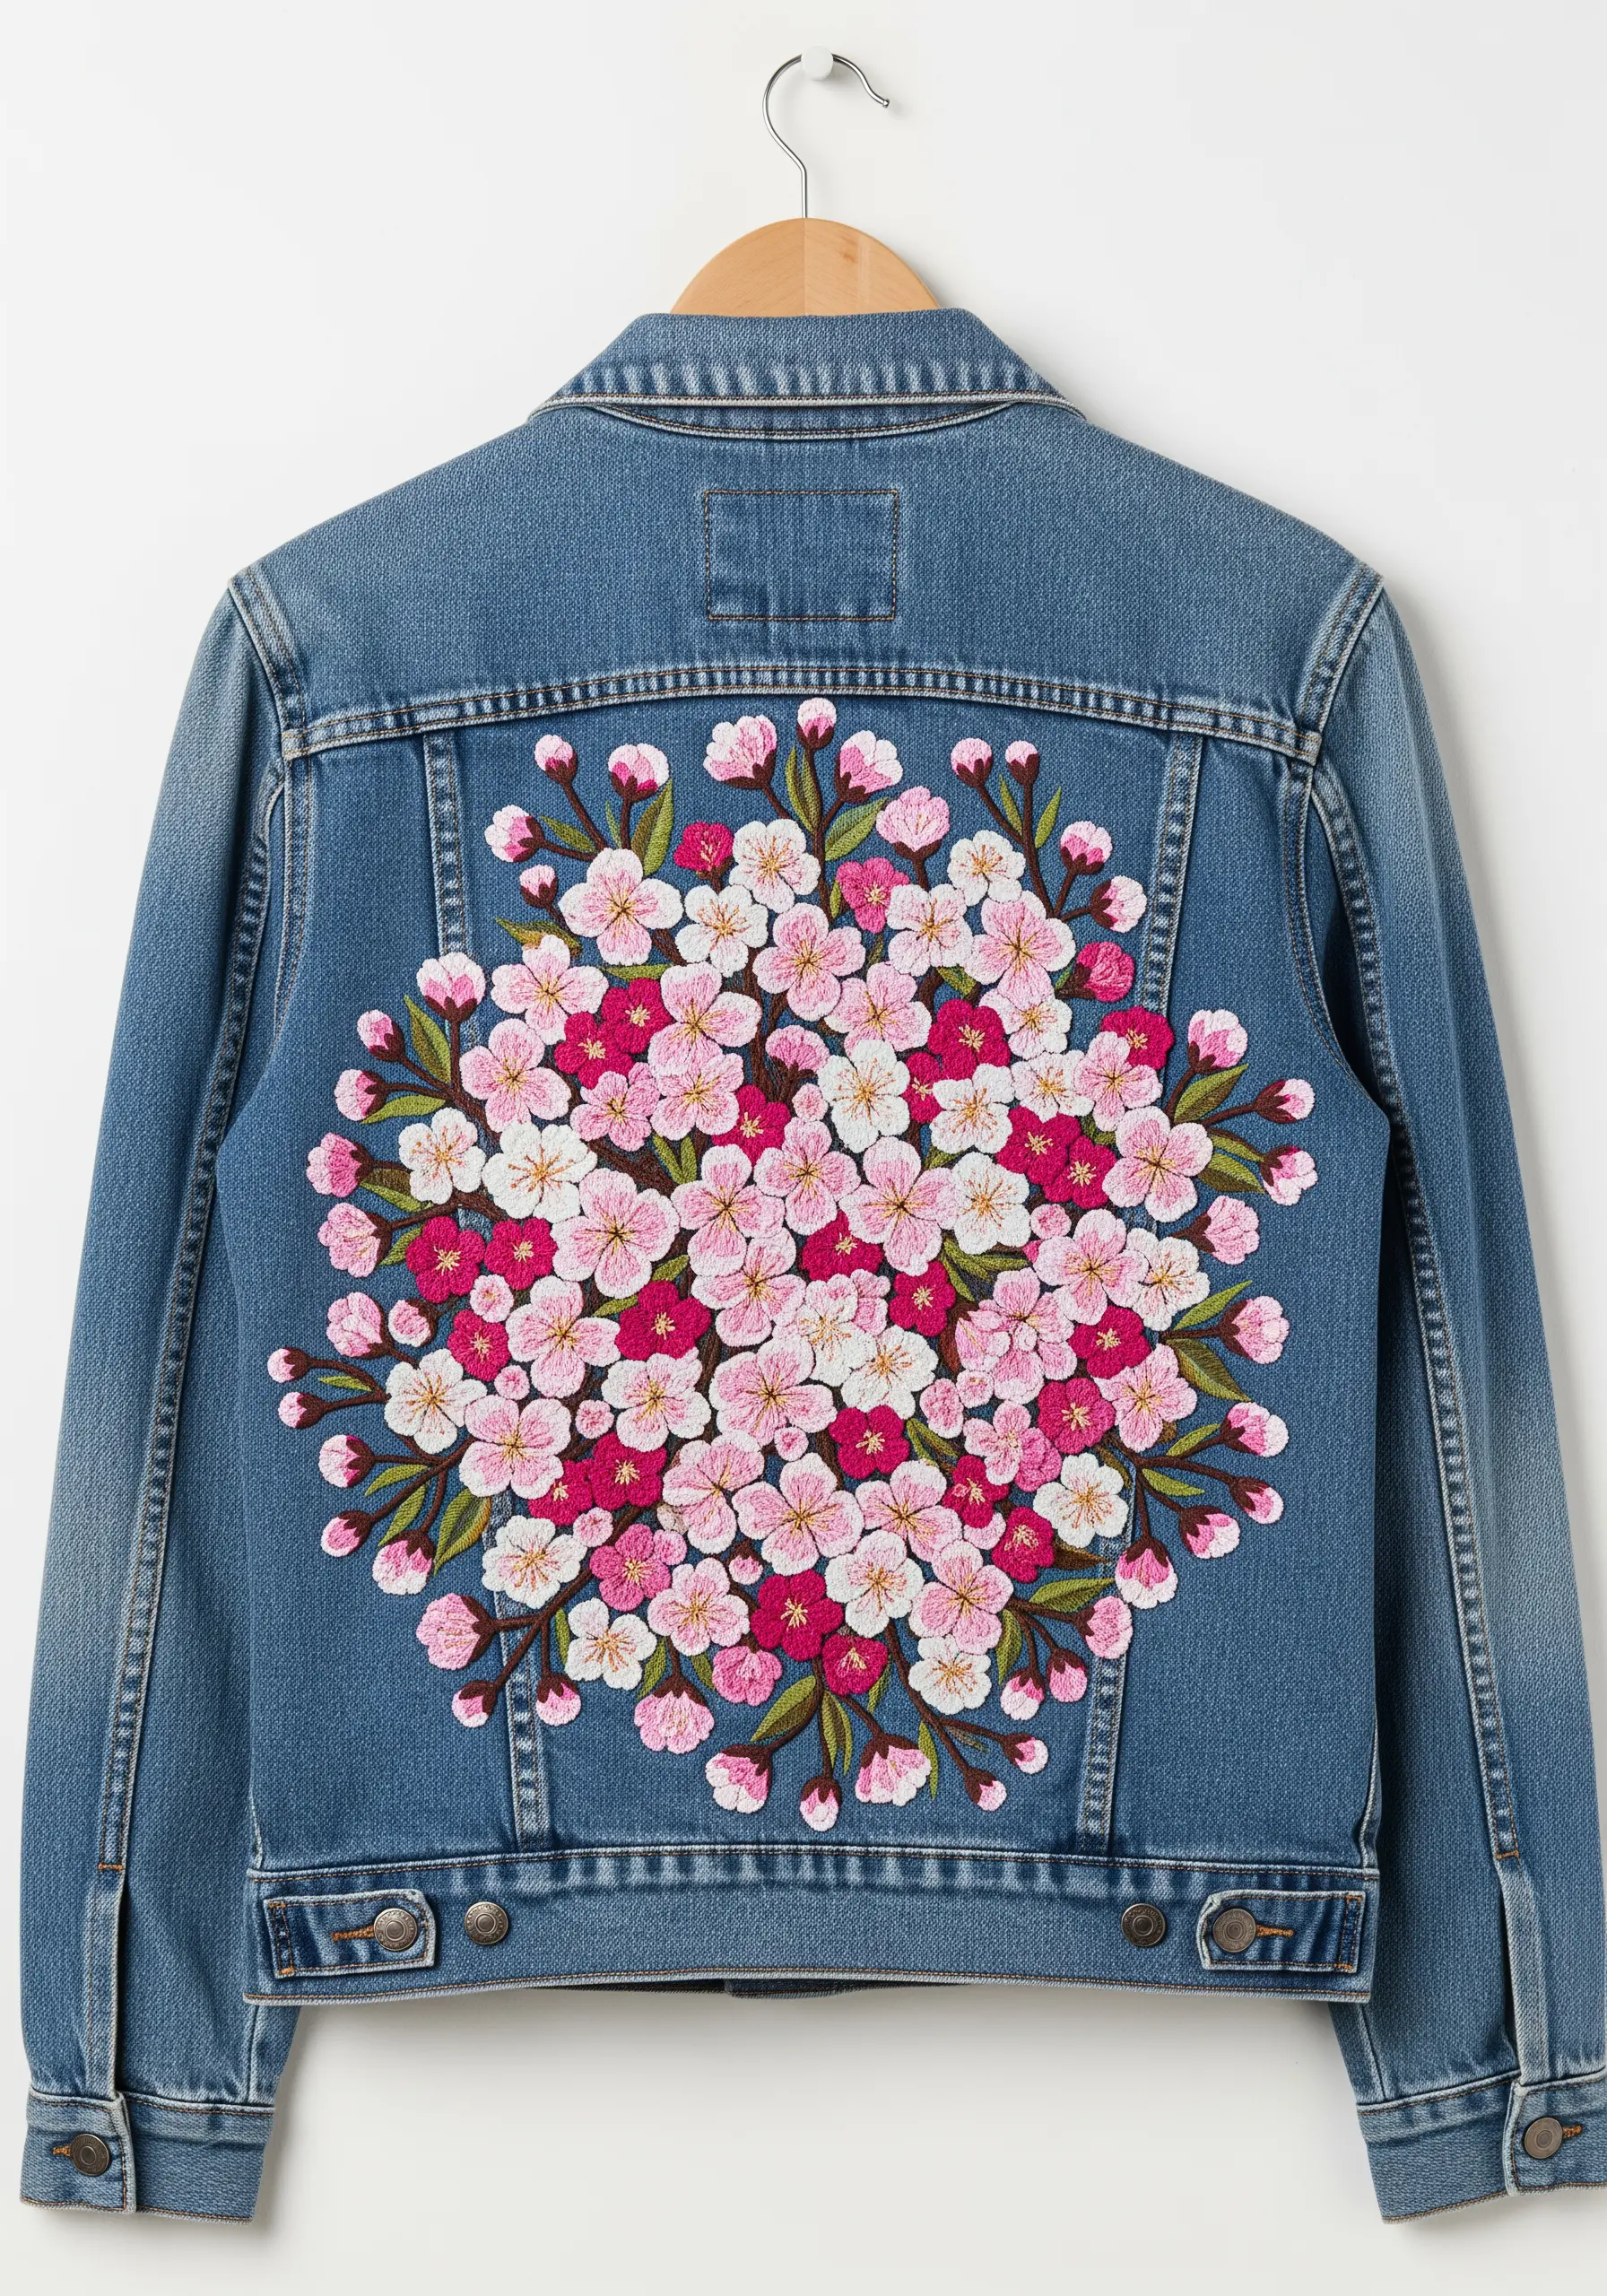
Achieving this dense, patch-like effect on denim requires a stable foundation and meticulous stitching.
Always use a medium-weight cut-away stabilizer on the inside of the jacket to prevent the fabric from puckering under the tension of thousands of stitches.
Vary the direction of your satin stitches within each petal to create subtle facets that catch the light differently, adding life and dimension to the solid blocks of color.
Create a dynamic, clustered look by choosing three to four shades of pink, from pale blush to a deep magenta, and distributing them unevenly. This controlled chaos is what gives the piece its vibrant energy, turning the jacket back into boho fashion statements.
3. Soft Focus Florals: Shading on Upholstery
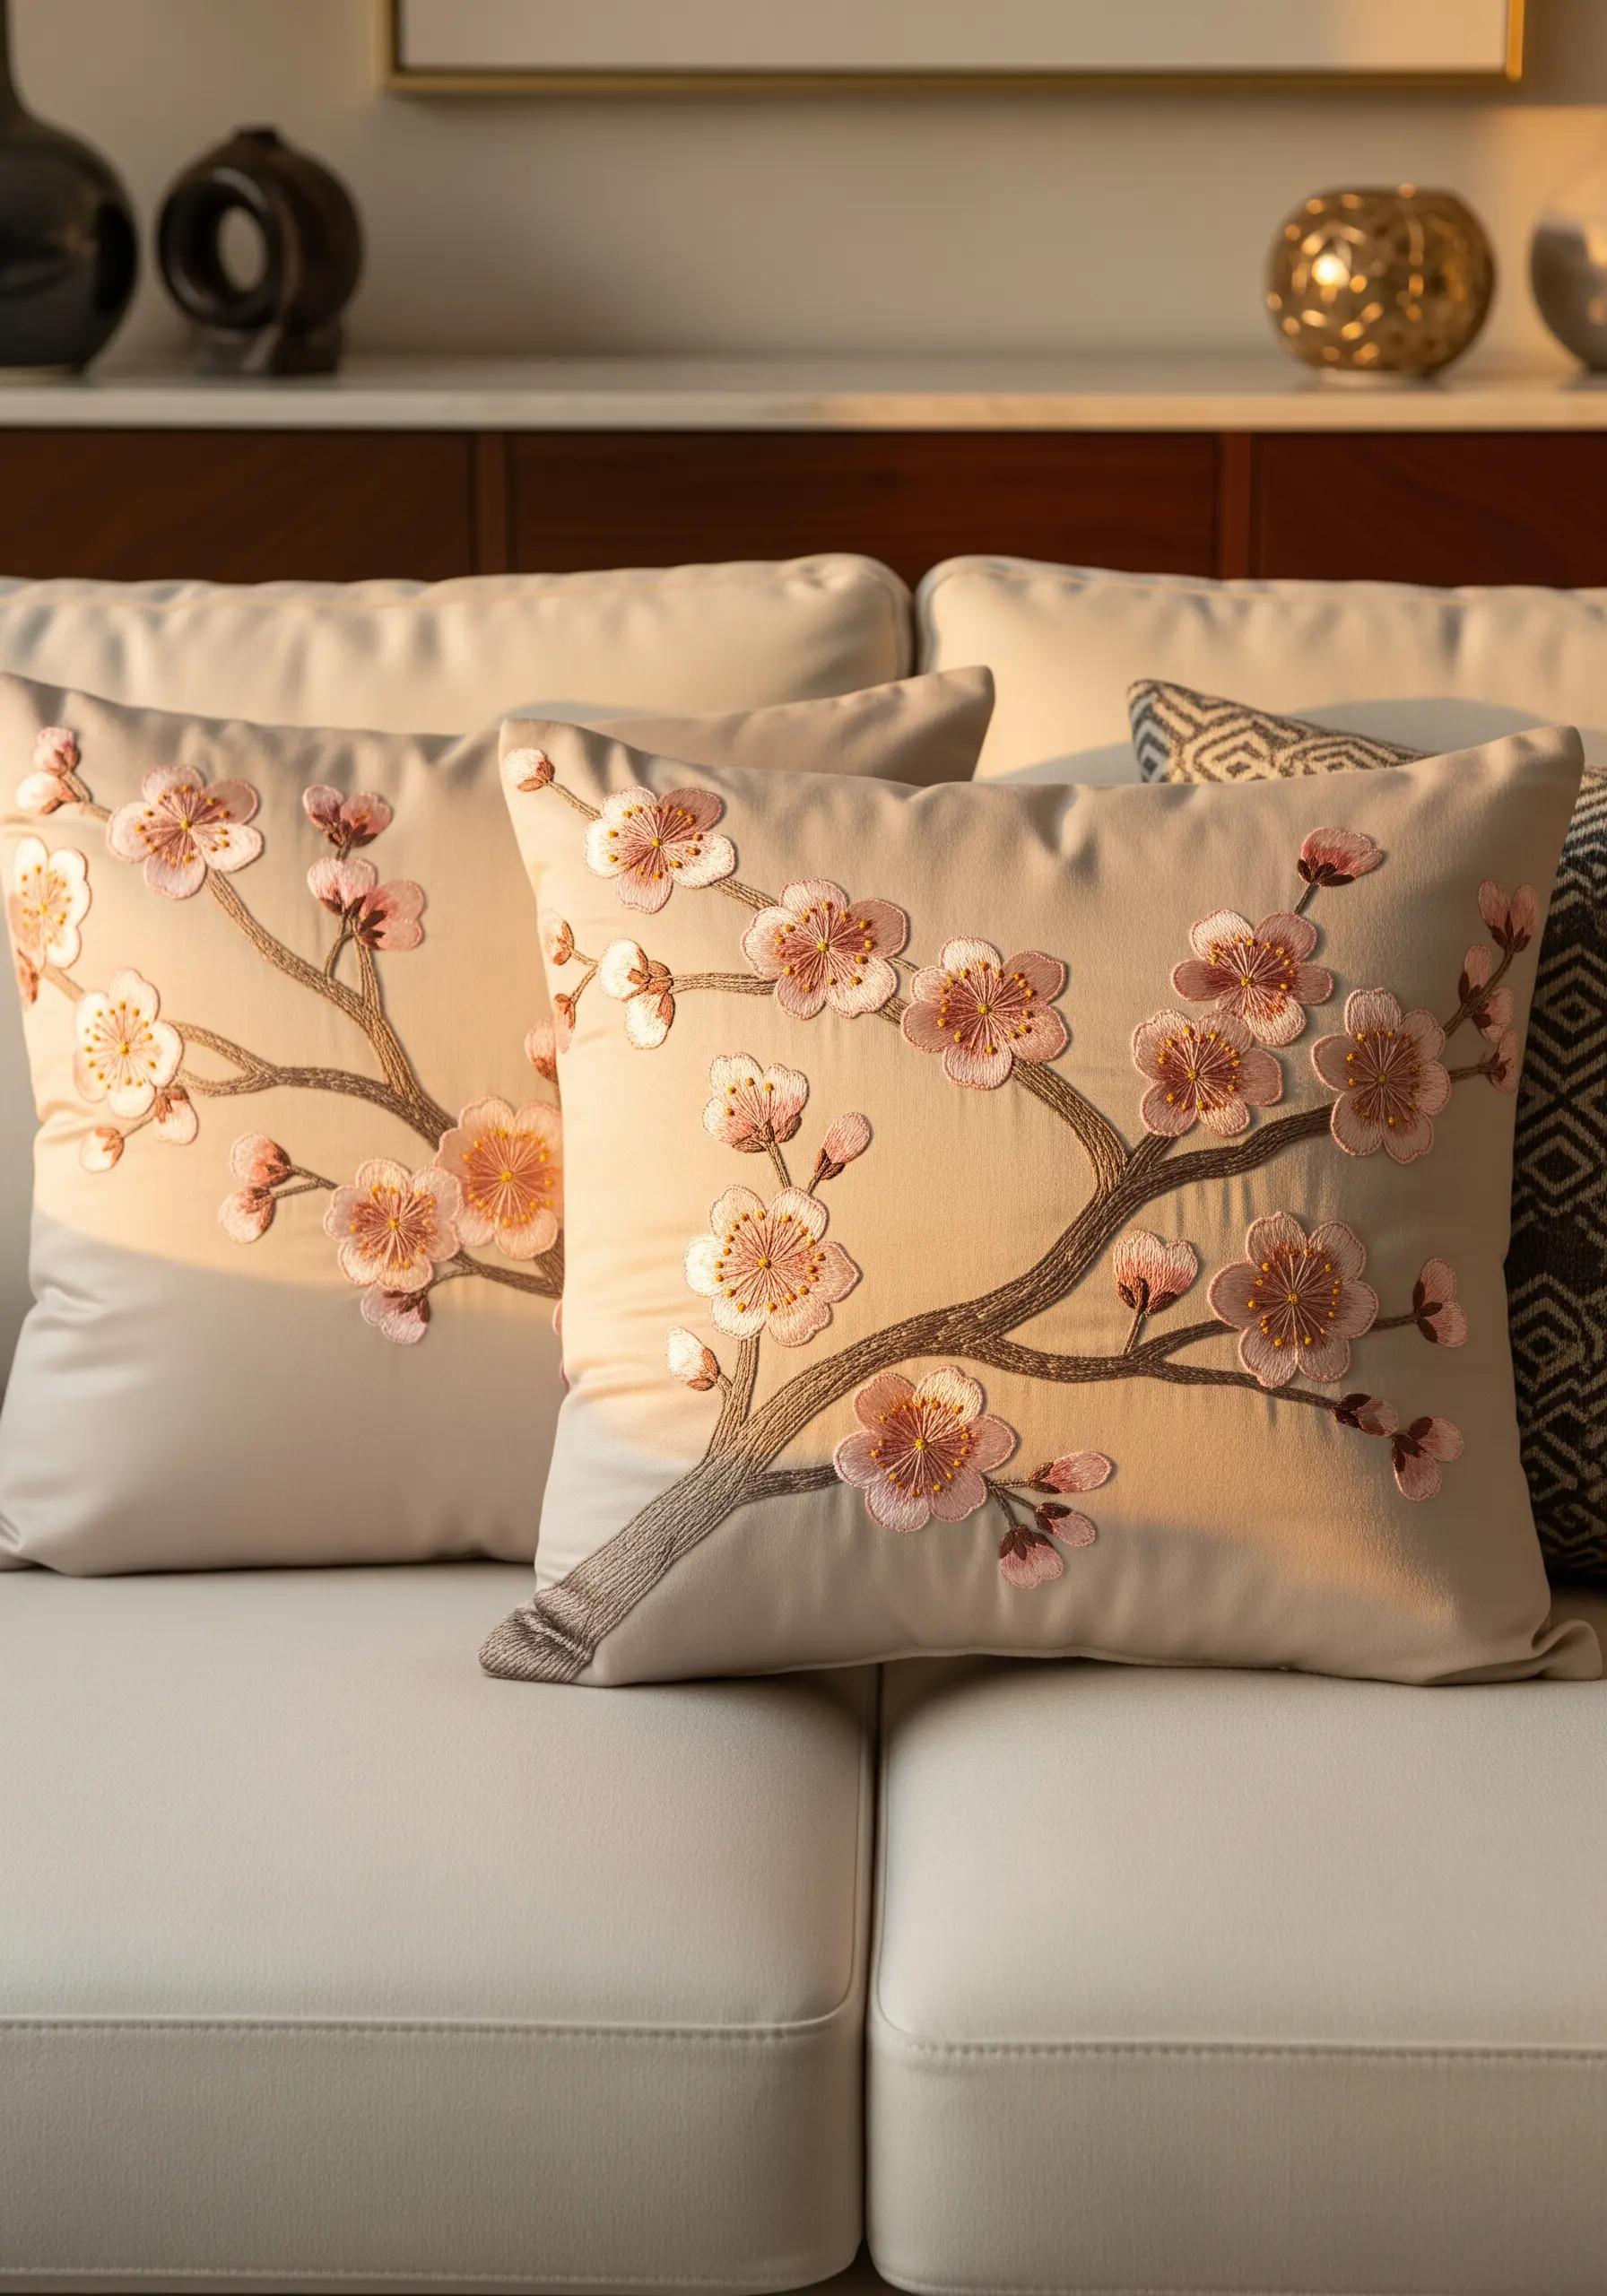
To give your blossoms a soft, painterly quality on home textiles, move beyond satin stitch and embrace the long-and-short stitch.
This technique allows you to seamlessly blend two or three tones within a single petal, creating a realistic gradient that feels sophisticated and gentle.
For the branches, use a whipped backstitch. This simple addition wraps the initial backstitch, giving the branches a rounded, dimensional quality that makes them stand out from the fabric.
The goal is to create embroidered cushion covers where the design feels fully integrated, adding quiet luxury to your space.
4. Cascading Petals: Creating Flow on Satin
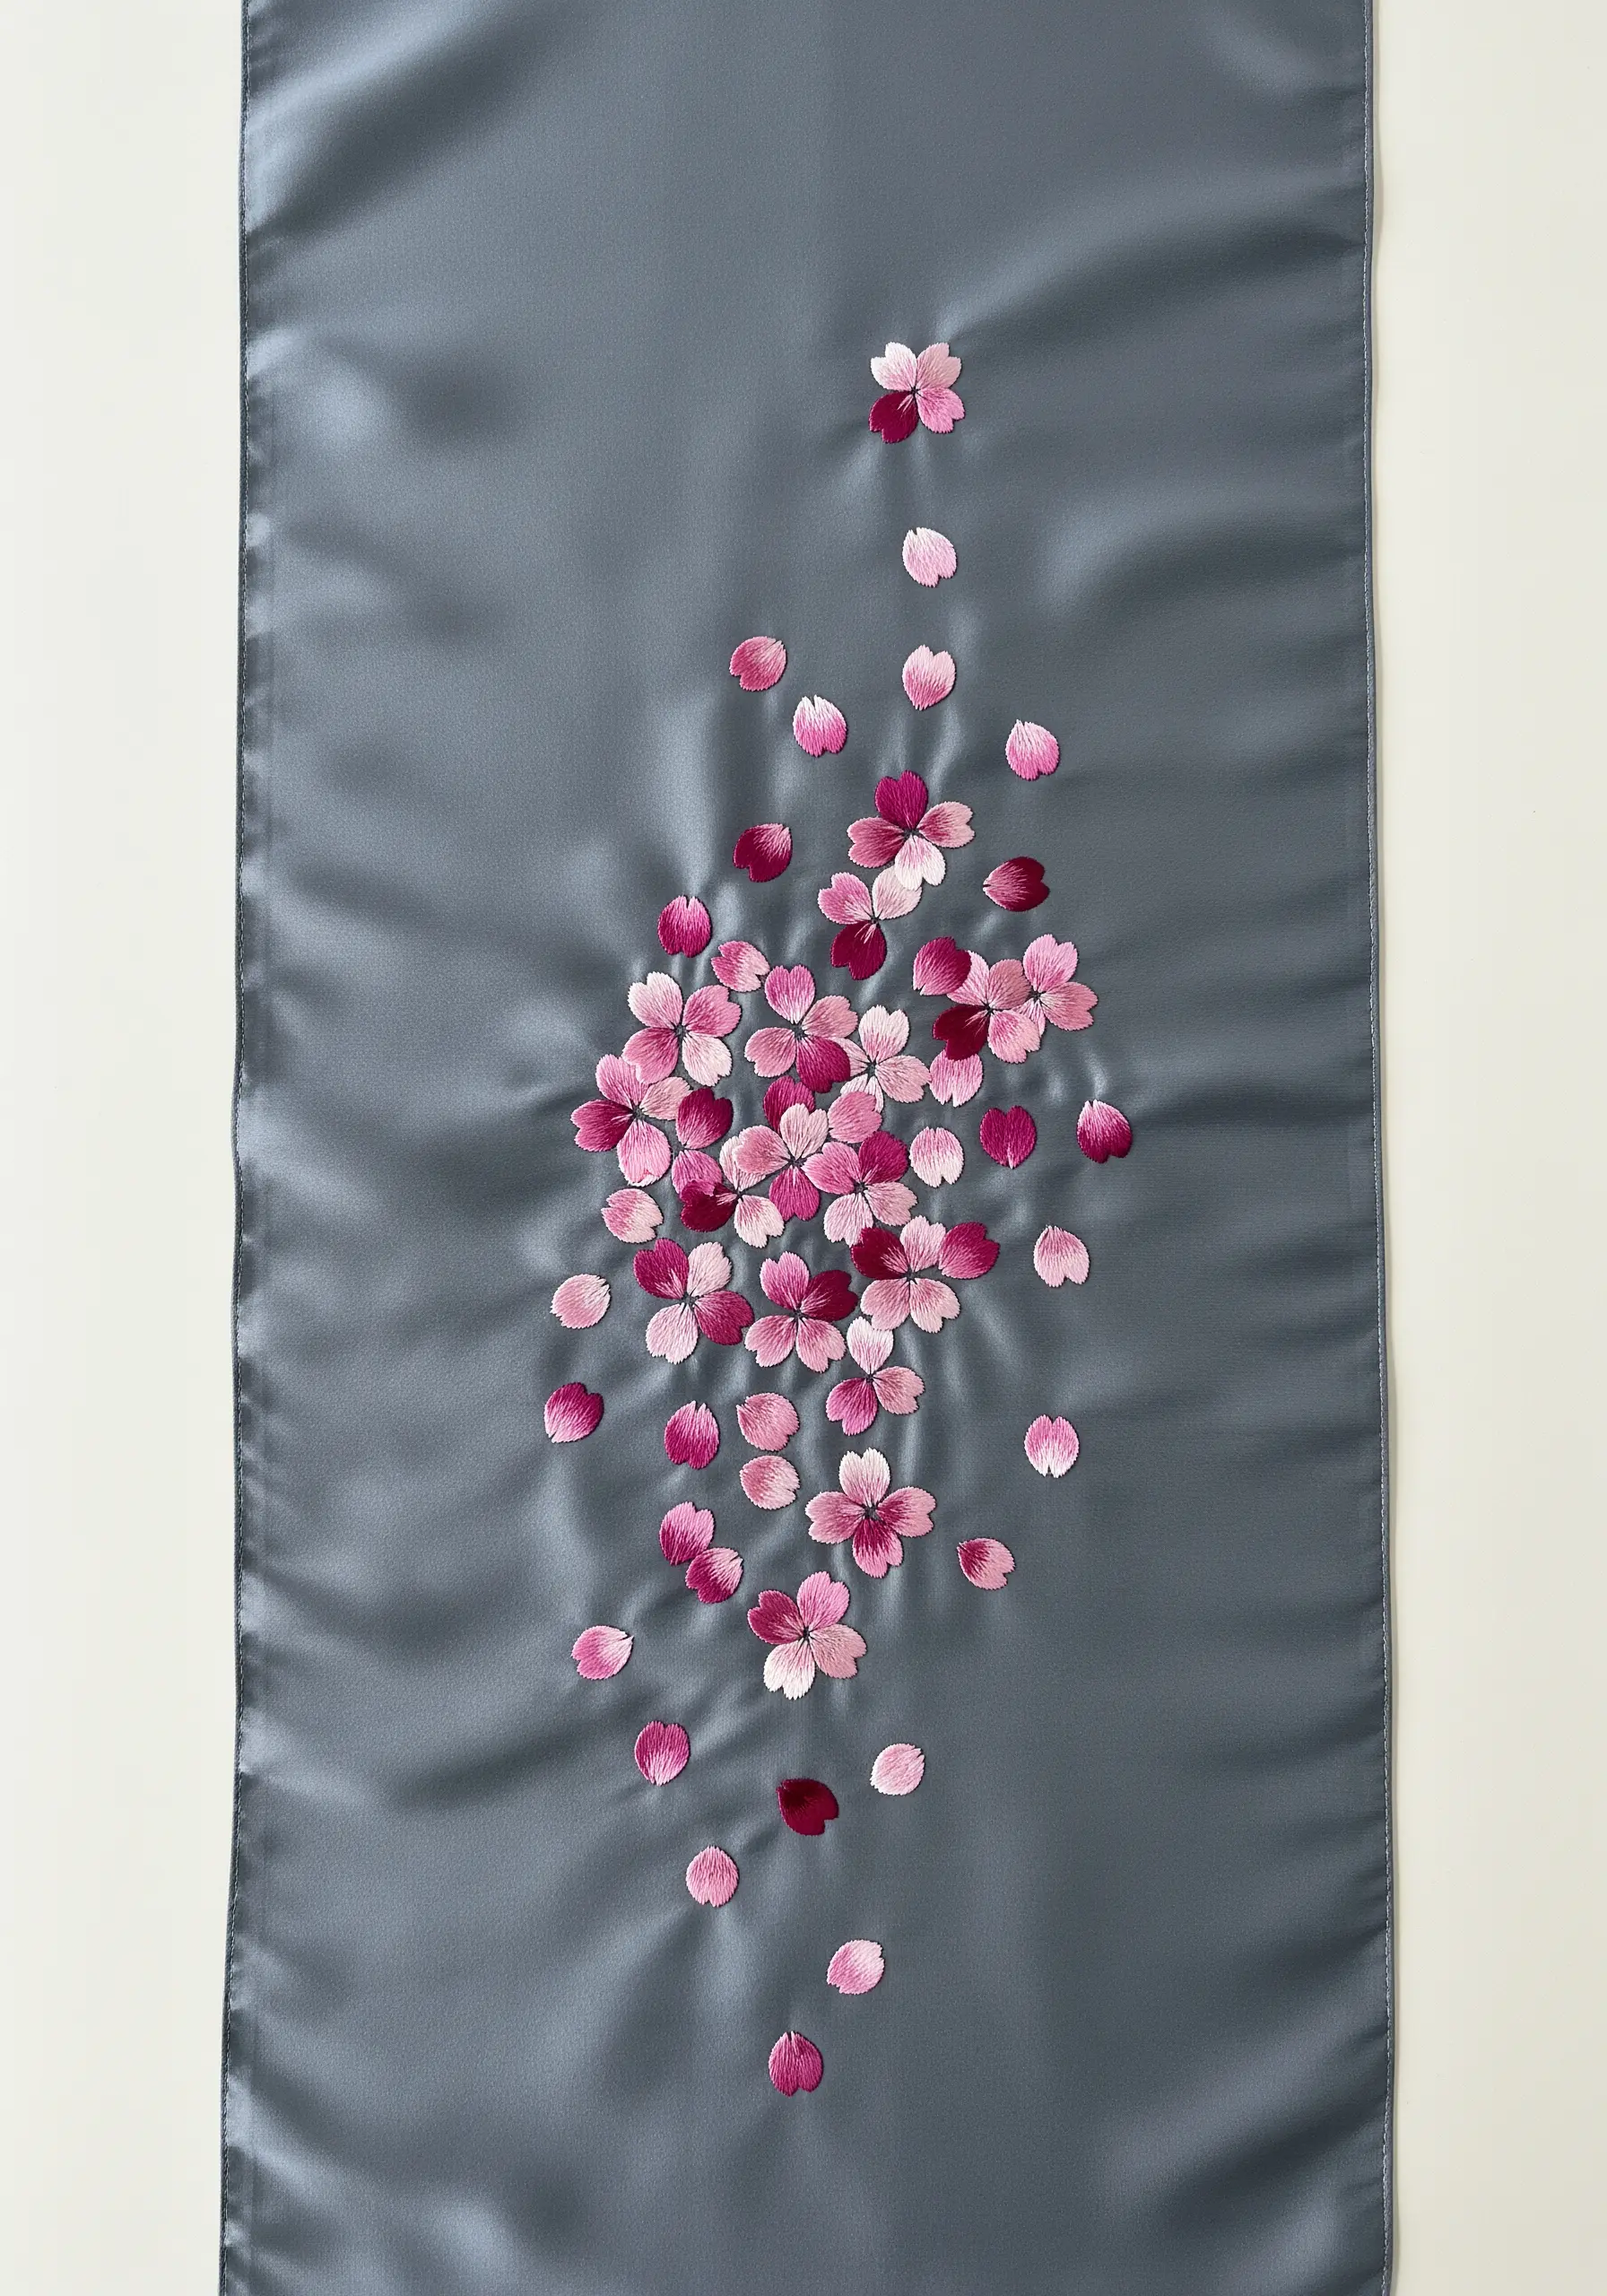
The elegance of this design lies in its sense of movement, as if petals are gently falling in a breeze.
Achieve this by varying the size, angle, and density of the blossoms as they travel down the fabric. Let the negative space guide your composition; it’s as important as the stitches themselves.
When working on a slick fabric like satin or silk, a water-soluble stabilizer is non-negotiable. It provides the grip and stability needed for even stitches and prevents the delicate material from puckering.
Use just one or two strands of floss to keep the embroidery light and airy, ensuring it doesn’t weigh down the fabric’s natural drape.
5. Midnight Bloom: High-Contrast Minimalism
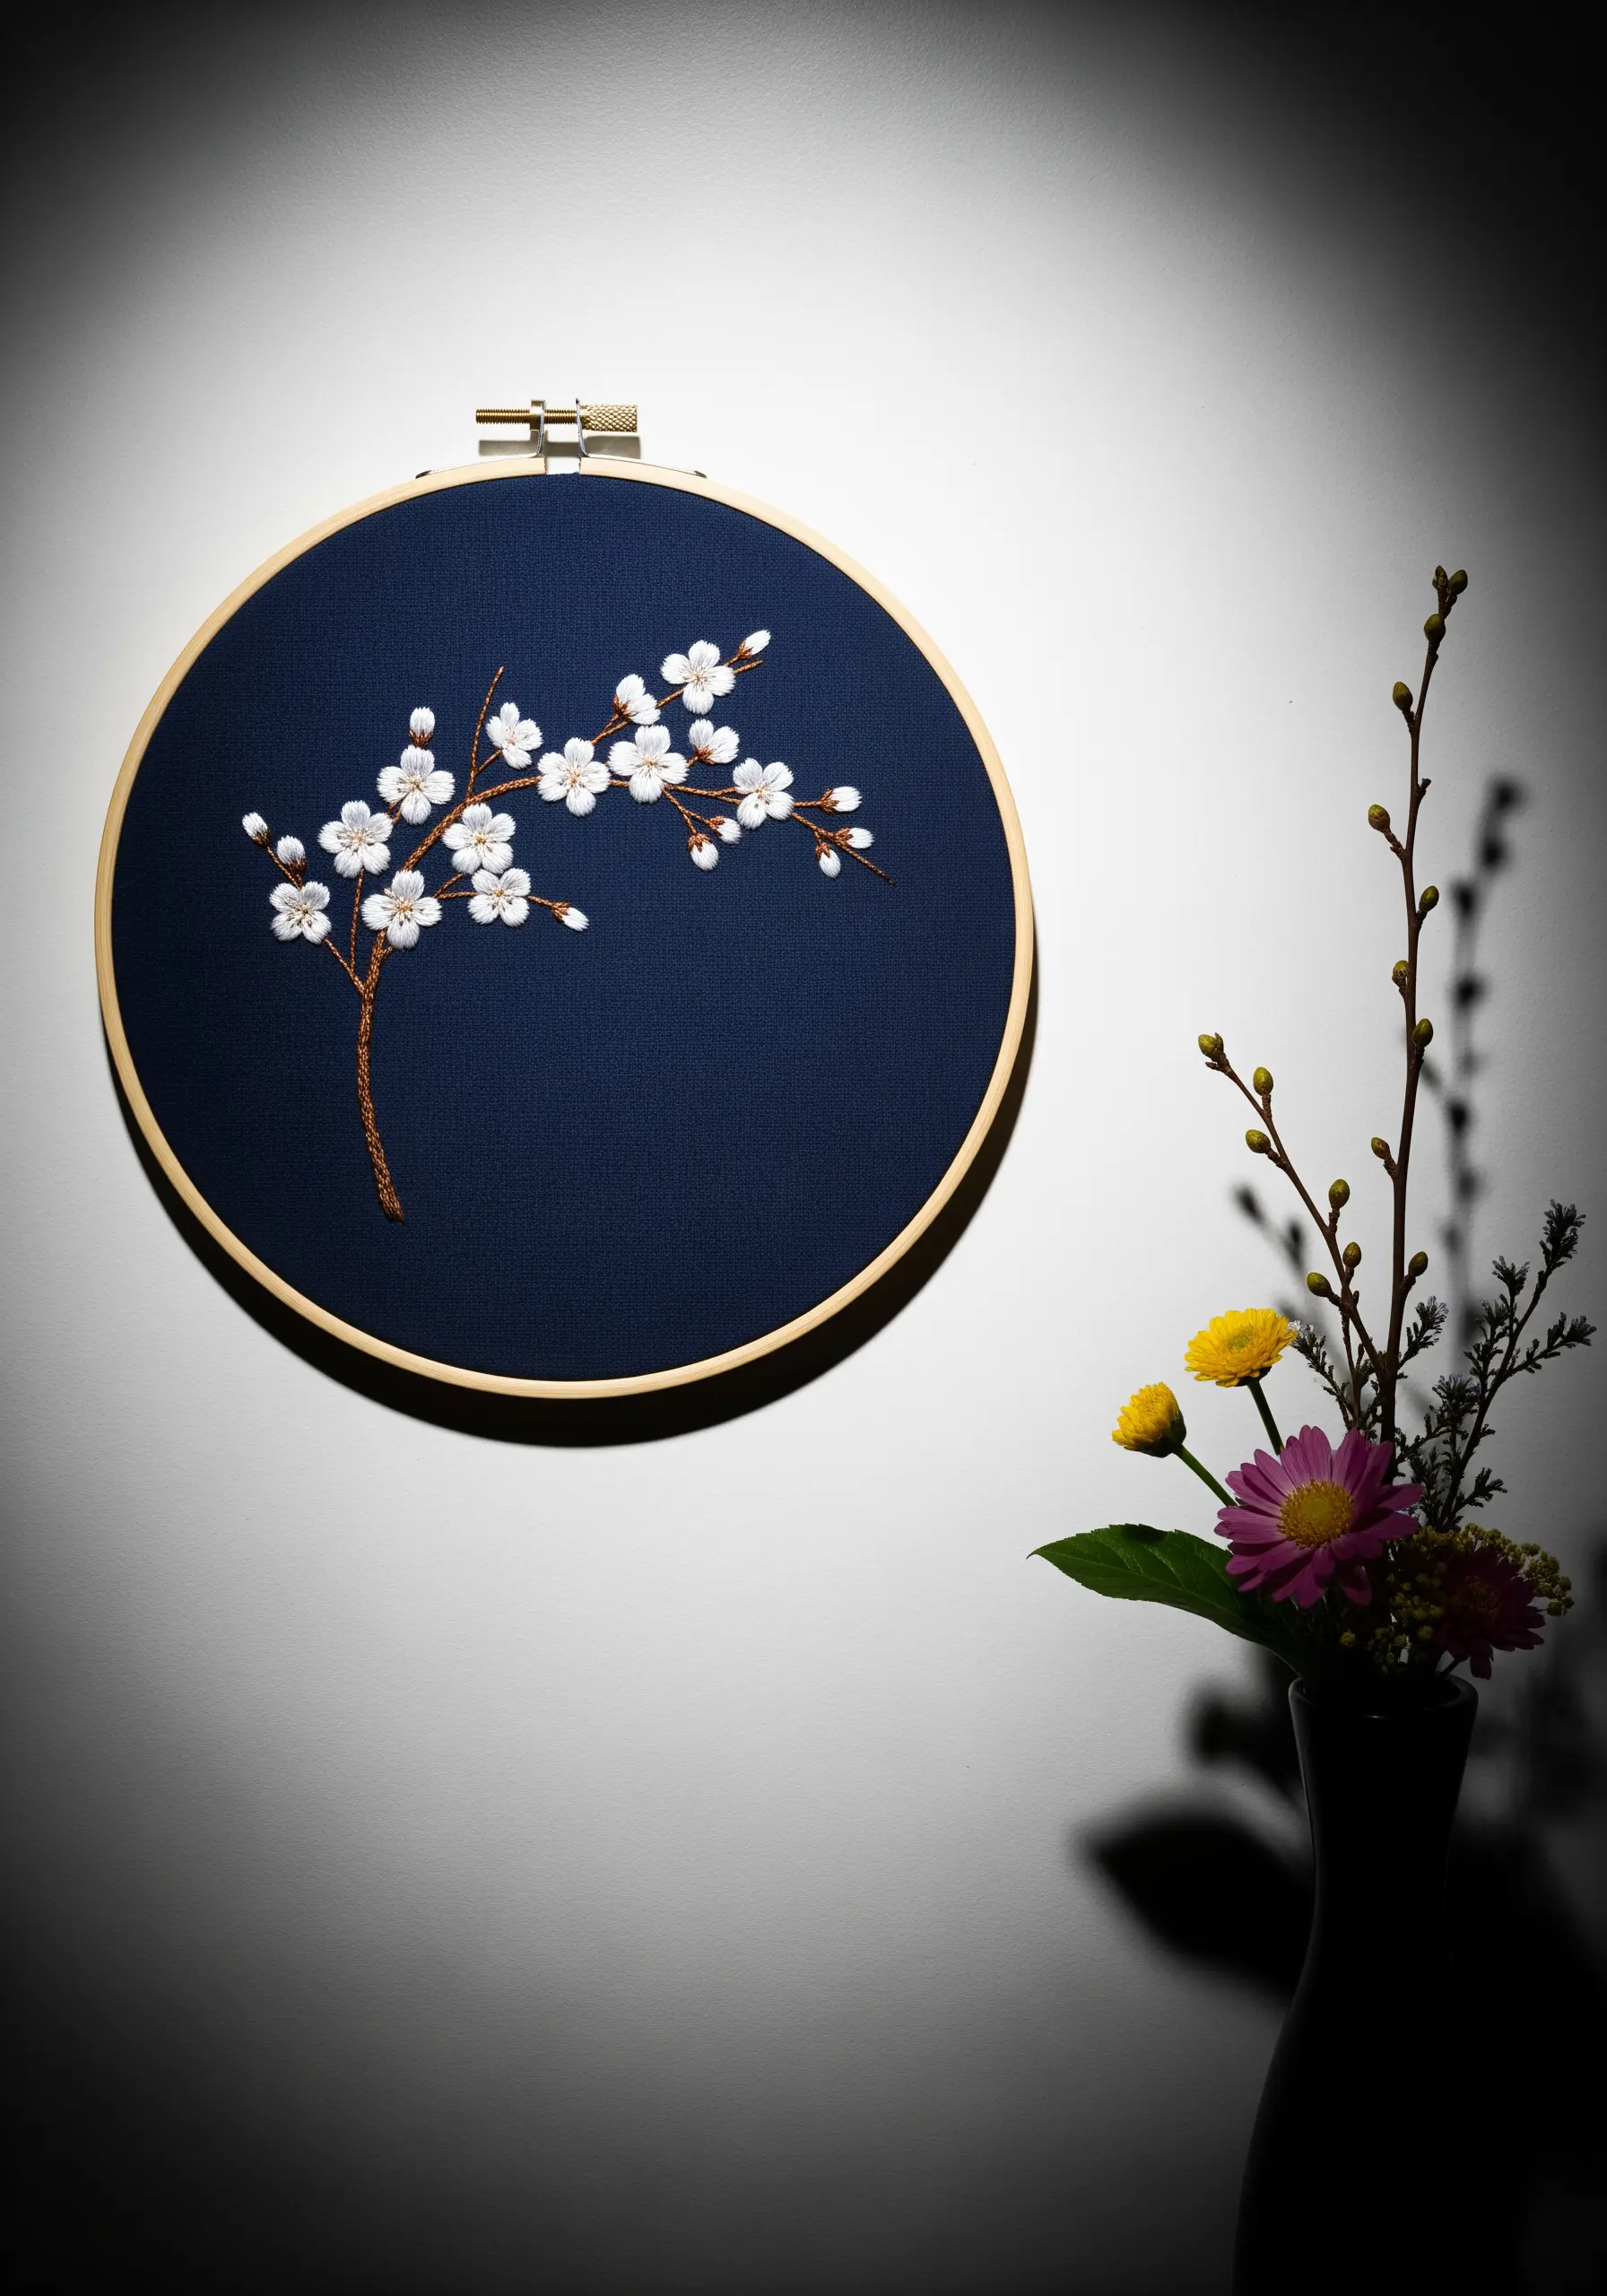
The power of this piece comes from its stark simplicity and dramatic contrast, a core principle in Japanese design.
Choose a tightly woven, dark fabric like navy cotton twill to serve as a deep, quiet background. Pair it with a bright white or pale cream thread to make every stitch count.
Use detached chain stitches (lazy daisies) for the petals; their open, clean shape adds to the minimalist feel. A simple, two-strand stem stitch for the branches provides definition without bulk.
This is a perfect exercise in restraint, proving that a well-composed design doesn’t need complexity to be impactful, resulting in minimalist embroidery hoops that exude calm.
6. Graphic Impact: The Boldly Outlined Blossom
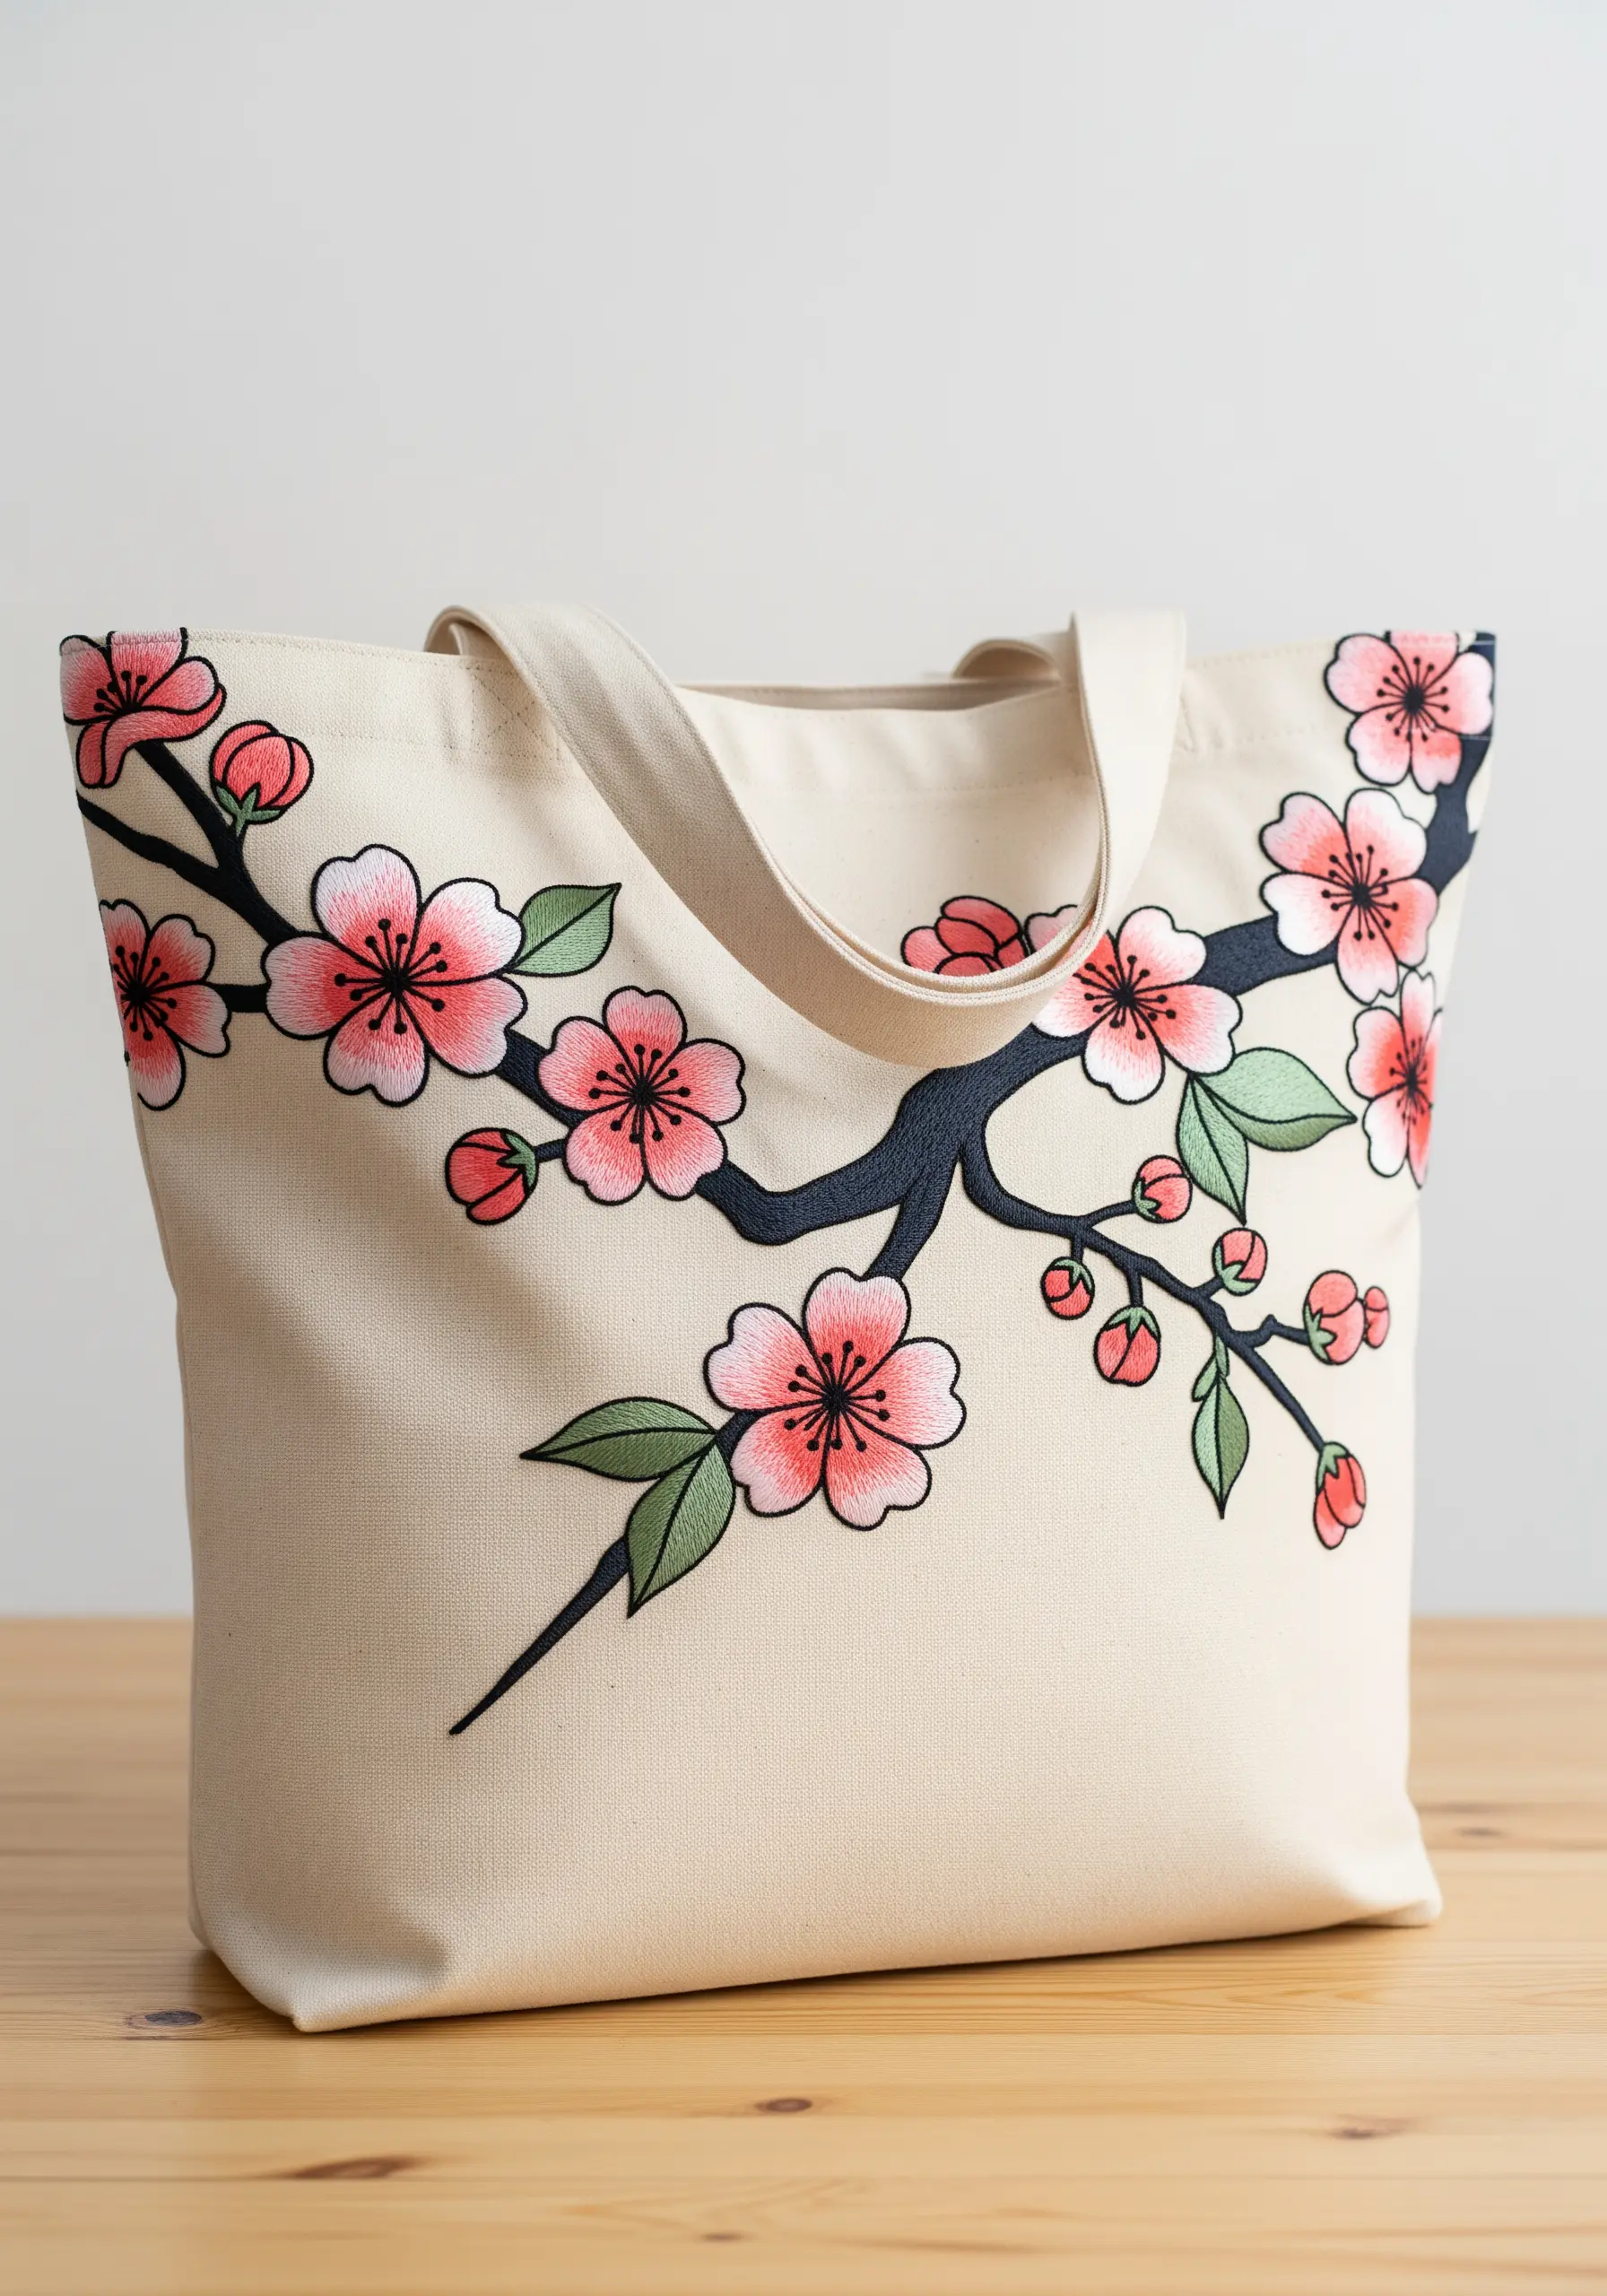
To capture this modern, illustrative style, focus on creating a crisp and confident outline.
Use a three-strand chain stitch or a heavy backstitch in a dark, contrasting color like black or deep navy. This creates a clean, graphic edge that contains the color.
For the color fills, use a smooth satin stitch. To ensure your stitches lay perfectly flat on a heavy canvas tote, first lay down a foundation of single, long stitches in the same direction you plan to fill. This padding prevents gaps and creates a professional, uniform surface.
This method elevates simple tote bag embroidery designs into wearable graphic art.
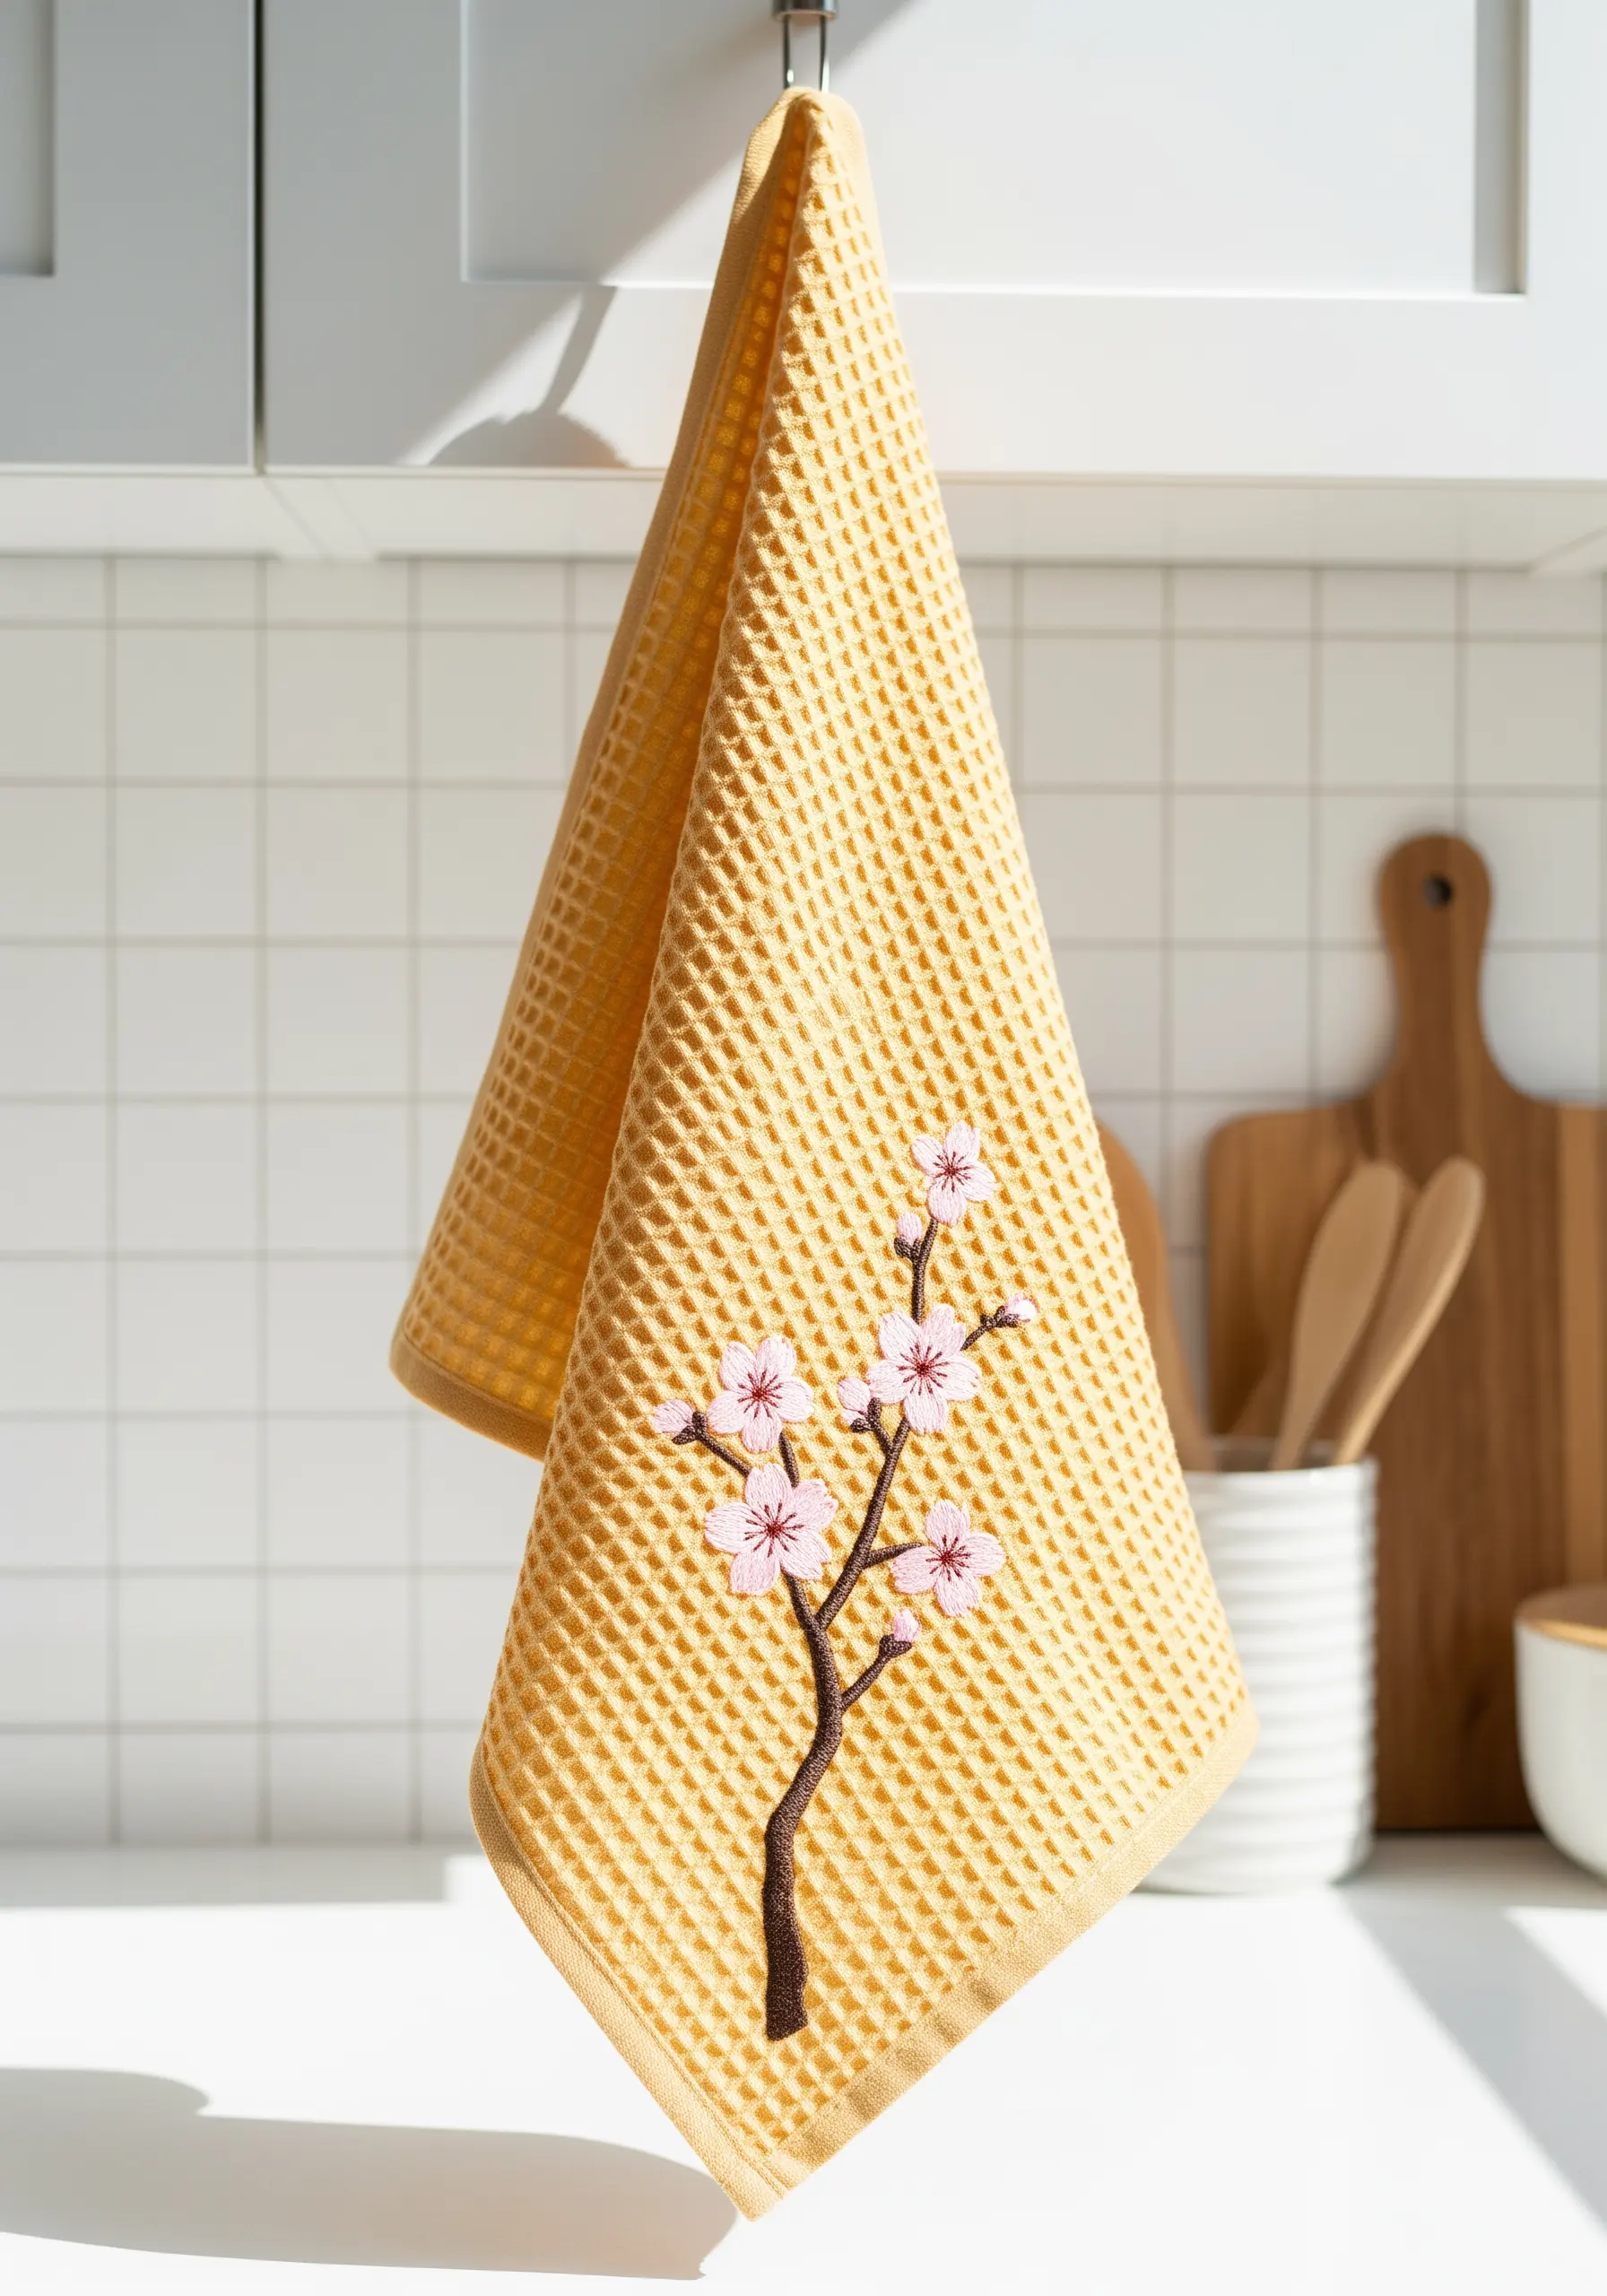
7. Whispers on Silk: Embroidery for Delicate Fabrics
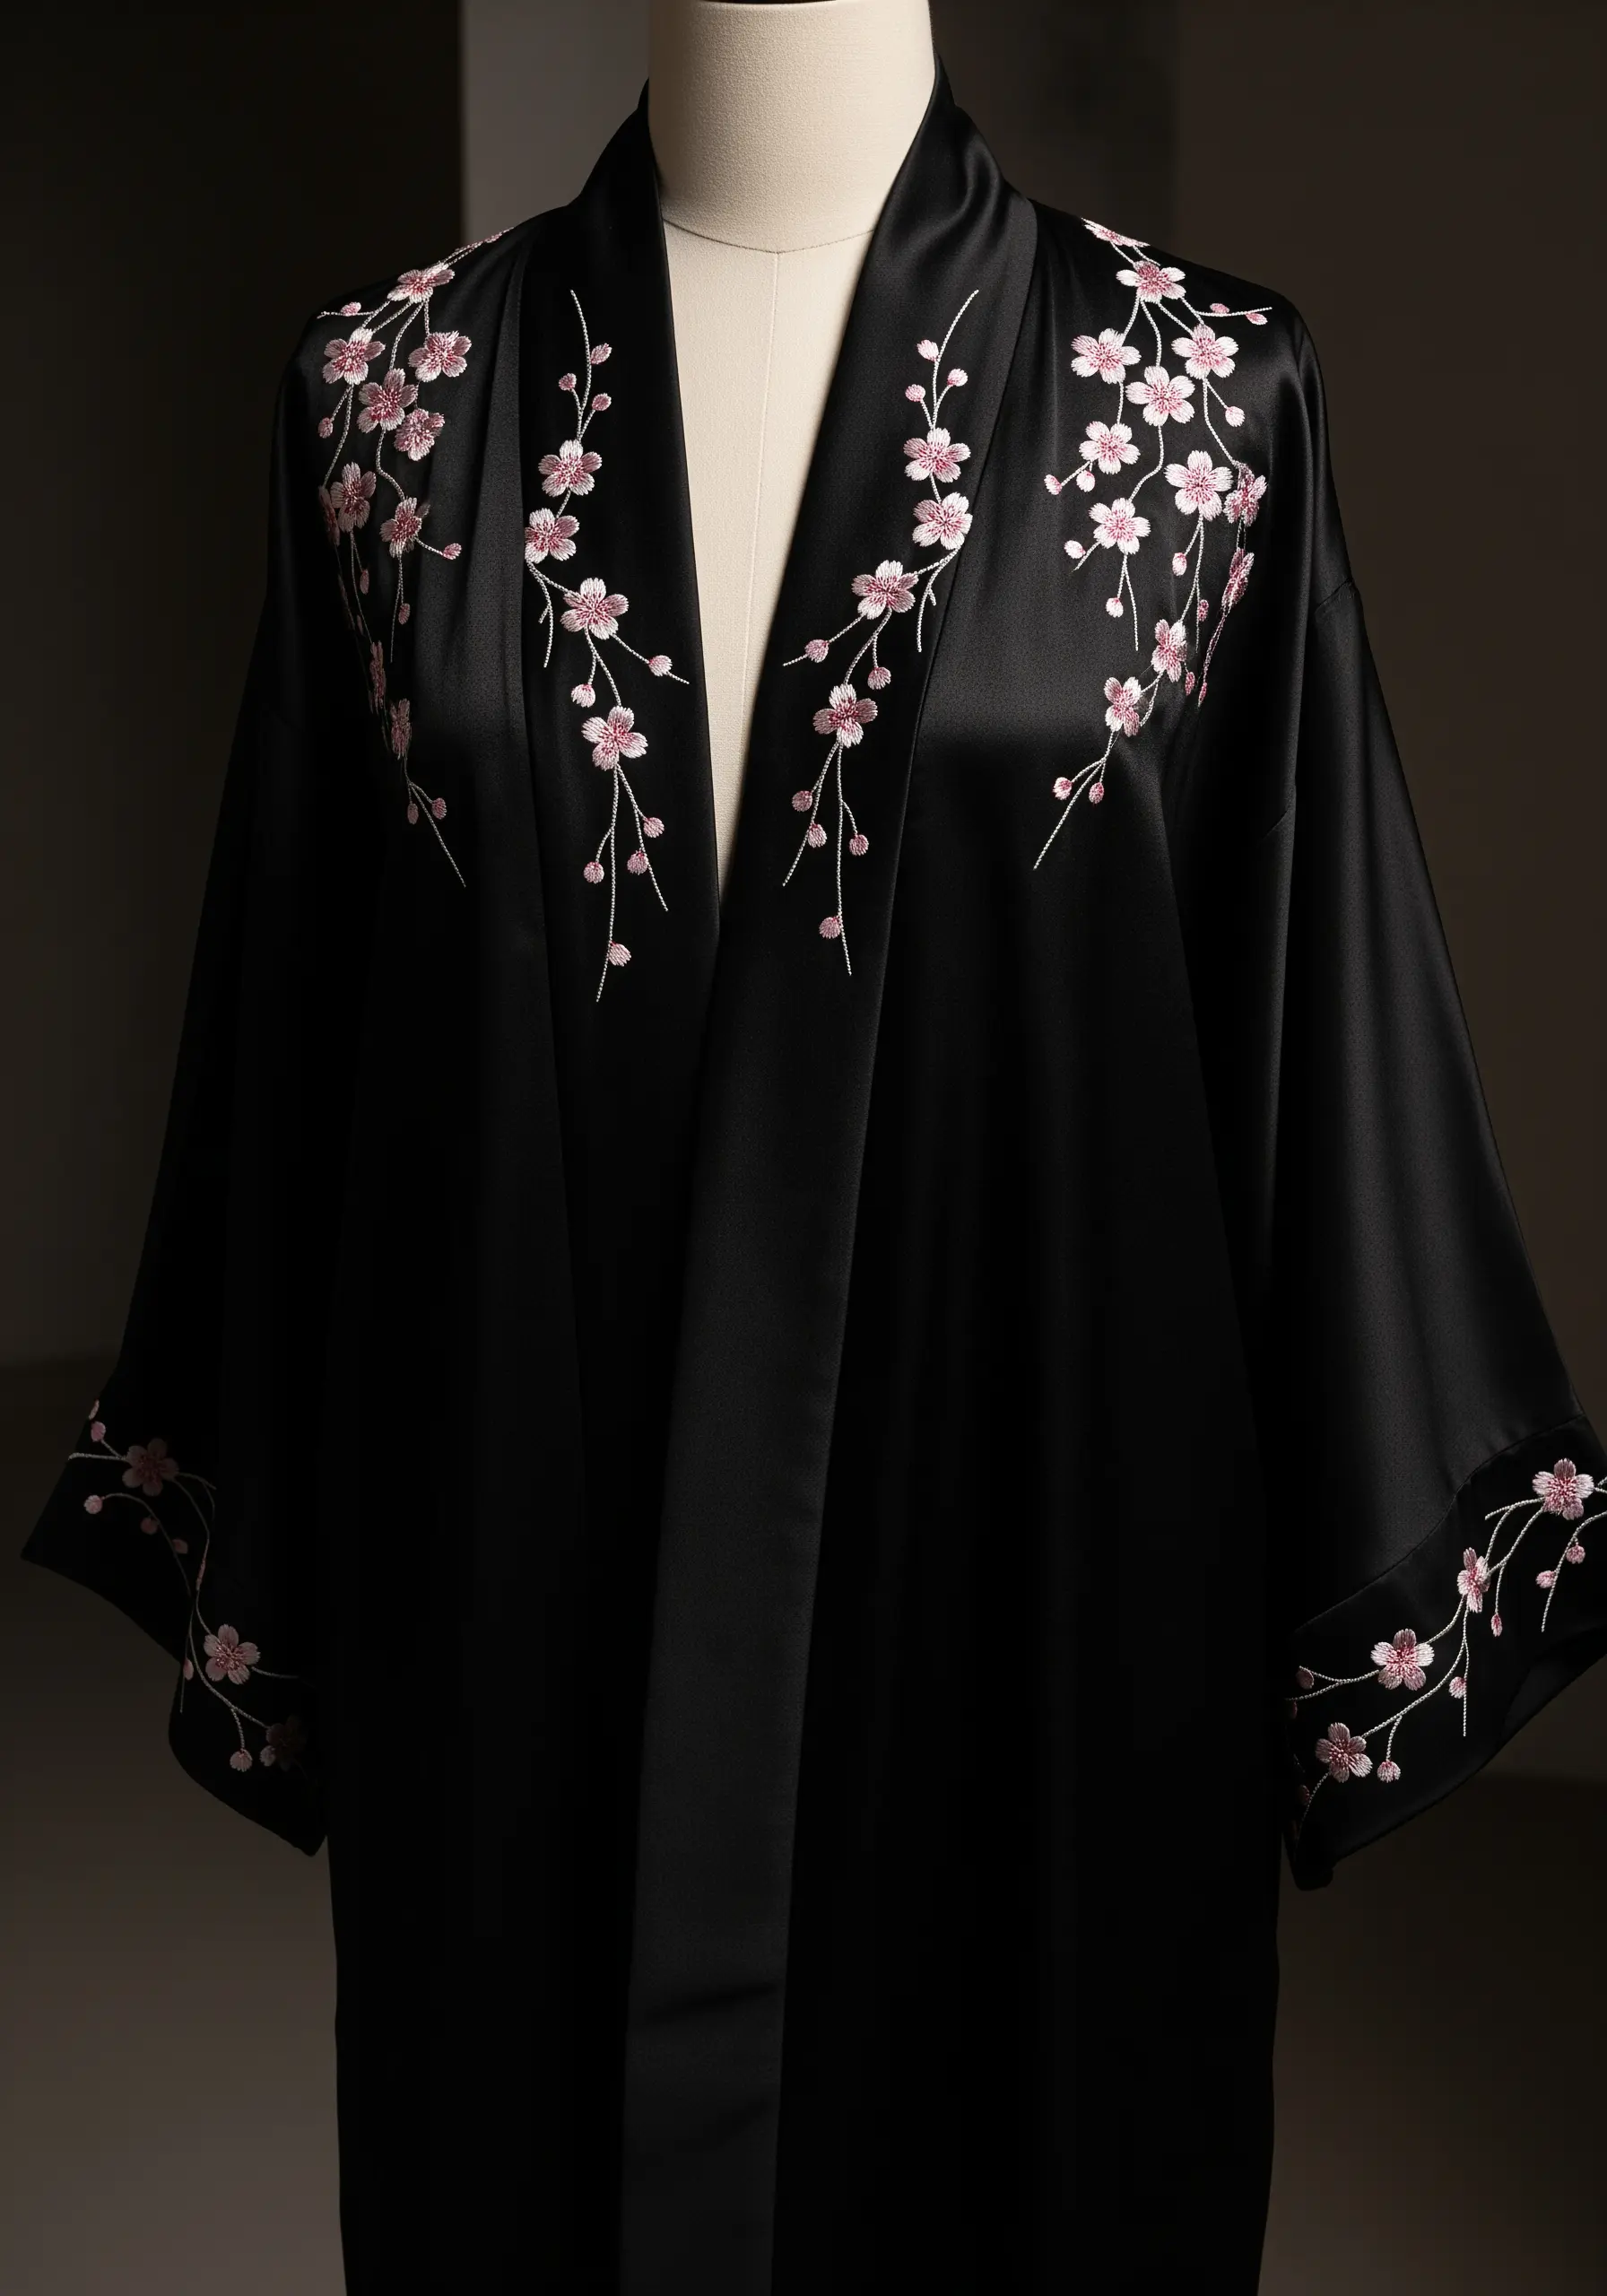
When working on fine fabrics like silk or satin, your technique must be exceptionally gentle and precise.
Select a fine, sharp needle (a size 10 is ideal) to part the threads of the fabric rather than piercing them, which prevents snags and pulls.
Limit yourself to one or two strands of floss to keep the embroidery light and prevent it from distorting the fabric’s natural drape. A lightweight tear-away stabilizer provides support during stitching without adding permanent bulk.
Allow the design to trace the natural lines of the garment—the lapel, the cuff—for a truly bespoke feel that honors both the thread and the textile.
8. The Triptych Narrative: A Blossom’s Life Cycle
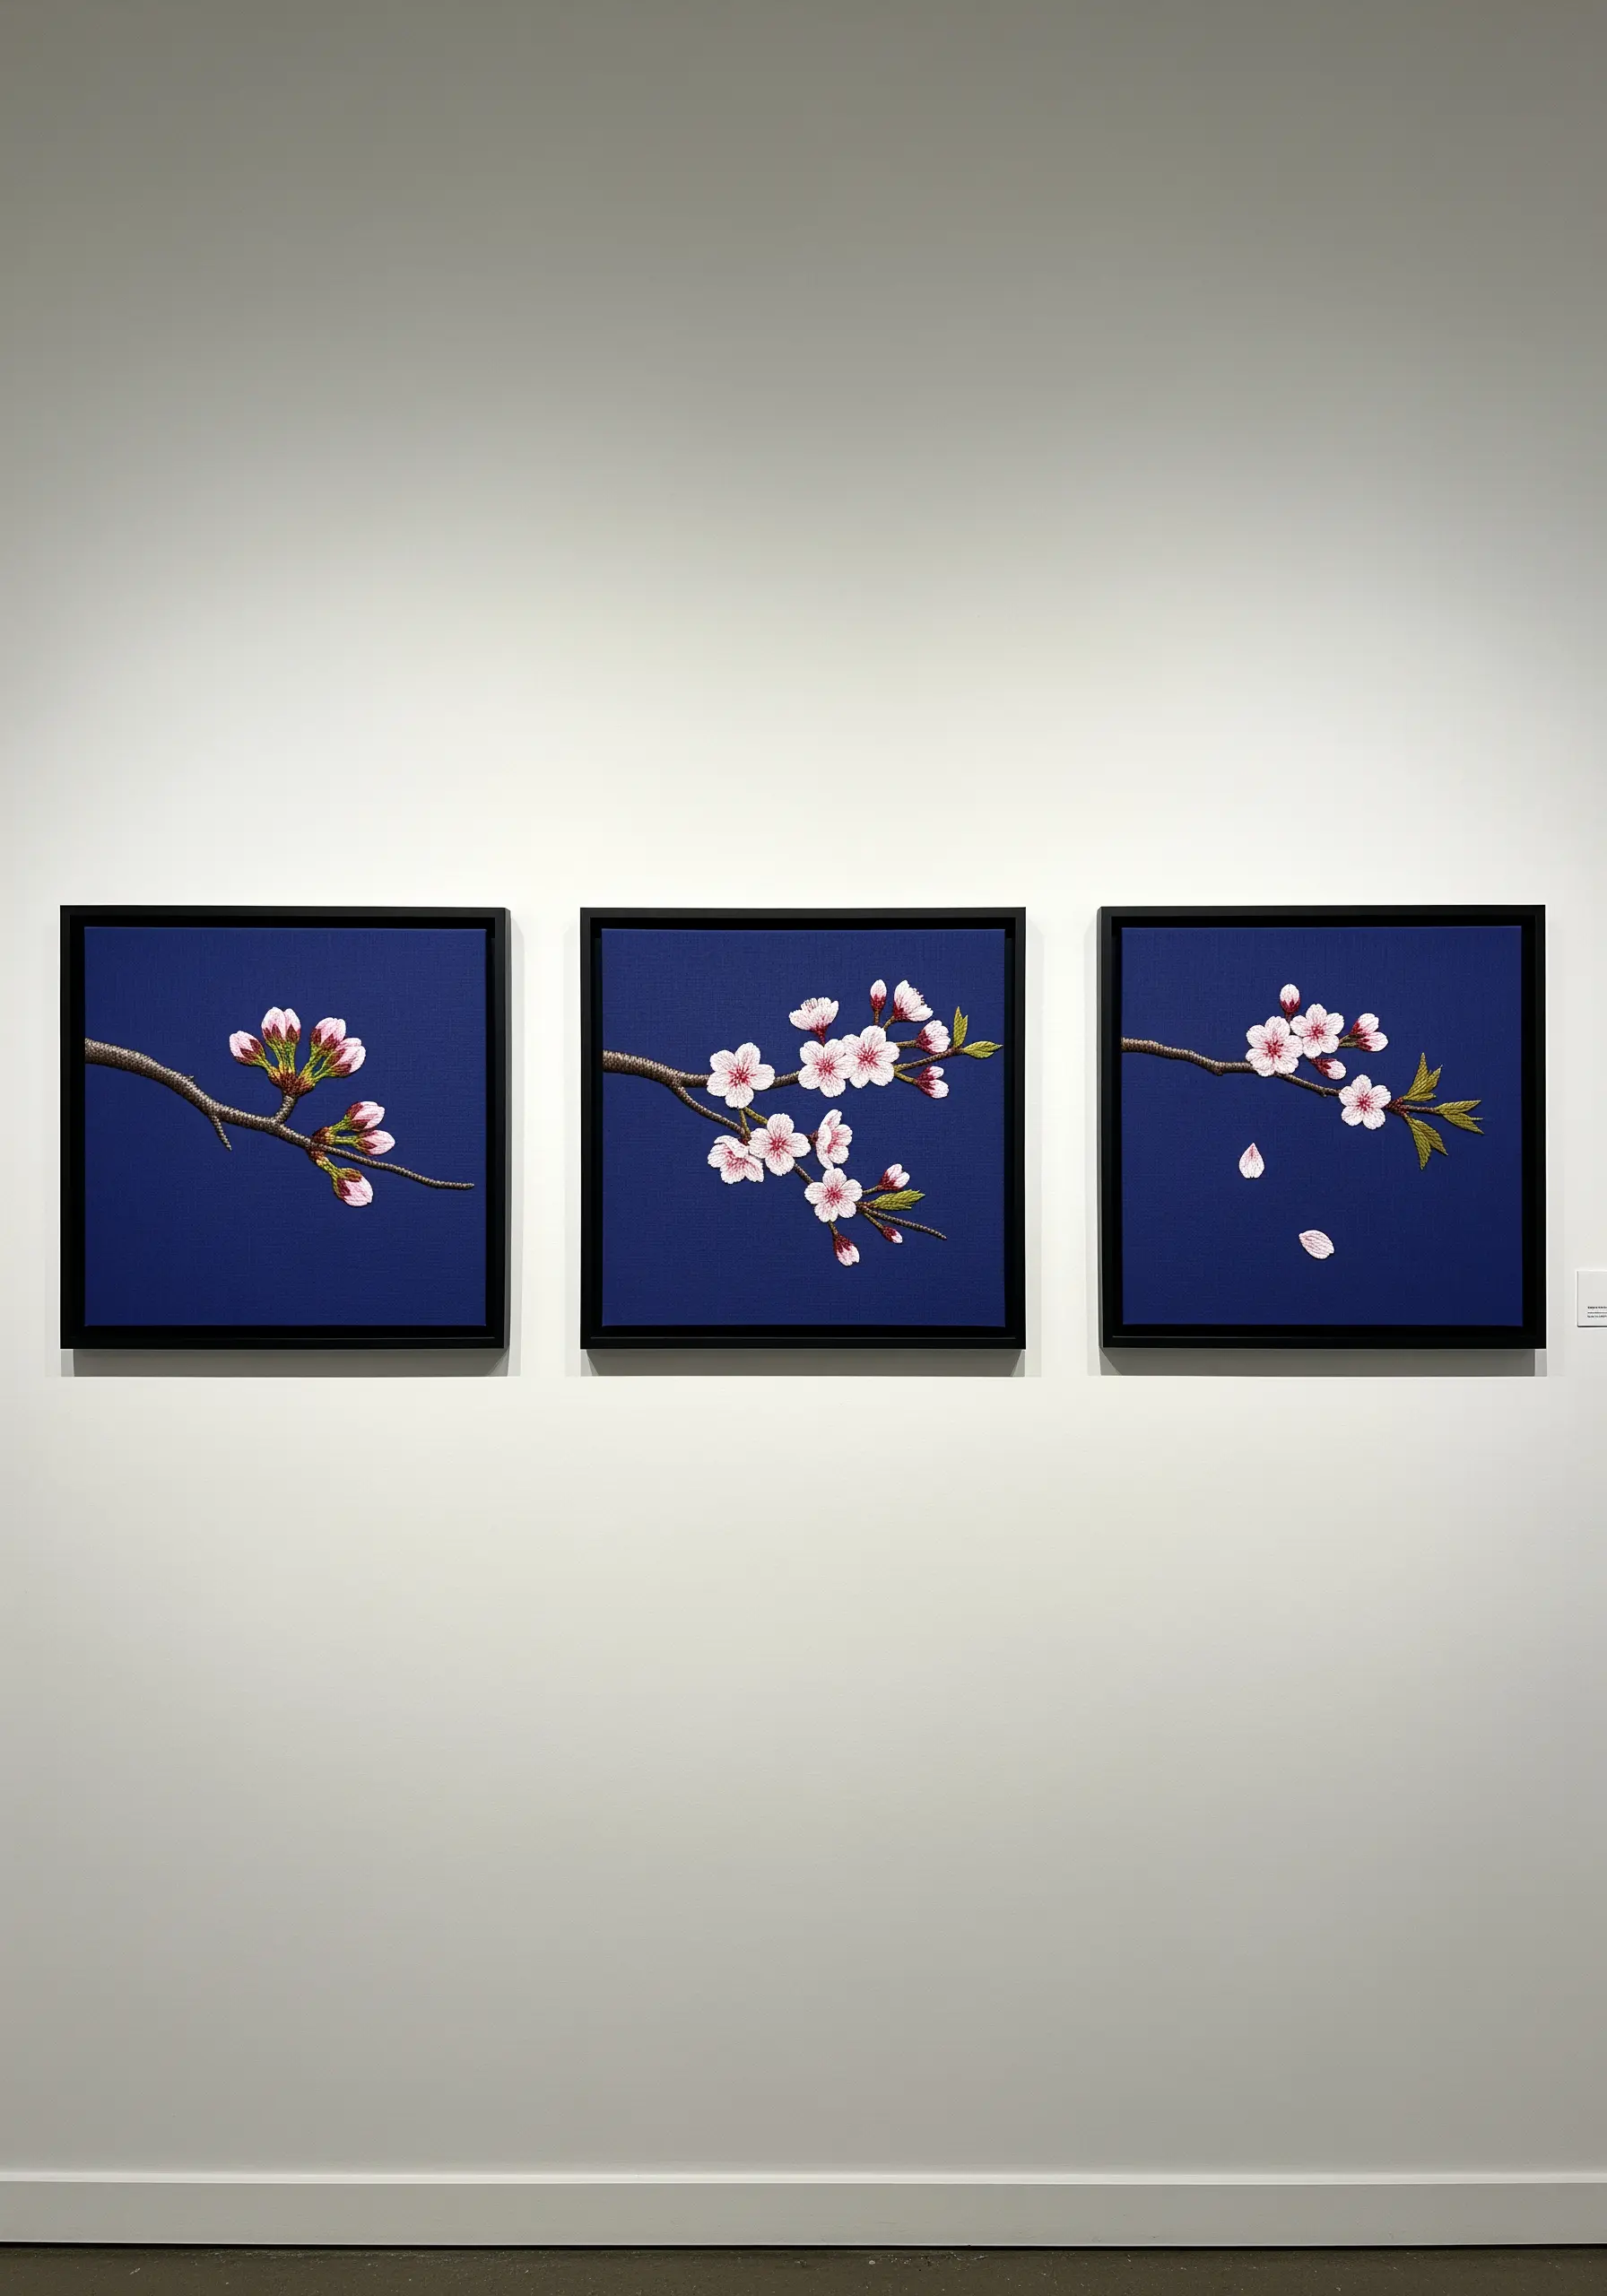
Turn a static image into a dynamic story by using a triptych format. This approach encourages you to think like a storyteller, not just a stitcher.
Plan the entire composition across three canvases before you begin, ensuring the branch flows seamlessly from one frame to the next. Dedicate each panel to a different stage: the first for tight buds, the second for full blooms, and the third for scattered, falling petals.
Maintain consistent fabric tension and use the same thread dye lots across all pieces to guarantee a cohesive, gallery-quality finish that looks like one continuous piece of art.
9. Textured Miniature: Raised Stitches on a Bookmark
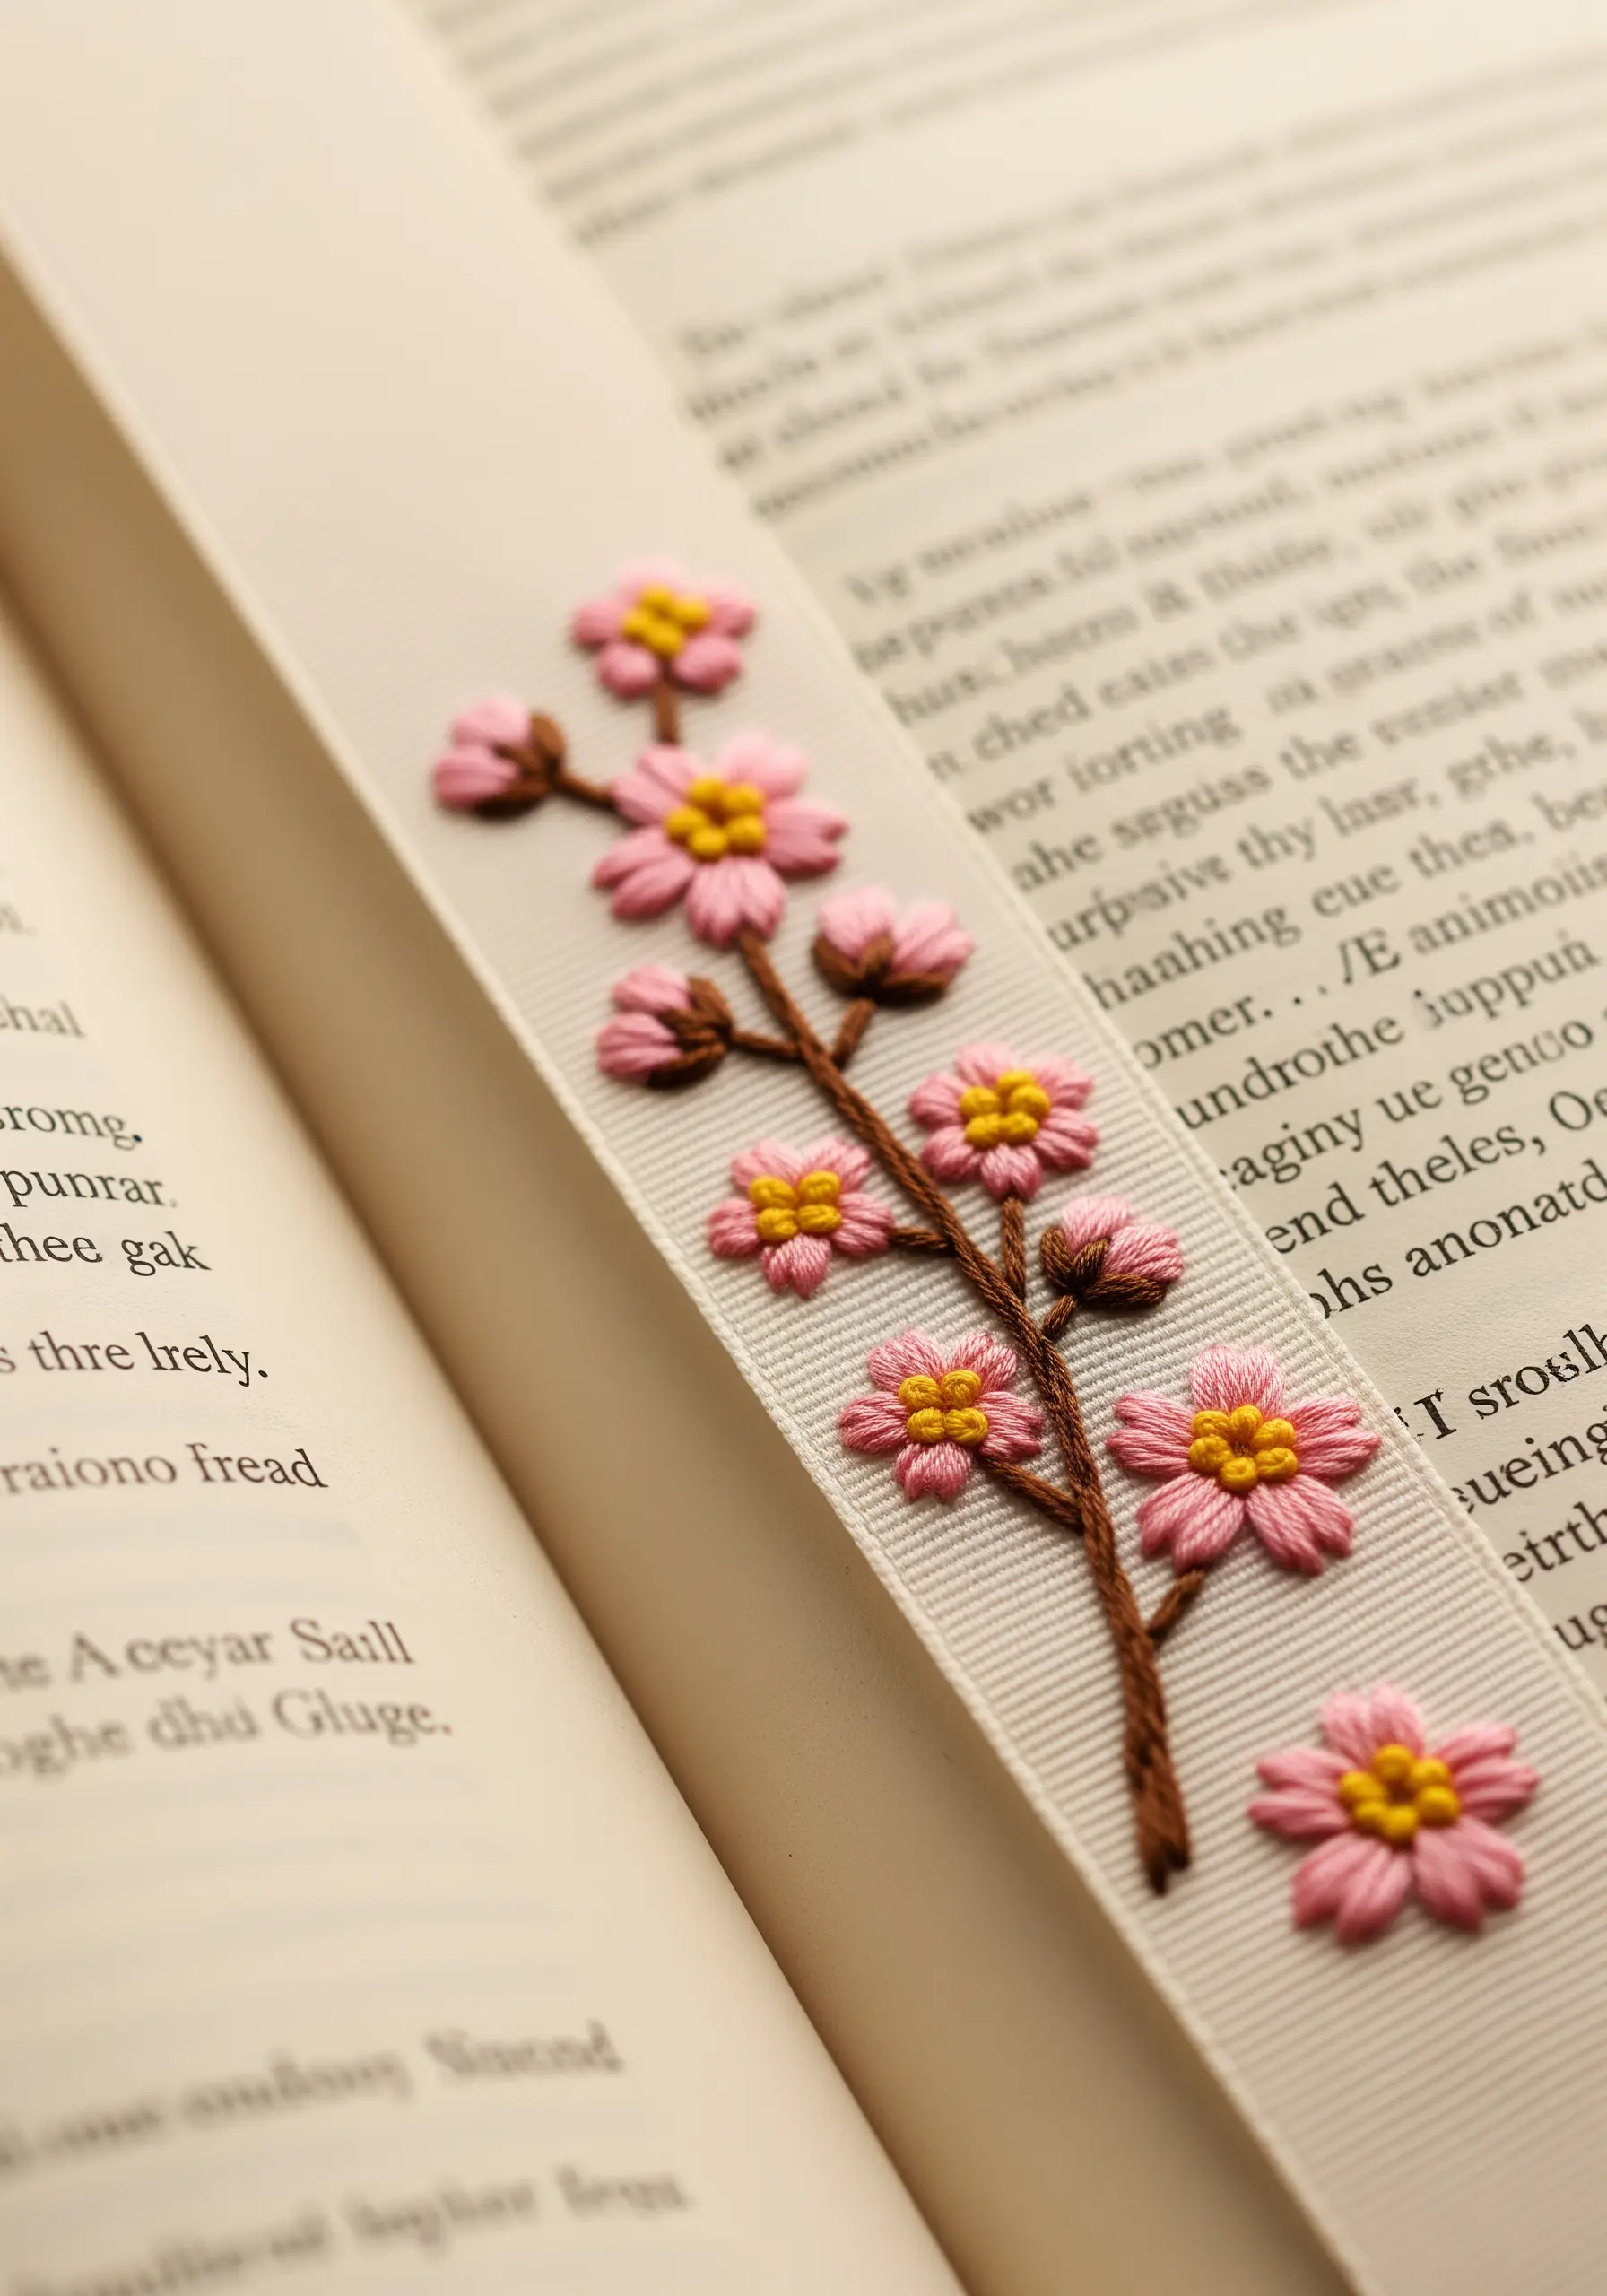
On a small scale, texture is your most powerful tool for creating impact. Transform flat petals into sculptural forms by using dimensional stitches.
The woven picot stitch or cast-on stitch are perfect for this, creating raised, 3D petals that you can physically feel. In the flower centers, a dense cluster of French knots adds another layer of tactile interest.
For the branch, try couching—tacking down a thicker thread or yarn with a thinner, matching floss. This technique gives the branch a defined, rustic quality that contrasts beautifully with the delicate flowers, creating lovely cozy, creative embroidery gifts.
10. Embroidered Silhouettes: Designing for Light and Shadow
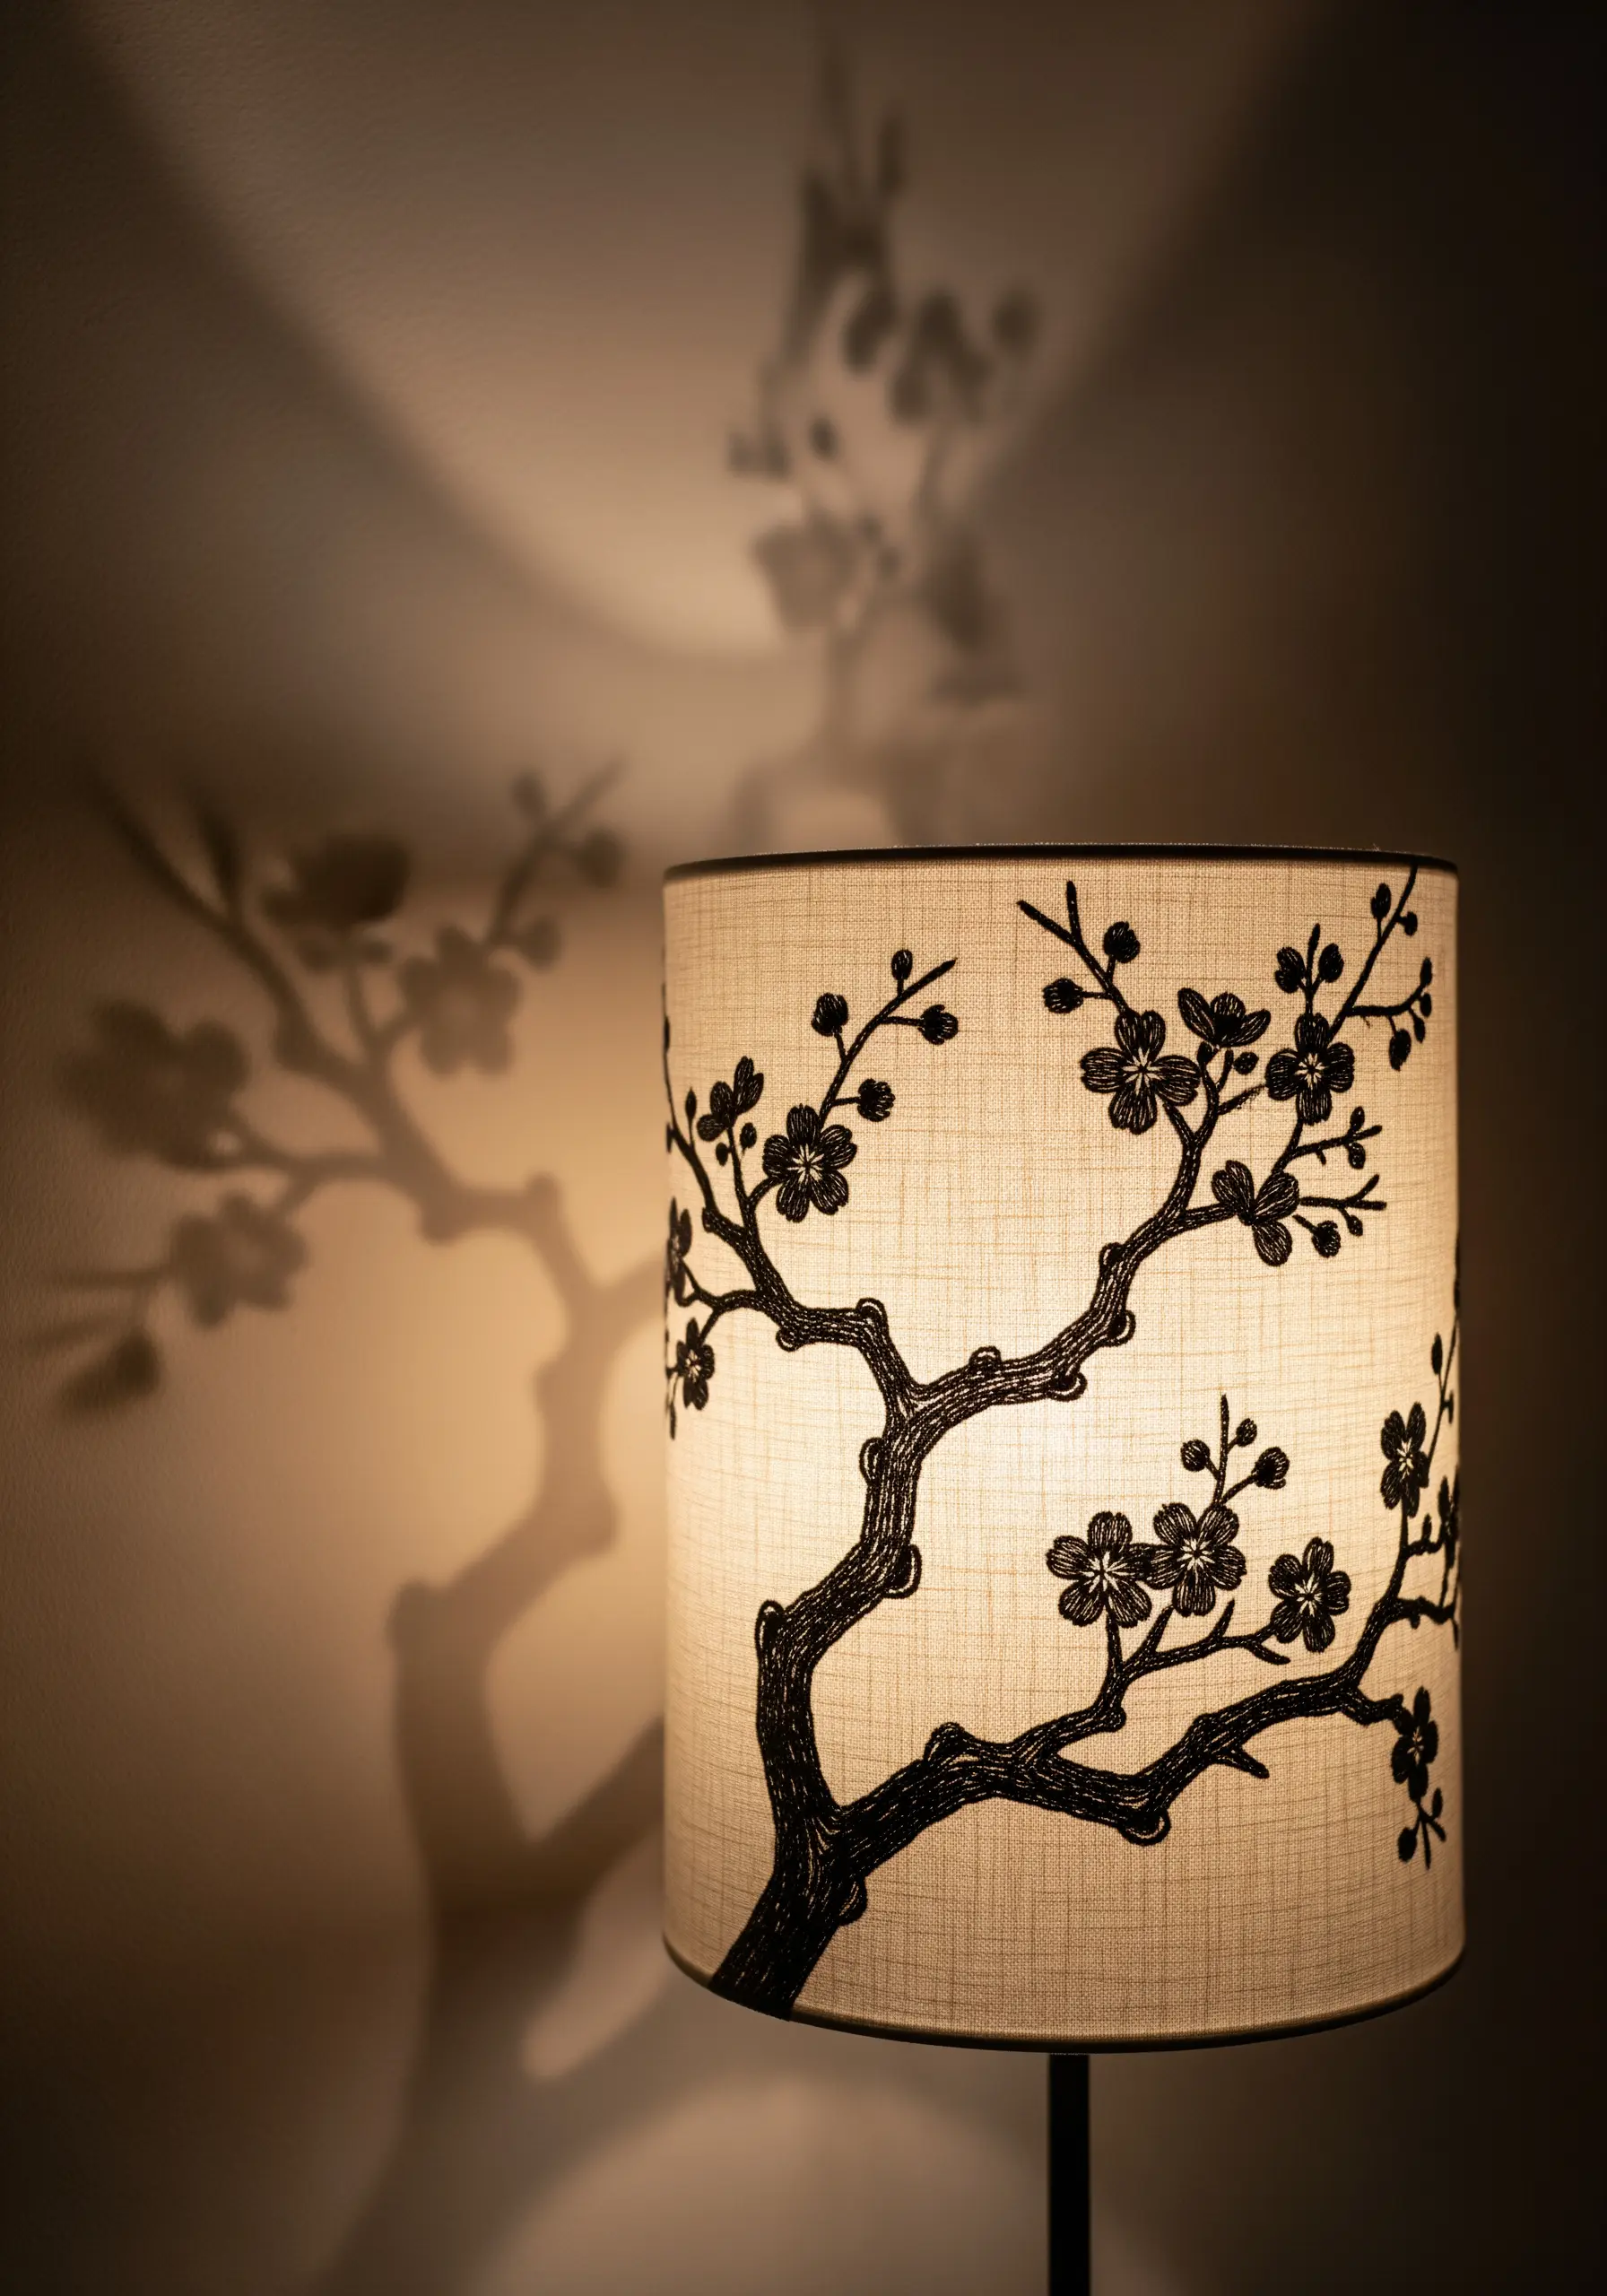
When embroidering an object that interacts with light, like a lampshade, your design has a dual life: how it looks when off, and the story it tells when on.
Stitch a bold silhouette using a dense, dark thread. A heavy chain stitch or tightly packed satin stitch will effectively block the light, casting a crisp and dramatic shadow onto the surrounding walls.
Always choose a heat-resistant fabric for the shade itself. This project is a beautiful reminder that embroidery isn’t just about the stitches; it’s about how those stitches can shape the atmosphere of a room.
11. Walkable Art: Customizing Canvas Sneakers
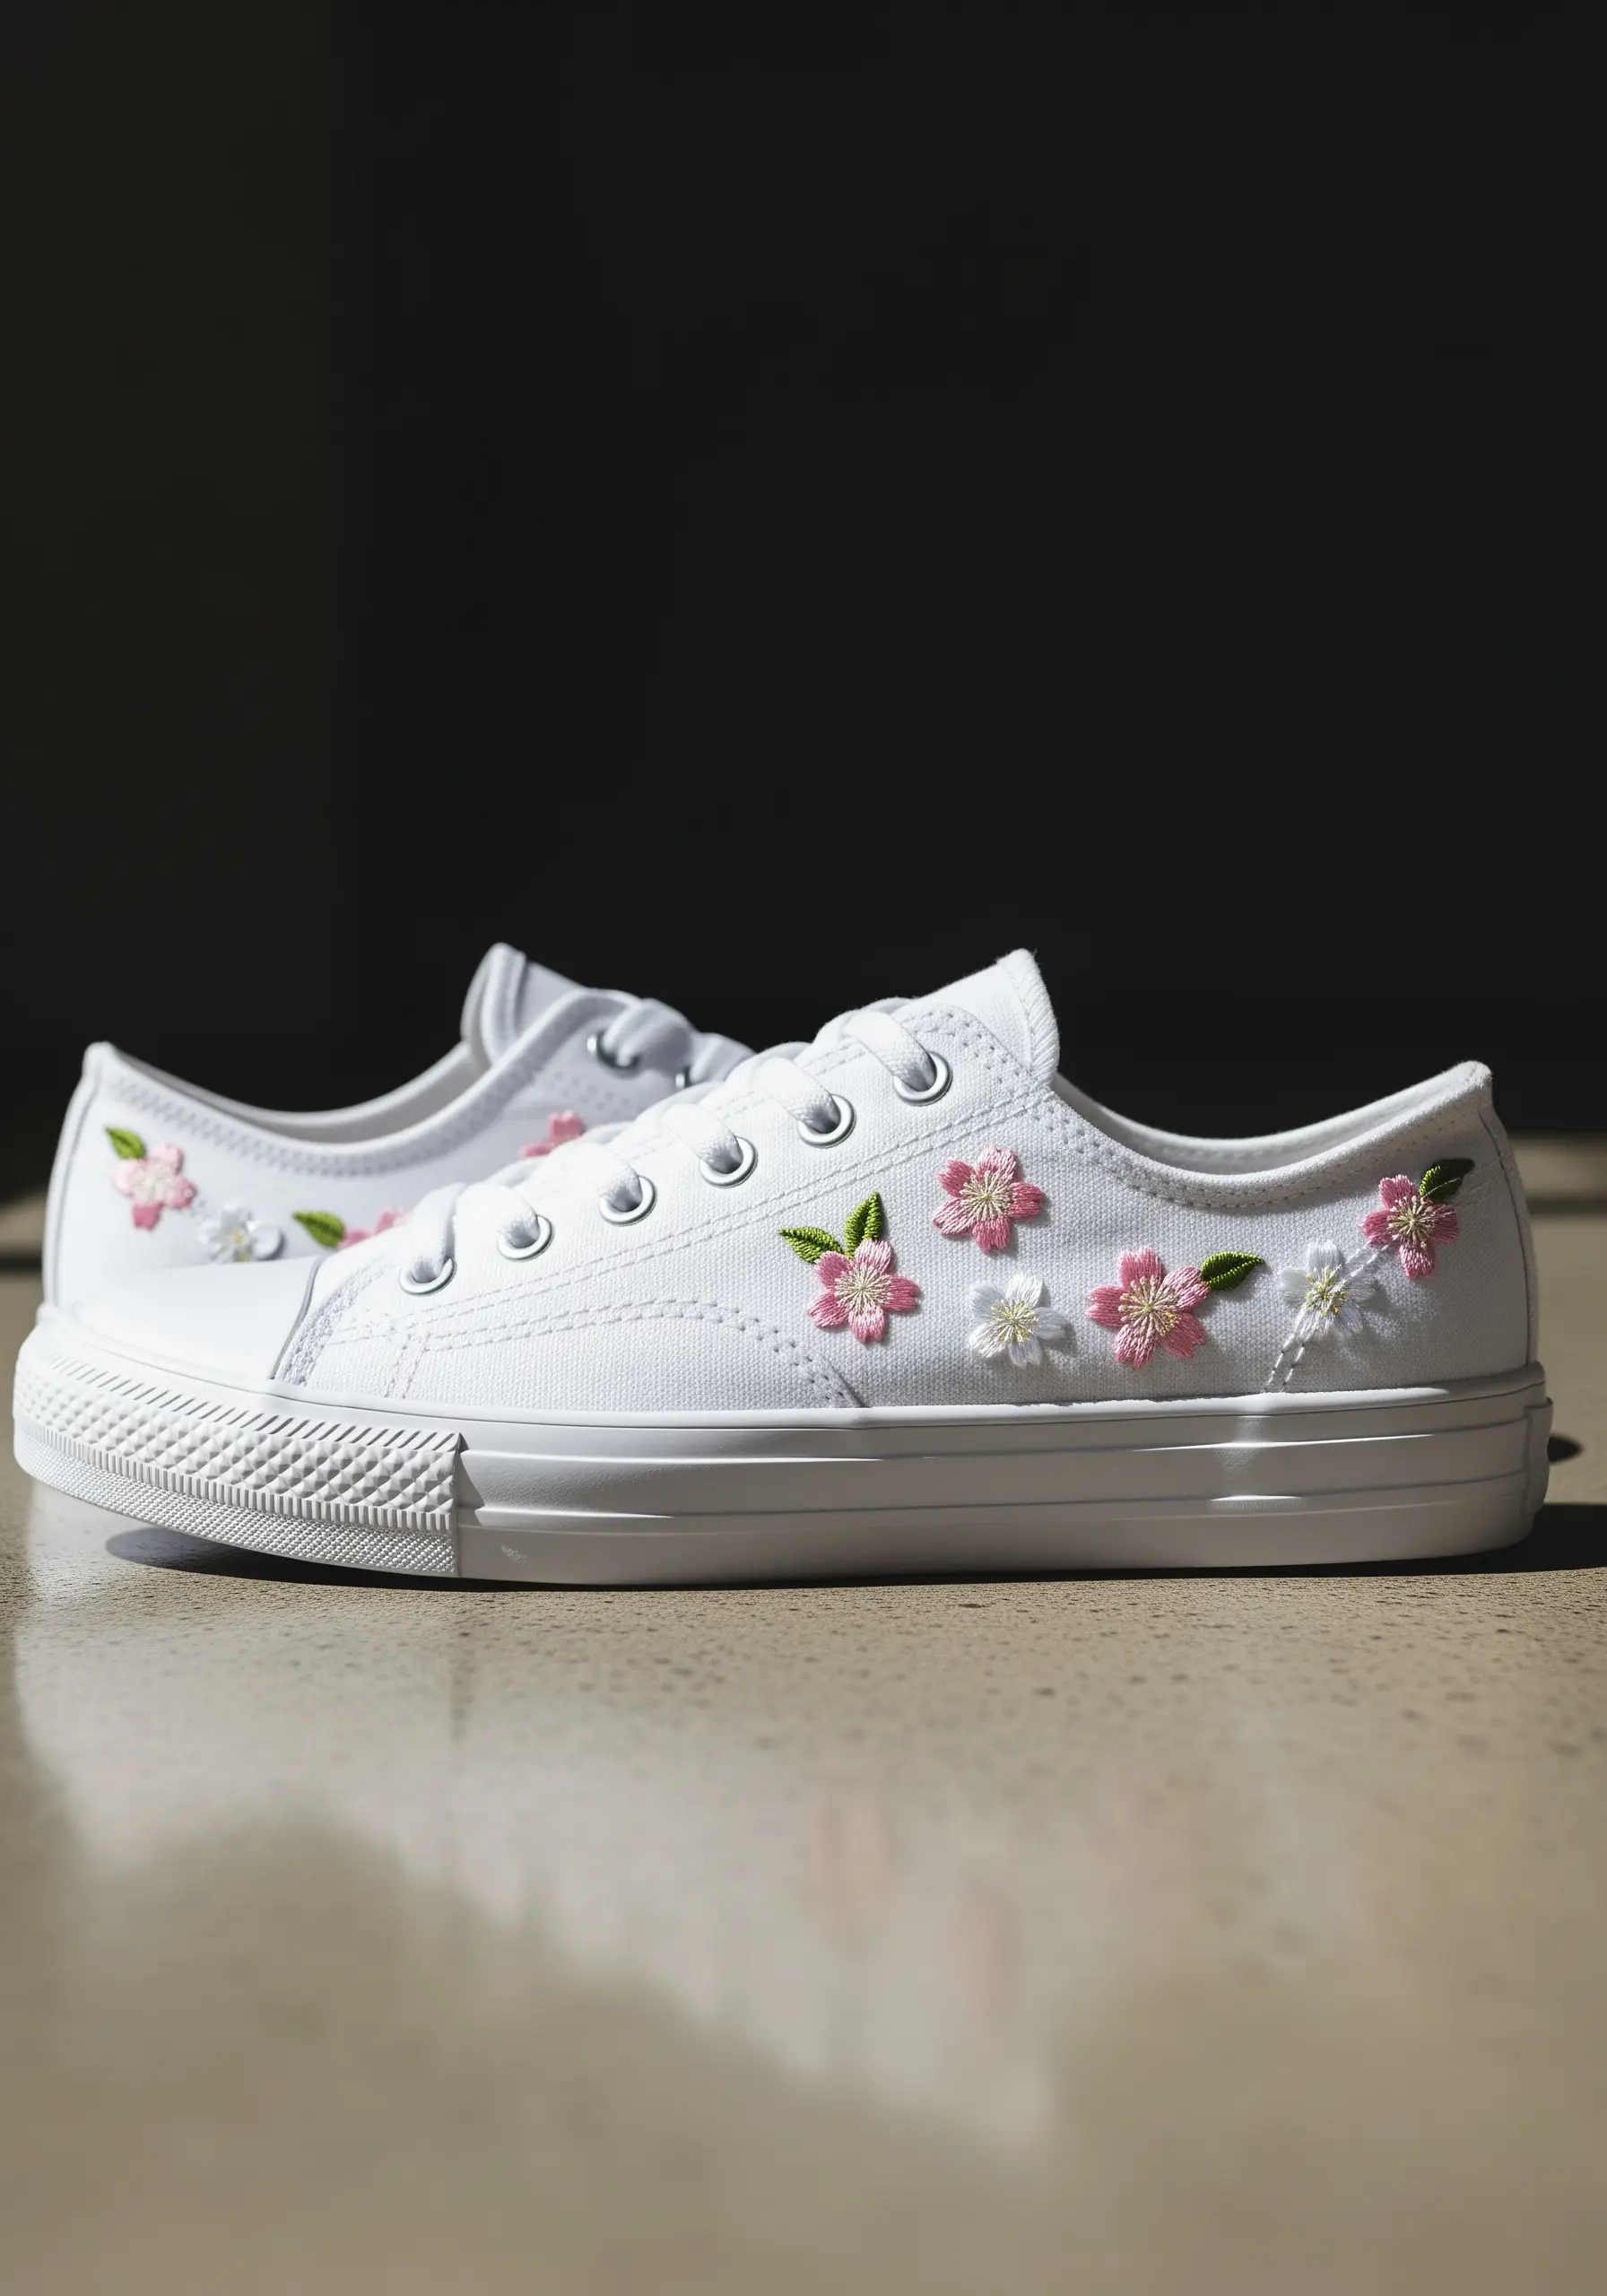
Embroidering on a sturdy, pre-made object like a canvas shoe requires different tools and a different mindset.
A strong needle, a good thimble, and pliers are your best friends here, helping you pull the needle through the tough material without strain.
The key to a stylish result is restraint. A few thoughtfully scattered blossoms along the side create a custom look that feels intentional and chic. Overcrowding the design can look messy.
Use high-quality, colorfast floss to ensure your wearable art can withstand daily adventures and the occasional cleaning.
12. The Storyteller’s Branch: Embellishing a Journal
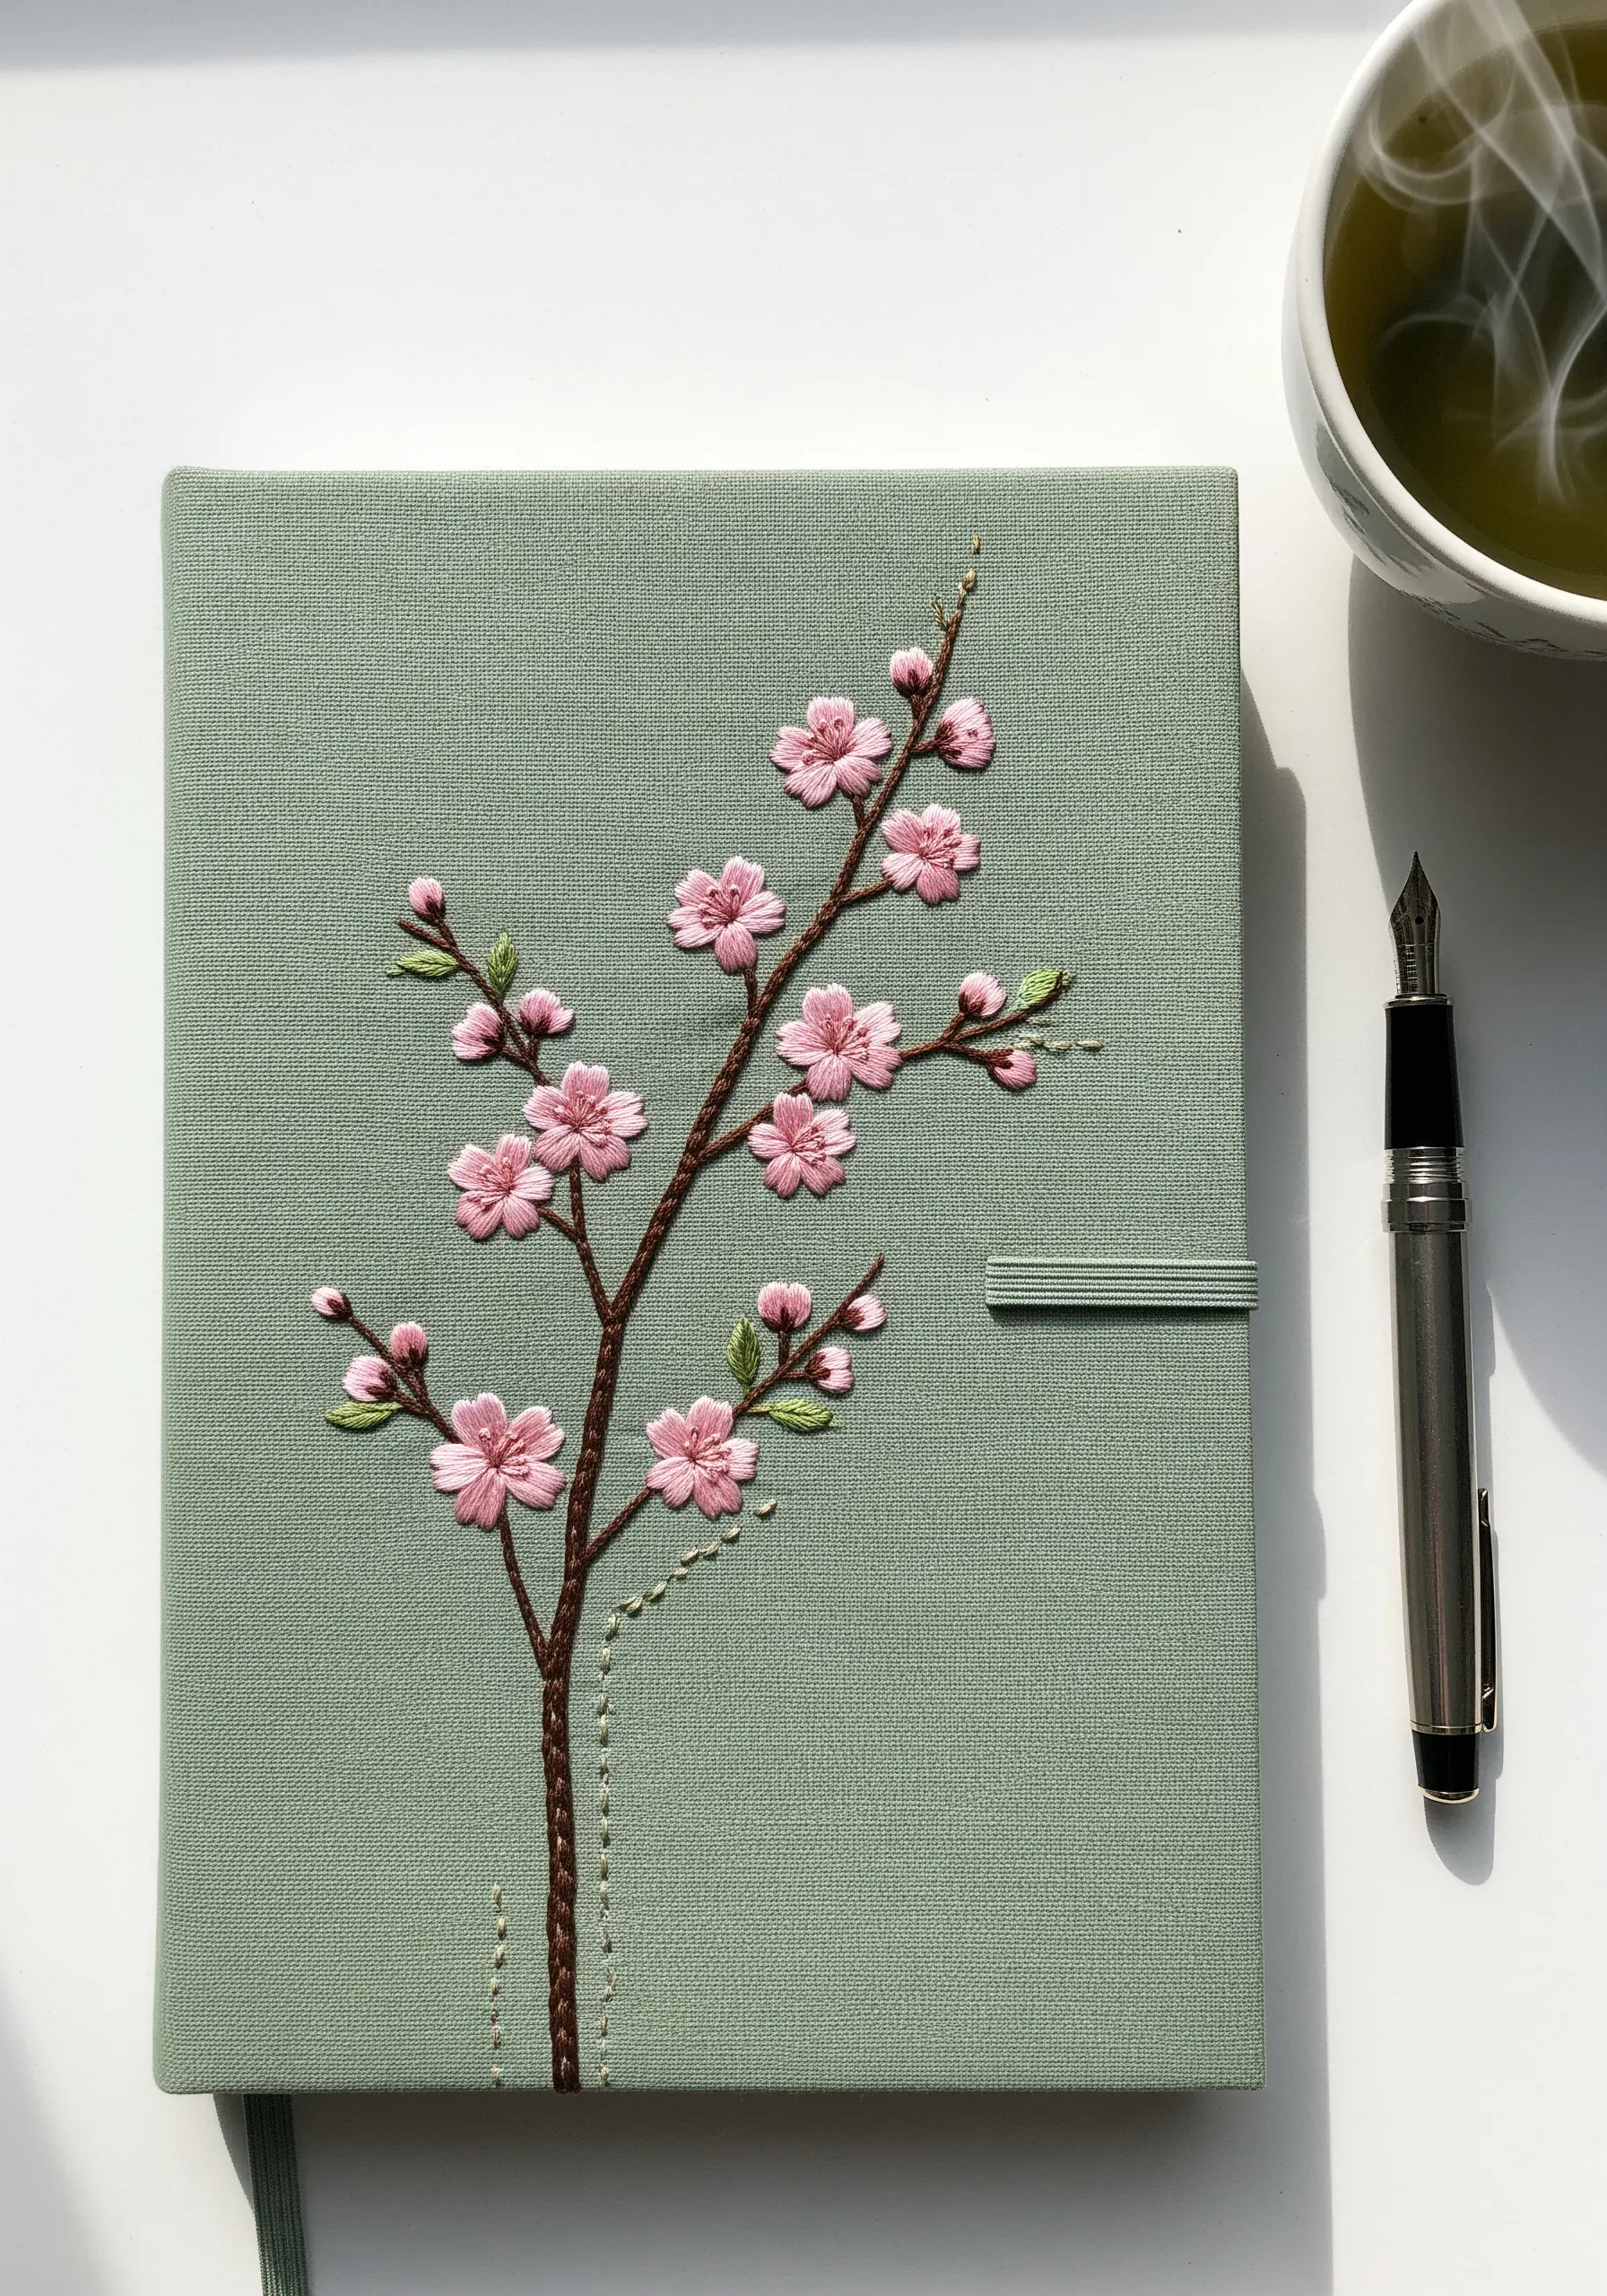
Transform a simple journal into a personal artifact with a single, well-considered motif.
A graceful branch stitched with a combination of stem stitch for the lines and satin stitch for the petals provides a beautiful focal point. The choice of a sage green cover creates a soft, natural backdrop that allows the pinks and browns to harmonize beautifully.
Consider adding a small, meaningful detail, like the trailing running stitches at the base, to suggest roots or a story yet to be written. These are the details that elevate simple quick stitch inspirations into cherished objects.
13. Functional Flora: The Embroidered Curtain Tie-Back
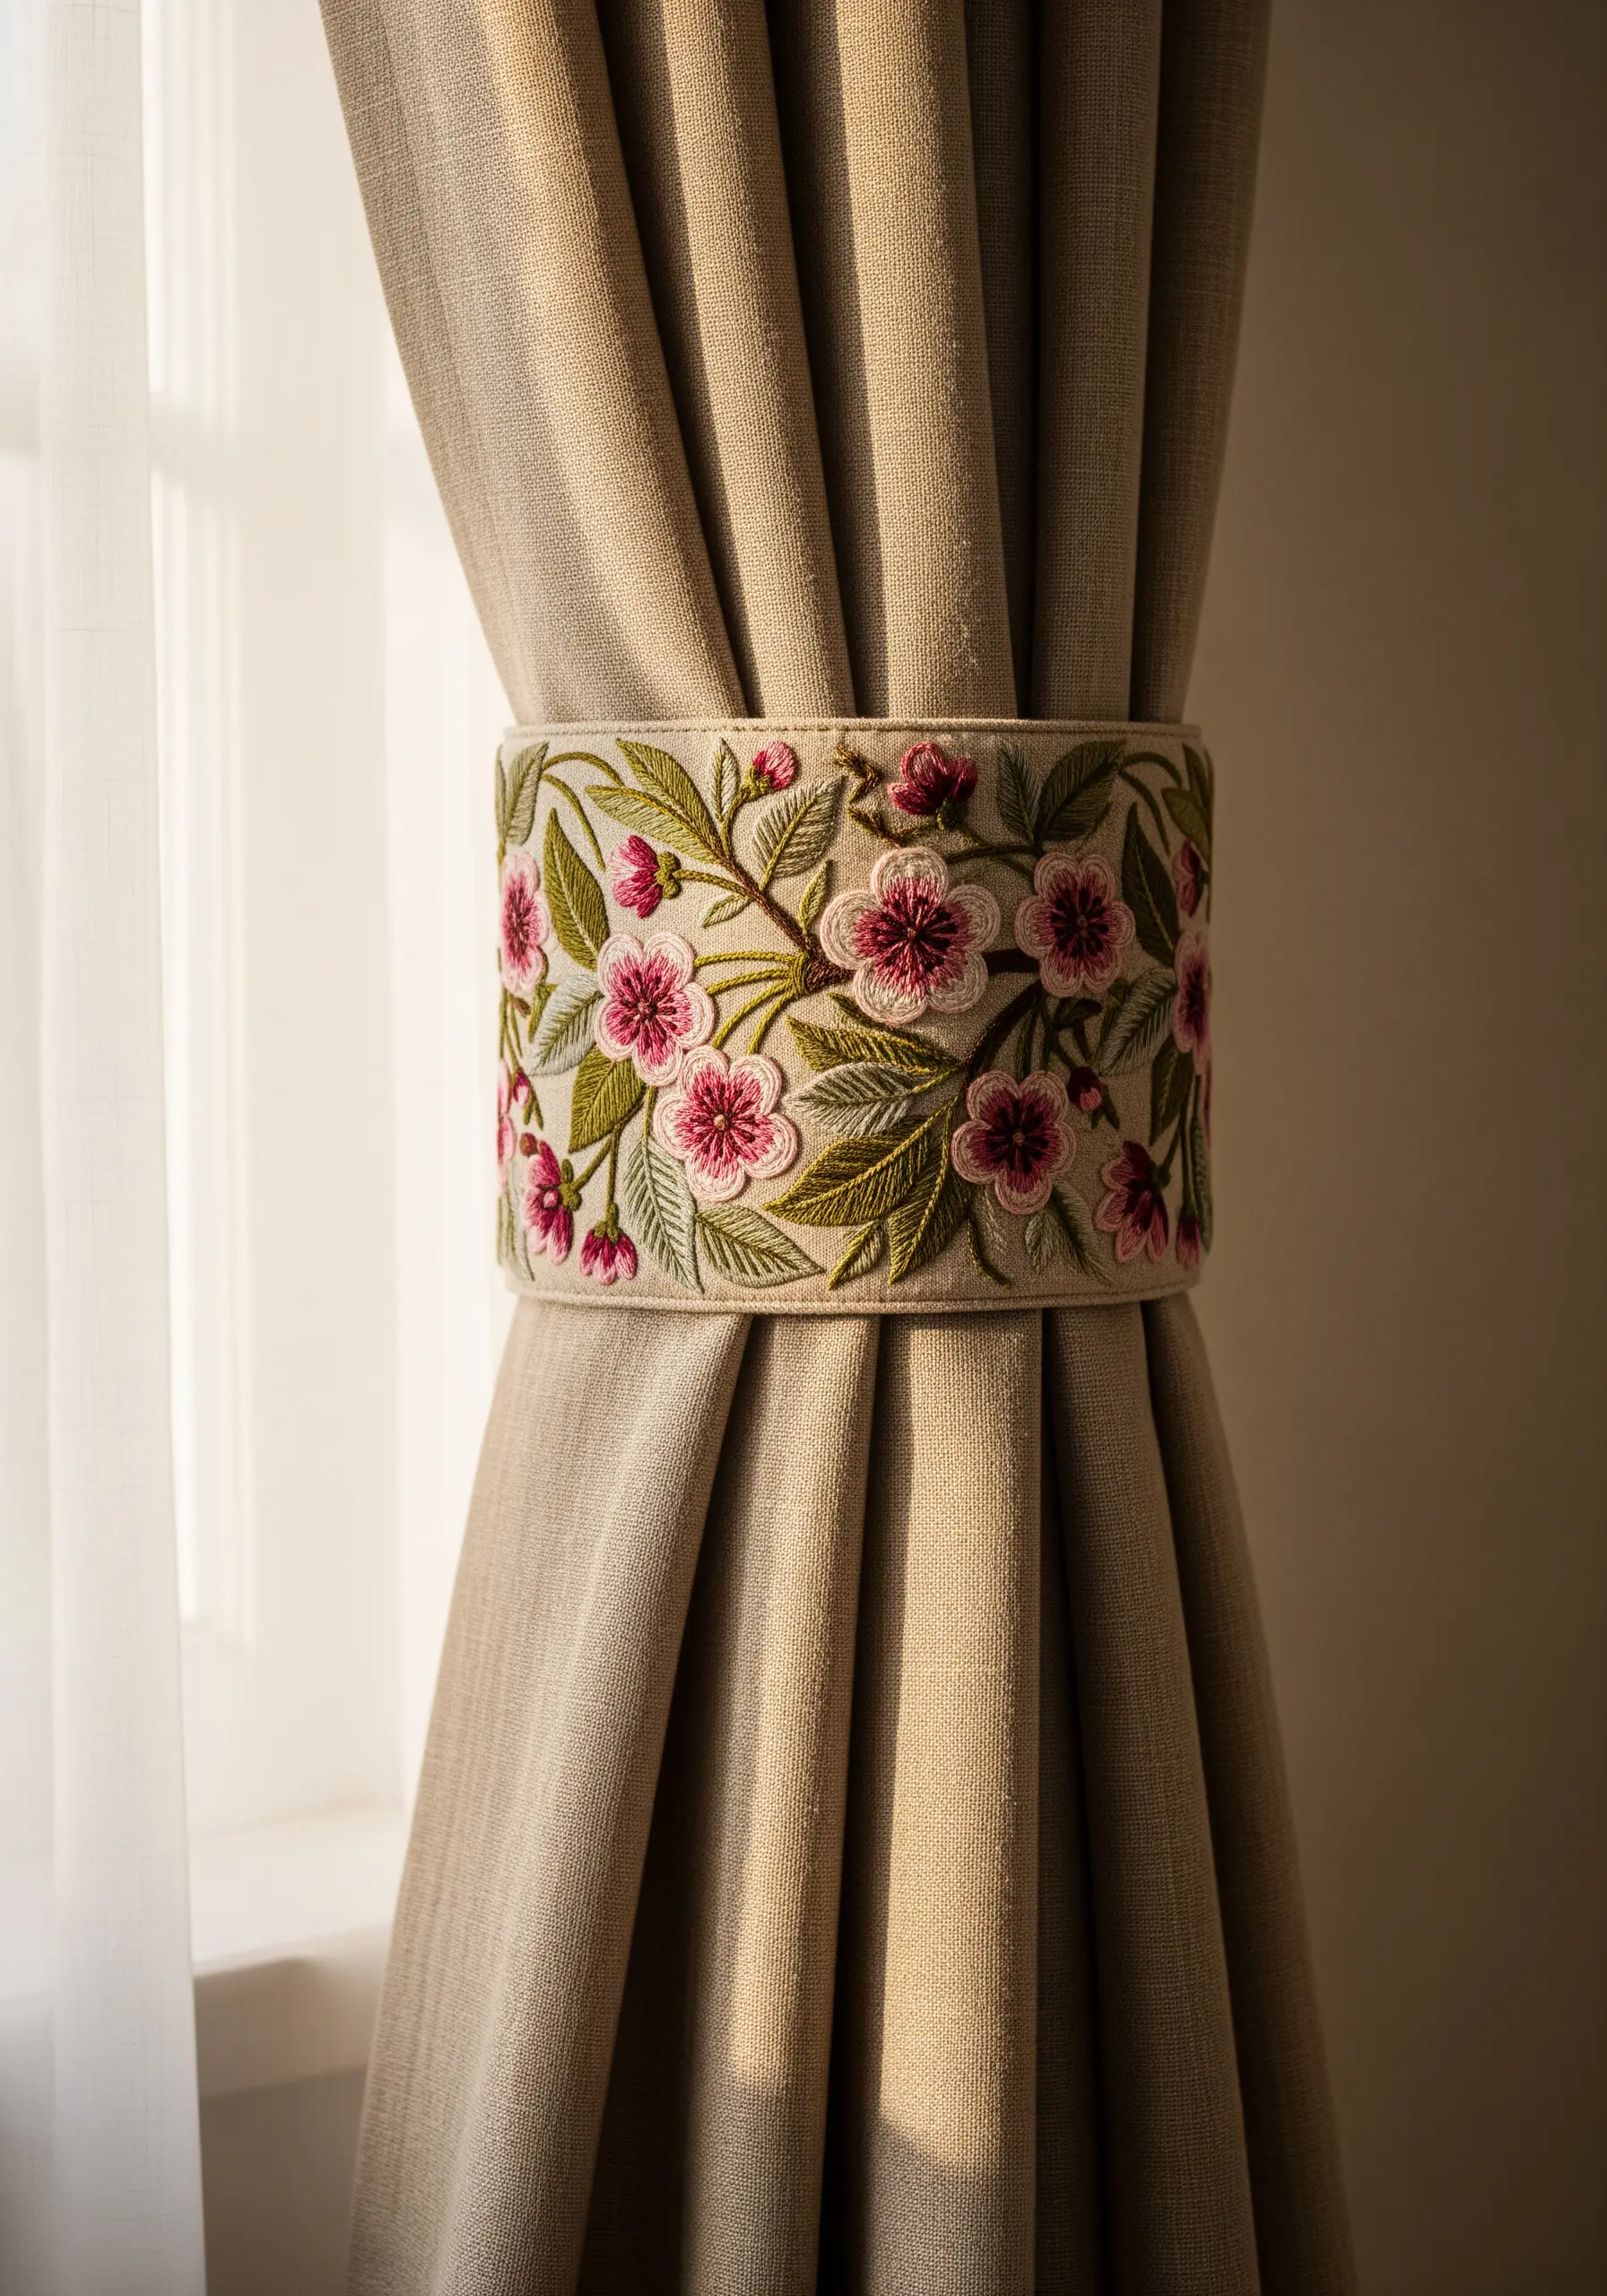
For embroidery on functional items, durability is as important as beauty. Your stitch choices must reflect this.
Use dense, resilient stitches like the long-and-short stitch or a padded satin stitch to ensure the design can withstand daily handling. Reinforce all edges with a split stitch; this creates a sharp, durable outline that prevents fraying and wear.
Choosing a robust base fabric like a heavy linen or cotton canvas provides the necessary structure and longevity. This project is a testament to the fact that the most beautiful objects in our homes can also be the most useful.
14. A Set of Variations: Cohesive Coaster Designs
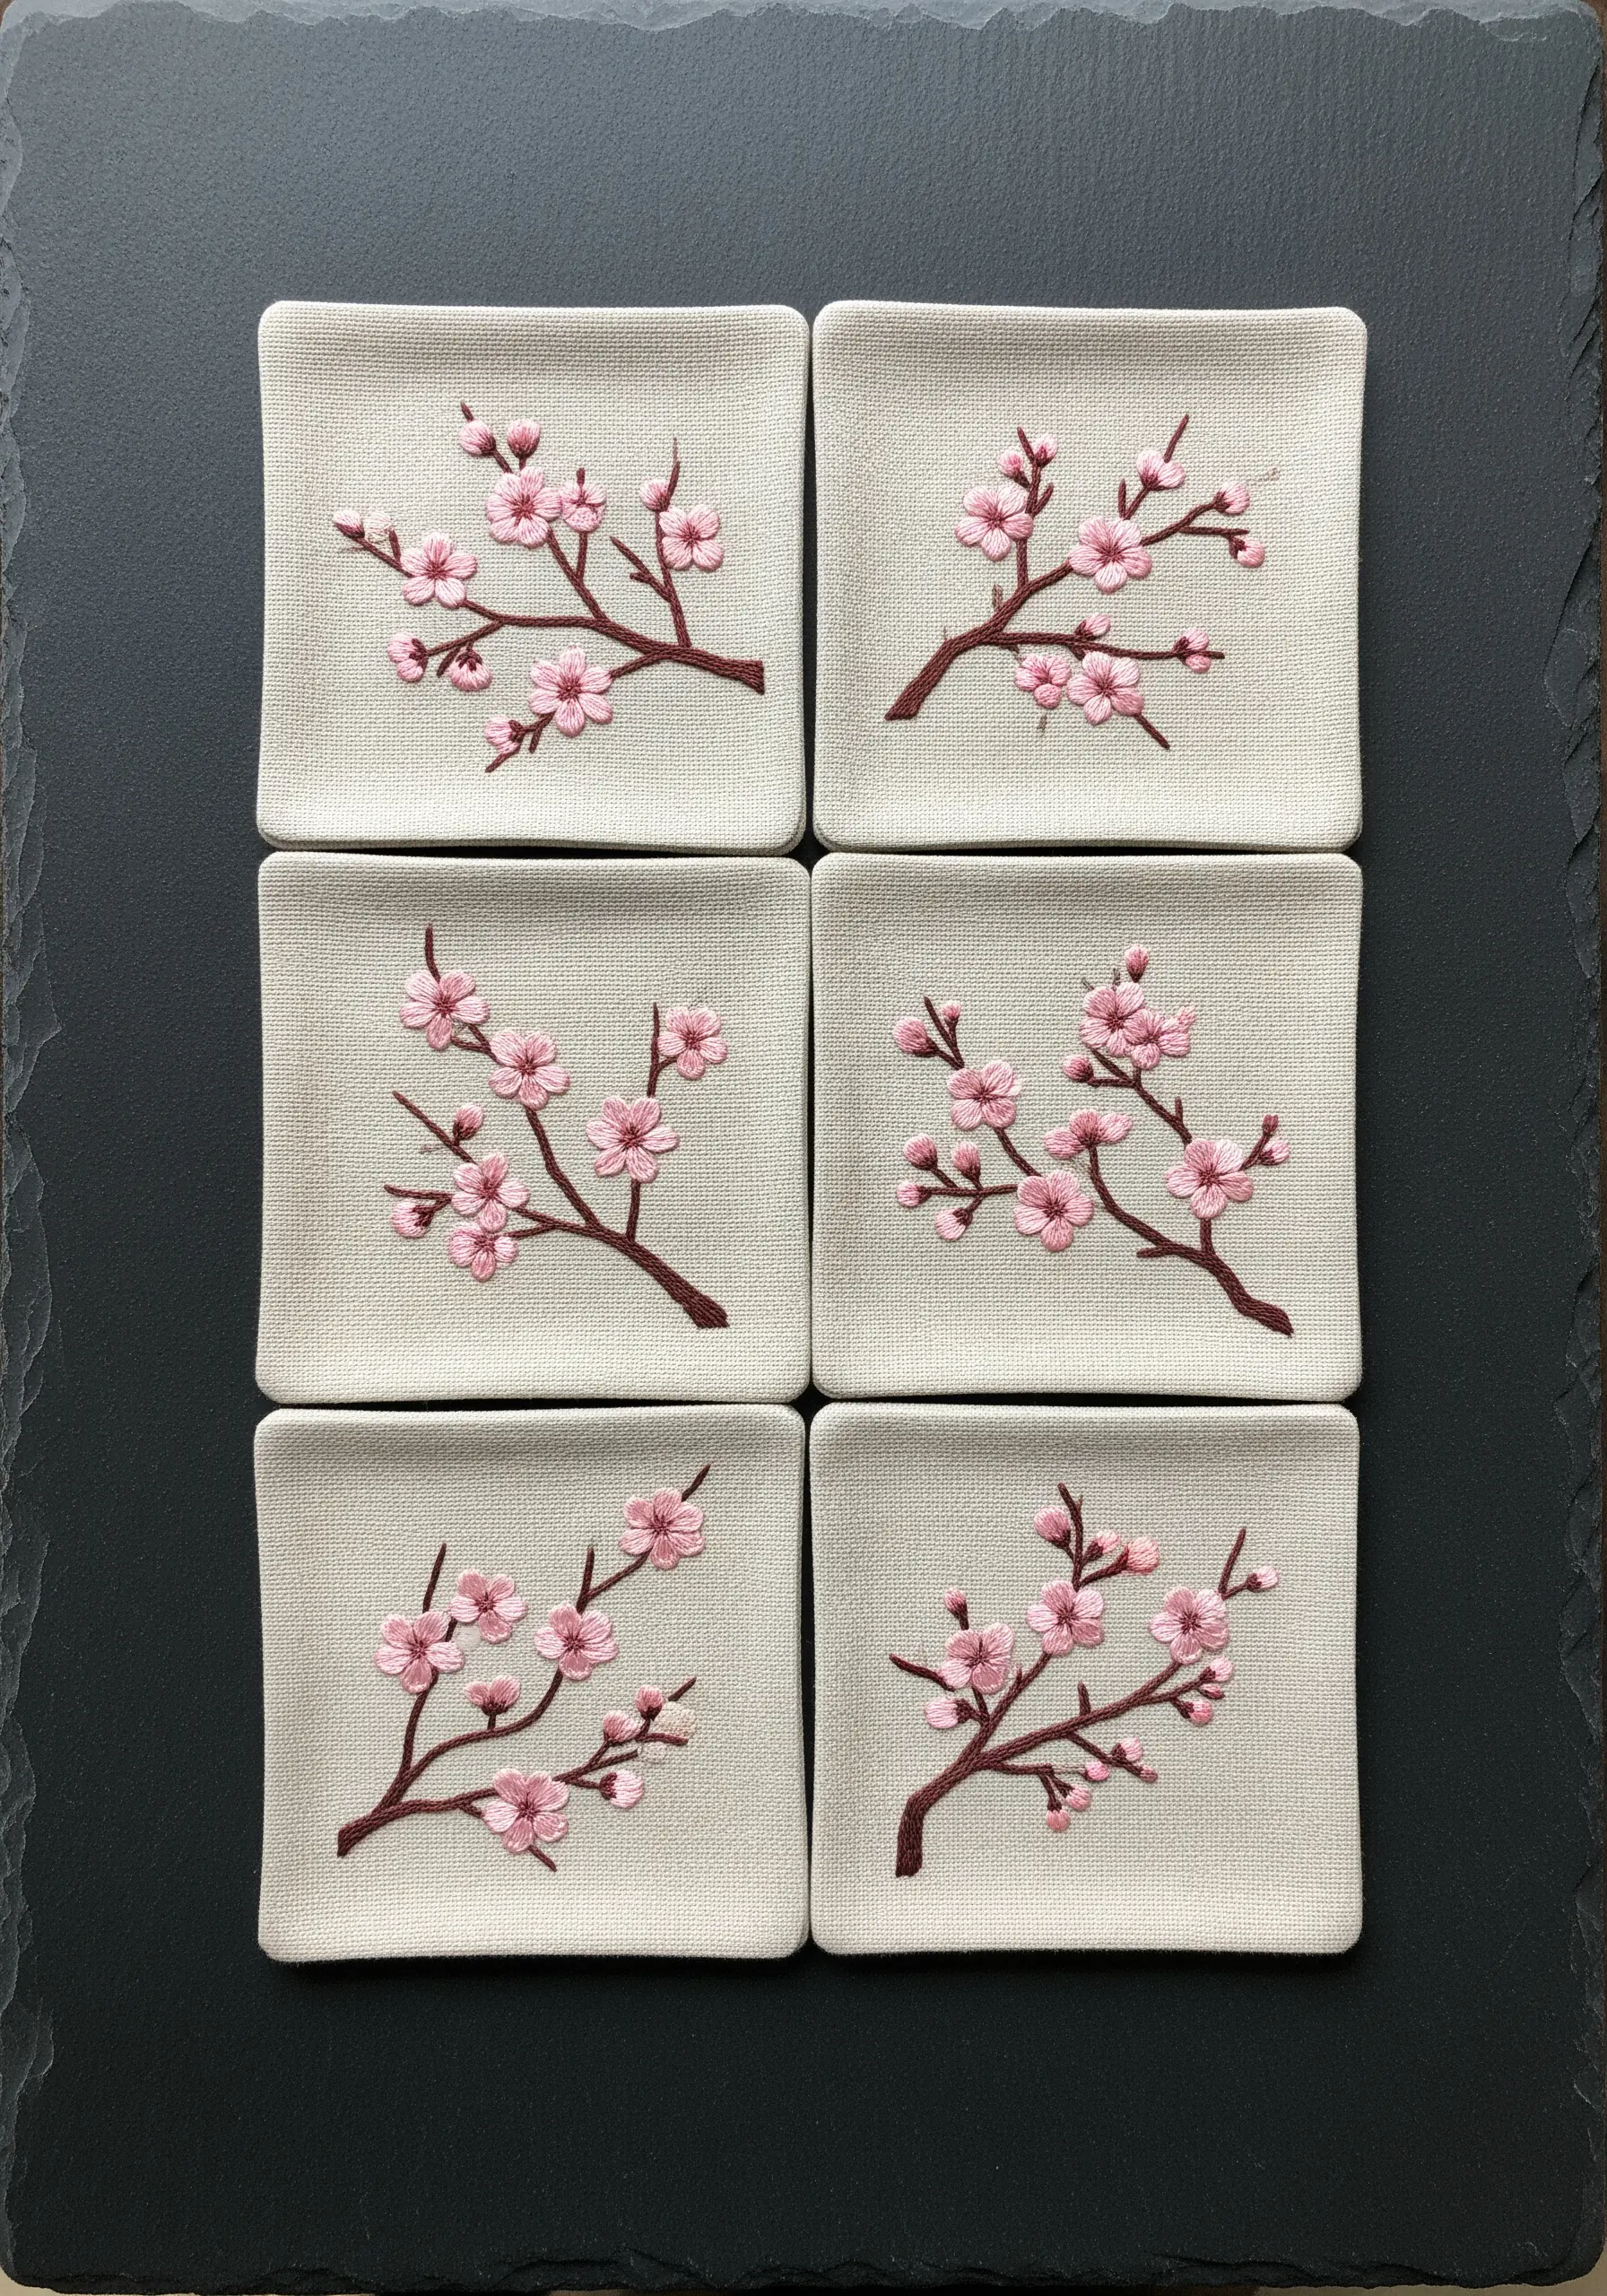
When creating a matching set, the goal is harmony, not identical repetition. Design variations on a central theme to make the collection feel artisanal and unique.
Use the same color palette and branch style across all coasters, but alter the composition on each one. Vary the number of blossoms, the curve of the branch, and the placement of the buds.
For a professional finish, back each coaster with a fusible interfacing before sewing. This adds stiffness and ensures they lay flat, protecting both your surfaces and your stitch work.
15. Symmetrical Sprigs: Framing the Décolletage
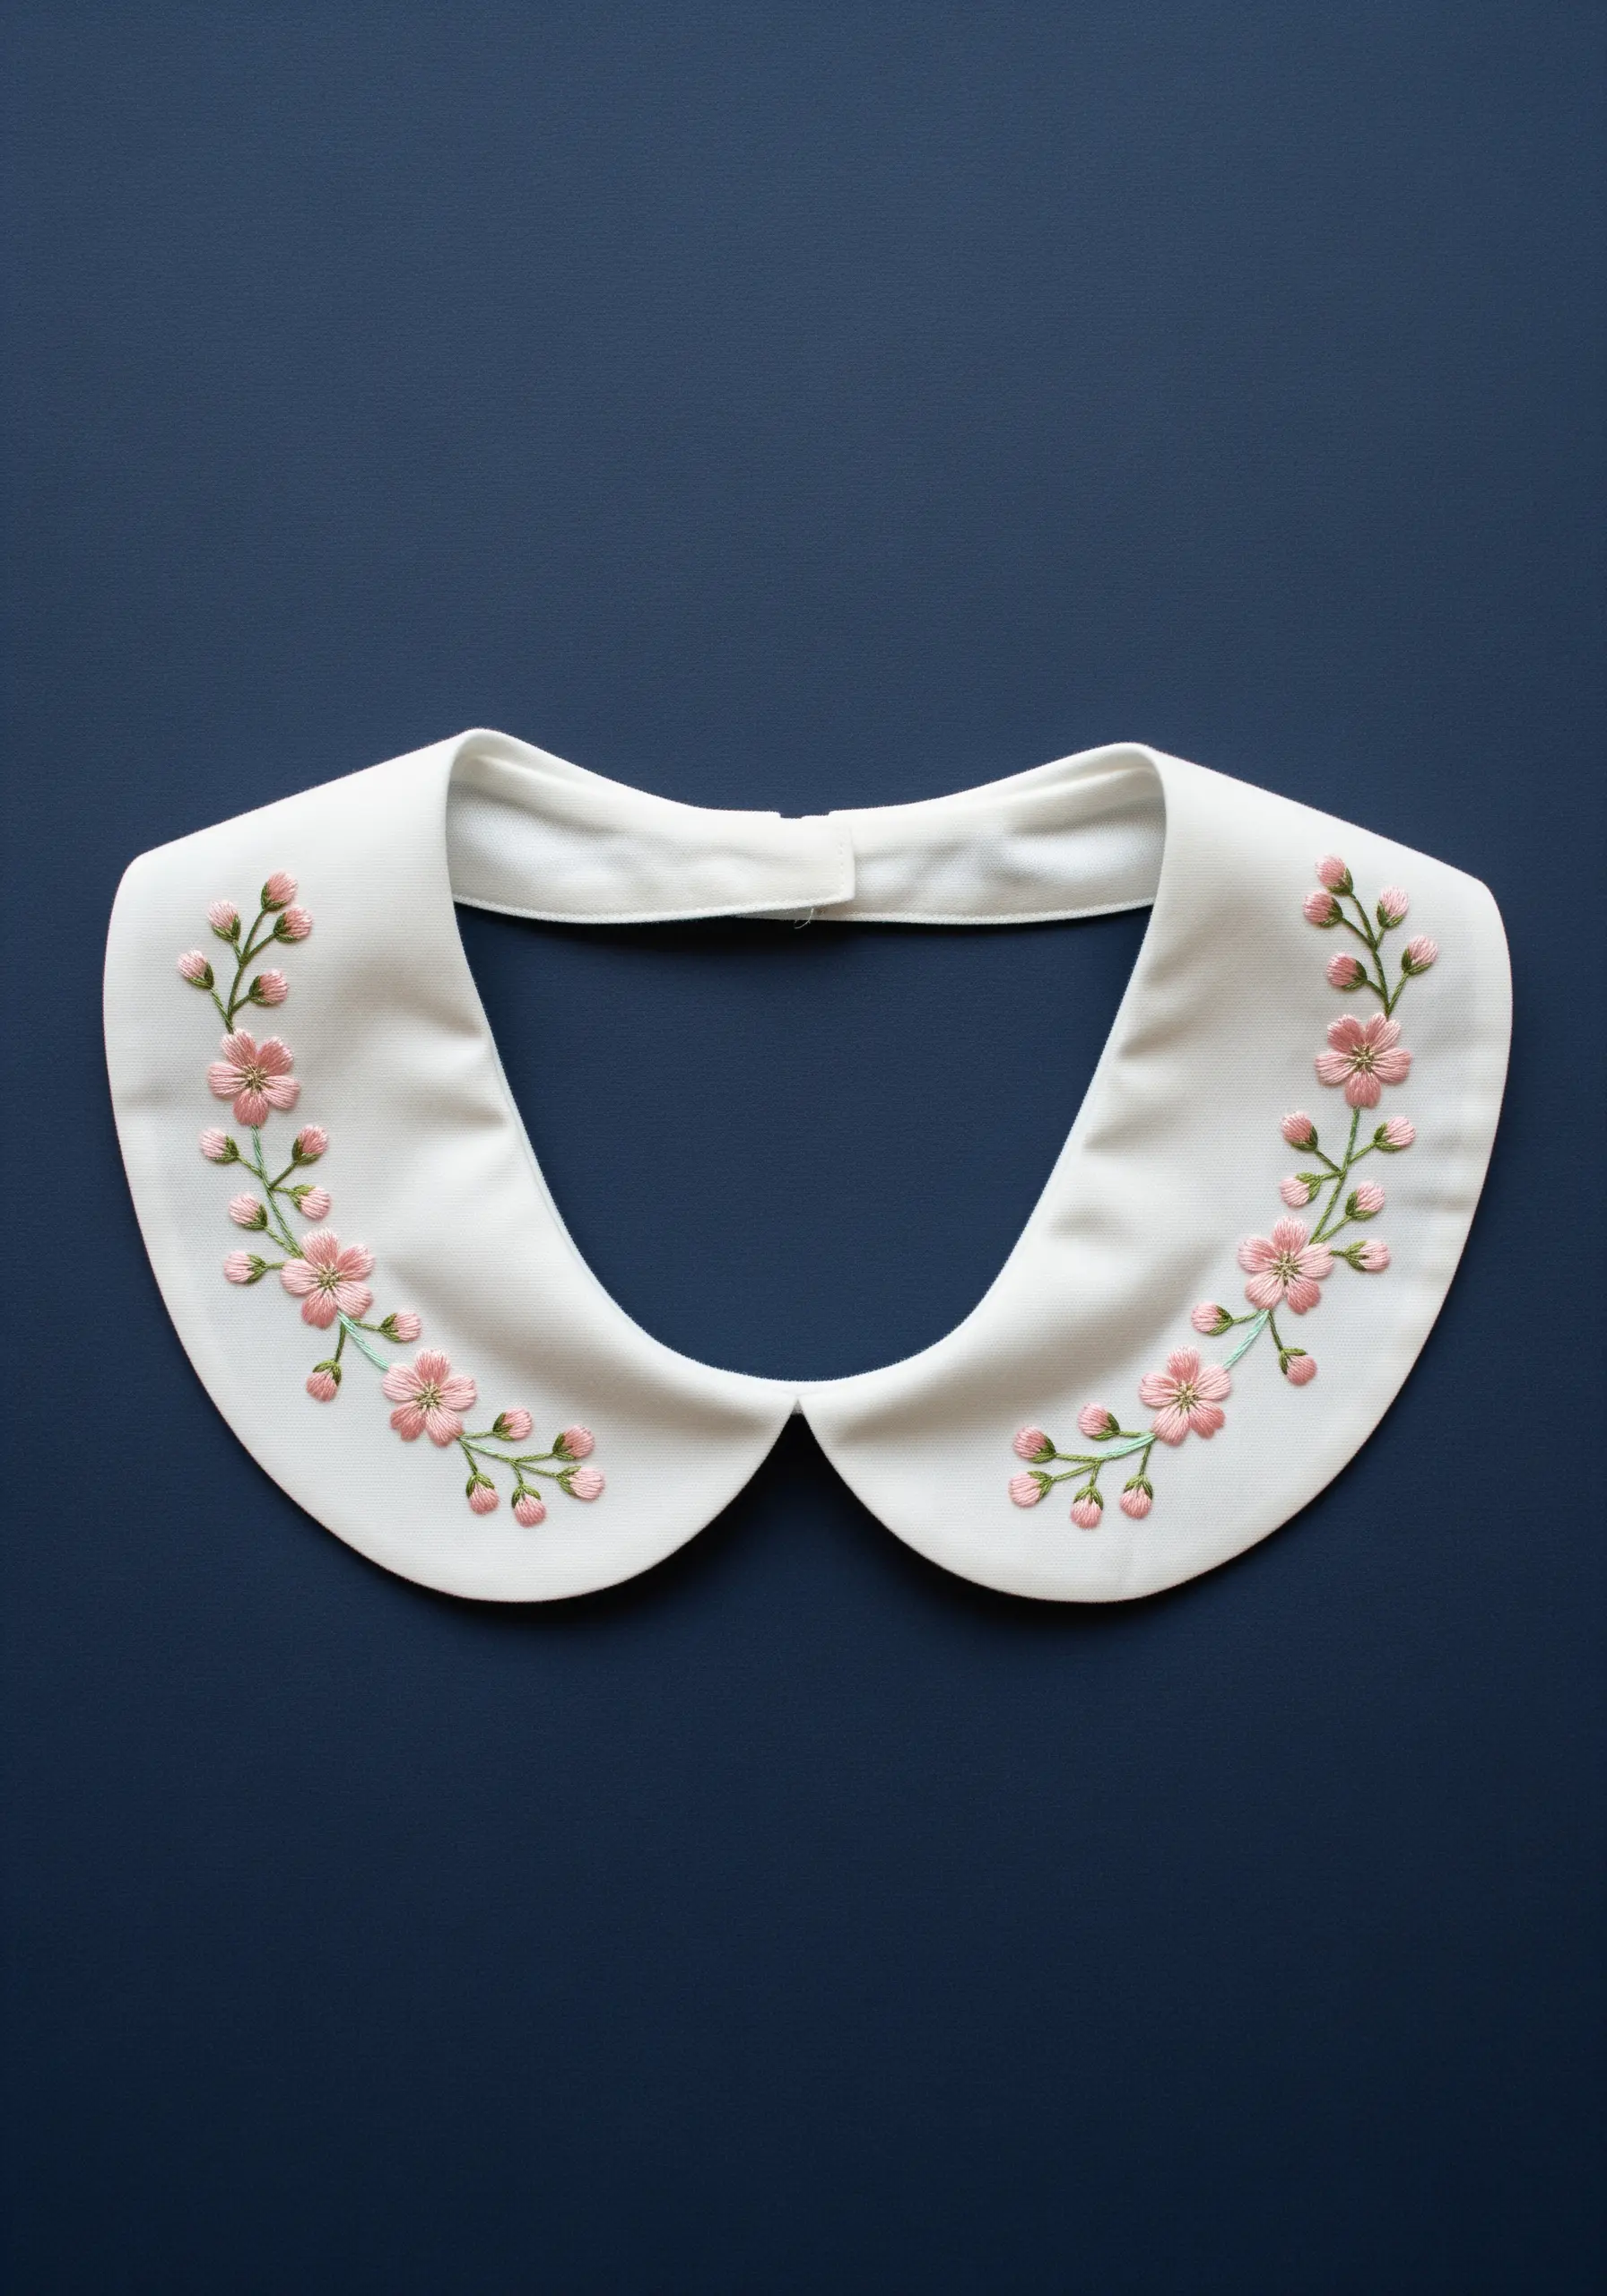
On a formal accessory like a detachable collar, symmetry provides balance and a high-end, polished finish.
To achieve a perfect mirror image, use a reliable transfer method. A light box and a heat-erasable pen allow for precise tracing, or you can use a water-soluble transfer paper printed with your design.
Keep your stitches delicate and refined to match the nature of the accessory. A simple satin stitch for the petals and a fine stem stitch for the branches and stems are all you need for an elegant result.
16. The Refined Corner: Understated Linen Embellishment
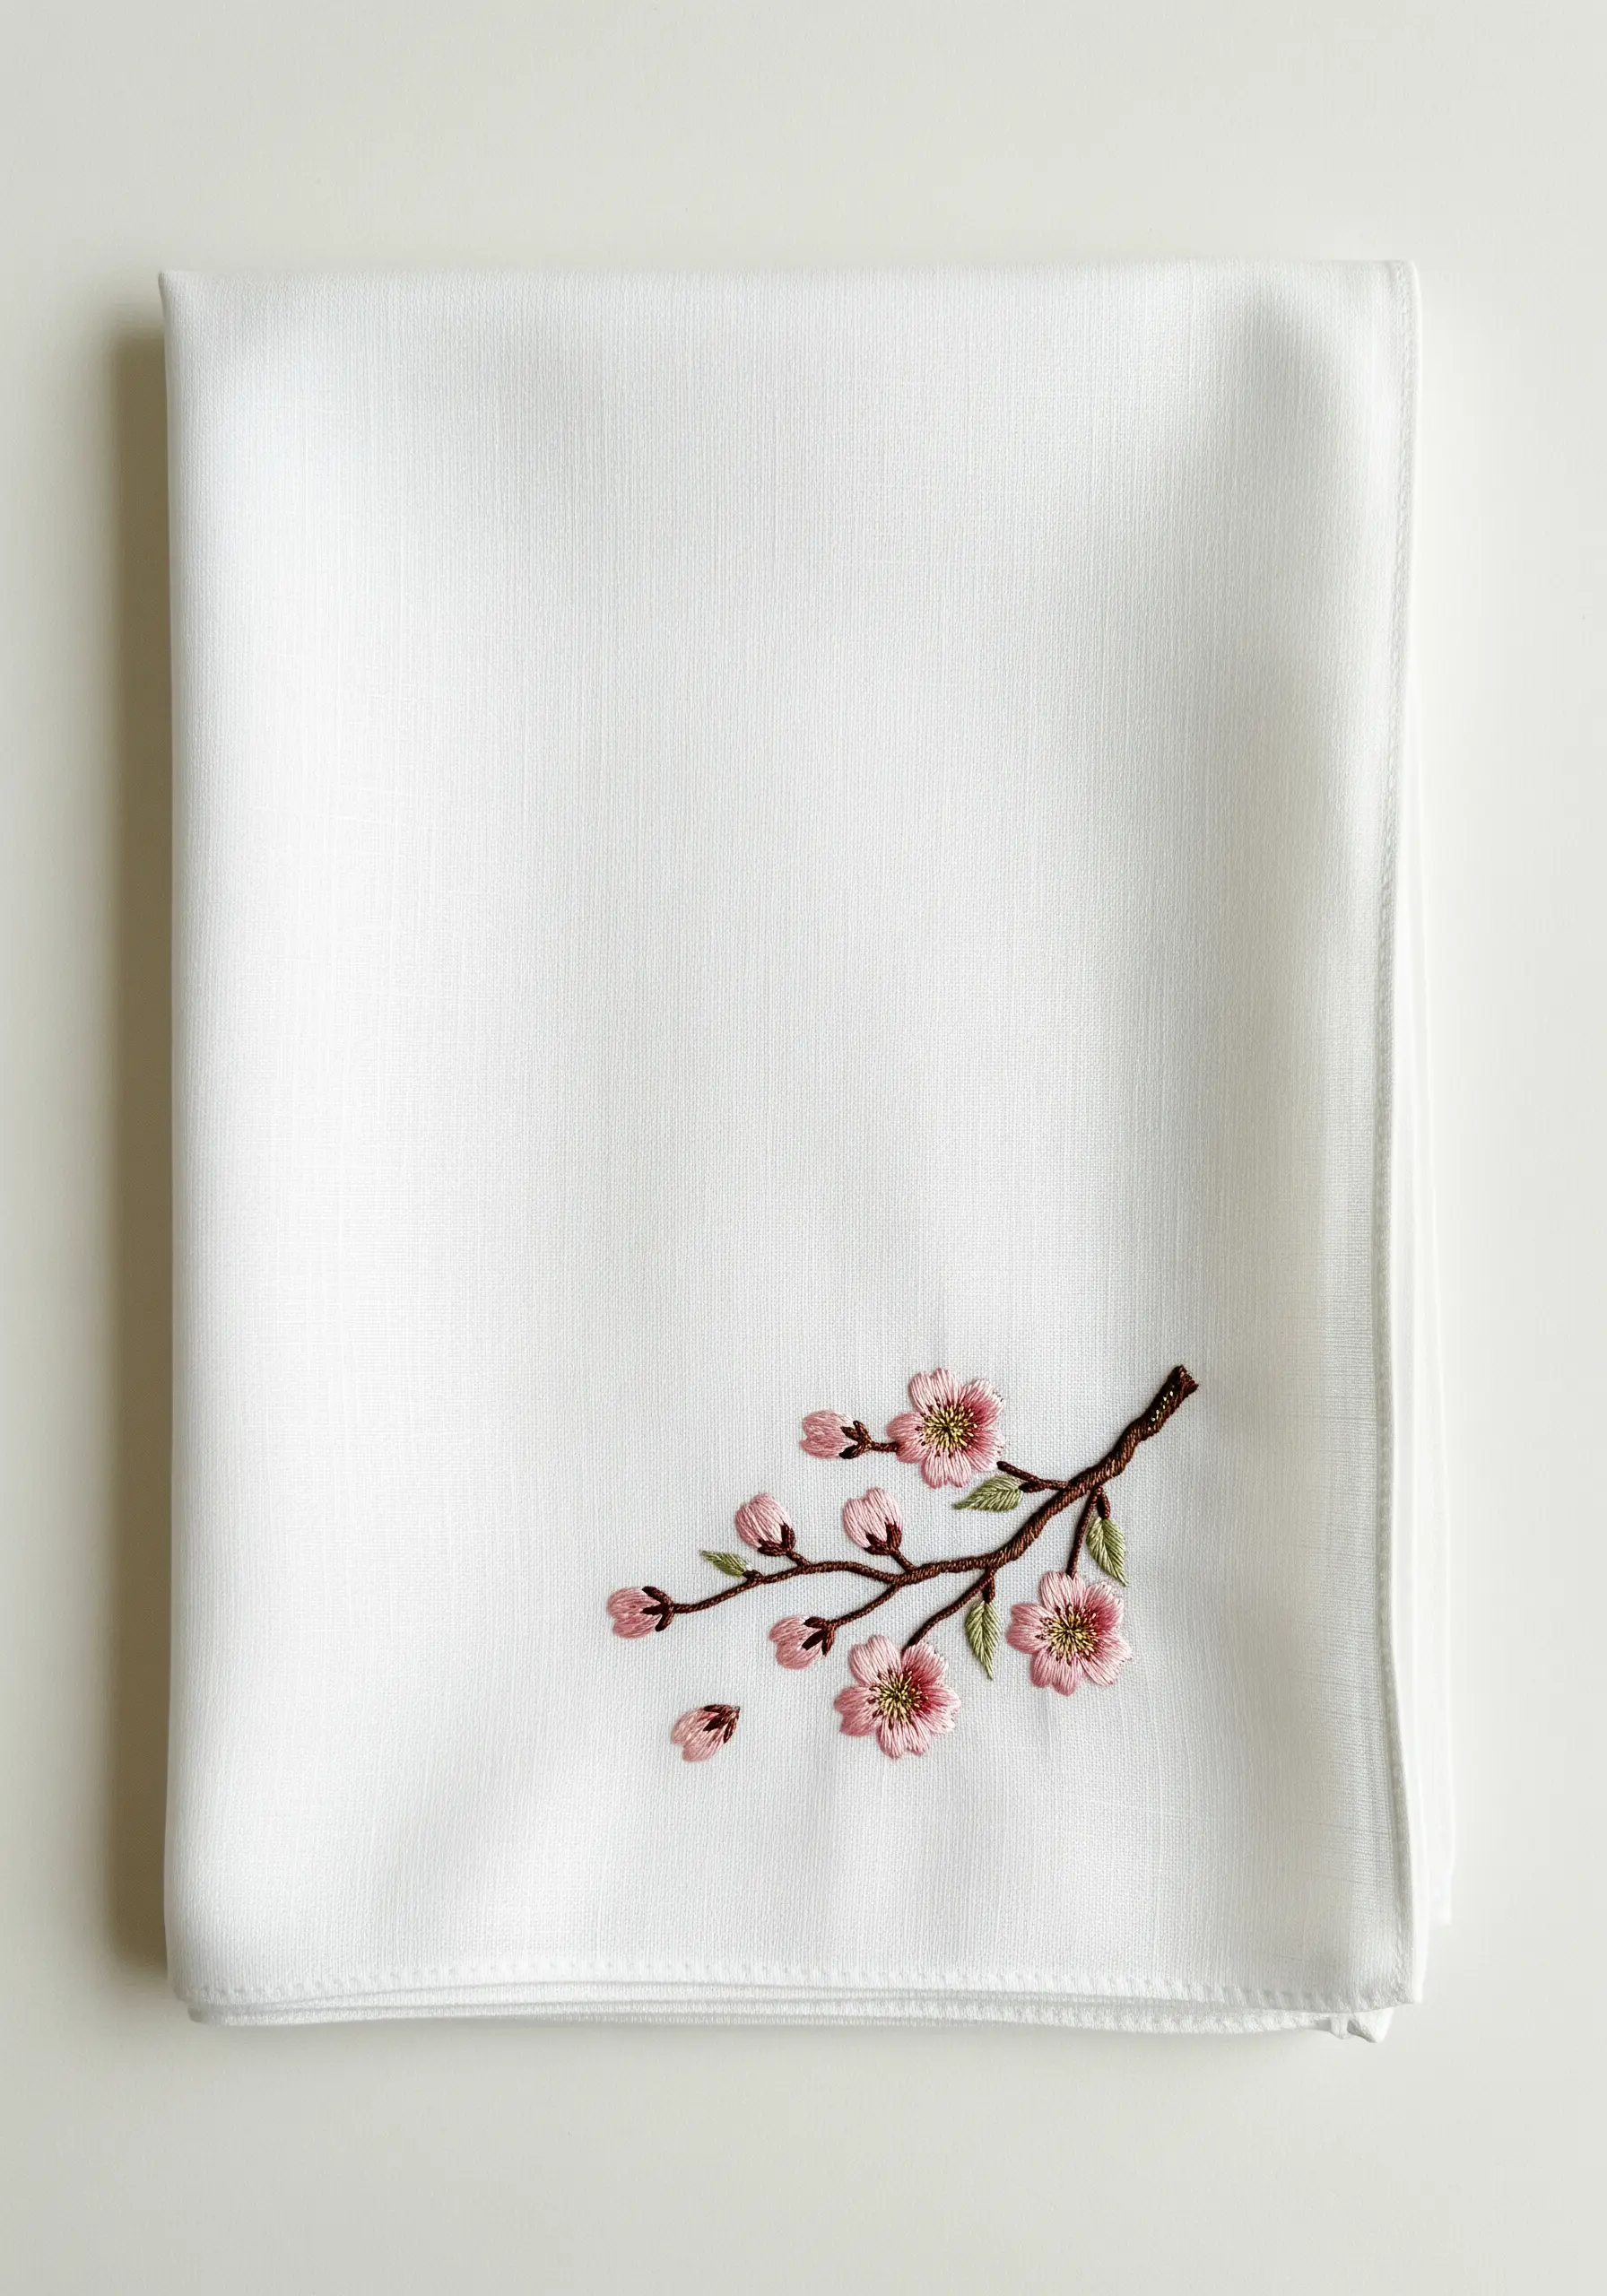
The height of sophistication is often found in the smallest details. A single, exquisitely stitched motif in the corner of a linen napkin adds a touch of personal luxury.
Scale and precision are everything. Use only two strands of floss to keep the stitches fine and avoid overpowering the delicate weave of the linen.
Create subtle textural contrast by combining smooth satin-stitched petals with tiny French knot buds. This small variation adds depth and interest, inviting a closer look. These are the embroidery table linen combinations that elevate a simple meal into a special occasion.
17. Moonlit Tapestry: Combining Embroidery and Quilting
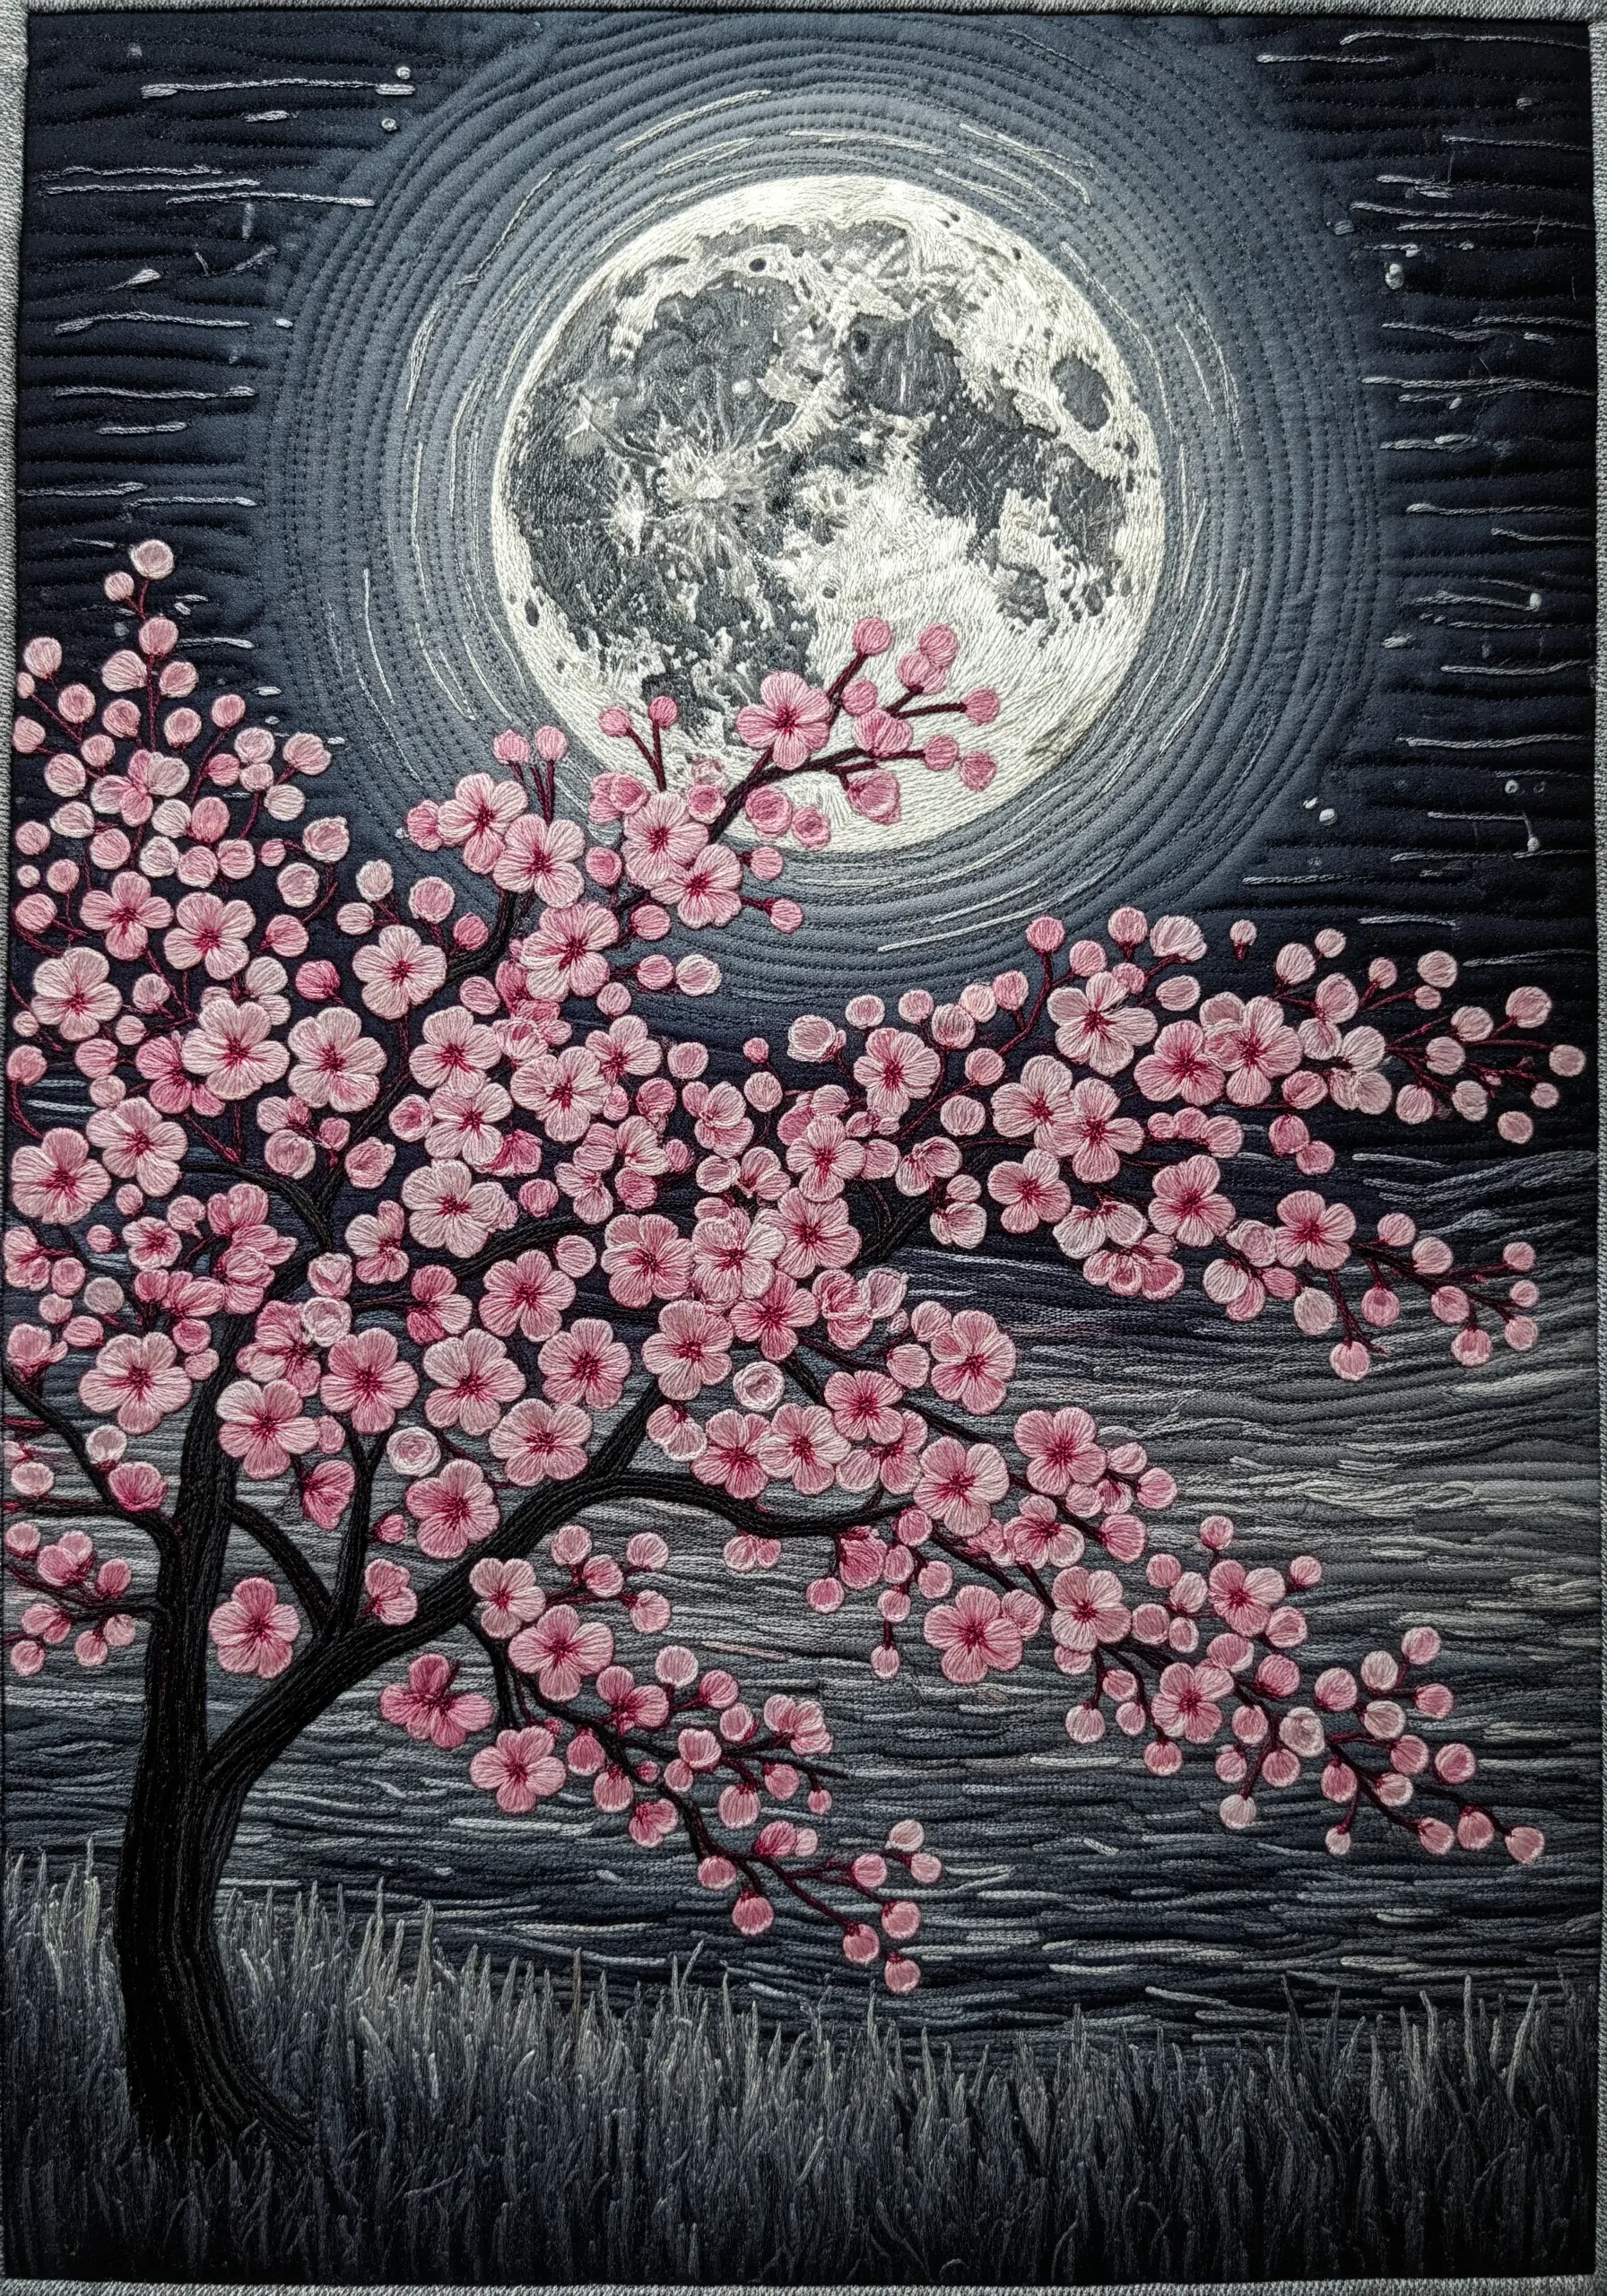
Push the boundaries of your craft by combining embroidery with other textile techniques to create unparalleled depth and texture.
Here, a background of free-motion quilting creates the movement of the night sky and the texture of the grass, establishing the scene before a single embroidery stitch is made.
The moon itself is a masterclass in thread painting, using directional stitches in various shades of grey, white, and silver to sculpt craters and capture reflected light.
The embroidered cherry blossoms are the final, vibrant layer, popping against the moody, textural background with startling clarity.
18. The Continuous Vine: Designing for a Headband
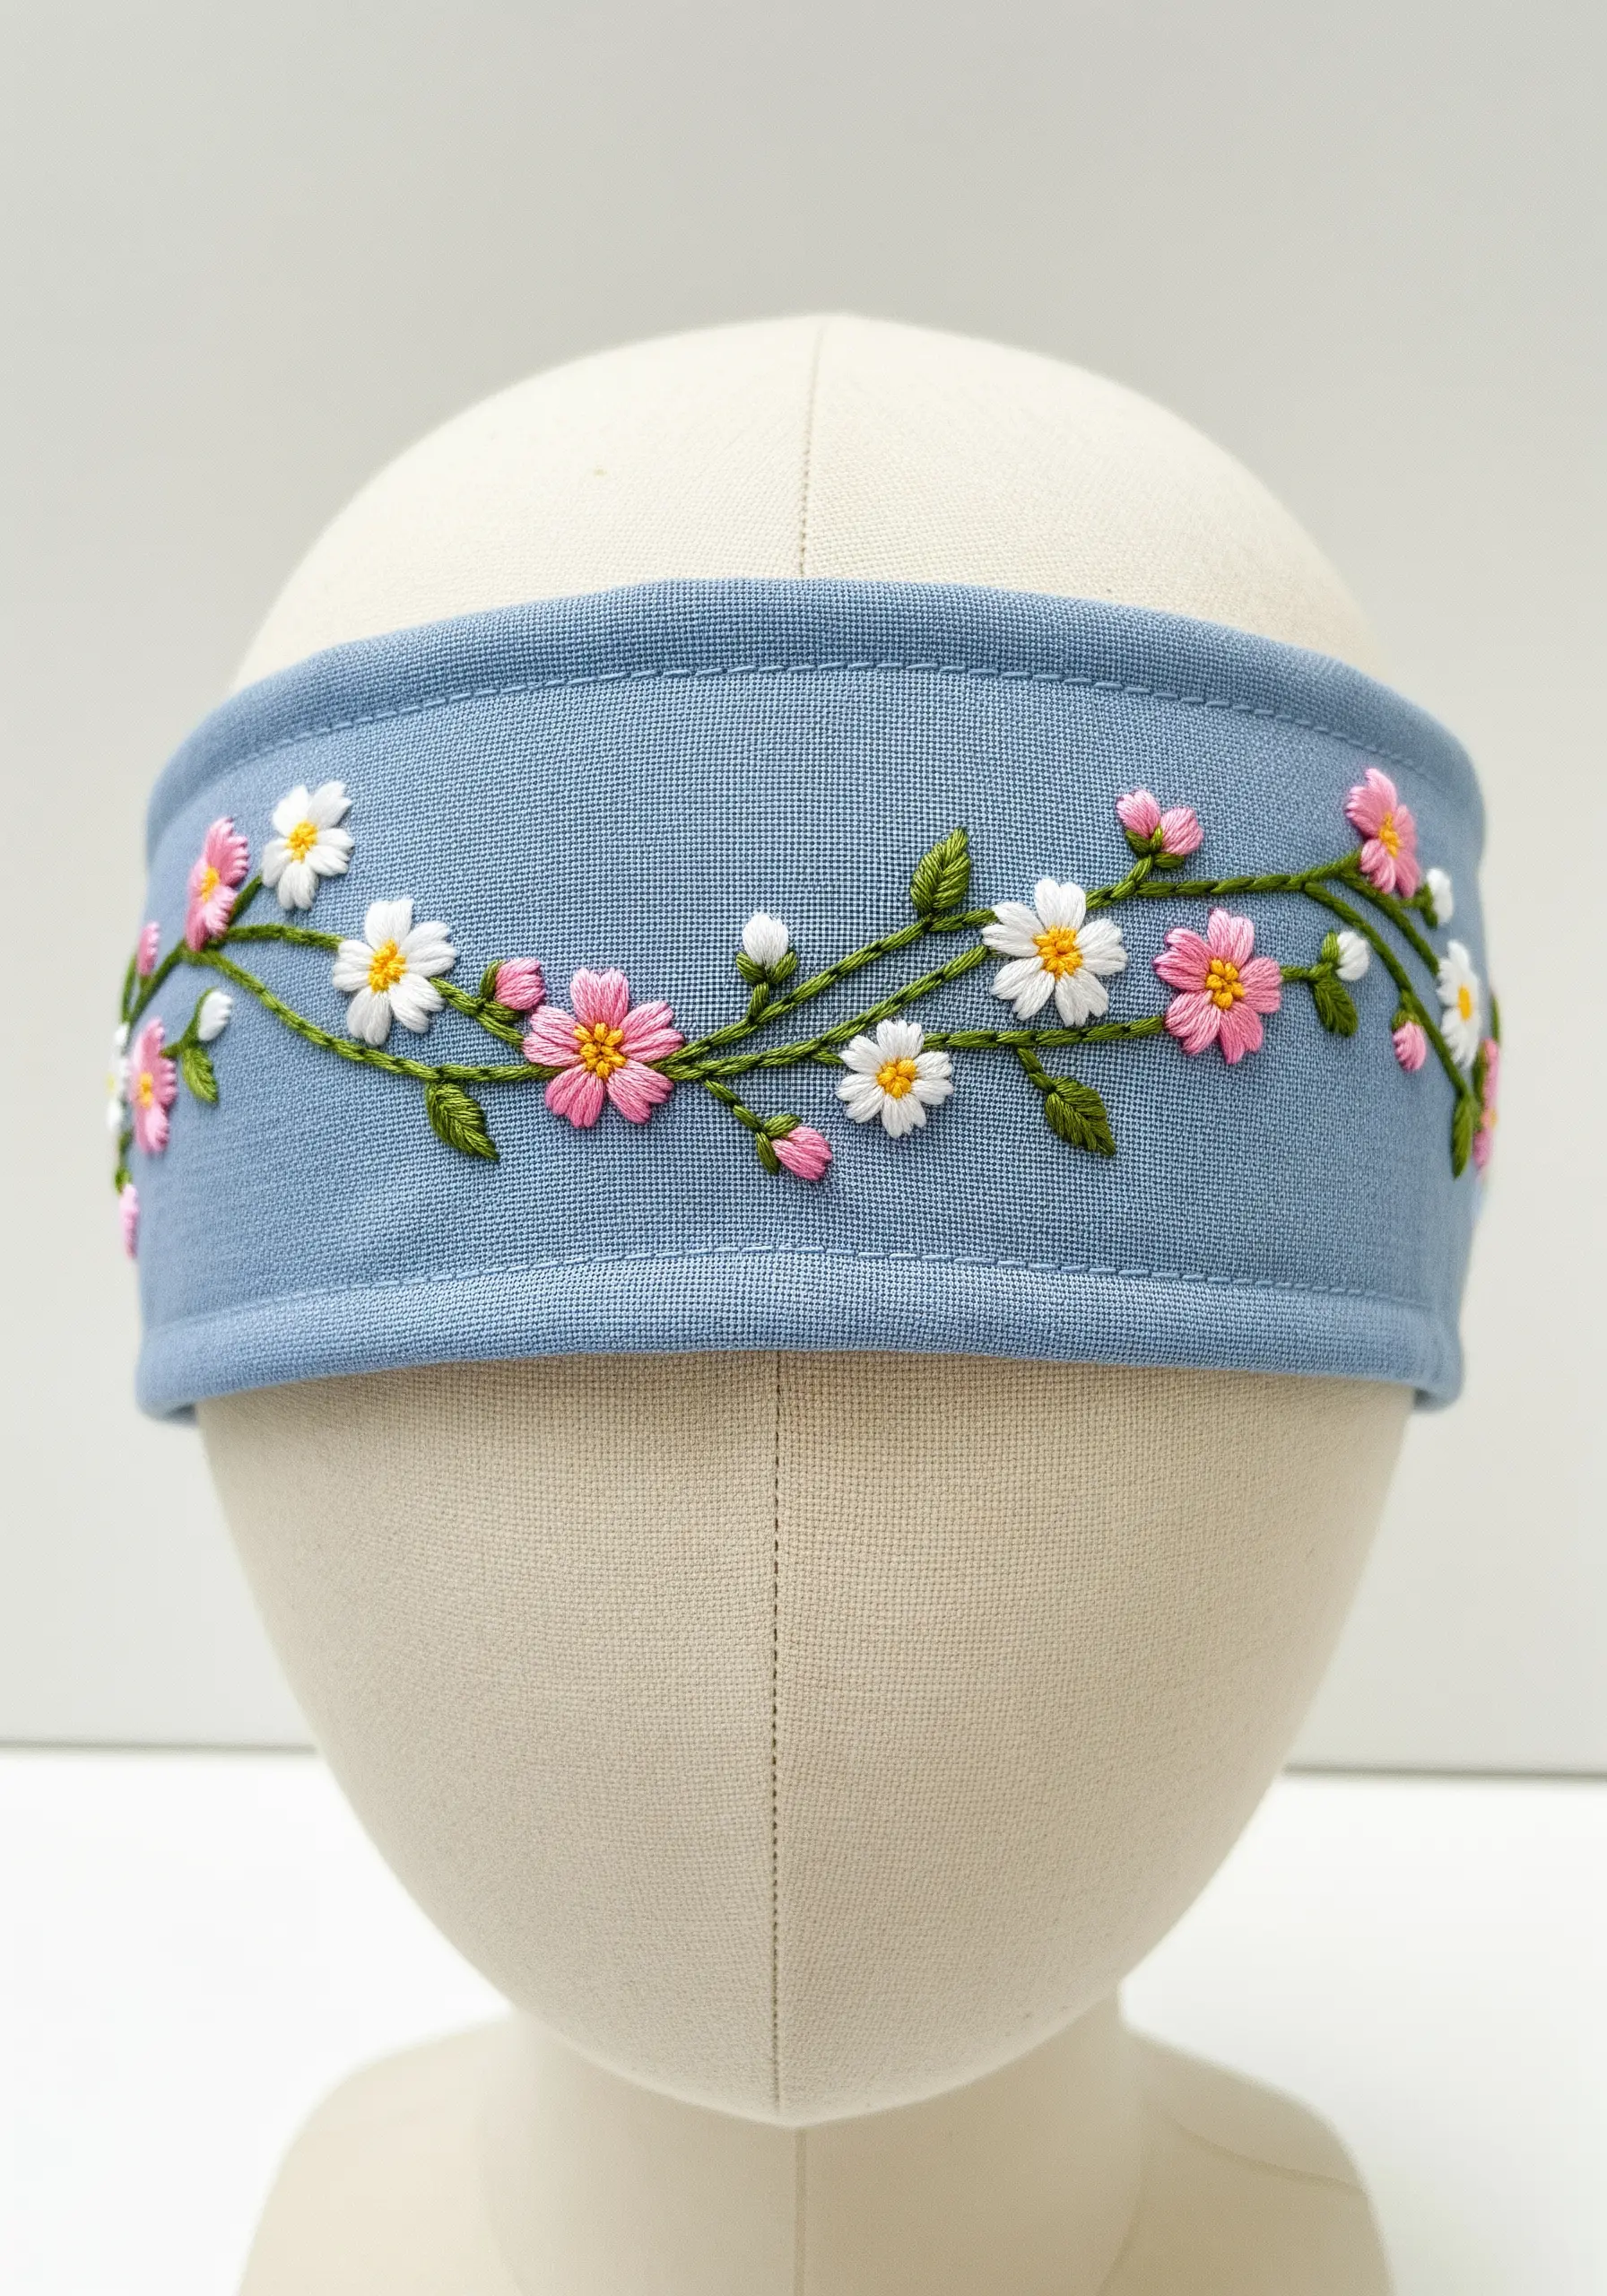
When designing for a curved, wearable item, create a pattern that feels continuous and looks beautiful from every angle.
A meandering vine is the perfect structure for this. Add rhythm and visual interest by alternating between different types of flowers, such as pink cherry blossoms and simple white daisies, connected by a flowing green stem.
Use simple, durable stitches like lazy daisies and French knots that will withstand stretching and wear. If your headband fabric is stretchy, use a ballpoint needle to avoid snagging and a lightweight stabilizer to prevent the design from warping.
19. Waffle Weave Charm: Stitching on Textured Fabric
To ensure your embroidery stands out on a highly textured fabric like waffle weave, you need to make your stitches bold and confident.
The recessed squares of the weave can easily swallow fine threads, so increase your strand count to three or four strands of floss. This gives your stitches enough body to sit proudly on top of the fabric’s surface rather than sinking into it.
Stick to simple, classic stitches that provide good coverage, like satin stitch for the petals and a whipped backstitch for a solid, defined branch. The result is a charming design that honors the texture of the fabric without getting lost in it.
20. The Translucent Tree: Embroidery as Architectural Art
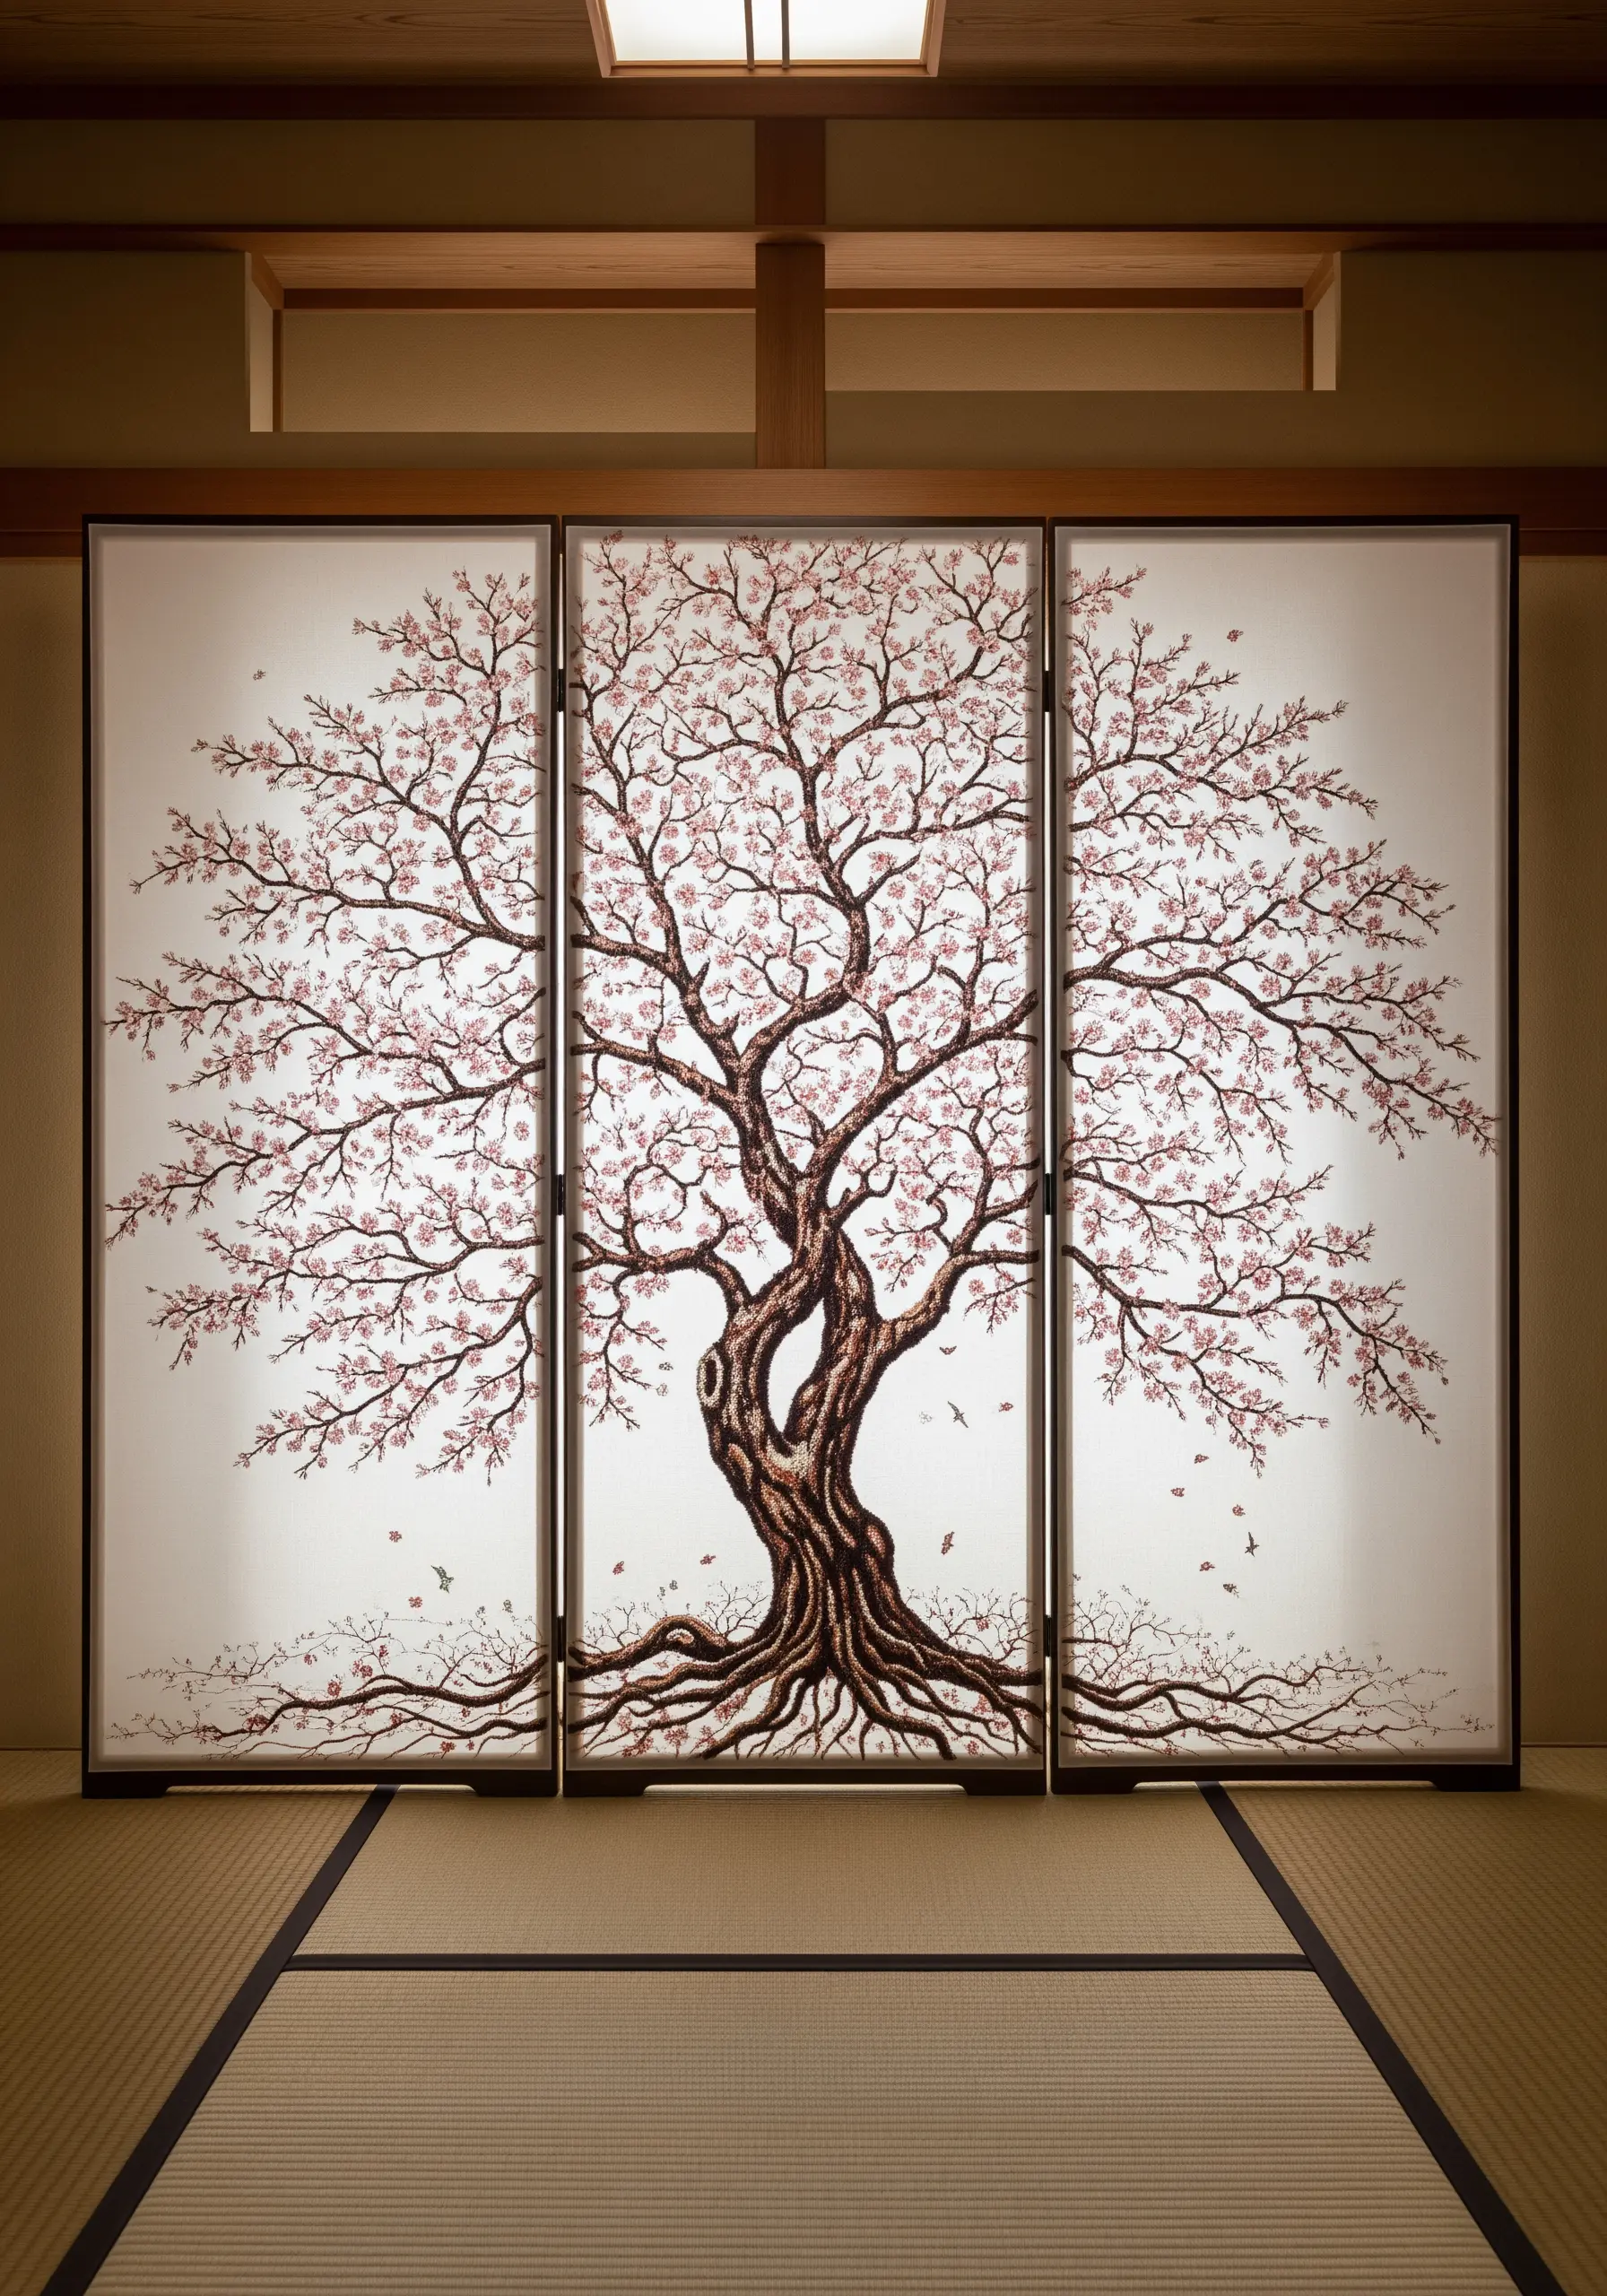
This is embroidery elevated to the level of architectural installation, where thread and fabric are used to shape space and filter light.
When working on a translucent material for a screen or room divider, the back of your work is as visible as the front. Your technique must be immaculate. Use reversible stitches and learn to bury your thread tails invisibly within your stitching.
The immense scale requires breaking the design into a grid and working methodically. This is more than a project; it’s an heirloom piece that demonstrates the transformative power of a simple needle and thread.


