

Have you ever felt a disconnect between the beautiful floral design in your mind and the one that ends up in your hoop? It’s a common feeling—the desire to move beyond simple outlines and into something more fluid, more expressive, more like a painting.
The secret isn’t necessarily more complex stitches, but a more painterly approach to your thread. It’s about learning to see your floss as pigment and your needle as a brush. By focusing on how colors blend, how light falls on a petal, and how stitch direction can create form, you unlock a new level of artistry.
These ideas are designed to help you make that shift. Here, you’ll find techniques for creating soft, watercolor-like backgrounds, for stitching petals with realistic depth, and for using texture to build entire landscapes. Your fabric is a canvas, waiting for you to paint with thread.
1. Lavender Fields on a Watercolor Canvas
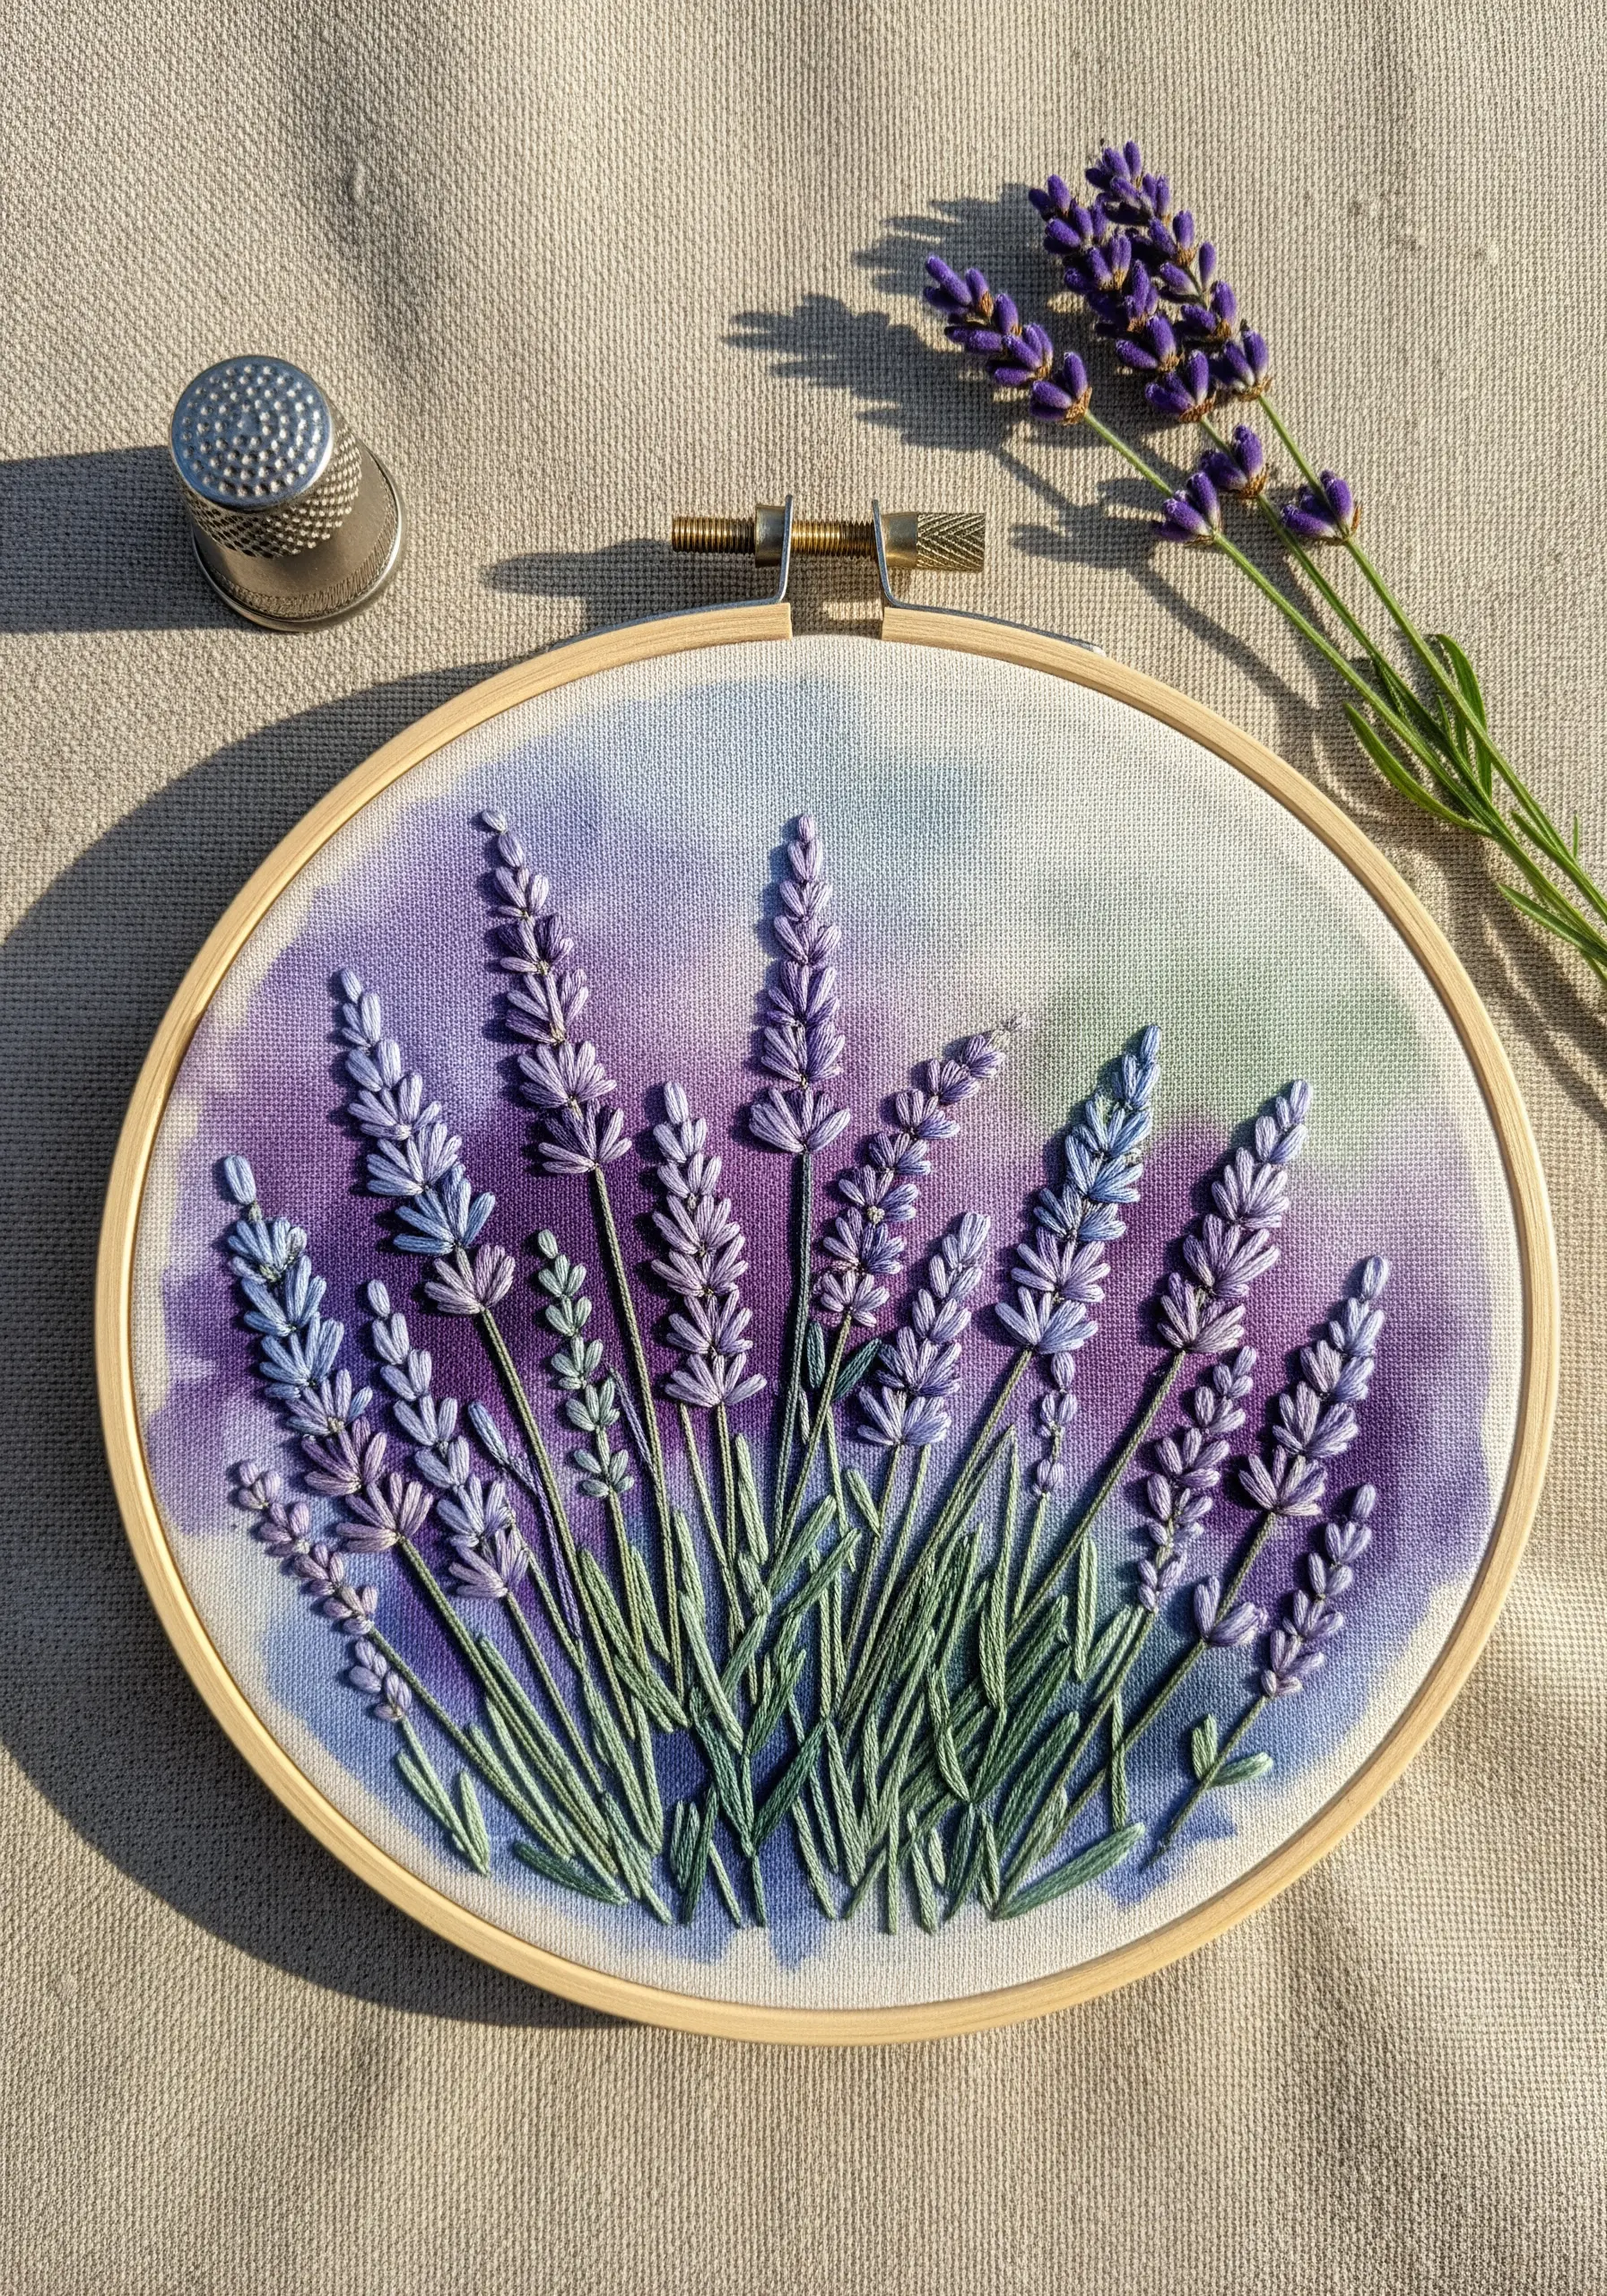
To achieve this dreamy, atmospheric effect, you’ll paint your fabric first.
Use a wash of diluted fabric paints in purples and blues, letting the colors bleed into one another to create a soft, out-of-focus background.
Once dry, stitch your lavender over the top.
Use padded satin stitch or bullion knots for the lavender buds to create texture that stands out against the flat, painted surface, giving the piece immediate depth.
2. Mastering Gradient Petals with Thread Painting
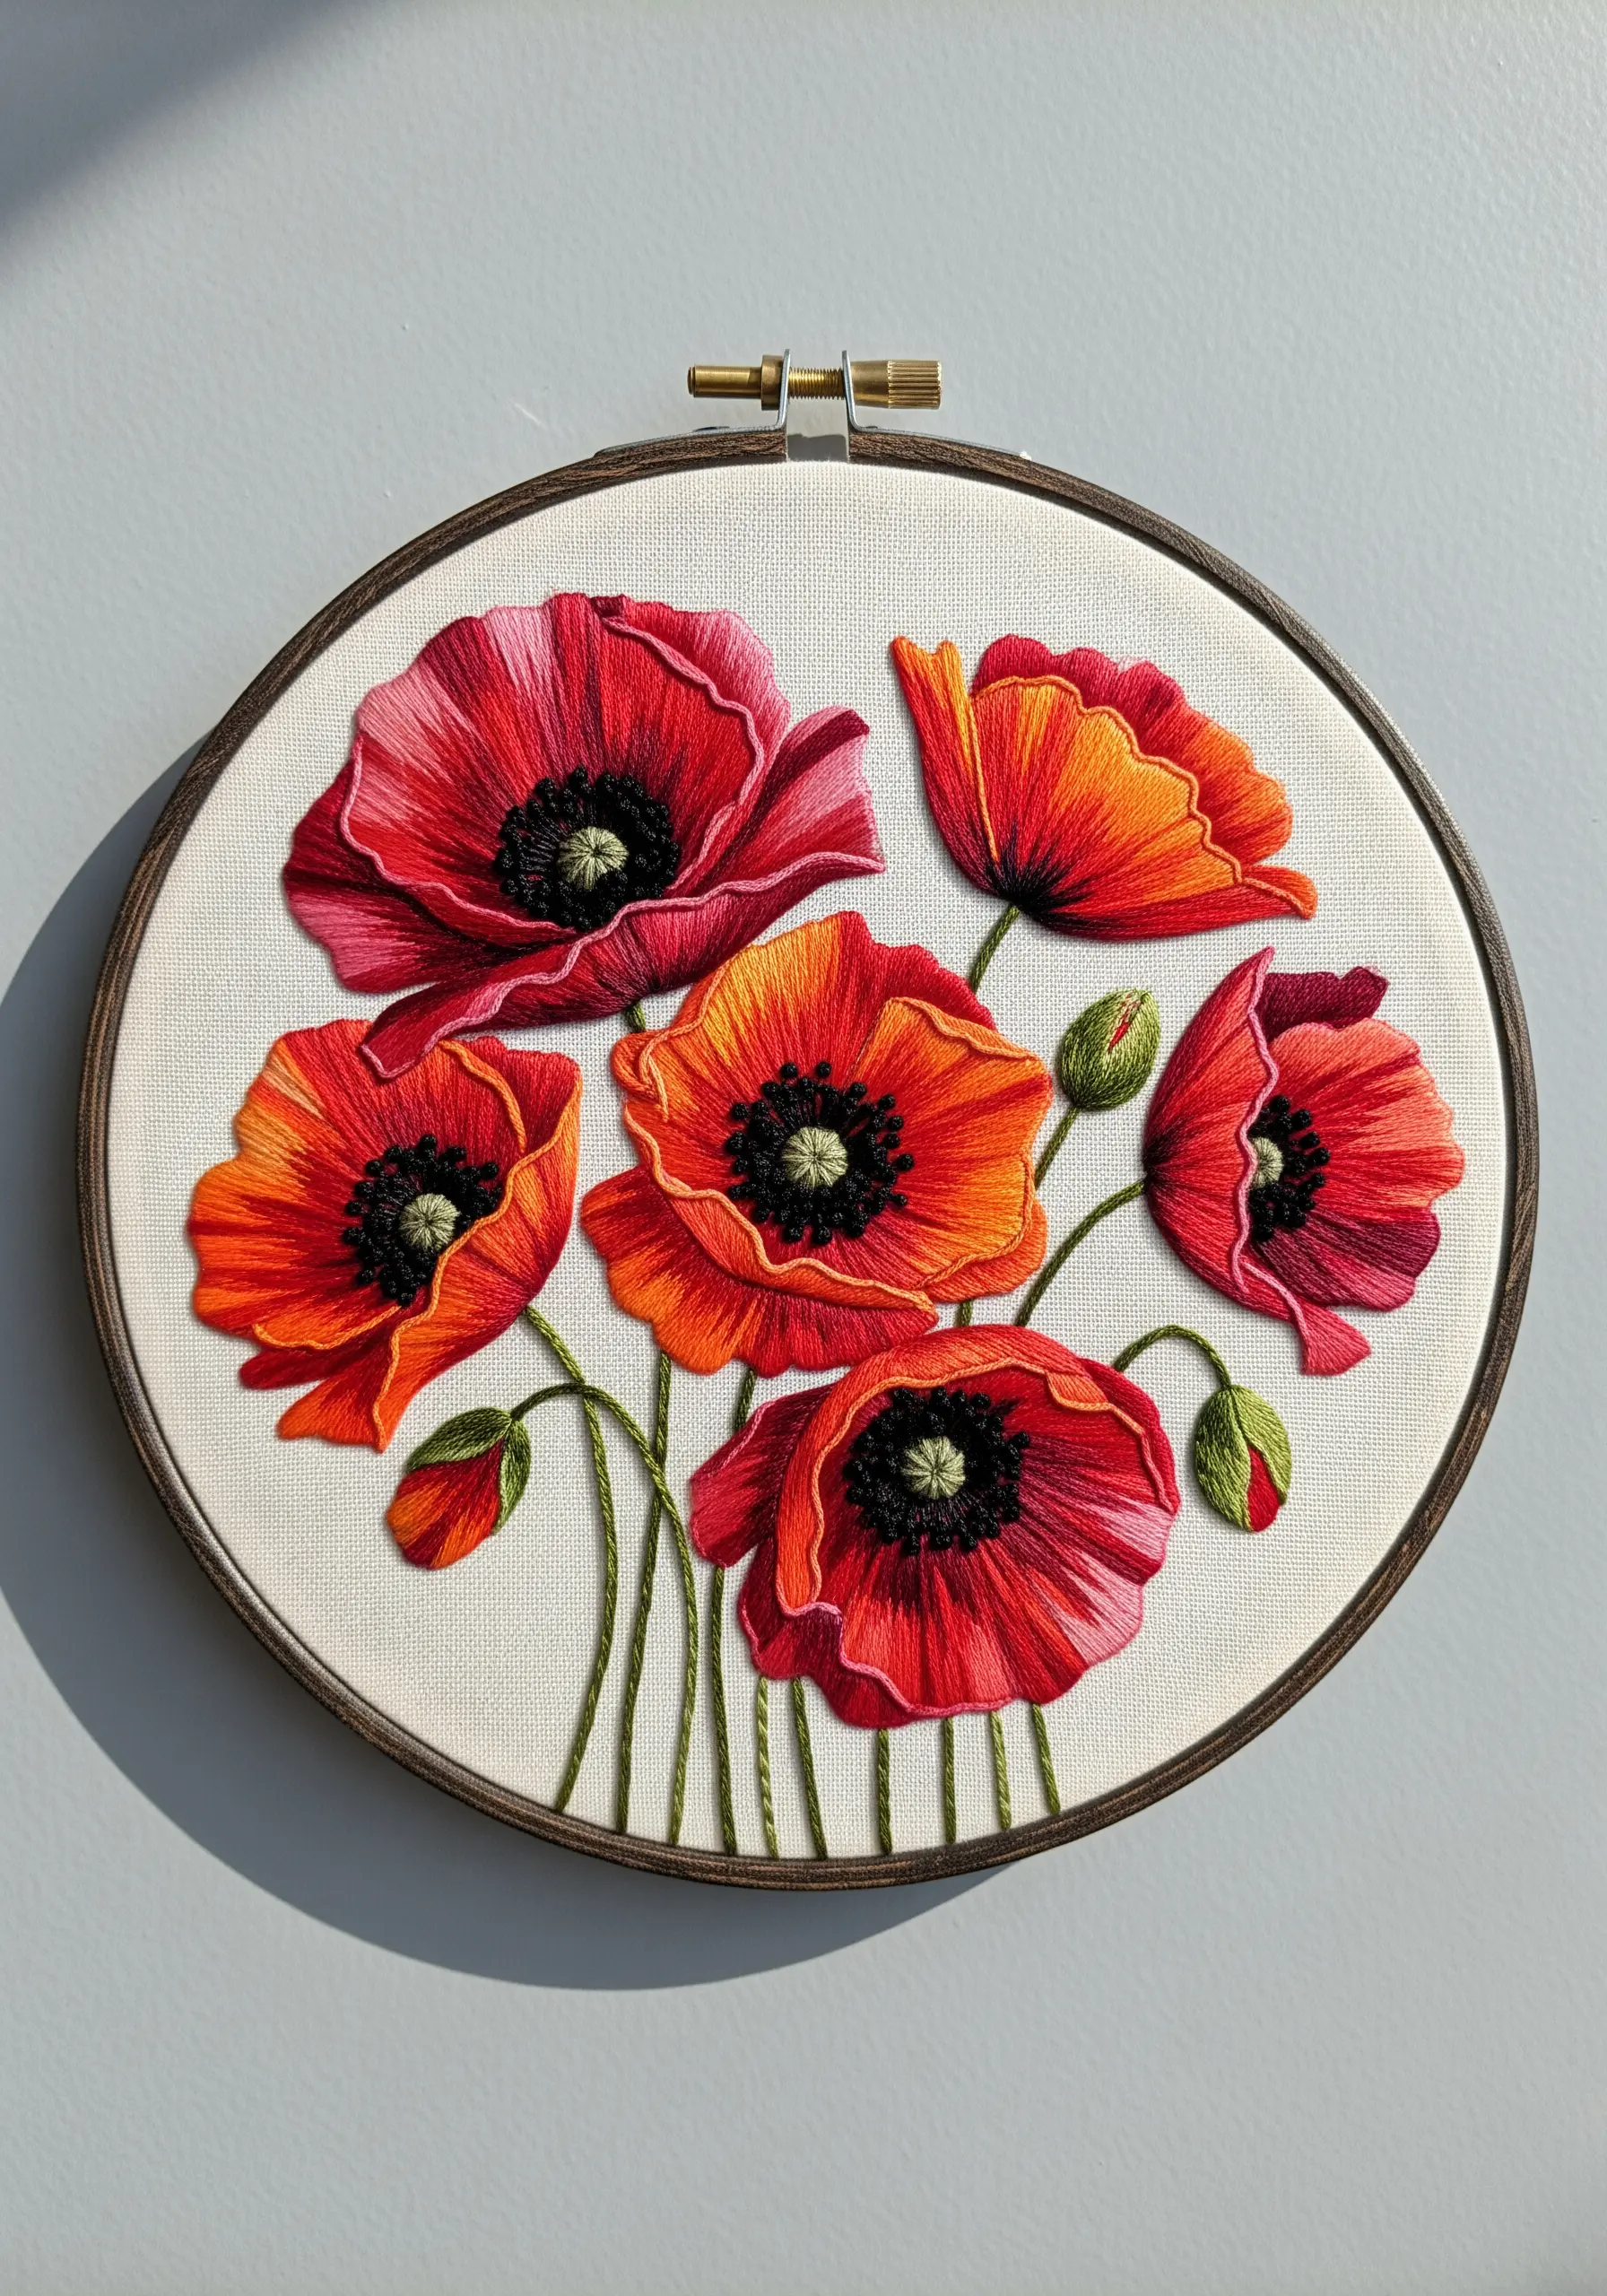
The secret to these lifelike poppies is the long-and-short stitch, used here to mimic a painter’s brushstroke.
Work with a single strand of floss for the most seamless blend, mapping out three or four color zones on each petal before you begin.
Always angle your stitches to follow the natural, curved direction of the petal’s growth—this is what creates the realism and form, transforming flat stitches into a dynamic flower.
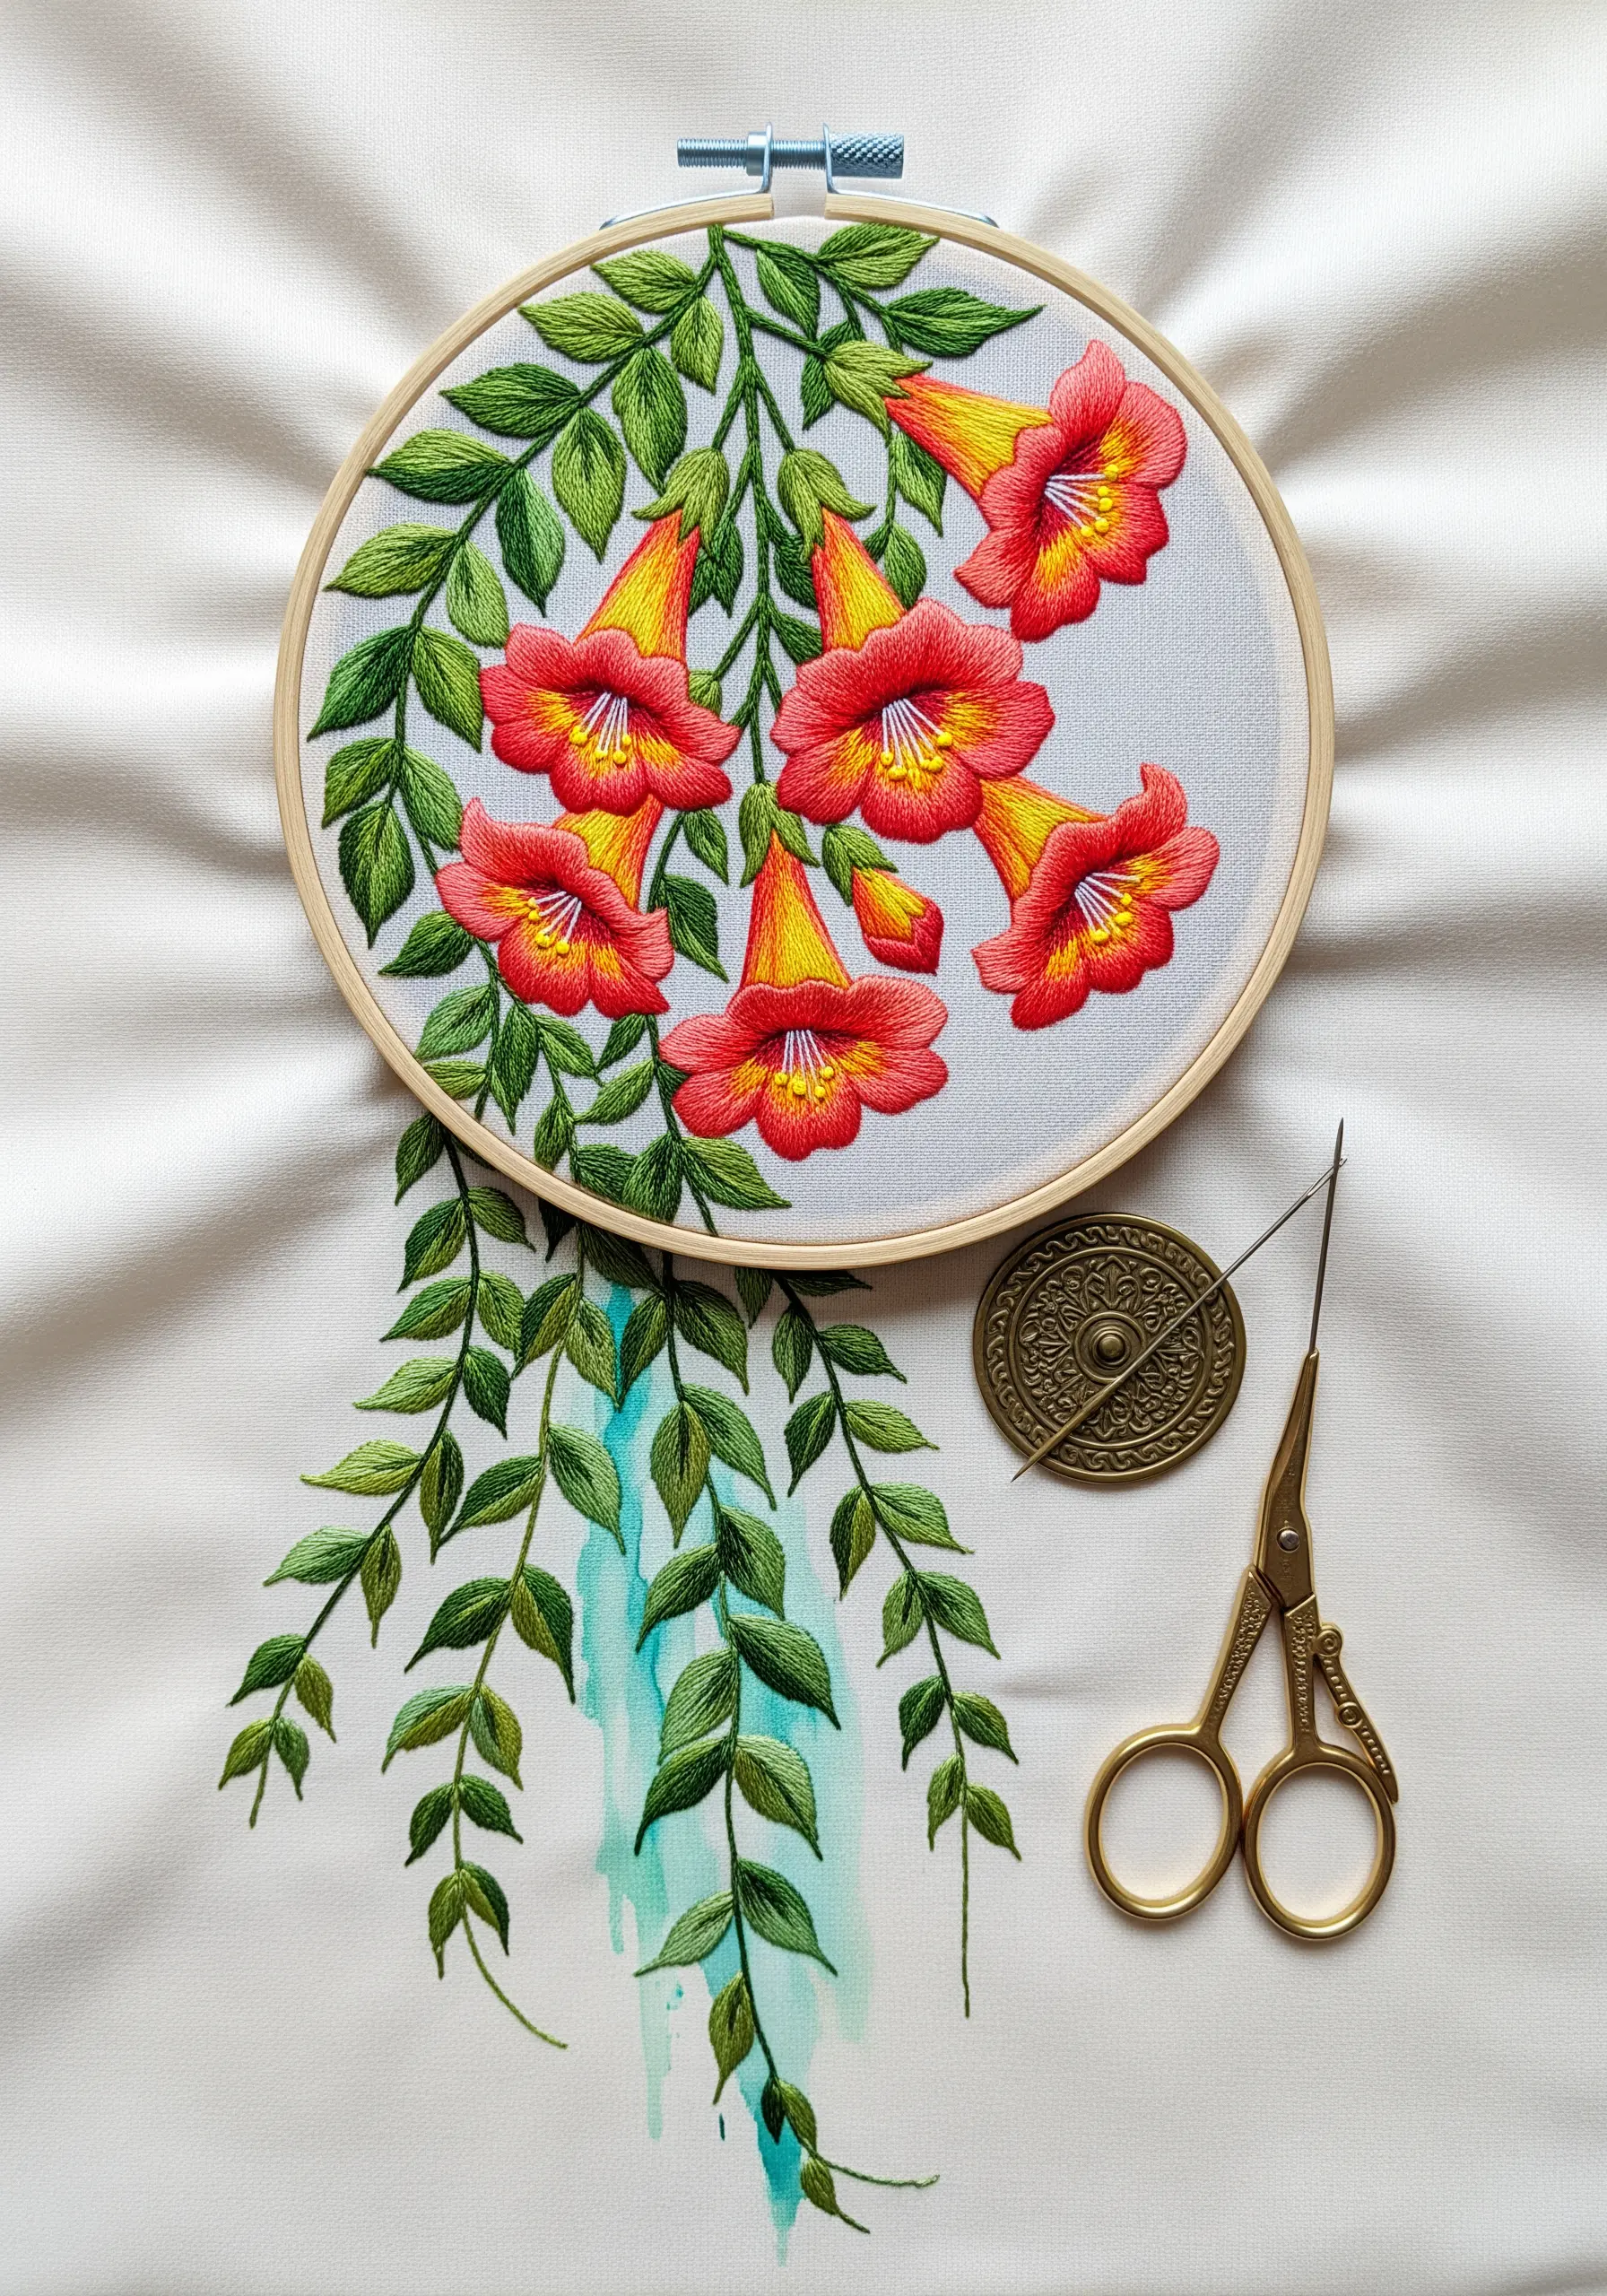
3. Cascading Wisteria with Silk Ribbon
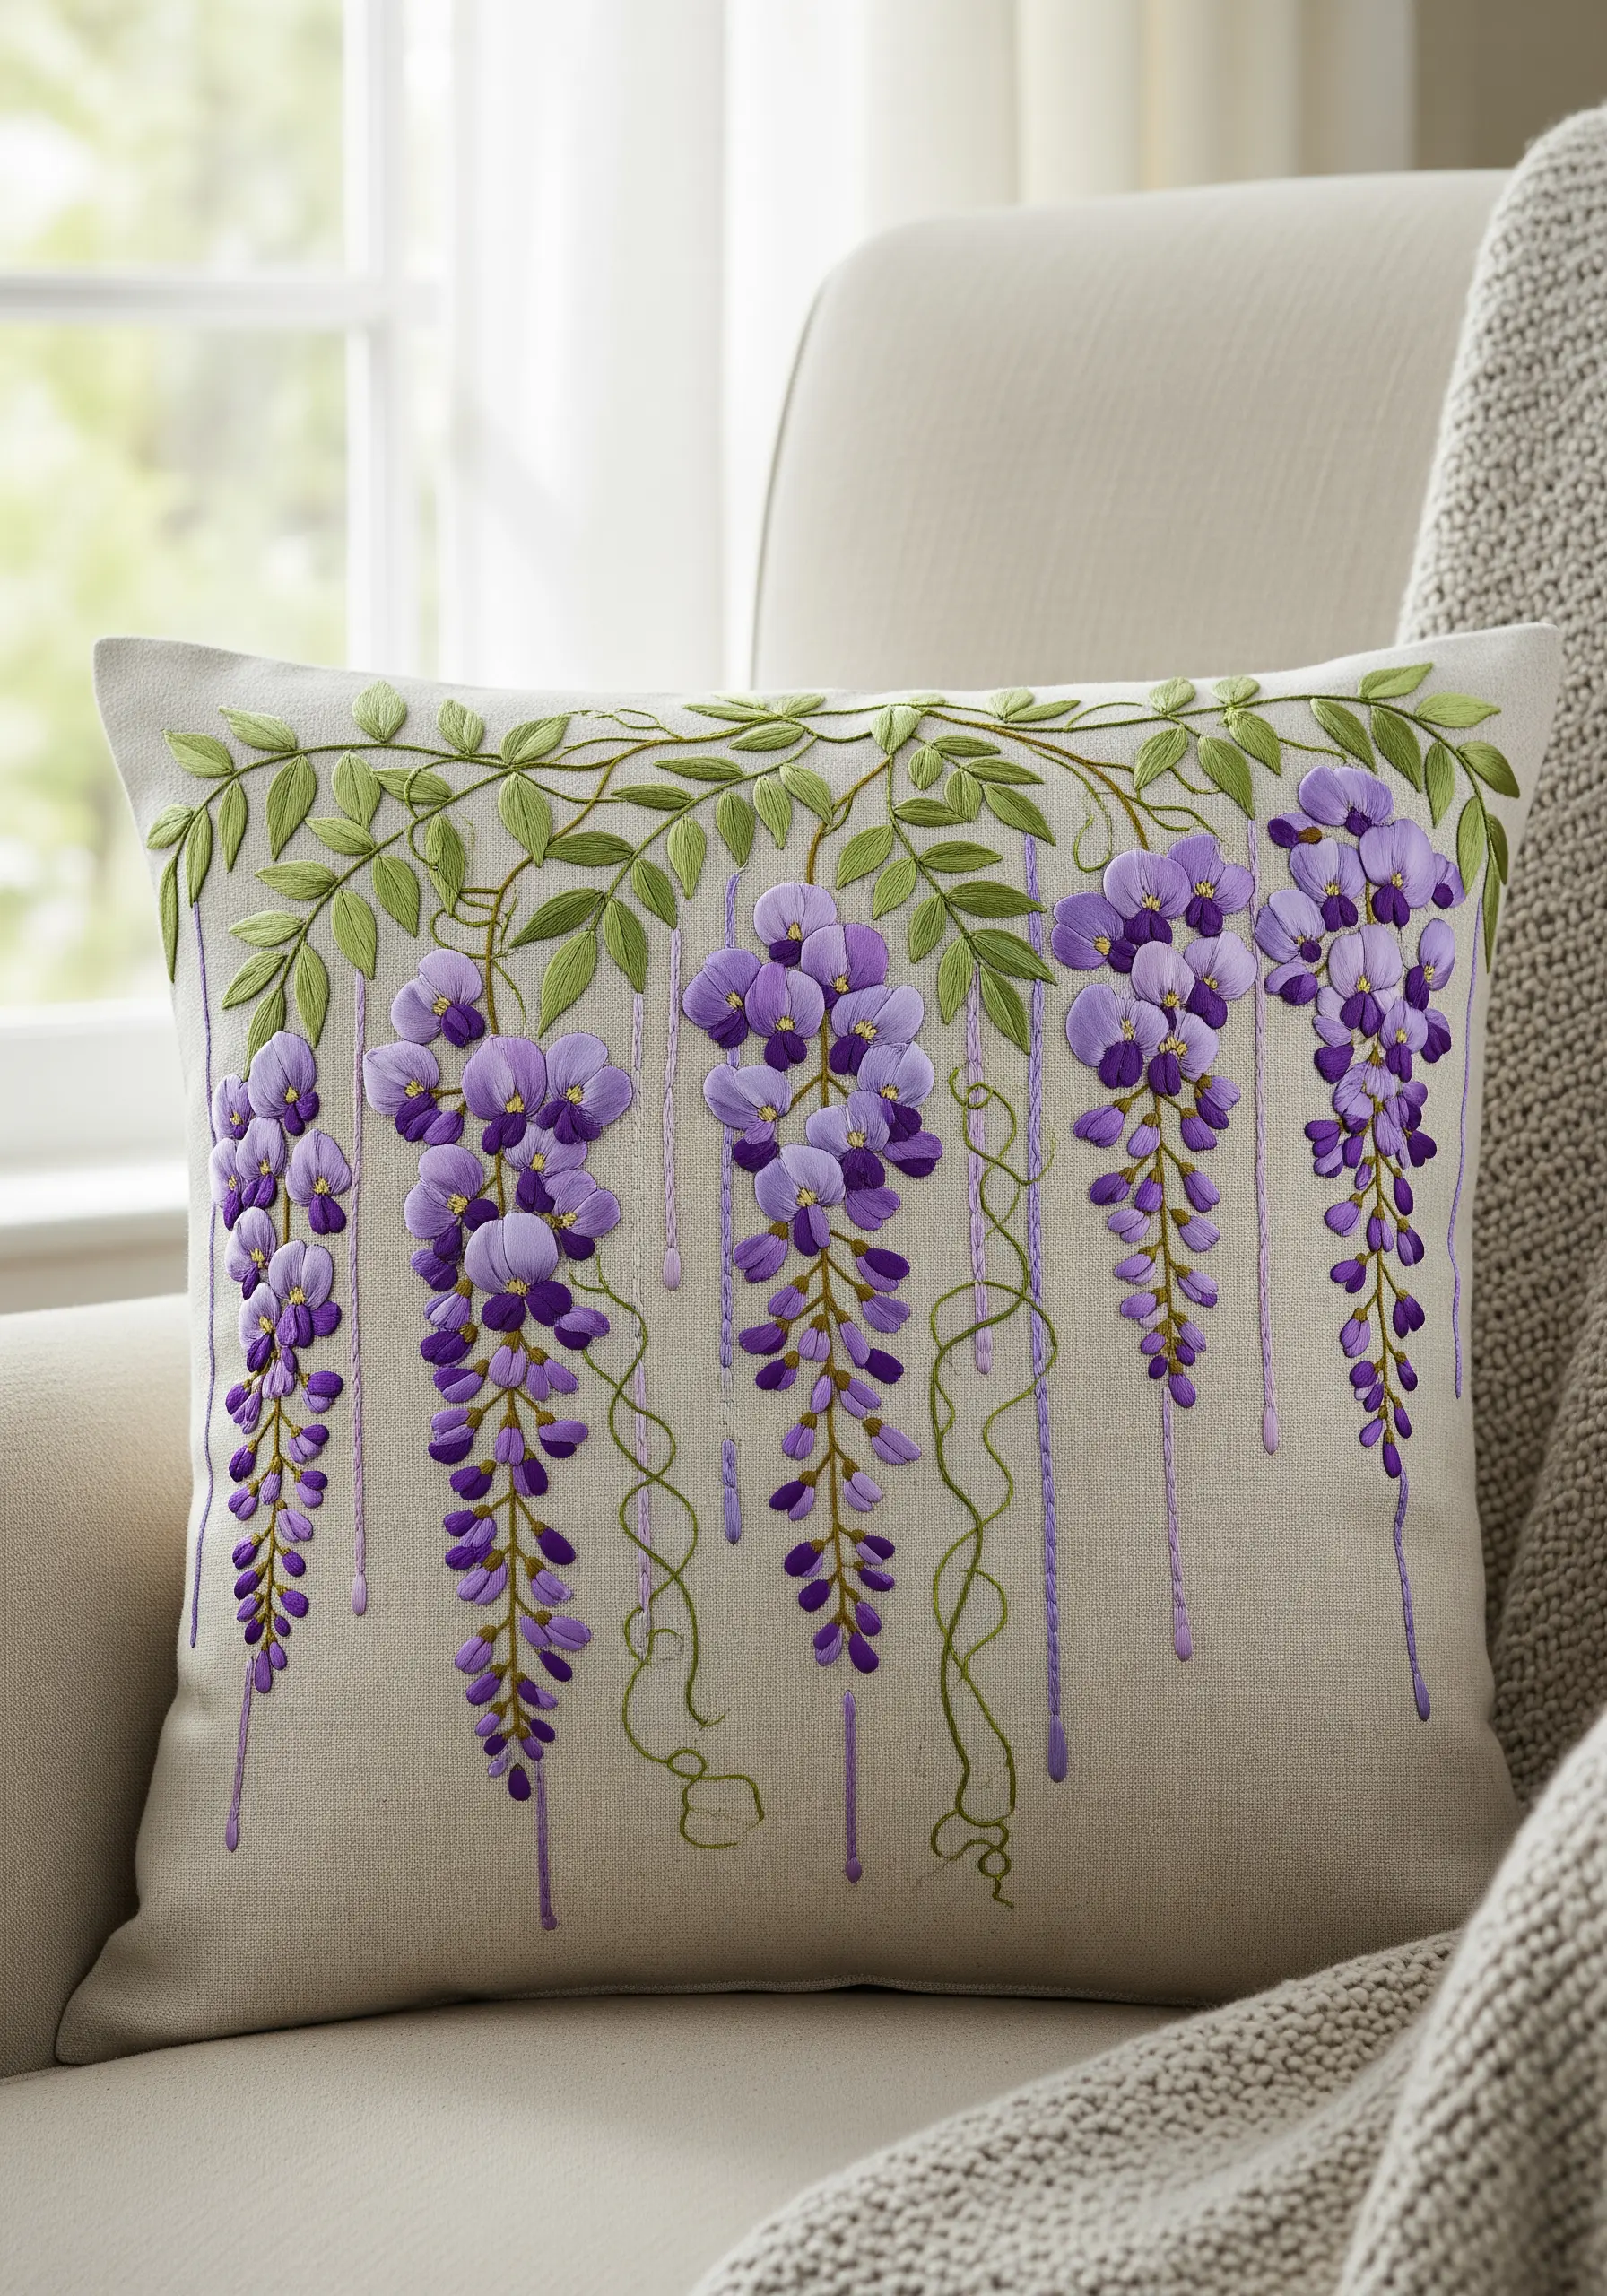
Introduce silk ribbon to your work to add unparalleled dimension and light-catching sheen.
Use ribbon stitch or lazy daisy stitch with a wide silk ribbon for the wisteria blossoms; the ribbon naturally folds and twists to create voluminous, realistic petals with very little effort.
Contrast this texture by using a single strand of cotton floss for the delicate, twining vines, which makes the lush blooms of your cushion embroidery motifs even more prominent.
4. Sculptural Queen Anne’s Lace with French Knots
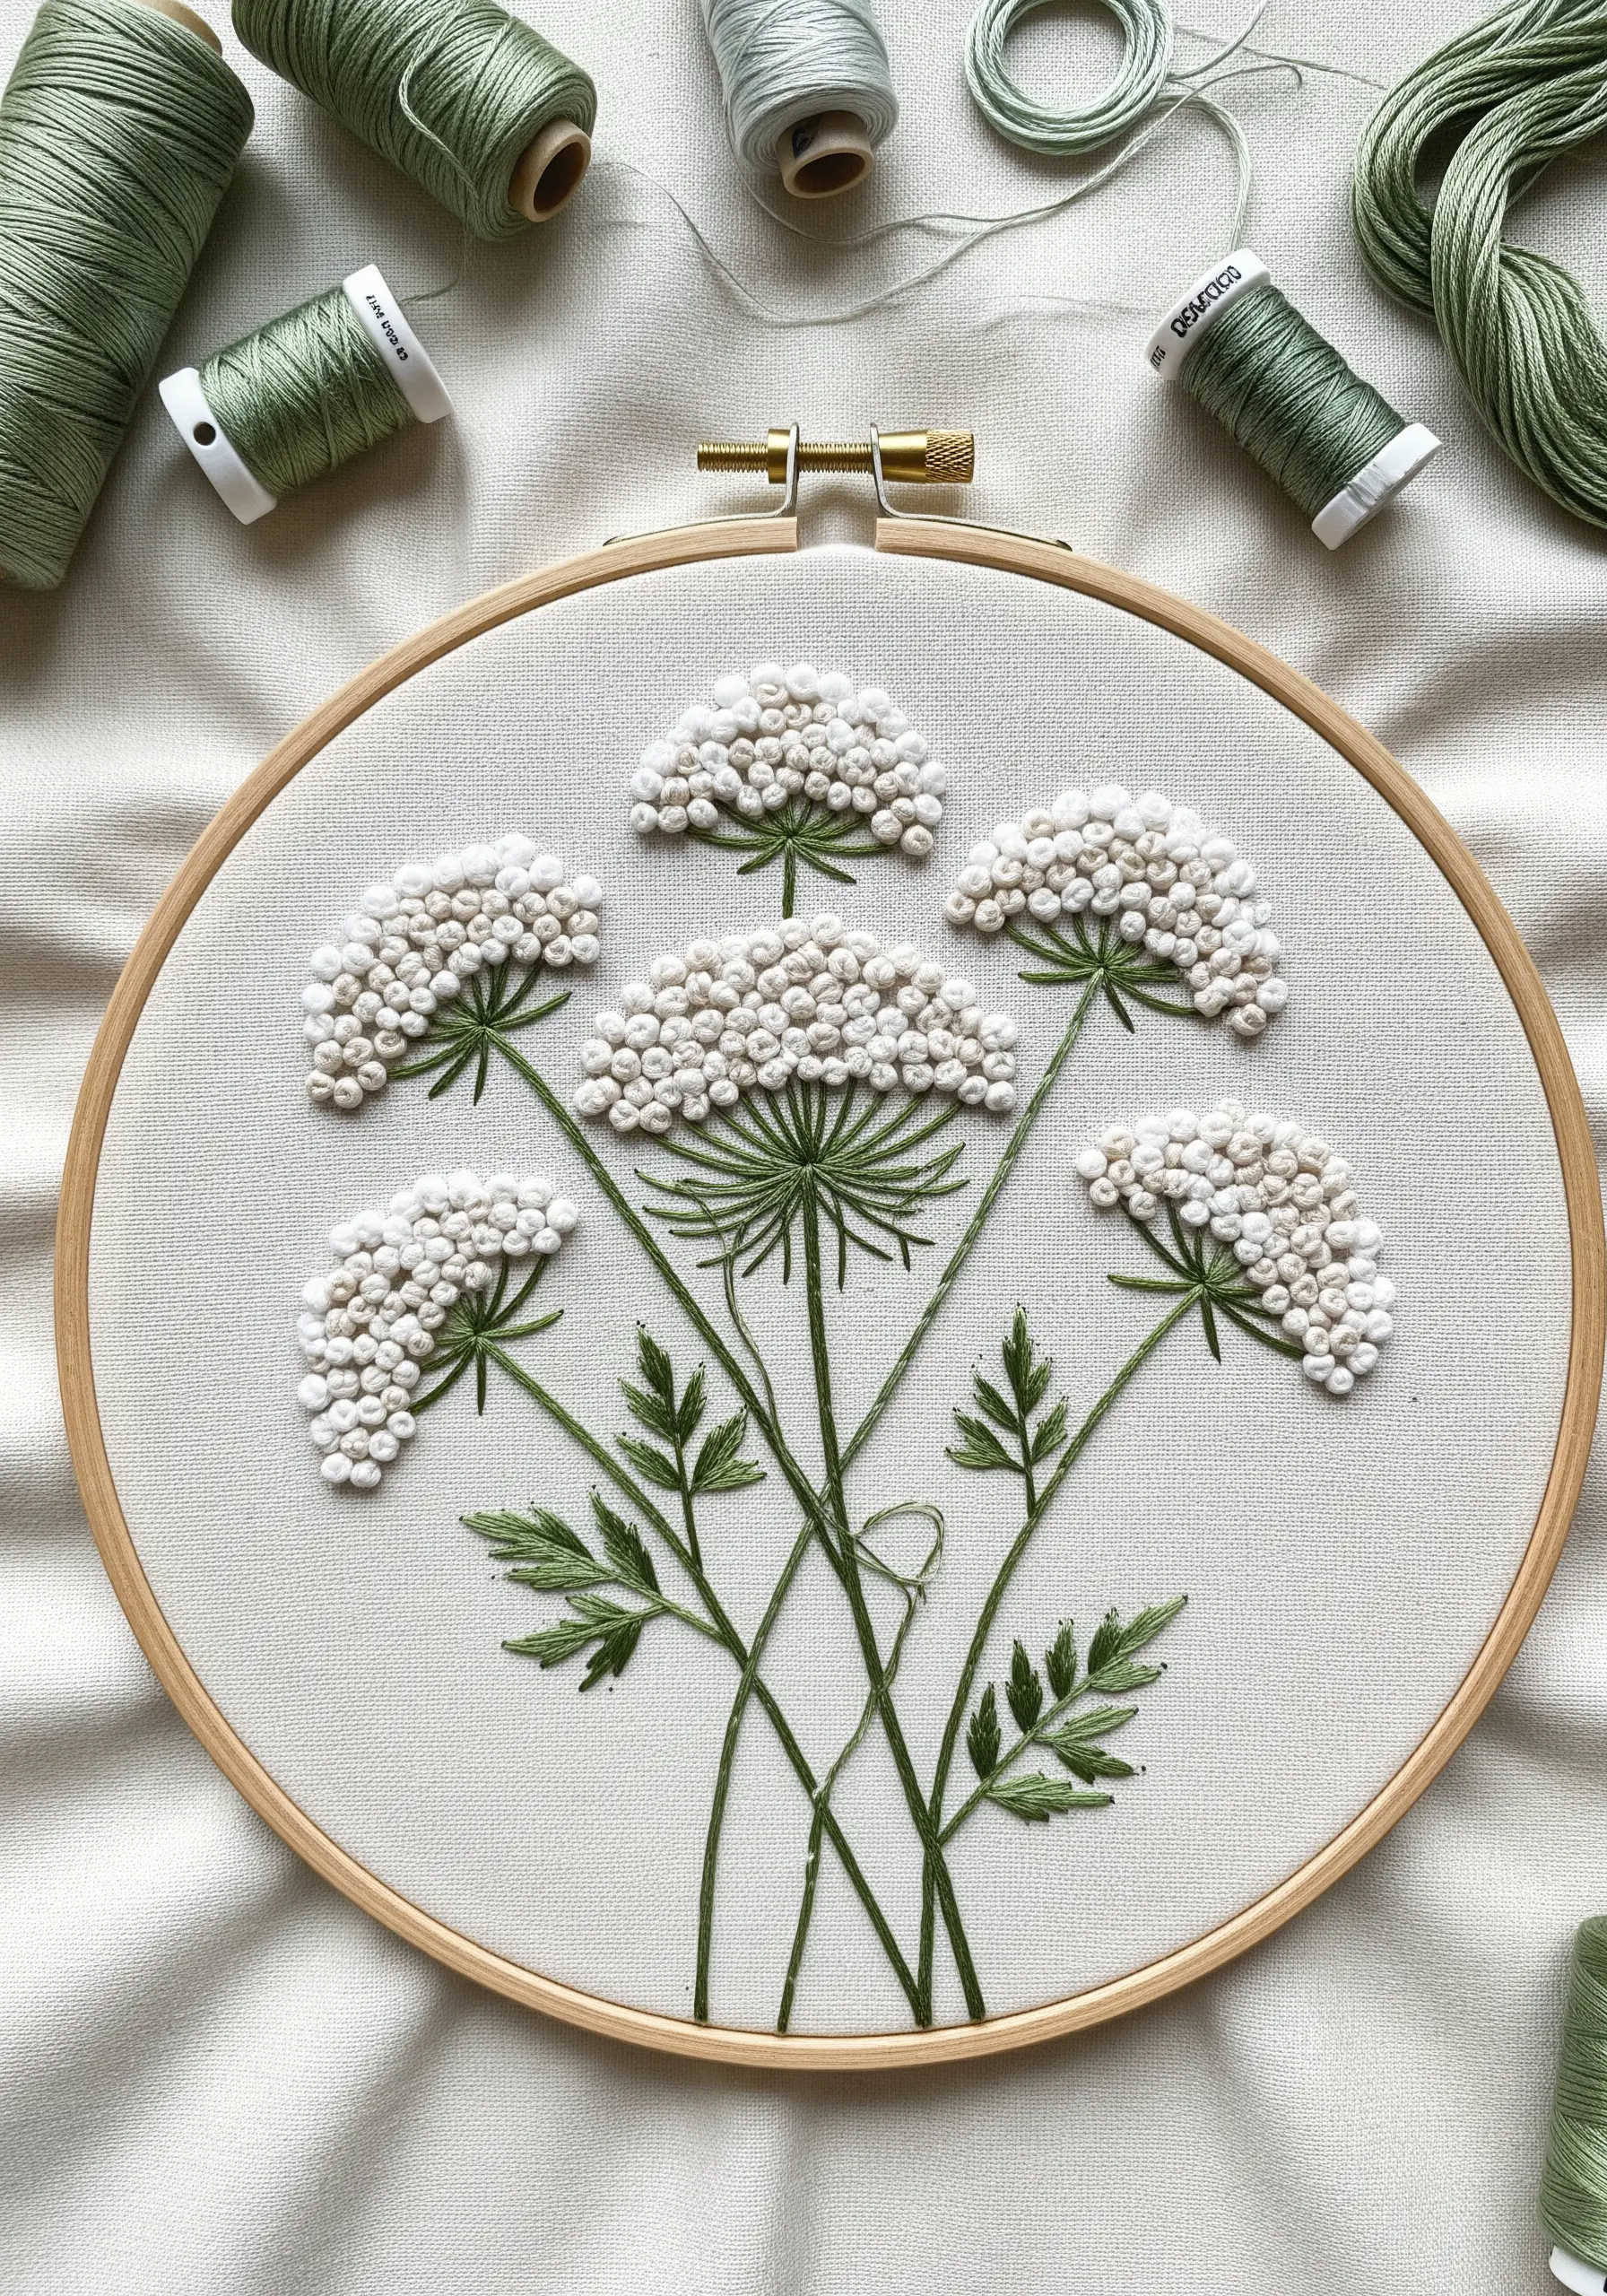
To build the dense, cloud-like texture of Queen Anne’s Lace, rely entirely on French knots.
Vary the number of times you wrap the thread around the needle (one, two, or three wraps) to create subtle variations in the size of each knot.
Cluster these knots tightly together to form the flower heads, creating a rich, tactile surface that invites touch.
Keep the stems delicate with a simple stem stitch to emphasize the weight and texture of the blossoms, drawing from these wildflower thread palettes for a natural look.
5. The Sharp Elegance of a Stitched Thistle

This design is a masterclass in contrasting textures.
For the spiky purple bloom, use straight stitches fanning out from a central point.
For the leaves, a fishbone stitch is essential for creating that defined central vein and sharp, angular edges.
Finally, add tiny, individual straight stitches along the stems and leaf edges for thorns—it’s these precise leaf vein details that make the thistle feel authentically prickly and wild.
6. A Crescent of Forget-Me-Nots
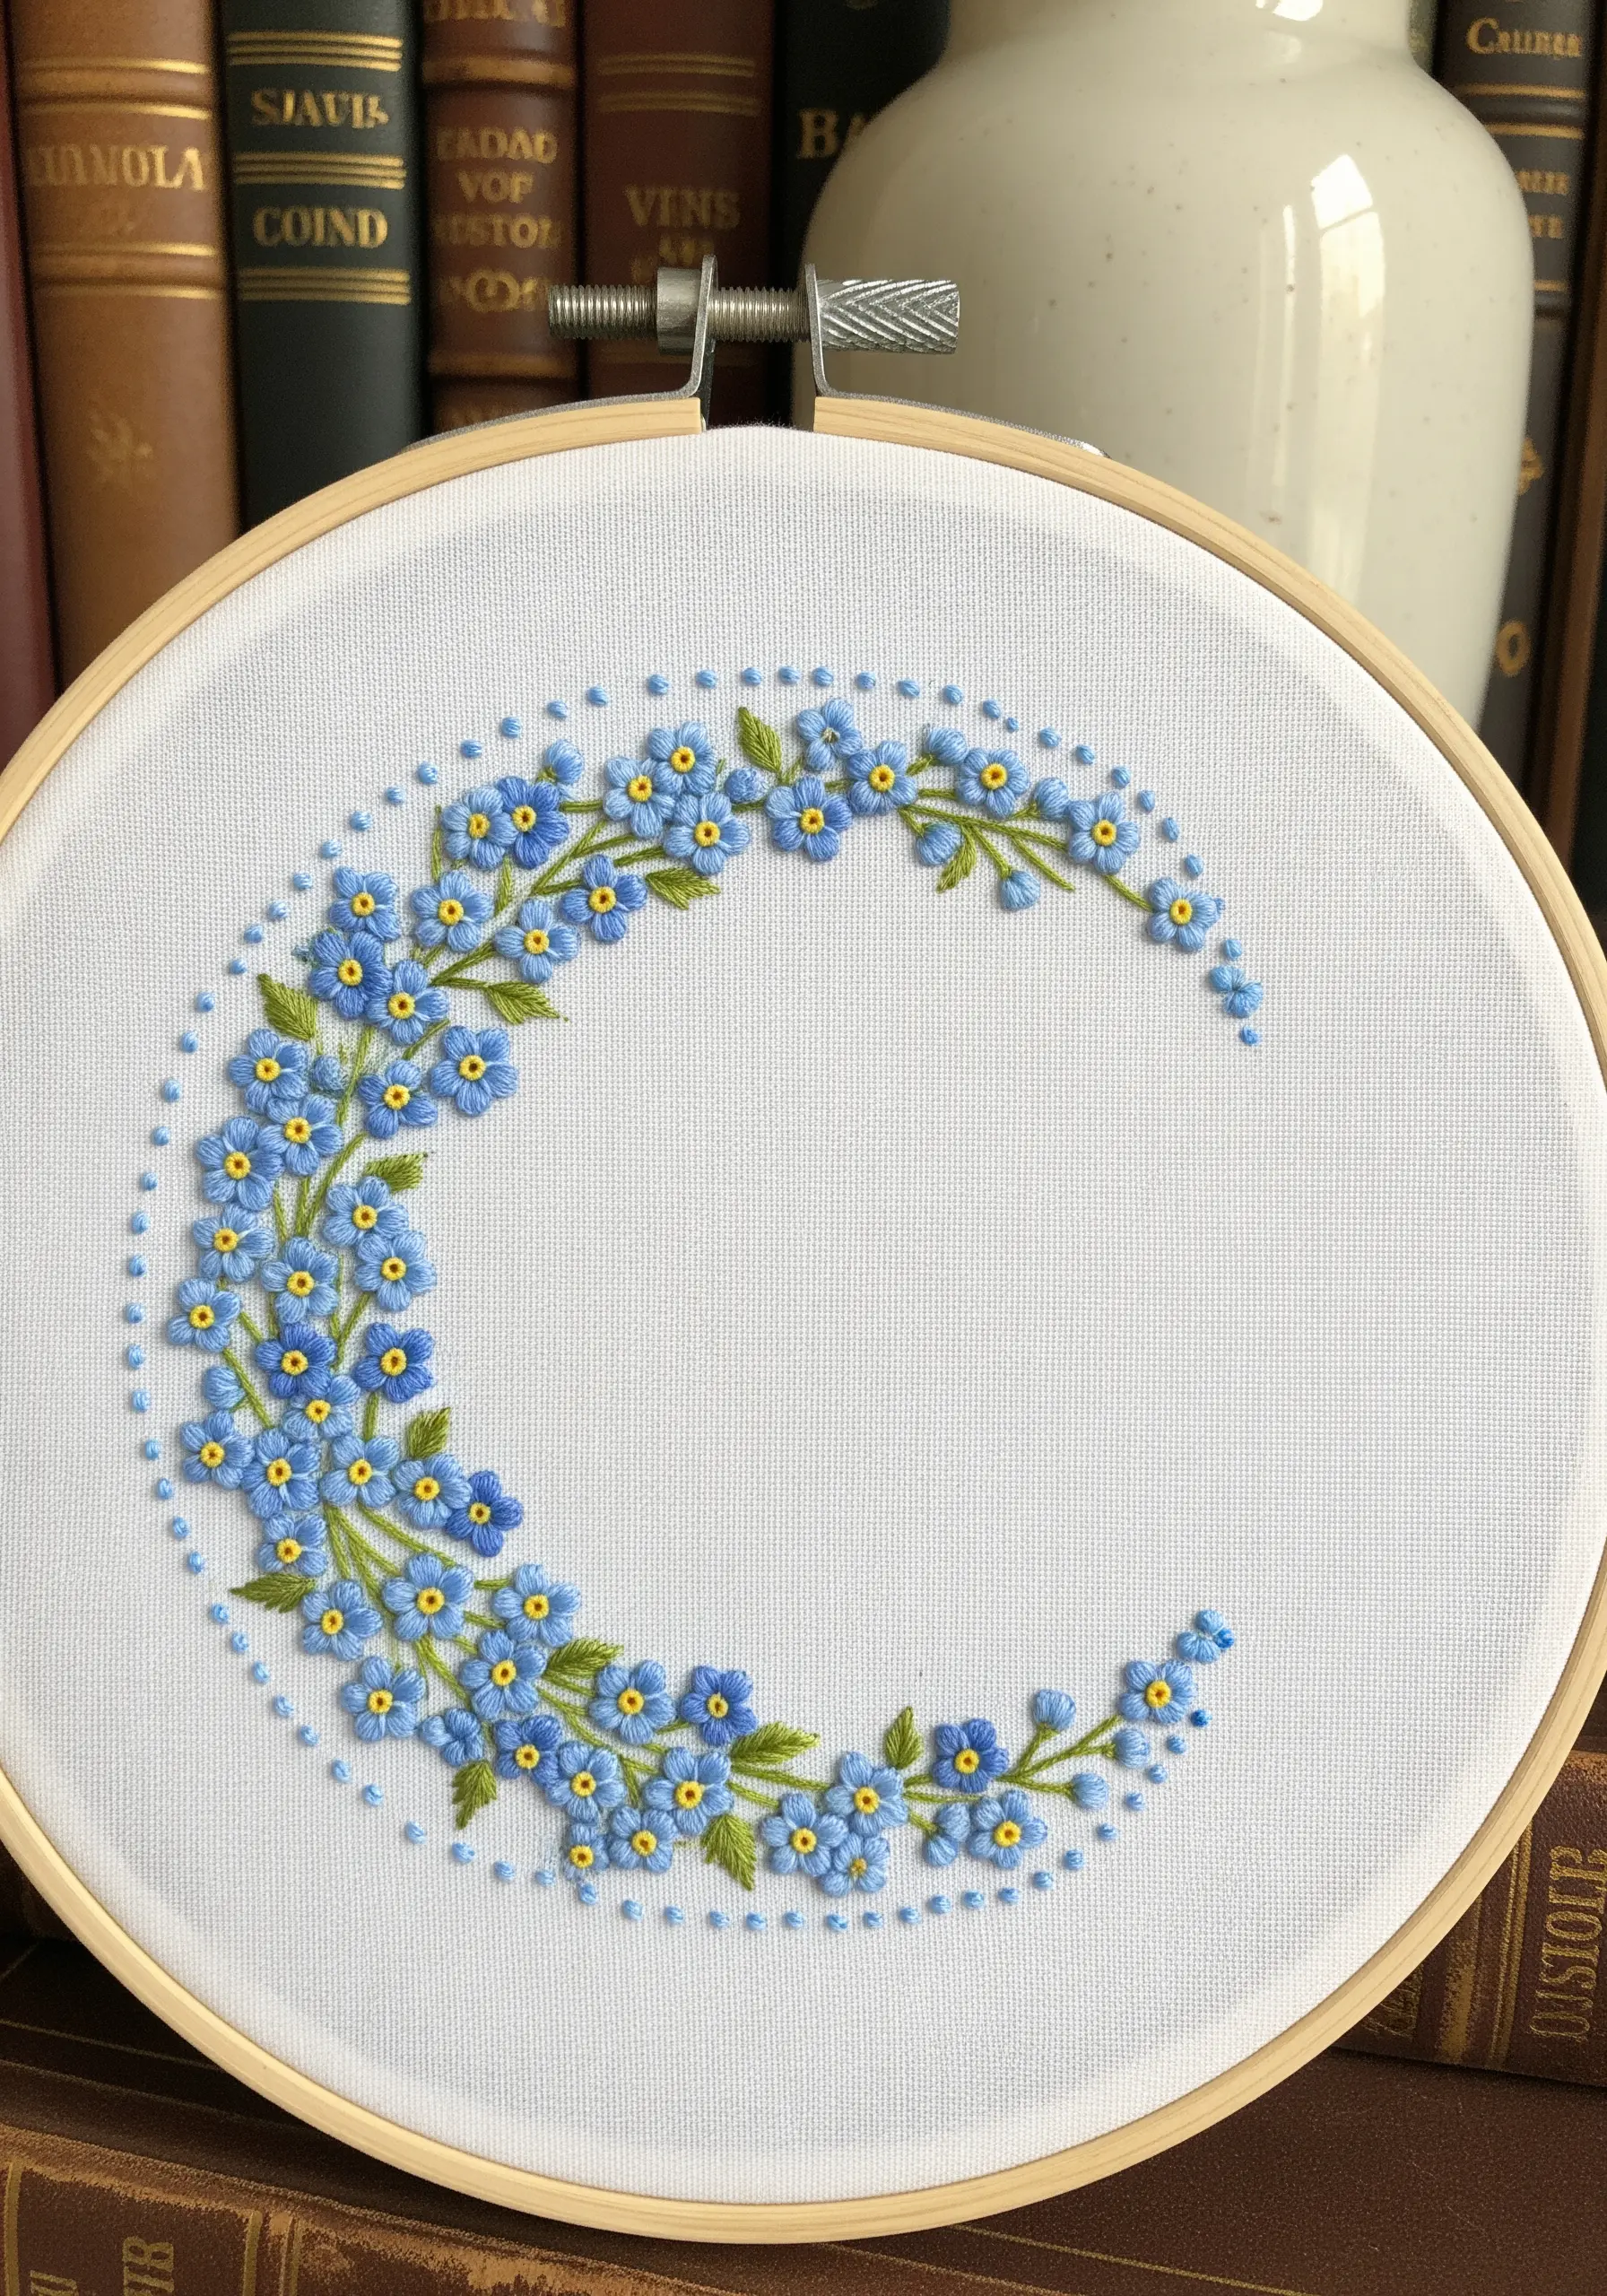
This design’s elegance comes from its thoughtful composition and use of negative space.
By arranging tiny lazy daisy stitches into a crescent moon shape, you create a sense of graceful movement that guides the eye.
The scattered French knots around the main motif prevent it from feeling static, adding a touch of whimsy.
This is a perfect example of how using negative space thoughtfully can make a simple design feel sophisticated and complete.
7. Luminous Daisies on a Midnight Canvas

Stitching with white thread on dark fabric creates a stunning, high-contrast effect.
To ensure your daisy petals are perfectly opaque and brilliantly white, first outline each petal with split stitch.
Then, fill the shape with satin stitch, working over your outline.
This simple preparation acts as an underlay, preventing the dark fabric from showing through and giving each petal a clean, slightly raised edge, perfect for daisy and buttercup projects.
8. Capturing the Wind with Dandelion Seeds
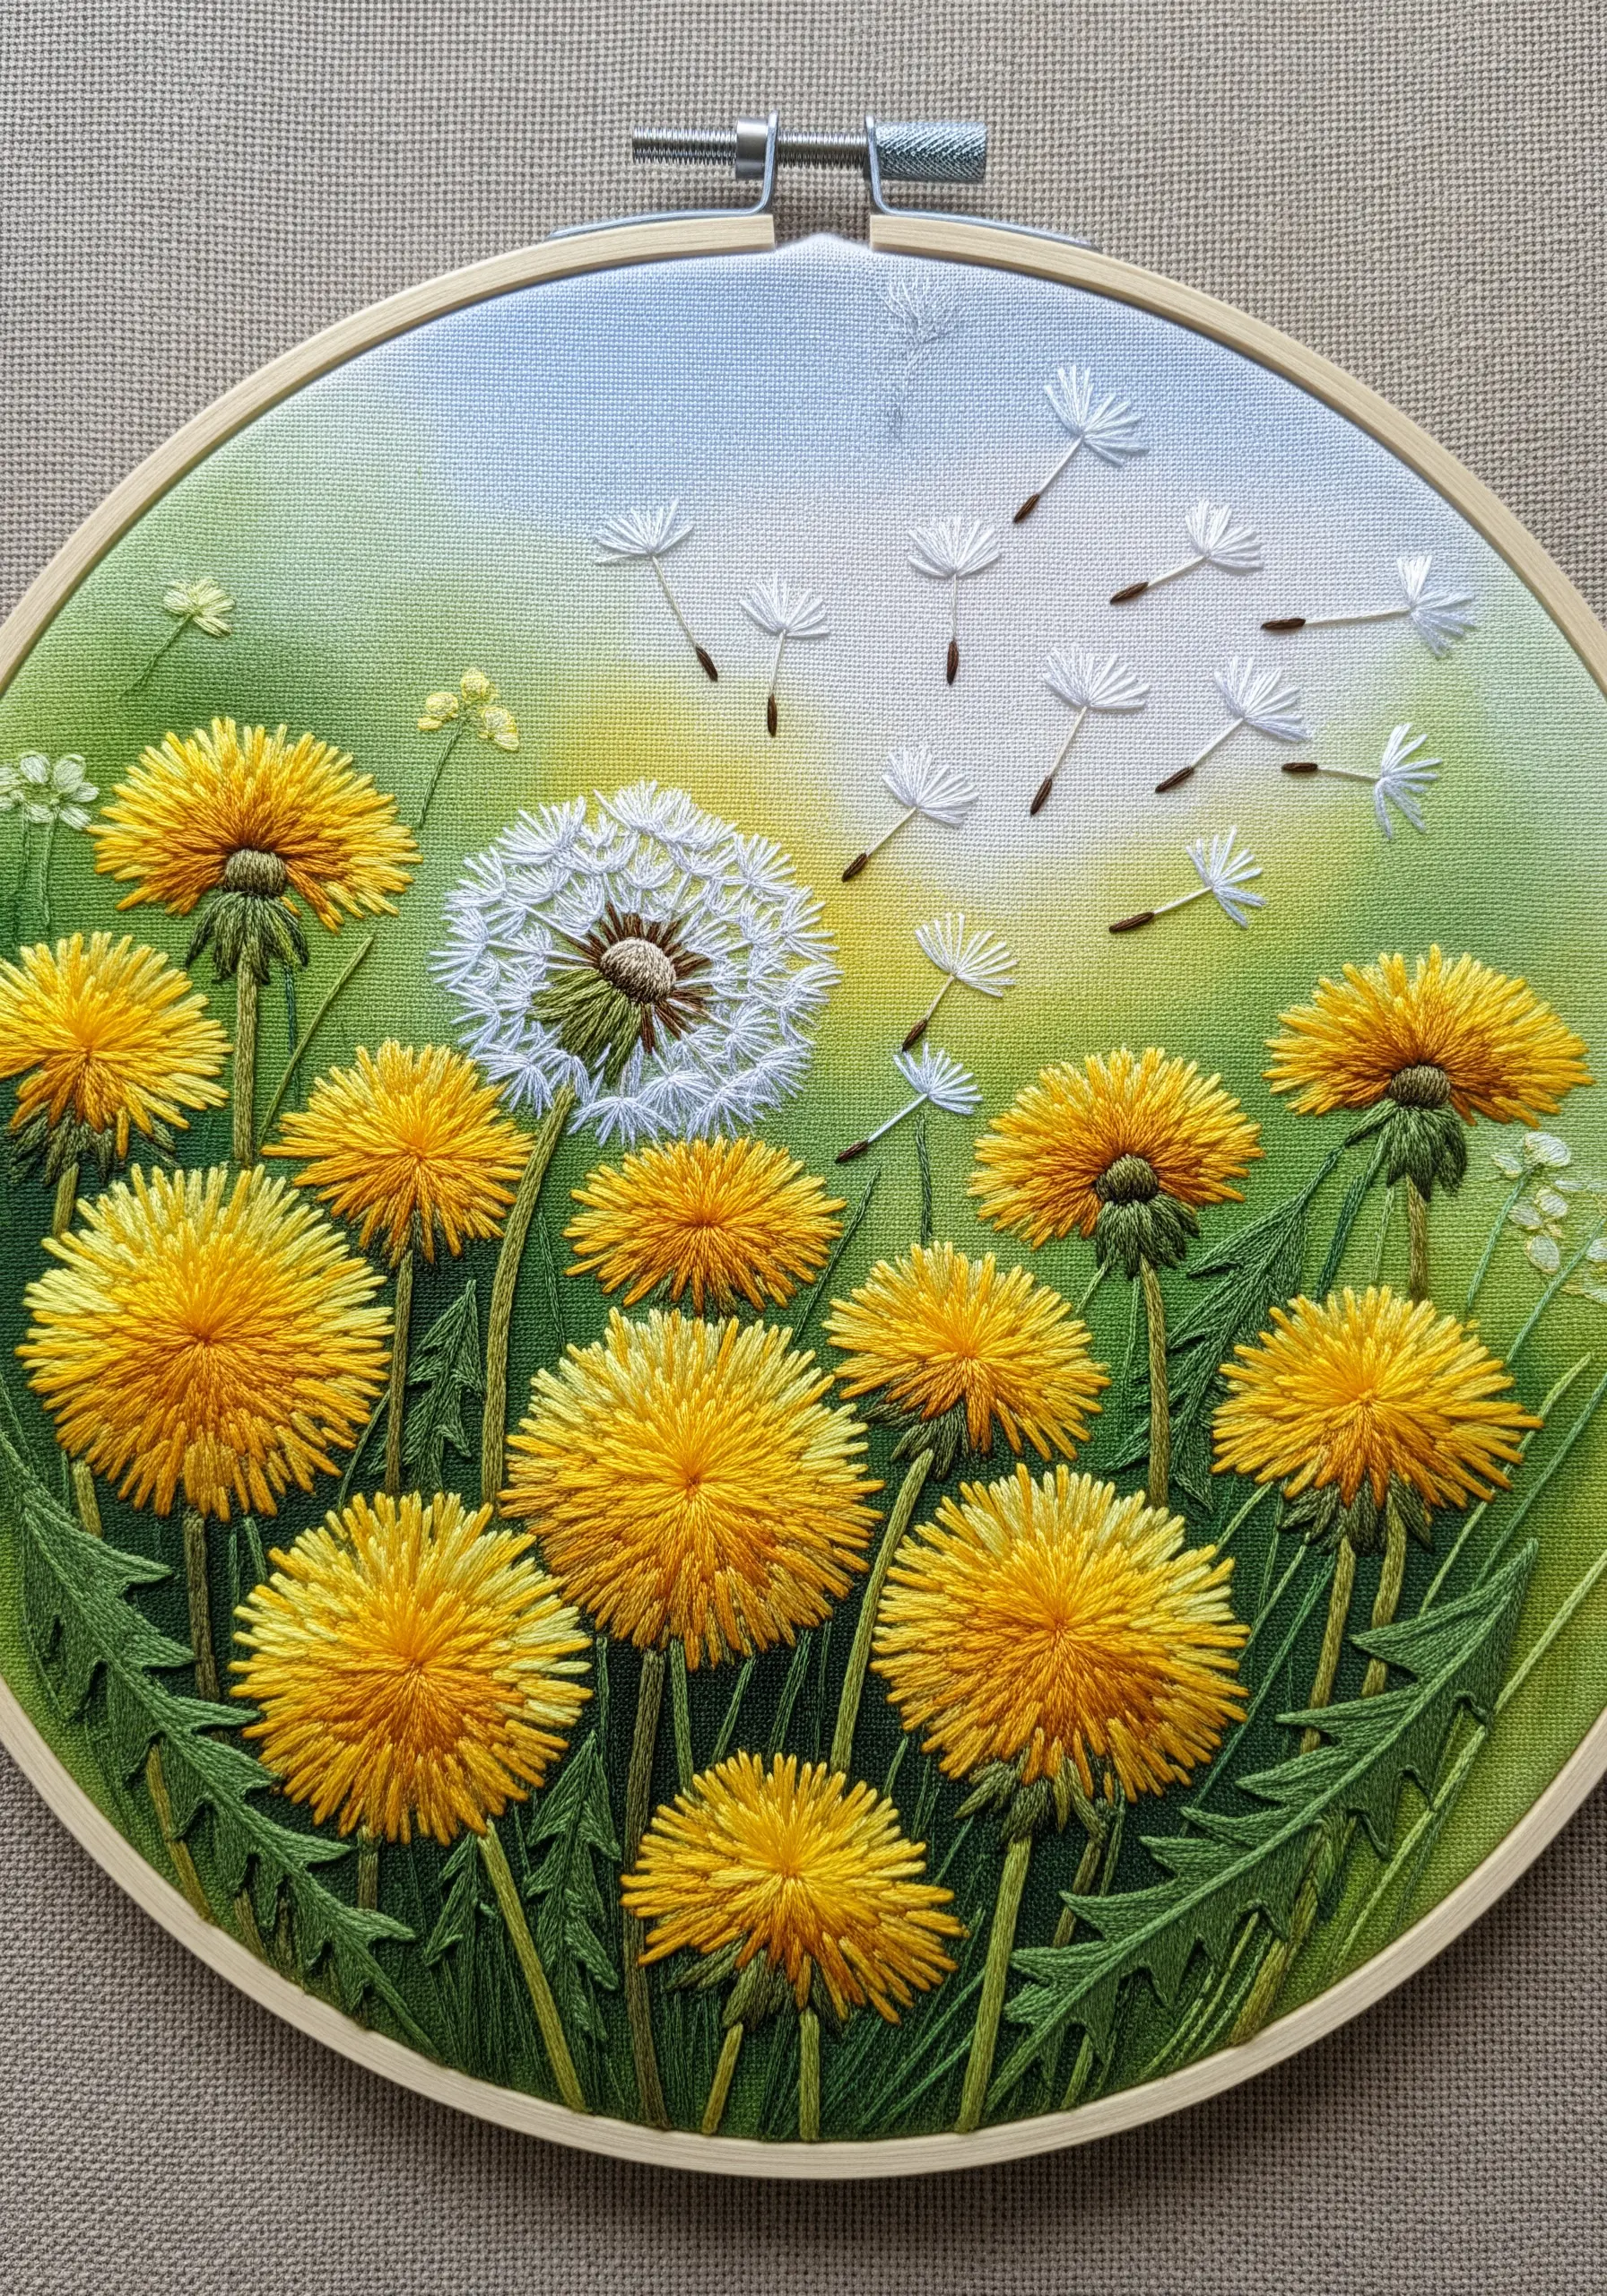
To create the illusion of dandelion seeds floating on the breeze, think about movement and lightness.
Use a single, detached straight stitch for the parachute, paired with a tiny seed stitch or French knot at the base for the seed itself.
Vary the length, angle, and spacing of each seed to create a natural sense of drift across the fabric.
This technique turns a static image into a dynamic story, especially in these dandelion and wildgrass stitch projects.
9. The Painterly Depth of Layered Peonies

To build the lush, overlapping petals of a peony, you must think in layers.
Start by stitching the petals that are furthest back first.
Use long-and-short stitch with a single strand of floss, blending 3-5 shades to create soft gradients.
Once the back layer is complete, stitch the foreground petals directly on top of it.
This physical layering of thread is what gives these peony embroidery ideas their incredible depth and realism.
10. Stitching a Waterside Iris Scene

When you turn photos into threaded landscapes, focus on translating elements into distinct textures.
For the water, use long, horizontal straight stitches with several shades of blue and white to mimic light reflecting on the surface.
In contrast, build the riverbanks with dense clusters of French knots in earthy tones.
This textural difference between the smooth, sleek water and the rough, pebbly shore is what brings the entire scene to life.
11. Elegant Foxglove with Delicate Details

For flowers with a distinct bell shape, padded satin stitch is your best technique for creating volume.
First, create a foundation of small, horizontal stitches within the flower’s shape.
Then, cover this padding with a final layer of smooth, vertical satin stitches.
This raises the flower from the fabric, giving it a subtle, three-dimensional form that feels far more lifelike than a flat stitch alone, perfect for all your botanical stitch art ideas.
12. A Wispy Cosmos and Watercolor Wreath
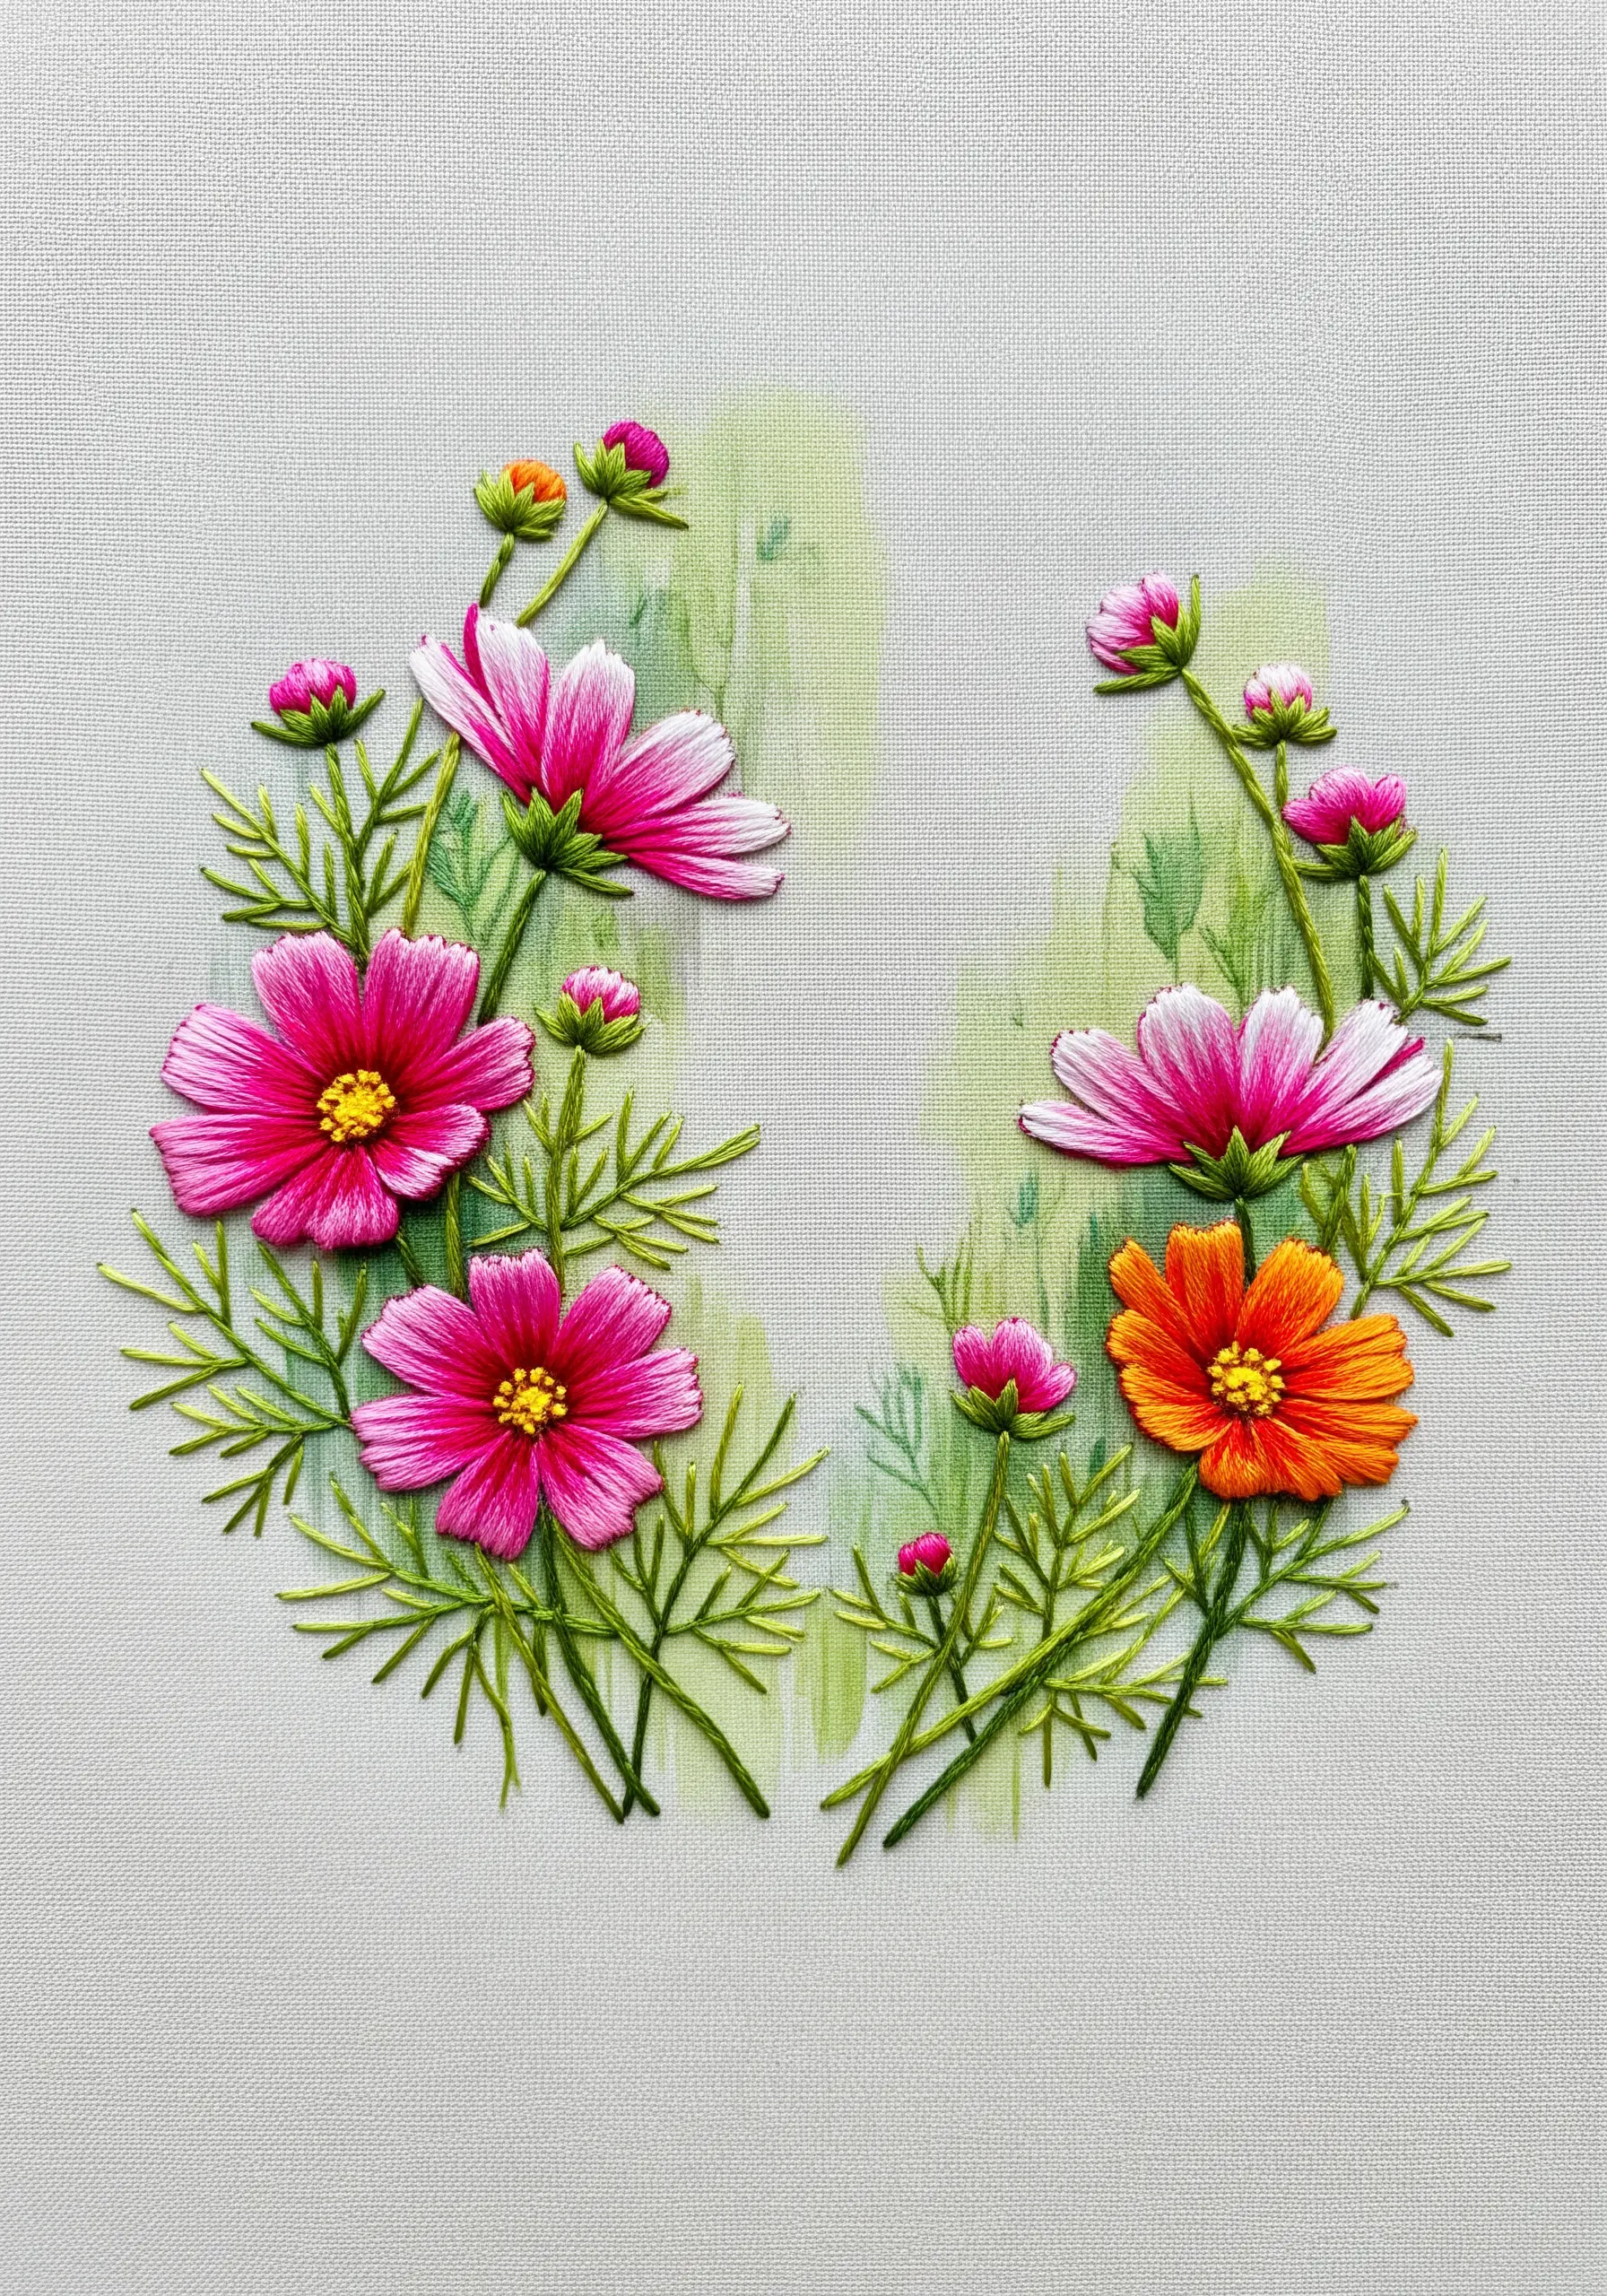
Achieve an ethereal glow by applying a soft wash of green watercolor or fabric paint to your fabric *before* you start stitching.
This creates a delicate, atmospheric base that your threadwork can interact with.
When stitching the cosmos petals, use long, open satin stitches, allowing small hints of the painted background to show through.
This enhances the translucent quality of the petals, making your watercolor-style floral threads look even more integrated.
13. Moody Forest Floor Embroidery
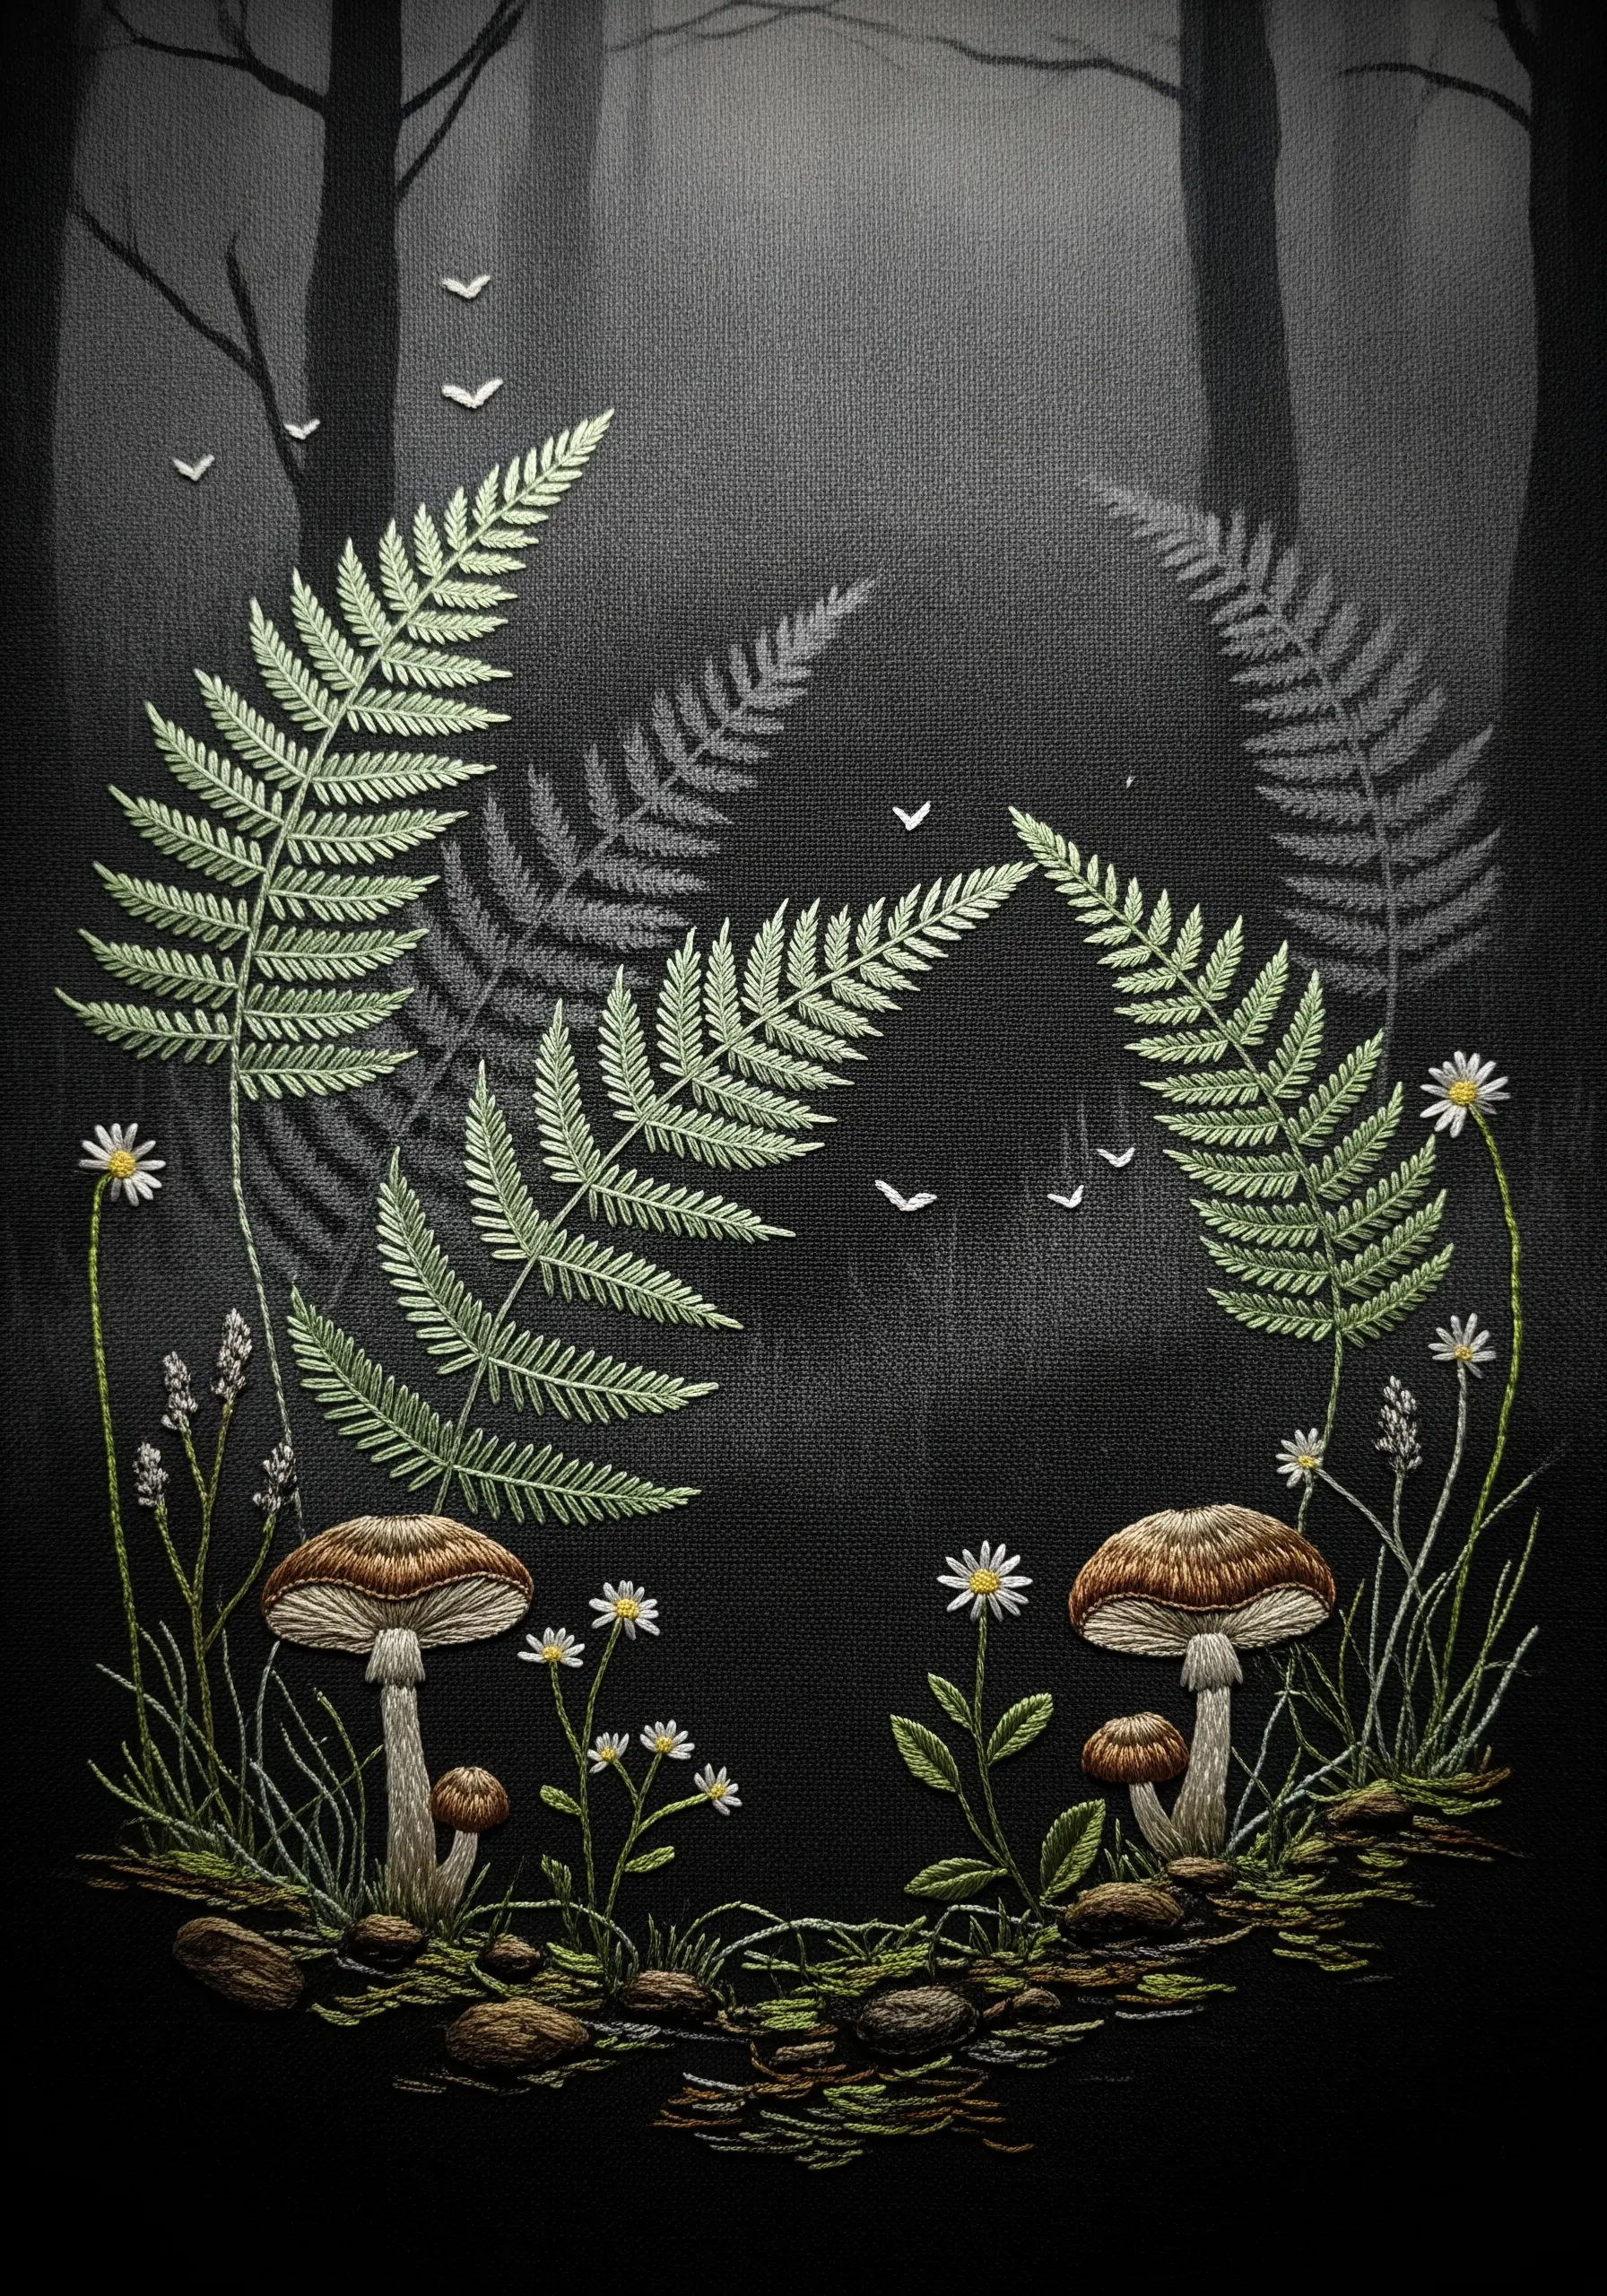
The choice of fabric is crucial for creating atmosphere.
A dark, textured linen or charcoal gray canvas immediately sets a moody, intimate tone.
For the delicate fern fronds, use fishbone stitch with a single strand of green thread for maximum definition.
Contrast this with the solid, rounded caps of the mushrooms, which you can create with directional satin stitch.
This technique is perfect for capturing detailed forest floor botanical stitch ideas.
14. Cascading Vines with a Watercolor Drip
This is a daring way to combine with paper and paint—or in this case, fabric paint.
First, complete all of your stitching.
Then, using a brush loaded with watered-down ink or fabric paint, touch the base of your embroidered vines and allow gravity to create a natural, artistic drip.
This modern technique beautifully merges the controlled art of embroidery with the spontaneous nature of paint, creating a piece that feels both handcrafted and contemporary.
Always test on a scrap fabric first!
15. Autumnal Bouquet in Painterly Cross-Stitch
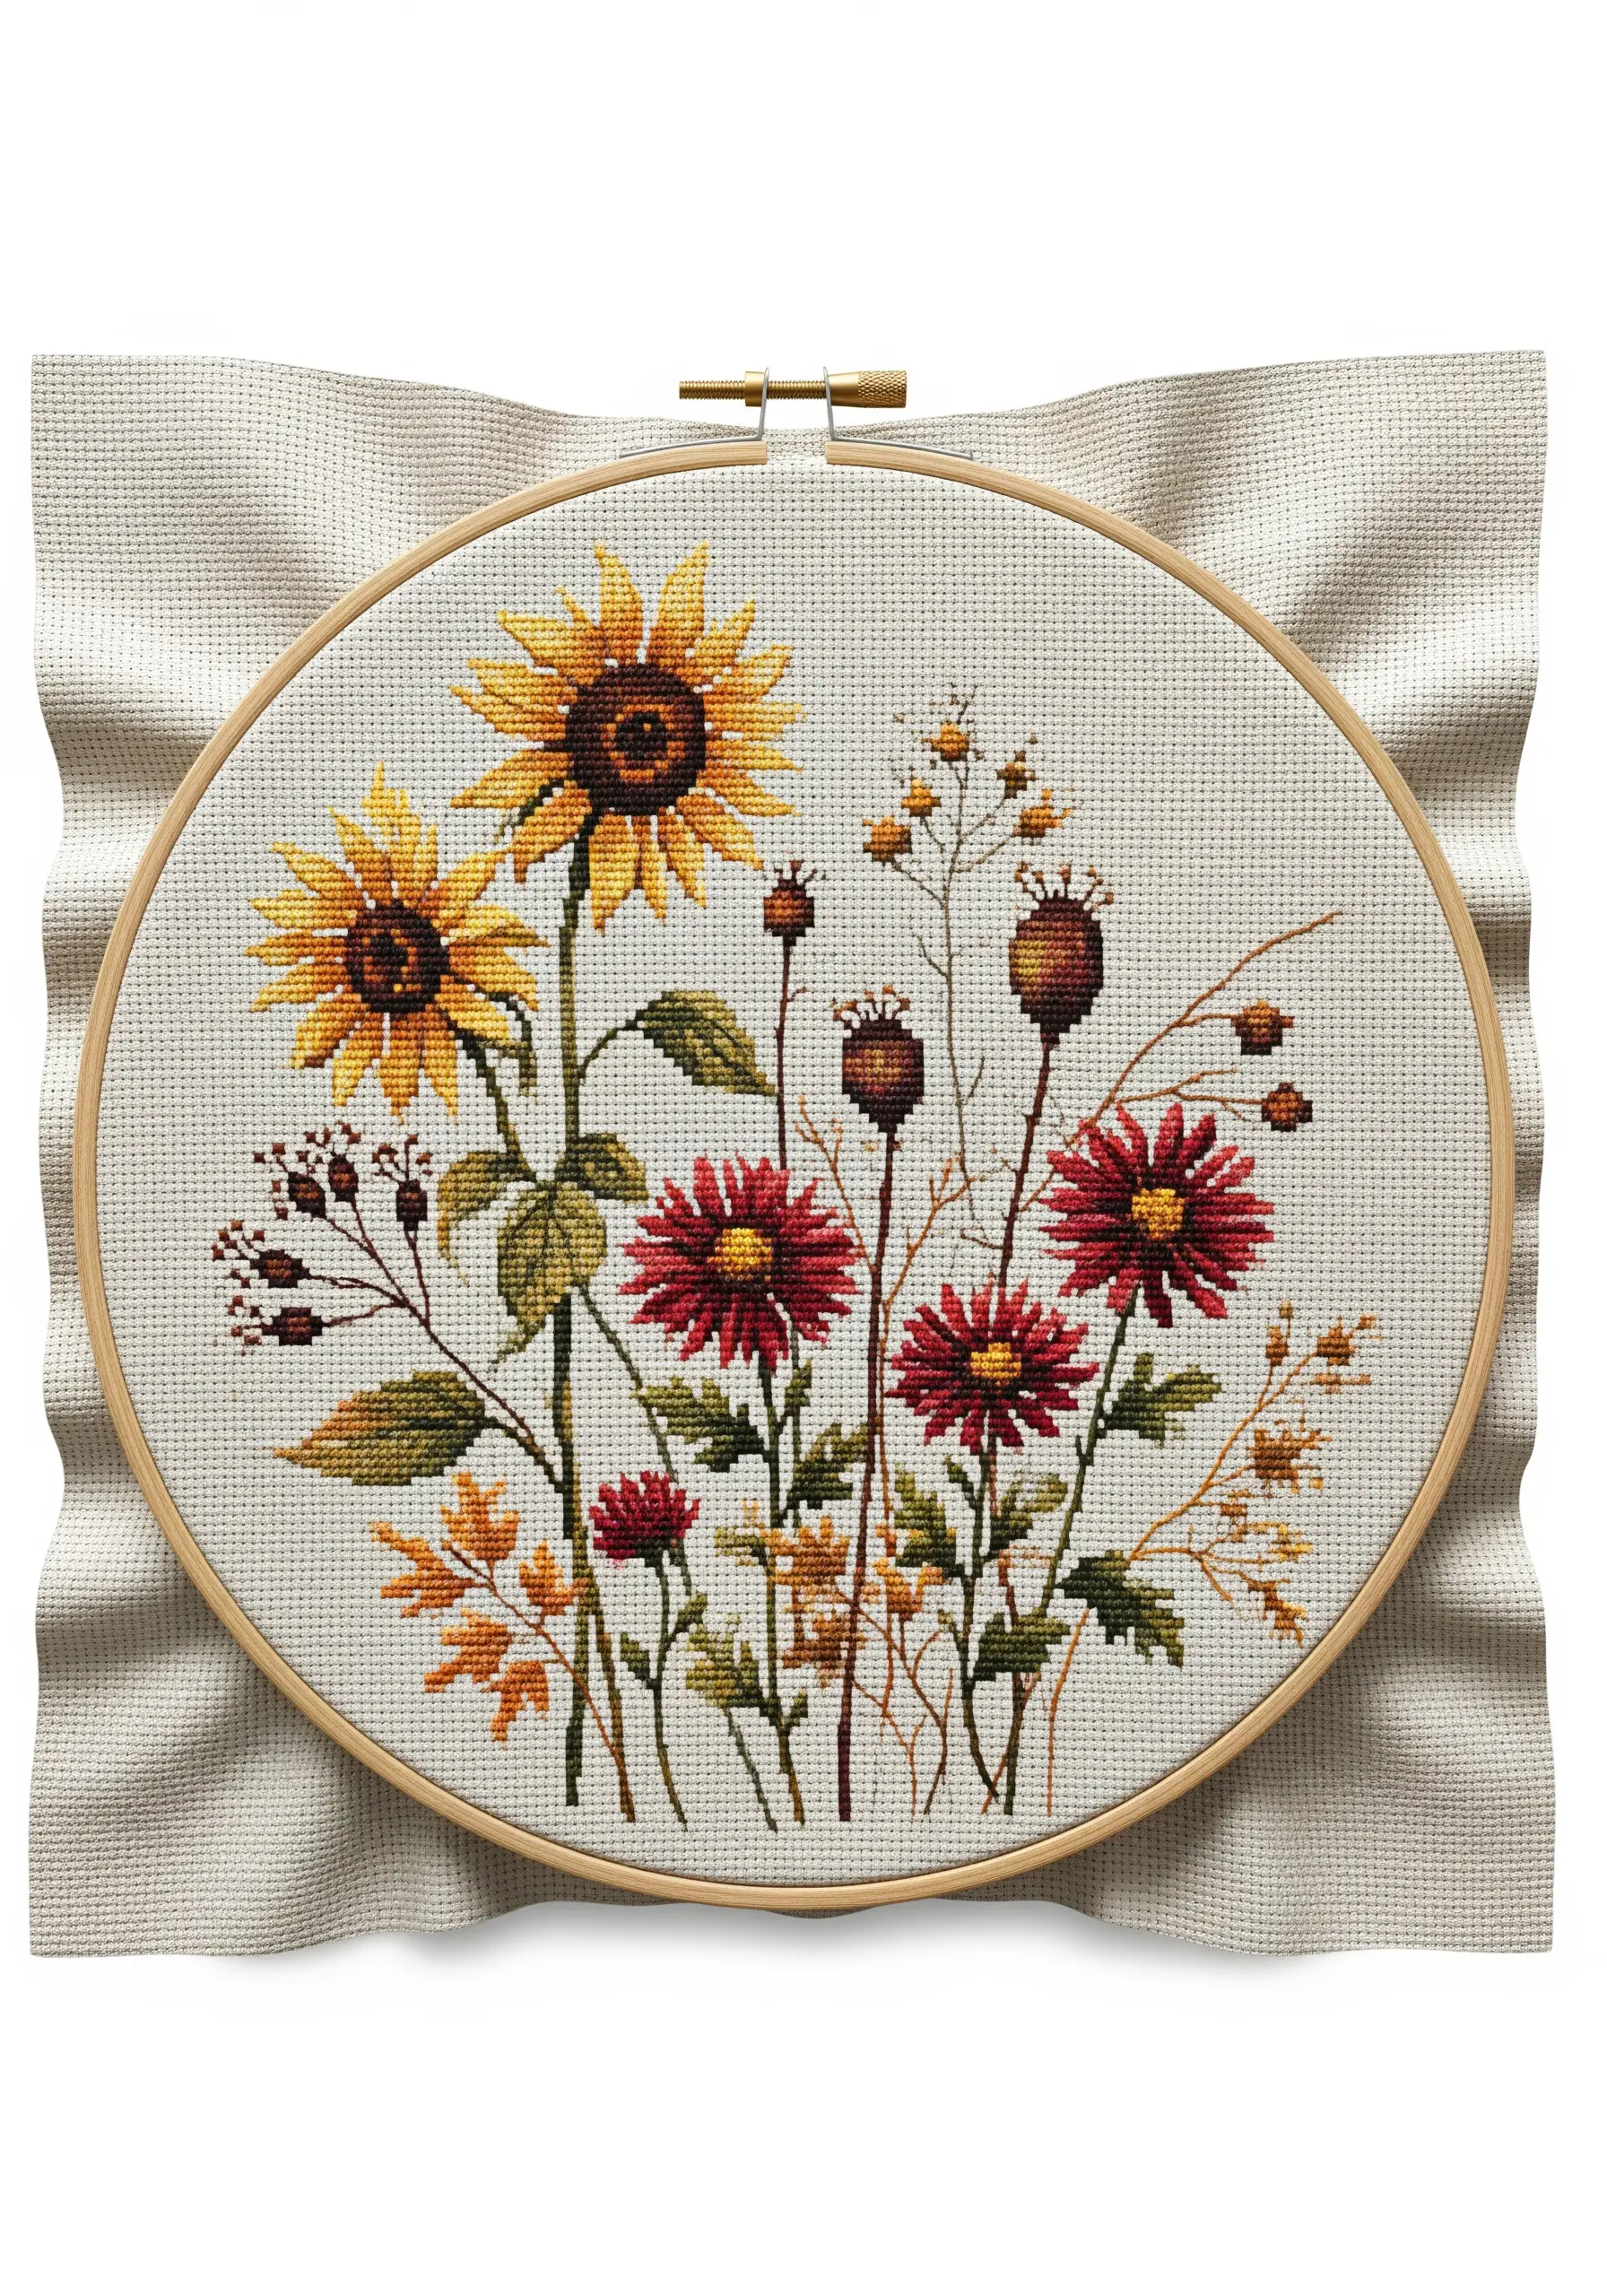
Even the structured grid of cross-stitch can yield a painterly effect.
The key is to select a pattern that utilizes extensive shading and color blending, often with dozens of closely related thread colors.
This technique avoids harsh color blocking and instead creates soft, blended transitions that mimic the way watercolors pool and mix on paper.
It’s an ideal approach for seasonal framed embroidery pieces that require depth and subtlety.
16. Three-Dimensional Roses on a Tote Bag

Move beyond the hoop by combining embroidery with appliqué for incredible texture on accessories.
To create these 3D roses, cut layered circles from felt or thick cotton fabric.
Stitch them onto the bag in a spiral, securing the base firmly and allowing the edges to lift.
You can then add embroidered details directly onto the fabric petals for shading.
This method is central to many botanical fabric collage embroidery ideas and adds a truly sculptural element.
17. Lifelike Bee and Textured Clover
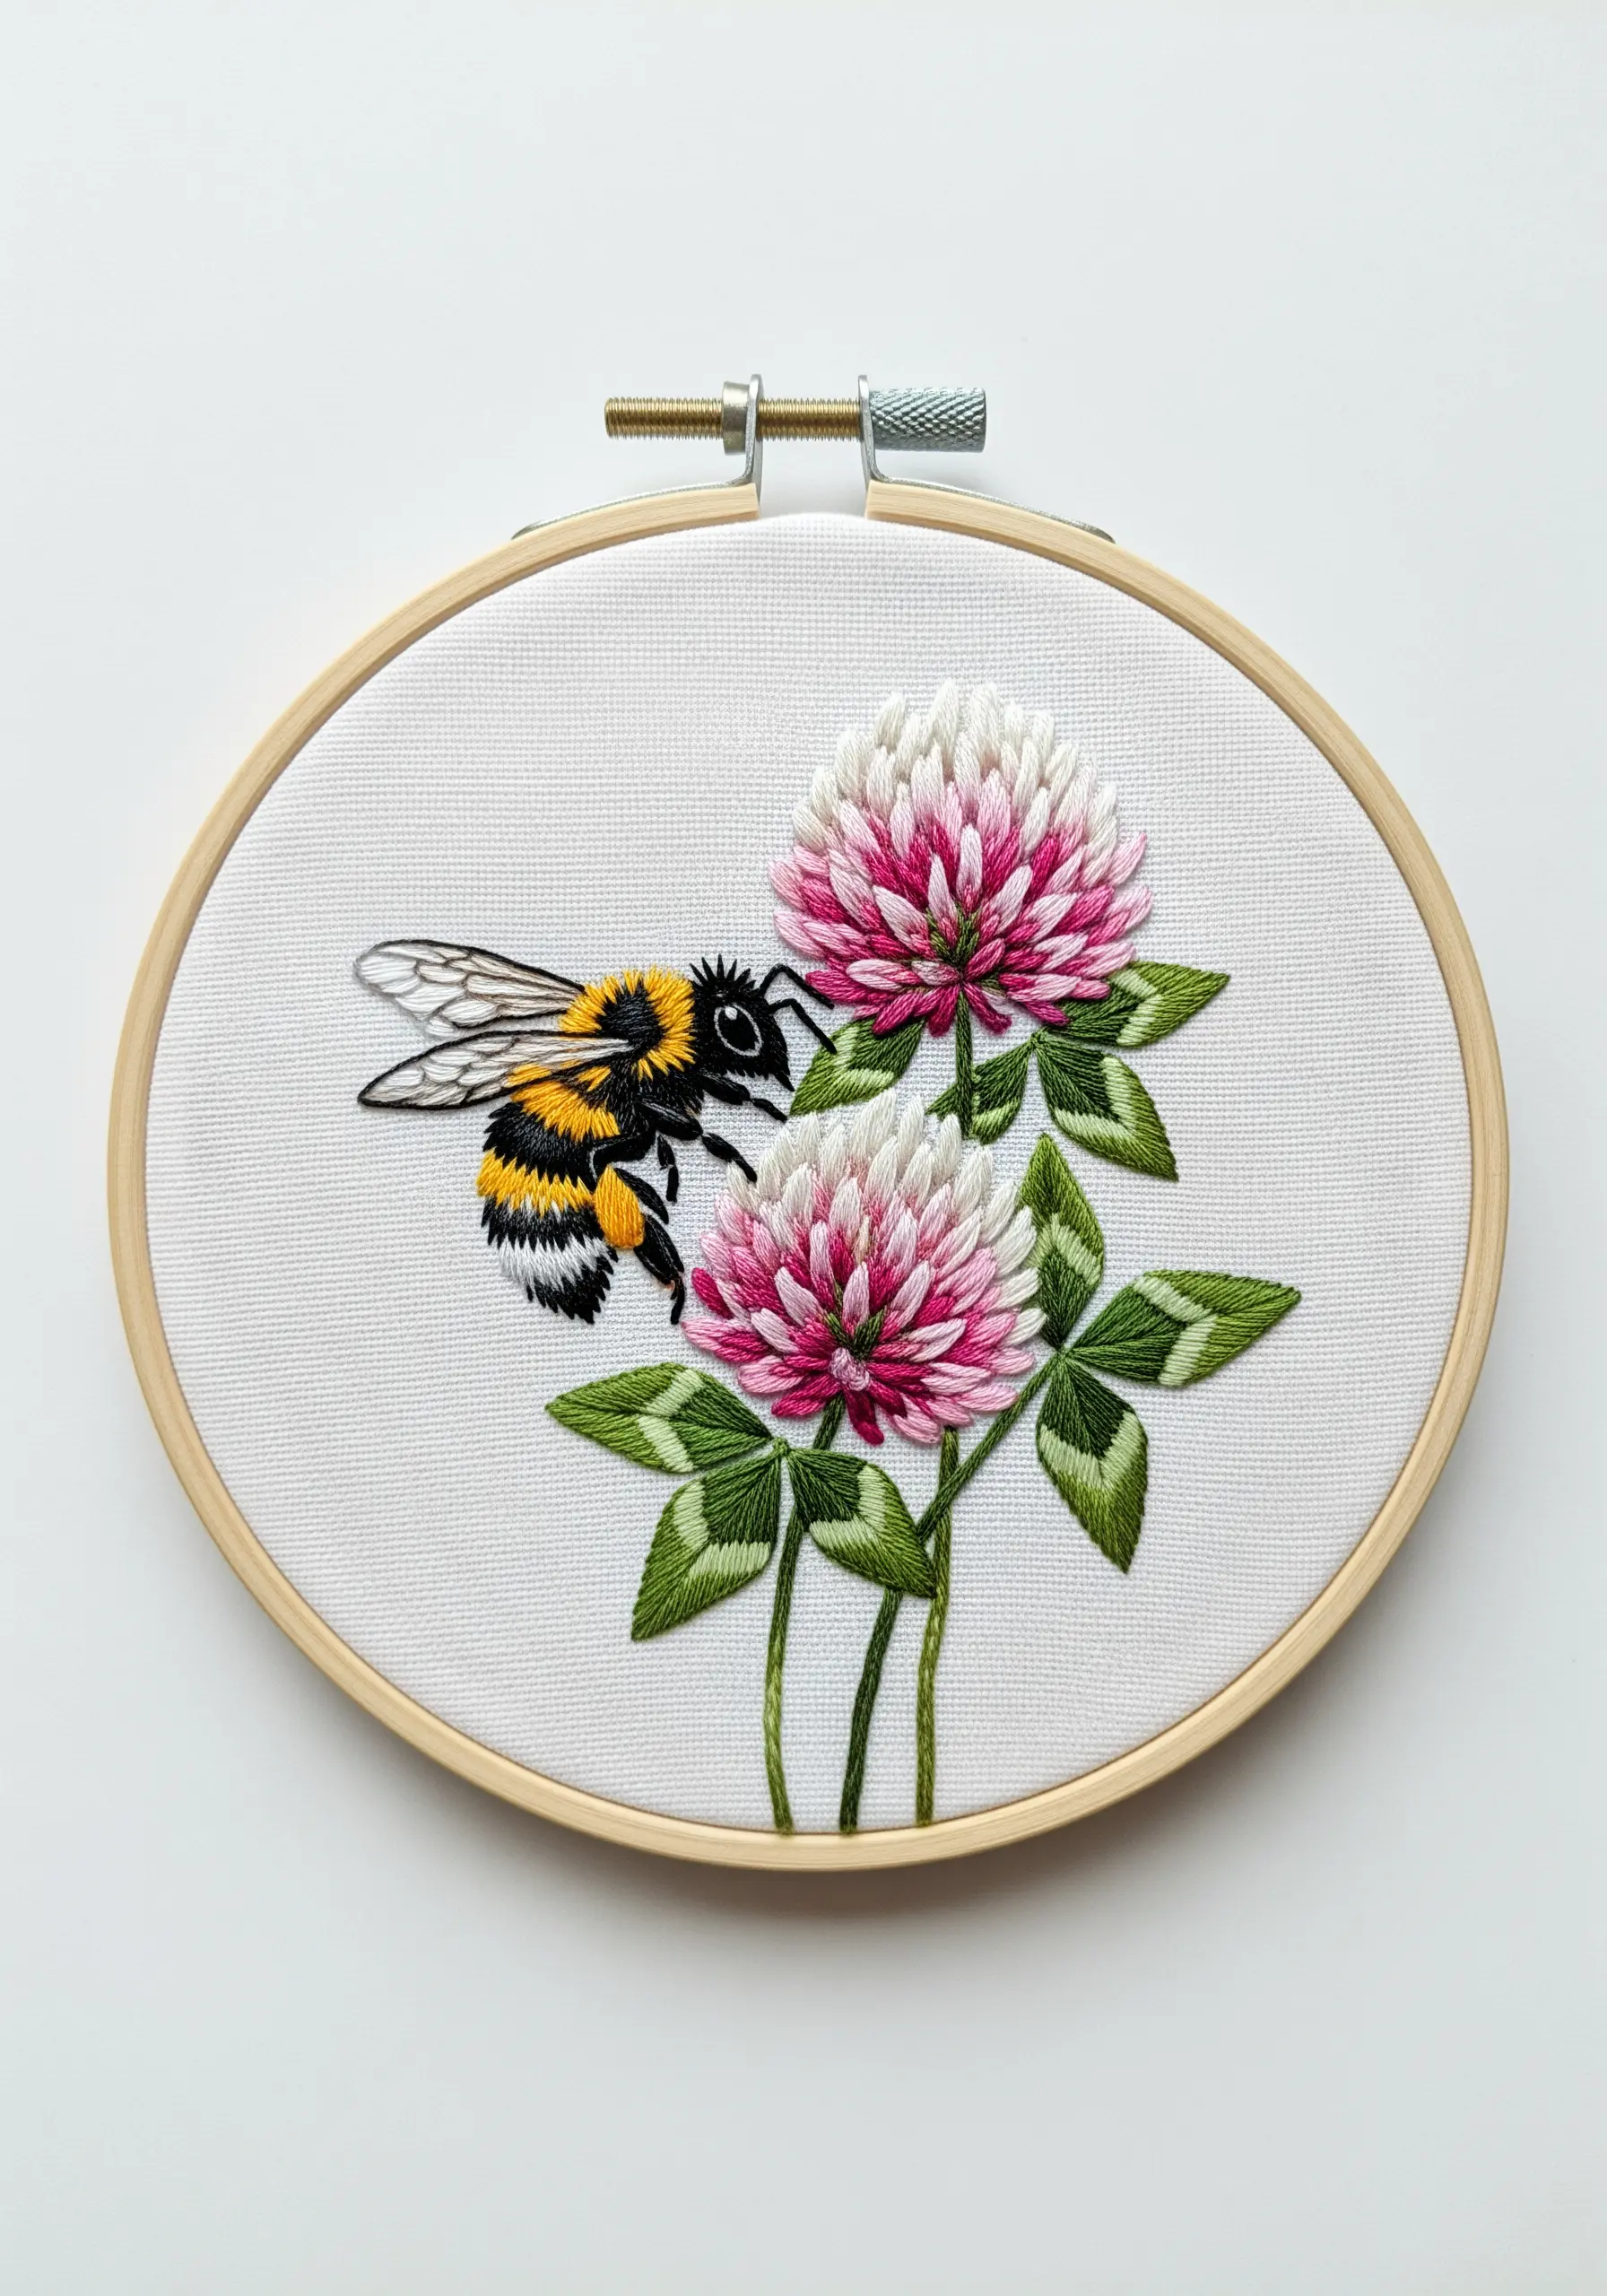
When stitching flora and fauna together, texture is everything.
For the bee’s fuzzy body, use short and long stitches that are slightly uneven to mimic fine hairs.
For the clover blossoms, use dense clusters of detached chain stitches, which create a puffy, rounded shape.
By consciously choosing different stitches to represent different surfaces—fur versus petals—you create a more dynamic and believable scene, as seen in many meadow bloom stitch projects.
18. Evening Blooms on a Deep Blue Canvas

This composition is a beautiful study in color theory on dark fabric.
The soft yellows and pale blues pop against the navy background because they are complementary and high in contrast, yet they share a similar soft, pastel tonal value.
This creates a look that is vibrant but also harmonious and calming.
When planning your own evening garden floral embroidery ideas, choose a focused palette of light tones to ensure your work shines against the darkness.
19. Voluminous Bleeding Heart Blossoms
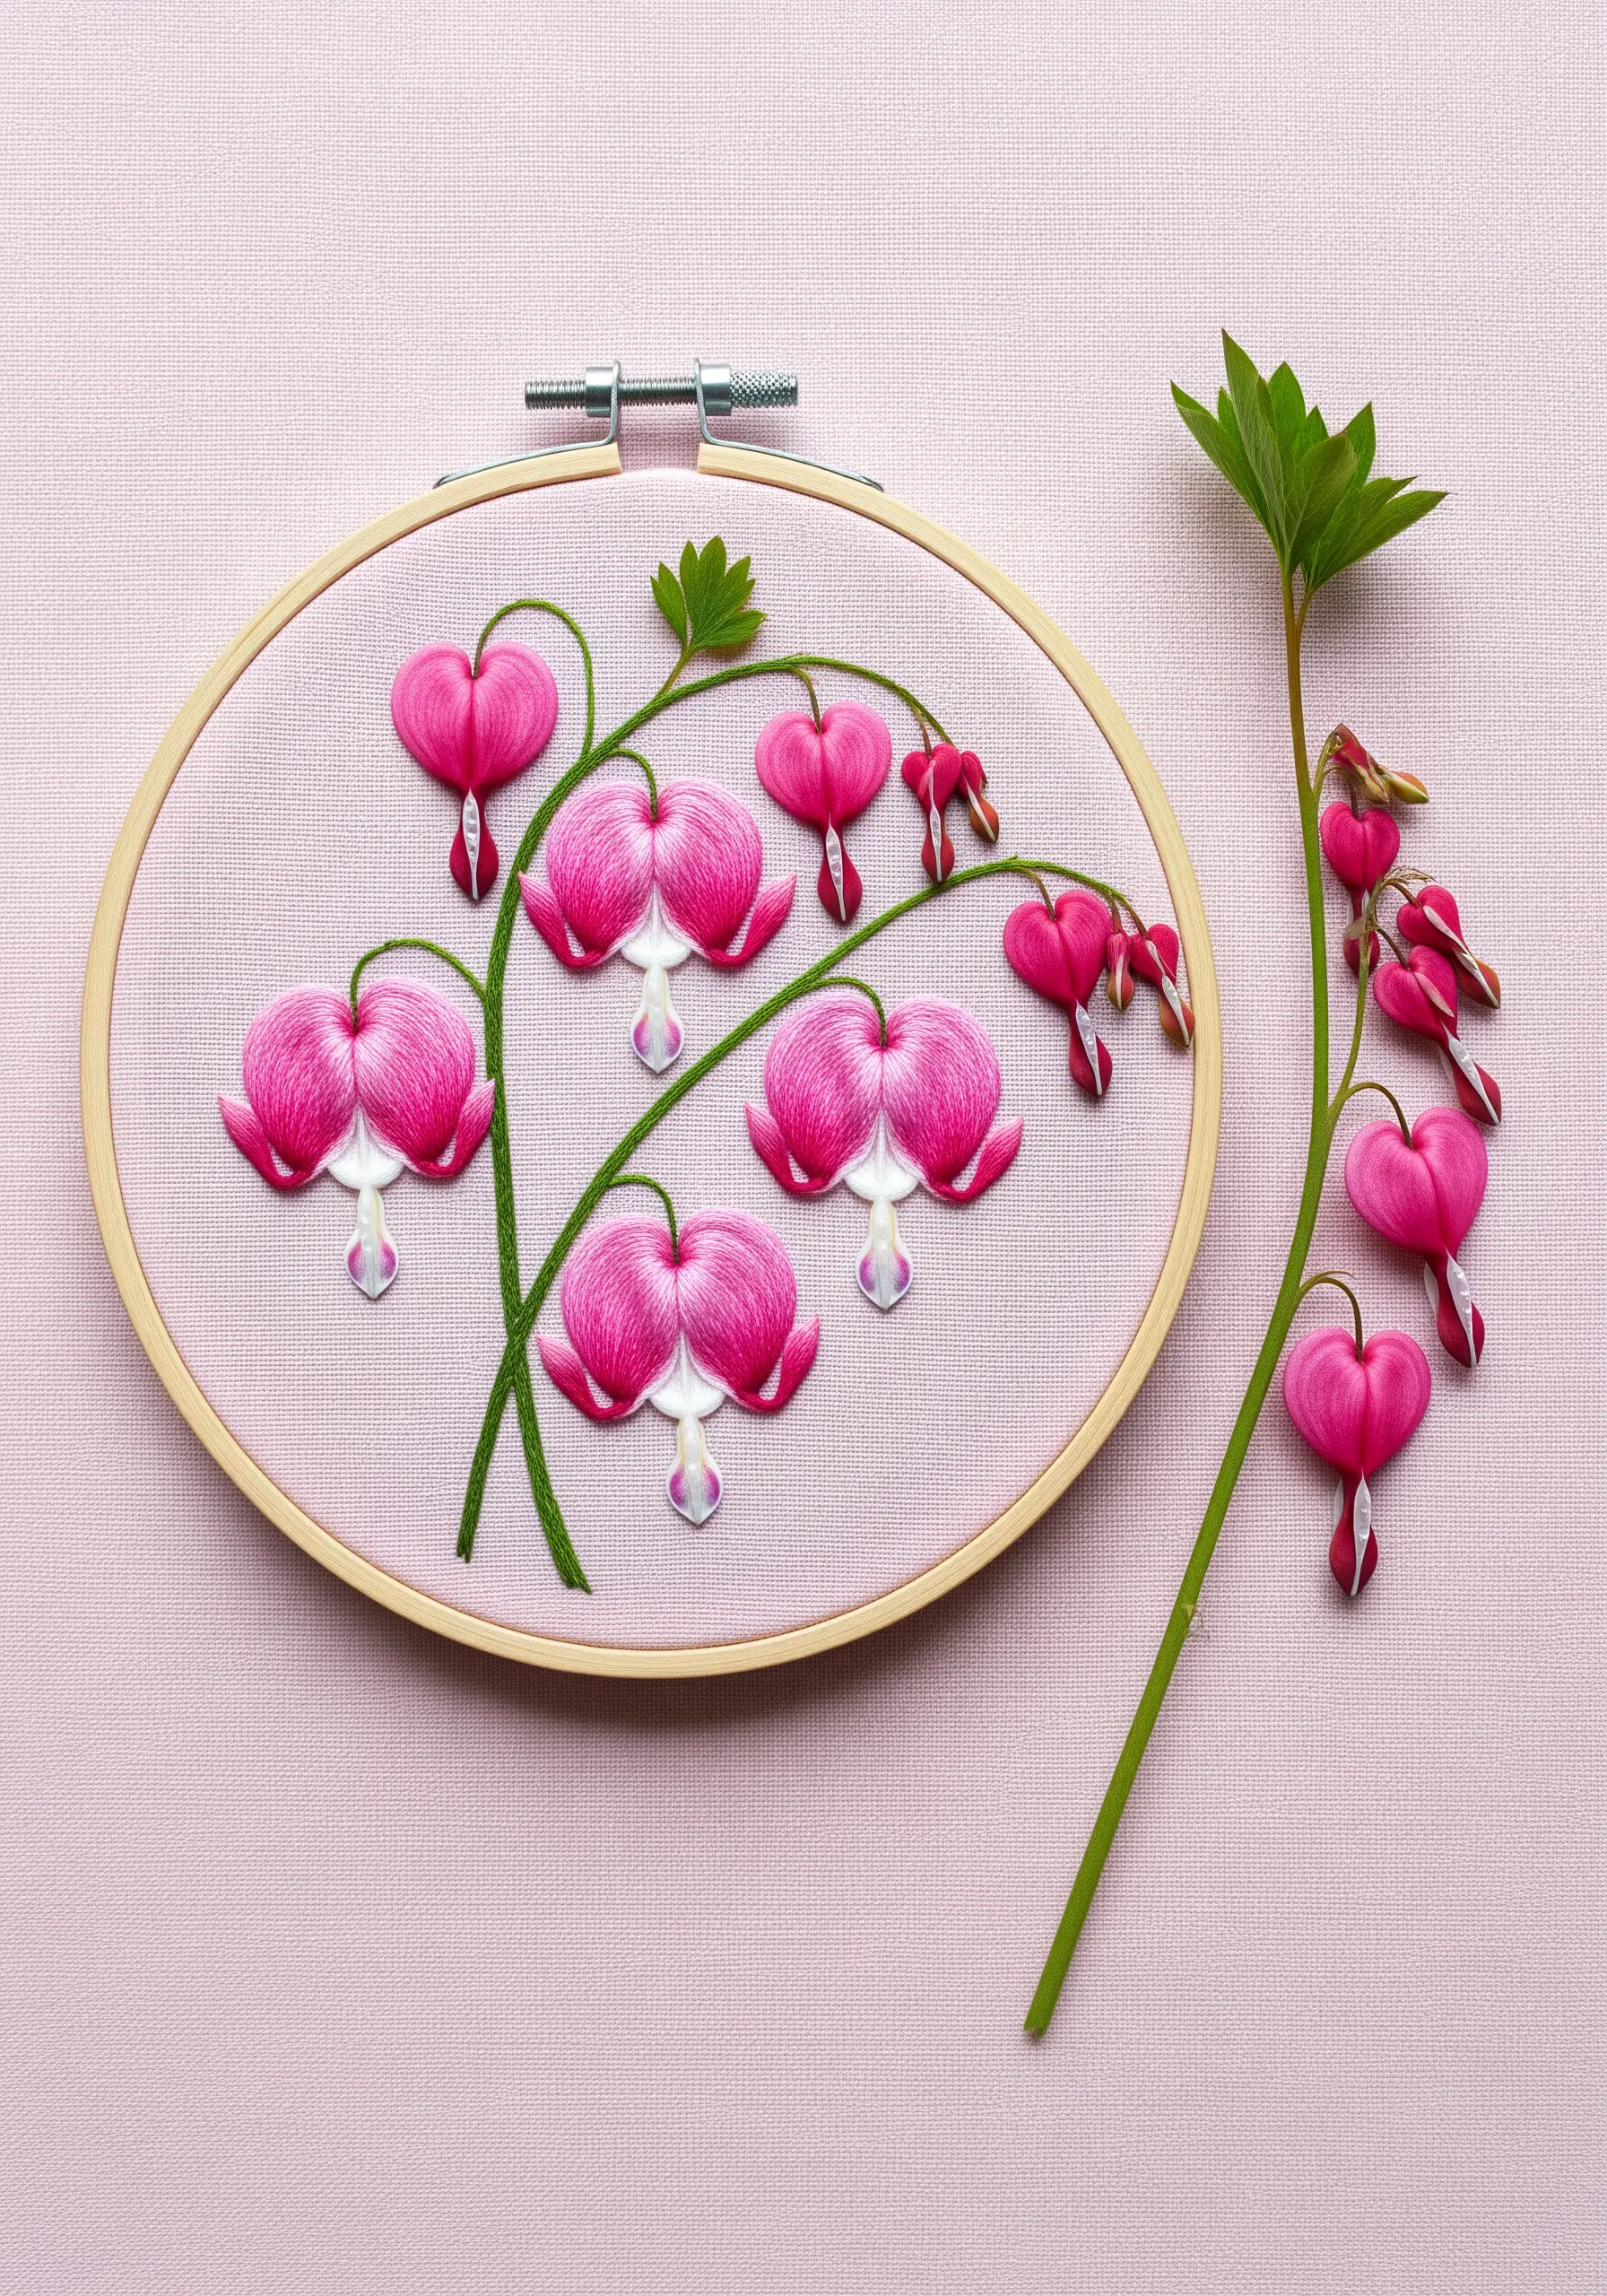
To capture the unique, puffy shape of bleeding hearts, a padded satin stitch is essential.
First, create an underlayer of small horizontal stitches within the heart shape.
Then, cover that padding with a final layer of smooth, vertical satin stitches.
This technique lifts the motif from the fabric, giving it a plump, 3D quality that makes it incredibly lifelike and touchable, making it one of the most satisfying romantic string art heart patterns to create.
20. A Lustrous Blueberry Wreath

The trick to making these blueberries look round and glossy lies in the direction of your satin stitch.
Angle your stitches to follow the curve of the berry, which creates a subtle contour.
For the finishing touch, add a single stitch or a tiny French knot of bright white thread at the top of each berry.
This acts as a specular highlight, tricking the eye into seeing a shiny, reflective surface, a technique that elevates any flower wreath hoop ideas.
21. A Vibrant Bouquet of Stitched Zinnias
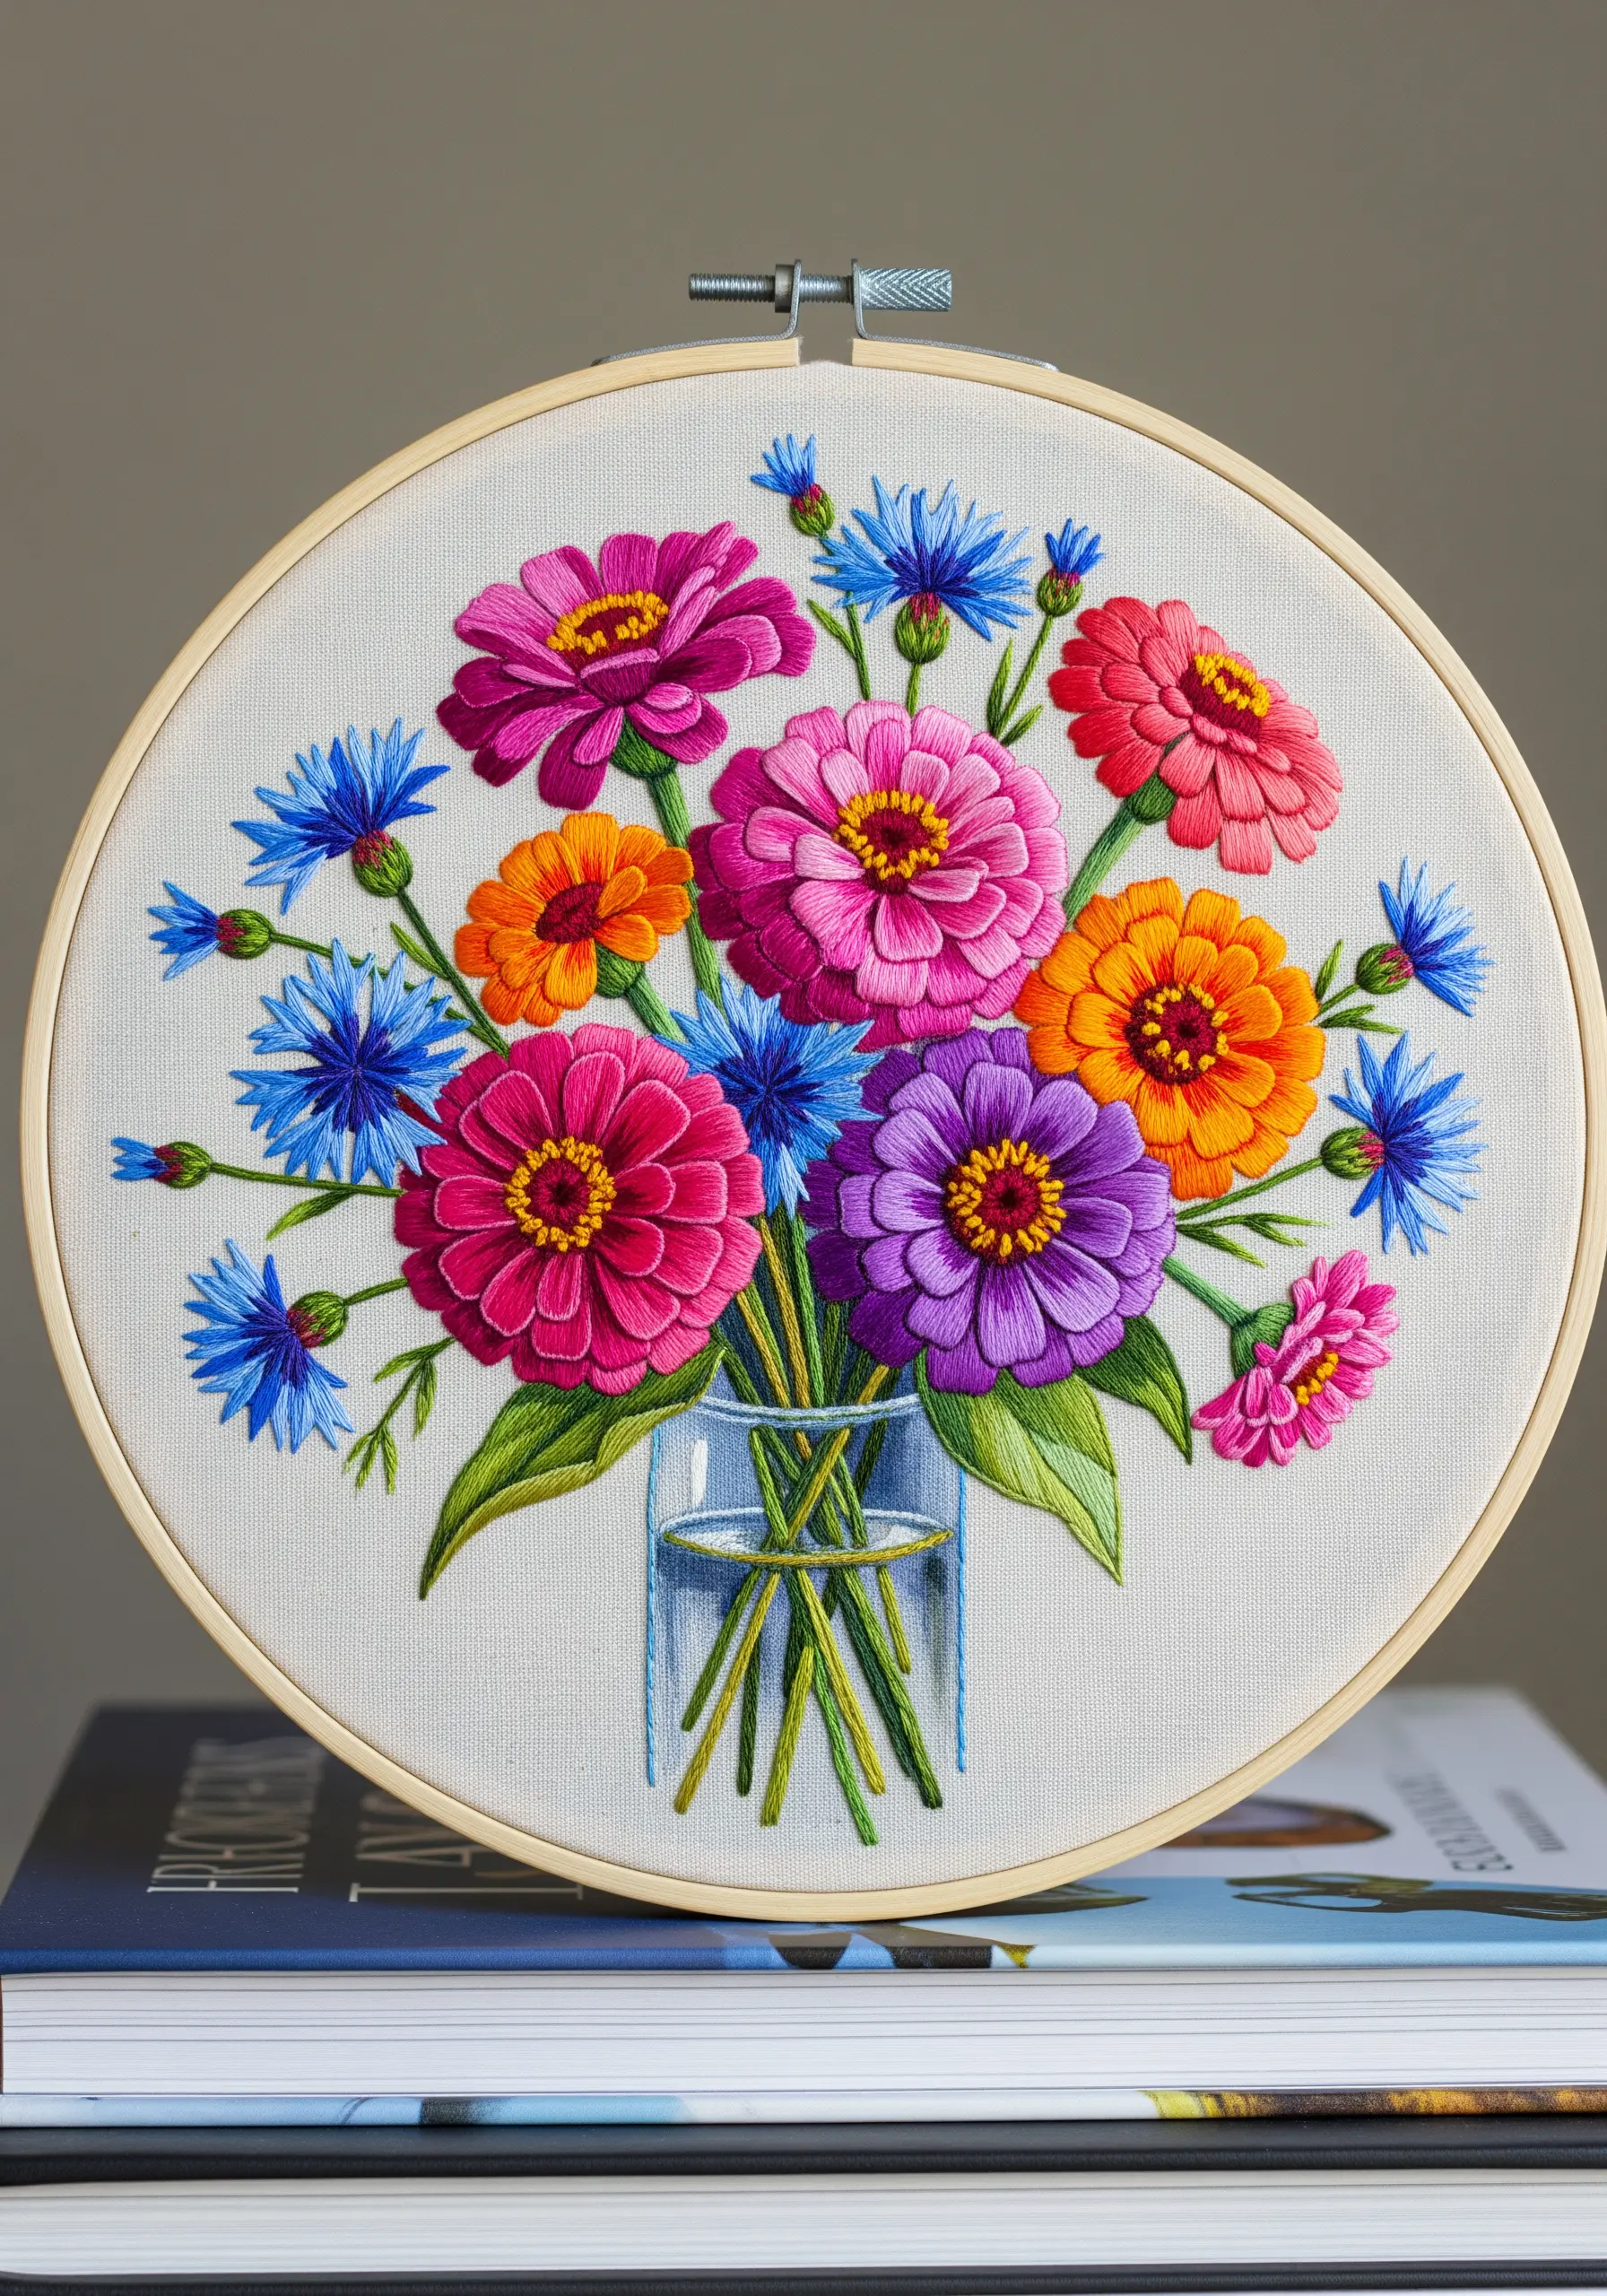
A fearless and joyful color palette can be your most powerful tool.
Don’t shy away from saturated pinks, oranges, and purples—when combined thoughtfully, they create energy and life.
To create the illusion of a transparent glass vase, use a minimalist approach: a few sparse, carefully placed straight stitches in white or light blue are all you need to suggest the form without filling it in.
This technique is perfect for trying out abstract color blend stitch ideas within a representational piece.
22. Rolling Hills of Embroidered Heather

You can create a powerful sense of atmospheric perspective using only thread and texture.
For the foreground, use dense, multi-toned French knots and bullion knots to make the heather feel close, detailed, and vibrant.
As you move to the hills in the background, transition to sparser seed stitches or simple straight stitches in more muted, hazy shades of purple.
This textural gradient is a sophisticated way to create depth, perfect for stitching a lavender field embroidery ideas or any landscape.


