

There is a special kind of quiet satisfaction in nurturing something from the ground up—whether it’s a pot of basil on your windowsill or a single, perfect stitch on fresh linen.
These small herb designs are an invitation to connect those two worlds. They are not about creating impossibly complex masterpieces, but about finding a moment of peace and focus, translating the simple beauty of your garden into art you can hold.
Here, you will discover how a slight change in stitch direction can make a leaf feel alive, how adjusting your thread count can give a petal soft volume, and how even the simplest stitches, when placed with intention, can create something truly elegant. Let’s begin.
1. Render Rosemary with Architectural Stitches
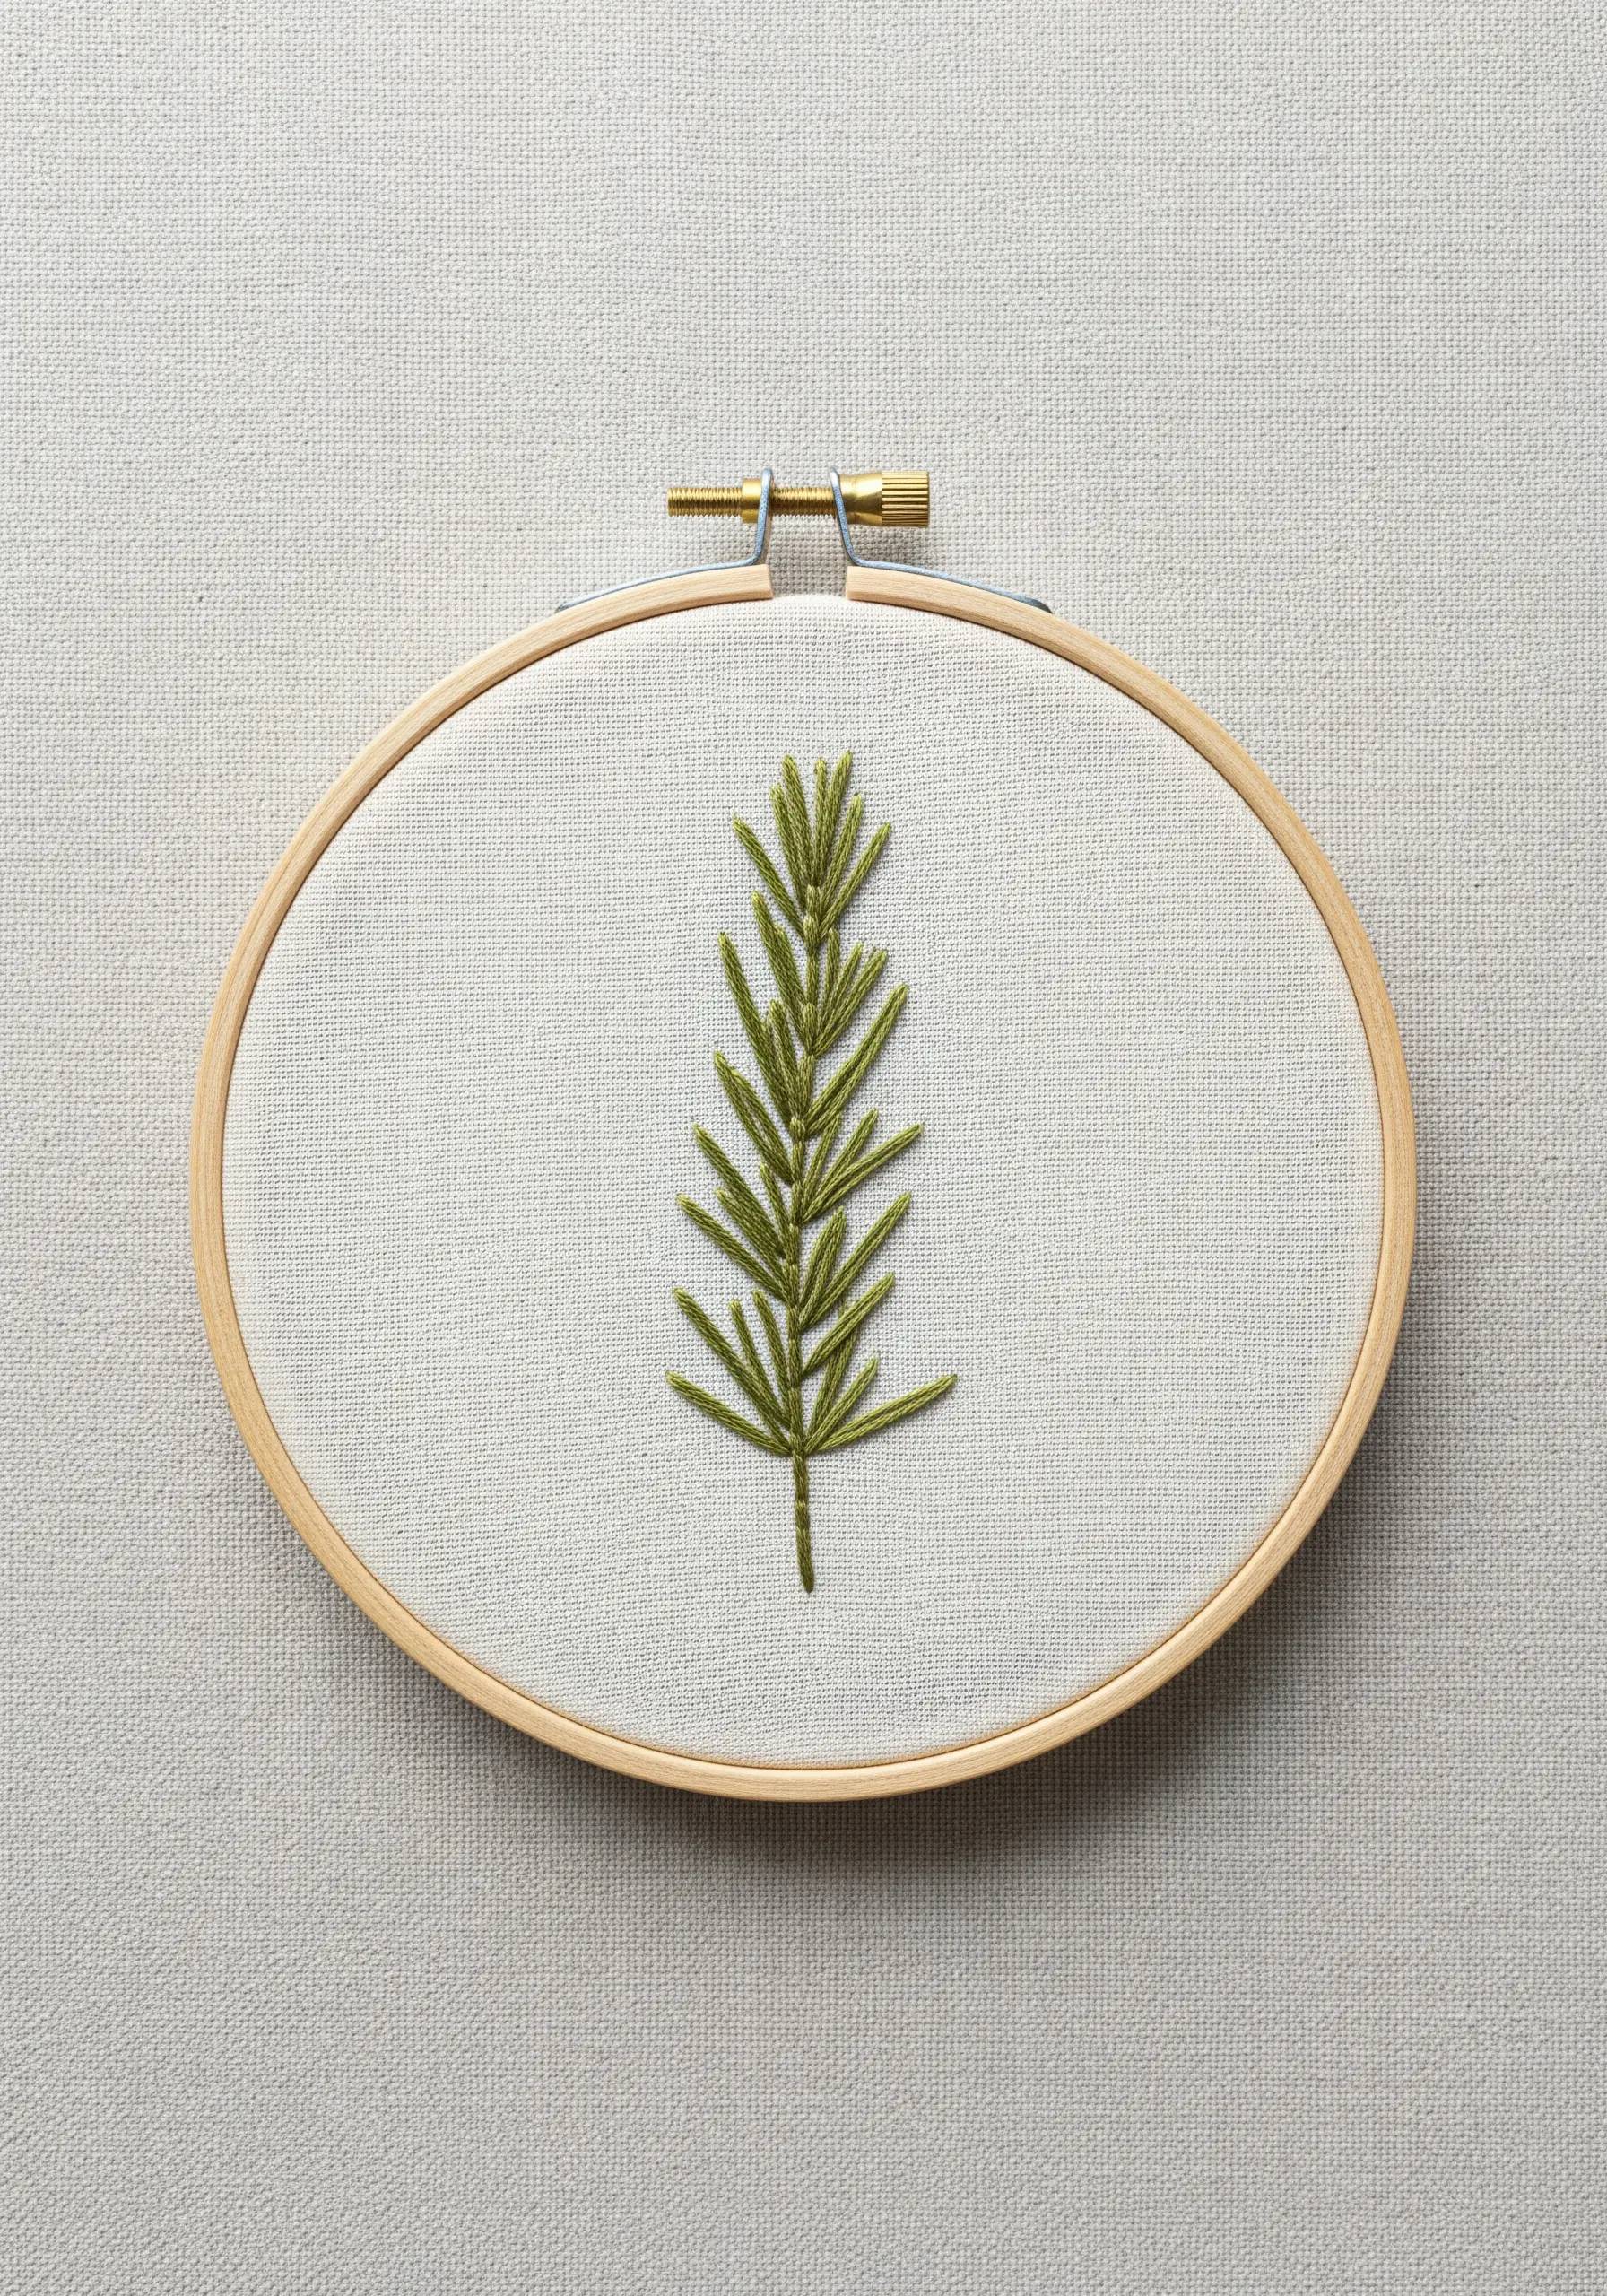
Capture the needle-like structure of rosemary not with satin stitch, but with precise, angled straight stitches.
Work from a central split-stitch stem, angling your needle stitches upwards and outwards at a consistent 45-degree angle for a clean, graphic look.
For a more organic texture, slightly vary the length and angle of each stitch, as if the sprig were caught in a gentle breeze.
Use three strands of a deep olive green floss on a high-count linen or even-weave cotton; the fabric’s structure will act as a grid, keeping your lines sharp.
2. Master the Soft Volume of Mint Leaves
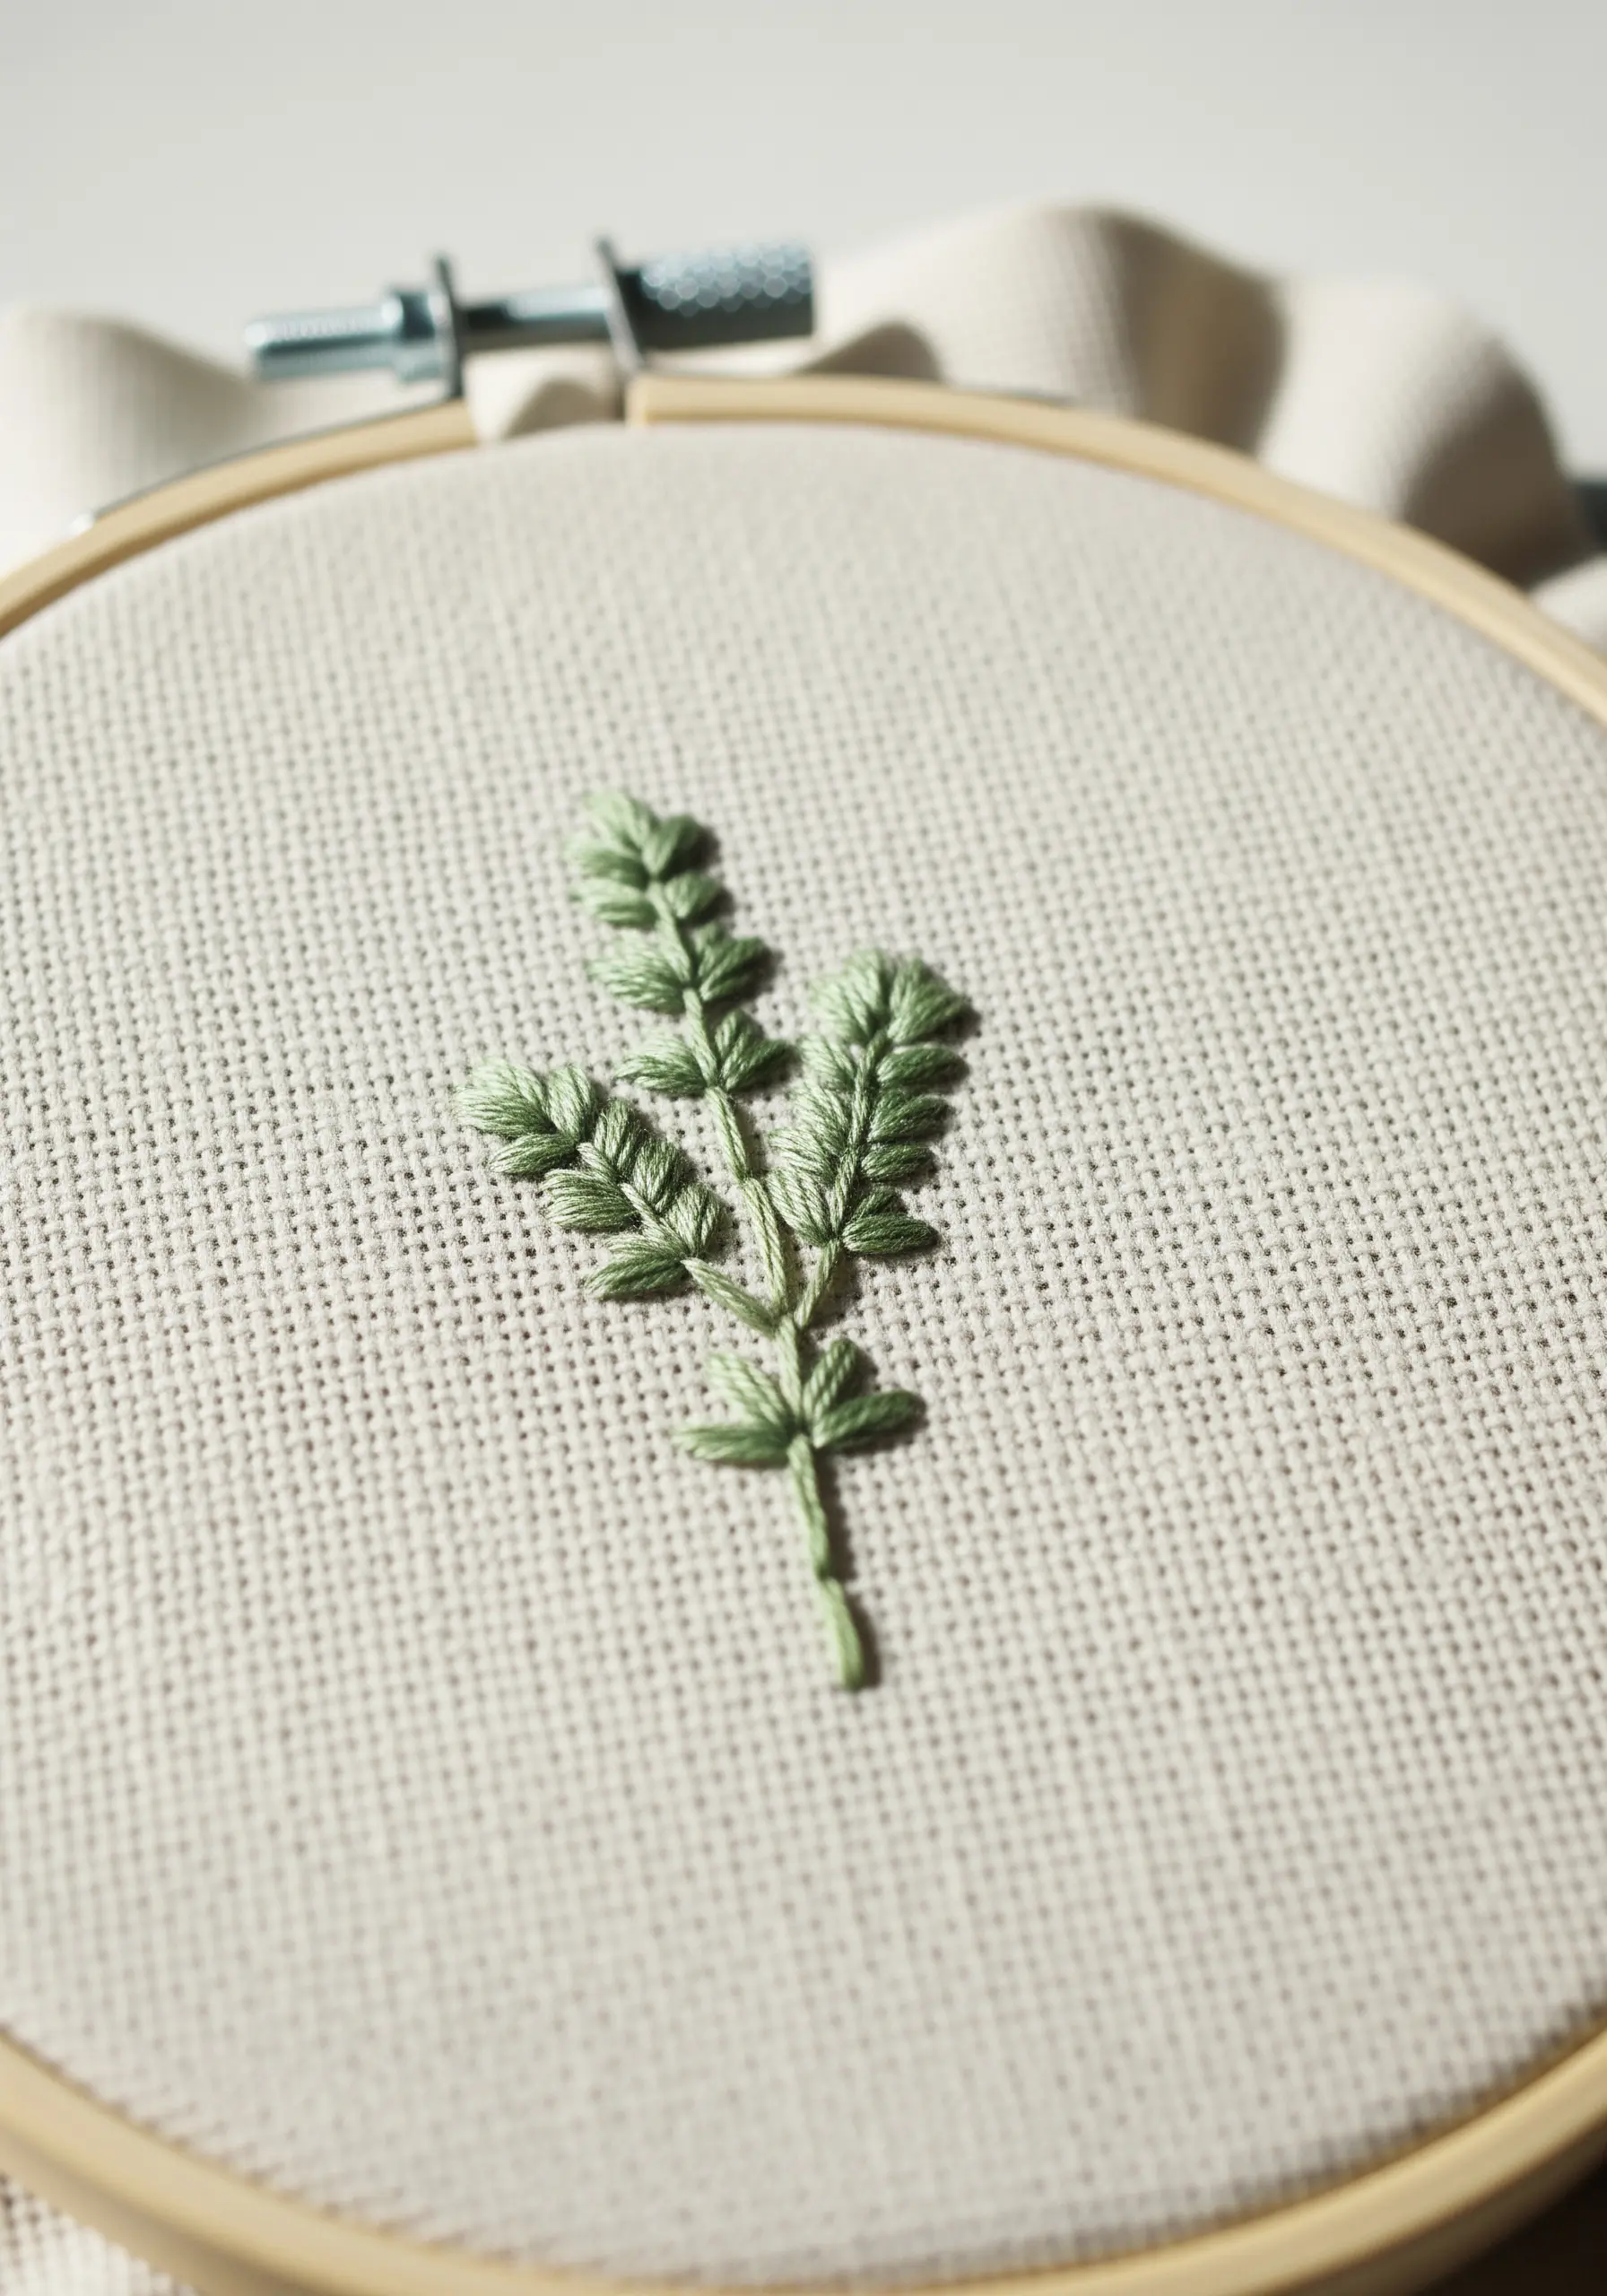
Give your mint or lemon balm leaves a soft, plump appearance by using the fishbone stitch with three strands of floss instead of the usual two.
This extra thread adds instant volume and creates a smoother, more touchable surface without complicating the stitch itself.
To enhance the realism, use a slightly lighter shade of green for the single stitch that forms the central vein—it subtly defines the leaf’s shape.
Stitch on Aida or a similar even-weave fabric; its woven texture adds a rustic quality perfect for kitchen-themed art.
3. Sculpt Basil with Directional Satin Stitch

Recreate the gentle cup of a basil leaf using directional long-and-short stitch, a technique often called needle painting.
Instead of stitching straight across, angle your stitches to follow the leaf’s natural curves, starting from the outside edge and working toward the central vein.
This method creates an illusion of light and shadow, giving the leaf a lifelike, three-dimensional form that a standard satin stitch cannot replicate.
Add the veins last using a single strand of a slightly darker green in a simple backstitch, which will pull the fabric slightly and deepen the sculptural effect.
4. Contrast Smooth Leaves with Textured Berries

Create visual interest by pairing the smooth glide of satin stitch with the tight, nubby texture of French knots.
Fill the leaves with a calm, dusty green satin stitch, keeping your stitches parallel and flat.
For the berries, switch to French knots, wrapping the thread twice around your needle for a tight, round bud, or three times for a larger, more prominent berry.
This tactile contrast is what makes the design compelling; it invites both the eye and the hand. This is a great way to explore a minimalist color palette while maximizing texture.
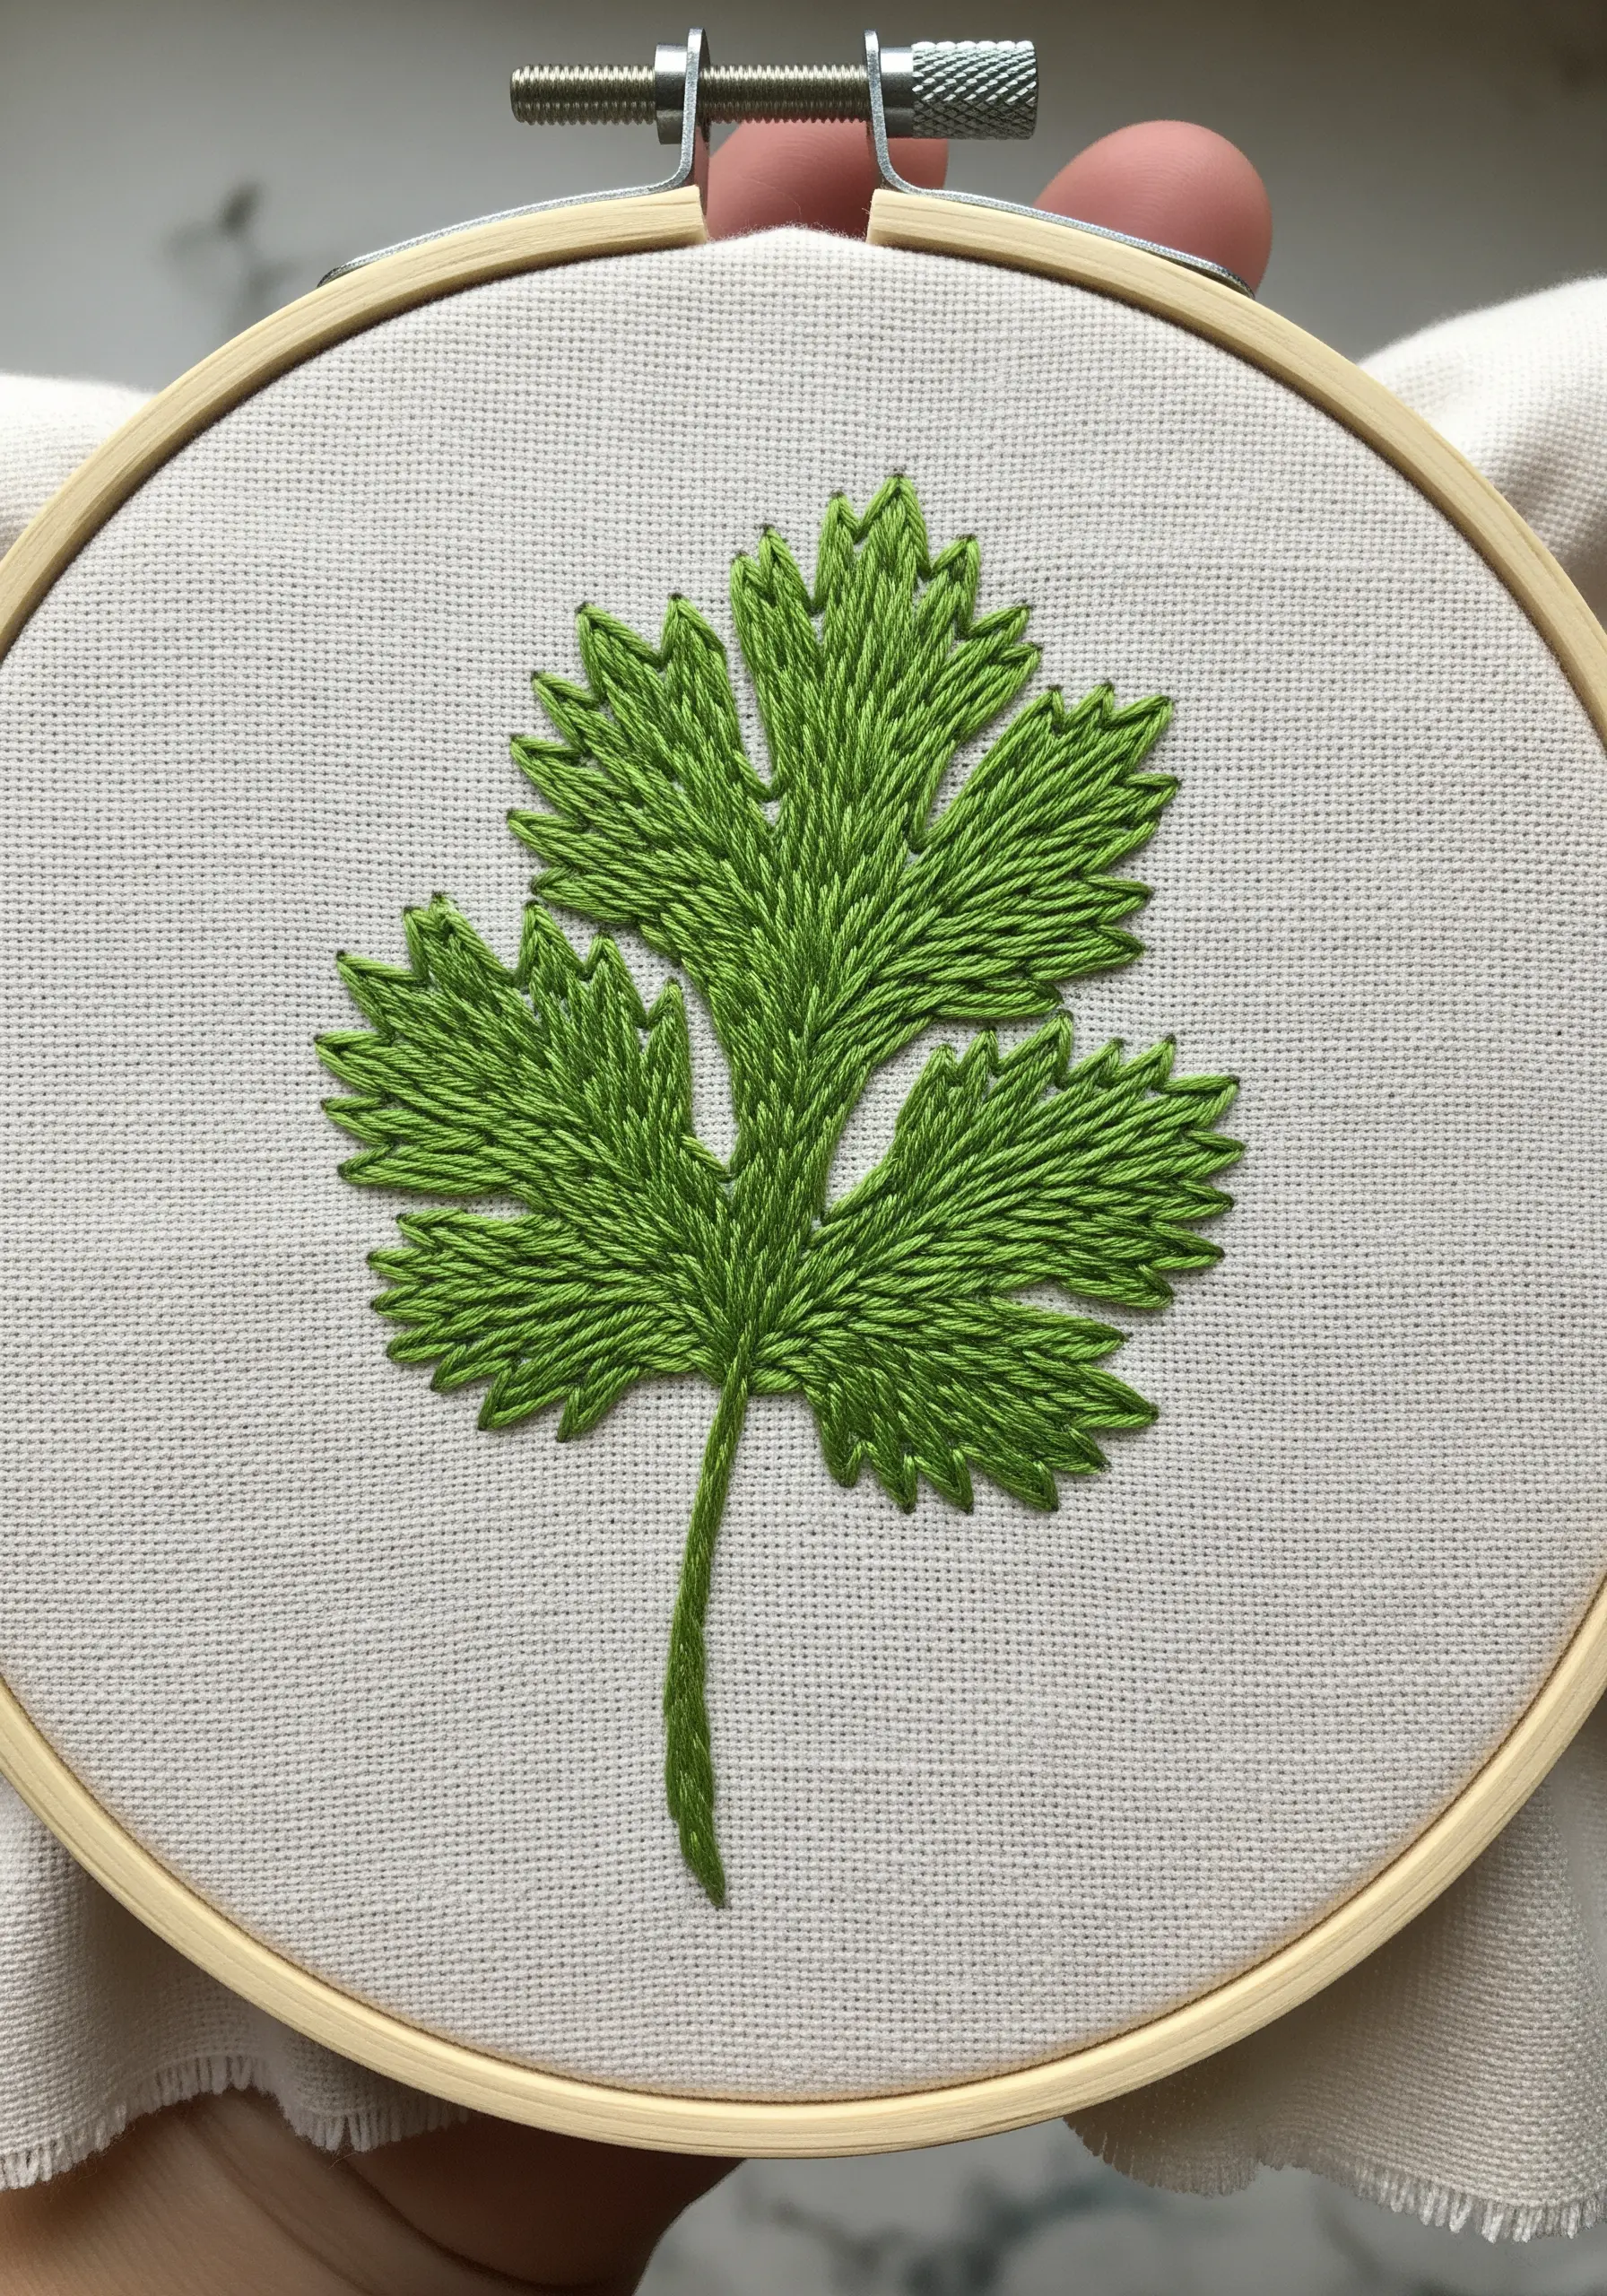
5. Weave the Dense Curls of Parsley
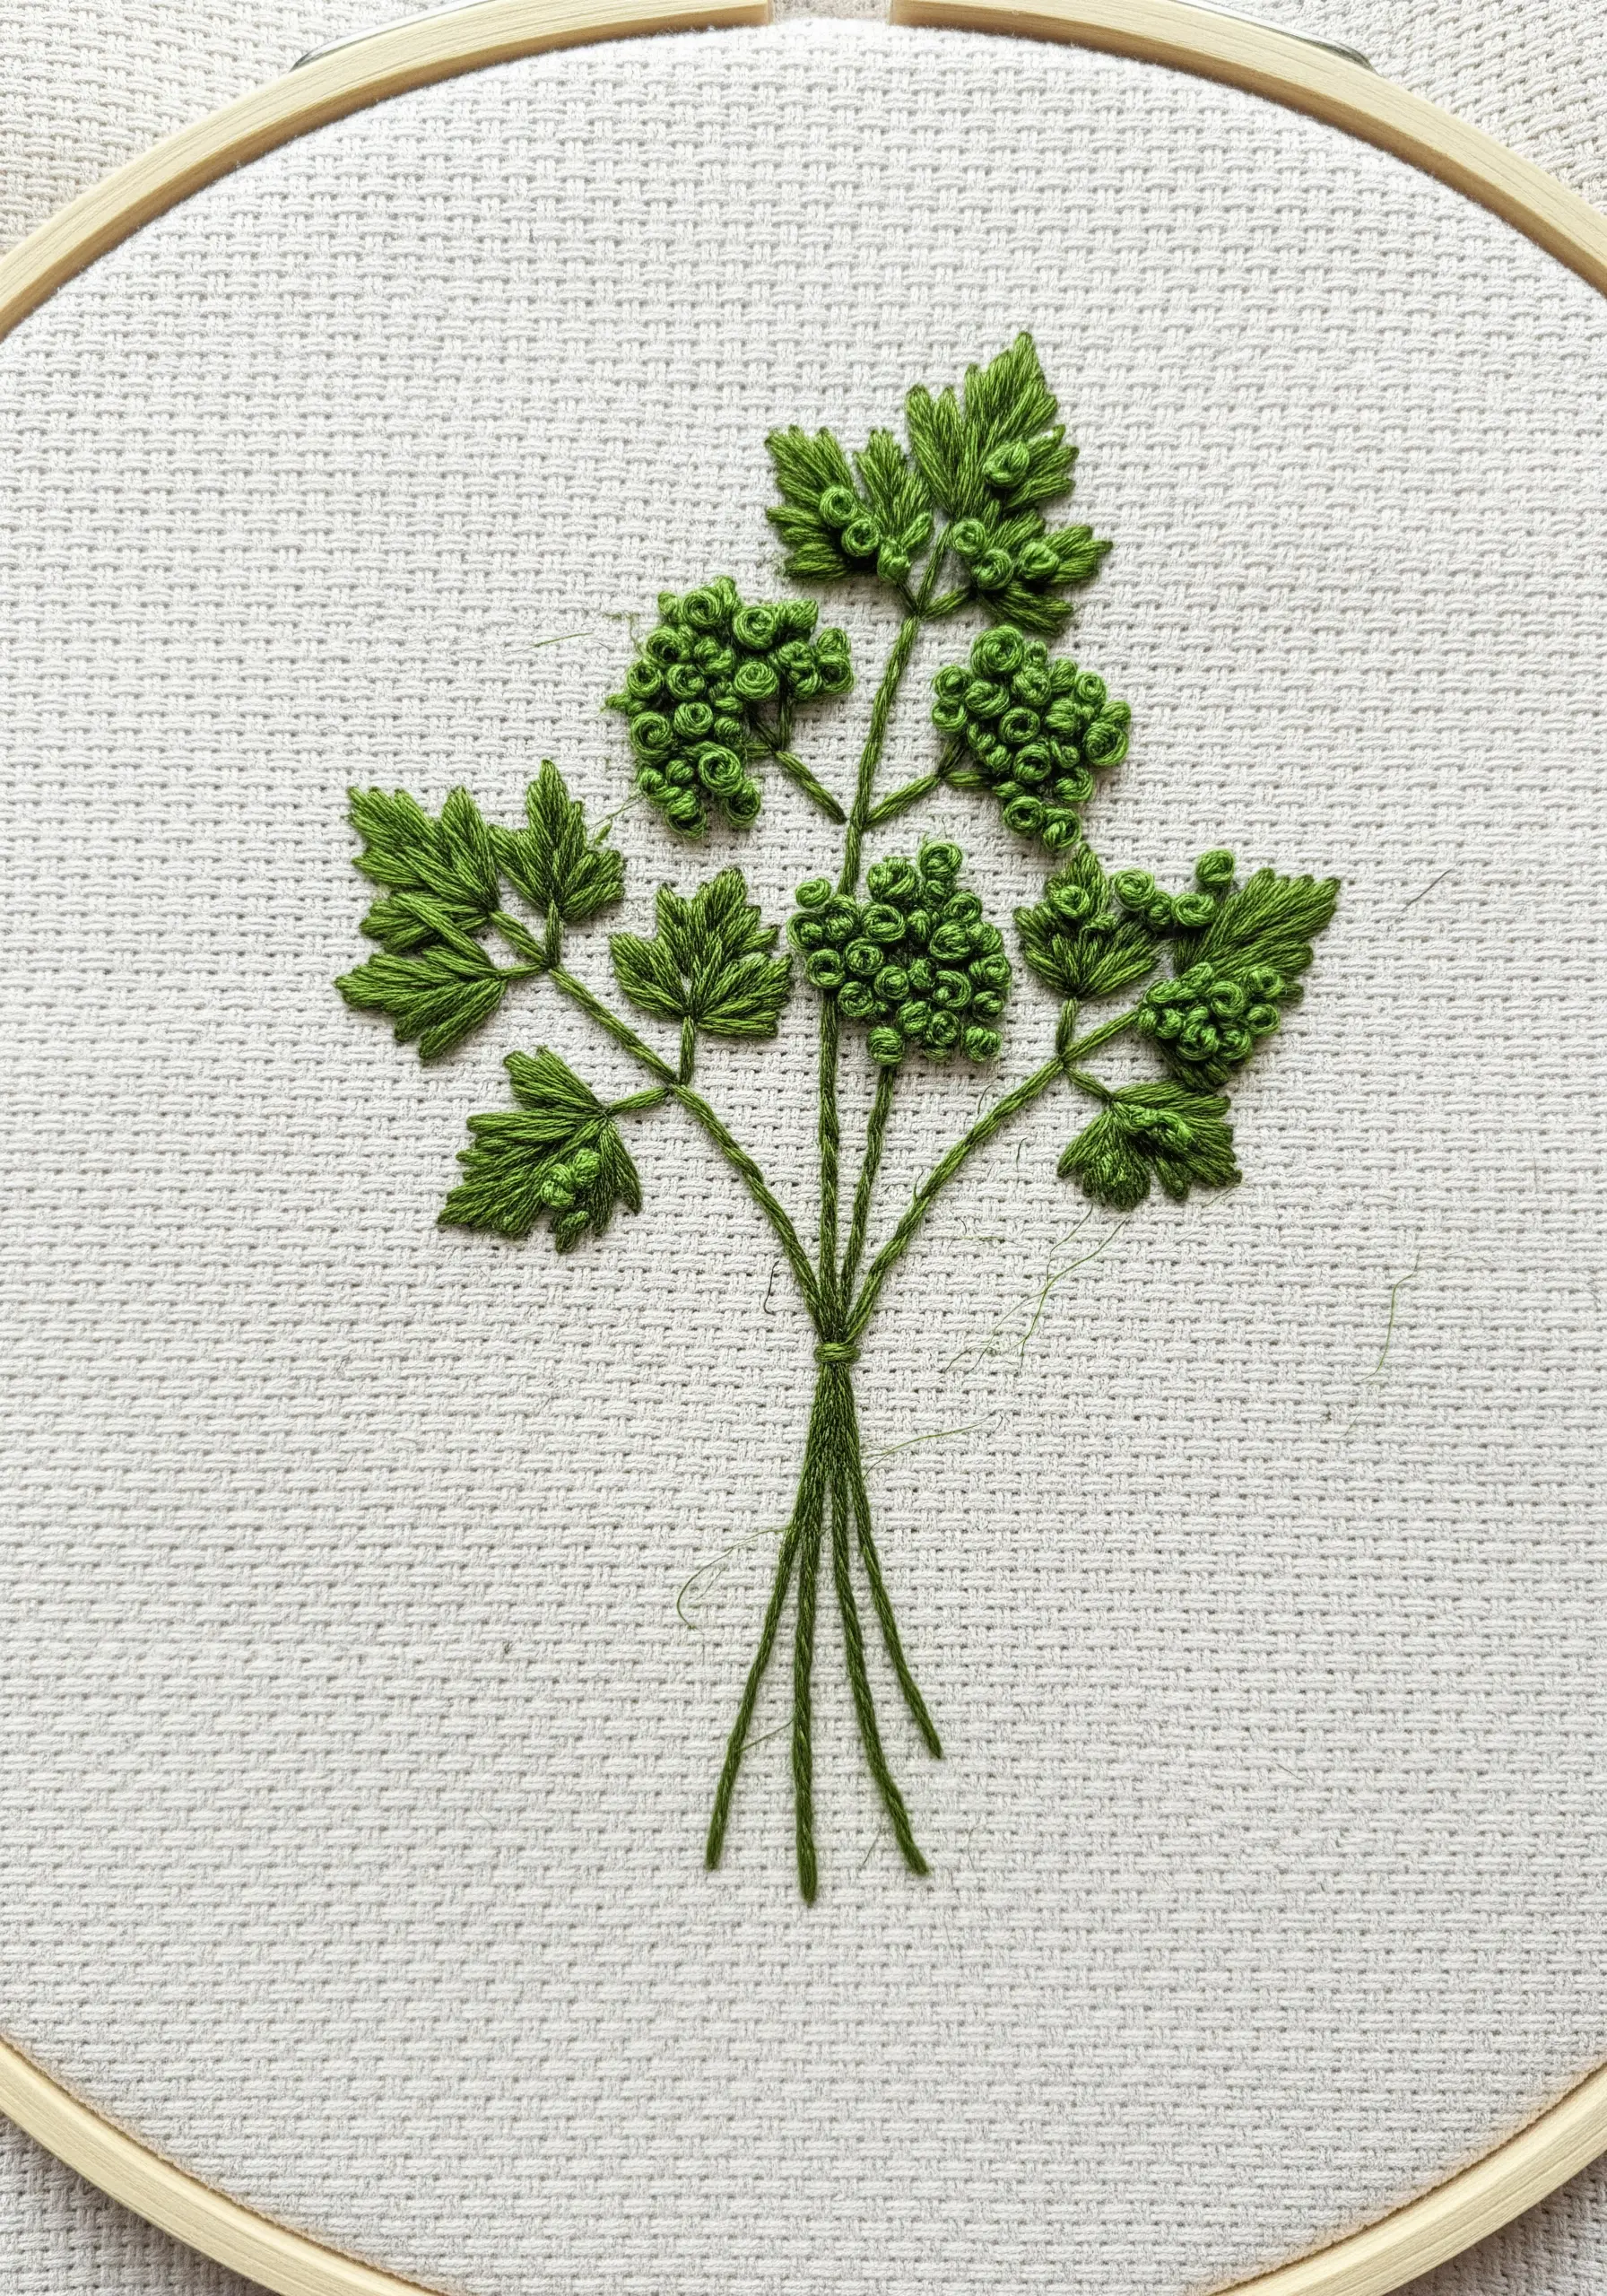
Capture the chaotic, fractal beauty of curly parsley by combining detached chain stitches, French knots, and small, random straight stitches.
Start with the stems, using a simple backstitch. For the leafy parts, work in clusters, placing French knots close together to form a dense base.
Then, scatter tiny straight stitches and single detached chain stitches around and over the knots to suggest the herb’s signature ruffled texture.
Using a vibrant, true-green floss makes the texture pop against a neutral background, creating a piece that feels full of life.
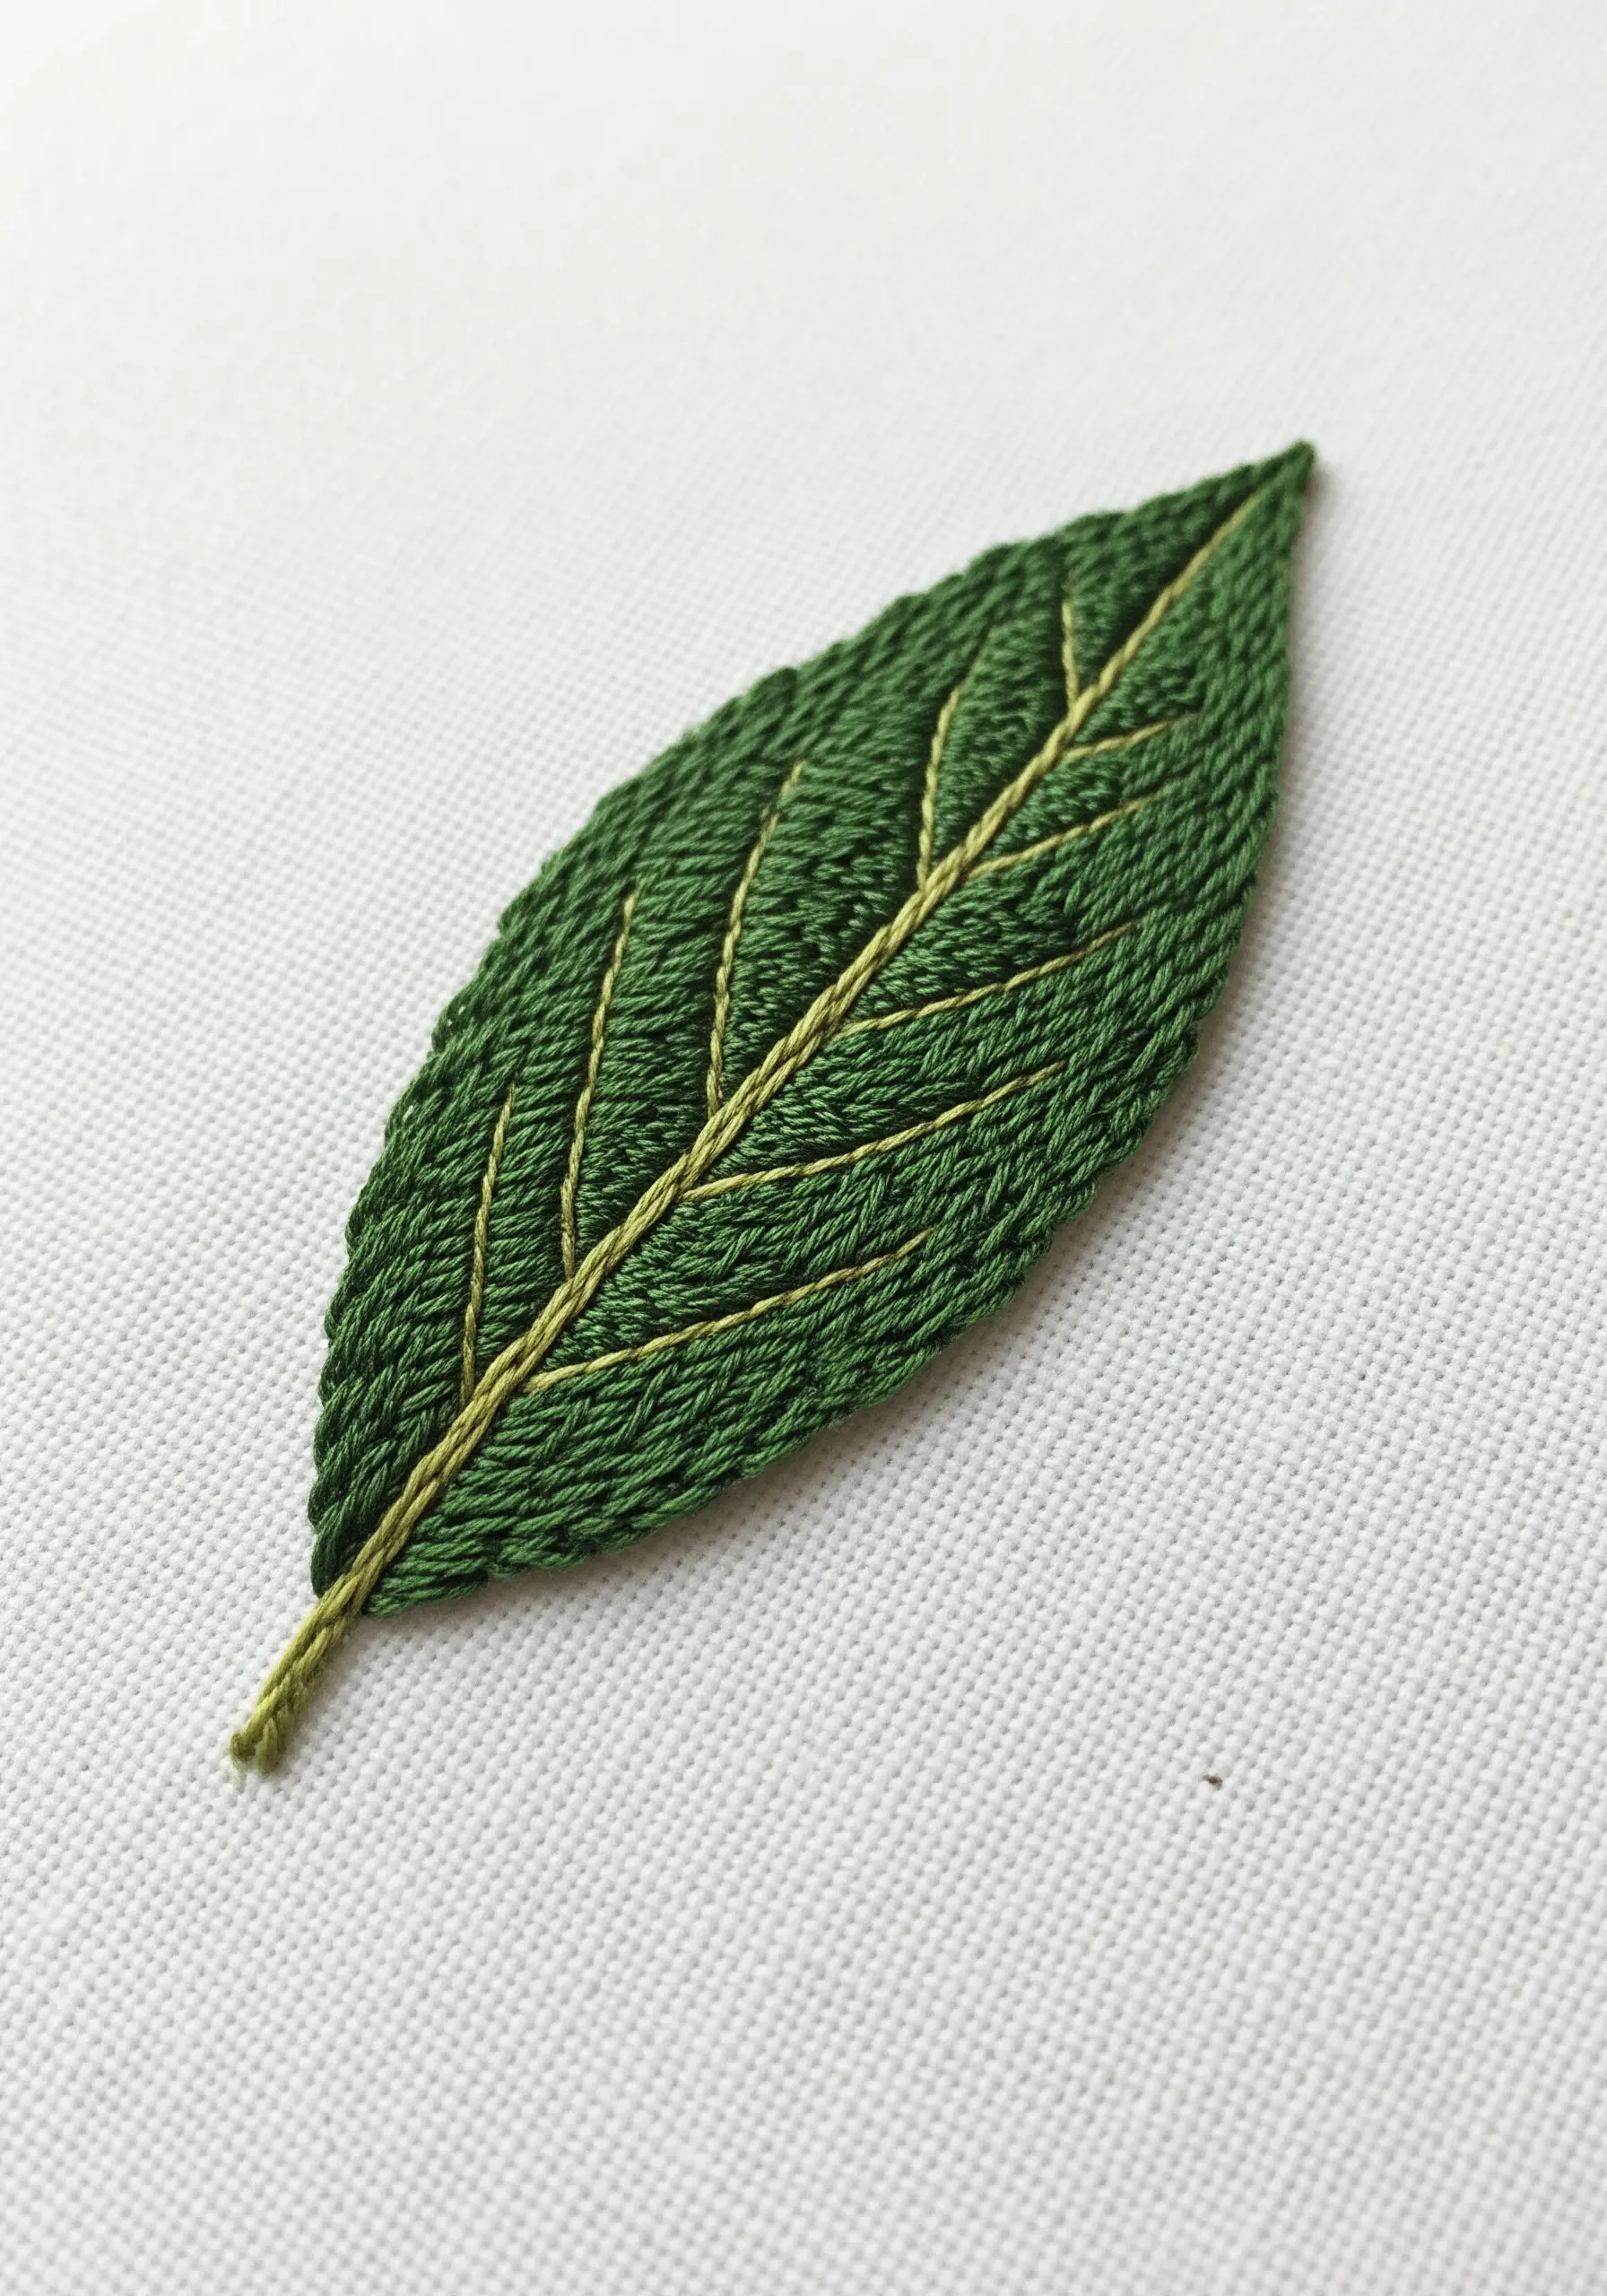
6. Frame a Single Leaf for Minimalist Impact
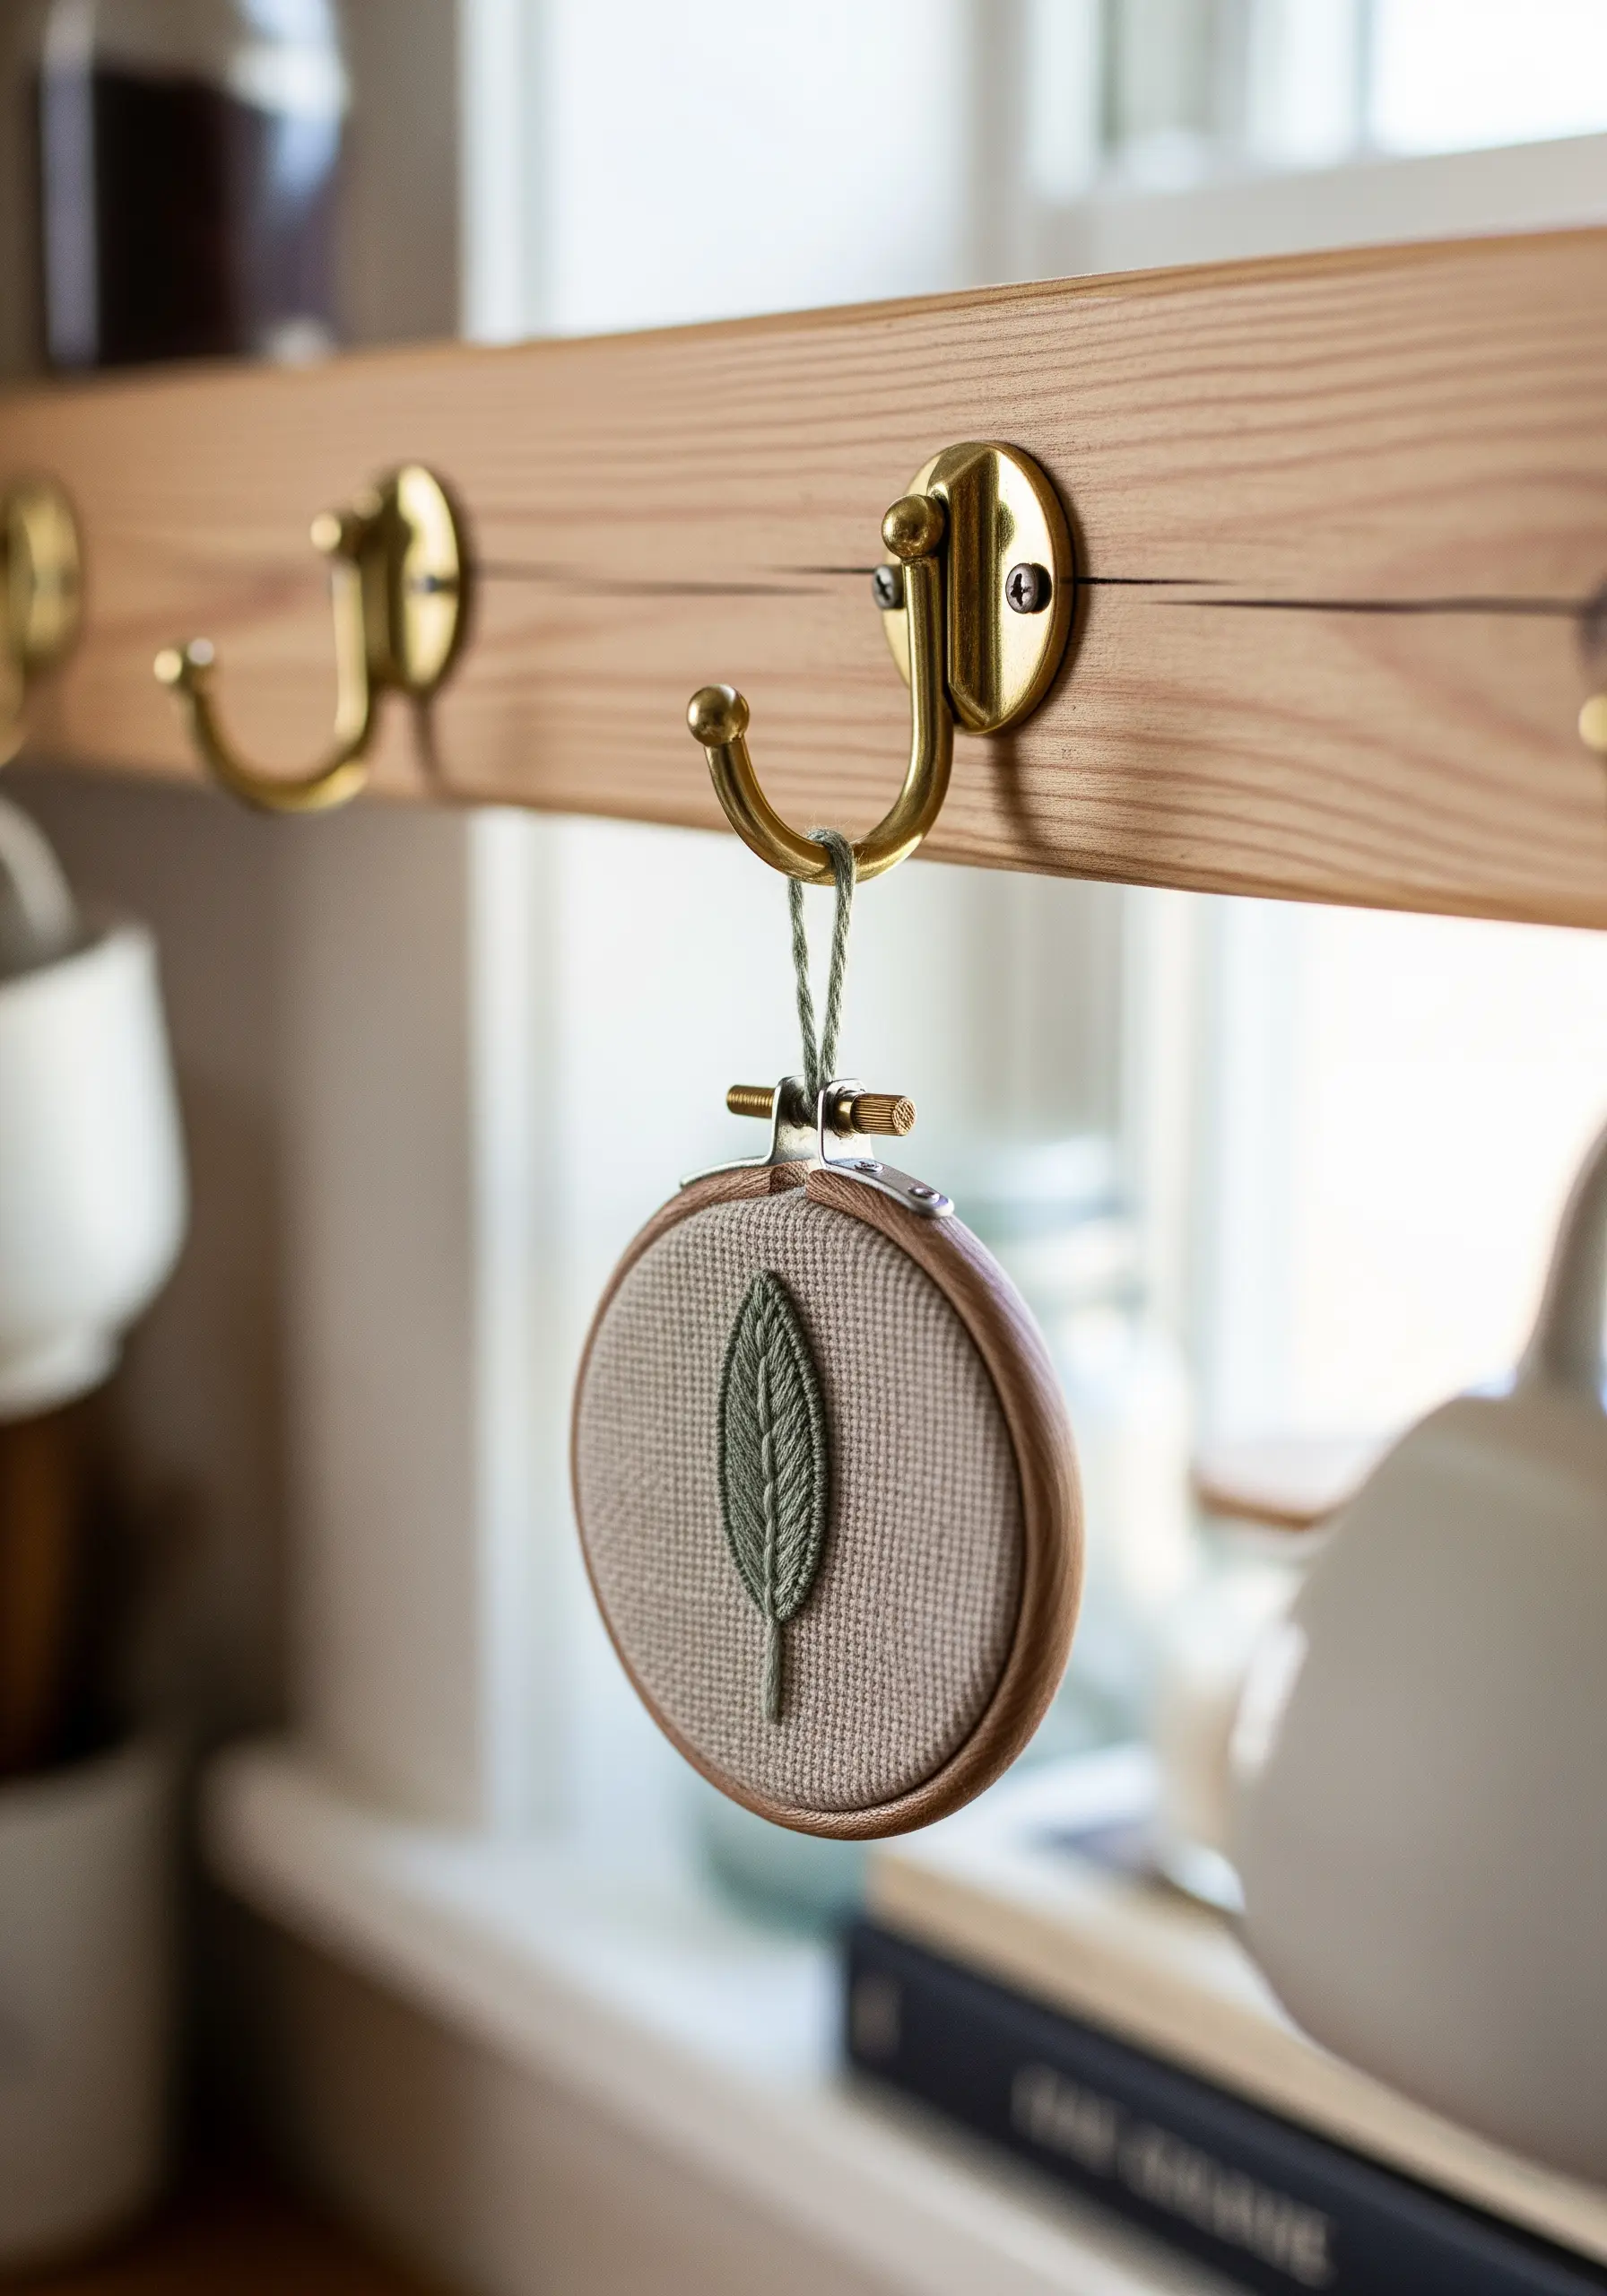
Turn a perfectly executed stitch into a standalone piece of art by focusing on a single, small motif in a miniature hoop.
This fishbone-stitched sage leaf, worked in a muted green on rustic linen, becomes a powerful focal point when framed alone.
Choose a decorative or stained hoop to elevate the finished piece from a craft project to a piece of home decor.
These small embroidery ideas make thoughtful gifts or can be hung from cabinet knobs and hooks to add a handmade touch to your kitchen.
7. Build Lavender Flowers with Bullion Knots
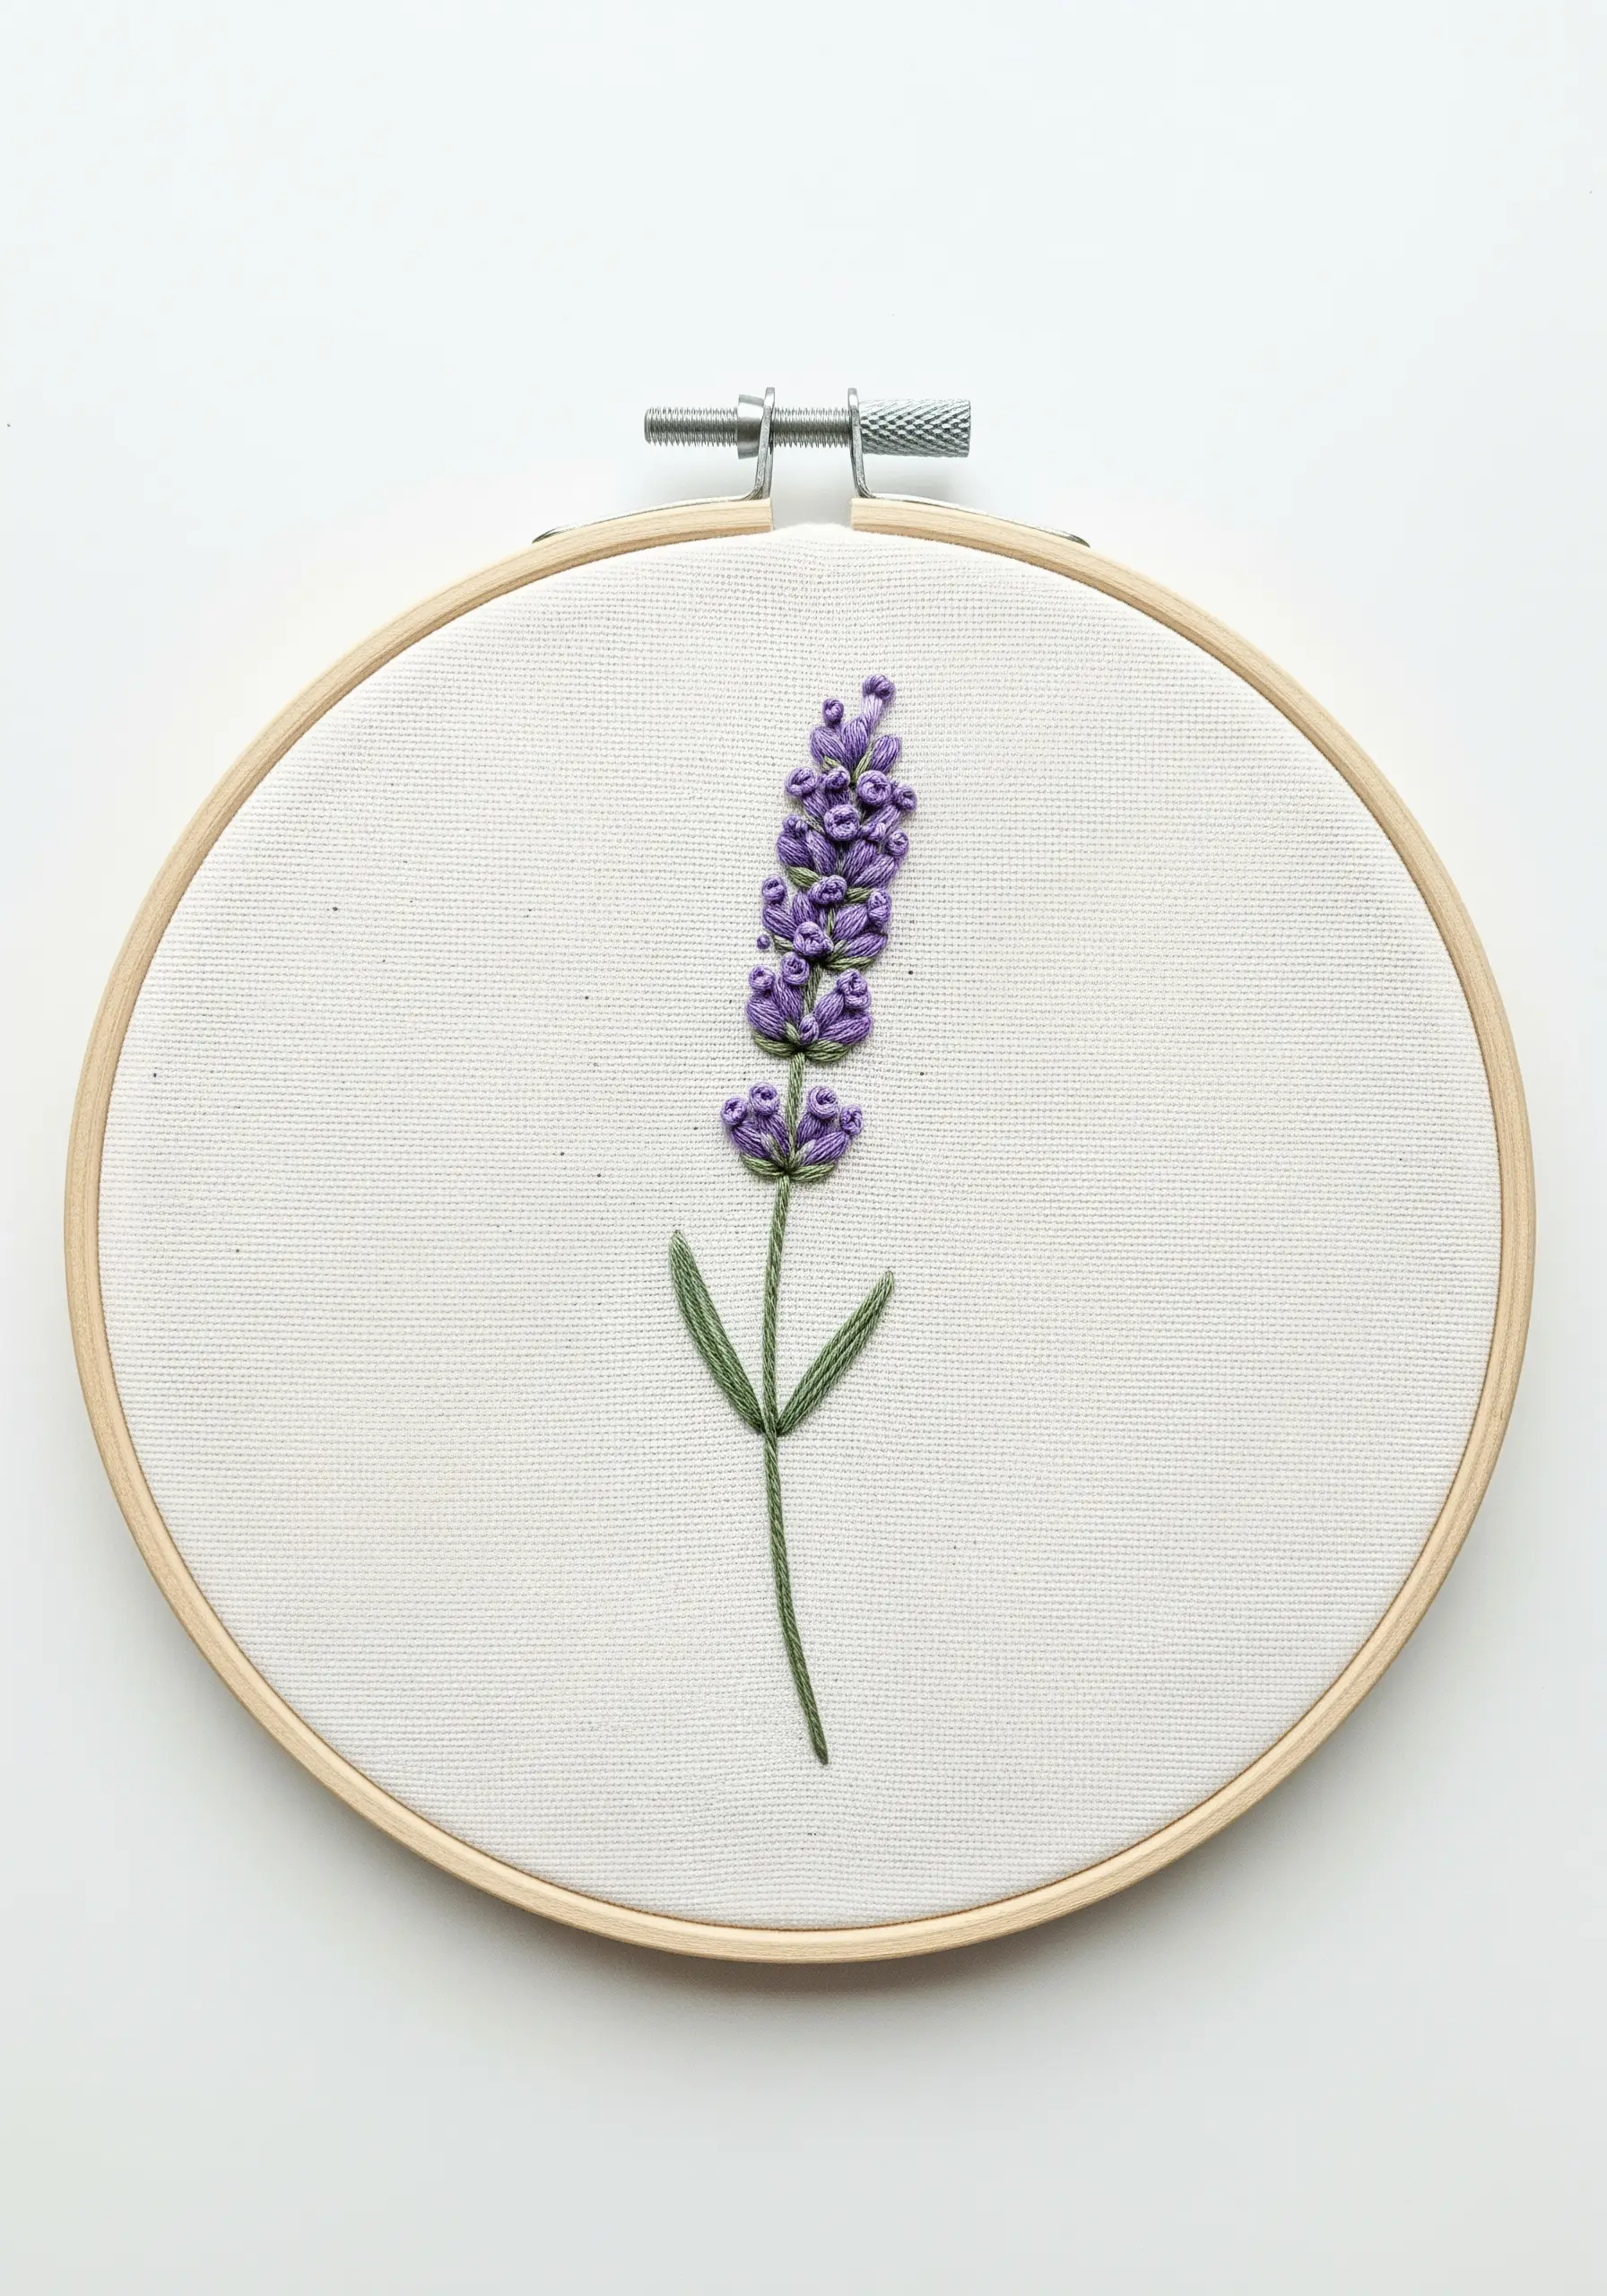
The key to realistic lavender is mastering the bullion knot for its dense, elongated flower buds.
To create a bullion knot, wrap your thread around the needle 6-8 times before pulling it through, adjusting the number of wraps to alter the bud’s length.
Cluster these knots tightly at the top of the stalk, using a variegated purple thread to give the flower head natural depth and color variation.
Work the stem in a simple stem stitch and add two small, tapered detached chain stitches for the leaves to complete the iconic silhouette.
8. Capture the Sweep of Chives with Long Stitches
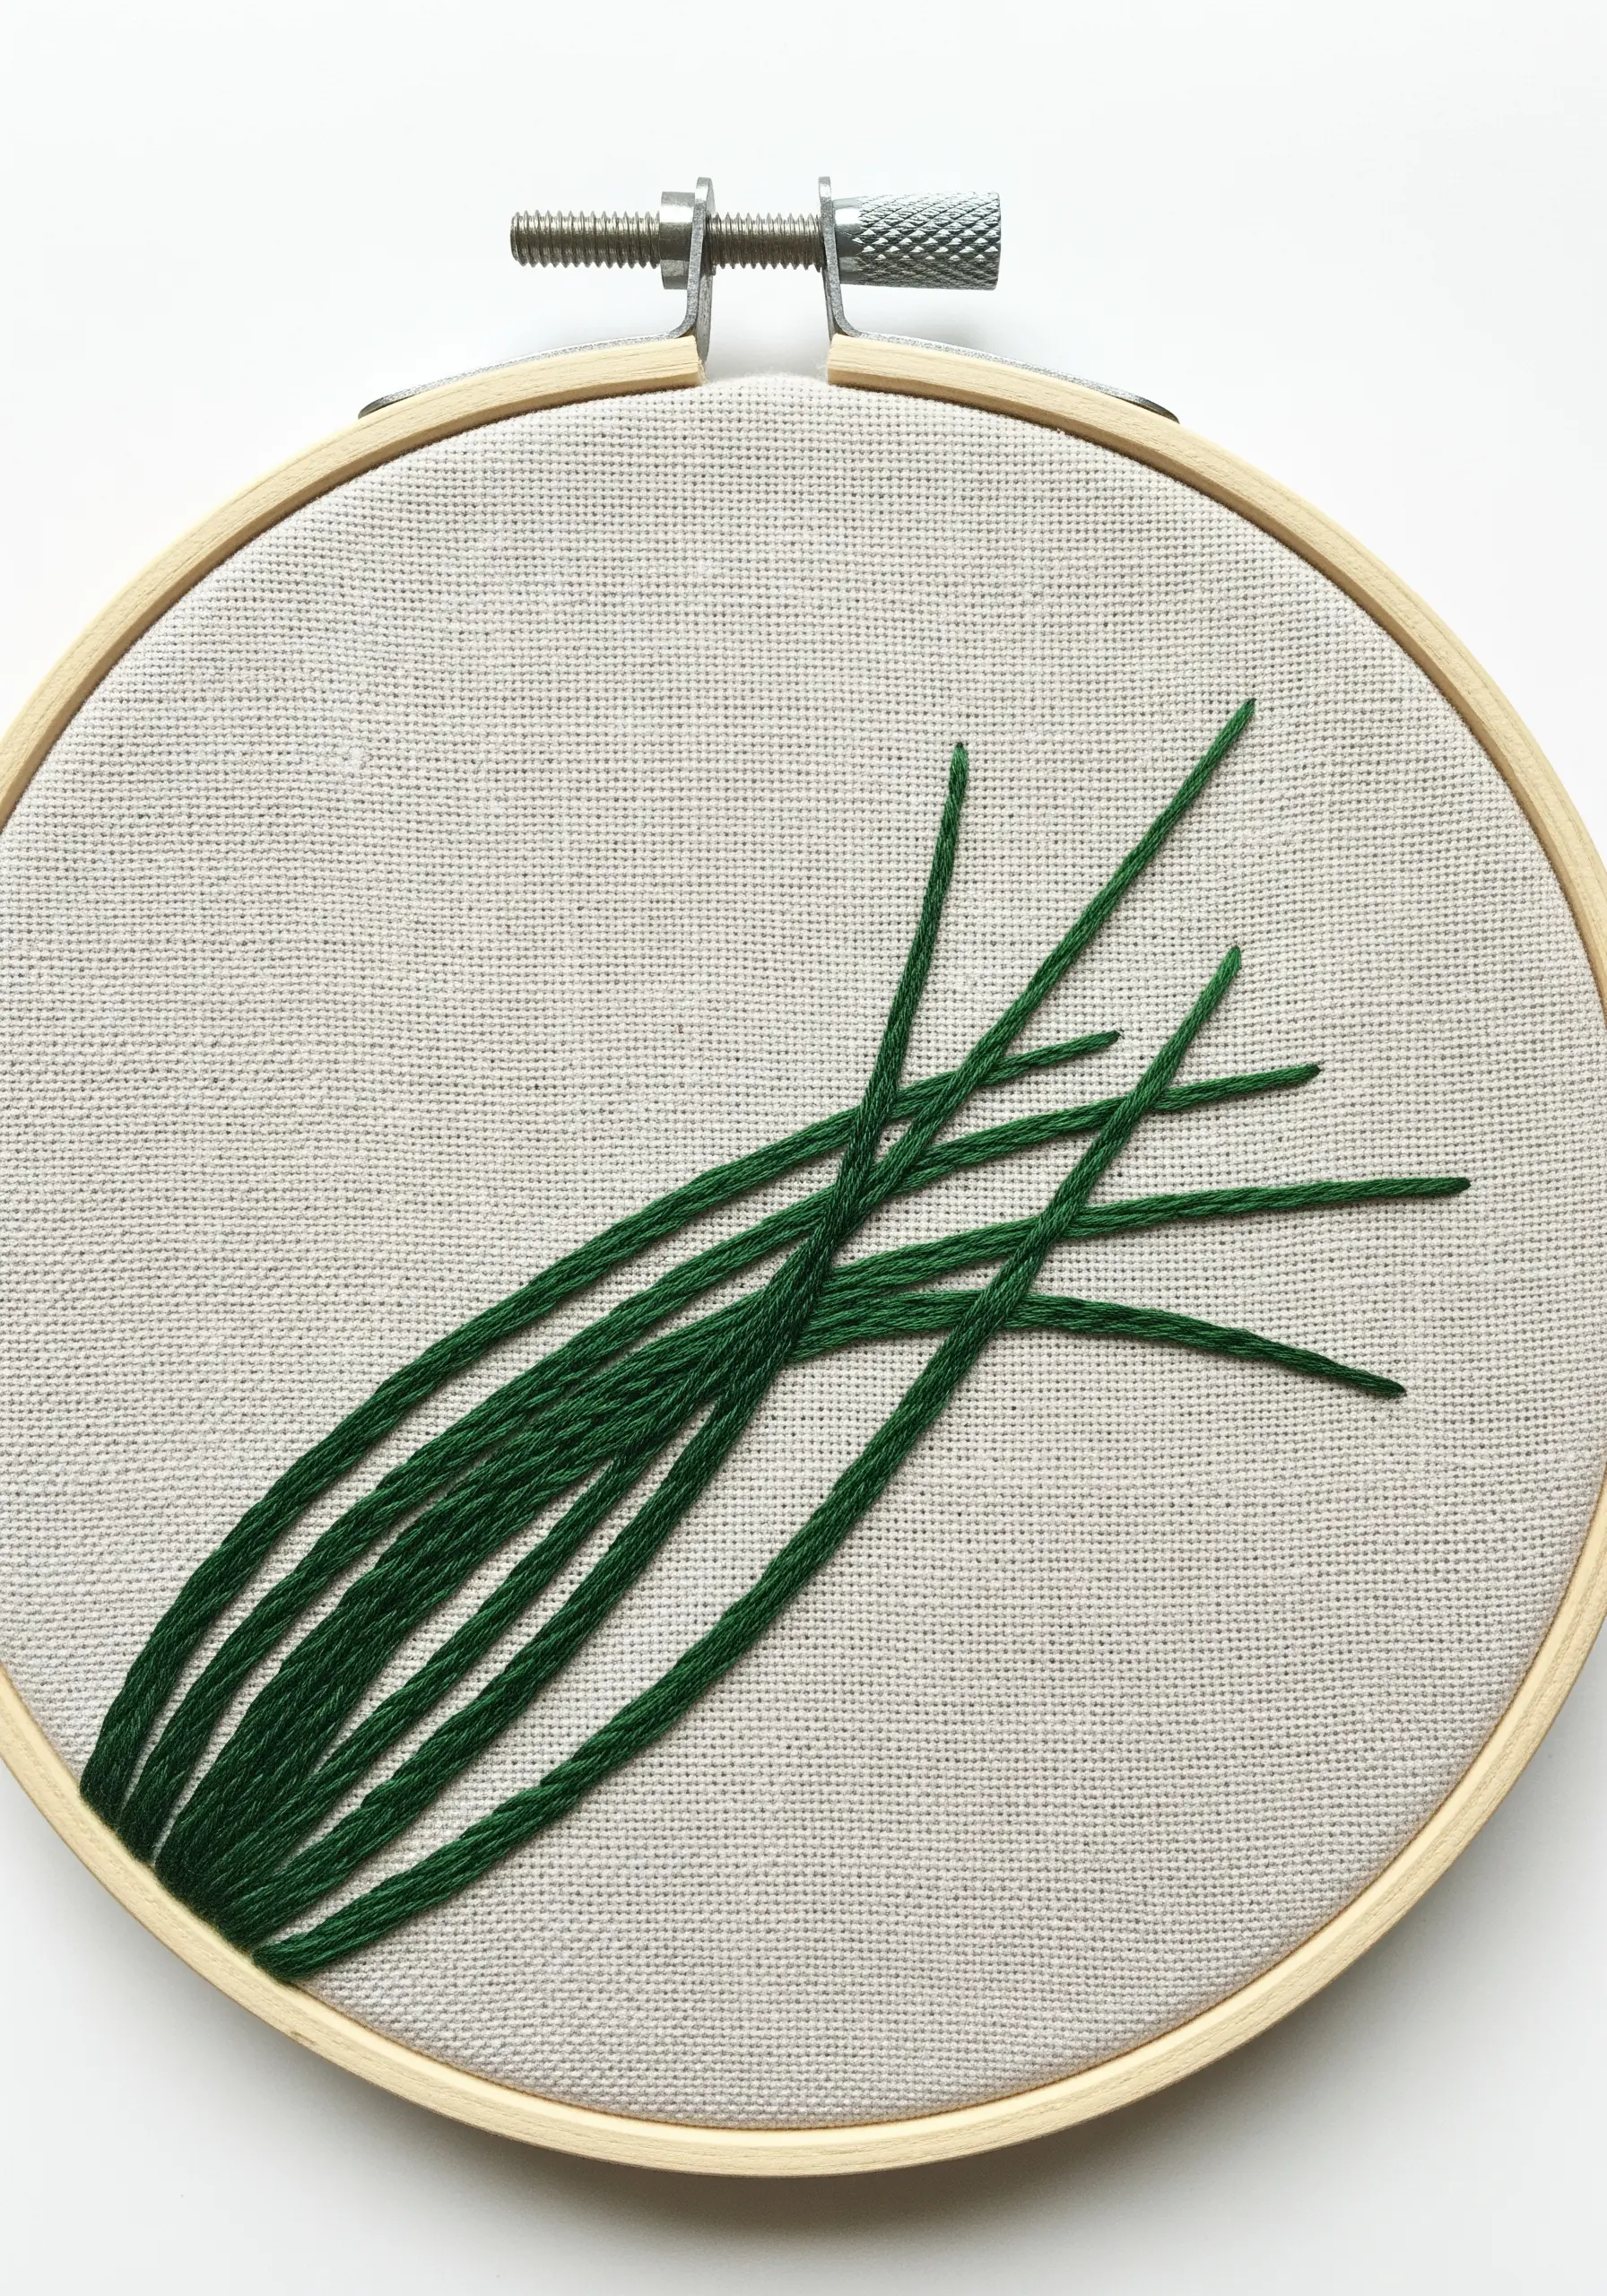
Evoke the graceful, graphic quality of chives by using long, sweeping straight stitches that cross and overlap.
To prevent these long stitches from sagging, use a high-quality, tightly woven fabric and ensure your hoop tension is drum-tight.
Use four strands of floss to give the chives a bold presence, varying the start and end points of your stitches to create a natural, fanned-out arrangement.
This design is a perfect exercise in composition and tension, turning the simplest stitch into modern line art.
9. Stitch Delicate Oregano Blossoms
Suggest the tiny, intricate flowers of an oregano plant with carefully placed French knots in soft, complementary colors.
Use just one or two strands of floss for these knots to keep them delicate and in scale with the small satin-stitched leaves.
Group the knots in small clusters of three or five, using a mix of pale pink and lilac thread for a subtle, heathered effect.
This technique of using minimal thread for maximum detail is perfect for capturing the essence of flowering herbs without overcrowding your design.
10. Draw Wispy Dill with Fine Lines
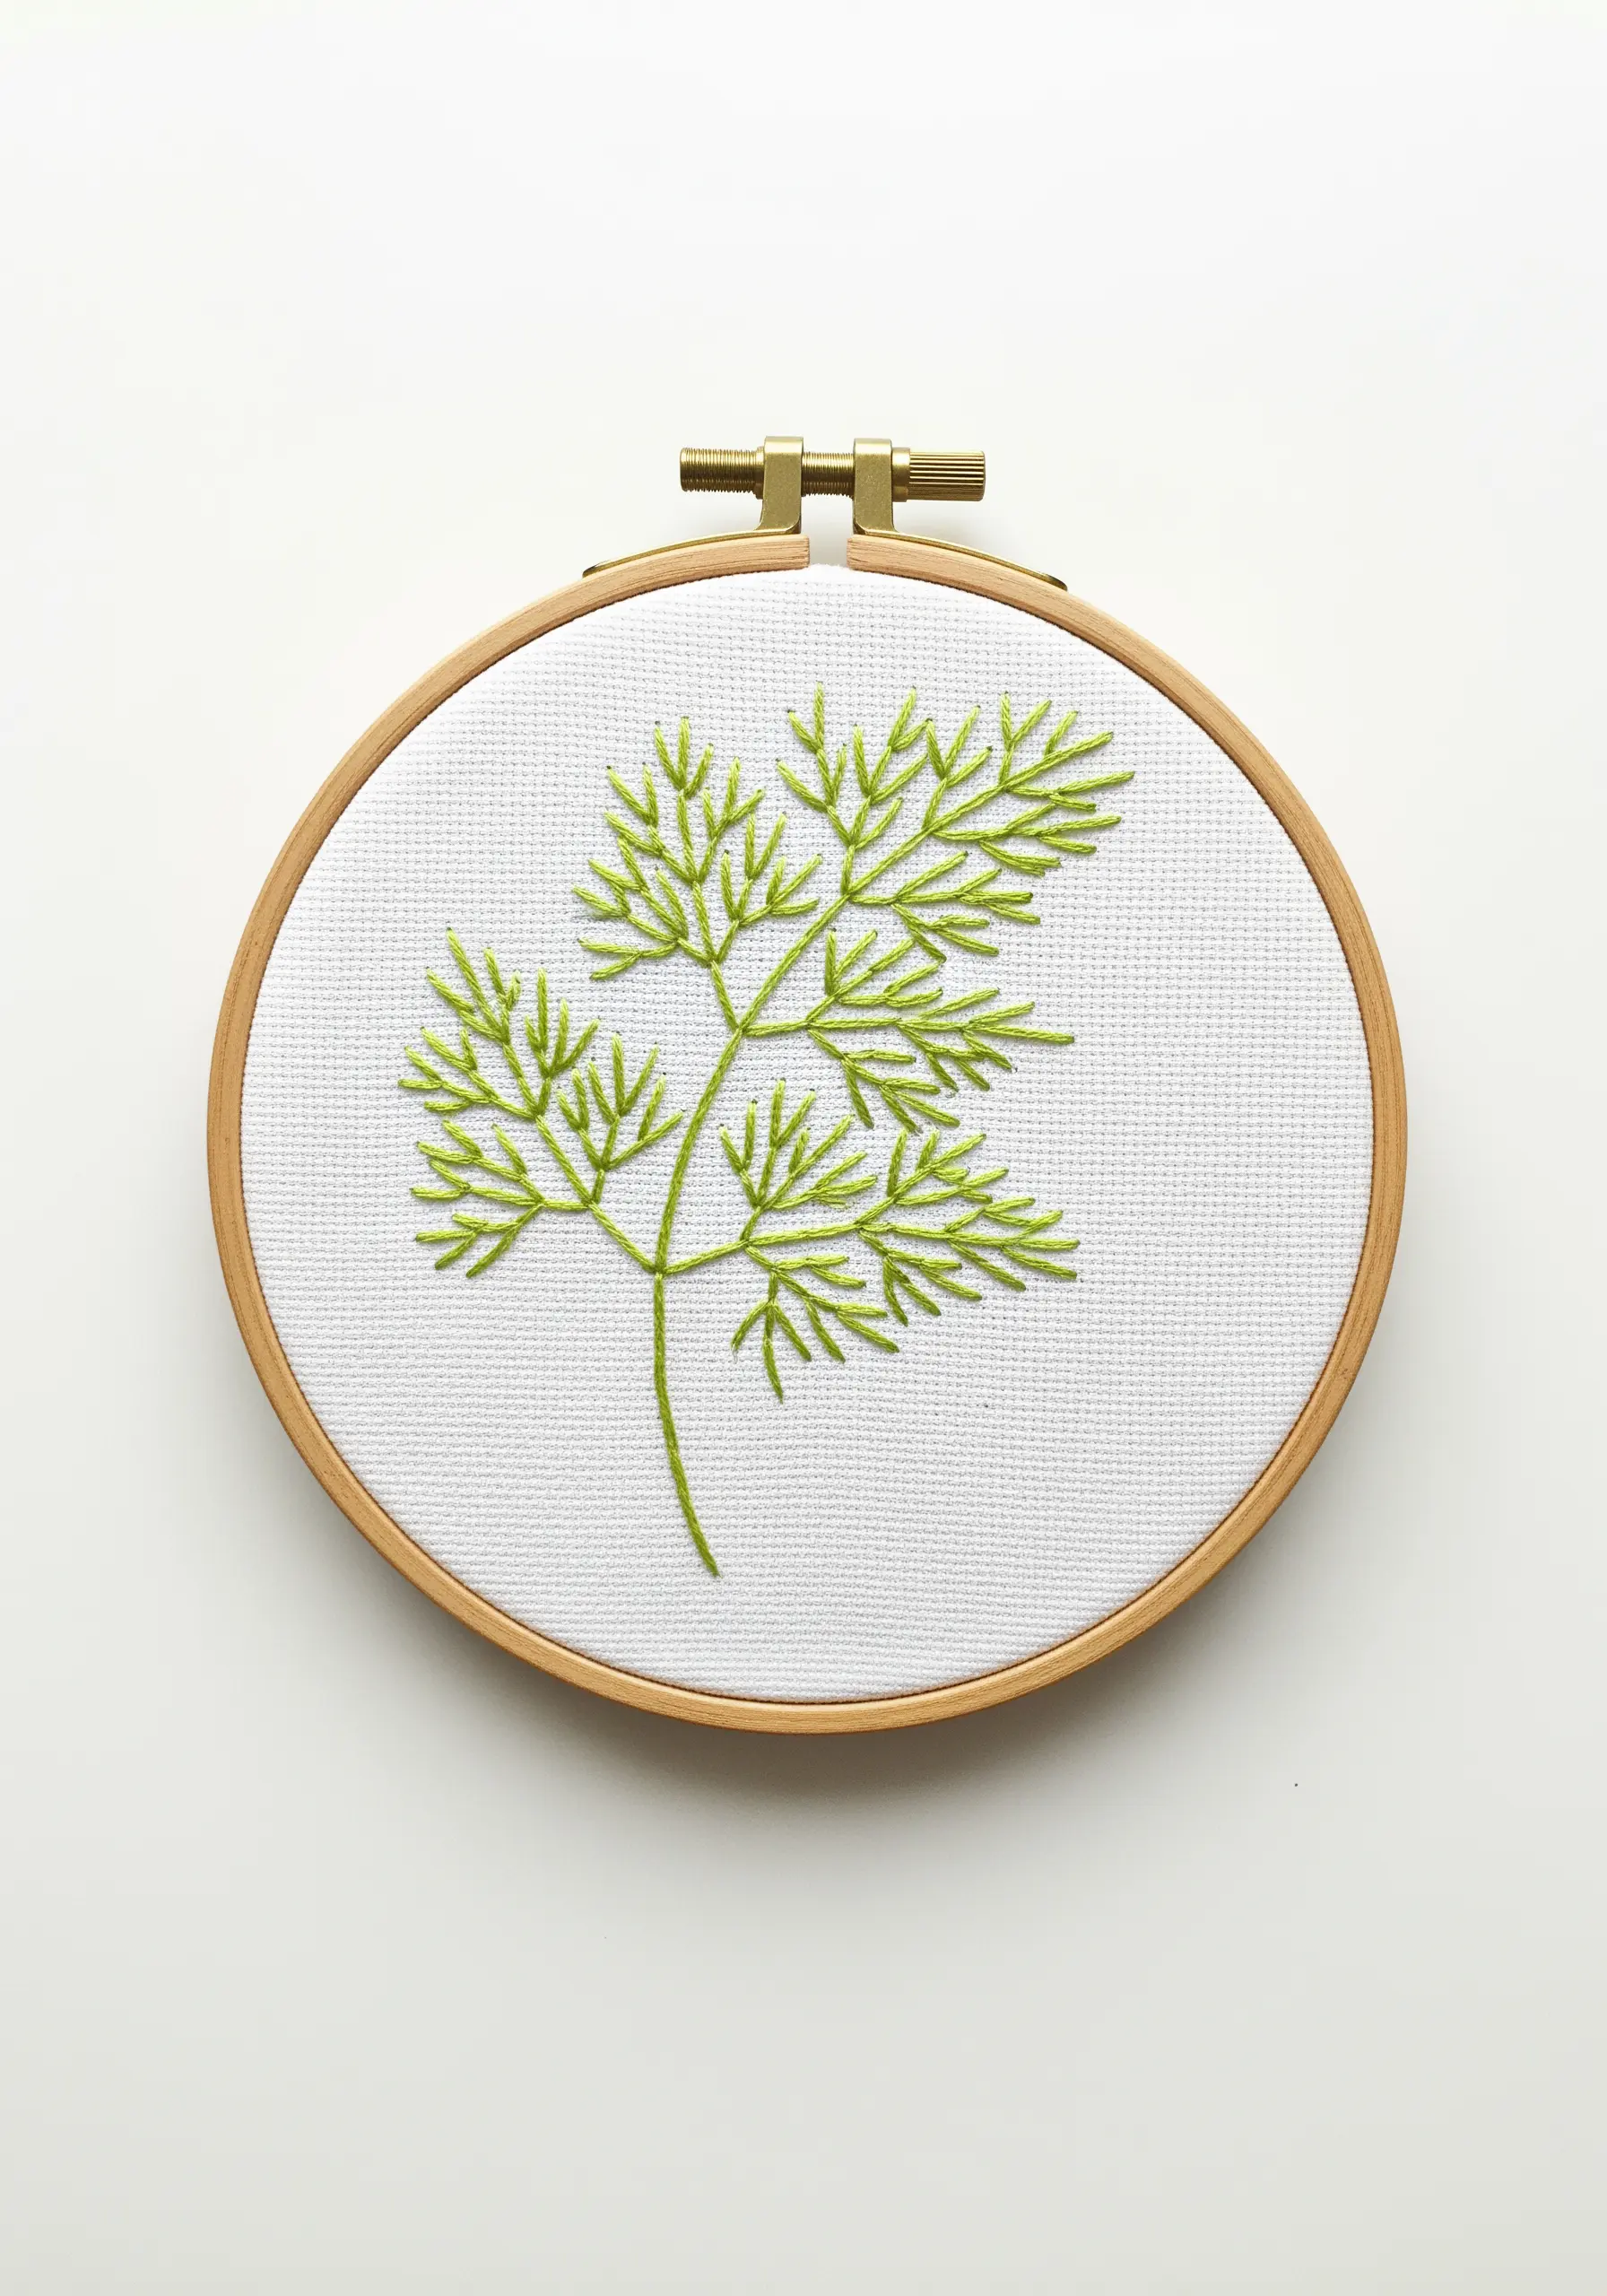
Recreate the airy, feathery texture of dill by using a single strand of floss and simple straight stitches.
The beauty of this design lies in its lightness, so resist the urge to use more thread or heavier stitches.
Map out the main stems with a backstitch, then branch off with tiny straight stitches, keeping the composition open and delicate.
Stitching this on a crisp white fabric enhances its clean, botanical illustration feel, making it a refreshingly modern take on a classic herb.
11. Define Edges for a Flawless Satin Stitch
Achieve impossibly neat satin-stitched leaves by first outlining the entire shape with a split stitch in the same color.
This raised outline acts as a perfect, contained edge for your satin stitches to butt up against, preventing them from slipping or becoming uneven.
Fill the shape with directional satin stitches, angling them just as you see in a real leaf. The split-stitch border will give the final piece a subtle, polished dimension.
This preparation is the secret behind professional-looking fill stitches and is well worth the extra step for a flawless finish.
12. Create Depth by Layering Stems and Hues

Transform a simple collection of leaves into a dynamic tarragon bunch by using layering and a narrow color palette.
Stitch the leaves in the background first, using a slightly darker or more muted shade of green.
Then, stitch the foreground stems and leaves over them, using a brighter green. This simple overlapping immediately creates a sense of depth and fullness.
This technique allows you to build a rich composition that feels lush and alive, even within a small hoop.
13. Sculpt Rounded Leaves with Padded Satin Stitch

Give herbs like marjoram or oregano a soft, pillowy dimension by using a padded satin stitch.
First, fill the interior of your leaf shape with a base of small, horizontal seed stitches. Don’t worry about neatness here; this layer is purely for volume.
Then, cover this padded base with your final satin stitch, working vertically. The under-stitching will lift the top layer, creating a raised, touchable surface.
This is one of the most effective abstract thread sculpting tricks to make your embroidery pop off the fabric.
14. Paint a Bay Leaf with Thread
Mimic the waxy, textured surface of a bay leaf through meticulous thread painting with long-and-short stitch.
Divide the leaf into sections along the veins. Fill each section with angled stitches that mimic the leaf’s natural grain, blending two or three shades of dark green for realism.
Use a single strand of a contrasting chartreuse or gold for the central vein and side veins, stitching it on top of the green fill.
This meticulous process transforms simple floss into a photorealistic textile study, showcasing one of the most beautiful wildflower thread painting techniques on a single leaf.
15. Raise Your Petals for a 3D Chamomile
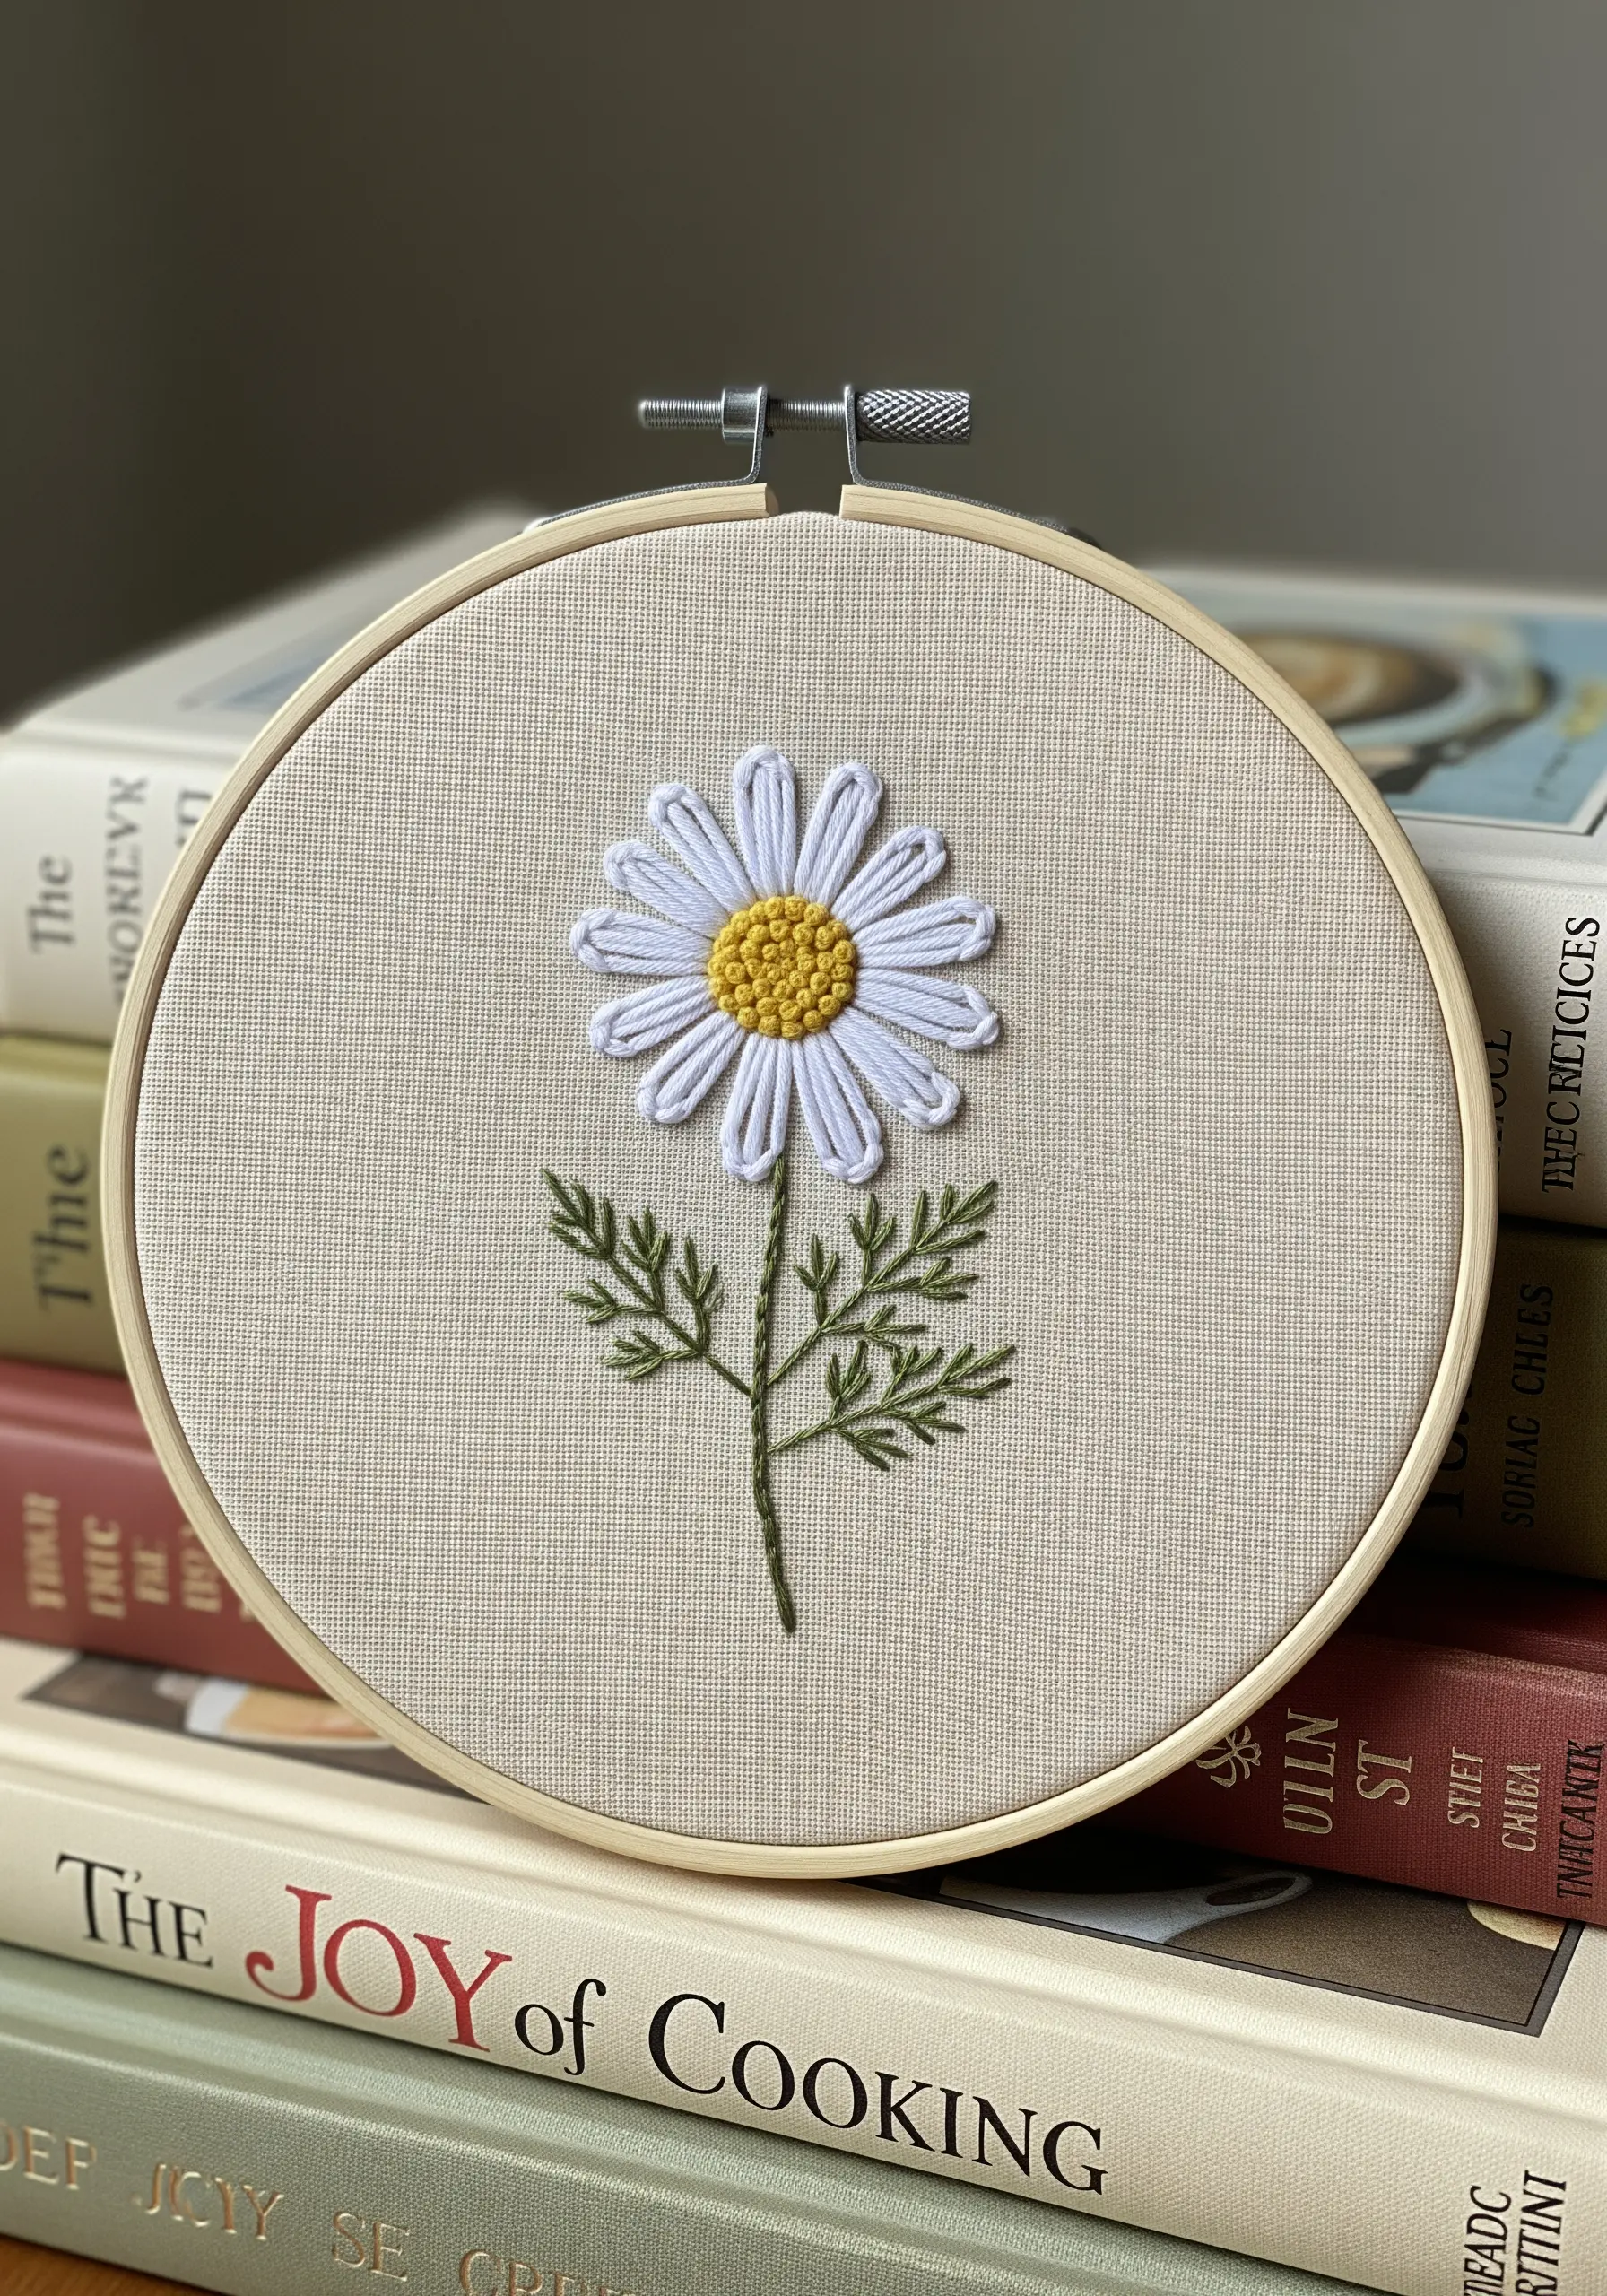
Make your chamomile flower pop by creating distinctly raised petals with a padded satin stitch.
Outline each individual petal with a backstitch. Then, fill the outlined shape completely with satin stitch, working your stitches over the raised border.
This technique contains the fill stitch neatly and gives each petal a defined, three-dimensional quality.
Complete the flower with a dense cluster of yellow and ochre French knots in the center for a highly textural and realistic finish.
16. Let Your Design Breathe with Negative Space
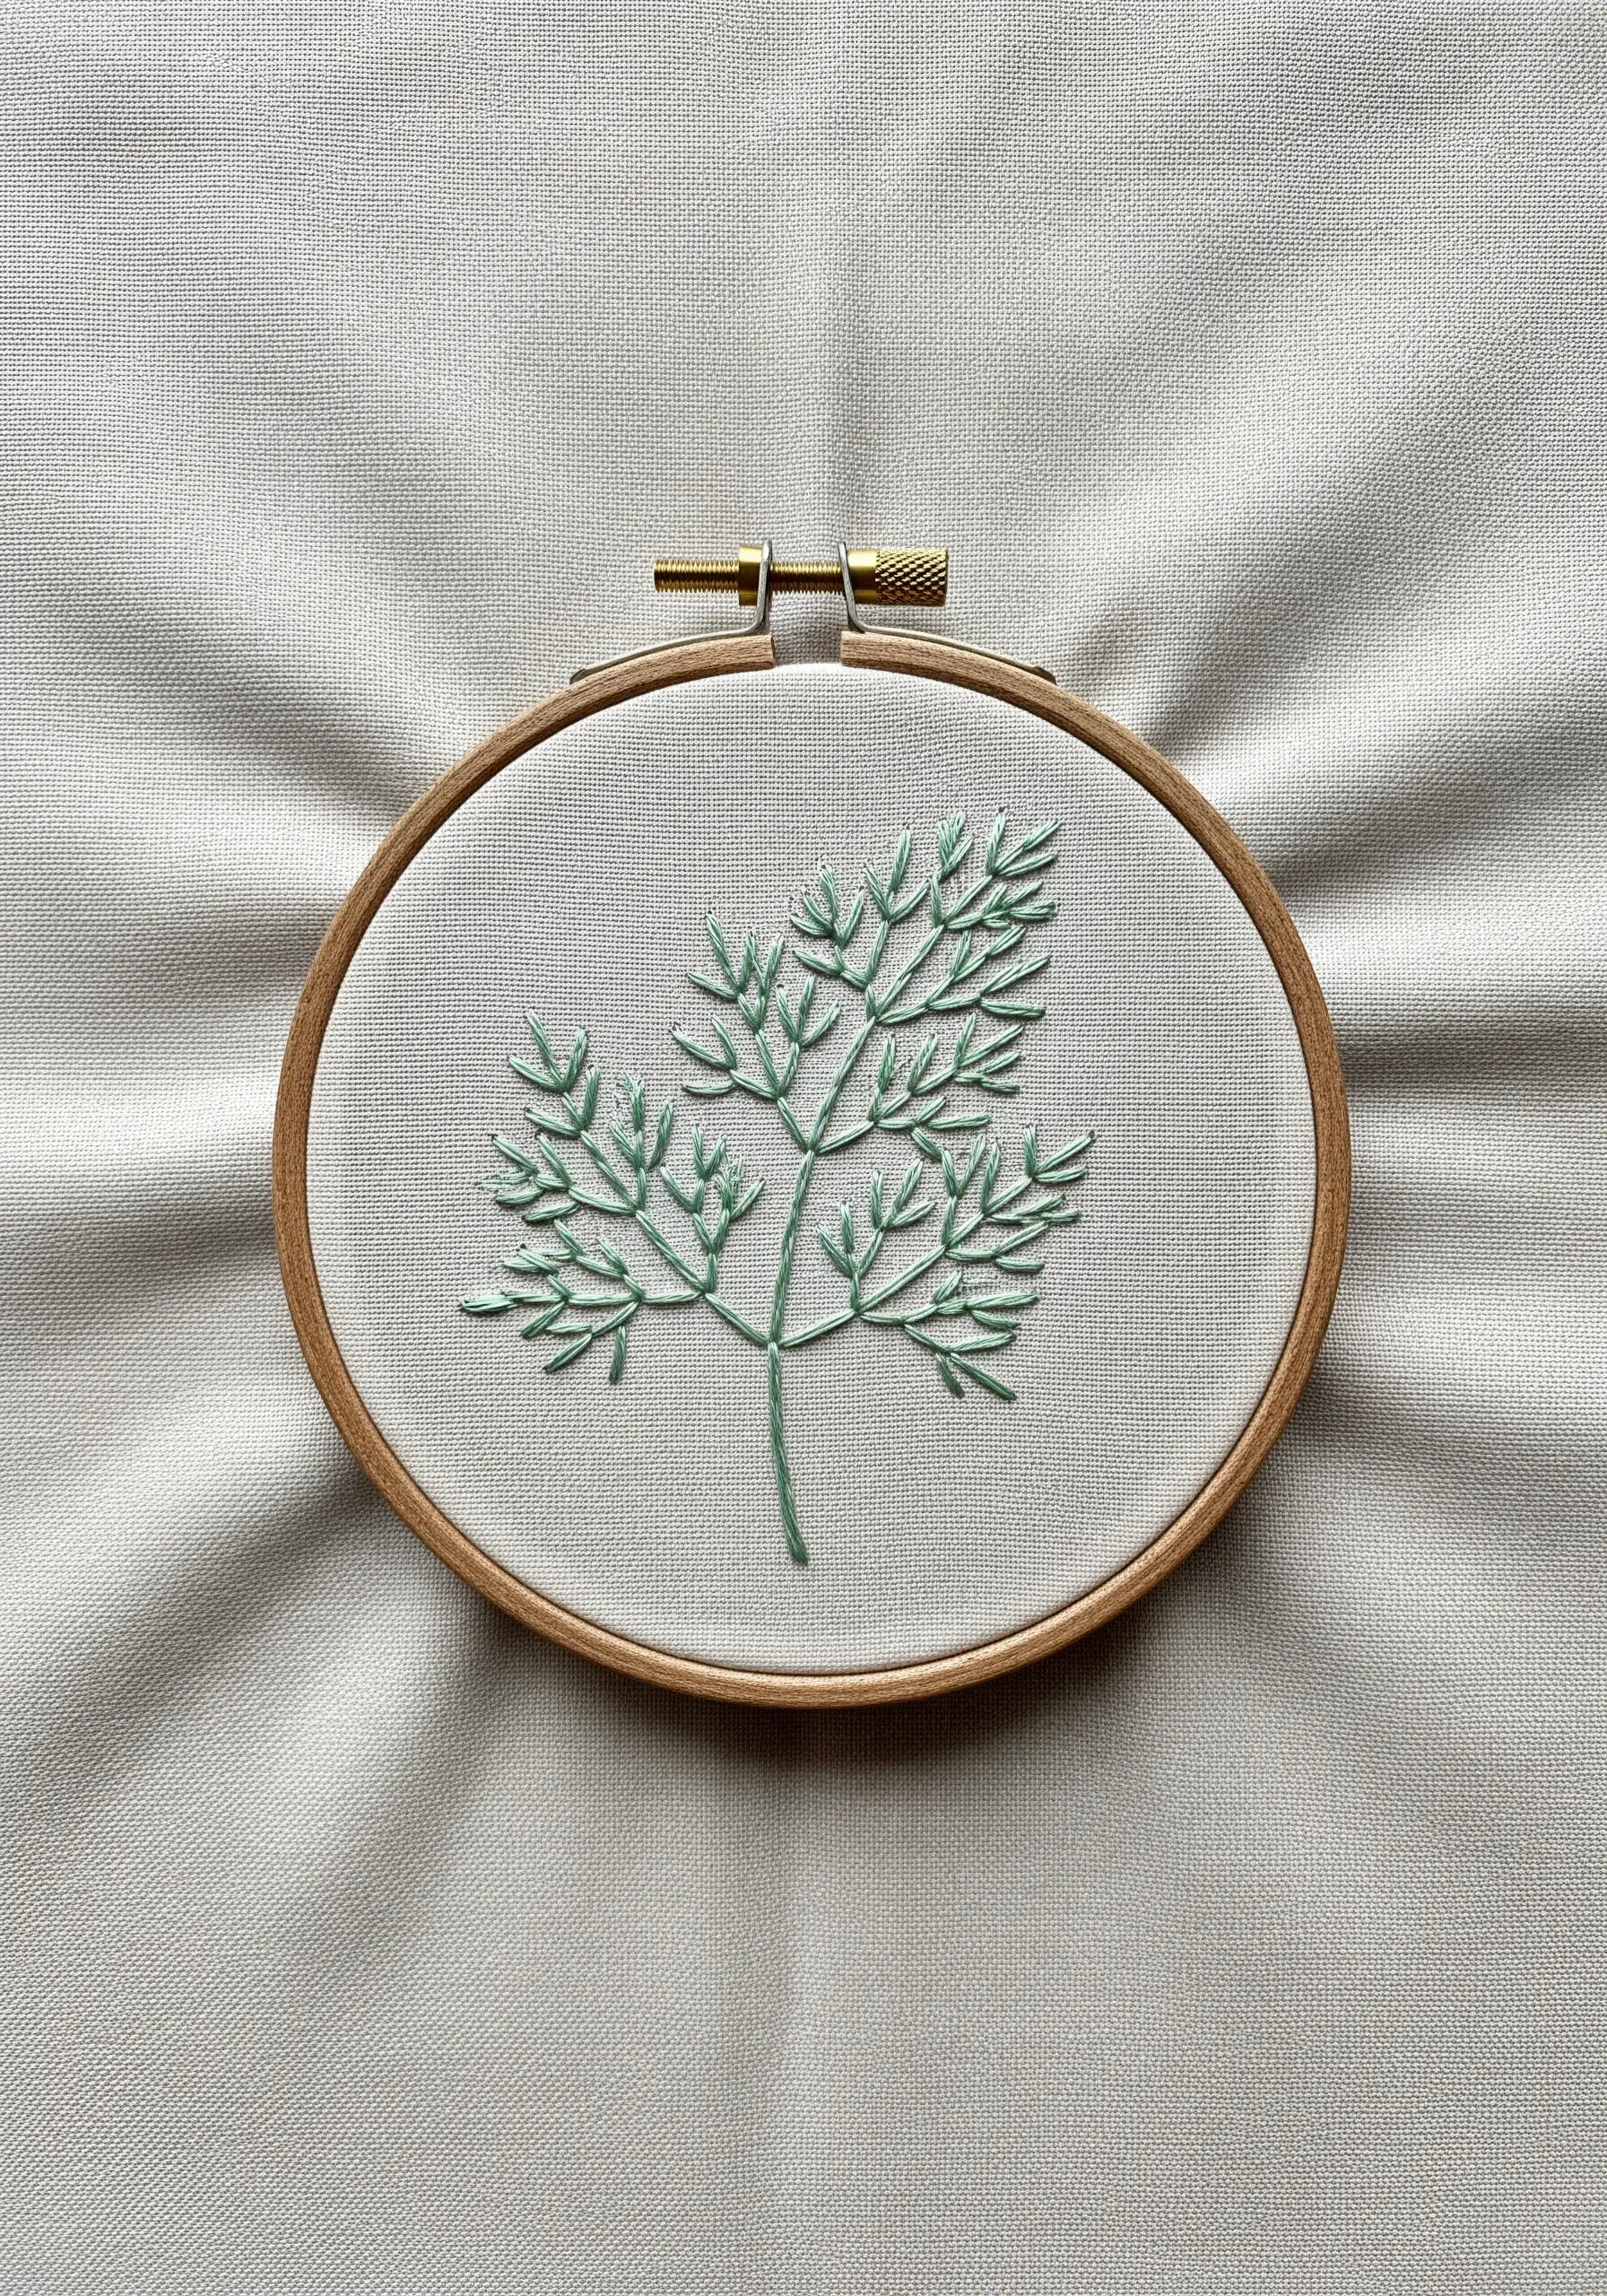
When stitching a delicate herb like fennel or dill, remember that the space you leave empty is just as important as the space you fill.
Resist the urge to add more branches or make the form denser. The beauty of this design is in its light, airy structure.
By keeping the composition minimal, you draw the viewer’s eye to the delicate quality of your line work.
This intentional use of negative space gives your work a modern, sophisticated feel that is both calm and confident.
17. Perfect Your Stitch on a Miniature Scale

Practice your directional satin stitch on tiny, heart-shaped leaves to develop precise control over thread placement.
On this small scale, every single stitch matters. Focus on keeping your stitches parallel and ensuring the angle of entry and exit is exact.
Use a sharp needle and only two strands of floss to maintain definition in such a small area.
These tiny motifs are perfect for embellishing shirt collars, handkerchief corners, or creating a pattern on a tea towel.
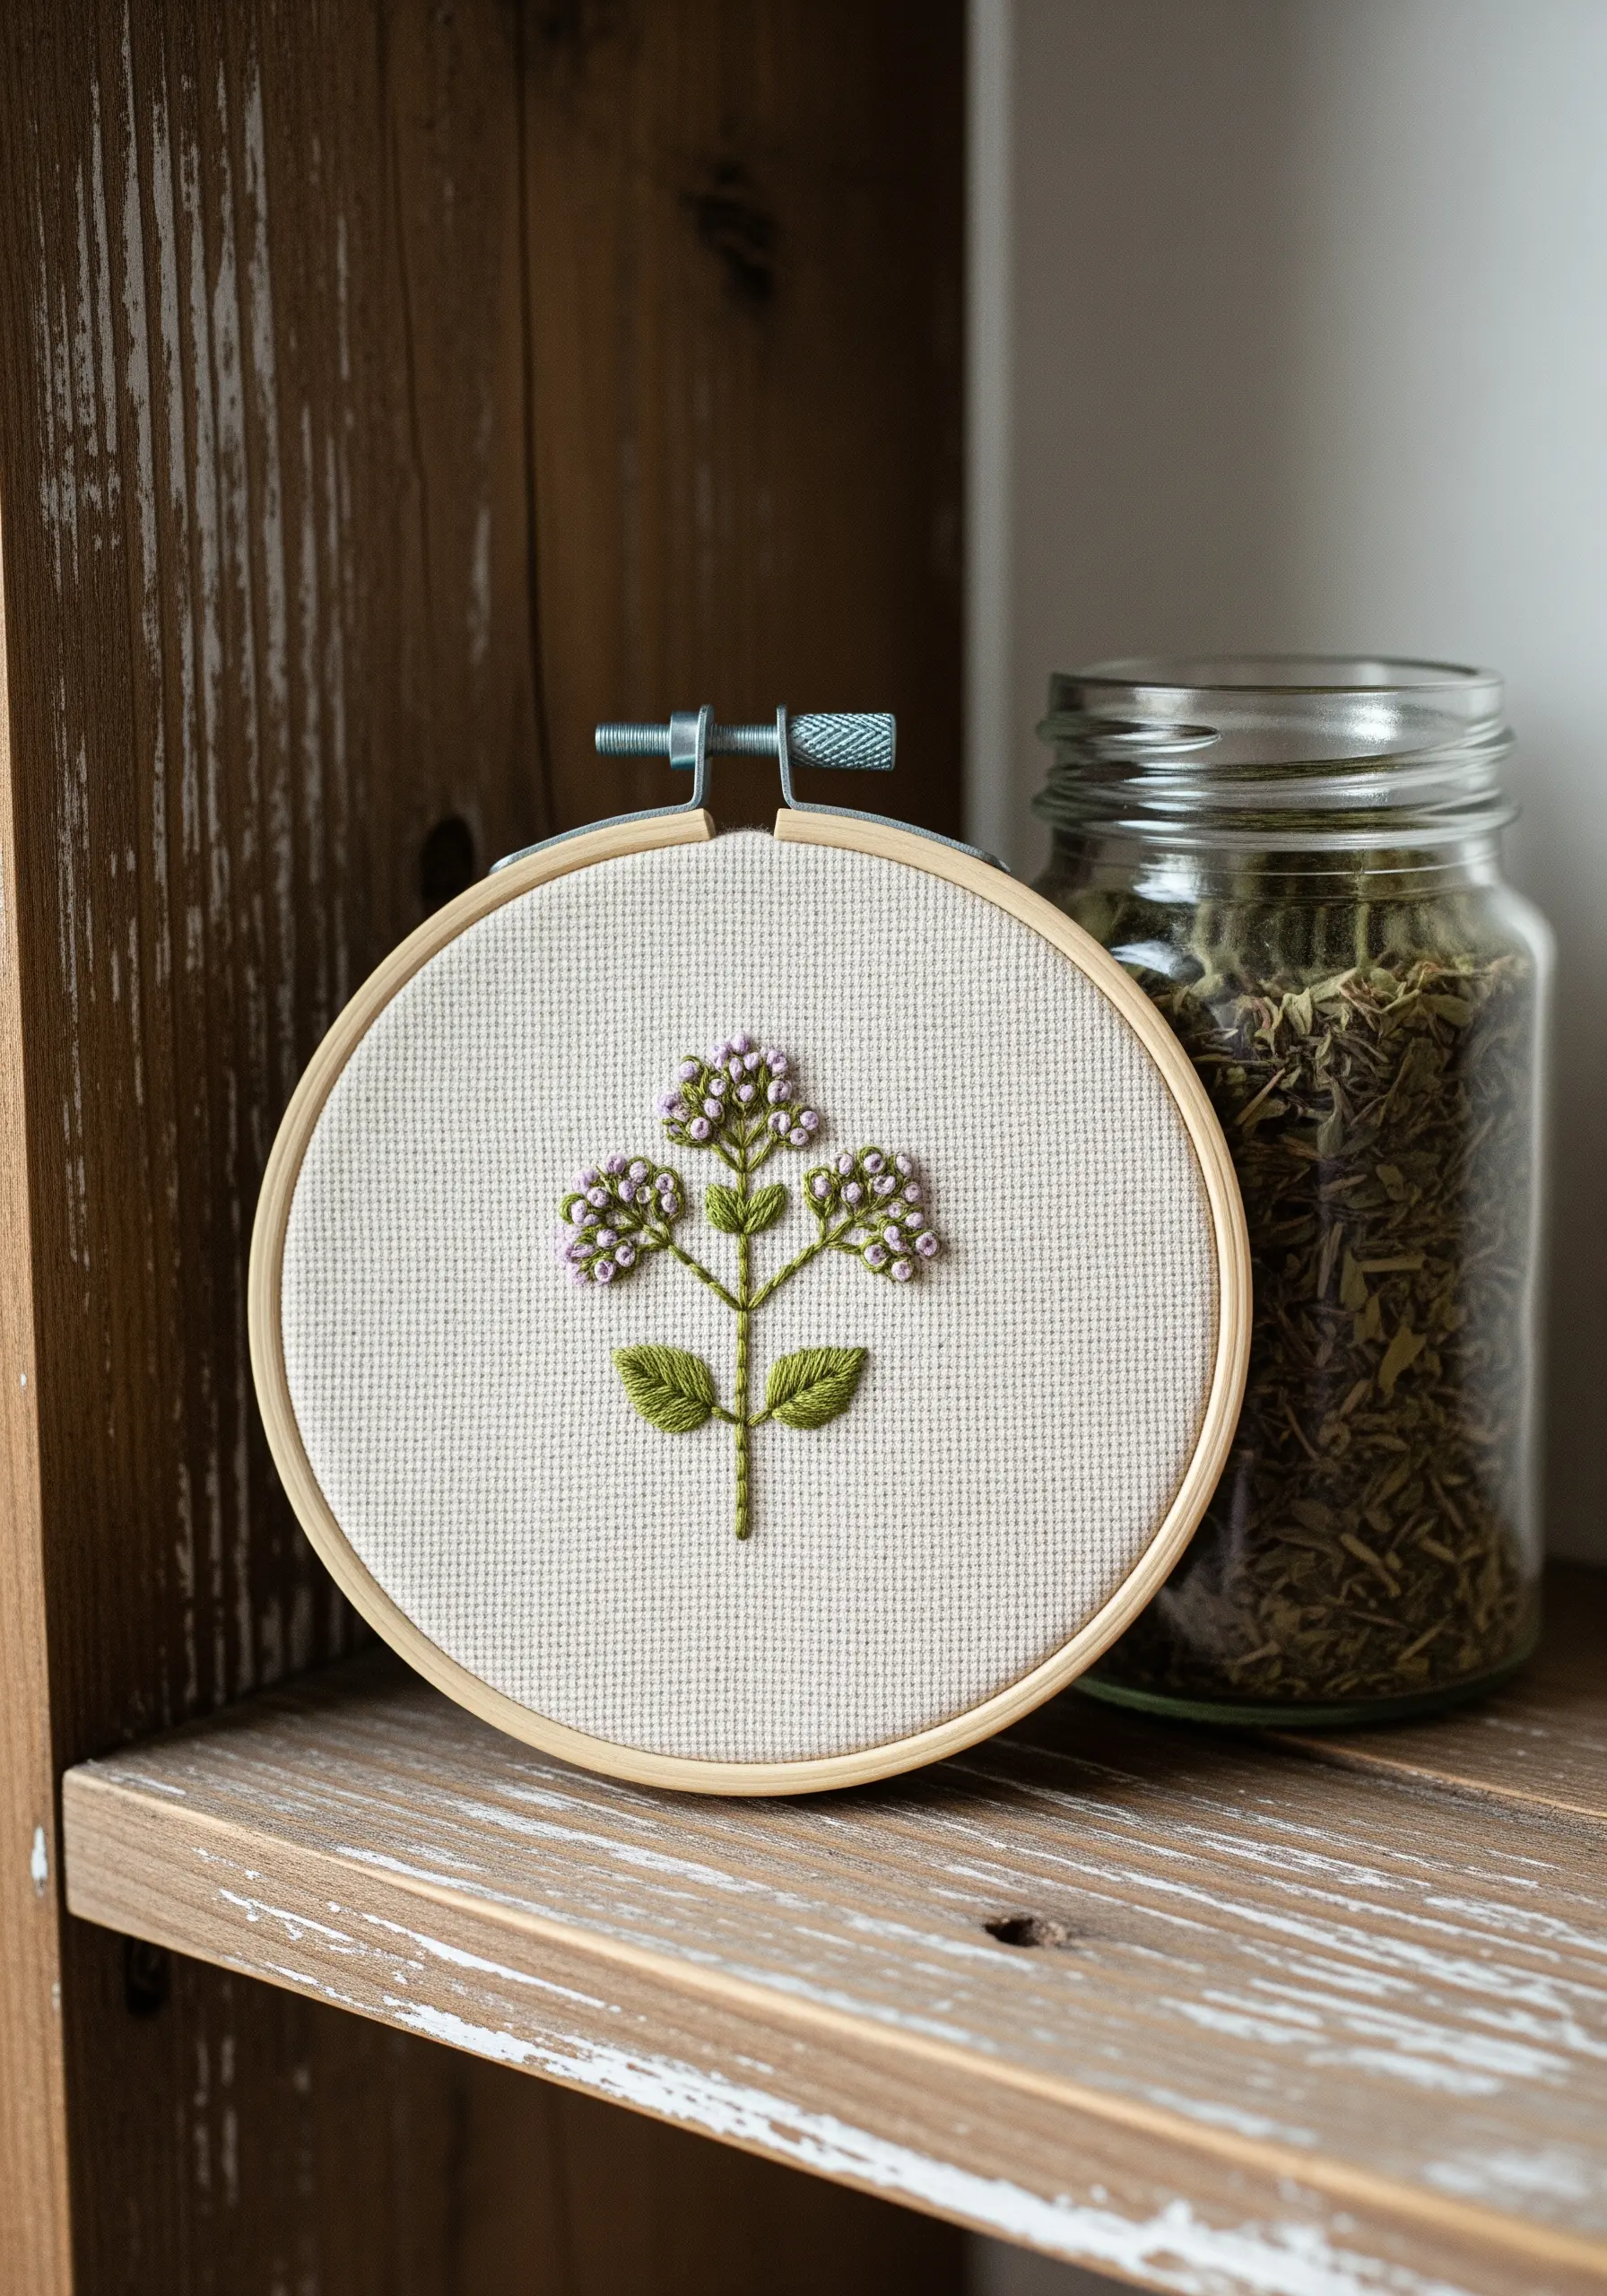
18. Style Your Hoops as Kitchen Vignettes
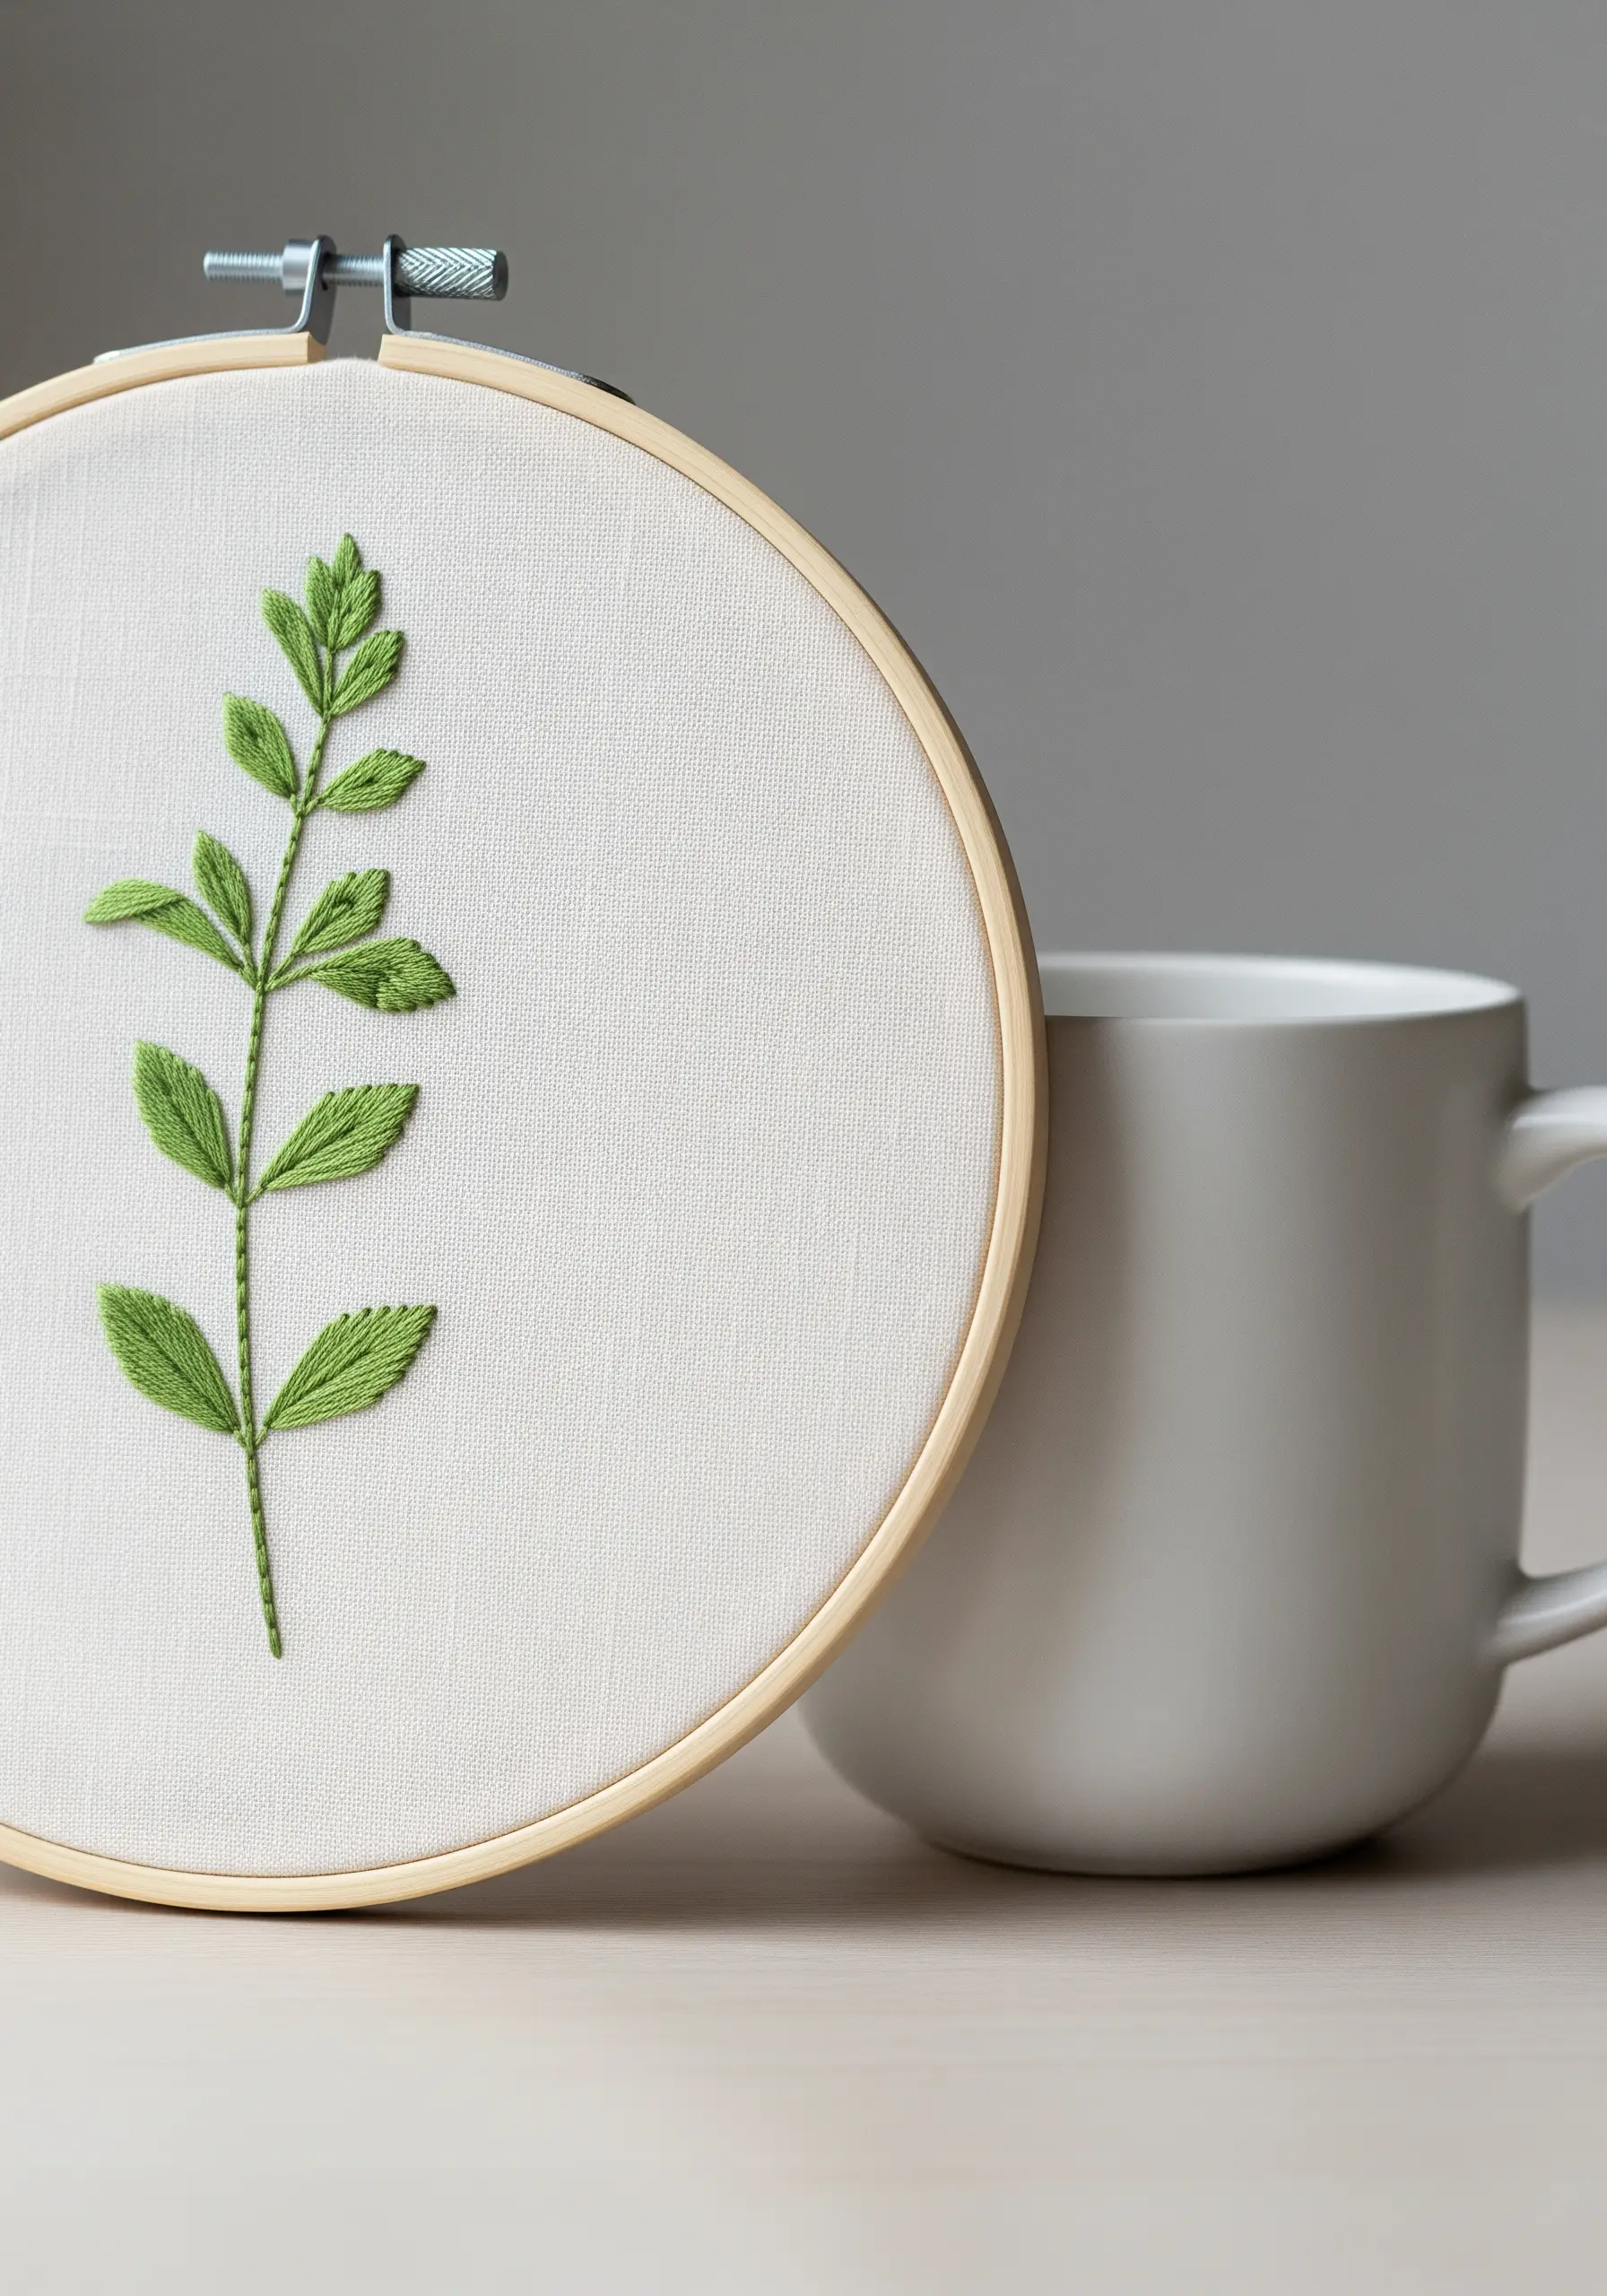
Extend the life of your embroidery beyond the hoop by styling it as part of your everyday kitchen environment.
A simple botanical sprig, stitched on neutral fabric, feels right at home propped up on a shelf next to your favorite mug or a stack of cookbooks.
This approach turns your stitching into functional decor, infusing your space with a personal, handmade warmth.
Think of your embroidered kitchen pieces not just as objects, but as part of the story of your home.
19. Build Organic Forms with Geometric Precision

Create the complex, fractal pattern of a chervil or parsley leaf using a foundation of simple, repeated straight stitches.
Begin with the central stem and main branches, stitched with backstitch. Then, add the tiny leaflets using small, V-shaped straight stitches.
Work symmetrically from the bottom up, keeping the stitch length and angles consistent to build a balanced, tree-like structure.
This methodical approach turns a seemingly intricate plant into a manageable and meditative stitching exercise with a stunningly detailed result.
20. Use Bold Color for a Botanical Pop
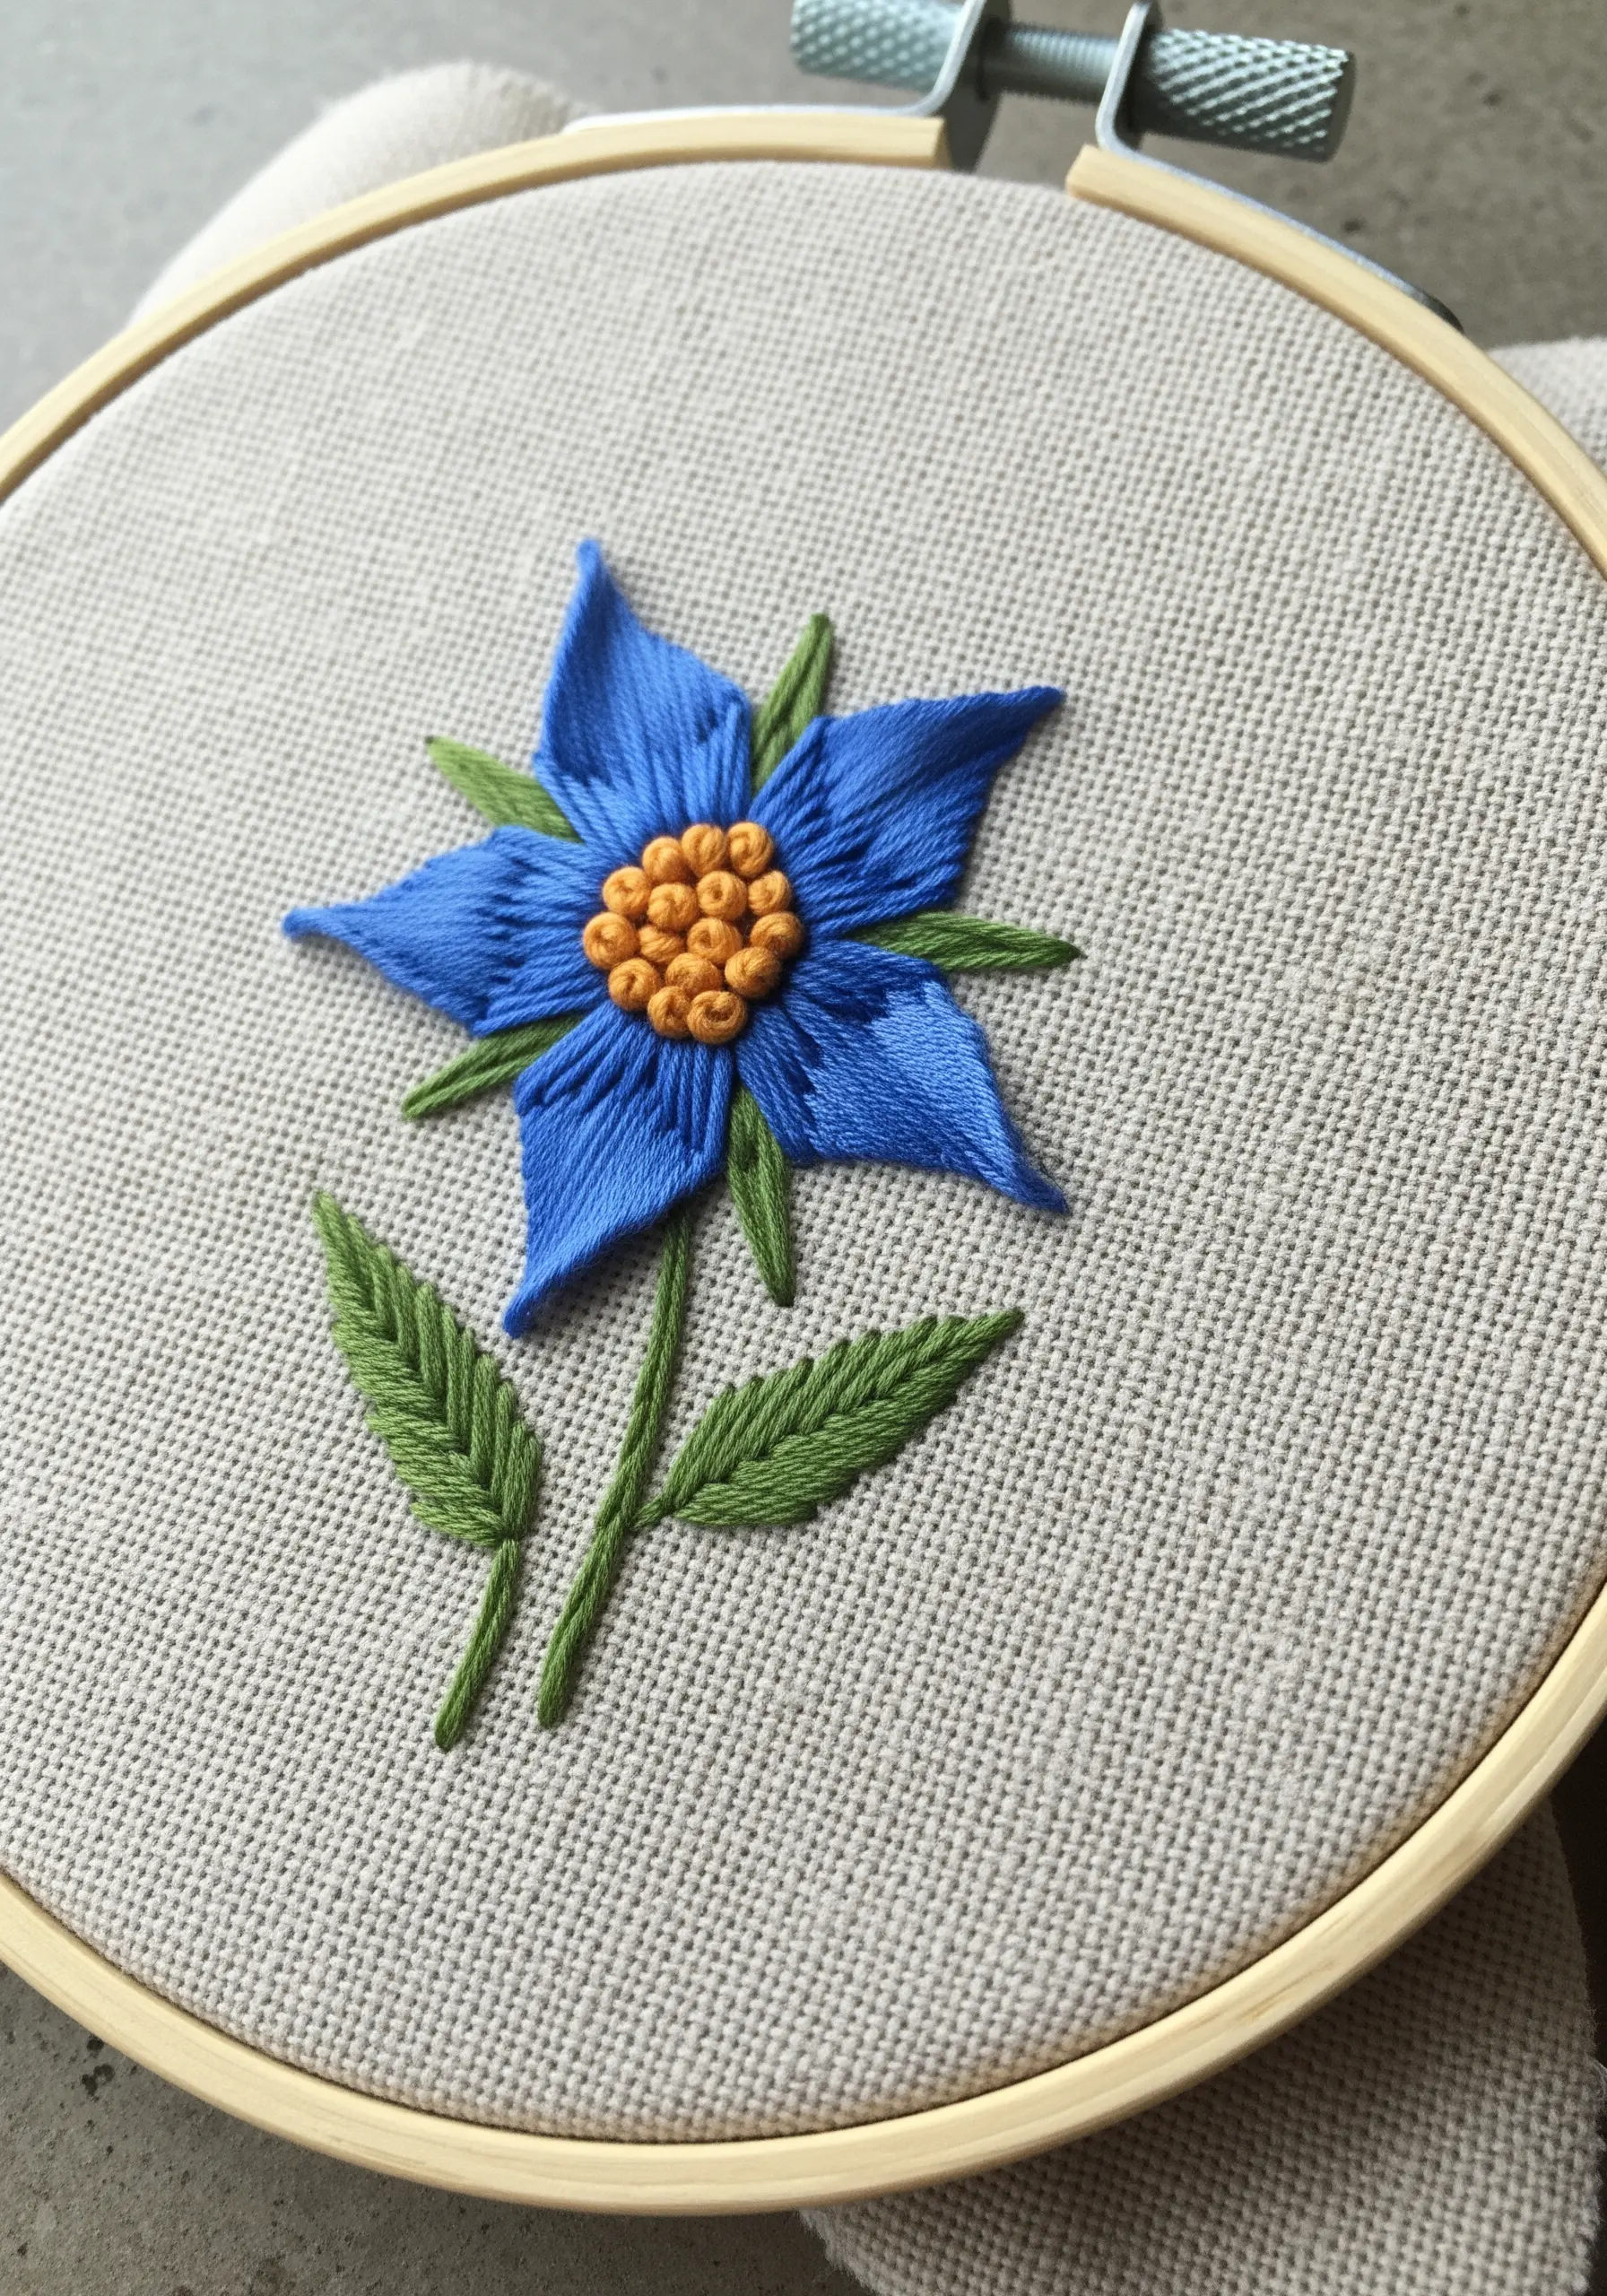
Make a statement with a flowering herb like borage by choosing a thread color that is unapologetically vibrant.
This brilliant cornflower blue, set against a neutral linen background, immediately captures attention and energizes the design.
When using such a strong color, ensure your stitch work is clean. The satin-stitched petals are smooth and directional, and the central French knots are tight and uniform.
Don’t be afraid to deviate from realistic colors; a strategic pop of color can turn a simple botanical into a memorable piece of art.
21. Curate a Cohesive Herb Garden Collection

Elevate individual herb designs by stitching them as a coordinated set, perfect for a gallery wall in your kitchen.
To ensure they look cohesive, use the same size and style of hoop, the same background fabric, and a related color palette across all pieces.
Here, the soft greens and muted tones create a harmonious collection, even though the herbs (sage, parsley, thyme) are all different.
Arranging your work in a series transforms your individual projects into a single, impactful installation, just like in these hooped wall collage layouts.


