

You have the desire to create, but the day is already full. The thought of starting an elaborate project feels overwhelming, so your embroidery supplies remain tucked away. I understand that feeling completely.
But what if you could create something beautiful, polished, and deeply satisfying in under an hour? True artistry isn’t measured in the time spent, but in the intention behind each stitch. These small projects are your invitation to reconnect with your craft, even when time is short.
Here, you won’t find complicated patterns. Instead, you’ll discover specific techniques that deliver maximum impact with minimum effort—a better way to stitch a leaf, a smarter way to create texture, a simpler way to finish your work. This is your moment to make something meaningful, right now.
1. Master Directional Satin Stitch for Lifelike Leaves
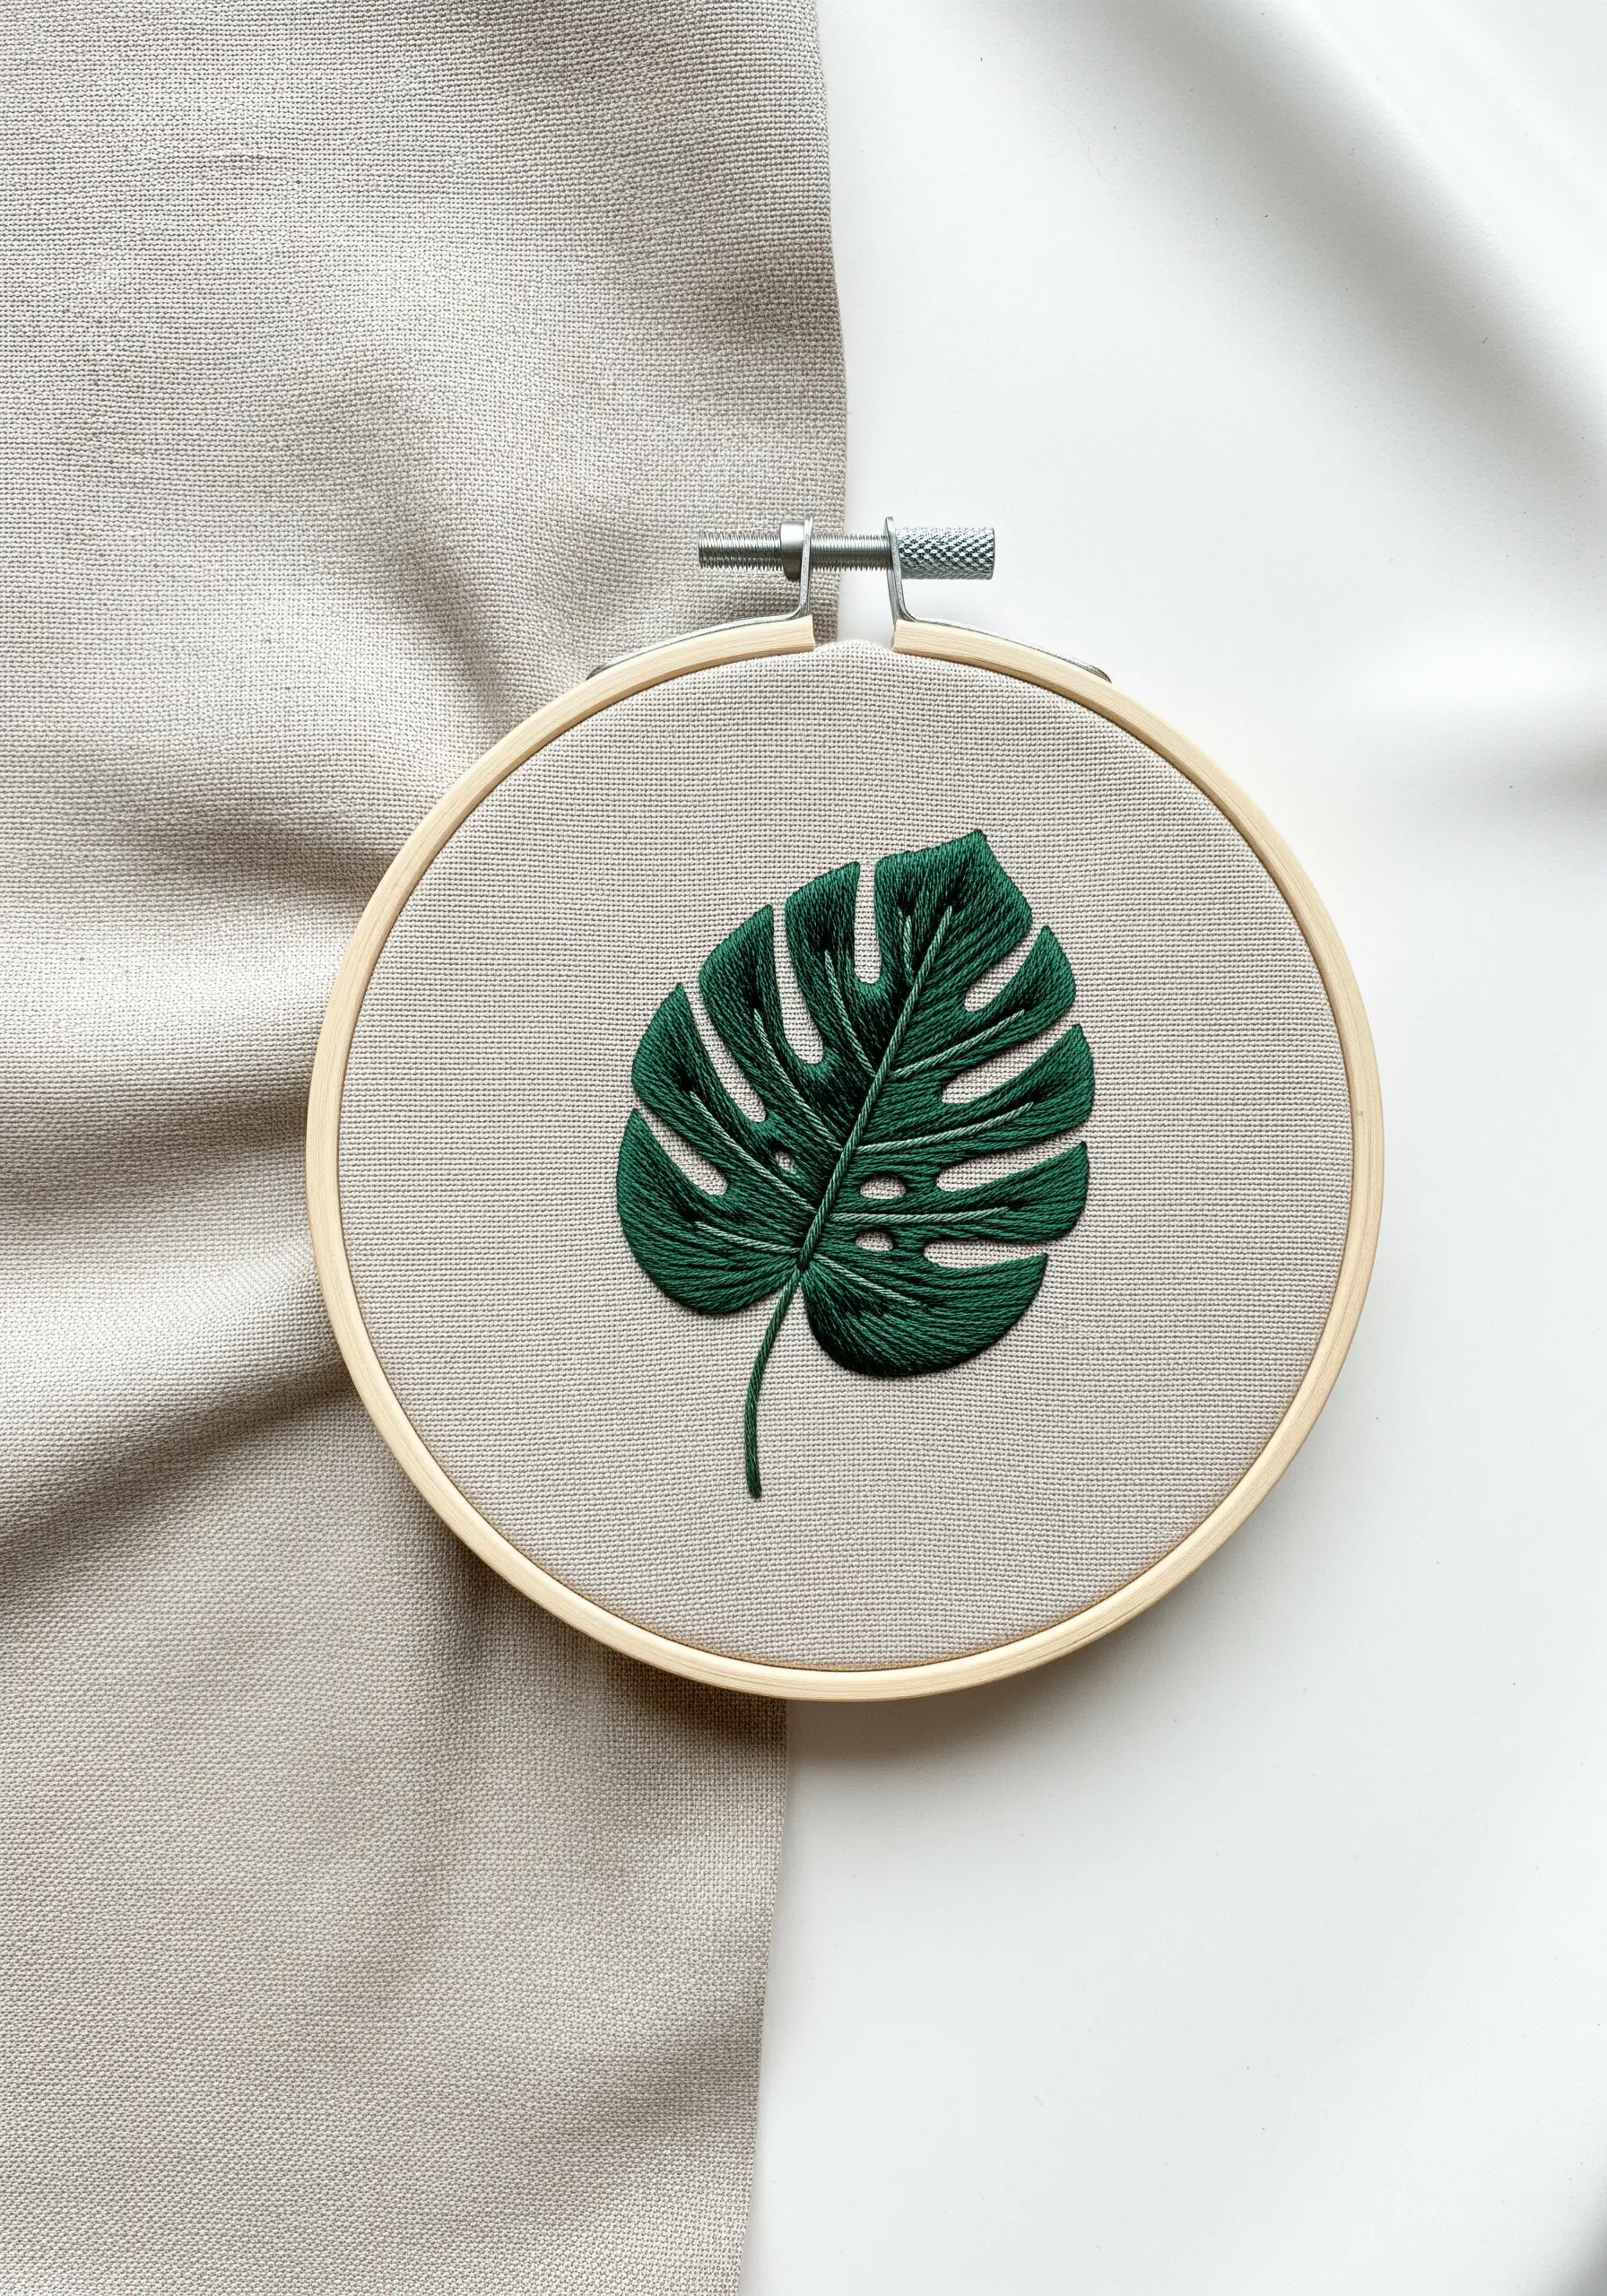
To give botanical motifs like this monstera leaf a natural sheen, vary the direction of your satin stitches to follow the organic shape.
Think about how light would hit the leaf; angle your stitches from the central vein outwards towards the edges.
For impeccably clean edges, first outline the entire shape with a single line of split stitch—this creates a raised boundary that your satin stitches can tuck neatly against.
Using three strands of six-strand cotton floss on a medium-weight linen provides excellent coverage without looking bulky, achieving that smooth, painted-with-thread finish.
This technique is perfect for any tropical leaf embroidery designs you want to bring to life.
2. Create Raised Outlines with Whipped Backstitch

For a bold, rope-like texture that stands out, elevate a simple backstitch by whipping it.
First, complete your outline with a standard backstitch, keeping your stitches small and even.
Then, using the same thread or a contrasting one, slide your needle under each backstitch without piercing the fabric, creating a smooth, dimensional cord.
This technique is especially effective for celestial motifs on dark fabric, giving the moon a tangible presence against the flatly stitched stars.
Consider a metallic or silk floss for the whipping thread to add a subtle, light-catching shimmer, transforming your hoop into a piece of metallic thread wall art.
3. The Art of a Symmetrical Satin Stitch Arch

Stitching a perfect arch requires a methodical approach to prevent distortion.
Instead of starting at one end, place your first stitch directly in the center of the arc, then work outwards, alternating sides—one stitch to the left, one to the right.
This technique ensures your stitches remain parallel and your curve stays balanced and symmetrical from start to finish.
Choosing a muted, earthy color palette gives the classic rainbow motif a modern, sophisticated feel that blends beautifully into contemporary decor.
This is a great way to experiment with pastel gradient stitch patterns in a contained, simple shape.
4. Stitching Micro-Motifs on Crisp Linens

When embroidering on fine fabrics like cotton or linen napkins, precision is key to avoiding puckering.
Use a single strand of embroidery floss and a sharp, fine needle to create delicate lines.
Always secure your fabric in a hoop and consider using a lightweight, tear-away stabilizer on the back for extra support; it prevents the fabric from pulling and keeps your stitches smooth.
For a motif like this bee, use a tiny backstitch for the outline and minimal satin stitches for the fill, ensuring the design remains crisp and elegant.
These are the foundational skills for creating beautiful minimal line art embroidery patterns on home textiles.
5. Build Botanical Texture with Woven Wheels

Instantly add dimension to your florals by combining different textural stitches.
For the lavender blossoms, use the woven wheel stitch (also known as a spider web rose) to create raised, circular buds that sit proudly on the fabric surface.
Contrast this with the fishbone stitch for the leaves; its overlapping structure naturally forms a central vein, giving a more realistic appearance.
A simple stem stitch for the stalk provides a clean line that connects these textured elements, making the entire sprig feel cohesive and lifelike.
Mastering these delicate leaf embroidery stitches will elevate all your botanical work.
6. Add a Playful Detail to Denim

Embroidering on denim is an easy way to personalize your wardrobe, but it requires the right tools.
Choose a strong, sharp needle designed for denim to pierce the thick fabric with ease, and use a thimble to protect your fingers.
For a whimsical touch like this paper plane’s flight path, use a simple running stitch with evenly spaced gaps.
This minimalist approach adds a narrative element to the design without overwhelming the garment, making it one of the most effective tiny embroidery ideas to personalize your denim jacket.
7. Create Impact with Radiating Straight Stitches

This bold sunburst design is a masterclass in tension and precision.
To ensure perfect symmetry, start by marking a central point and evenly spaced points around the circumference of your hoop.
The key to a professional finish is maintaining consistent thread tension for every single stitch—not too tight to pucker the fabric, and not too loose to sag.
Using all six strands of cotton floss or a thicker Perle cotton thread will give the radiating lines a substantial, graphic quality perfect for modern abstract thread embroidery ideas.
8. Build Dimensional Lettering with Braid Stitch
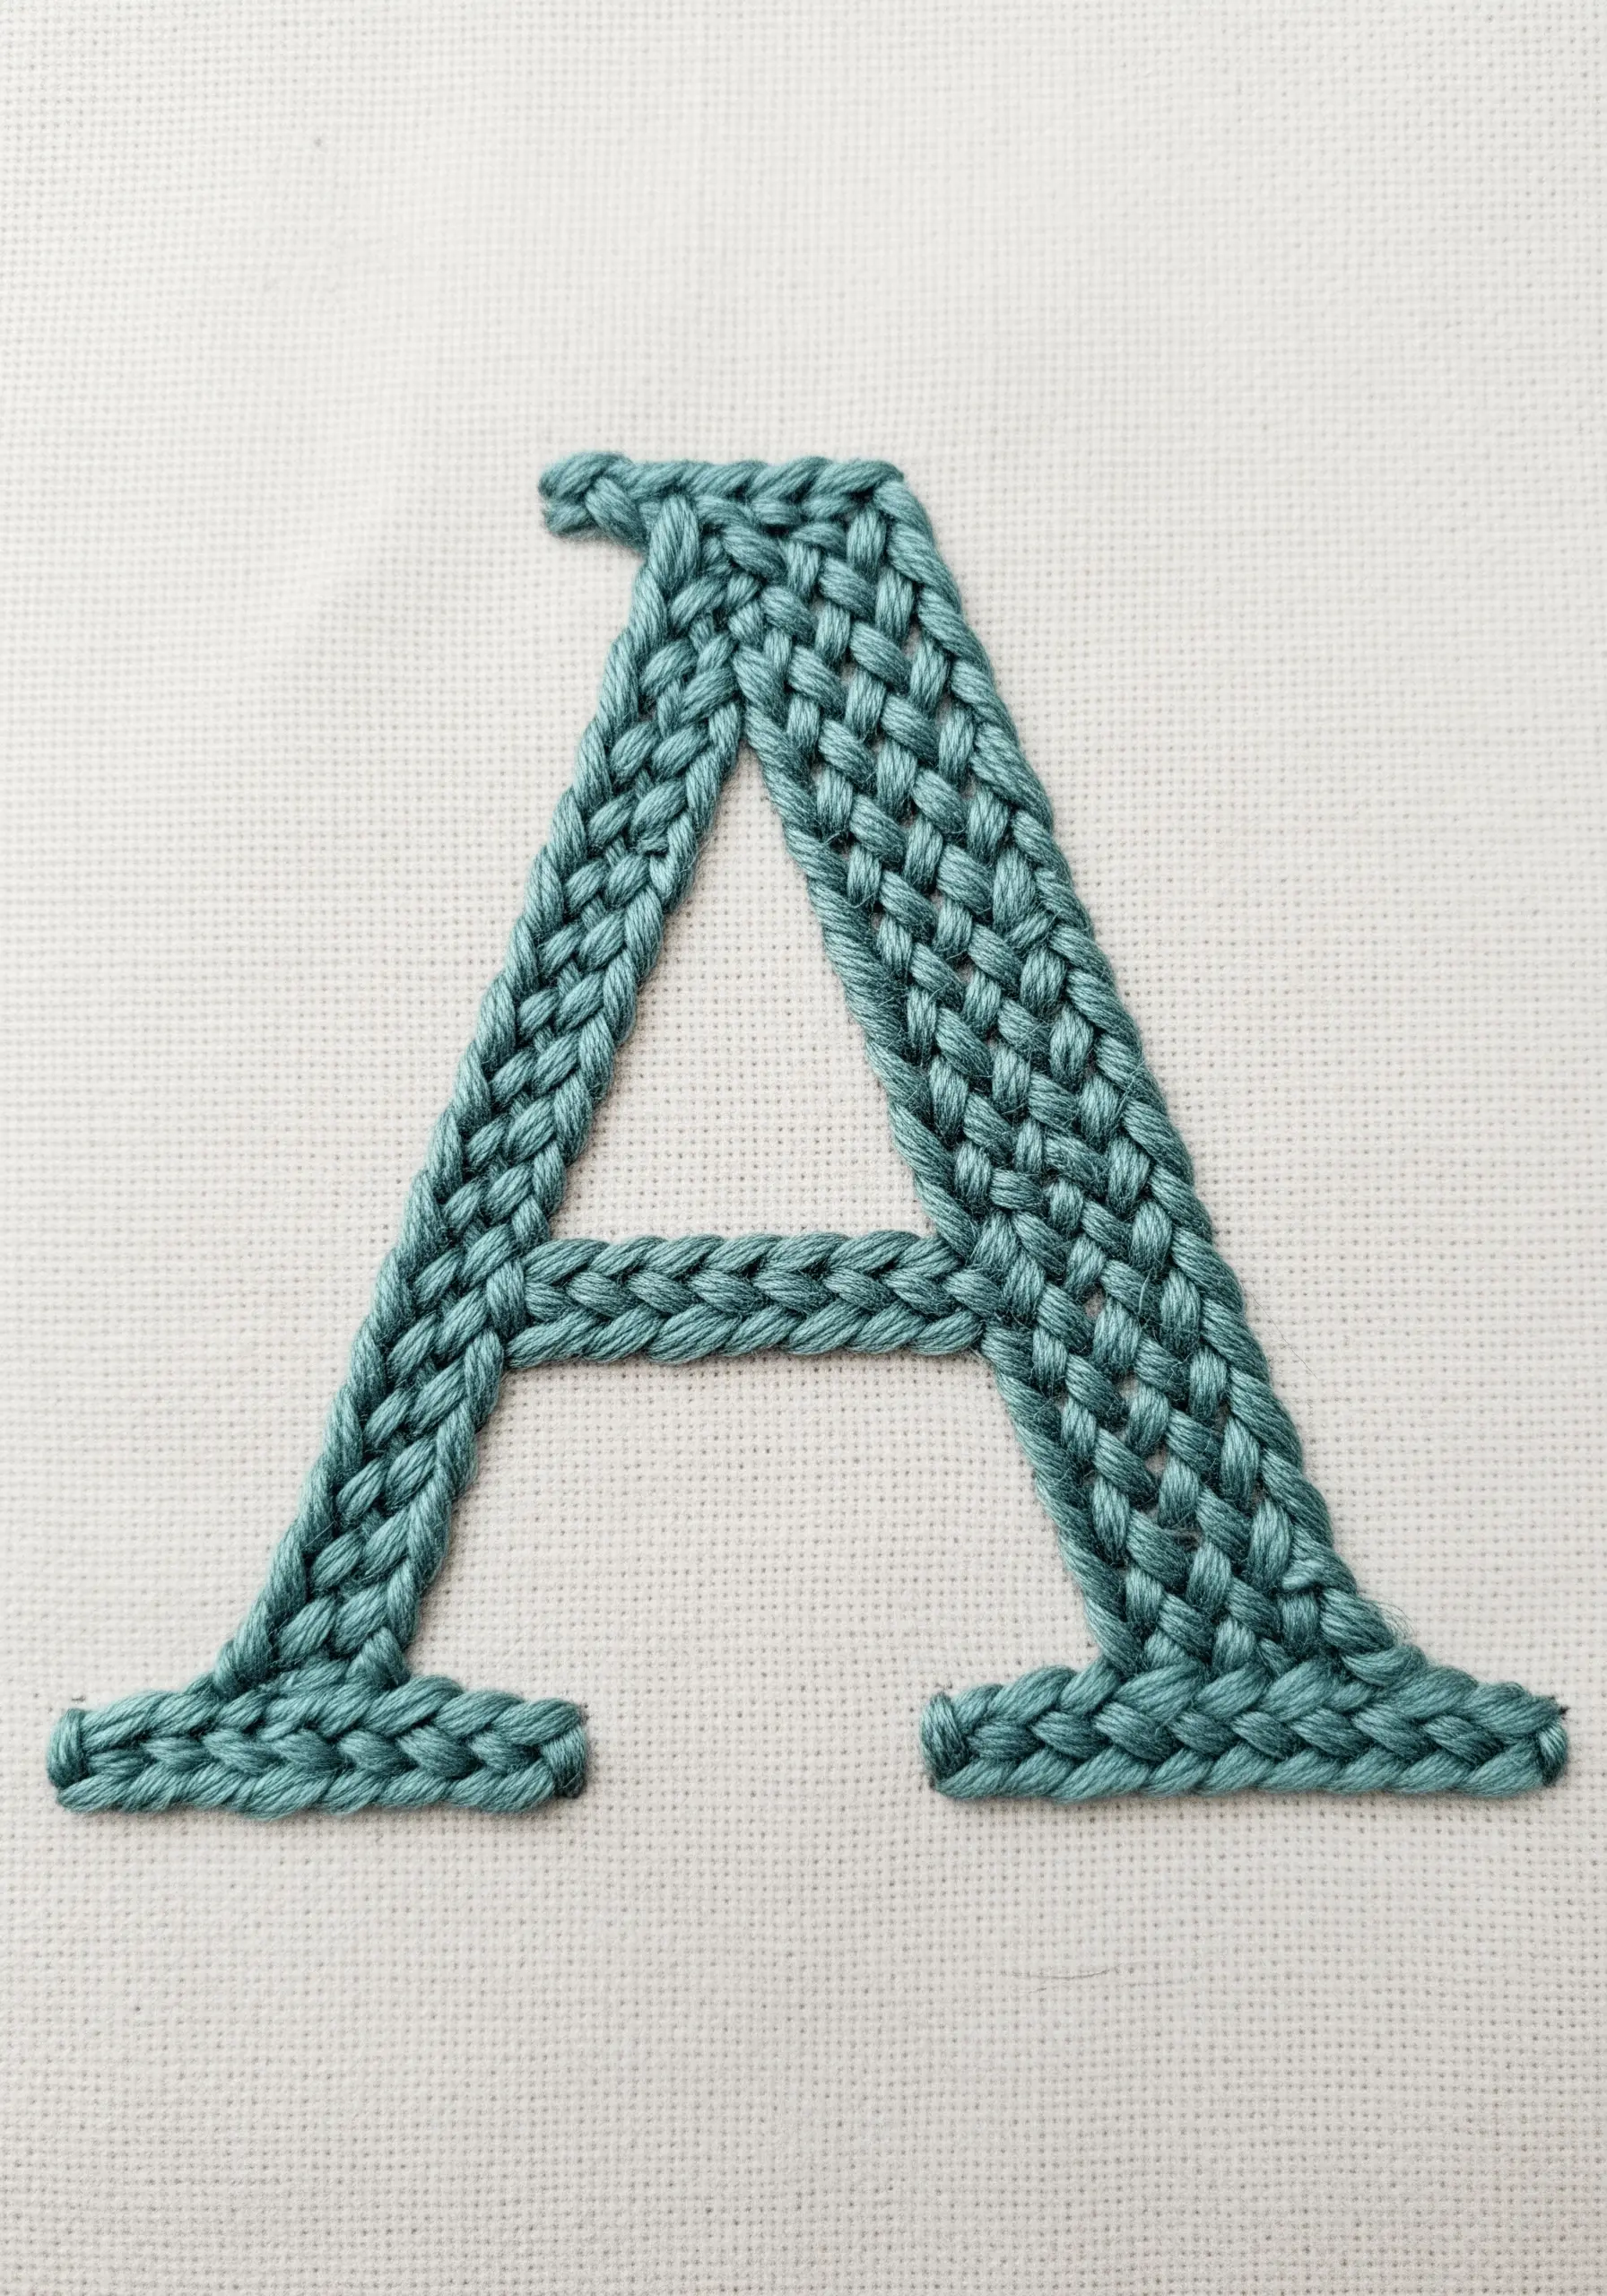
Move beyond flat satin stitch for lettering and embrace texture with the raised braid stitch.
This stitch creates a beautiful, woven effect that looks almost three-dimensional, giving your letters significant visual weight and a tactile quality.
To keep the shape precise, first trace and outline your letter with a simple backstitch, then fill the interior with rows of braid stitch.
This is a perfect technique for creating a standout personalized monogram on a pillowcase or keepsake.
9. Reinforce Embroidery on High-Use Items
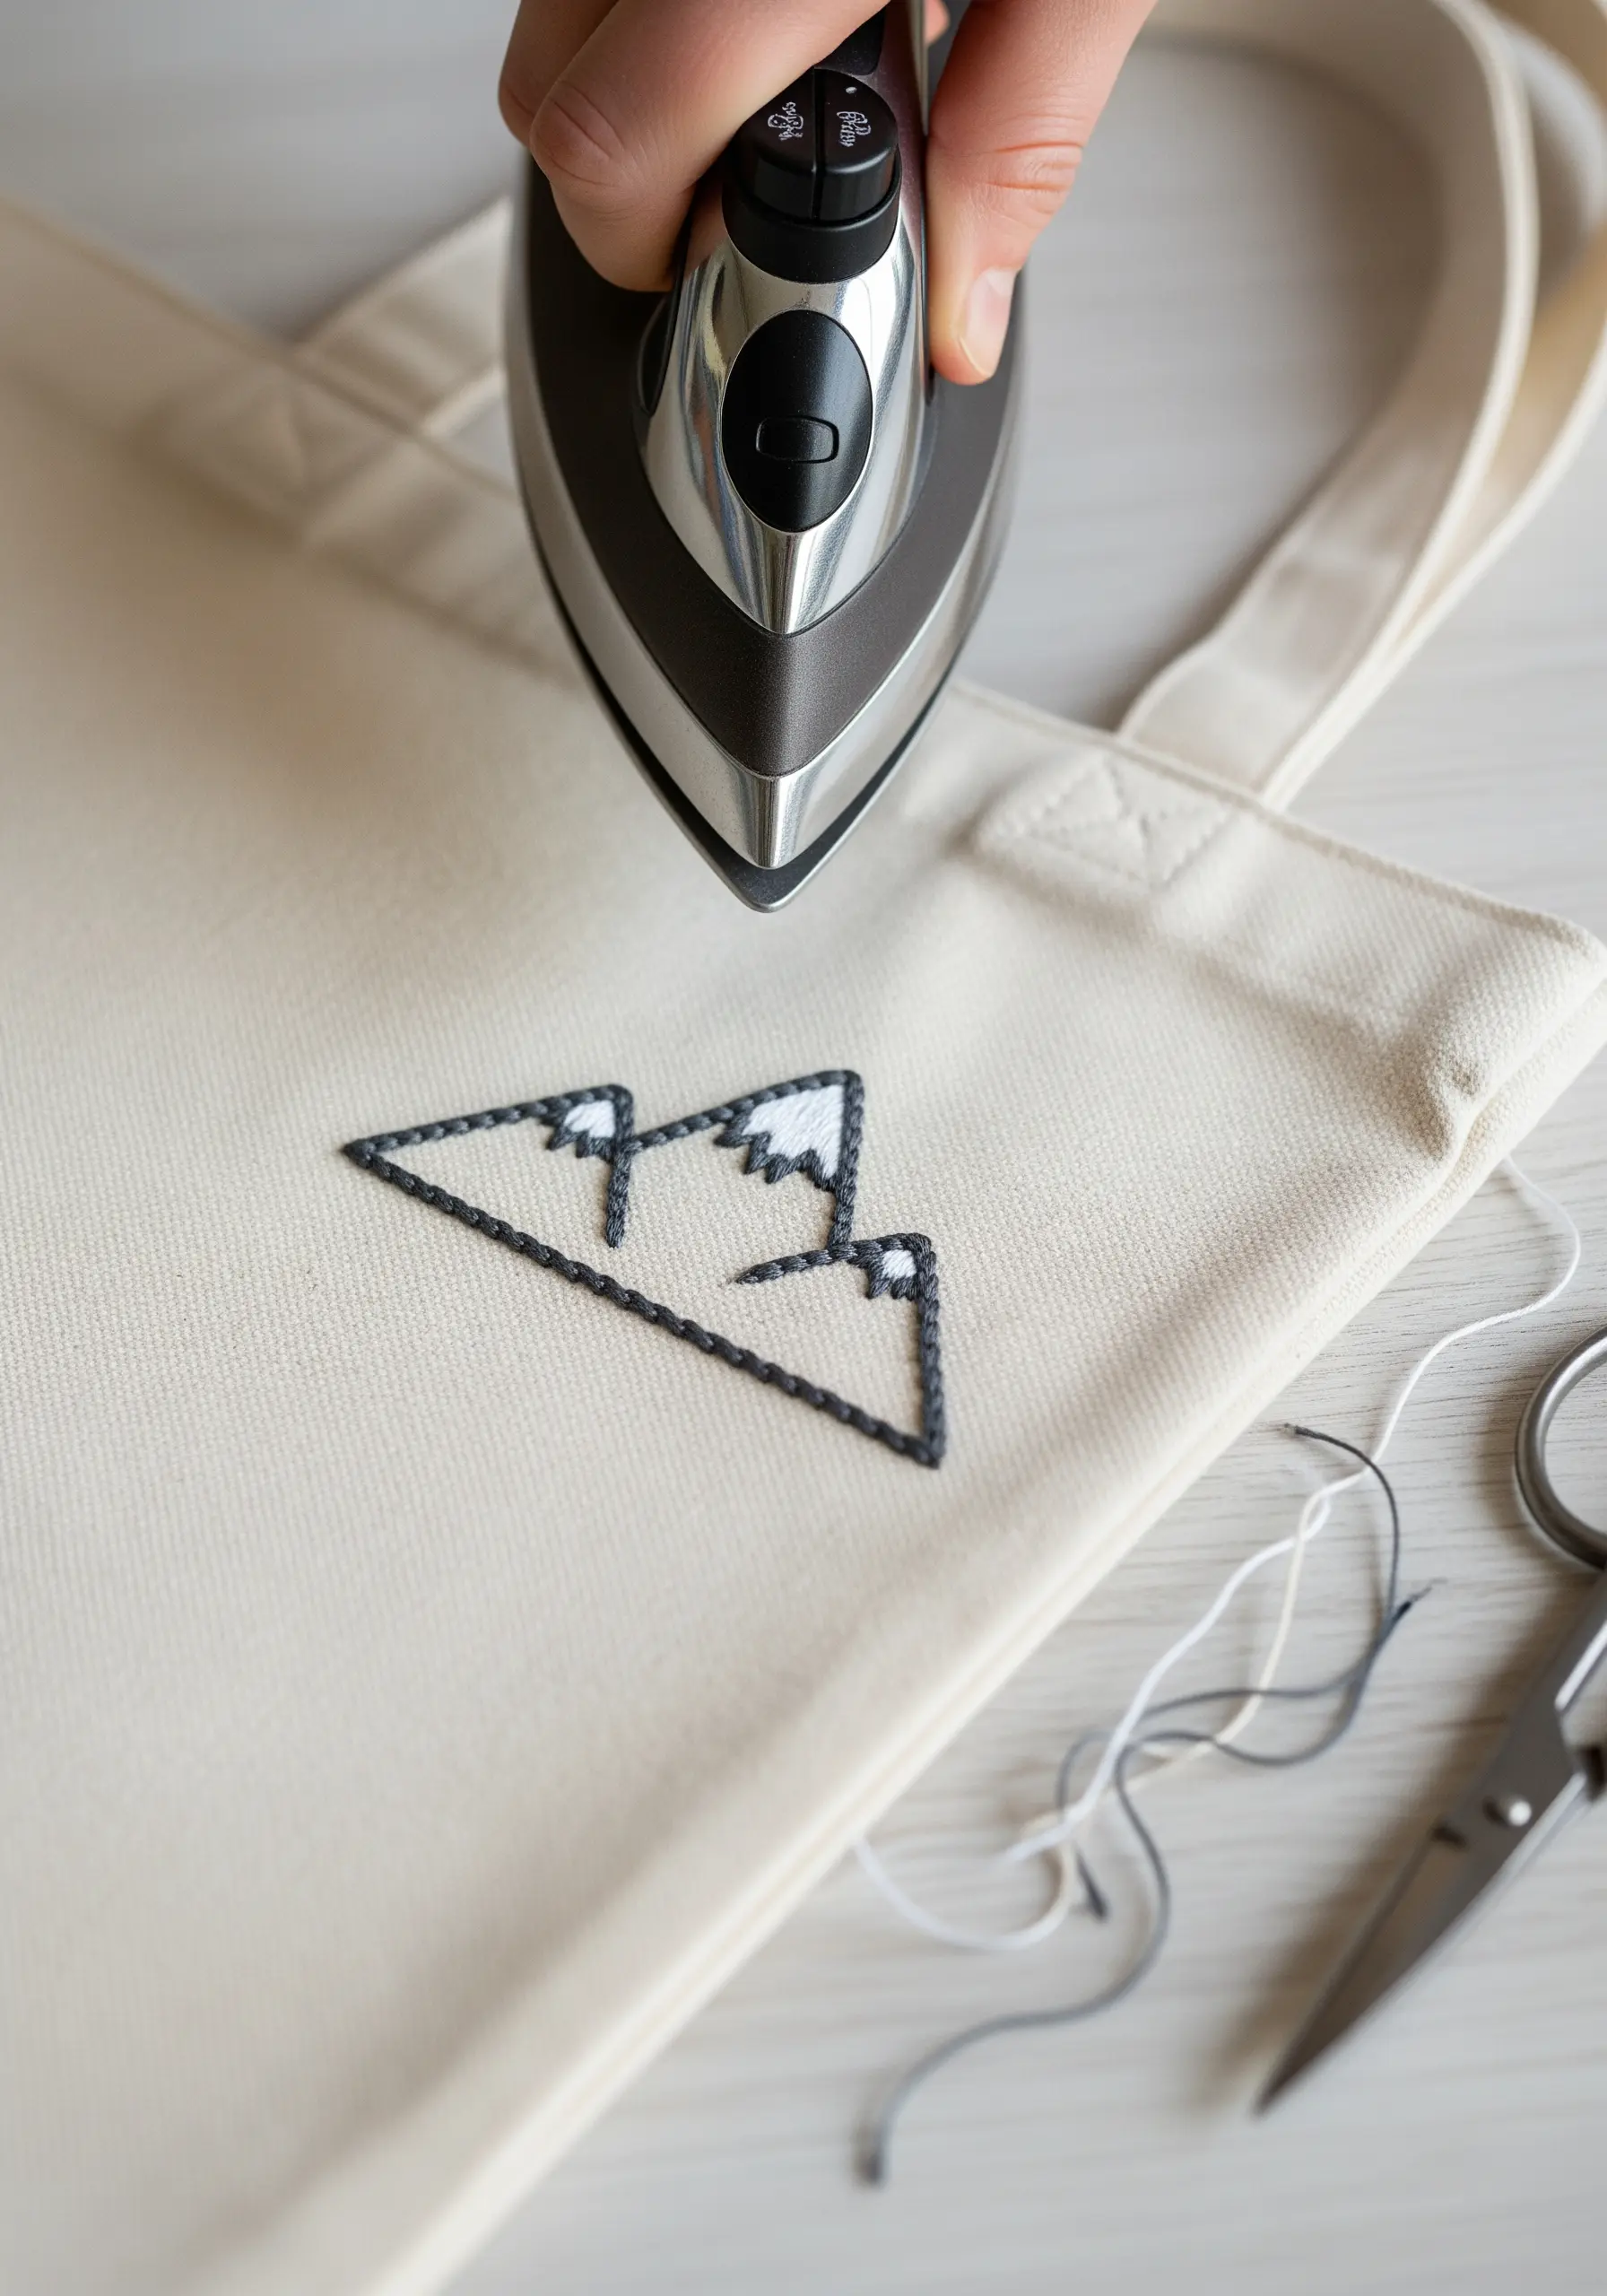
When you stitch on functional items like tote bags, durability is as important as aesthetics.
Once your embroidery is complete, cut a piece of fusible (iron-on) interfacing slightly larger than your design.
Place it over the back of your stitches on the inside of the bag and press with a hot iron according to the manufacturer’s instructions.
This simple step protects the threads from snagging and friction, ensuring your art lasts through daily use and making your modern thread abstract designs practical and permanent.
10. The Refined Power of Single-Color Line Art
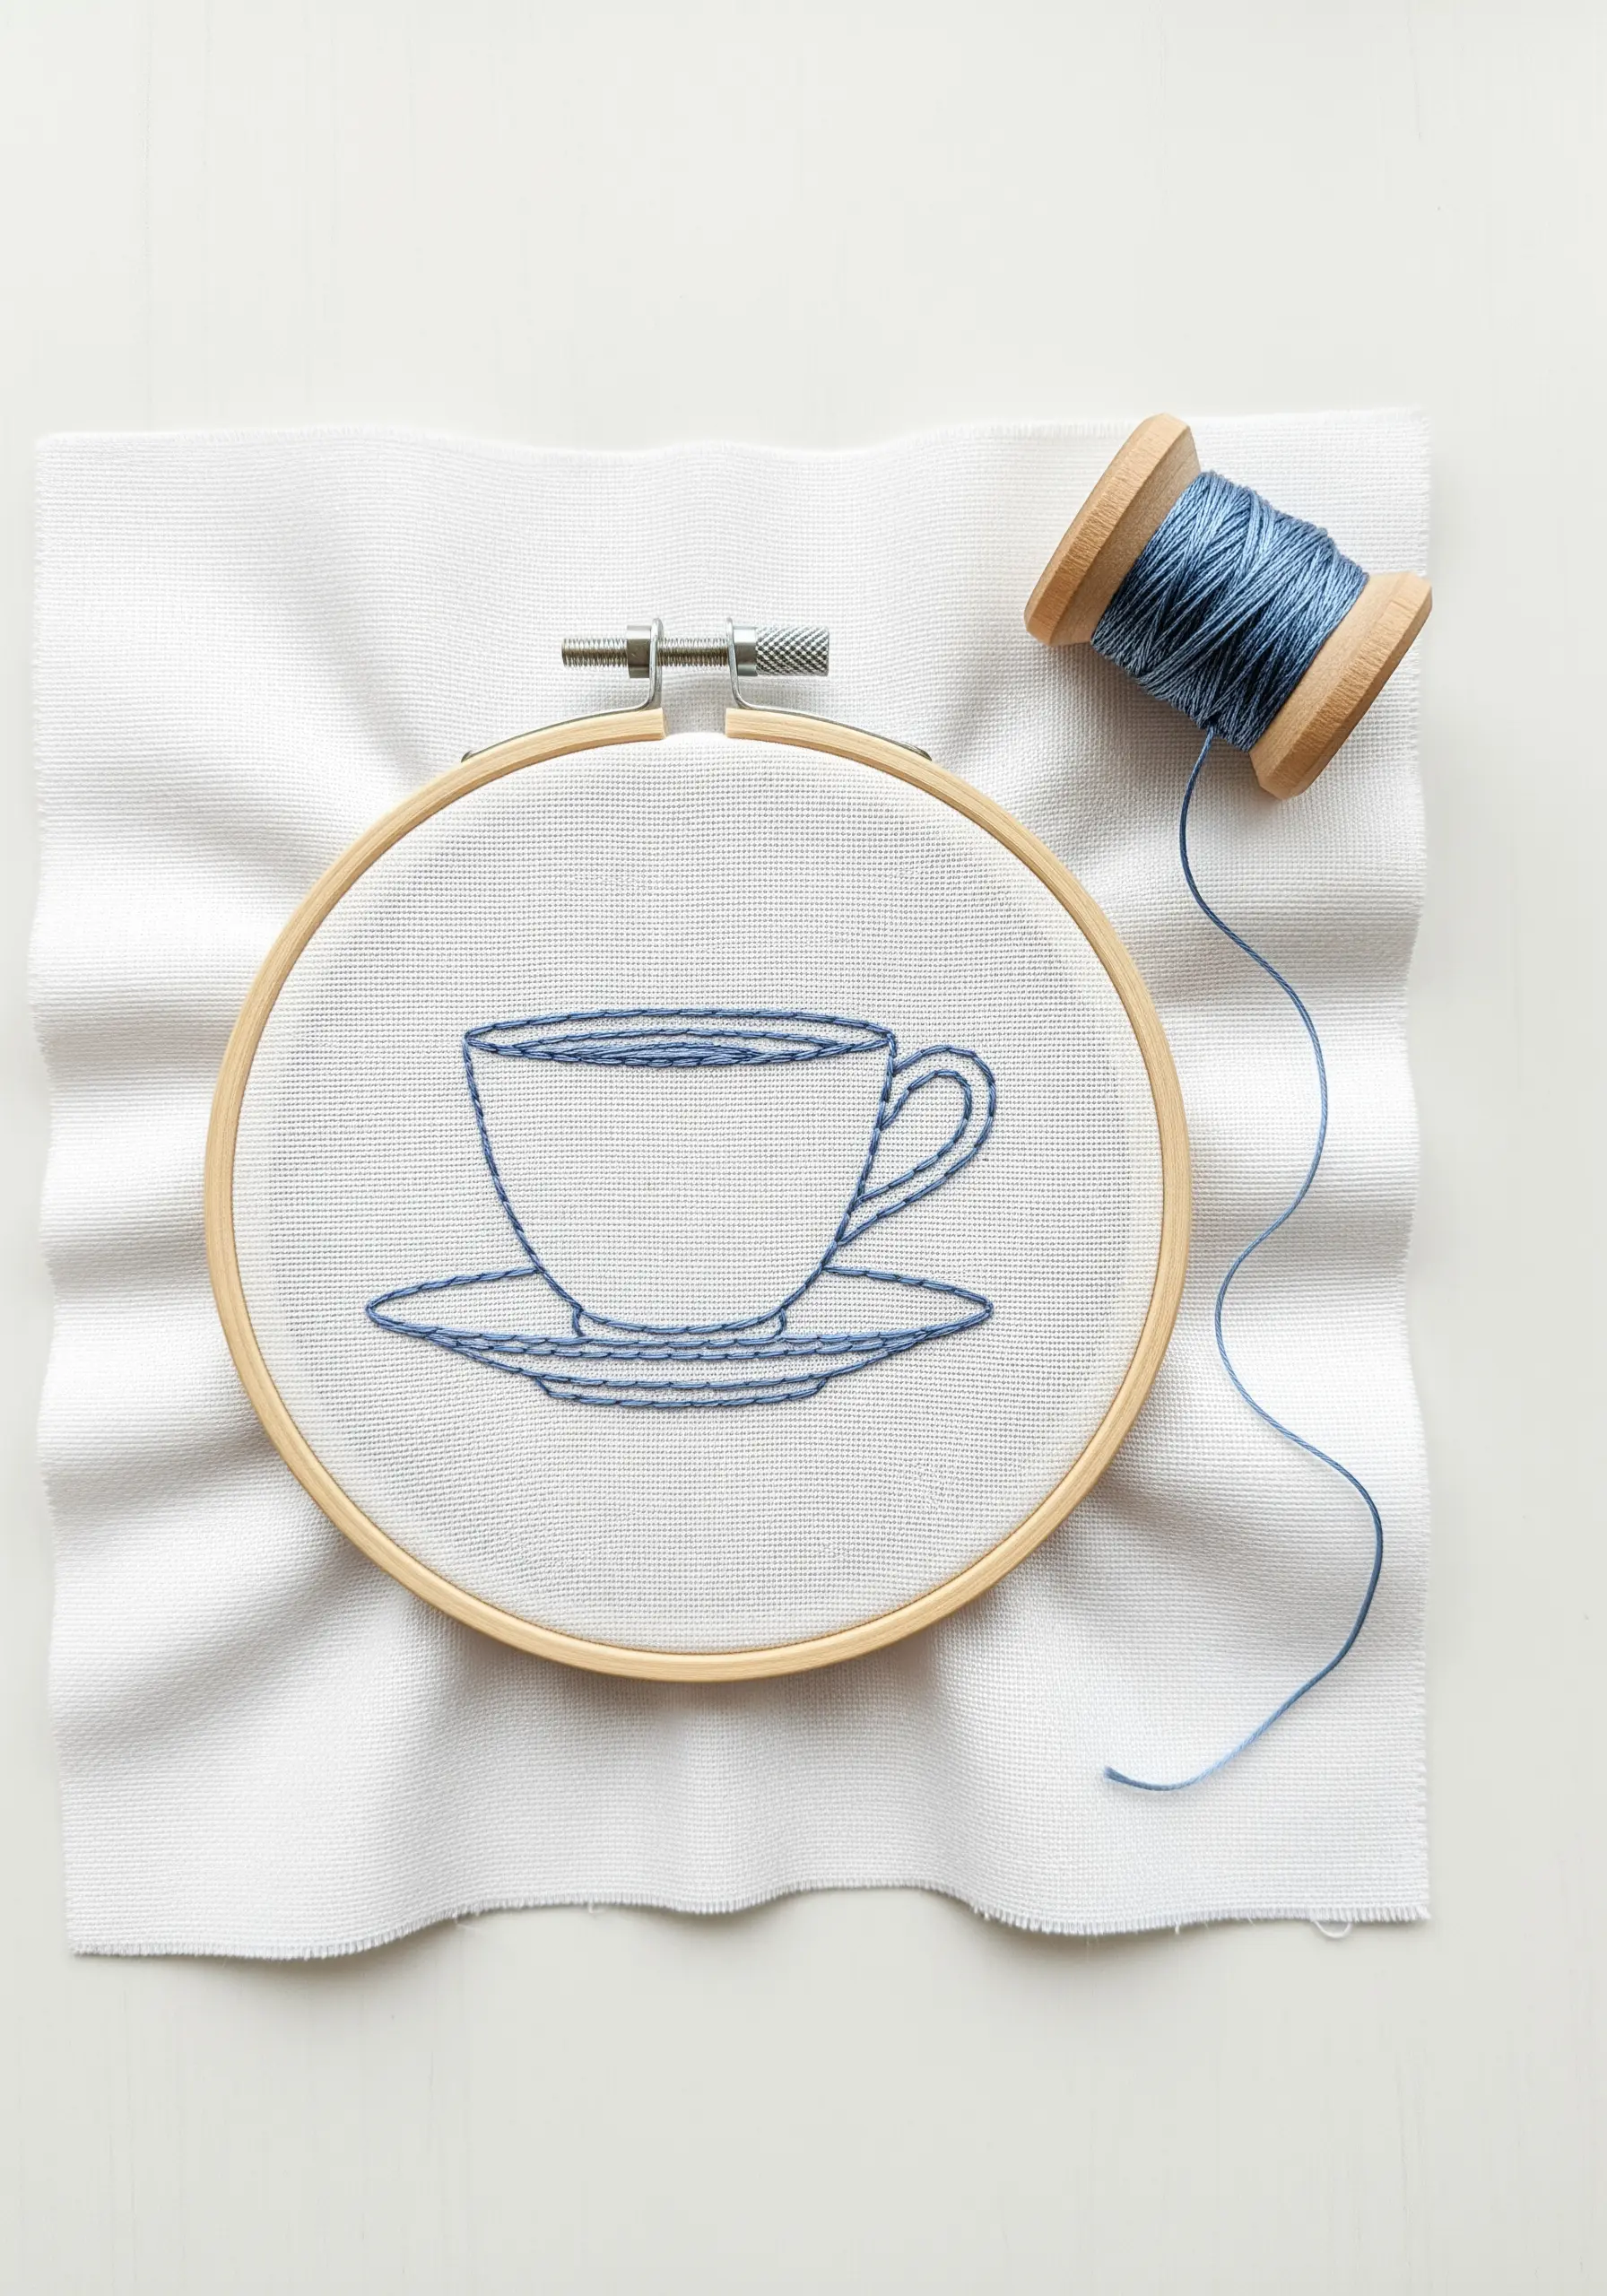
A minimalist design gains its strength from the quality of its lines.
To achieve the smooth, continuous curves of this teacup, use a split stitch or a stem stitch, which are ideal for creating clean, unbroken outlines.
Opt for only two strands of floss; this keeps the line work delicate and prevents it from appearing heavy or clunky.
This approach celebrates negative space and proves that you don’t need complex fills or multiple colors to create elegant and impactful minimalist embroidery ideas.
11. Layer Stitches for Potted Plant Dimension

Create a clear distinction between the elements in your design by using contrasting stitch directions and textures.
For the succulent, use short, angled satin stitches or a fishbone stitch to mimic the organic growth of the leaves, fanning them out from the center.
For the pot, switch to uniform horizontal stitches to convey a solid, structured form.
This simple adjustment in stitch direction immediately adds depth and realism, making it one of the most effective techniques for stitching convincing houseplant embroidery motifs.
12. Craft a Functional Embroidered Bookmark

Felt is an ideal base for functional projects like bookmarks because it’s sturdy and doesn’t fray.
Use detached chain stitches for the dandelion florets and a whipped backstitch for a solid stem.
The key to a professional finish is to cut a second identical piece of felt to use as a backing.
Once your embroidery is complete, place the backing piece behind your work and use a neat running stitch or blanket stitch around the entire edge to secure the two layers and hide the messy back.
This technique creates polished and durable handmade embroidered accessories.
13. Explore Depth with Directional Fill Stitches
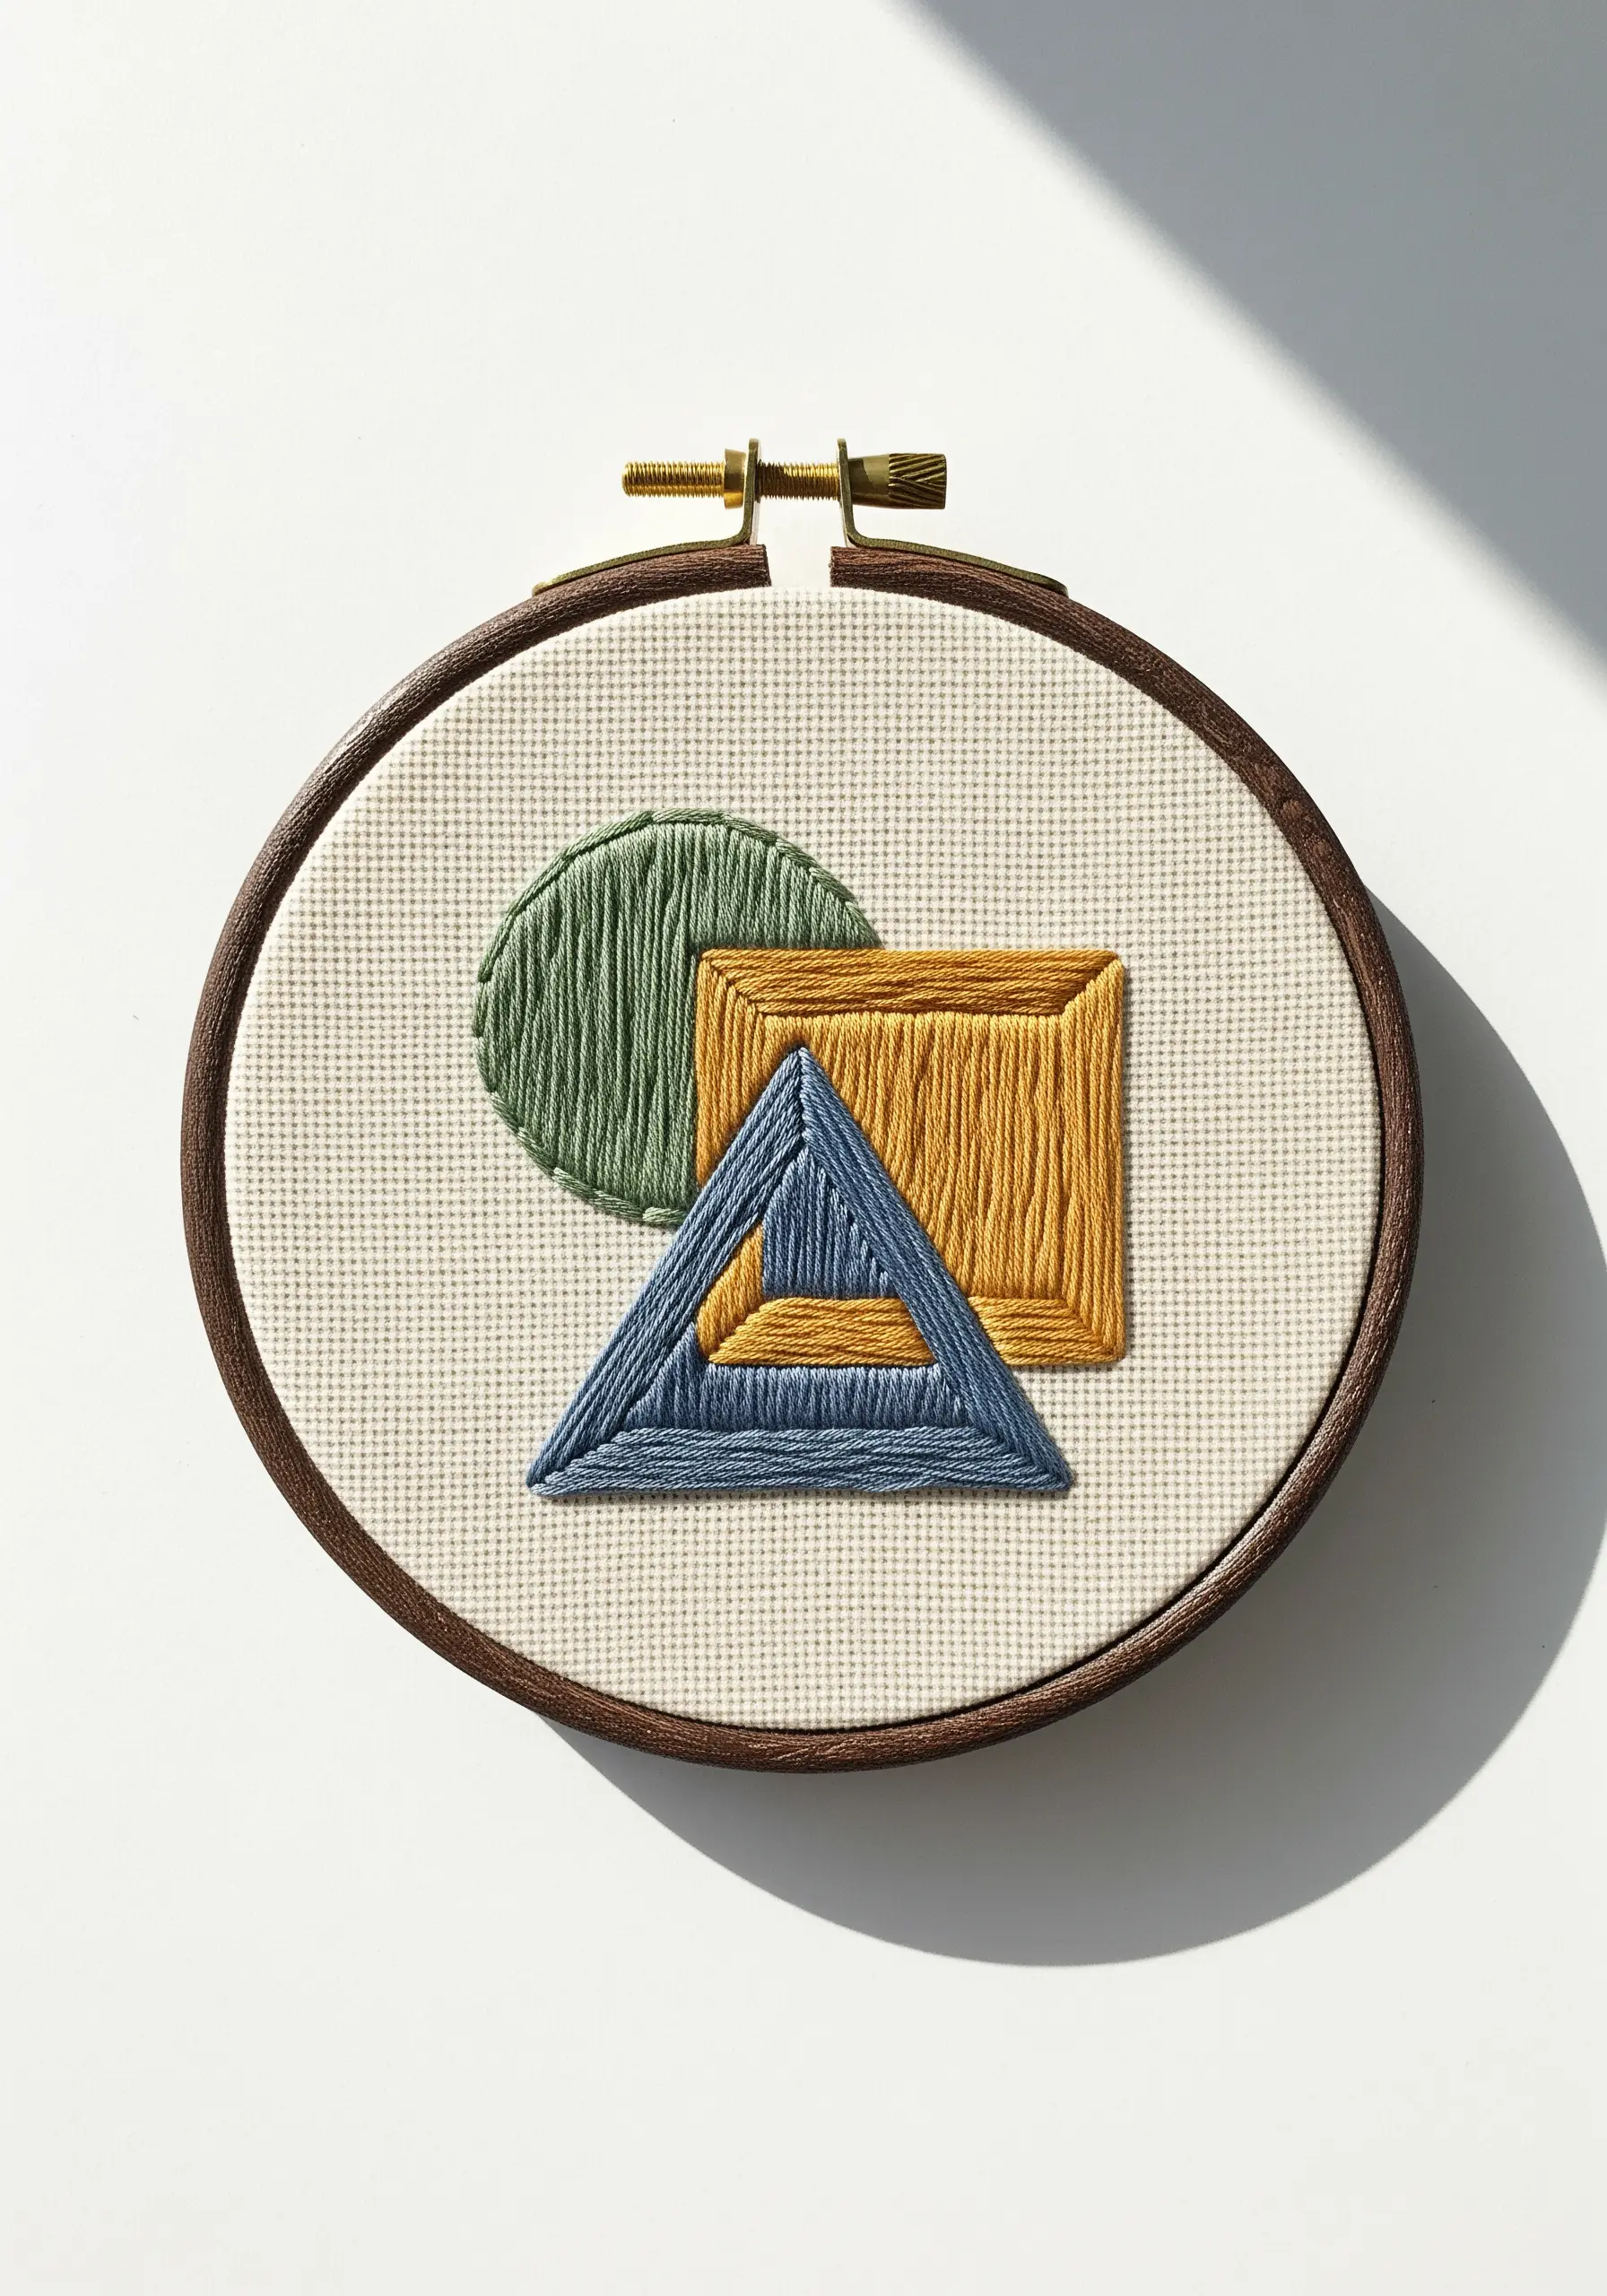
Even with simple shapes and solid colors, you can create a surprising amount of visual interest by being intentional with your fill stitches.
Instead of filling each shape with stitches running in the same direction, vary them—make the circle’s stitches vertical, the square’s horizontal, and the triangle’s diagonal.
This technique causes the light to reflect off the thread differently in each shape, creating a sense of layering, texture, and dimension without adding any complexity.
It’s a foundational concept for creating dynamic geometric abstract thread patterns.
14. Add Delicate Floral Details to a Shirt Cuff

To add a subtle, bespoke touch to clothing, focus on small, perfectly executed stitches.
The detached chain stitch (or lazy daisy) is perfect for creating the uniform petals of these daisies.
For the center, a cluster of two or three tightly worked French knots provides a pop of color and texture.
Always use a small embroidery hoop and a water-soluble stabilizer on shirting fabric to prevent puckering and ensure your tiny floral arrangement looks crisp and professional.
This approach is perfect for all kinds of whimsical floral embroidery ideas.
15. Create Contrast with Fill and Outline

Elevate a simple botanical motif by combining two different techniques within the same shape.
Fill one half of the leaf with a dense pattern like seed stitch or short satin stitches to create a solid, textured area.
On the other half, use only radiating straight stitches or a backstitch to suggest the leaf’s delicate veins, leaving plenty of negative space.
This contrast between dense and sparse stitching creates a modern, graphic effect that is far more engaging than a simple outline or a fully filled shape.
It’s an excellent way to practice showing leaf vein details.
16. Use French Knots for Precise Celestial Details

The key to creating delicate, star-like dots is mastering the small French knot.
For a tiny, tight knot, use only one or two strands of floss and wrap the thread around the needle just once before plunging it back into the fabric.
This creates a perfect, bead-like point of light that is much more refined than a multi-wrap knot.
Connect these stellar points with a simple backstitch to map out your constellation, turning your hoop into one of many beautiful aesthetic embroidery projects.
17. Achieve a Feather’s Texture with Fly Stitch

To recreate the delicate structure of a feather, the fly stitch is your best friend.
First, create the central shaft using a stem stitch or a thin line of backstitch.
Then, work angled fly stitches down each side, packing them closely together to form the barbs of the feather.
Varying the length and angle of each fly stitch slightly will give the finished piece a soft, natural, and realistic appearance.
This method is a wonderful way to explore earth-inspired embroidery textures.
18. Embrace Negative Space in Thread Art

Challenge the traditional definition of embroidery by using the hoop itself as part of your canvas.
This technique involves wrapping thread directly around the hoop’s frame to create minimalist symbols and lines, leaving the center entirely empty.
The key is to maintain tight tension and secure the thread ends discreetly on the back of the frame.
This is a fast, modern, and incredibly effective way of combining thread and negative space to create striking art for your home.


