

Have you ever found yourself pausing, needle in hand, wondering how to push your designs beyond the familiar stitches? Sometimes the best way to deepen your understanding of thread is to put it down for a moment and pick up a different medium entirely.
Think of paper collage not as a replacement for embroidery, but as its parallel—a playground where you can experiment with color blending, texture, and composition without the commitment of fabric and floss. Each strip of paper can act as a line of satin stitch, each rolled coil a French knot, and each layered shape a piece of appliqué.
These techniques will train your eye and hands in new ways, sharpening your instincts for what makes a composition feel balanced, dynamic, and emotionally resonant. When you return to your hoop, you’ll bring back a fresh perspective, ready to translate these paper-based discoveries into your most intentional and beautiful embroidery yet.
1. Translate Bullion Knots Into Paper Quilling
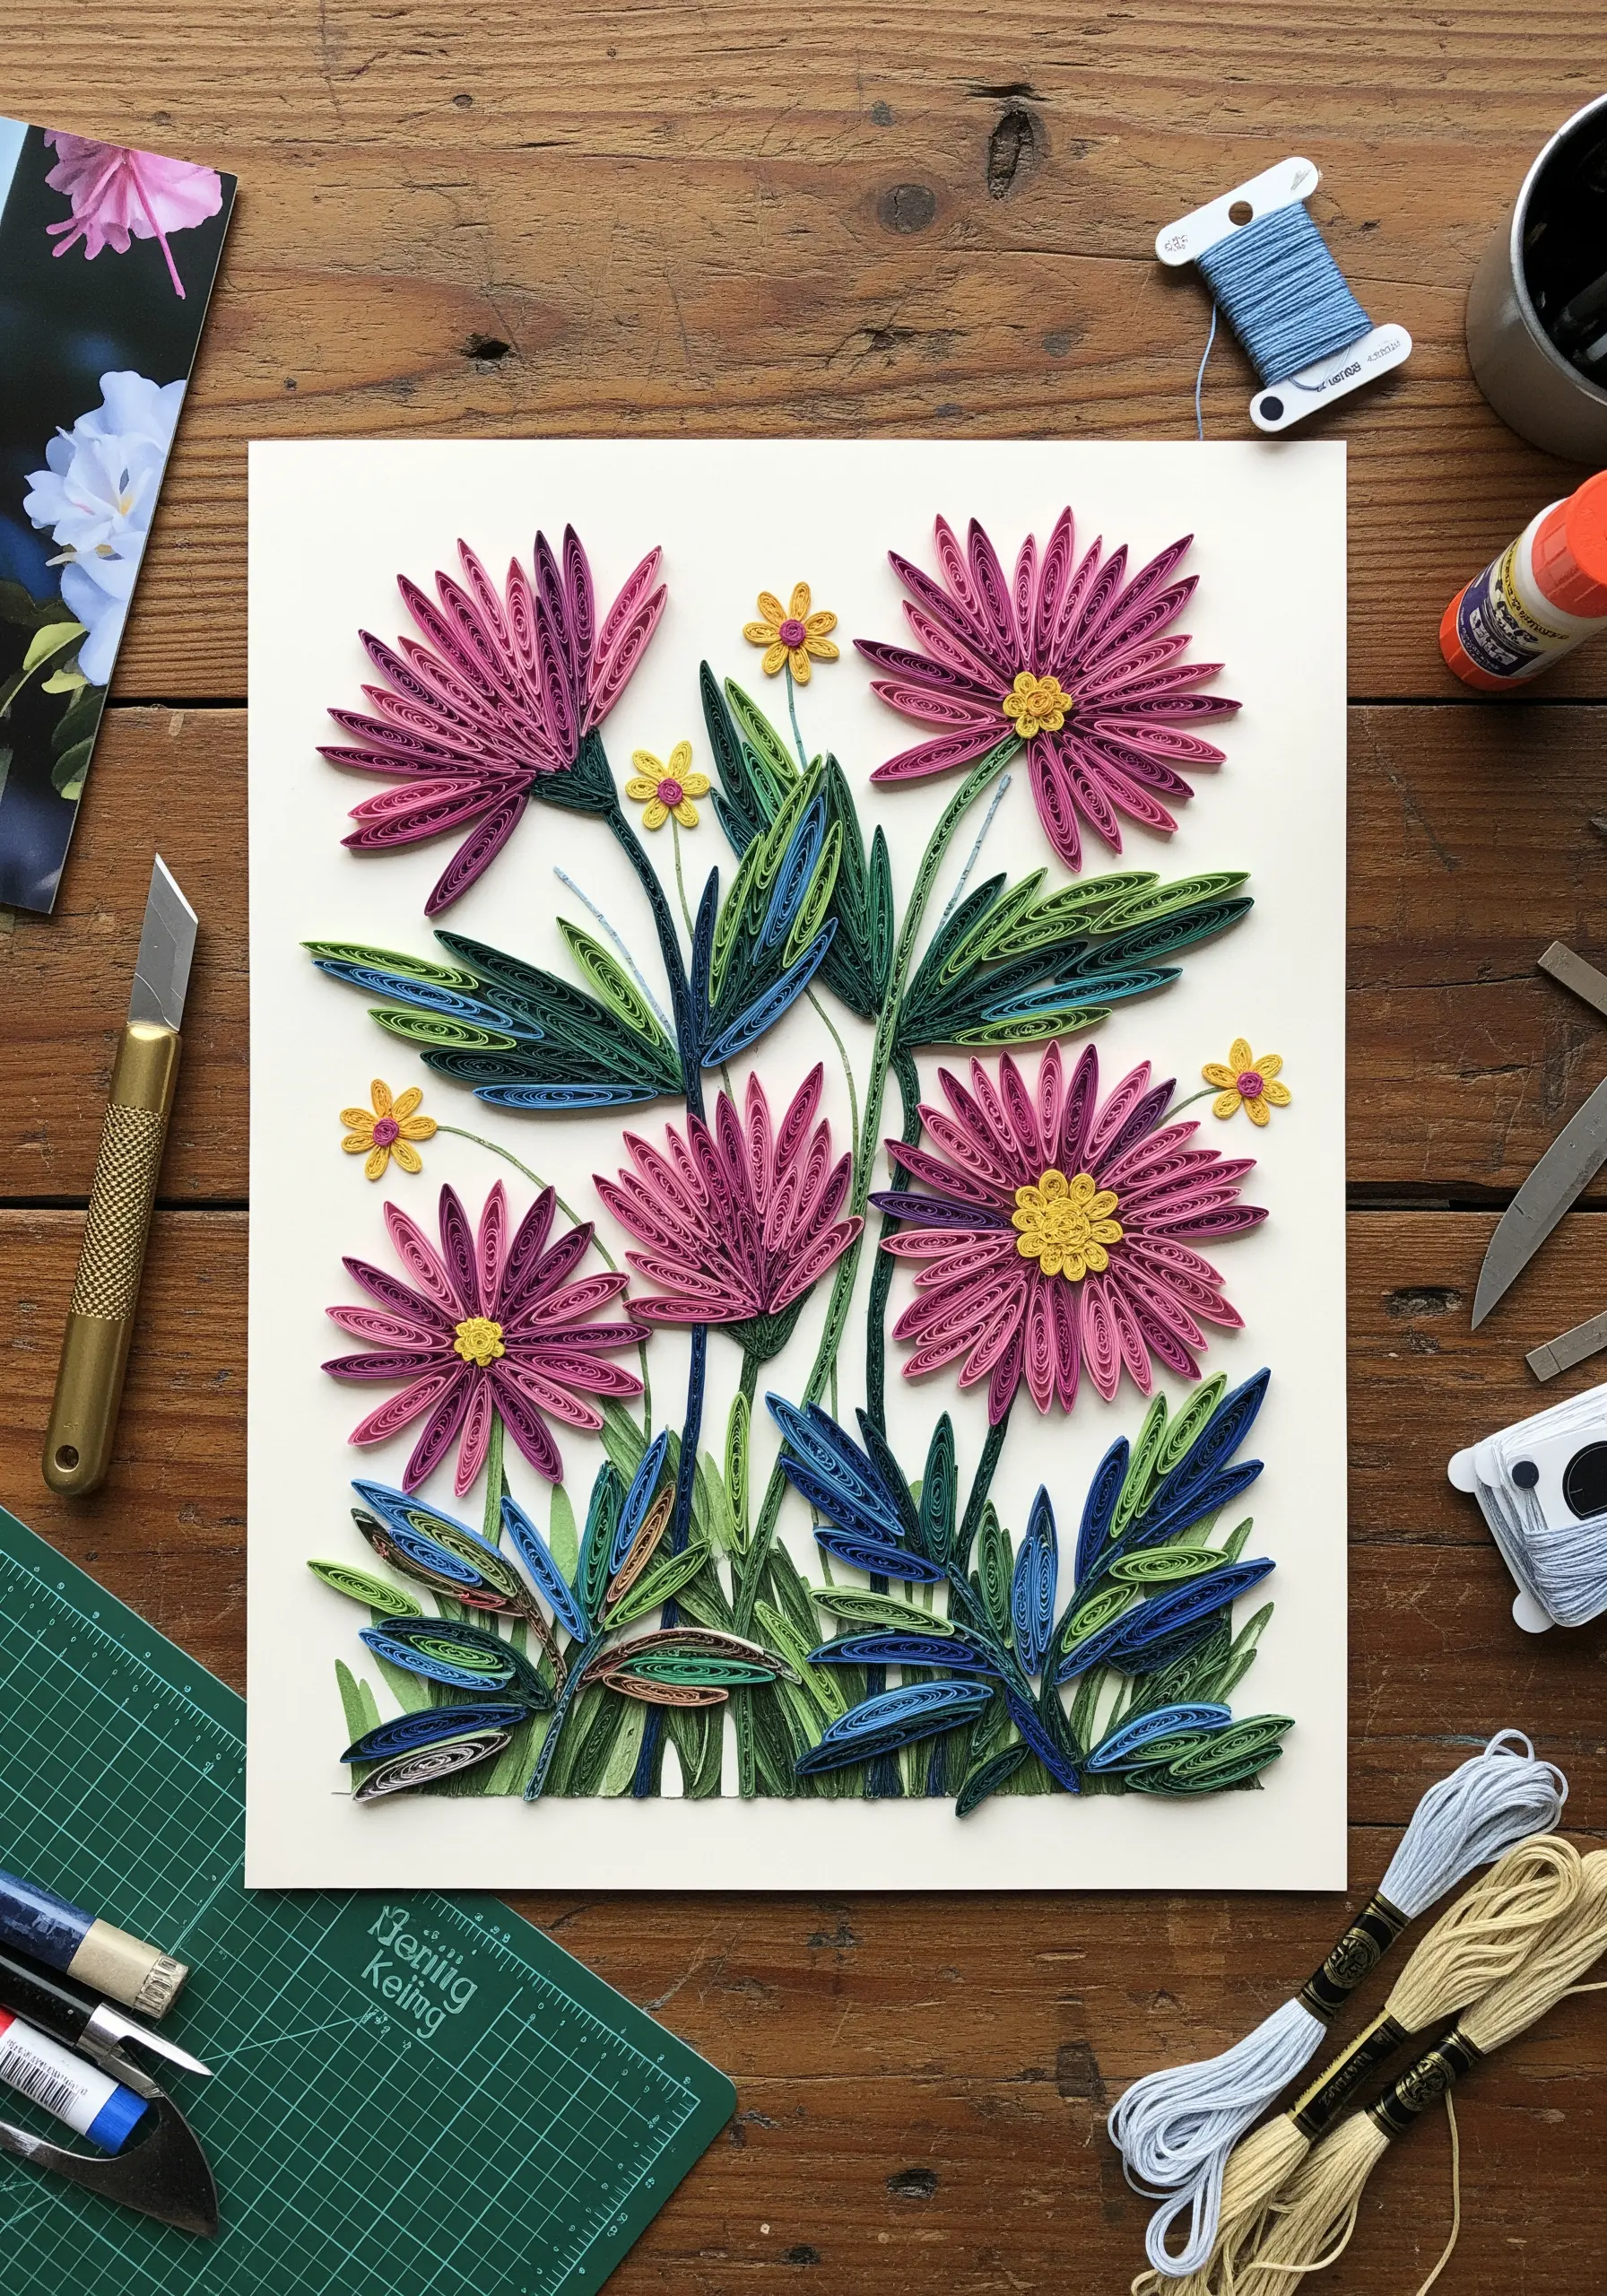
Think of each tightly rolled paper strip as a three-dimensional stitch, similar to a bullion knot or a series of French knots.
Create depth in your floral motifs by varying the tightness of each coil—looser rolls create softer, more open petals, while tighter ones provide dense, textural centers.
This technique allows you to explore the principles of stitch tension and placement without thread, training your eye for composition and balance before you even pick up a needle.
Use a consistent paper weight to ensure your ‘stitches’ have a uniform, professional finish, just as you would choose a specific thread count for a project.
2. Master Cross-Stitch Principles with a Paper Mosaic
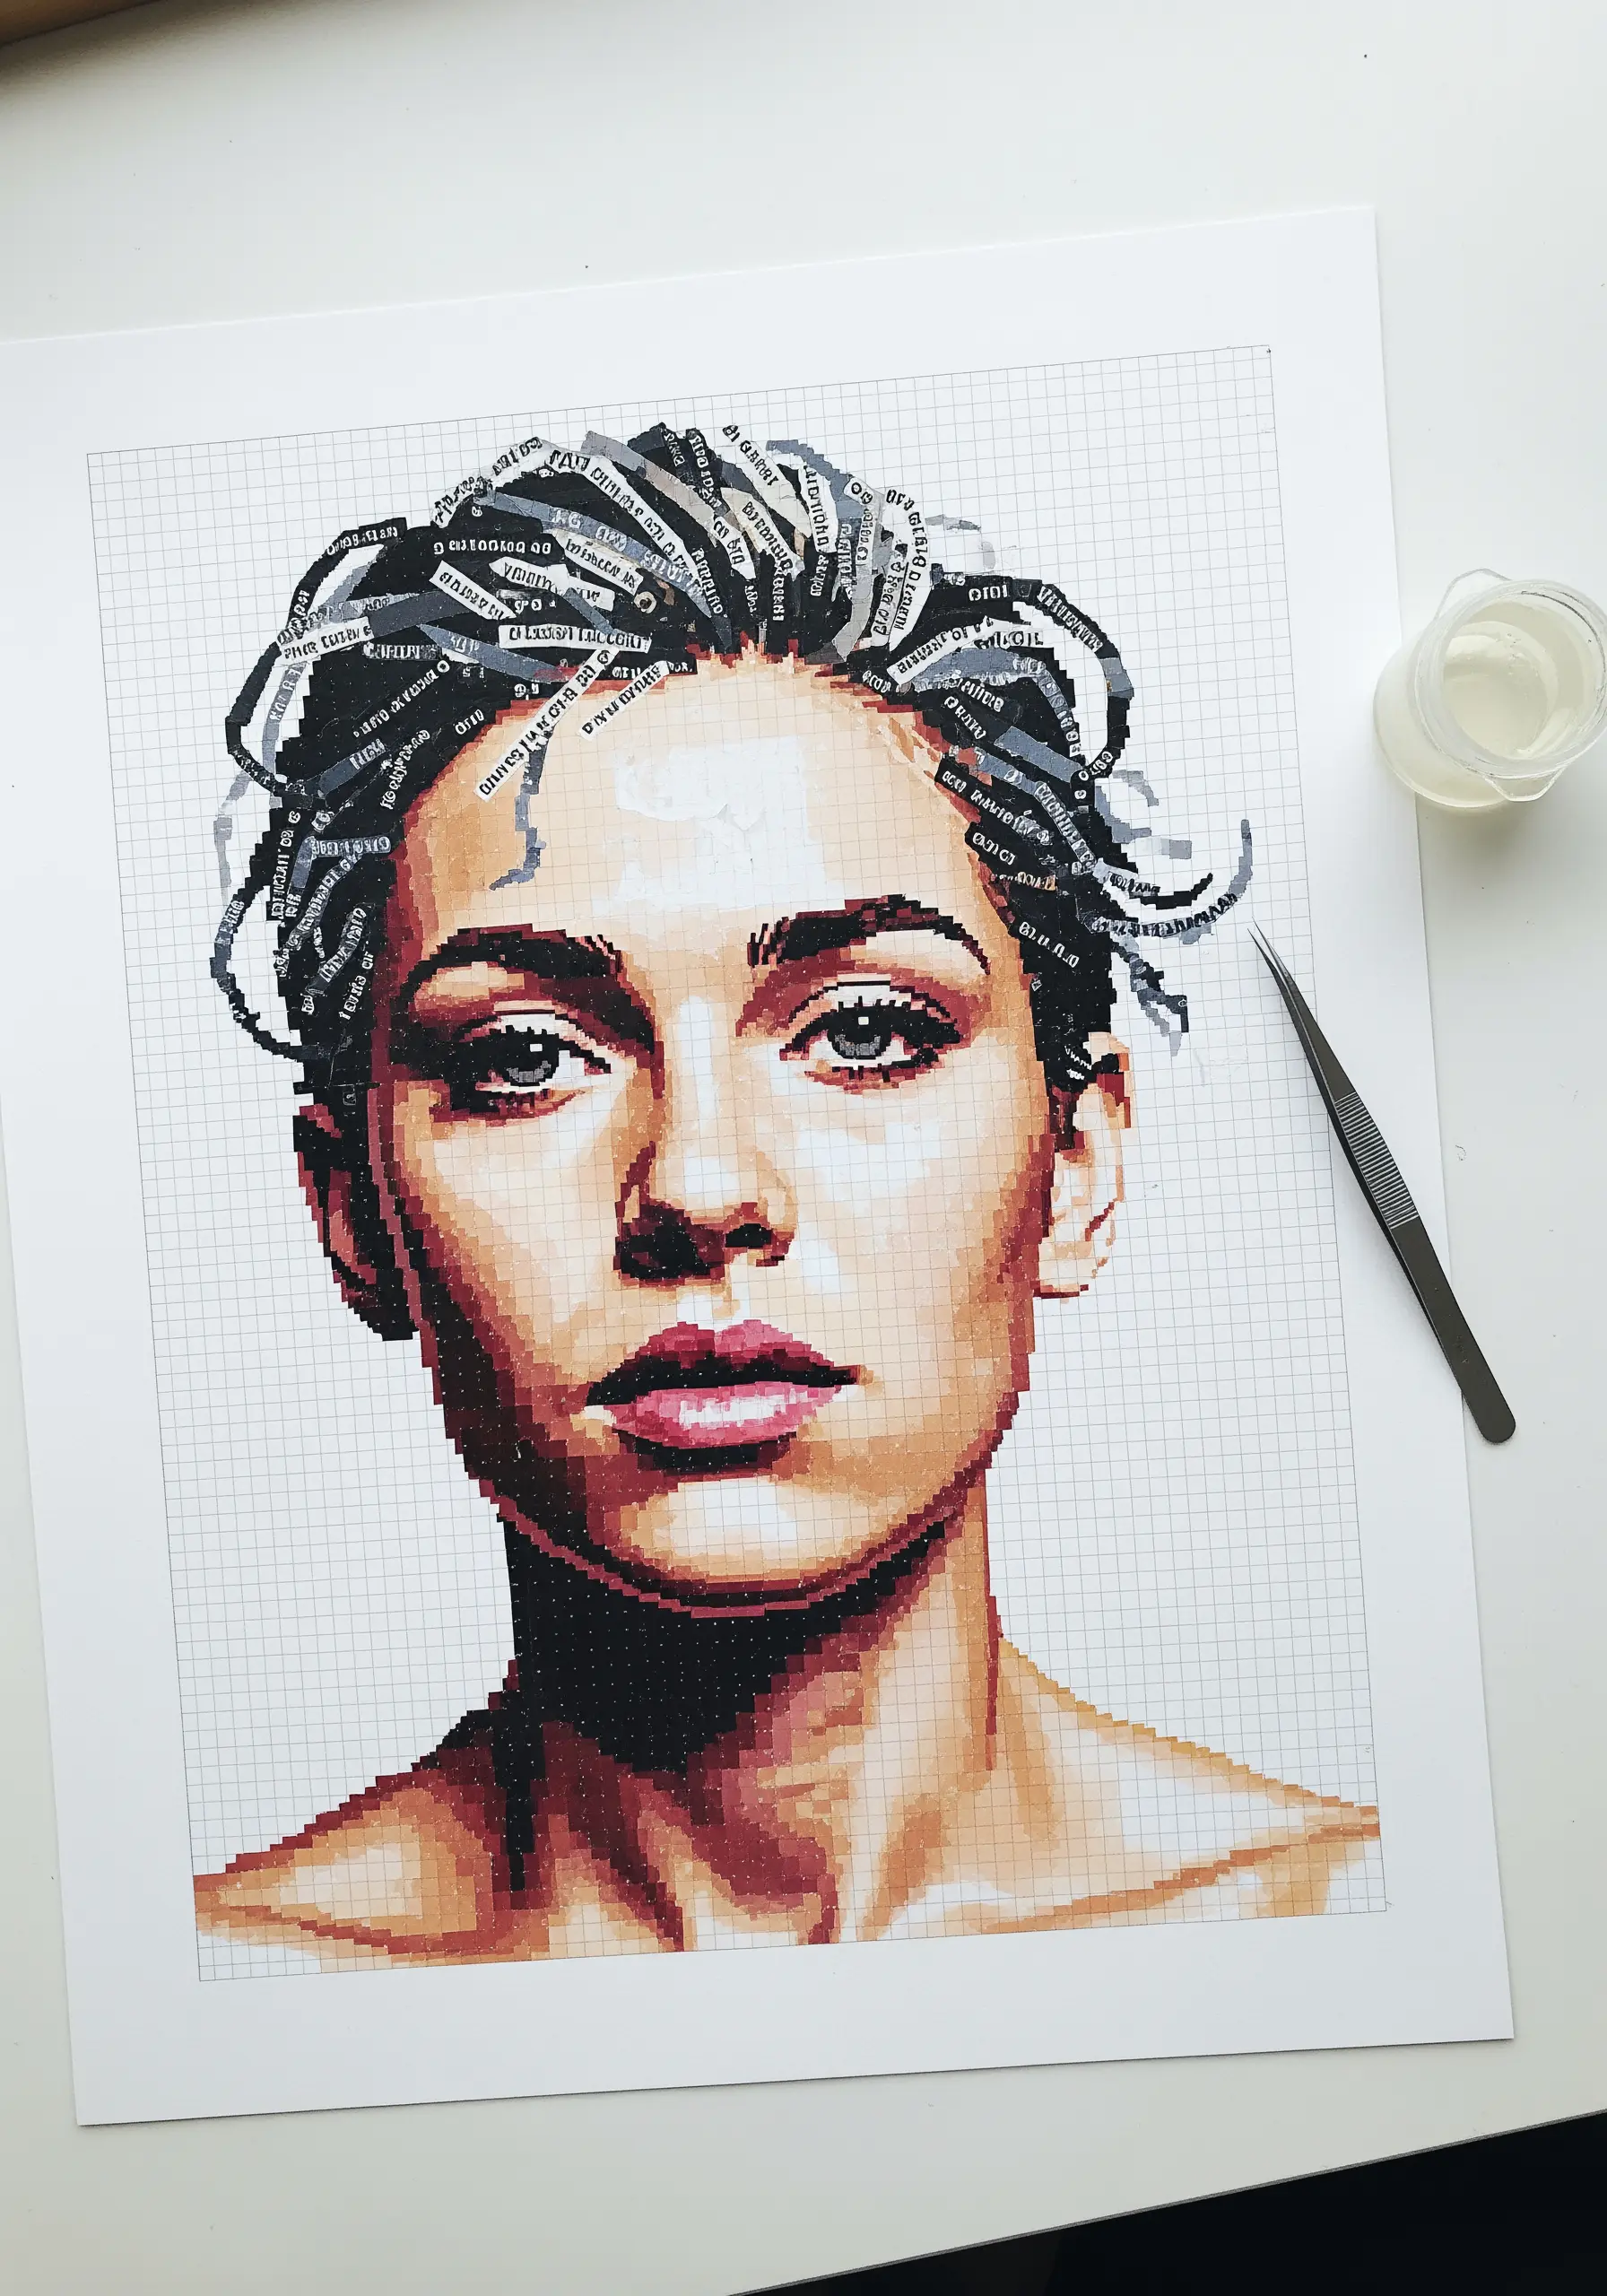
Approach this collage technique as if you were creating a cross-stitch pattern, where each tiny square of paper represents a single ‘X’ stitch.
Arrange your paper squares on a grid to map out a portrait, allowing you to practice color theory and shading in a controlled, pixelated format.
The precision required here sharpens your ability to follow a chart and understand how subtle color shifts create realism—a crucial skill for thread painting.
Notice how the clipped magazine text adds a layer of texture, much like how a variegated thread introduces subtle unpredictability to a stitched piece.
3. Create Directional Flow with Paper ‘Long Stitches’
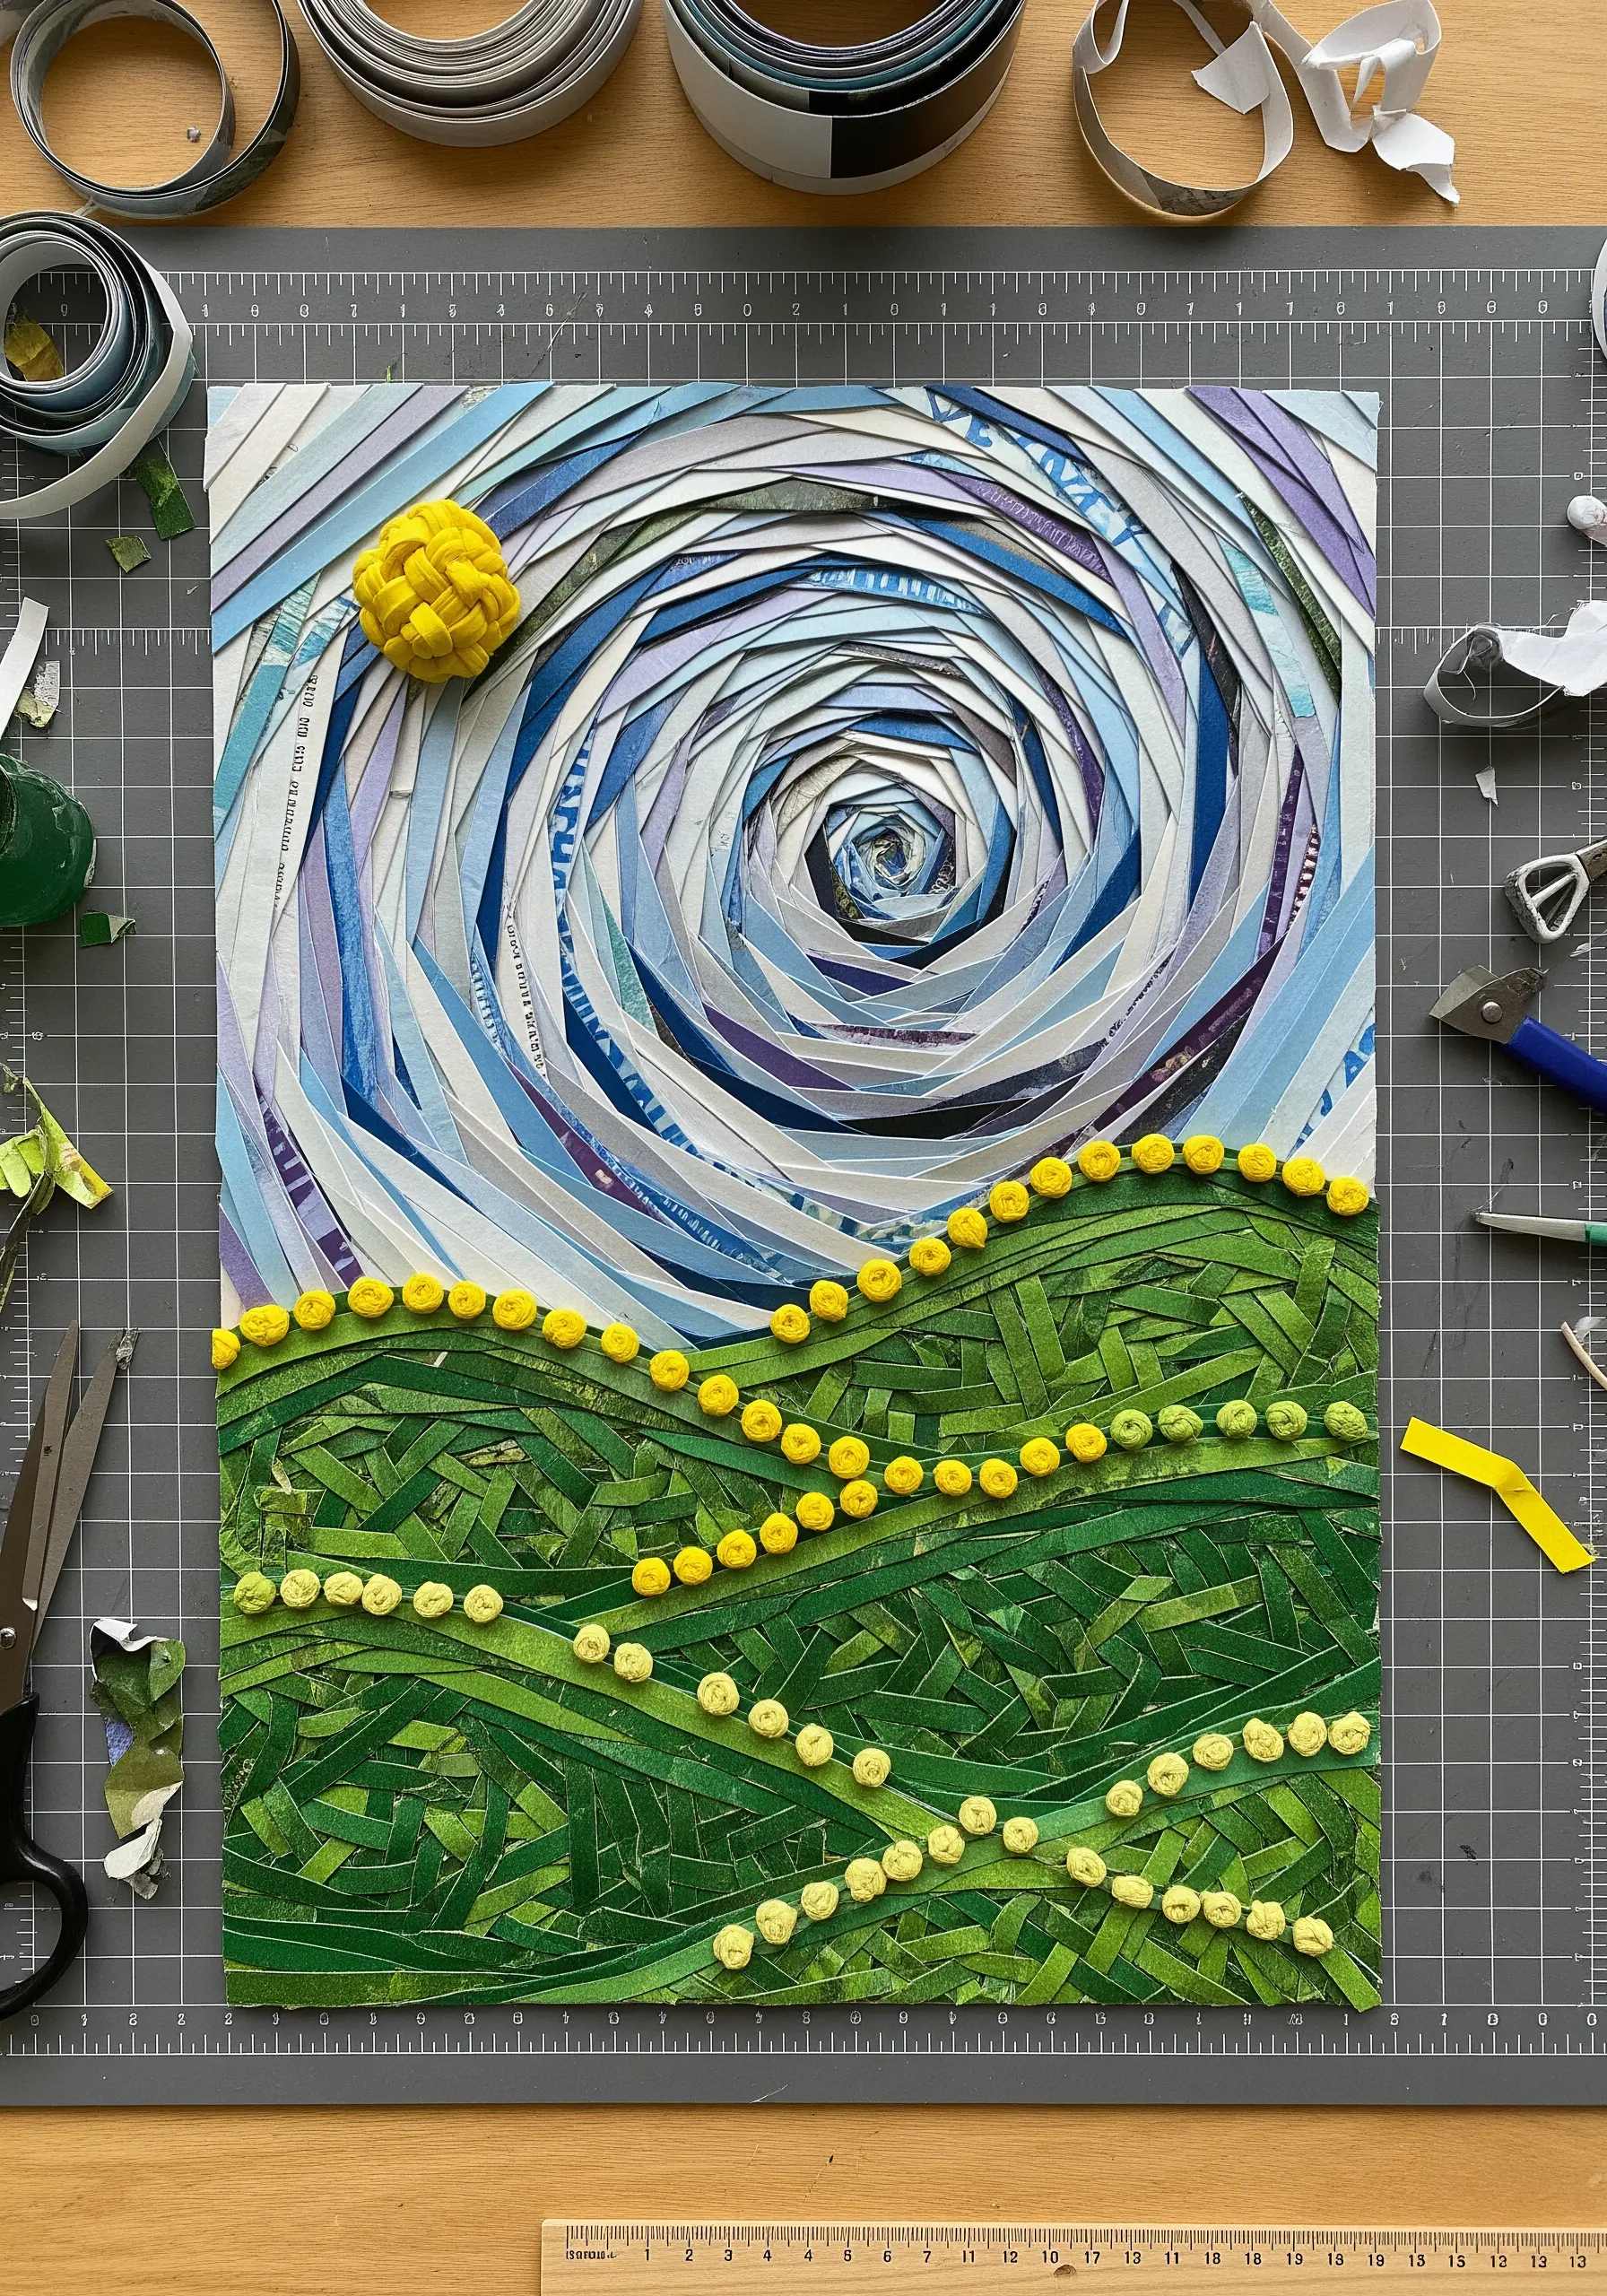
Mimic the fluid energy of a long-and-short stitch fill by arranging thin paper strips to follow the contours of your design, like the swirling sky in this landscape.
This method teaches you how the direction of your ‘stitches’ can create movement and guide the viewer’s eye across the piece—a fundamental concept in painterly embroidery.
For the hills, short, densely packed paper pieces replicate the texture of seed stitch, creating a tactile contrast against the smooth sky.
The tiny rolled yellow dots function as perfect French knots, adding pops of controlled texture and visual interest.
4. Weave a Mandala with Layered Paper Fringes
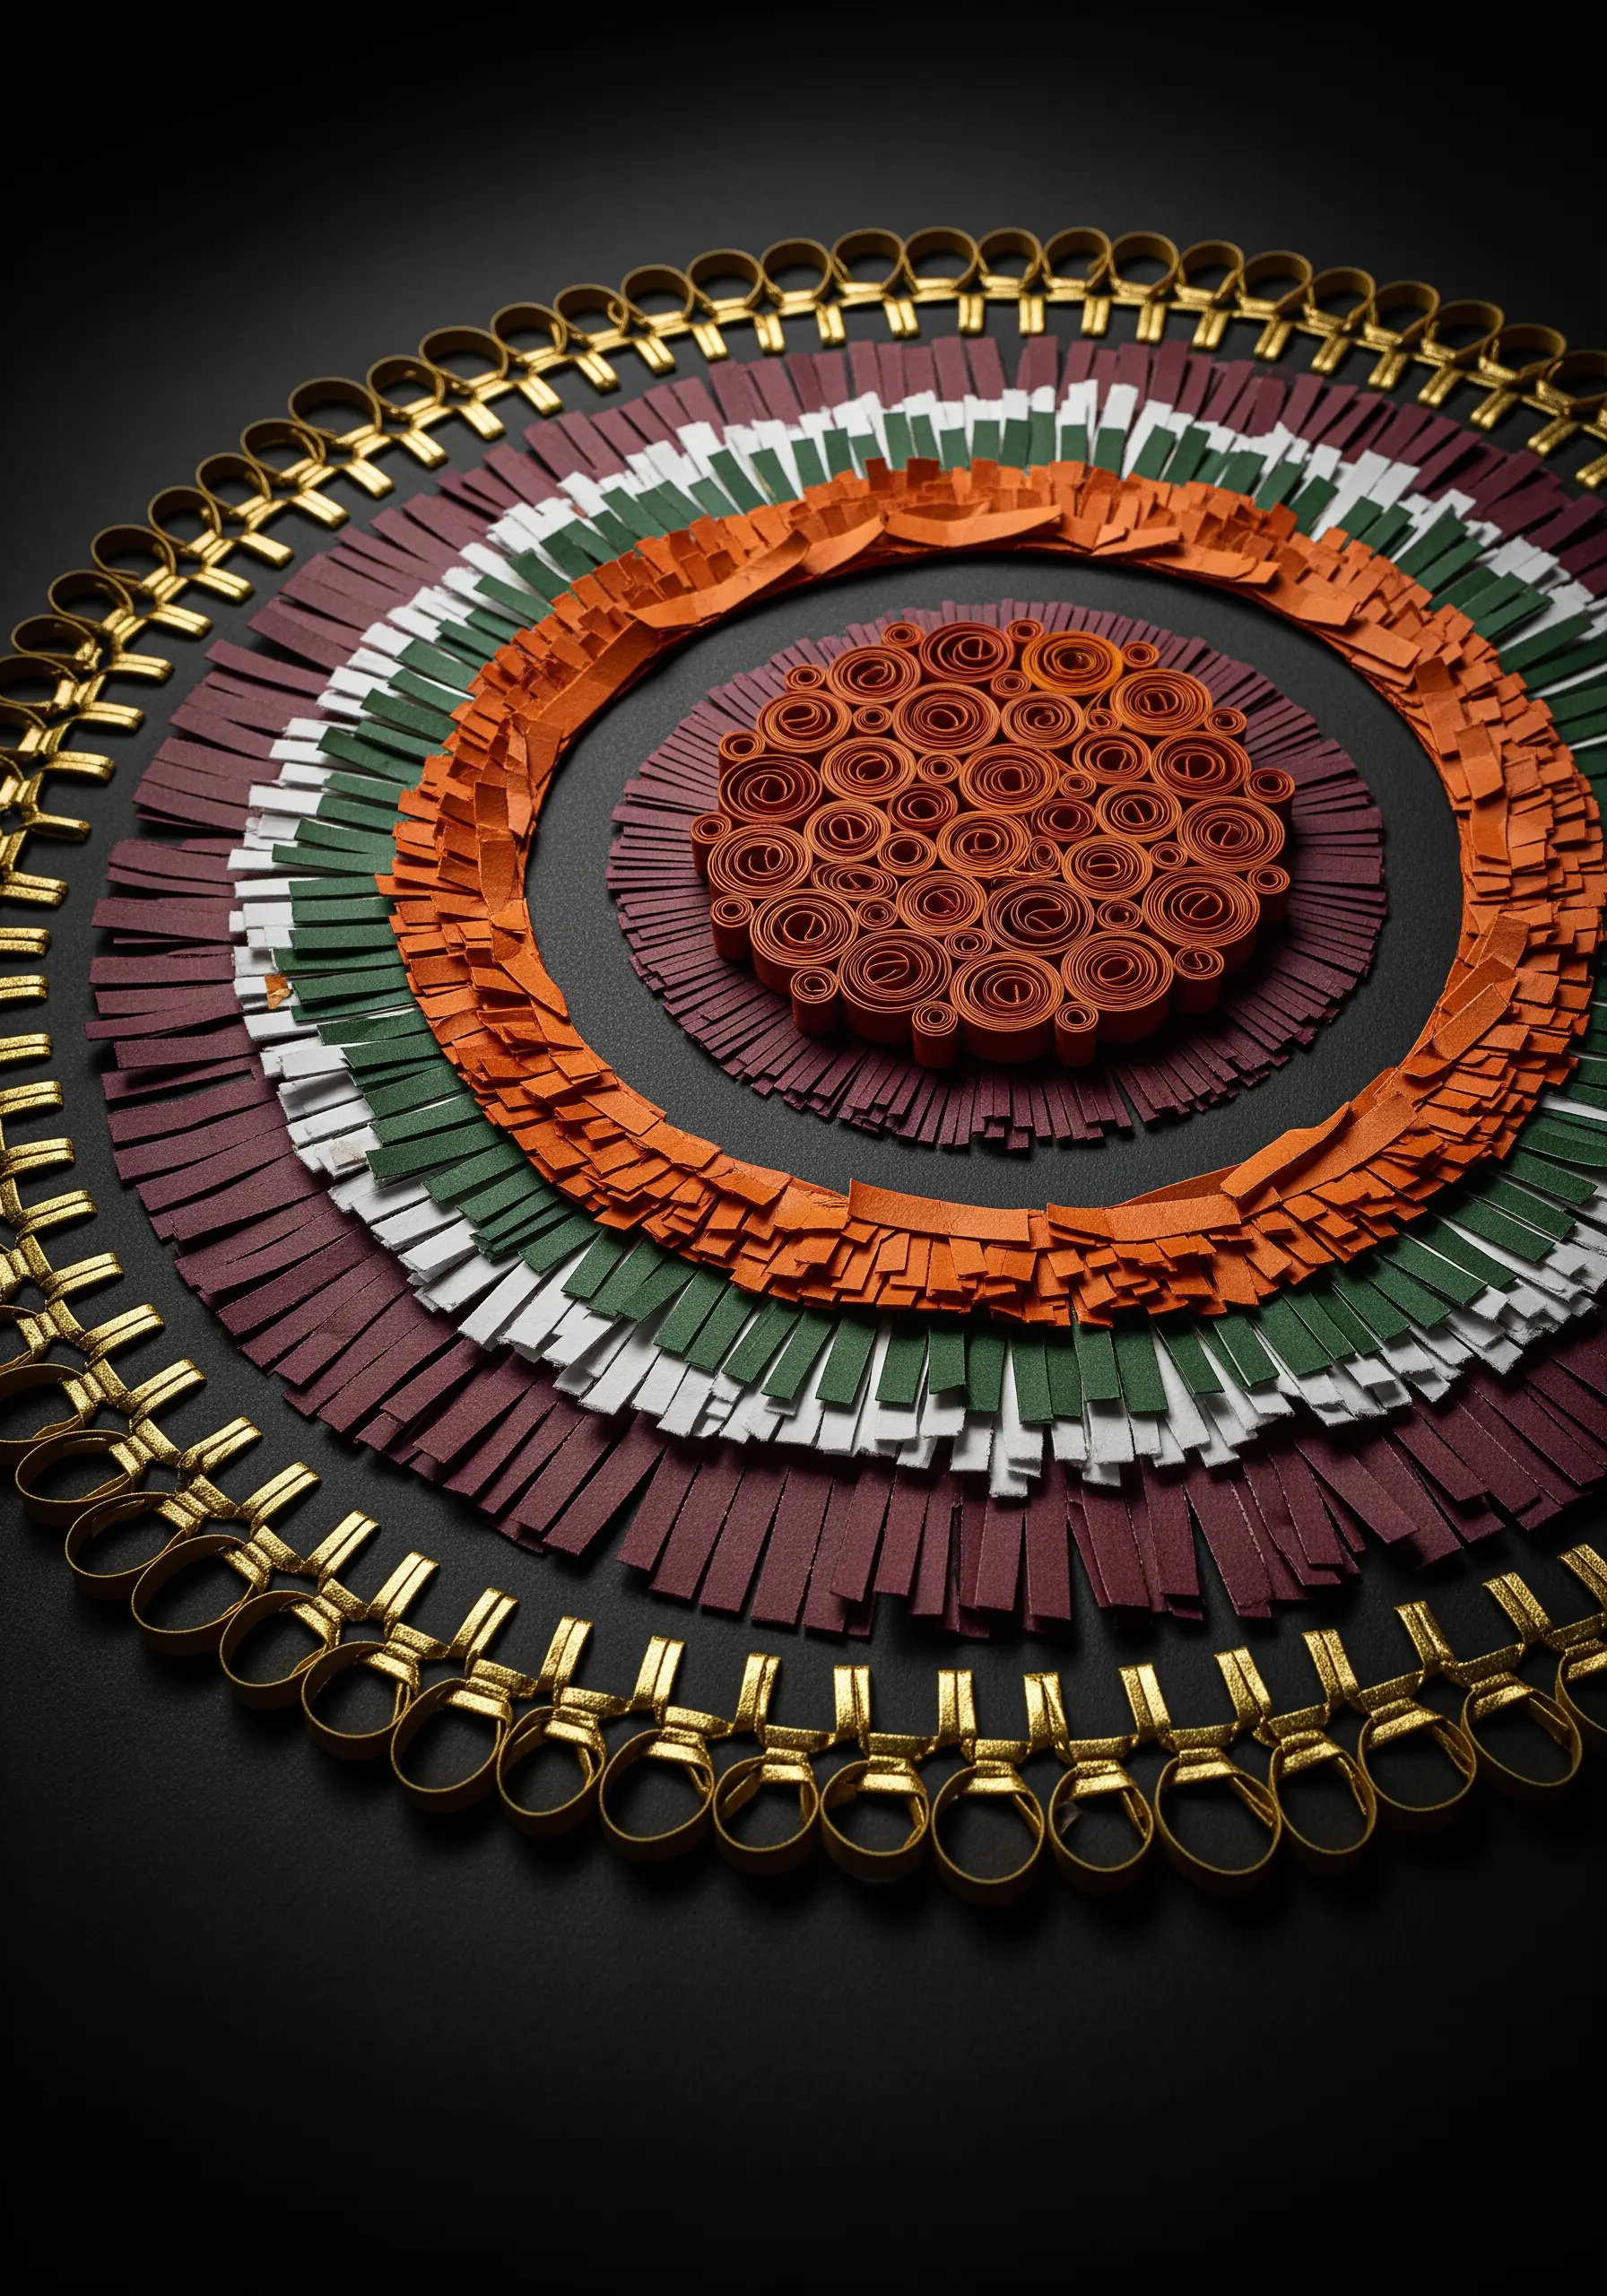
Translate the precision of laid work or satin stitch into paper by creating a radial design with meticulously cut and layered strips.
Create a fringe effect by snipping the ends of your paper strips before gluing them down, which adds a soft, textile-like texture to the edges of each colored ring.
The metallic elements introduce a reflective quality, similar to using a fine metallic thread to outline or highlight sections of an embroidered mandala.
This composition emphasizes the importance of symmetry and repetition, core principles that give tiny mandala patterns their meditative quality.
5. Build Raised Feathers with Paper Stumpwork
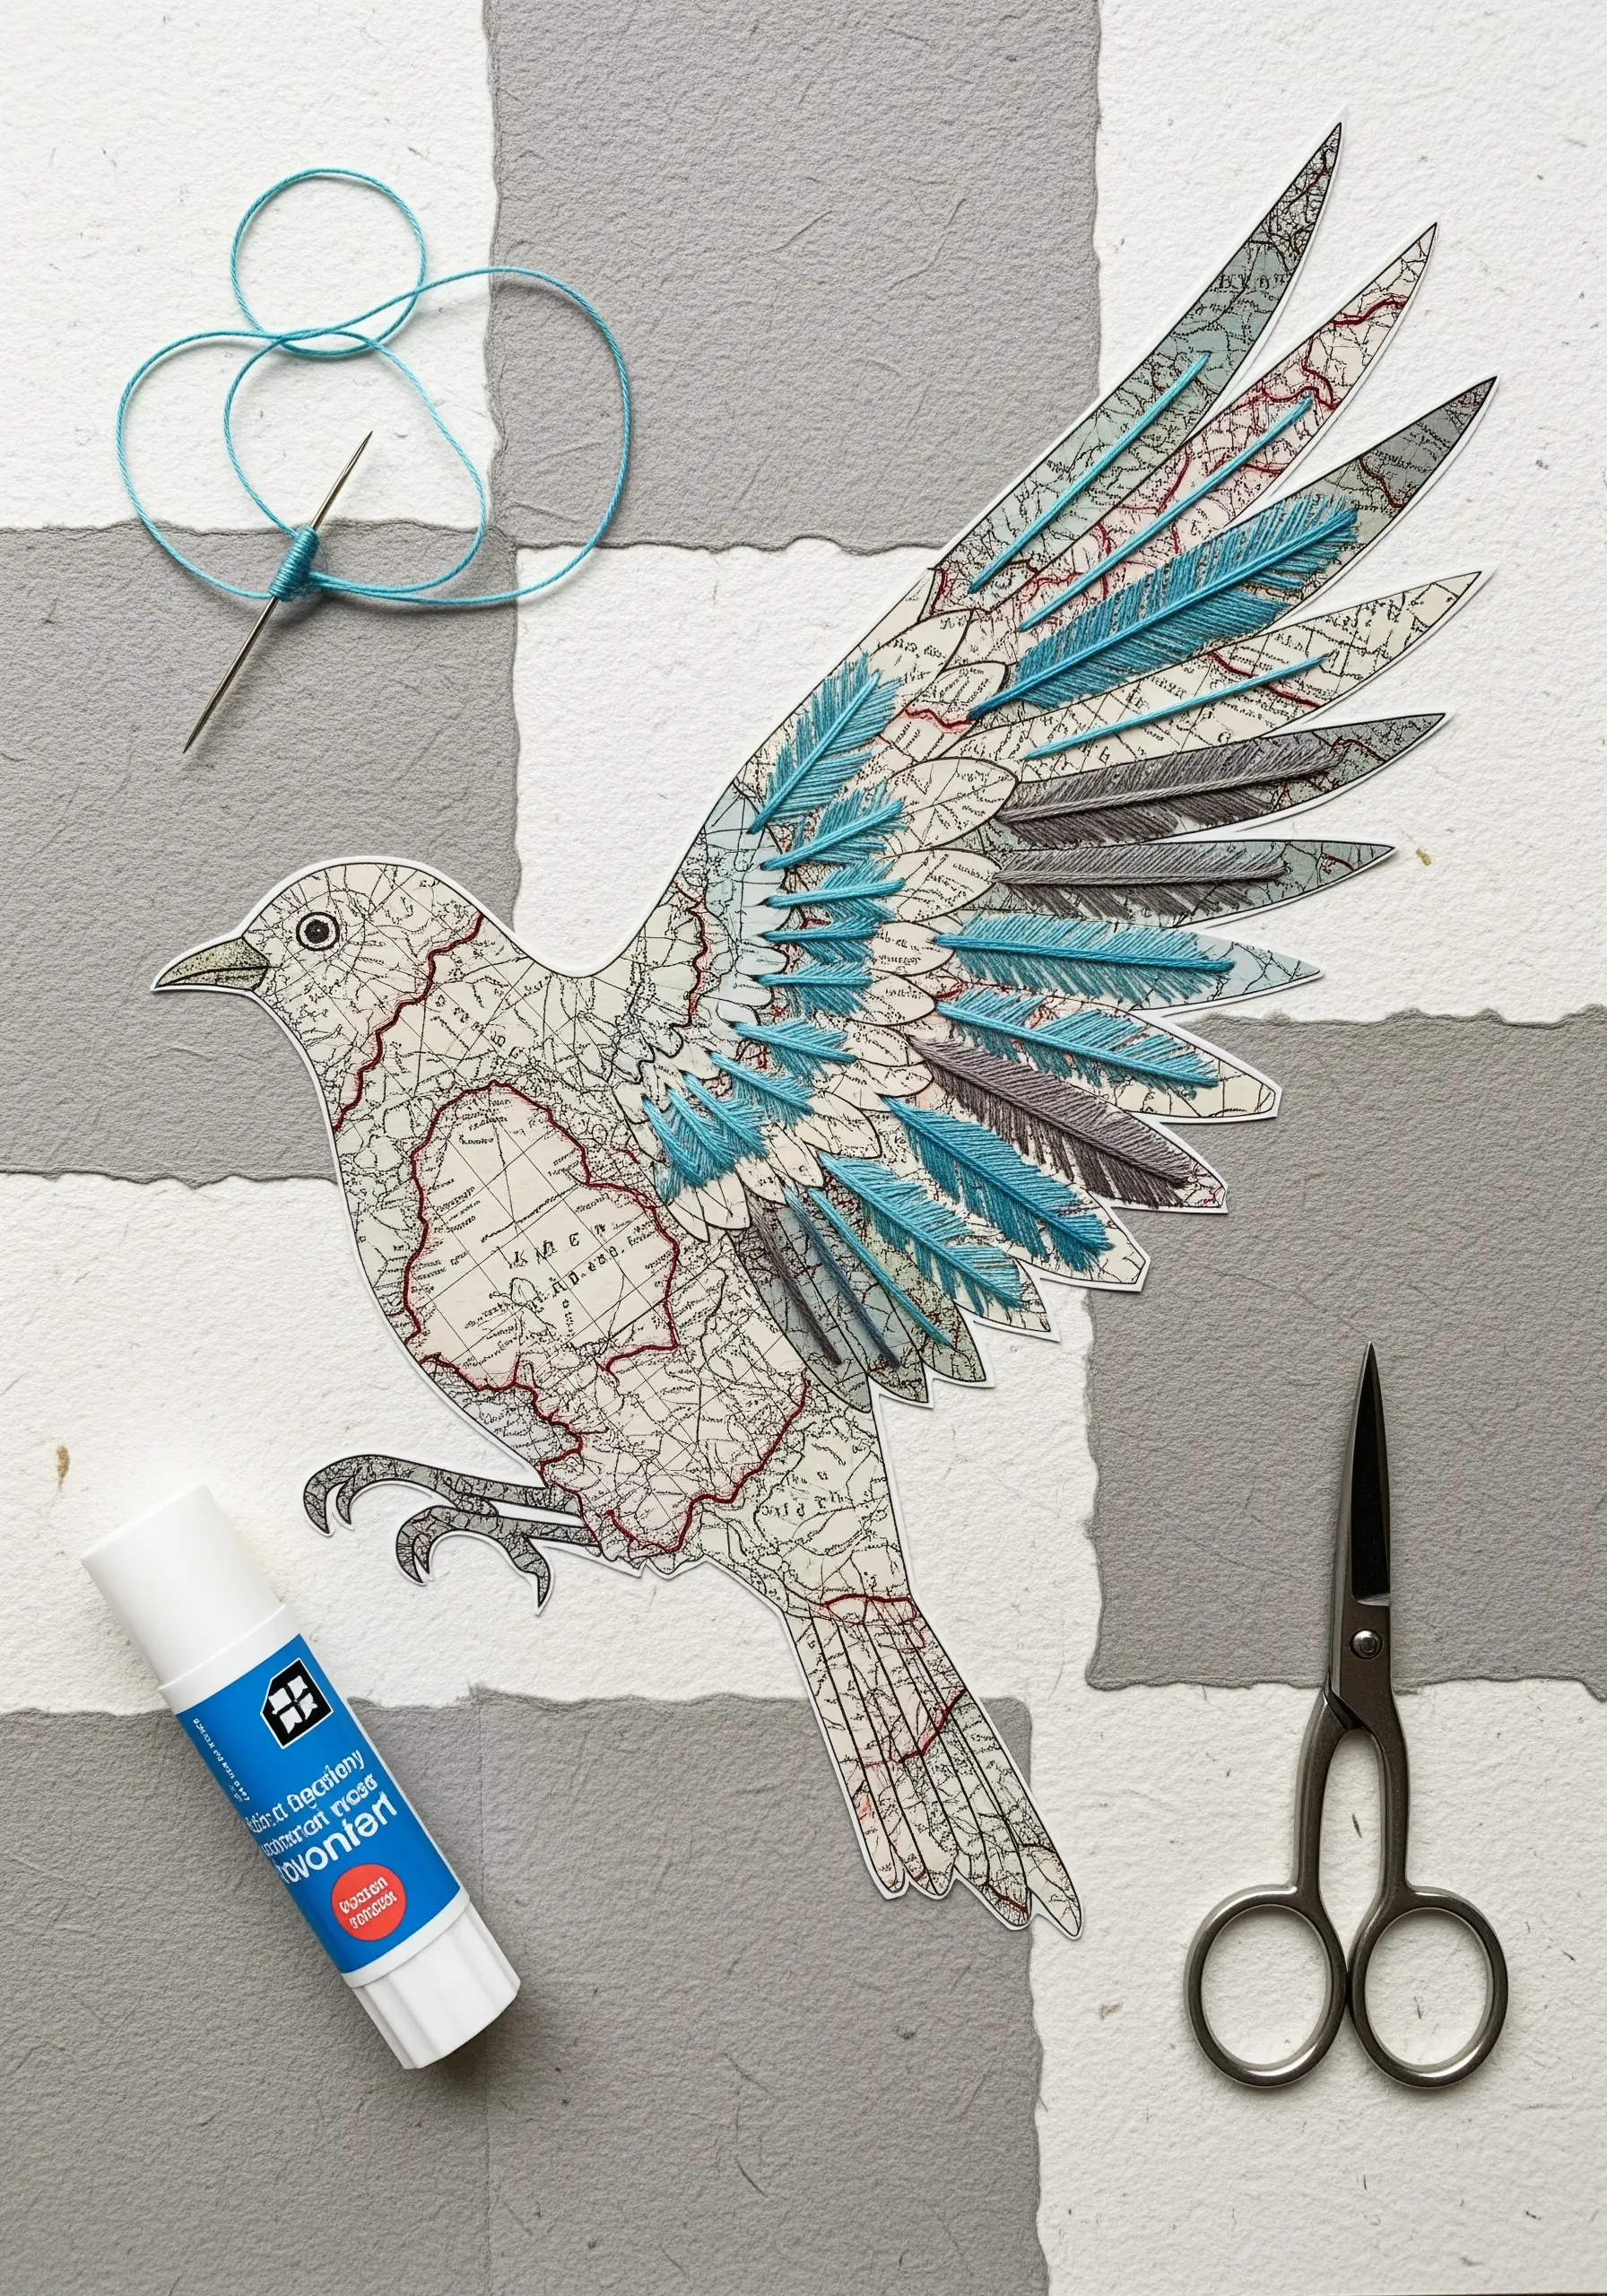
This technique is a direct translation of stumpwork, or raised embroidery, where elements are stitched separately and applied to the base for a 3D effect.
Cut individual feather shapes from paper and glue only the quill end, allowing the tips to lift slightly from the surface to create natural depth and shadow.
Layering these paper ‘slips’ mimics the way you would build up dimension with detached buttonhole stitches or wired shapes in textile art.
Notice how the map-printed paper adds a narrative layer, just as a carefully chosen fabric print can enhance the story of an embroidery piece.
6. Etch with ‘Thread’ Using Paper Cutouts
Use negative space and fine paper lines to replicate the clean precision of backstitch or stem stitch outlines in modern embroidery.
By cutting away the background, you leave behind a ‘stitched’ illustration where the paper itself becomes the thread line.
This exercise hones your understanding of line weight and composition, teaching you how much detail is needed to define a shape without overwhelming it.
The dashed lines are a brilliant way to suggest motion or energy, much like using a running stitch to add subtle texture to a minimal design.
7. Combine Paper Appliqué and Coiled ‘Knots’

Build your composition by first laying down large paper shapes, a technique directly parallel to appliqué in textile art.
Once your base shapes are in place, fill them with texture by adding tightly coiled paper strips, which act as dense clusters of French knots or seed stitches.
This mixed-media approach teaches you to balance flat color fields with areas of high texture, a key skill for creating dynamic embroidery designs.
Using a patterned paper for the bowl is like choosing a bold print for a fabric collage base, letting it add character before a single ‘stitch’ is made.
8. Paint with Paper Scraps for a Gradient Effect
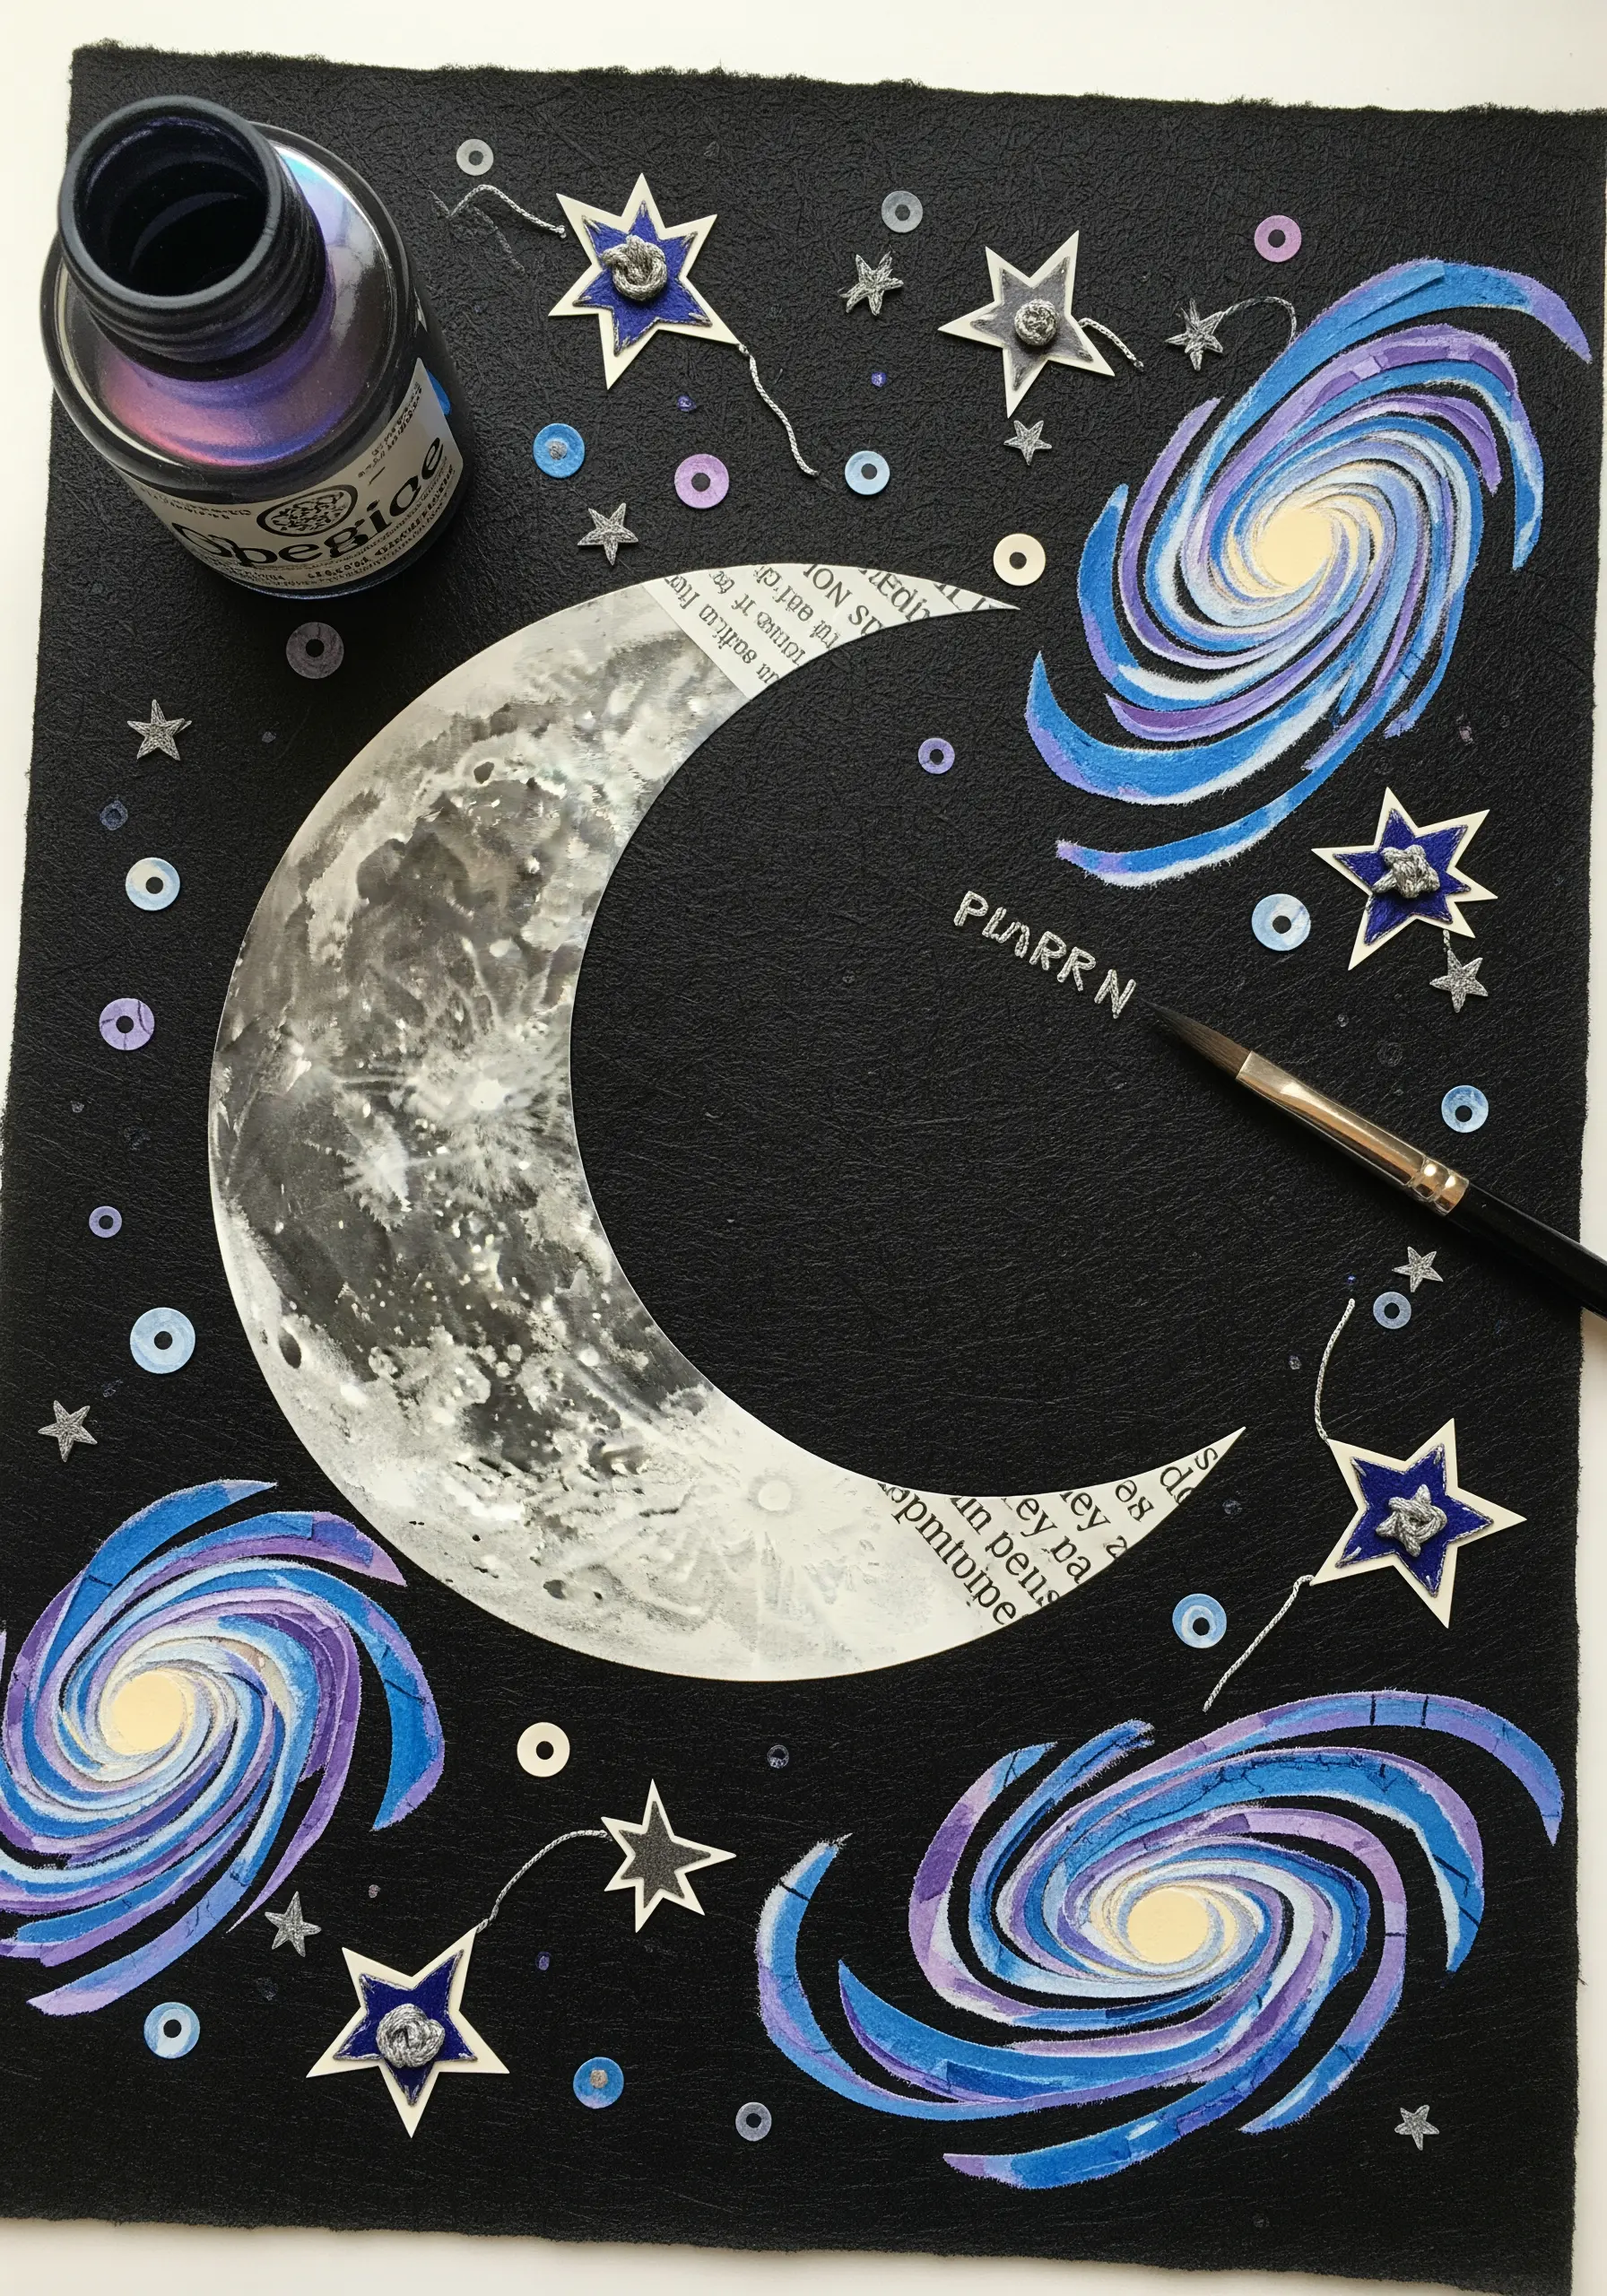
Achieve a soft, painterly effect by using tiny, torn scraps of paper to blend colors, much like you would with single strands of floss in needlepainting.
The swirling galaxies are formed by arranging strips of paper in a spiral, letting the colors flow into one another to create a sense of movement.
Adding tiny sequin-like paper dots and thread outlines mimics the final embellishments in an embroidery project, like adding beads or metallic thread for sparkle.
This process encourages an intuitive approach to color blending, freeing you from the constraints of a pattern and focusing purely on flow.
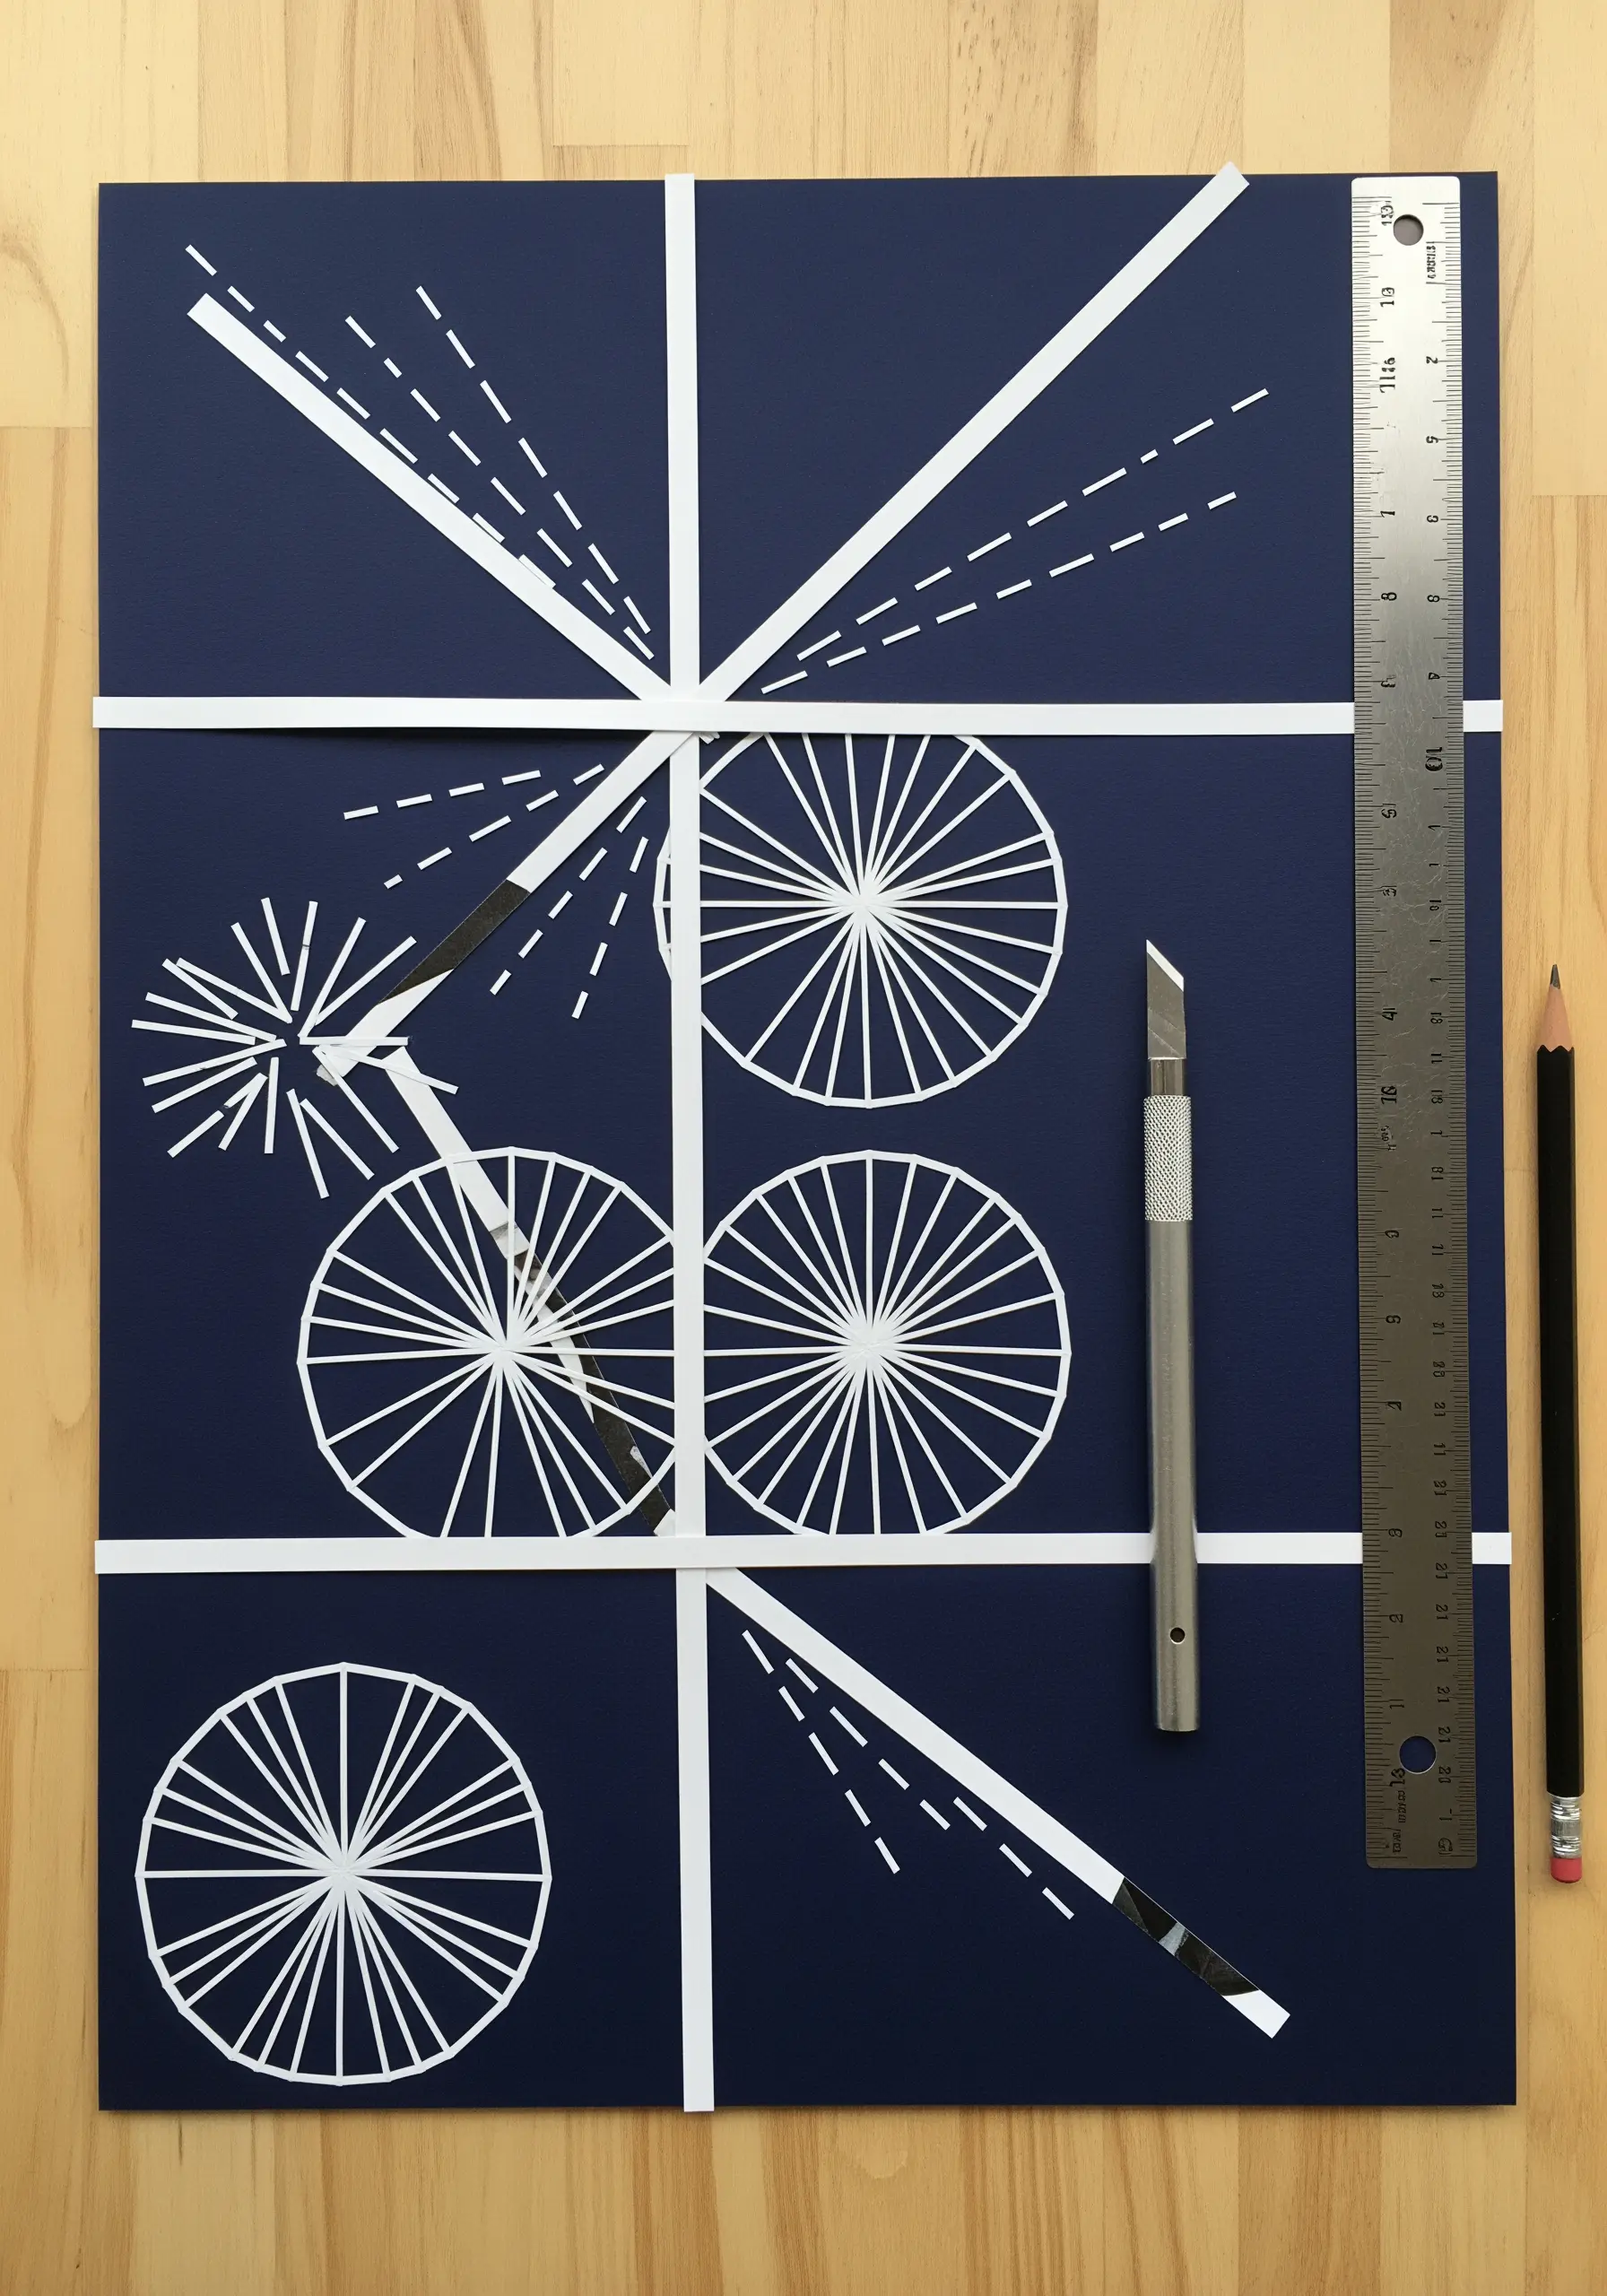
9. Define Shapes with a ‘Running Stitch’ Outline
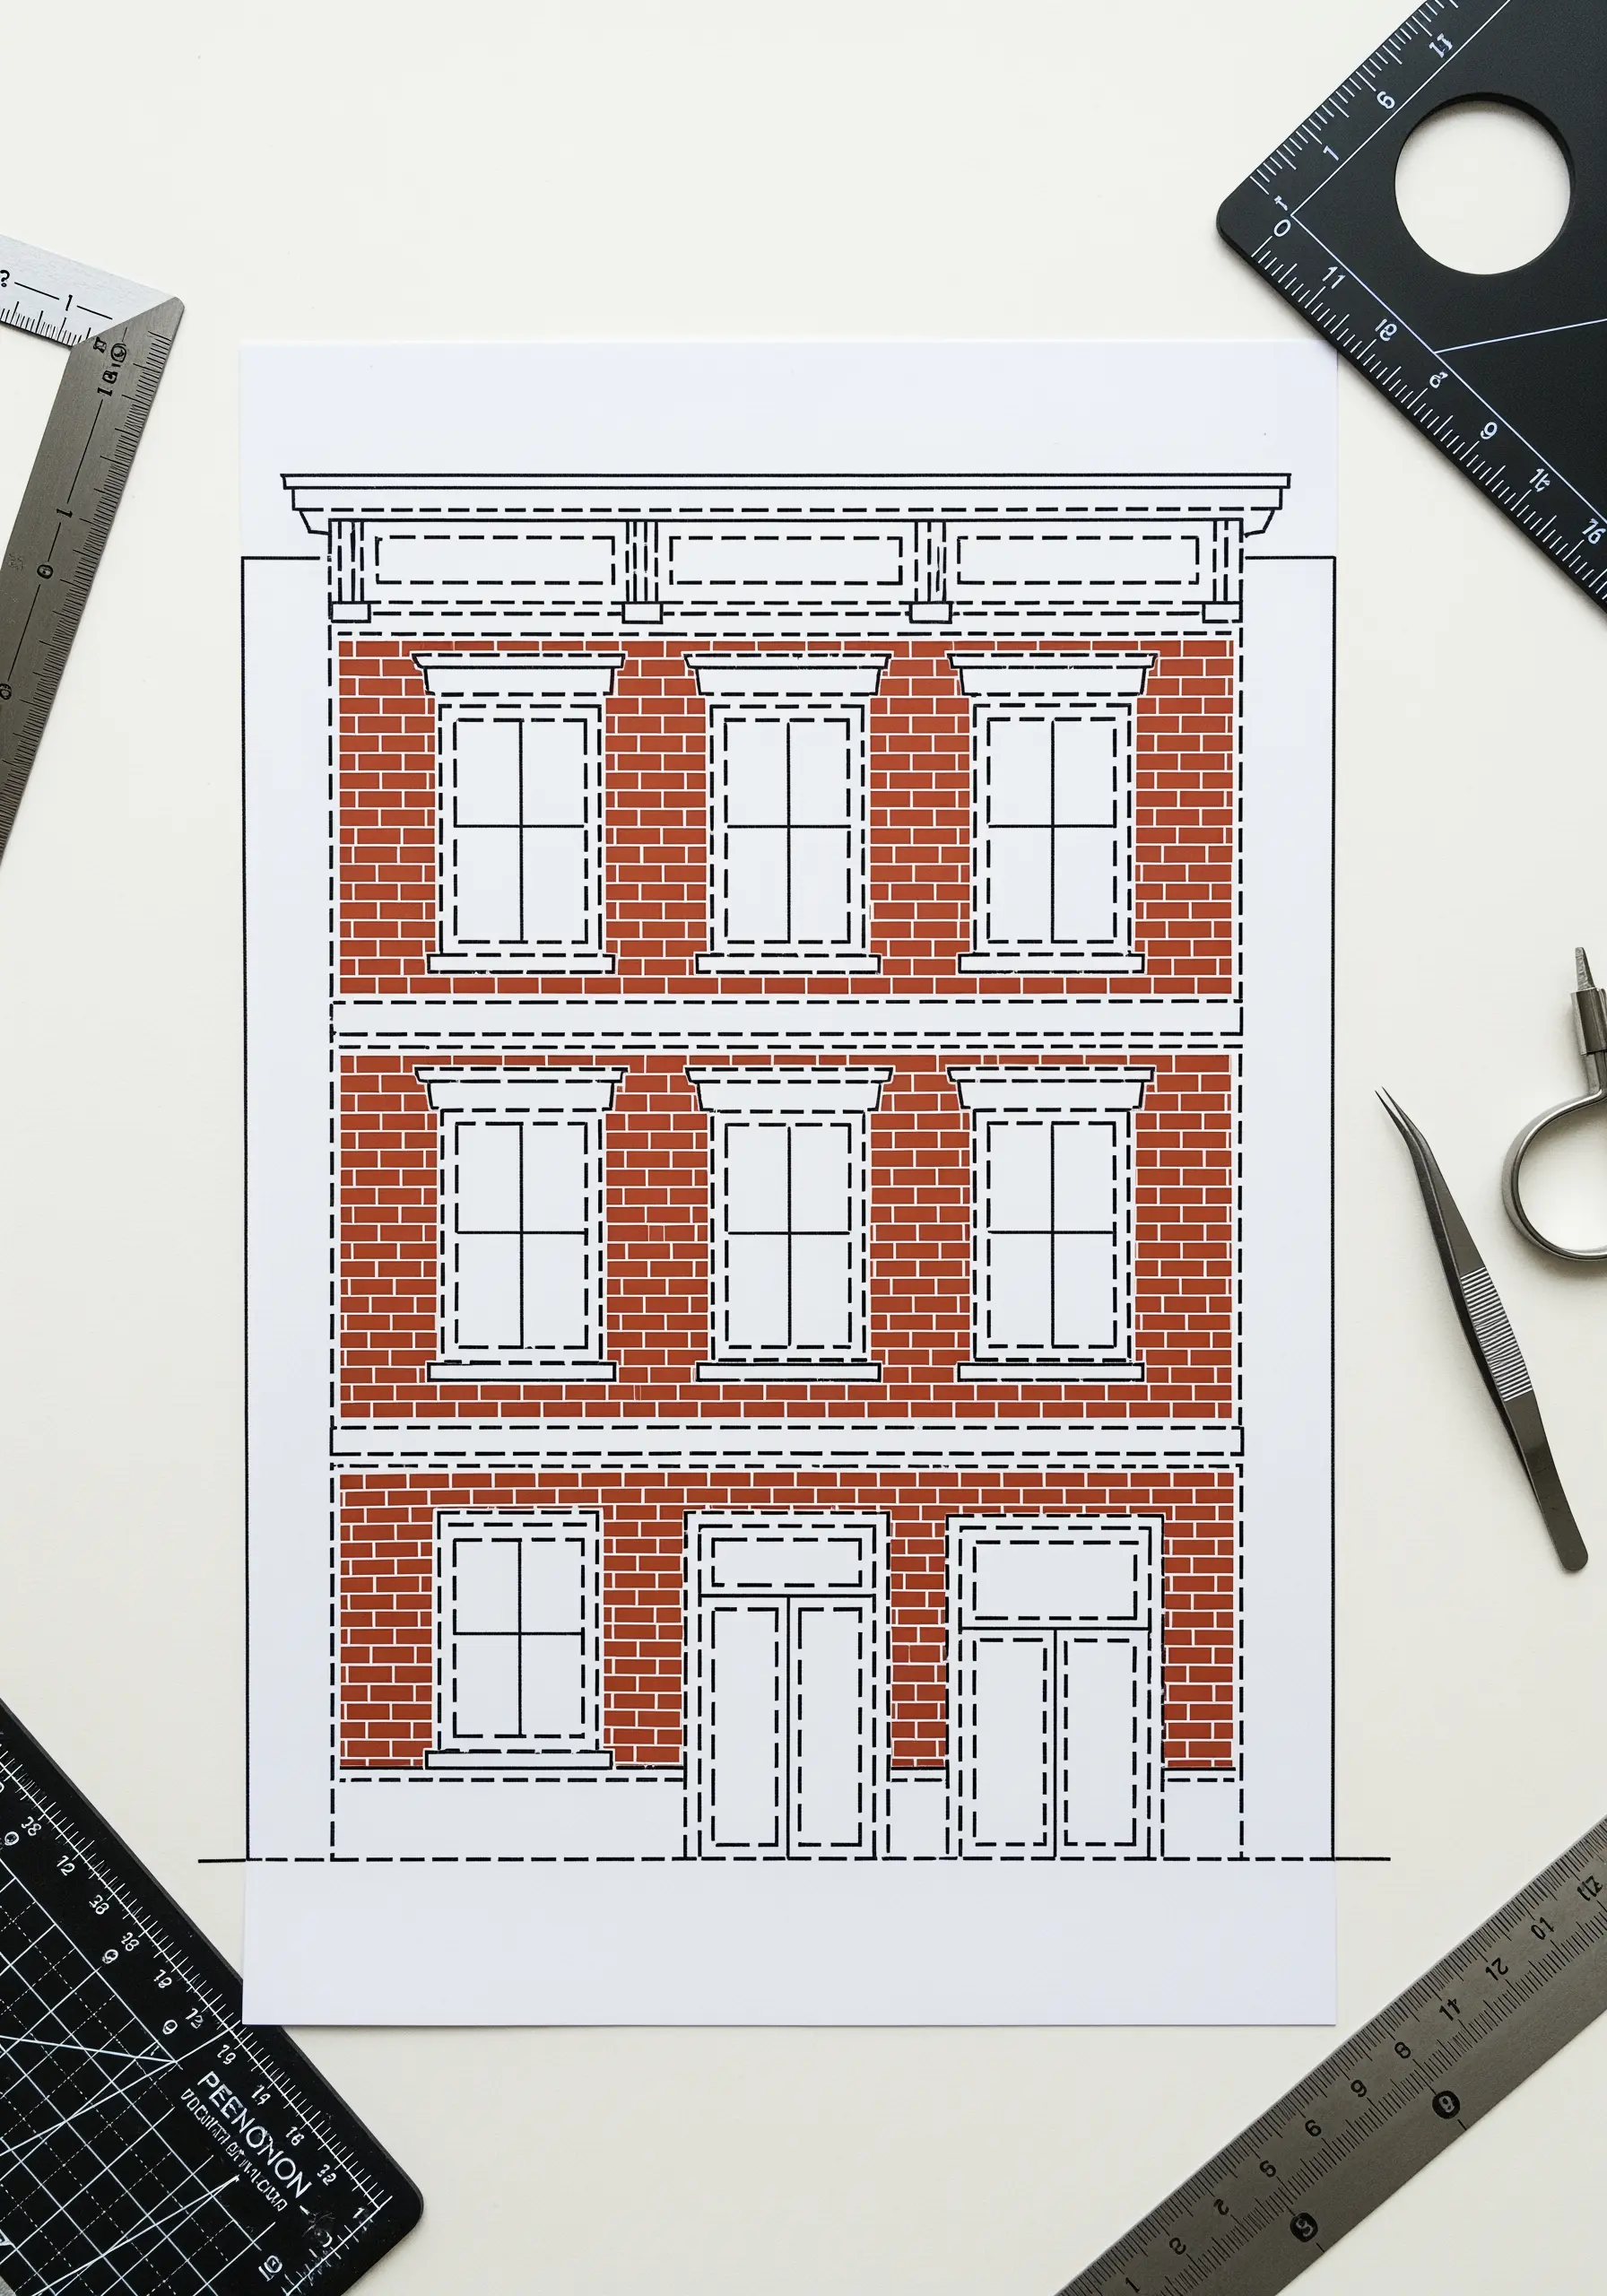
Use dashed lines in your design to stand in for a running stitch, creating a visual guide that suggests sewing without a single puncture.
This graphic approach is perfect for architectural subjects, where the clean, geometric lines of the ‘stitches’ reinforce the structure of the building.
The textured brick paper acts as your fabric, providing a rich background that contrasts beautifully with the stark white ‘thread’ of the outlines.
It’s an excellent way to plan an embroidery composition, allowing you to test stitch placement and length visually before committing to fabric.
10. Layer Paper Feathers for a Thread-Painted Look
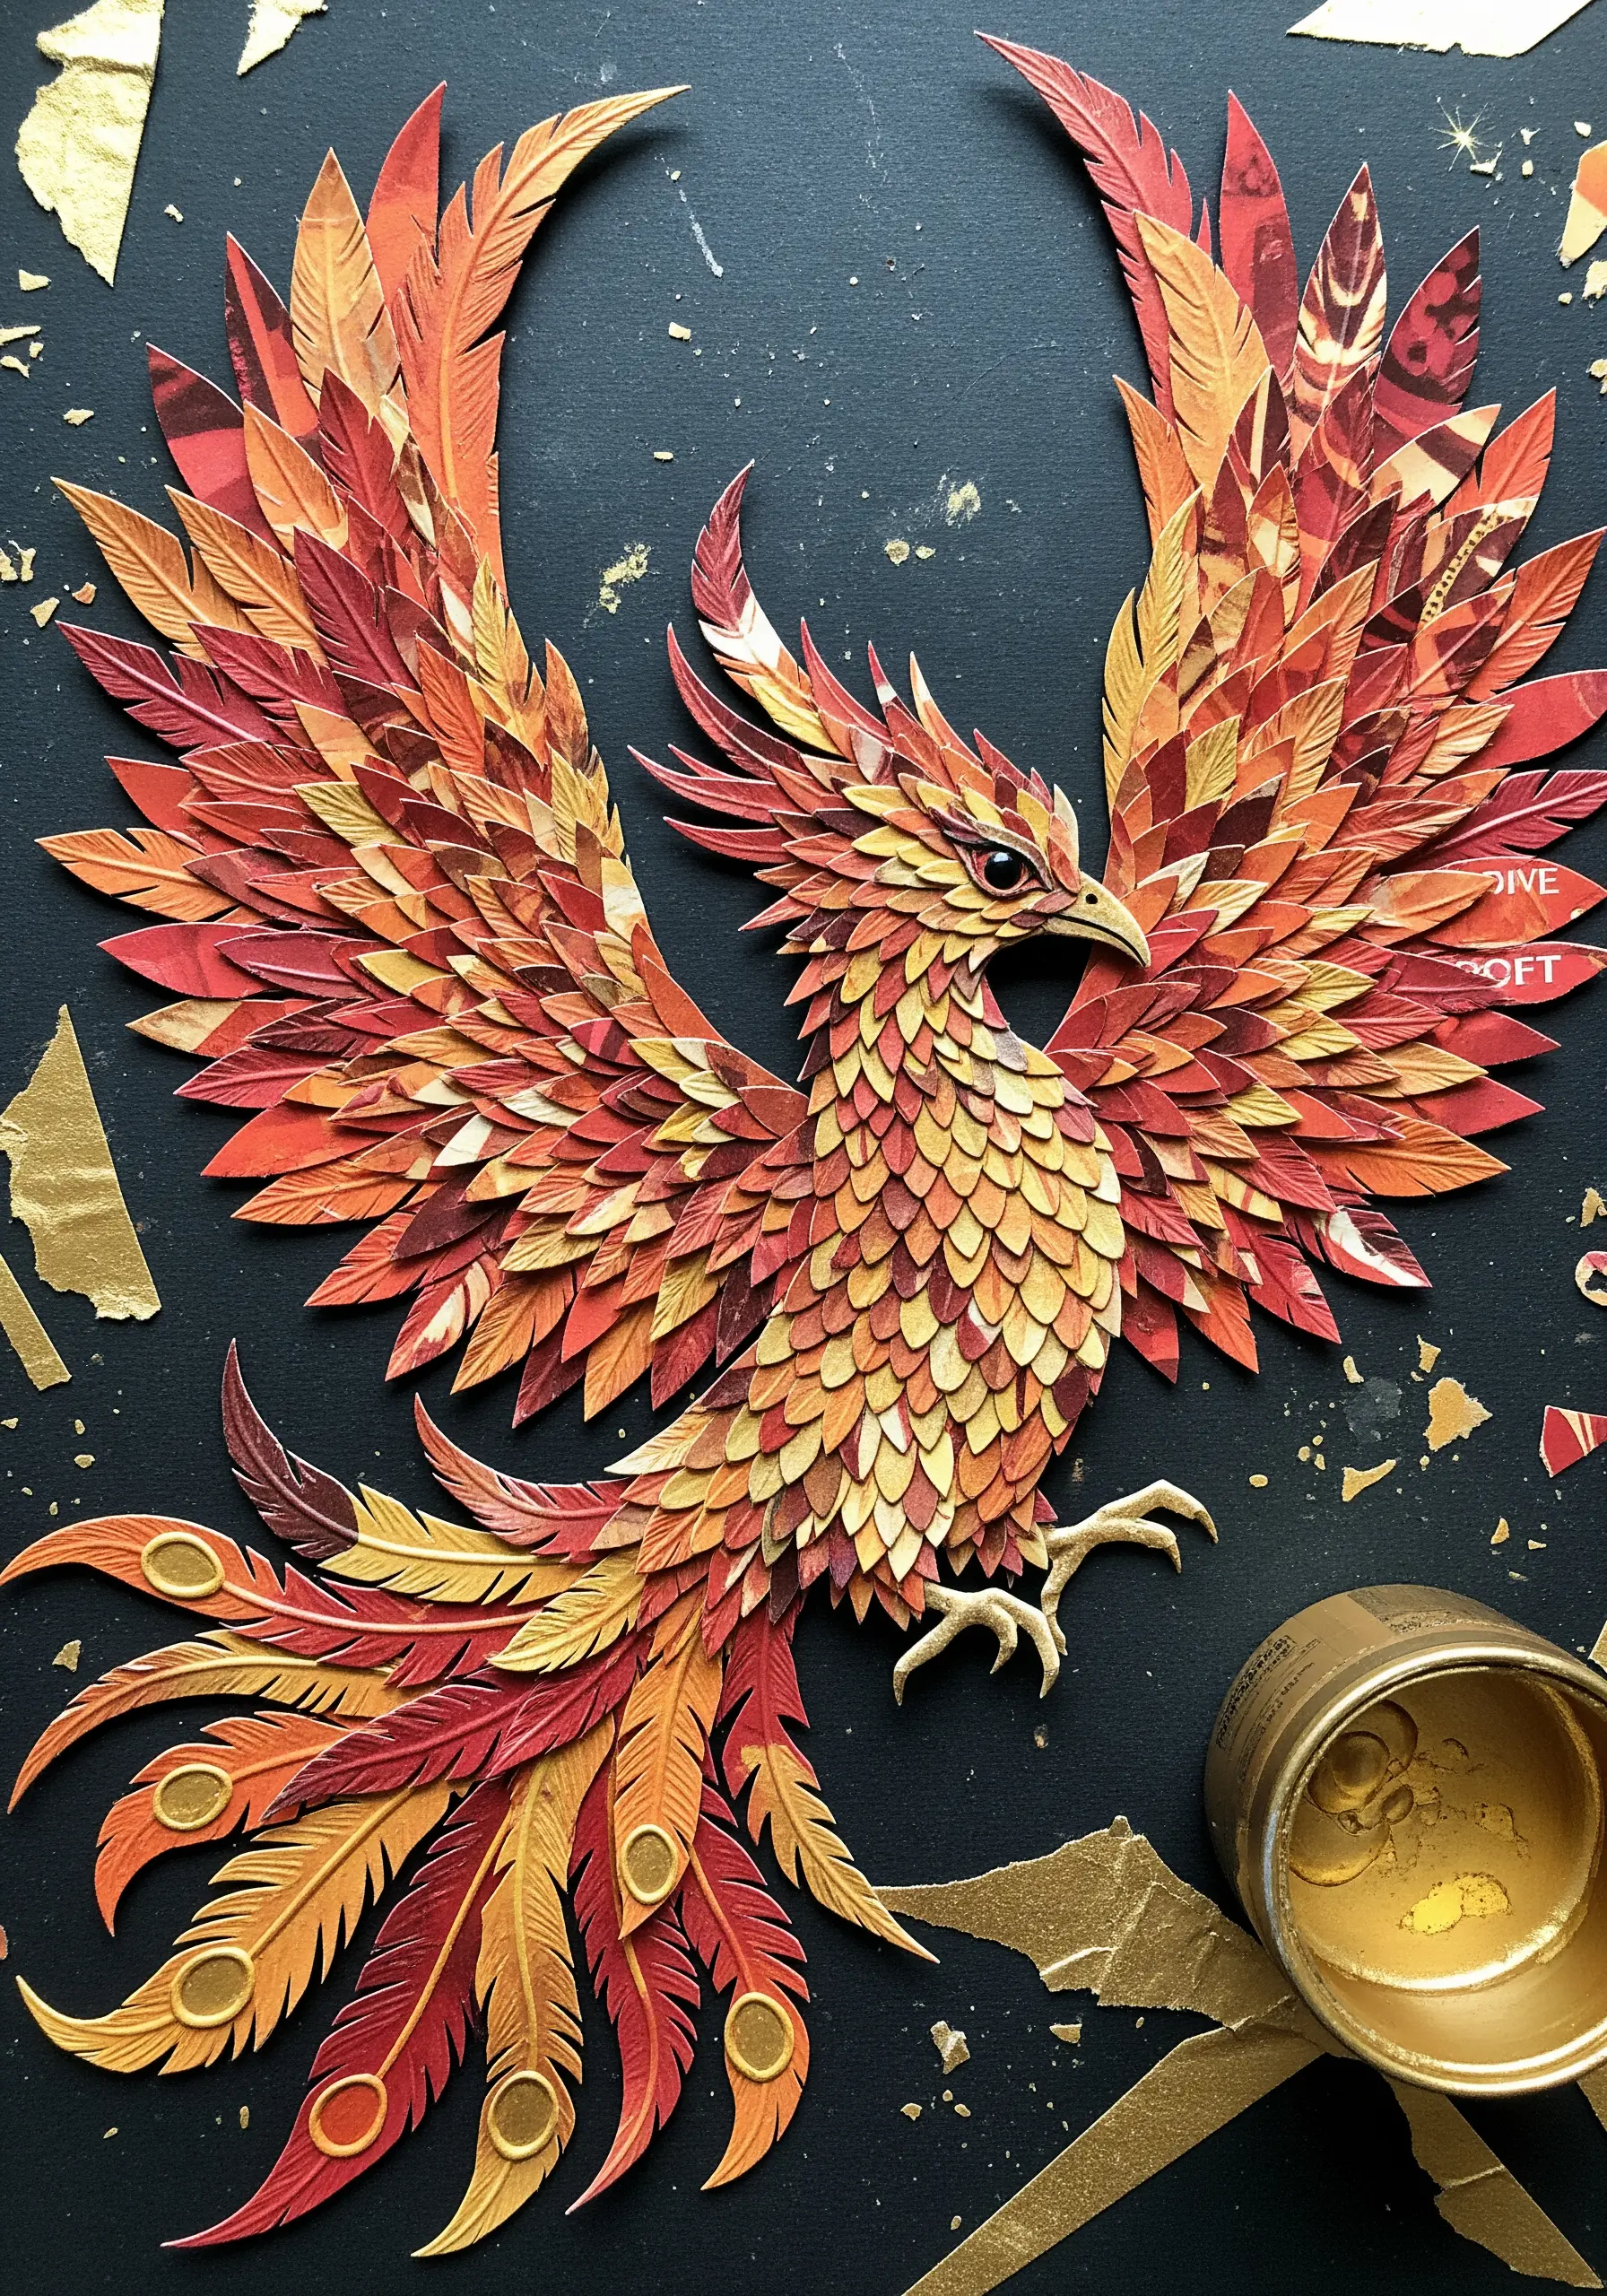
Create the rich, blended color of thread painting by layering dozens of individually cut paper ‘feathers,’ each a slightly different shade.
Arrange the paper pieces to follow the natural direction of feathers, just as you would angle your long-and-short stitches to create realistic flow and dimension.
This method allows you to build complex gradients and textures, transitioning smoothly from warm reds to bright golds without needing to blend thread.
Adding touches of gold leaf at the end is like incorporating a luxe metallic thread, instantly elevating the piece and catching the light.
11. Construct Typography with Rolled ‘Threads’
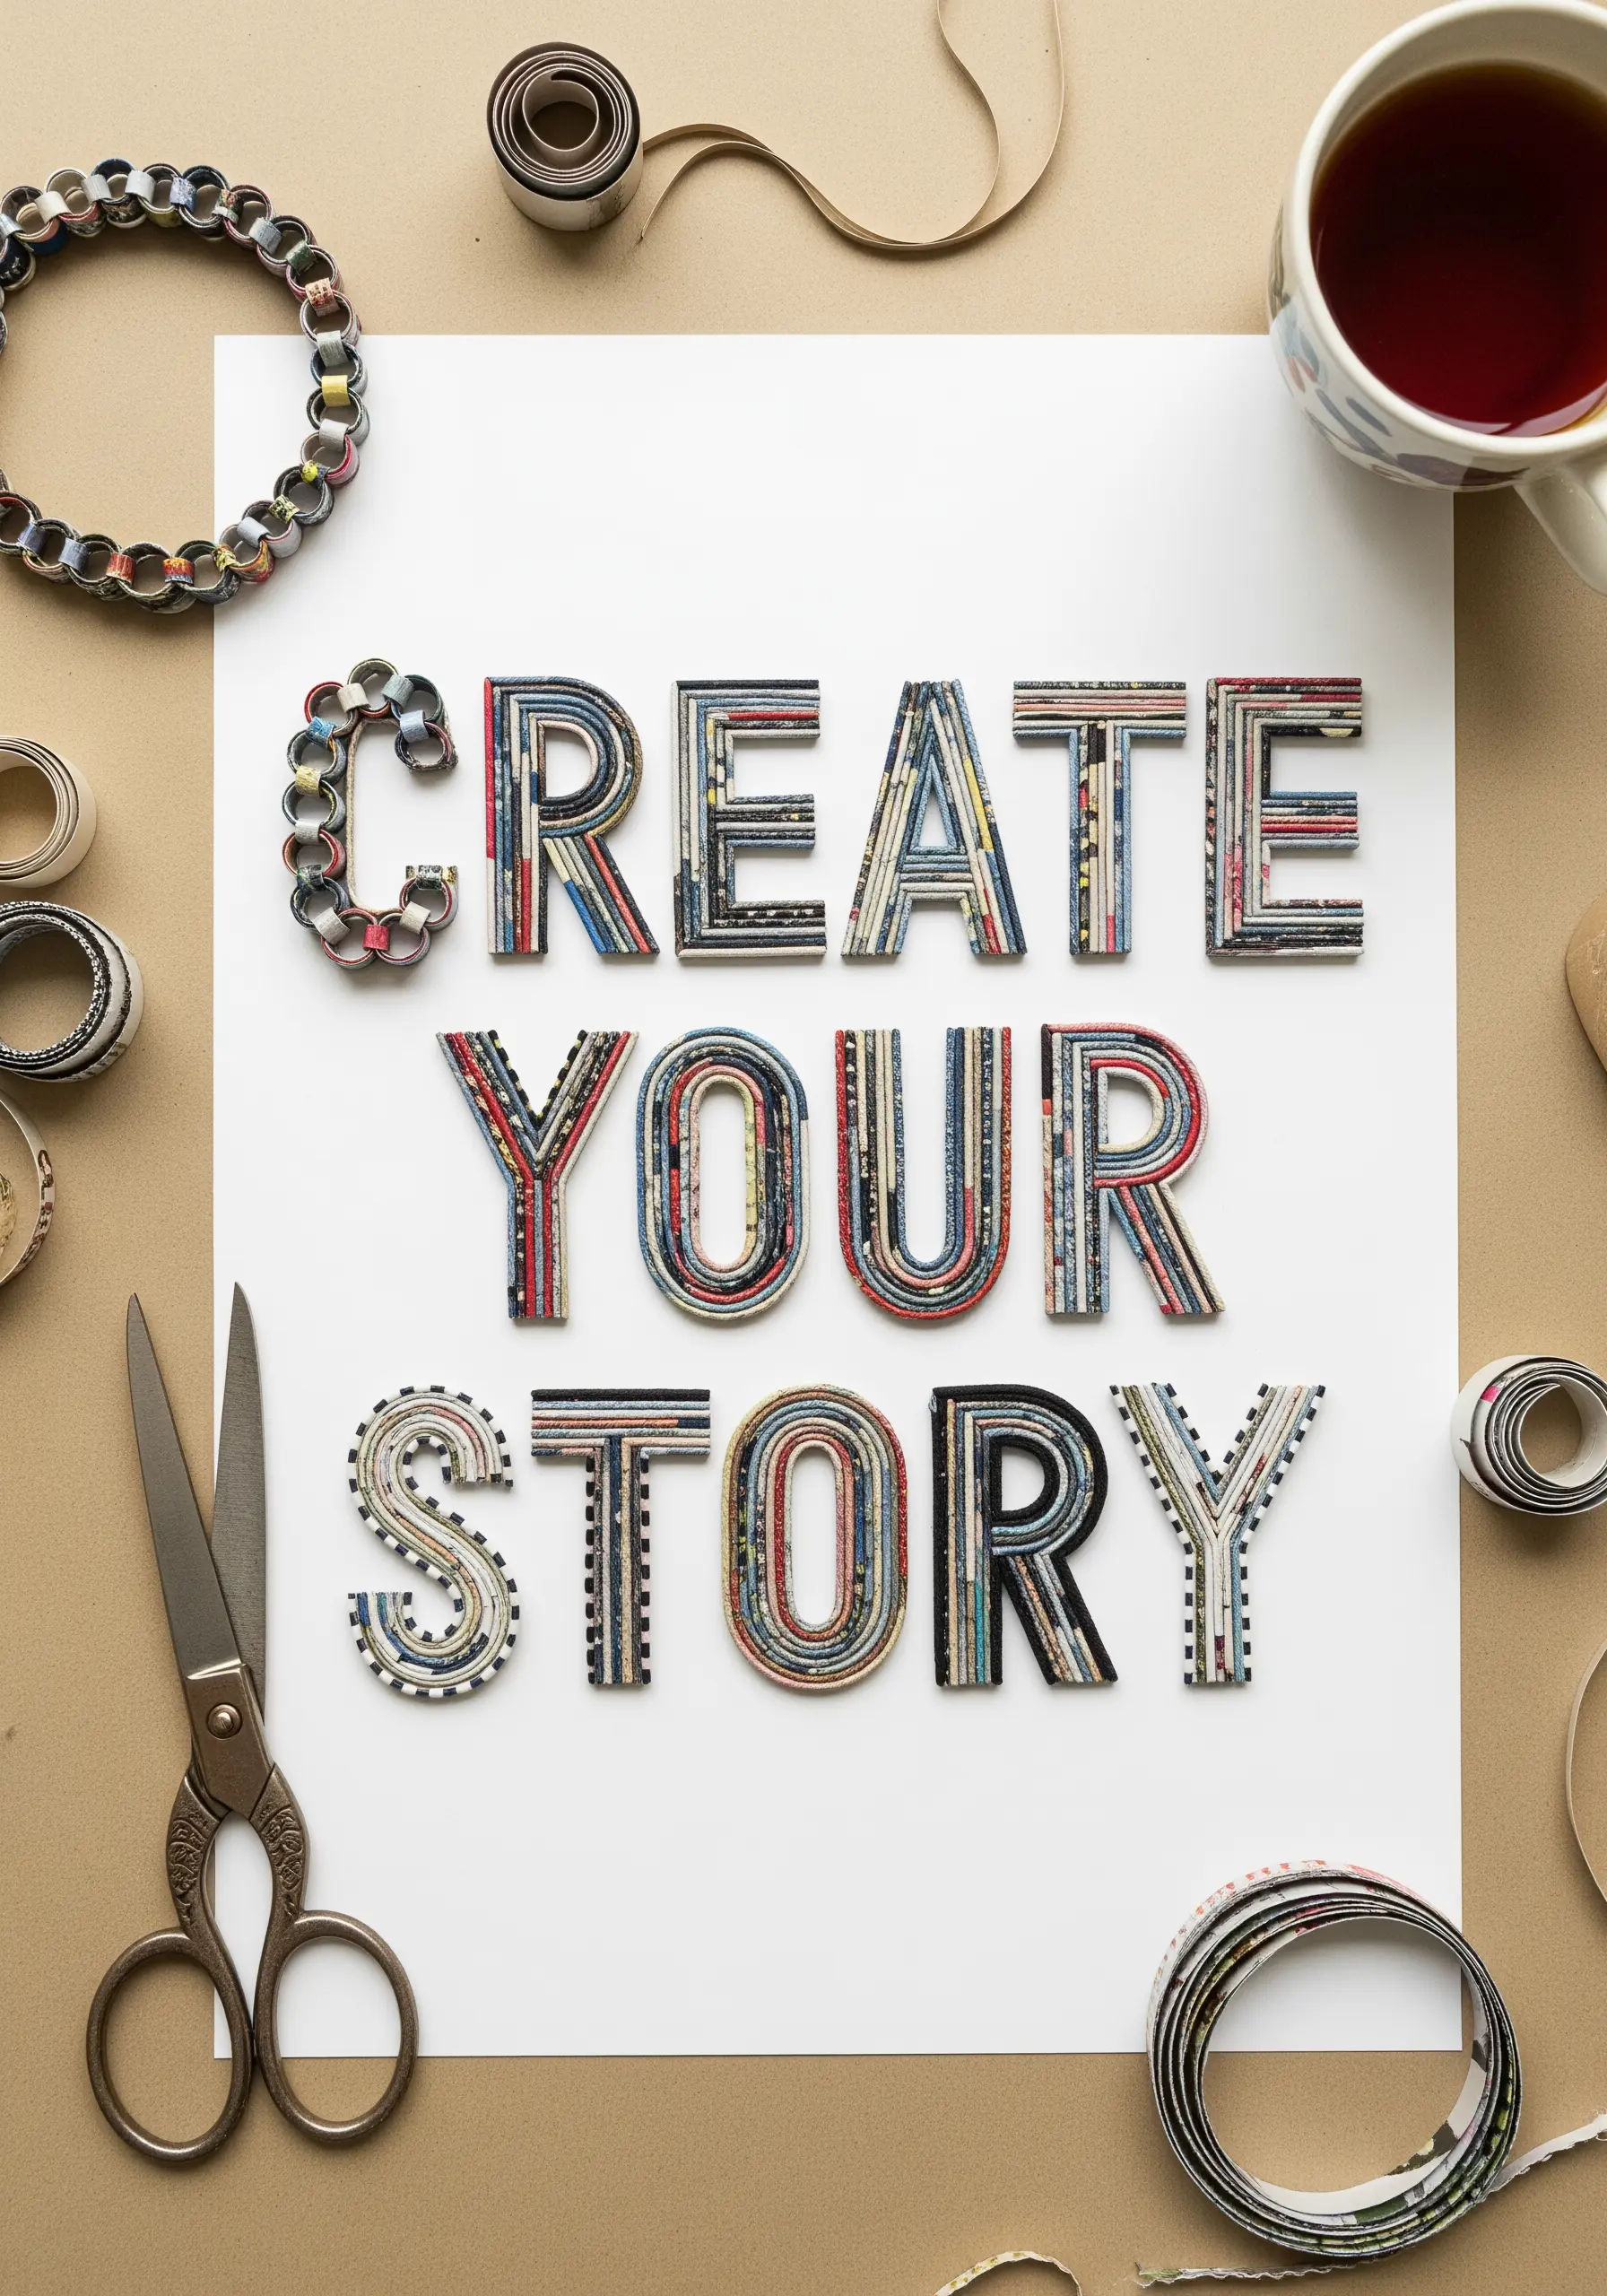
Build dimensional lettering by wrapping strips of patterned magazine paper around a cardboard base, creating a texture similar to wrapped or whipped stitches.
This technique turns flat paper into a sculptural element, giving your words a tangible presence that stands out from the background.
The variation in the magazine clippings mimics the subtle color shifts of variegated floss, adding visual interest and depth to each letter.
It’s a fantastic way to explore how texture can define form, a skill directly applicable to creating bold, thread-based typography.
12. Create an Underwater Scene with Paper Weaving and Fringe
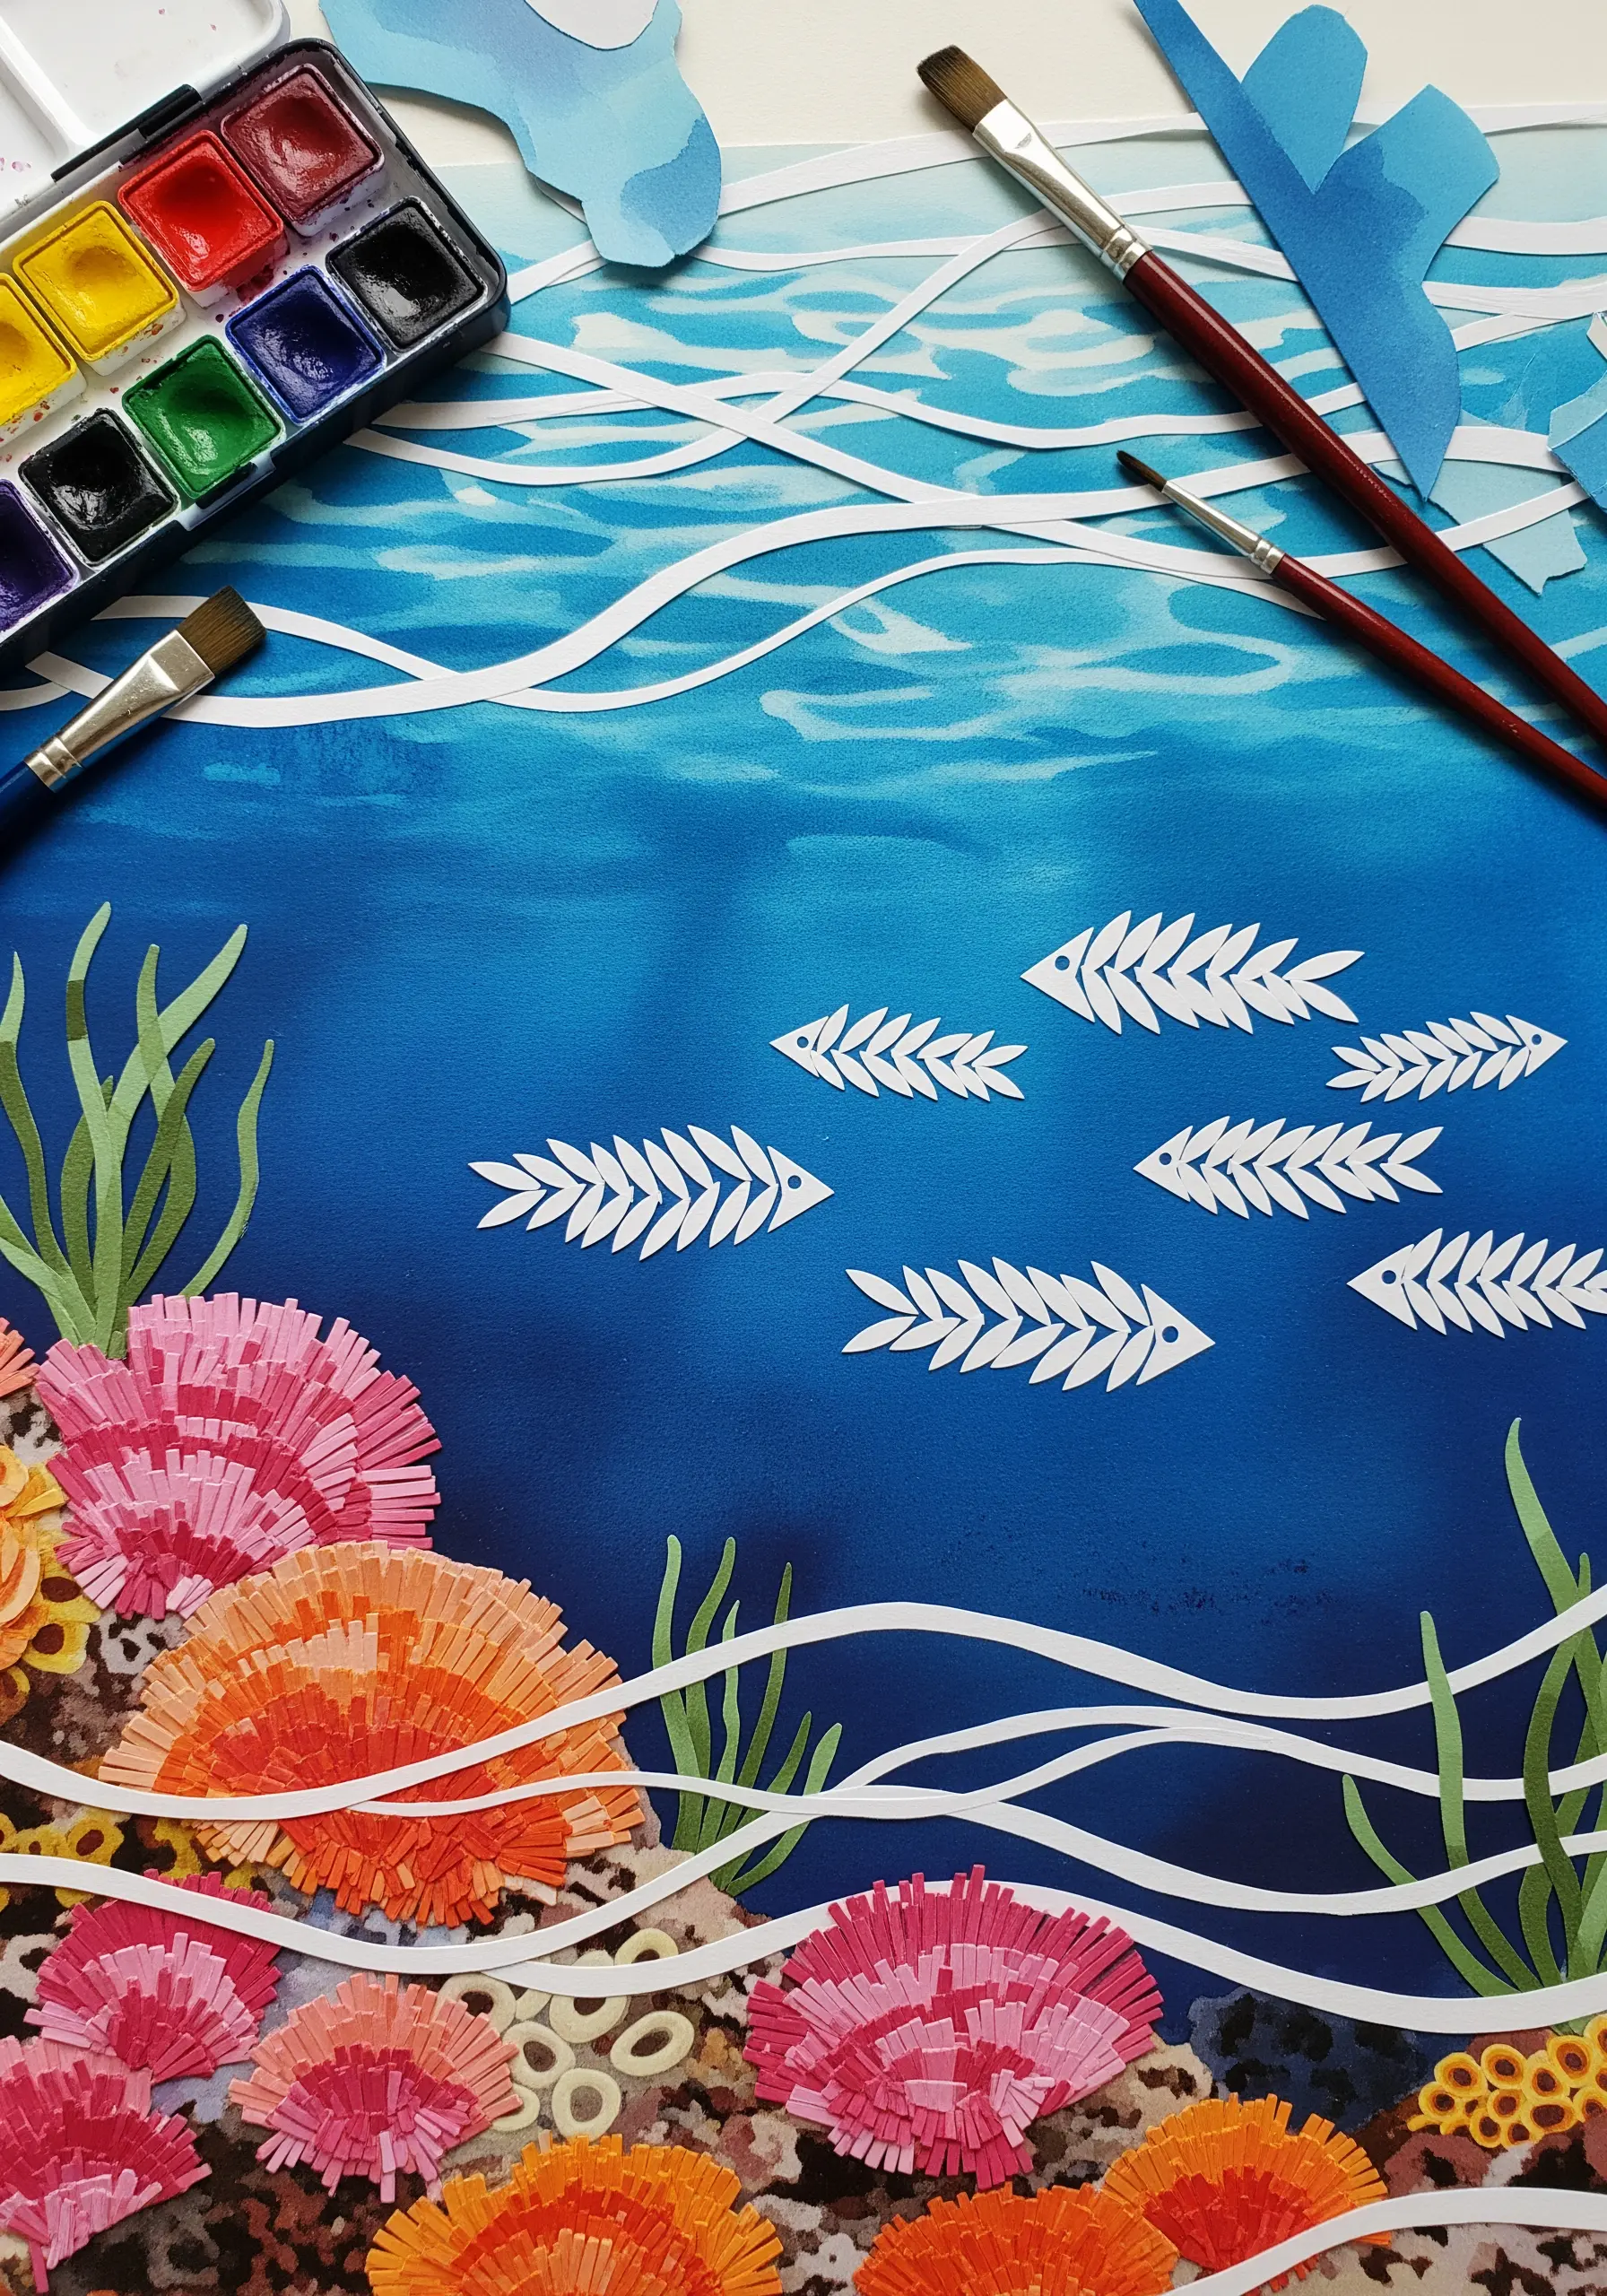
Translate the texture of weaving and Turkey work into your paper art by creating fringed coral and cut-out fish skeletons.
Snip fine lines into folded paper to create the coral’s delicate texture; when unfolded, it expands to mimic the looped pile of a Turkey knot.
The fish skeletons, cut from a single piece of paper, demonstrate how negative space can create intricate detail, much like in cutwork embroidery.
A watercolor wash on the background provides a soft, blended base, similar to painting your fabric before you begin stitching to establish mood and depth.
13. Explore Stitch Textures in a Monochrome Paper Sampler
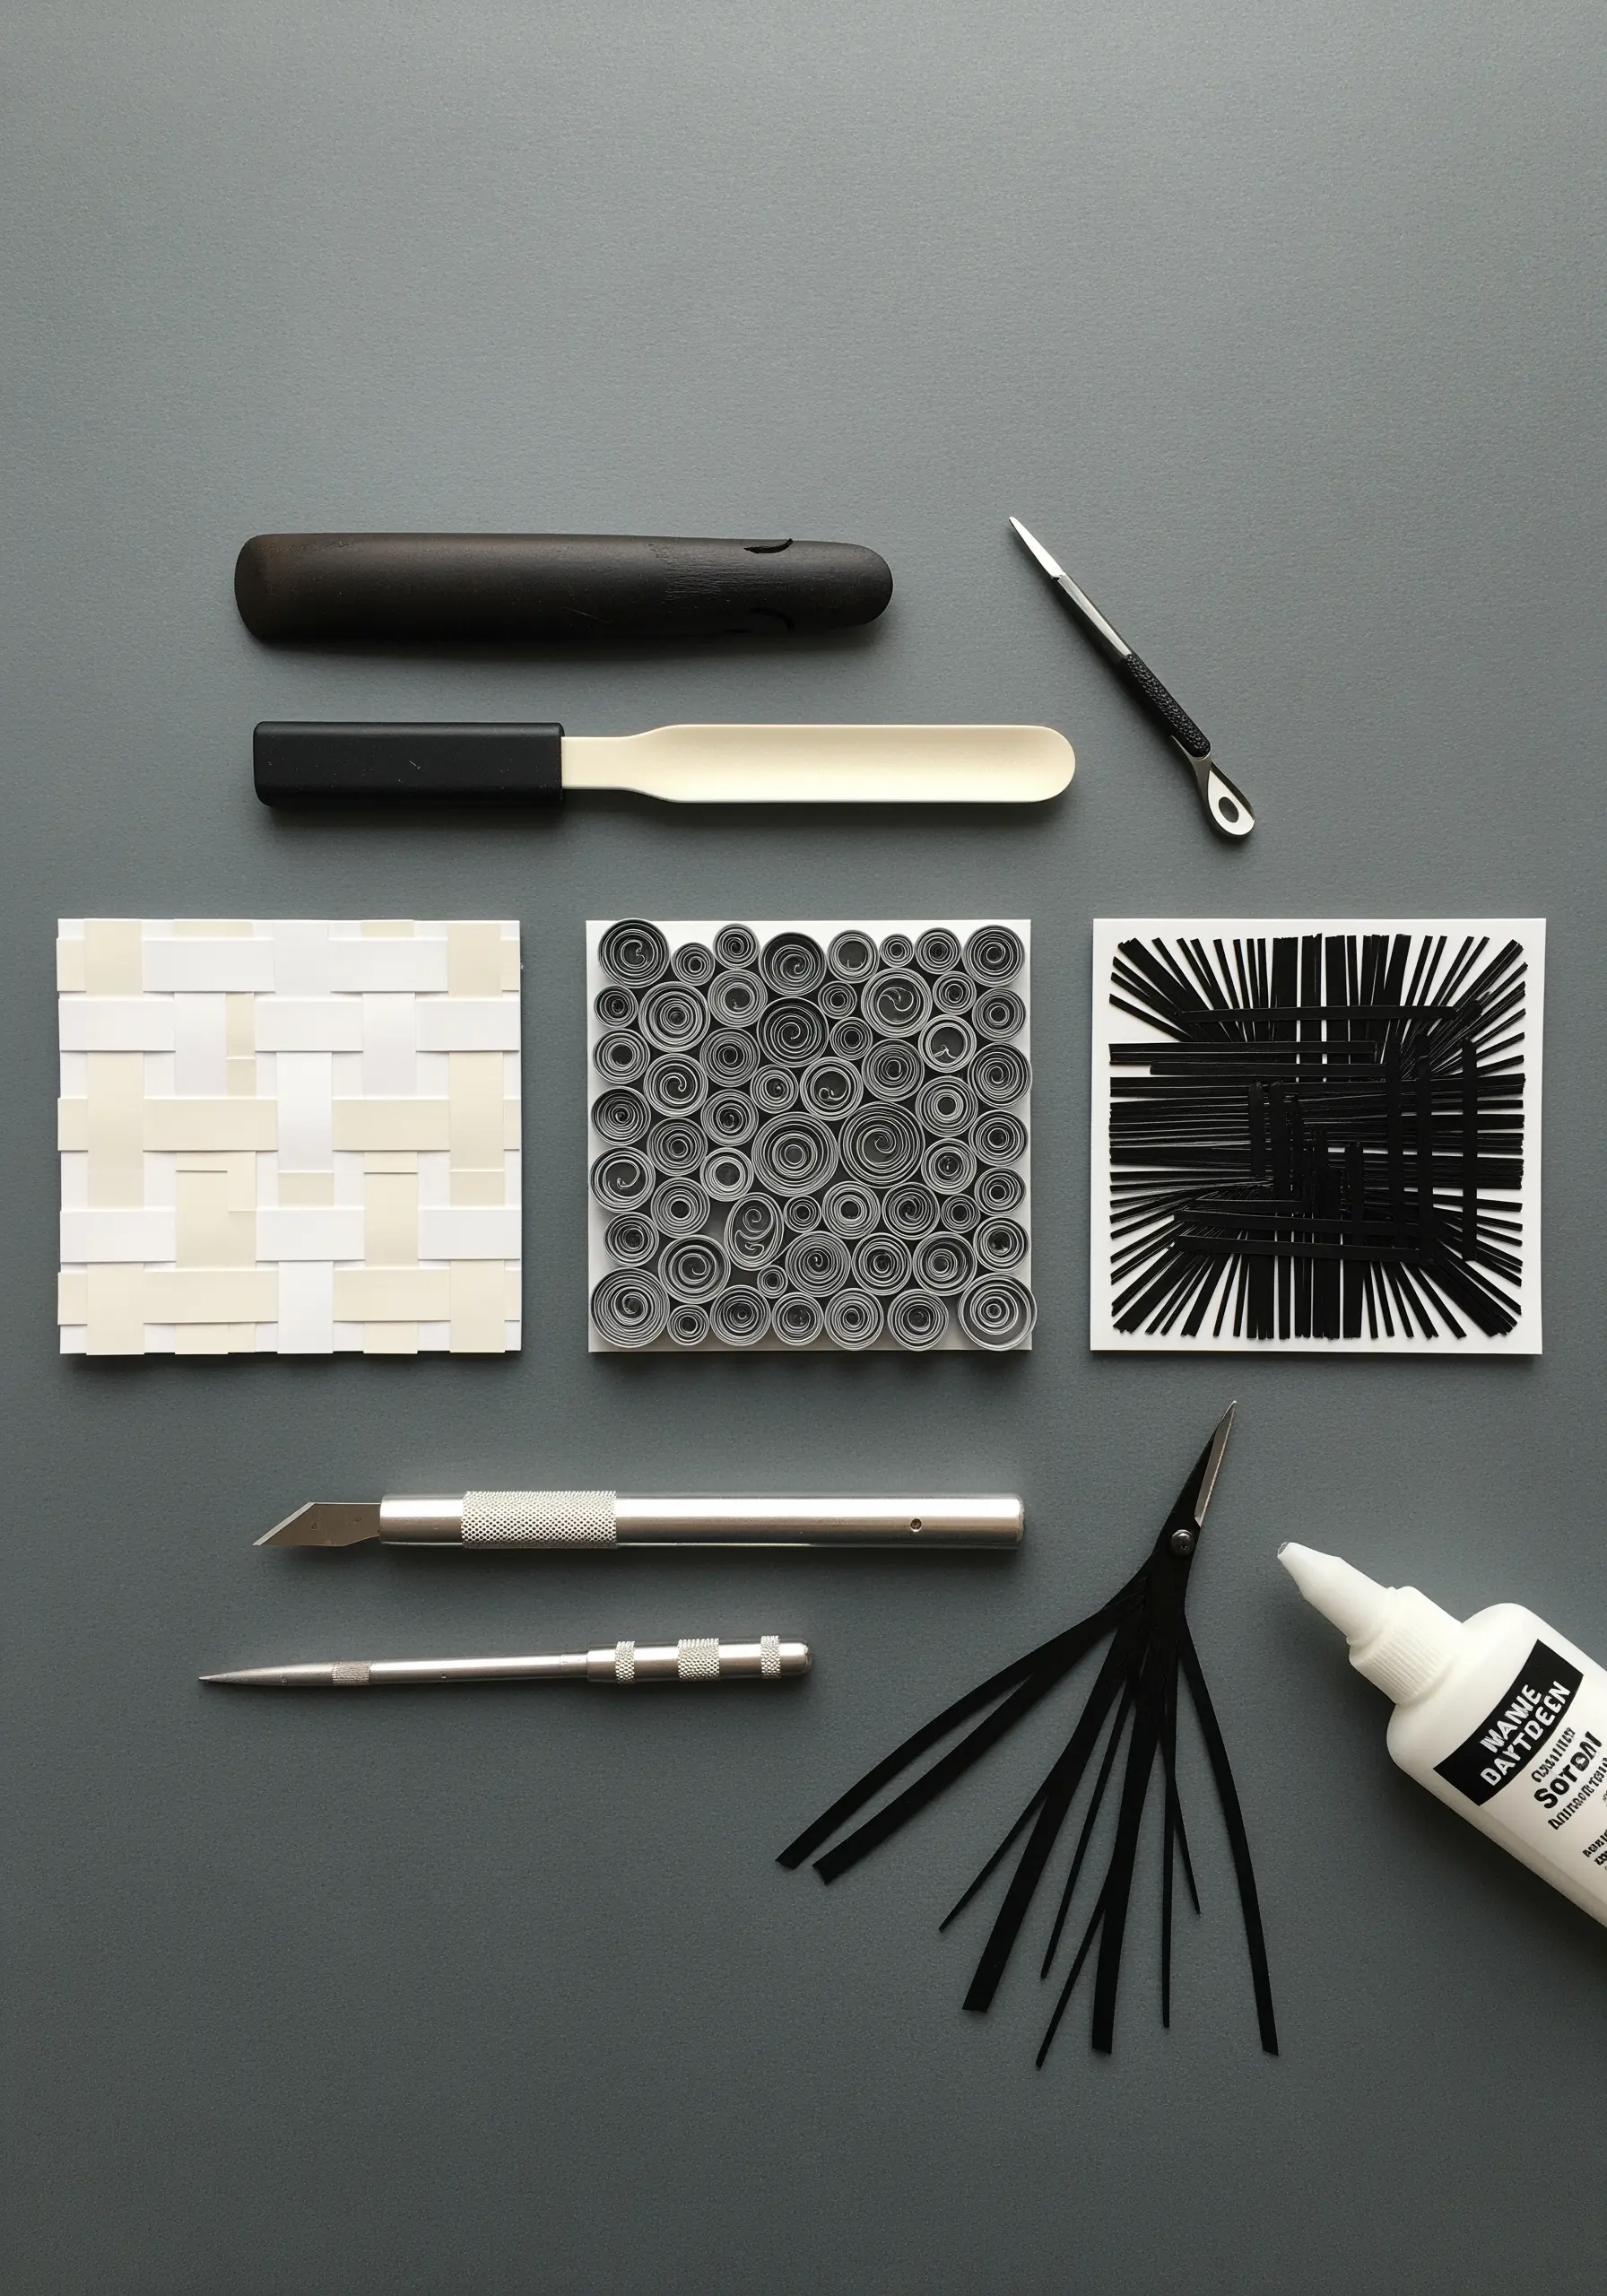
Challenge yourself to create a sampler using only paper, translating different stitch textures into paper-based techniques.
Replicate a woven fill stitch by interlacing thin strips of paper, create the look of French knots with tightly rolled coils, and mimic the effect of straight stitches with radiating lines.
Working in monochrome forces you to focus entirely on texture, light, and shadow to create definition—an invaluable exercise for any textile artist.
This practice deepens your understanding of how textured neutral embroidery samplers achieve their sophisticated look through structure rather than color.
14. Mix Fabric Appliqué with Thread-Wrapped Centers
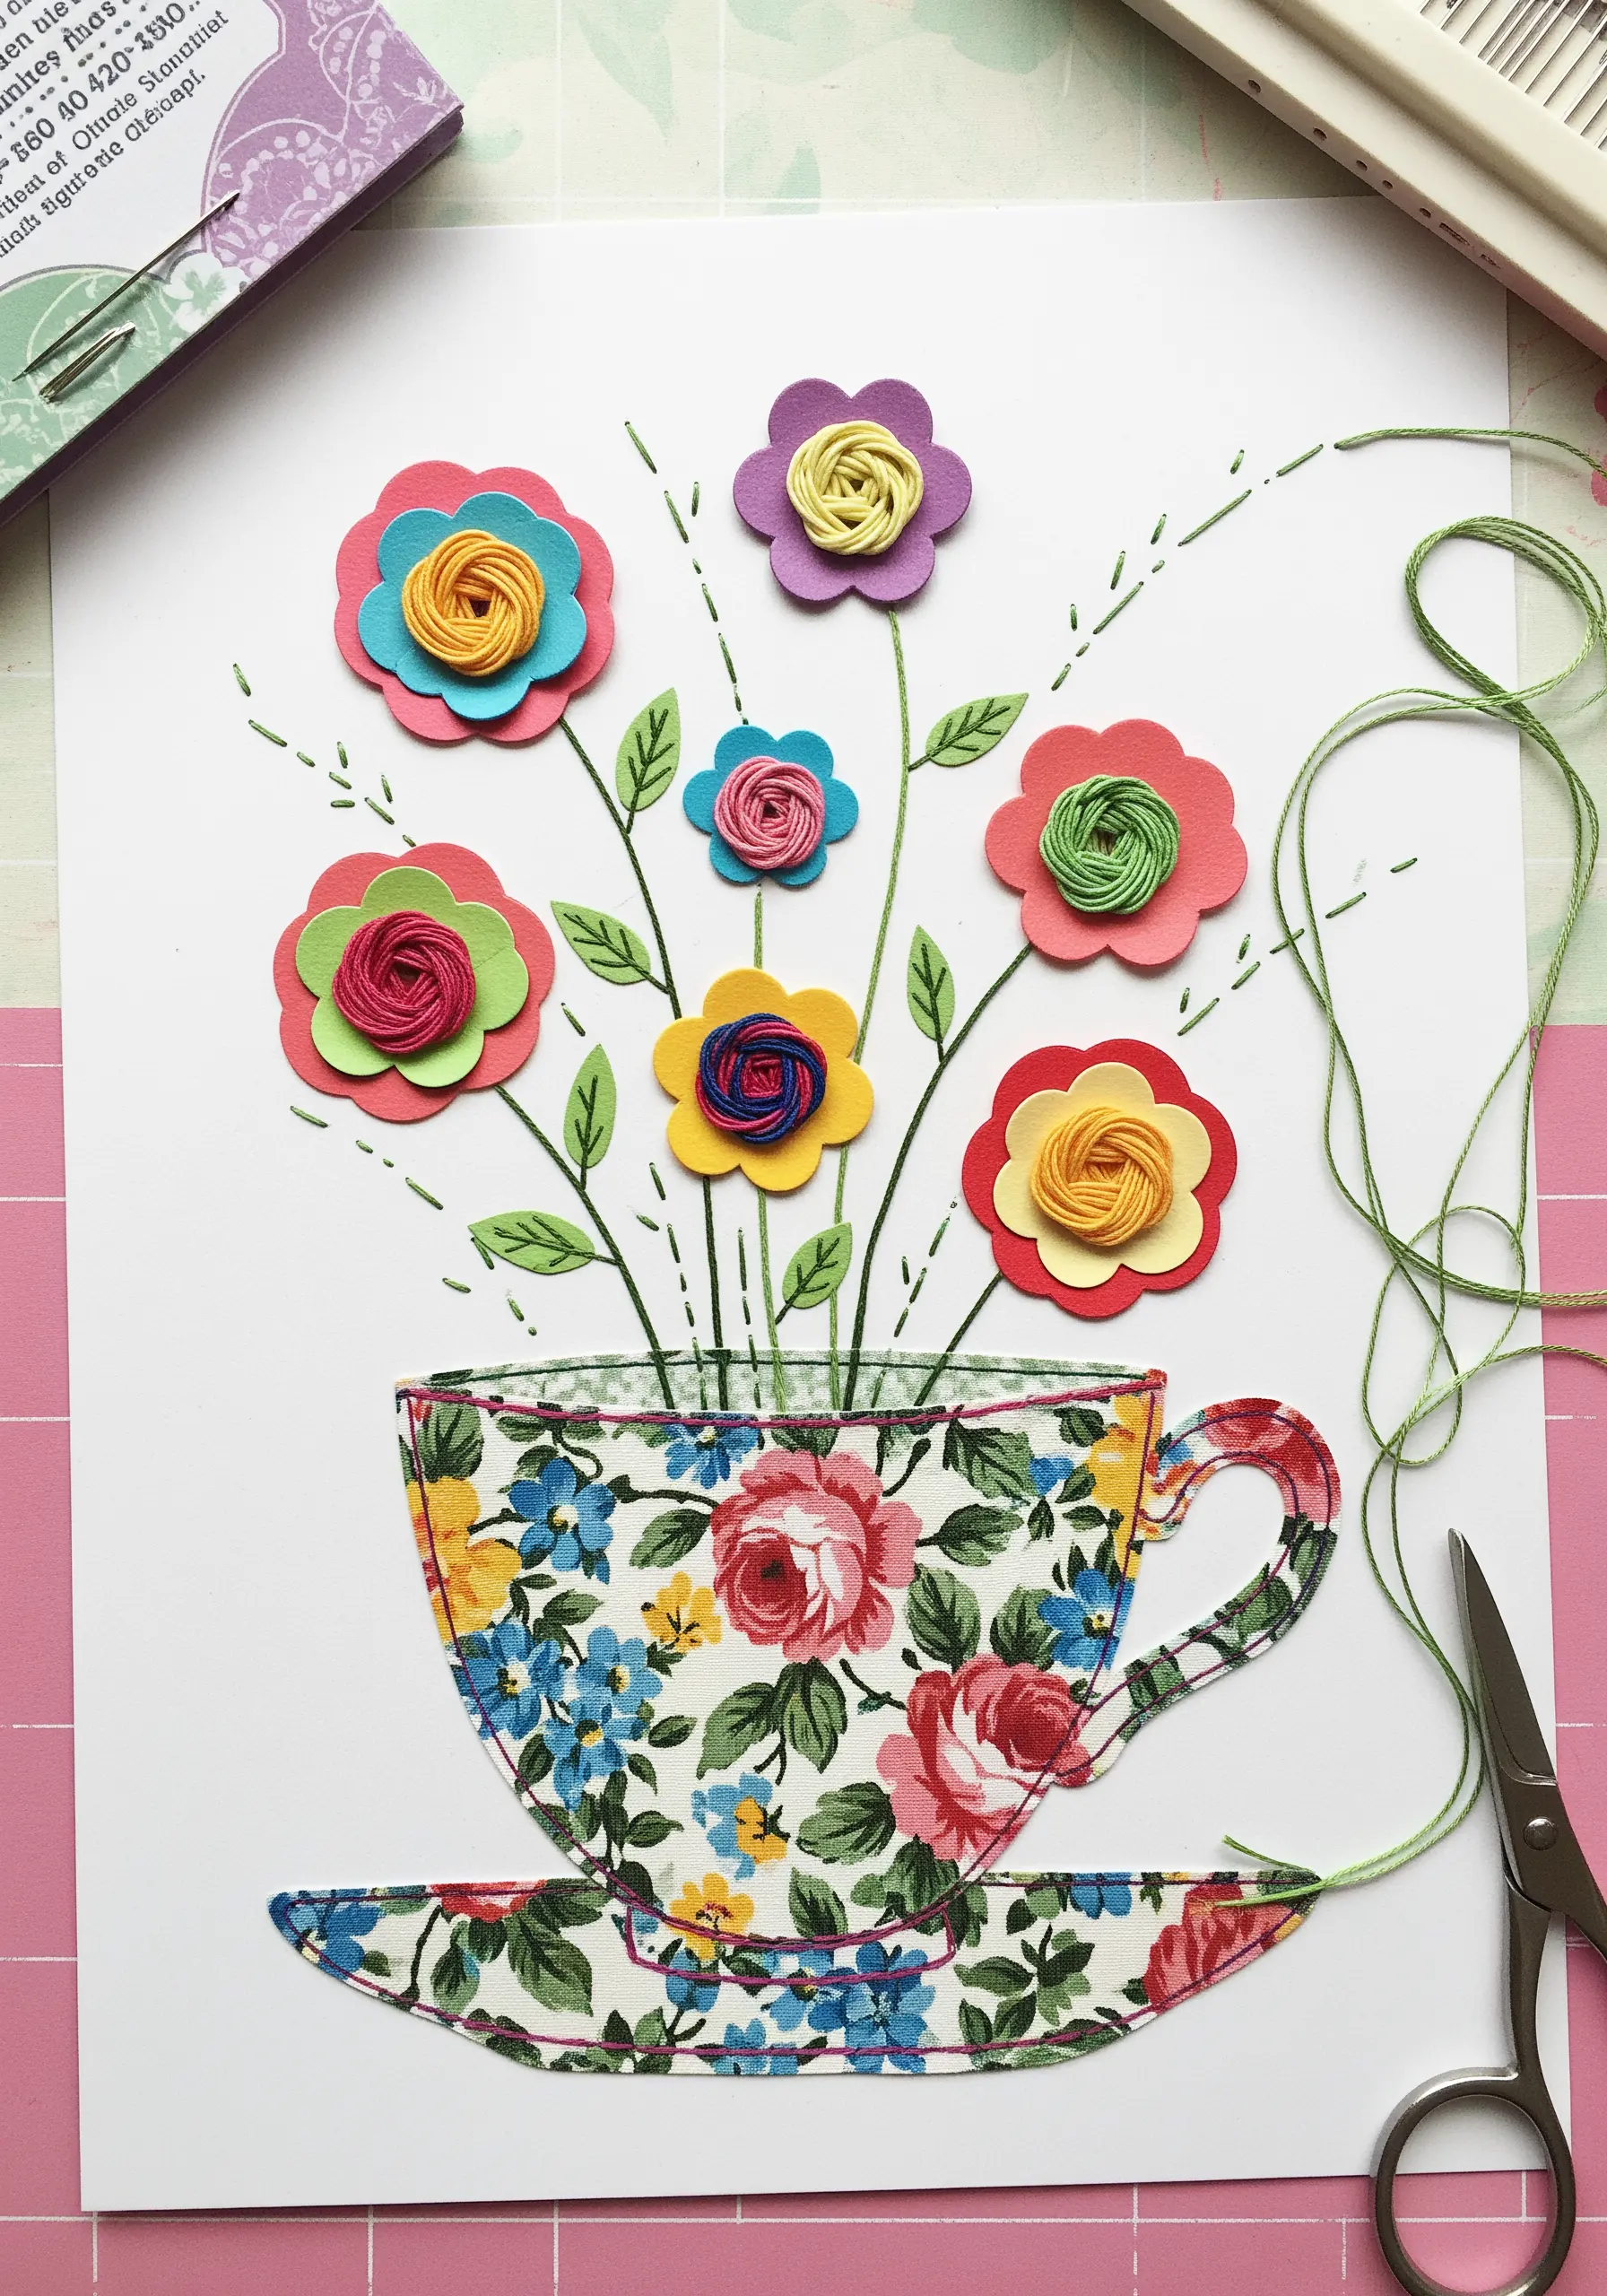
Combine the softness of fabric with the structure of paper and thread in a charming mixed-media piece.
Cut your main shape, like the teacup, from a piece of patterned fabric and appliqué it onto heavy paper for a soft, textile foundation.
For the flower centers, wrap embroidery floss tightly around a small paper circle to create a woven, textured focal point that introduces real thread into your collage.
The stitched stems and leaves act as simple line work, connecting the collaged elements and guiding the eye, proving that even the simplest backstitch has a powerful role in composition.
15. Construct a Mandala with Folded Paper ‘Petals’
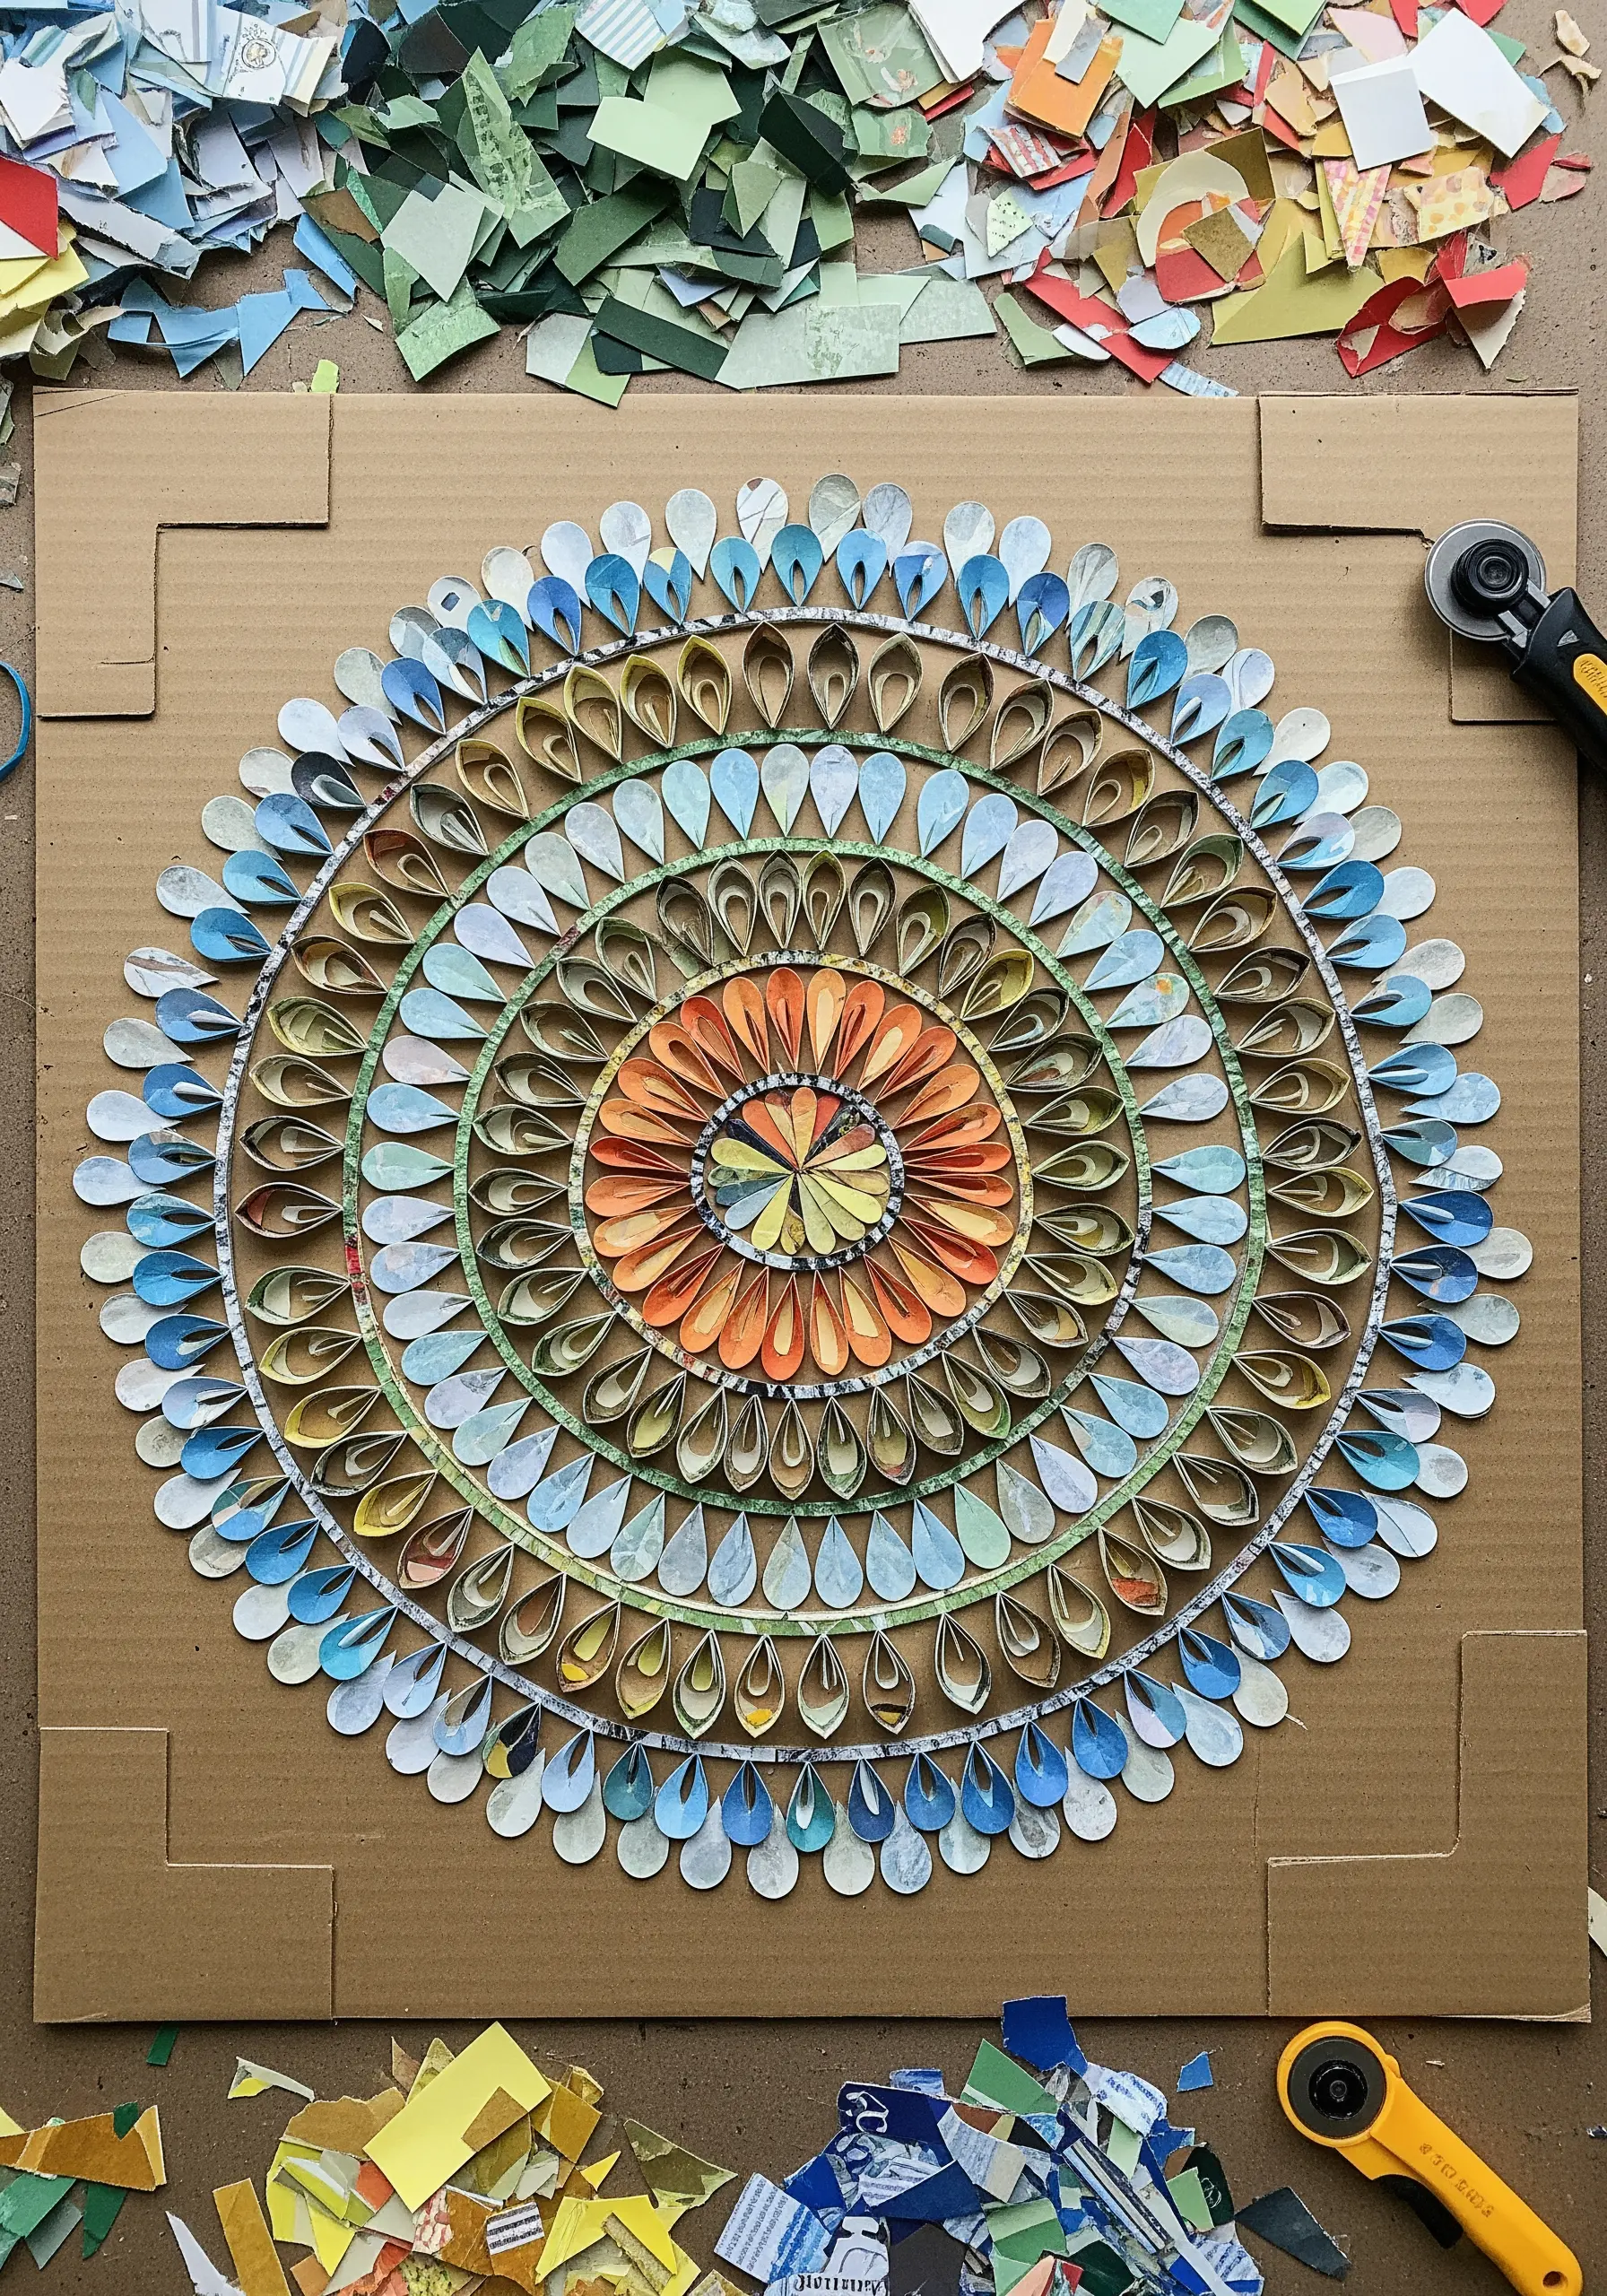
Build a complex mandala by arranging hundreds of folded paper teardrops, each one acting like a single detached chain stitch or lazy daisy.
The way each piece is folded creates a subtle shadow line, adding depth and definition that makes the overall pattern pop.
By using paper with different prints and colors, you introduce a gradient effect that radiates from the center, similar to working with multiple shades of floss.
This meditative, repetitive process is a wonderful way to practice precision and patience, two virtues essential for intricate embroidery work.
16. Sculpt a Flowing Form with Graduated Paper Strips

Create the illusion of draped fabric by arranging long, flowing strips of paper, mimicking the lines of a satin stitch used to fill a large area.
The success of this technique lies in the careful selection of color and tone; arranging the strips from dark to light creates realistic shadows and highlights.
Leaving the ends of the strips loose at the bottom adds movement and a delicate, fringe-like quality, as if the ‘threads’ are unraveling.
This method teaches you to see how line and color work together to define shape and volume, a core principle of minimal thread painting patterns.
17. Create Iridescence with Stained Glass Paper Collage
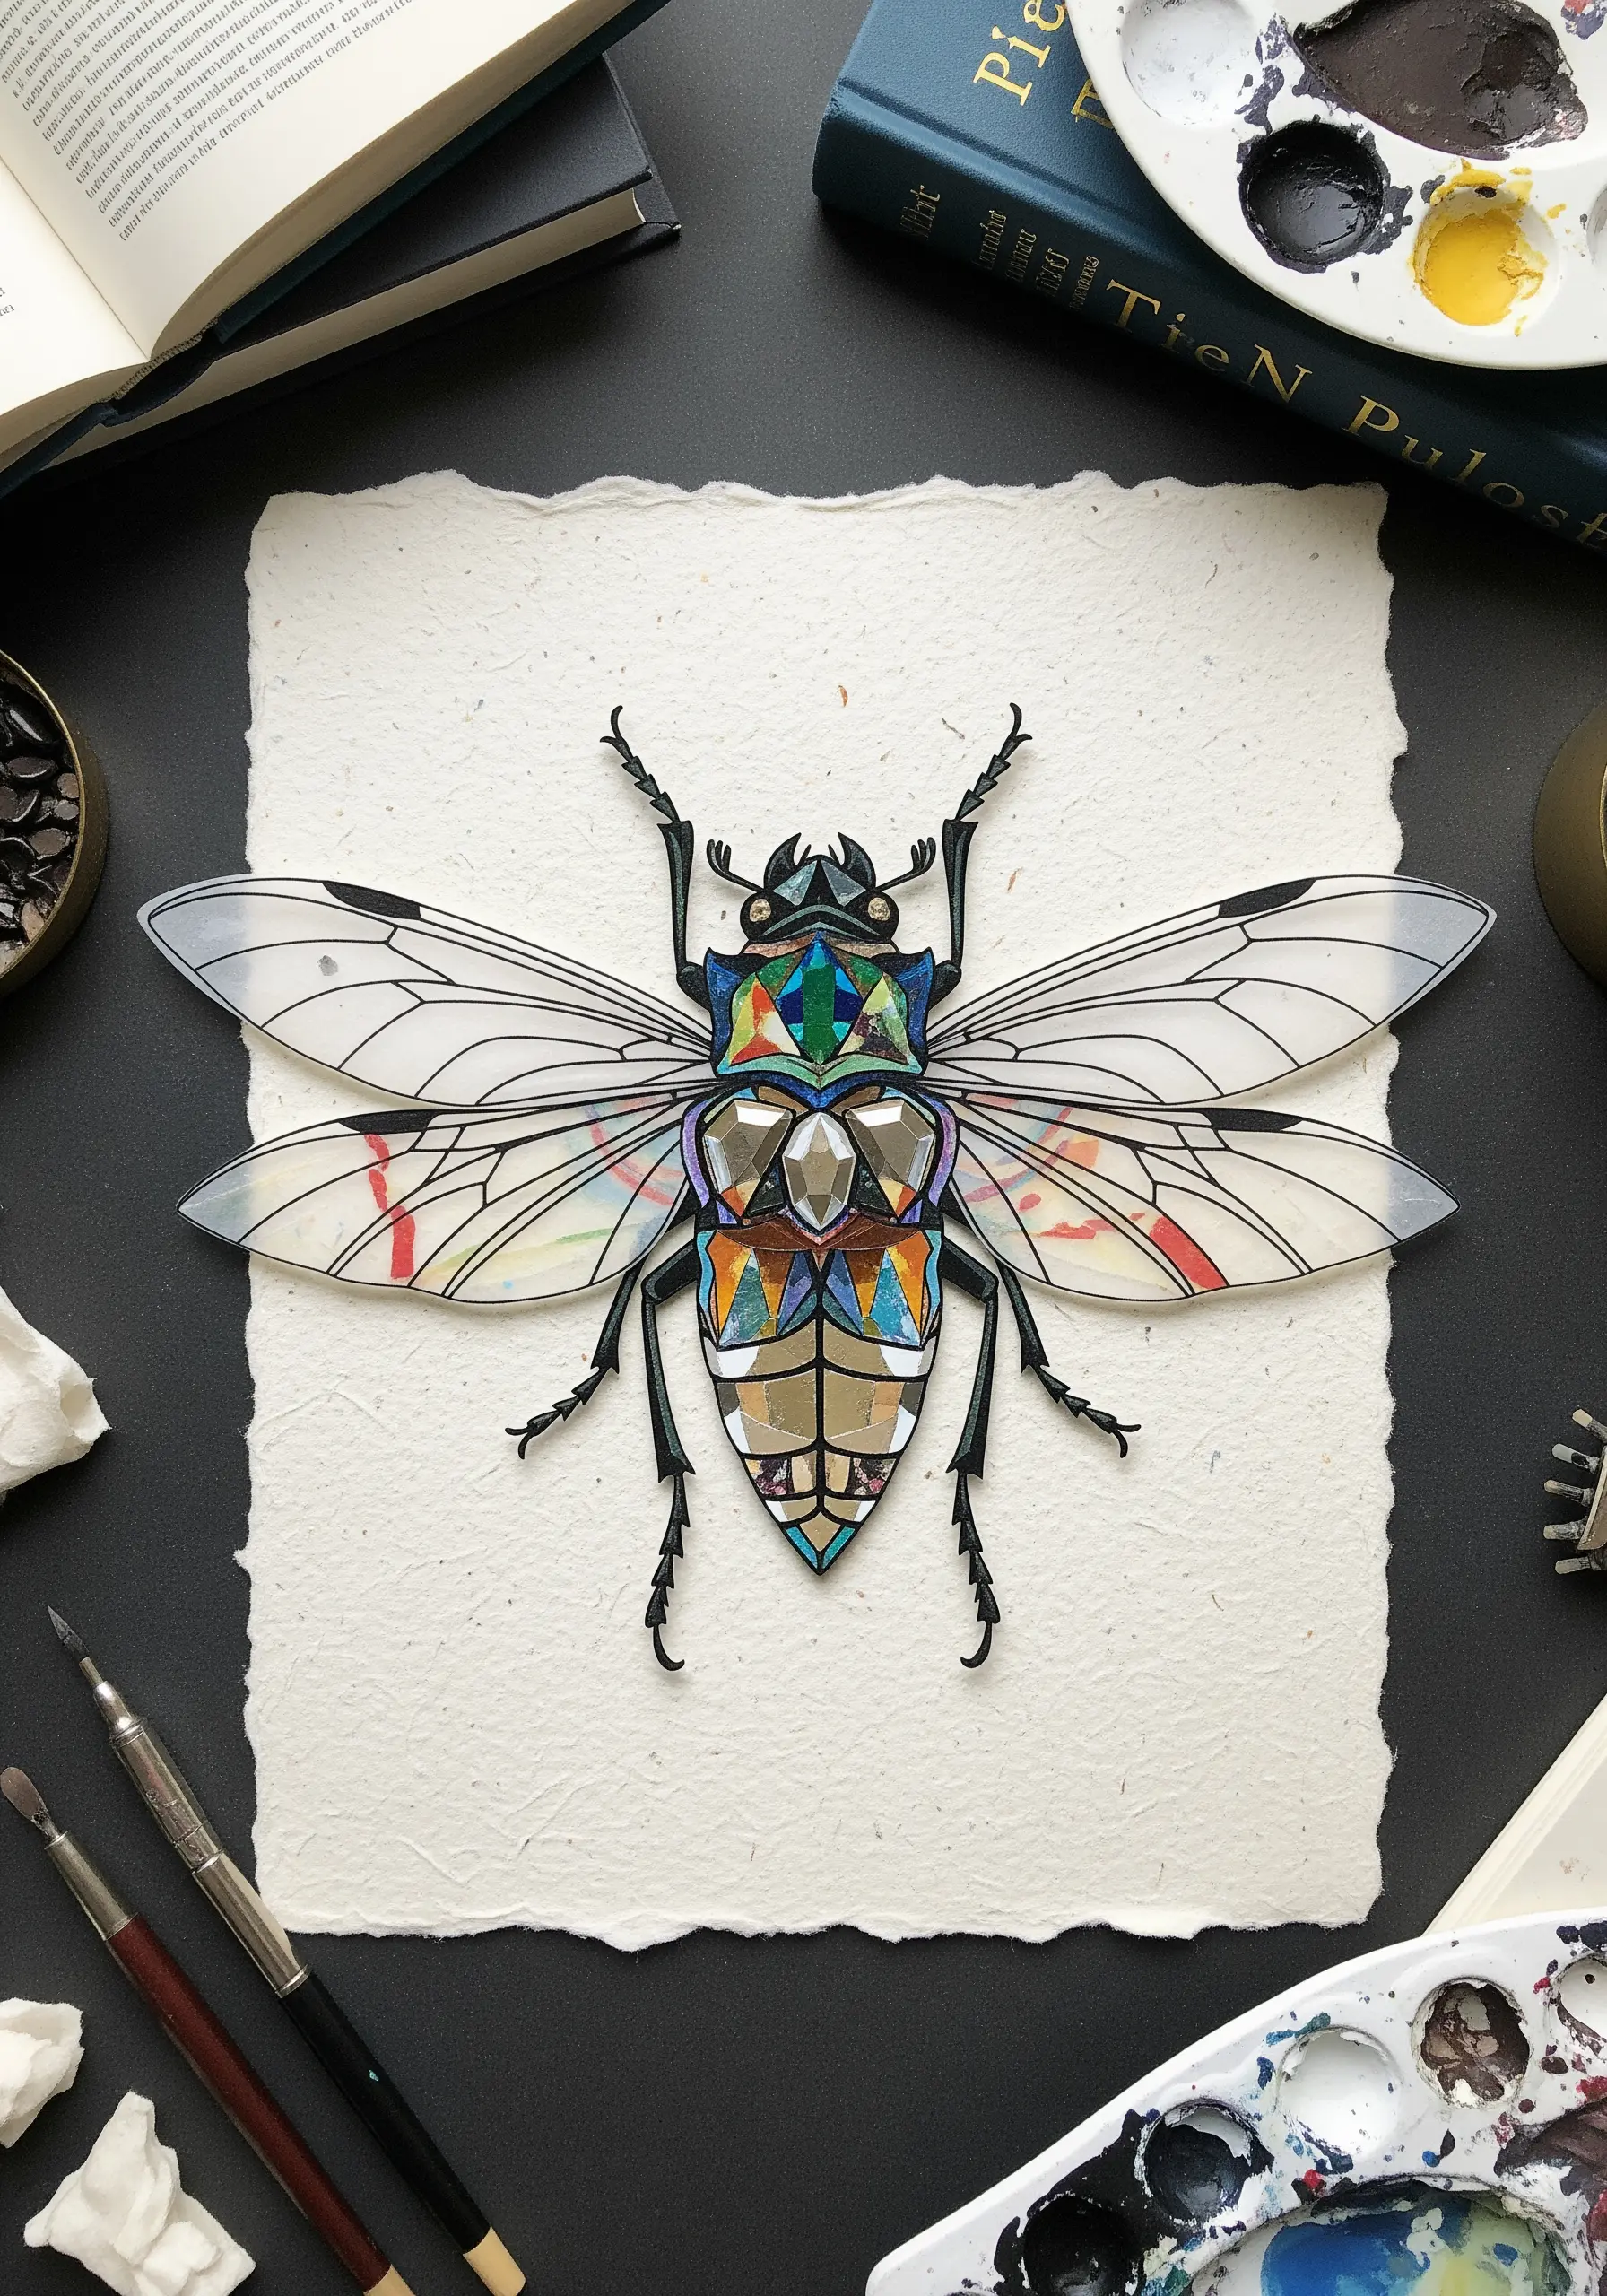
Mimic the shimmer of beetle-wing embroidery or iridescent threads by using translucent or metallic papers in a segmented, stained-glass style.
Outline your design with a bold black marker or fine paper strips to create the ‘leading’ that separates each color field, just as a backstitch outline defines shapes in a pattern.
Place colorful, textured paper scraps within these outlines to create a jewel-like effect, allowing the colors to pop against the clean black lines.
This technique is perfect for capturing the prismatic quality of insects or gemstones, where sharp definition and vibrant color are key.
18. Frame a Paper Quilt with a ‘Blanket Stitch’ Border
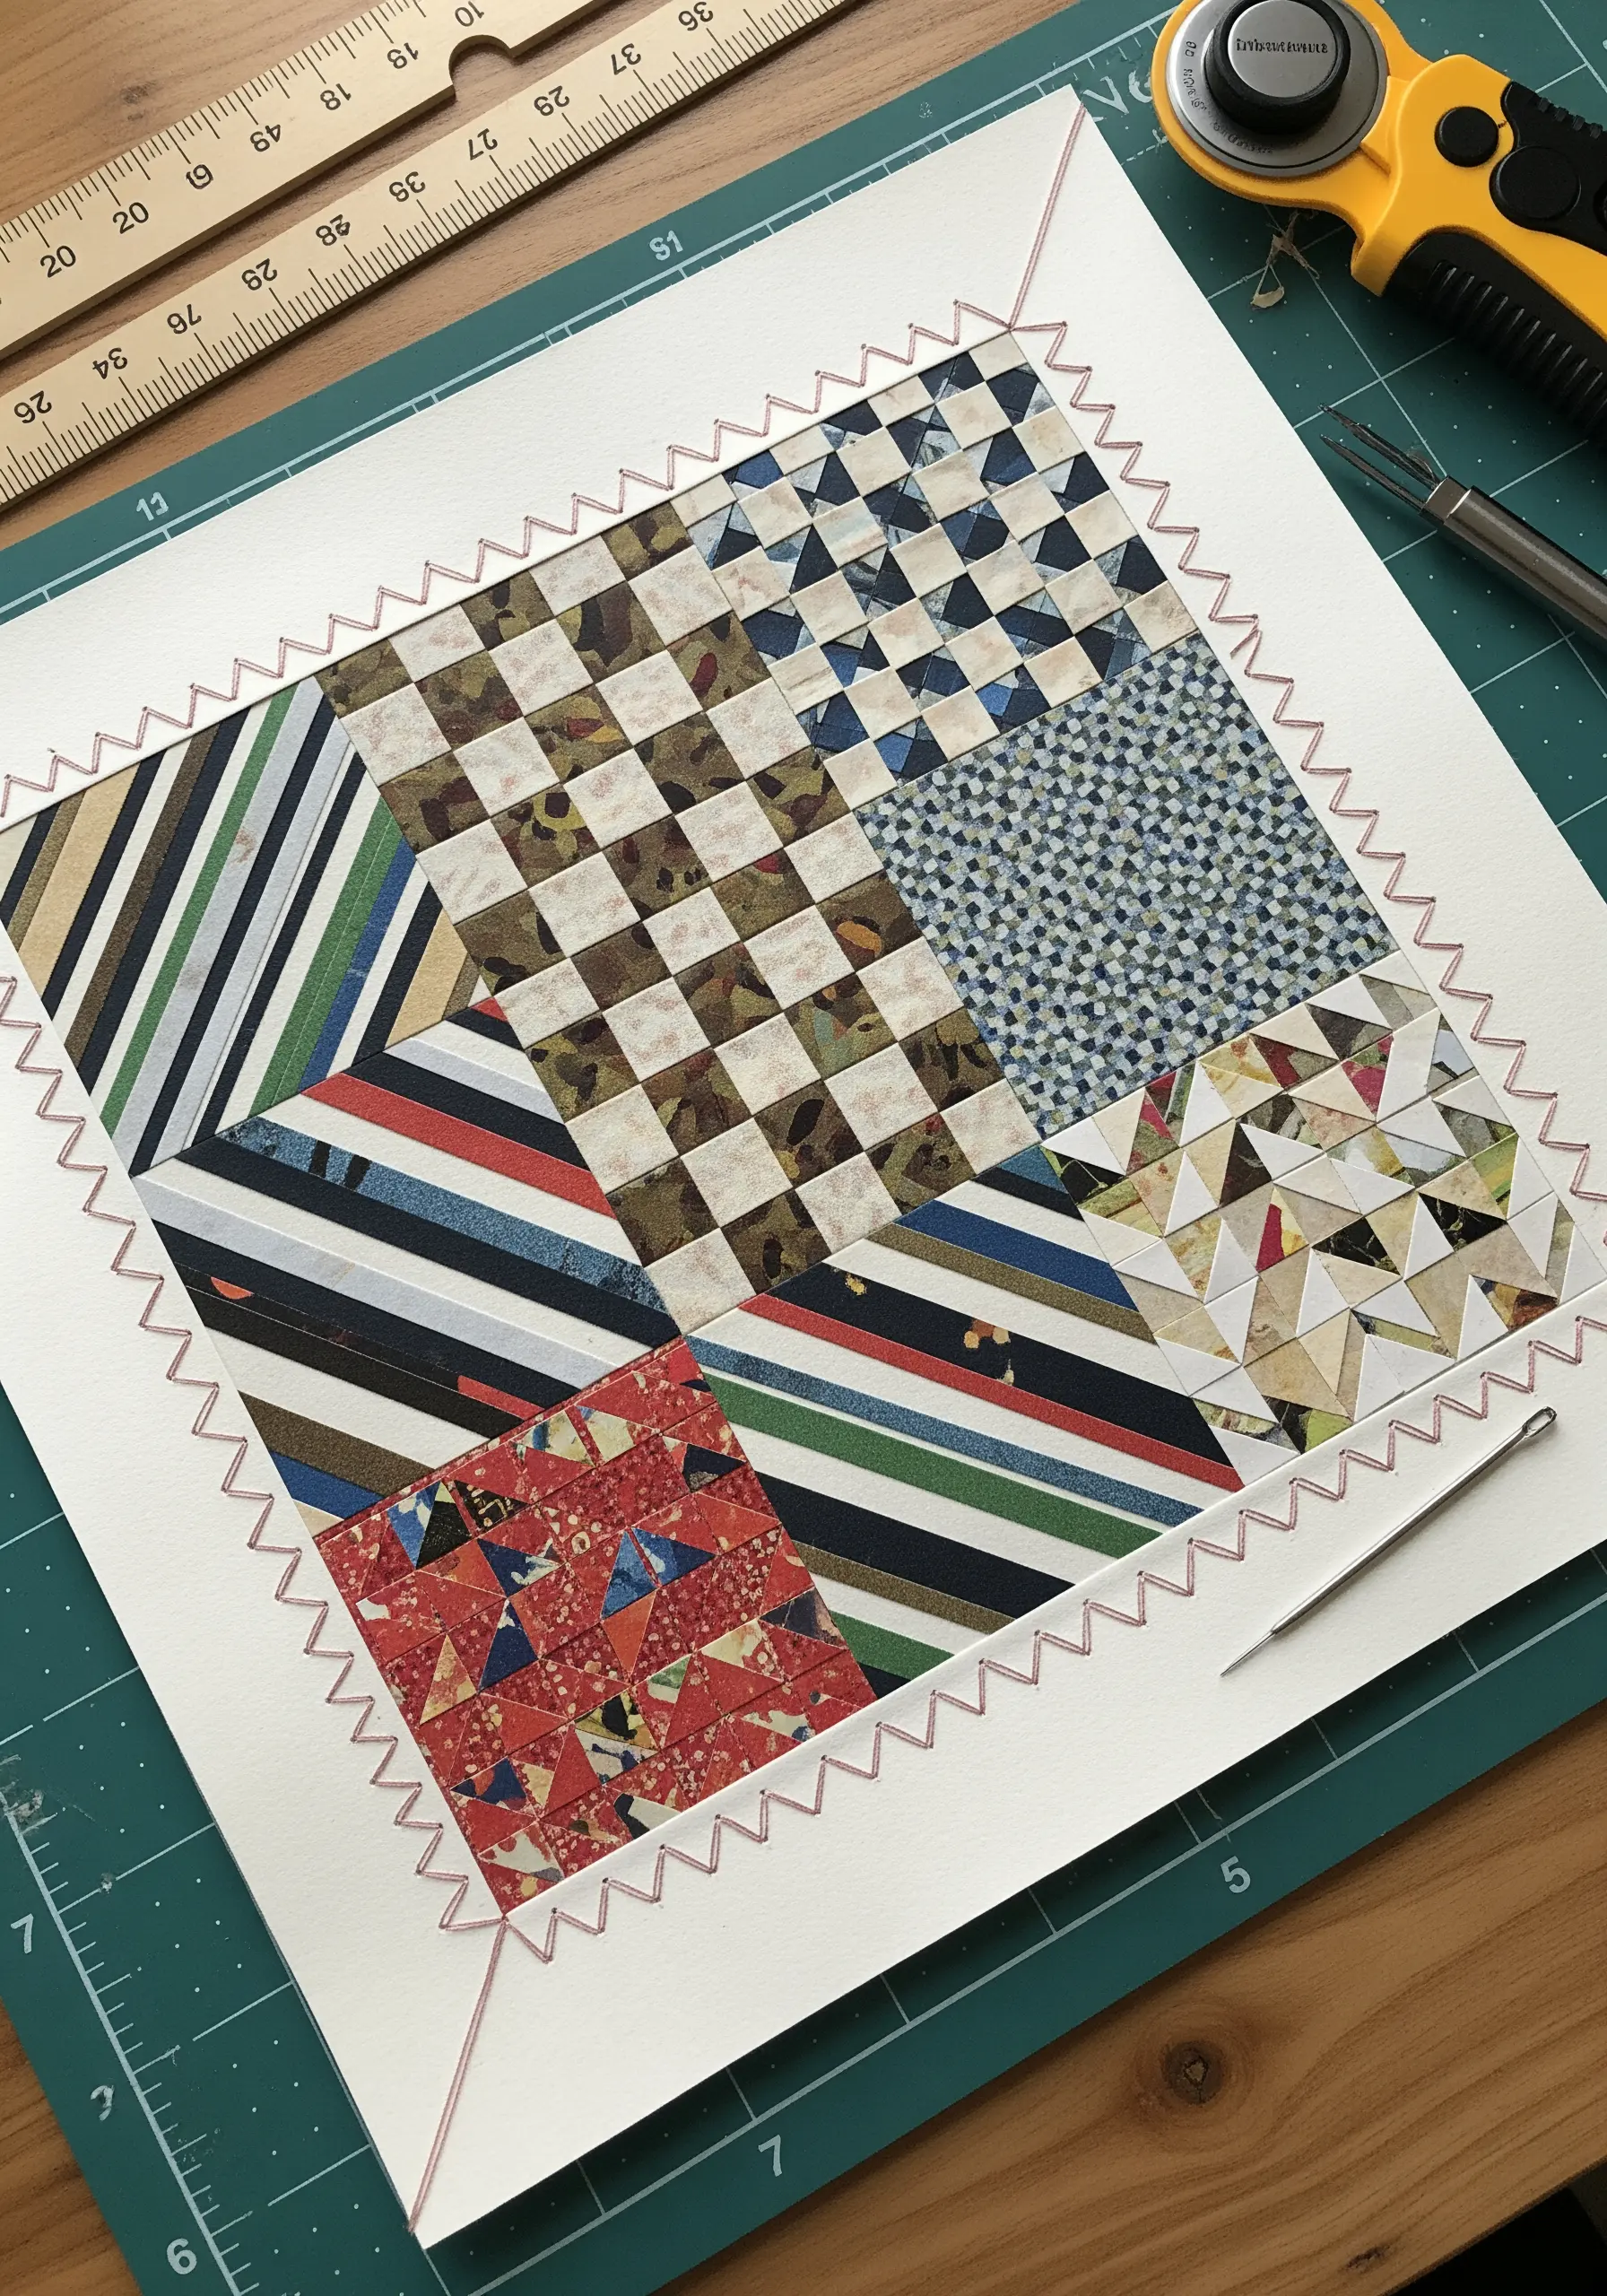
Combine the logic of quilting with the finishing touch of embroidery by creating a paper patchwork square and framing it with a decorative stitched border.
Arrange squares of patterned paper to create a miniature quilt block, focusing on the interplay of color and pattern just as a quilter would.
Instead of fabric, pierce the paper and use a simple zig-zag or blanket stitch around the edge to secure the collage and add a handmade, textile flourish.
This is a perfect example of how handmade collage techniques can be elevated with the simple addition of real thread.
19. Layer Landscapes to Create Atmospheric Perspective
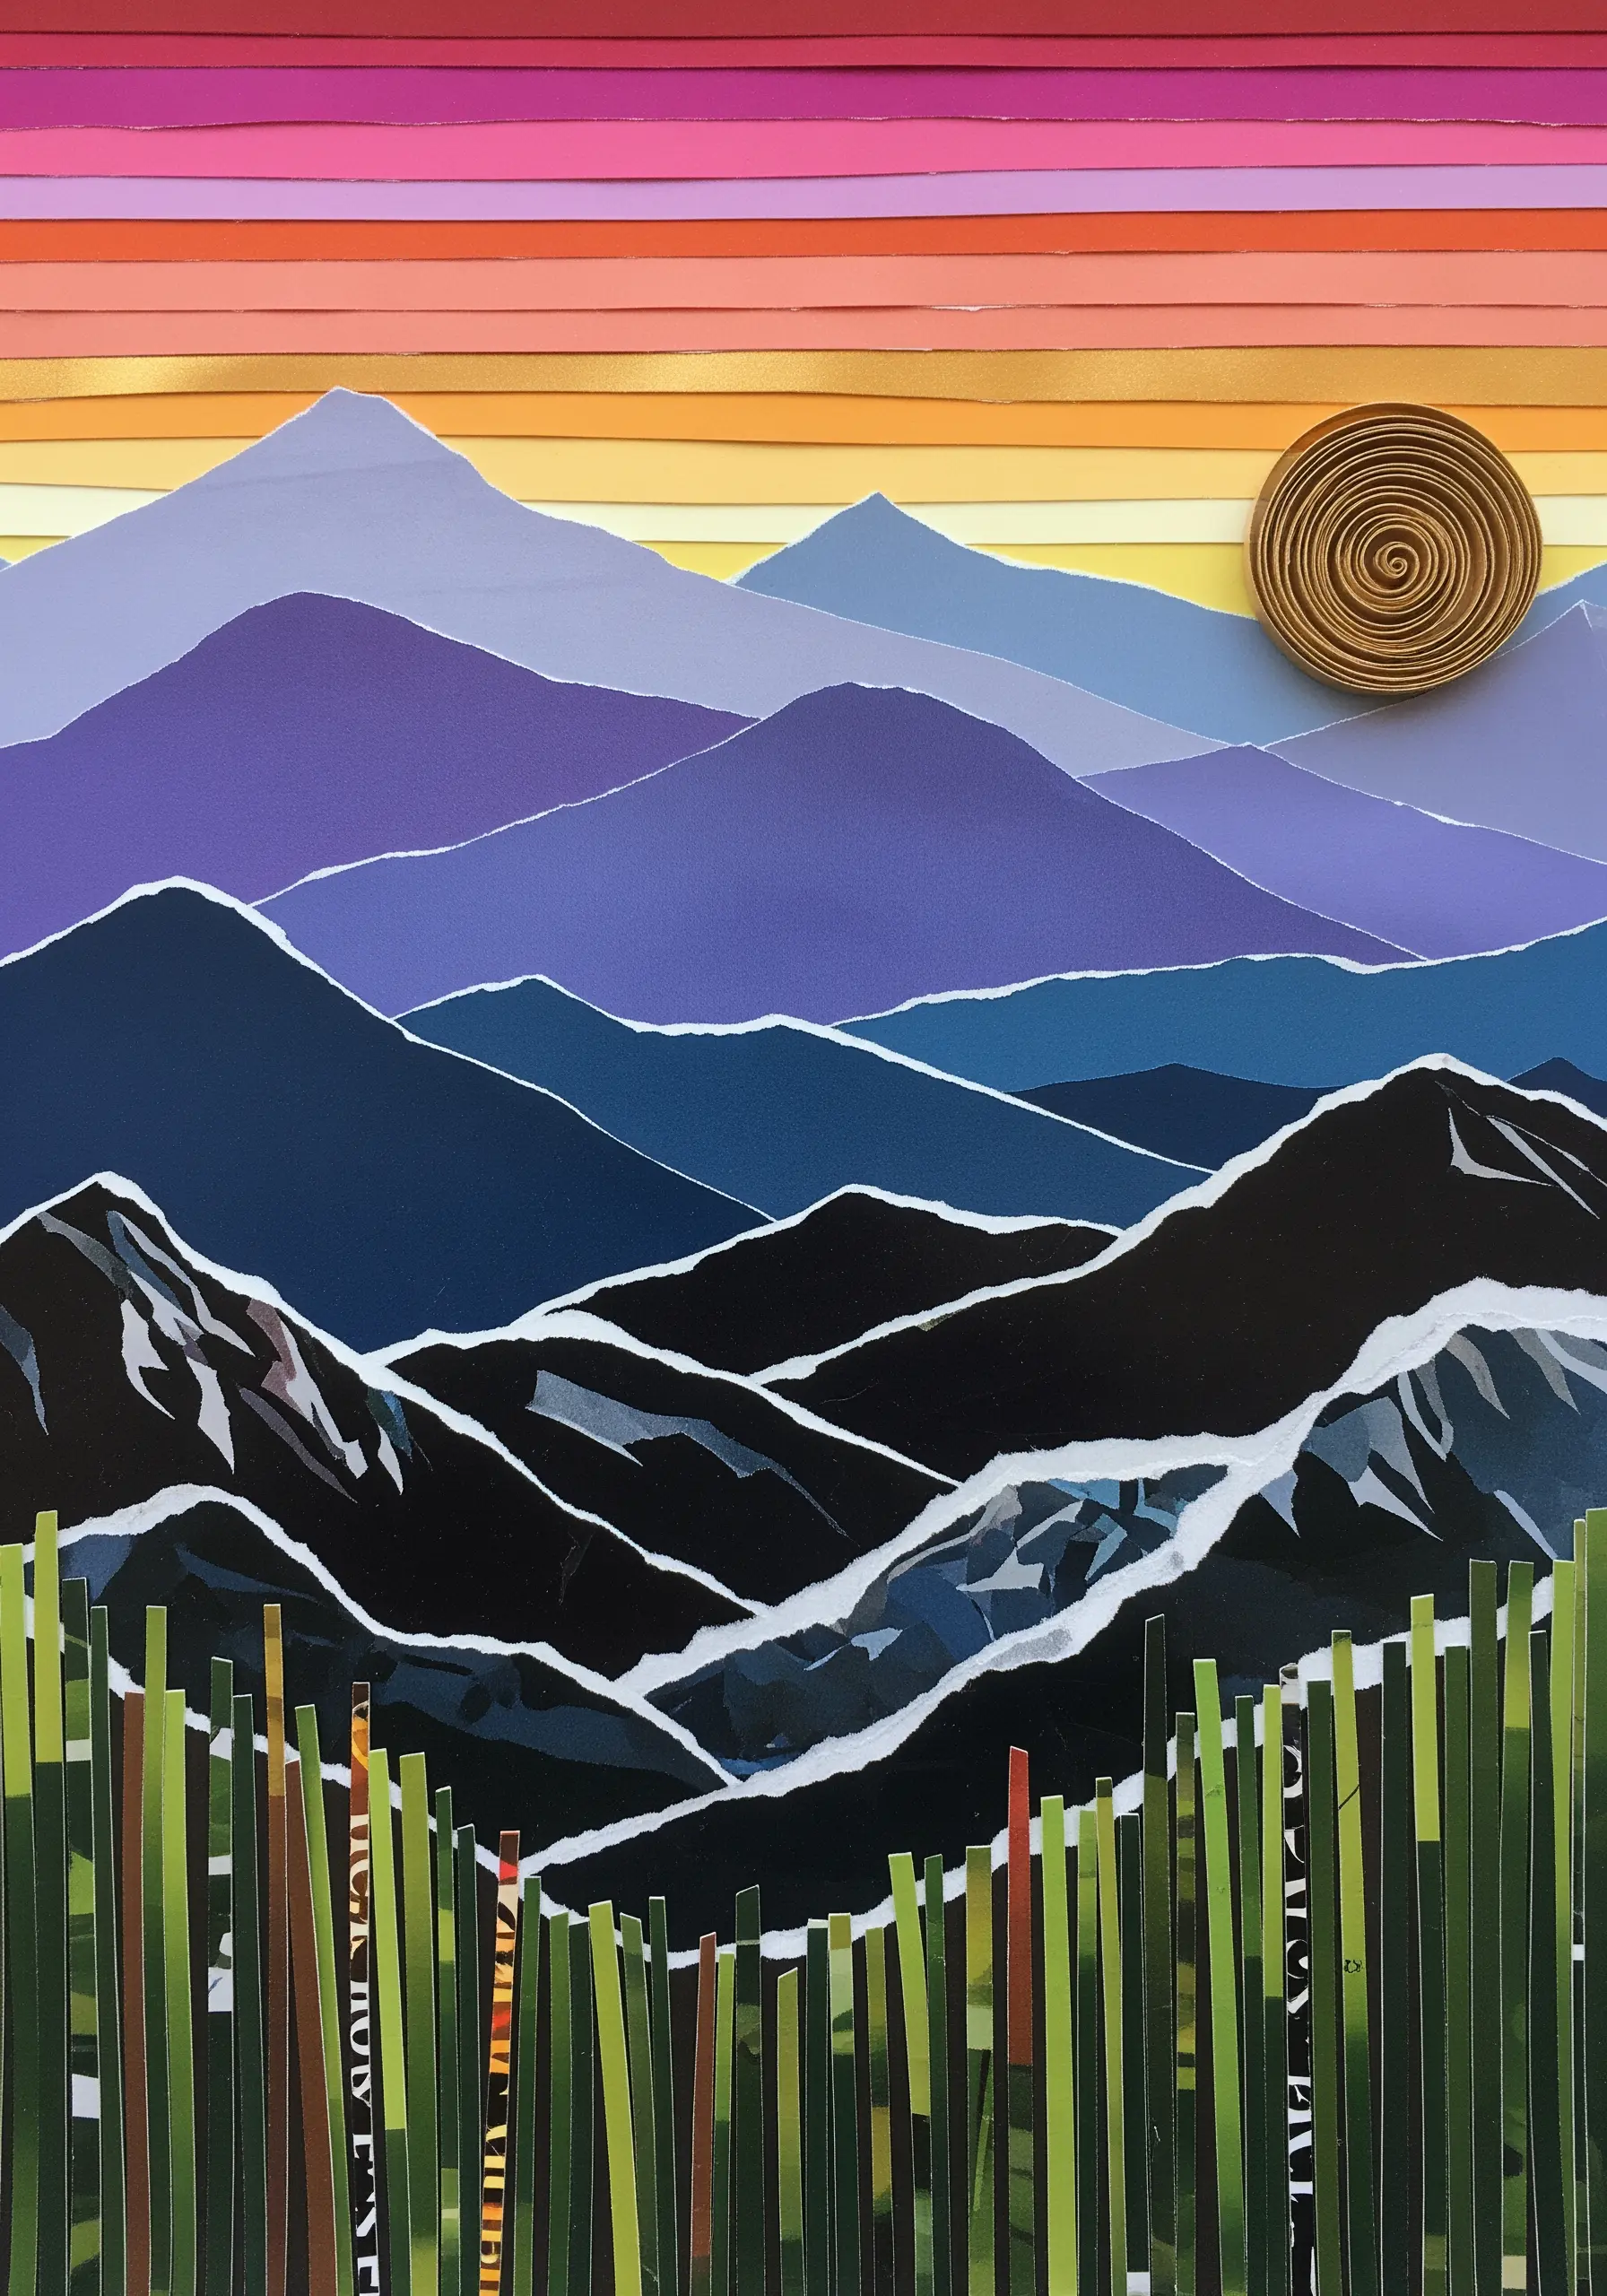
Use layers of paper in progressively lighter shades to create a sense of distance and depth in a landscape, a technique known as atmospheric perspective.
This is the paper equivalent of using fewer strands of floss or paler colors for background elements in an embroidery scene to make them recede.
The sharp, clean edges of the cut paper mountains create a graphic, modern aesthetic, while the torn edges in the foreground add organic texture.
A coiled paper sun introduces a single point of sculptural texture, drawing the eye and balancing the composition—much like a single, bold satin-stitched element.
20. Build Abstract Texture with Torn and Layered Strips
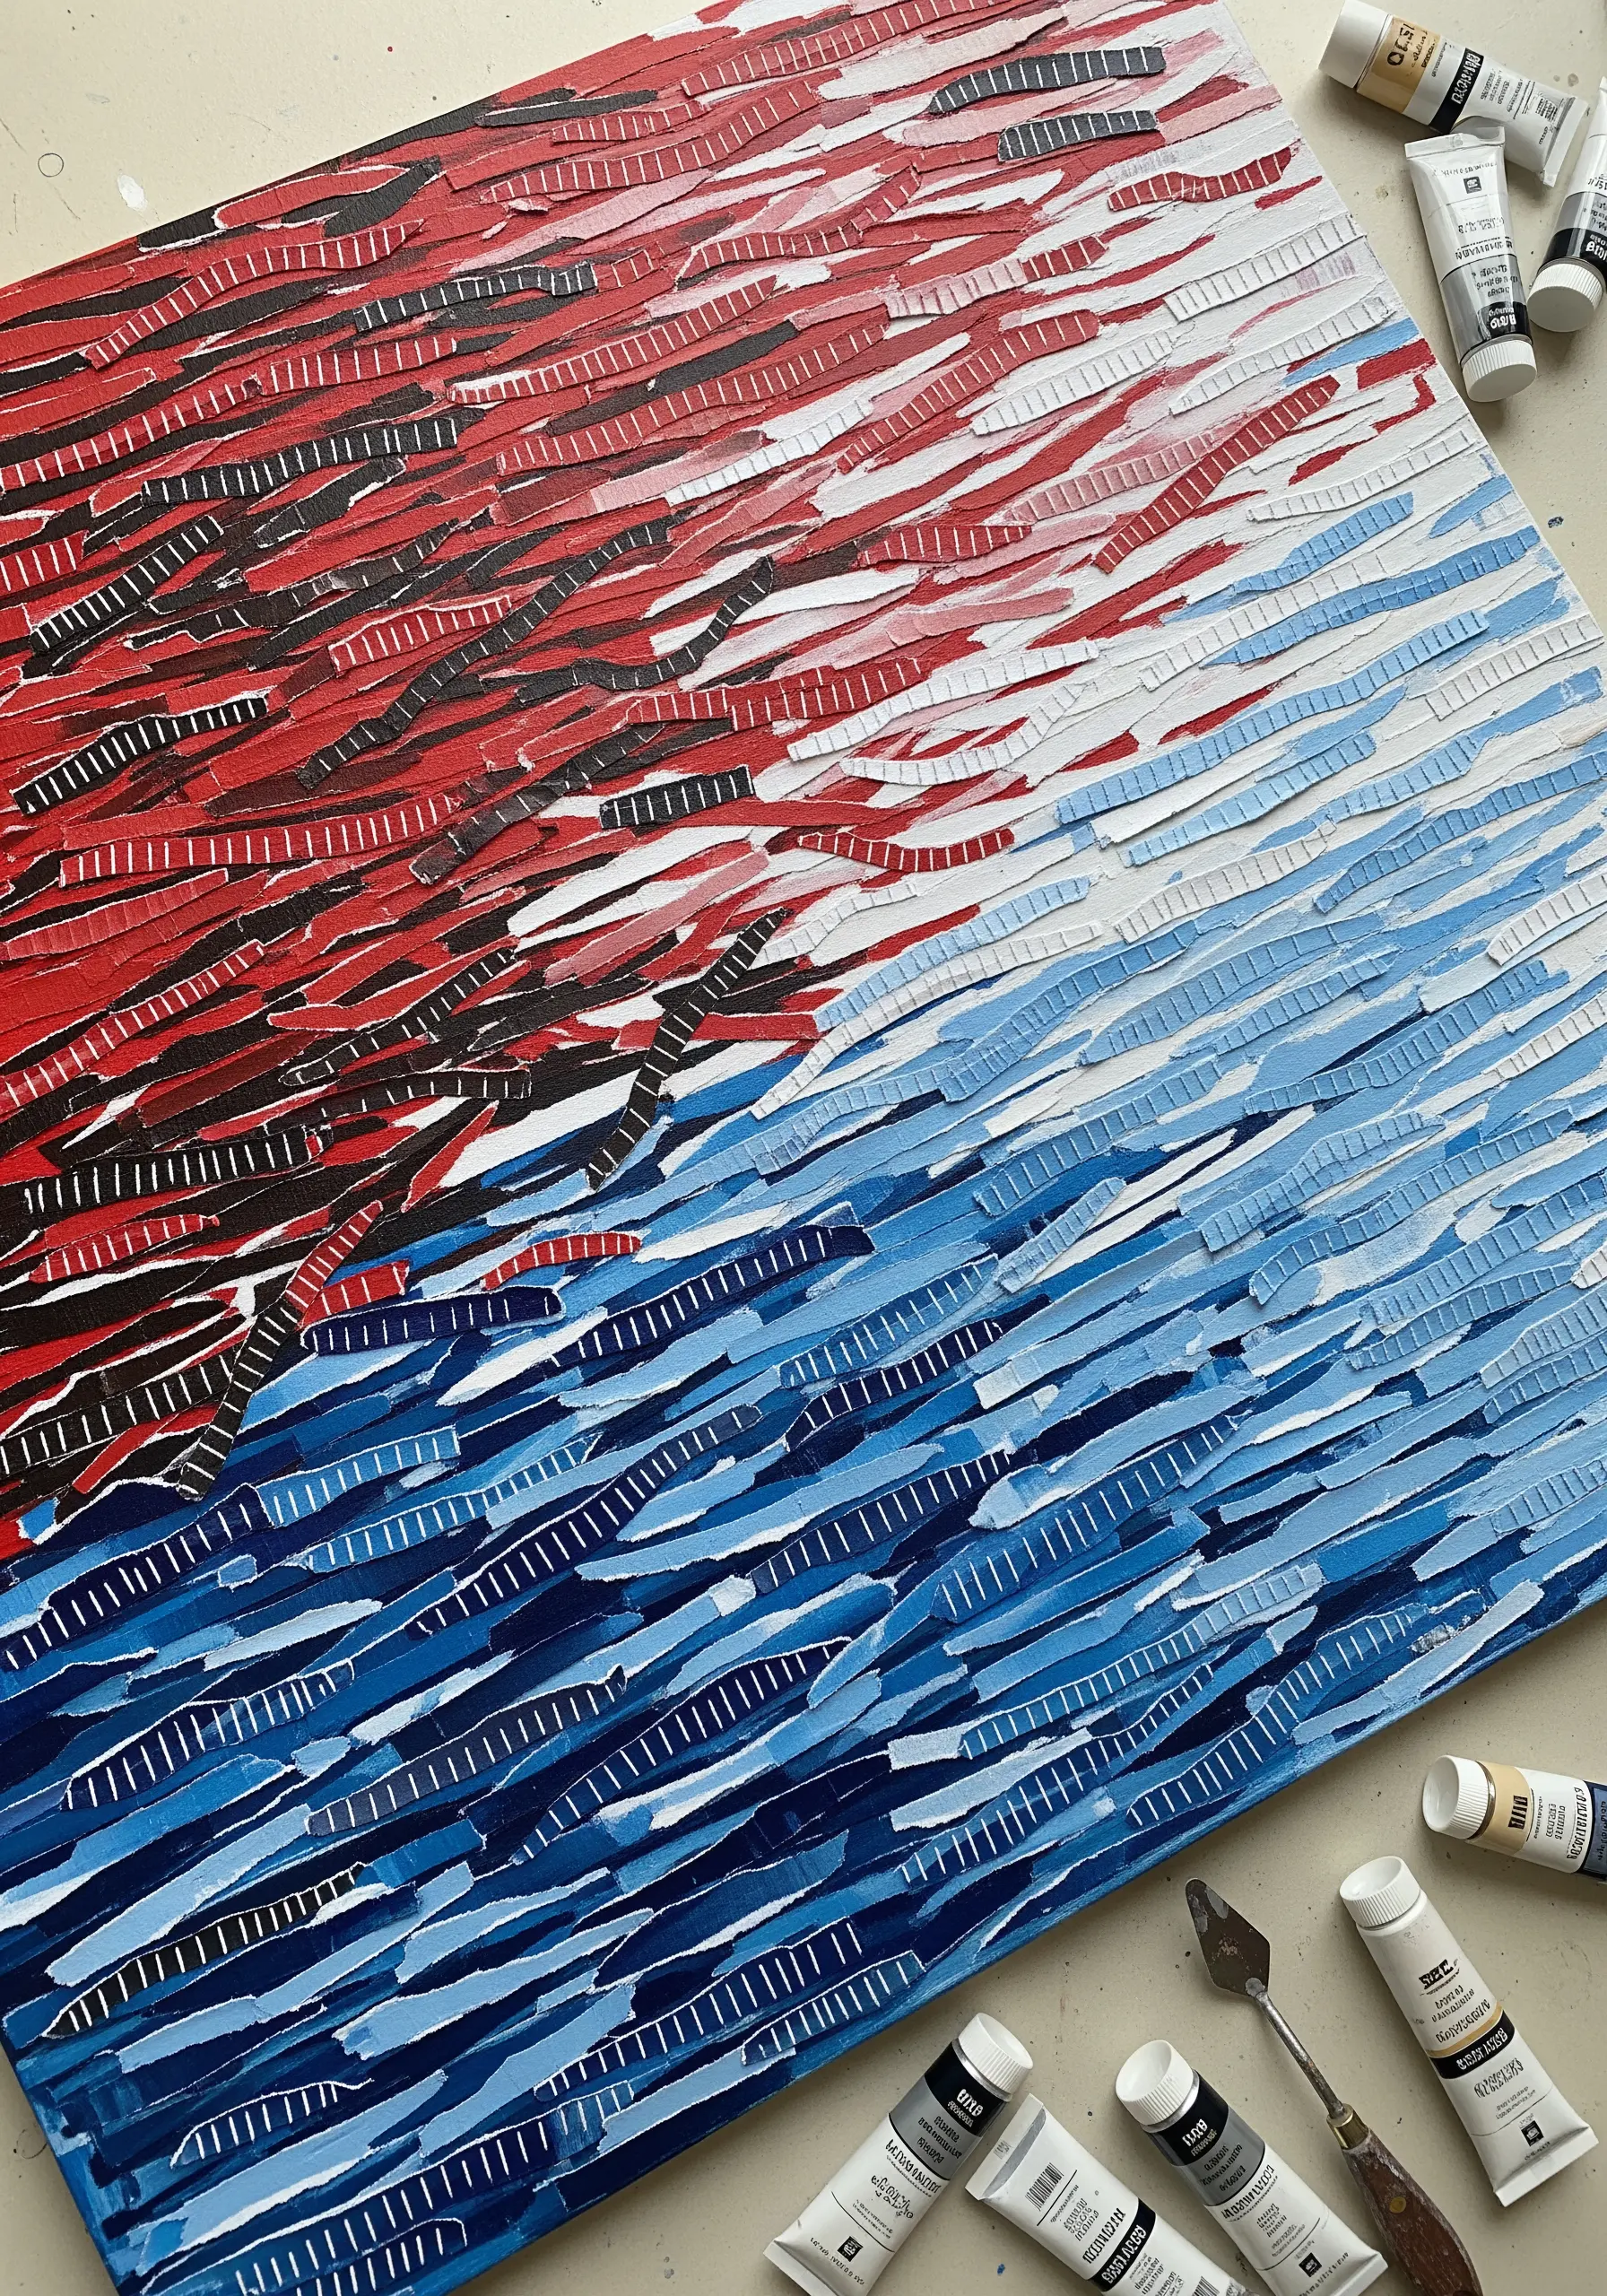
Move beyond representation and explore pure texture by layering torn paper strips, painted with a limited color palette.
This method is similar to creating a highly textured fill with Turkey work or unraveled threads, where the focus is on the tactile surface rather than a defined shape.
Arrange the strips directionally to create a sense of opposing forces or movement, demonstrating how texture can convey energy and emotion.
The small white ‘stitches’ painted across the strips add a layer of fine detail, breaking up the larger color masses and adding a delicate, graphic rhythm.
21. Assemble a Scene with Layered, Die-Cut Shapes
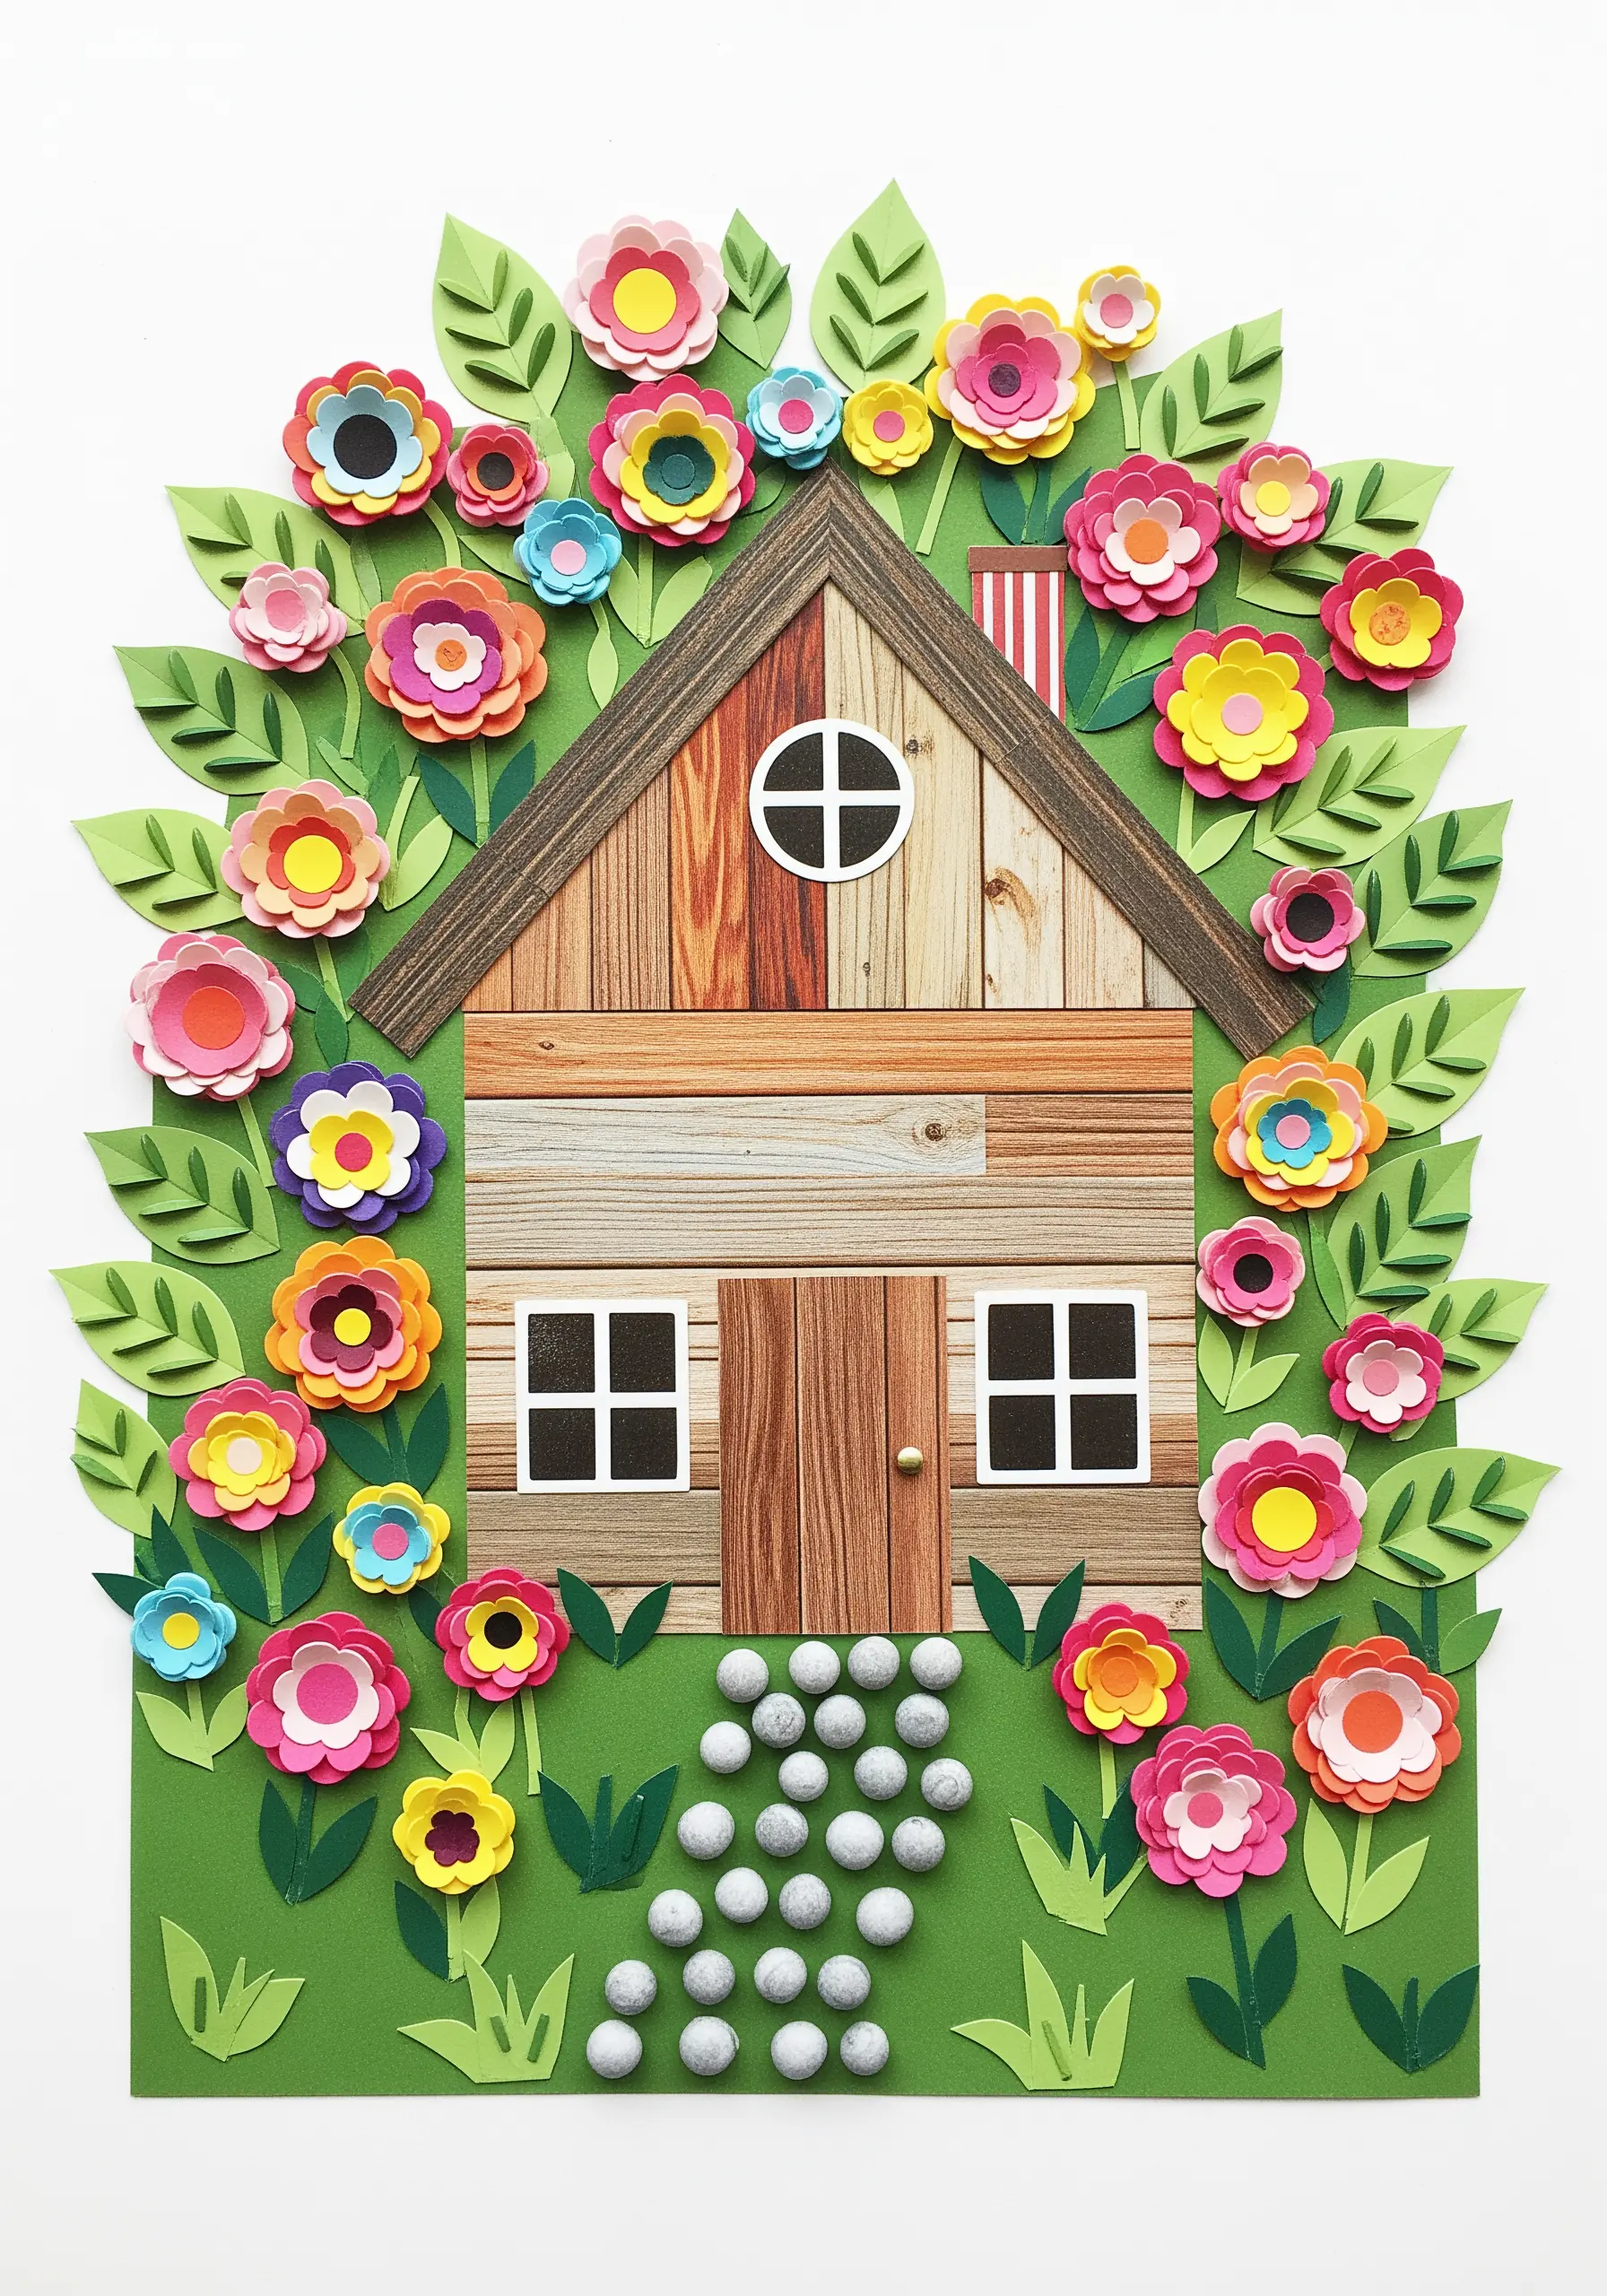
Construct a whimsical scene by layering pre-cut or die-cut paper shapes, treating each piece like a pre-made appliqué element.
This approach allows you to focus entirely on composition, color harmony, and the delightful interplay of overlapping forms without the stress of complex cutting.
The rolled paper spheres for the pathway are like perfectly uniform French knots, leading the eye into the design with a pop of repeating texture.
It’s a joyful way to explore storytelling through imagery, a skill that translates directly to designing narrative embroidery panels or nursery-friendly textile wall art.
22. Create an Ombré Wall with Vertical ‘Threads’
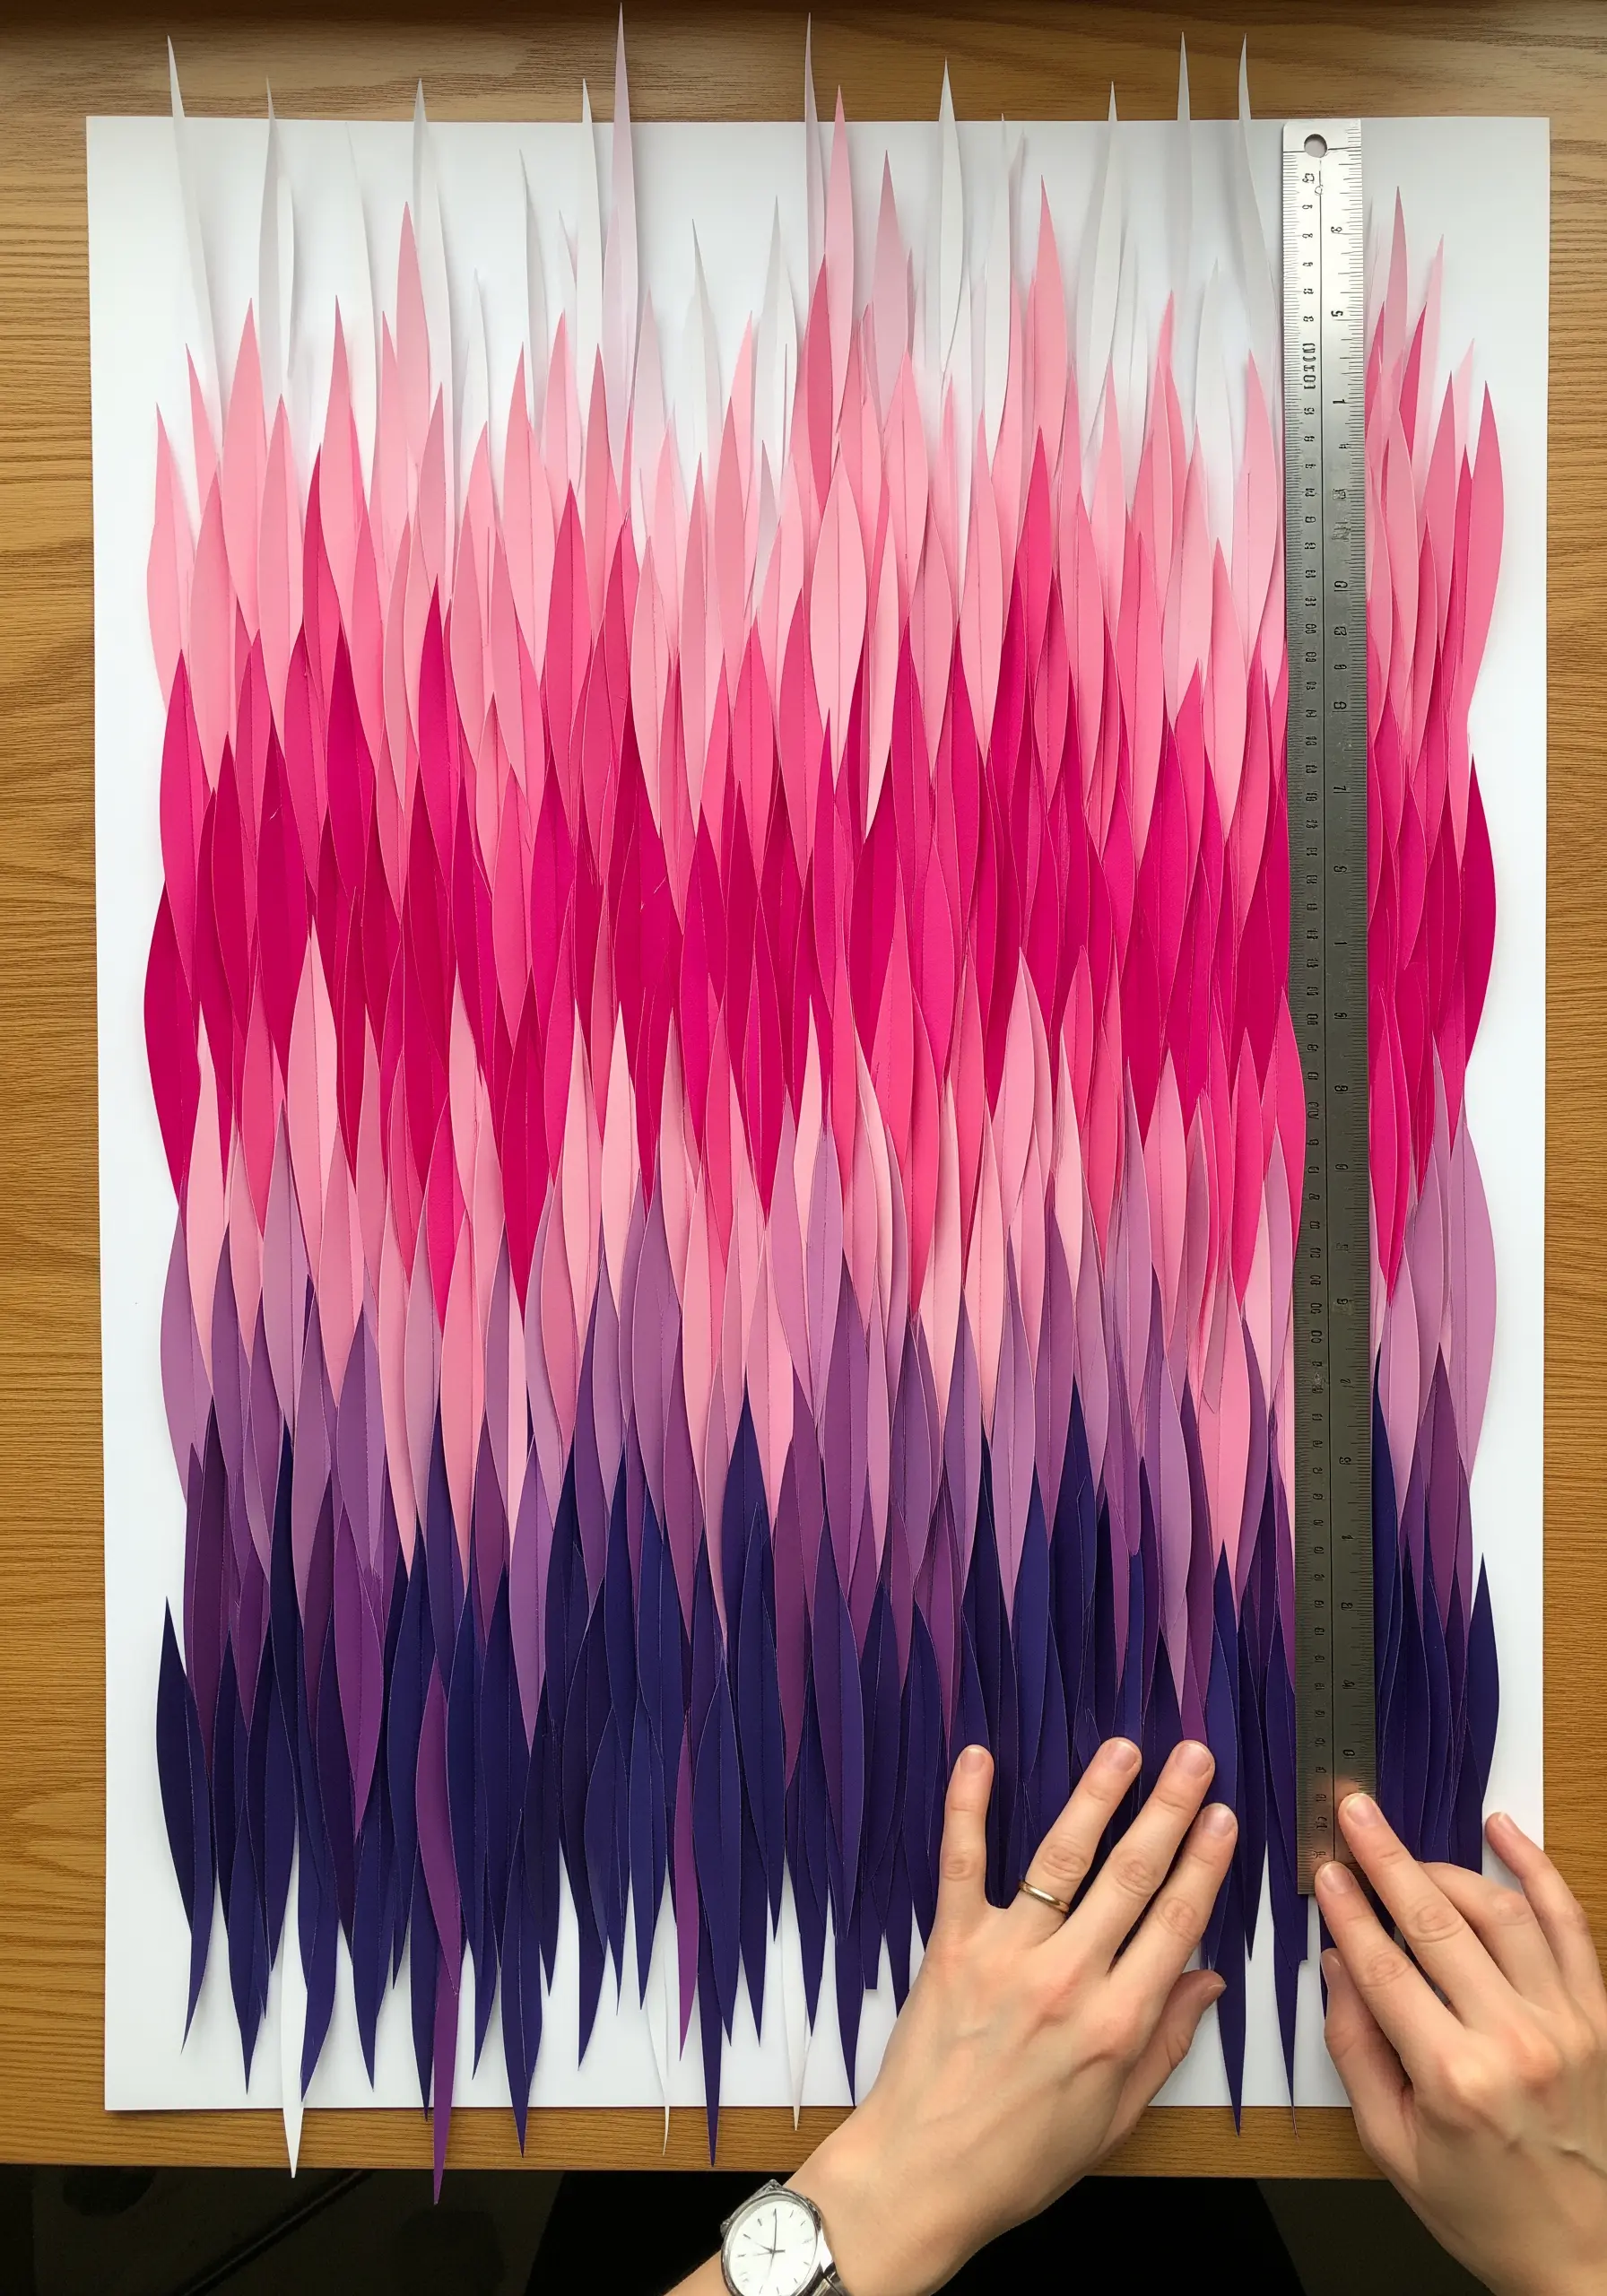
Achieve a stunning gradient effect by arranging vertical strips of paper in a dense, overlapping pattern, creating the look of a floor-to-ceiling satin stitch installation.
The key is to cut each strip with a pointed tip and to carefully manage the color transition from light to dark to create a seamless ombré flow.
This large-scale project teaches you about the visual impact of color weight and density, principles that are just as important in a tiny 4-inch hoop.
It’s a bold way to translate the feeling of a textile wall hanging into paper, proving that the core concepts of fiber art are universal.


