

Have you ever finished a project and felt it was missing a certain something? A touch of polish that separates the handmade from the truly refined? That gap is smaller than you think, and it has nothing to do with buying more supplies or mastering impossibly complex techniques.
It’s about intention. It’s in choosing a split stitch over a backstitch for a smoother curve, or adding a simple padded base to make your lettering stand up and cast a shadow. These small adjustments are where the magic lies, elevating your work from a collection of stitches into a cohesive piece of art.
Here, you’ll find ideas that are not just personal, but technically thoughtful. Each one is a small lesson in texture, dimension, and finish, designed to give you that feeling of pride and confidence every time you look at your work. Let’s begin.
1. Weave a Floral Monogram

To create a monogram that feels lush yet defined, focus on varying your stitch textures.
Use a padded satin stitch for the fuller petals and tiny French knots for the flower centers to create depth.
For the foliage, combine a smooth stem stitch for the vines with a fishbone stitch for individual leaves, which gives them a natural, raised spine.
This mix of stitches prevents the design from looking flat and ensures the letterform remains clear and legible.
2. Stitch a Graphic Mountainscape on Denim
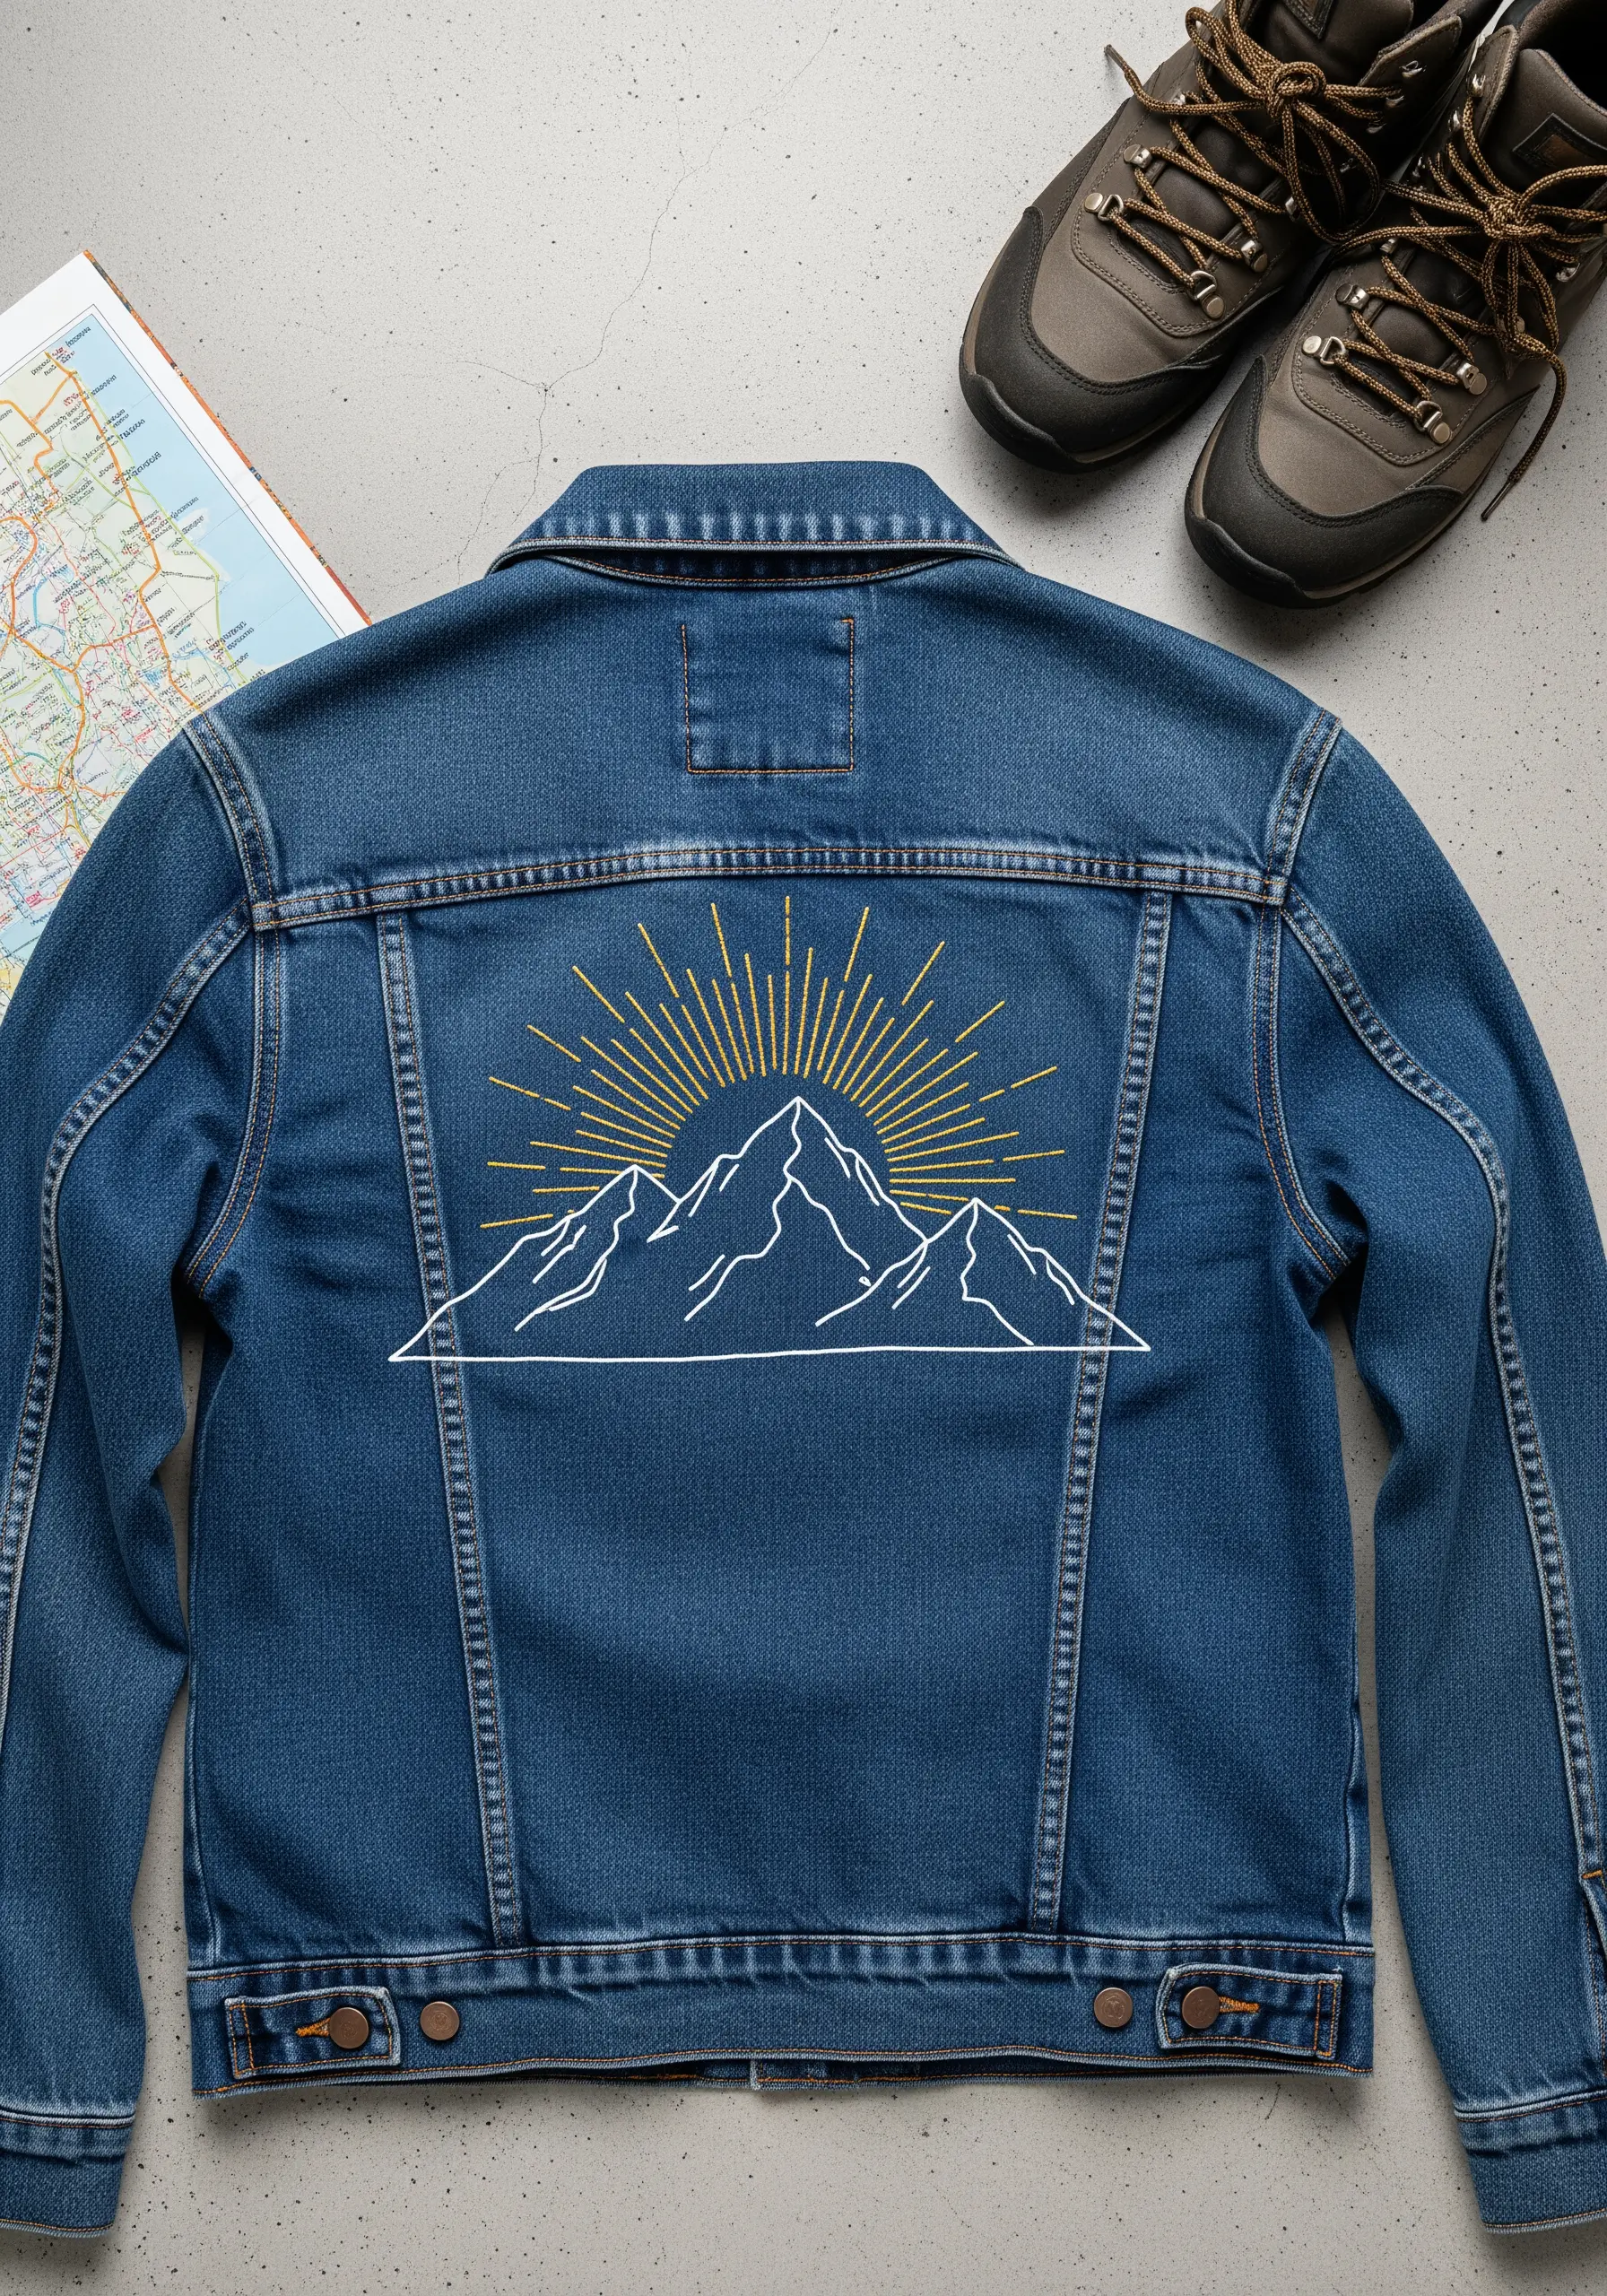
When embroidering on a heavy fabric like denim, your stitch choice is crucial for creating clean, visible lines.
Opt for a backstitch or a stem stitch using all six strands of your floss, or even a Perle cotton thread for extra weight.
This ensures your design stands out against the twill texture instead of sinking into it.
A simple, graphic outline like this gains its power from the boldness of the line, making bold back-panel embroidery designs feel both modern and effortless.
3. Create Plush, 3D Lettering on Pillows
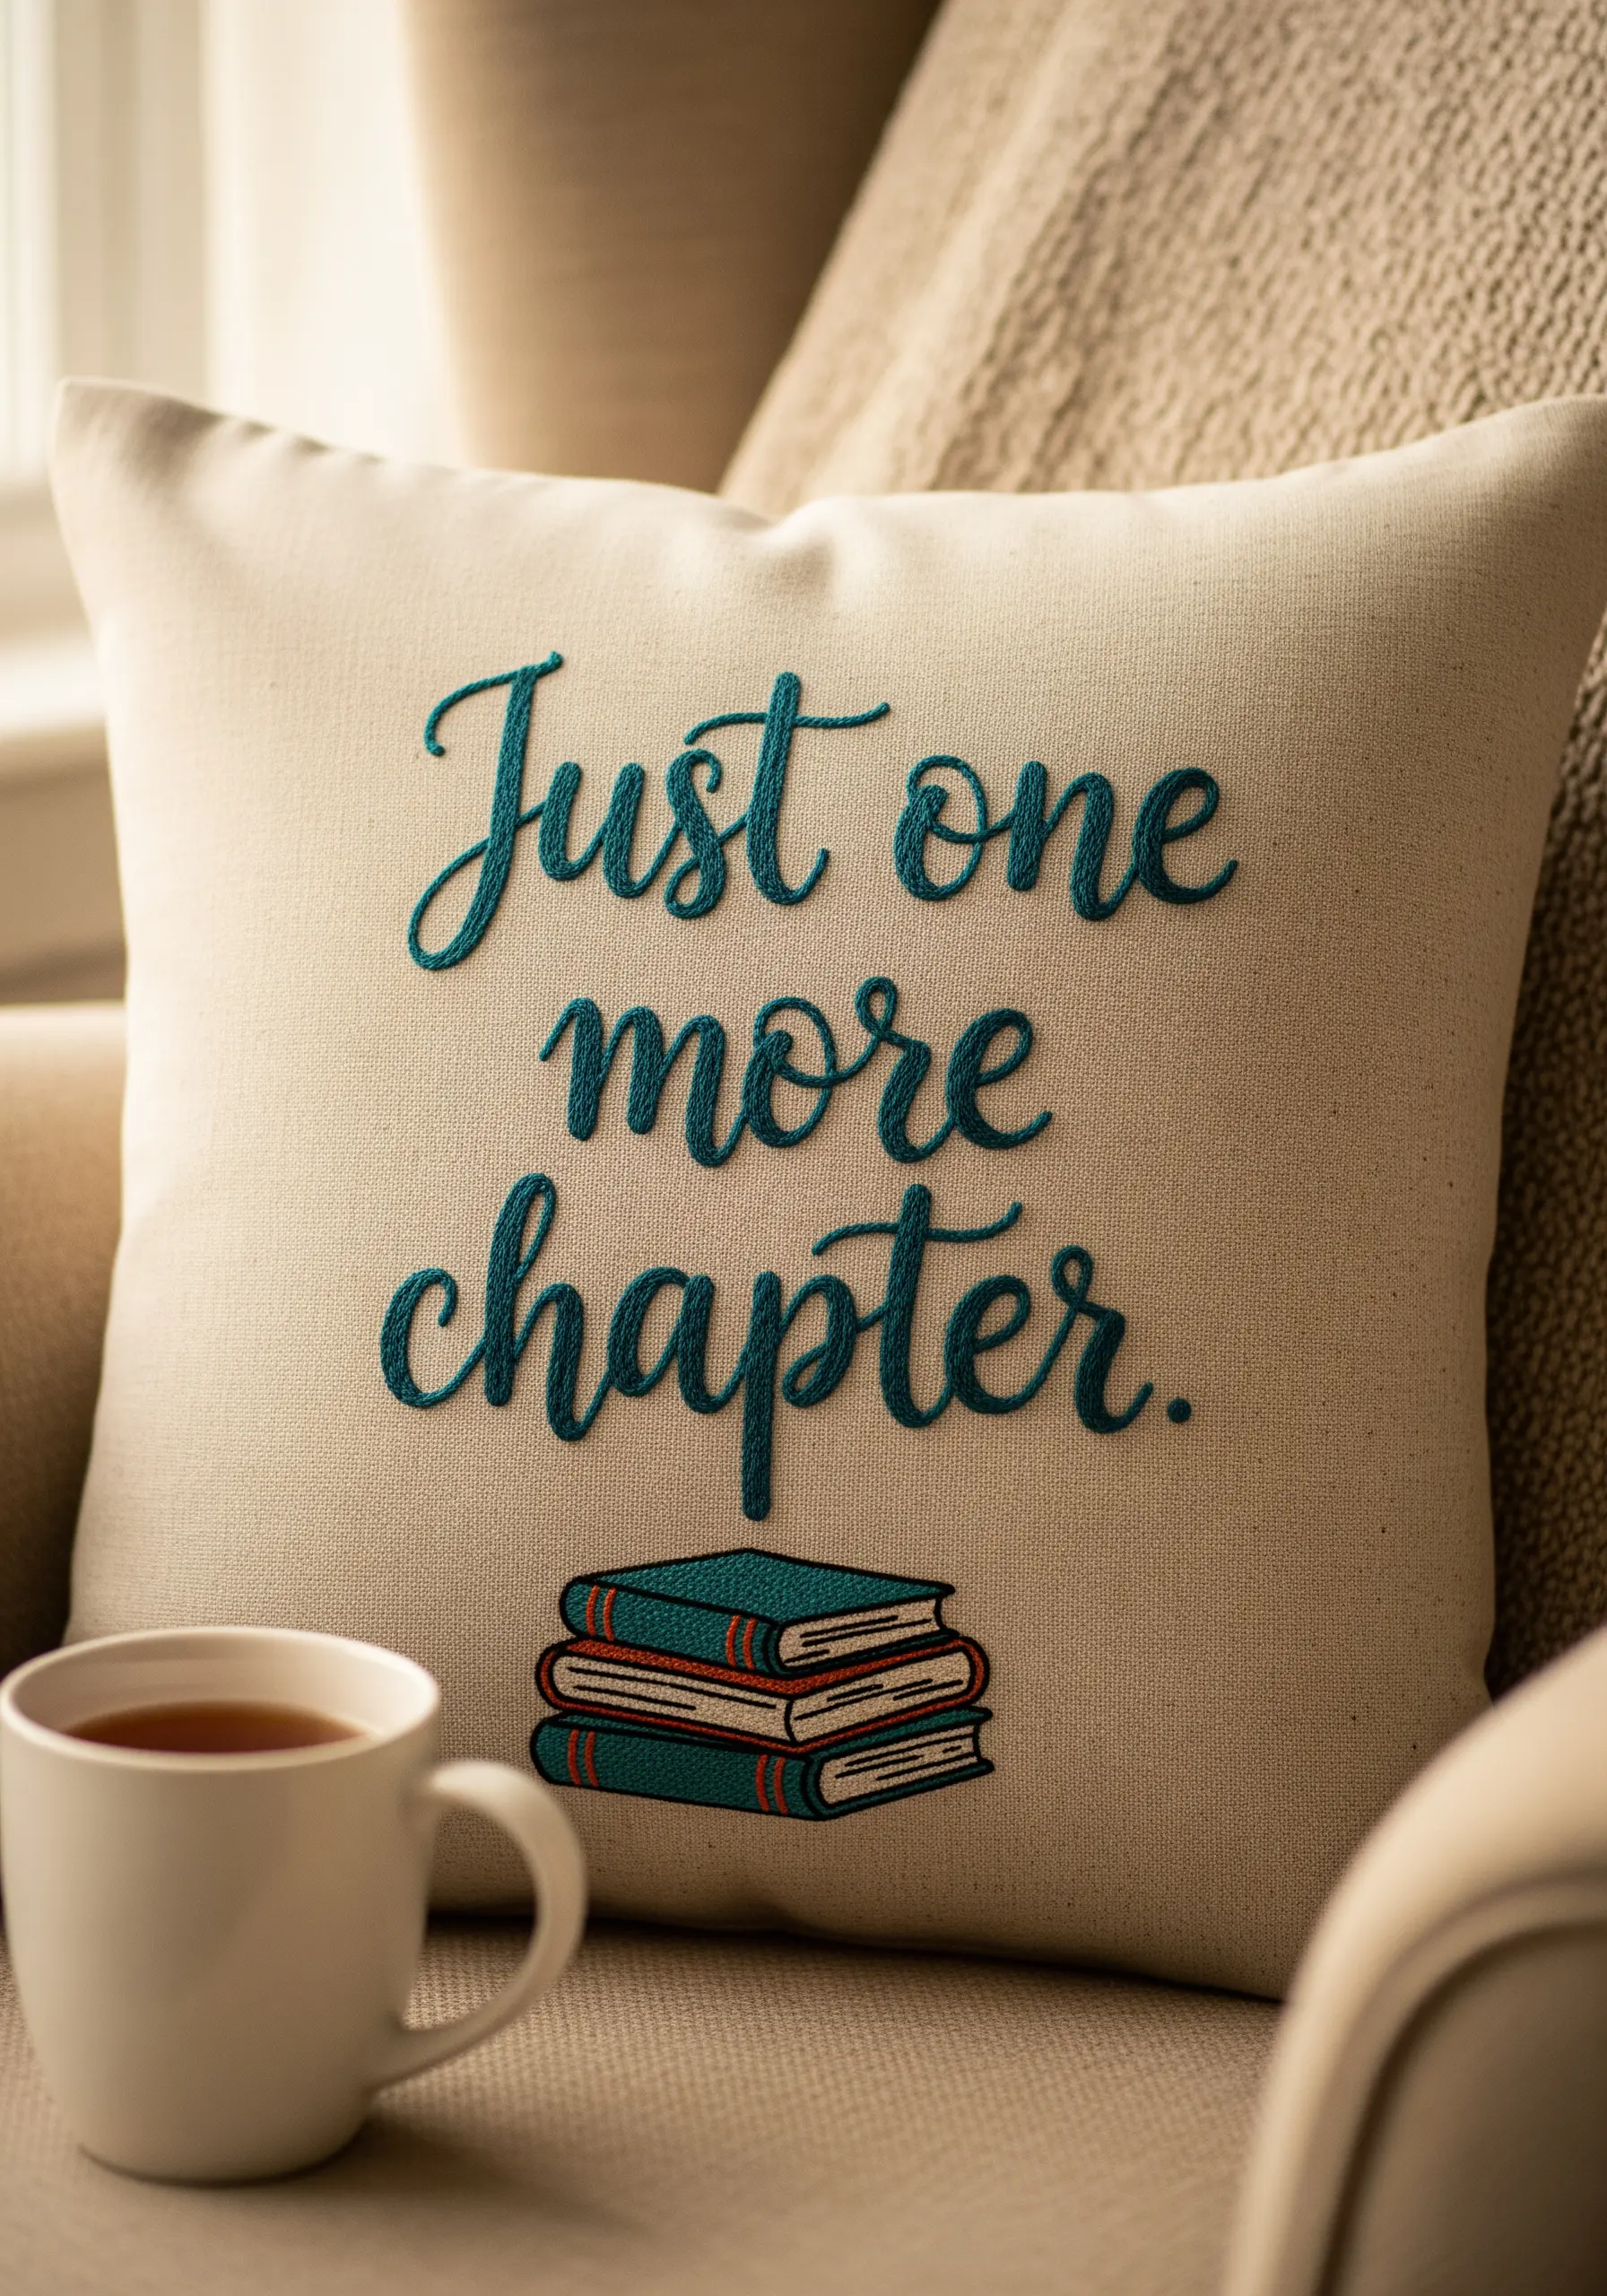
To give embroidered text a raised, professional finish, use a whipped backstitch.
First, complete your lettering with a standard backstitch, then weave a second thread under each stitch without piercing the fabric.
This technique creates a rounded, cord-like effect that makes the text feel tactile and luxurious, perfect for inspirational quote word pillow embroidery patterns.
Use a full six strands for the base stitch and another six for the whipping to maximize the volume.
4. Add Delicate Herbal Sprigs to Linens
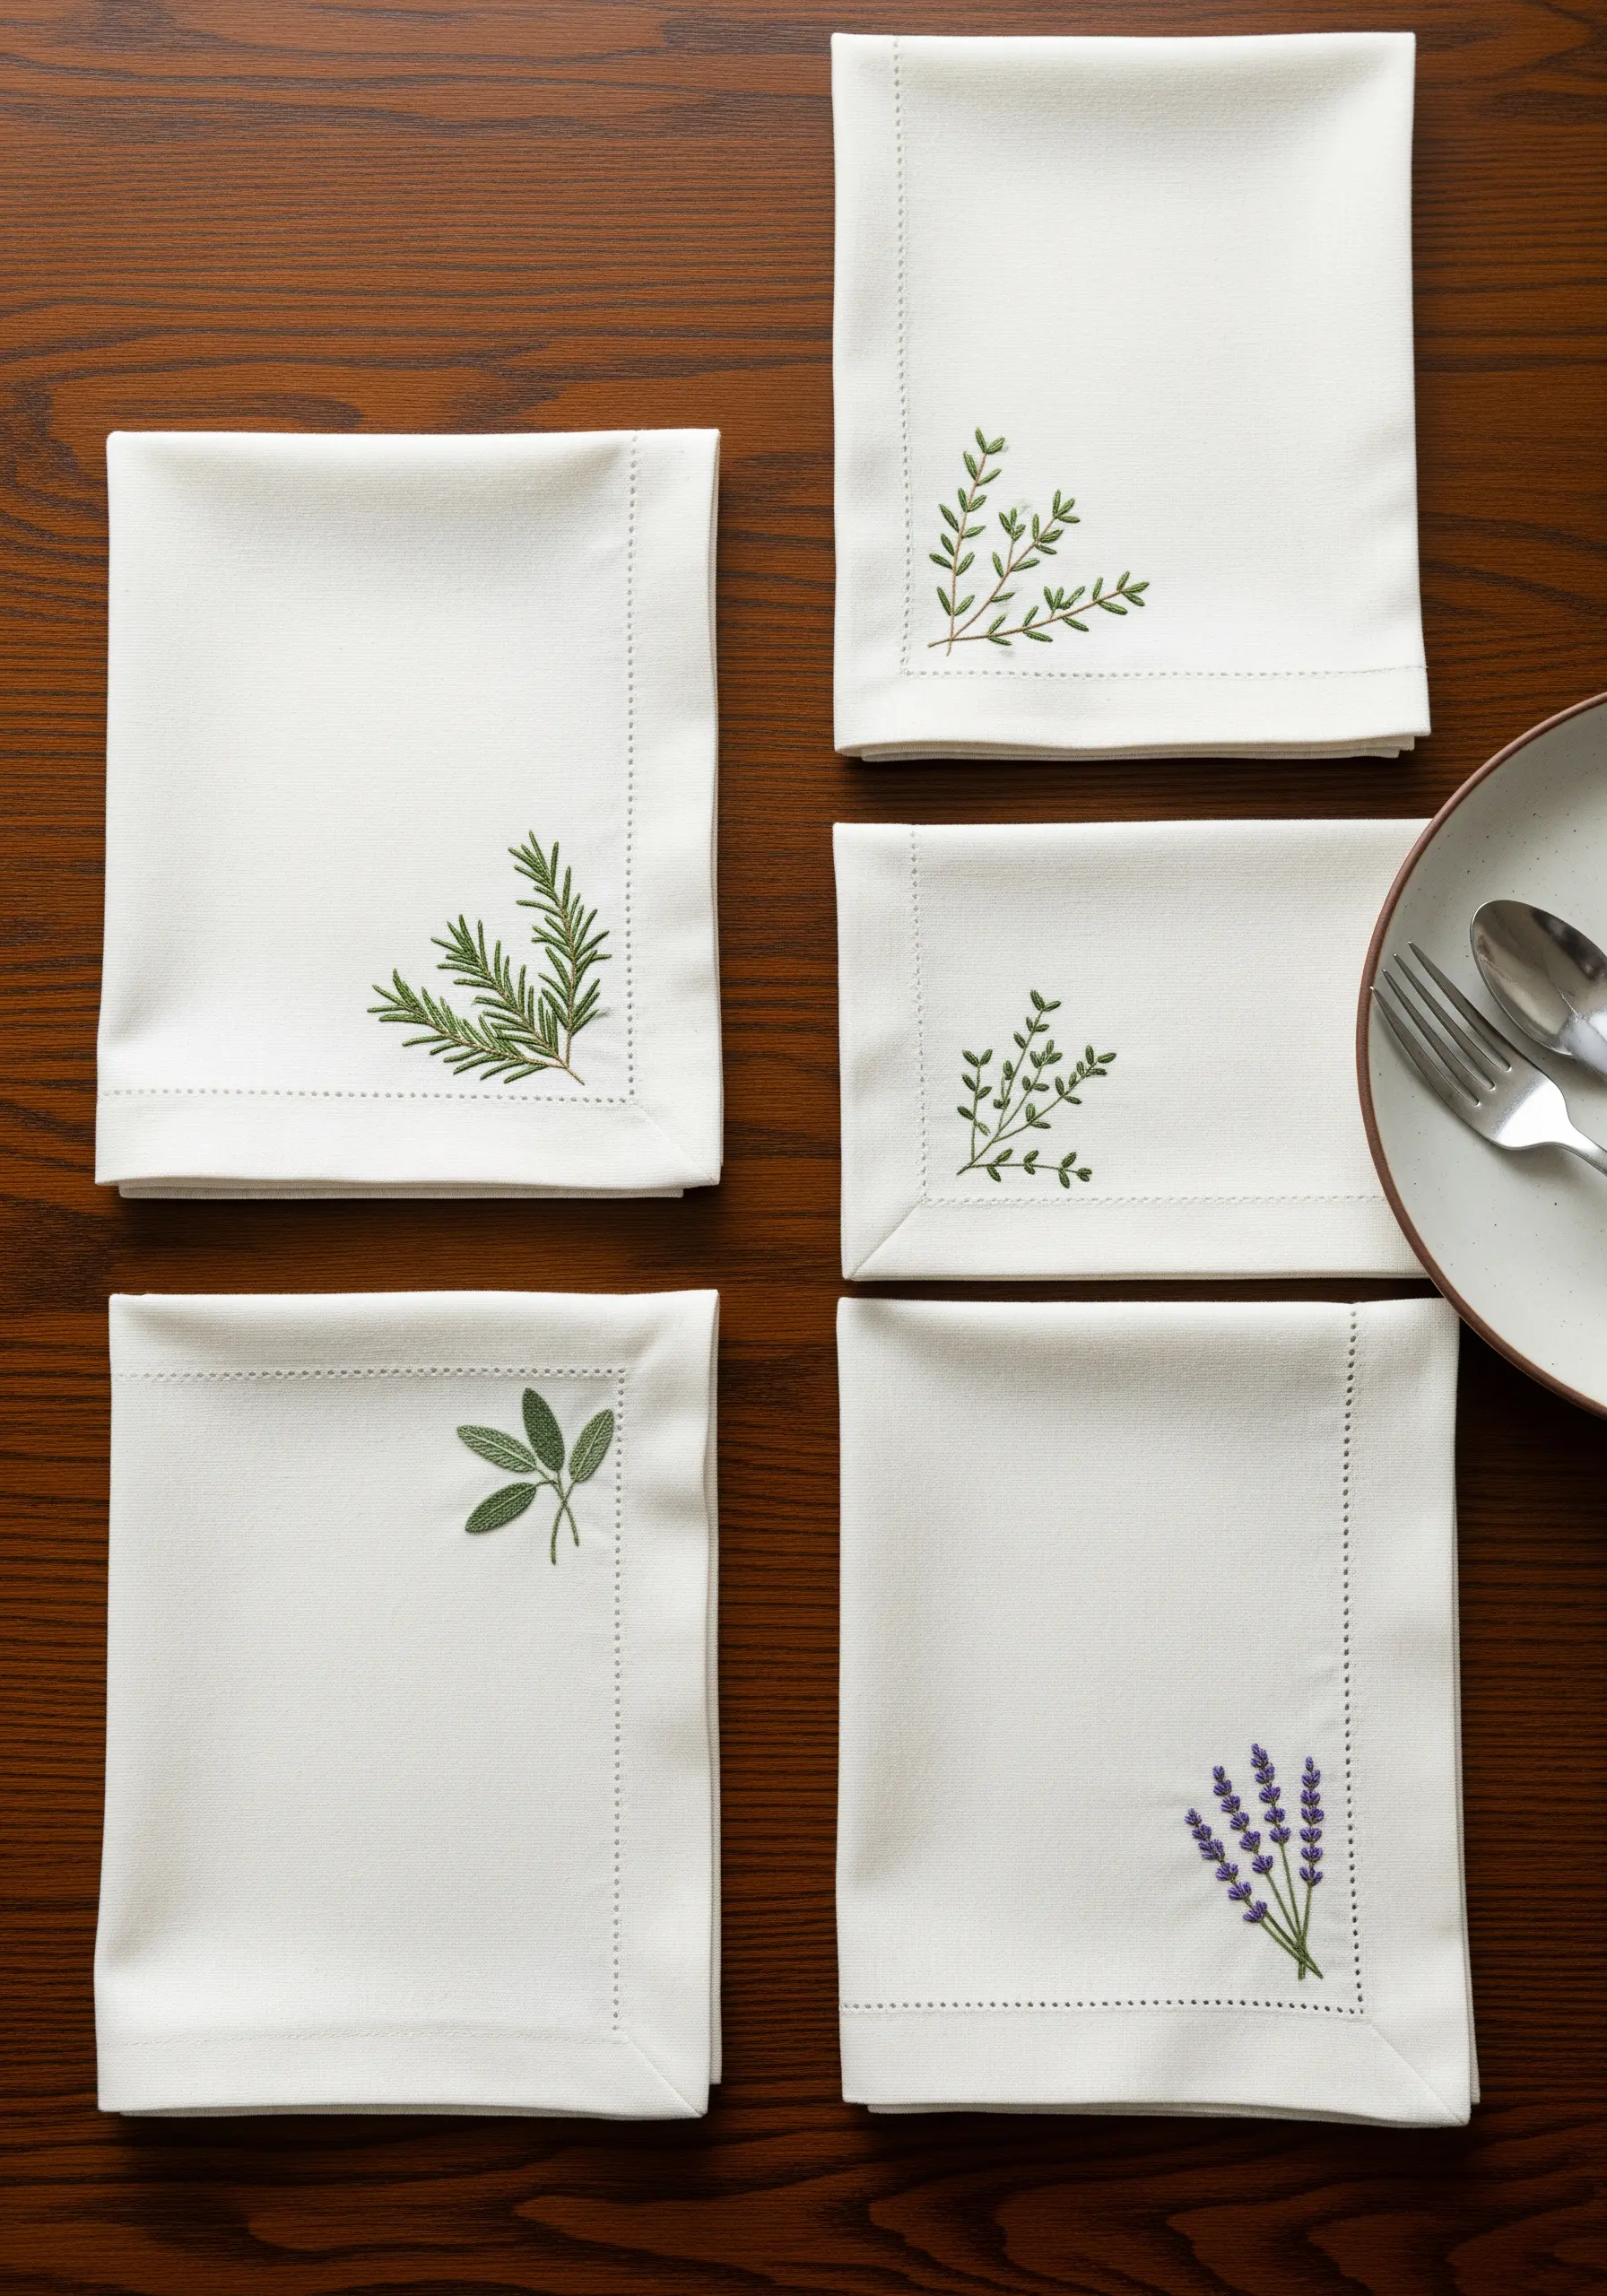
When personalizing fine textiles like linen napkins, subtlety is key to achieving an elegant look.
Use just one or two strands of floss to keep the embroidery from overwhelming the delicate fabric.
For herbs like rosemary, use a fishbone stitch to create the needles, which gives them a realistic, layered texture.
This minimalist approach turns simple motifs into heirloom-style table linen embroidery patterns that feel both modern and timeless.
5. Immortalize a Pet with Minimalist Line Art
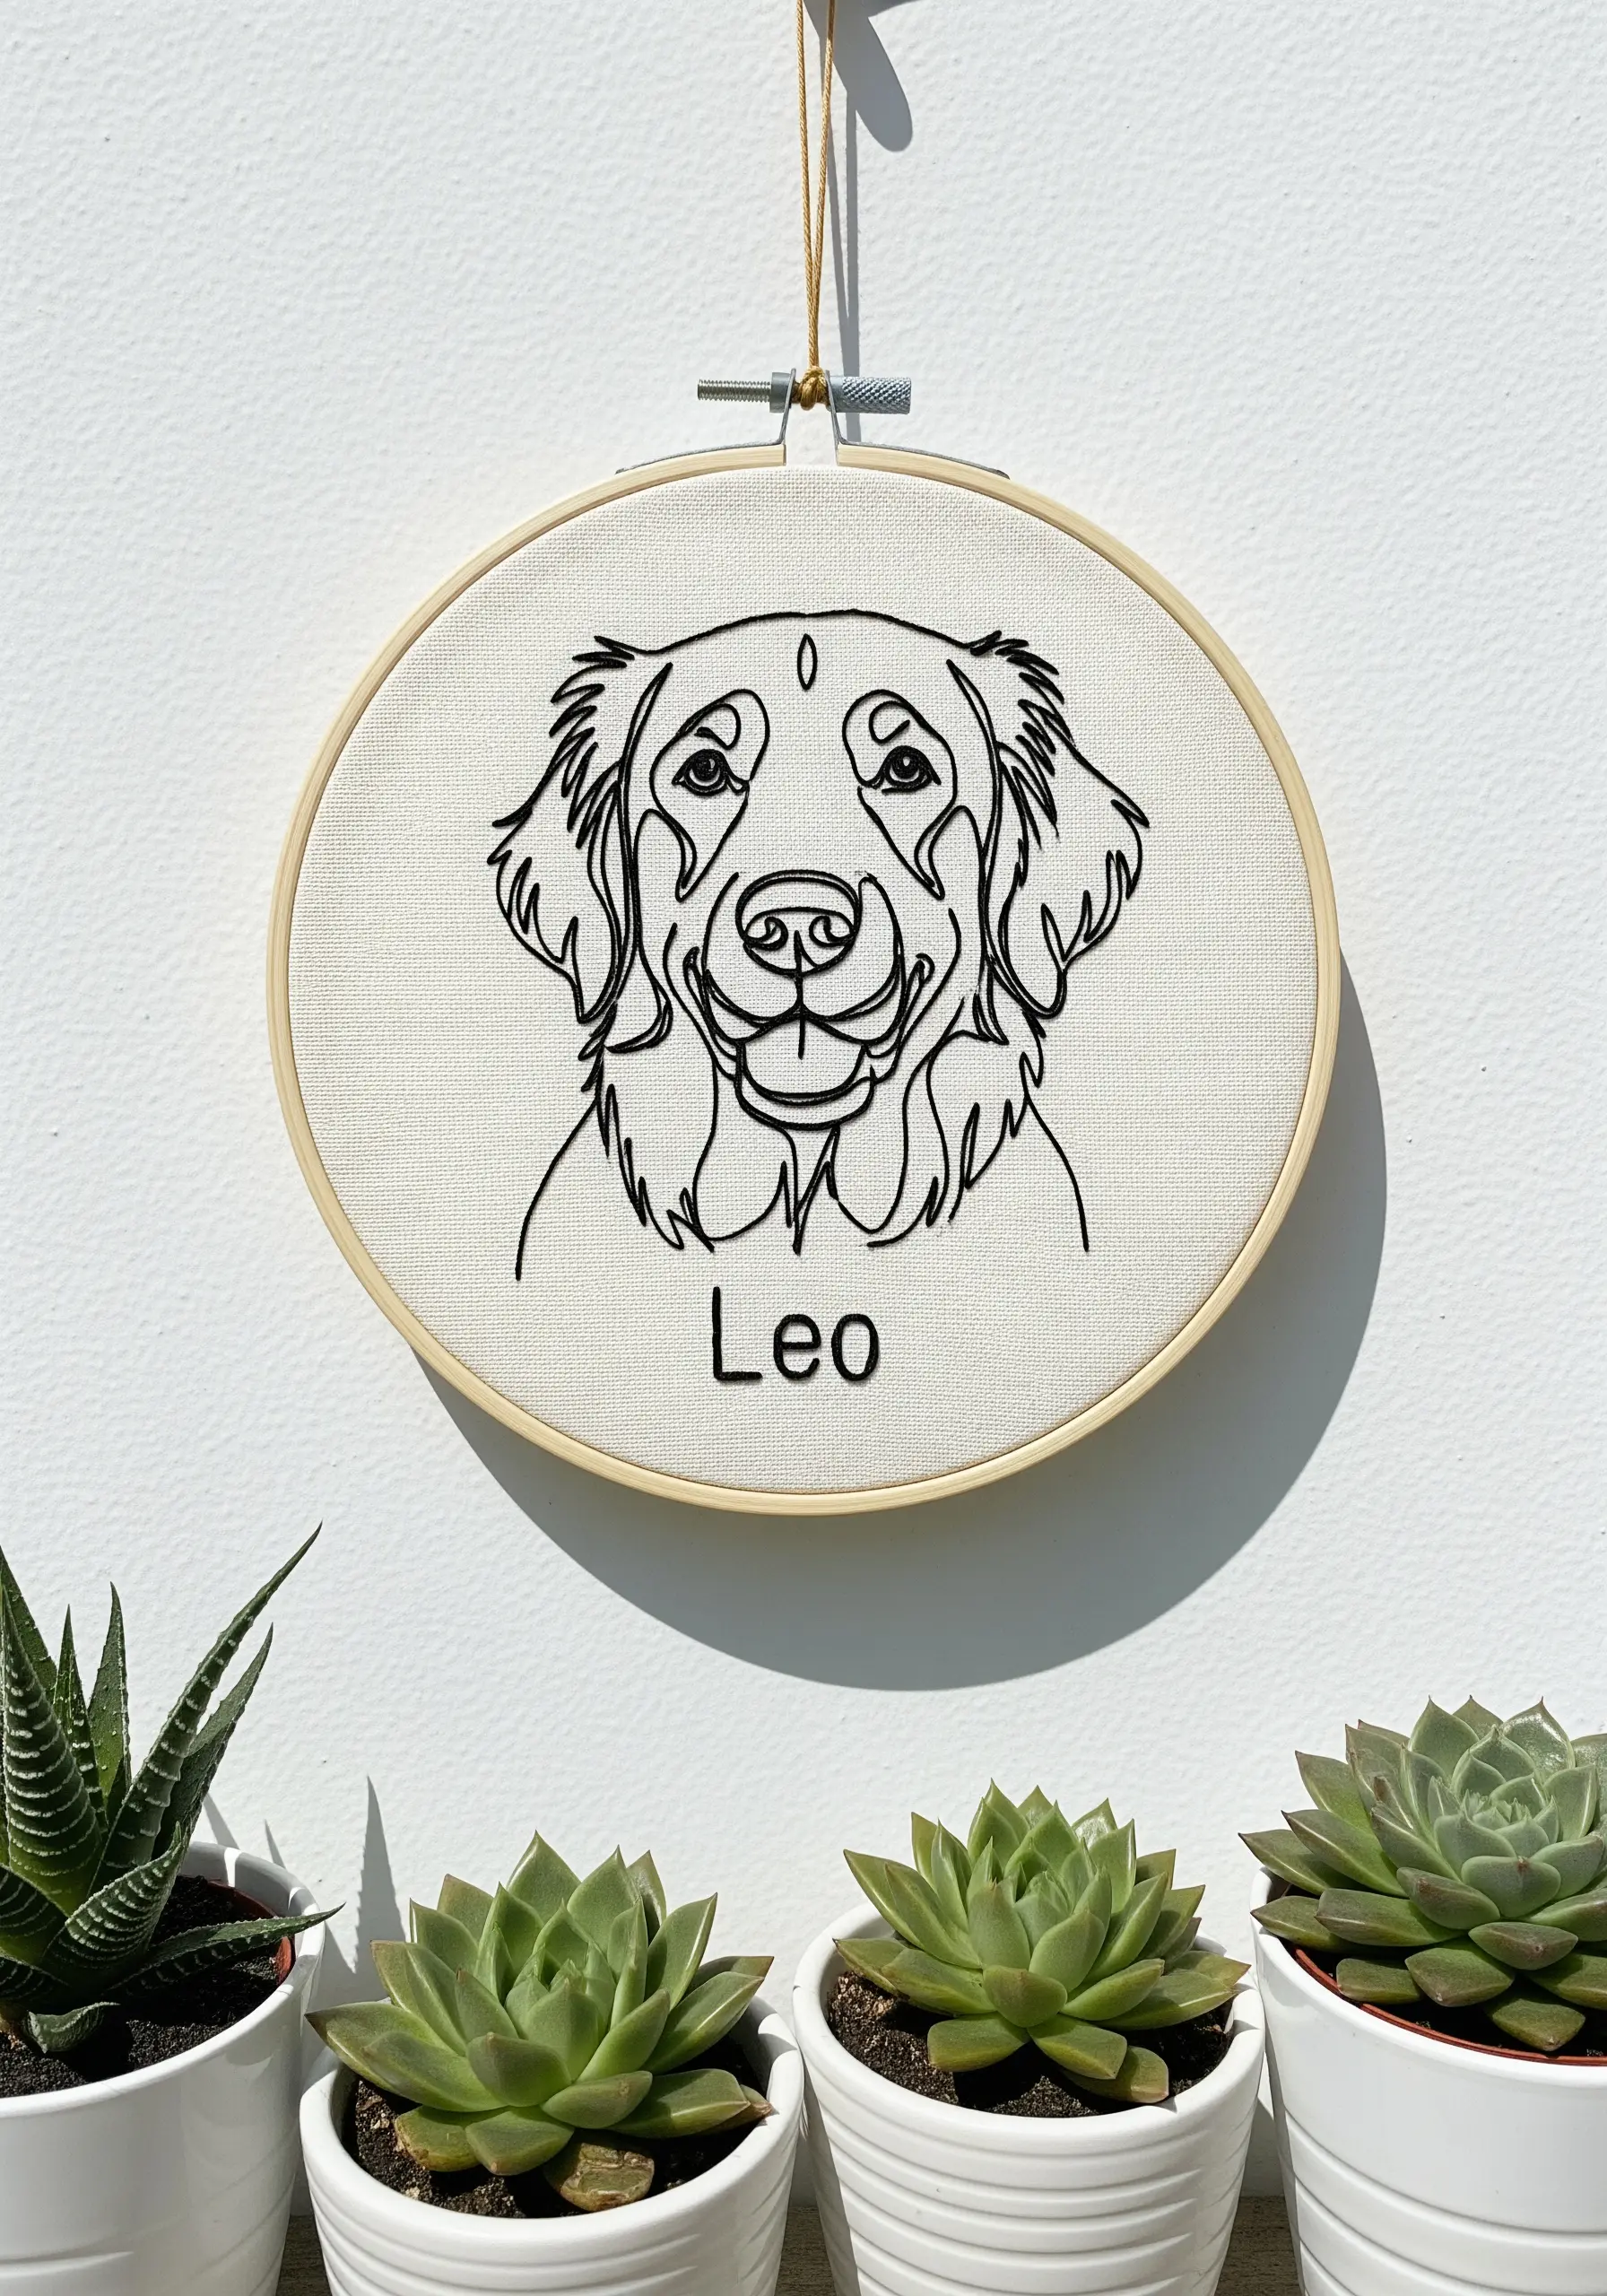
Capturing a pet’s likeness in a line-art portrait relies on clean, continuous curves.
Instead of a standard backstitch, which can look segmented on curves, use a split stitch or a stem stitch.
These stitches create a smoother, more fluid line that mimics the quality of an ink drawing.
Transfer your design with a fine-tipped, water-soluble pen to ensure your stitched lines are precise, creating elegant pet portrait embroidery ideas.
6. Embroider a Celestial Tote Bag
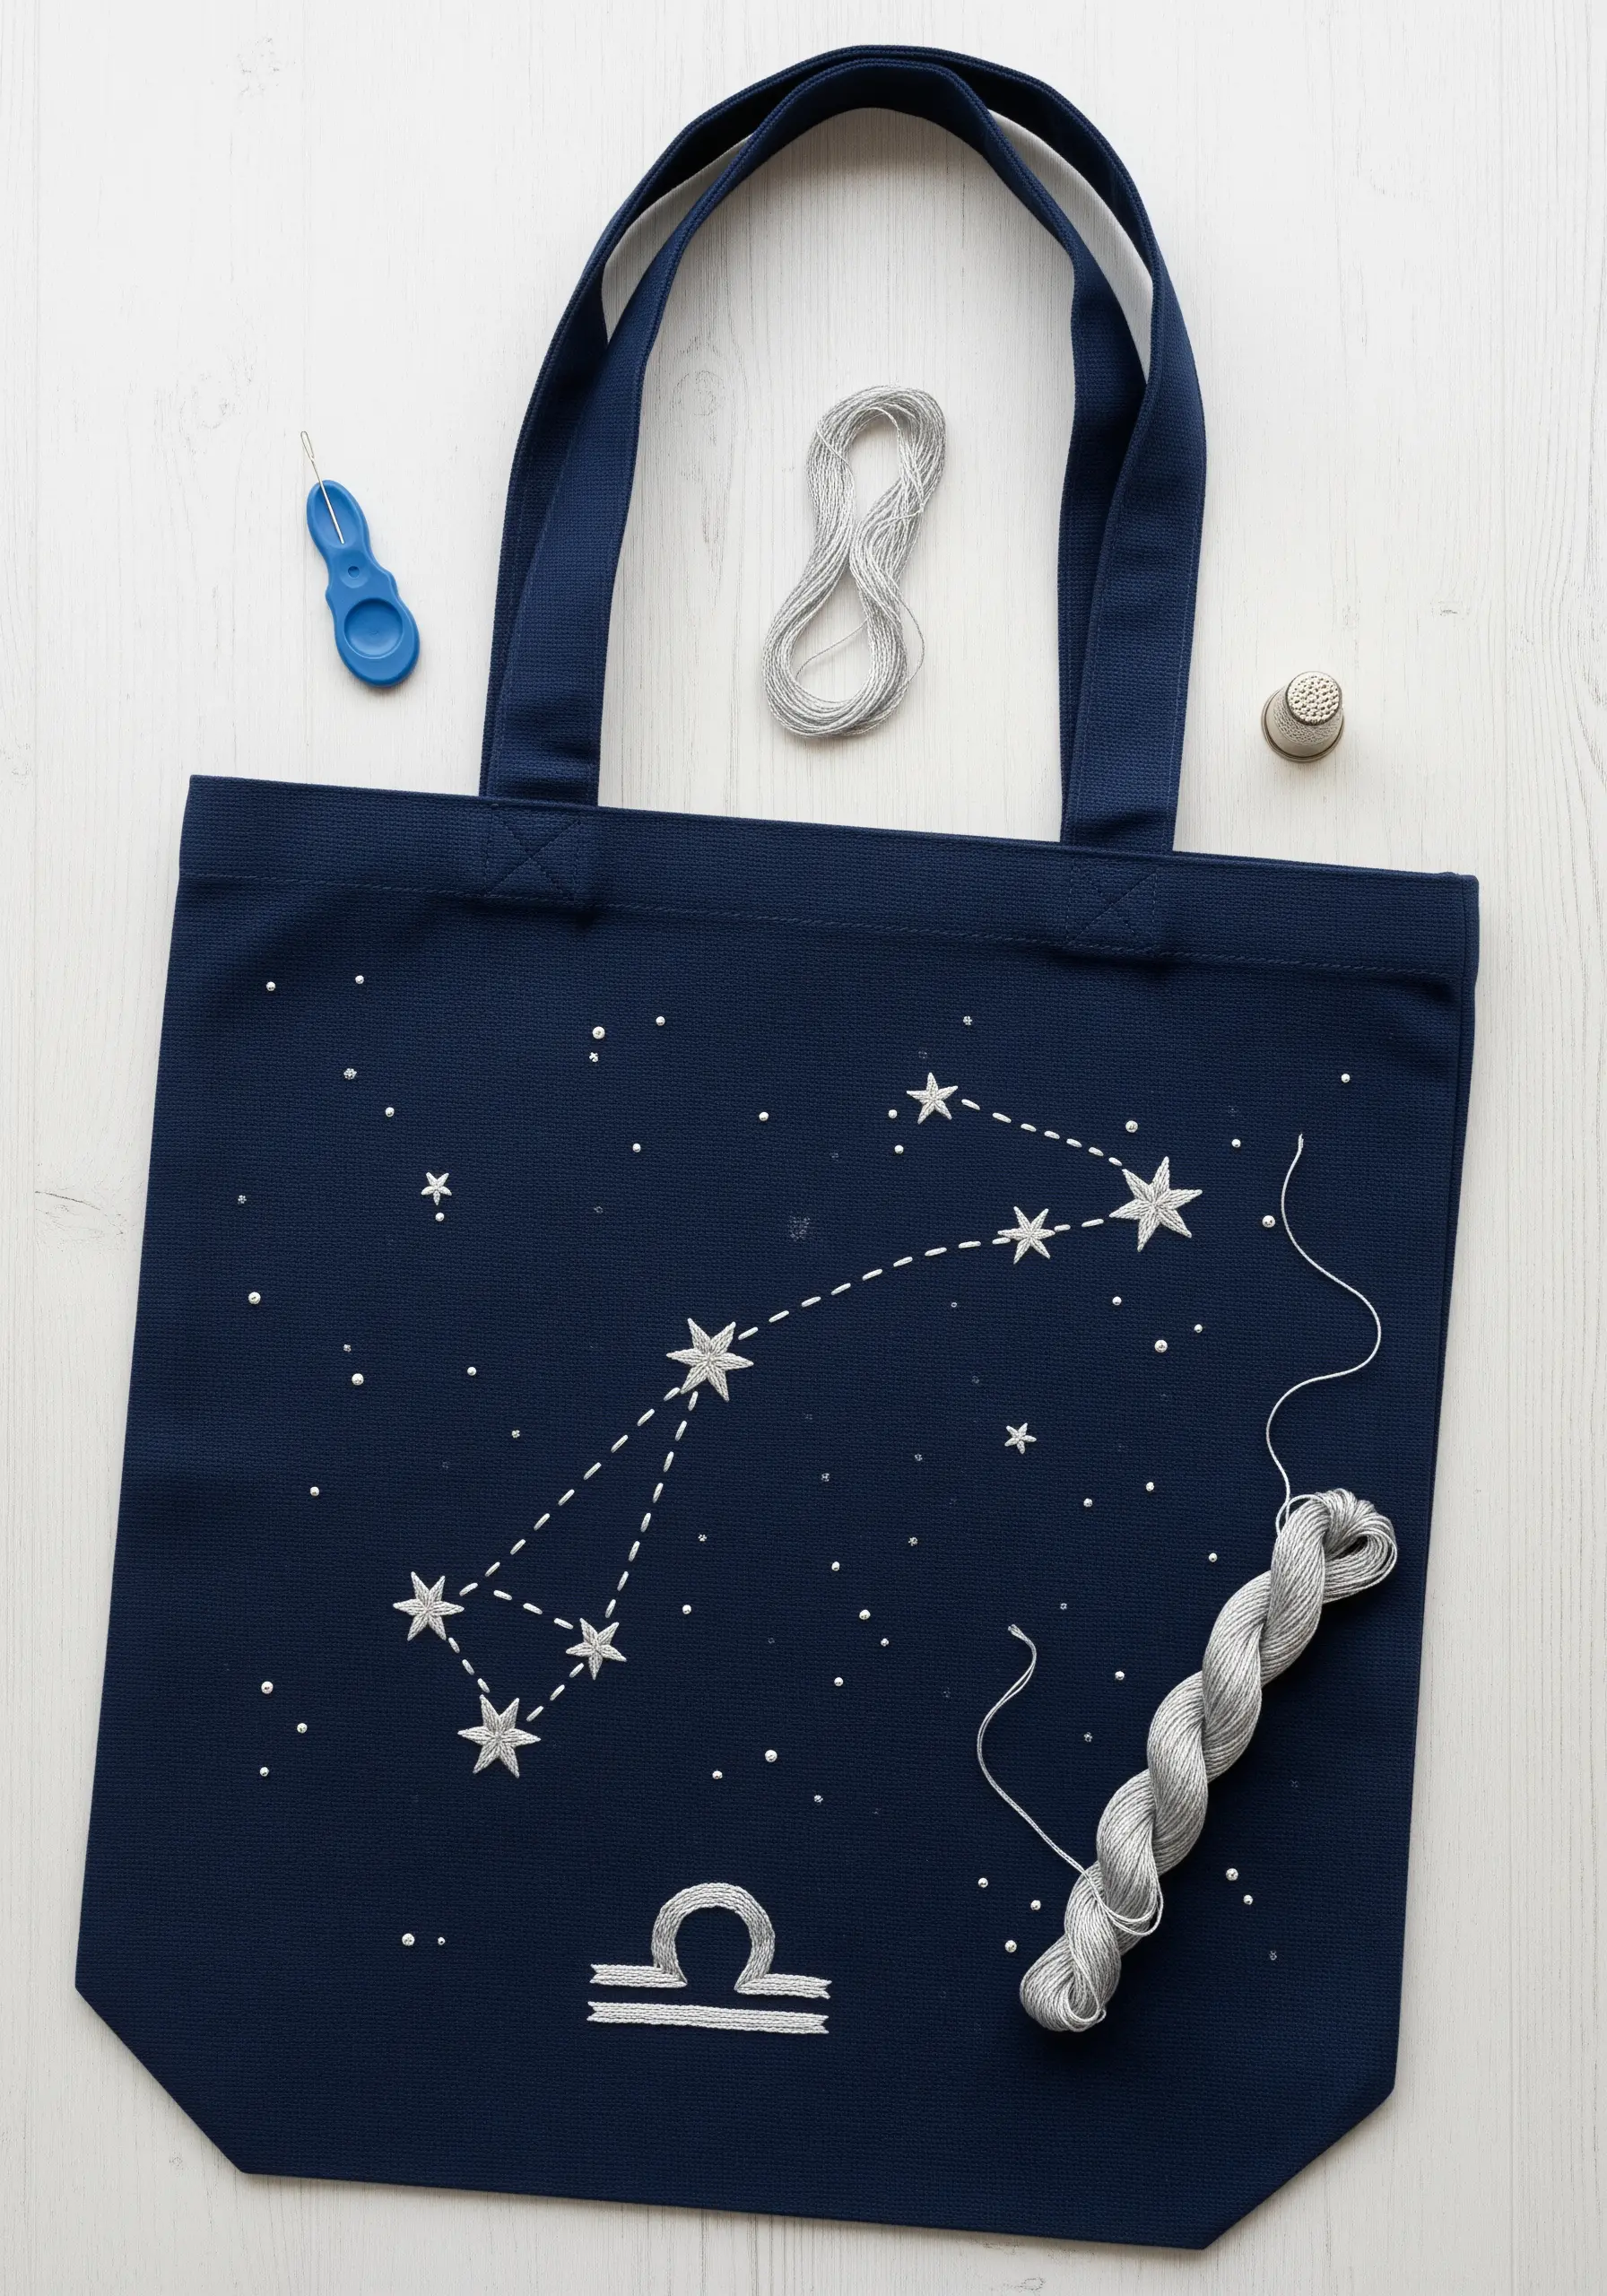
Working with metallic thread can be challenging, but the right technique makes it effortless.
Cut your thread into shorter lengths—no more than 12 inches—to minimize friction and prevent unraveling.
Use a thread conditioner or run the floss through beeswax to help it glide smoothly through the canvas.
For the stars, a simple satin stitch or a cluster of French knots creates a beautiful shimmer that contrasts perfectly against a dark fabric.
7. Design a Cheerful Kitchen Towel
To make your lettering pop with a rounded, playful texture, use a chain stitch outline filled with satin stitches.
The raised edge from the chain stitch contains the satin stitch, resulting in a cleaner, more defined shape.
For tiny details like the daisies, use a lazy daisy stitch (detached chain stitch) for the petals—it’s quick, easy, and creates perfectly uniform loops every time.
This combination elevates simple embroidered kitchen towel designs into polished pieces.
8. Apply a Faux-Knit Monogram to a Journal
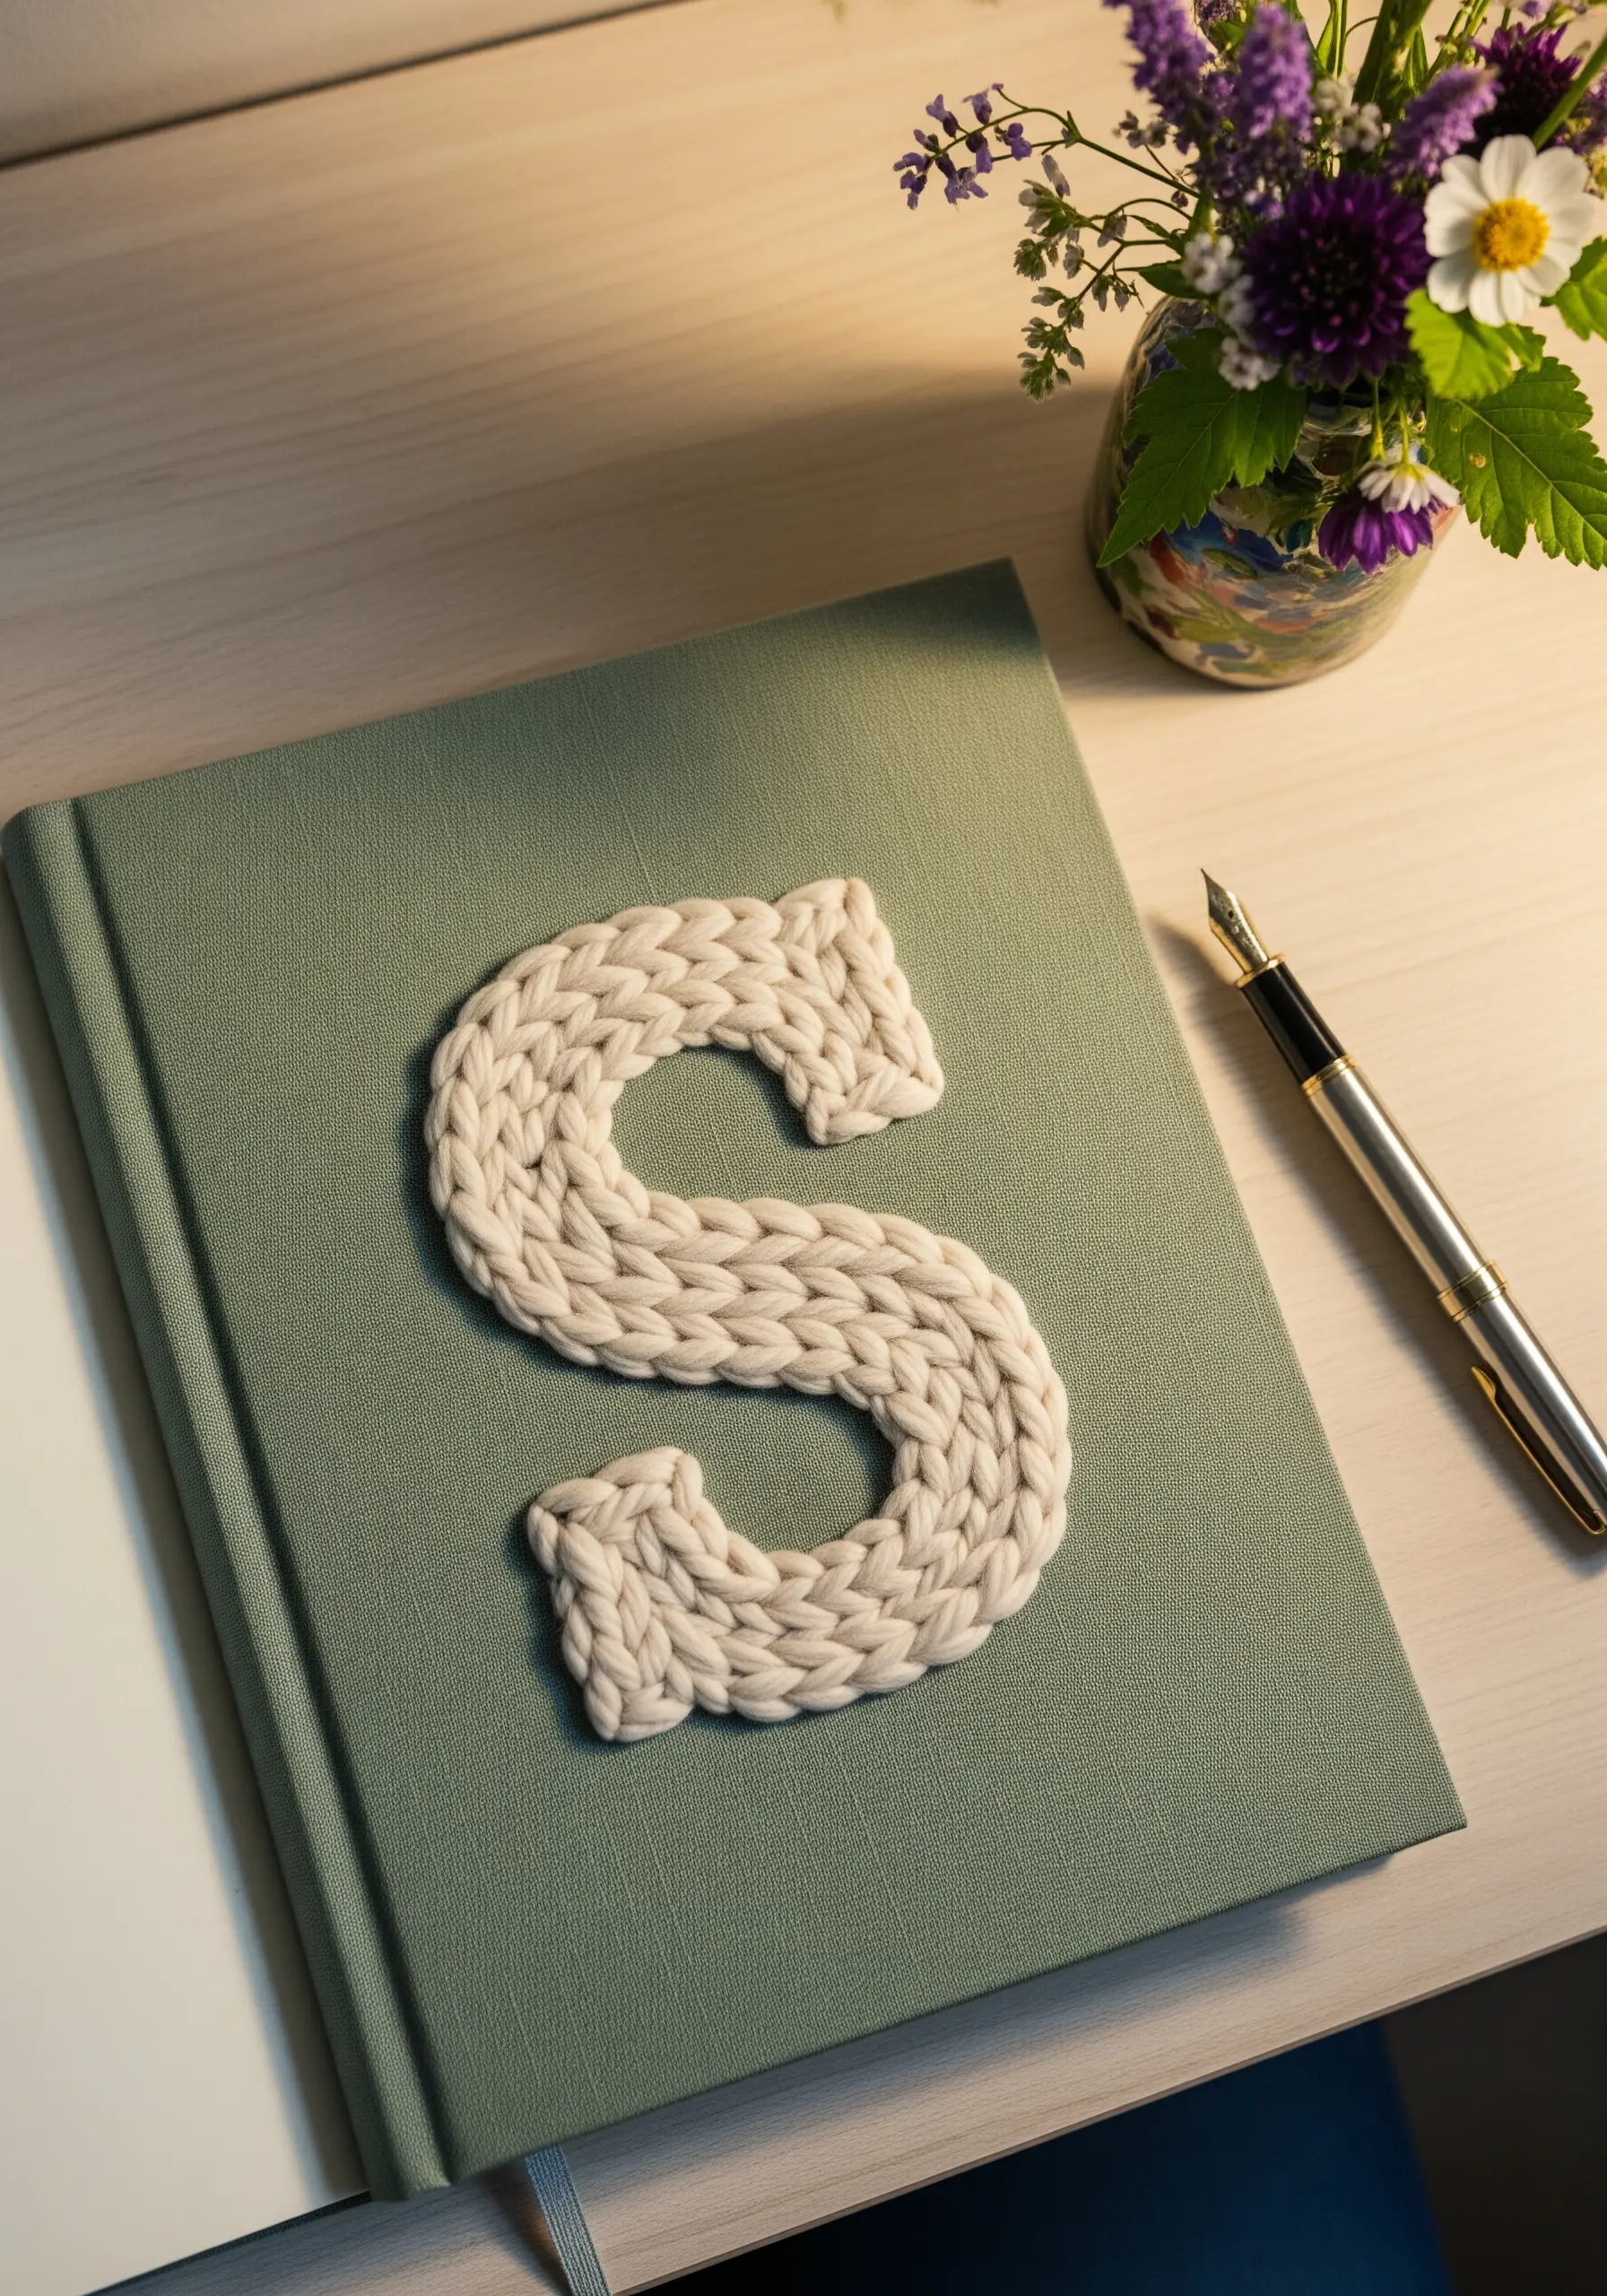
Create the illusion of a cozy, knitted initial by using a couching technique with chunky yarn or cotton rope.
Lay your yarn in the desired letter shape on the surface of the journal cover.
Then, use a regular embroidery needle and a matching single strand of floss to tack the yarn down with small, evenly spaced stitches.
This is one of the most effective mixed fiber creations for adding dramatic texture without complex stitches.
9. Stitch a Vibrant Quote on a Felt Banner

When stitching dense satin stitches on a soft material like felt, a stabilizer is your best friend.
Iron on a cut-away stabilizer to the back of the felt before you begin stitching to prevent the fabric from stretching or puckering.
This ensures your stitches lie flat and your letters remain crisp and uniform.
The felt stars can be attached with a single stitch in the center or a dot of fabric glue for a no-sew finish.
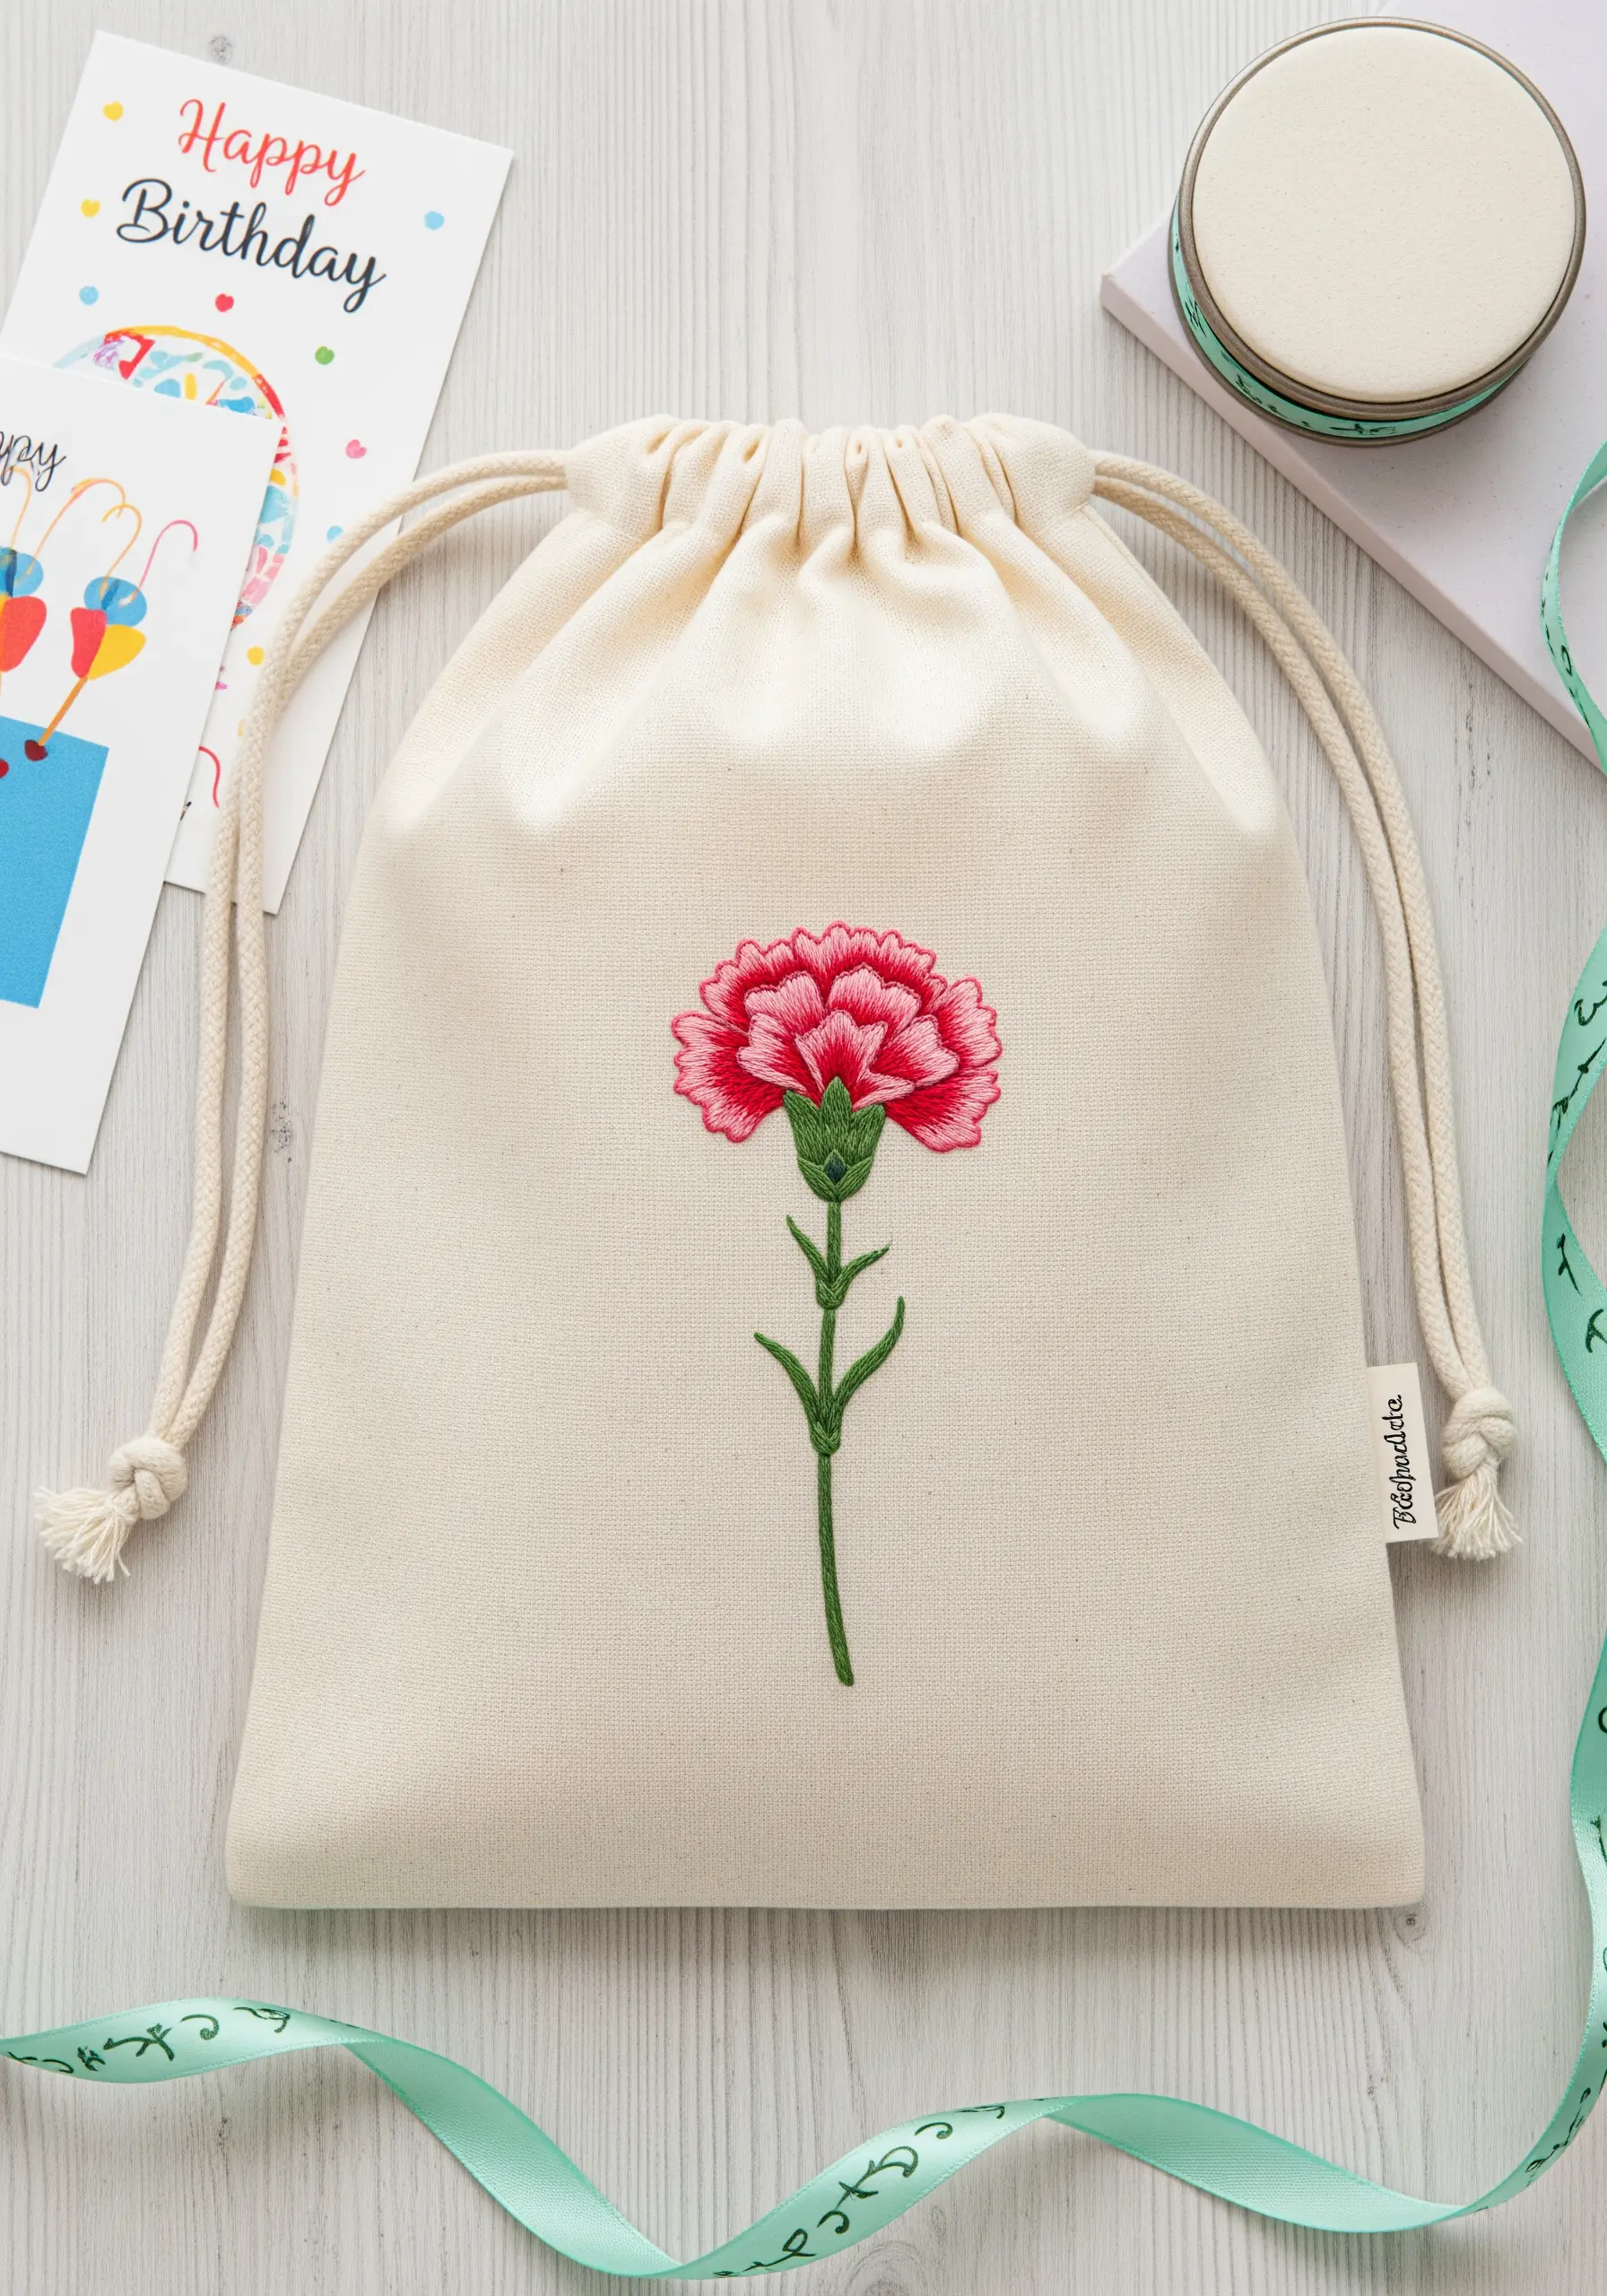
10. Craft a Personalized Felt Bookmark

Felt is an ideal base for embroidery because its matted fibers provide a sturdy, non-fraying surface that doesn’t require a hoop.
For delicate lavender buds, use French knots, varying the number of wraps around the needle (one or two) to create buds of different sizes for a more organic feel.
A simple running stitch around the edge is all you need to join the front and back pieces, making for a quick and polished finish.
11. Embellish Canvas Sneakers with a Wave Motif

Embroidering on shoes requires strength and the right tools.
Use a sharp, sturdy needle (a sashiko or denim needle works well) and a thimble to protect your fingers as you push through the tough canvas.
A simple backstitch is perfect for creating clean, graphic lines that won’t disrupt the shoe’s structure.
By using a gradient of blues, you can create a dynamic sense of movement with a very simple stitch.
12. Create Delicate, Transparent Bee Wings
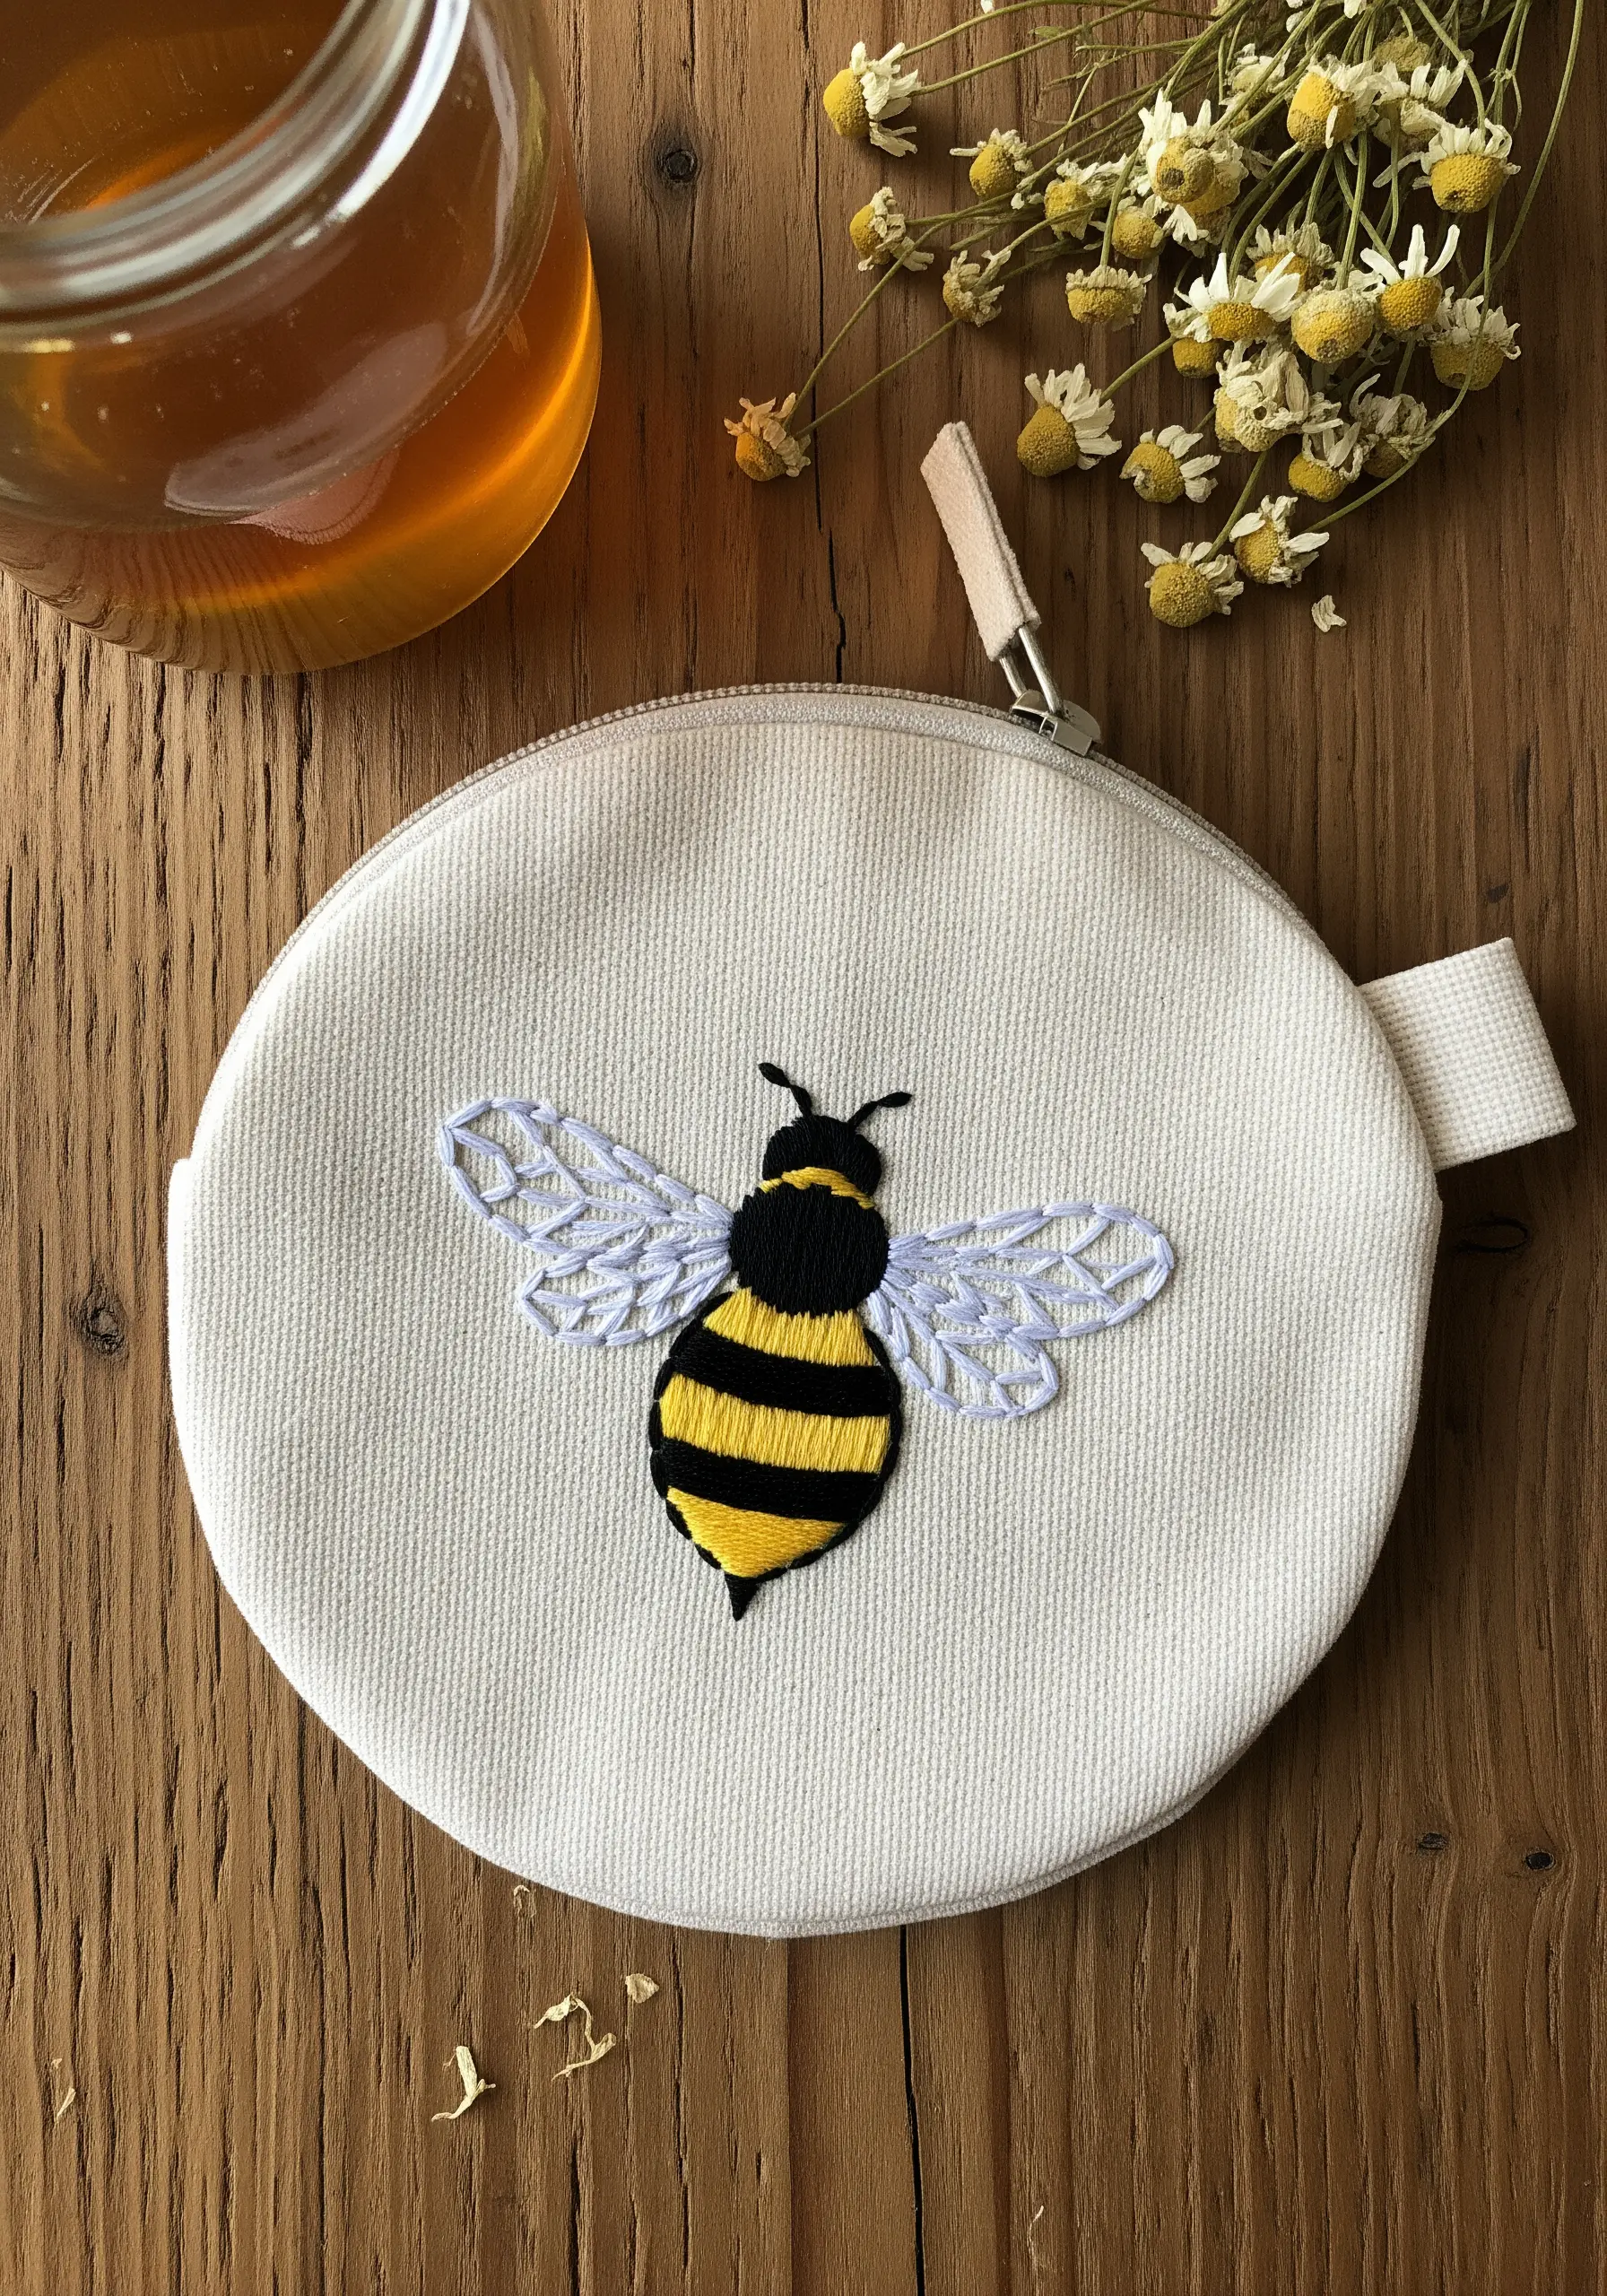
To achieve the look of translucent wings, use negative space to your advantage.
Instead of filling the wing area, simply outline the geometric cells with a fine backstitch using a single strand of light gray or pale blue floss.
This technique tricks the eye into seeing a delicate, airy structure, which contrasts beautifully with the densely filled satin stitch of the bee’s body.
13. Personalize a Cap with Clean, Modern Text
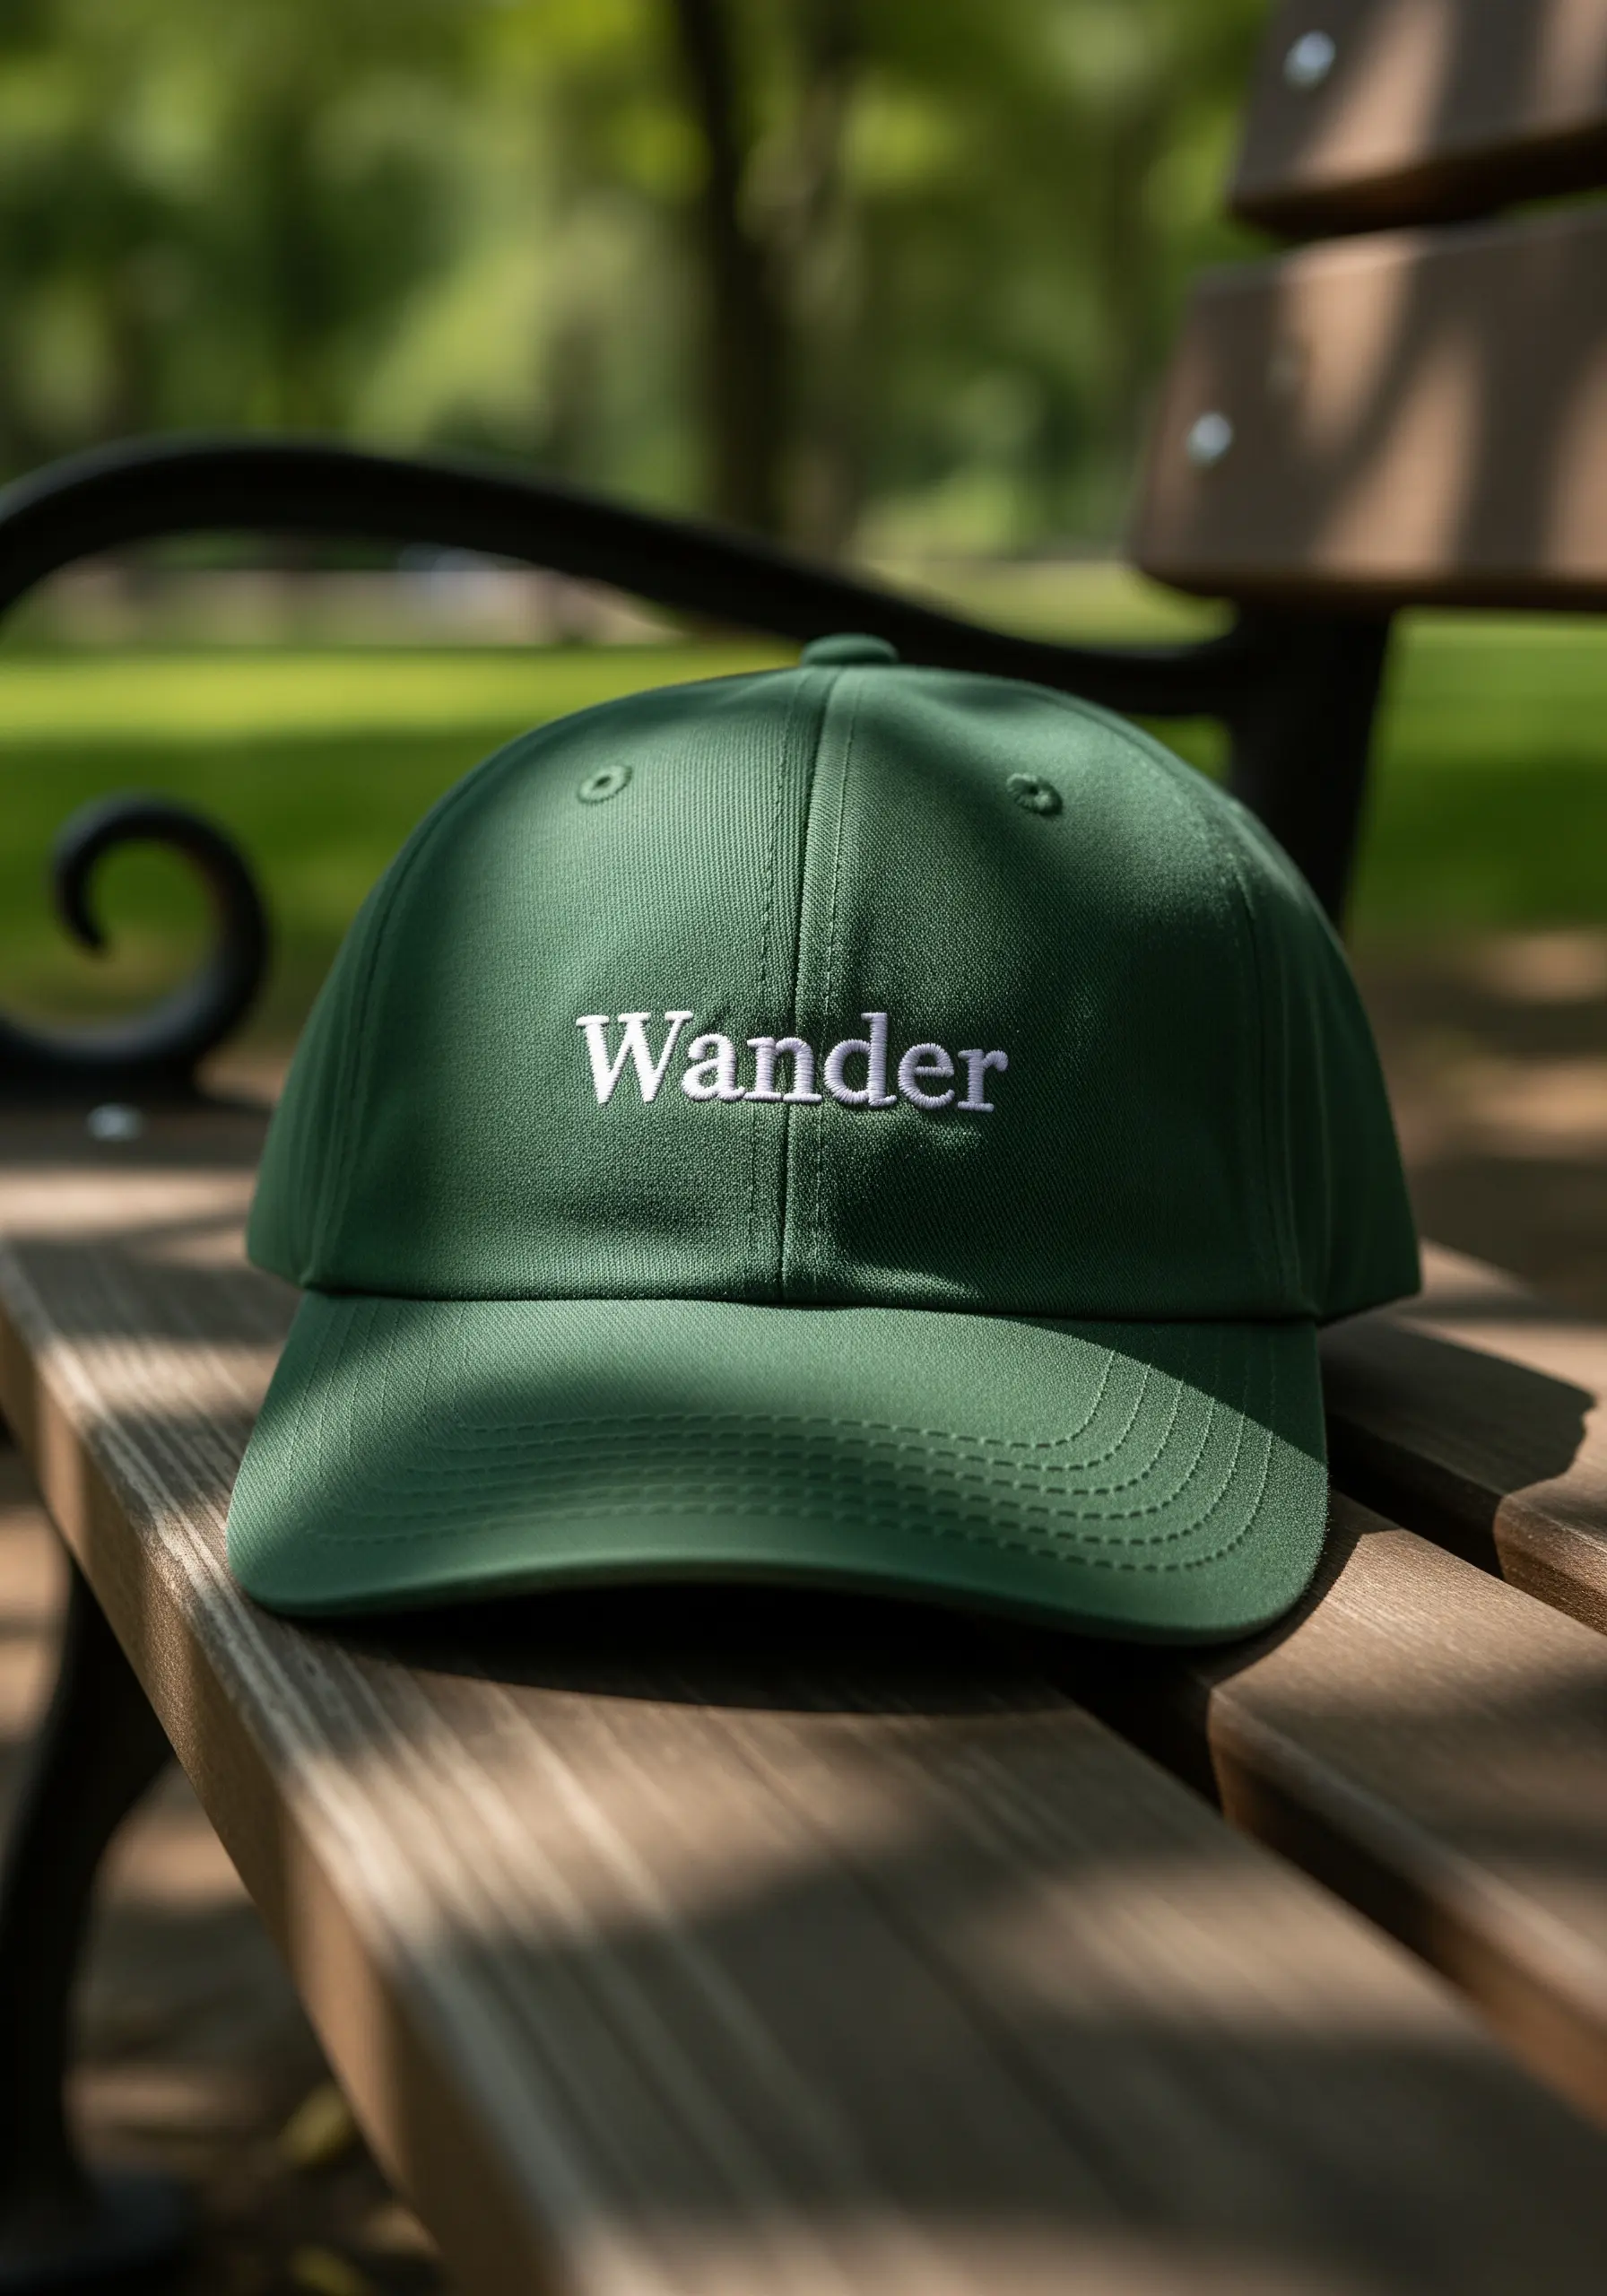
For crisp lettering on a structured item like a baseball cap, precision is everything.
Use a sticky, water-soluble stabilizer on the front of the cap to print or draw your design; it will hold the fabric taut and give you a perfect guide.
A simple, well-executed backstitch with three strands of floss provides the ideal weight for clean, readable text that feels both modern and understated.
14. Frame a Name with a Botanical Wreath
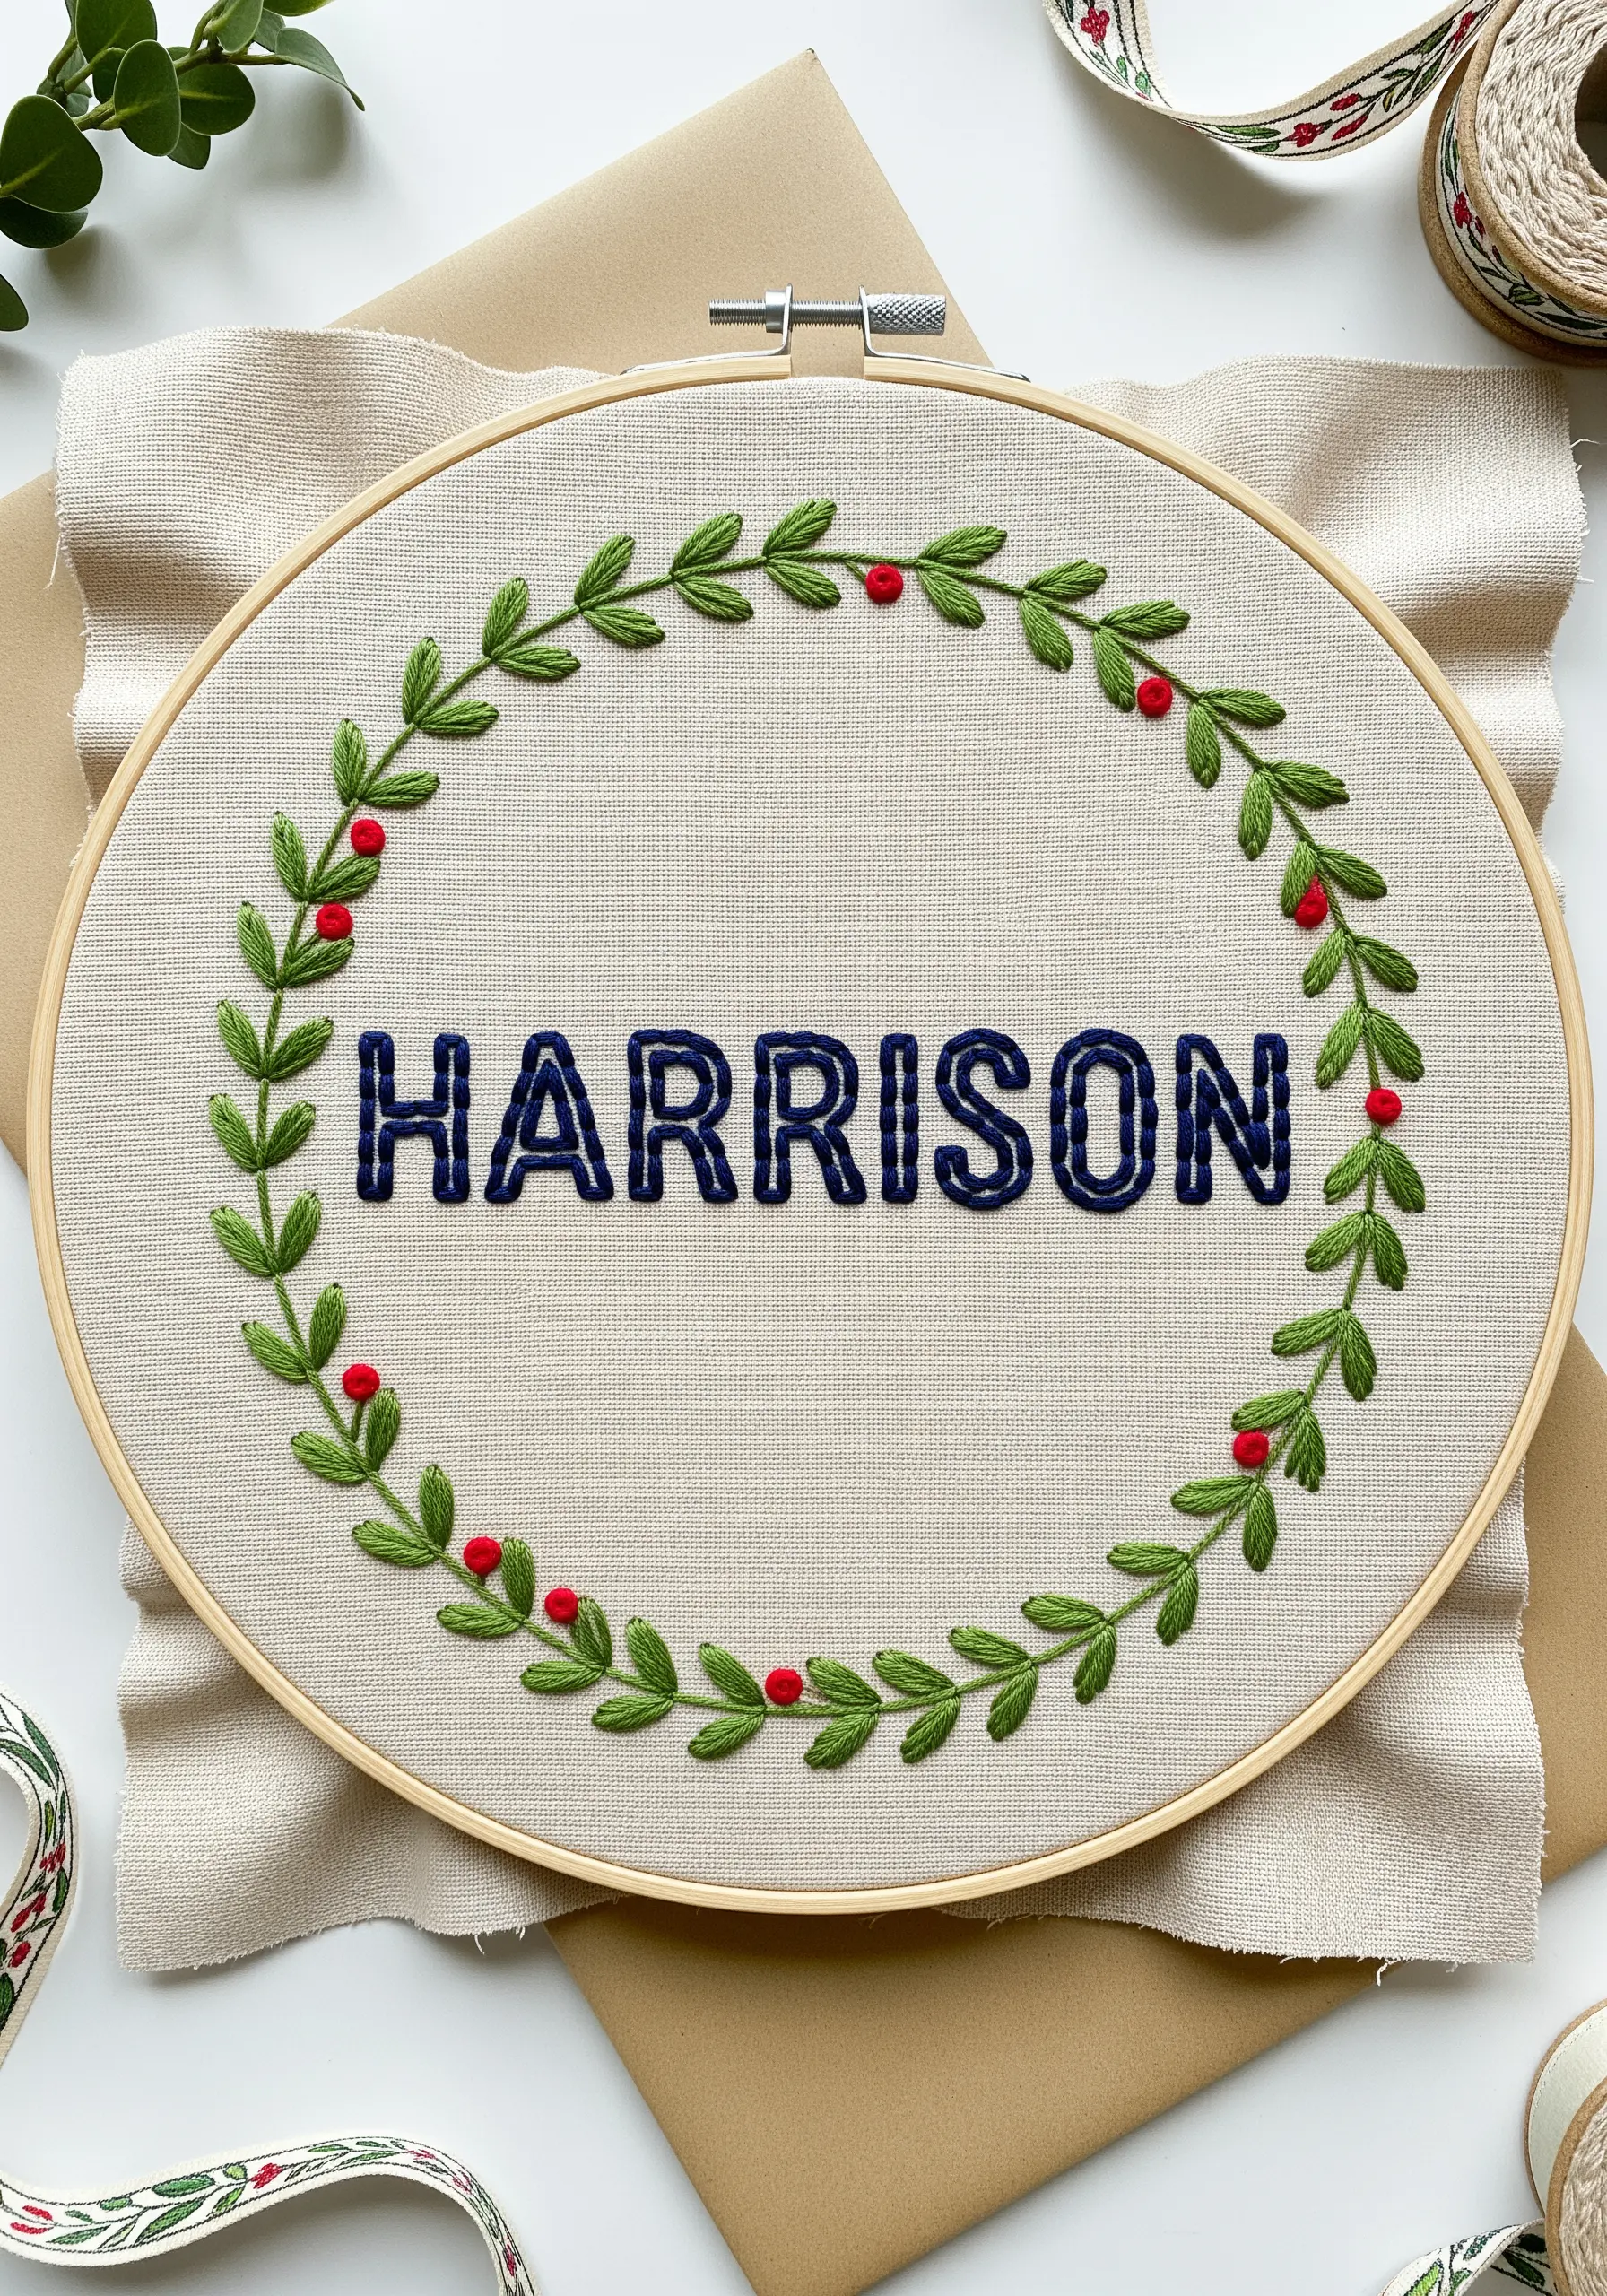
Combine appliqué and embroidery for a design that is both fast to create and visually striking.
Cut the letters from felt and attach them with a neat running stitch just inside the edge for a clean, graphic look.
Surround the name with a simple wreath using a stem stitch for the vines and lazy daisy stitches for the leaves.
This technique gives your personalized embroidery wall pieces a beautiful, dimensional quality.
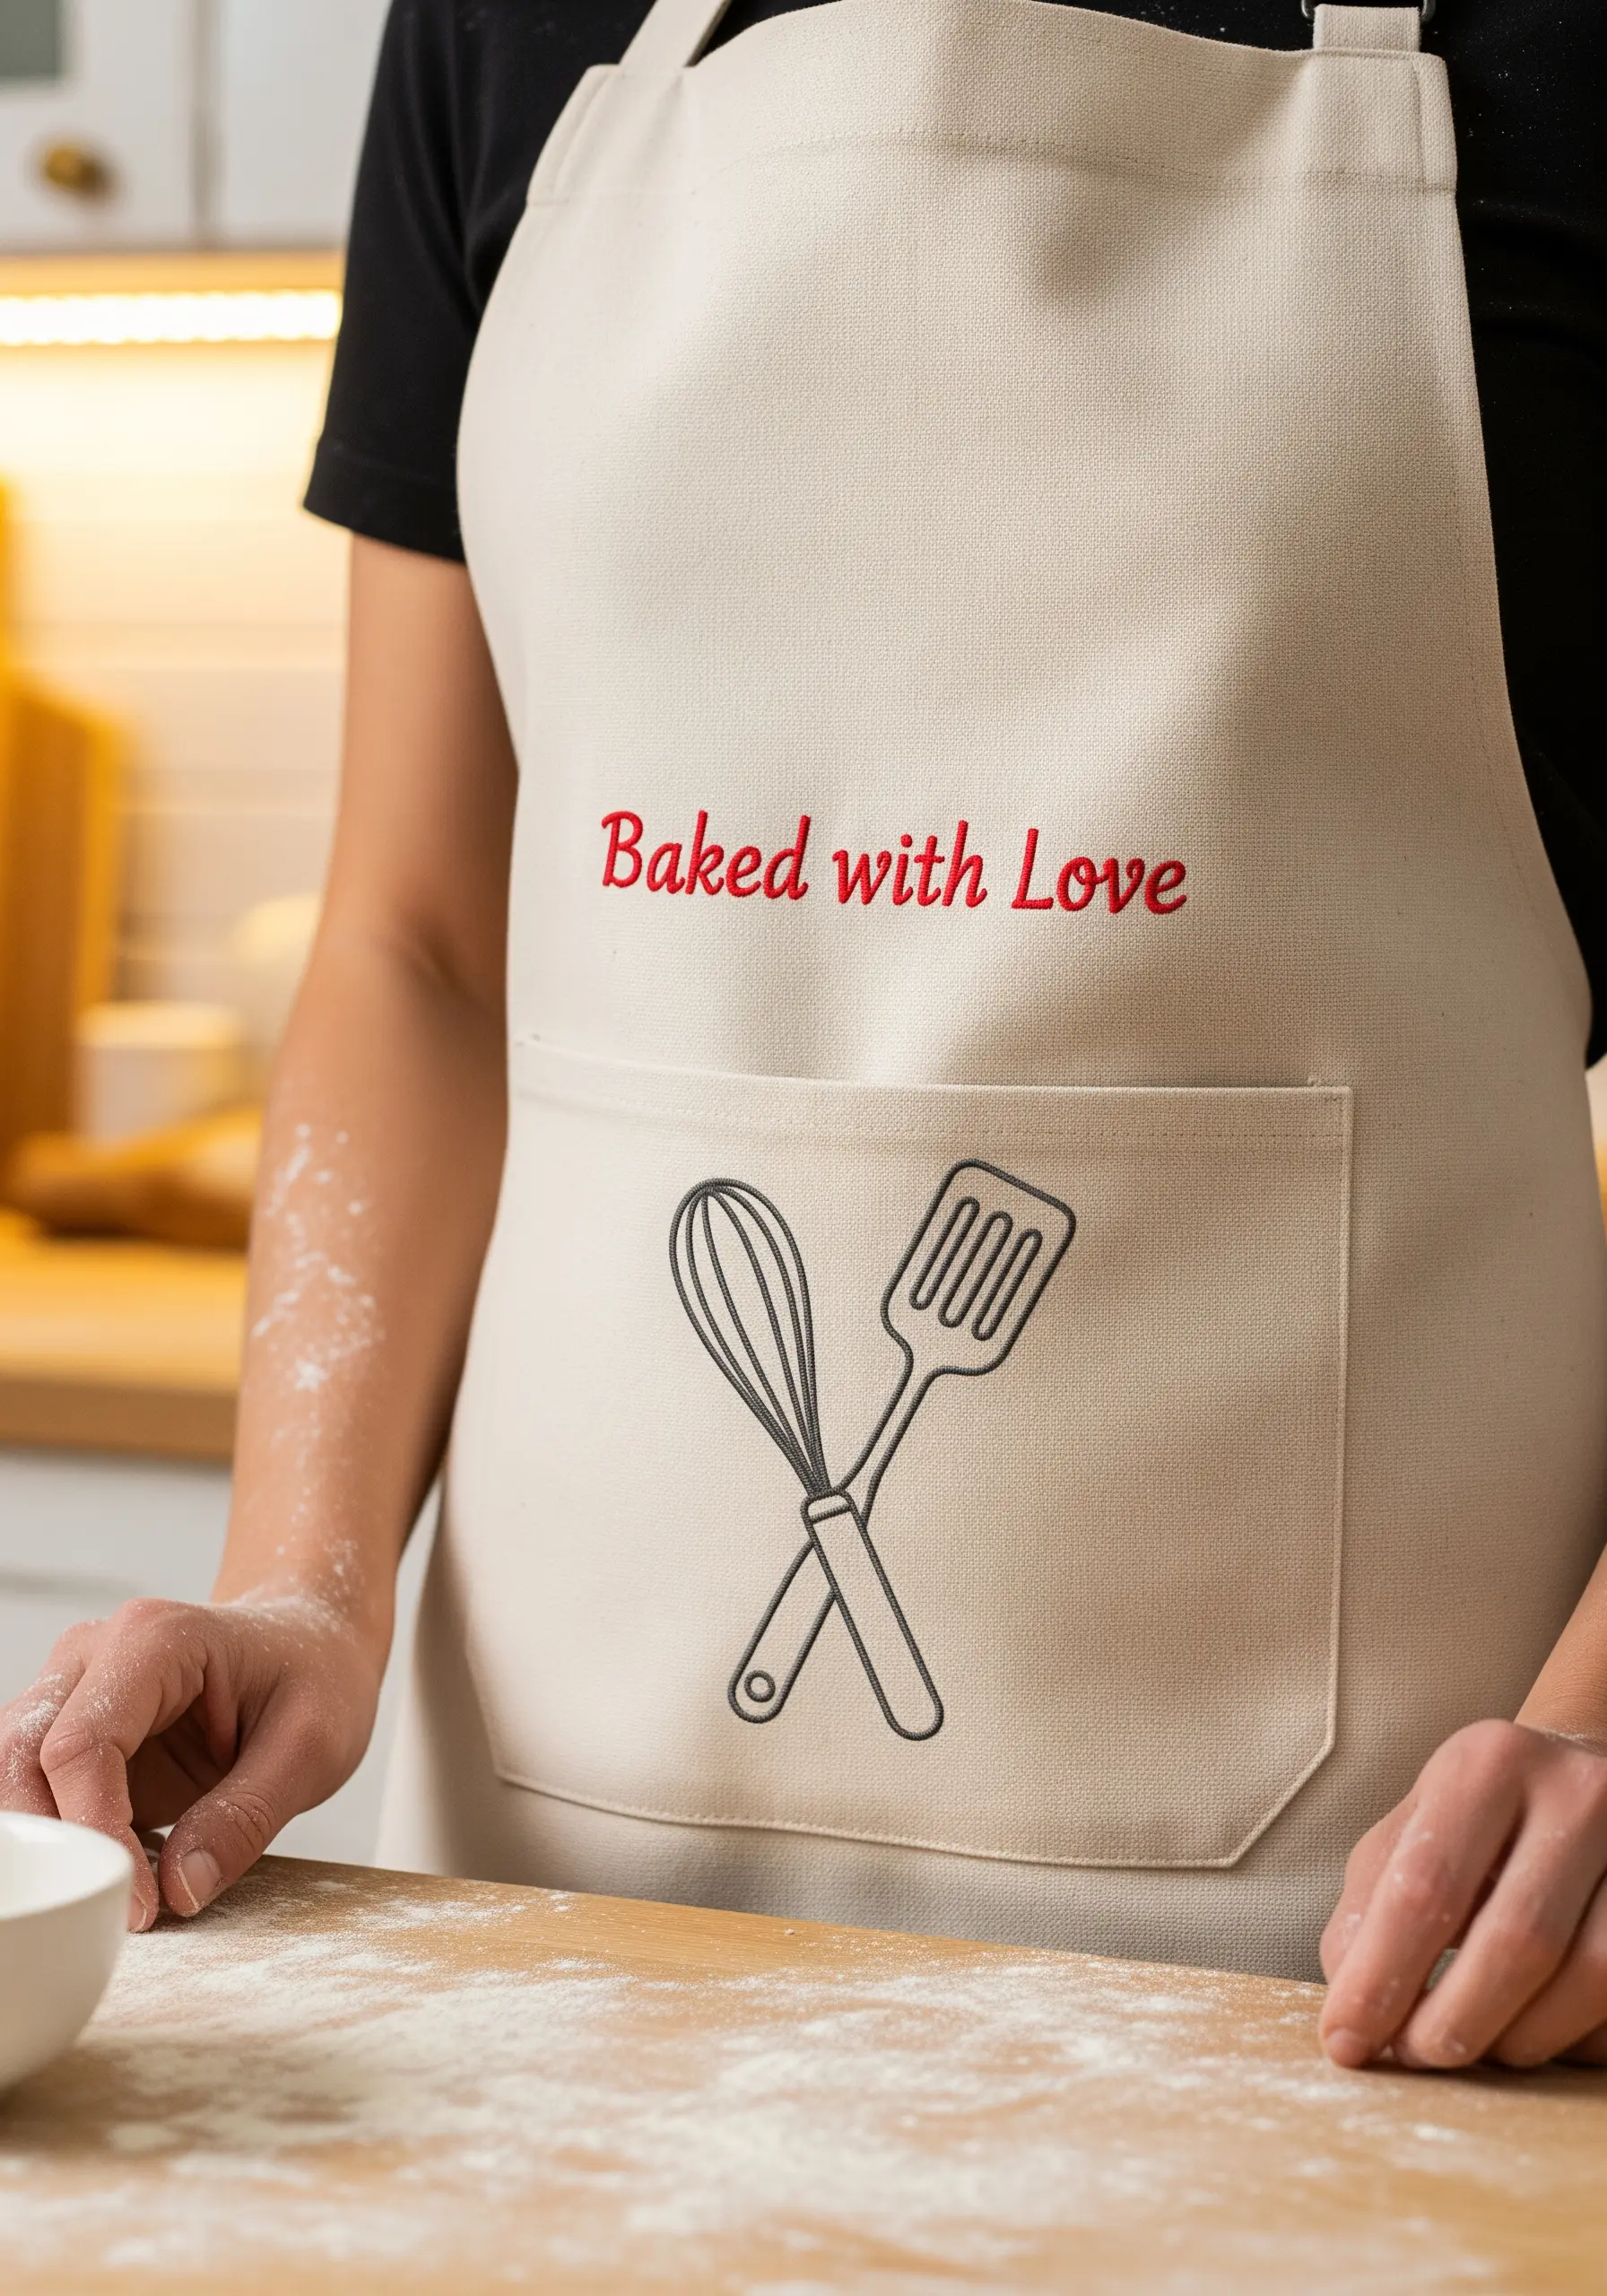
15. Add a Heartfelt Quote to an Apron
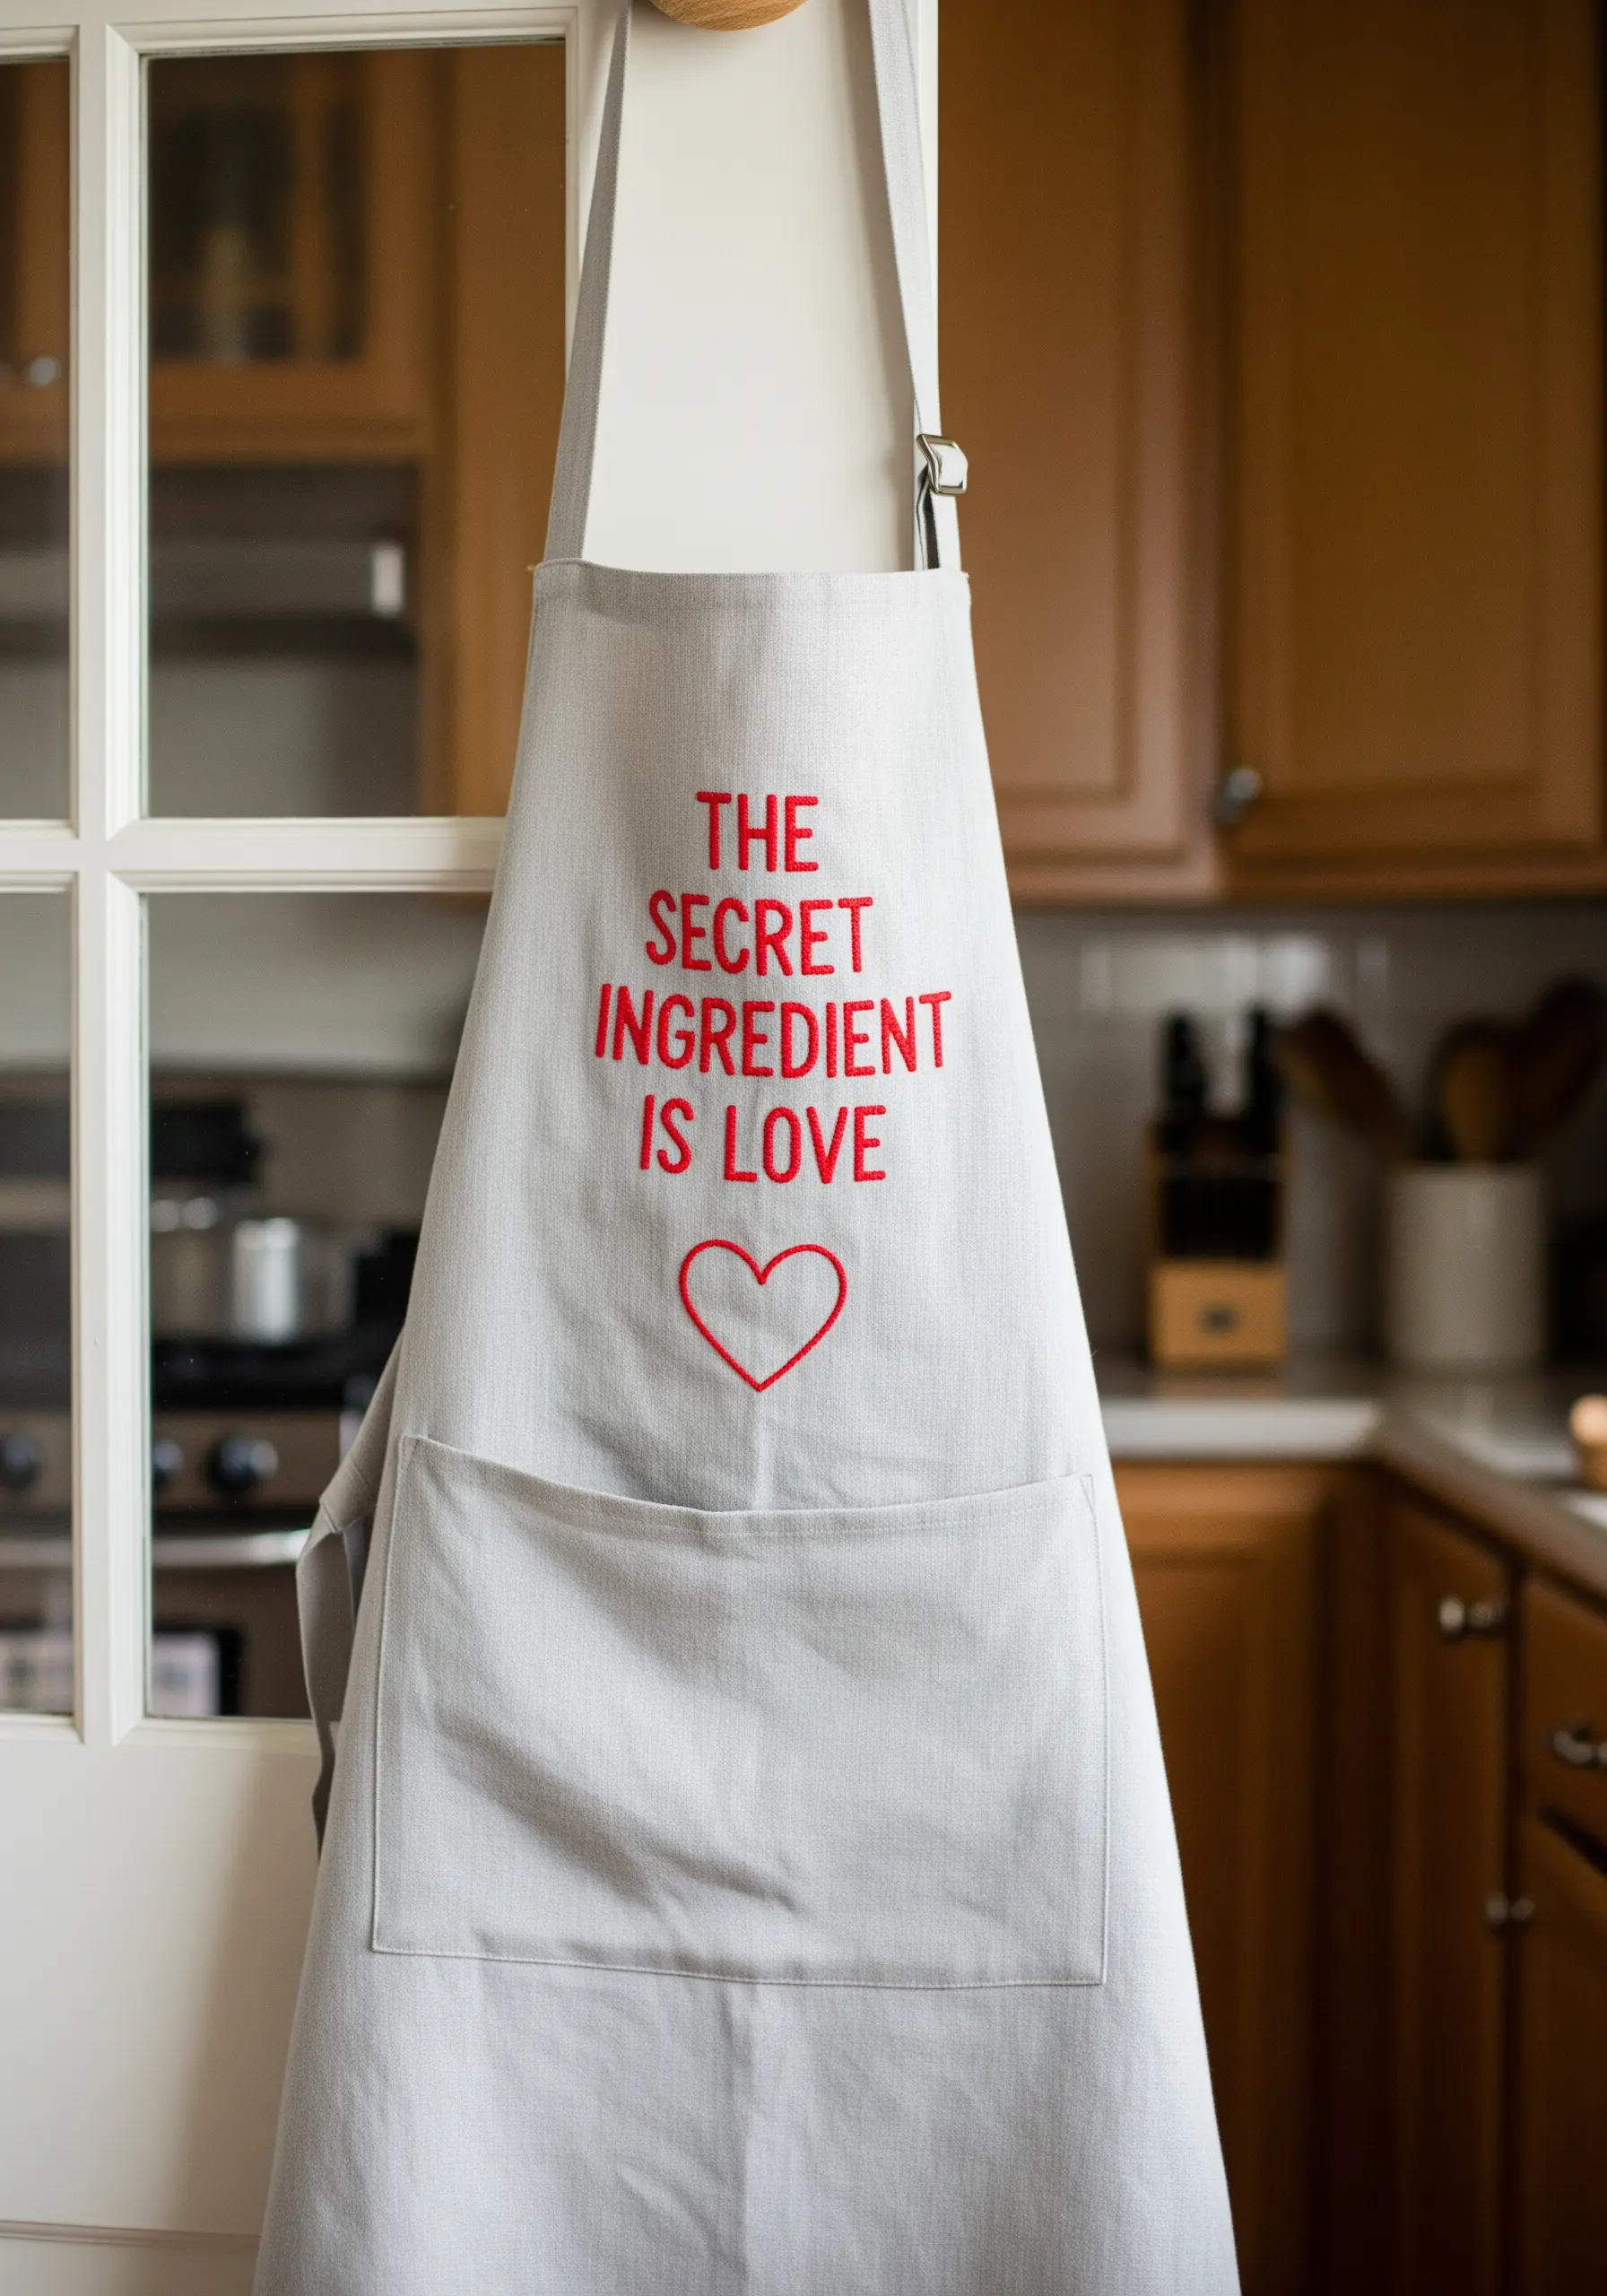
When embroidering on functional items like aprons, choose a stitch that is both beautiful and durable.
A backstitch is the perfect choice for simple, clean lettering as its interlocking stitches are strong and hold up well to washing.
Use three strands of floss for a line that is substantial but not bulky, ensuring the message remains the star of the piece.
16. Map a Memory on a Passport Cover
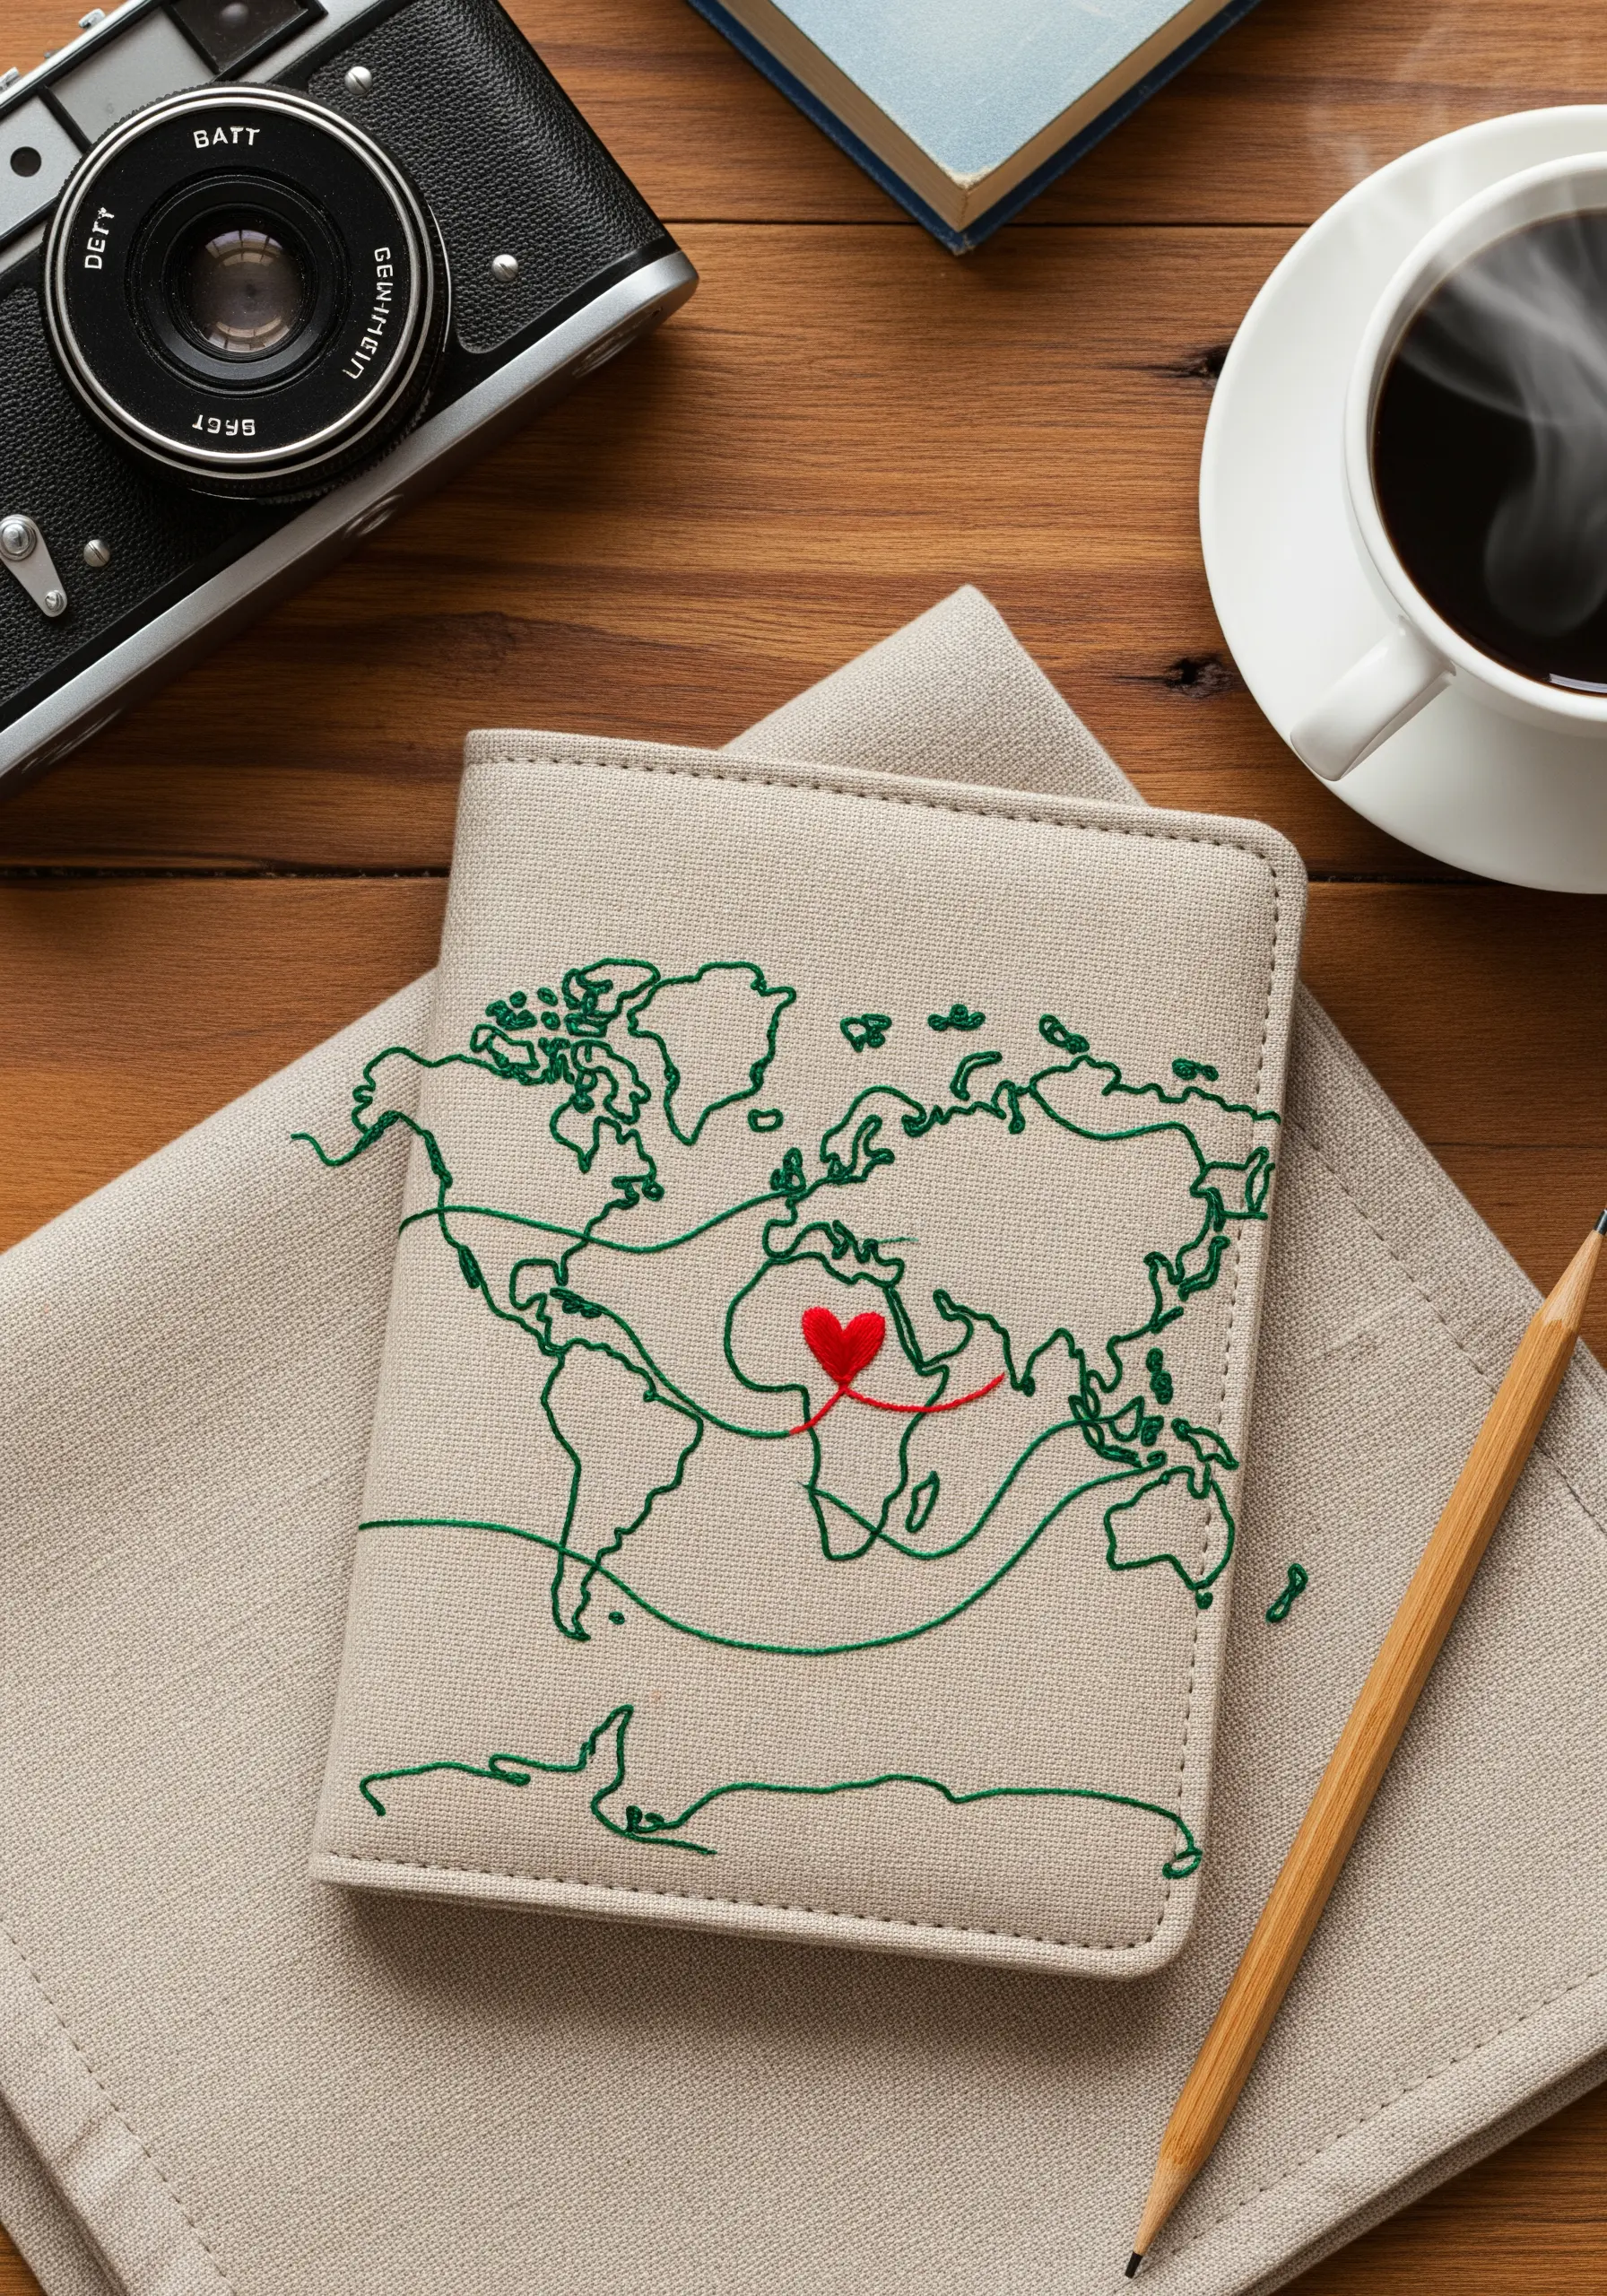
A continuous line design like a world map looks best when stitched with a fluid, unbroken line.
The stem stitch is perfect for this, as it naturally creates smooth curves and allows you to easily change direction without creating sharp angles.
Stitch a tiny red heart over a meaningful location to add a personal focal point that tells a story.
17. Design a Dreamy 3D Nursery Hoop
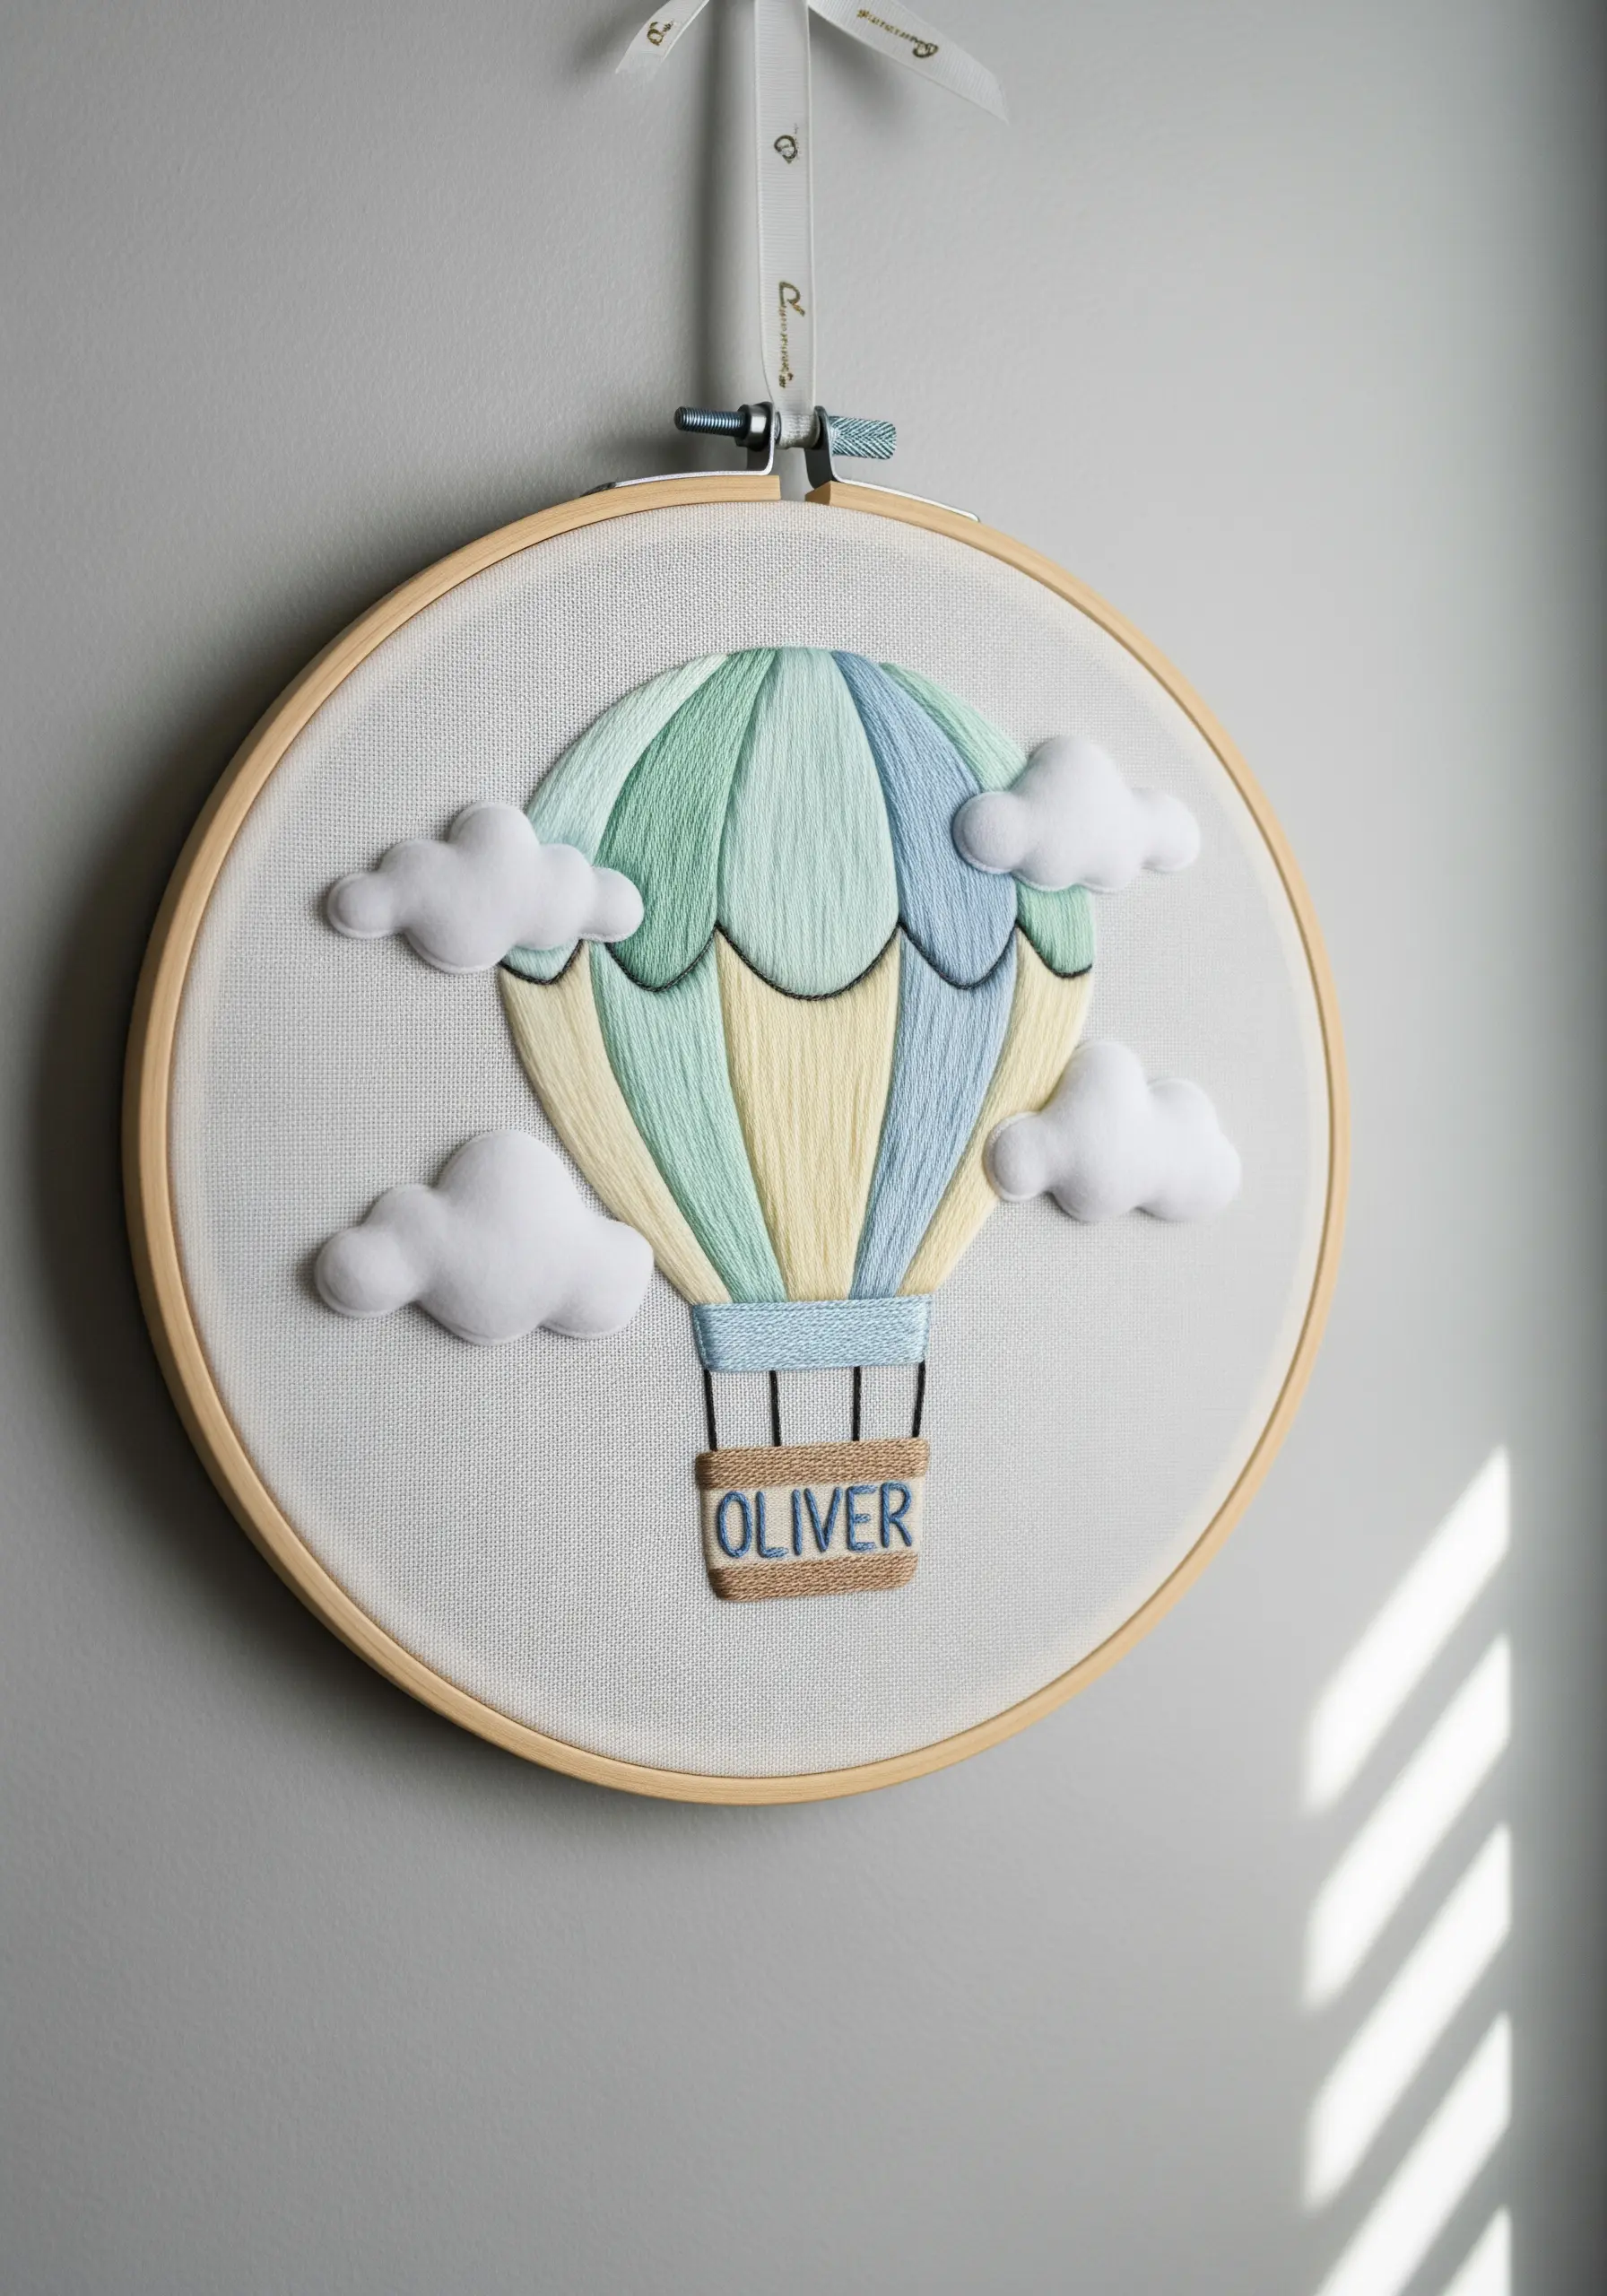
Incorporate soft, dimensional elements to create tactile nursery stitch art wall ideas.
Use a padded satin stitch for the balloon panels by creating a base of horizontal stitches before covering them with vertical satin stitches; this gives it a plump, rounded shape.
For the clouds, cut the shapes from felt, add a bit of stuffing behind them, and attach them to the fabric with a simple whip stitch around the edges.
18. Stitch Reusable Garden Markers
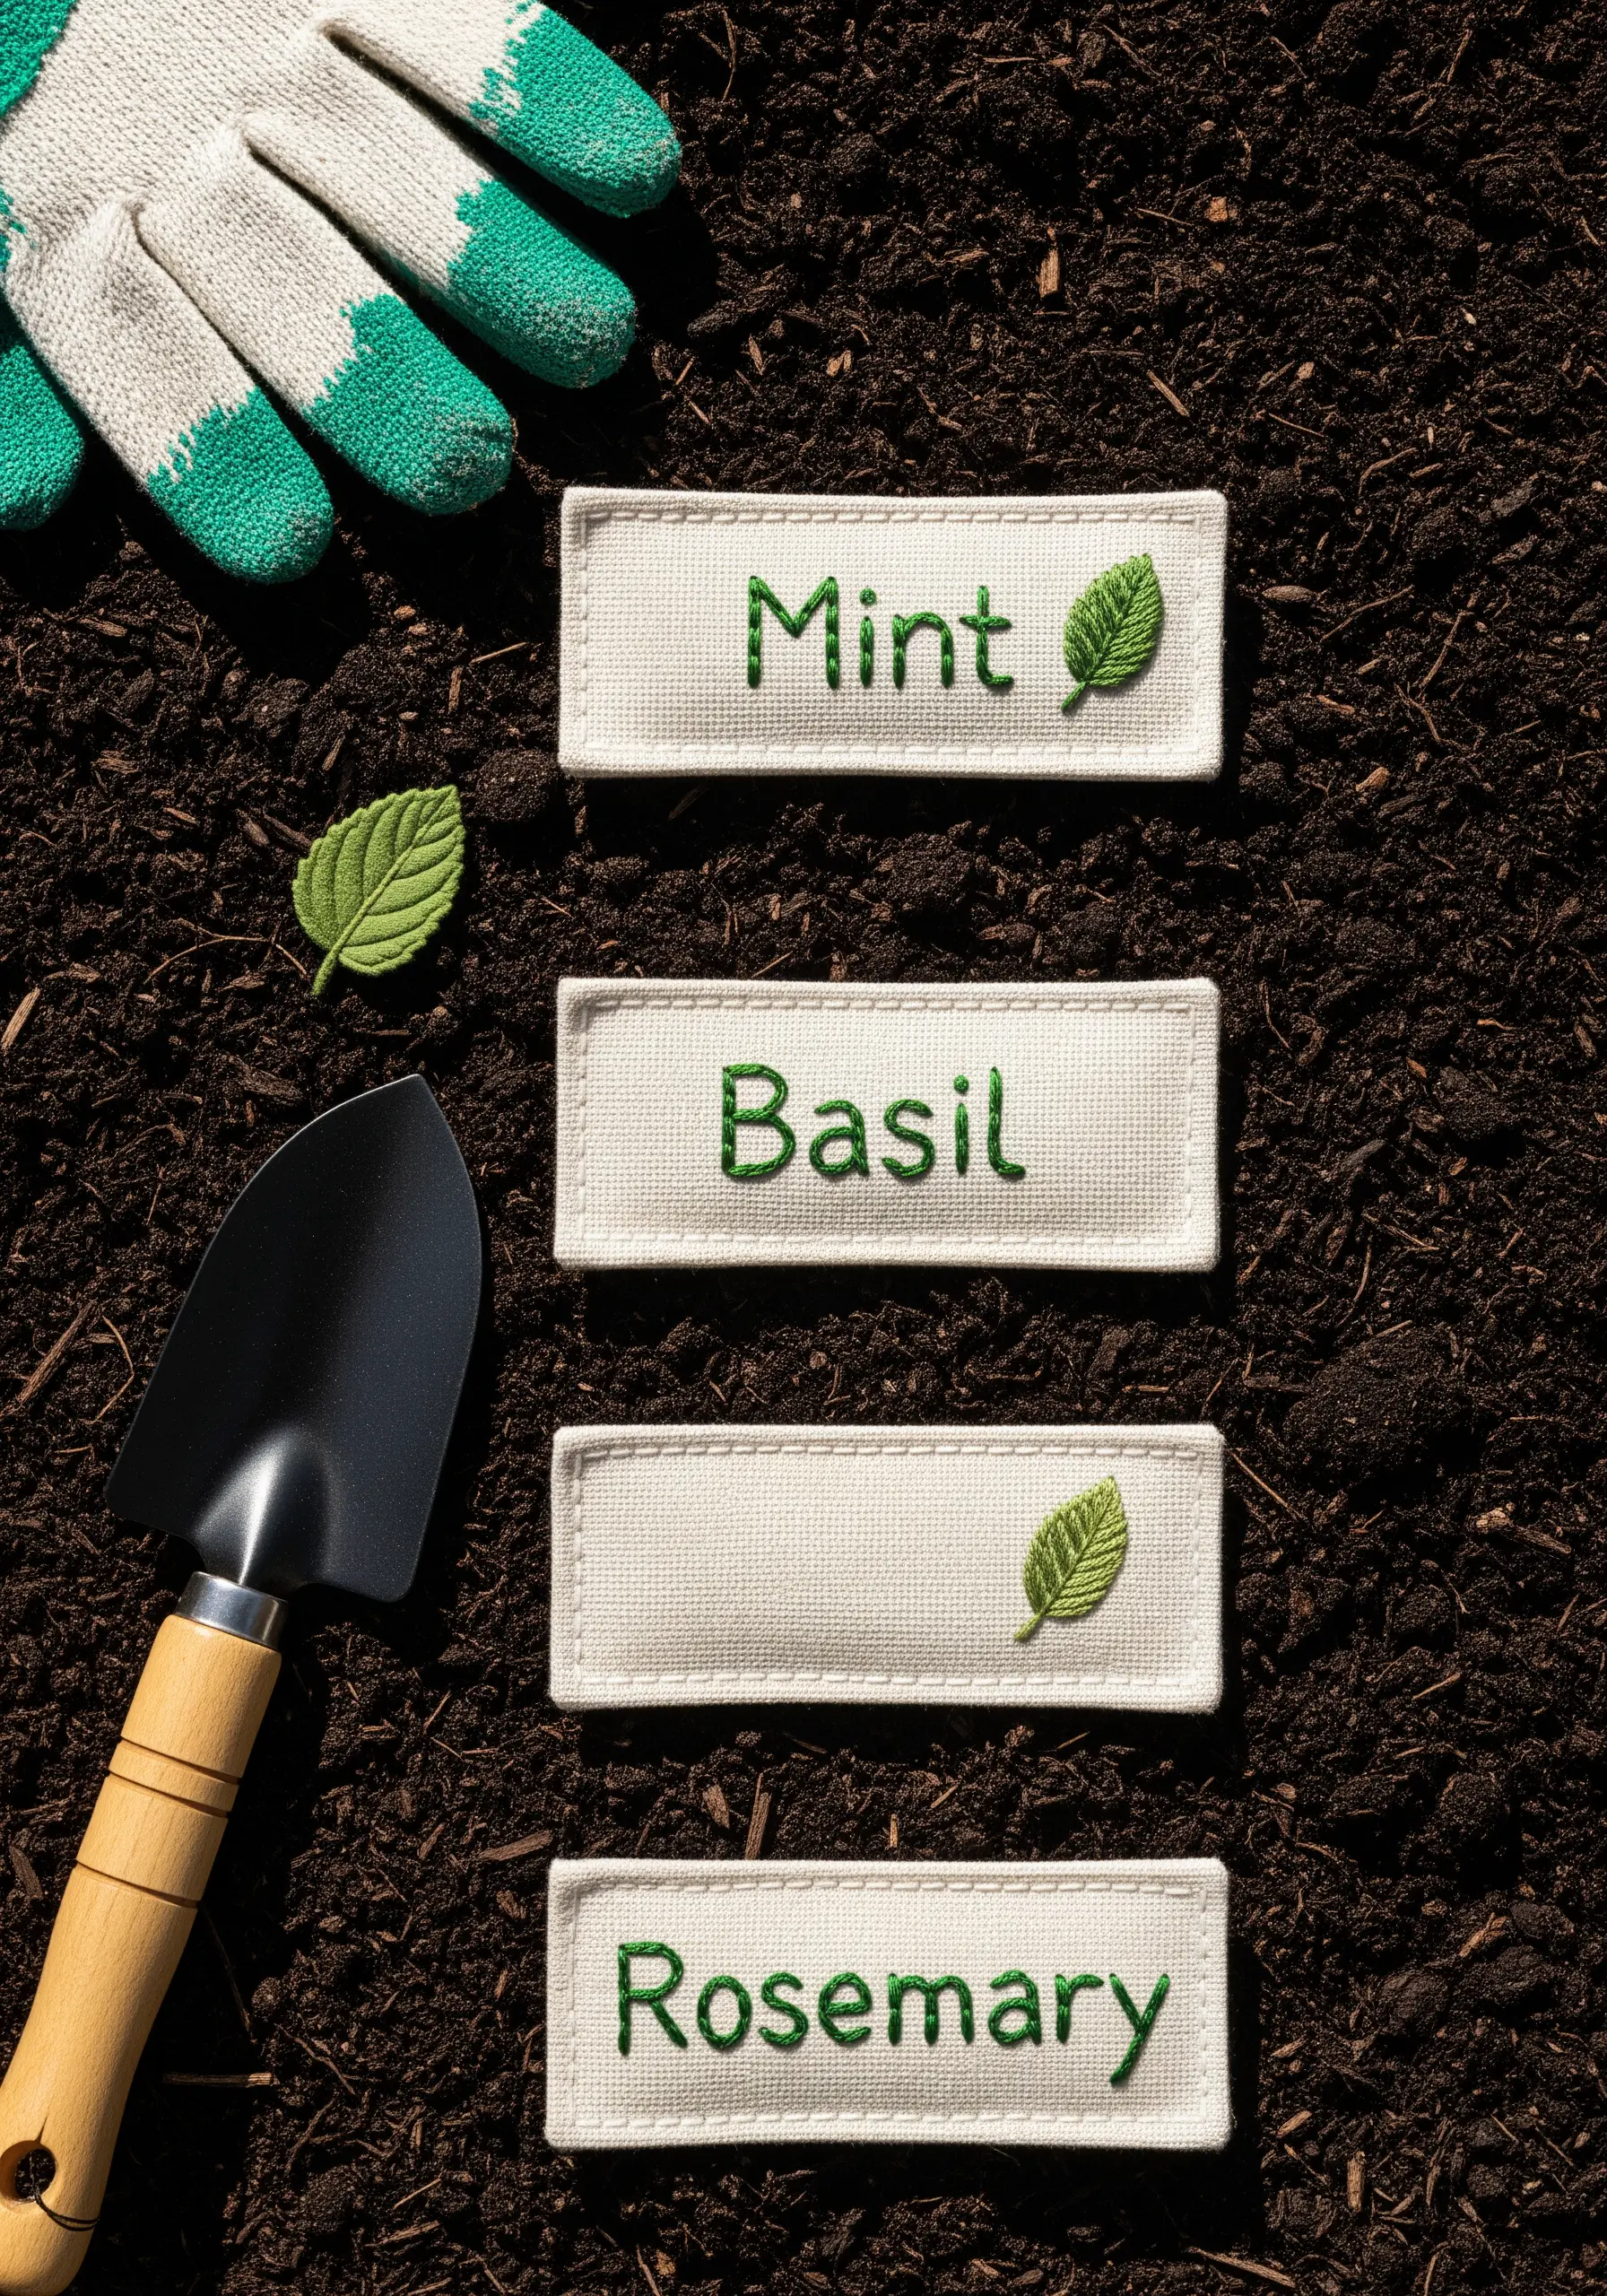
Create durable and beautiful plant markers by stitching on sturdy canvas fabric tags.
Use a split stitch for the lettering; its rope-like texture is highly legible and gives a refined finish that mimics print.
For the tiny leaf details, a single detached chain stitch paired with a straight stitch stem is all you need for a charming, recognizable motif.
19. Embellish a Shirt with Collar Florals
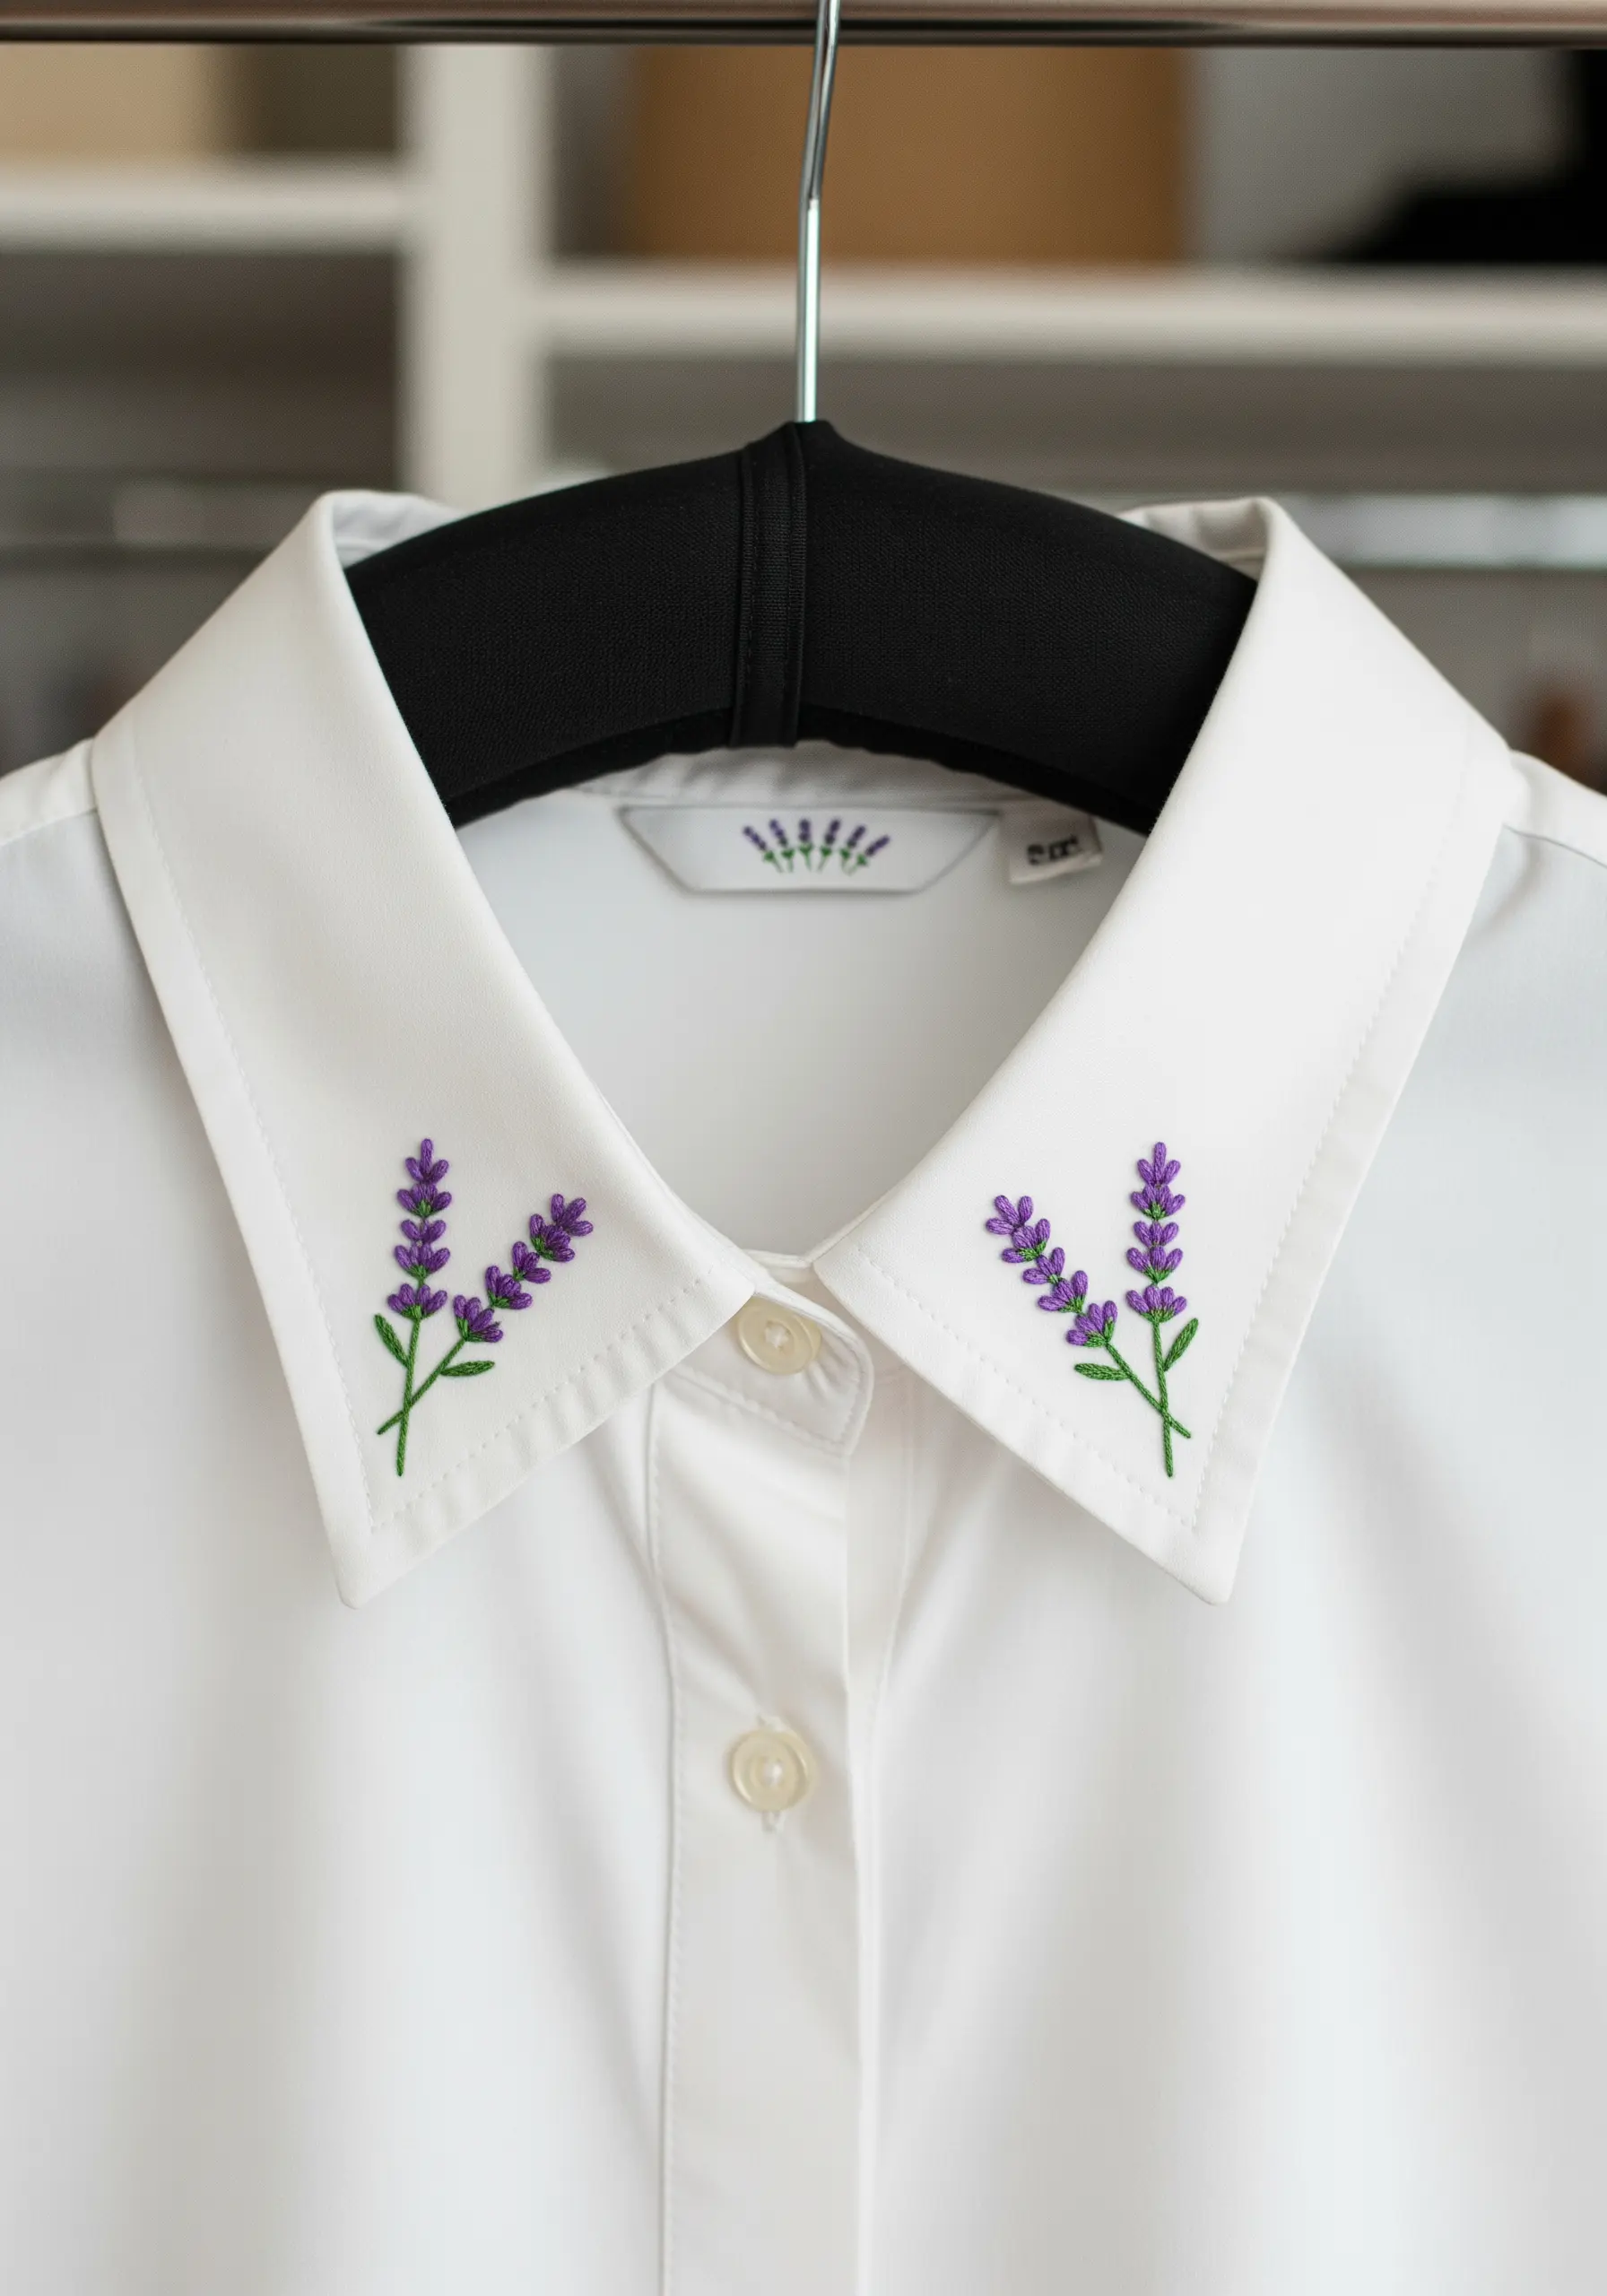
The key to elegant collar embroidery is symmetry and delicacy.
Use a light-erasable fabric pen and a lightbox (or a bright window) to trace your design onto both collar points, ensuring they are perfectly mirrored.
Stitch with only two strands of floss to keep the design from looking bulky on the crisp shirt fabric.
These delicate floral collar embroidery patterns add a touch of bespoke charm.
20. Create a Timeless Wedding Monogram
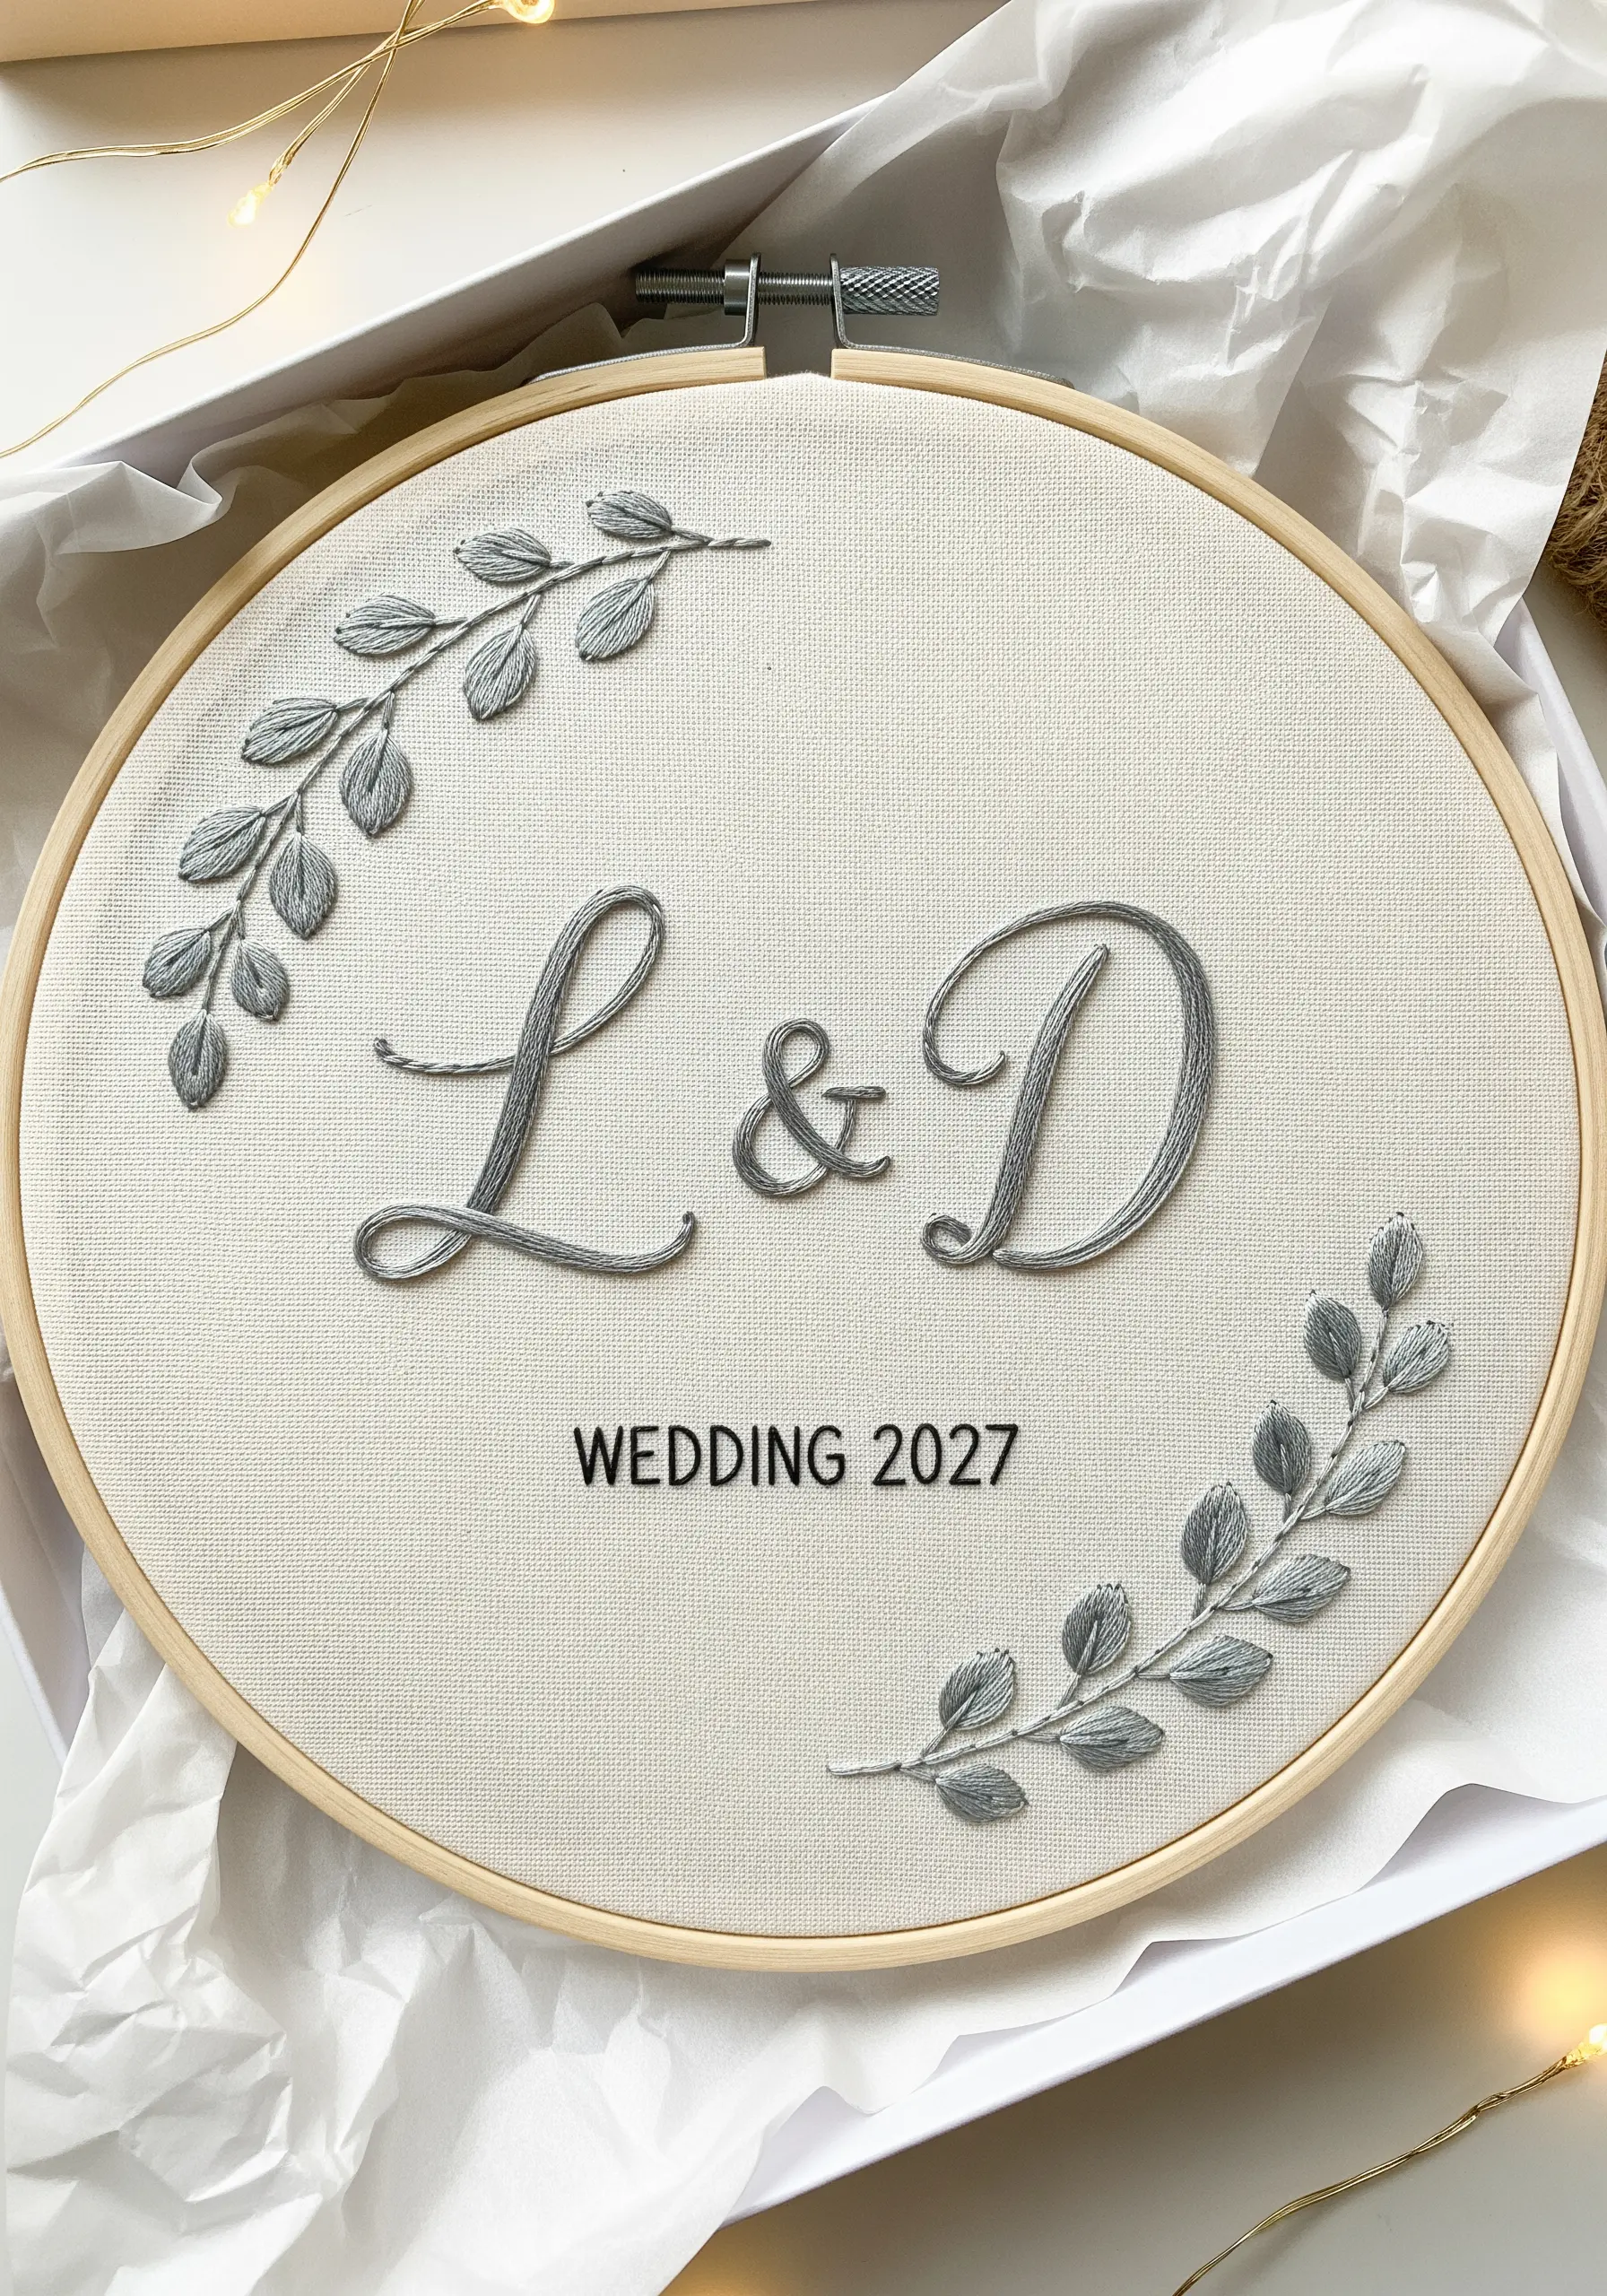
To give monogrammed initials a luxurious, sculpted appearance, always use a padded satin stitch.
First, fill the inside of the letter shapes with foundation stitches (small running stitches or a seed stitch).
Then, cover this padding with long, smooth satin stitches laid perpendicular to the foundation.
This simple extra step raises the embroidery from the fabric, creating elegant shadows and a high-end, embossed look.
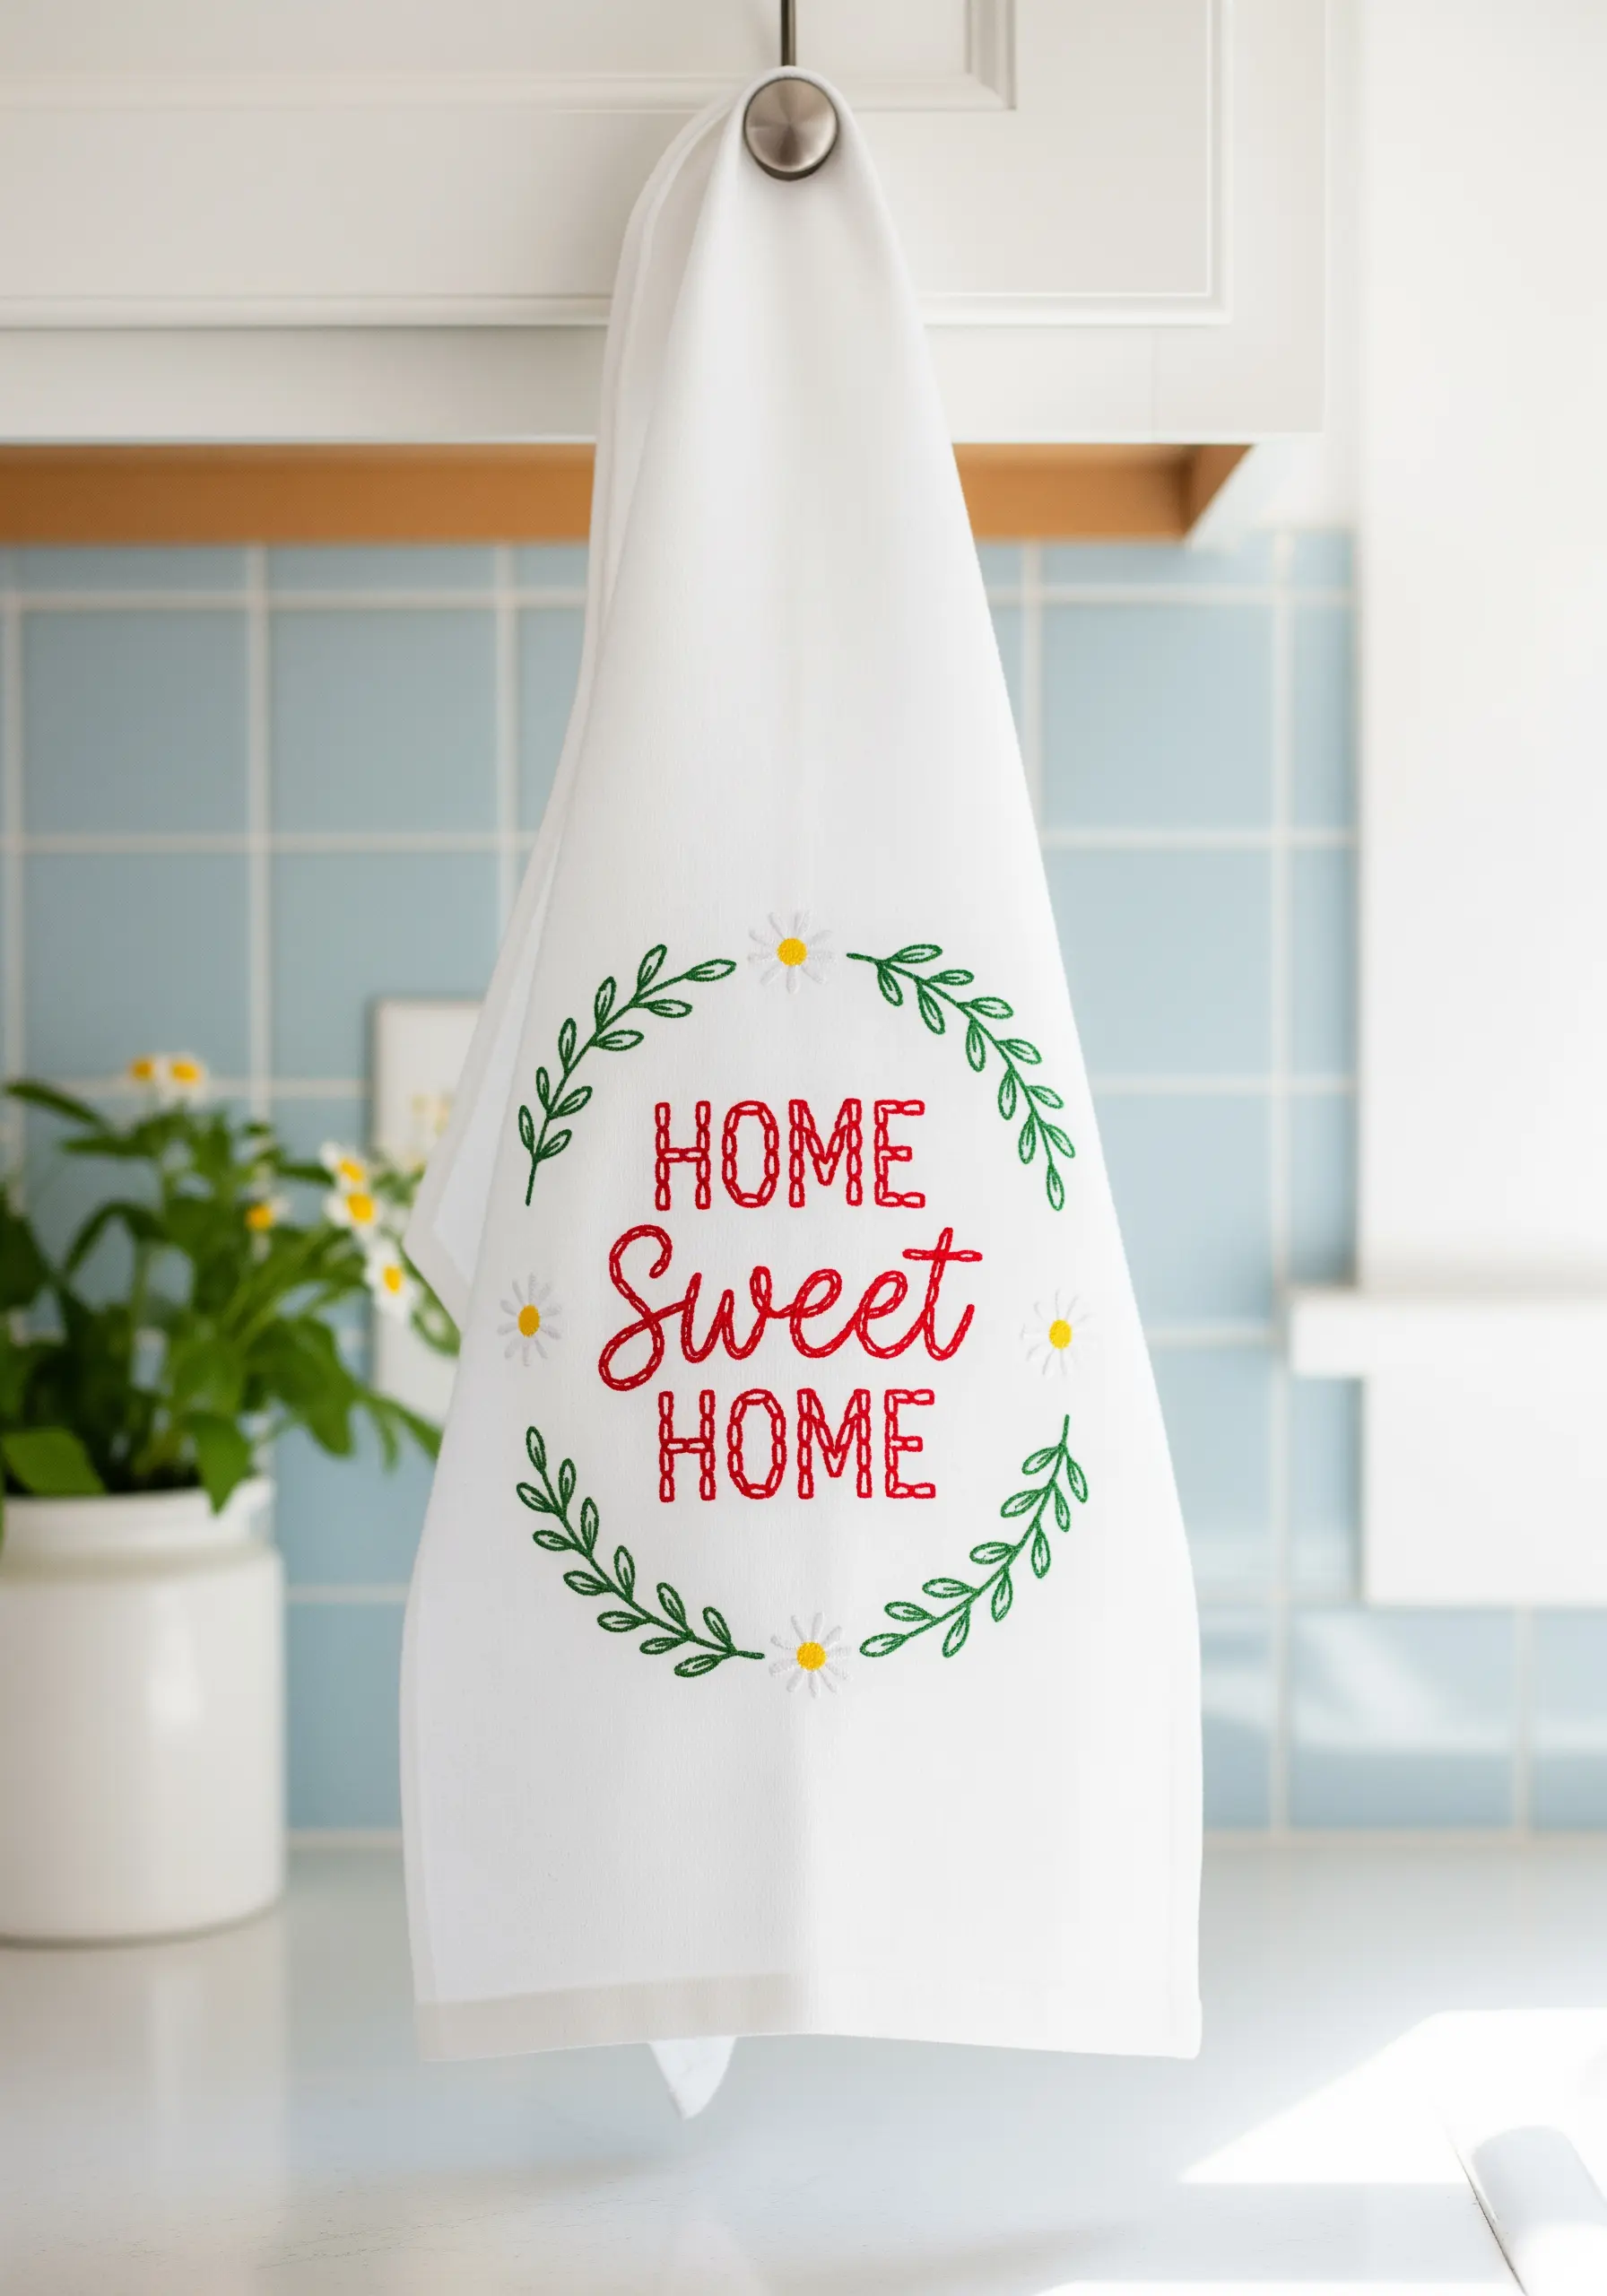
21. Stitch a Family Recipe onto a Tea Towel
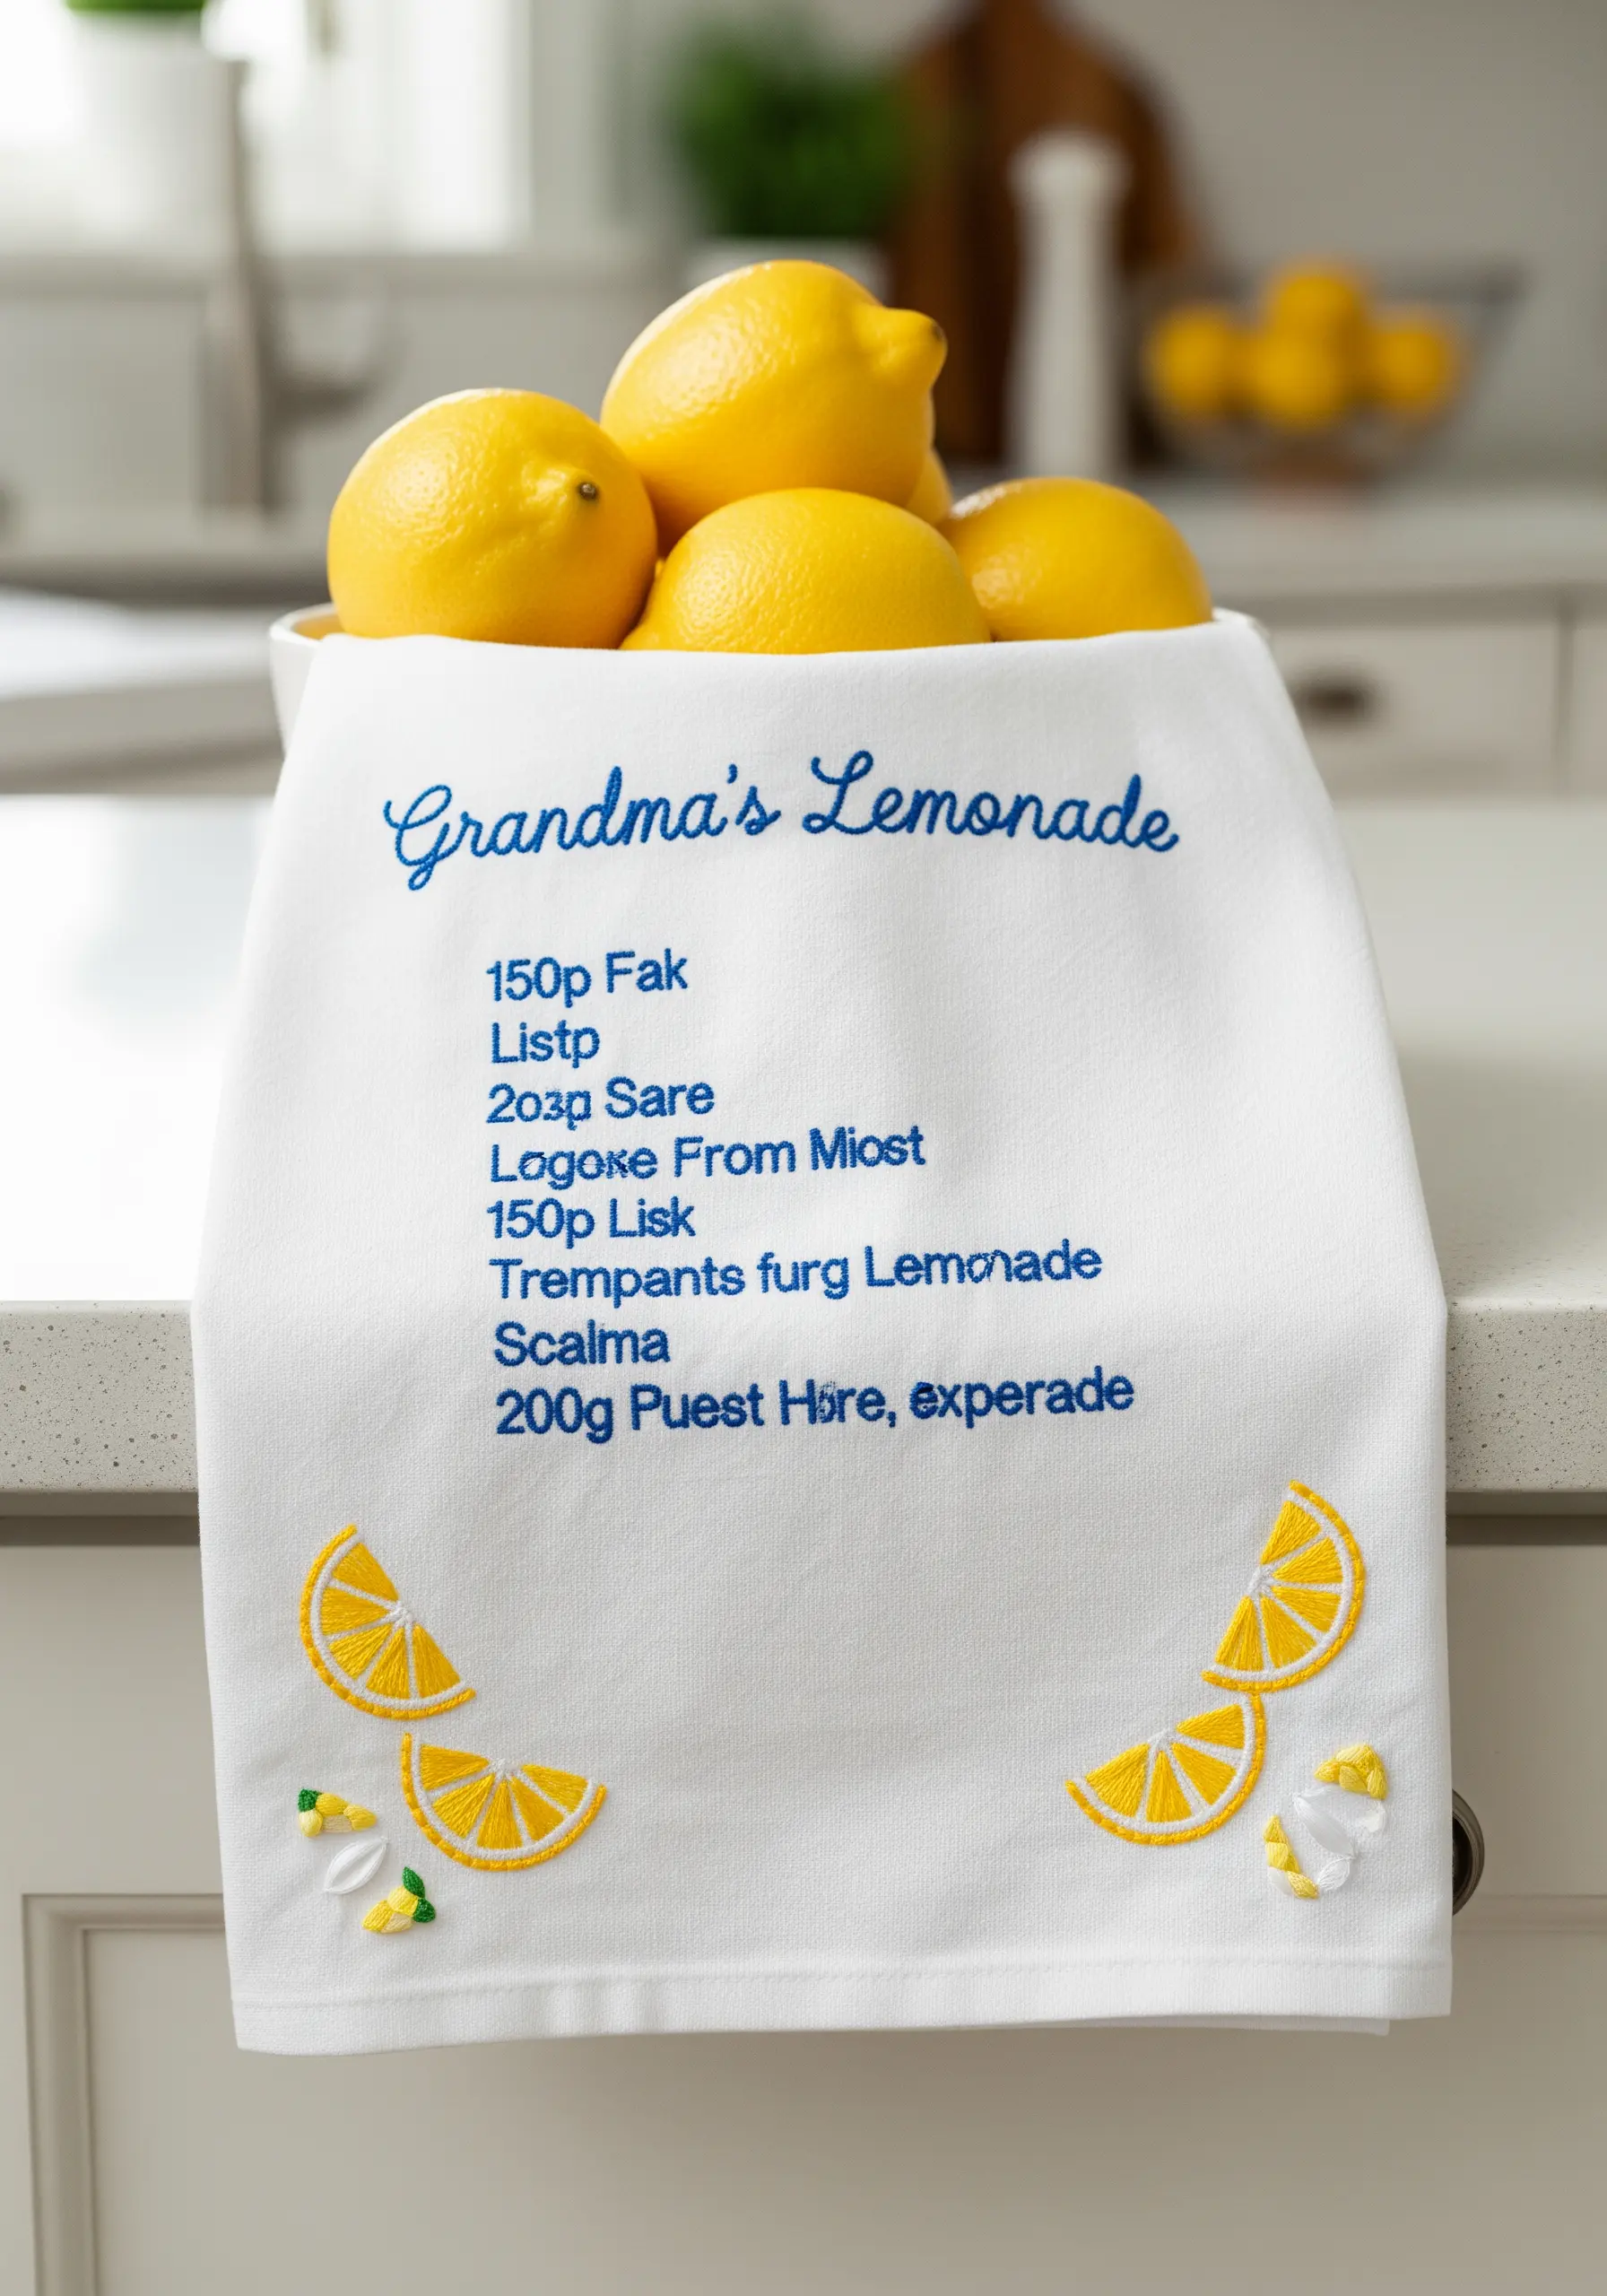
To preserve a cherished recipe in thread, prioritize legibility and charm.
Use a simple backstitch for the text, using two strands for clarity without adding bulk. Choose a classic serif or a clean script font that is easy to read from a distance.
Add small, illustrative motifs like lemon slices using a satin stitch to bring the recipe to life and add a touch of personality.
22. Personalize a Keychain with Special Coordinates
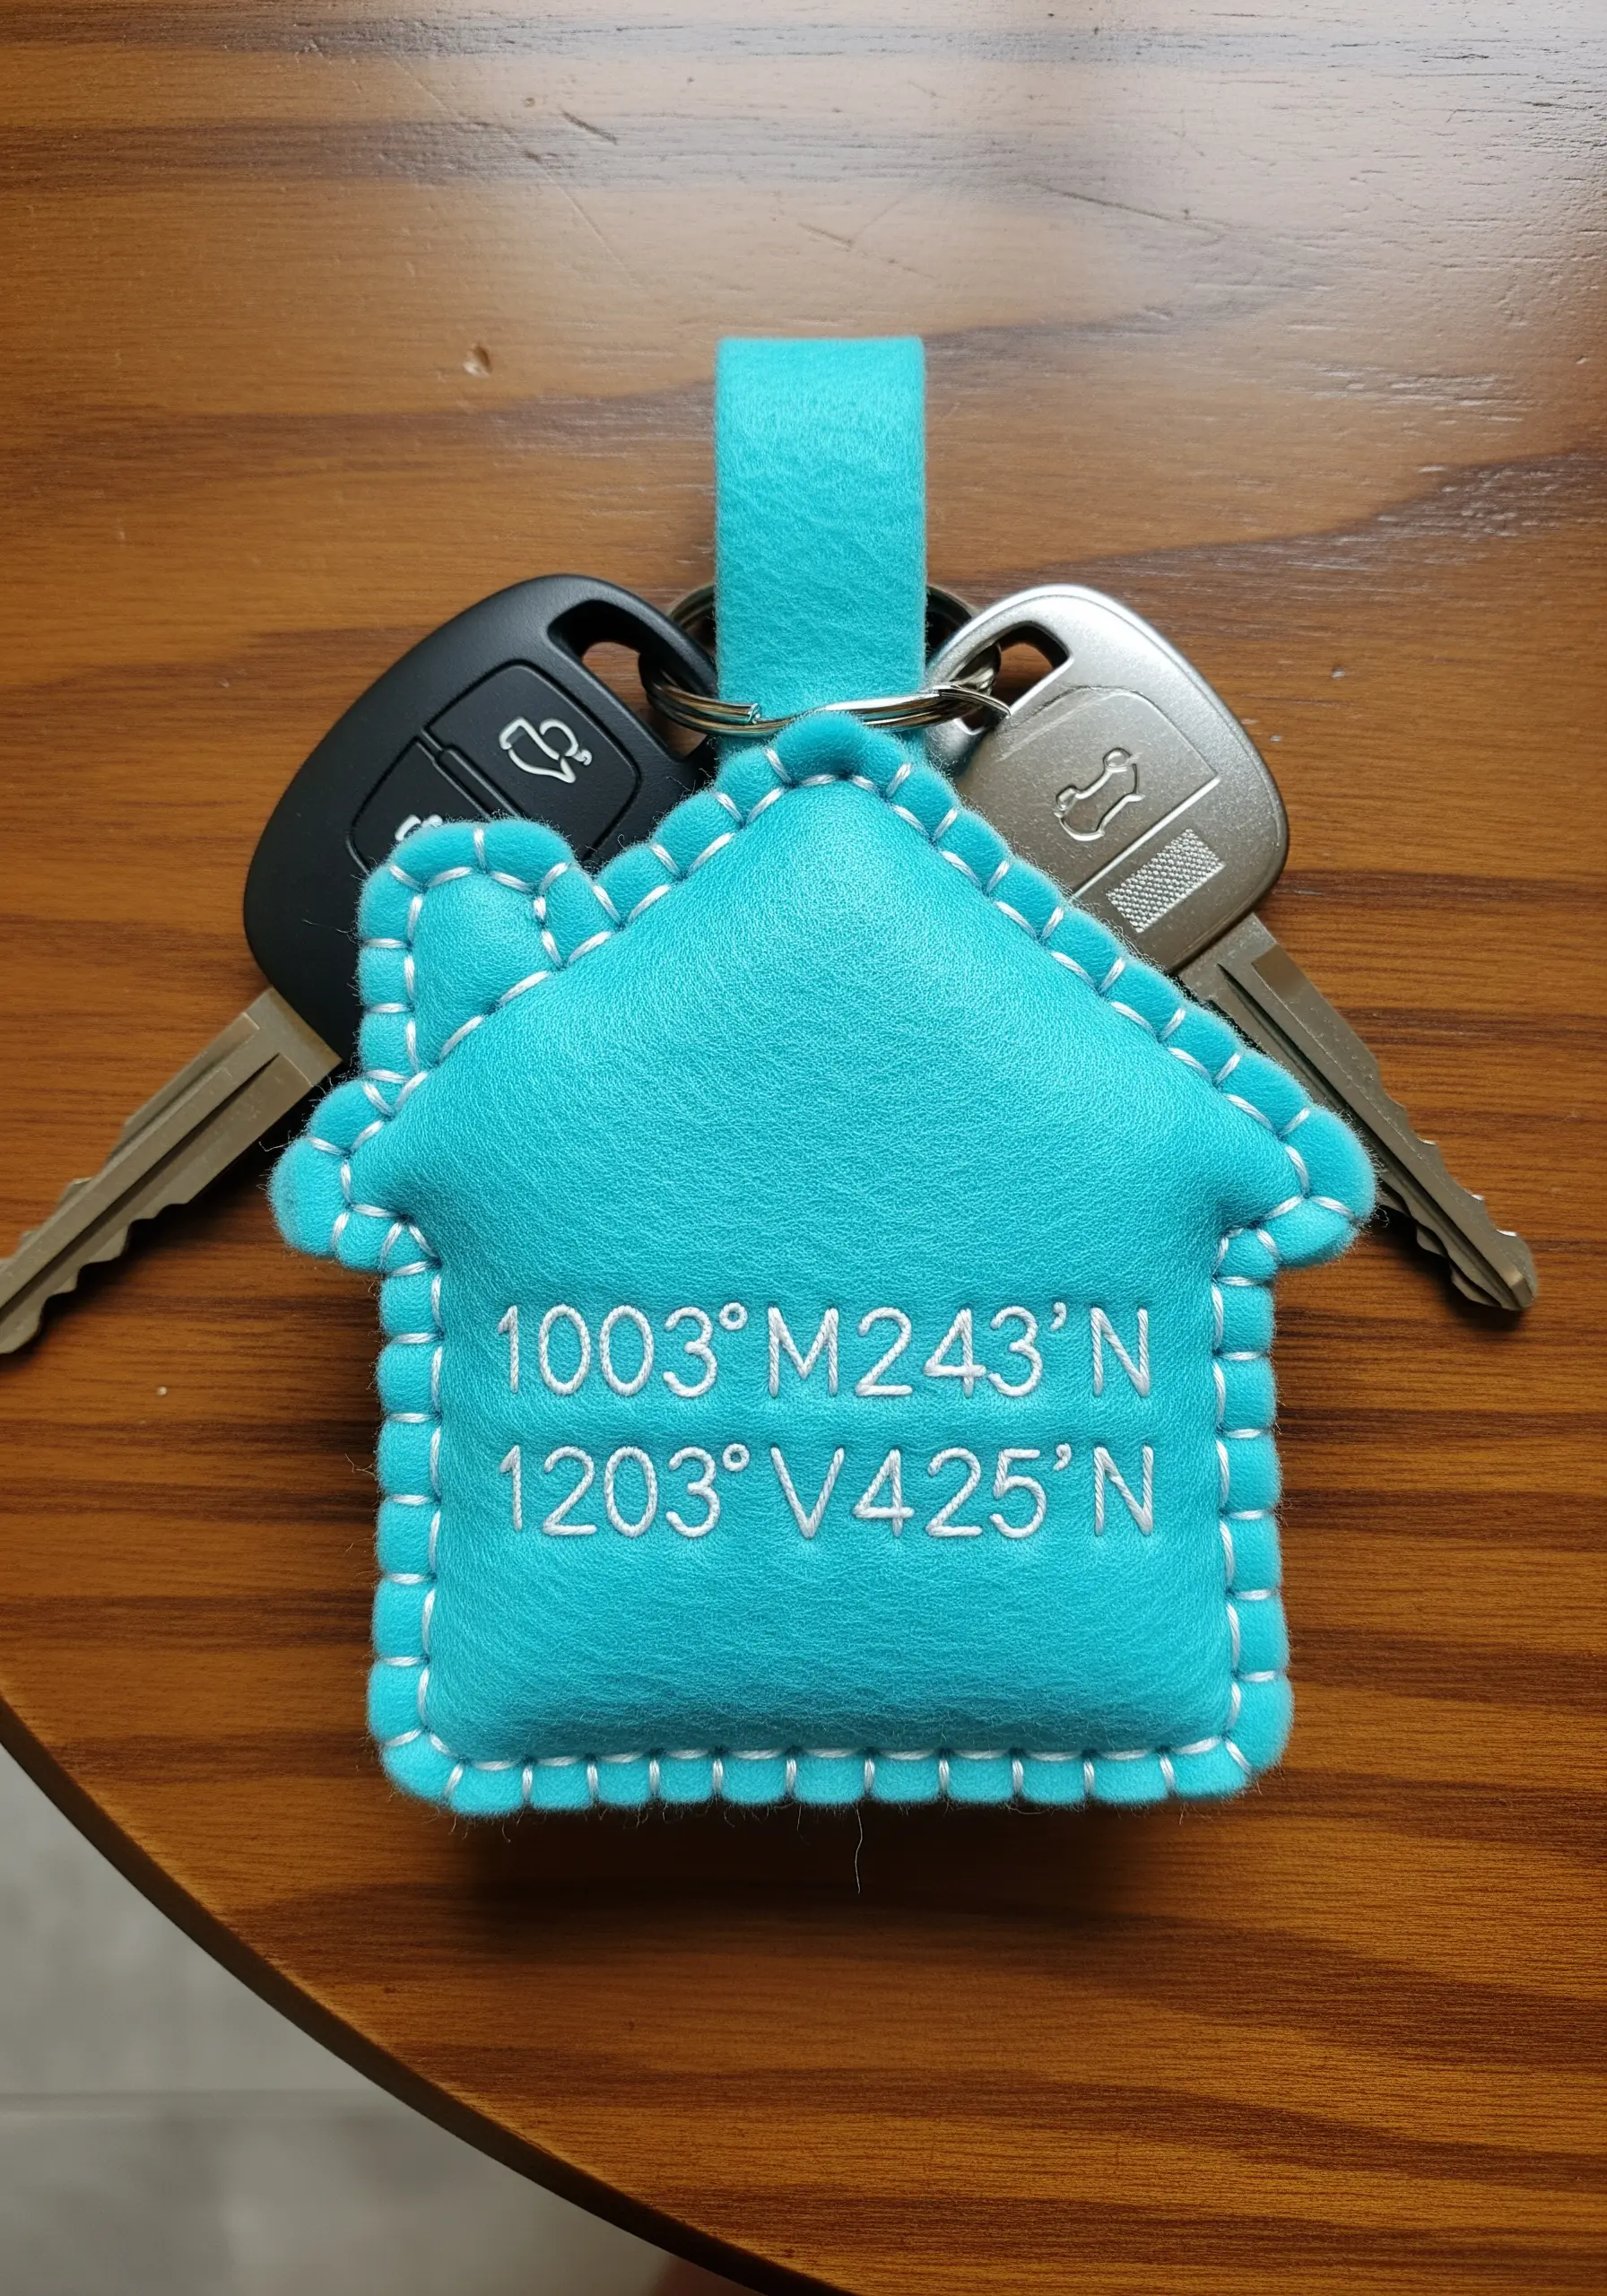
Craft a meaningful gift by embroidering coordinates onto a felt keychain.
Because felt has no grain, your stitches will sit cleanly on the surface. Use a simple backstitch for the numbers, keeping your stitches small and even for maximum clarity.
A contrasting blanket stitch around the edge not only secures the felt layers together but also adds a decorative, handmade frame to your design.
23. Create a Luxe Zodiac Accent Pillow
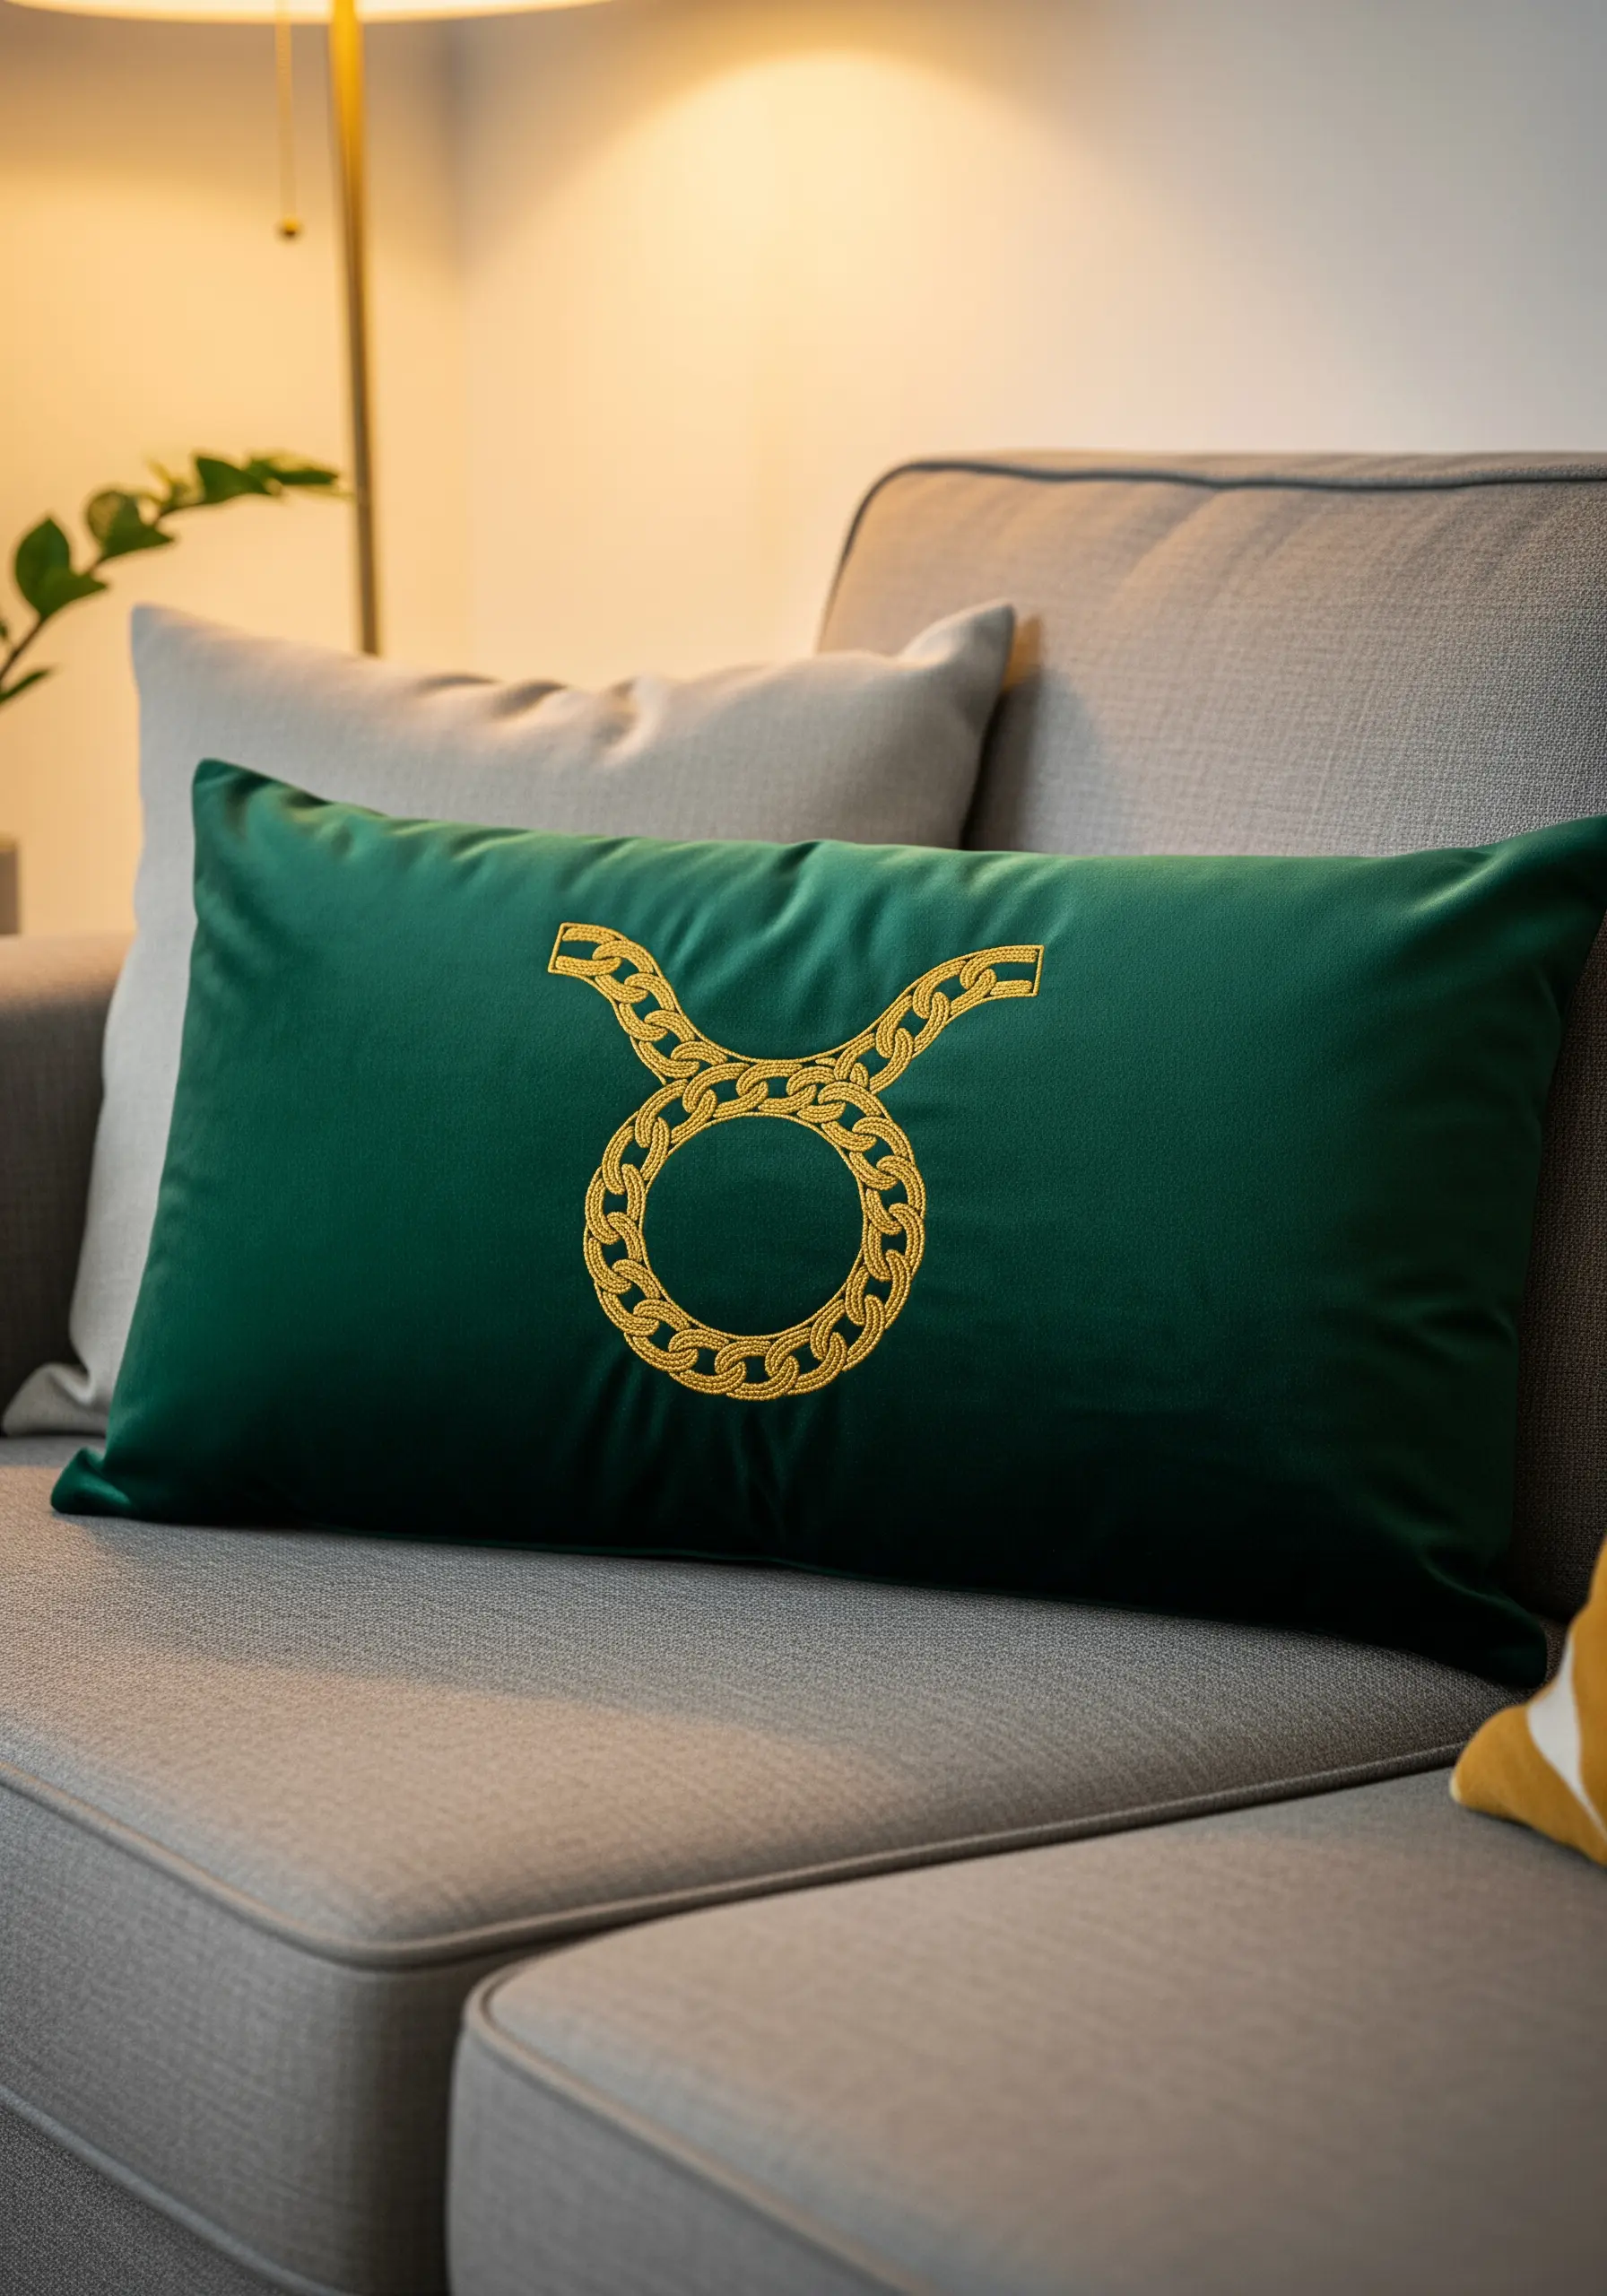
Elevate a simple zodiac symbol by giving it a unique, textural interpretation.
Instead of a plain outline, reimagine the symbol as a gold chain using a heavy chain stitch with a metallic or silk thread.
Stitching on a rich, dark velvet fabric enhances the metallic sheen, creating a piece that feels opulent and intentionally designed, far beyond a simple motif.
24. Fashion a Minimalist Eyeglass Case
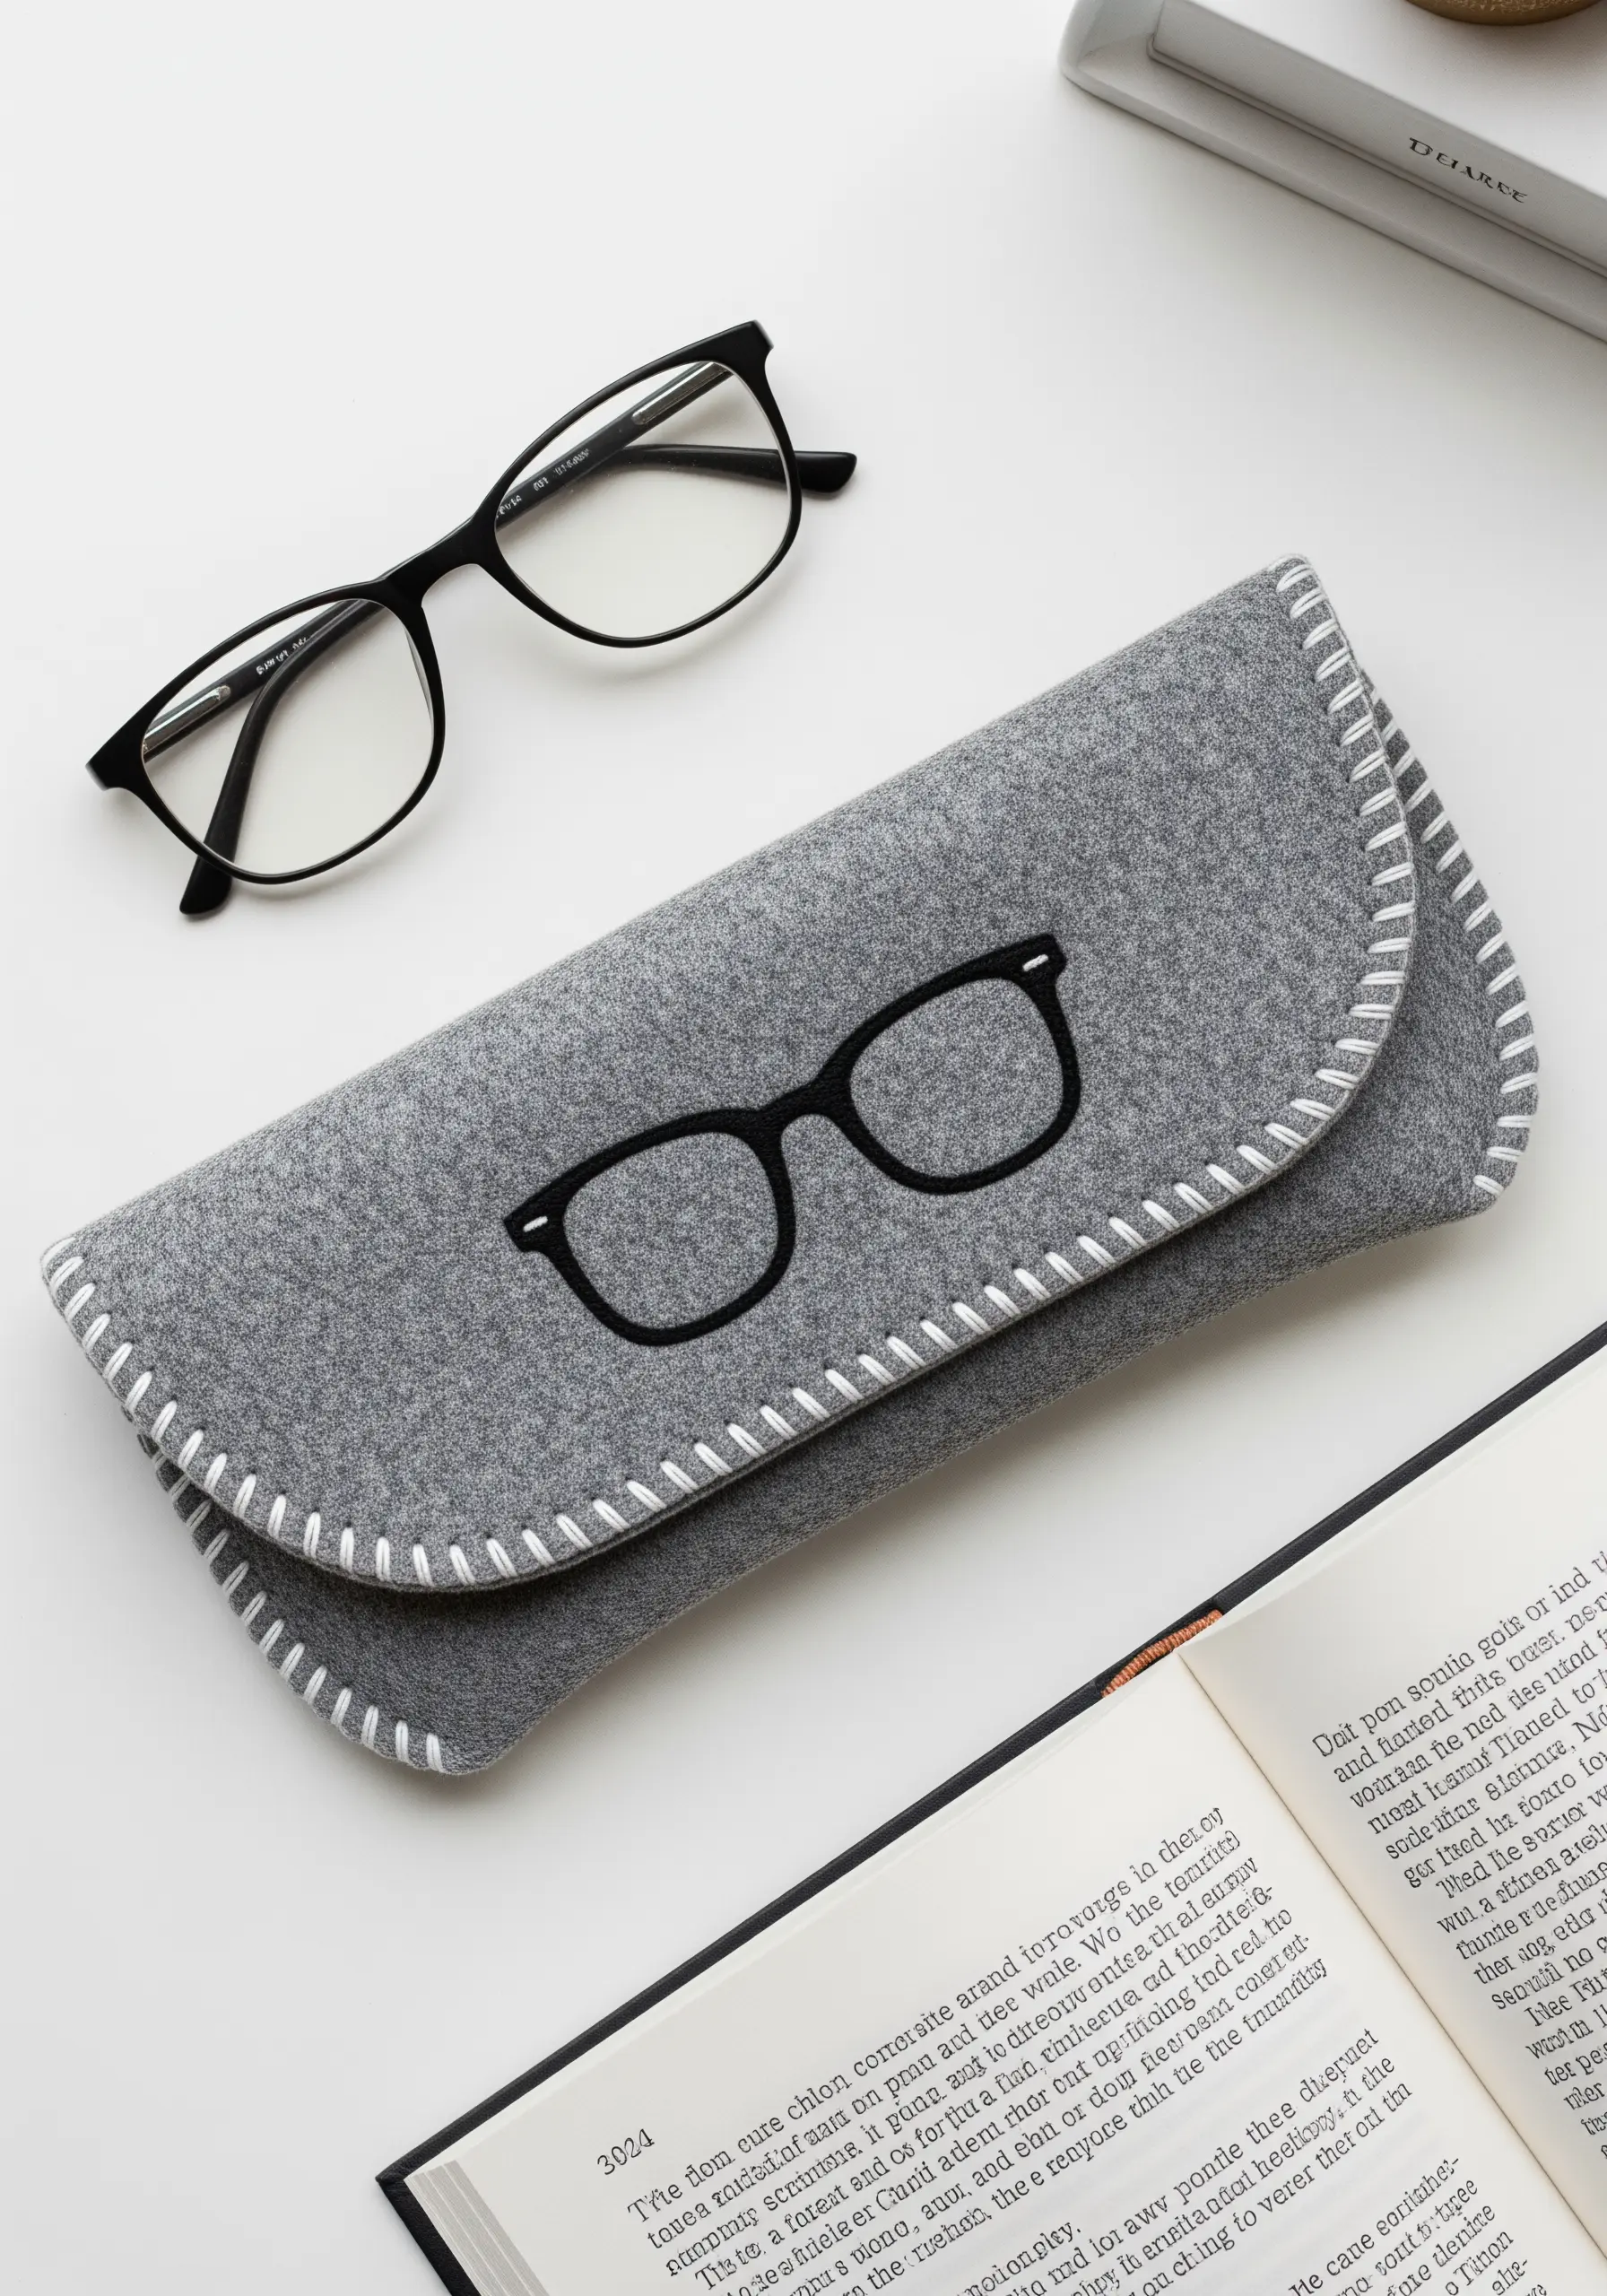
Sometimes the simplest stitches make the biggest statement.
On a heather gray felt, a clean backstitch outline of a pair of glasses in black floss is graphic and modern.
Finish the case with a contrasting blanket stitch in white thread along the curved edge. This detail not only adds structural integrity but also provides a clean, visual highlight that frames the design.
25. Design a Modern, Personalized Apron
Combine clean text and simple line art for a personalized apron that feels contemporary and stylish.
Use a split stitch for the lettering to give it a slightly more substantial and refined look than a standard backstitch.
For the tool illustrations, a simple backstitch is perfect for maintaining the crisp, graphic quality of the line drawings. This pairing creates a balanced and professional-looking design.
26. Embellish a Gift Bag with a Single Bloom
Transform a simple drawstring bag into a reusable gift wrap with a striking, single flower.
Use the long and short stitch to create a smooth, paint-like gradient on the petals, blending shades of pink from light to dark to give the flower realistic dimension.
This technique, also known as thread painting, elevates a simple motif into a small work of art, making the bag as special as the gift inside.
27. Create a Field of Daisies on Fabric
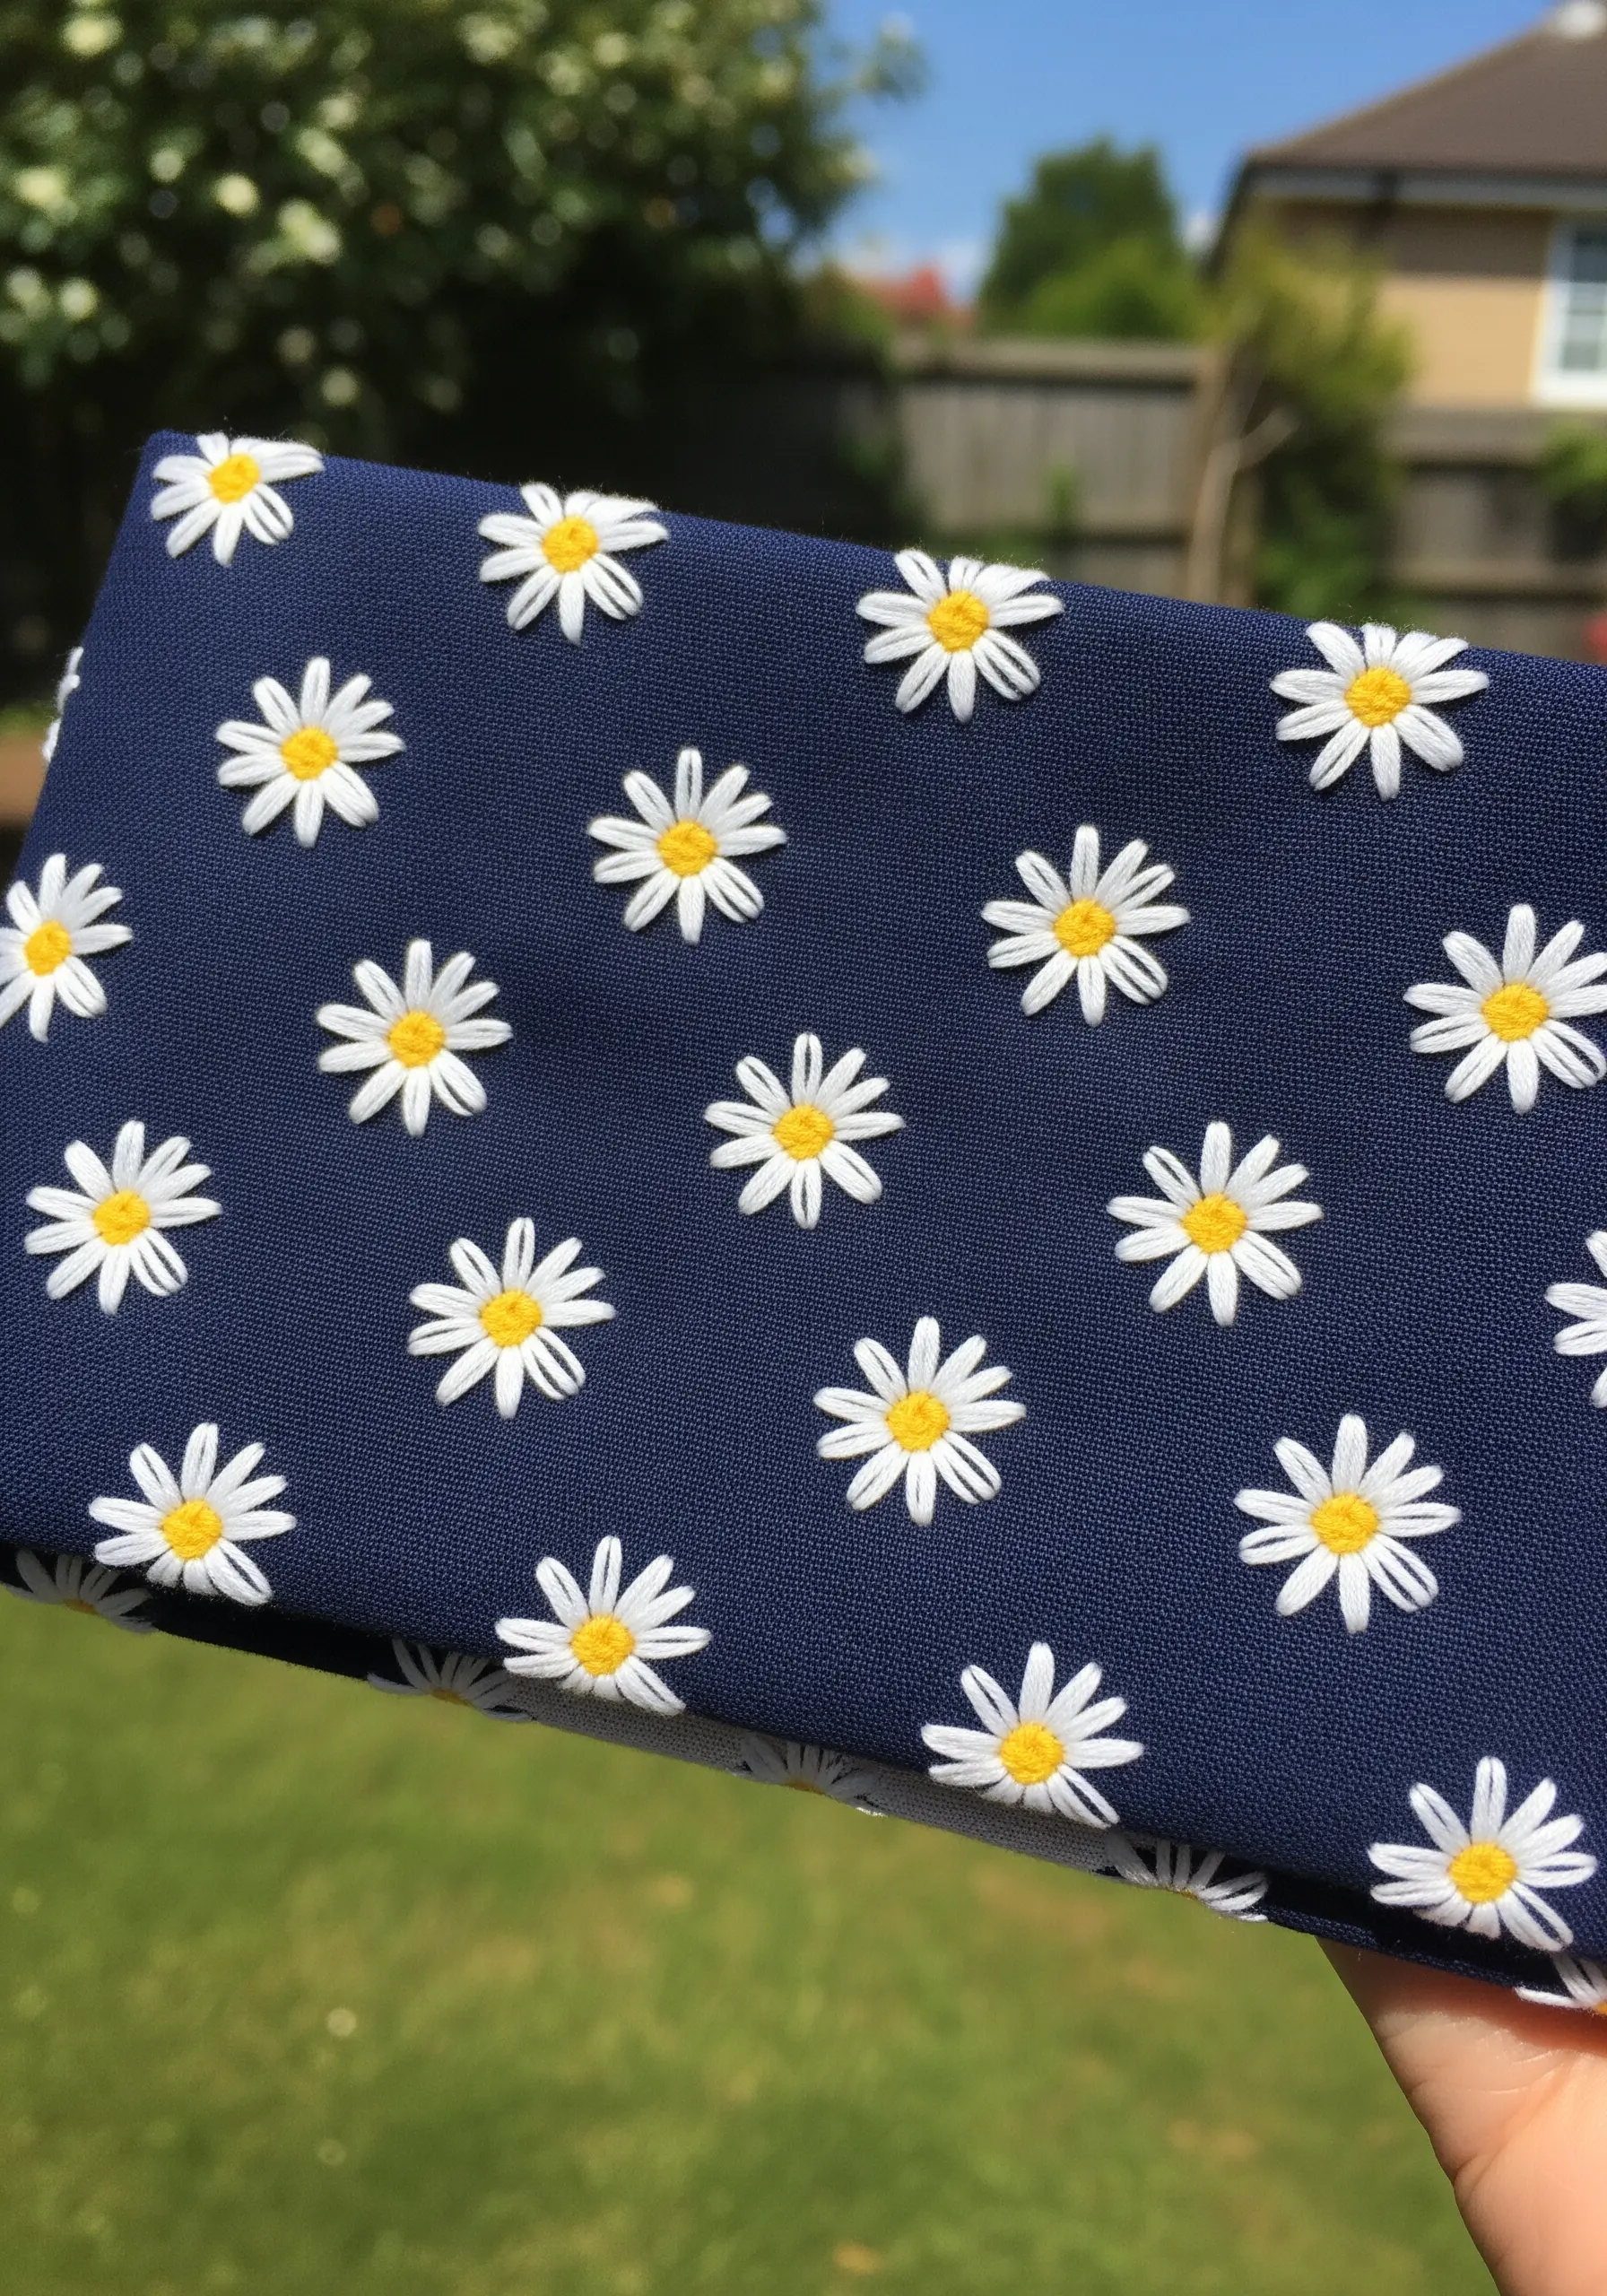
To create a charming, all-over pattern, rely on a few simple, repetitive stitches.
Each daisy petal is a single lazy daisy stitch (detached chain stitch), which ensures every petal is uniform in shape and size.
Fill the center with a cluster of three to four French knots in a contrasting yellow. This simple two-stitch combination is incredibly effective for creating a dense, playful floral pattern.
28. Make a Bold Monogrammed Luggage Tag
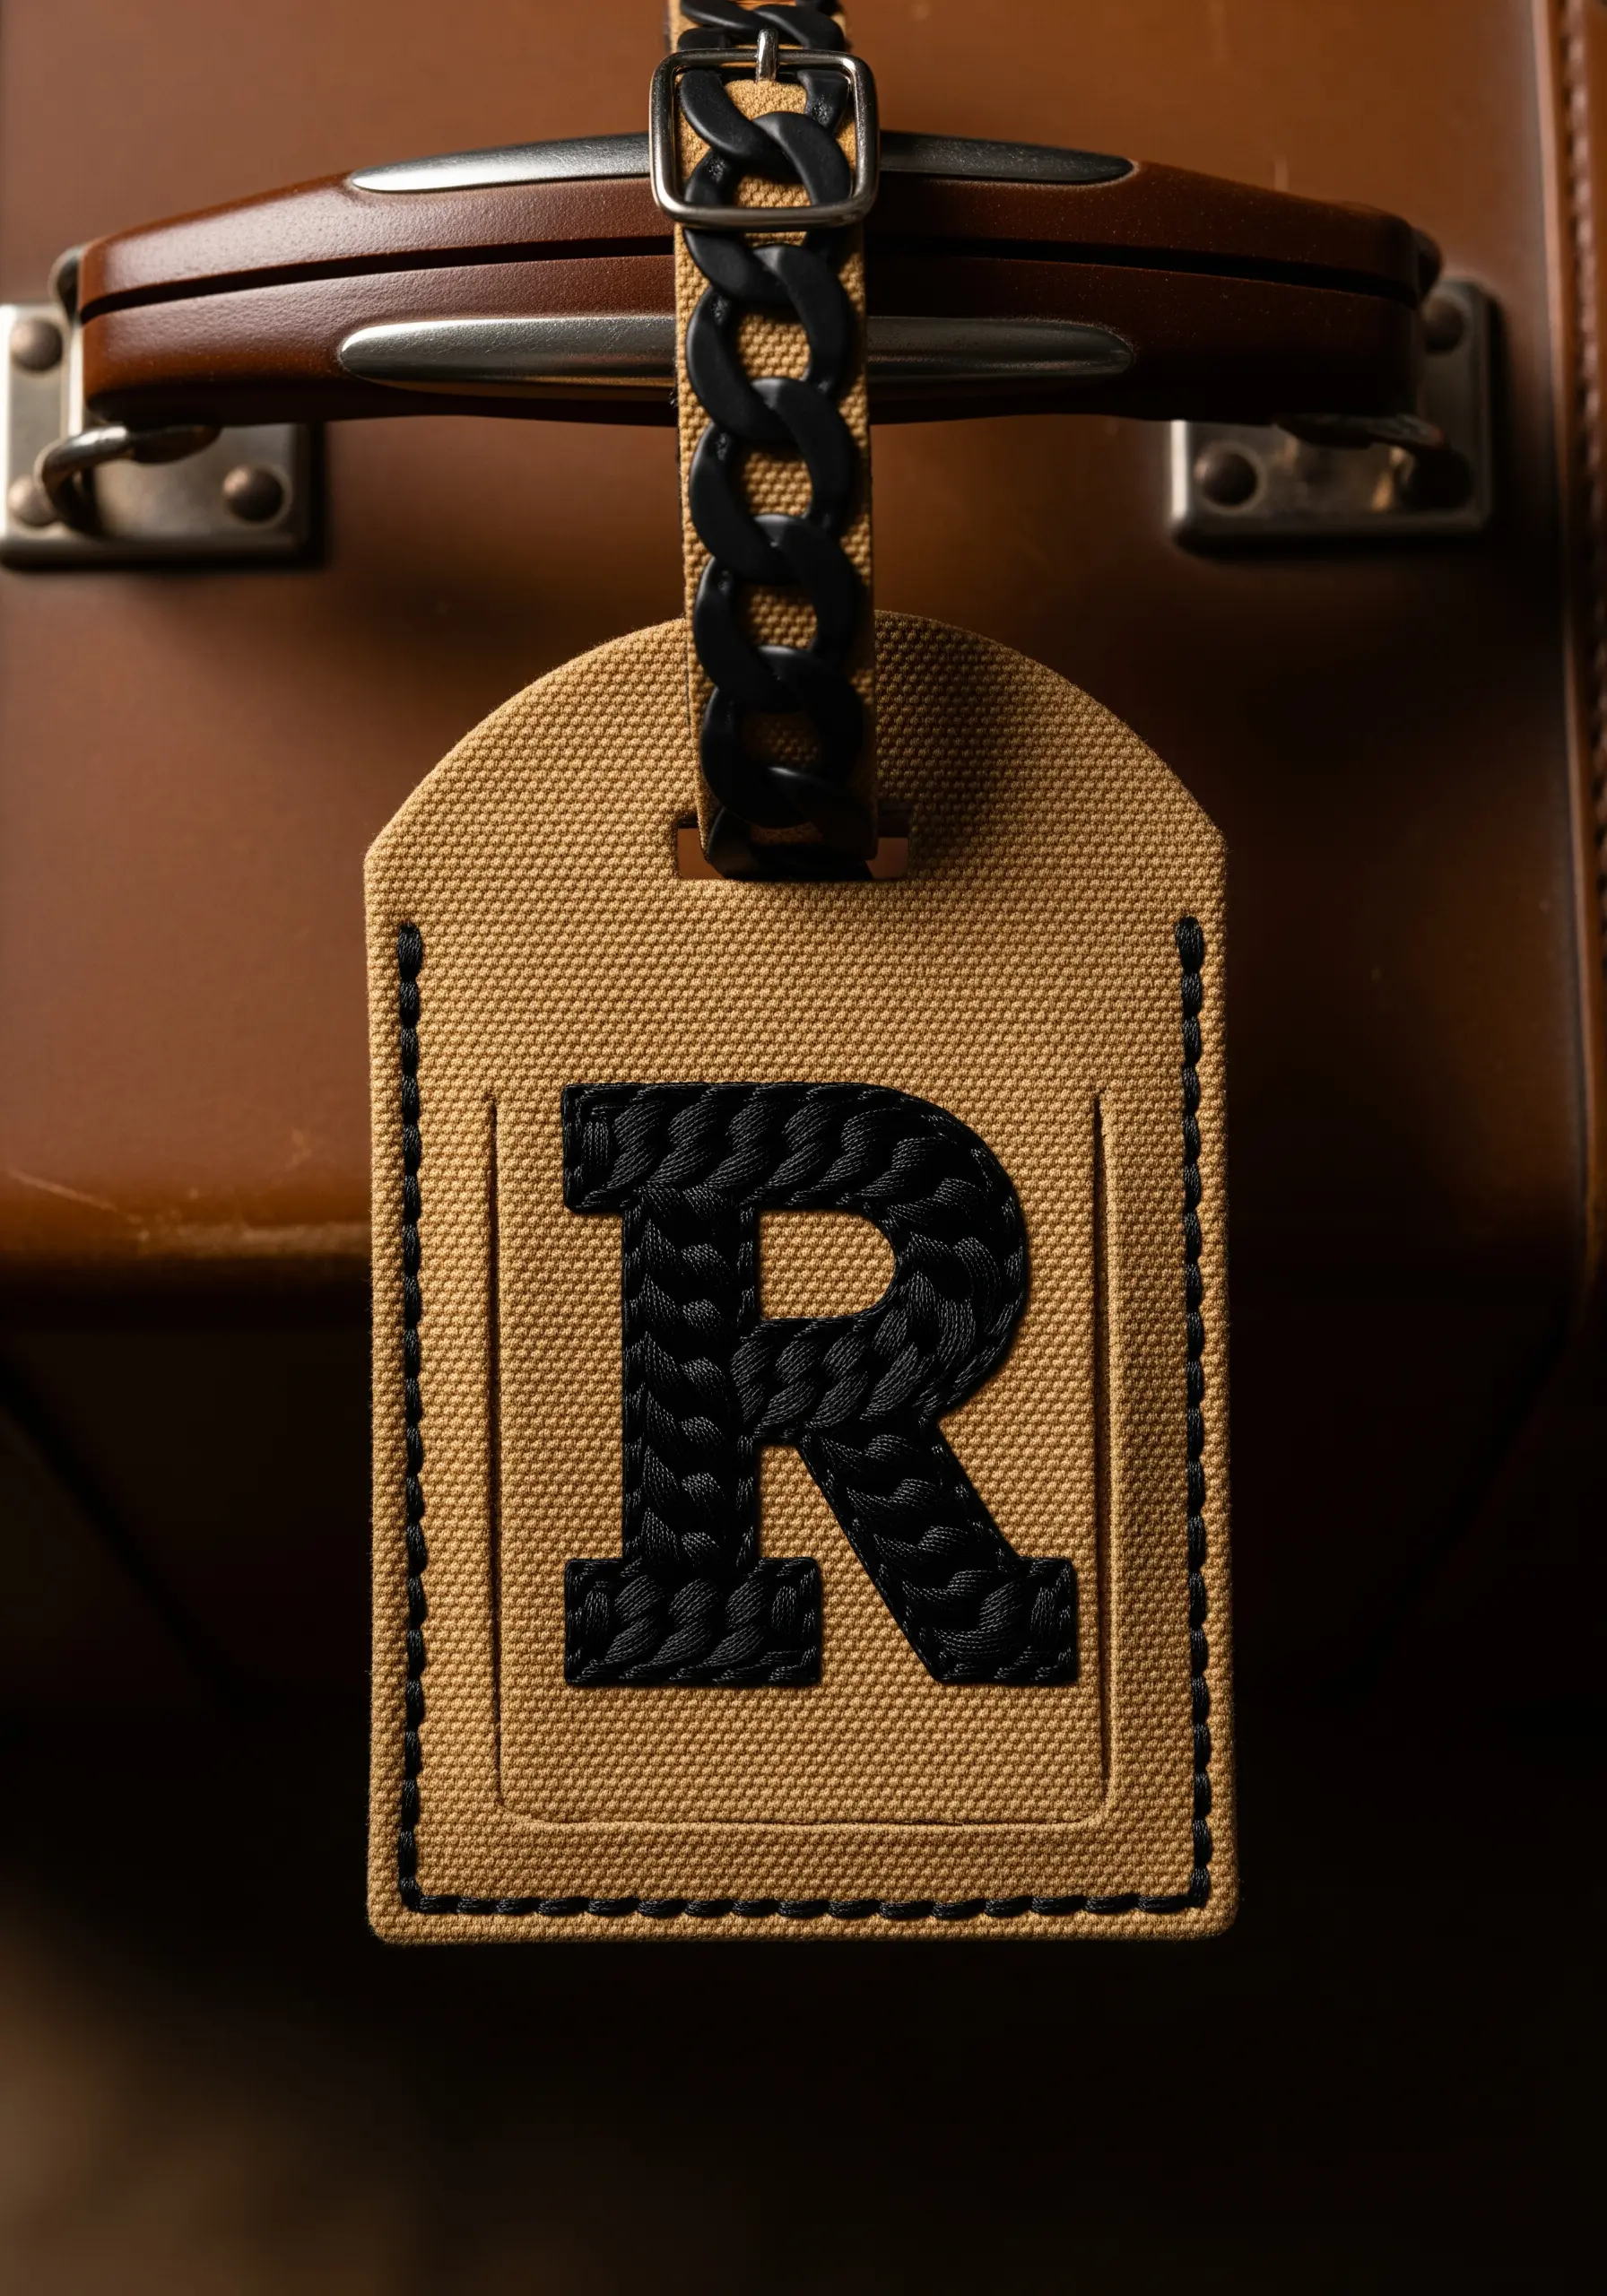
For a monogram that needs to be seen from a distance, choose a dense, high-contrast design.
Fill a bold, block-letter initial with a tight satin stitch using black floss on a neutral background.
The key to a perfect satin stitch on a large area is to keep your stitches parallel and your tension even. An outline in backstitch first can help guide your satin stitches and create a crisper edge.
29. Stitch a Functional Kitchen Conversion Chart
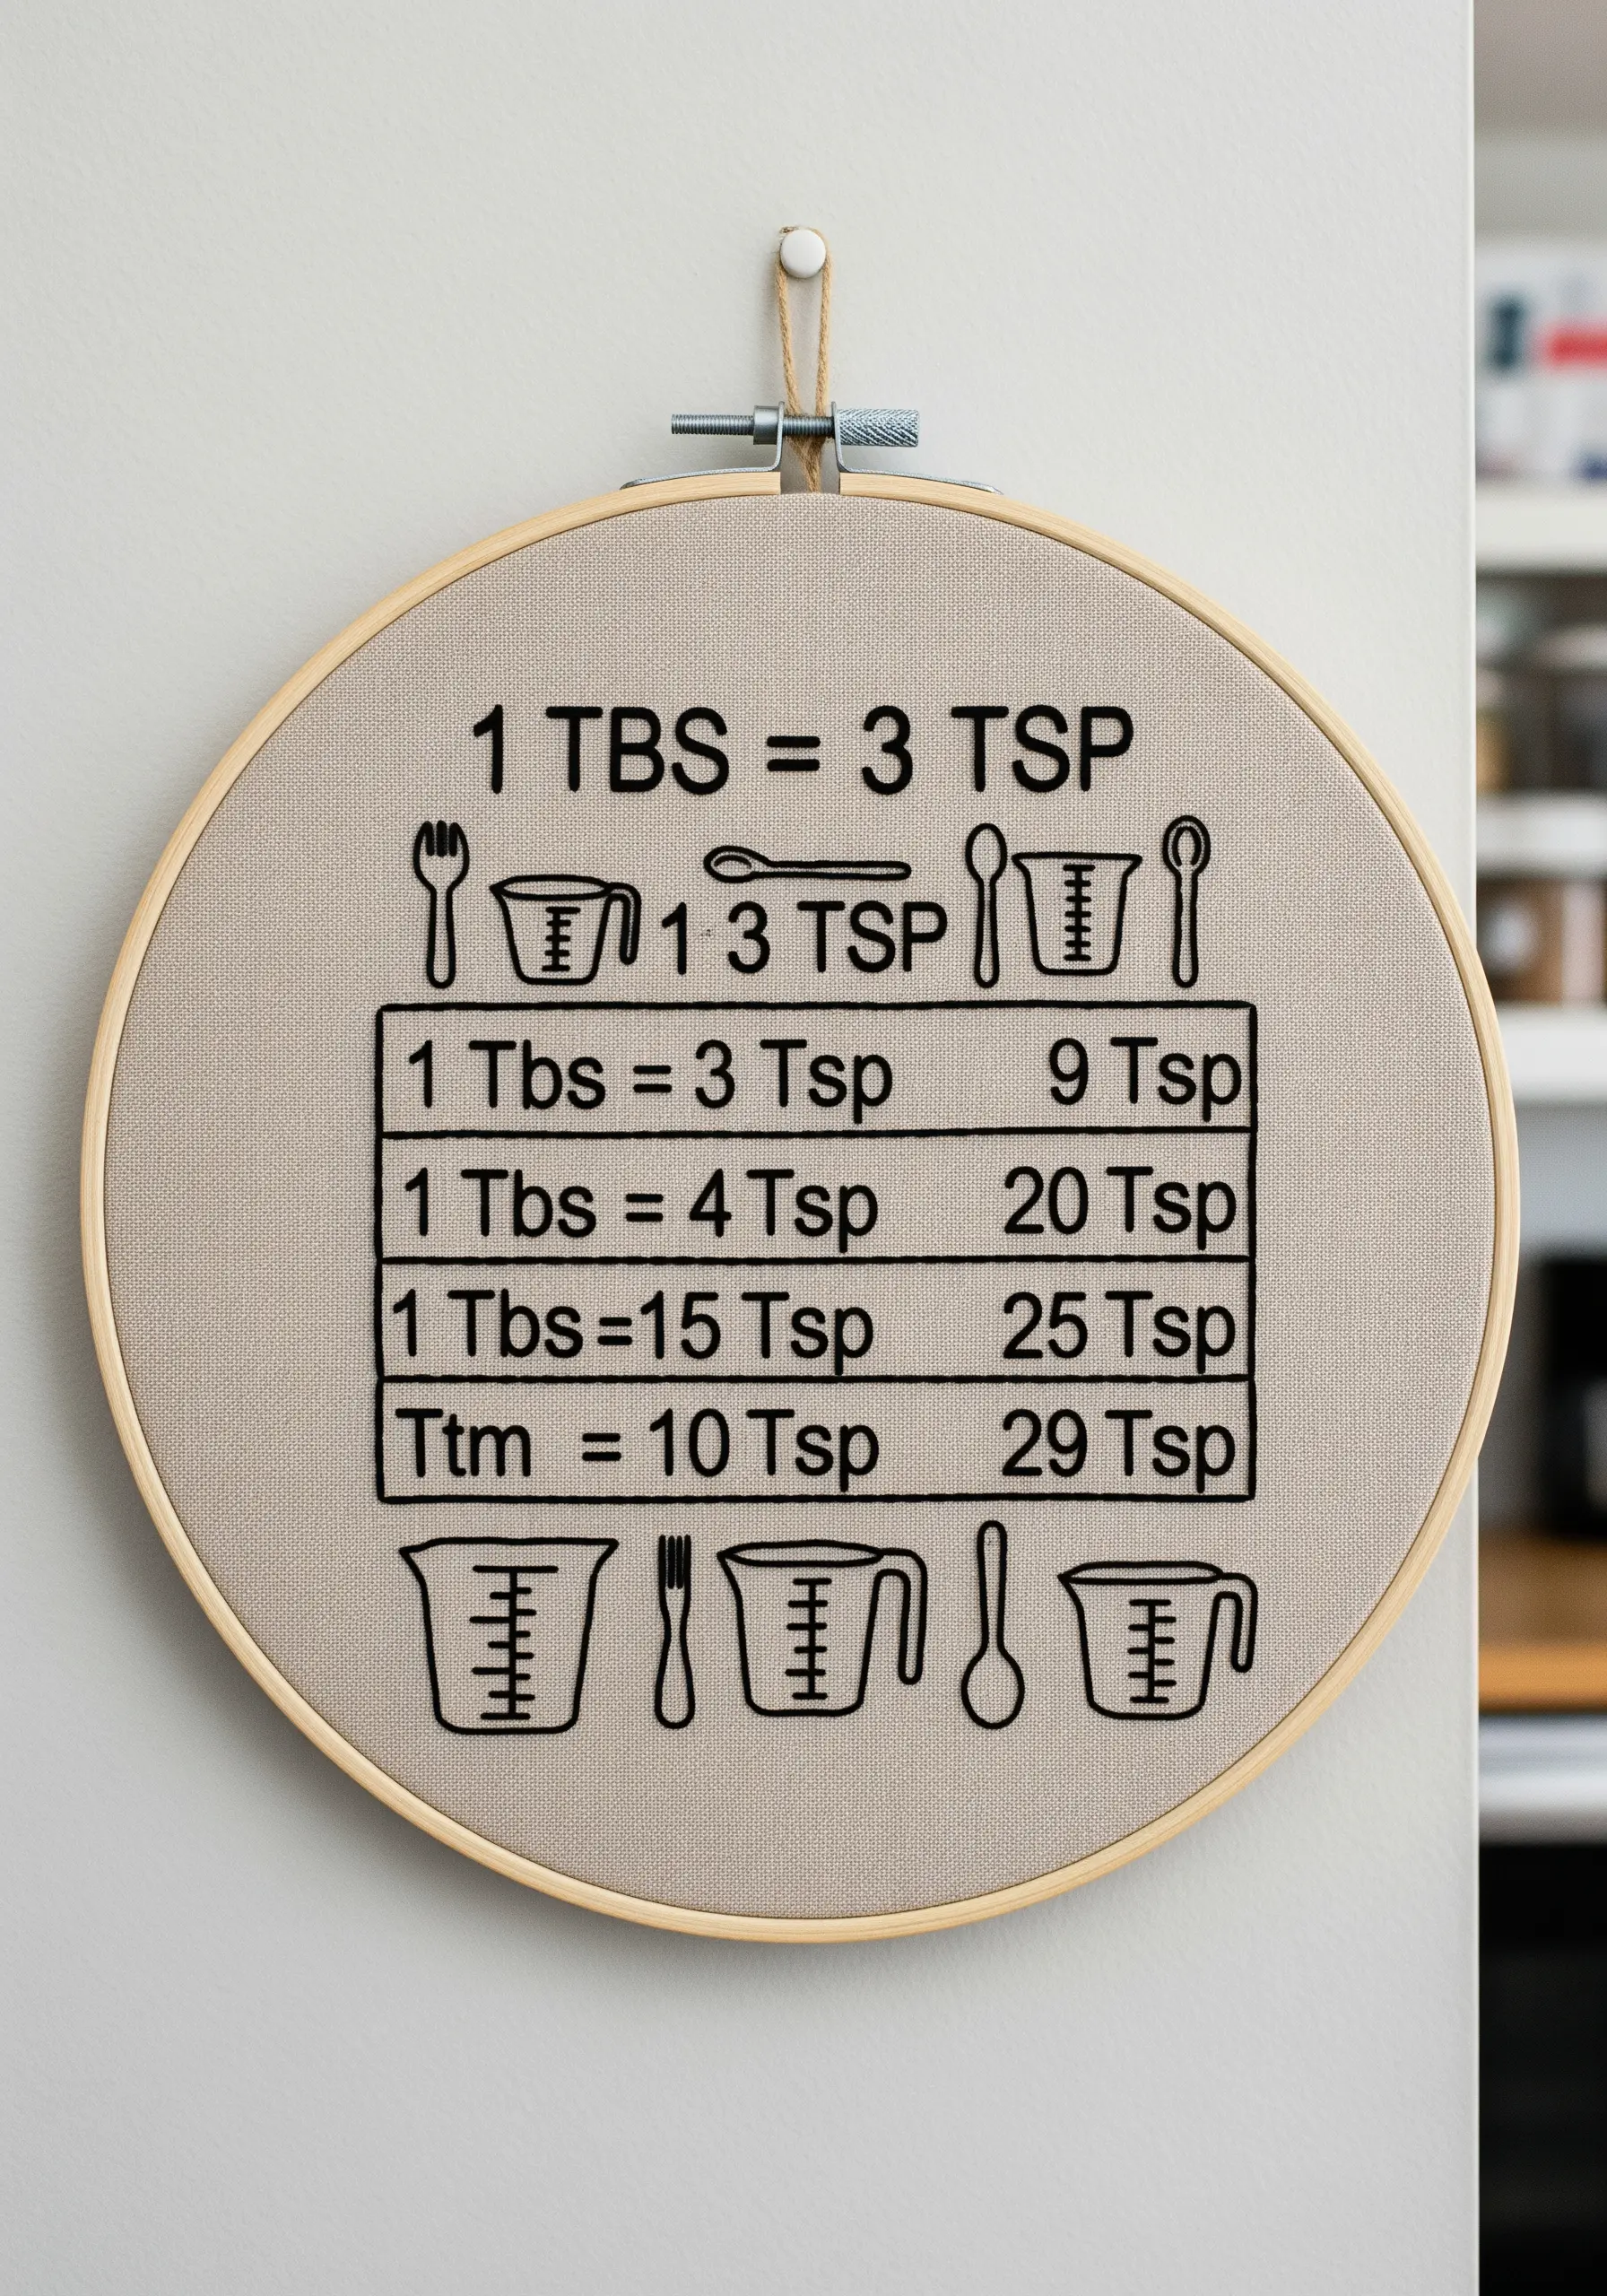
For a project with a lot of text and numbers, clarity is paramount.
Use a simple backstitch with two strands of floss to keep the lettering crisp and easy to read.
A water-soluble stabilizer is essential here; print your design directly onto it to ensure perfect spacing and alignment for all the text and icons. It provides a foolproof guide that washes away completely.
30. Craft Elegant Holiday Napkins
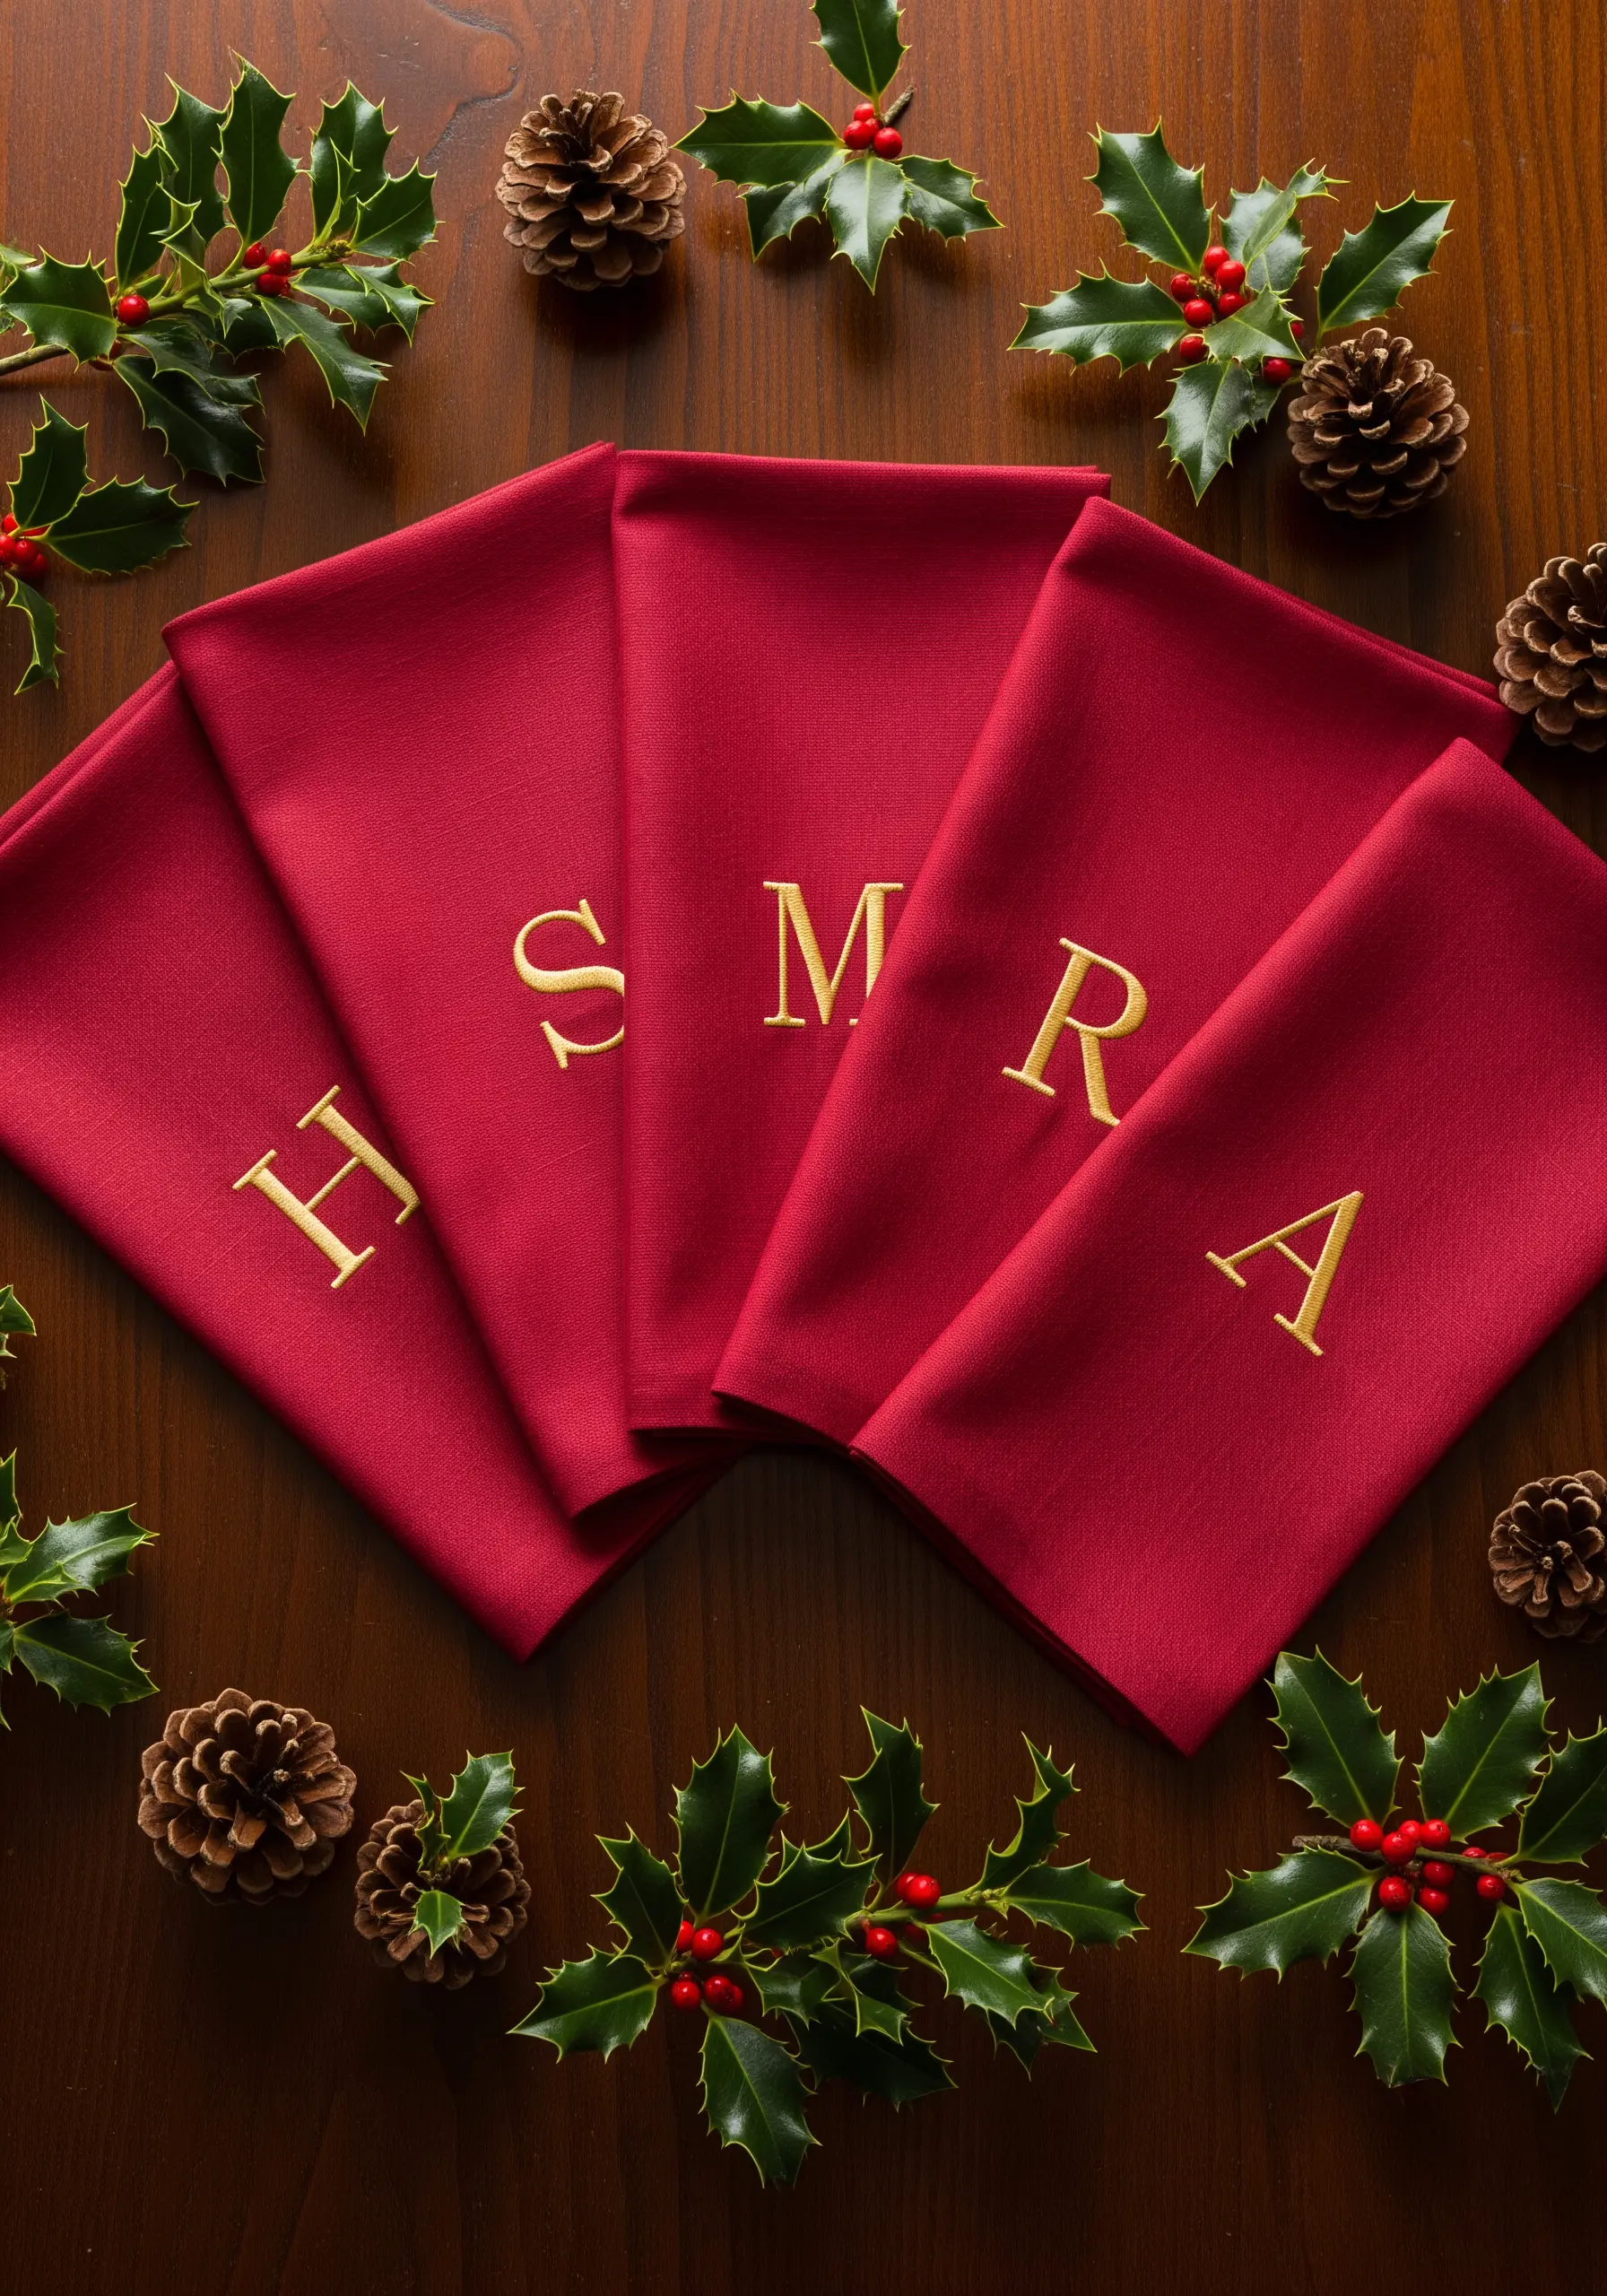
To create sophisticated, personalized napkins for a holiday table, opt for an elegant font and a metallic thread.
A simple satin stitch is all you need to fill the letters, but the choice of a high-sheen gold or silver thread instantly elevates the design.
Stitch on a richly colored fabric like deep red or forest green linen to make the metallic thread pop, creating a look of quiet luxury.
31. Personalize a Pet Bandana
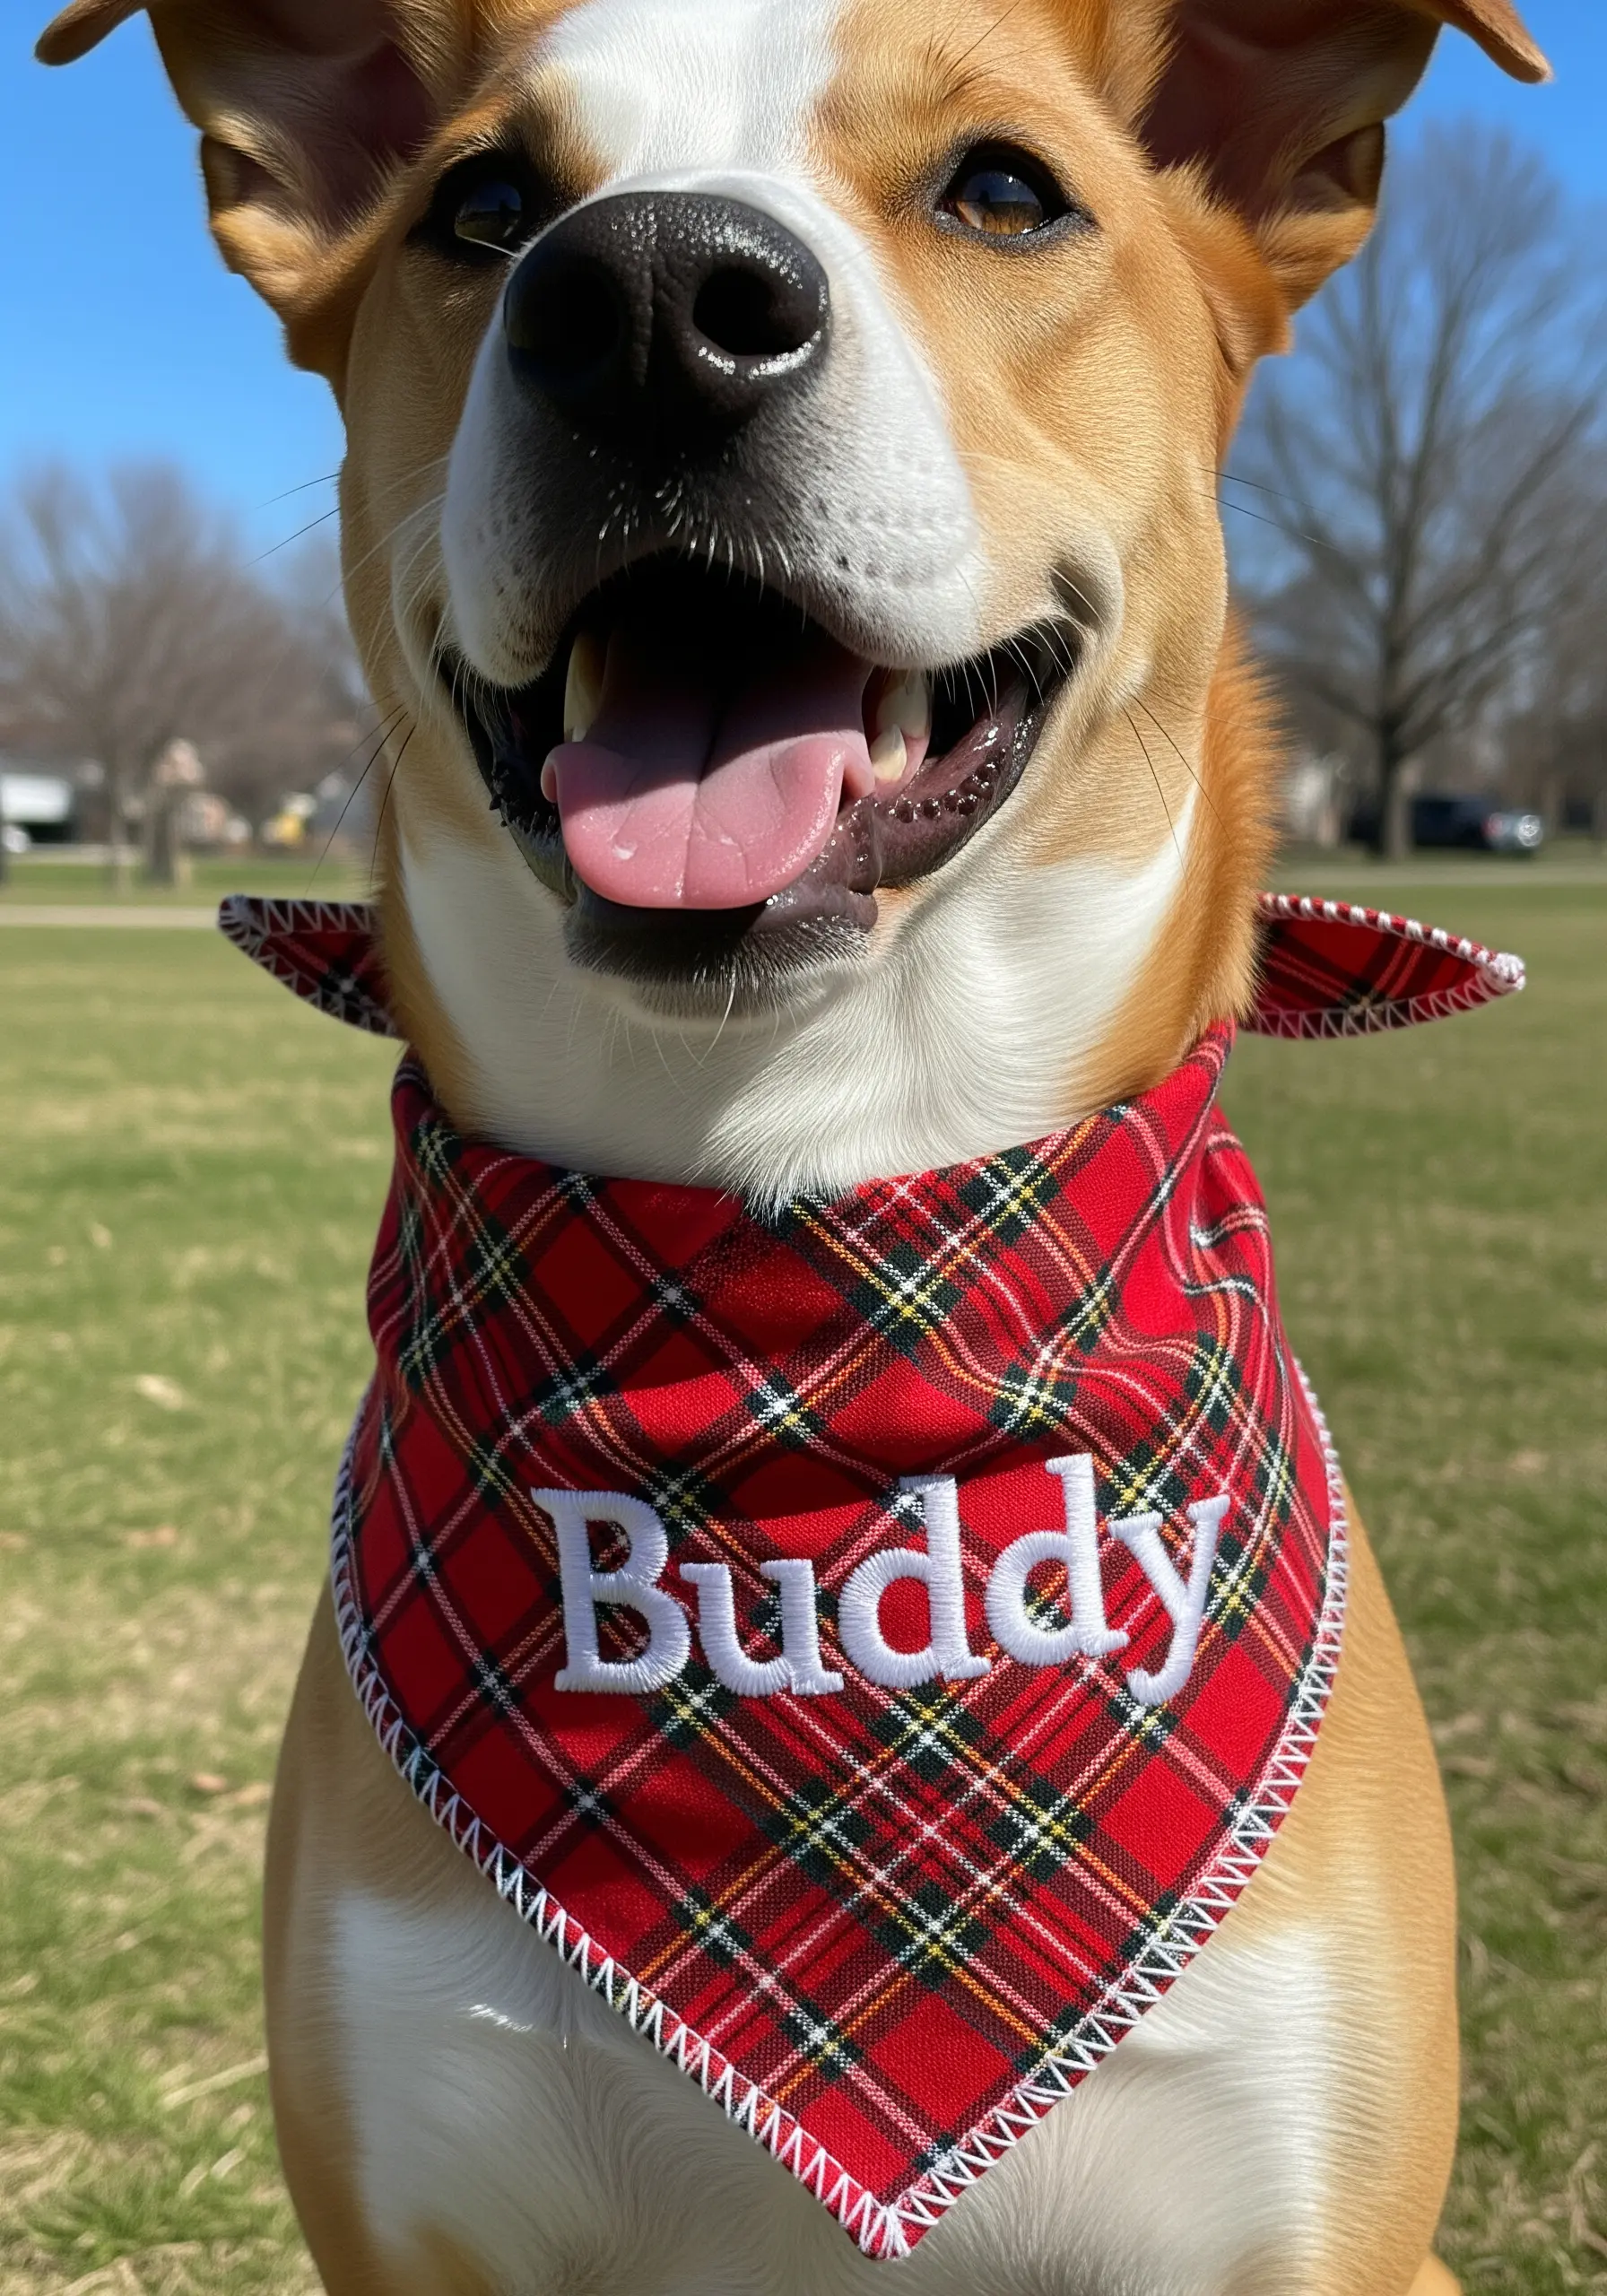
When embroidering on a patterned fabric like plaid, you need to make your lettering stand out.
First, stitch the name using a standard backstitch in white. Then, outline the letters with another backstitch using a darker color, like black or navy.
This drop-shadow effect creates a sharp contrast that makes the name highly visible and adds a clean, graphic finish.
A decorative blanket stitch around the edge adds a final, polished touch.
32. Create a House Portrait with a Pop of Color
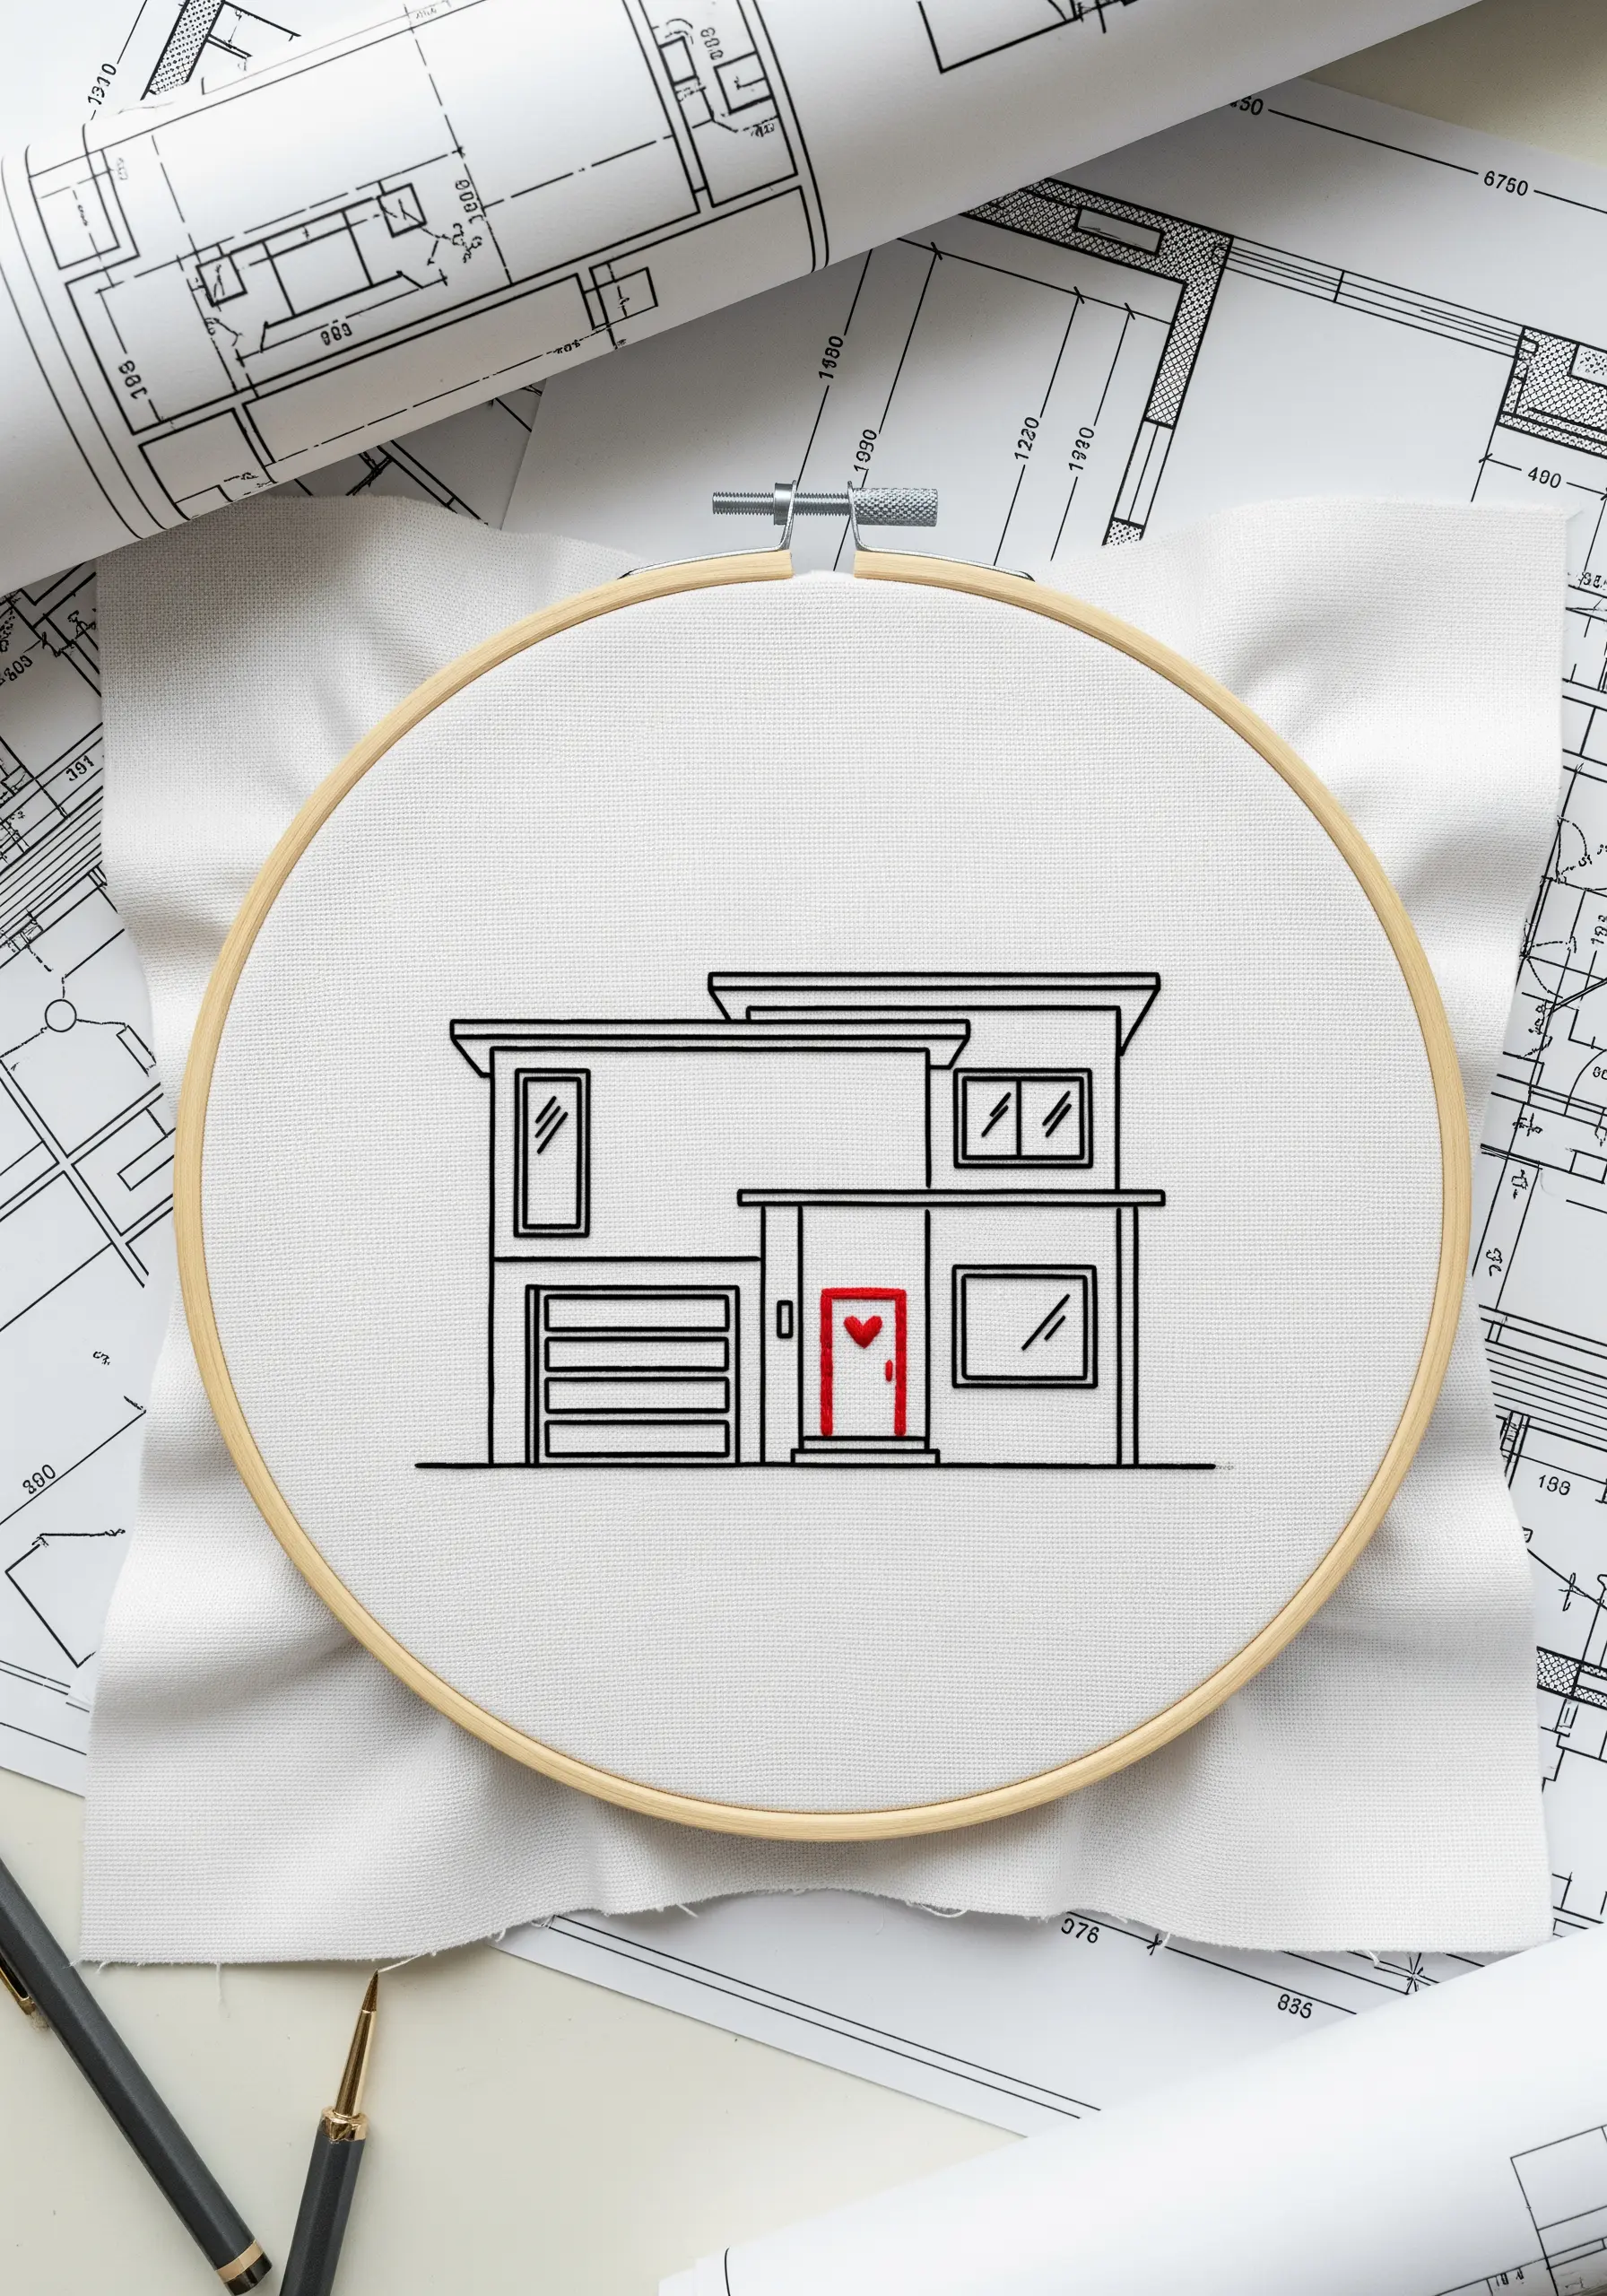
Capture the spirit of a home with a minimalist architectural portrait.
Use a simple backstitch in black thread to create the clean lines of the house. This keeps the focus on the structure and form.
Then, choose one significant detail—like the front door—and fill it with a satin stitch in a single, bold color. This selective use of color draws the eye and adds a powerful touch of personality.
33. Stitch a Sunshine-Filled Message
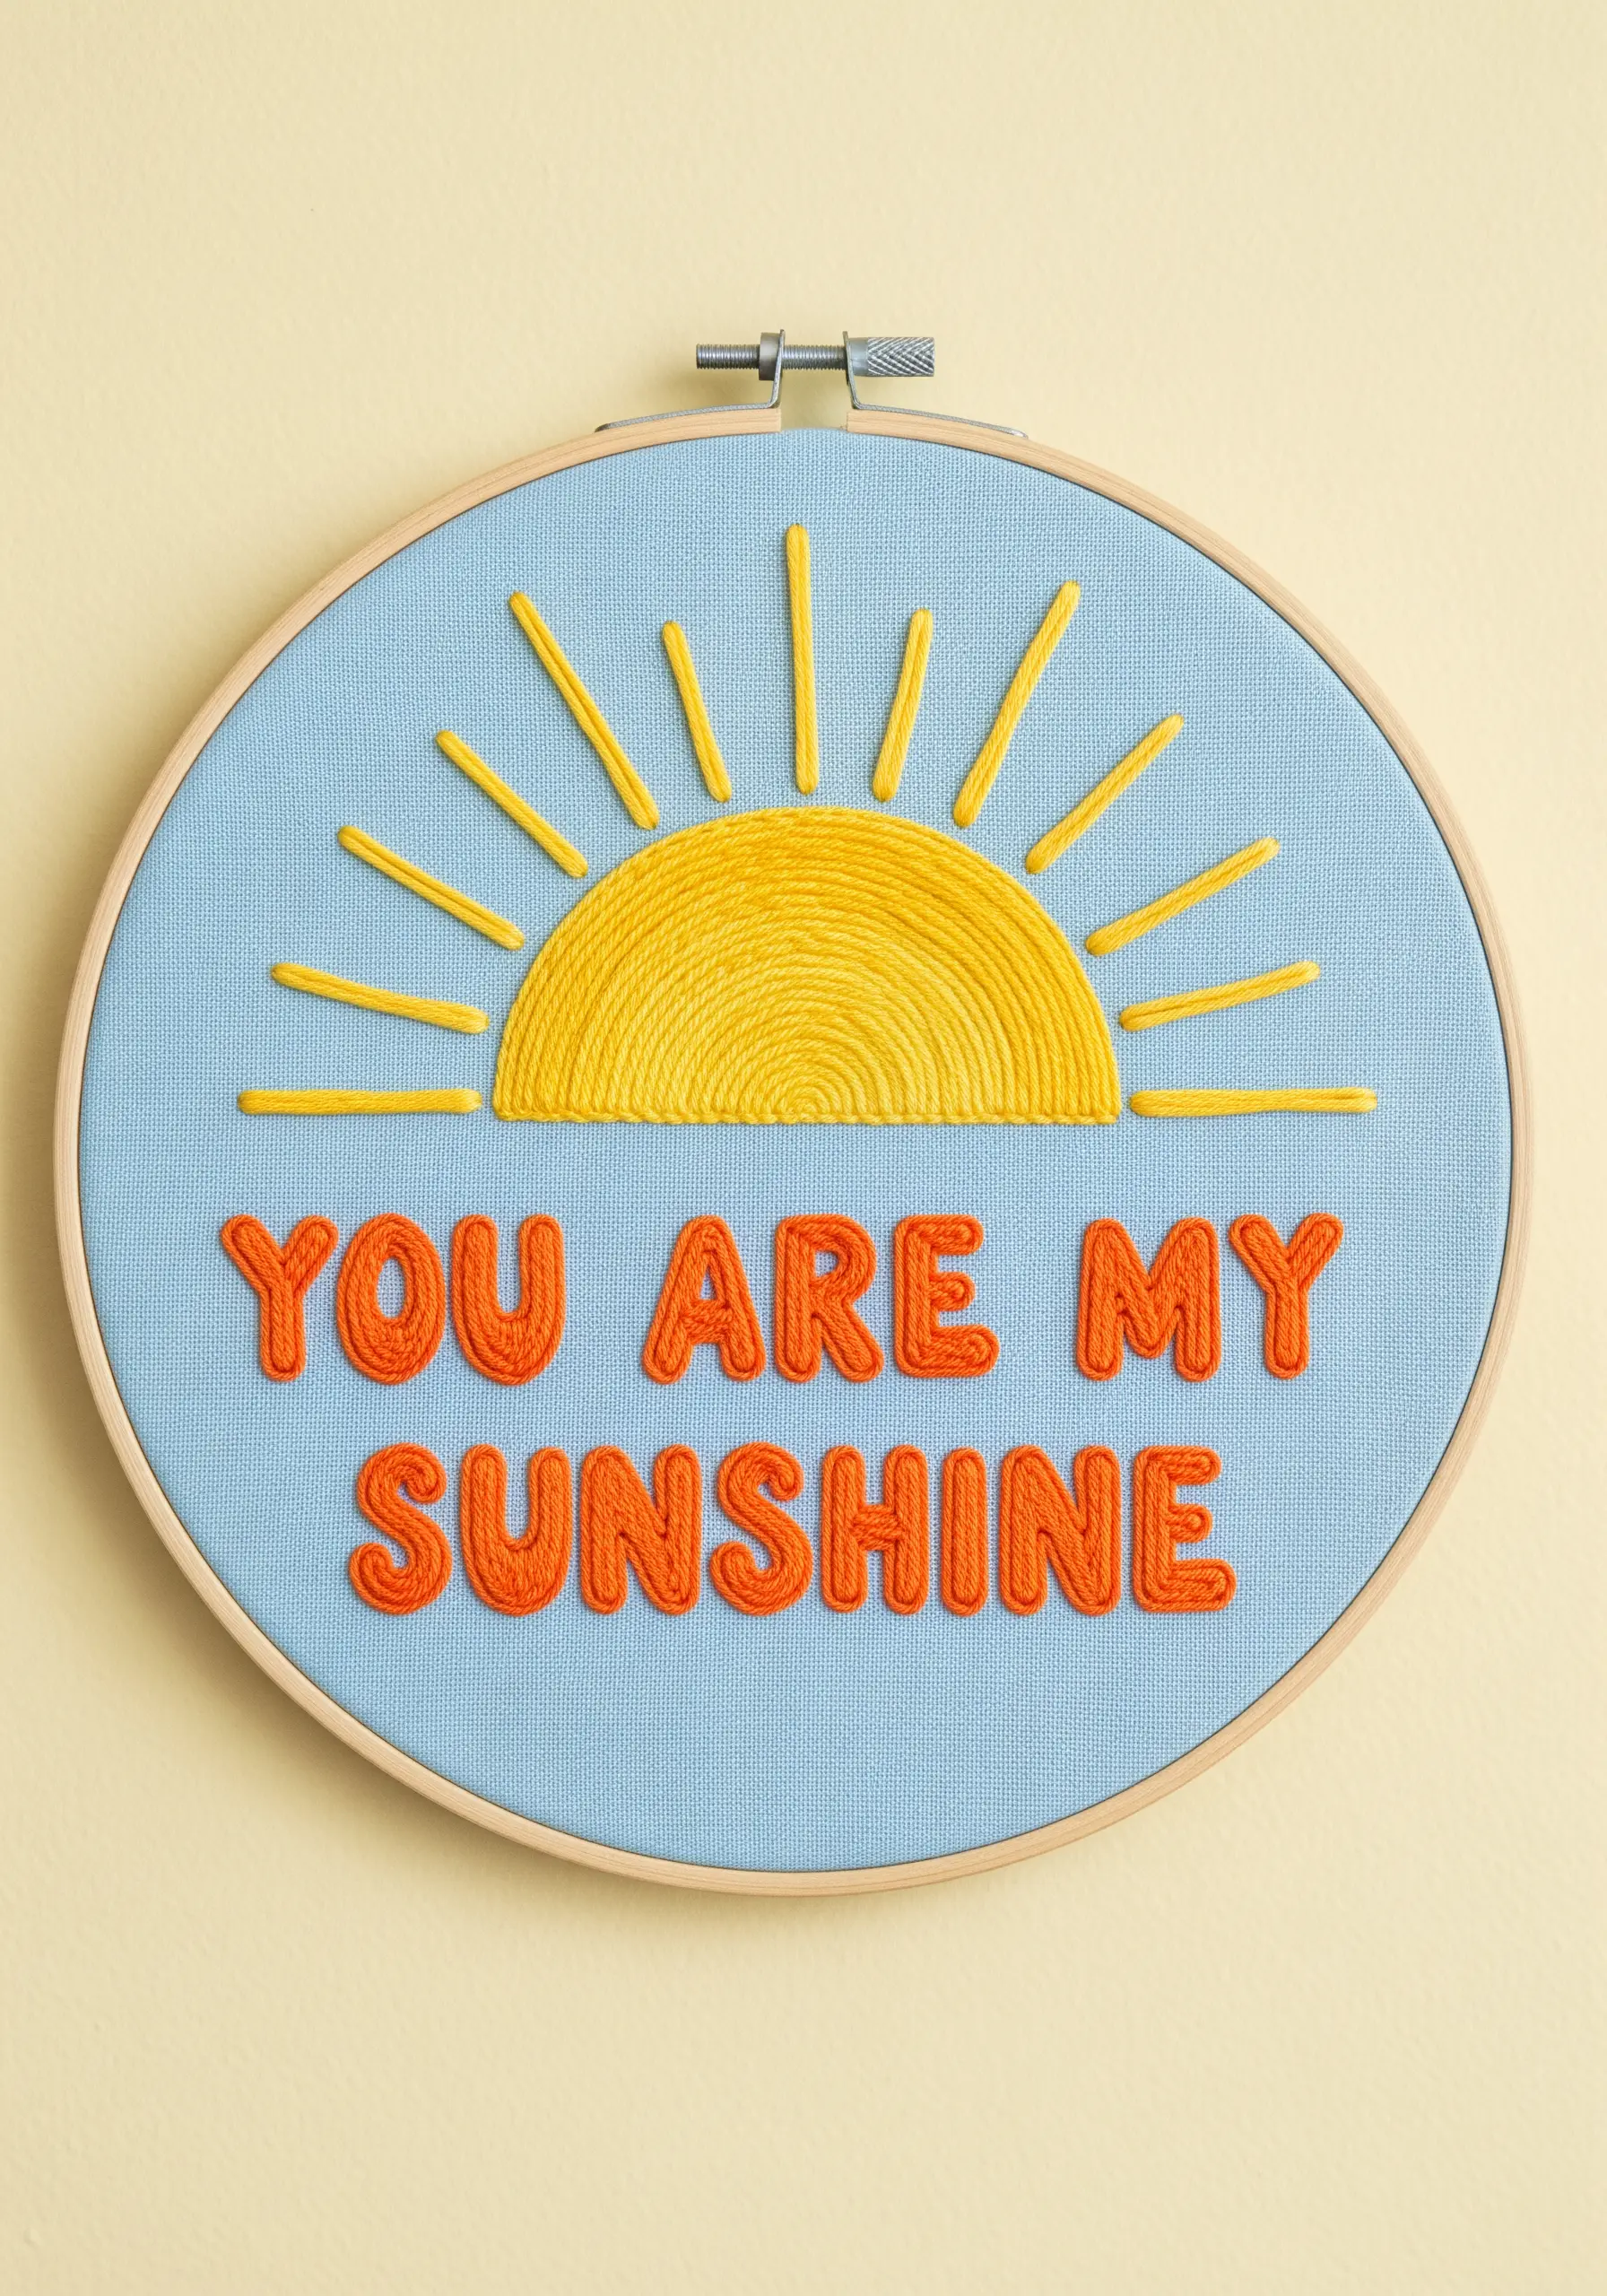
Give your letters a thick, rounded appearance by using a stem stitch as a filler.
Instead of one outline, stitch multiple parallel rows of stem stitch close together to fill the entire letter shape.
This technique creates a beautifully textured, rope-like fill that is faster than satin stitch and adds a playful, dimensional quality to your text, perfect for nursery-friendly textile wall art.
34. Design Graphic Felt Coasters
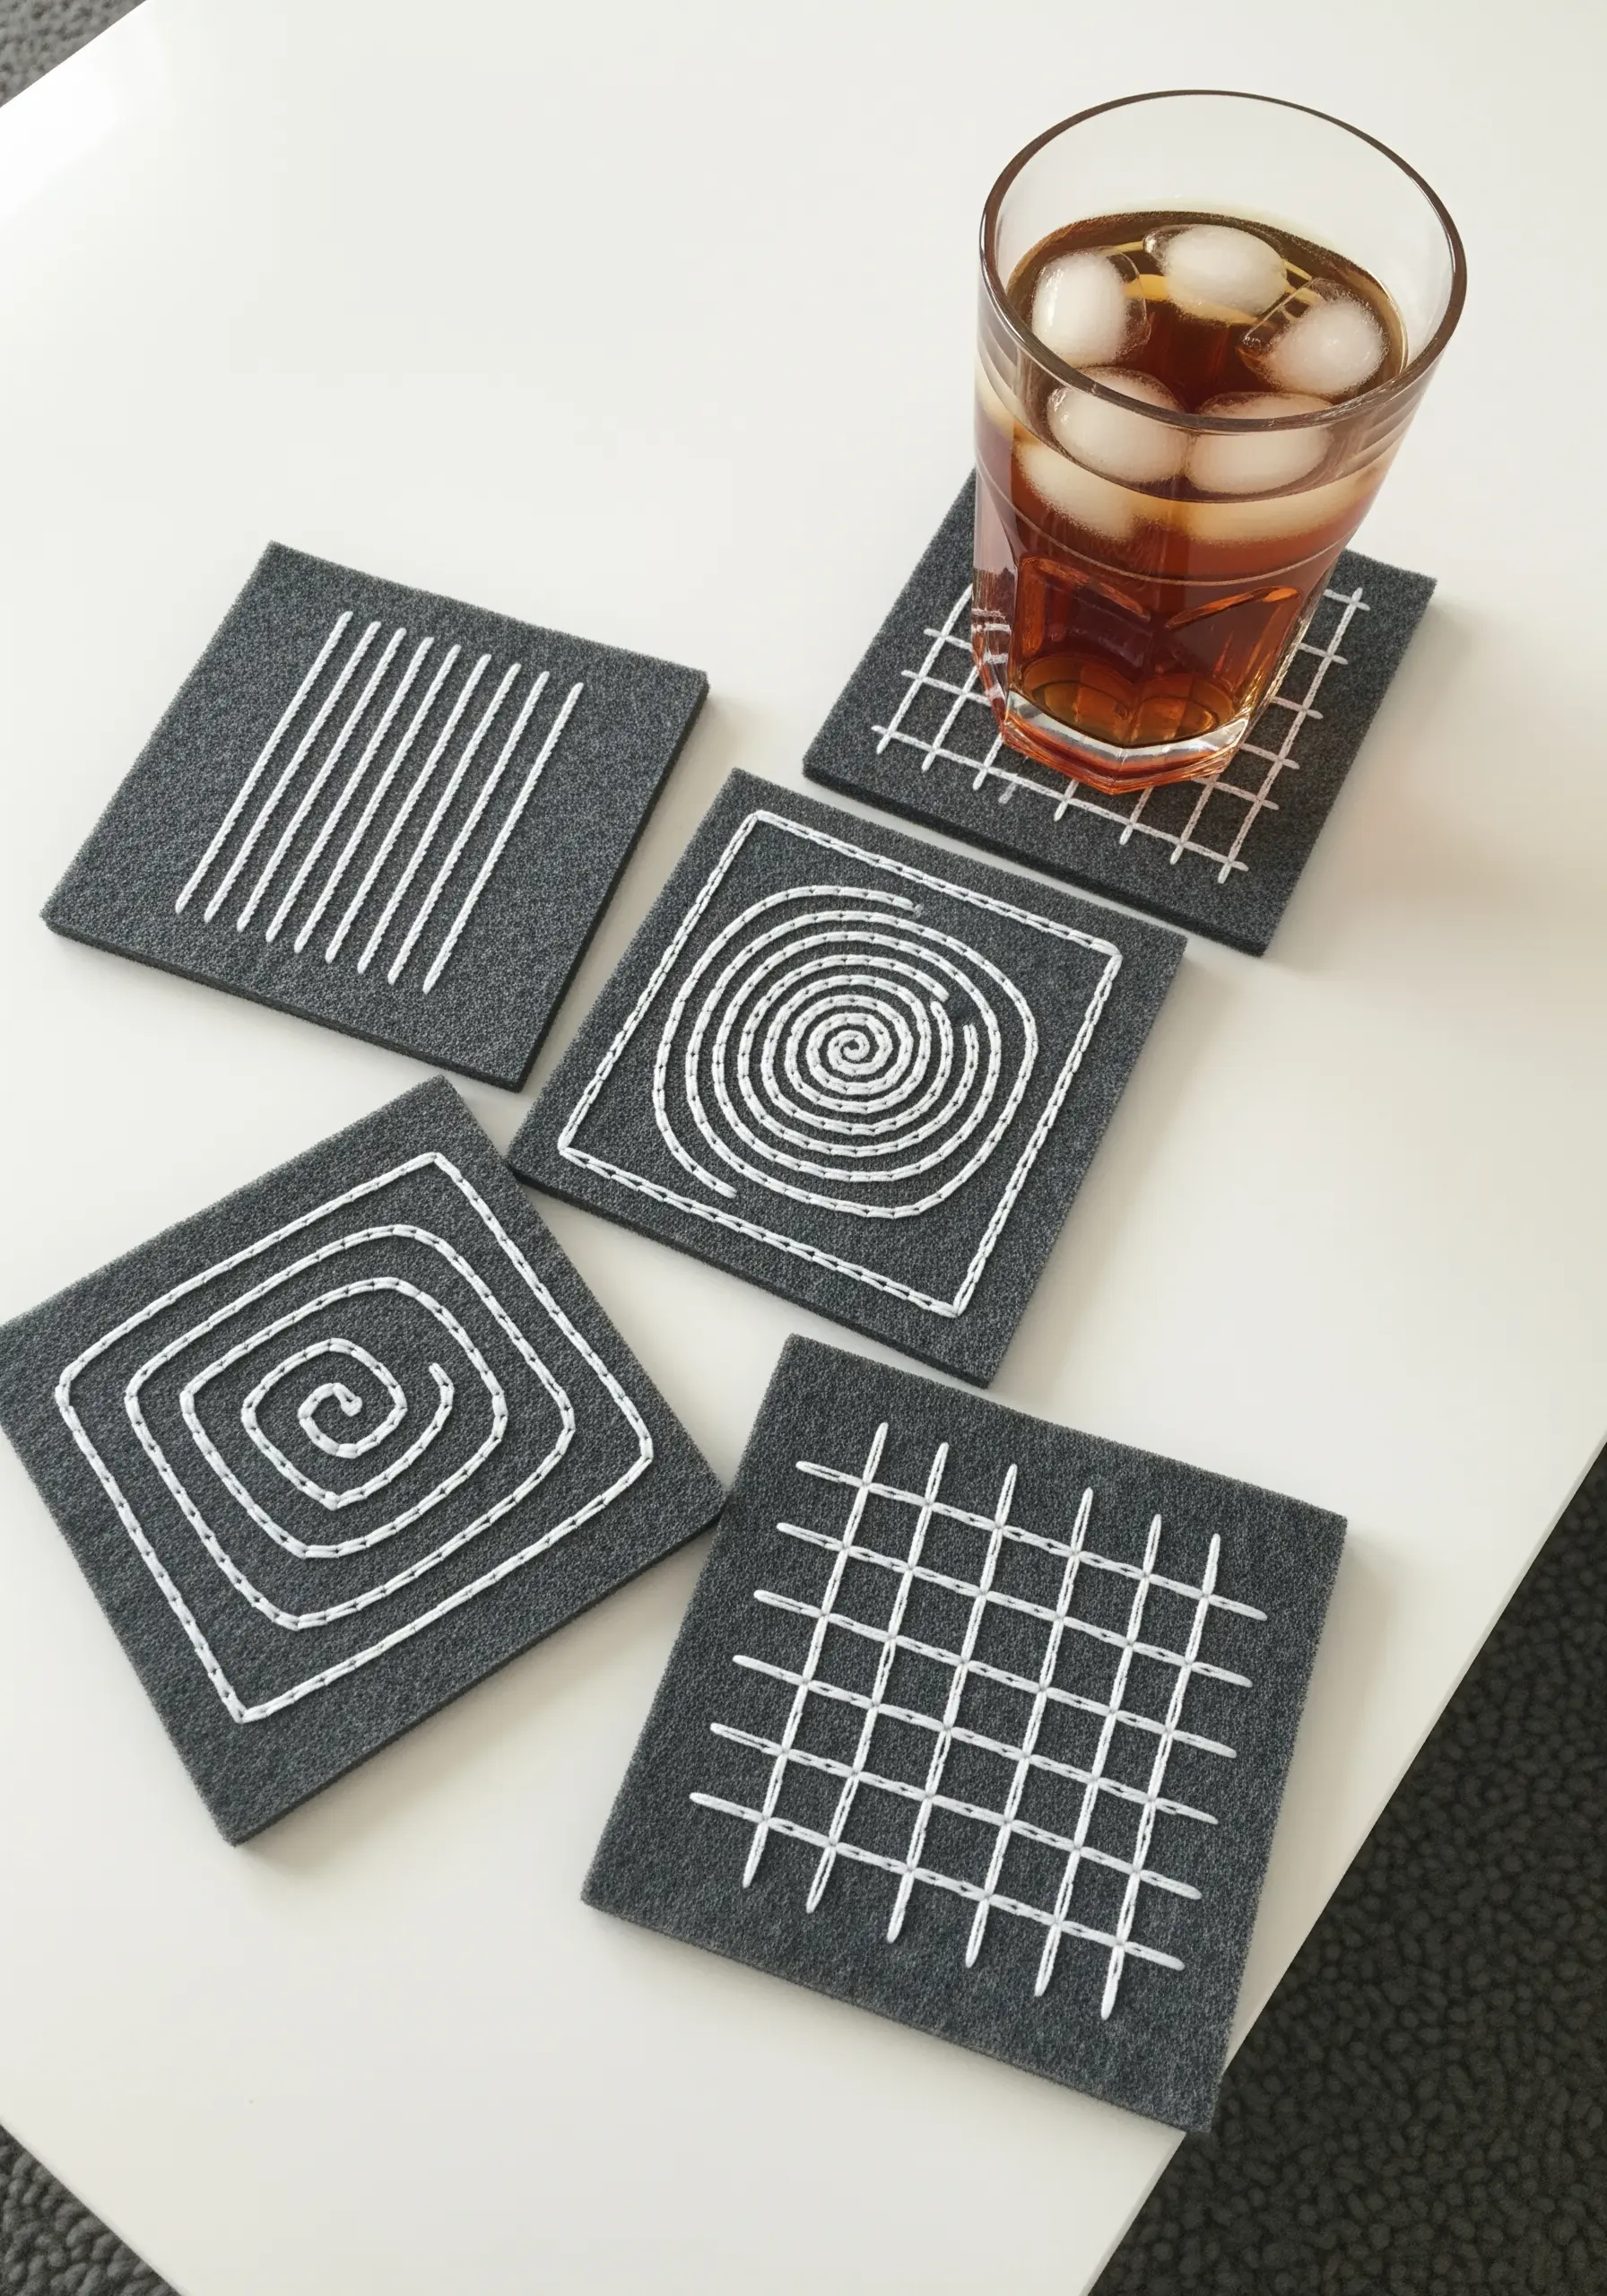
Create a set of modern, graphic coasters by embroidering simple patterns onto thick felt.
Use a basic backstitch with a contrasting, heavy-weight thread, like all six strands of floss or even a thin yarn.
The rigidity of the felt means you don’t need a hoop, making this a quick and satisfying project. Stick to simple geometric designs—lines, grids, spirals—for a chic, cohesive set.
35. Create a Book Lover’s Tote Bag
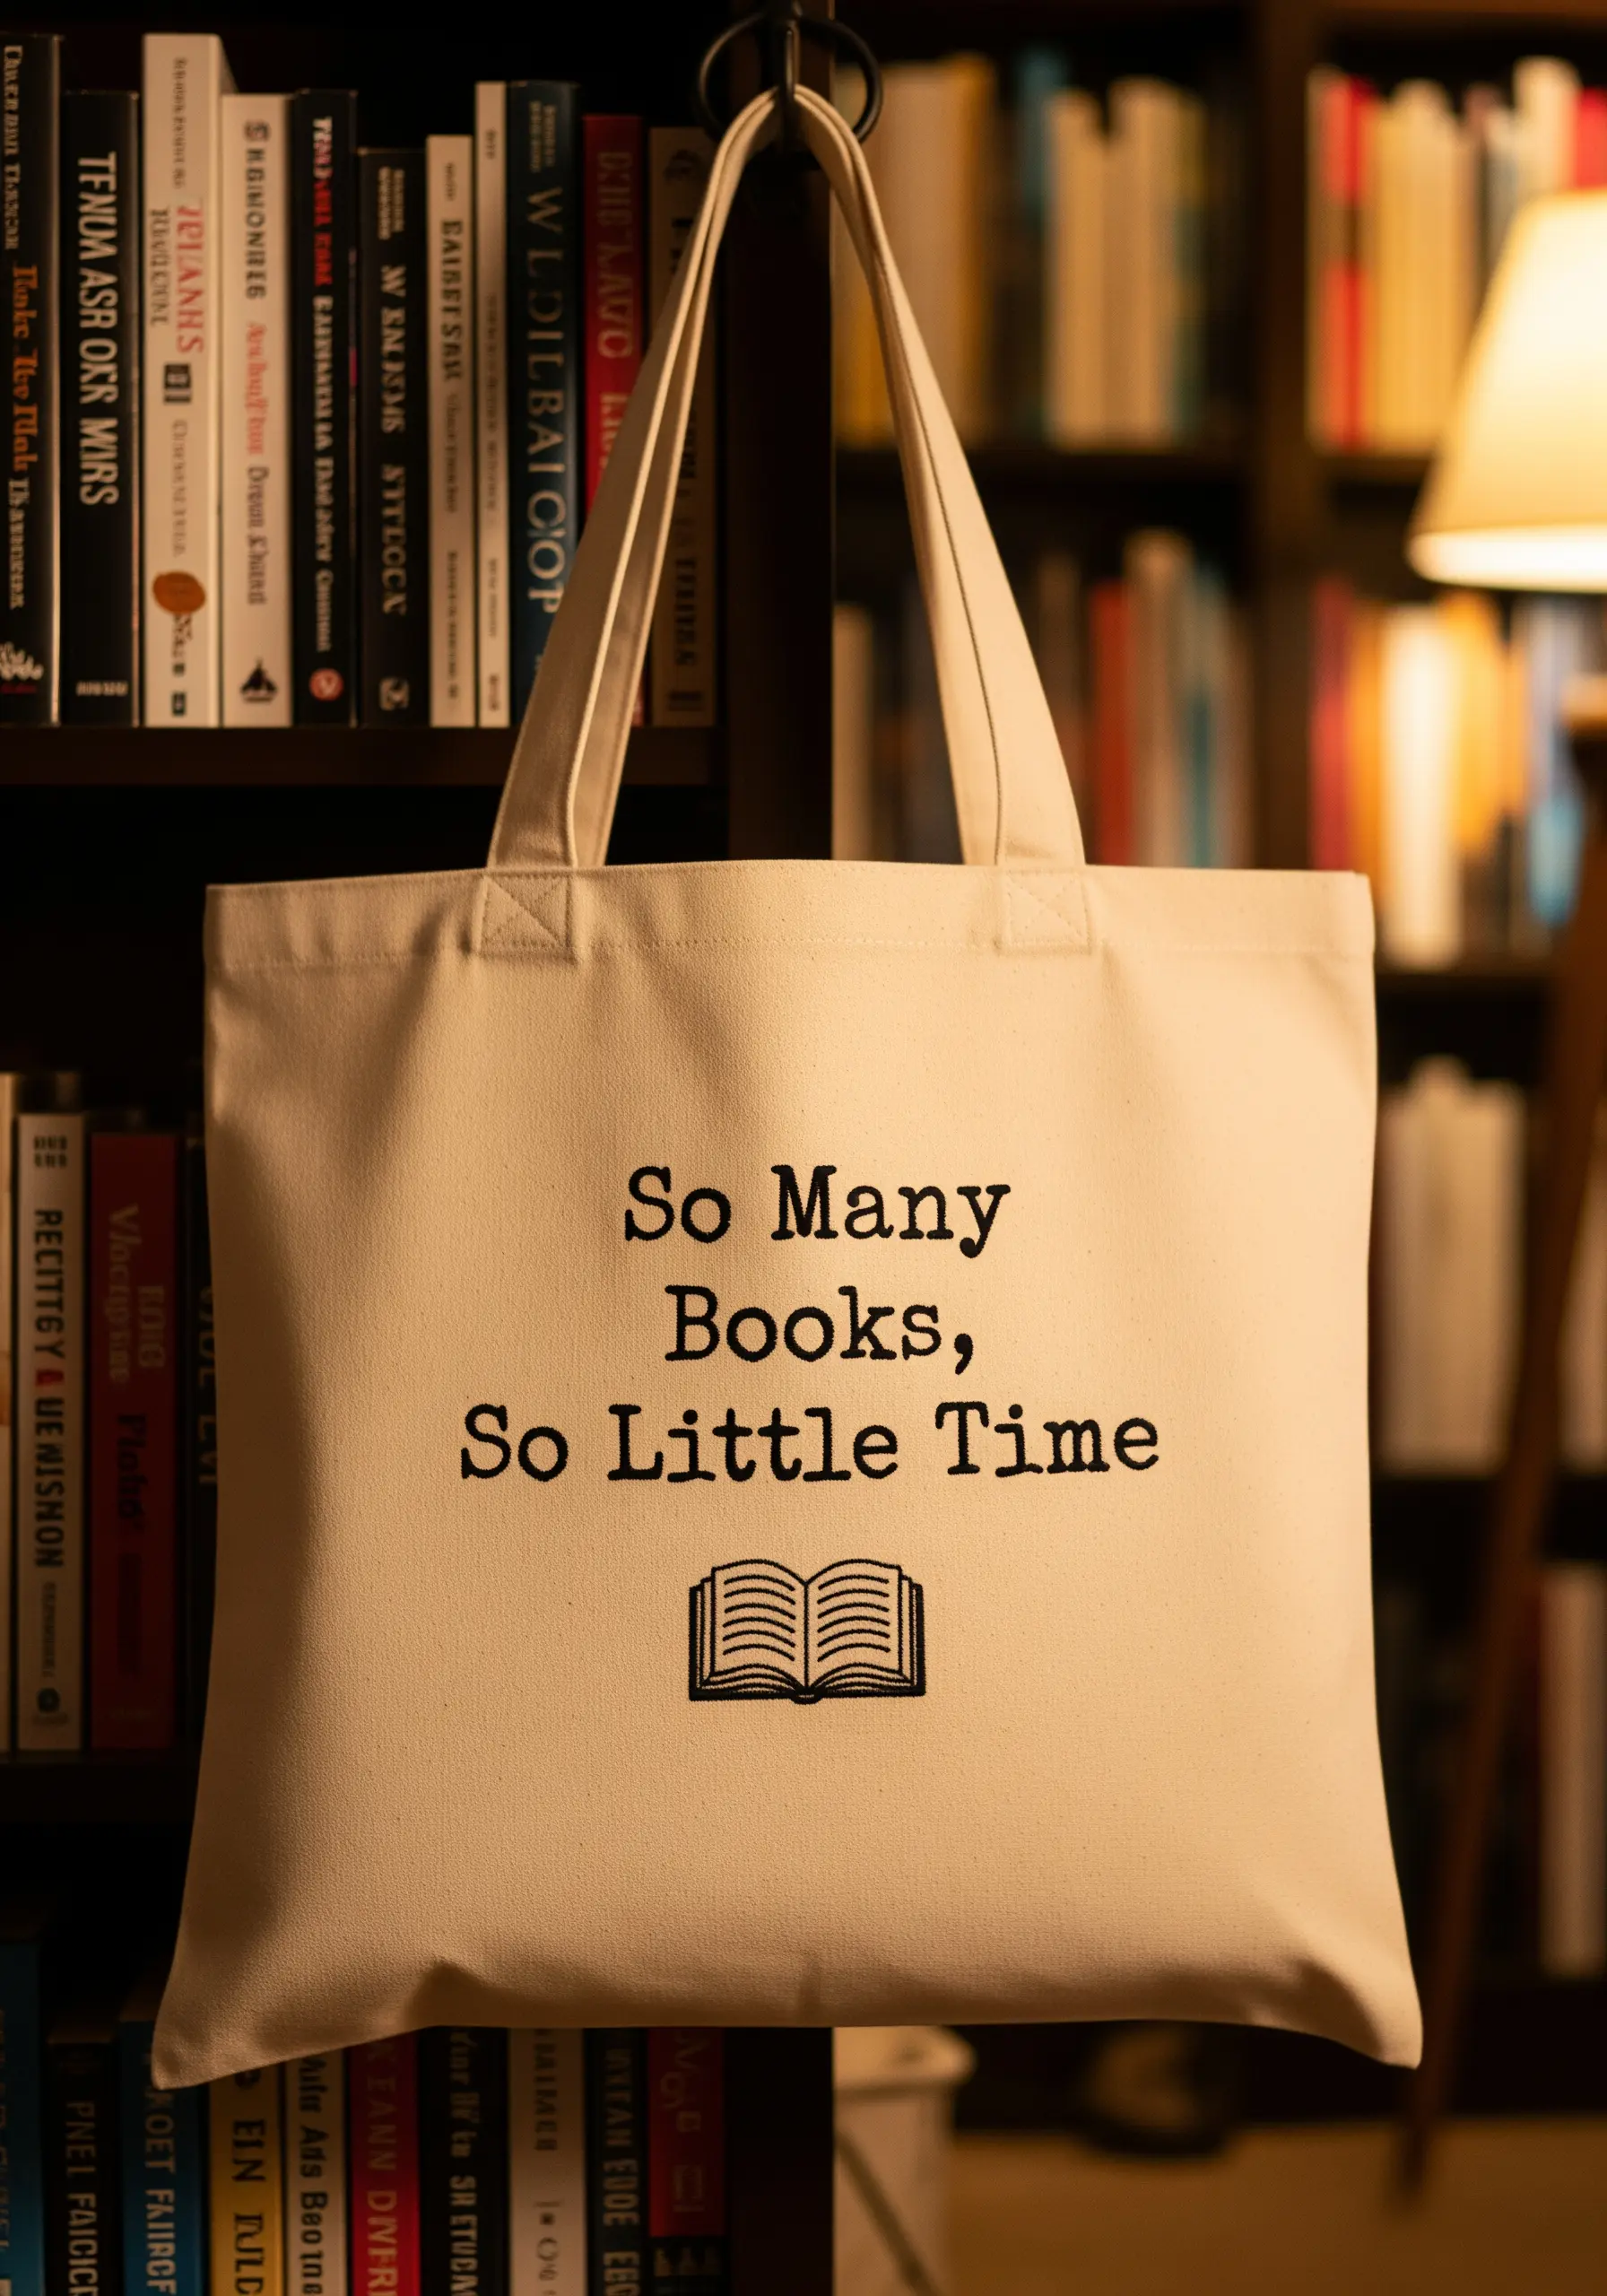
For text-based designs on canvas, a clean, classic font stitched with precision is key.
Use a simple backstitch with three strands of black floss to mimic the look of printed text.
To ensure your lines are perfectly straight and your letters evenly formed, use a heat-erasable pen to transfer your design. The marks will vanish with the heat of an iron, leaving only your flawless stitching behind.


