

Perhaps you’re standing before your collection of threads and fabrics, feeling a quiet desire to create something with more depth, more texture, more story. You know the stitches, but you’re ready for your work to feel less like a pattern and more like a piece of art.
Moving into mixed media isn’t about mastering complex, difficult techniques. It’s about the thoughtful combination of materials. It’s about letting paint create a mood that thread can dance on, or allowing a piece of paper to provide a crisp edge that floss cannot.
Here, you’ll discover how to integrate paint, paper, beads, and even natural elements into your embroidery. Each idea is a gentle invitation to see your craft in a new light—not as separate disciplines, but as harmonious partners. You have everything you need to begin right now.
1. Create a 3D Paper Terrarium

Combine the delicacy of watercolor with the texture of thread to build a botanical world in your hoop.
Start by painting your leaves and succulents on heavy watercolor paper, then carefully cut them out.
Arrange these paper elements on your fabric background, using small dabs of fabric glue to hold them in place.
You can then stitch directly through the paper to add veins and shadows, which anchors the pieces and adds a layer of textile detail.
Incorporate woven wheel roses and tiny seed beads for pops of 3D texture and a hint of dew-like sparkle.
This method allows you to create a miniature garden with crisp, graphic shapes that would be difficult to achieve with thread alone.
2. Stitch a Celestial Canvas with Silver Leaf

Take your embroidery off the hoop and onto a painted canvas for a piece of true wall art.
Prepare your canvas with a deep blue acrylic paint wash, splattering it with white or silver for a galactic effect.
Before you stitch, gently use an awl or a thick needle to pre-pierce holes for your constellation lines; this prevents the canvas from buckling.
Use a high-sheen metallic thread for the stars and pathways, and apply silver leaf flakes with adhesive for organic, light-catching nebulae.
The combination of matte paint, shimmering thread, and reflective leaf creates a cosmic masterpiece with incredible depth.
3. Explore Geometric Couching and Weaving
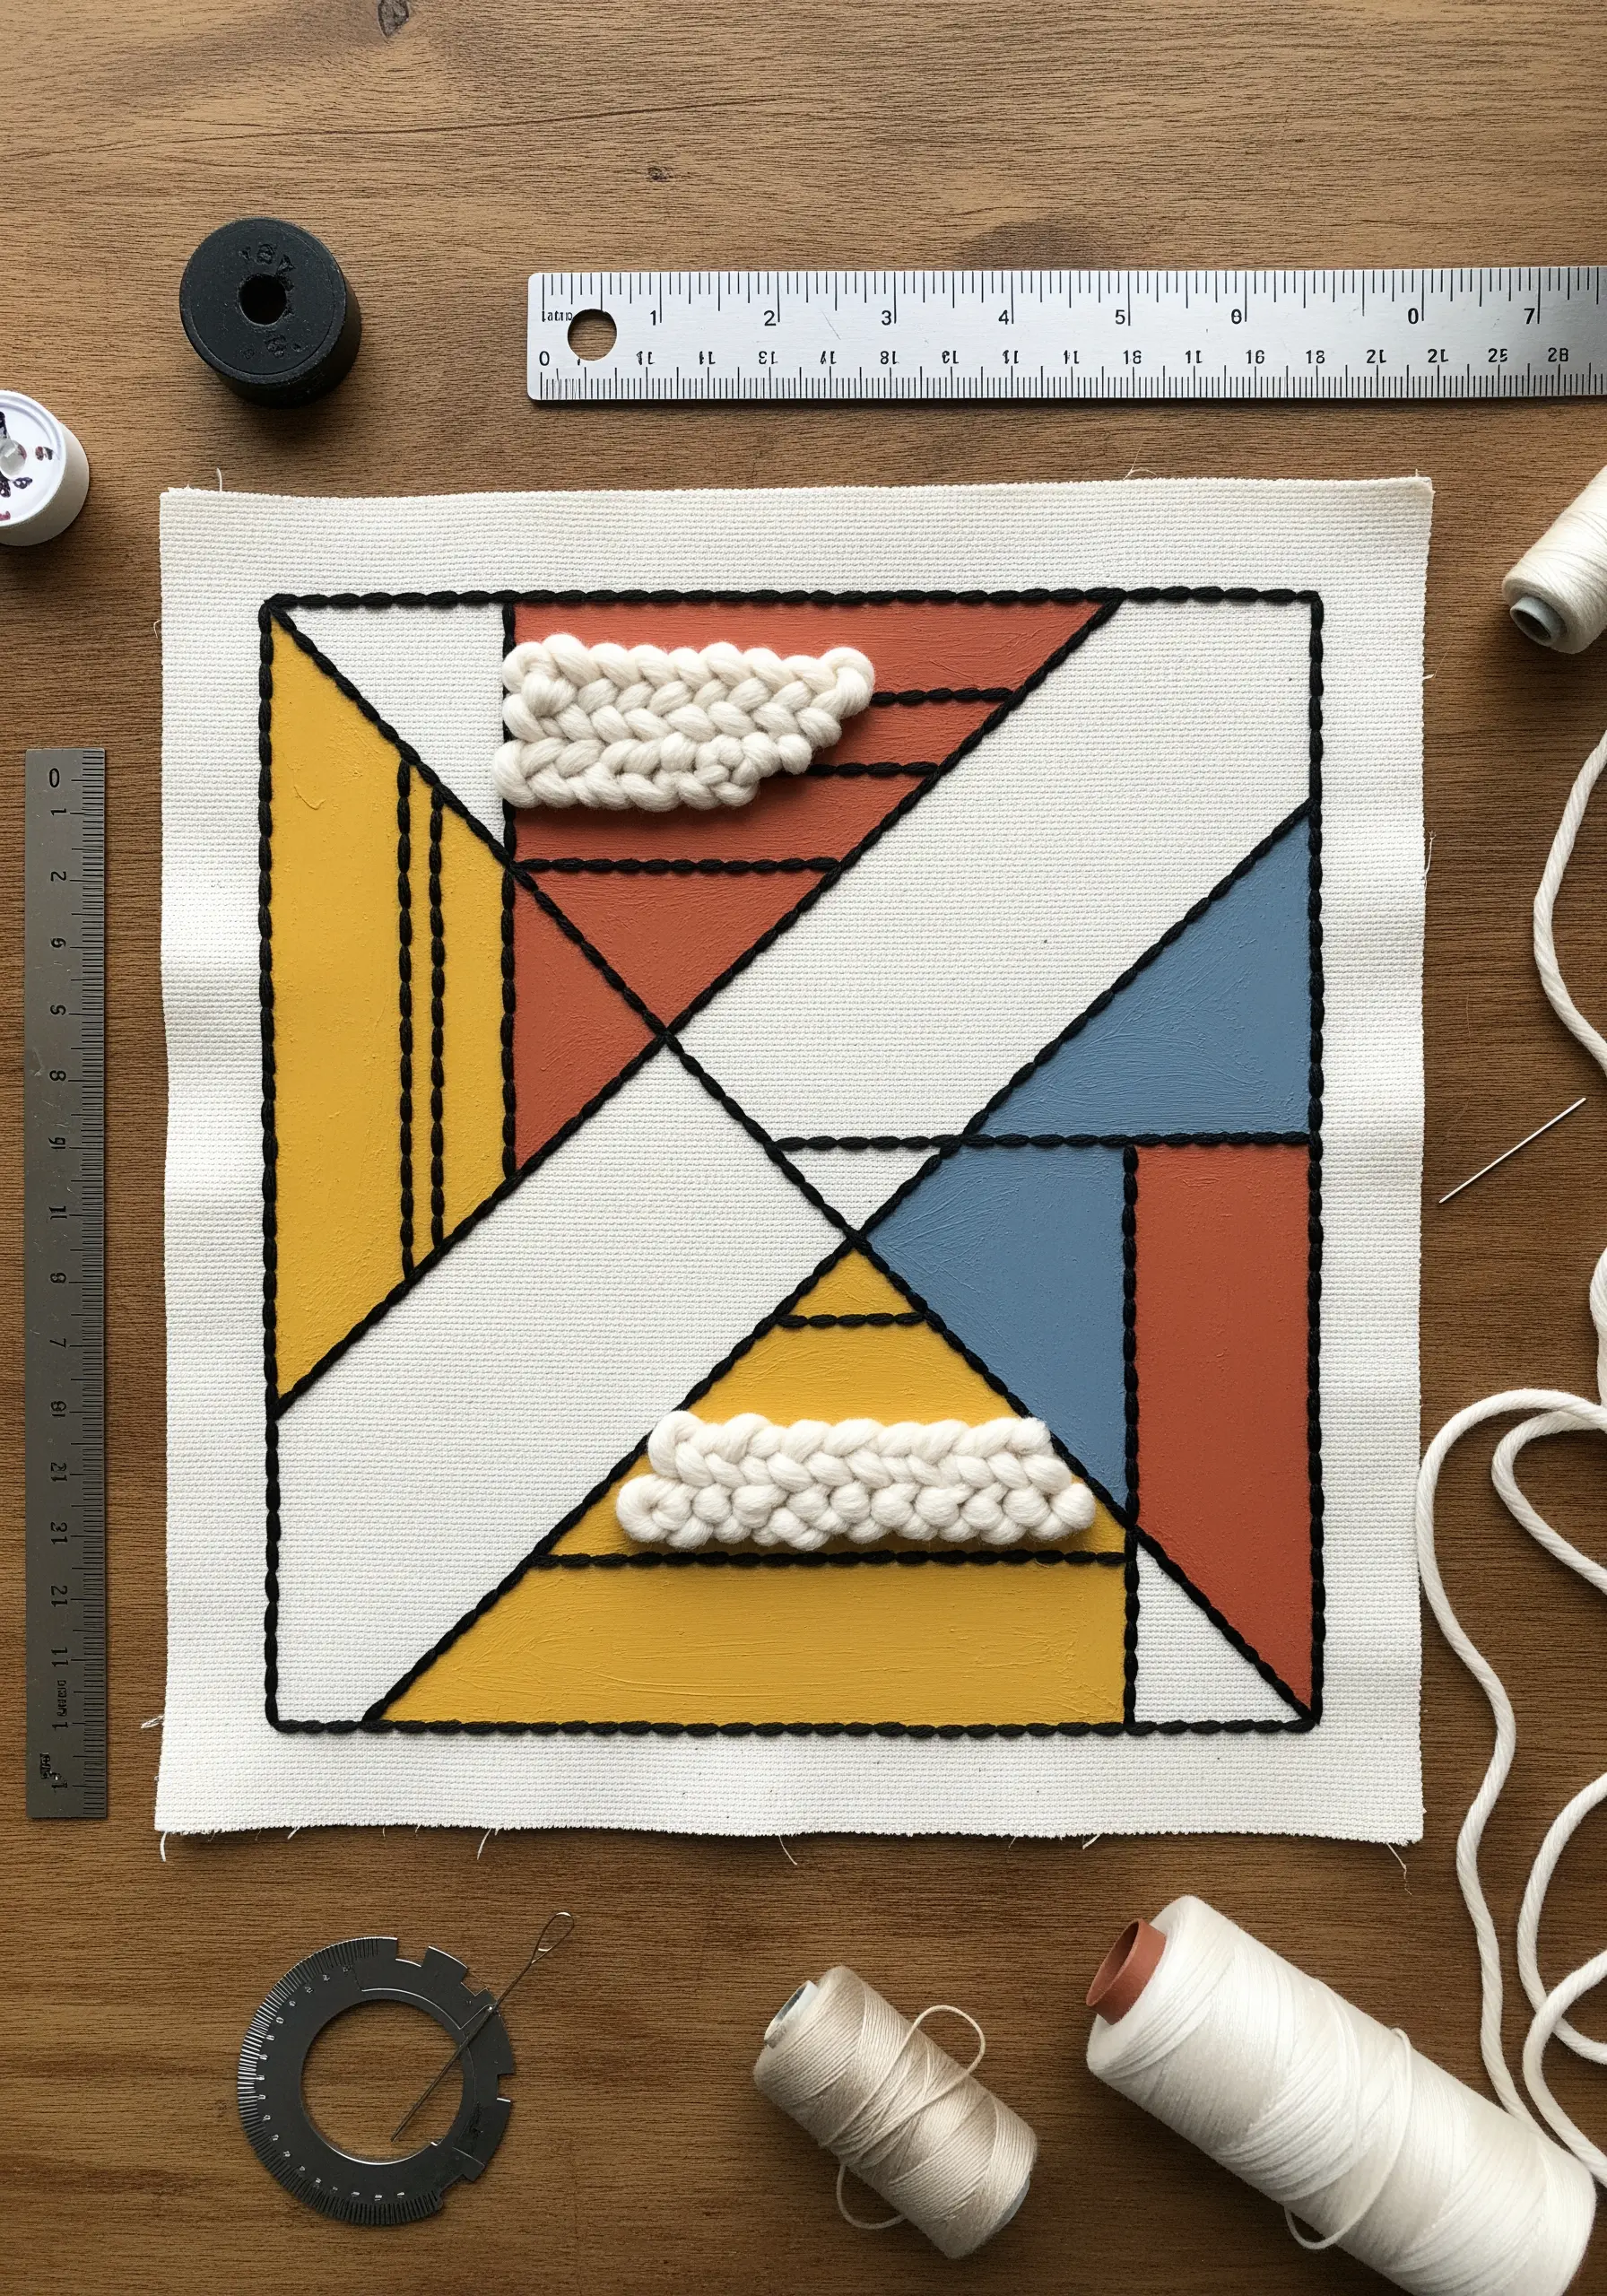
Elevate a simple geometric design by turning it into a playground of texture and technique.
Start by painting flat, bold color blocks onto a sturdy cotton or linen canvas.
Instead of a simple backstitch, outline your shapes by couching a thick black cord or yarn, which creates a powerful, graphic line.
For selected areas, create a warp by stitching long, parallel foundation threads, then weave chunky wool roving or yarn through them to add soft, sculptural volume.
This contrast between flat paint, sharp lines, and soft weaving makes the entire piece feel dynamic and intentional.
4. Sculpt a Seascape with Fabric and Cardboard
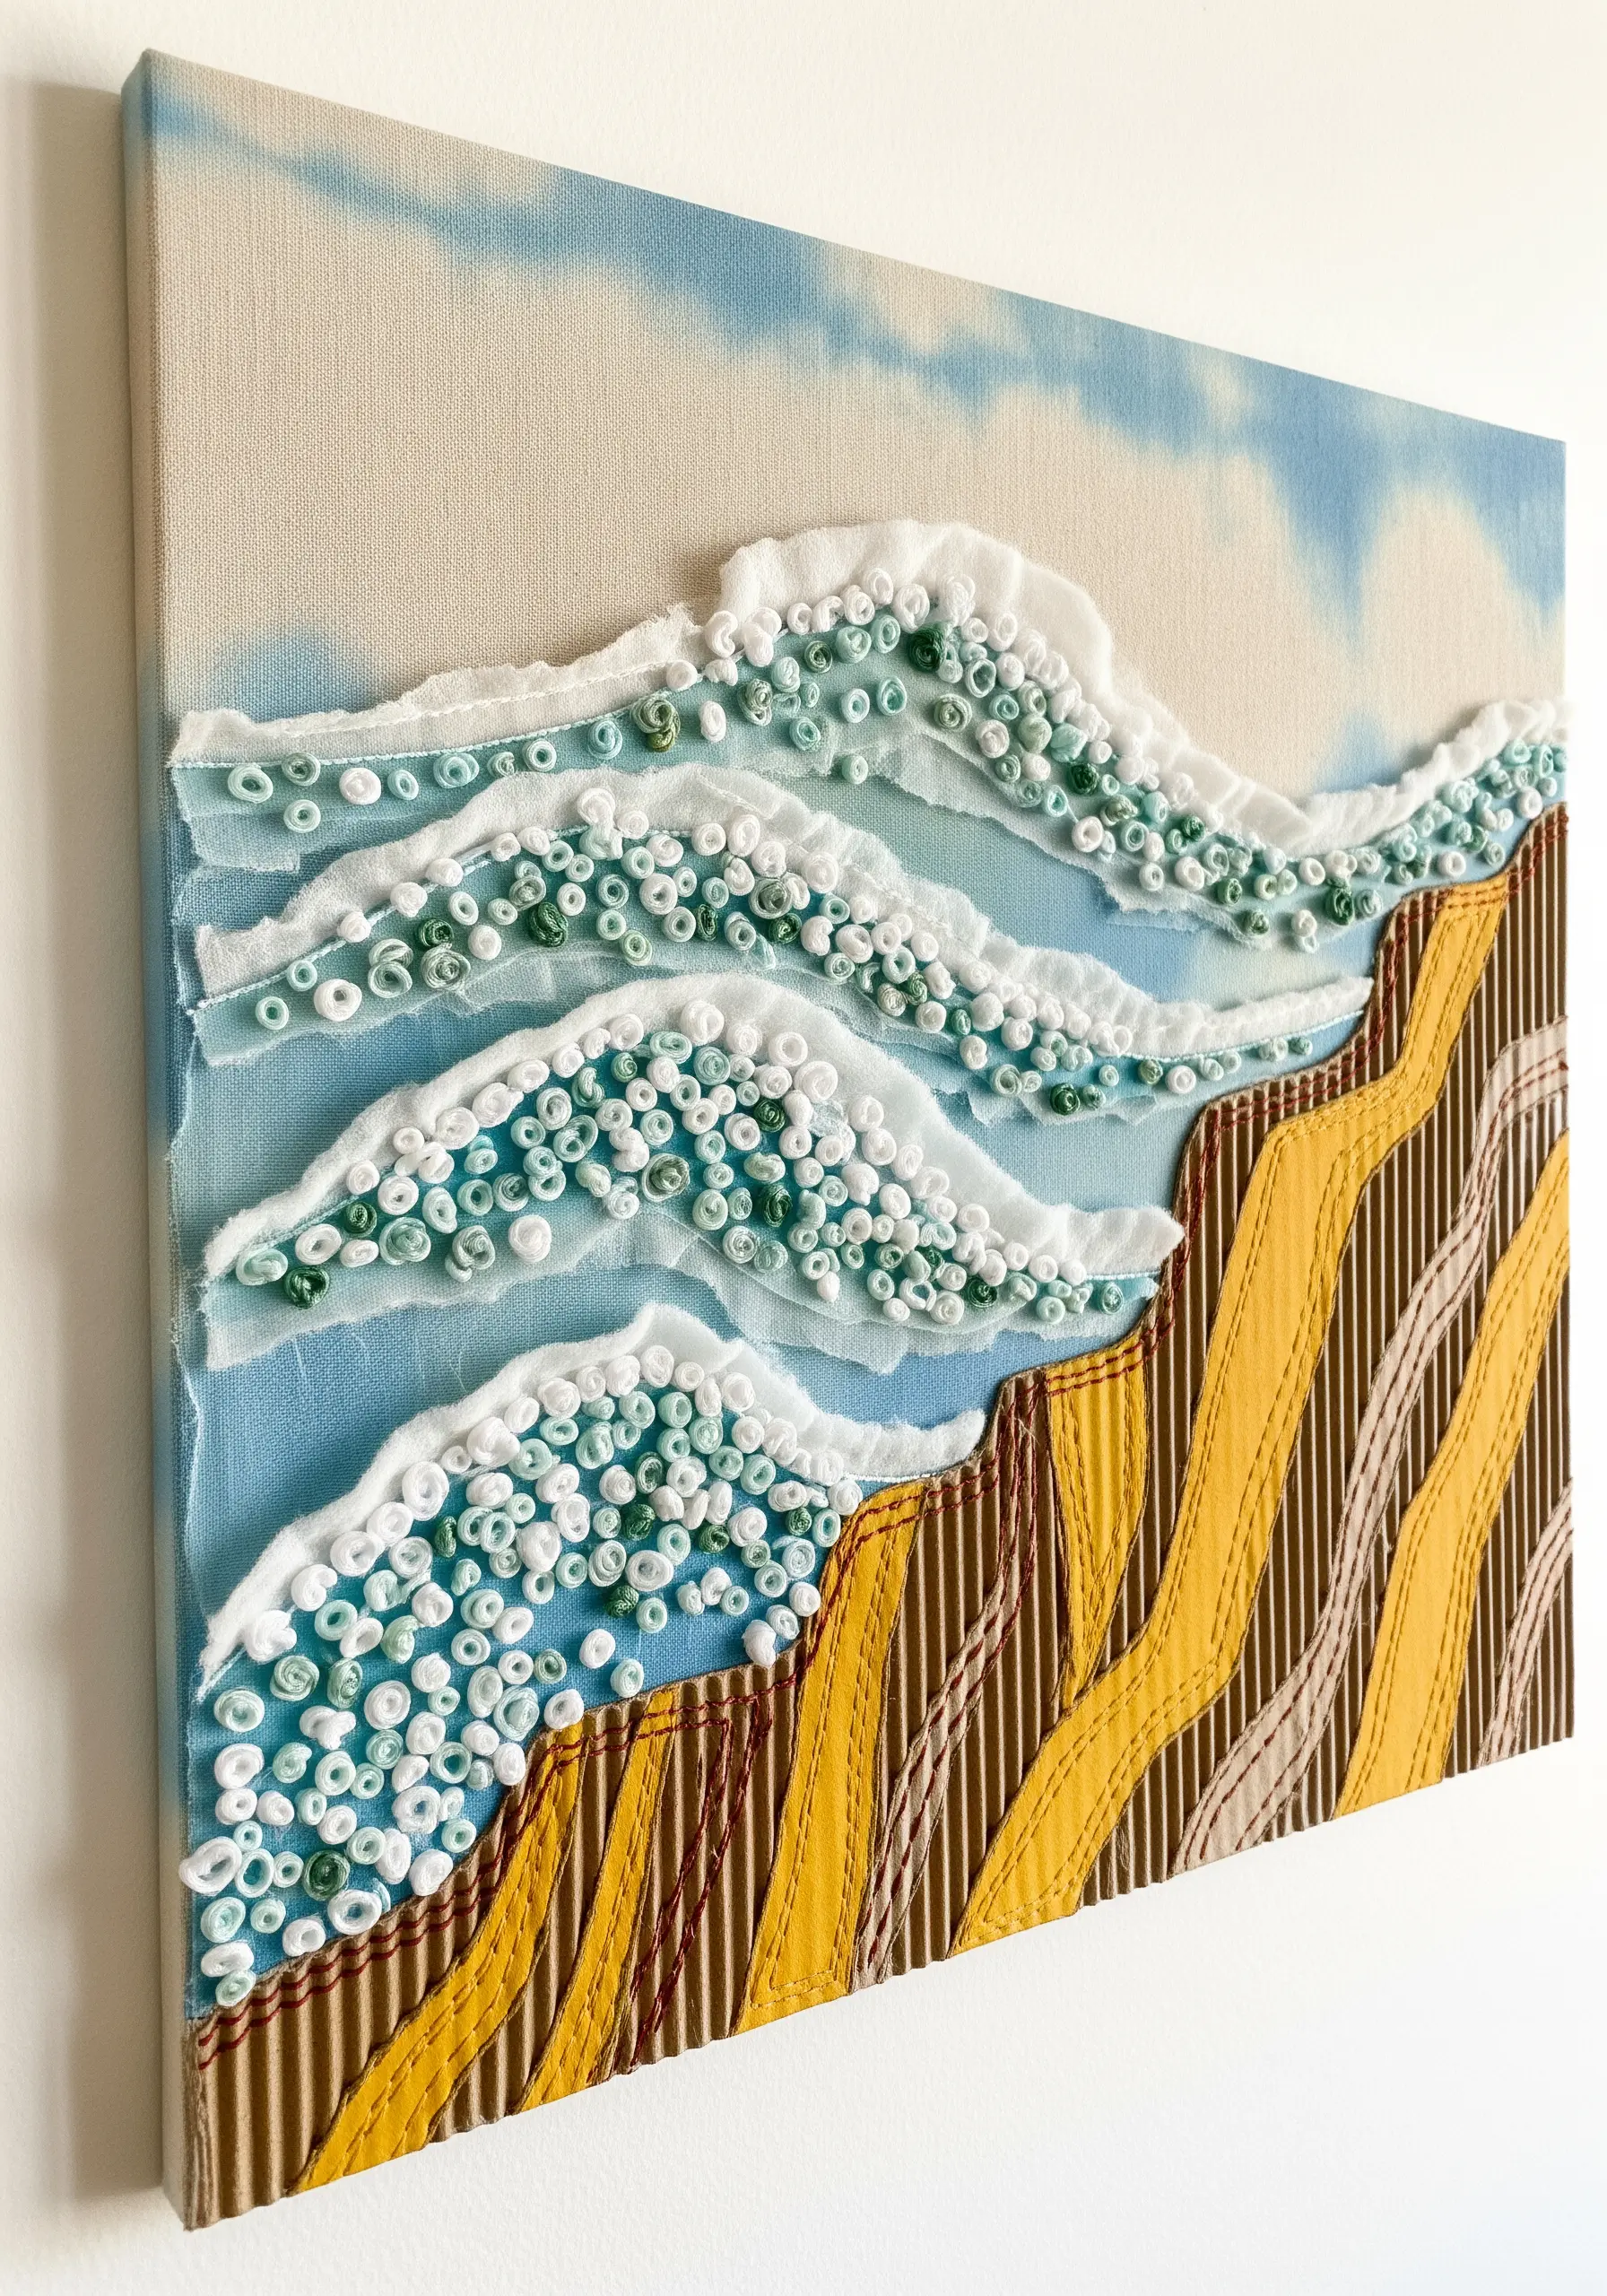
Capture the motion of the sea by using unconventional materials to build texture and form.
Create frothy wave crests by tightly rolling thin strips of organza or chiffon and securing them with small, discreet stitches.
This fabric “quilling” technique gives the seafoam a light, airy volume that contrasts beautifully with the flat, painted water.
For the cliffs, use corrugated cardboard with the ridges exposed to create a strong, linear element.
Stitching along these ridges emphasizes their form and integrates them into the textile narrative, adding an organic texture that feels both raw and refined.
5. Layer Fabric Collage into Thread-Painted Portraits
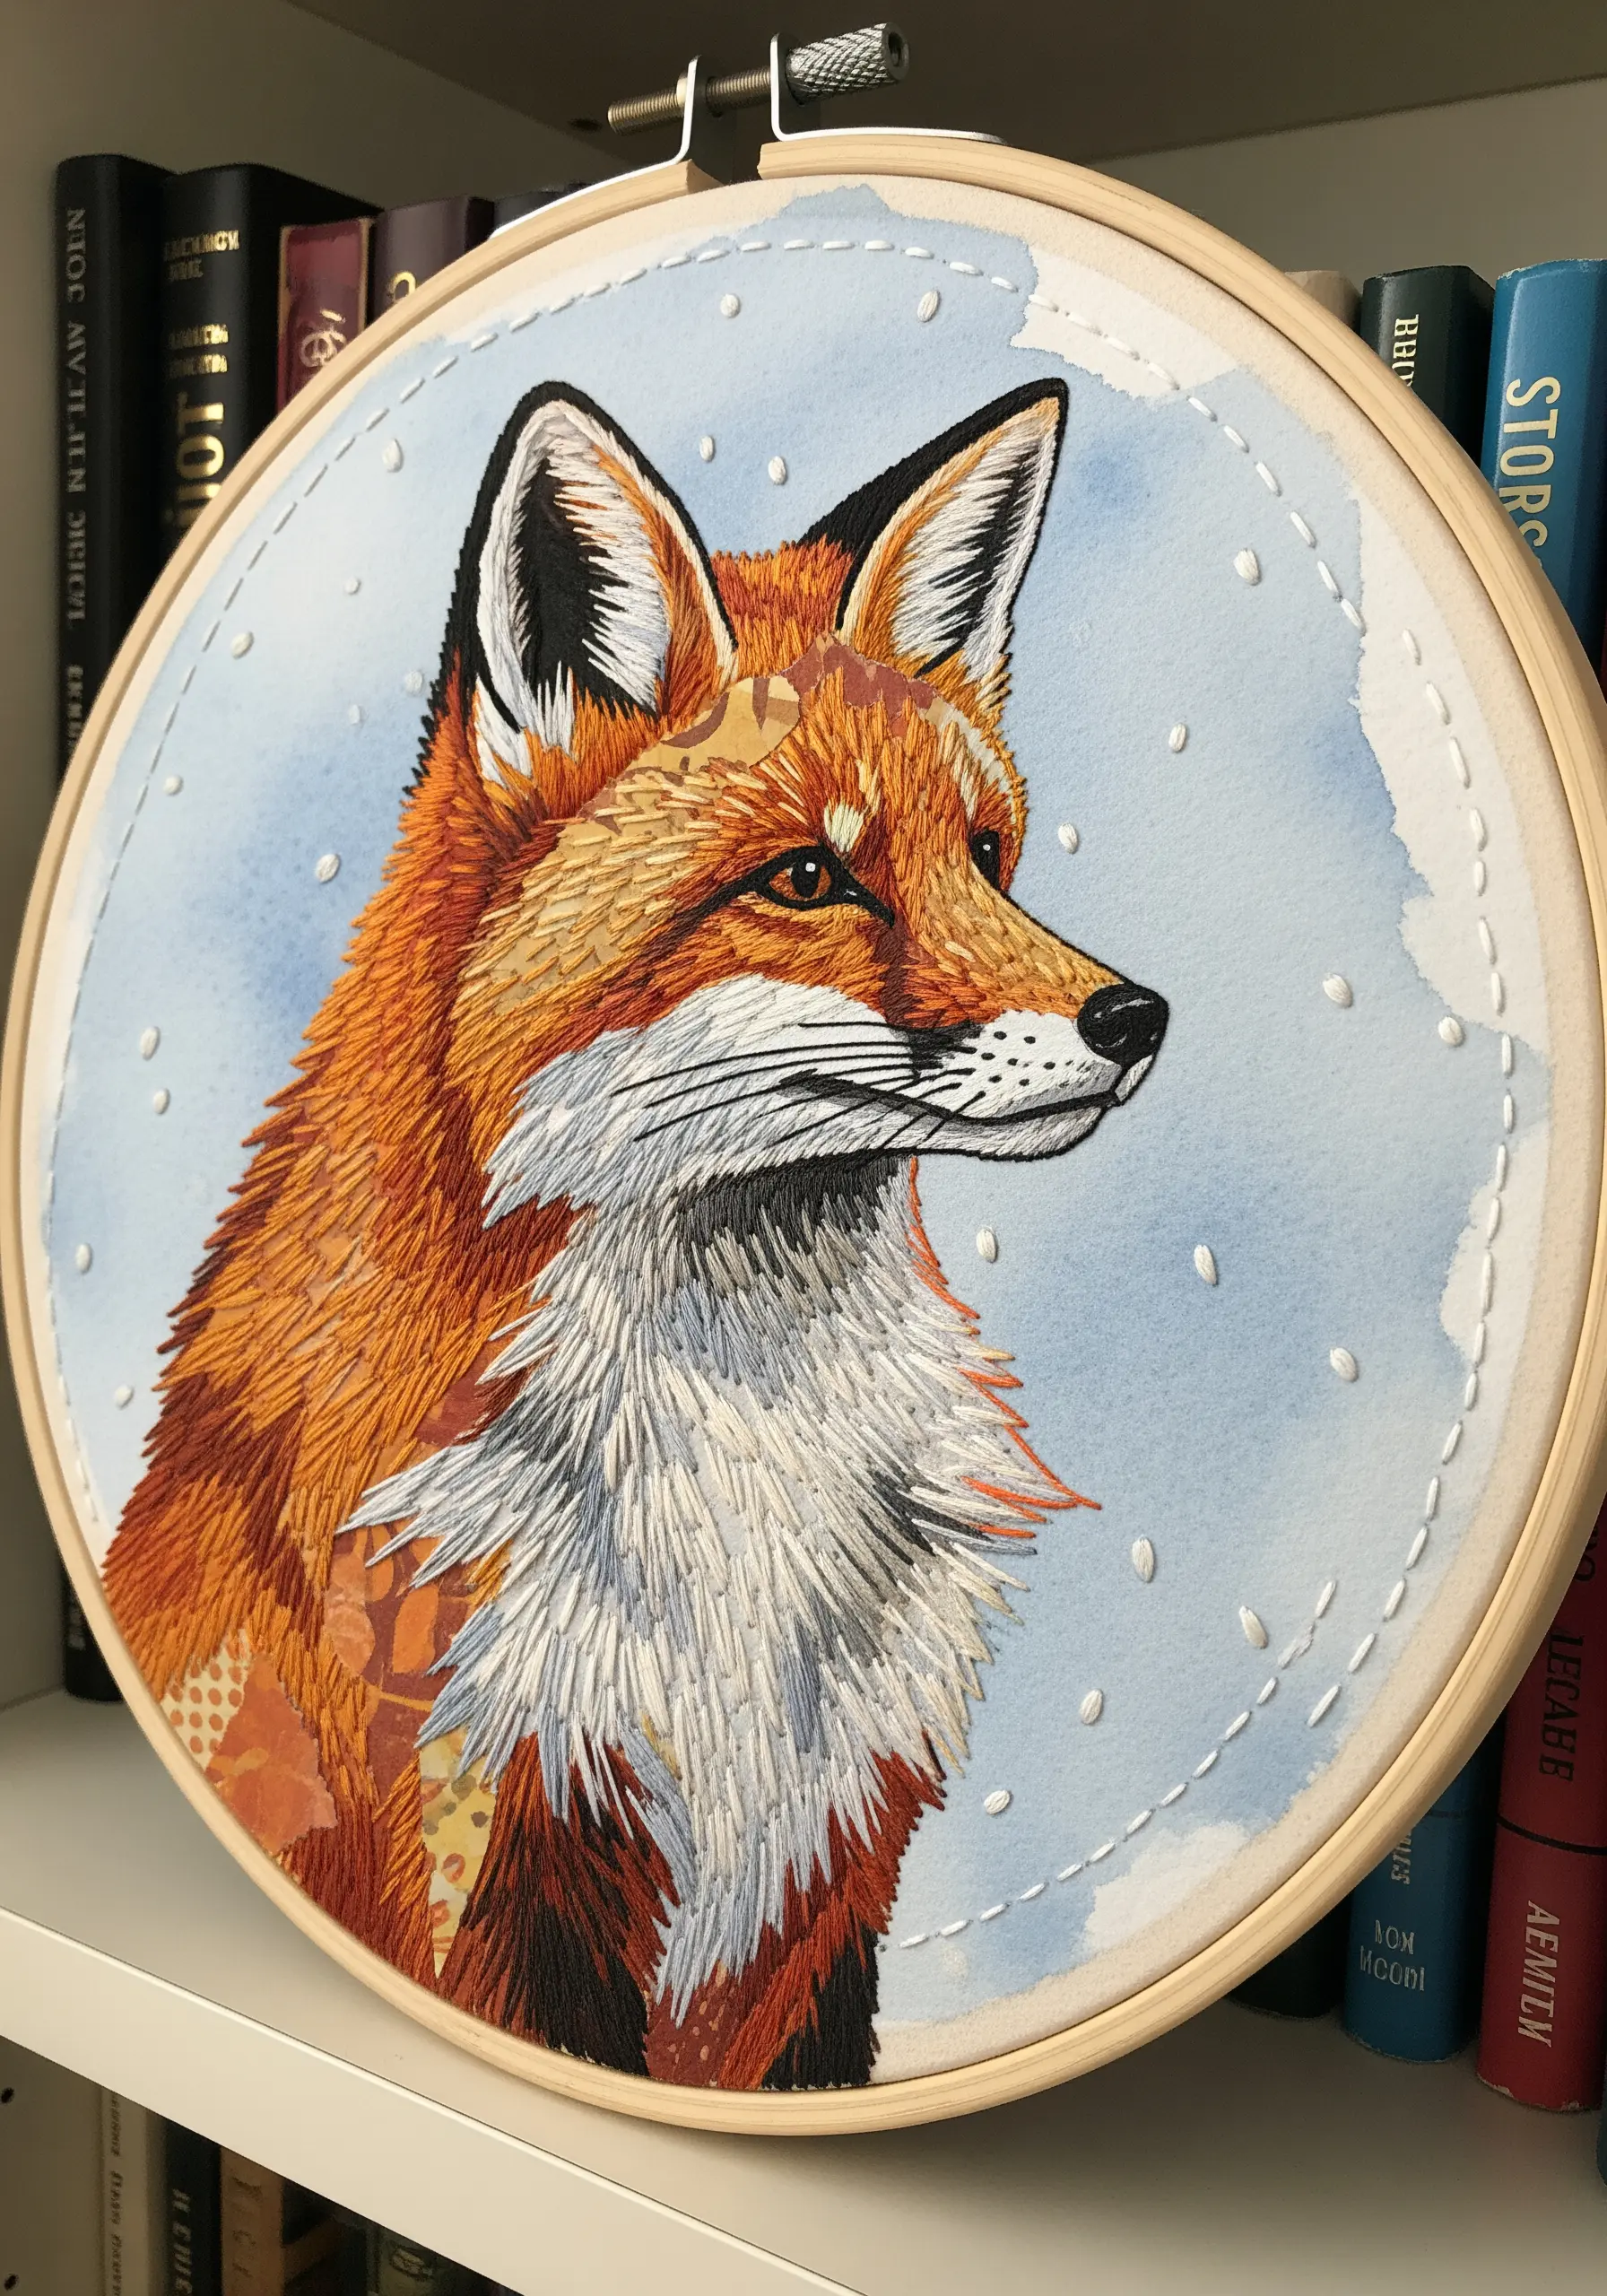
Give your animal portraits an unexpected layer of depth by incorporating fabric appliqué beneath your stitches.
Begin with a light watercolor wash on your background fabric to set the mood.
Then, cut small, intuitive shapes from patterned cotton scraps and place them where you want to build texture, like the fox’s ruff or cheekbones.
As you work your long-and-short stitches over these fabric pieces, the underlying colors and patterns will peek through subtly, creating a richness and complexity that thread painting alone cannot achieve.
This technique turns a simple portrait into a story of layered materials.
6. Frame Pressed Botanicals with Paint and Thread
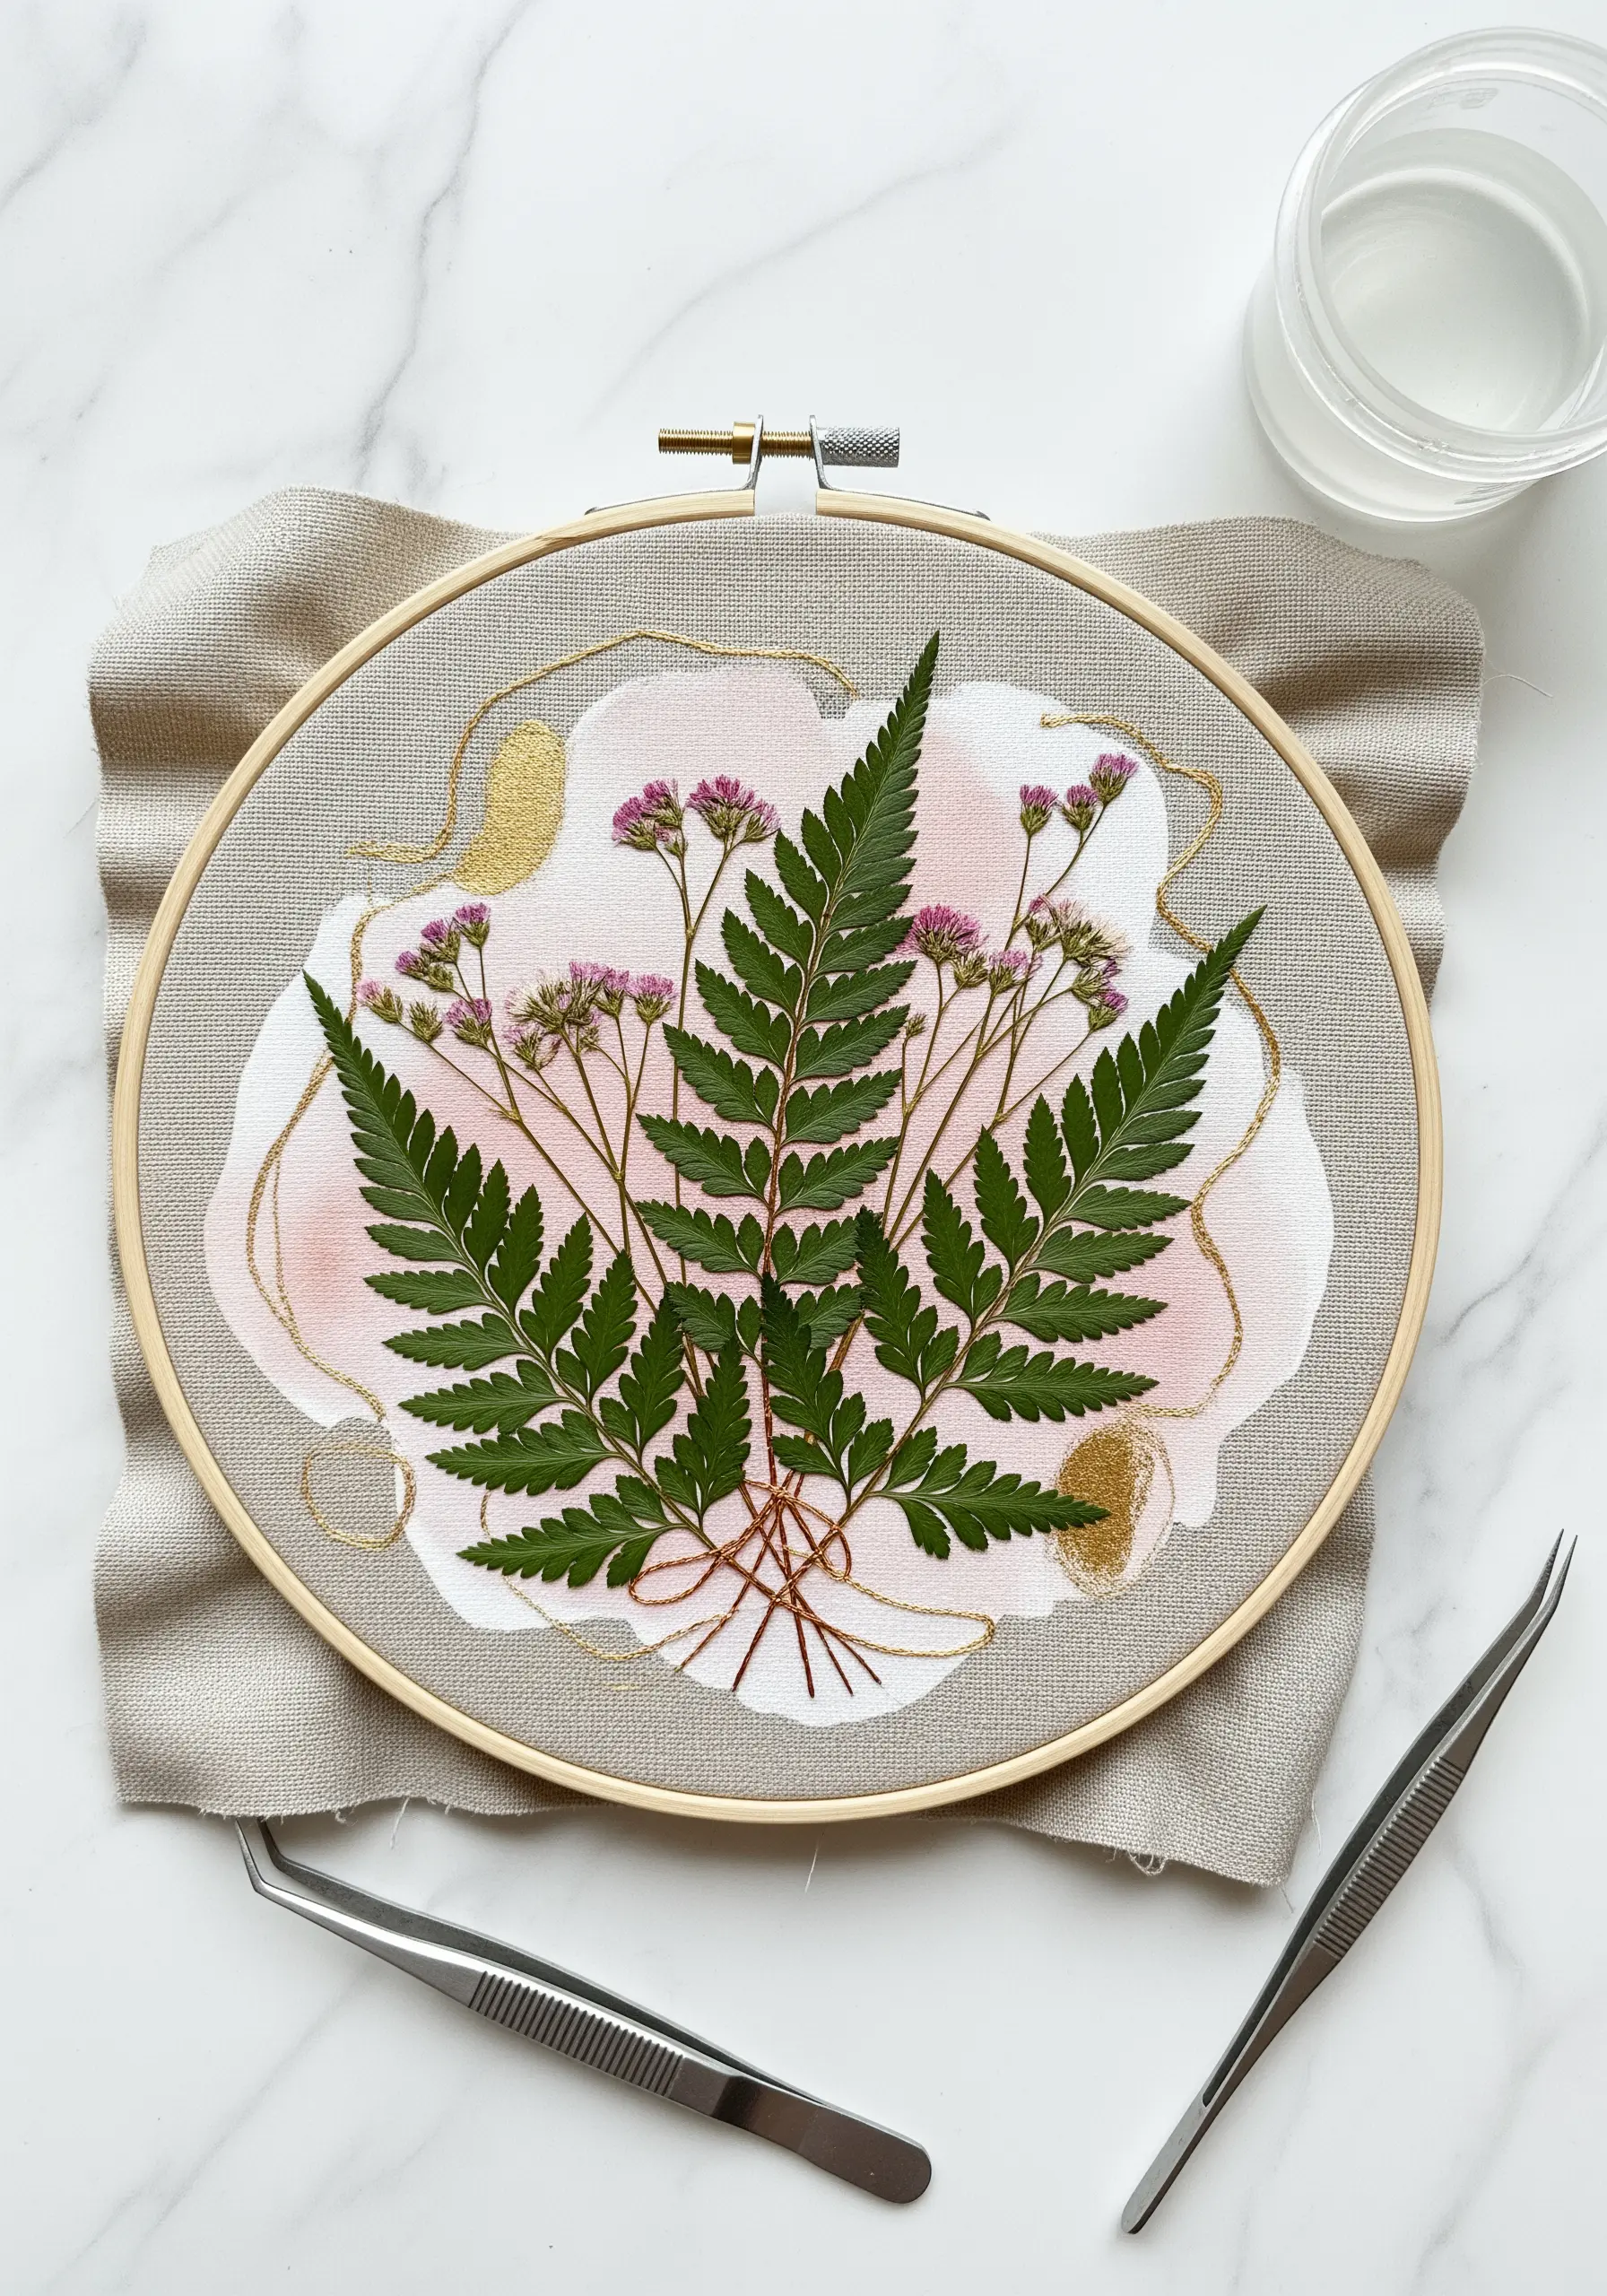
Preserve the delicate structure of real flowers and leaves by integrating them directly into your embroidery.
First, create a soft, abstract shape on your linen with watercolor paint, letting it dry completely.
Carefully arrange your pressed botanicals on the fabric and secure them with a clear, flexible craft adhesive.
To elevate the composition, use a single strand of metallic gold thread to stitch organic, flowing lines around the arrangement.
This simple touch adds a hint of luxury and connects the natural elements to the textile background, creating a piece that feels both organic and curated.
7. Build an Architectural Cityscape with Felt
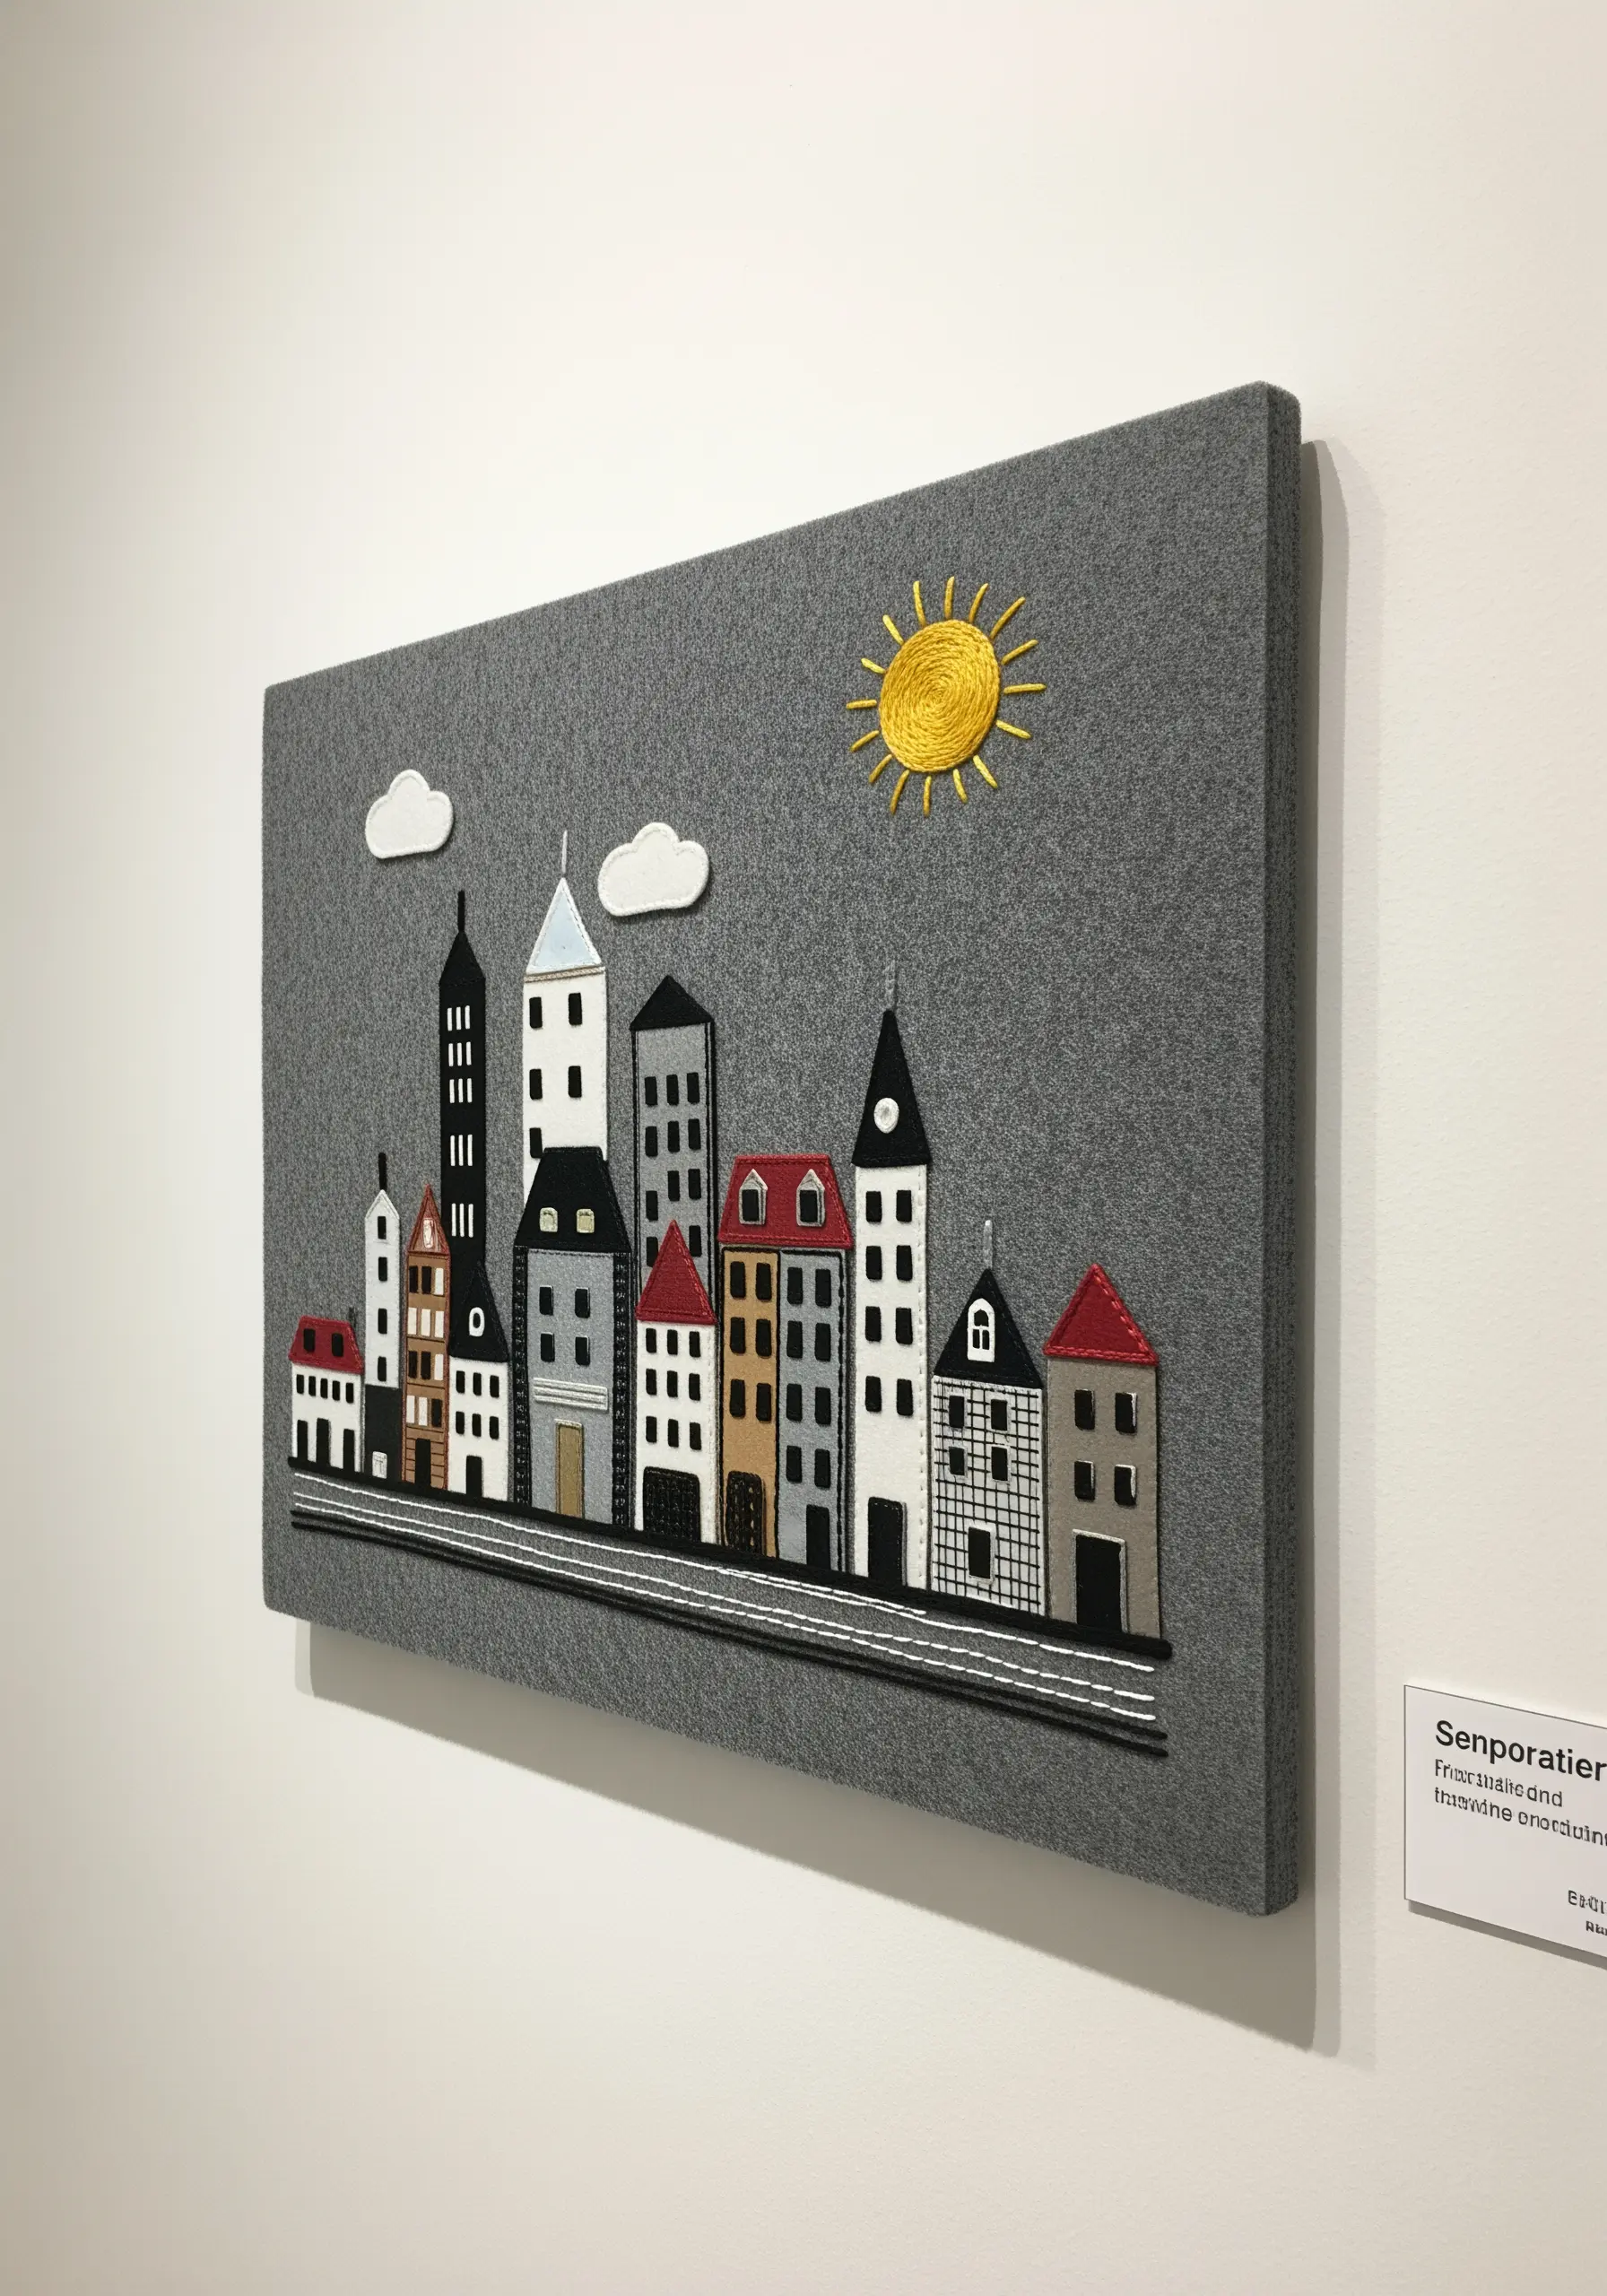
Use the clean edges and bold colors of felt to construct a stylized architectural scene.
This technique relies on precise cutting and layering rather than complex stitching.
Mount a large piece of neutral felt onto a canvas or board to serve as your background.
Cut your building shapes from various colors of felt and arrange them to create a sense of depth and perspective.
Use only the most minimal stitch motifs—simple running stitches in contrasting thread—to suggest windows, doors, and rooflines, letting the felt shapes do most of the visual work.
8. Embroider Typography on Watercolor Paper
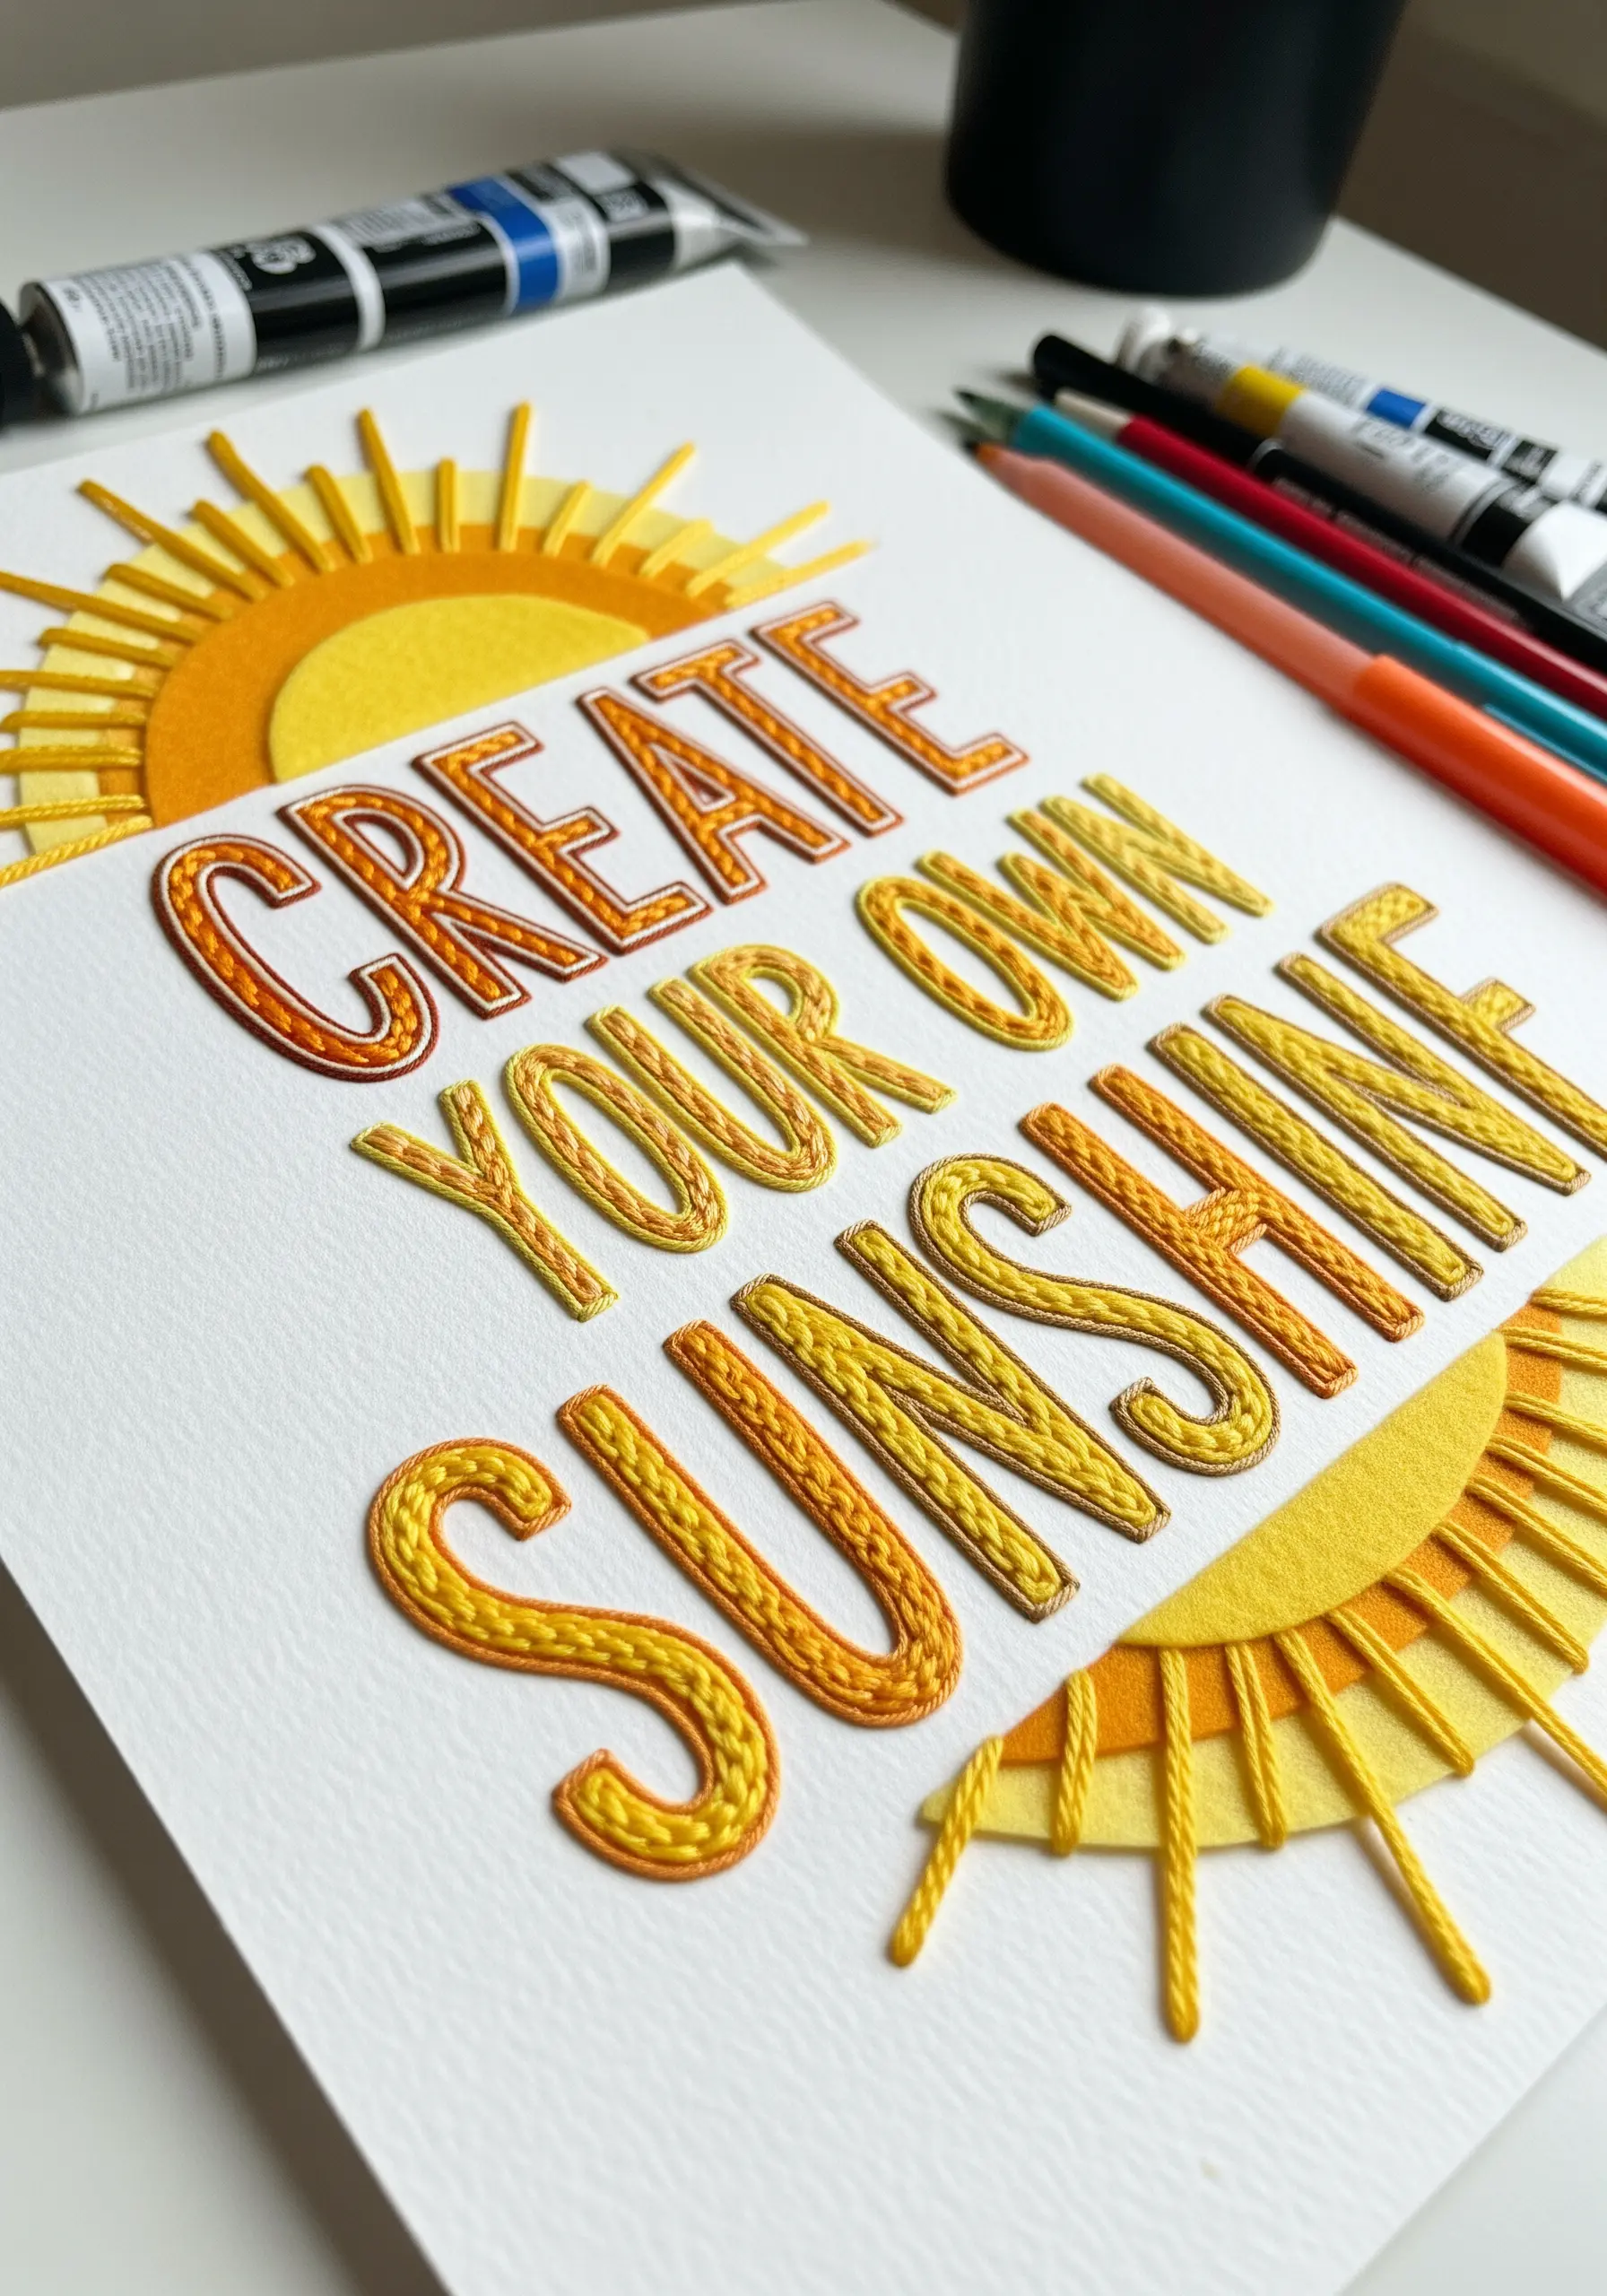
Stitching on paper offers a crispness that fabric can’t, making it perfect for bold typographic art.
Choose a heavy, high-quality watercolor paper that can withstand perforation.
Lightly sketch your letters and then use a fine needle to pre-pierce stitching holes along the lines. This crucial step prevents the paper from tearing as you work.
Fill the letters with a dense, smooth satin stitch, keeping your thread tension even and gentle.
The combination of the paper’s tooth, the watercolor background, and the raised, lustrous thread creates a piece with immense graphic appeal.
9. Compose a Jungle Scene with Paper and Beads
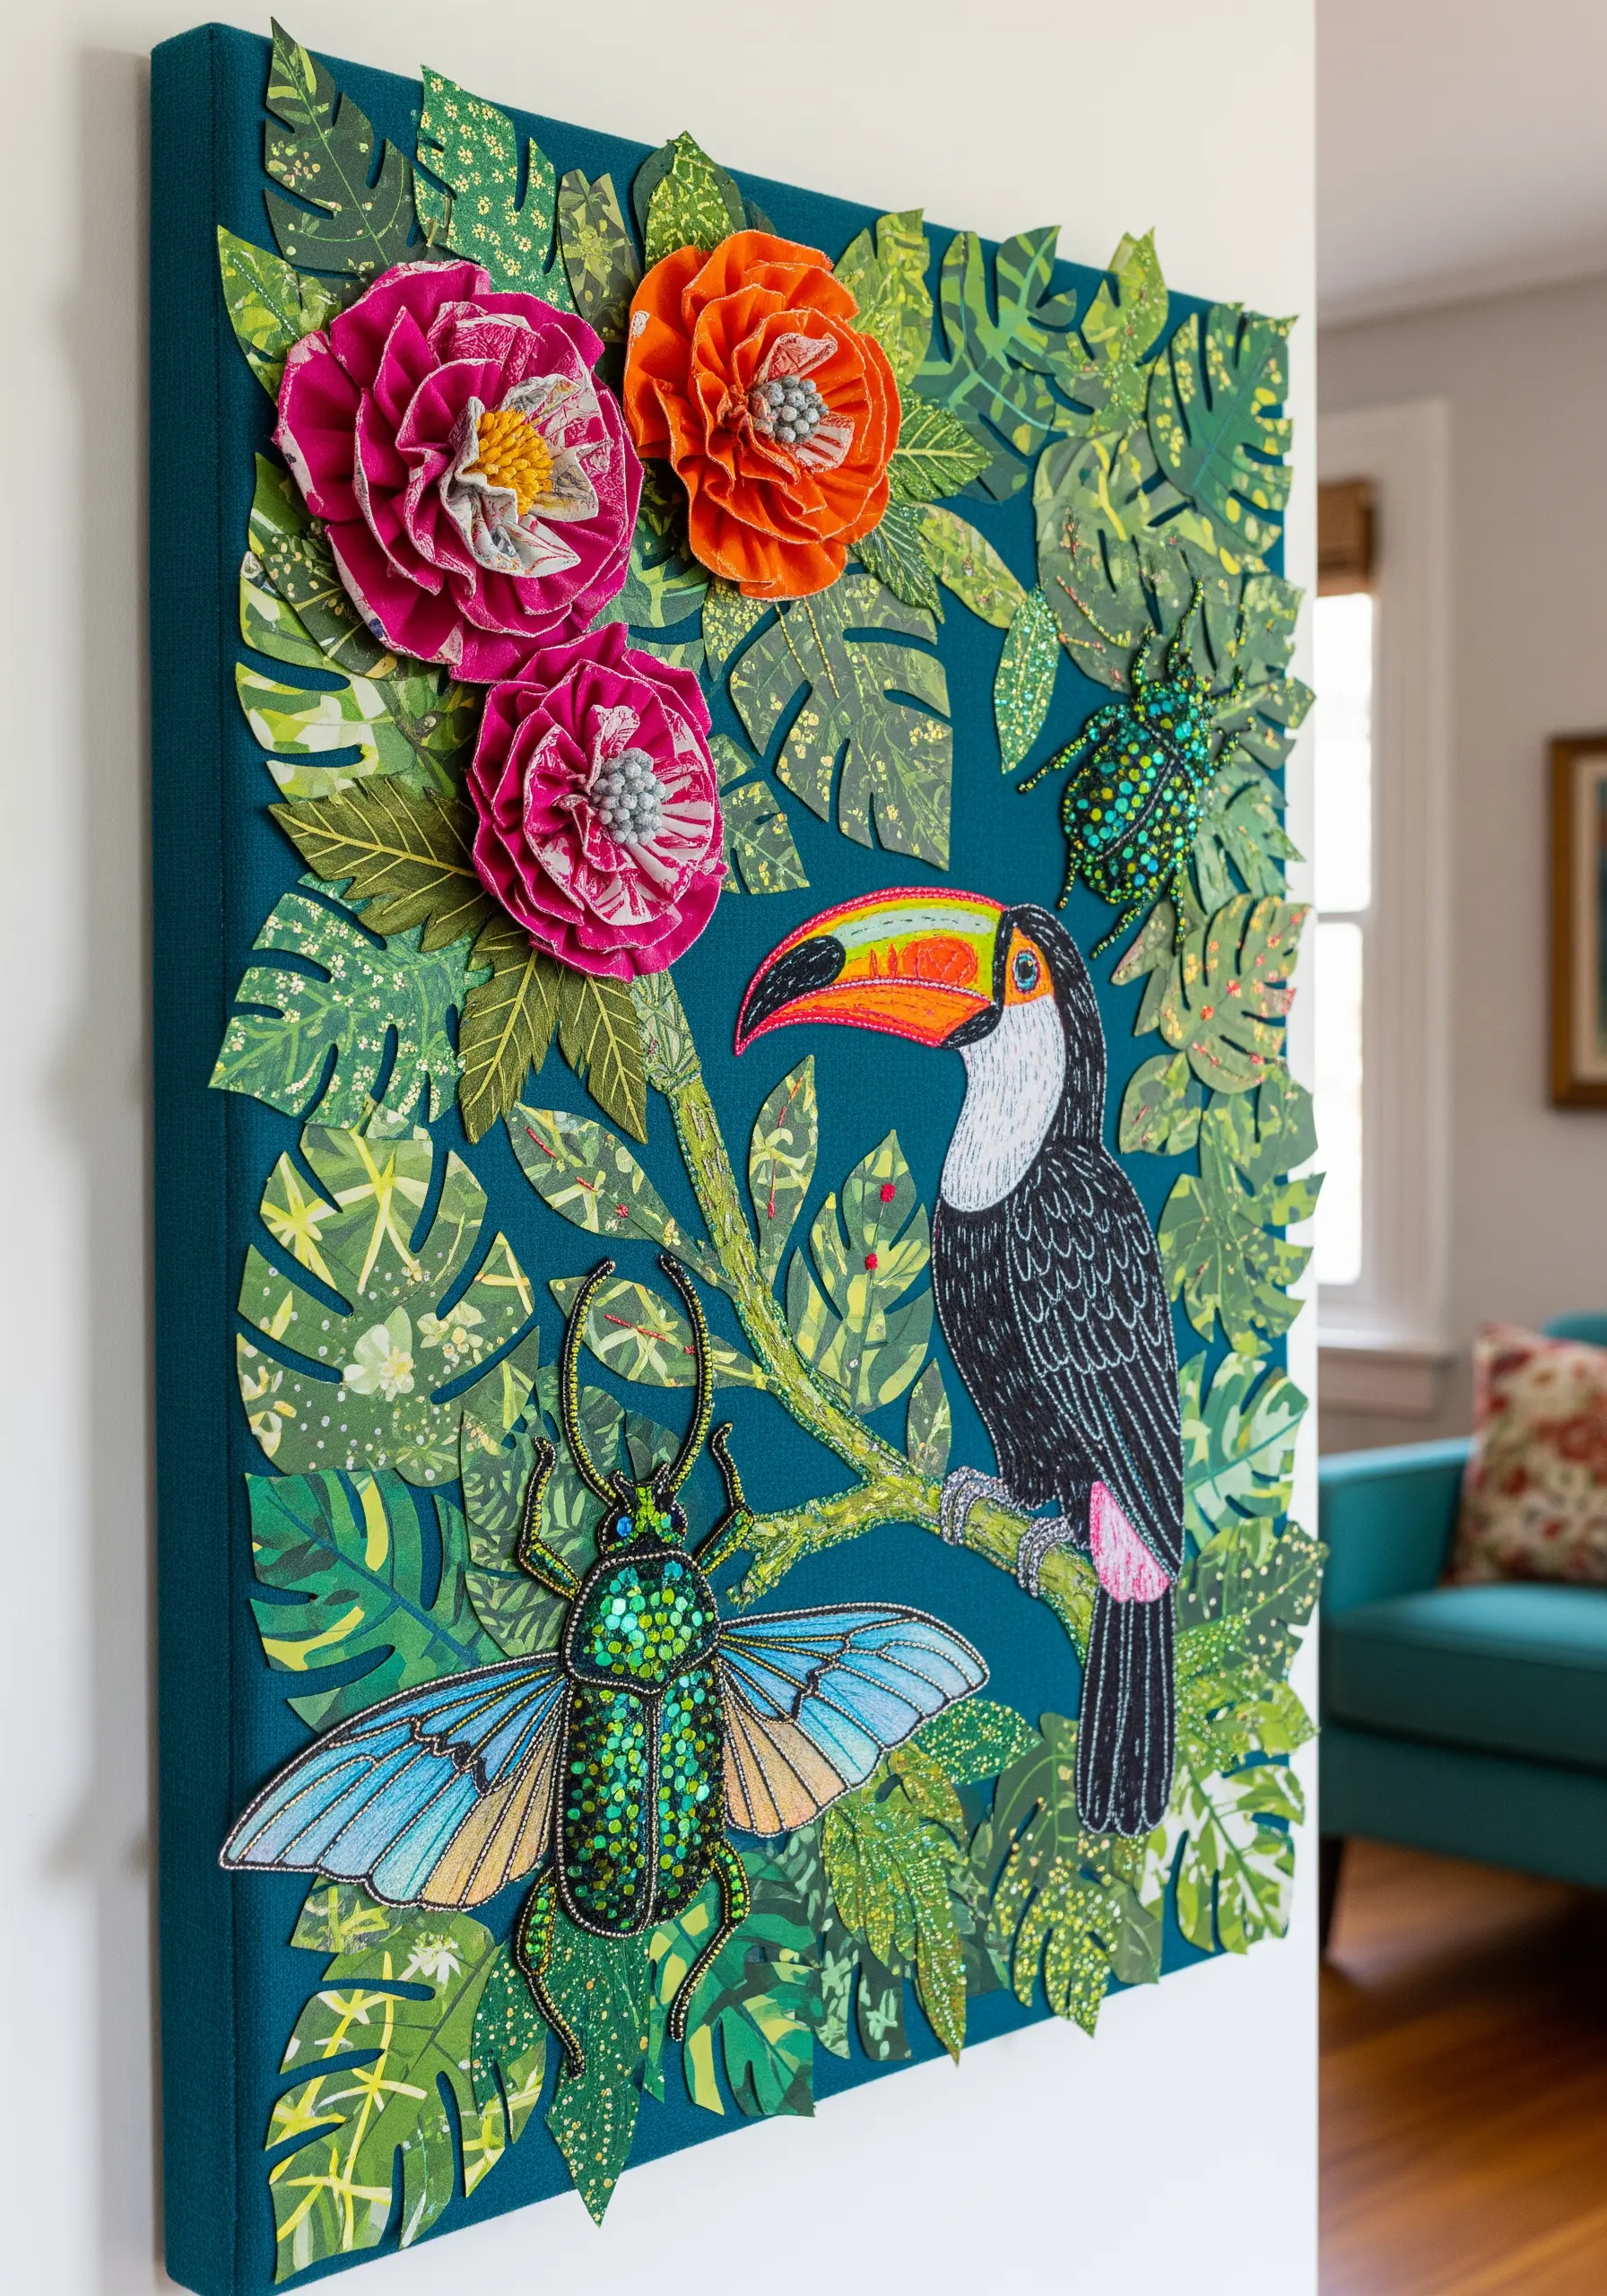
Create a lush, vibrant ecosystem by combining the arts of collage, embroidery, and beadwork.
Build your background by layering cutouts of tropical leaves from various patterned and solid-colored papers.
Stitch your central figures, like the toucan, on a separate piece of stabilized fabric for control, then cut it out and appliqué it onto your paper collage.
The real magic comes from the embellishments: use tiny, iridescent seed beads and sequins on the insects’ wings. This makes them catch the light and appear to shimmer with life, adding a focal point of texture against the flat paper leaves.
10. Chart Textures on a Watercolor Grid
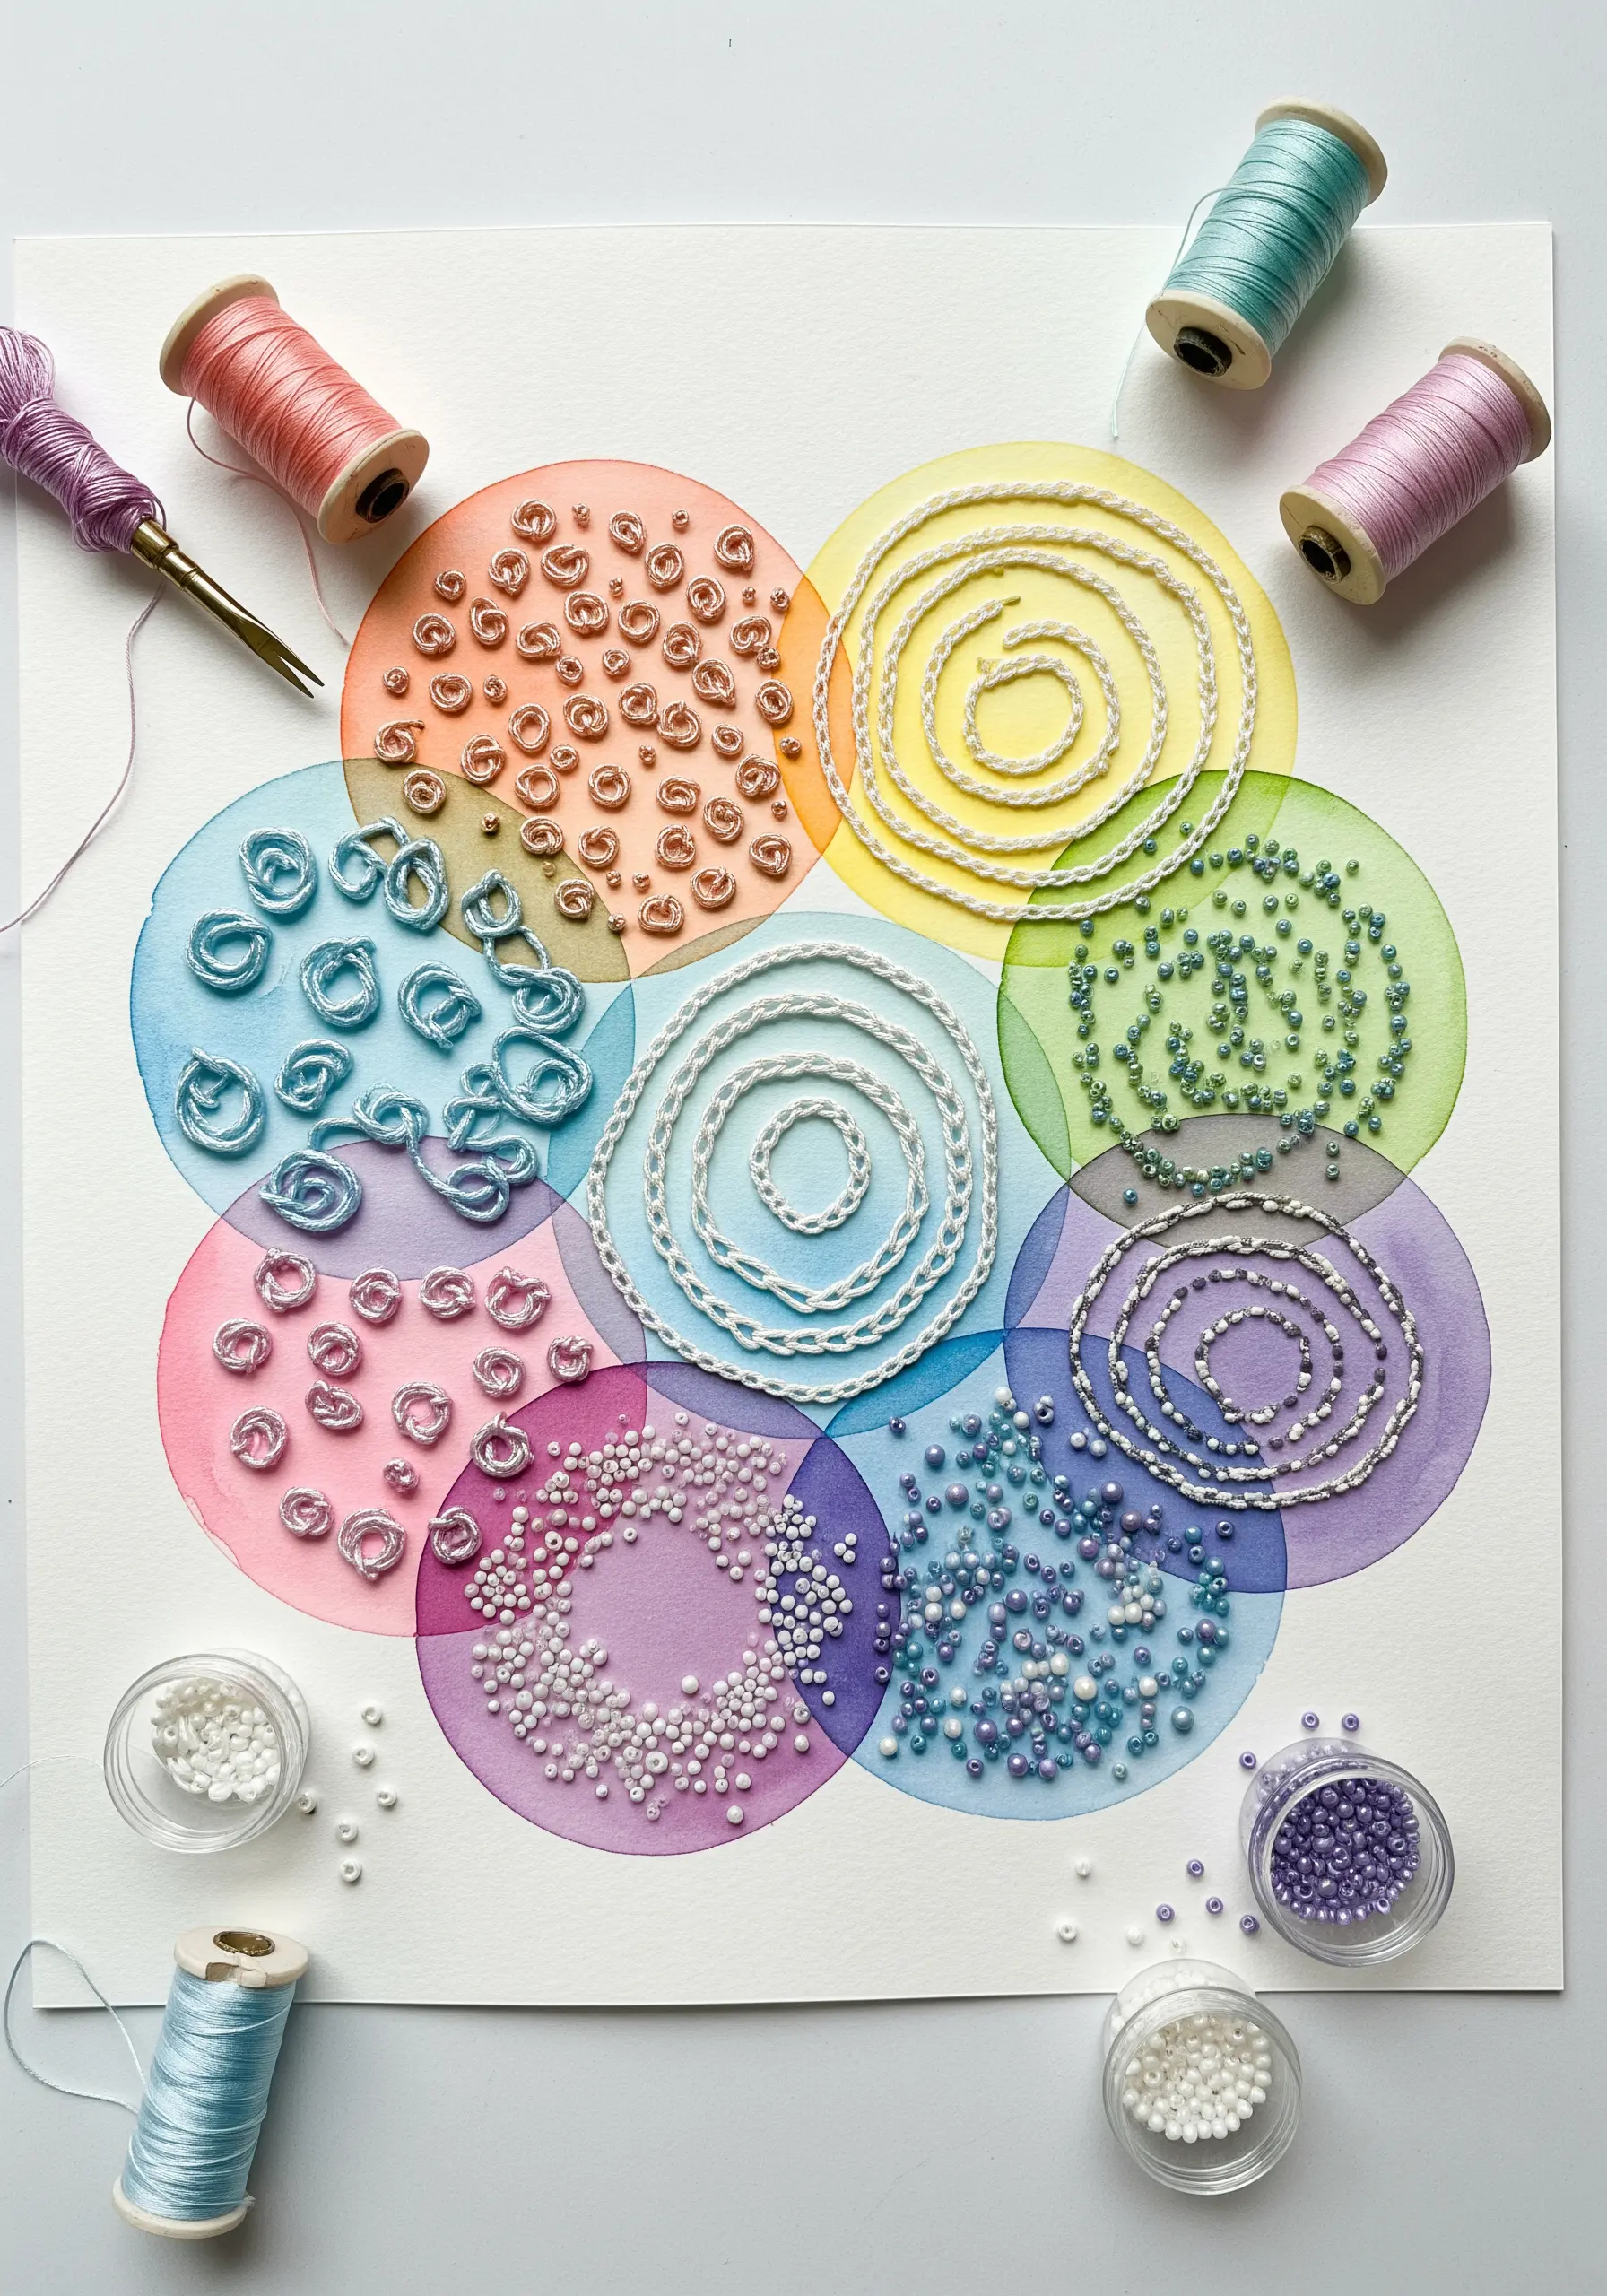
Turn your stitch practice into a finished piece of art by working within a structured, colorful framework.
Paint a simple grid of overlapping watercolor circles on heavy paper.
Designate each circle for a specific stitch, bead, or texture you want to explore—think bullion knots, French knots, chain stitches, seed beads, or couched threads.
This approach transforms a technical sampler into a beautiful composition, allowing you to experiment freely with color and texture in a contained, organized way. It’s a perfect way to explore mixed-media techniques without pressure.
11. Craft a Translucent Mountainscape
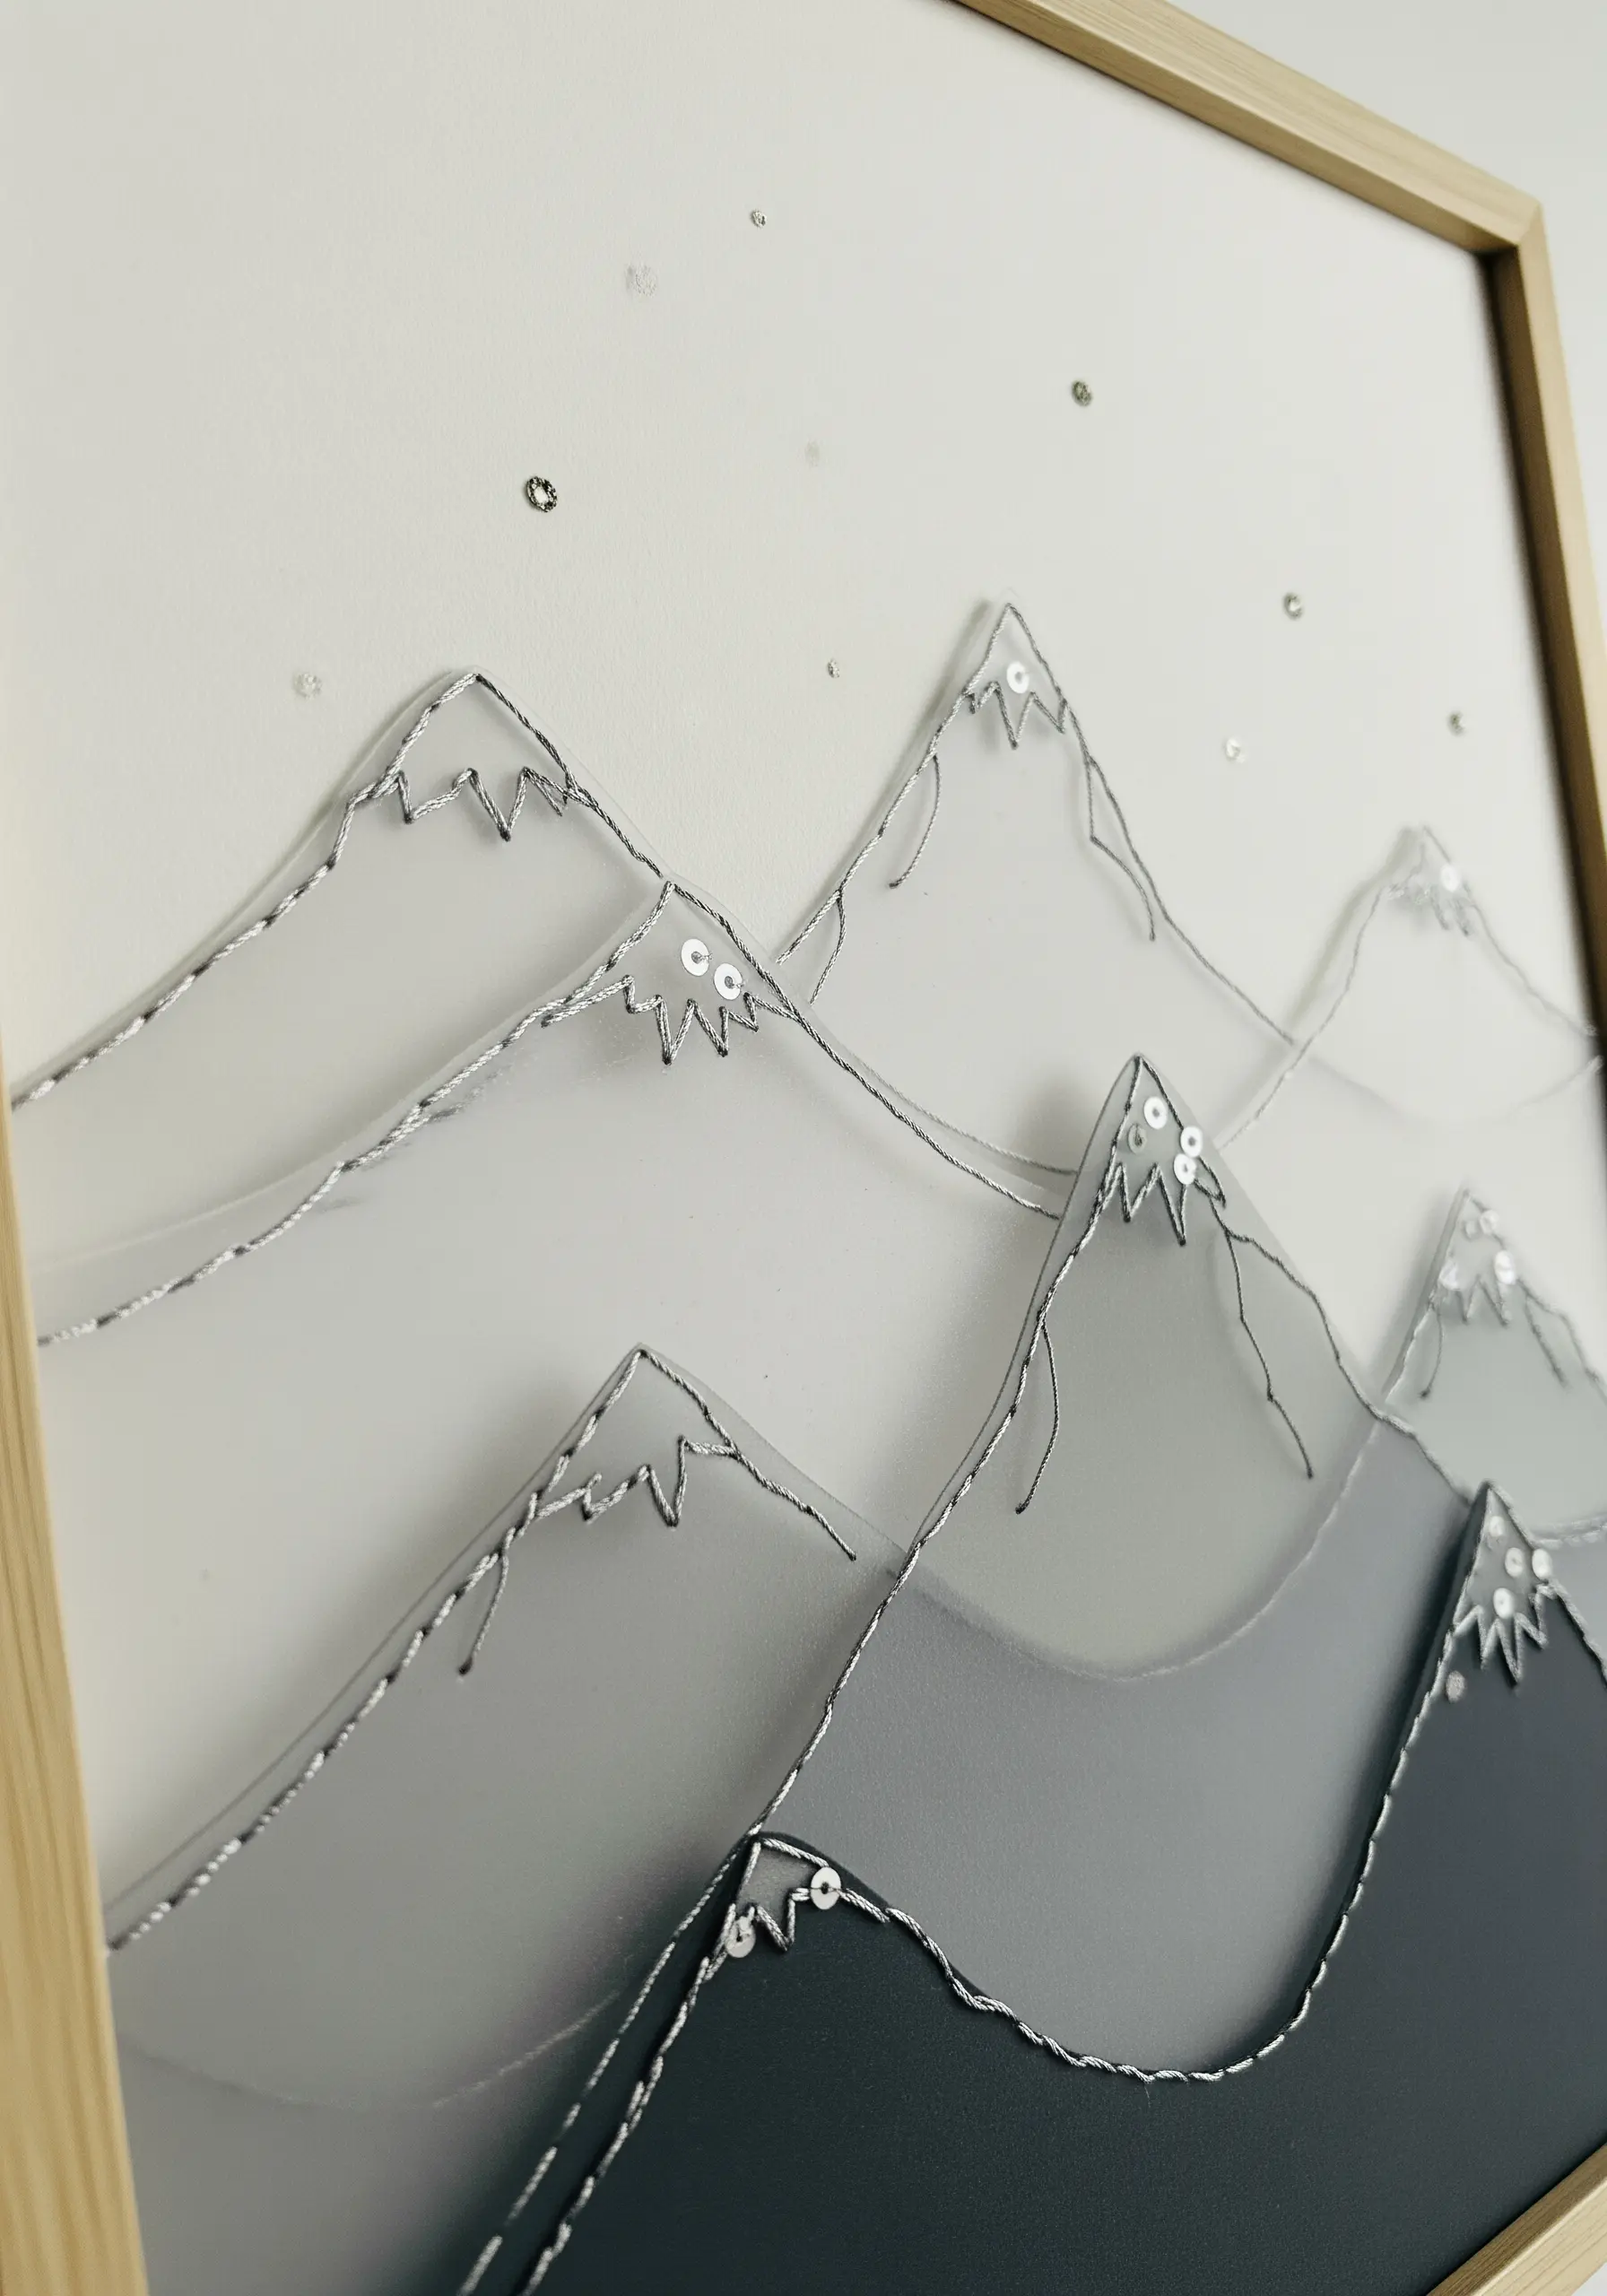
Create an ethereal sense of depth by layering sheer materials to build a minimalist landscape.
Cut mountain shapes from sheets of vellum or layers of organza fabric in a grayscale palette.
Arrange them on a neutral background, allowing their translucency to create soft, overlapping shadows that suggest distance.
Use a single strand of silver metallic thread to stitch a delicate backstitch along the peaks, defining their sharp ridges.
A few strategically placed iridescent sequins will catch the light like distant snow and ice, completing the frosty, atmospheric effect.
12. Unite Yarn and Faux Leather in a Celestial Hoop
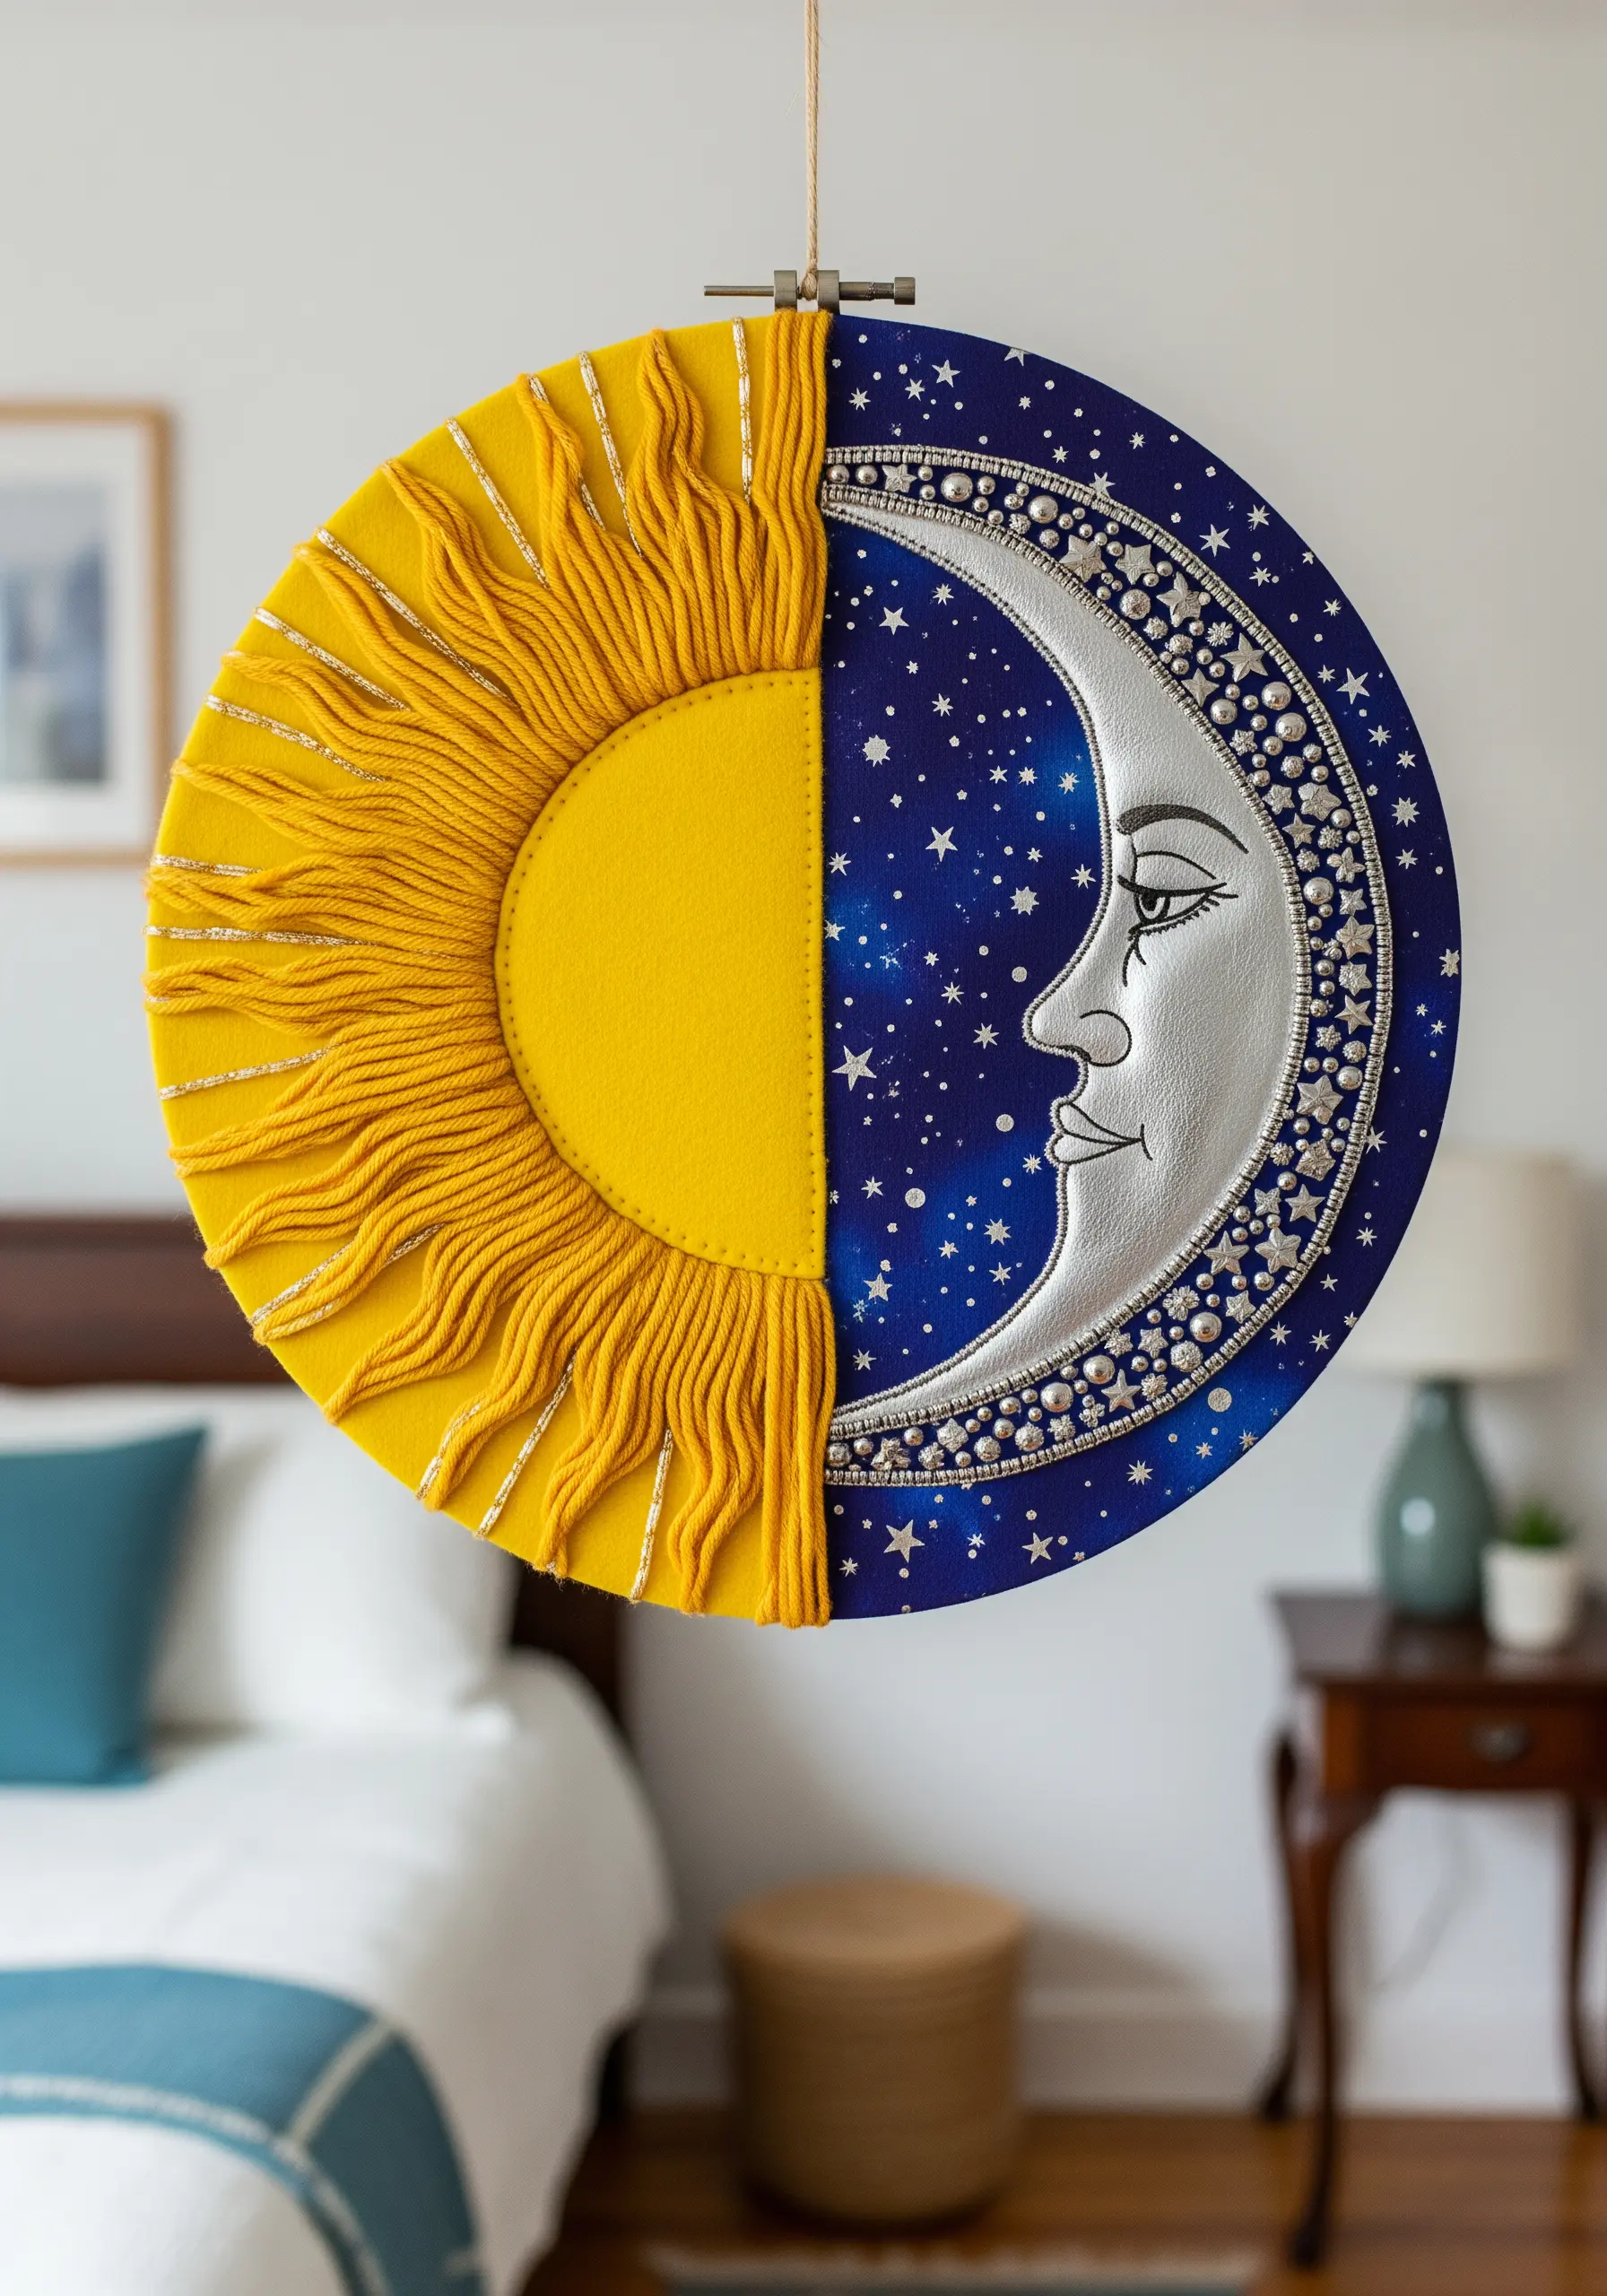
Express a powerful duality by combining radically different textures in a single, cohesive design.
For the sun, wrap a thick, warm-toned yarn around a felt base to create bold, radiating lines that feel soft and energetic.
For the moon, use a cool, smooth material like silver faux leather or vinyl. Its sleek surface provides the perfect backdrop for embellishment.
Stitch along the moon’s curve with silver thread and a variety of beads to suggest craters and starlight, creating a beautiful contrast between the soft yarn and the hard, reflective beads.
13. Blend a Watercolor Sky with a Stitched Foreground

Create a landscape with dramatic contrast by letting different mediums define the sky and the earth.
On heavy paper or stabilized fabric, paint a soft, blended sky using watercolors. This creates a smooth, atmospheric backdrop that would be difficult to replicate with thread.
Once it’s completely dry, you can bring the foreground to life with dense, textural stitching.
Use a mass of French knots, straight stitches, and seed stitches in various shades of green to create a lush, tangible meadow that you can almost feel, making the smooth sky seem even more distant and serene.
14. Engineer a 3D Stumpwork Butterfly
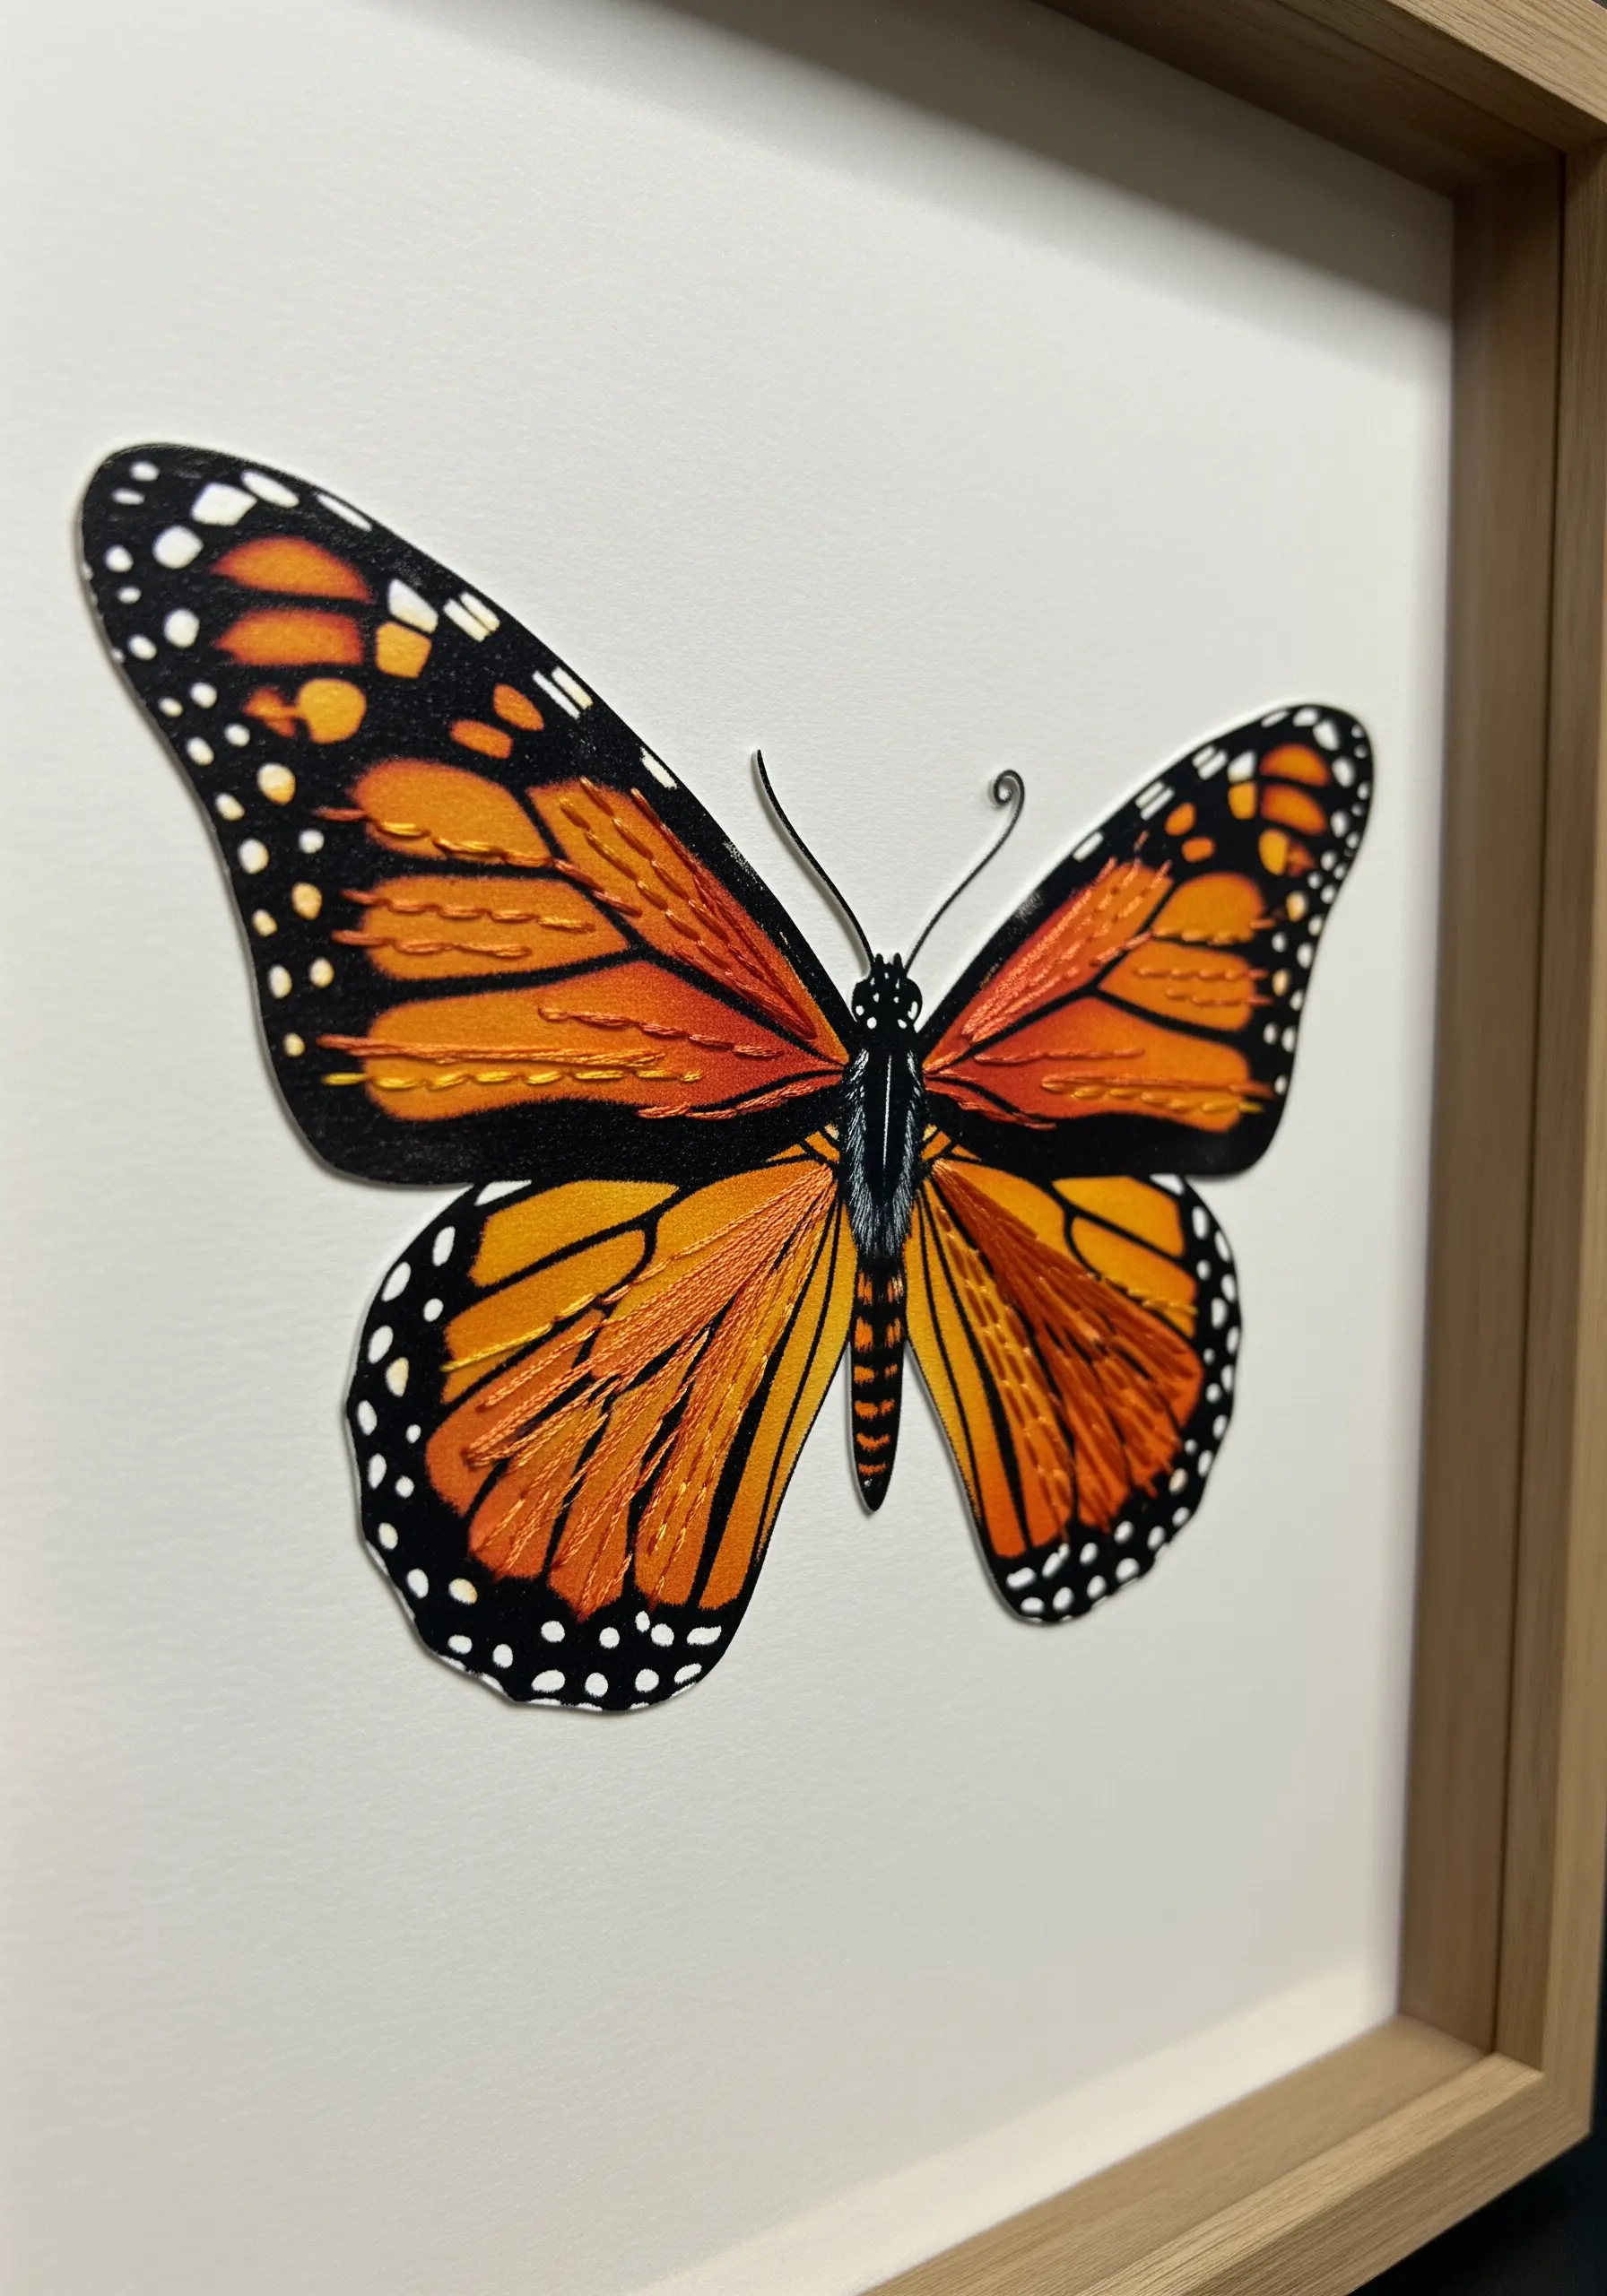
Give your embroidered creations a sense of life and movement by lifting them off the page.
This modern stumpwork technique involves stitching the butterfly’s wings on a separate piece of fabric that has been reinforced with a stiff stabilizer.
Once the embroidery is complete, carefully cut out the wings, leaving a small tab at the base.
Position the body on your background paper or fabric and then discreetly stitch the wing tabs in place.
This method allows the wings to float above the surface, creating realistic shadows and a breathtaking 3D effect.
15. Illuminate a Mandala with Sequins and Mirrors
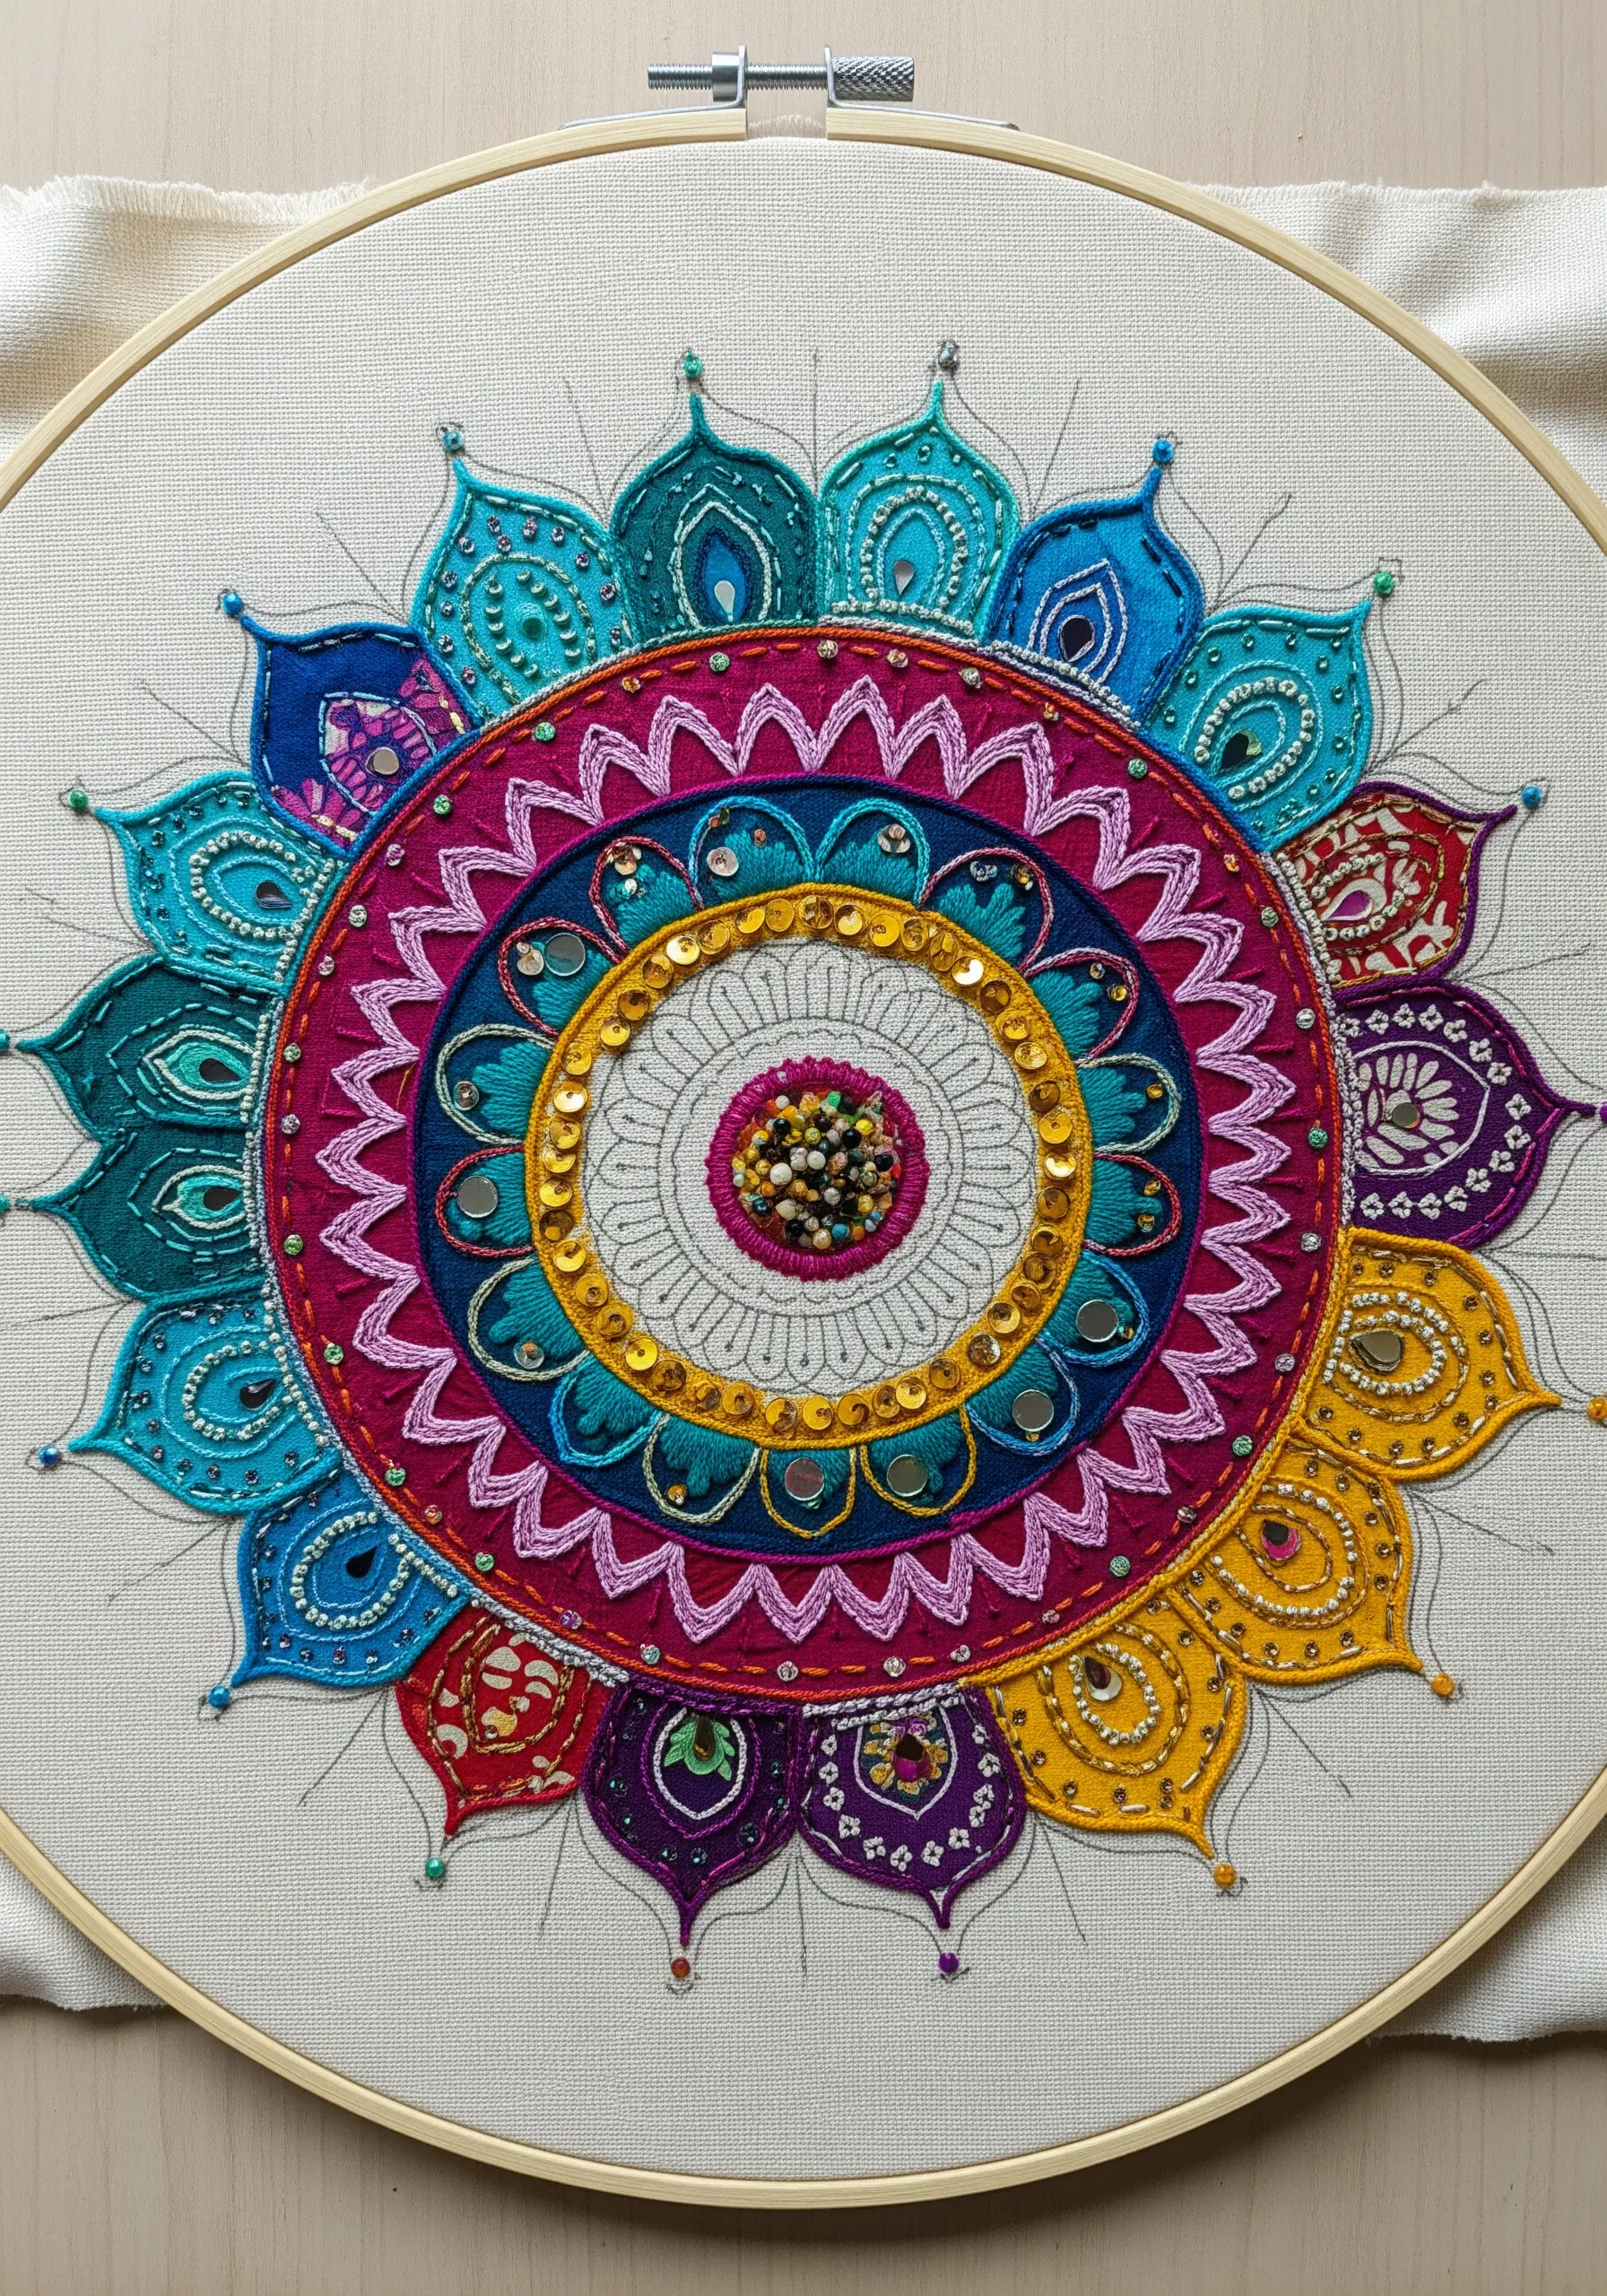
Transform a traditional mandala from a flat design into a radiant, light-catching centerpiece.
While stitching your pattern, strategically incorporate reflective elements.
A ring of overlapping gold sequins in the center will create a brilliant focal point.
In the outer petals, add tiny shisha mirrors secured with a buttonhole stitch frame, and scatter seed beads throughout the design.
These additions do more than just embellish; they interact with the light in your room, making the mandala feel alive and dynamic.
16. Craft Felt Citrus with Beaded Droplets
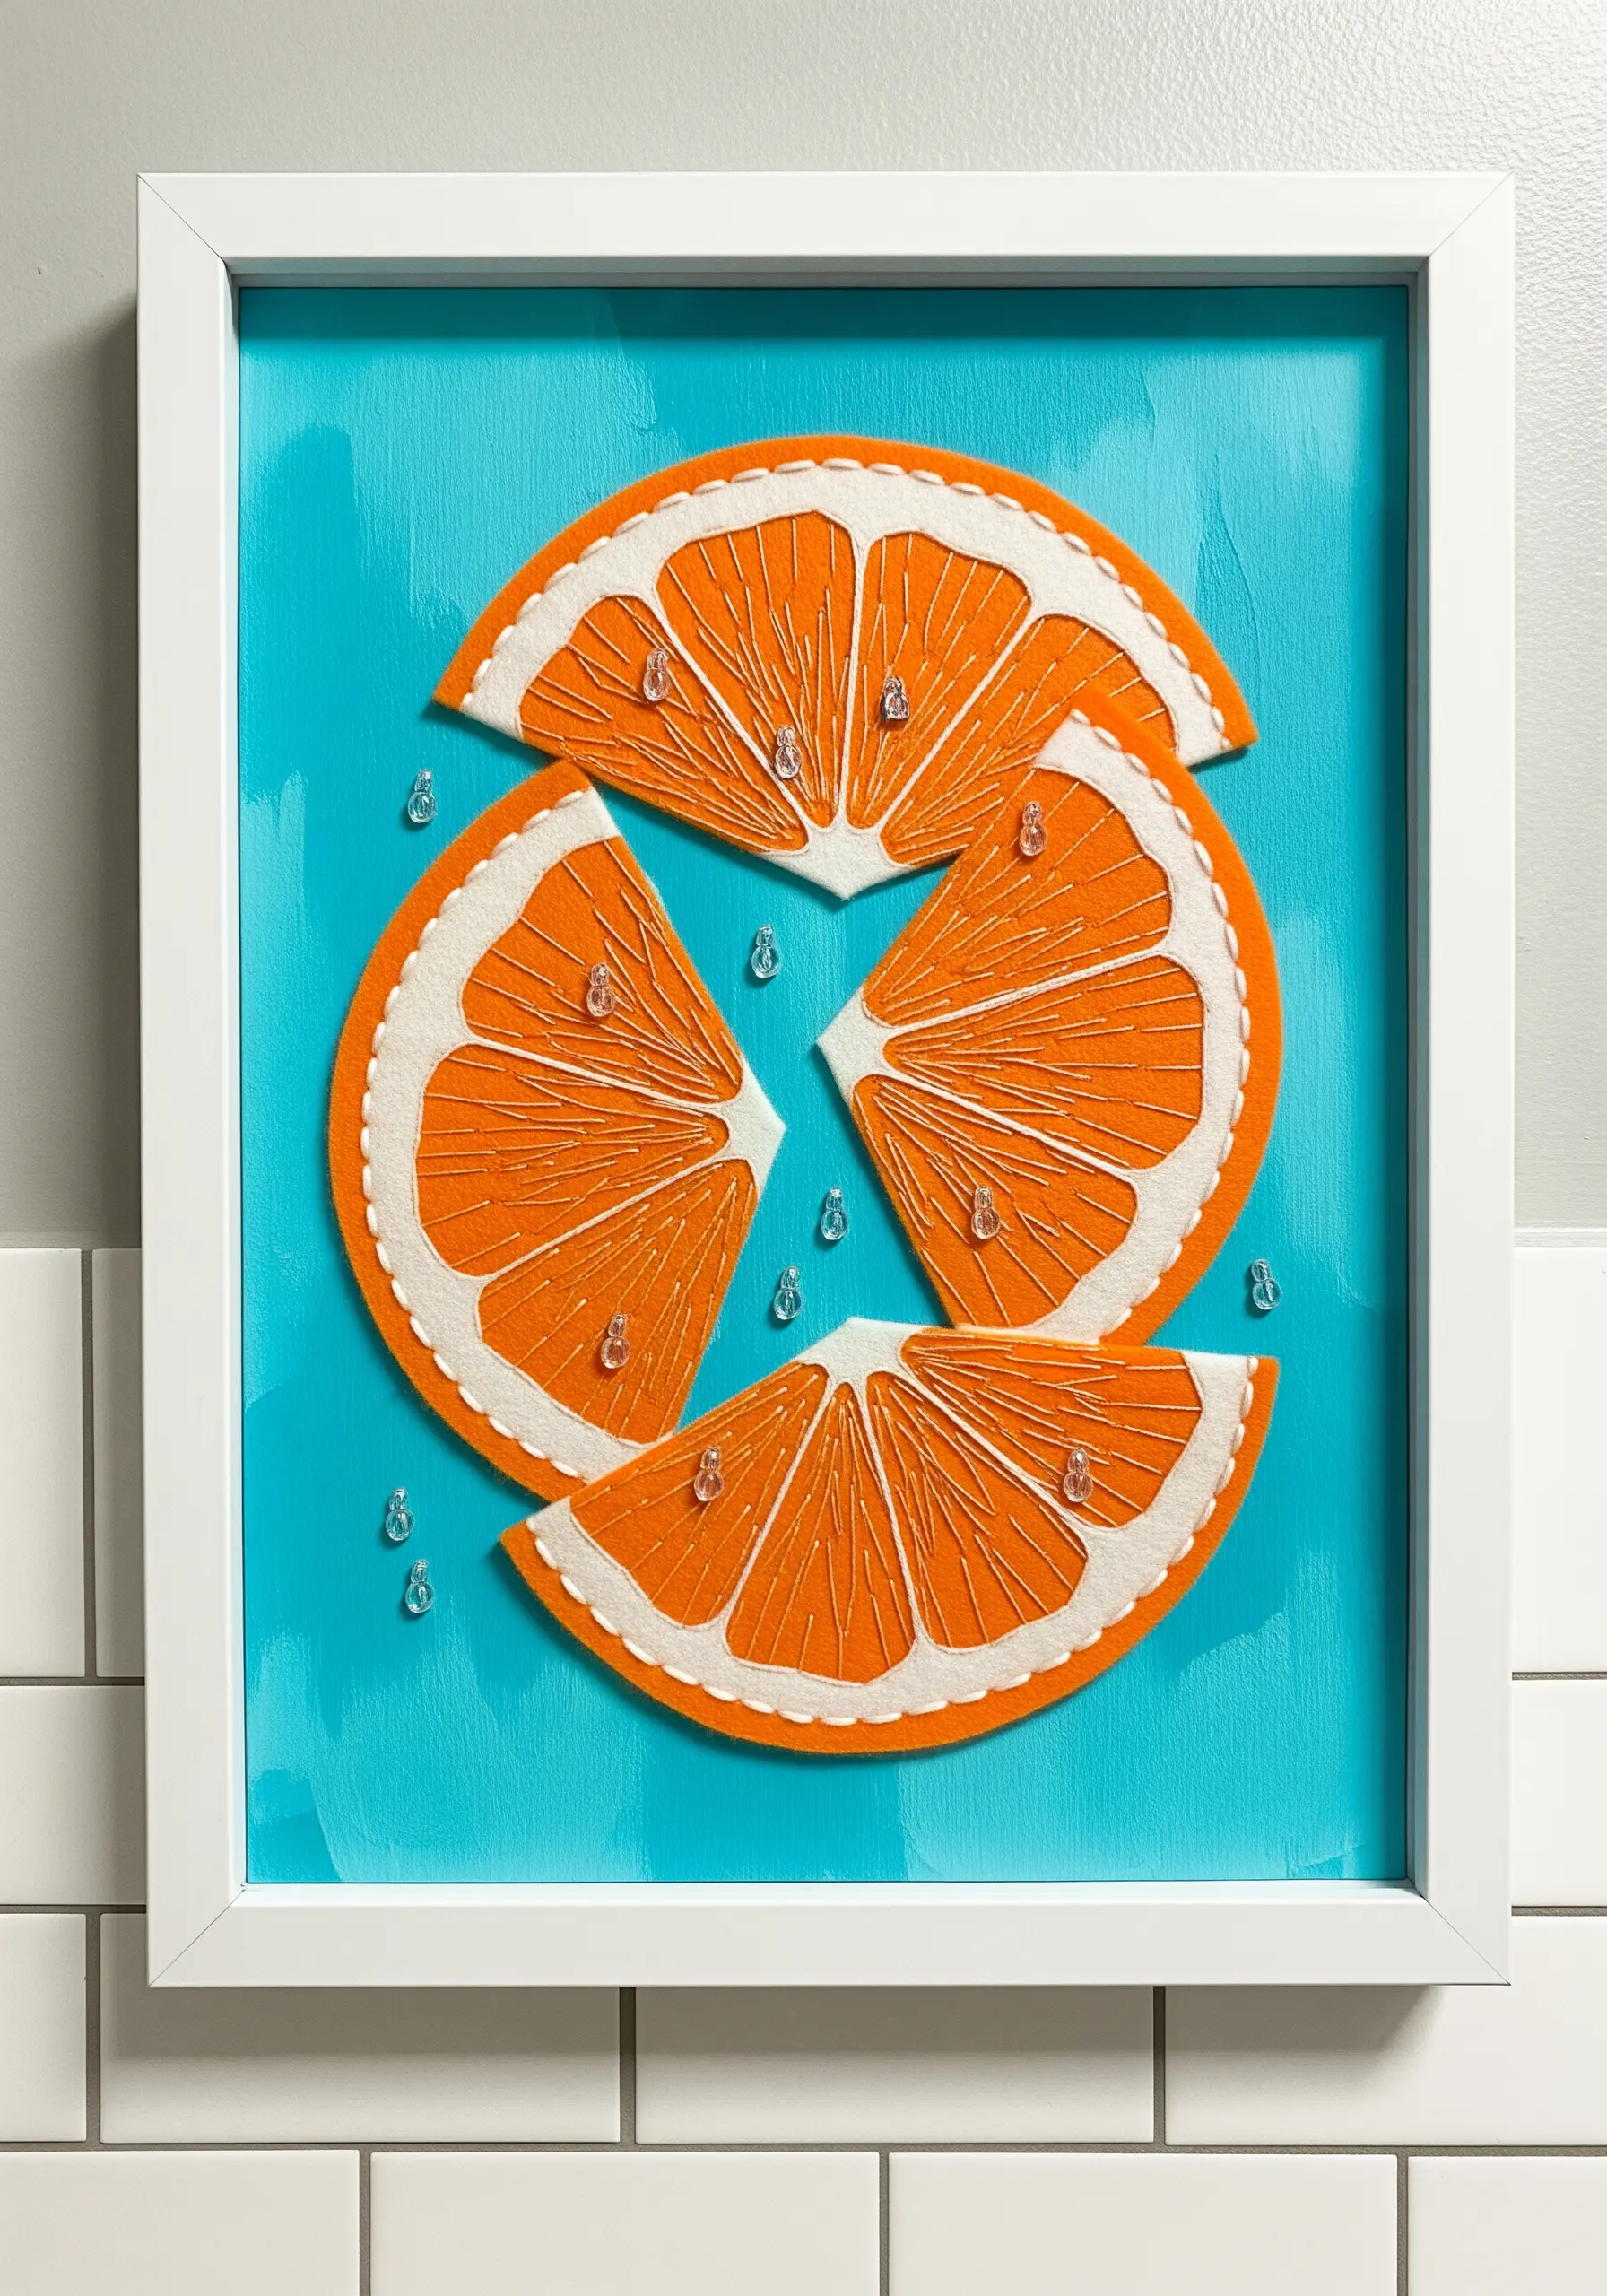
Capture the essence of freshness by combining the clean look of felt with the sparkle of glass beads.
Cut your orange slice shapes from felt to achieve crisp, perfect edges. Use simple straight stitches radiating from the center to represent the segments.
Mount your finished felt pieces onto a brightly painted canvas.
The final touch is to add clear, teardrop-shaped glass beads scattered around the slices. These act as tiny, glistening juice droplets, adding a playful and realistic detail that makes the whole piece pop.
17. Knot a Coral Reef with Holographic Fish
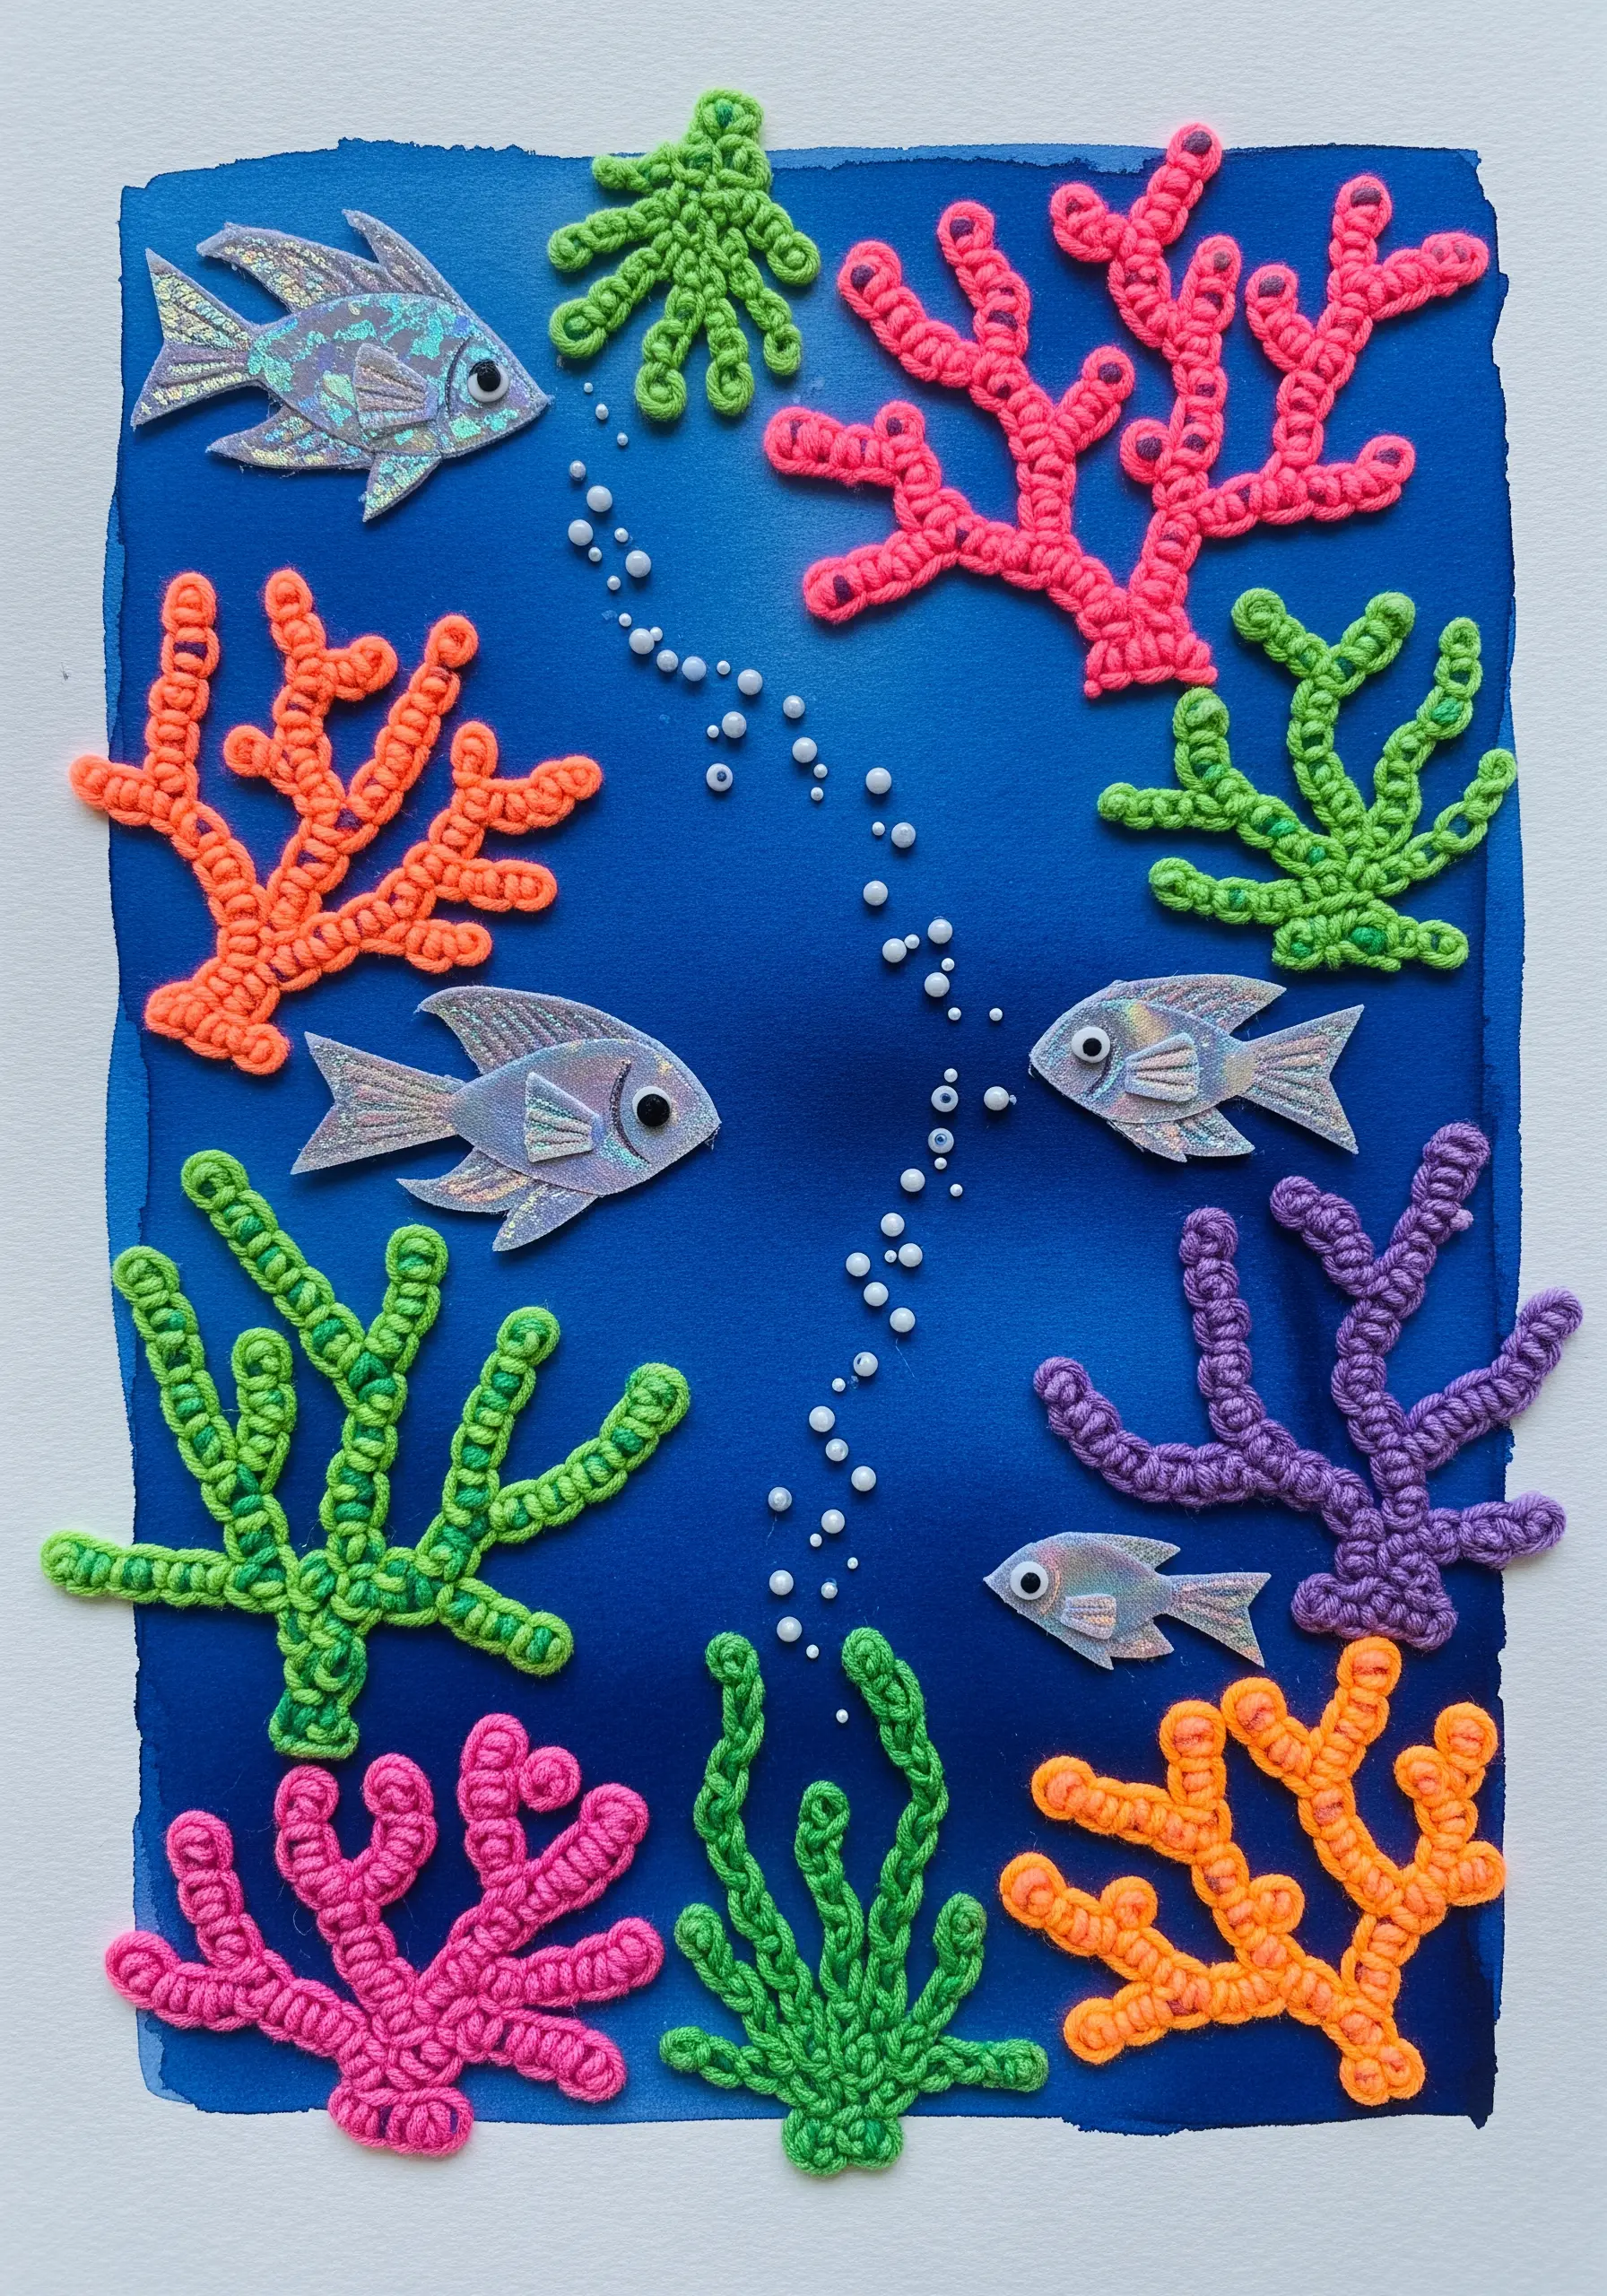
Go beyond the needle and use knotting techniques to build a sculptural underwater world.
Create coral structures using colorful floss and simple macrame-style knots, like the square knot or double half-hitch. This gives the coral a true three-dimensional quality that traditional stitches can’t replicate.
For a magical contrast, populate your scene with fish cut from holographic or iridescent paper.
The flat, shimmering fish will stand out against the textural, knotted coral and the soft watercolor background, mimicking the way light filters through water.
18. Chart the Zodiac on a Painted Galaxy
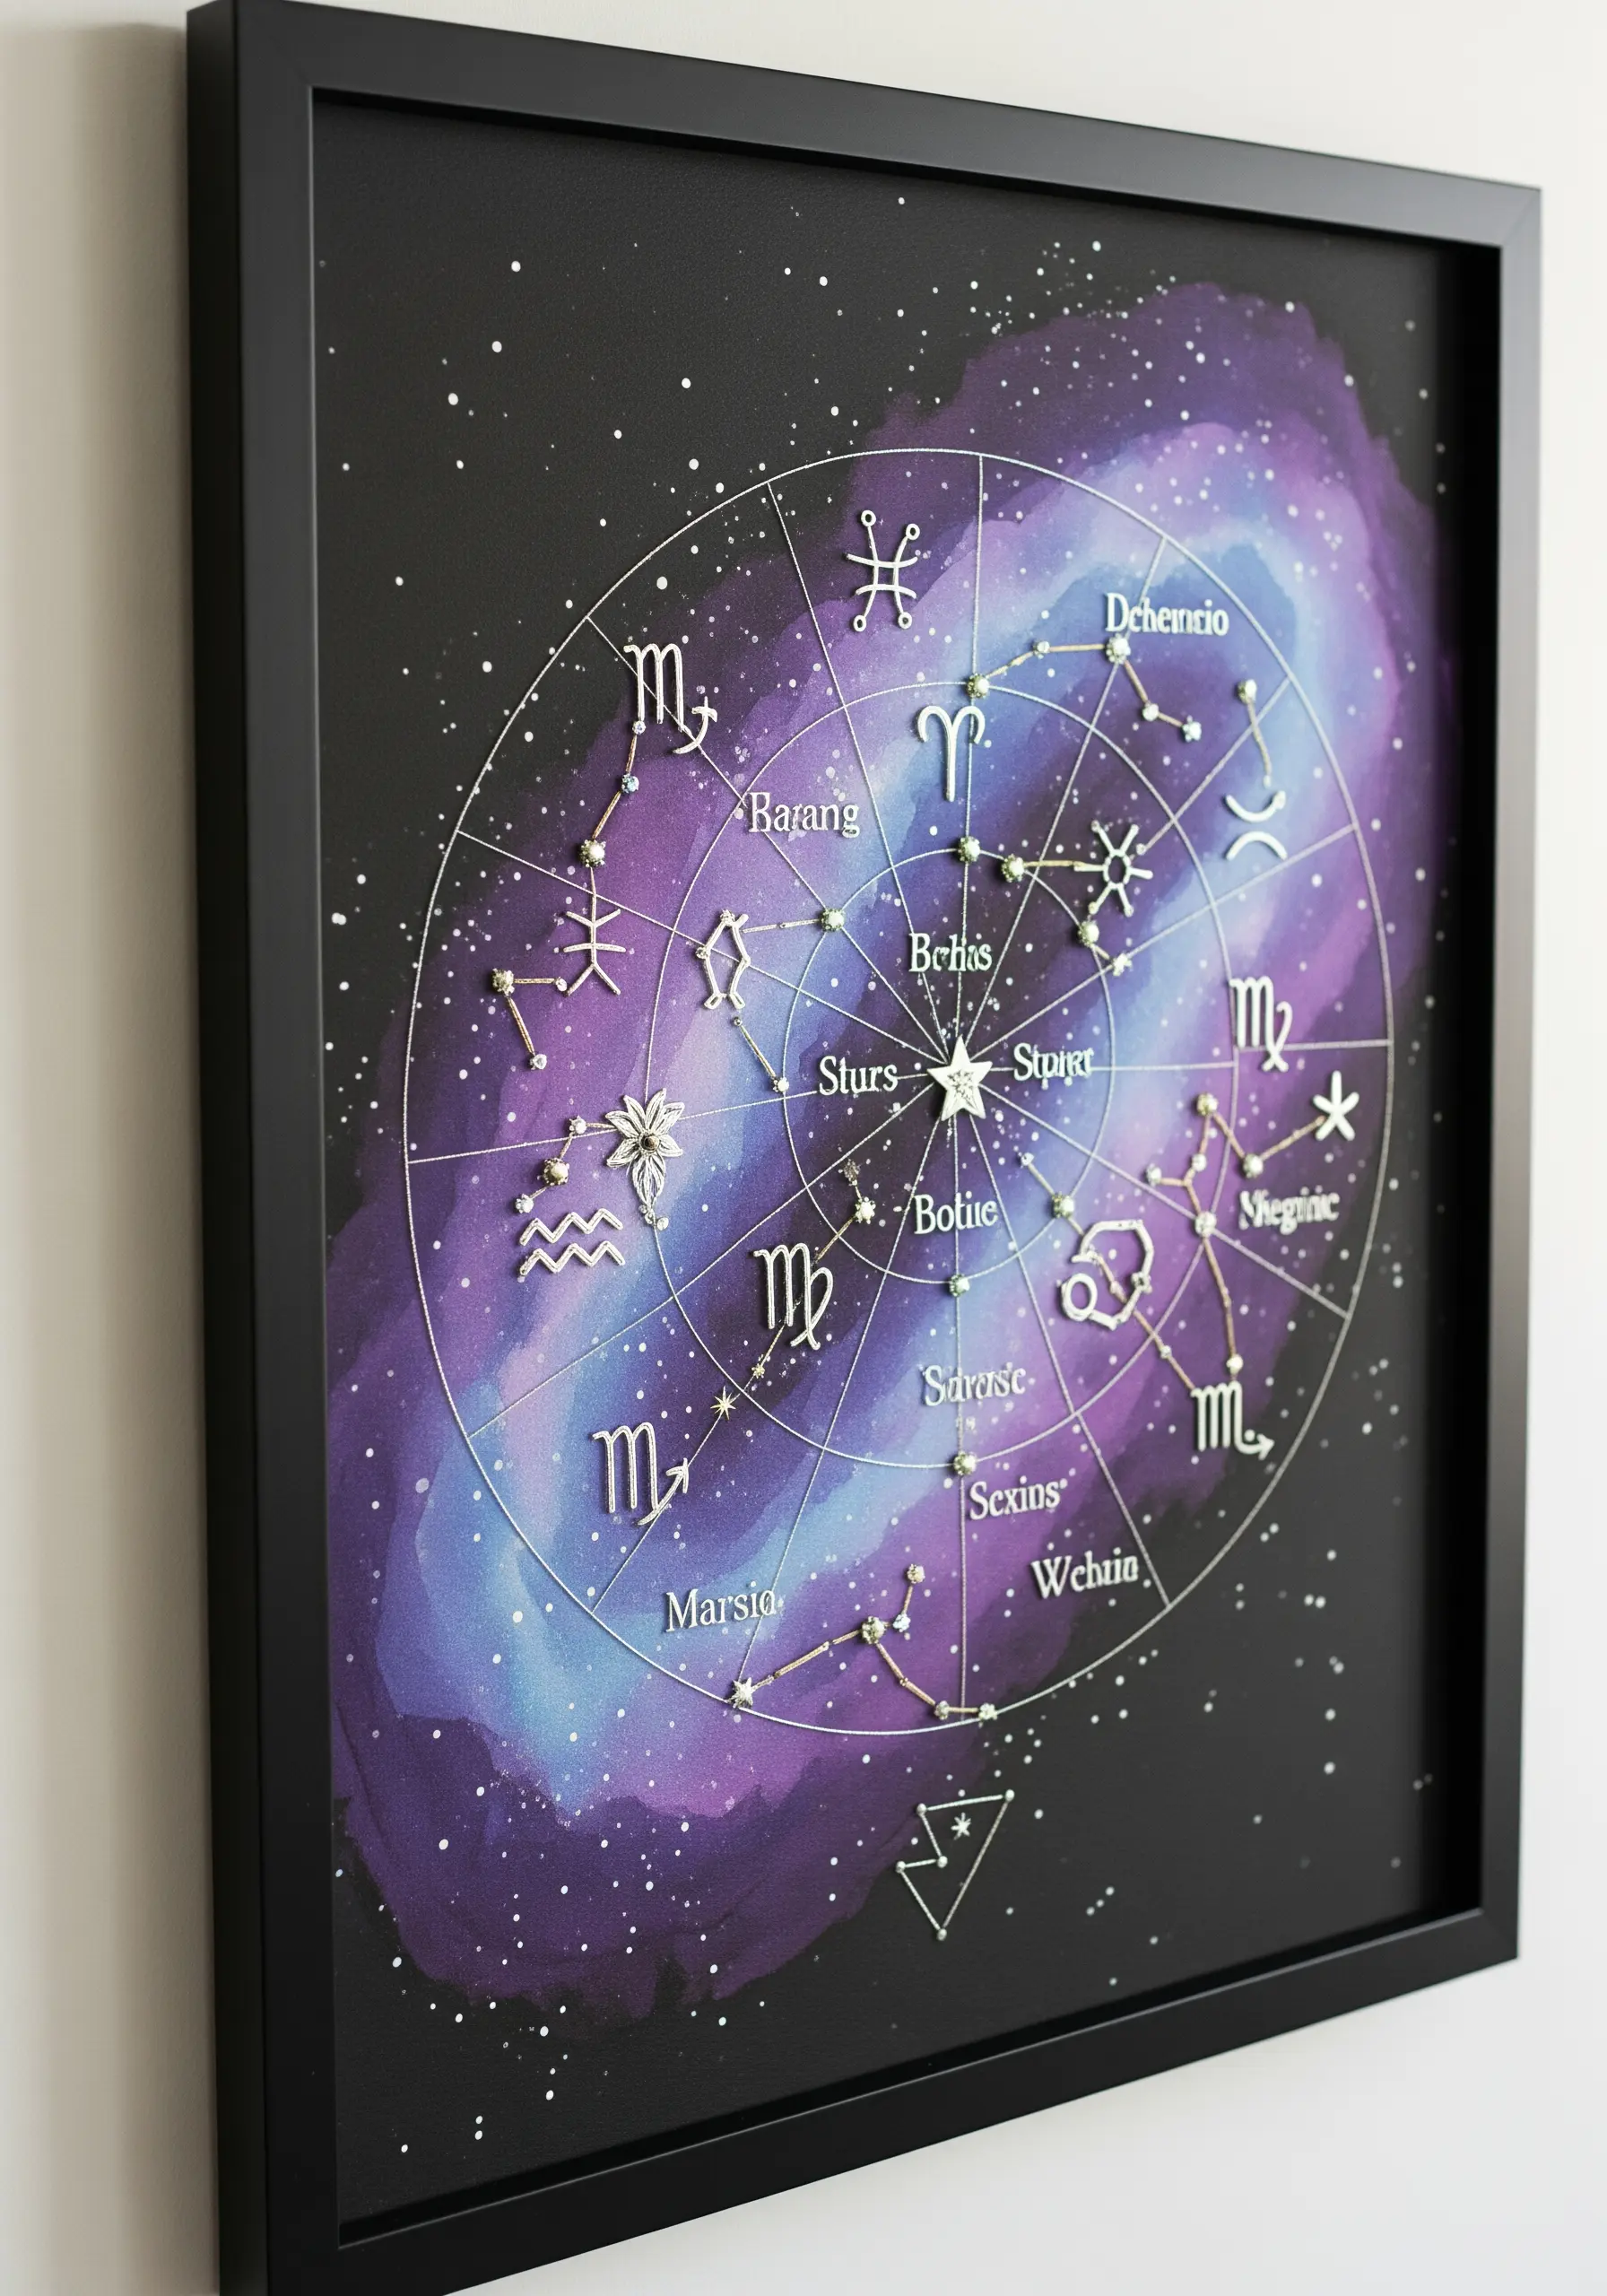
Combine painting and stitching to create a personalized astrological map with celestial depth.
Begin by painting a swirling nebula on a black canvas using purples, blues, and whites.
Once dry, use a sharp needle to pre-punch holes for your design. Stitch the zodiac wheel and constellation lines with a fine silver metallic thread for crispness and shimmer.
Represent the stars with tiny French knots or securely stitched silver beads, which will catch the light and add a subtle tactile dimension to your cosmic artwork.
19. Create an Abstract Collage with Found Paper
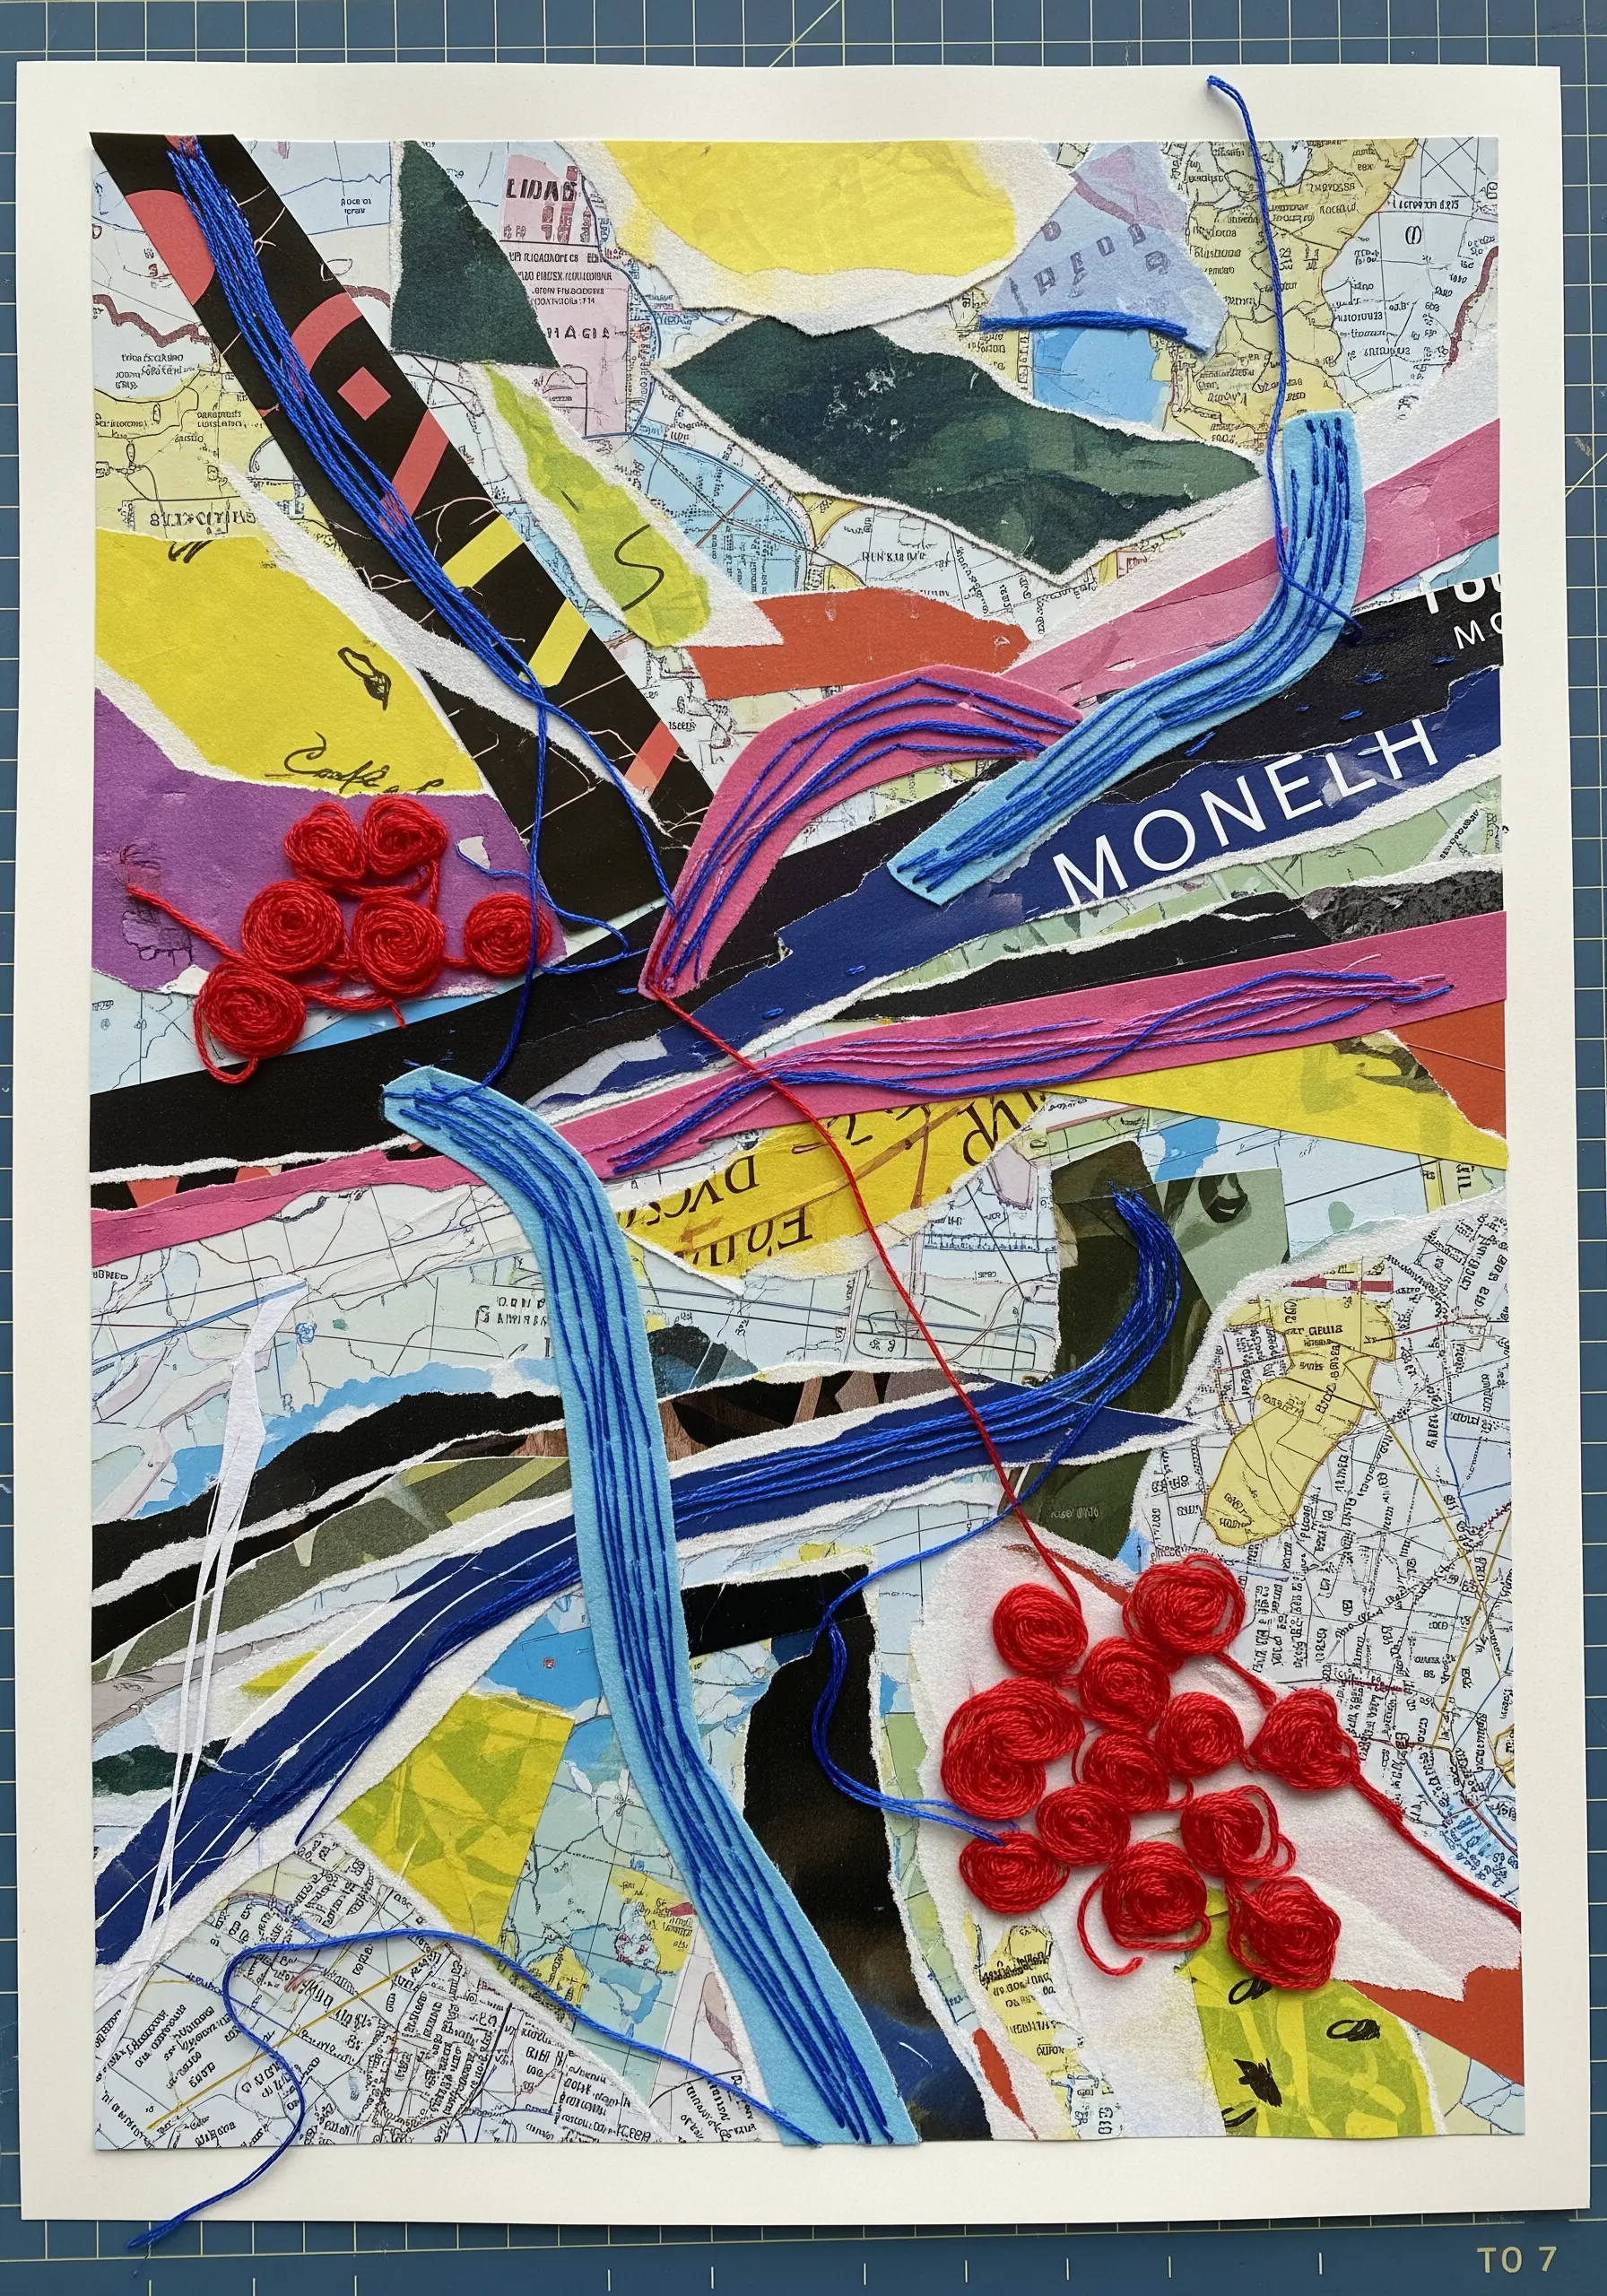
Use torn paper as an unpredictable and dynamic base for expressive, free-form stitching.
Build a layered background from found materials like old maps, book pages, and colored paper scraps.
Let the lines and colors of the collage guide your thread work. Use a thick yarn and a couching stitch to lay down bold, gestural lines that unify the disparate paper elements.
Add dense clusters of woven wheel roses or French knots as textural anchor points, creating a conversation between the flat, torn paper and the sculptural quality of the thread.
20. Sculpt a Lifelike Magnolia from Stiffened Fabric
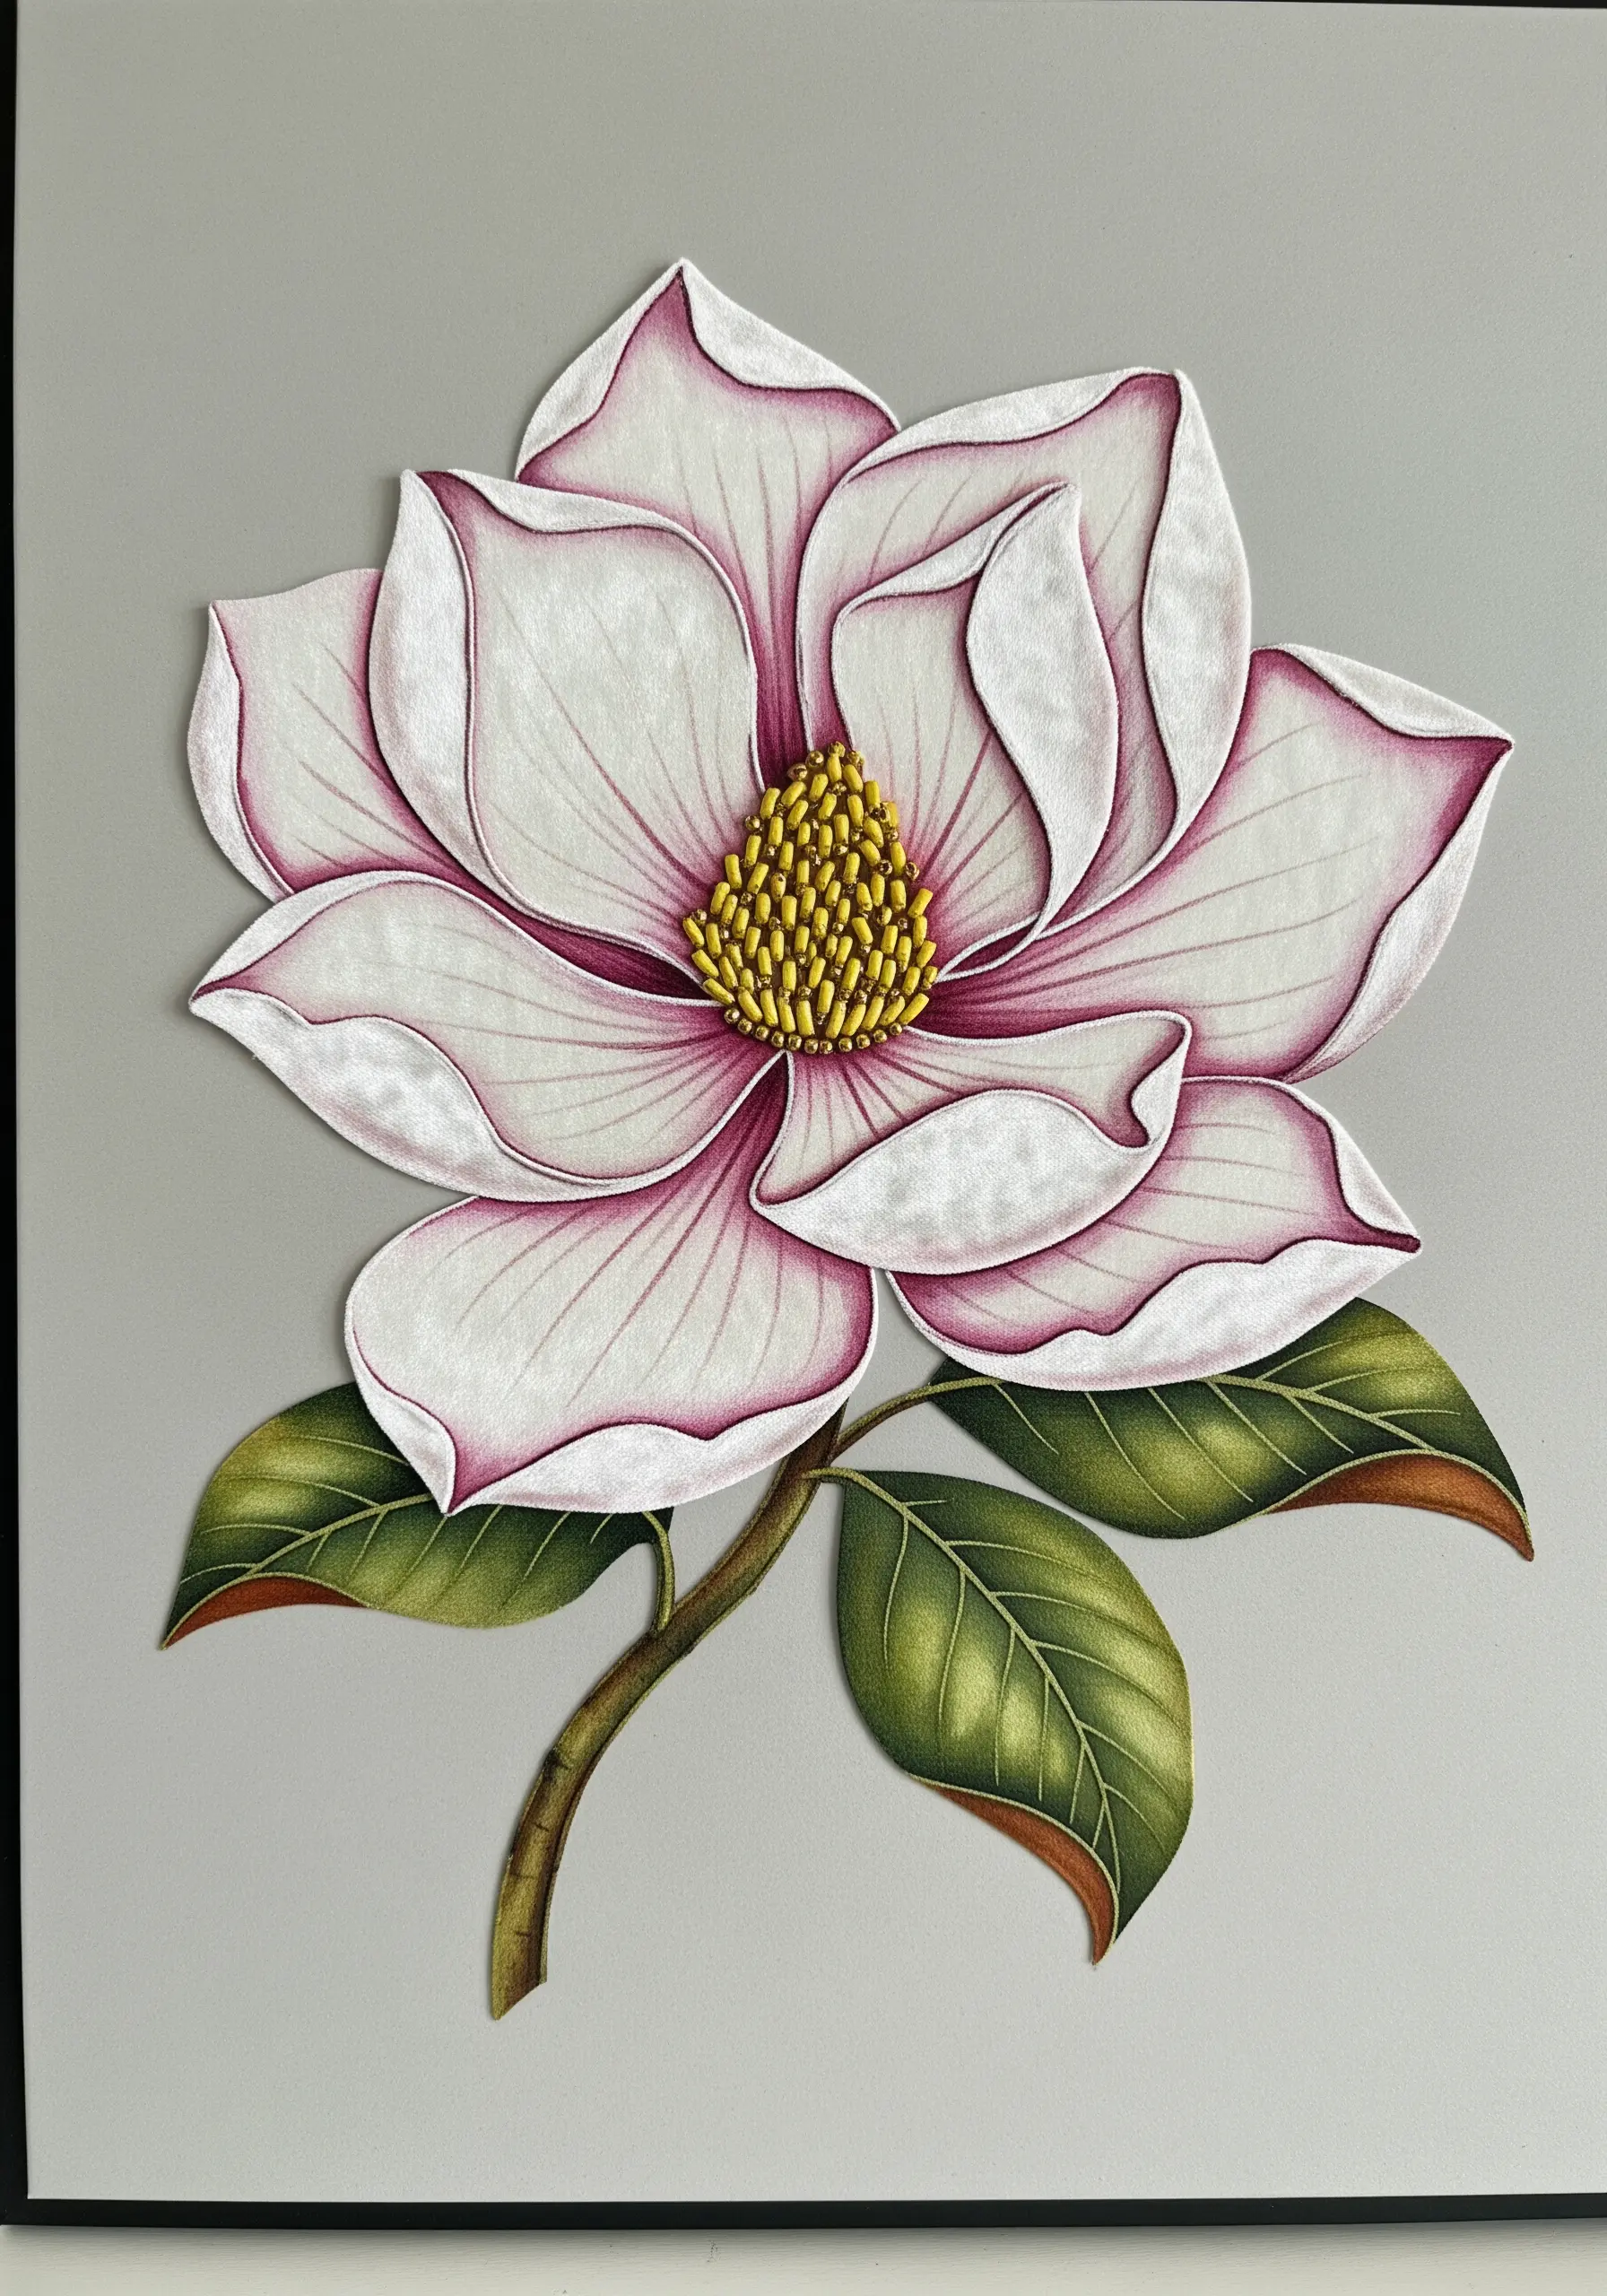
Construct a botanically accurate flower by treating each petal as its own small project.
Cut your petal shapes from fabric that has been stiffened with a stabilizer, or use heavy watercolor paper.
Use paints or pastels to add soft color gradients and realistic details.
Before assembling the flower, use a single strand of thread to stitch a delicate outline along the edge of each petal. This adds subtle definition and a textile quality that elevates the piece beyond simple paper craft.
Finally, layer the petals and secure them to create a stunning, dimensional bloom.
21. Design a Diorama with Embroidered Paper Balloons
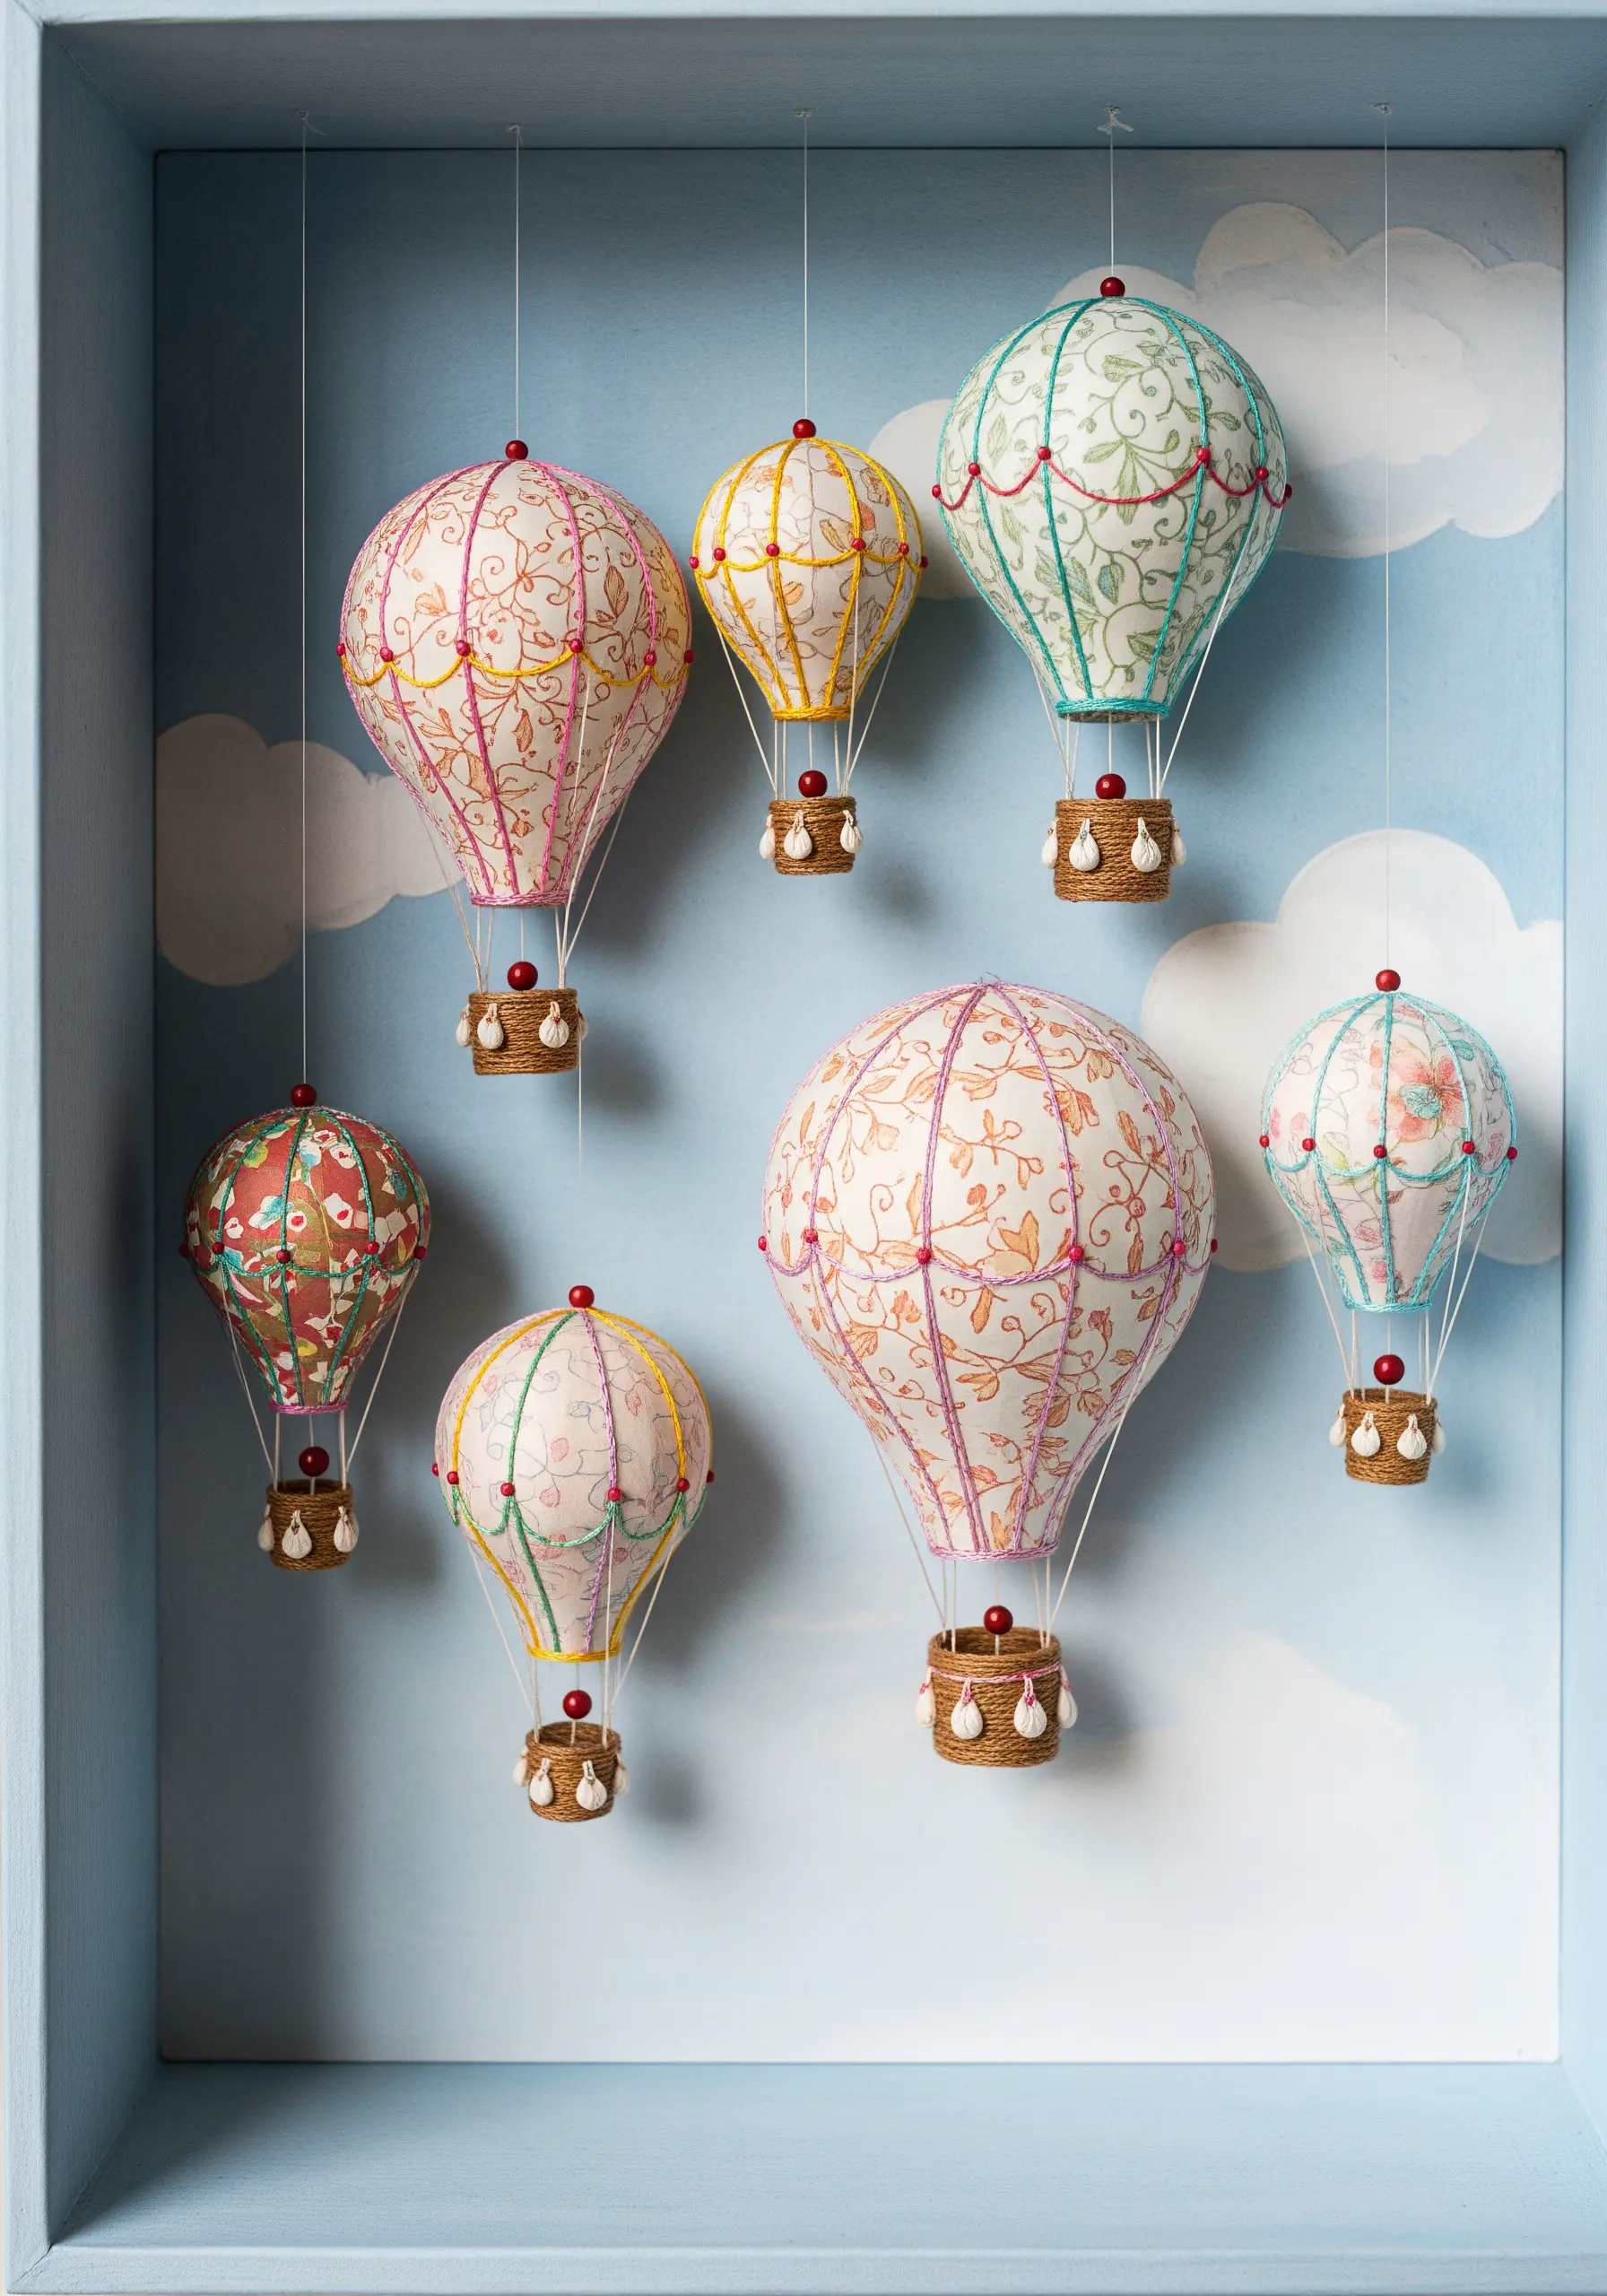
Create a miniature world in a shadow box by combining 3D paper craft with fine embroidery.
Construct your hot air balloons using patterned scrapbook paper for color and charm.
Before you fold and glue the paper into its 3D shape, add delicate details—like the basket lines or decorative swirls—with a single strand of embroidery floss.
Stitching on the flat paper is far easier and yields cleaner results. Suspend the finished balloons with fine thread inside a painted box to complete your whimsical diorama.
22. Refine a Classic Silhouette with Delicate Stitching
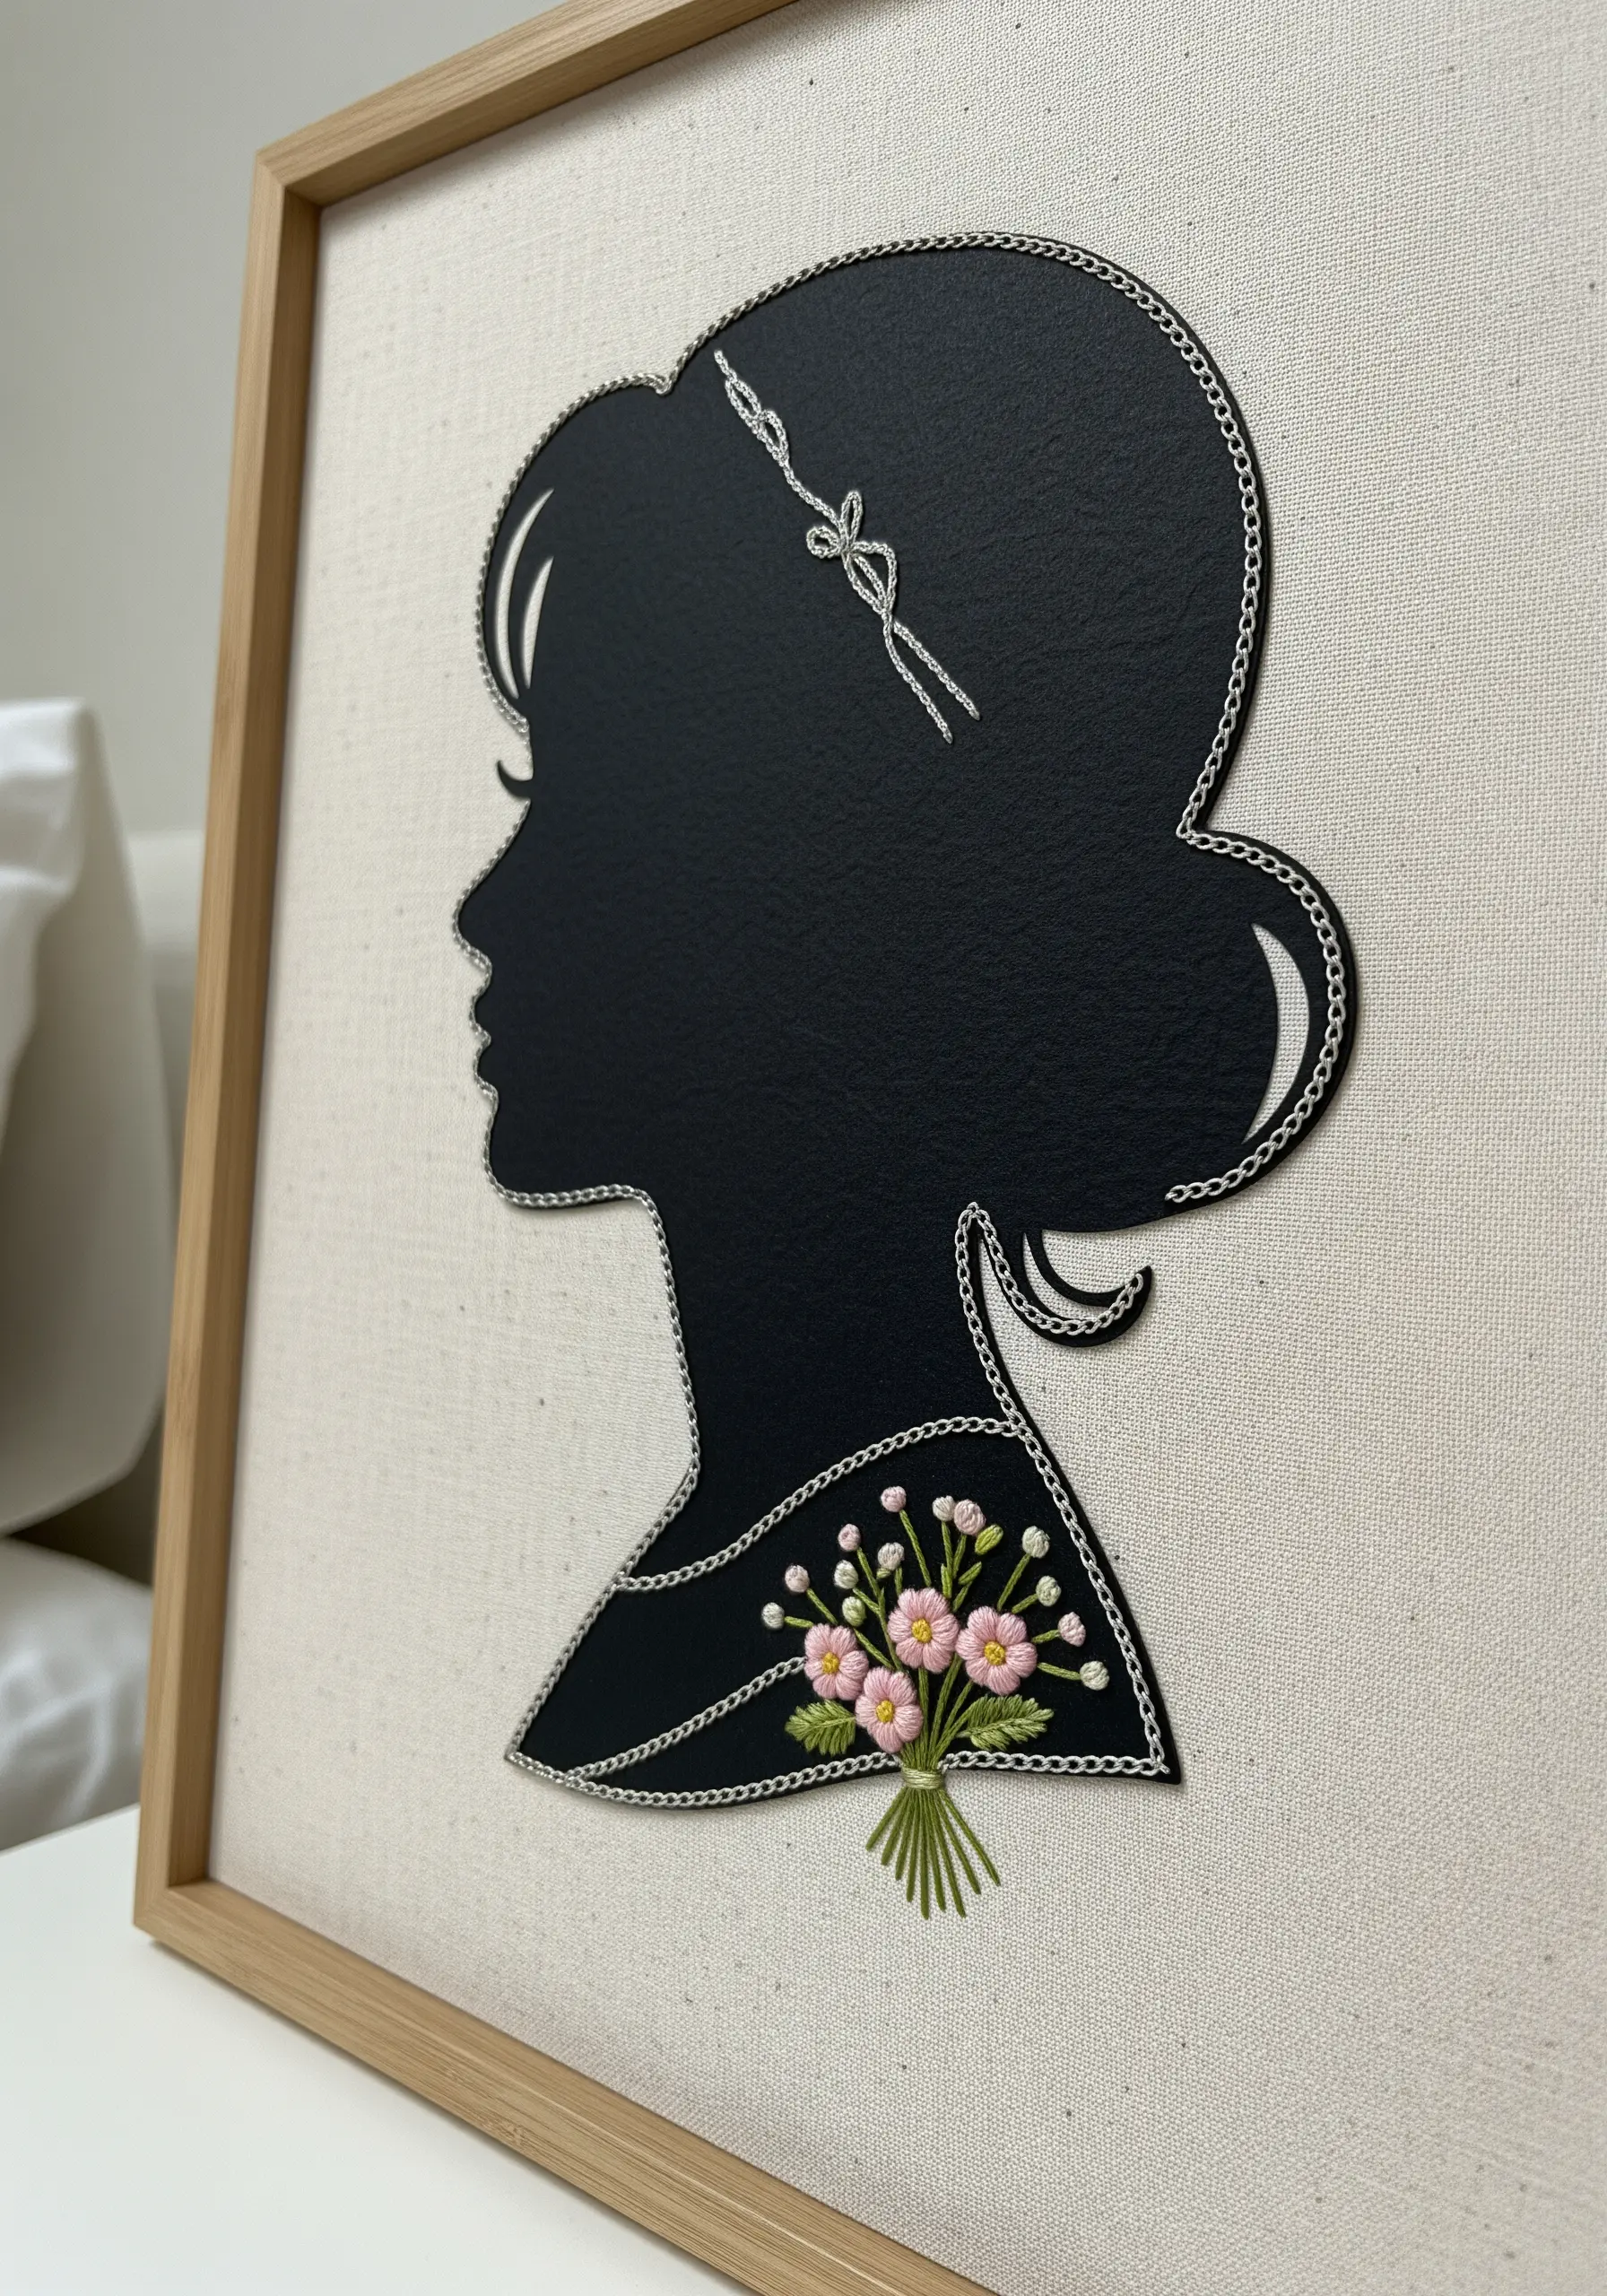
Combine the bold, graphic nature of a silhouette with the intricate detail of embroidery for a piece that is both modern and timeless.
Start with a crisp silhouette cut from black paper or felt, and mount it on a neutral linen background.
Use a neat, even chain stitch in a contrasting metallic thread to outline the entire shape. This creates a refined, almost jewelry-like border.
Add an unexpected focal point with a tiny, colorful bouquet of French knot flowers, which provides a beautiful moment of soft detail against the stark black.
23. Layer an Autumnal Hoop with Felt and Found Objects
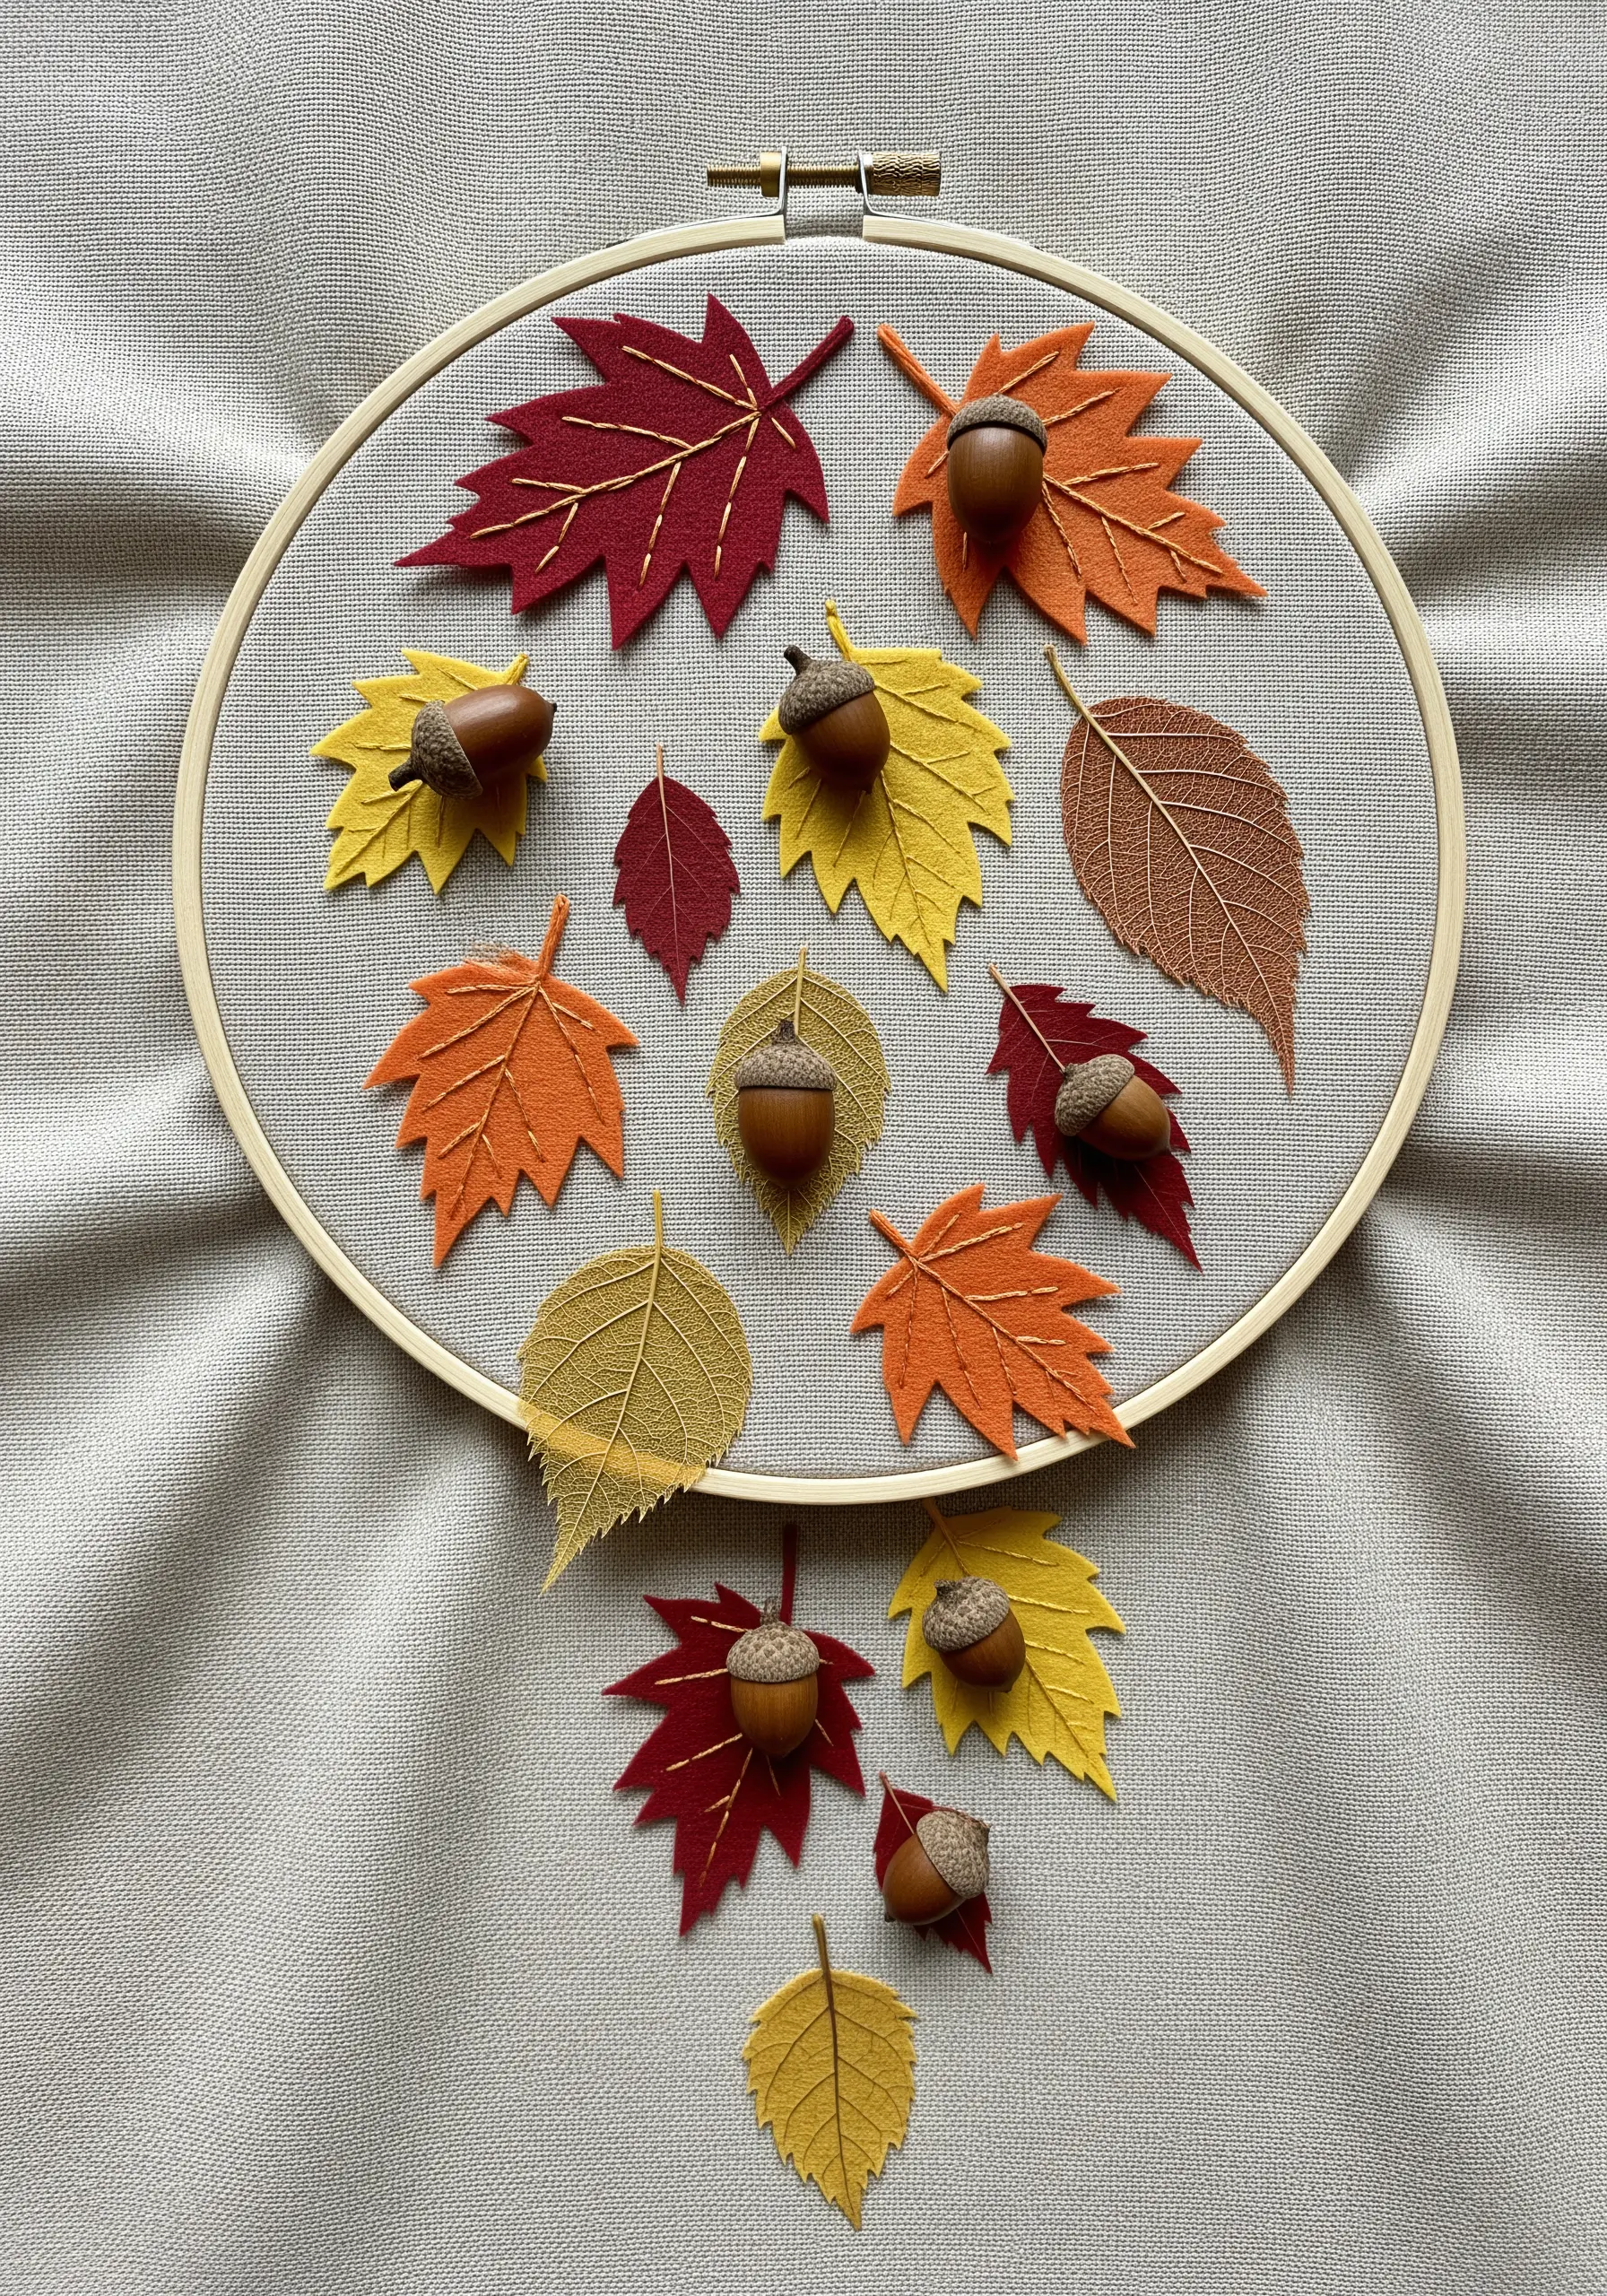
Capture the essence of autumn by combining a variety of textures, both handmade and natural.
Cut leaf shapes from felt, textured fabrics, and thin, papery textiles in a warm, autumnal palette.
Add definition to a few key leaves by stitching simple veins with a contrasting thread.
The most important step is to incorporate authentic natural elements. Secure real acorn caps or tiny twigs among the fabric leaves to ground the piece and create a rich, multi-sensory collage that celebrates the season.
24. Make a Statement with Sculptural Line and Color
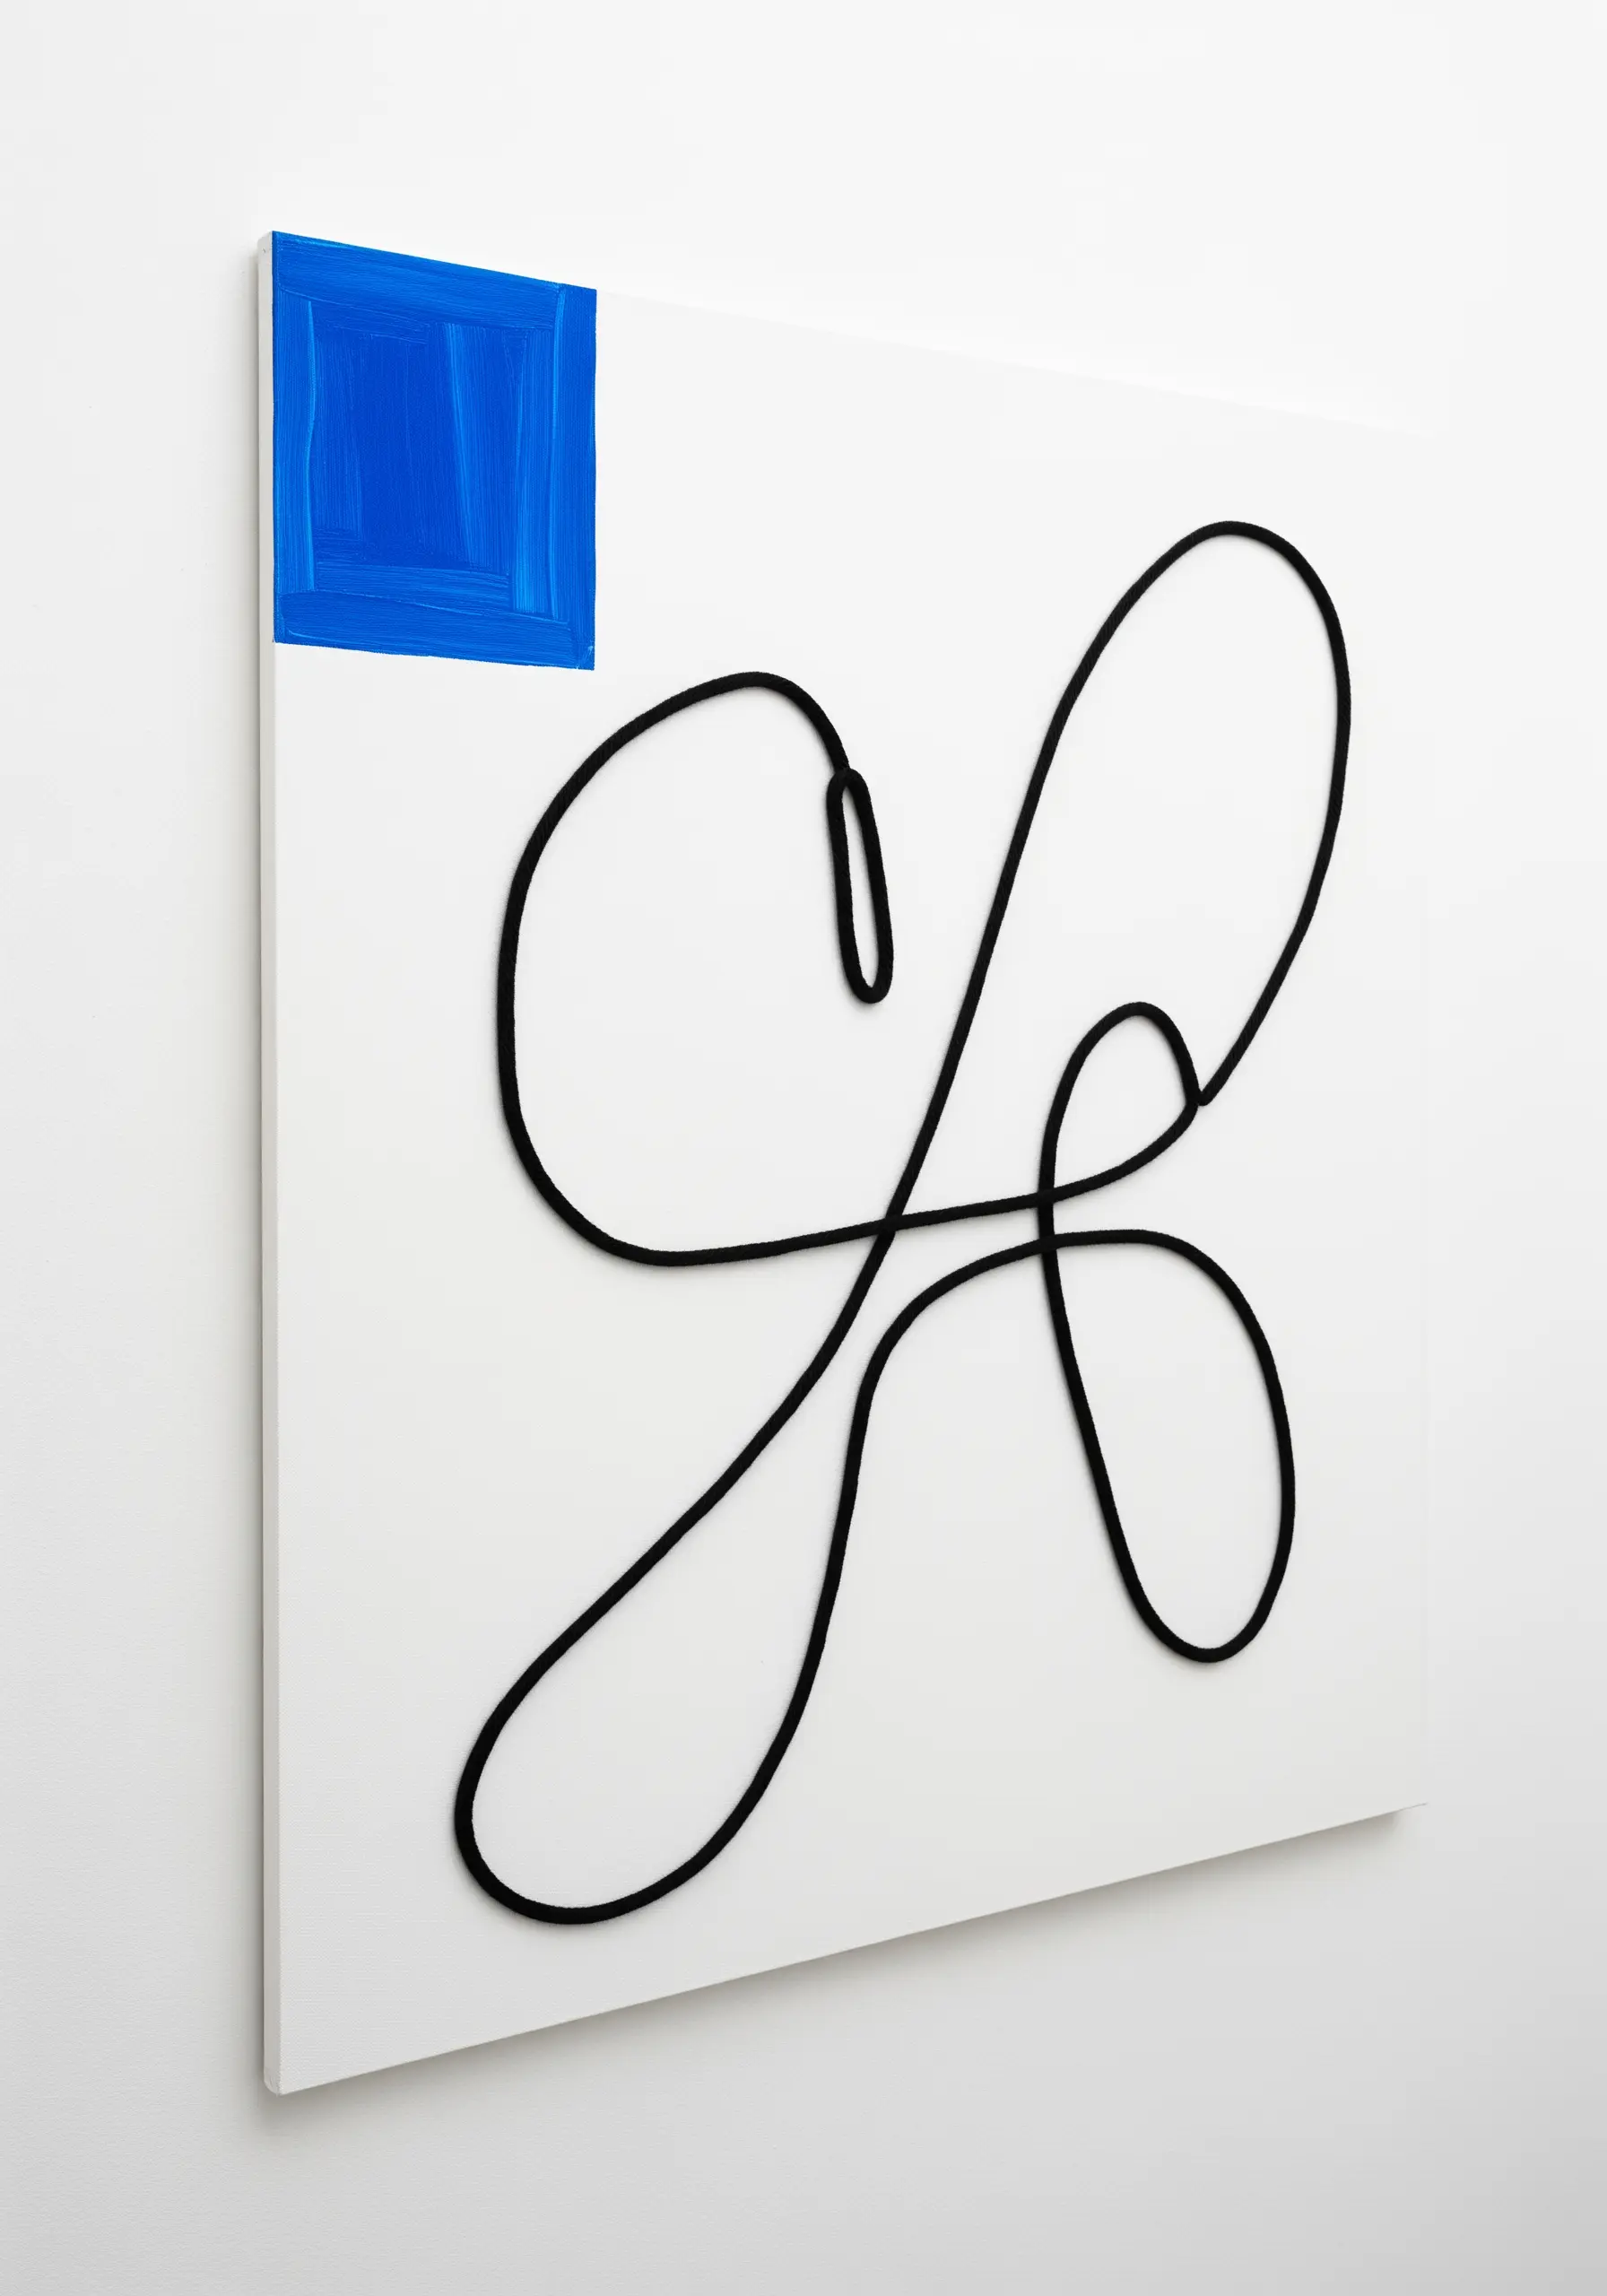
Explore the core principles of modern art by focusing on line, form, and a single point of color.
On a stark white canvas, paint one small, perfect square of a vibrant, saturated color. This will be the anchor for your composition.
Next, take a single piece of thick, black cord and arrange it in a fluid, calligraphic loop that interacts with the painted square.
Secure the cord to the canvas using either a clear adhesive or tiny, invisible stitches. The resulting piece is a powerful study in minimalism, where the shadow cast by the cord becomes part of the art.
25. Craft a Solar System with String Art and Yarn
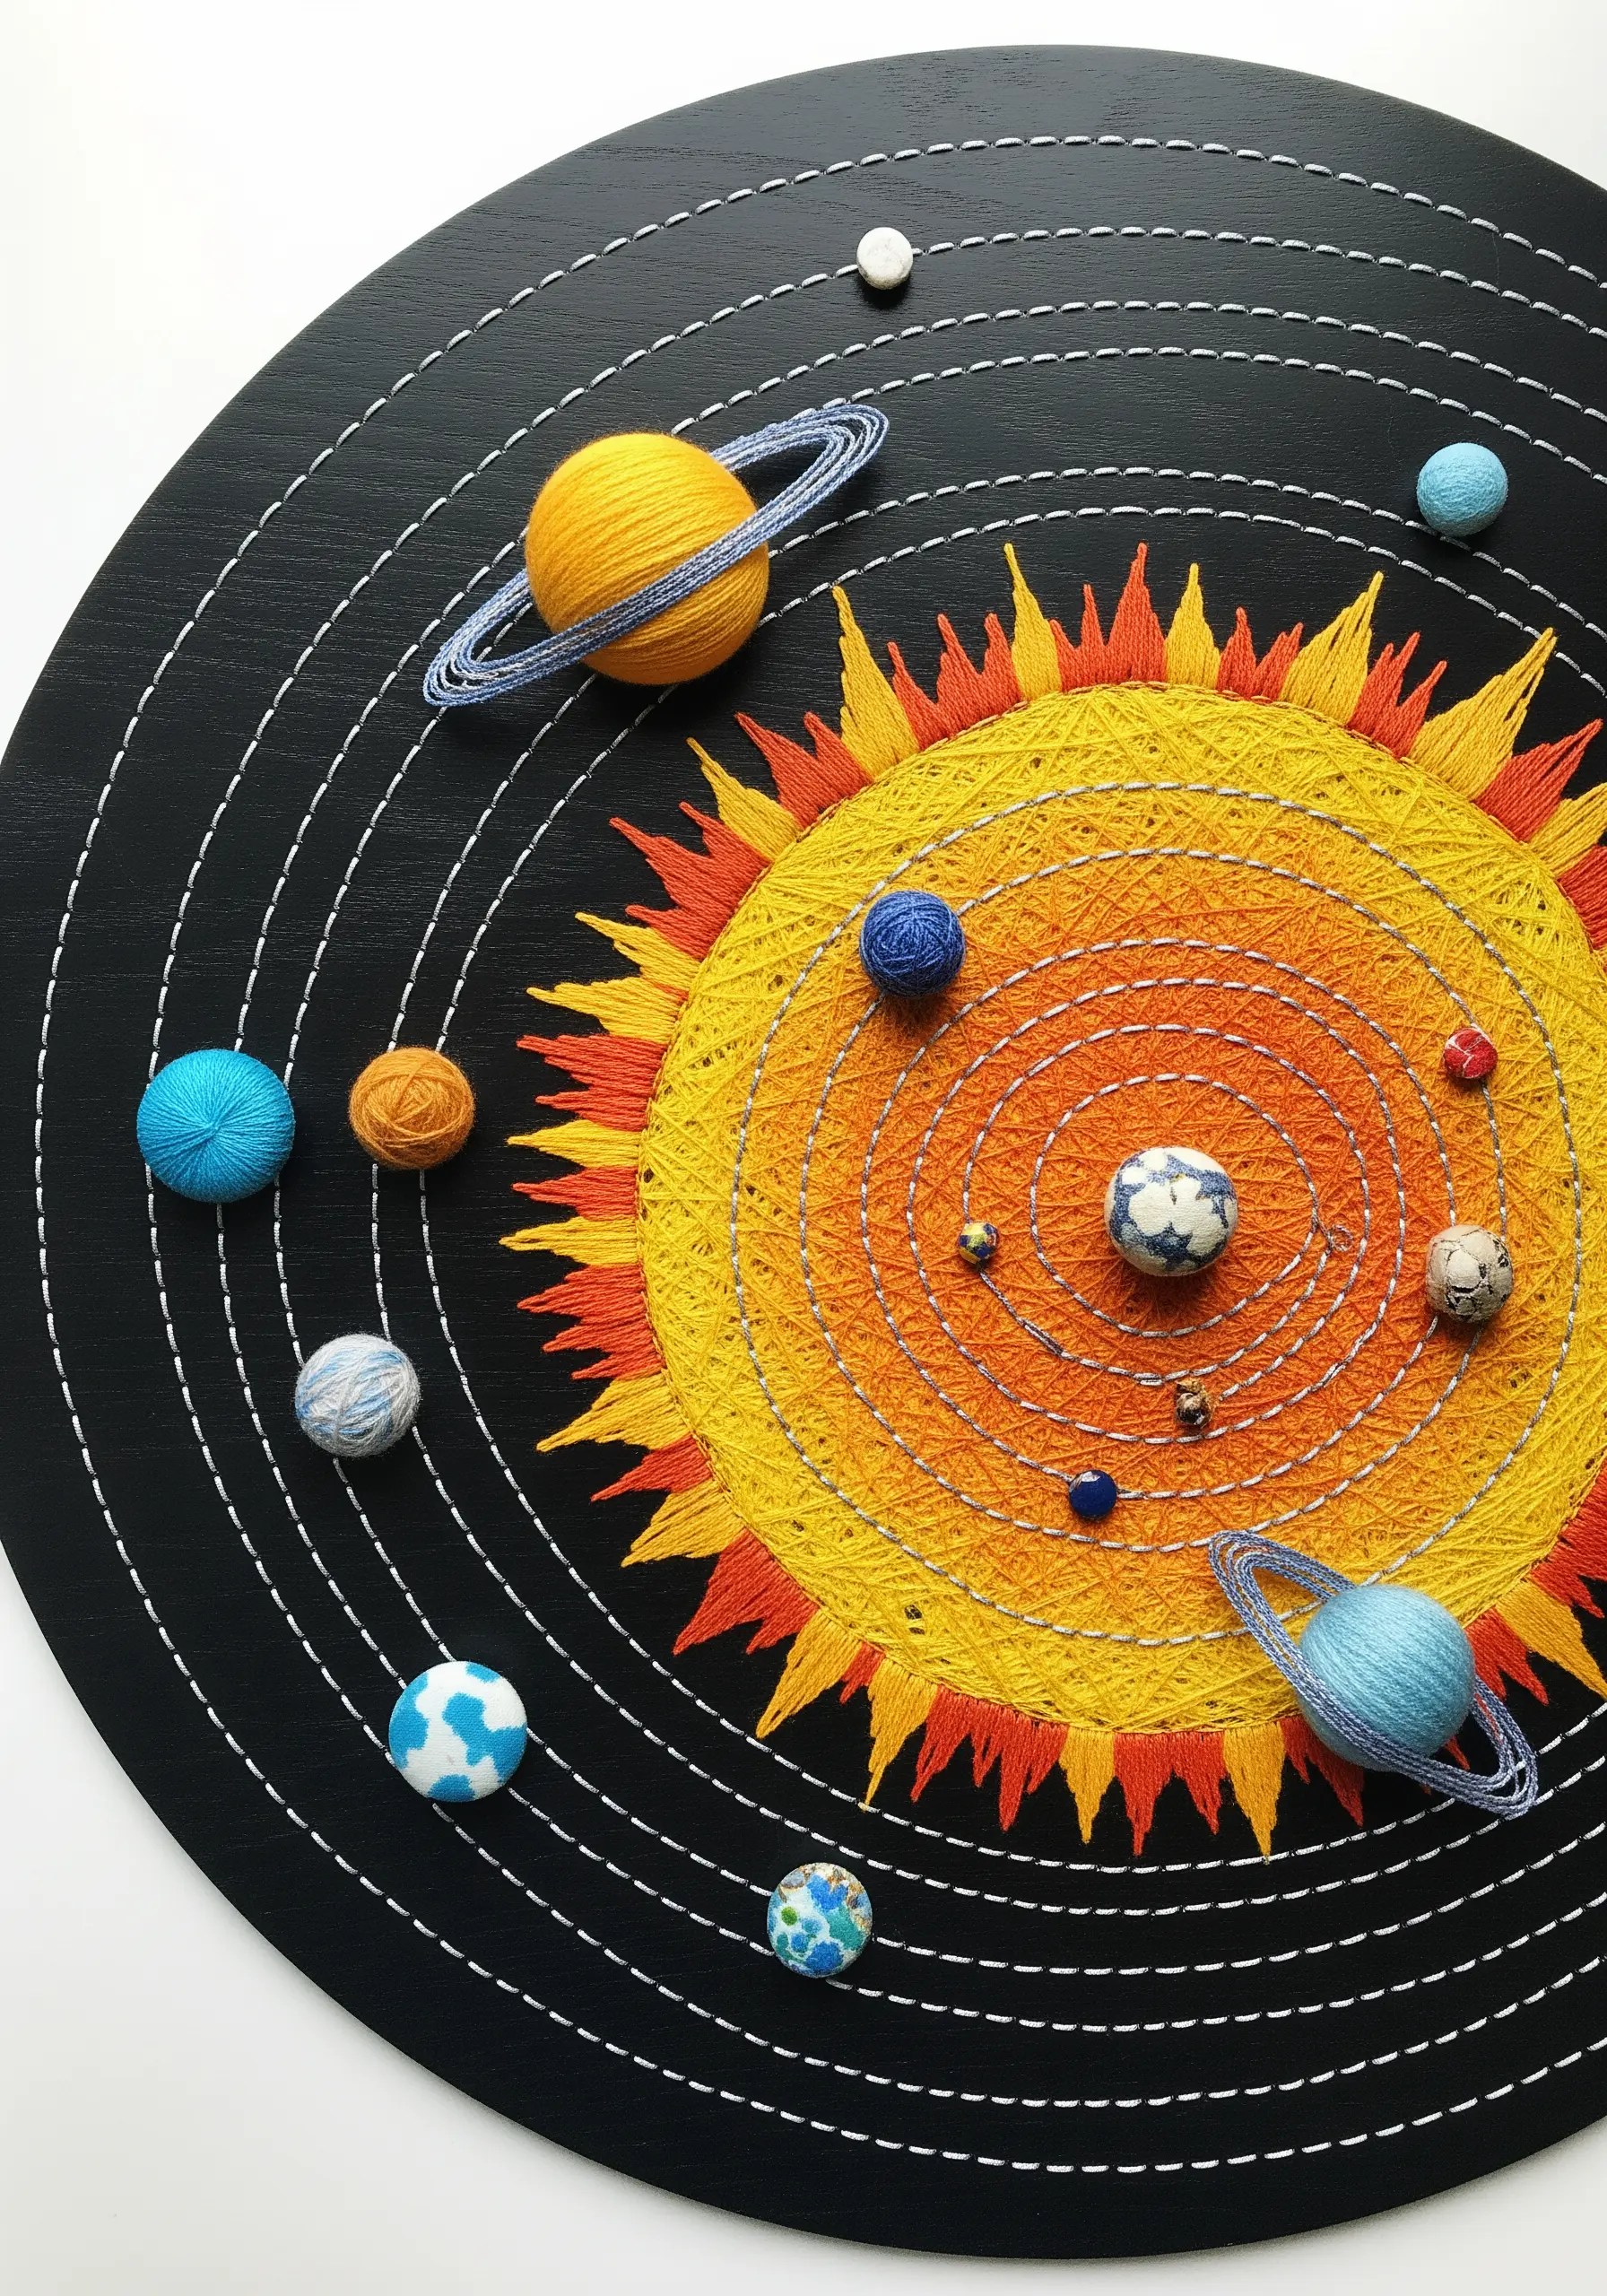
This tactile project combines the linear quality of string art with the soft volume of yarn.
On a black painted wooden circle, map out your orbits with small nails or pins.
To create the planets, wrap colorful yarn around foam balls, wooden beads, or felted pom-poms until they are completely covered.
Secure the yarn-wrapped planets in their positions, then use a continuous strand of white or silver thread to weave the orbital patterns around the nails. The contrast between the thread lines and the soft, spherical planets is what makes this fiber art so visually compelling.
26. Build a Fairytale Forest Diorama
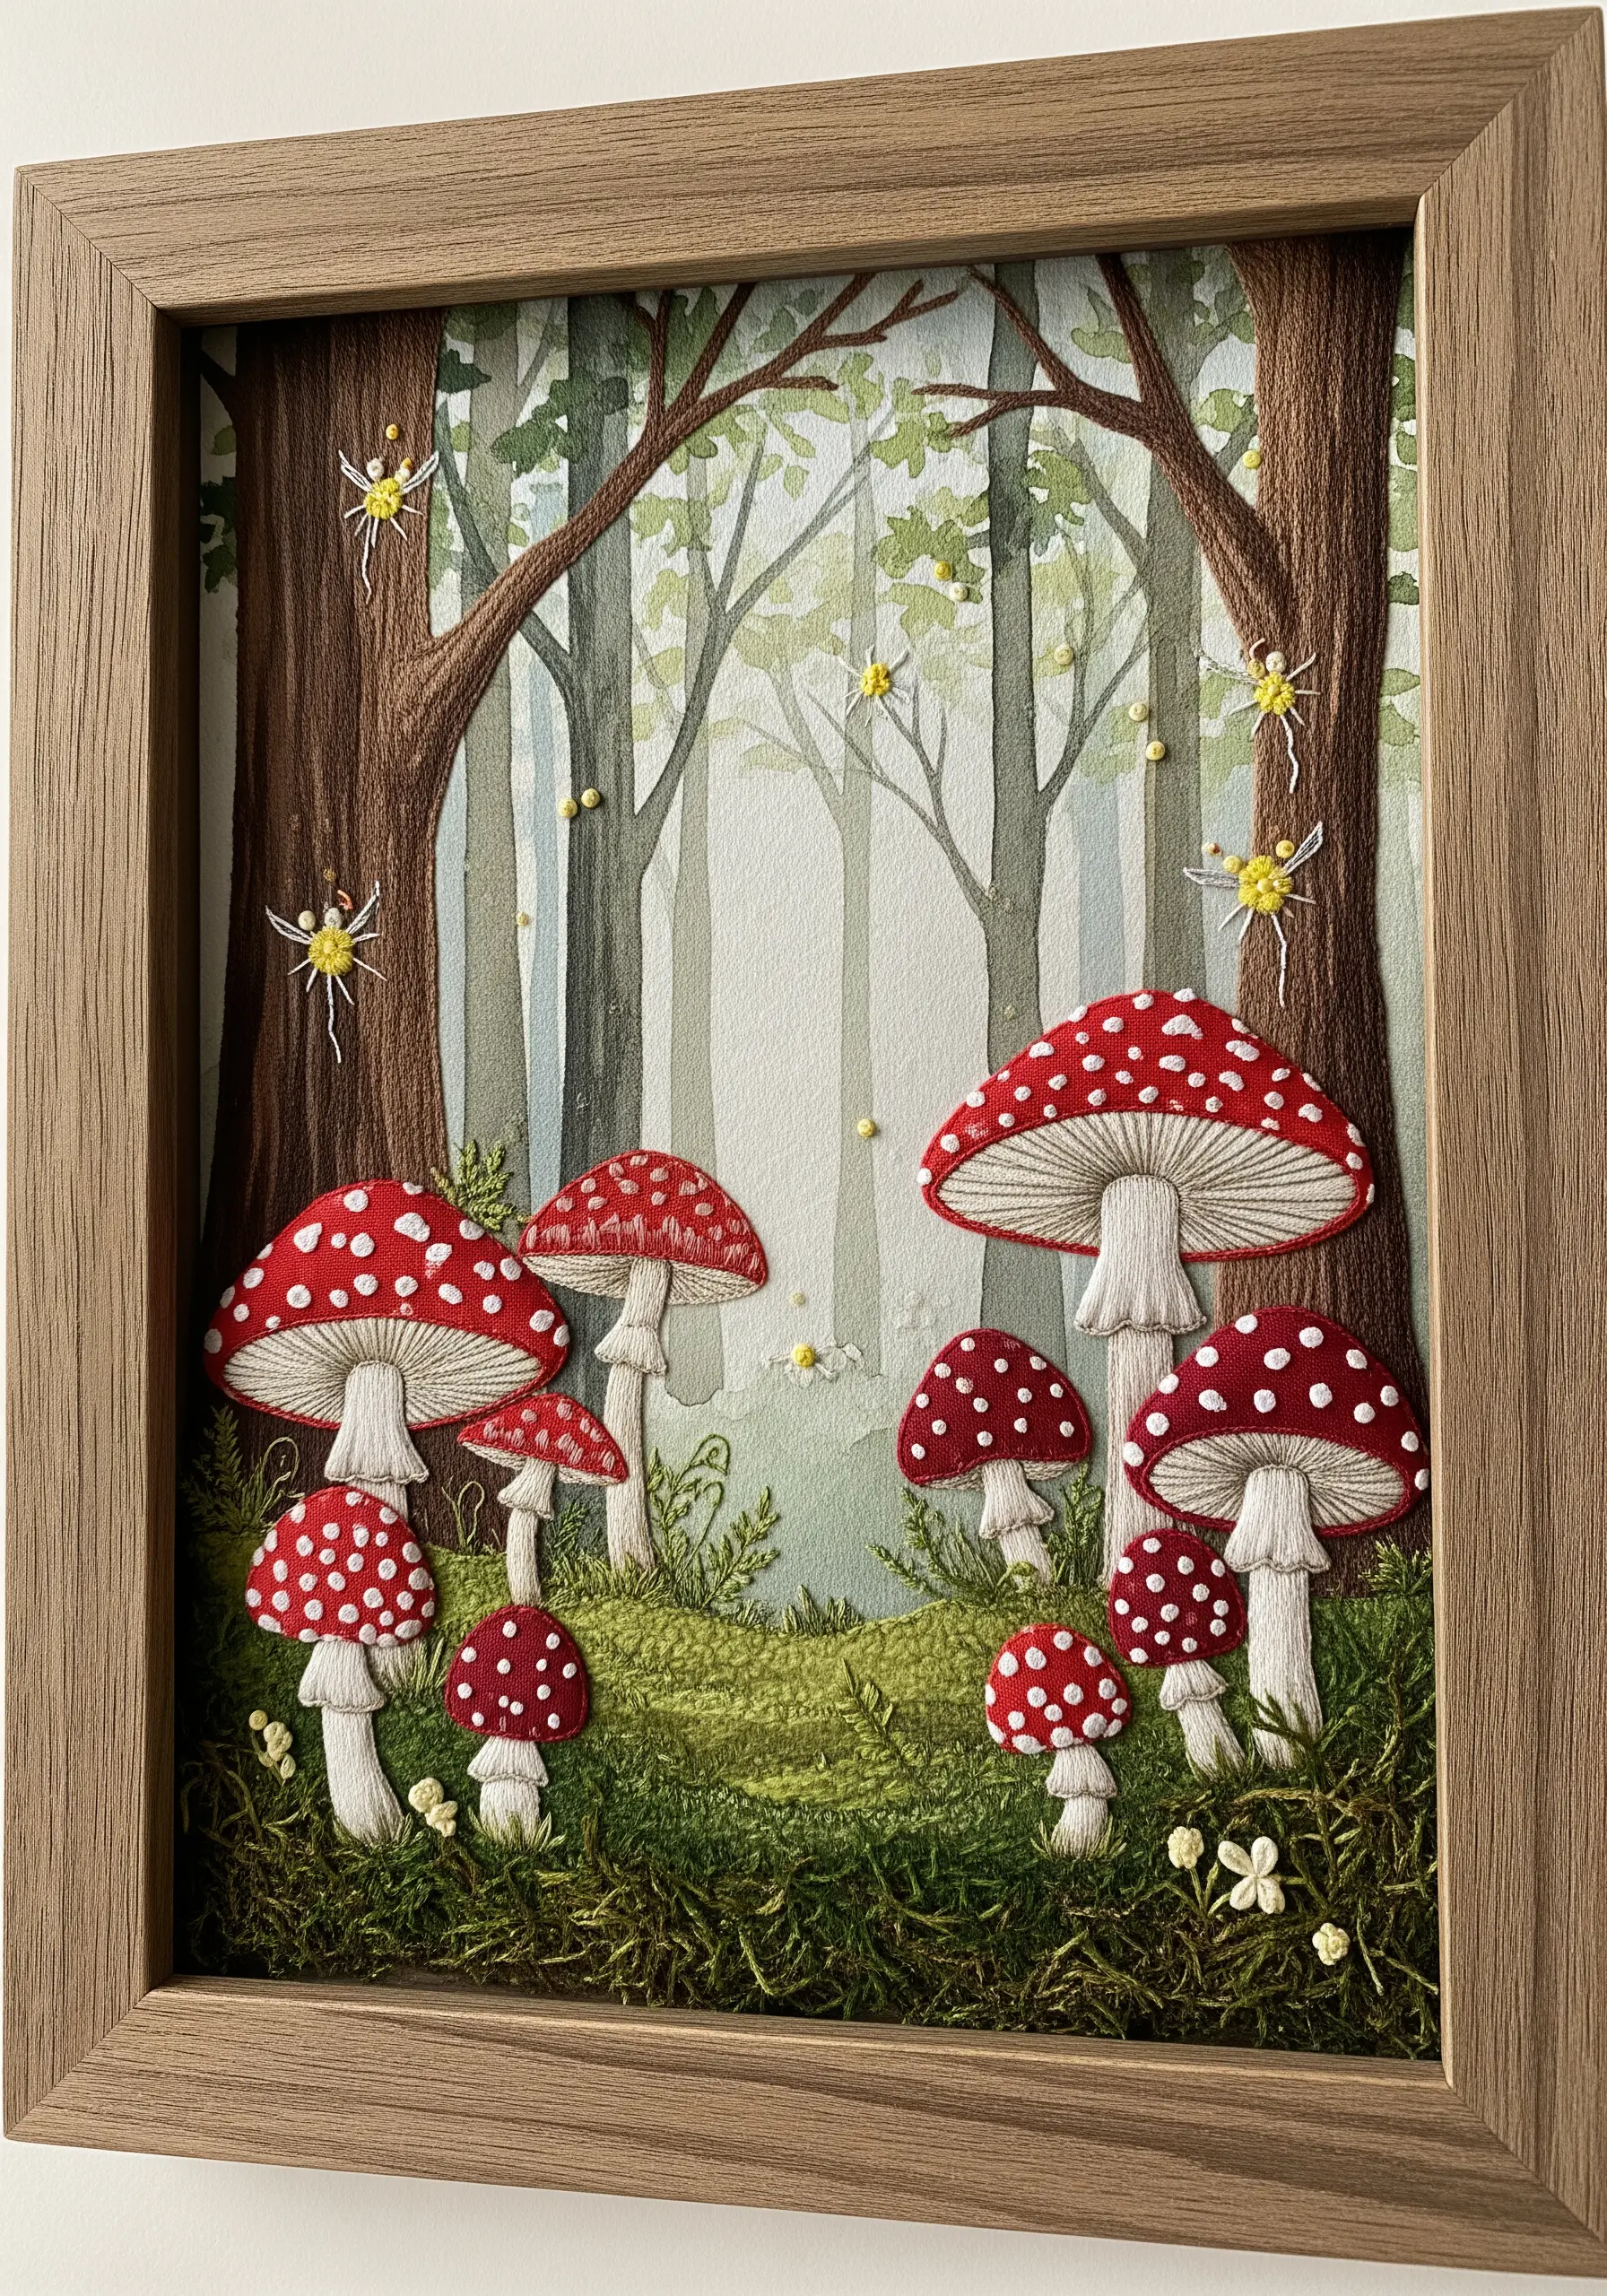
Create a scene of pure enchantment by layering paint, thread, and natural materials within a shadow box.
Start with a watercolor painting of a misty forest on paper for your background.
Stitch your toadstools on a separate piece of fabric, using padded satin stitch to give them a plump, 3D feel. Cut them out and mount them in the foreground.
The final, magical touch is adding a layer of real, preserved moss along the bottom of the frame. This instantly creates an authentic forest floor and makes your cottagecore scene feel truly immersive.
27. Design a Honeycomb Sampler with Ribbon and Felt
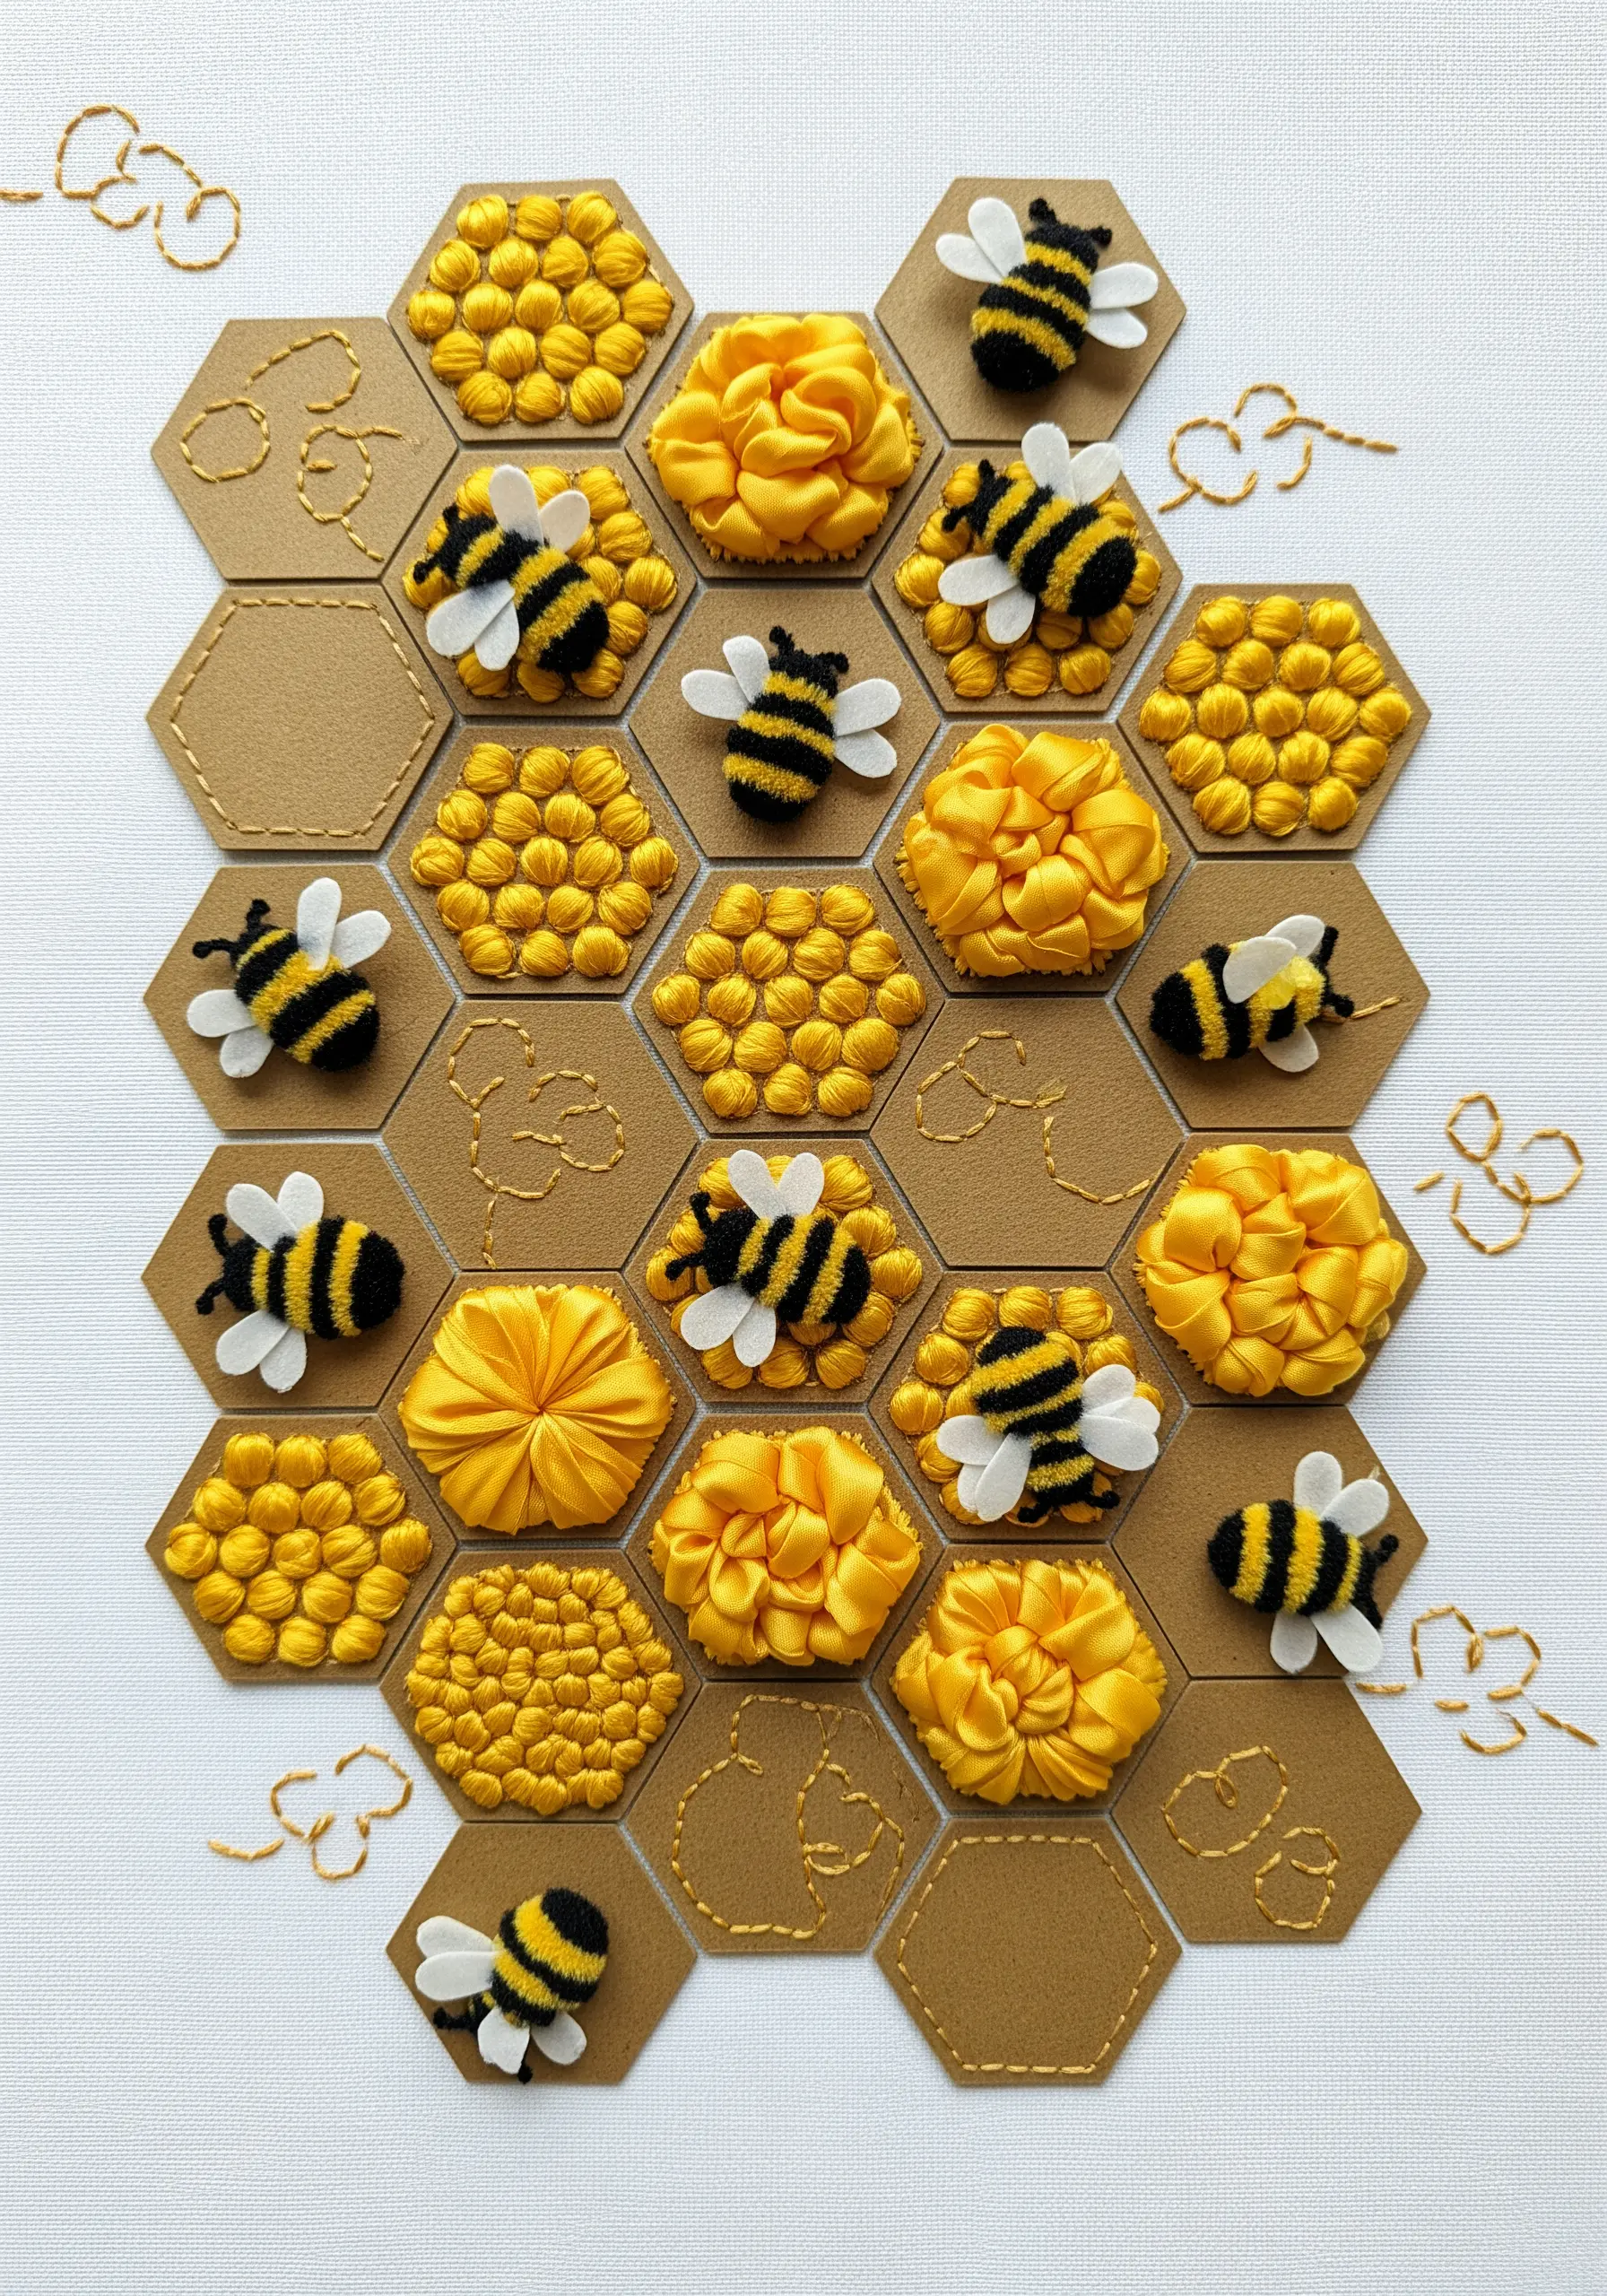
Use a simple geometric shape as a canvas for exploring a rich variety of textures within a single color family.
Create a honeycomb pattern on your base fabric using cut felt pieces or a simple stitched outline.
Fill each hexagon with a different stitch or material: dense French knots, woven picot stitches, or gathered satin ribbon for a floral effect.
For a whimsical finish, craft tiny bees from felt and chenille stems, and stitch them onto your honeycomb, as if they are busily at work.
28. Layer a Gradient Landscape with Faux Leather
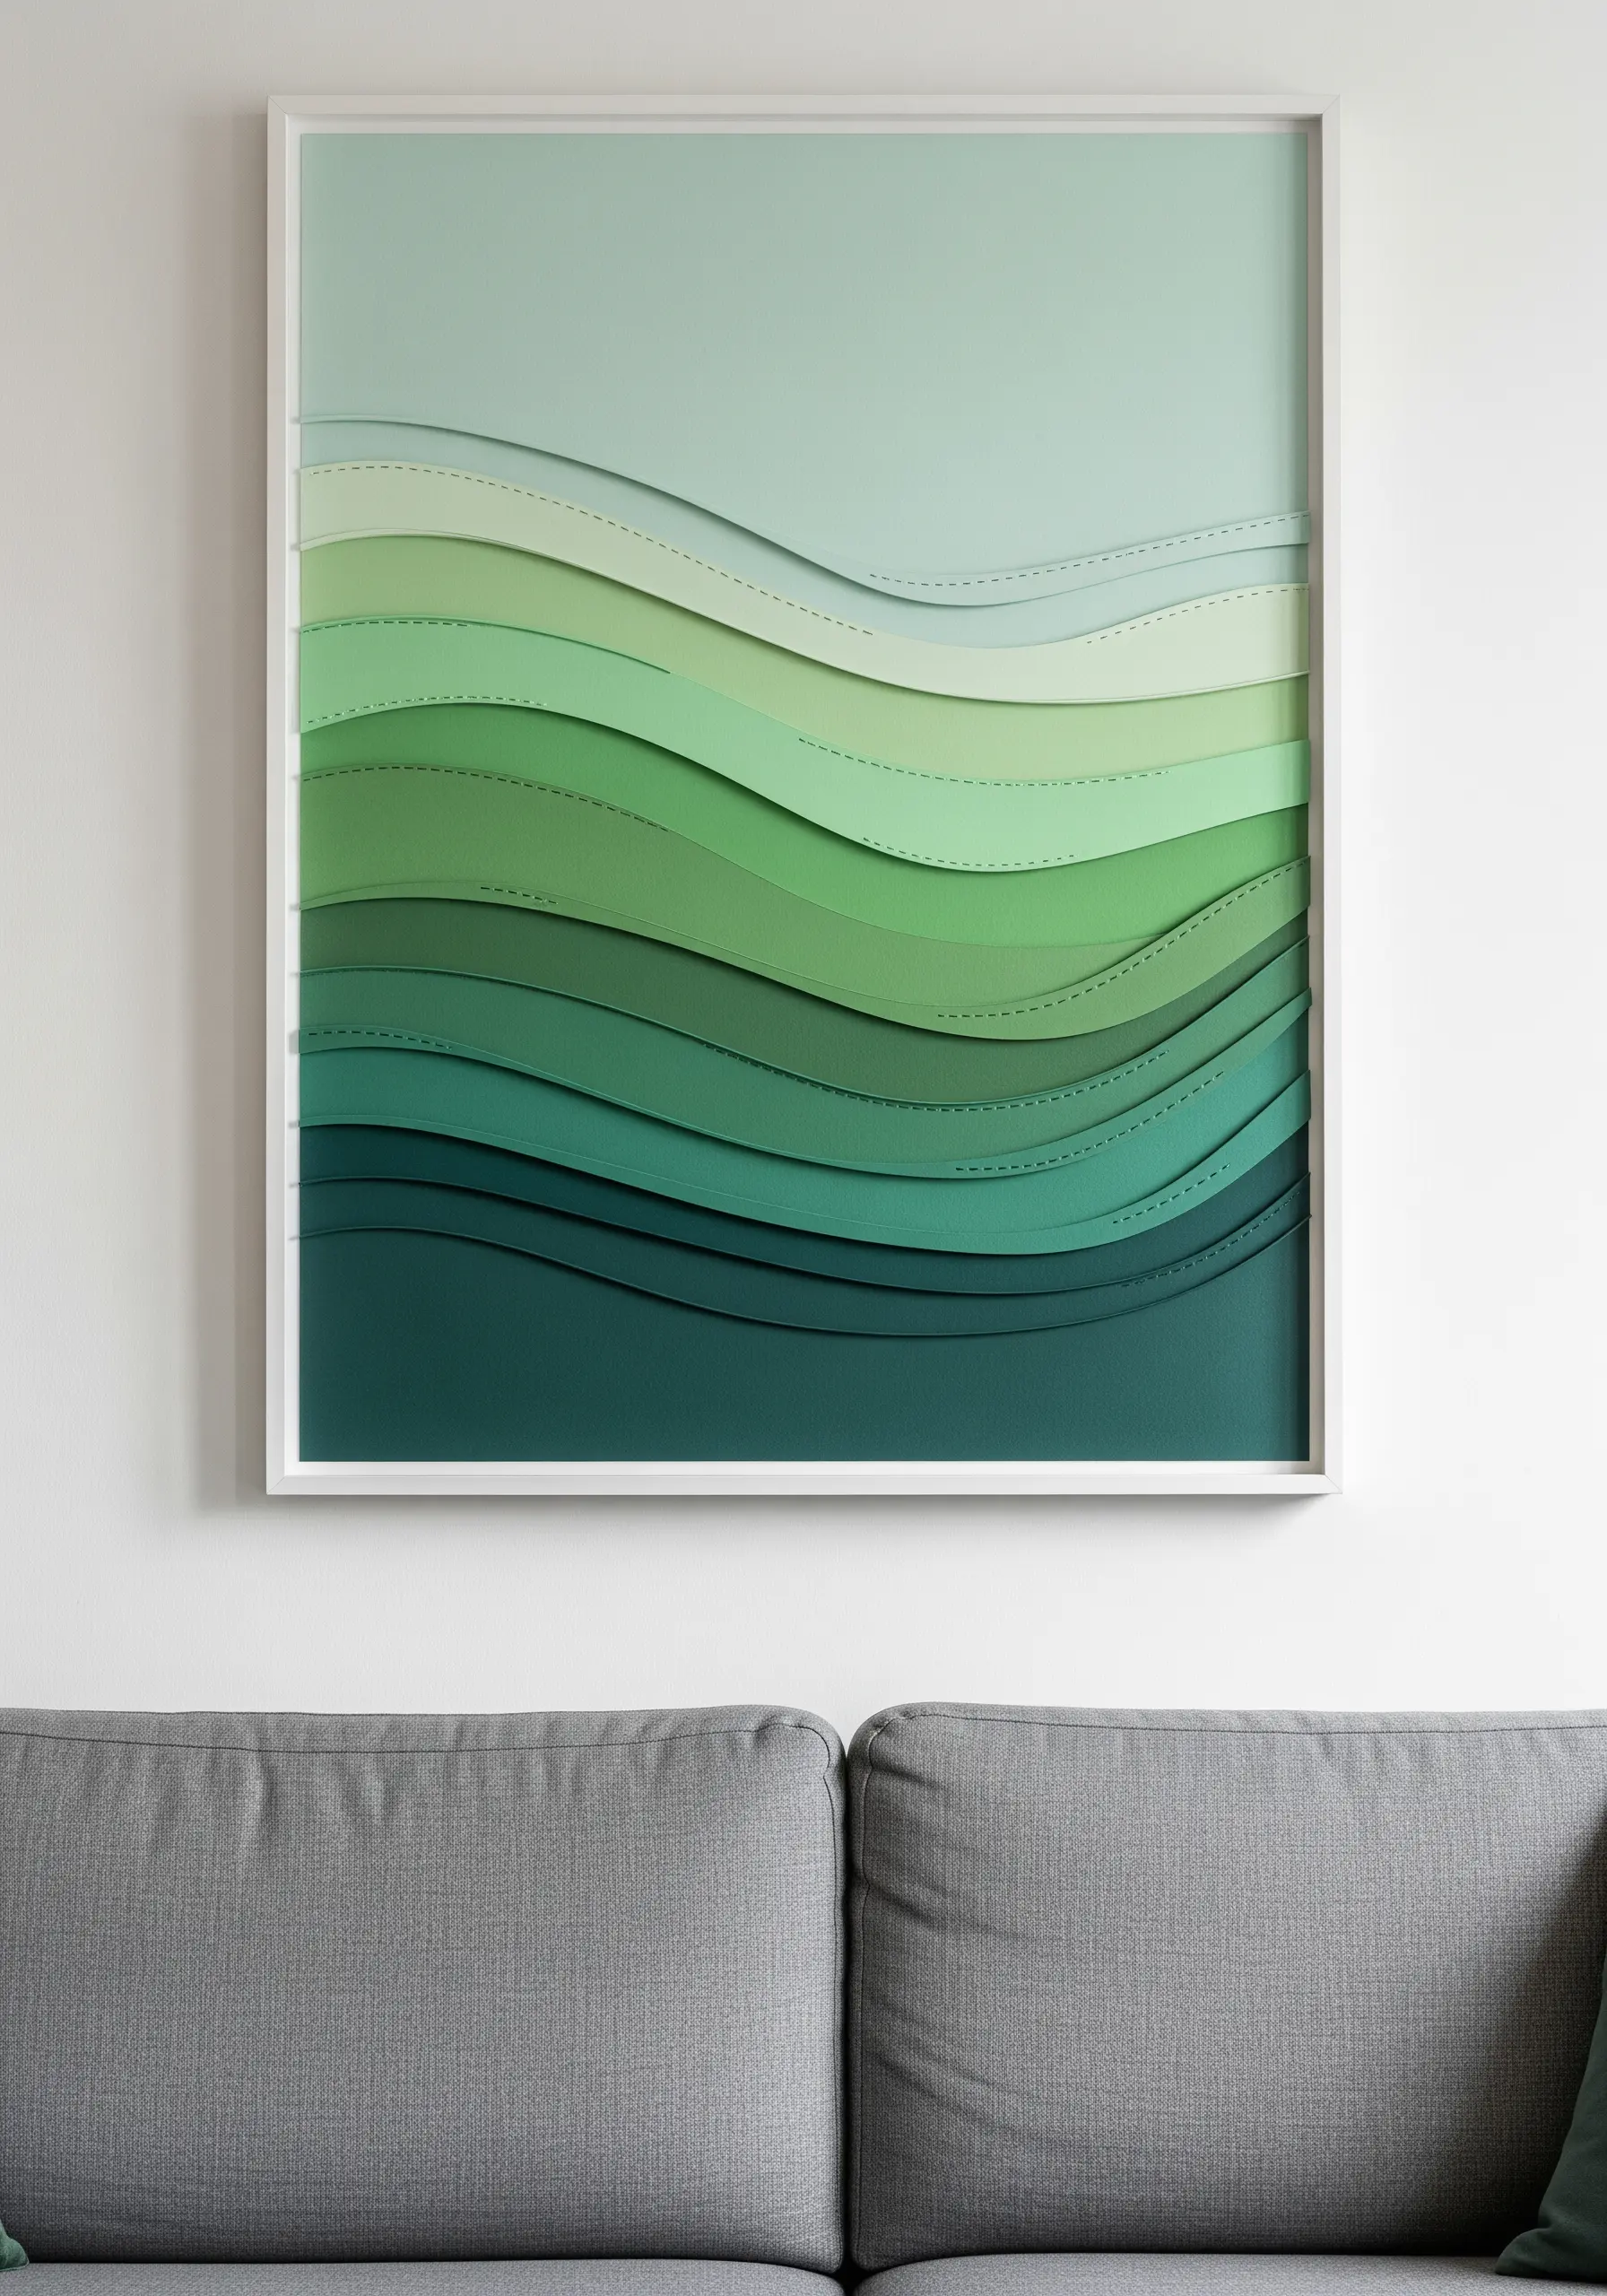
Create a sleek, modern piece of wall art that relies on the beauty of the material itself.
Choose faux leather or vinyl in a gradient of colors, from light to dark.
Cut each color into a gentle, organic wave shape. Layer these pieces on a canvas, starting with the darkest shade at the bottom.
Use a simple, clean running stitch along the top edge of each layer to secure it. The contrast between the smooth, manufactured material and the elemental, handmade stitch is what gives this minimalist piece its sophisticated appeal.
29. Detail Painted Paper Feathers with Thread
This project beautifully merges the fluidity of watercolor with the linear precision of a single stitch.
Cut feather shapes from heavy watercolor paper and paint them with soft, blended colors.
Once they are completely dry, use a single strand of metallic or contrasting thread to stitch a simple backstitch or running stitch down the center to represent the quill.
This one line of thread introduces a subtle textile element, adding a touch of texture and shimmer that elevates the paper craft into a more complex piece of mixed-media art.
30. Weave a Textural Wave with Wool Roving
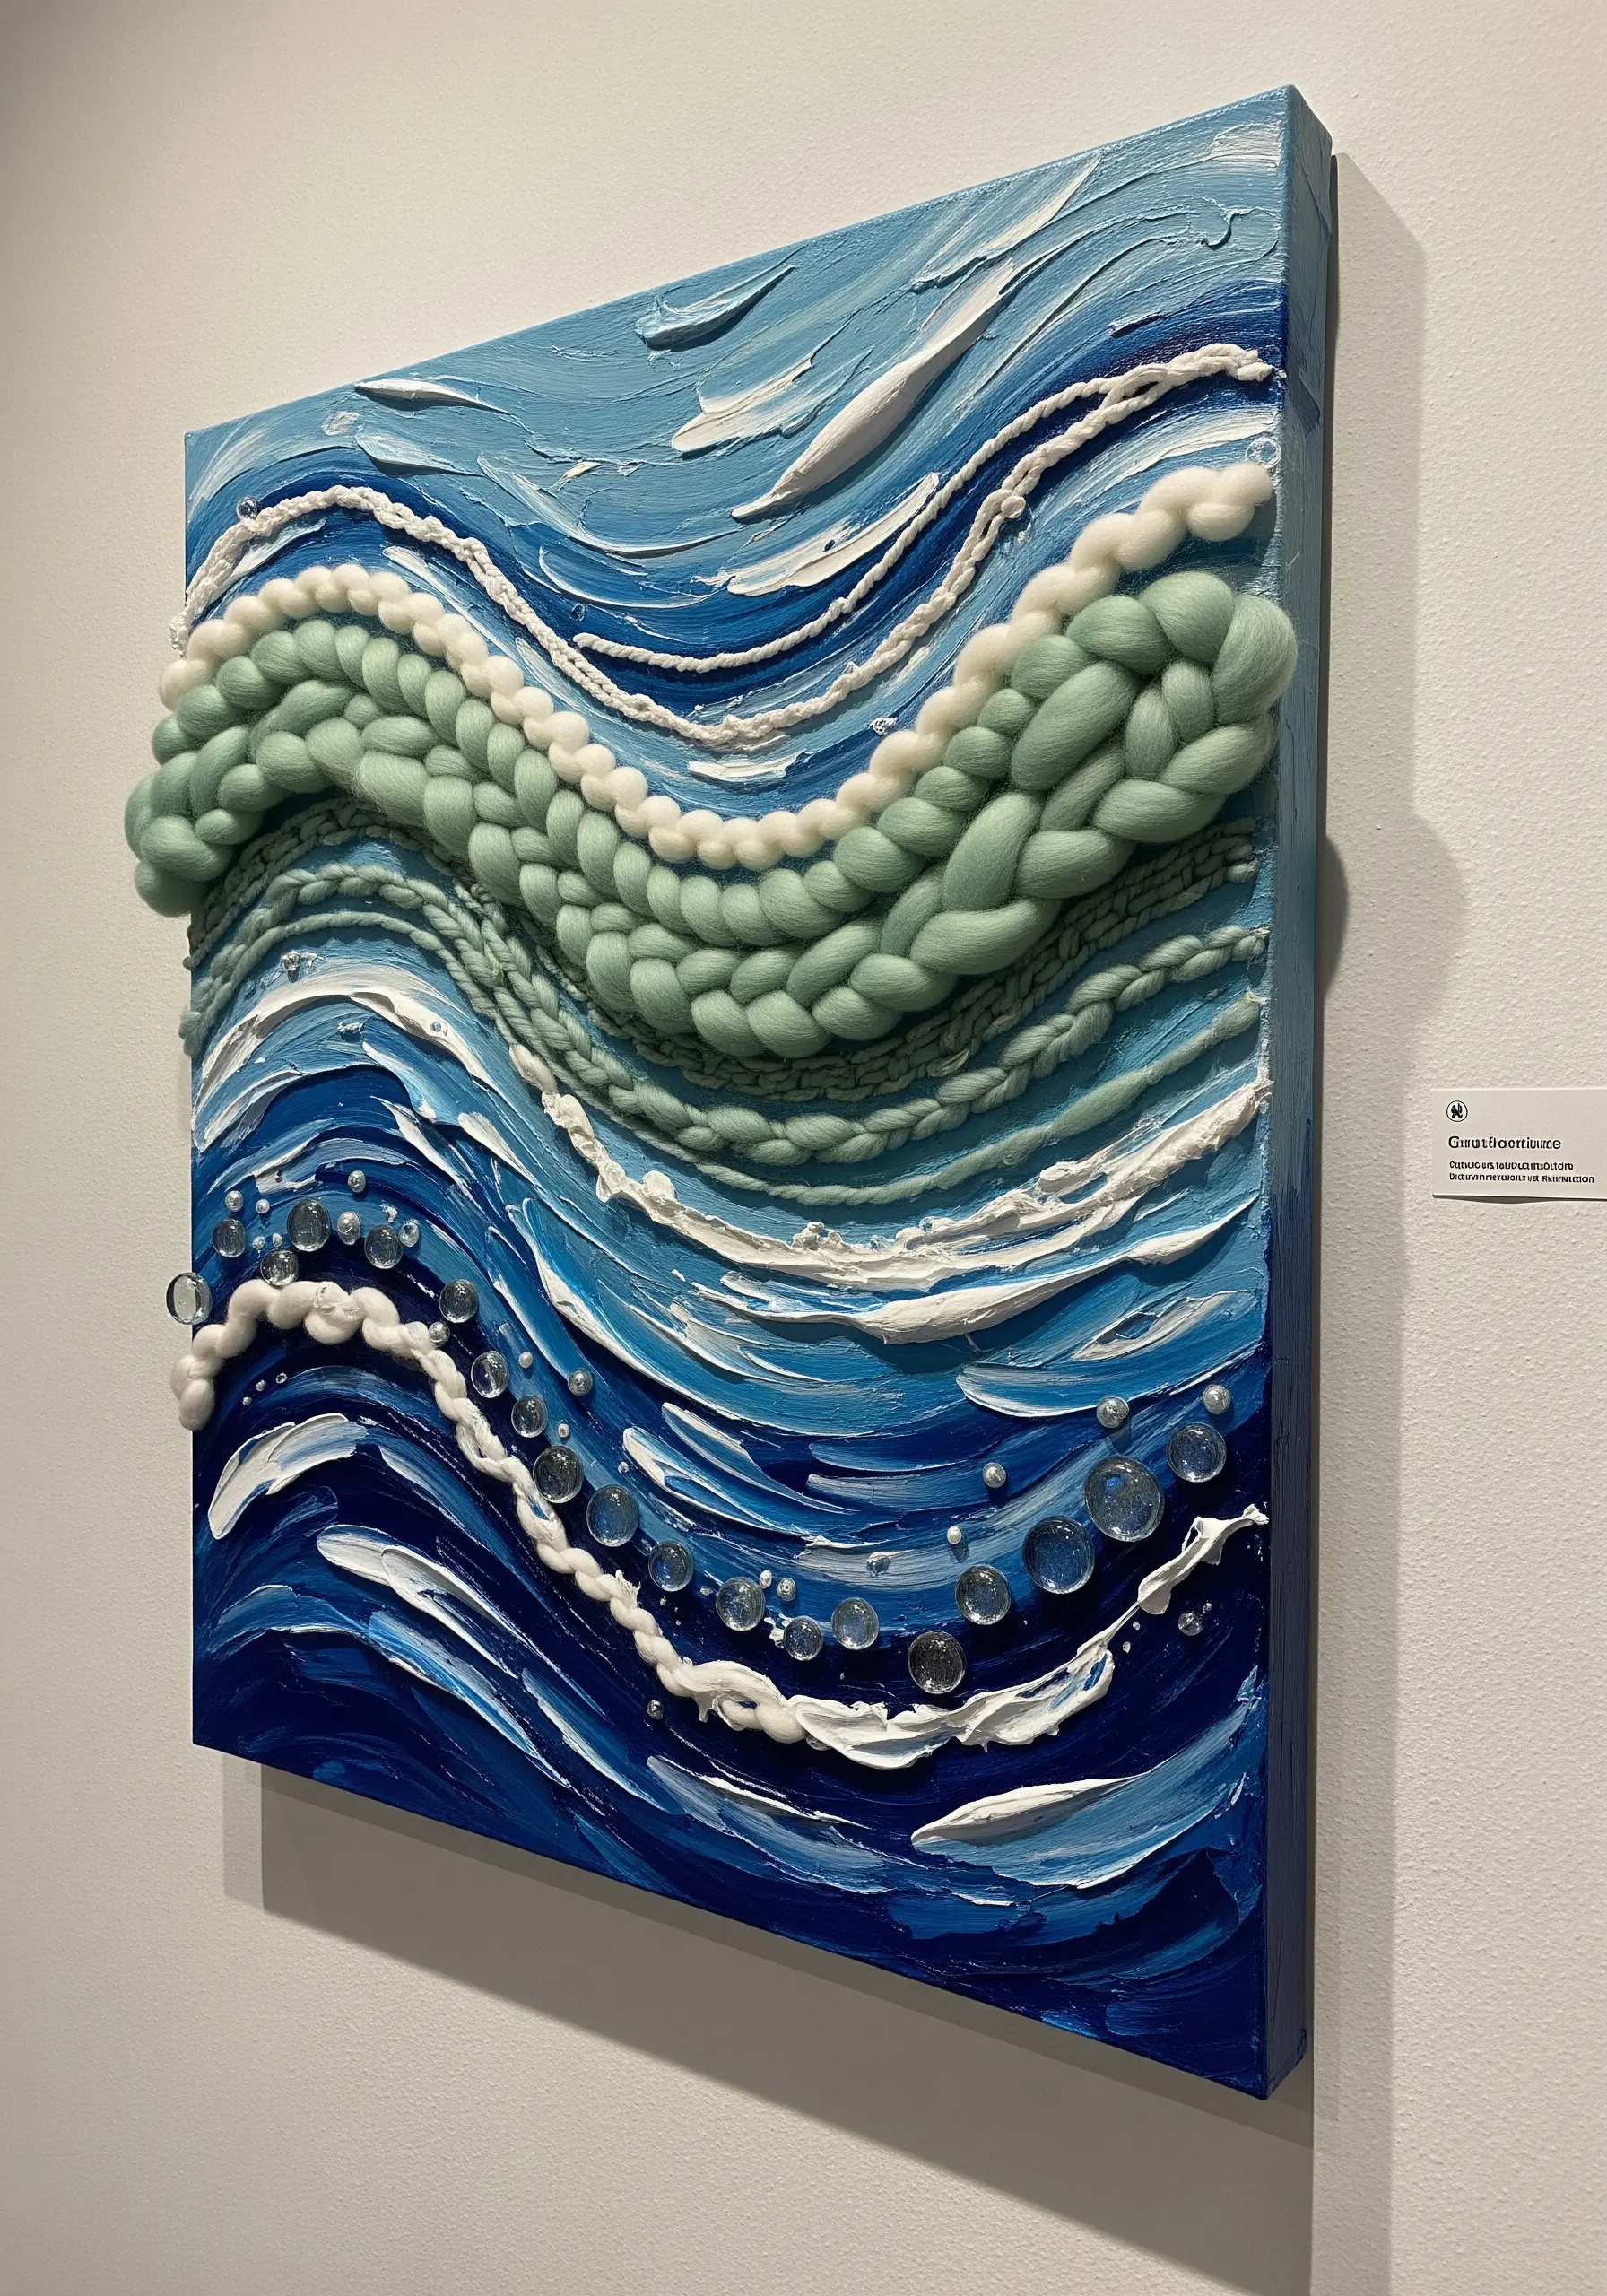
Capture the immense energy of the ocean by using materials that provide dramatic volume and texture.
Start by creating a dynamic background on canvas with thick, gestural strokes of acrylic paint.
Then, couch or weave thick, unspun wool roving directly onto the surface to form the crest of the wave. The roving’s soft, fibrous quality perfectly mimics seafoam.
For the final touch, stitch clear glass beads and sequins into the base of the wave to represent bubbles and spray, adding a layer of sparkle that contrasts with the matte wool.
31. Craft a Felt Nursery Mobile with Beaded Rain
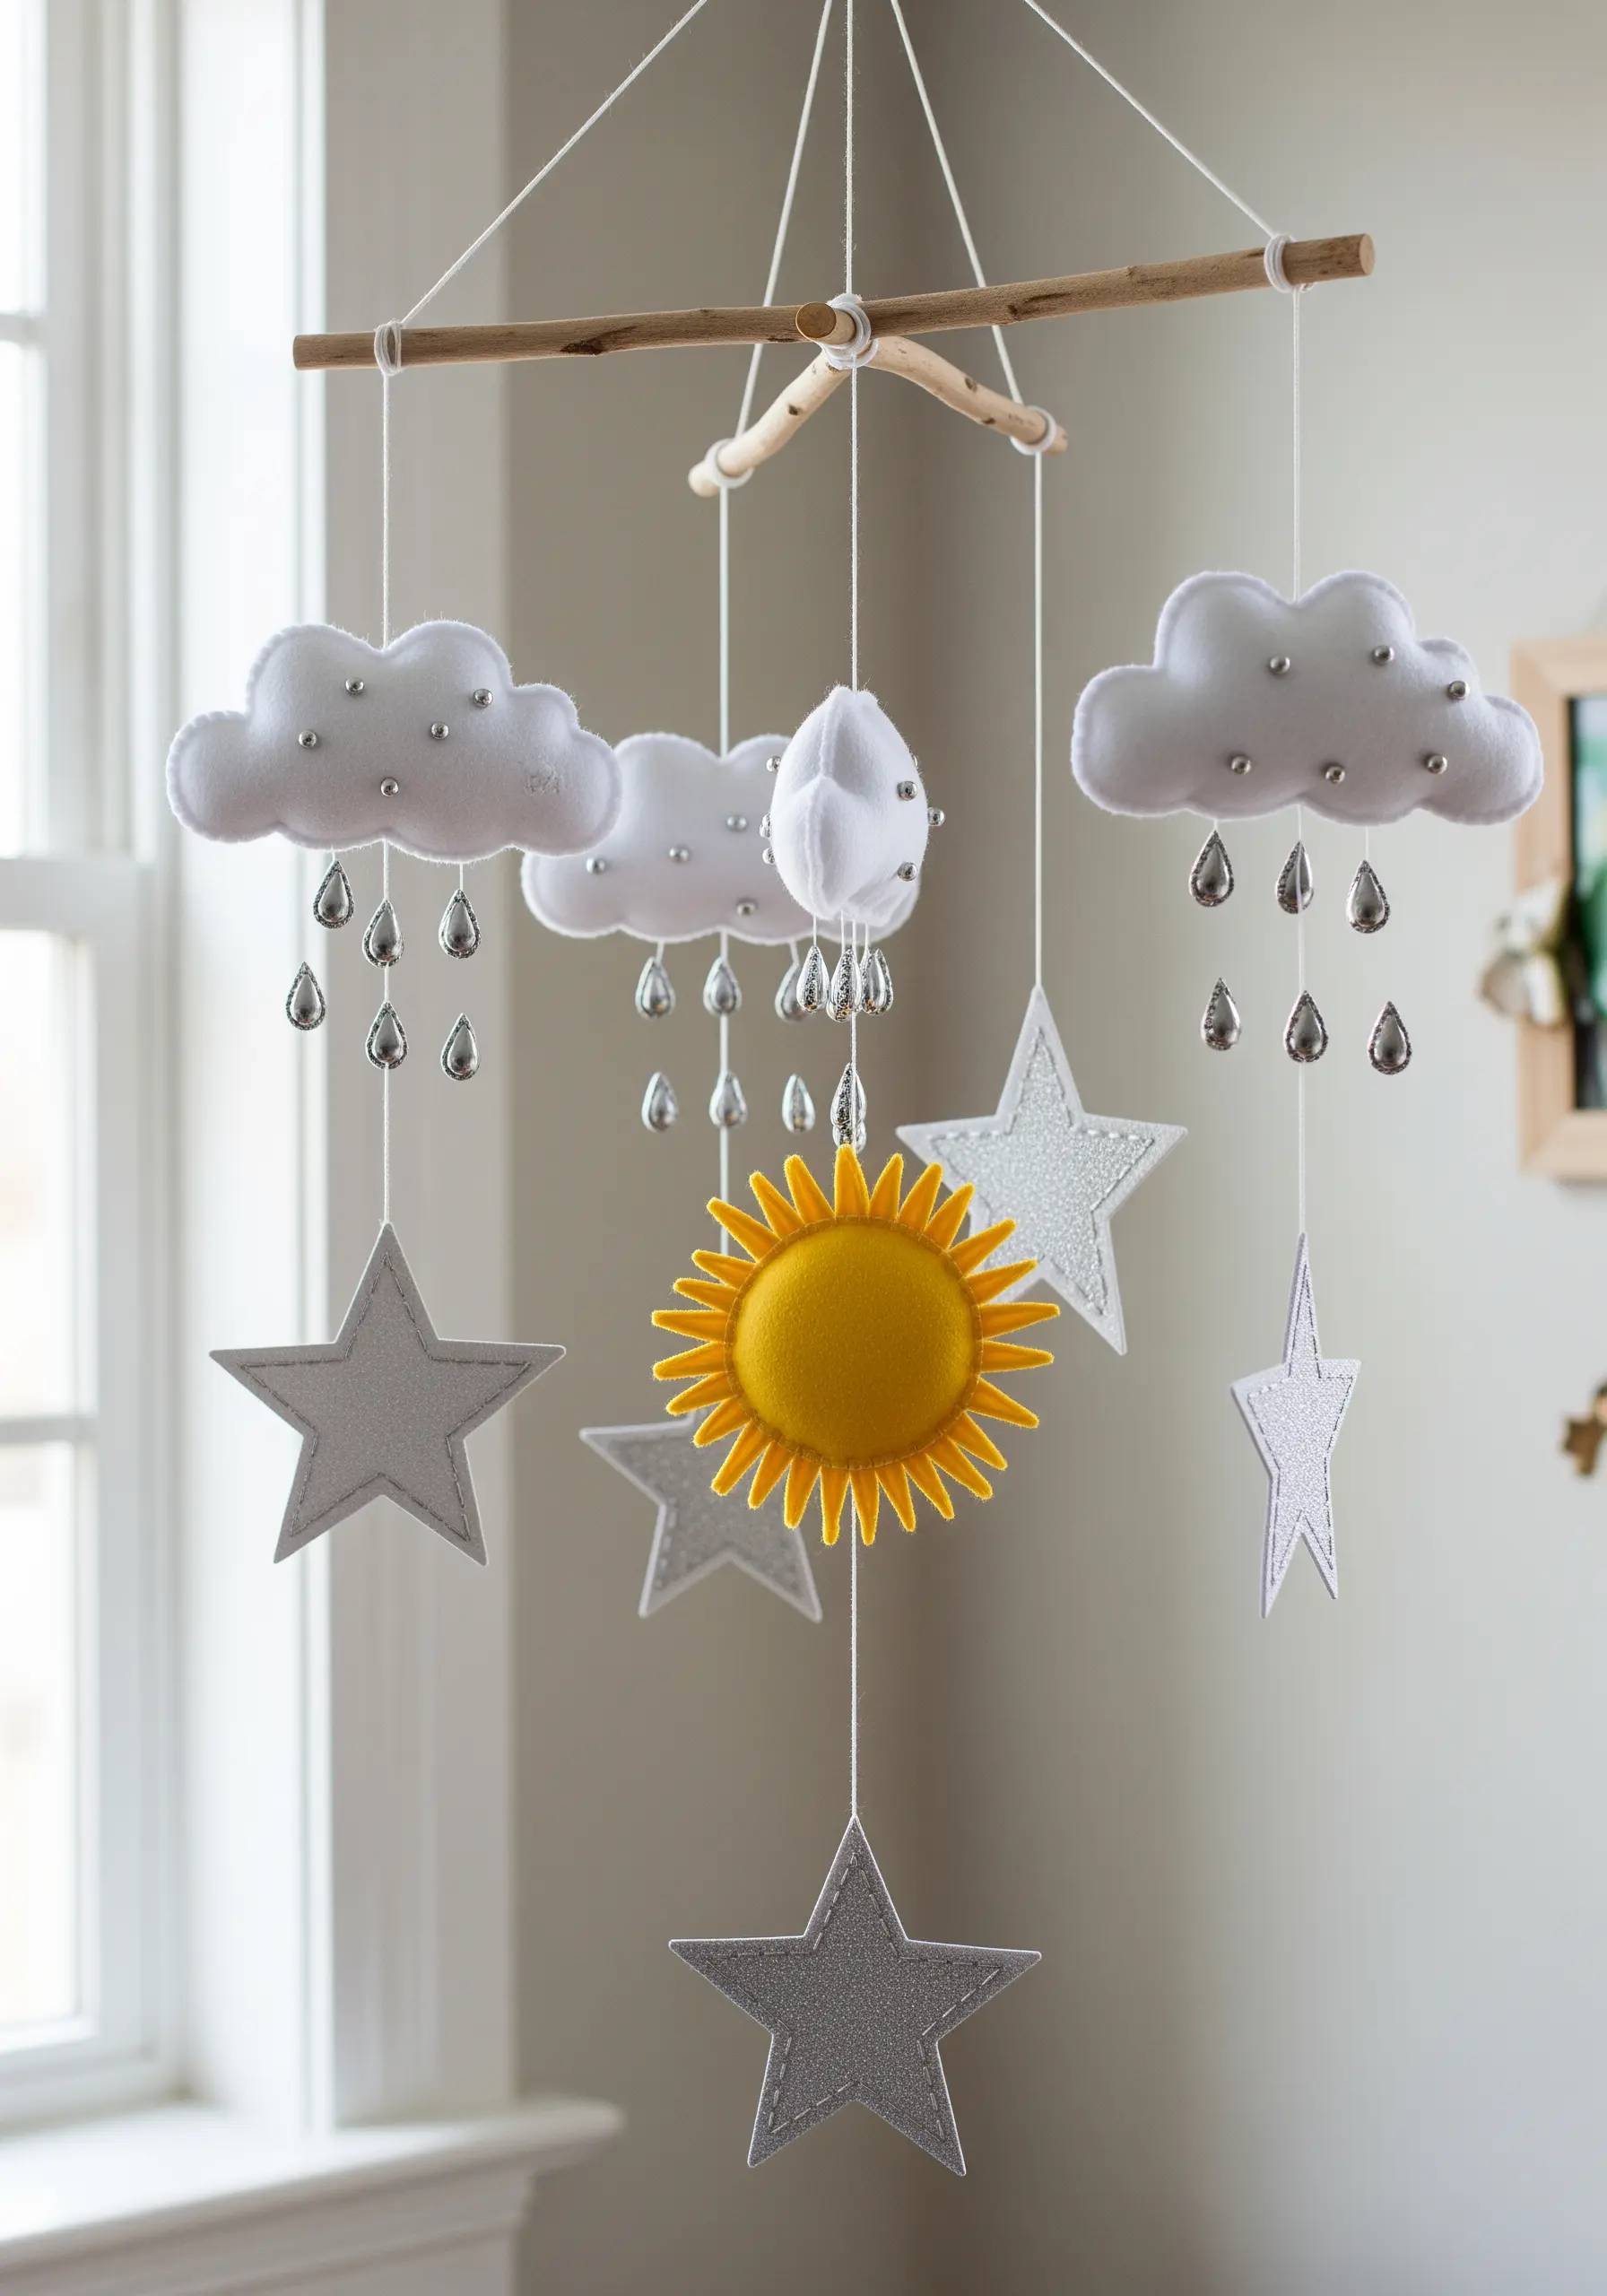
Create a gentle, heirloom-quality mobile by focusing on soft textures and delicate embellishments.
Use high-quality wool-blend felt for your clouds, sun, and star shapes. Lightly stuff them with a bit of batting to give them a soft, pillowy dimension.
Instead of thread, use strung silver or iridescent beads to create shimmering raindrops falling from the clouds.
A neat, simple running stitch around the edge of each felt shape provides a clean, handmade finish that is both charming and durable, perfect for a soothing nursery atmosphere.


