
You have the threads, the fabric, and the desire to create something beautiful. But sometimes, your finished piece doesn’t quite capture the vision in your mind. It feels handmade, but not quite *art*. How do you bridge that gap?
The secret isn’t in buying more supplies or learning impossibly complex techniques. It’s in the small, intentional shifts: choosing a different fiber, layering one texture against another, or combining two simple crafts to create something entirely new and sophisticated.
Here, you’ll find 21 ways to rethink your approach. These aren’t just projects; they are invitations to play with fiber in ways that add depth, elegance, and a truly professional finish to your work. This is how you make gifts that feel as incredible as they look.
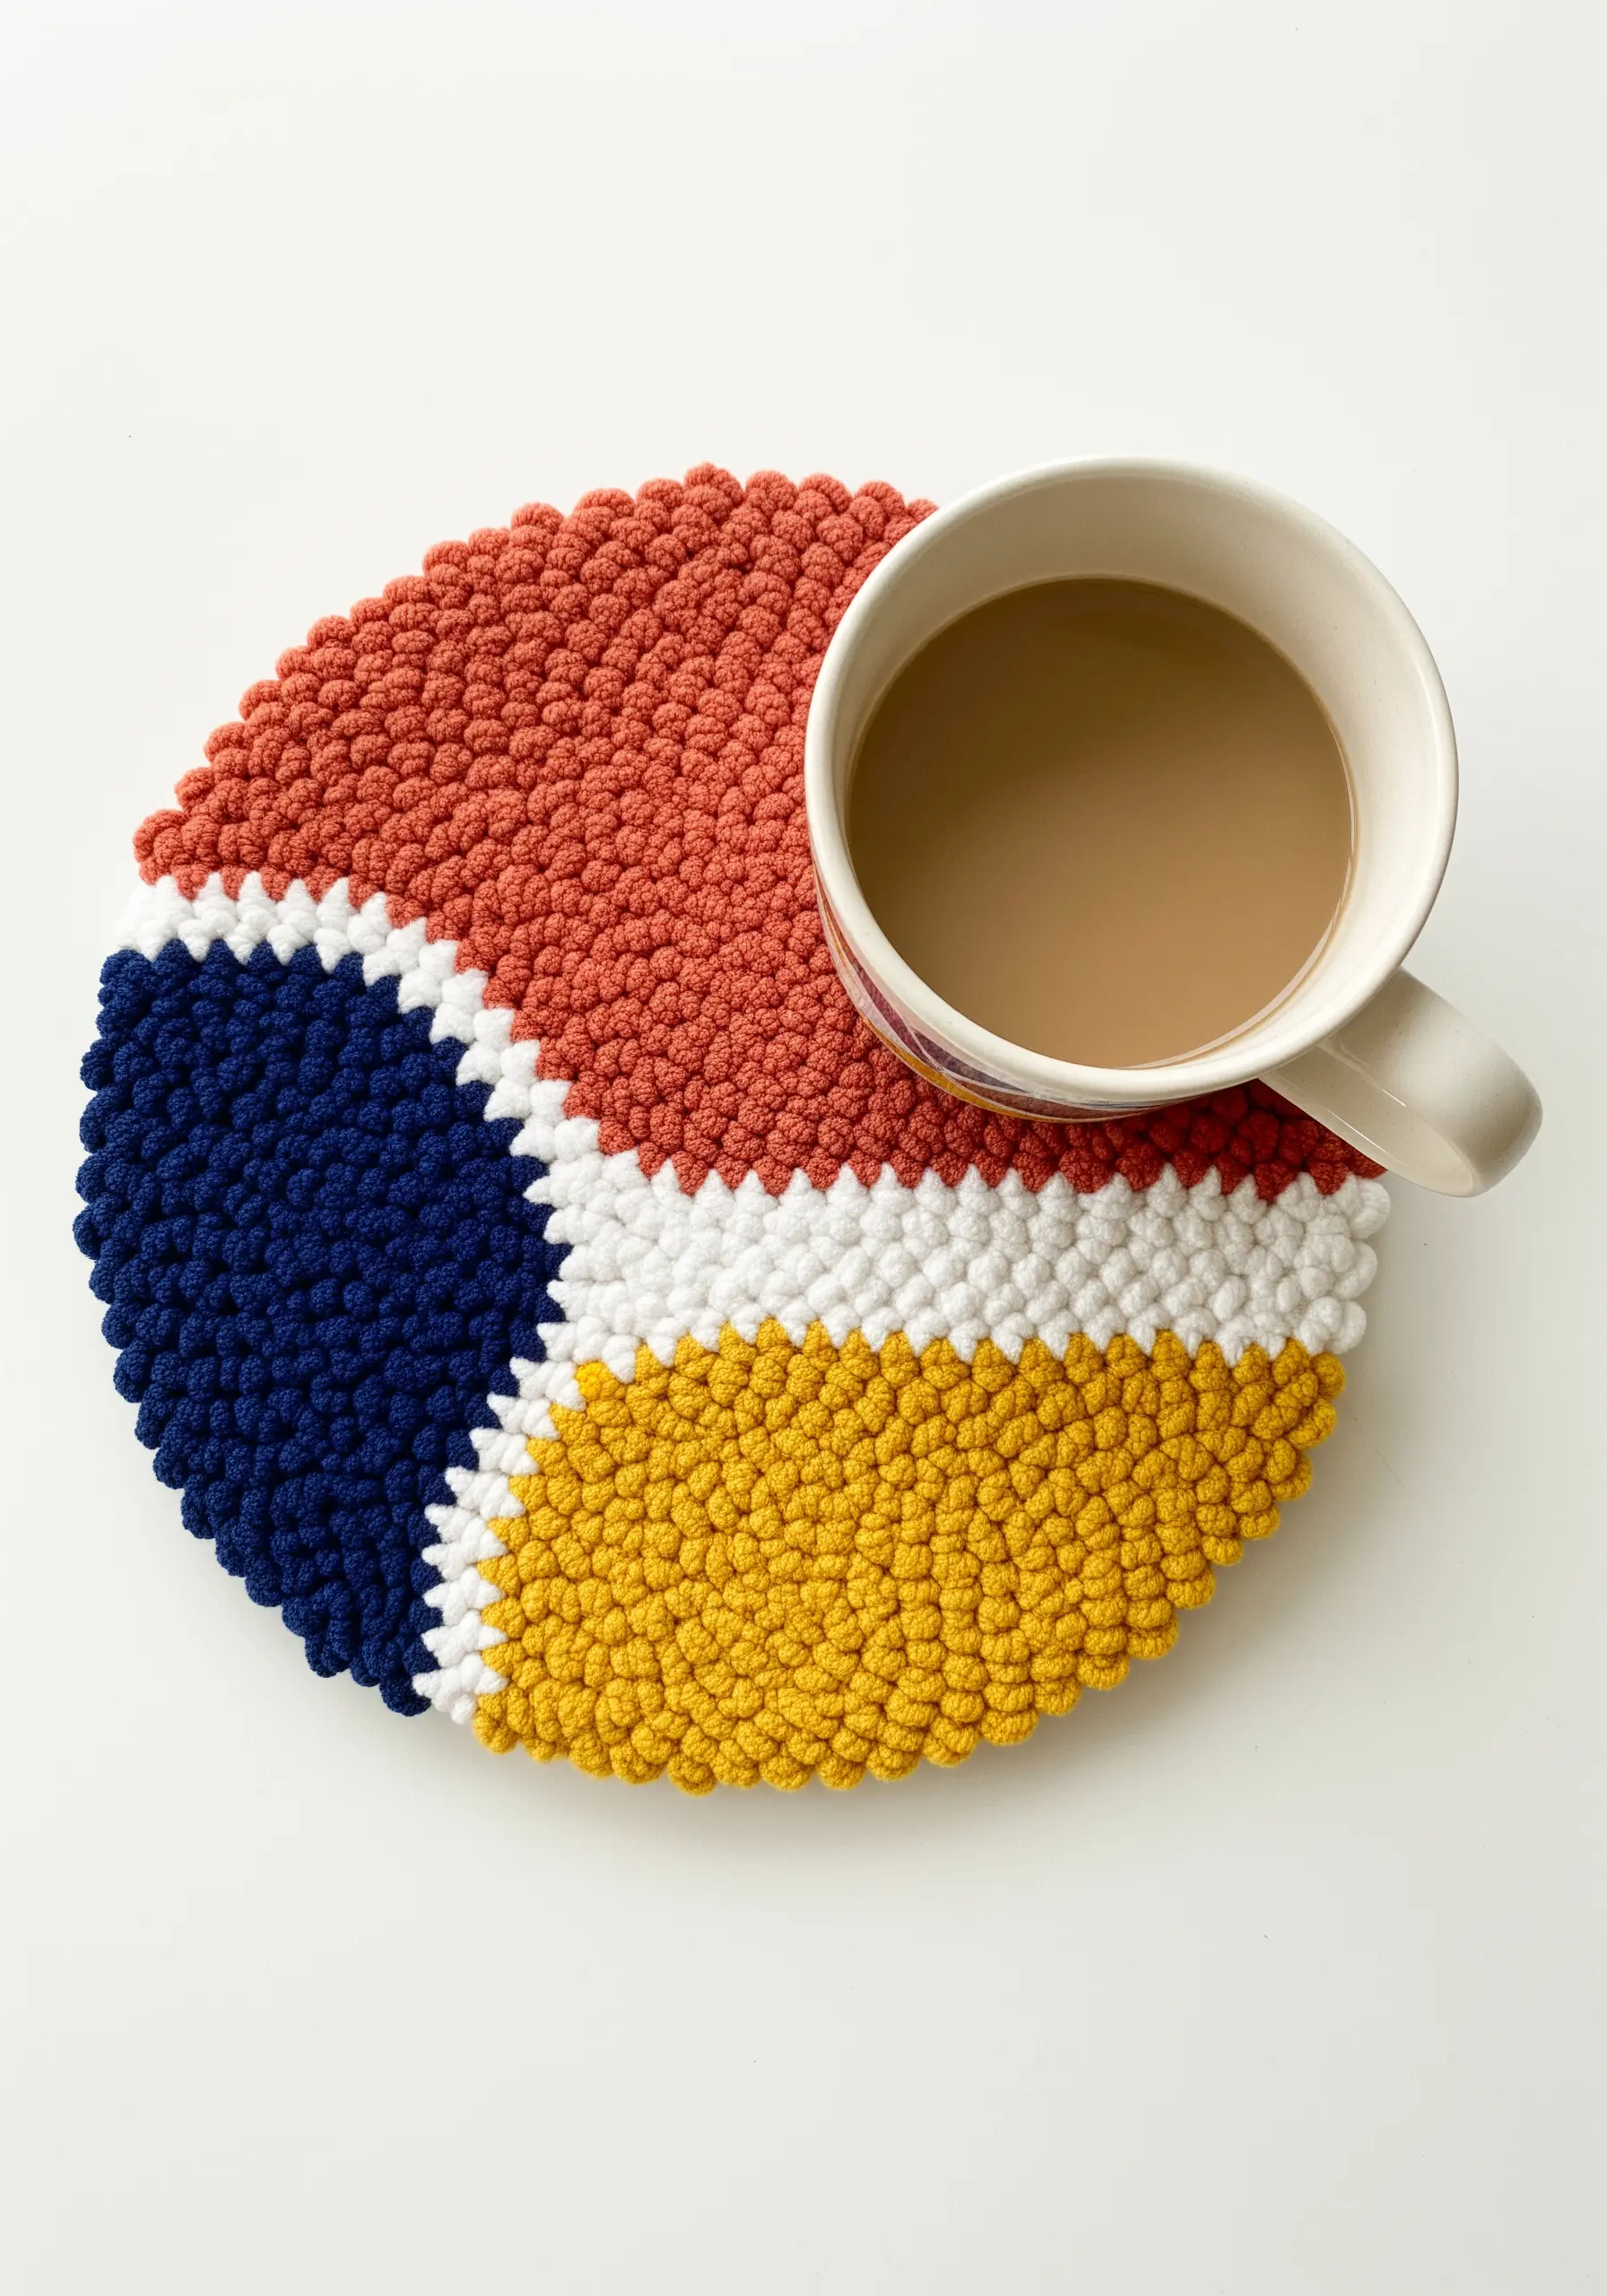
1. Sculptural Rope Coiling for Functional Art
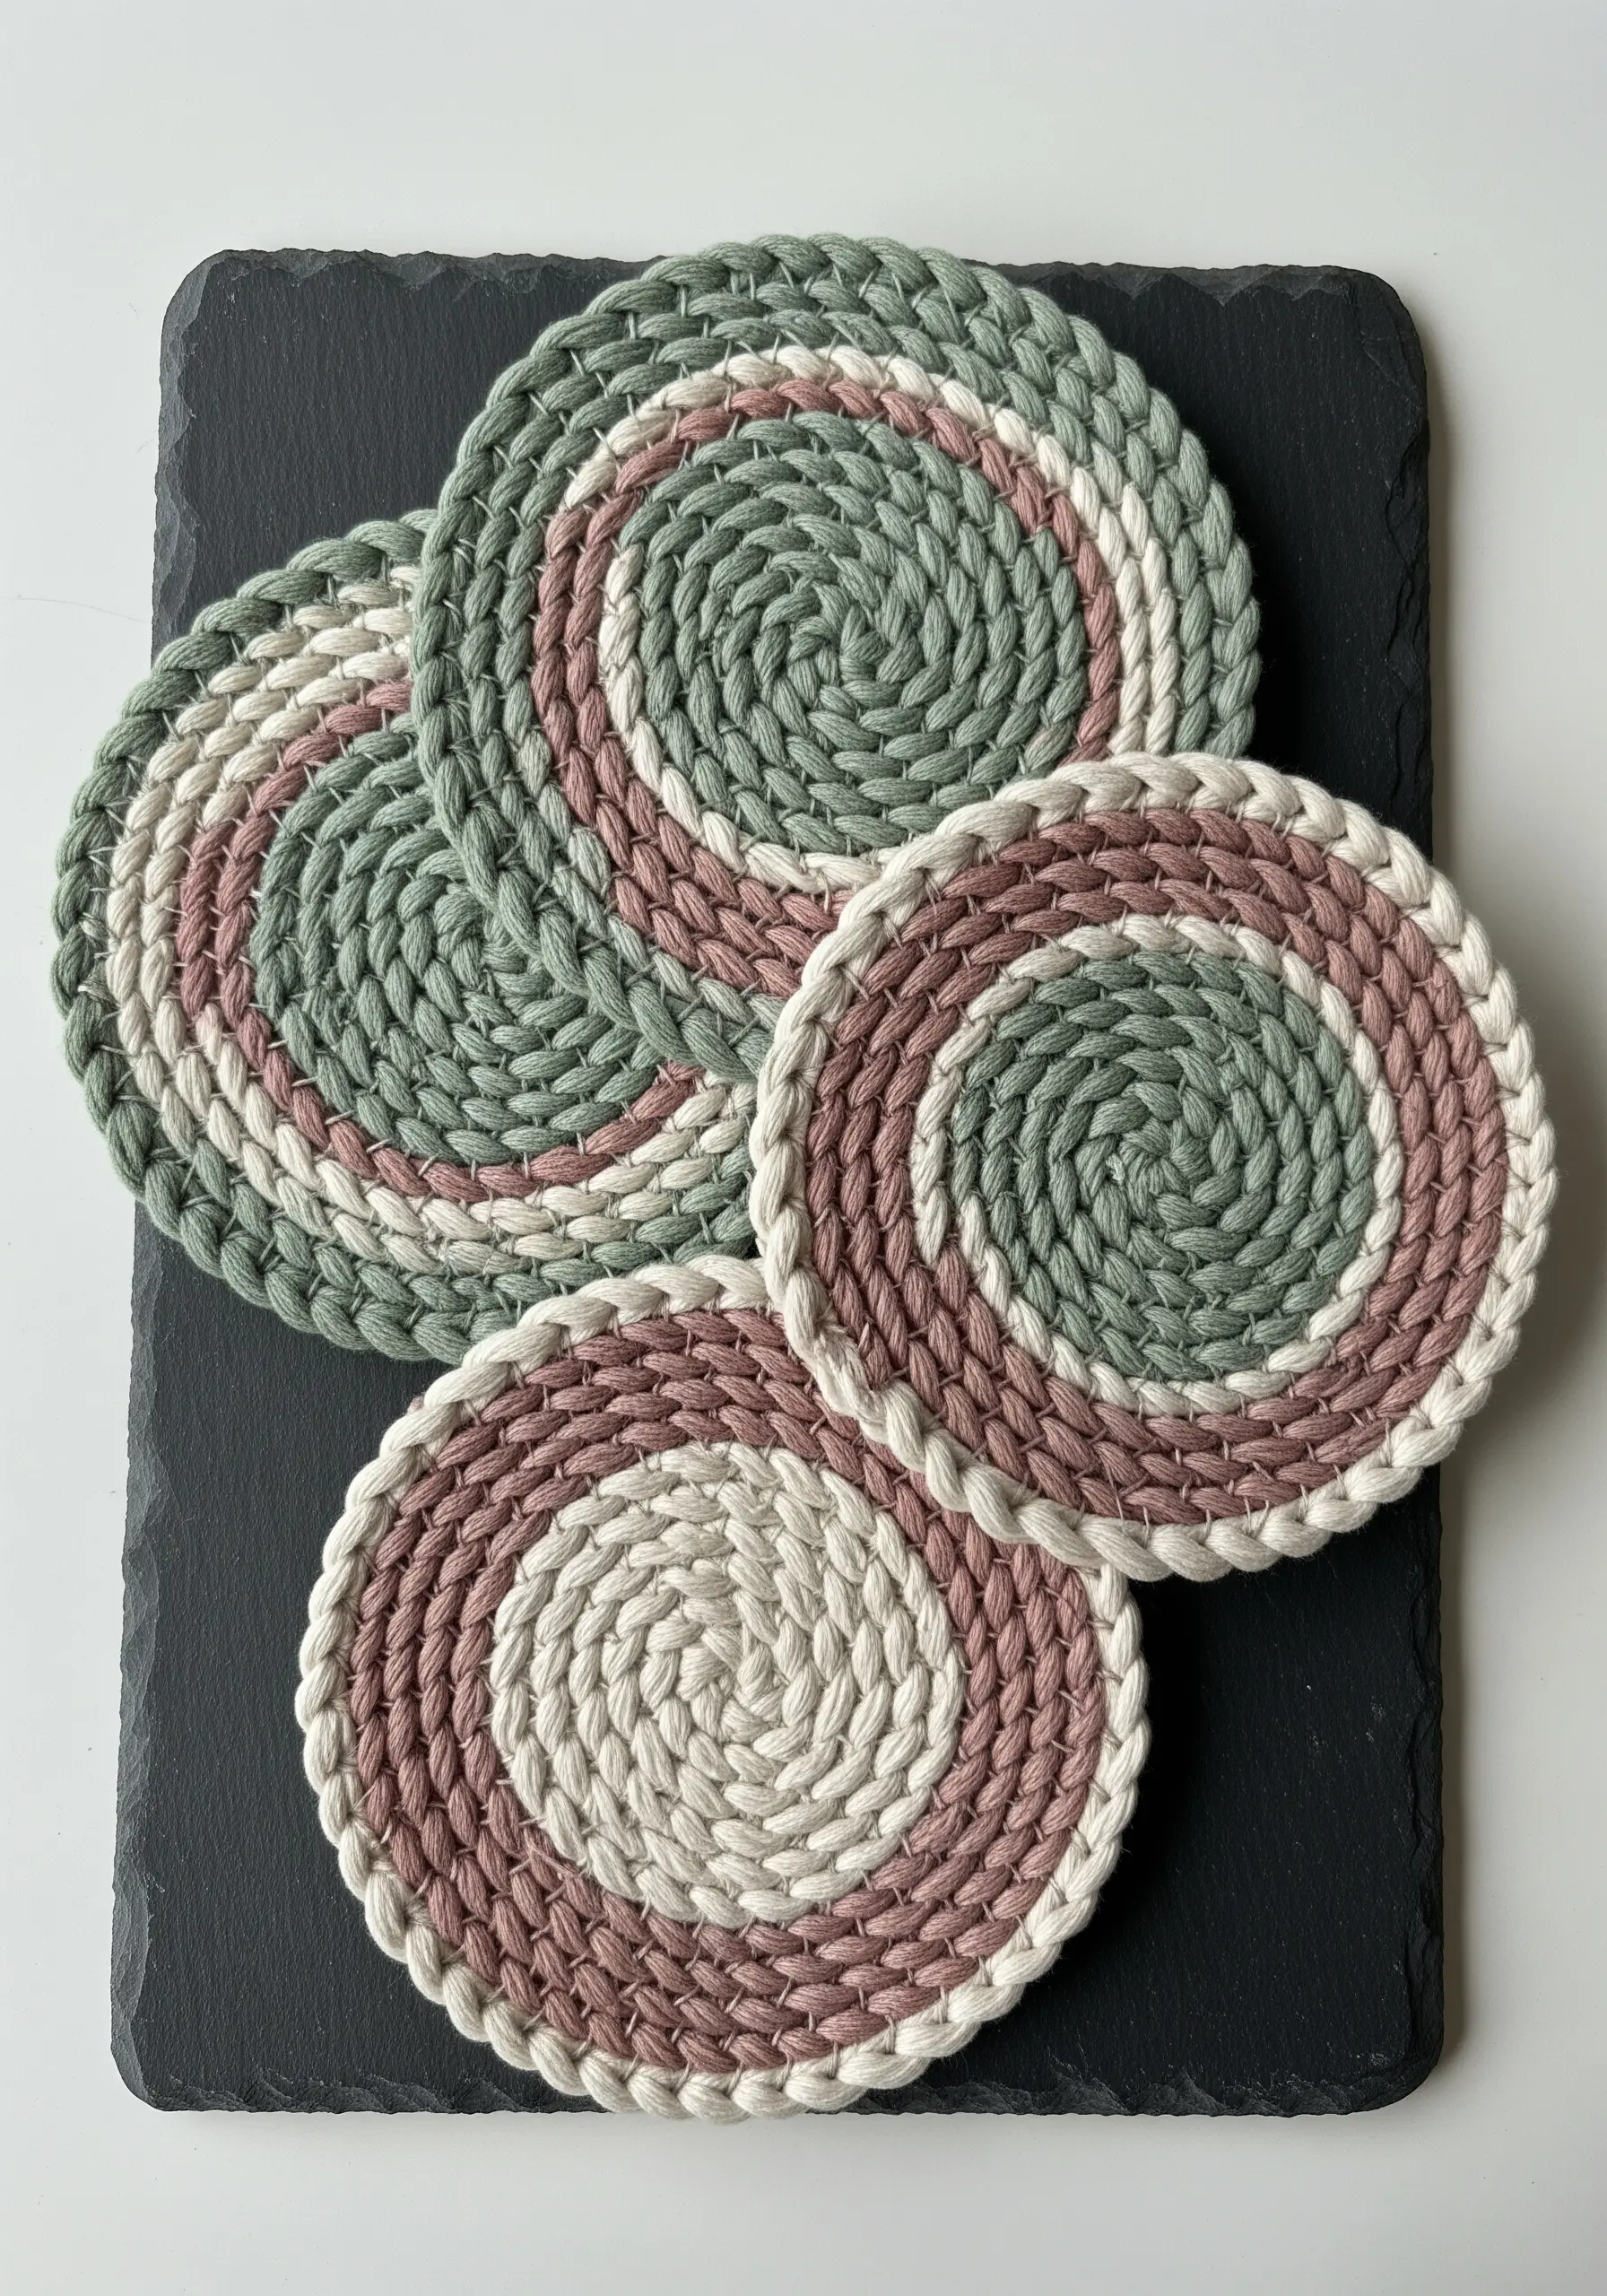
Create these elegant coasters by tightly wrapping cotton rope with fine yarn or embroidery floss.
The key to a flat, even spiral is consistent tension in both the rope you are coiling and the thread you are wrapping.
To switch colors cleanly, stitch the end of the old color into the coil and begin wrapping with the new color directly over it, ensuring no tails are visible.
Using a sturdy cotton rope provides excellent heat resistance and absorbency, making these handmade art pieces functional as well as beautiful.
2. Achieve Depth with Dimensional Floral Stitches
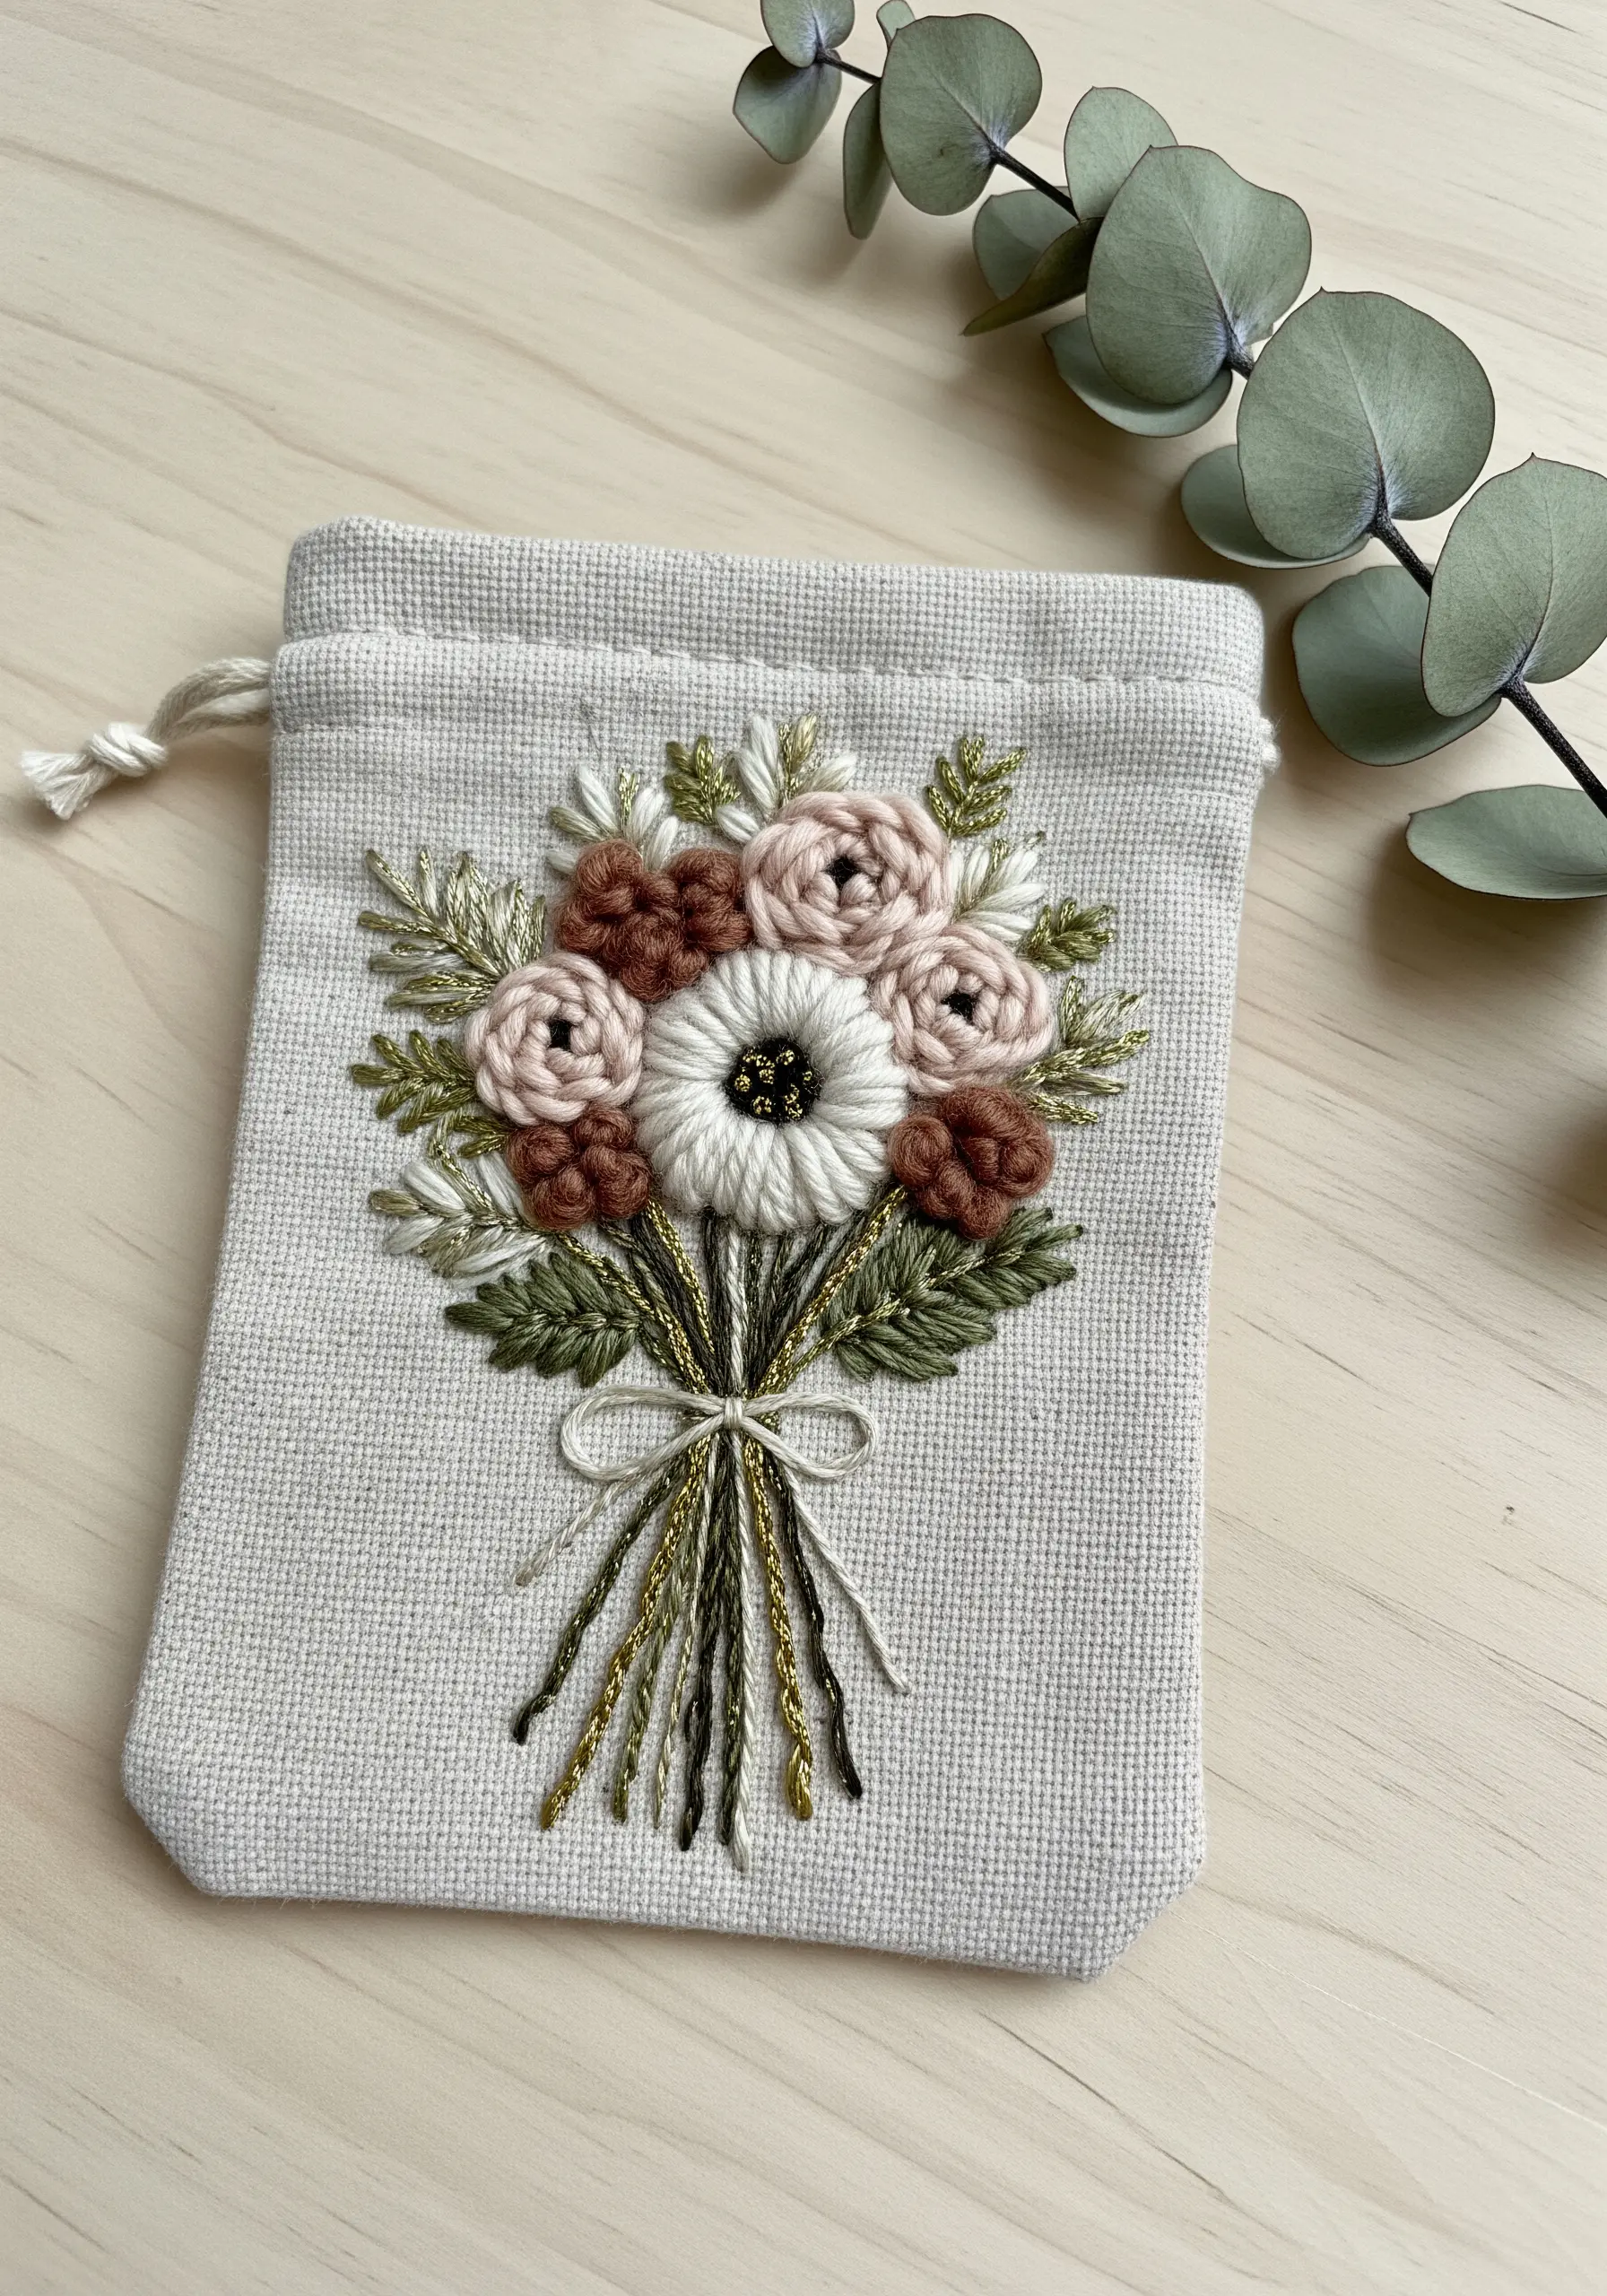
To give your floral bouquets a lush, three-dimensional quality, focus on layering high-texture stitches.
Use wagon wheel roses for the main flowers, packing the woven stitches tightly for a full, rounded shape.
Incorporate bullion knots for smaller buds and French knots for centers, which adds intricate detail that invites a closer look.
For the leaves, a simple satin stitch works beautifully, but consider using a slightly thinner thread to allow the dimensional flowers to remain the focal point.
A single strand of metallic gold thread woven into the bouquet’s tie adds a subtle, luxurious highlight that elevates the entire piece.
3. Integrate Fabric Scraps into Macrame
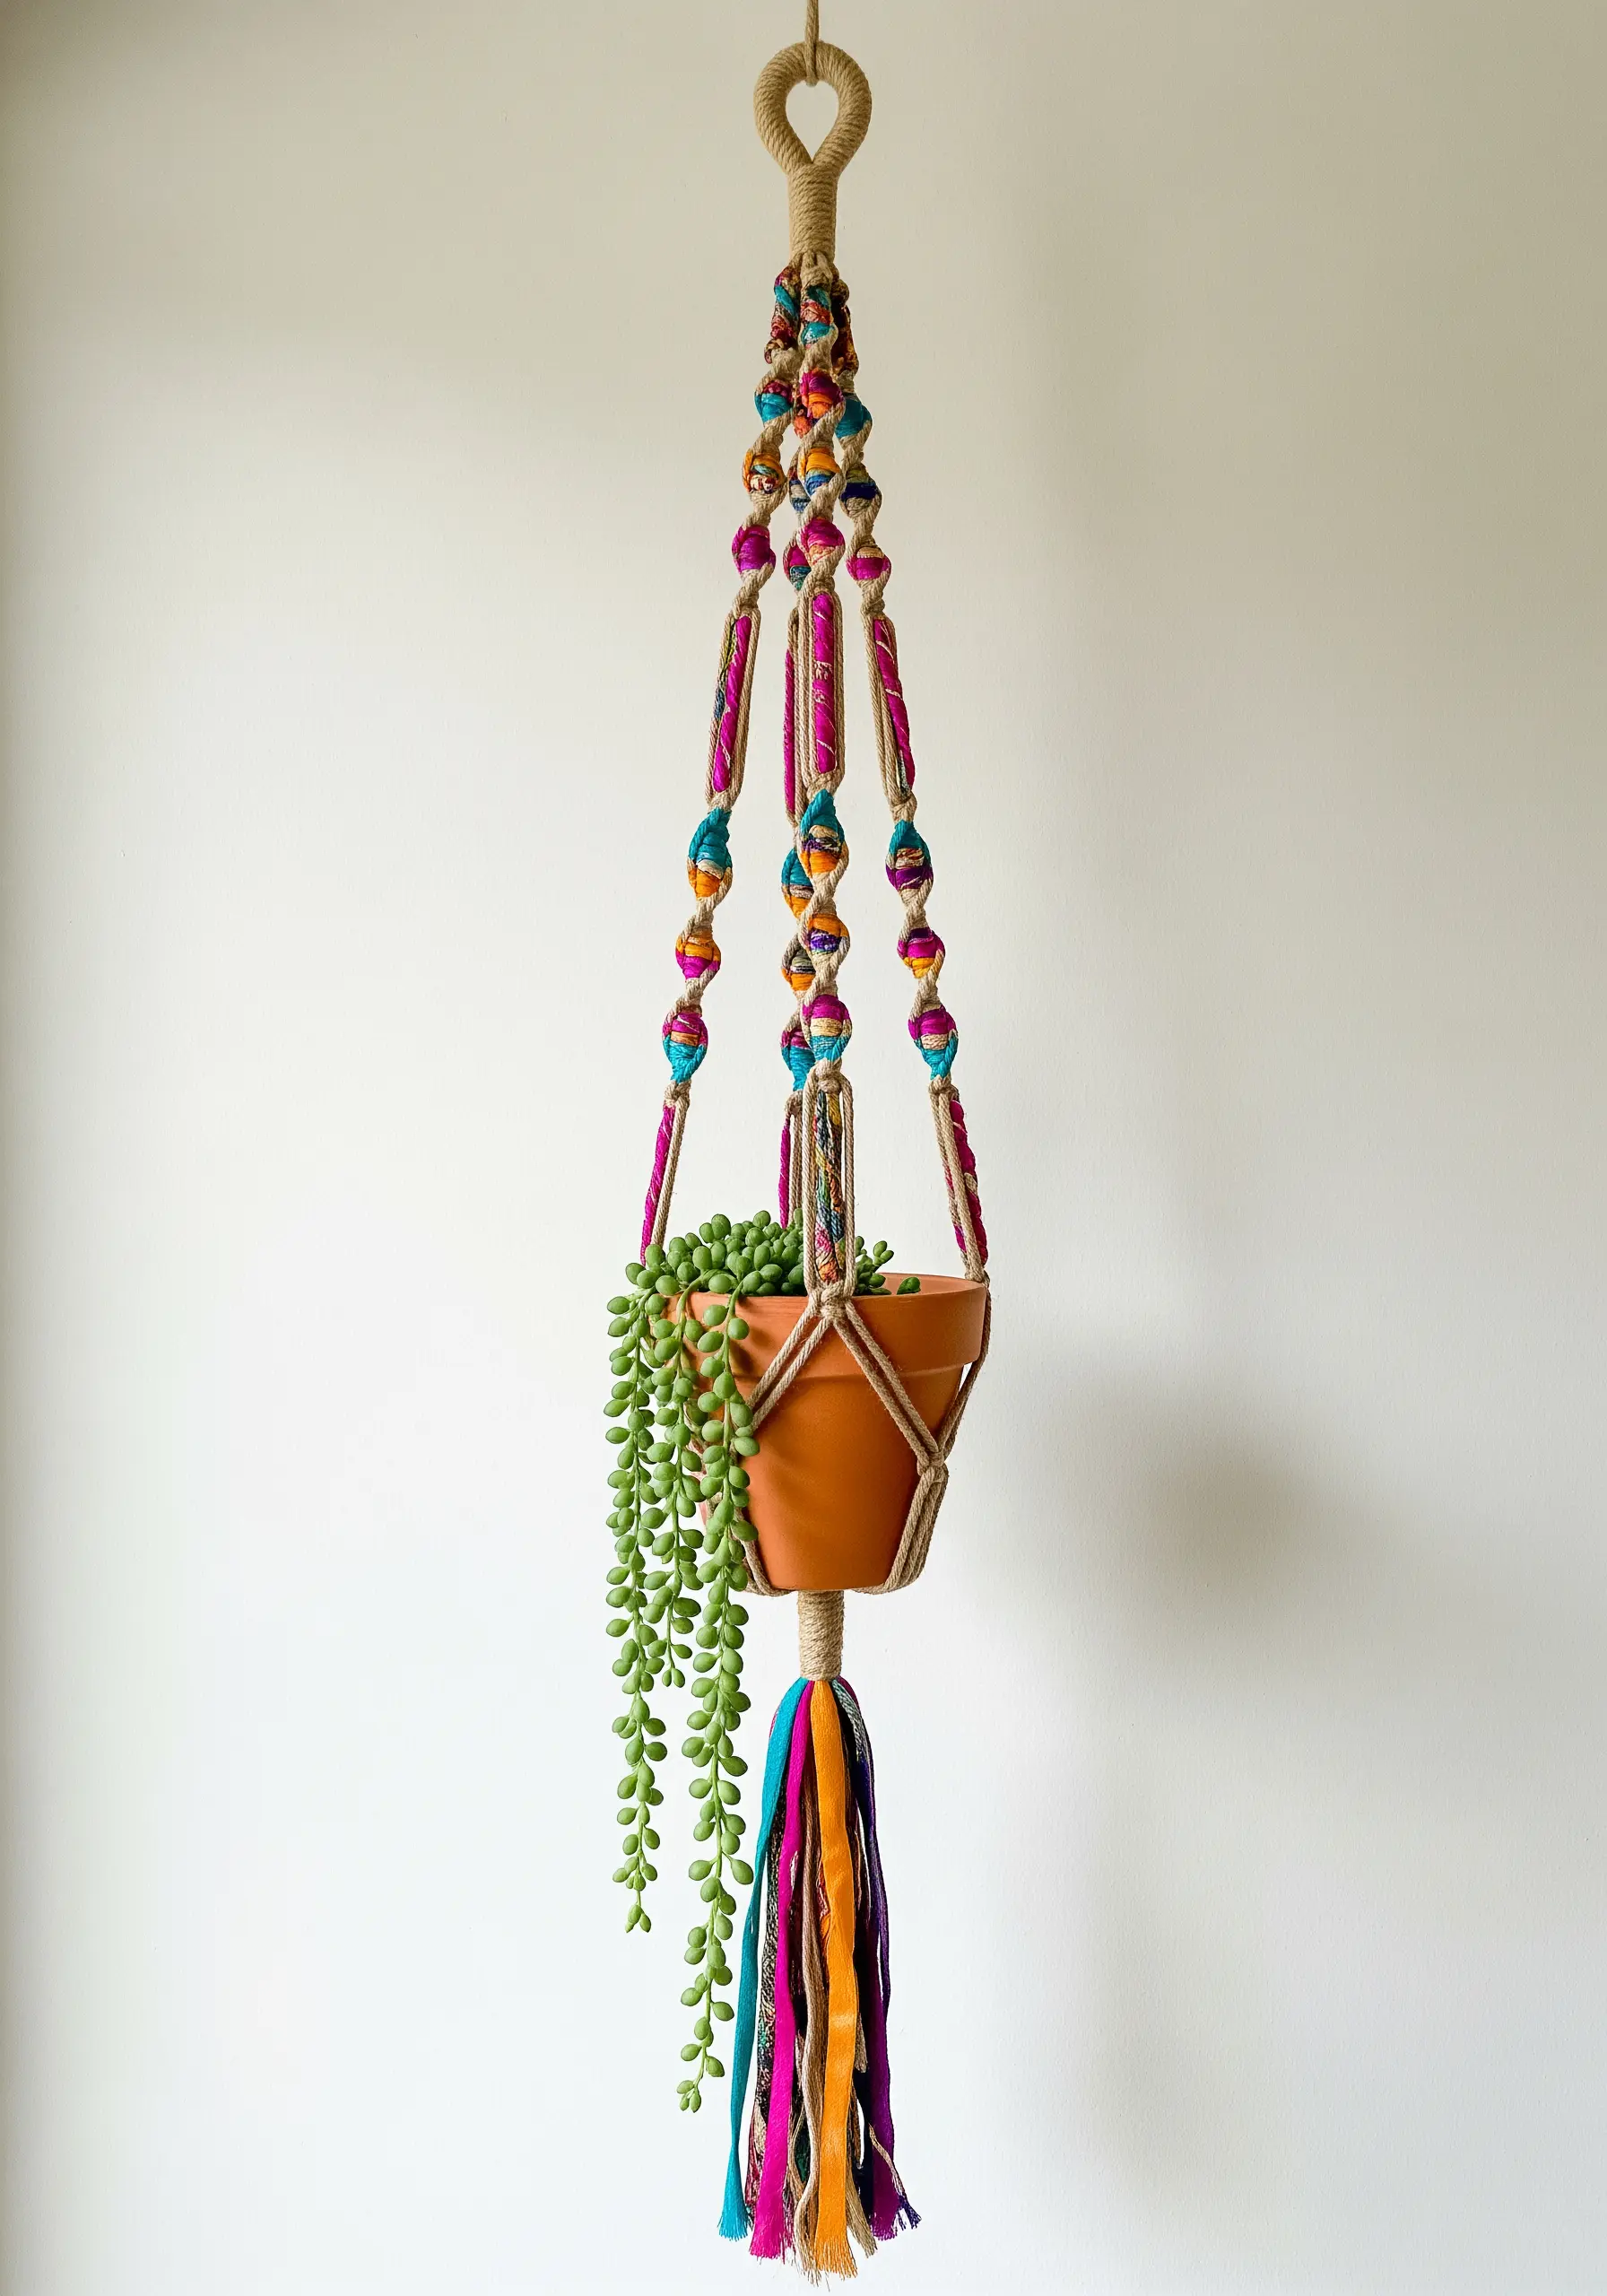
Give your macrame projects a vibrant, bohemian feel by incorporating strips of fabric alongside traditional cord.
Cut or rip thin strips from recycled materials like silk scarves, cotton dresses, or even old t-shirts.
You can introduce the fabric by holding it together with your main cord as you tie knots, or by using the fabric itself to create wrapped sections known as gathering knots.
This technique not only adds pops of color and pattern but also creates wonderful textural contrast against the neutral rope, turning a simple plant hanger into one of your favorite boho-style embroidery decor ideas.
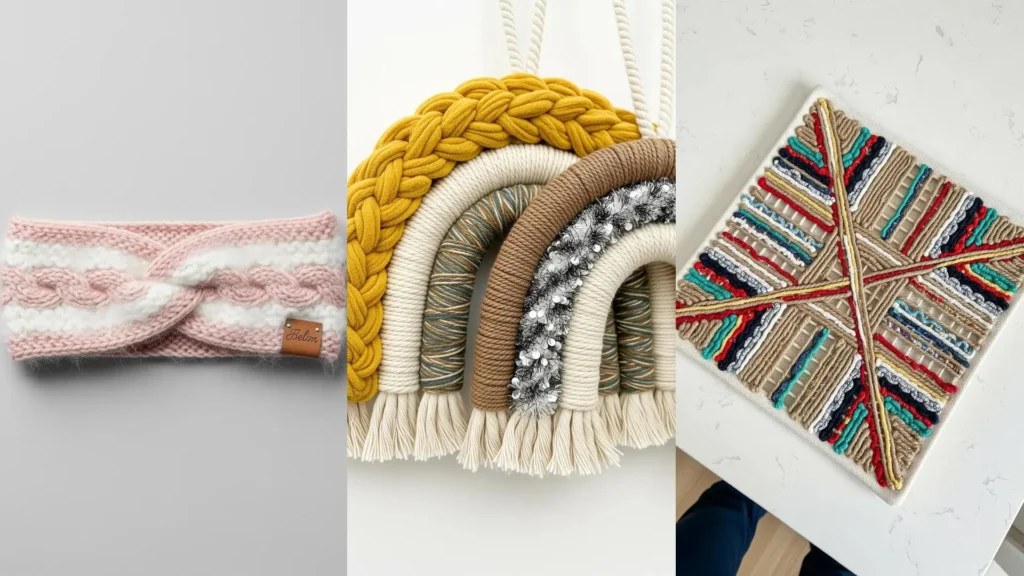
4. Create Graphic Shapes with Dense Textures
To create bold, graphic pieces like this trivet, choose a chunky, plush yarn such as chenille or a blanket-style yarn.
Whether you’re using crochet or another knotting technique, the key to sharp, clean edges between colors is maintaining firm and consistent tension in your stitches.
Working with a hook or needle that is slightly smaller than the yarn recommends will produce a tighter, denser fabric with no gaps, making your color blocks look solid and intentional.
5. Weave Miniature Landscapes in a Hoop
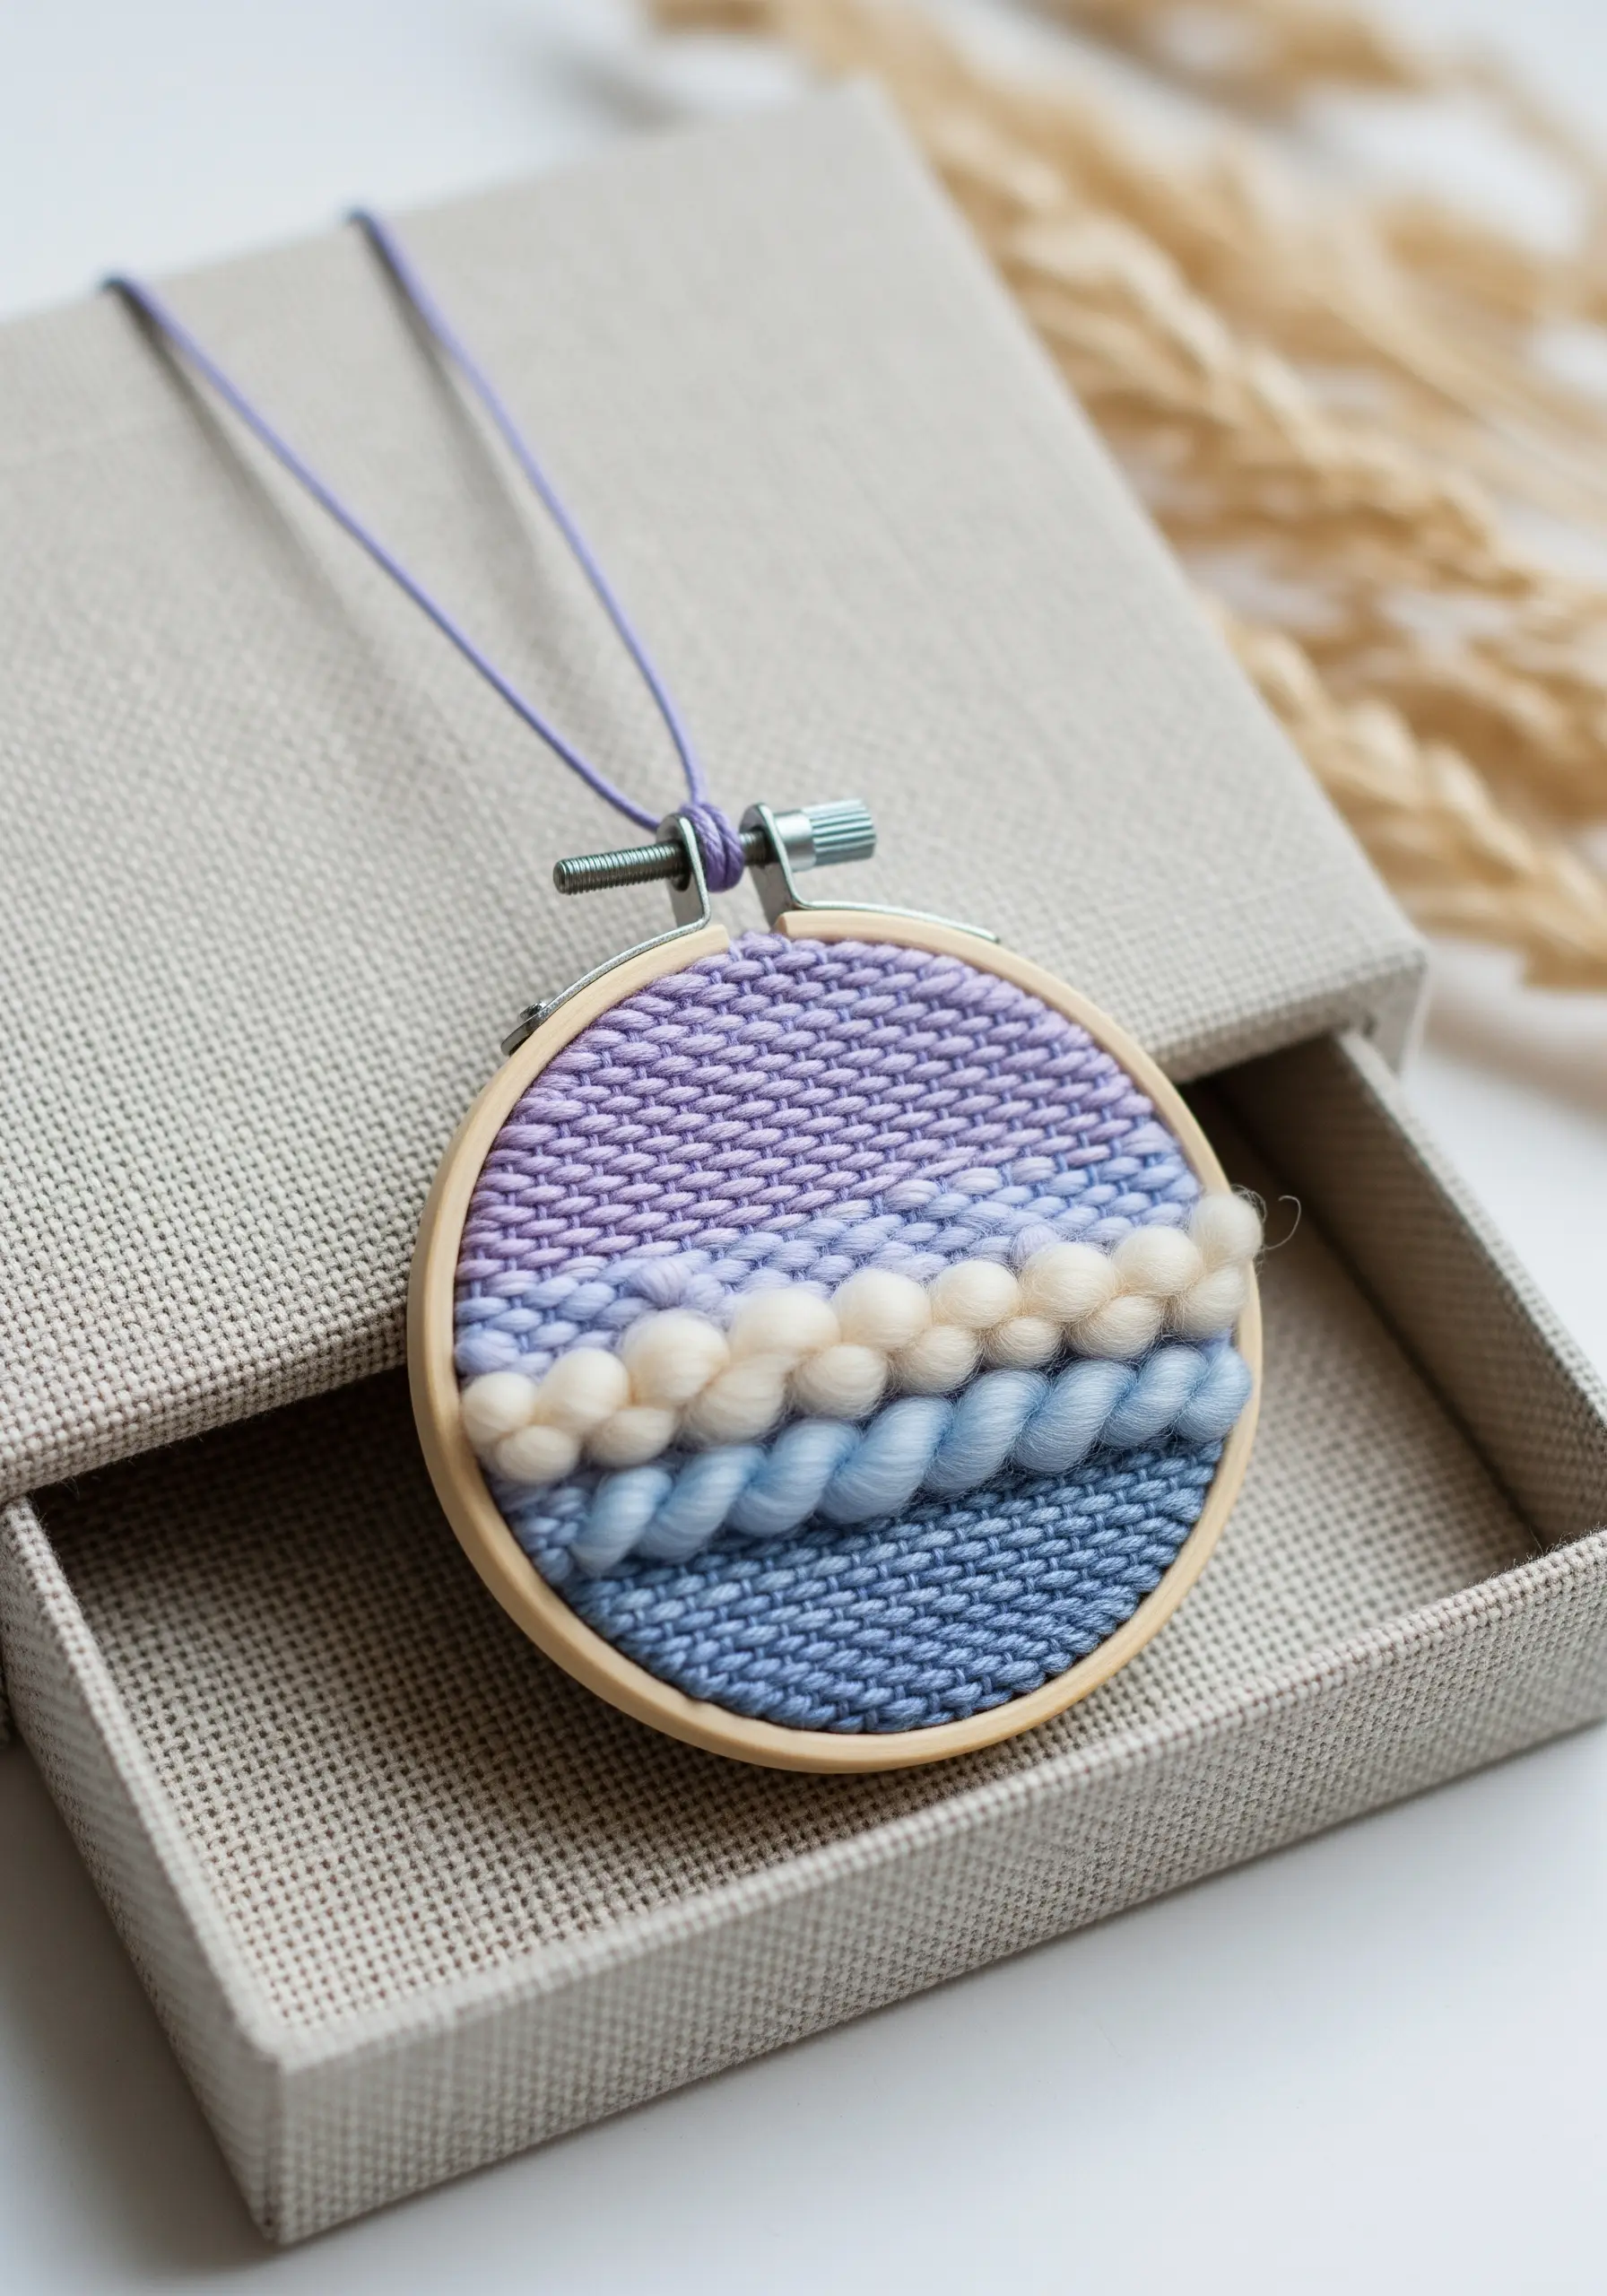
A small embroidery hoop can serve as the perfect loom for creating a tiny woven pendant.
Create your warp by wrapping a strong thread vertically around the hoop, then begin weaving with your weft threads.
The secret to a dynamic landscape is varying your materials: use fine, smooth yarn for a calm sky, thick, unspun wool roving for fluffy clouds, and a tightly twisted cord for a textured sea.
These mini embroidery projects are a wonderful way to use up treasured yarn scraps and turn them into wearable art.
6. Paint with Wool and Stitch the Details

Combine the soft, painterly effects of needle felting with the sharp precision of embroidery for a truly magical result.
Begin by laying down wisps of colored wool roving onto your fabric base and use a felting needle to blend them together, creating a soft-focus background like a galaxy or sunset.
Once your felted base is complete, stitch your details on top. Use single strands of thread for fine lines, dense satin stitch for solid shapes, and French knots or seed beads for sparkling stars.
This is one of the best mixed-media embroidery techniques for creating depth and atmosphere.
7. Weave Elegant Bookmarks with Metallic Accents

You can create a beautiful, sturdy bookmark on a simple piece of cardboard cut to size and notched for a loom.
For an elevated look, alternate your primary weft thread with a fine metallic one.
This adds a subtle, sophisticated shimmer that catches the light as the book is handled, transforming a simple weave into a treasured object.
Finish with a neatly braided tassel made from the same weft yarns to create a cohesive and professional-looking gift.
8. Highlight Knit Textures with Contrasting Yarns
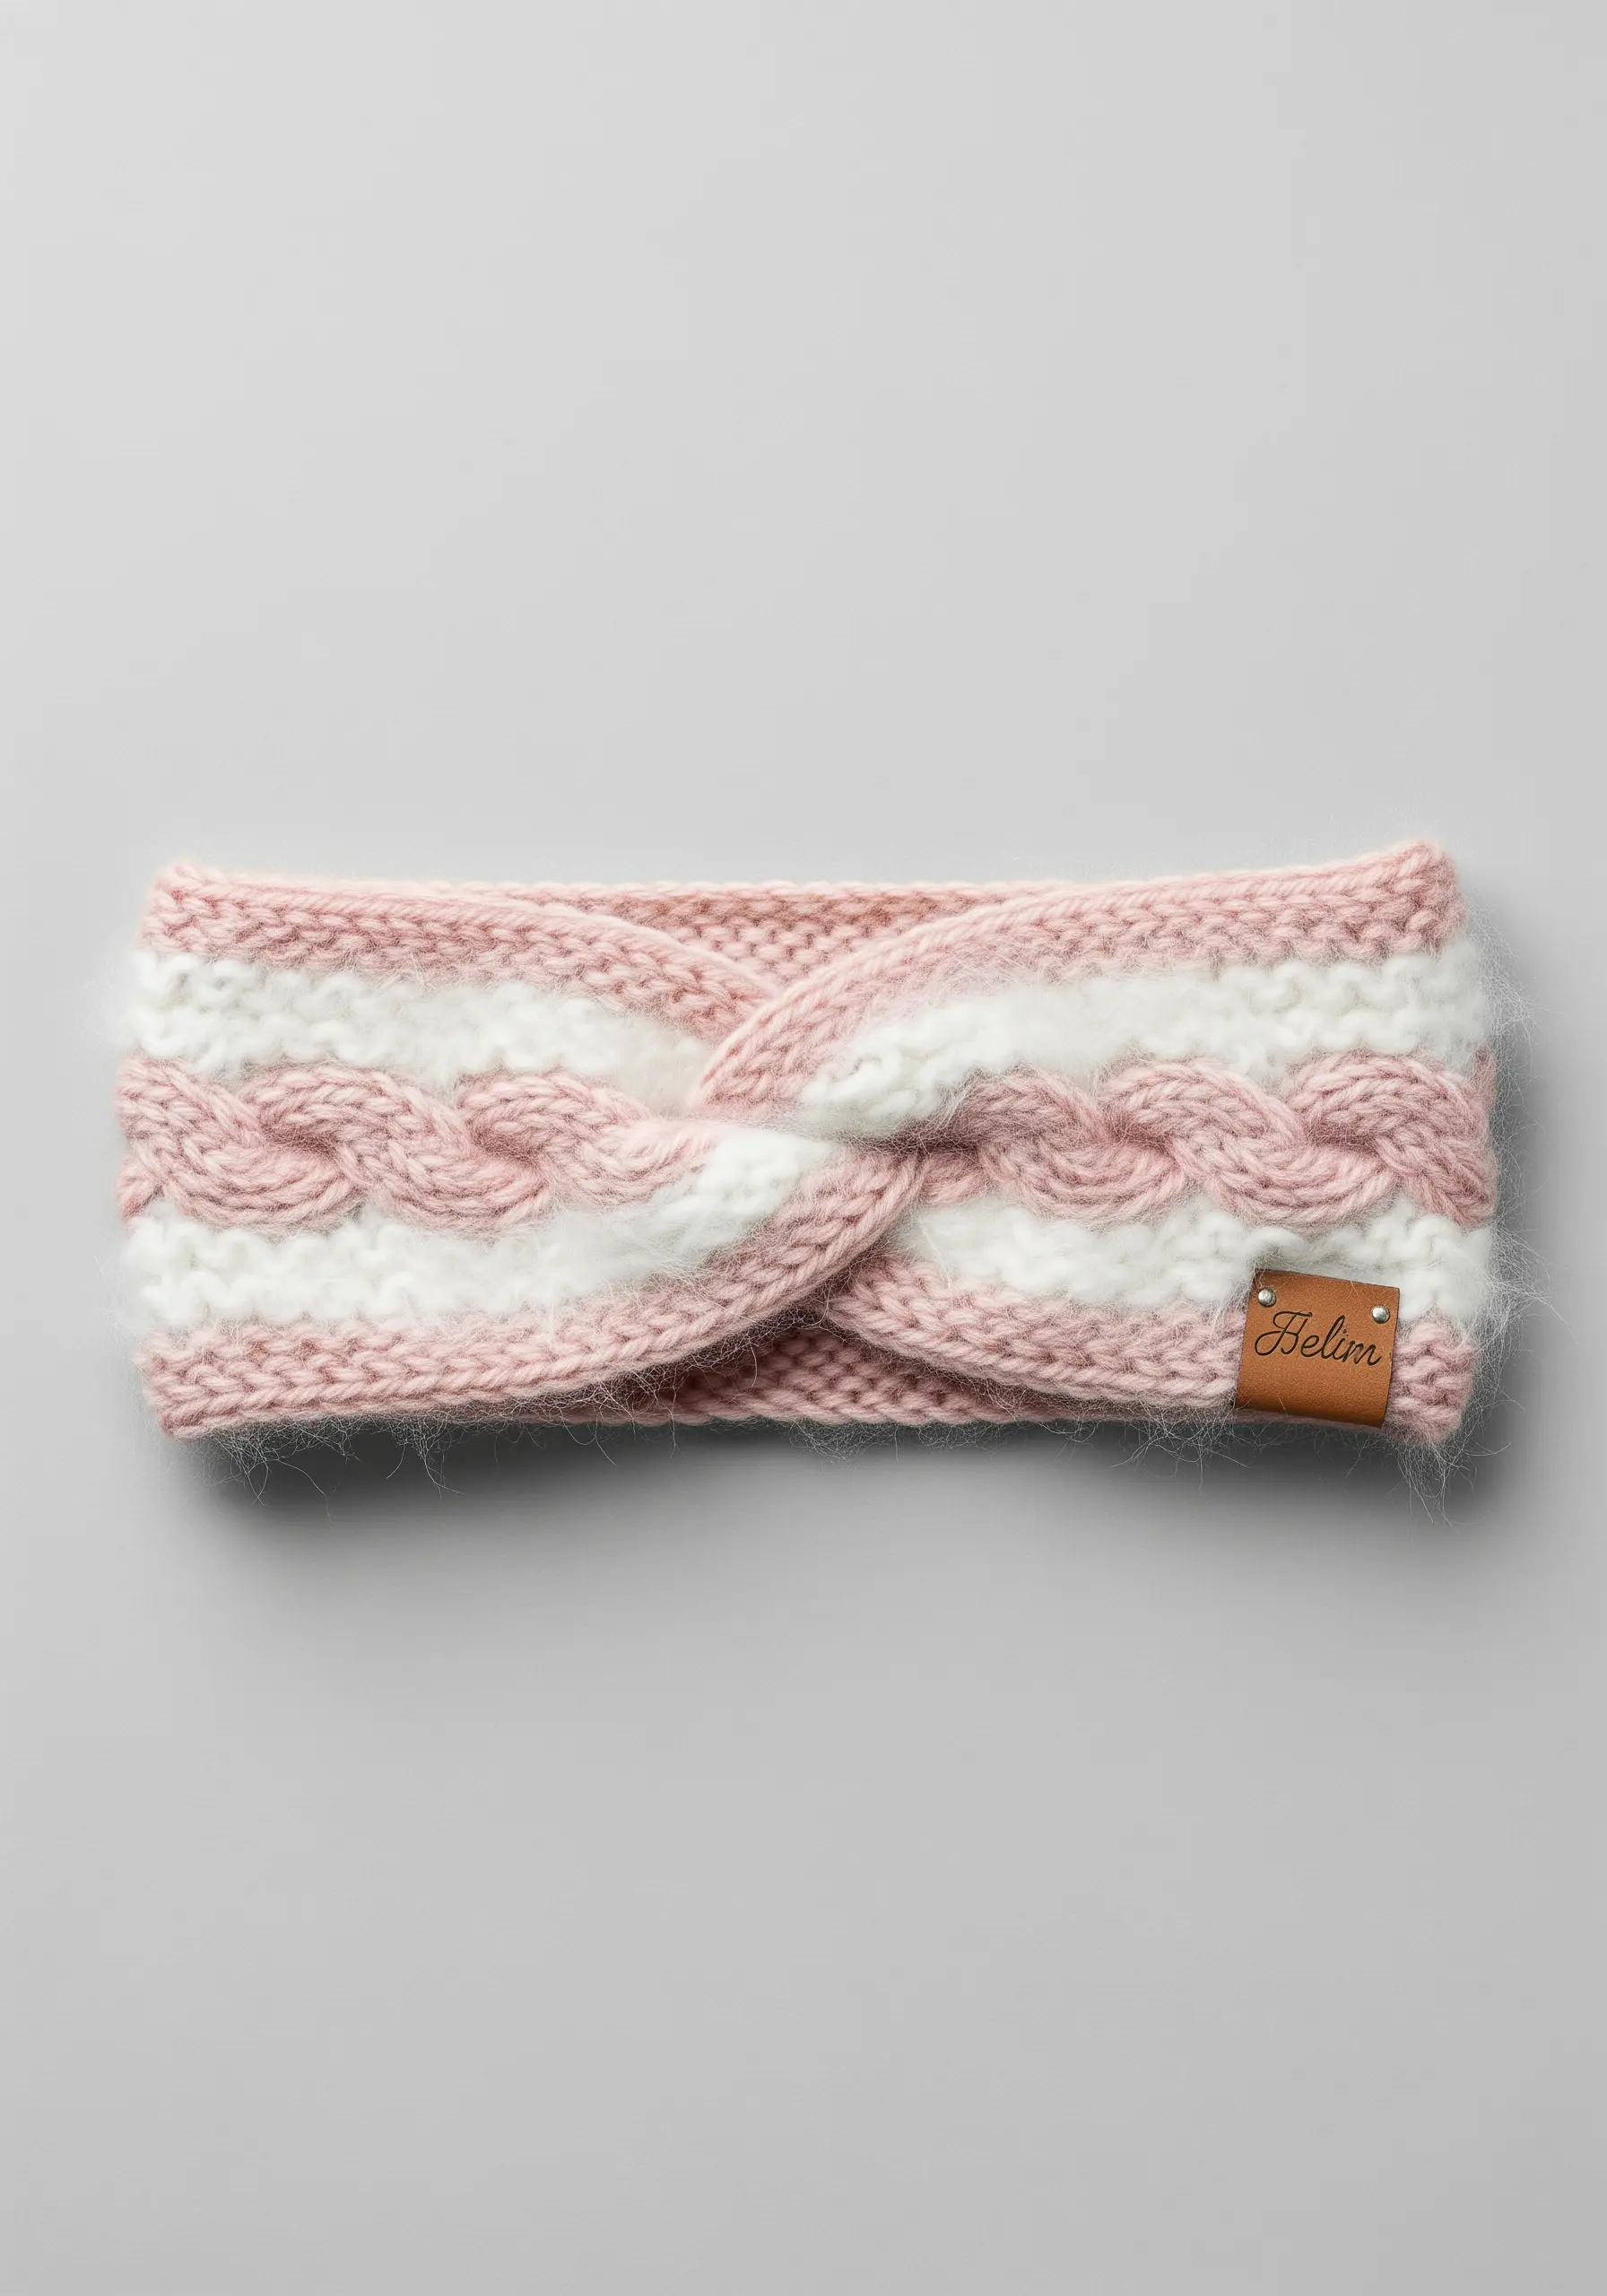
When knitting a piece with textural stitches like cables, you can make the pattern stand out by using a different type of yarn for that section.
Here, a fluffy, high-loft yarn like angora or a mohair blend is used for the white cable against the smoother pink stockinette stitch.
This contrast in texture draws the eye directly to the intricate braided detail, making it the undeniable hero of the piece.
9. Build Sculptural Weavings with Roving and Braids
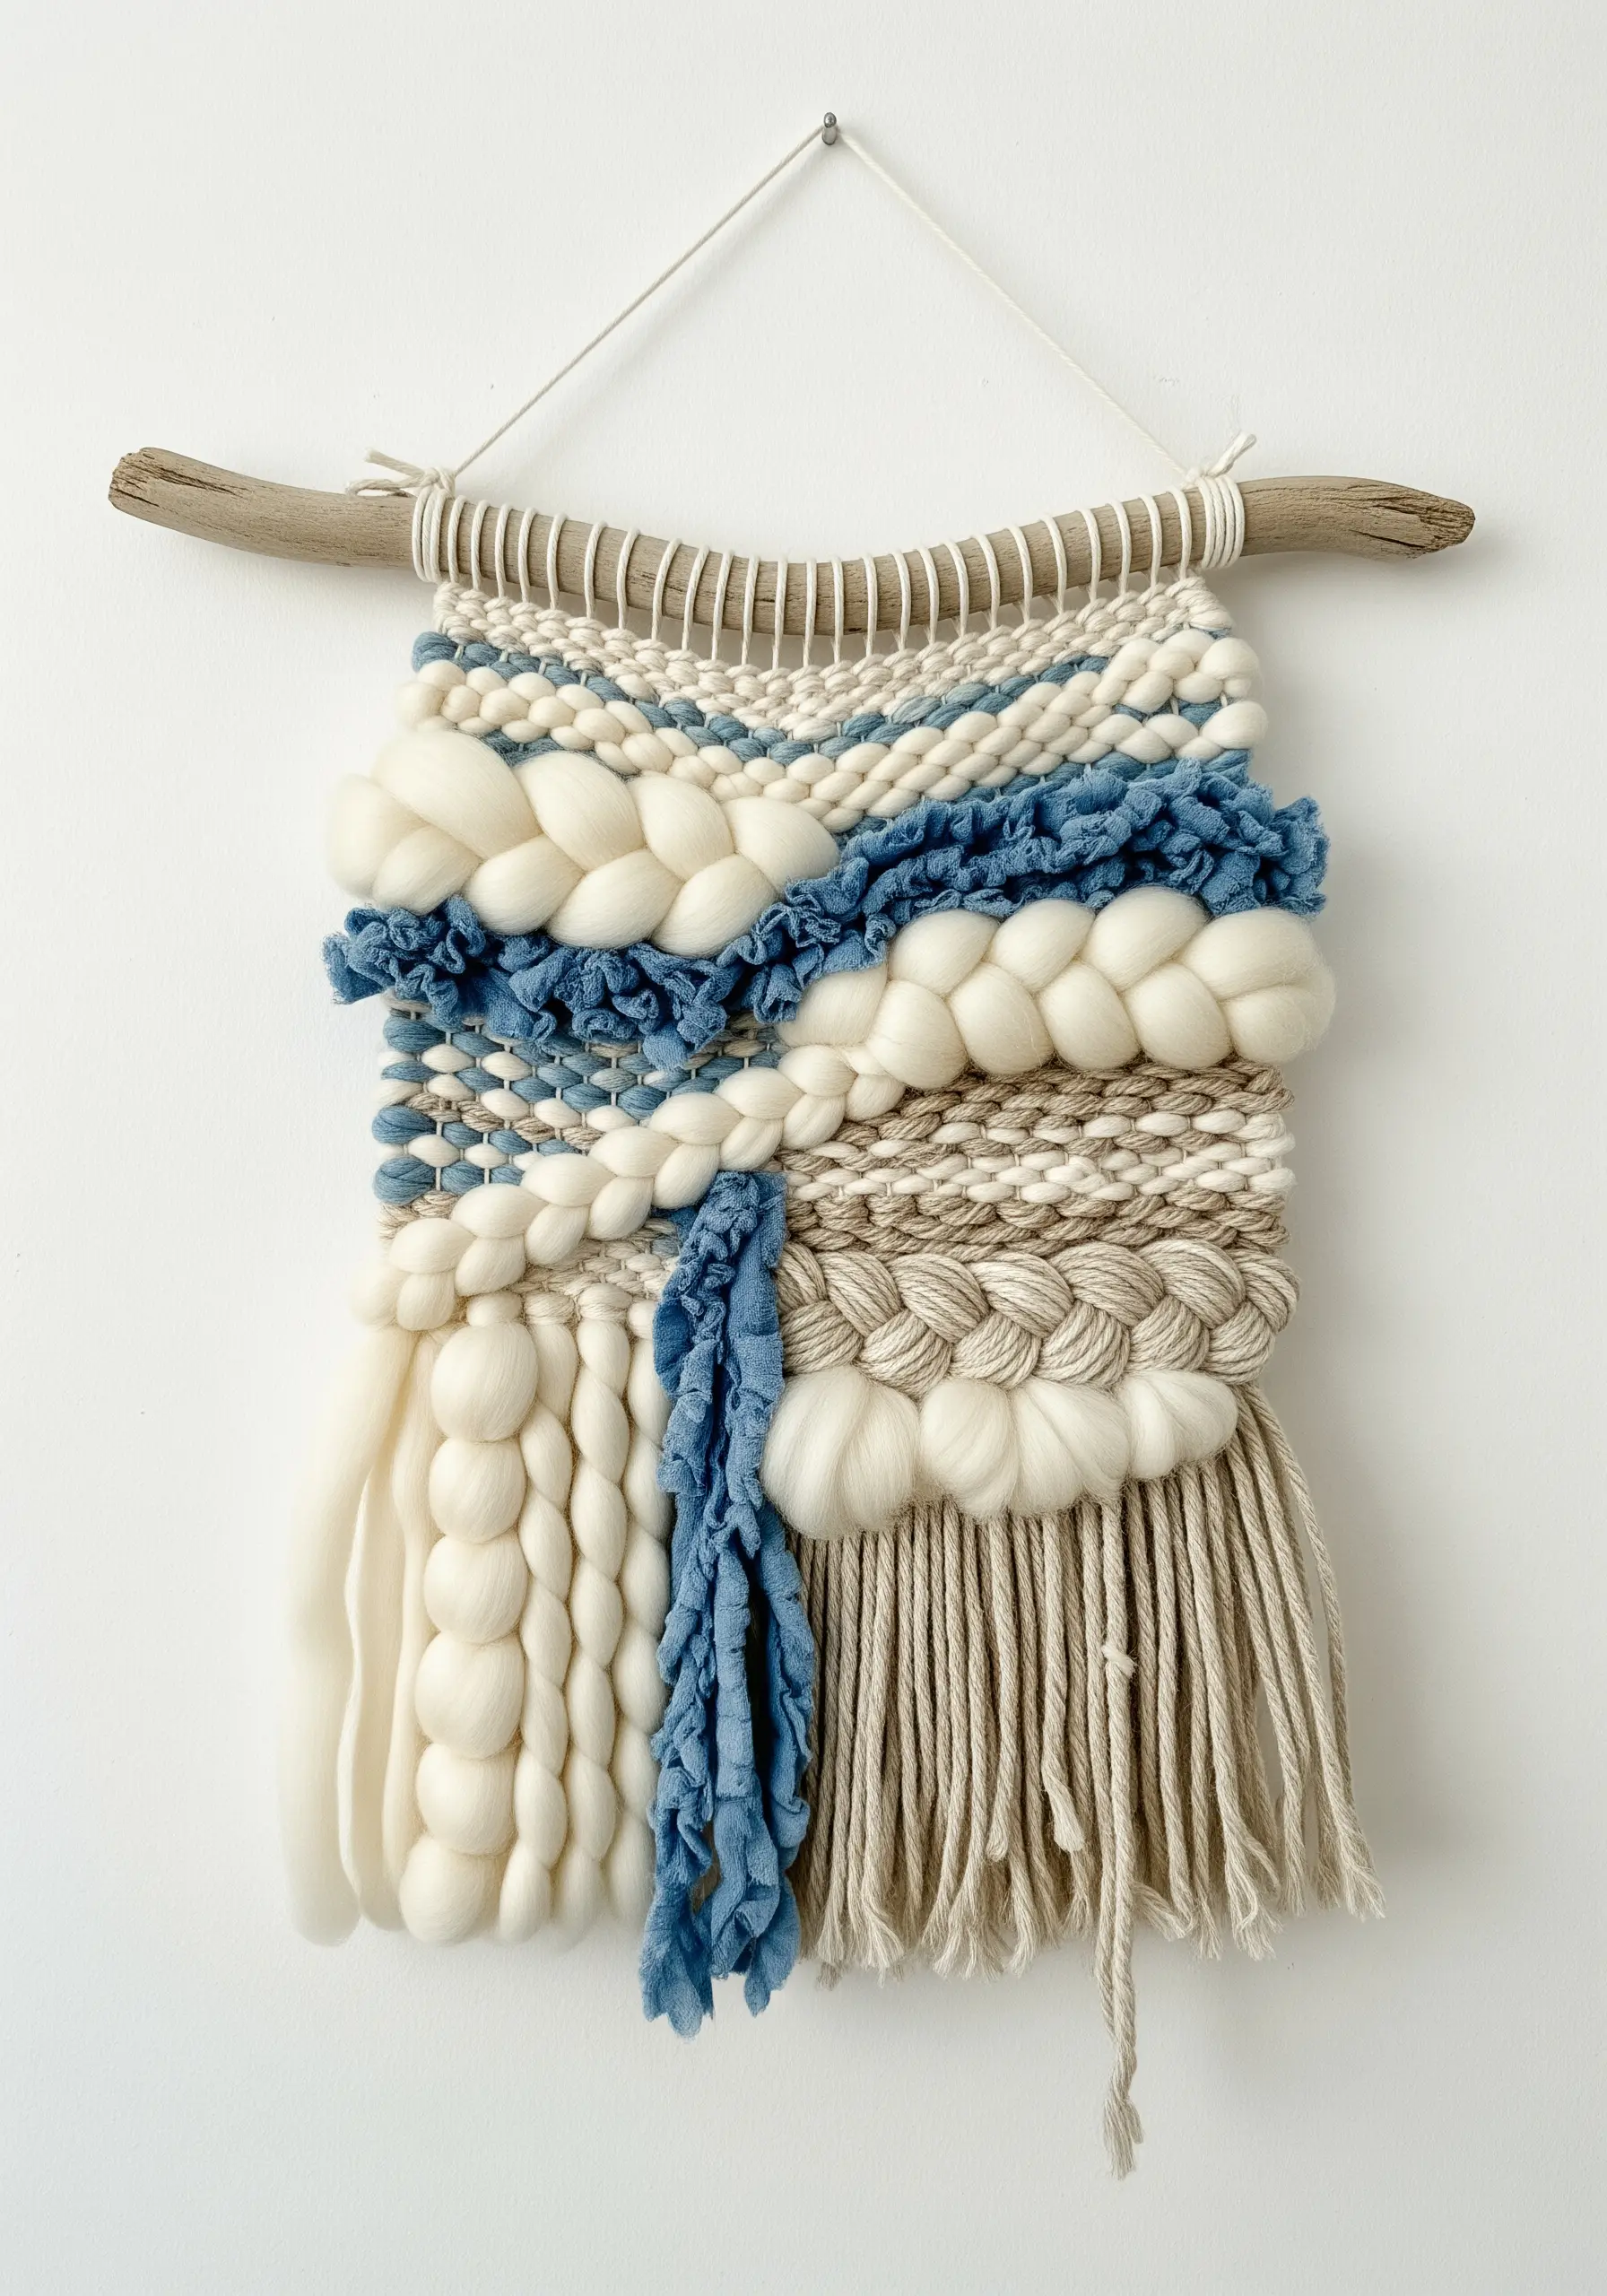
To create a woven wall hanging with dramatic depth, you must embrace extreme textural variety.
Use thick, unspun wool roving to create large, pillowy clouds and heavy braids. This forms the foundational structure of your design.
Contrast these soft, bulky sections with areas of tightly woven, finer yarns to create negative space and visual rest.
Incorporating techniques like soumak stitch and rya knots will add even more dimension, resulting in yarn wall art techniques that transform simple threads into art.
10. Refine Amigurumi with Faux Fur Details
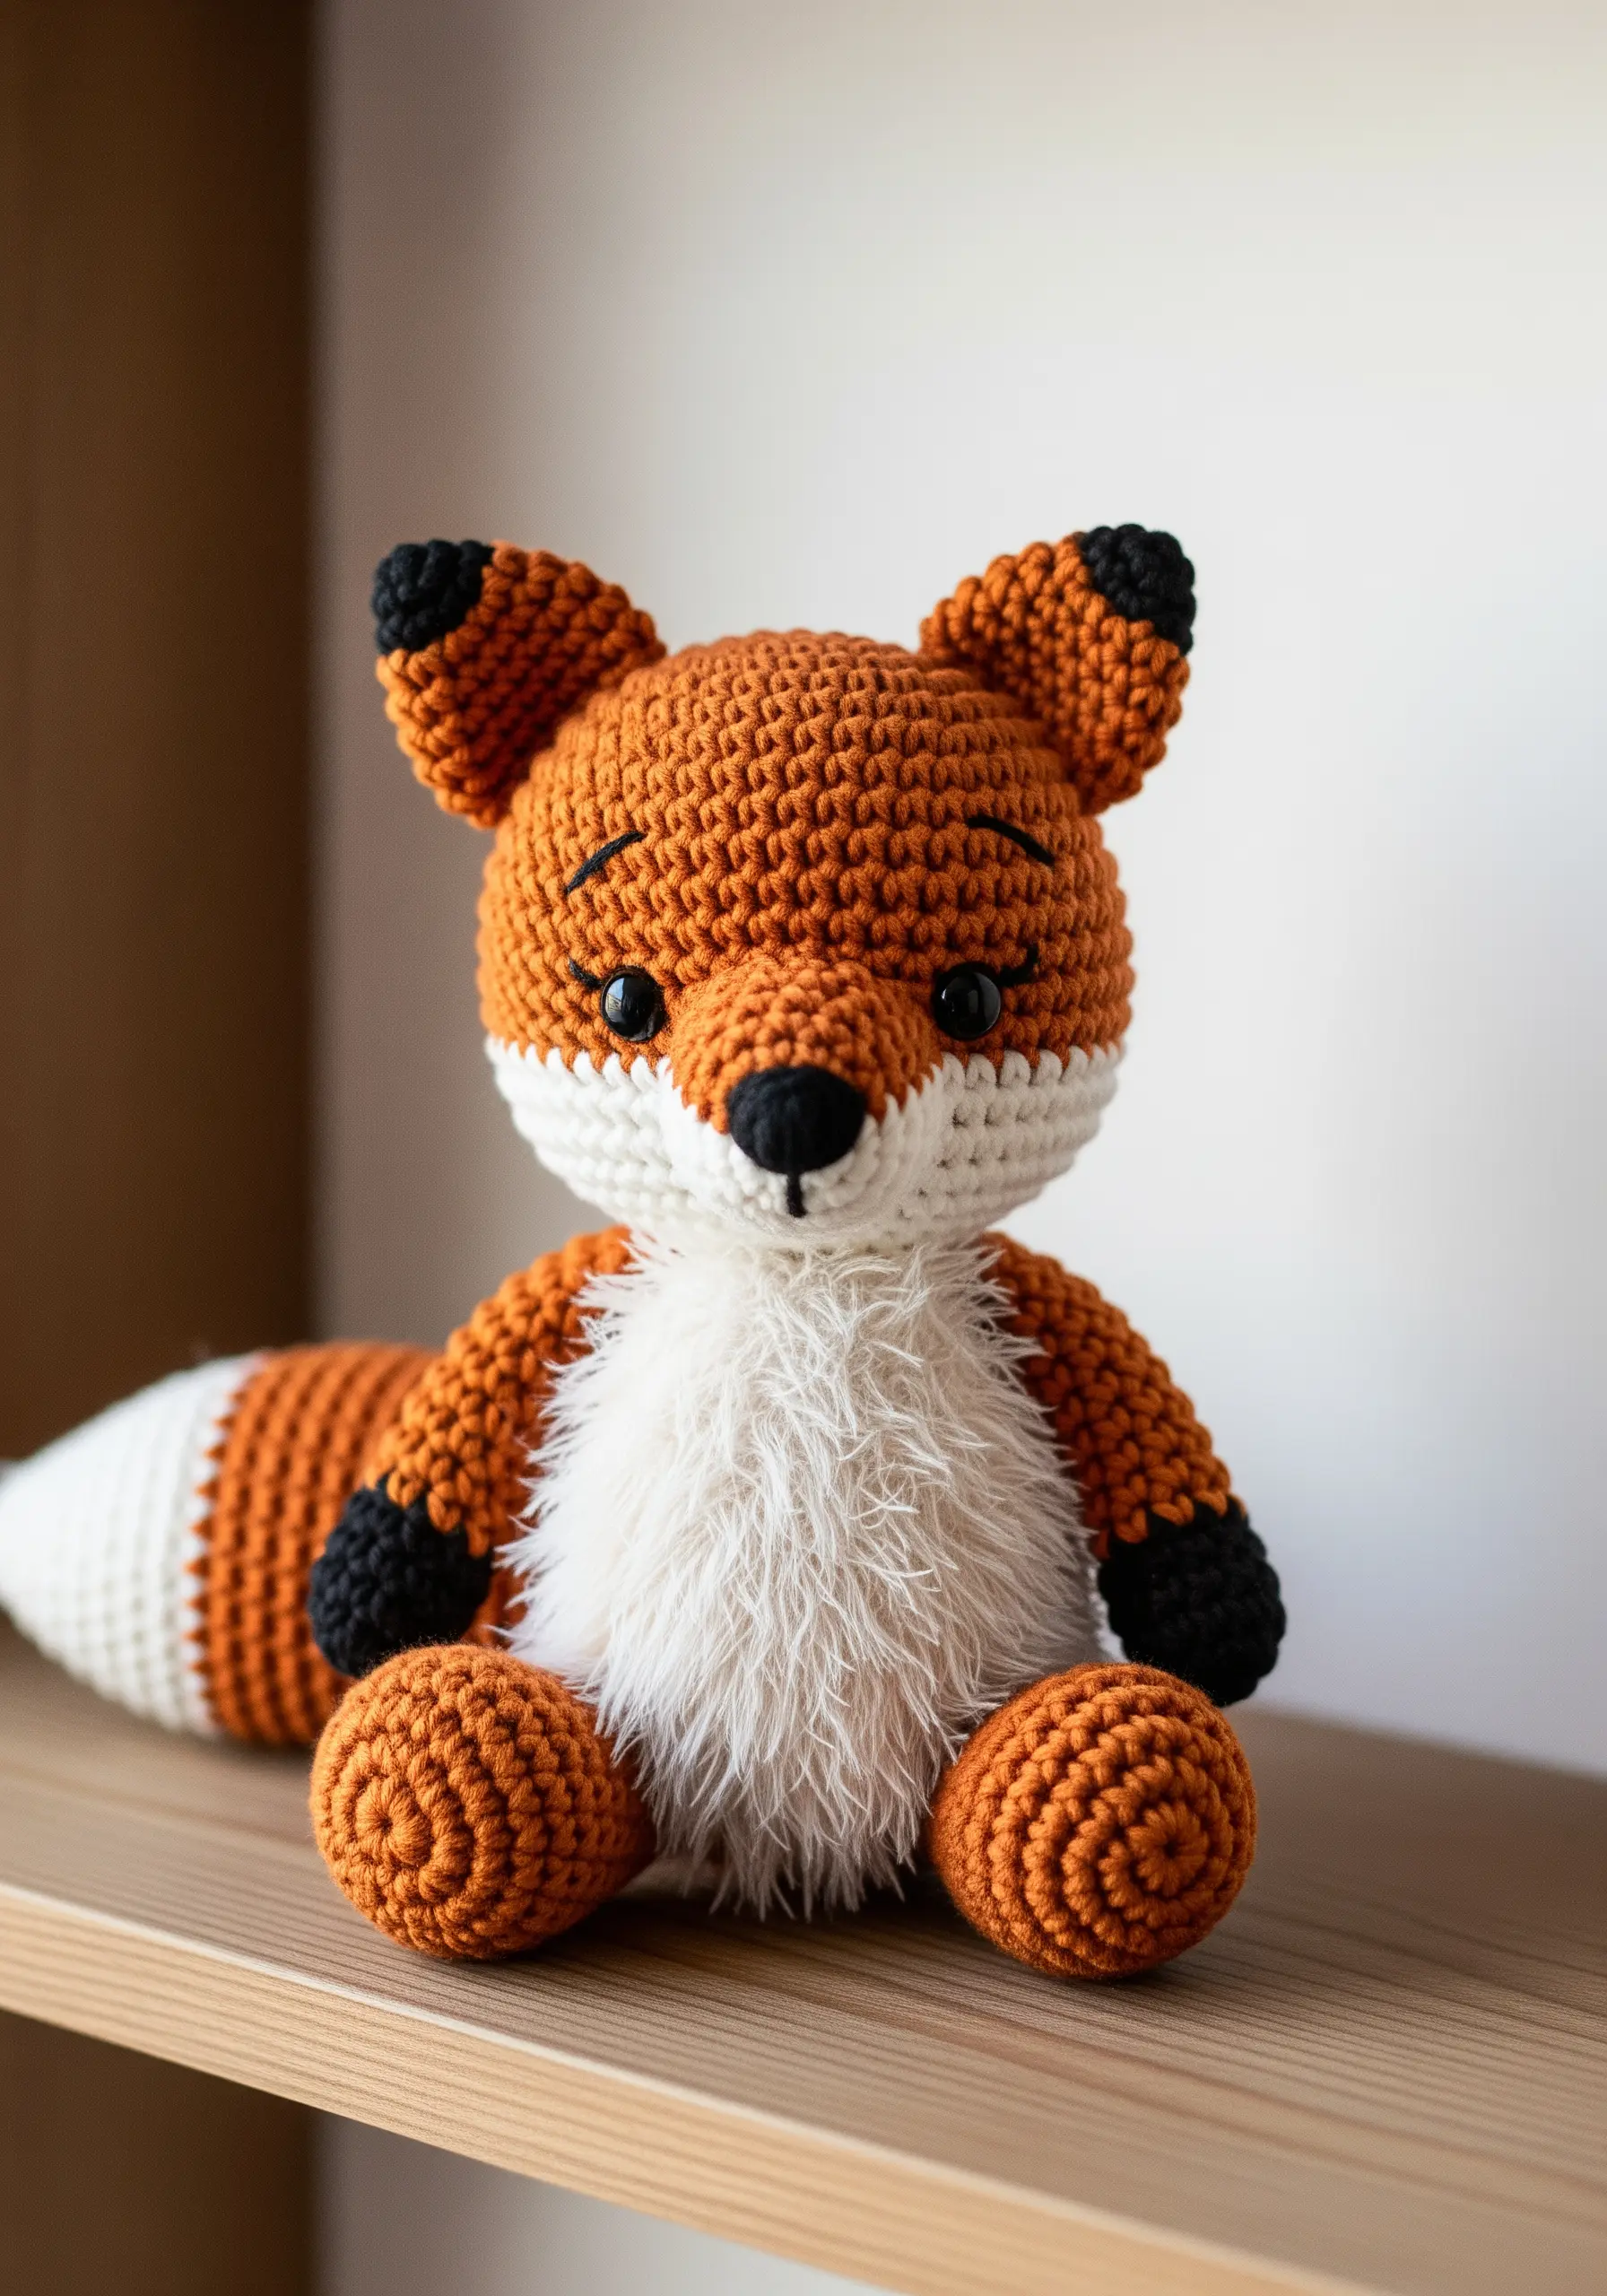
While tight, even crochet stitches are the foundation of great amigurumi, adding a soft, textural element can bring your creation to life.
After crocheting a section with 100% acrylic yarn, use a wire pet slicker brush to vigorously brush the surface.
This technique breaks up the yarn fibers and creates a wonderfully soft, fuzzy effect that mimics fur, perfect for a fluffy chest or tail tip.
It’s a simple step that adds a professional, highly tactile finish to your work.
11. Weave with Confetti Yarn for Effortless Color

For a project that looks complex but is simple to execute, choose a variegated or ‘confetti’ style yarn for your weft.
By weaving this multi-tonal yarn against a solid, neutral background, you create an intricate pattern of color without needing to change threads or follow a complicated chart.
Finishing the top and bottom edges with a different, solid stitch—like the knitted garter stitch seen here—provides a clean border that frames the colorful weaving beautifully.
12. Sculpt Realistic Birds with Needle Felting

Needle felting allows you to blend colors with the subtlety of a painter.
Start with a core shape of undyed wool, felting it firmly into the basic form of the bird.
Then, apply very thin layers of your colored wool roving on top. To create smooth gradients, pull and mix small wisps of different colors together in your hands before felting them onto the surface.
This technique allows for stunning realism and is perfect for capturing the delicate beauty of nature.
13. Elevate Macrame Rainbows with Mixed Textures
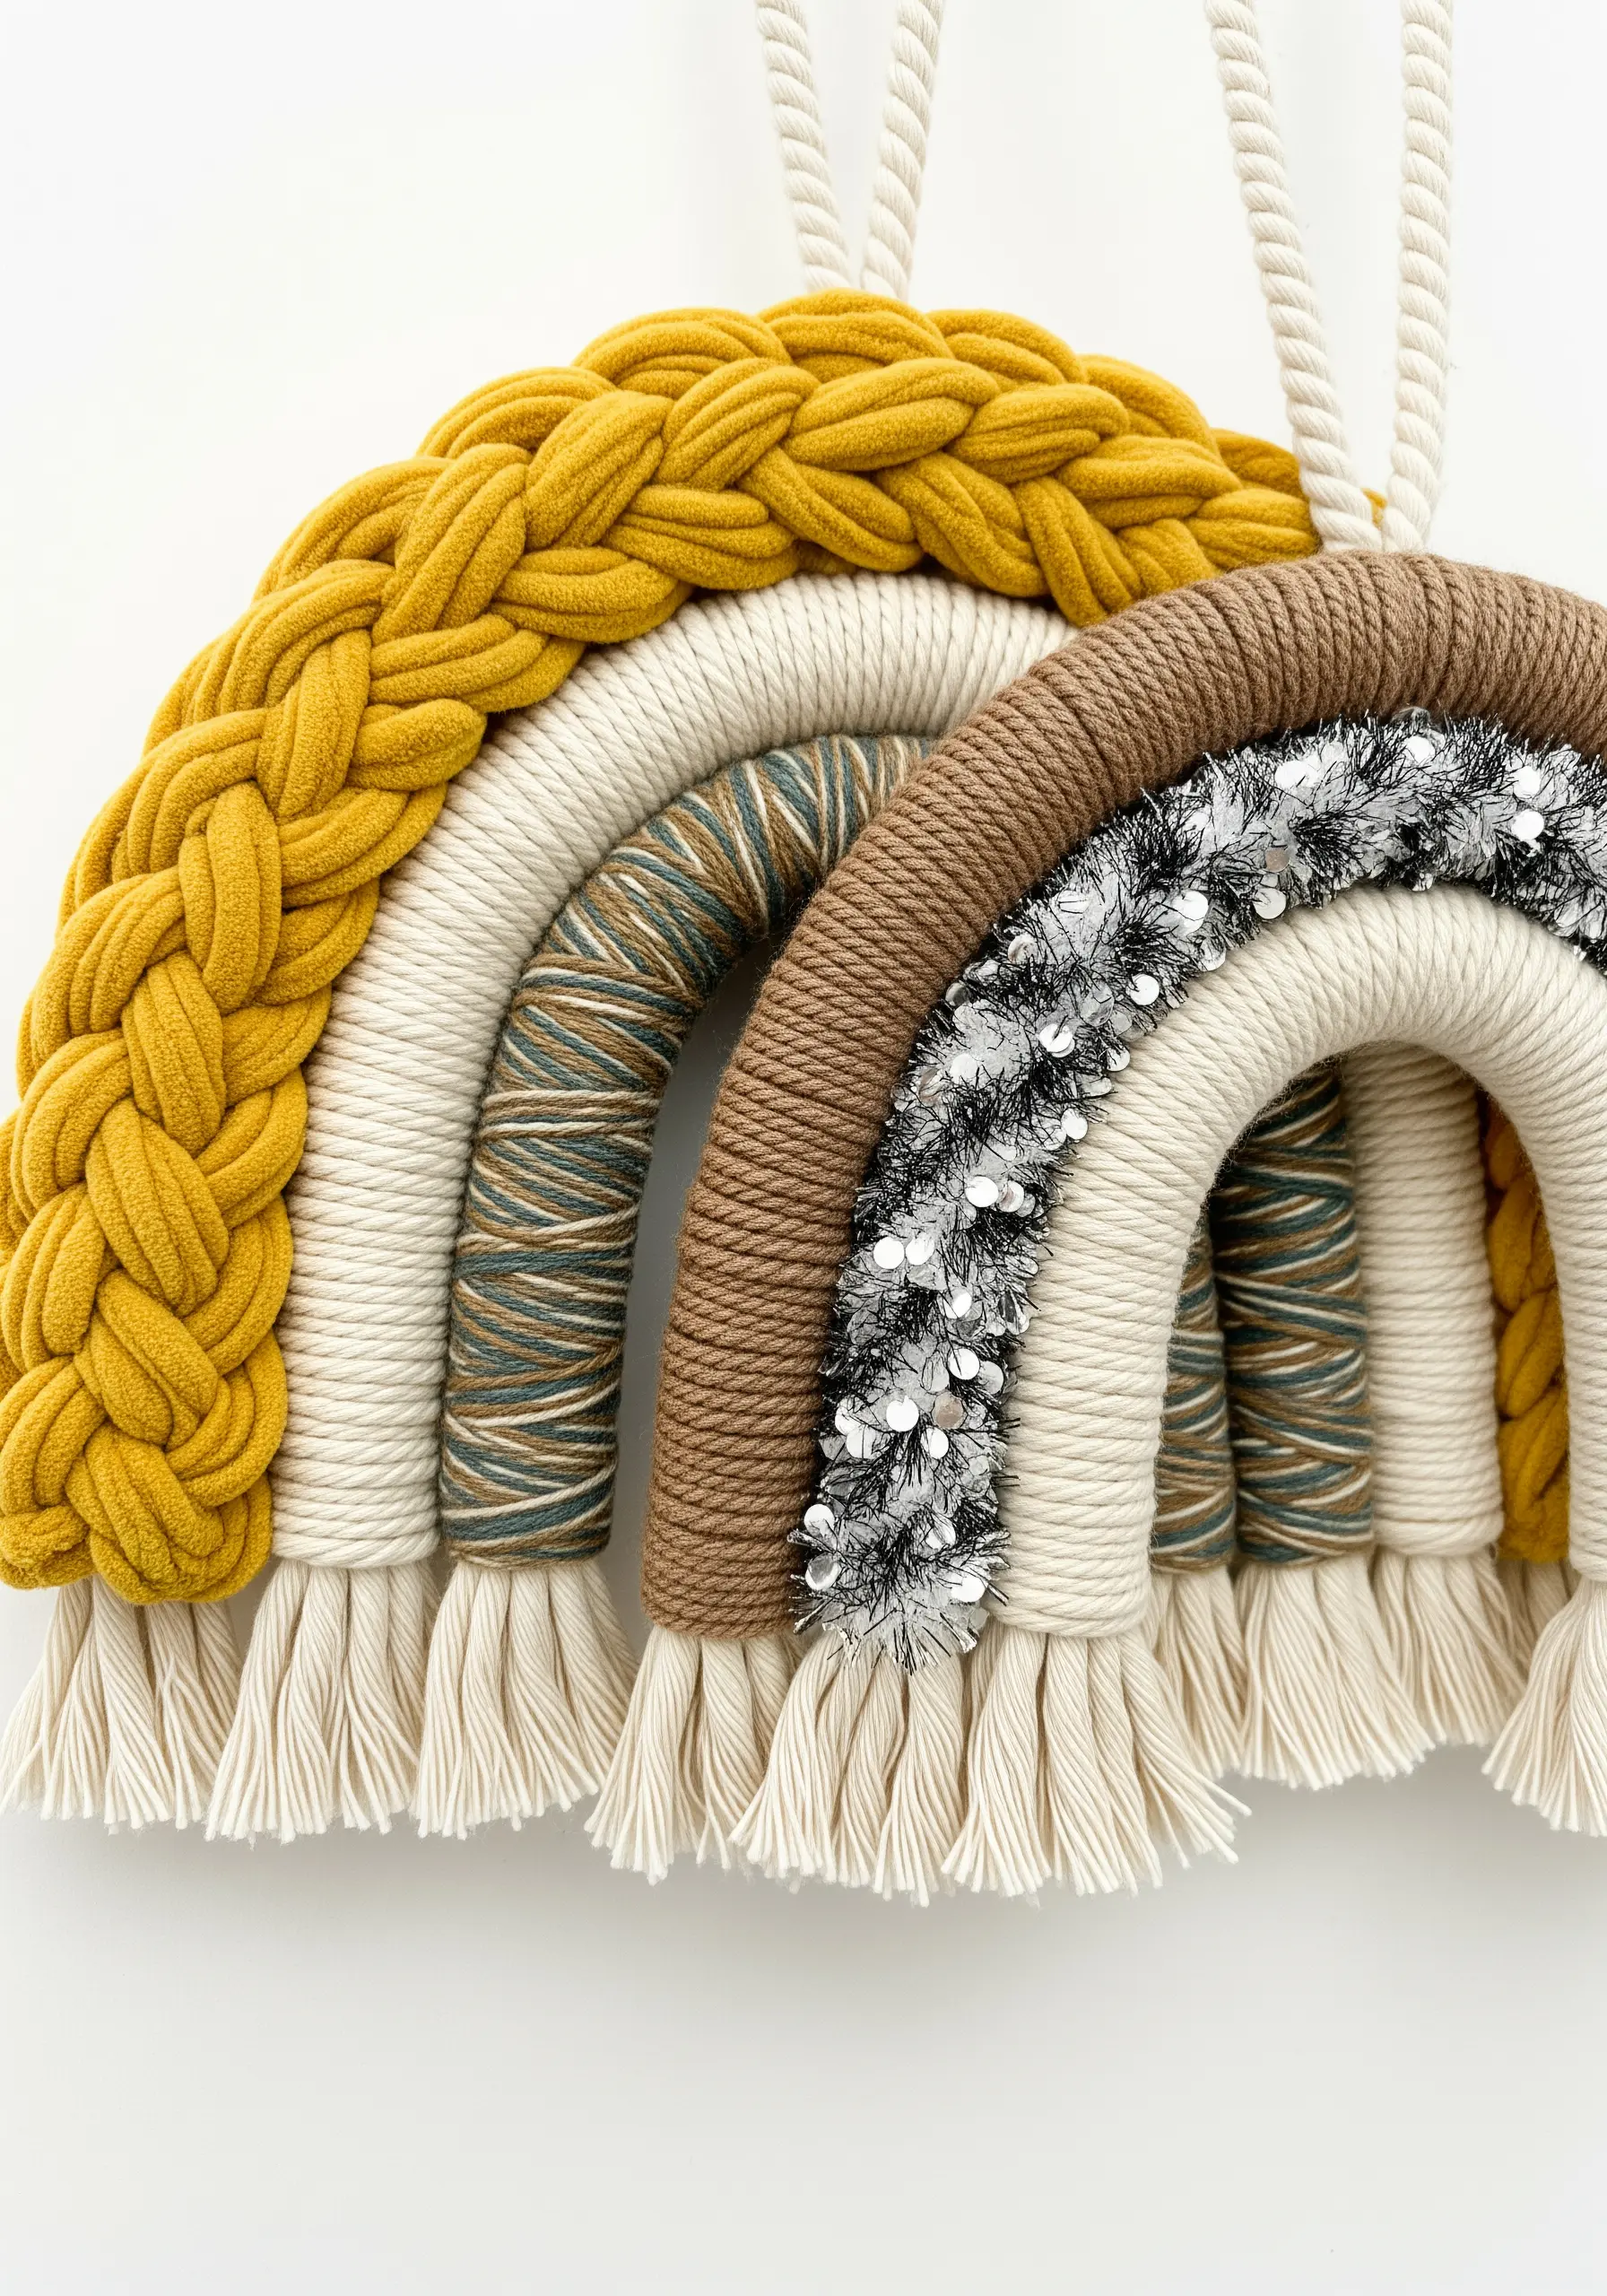
Take the popular macrame rainbow to the next level by focusing on a sophisticated color palette and varied textures.
Instead of wrapping each arch with the same yarn, choose a different material for each one.
Combine a braided jersey yarn, a variegated cotton thread, a classic wool, and even a novelty sequined or tinsel yarn.
This multi-textured approach results in a much richer, more engaging piece that feels curated and artistic, making it one of those mixed fiber creations that will make your home feel cozy and artistic.
14. Add a Woven Centerpiece to Macrame Keychains

Make your macrame keychains stand out by incorporating a small woven section as a focal point.
Create an opening in your design using lark’s head knots on either side, then use the central cords as a warp.
Weave colorful embroidery floss back and forth to create a vibrant, patterned diamond using a simple tabby weave or diagonal soumak knots.
This small detail transforms a simple project into a unique and eye-catching accessory.
15. Spin Your Own Expressive Art Yarn

For a truly unique fiber creation, try spinning your own art yarn. This process allows you to embed texture directly into the thread.
Techniques like ‘coils’ and ‘beehives’ involve wrapping a thread around a thicker single strand as you ply, creating dramatic, bubbly textures.
You can also introduce ‘nubs’ or ‘cocoons’ by trapping small tufts of contrasting fiber between your plies.
The resulting yarn is a work of art in itself, perfect for weaving, knitting, or embellishing other projects.
16. Upgrade Woven Baskets with Yarn and Tassels
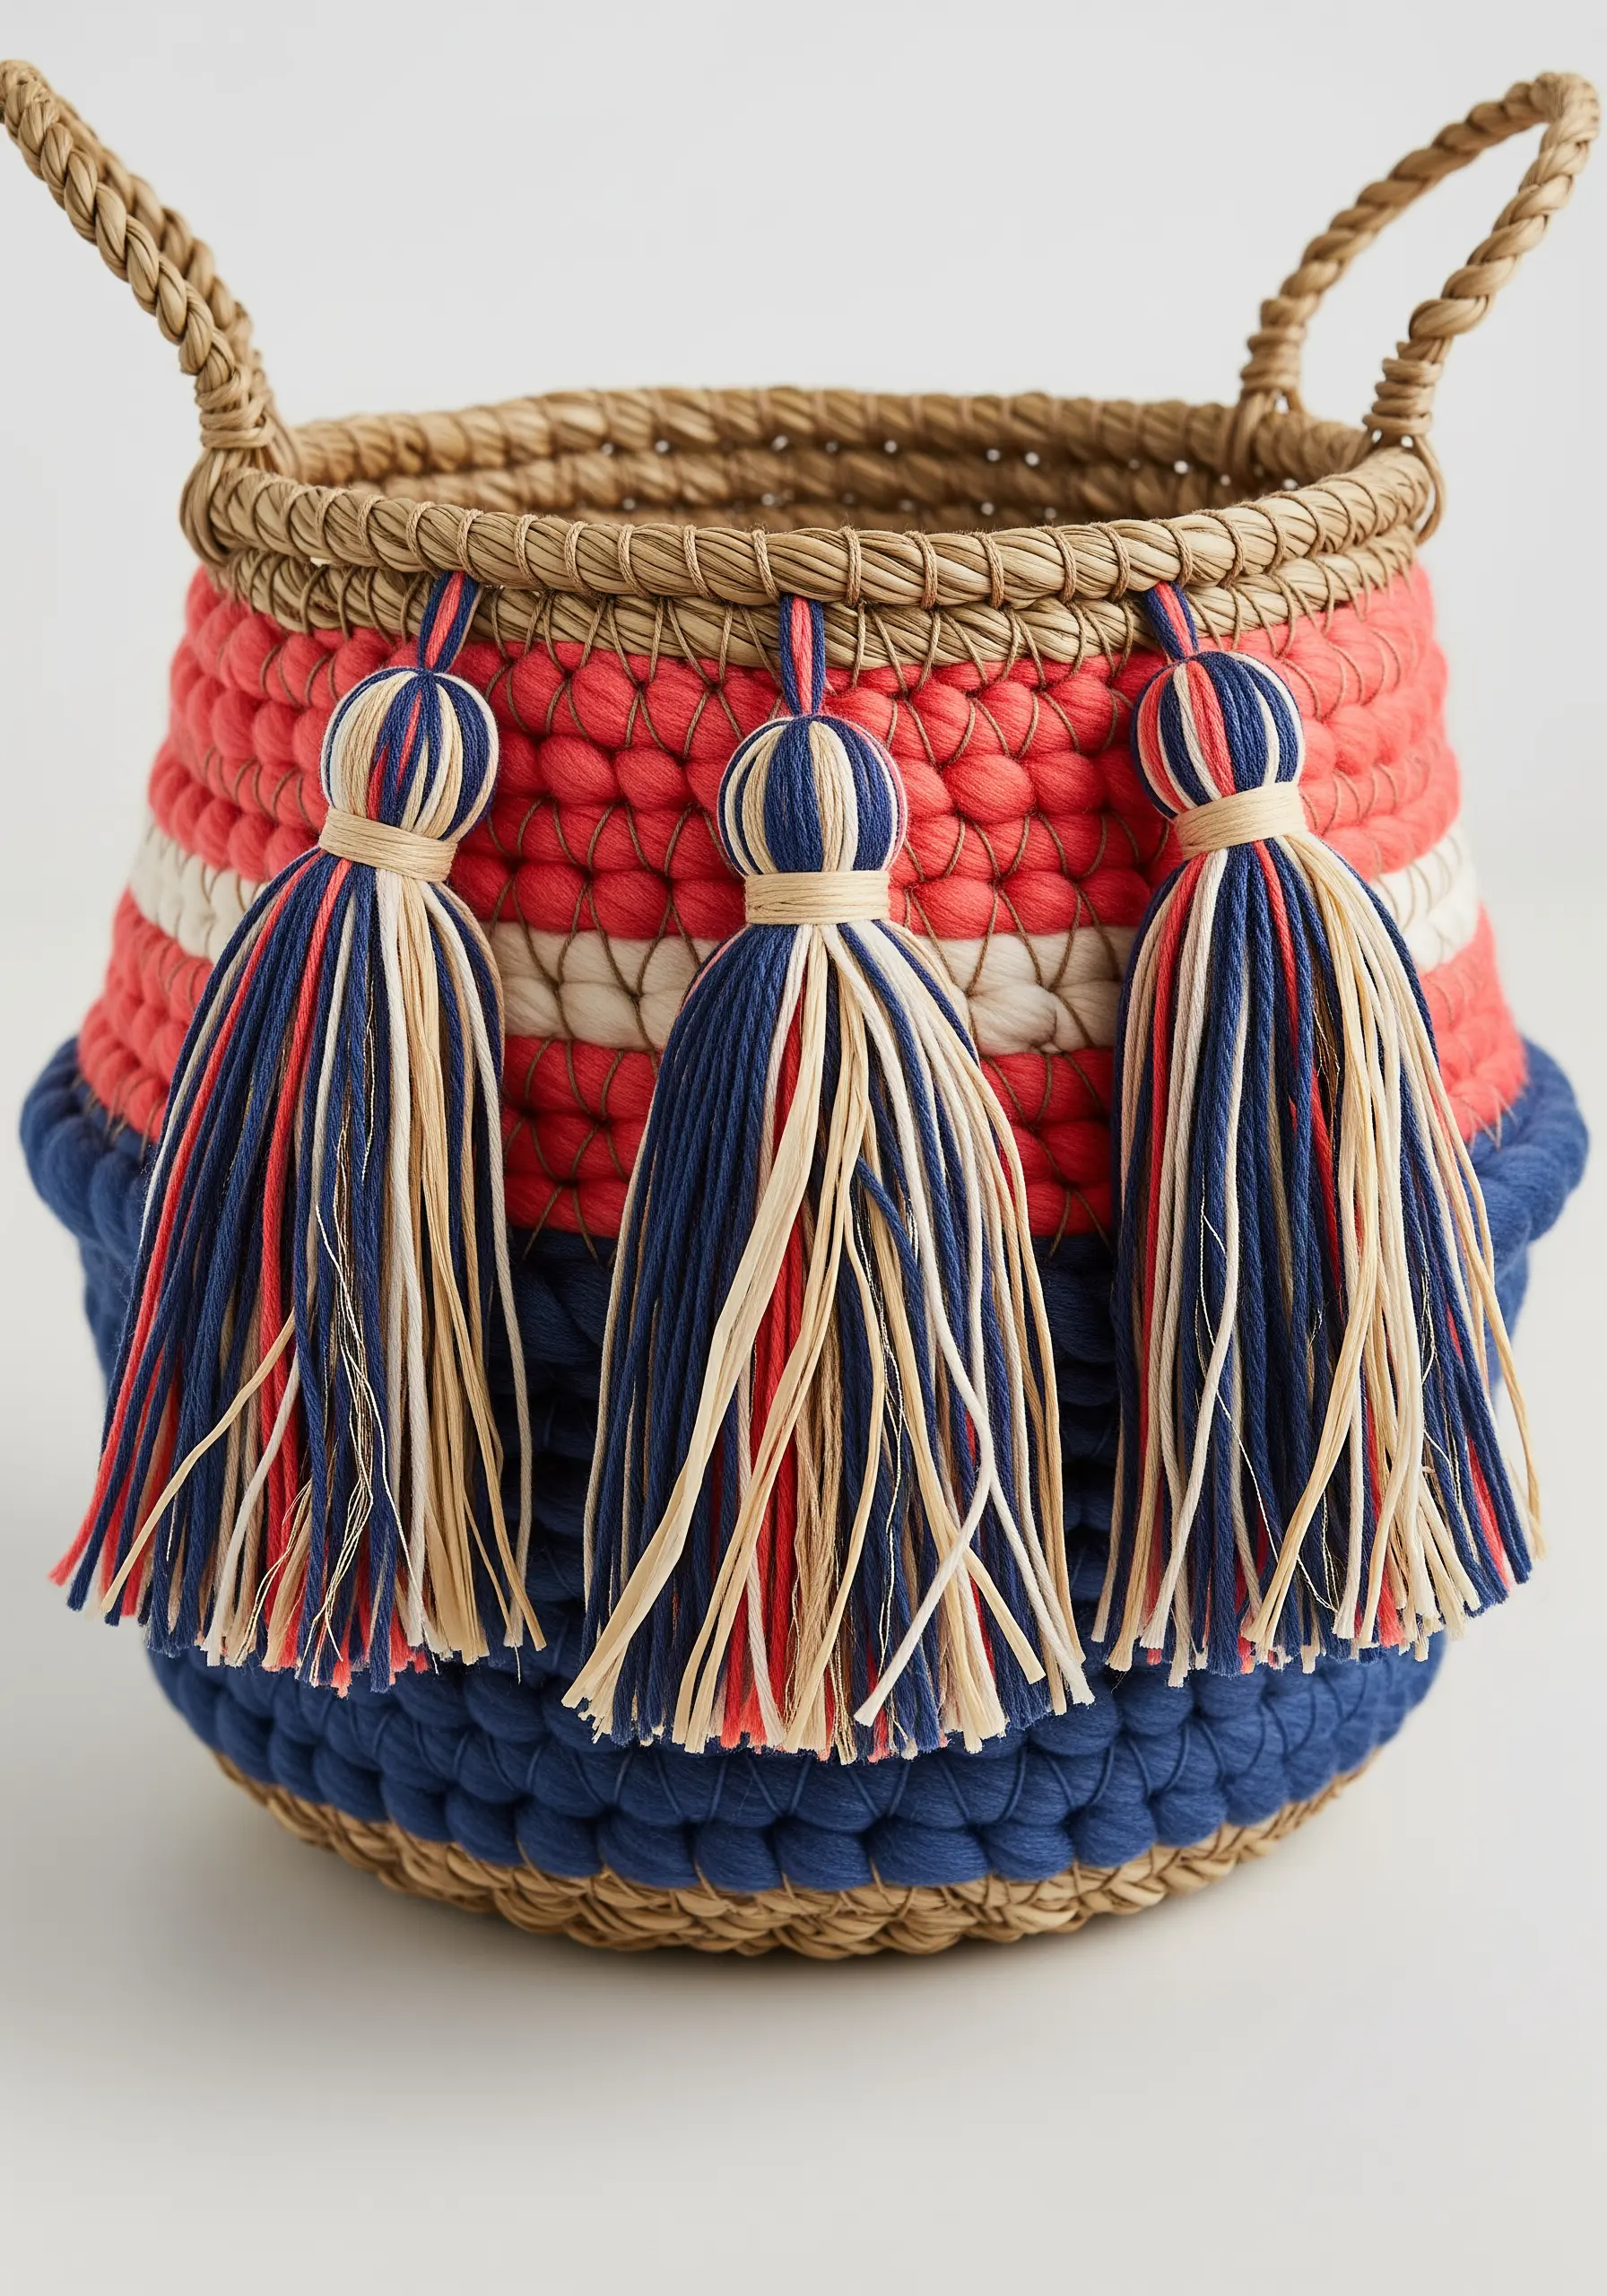
Transform a generic woven basket into a personalized decor piece with two simple additions: yarn wrapping and tassels.
Use a chunky, soft yarn to wrap sections of the basket, securing the ends by tucking them tightly underneath the wrapped portion.
To create dynamic, high-end tassels, don’t just use one type of yarn. Combine different weights, colors, and even materials like raffia or metallic floss for a fuller, more luxurious look.
17. Create Geometric String Art on Canvas

You can achieve the clean, graphic look of string art with a softer, more tactile finish by working on a stretched canvas.
Use an awl to pre-punch a grid of holes along your design lines. This protects the canvas and provides clear anchor points for your thread.
Build up your design by wrapping yarn in layers, crisscrossing different colors to create optical blends and the illusion of depth.
The negative space on the canvas is just as important as the thread, so compose your design with balance in mind.
18. Braid with Metallic Cord for a Jewelry Finish
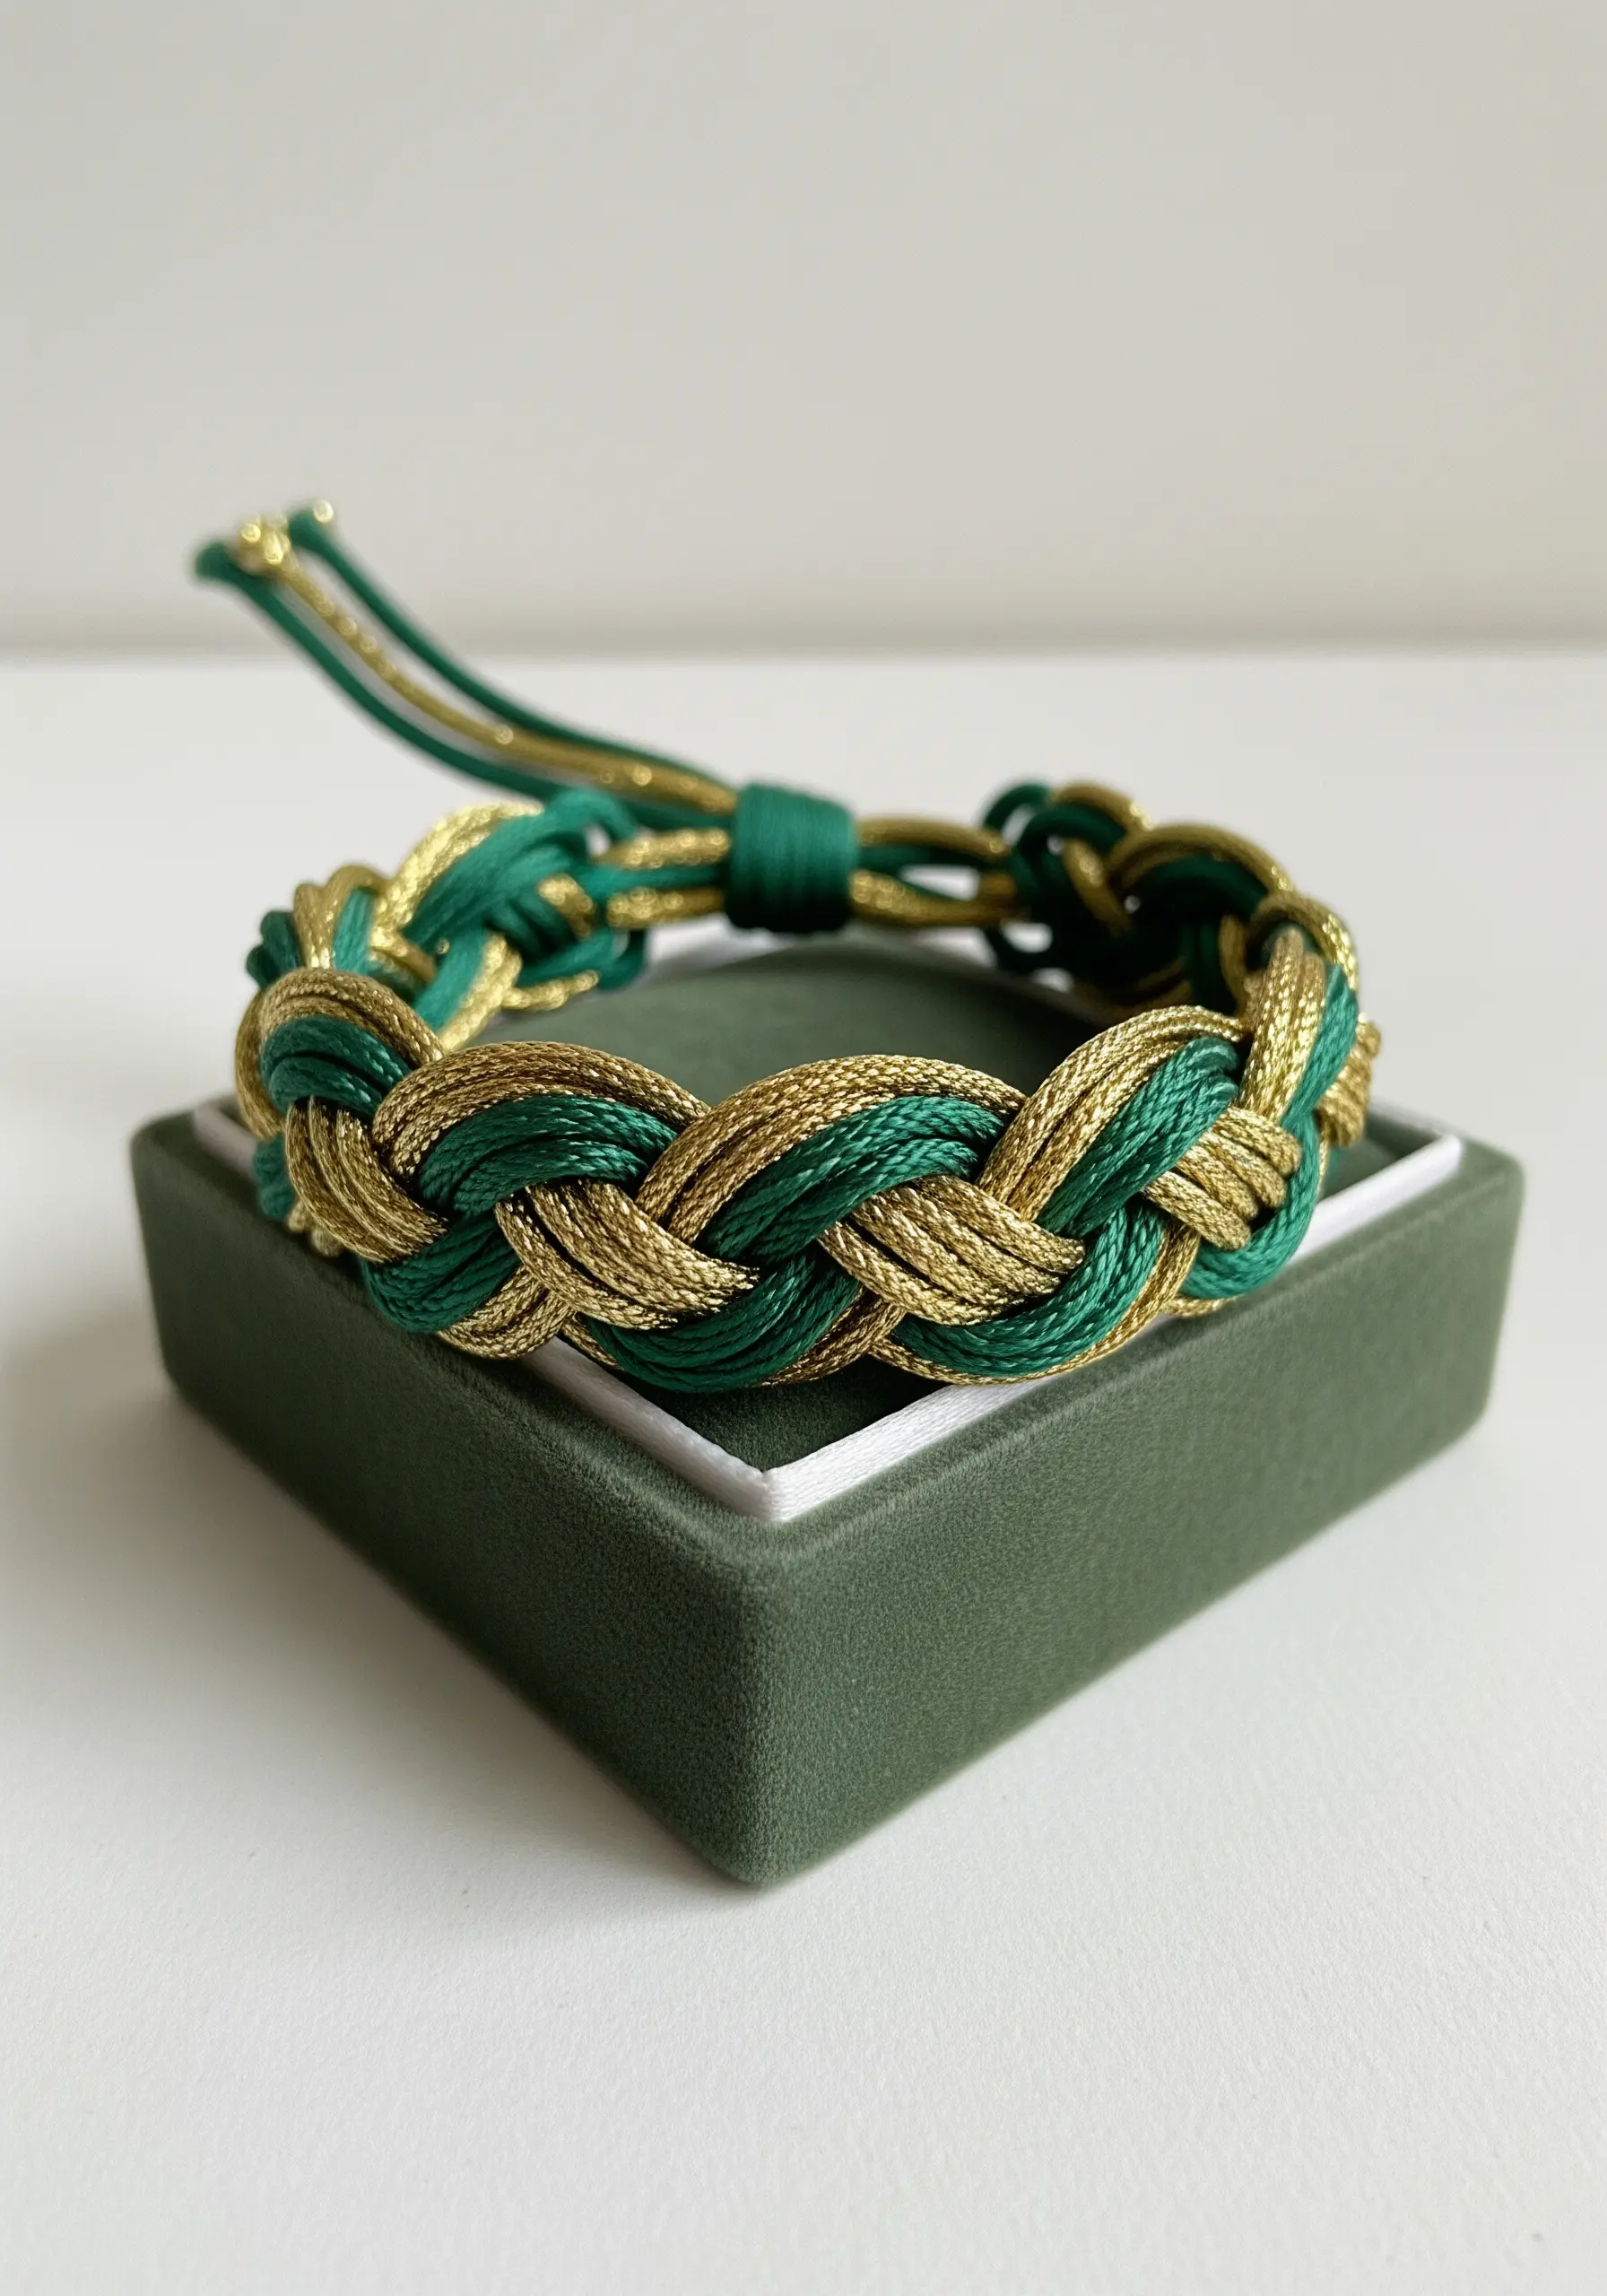
For a braided bracelet that looks less like a craft project and more like fine jewelry, incorporate a high-quality metallic thread.
Choose a smooth, non-stretchy cord for your main color and a flexible metallic cord that won’t break as you braid.
Whether you’re making a simple three-strand braid or a more complex kumihimo weave, the metallic element will catch the light beautifully, giving the piece an elegant, expensive-looking shimmer.
19. Frame a Mirror with Plush Punch Needle

Punch needle is the perfect technique for creating a soft, tactile frame with bold, graphic appeal.
To achieve clean lines between your colors, always outline the shape first and then fill it in, working from the outside edge inward.
Using a consistent loop height and packing your stitches closely together will result in the dense, plush texture that defines this craft.
This is one of the most satisfying fun fabric crafts that turn simple textiles into statement pieces, transforming a plain mirror into a focal point.
20. Embroider Delicate Botanicals on Felt
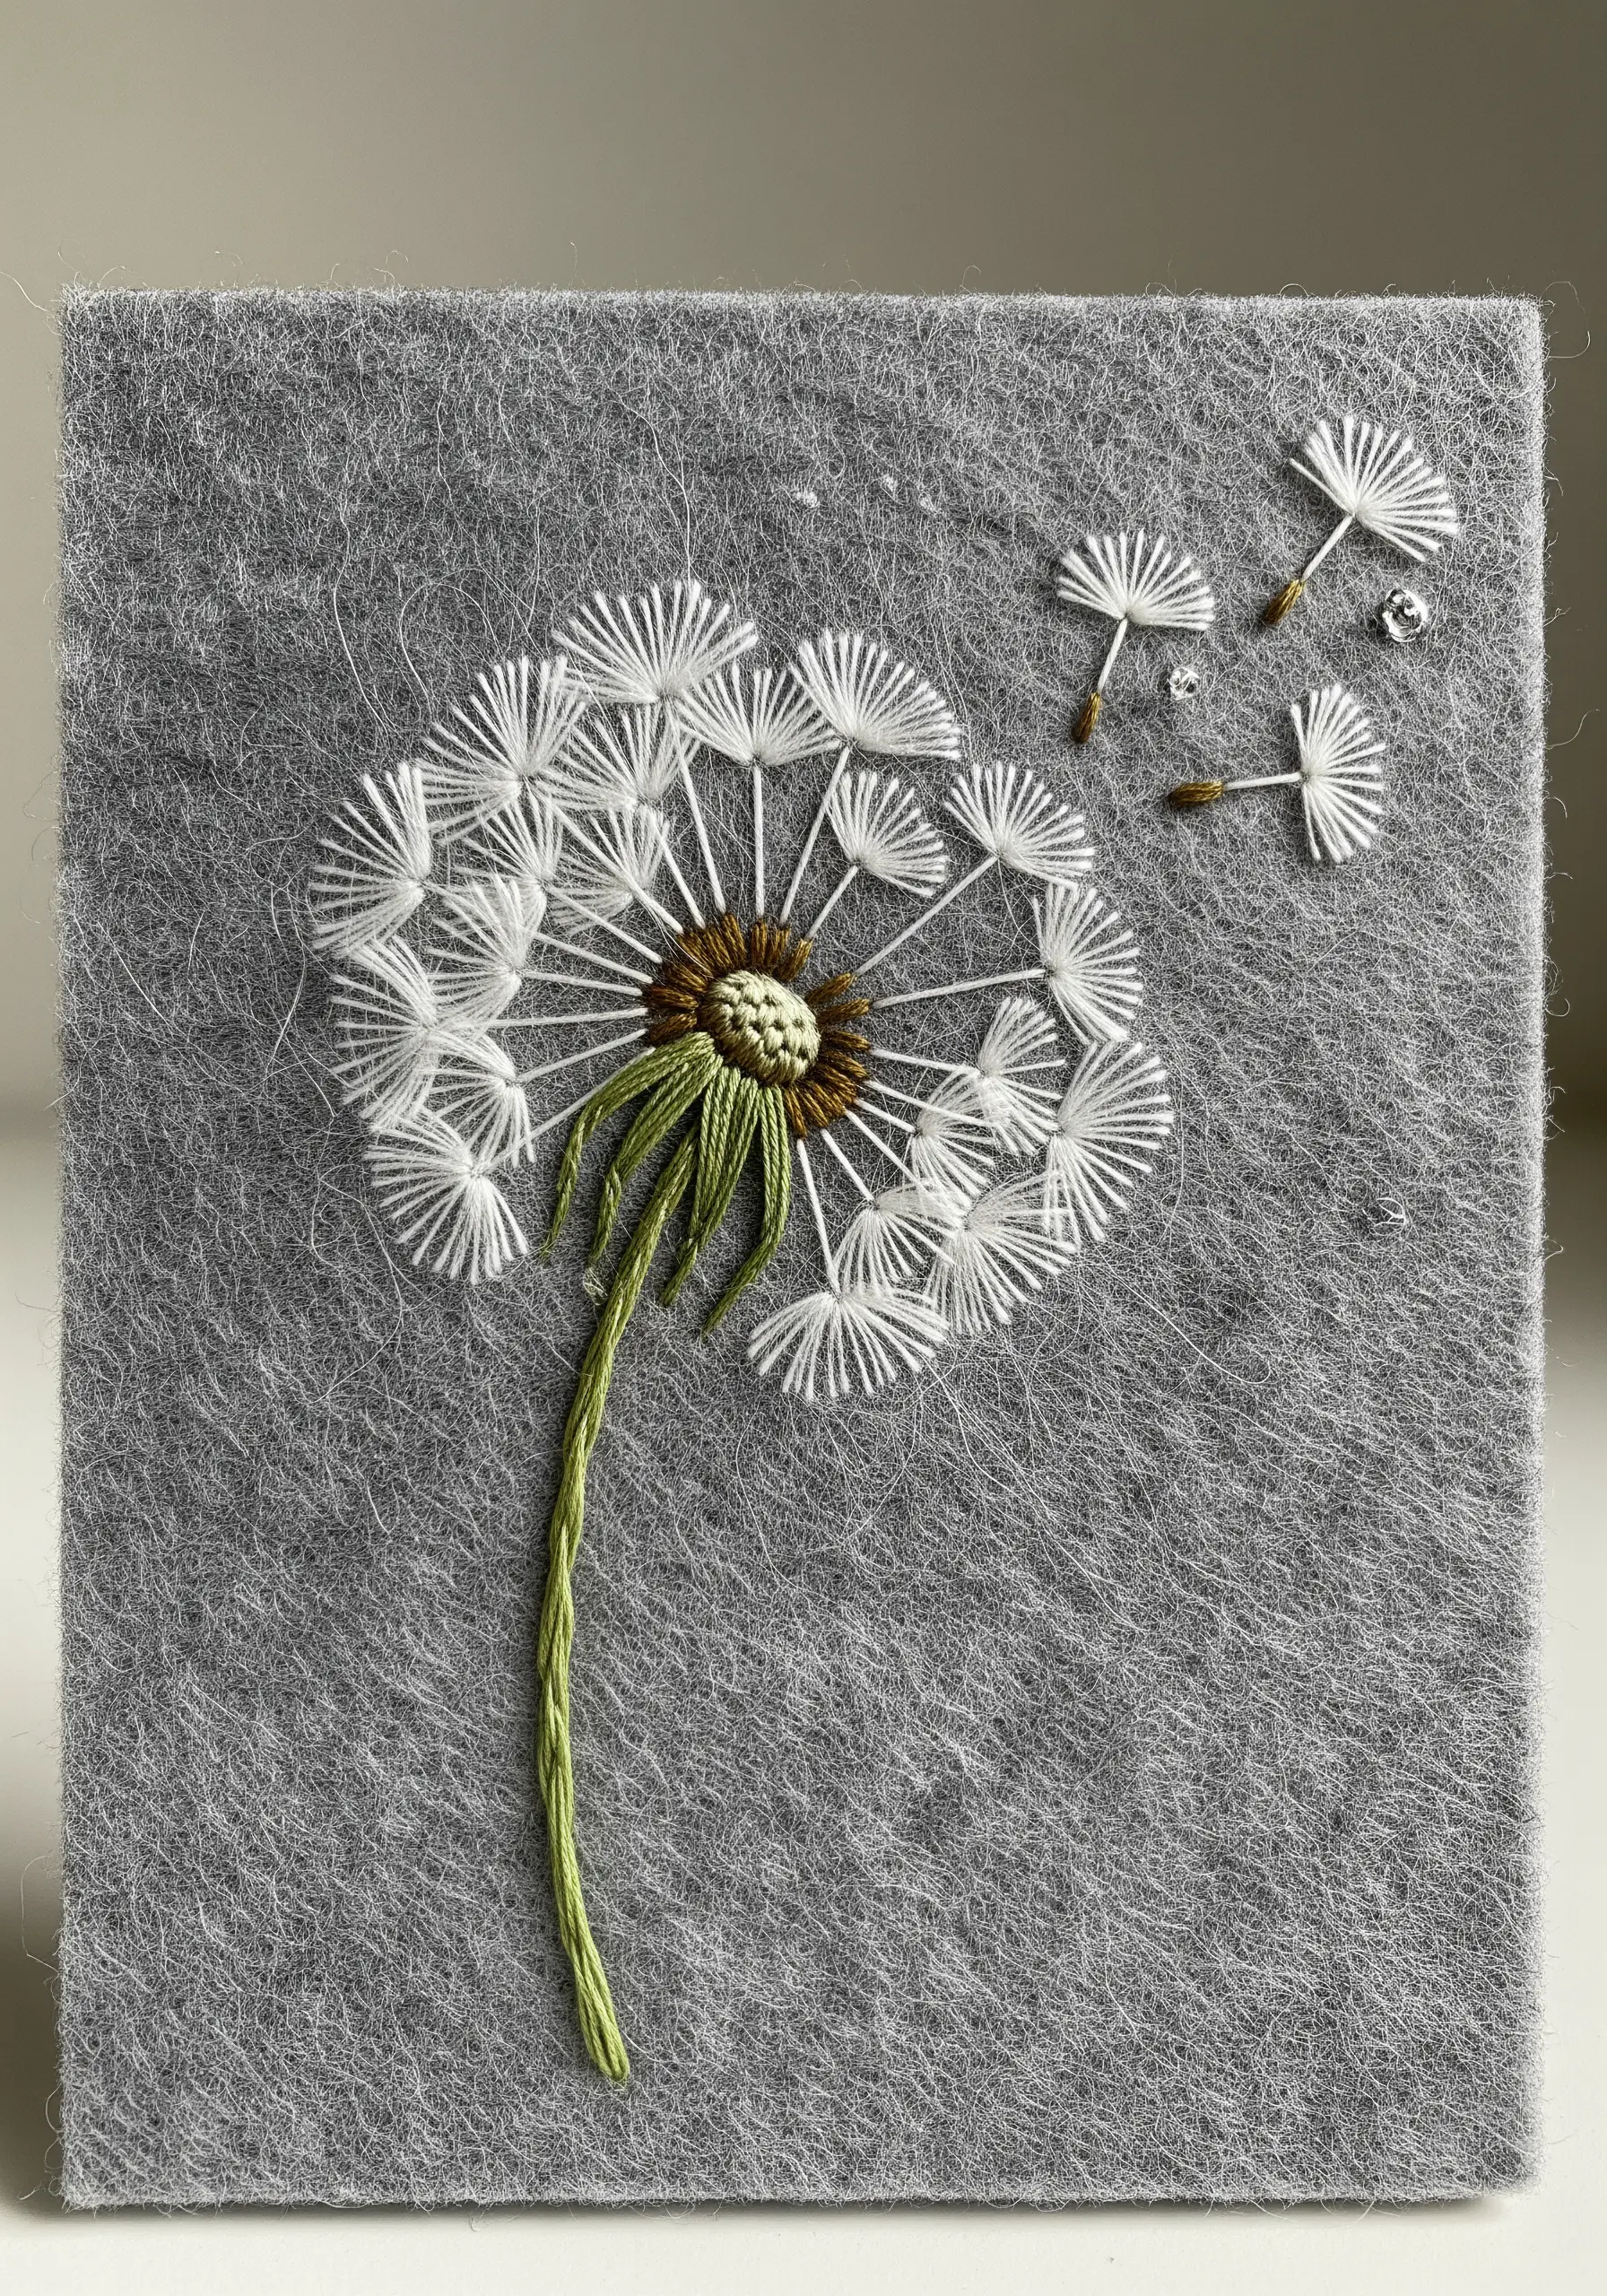
Using a piece of pressed wool felt as your base fabric provides a stable, non-fraying surface that makes delicate stitches shine.
The slightly fuzzy texture of the felt creates a soft background that adds depth and makes your threadwork pop.
For the dandelion’s airy seeds, use detached chain stitches paired with a single straight stitch. To create a sense of movement, increase the spacing between the floating seeds as they drift across the fabric.
This is a wonderful way to create small, frameable artistic tiny decor pieces.
21. Combine Needle Felting with Natural Elements

Create unique, nature-inspired gifts by combining soft, felted wool with found natural objects.
Use wool roving in earthy tones to needle felt the round, dense bodies of the acorns. The key is to felt them firmly so they hold their shape well.
Then, use a strong craft adhesive to attach real, cleaned acorn caps to the top of your felted forms.
The contrast between the soft, matte texture of the wool and the hard, smooth sheen of the natural cap is what makes these objects so charming and memorable.


