
You have the hoop, the thread, and the desire to create something lasting—but transforming a plain cushion into a personal heirloom requires more than just a pattern. It demands an understanding of how texture, tension, and thread choice interact with your fabric.
Whether you are navigating the tricky pile of velvet, looking to add structure to a soft knit, or wanting to capture the personality of a handwriting sample, the difference lies in the technical details. Stabilizers, needle sizes, and stitch directions are the silent partners in polished embroidery.
In this guide, I will walk you through 29 distinct approaches to personalized cushions. We aren’t just looking at pretty pictures; we are breaking down the specific technique behind each finish so you can replicate that professional, high-end look in your own studio today.
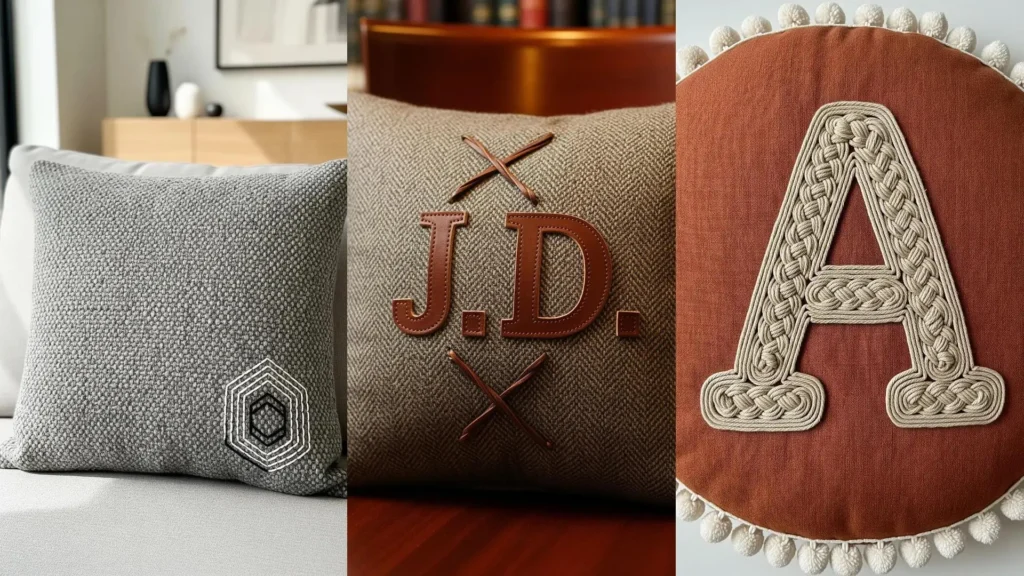
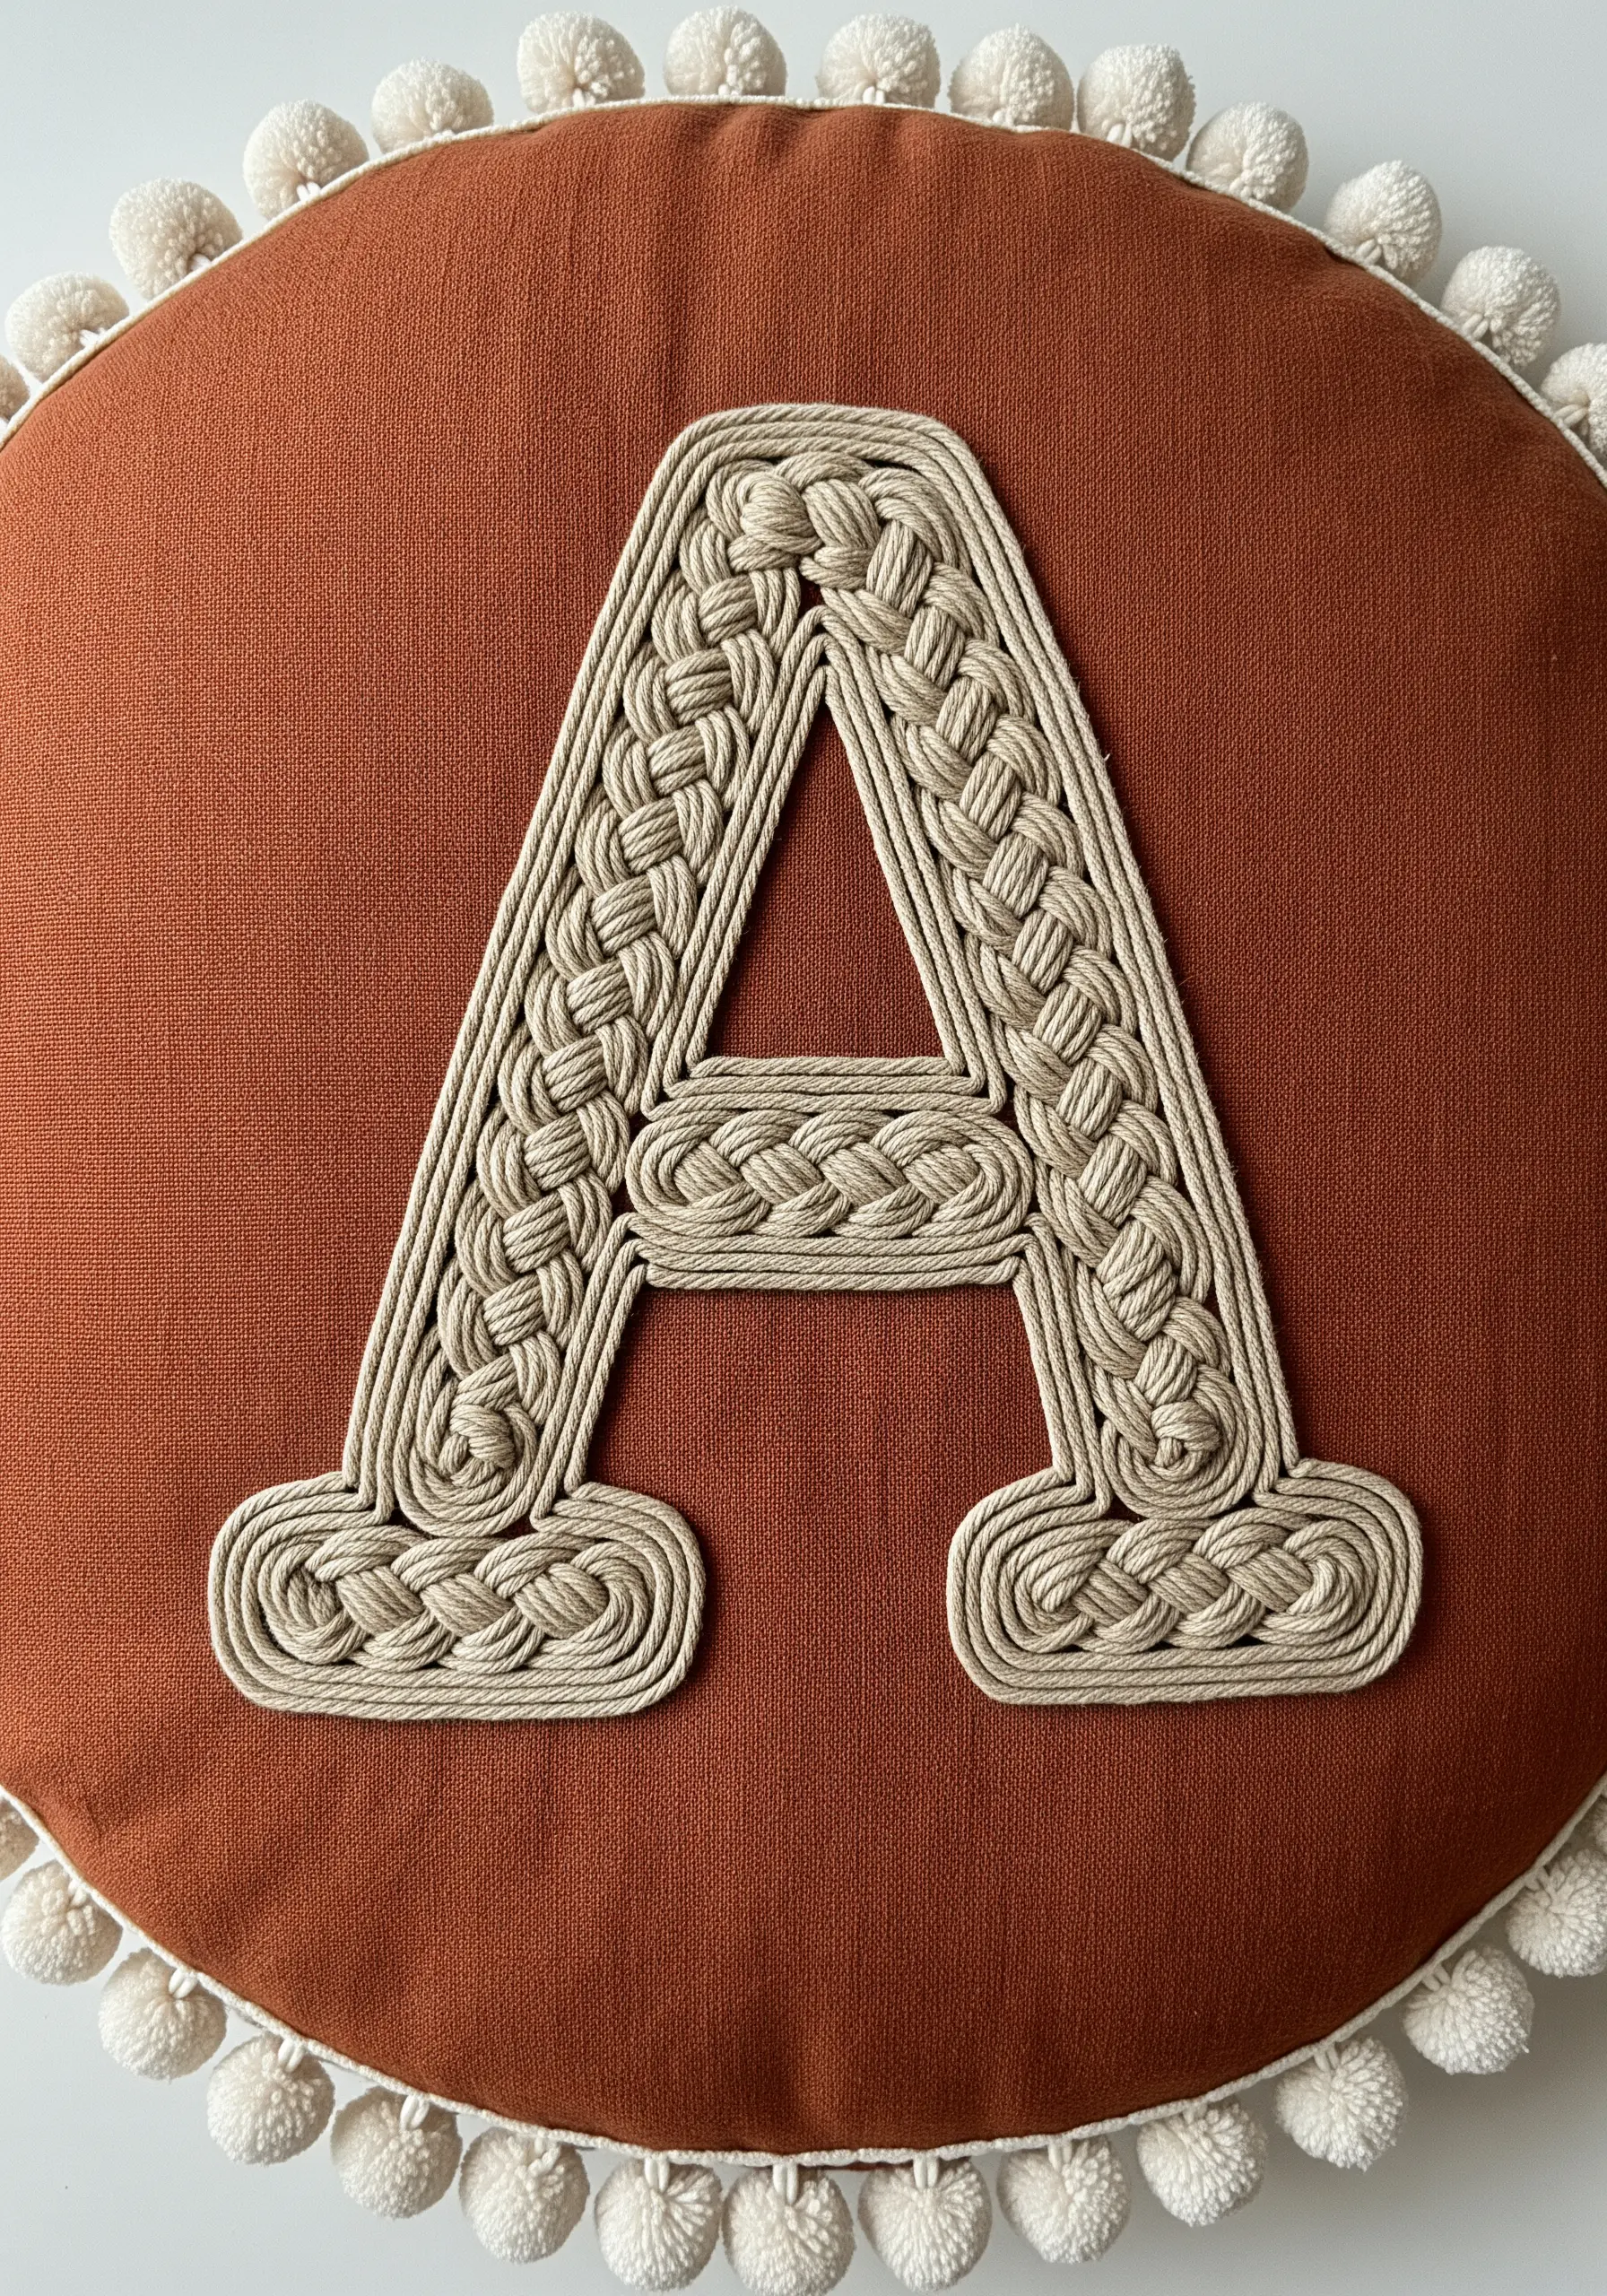
1. Baroque goldwork on deep velvet
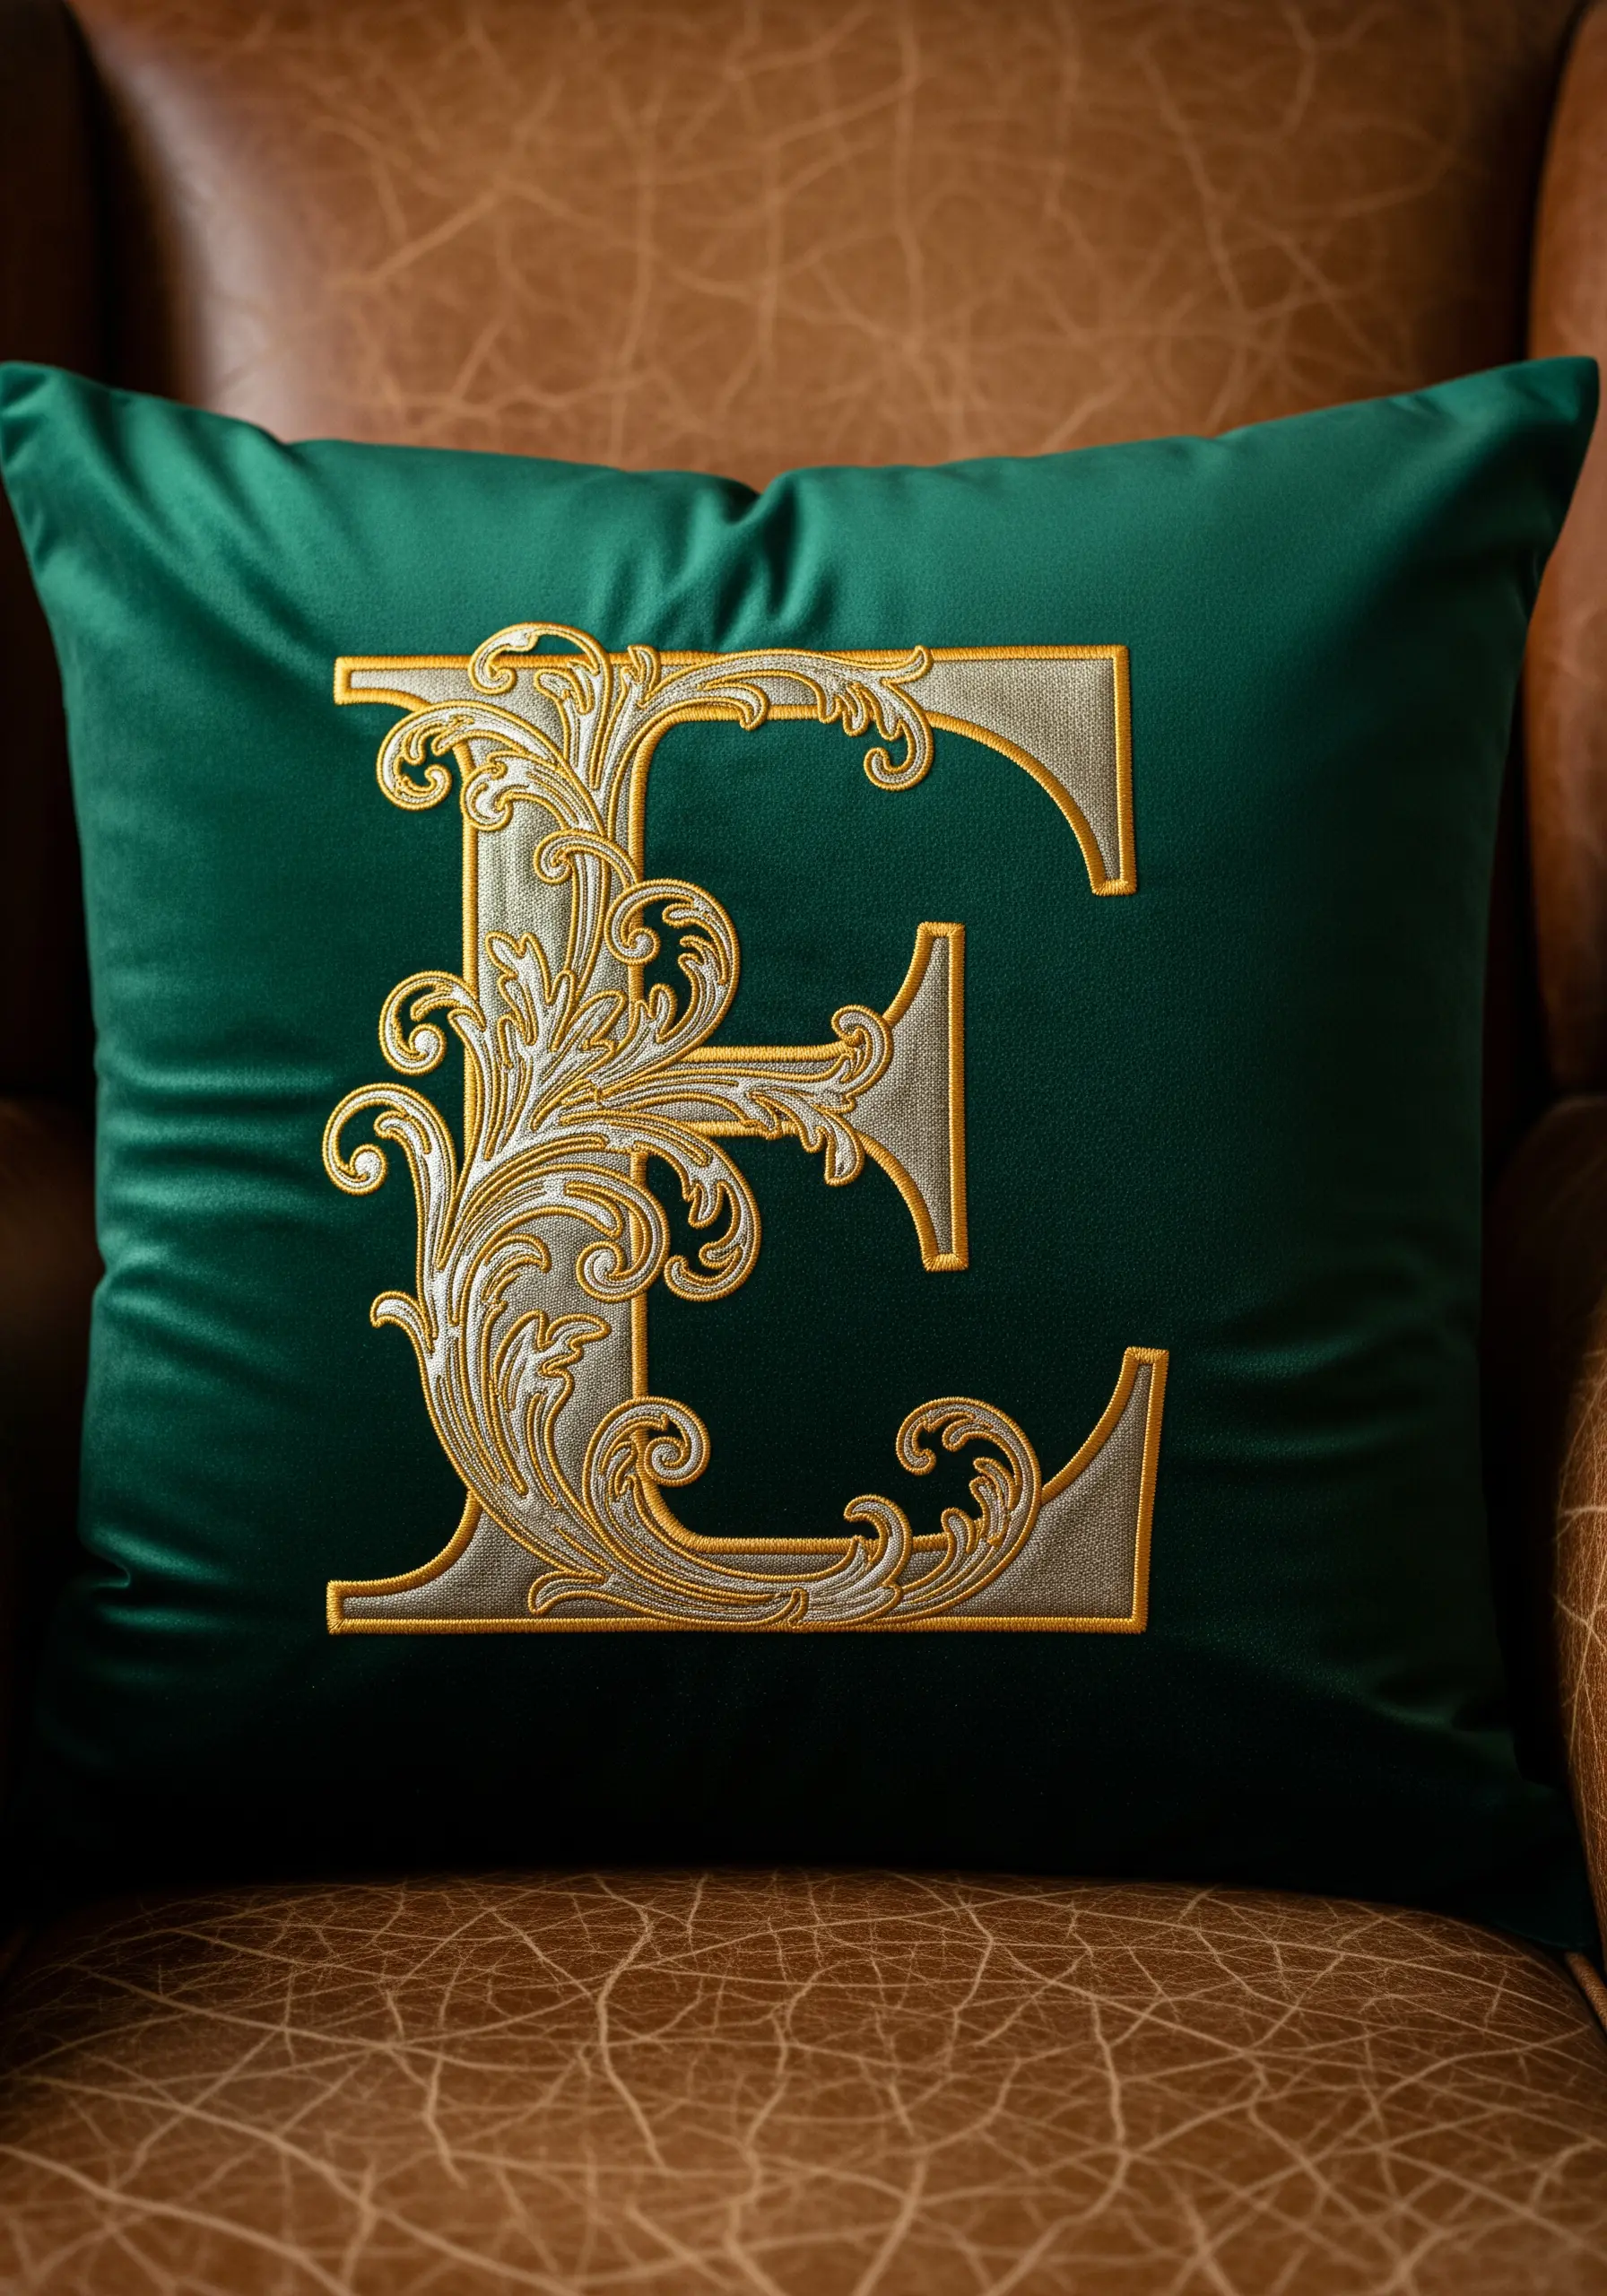
Velvet is luxurious, but the pile can swallow your stitches if you aren’t careful; always use a water-soluble stabilizer on top to keep your satin stitch floating beautifully above the surface.
For this regal initial, mix gold thread cushion designs that create a regal luxe look on a budget by combining standard embroidery floss with metallic filaments to prevent breakage while maintaining that high-shine impact.
The swirling acanthus leaves require a split stitch outline first to pad the shape, giving the goldwork a raised, three-dimensional effect that catches the light.
2. Fine-line botanical wreath spacing
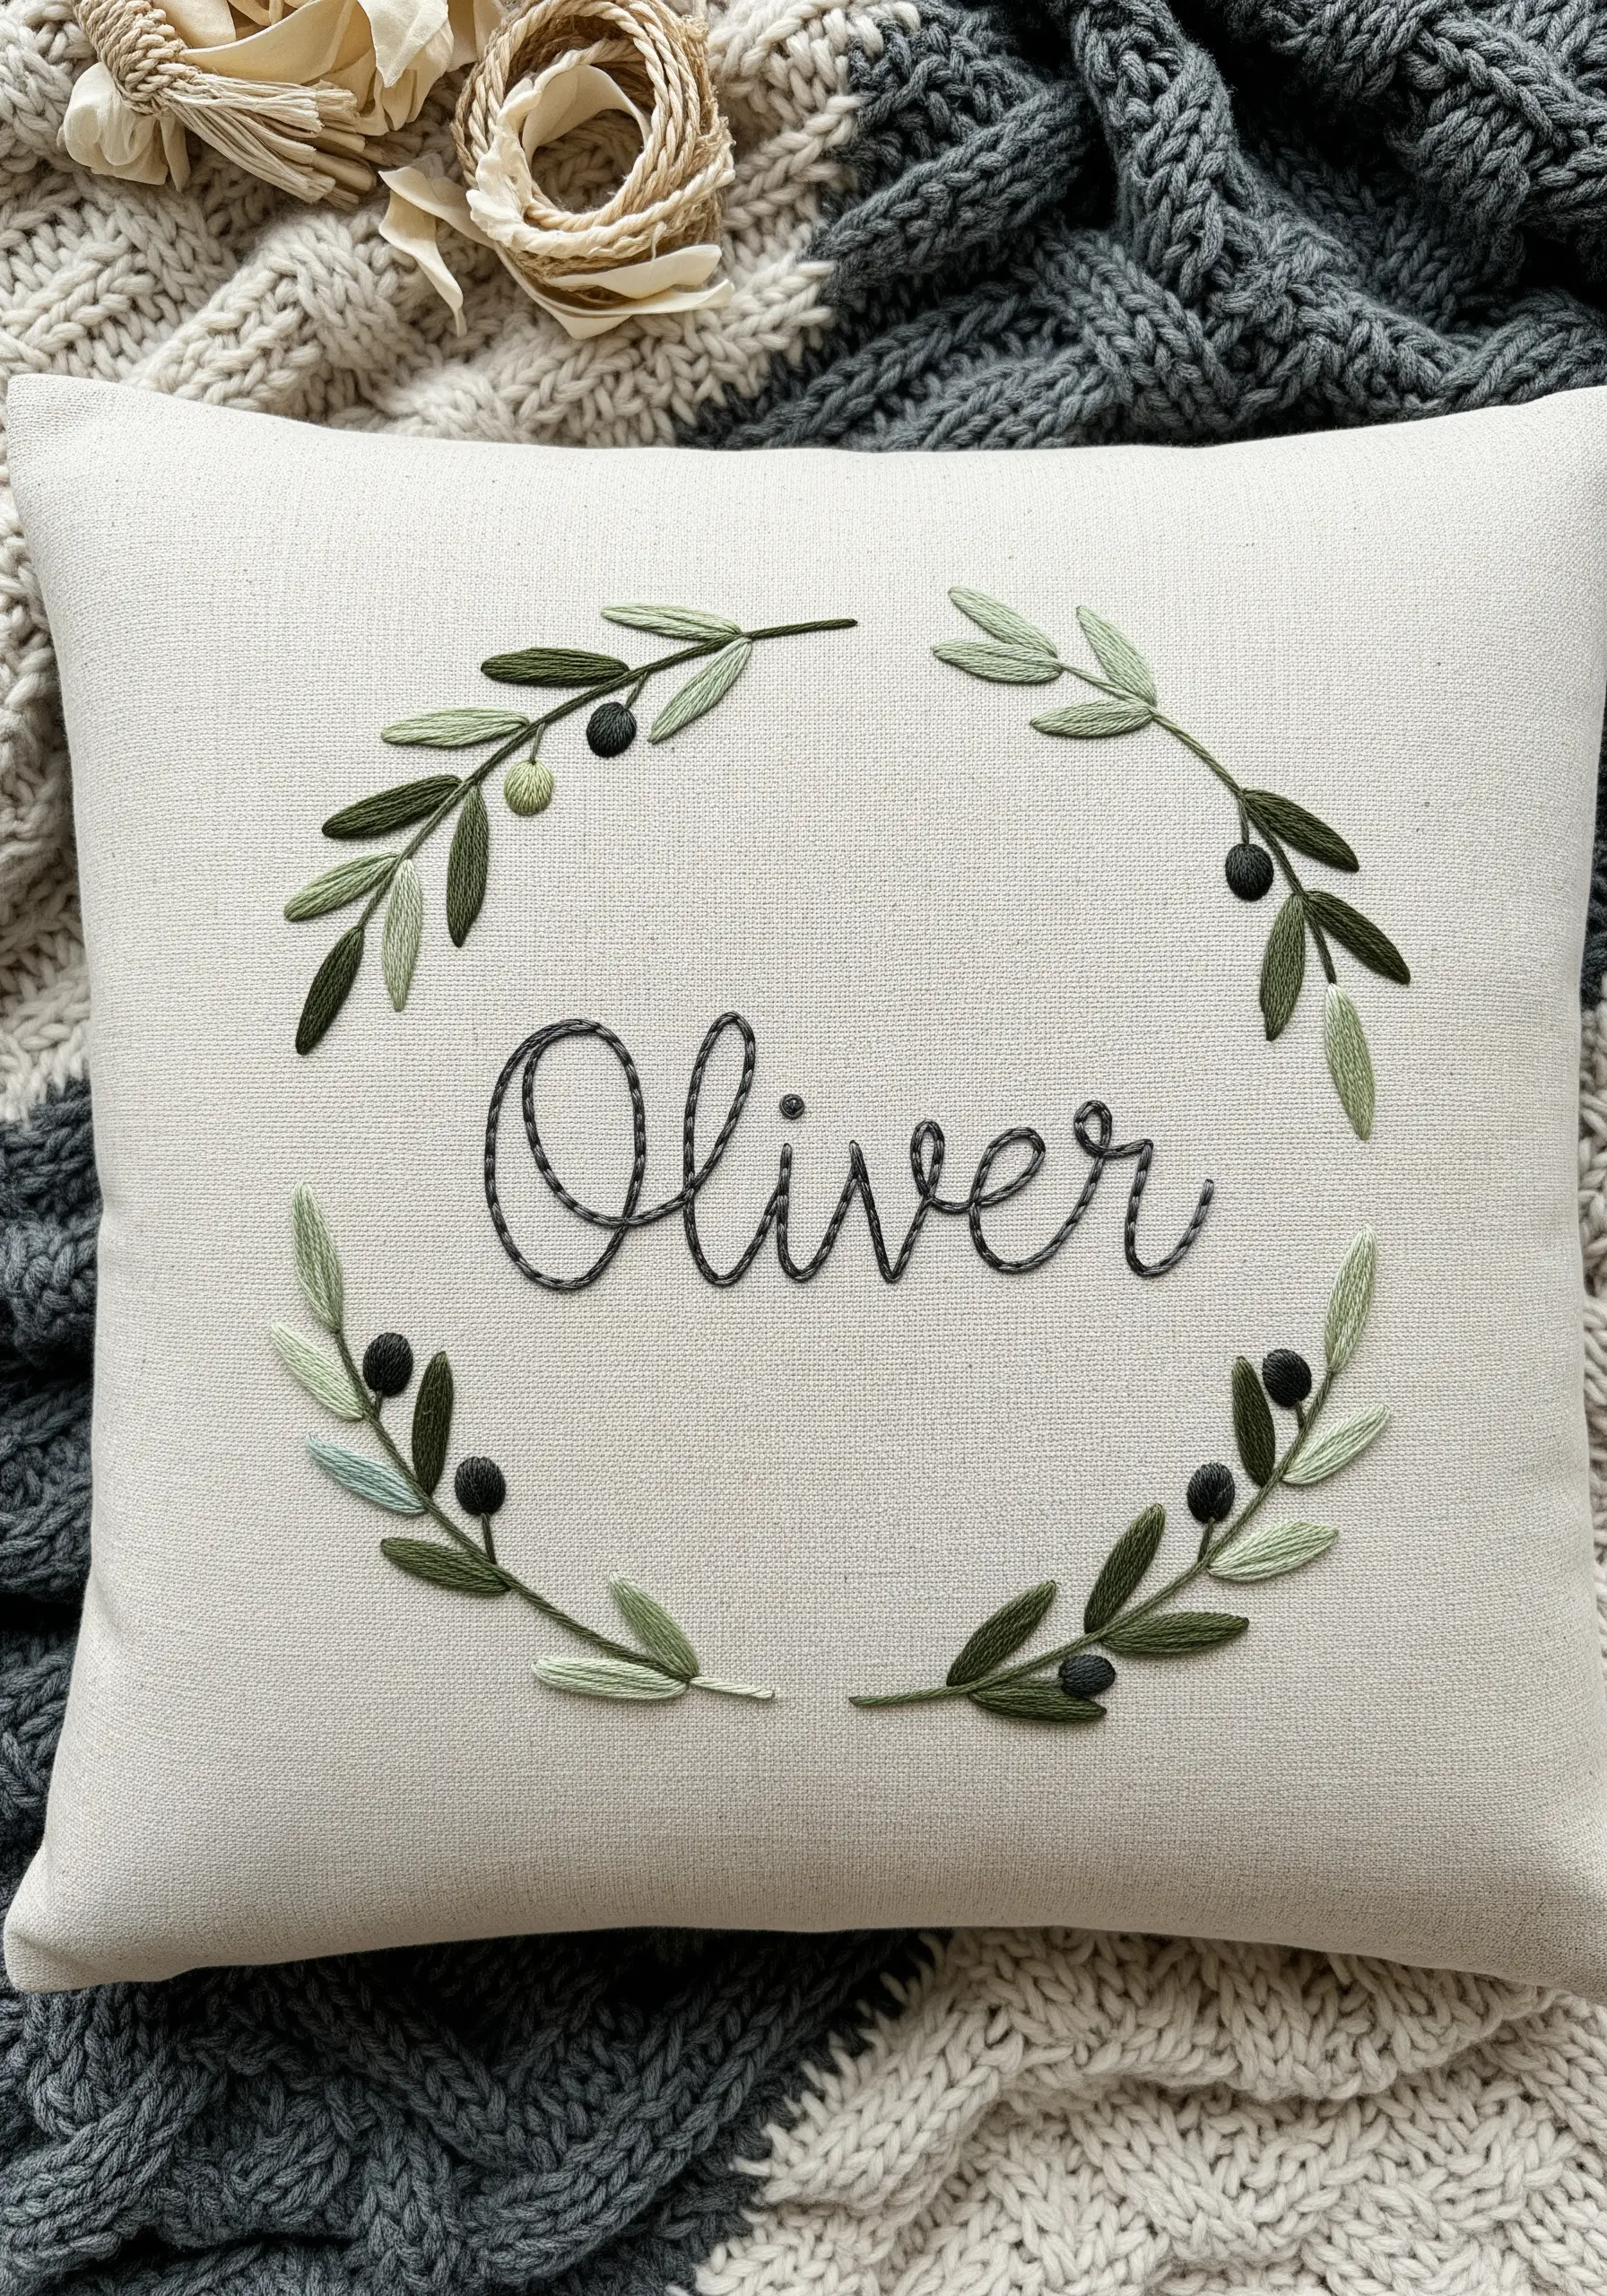
Achieving this level of delicacy requires stripping your floss down to a single strand for the leaves and two strands for the text, ensuring the script feels handwritten rather than bulky.
Notice how the negative space is just as important as the thread; leaving ample room between the wreath and the name prevents the design from feeling cluttered.
For the olives, try minimalist leaf vine embroidery ideas for beginners who want aesthetic results fast by using a padded satin stitch to give the fruit a slight roundness against the flat linen.
3. Beaded accents on satin monochrome

Monochrome embroidery relies entirely on texture; by incorporating seed beads into your filigree border, you create a tactile contrast against the smooth slide of the pink satin.
When stitching on slippery fabrics like satin, use a smaller needle to minimize puckering and maintain high tension in your hoop.
These subtle embroidery touches to bring life to any corner work best when you color-match your beads exactly to your thread for a sophisticated, high-end finish.
4. Structured applique on plaid
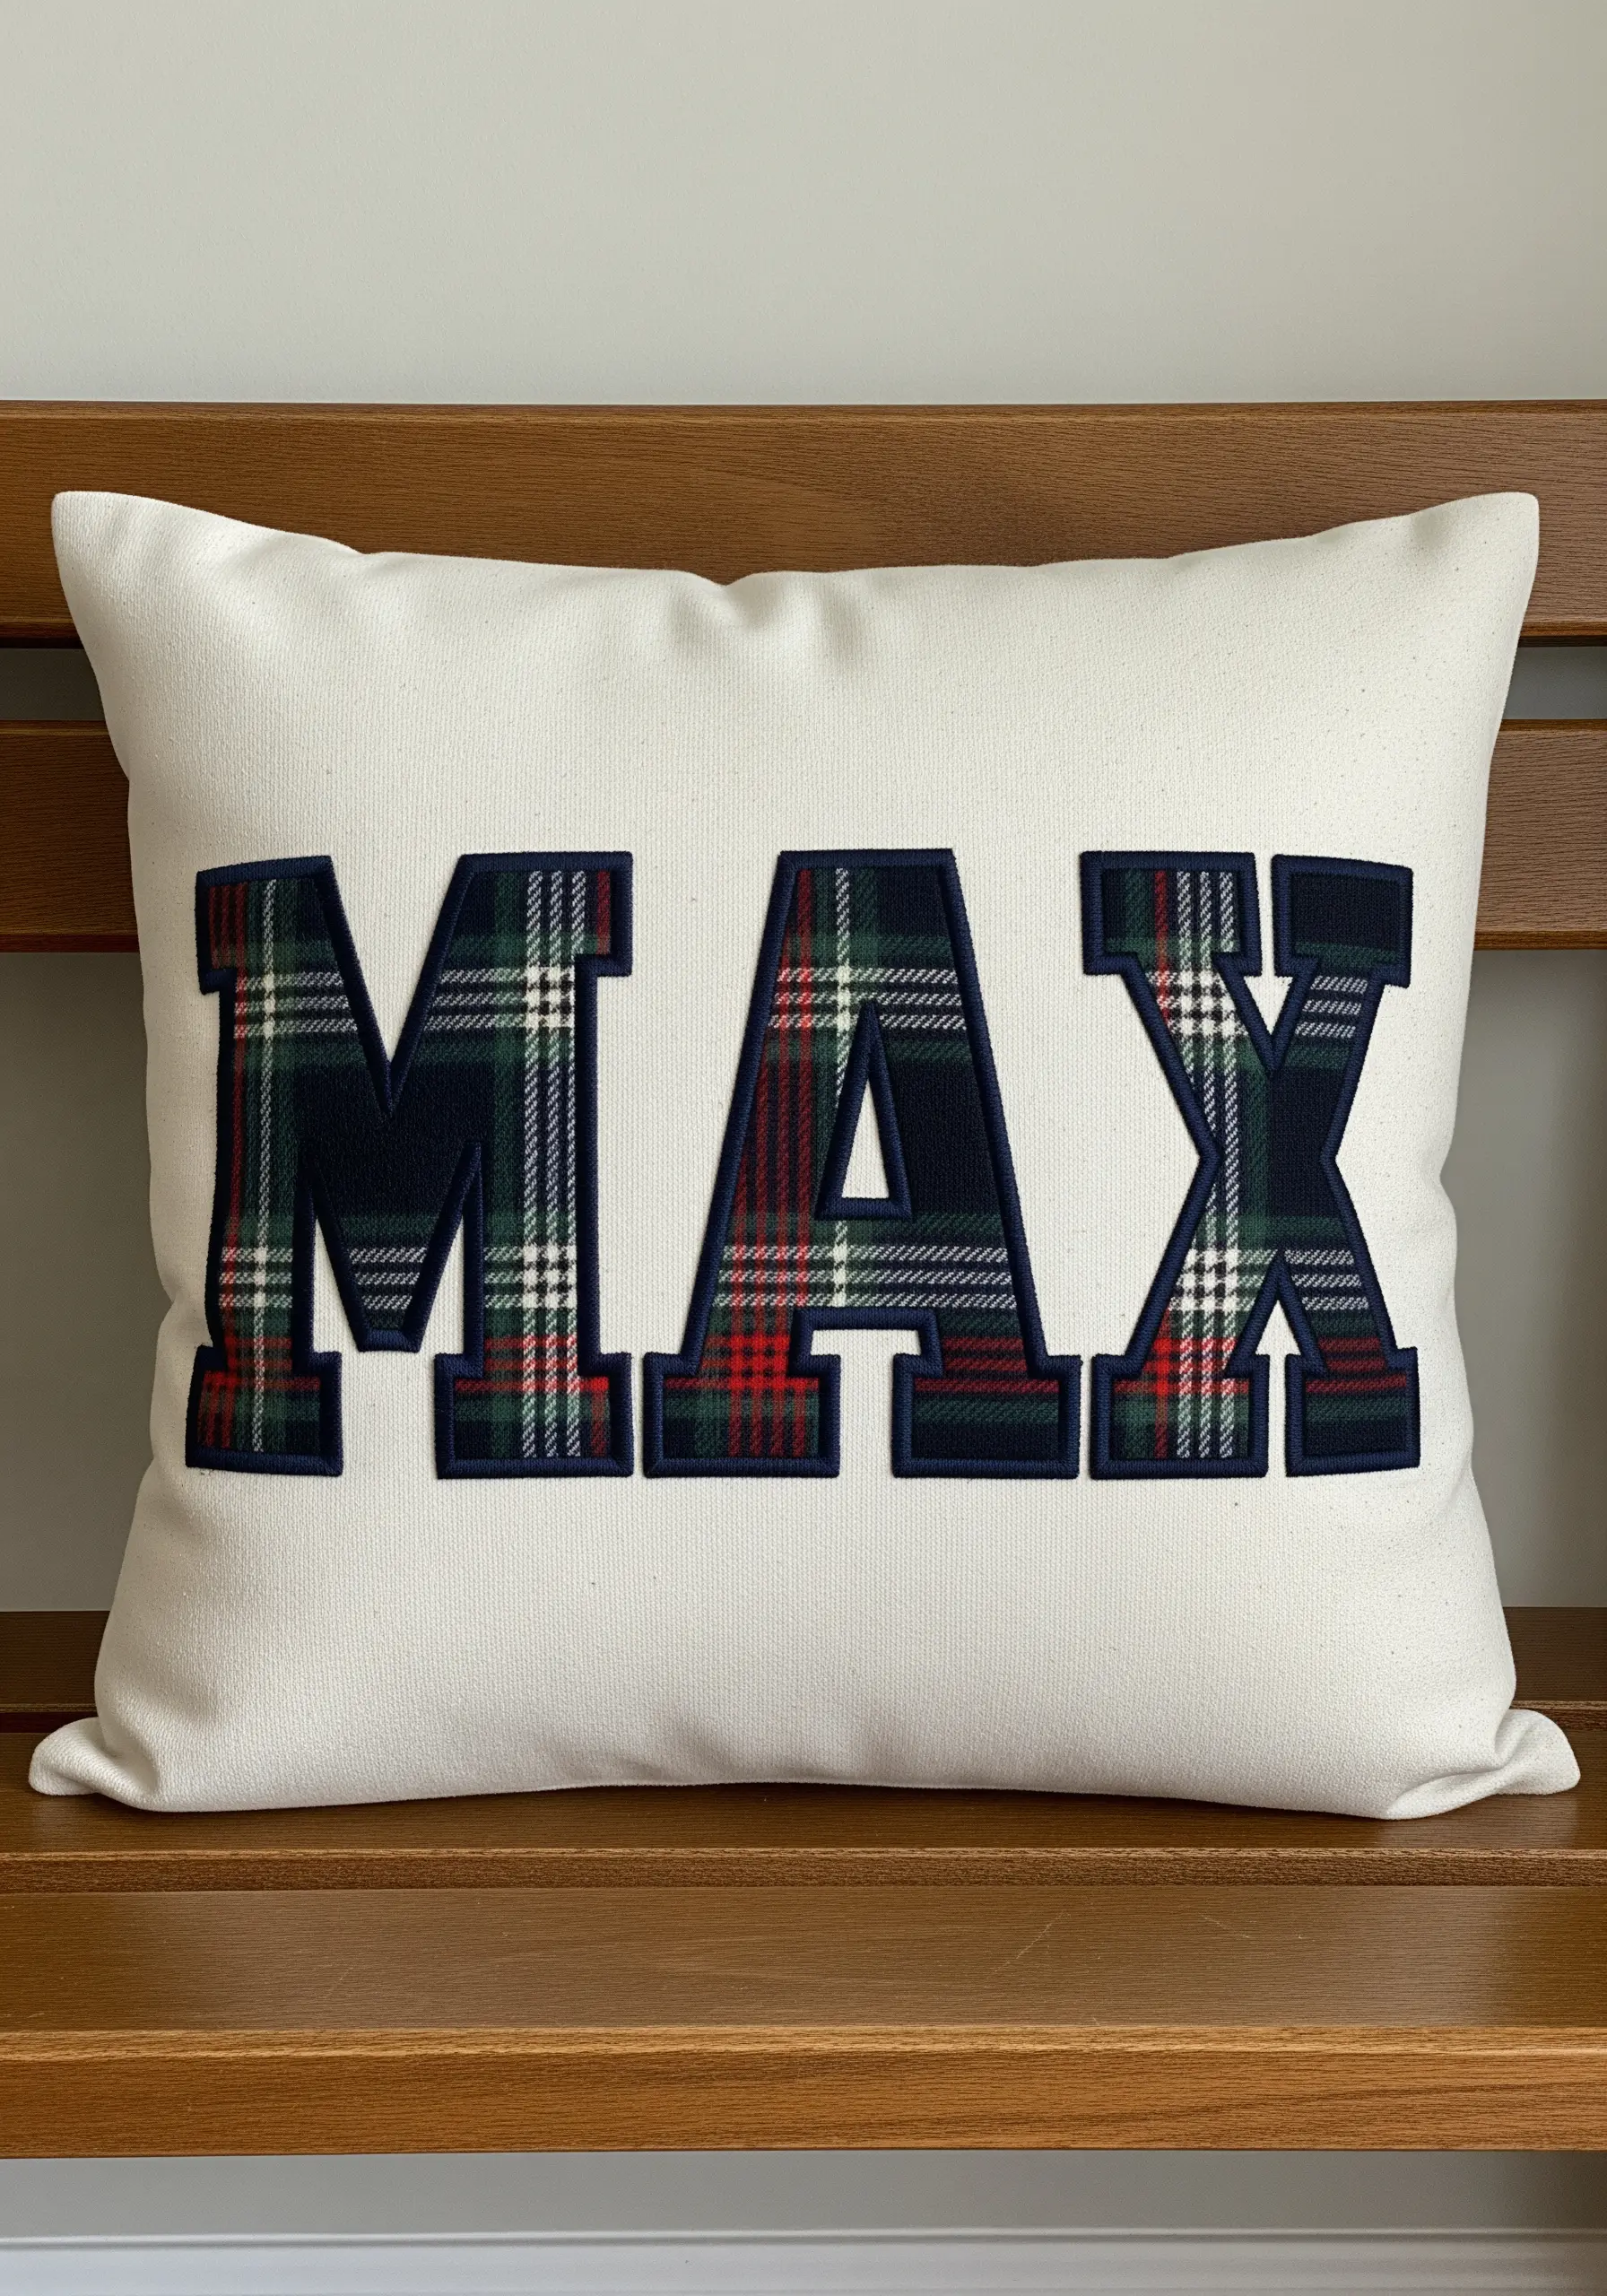
Applique allows you to introduce bold patterns like tartan without complex stitching; the key is a dense satin stitch border that completely encases the raw edges of the fabric letters.
To ensure your letters stand out against a plain background, use a fusible web on the back of the plaid before stitching to prevent fraying and shifting.
This technique is one of those creative ways to turn old fabrics into fun embroidery projects, letting you repurpose flannel shirts into bold typographic statements.
5. Punch needle loop texture gradients

Punch needle embroidery offers a rug-like texture that is durable and cozy; varying your loop height can add physical depth to the letter itself.
Focus on your color transition; using four shades of yarn from dark rust to cream creates a retro 70s aesthetic that feels warm and inviting.
Explore textured yarn wall art techniques that will elevate your space and apply them to cushions by using a tightly woven monks cloth backing to secure the yarn loops permanently.
6. Chain stitch retro typography
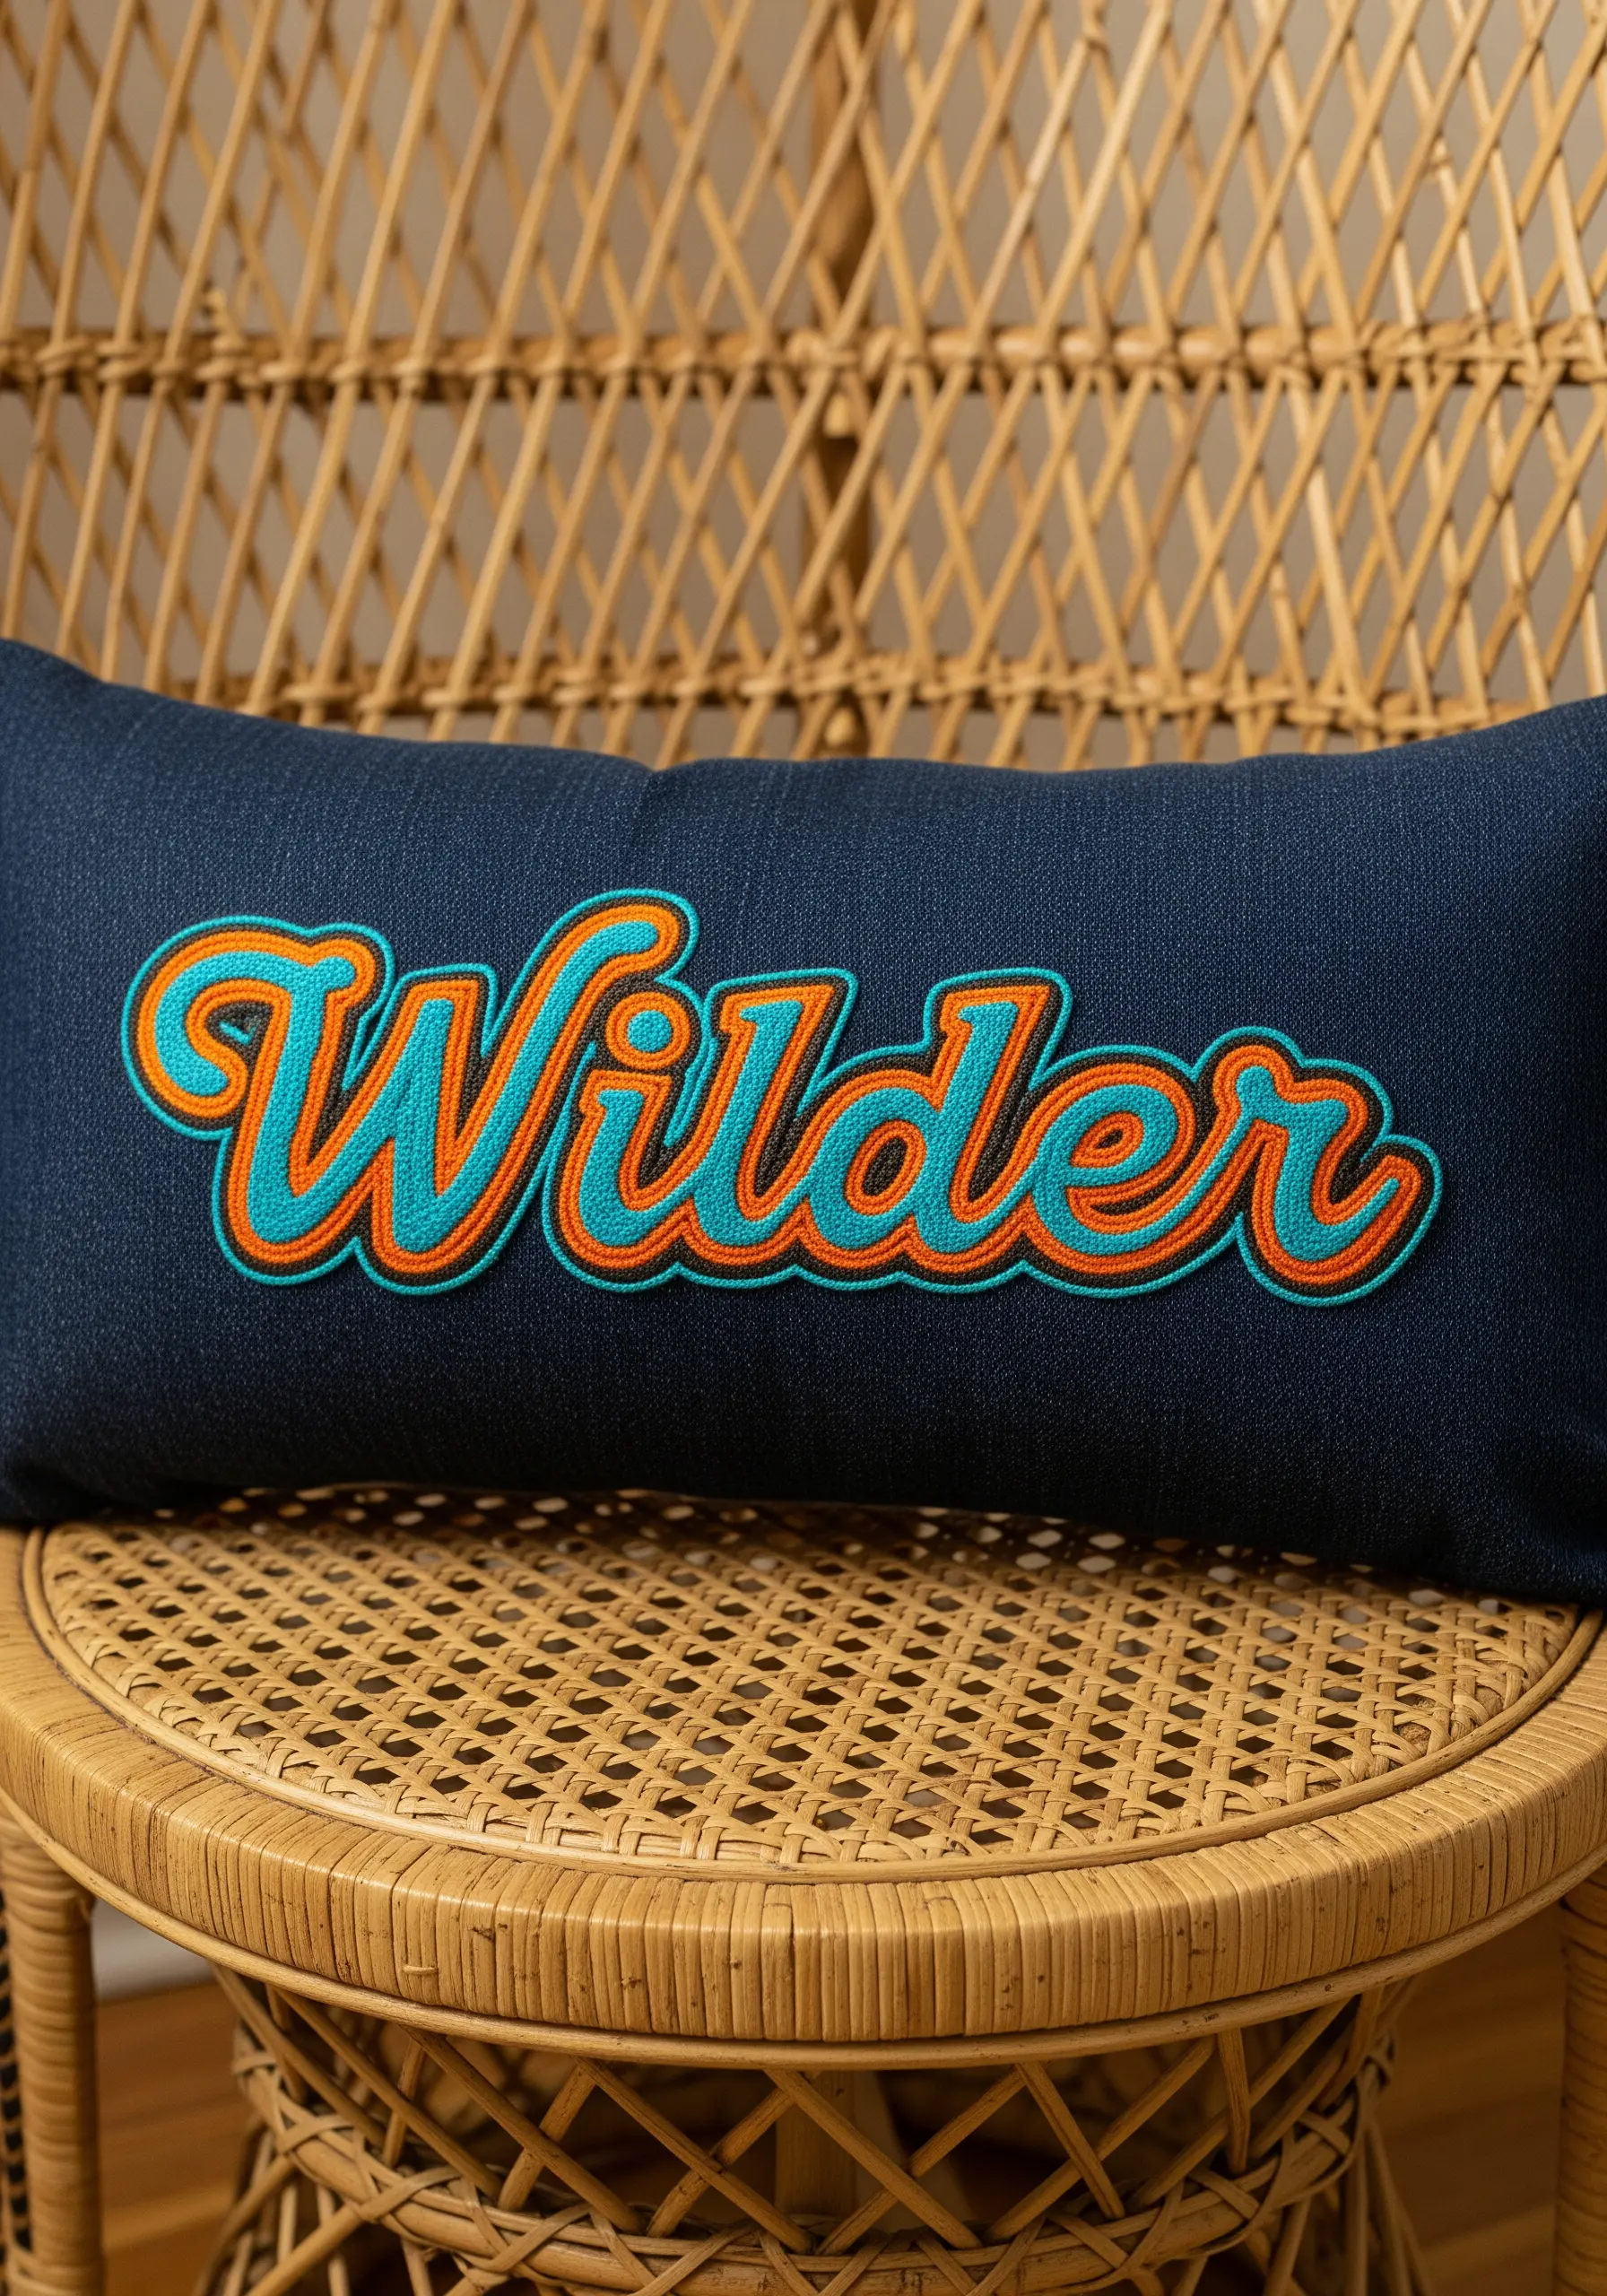
The chain stitch is your best friend for retro script; its linked structure mimics the fluidity of handwriting and provides a bold, continuous line that satin stitch often lacks.
Use a contrasting outline color, like the teal against the orange here, to make the text pop off the denim background.
These thread-based typography ideas for bold modern quotes that pop on canvas apply perfectly to denim, where you need a thicker thread weight (like pearl cotton) to stand up to the heavy fabric grain.
7. Heirloom whitework and lace integration
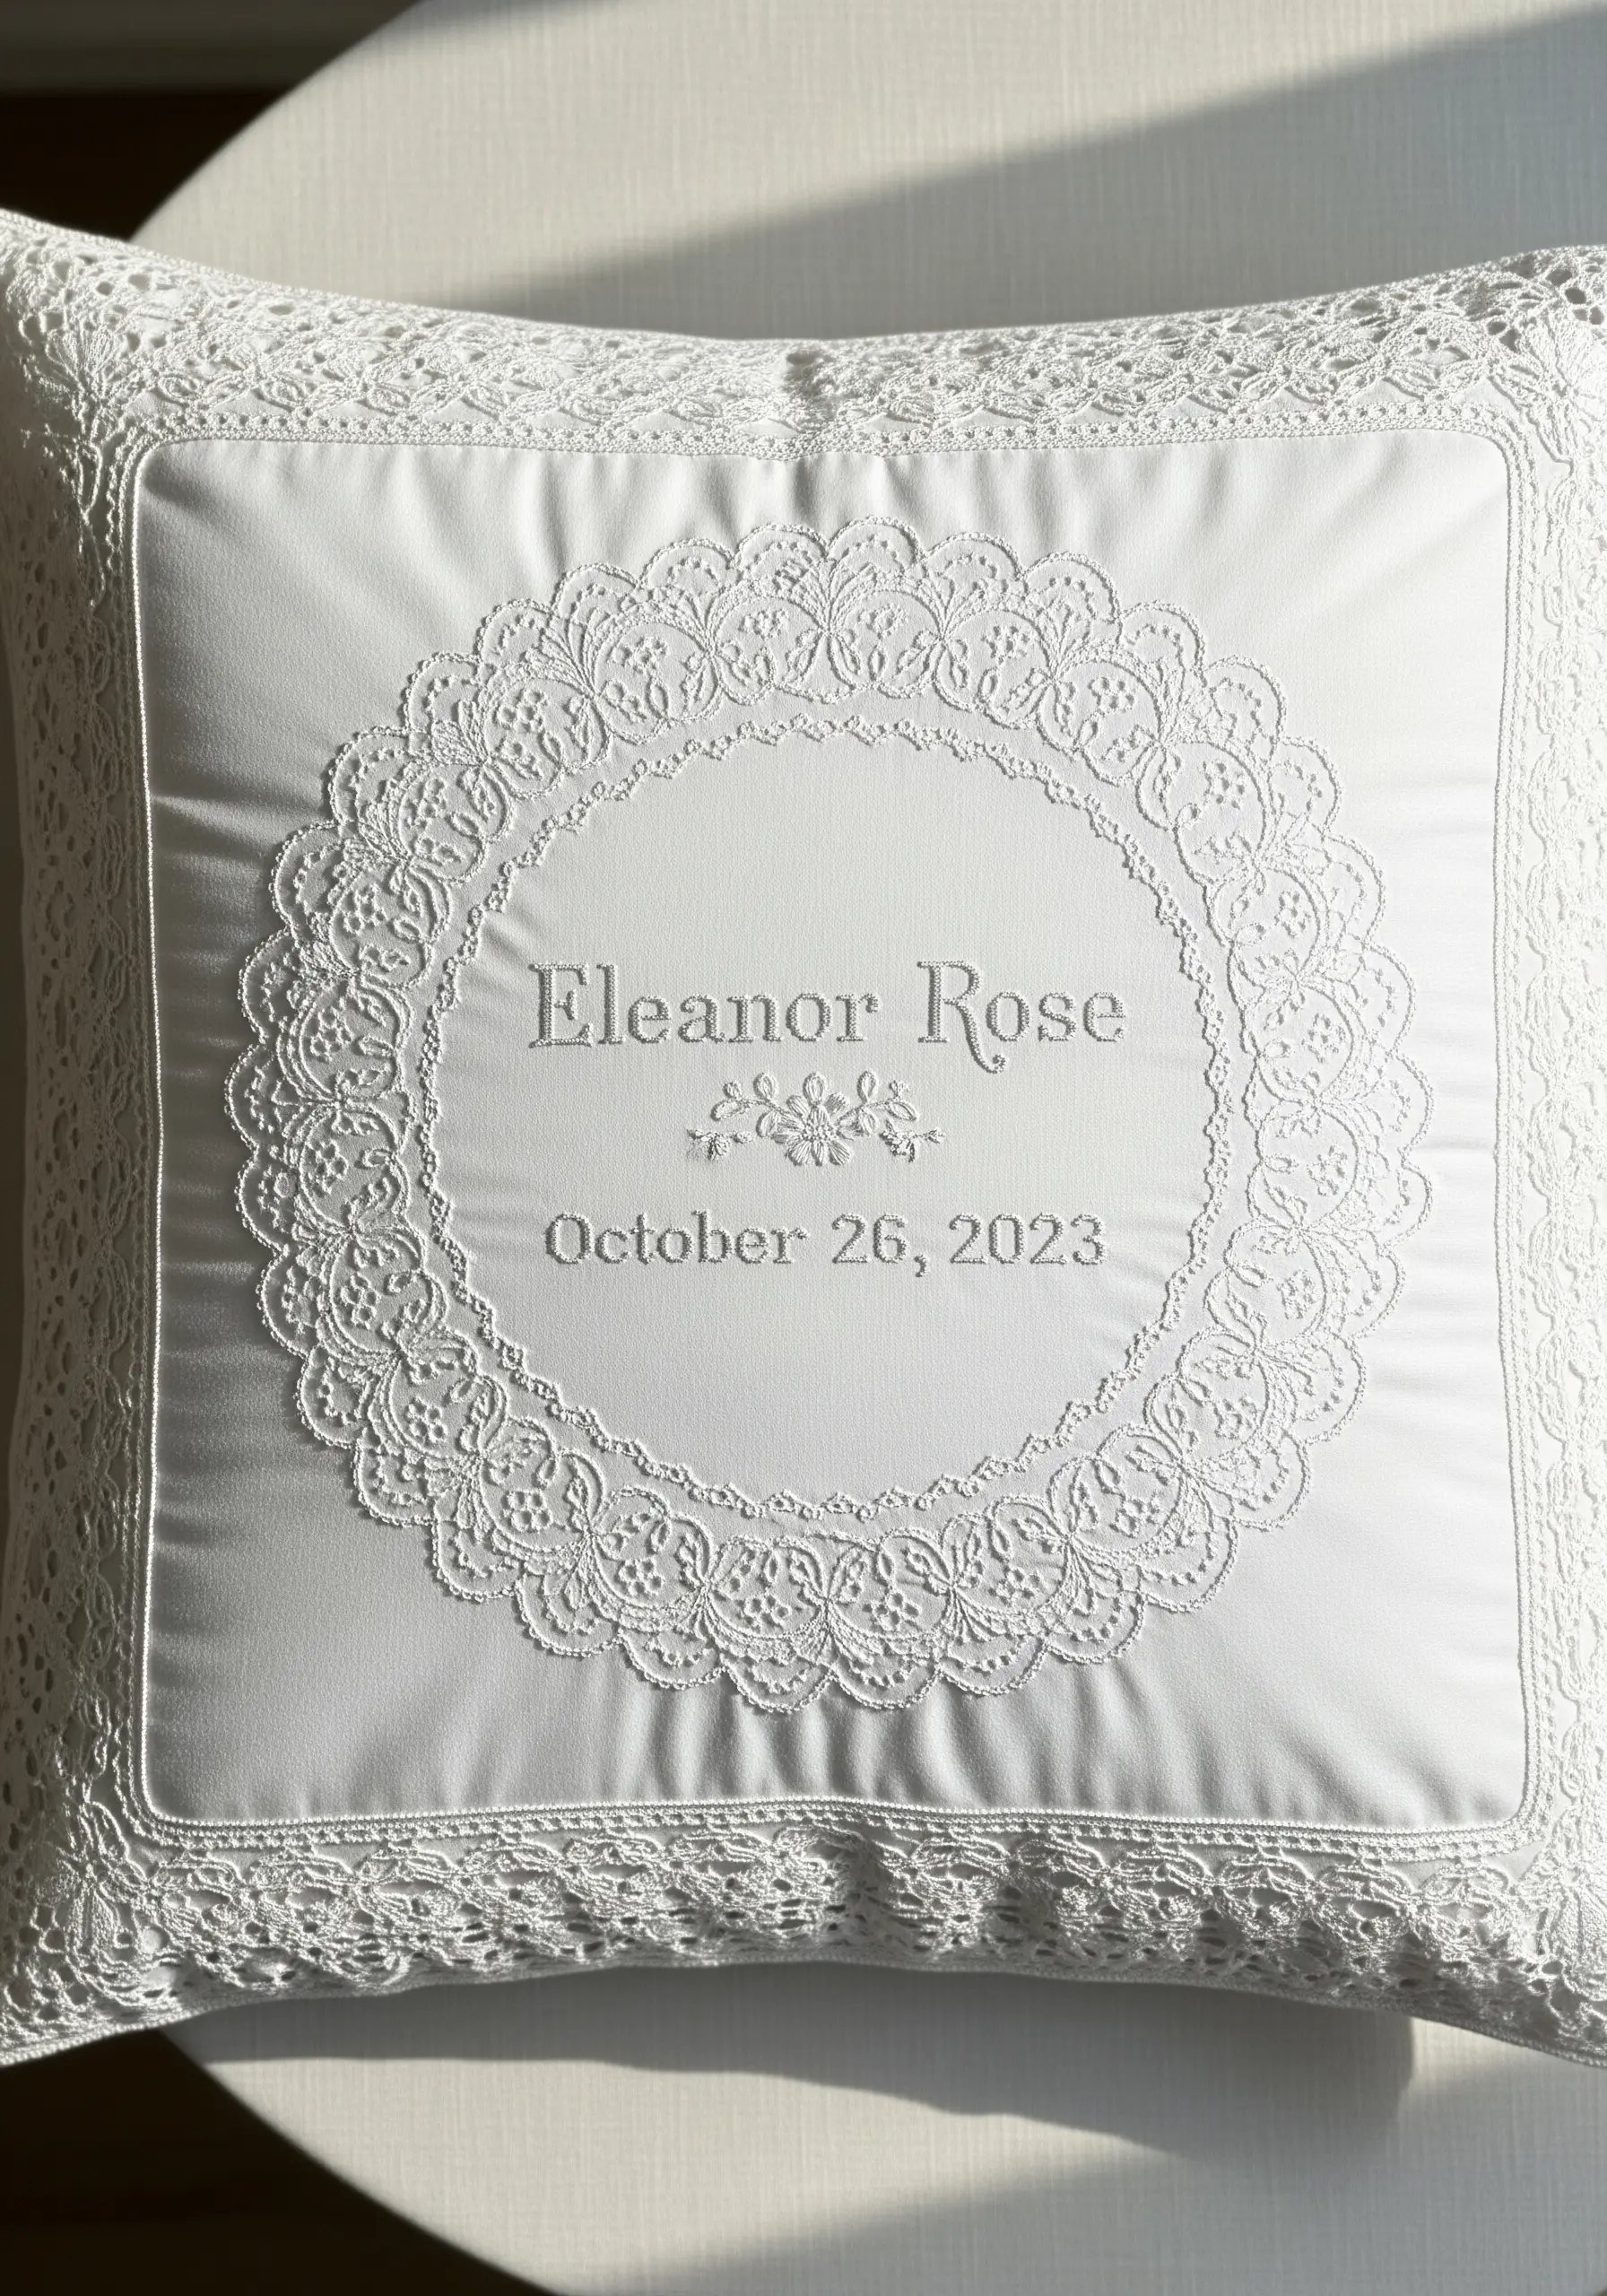
For a timeless keepsake, focus on precision; the font here is a classic serif that requires very short split stitches to navigate the sharp corners and serifs cleanly.
Integrating a lace border frames the text naturally; ensure your embroidery is centered perfectly within the lace motif before you take a single stitch.
This style of handmade embroidery gifts that will be treasured forever relies on high-quality mercerized cotton thread which has a subtle sheen that looks beautiful on white linen.
8. Geometric stitching on chunky knit
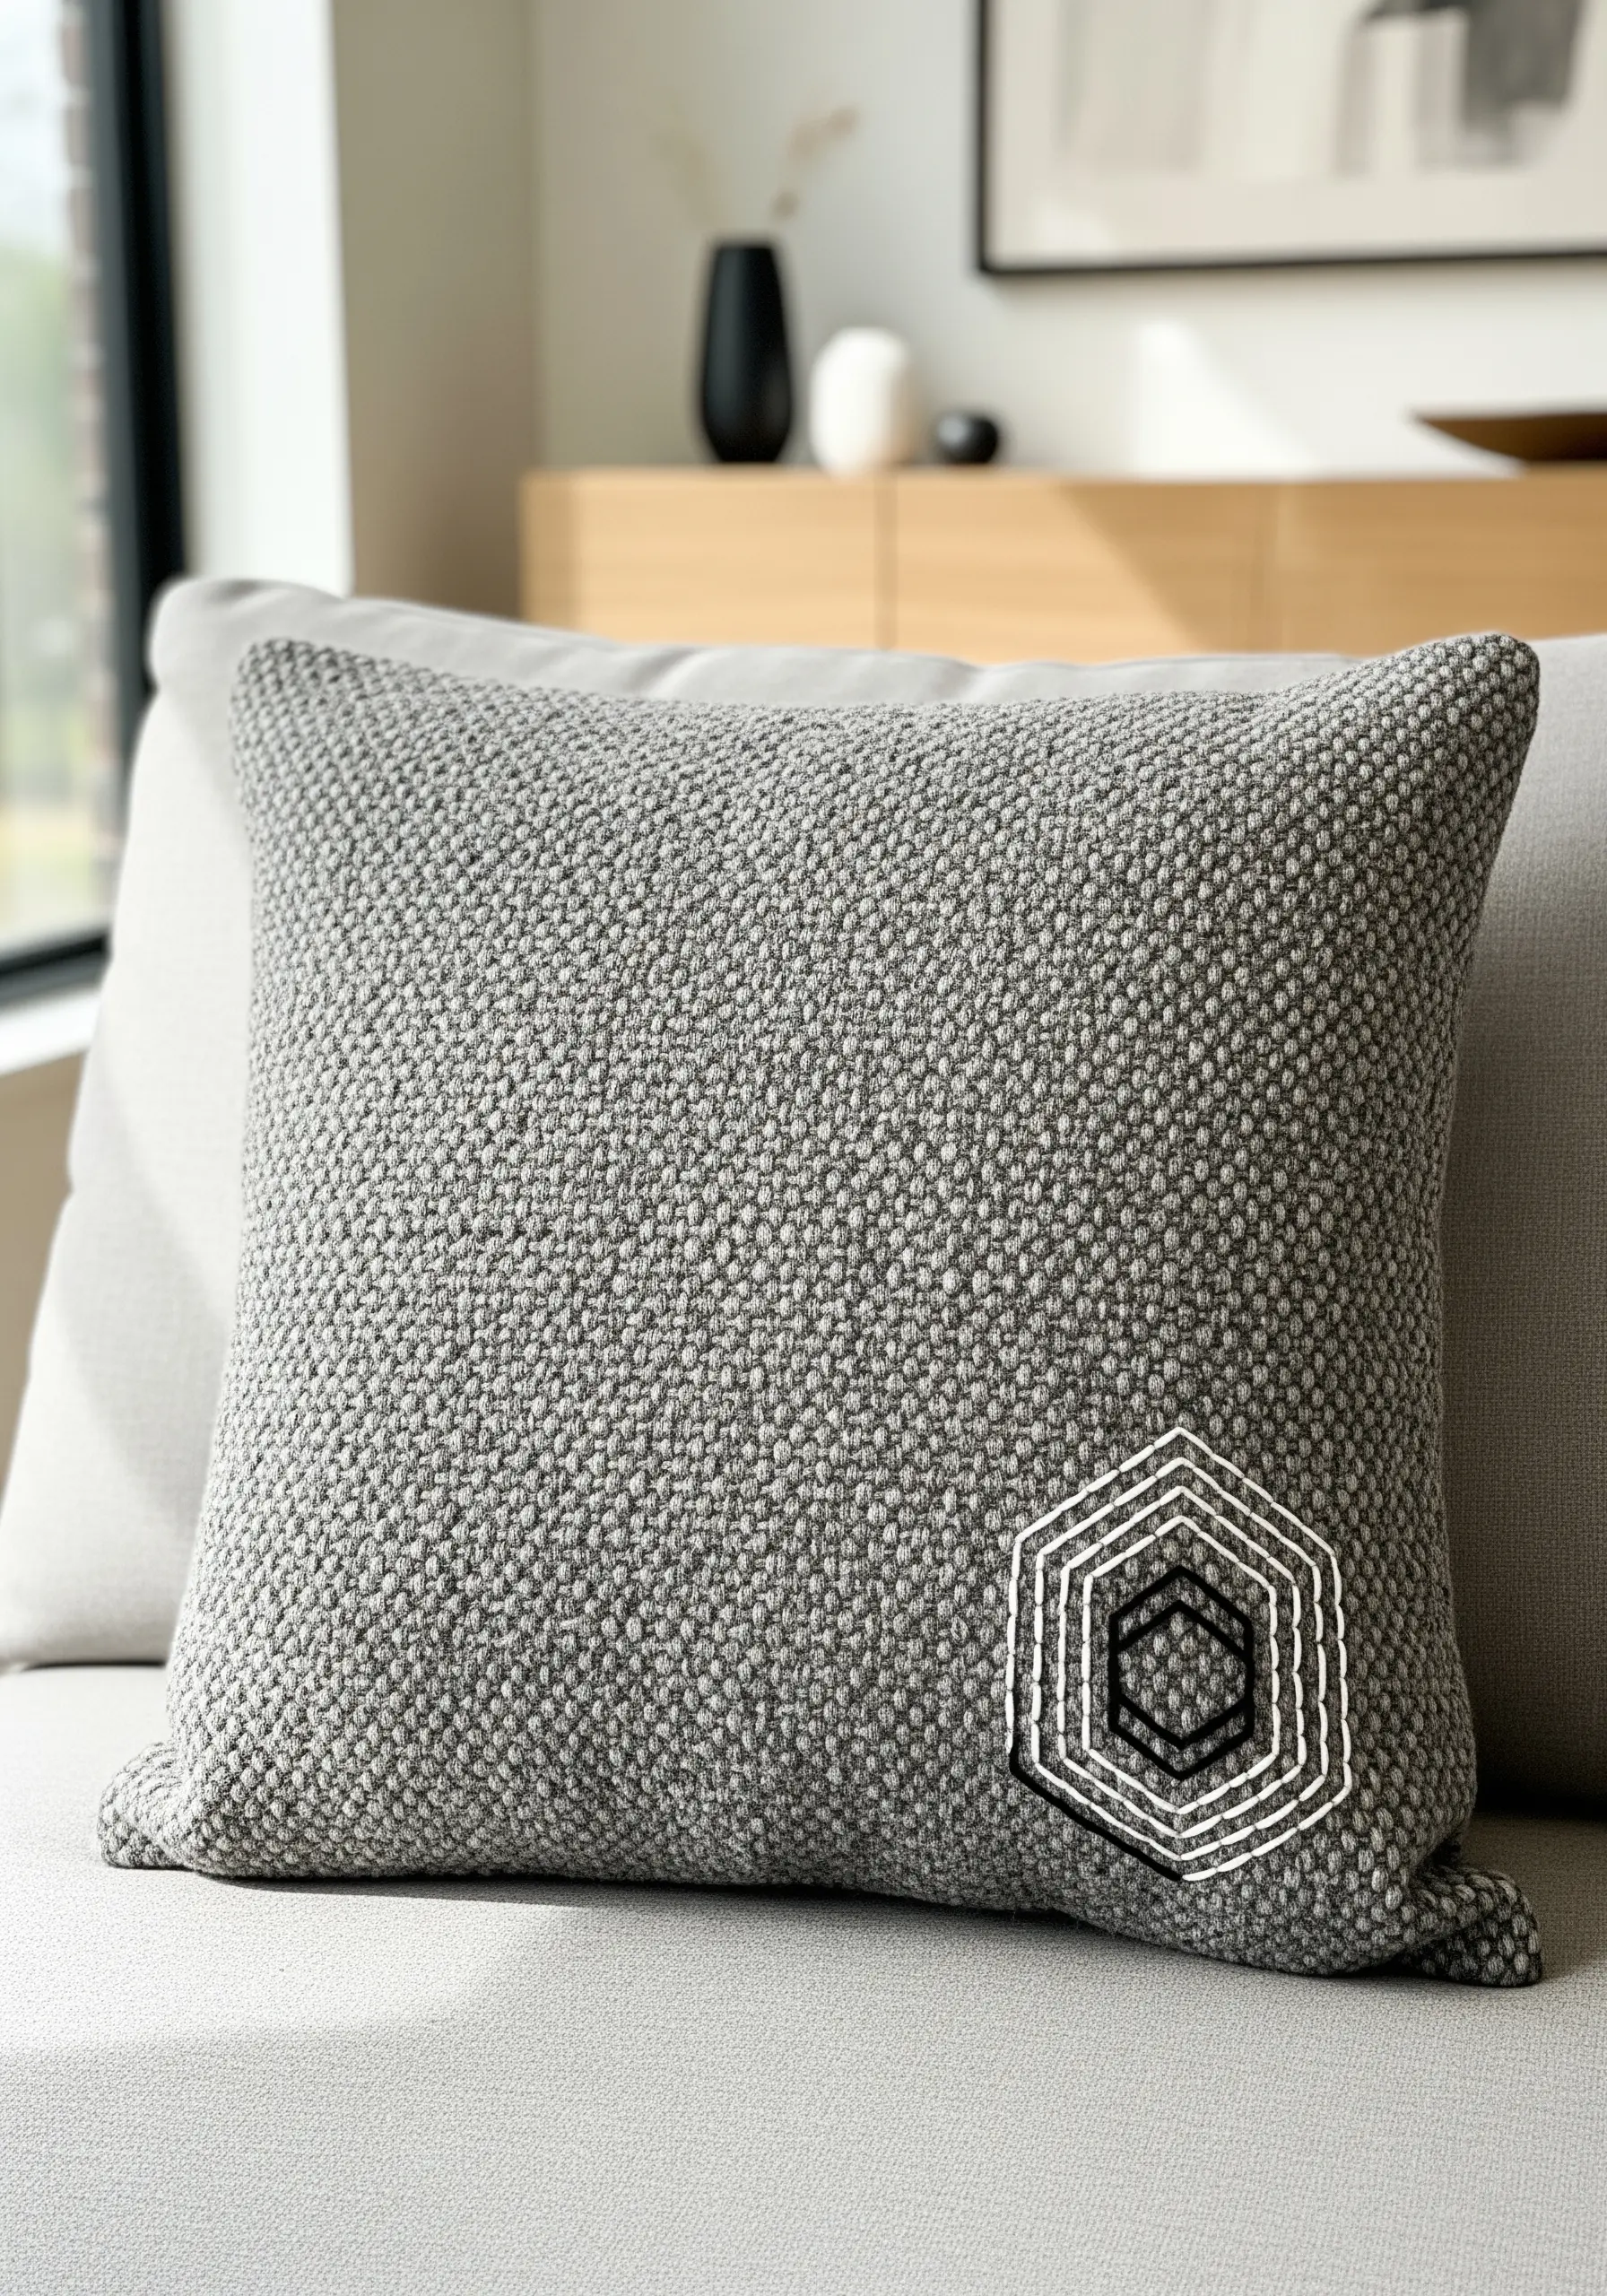
Embroidering directly onto a chunky knit requires a ‘floating’ technique; do not pull your thread tight, or you will distort the weave of the cushion cover.
Use a tapestry needle with a blunt tip to glide between the knit loops rather than piercing the yarn itself.
These modern embroidery stitches every beginner needs to make aesthetic apartment decor prove that simple geometric running stitches can look architectural and sophisticated when scaled up for texture.
9. Mixed metallic outlines for nurseries

Softness is key for nursery decor, so instead of a full fill, use a metallic outline stitch to define the text without creating a scratchy surface.
The combination of silver and gold threads adds a celestial shimmer that keeps the design feeling dreamy and light.
Check out nursery friendly textile wall art patterns for soft dreamy baby rooms and apply them to shaped cushions, ensuring you knot your threads securely inside so they withstand washing.
10. Bold script over floral prints
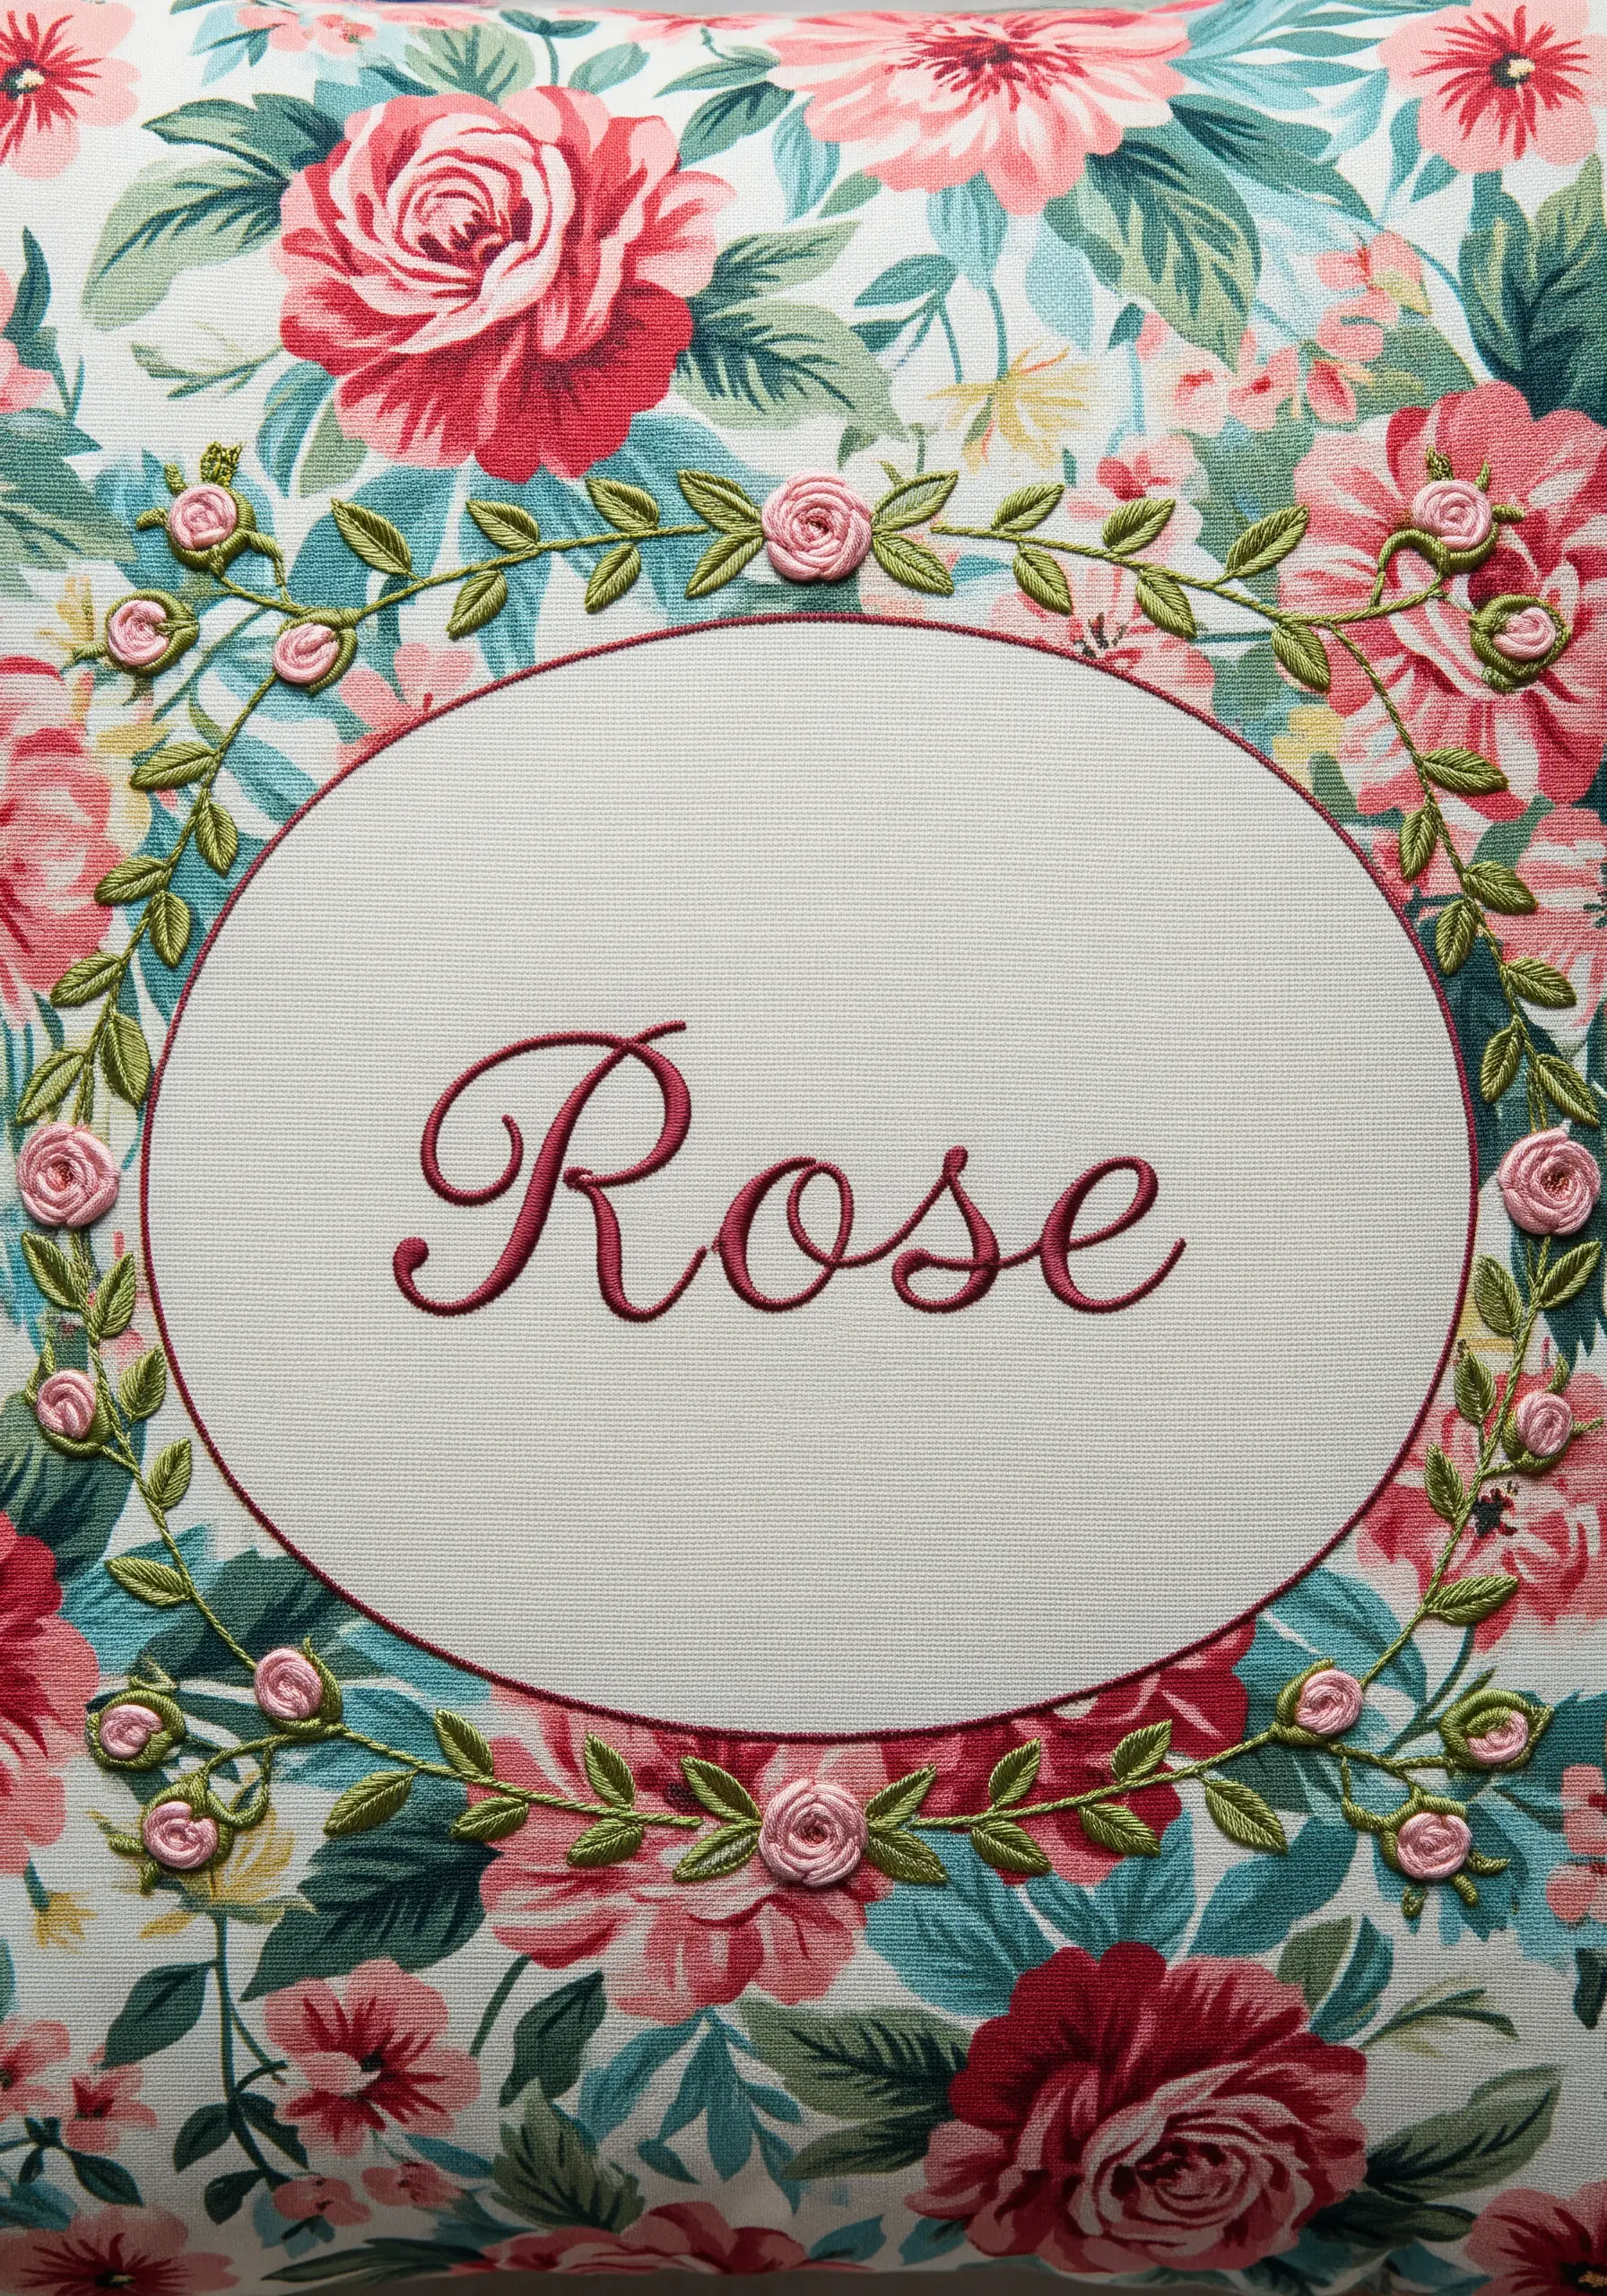
Don’t be afraid to stitch over a busy print; the trick is to choose a thread color that exists in the pattern but is darker or more saturated to ensure legibility.
Use a heavy stem stitch or a whipped backstitch to create a line thick enough to sit on top of the floral chaos without getting lost.
You can adapt romantic rose embroidery patterns to personalize wedding gifts in the most elegant way by using the fabric’s own print as a guide for placement, stitching the name inside a natural opening in the design.
11. Leather applique on herringbone

Mixing textures creates a masculine, library-chic aesthetic; cut your initials from leather scraps and pre-punch holes with an awl before stitching them down to save your fingers.
The cross-stitch details in leather cord add a rustic, hand-finished look that complements the structured herringbone wool.
Explore mixed media techniques for embroidery lovers who crave unique art to learn how to combine rigid materials like leather with soft textiles for a durable, high-end finish.
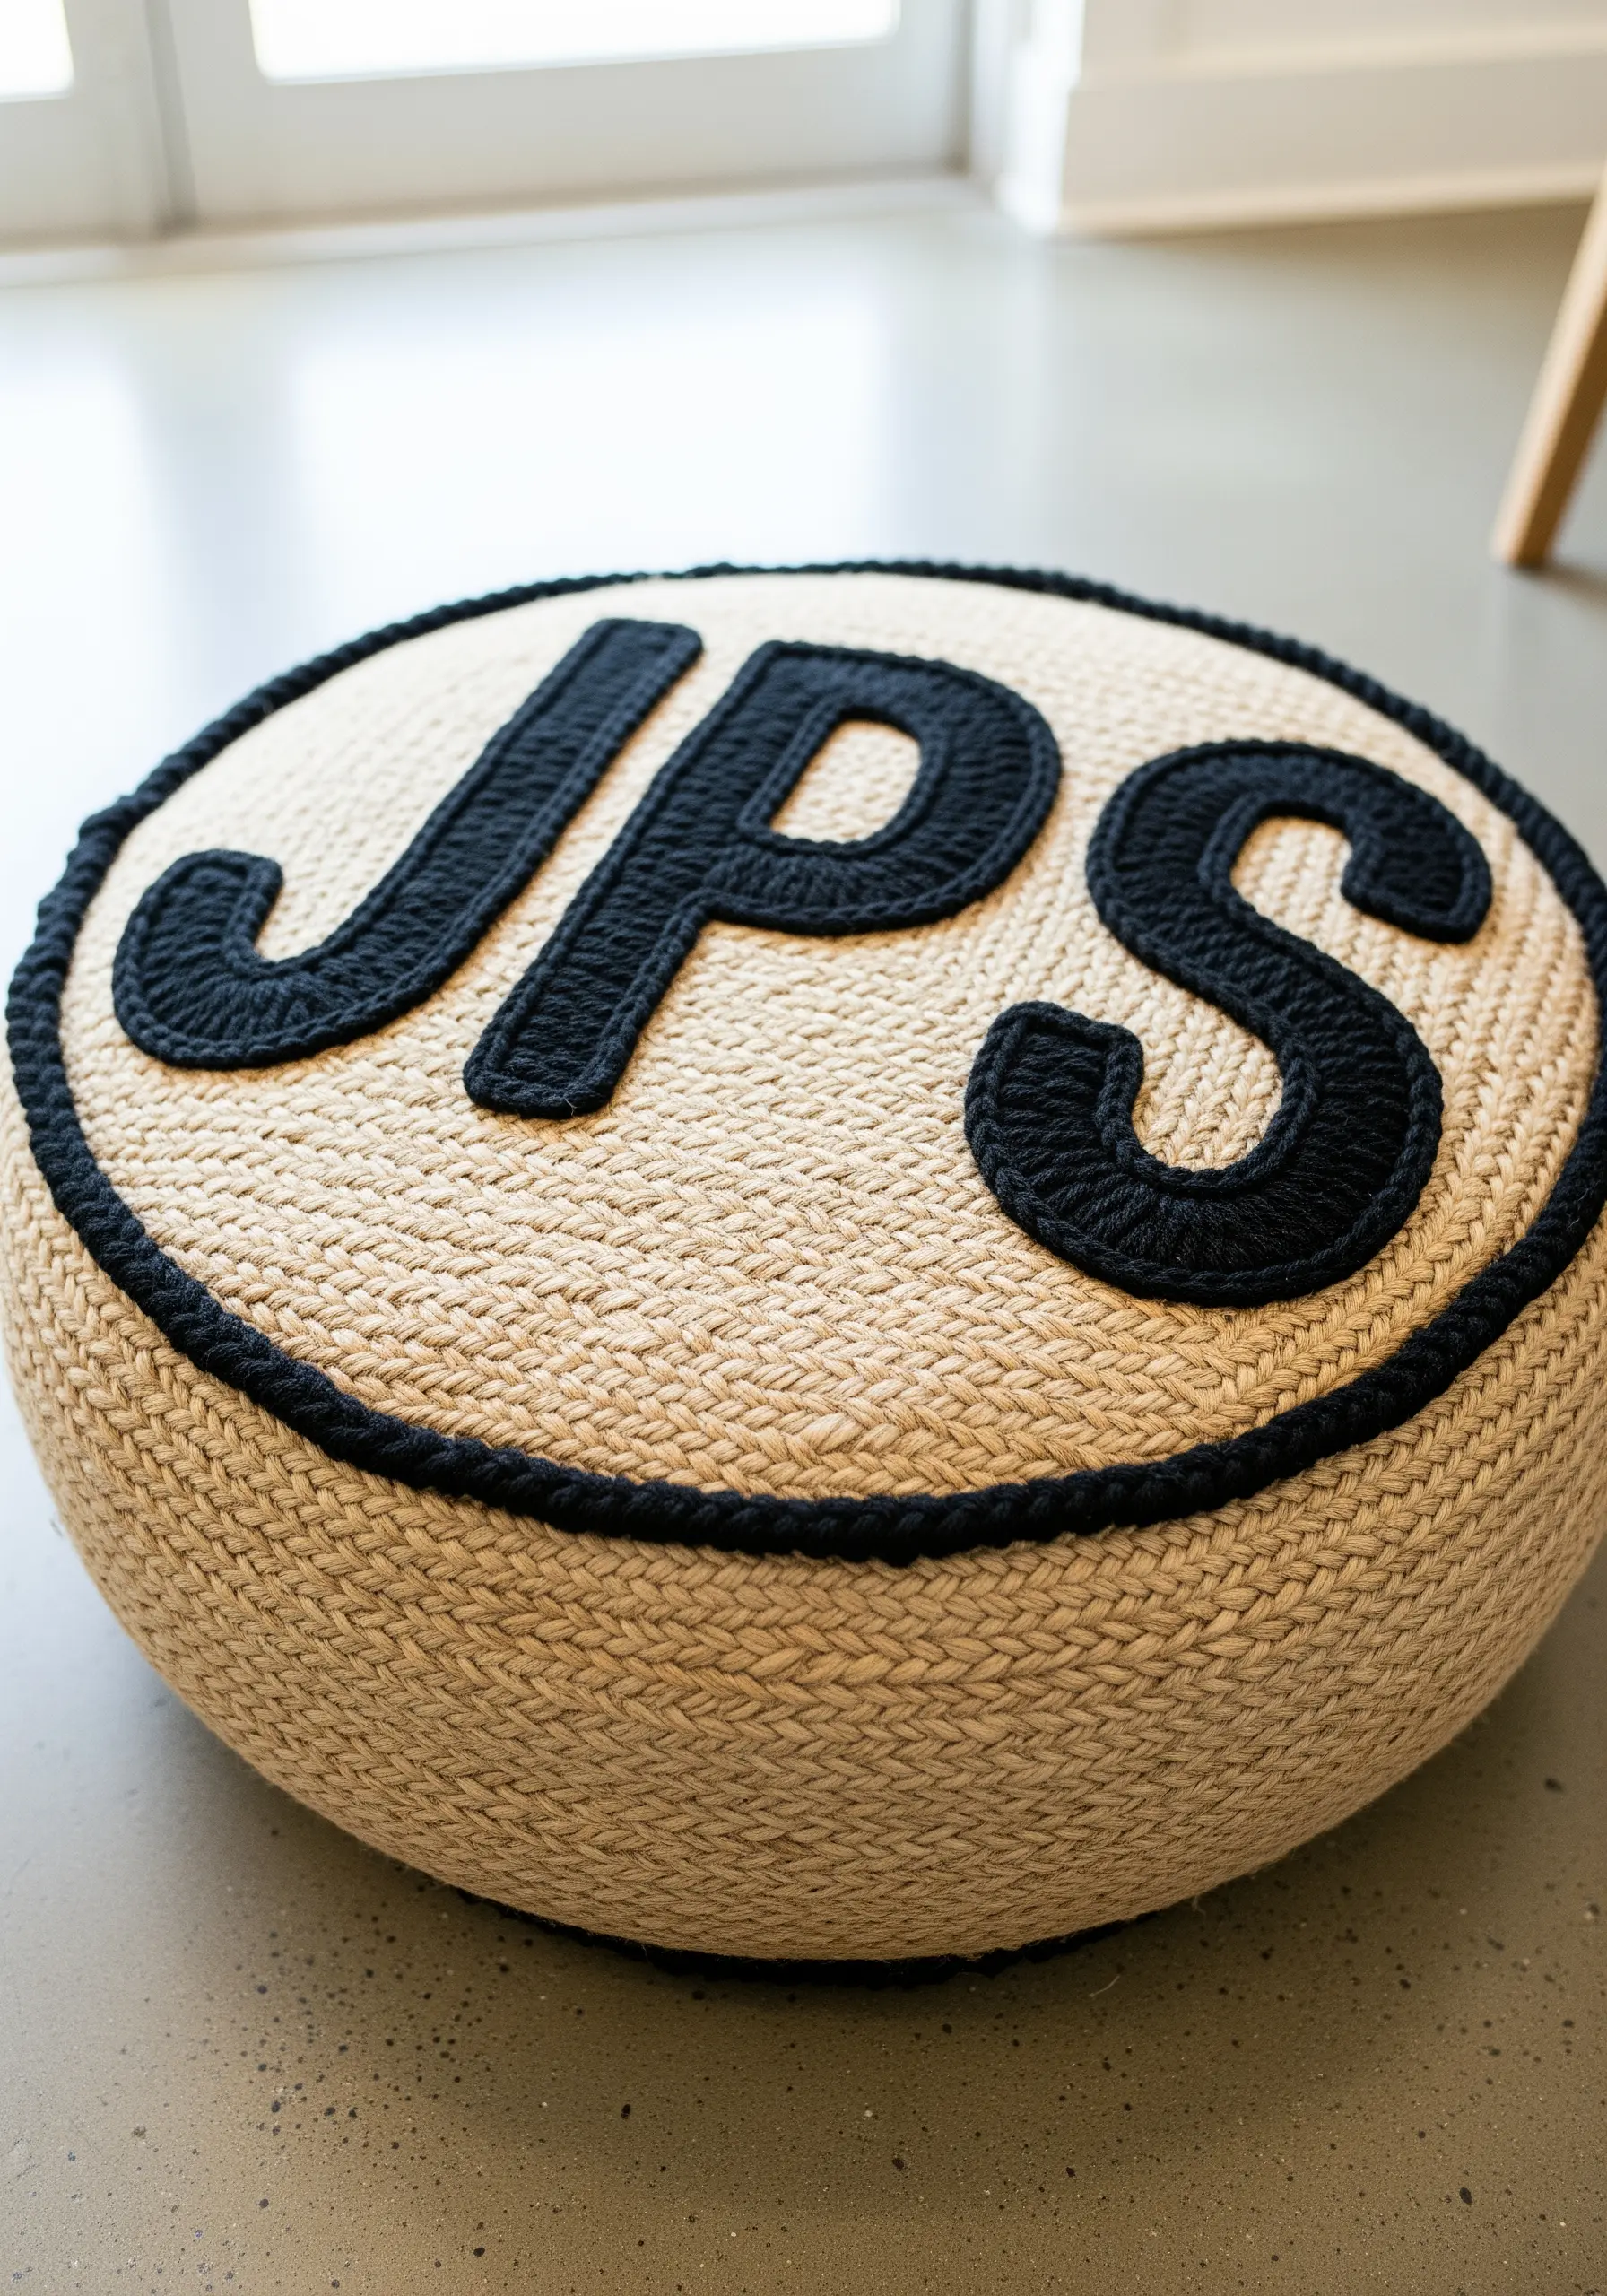
12. Rope couching for bold texture
Instead of stitching with floss, try couching a thick cotton rope to form your letter; this creates an instant 3D effect that is tactile and modern.
Use a matching thread color to tack the rope down invisibly, or a contrasting color to add a decorative twist to the coil.
For more impact, look at stunning yarn wall art projects you can finish in a weekend—the same couching techniques apply perfectly to creating durable, statement cushions like this one.
13. Negative space in sequins

Creating text with sequins isn’t just about sewing them on; it’s about directionality—layer your sequins like fish scales so they catch the light uniformly.
For a readable script, consider using a ‘negative space’ technique where the sequins form the background and the fabric (or a flat matte embroidery fill) forms the letters.
If you love high-impact shine, glitter thread embroidery ideas to glam up night out tops dresses can be adapted for home decor to add that same evening-wear sparkle to your living room.
14. Thread painting on gingham grids
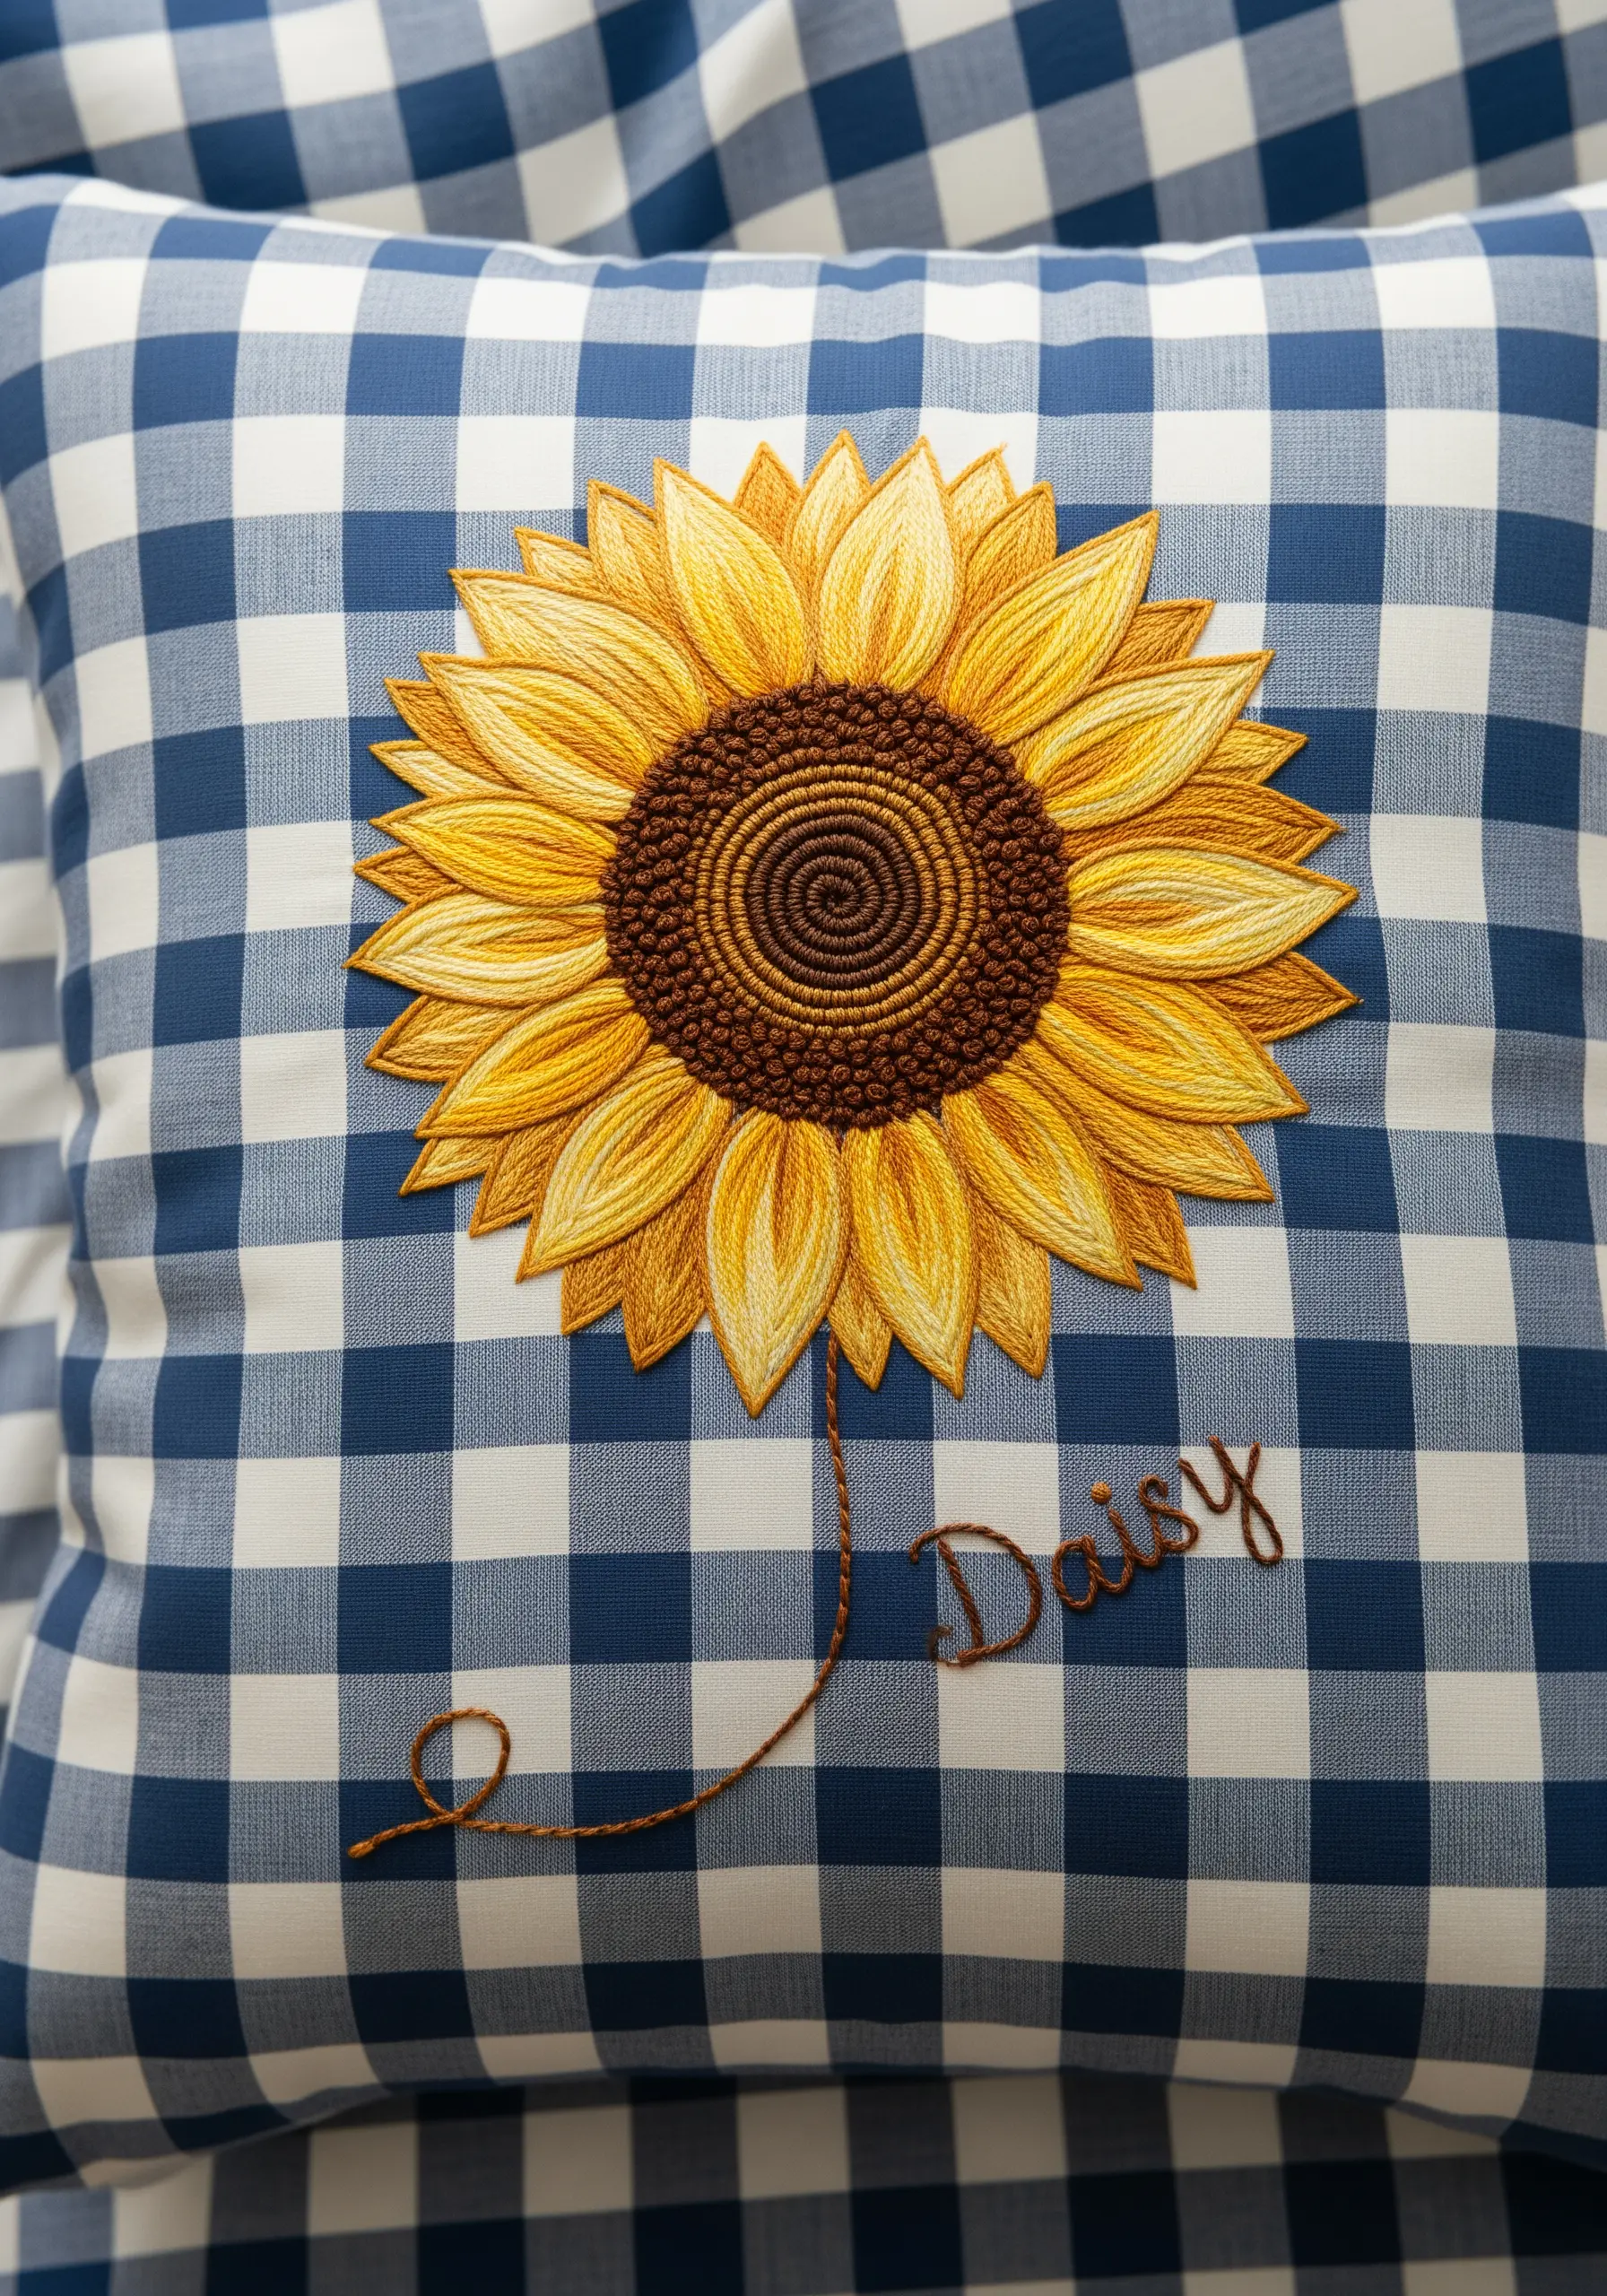
Gingham is the perfect cheat sheet for alignment; use the checks to keep your text perfectly straight and your sunflower centered without extensive measuring.
The sunflower petals utilize thread painting (long and short stitch) to blend yellows and golds, giving depth and realism against the geometric background.
You can use tote bag embroidery stitch combos that look store bought but are easy to do on sturdy cottons like this, as the fabric holds dense stitching without puckering.
15. Collegiate satin stitch for graduates
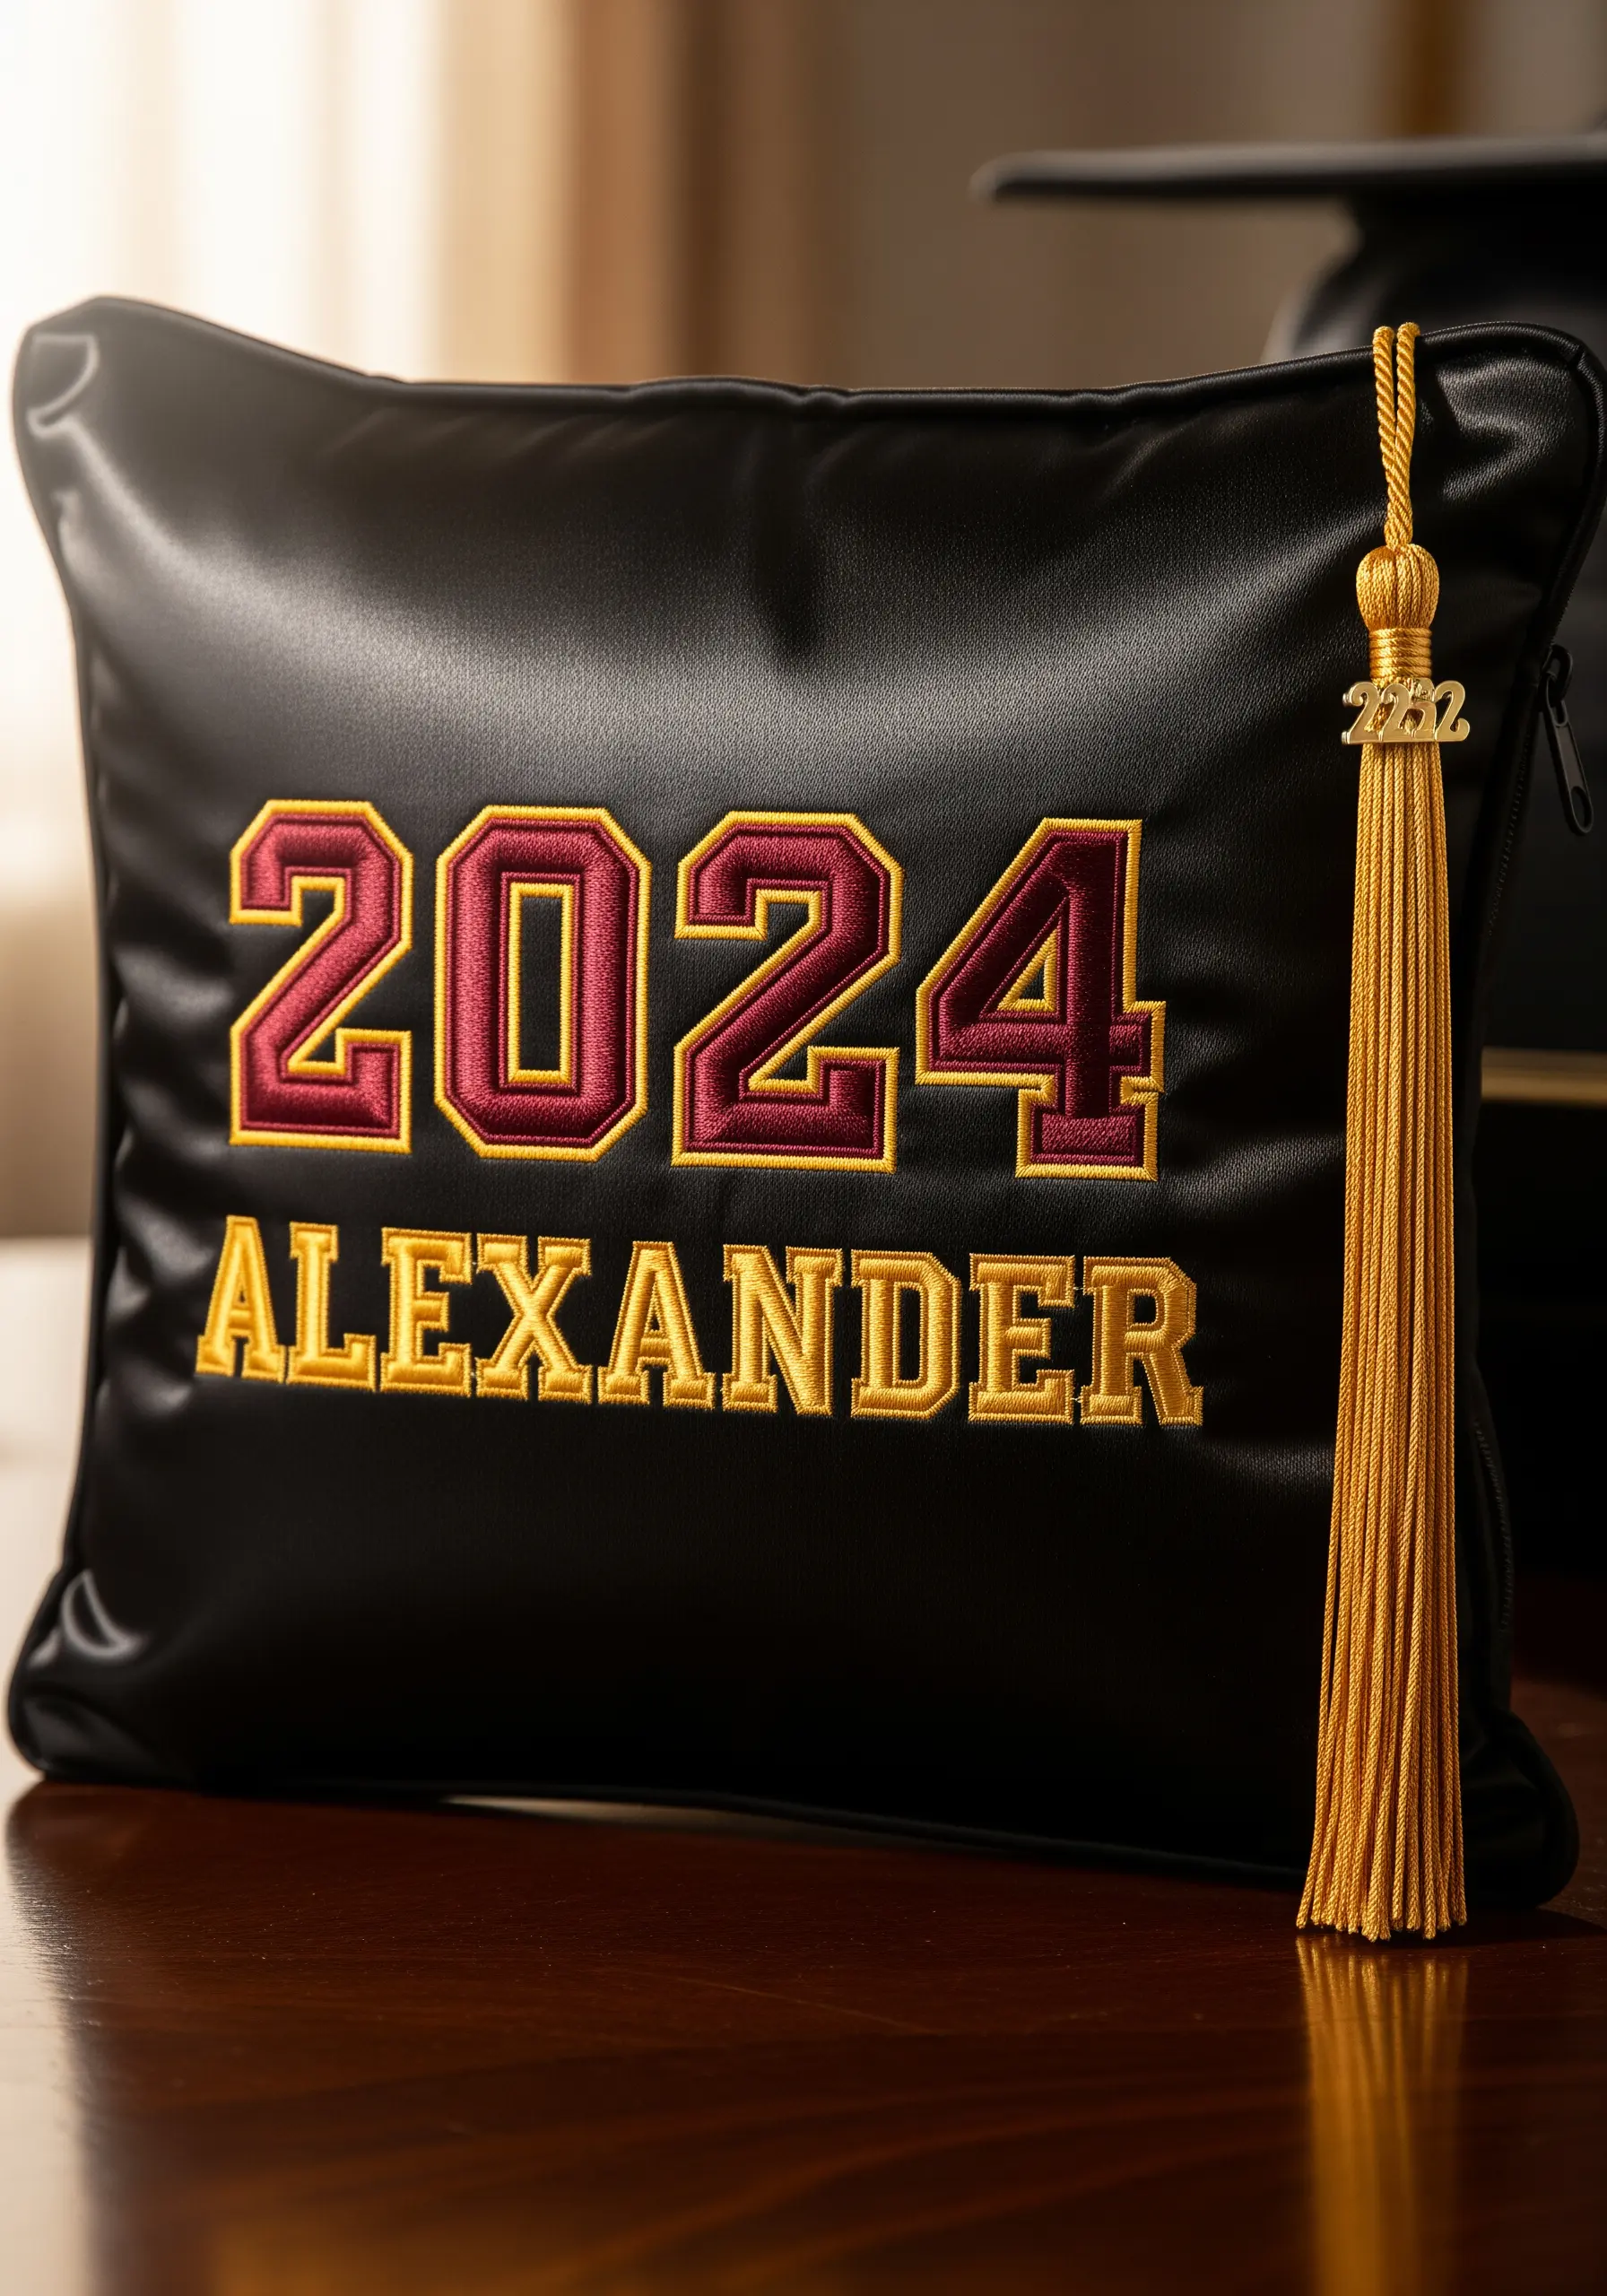
For graduation keepsakes, precision is non-negotiable; use a split stitch underneath your satin stitch to create a sharp, raised edge that mimics professional collegiate patches.
The gold outline isn’t just decorative; it cleans up the edges of the burgundy fill, hiding any unevenness in your satin stitching.
These personalized embroidered gifts you can make in a weekend feel premium when you match the thread colors exactly to the school’s official branding palette.
16. Wildflower palette harmony

When embroidering on colored fabric like sage green, select thread colors that complement rather than compete; deep reds and cornflower blues create a natural, garden-like balance.
Use a lazy daisy stitch for the smaller leaves but tack the loop down at the center to keep the shape open and airy.
These soft neutral nature inspired stitch patterns that bring the outdoors in work best when the central initial is stitched in a shade that harmonizes with the stems, tying the whole wreath together.
17. Geometric neon layering

Modernize your embroidery by abandoning curves; use straight satin stitches in varying lengths to build up geometric block letters.
The electric blue and neon pink threads vibrate against the grey wool; layering thin straight stitches over the main fill adds a kinetic, architectural energy.
Draw inspiration from modern neon thread designs for electrifying streetwear night glow embroidery to bring a street-art aesthetic into your home decor.
18. Gradient typography shading
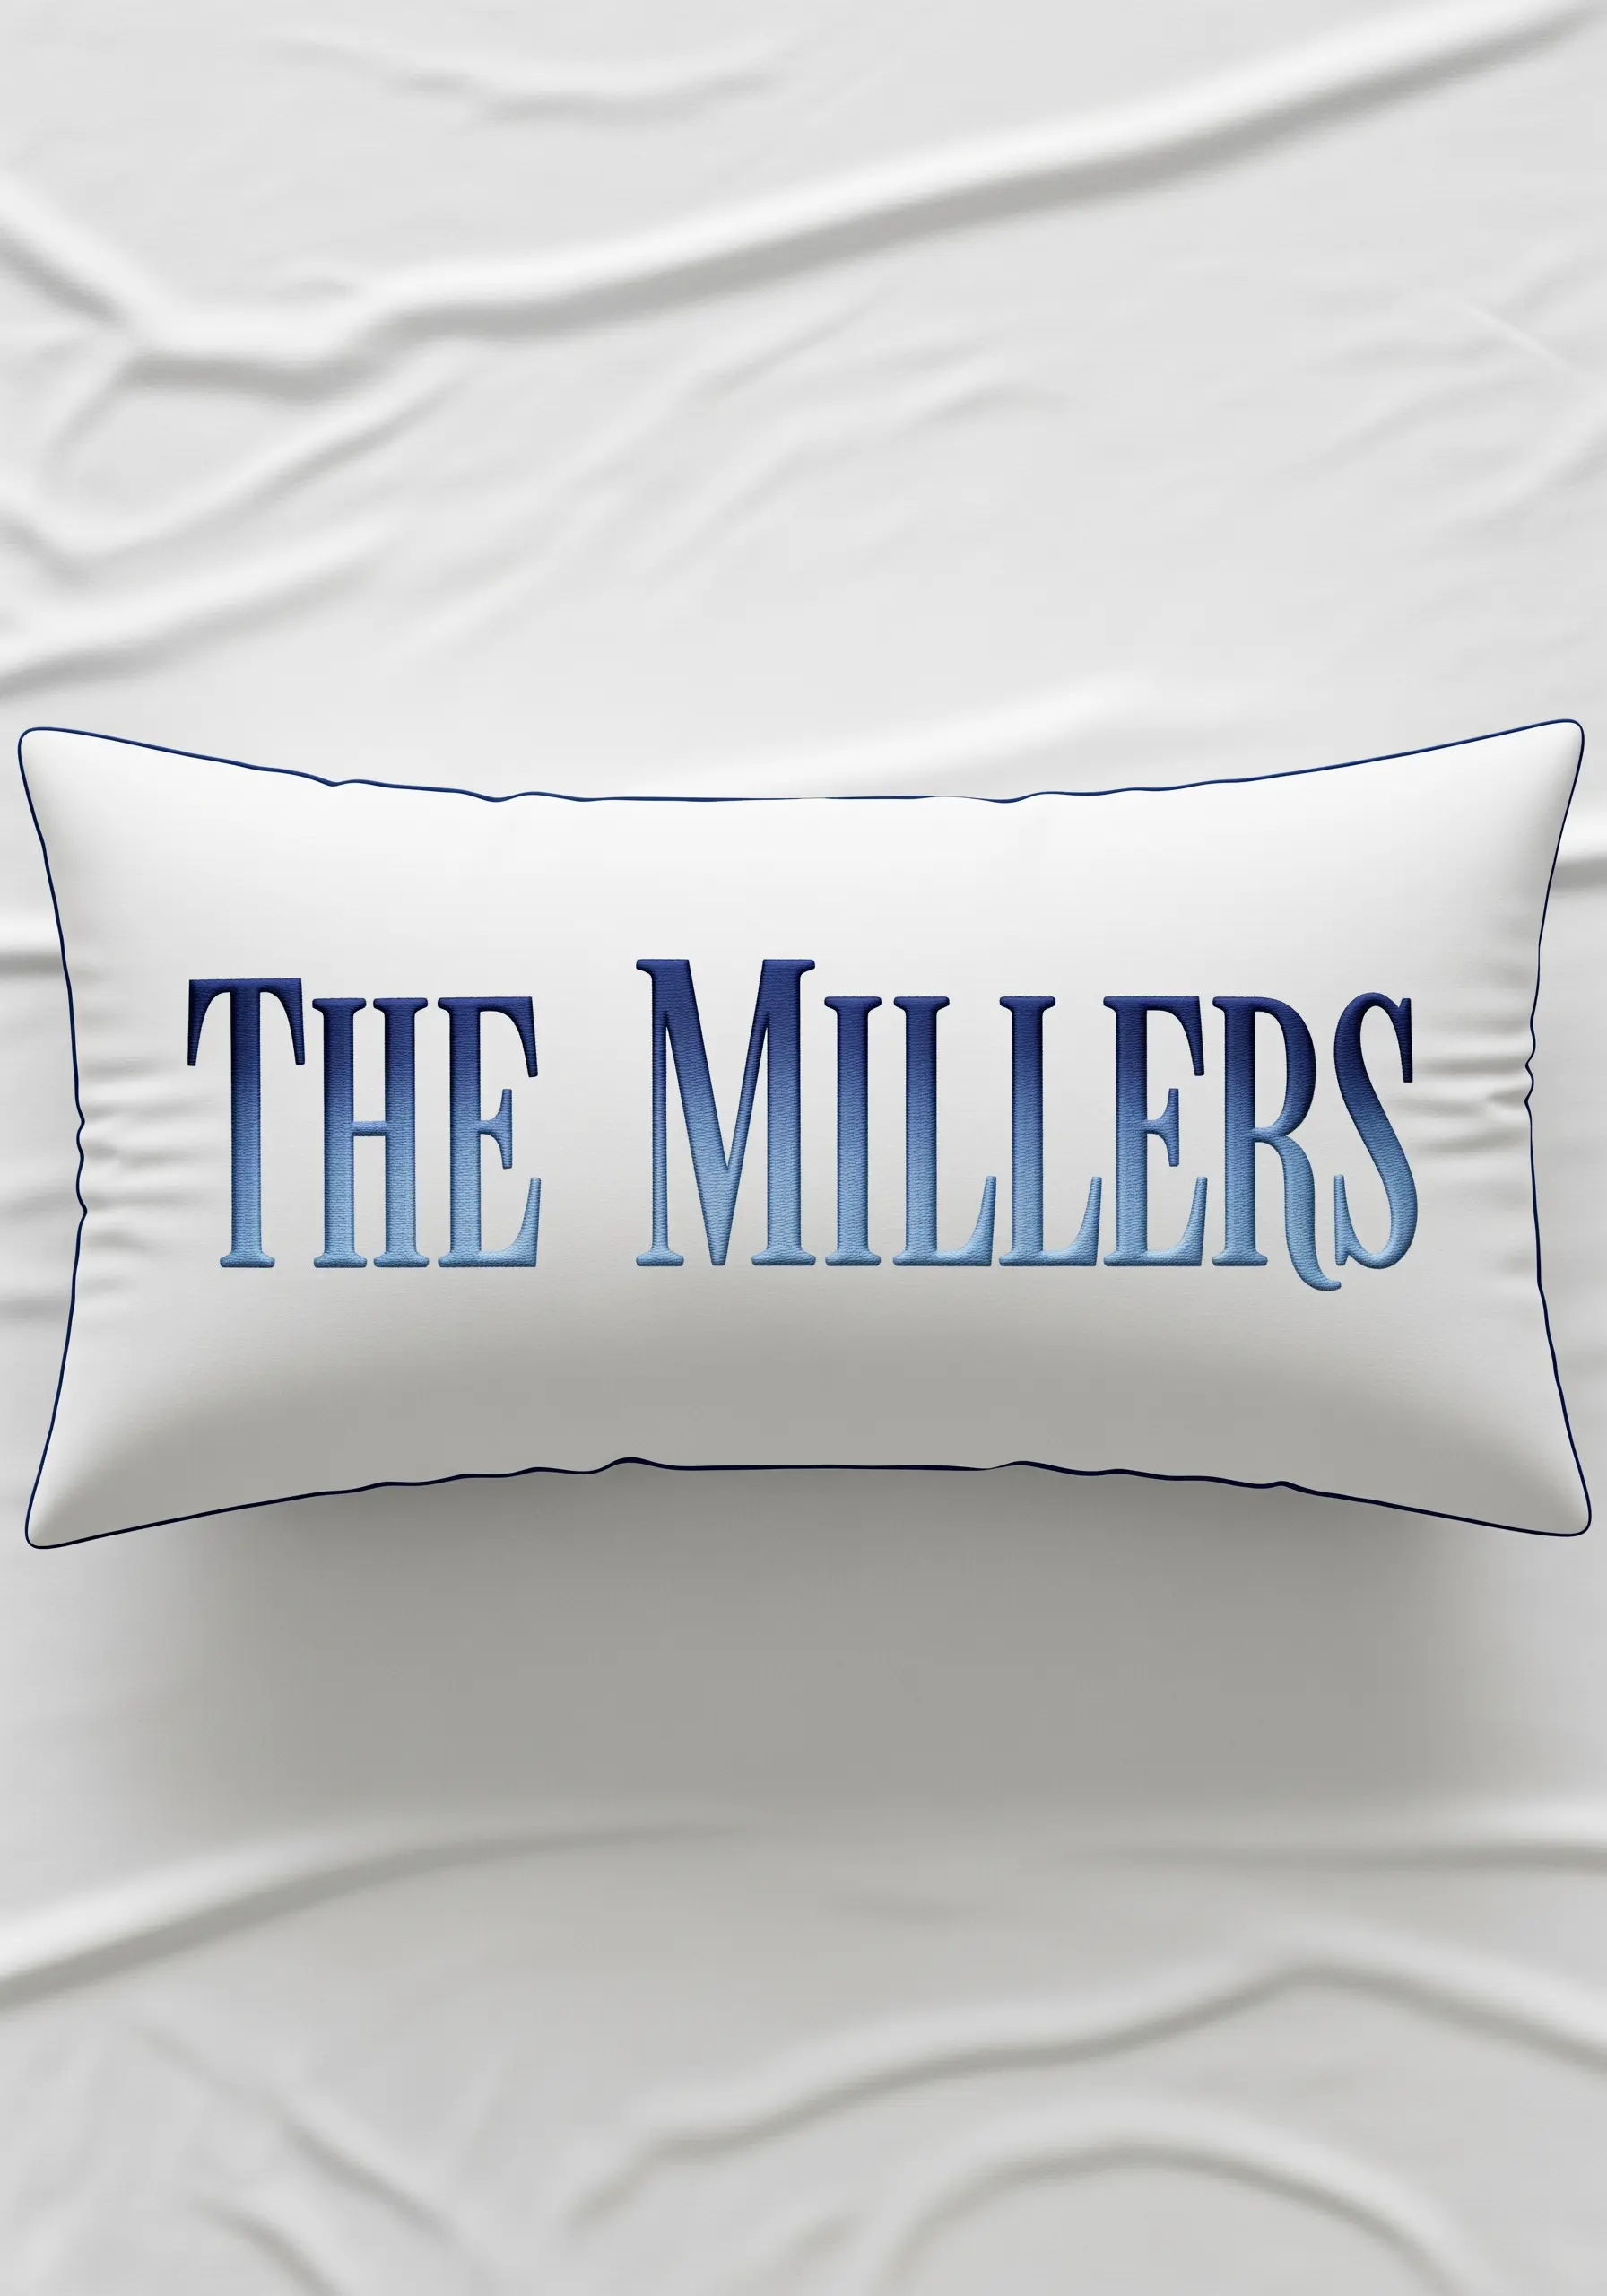
To achieve a smooth ombre effect in lettering, you must master the long-and-short stitch, blending three to four shades of blue seamlessly from top to bottom.
Pay attention to kerning (the space between letters); on a lumbar pillow, you have horizontal space, so let the letters breathe for better readability.
Use ombre gradient thread embroidery ideas for trendy throw cushions to select a color family that transitions smoothly without harsh lines of demarcation.
19. Pearls and silver filament
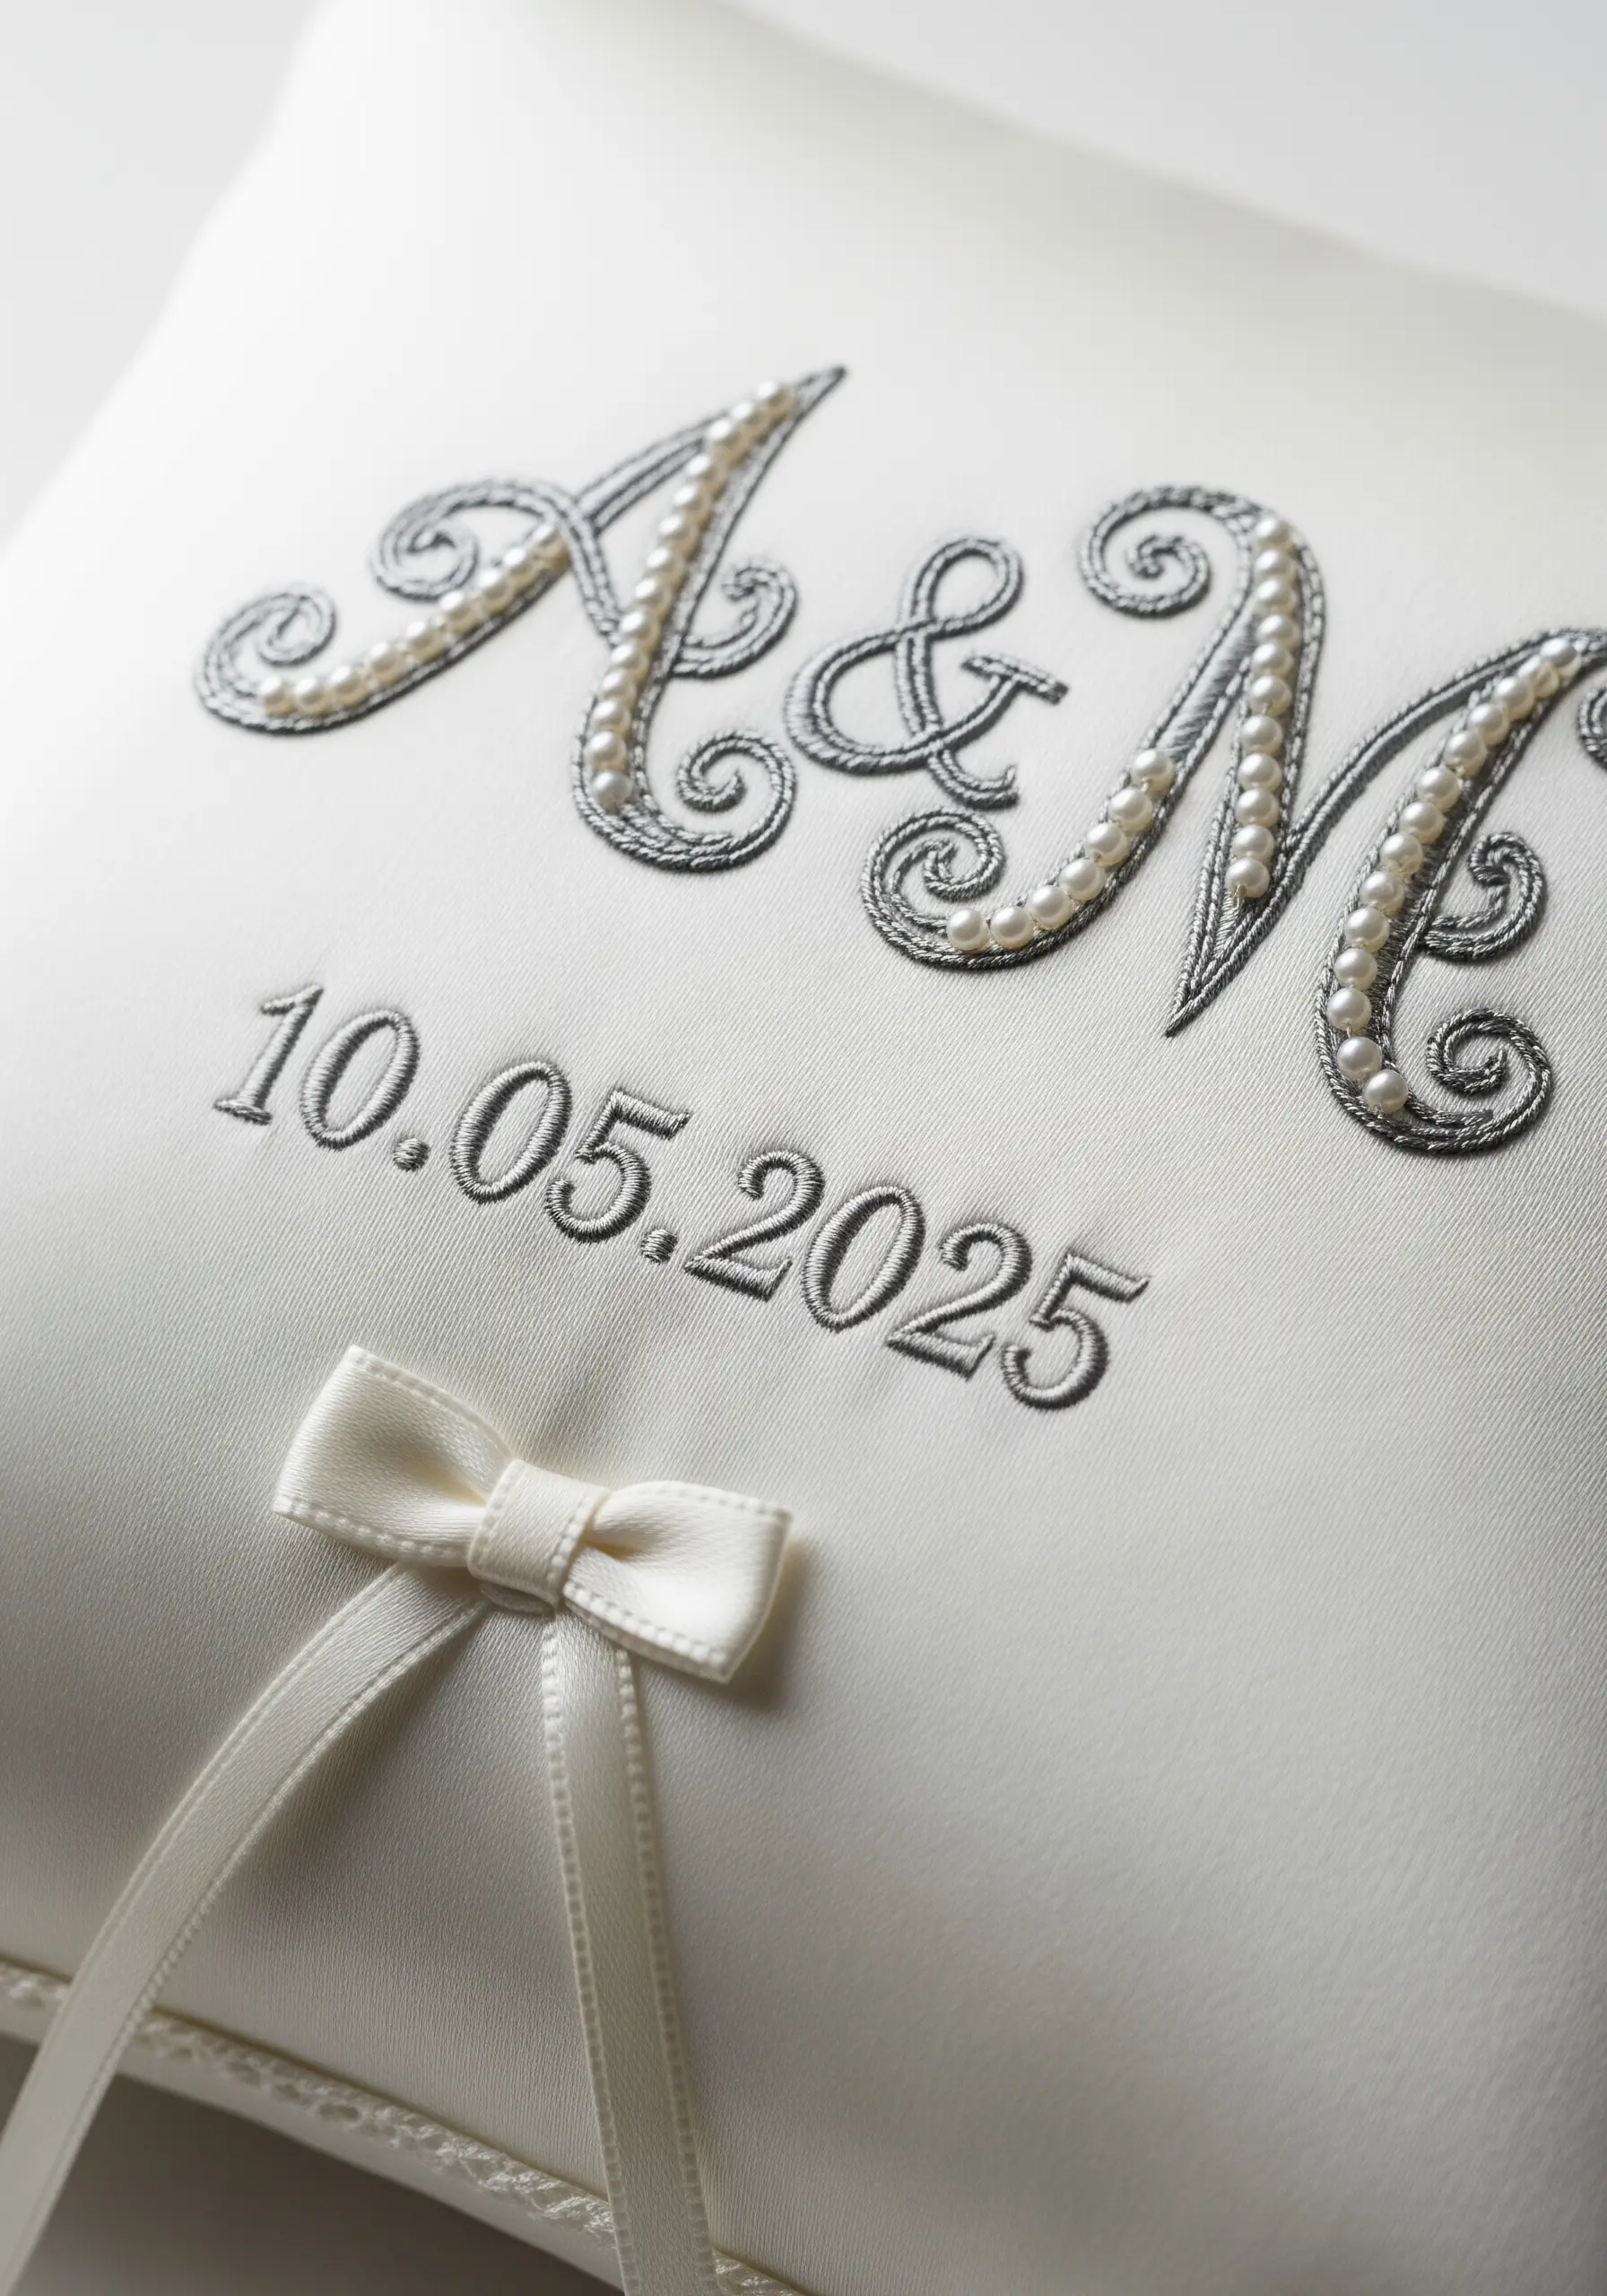
For a wedding ring pillow or keepsake, texture communicates luxury; couch a string of faux pearls directly onto the fabric to form the initials.
Pair the pearls with silver metallic thread for the date, using a simple backstitch that allows the sparkle to do the work without overcrowding the design.
These romantic embroidery patterns perfect for couples bedrooms rely on high-quality materials—plastic beads will look cheap, so opt for glass or high-shine faux pearls.
20. Rope stitch for nautical themes
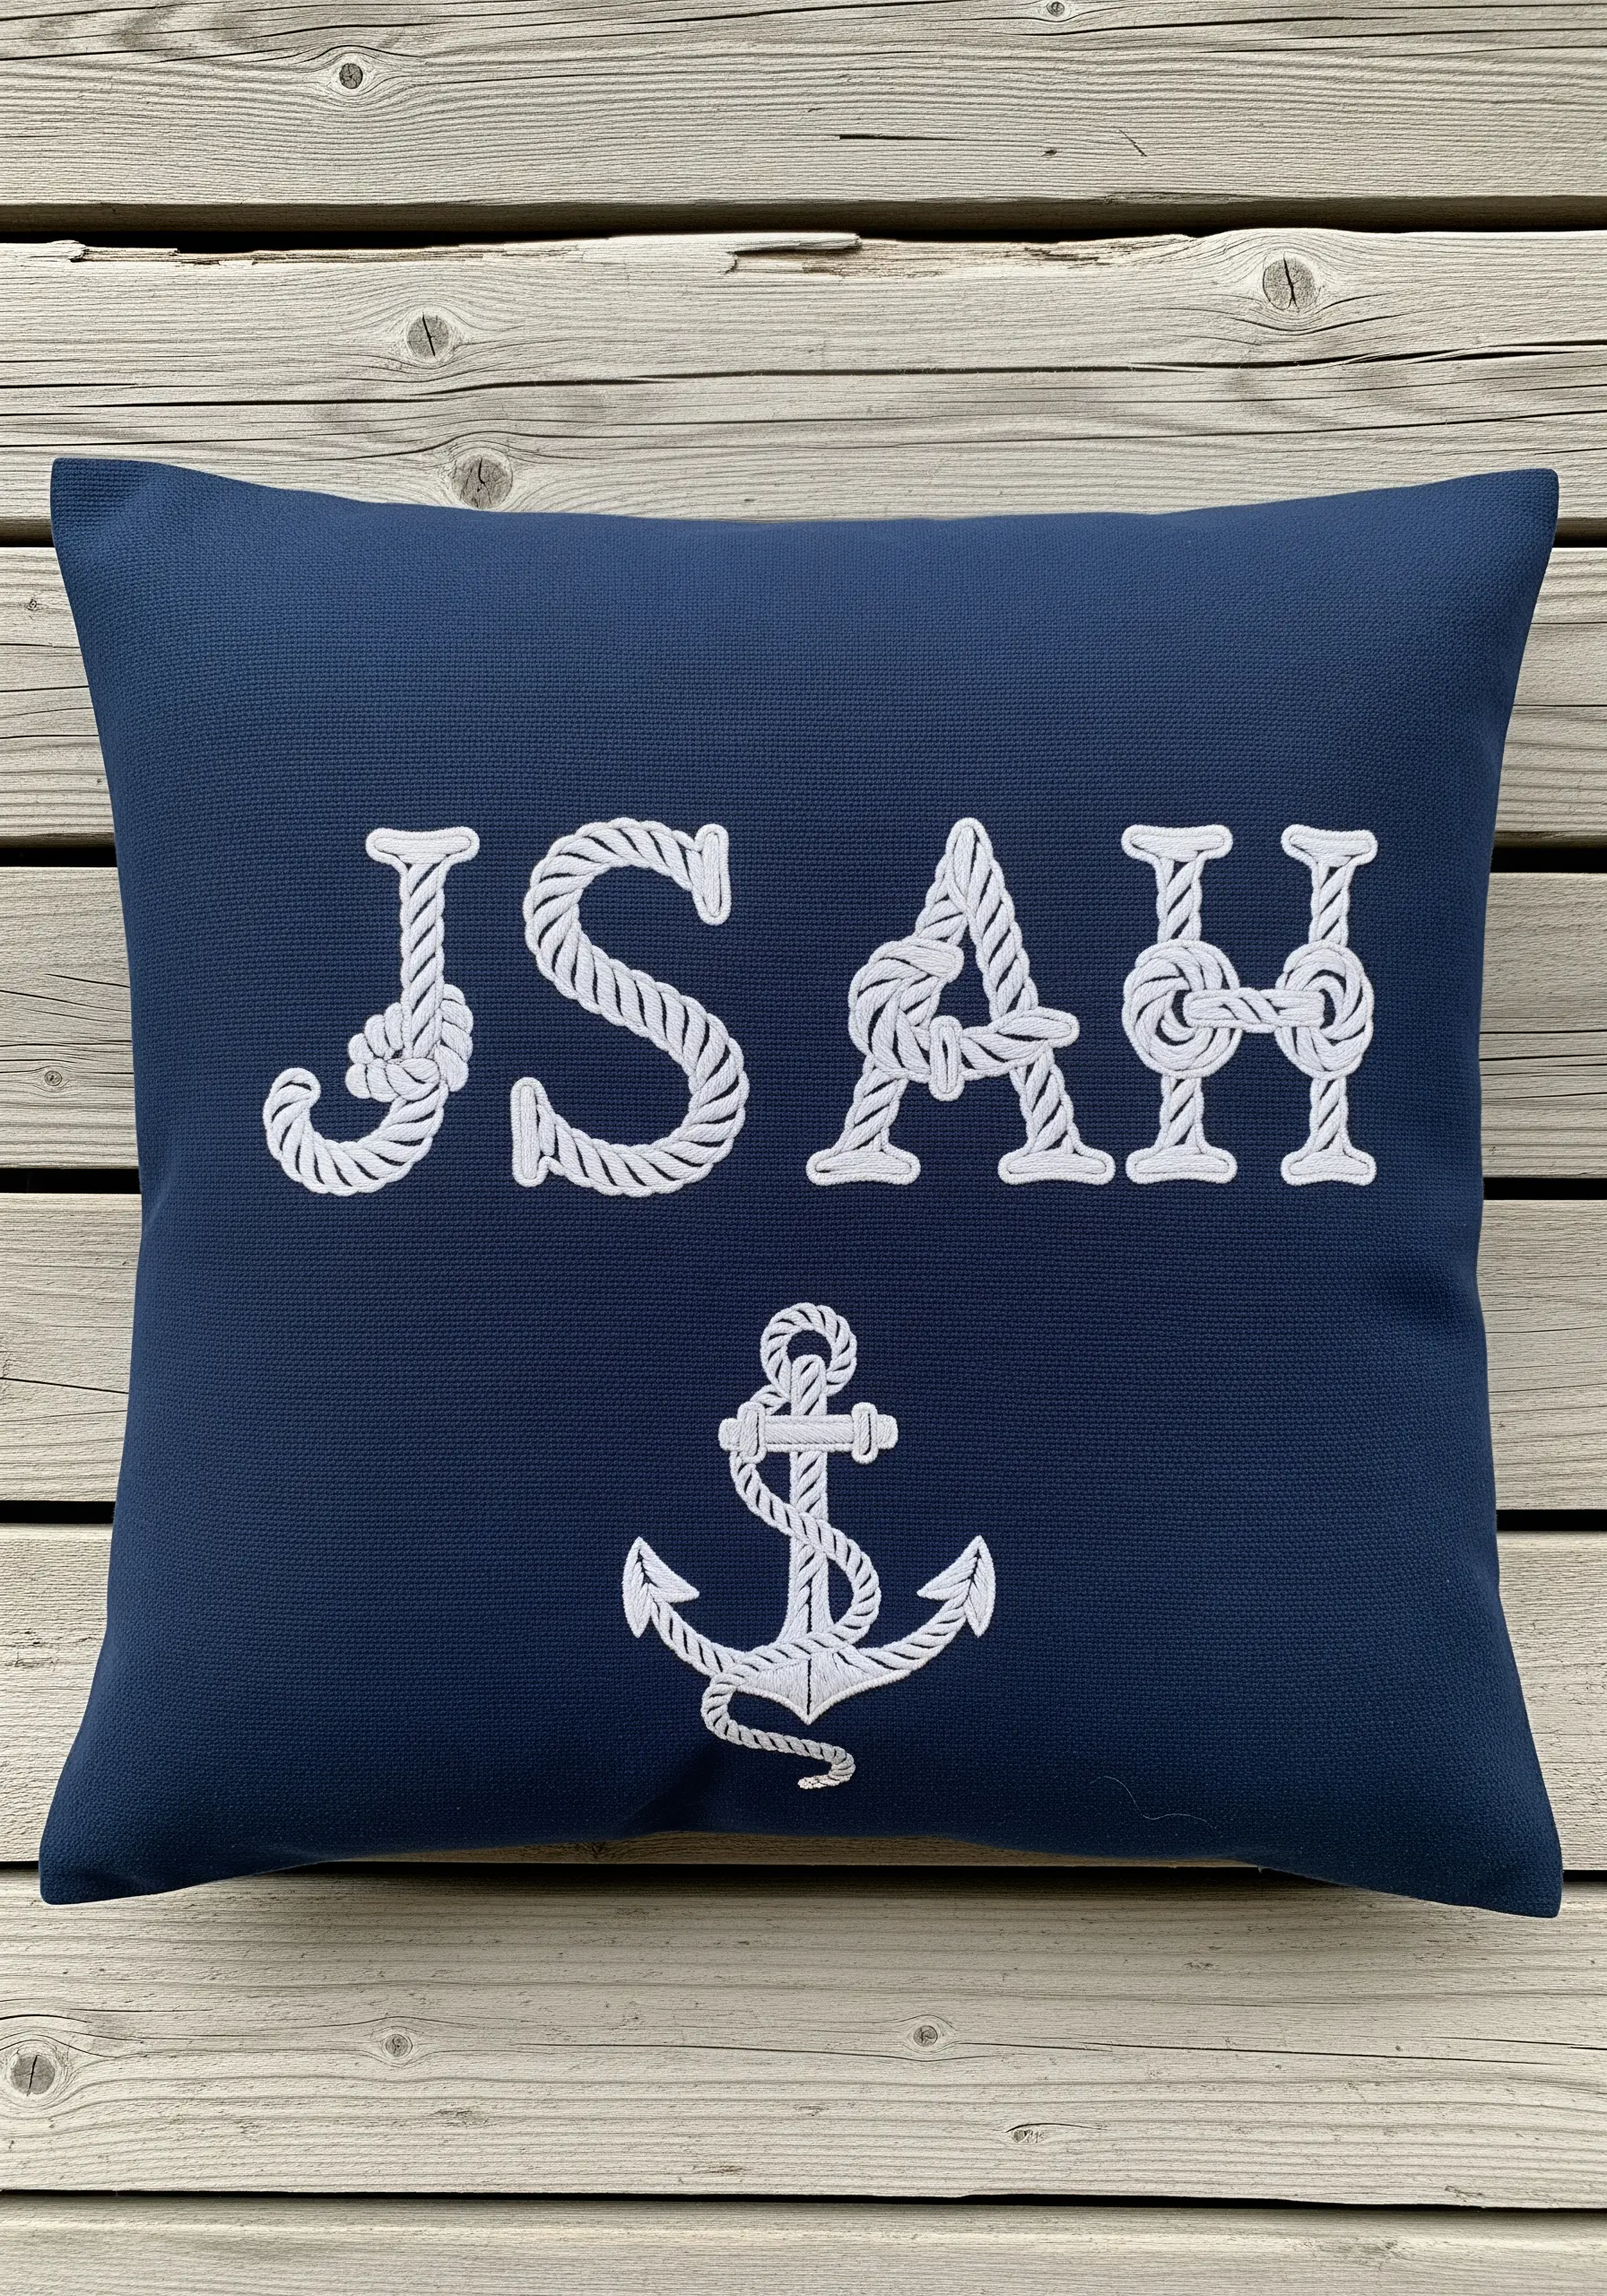
The ‘rope stitch’ or a heavy twisted chain stitch is essential here; it mimics the texture of actual nautical cordage.
Use a bright white pearl cotton thread on navy canvas to ensure the design pops and has the durability to withstand use on a deck or patio.
Browse ocean marine embroidery wall themes perfect for coastal inspired homes to see how thick, twisted stitches can replicate nets, ropes, and knots effectively.
21. Festive padded satin stitch
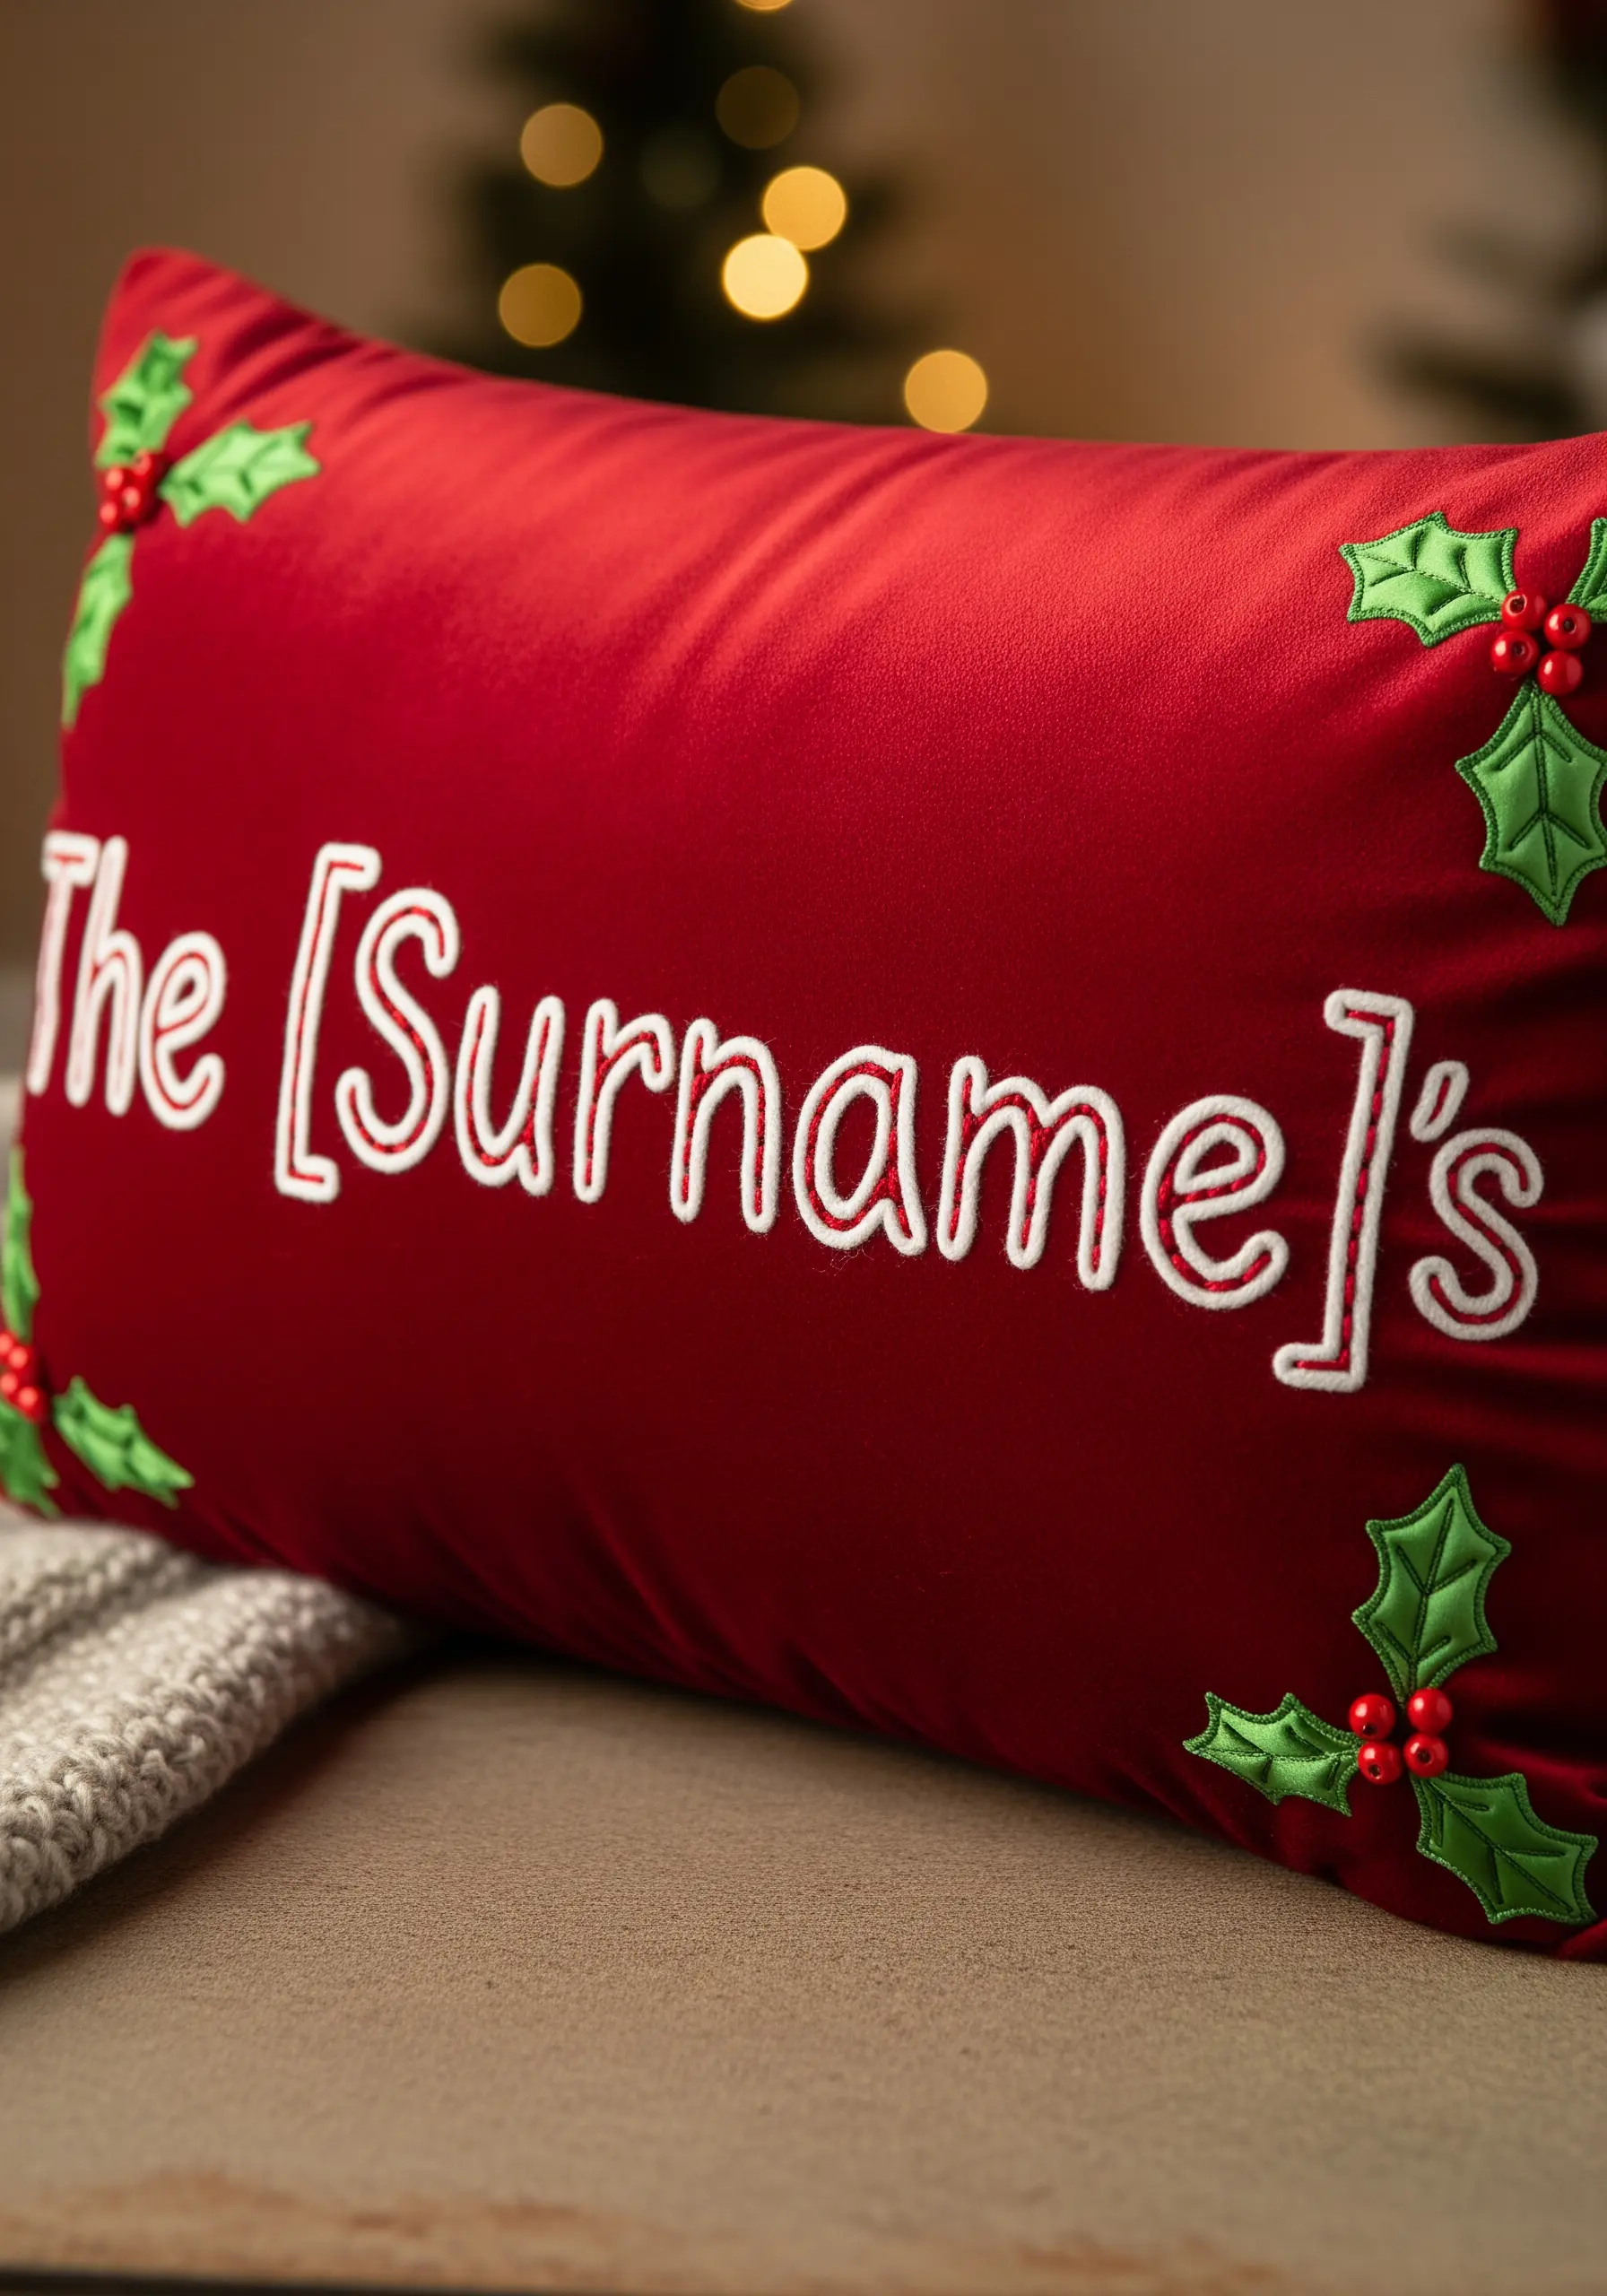
For holiday decor, you want your letters to look like candy canes; use a heavy padding of chain stitches underneath your red satin stitch to give it a rounded, puffed profile.
The white outline stitch acts as a highlight, sharpening the text against the deep red velvet background.
Look into holiday themed table linen embroidery designs for Christmas Eid Diwali more for border motifs like holly leaves that can frame your family name beautifully.
22. Stabilizing patchwork for text
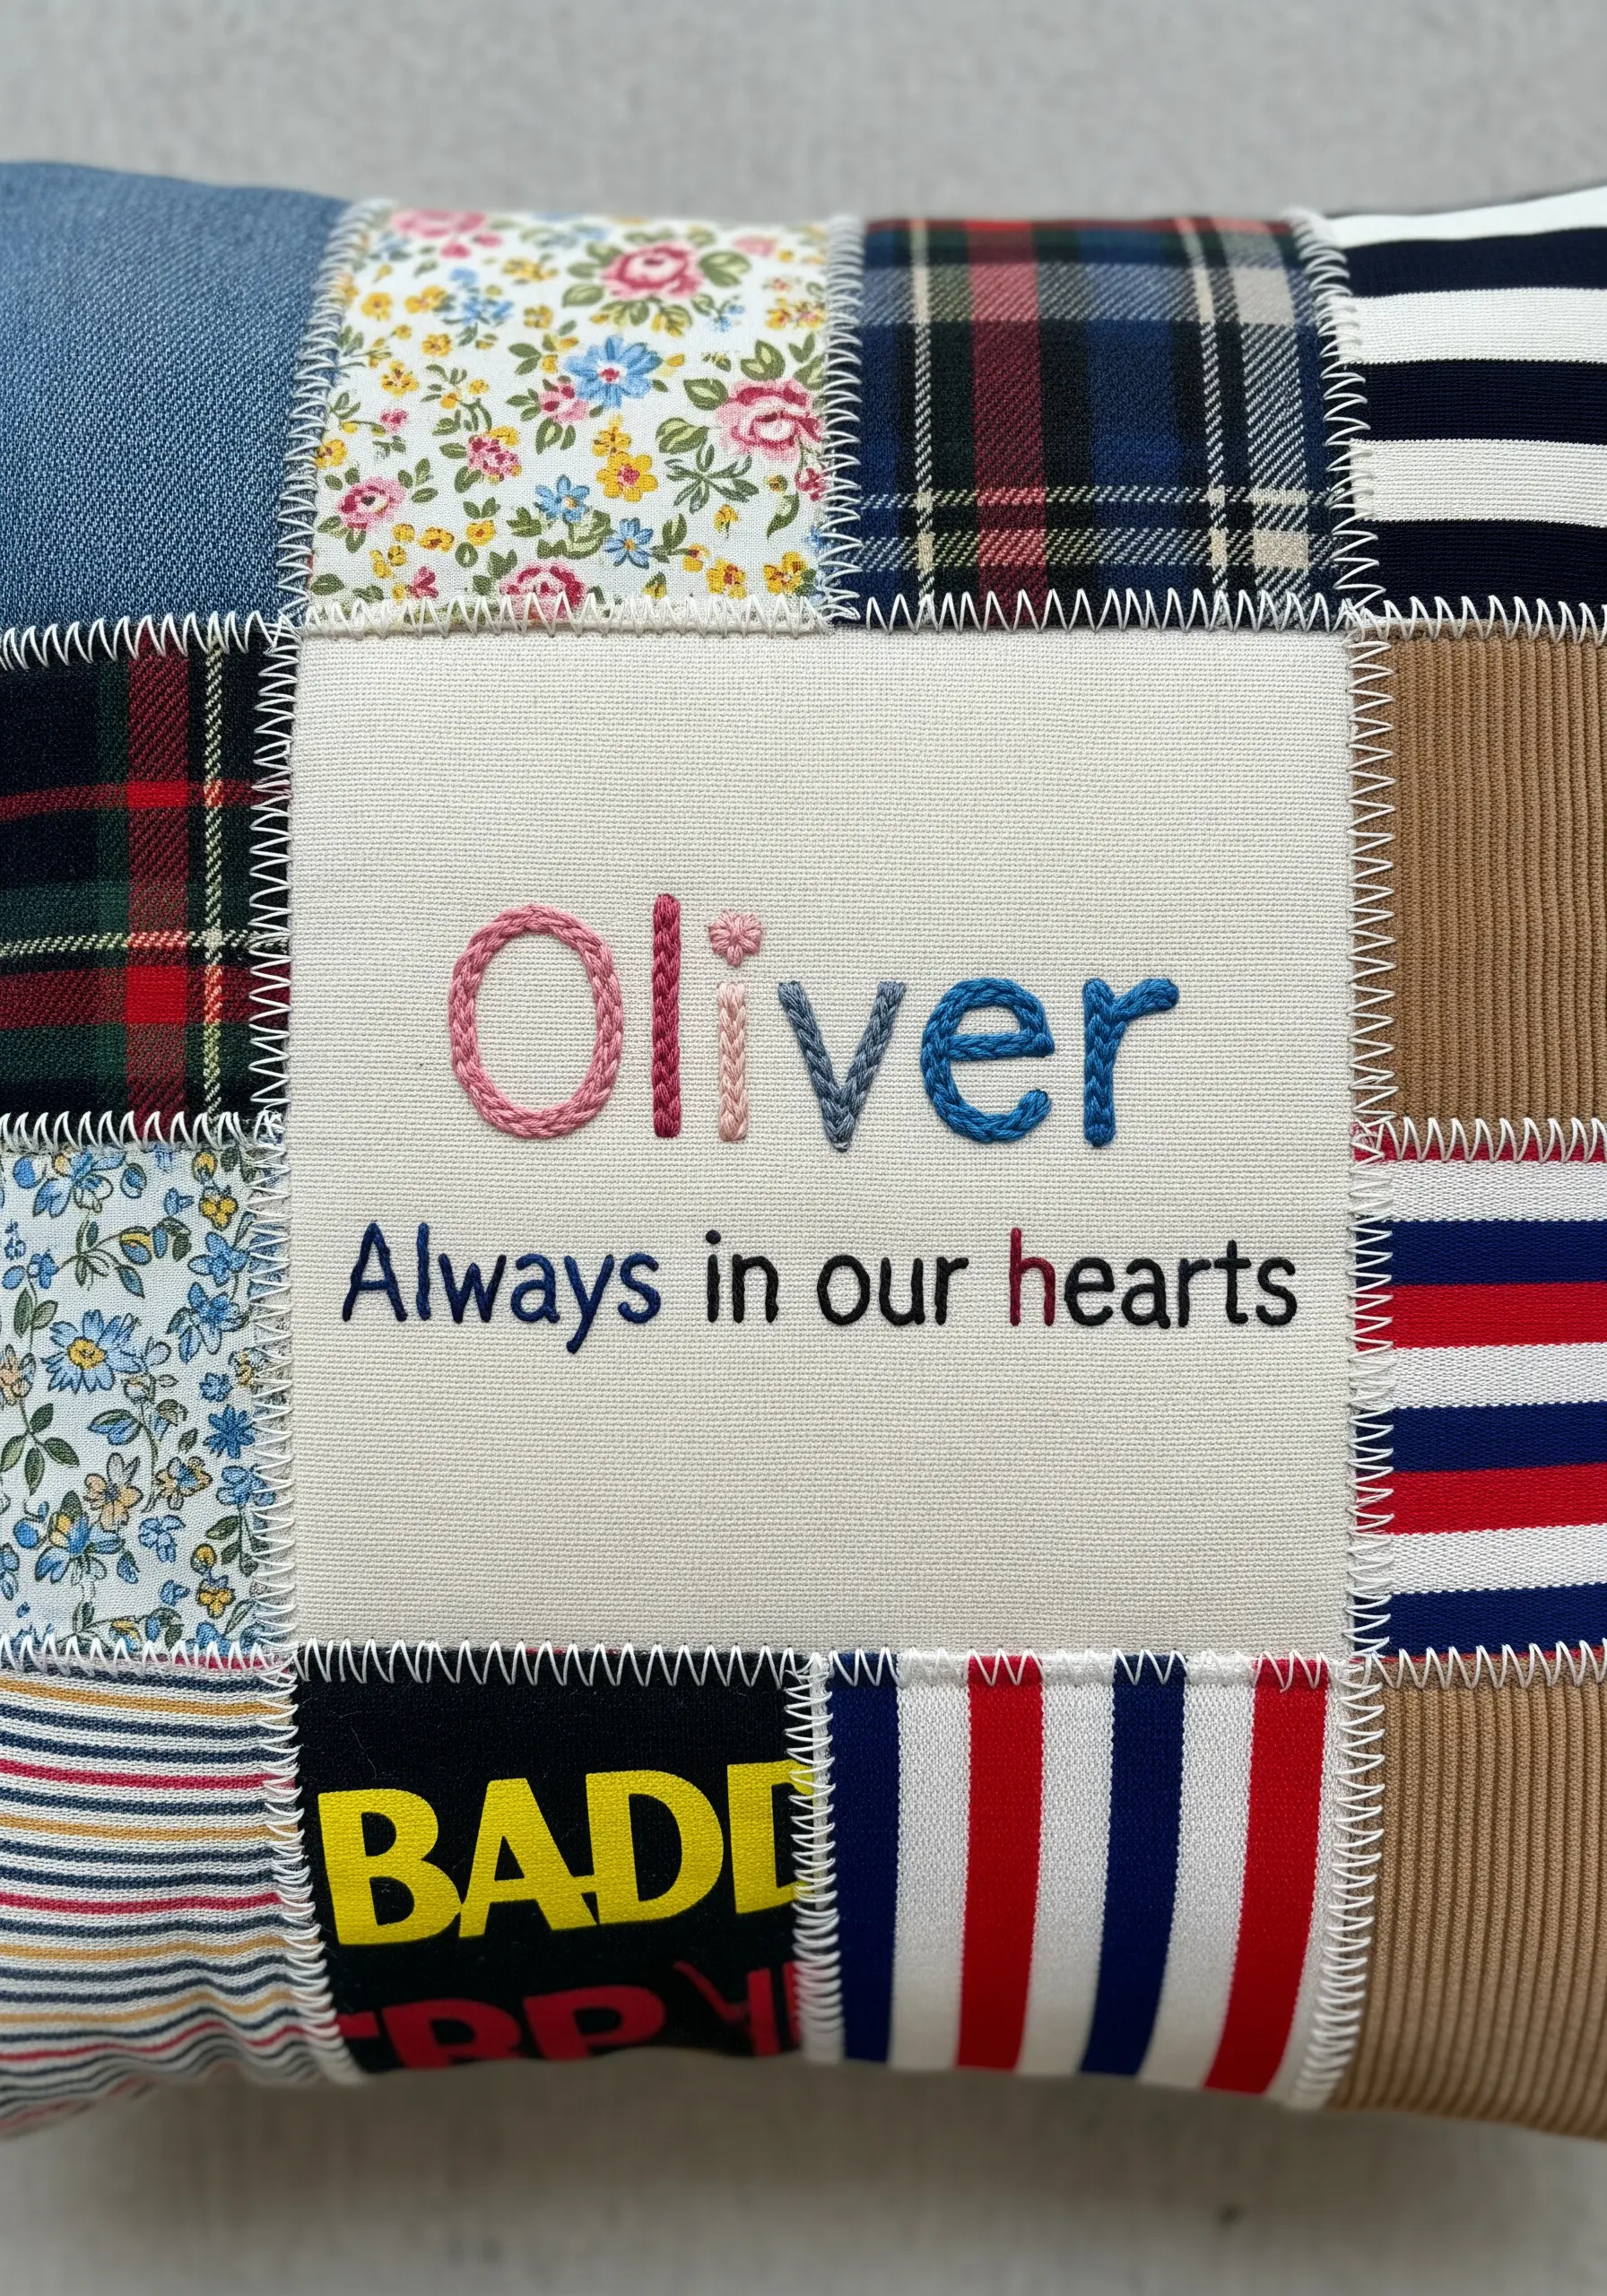
Patchwork is unstable by nature; you must apply a fusible interfacing to the back of the entire panel before stitching the text to prevent the seams from pulling apart.
Choose a thread color for the name that pulls from the busiest patch in the quilt to create cohesion, but outline it in a neutral to ensure it reads clearly.
This is one of those fabric collage embroidery ideas that turn scraps into magical wall art, transforming leftover quilting cottons into a personalized memory pillow.
23. Heavy wool chain stitch on canvas
For floor cushions or poufs, standard floss is too delicate; switch to tapestry wool and use a large needle to create chunky, durable chain stitches.
The scale is important here—large, bold letters match the scale of the furniture piece, whereas small text would look lost.
Check out bold yarn wall art patterns that turn blank walls into statements for inspiration on working with heavy-weight fibers to create durable, rug-like textures.
24. Pastel layering and applique
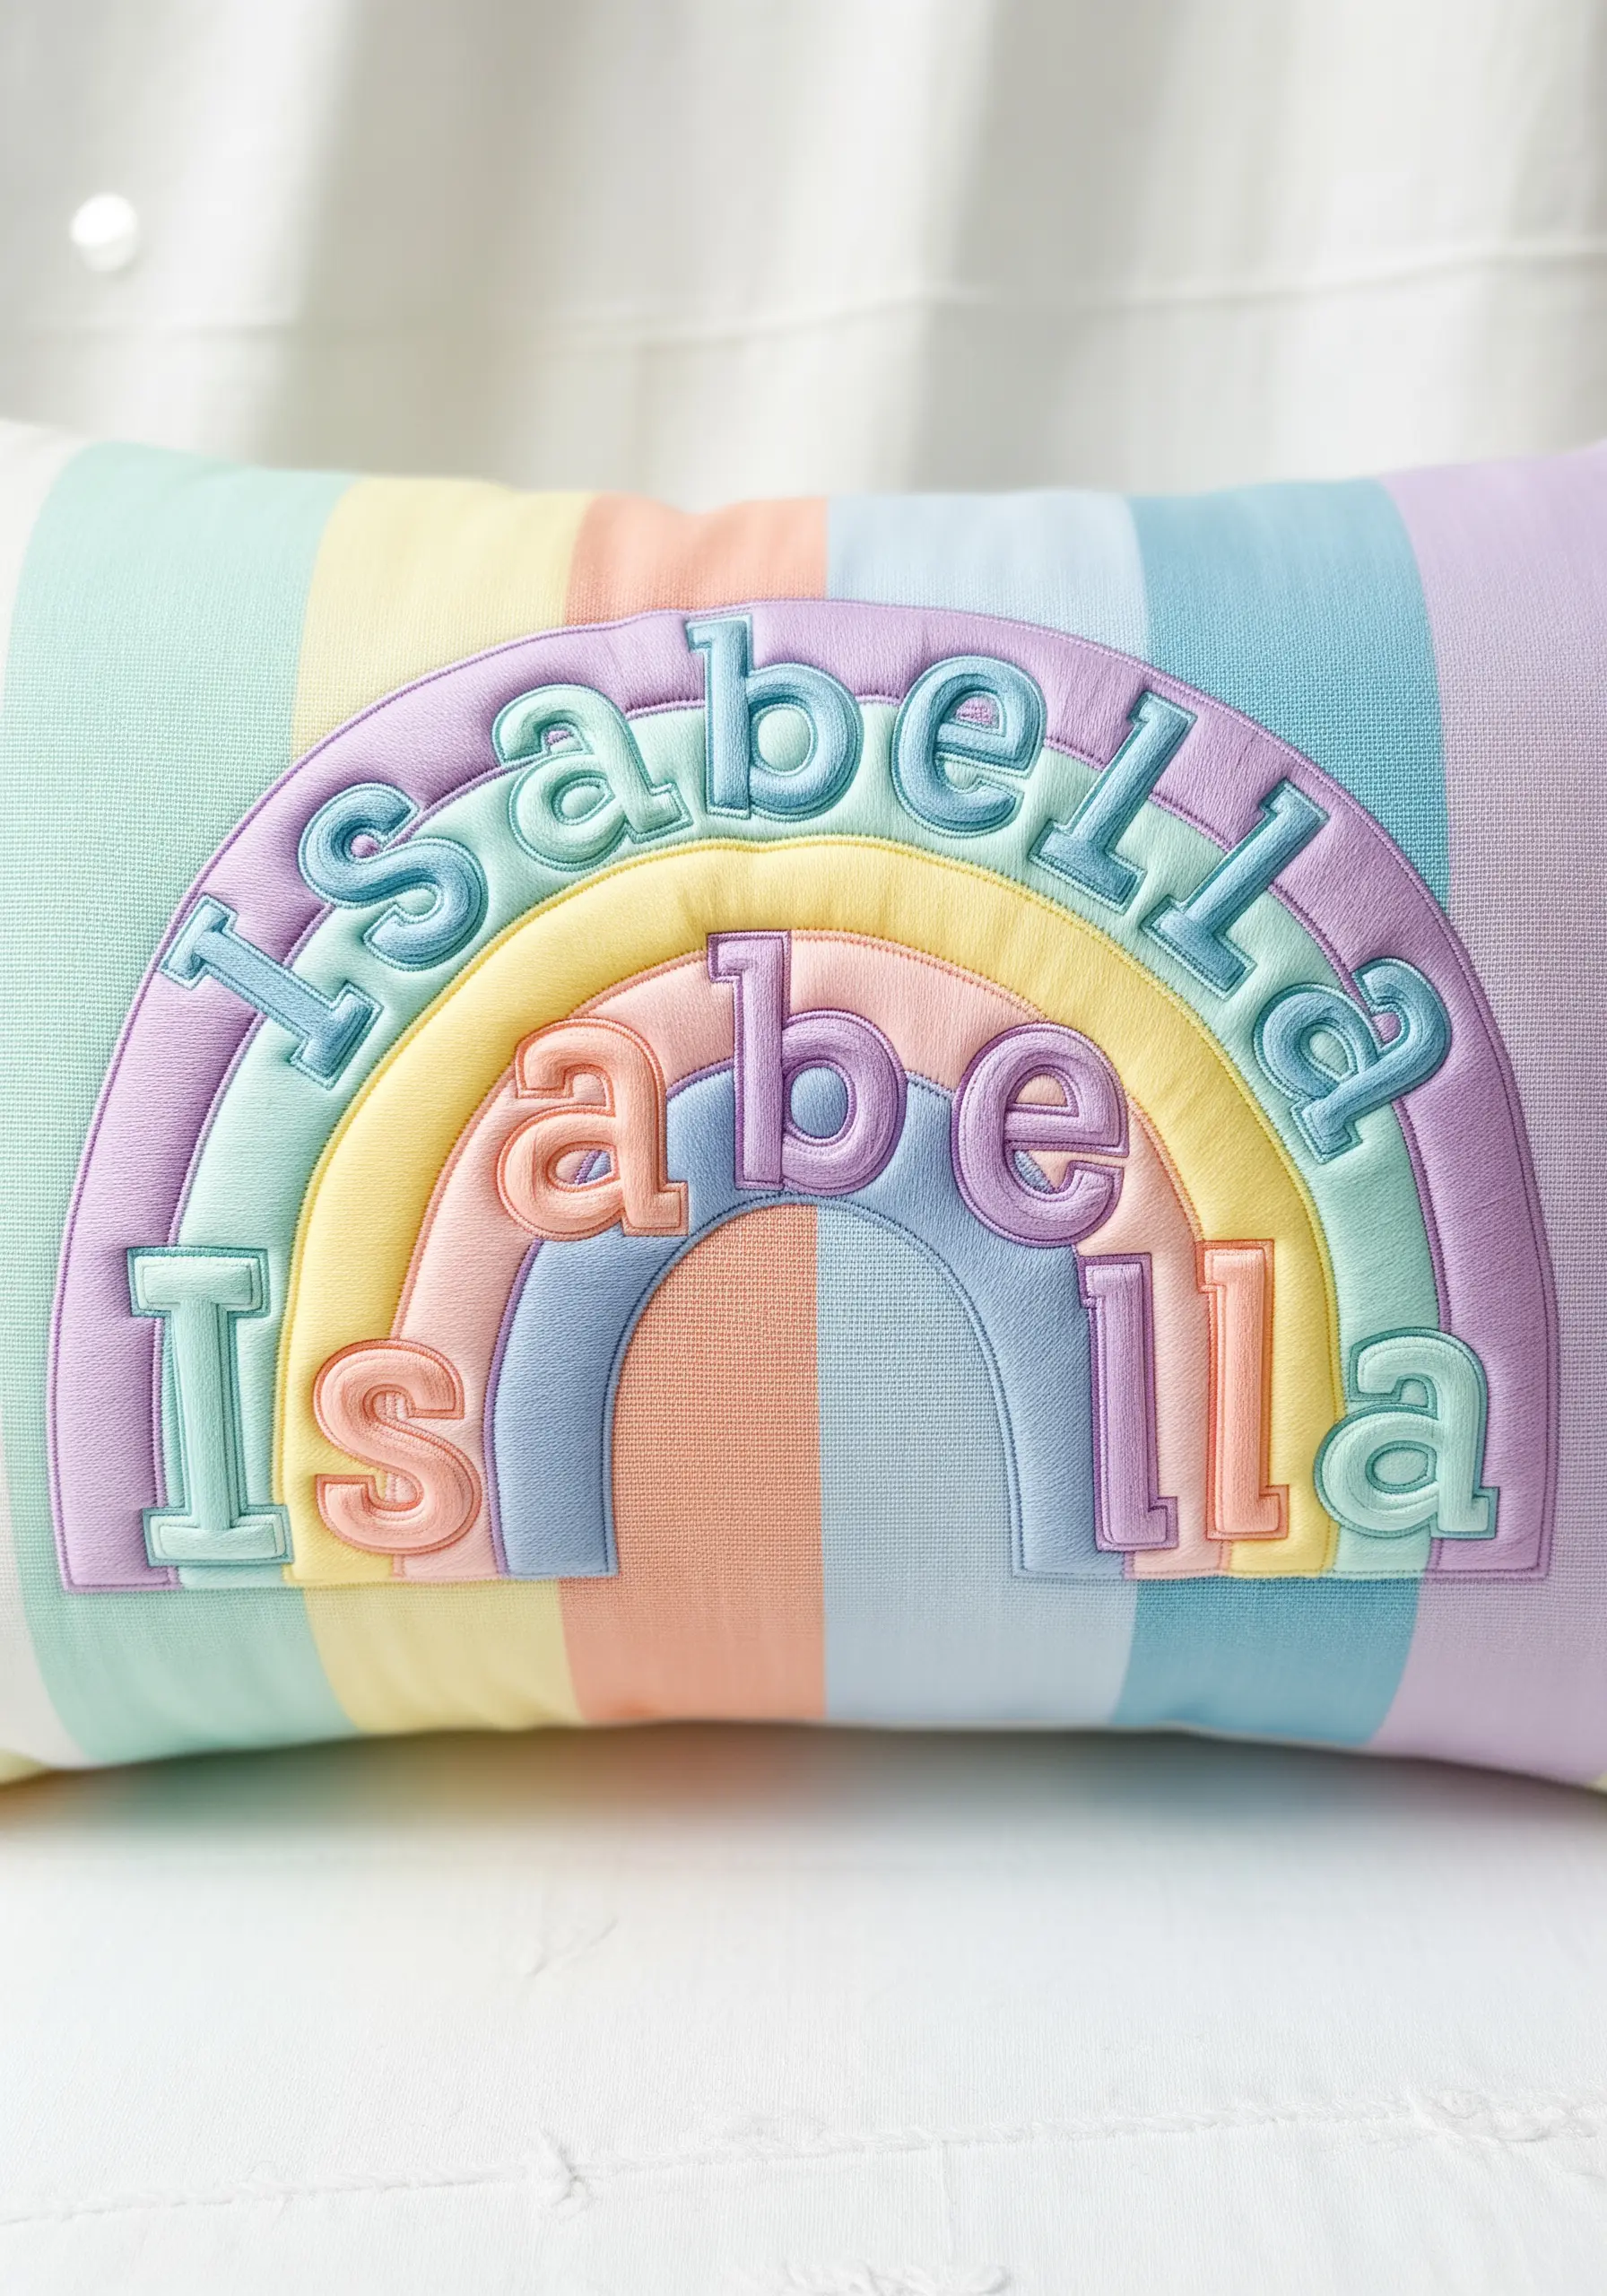
This rainbow effect is achieved through applique layers; sew the curved fabric strips first, then embroider the name over the top using a satin stitch that matches each band.
The challenge is maintaining consistent tension so the fabric doesn’t bunch as you stitch across multiple grain lines.
These nursery stitch art wall ideas for cute soft baby room decor show how pastel palettes can remain distinct and readable by using tone-on-tone stitching.
25. Silk ribbon dimensional florals

Silk ribbon embroidery creates florals that jump off the fabric; use a chenille needle to pull the ribbon through without damaging it.
Combine the ribbons with standard floss for the stems and French knots to create a rich, multi-textured surface that feels vintage and expensive.
For techniques on forming petals, look at floral inspired ribbon embroidery ideas for textured petals and 3d statement pieces to add that heirloom quality to your initials.
26. Precision Sashiko running stitch
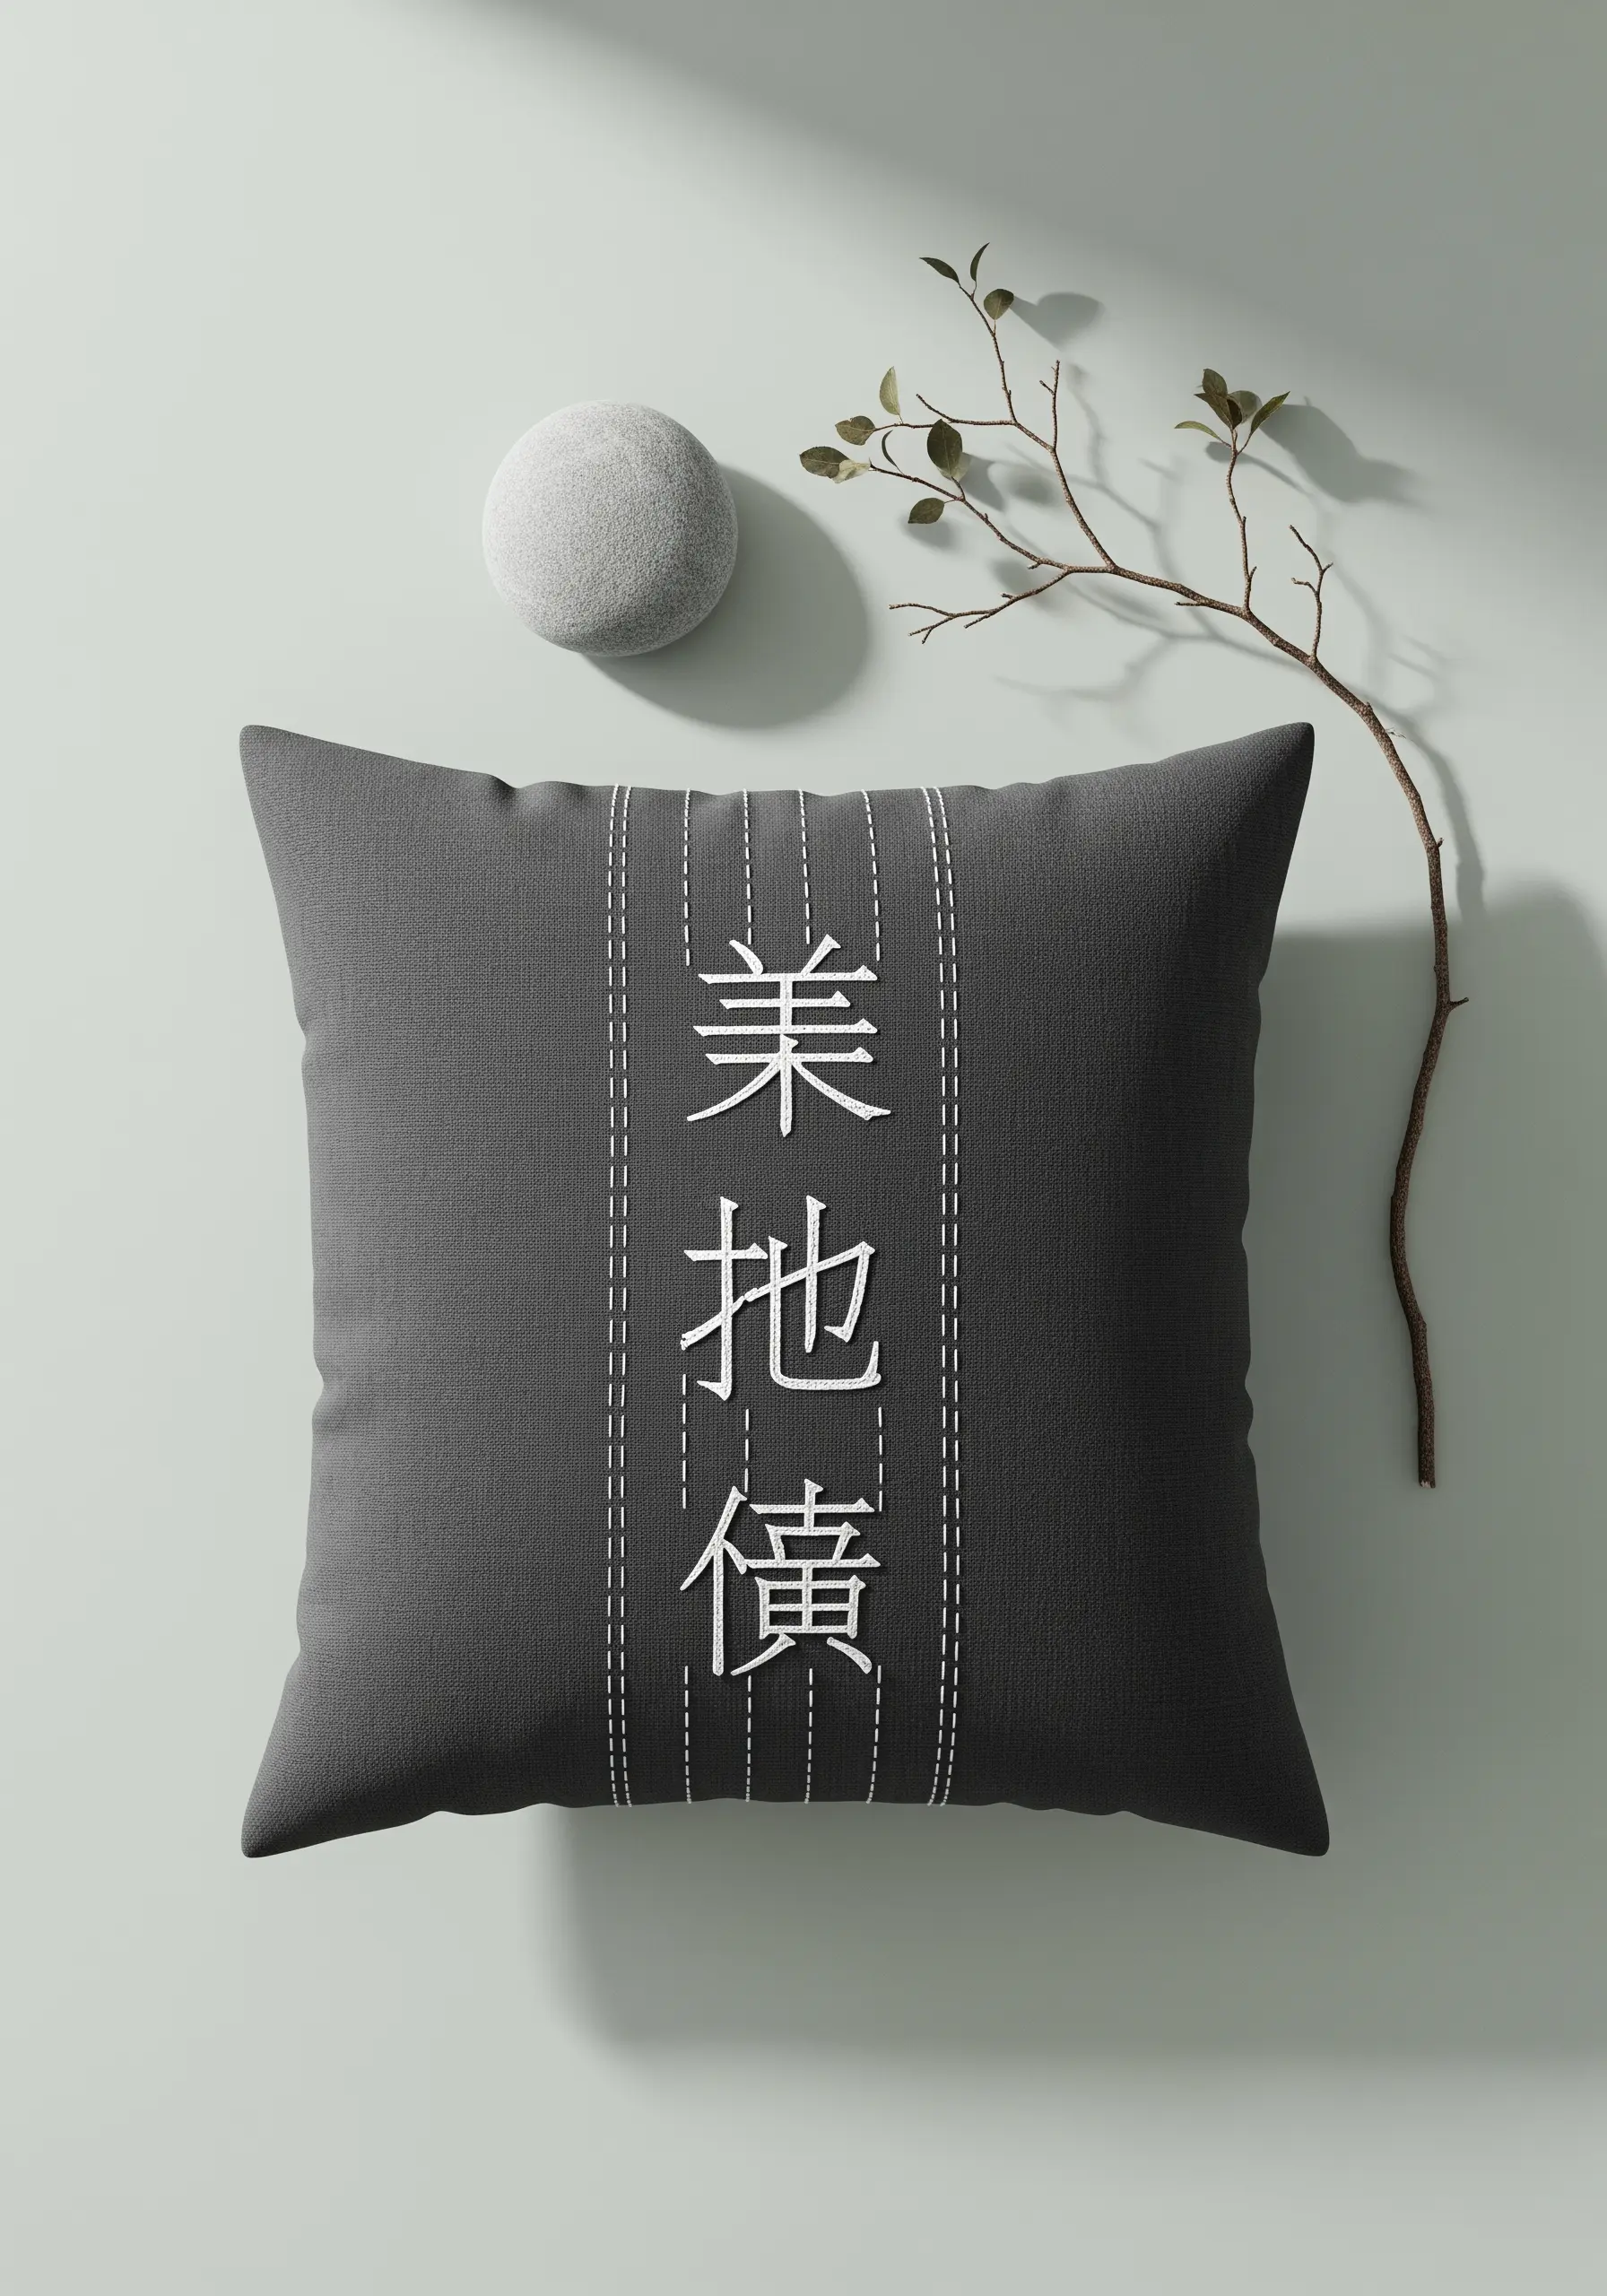
Sashiko is the art of the running stitch; the beauty lies in the absolute regularity of the stitch length and the space between them.
Use a long darning needle to load multiple stitches onto the needle at once, which helps maintain a straight line and consistent spacing.
Refine your technique with Japanese Zen inspired embroidery designs to balance bedroom energy, where the focus is on the rhythm of the white thread against the charcoal linen.
27. Leather tags on faux fur

You cannot embroider effectively on long-pile faux fur; the solution is to embroider onto a leather or felt patch first, then stitch that patch onto the fur.
Use a heavy topstitching thread for the border of the patch to make it look like a high-end designer label.
This is a clever hack found in DIY art objects that look expensive but are surprisingly easy, instantly elevating a generic fluffy pillow into a custom luxury item.
28. Thread painting fur direction

The secret to a realistic pet portrait is stitch direction; your thread must follow the exact growth pattern of the animal’s real fur.
Blend colors by bringing the needle up through the previous stitch (splitting the thread) to create a soft, seamless transition rather than distinct stripes.
Mastering pet portrait embroidery ideas that help beginners capture fur texture like pros starts with observing how light hits the fur and using lighter threads solely for those highlights.
29. Typewriter font backstitch
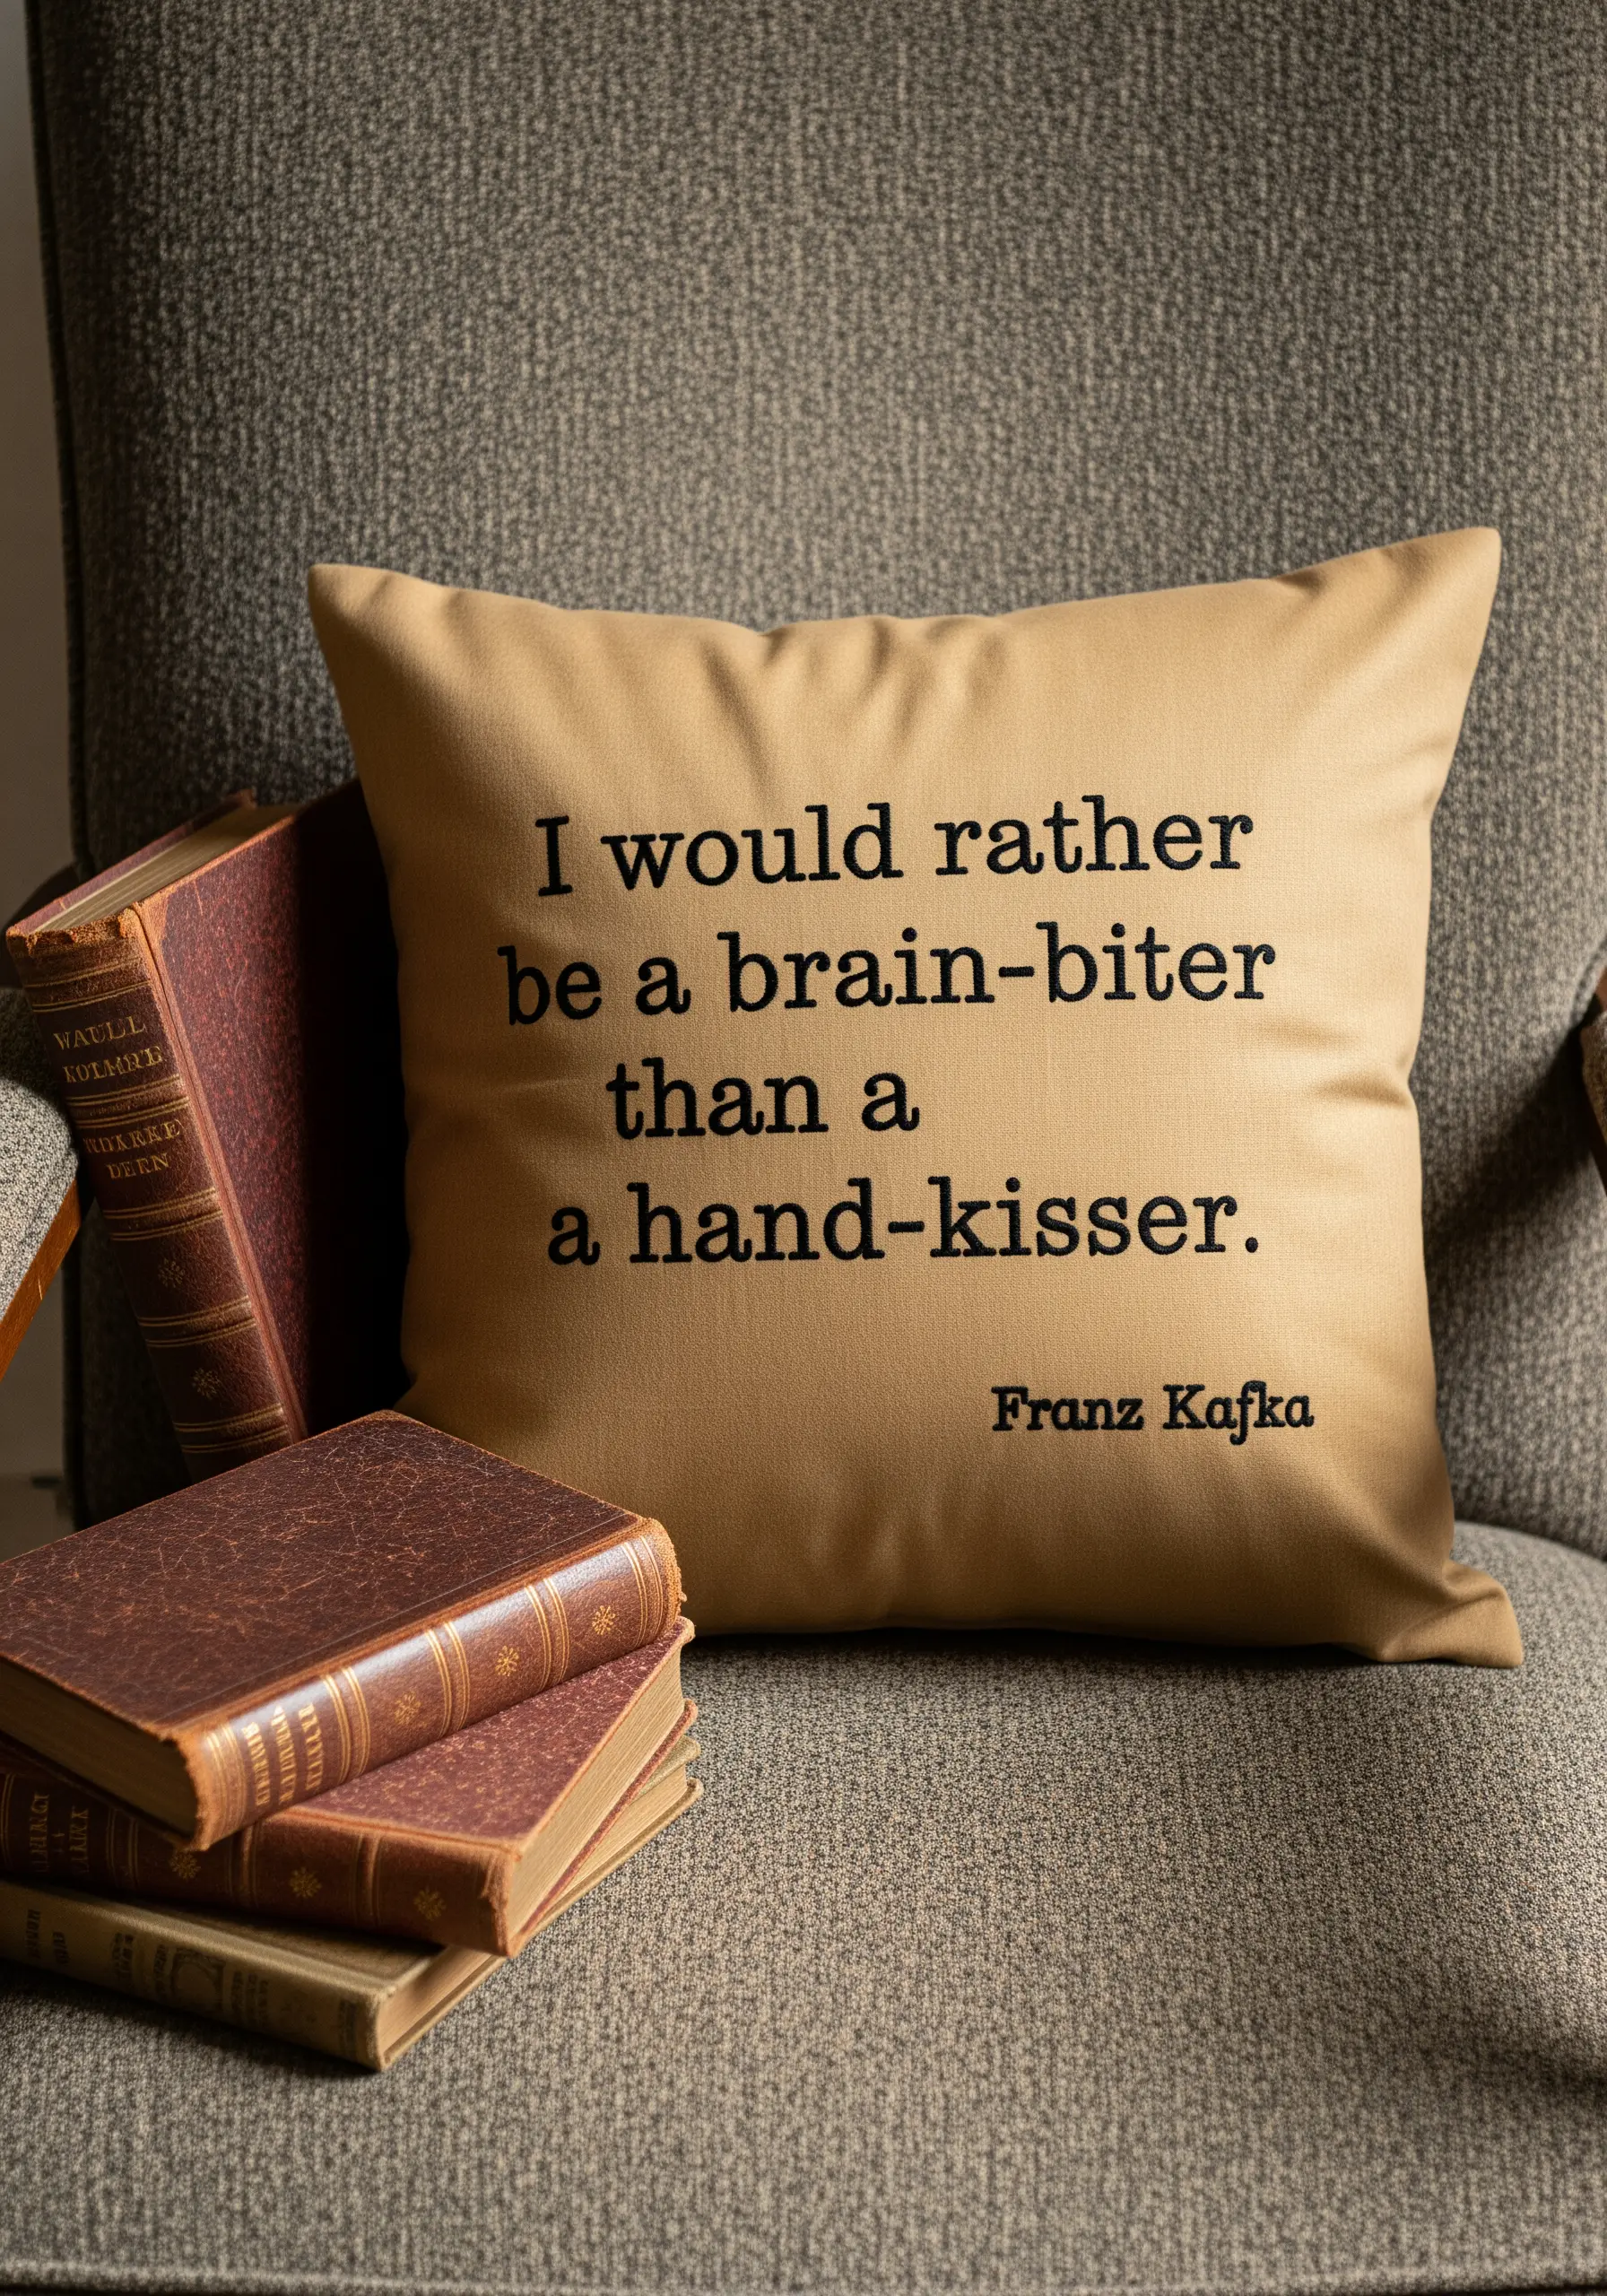
To mimic the ink-bleed of a vintage typewriter, use a whipped backstitch; the whipping wraps the line, making it solid and slightly raised like printed ink.
Serif fonts are tricky; pay extra attention to the ‘feet’ of the letters, ensuring they are sharp and square, not rounded.
These inspirational quote word pillow embroidery patterns to elevate your reading nook work best on smooth cotton canvas where the texture won’t distort the fine lettering.


