

You have the passion, the threads, and the desire to create something beautiful. But perhaps you feel your work could have a little more… intention. A little more polish. It’s a feeling I know well—the gap between the vision in your mind and the piece in your hoop.
I want you to know that the distance between ‘handmade’ and ‘handcrafted’ is shorter than you think. It isn’t about learning dozens of complex stitches or buying expensive materials. It’s about making small, deliberate choices in how you use the skills you already possess.
In the ideas that follow, we’ll explore how changing the direction of a stitch can create light, how pairing different textures can build dimension, and how even the simplest line can tell a powerful story. This is where your embroidery transforms from a hobby into an art form. Let’s begin.
1. Master the Directional Satin Stitch
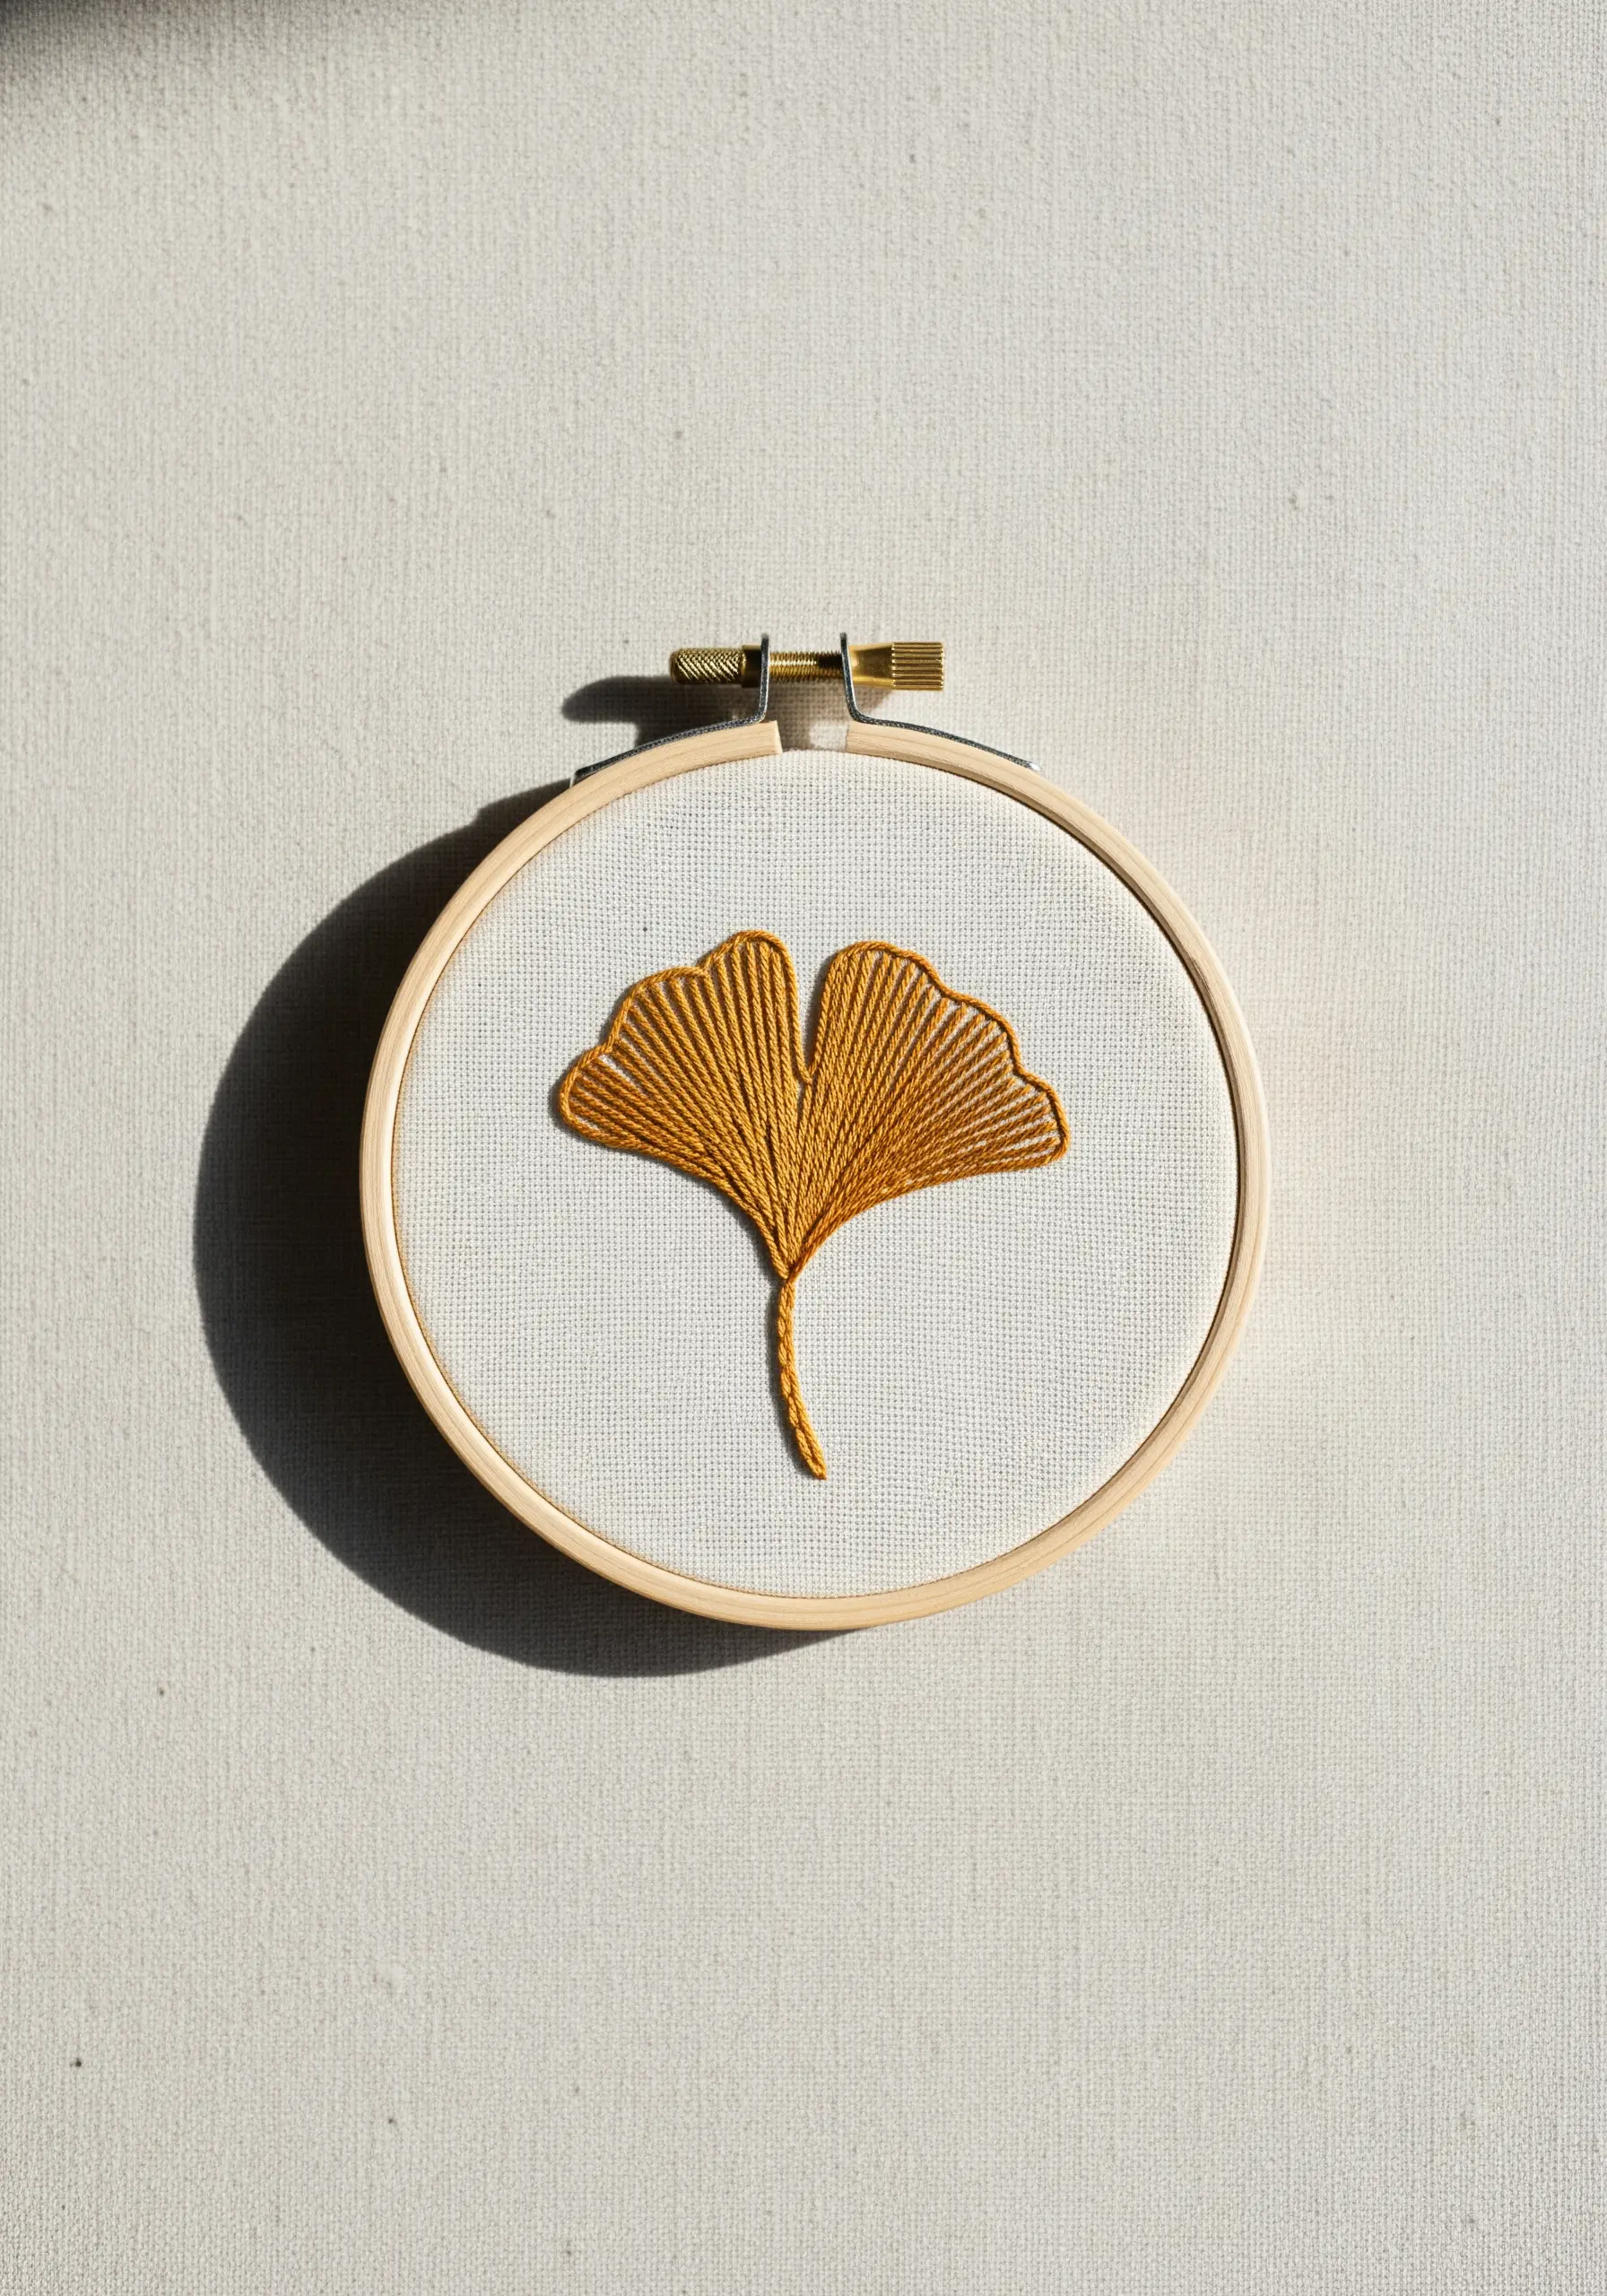
Create the elegant fan shape of a ginkgo leaf by mastering directional satin stitch.
Instead of stitching straight across, angle your stitches to radiate from a single point at the base of the leaf.
This technique creates a sense of movement and organic form, making your botanicals look far more dynamic.
Use three strands of floss for a smooth, matte finish that emphasizes the clean lines of your work.
For even more polish, outline the shape with a single-strand split stitch before filling it in; this creates a raised, sharp edge.
2. Build Texture with French Knots and Split Stitch
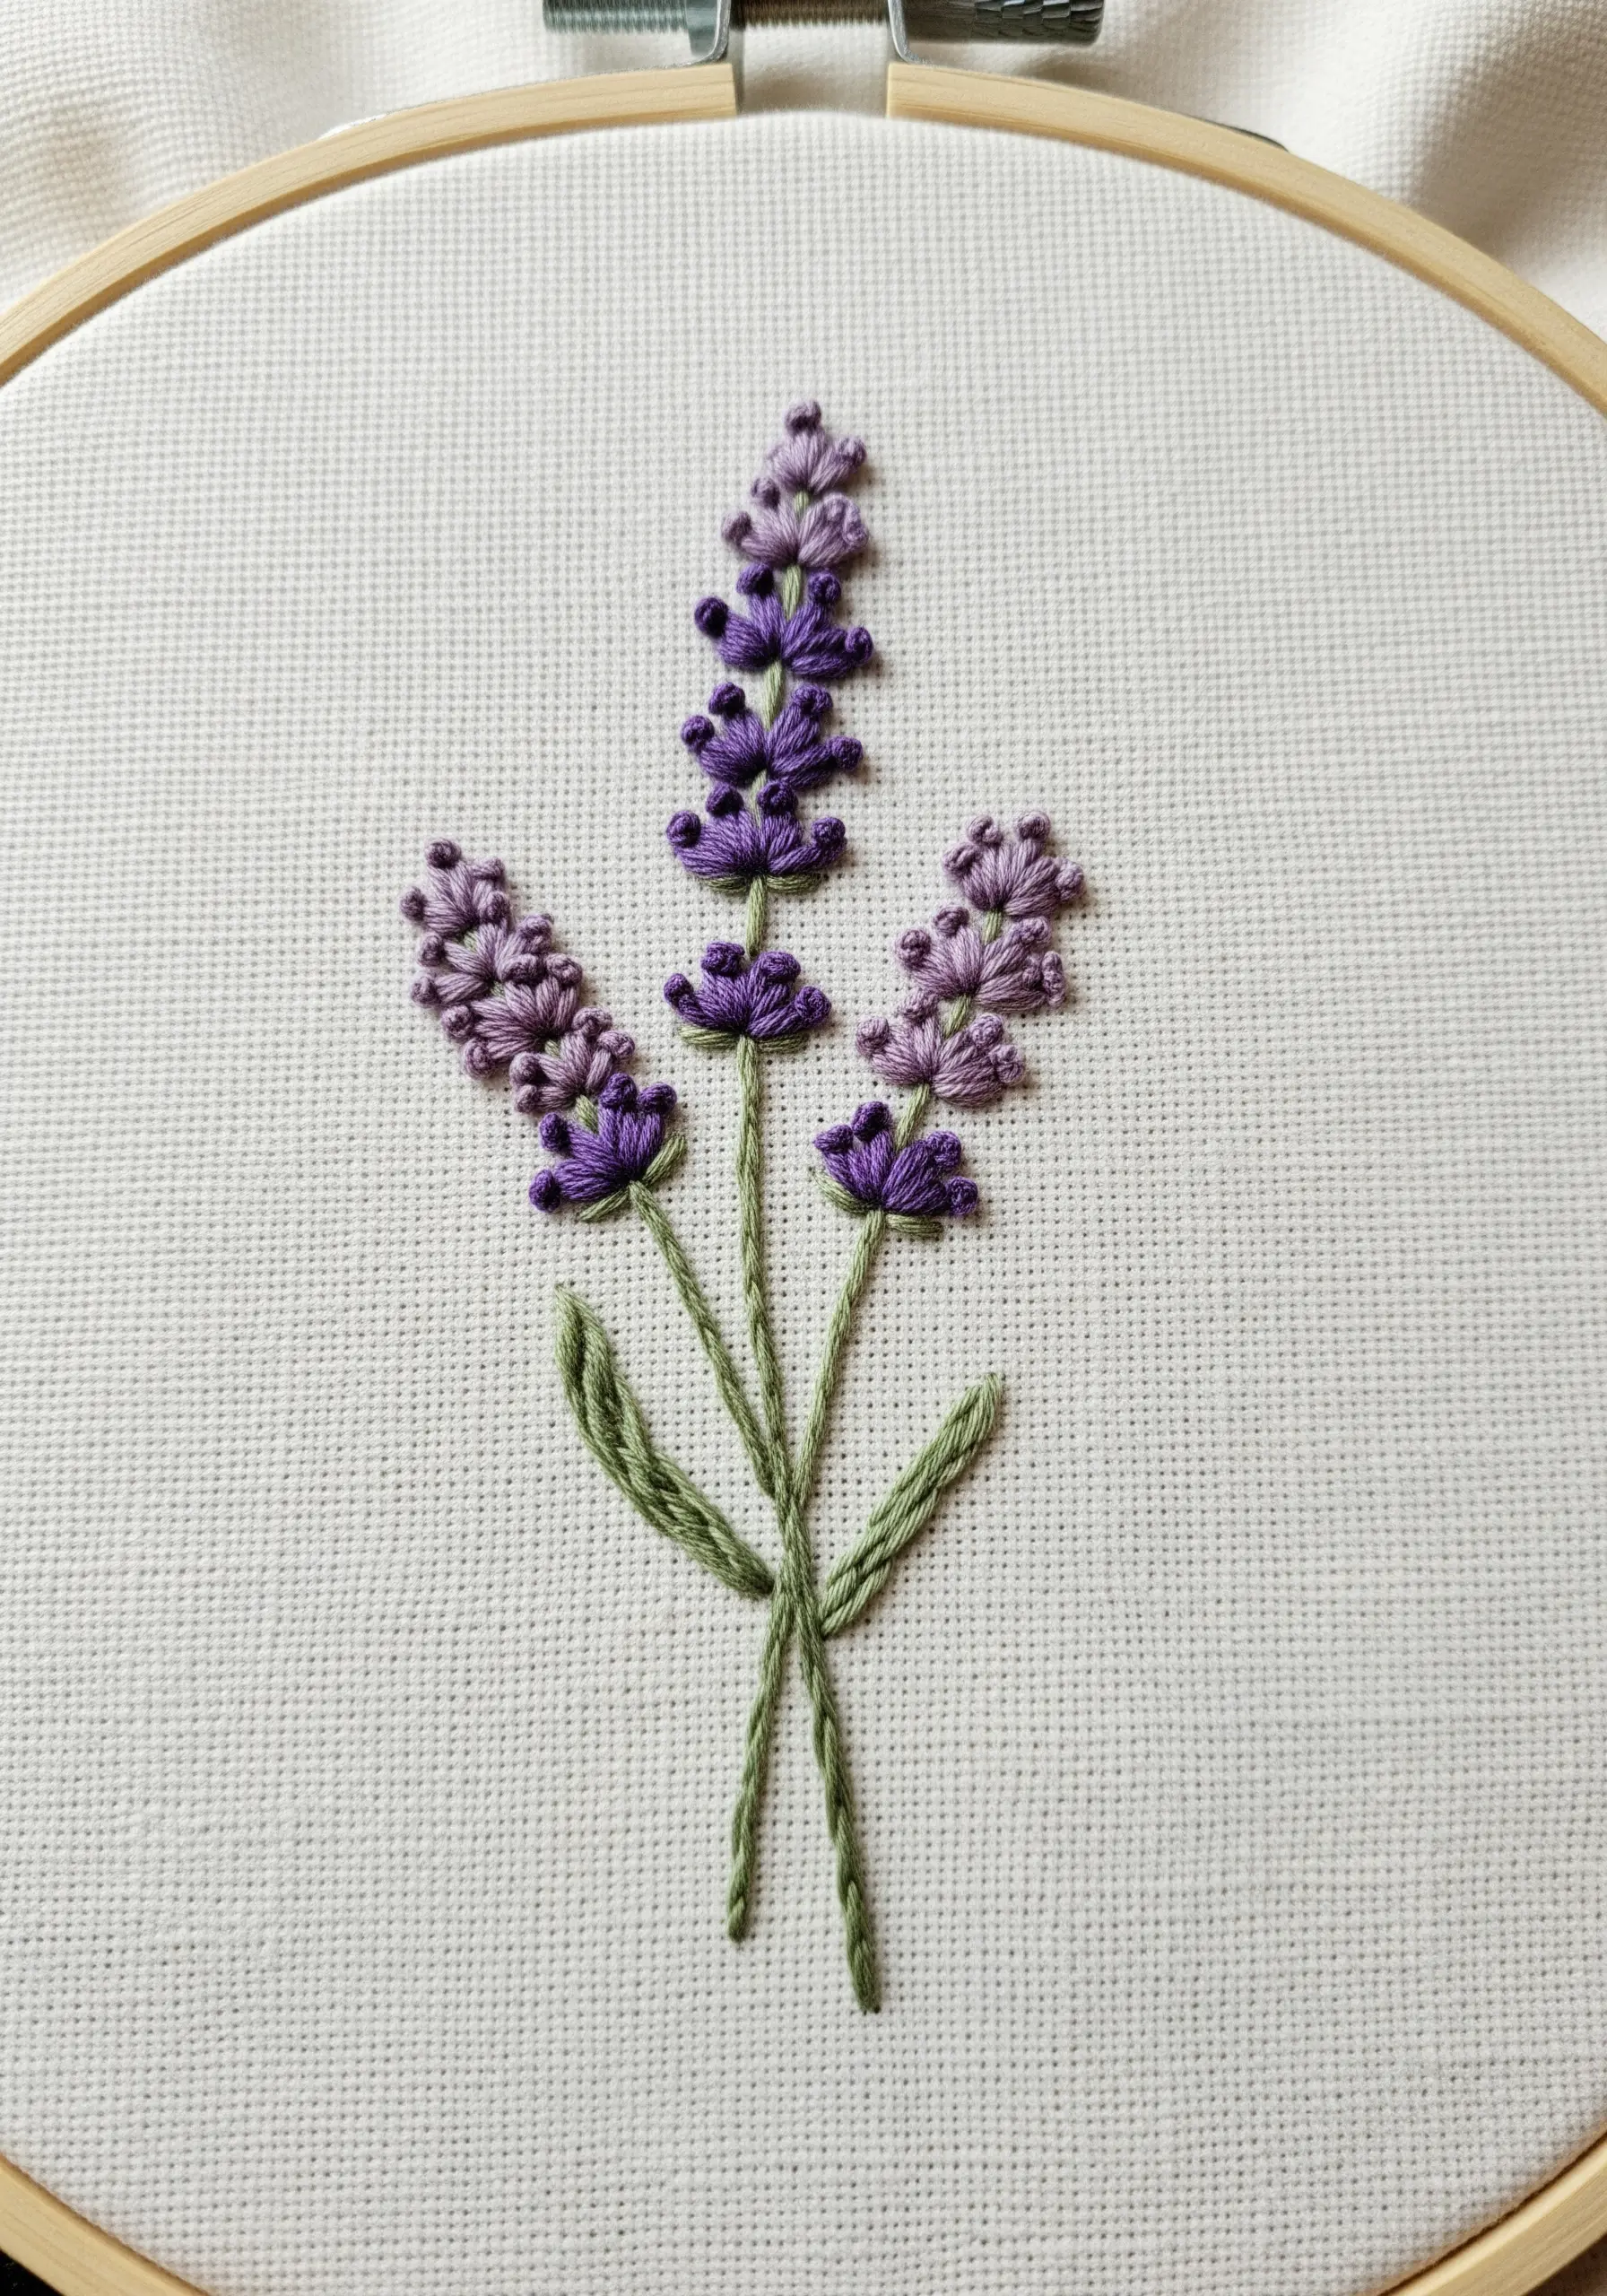
Give lavender sprigs lifelike texture by using French knots for the buds and a fine split stitch for the stems.
Vary the number of times you wrap the thread for the knots—one wrap for smaller, tighter buds at the top and two wraps for fuller blossoms below.
Use two or three shades of purple and scatter them randomly to mimic the natural color variations in a real lavender stalk.
Keeping the stems thin and delicate with a single strand of green floss prevents the design from feeling bulky and preserves its graceful look.
3. Create Depth with Geometric Fills
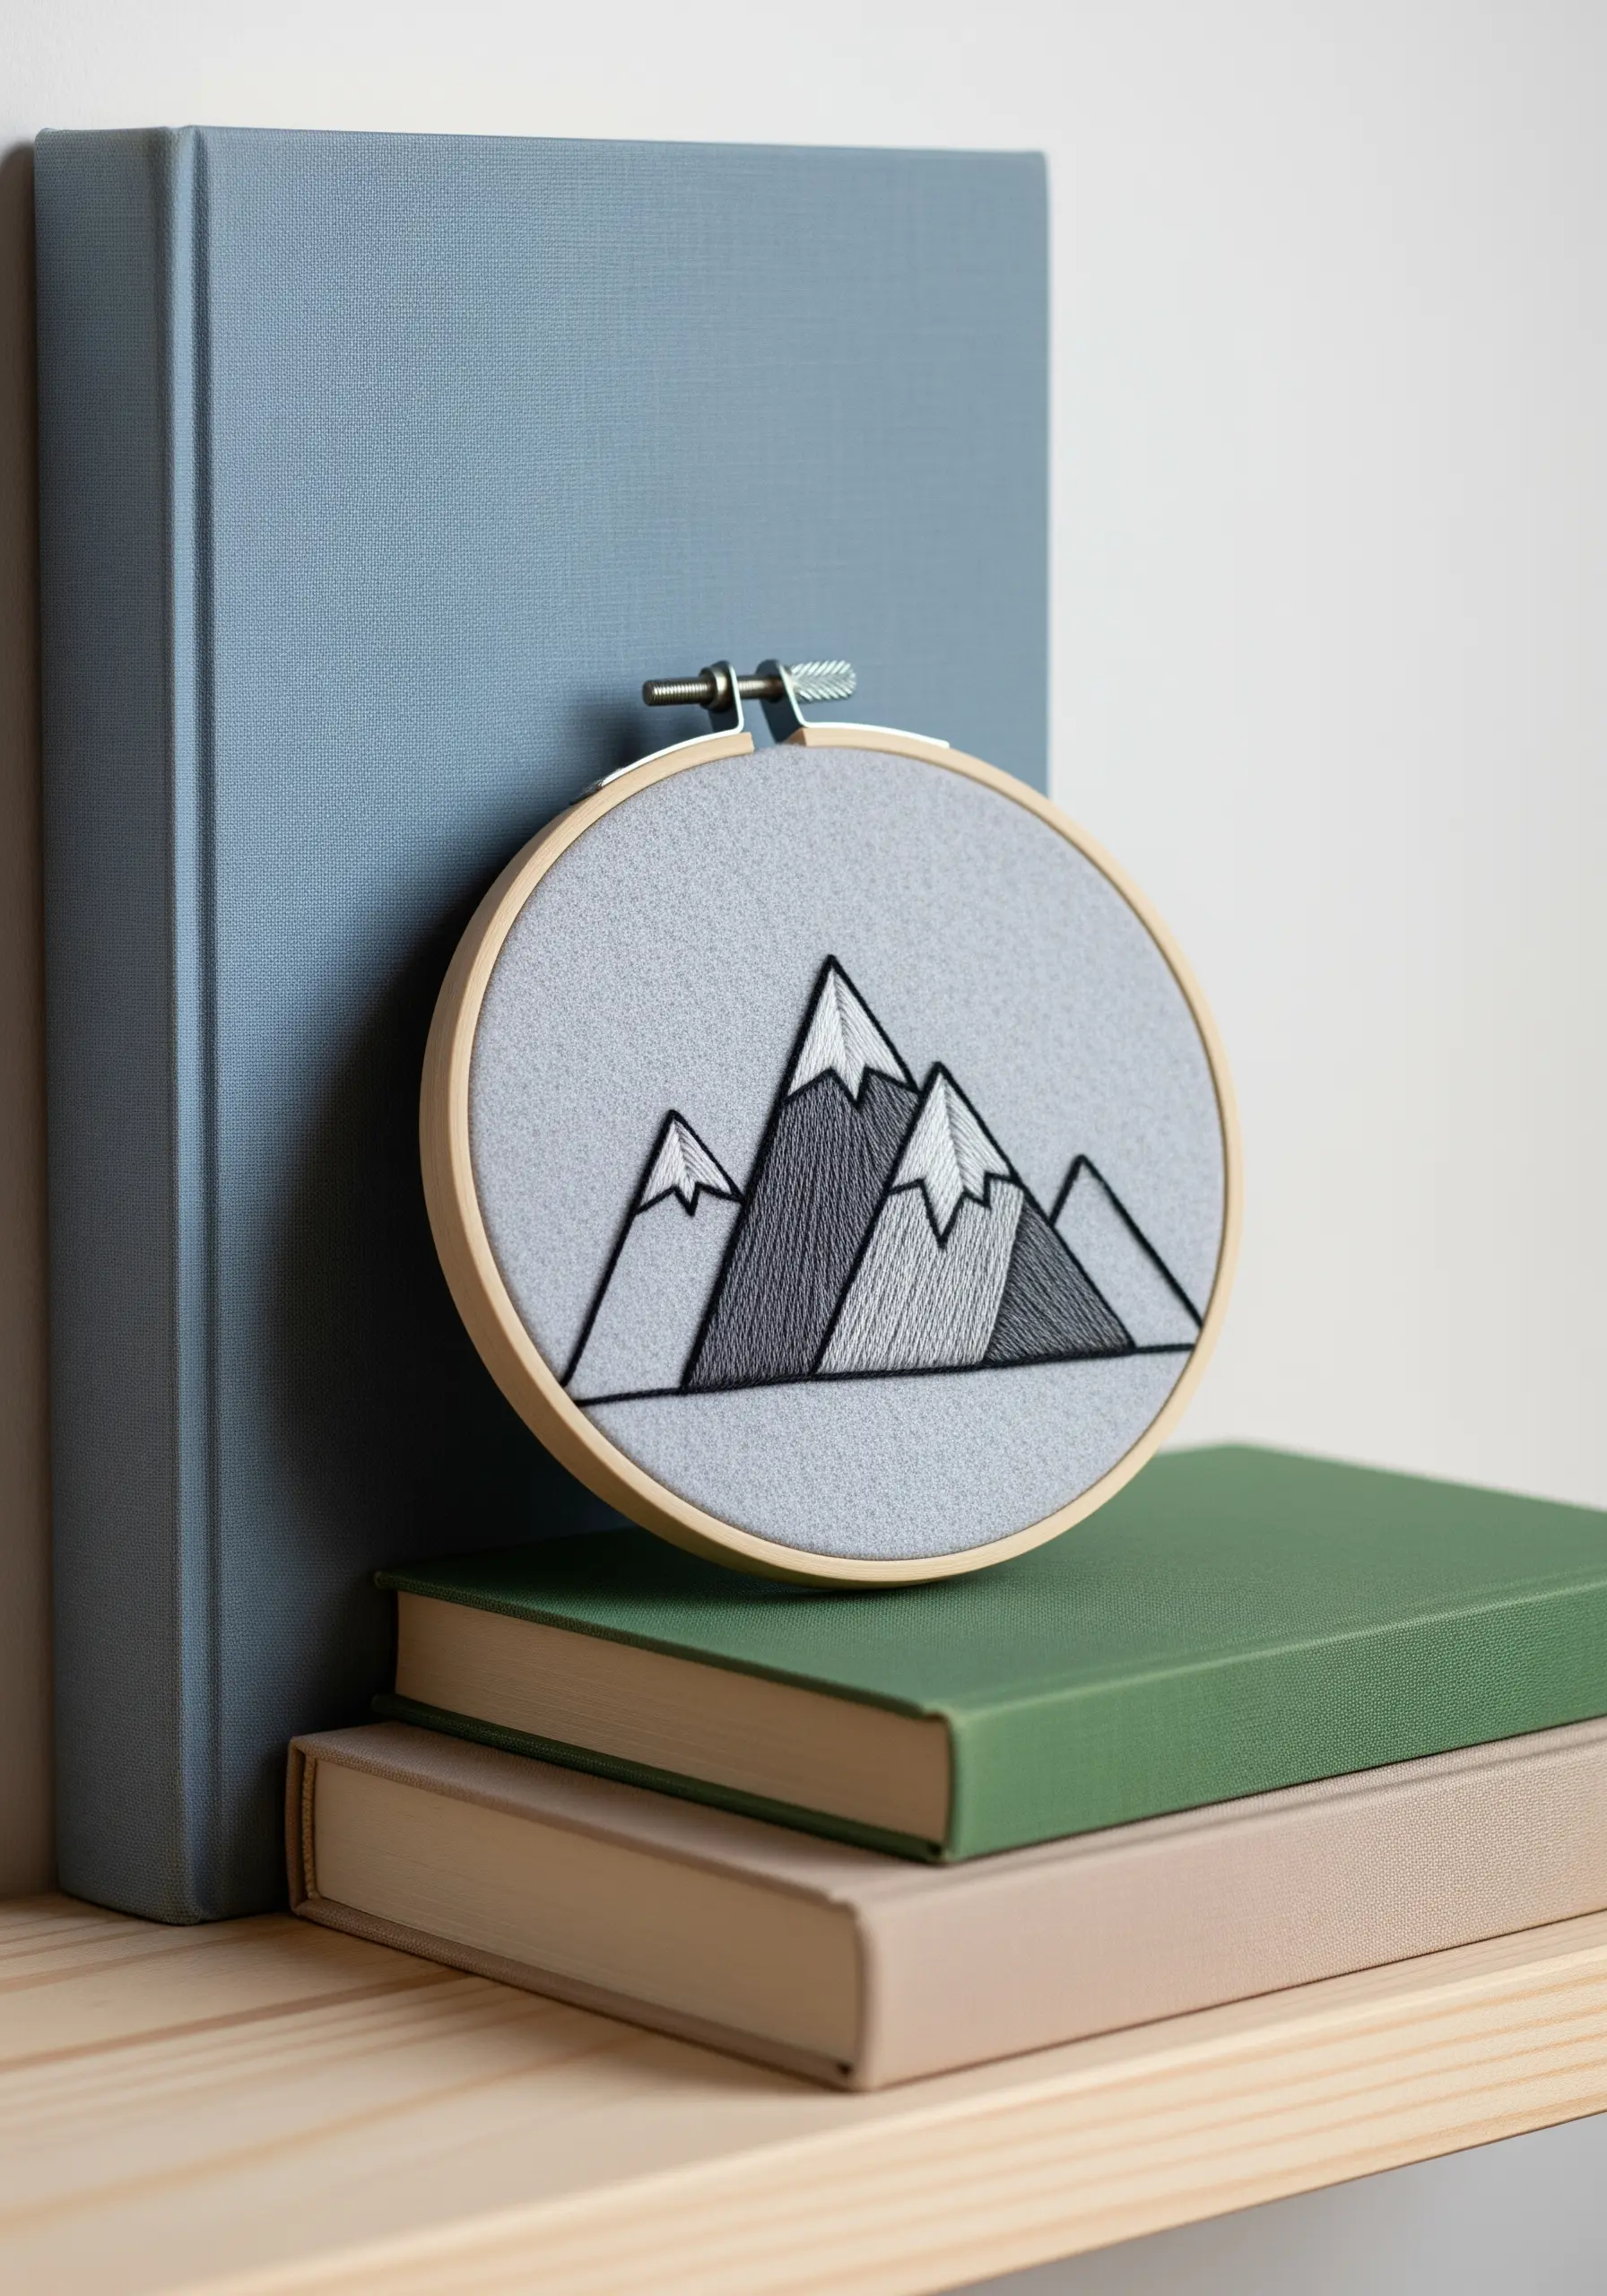
Transform a simple mountain outline into a graphic landscape by filling sections with angled satin stitches.
Divide each peak into geometric planes and vary the direction of your stitches in each one to simulate light and shadow.
Using a monochrome palette of black, grays, and white enhances the sharp, modern aesthetic.
For the cleanest possible edges, outline each section with a split stitch before filling it—this gives your satin stitch a perfect line to meet.
This technique turns a flat design into something with architectural depth and visual interest.
4. Achieve Bold Lines with Whipped Backstitch
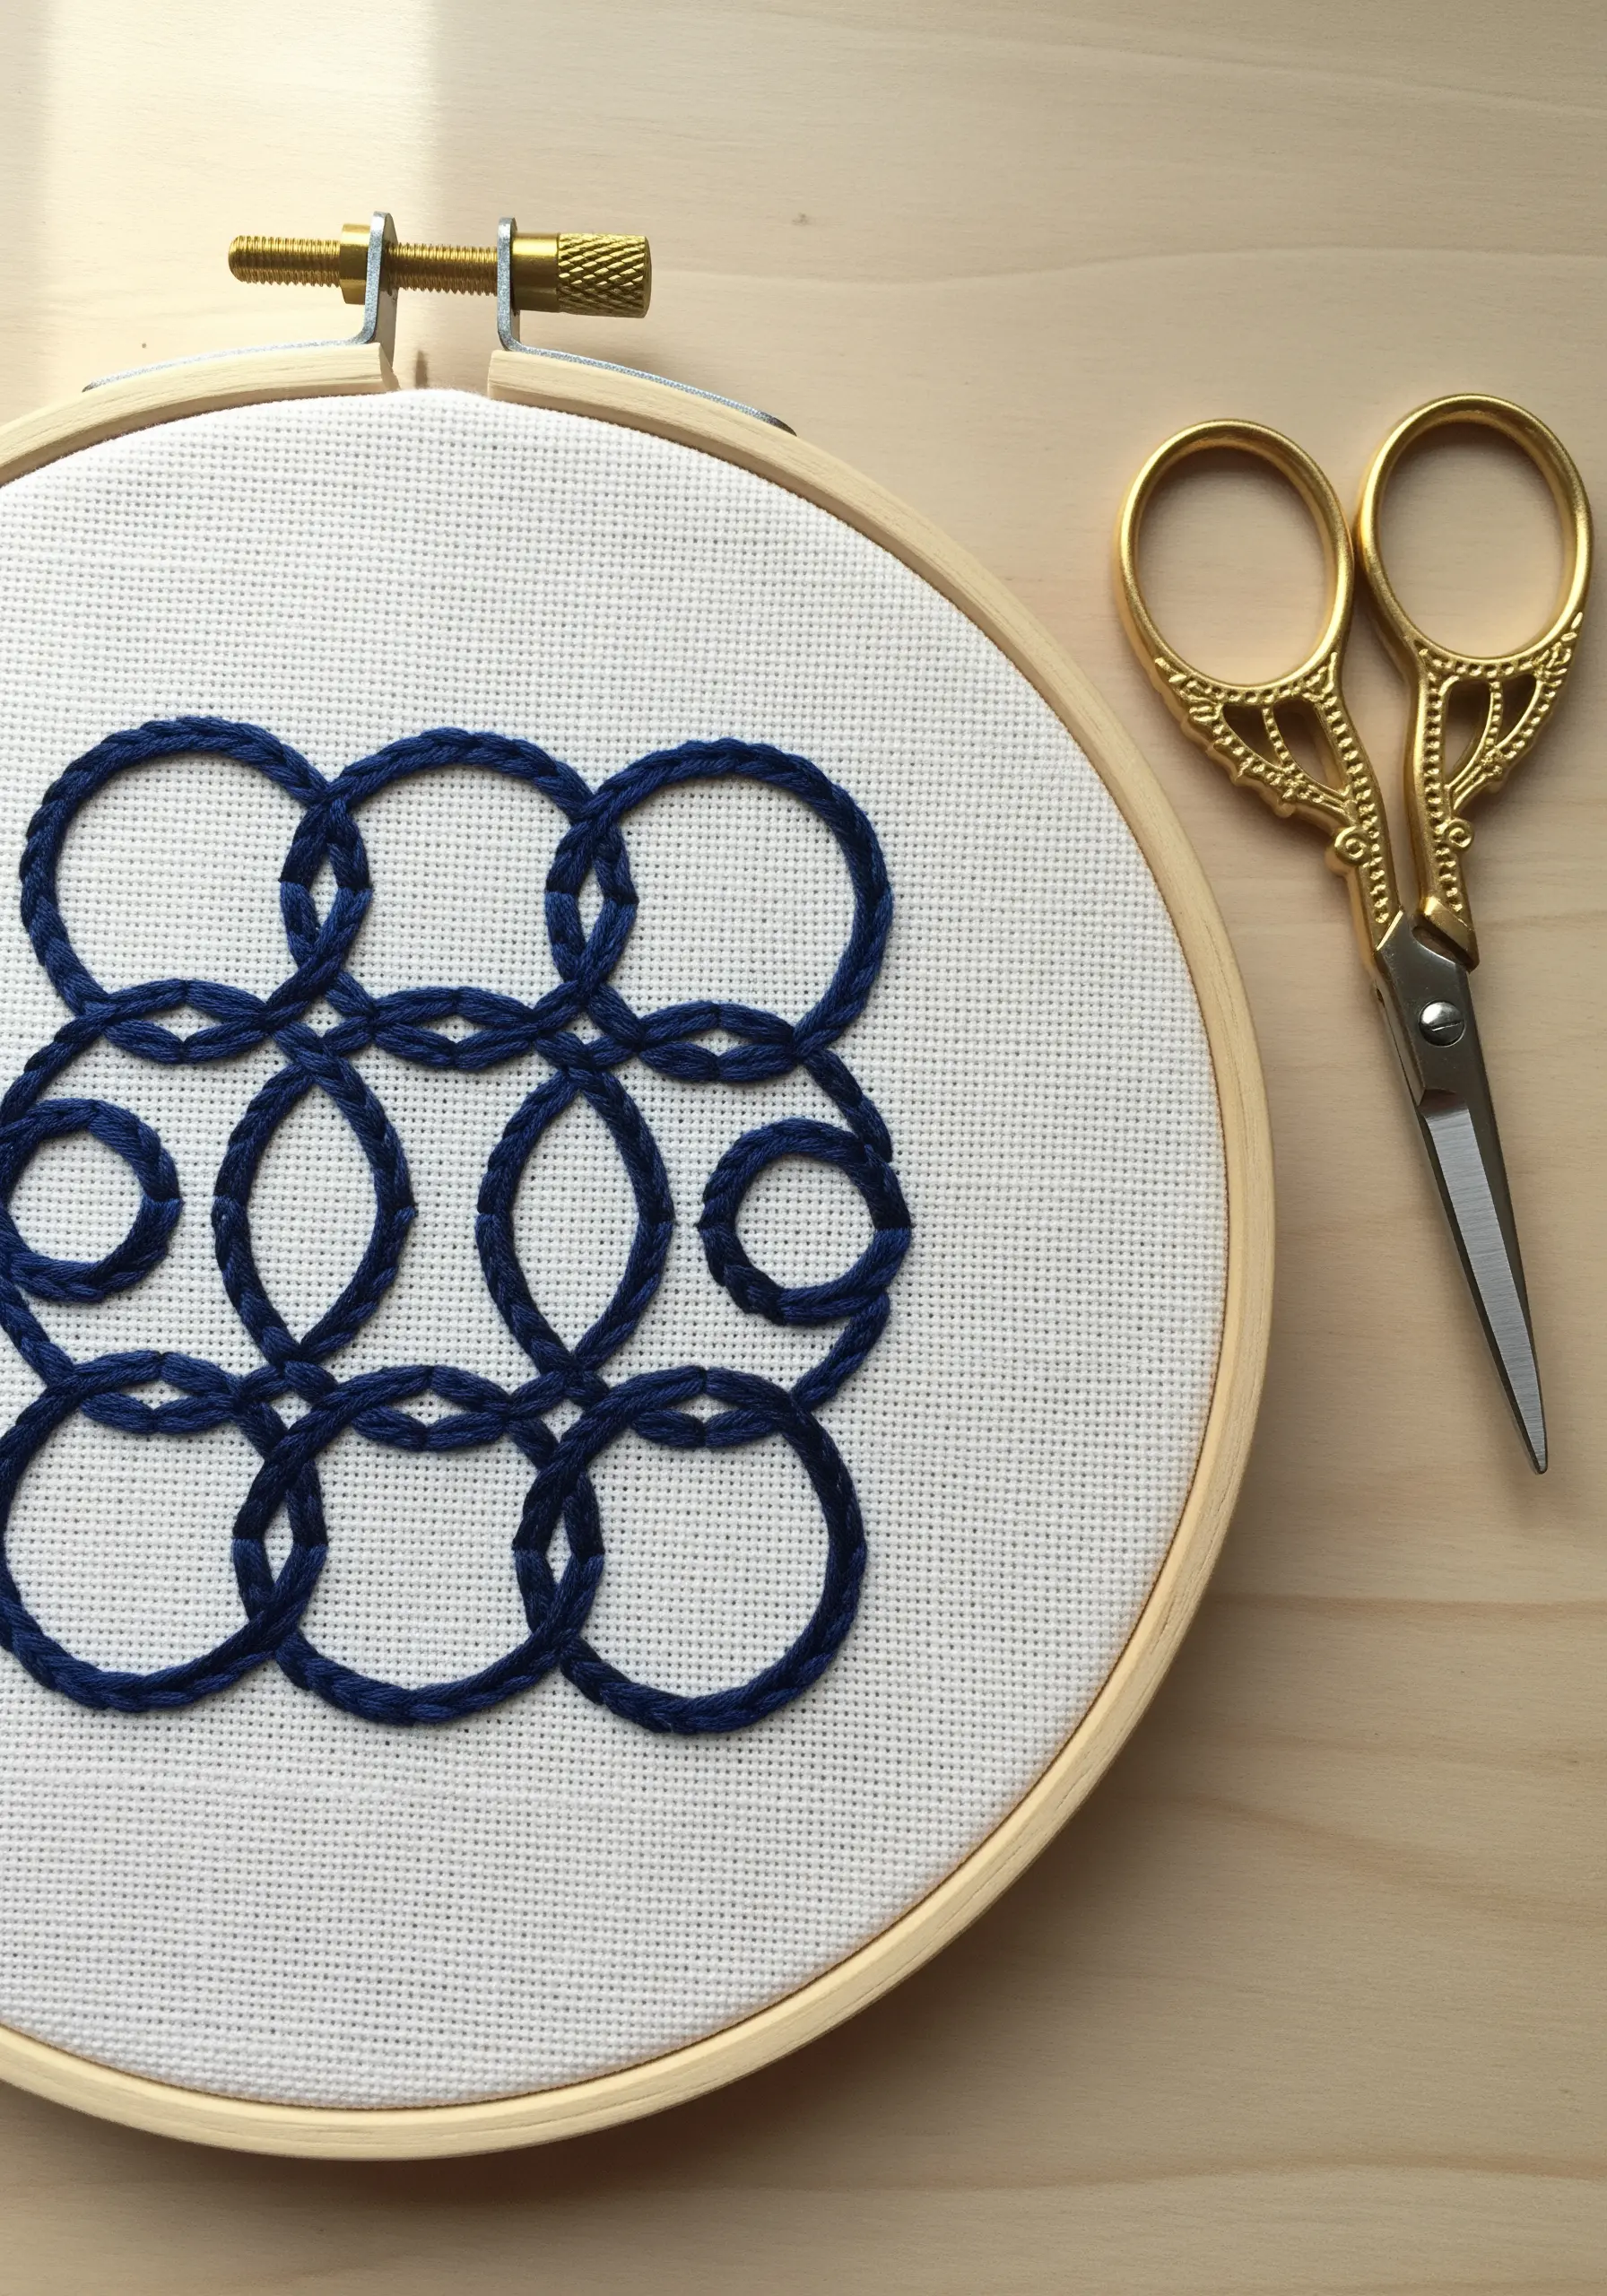
For clean, continuous geometric patterns, use a whipped backstitch instead of a standard backstitch.
First, lay down a foundation of simple backstitches along your design line.
Then, using the same or a contrasting thread, pass your needle under each backstitch without piercing the fabric.
This wrapping motion covers the gaps between stitches, creating a smooth, rope-like line that gives your work a professional, raised finish perfect for interlocking shapes.
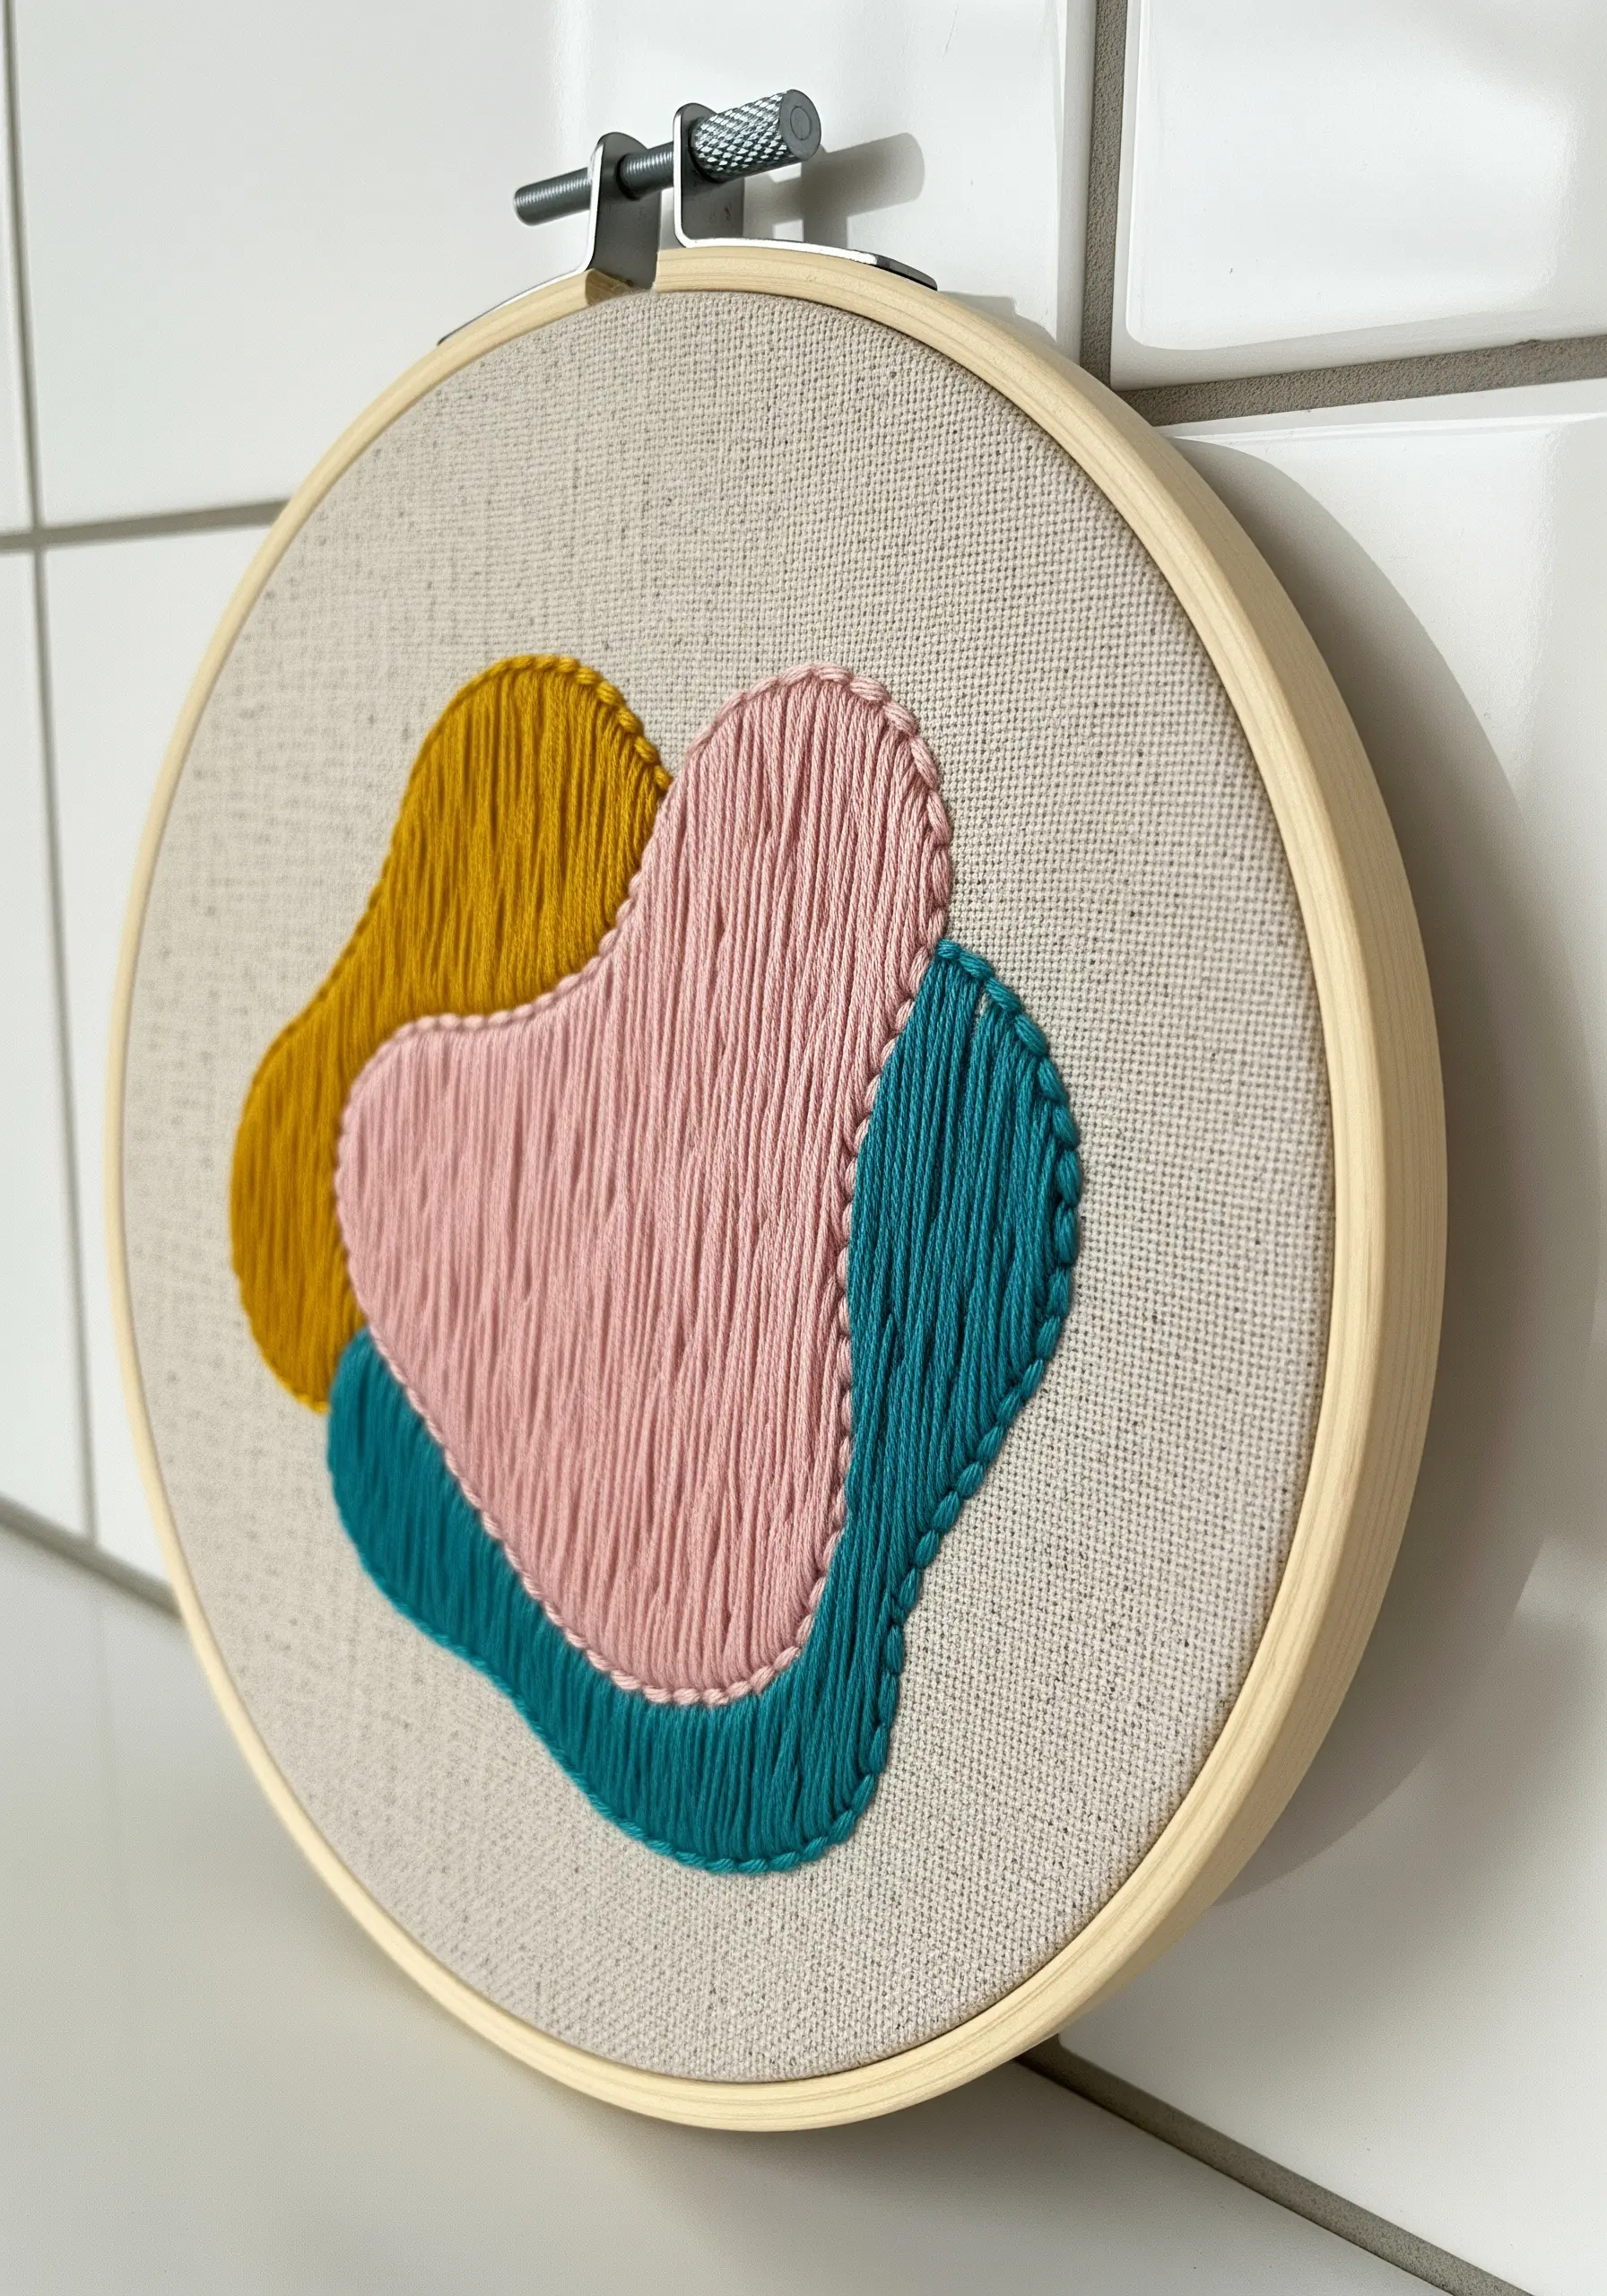
5. Define Shapes with Negative Space and Texture
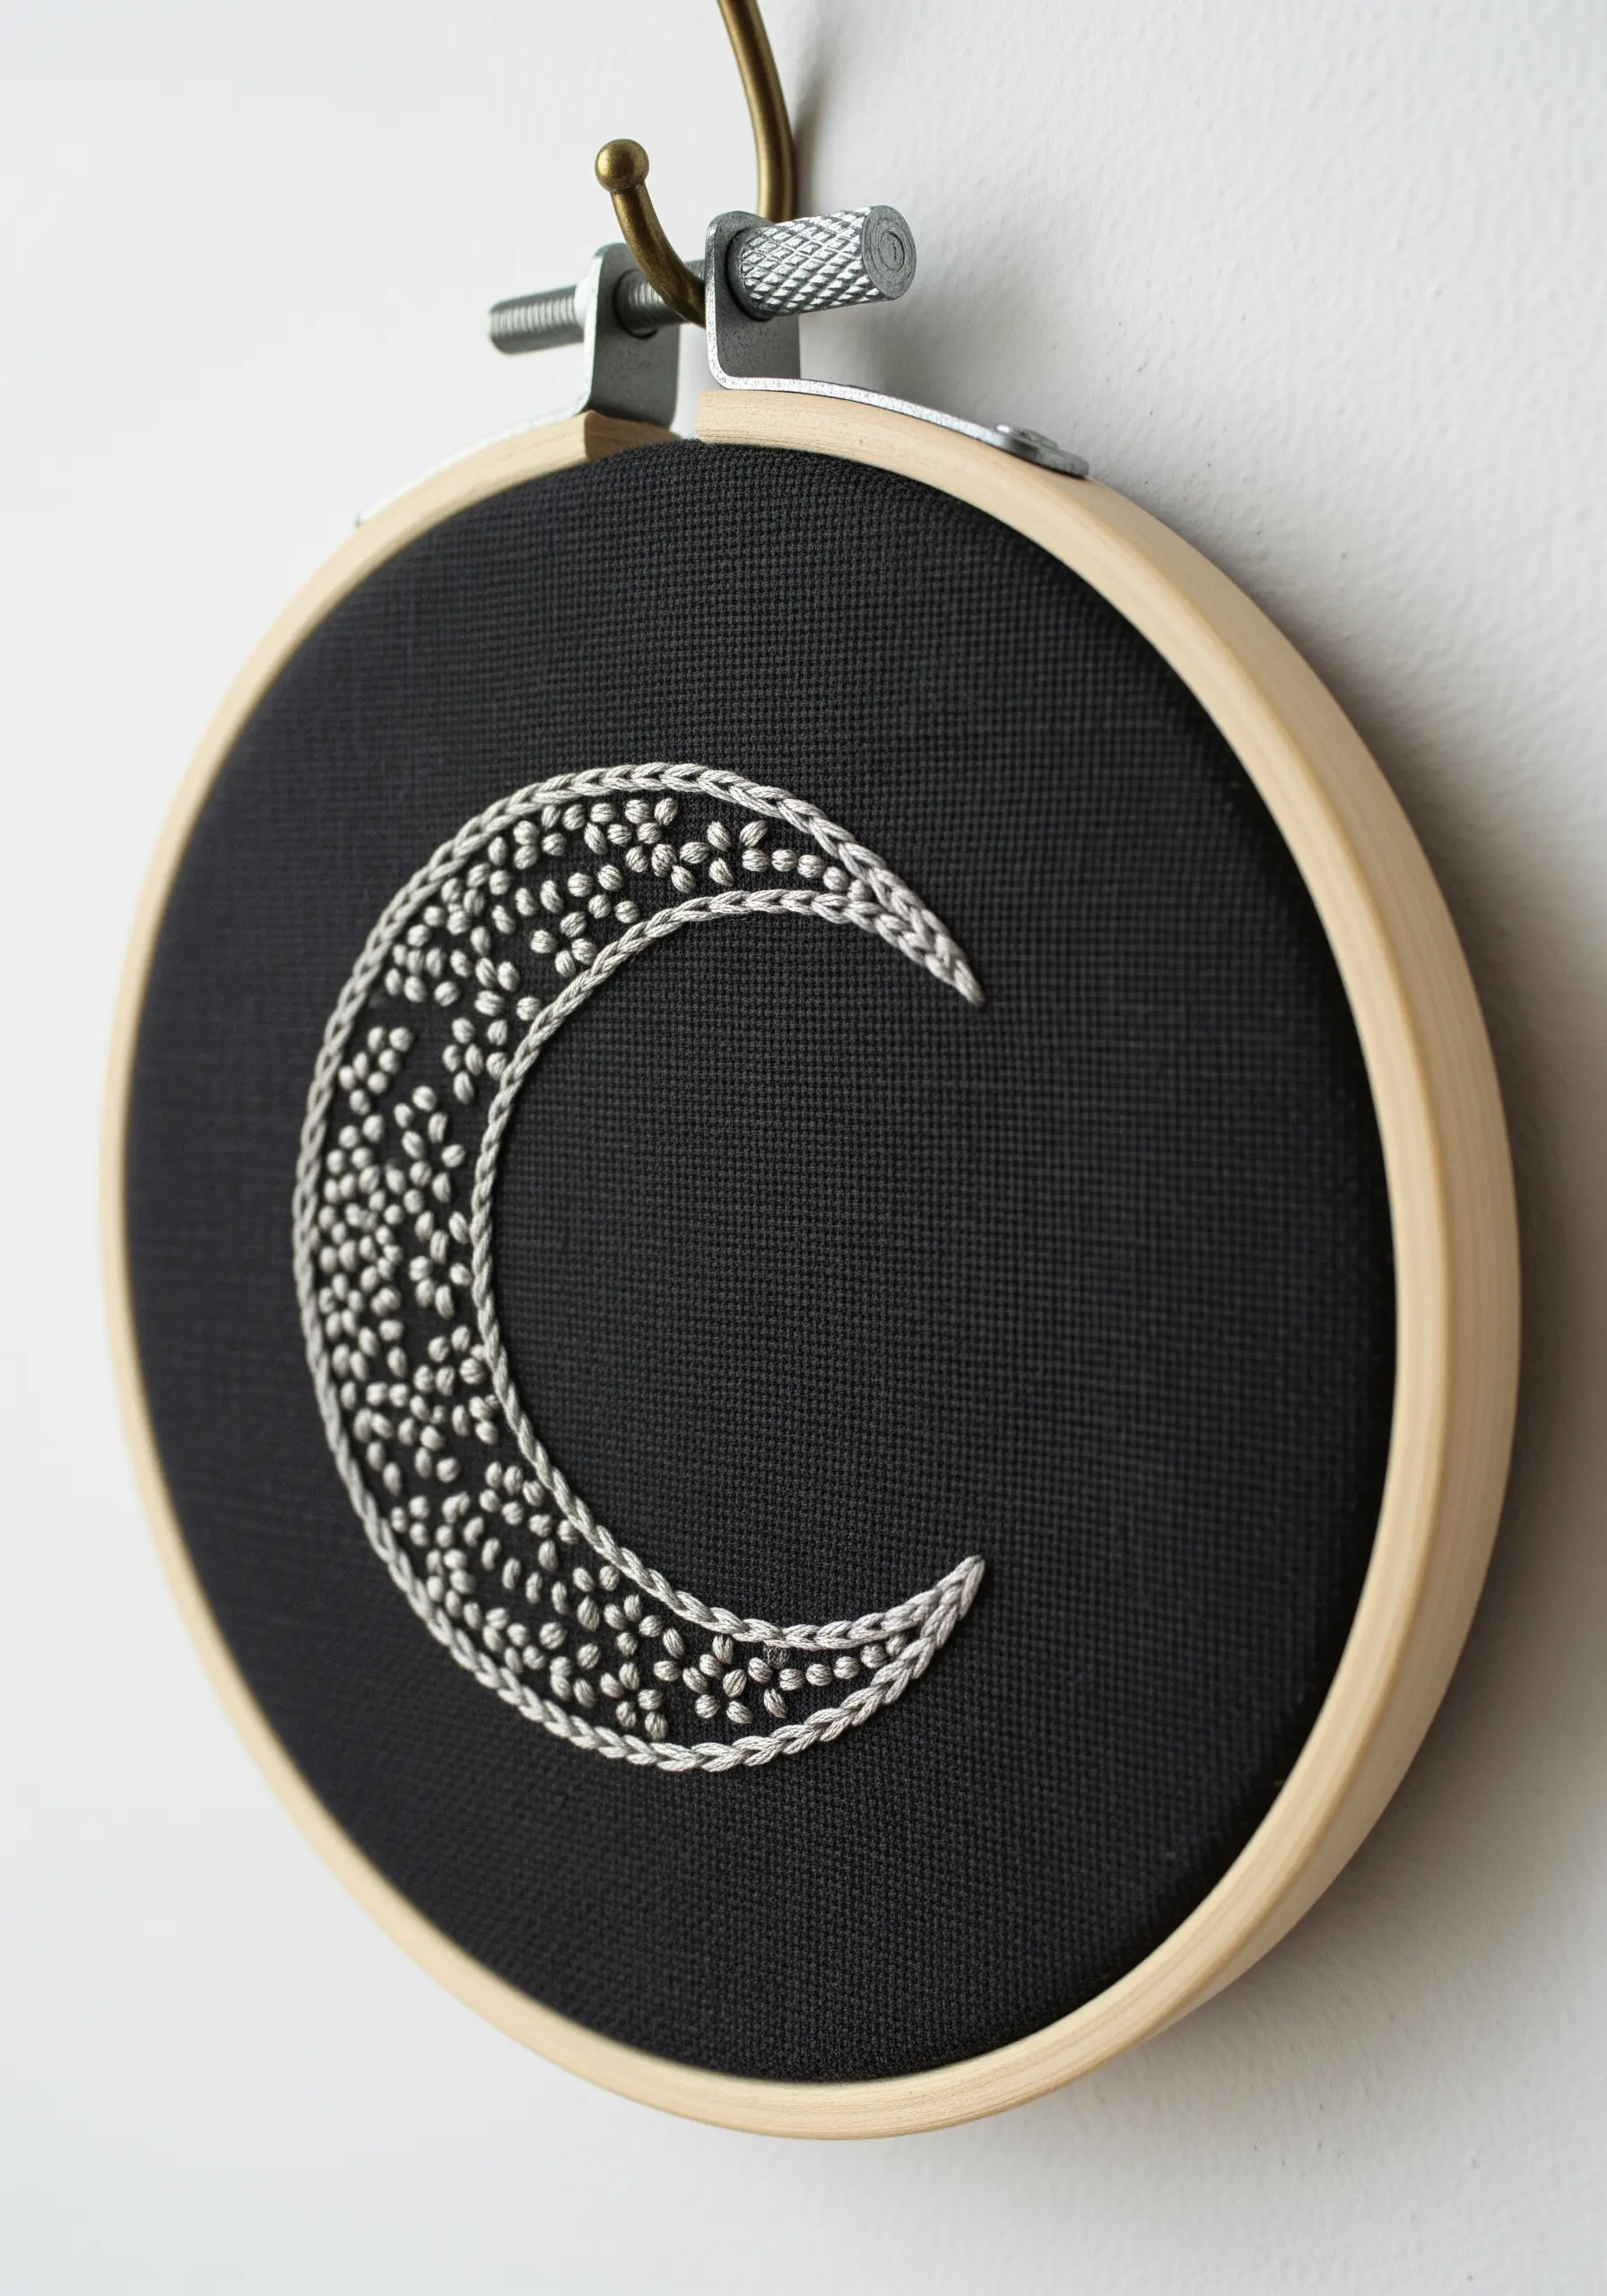
Create a powerful design by letting texture and negative space do the talking.
Outline a crescent moon with a delicate chain stitch, then fill the interior with a dense scattering of French knots.
Stitching with white or metallic thread on black fabric creates a dramatic, high-contrast effect that feels celestial and modern.
The key is the varied density of the knots; cluster them more tightly near the edges to reinforce the shape, allowing them to breathe in the center.
This technique creates soft cosmic vibes without overwhelming the composition.
6. Combine Bold Fills with Delicate Outlines

Give graphic motifs like this bee a clean, illustrative quality by pairing satin stitch fills with sharp backstitch outlines.
Fill the body with dense, smooth satin stitches in contrasting colors, ensuring each stitch lies flat and parallel.
Then, use a single strand of black floss to outline the entire shape, including the delicate wings and legs.
This combination of solid fill and fine line work creates a crisp, defined look that pops against the fabric, balancing weight and delicacy perfectly.
7. Capture Fluidity with a Single, Thick Line

For continuous line art, you need a stitch that provides a smooth, unbroken curve.
Instead of a standard backstitch, which can look disjointed on tight curves, use a whipped backstitch or a stem stitch with a thicker thread (all six strands).
This creates a bold, sculptural line that emphasizes the fluidity of the drawing.
The key is to maintain consistent tension so the line has a uniform thickness, turning a simple sketch into a piece of gallery-style hoop art.
8. Juxtapose Textures for Tactile Realism
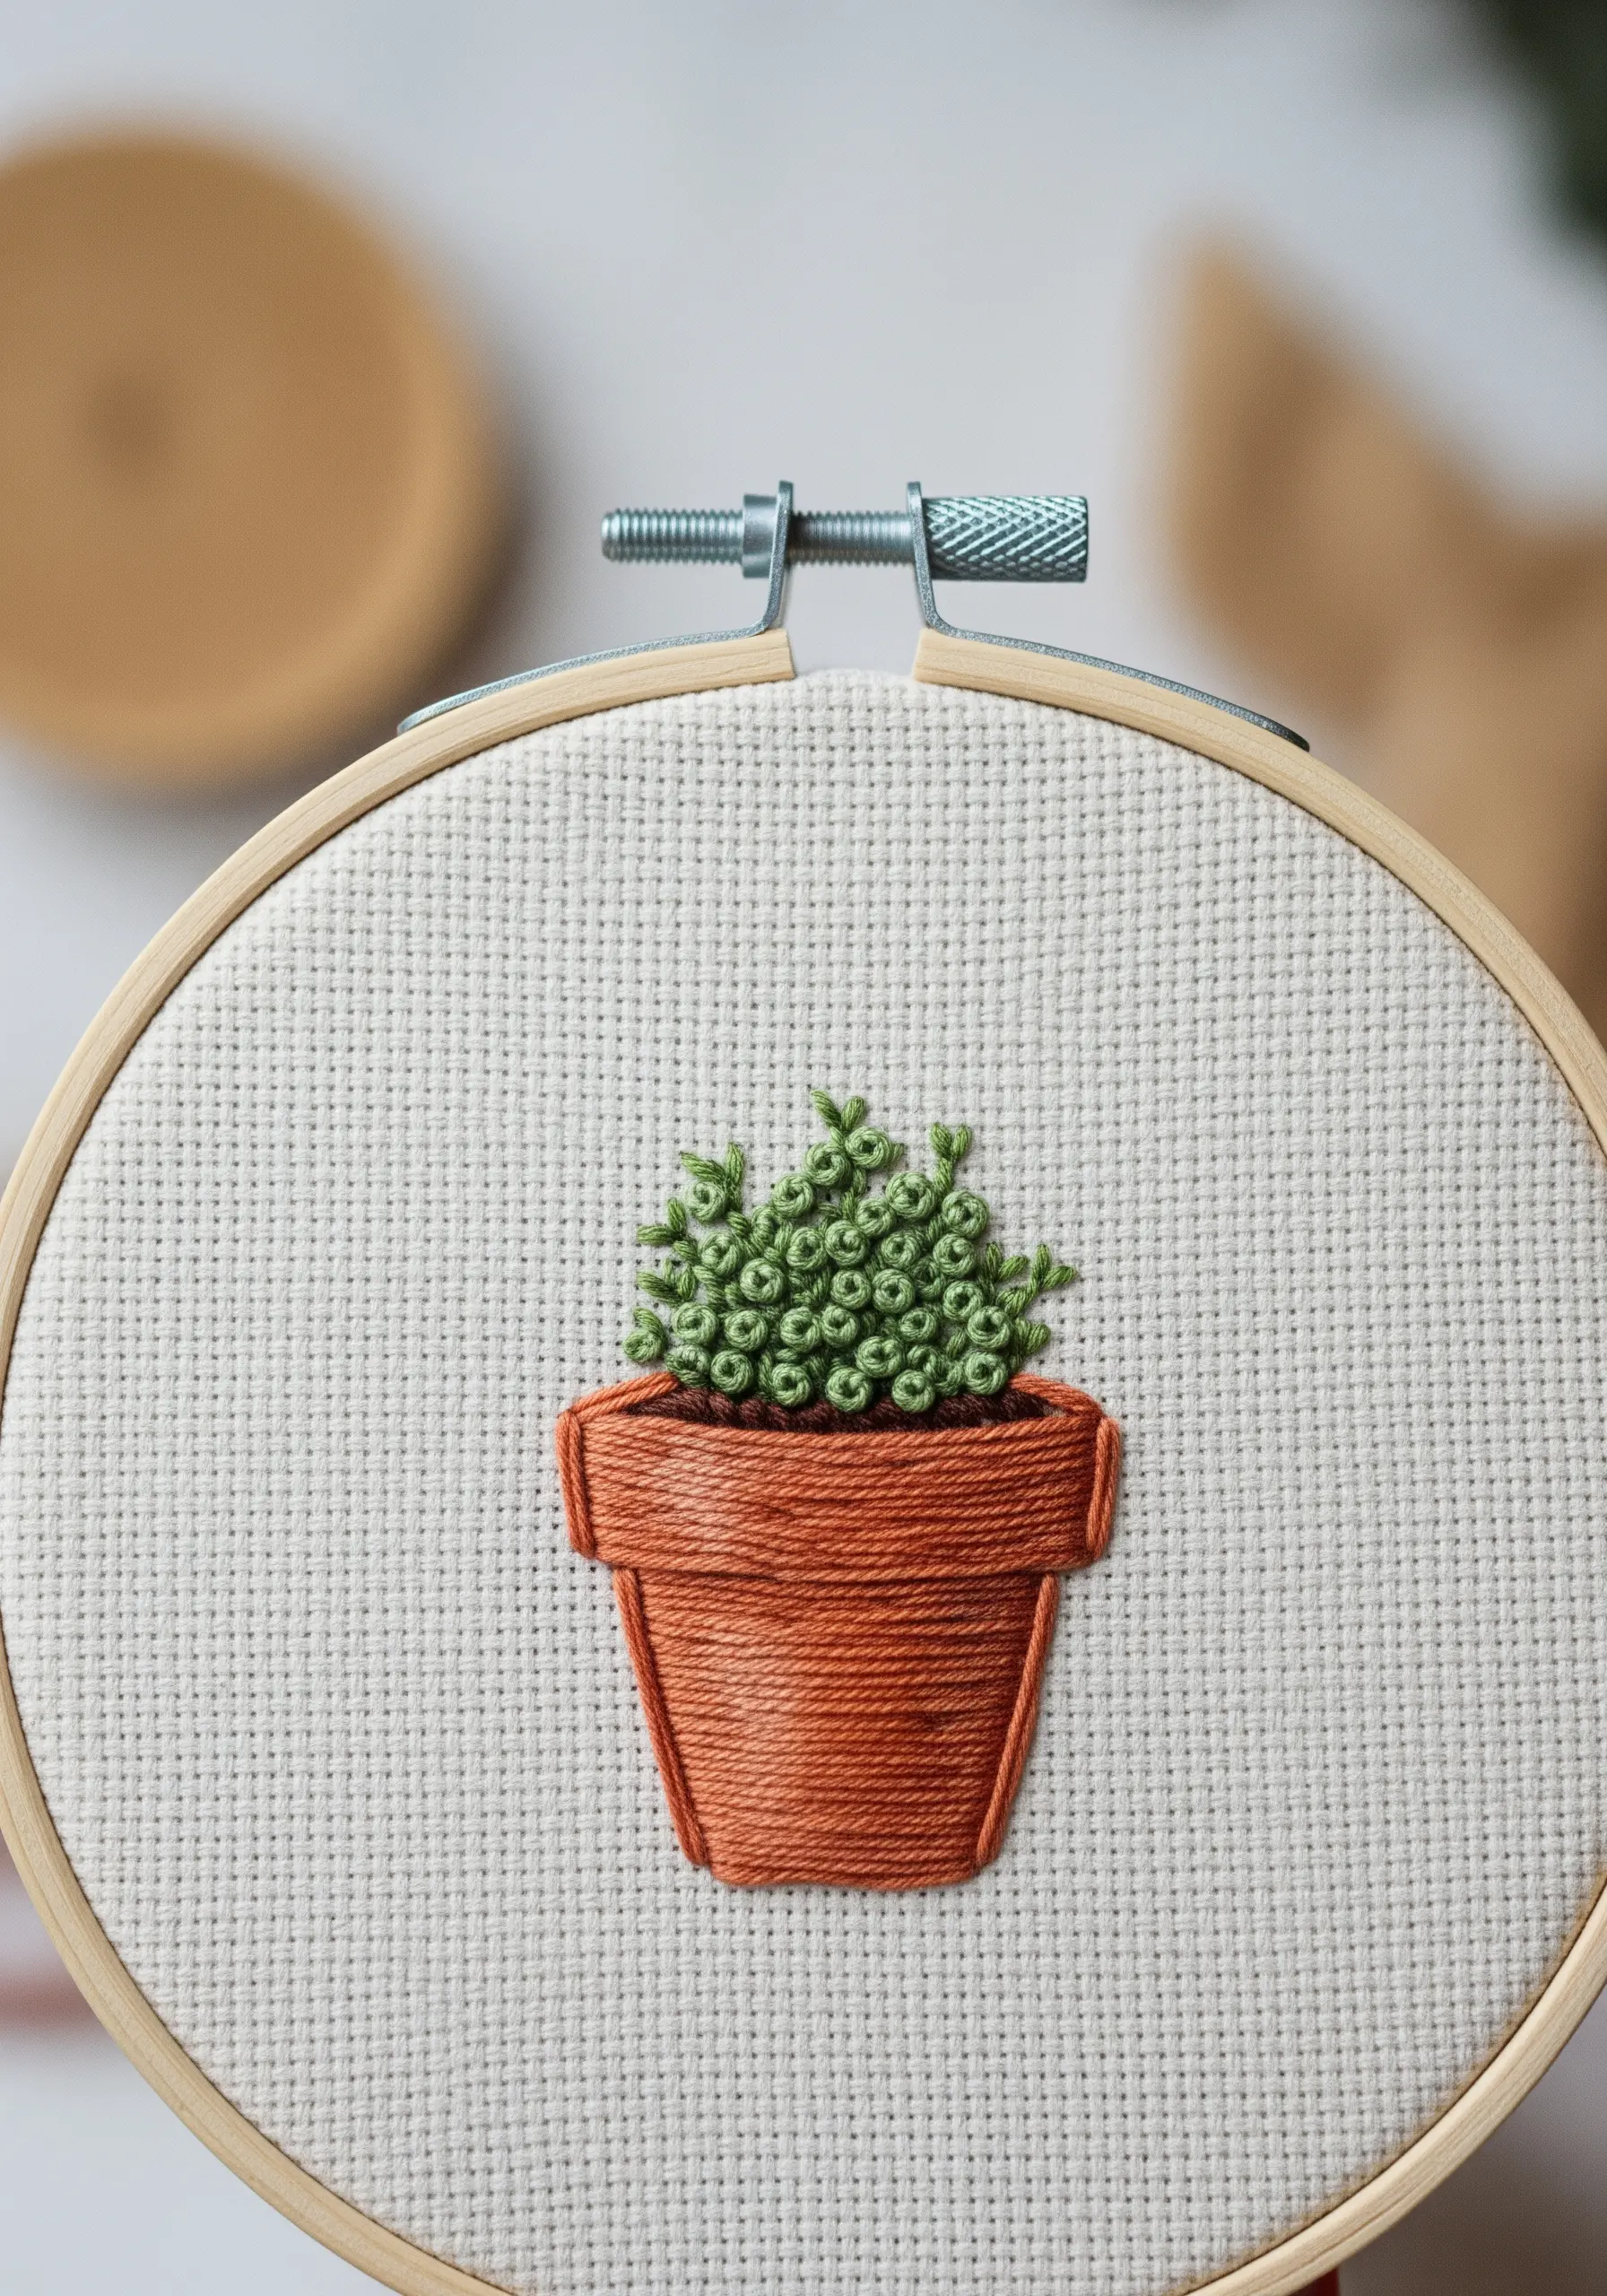
Make simple objects feel three-dimensional by pairing contrasting stitch textures.
Embroider the terracotta pot with uniform, horizontal satin stitches to mimic the smooth, thrown lines of pottery.
For the plant, switch to a dense cluster of French knots using a slightly lighter thread weight to create a bushy, organic feel.
This intentional contrast between the smooth, flat stitches of the pot and the bumpy, raised knots of the leaves is what gives the piece its satisfying tactile depth.
9. Explore Form with Padded Monochromatic Stitching
Elevate simple icons by using padded satin stitch to create a raised, bas-relief effect.
First, fill the shape with an underlay of small seed stitches or a layer of satin stitches perpendicular to your final layer.
Then, cover this padding with your top layer of satin stitches.
Sticking to a single color, like white on white, focuses all the attention on the sculptural quality of the stitches, proving that you don’t need color to make a strong statement.
These are perfect for embroidered nursery decor ideas.
10. Create Natural Forms with Fishbone Stitch
The fishbone stitch is your secret to creating realistic leaves with a single, fluid motion.
This stitch creates a central vein organically as you work, with stitches overlapping slightly at the center and angling outwards.
Start with a single straight stitch from the tip down the center, then alternate sides, bringing your needle up on the outer edge and down just over the center line.
This method builds both the shape and the detail of the leaf simultaneously, resulting in a beautifully tapered, natural form.
11. Add Braided Texture with Chain Stitch
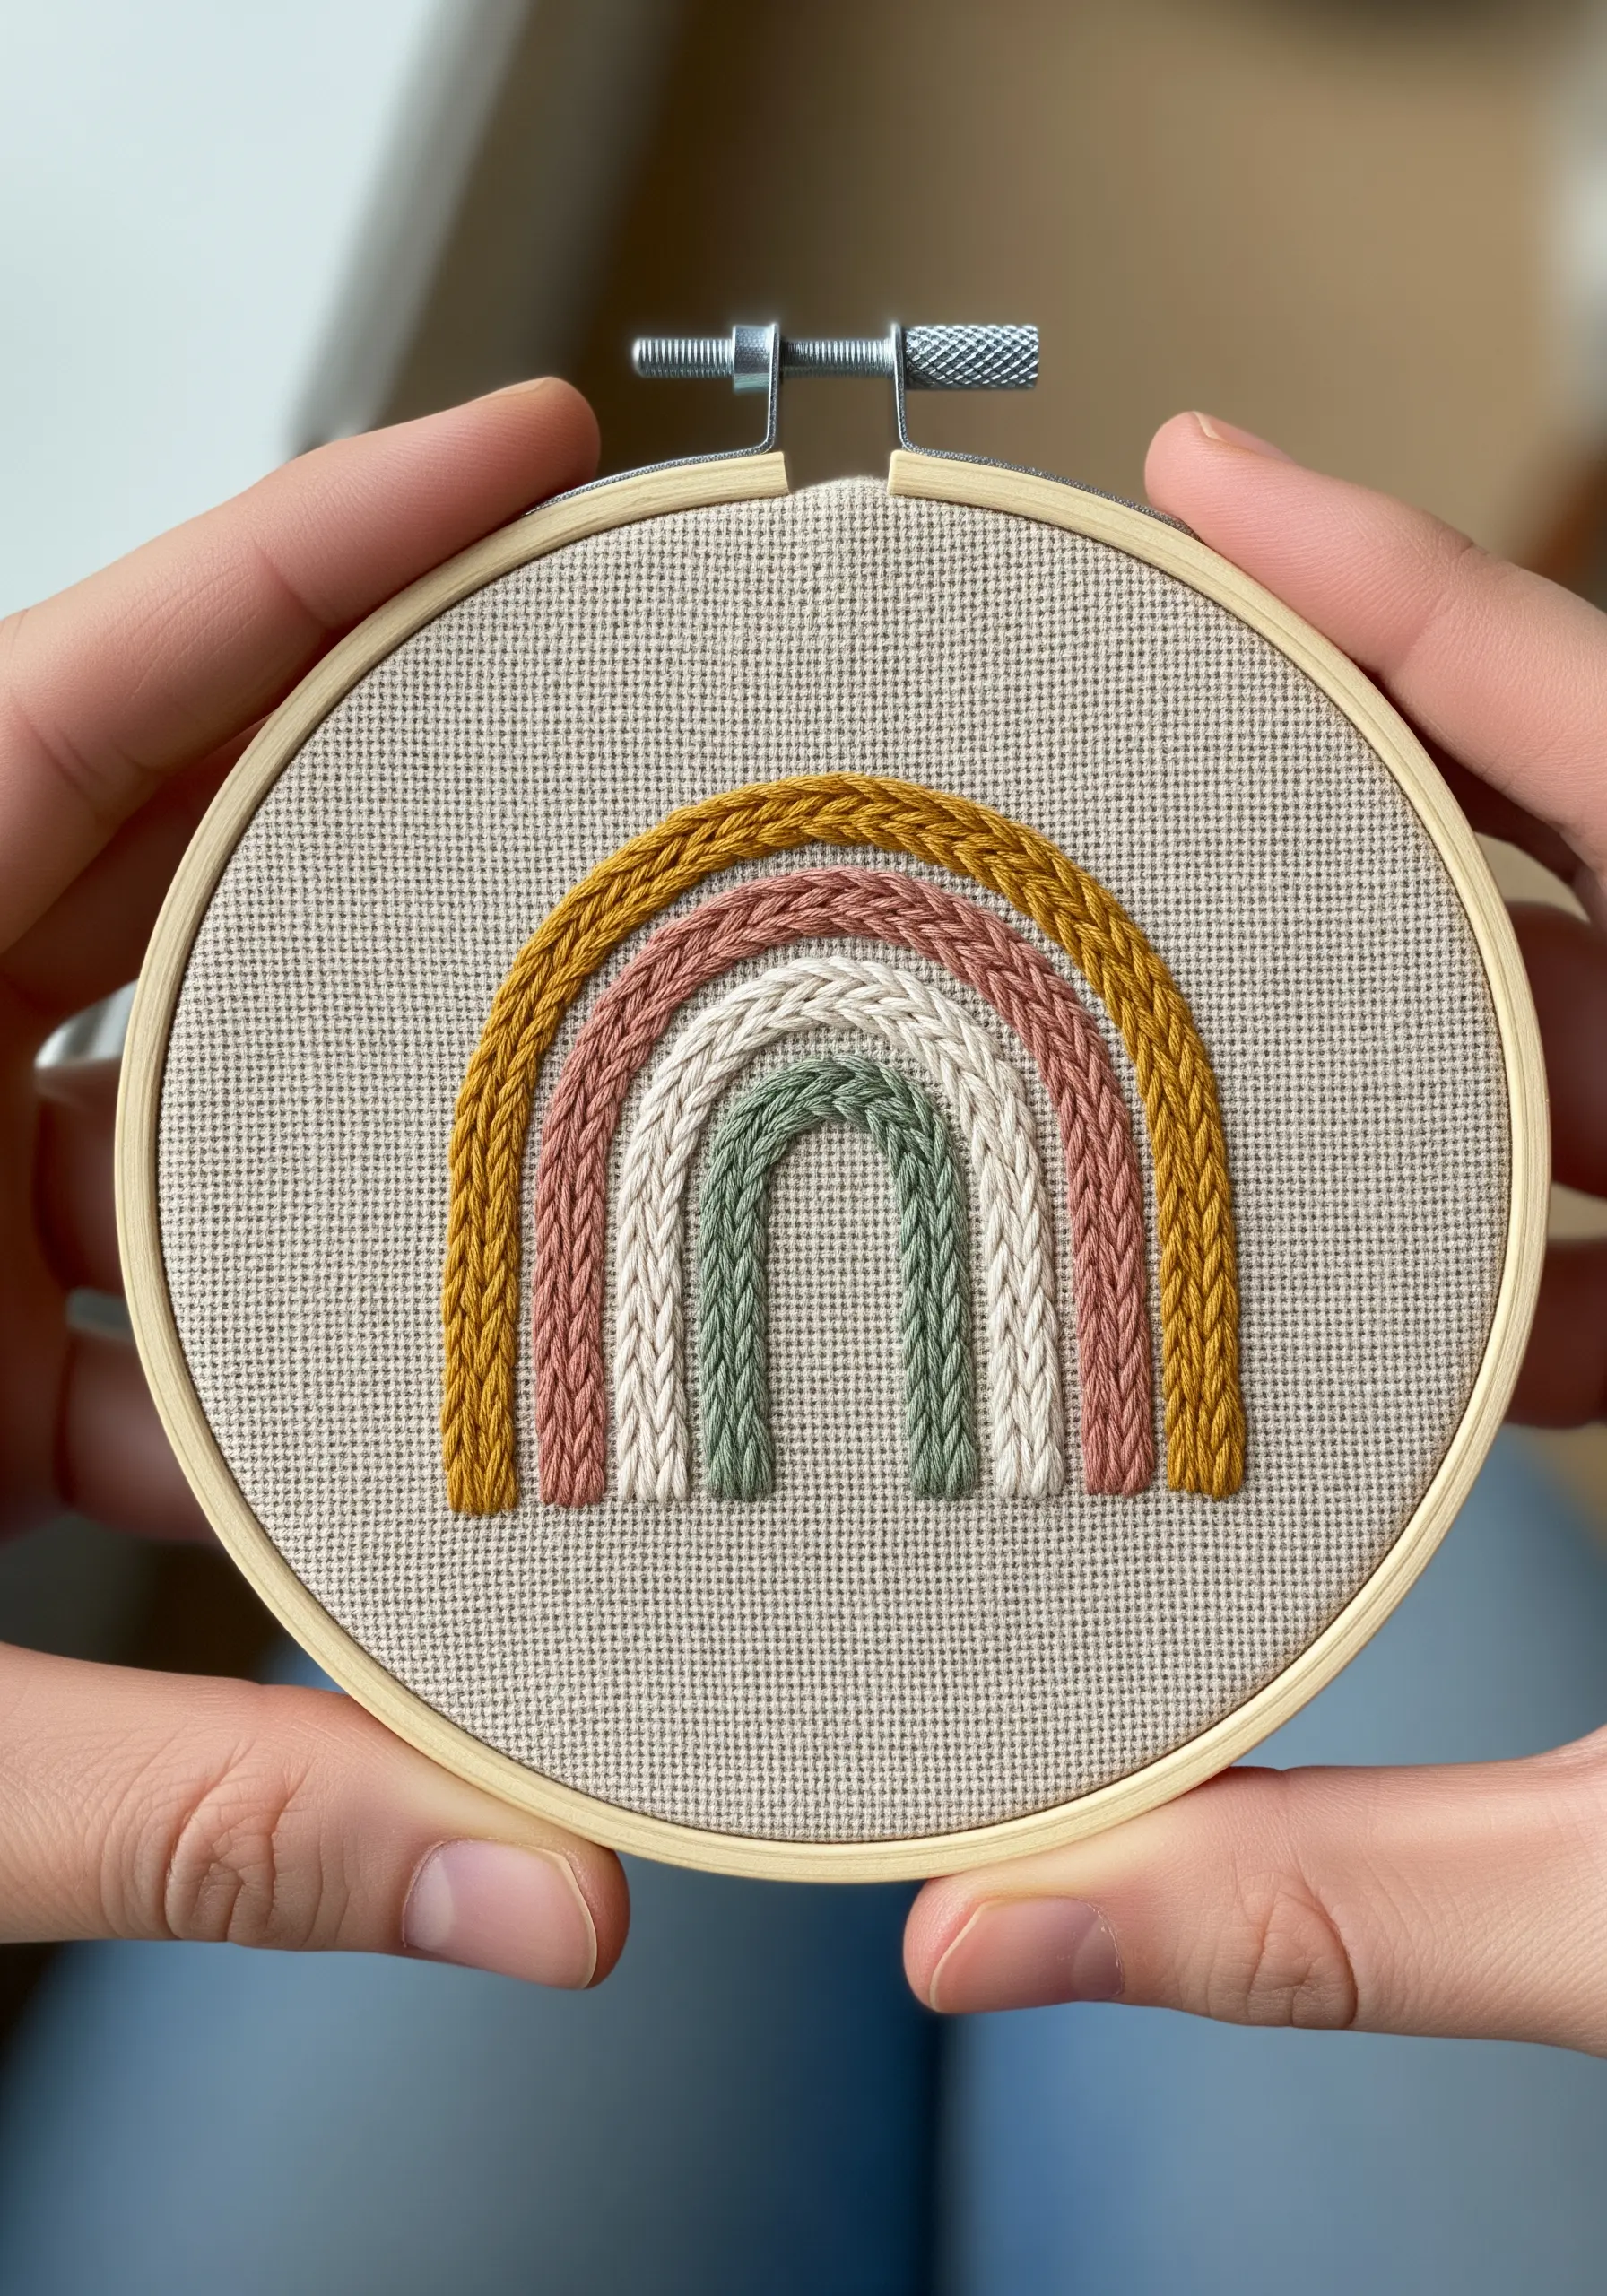
Instead of a flat satin stitch, give the bands of a rainbow a thick, tactile quality using chain stitch.
This stitch creates a series of interlocking loops that look like a braid, adding both texture and visual weight to each color.
Work each arc of the rainbow with a full six strands of floss for maximum impact.
Choosing an earthy, muted palette gives the classic rainbow motif a modern, sophisticated update, making it feel less primary and more personal.
12. Achieve Typographic Precision on Grid Fabric
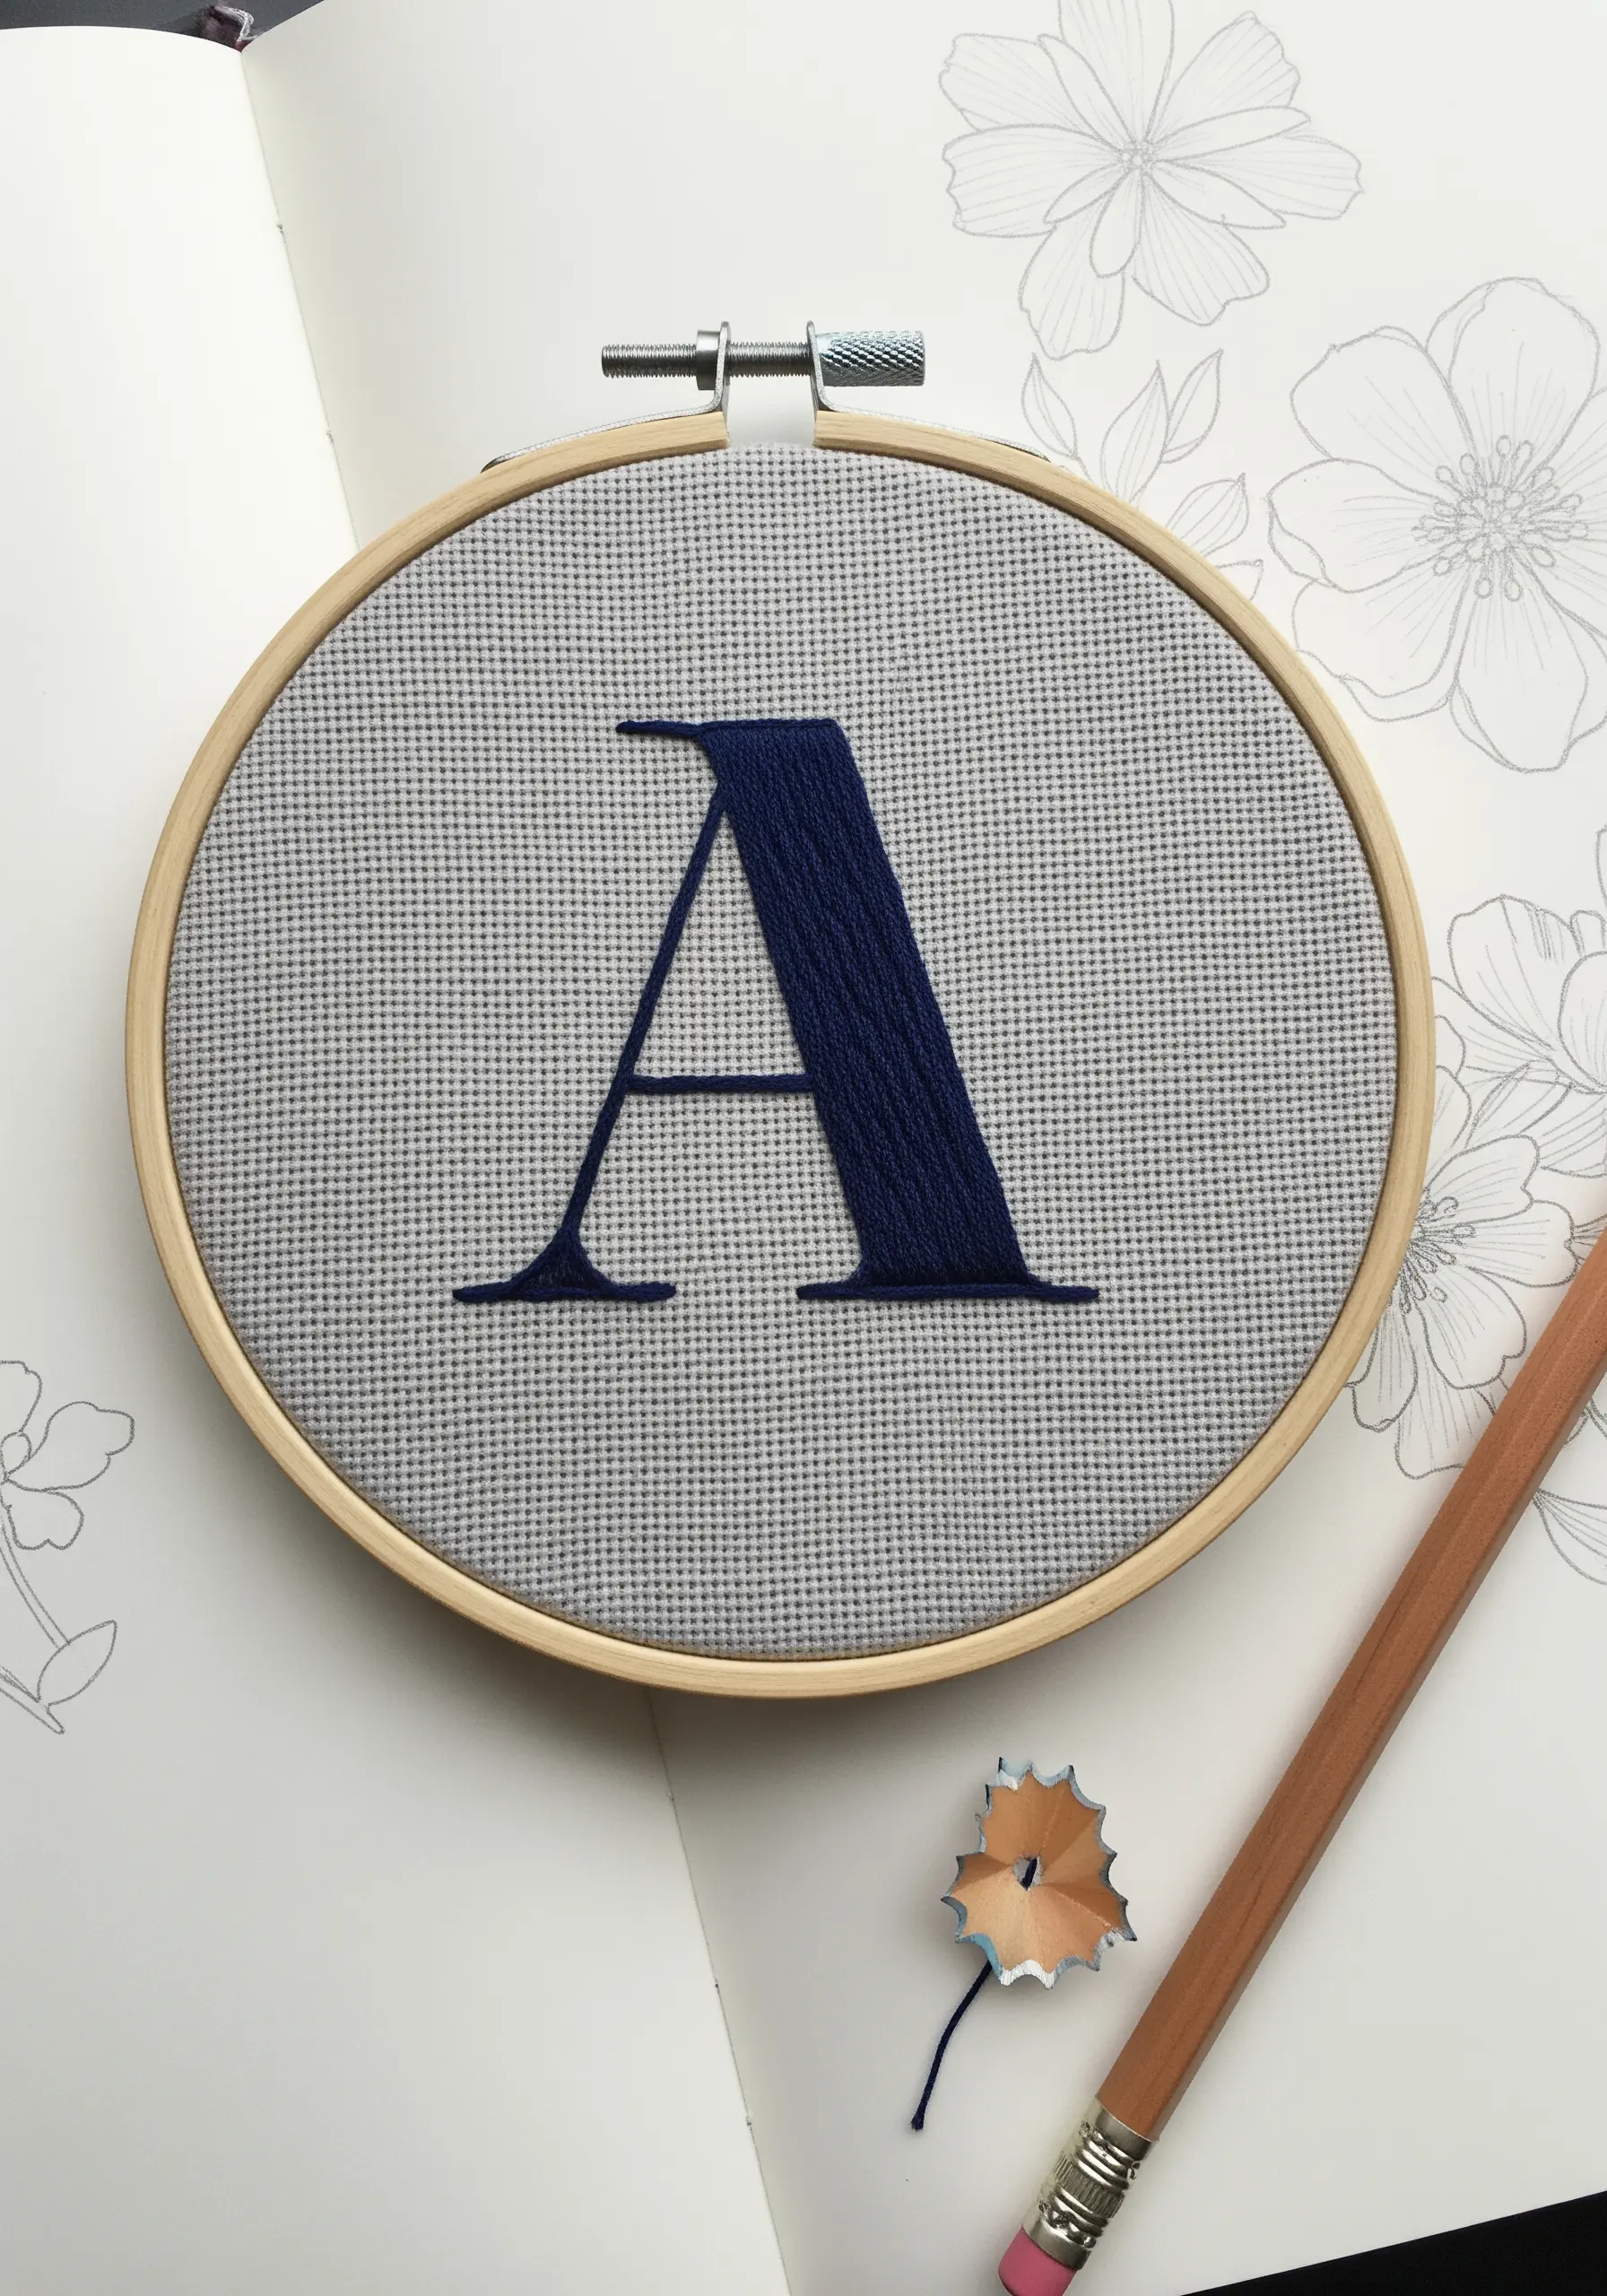
For sharp, flawless lettering, switch from plain weave fabric to Aida cloth or evenweave linen.
The grid structure of the fabric acts as a natural guide, allowing you to create perfectly straight lines and crisp serifs with your satin stitches.
Use the holes to count your stitches, ensuring every part of the letter is symmetrical and balanced.
This technical approach is ideal for monograms or logos where precision and clarity are paramount, resulting in a clean, almost digitally perfect finish.
13. Build 3D Shapes with Woven Picot Stitch
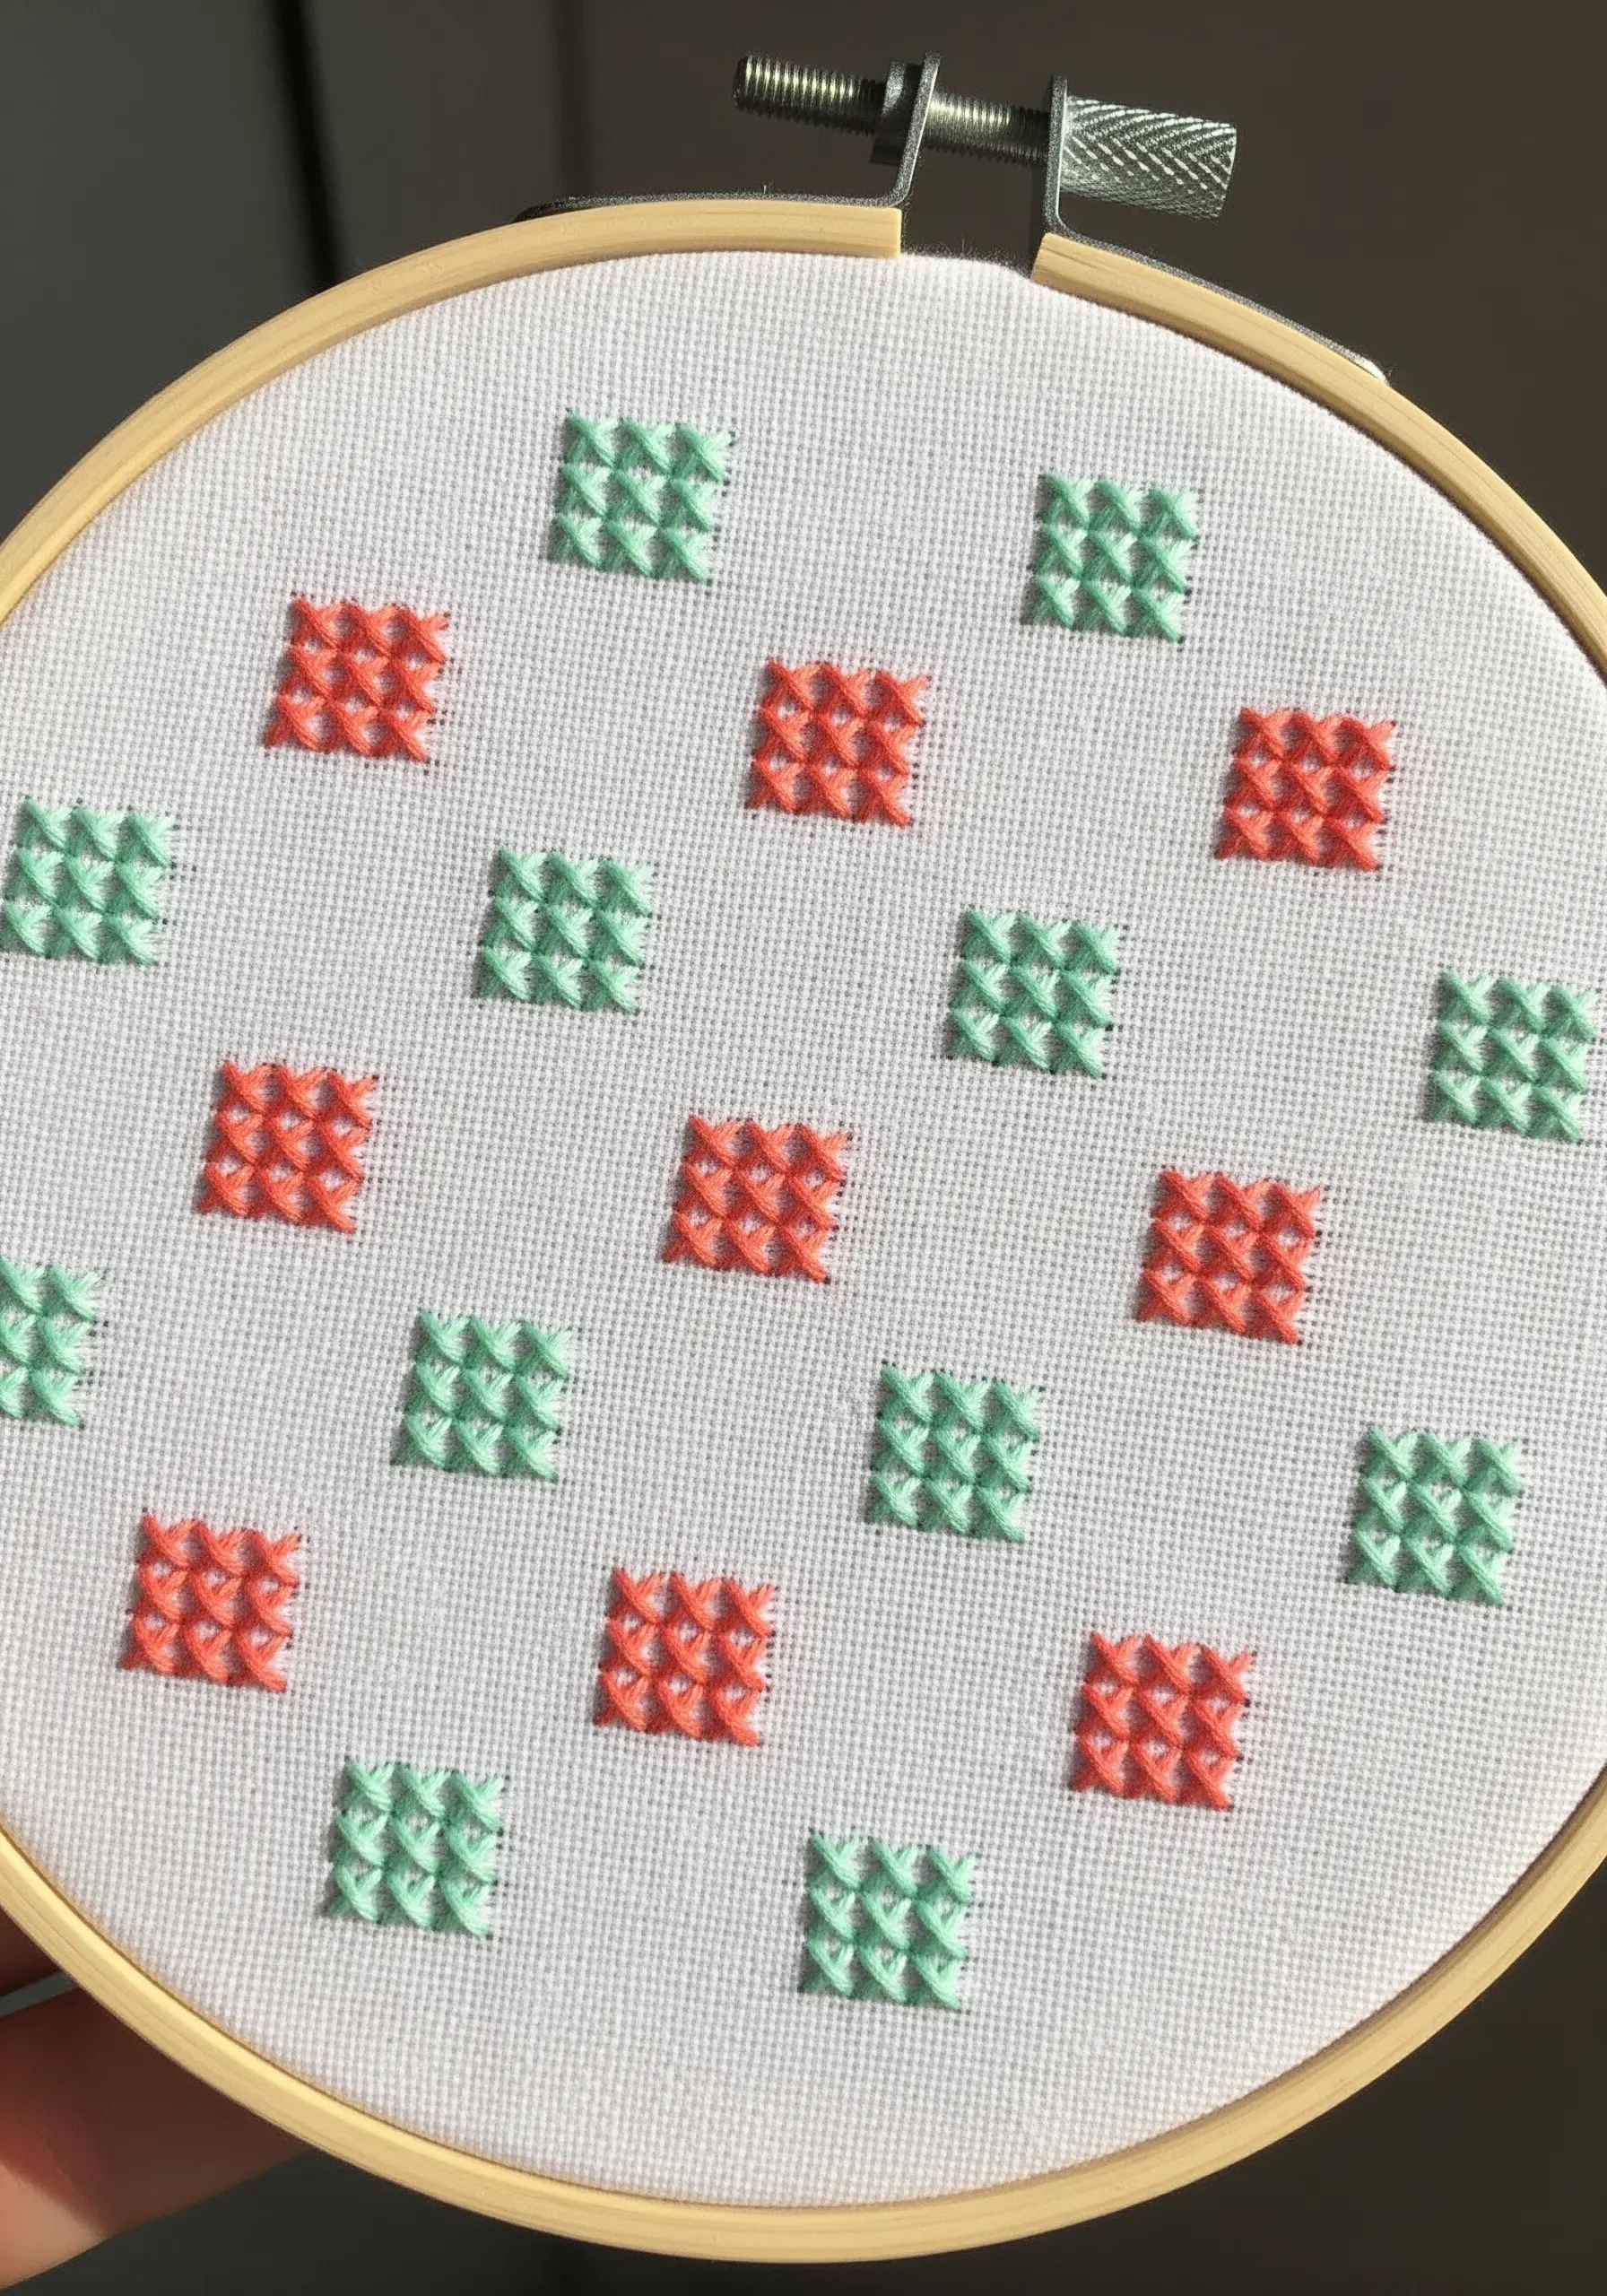
Move beyond flat embroidery by creating small, three-dimensional squares with the woven picot stitch.
Create a foundation of three parallel straight stitches, then weave your thread over and under these anchor stitches without piercing the fabric.
As you build up the layers, the woven shape will lift off the surface, creating a tiny, textured tile.
Arranging these in a simple grid with contrasting colors transforms a basic pattern into a tactile, visually engaging piece of modern fiber art.
14. Paint with Thread for Fluid Motion
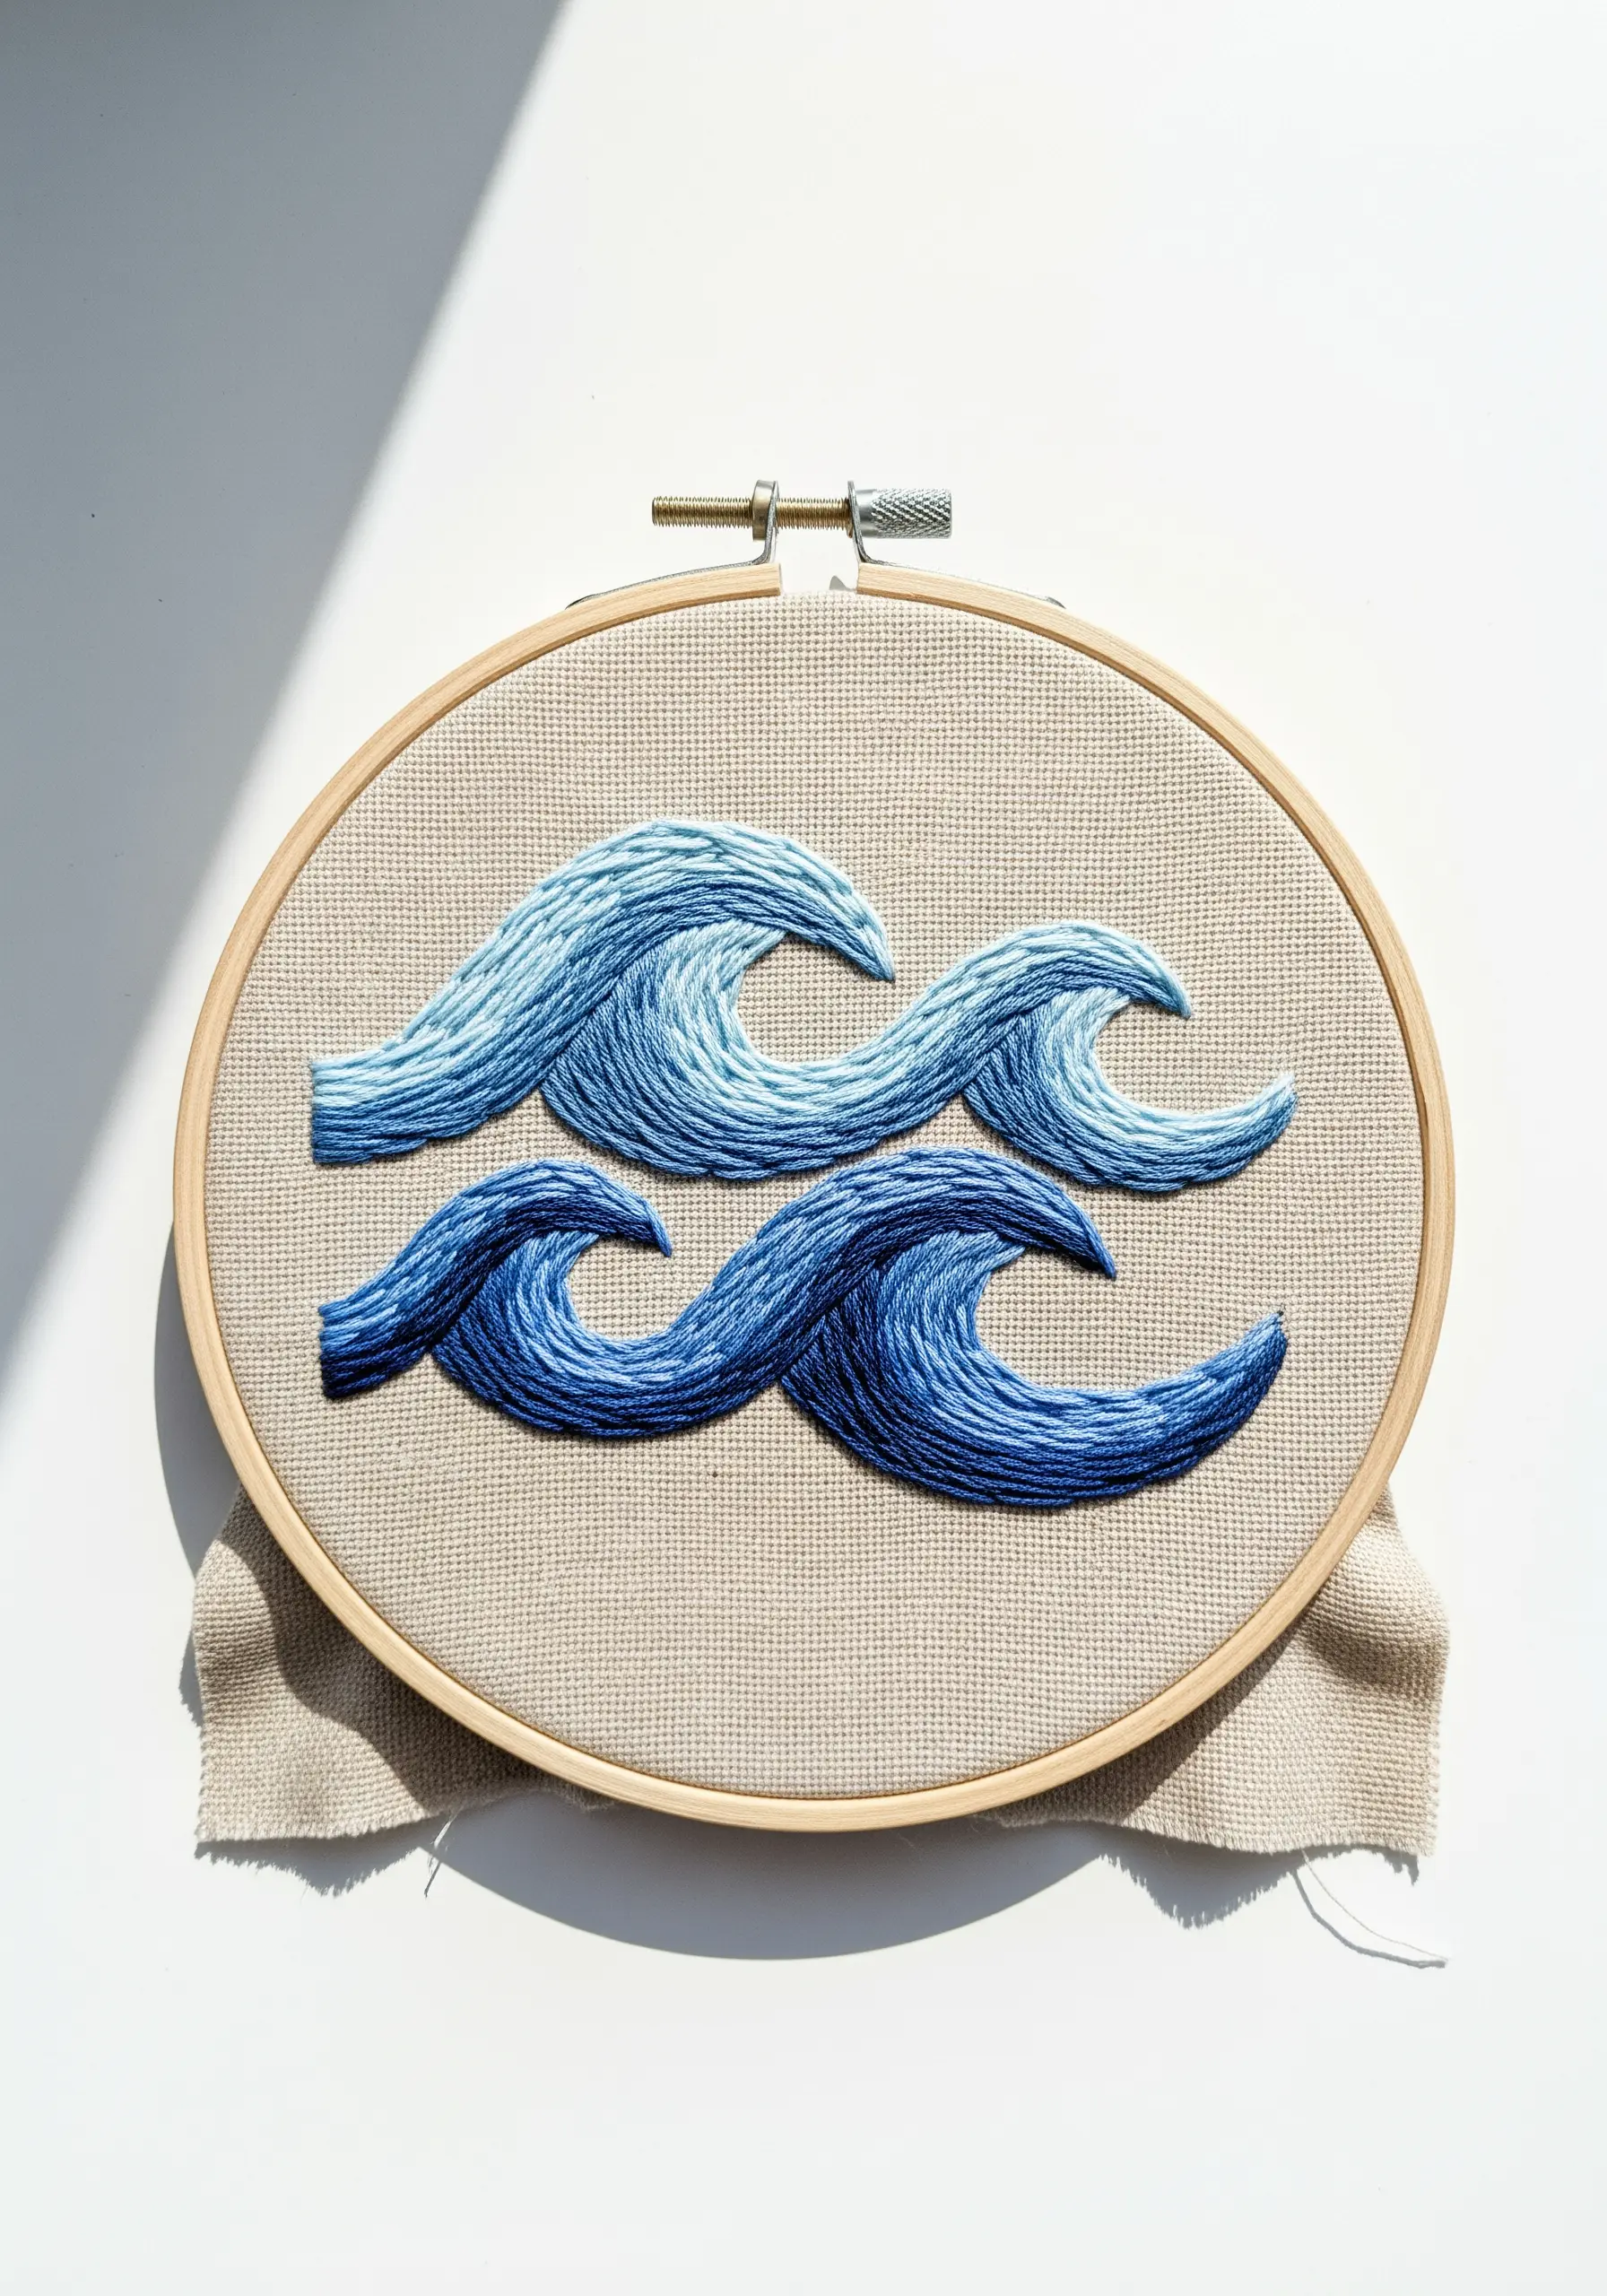
Capture the movement of water using the long-and-short stitch, a technique also known as thread painting.
Fill the wave shapes with stitches of varying lengths and complementary shades of blue, blending them softly into one another.
The key is to angle your stitches to follow the curve of the wave, creating a powerful sense of direction and flow.
This approach transforms static thread into a dynamic scene, giving your embroidery a painterly, expressive quality.
15. Imply Form with a Sketch-Like Style
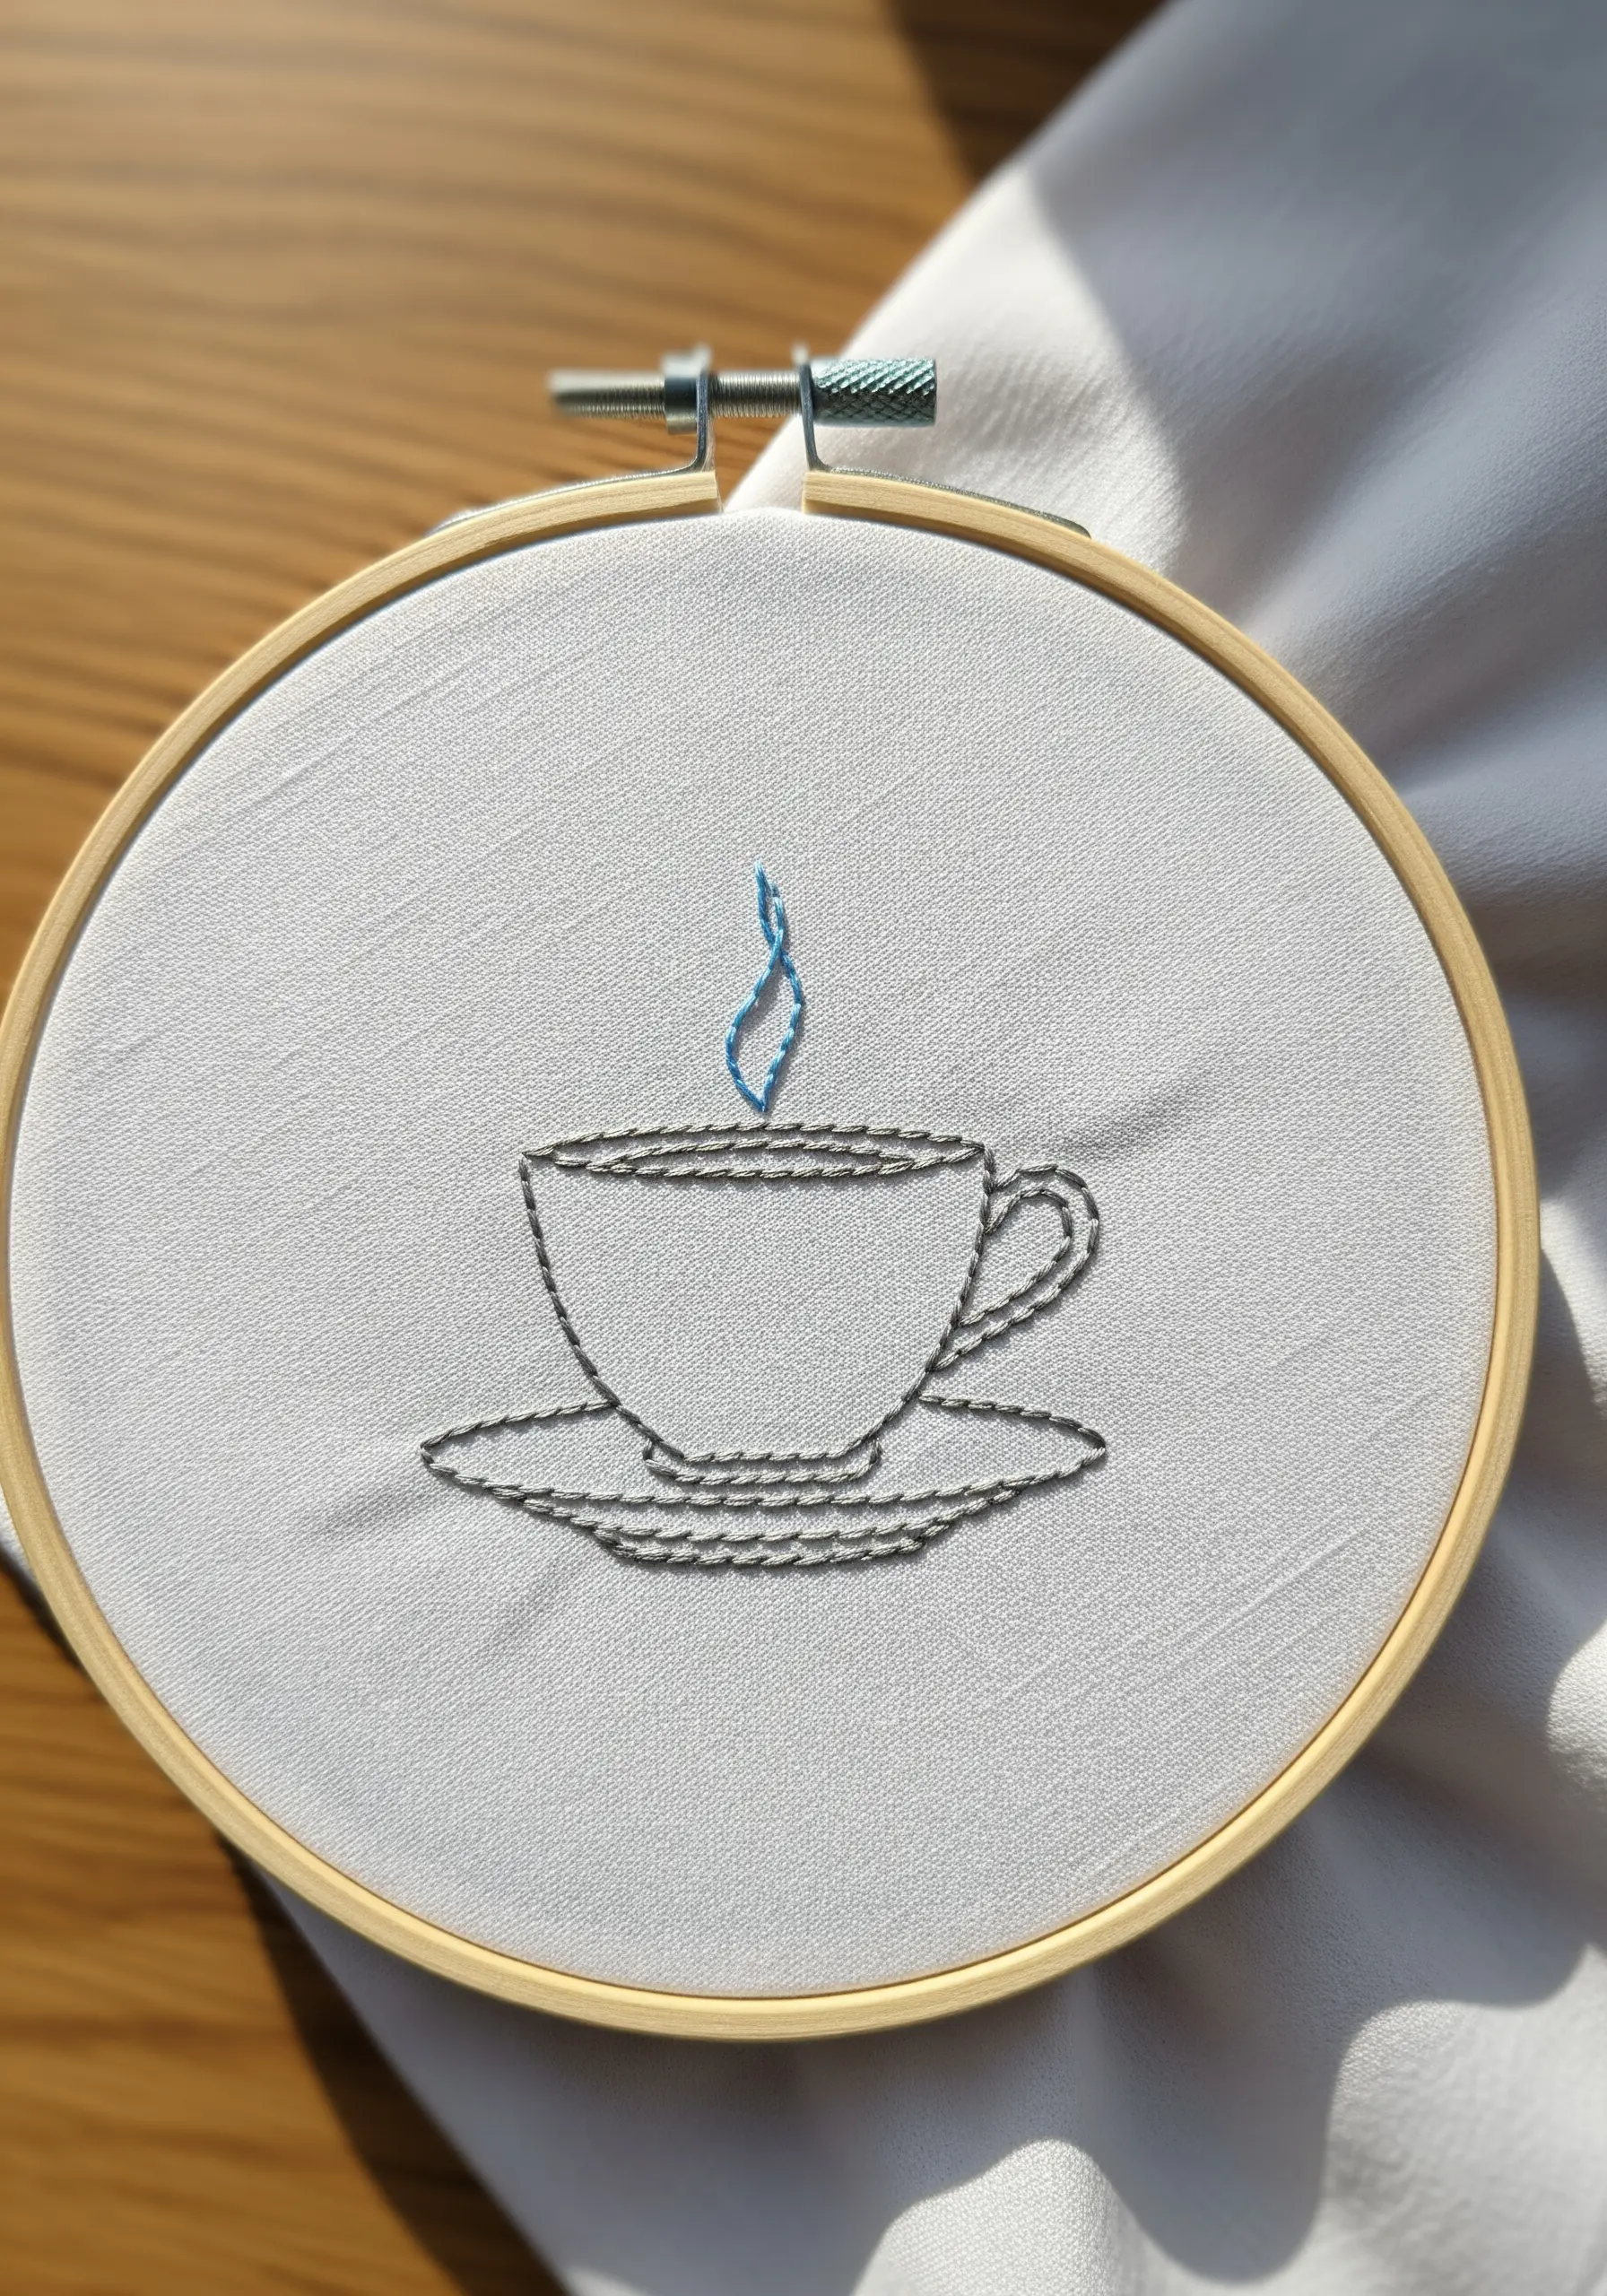
You don’t need to fill a shape completely to define it.
Use a simple backstitch to create a delicate, illustrative outline, like a pen-and-ink drawing.
To suggest volume and shading, use shorter, layered backstitches or seed stitches in areas that would be in shadow.
Adding a single pop of a contrasting color, like the blue steam, draws the eye and adds a touch of playful personality to an otherwise monochrome piece.
This is a perfect way to execute cottage café-inspired home decor.
16. Introduce Beads for Concentrated Texture
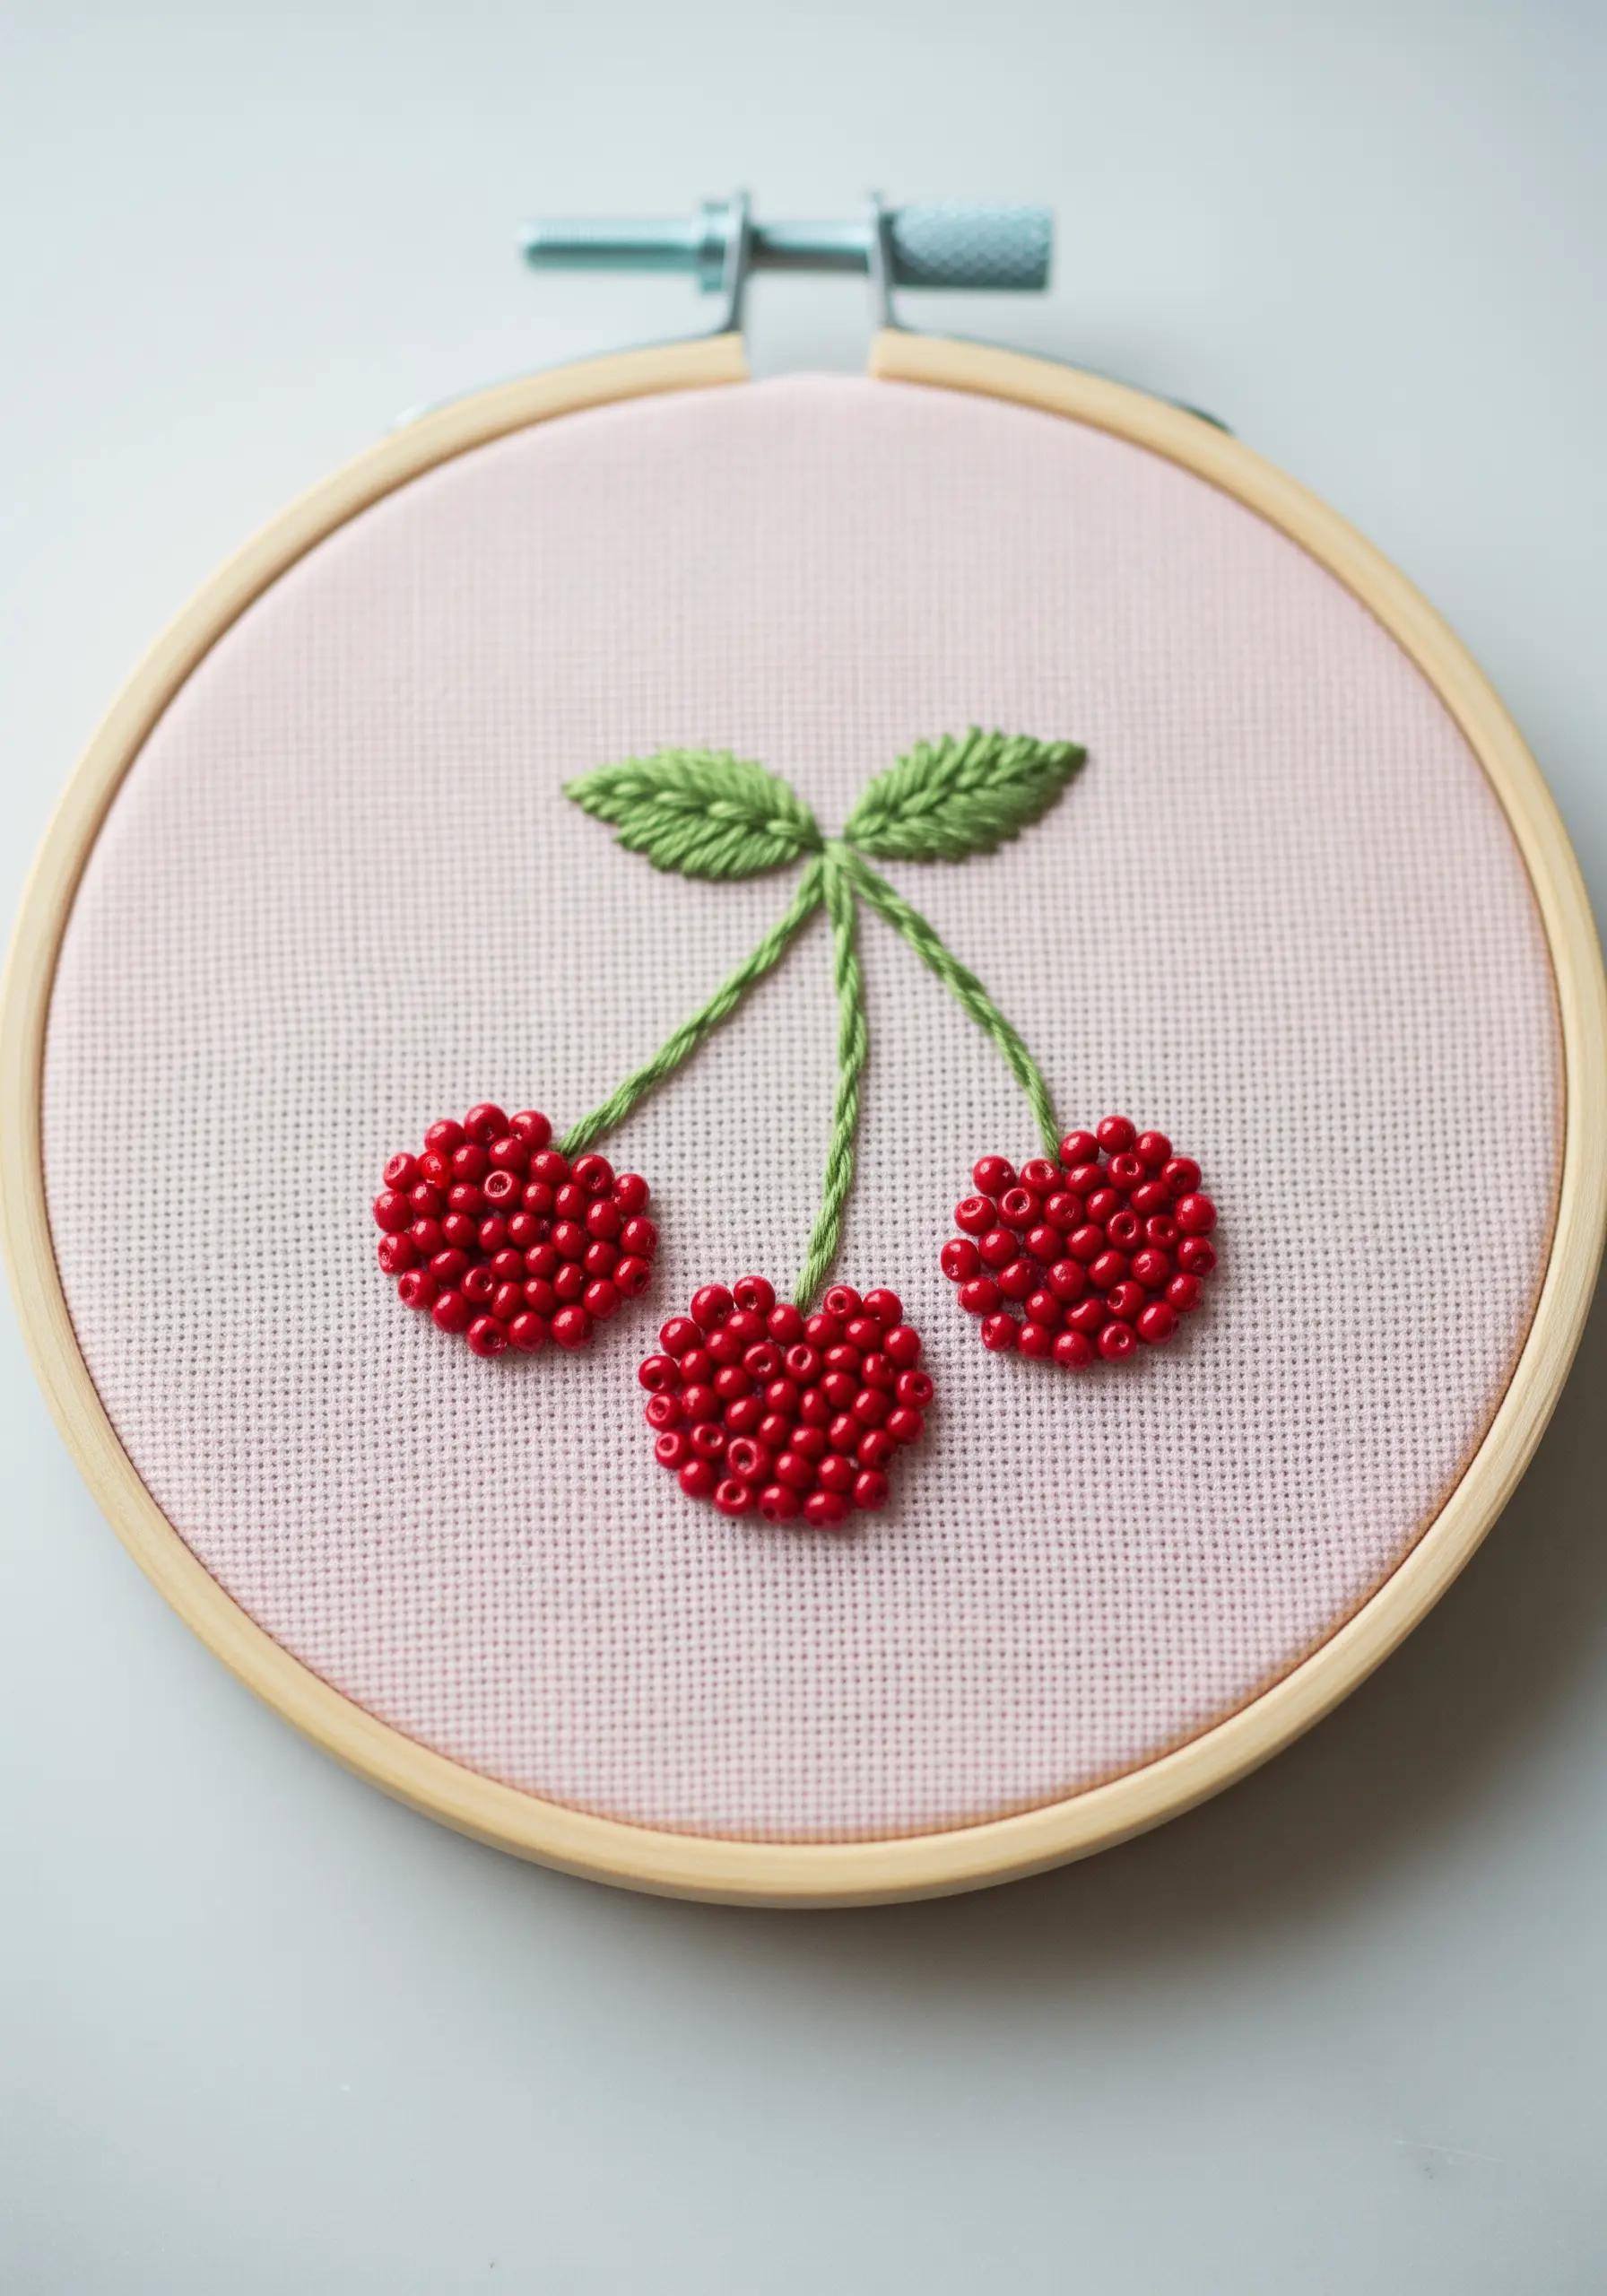
Integrate seed beads to add a unique texture and a subtle sheen that thread alone cannot achieve.
Instead of filling the cherries with French knots, stitch on red seed beads one by one, packing them tightly to create a dense, bumpy surface.
Combine this with traditional embroidery for the leaves and stems, using a fishbone stitch for a smooth contrast.
This mixed-media approach adds a surprising and delightful tactile element to your work.
17. Use a Pop of Color as a Focal Point
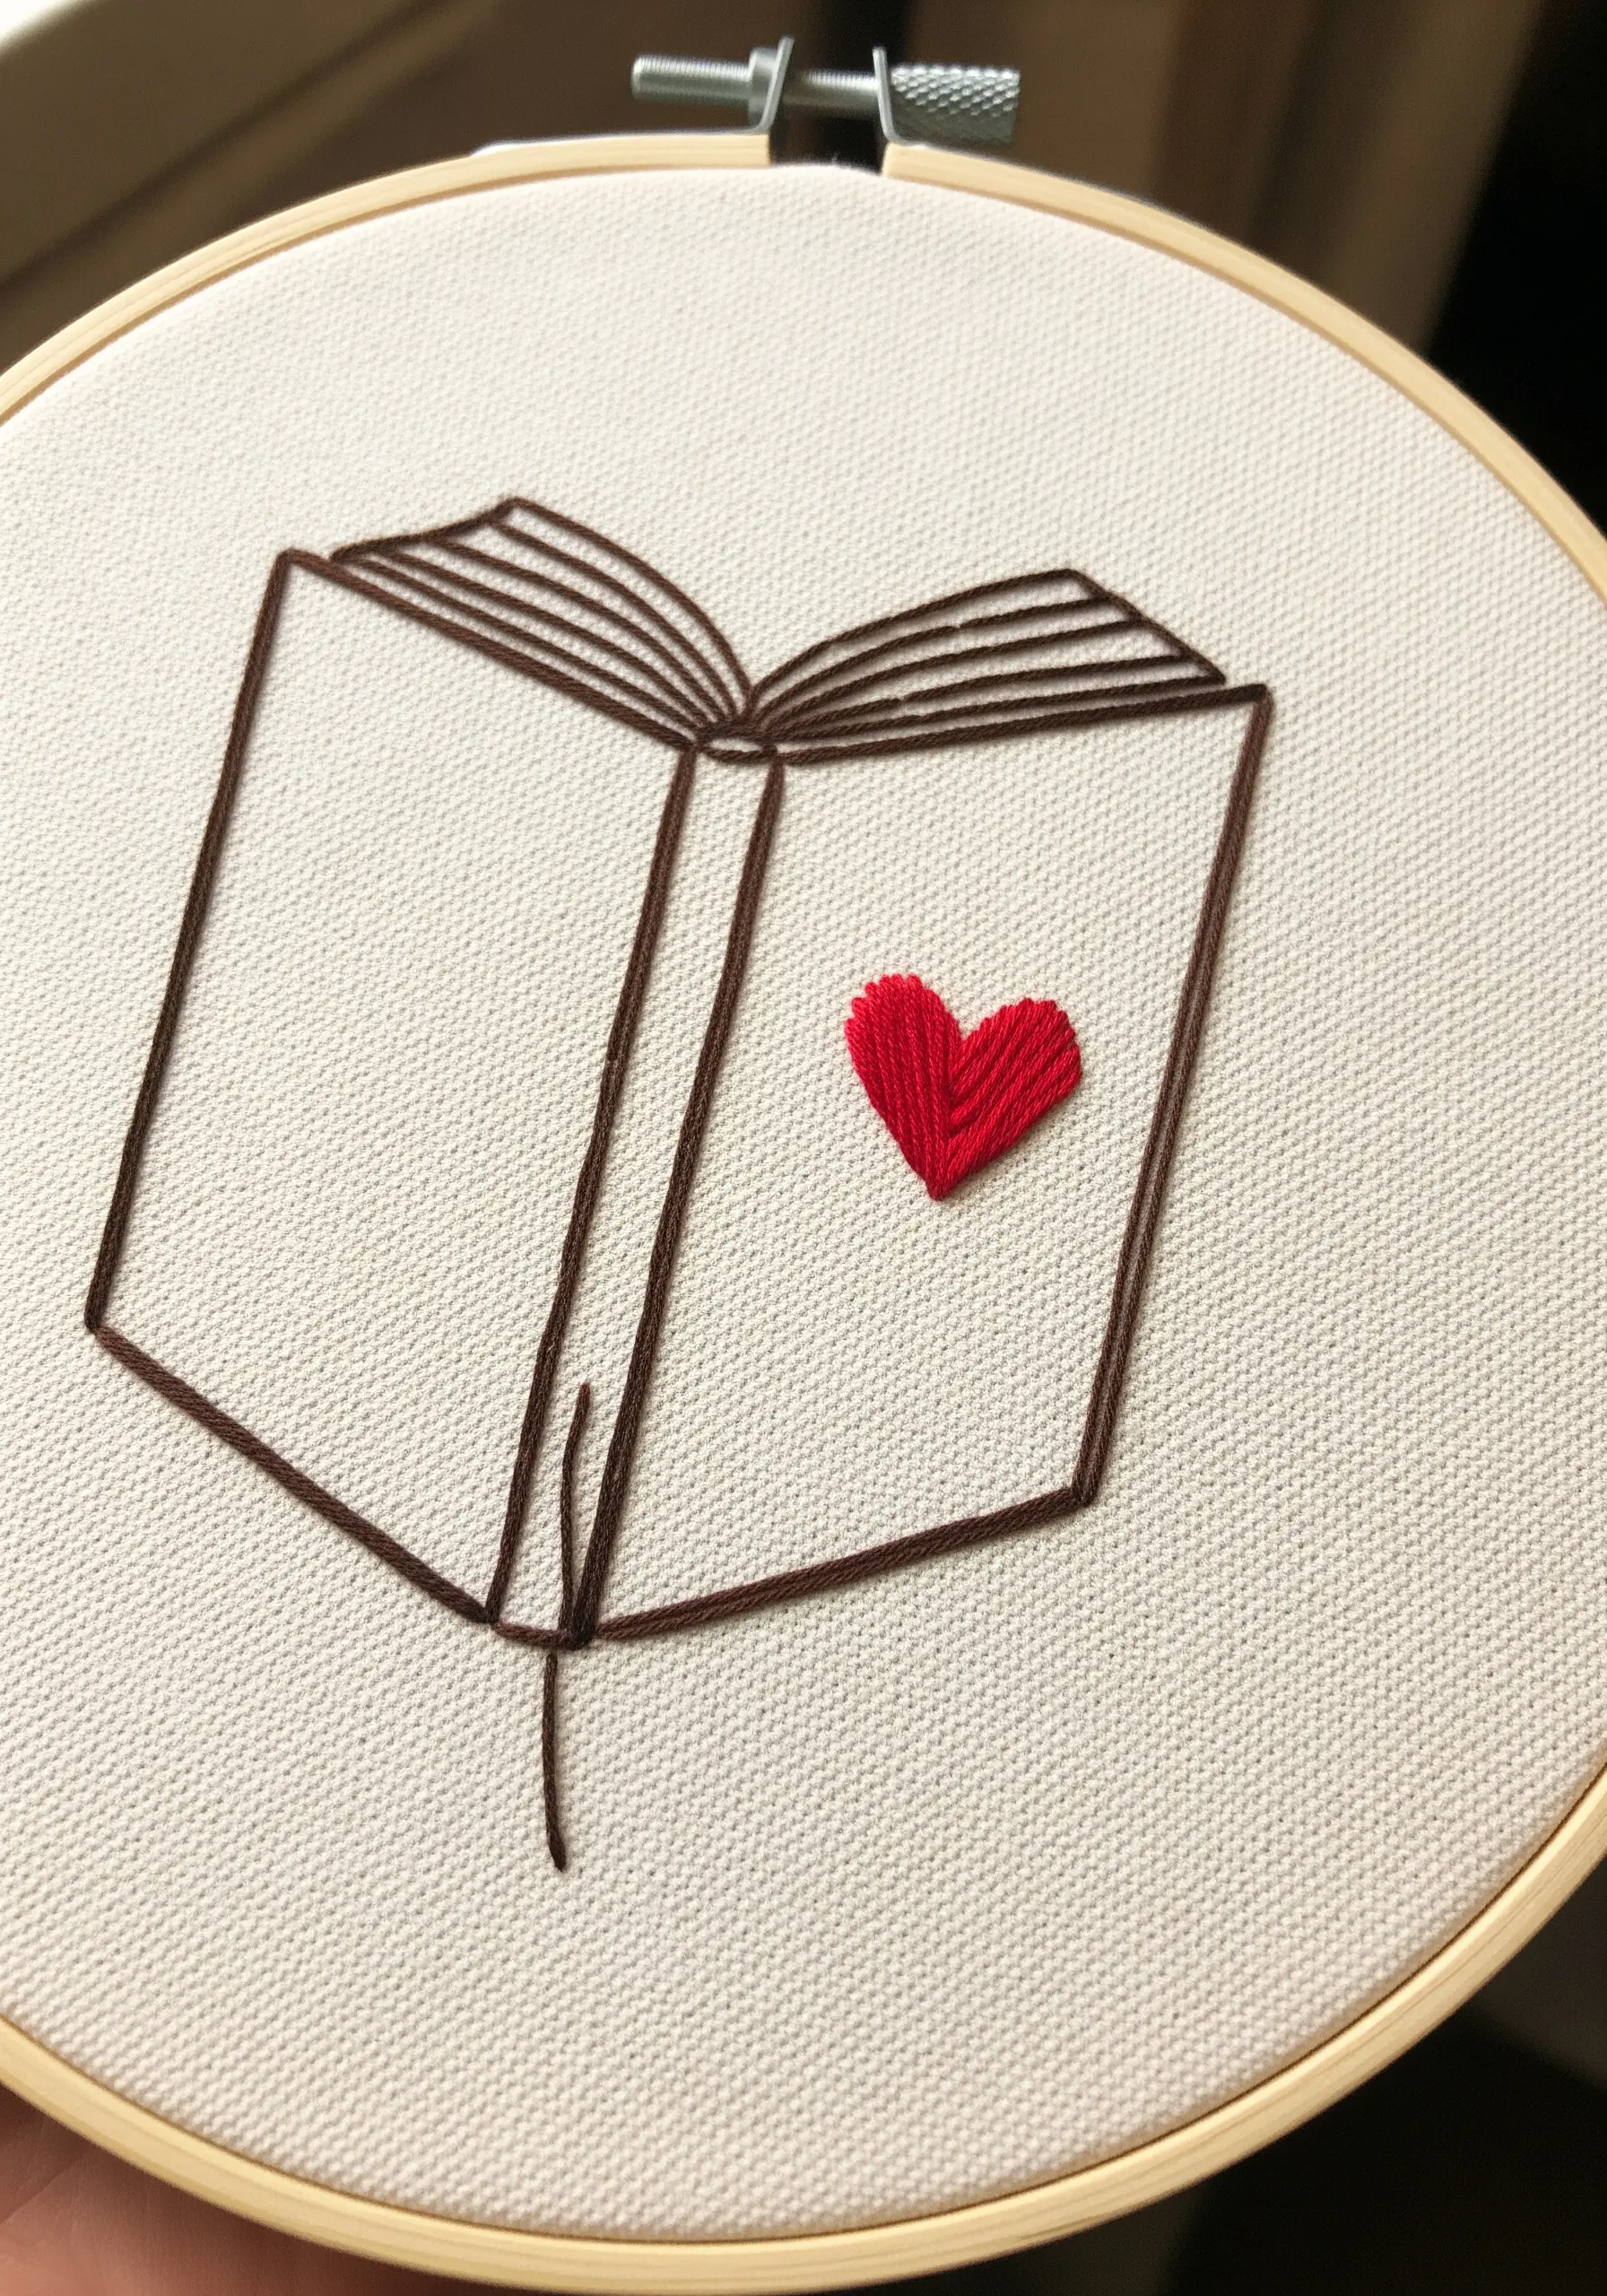
In a minimal line-art design, a small, solid block of color can become the most powerful element.
Keep the main subject—the book—as a simple outline using a clean backstitch or stem stitch in a neutral color.
Then, fill a small detail, like the heart, with a dense, perfectly smooth satin stitch in a vibrant, contrasting hue.
This technique creates an immediate focal point, drawing the viewer’s eye and adding emotional weight to the composition.
18. Create Stars with Lazy Daisy Stitches
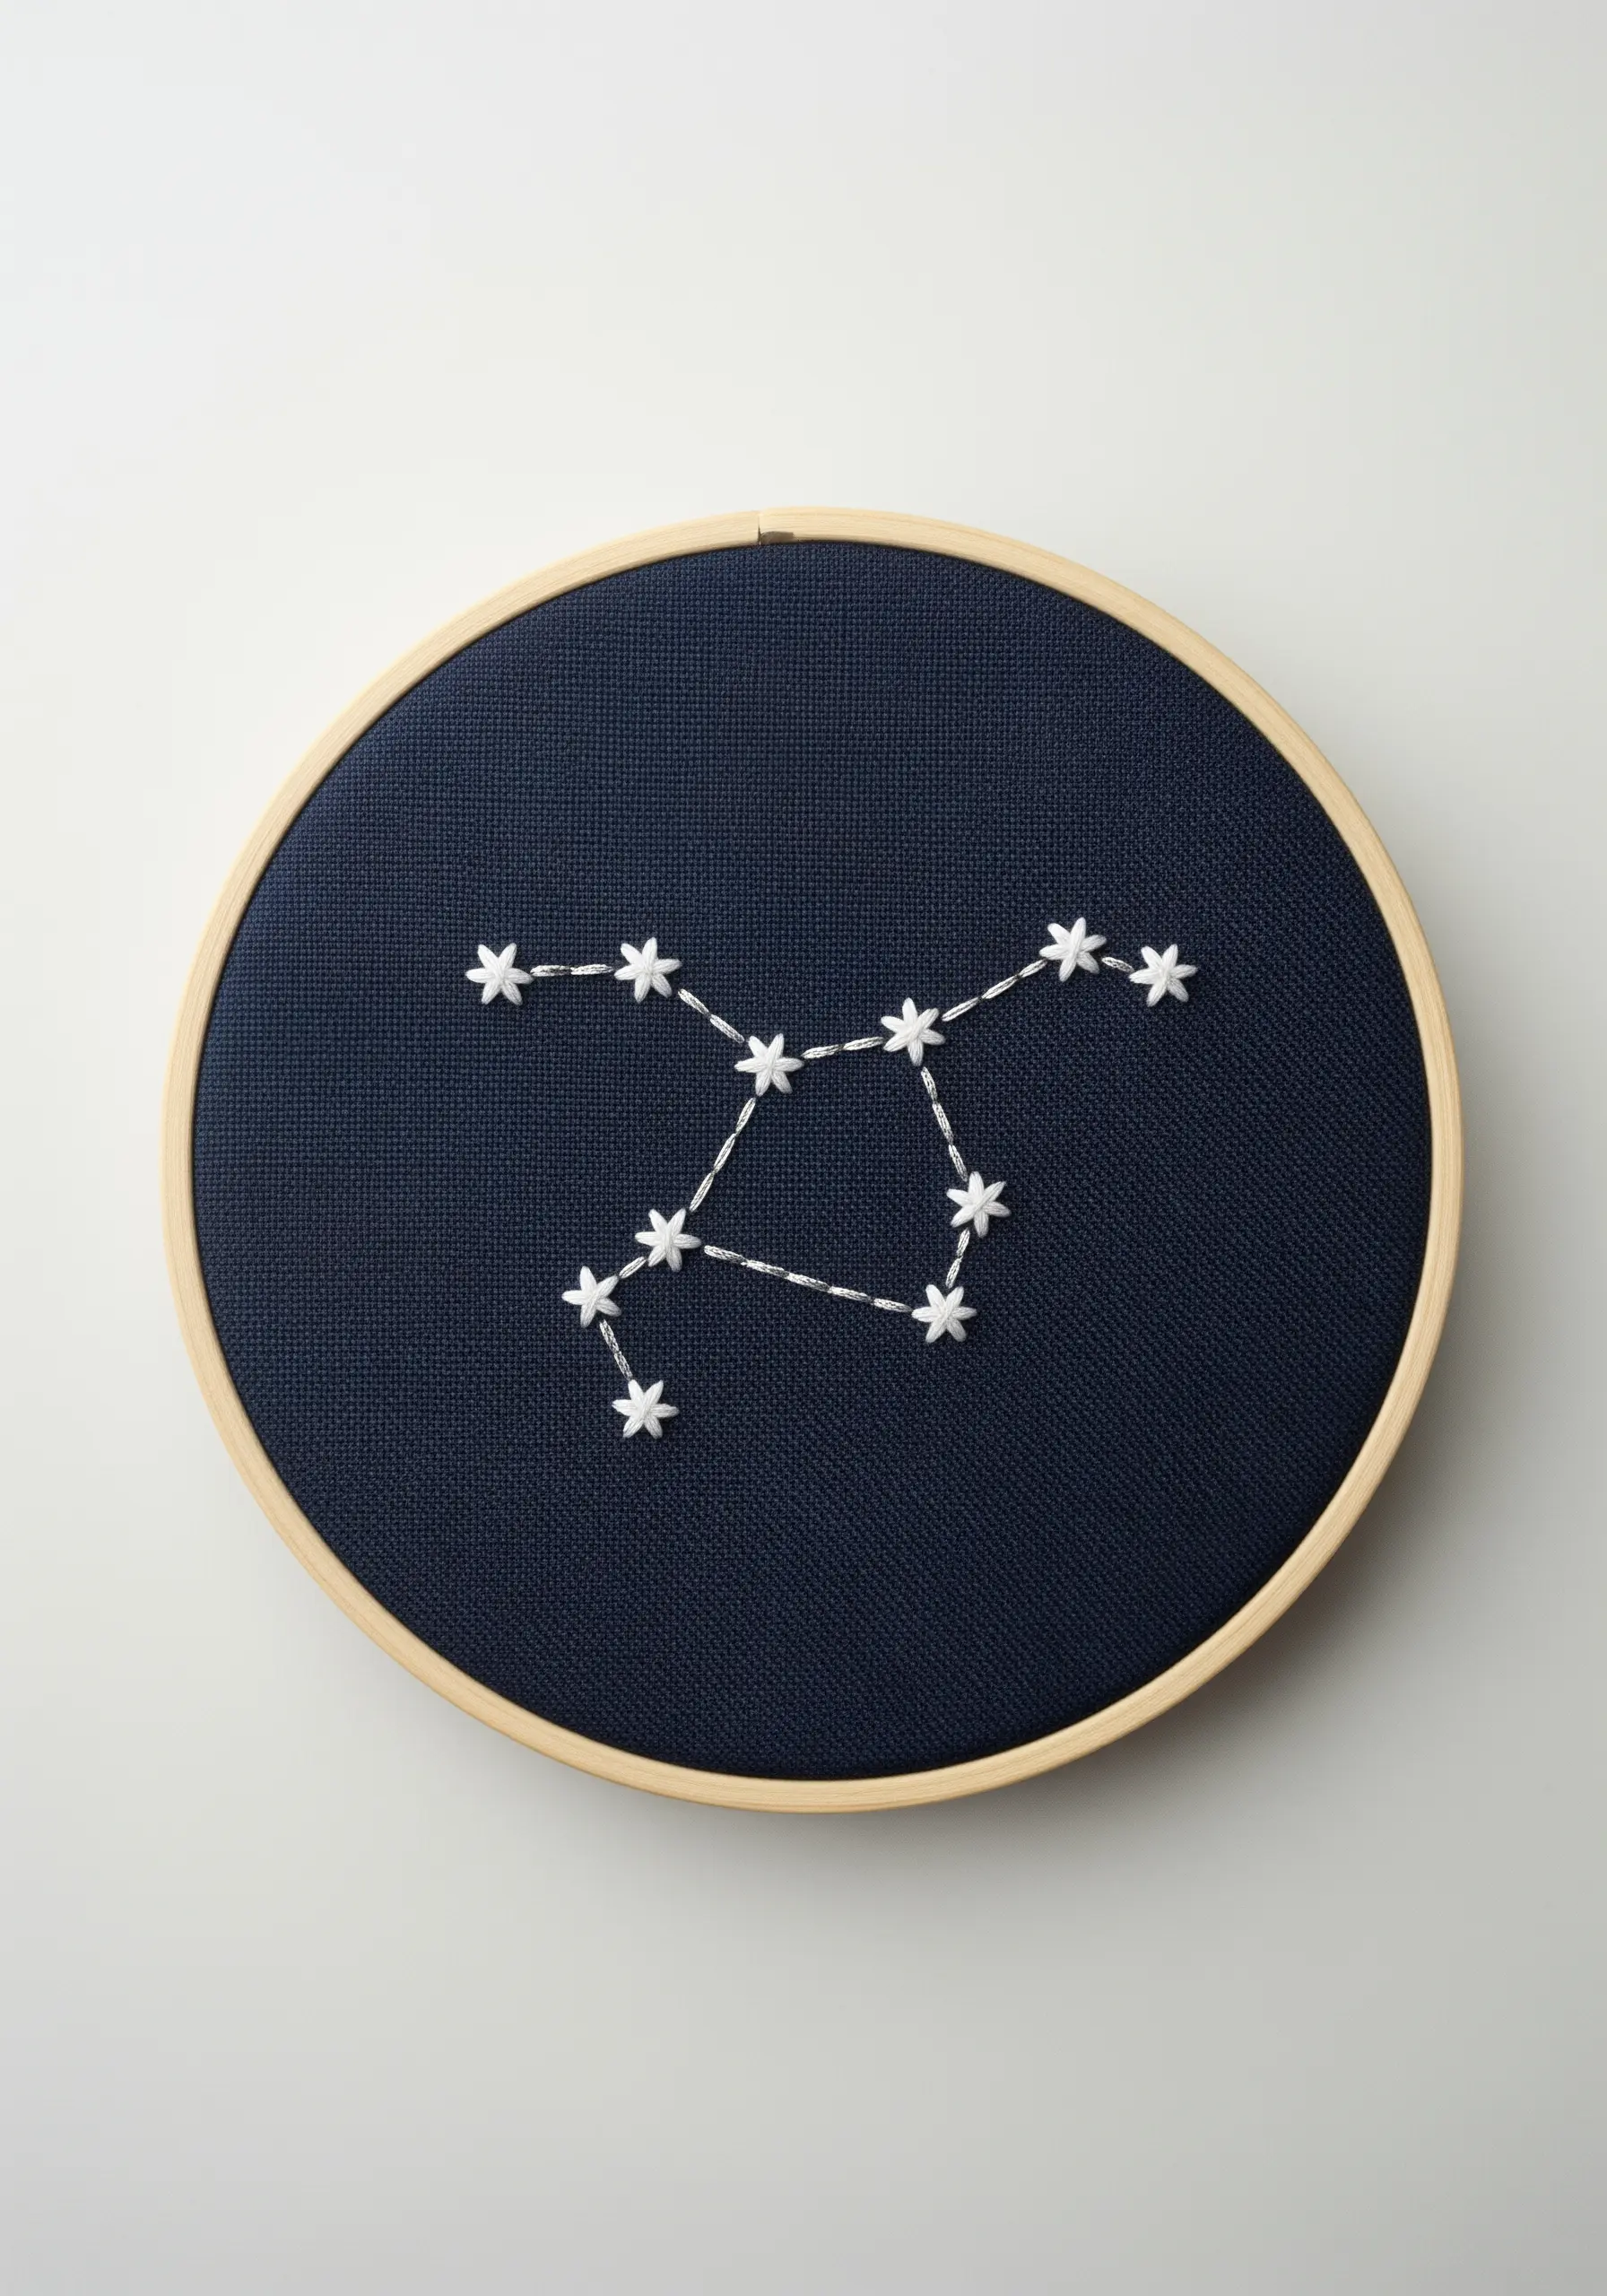
For a stylized celestial design, use lazy daisy stitches to represent stars instead of simple French knots or straight stitches.
Arrange five or six stitches in a circle to form a delicate, star-like shape.
Connect your star-flowers with a fine, single-strand backstitch to map out the constellation.
Using a bright white or silver metallic thread on a dark navy fabric enhances the night-sky effect, making the stars appear to twinkle.
19. Deconstruct a Flower into Simple Lines

Capture the essence of a dandelion seed head by reducing it to its fundamental components: straight stitches.
Use single straight stitches for the main stems radiating from the center.
Add smaller, V-shaped stitches (or detached chain stitches) at the end of each stem to represent the seeds.
This minimalist approach is an elegant study in line and form, proving that complex subjects can be rendered beautifully with the simplest of stitches, resulting in minimal DIY embroidery pieces.
20. Define Abstract Shapes with a Clean Border
When filling large, abstract shapes with long stitches, the outline is everything.
First, define the border of each organic shape with a tight, clean backstitch or chain stitch.
Then, fill the interior with long, vertical satin stitches, using the outline as a crisp boundary.
This technique, known as color blocking, prevents the edges from looking fuzzy and gives the entire piece a bold, graphic quality. The contrast between the textured outline and the smooth fill adds another layer of interest.
21. Tell a Story with Varied Stitch Types
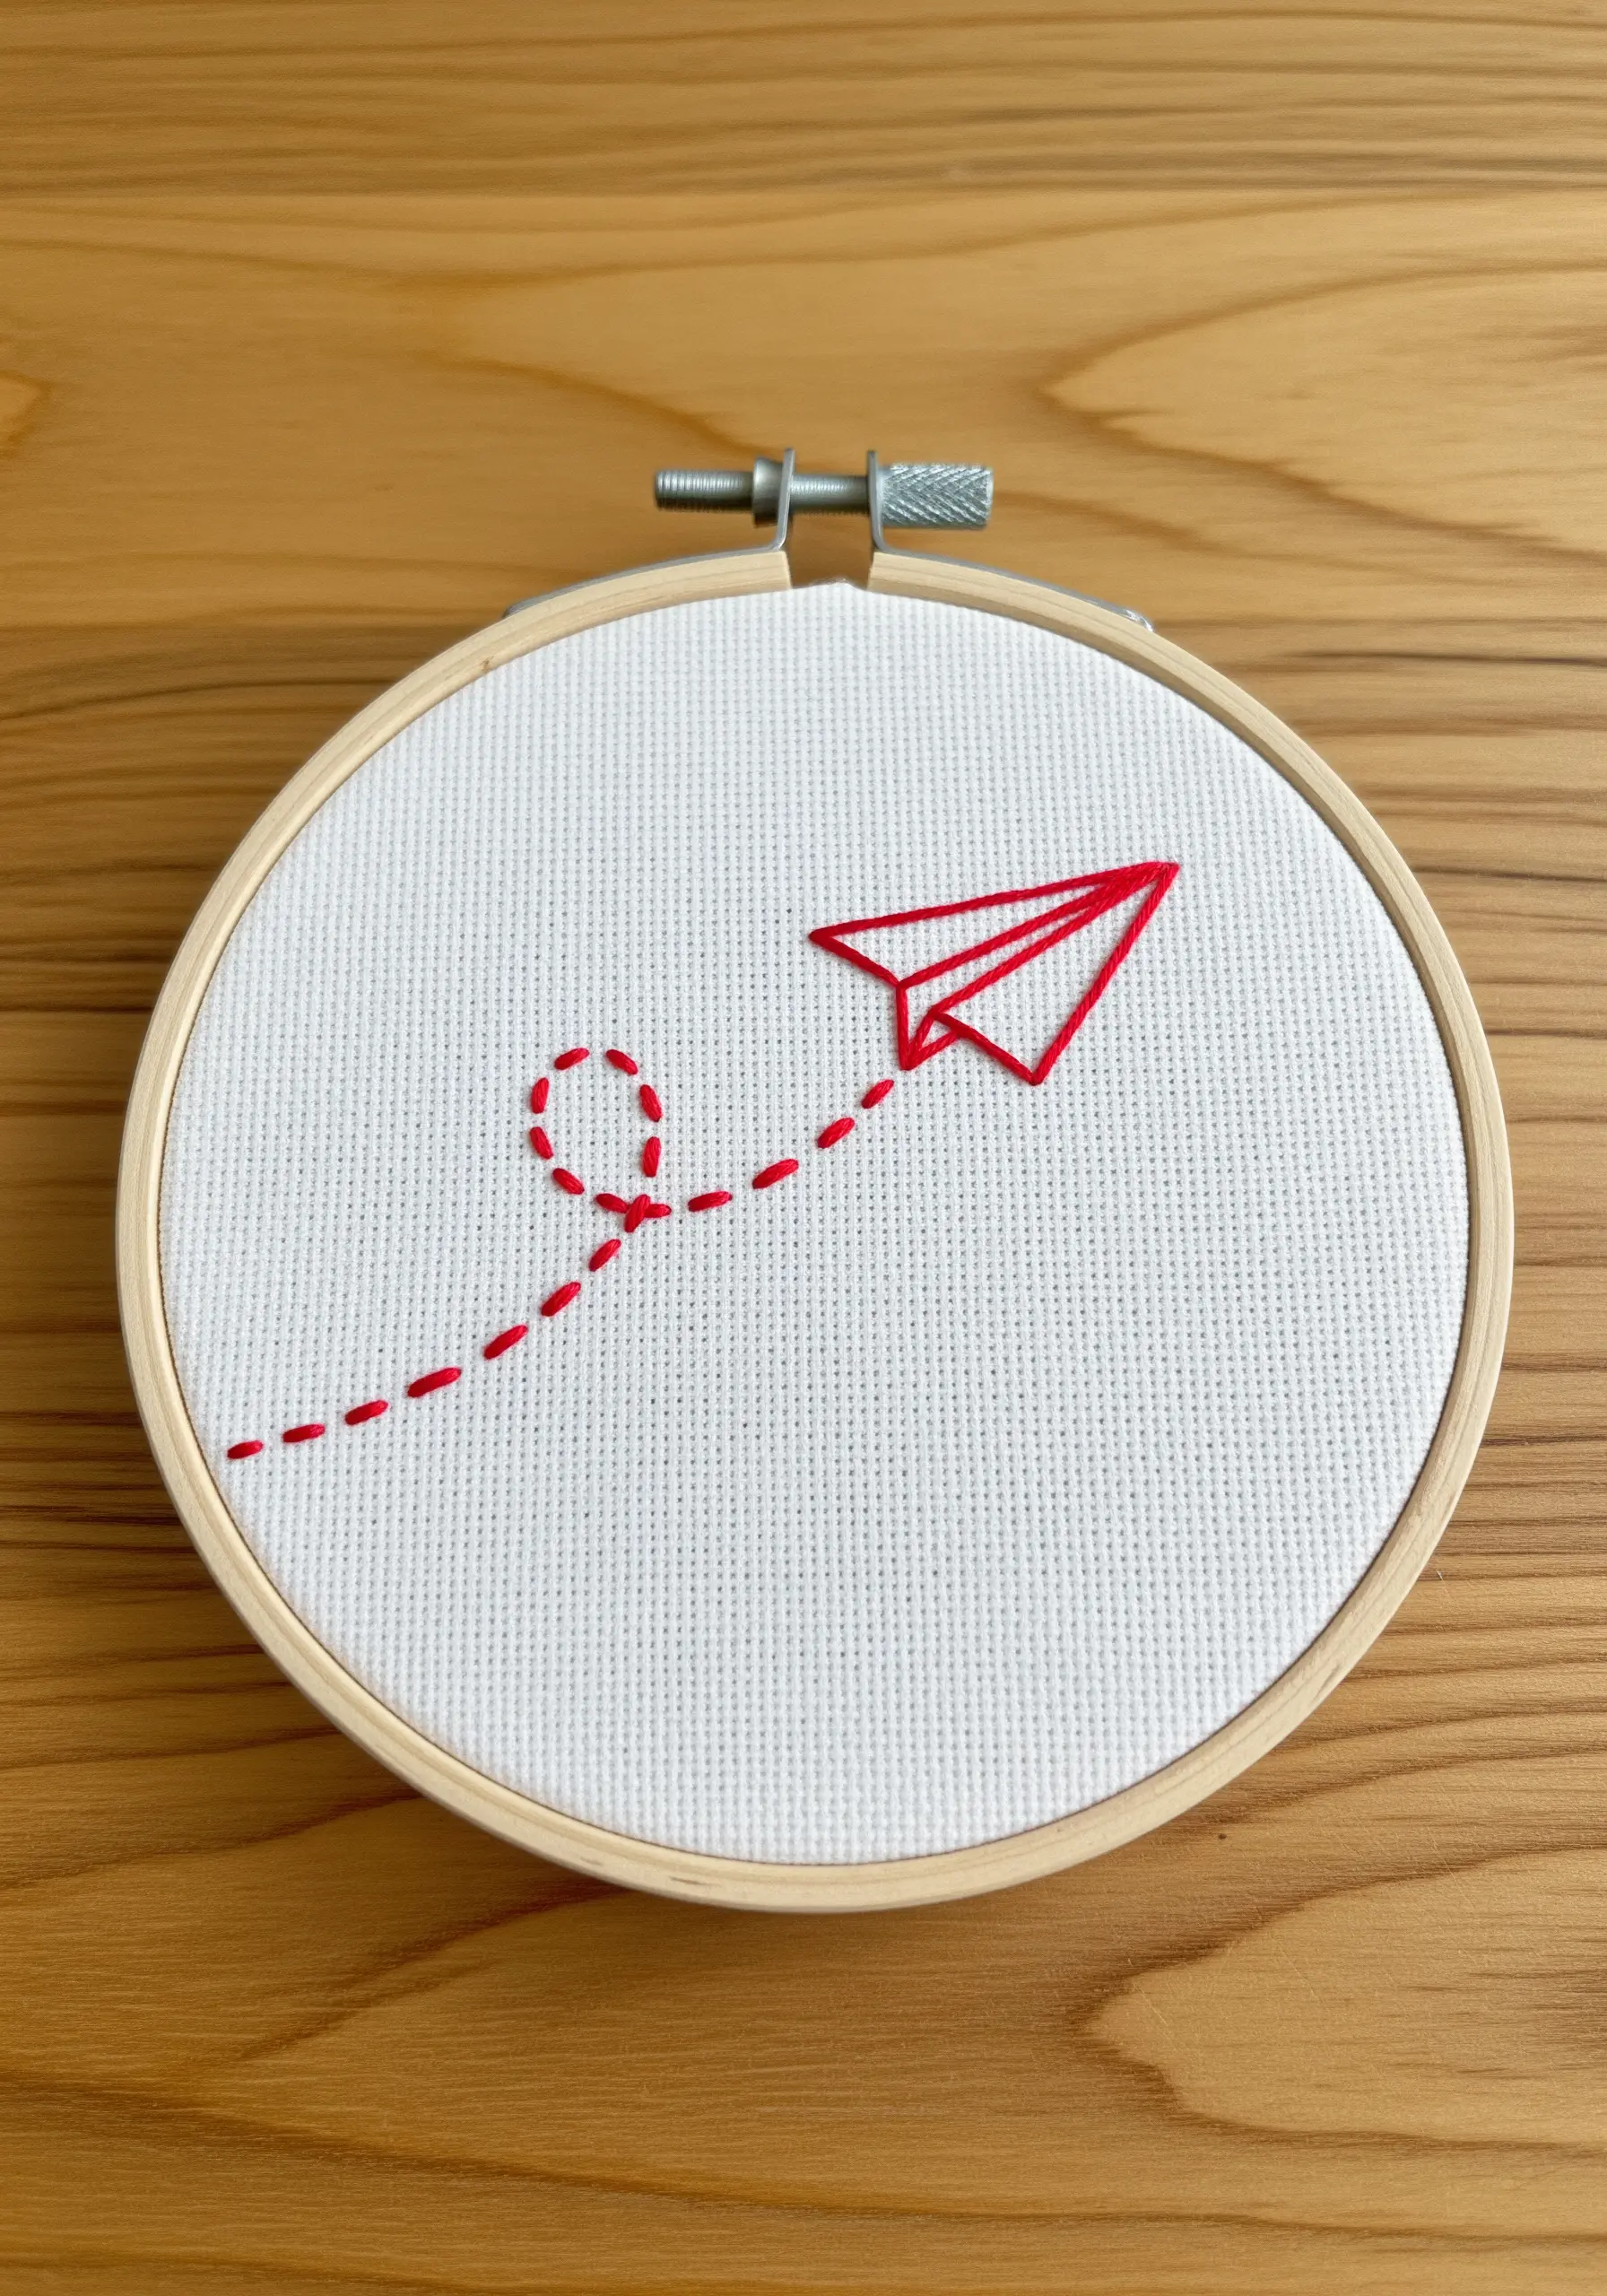
Use different stitches to convey movement and energy in a minimalist design.
Embroider the paper airplane using a solid backstitch or split stitch to give it a sense of solid form.
For the flight path, switch to a simple running stitch—the gaps in the dashed line create the illusion of motion and whimsy.
This simple switch in stitch type transforms a static image into a tiny narrative, perfect for line art travel and adventure symbols.
22. Use Open Fills for Delicate Detail
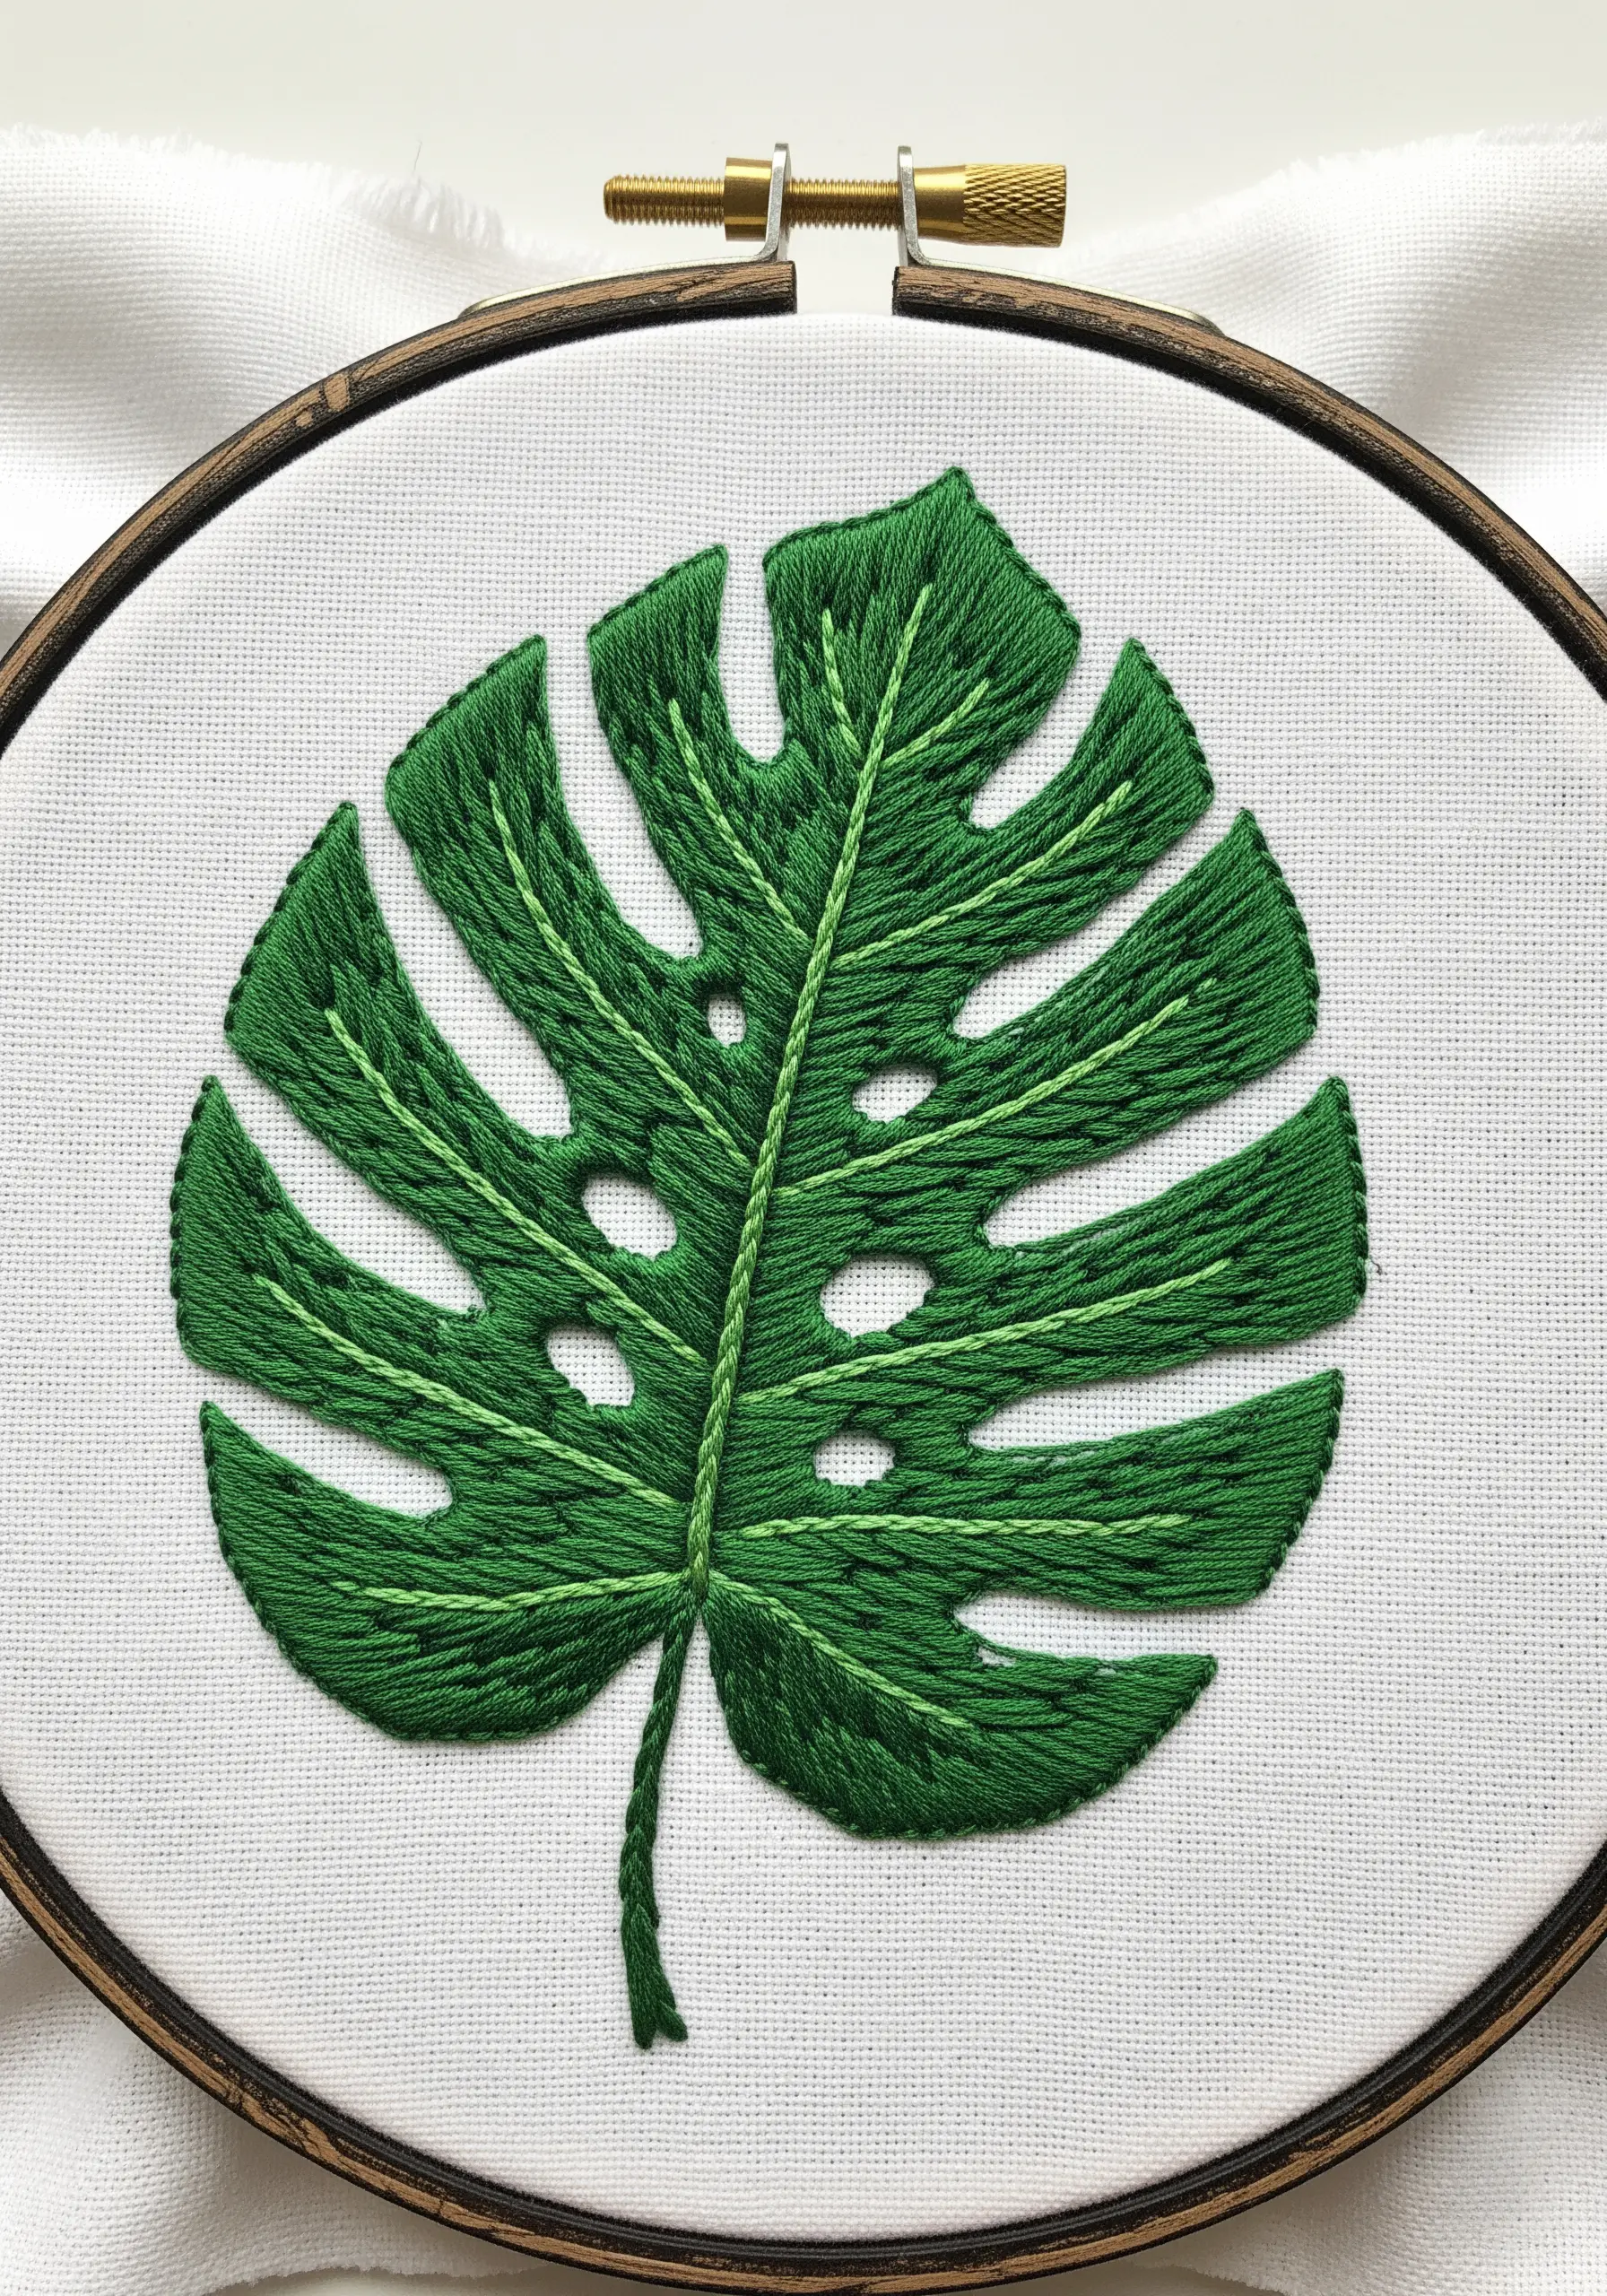
Instead of a heavy satin stitch, fill in large leaves with an open fishbone stitch or spaced straight stitches.
This technique allows the background fabric to show through, creating a lighter, more delicate feel while still defining the shape.
Use a contrasting shade of green and a simple backstitch for the central vein and outline to add definition and structure.
This method is perfect for intricate shapes like a monstera leaf, where a solid fill might look too dense and lose detail.
23. Elevate Silhouettes with Padded Satin Stitch
Give a simple silhouette a raised, three-dimensional quality with padded satin stitch.
Start by outlining the shape with a split stitch, then fill the interior with a layer of horizontal seed stitches.
Finally, cover the entire shape with a dense layer of vertical satin stitches using all six strands of floss.
The underlying padding pushes the top layer up, creating a smooth, tactile, and bold emblem that stands out, especially for modern thread art ideas.
24. Create Perfect Circles with Spiral Satin Stitch
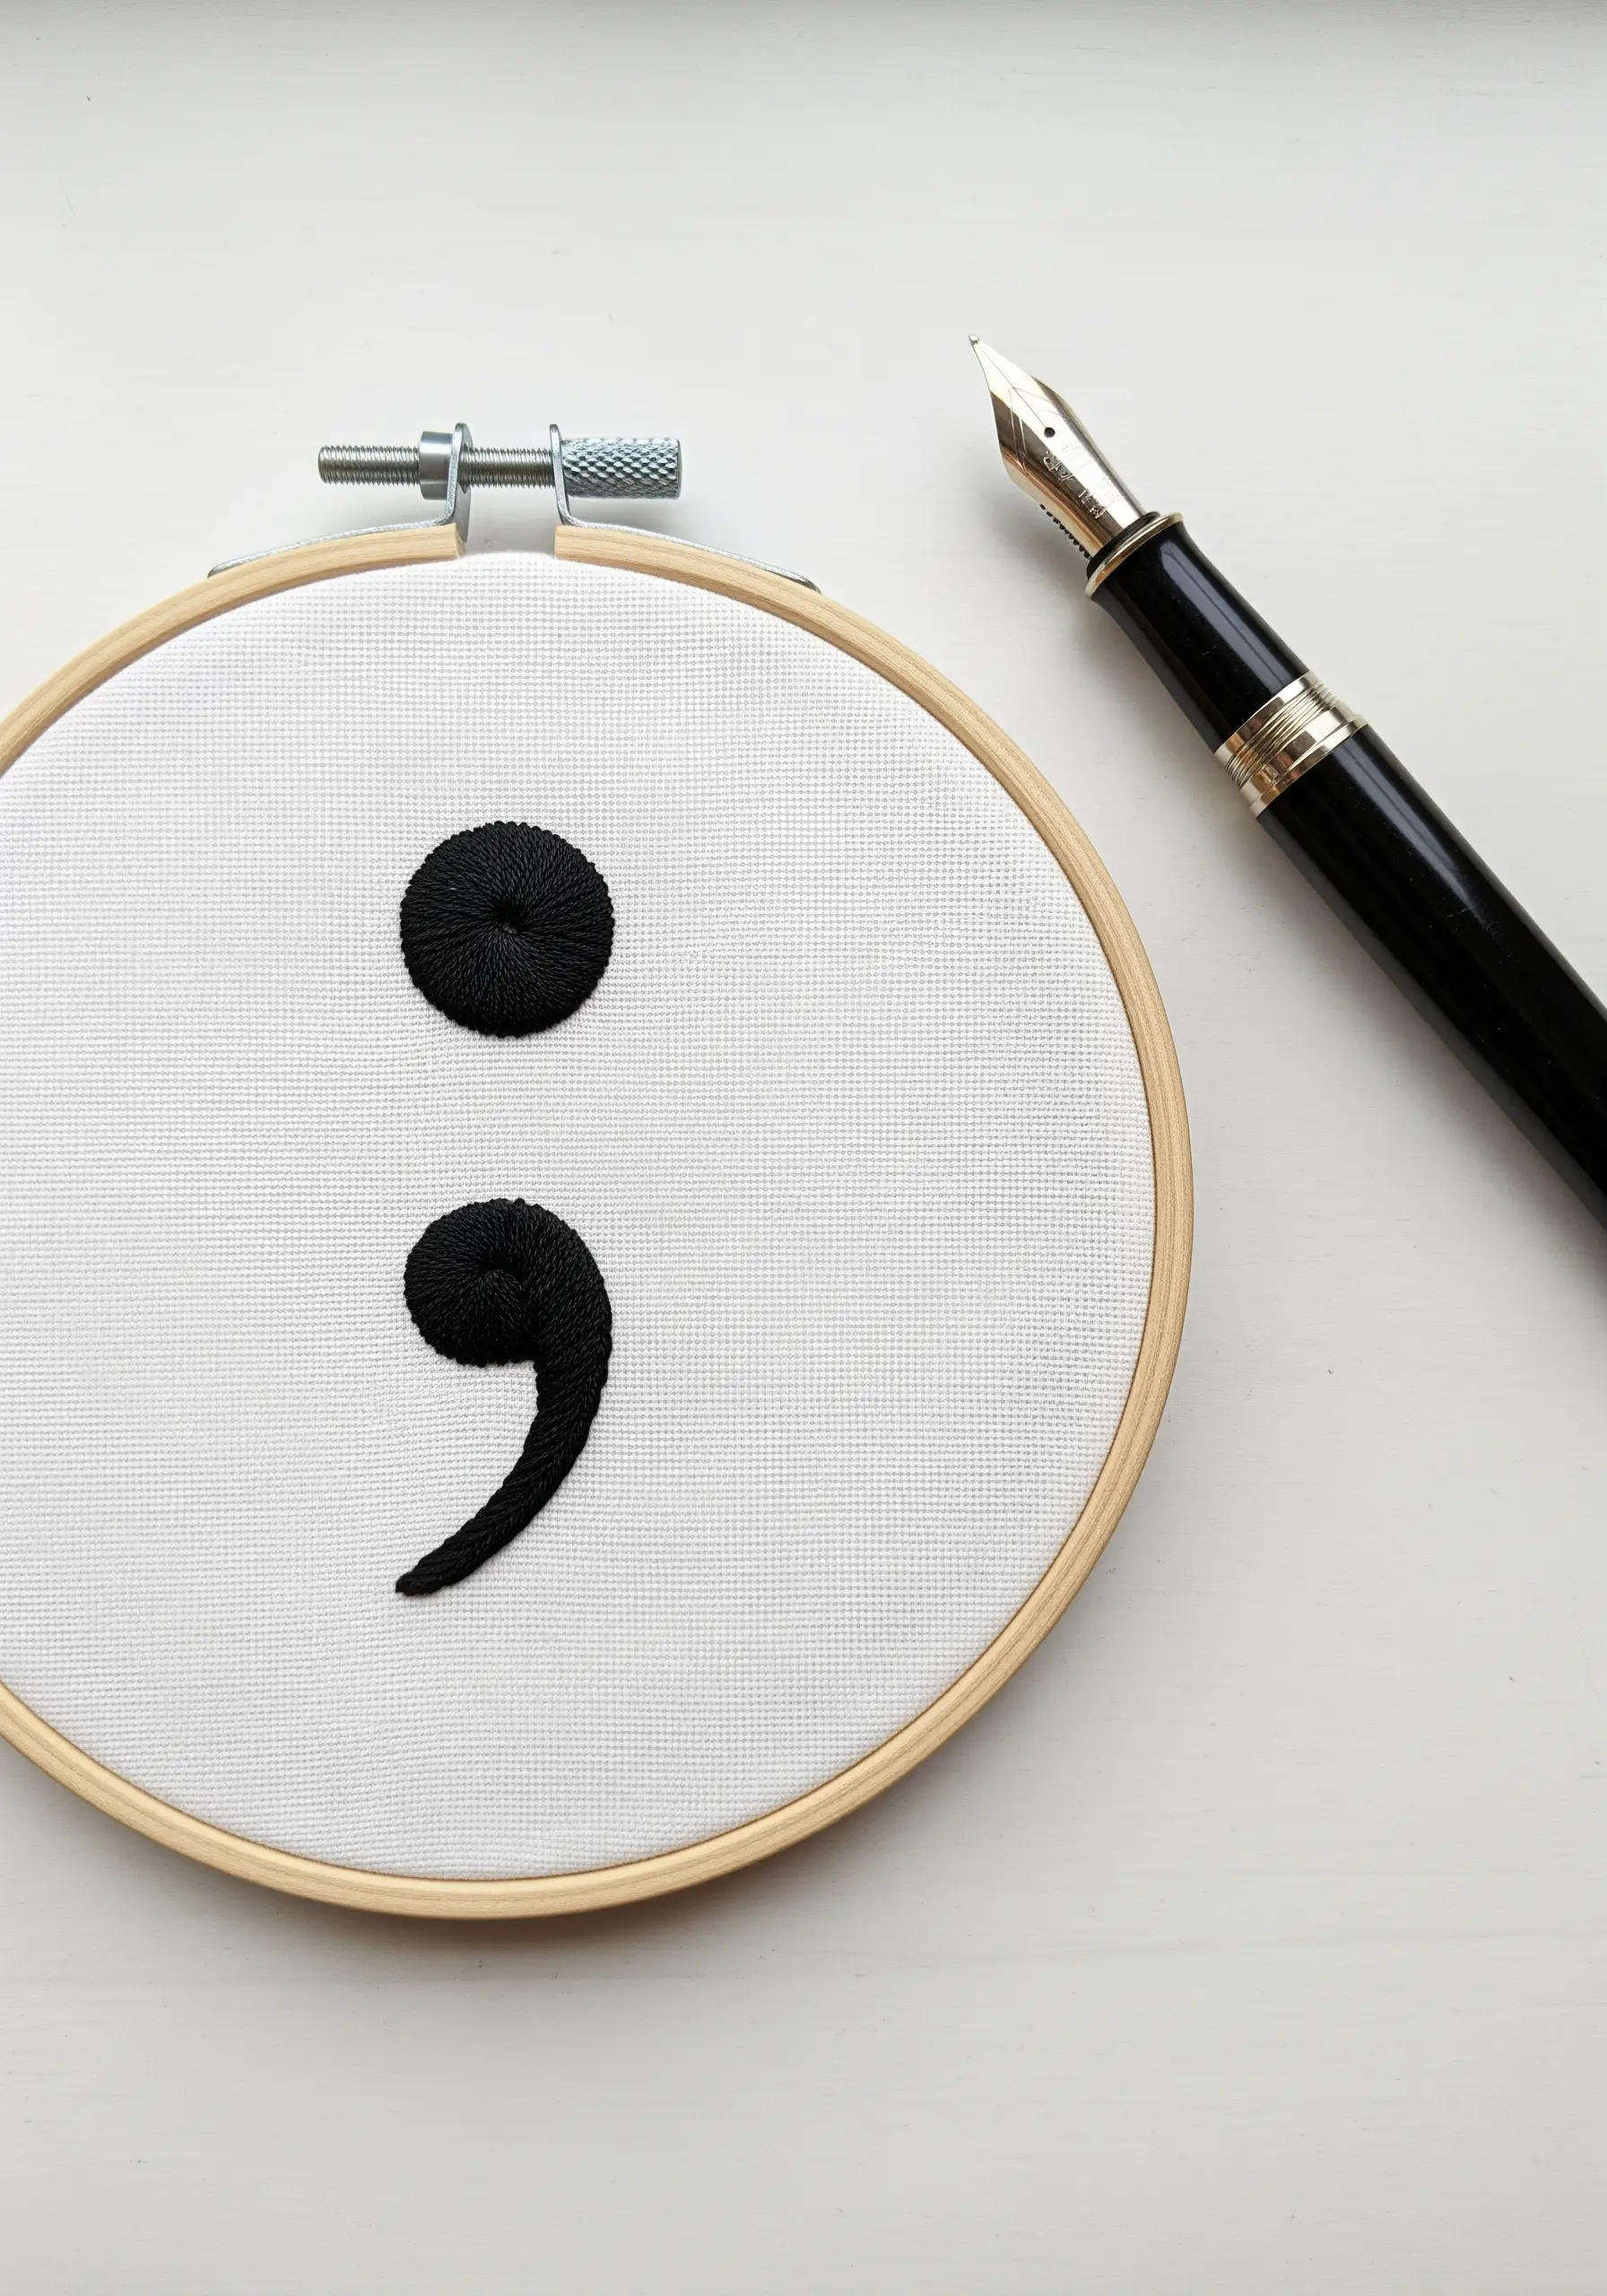
Achieving a perfectly smooth, round fill with a standard satin stitch can be challenging.
Instead, try a spiral fill. Start in the very center of the circle and work a continuous line of tiny stitches in an expanding spiral.
This technique eliminates the hard start-and-stop lines of parallel stitches, resulting in a beautifully seamless, polished circle with a subtle texture.
It’s an ideal method for punctuation, dots, and other small circular elements in designs like these inspirational quote string art designs.
25. Add Definition with Contrasting Outlines
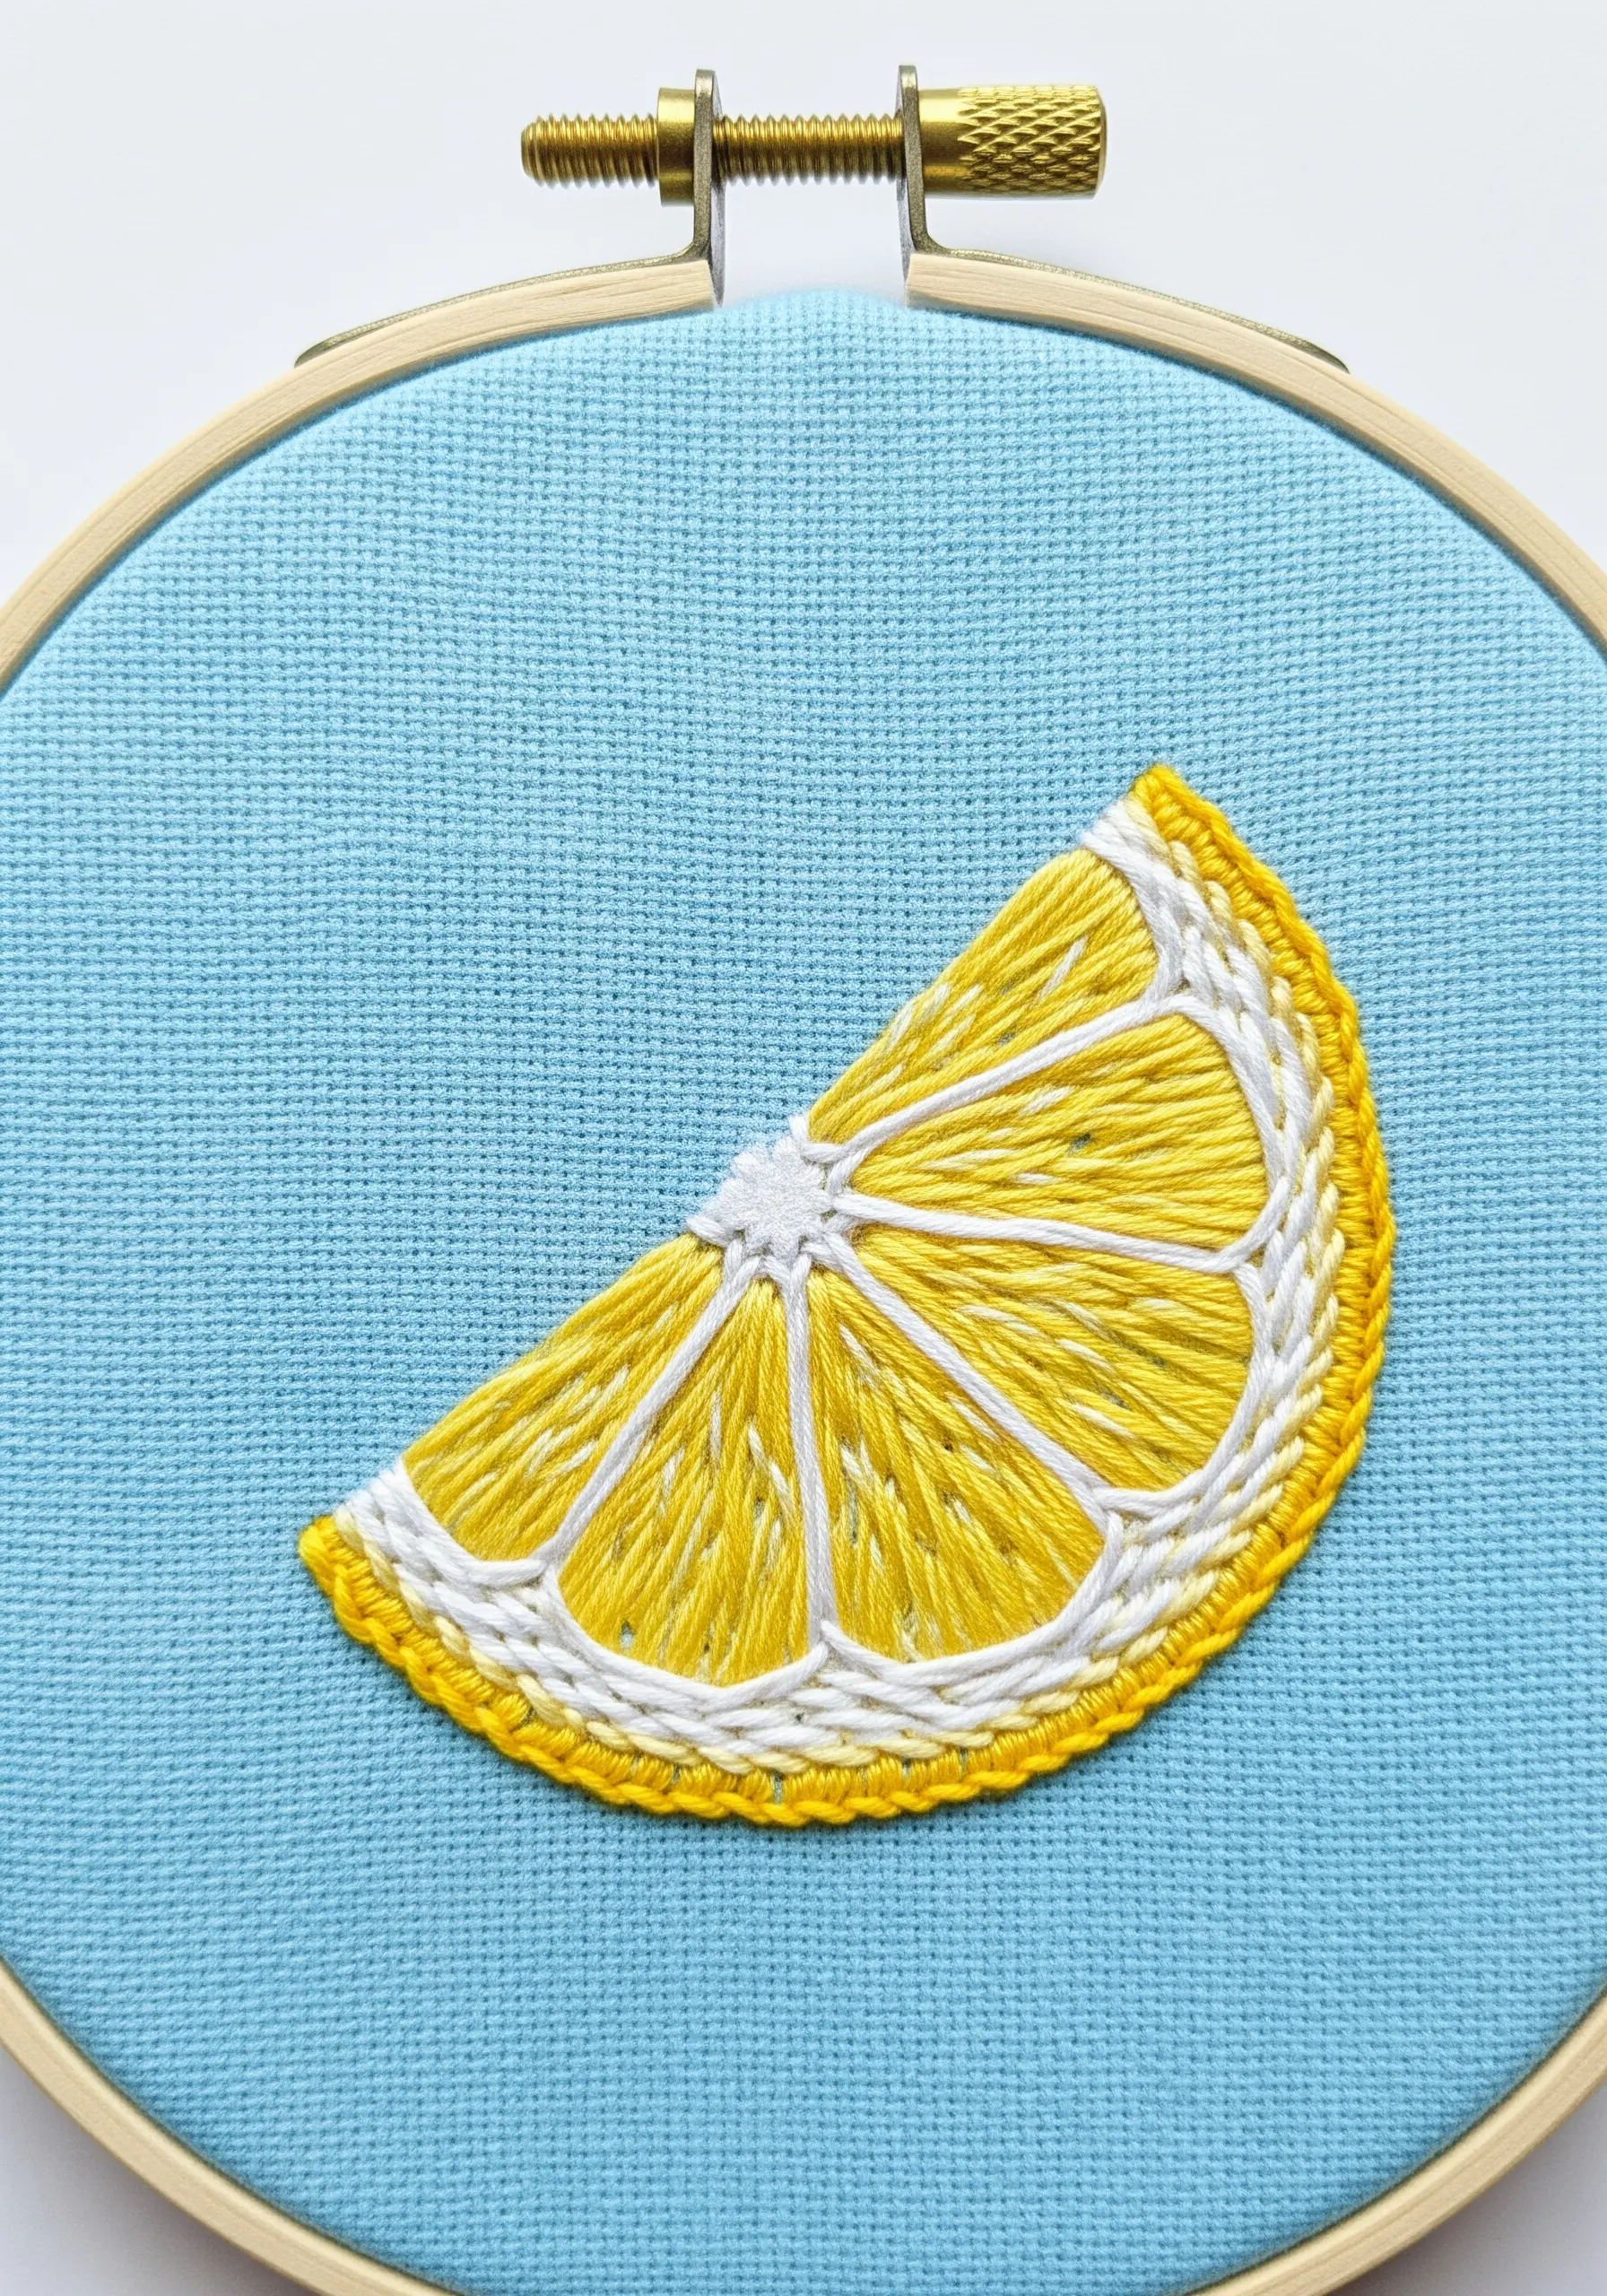
Make your fruit motifs pop by using multiple stitches and colors for definition.
Fill the segments of the lemon with long, radiating satin stitches in bright yellow.
Then, use a contrasting white thread to outline each segment with a backstitch, clearly defining the pith.
Finally, frame the entire slice with a textured stitch like a chain stitch or Pekinese stitch in a slightly darker yellow or white to represent the rind. This layering adds realism and visual interest.
26. Achieve Natural Gradients with Variegated Thread
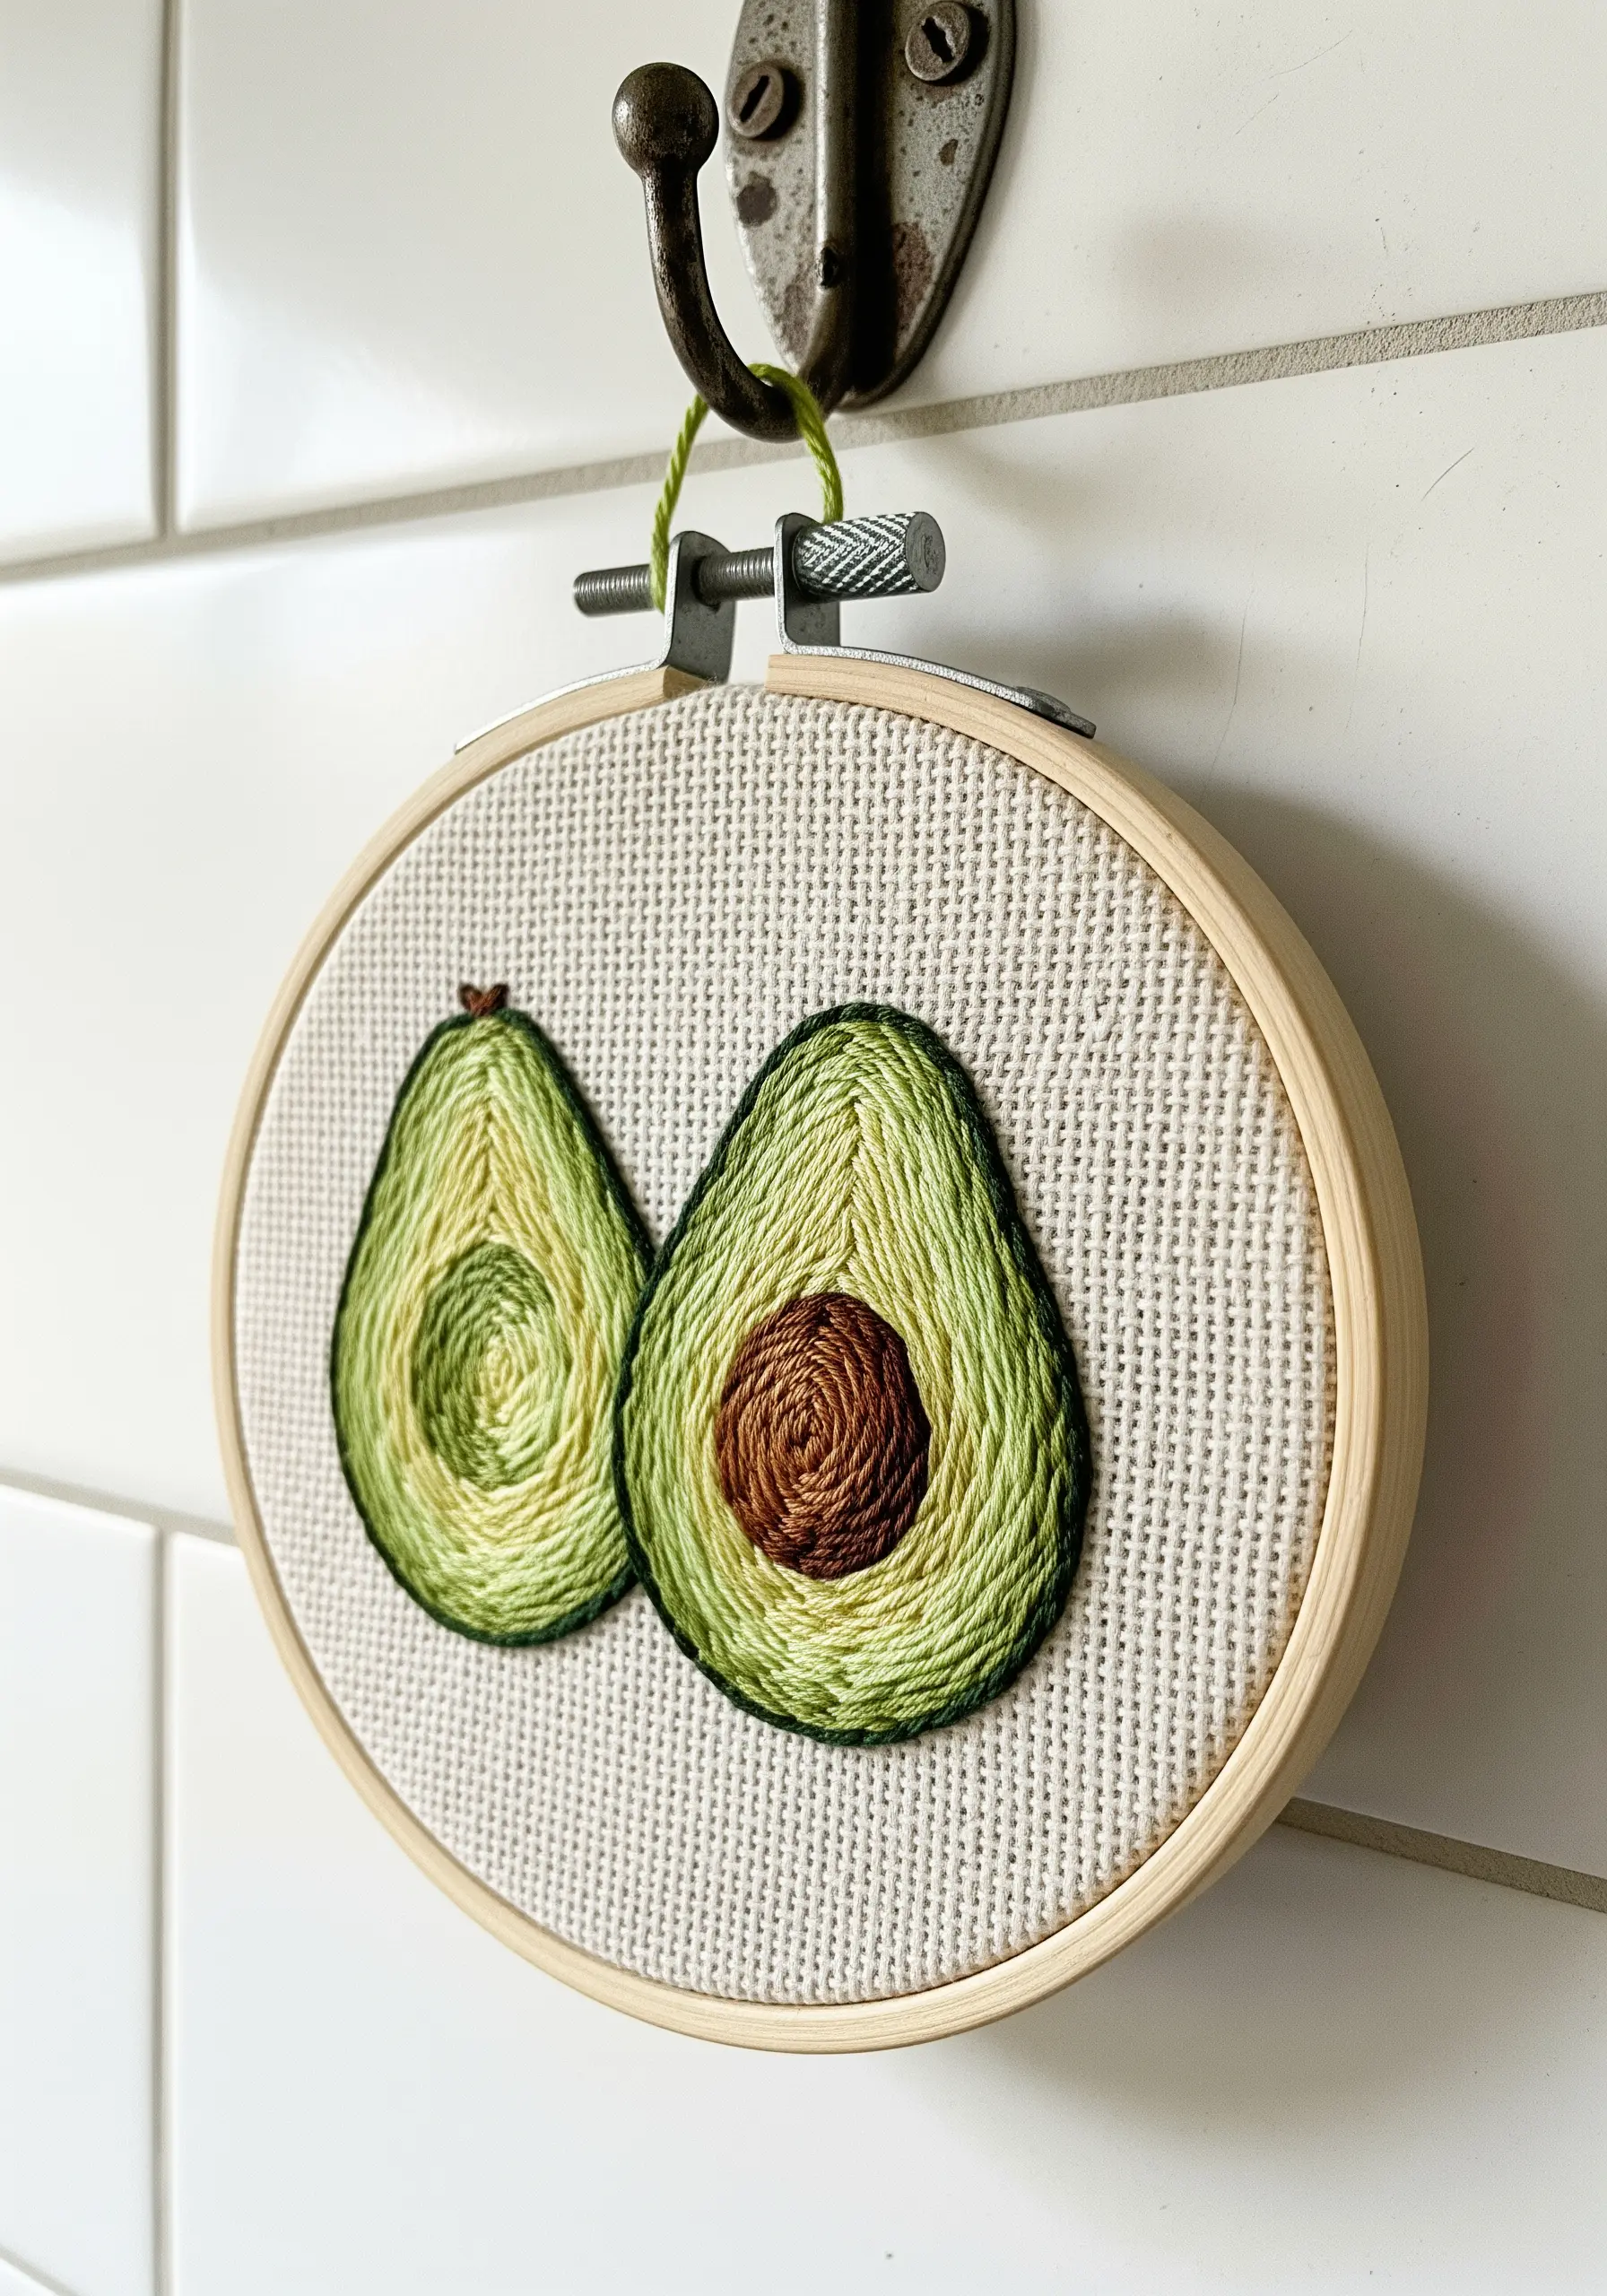
Let variegated thread do the color-blending work for you.
Choose a floss that contains several shades of green and brown to stitch this avocado.
By using a simple spiral or circular satin stitch, the colors will change randomly as you sew, creating a natural, subtle gradient that mimics the real fruit.
This technique offers maximum visual impact with minimal effort, as the variegated thread creates gradient magic on its own.
27. Add Whimsy with Scattered French Knots
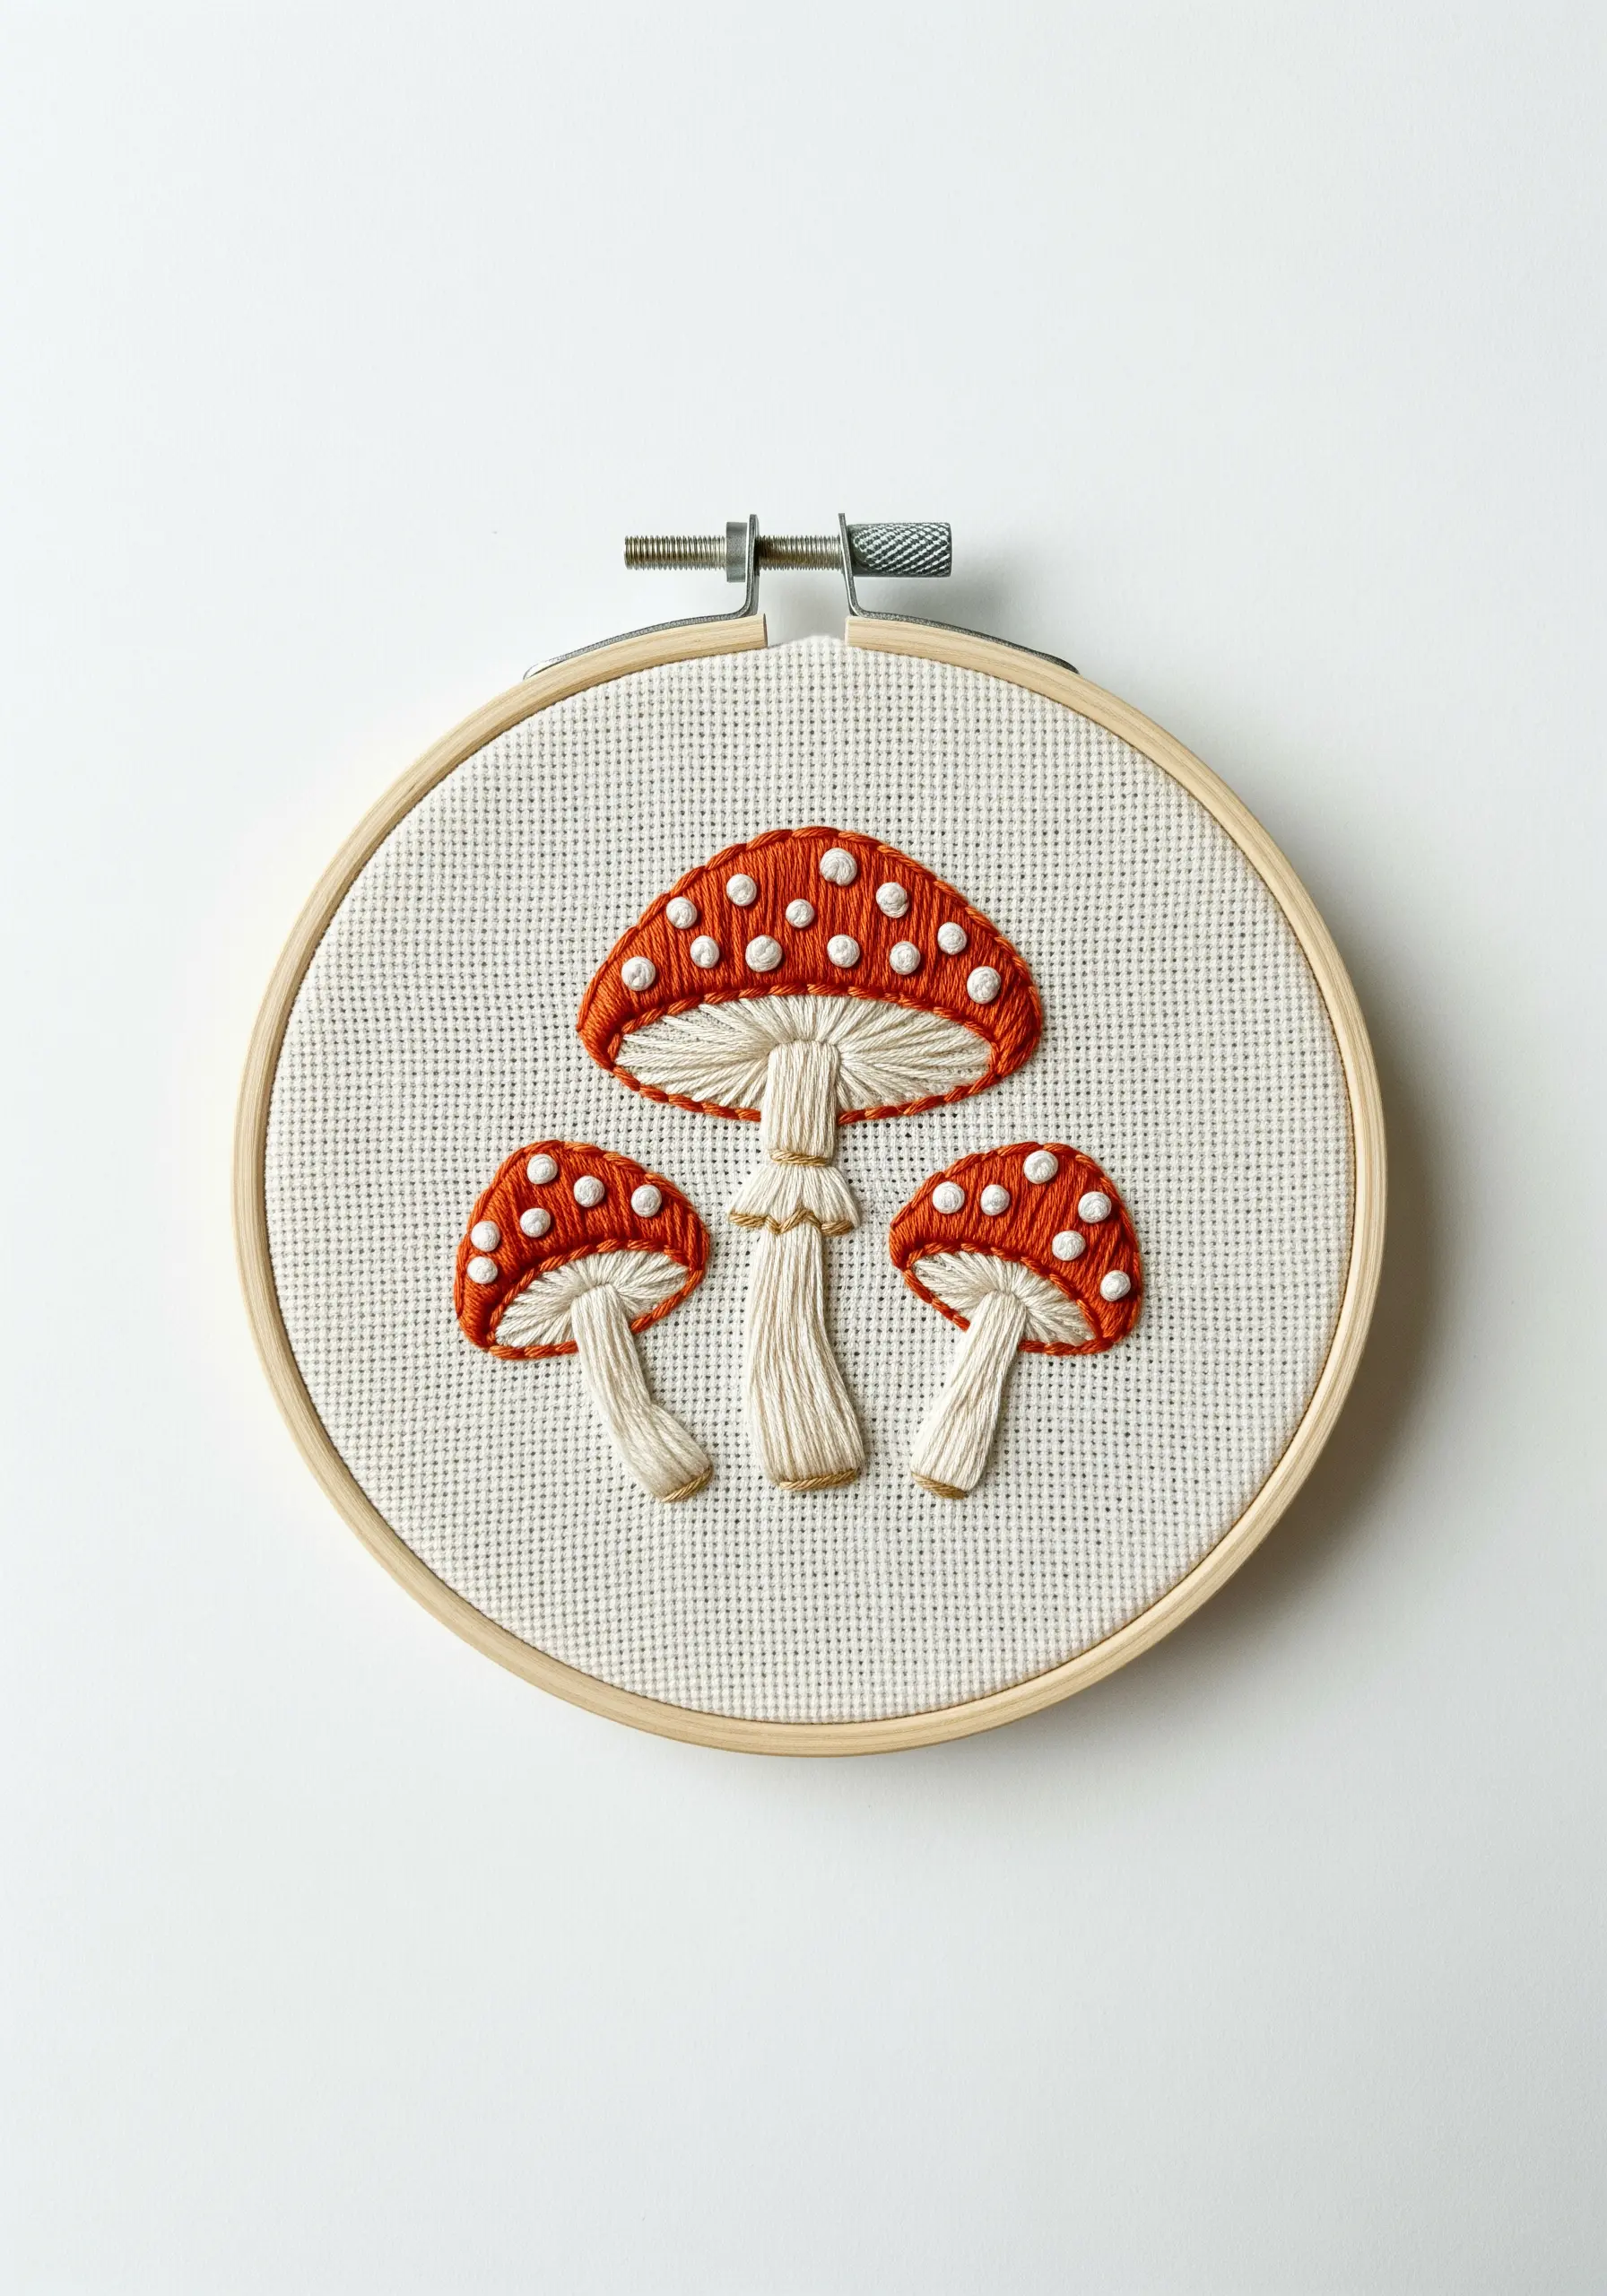
Bring a touch of playful detail to your motifs with strategically placed French knots.
After filling the mushroom caps with a smooth satin stitch, scatter tiny white French knots across the surface to represent the classic spots of a toadstool.
This simple addition transforms a flat shape into a recognizable and charming object.
Using a contrasting texture (the bumpy knots on the smooth satin stitch) is a powerful way to add character to your realistic mushroom forest floor projects.
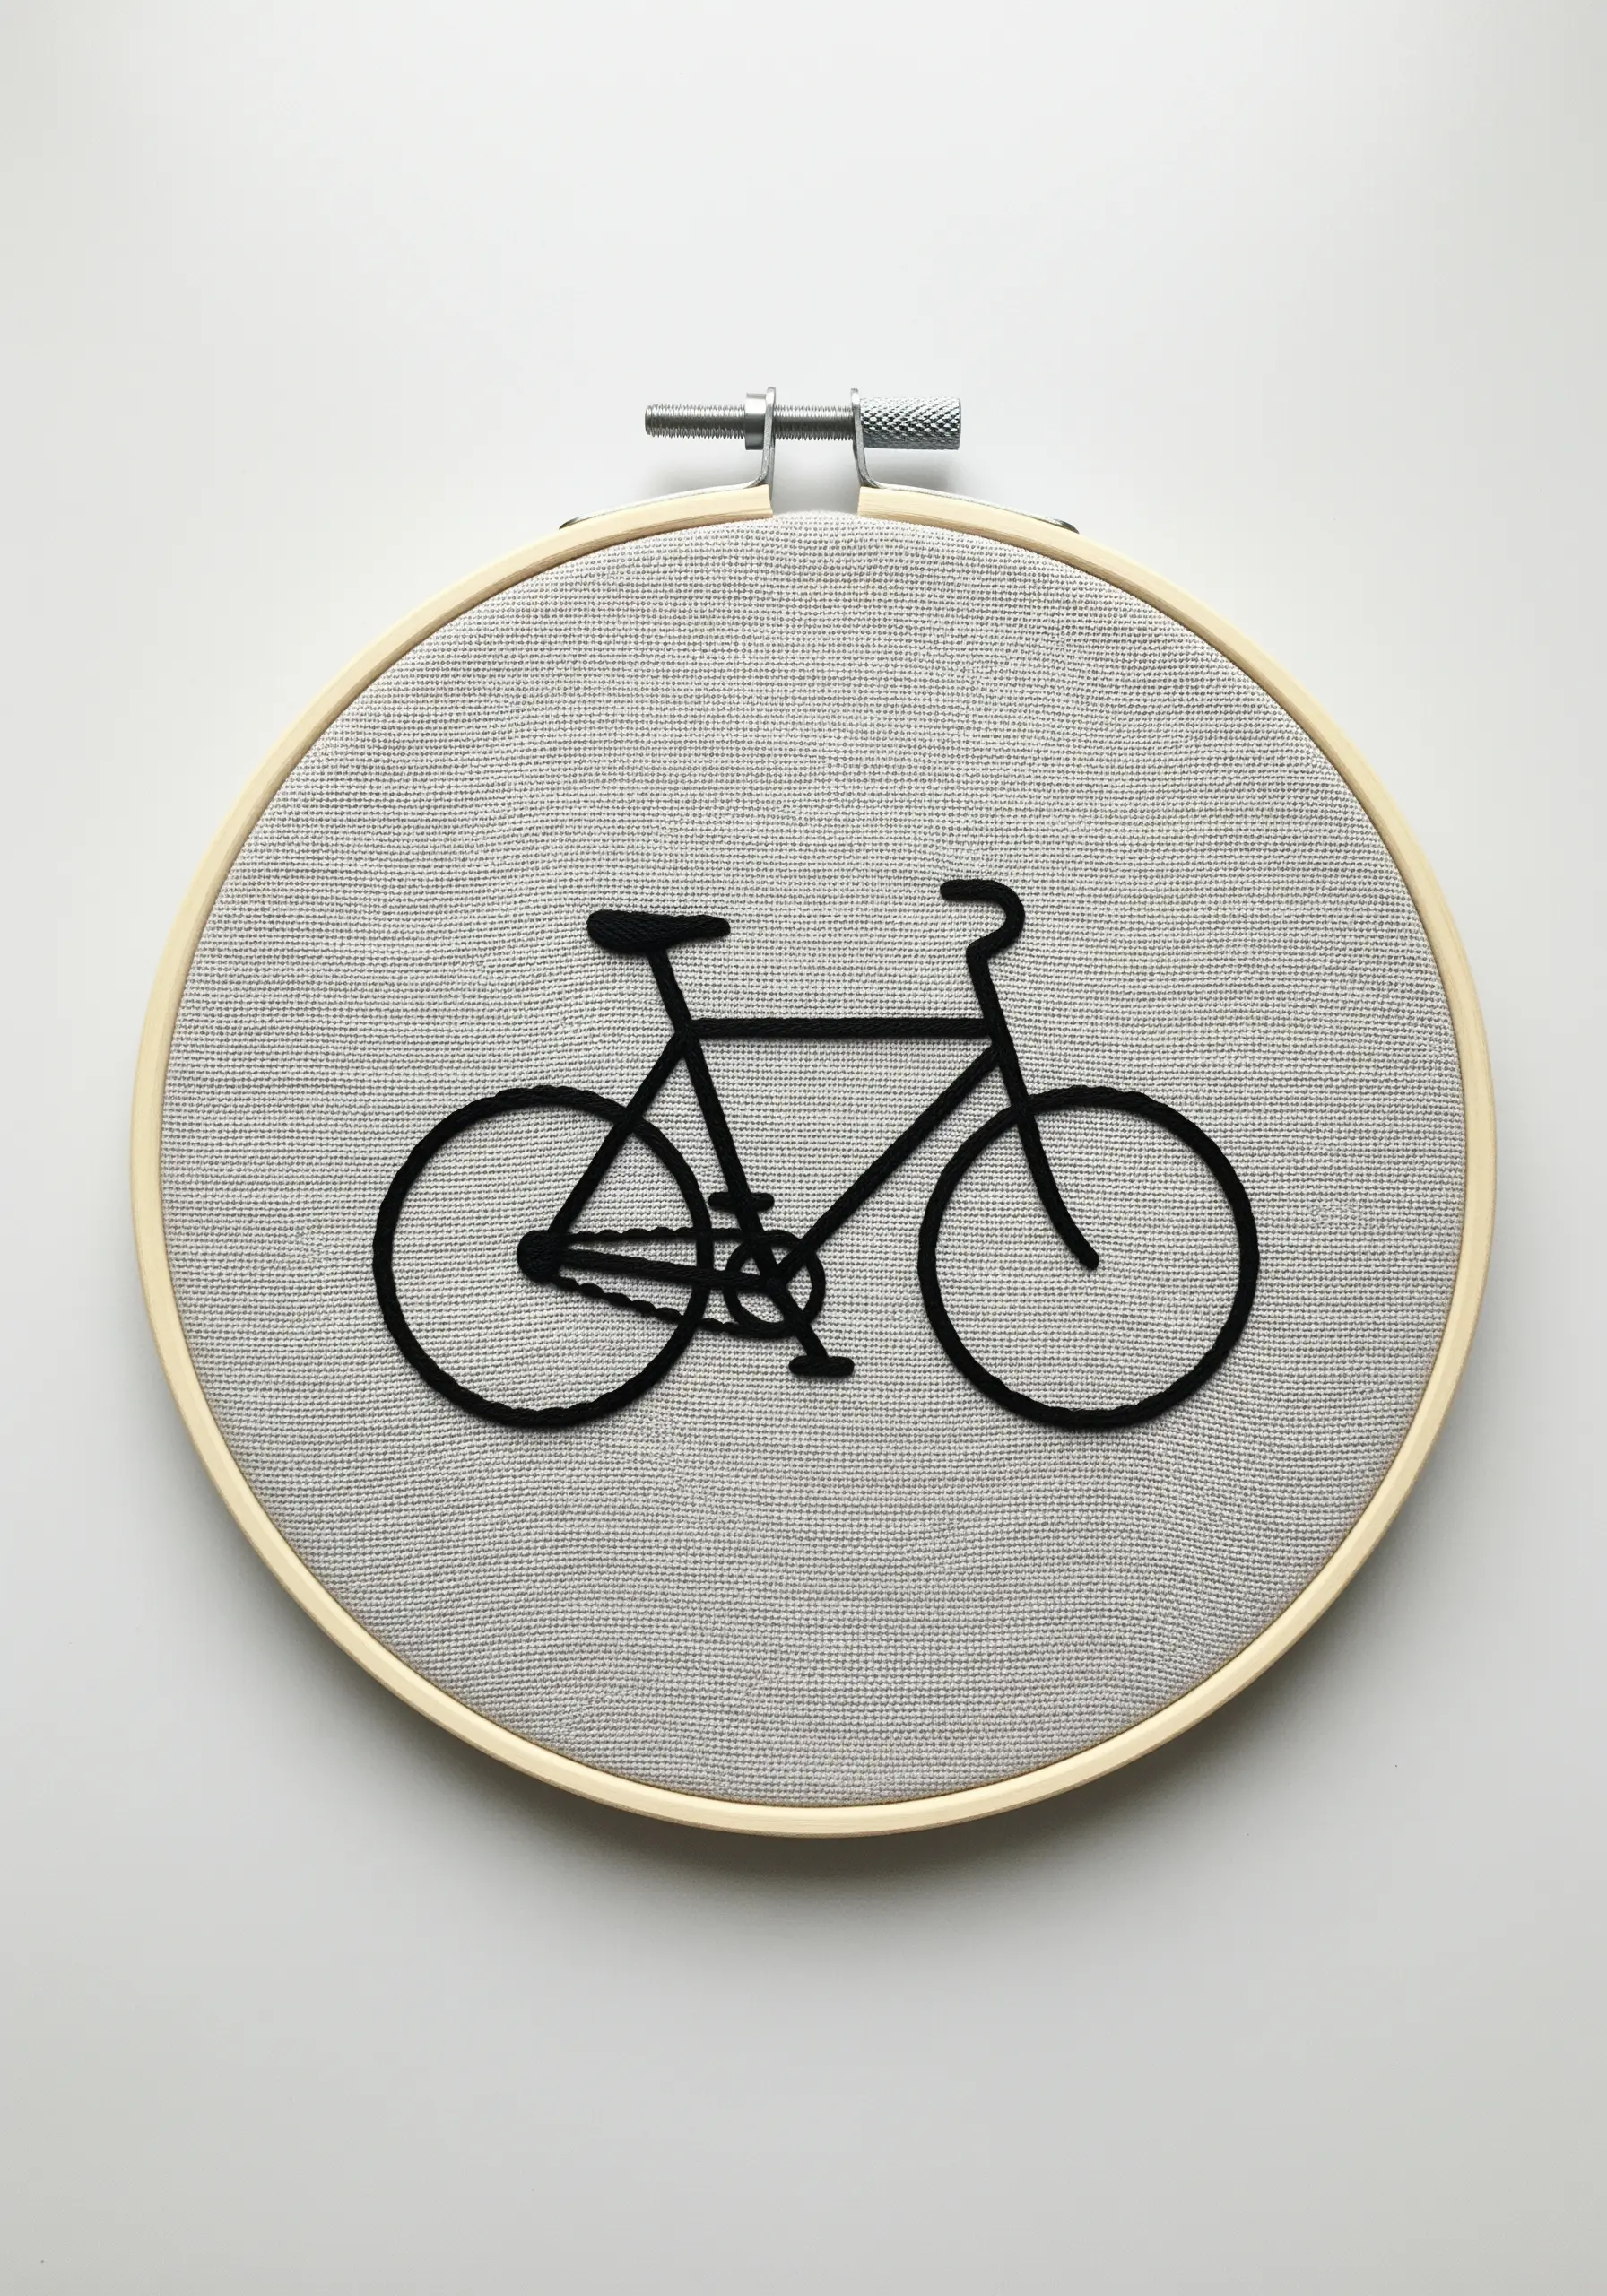
28. Emphasize Form with a Consistent Outline
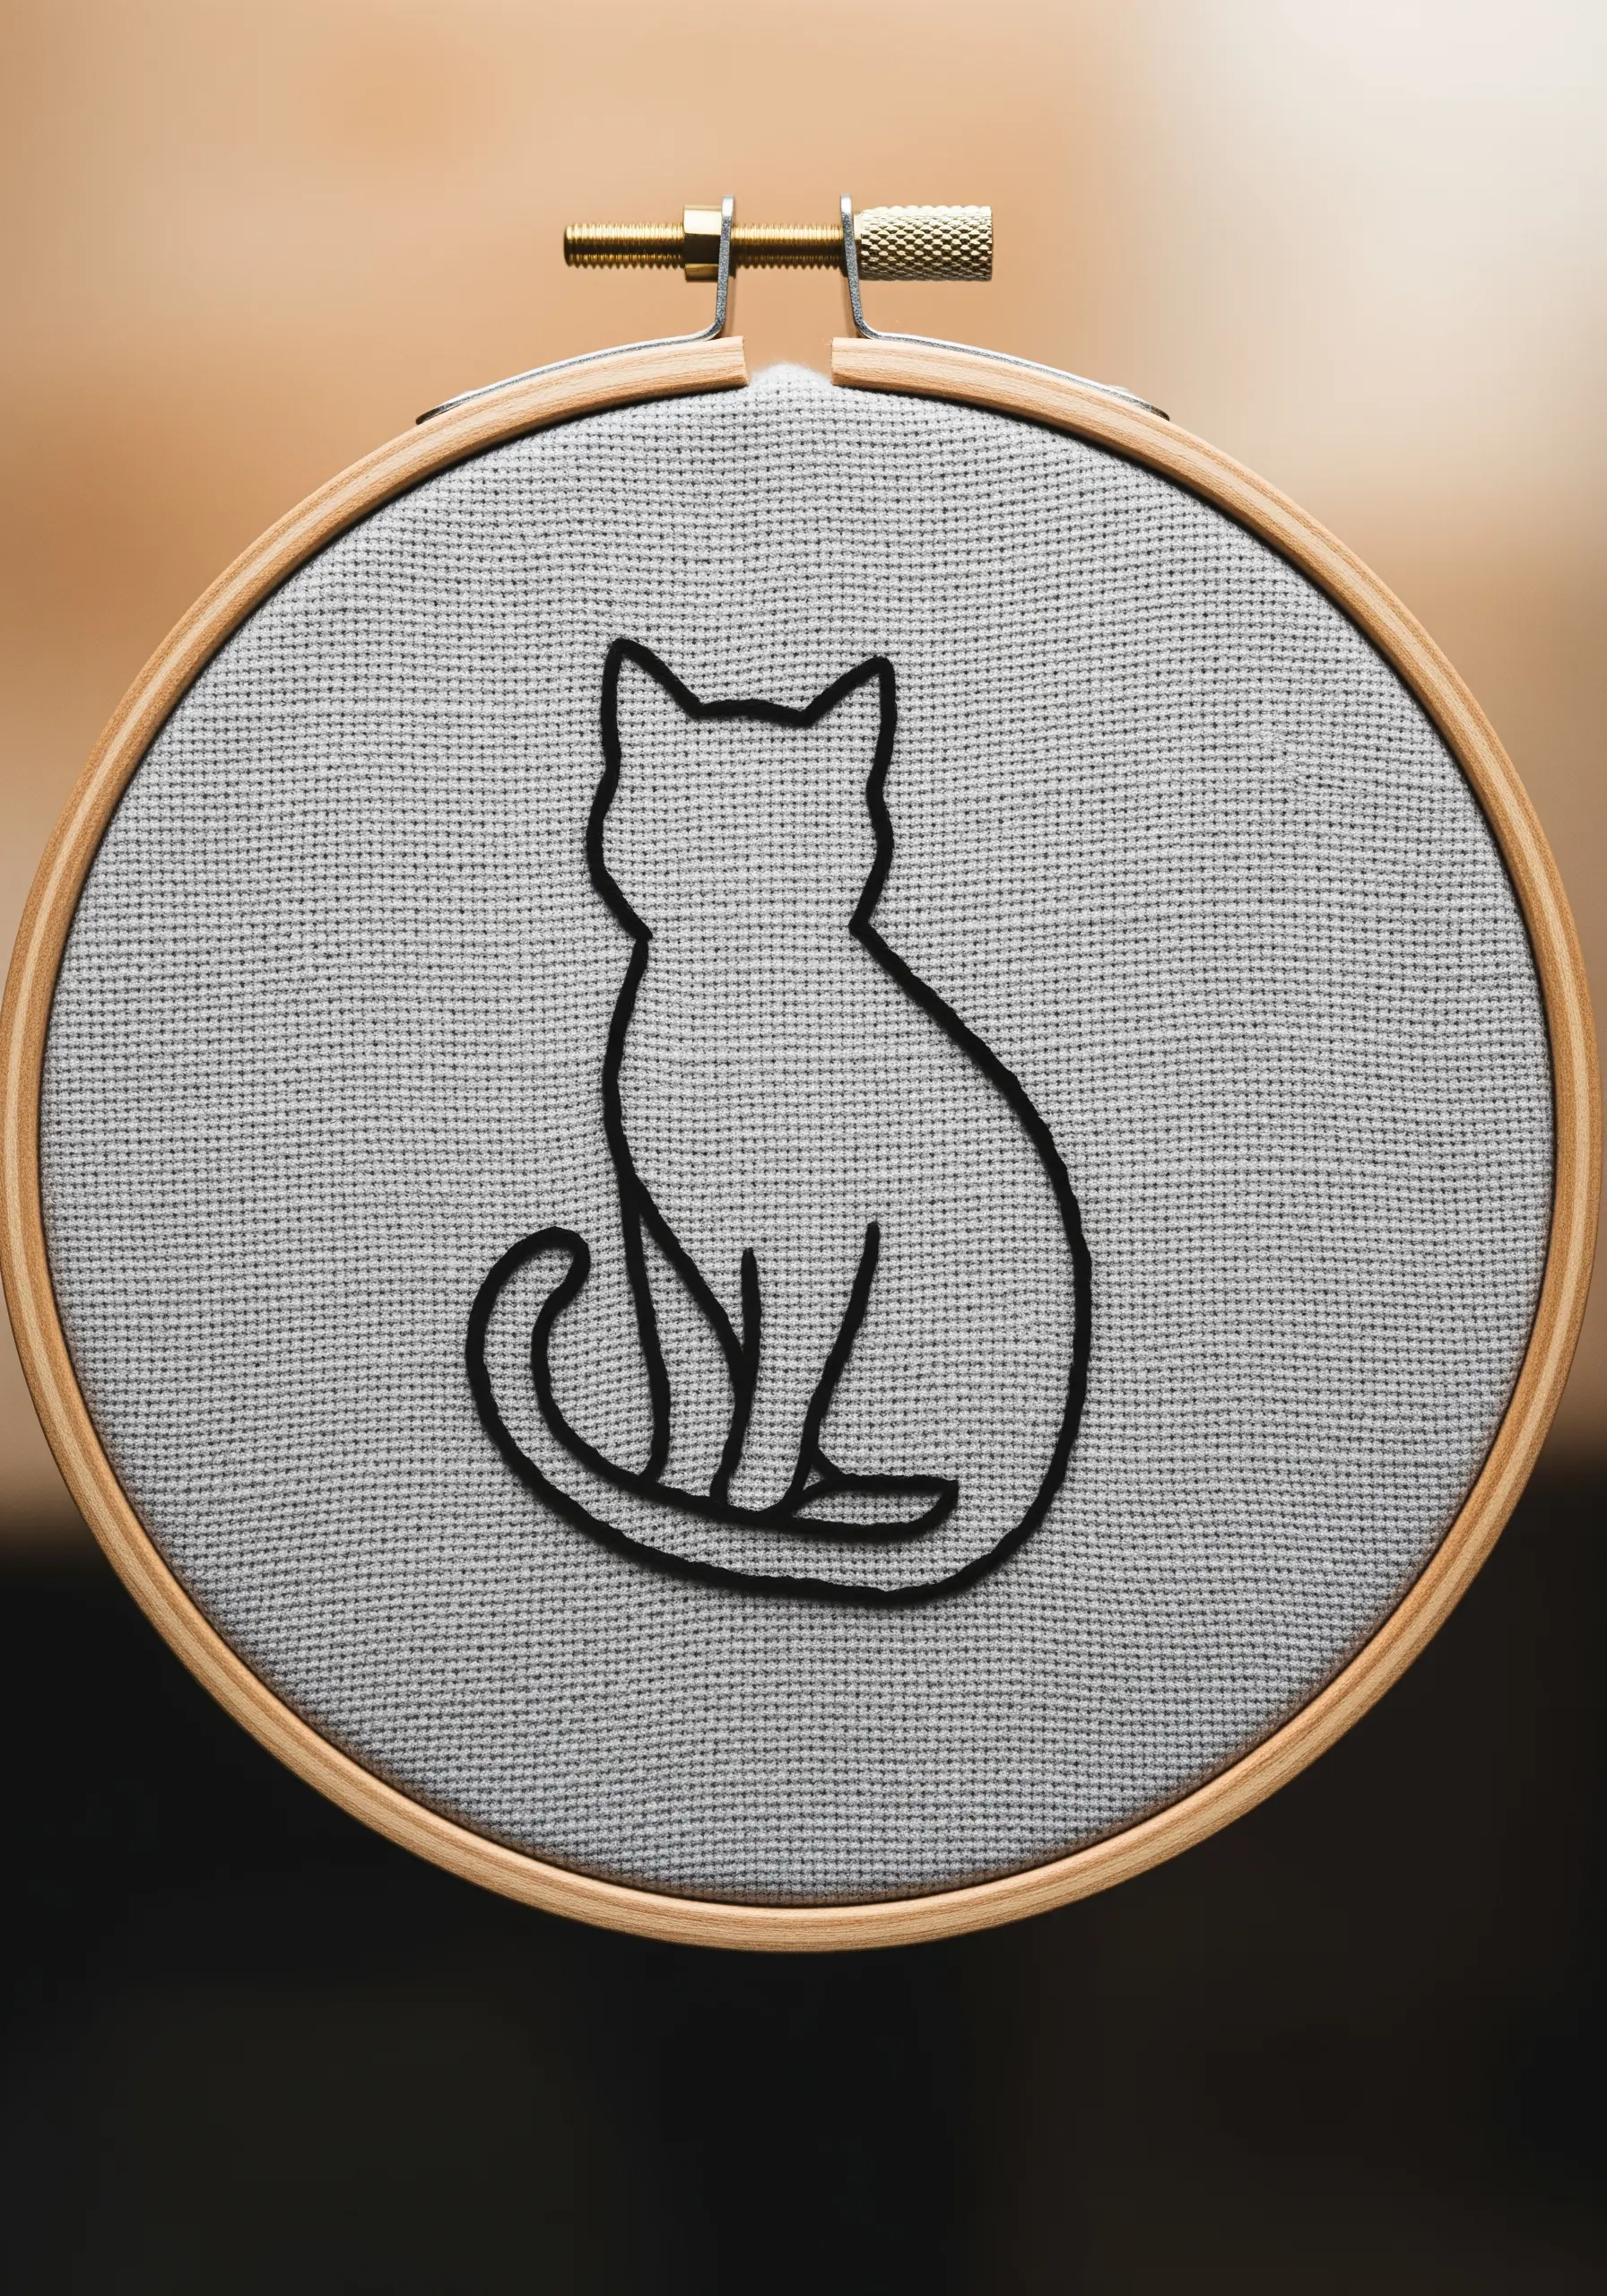
When rendering a silhouette, the quality of your line is everything.
Use a whipped backstitch or a stem stitch with three to four strands of floss to create a line that is both substantial and perfectly smooth.
The goal is to eliminate any wobbles or inconsistencies in thickness, so the eye follows the continuous curve of the form without distraction.
This precise technique is essential for minimal pet-themed line art stitches where the outline alone tells the story.
29. Couch Metallic Threads for Ornate Details
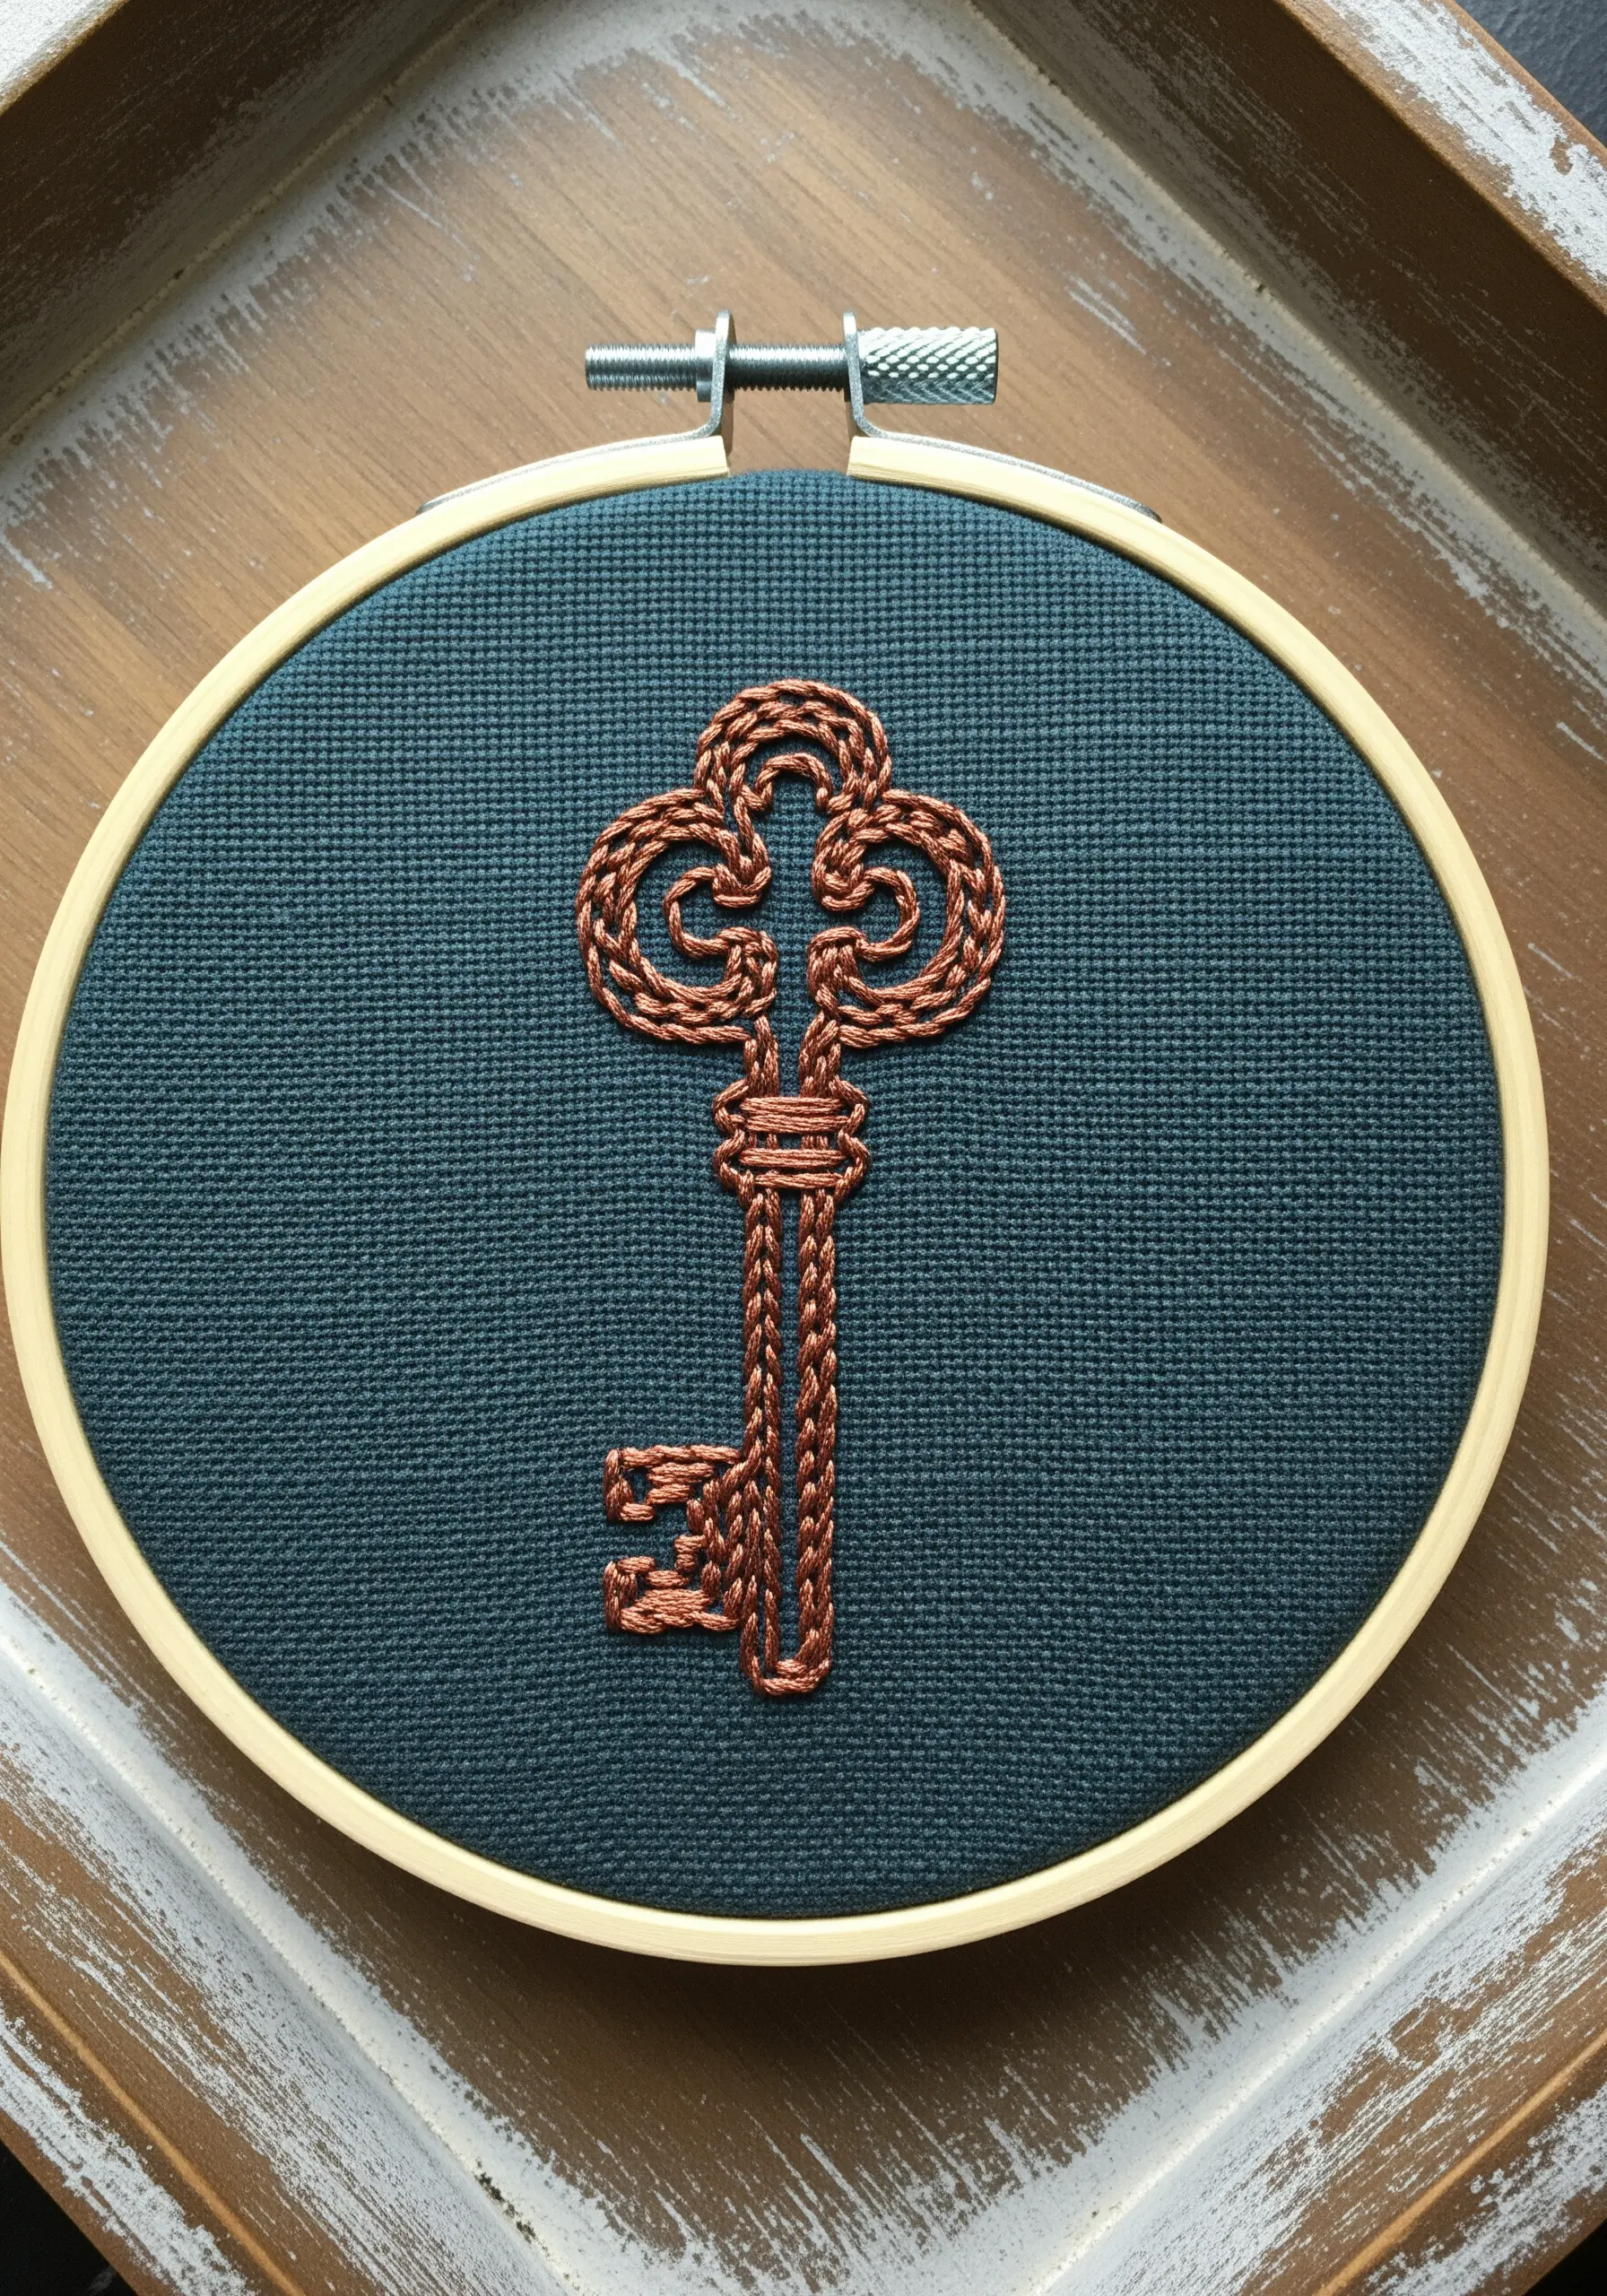
Metallic threads can be difficult to stitch with directly, but couching makes it easy to add their brilliant shine.
Lay your metallic thread on the surface of the fabric along your design line.
Then, using a second, thinner thread in a matching color, make tiny tacking stitches at regular intervals to hold the metallic thread in place.
This technique gives you perfect control over placement and is ideal for intricate, decorative designs like this antique key, a great addition to your mini embroidery designs.
30. Isolate Stitches to Showcase Their Beauty
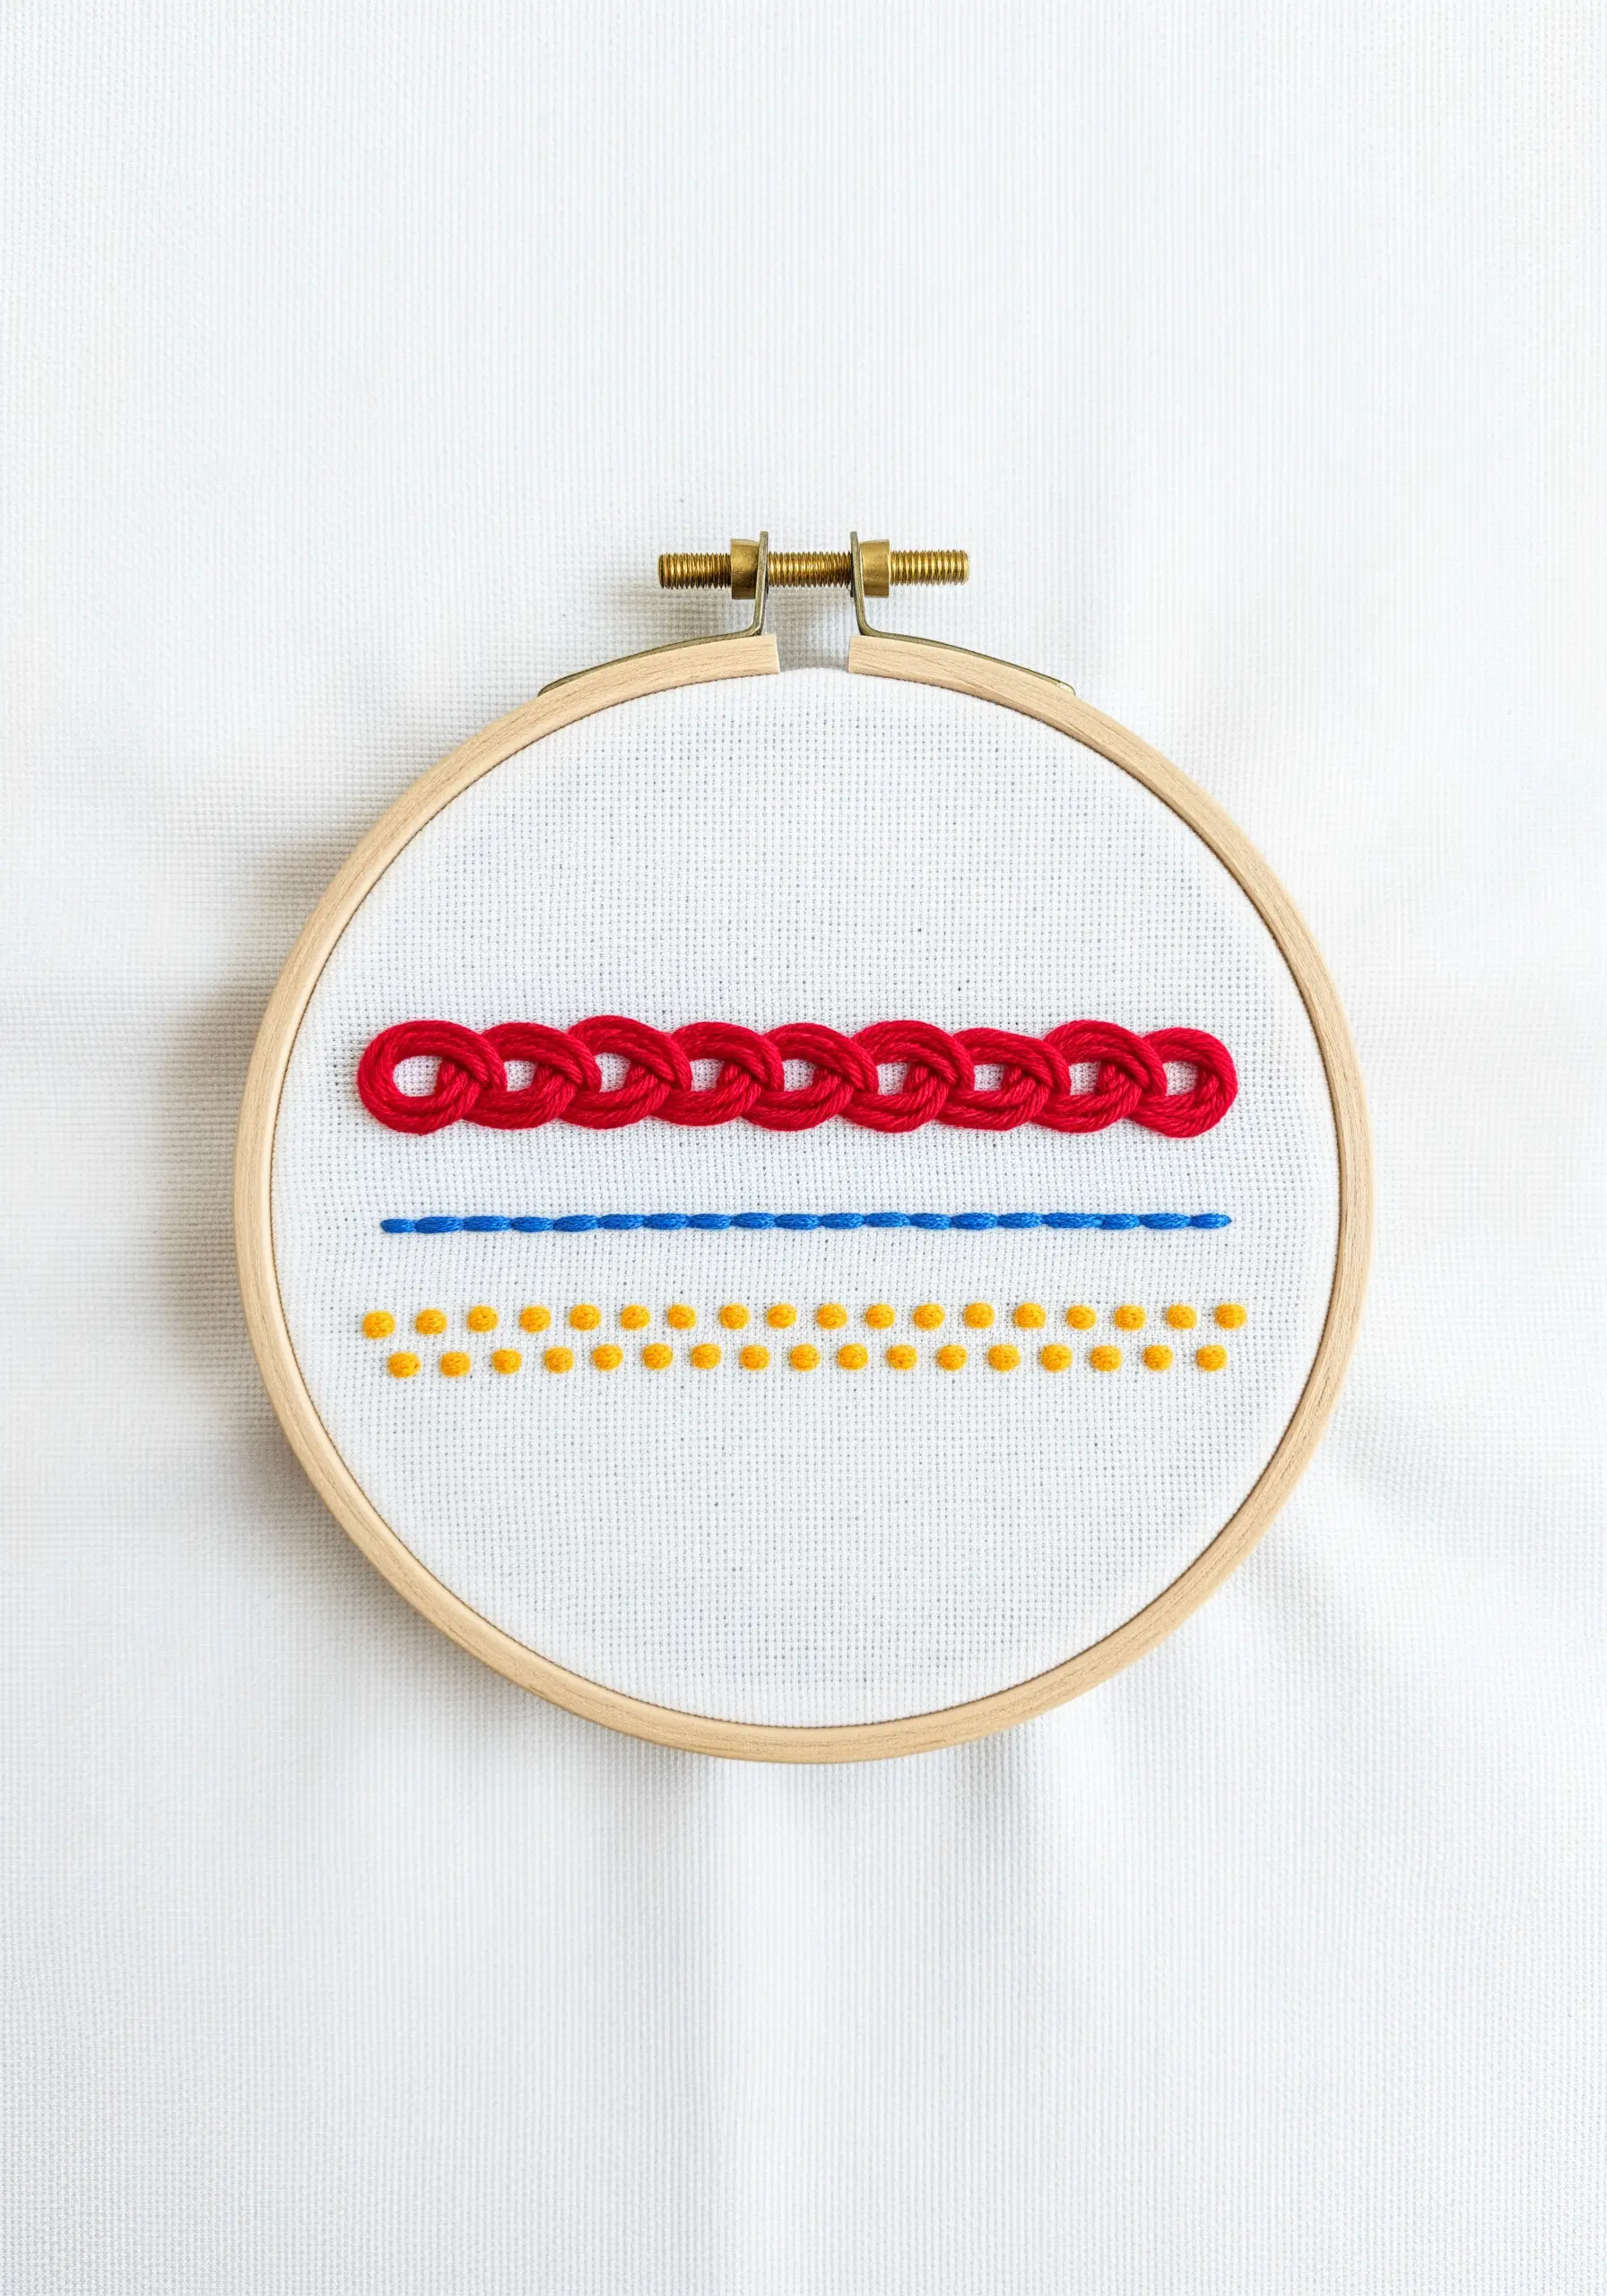
Create a modern stitch sampler by isolating a few key stitches and presenting them as graphic elements.
Instead of crowding a hoop with dozens of stitches, choose three with distinct textures: the woven Pekinese stitch, the clean backstitch, and the dot-like French knot.
Arrange them in clean, separate lines with ample negative space in between.
This approach transforms a practice exercise into a deliberate piece of minimal art, inviting appreciation for the form of each individual stitch and is great to practice real plant shapes.
31. Prioritize Precision for Geometric Motifs
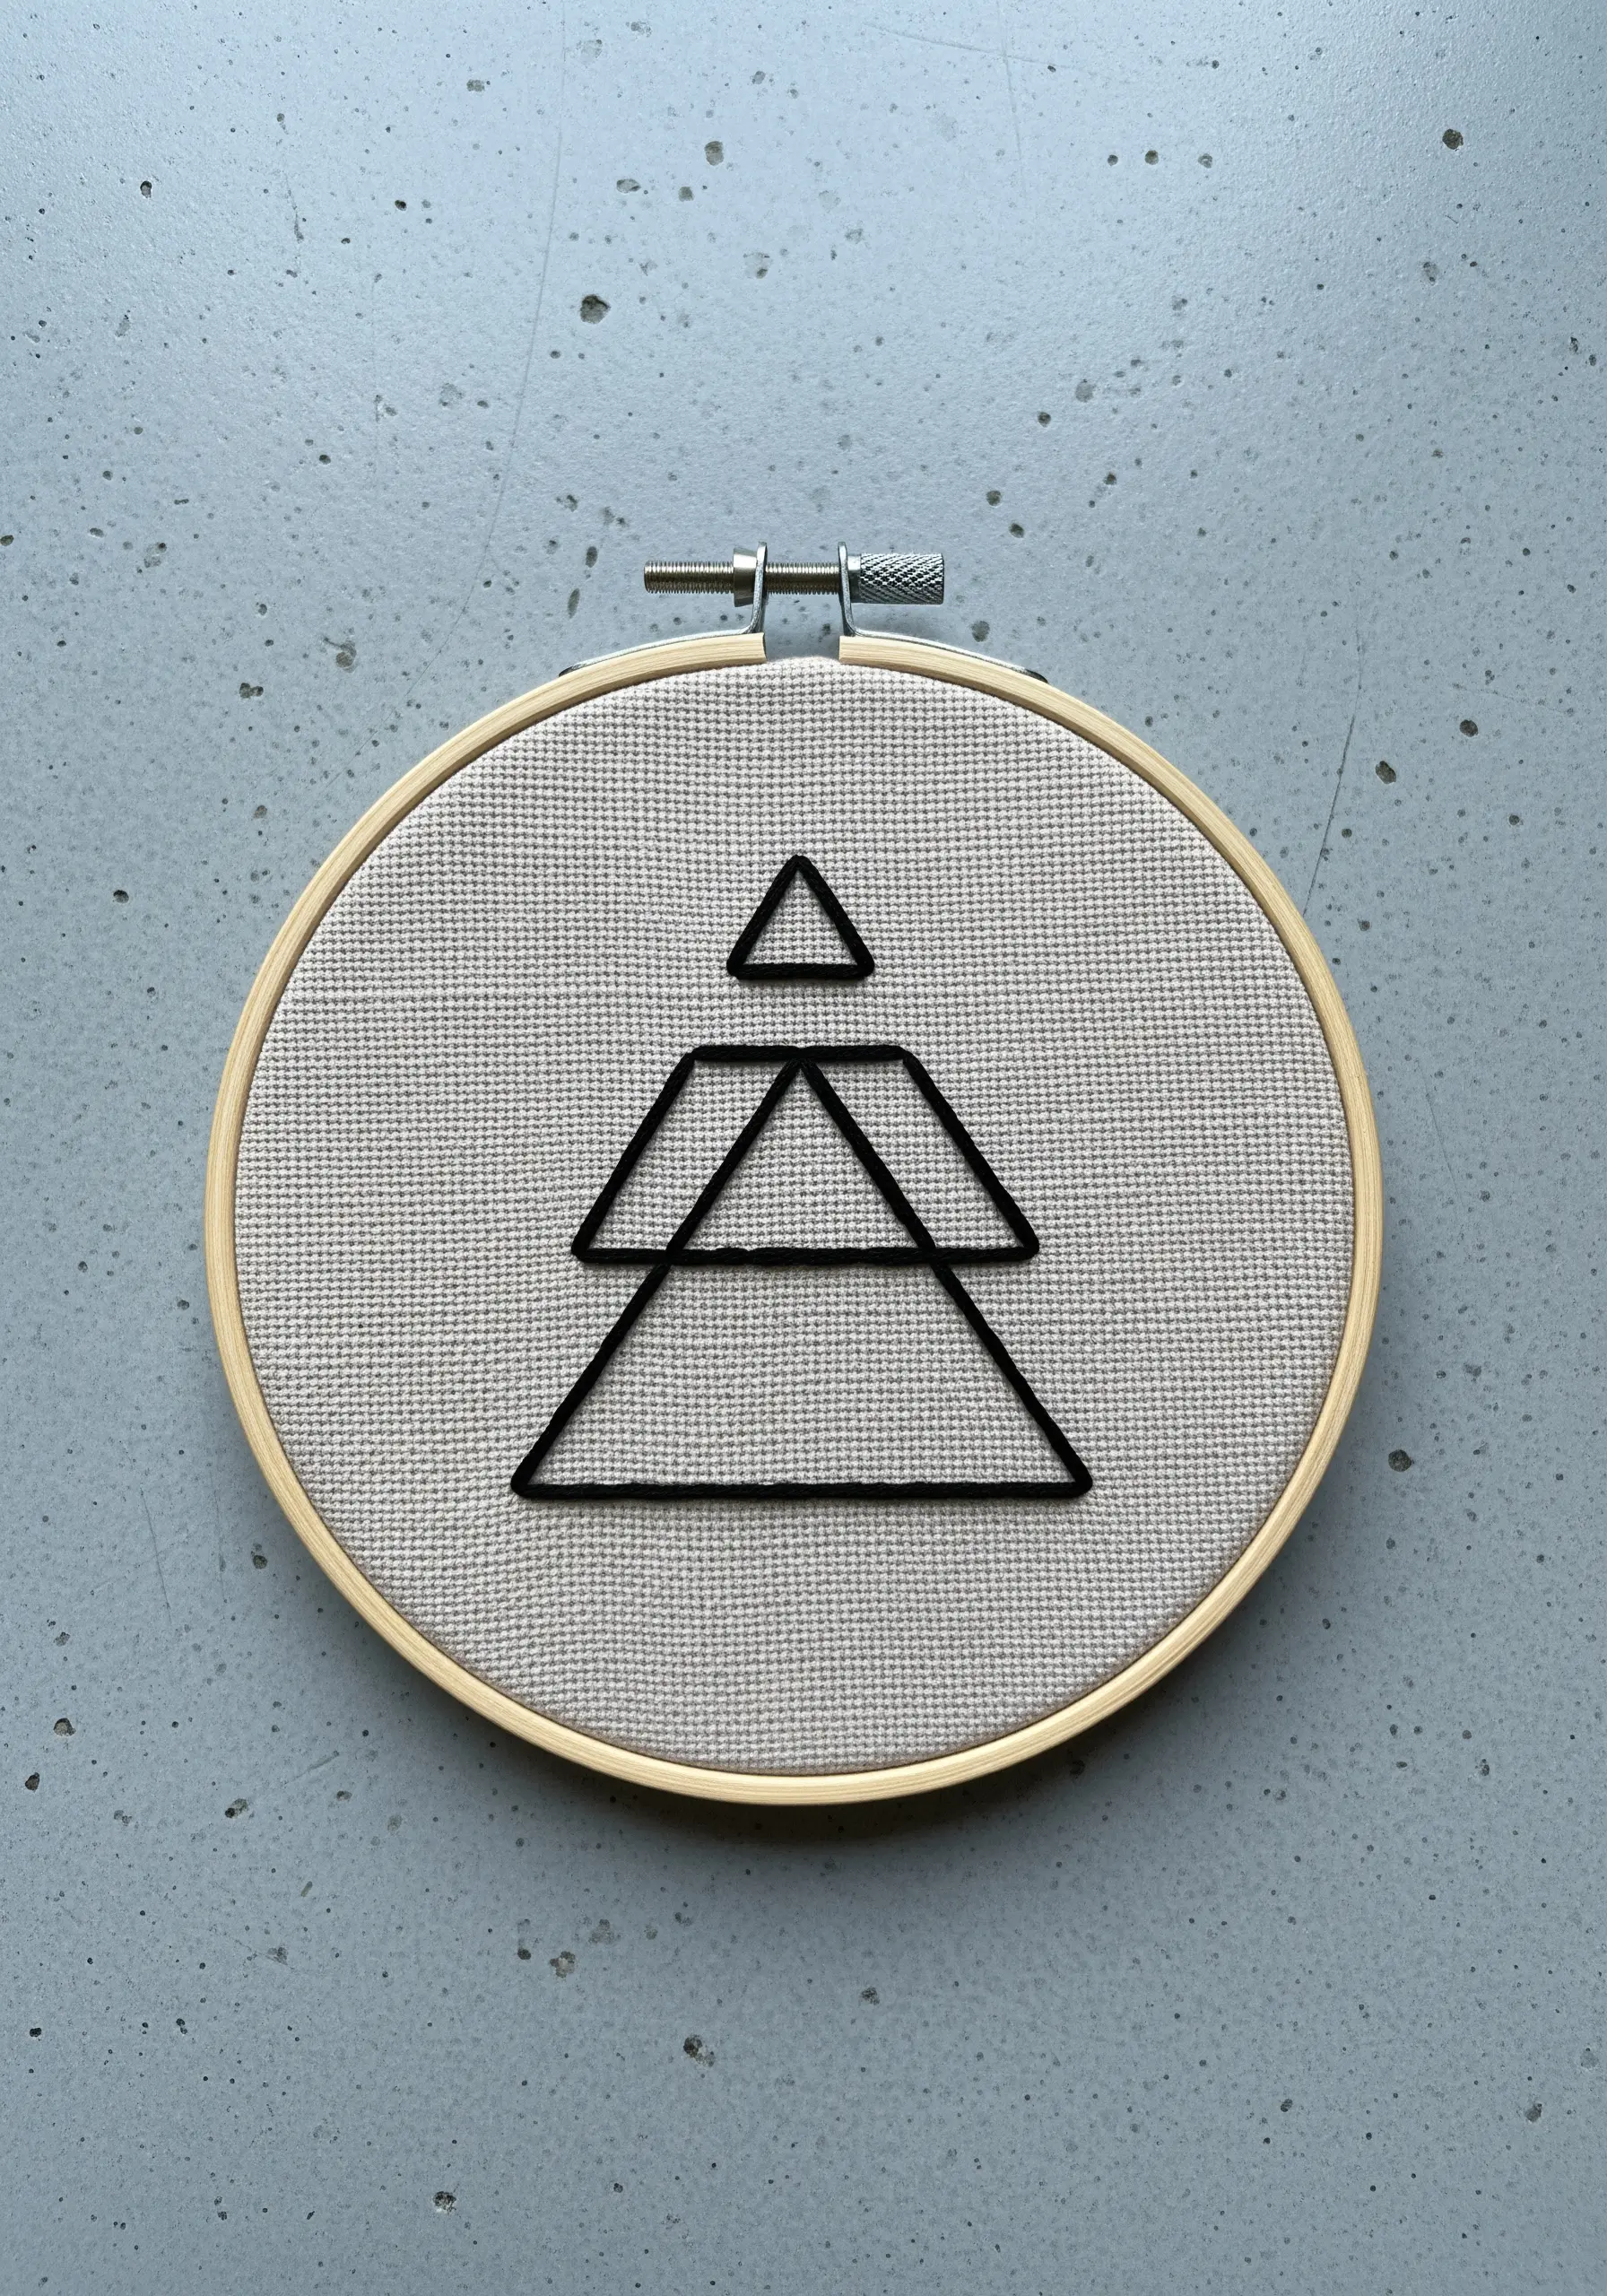
When stitching geometric symbols, precision is more important than complex techniques.
Use a simple backstitch with two or three strands of floss for a clean, strong line.
The most crucial step is to ensure your lines are perfectly straight and your corners are sharp and angular.
Using a gridded fabric like Aida can help, but you can also draw precise guidelines with a water-soluble pen to achieve a crisp, architectural look that defines minimalist embroidery decor.
32. Embellish Apparel with a Light Touch

When embroidering on clothing, placement and scale are key.
A scattered pattern of small, simple daisies along a collar adds a personalized, whimsical touch without overwhelming the garment.
Use lazy daisy stitches for the petals and a single French knot for the center.
Always use a stabilizer on the back of the fabric to prevent puckering, and choose a simple, classic garment like a denim shirt to let your stitching shine. These are great as cottagecore floral patches.
33. Use a Stabilizer for Bold Stitches on Denim
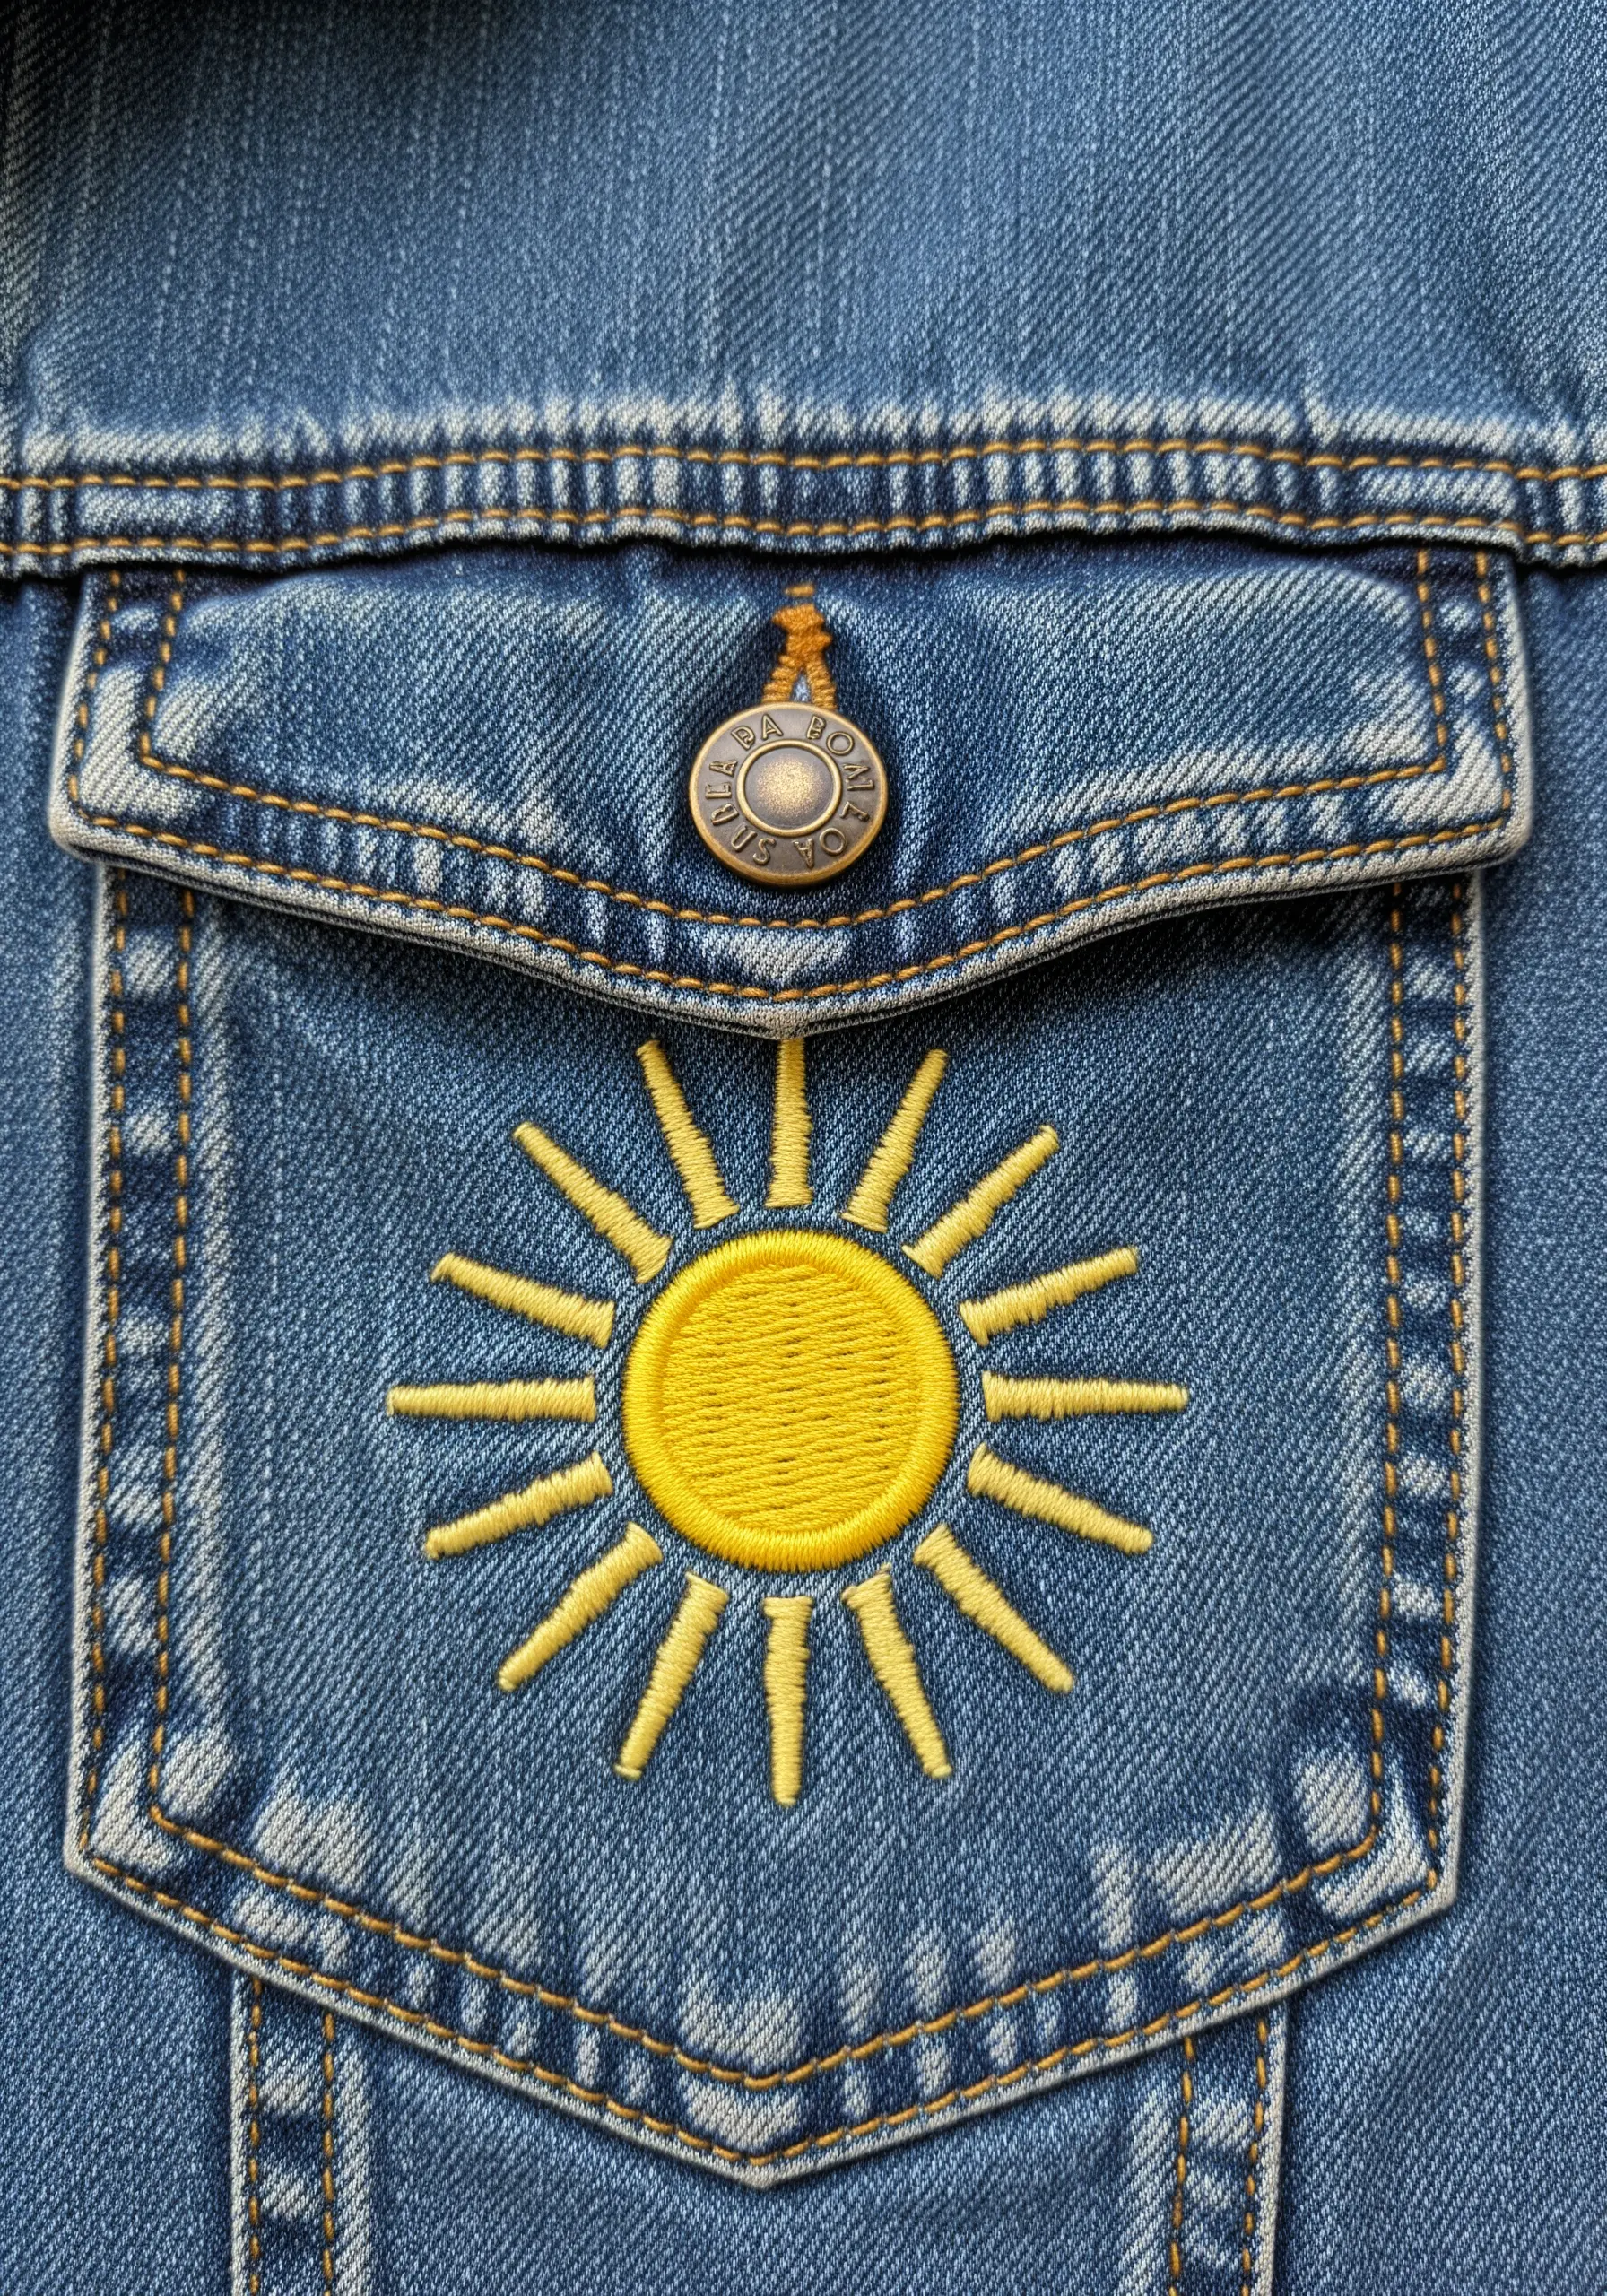
To achieve a smooth, professional-looking satin stitch on a thick, stretchy fabric like denim, a stabilizer is non-negotiable.
Iron on a fusible interfacing to the back of the pocket area before you begin stitching.
This provides a stable foundation, preventing the fabric from warping under the tension of the dense stitches.
Your satin stitch will lie flatter and look much cleaner, turning a simple patch into a bold, polished statement perfect for trying out aesthetic embroidery ideas.
34. Add a Single Motif to a Textured Surface
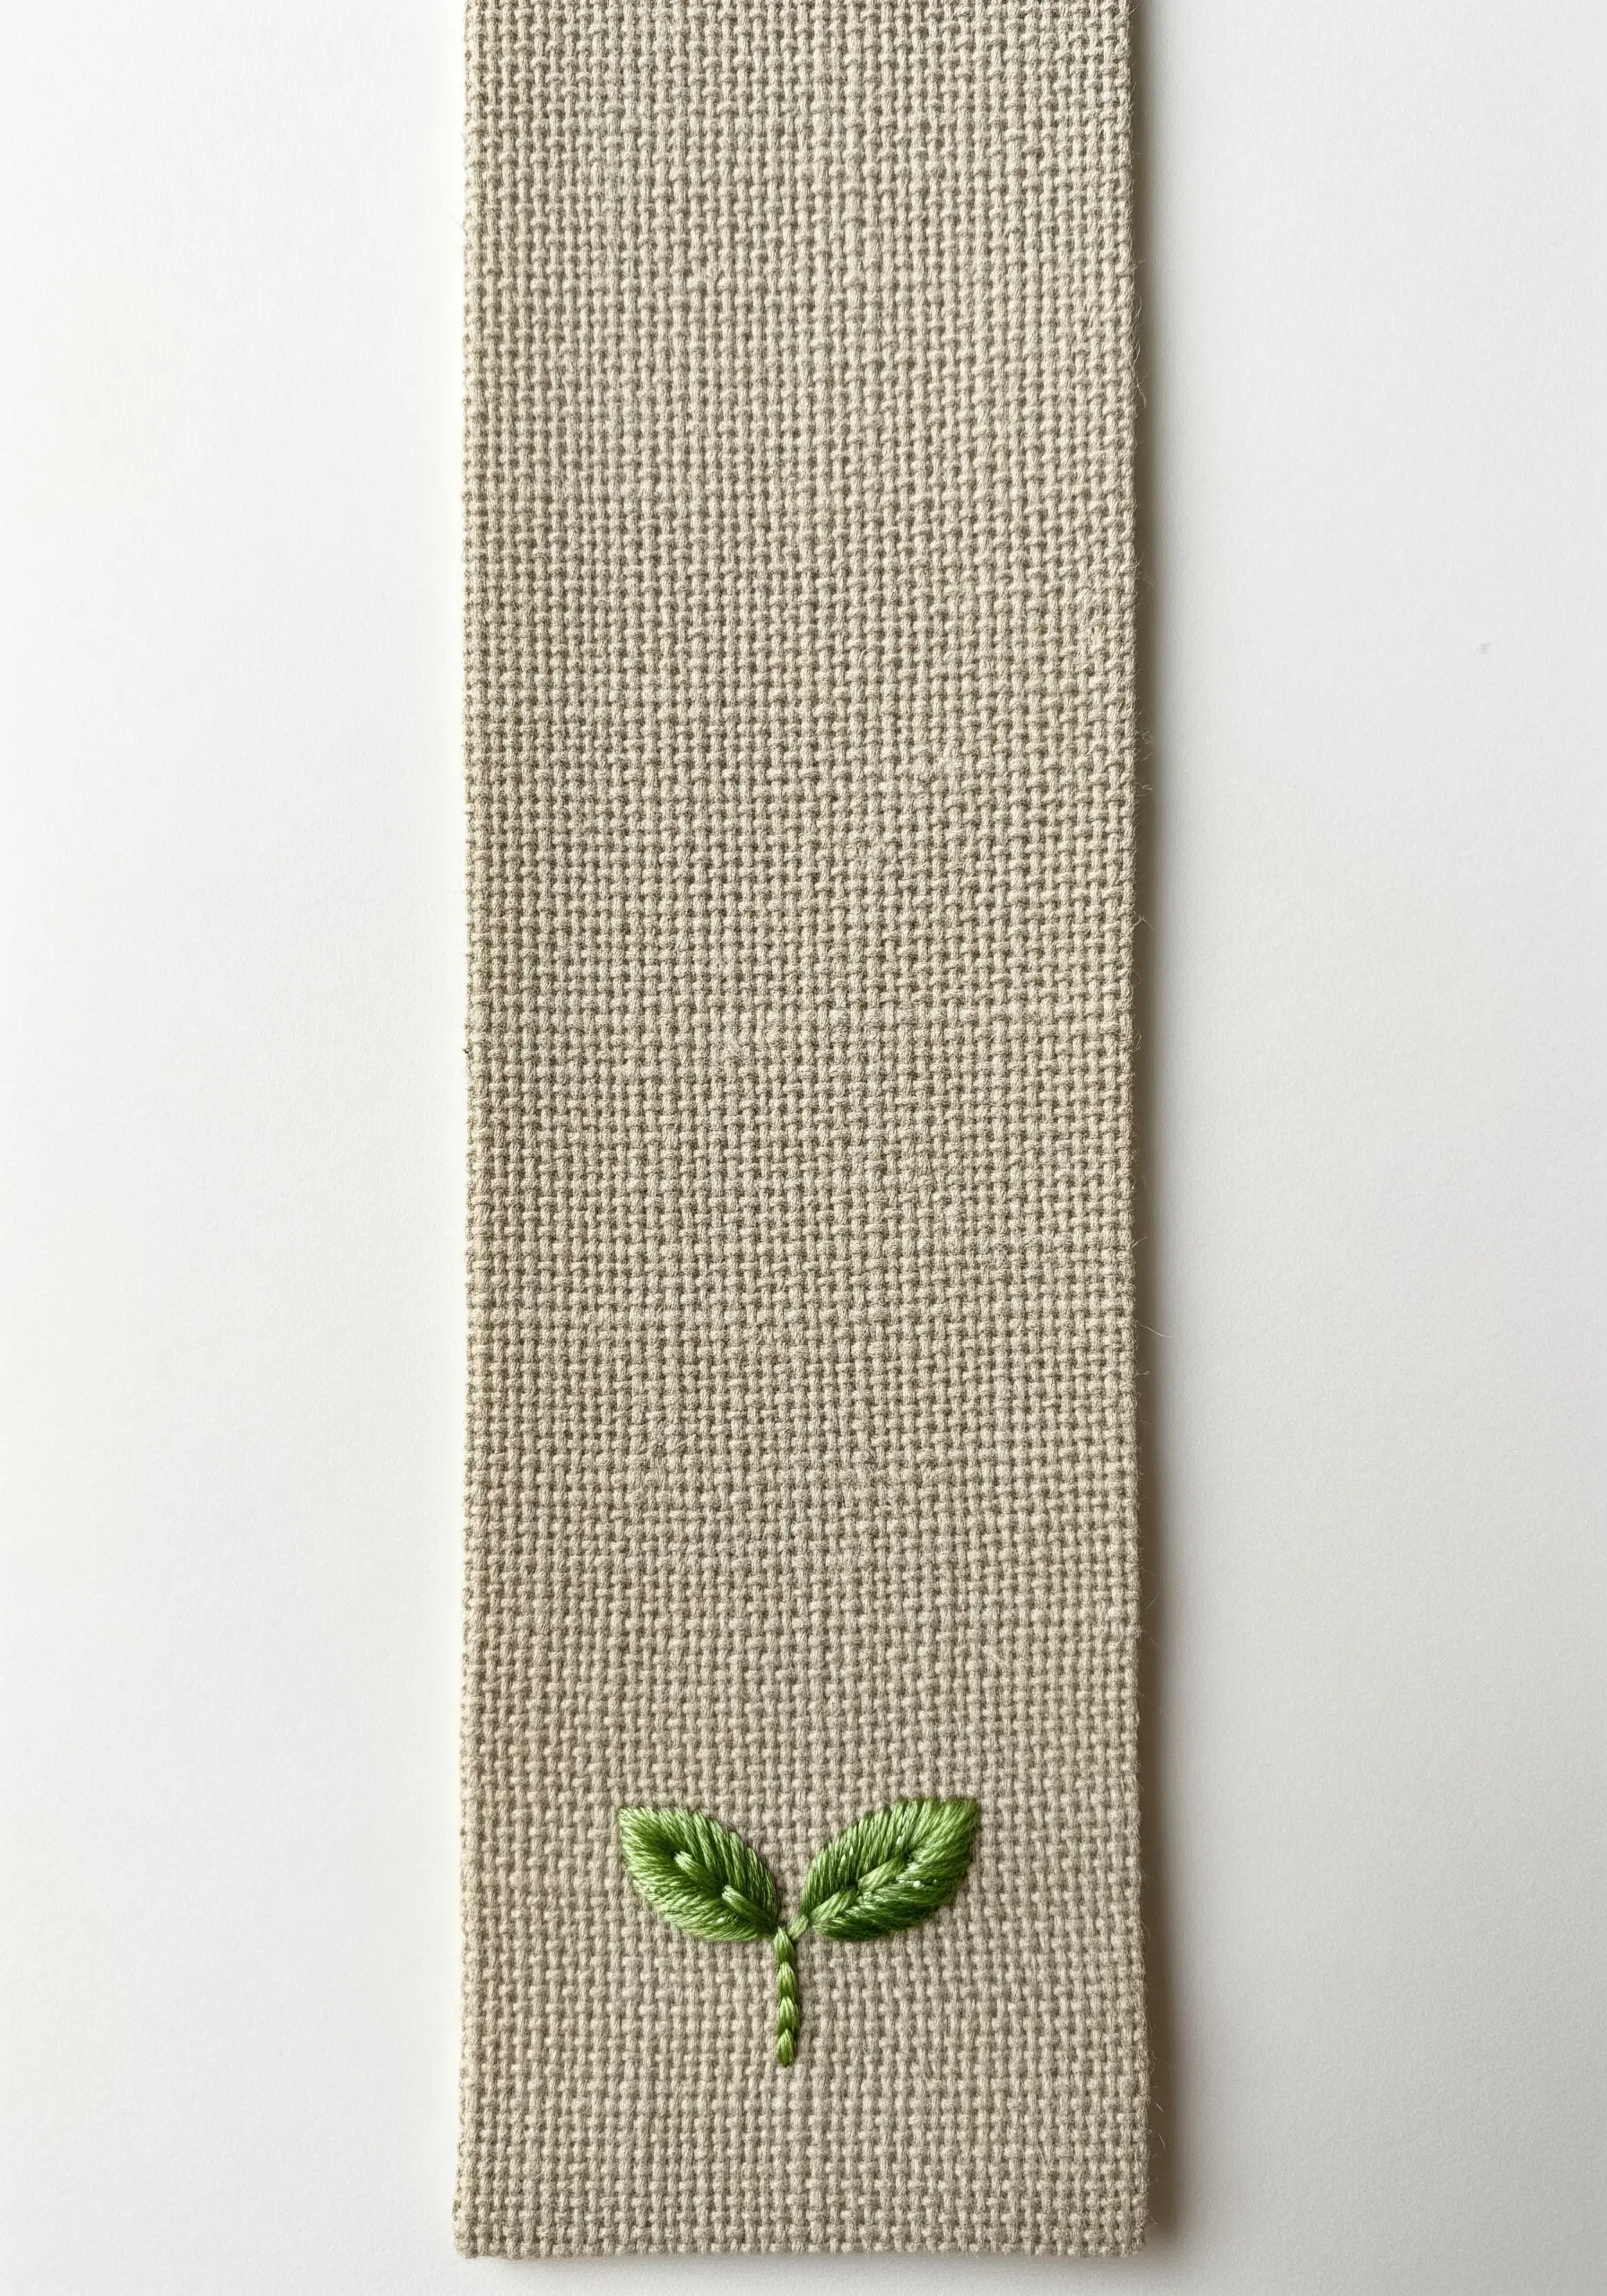
Make a powerful statement by placing one small, beautifully executed motif on a richly textured fabric.
Embroider a tiny seedling using a fishbone stitch on a piece of burlap or coarse linen for a bookmark or gift tag.
The contrast between the smooth, delicate floss and the rustic, open weave of the fabric creates a compelling visual and tactile experience.
This proves that even the smallest stitch can have a huge impact when paired with the right material, and these simple embroidery designs elevate any item.
35. Capture a Scene with Extreme Minimalism

Suggest a vast landscape using just two lines and a hint of texture.
A single, taut backstitch creates the horizon line, instantly dividing the space into sea and sky.
A small cluster of pink satin stitches represents the setting sun, its minimal form drawing the eye.
The rest of the story is told by the negative space—the empty fabric becomes the calm water and quiet sky. This is the essence of turning minimal embroidery wall pieces into art.


