

Perhaps you’ve mastered the basic stitches, yet you feel a gap between the work you’re making and the art you aspire to create. It’s not about learning more stitches; it’s about learning what they can *do*.
This is where your embroidery transforms. It’s in the choice to couch a thick yarn instead of satin stitching a wide line, or the decision to add dimension with a single, well-placed wired petal. It’s in understanding how texture, light, and material choice can communicate more than color alone.
Here, we move beyond the pattern. Think of these techniques not as rules, but as new languages. A way to add depth, emotion, and a distinct, personal signature to every piece of fabric you touch. Let’s begin.
1. Sculpt a 3D Woodland Diorama

Move beyond the flat surface by combining stumpwork with high-texture stitches to build a miniature world.
Use dense French knots in variegated green threads to mimic moss, creating an uneven, organic base that immediately adds depth.
For the mushrooms, create detached, padded satin stitch elements that you can apply over the moss, allowing them to physically stand out from the background.
Incorporate found objects like tiny pieces of bark or acorns to blur the line between thread and nature, turning your hoop into a true mixed-media sculpture.
2. Stitch a Galaxy with Pointillism

Create large-scale abstract art by using thousands of tiny stitches as points of light and color.
Work on a vast black canvas and use French knots or colonial knots as your ‘pixels,’ varying their size slightly to create texture and movement.
Select metallic, glitter, and variegated threads in cosmic blues, purples, and golds to mimic swirling nebulae and distant stars.
This technique transforms simple knots into a complex, shimmering tapestry that commands attention and makes a powerful statement piece.
3. Layer Botanicals on Sheer Fabric
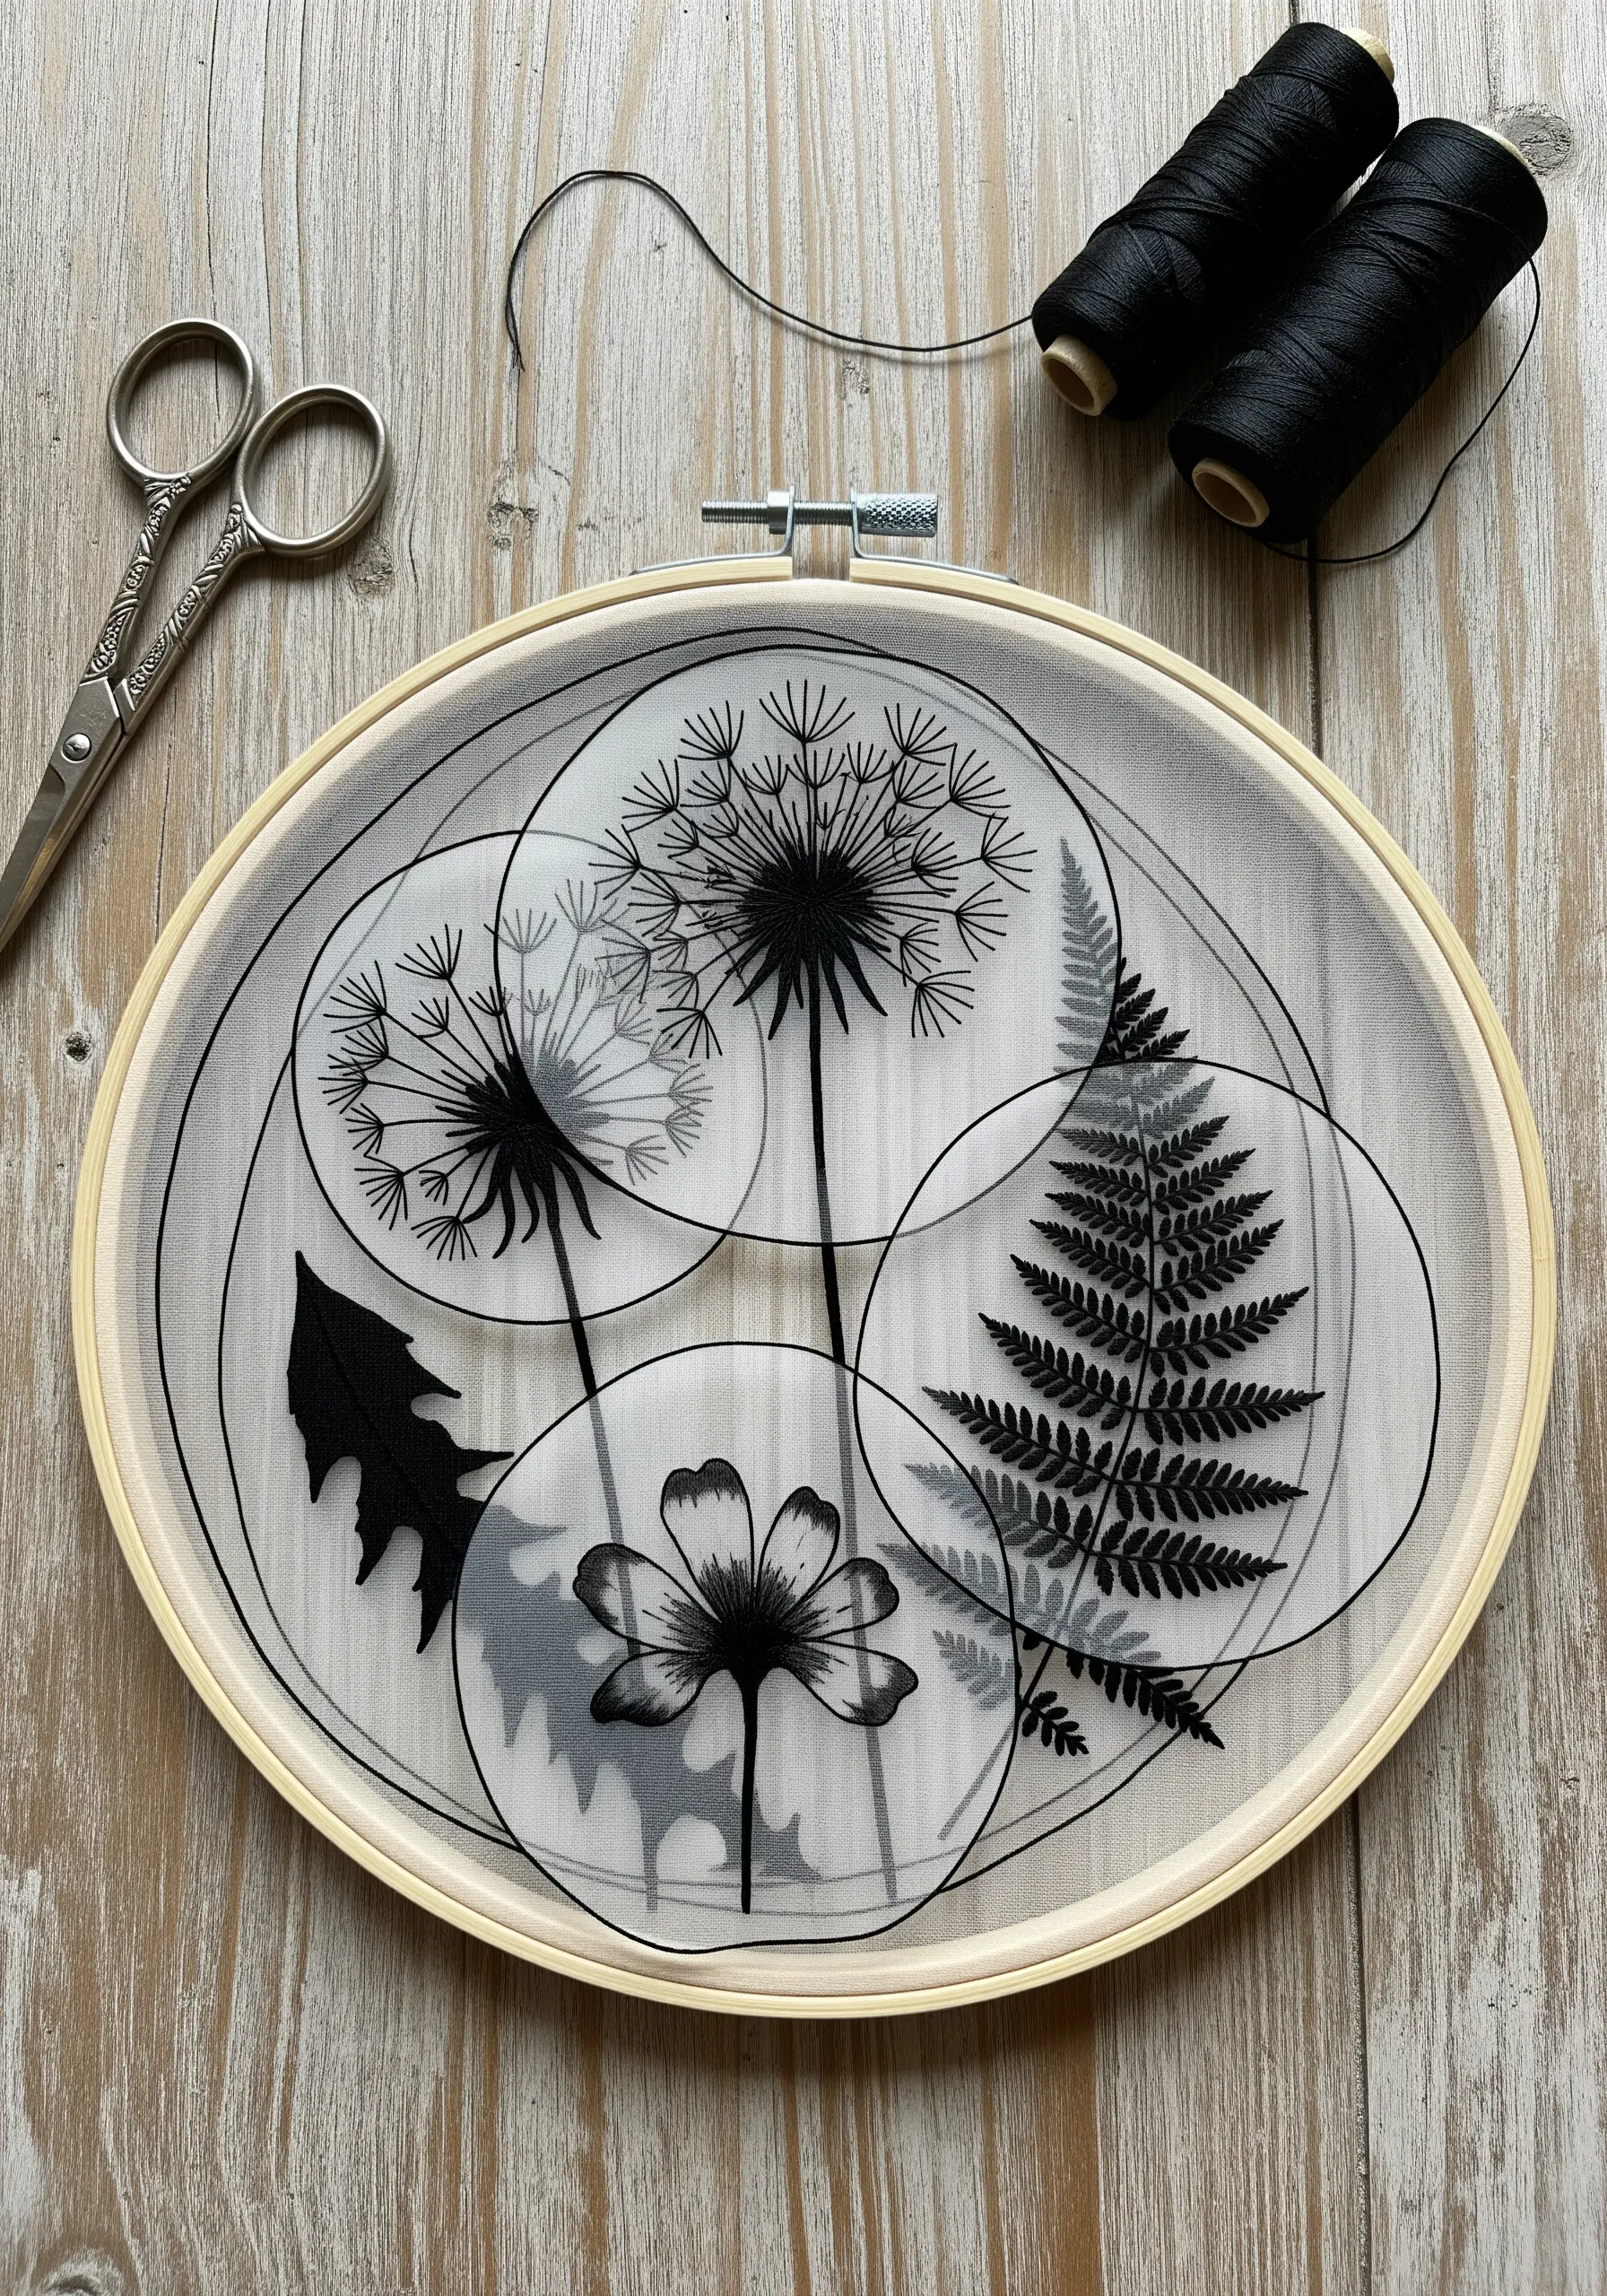
Use transparent fabric like tulle or organza to create ethereal, overlapping botanical designs.
By stitching on multiple layers of sheer material within the same hoop, you can produce a ‘ghosting’ effect where elements in the background appear softer and more distant.
This works beautifully for delicate subjects like dandelion seeds or ferns, giving them a sense of weightlessness and motion.
Use a single strand of black thread for a crisp, graphic look that contrasts sharply with the fabric’s softness, turning your embroidery into a delicate, floating illustration.
4. Couch Thick Yarn for Graphic Impact

Instantly add bold, graphic lines to heavy fabrics like denim by couching chunky yarn or cord.
Instead of trying to pull a thick fiber through the fabric, lay it on the surface and use a thinner, matching or contrasting thread to tack it down with small, evenly spaced stitches.
This method is not only faster than satin stitching but also creates a pronounced, sculptural line that stands out dramatically.
Combine thick, couched neon yarn with delicate backstitched lines to create a dynamic interplay of texture and scale on apparel.
5. Embroider on Natural, Non-Fabric Surfaces

Take your stitching beyond textiles by using preserved natural leaves as your canvas.
Choose sturdy, waxy leaves like magnolia, which can handle a fine needle without tearing.
Use meticulous thread painting with single strands to create hyper-realistic insects, where the leaf itself becomes part of the final artwork.
This technique requires a delicate touch and challenges you to adapt your stitches to a fragile, organic base, resulting in stunningly unique display pieces.
6. Engineer Posable 3D Butterfly Wings
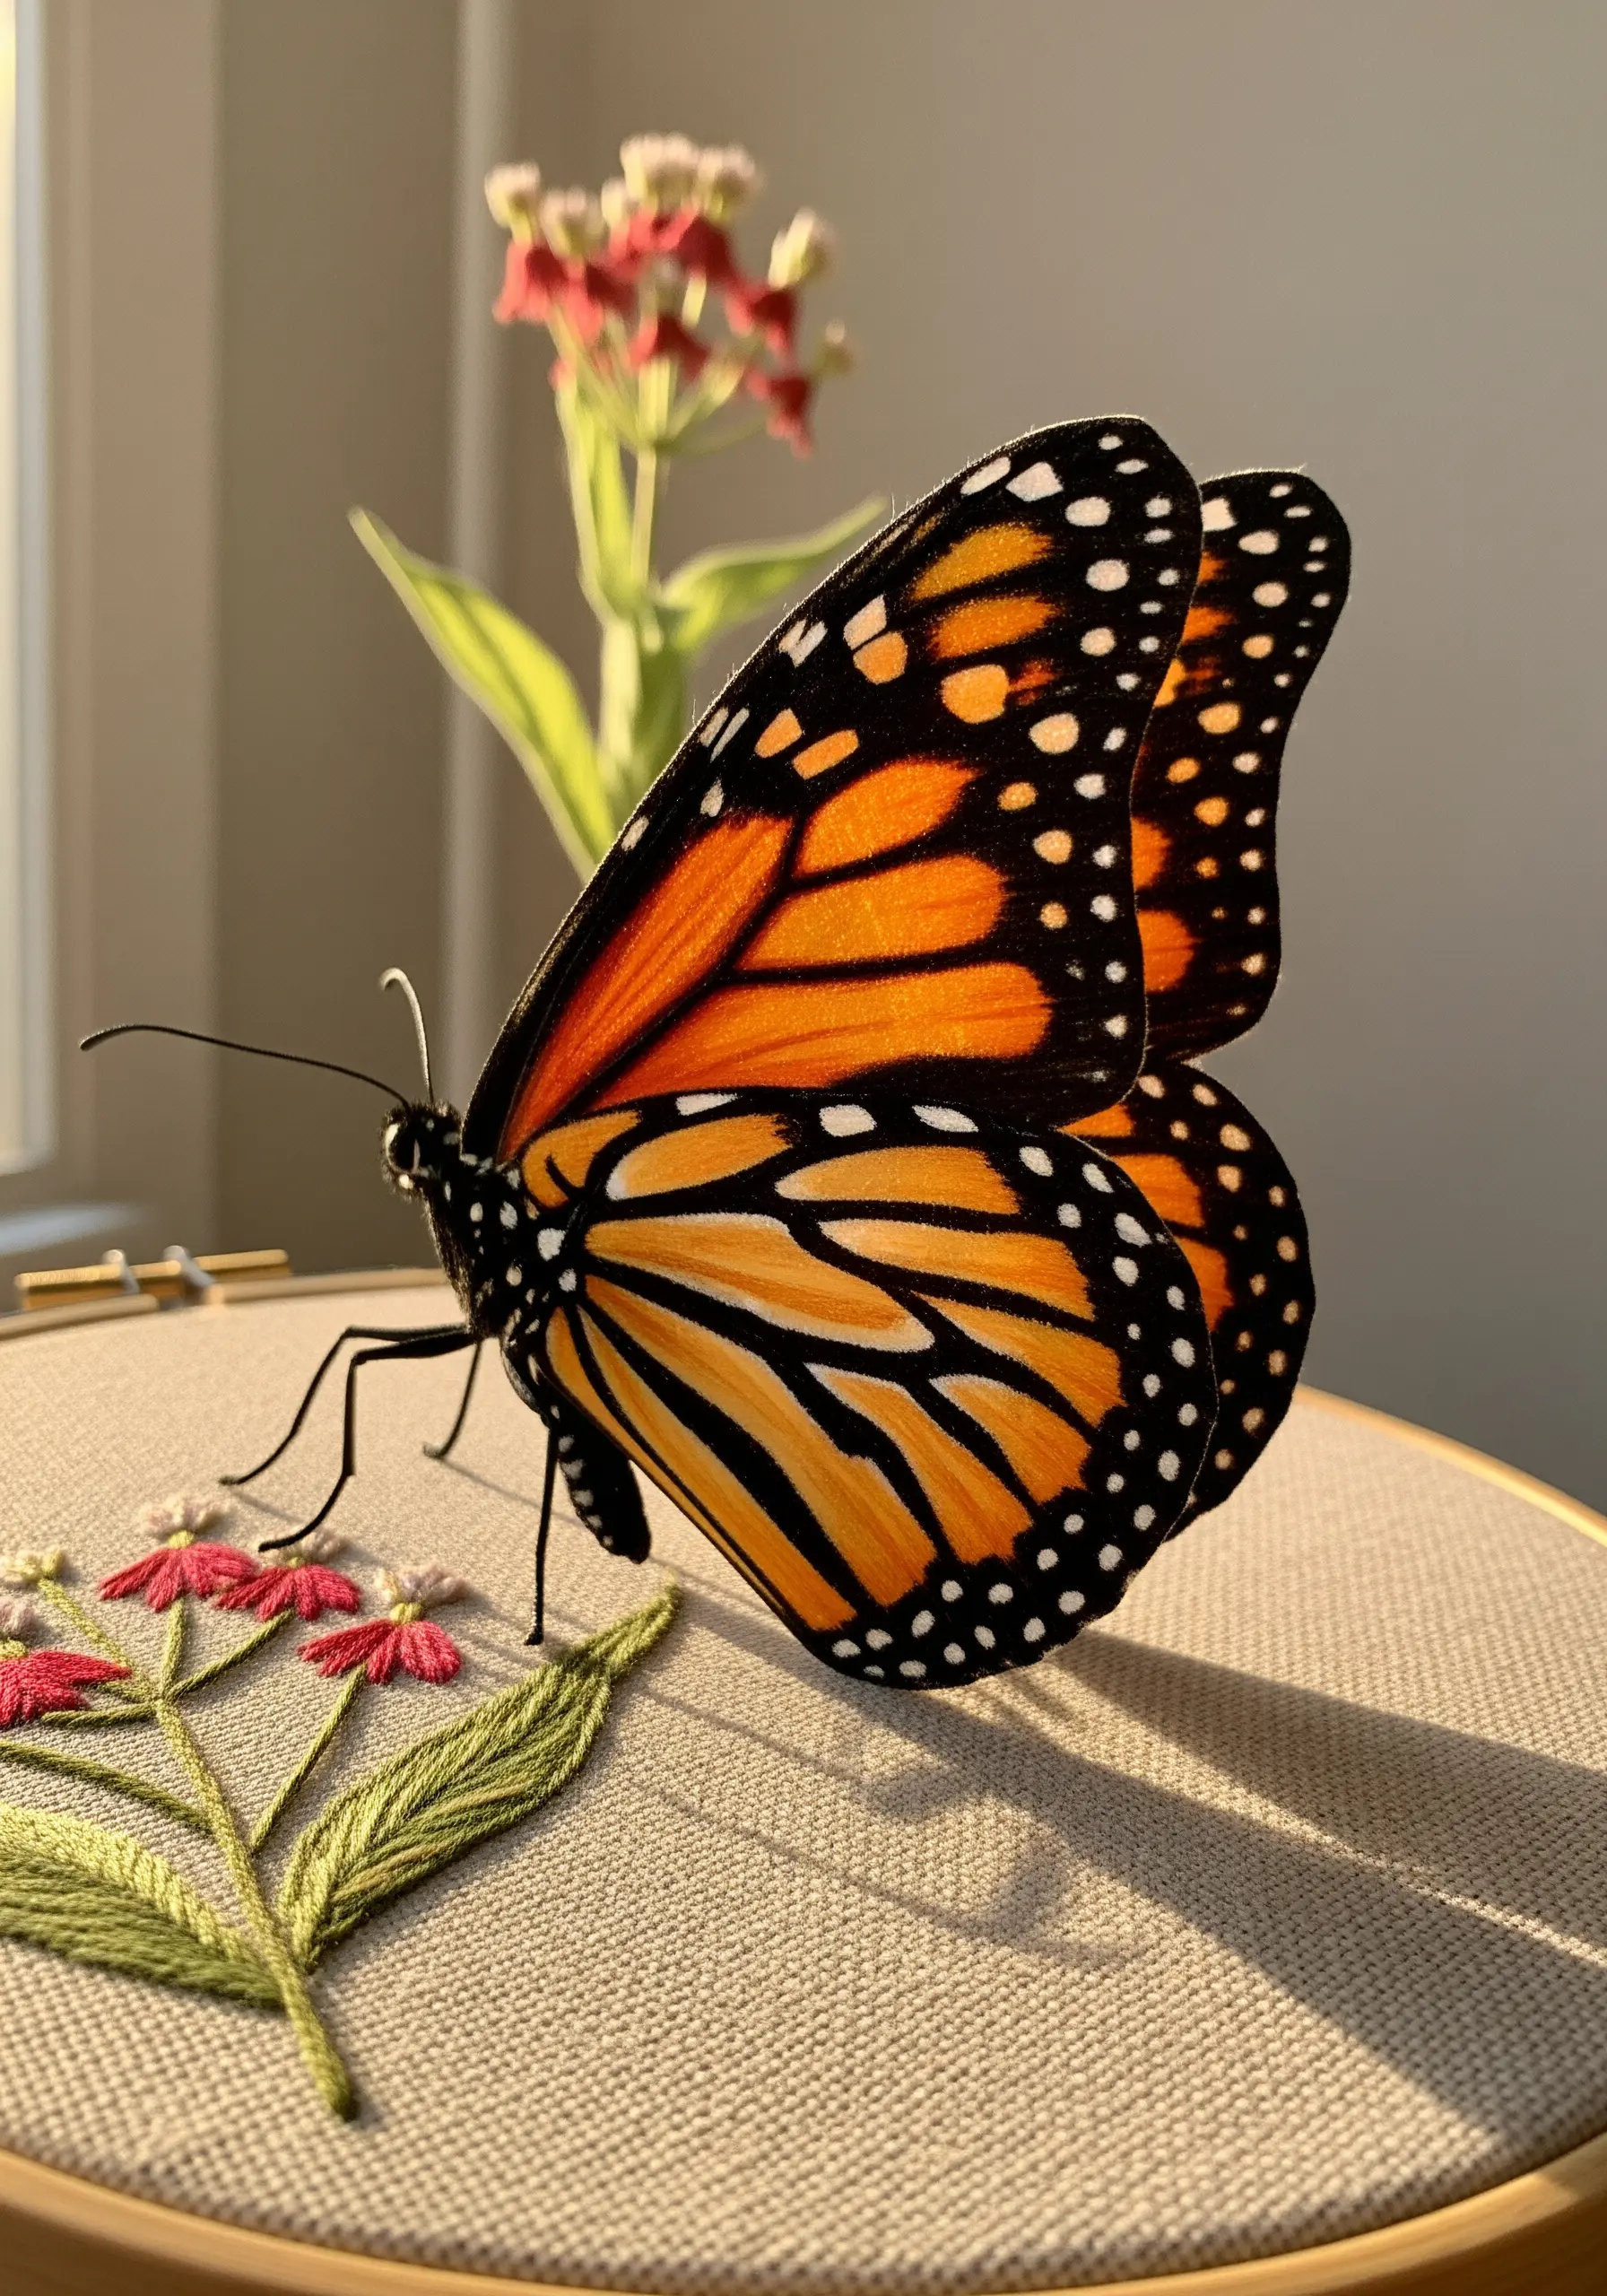
Elevate your stumpwork by creating detached, wired elements that can be shaped and positioned after stitching.
To form the wings, lay a thin, flexible wire onto your scrap fabric and stitch over it, filling the shape with long-and-short stitch.
Once complete, carefully cut the wing from the fabric, leaving a small fabric border that you can wrap around the wire.
Attach the finished wings to the embroidered body on your main fabric, bending them into a lifelike, upward pose for dynamic, three-dimensional realism.
7. Create Freestanding Thread Lace Sculptures
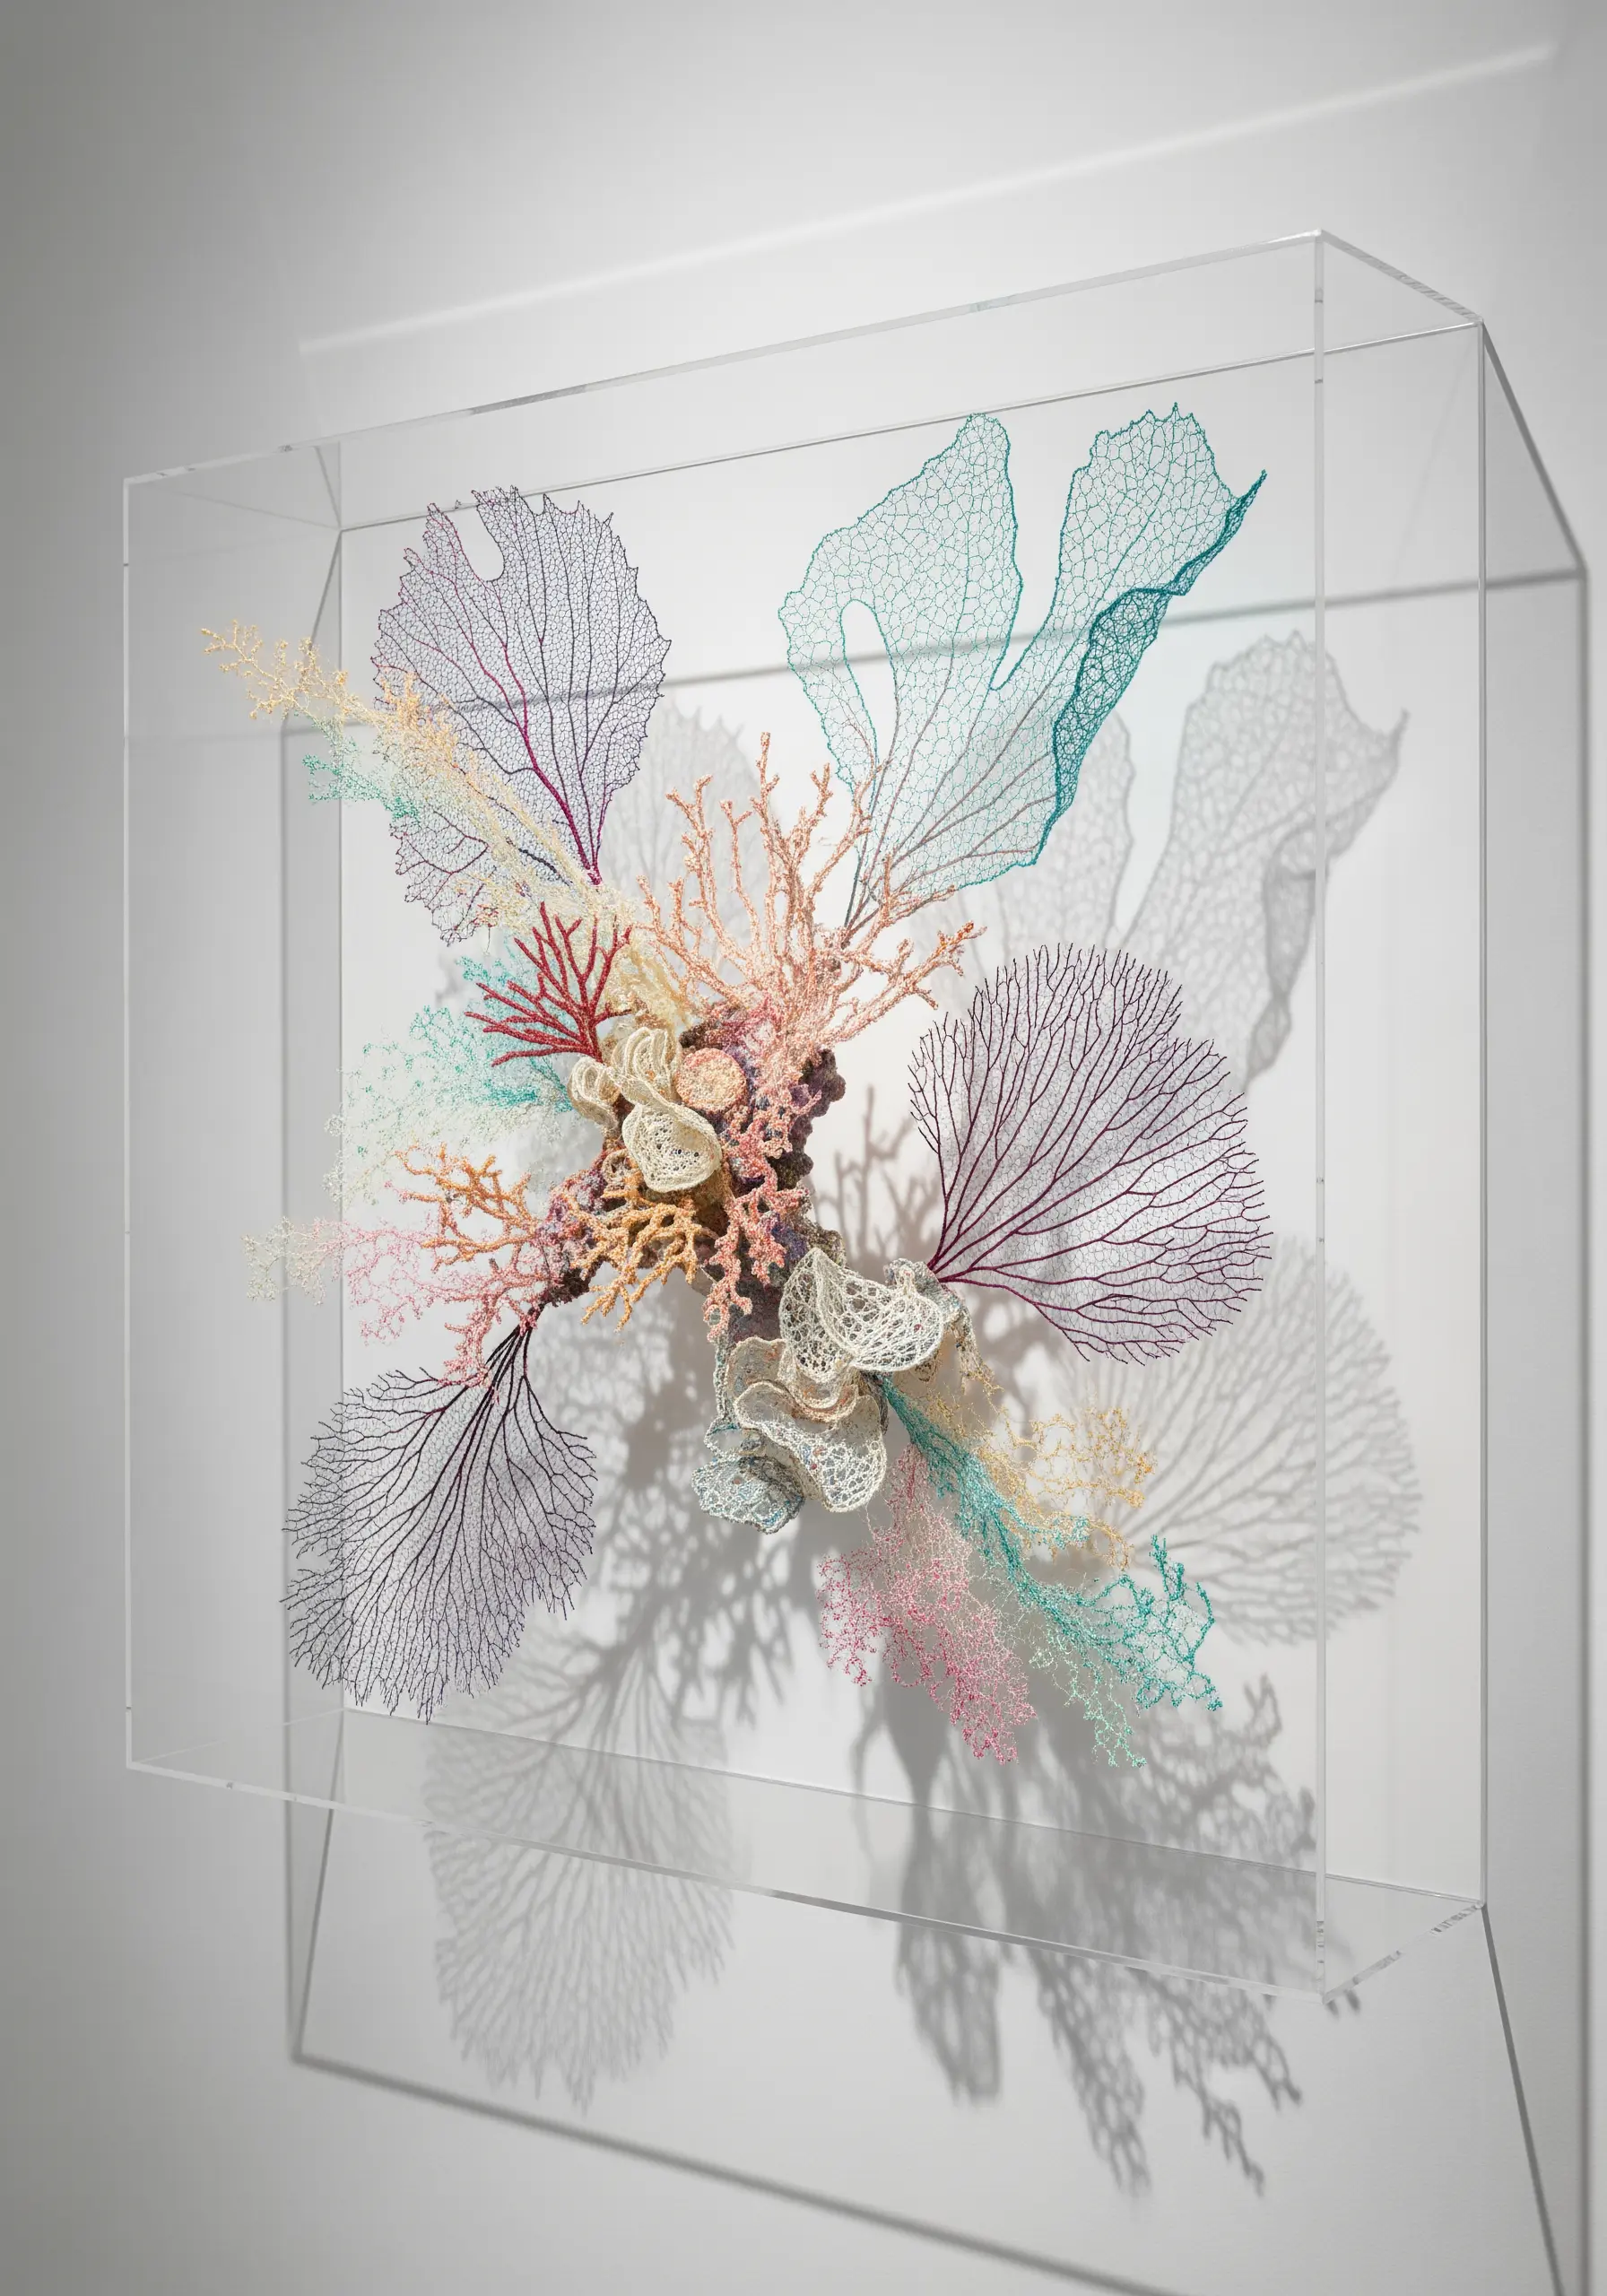
Construct delicate, three-dimensional forms entirely from thread by using a water-soluble stabilizer.
Stretch the stabilizer in your hoop and stitch your design onto it, ensuring all parts of the design are interconnected to create a stable structure.
Once stitching is complete, dissolve the stabilizer in water, leaving behind only the intricate, lace-like thread structure.
This technique is perfect for creating complex, airy forms like coral or snowflakes, which can then be assembled into stunning fiber art installations.
8. Weave with Chunky Roving for Extreme Texture
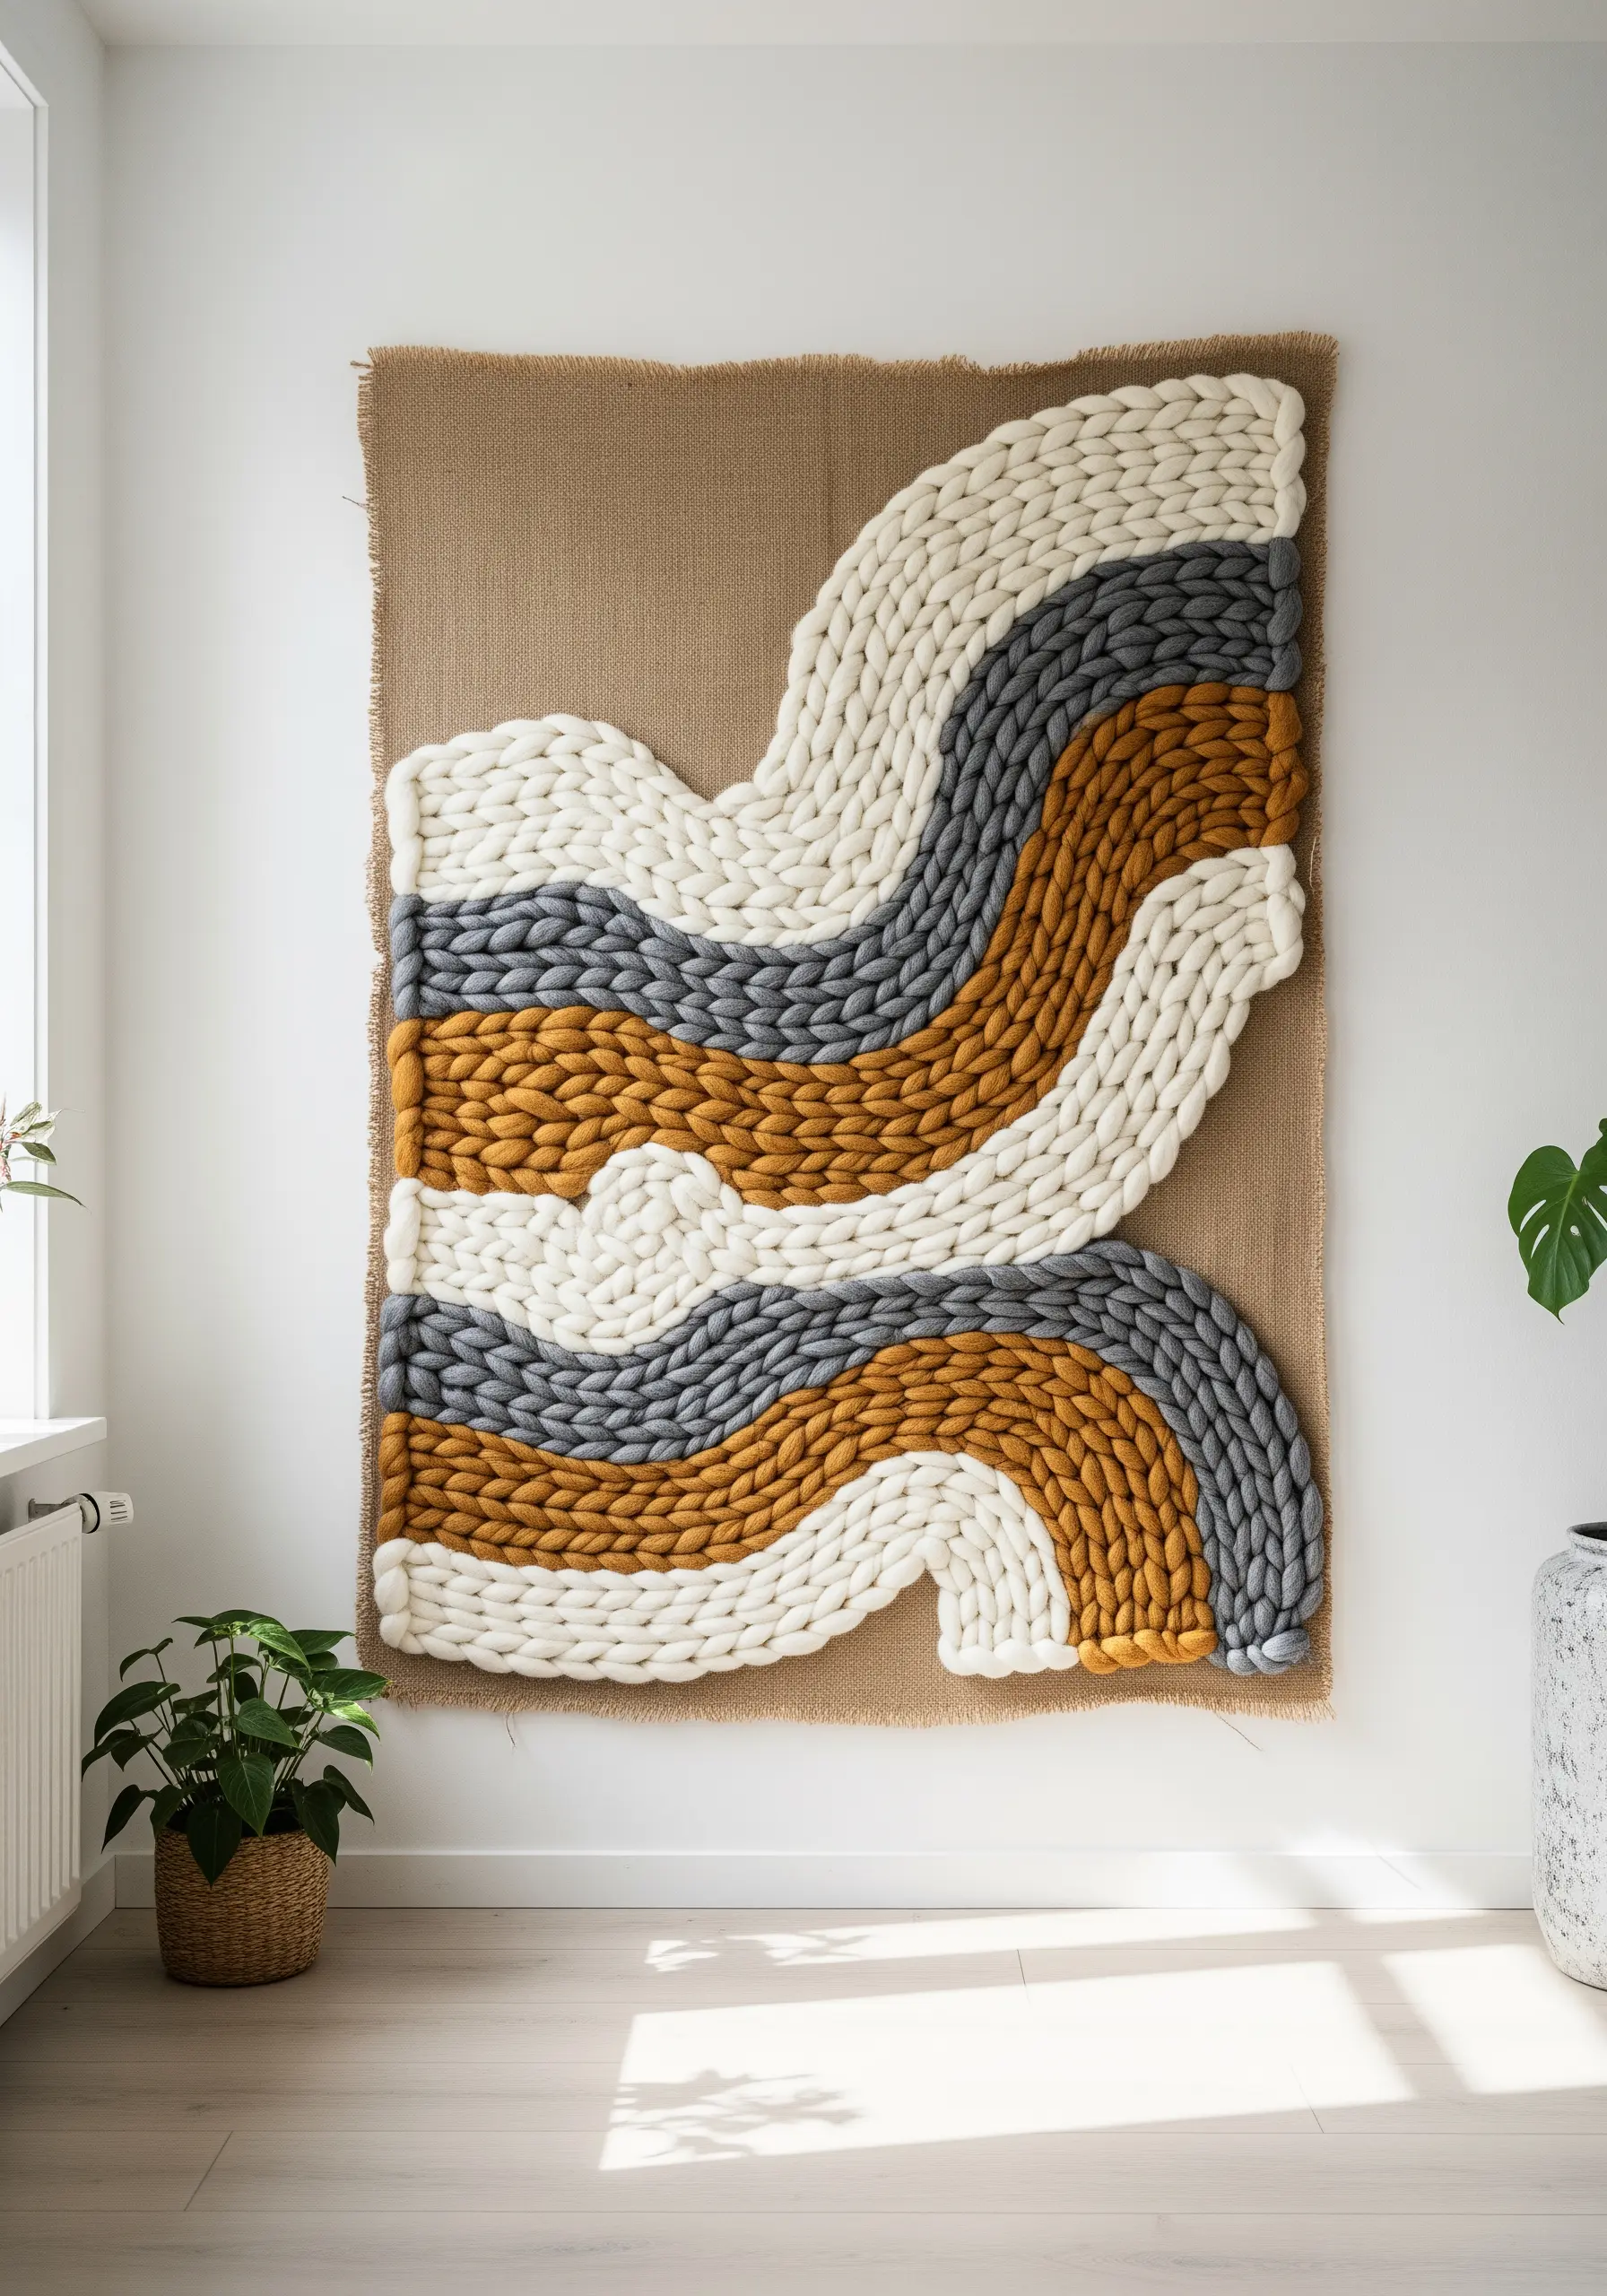
Step away from fine floss and embrace the dramatic texture of super-chunky wool roving for large-scale wall art.
Use a sturdy backing like burlap or monk’s cloth and either couch the roving down or use a simple weaving technique to attach it securely.
This creates a bold, sculptural piece with incredible softness and depth that bridges the gap between embroidery and weaving.
The oversized stitches and soft wool create cozy, statement-making fiber art that is both visually and tactilely appealing.
9. Mimic Iridescence with Sequins and Beads

Capture the shimmering, color-shifting quality of a peacock feather by integrating sequins and beads into your thread painting.
Use metallic threads for the feather’s delicate barbs, stitching them with long, radiating straight stitches.
In the ‘eye’ of the feather, strategically place overlapping sequins in blues, greens, and purples to replicate its natural iridescence in a way thread alone cannot.
A few carefully placed seed beads can add a final touch of sparkle and texture, elevating the entire piece from flat embroidery to a luxurious embellishment.
10. Apply Goldwork to Unexpected Surfaces
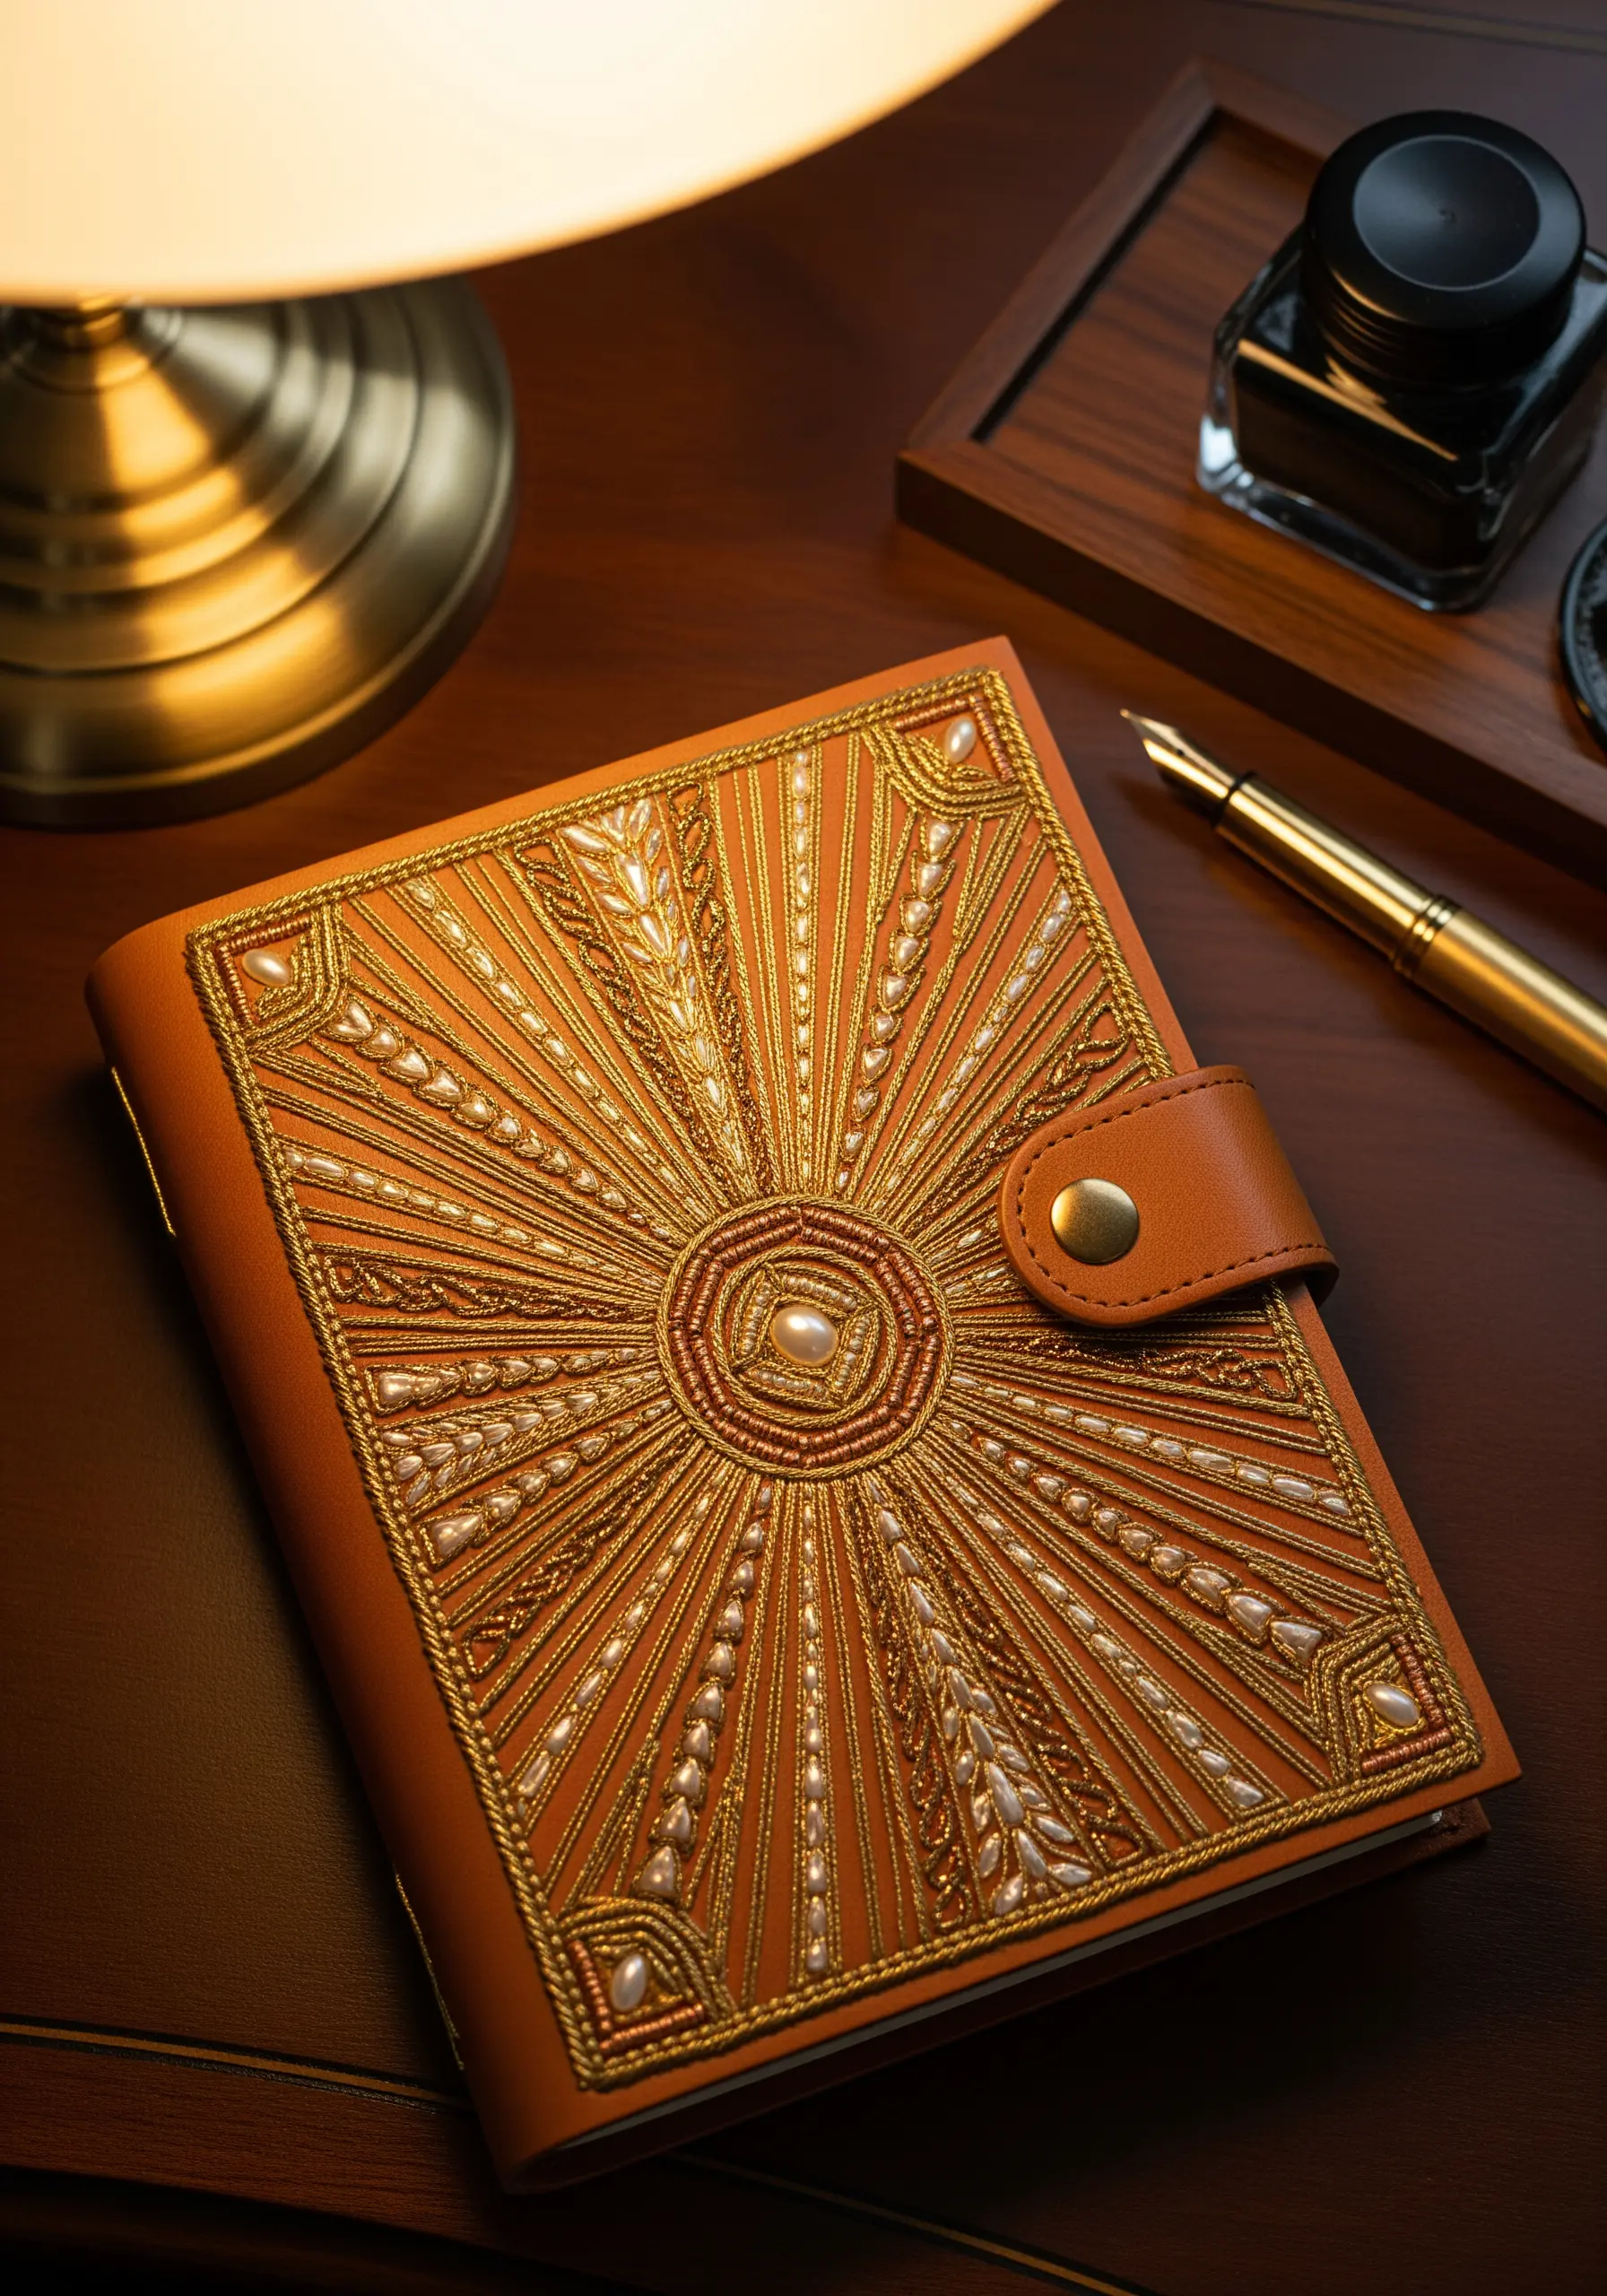
Take the traditional art of goldwork beyond ceremonial textiles and apply it to modern items like a leather journal cover.
Use padded satin stitch to give the metallic threads a raised, three-dimensional profile that adds richness and shadow.
Incorporate small pearls or beads alongside couched gold passing thread to create a design that feels both ancient and contemporary.
Working on leather requires a strong, sharp needle, but the resulting contrast between the smooth surface and the intricate metallic texture is exceptionally luxurious.
11. Draw Portraits with Scribble Stitching

Construct a portrait not with fill stitches, but with continuous, overlapping loops of thread, akin to a pen-and-ink drawing.
This technique, achievable by hand or with free-motion machine embroidery, uses line density to create shadow and form.
Instead of focusing on perfect stitches, concentrate on the flow and energy of the line to build up facial features.
The resulting artwork feels expressive and dynamic, capturing a sense of life and movement that traditional satin stitch often misses.
12. Create Digital Glitch Art with Thread
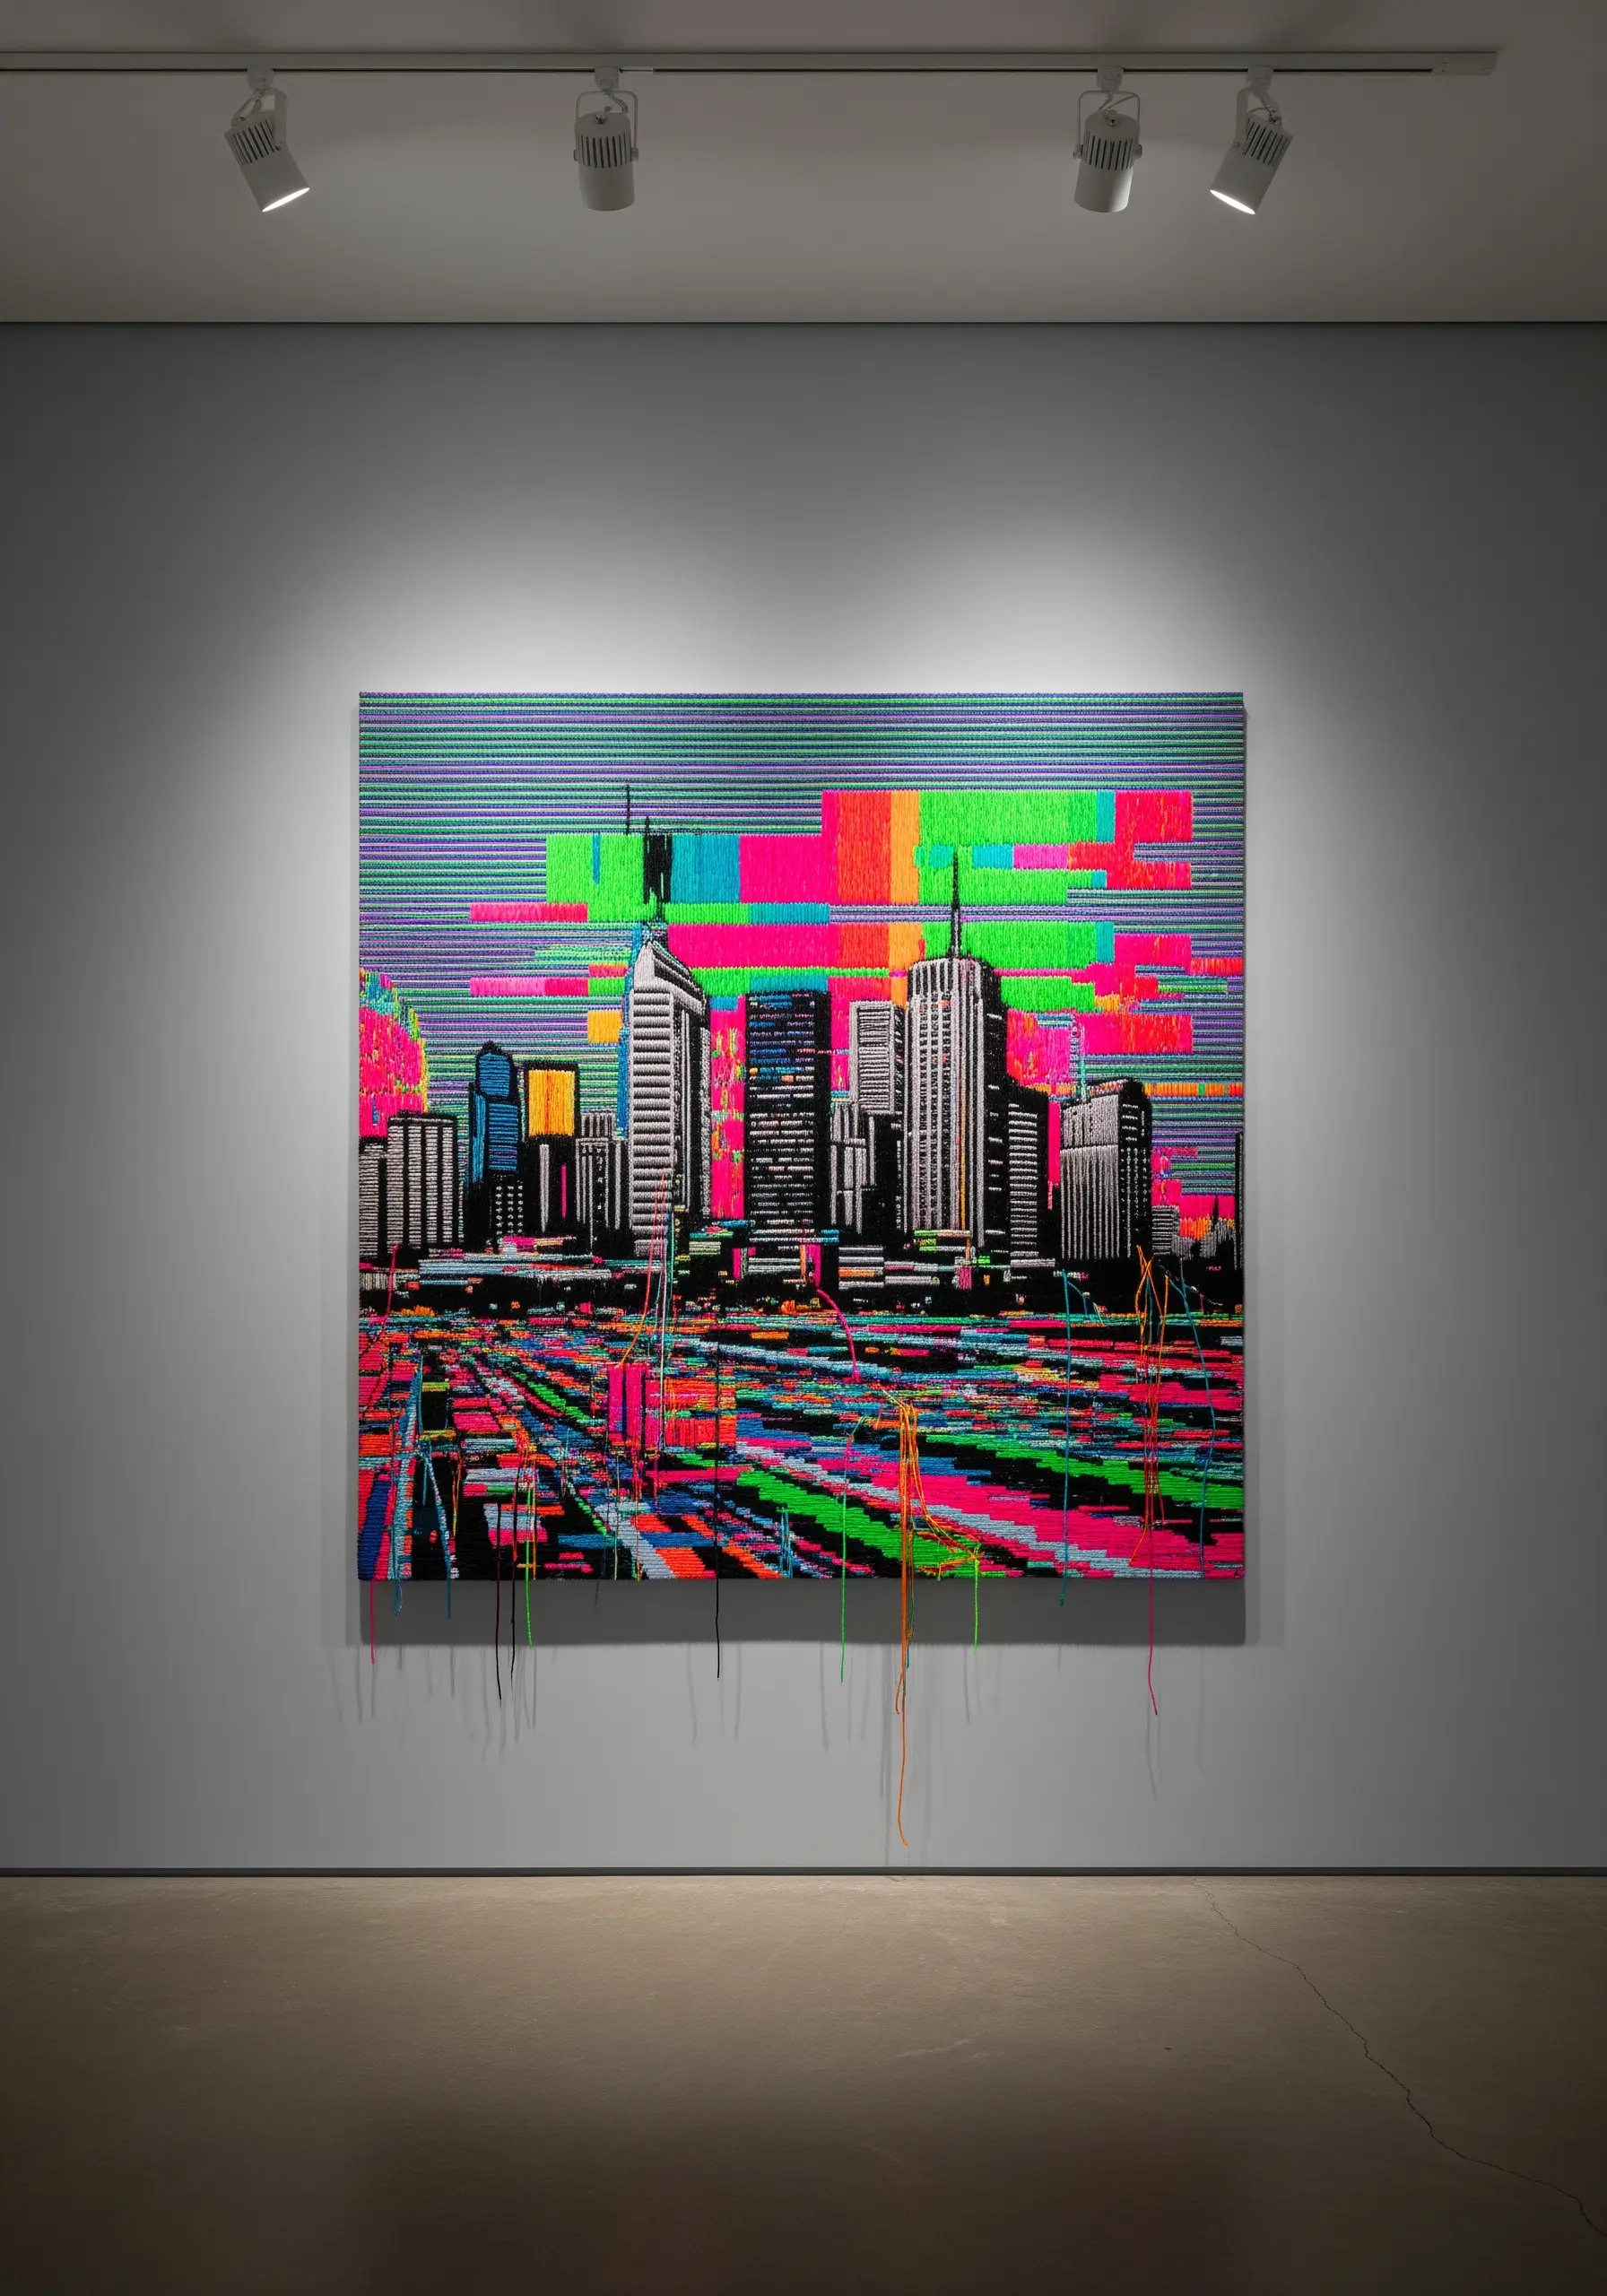
Embrace imperfection by translating the aesthetic of digital glitches into your embroidery.
Combine precise, grid-like satin stitching for a cityscape or geometric pattern with intentionally chaotic elements.
Introduce blocks of neon color that seem to disrupt the image, and leave long, dangling threads at the bottom of the piece as if the artwork is unraveling.
This juxtaposition of control and chaos creates a powerful visual narrative about the intersection of digital and handmade worlds.
13. Build Plush Landscapes with Punch Needle

Use a punch needle tool to create highly textural, carpet-like surfaces for floor rugs or wall hangings.
The technique involves punching loops of yarn through a weaver’s cloth, which creates a plush, dense pile on the reverse side.
By varying the height of your loops and using a rich, earthy color palette, you can sculpt contoured, topographical designs that invite touch.
This method is significantly faster than traditional embroidery for covering large areas and produces a uniquely satisfying, professional finish.
14. Add Dimension with Photo Embroidery

Transform a printed photograph into a mixed-media artwork by adding selective embroidery.
Choose a high-quality photo printed on matte canvas or heavy paper, which can withstand stitching.
Instead of embroidering the entire image, select key details to highlight—like a floral crown on a portrait—using satin stitch and French knots to add color, texture, and dimension.
This technique creates a powerful contrast between the flat photograph and the raised, tactile thread, making the image pop in an unexpected way.
15. Master Elegance with Single-Line Contours
Challenge your precision by creating a design using a single, unbroken line, forcing you to focus on the purity of form.
Plan your stitch path carefully to ensure the line flows continuously without awkward backtracking or overlapping.
A simple backstitch or stem stitch using 3-6 strands of black floss on a neutral linen canvas is all you need for a bold, graphic statement.
This minimalist approach celebrates negative space and proves that powerful art doesn’t require complexity, making for stunning, modern wall decor.
16. Sculpt Fabric with 3D Smocking

Manipulate fabric itself to create texture and pattern, using thread not as decoration, but as a structural tool.
This advanced smocking technique involves stitching a grid on the back of the fabric and gathering the points to create a repeating, three-dimensional geometric pattern on the front.
The result is a highly sculptural, architectural surface where light and shadow play across the repeating forms.
It transforms a flat piece of fabric into a dynamic textile installation without adding any color or surface embellishment.
17. Add Fluffy Textures with Needle Felting

Integrate the soft, sculptural qualities of wool roving directly onto your embroidered fabric using needle felting.
After embroidering your background scene, place small tufts of wool roving where you want a fluffy texture, like a sheep’s fleece or a cloud.
Use a special barbed felting needle to repeatedly poke the roving; this tangles the wool fibers with the fabric fibers, securing it in place.
This technique adds a delightful, touchable 3D element that is impossible to achieve with thread alone.
18. Incorporate Light with Shisha Mirror Work

Add flashes of light and bohemian charm to your projects with Shisha embroidery, the art of attaching small mirrors to fabric.
Place a small craft mirror (shisha) on your fabric and create a framework of foundation stitches over it.
Then, work a series of buttonhole or blanket stitches around the frame, pulling tightly to secure the mirror in place.
This technique is perfect for embellishing tote bags, cushions, and clothing, turning a simple item into a vibrant, eye-catching accessory.
19. Create Lace-Like Voids with Cutwork
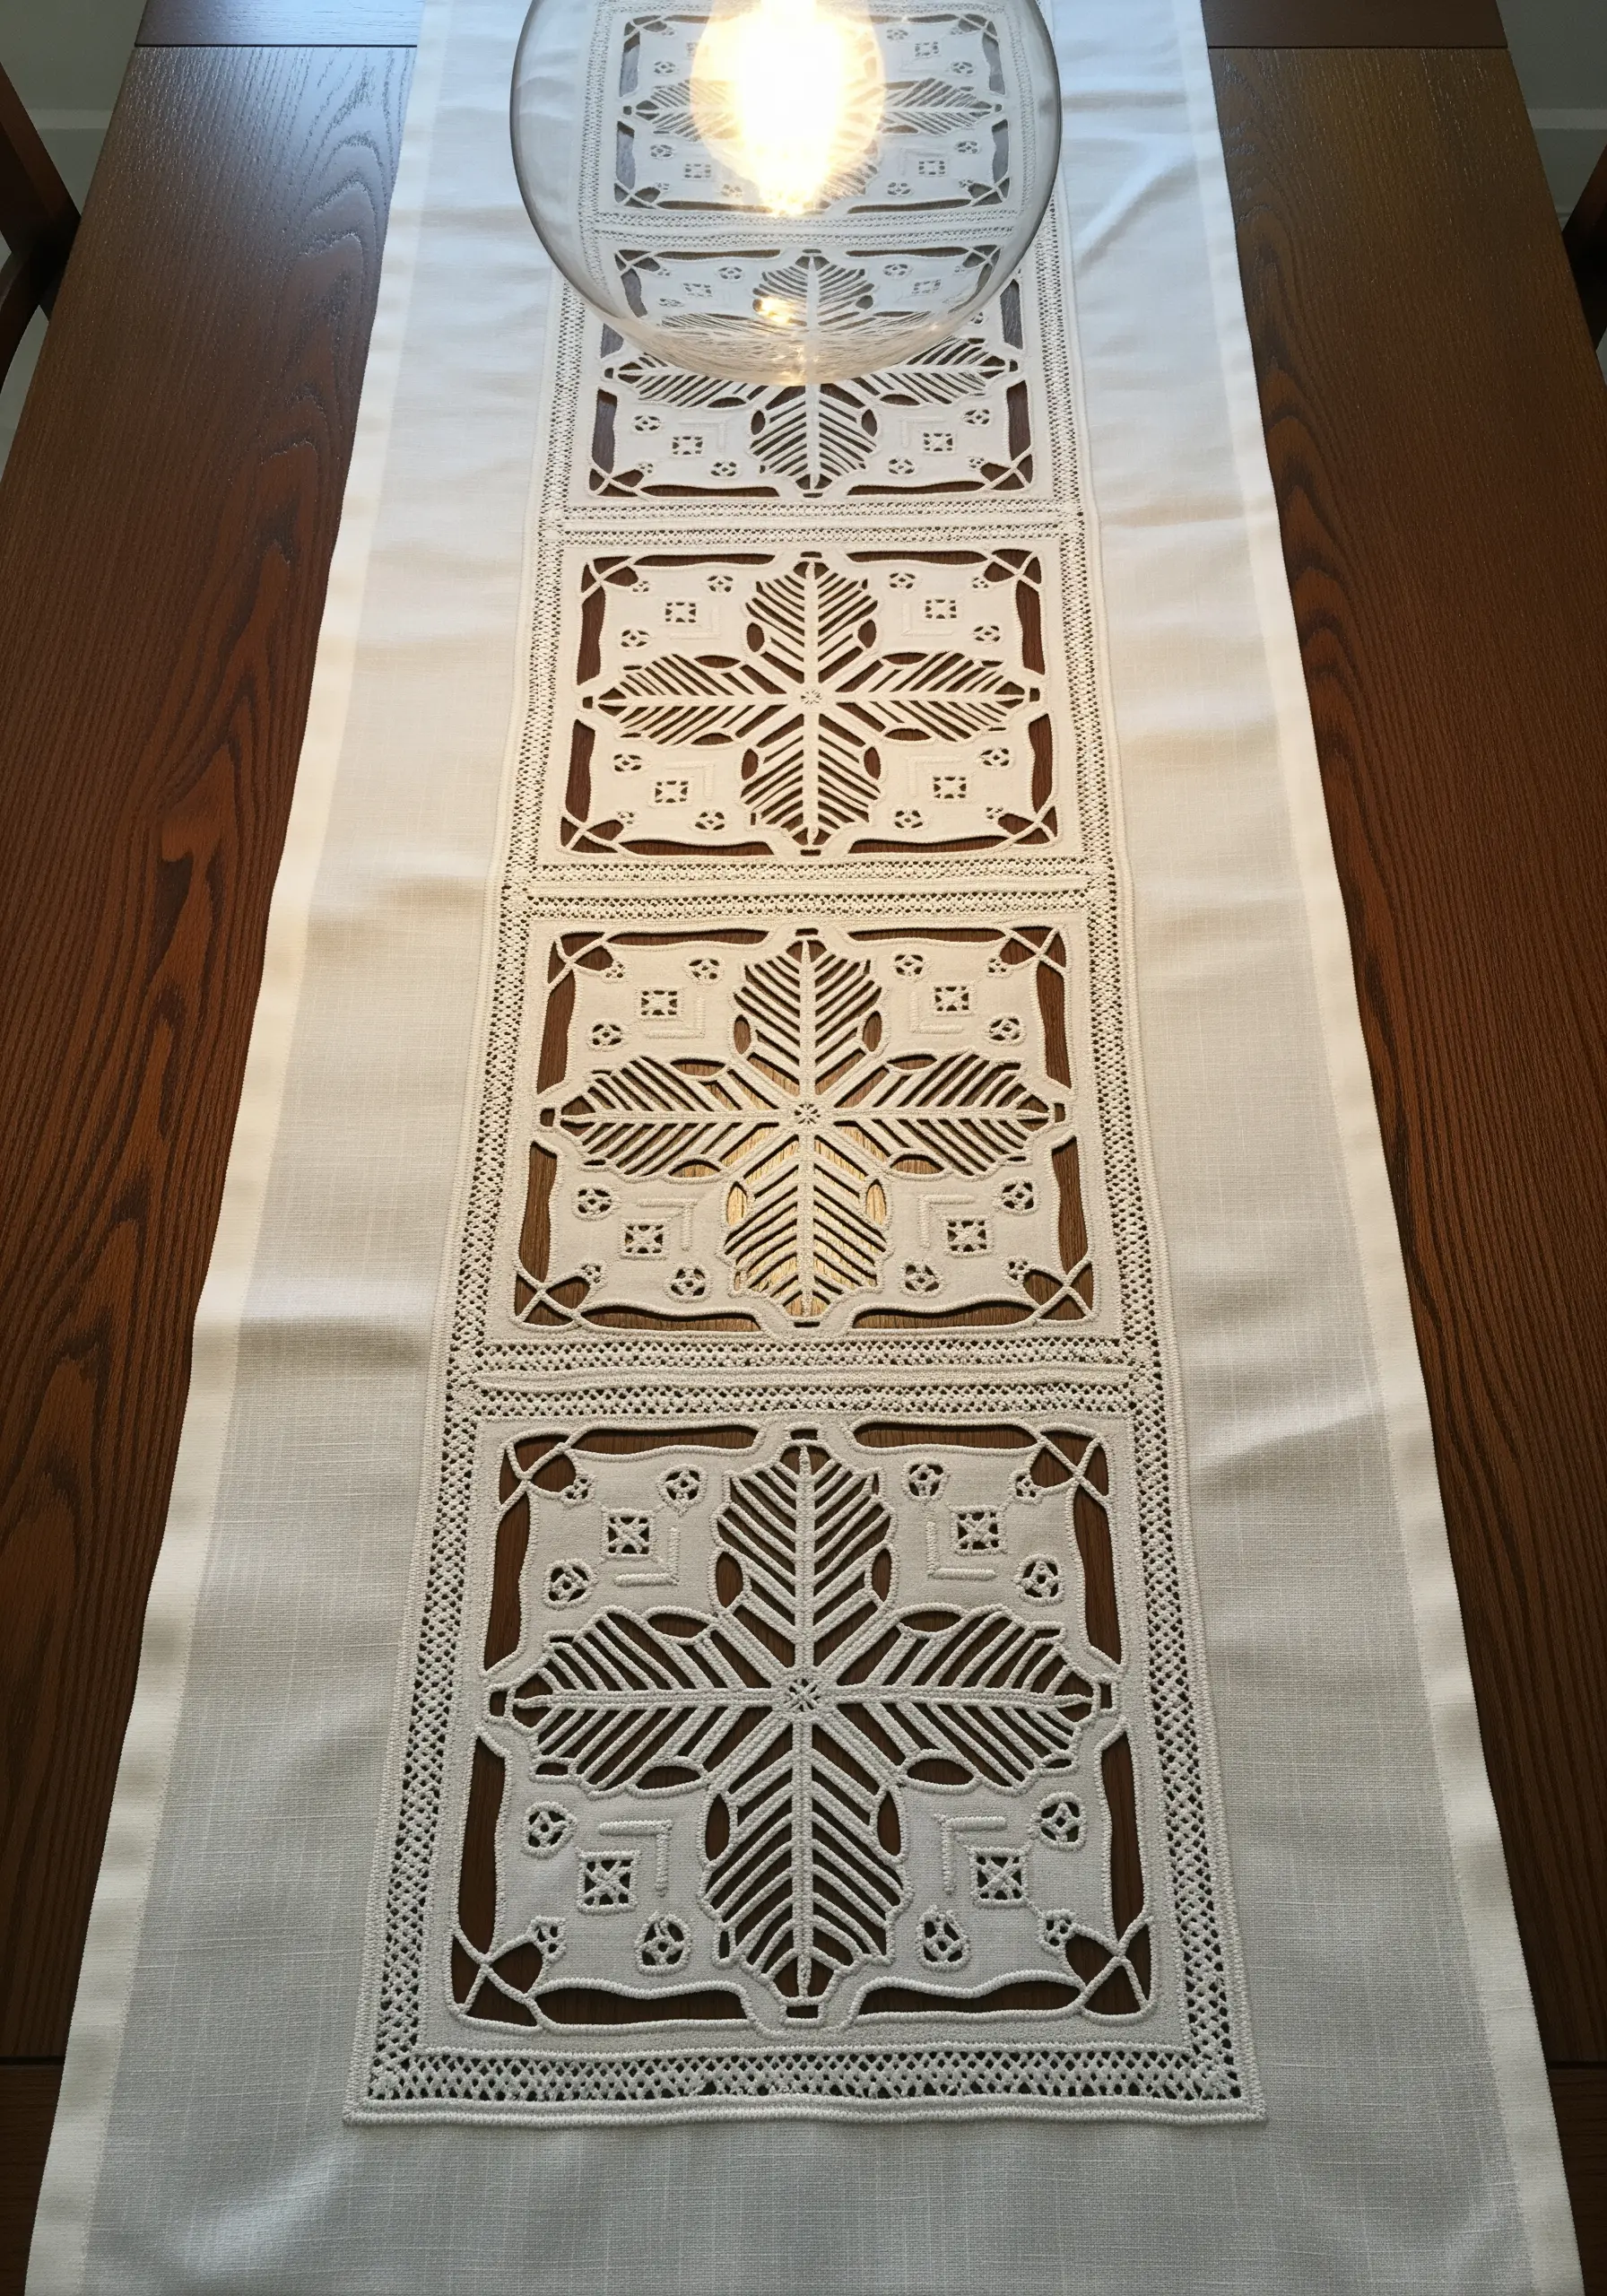
Master the art of negative space by carefully cutting away portions of your fabric to create intricate, lace-like designs.
First, outline the areas to be removed with a running stitch, then secure the edges with dense buttonhole stitches, with the purl of the stitch facing the area to be cut.
Using a pair of fine, sharp embroidery scissors, carefully snip away the fabric inside the stitched lines.
This technique, often seen in heirloom linens, adds an incredible level of elegance and airiness to table runners and decorative textiles.
20. Define Shapes with Whipped Stitch Outlines
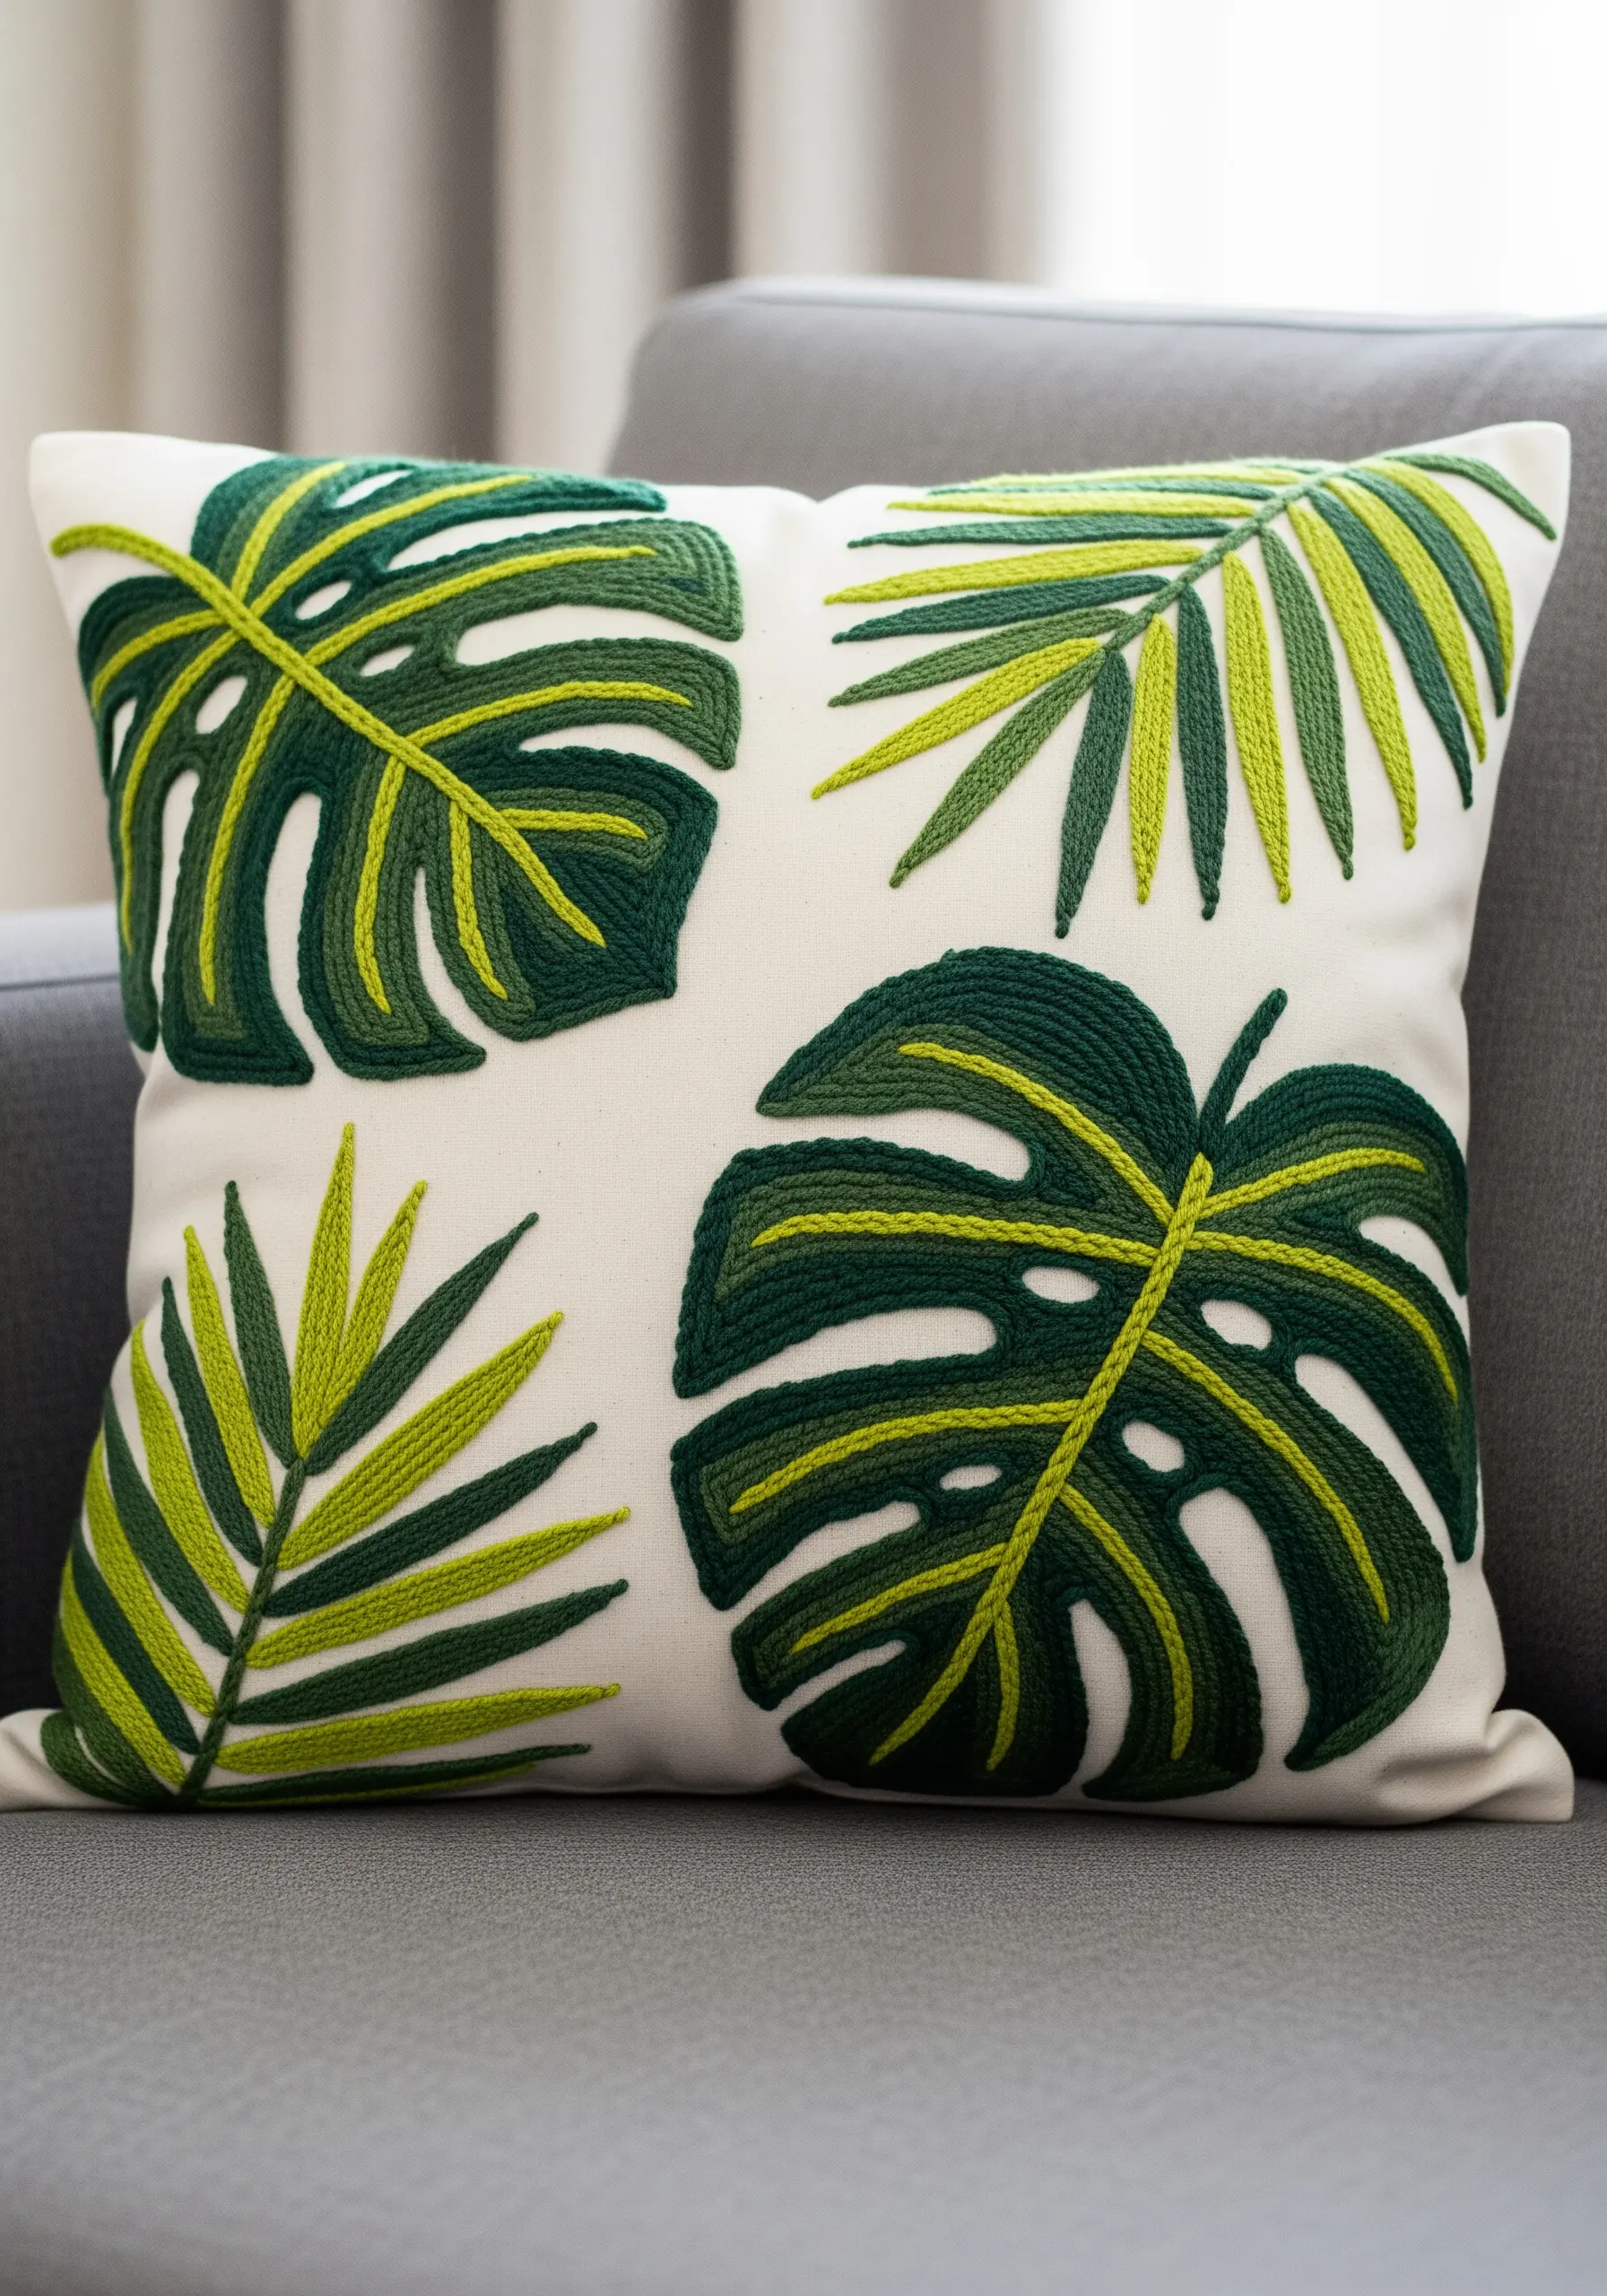
Give your outlines a raised, cord-like finish by whipping them with a contrasting or matching thread.
First, create a foundation of backstitches or stem stitches along your design line.
Then, using a second thread on a tapestry needle, pass the needle under each foundation stitch without piercing the fabric, wrapping the line smoothly.
This simple addition transforms a basic outline into a bold, defined edge that makes motifs like these tropical leaves pop with clean, graphic precision.
21. Sculpt Petals with Silk Ribbon

Achieve realistic, dimensional florals quickly by using the width and sheen of silk ribbon instead of thread.
Use a wide ribbon and a simple ribbon stitch—where you pierce the ribbon itself at the end of the stitch—to create soft, voluminous peony petals that fold and curl naturally.
The ribbon’s surface catches the light beautifully, creating highlights and shadows that mimic real flower petals with minimal effort.
This technique allows you to fill large areas with texture and color much faster than with traditional floss.
22. Turn Repairs into Art with Woven Darning

Embrace visible mending by transforming a hole in a garment into a decorative woven patch.
First, create a grid of threads (the warp) across the hole, anchoring them in the stable fabric around the edges.
Then, use a contrasting color to weave another thread (the weft) over and under the warp threads, building a new piece of woven fabric directly in the gap.
This not only saves a beloved sweater but also adds a personal, artful detail that tells a story.
23. Recreate Blueprints with Precision Line Work
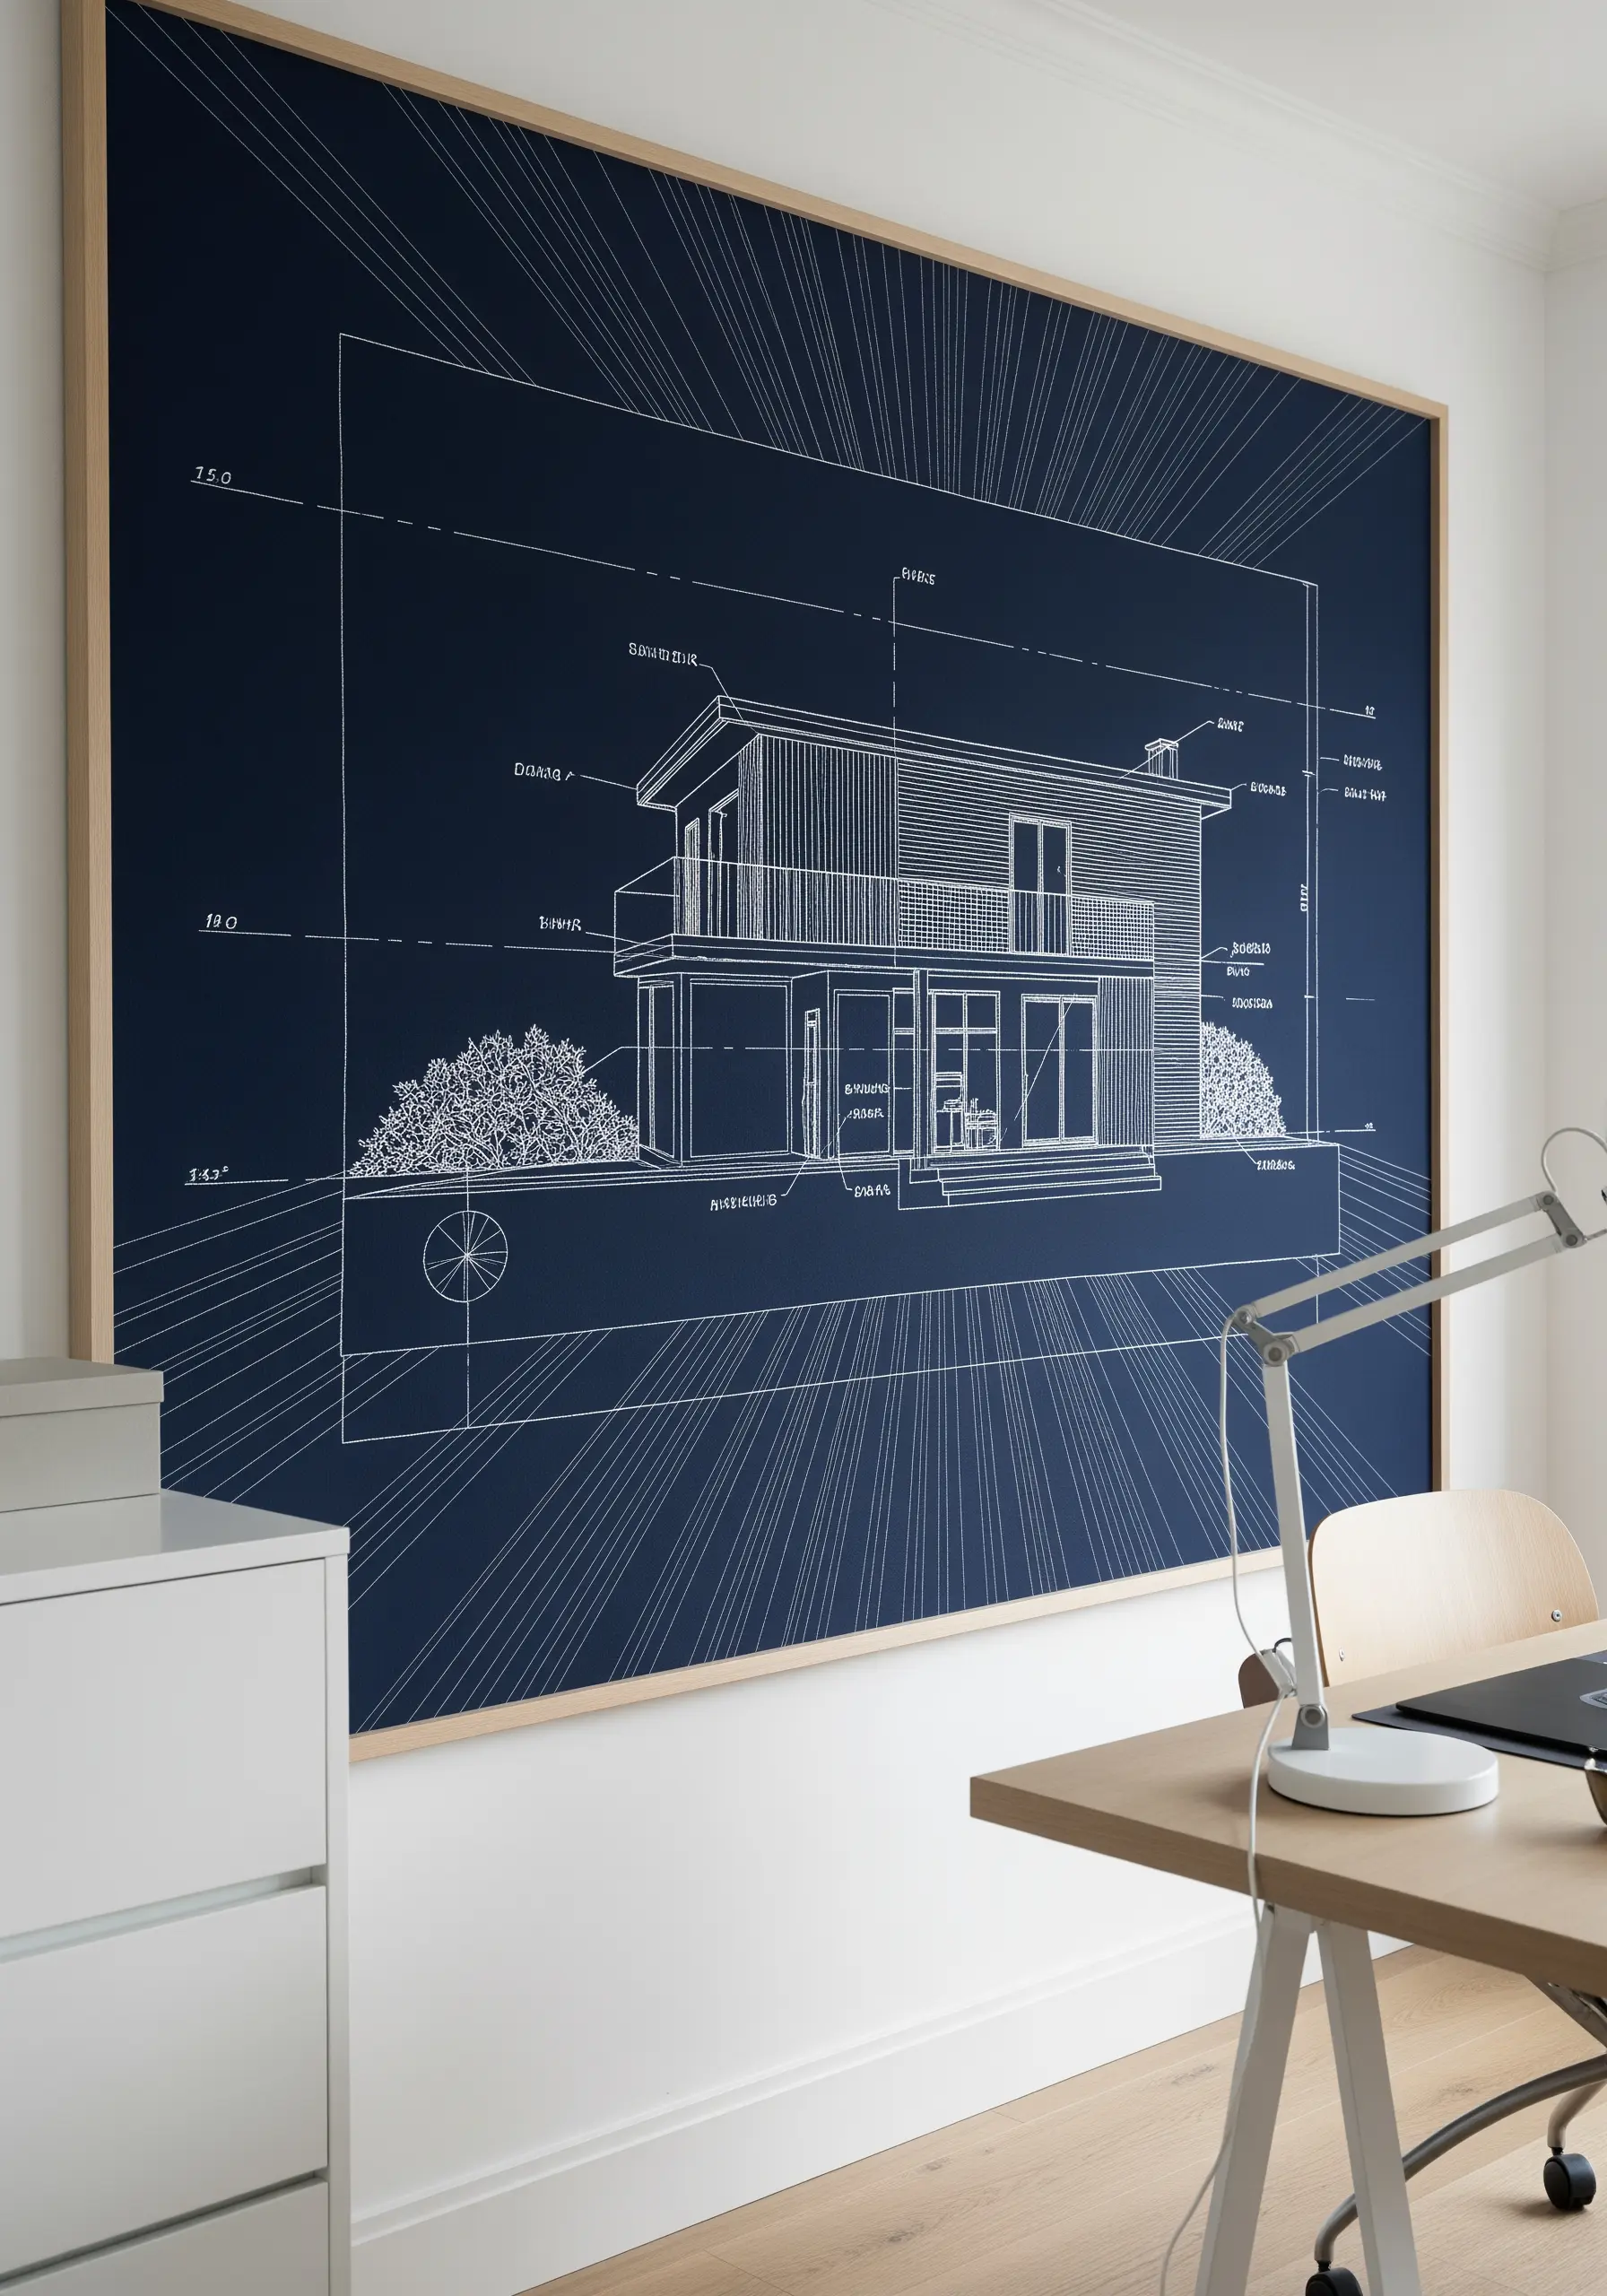
Capture the clean, technical aesthetic of an architectural blueprint by using simple line stitches on a dark background.
Choose a deep navy or black fabric and use a single strand of white floss for maximum contrast and sharpness.
Rely on the humble backstitch for the entire piece, focusing on maintaining perfectly uniform stitch length and sharp, clean corners.
This exercise in precision turns a simple stitch into a sophisticated piece of minimalist wall art with a modern, intellectual feel.
24. Blend Stitches and Watercolor

Combine the softness of watercolor with the crispness of embroidery for a charming, illustrative effect.
Lightly sketch your design onto cotton fabric, then apply watercolor paint, allowing it to bleed and blend naturally. Let it dry completely.
Once the paint is set, go over the outlines and add fine details with black thread using a backstitch or split stitch.
The thread provides structure and definition that contrasts beautifully with the fluid, unpredictable nature of the paint wash.
25. Illuminate Your Art with Glow-in-the-Dark Thread

Create a design with a hidden dimension by using specialty glow-in-the-dark embroidery floss.
This thread looks white or off-white in daylight but emits a bright glow after being charged with light.
Stitch your design on black fabric for the most dramatic effect, using simple line stitches to create ethereal subjects like jellyfish, stars, or ghosts.
It’s a simple material swap that adds an element of magic and surprise, revealing a second, secret artwork when the lights go out.
26. Construct a Circuit Board with Wire and Thread
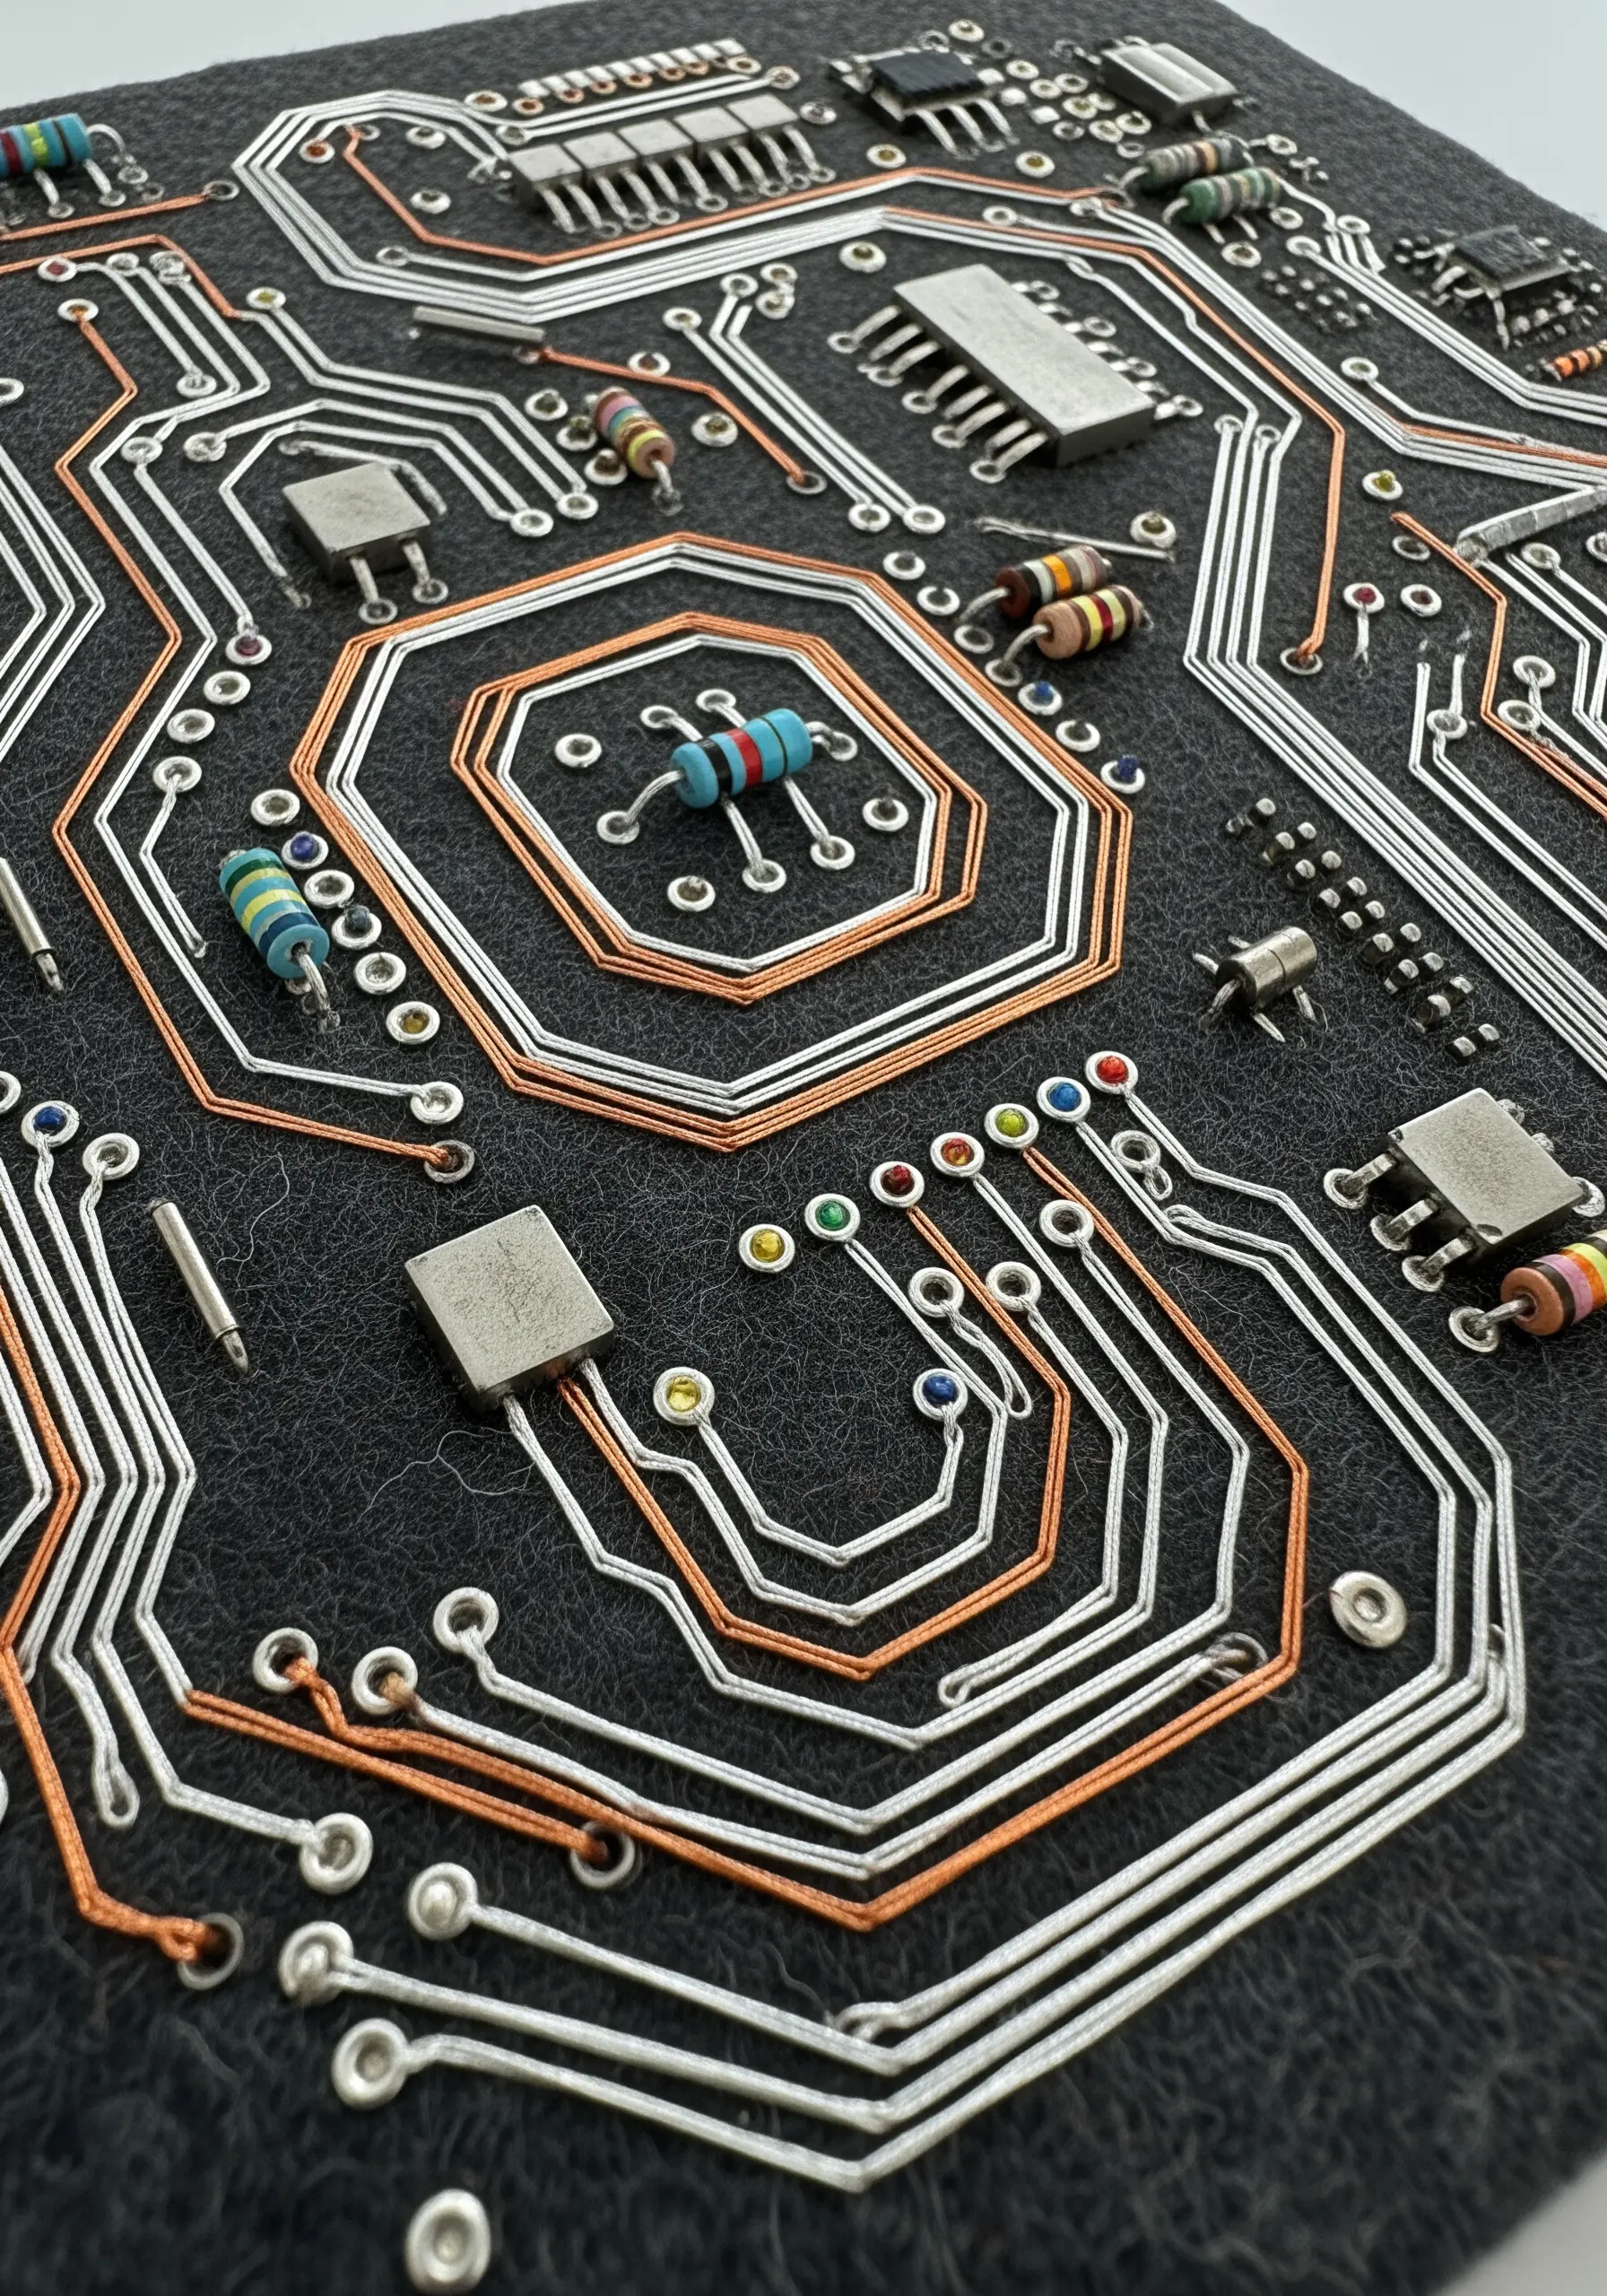
Merge craft and technology by creating a textile circuit board using unconventional materials.
Use metallic threads and fine copper wire to create the conductive paths, couching them onto a felt or canvas base for precision.
Incorporate actual (non-functional) electronic components like resistors and capacitors, stitching them down securely as you would with beads.
This highly conceptual, textural project is a perfect example of contemporary embroidery that pushes creative boundaries.
27. Compose an Abstract Piece Without Stitches
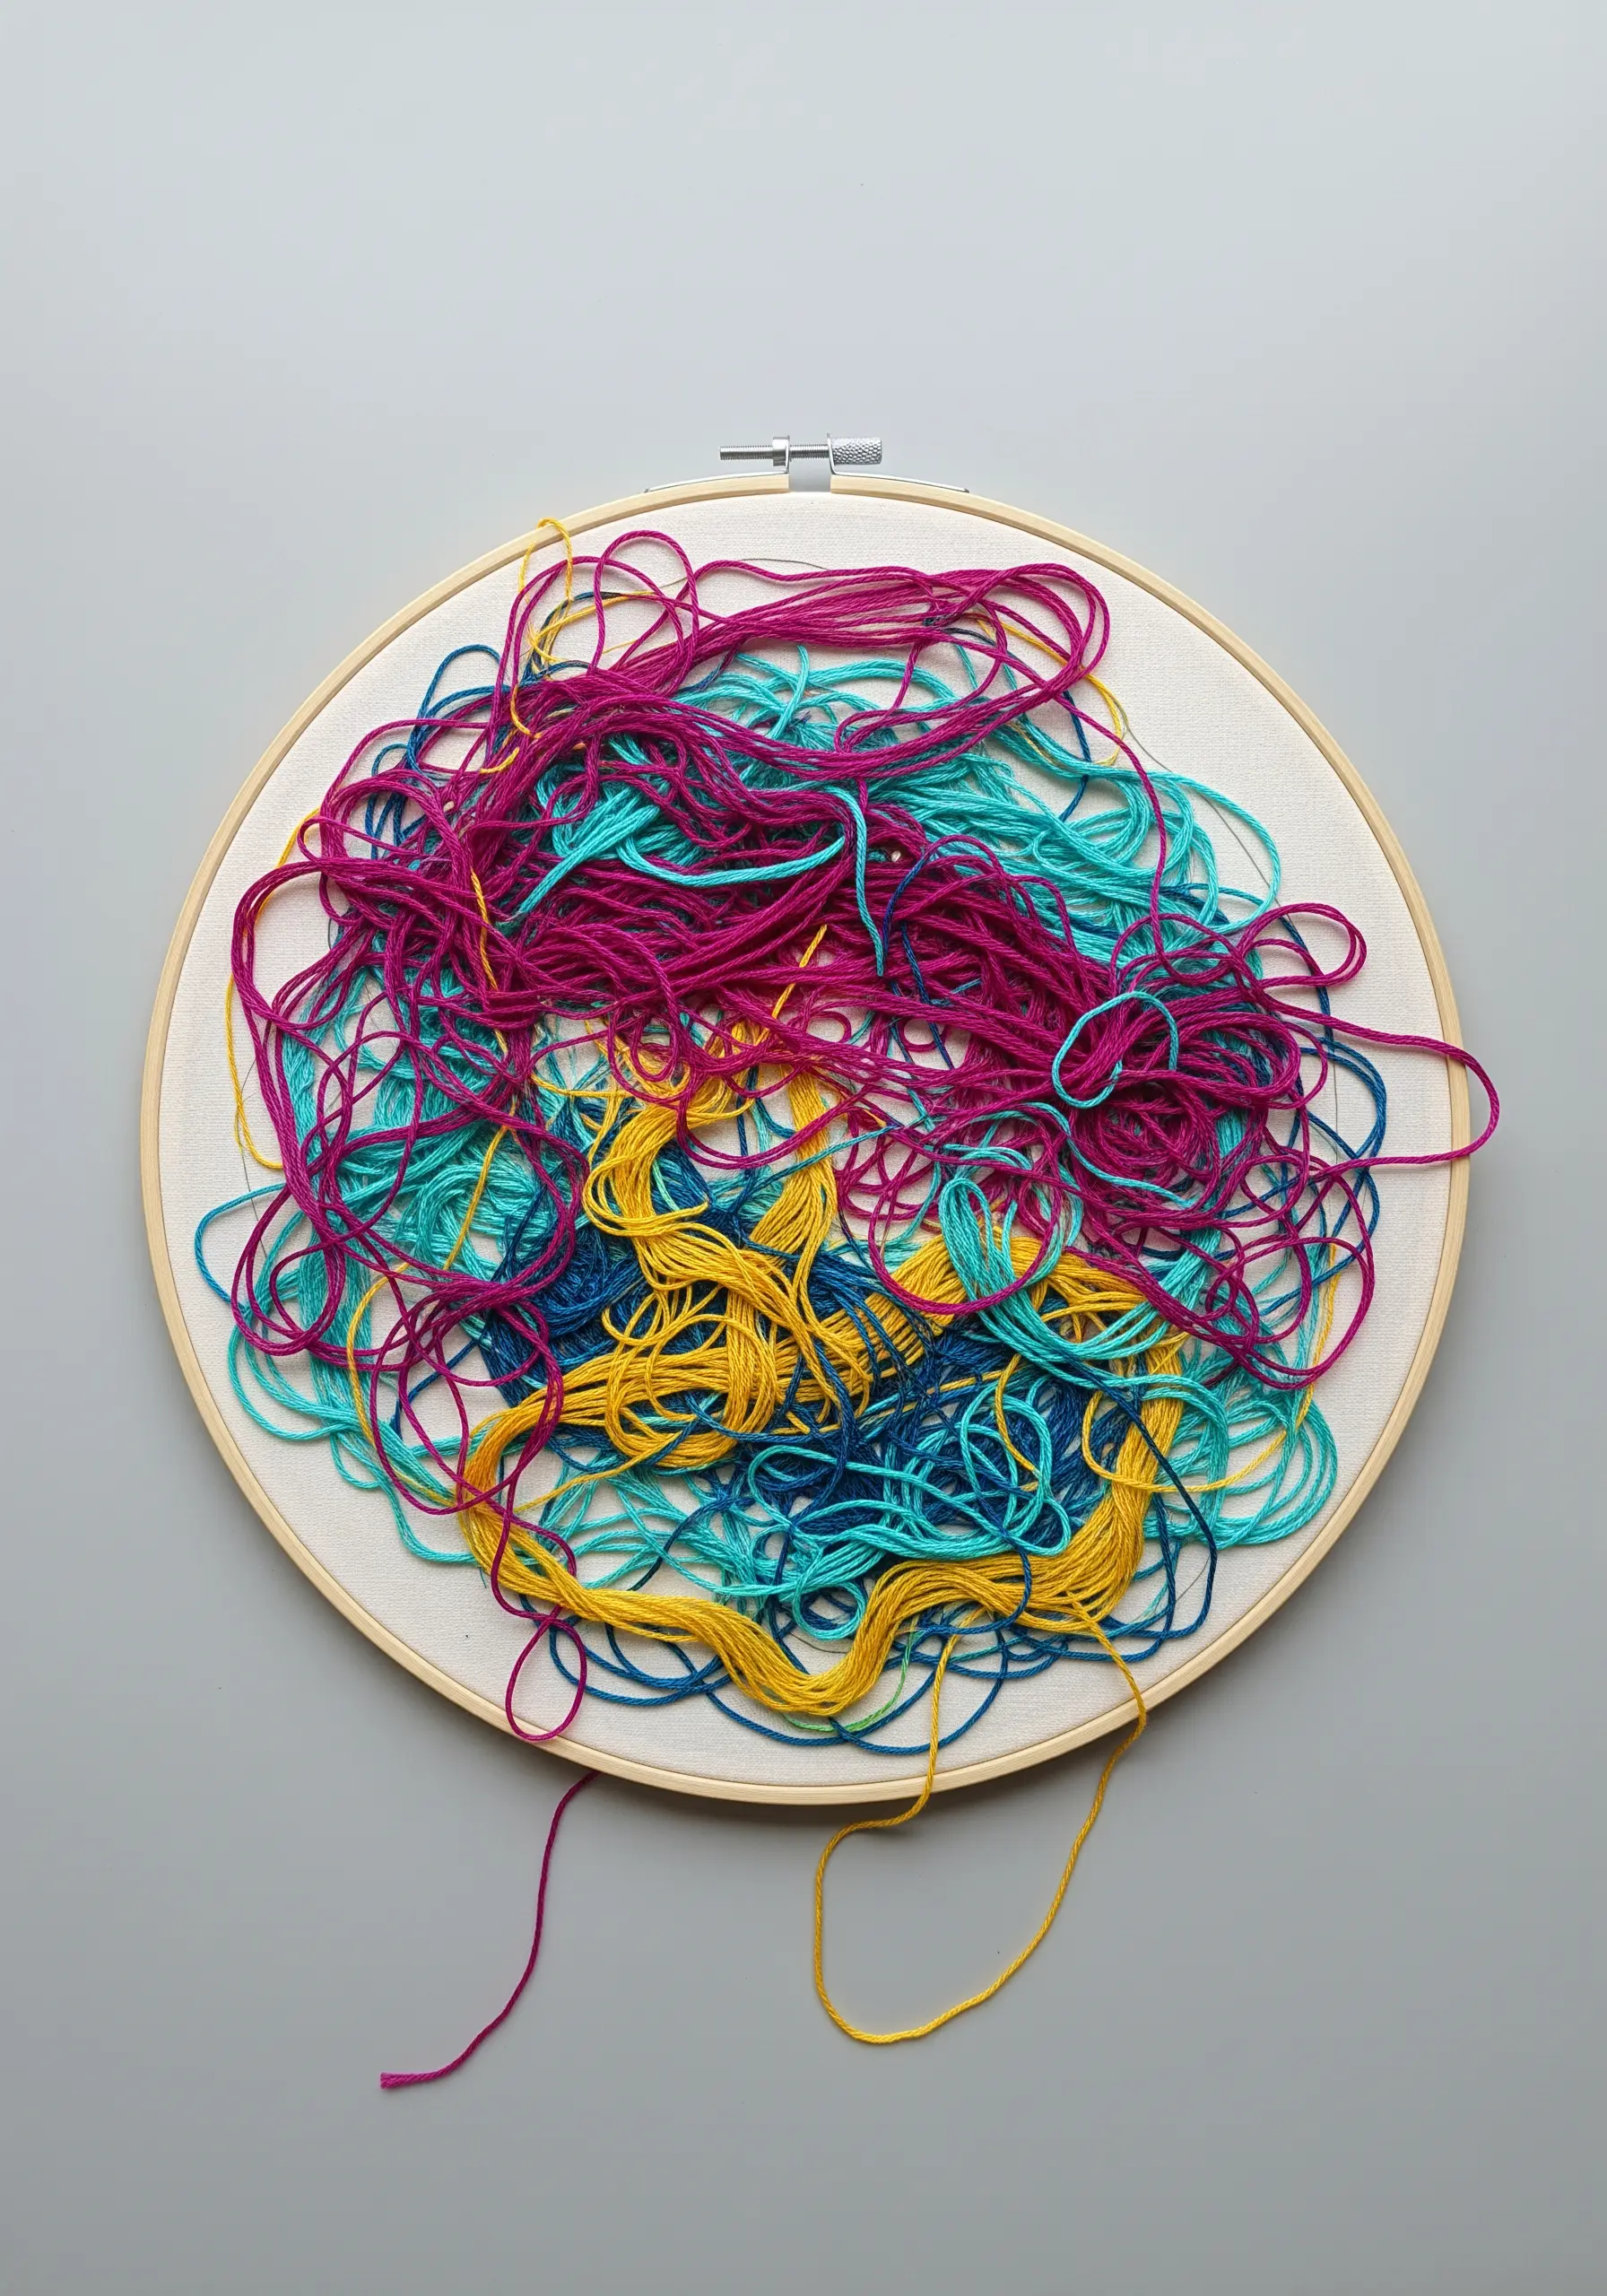
Challenge the very definition of embroidery by creating a composition entirely from loose, unstitched thread.
Instead of stitching, focus on the interplay of color, texture, and form by arranging, layering, and tangling threads directly within the hoop.
Secure the composition by trapping the threads between two layers of fabric or by mounting it in a shadow box frame.
This experimental technique shifts the focus from methodical stitching to pure expression, resulting in a vibrant, chaotic, and uniquely personal piece of abstract fiber art.
28. Embrace Nostalgia with Pixel-Perfect Cross-Stitch
Translate digital, 8-bit art into a textile format using the inherently grid-based nature of cross-stitch.
Work on Aida cloth, where the woven squares provide a perfect grid, allowing each ‘X’ stitch to represent a single pixel.
This is the ideal technique for recreating retro video game characters or creating your own pixelated designs.
It’s a methodical and relaxing process where following a simple color chart allows you to build a clean, graphic image with a charming, nostalgic feel.
29. Embroider on Functional Home Decor
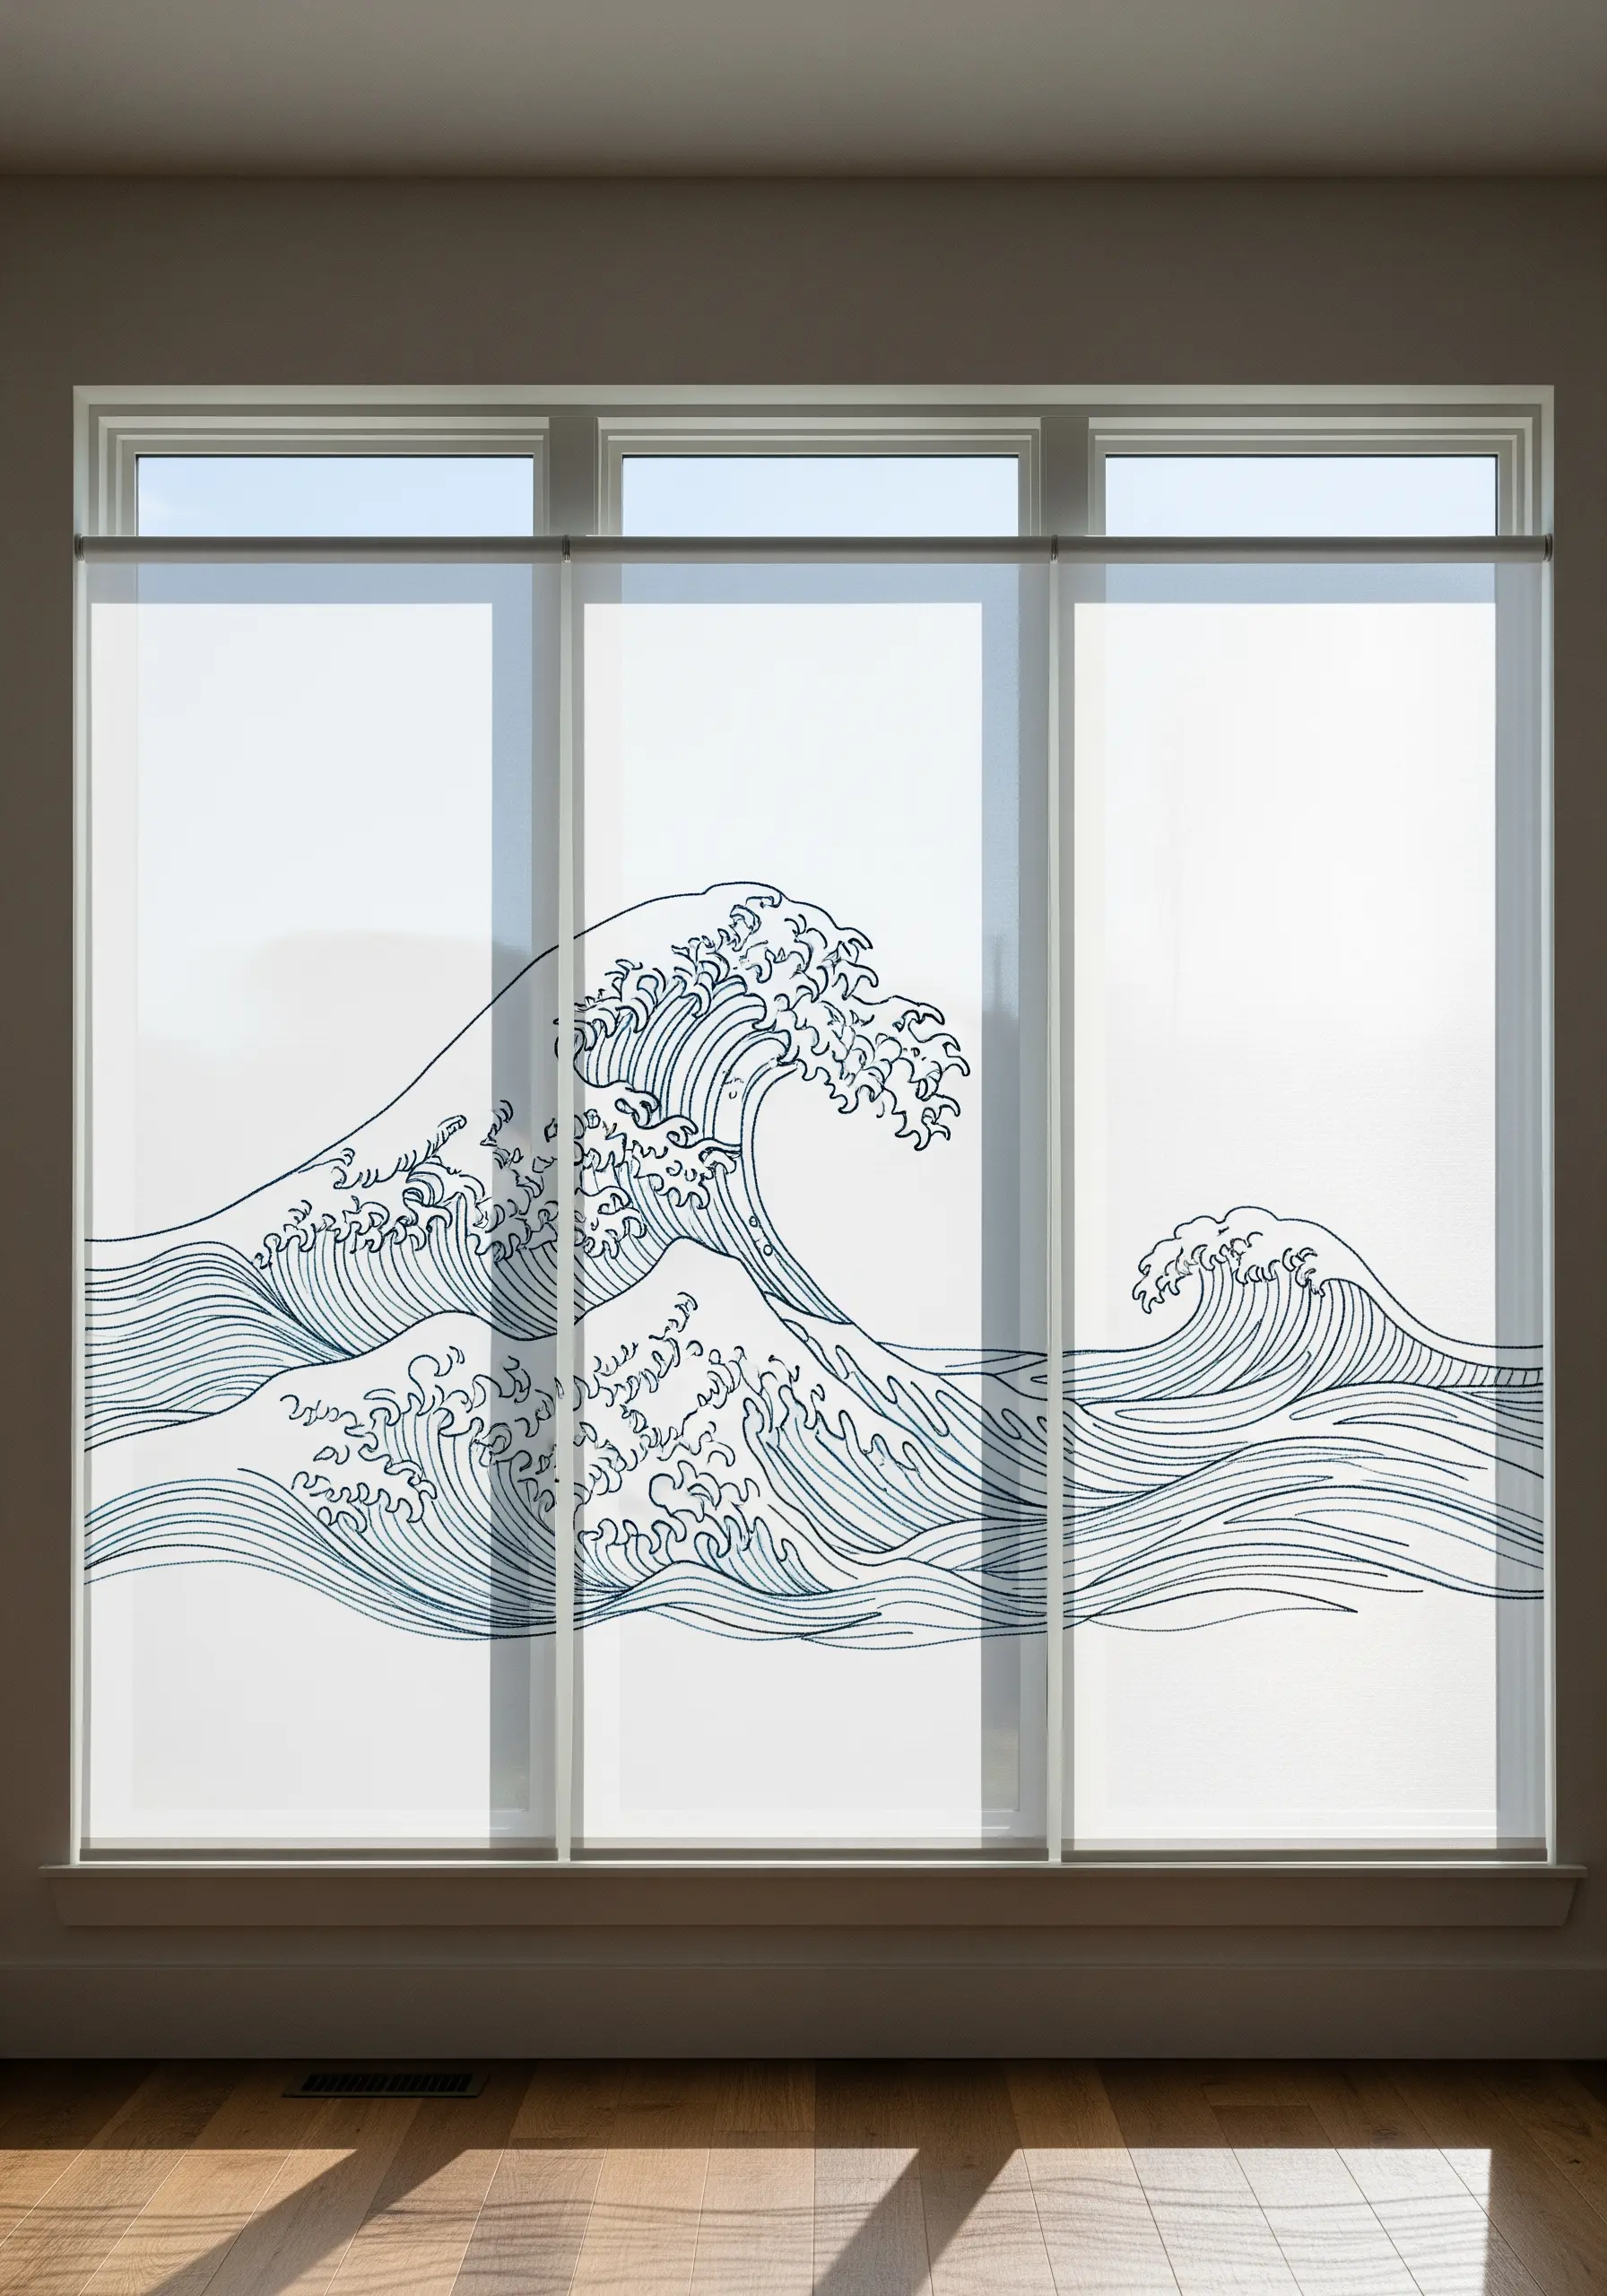
Take your embroidery off the wall and integrate it into your home’s functional elements, like a window blind.
Choose a simple, large-scale line art design that can make an impact from a distance.
Since you can’t use a hoop, you’ll need to maintain even tension by hand as you work a simple backstitch or stem stitch across the surface.
This ambitious project transforms an everyday object into a piece of custom art that interacts with light and becomes a central feature of the room’s design.
30. Paint Inside the Lines for a Stained-Glass Effect

Reverse the typical paint-then-stitch process for a clean, contained burst of color.
First, complete all of your embroidery, using a bold backstitch outline for your motifs.
Then, using a small brush and fabric paint or diluted watercolor, carefully paint *inside* the stitched outlines.
The embroidered border acts as a barrier, containing the color and creating a clean, almost illustrative look reminiscent of stained glass or a coloring book page.
31. Weave and Wrap on a Wire Armature
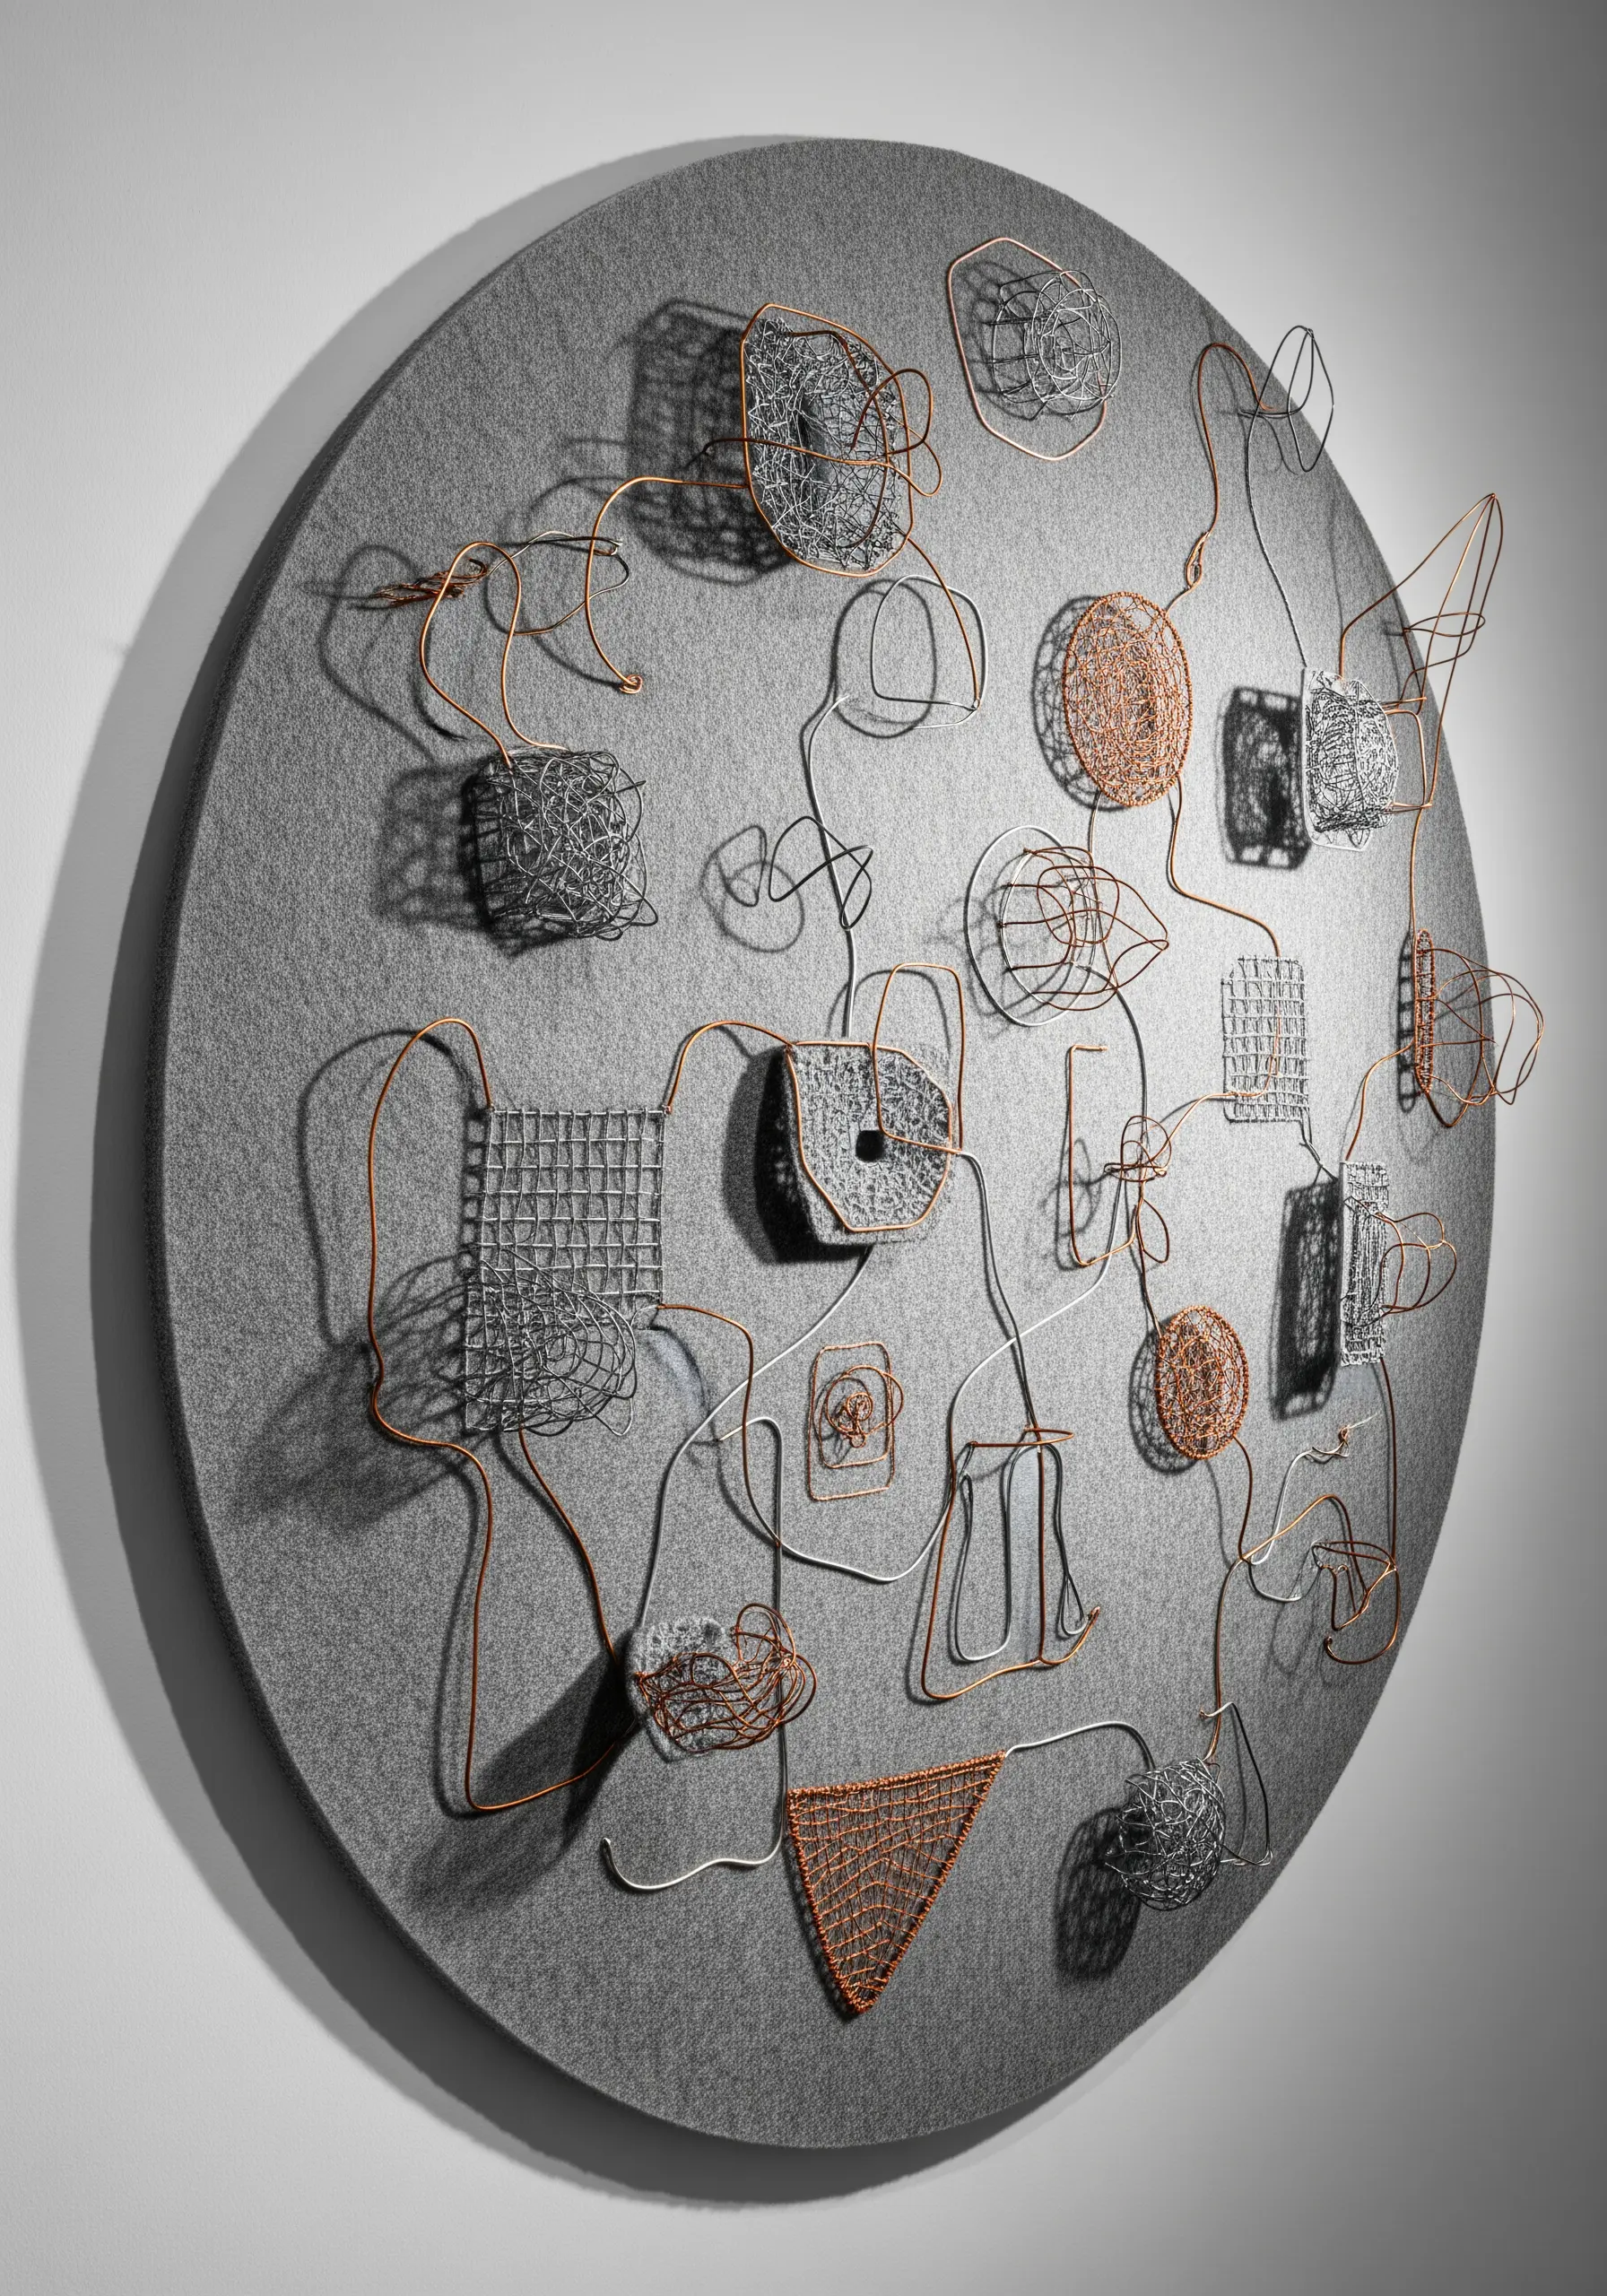
Build three-dimensional drawings in space by using wire as both the structure and the canvas.
Bend and shape copper or steel wire into an abstract armature, creating both outlines and forms.
Then, use traditional techniques like weaving, wrapping, and stitching to add texture and detail directly onto the wire frame.
This method moves embroidery firmly into the realm of sculpture, creating pieces that cast intricate shadows and explore form in a way that fabric never could.
32. Achieve Photorealism with Needle Painting

Master the art of thread painting to create textures and color blends so smooth they look like a photograph.
This technique relies on the long-and-short stitch, using a single strand of floss to seamlessly blend dozens of shades together.
The key is to make your stitches follow the natural direction of the subject’s fur or feathers, creating a sense of realistic movement and depth.
It is the ultimate test of patience and color theory, allowing you to achieve a level of detail that is truly breathtaking.


